This is the blog section. It has two categories: News and Releases.
Files in these directories will be listed in reverse chronological order.
This is the multi-page printable view of this section. Click here to print.
This is the blog section. It has two categories: News and Releases.
Files in these directories will be listed in reverse chronological order.
When Product(s) are created, the Brands they belong to are also added during that time. Therefore, when the Customers select a Product Category on the Shop, they will see the all the Brands on the left side under that specific Category. The example screenshot indicates the Brands under the selected Category:
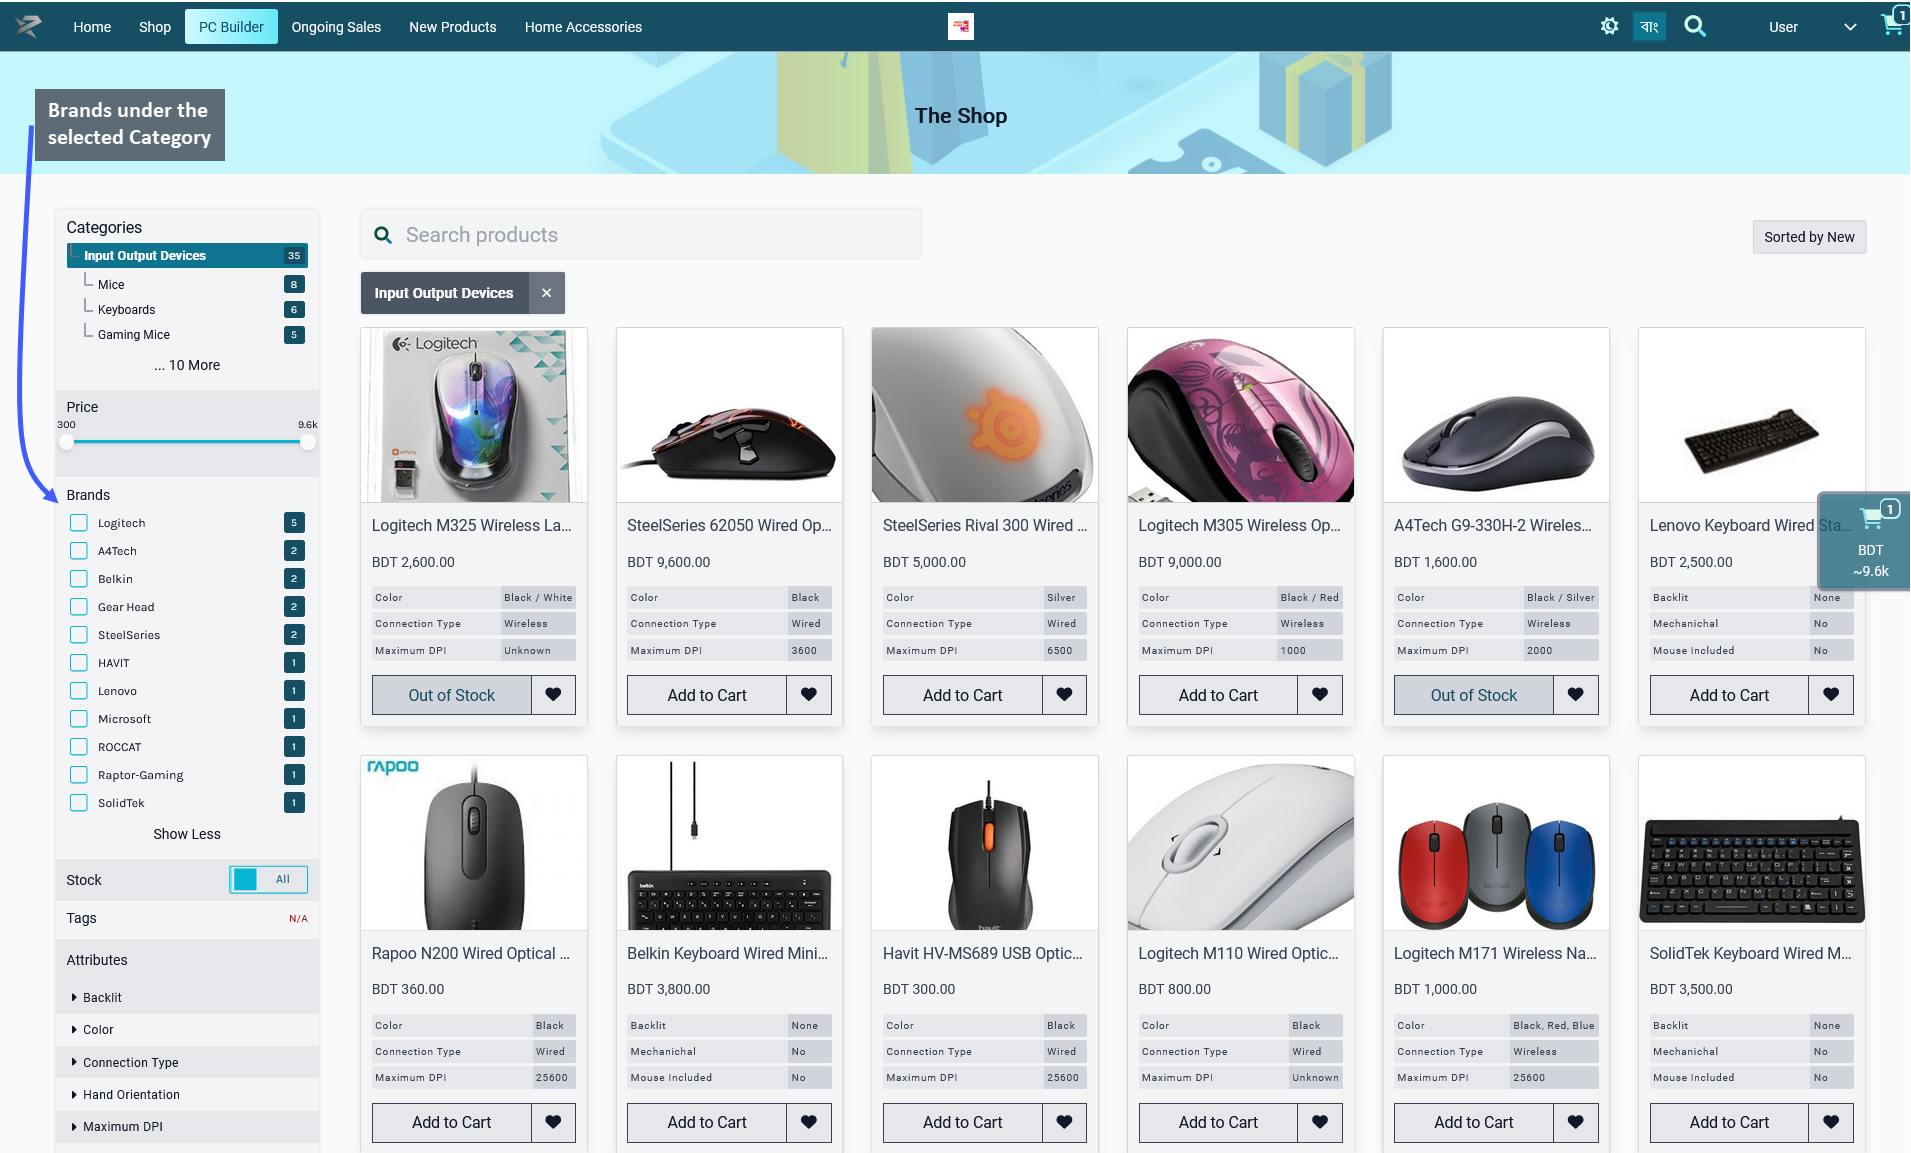
Image: When a specific Product Category is selected, the Brands it includes will show underneath it.
If a specific Brand is selected, then only Products under that Brand will show. For example, in the screenshot below, it can be seen that selecting the Logitech Brand has filtered out the Products of that Brand only.
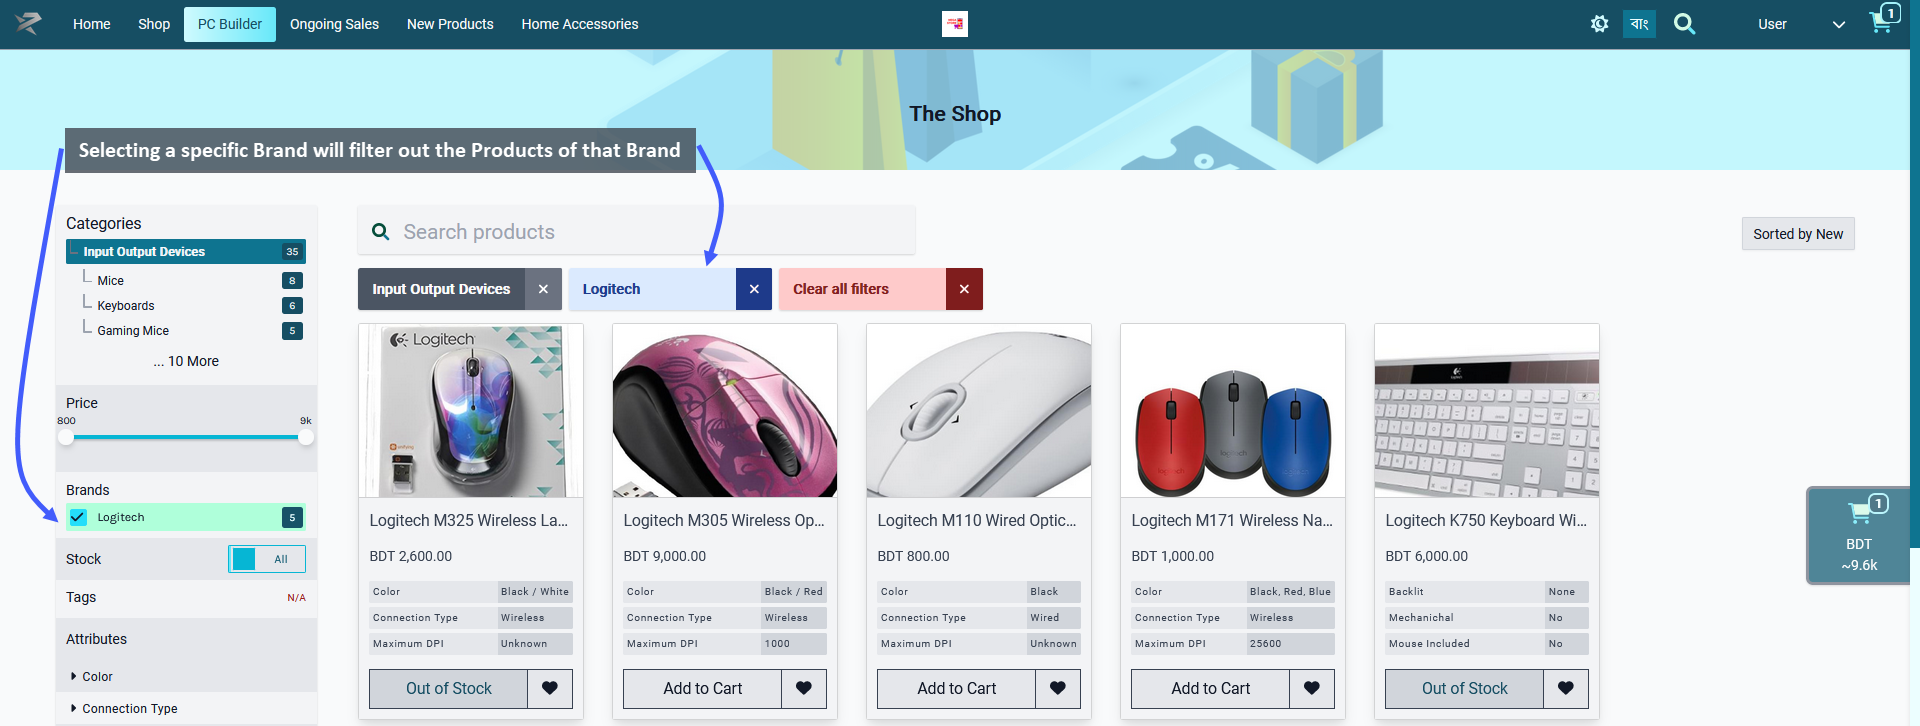
Image: When a specific Brand is selected, Products under that Brand will be filtered out and displayed.
Shop Owners can create Menu within the Default Header to create dropdown menu for Brands. To do this, first go to the Menu section under the Content Management module which will open the settings to create menus. From here, select the Edit button under the Default Header (Commerce) menu:
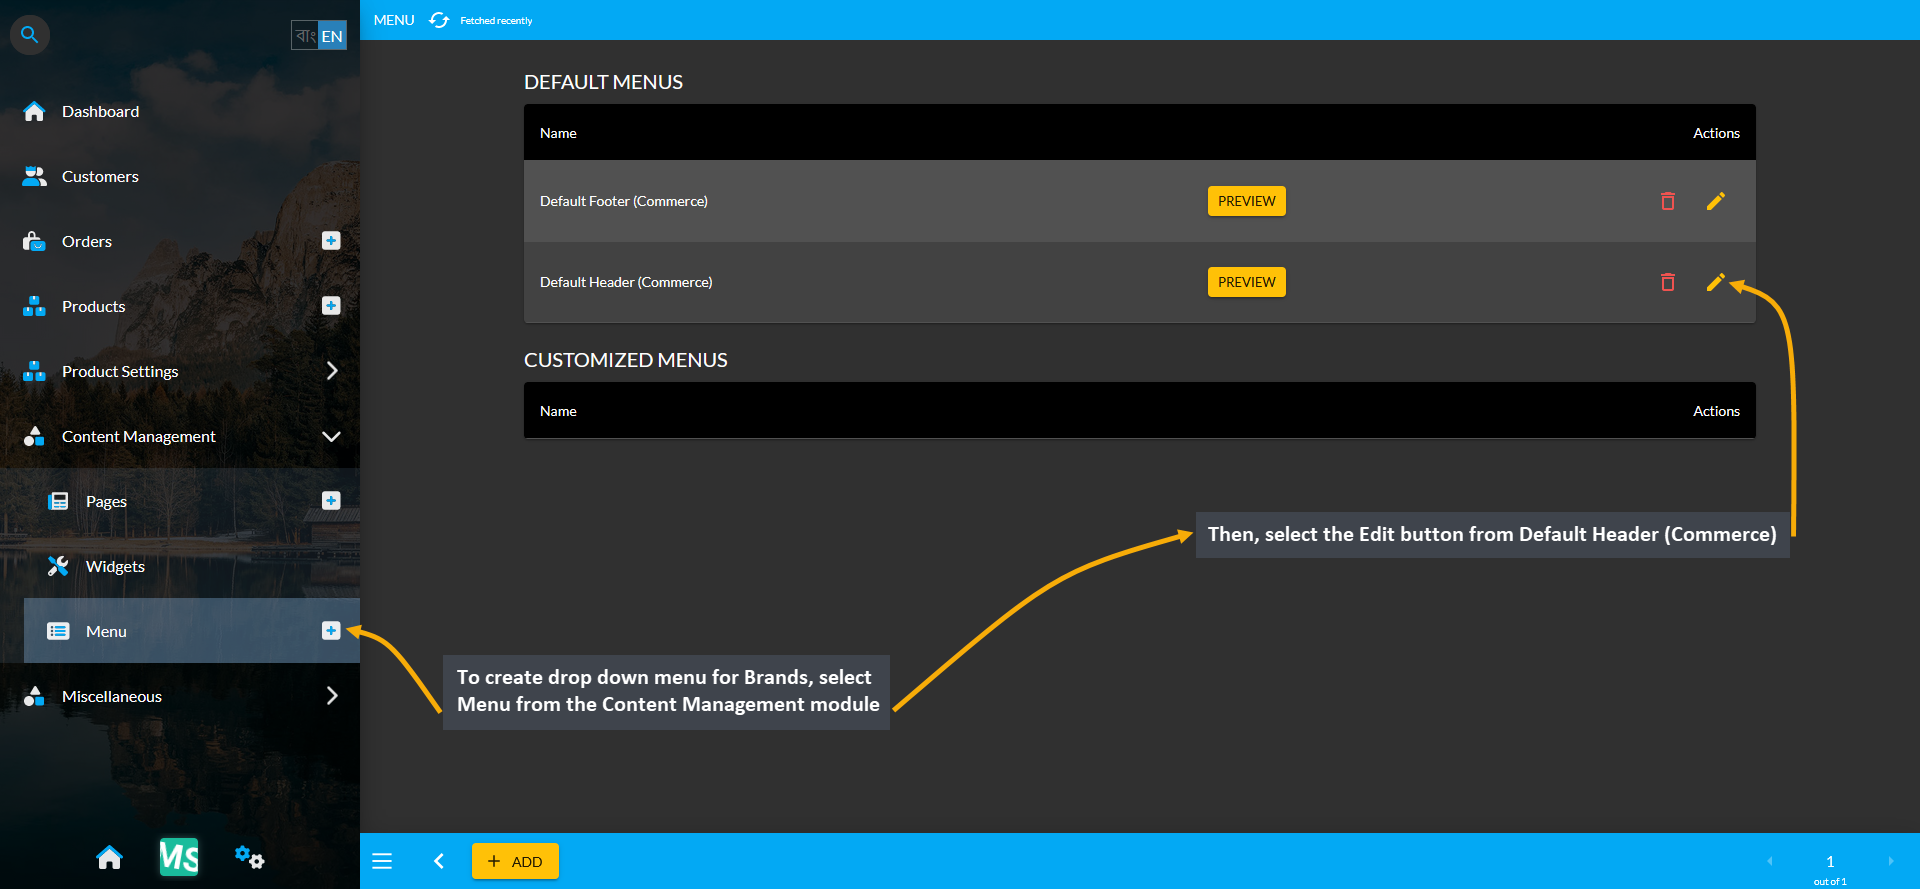
Image: To create a dropdown menu for Brands, go to Menu and select Edit button from the Default Header.
On Default Header (Commerce) menu, click the ADD button from Custom Link to create new menu for Brands. Clicking on the ADD button will create new menu each time that can be assigned as main menu or sub-menu.
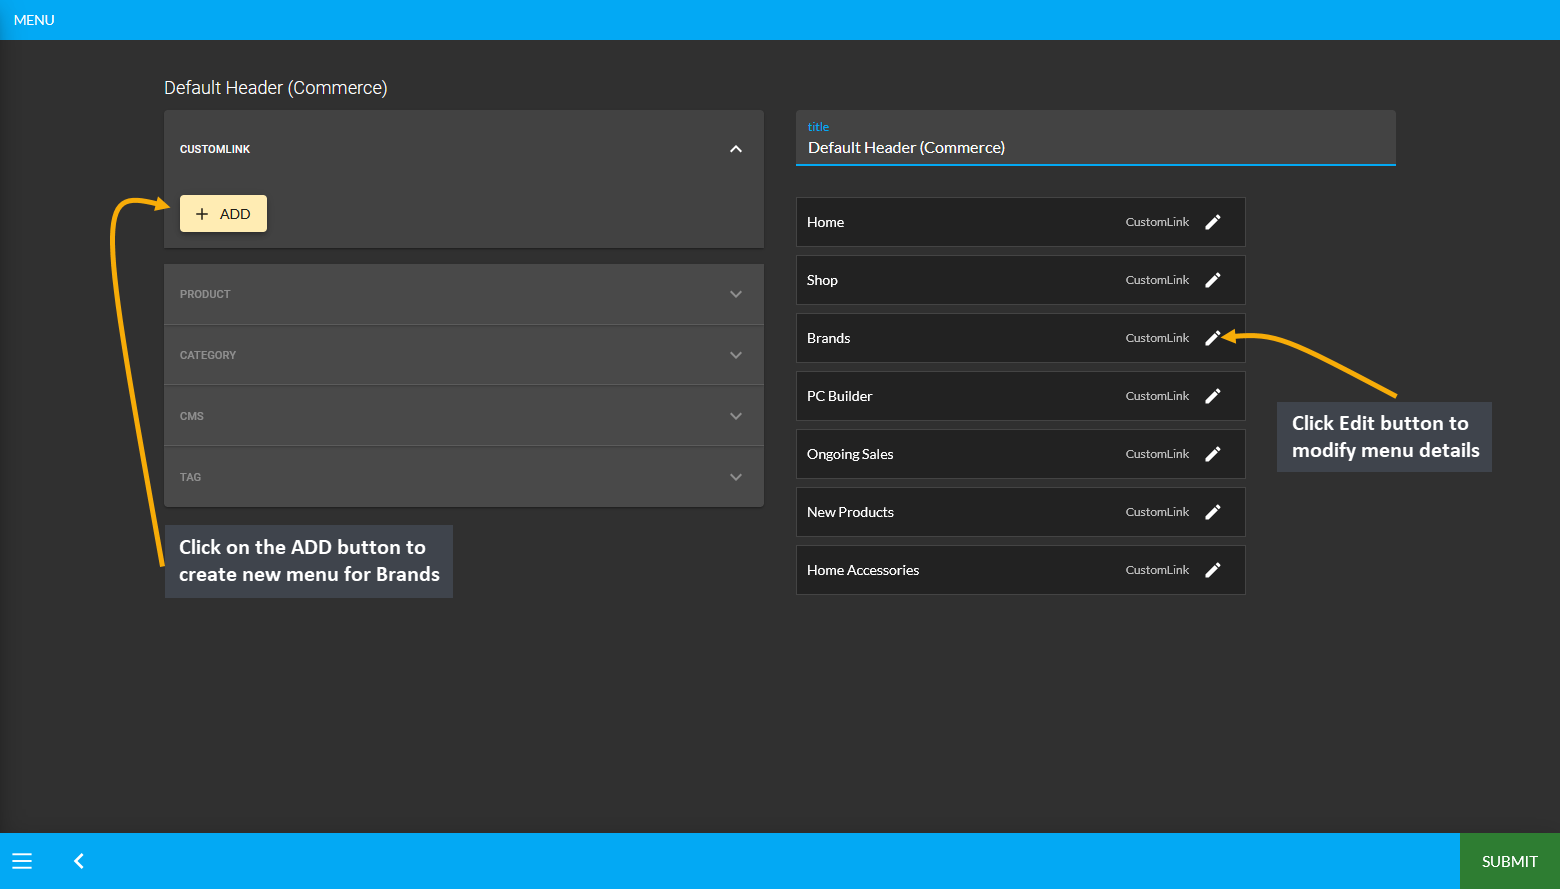
Image: Click the ADD button under Default Header (Commerce) to create a New Menu for Brands.
After creating the New Menu, click its Edit button and a pop-up will appear to edit the details of the menu. From here, set its Title as Brands and click the Update button to create new Brands menu. By keeping Brands as the main menu, the Shop Owner can add sub-menus with several Brand Names and links to their Pages.
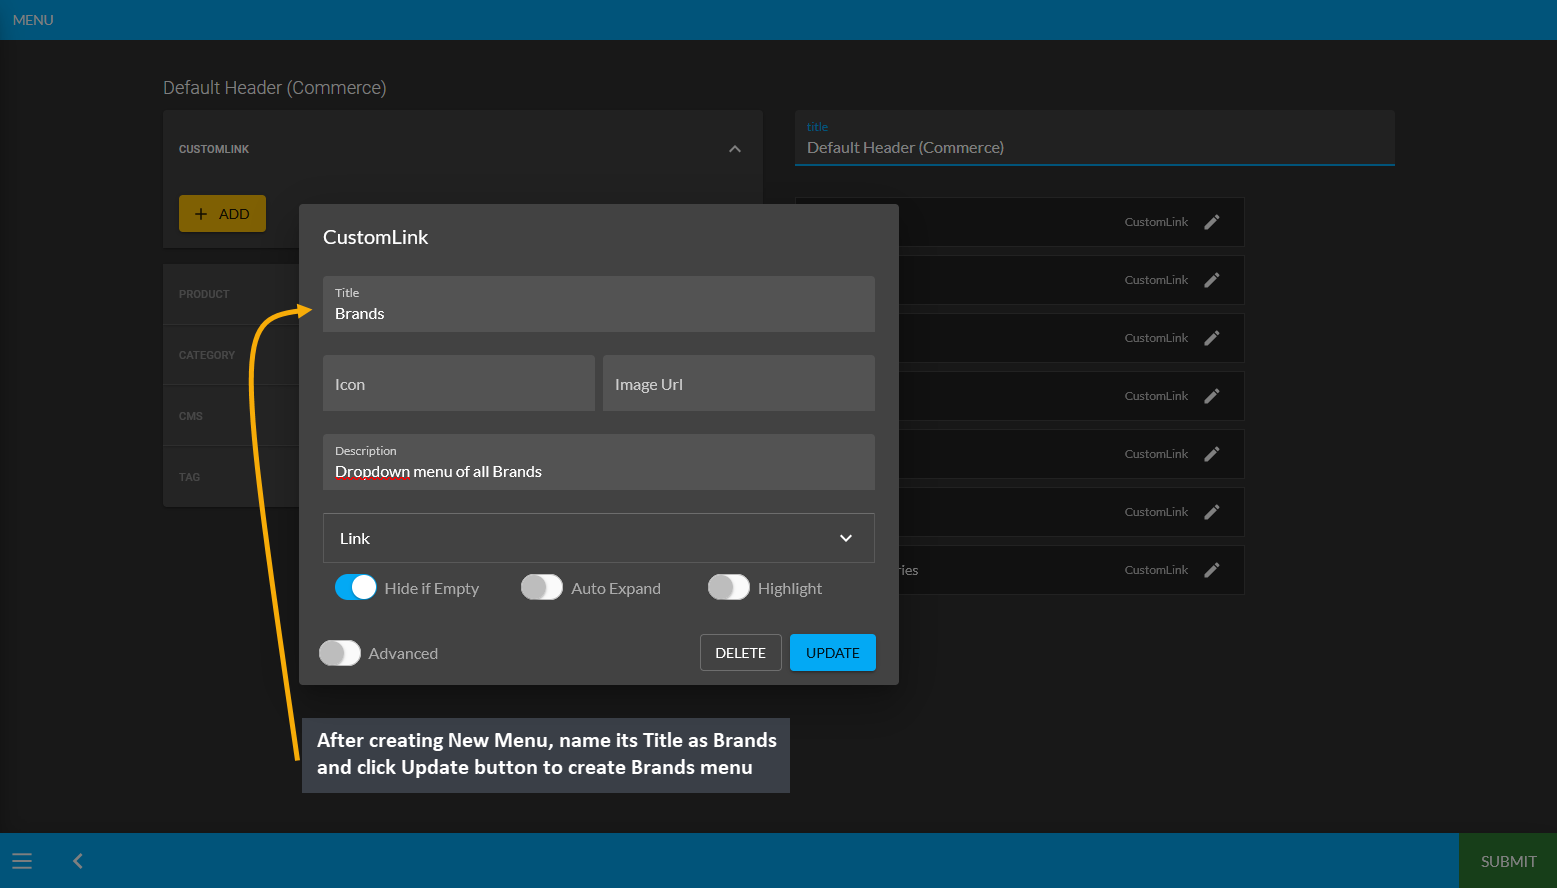
Image: On the pop-up, set Menu Title as Brands and click the Update button to create new "Brands" Menu.
In the example below, it can be seen that 11 Brands are listed under Input Output Devices Category, so the Shop Owner will have to create 11 sub-menu of these brands under the Main Brands menu.
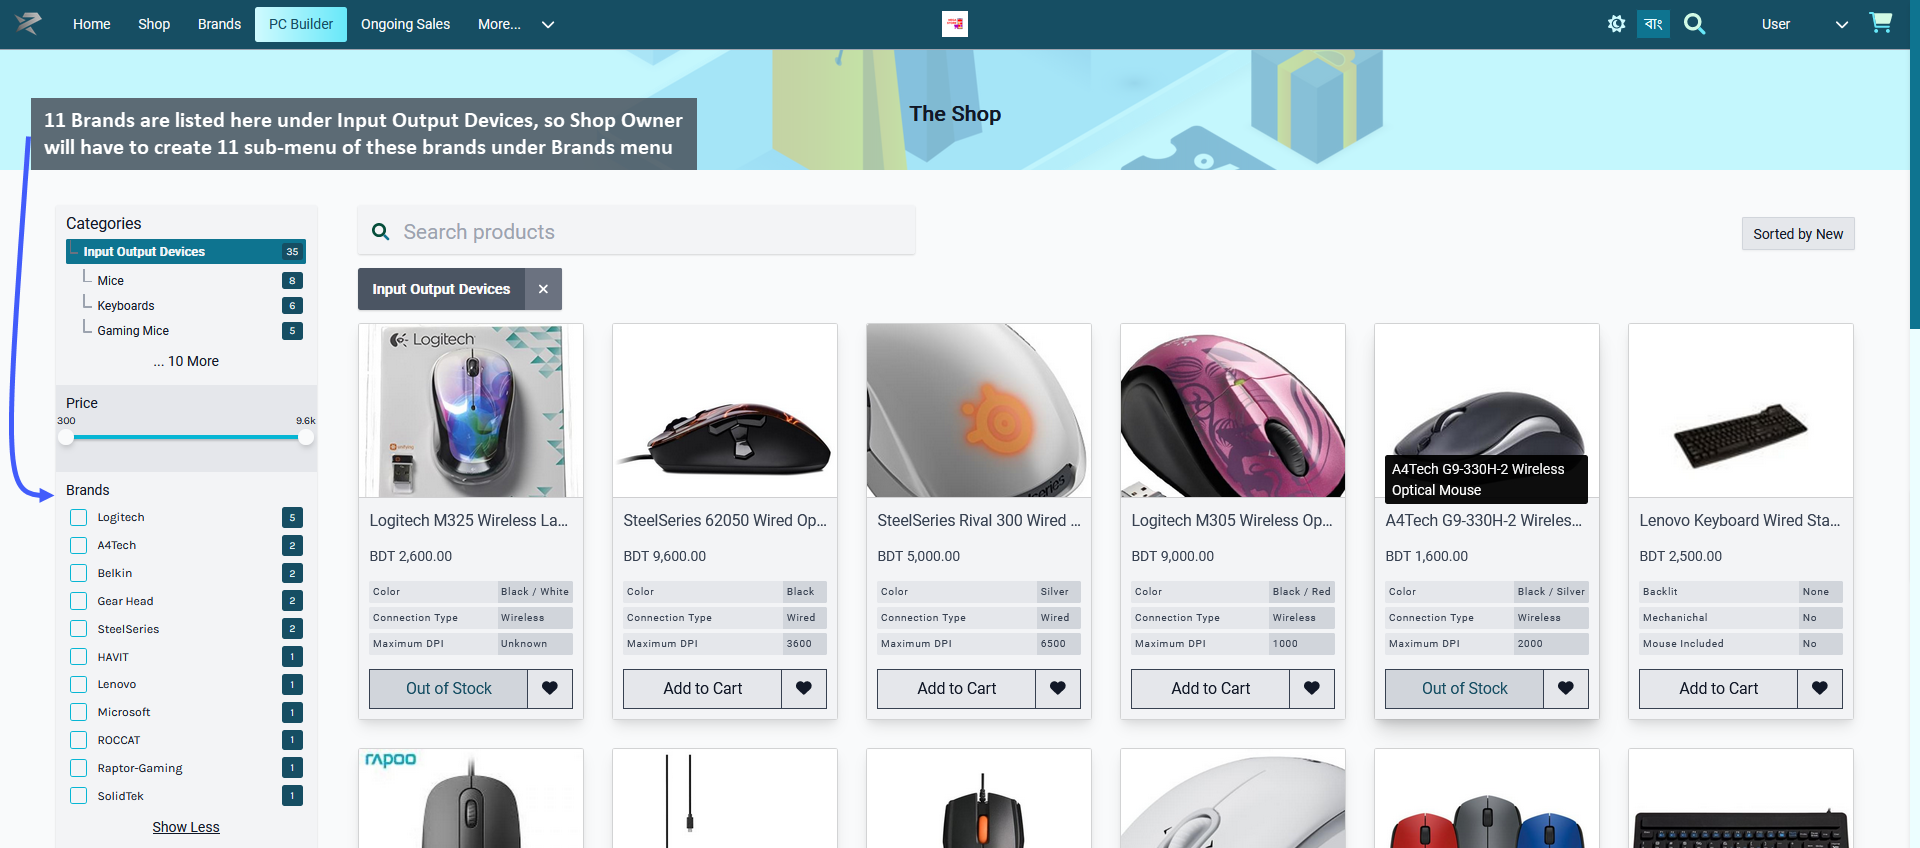
Image: The number of Brands appearing under the selected Category will have to be created as sub-menus.
To create the sub-menu for these 11 brands, click the ADD button from Custom Link to create 11 new menu and drag them under the Main Brands Menu which will automatically convert them into sub-menus.
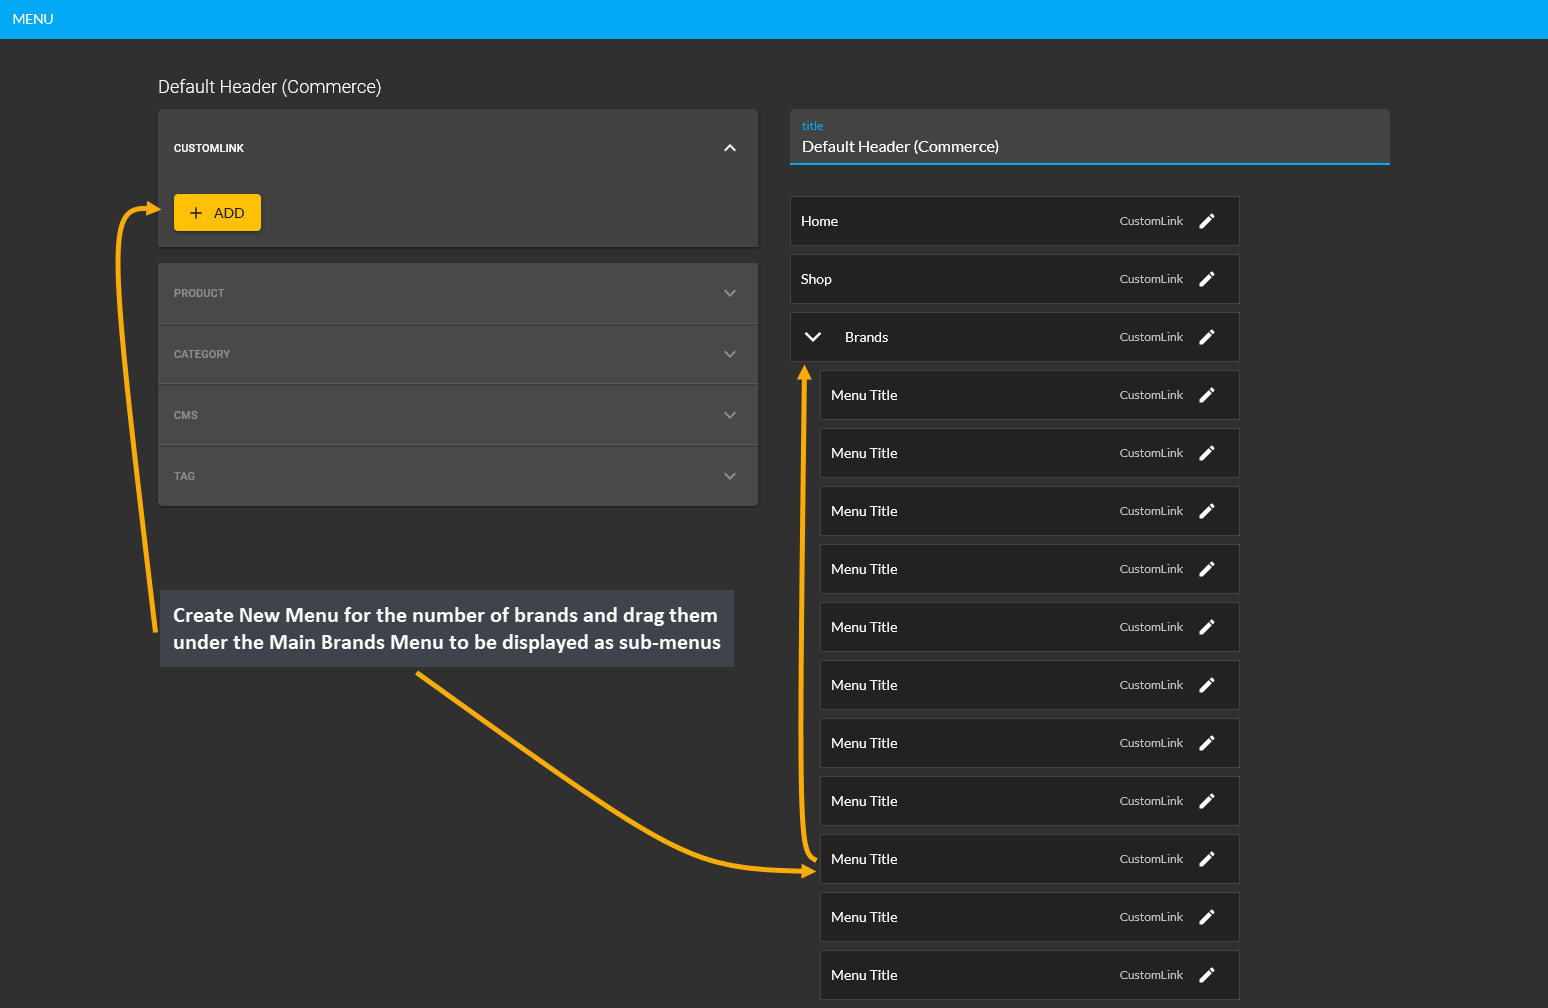
Image: Create new menu for the number of brands and drag them under main Brands menu to create sub-menus.
Now, as the sub-menus for brands are created, the Shop Owner can edit them by clicking on the Edit icon beside the menu. This will open a pop-up where Title and Link needs to be filled to activate the sub-menu. Set the Title based on the brand name like Logitech and copy the relative link from the Shop Page and click Update.
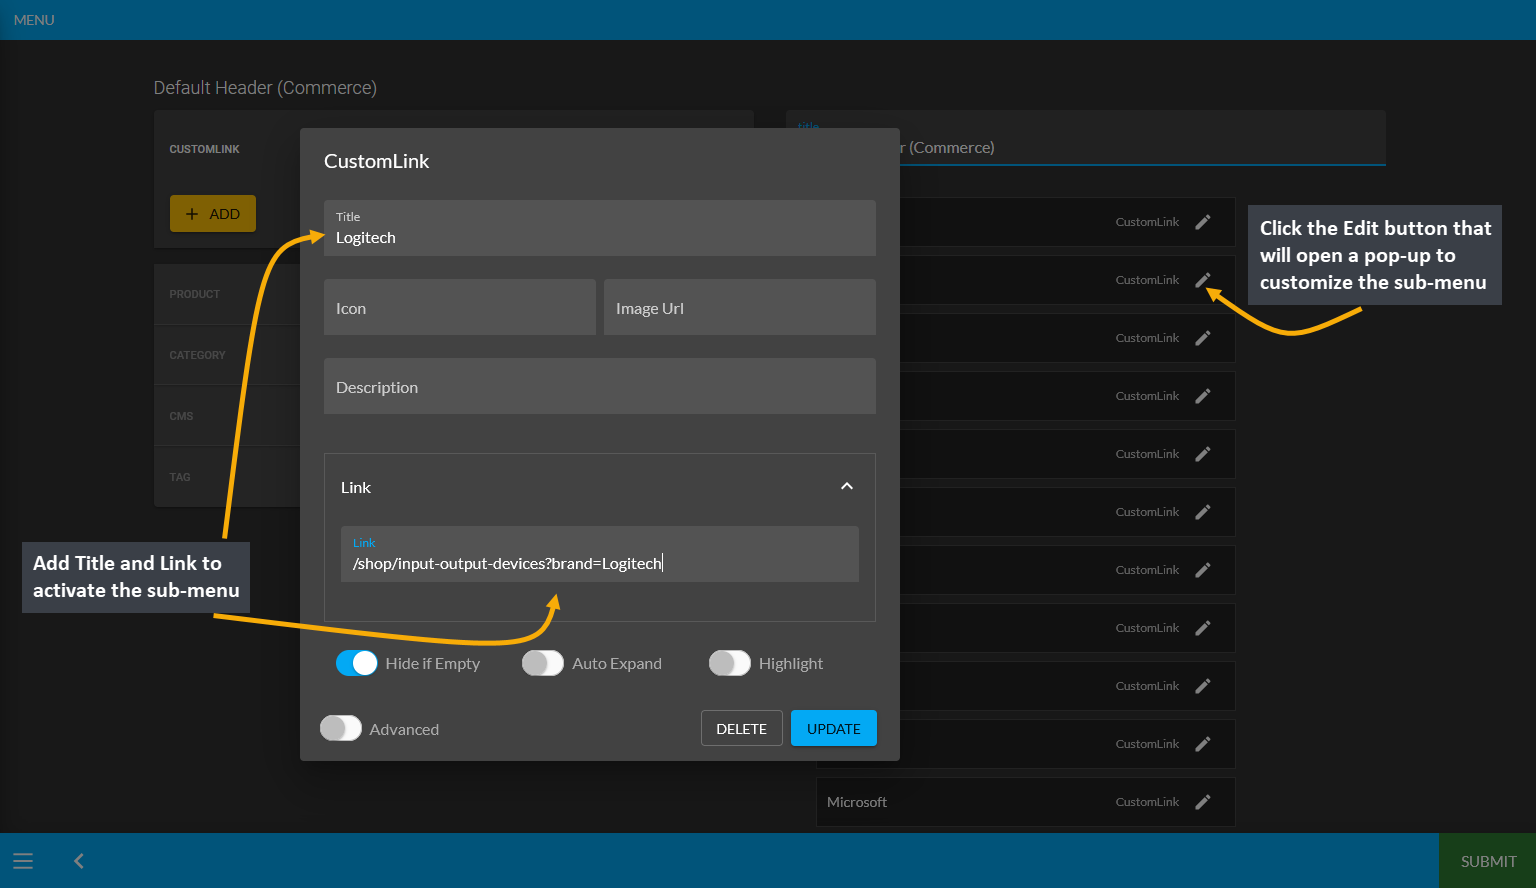
Image: Edit the sub-menu by clicking on the Edit button and fill out the Title and the Link on pop-up.
Retrieving the relative link can be done in a few simple steps. First, visit the Shop Page and from the list of Brands that shows under the selected Category, select the specific brand like Logitech. This will only show the Products under the Logitech brand. Now, from the URL search bar, copy the relative link that will begin from /shop like:
/shop/input-output-devices?brand=Logitech
/shop/input-output-devices?brand=A4Tech
/shop/input-output-devices?brand=SteelSeries
Simply copying and pasting relative link to the Link option on sub-menu’s editing pop-up window will activate the designated brand’s sub-menu. Then, click the Update button to complete the process.
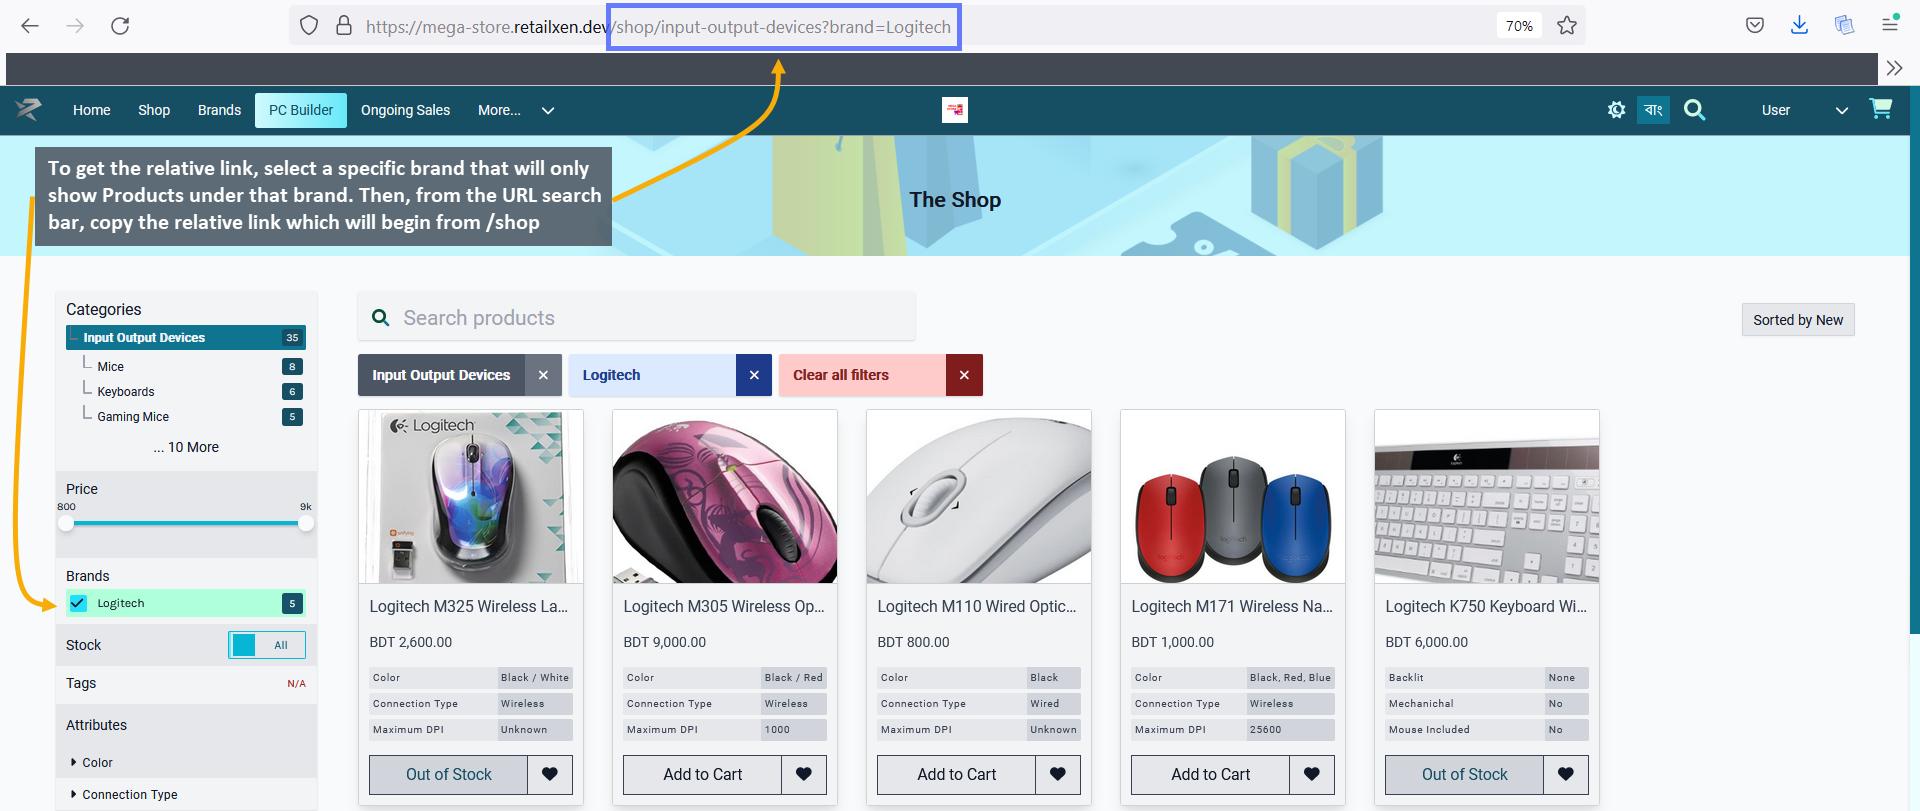
Image: Get relative link by selecting a specific Brand and copy the link from URL that begins from /shop.
Now, edit the sub-menus of all the 11 Brands in the same way by adding the Title and Link on the edit window pop-up. Click on Update to complete the process which will activate all the sub-menus under the Main Brands Menu. Once done, all the added sub-menus can be seen under Main Brands Menu on Default Header Page. Then, hit the Submit button that to save all the progress of the Brands dropdown menu creation.
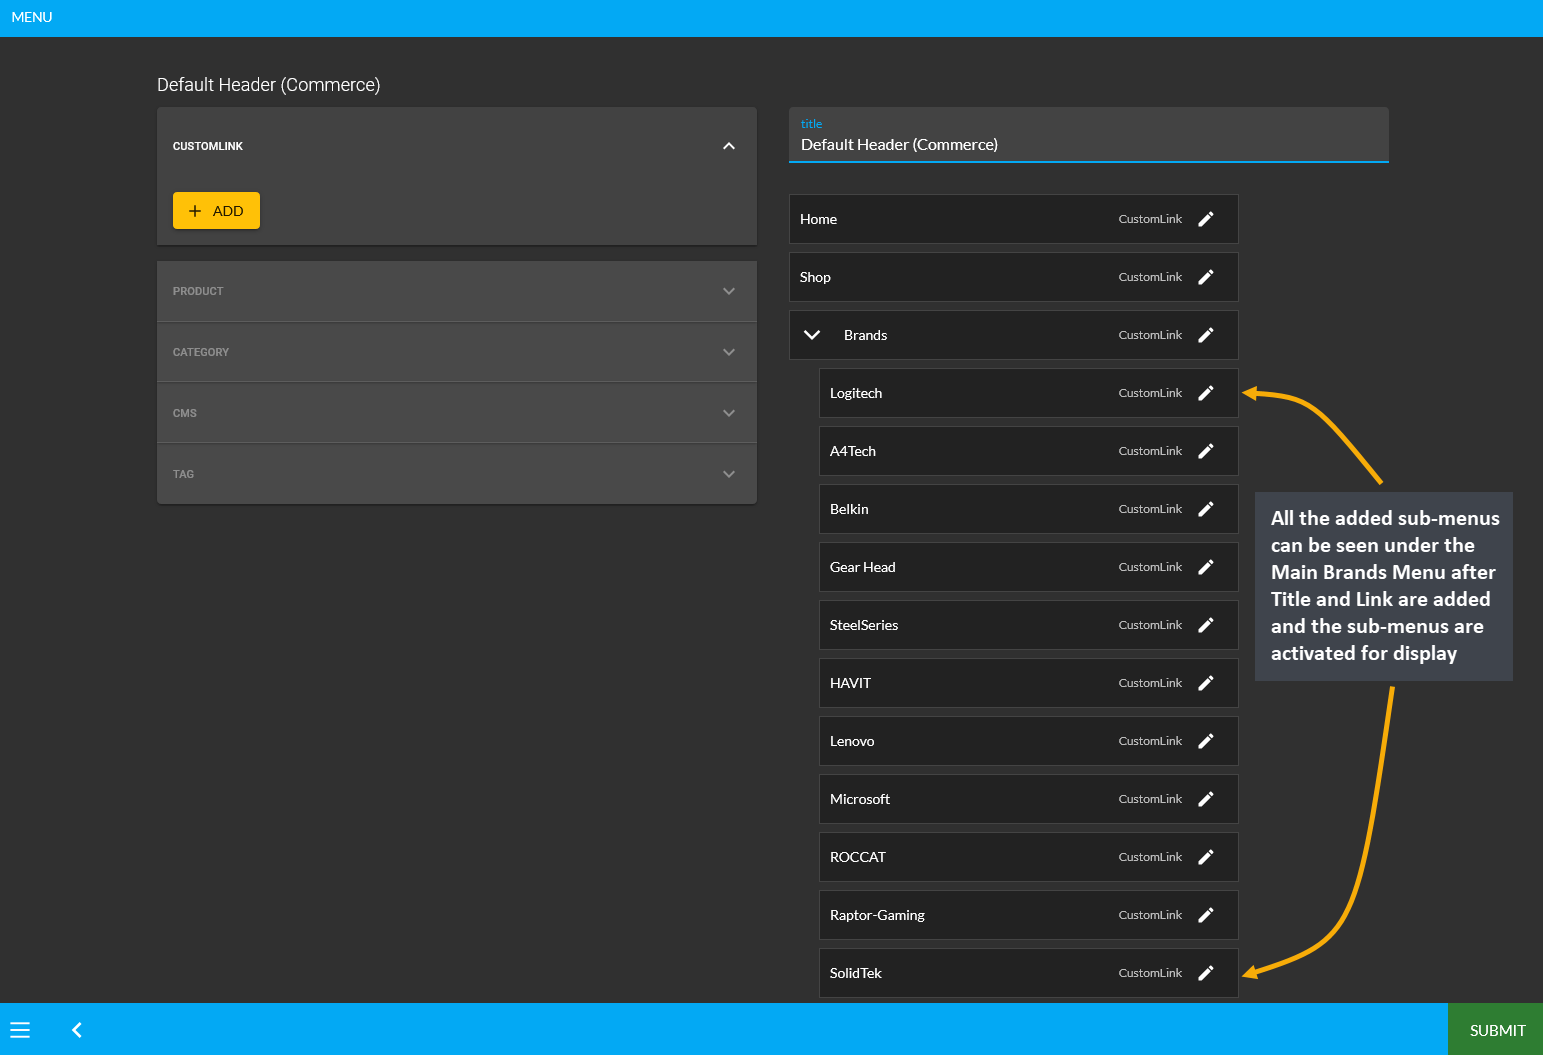
Image: Added sub-menus can be seen under the Main Brands Menu after they are updated with Title and Link.
On The Website, the Main Brands Menu can be seen on the Header with a dropdown option to select the sub-menus of different brands like Logitech, A4Tech, Belkin, Gear Head, and SteelSeries etc. Here, clicking on any of the brands will redirect to that brand’s Product Page. For instance, if Logitech sub-menu is clicked from under the Brands Menu dropdown, it will redirect to Logitech’s Product Page as shown in the example screenshots.
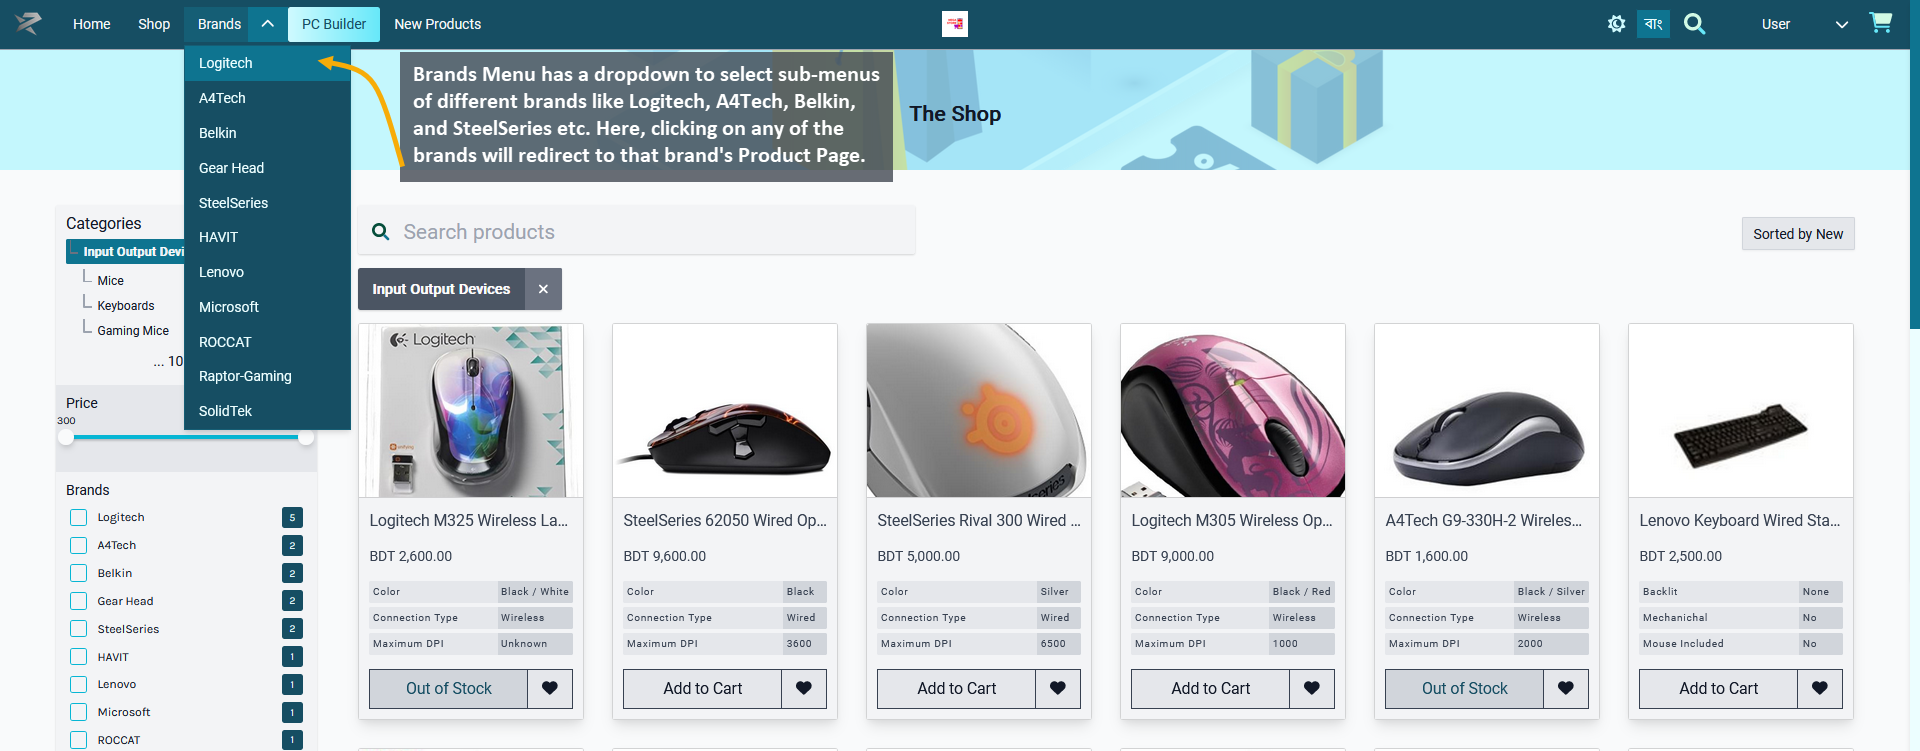
Image: Click Brands Menu and select any brand from the dropdown that will redirect to its Product Page.
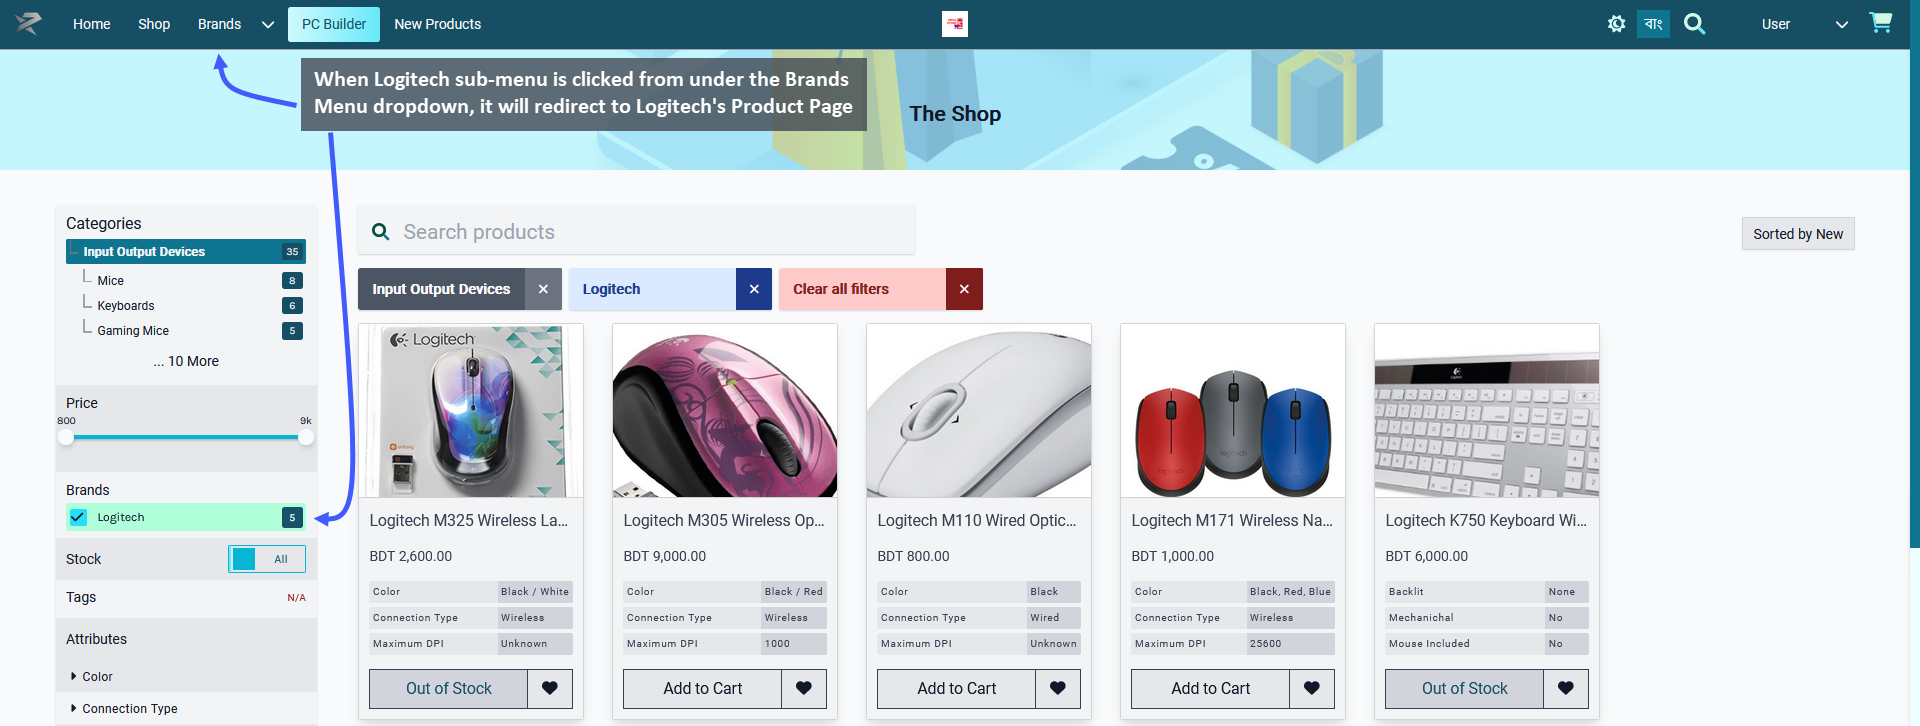
Image: When Logitech sub-menu is selected from Brands dropdown, it redirected to Logitech's Product Page.
The RetailXen Content Management System can be accessed from any compatible device to will allow Shop Owners to sell their Product(s) and Services on multiple platforms including The Website, mobile application, and physical stores. The integrated payment gateways, automatic VAT calculations, shipping methods, Order, Product(s), and Customer management makes it a convenient web-based commerce solution.
Similar to the tasks that traditional cost system performs with retail Point of Sales software, Retail Xen Admin will also allow doing purchase, daily sale, checking profit-loss, maintaining serial-wise Products with warranty system so that warranty claims for serial-wise Products can be streamlined. RetailXen CMS can perform:
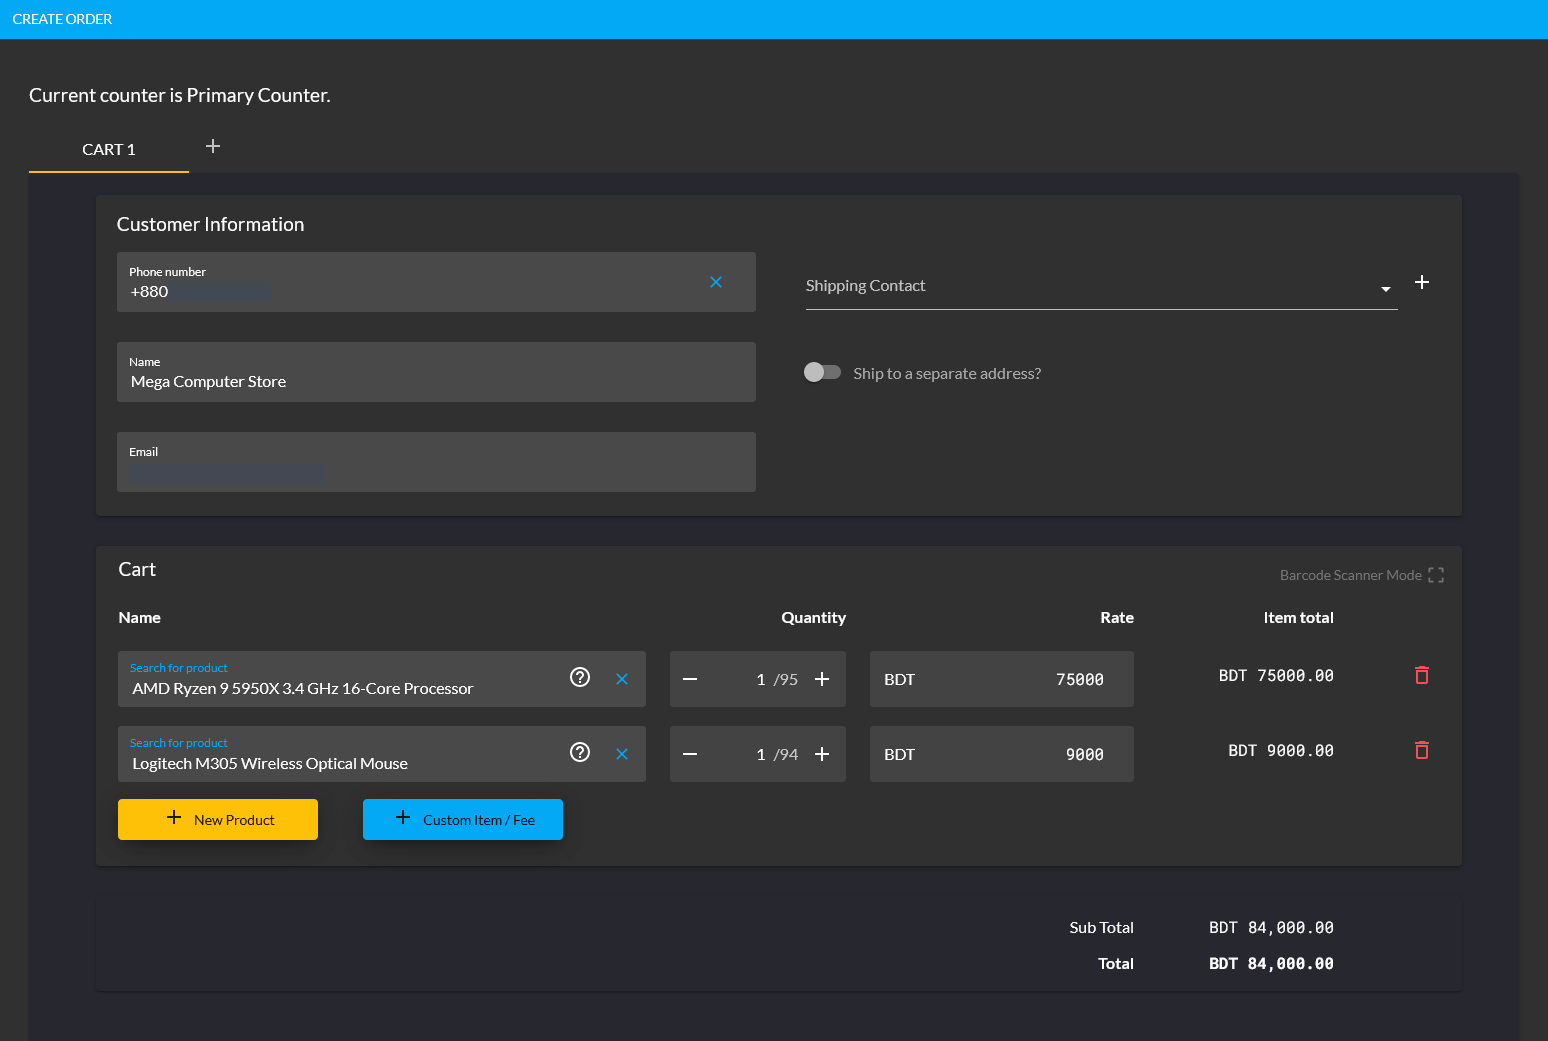
Image 1: RetailXen performs similar functions of the traditional cost system i.e. Point of Sales software.
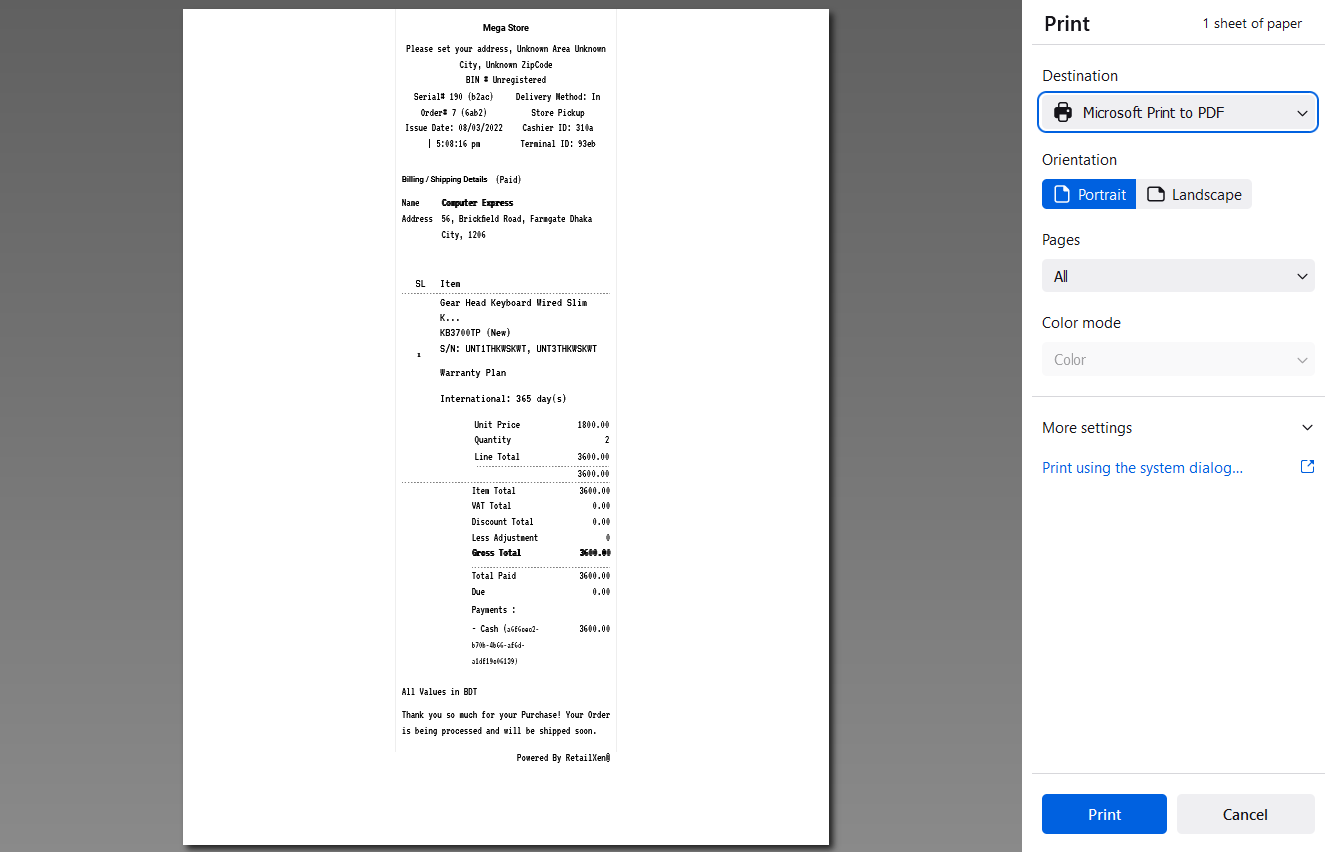
Image 2: Invoices of purchases can be printed in the format of Point of Sales software for Customers.
As an ecommerce platform, RetailXen is ideal for Shop Owners who wants to start an ecommerce store which is provided by the RetailXen Website for long-term growth. This Content Management System includes common business tools on the Admin Panel interface that will allow Sellers to design their online store and sell their to boost retail sales. Crafting and launching The Website with RetailXen will be simple for Shop Owners with data protection on Customer’s contact details and payment information.
Shop Owners having little to no experience in web development can rely on RetailXen to have full control over their Orders, Product(s), and Customers. Offering competitive and cost-efficient packages, RetailXen offers an user-friendly CMS to operate everything efficiently from home page to Product ordering to checkout that will keep Customers coming back. With inventory management, payment, and shipping gateways, RetailXen will be the perfect ecommerce solution.

Image: Retail Xen Content Management System is a platform independent web-based commerce solution.
For effective warranty management, RetailXen provides a Robust Warranty Management System (RMA), through which Shop Owners can track all warranties of any Product throughout its lifecycle. Using the system, the Shop Owners will be able to create, activate, and track warranties and warranty claims for Product(s).
The information of a Customer’s warranty coverage and Product warranty information like manufacturing date, expiry date, and warranty period will be stored in RetailXen’s database. Therefore, Shop Owners will be able to handle all processes associated with warranties for Product(s) to improve Customer satisfaction.
During a Product’s warranty period, if a Customer makes warranty claims, then the Shop Owner can manage the return merchandise authorization through which the Customer can return their Product for a refund, repair, or replacement. RetailXen’s Robust Warranty Management will help store and manage them better.
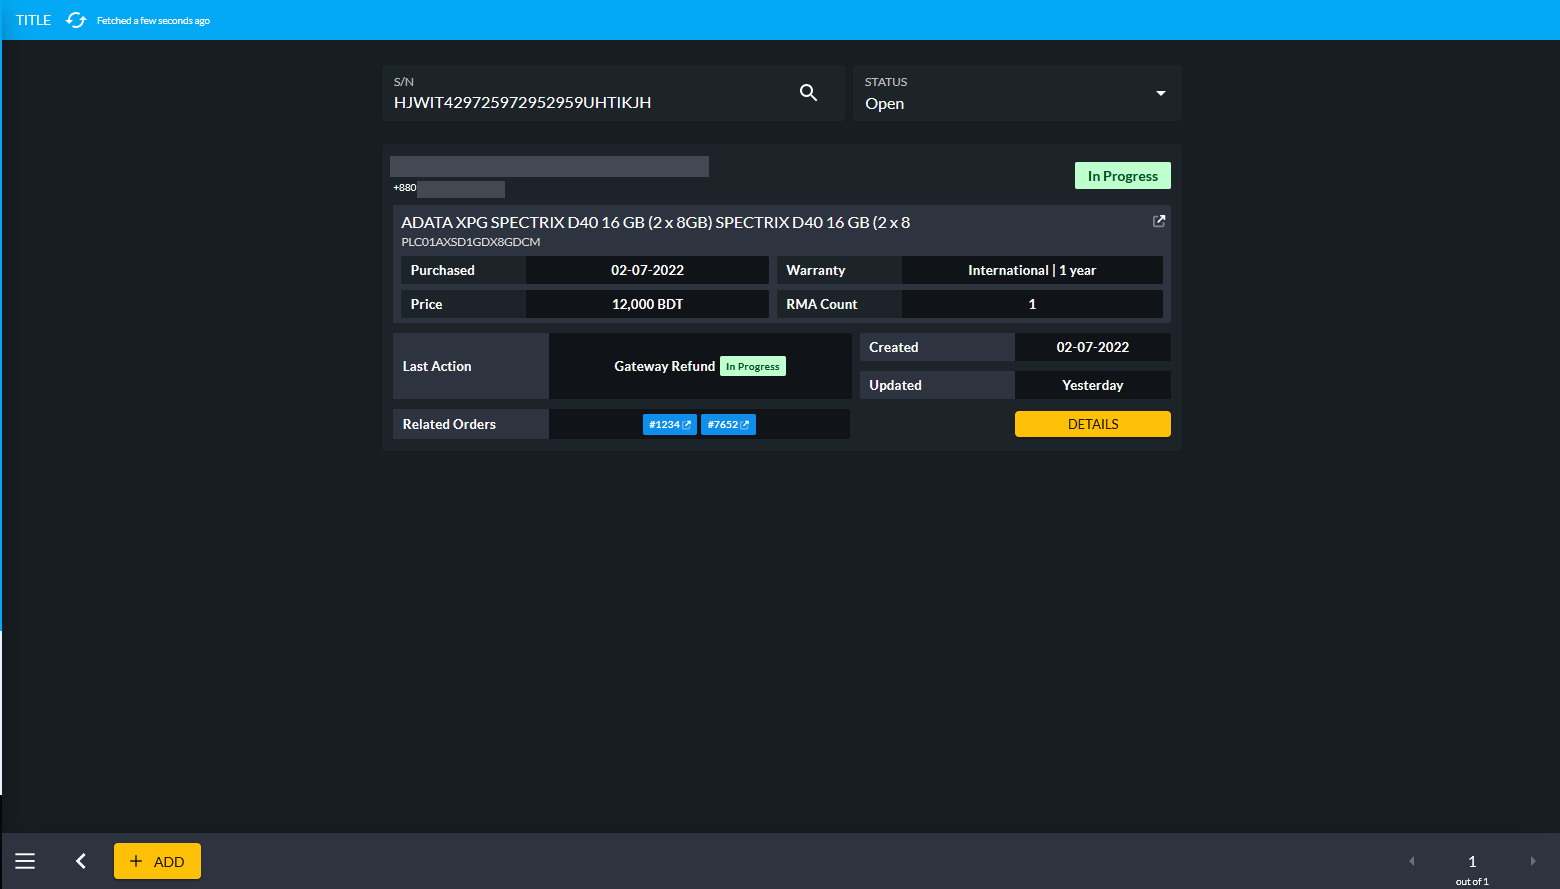
Image: Retail Xen provides Lifetime, Local, International, Service, and Replacement Warranties with RMA.
After Customer makes warranty claim on a defective Product, their claim will be examined by customer service. If their claim is approved, then refund, replacement, or refund will be provided for their Product by the Shop Owner. Based on the warranty information on database, Shop Owners can efficiently process warranty claims.
Based on Lifetime, Local, International, Service, and Replacement Warranties, RetailXen Admin will keep record of serial-wise Products with warranty system so that warranty claims for them can be streamlined. Besides, with warranty processing being automated, the Shop Owner will be able to provide faster service, resulting in higher Customer satisfaction.
Retail Xen’s allows the Shop Owners to provide after-sales servicing to Customers based on the Product(s) or Services they have already purchased. It includes support regarding the warranty services, repairs, or upgrades. Considering the fact that, satisfied Customers tend to create repeat Customers, RetailXen incorporates features of technical support and handling returns, exchanges, or repairs easier.

Image: Retail Xen incorporates Servicing features like technical support or Product repairs.
The RetailXen Content Management System will allow Shop Owners to create, modify, and remove any contents from The Website without needing to learn the Hypertext Markup Language (HTML). Utilizing the multifunctional Admin Panel with built-in editors and modules, they will be able to create, reniew, and publish web contents of their online Shop. The main modules of the CMS consists of Dashboard, Customers, Orders, Products, Product Settings, Content Management, and Miscellaneous.
The Shop Owner can efficiently use the CMS to manage contents, add Payment Methods, Shipping Gateways, or create Products, Customers, Orders, Brands, Galleries, Tags, and Warranty Plans. Besides, they can view overall statistics of Orders, revenues, new users, or low stock Products etc. After successfully registering and creating various tenant users based on the monthly package plan, the Shop Owner can edit and manage their shop fast and efficiently with the CMS.
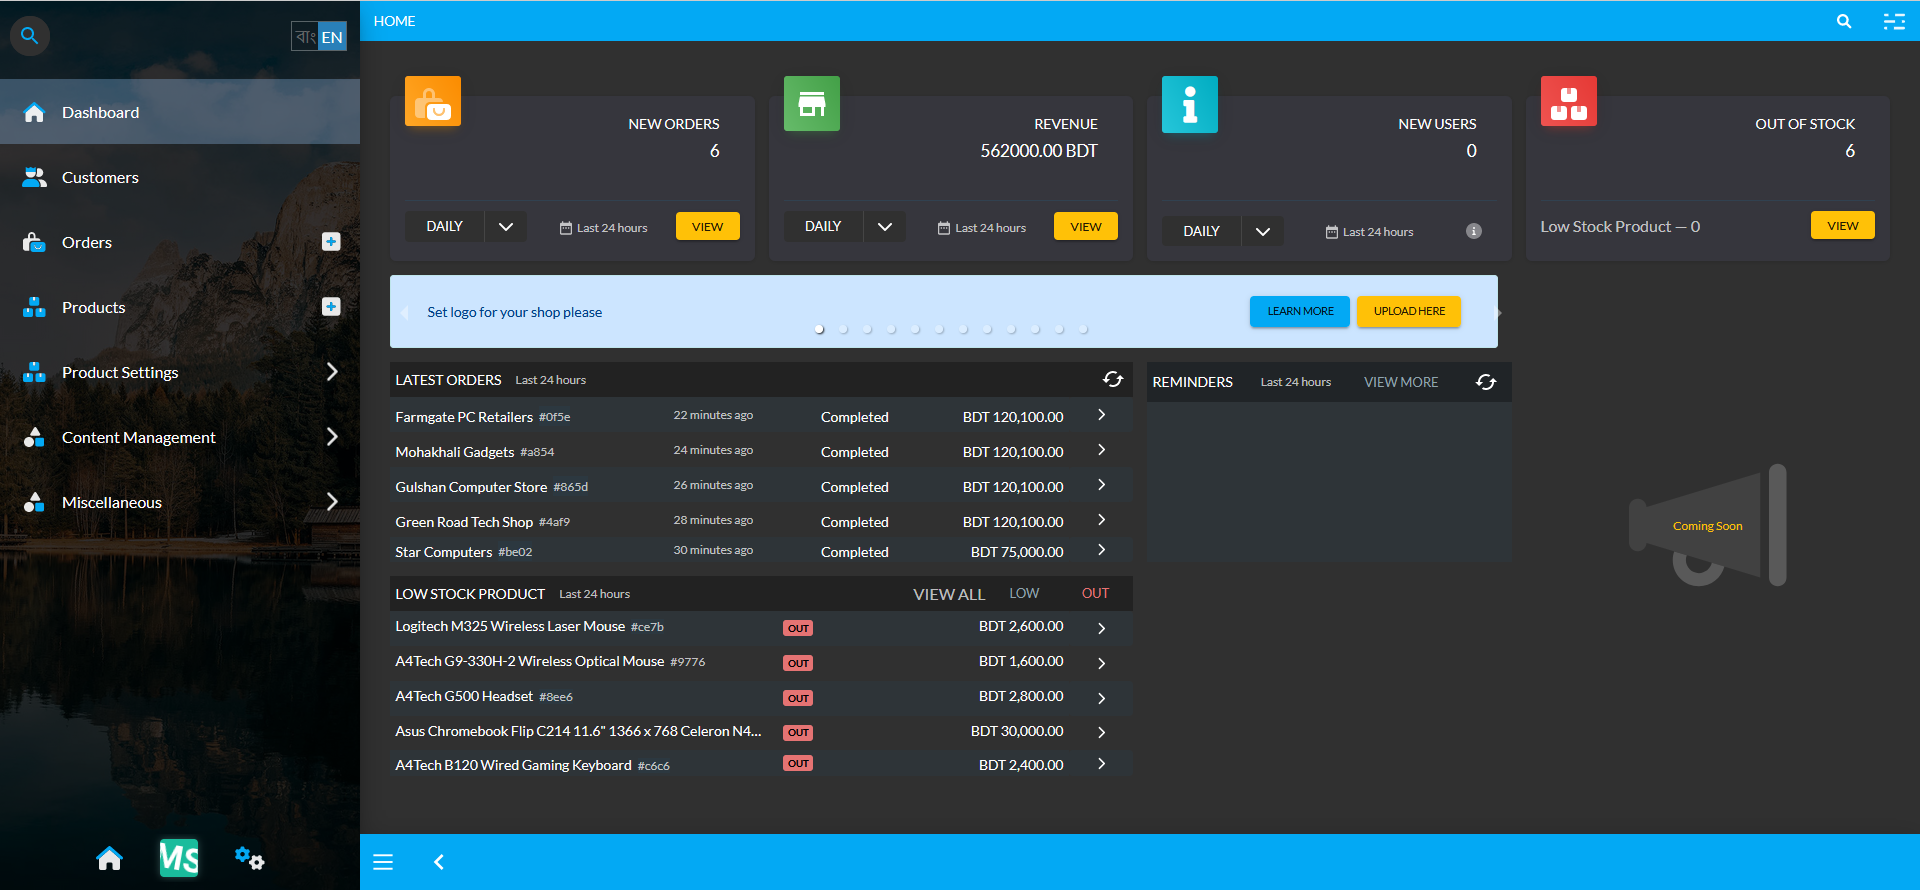
Image: RetailXen Content Management System providing the best ecommerce solution for Shop Owners.
Usually, when creating a website from scratch, data entry needs to be done manually for enlisting Products, but when using Retail Xen, Shop Owners will not have to perform data entry for already enlisted Branded Products on the CMS, because almost all known Brands are pre-filled in the system with details. So, the Shop Owner will not have to hire employees for performing data entry.
Shop Owners can use the Search box to find already enlisted Branded Products during New Product creation. Using the Global Product templates, they can create their own Products by selecting them from the Search box which comes with pre-filled information. All they have to do is insert the Product name and price to enlist them. This is an unique feature from RetailXen, which is not available on other ecommerce platforms.
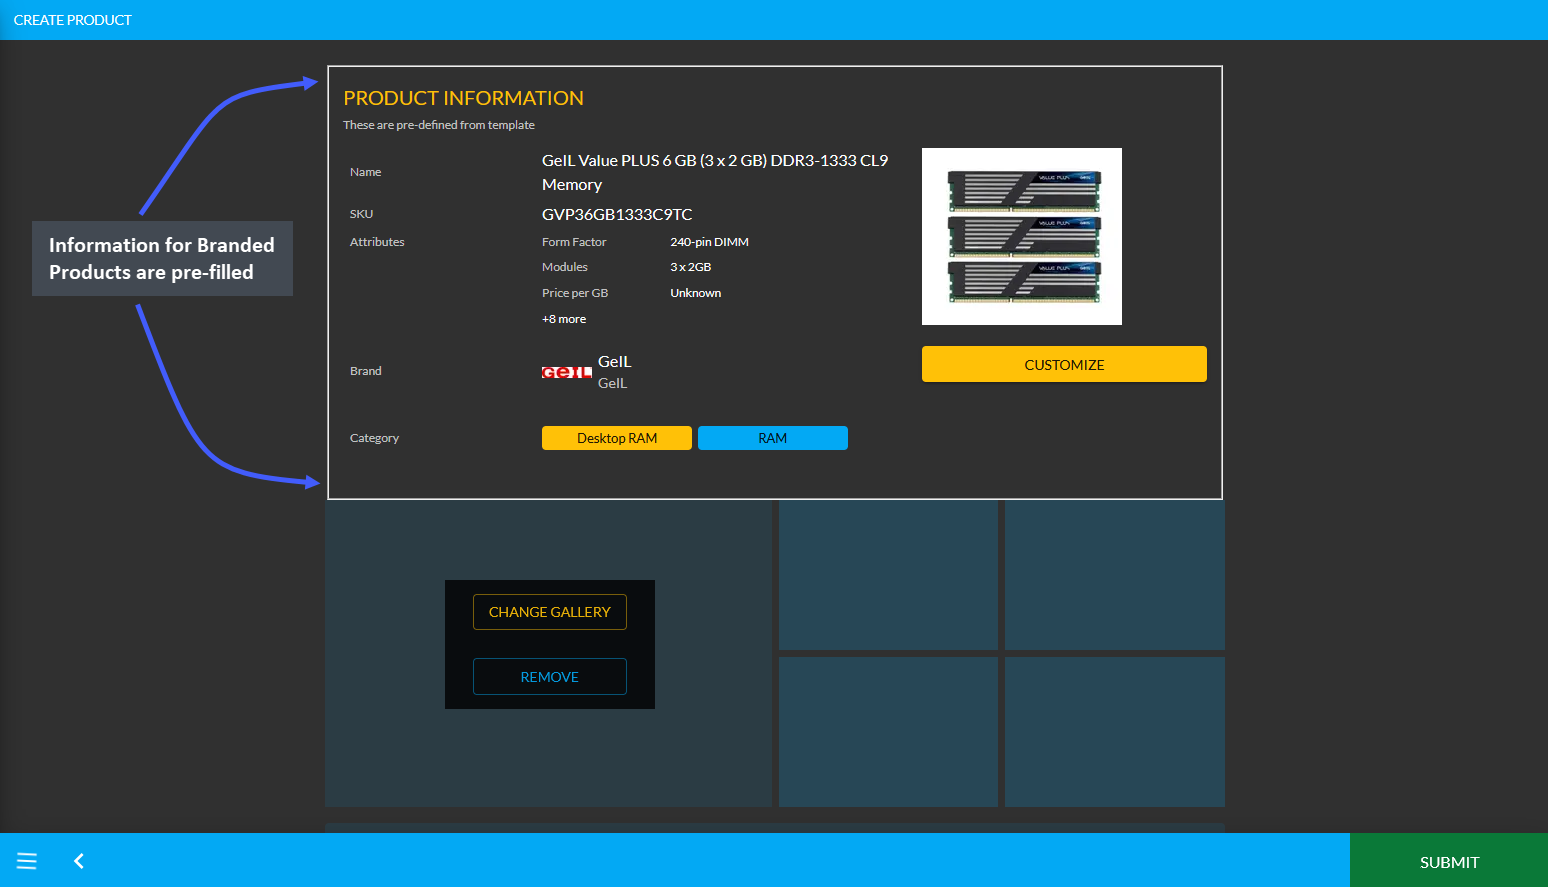
Image 1: Product information is pre-filled for Branded Products and will save time for data entry.
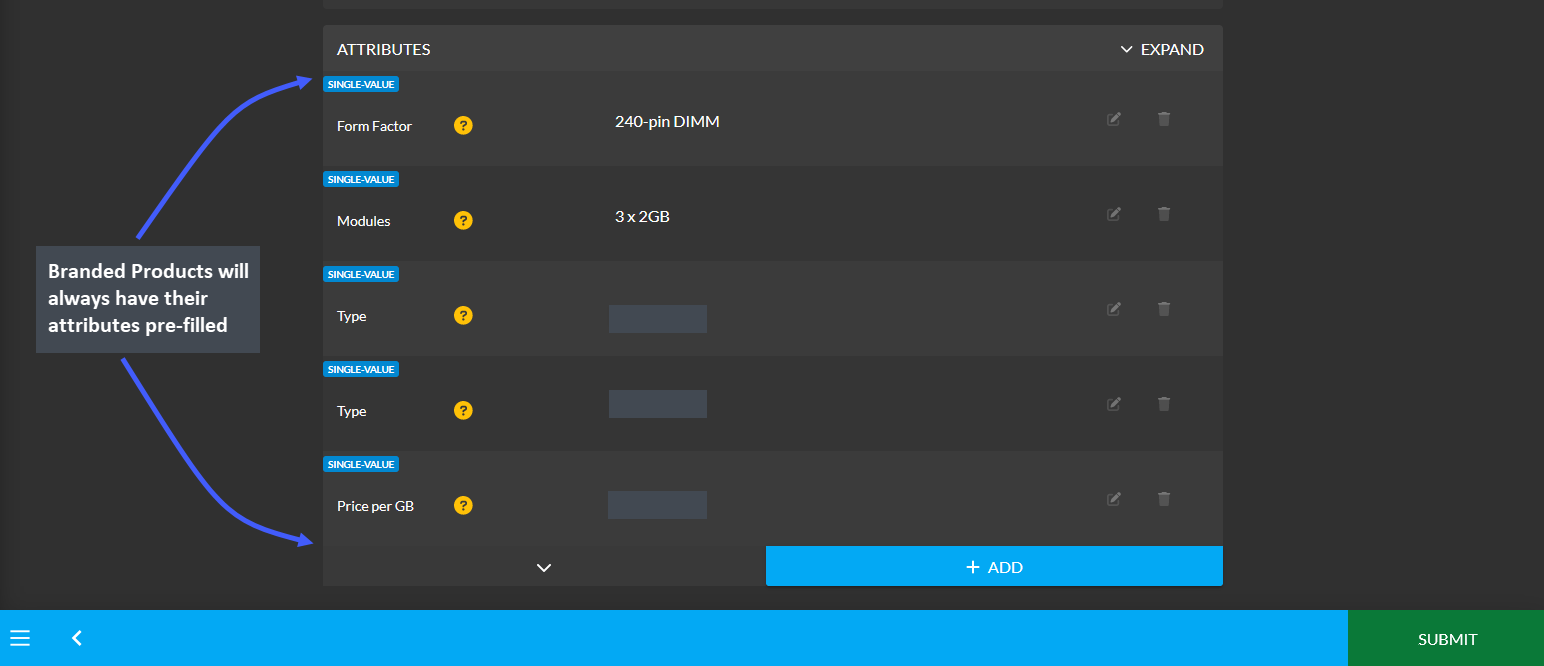
Image 2: Product attributes are already pre-filled but more attributes can be added.
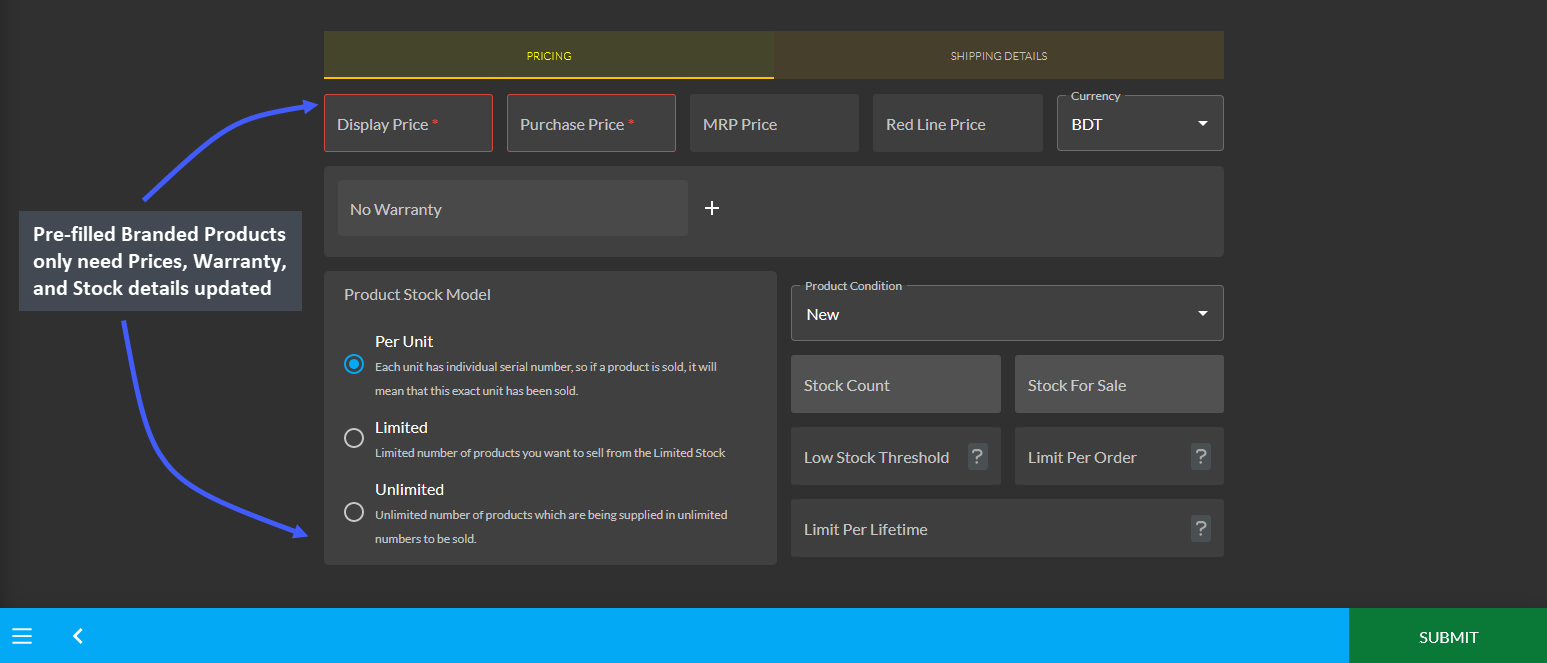
Image 3: Pre-filled Branded Products only need Prices, Warranty, and Stock details updated.
The Shop Owner will be able to view Hourly, Daily, Weekly, Monthly, Half Yearly, and Yearly profit-loss through the Cost Basis reports. Separate reports of Cost Basis can be viewed for Customer, Order, Product, and Product Batch. At the end of the day, they can view how much money is owed between two business parties.
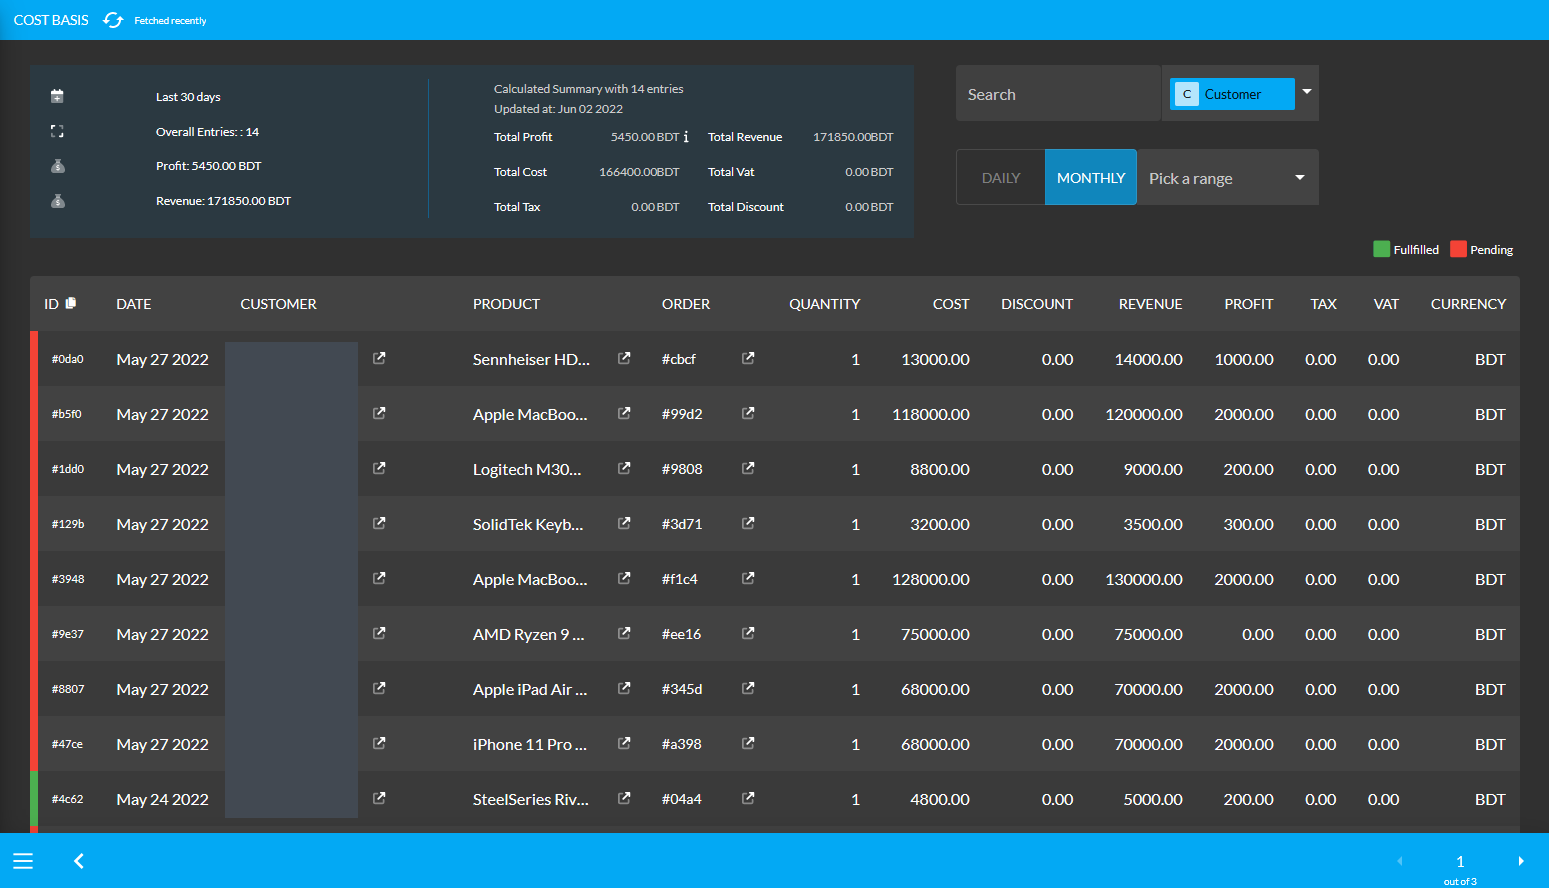
Image: Shop Owners can calculate their profits and losses through the Cost Basis reports.
The PC Build feature usually needs to be added to any website with additional costs, but RetailXen includes this feature already added within the menu on The Website. Using the PC Build, Customers can build their own PC, save personal builds to order in future, compare different PC Build components, and get quotation of different PC Builds within different price ranges. Customers can see their builds under My Builds and Shop Owners can add compataible builds within the Featured Builds tab for the convenience of Customers.
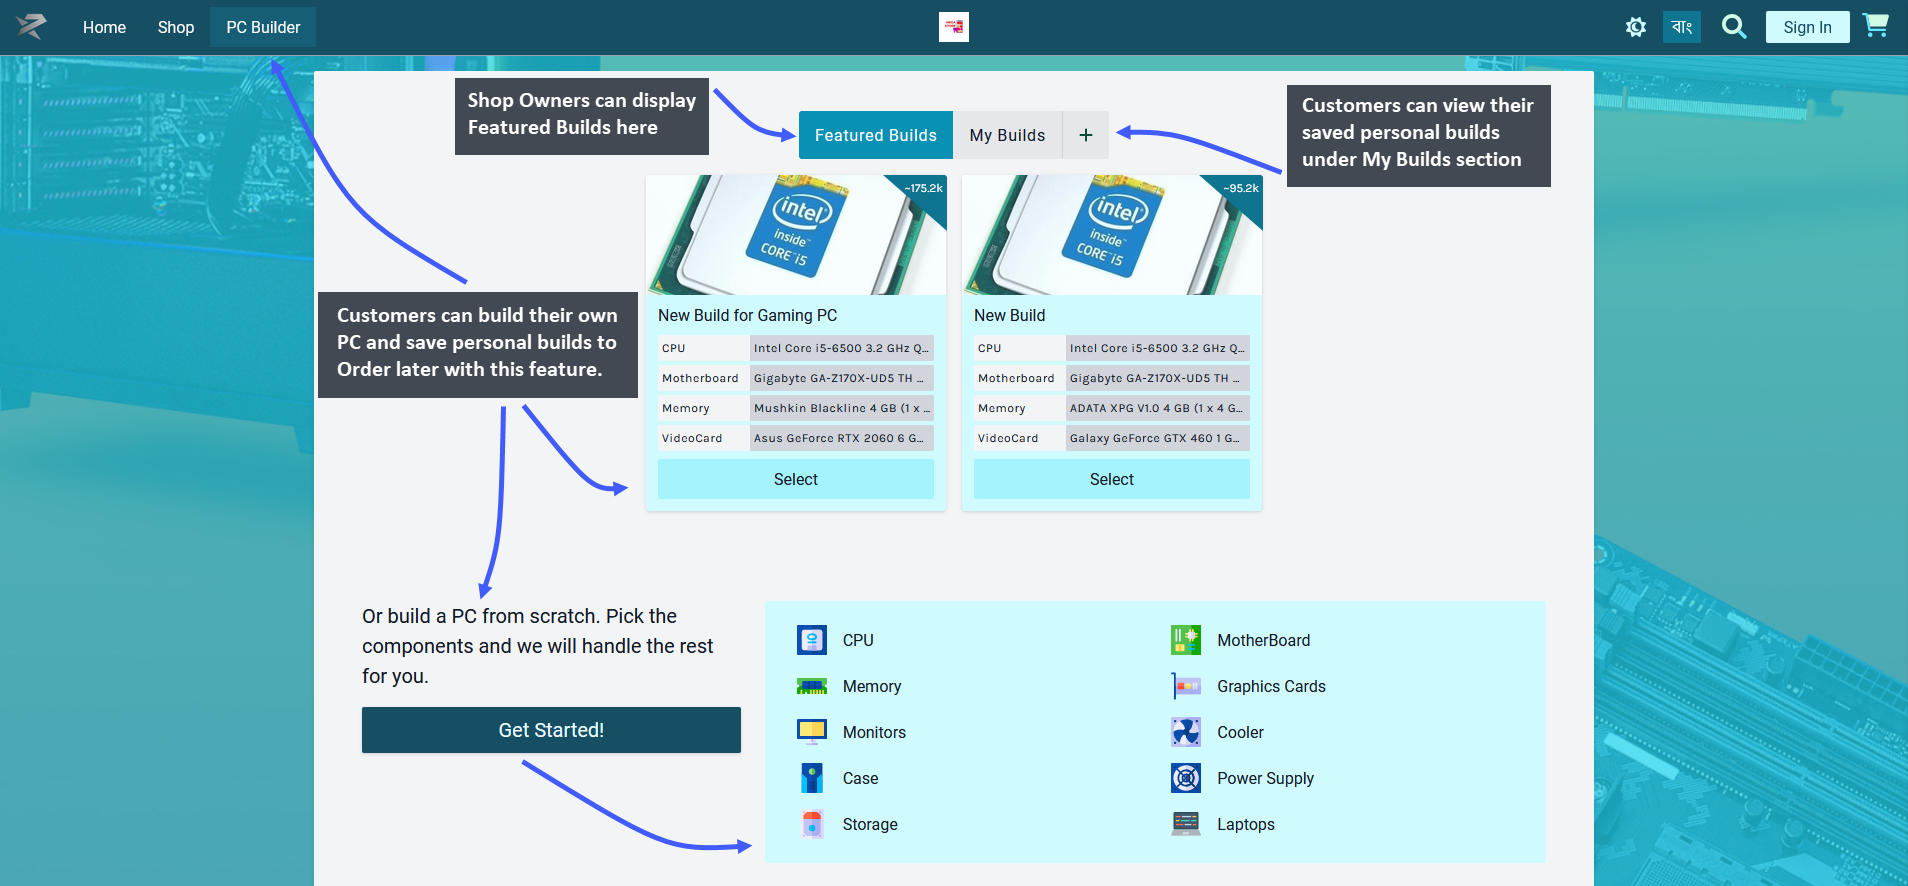
Image: Customers can build their own PC, save the personal builds, and get a quotation to Order.
The regular software available in the market can only complete the functions of purchase sale. In order to setup other Payment Gateways, Shop Owners generally have to buy them under their website. So, in those cases, they will have to manage two software, one being the website and the other being the purchase sale software.
However, Retail Xen provides all different types of Payment Gateway systems with incorporated billing software under the Admin Panel. The payment gateways that can be activated from the gateway settings include Cheque, Cash, Cash on Delivery, Credit Card, Ledger, SSL Commerz, PortWallet, Bank Transfer, BKash, Bkash (Manual), Nagad, and Nagad (Manual). They will make Customers’ purchases a lot faster on The Shop Owner’s Website.
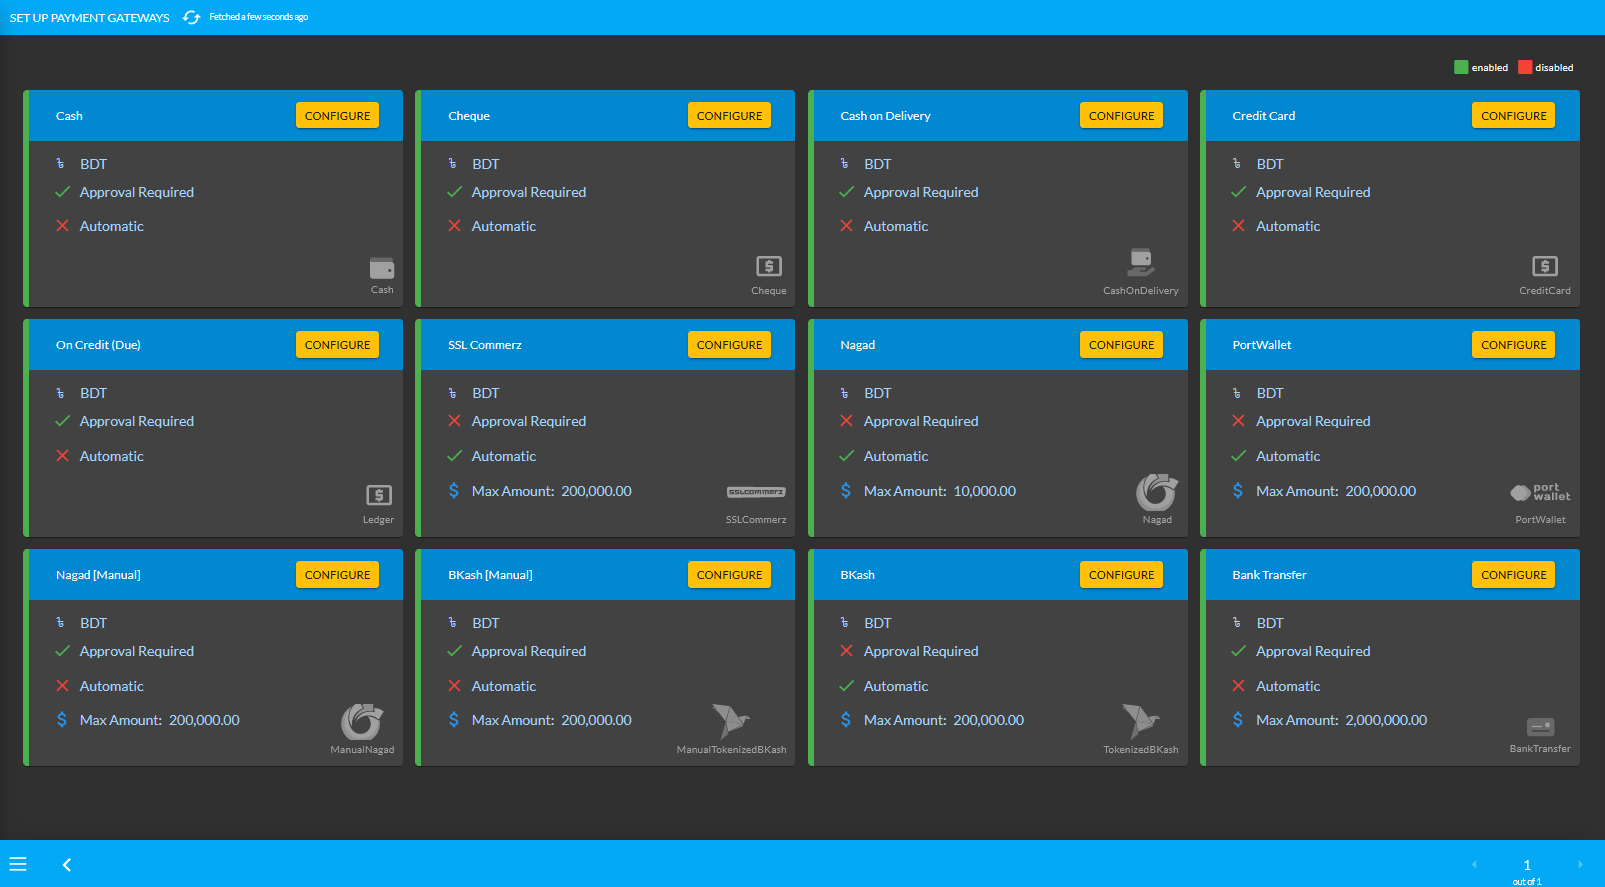
Image: Shop Owners can activate various Payment Gateways to receive payments for their Orders.
Retail Xen provides the facility of activating various shipping carriers for Shop Owners to assist with the delivery of Product(s) to Customers. Having the right kind of Shipping Gateways will help Shop Owners to speed up the revenues as the delivery process will be done in time, resulting in happy Customers. For this reason, Retail Xen opts to select the best and popular shipping gateways nationwide for the Shop Owner’s business needs.
The available Shipping Gateways in the Admin Panel include options of Direct, InStorePickUp, FedEx, UPS, RedX, Ecourier, GoGoBangla, Koopon, PaperFly, DHL, Aramex, and Now. From these available options, the Shop Owner can choose to activate any Shipping Gateway that suits their e-commerce needs.
If the Shop Owner prefers a specific shipping carrier that is not enlisted, they will be able to add it by contacting Retail Xen. If they need to add a new Shipping Gateway to their Admin Panel, they will need to make additional payment to Retail Xen to add it. It is because implementing new Shipping Gateway within the system will require some charges from the selected shipping carrier.
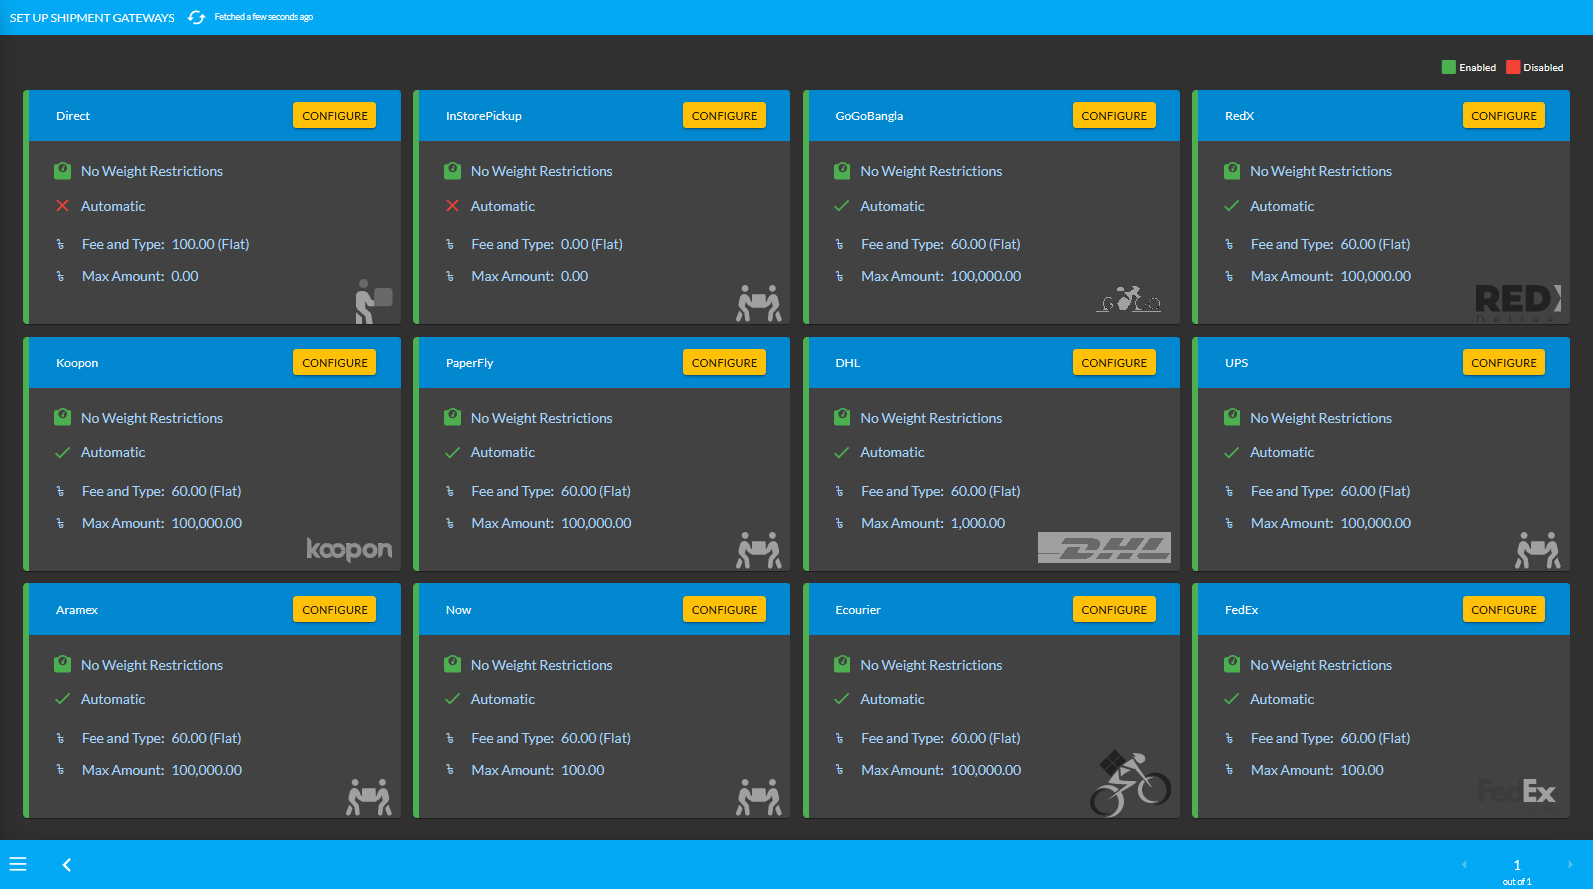
Image: Shop Owners can activate various Shipment Gateways to ensure smooth delivery of their Orders.
Ledger includes transaction details of purchase-sale with another party which is an essential component of any business. Instead of maintaing a hand-written ledger, Retail Xen’s built-in Ledger system will allow a Shop Owner to make Cash Purchase, Credit Purchase, and Product Purchase from another Shop Owner, i.e. the Credit Supplier. The Ledger system will keep record of all types of purchases from another Credit Supplier.
For instance, a Shop Owner can purchase Products worth of 20,000 BDT from a Credit Supplier without paying right away. The Credit Supplier who will get 20,000 BDT from the Shop Owner will be able to buy Products from them later worth of 20,000 BDT which will be recorded and maintained under the Ledger system.
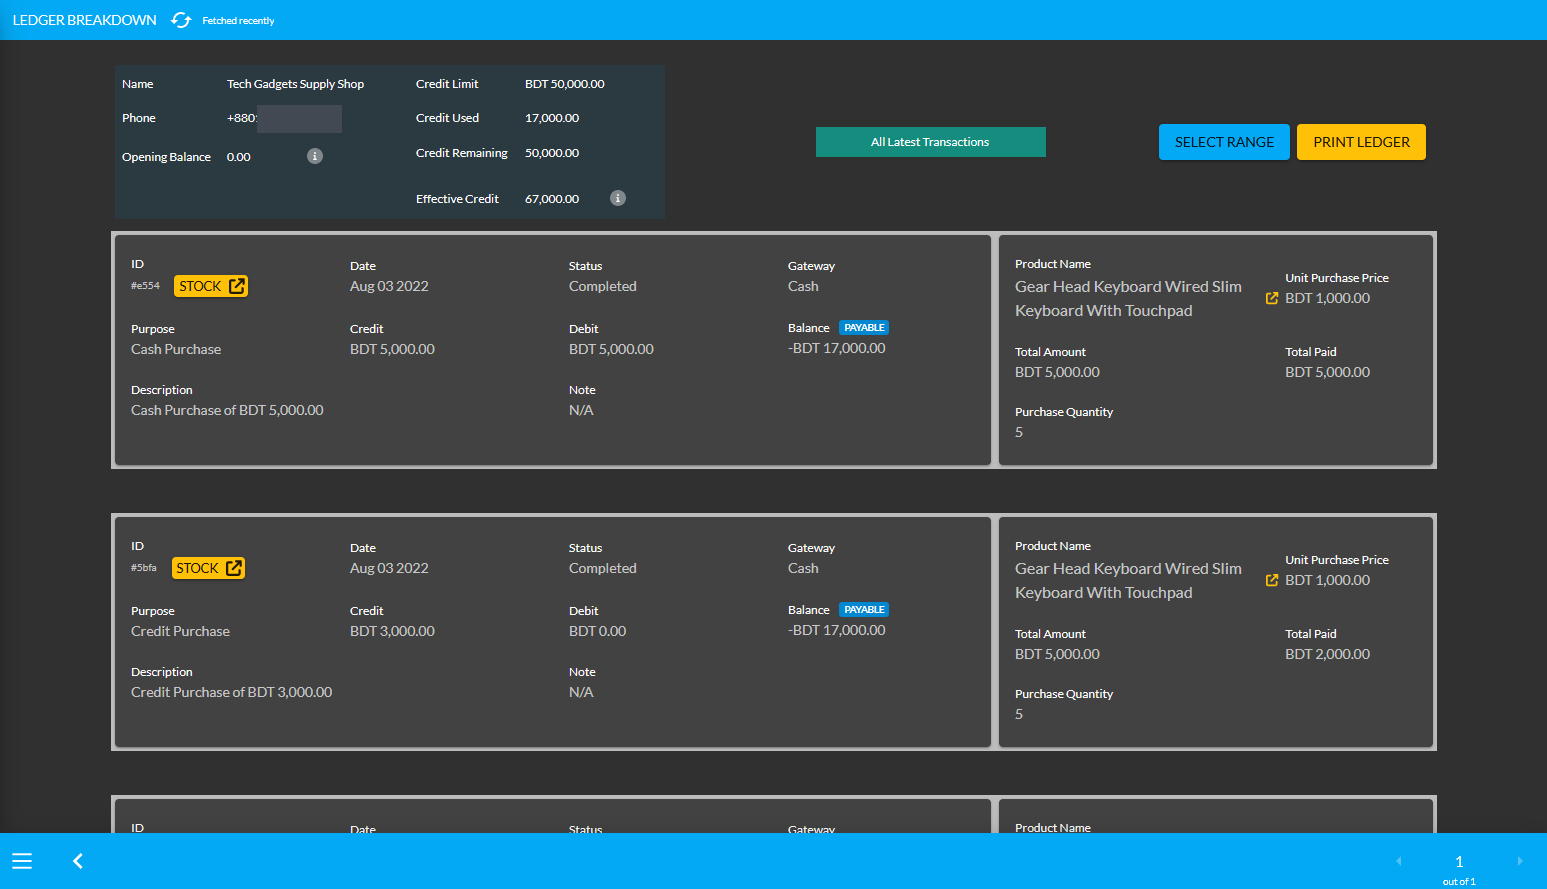
Image: Shop Owners can make Cash Purchase, Credit Purchase, and Product Purchase using Ledger system.
To receive the facilities of the complete VAT solution, Shop Owners will have to write their BIN Number and upload their BIN certificate under the Legal section of the Tenant setup option. The Shop Owner will not have to worry about VAT calculations. Many Shop Owners may not have clear ideas about the VAT charges for specific Products. Having an already estimated VAT charges for Products in the Admin Panel will be beneficial to them.
For this reason, RetailXen is built with VAT charges automatically calculated for the listed Products based on the HS Code of Product Categories. So, when a Shop Owner will sell a Product, the calculated VAT will automatically be added to the Total Bill, which they will have to simply submit in the Bank. Therefore, when the VAT office will make inquiries, they could show that they have submitted the return by showing the invoice.
Local cost systems do not have the feature of the Customer List. However, RetailXen Admin Panel has a Customers module under which the list of Customers can be viewed. So, if a Shop Owner wants to send SMS promotions to selected Customers. Even for this, RetailXen has a built-in templates for sending SMS, email, and push notifications to Customers.
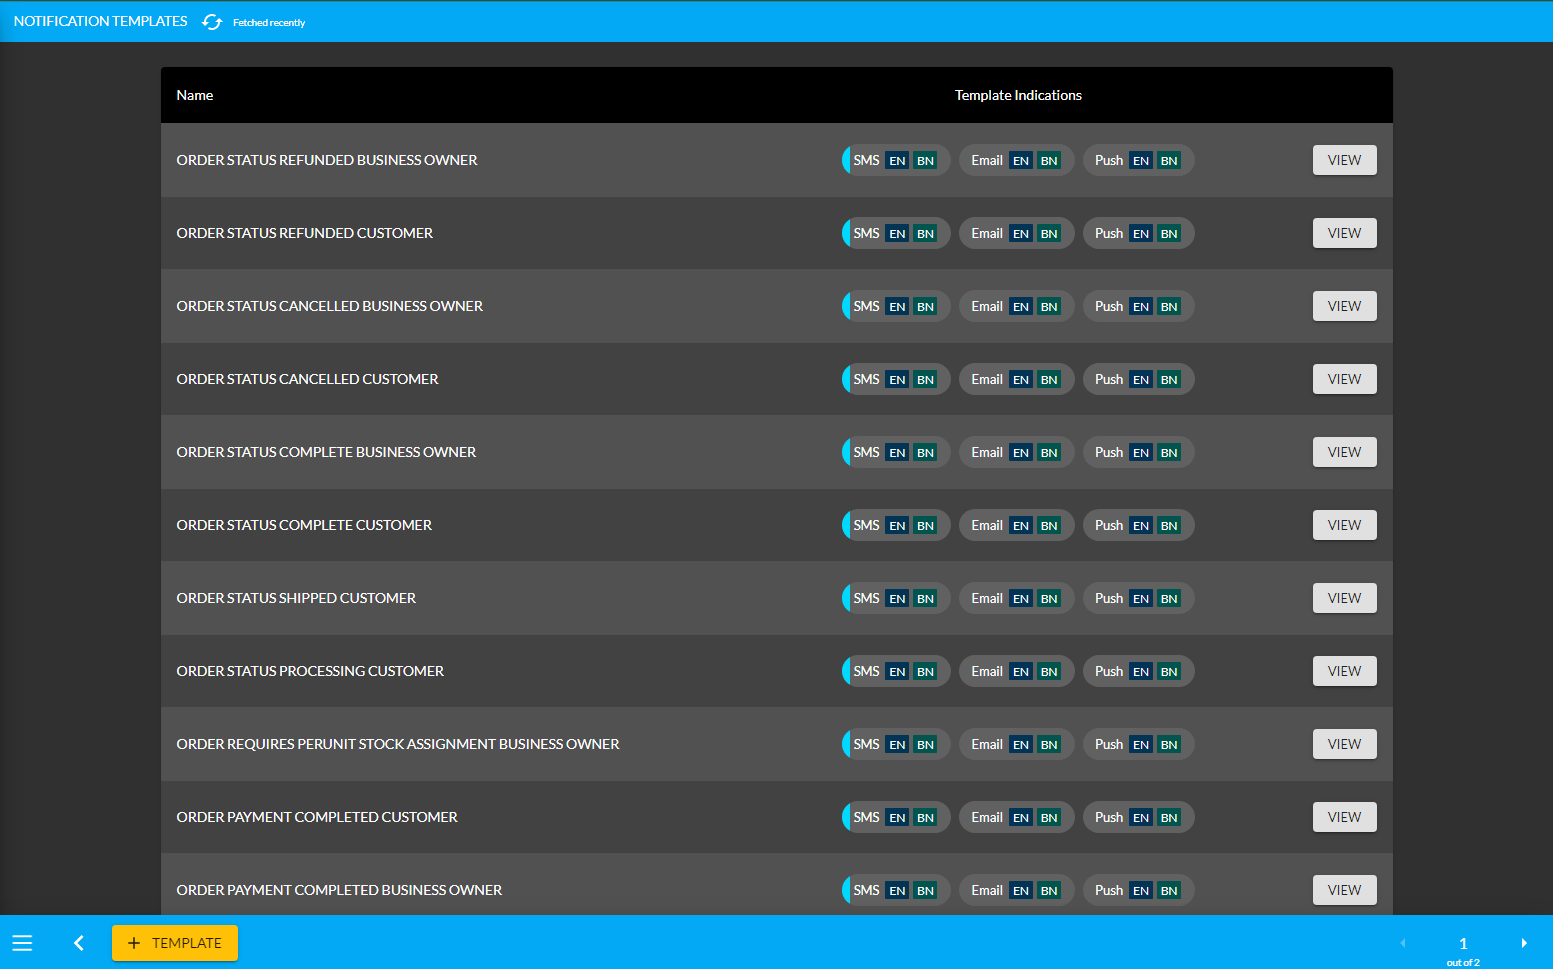
Image 1: Shop Owners can use built-in templates to send SMS, email, and push notifications to Customers.
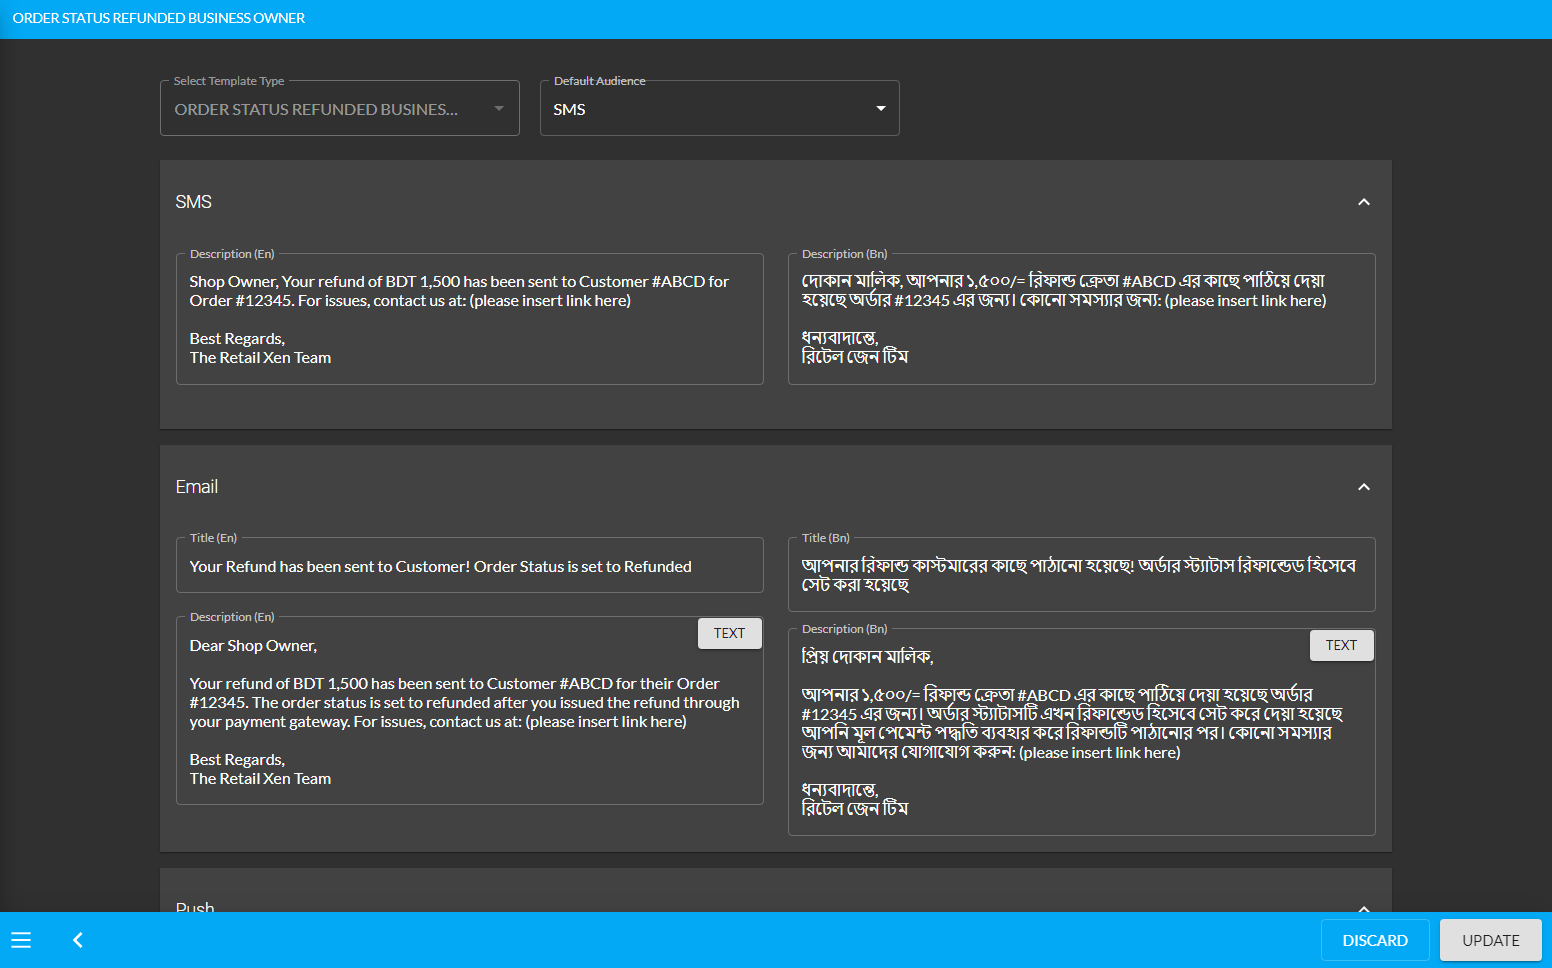
Image 2: Example of an SMS template that Shop Owner can modify and send to Customers.
The organized Order History comes with complete list of Orders for the Shop Owners’ convenience. If any Order is placed from The Website, it will be marked as WEBSITE and if any Order is placed from the Admin Panel by the Shop Owner for any Customer, it will be marked as ADMIN PANEL. This will allow Shop Owners to identify which Orders were placed by Customers from The Website and which Orders were placed on behalf of Customers by the Shop Owner.
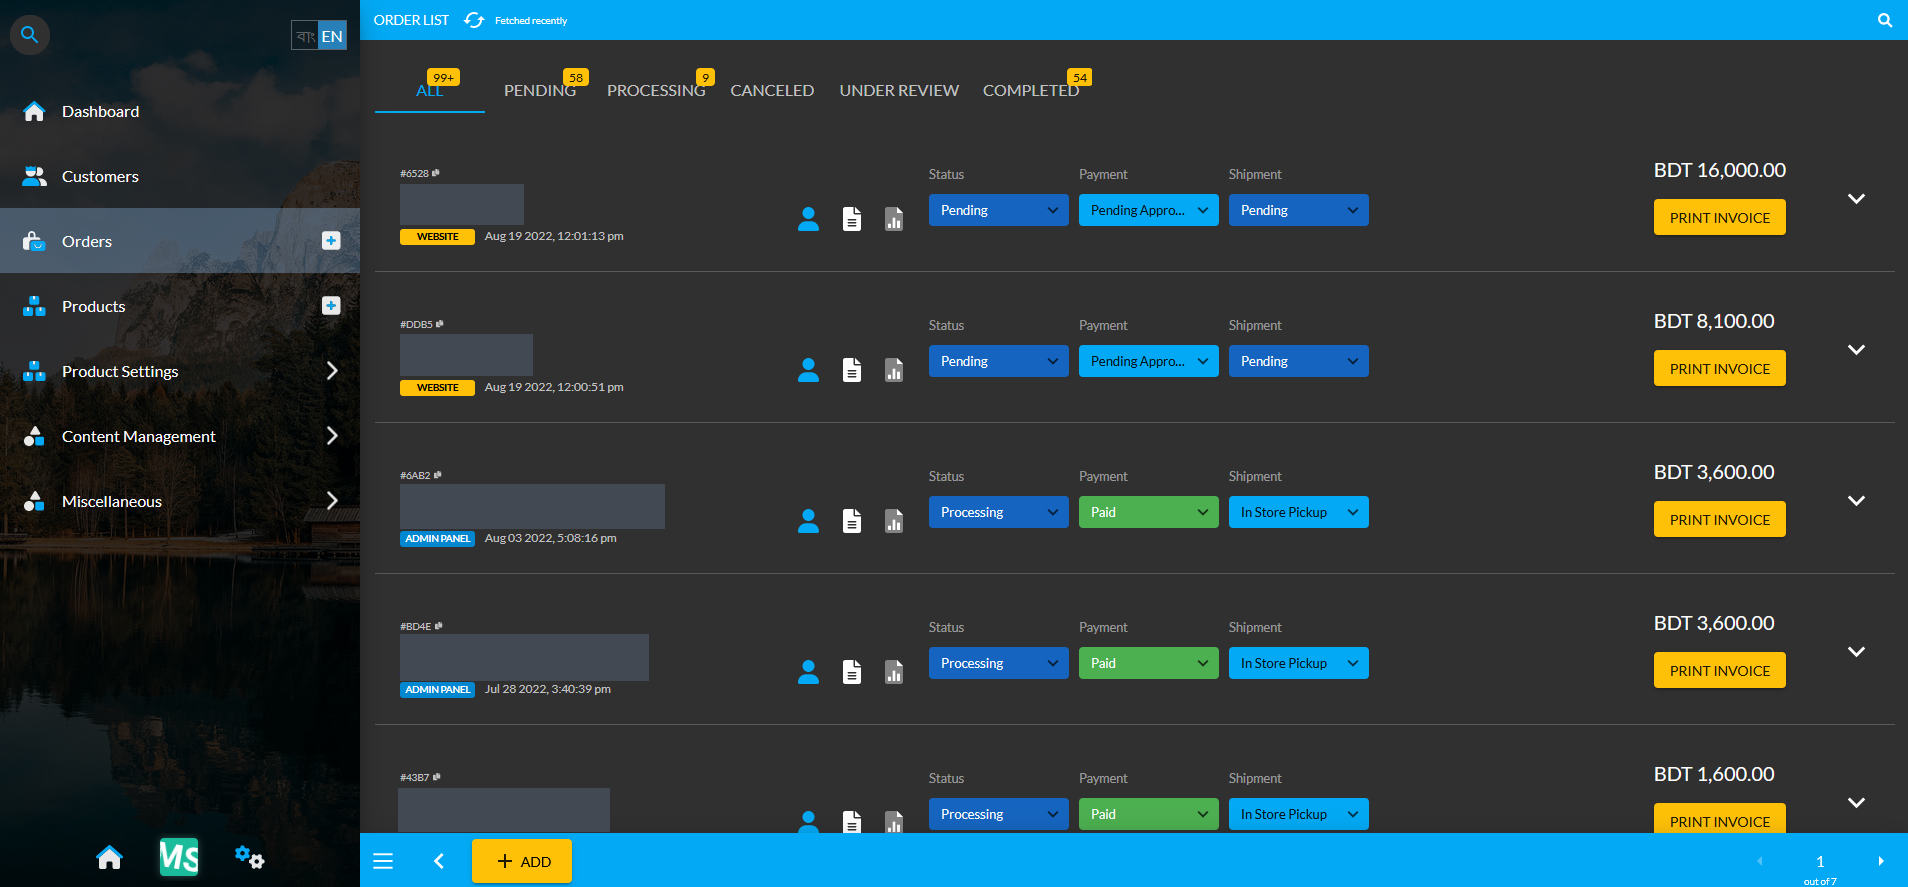
Image: Shop Owners can view the Order History with Orders placed from WEBSITE and ADMIN PANEL.
Invoices can be printed anytime from both new and old Orders. It will be beneficial for Shop Owners to retrieve old invoices anytime whenever needed to print out. Retail Xen supports three invoice printing formats. One of them is the cost machine printing format, also known as the Point of Sales (POS) format, and the other two are the normal A4 invoice printing format and the Letter invoice printing format.
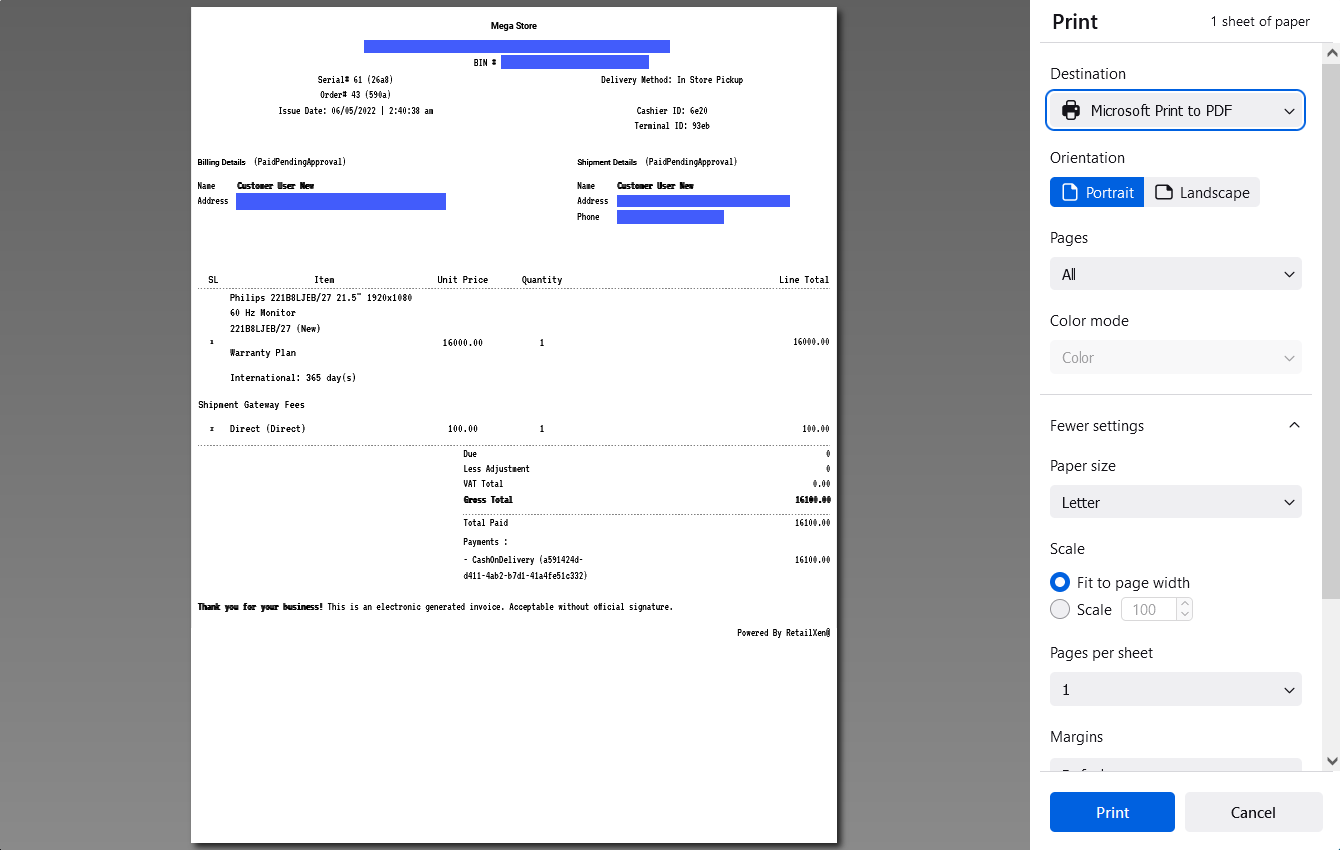
Image 1: Purchase invoices are generally set to A4 formats which Shop Owners can print out for Customers.
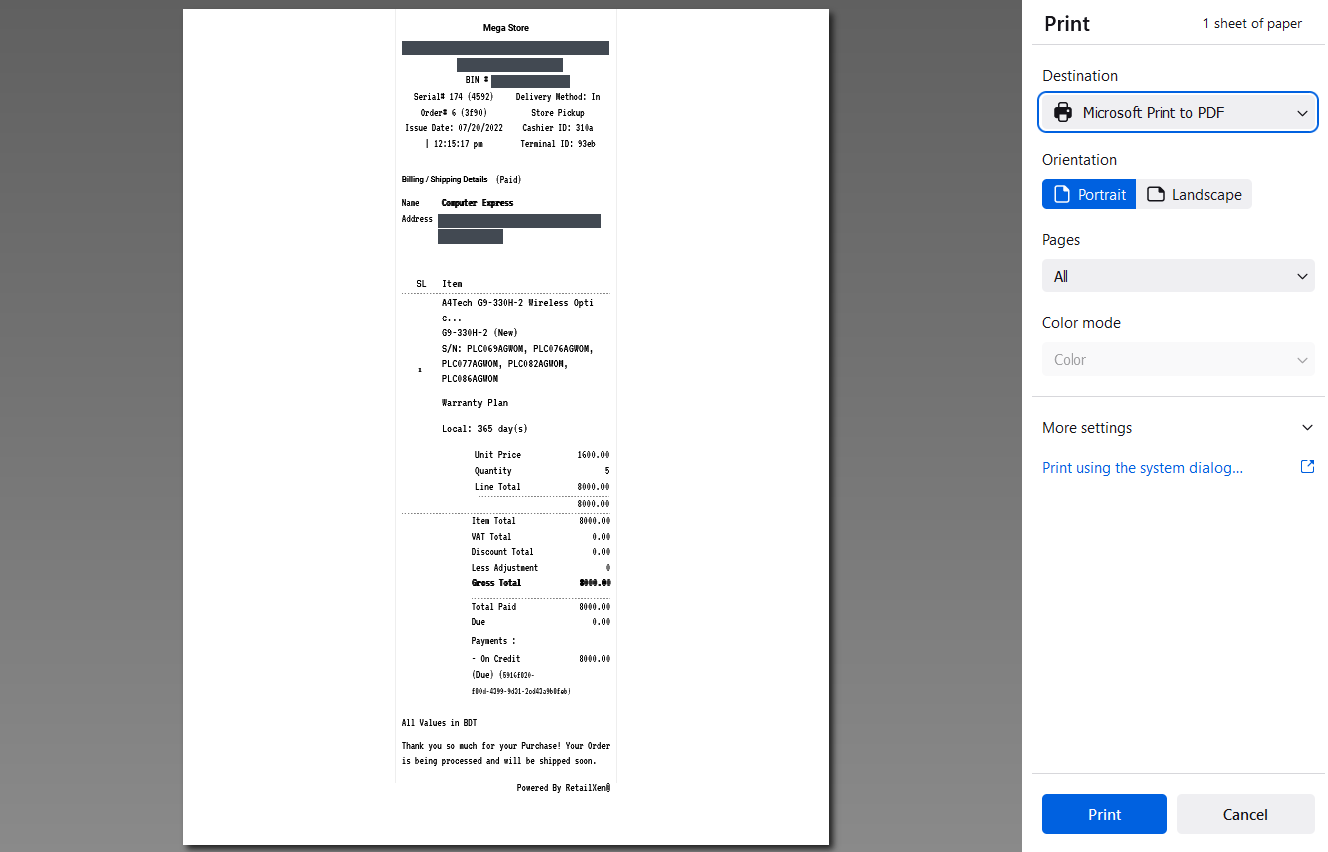
Image 1: Purchase invoices can also be printed in Point of Sales formats by Shop Owners for Customers.
RetailXen is a platform independent web-based commerce solution for purchase, sale, profit, loss, and client-wise ledger etc. It is the complete solution for shop management and for conducting large scale ecommerce purchase-sale activities within the Website. Having all the benefits combined, Retail Xen works as an ecommerce website and content management system with purchase sale software, warranty, and servicing features. This CMS also has a PC Build feature for Customer to build a PC or get quotation for different components of a PC.
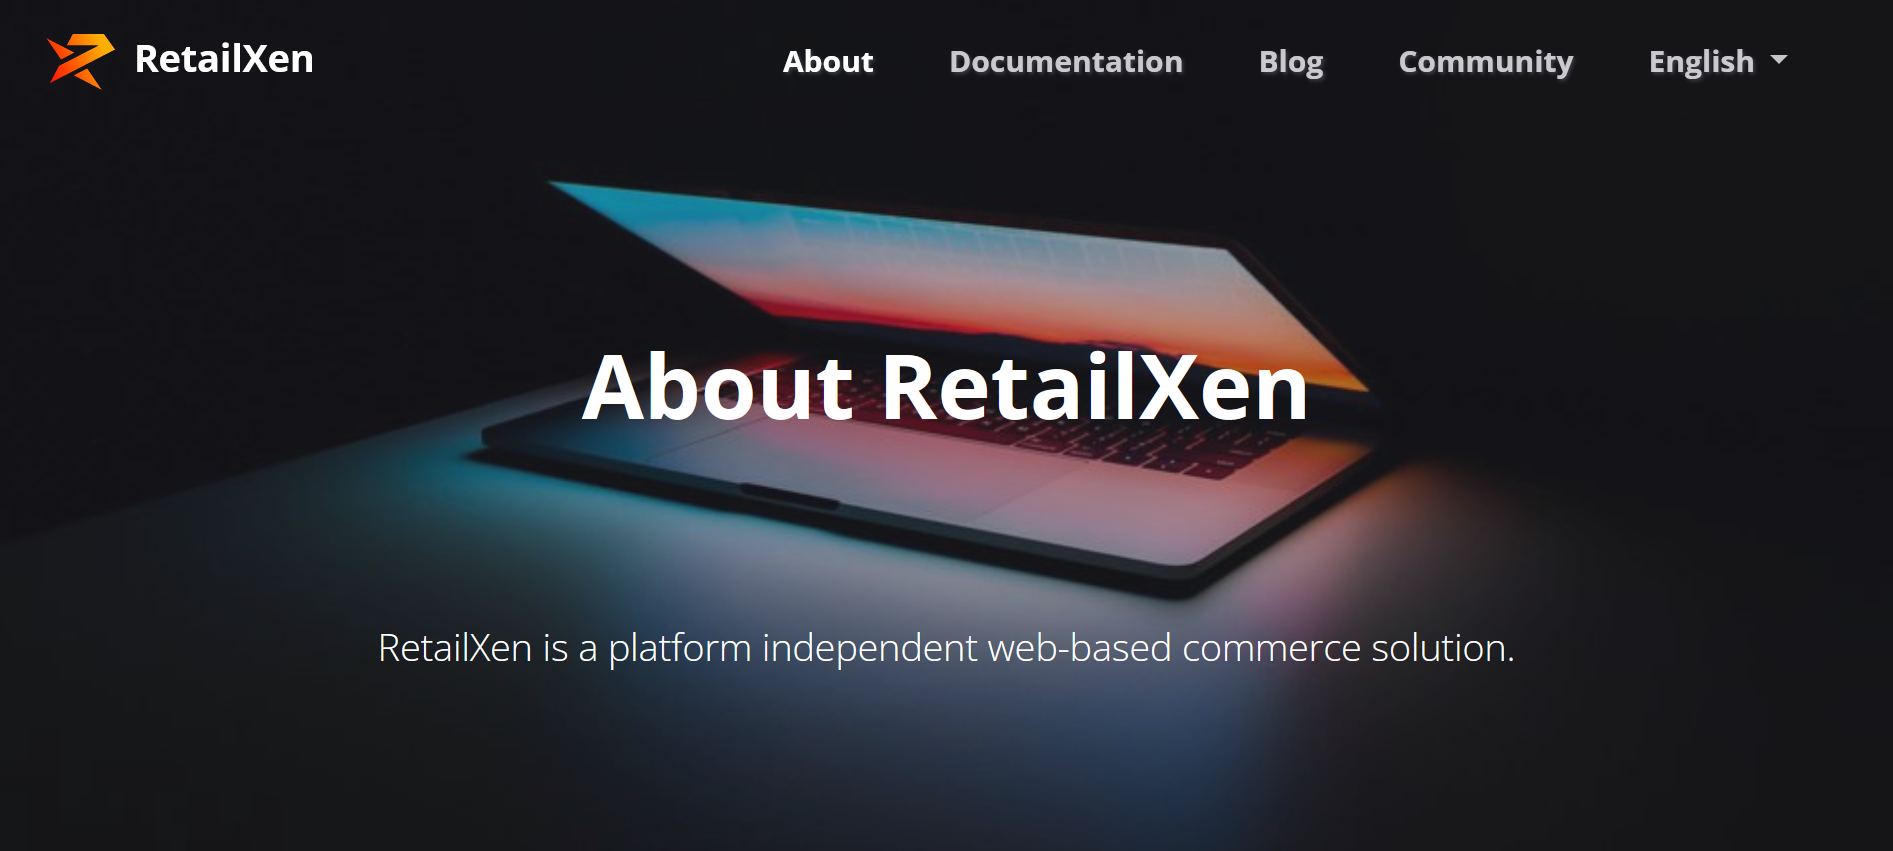
RetailXen provides complete retail solution for managing day-to-day business through the ecommerce software with intuitive user interface that comes with minimum monthly charges in different package plans. The Sellers will be able to manage both The Website and the Admin Panel to build their store, manage Orders, Customers, and sell Products.
The Website will allow Business Owners to sell their Products and Services online through the Shop powered by the Content Management System. Customers will be able to directly select Products and place Orders through The Website using different Shipping and Payment Options. Orders received will show instantly on Admin Panel.
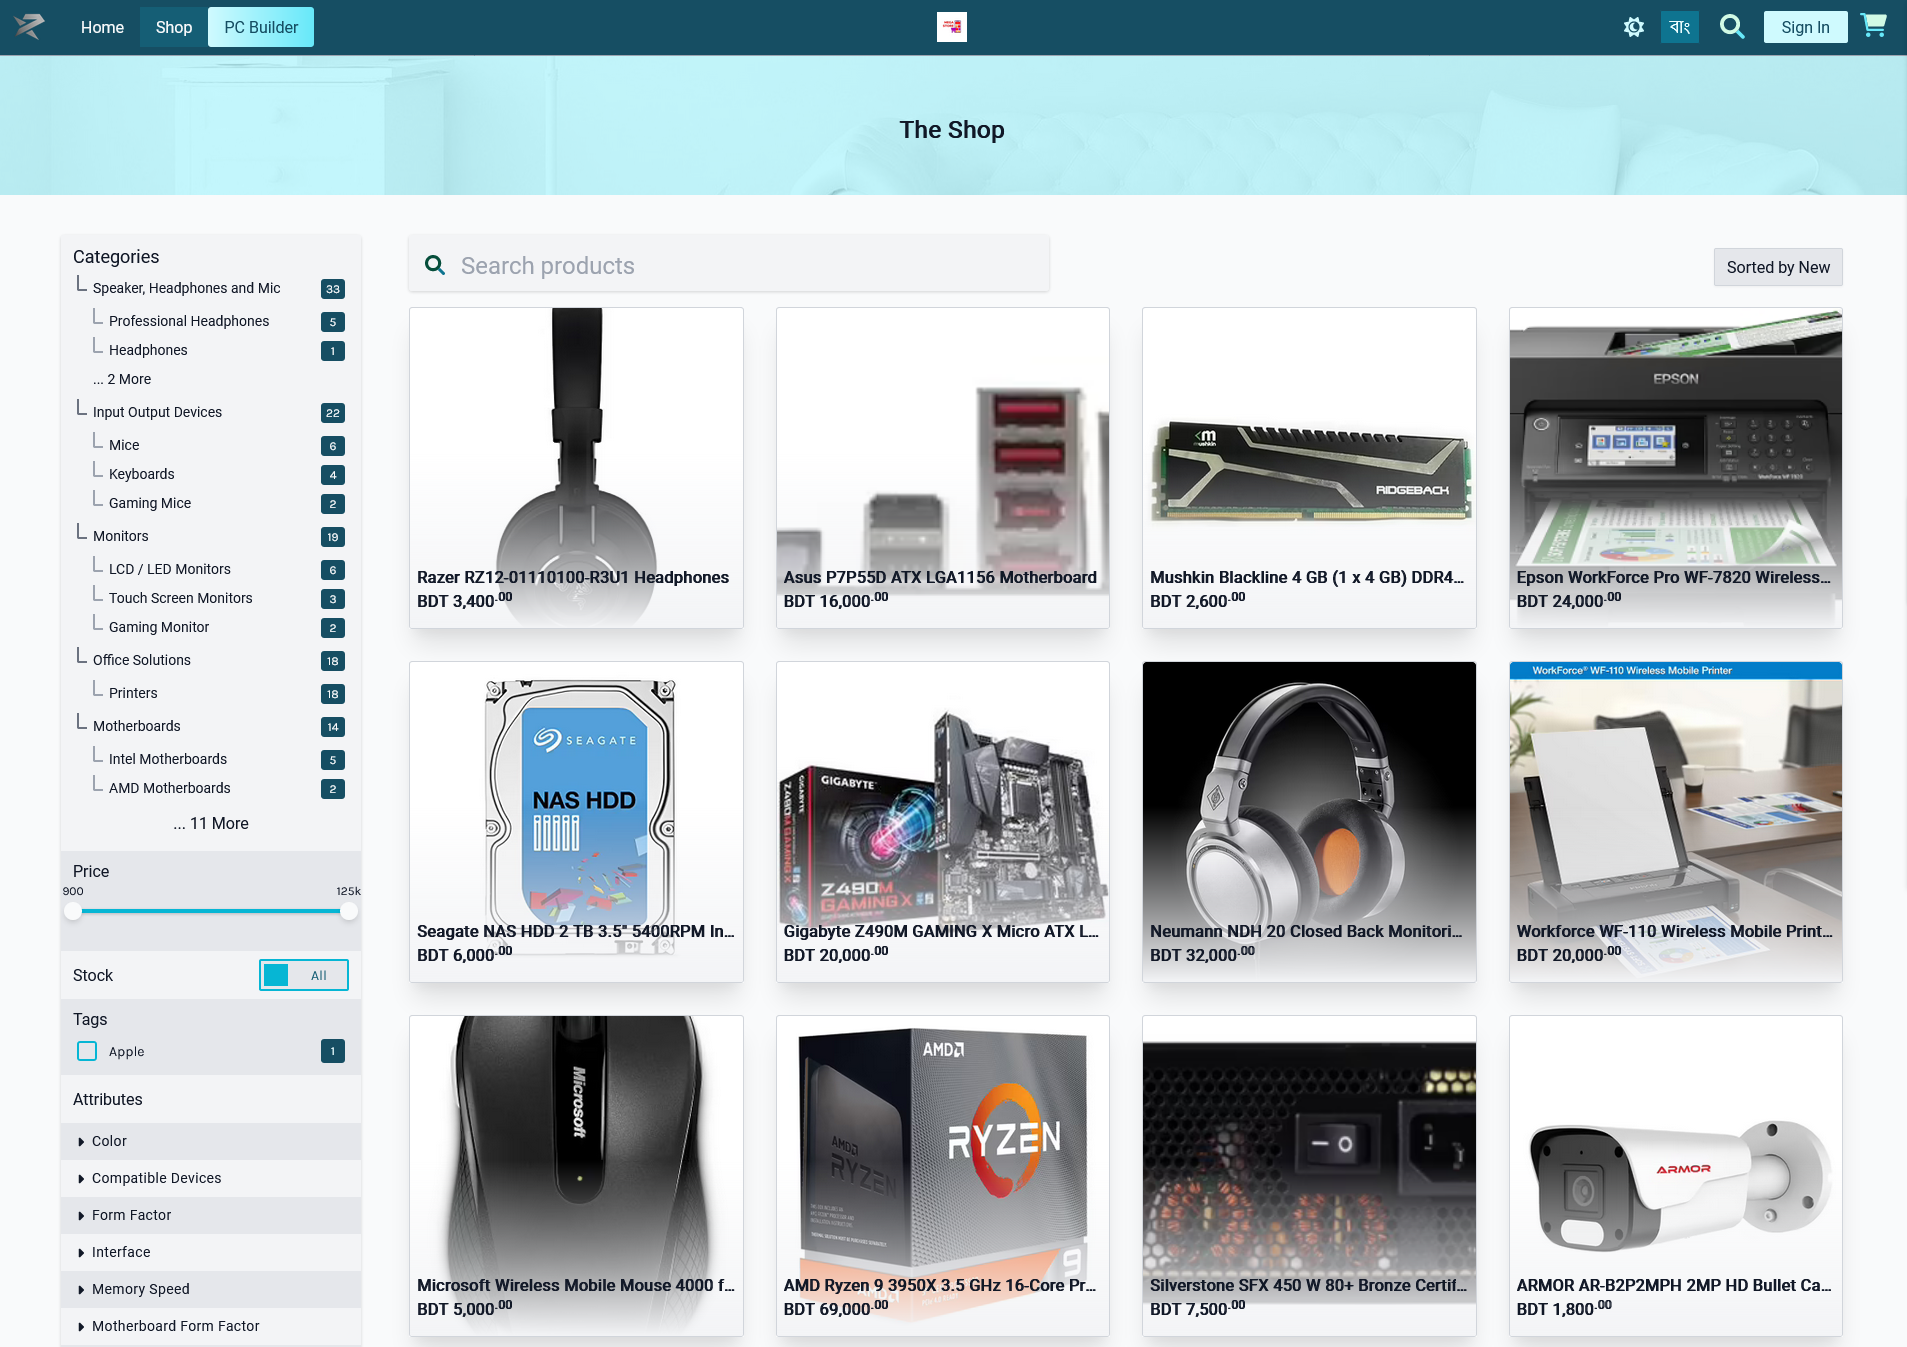
Conversely, the Admin Panel allows personalizing and managing the Shop, adding new Products, taking Orders, managing Customers, generating invoices, and maintaining ledger to start selling right away! The comprehensive Admin Panel will provide all the facilities of maintaining an online businesses with single to multiple Admins to manage The Website with various modules and administrative tools.
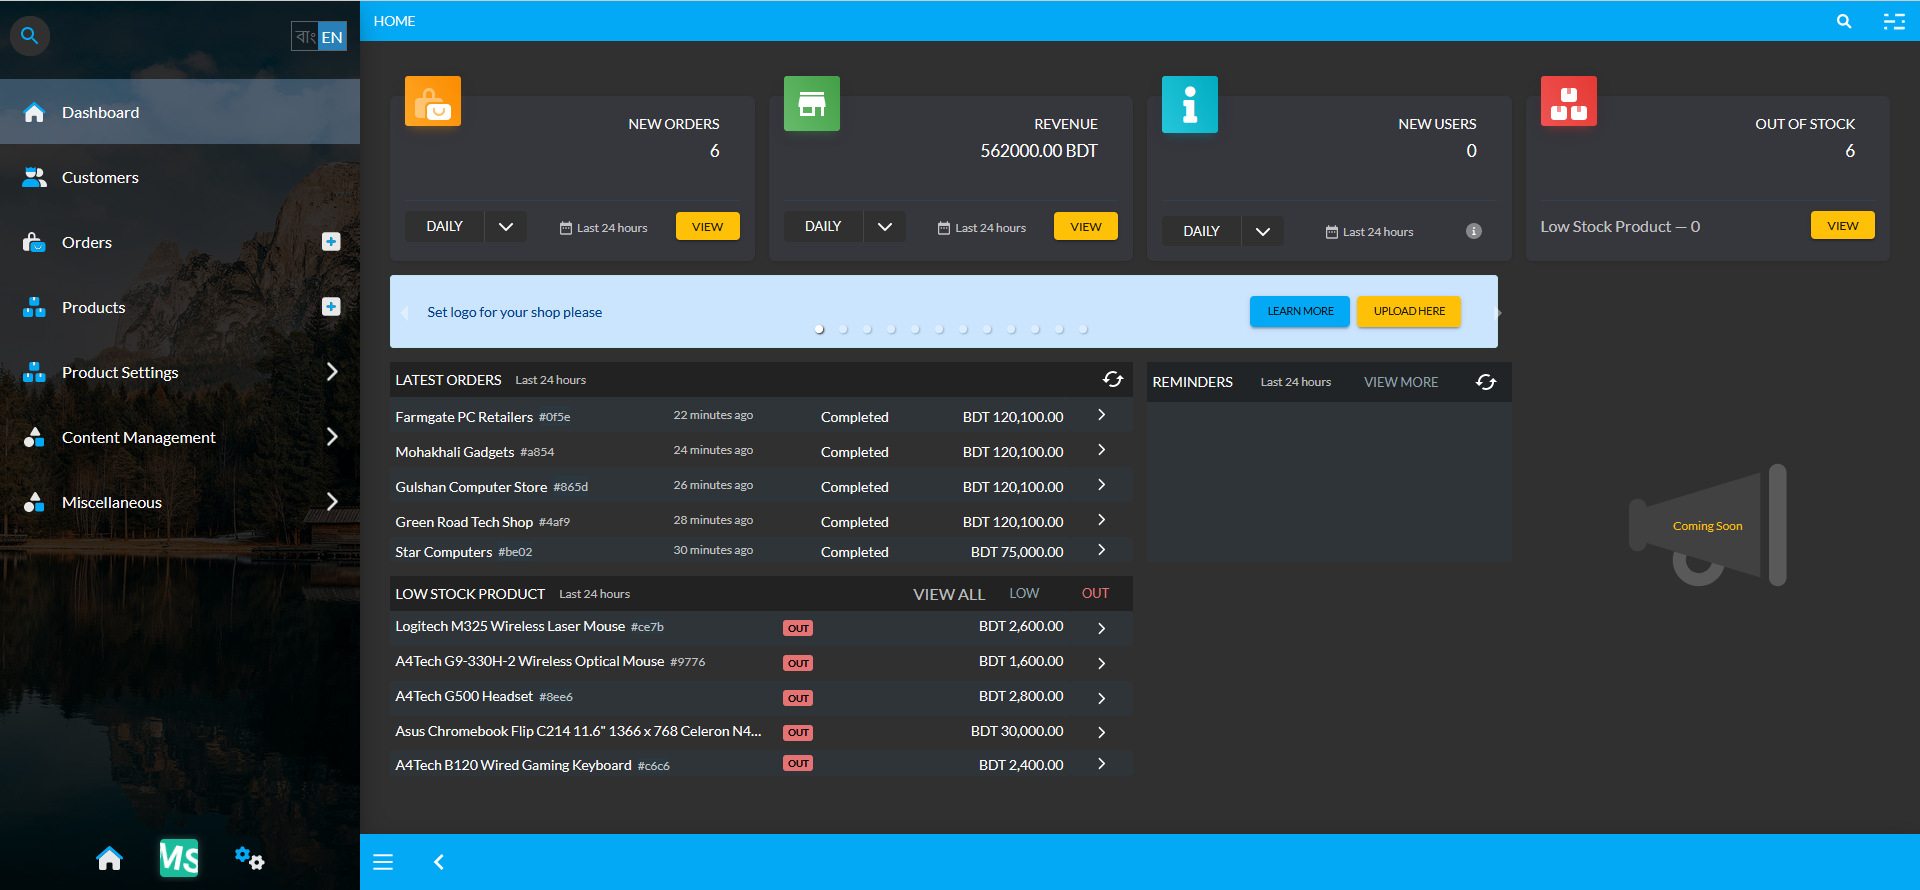
Providing all the benefits of a Website, RetailXen allows Business Owners or Sellers to build and manage their own online Shop and The Website for selling Product(s) to target Customers. Having an array of modules on the Admin Panel, the Seller can easily manager Orders, Products, Customers, Brands, Galleries, Pages, Widgets, and Menus etc.
Text can be bold, italic, or strikethrough. Links should be blue with no underlines (unless hovered over).
There should be whitespace between paragraphs. There should be whitespace between paragraphs. There should be whitespace between paragraphs. There should be whitespace between paragraphs.
There should be whitespace between paragraphs. There should be whitespace between paragraphs. There should be whitespace between paragraphs. There should be whitespace between paragraphs.
There should be no margin above this first sentence.
Blockquotes should be a lighter gray with a border along the left side in the secondary color.
There should be no margin below this final sentence.
This is a normal paragraph following a header. Bacon ipsum dolor sit amet t-bone doner shank drumstick, pork belly porchetta chuck sausage brisket ham hock rump pig. Chuck kielbasa leberkas, pork bresaola ham hock filet mignon cow shoulder short ribs biltong. Bacon ipsum dolor sit amet t-bone doner shank drumstick, pork belly porchetta chuck sausage brisket ham hock rump pig. Chuck kielbasa leberkas, pork bresaola ham hock filet mignon cow shoulder short ribs biltong. Bacon ipsum dolor sit amet t-bone doner shank drumstick, pork belly porchetta chuck sausage brisket ham hock rump pig. Chuck kielbasa leberkas, pork bresaola ham hock filet mignon cow shoulder short ribs biltong.
Bacon ipsum dolor sit amet t-bone doner shank drumstick, pork belly porchetta chuck sausage brisket ham hock rump pig. Chuck kielbasa leberkas, pork bresaola ham hock filet mignon cow shoulder short ribs biltong.
On big screens, paragraphs and headings should not take up the full container width, but we want tables, code blocks and similar to take the full width.
Lorem markdownum tuta hospes stabat; idem saxum facit quaterque repetito occumbere, oves novem gestit haerebat frena; qui. Respicit recurvam erat: pignora hinc reppulit nos aut, aptos, ipsa.
Meae optatos passa est Epiros utiliter Talibus niveis, hoc lata, edidit. Dixi ad aestum.
This is a blockquote following a header. Bacon ipsum dolor sit amet t-bone doner shank drumstick, pork belly porchetta chuck sausage brisket ham hock rump pig. Chuck kielbasa leberkas, pork bresaola ham hock filet mignon cow shoulder short ribs biltong.
This is a code block following a header.
| What | Follows |
|---|---|
| A table | A header |
| A table | A header |
| A table | A header |
There’s a horizontal rule above and below this.
Here is an unordered list:
And an ordered list:
And an unordered task list:
And a “mixed” task list:
And a nested list:
Definition lists can be used with Markdown syntax. Definition terms are bold.
Tables should have bold headings and alternating shaded rows.
| Artist | Album | Year |
|---|---|---|
| Michael Jackson | Thriller | 1982 |
| Prince | Purple Rain | 1984 |
| Beastie Boys | License to Ill | 1986 |
If a table is too wide, it should scroll horizontally.
| Artist | Album | Year | Label | Awards | Songs |
|---|---|---|---|---|---|
| Michael Jackson | Thriller | 1982 | Epic Records | Grammy Award for Album of the Year, American Music Award for Favorite Pop/Rock Album, American Music Award for Favorite Soul/R&B Album, Brit Award for Best Selling Album, Grammy Award for Best Engineered Album, Non-Classical | Wanna Be Startin’ Somethin’, Baby Be Mine, The Girl Is Mine, Thriller, Beat It, Billie Jean, Human Nature, P.Y.T. (Pretty Young Thing), The Lady in My Life |
| Prince | Purple Rain | 1984 | Warner Brothers Records | Grammy Award for Best Score Soundtrack for Visual Media, American Music Award for Favorite Pop/Rock Album, American Music Award for Favorite Soul/R&B Album, Brit Award for Best Soundtrack/Cast Recording, Grammy Award for Best Rock Performance by a Duo or Group with Vocal | Let’s Go Crazy, Take Me With U, The Beautiful Ones, Computer Blue, Darling Nikki, When Doves Cry, I Would Die 4 U, Baby I’m a Star, Purple Rain |
| Beastie Boys | License to Ill | 1986 | Mercury Records | noawardsbutthistablecelliswide | Rhymin & Stealin, The New Style, She’s Crafty, Posse in Effect, Slow Ride, Girls, (You Gotta) Fight for Your Right, No Sleep Till Brooklyn, Paul Revere, Hold It Now, Hit It, Brass Monkey, Slow and Low, Time to Get Ill |
Code snippets like var foo = "bar"; can be shown inline.
Also, this should vertically align with thisand this.
Code can also be shown in a block element.
foo := "bar";
bar := "foo";
Code can also use syntax highlighting.
func main() {
  input := `var foo = "bar";`

  lexer := lexers.Get("javascript")
  iterator, _ := lexer.Tokenise(nil, input)
  style := styles.Get("github")
  formatter := html.New(html.WithLineNumbers())

  var buff bytes.Buffer
  formatter.Format(&buff, style, iterator)

  fmt.Println(buff.String())
}
Long, single-line code blocks should not wrap. They should horizontally scroll if they are too long. This line should be long enough to demonstrate this.
Inline code inside table cells should still be distinguishable.
| Language | Code |
|---|---|
| Javascript | var foo = "bar"; |
| Ruby | foo = "bar"{ |
Small images should be shown at their actual size.
Large images should always scale down and fit in the content container.
Add some sections here to see how the ToC looks like. Bacon ipsum dolor sit amet t-bone doner shank drumstick, pork belly porchetta chuck sausage brisket ham hock rump pig. Chuck kielbasa leberkas, pork bresaola ham hock filet mignon cow shoulder short ribs biltong.
Bacon ipsum dolor sit amet t-bone doner shank drumstick, pork belly porchetta chuck sausage brisket ham hock rump pig. Chuck kielbasa leberkas, pork bresaola ham hock filet mignon cow shoulder short ribs biltong.
Bacon ipsum dolor sit amet t-bone doner shank drumstick, pork belly porchetta chuck sausage brisket ham hock rump pig. Chuck kielbasa leberkas, pork bresaola ham hock filet mignon cow shoulder short ribs biltong.
Bacon ipsum dolor sit amet t-bone doner shank drumstick, pork belly porchetta chuck sausage brisket ham hock rump pig. Chuck kielbasa leberkas, pork bresaola ham hock filet mignon cow shoulder short ribs biltong.
Bacon ipsum dolor sit amet t-bone doner shank drumstick, pork belly porchetta chuck sausage brisket ham hock rump pig. Chuck kielbasa leberkas, pork bresaola ham hock filet mignon cow shoulder short ribs biltong.
Bacon ipsum dolor sit amet t-bone doner shank drumstick, pork belly porchetta chuck sausage brisket ham hock rump pig. Chuck kielbasa leberkas, pork bresaola ham hock filet mignon cow shoulder short ribs biltong.
Bacon ipsum dolor sit amet t-bone doner shank drumstick, pork belly porchetta chuck sausage brisket ham hock rump pig. Chuck kielbasa leberkas, pork bresaola ham hock filet mignon cow shoulder short ribs biltong.
Bacon ipsum dolor sit amet t-bone doner shank drumstick, pork belly porchetta chuck sausage brisket ham hock rump pig. Chuck kielbasa leberkas, pork bresaola ham hock filet mignon cow shoulder short ribs biltong.
This is the final element on the page and there should be no margin below this.