Documentation
Welcome to Retail Xen! We are ready to help you start building your business and reach out to more Customers across the web. We are here to provide you the best ecommerce solutions to help you get set up for success.
This documentation is structured with how-to guidelines, technical references, explanations, and examples with screenshots. We hope that, this documentation will serve the Shop Owners better, because while using the CMS software they will find the right kind of guidelines here that will serve their needs to understand the modules and their operations.
Retail Xen provides complete retail solution for managing day-to-day business through the ecommerce software with intuitive user interface that comes with minimum monthly charges in different package plans. We have The Website and the Admin Panel. The Website allows businesses to sell their Products and Services online through the Shop powered by the Content Management System. With The Website, you can get your online business or store up and running.
On the other hand, the Admin Panel allows personalizing and managing the online Shop, add new Products, take Orders, manage Customers, generate invoices, maintain ledger, and start selling right away! The comprehensive admin panel will provide all the facilities of maintaining an online businesses easily with single to multiple admins to manage The Website with various modules and administrative tools.
This is a help documentation for the admin panel. In this documentation, the Shop Owners will learn about how to operate the Admin Panel by reading through the materials as end-users with guidelines to follow.
1 - Introduction and Admin Panel
Introduction to our Retail Xen Website Content Management
This page introduces you with the basics of our Content Management System.
Retail Xen Content Management System
Thank you for purchasing our e-commerce software. This Content Management System will allow Shop Owners or Content Managers to modify their Website templates with minimum monthly charges in different package plans. The system is specifically designed to get your online business or store up and running and aims to be a positive solution to your e-commerce needs. The CMS allows to personalize the Store, add Products, take Orders, manage Customers, generate invoices, maintain ledger, and start selling right away!
Please read through the documentation to get used to various sections involved with managing your online store using the CMS. This web-based management tool with a comprehensive admin panel will provide all the facilities of maintaining an online businesses easily. Administrative tools intended to help manage the commerce Website are available on the Tenant Admin Panel which also grants permission to create single to multiple admins.
Features of Retail Xen
The salient features of the Content Management System also includes creating and editing the Website interface and handling the Website’s maintenance with ease. The built in admin tools with their various levels of access are there for creating, editing, and publishing contents with modules. The Content Management System is run from our own servers to protect the data and prevent unauthorized access to sensitive information.
1.1 - Overview
Retail Xen CMS will give Shop Owners edge over the competition from other online businesses. It will let them create and manage Website Pages on the Shop easily.
Admin Panel Modules
Use this Content Management System to create, modify, and remove contents from the Website without needing to know the Hypertext Markup Language (HTML). Utilize the straightforward admin panel with built-in editors and modules for creating, reviewing, and publishing web page contents. The main modules consist of the Dashboard, Customers, Orders, Products, Product Settings, Content Management, and Miscellaneous.
Shop Management
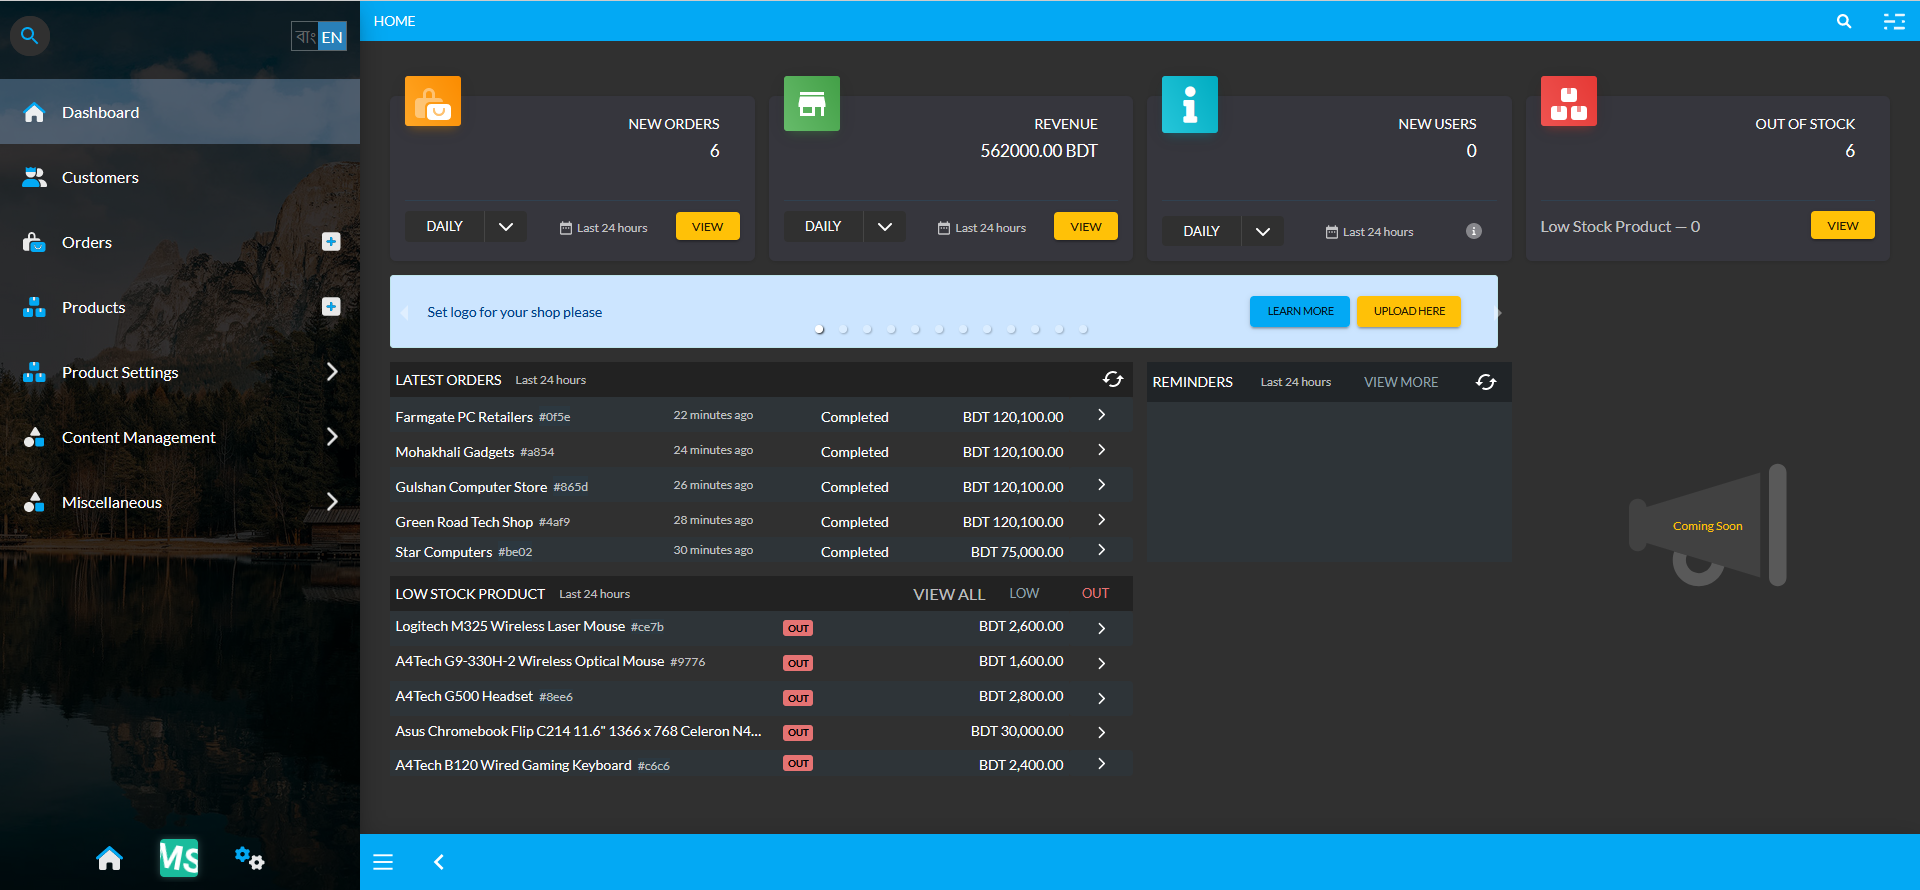
The Shop Owner can efficiently use the CMS to manage contents, add Payment Methods, Shipping Gateways, or create Products, Customers, Orders, Brands, Galleries, Tags, and Warranty Plans. Besides, they can view overall statistics of Orders, revenues, new users, or low stock Products etc. Upon successfully registering and creating various tenant users, the Shop Owner can edit and manage their shop fast and efficiently with the CMS.

Image: Shop Owners can edit and manage their shop fast and efficiently with the Retail Xen CMS.
1.2 - Browser Requirements
This Content Management System is compatible with certain browsers but has limited compatibility with other browsers.
This Content Management System have been designed to be compatible with the following browsers:
- Latest version of Chrome, Edge, Firefox (All Platforms)
- Latest version of Safari (Apple Devices)
- Internet Explorer, Safari (Windows) will not work
- Other browsers may work but not recommended
1.3 - Creating User Account
Create a New User Account in our Content Management System to handle your daily business tasks easily and efficiently.
Purchase Retail Xen™ Package Plans
Business Owners can purchase from four different Package Plans to setup their shop through the Retail Xen Content Management System. The current values of the package plans may change.
| Package Names | Package Description |
|---|
| Trial Package | Include 30 days Validity with 1 Admin, 1 Branch, and 1 Product for Free (Without any Fee). |
| Silver Package | Include 30 days Validity with 1 Admin, 2 Branches, and 50 Products for 2,500 BDT Monthly Fee. |
| Gold Package | Include 30 days Validity with 2 Admins, 2 Branches, and 100 Products for 5,000 BDT Monthly Fee. |
| Platinum Package | Include 30 days Validity with 10 Admins, 5 Branches, and 500 Products for 10,000 BDT Monthly Fee. |
Register on Retail Xen CMS
Registration for the Content Management System can be done through this: Retail Xen Register Link. Clicking on this Registration Link will redirect to the following page as shown in the example screenshot here.
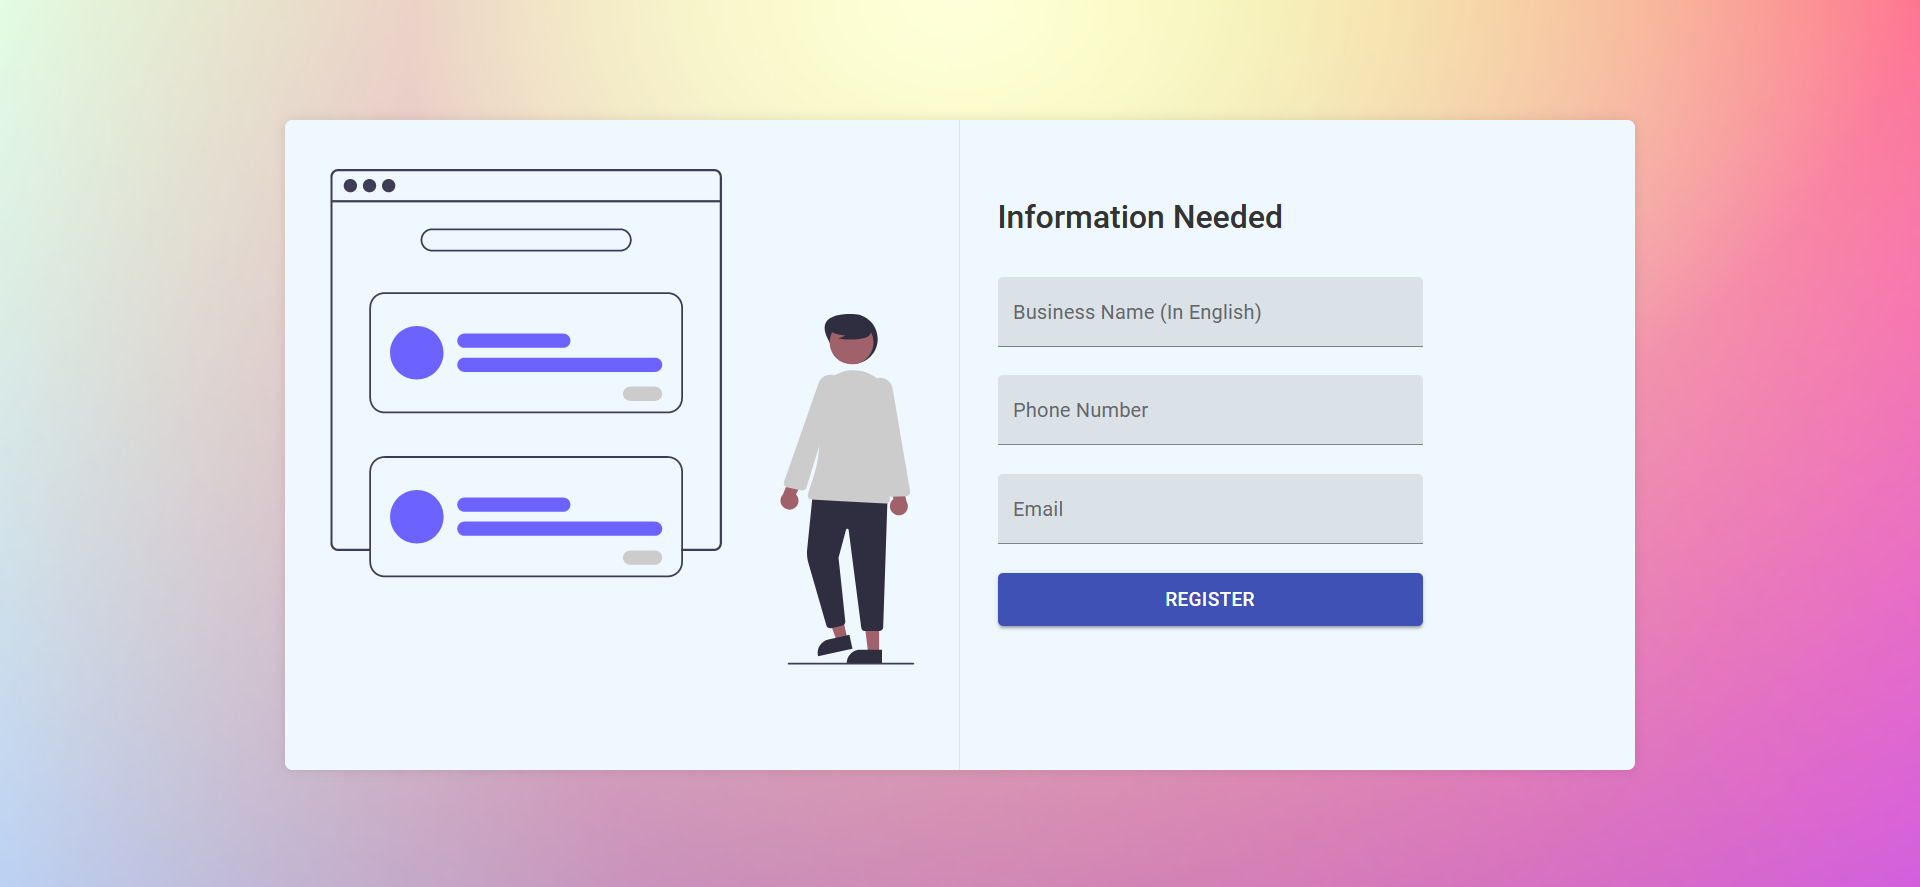
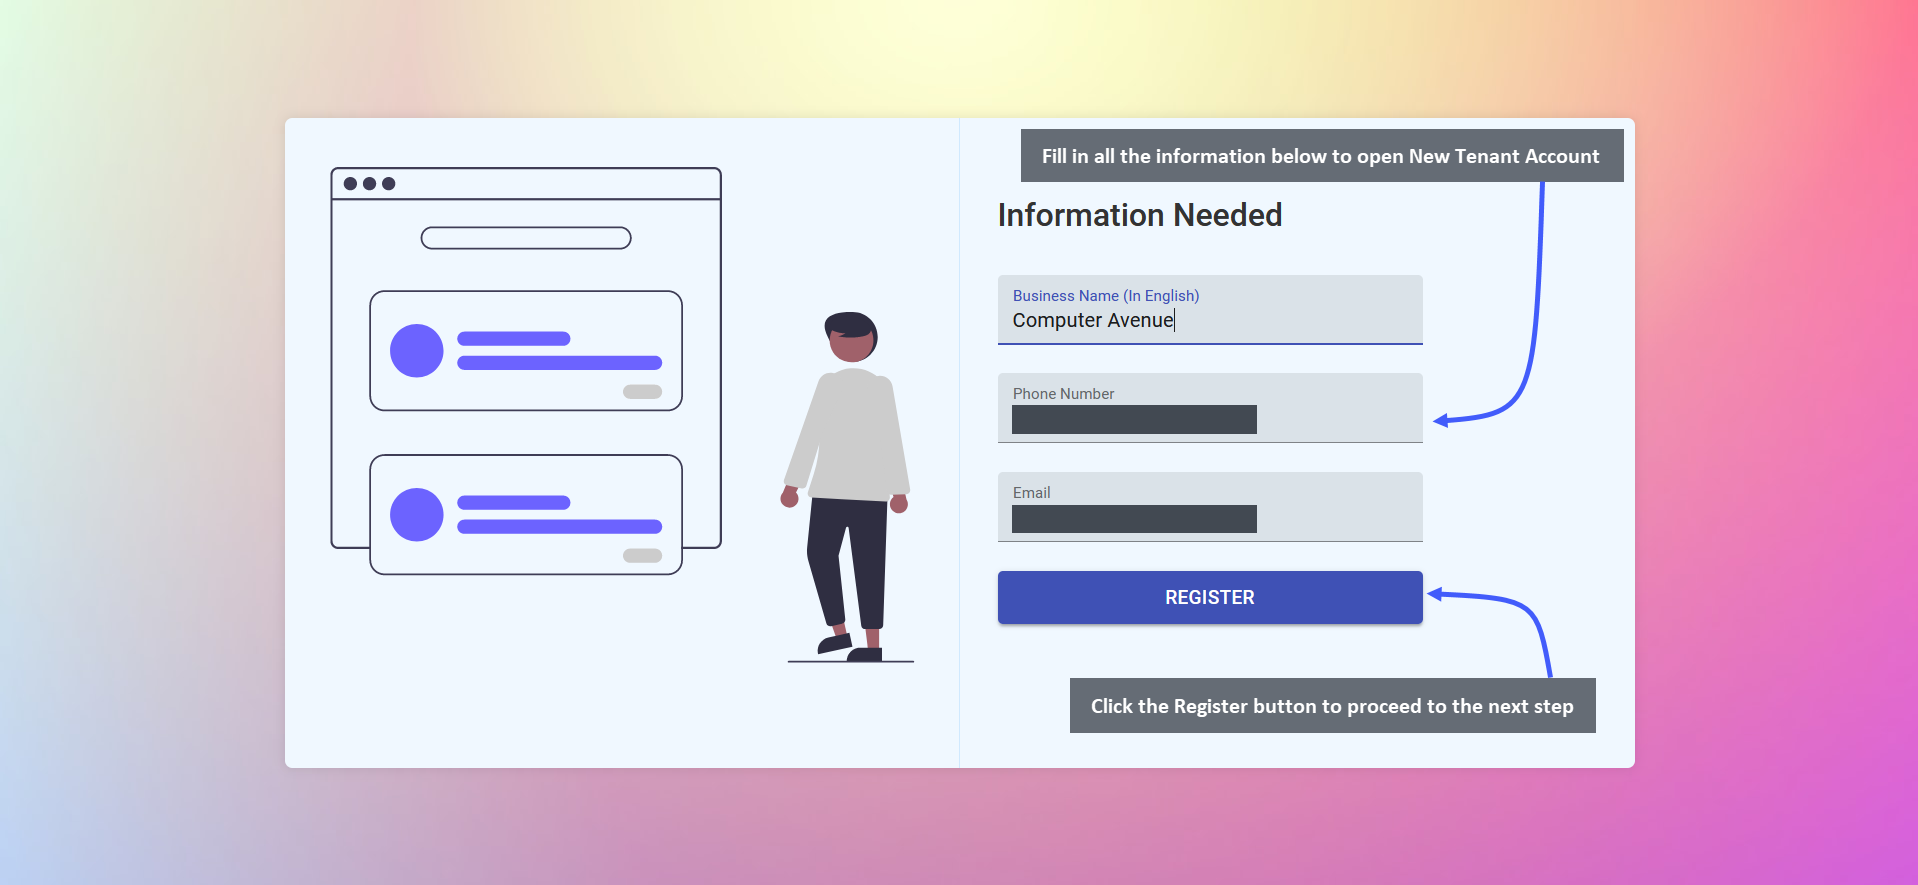
The New User Account needs to be opened with few information including Business Name (In English), Phone Number, and Email. Fill them in and click on the Register button to proceed to the next step as shown below.
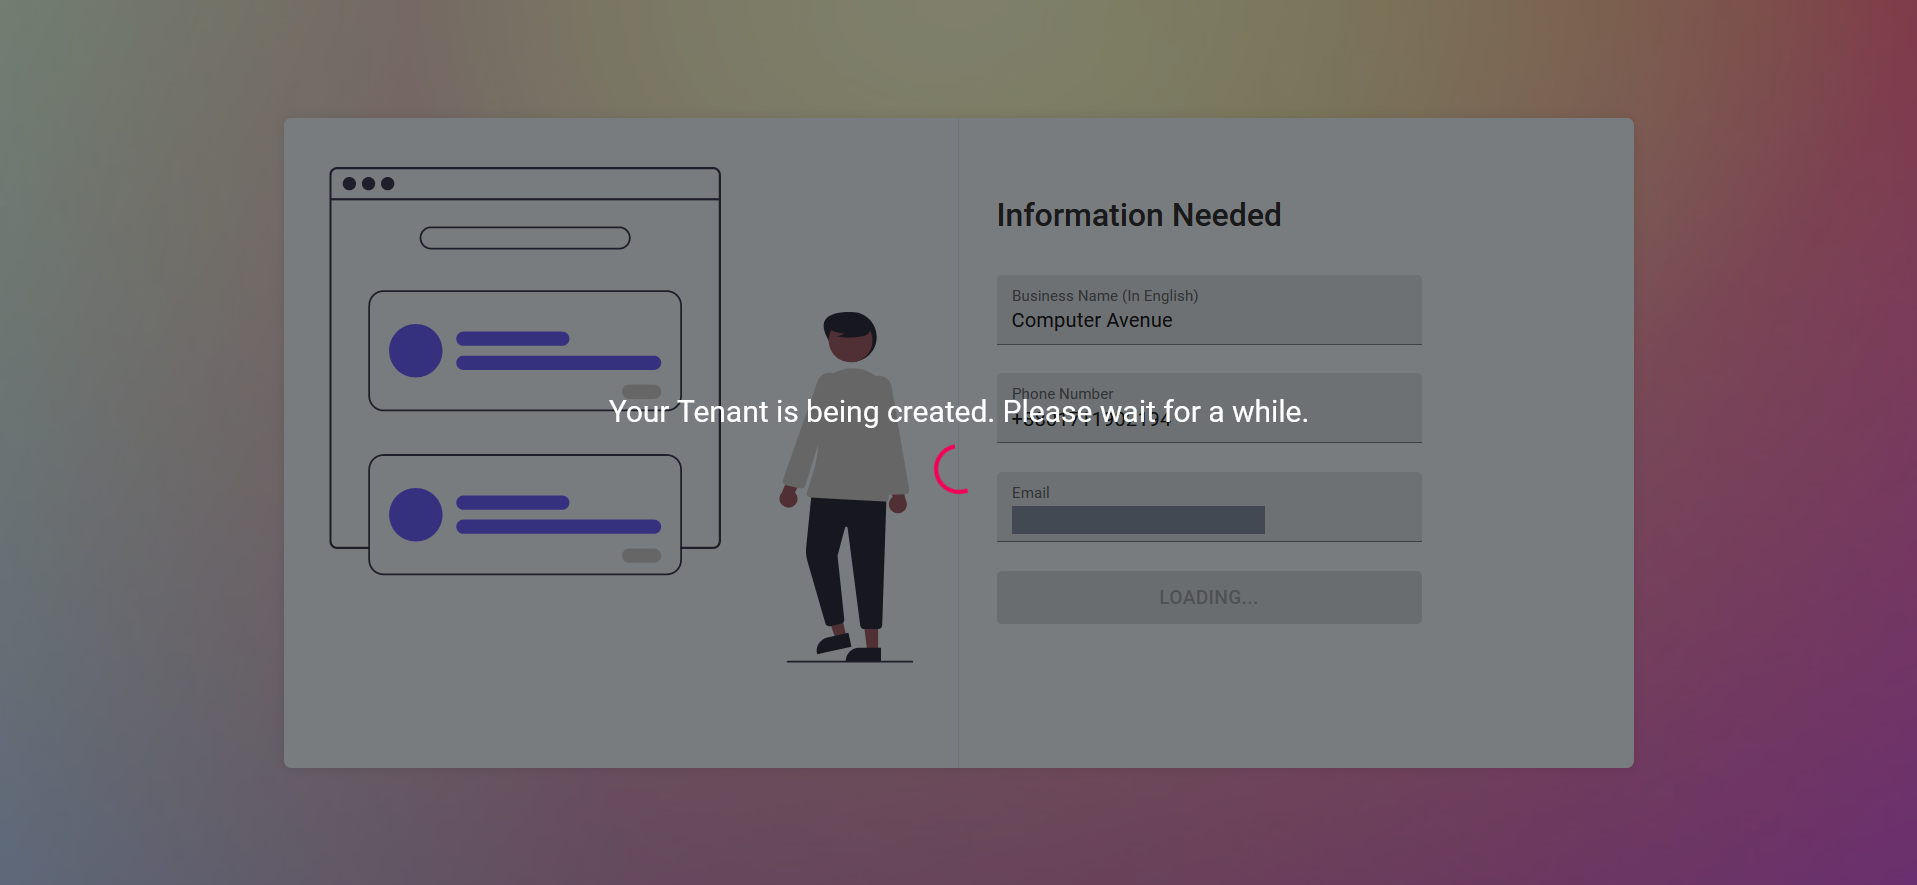
Clicking on the Register button will display that the Tenant is being setup as shown in the screenshot below.
Signing Up with a New Phone Number
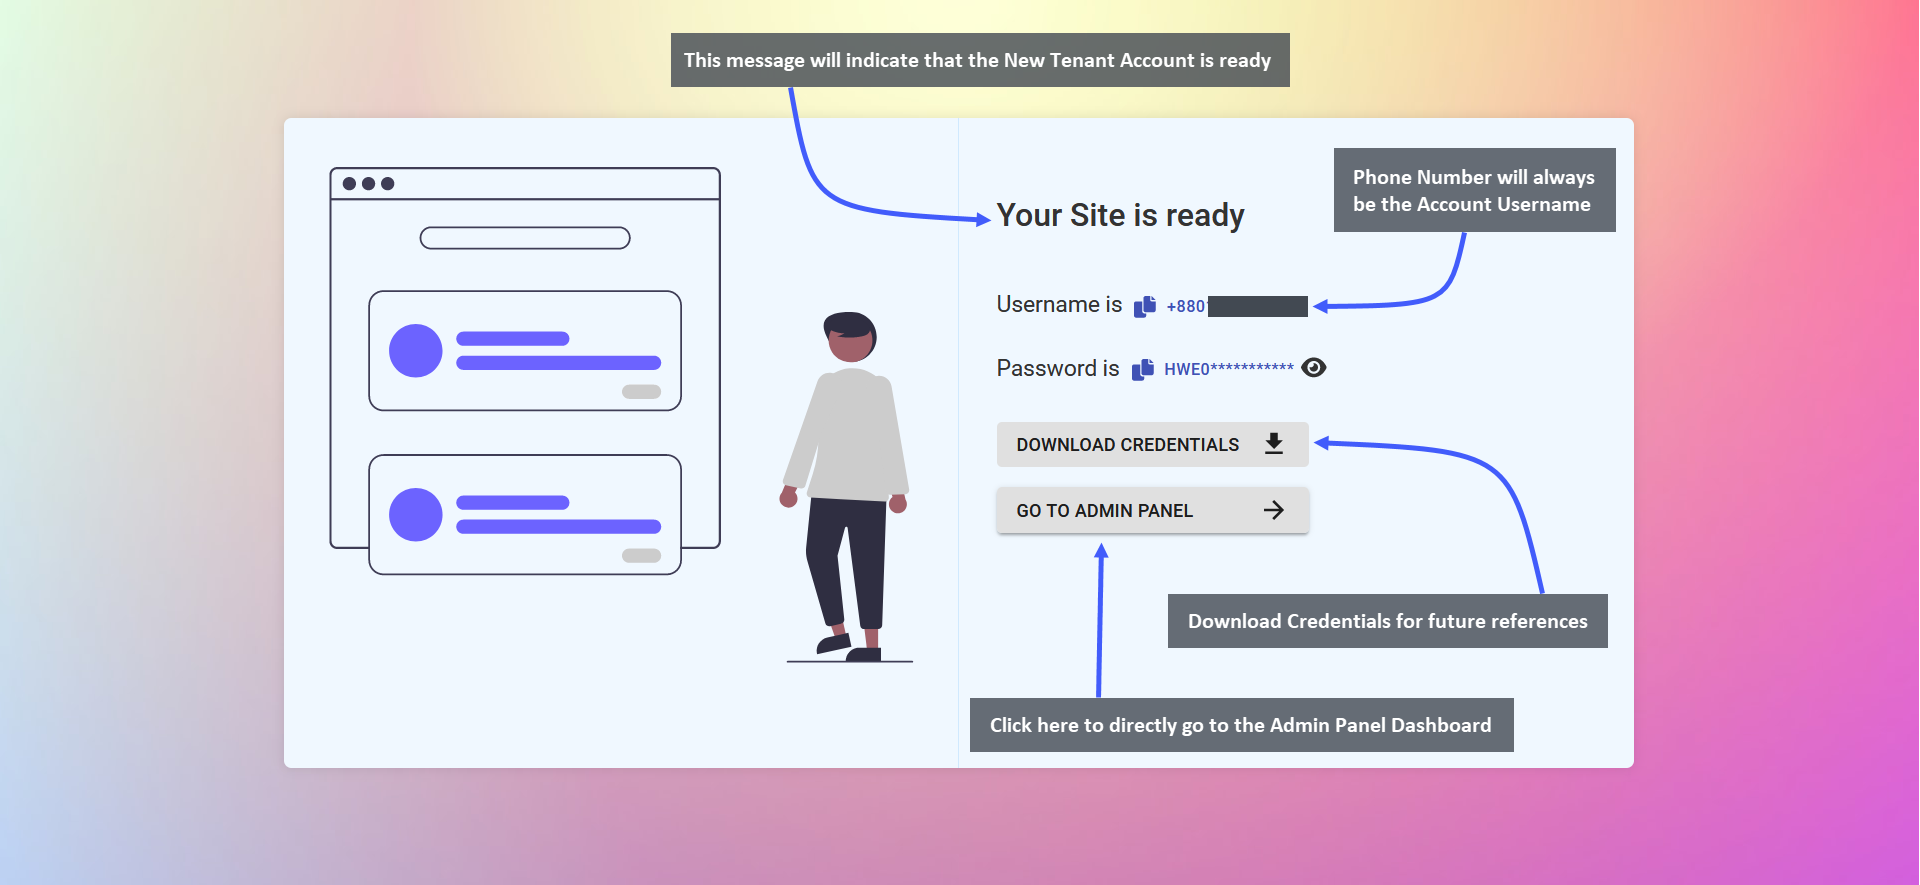
If the User Signs Up for the Tenant Account with a new phone number that has never been used for registration before, then it will redirect to the Username and Password download page. So, once the New Tenant Account is ready, it will redirect to a page from where there will be a button to Download Credentials for New User.
Below will be an option to Go to Admin Panel, clicking on which will redirect to New Tenant Admin Dashboard. It is important to download the credentials of the Tenant Account for future references.
Signing up with an Existing Phone Number
If the User Signs Up for the Tenant Account with an existing phone number, then it will redirect to a page with a message and a box asking to provide the OTP that is sent to the Phone Number. Type the OTP that sent to the phone number. Once OTP is typed, it will automatically start processing the Tenant Account of the New User.
If OTP is not sent, click on the Resend button to send a new OTP. OTP is only sent if an account with the phone number already exists. When New Tenant Account is ready, it will redirect to a page to Download Credentials for New User. Click Go to Admin Panel to directly go to the Dashboard of the New Tenant Admin.
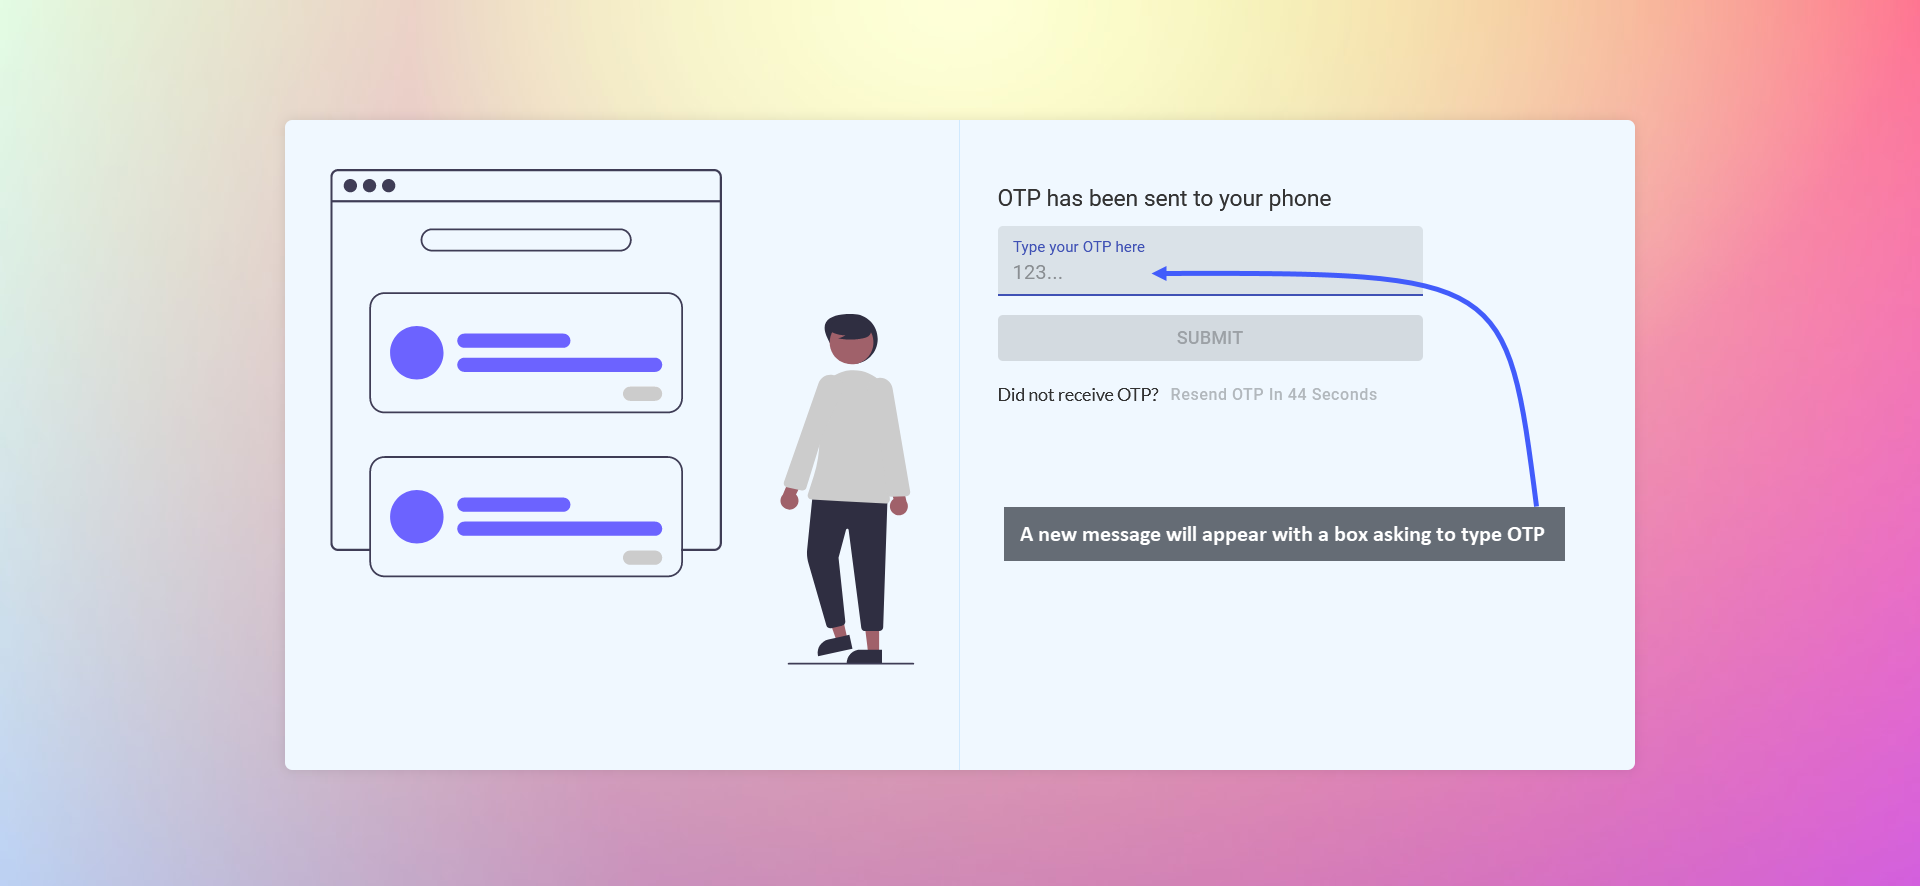
Image 1: After OTP is sent to Phone, a new message will appear with a box asking to type the OTP.
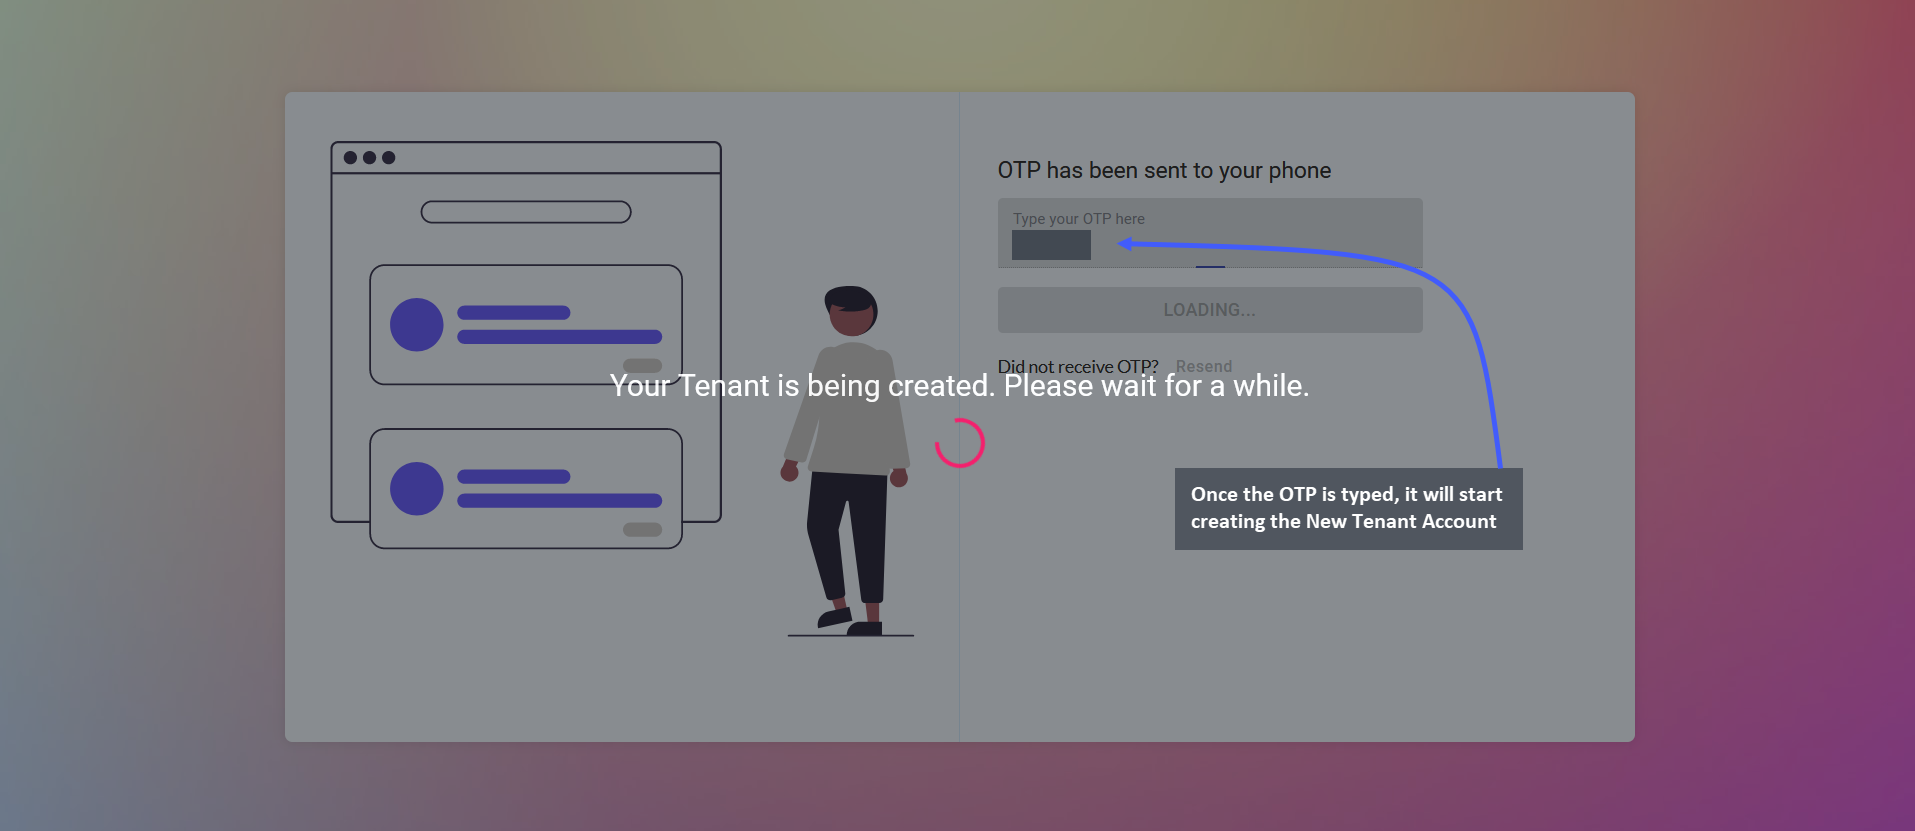
Image 2: After the OTP is typed on the box, it will start processing and creating the New Tenant Account.
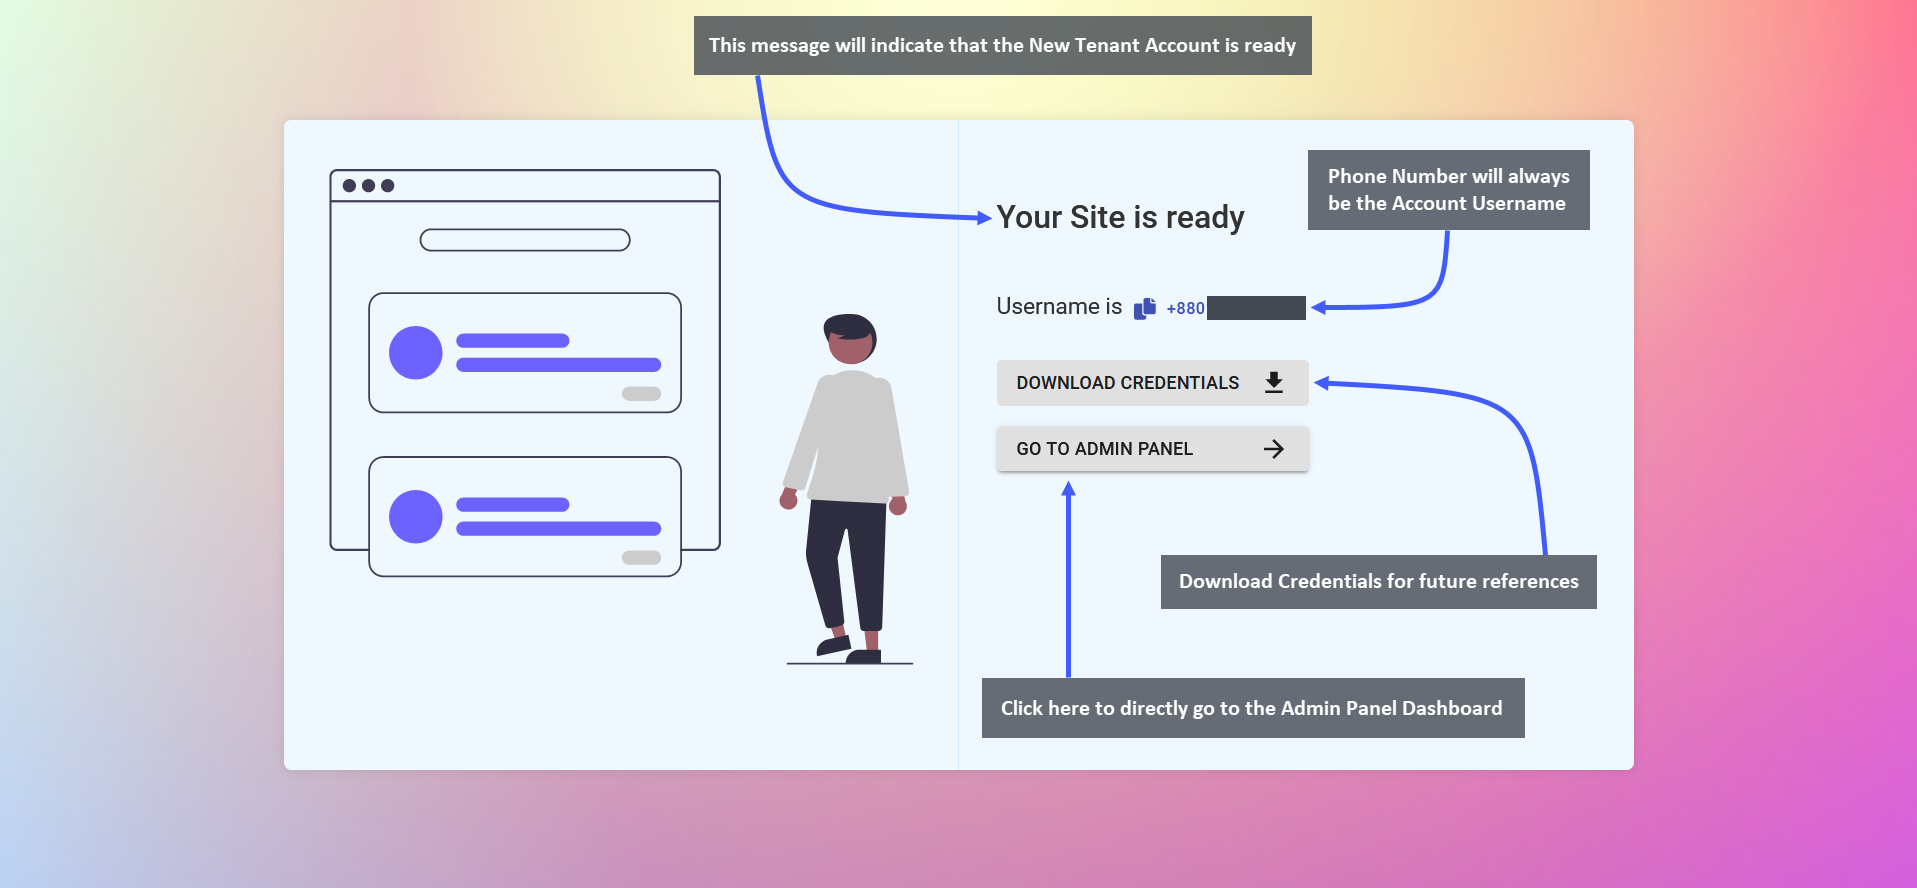
Image 3: When Tenant Account is ready, Dashboard will be accessible and Credentials can be downloaded.
New Admin Panel Dashboard
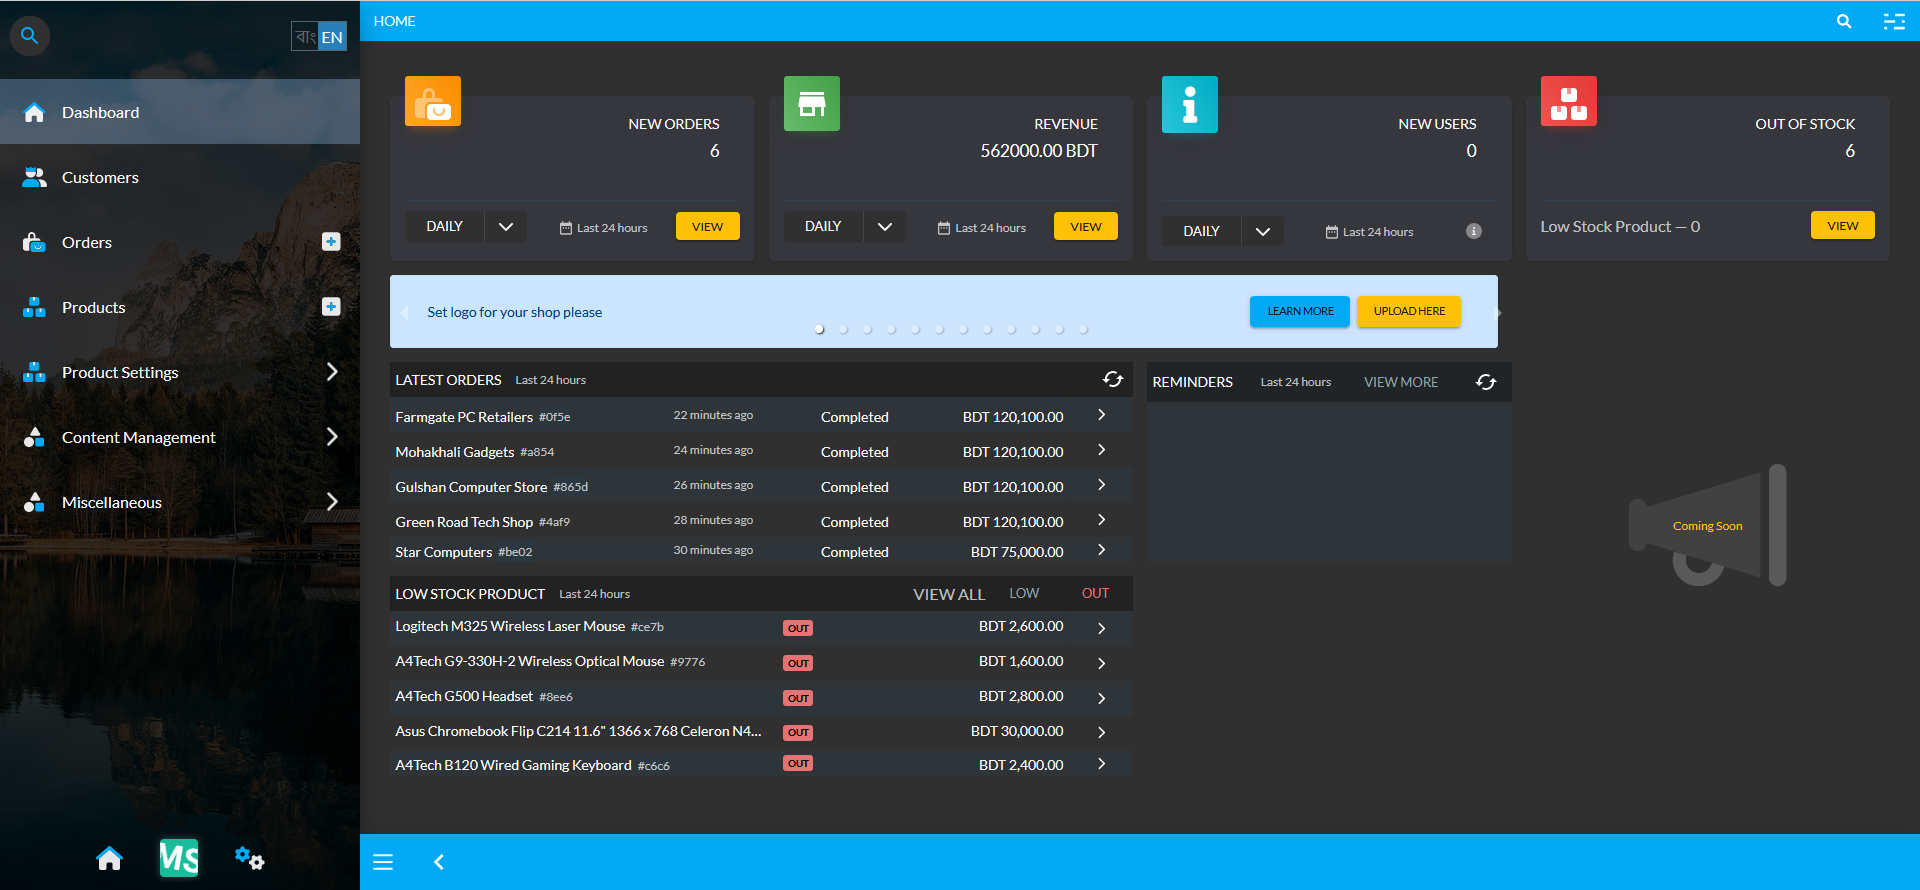
Click on Go to Admin Panel to be redirected to the New Admin Dashboard with various settings and modules. It consists of six main modules - Dashboard, Customers, Orders, Products, Product Settings, and Content Management.
1.4 - Logging into the CMS
Logging into the CMS will allow Tenant Users to create and manage several tenants and shops.
Login to the Admin Panel
When the New Tenant Account is created, save or bookmark the Login URL for future logins. The Login Link will usually include the Store Name at the beginning of the URL within the blank space as shown in this example: https://_________________________________.retailxen.net/admin/dashboard
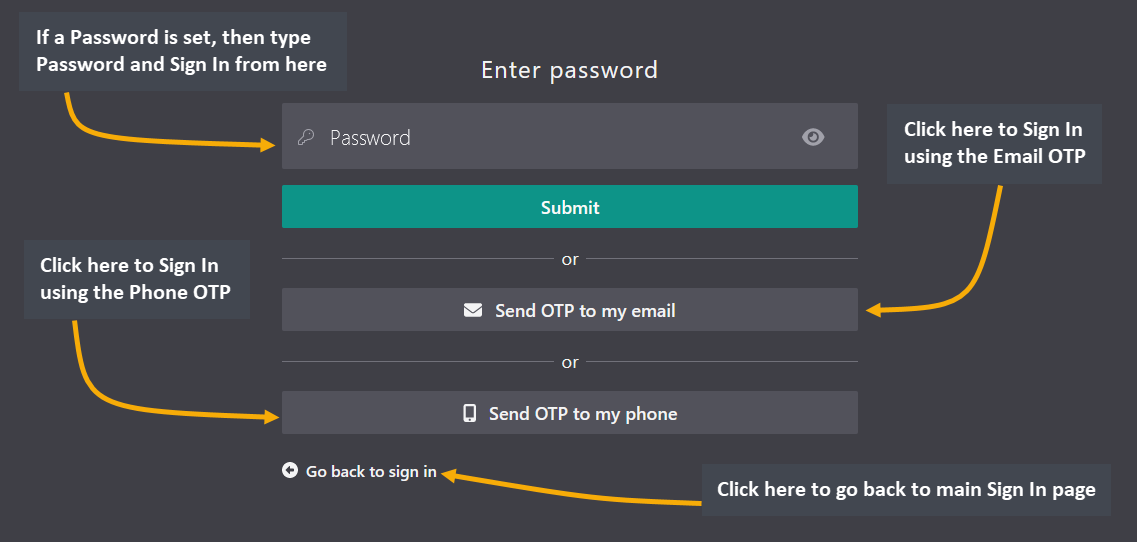
Therefore, log into the Admin Panel using the saved login link. When attempting to Log in, the page will appear as follows, where the User can Sign in with Password, or alternatively Sign in with Email or Phone OTP.

Steps of Admin Panel Login
Clicking on the Sign In button will redirect to this page, where there are options to Sign In using Password, Email OTP, or Phone OTP as shown in the screenshot. So, use any of the three Sign in options to Login to Dashboard.
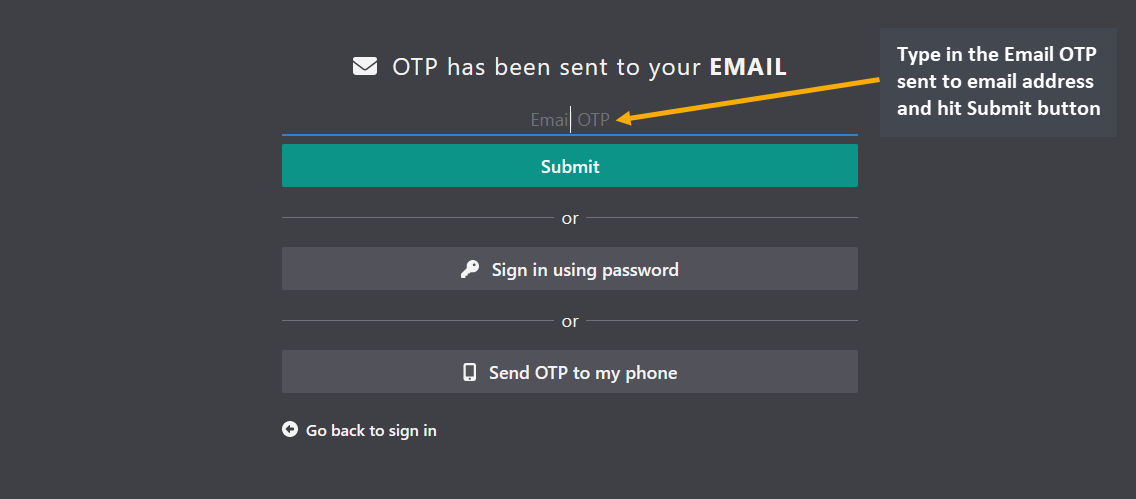
To Sign in with Email OTP, click on Send OTP to my Email that will redirect to this page. Type in the Email OTP received in the email address and hit Submit that will automatically Log the User into the Dashboard.
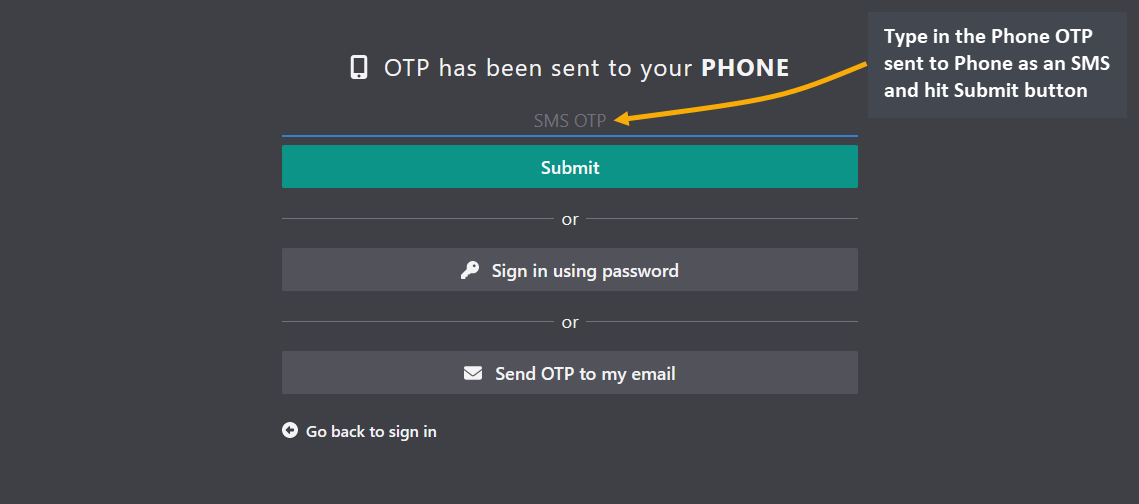
To Sign in with Phone OTP, click on Send OTP to my Phone that will redirect to this page. Type in the Phone OTP received in the phone as an SMS and hit Submit that will automatically Log the User into the Dashboard.
Admin Panel Dashboard
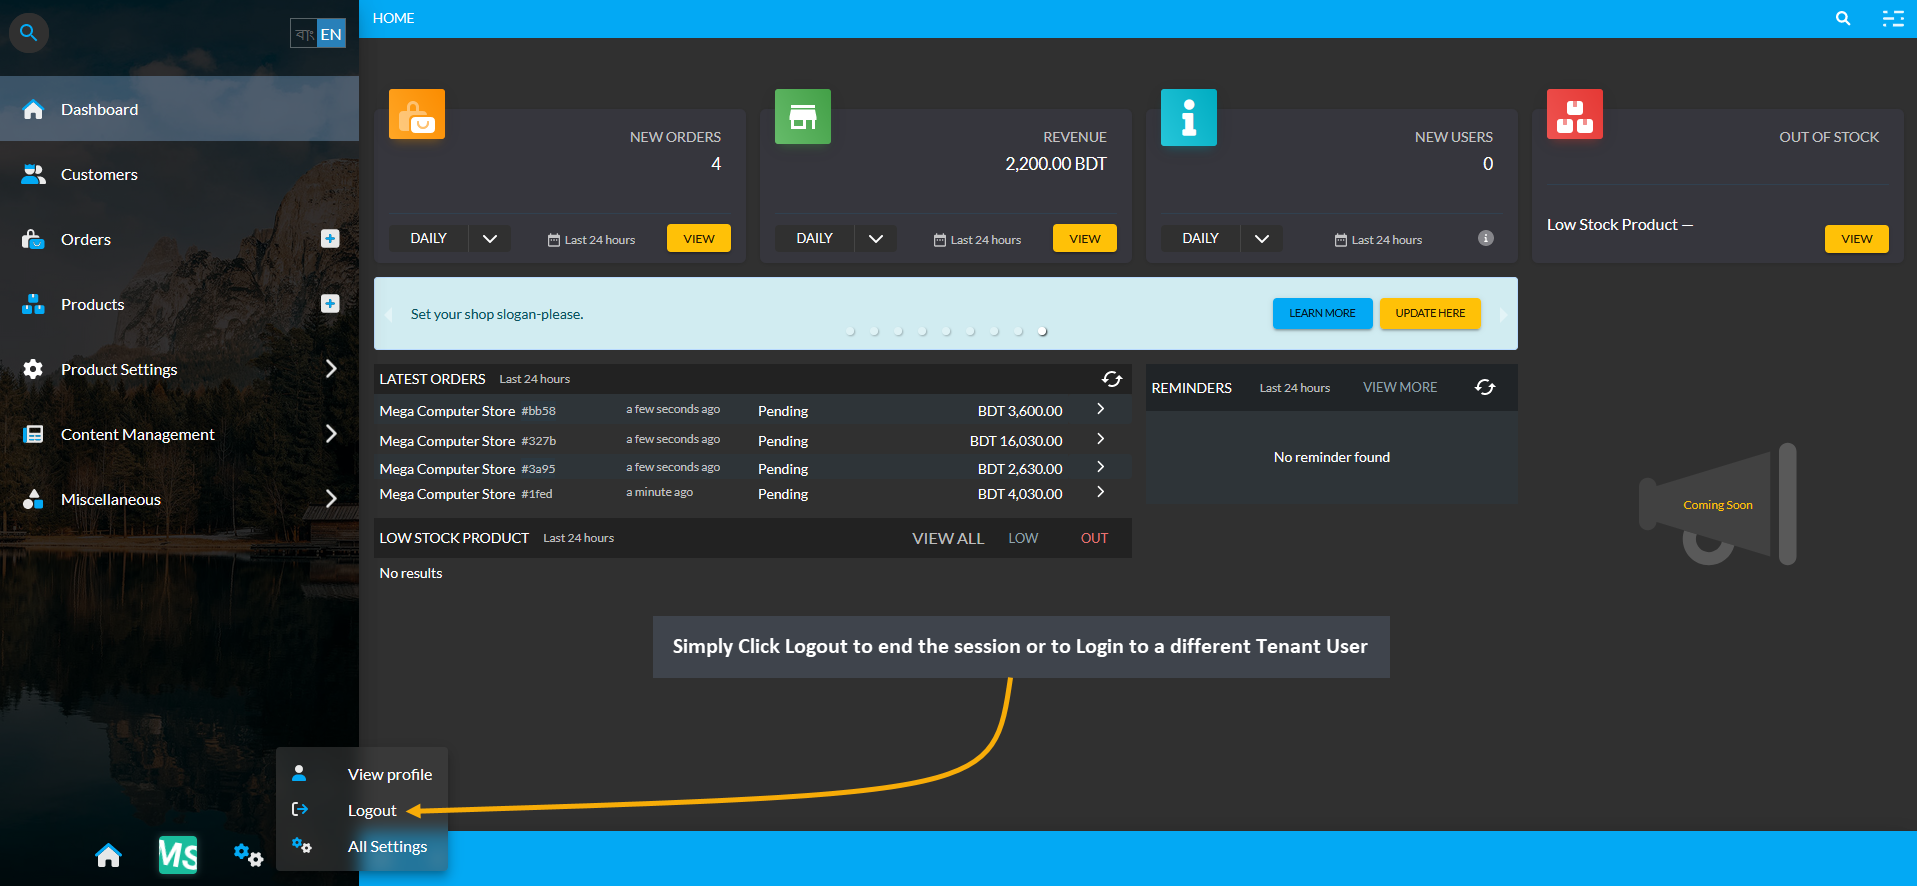
Logging in will redirect to the Admin Panel which comprises of separate modules to manage various aspects of the Shop like – Customers, Orders, Products, Product Settings, Content Management, and Miscellaneous. So, check up on day-to-day sales or manage Products, Orders, Customers, and The Website using these modules.

To end the sesson or to login to a different Tenant User, simply click Log Out option from the Navigation Menu.
2 - User Management FAQ
Learn about the functionality of User Management roles on Admin Panel.
User Management
User Management menu can be accessed from Staff from All Settings. Click the Manage button to view the list.
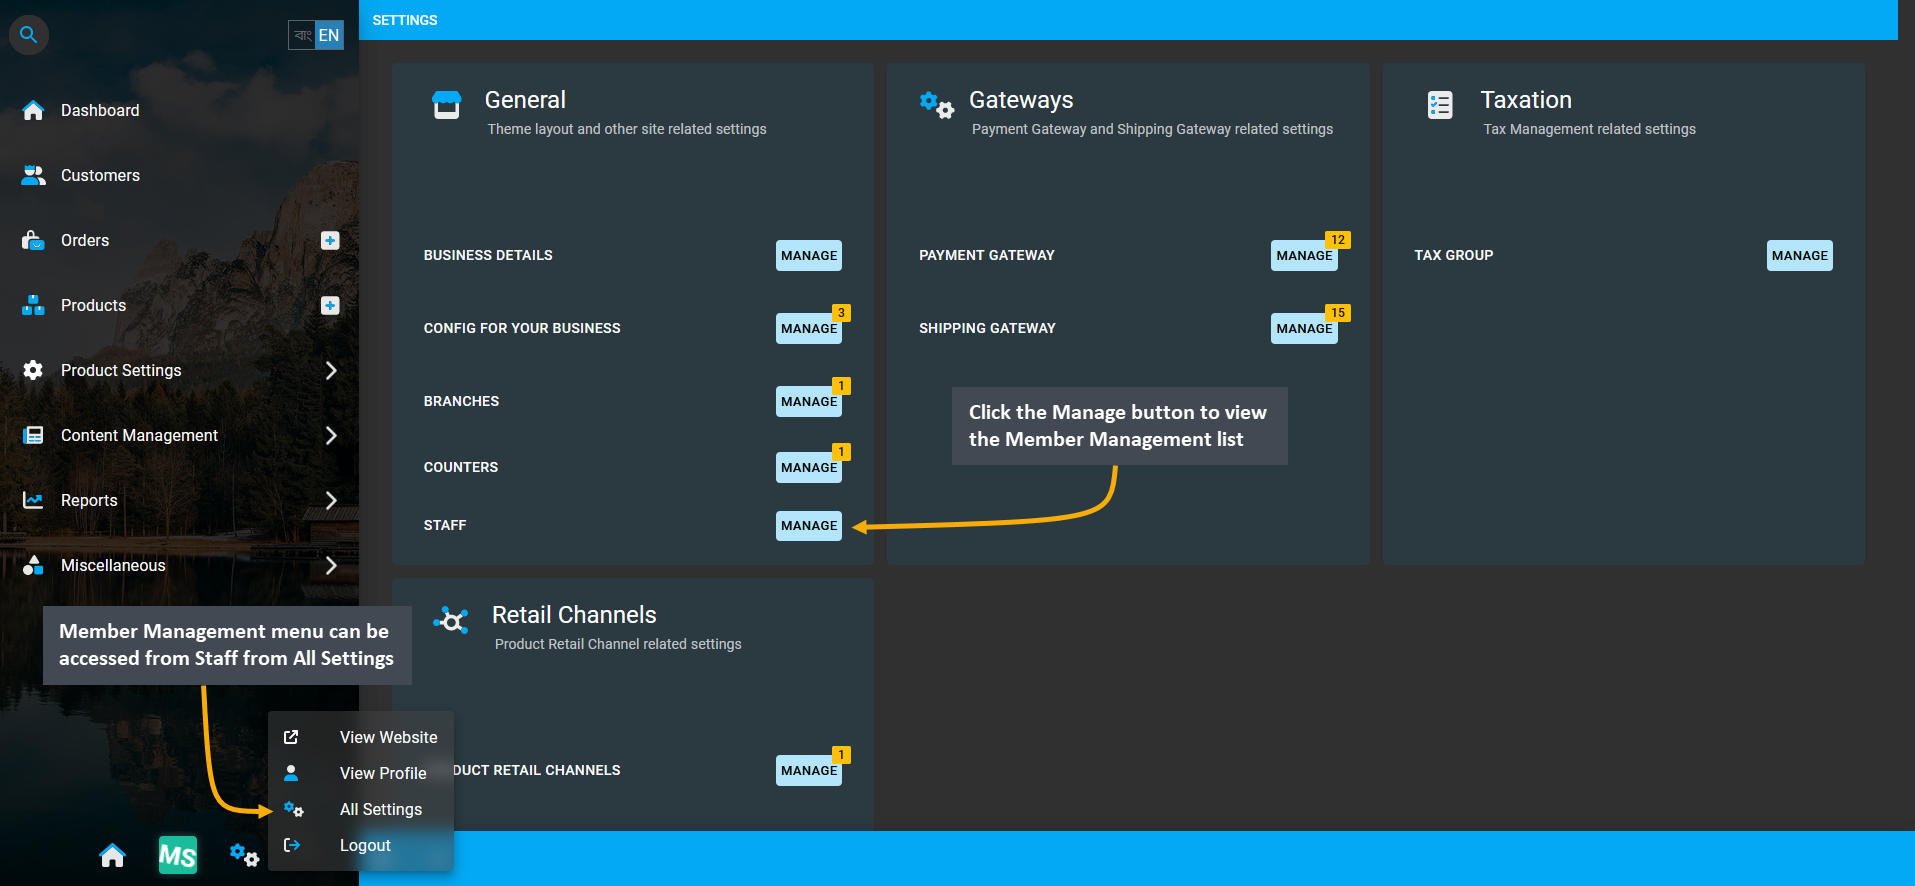
Image 1: Member Management menu can be accessed from Staff from All Settings by clicking the Manage button.
The User Management tab on the admin panel allows the Shop Owner to send invite and assign members to different management roles like Admin, Manager, Sales, Support, and RMA. Each of these assigned roles will give permission to each member to perform specific actions within the Shop according to their roles.
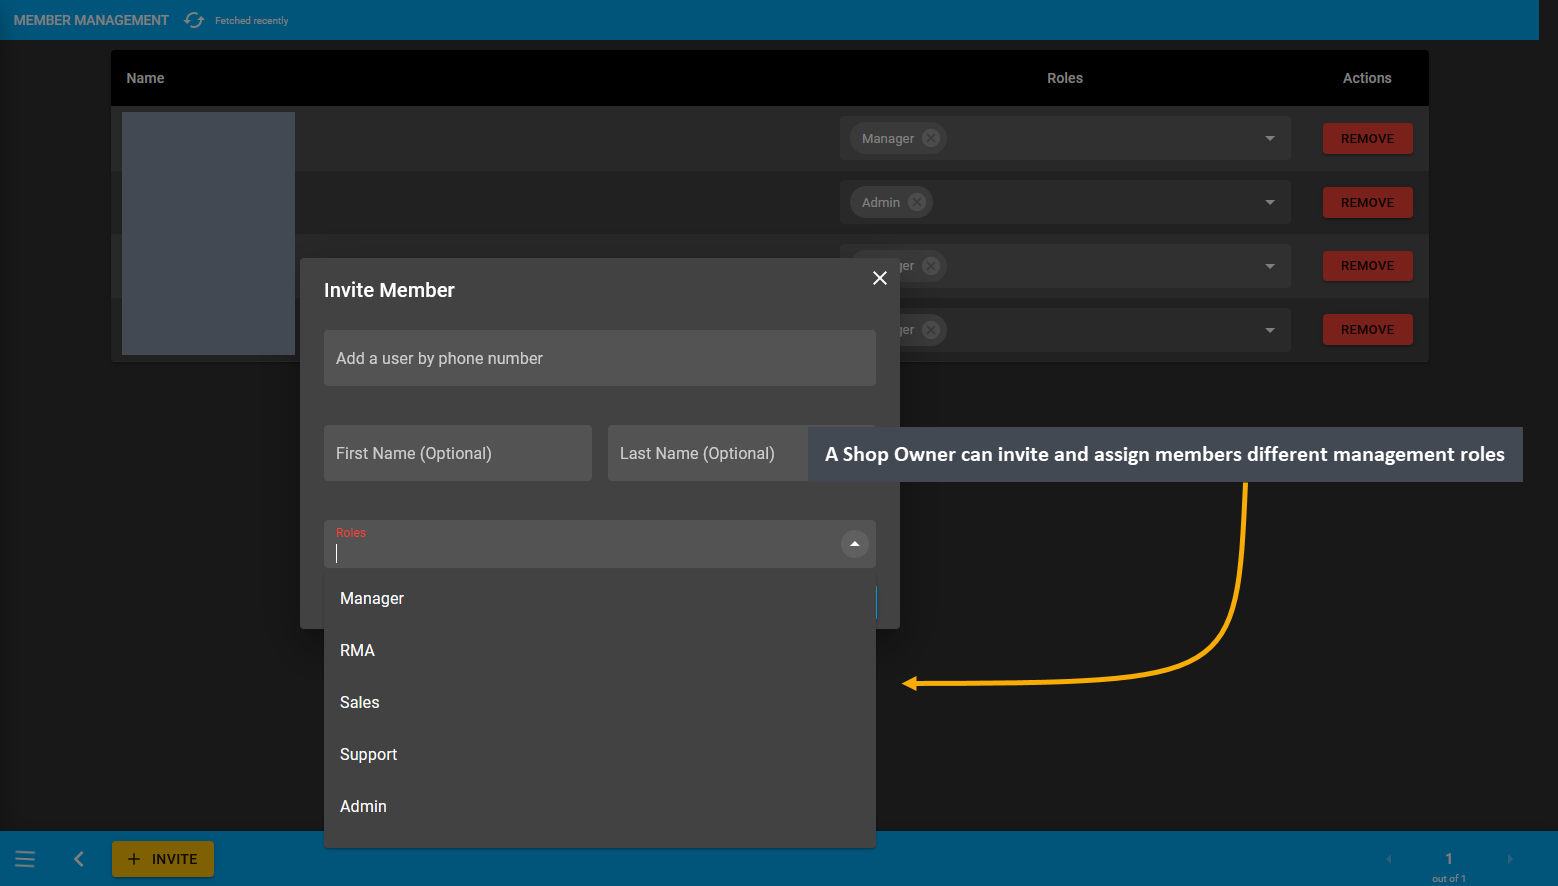
Image 2: A Shop Owner can invite and assign members different management roles from the management page.
Management Roles
The Owner of the Shop can do everything from assigning roles, permissions, and managing everything on Shop. Admin role can also manage everything on the Shop, but can be demoted or removed by Owner. Manager role can manage Order, Product, Customer, Shipping, RMA, Reminders, PC Builder, Cost Basis, Product Settings, and CMS on the Shop. Sales role will allow overseeing all sales matter on Shop. Support role will allow managing all the support related inquiries on Shop. RMA role allows managing all RMA cases on Shop.
User Invite
Invite and assign users to any Management Role by clicking on the Invite button that will allow adding a User by phone number. This will open a pop-up that will allow assigning that User one or multiple management roles.
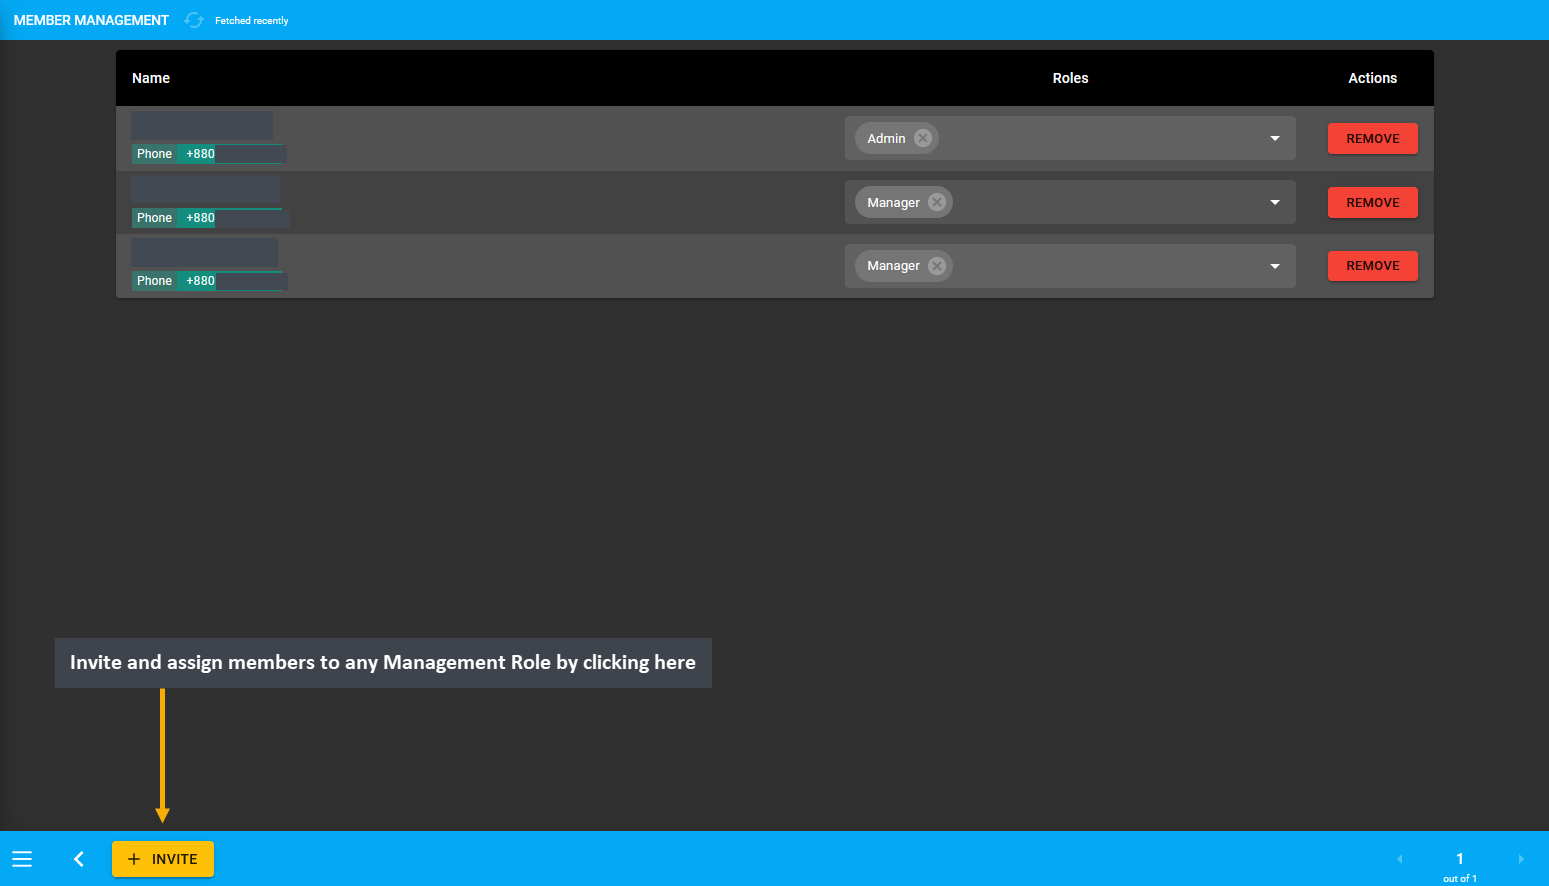
Image 3: A Shop Owner can invite users and assign roles using the Invite button from the management page.
After clicking the Invite button, a pop-up will open to Invite Member to the Shop. Here, the Shop Owner can add a New User by their Phone Number, adding first and last name to assign any chosen role. From the Roles dropdown, select any role from Admin, Manager, Sales, Support, and RMA to assign to the New User.
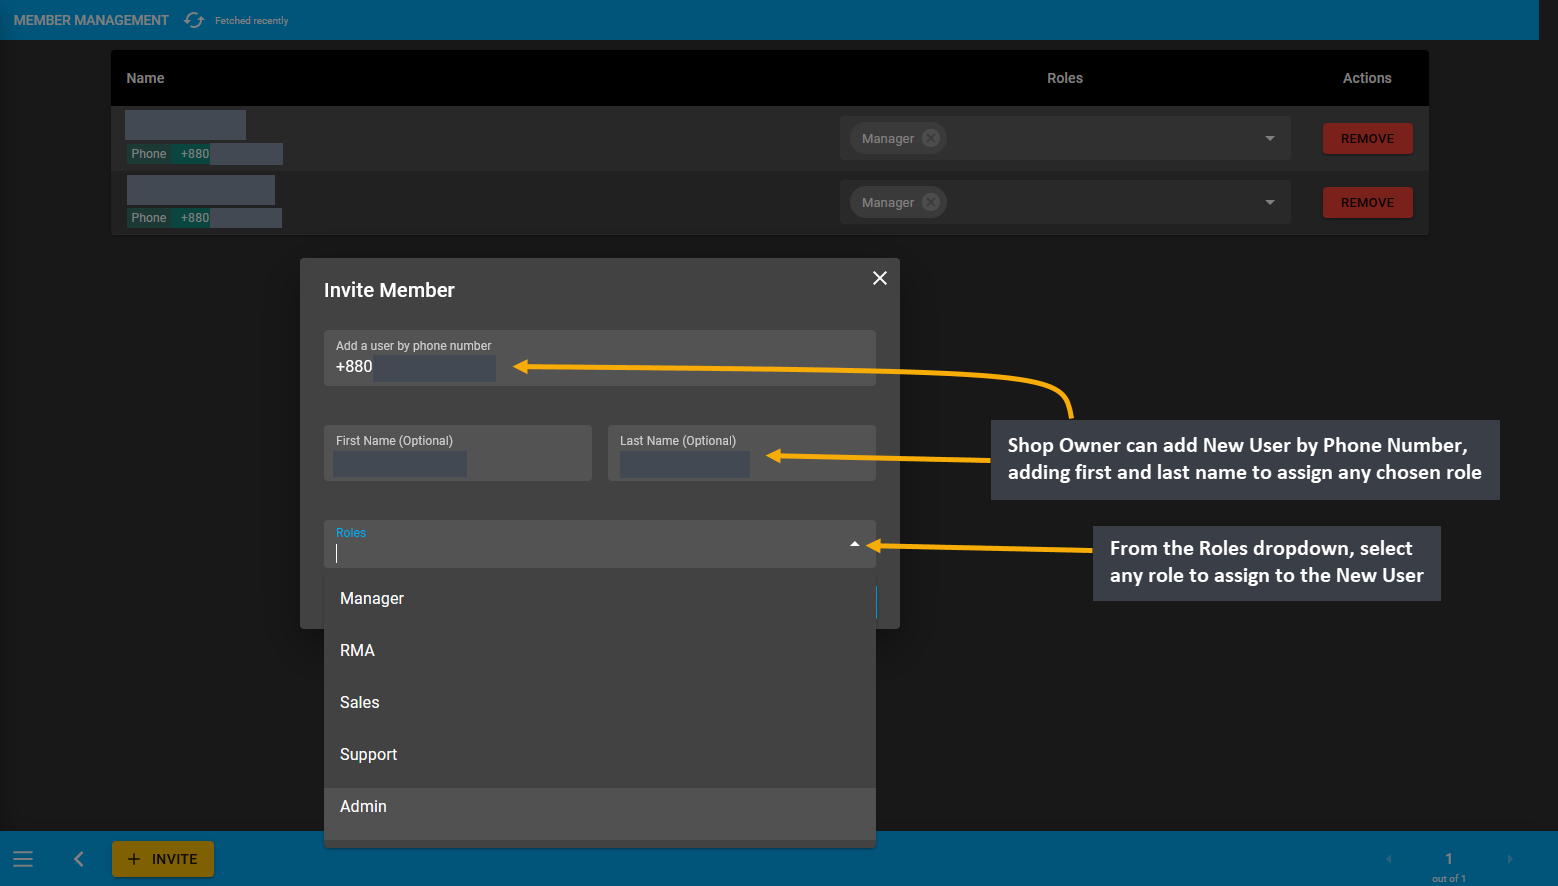
Image 4: Shop Owner can add New User by Phone Number, adding first and last name to assign any chosen role.
When the target role i.e. Admin is selected, click the Invite button. An invite will be automatically sent to the User’s phone number and email address. From there, they can choose to accept or ignore to join the Shop.
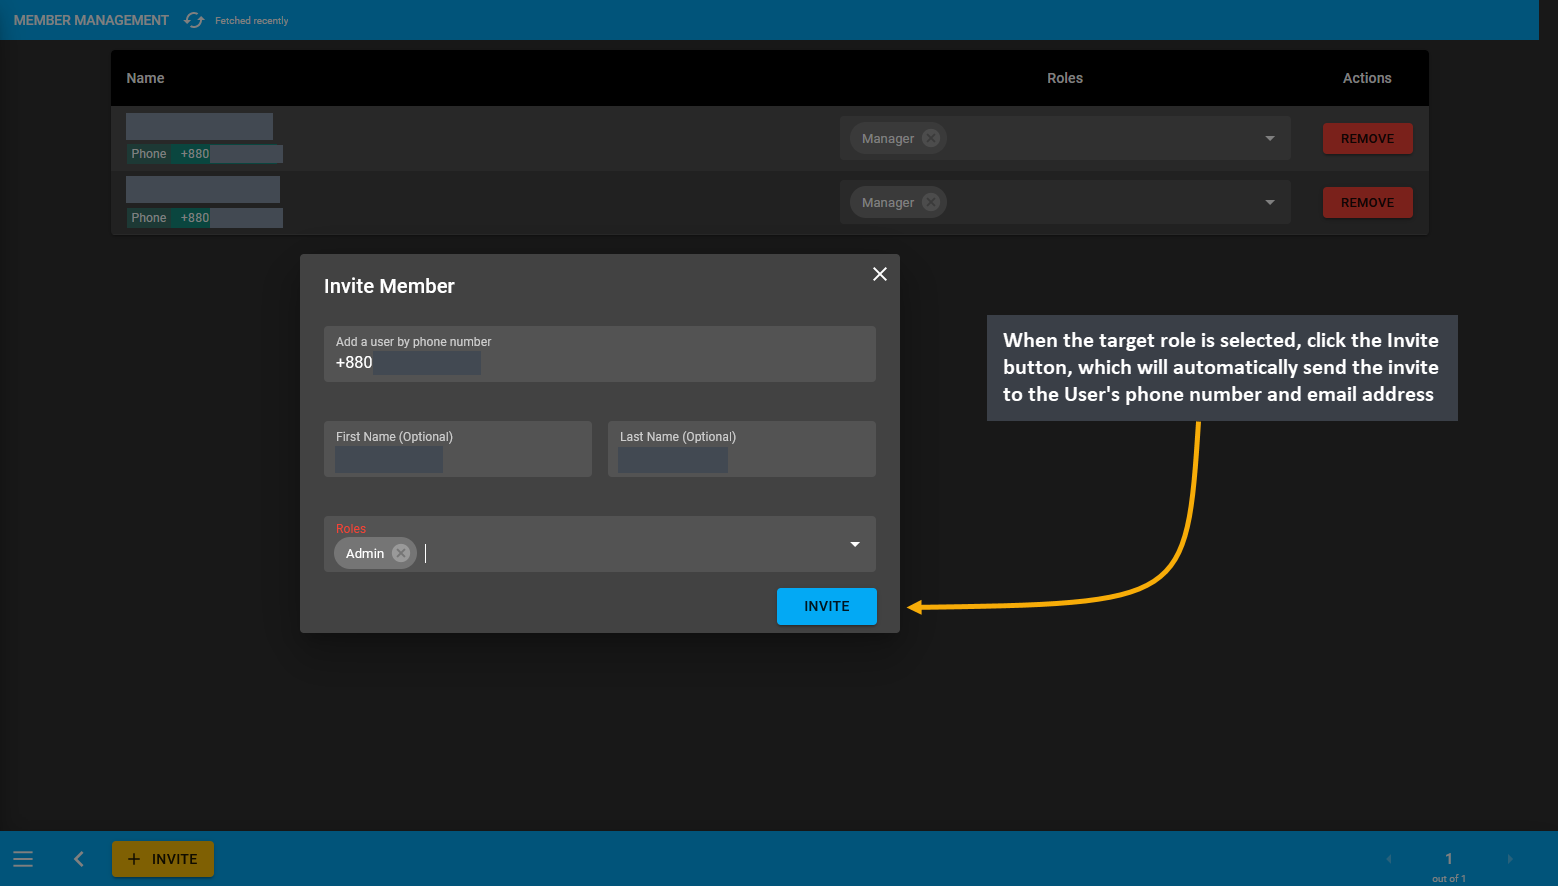
Image 5: Click Invite button that will automatically send invite to User's phone number and email address.
Several roles can be assigned to several Users that will show within the User Management List. Any role can be removed and any new role can be assigned to the same User from the Roles dropdown. To remove any user completely from the Admin Panel, click the delete button.
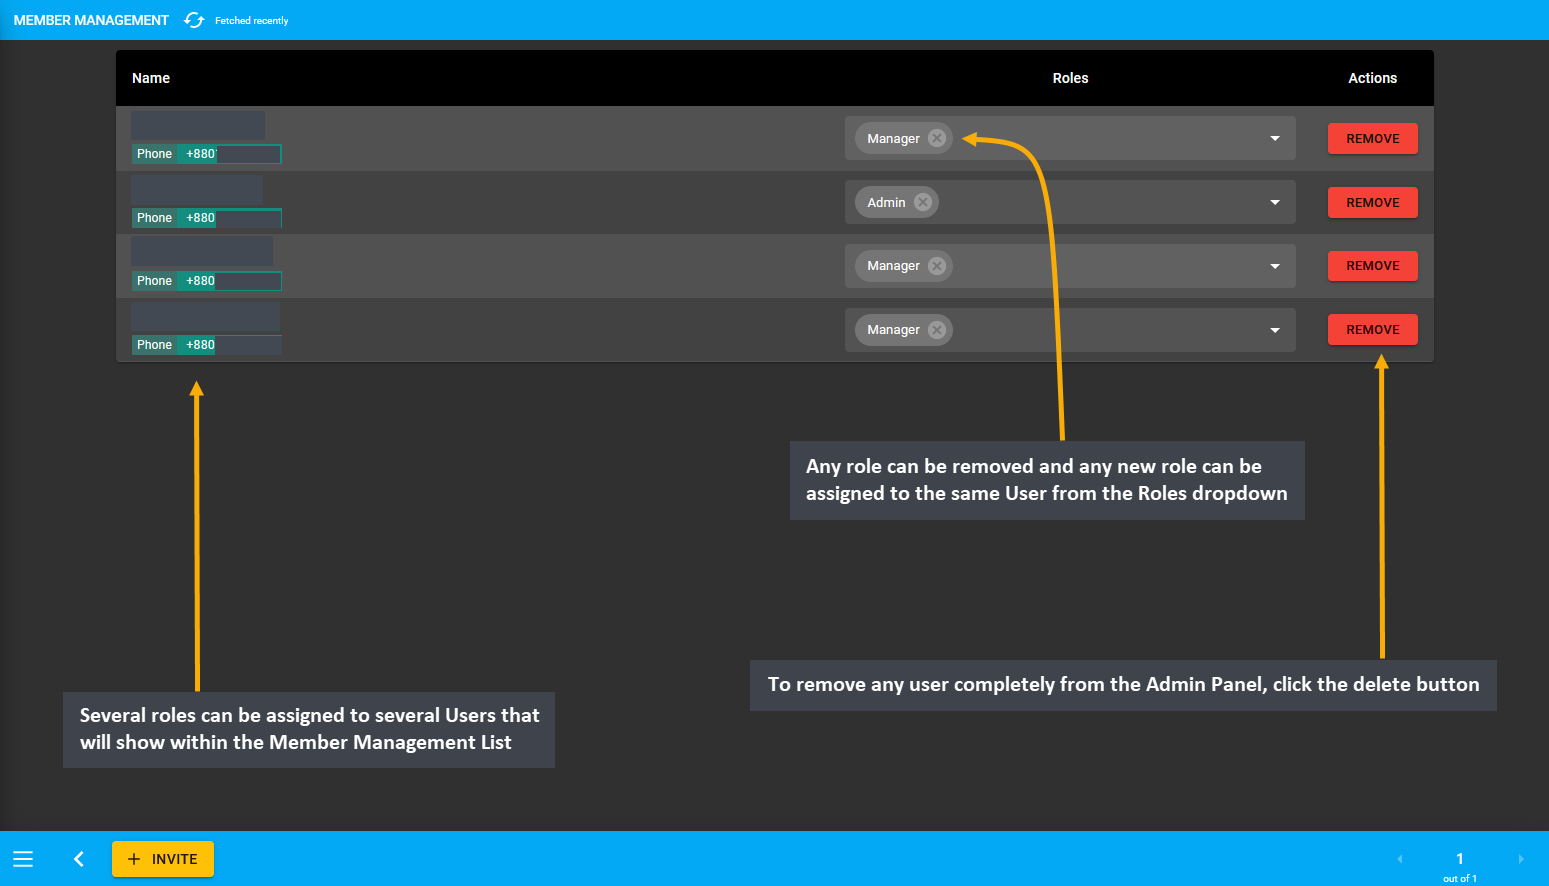
Image 6: Any role can be removed and any new role can be assigned to the same User from the Roles dropdown.
User Management: Permission Matrix
Shop Users from Admin, Manager, Sales, Support, and RMA are granted different permissions to access different modules on the Admin Panel. Below, is an overview of the permission matrix based on different level of Users.
| Description | Owner | Admin | Manager | Support | Sales | RMA |
|---|
| All Settings | ☑ | ☑ | ☒ | ☒ | ☒ | ☒ |
| Settings (without major settings) | ☑ | ☑ | ☑ | ☒ | ☒ | ☒ |
| Dashboard Updates | ☑ | ☑ | ☑ | ☑ | ☑ | ☑ |
| Create and Manage Order | ☑ | ☑ | ☑ | ☒ | ☑ | ☒ |
| View Orders | ☑ | ☑ | ☑ | ☑ | ☑ | ☑ |
| Create Transaction | ☑ | ☑ | ☑ | ☒ | ☑ | ☒ |
| Update Transaction | ☑ | ☑ | ☑ | ☒ | ☒ | ☒ |
| View Transactions | ☑ | ☑ | ☑ | ☑ | ☑ | ☑ |
| Create Shipment | ☑ | ☑ | ☑ | ☒ | ☑ | ☒ |
| Update Shipment | ☑ | ☑ | ☑ | ☒ | ☒ | ☒ |
| View Shipments | ☑ | ☑ | ☑ | ☑ | ☑ | ☑ |
| Create and Update Product | ☑ | ☑ | ☑ | ☒ | ☒ | ☒ |
| View Products | ☑ | ☑ | ☑ | ☑ | ☑ | ☑ |
| Create and Update Customer | ☑ | ☑ | ☑ | ☒ | ☒ | ☒ |
| Create and Manage Supplier | ☑ | ☑ | ☑ | ☒ | ☒ | ☒ |
| View Customers | ☑ | ☑ | ☑ | ☑ | ☑ | ☑ |
| View Cost Basis | ☑ | ☑ | ☑ | ☒ | ☒ | ☒ |
| Manage Product Settings | ☑ | ☑ | ☑ | ☒ | ☒ | ☒ |
| Manage PC Builds | ☑ | ☑ | ☑ | ☒ | ☒ | ☒ |
| Manage Reminders | ☑ | ☑ | ☑ | ☑ | ☑ | ☑ |
| CMS Create and Update | ☑ | ☑ | ☑ | ☒ | ☒ | ☒ |
| RMA Manage | ☑ | ☑ | ☑ | ☑ | ☒ | ☑ |
Management Role: Owner
The Owner of the Shop has permissions and accesses to all actions within the Shop. Once, the Owner opens the Shop, they can invite other Users in different management roles to manage different sections of the Shop. Shop Owner cannot be removed from Admin, but they can remove and reassign other Users in other roles.
Settings and Order
Shop Owner have access to all major settings on the Shop. They can create and update Orders, view all Orders and full Order List. While creating an Order for a Customer or after an unpaid Order is placed, Owner can create transaction to add all types of Payment Gateways for the Order and update the transaction. They can also view any transaction and full Transaction List on Orders. Based on Customer payment, Owner can set a transaction to completed or failed and add a new transaction to have the Order payment completed.
Shipment and Product
When an Order is created, Owner can create and update Shipment to have Product delivered to the Customer’s address. They can also view any Shipment and full Shipment List on Orders. They have the permission to create and update Products on the Shop. They can view full Product List and also view and edit any Product or update Stock for Per Unit Products. Owners can purchase stock from Suppliers and view Product Stock Dashboard.
Customer
Shop Owner can create Regular Customers, Credit Customers, and Credit Suppliers. They have the permission to Update Customers, which may include converting a Regular Customer to a Credit Customer or a Credit Supplier. They can also update Customer information on Dashboard and provide Credit Limit to Customer and give them permission to use Credit and view Ledger on the website. They can view any Customer or full Customer List.
Cost Basis and RMA
Owners can view Cost Basis for Orders, Customers, Products, and Product Batches based on different ranges. For Product claims on missing items of defective Product issues, they can open RMA case to process the Customer’s claim. They have access to all the workflow of RMA to provide service, warranty, return, exchange, and refund to Customer. They can add updates on the RMA case and change case status. For resolving Product claims, they can create Related Orders and Related Cases under the RMA Ticket to provide proper resolution to Customer.
Product Settings
Shop Owner has all Product Settings access as they can view Global Brand List and create their own Brands. They can create and edit Product and Branch gallery. They can view Global Warranty Plans and create own Warranty Plans. However, they only have the permission to view the Global Product Categories. To use as alternate for pre-defined Categories, the Owner can create Tags and enable to option to view Products on the website under tags after assigning the Products under specific tags. These tags will show Products within Tags hierarchy on website.
PC Build, CMS, and Menu
PC Builds placed from the website can be viewed by Shop Owner from Users Build List. Owners can create PC Builds with certain specifications and then select 3 builds from them to set as 3 Featured PC Builds to show on the Website for promotion. They can manage and update default CMS Pages (Home, Contact, About, Privacy, Refund, Shipping, and EMI) or create Custom Pages with Banner, Product, Category, Text, and Image Widgets. These pages will display on the Shop Website. Owner can also create menus to show on the website header.
Reminders
If Orders are placed with Cheque Payment Gateway, Reminders can be created to receive and complete a Cheque payment by Owner. They can also create Reminders when purchasing Per Unit Product Stock from Supplier when selecting Without Payment or Partial Payment. For RMA Case Supplier update, Shop Owner can create a Reminder to remind them of the date they need to contact the Supplier to receive replacement Product for Customer when dealing with multiple Orders. Owners can create Custom Reminders and update all Reminders and statuses. They can update the transaction status to completed or failed for Cheque reminders. Shop Owner can edit and delete reminders and also view all reminders within daily, weekly, and monthly range list.
Management Role: Admin
The Admin has permissions and accesses to everything like the Manager, but they can be removed or demoted by the Shop Owner. They can invite other Users to the management roles, but they cannot remove others from their roles. Like the Owner, the Admin have access to all major settings on the Shop to manage day-to-day business.
Settings, Order, and Transaction
Admin has access to Settings without major settings option. They can create and update Orders and also view any Order and full Order List. While creating an Order for a Customer or after an unpaid Order is placed, the Admin can create transaction to add Payment Gateways for the Order and update the transaction. They can also view any transaction and full Transaction List on Orders. Admins can also Settle Ledger using Payment Gateways to resolve the payable balance from On Credit (Due) Order payments and reset the Ending Balance.
Shipment and Product
When an Order is created, an Admin can create and update Shipment to have Product delivered to Customer’s address. They can view any Shipment and full Shipment List on Orders. Admins also have the permission to create and update Products on the Shop. They can also view the full Product List and also view and edit any Product or update Stock for Per Unit Products. Stock purchase from Suppliers can be done by Admins.
Customer
Admins can create Regular Customers, Credit Customers, and Credit Suppliers. They have permission to Update Customers, which may include converting a Regular Customer to a Credit Customer or a Credit Supplier. They can also update Customer information on Dashboard and provide Credit Limit to Customer and give them permission to use Credit and view Ledger on the website. They can view any Customer Dashboard and full Customer List.
Cost Basis and RMA
Cost Basis for Orders, Customers, Products, and Product Batches can be viewed by Admins from different ranges. For Product claims on missing items of defective Product issues, an Admin can open an RMA case or ticket to file the issue. They have access to all the workflow of RMA to provide service, warranty, return, exchange, and refund to Customer. They can add updates on the RMA case and change case status. For Product issues, they can create Related Orders and Related Cases under RMA Ticket to provide resolution to Customer for their claims.
Product Settings
Admin has all Product Settings access as they can view Global Brand List and create their own Brands. They can create and edit Product and Branch gallery. They can view Global Warranty Plans and create their own Warranty Plans. However, they only have the permission to view the Global Product Categories. To use as alternate for pre-defined Categories, a Manager can create Tags and enable to option to view Products on the website under tags after assigning the Products under specific tags. These tags will show Products within Tags hierarchy on website.
PC Build and CMS
PC Builds placed from the website can be viewed by Admins from Users Build List. They can also set 3 Featured PC Builds to show on the Website. The CMS Pages and Widgets can be created and managed by them. They can update default CMS Pages (Home, Contact, About, Privacy, Refund, Shipping, and EMI) or create New Custom Pages with Banner, Product, Category, Text, and Image Widgets. These pages will display on the Shop Website.
Reminders
If Orders are placed with Cheque Payment Gateway, Reminders will be created to receive and complete a Cheque payment by an Admin. They can also create Reminders when purchasing Stock for Per Unit Product from Supplier when selecting Without Payment or Partial Payment. For RMA Case Supplier update, an Admin can create Reminder to remind them of the date they need to contact the Supplier to receive replacement Product for Customer when dealing with multiple Orders. Admins can create Custom Reminders and update all Reminders and statuses. They can edit and delete reminders and also view all reminders within daily, weekly, and monthly range list.
Management Role: Manager
Settings, Order, and Transaction
The Manager have similar access like Admin. However, they have access to Settings without major settings option. They can create and update Orders and also view any Order and the full Order List. While creating an Order for a Customer or after an unpaid Order is placed, the Manager can create transaction to add Payment Gateways for the Order and update the transaction. They can also view any transaction and full Transaction List on Orders. Managers can also Settle Ledger using Payment Gateways to resolve the payable balance from On Credit (Due).
Shipment and Product
When an Order is created, a Manager can create and update Shipment to have Product delivered to Customer’s address. They can also view any Shipment and full Shipment List on Orders. Managers also have the permission to create and update Products on the Shop. They can also view the full Product List and also view and edit any Product or update Stock for Per Unit Products. Stock purchase from Suppliers can be done by Managers.
Customer
Managers can create Regular Customers, Credit Customers, and Credit Suppliers. They have the permission to Update Customers, which may include converting a Regular Customer to a Credit Customer or a Credit Supplier. They can also update Customer information on Dashboard and provide Credit Limit to Customer and give them permission to use Credit and view Ledger on the website. They can view any Customer or full Customer List.
Cost Basis and RMA
The Cost Basis for Orders, Customers, Products, and Product Batches can be viewed by Managers from different ranges. For Product claims on missing items of defective Product issues, a Manager can open RMA case or ticket to file a record about the issue. They have access to all the workflow of RMA to provide service, warranty, return, exchange, and refund to Customer. They can add updates on the RMA case and change case status. For Product issues, they can create Related Orders and Related Cases under RMA Ticket to provide resolution to Customer.
Product Settings
Manager has all Product Settings access as they can view Global Brand List and create their own Brands. They can create and edit Product and Branch gallery. They can view Global Warranty Plans and create their own Warranty Plans. However, they only have the permission to view the Global Product Categories. To use as alternate for pre-defined Categories, a Manager can create Tags and enable to option to view Products on the website under tags after assigning the Products under specific tags. These tags will show Products within Tags hierarchy on website.
PC Build and CMS
PC Builds placed from the website can be viewed by Managers from Users Build List. They can also set 3 Featured PC Builds to show on the Website. The CMS Pages and Widgets can be created and managed by them. Managers can update default CMS Pages (Home, Contact, About, Privacy, Refund, Shipping, and EMI) or create New Custom Pages with Banner, Product, Category, Text, and Image Widgets. These pages will display on the Shop Website.
Reminders
If Orders are placed with Cheque Payment Gateway, Reminders will be created to receive and complete a Cheque payment by a Manager. They can also create Reminders when purchasing a Per Unit Product Stock from Supplier when selecting Without Payment or Partial Payment. For RMA Case Supplier update, Manager can create Reminder to remind them of the date they need to contact the Supplier to receive replacement Product for Customer when dealing with multiple Orders. Managers can create Custom Reminders and update all Reminders and statuses. They can edit and delete reminders and also view all reminders within daily, weekly, and monthly range list.
Management Role: Support
Order and Transaction
The Support have limited access to manage Order processing and handling Custom claims of the Shop. They can view any Order, the full Order List, any transaction and full Transaction List of Orders. When providing support to Customers for their Orders or creating a claim ticket or RMA case, they can recheck all Order and transaction details.
Shipment and Product
After an Order is created, a Support person can view any Shipment and full Shipment List of Orders to keep track that the Product is delivered to the Customer’s address properly. They can also view the full Product List and view any Product, especially the Stock for Per Unit Products. In this way, they can ensure that the Shop has enough Product to fulfill an Order or Customer’s requirement.
Customer
A Support person can view all the Customer information on Dashboard and their Credit Limit to recheck Order issues when a handling a Customer’s claim. They can also view any Customer or full Customer List to be able to contact them for any Order or shipping issues.
RMA (Ticket)
For Product claims on missing items of defective Product issues, a Support person can open RMA case or ticket to file a record about the issue. They have access to all the workflow of RMA to provide service, warranty, return, exchange, and refund to Customer. They can add updates on the RMA case and change case status. For Product issues, they can create Related Orders and Related Cases under RMA Ticket to provide resolution to Customer. They can view any RMA case and all the cases on the RMA List.
PC Build
PC Builds placed from the website can be viewed by a Sales person from Users Build List. They can check the individual Builds from the List to recheck the ordered Products and their prices when handling with RMA claims of PC Build Orders.
Reminders
A Support person can create Custom Reminders and update all Reminders and statuses. They can edit reminders and also view all reminders within daily, weekly, and monthly range list.
Management Role: Sales
Dashboard
For managing Orders and Customers, a Sales person can view the Dashboard statistics. They can view the New Orders and New Users created on the website. Latest Orders and Low Stock Products will also be visible to them. They are also view the list of Reminders on dashboard.
Order and Transaction
The Sales have limited access to manage Order processing and handling Custom claims of the Shop. They can create and update Orders and also view any Order and the full Order List. While creating an Order for a Customer or after an unpaid Order is placed, they can create transaction to add Payment Gateways for the Order and update the transaction. They can also view any transaction and full Transaction List on Orders. When providing support to Customers for their Orders or creating a claim ticket or RMA case, they can recheck all Order and transaction details.
Shipment and Product
When an Order is created, a Sales person can create Shipment to have Product delivered to Customer’s address. They can also view any Shipment and full Shipment List on Orders. They can also view the full Product List and view any Product, especially the Stock for Per Unit Products. In this way, they can ensure that the Shop has enough Product to fulfill an Order or Customer’s requirement.
Customer
A Sales person can view all the Customer information on Dashboard and their Credit Limit to recheck Order issues when a handling a Customer’s claim. They can also view any Customer or full Customer List to be able to contact them for any Order or shipping issues.
PC Build
PC Builds placed from the website can be viewed by a Support person from Users Build List. They can check the individual Builds from the List to recheck the ordered Products and their prices when handling with RMA claims of PC Build Orders.
Reminders
A Sales person can create Custom Reminders and update all Reminders and statuses. They can edit and delete reminders and also view all reminders within daily, weekly, and monthly range list.
Management Role: RMA
RMA (Ticket)
For Product claims on missing items of defective Product issues, an RMA agent can open RMA case or ticket to file a record about the issue. They have access to all the workflow of RMA to provide service, warranty, return, exchange, and refund to Customer. They can add updates on the RMA case and change case status. For Product issues, they can create Related Orders and Related Cases under RMA Ticket to provide resolution to Customer. They can view any RMA case and all the cases on the RMA List.
3 - General Accounting
Read through this section to understand how to keep track of sales, costs, profits, inventory, checks, cash, and day to day ledger for your business.
General Accounting
Accounting is the function of organizing the financial data in the business. In essence, the flow of money in the business is recorded, tracked, and monitored by the Shop Owner’s Accounting. In this case, the Shop Owner will often have to monitor their revenues and expenses. Using the Content Management System will allow tracking, recording, and monitoring the flow of money in the Shop while the Shop Owner manage Orders and Supplies.
Discussed below are some important points that the Shop Owner need to keep in mind for day-to-day business:
Set and Update Product Stock
The Shop Owner needs to check their Current Product Stock to ensure that they can fulfill the Customers’ Orders in time. For convenience, the Stock Count, Stock for Sale, and Low Stock Threshold can be set during the Product creation which will automatically provide reminders of low stock, out of stock, and available Product stock.
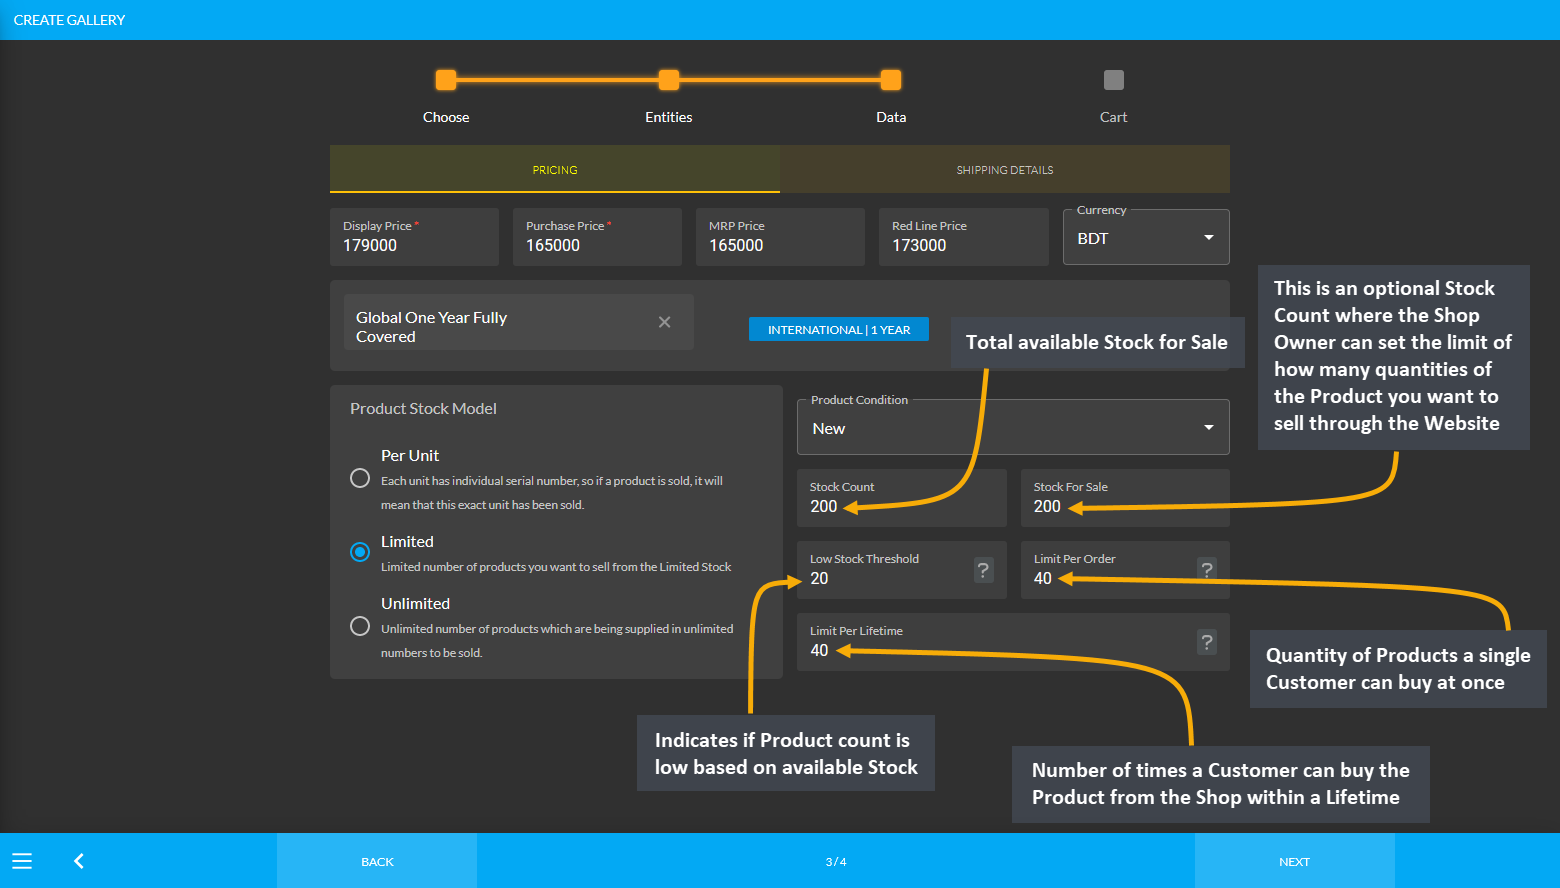
Image 1: Stock Count, Stock for Sale, and Low Stock Threshold can be set during the Product creation.
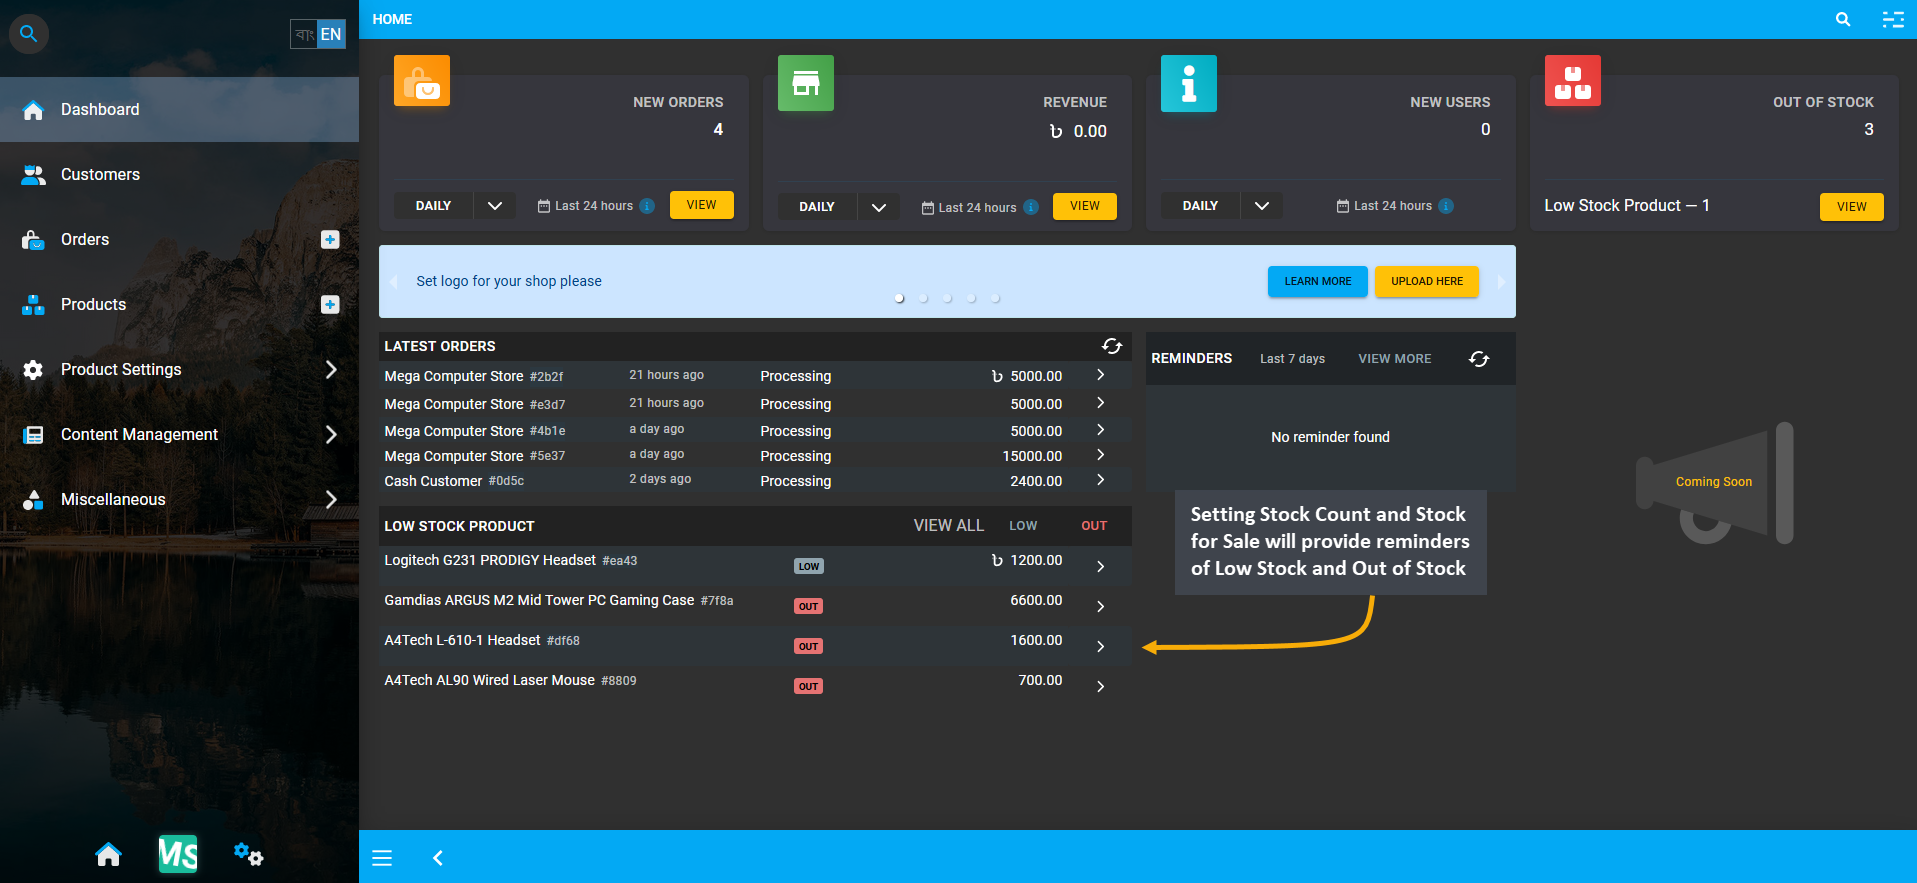
Image 2: Setting Stock Count and Stock for Sale will provide reminders of Low Stock and Out of Stock.
Set Product Prices
The Shop Owner needs to set their Product prices and check them often with the market prices to make sure that the Product Prices are set higher than expenses for making profit. They can use strategic pricing methods, like initially setting low Product prices and raising the Product prices once they have enough Customers, or setting high initial prices and reducing them over time, or discount pricing by regularly marking down goods or services.
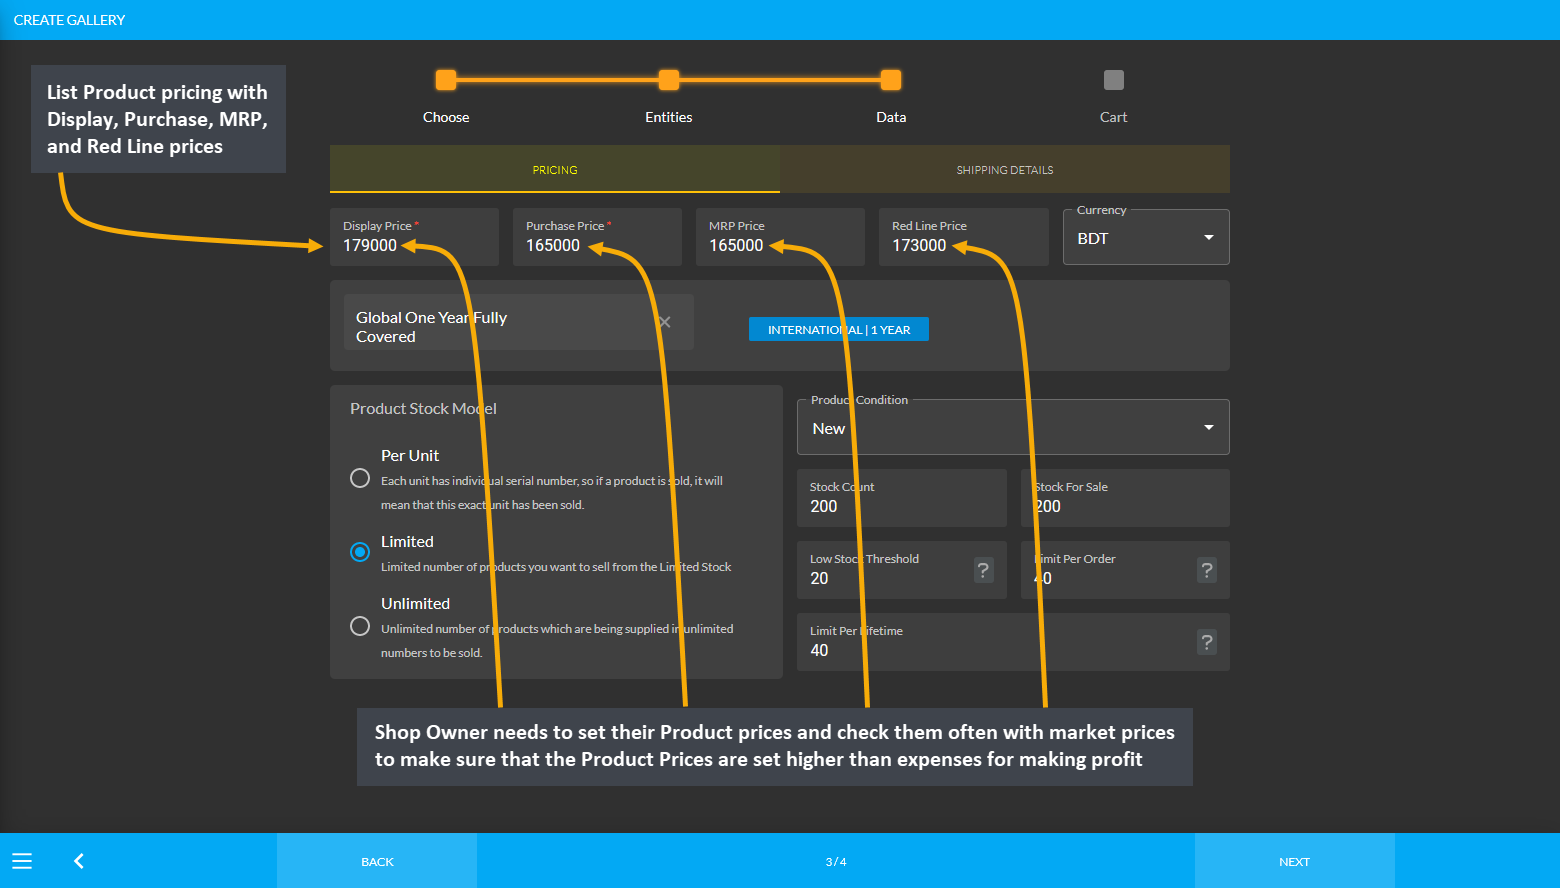
Image 3: Shop Owner needs to set the various Product prices and check them often with the market prices.
Record of Product Purchase
The Shop Owner purchasing Product Batches from the Supplier will be recorded on Unit Stock Management page. Therefore, when the Shop Owner purchases Products from Suppliers, they can set Payment Method to pay for purchase from the Supplier on Add Product Stock page. The record of purchase by the Shop Owner from the Supplier will be available for view under the Ledger Breakdown page, which can be printed for keeping record.
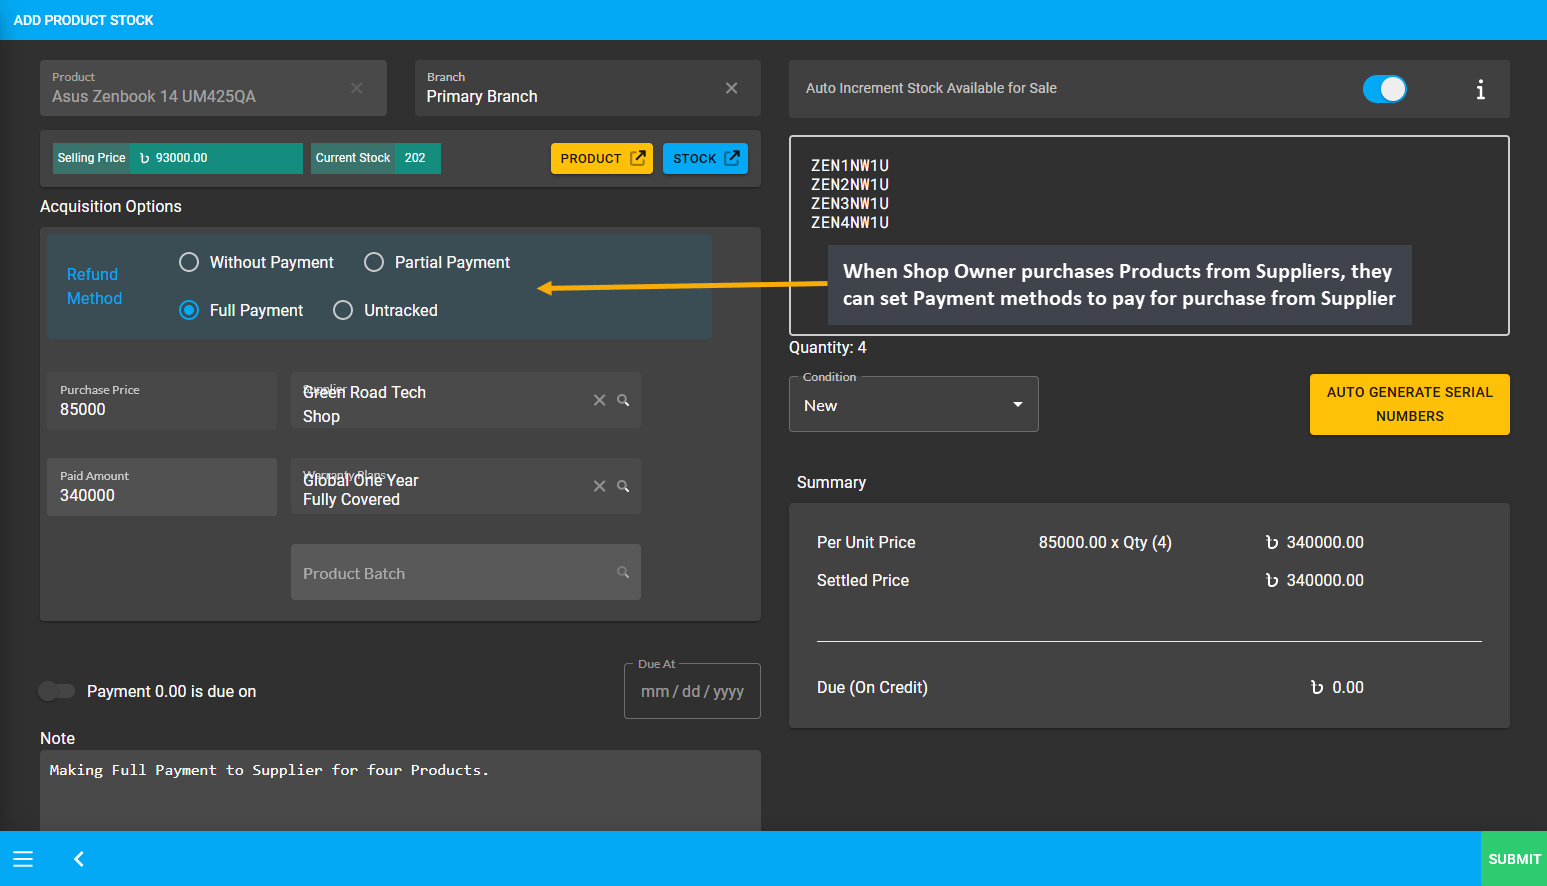
Image 4: When Shop Owner purchases Products from Suppliers, they can set their preferred Payment Method.
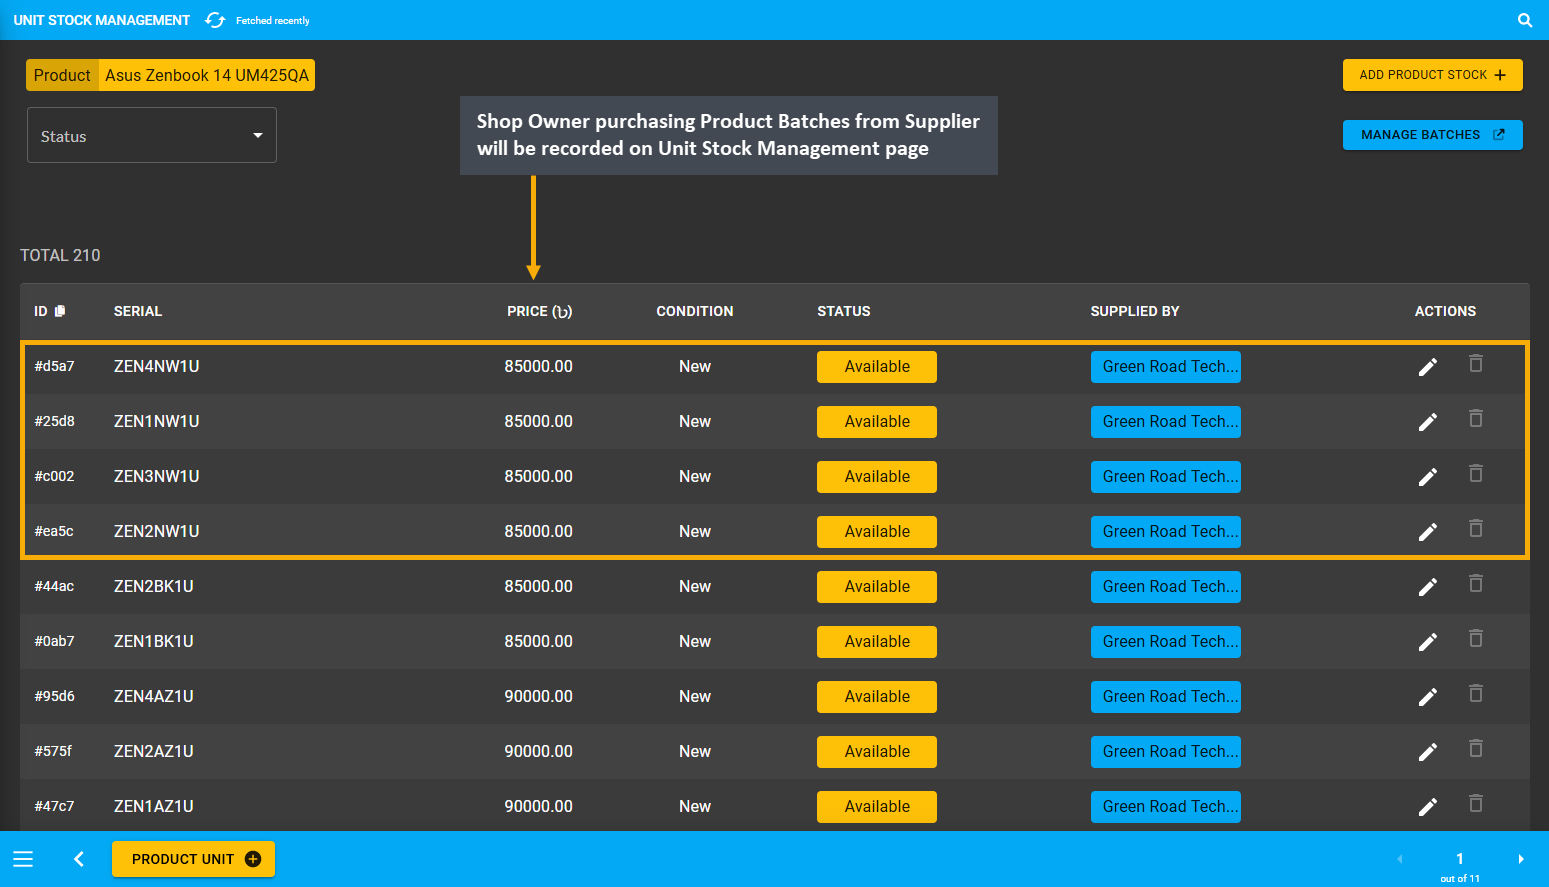
Image 5: Shop Owner purchasing Products from Supplier will be recorded on the Unit Stock Management page.
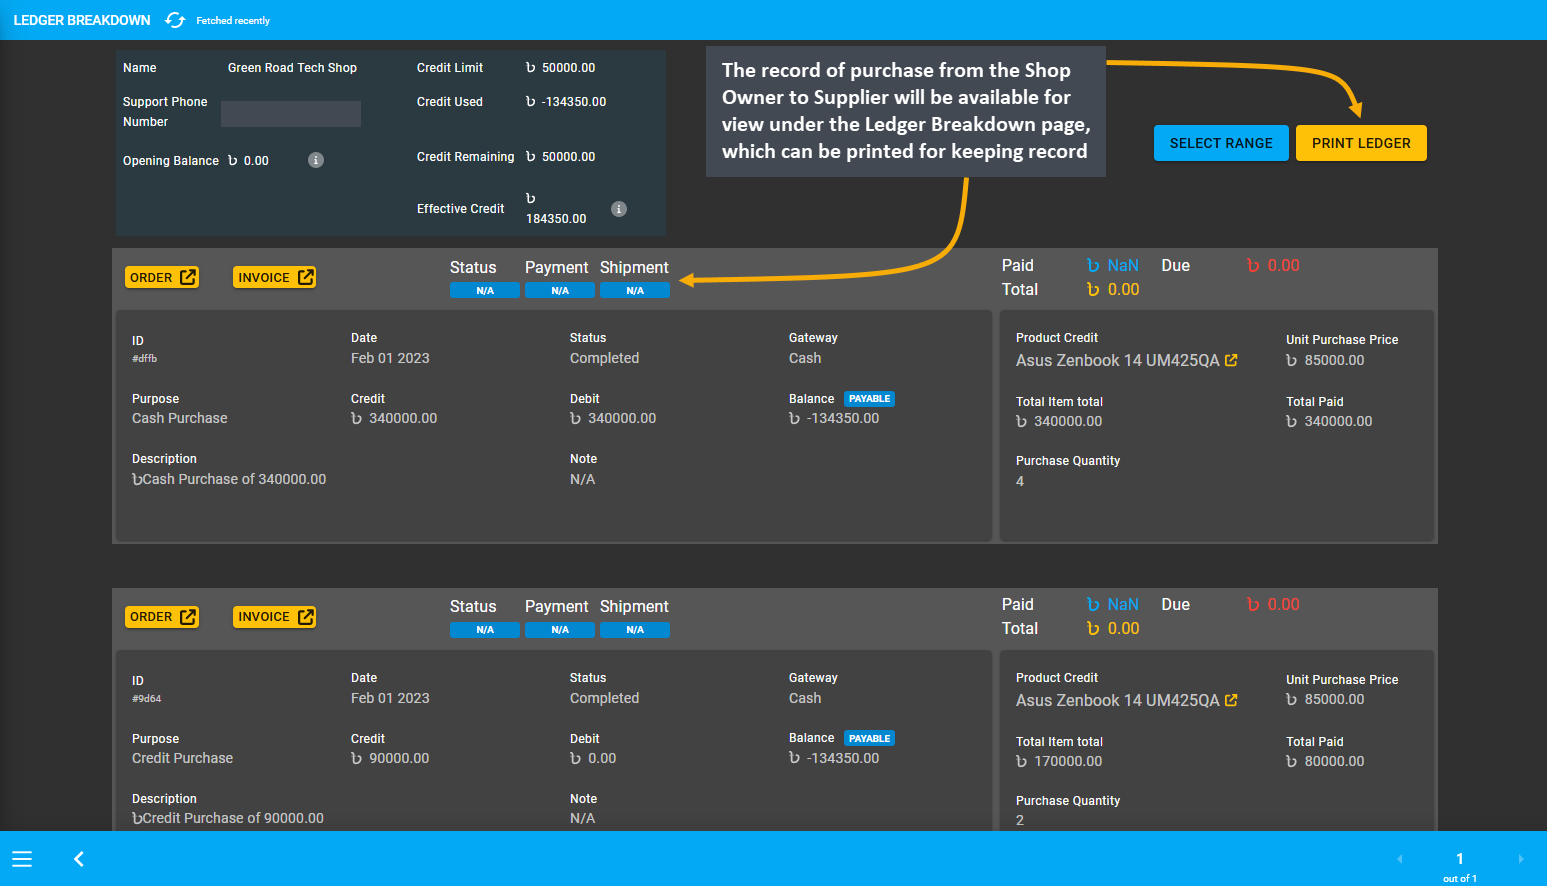
Image 6: Record of purchase by Shop Owner from Supplier will be recorded on the Ledger Breakdown page.
On a similar note, if the Shop Owner sell Products to Customers without demanding immediate payment, then they need to create invoices. Create invoices with information like the date of transaction, Customer, Seller, and Product information, the due amount, payment terms, and an invoice number for reference to keep record.
Sales Record with Cost Basis Report
Shop Owner needs to keep track of their Product sales on a day to day basis. Maintaining a record on paper or electronic is important for any business. The sales record can be organized from invoices, sales receipts, cash register, VAT documents, and bank statements. So, record every sale and amount charged to Customers.
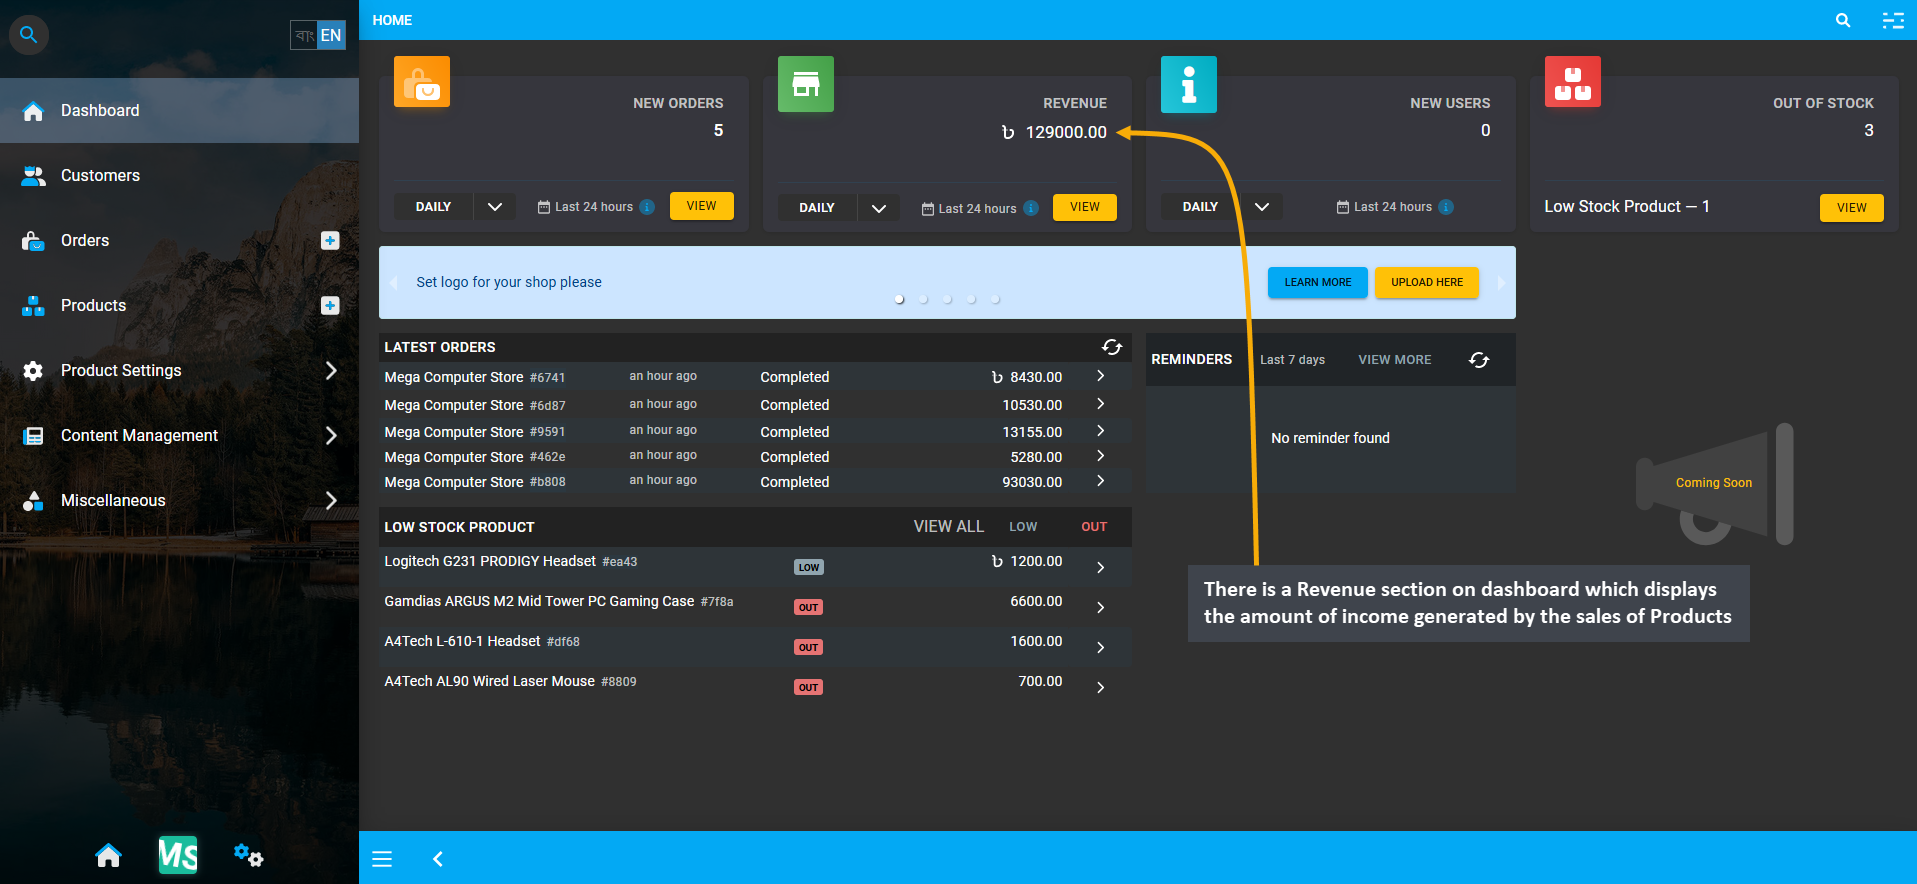
Image 7: Revenue section on dashboard displays the amount of income generated by the sales of Products.
To observe the progress, the Cost Basis Report of daily, weekly, monthly, or yearly sales is automatically updated by the CMS. There is also a Revenue section on dashboard which displays the amount of income generated by the sales of Products. Since recording daily profit and loss is one of the fundamental financial documents, the Shop Owner needs to keep track of how much money their business brings and how much are their expenses.
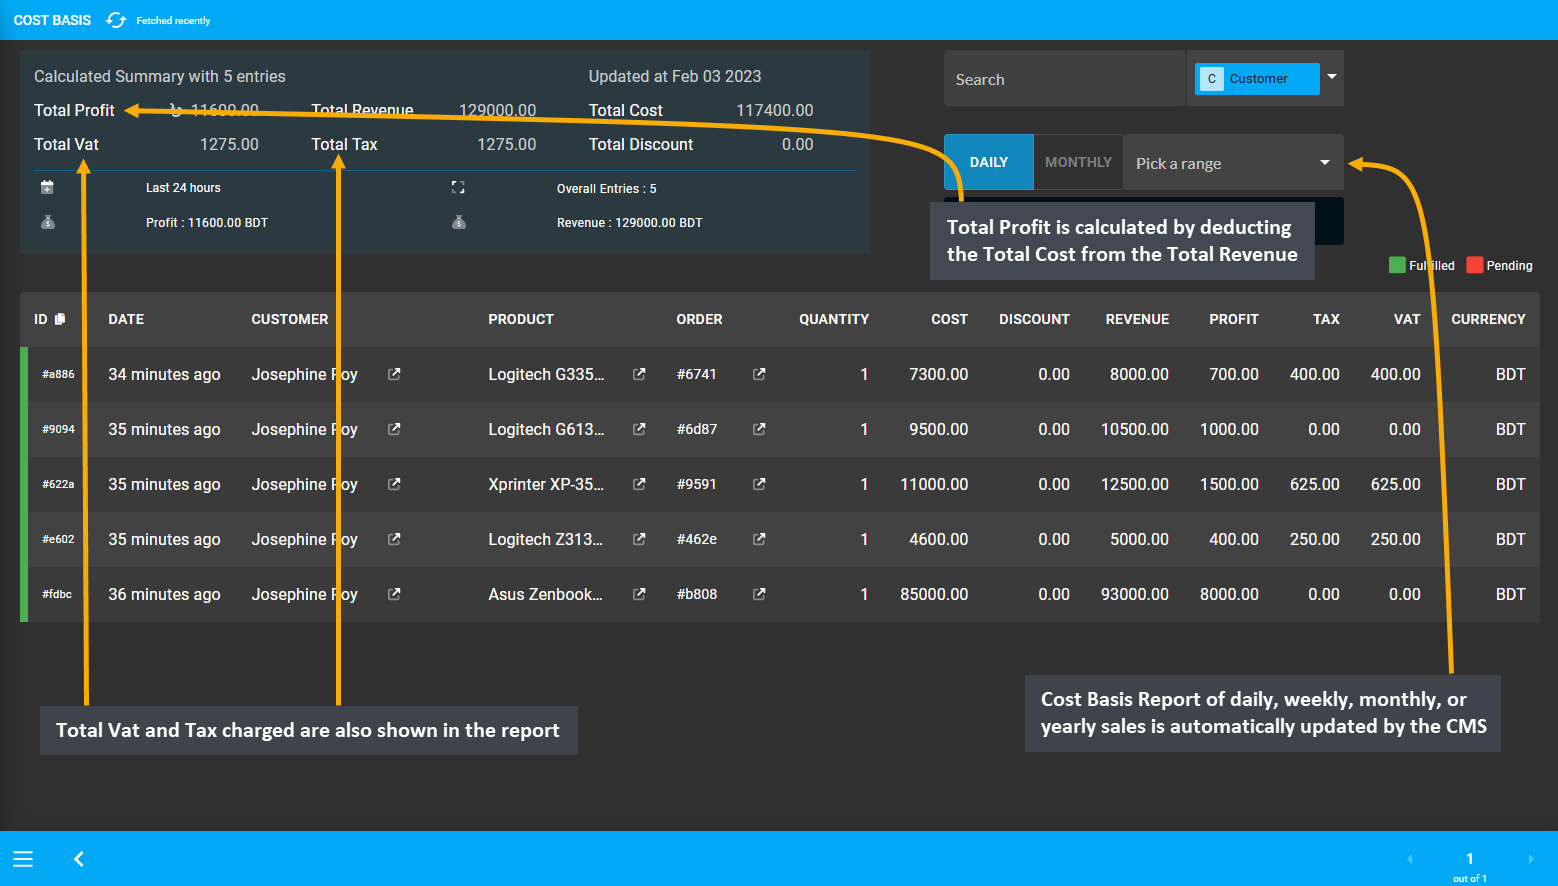
Image 8: Cost Basis Report of daily, weekly, monthly, or yearly sales is automatically updated by the CMS.
Therefore, it is important to determine the cost of Products sold and to keep track of revenue earned from selling the Products which are available through the automated Cost Basis Report. Total Profit is calculated by deducting the Total Cost from the Total Revenue. Total Vat and Tax charged are also shown in the report.
Inventory Overview
The Inventory includes the total amount of Stock in storage available for sale. The Unit Stock Management page will show the Inventory from where all Products with few different statuses i.e. Available, Broken, Reserved, Sold, Returned, or RMA allocated. So, by keeping track of the Inventory, the Shop Owner can manage different Product Stocks with different statuses for different types of Orders to compare Product stock versus Product sales.
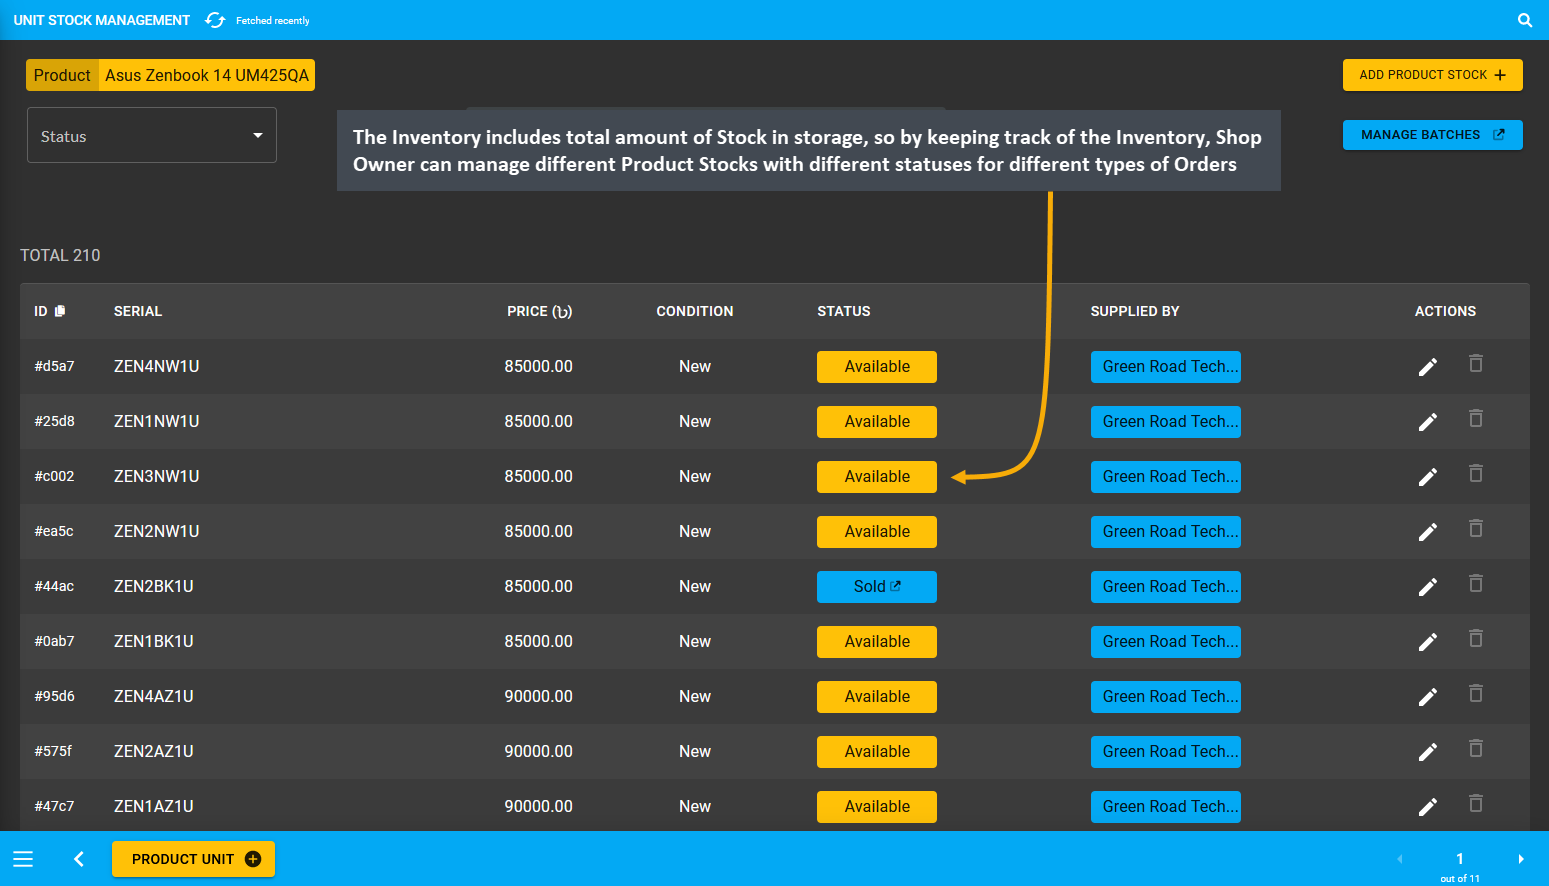
Image 9: The Inventory includes total amount of Stock in storage, so that Shop Owner can keep track of it.
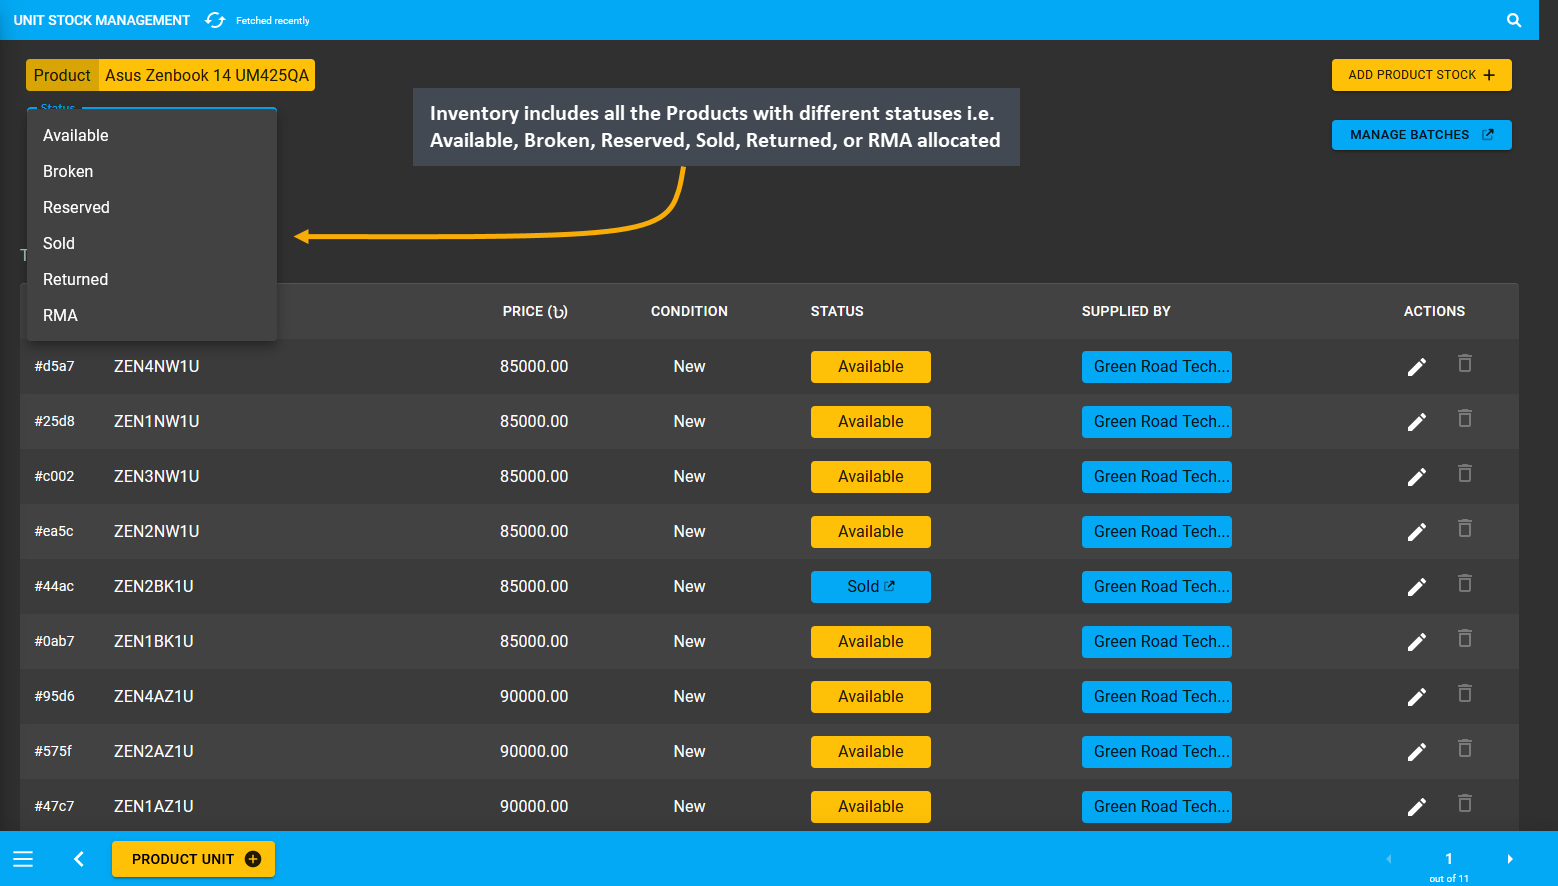
Image 10: Product inventory include Available, Broken, Reserved, Sold, Returned, or RMA allocated Products.
Create Return Policy for Customer
It is important for the Shop Owner to create a clear and concise Return Policy for Customers. Make sure that the Product Return Policy will give Customers a feeling of security in that the Products they will purchase is going to be exactly what they receive. Customers will always want to be guaranteed about the Products that they will be purchasing from the Shop Owner. So, create own Policy to add to the Website, or use our Return Policy template.
Establish a fair Return Policy for Customers which reflects the trust the Shop Owner have in the Products they sell. Create Return Policy with options for replacement Products, Ledger Credit, or Refund based on Customer’s claim.
Record Credit, Payable, and Receivable with Ledger
The Shop Owner needs to keep record of calculation between the business parties. For instance, the Shop Owner can calculate Payable, which means that that Credit Supplier will get the mentioned amount from Shop Owner. So, Payable is when something is purchased without paying right away. Selecting Payable for previous transaction on Import Ledger will add to Payable amount that the Shop Owner owes to the Credit Supplier.
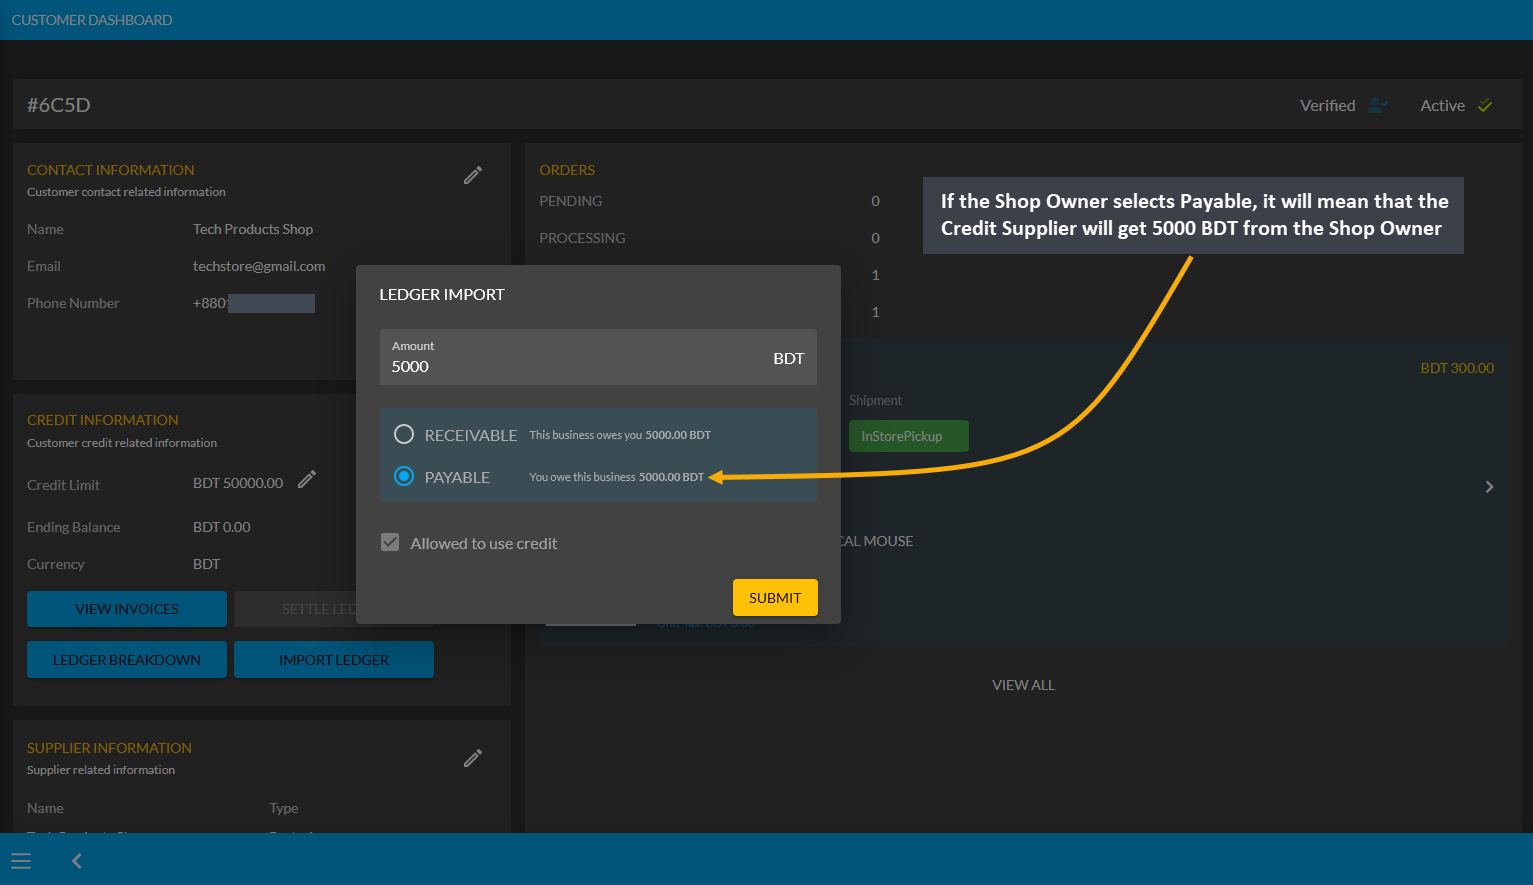
Image 11: If Shop Owner selects Payable, it means Credit Supplier will get mentioned amount from them.
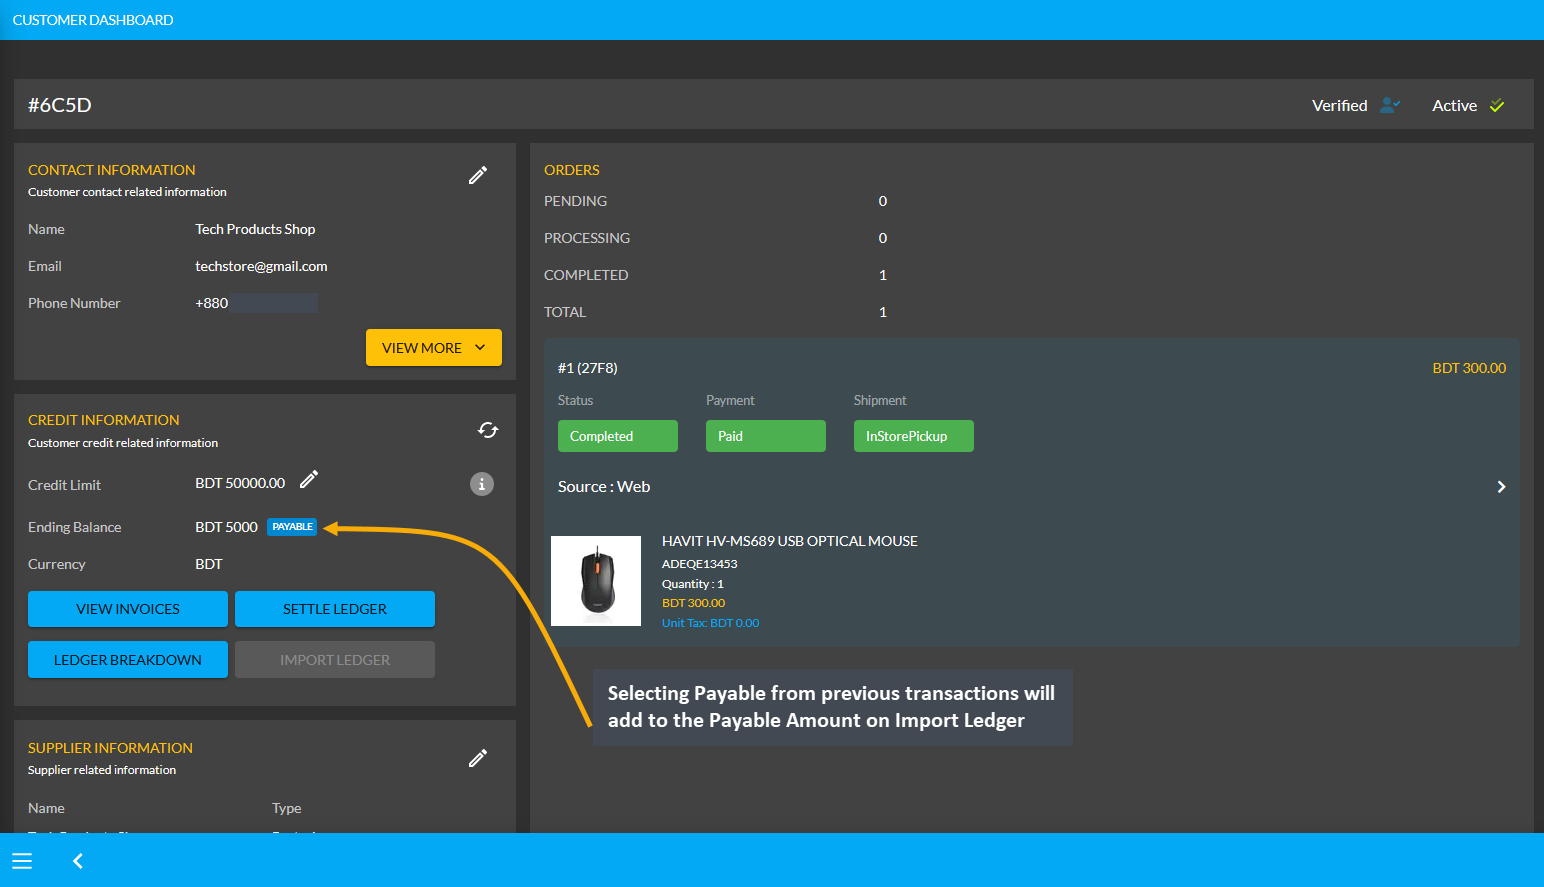
Image 12: Selecting Payable from previous transactions will add to the Payable Amount on Import Ledger.
Similarly, the Shop Owner can calculate Receivable, which means that the Credit Supplier will pay the mentioned amount to the Shop Owner. Thus, Receivable is when Shop Owner purchase something On Credit from the Credit Supplier. Selecting Receivable for previous transaction will add to the Receivable amount on Import Ledger which the Shop Owner owes from the Credit Supplier.
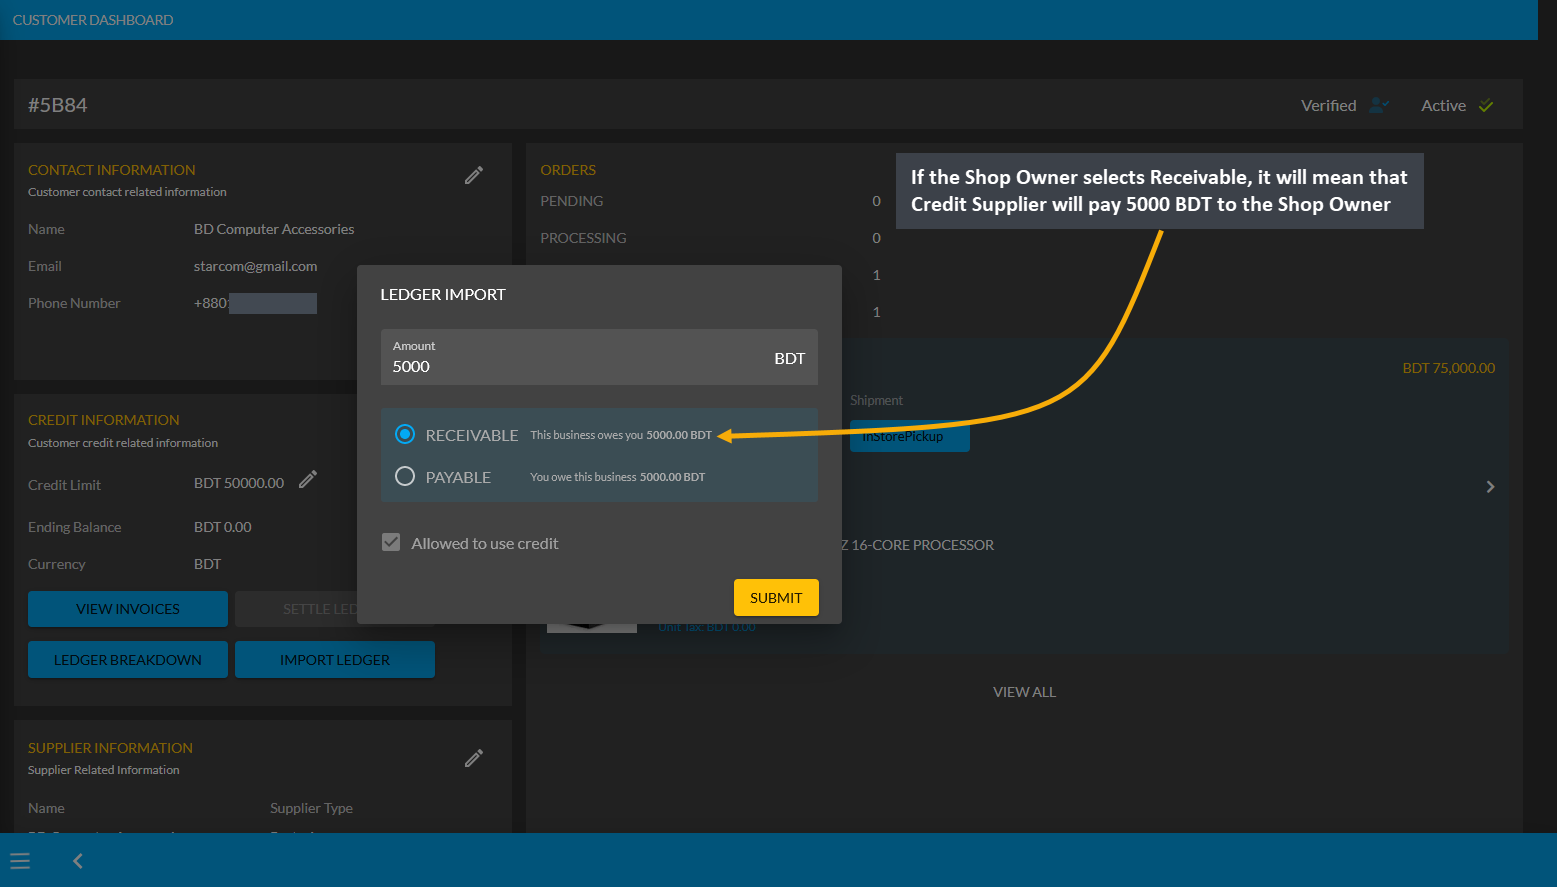
Image 13: If Shop Owner selects Receivable, it means Credit Supplier will pay mentioned amount to them.
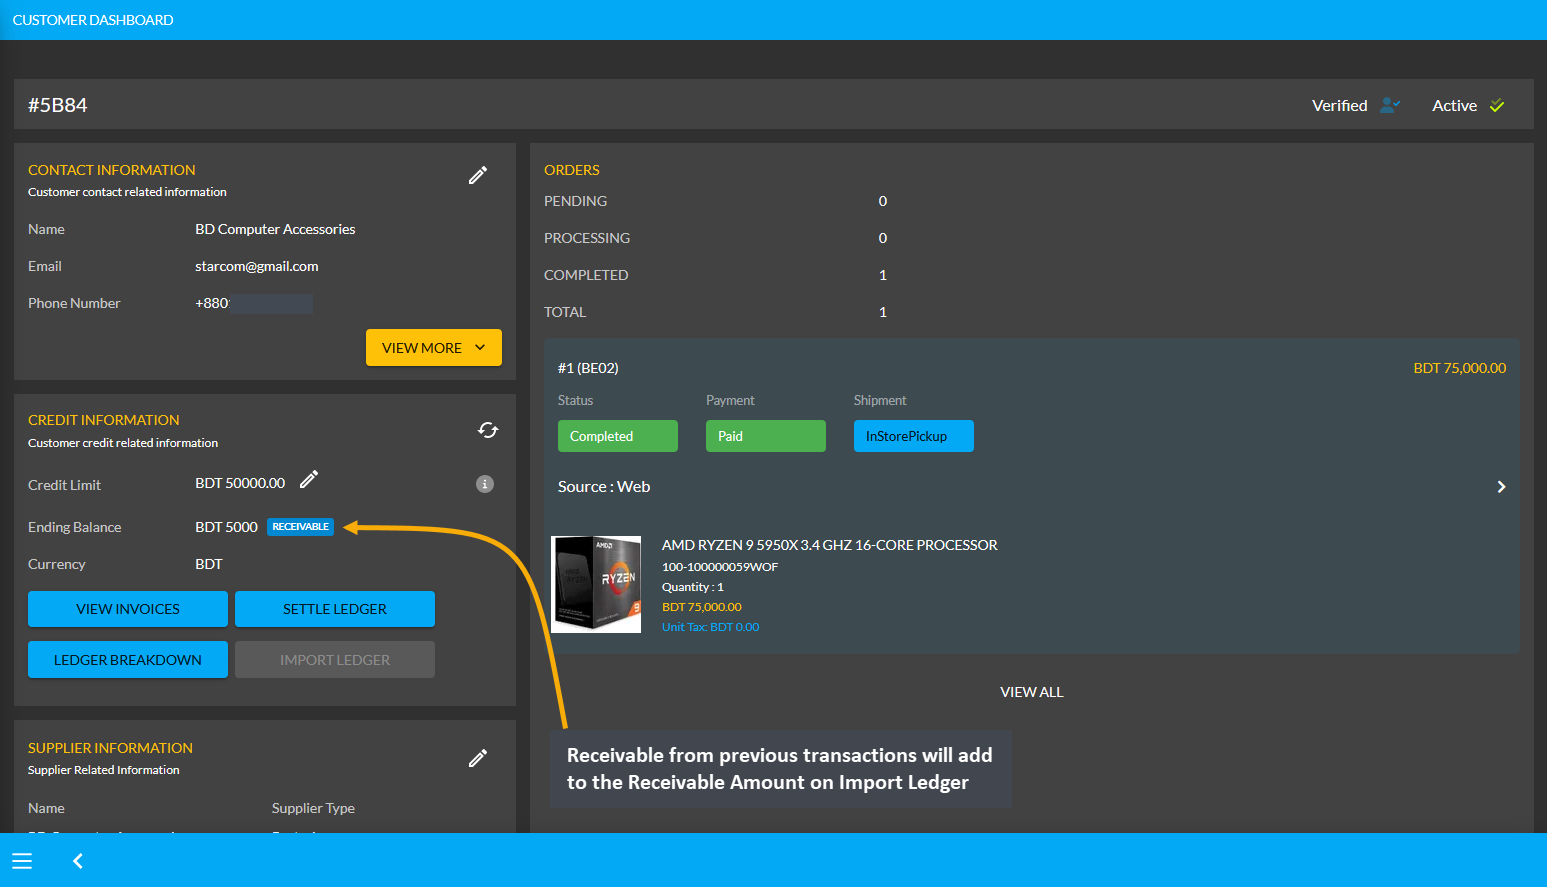
Image 14: Receivable from previous transactions will add to the Receivable Amount on Import Ledger.
The CMS has a Ledger system where Ledger is like a complete transaction history of day-to-day business. Shop Owners can decide to grant any Customer Credit Limit with which they can buy Products from the Shop Owner that will reflect in their Ledger. With Credit balance, Customers can purchase Products from Shop Owners using On Credit without having to instantly pay. All the transactions will be available on the Ledger Breakdown page.
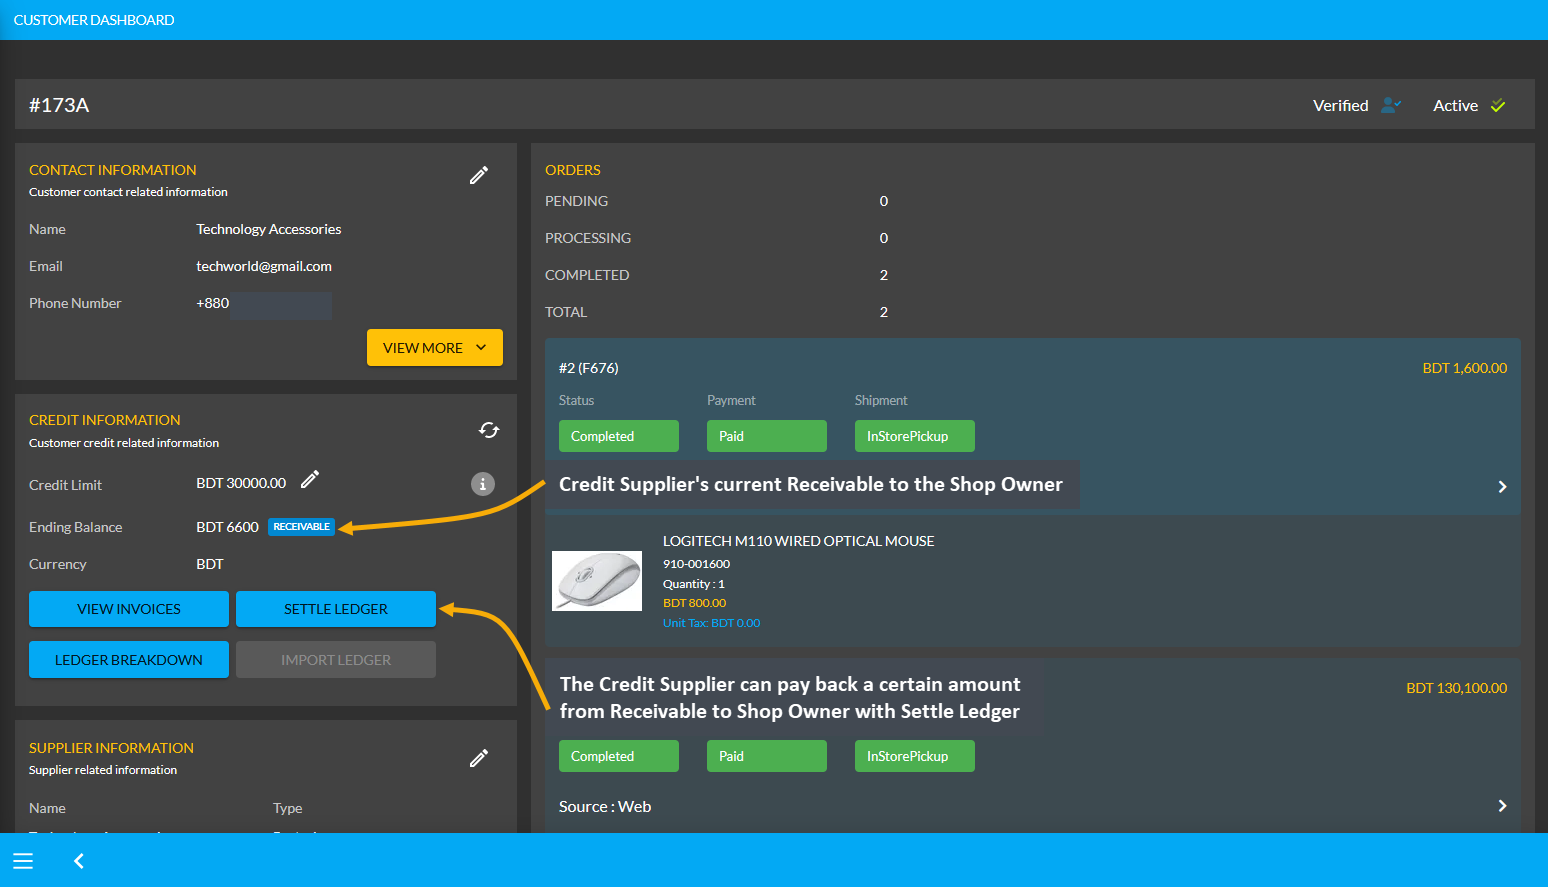
Image 15: Credit Supplier can pay back an amount from Receivable to Shop Owner with Settle Ledger feature.
Ledger balance can be settled with any Payment Gateway (Cheque, Cash On Delivery, Credit Card, SSLCommerz, Nagad, Nagad Manual, BKash Manual, BKash, PortWallet, Cash, and Bank Transfer) available within Settle Ledger.
Invoice with Payment History
Keep track of Payment history for the Website Orders through invoices for Customers as they make all Payments with Cash and other Payment Gateways, the details of which will be recorded. Verify all the payment information before approving transactions and avoid processing delays for both traditional and electronic payments. If Shop Owner need to check back on an old Order, they can refer back to invoices of those Orders from the Order List.
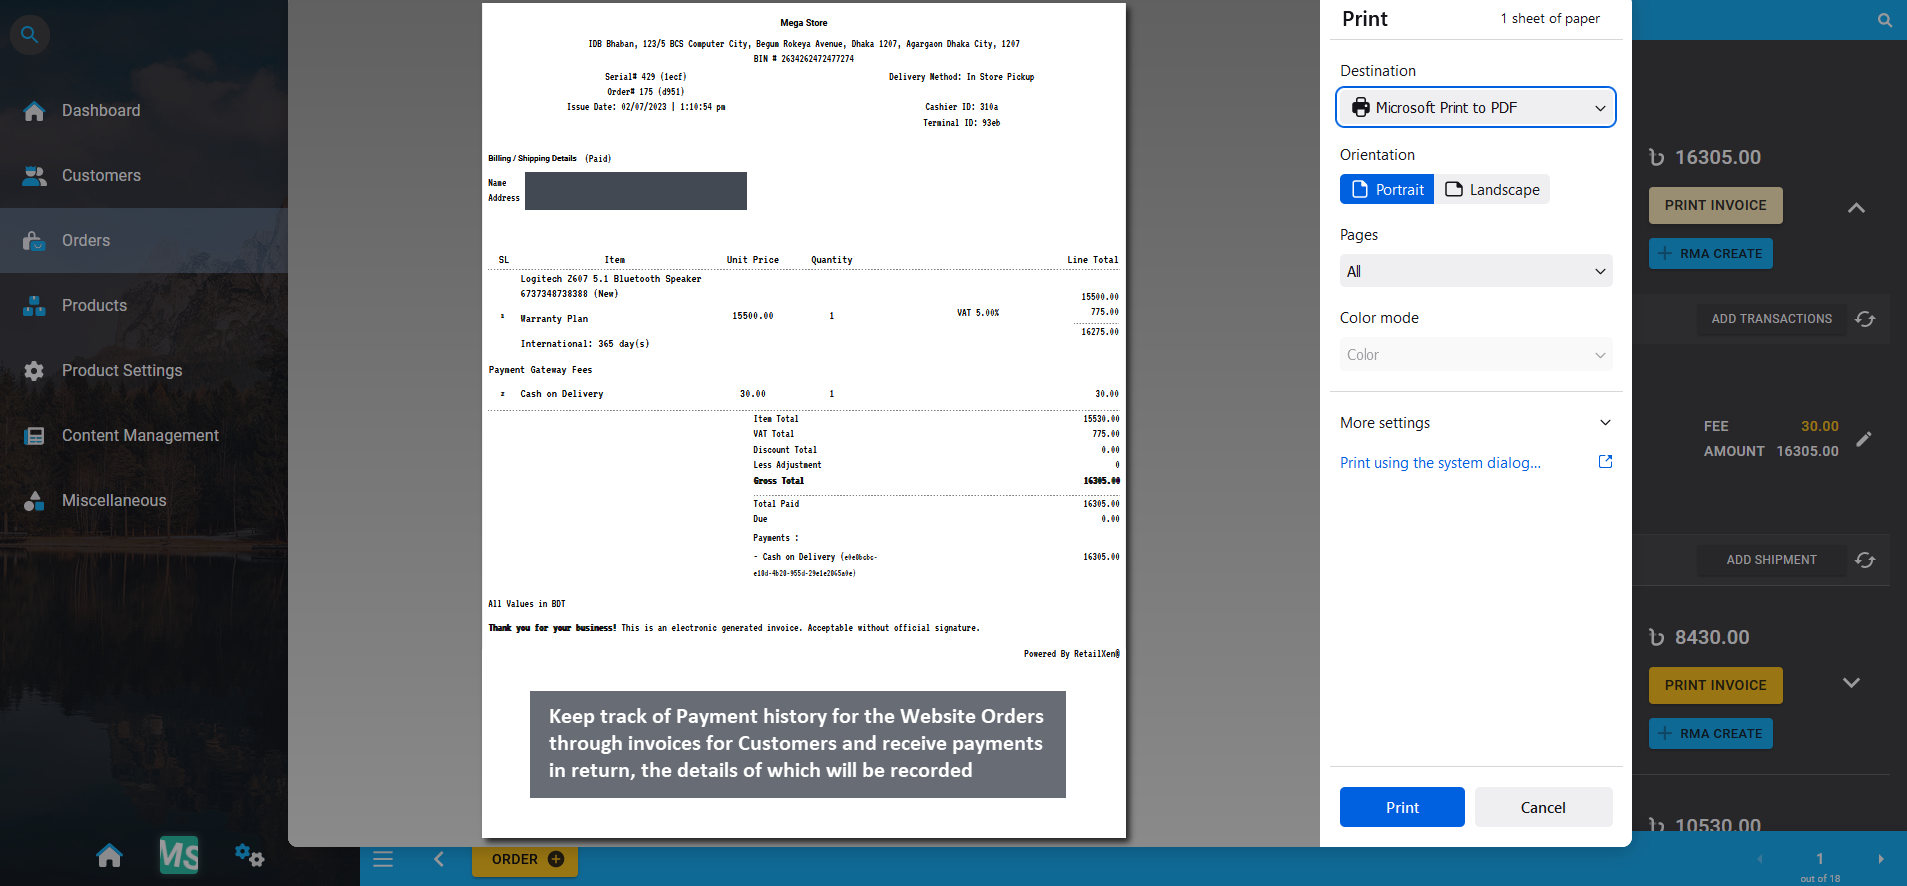
Image 16: Keep track of Payment history for the Website Orders through invoices for all type of Customers.
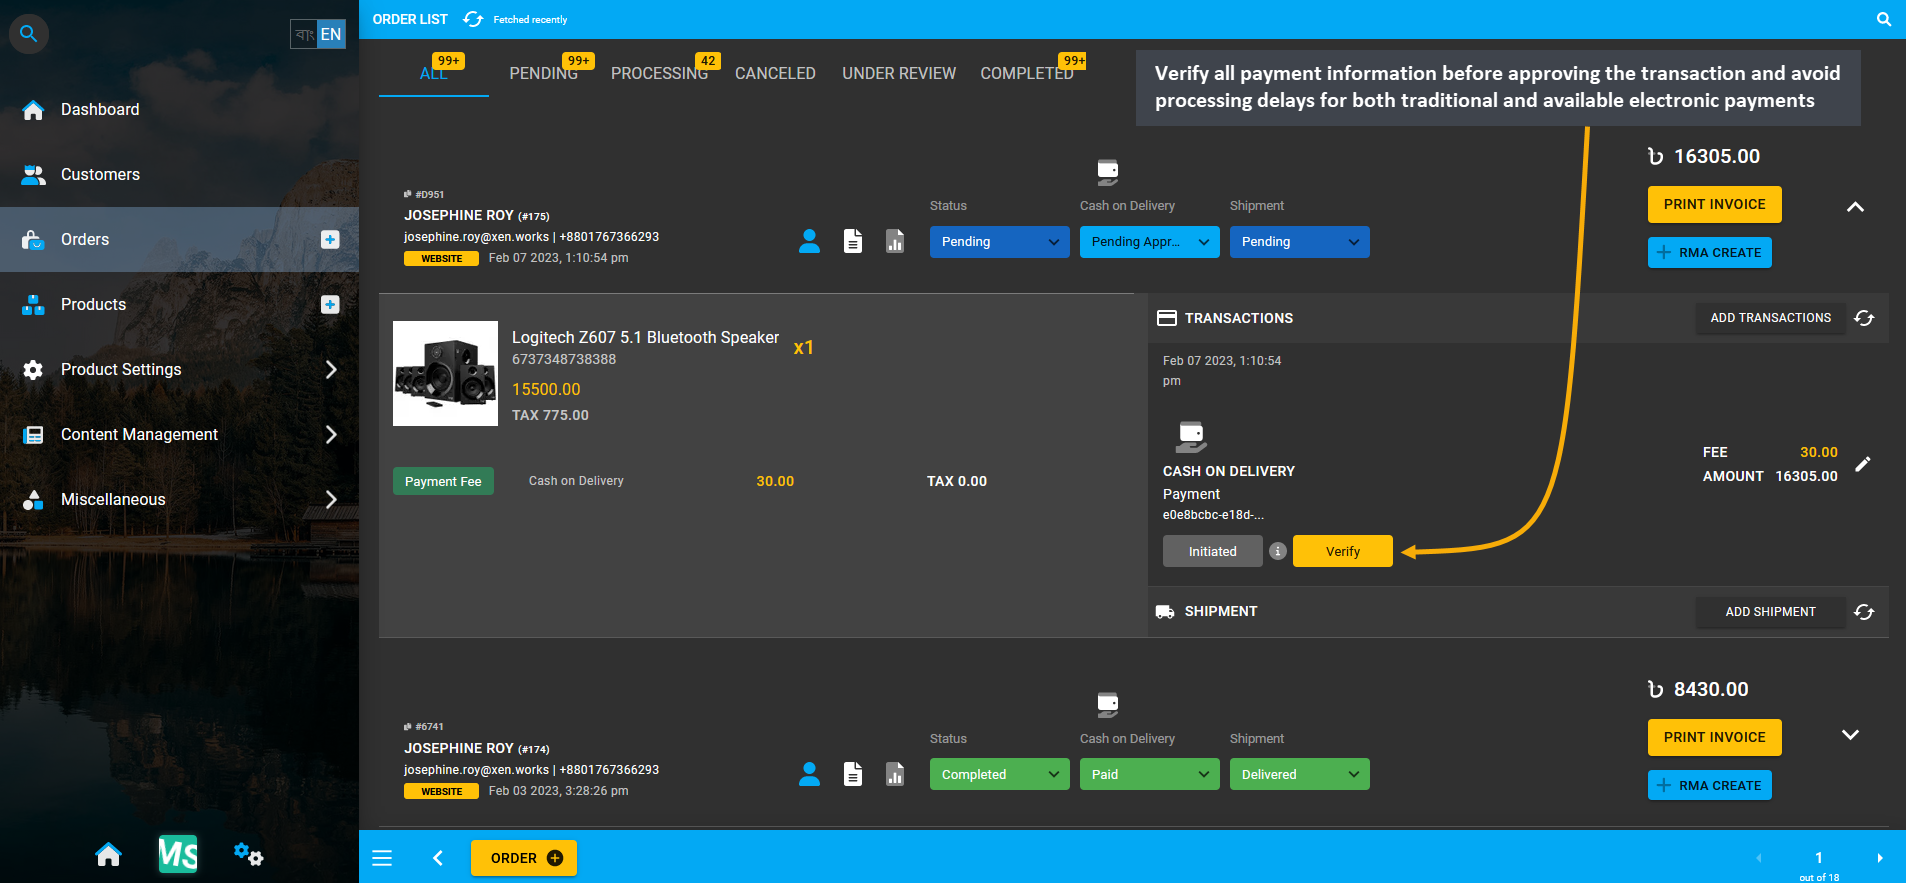
Image 17: Verify all the payment information before approving the transaction to avoid processing delays.
Create Terms for Service, Replacement, and Refund
The Shop Owner needs to create Terms for Service, Replacement, and Refund of Products. Customers can review these terms to file any claim on any Products quality issue if they are not satisfied with their purchase. The terms will apply to sales of all Products and the Customer can formally file a claim for warranty, service, replacement, or refund procedure. Refer to our Terms of Service and Return and Refund Policy templates to get clear ideas.
Create RMA Case to manage Product Claims
Retail Xen provides a Return Merchandise Authorization (RMA), through which Shop Owners can track all Product related claims, return process, warranty process, refund claims, custom service warranty, and Product exchange process. Using RMA workflow, the Shop Owners will be able to receive a Product, arrange exchange or refund, track warranties, and Product claims. Out of Warranty service can be provided by Shop Owners through RMA. Learn details of effective Warranty management by going through Return Merchandise Authorization (RMA).
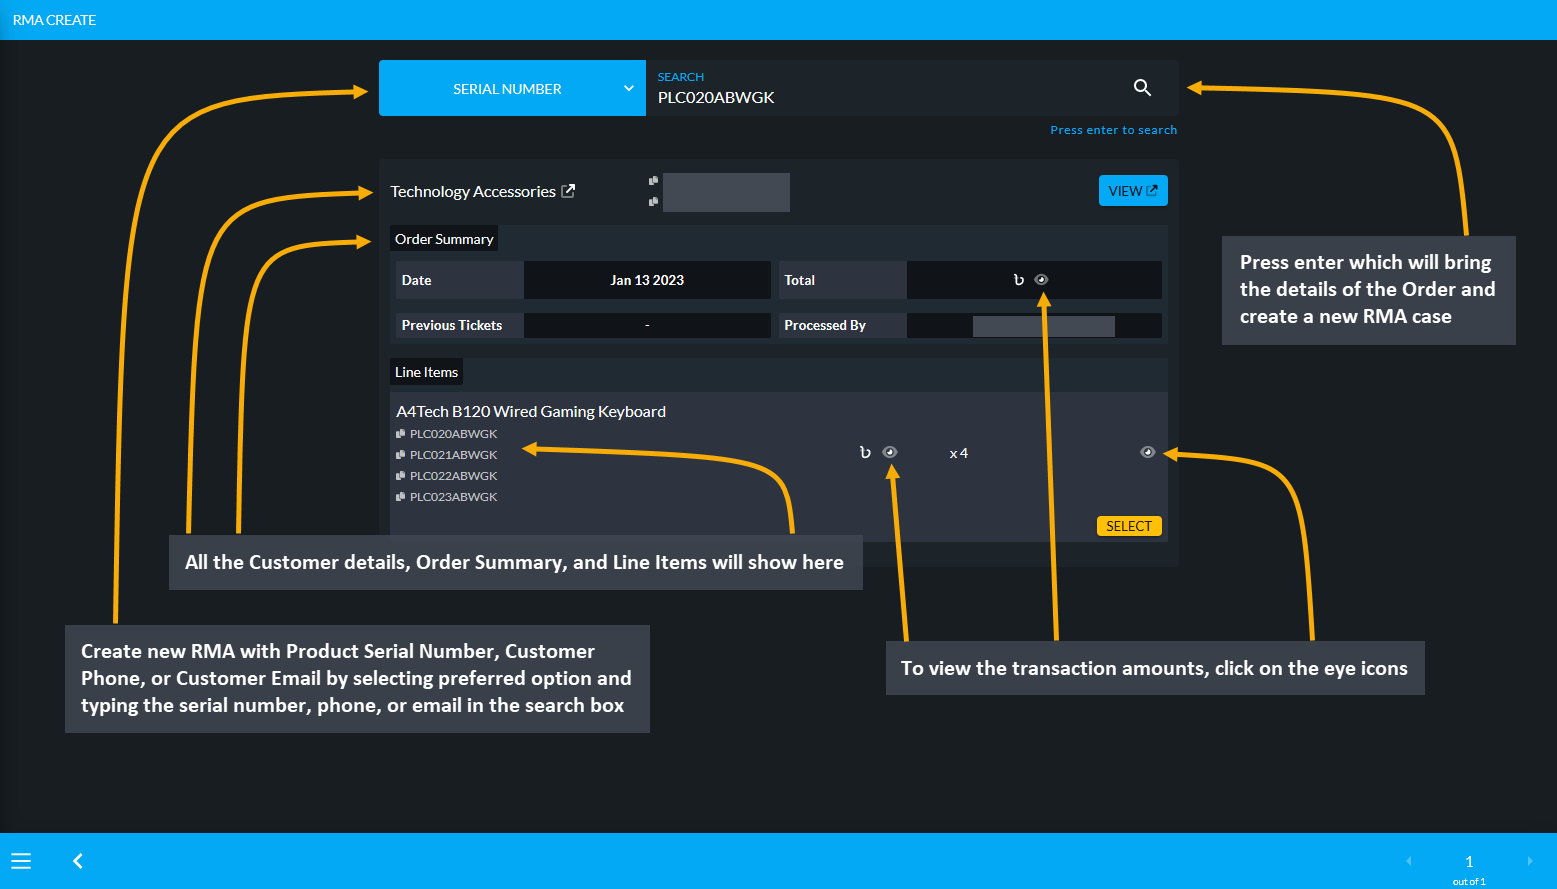
Image 18: Create new RMA with Product Serial Number, Customer Phone, or Customer Email by typing on search.
After RMA is created, the Order and RMA case details will show on the RMA View page. Within Product details, the purchased date, warranty date, sale price, and Related Cases will show. Below it are the RMA Workflow, which will allow Shop Owner to take action for the Product with different actions. There are several workflow actions such as Comment, Denial, Supplier, Service, Return, Exchange, Refund, and Warranty. Click on each of these workflows to add comment, upload images, and update status to save the workflow update for the RMA case.
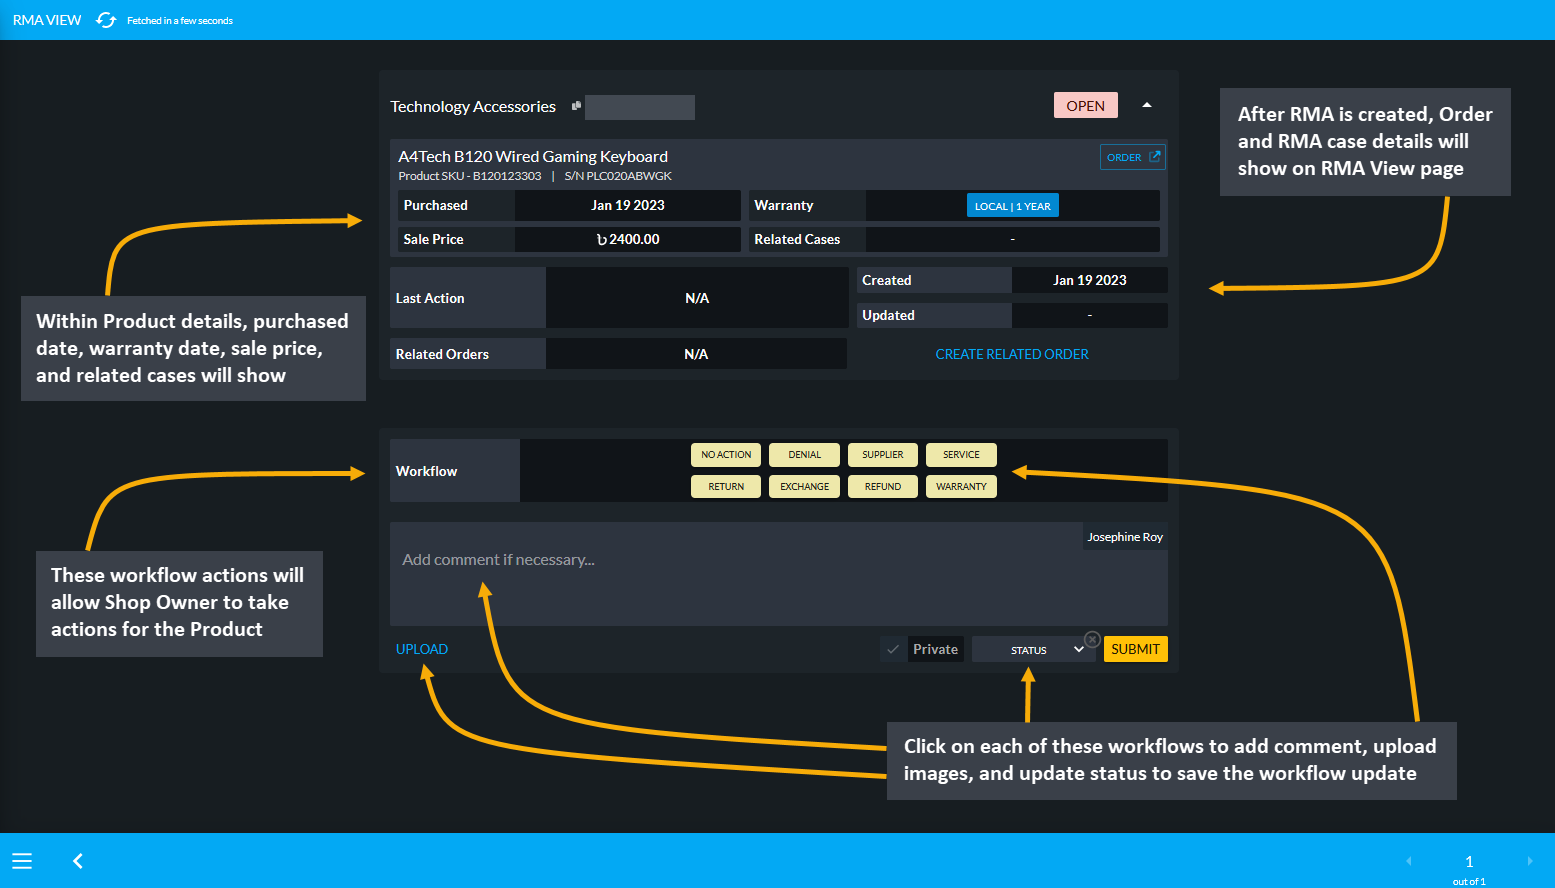
Image 19: Product details, Order details, RMA case details, RMA workflow actions and status can be updated.
Process After Warranty Service
Generally, After Warranty Service includes support, maintenance, and repair of Products purchased by Customer. They can request for technical or on-site support for after warranty service of Products from the Shop Owner. For instance, warranty for RMA case could include giving Product parts or service warranty. So, if warranty is expired, they can charge Customer regarding warranty related services, they can use the option to Create Related Orders.
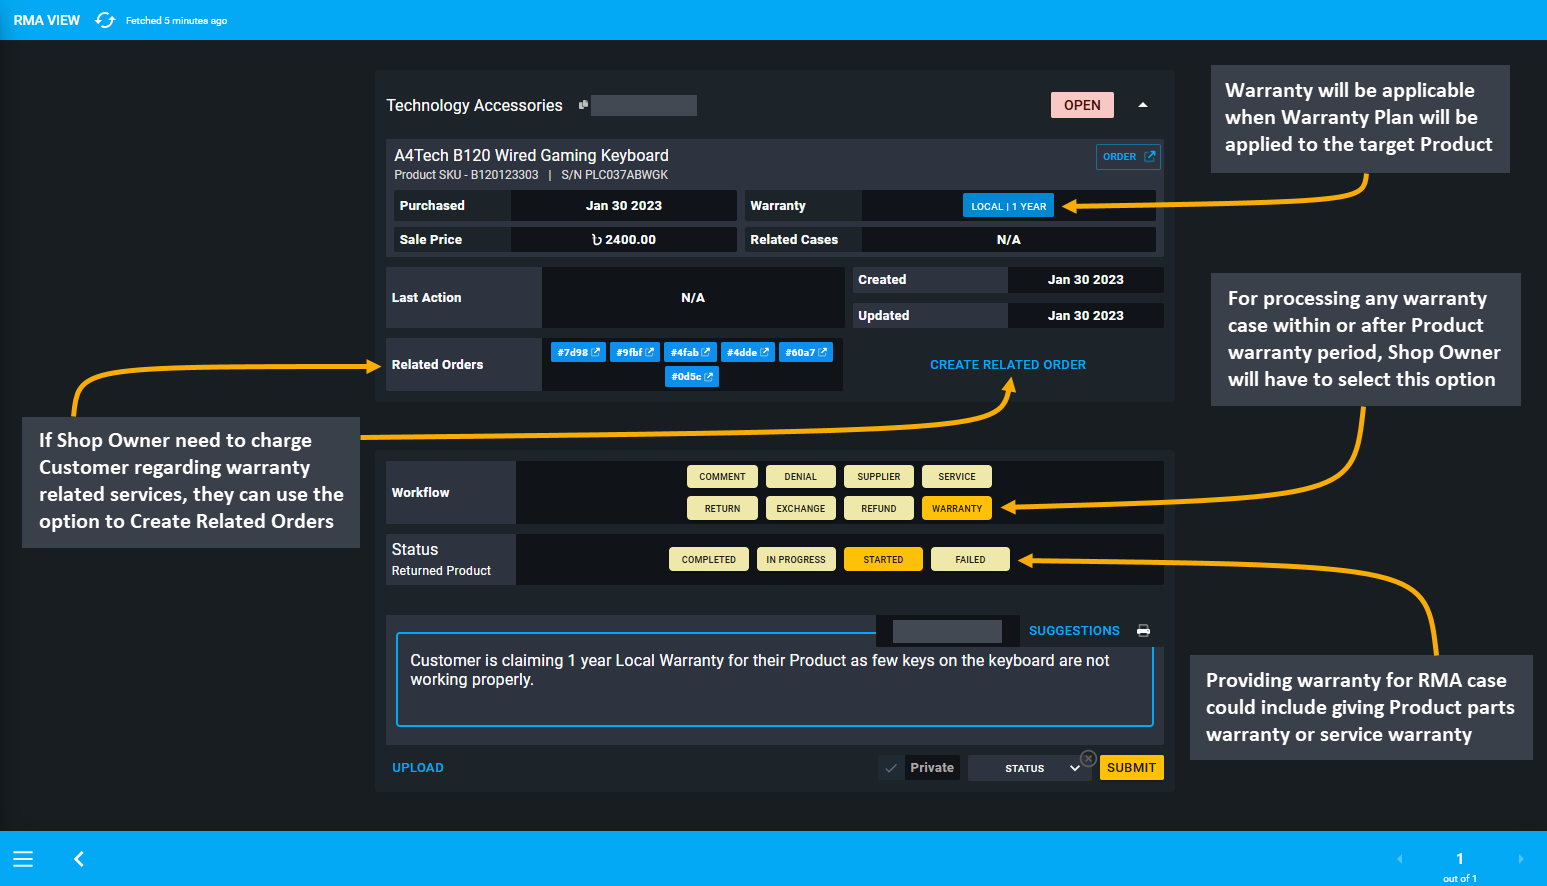
Image 20: Use Warranty to process any warranty case within or after Product warranty period that applies.
4 - Errors Glossary
Read this section to understand the nature of errors that may occur in the system.
This document is intended to serve as a glossary of errors applicable to users of the content management system who will need this as an independent guide to understand errors that frequently occurs in the system. The phenomena of common errors are described below with screenshots which will be essential for easy understanding.
Errors Glossary
The following glossary displays Lists of various errors that may occur when operating the Admin Panel.
Concurrency Issue
When multiple users try to access and change data in the system concurrently, data integrity in the system may be compromised. Thus, when resources are shared or transactions are executed by multiple interactive users at the same time in an unrestricted or uncontrolled manner, it may lead to concurrency issues. So, access needs to be controlled to prevent these undesirable effects.
Concurrency Control Failure
Product, Order, Transaction, and Invoice are Concurrently Controlled Entities, where only one User can operate at a time. For example, if a User is trying to Edit a Product which is a concurrently controlled entity, and another User tries to simultaneously Edit that Product, then Concurrency Control Failure will occur and it will throw one User out of the system. So, if the entity a User is trying to operate on is concurrency controlled, it means that other Users may be trying to edit it simultaneously, but cannot.
Therefore, if a Customer is trying to Order a concurrently controlled entity like Product, the Product Stock Count will decrease automatically in the system while editing the Product. Other concurrency controlled entities such as Order, Transaction, and, Invoice will not allow being operated by multiple Users at the same time. If the Users try to operate within a concurrently controlled entity simultaneously, Concurrency Controlled Failure will occur.
5 - Home Page
Admin Panel or Home Page for all Tenants
This page shows the overview of the Tenant Account on the Dashboard and Home Page sections.
Admin Panel Home Page
The Content Management System consists of six main modules - Dashboard, Customers, Orders, Products, Product Settings, and Content Management. Using these modules, various sections and tabs of the Website can be created and edited. Select any module and their sub-sections from the left hand menu as needed.
The Shop Owner can create and modify Orders, Products, Customers, Pages, and Widgets on the Website. A Shop Owner can employ multiple Admins to manage the Shop for Customers, enlist Products, and manage Orders etc.
Admin Panel Dashboard
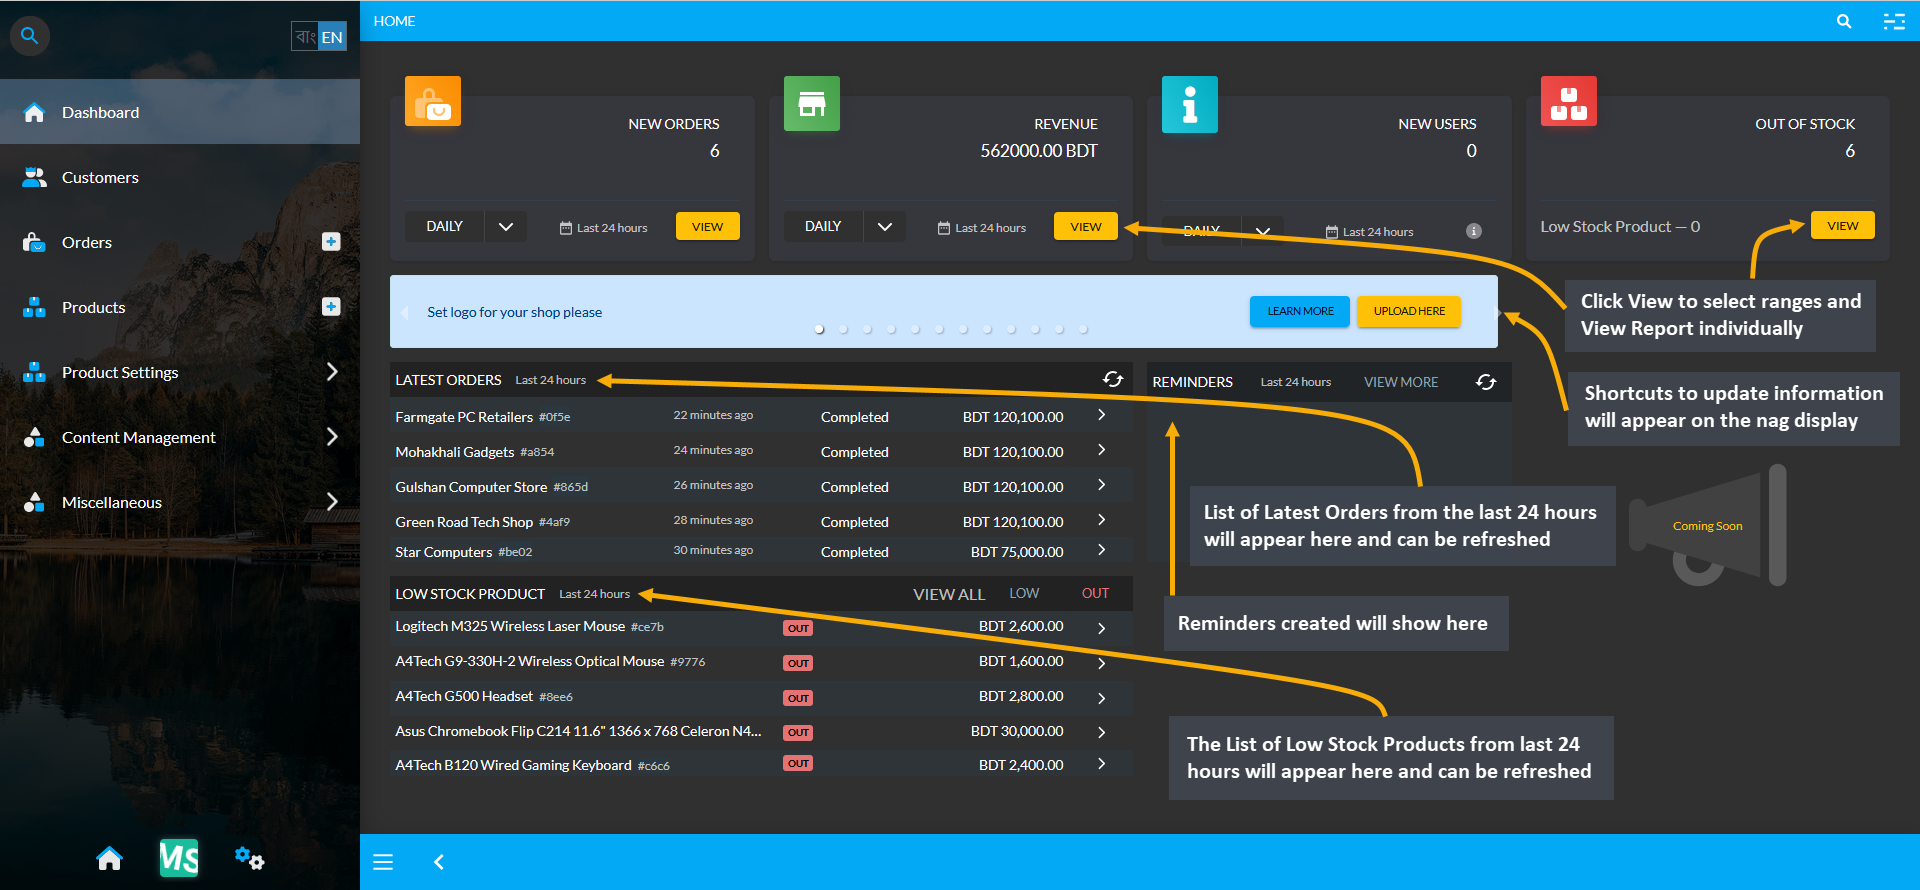
In the New Admin Panel Dashboard, four sections for New Orders, Revenue, New Users, and Out of Stock are shown on top. The functions of each section is described below in details with screenshots. Below them is a nag display where shortcut options to update information will keep showing if they have not been updated yet.
The nag display will prompt the Shop Owner to setup shop logo, slogan, support phone number, Facebook page, payment gateways, shipping gateways, refund policy page, shipping page, EMI page, TIN, BIN, and Trade License etc. For more details, please read about How to Complete Shop Setup.

Timeframe Range Explained
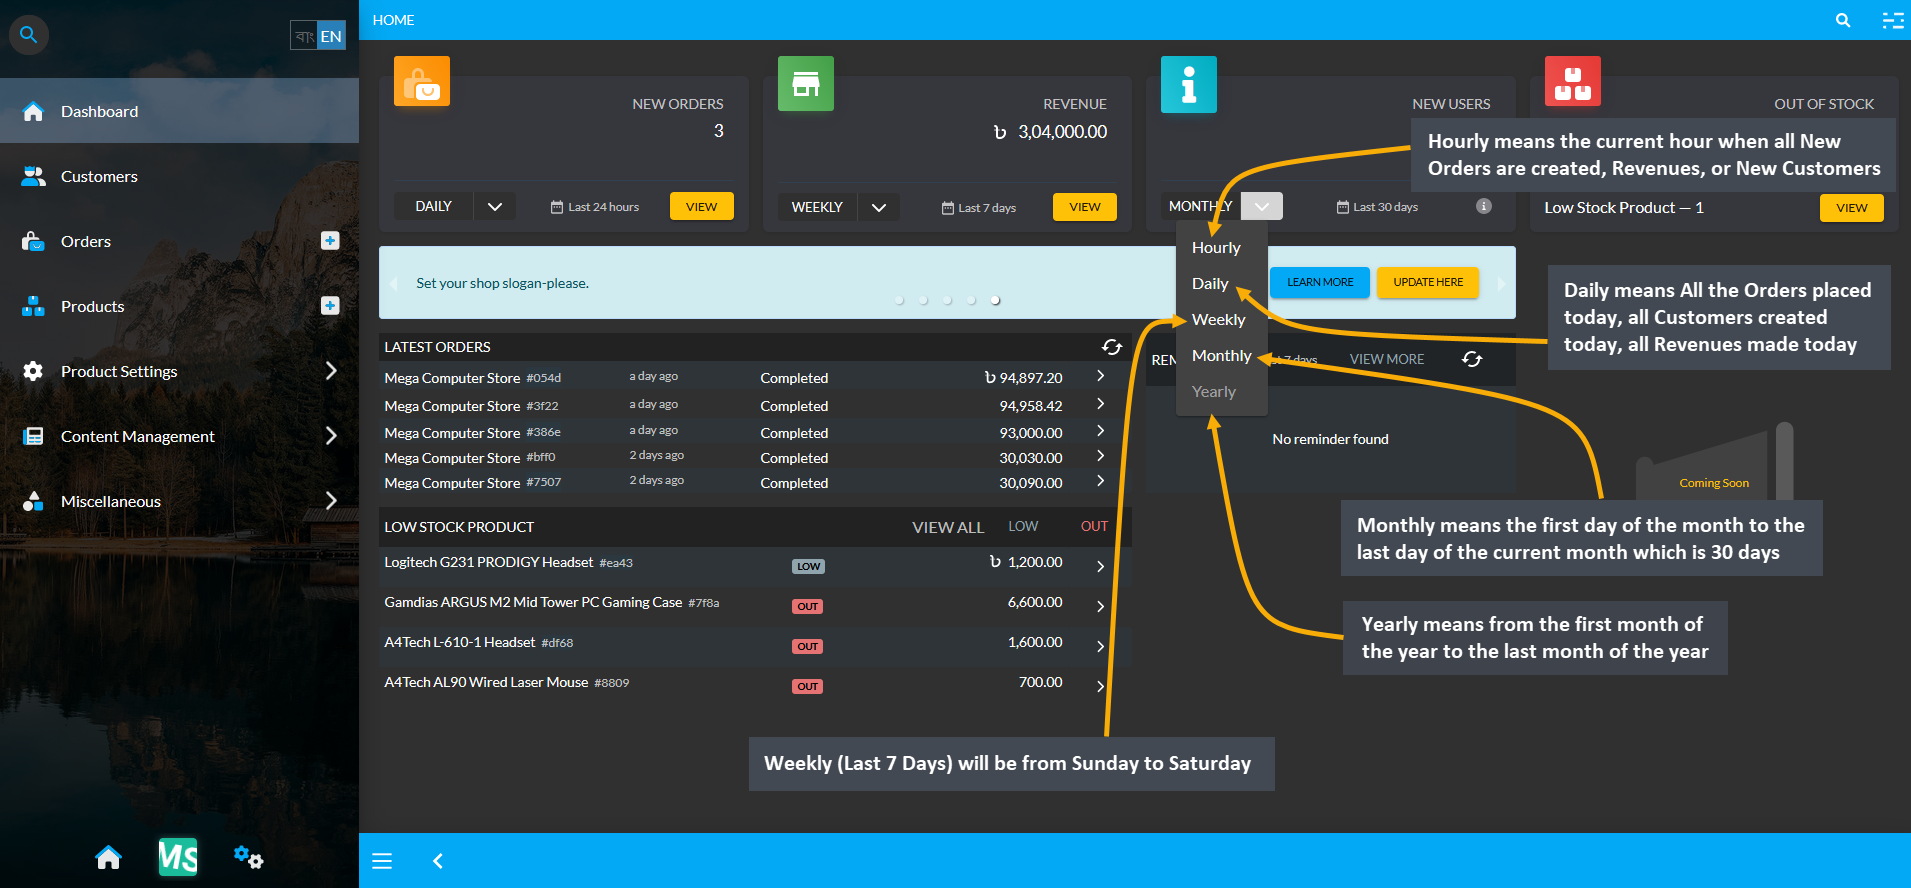
Depending on the selected timeframe, the results will show. Hourly means the current hour when all New Orders are created, Revenues, or New Customers are made. Daily means all the Orders placed today, all Revenues made today, and all the New Users created today. Weekly means the Last 7 Days, which will generally be from Sunday to Saturday, i.e. if today is Friday, 7 Days will be from last Sunday to upcoming Saturday.
Similarly, if today is Sunday, then 7 days time frame will start from today 0:00AM till next Saturday 23:59PM. Thus, current Week will mean current Sunday to current Saturday, but if today is Saturday, then 7 Days will be from last Sunday to today (Saturday). Monthly means the first day of the month to the last day of the current month which is 30 days. Likewise, Yearly means from the first month of the year to the last month of the year.
New Orders
Select ranges of Hourly, Daily, Weekly, Monthly, and Yearly and then click View to check all the Orders placed within that selected range. Based on the selected range, it will redirect to the Order List Page.
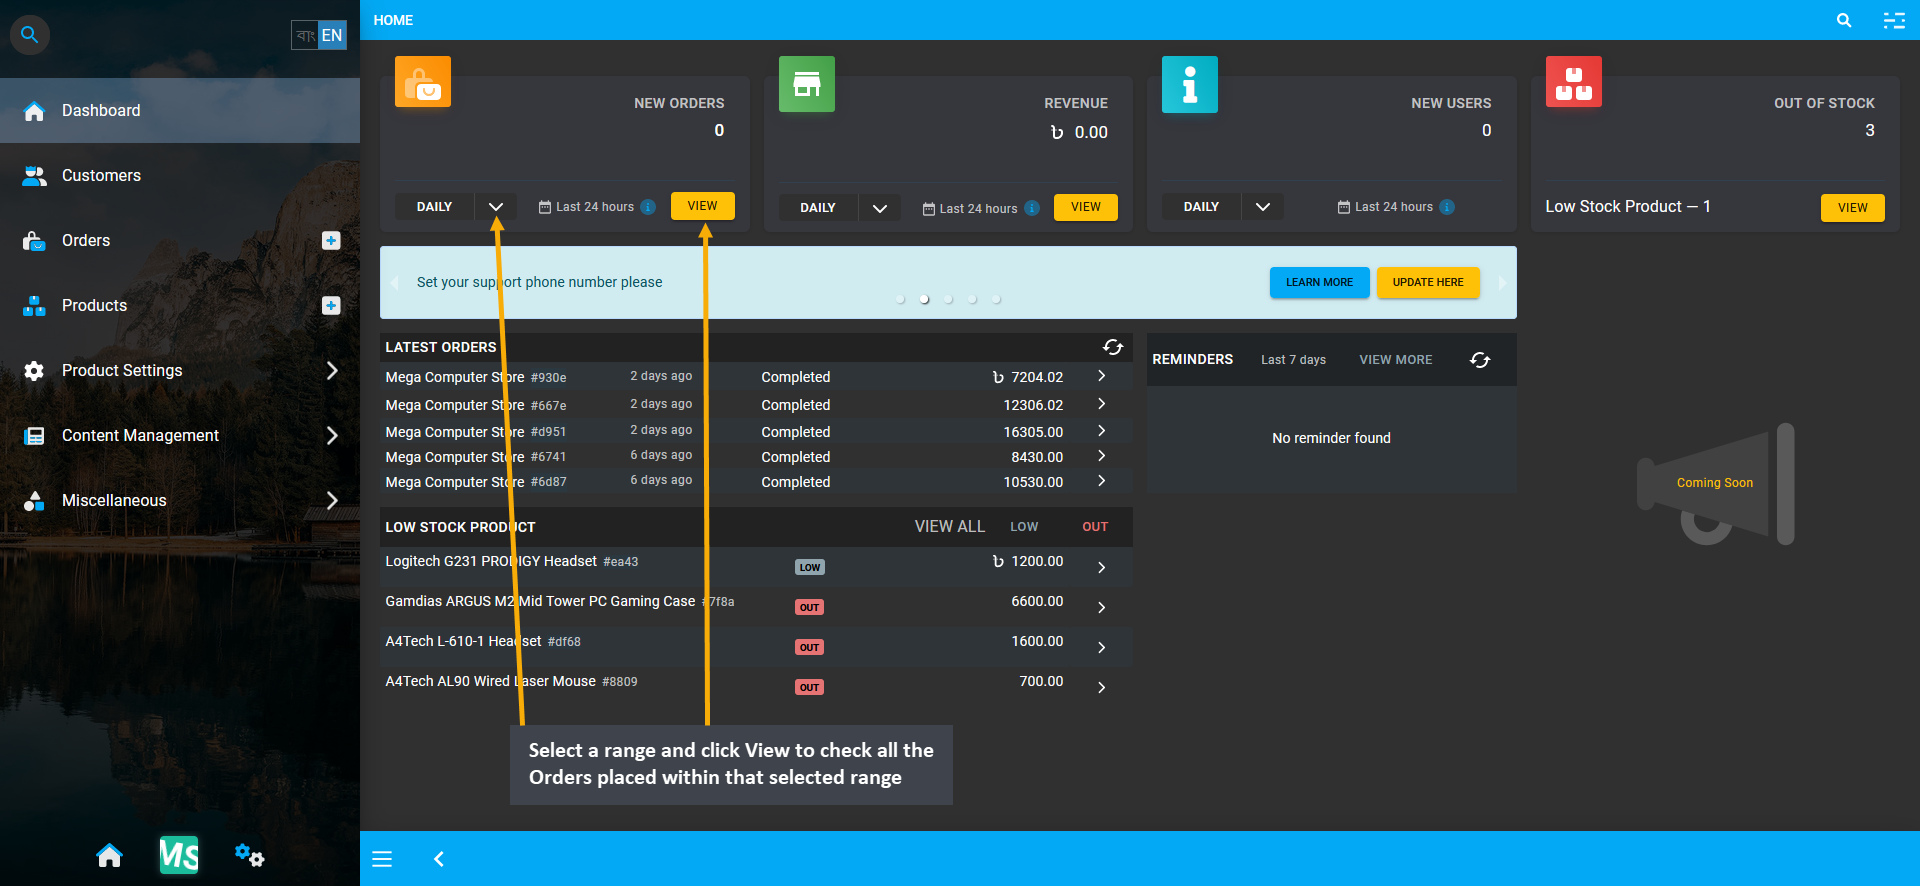
Image 1: Select a range and click View to check all the Orders placed within that selected range.
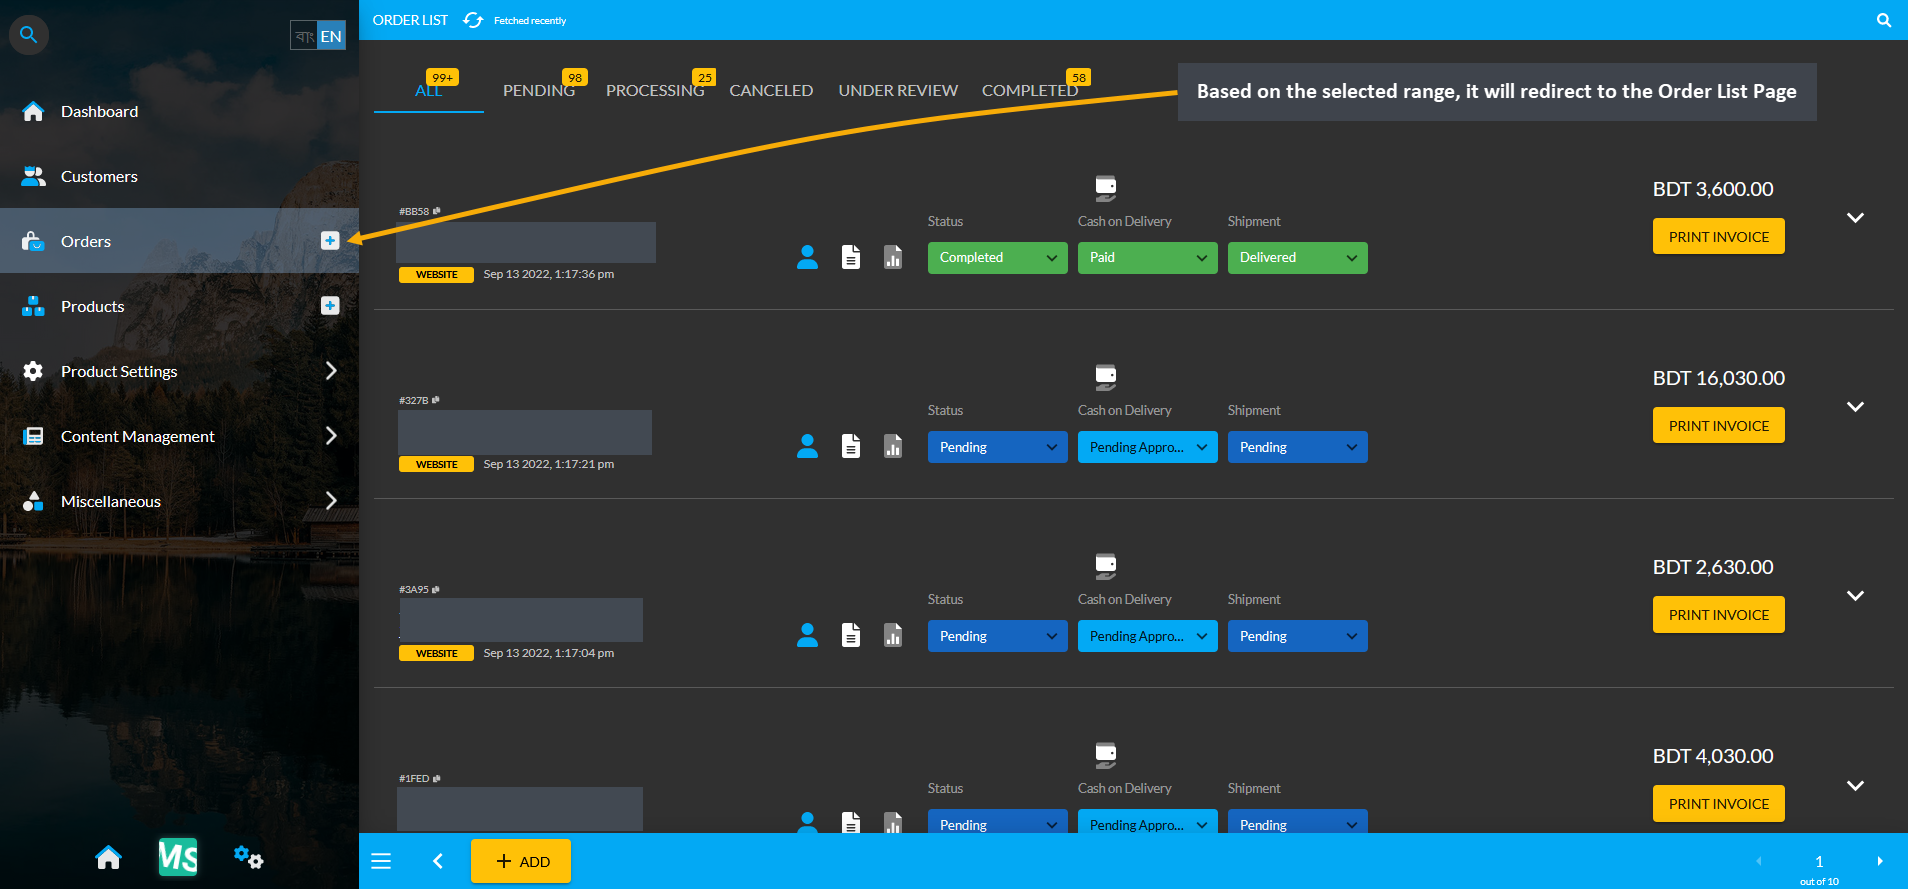
Image 2: Based on the selected range, it will redirect to the Order List Page with the range of Orders.
Create New Order
New Orders can also be created by clicking on the + button on the main Orders tab as shown in the example.
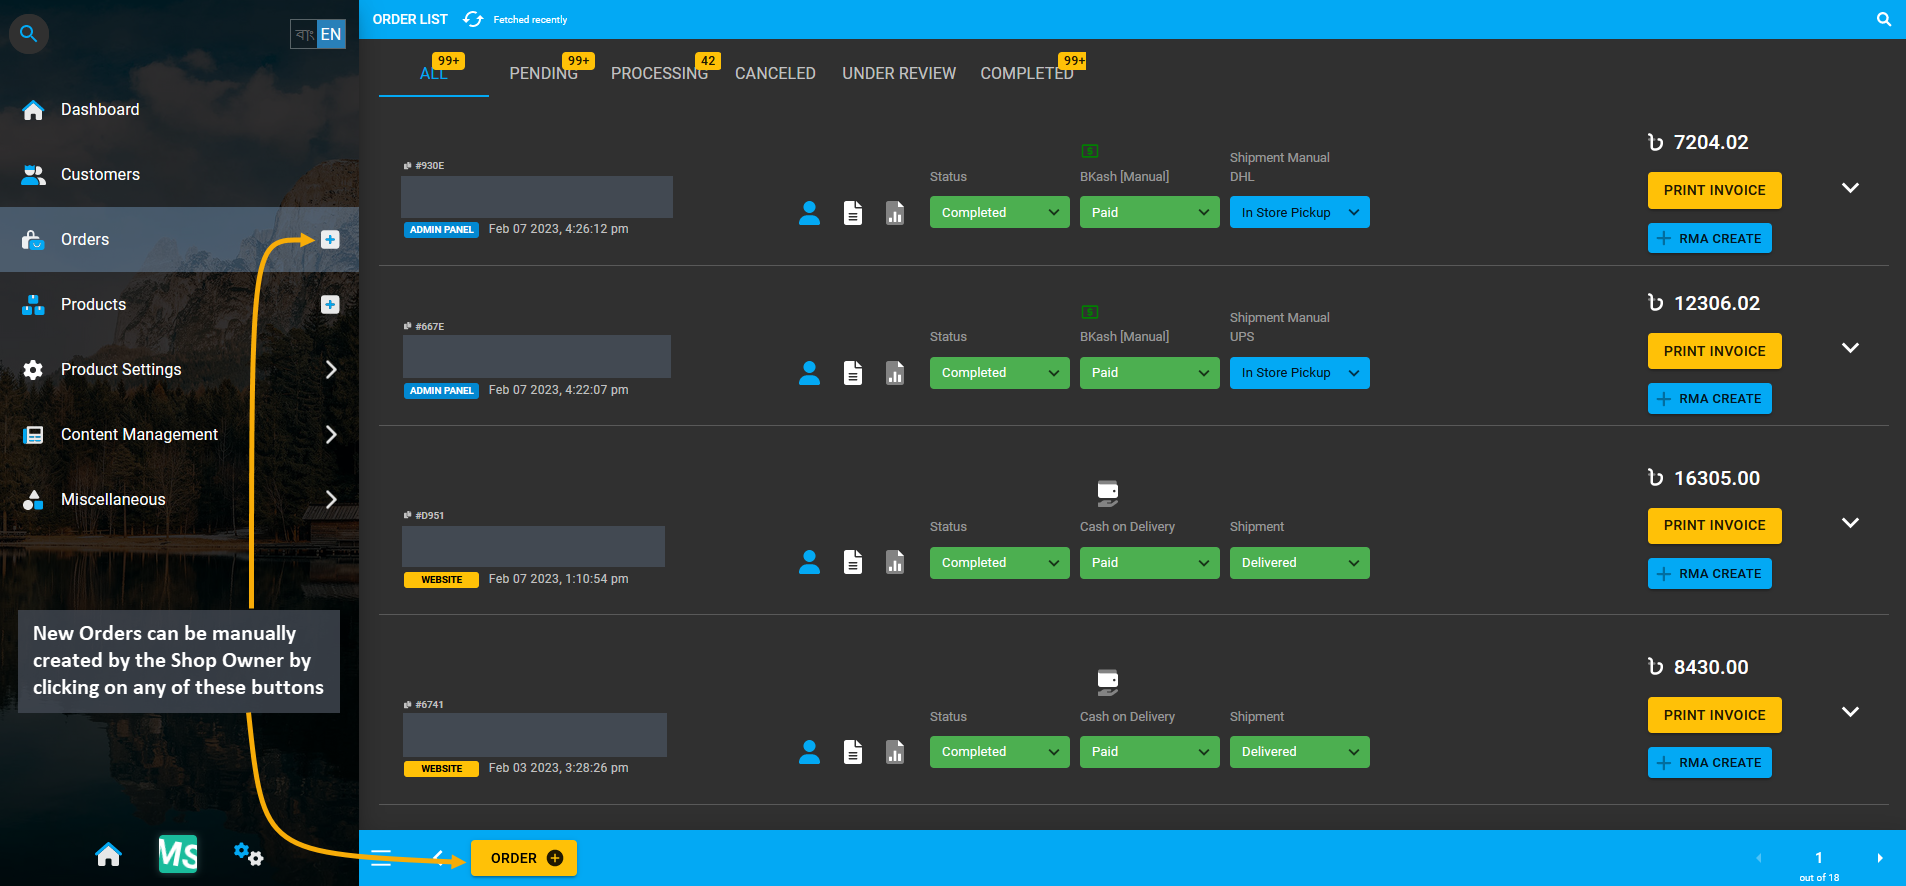
Image 1: New Orders can be manually created by Shop Owner from Order List page by clicking Order + button.
The first step towards creating New Order manually is to select the Branch and Counter for the Shop. Click Proceed when done. Several Manual Orders can be created for a Customer or multiple Customers by creating different Carts and adding Products to them which can be checked out individually from the Admin Panel.
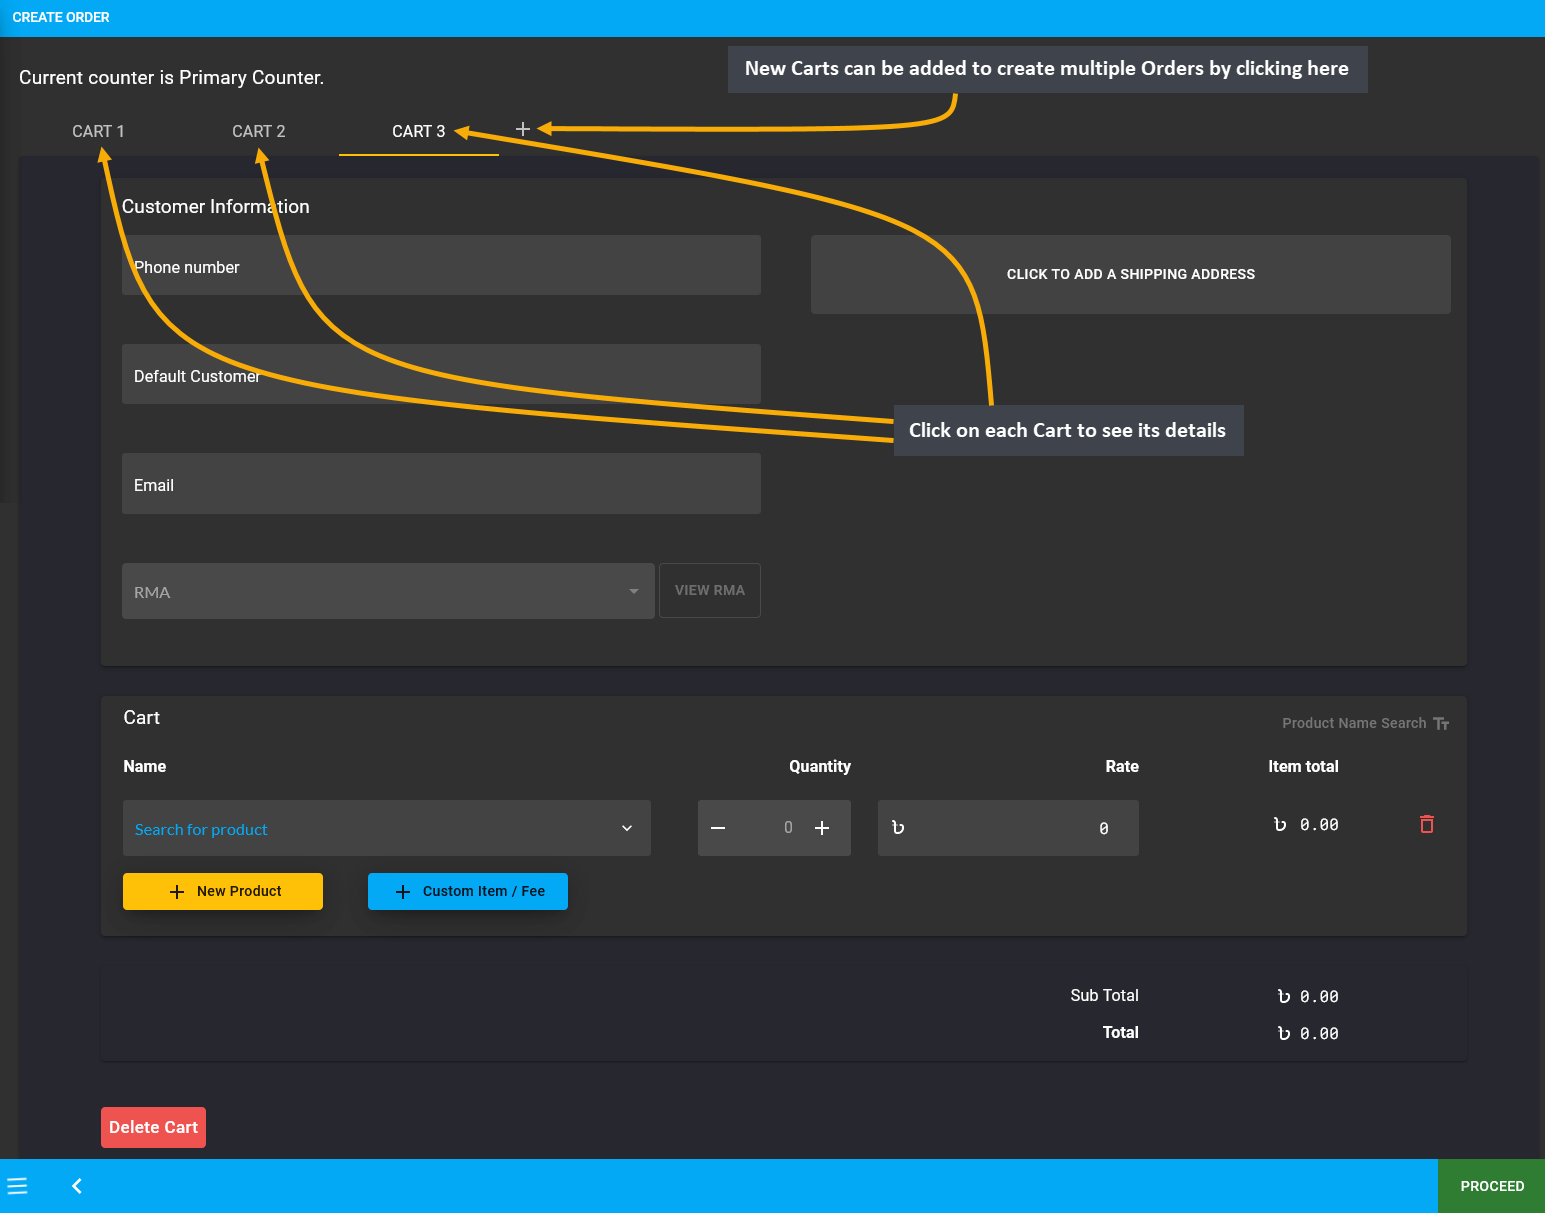
Image 2: Several New Orders can be created for multiple Customers by adding Products to different Carts.
Then, fill in the basic Customer information like phone number, name, and email from the Customer Information tab. Then Click to add a Shipping Address which will redirect to a new pop-up to add a new address with the Label (Billing or Shipping), Address, Area, City, Country, and Zip Code. After clicking the Submit button, Shipping Address will be added to the Customer information. Add new address by clicking the + button beside Shipping Contact.
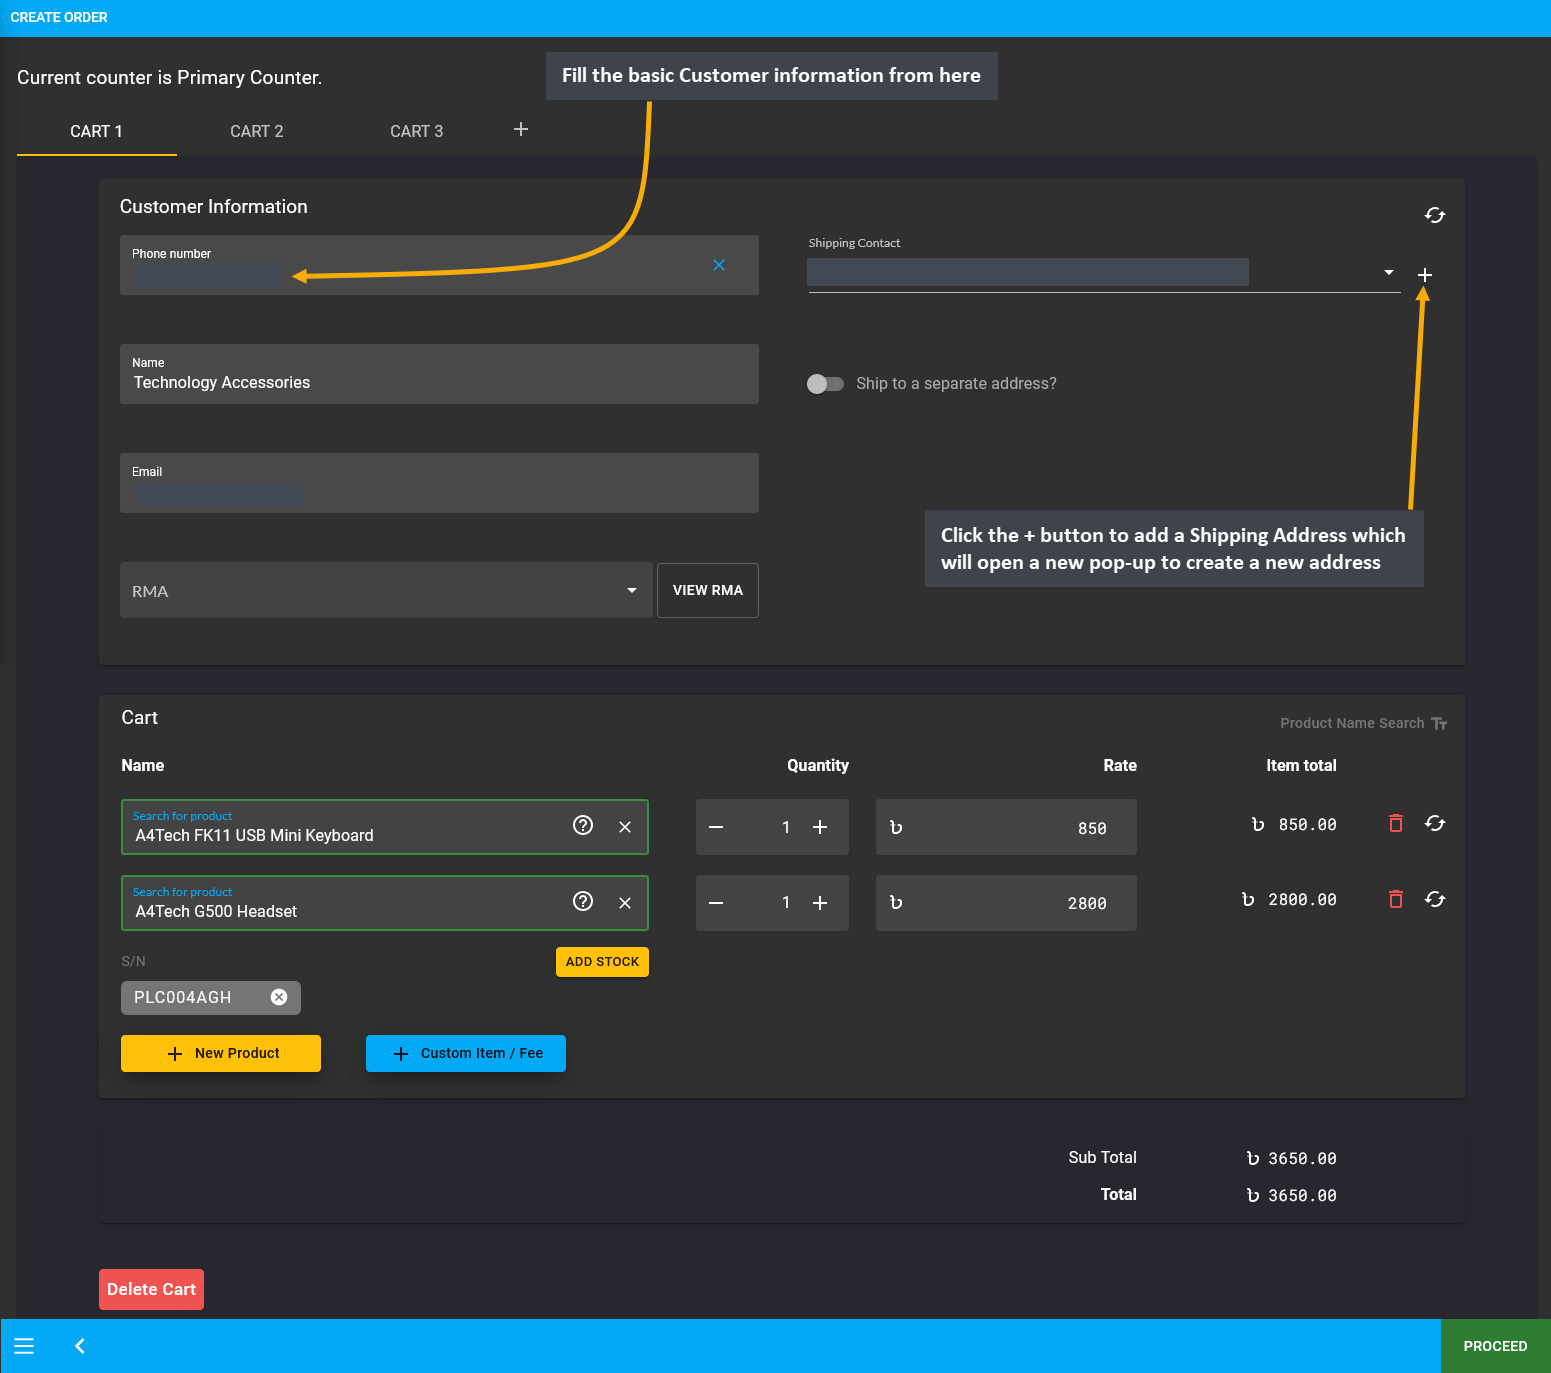
Image 3: Fill out Customer information like phone number, name, and email from Customer Information tab.
Add Products to Cart
After confirming the Billing and Shipping address, new Products can be added to the Order Cart. For this, click on the New Product button and a box will appear from which new Product can be added to Cart. Within it, search for existing Products from the Product List and add desired quantities that will automatically calculate the item total. To add multiple Products, click New Product that will add a separate new item to cart each time.
There is a separate option to add Custom Products to Cart. For this, click on the Custom Item/ Fee button that will let you add Custom Products to Cart which are not available on existing product list. Clicking on this button will create a new box (underneath the New Product box) for Custom Products.
To add multiple Custom Products, click on the Custom Item/ Fee button with desired quantities and rate/ fees. Use the Delete Cart button to delete any Cart that were manually added. Click on the Bin Icon to delete Products from the Cart. When done, click Proceed to continue to the next step.
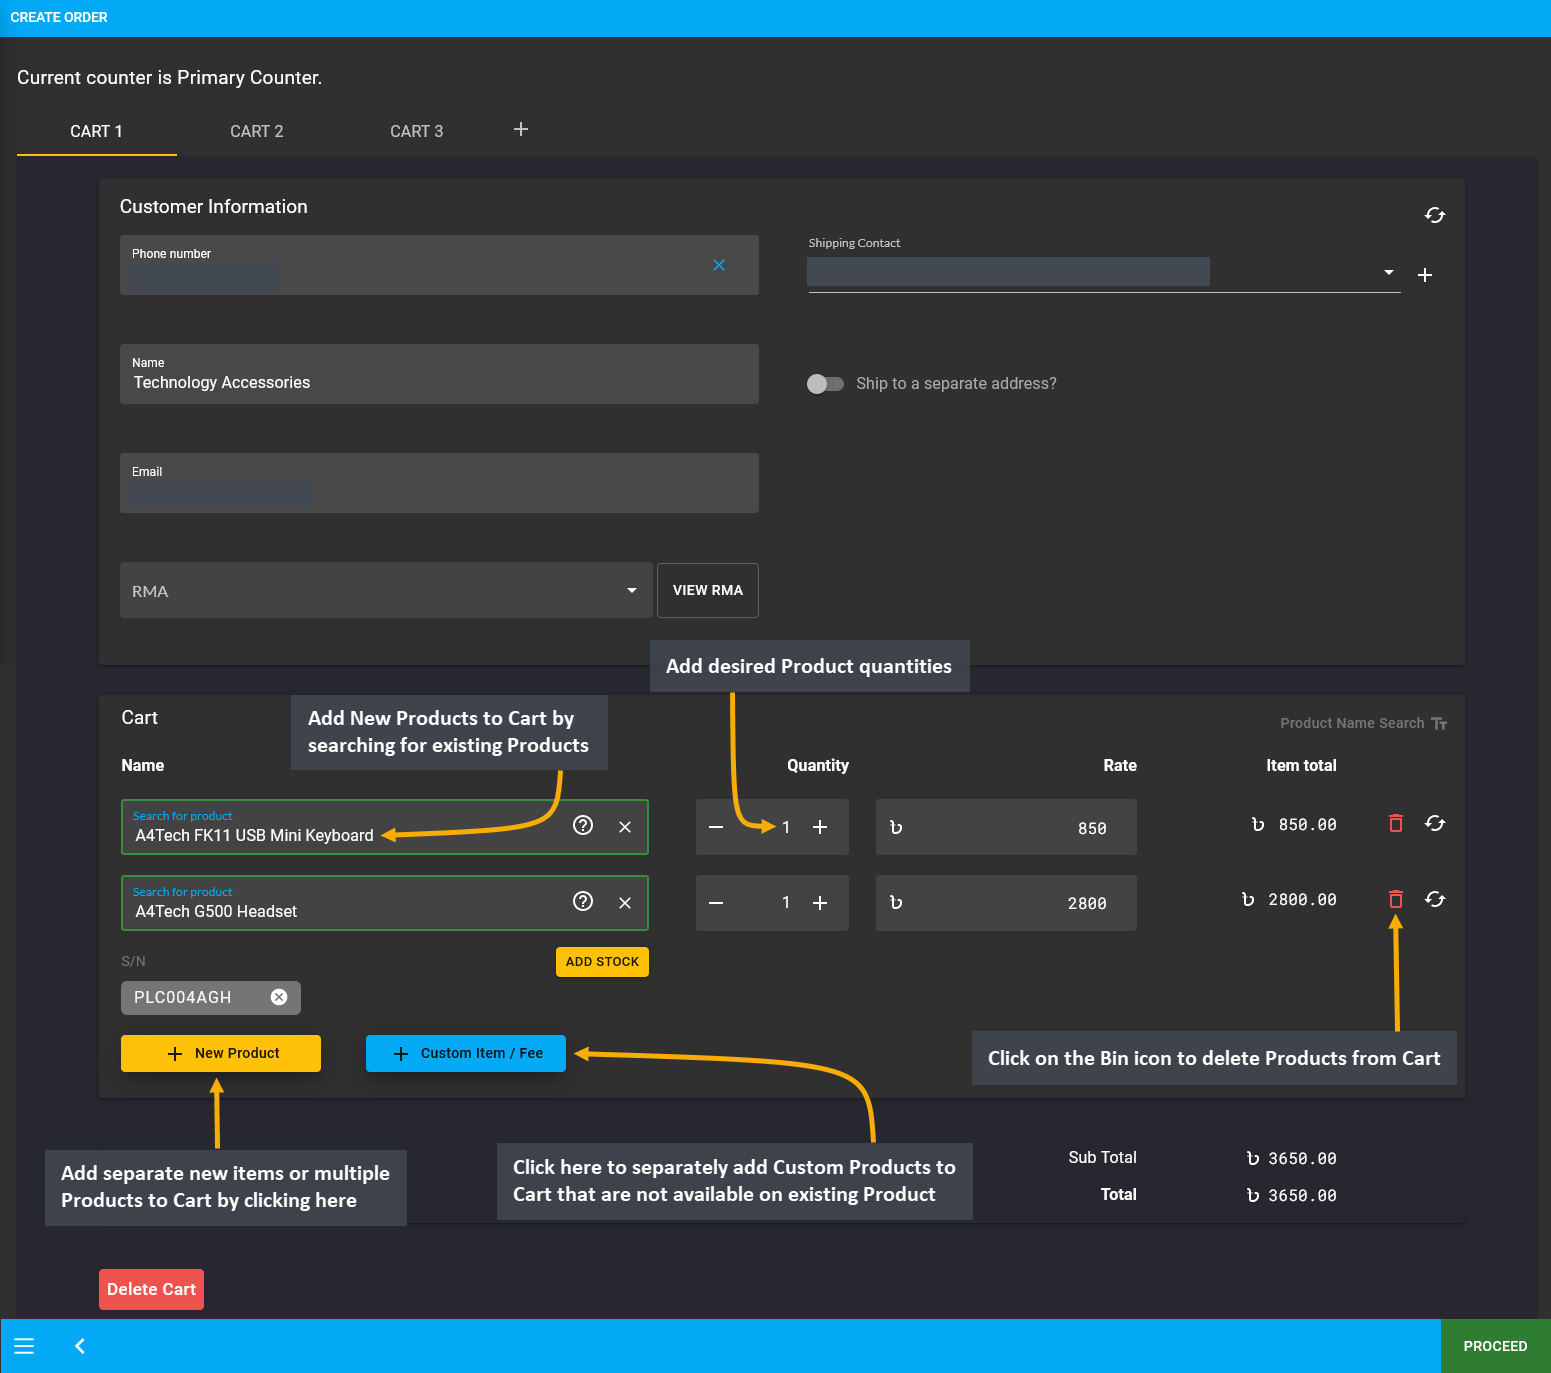
Image 4: Add Multiple Products or add Custom Products to Cart with desired quantities and rates or fees.
Select Shipment and Payment Options
In the next page, review the Cart, and select Shipment and Payment options. To make any changes, click the Edit button. If all the information is correct, click Confirm Order that will redirect to a new page with the message that the Order has been confirmed. From here, you can choose to Print Invoice or Close Tab.
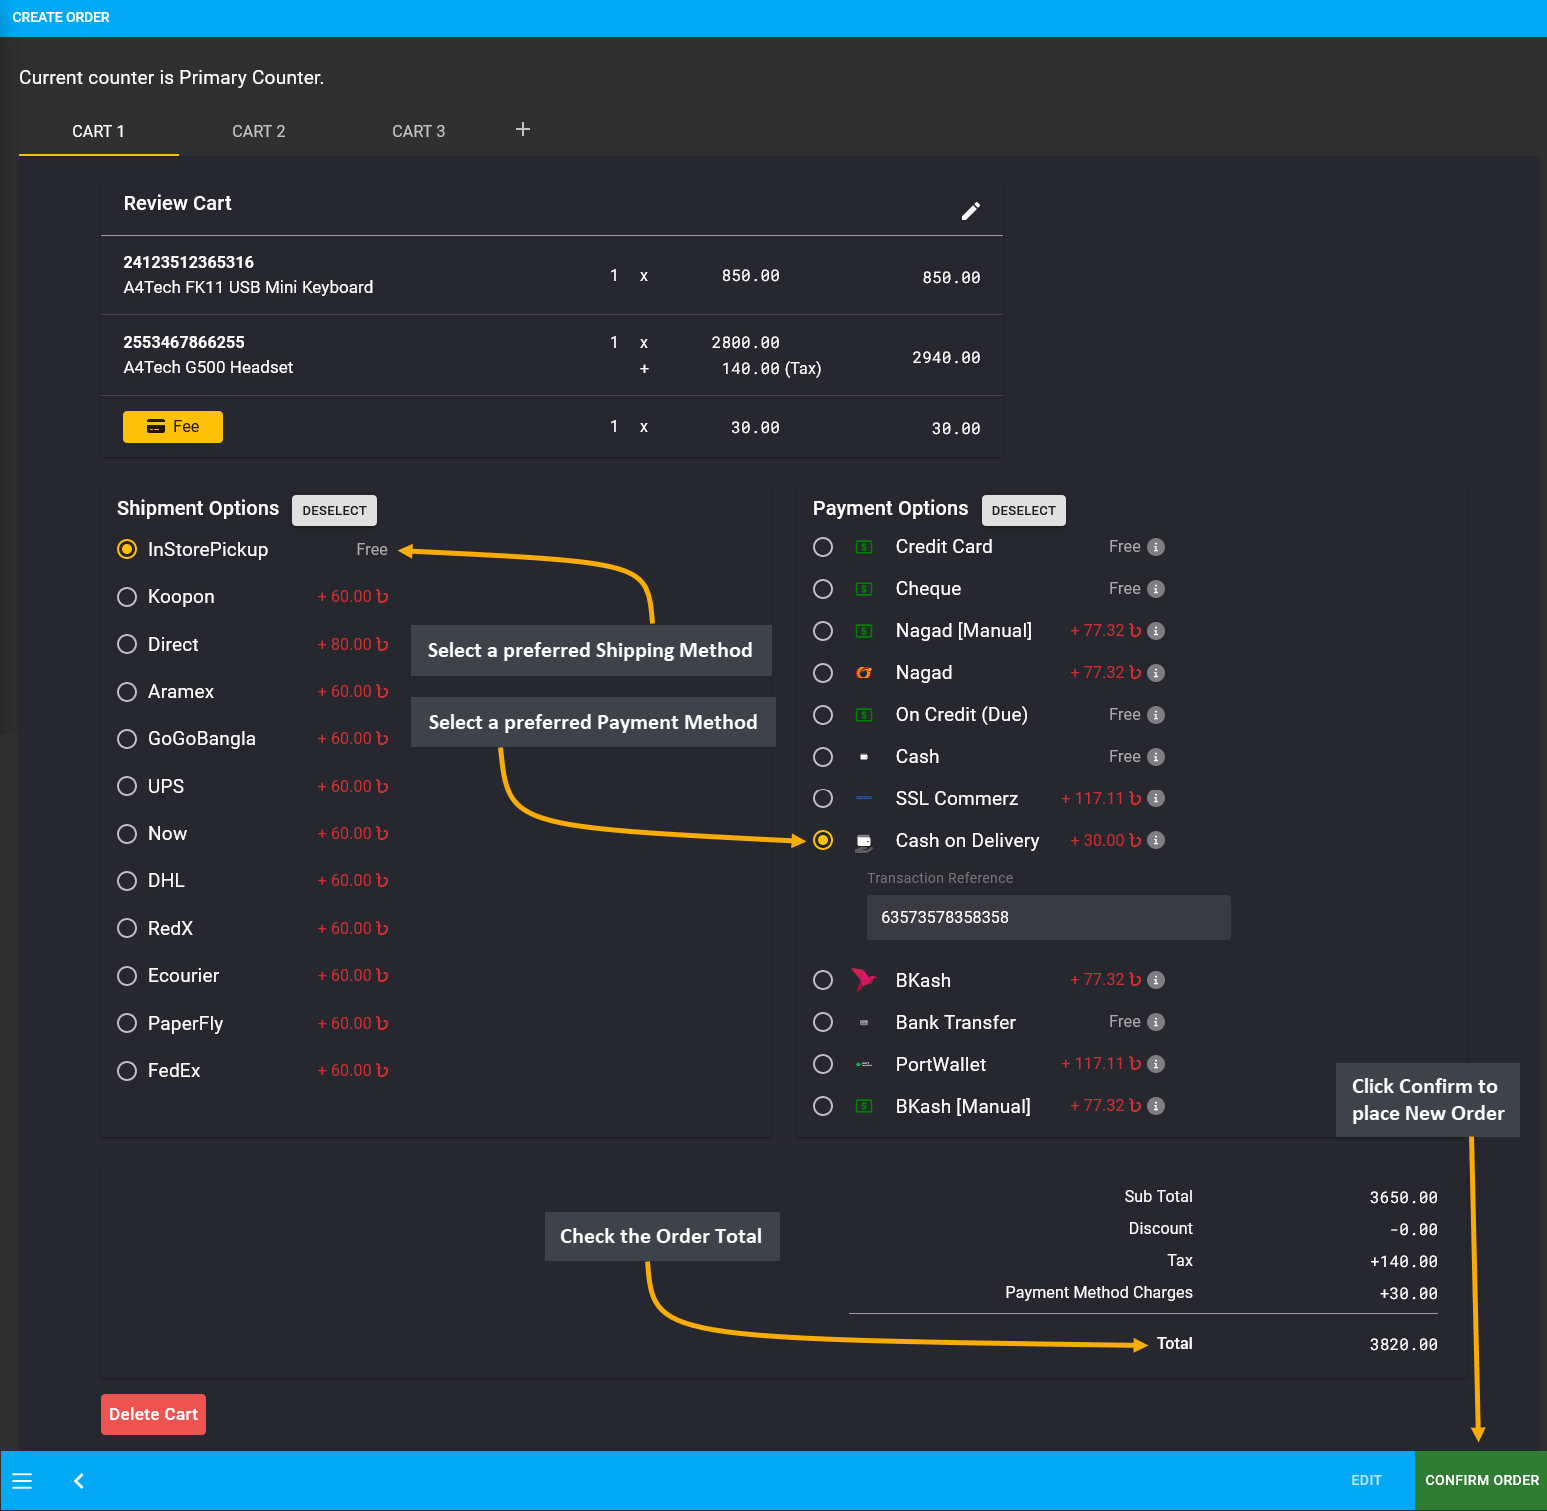
Image 5: Review the Cart, select Shipment and Payment options, and click Confirm Order to place the Order.
Print Invoice
From the Order List, invoices for Orders can be printed using the Print Invoice button on the right. Clicking it will open the detailed Order Invoice to print. Set Printer, Pages, Layout, and Colors from the print settings as needed. Then, click on the Print button at the bottom right corner to print the Order Invoice for Customers.
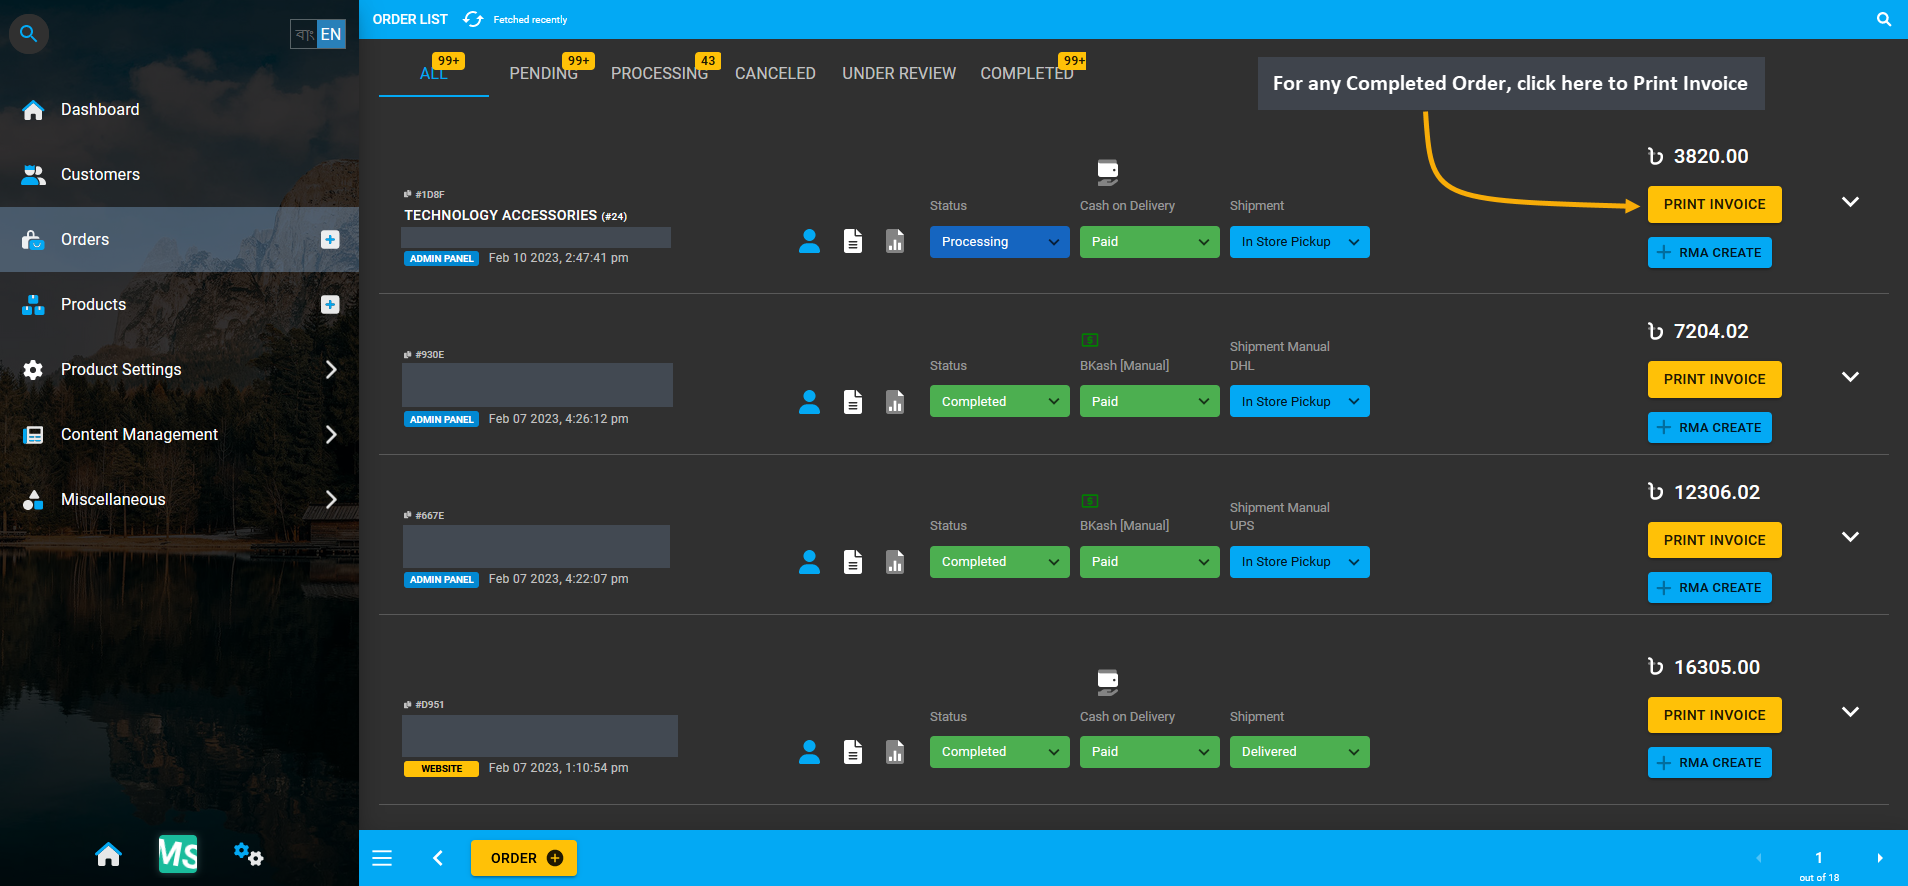
Image 6: For any Completed Order, click the Print Invoice button to print the Order Invoice for reference.
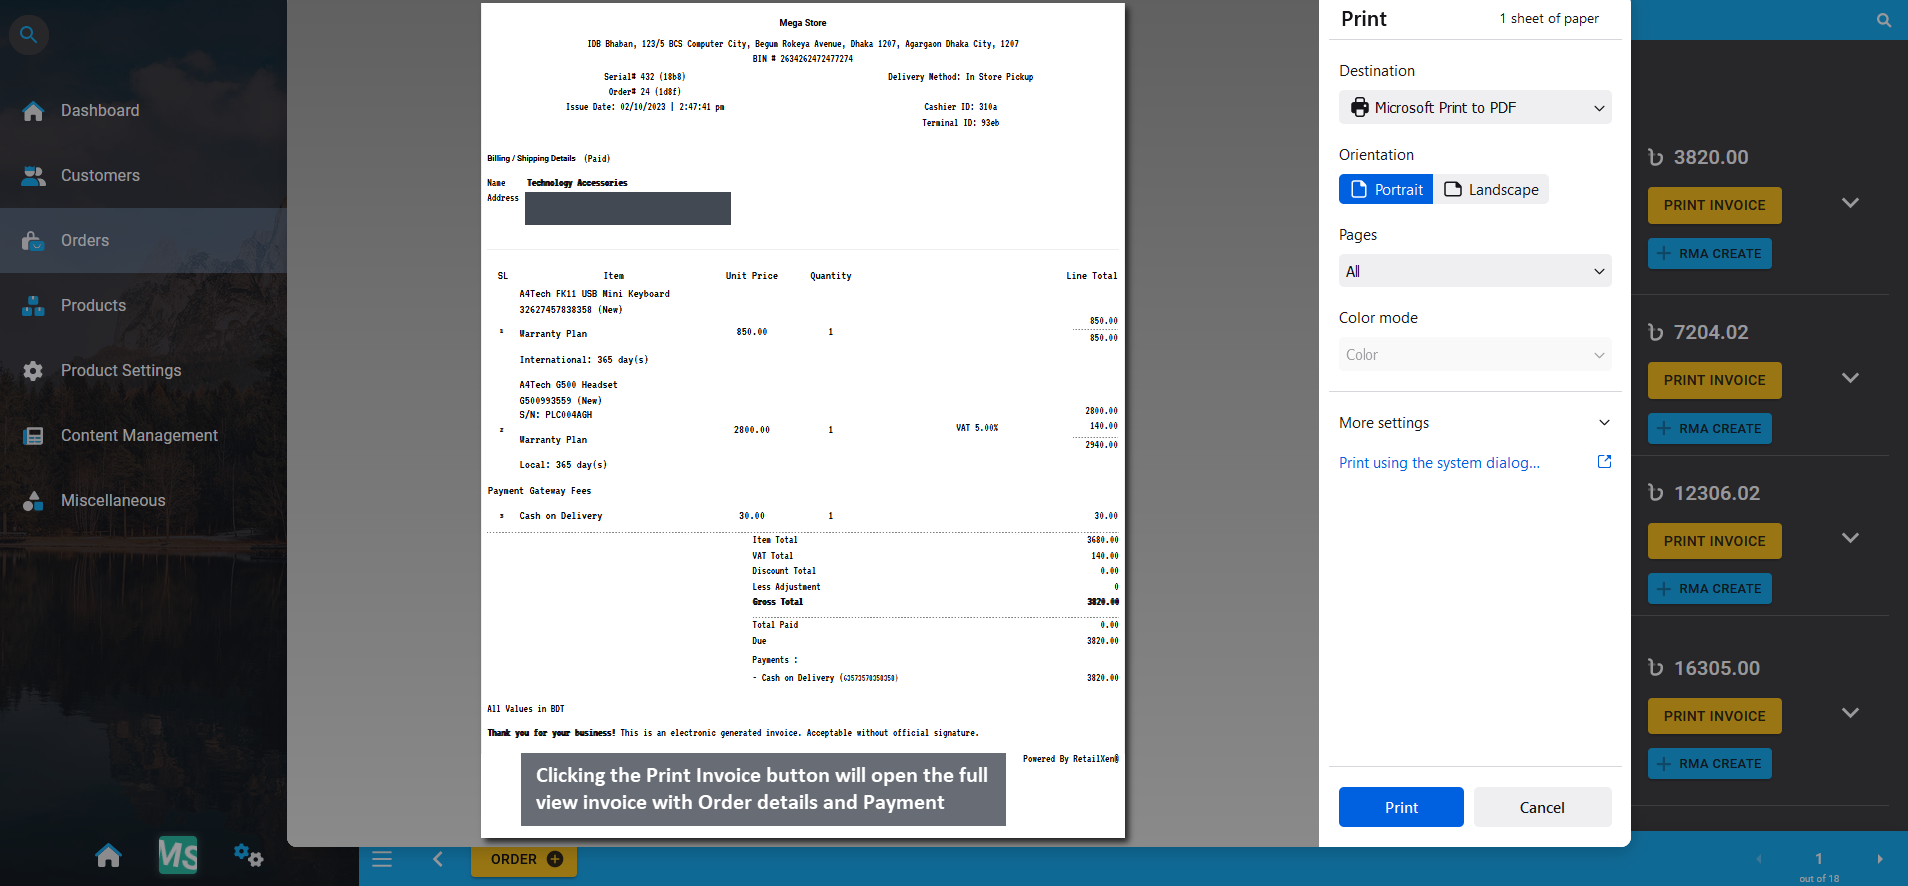
Image 7: Print Orders using Print Invoice button clicking on which will open the Order Invoice to print.
After a New Order or multiple New Orders are created, the total count of New Orders placed within the default Daily time range will show under New Orders on the Dashboard.
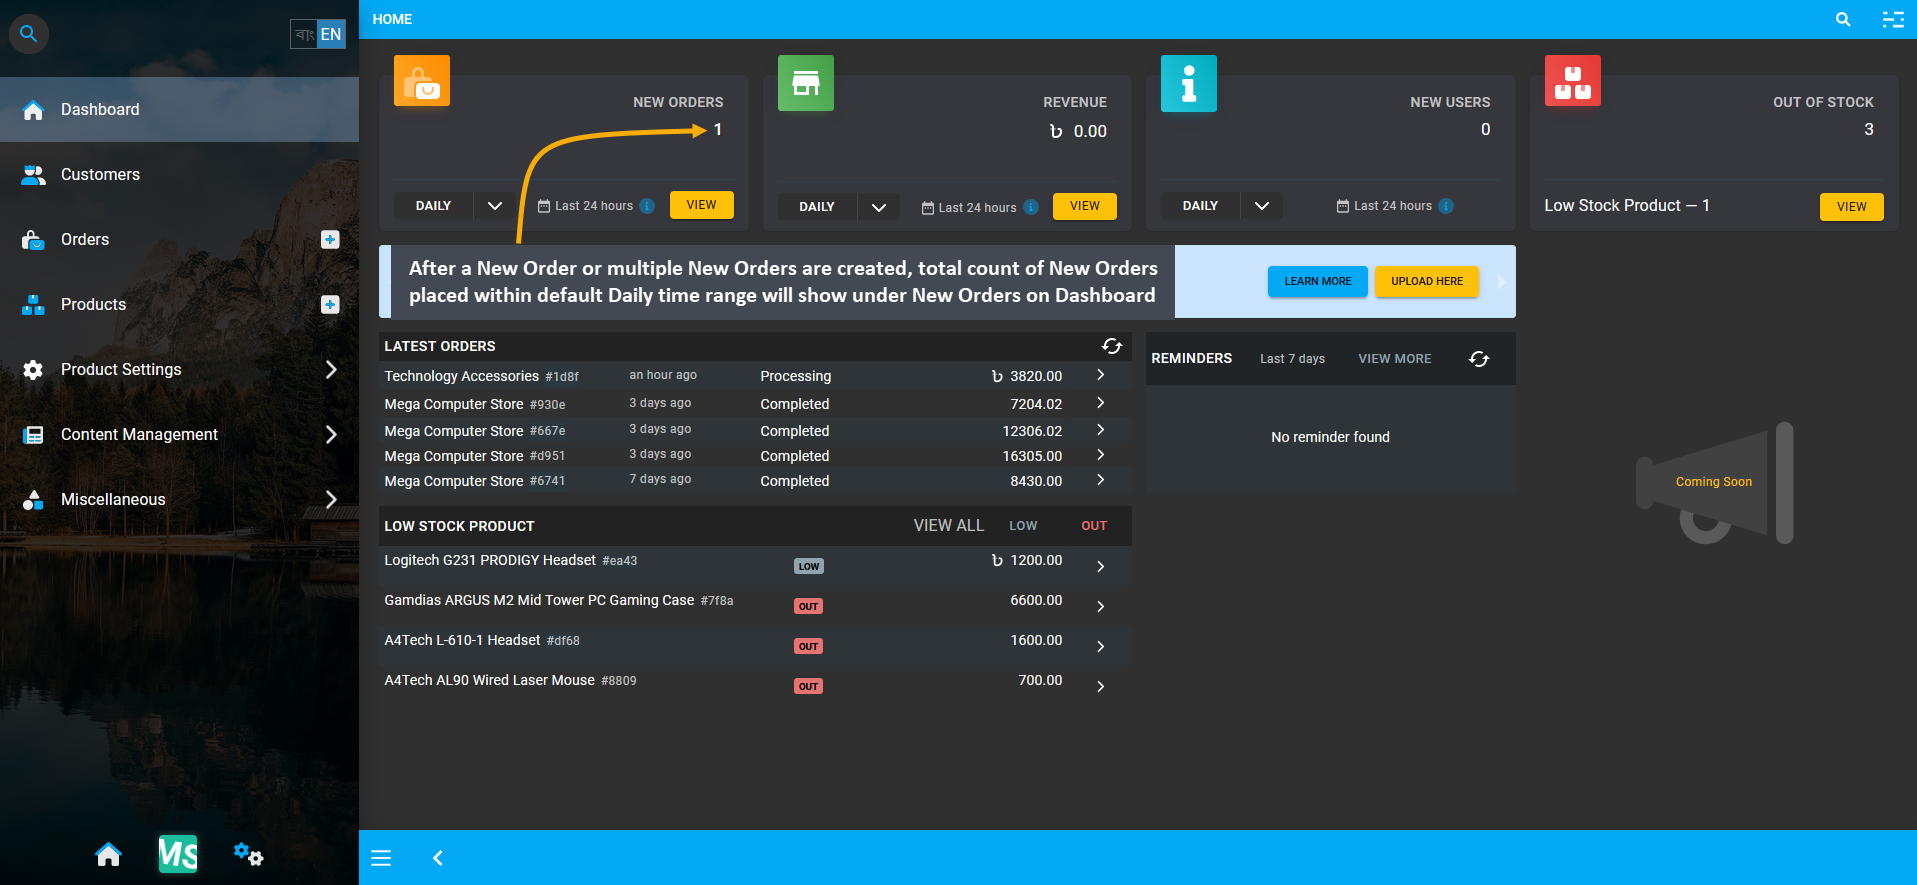
Image 9: Total New Orders placed within default Daily time range will show under New Orders on Dashboard.
Revenue
In the Revenue section, the Shop Owner can check its Cost Basis based on Hourly, Daily, Weekly, Monthly, and Yearly ranges. Select a range and click on View to be redirected to the Cost Basis Page with detailed entries of profit, cost, tax, vat, discount, and revenue are shown with fulfilled and pending Orders.
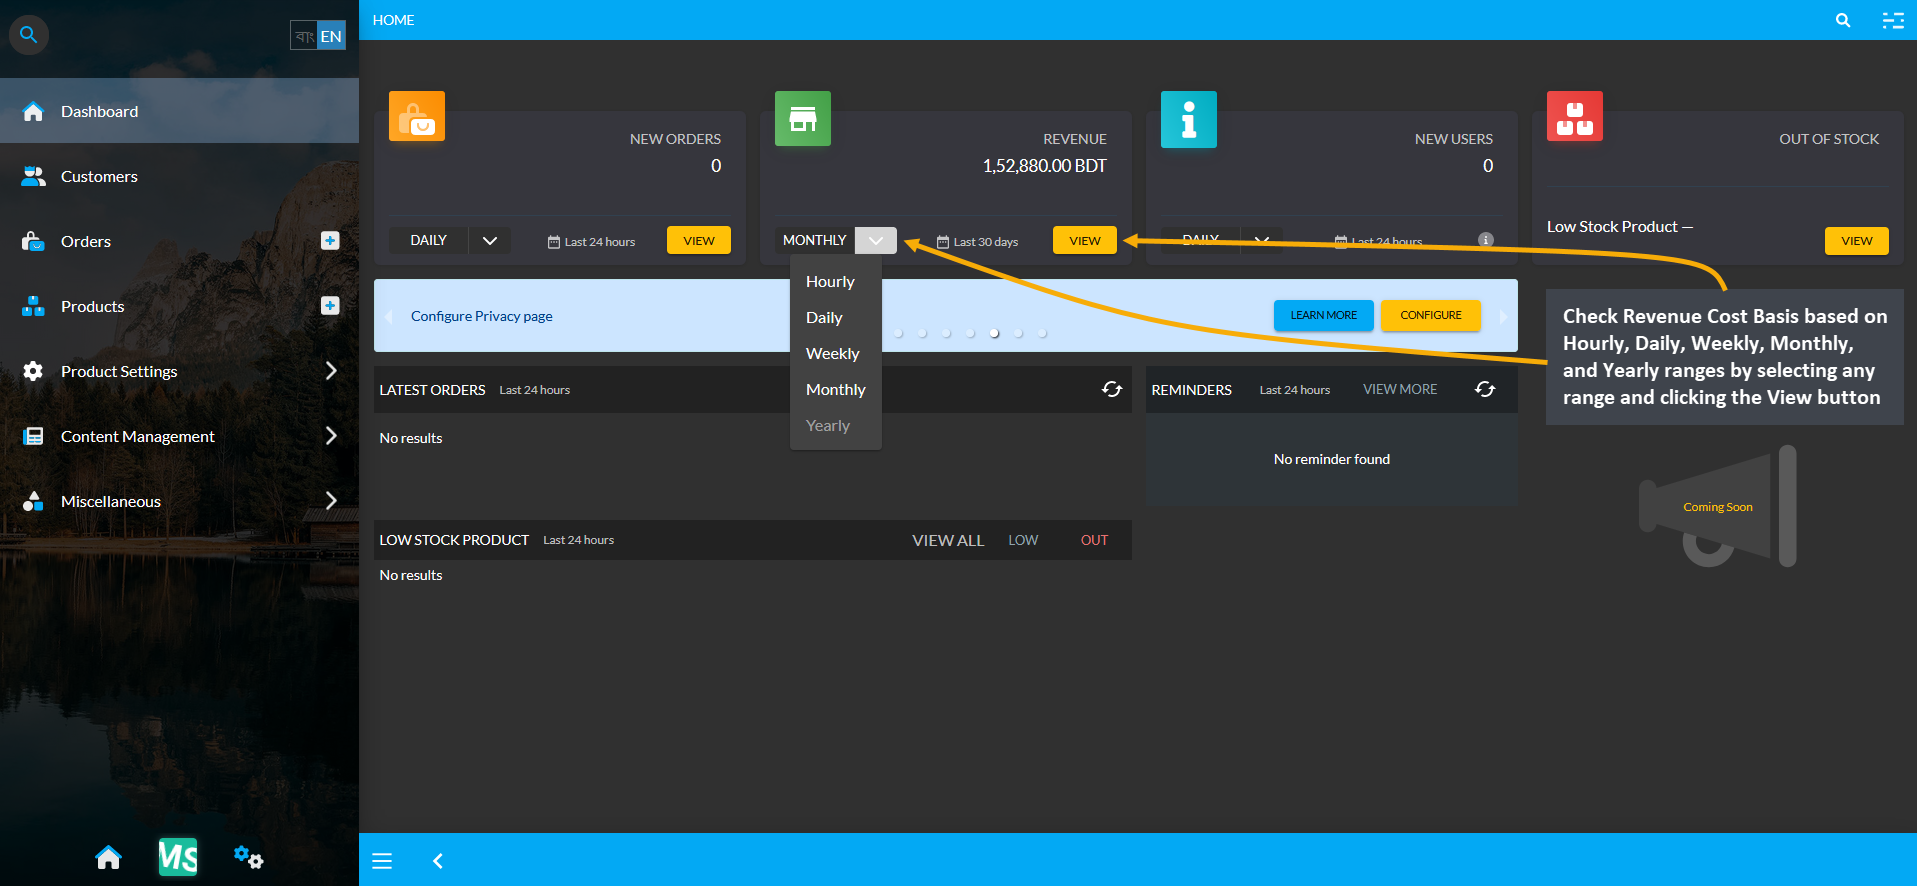
Image 1: Check Revenue Cost Basis by selecting from the given ranges and clicking View for details.
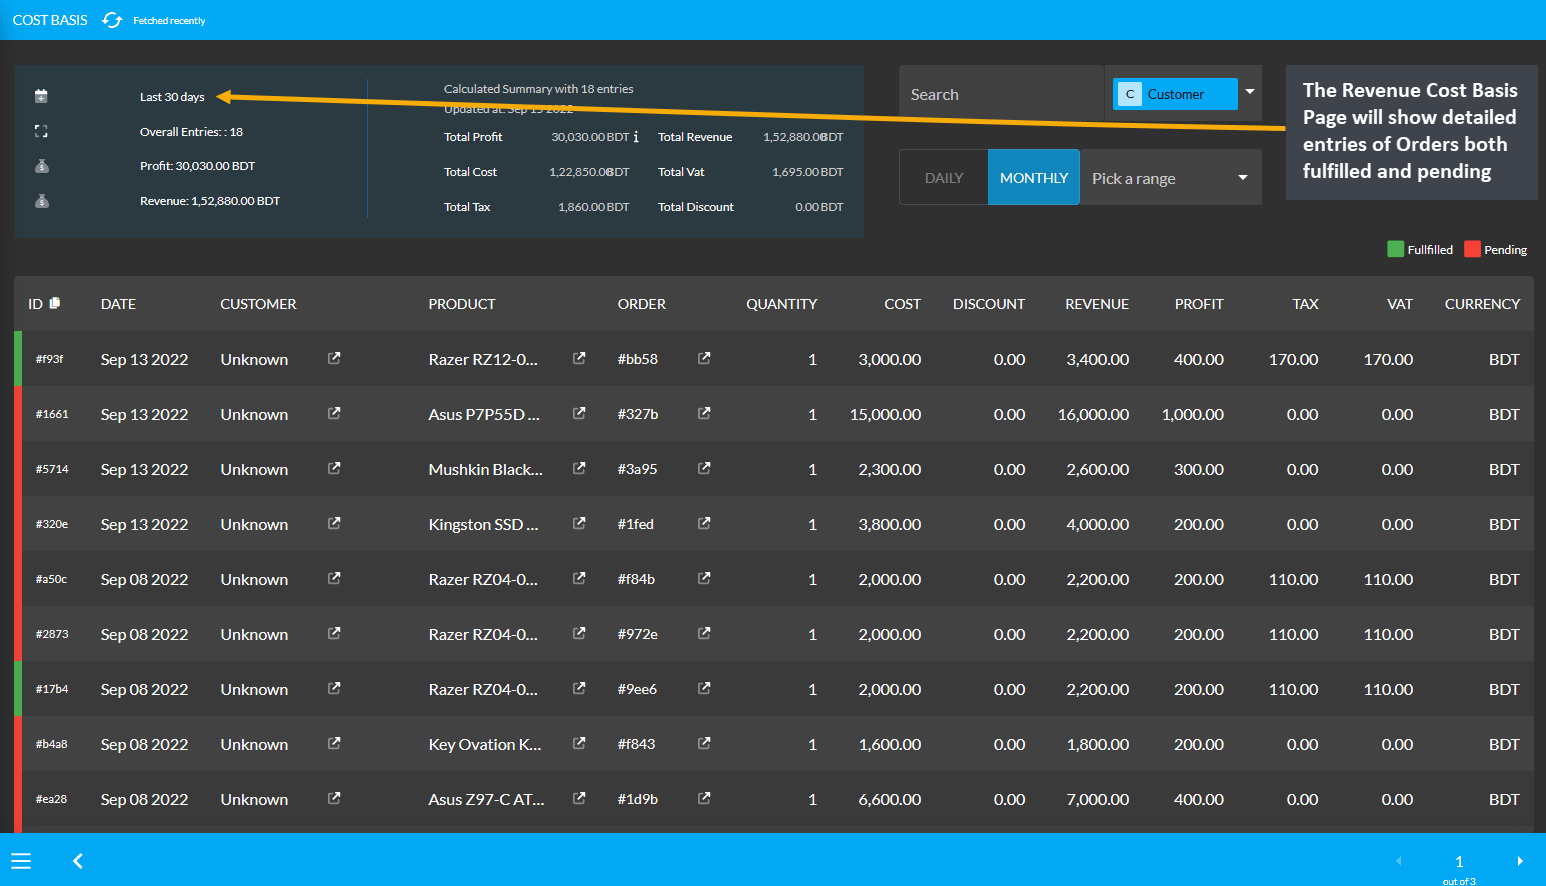
Image 2: The Revenue Cost Basis Page will show detailed entries of Orders both fulfilled and pending.
Revenue will Update after Order Payments are Confirmed
On the Revenue dashboard, even after creating Orders with few sales on the same day, selecting the Daily range may still show Revenue as 0.00 because those Order payments were not confirmed. Under the Latest Orders, they will still show as Pending, which means they are still not completed due to incomplete payment. In this case, click the View button to see which Order entities have not yet been fulfilled.
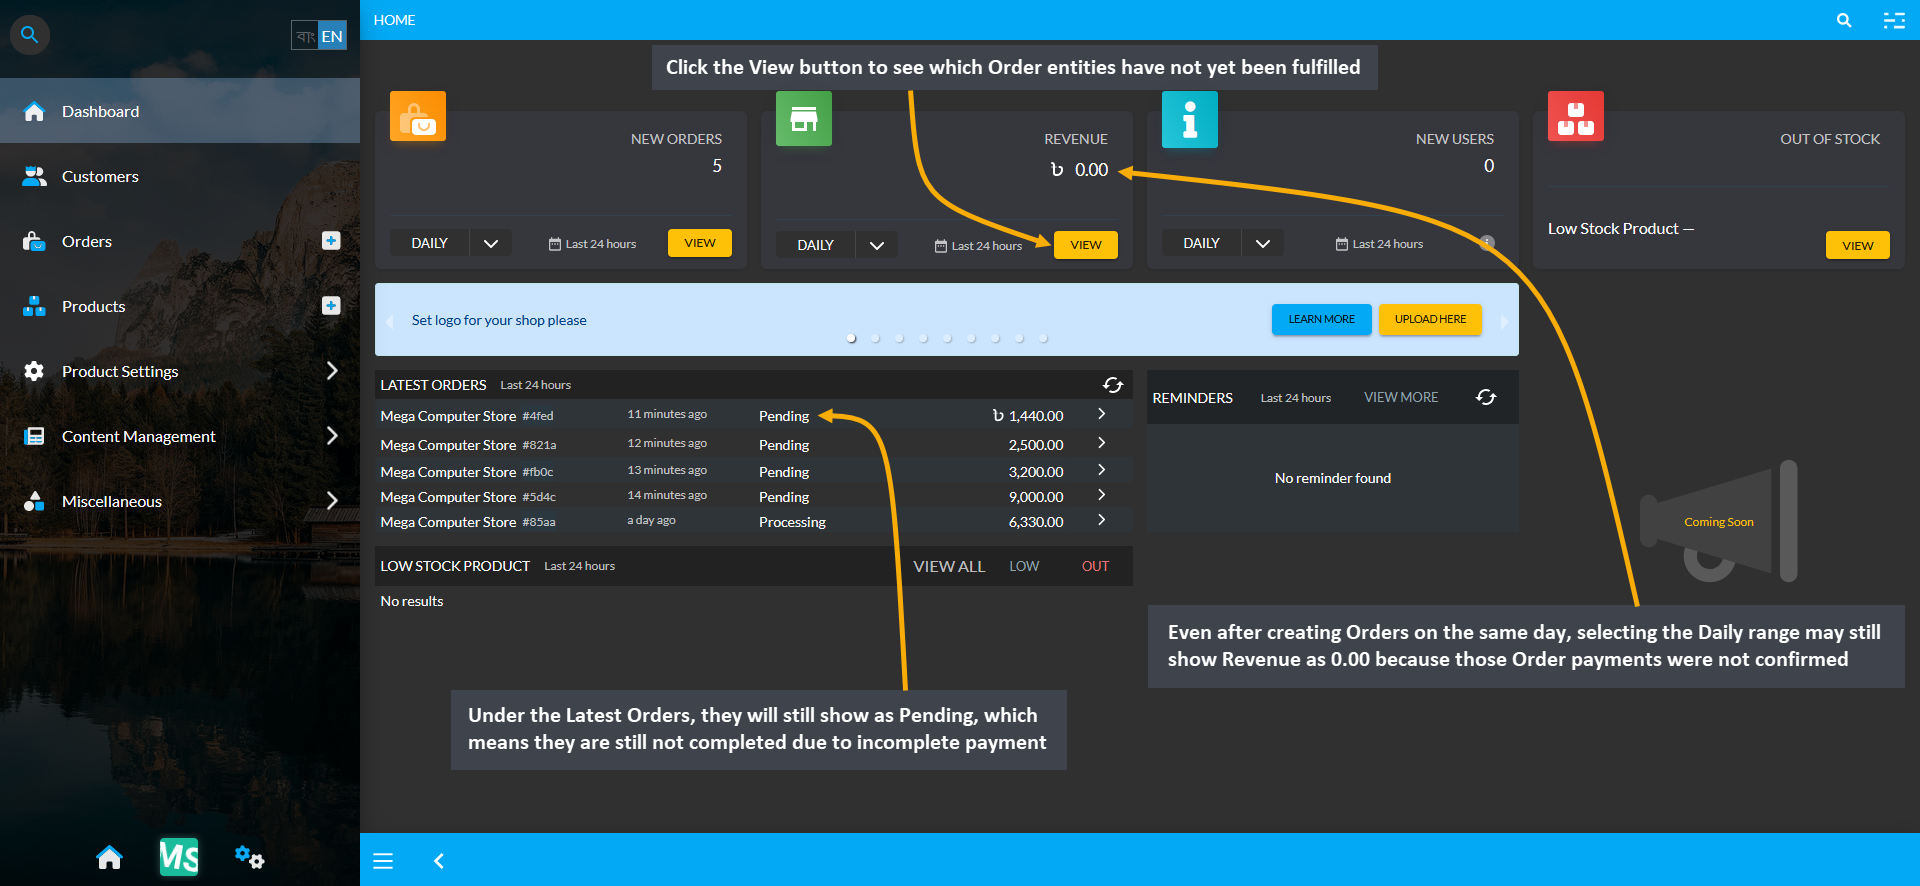
Image 3: Revenue will not be updated until Pending Orders are completed with Payment confirmation.
Clicking on View will redirect to the Revenue Cost Basis page, where it will be seen that no Revenues were made as all the Orders are still Pending with Payment confirmation. It means that those Orders have only been placed, but they have not been Paid or their Payment have not yet been confirmed. So, until Payment is confirmed for these Orders, Revenue based on them will not be updated on the Dashboard Revenue section.
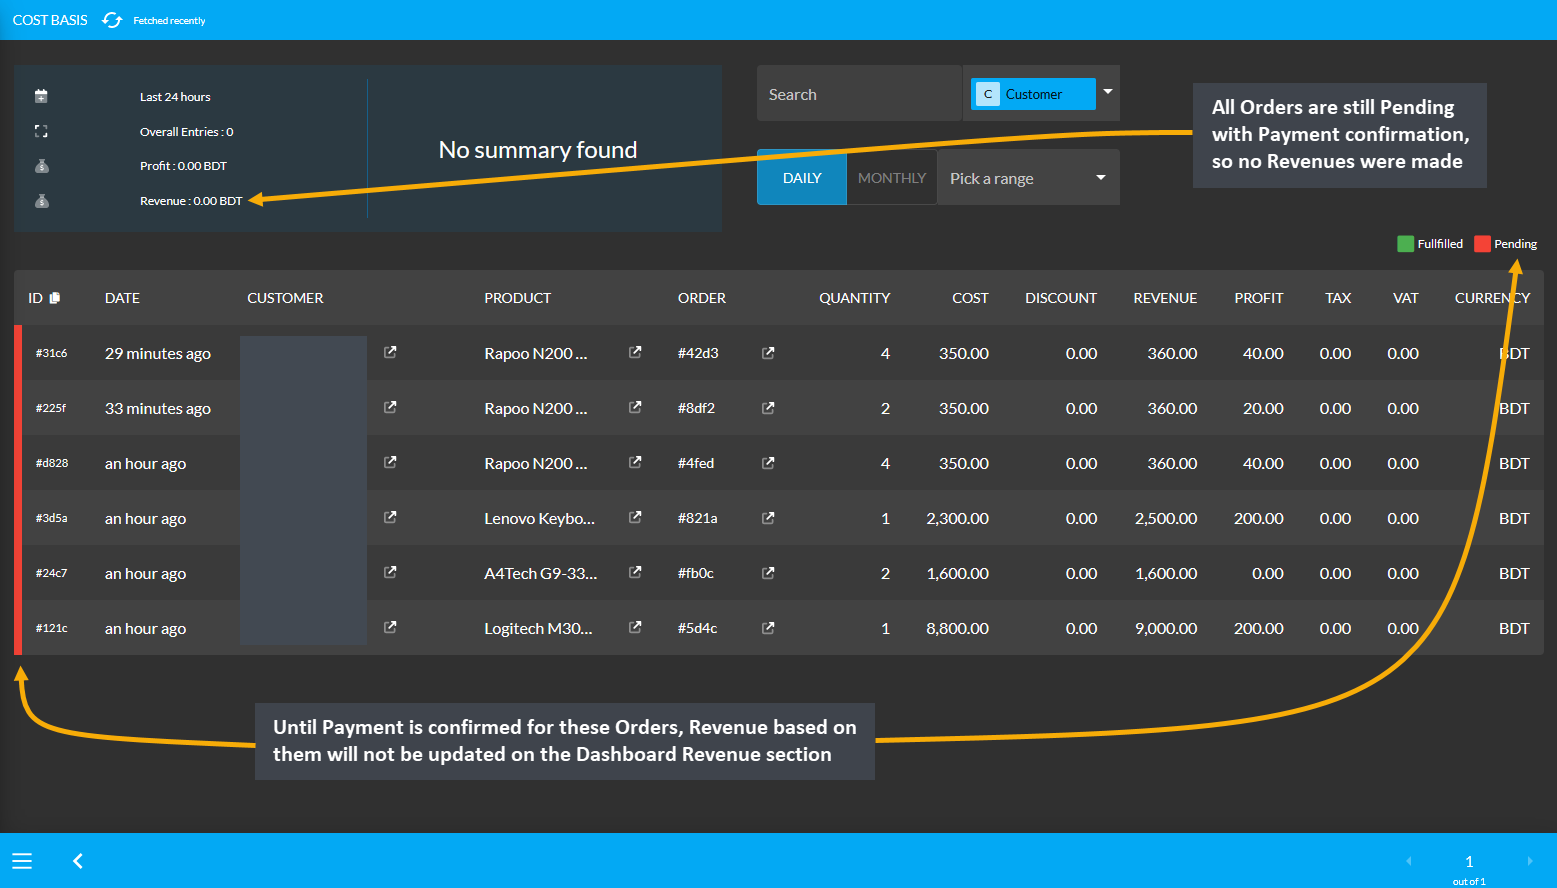
Image 4: Until Payment is confirmed for Pending Orders, no revenues will be made for those Orders.
To convert these Pending Orders, Shop Owner has to go to Order List, where these Orders can be seen as Pending.
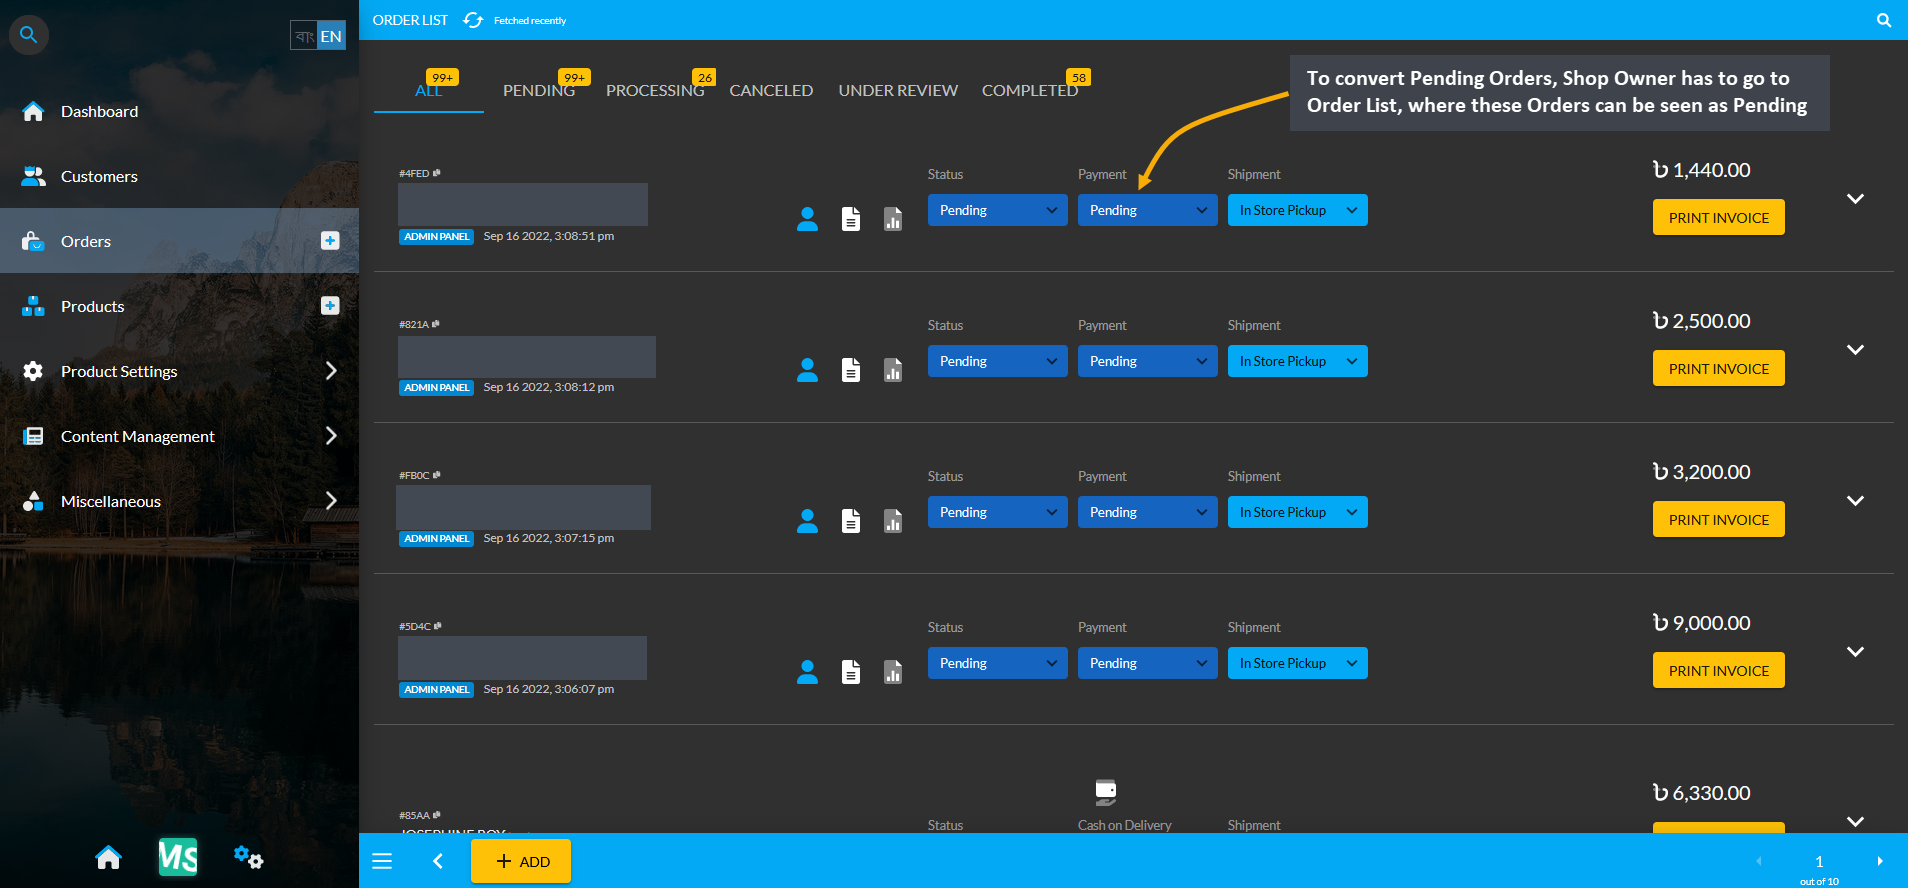
Image 5: To convert Pending Orders, Shop Owner has to go to Order List to complete their payment.
Here, click on the down arrow V on each Order to open Order details, and click the Add Transaction button to complete Payment for the Pending Orders to change their status to Completed as shown in the example.
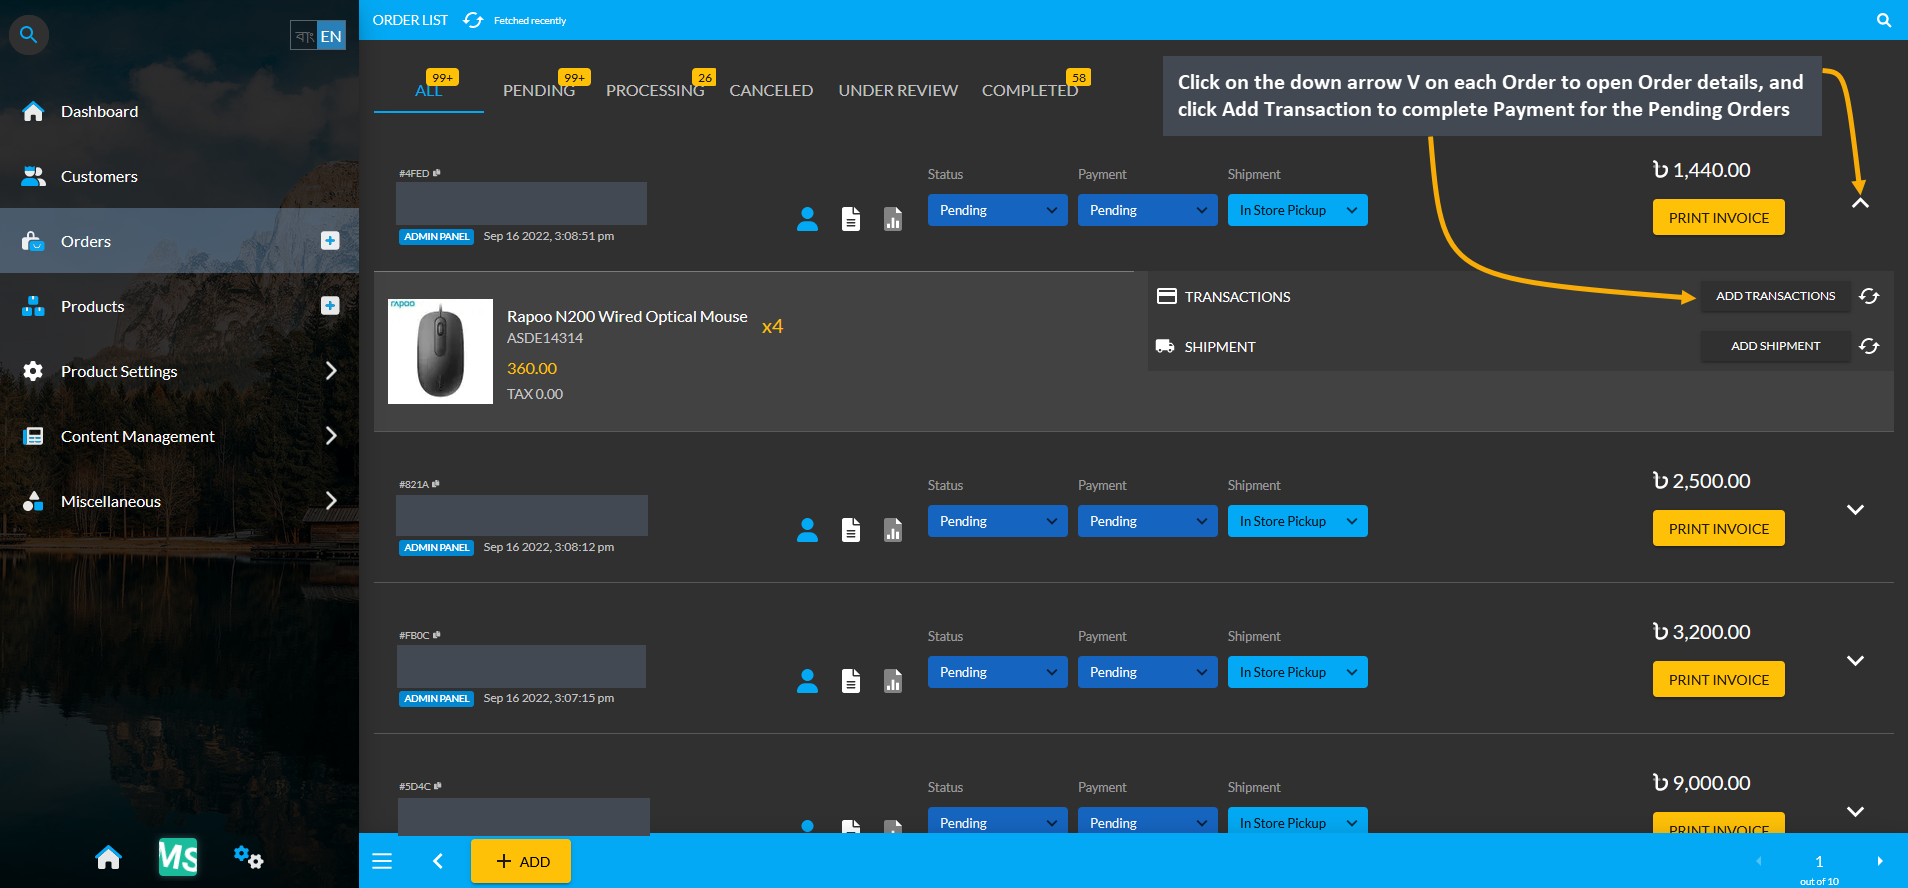
Image 6: Click down arrow V on each Order and click Add Transaction to complete Payment for Pending Orders.
Then, select a preferred Payment Gateway, enter full Order amount, and click Submit to complete Payment.
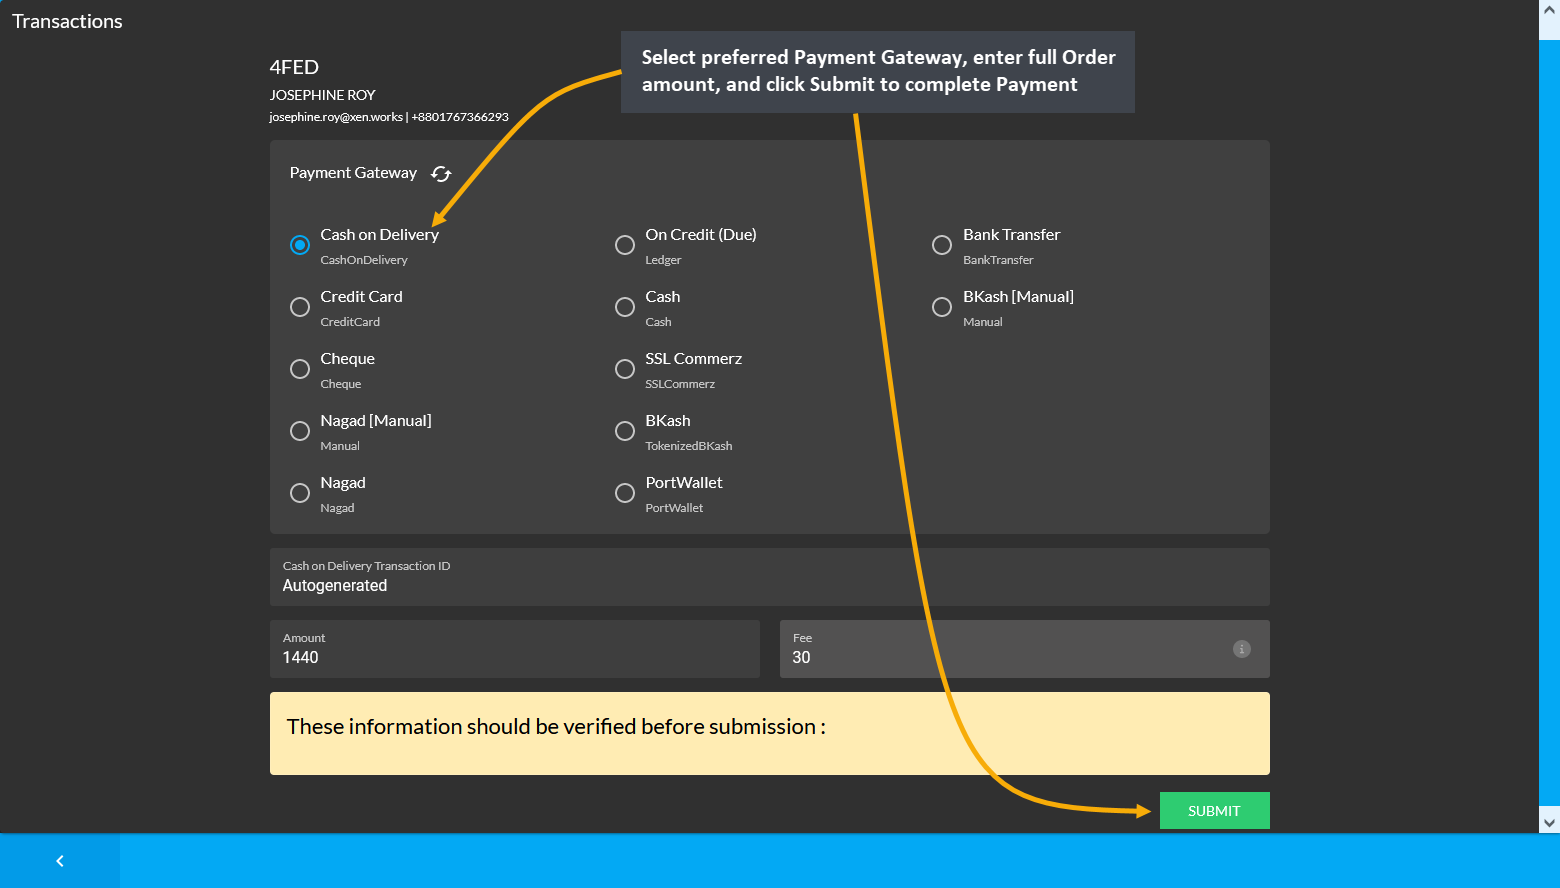
Image 7: Select preferred Payment Gateway, enter full Order amount, and click Submit to complete Payment.
After Payment transaction is completed, Pending Orders on Order List will show their Payment status as Paid.
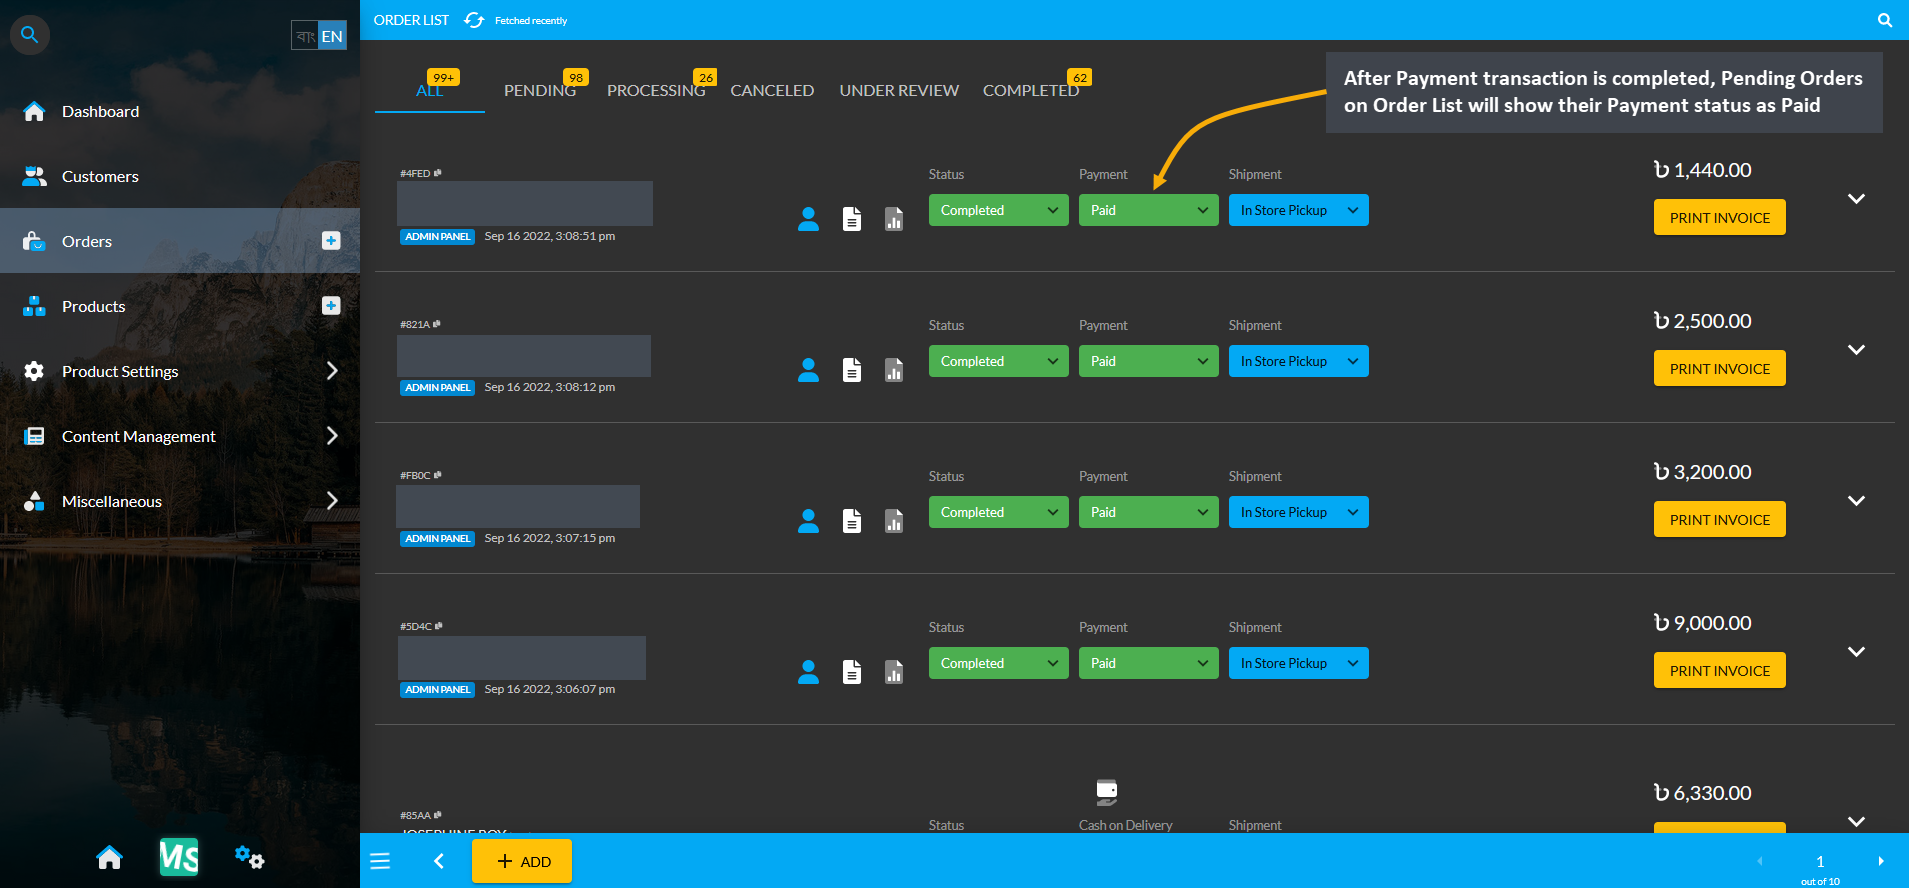
Image 8: After Payment transaction is completed, Pending Orders will display Payment status as Paid.
Even though Payment Status shows Paid, here the transaction is technically Initiated for some payment methods like Cash on Delivery. Hence, the current status of the transaction will show as Initiated. However, to change the transaction status, it needs to be edited, which can be done by clicking the Verify button, or else the transaction will not be completed and be added to Revenues. Follow these few steps as shown in the example below.
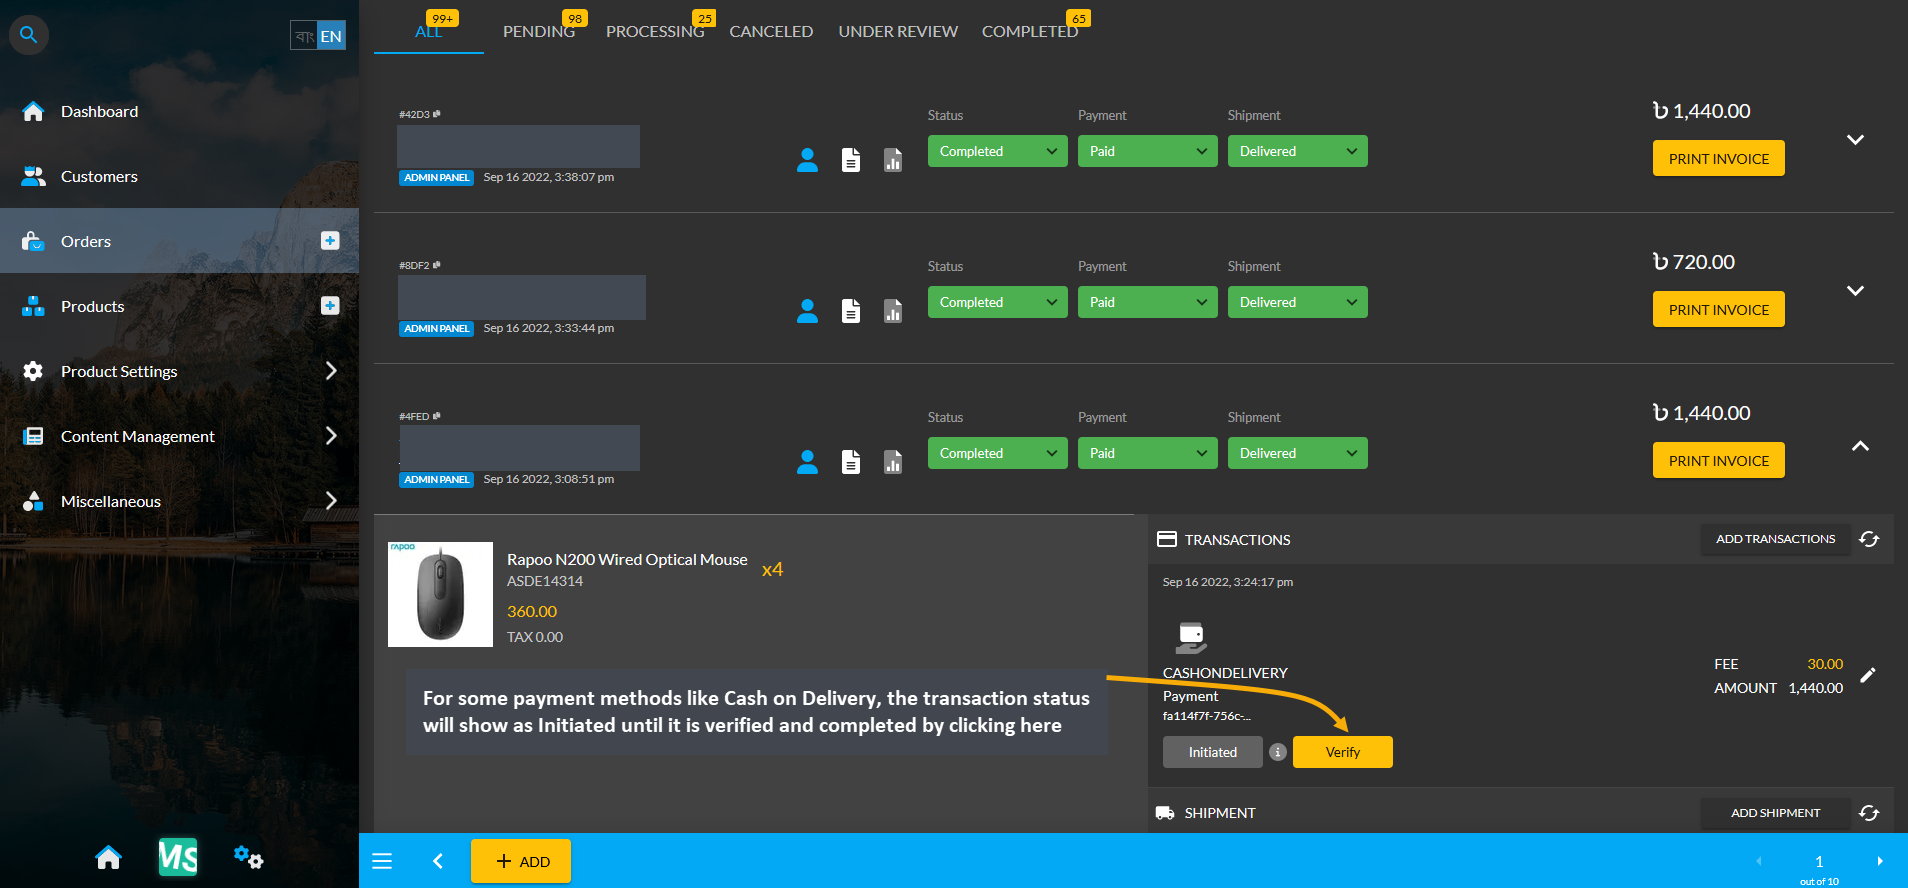
Image 9: Transaction status will show as Initiated until it is verified and completed for some payments.
After clicking on the Verify button, a pop-up will show where the transaction needs to be Set As Completed by selecting the option and hitting the Submit button as shown below.
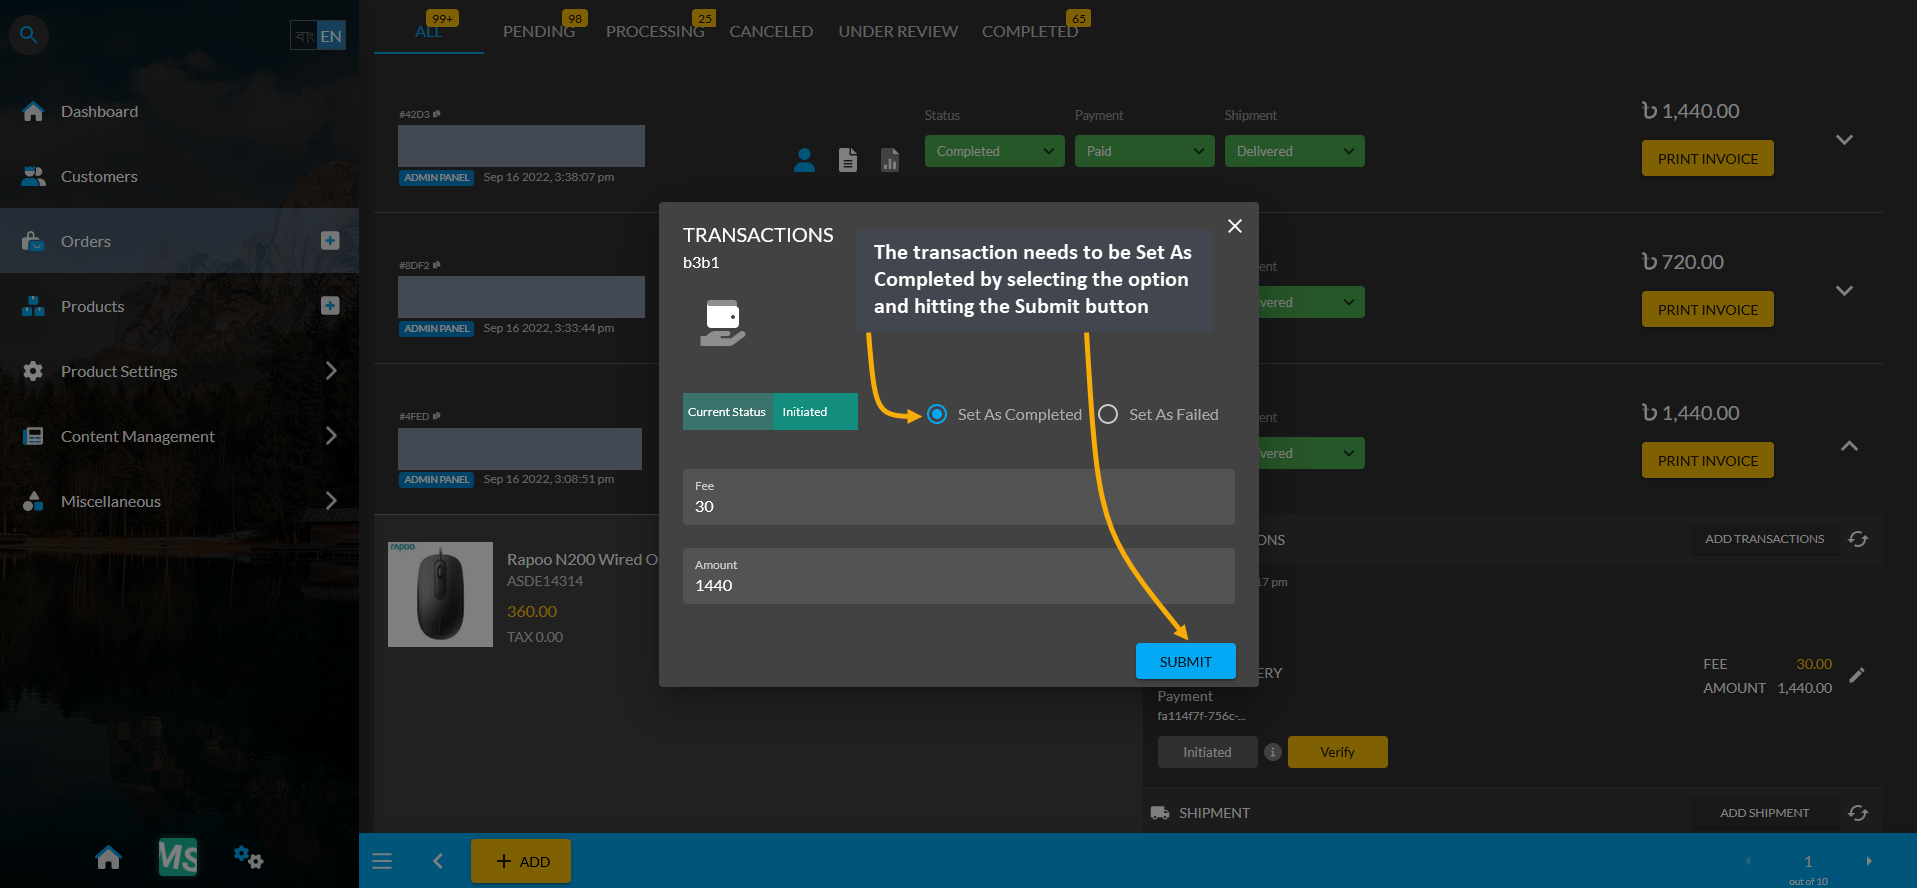
Image 10: Transaction needs to be Set As Completed by selecting the option and hitting the Submit button.
A message will show up asking to confirm that the transaction status is updated, so if the Order status should be updated to Completed as well. Click Agree to proceed and update Order status to Completed.
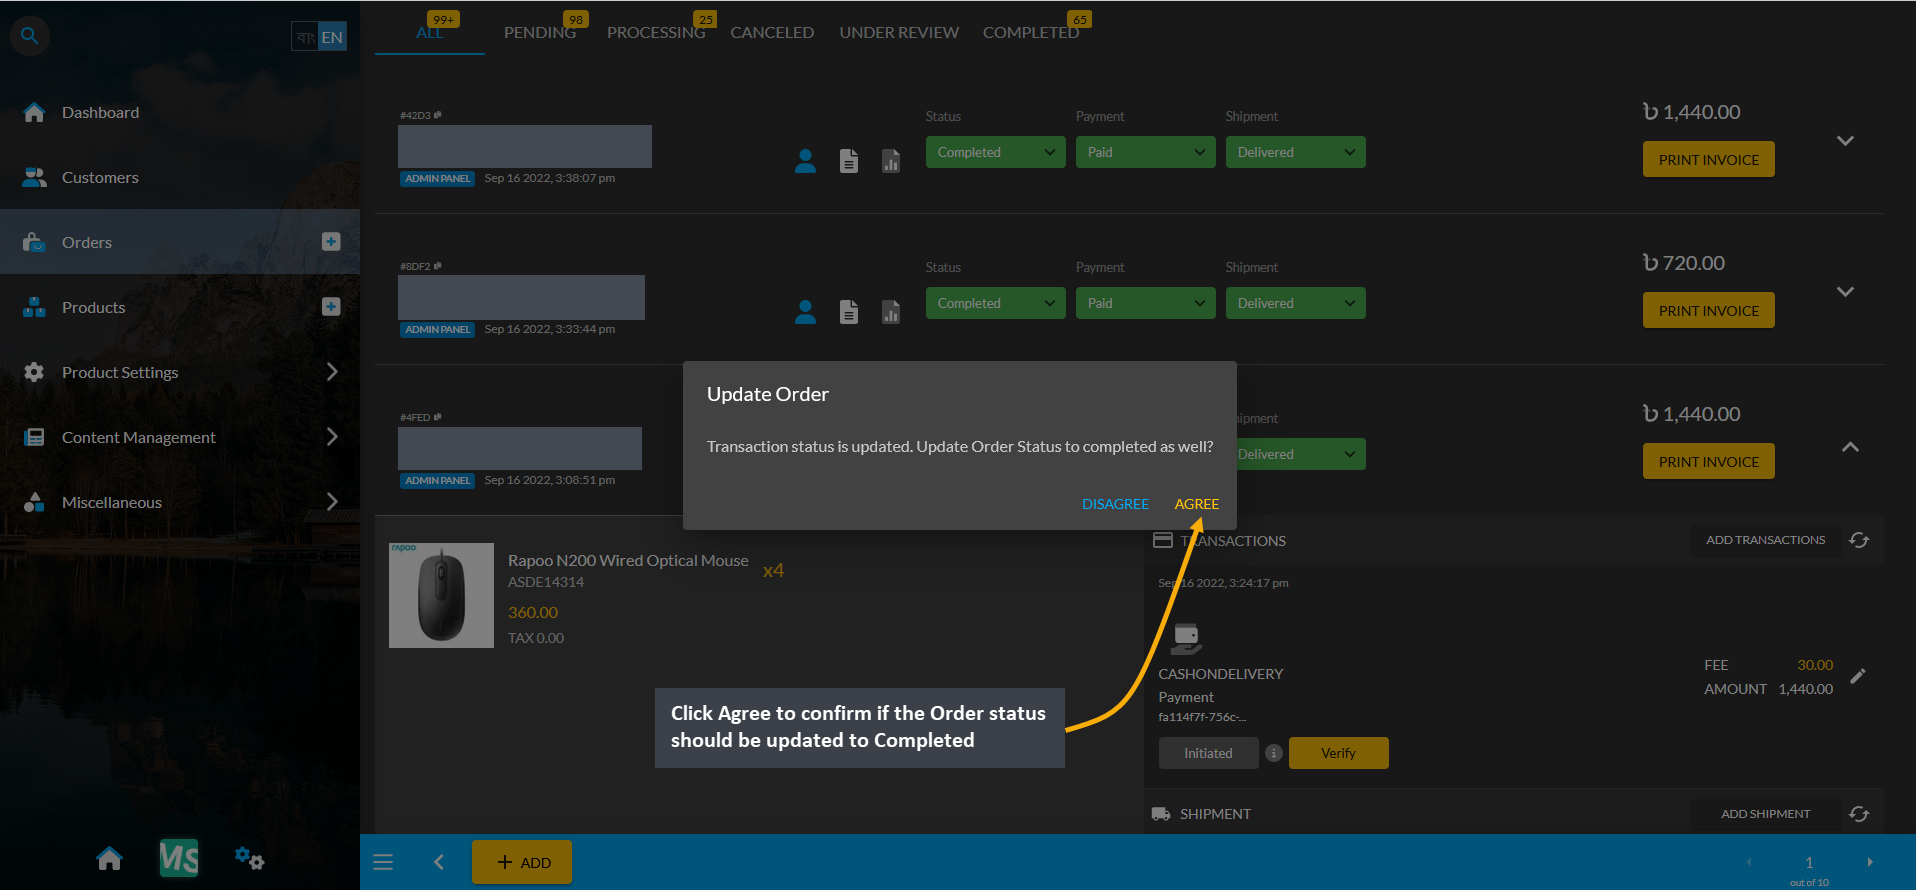
Image 11: Click Agree to confirm if the Order status should be updated to Completed as well.
Upon successfully confirming to change the Order status, the Order status will now show as Completed, which means that the Order transaction is completed and added to Revenues.
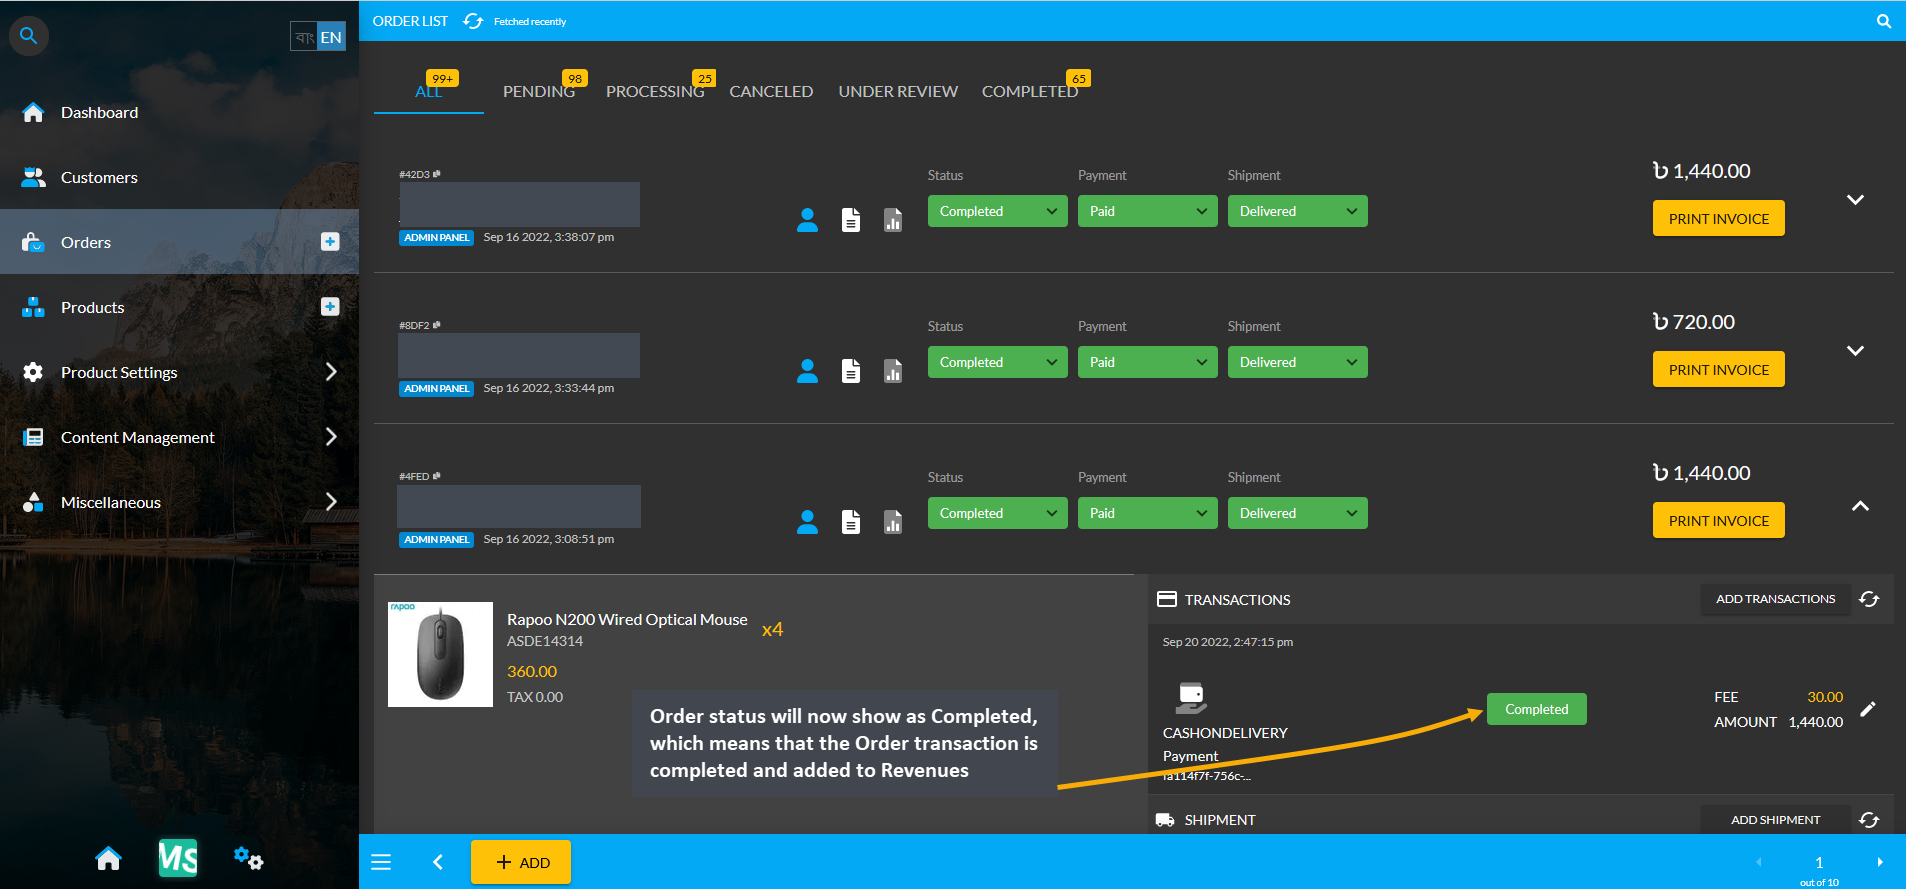
Image 12: Order status will now show as Completed, which means that the Order will add to the Revenues.
Now, on the Revenue Cost Basis page, it will be seen that Revenues were made for all these Orders which were successfully Completed or Fulfilled and their transaction have been confirmed.
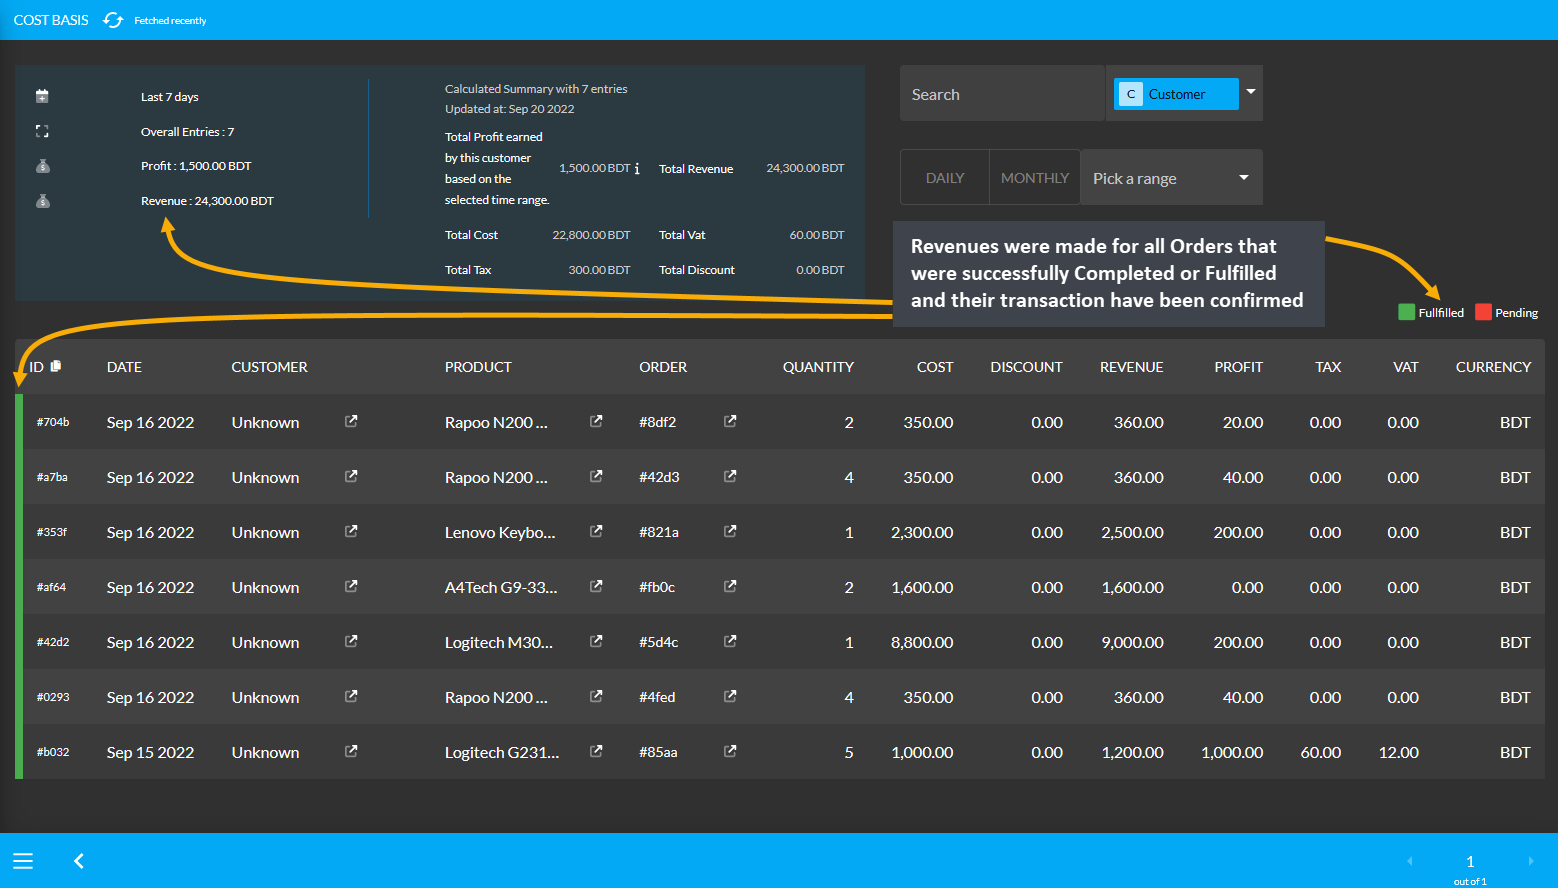
Image 13: Cost Basis will show that Revenues were made for all Orders that were Completed or Fulfilled.
As Payment transactions were confirmed for all these Orders, Revenue based on them will be updated and show on the Dashboard Revenue section as shown in the example below.
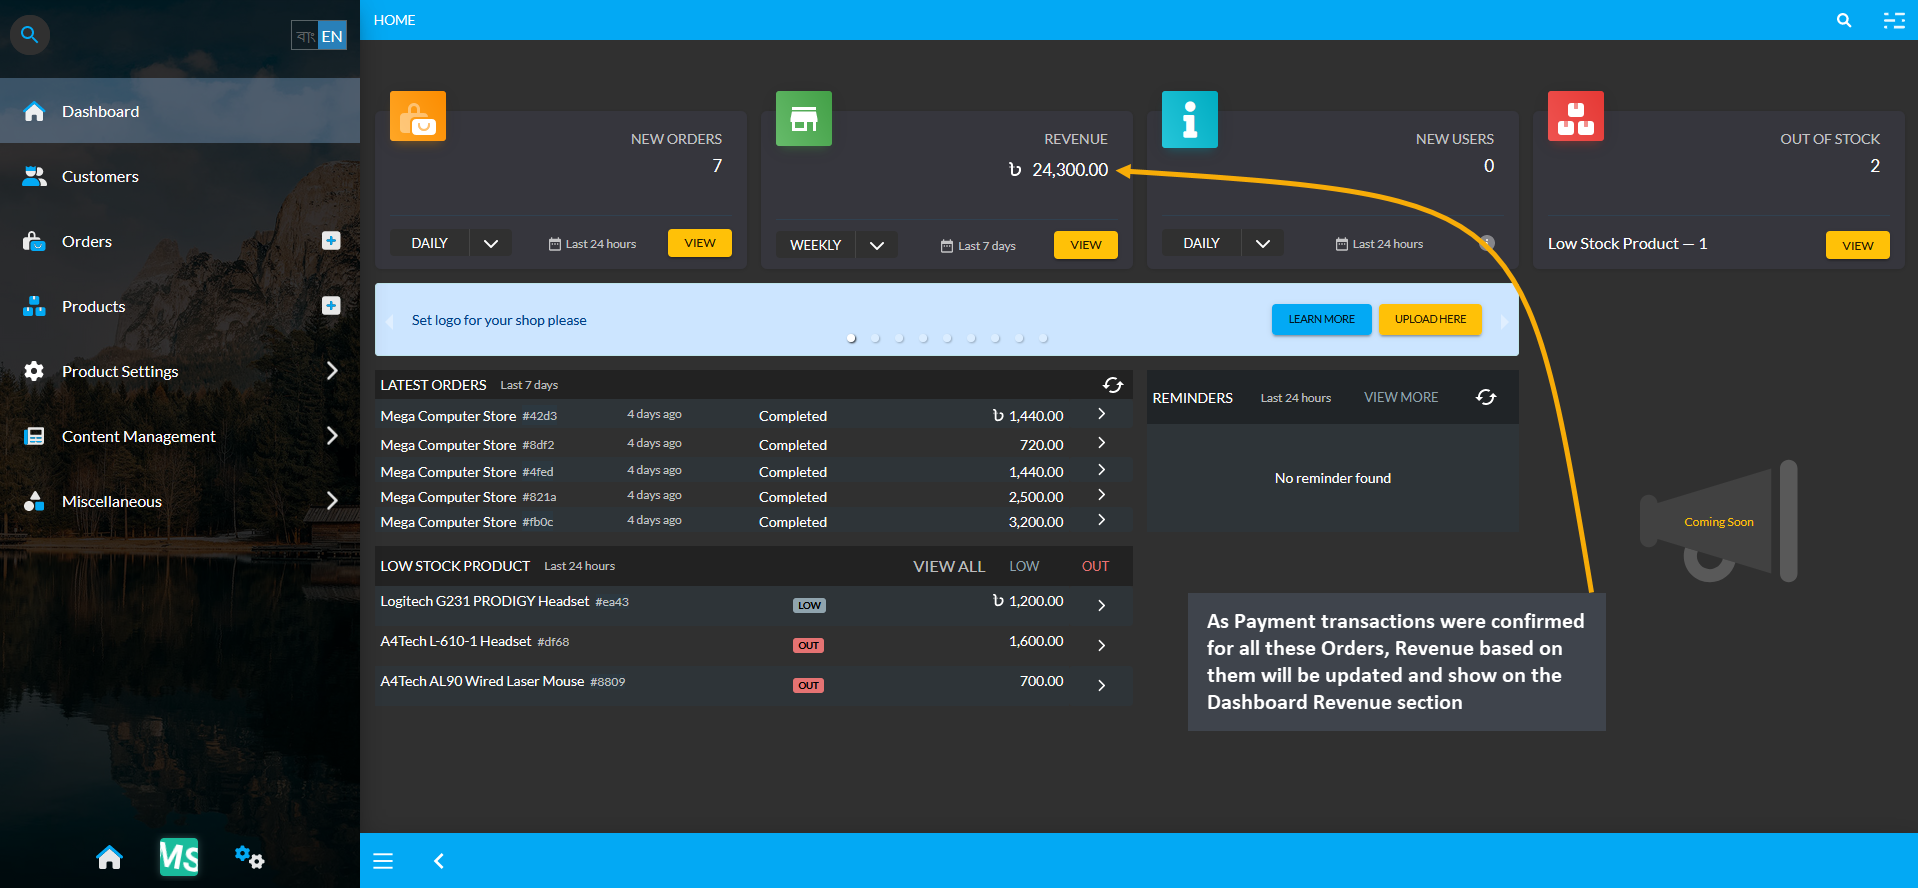
Image 14: Revenue based on Completed Orders will be updated and show on the Dashboard Revenue section.
New Users
New Users will display the count of New Users or Customers from the Website based on the selected timeframe. The Shop Owner can select ranges of Hourly, Daily, Weekly, Monthly, and Yearly to view number of New Users.
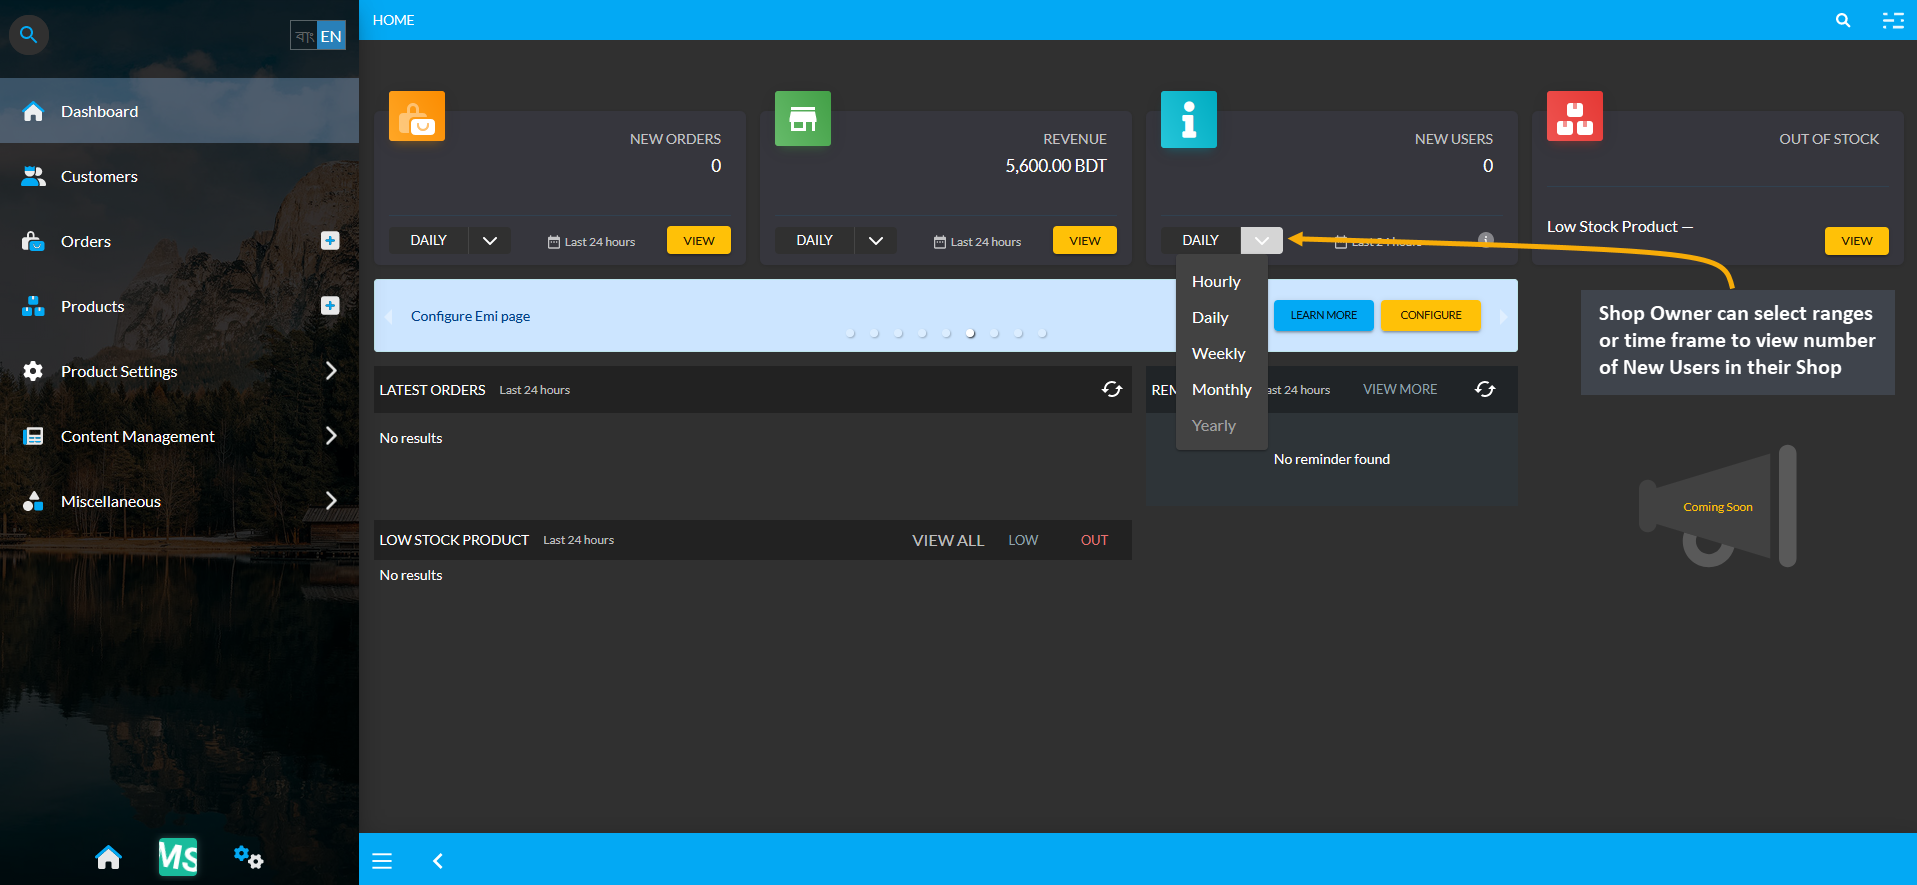
Image 1: Shop Owner can select any timeframe or ranges to view the number of New Users in their Shop.
Out of Stock and Low Stock Products
Out of Stock will display the count of both Out of Stock and Low Stock Products. Click on View to be redirected to the count of both Out of Stock and Low Stock Products on a separate page. The list of Low Stock Products will be displayed at the bottom end of the screen under Latest Orders with Low and Out buttons to check. Low Stock Products will also show the latest Out of Stock Products under this section.
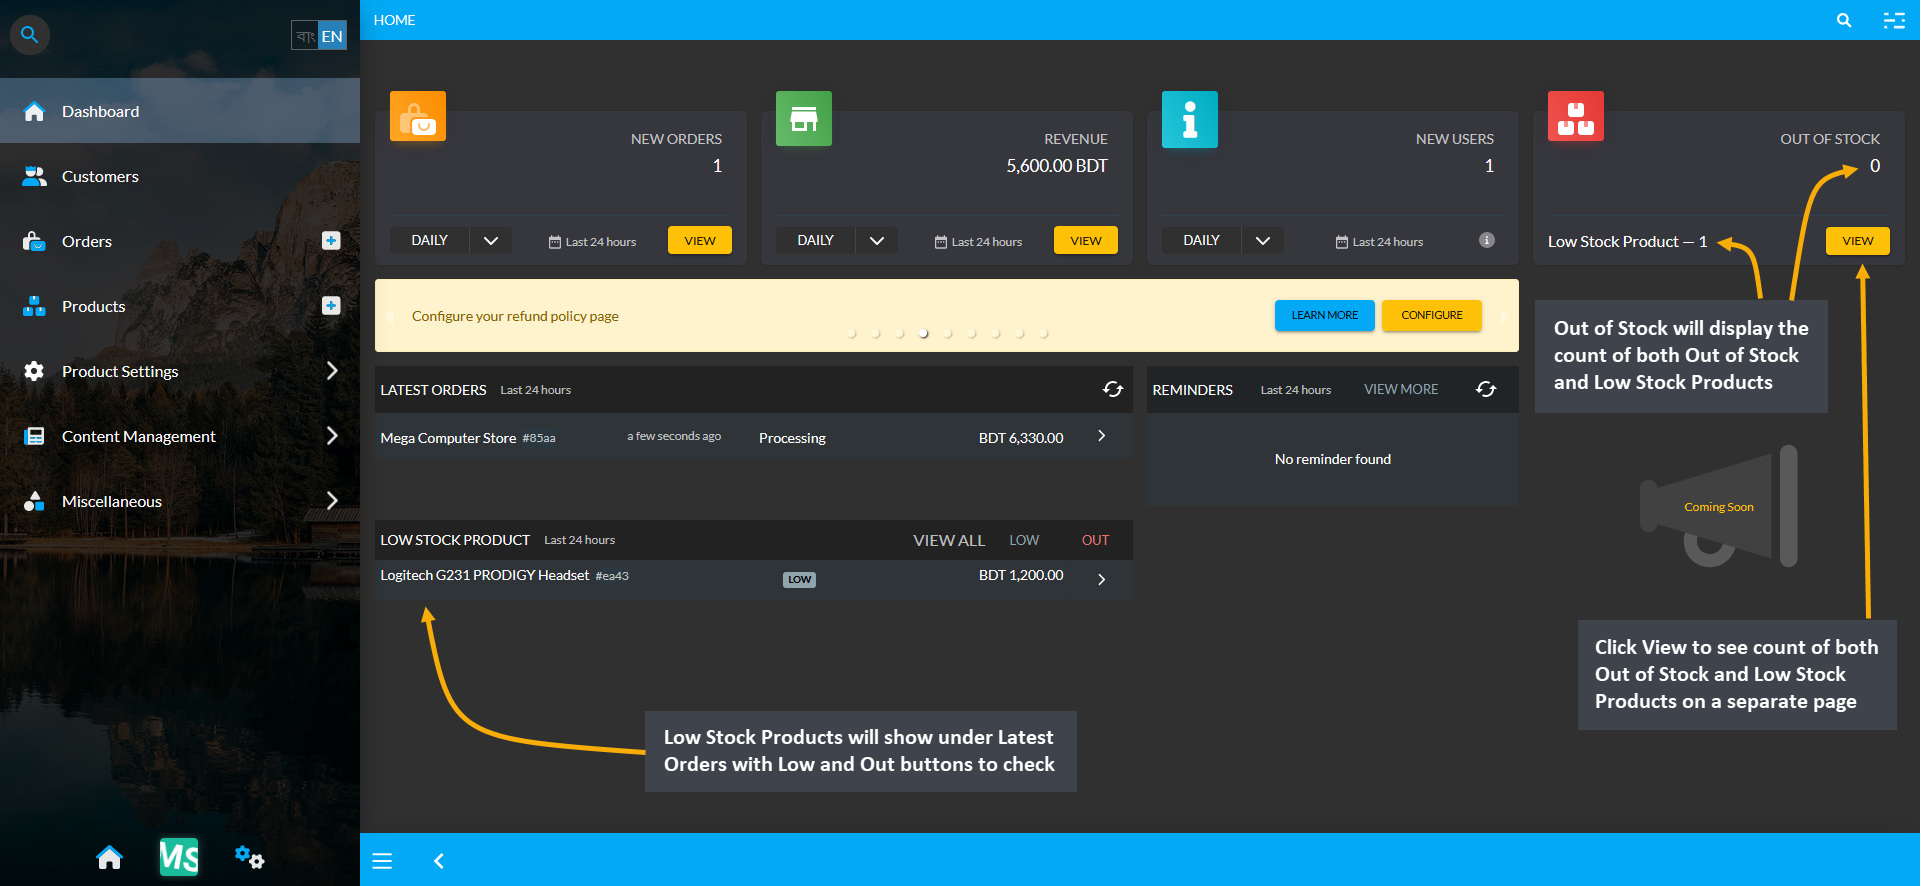
Image 1: Out of Stock will display the count of both overall Out of Stock and Low Stock Products.
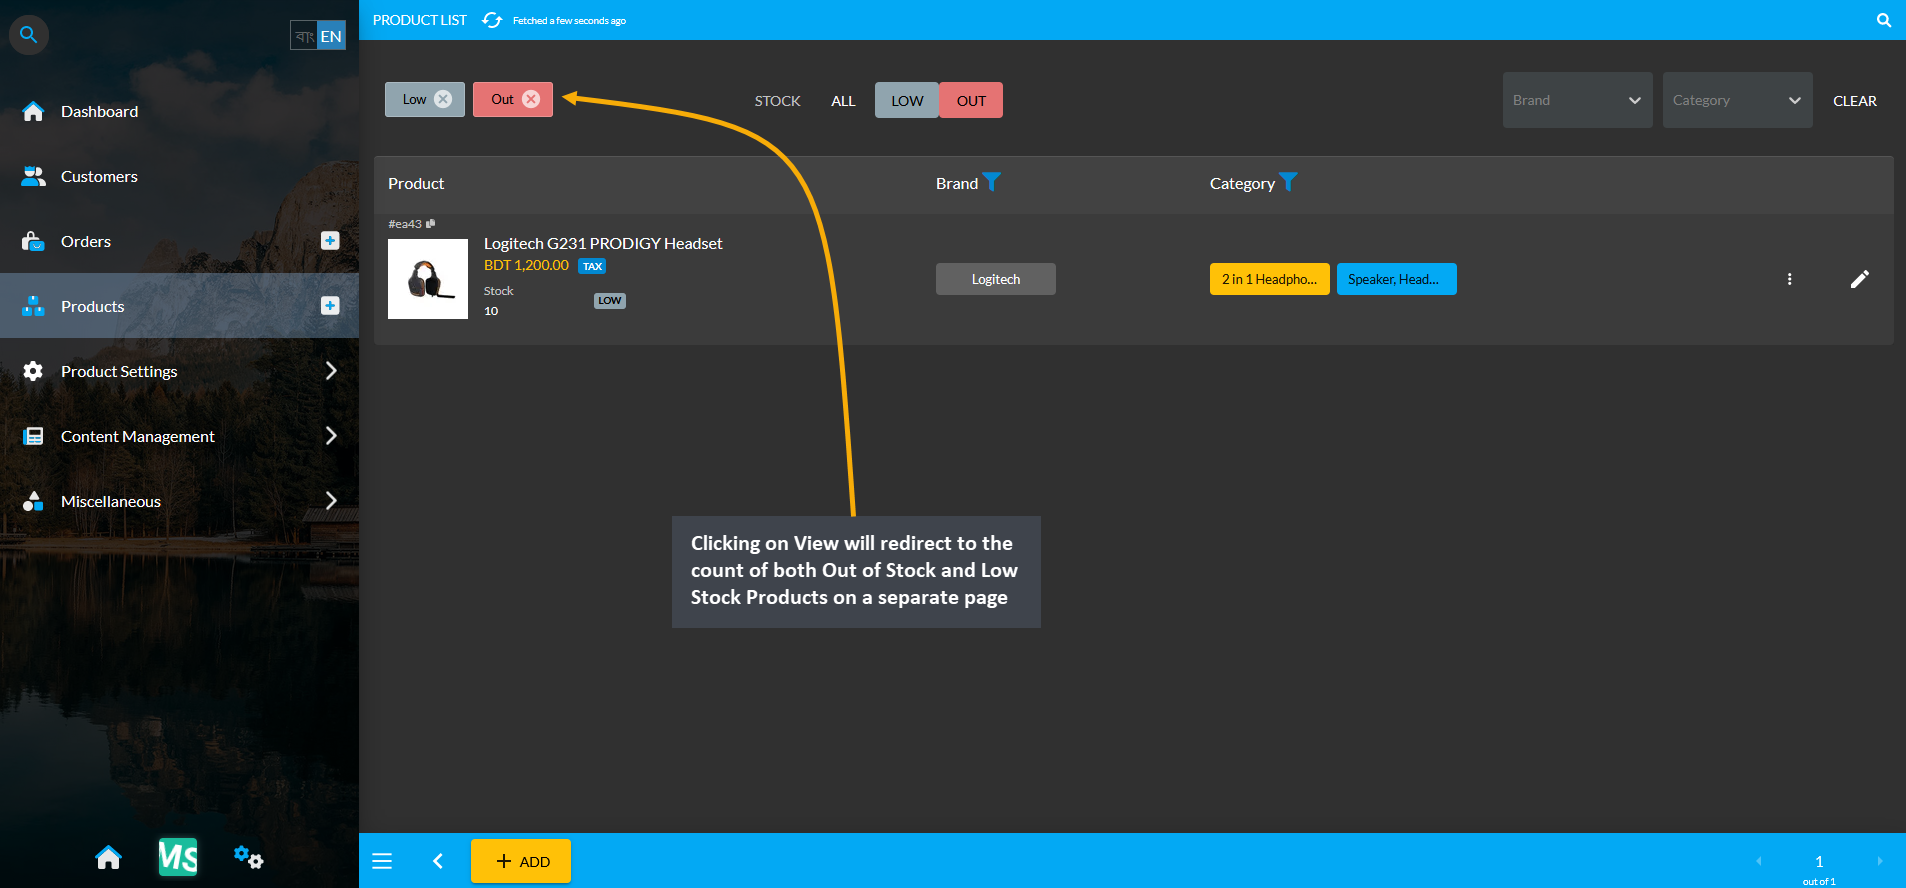
Image 2: Clicking on View will show count of both Out of Stock and Low Stock Products on a separate page.
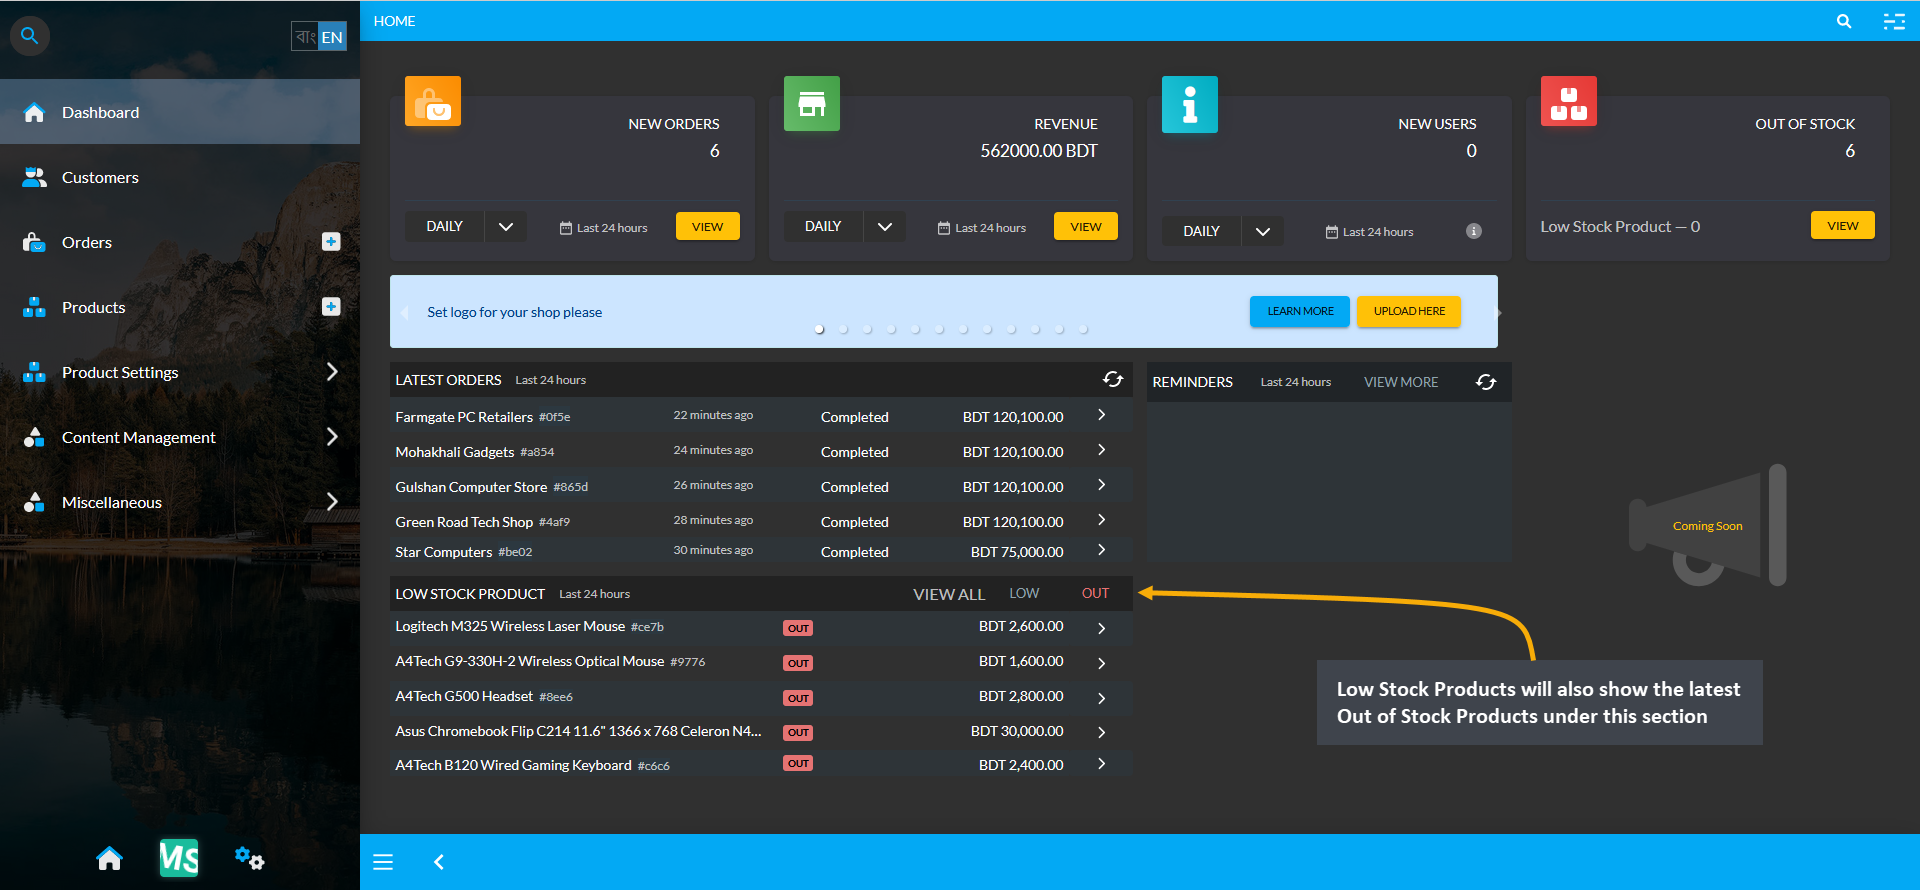
Image 3: Low Stock Products will also show the latest Out of Stock Products under this section.
Latest Orders
There is a section for Latest Orders showing Customers and Order amount from the last 7 days in the Website under the nag display dashboard. There is a refresh ⟳ button that can be used to check the latest Orders placed.
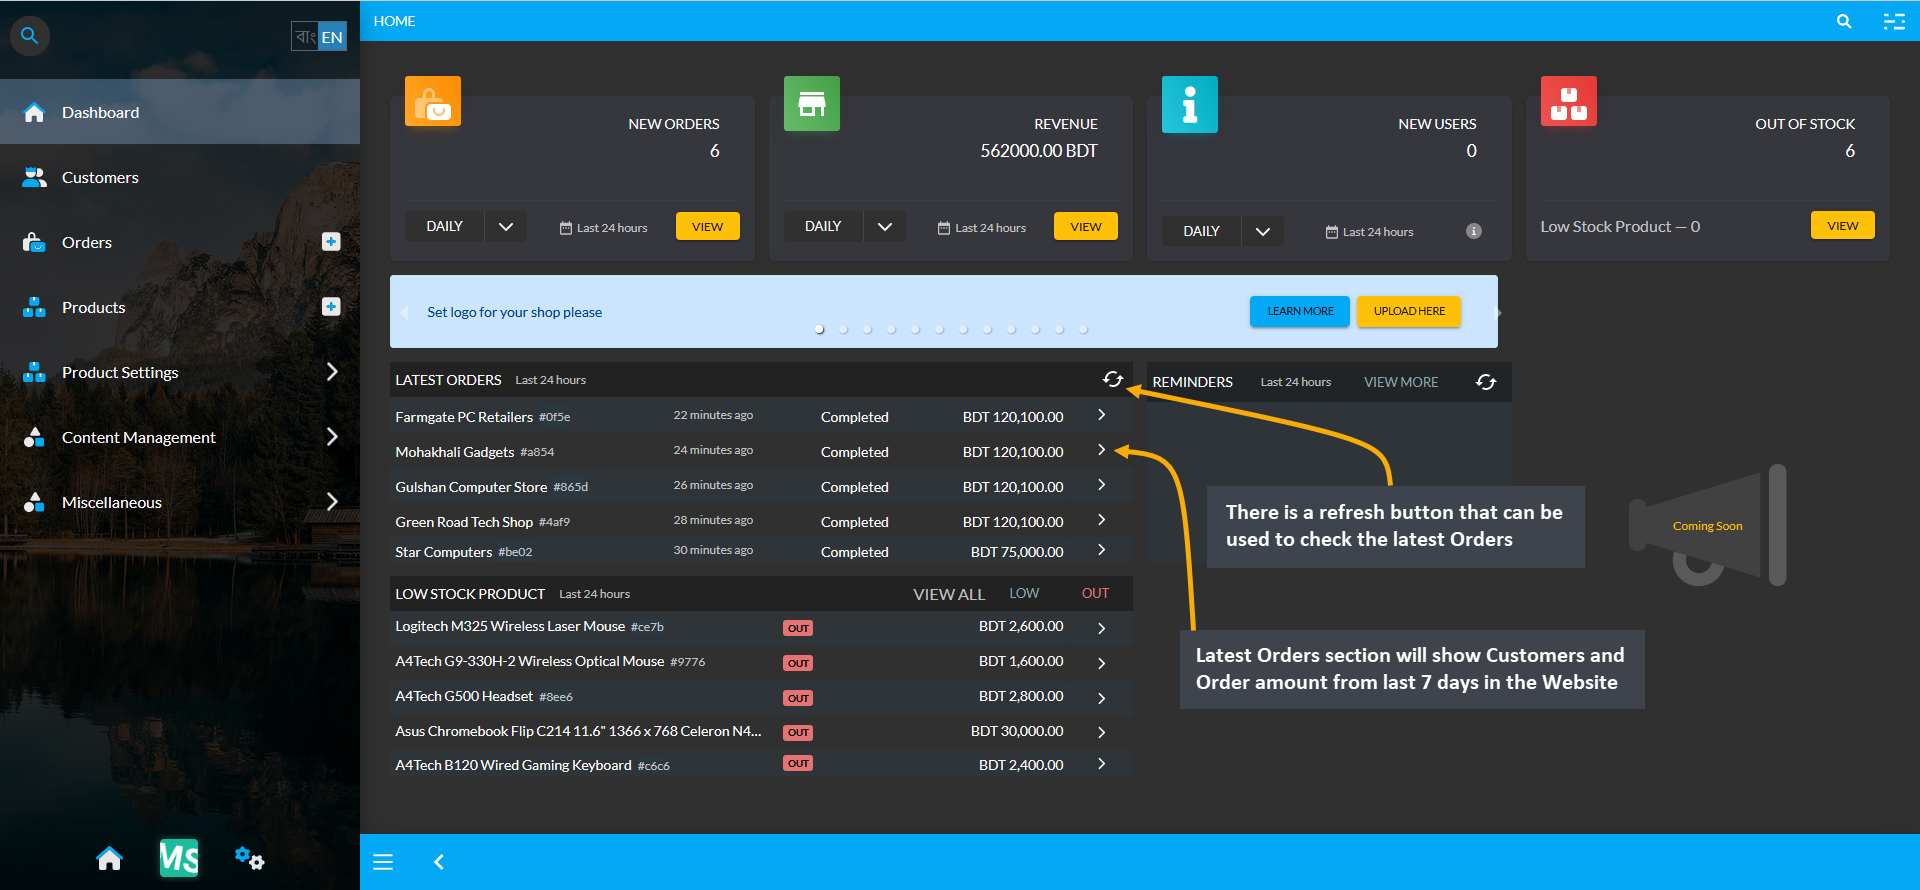
Image 1: Latest Orders section will show Customers and Order amount from last 7 days with ⟳ button.
Reminders
The Shop Owners can set Reminders that they need to follow up which will show beside Latest Orders section. A maximum of 5 Reminders will display on the dashboard refreshing with results of last 24 hours. Click on the View More button to be redirected to the Reminders page, where Reminders can be updated or deleted.
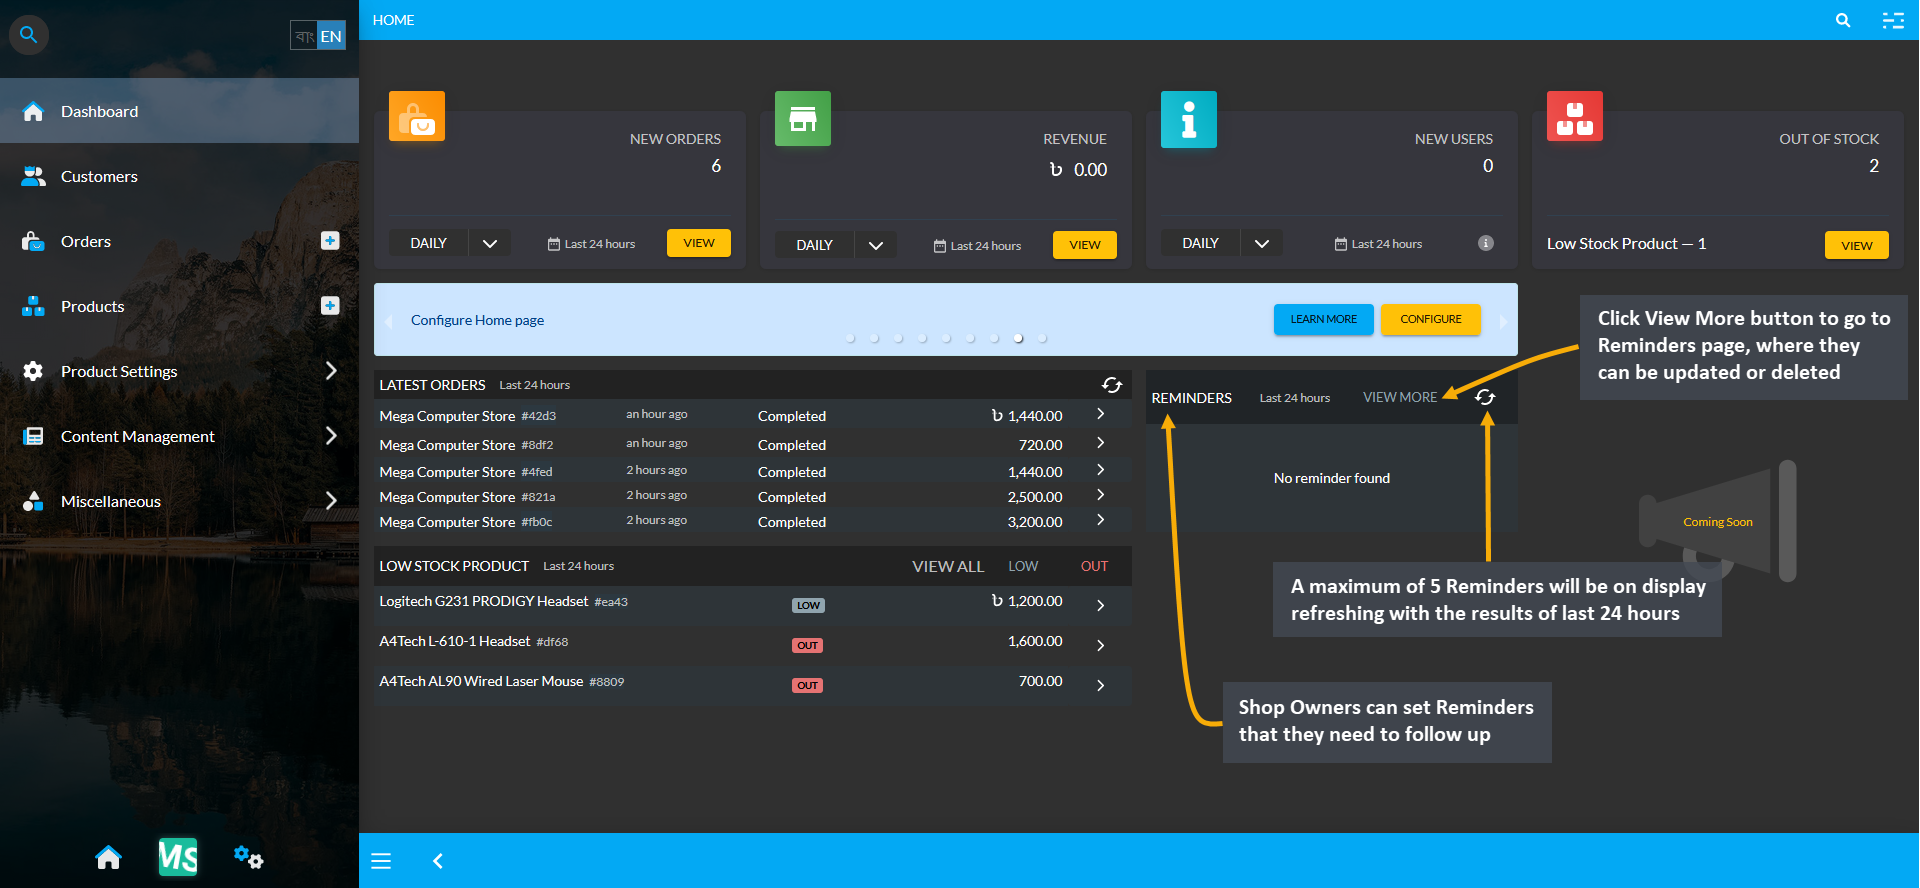
Image 1: Reminders section will show Reminders from last 24 hours with ⟳ button to follow up with.
On the Reminders Page, newly created or existing Reminders can be seen under the List with Pending Reminders that are Over Due needs to be completed, such as Payment Dues or Cheque Settlements. New Reminders can be added by clicking on the Add button. Find Reminders based on Types like Cheque and Custom or Status such as Pending, In Progress, Completed or timeframe like Daily, Weekly, and Monthly options.
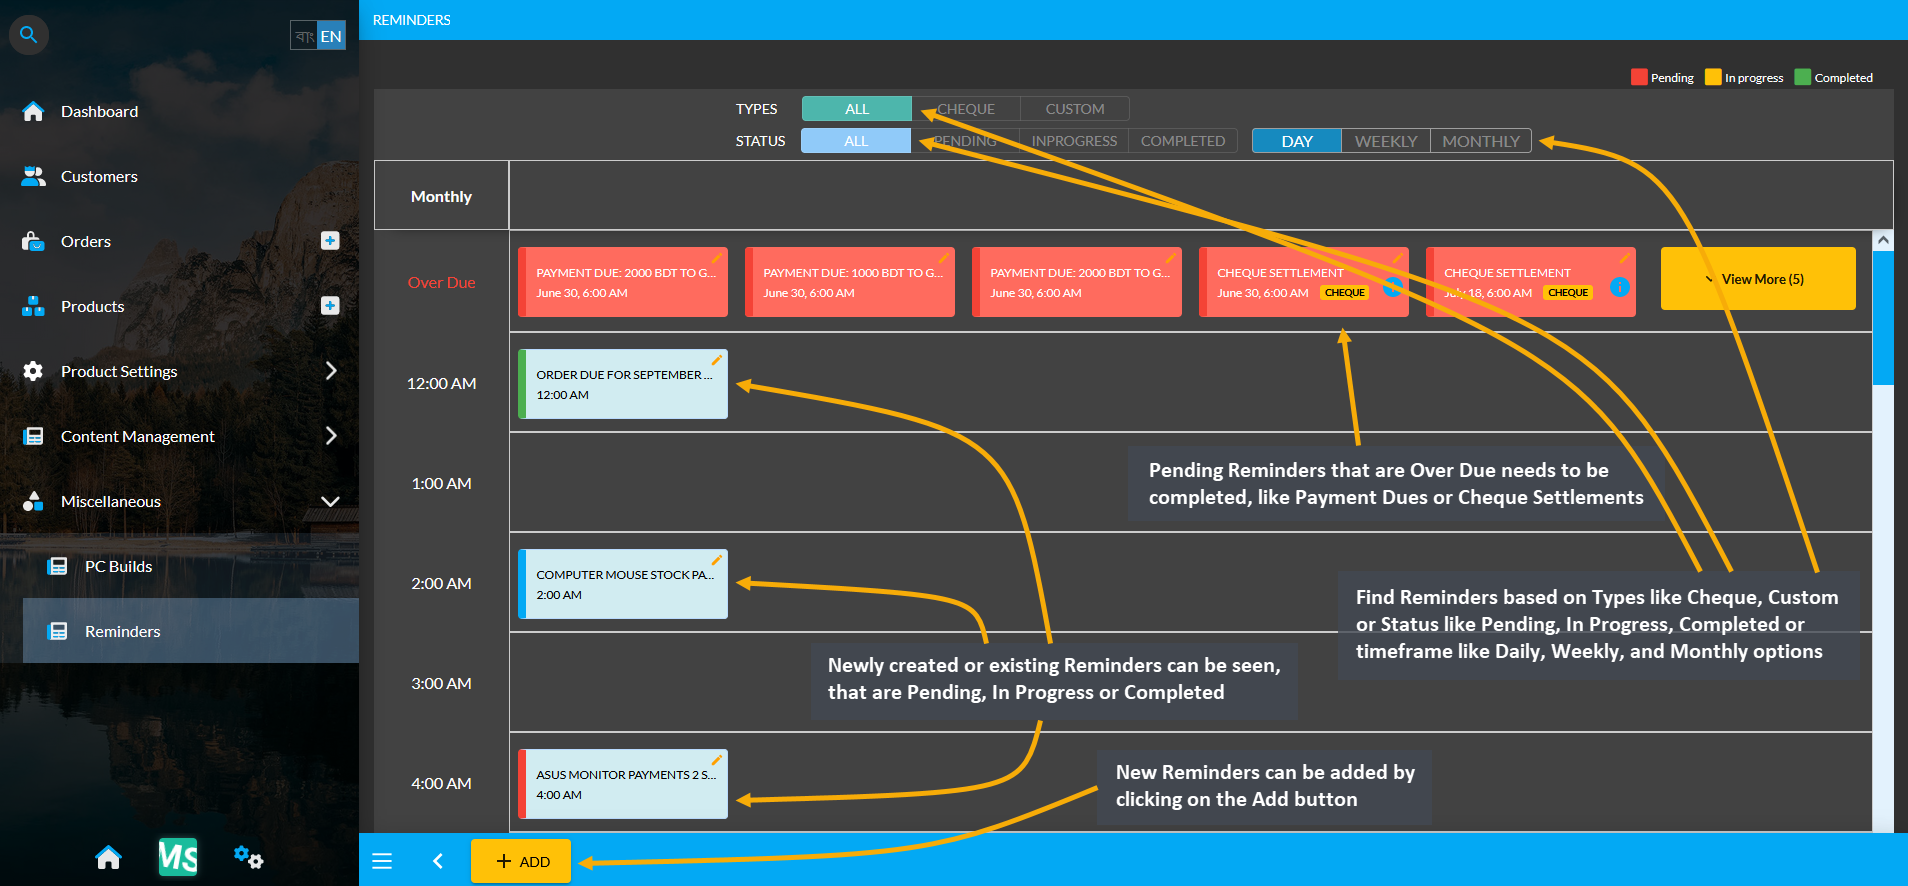
Image 2: New, Existing, and Pending Reminders can be seen based on Types, Status, and Time Frames.
Create New (Custom) Reminder
New Custom Reminders can be added by clicking the Add button, which will open this pop-up. Set the reminder Title and Due Date and Time, set status to Pending, In Progress, or Completed and click Add to create New Reminder.
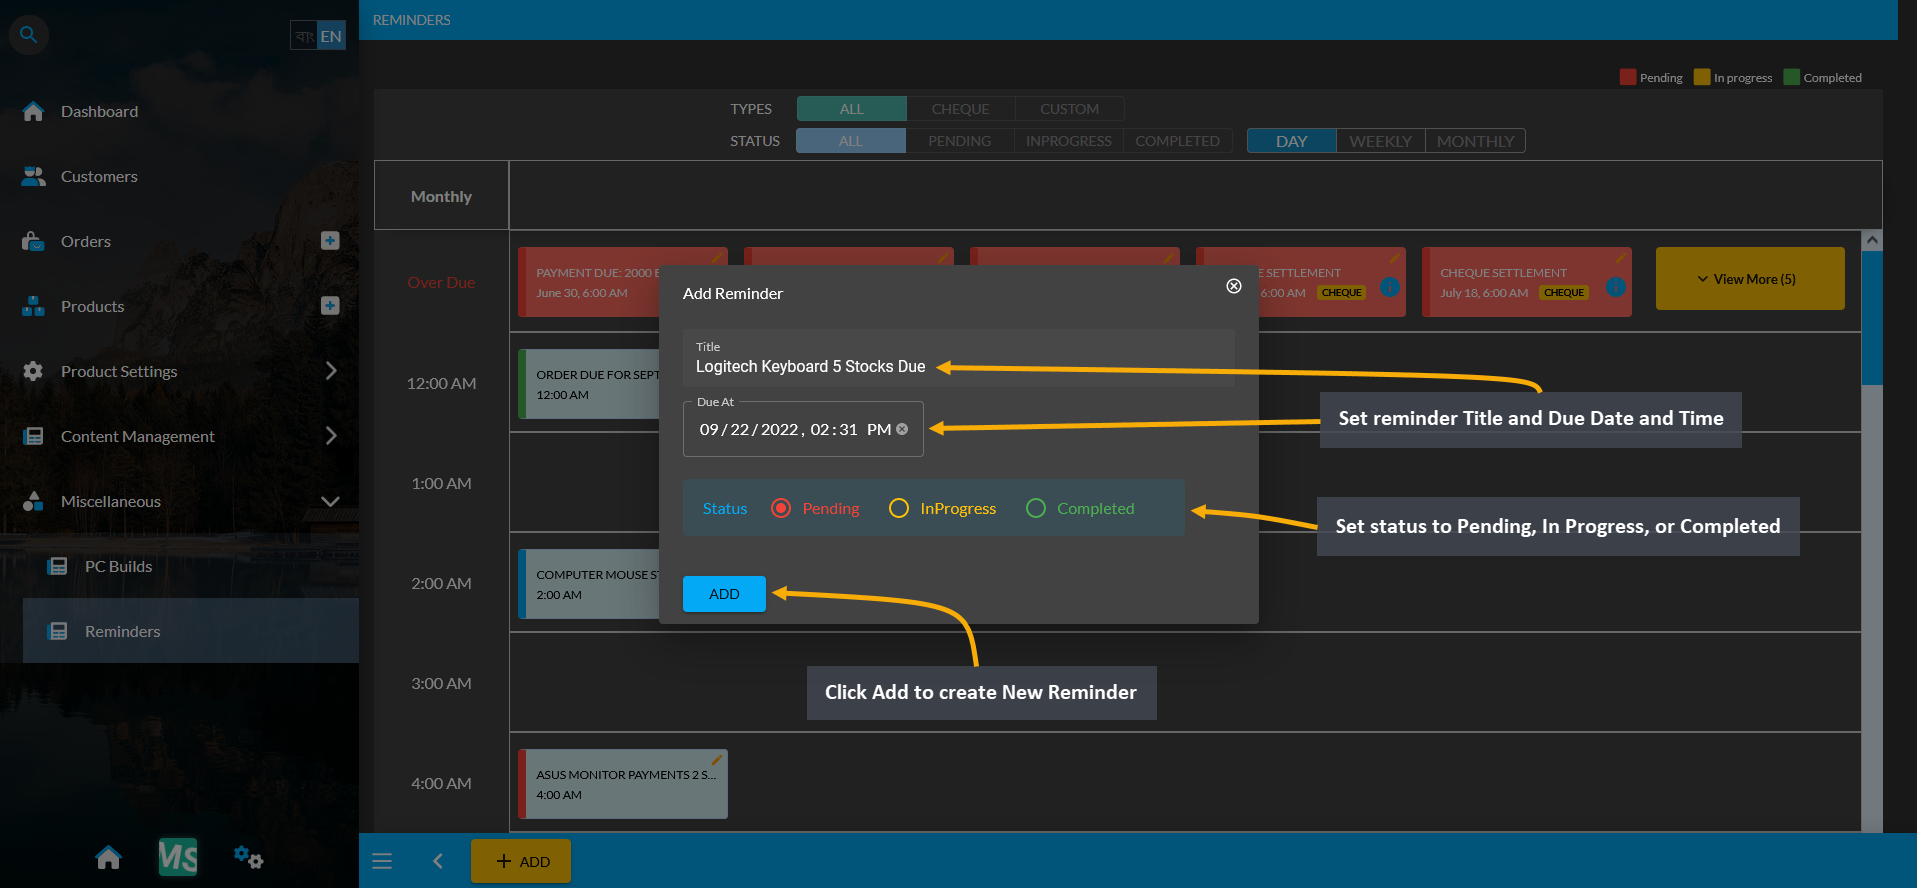
Image 1: Set Reminder Title, Due Date, Time, and Status to create New Custom Reminder from Reminders Page.
Newly created Reminders can be seen within the Daily, Weekly, and Monthly timeframe. Based on the selected timeframe, Reminders can be seen within the list which can be edited by clicking on the Edit icon.
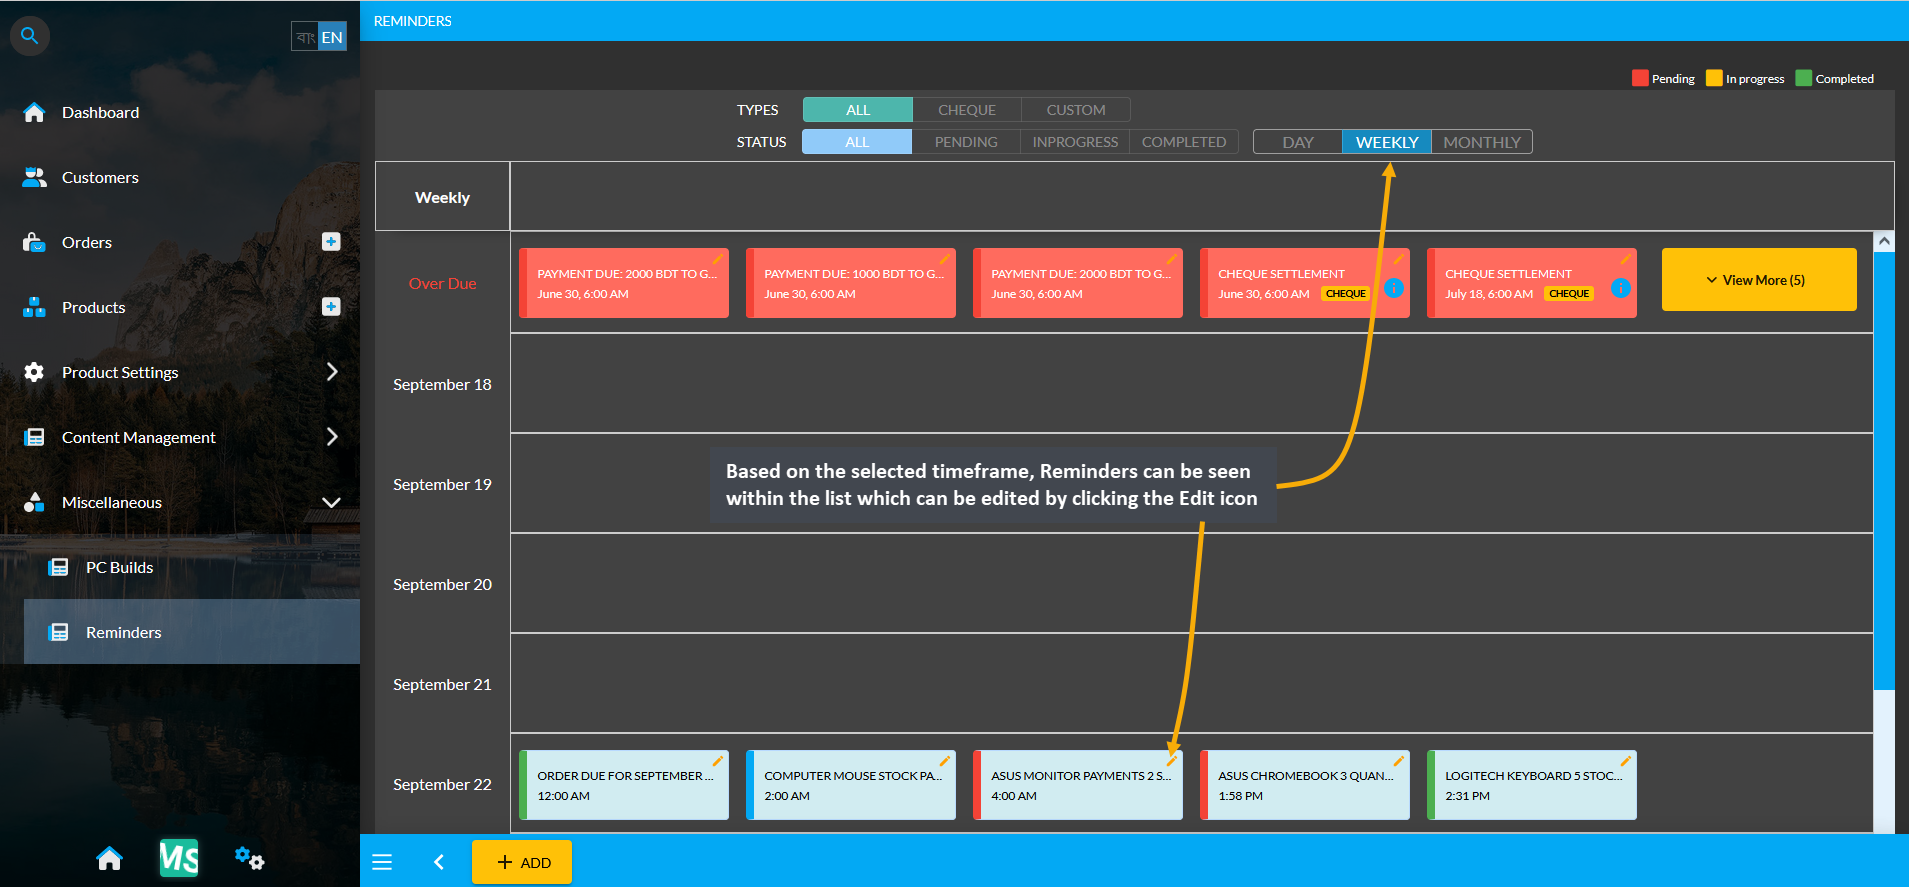
Image 2: Based on the selected timeframe, Reminders can be seen within the list which can be edited.
Within the dashboard Reminders section, five latest Reminders will be seen that were created within the last 24 hours. Click refresh ⟳ button to refresh this section and click View More to go to Reminders page for full view.
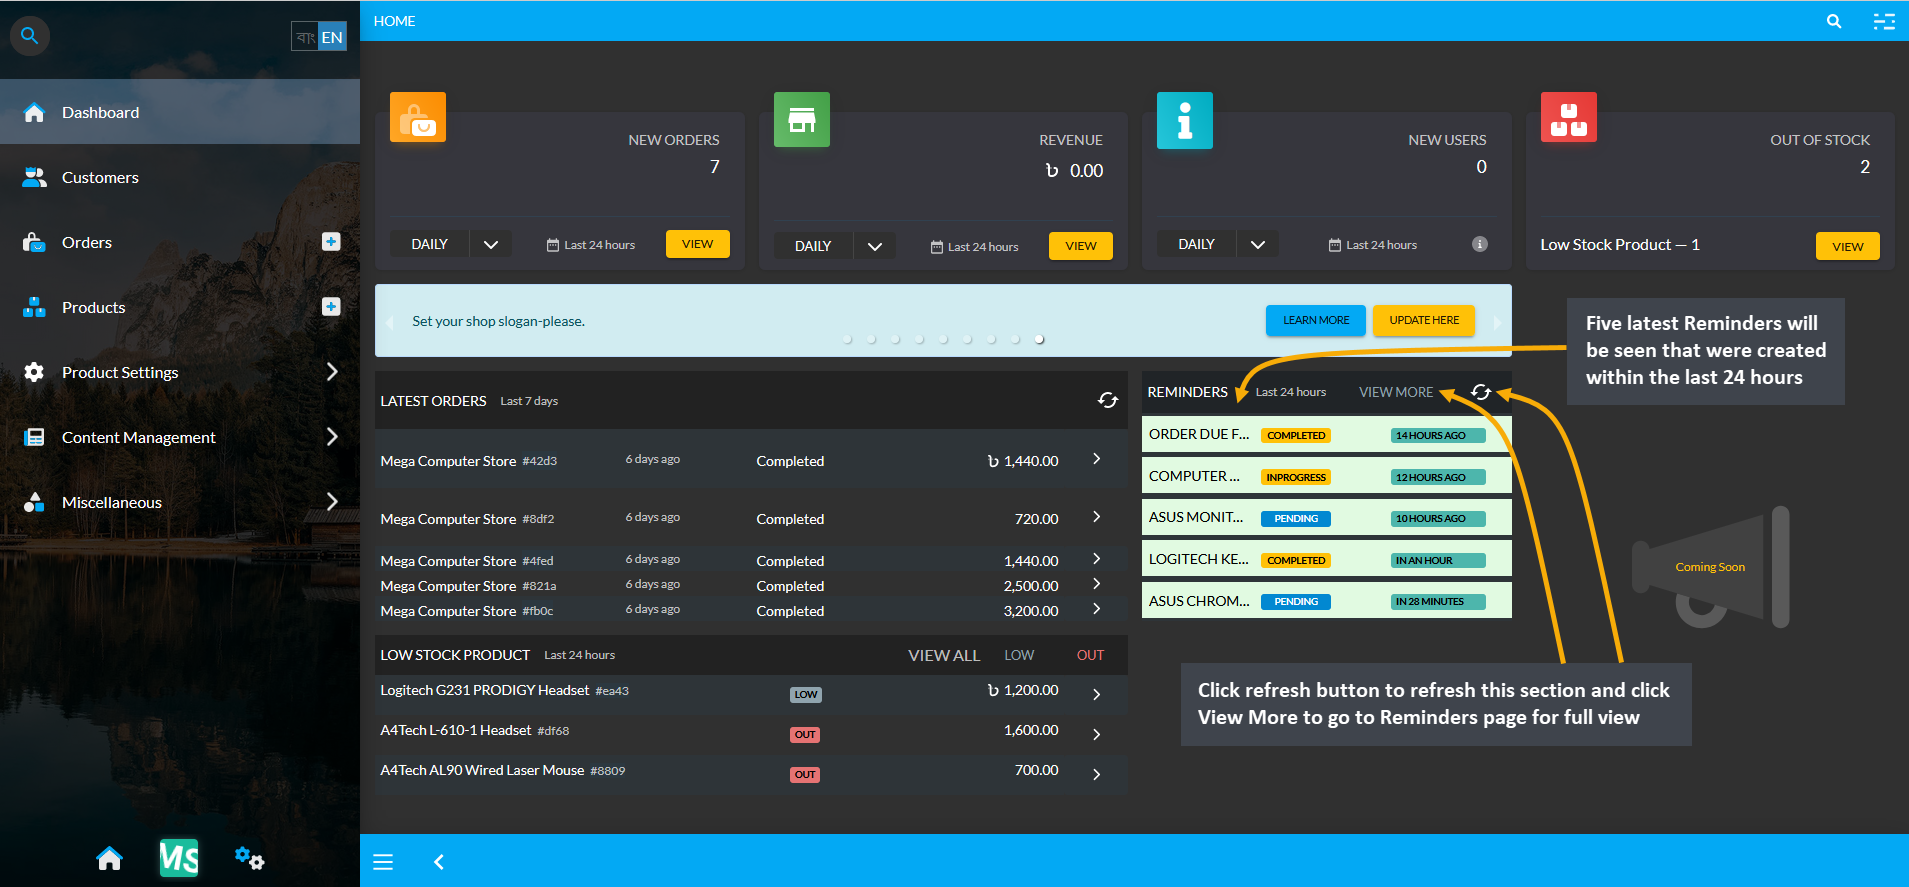
Image 3: Five latest Reminders will be visible from last 24 hours, click View More to view full details.
Create Cheque Reminders
New Cheque Reminders will be created when placing a New Order and choosing Payment Method with Cheque. This will automatically create and set a Cheque Reminder within the Reminders page. In this case, place New Order from Orders tab with Customer information, preferred Product, and Quantity and click Proceed to continue.
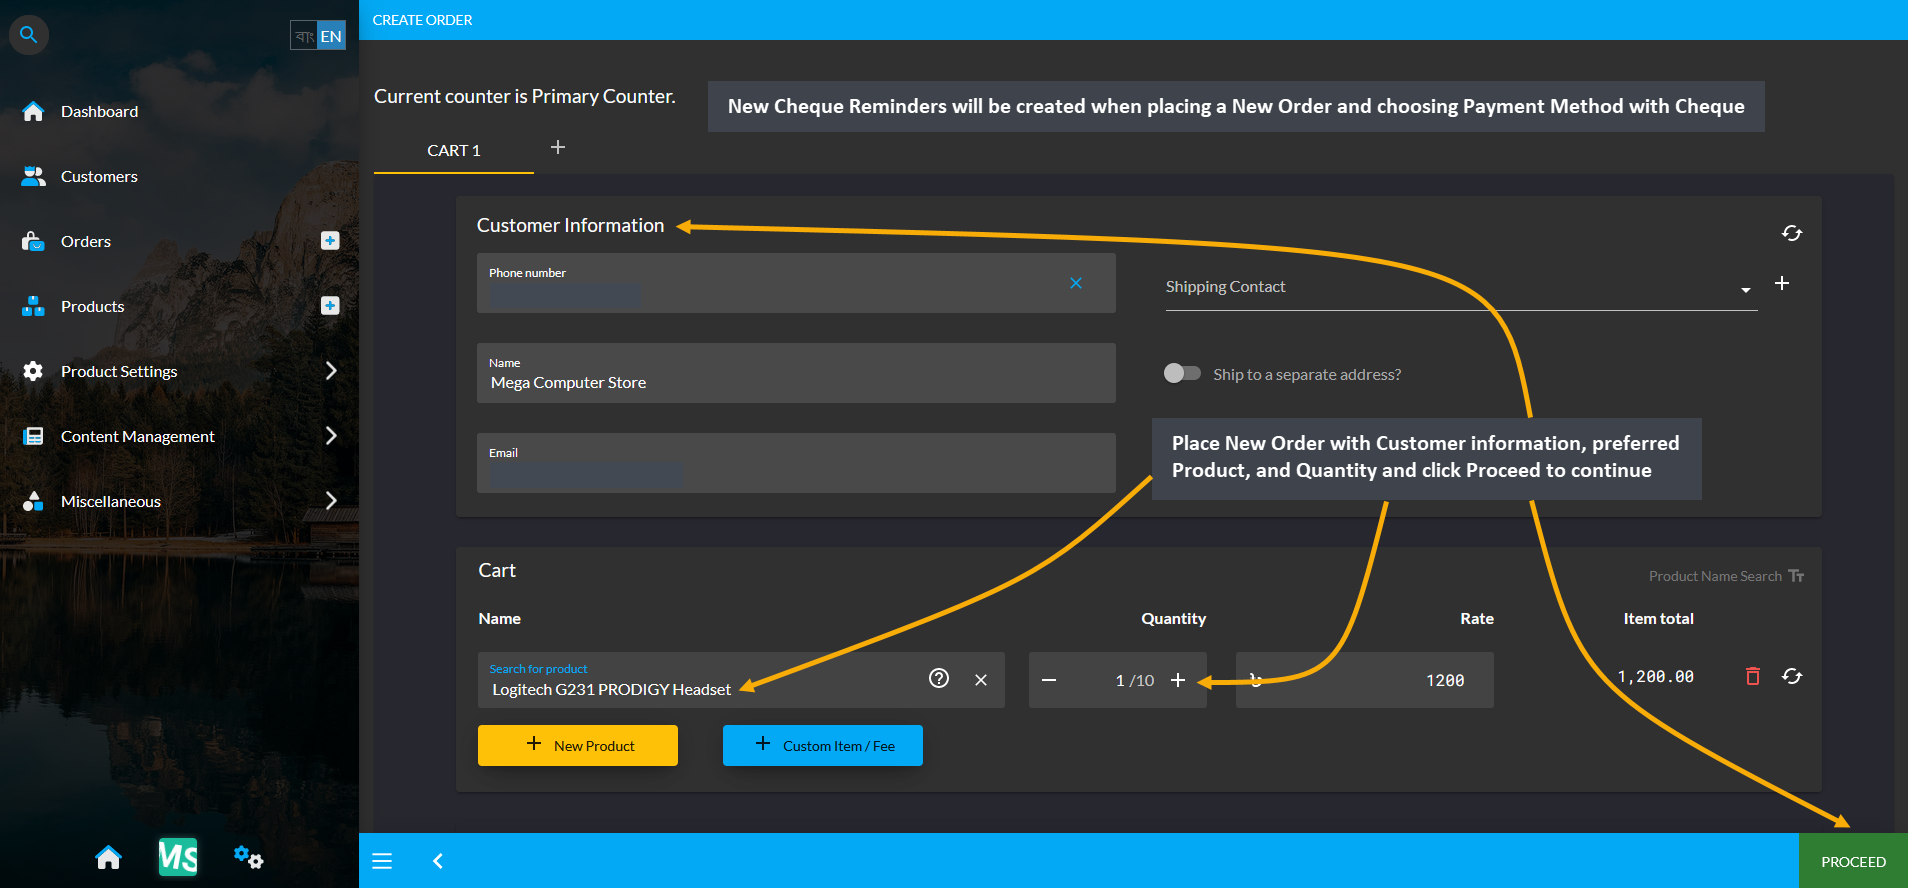
Image 1: Cheque Reminders will be created when placing New Order and choosing Payment Method with Cheque.
After selecting preferred Shipping Option, select Payment Method with Cheque which will automatically create and set a Cheque Reminder within the Reminders page. Set Cheque Number, Due Date, Bank Name, and click Confirm Order to place New Order. Due Date will be set as Reminder to remind Shop Owner of the due.
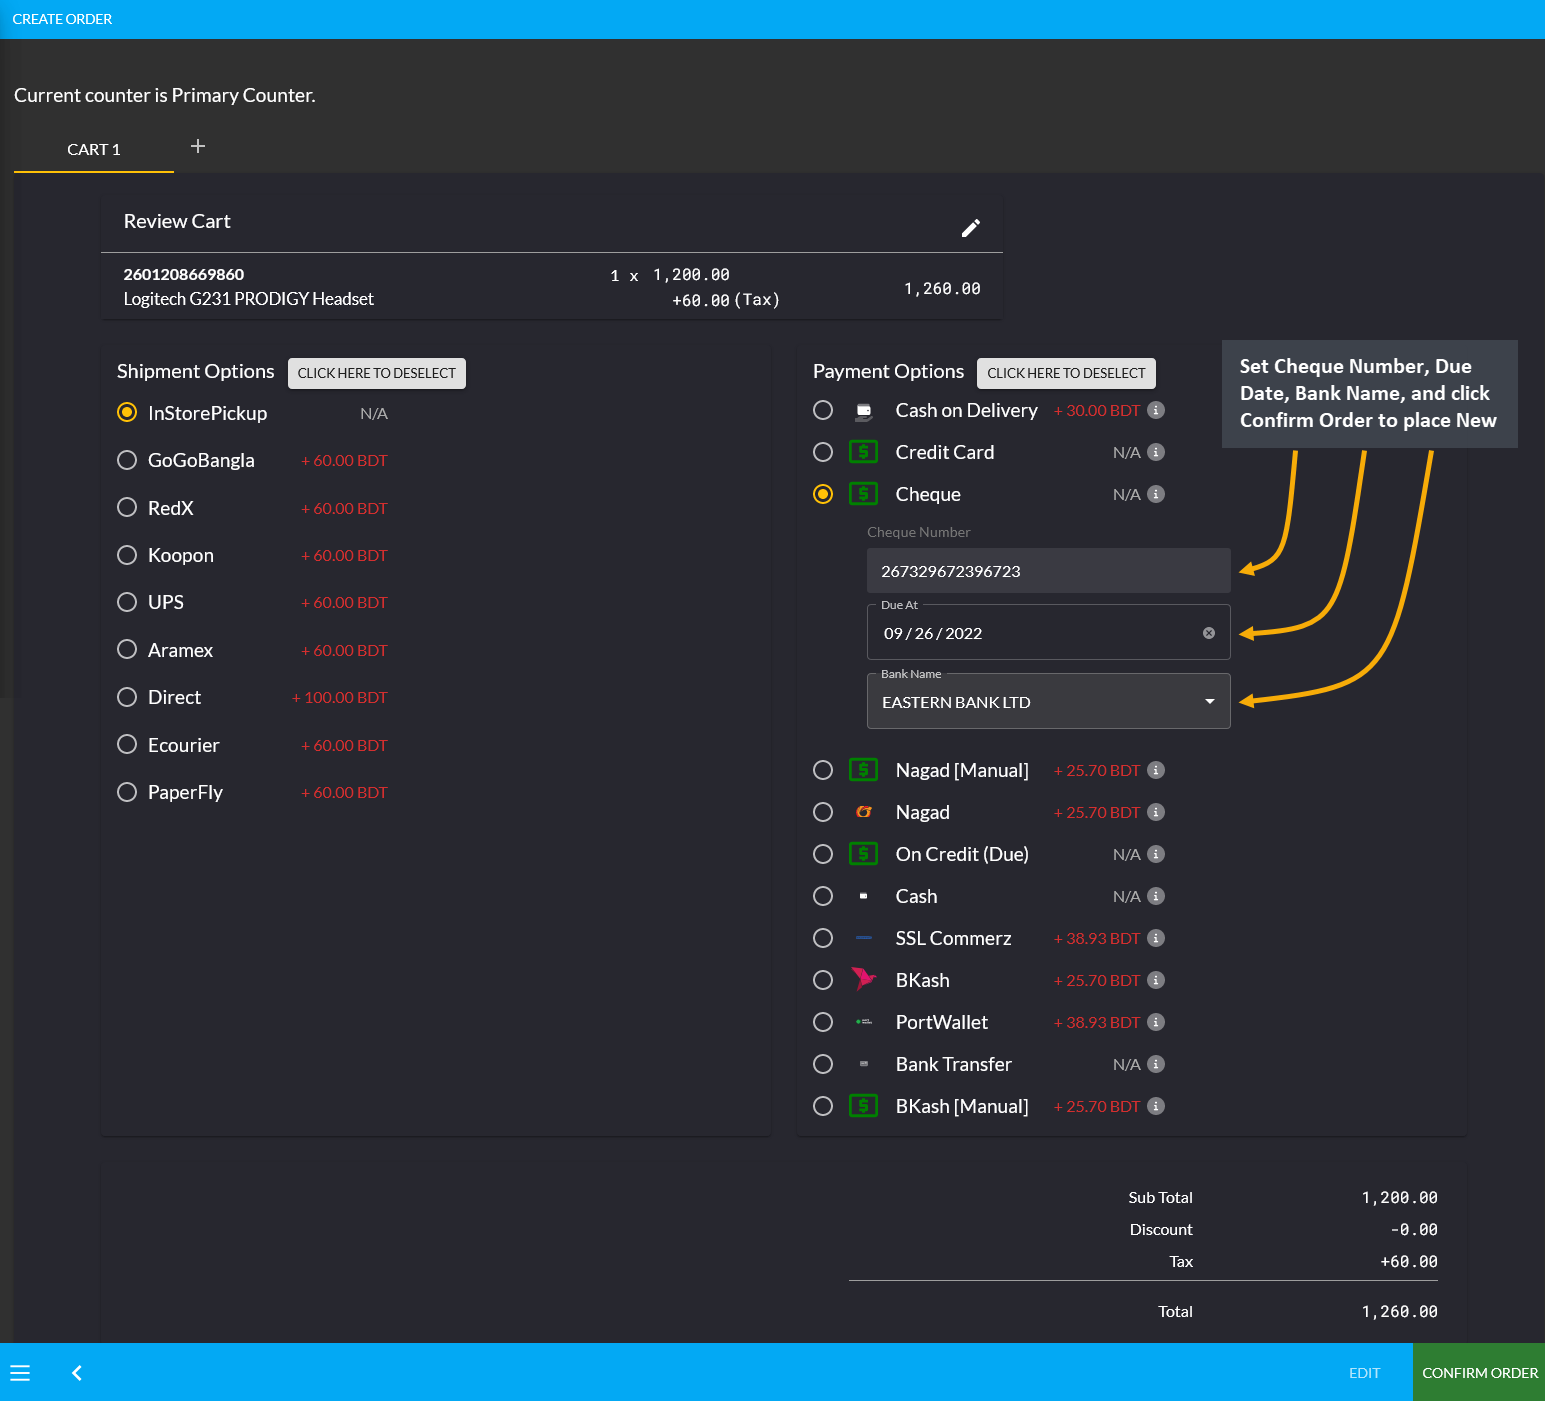
Image 2: Select Payment Method with Cheque which will automatically create and set a Cheque Reminder.
In the Reminders Page, select Cheque from types and select a preferred i.e. Monthly timeframe to find the Cheque Reminders that were created when placing New Order and making payment with Cheque. Update any Reminder information by clicking on the Edit icon. Click on the tooltip icon (i) to see Cheque Number, amount, and status.
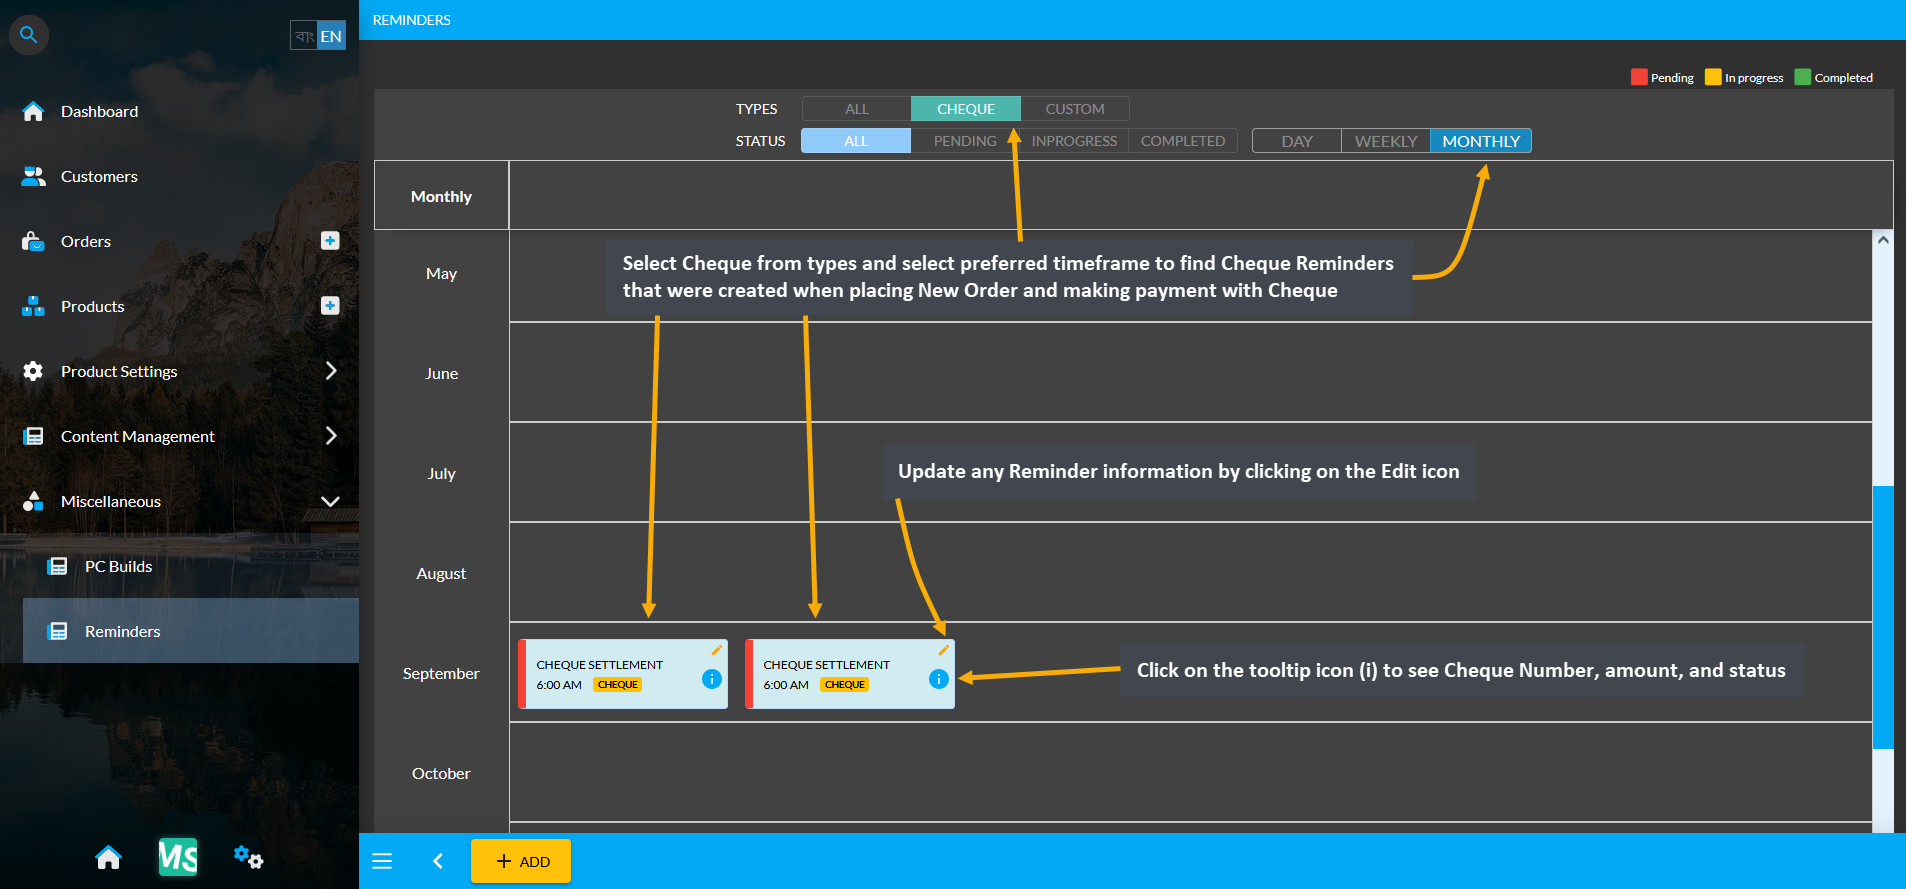
Image 3: Find Cheque Reminders by selecting type and timeframe and click the Edit icon to add an update.
The function of the Search option at the top left corner of the screen is to mainly to redirect to any module in the Main Menu quickly when you need to access it. Search with exact keywords on the search bar to find any module.
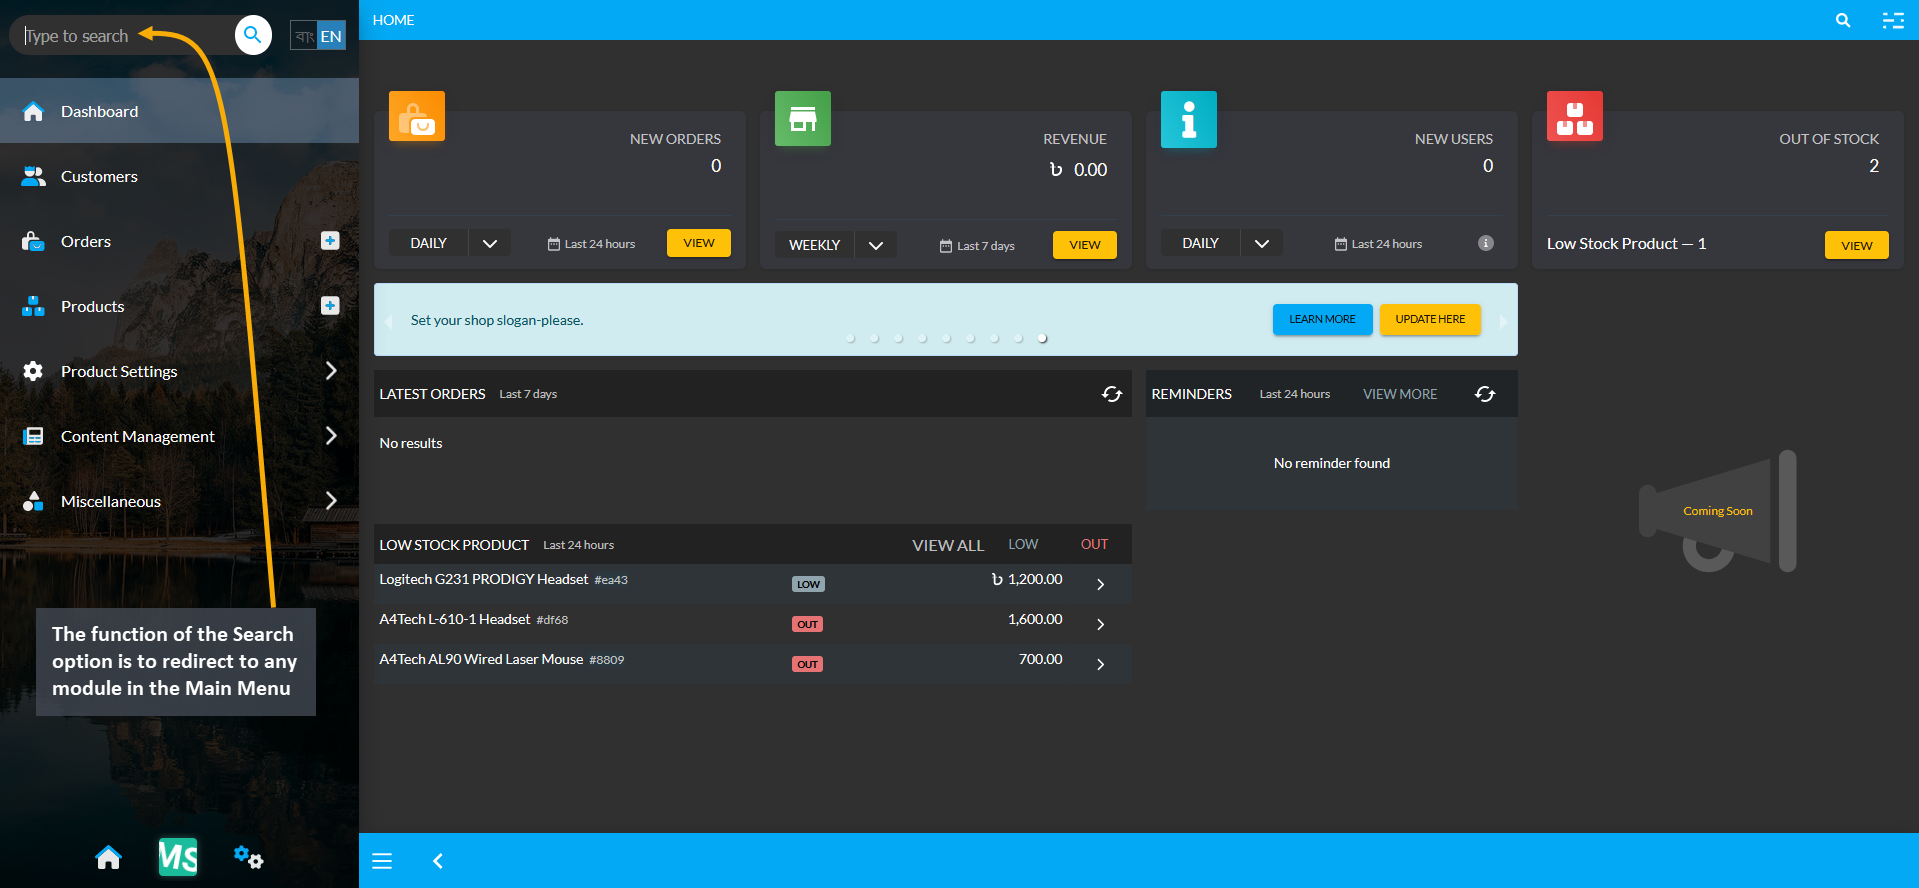
Image 1: The function of the Search option is to redirect to any module in the Main Menu.
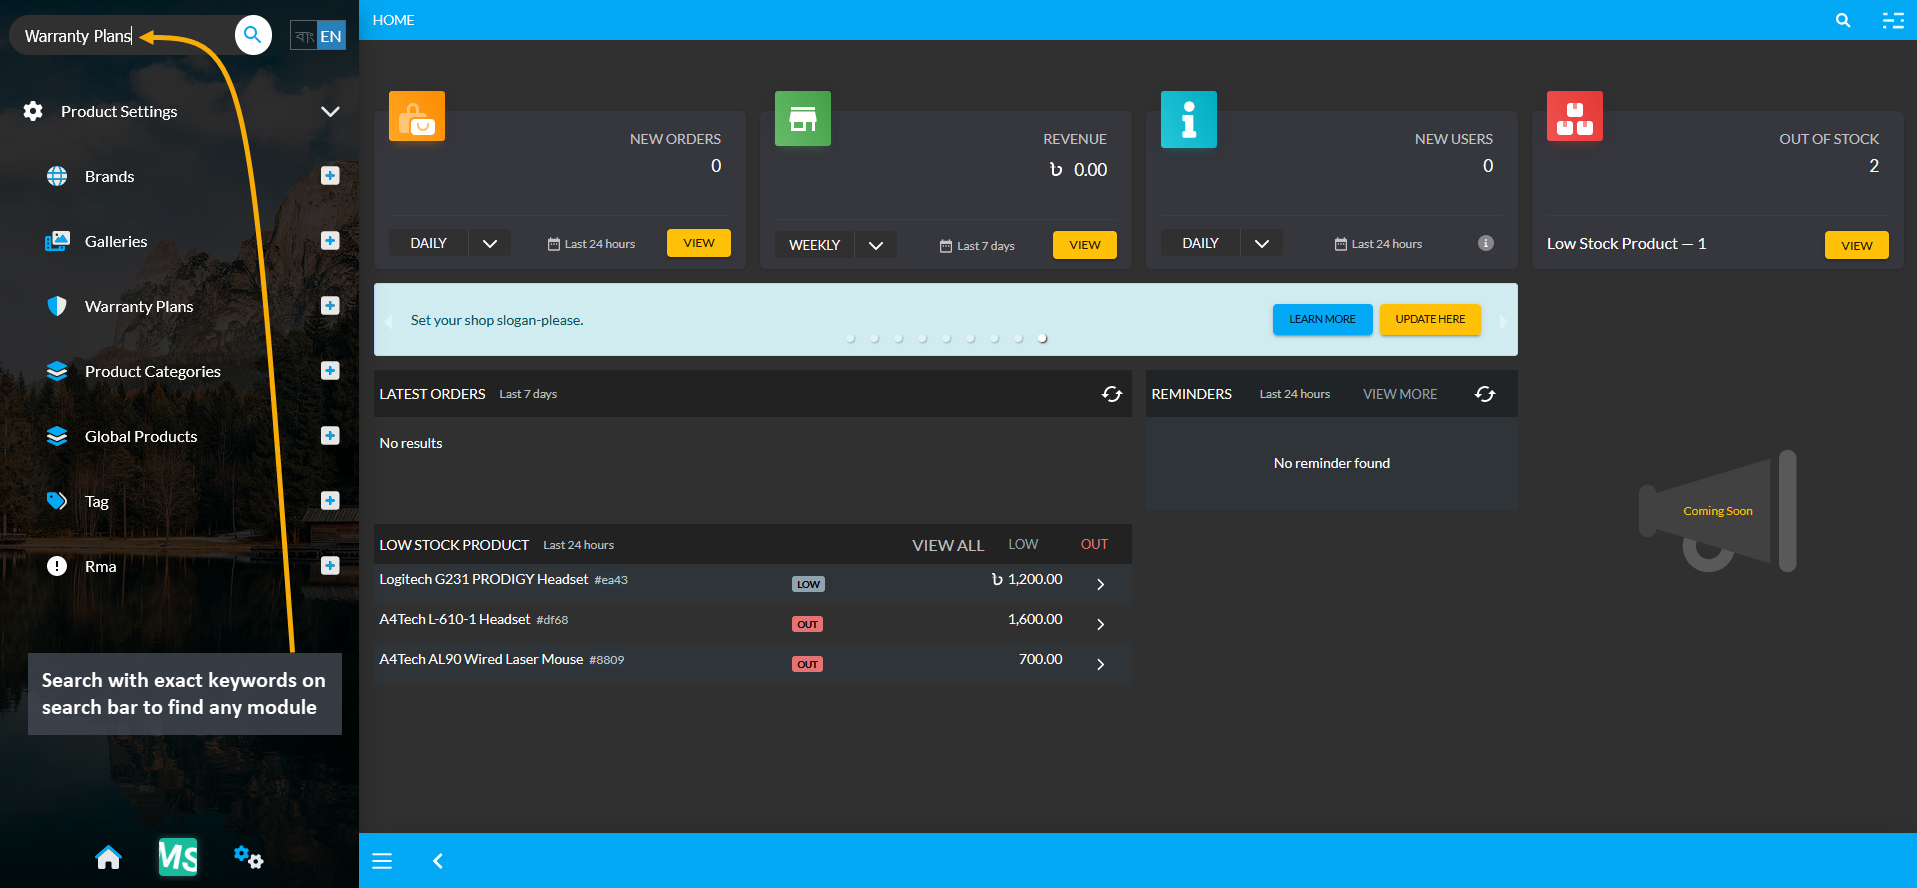
Image 2: Search with exact keywords on the search bar to find any module within the Main Menu.
5.1 - CMS Flowchart
This Flowchart shows an overview of creating and managing Tenant from Admin.
timeline
    title Register on Retail Xen
    section New Tenant Registration
    Step 1: Visit Retail Xen Registration link : Register with the Business Name, Phone, and Email
    Step 2: If Registered with New Phone Number : Password will be autogenerated for New Tenant
    Step 3: If Registered with an Existing Phone Number : OTP sent to Phone Number needs to be confirmed
    Step 4: Download Tenant Credentials and save
    Step 5: Go to Admin Panel Dashboard
%%{init: { 'logLevel': 'debug', 'theme': 'forest' } }%%
timeline
title Setup Website Shop from Admin
section Steps to Setup Shop for the Website
Step 1: Setup Shop Logo, Name, Slogan, and Description
Step 2: Setup Shop Business Name and Shop Type
Step 3: Upload Trade License, TIN, and BIN Number
Step 4: Add Support Email, Phone Number, and Social Media
Step 5: Review Basic Settings, Branches, and Counters
Step 6: Configure Payment and Shipping Gateways
Step 7: Setup Policy Pages on the Website
%%{init: { 'logLevel': 'debug', 'theme': 'forest' } }%%
timeline
    title Create New Customer
    section Create Regular Customer
    Step 1: Create New Customer with Name and Phone Number
    section Create Credit Customer
    Step 1: Enable and Issue Credit Limit
    Step 2: Allow Customer to use Credit Limit
    Step 3: Credit Limit will only apply on Orders from Admin Panel
    section Create Credit Supplier
    Step 1: Use Enable Supplier button to Create Supplier
    Step 2: Add Supplier Contact and Bank Account Details
%%{init: { 'logLevel': 'debug', 'theme': 'forest' } }%%
timeline
title Create Credit Supplier
section Ways to Create New Credit Supplier
Step 1: Create New Supplier with Name and Phone Number : Or, enable New Credit Supplier from Credit Customer
Step 2: Shop Owner cannot purchase Product until Supplier is created
section Activate Credit Supplier
Step 1: Issue Credit Limit to Supplier and allow using Credit Limit
Step 2: Import Ledger for Supplier if they have previous transaction
Step 3: Add Supplier Contact and Bank Account Details
Step 4: Purchase Product Stock from Supplier as Shop Owner
Step 5: View Invoices and Ledger Breakdown%%{init: { 'logLevel': 'debug', 'theme': 'forest' } }%%
timeline
title Create New Product
section Create New Product from Global Product Templates
Step 1: Select Predefined Product Template from search
Step 2: Set Product Prices and select Product Stock Model
Step 3: Set Product Condition, Stock Count, Order Limit
section Create Custom Product from Scratch
Step 1: Type Product Name on Search Box and click Add New
Step 2: Set Product Details, Attributes, Images
Step 3: Set Product Prices and select Product Stock Model
Step 4: Set Product Condition, Stock Count, Order Limit
Step 5: Create Cart Notice, Button Label, Notes, After Sales Message%%{init: { 'logLevel': 'debug', 'theme': 'forest' } }%%
timeline
title Create New Order
section Create Orders for Customers from the Admin Panel
Step 1: Fill Customer Information
Step 2: Add Products to Cart
Step 3: Select Shipment and Payment Options
Step 4: Check New Order and Print Invoice
Step 5: Verify Pending Orders and Update Order Status
Step 6: Check Order Cost Basis Summary%%{init: { 'logLevel': 'debug', 'theme': 'forest' } }%%
timeline
title Configure Product Settings
section Set Product Settings Modules for Website
Brands: Search Global Brands or Create New Brand
Galleries: Create Product and Branch Gallery
Warranty Plans: Create Custom Warranty Plans
Product Categories: View Predefined Product Categories
Tags: Create Parent and Child Tags
Tags on Website: Use Tags as Website Category%%{init: { 'logLevel': 'debug', 'theme': 'forest' } }%%
timeline
title Use Default Category or Custom Tag
section Use Default Product Categories on the Website
Step 1: View List of Predefined Product Categories from Product Settings
Step 2: Select appropriate Category for each Product during Product creation
Step 3: Categories assigned for Products will show on Website
section Use Custom Tags on the Website instead of Default Categories
Step 1: Create Parent and Child Tags from Product Settings
Step 2: Select Custom Tags for each Product during Product creation
Step 3: Go to Basic Settings on Tenant Config from Config for your Business under General Settings
Step 4: Under Product Category, enable the option - Commerce Category as Tag
Step 5: Tags assigned for Products will show on the Website%%{init: { 'logLevel': 'debug', 'theme': 'forest' } }%%
timeline
title Configure Content Management
section Manage Default Pages for Website
Step 1: Setup Home, EMI, Shipping, Refund, Contact, and Privacy Pages
section Create Custom Pages
Step 1: Create Page Name, Slug, Title, Subtitle
Step 2: Add and Rearrange Widgets on Page
section Add Widgets on Pages
Step 1: Create Text Widget, Image Widget, Banner Widget, Product Widget, Category Widget
Step 2: Activate Call-To-Action Button with Button Link and Button Text
Step 3: Configure Widget Options - Edit Content Box, upload Image, Add Alt Text, Image Link, Choose Layout, Select Tag or Category, and set Max Quantity%%{init: { 'logLevel': 'debug', 'theme': 'forest' } }%%
timeline
title Create Menu within Default Header
section Create Dropdown style Menu from any Main Menu within Website Header
Step 1: Click Add button from Custom Link
Step 2: Set Title and Update to create New Menu
section Create Sub-Menus under Main Menu within Website Header
Step 1: Click Add button from Custom Link to create Sub-Menus
Step 2: Drag them under Main Menu to convert them into Sub-Menus
Step 3: Retrieve Relative Links for all the Sub-Menus
Step 4: Visit Website Shop Page, open target Sub-Menu, and copy its relative link from URL search bar
Step 5: Add Title and Relative Link on each Sub-Menu to activate them%%{init: { 'logLevel': 'debug', 'theme': 'forest' } }%%
timeline
title Configure All Settings
section Setup General Tenant Settings
Basic Settings: Enable Website, PC Builder, Requires Payment, Tags as Product Categories, Phone and Email verification toggles, setup Messenger widget for Website
Theme Settings: Select theme colors, fonts, and preferred layout for Website
Invoice Layout Settings: Select Invoice print layout from Point of Sales (POS), A4, and Letter formats
Branch Settings: Create Branch with Contact details and Address, Add Branch Type, Gallery, and set Schedule
Counter Settings: Create and set Counters under Branches, activate or deactivate Counters as needed%%{init: { 'logLevel': 'debug', 'theme': 'forest' } }%%
timeline
title Payment and Shipping Gateway Settings
section Configure Payment Gateways
Cash on Delivery: Set Minimum and Maximum amount, enable for Website, enable Fee, set Display Instruction
Bank Transfer: Set Minimum and Maximum amount, enable for Website, enable Fee, Add Bank Account, set Display Instruction
Credit Card, Cash, Cheque: Set Minimum and Maximum amount, enable for Website, set Display Instruction
On Credit (Due): Set Minimum and Maximum amount, enable for Website, enable Fee
PortWallet, SSLCommerz: Set Minimum and Maximum amount, enable for Website, enable Fee, add Test API Keys, set Display Instruction
Bkash, Nagad: Set Minimum and Maximum amount, enable for Website, enable Fee, add Test API Keys, set Display Instruction
Bkash (Manual), Nagad (Manual): Set Minimum and Maximum amount, enable for Website, enable Fee, add BKash or Nagad phone number, Upload QR Code, set Display Instruction
section Configure Shipping Gateways
Manual Shipping Gateways, In Store Pickup, Direct: Set Maximum value, enable for Website, enable Fee, set Fee Value, set Display Instruction%%{init: { 'logLevel': 'debug', 'theme': 'forest' } }%%
timeline
title Taxation and Retail Channel Settings
section Configure Tax Groups for Products
Check List of all Predefined Global Tax Groups: Global Tax Groups with predefined Name, Description, HS Code, Tax Rules
Create New Custom Tax Groups: Add description, name, activate or deactivate Tax Group, input HS Code for target Product Category, and create New Tax Rule for Tax Group
Create Tax Rule to Assign for Tax Group: Add description, name, select Tax Variant for Tax Rule, enable Fee, activate or deactivate Tax Rule, add Compound or Priority attributes
section Configure Product Retail Channels
Setup Product Retail Channels: Add New Product Retail Channels with Names and Avenues
Setup Commerce: Enable or disable Commerce to show or hide Products on the Website6 - Setup Tenant Details
Update information for the Tenant Account by filling out the basic, legal, and social information in three steps.
To setup the Basic, Legal, and Social details of the Tenant, please follow these steps:
Setup Tenant Details
Tenant Details can be edited by clicking the Tenant Selector which will open the Tenant Selection menu. There, from the list of Tenants, choose the Tenant to edit by clicking the Edit button beside the Tenant name.
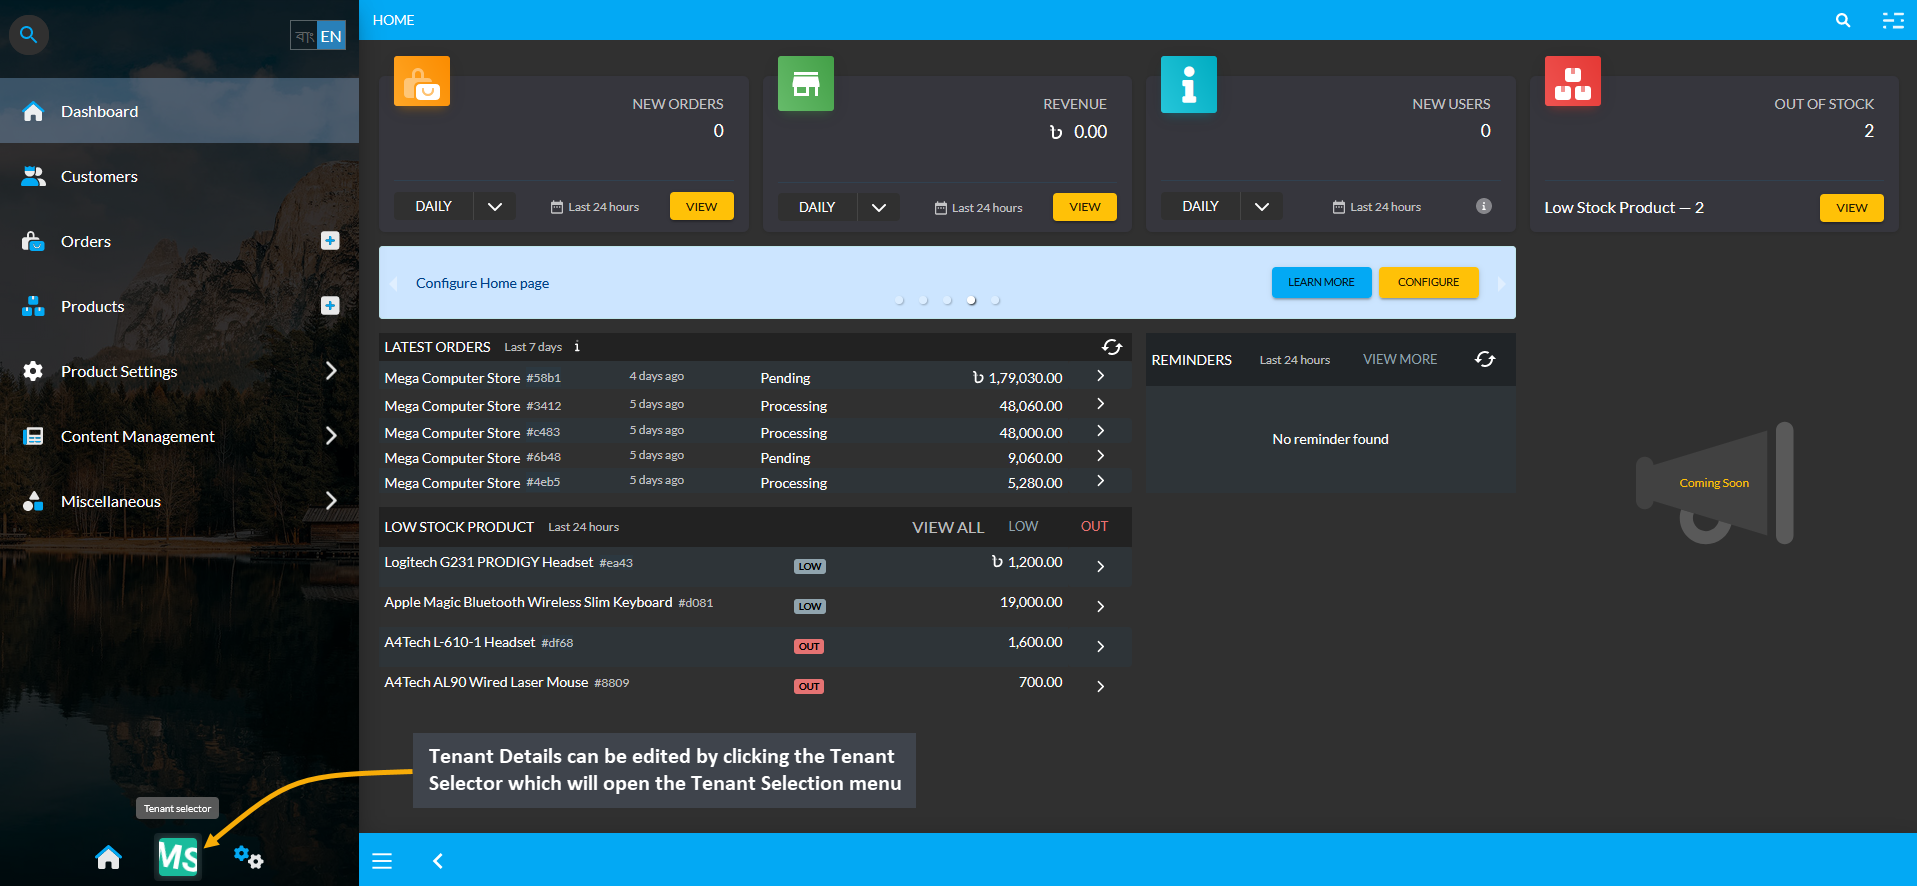
Image 1: Tenant Details can be edited by clicking the Tenant Selector to open Tenant Selection menu.
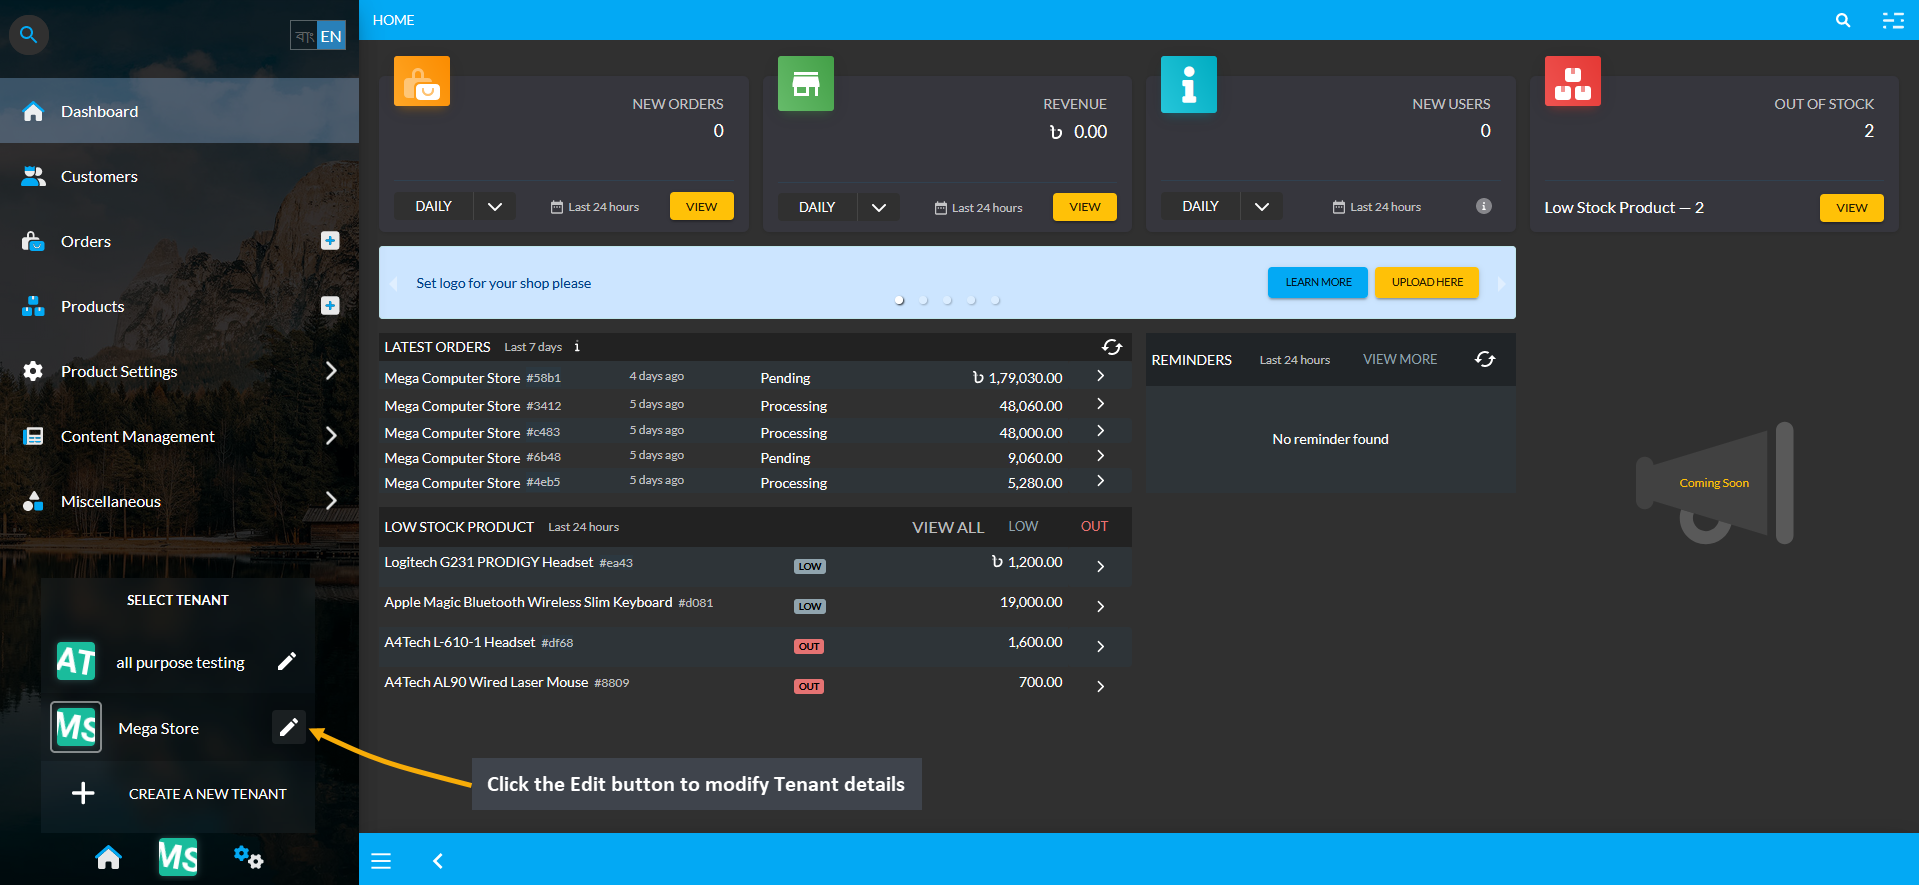
Image 2: Click the Edit button to modify Tenant details from the Tenant Selection menu.
Setting up the basic information includes uploading a Shop Logo, Banner, and creating a Shop Name, Slogan, and Description. Click Next to proceed to subsequent steps for setting up business information for the Shop.
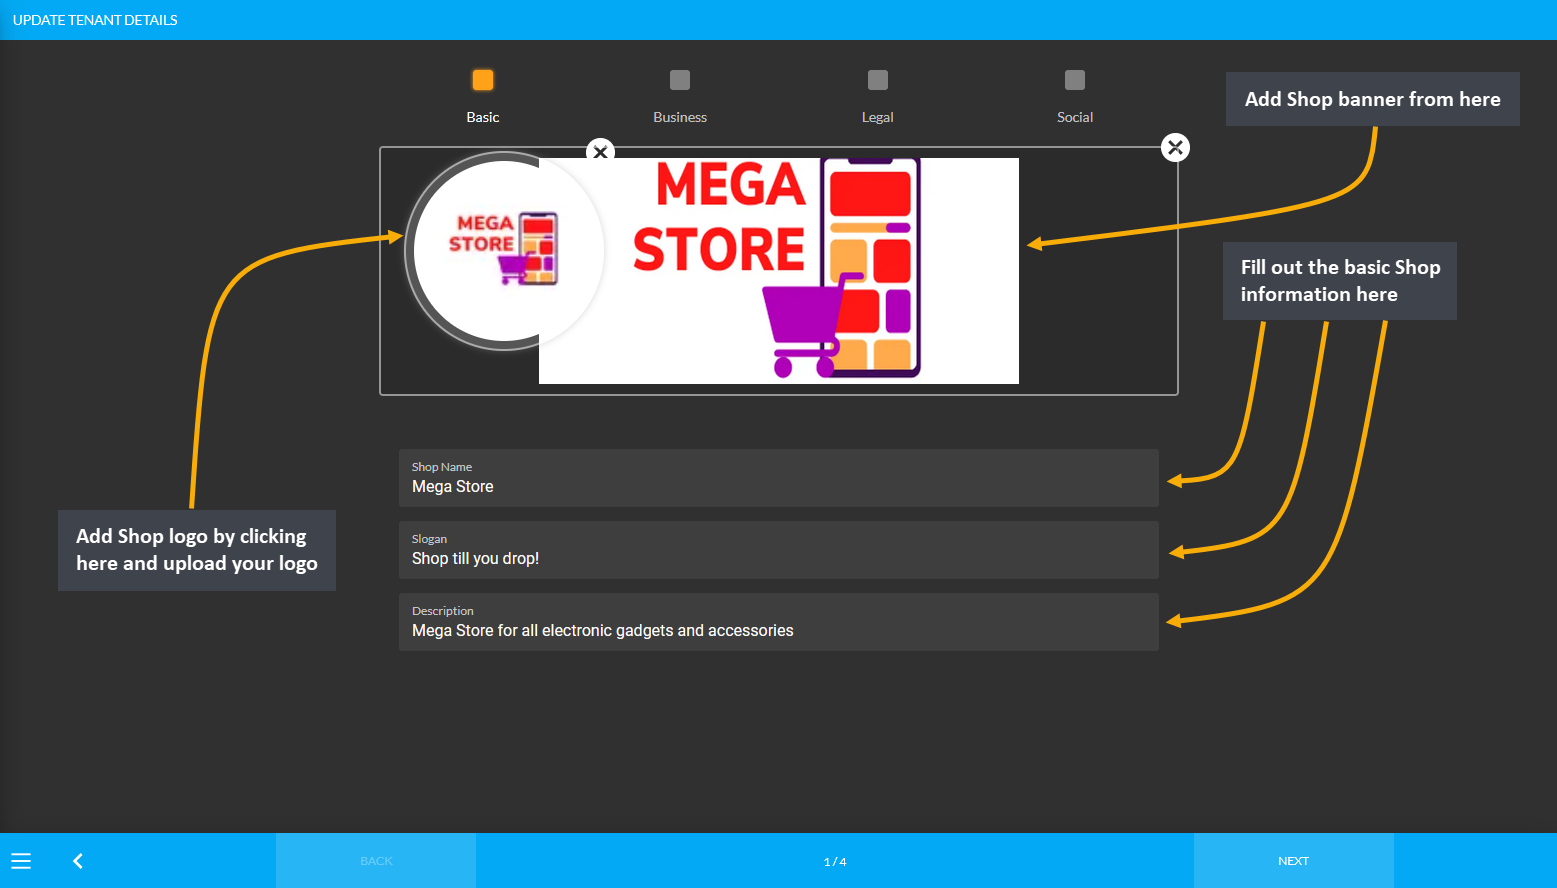
Image 1: Setup Basic Shop information with Logo, Banner, Shop Name, Slogan, and Description.
The second part of completing the basic information includes setting up Business Name and Shop Type. Based on the type of the Shop, select - Sole Proprietorship, Partnership, Limited Private Company, or Limited Public Company.
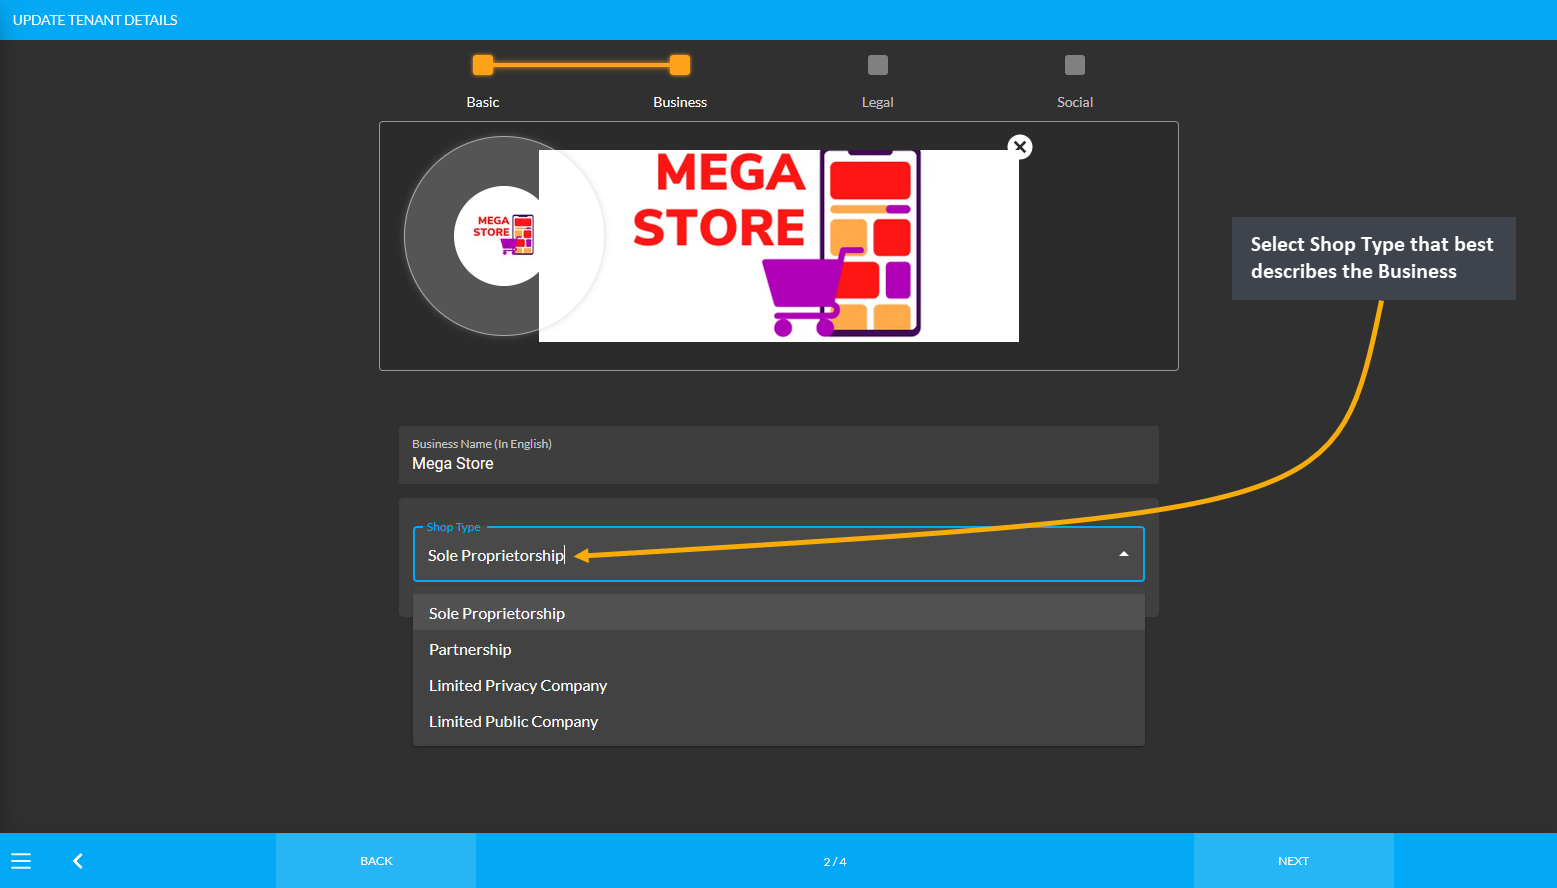
Image 2: Complete Basic Shop information by setting up Business Name and Shop Type from options.
Setup legal information by adding Tax Identification Number (TIN), Business Identification Number (BIN), Trade License Number and uploading a TIN Certificate, BIN Certificate, and Trade License according to the government law. These Certificates need to be uploaded in PDF format and after they are successfully uploaded, a Success button will be visible which will indicate that the TIN, BIN, and Trade License Numbers were added to the Shop.
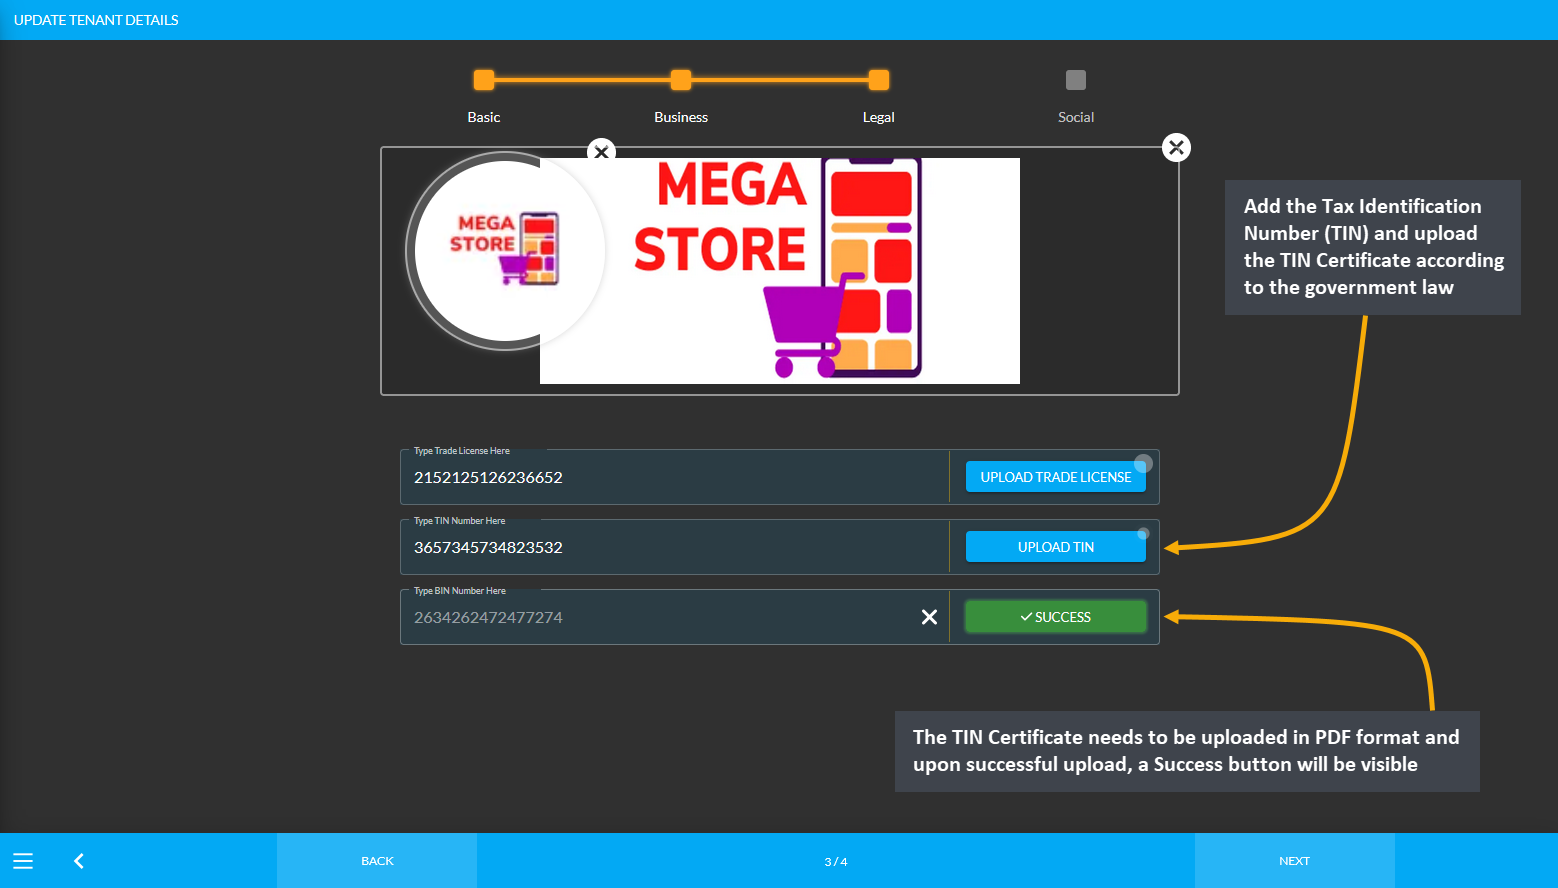
Image 1: Setup Tax Identification Number (TIN), Business Identification Number (BIN), Trade License Number.
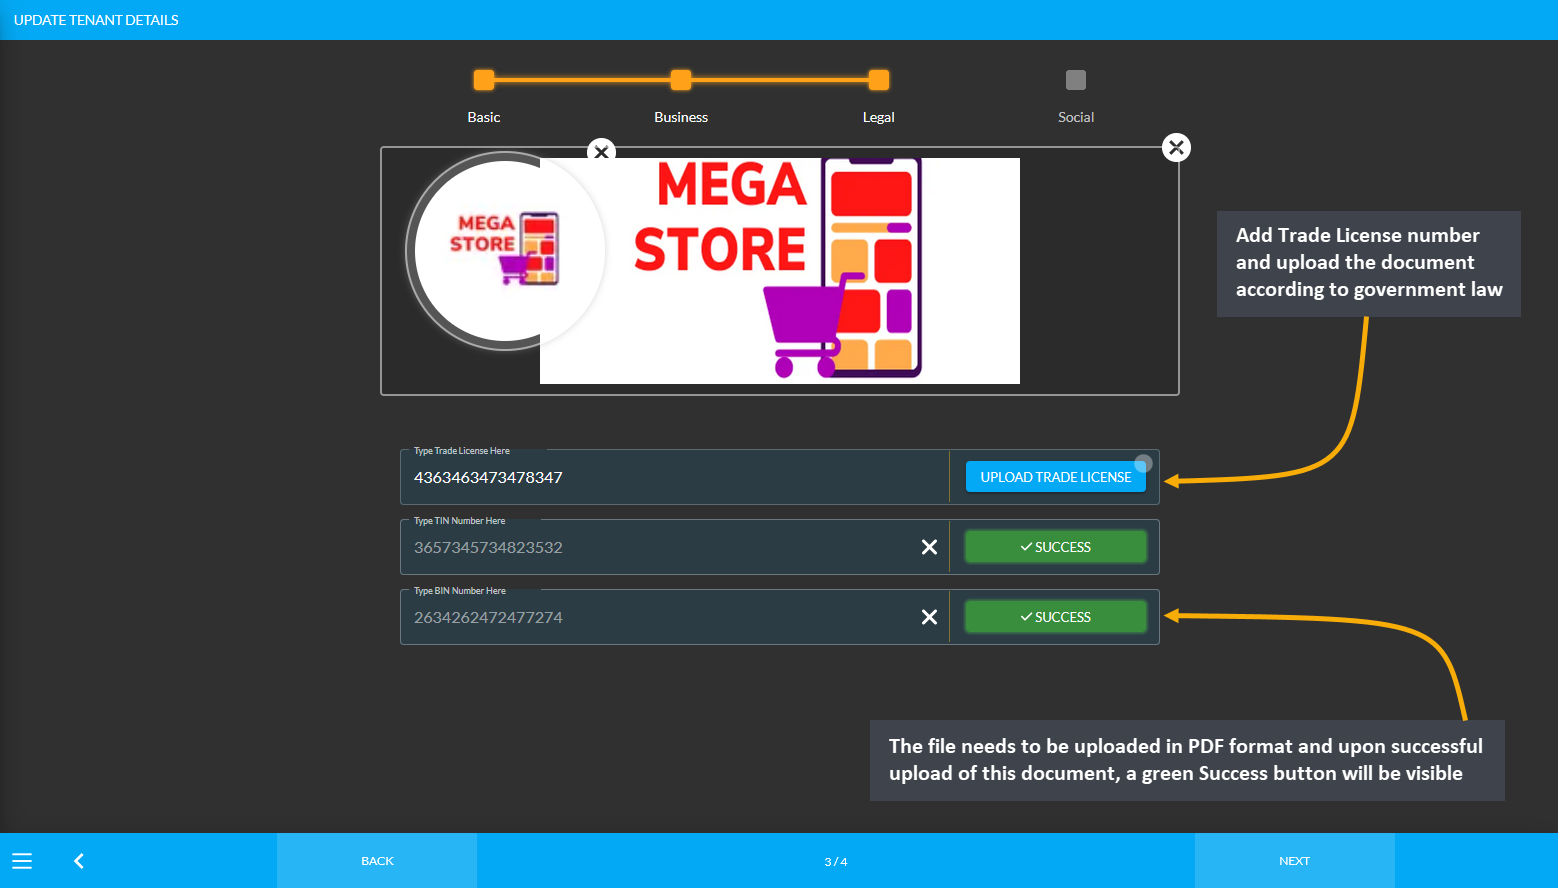
Image 2: The TIN Certificate, BIN Certificate, and Trade License need to be uploaded in the PDF format.
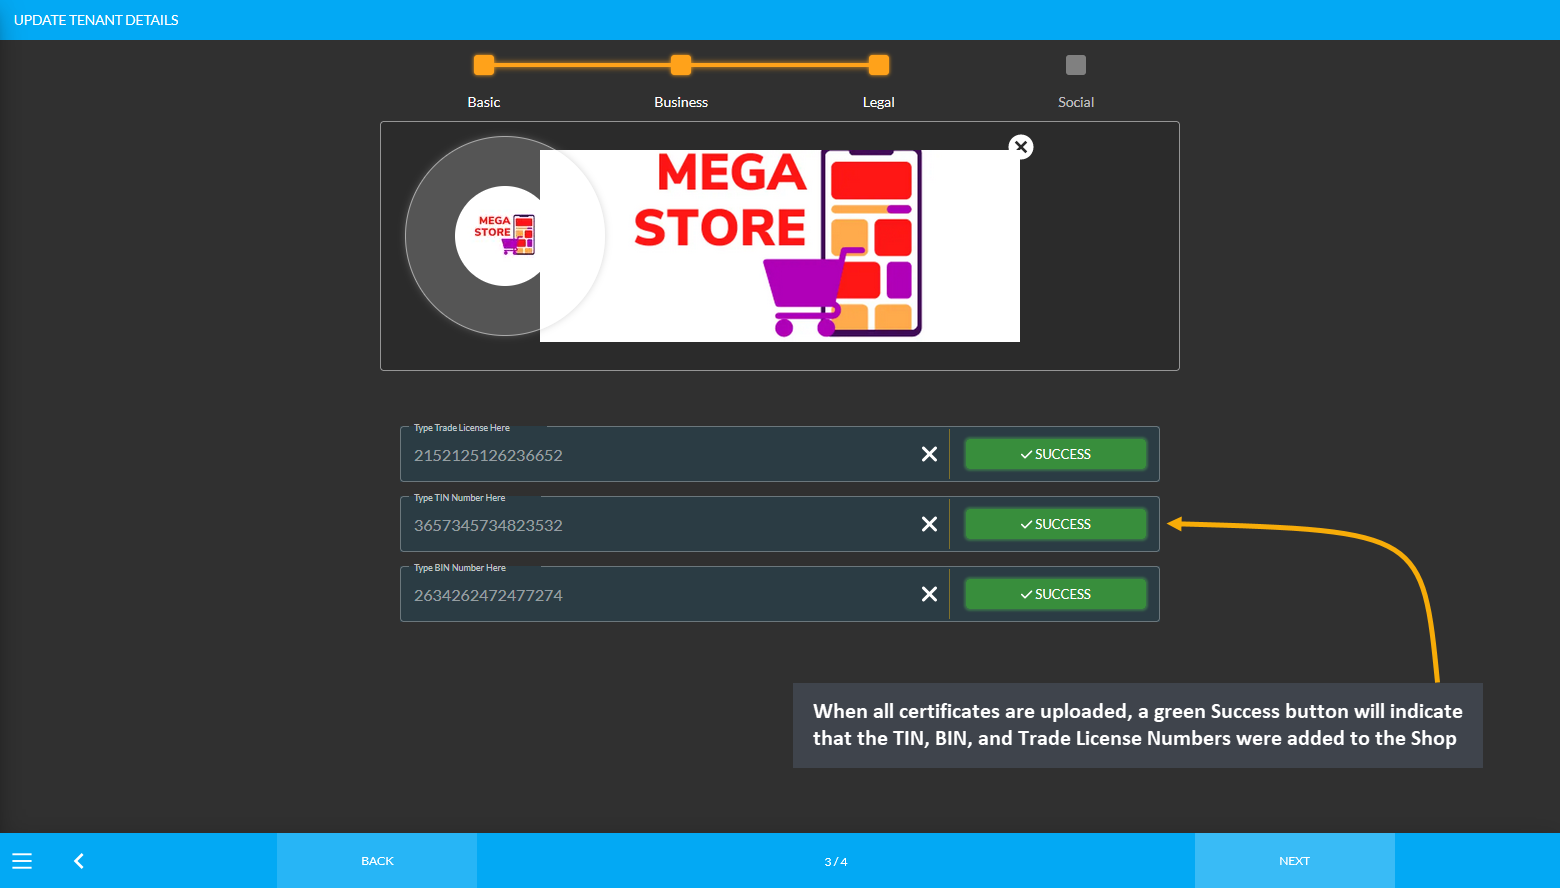
Image 3: A Success button will show indicating that the TIN, BIN, and Trade License Numbers were added.
Another important step towards setting up the Tenant Account is filling out the social information of the Shop. To complete this step, add email address, support phone number, and other social media accounts as needed. Add a valid phone number to setup the Support Phone Number. Click Submit to save all the information successfully.
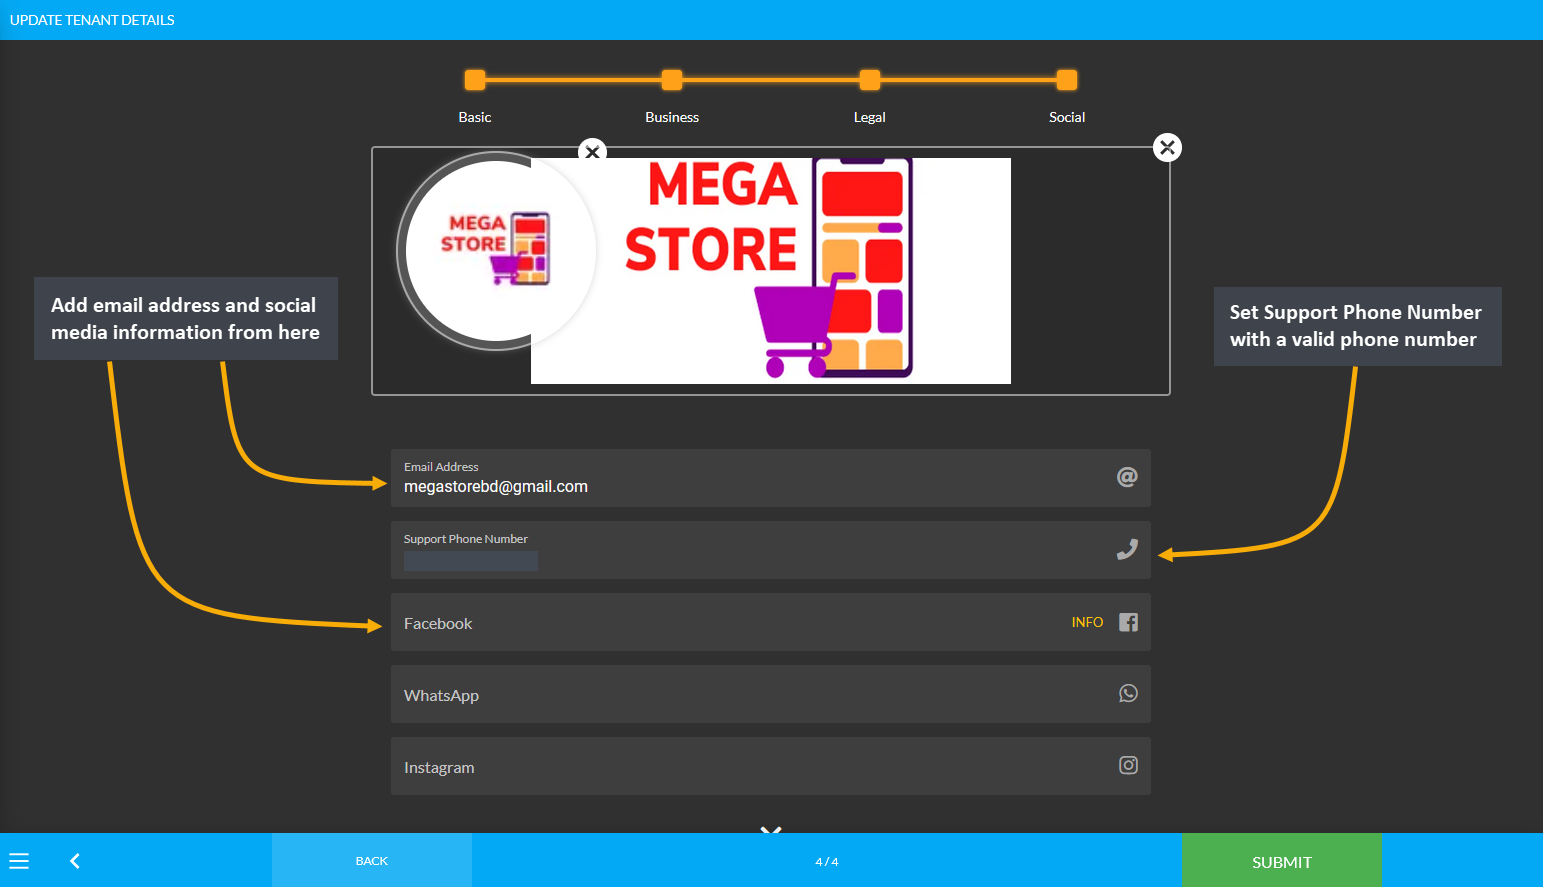
Image 1: Setup Shop Social information with email address, support phone number, and social media accounts.
7 - All Settings
All Settings will allow configuring business information, Payment gateways, Shipping gateways, tax related settings, and product retail channel settings.
Click on All Settings to configure general, gateways, taxation, and retail channel settings for the Shop.
The main configuration for business information, web page themes, Payment gateways, Shipping gateways, Tax management related settings, and product retail channel settings can be done through All Settings.
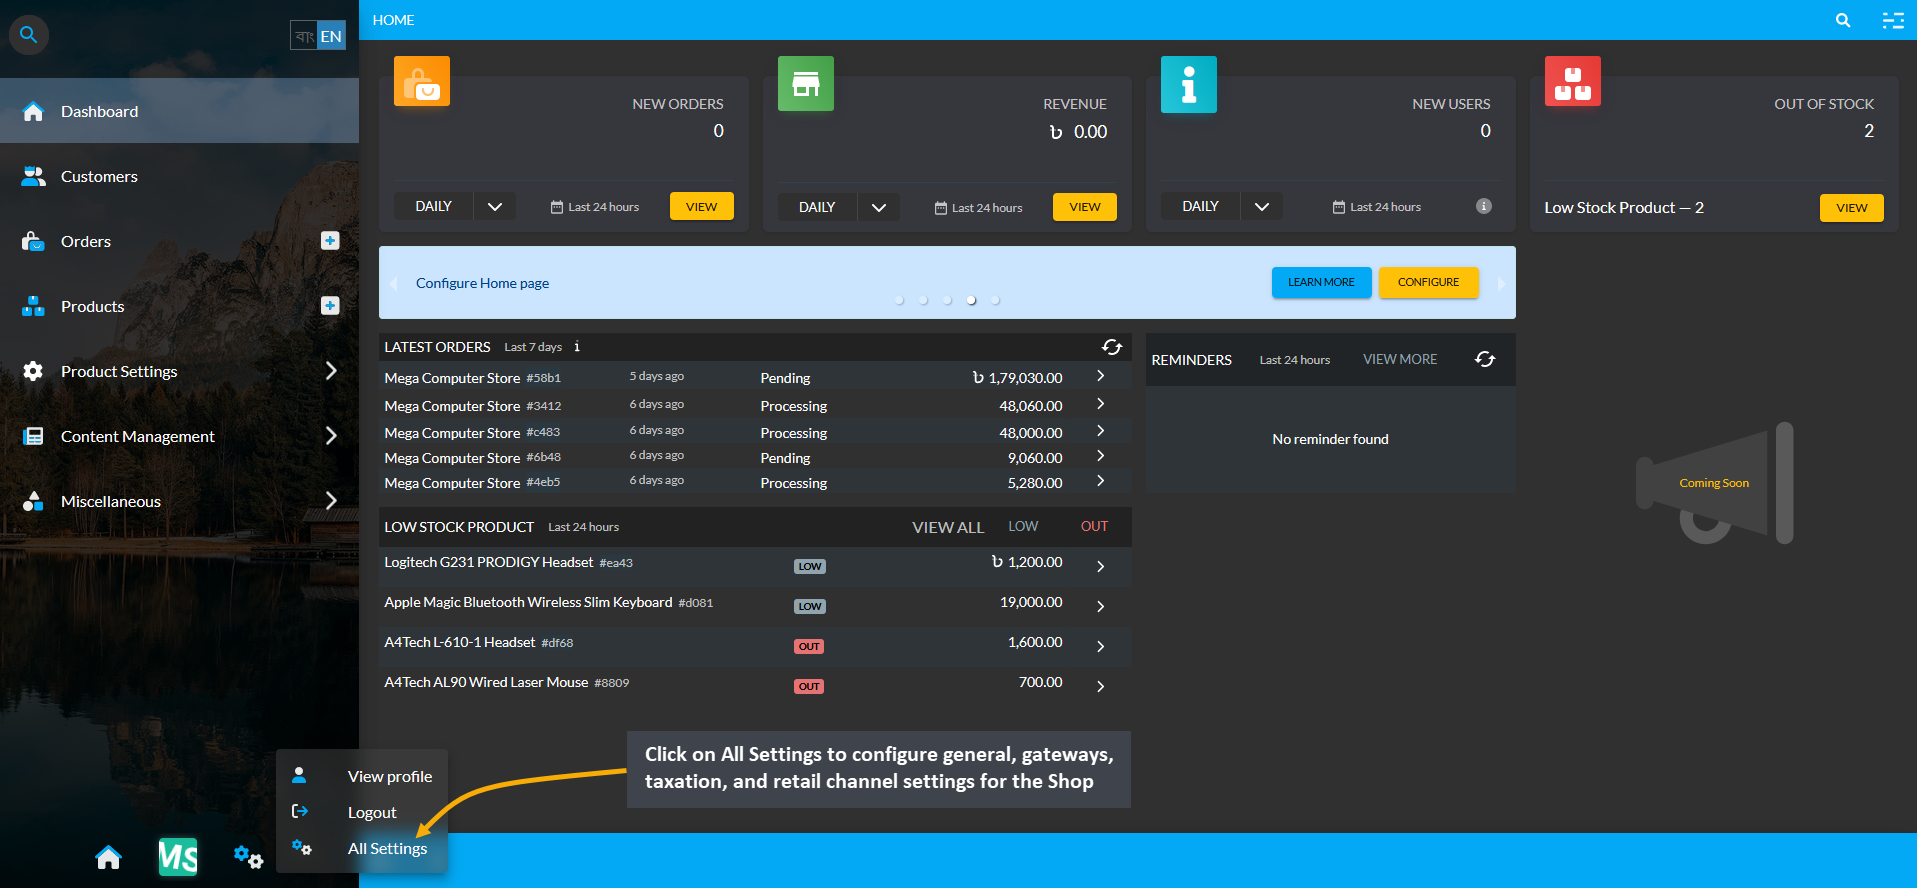
Clicking on All Setting will open the Page where General settings for business details, branches, and counters can be set. Then, Payment Gateway and Shipping Gateway can be configured. Already created Tax Groups based on Product Categories can be viewed under Taxation. Finally, control whether Products will be allowed to be visible on the Shop or not with Retail Channels setting. Shop Owner needs to configure these settings first for their Shop.
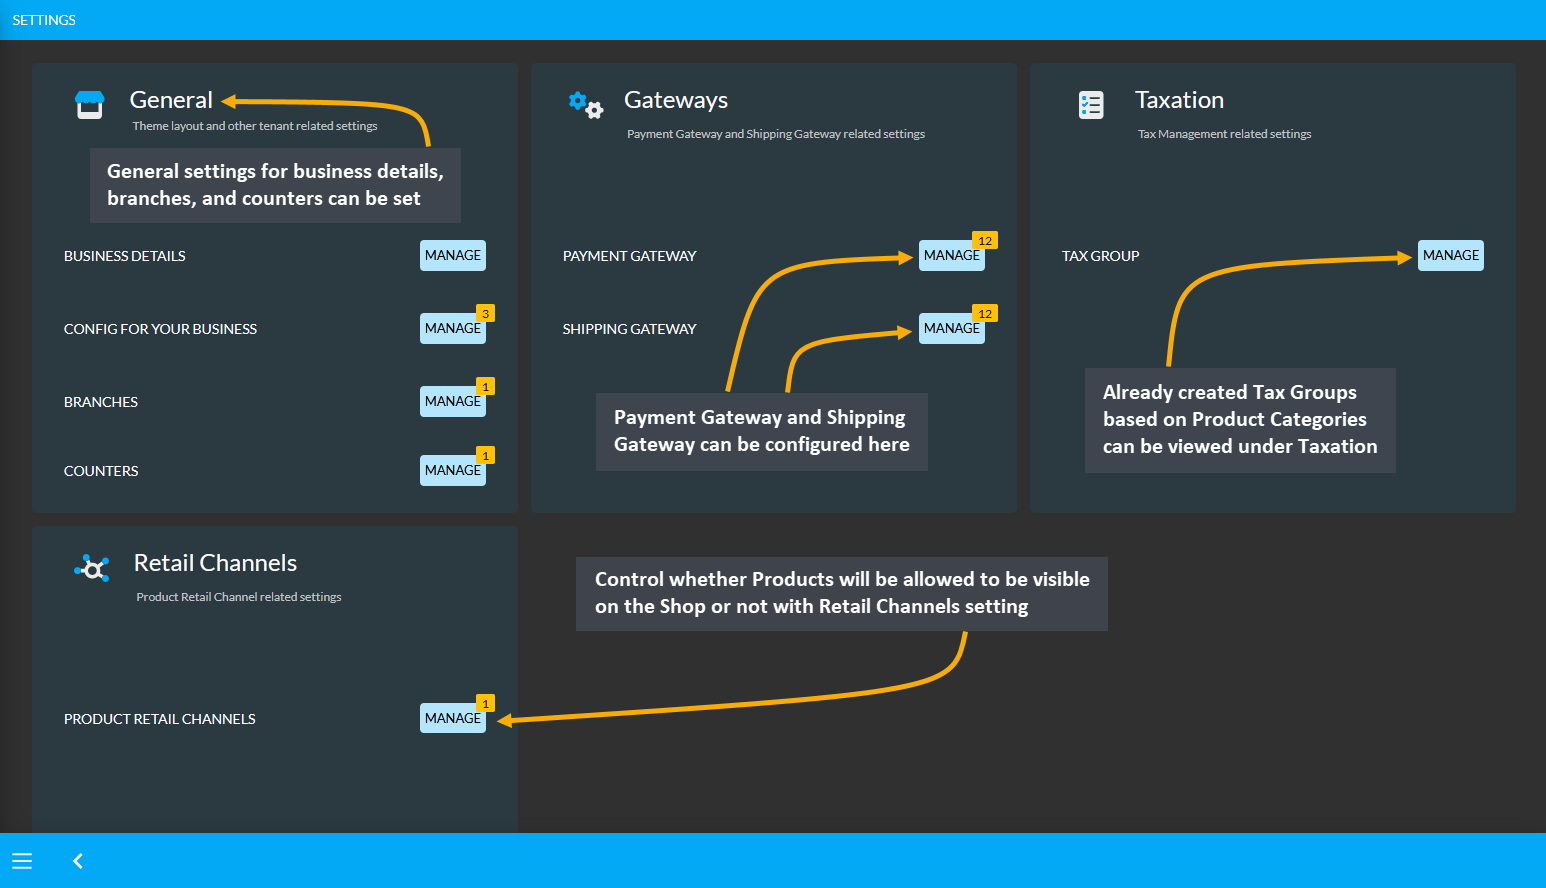
7.1 - General Tenant Settings
The main configuration for business information, web page themes, payment gateways, shipping gateways, tax management related settings, and product retail channel settings can be done through this module.
General Tenant Settings
Under General Settings, the first option to configure is the Business Details, which have been previously described Setup Tenant Details. Then, there are Config for your Business, Branches, and Counters that needs to be set. Click on Config for your Business from Settings that will open Basic settings, Theme settings, Invoice format settings.
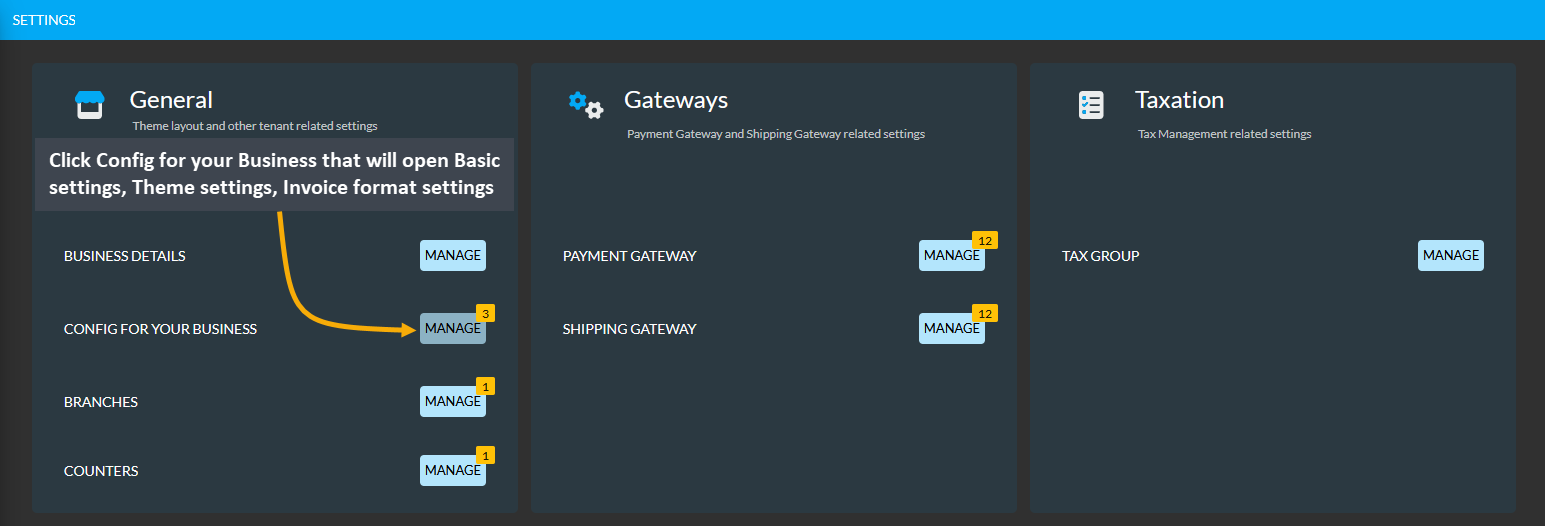
Basic Settings
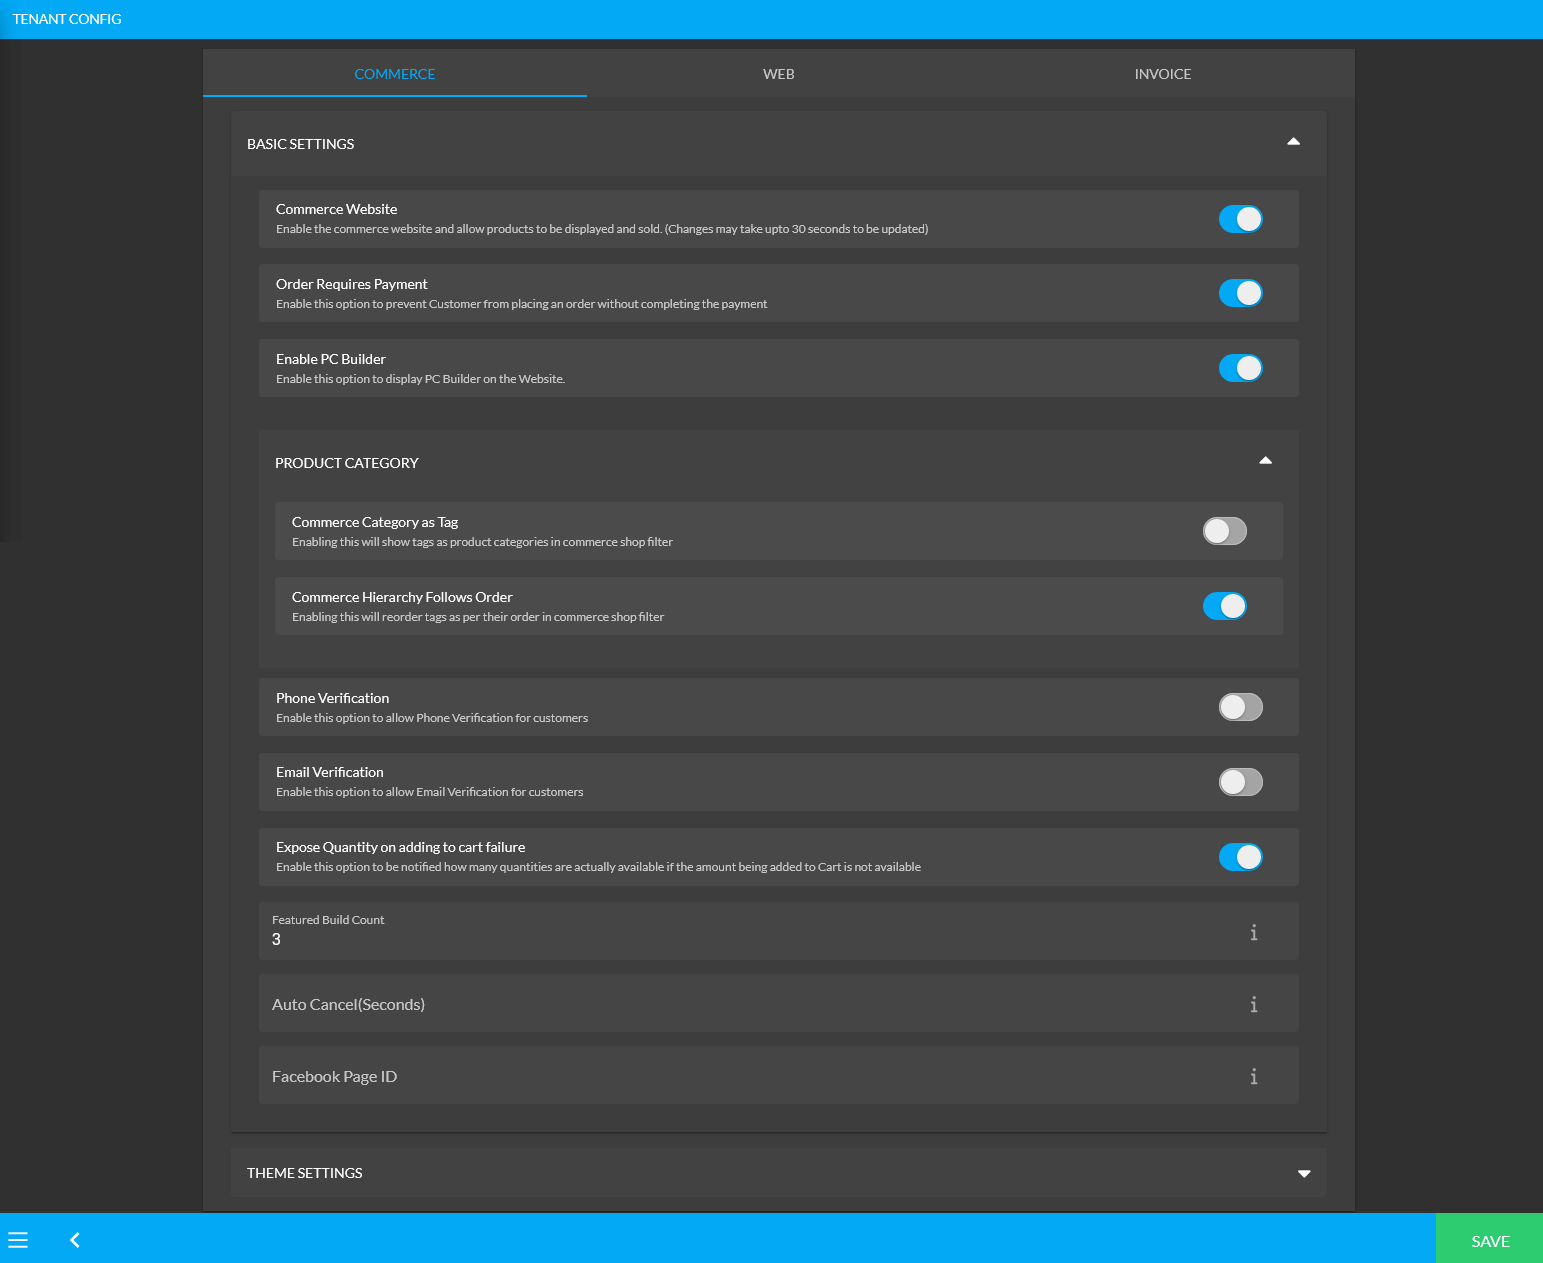
Basic Settings include options of Commerce Website toggle which enables the Website and allows Products to be displayed and sold. The Order Requires Payment toggle will prevent a Customer from placing an Order without completing the Payment. The Enable PC Builder toggle will allow displaying PC Builder tab on the Website.
Under Product Category, there are options to use Tags as Product Categories on Website, reorder Tags according to their order on Website shop filter, allow phone and email verification, expose quantities on Cart if the amount added is not available, show build count, auto cancel timing, and link the Facebook Page ID to setup Messenger widget on the Website. These are the basic settings that Shop Owner needs to configure.
Theme Settings
Click the down arrow to minimize Basic Settings and see the wide view for Theme Settings. Check the detailed configuration options for theme colors and fonts with preview. There is a dropdown to select preferred layout from Full Width (Default), Large, Standard, and Small. Click Save button to confirm all the changes.
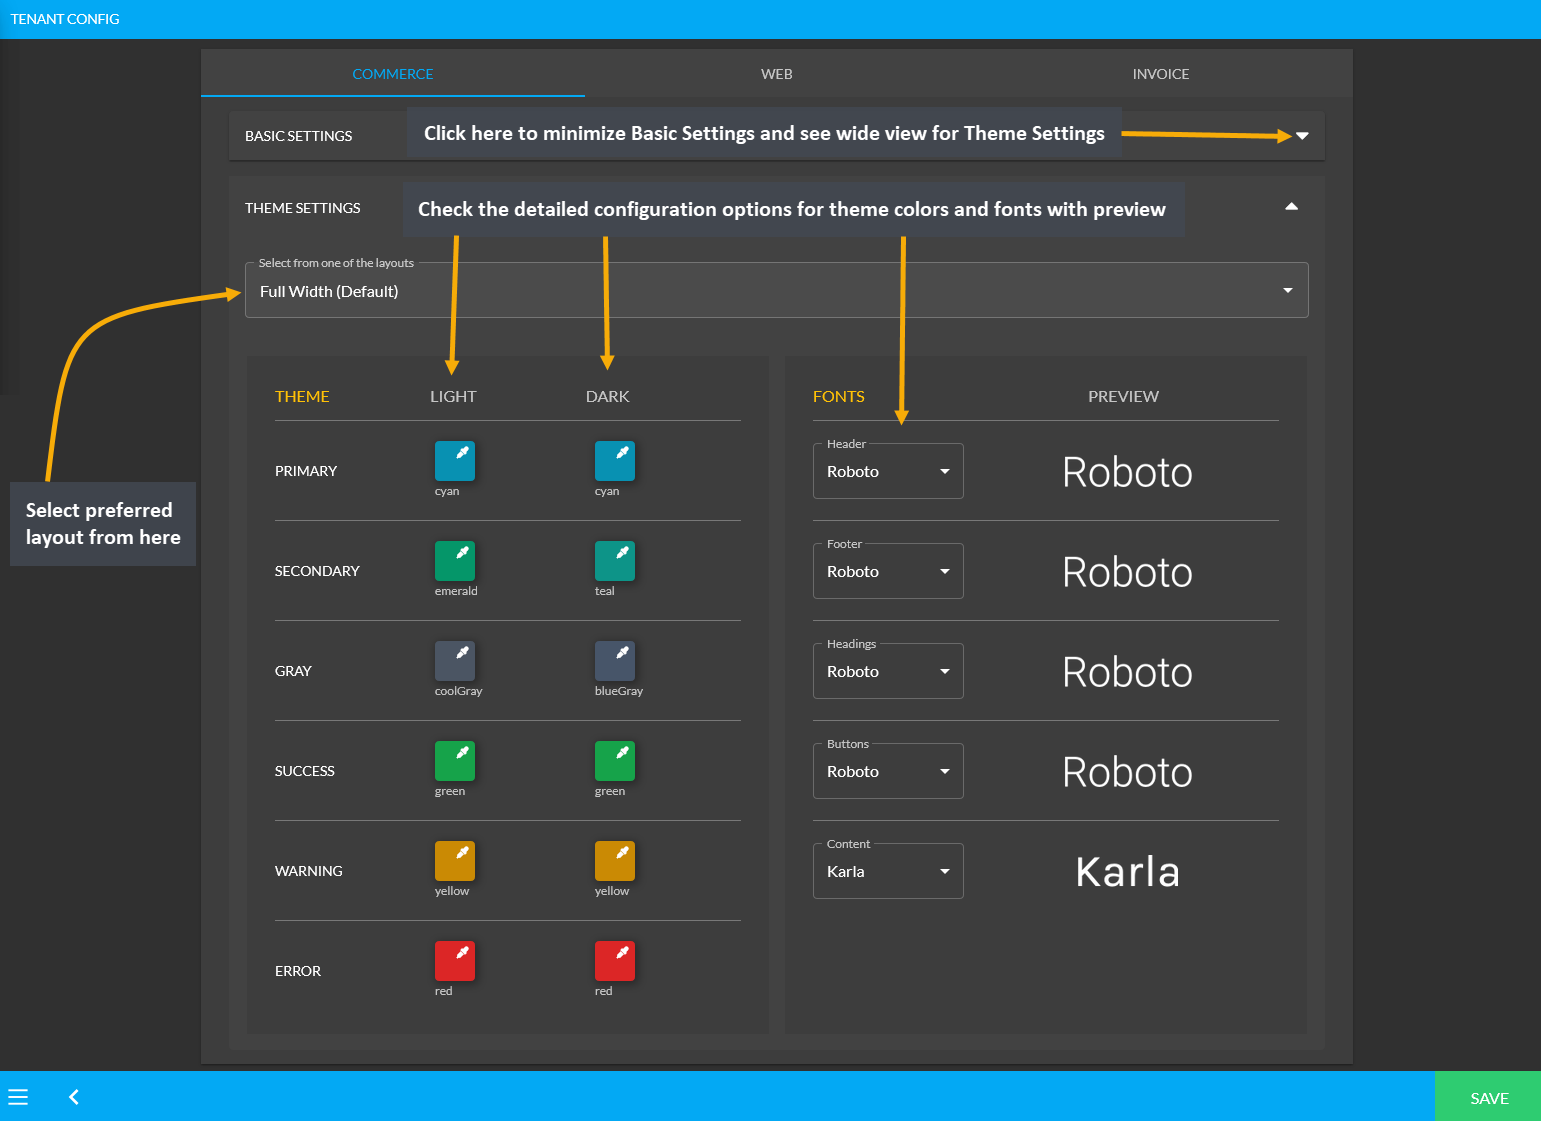
Image 1: Check detailed configuration options for theme colors and fonts with preview from Theme settings.
Instantly change the Website themes to Dark, Light, or Auto, click on the Web tab beside Commerce tab which will allow switching Themes immediately for the Website. Click on any of the options to set the desired Web outlook.
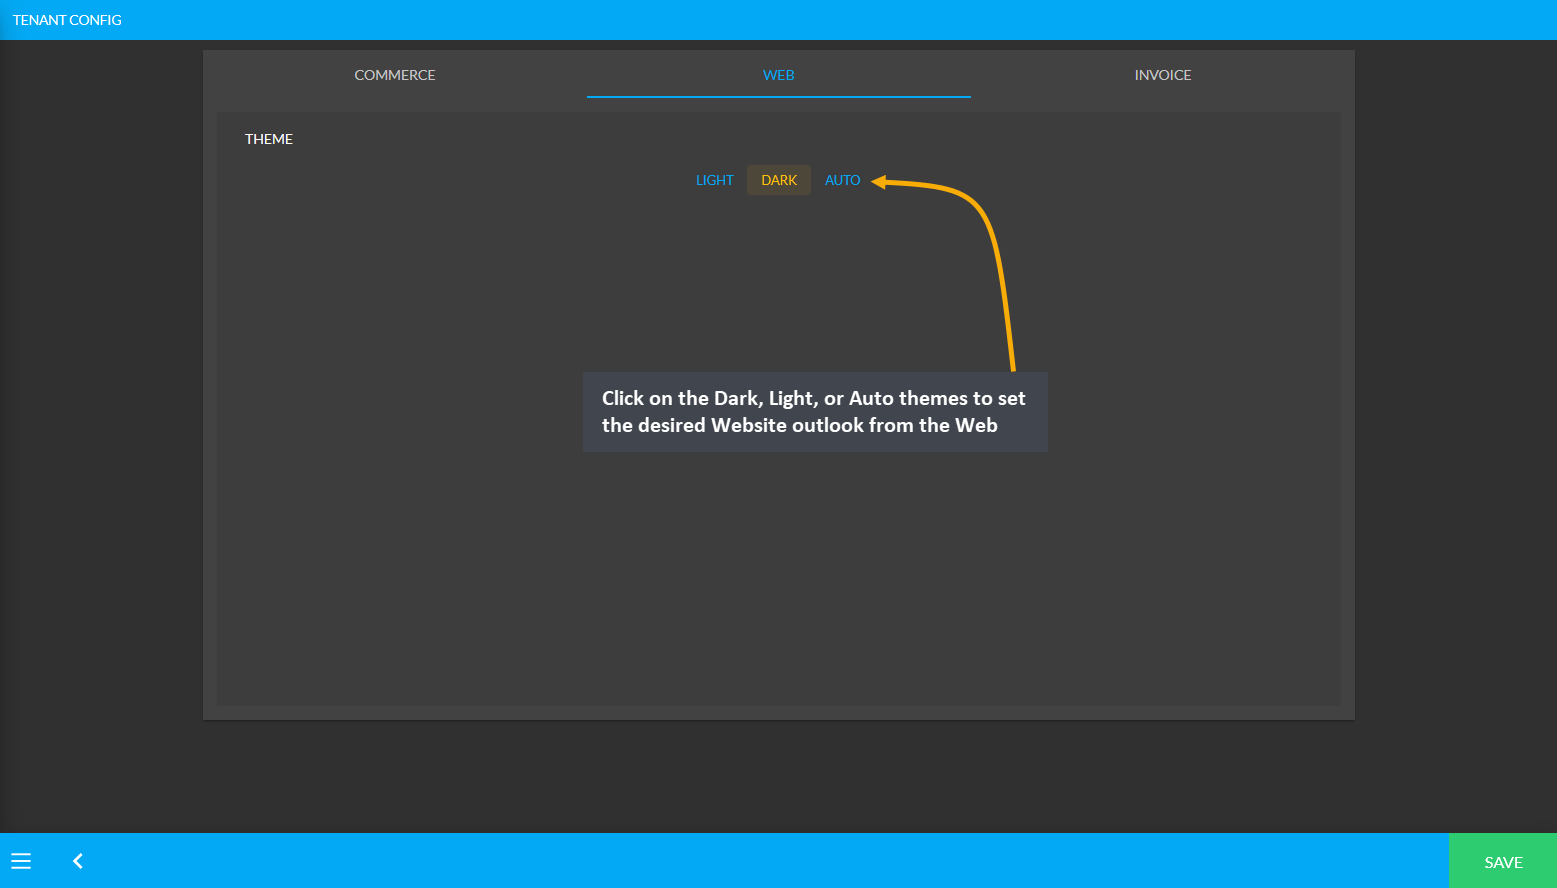
Image 2: Click on the Dark, Light, or Auto themes to set the desired Website outlook from the Web tab.
Invoice Layout Settings
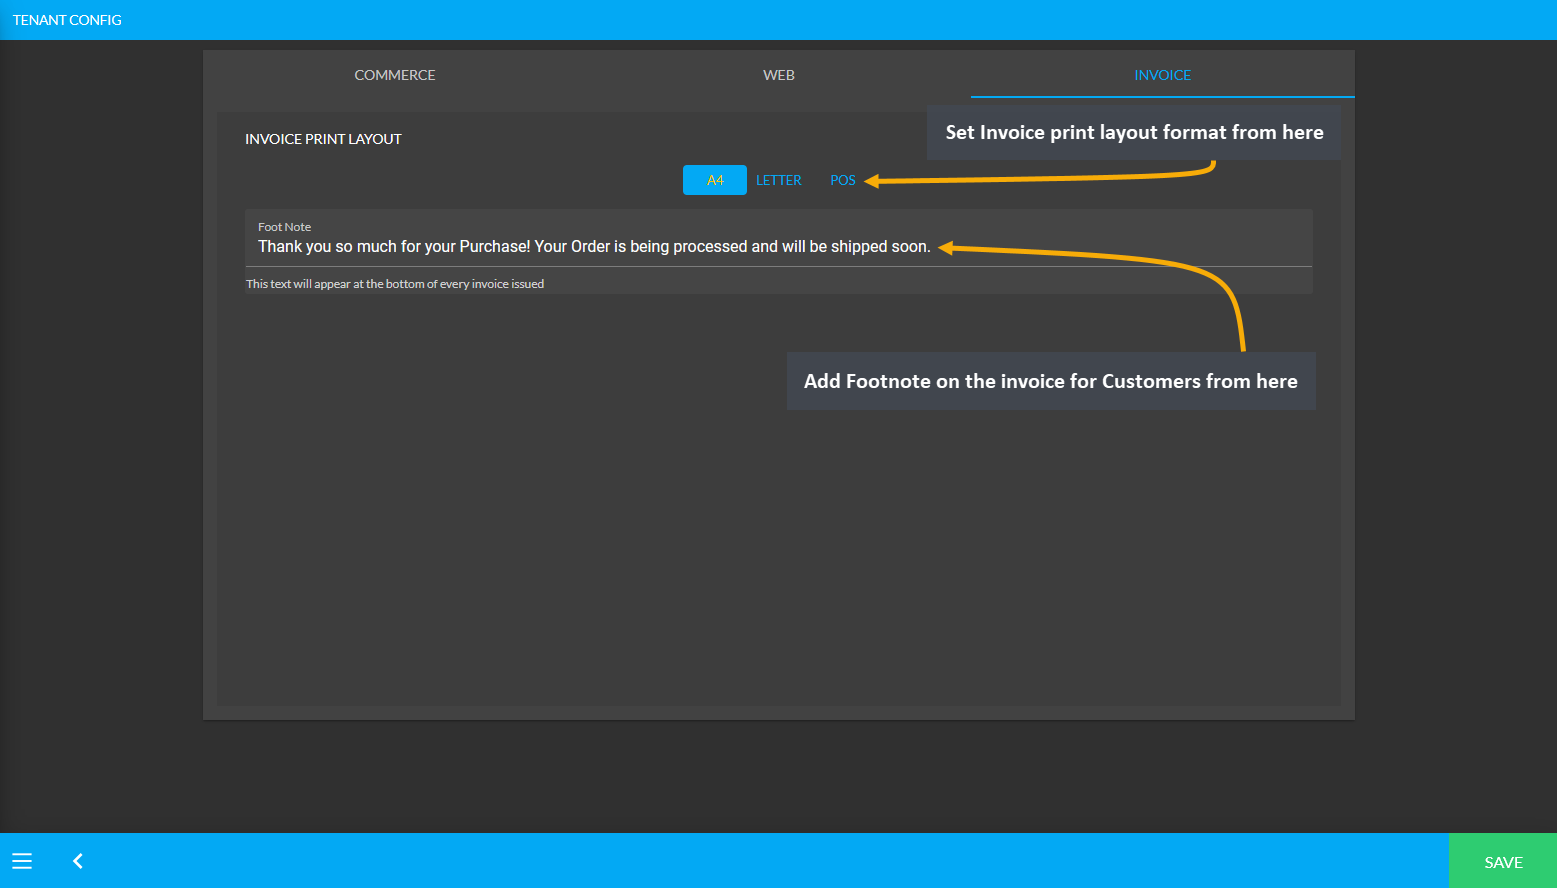
Invoices can be printed anytime for both new and old Orders. Shop Owners can retrieve the old invoices anytime whenever they need to print out from the Order List. Retail Xen supports three invoice printing formats. Invoice printing formats can be configured from the Invoice tab beside the Web tab.
There are three types of Invoice print layout. One of them is the cost machine printing format, also known as the Point of Sales (POS) format, and the other two formats are the regular A4 invoice printing format and the Letter invoice printing format. There is an option to include a Footnote on the invoice for Customers as illustrated.
Branch Settings
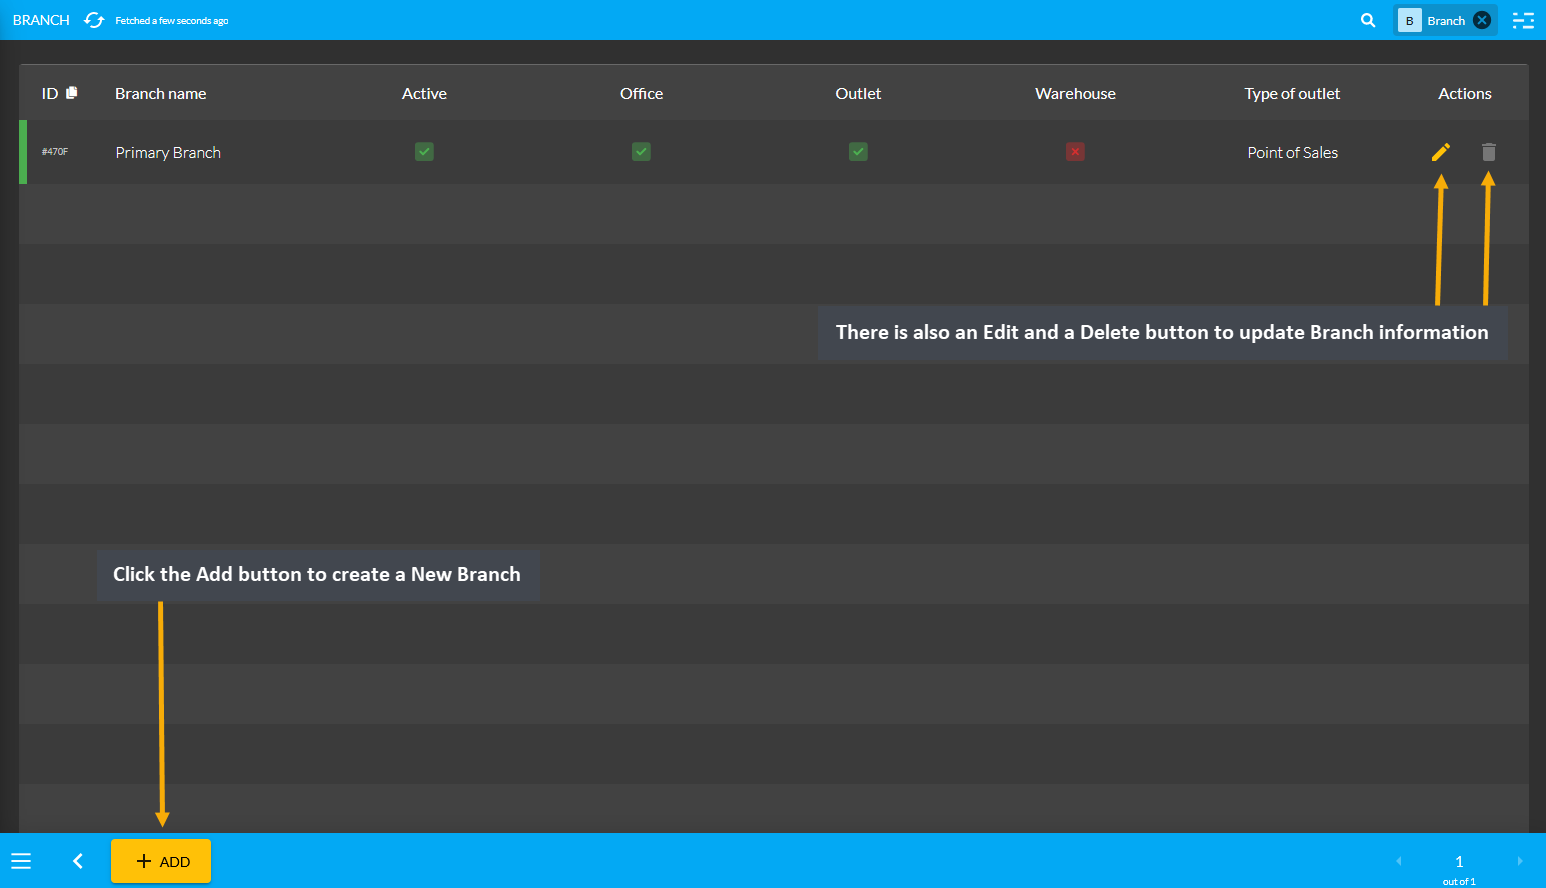
Under General Settings, the third option to configure is Branches. There are options to add Branch Name, make any Branch active or inactive, display Branch as Office or Warehouse, or add Type of Outlet as Point of Sales or Restaurant. To add a New Branch, click the Add button at the bottom left of the page. This will redirect to a new page for updating Branch information. There is also an Edit and a Delete button to update Branch information.
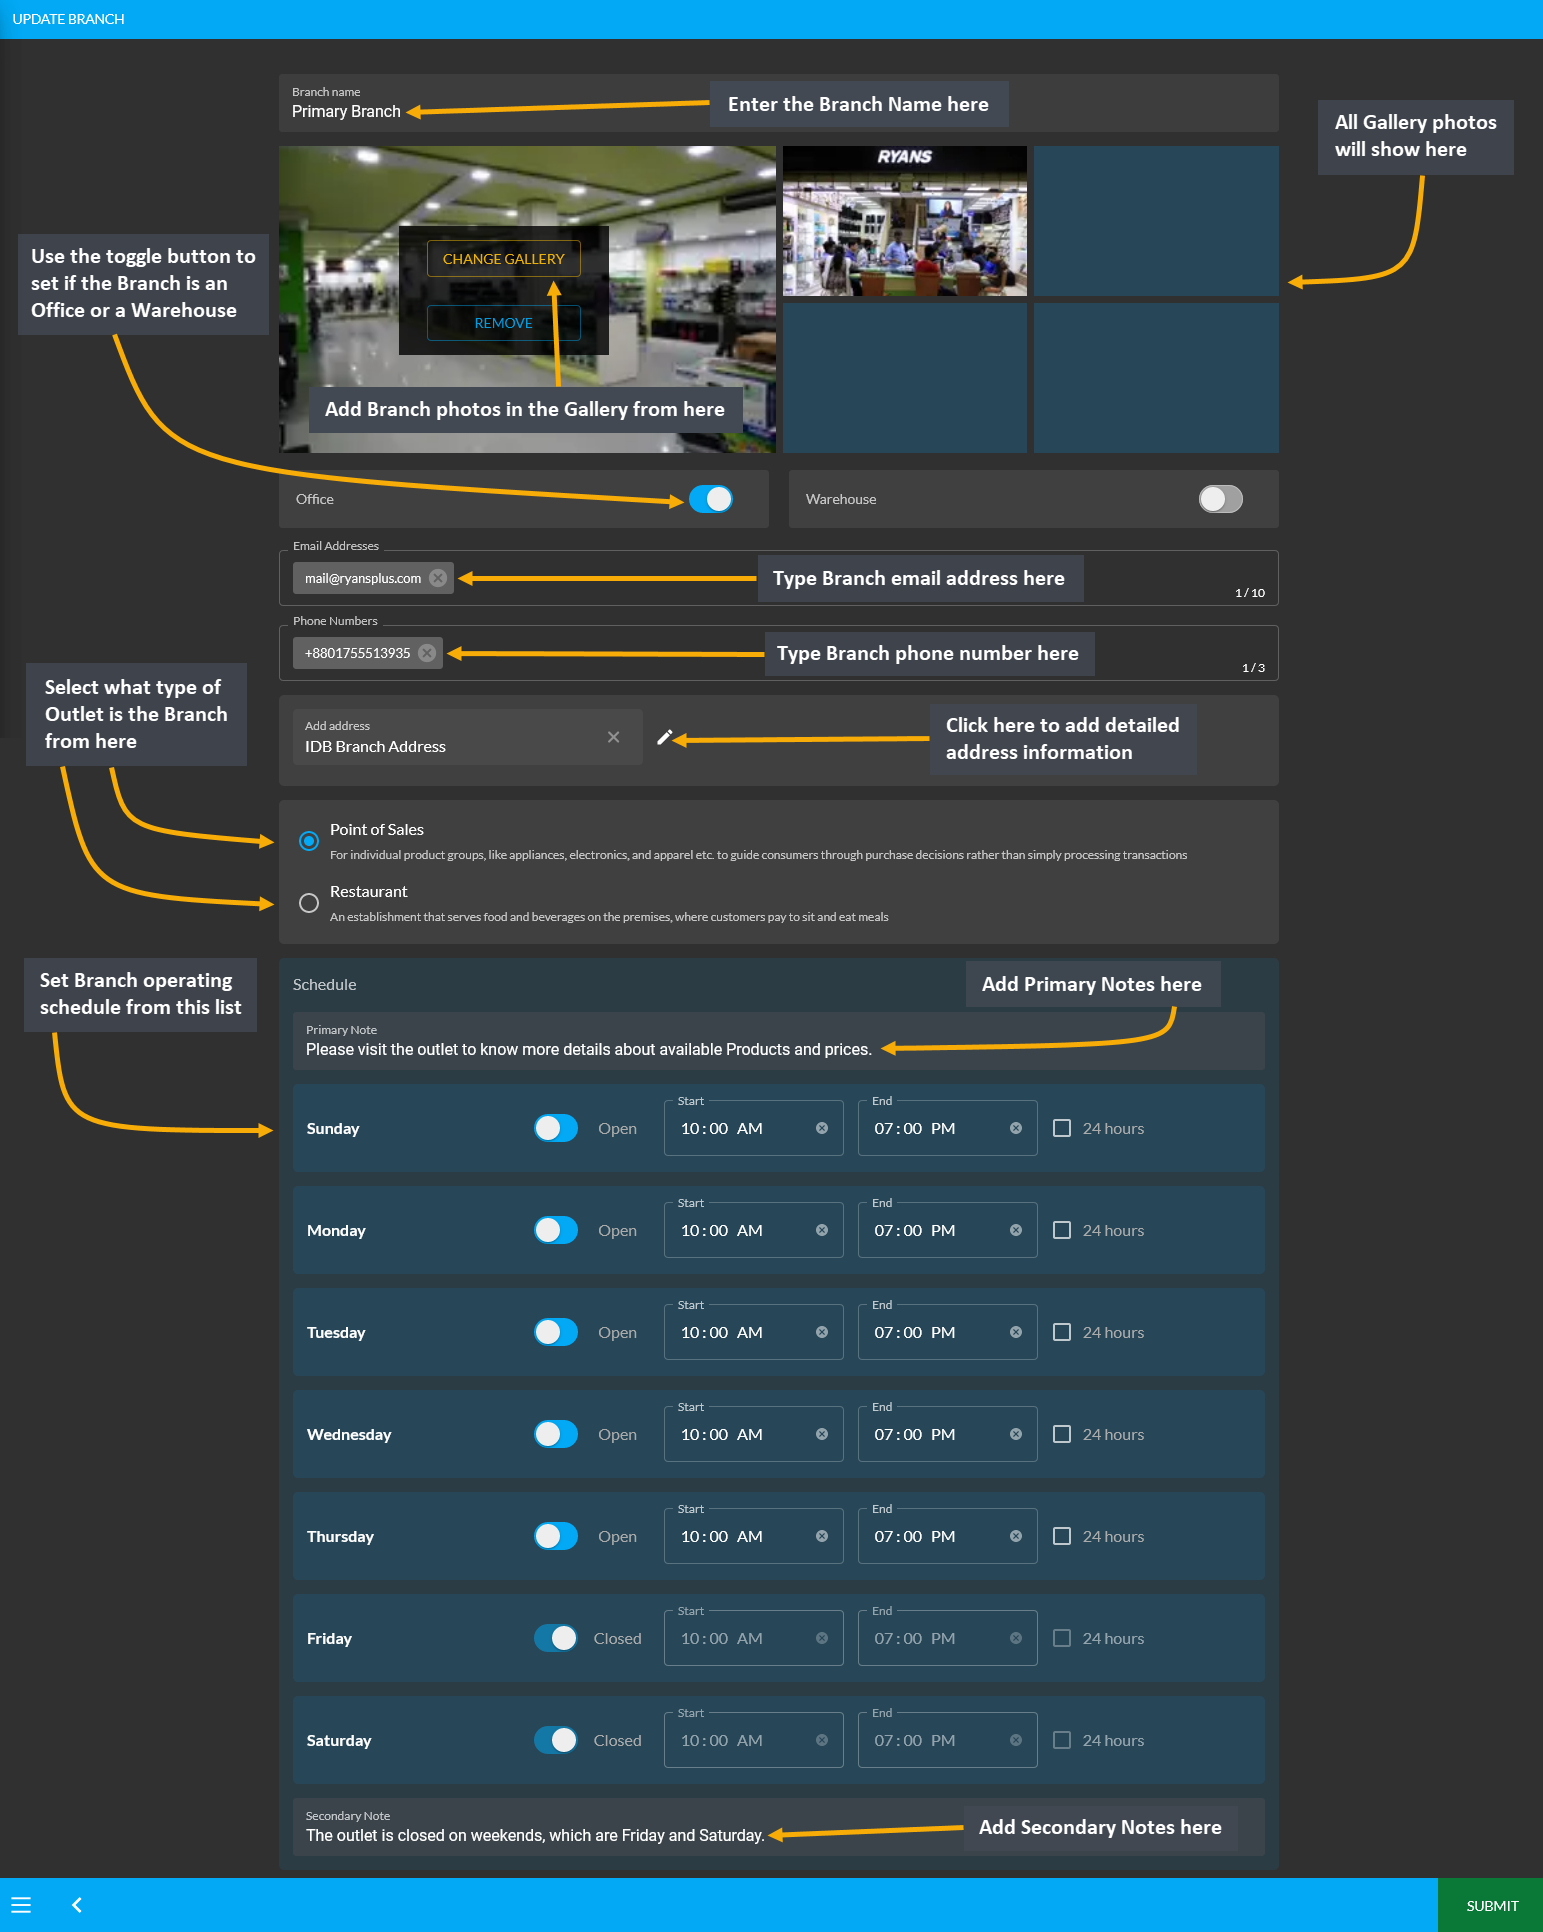
Every Shop will have different Branches on various locations. For this reason, the Admin Panel include options to create Branches. Under Update Branch, the Shop Owners can set Schedule with business hours for Customers to visit and make a Product purchase. The first field to fill out for the Branch is the Branch Name.
Below is the Gallery where Shop Owners can add photos of their Branch outlets with Add New Gallery option. Add multiple images for Branch gallery. Then, there are two toggle buttons to set Branch as Office or Warehouse. Next, the Shop Owner can select if their Outlet is Point of Sales or Restaurant that best describes the Branch.
Then, fill out the email address, phone number, and detailed address of the Branch. Then, set the Branch operating Schedule for Customers to visit or make a purchase. Set business days and holidays with Start and End times. Use the toggle button to show when the Branch is open or closed. Add Primary Note or Secondary Note as needed.
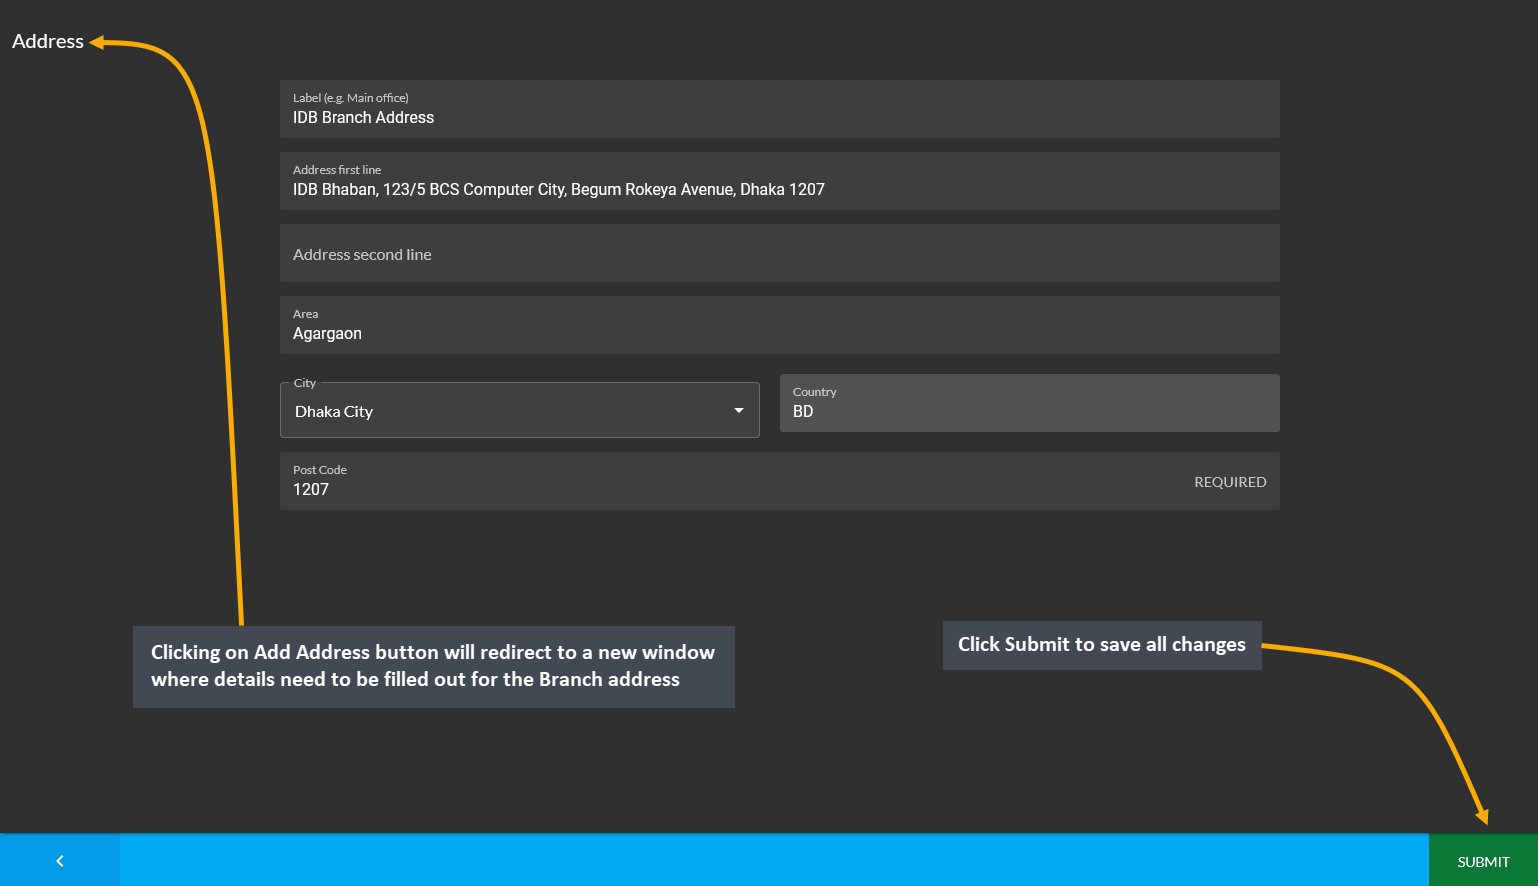
Add Branch Address
Within Branch Settings to Update Branch, clicking the Edit icon beside the Add Address box will open a pop-up where Branch address details needs to be filled out. From here, fill out the Label, Address, Area, City, Country, and Zip Code. Click Submit to save all changes. It will redirect to the main page to update rest of the details.
Counter Settings
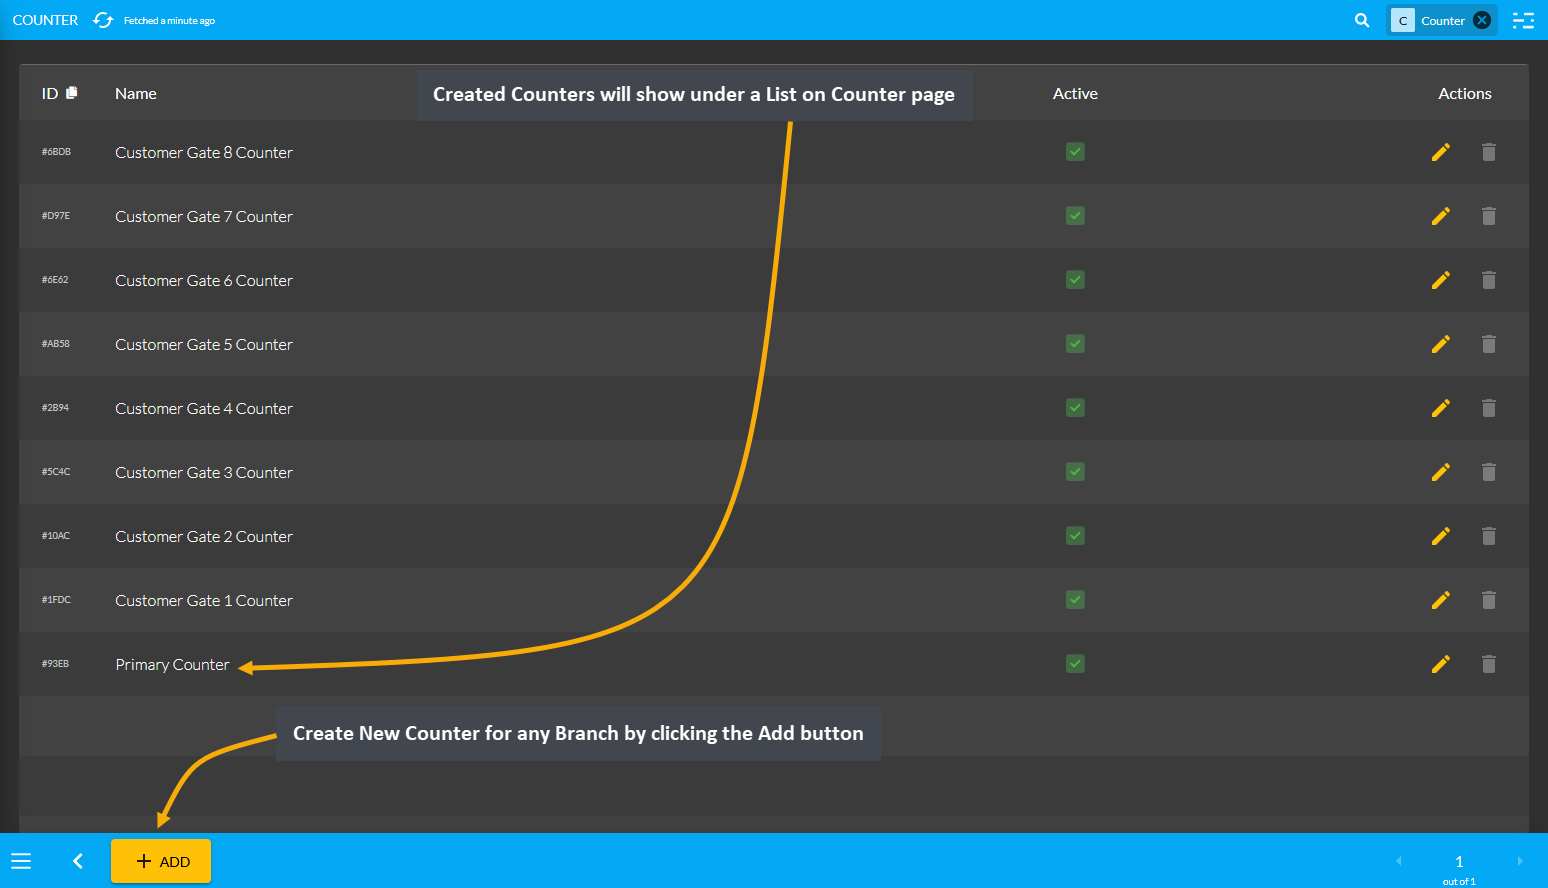
Under General Settings, the fourth option to configure is Counters. Create and set Counters under a specific Shop Branch for taking Orders from Customers. When there are too many Counters in a single Shop Branch, creating Counter will help Admins create and handle Orders. Created Counters will show under a List on Counter page.
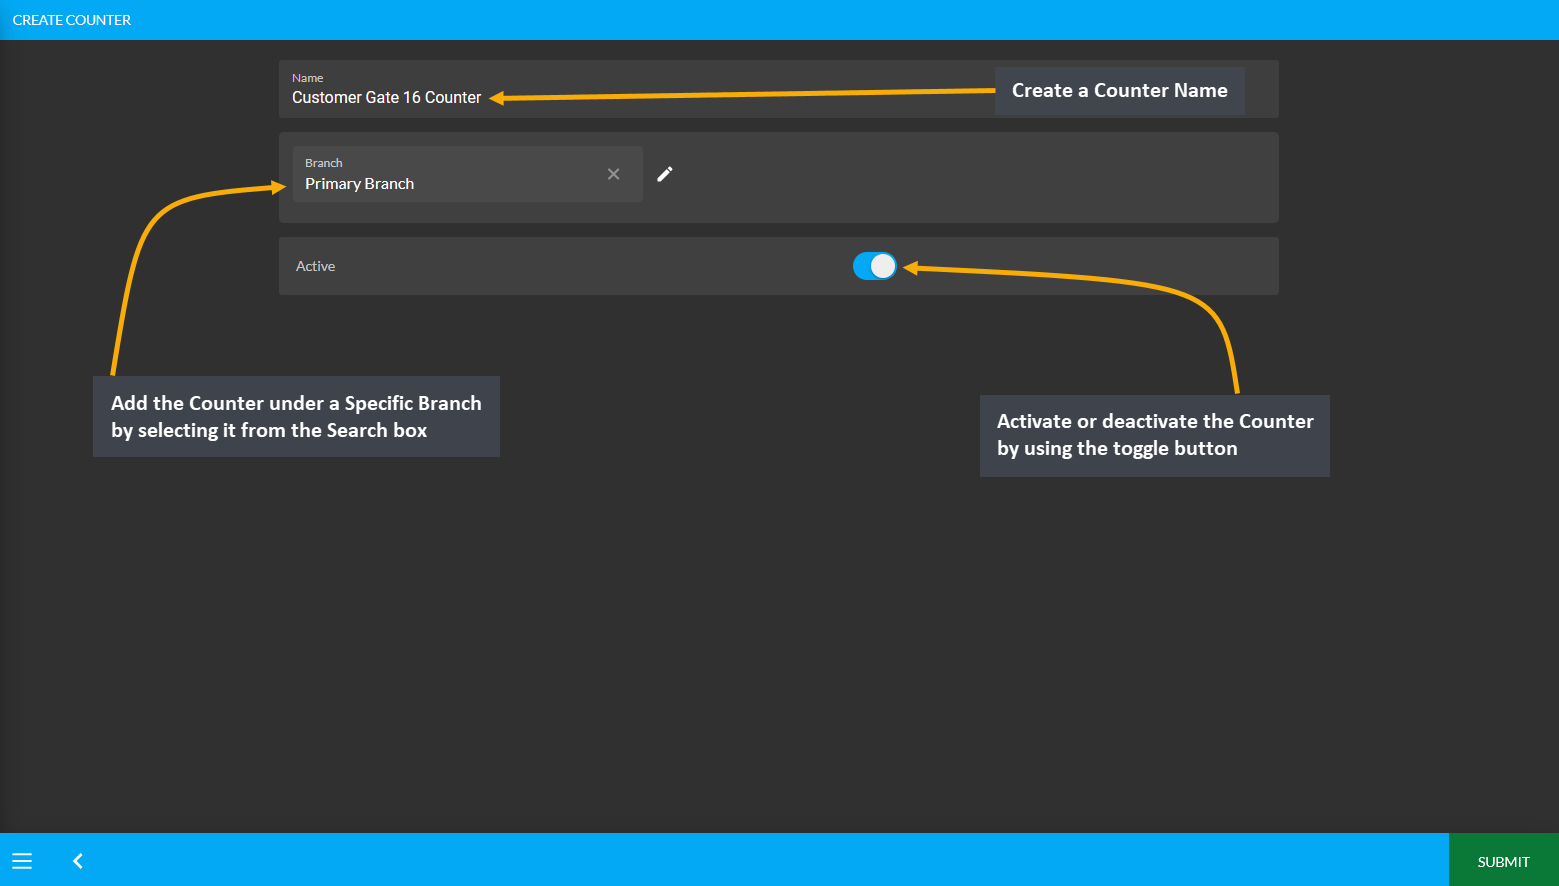
Create New Counter for any Branch by clicking the Add button. It will redirect to a new page from where Counter Name needs to be created and added under a Specific Branch by selecting it from the Search box, and activate or deactivate the Counter as needed. Click the Submit button to create a New Counter that will show under the list.
7.2 - Payment Gateway Settings
Learn more about the configuration of Payment Gateways and how to activate them for Order transactions.
Payment Gateway Settings
Configure Payment Gateways from Gateways under All Settings tab. The Payment Gateways that are embedded in the system are Cash, Cheque, Cash on Delivery, Bank Transfer, Credit Card, Ledger, PortWallet, SSLCommerz, Nagad, Nagad (Manual), Bkash, and Bkash (Manual). Shop Owners can activate or enable them whenever needed.
Click the Configure button beside each Payment Gateway to configure them. If any gateway is enabled, they will be marked as green, if any gateway is disabled, they will be marked as red. So, the Shop Owner can enable and disable any payment gateway to allow Customers to make payment via any of these gateways on The Website.
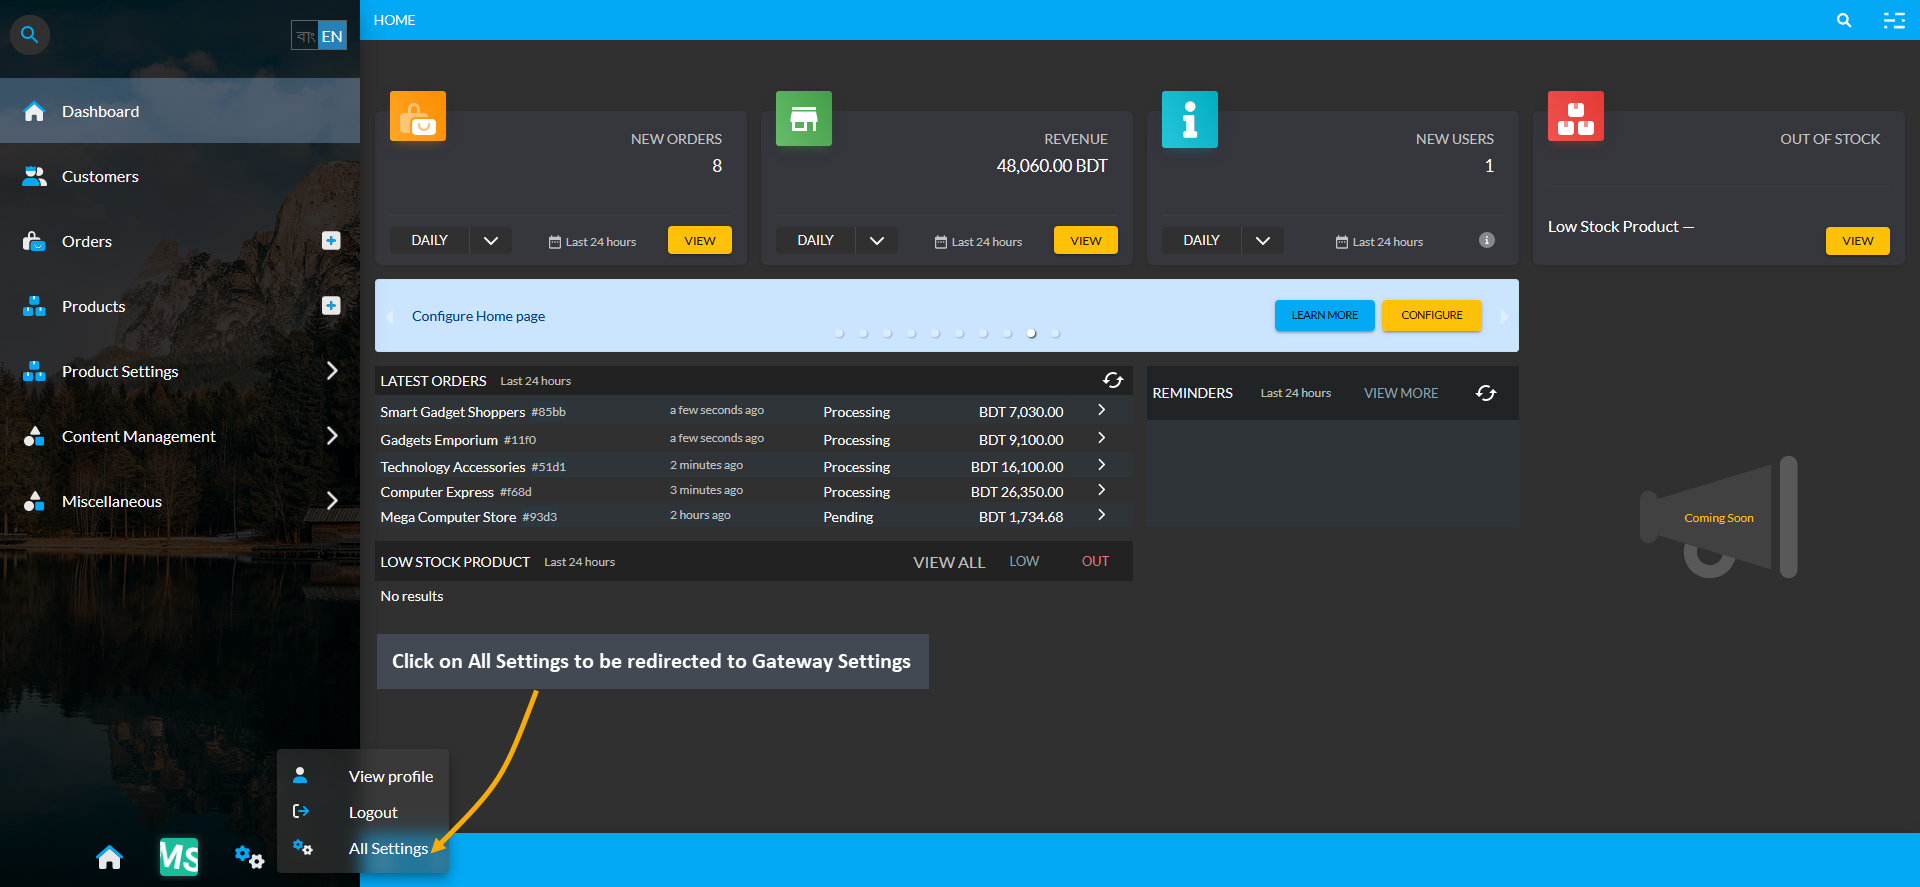
Image 1: Click on All Settings to be redirected to Gateway Settings from the Dashboard.
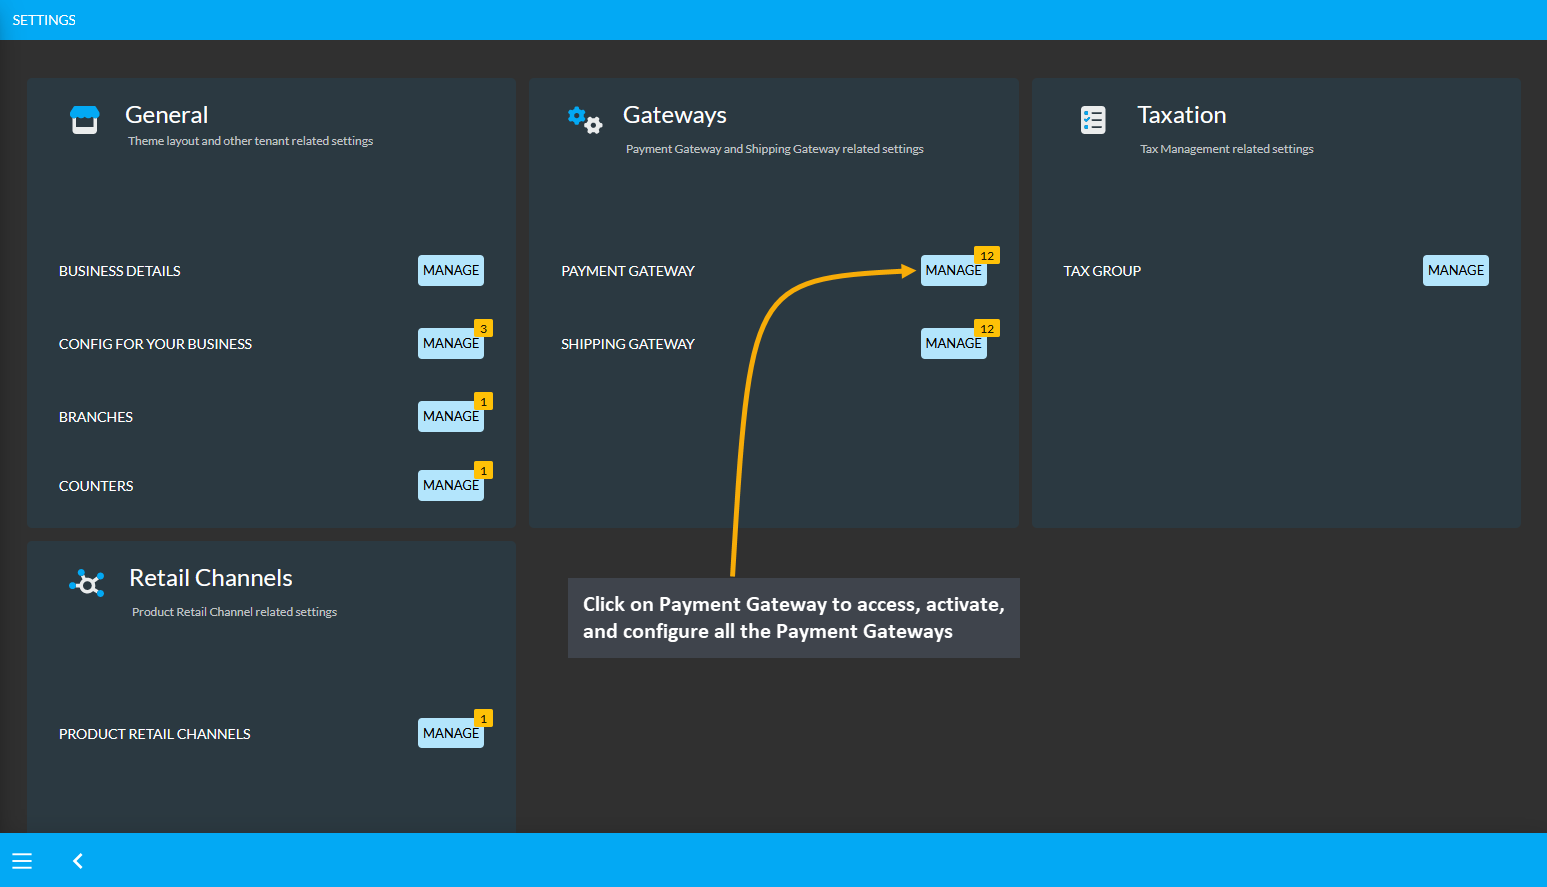
Image 2: Click on Payment Gateway to access, activate, and configure all the Payment Gateways.
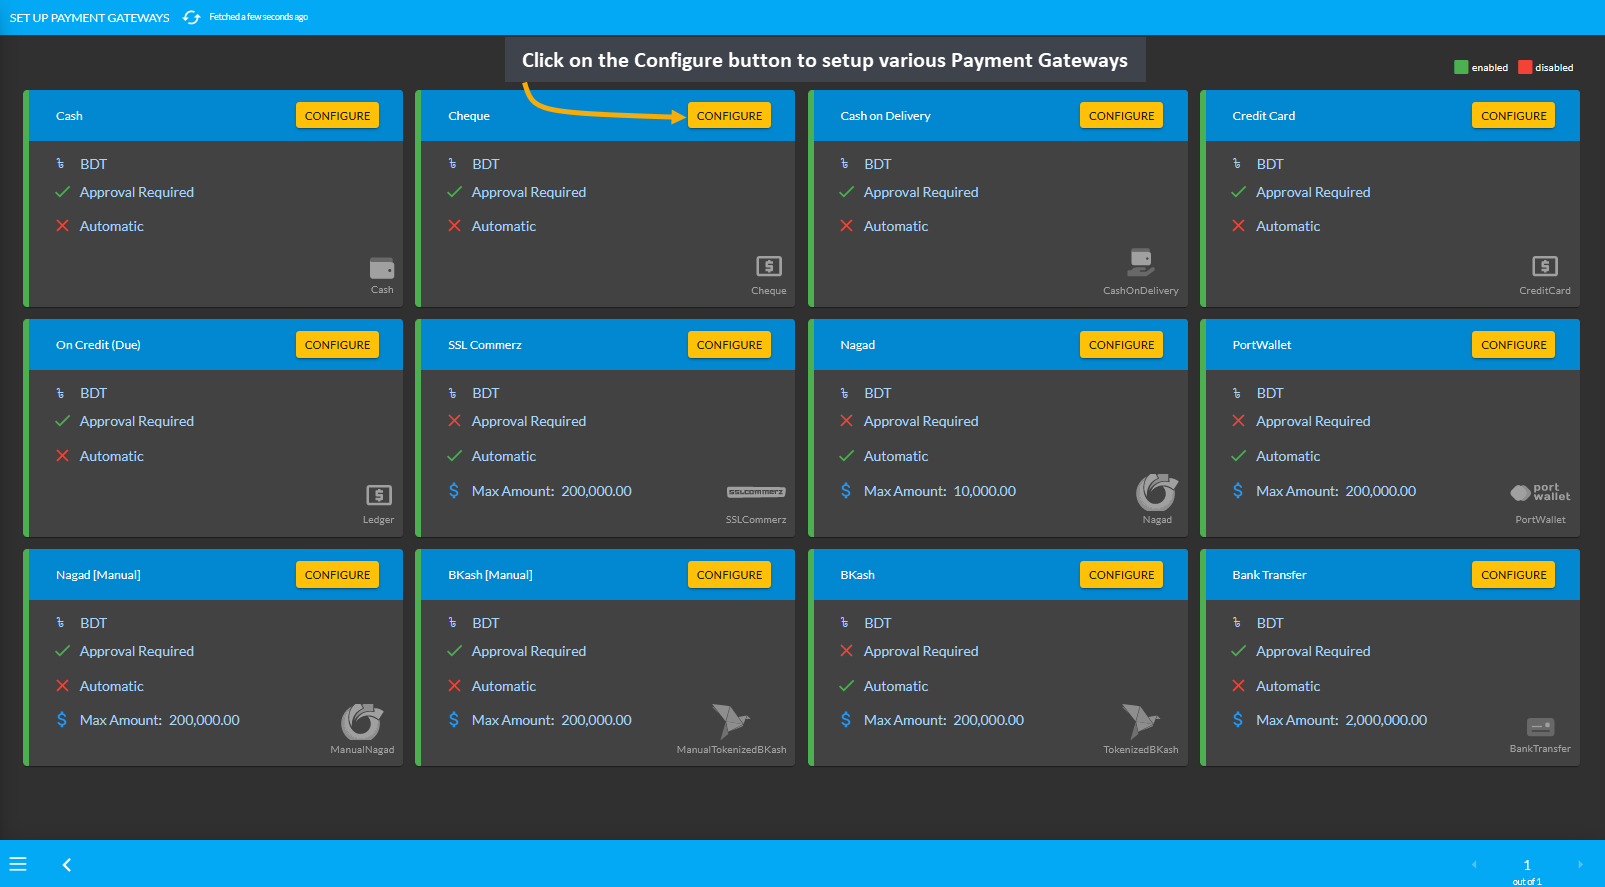
Image 3: Click on the Configure button to setup various Payment Gateways from the list.
For the configuration of Payment Gateways, there are options to setup display name, minimum amount required, maximum amount allowed, fees, display instruction, QR Code, test API credentials, bank account (bank transfer), allowed currencies, and EMI (for credit cards) etc. One payment gateway configuration will vary from another.
New Feature: Ecommerce Enabled
Enable Commerce is a new feature that was introduced on the Admin Panel. Enabling or disabling this option is going to display or not display the selected Payment Gateway on The Website for Customers.

Image 1: Enable or disable Commerce feature to display Payment Gateway on The Website for Customers.
If the Enable Commerce is disabled, then the selected Payment Gateways will show as disabled like SSLCommerz, PortWallet, Bank Transfer, BKash, BKash (Manual), Nagad, and Nagad (Manual) as shown in the example.
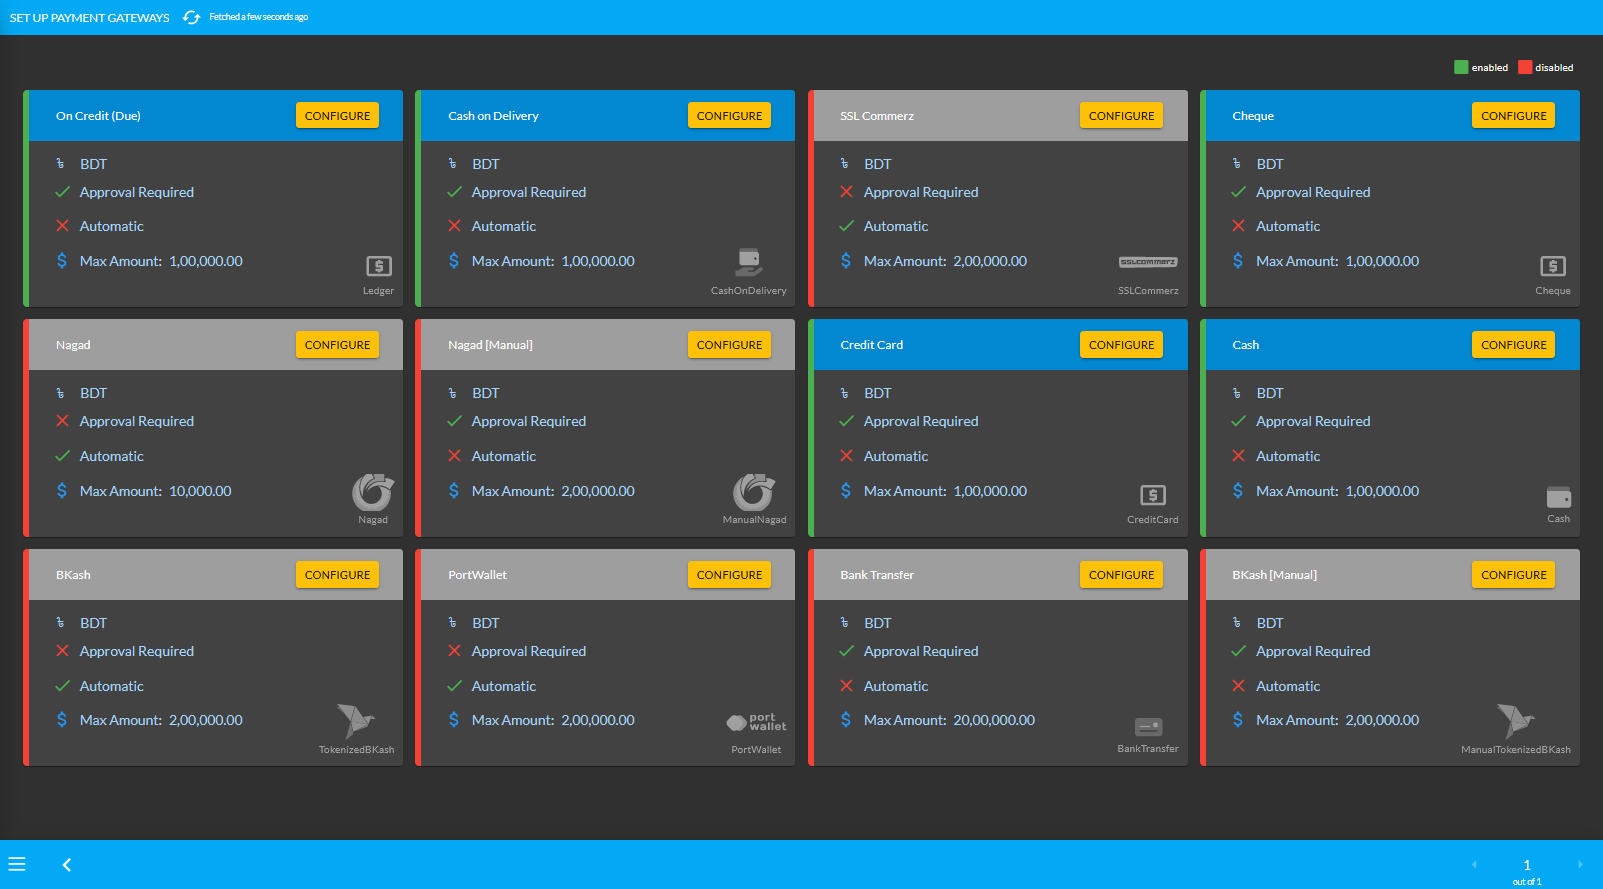
Image 2: Commerce feature disabled for few Payment Gateways that will not display on The Website.
With the Enable Commerce option turned on from the Admin Panel for selected Payment Gateways, the Website will display those Payment Gateways when Customer checks out from their Cart to place a New Order as shown.
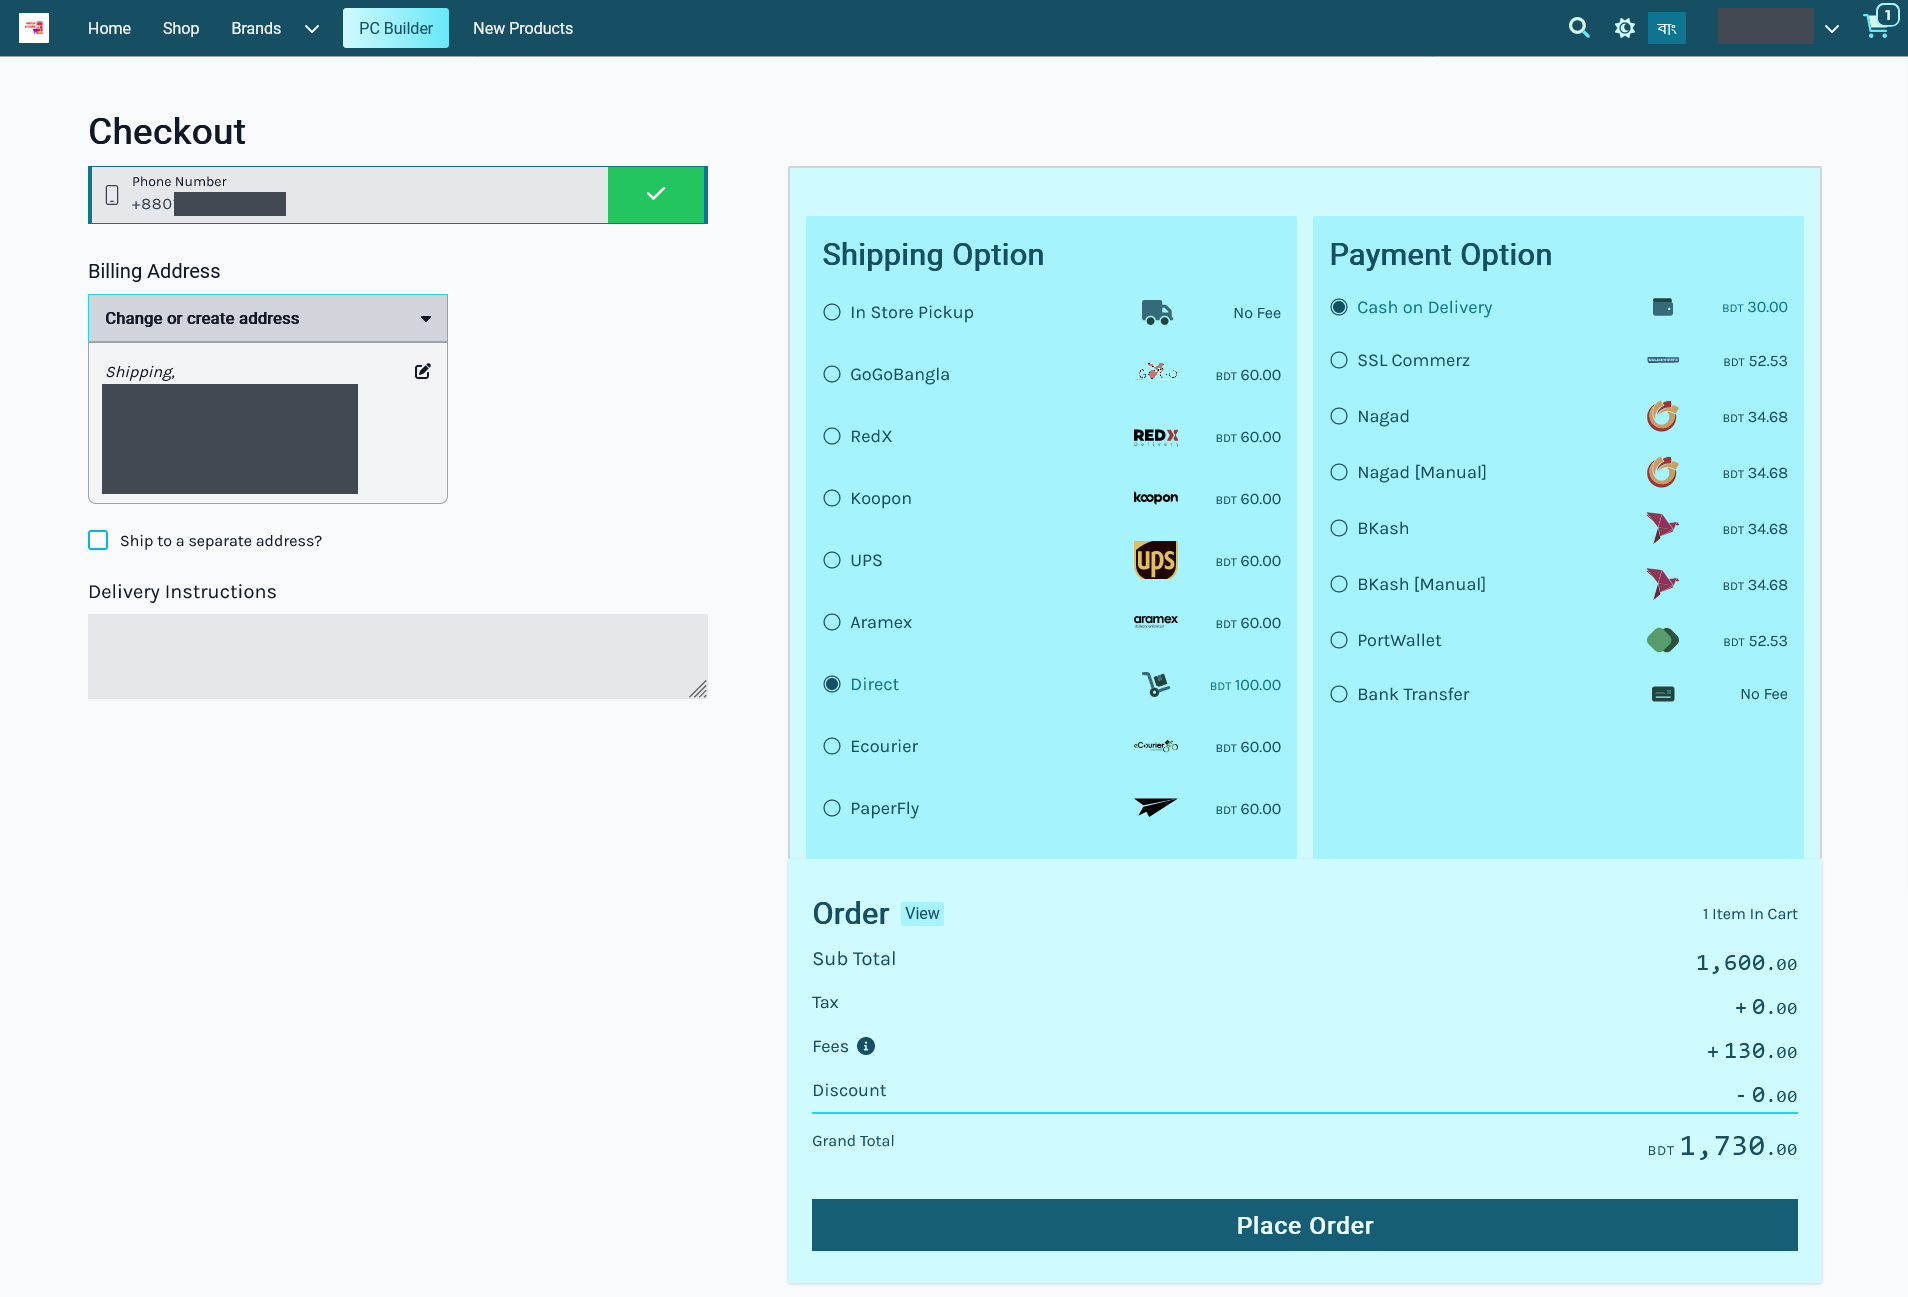
Image 3: The Website will display all the available Payment Gateways with Enabled Commerce turned on.
Conversely, with Enable Commerce option turned off from the Admin Panel for selected Payment Gateways, the Website will not display those Payment Gateways when Customer checks out from their Cart to place New Order.
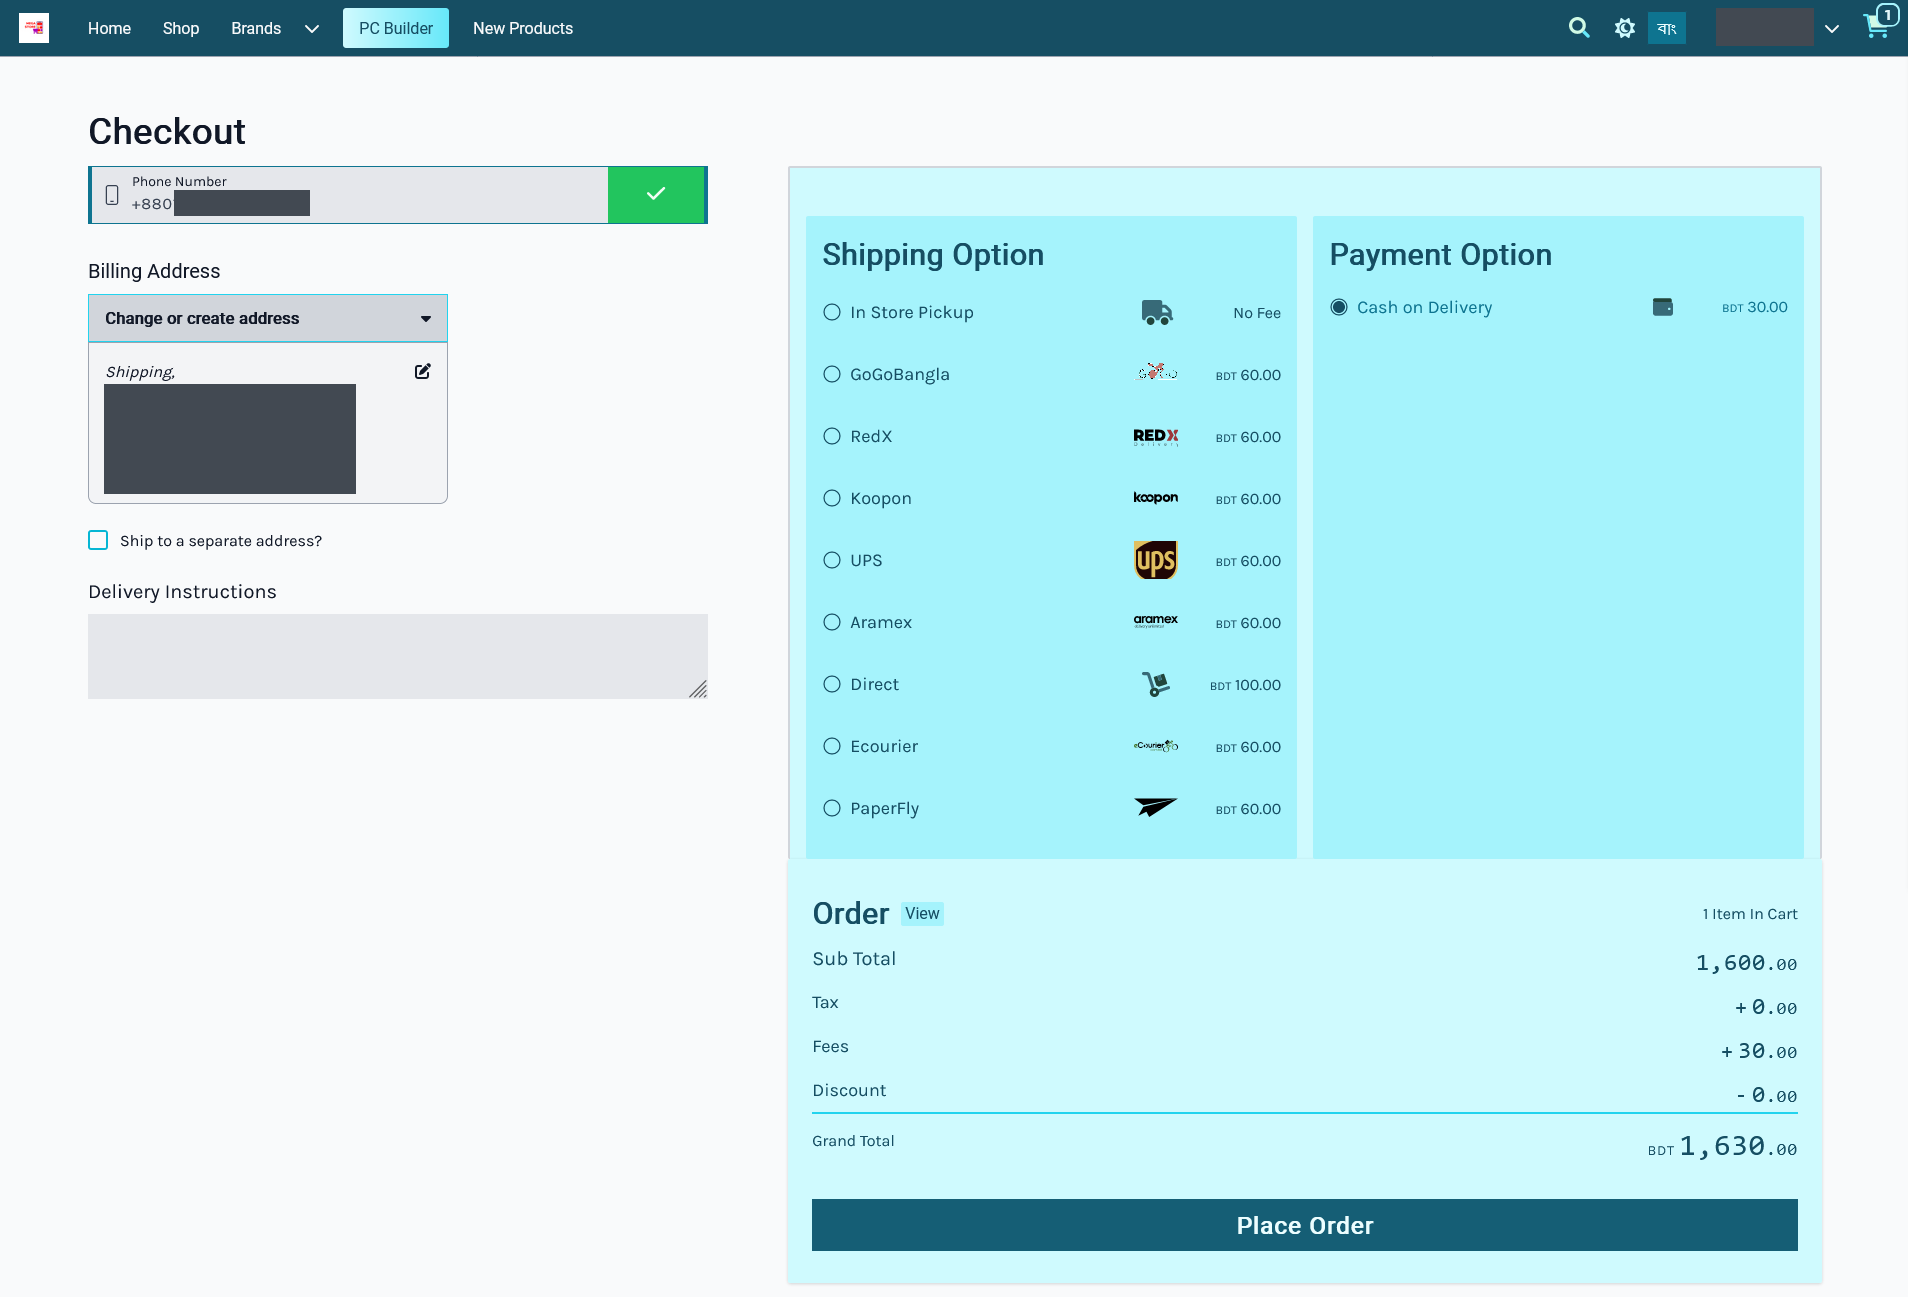
Image 4: The Website will not display selected Payment Gateways when Enabled Commerce is turned off.
Bank Transfer
The payment gateway for Bank Transfer can be set with a Minimum and Maximum amount. Use Enable button to activate the gateway. There is a toggle button to enable Fee and set a Fee Value. Click Add Bank Account button to add bank details. Finally, set the Display Instruction and click Save to confirm all changes and enable the gateway.
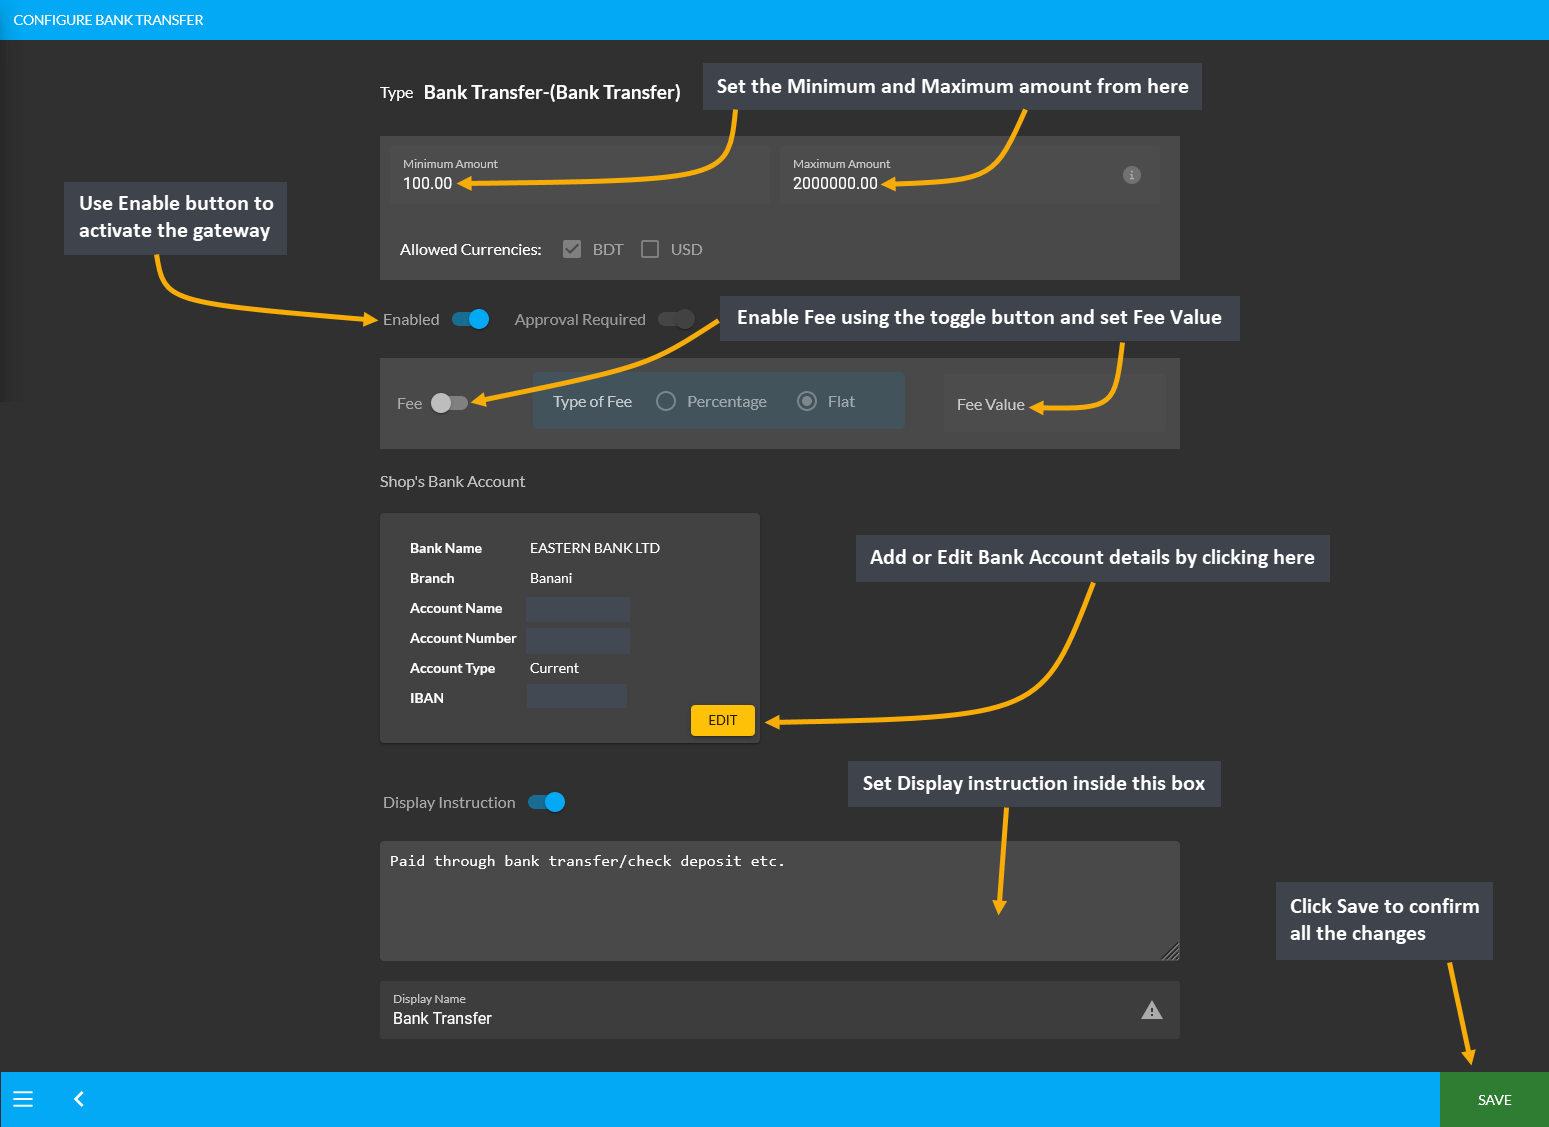
Image 1: Setup Bank Transfer with a minimum and maximum amount, fees, and detailed bank information.
Within Bank Transfer, clicking on the Add Bank Account or Edit button will open a pop-up from where the Shop Owner can setup their bank details. The bank details include setting up bank name, bank account name, bank account number, bank branch, bank swift, bank routing number, IBAN and account type.
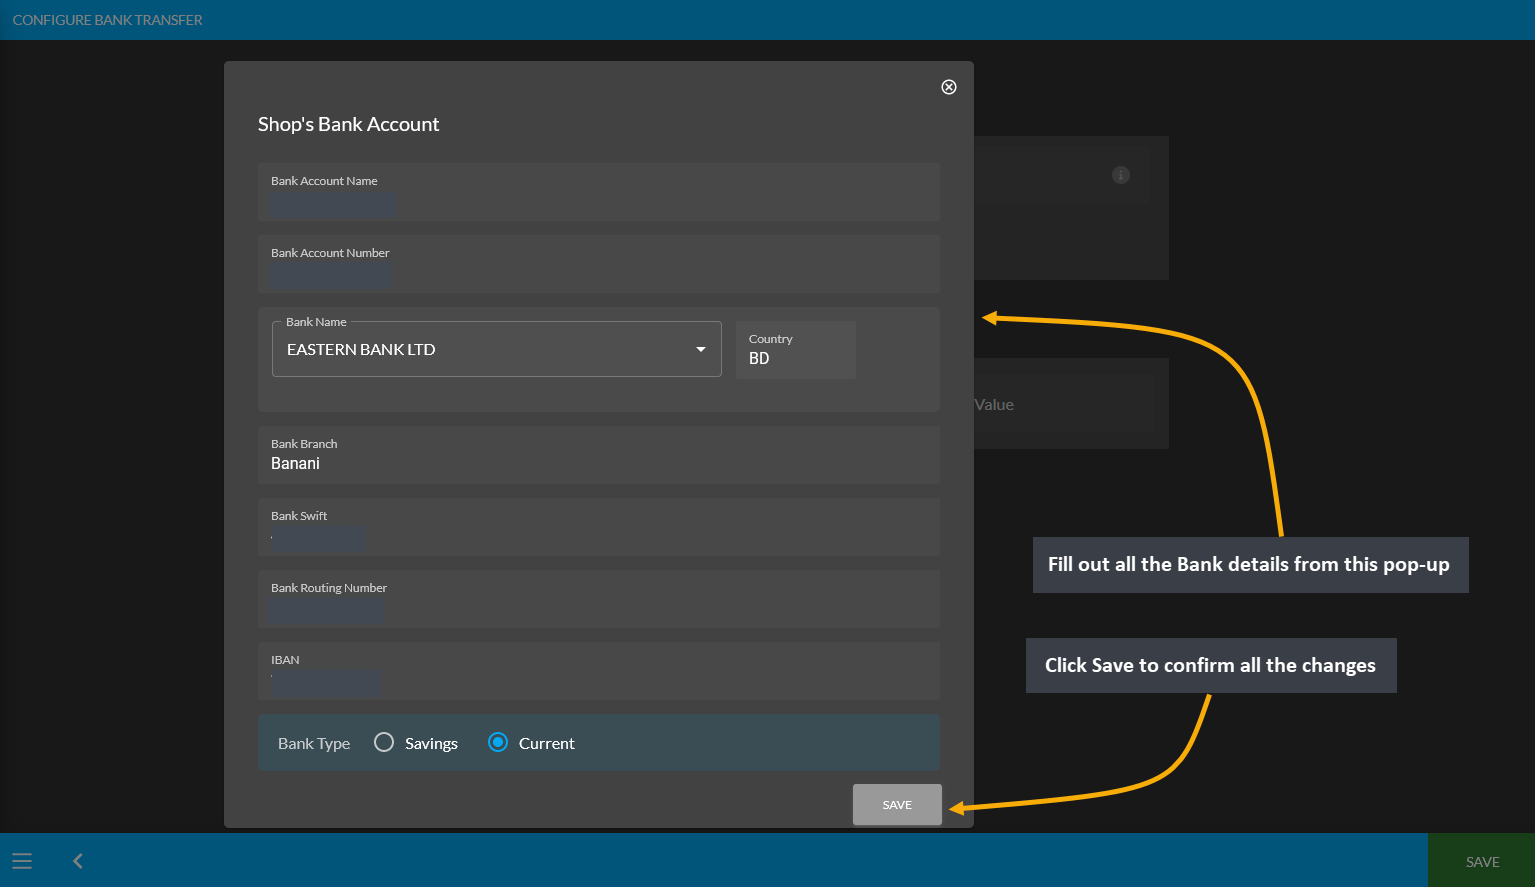
Image 2: Setup Bank details with Name, Account Name, Type, Number, Branch, Swift, Routing Number, and IBAN.
BKash (Manual)
The payment gateway for Bkash (Manual) can be set with a Minimum and Maximum amount. Use Enable button to activate the gateway. There is a toggle button to enable Fee and set a Fee Value. Enter BKash phone number and select Merchant Payment or Send Money. Upload QR Code using a screenshot downloaded from the phone and set Display Instruction below as shown. Click Save to confirm all changes and enable the gateway.
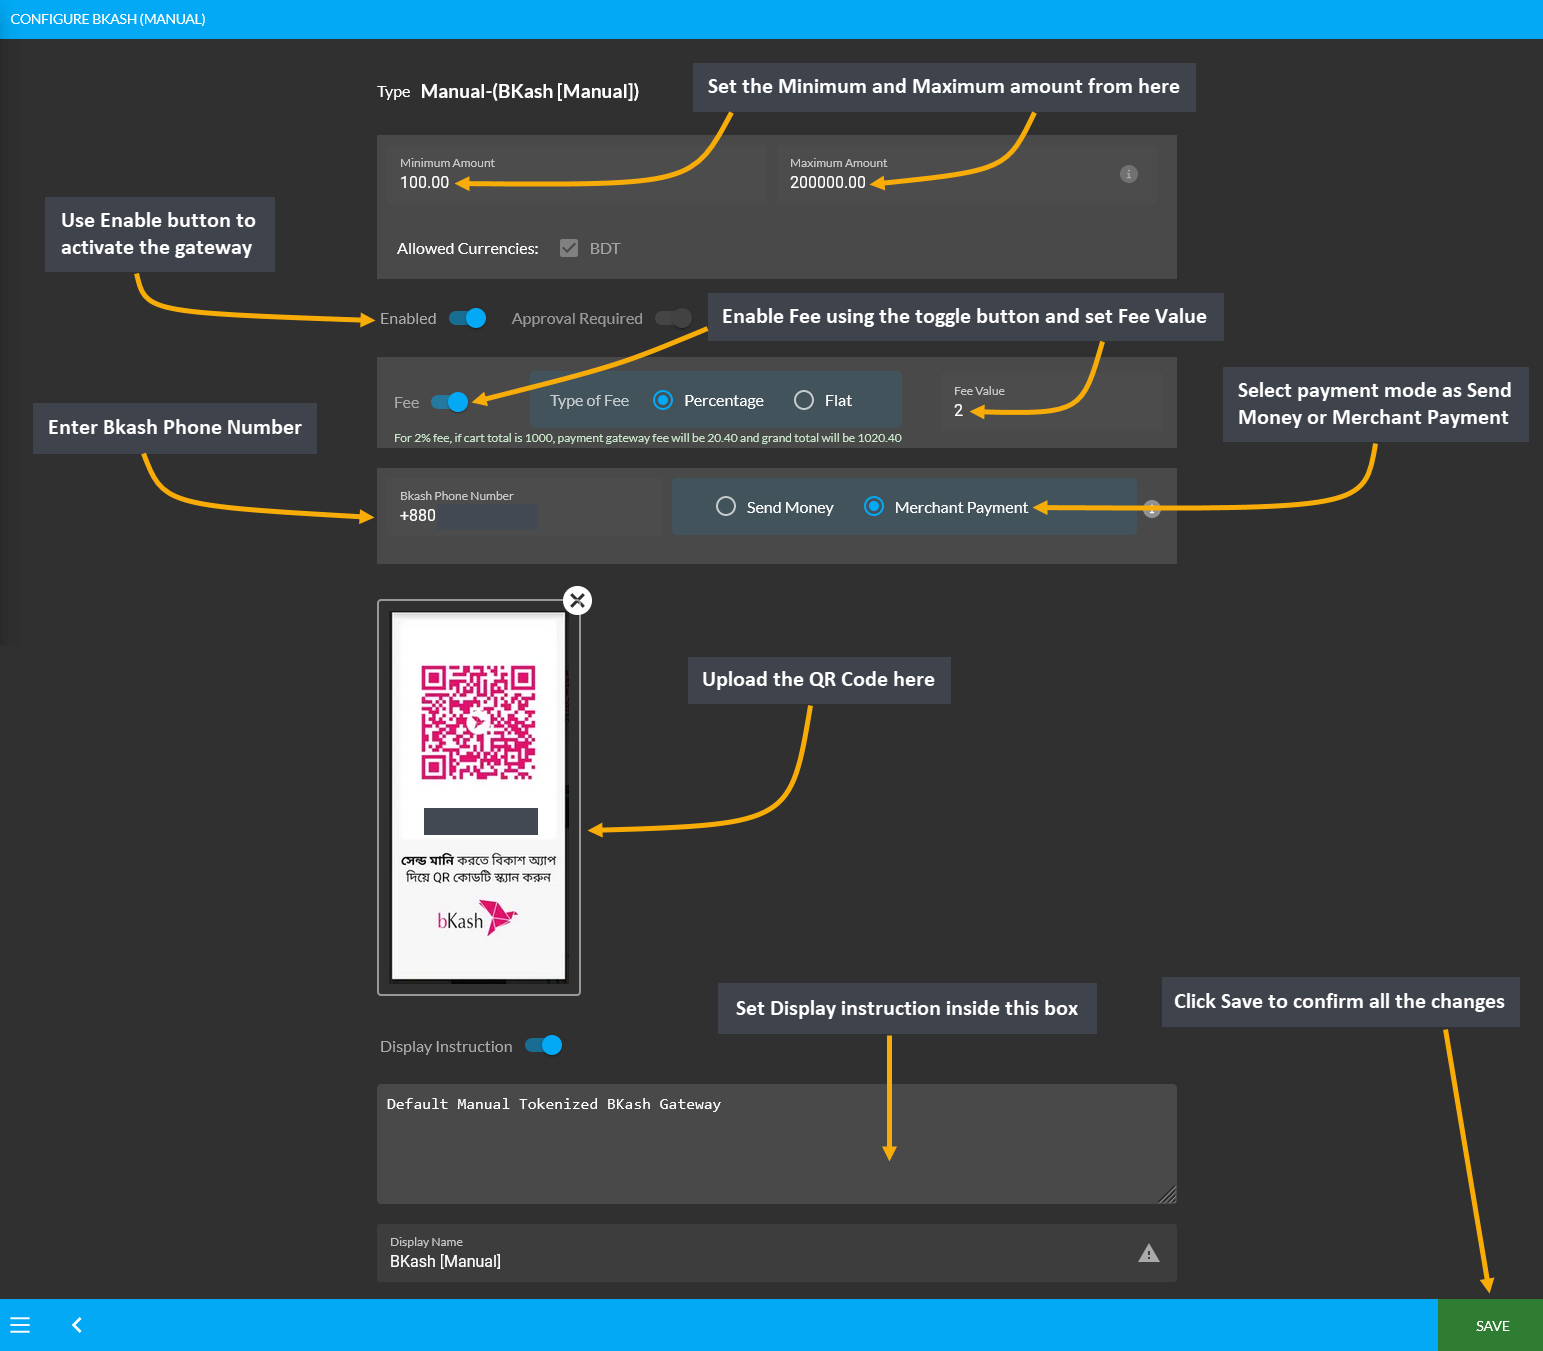
Image 1: Setup BKash (Manual) with amounts, fees, BKash phone number, payment mode, and QR code.
Downloading QR Code from BKash
In order to upload QR Code for activating BKash Manual Gateway, there are few steps to follow. First, User needs to login to their BKash Account using Account Number and Pin. Then, they need to click the avatar on top of the screen. This will redirect to the screen to download the QR Code to upload in BKash (Manual) payment gateway.
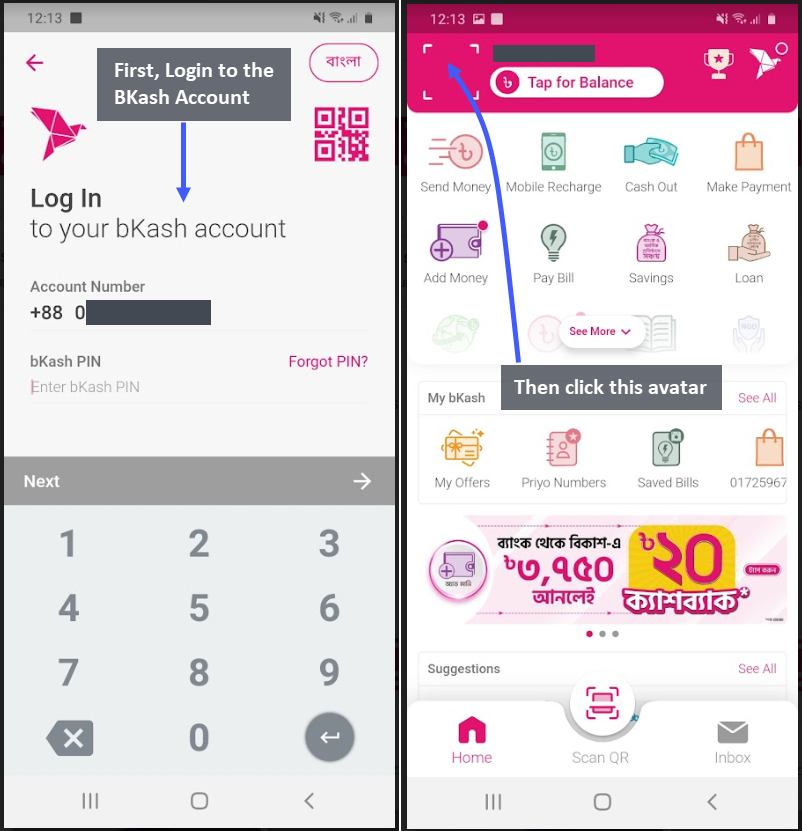
Image 1 and 2: Logging into BKash Account and selecting avatar to redirect to downloading QR Code.
The next page will recirect to the User’s unique QR Code. Click the Download QR Code button which will redirect to the downloadable BKash QR Code image. Now, get this file on computer with email, message, or Google Drive so that it can be downloaded. Then, upload the BKash QR Code while activating BKash payment gateway.
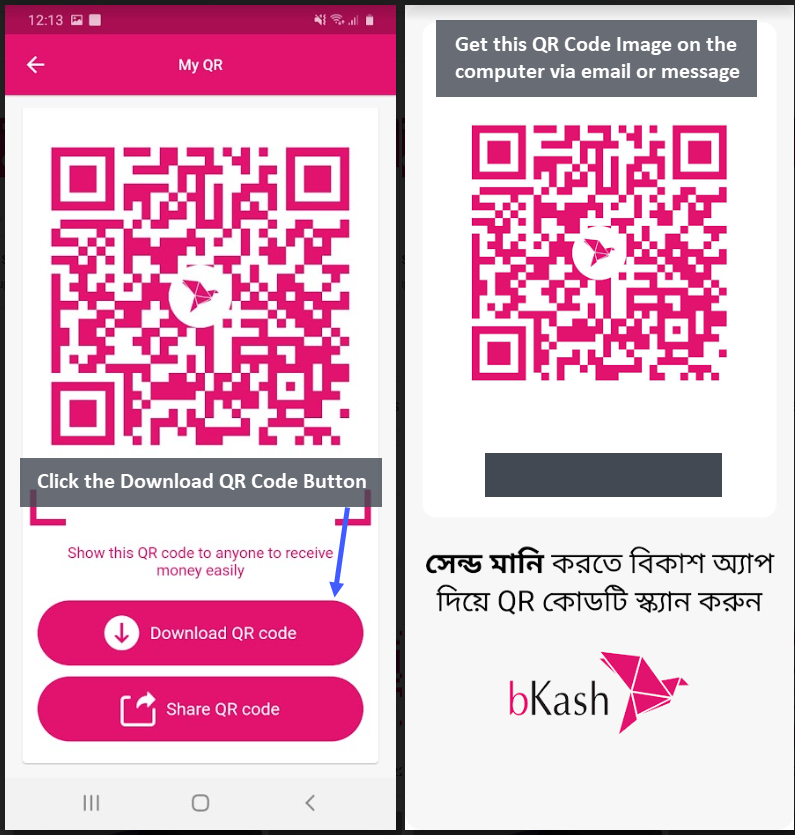
Image 3 and 4: Click Download QR Code Button and get the QR Code image on computer via email or message.
Ordering on Website with or without BKash QR Code
The Bkash (Manual) Payment Gateway can be created both with QR Code (which can be downloaded from phone) that can later be uploaded while activating BKash payment gateway or without QR Code image. Please note that, when paying with Bkash (Manual) for ordering on The Website, this is how the BKash payment gateway will show with the QR Code and without the QR Code.
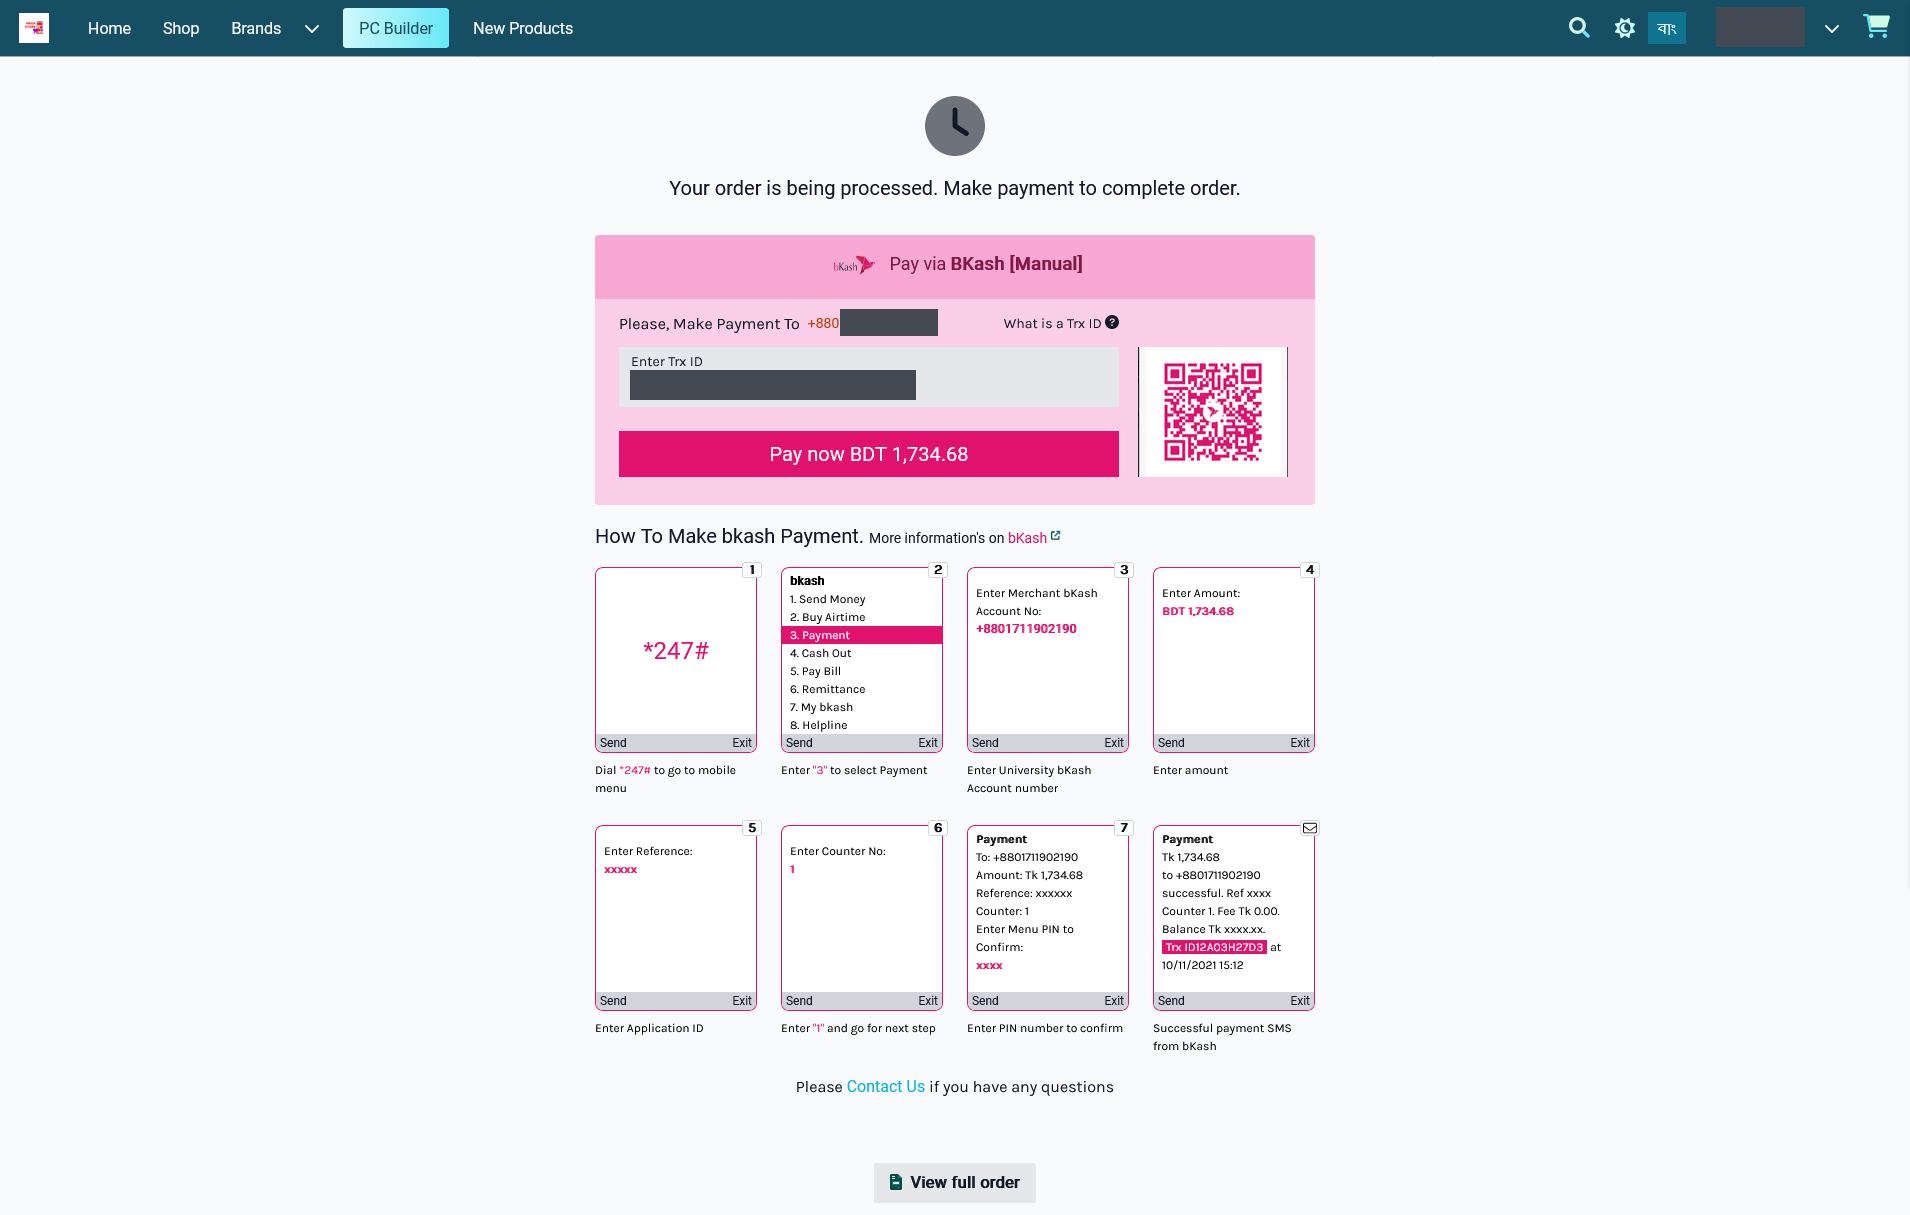
Image 1: Bkash payment with QR Code when placing Order and completing payment on The Website.
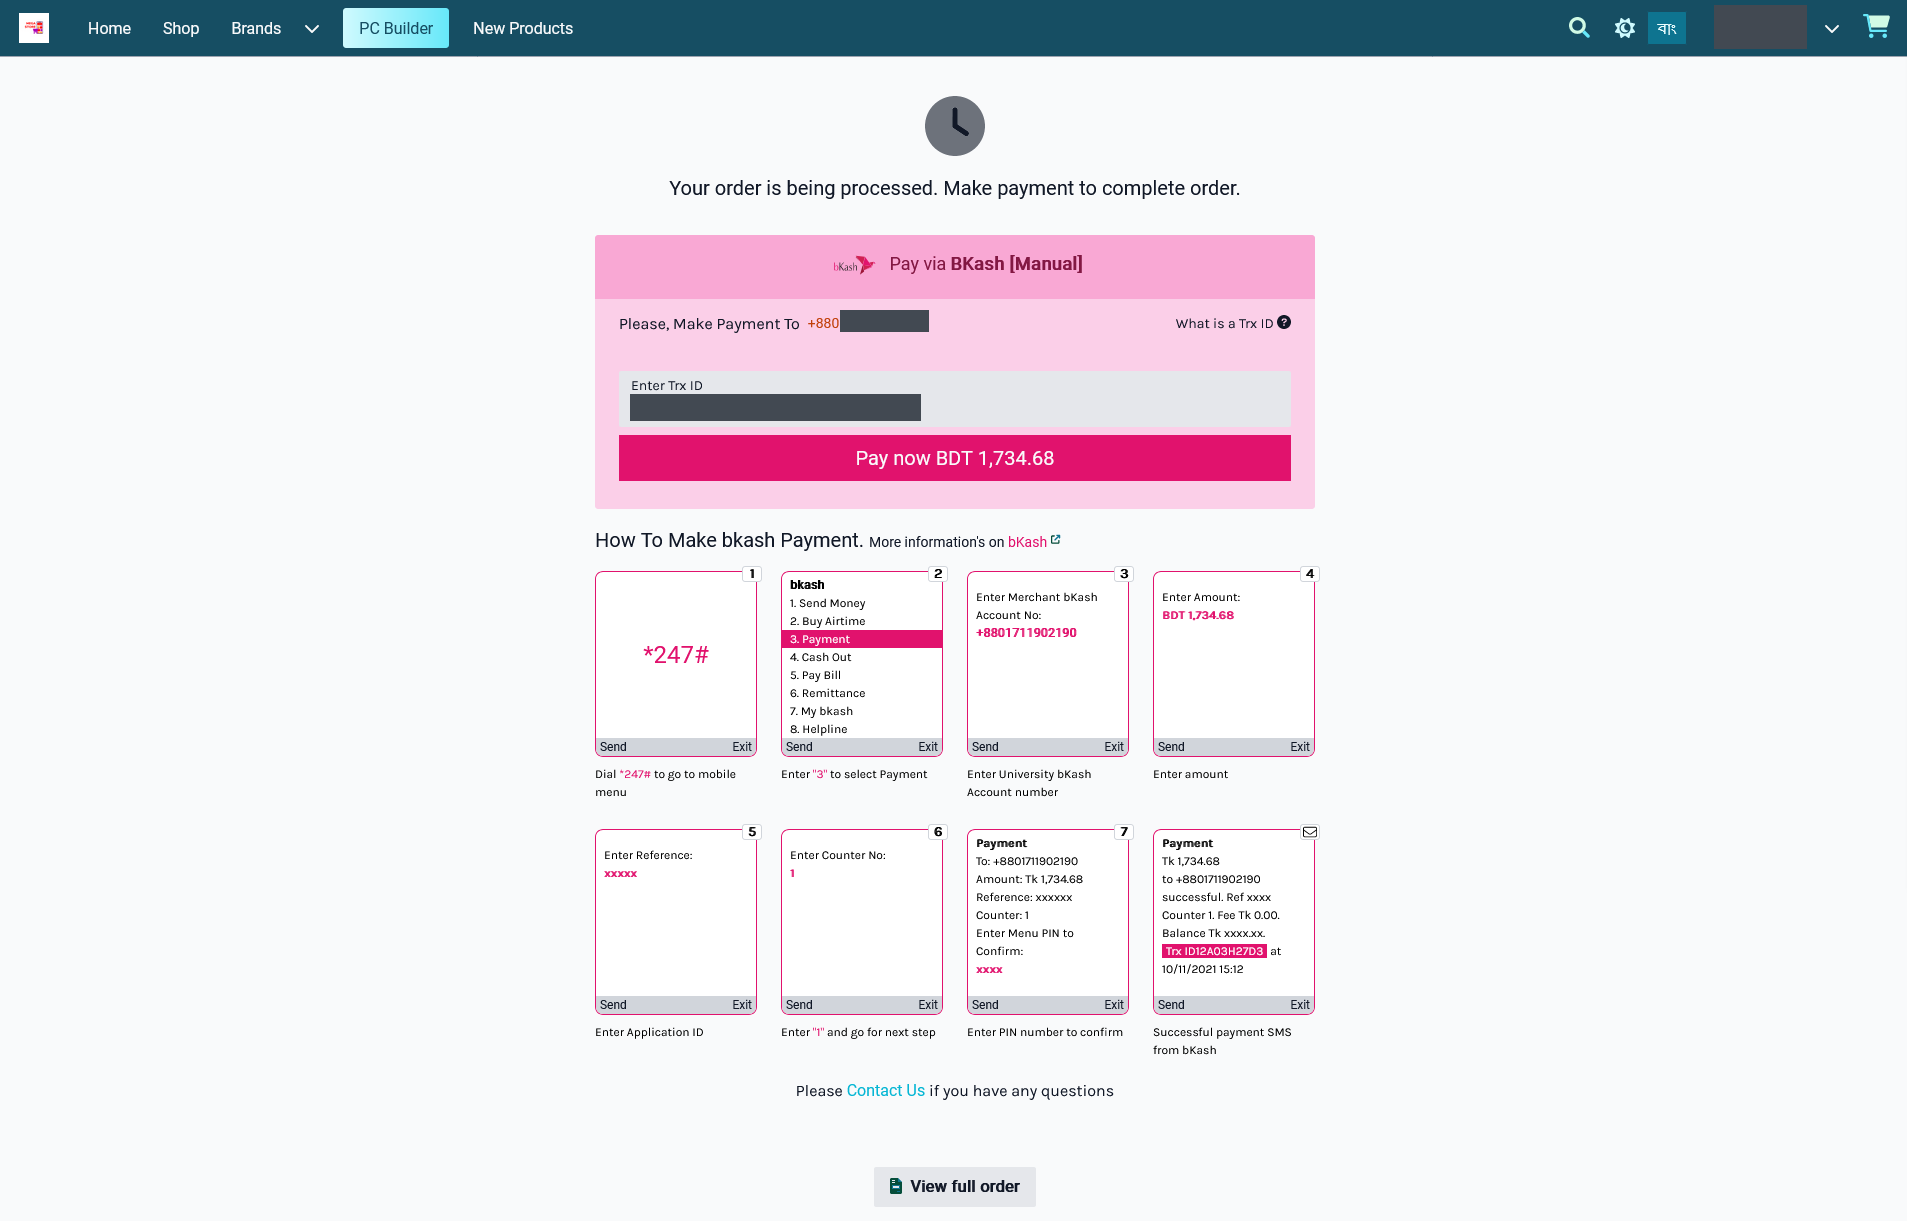
Image 2: Bkash payment without QR Code when placing Order and completing payment on The Website.
Nagad (Manual)
The payment gateway for Nagad (Manual) can be set with a Minimum and Maximum amount. Use Enable button to activate the gateway. There is a toggle button to enable Fee and set a Fee Value. Enter Nagad phone number and select Merchant Payment or Send Money. Upload QR Code using a screenshot downloaded from the phone and set Display Instruction below as shown. Click Save to confirm all changes and enable the gateway.
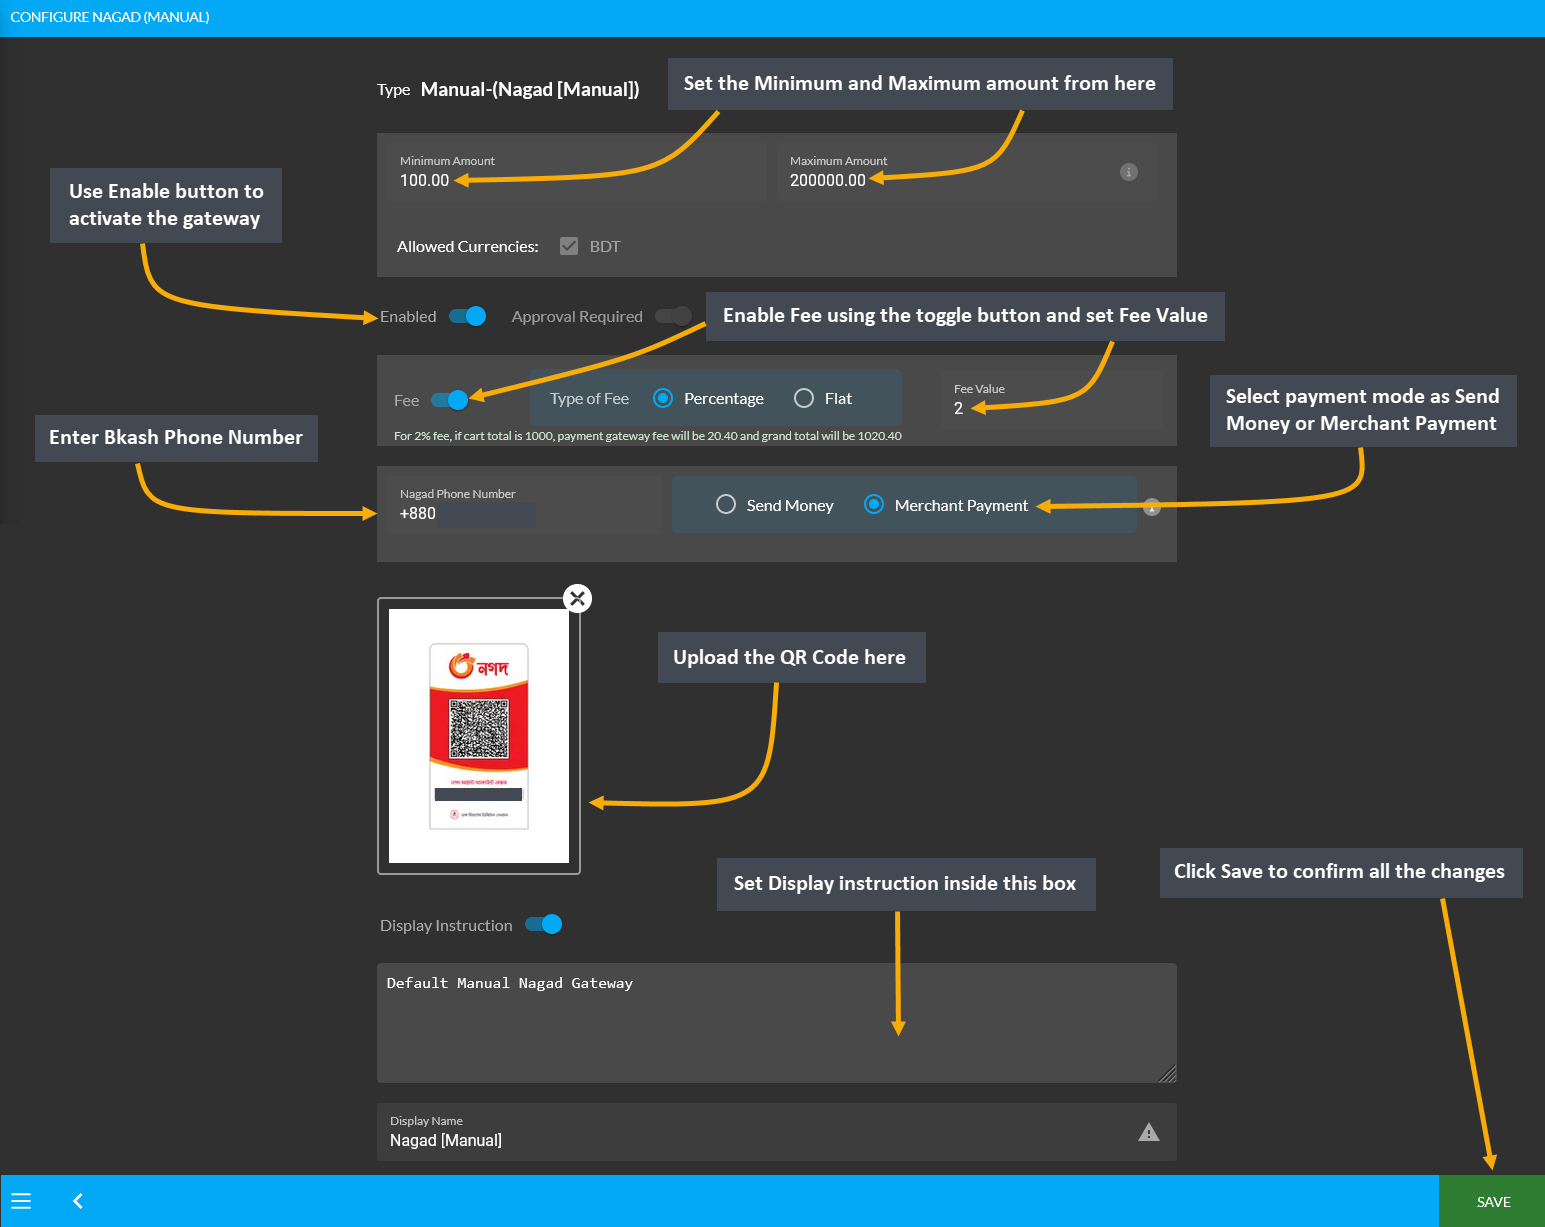
Image 1: Setup Nagad (Manual) with amounts, fees, BKash phone number, payment mode, and QR code.
Ordering on Website with or without Nagad QR Code
The Nagad (Manual) Payment Gateway can be created both with QR Code (which can be downloaded from phone) that can later be uploaded while activating Nagad payment gateway or without QR Code image. Please note that, when paying with Nagad (Manual) for ordering on The Website, this is how the Nagad payment gateway will show with the QR Code and without the QR Code.
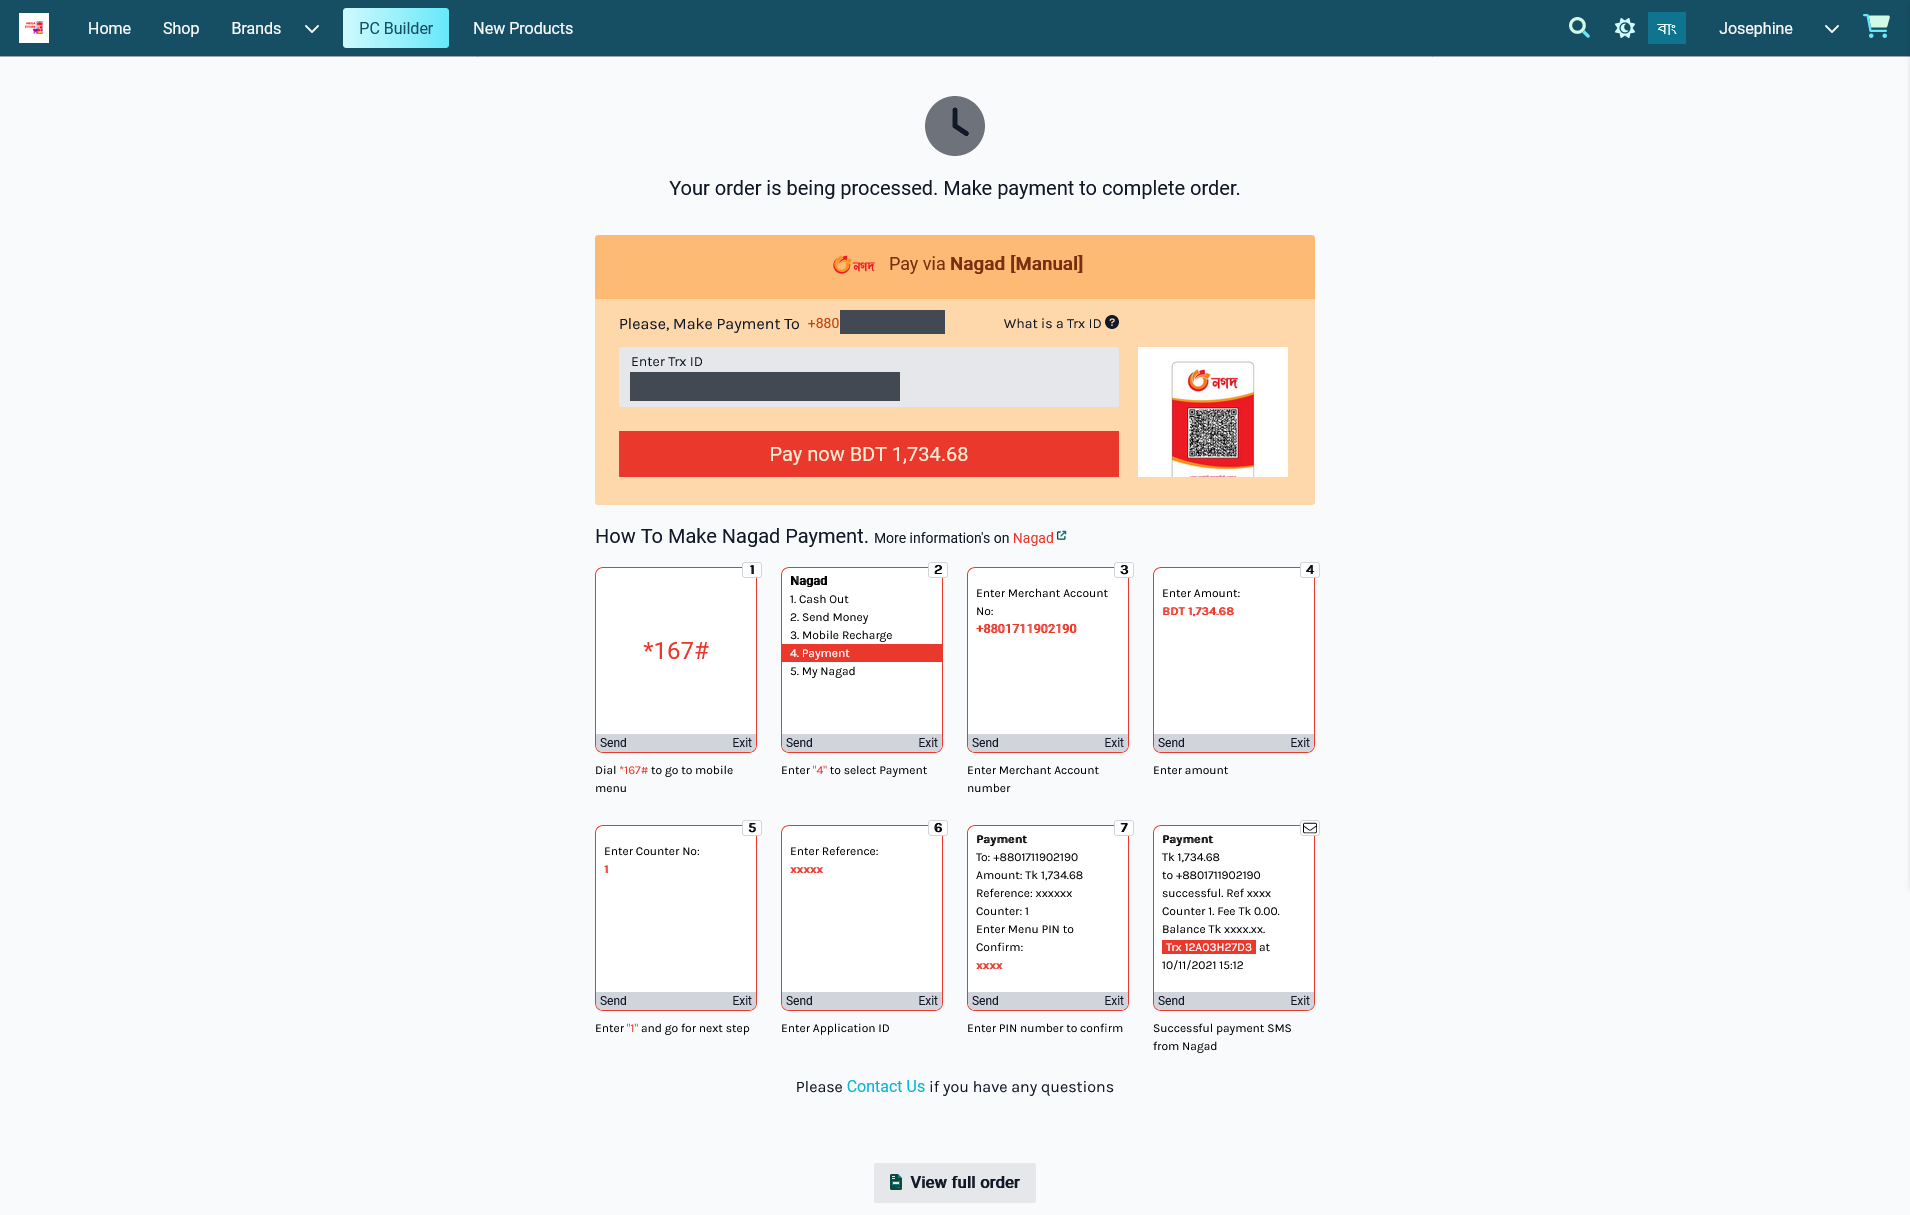
Image 2: Nagad payment with QR Code when placing Order and completing payment on The Website.
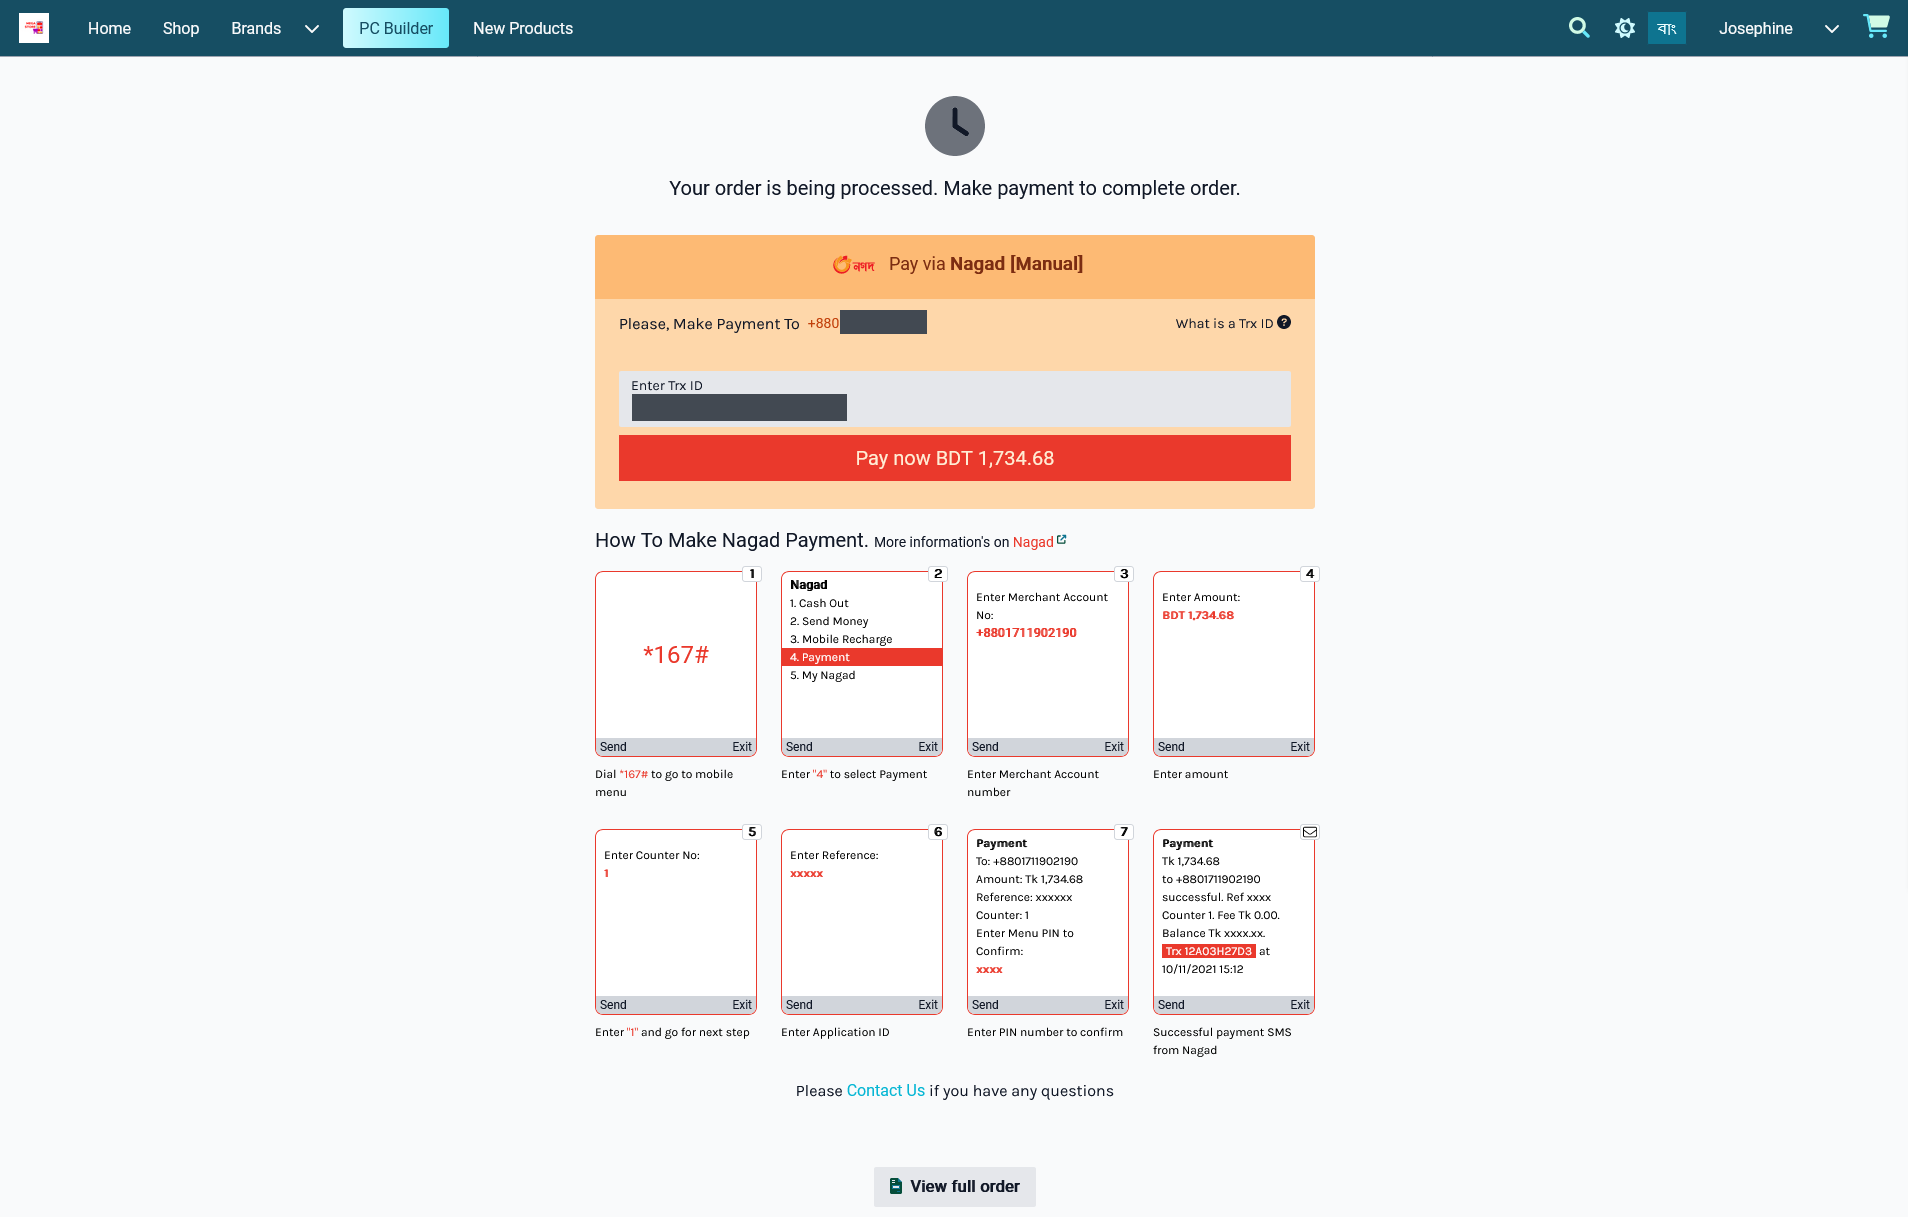
Image 3: Nagad payment without QR Code when placing Order and completing payment on The Website.
Cash On Delivery
To setup the payment gateway for Cash on Delivery, first set a Minimum and Maximum amount for Customer’s payment. Use Enable button to activate the gateway. Then, use the toggle button to enable Fee and set the Fee Value. There is a box to enable and set Display Instruction for Customer’s convenience to pay the cash during order delivery at their address. Click Save to confirm all changes and enable the gateway.
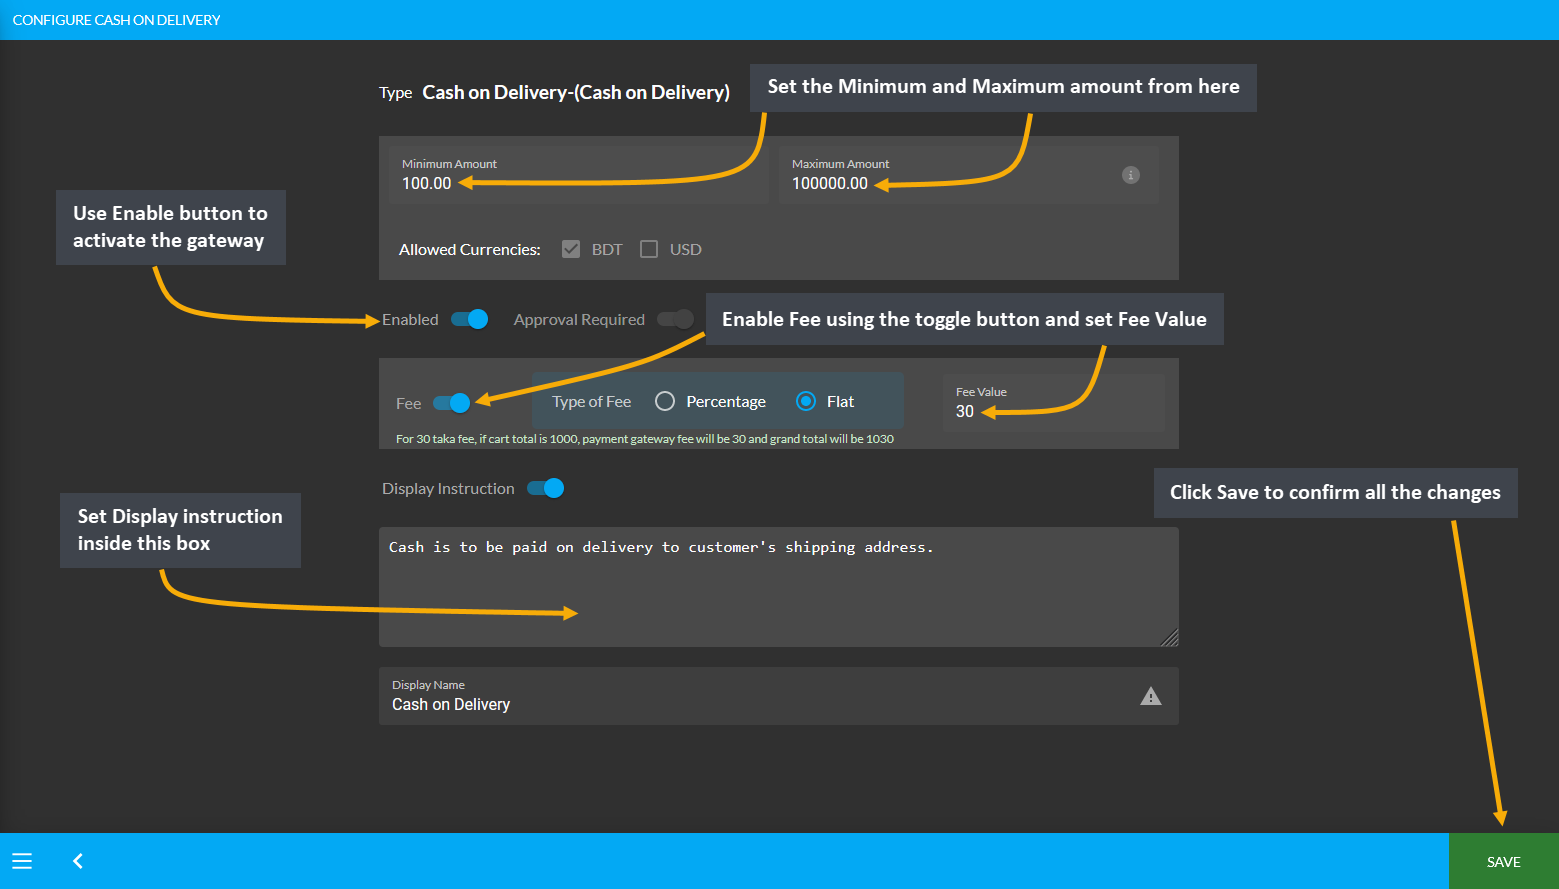
Image 1: Setup the Cash on Delivery with minimum and maximum amounts, fees, and display instructions.
On Credit (Due)
To setup the payment gateway for On Credit (Due), first set a Minimum and Maximum amount for Customer’s payment. Use Enable button to activate the gateway. Then, use the toggle button to enable Fee and set the Fee Value if any additional fee needs to be charged. Click Save to confirm all changes and enable the gateway.
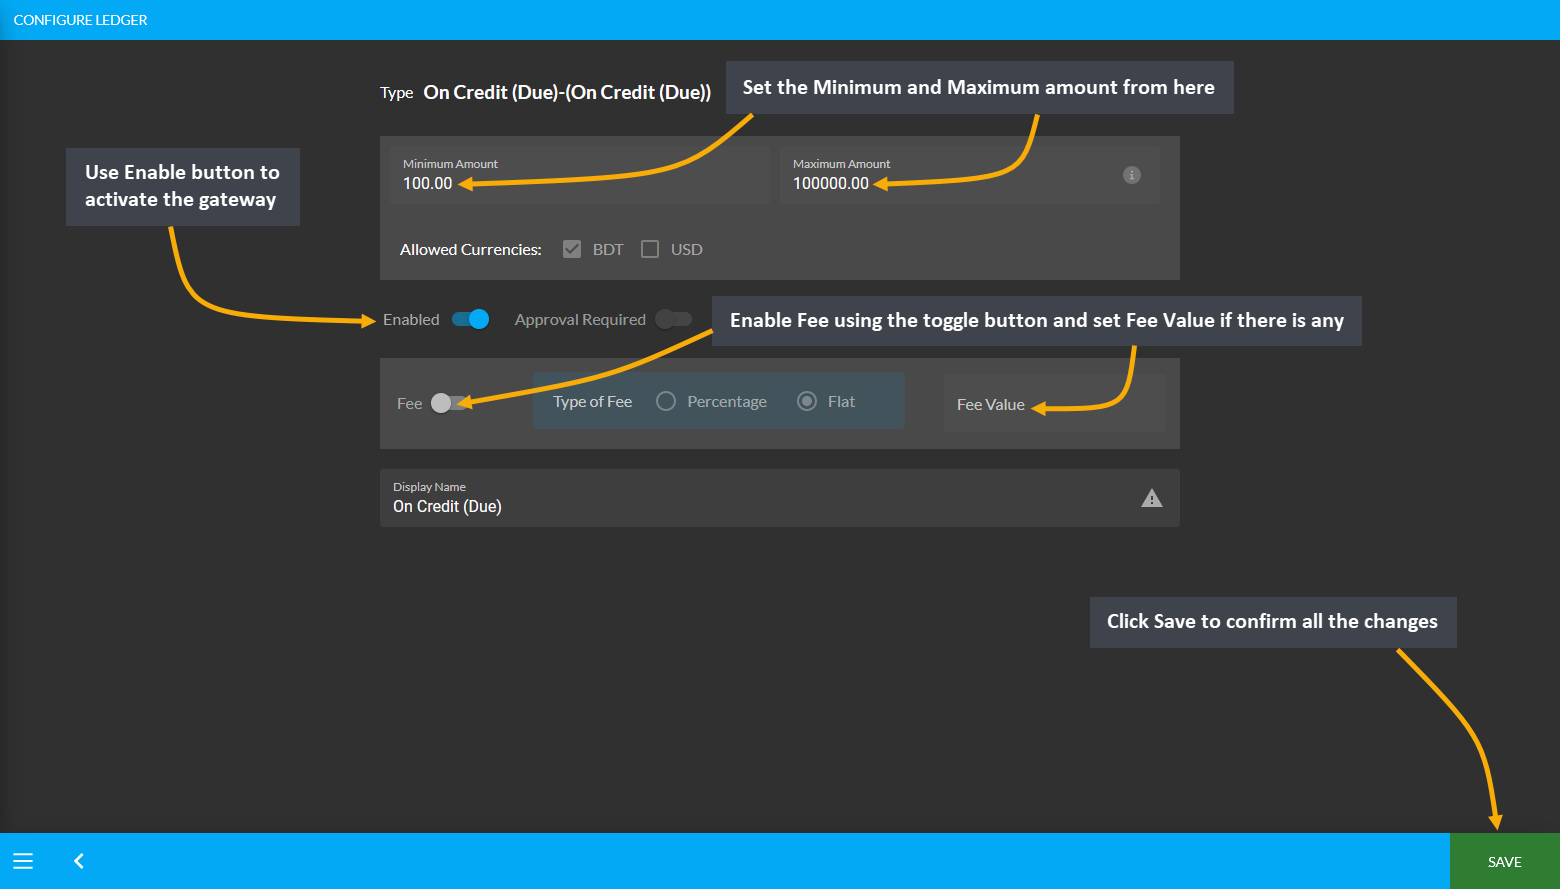
Image 1: Setup the On Credit (Due) with minimum and maximum amounts and fees if applicable.
Credit Card, Cash, or Cheque
To setup the payment gateway for Credit Card, Cash, or Cheque, first set a Minimum and Maximum amount for Customer’s payment. Use Enable button to activate the gateway. Set the Display Instruction for these gateways. Click Save to confirm all changes and enable the gateway.
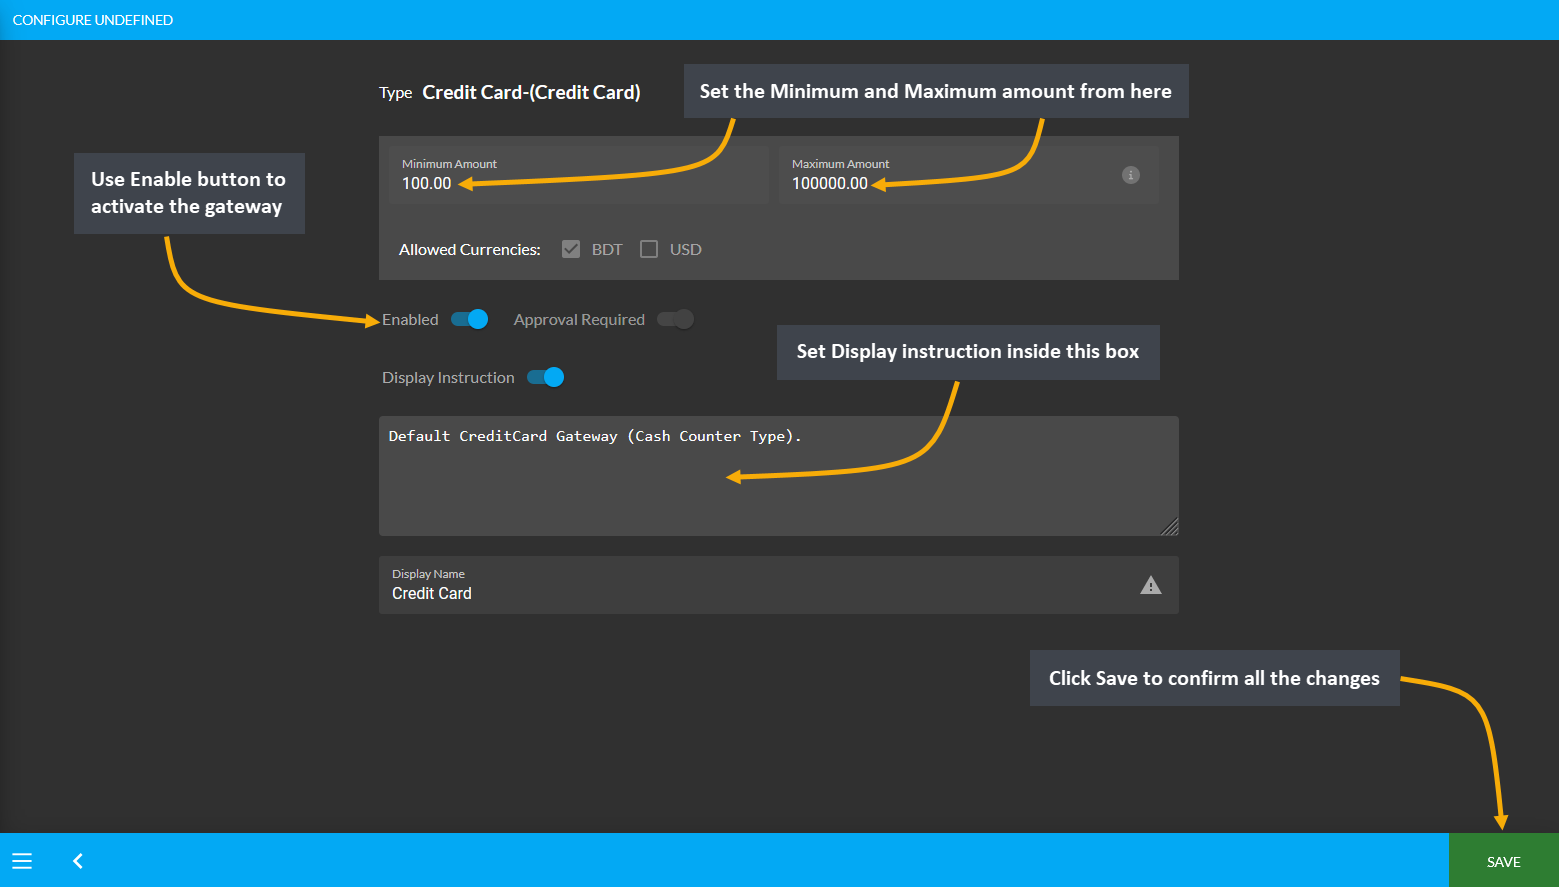
Image 1: Setup the Credit Card with minimum and maximum amounts and display instructions.

Image 2: Setup the Cash with minimum and maximum amounts and display instructions.
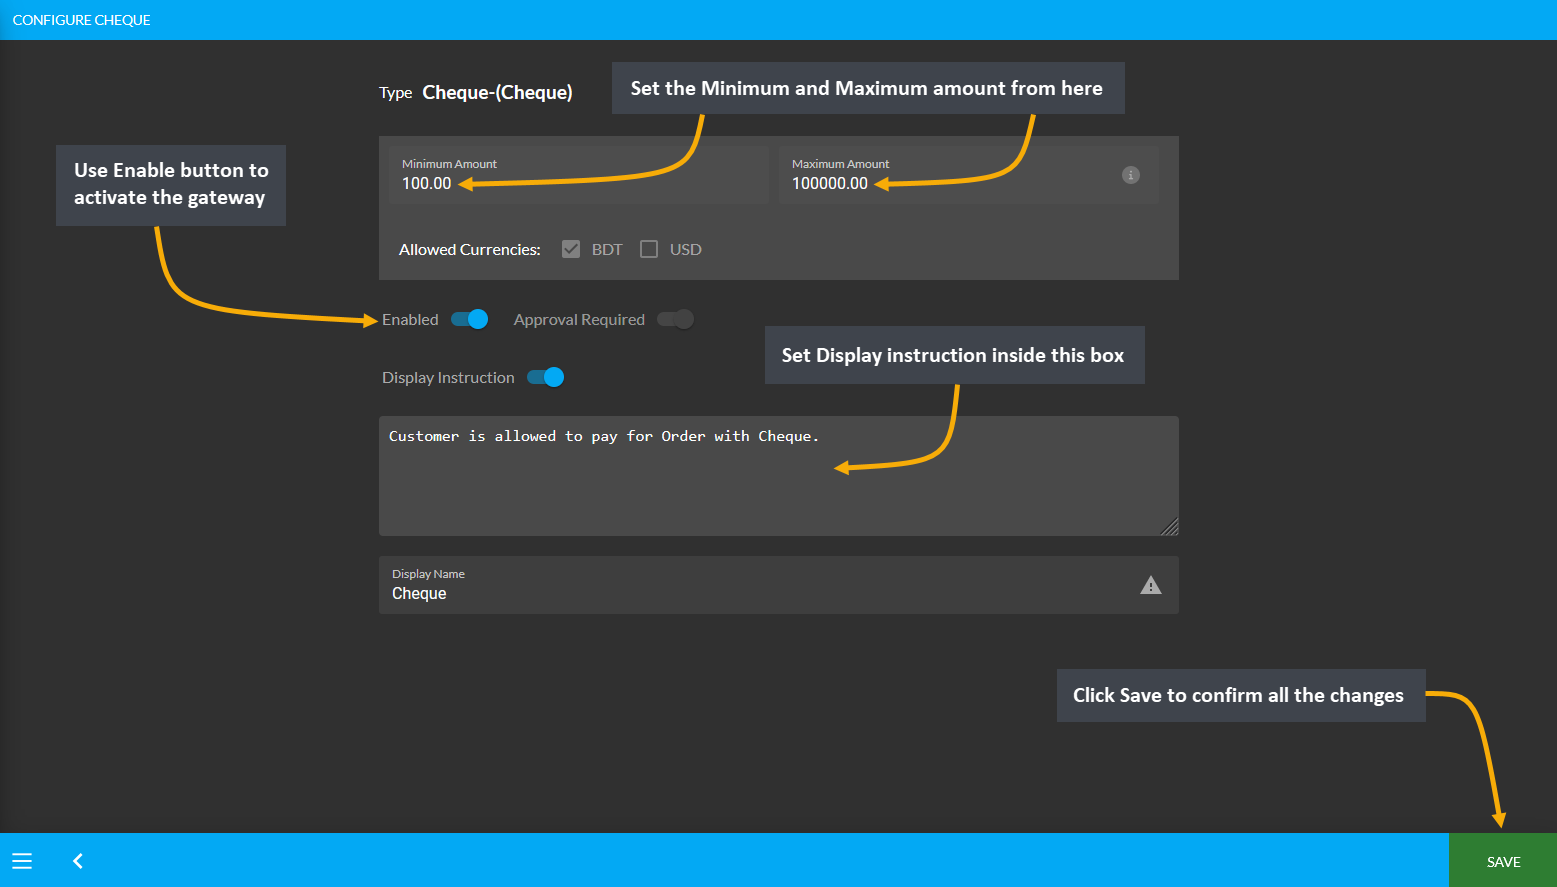
Image 3: Setup the Cheque with minimum and maximum amounts and display instructions.
BKash
To setup the payment gateway for BKash, first setup a Minimum and Maximum amount for Customer’s payment. Use Enable button to activate the gateway. Then, use the toggle button to enable Fee and set the Fee Value. In the section of Test API Keys, copy-paste the test API Keys from BKash to allow Customers to pay for their Products.
Providing these API keys will allow to verify them with BKash automatically. Finally, there is a box to set Display Instruction as shown in the example screenshot. Click the Save button after all the steps are completed.
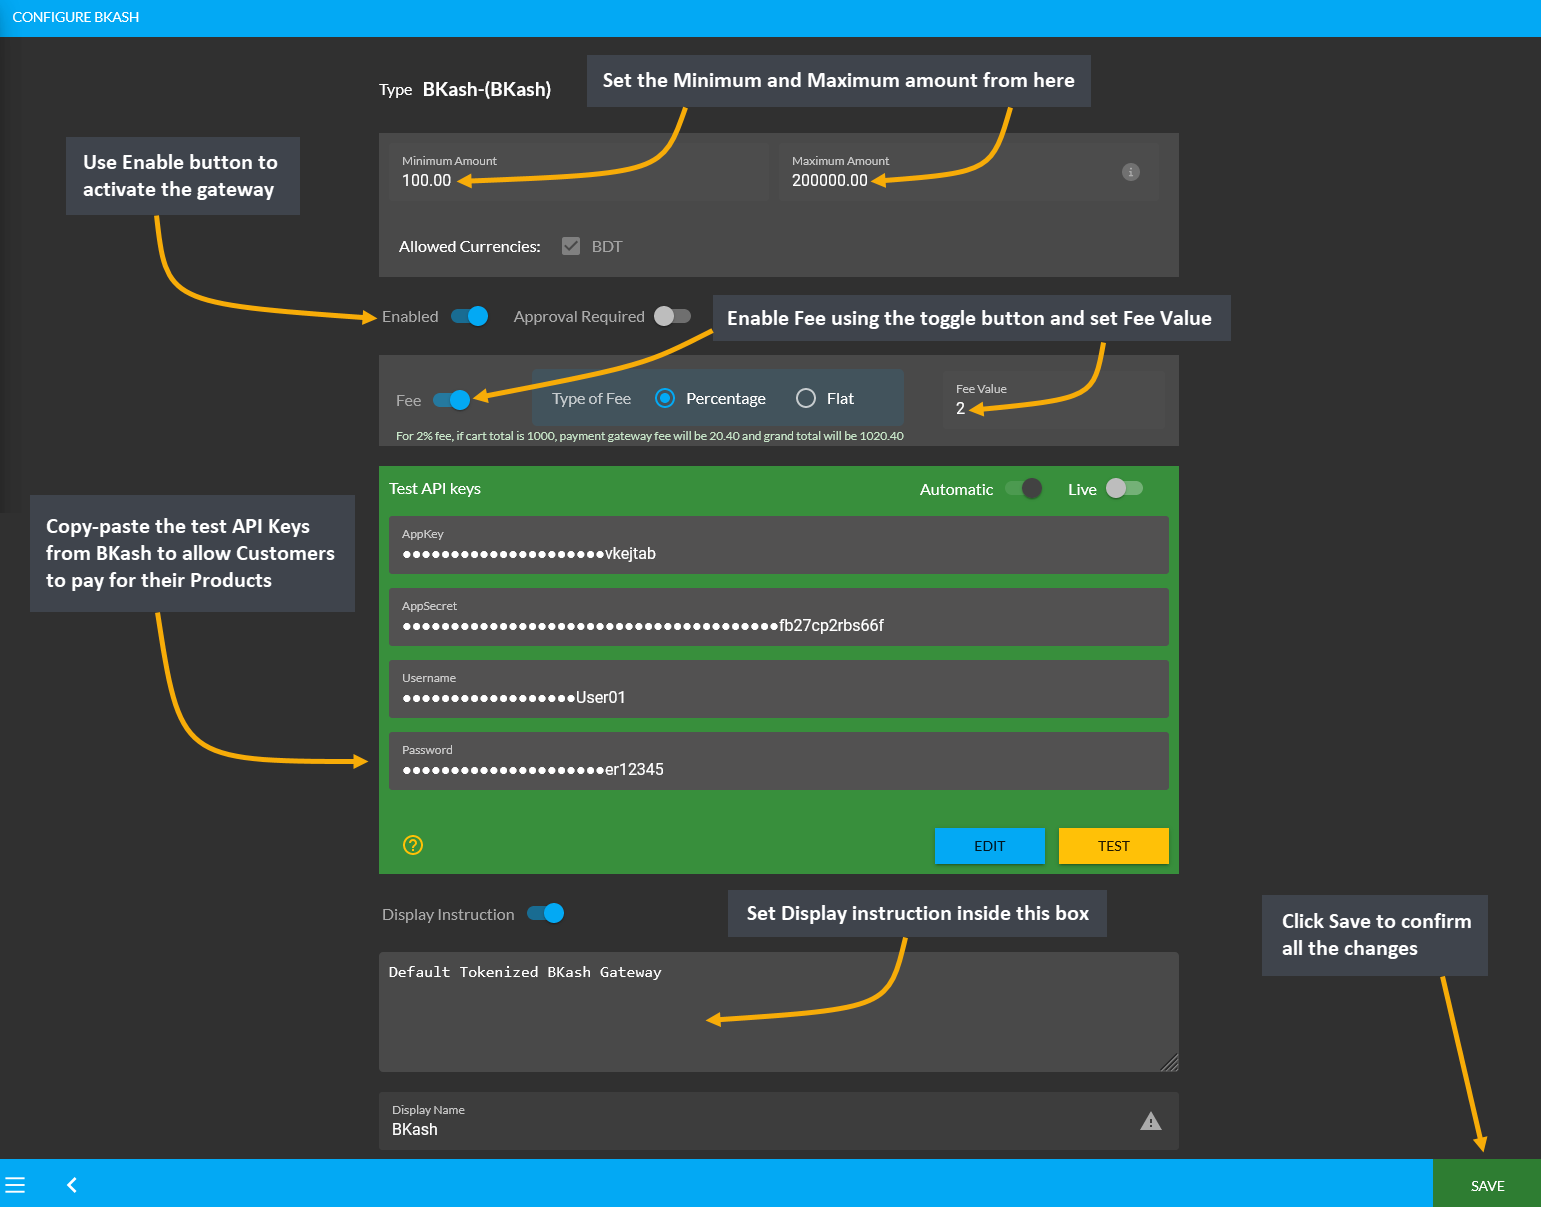
Image 1: Setup the BKash with minimum and maximum amounts, fees, Test API keys, and display instructions.
Nagad
To setup the payment gateway for Nagad, first setup a Minimum and Maximum amount for Customer’s payment. Use Enable button to activate the gateway. Then, use the toggle button to enable Fee and set the Fee Value. In the section of Test API Keys, copy-paste the test API Keys from Nagad to allow Customers to pay for their Products.
Providing these API keys will allow to verify them with Nagad automatically. Finally, there is a box to set Display Instruction as shown in the example screenshot. Click the Save button after all the steps are completed.
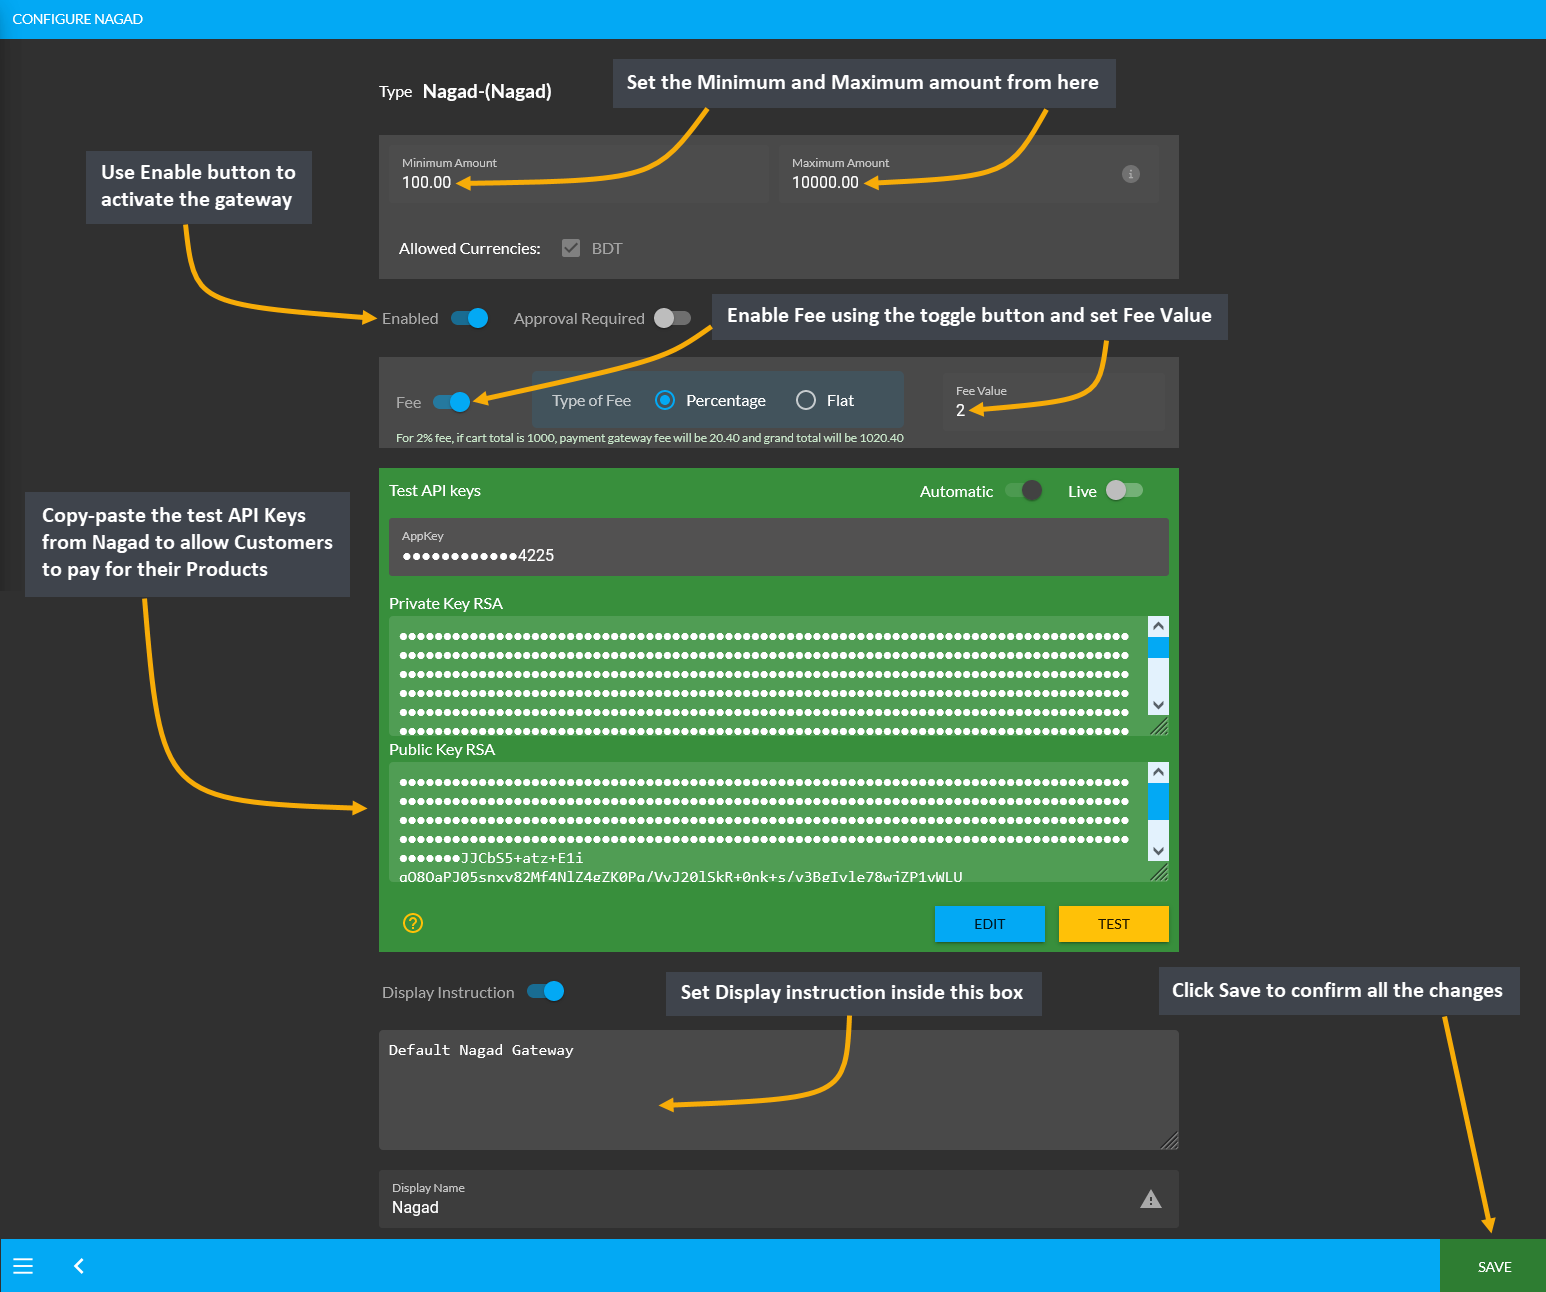
Image 1: Setup the Nagad with minimum and maximum amounts, fees, Test API keys, and display instructions.
PortWallet
Configure the payment gateway for PortWallet by setting a Minimum and Maximum amount for the Customer’s payment. Use Enable button to activate the gateway. Then, use the toggle button to enable Fee and set Fee Value. Within the Test API Keys section, copy-paste test API Keys from PortWallet to allow Customers to pay for their Products. Also, select the monthly EMI that will be applicable.
Providing these API keys will allow to verify them with PortWallet automatically. Finally, there is a box to set the Display Instruction as shown in the example screenshot. Click the Save button after all steps are done.
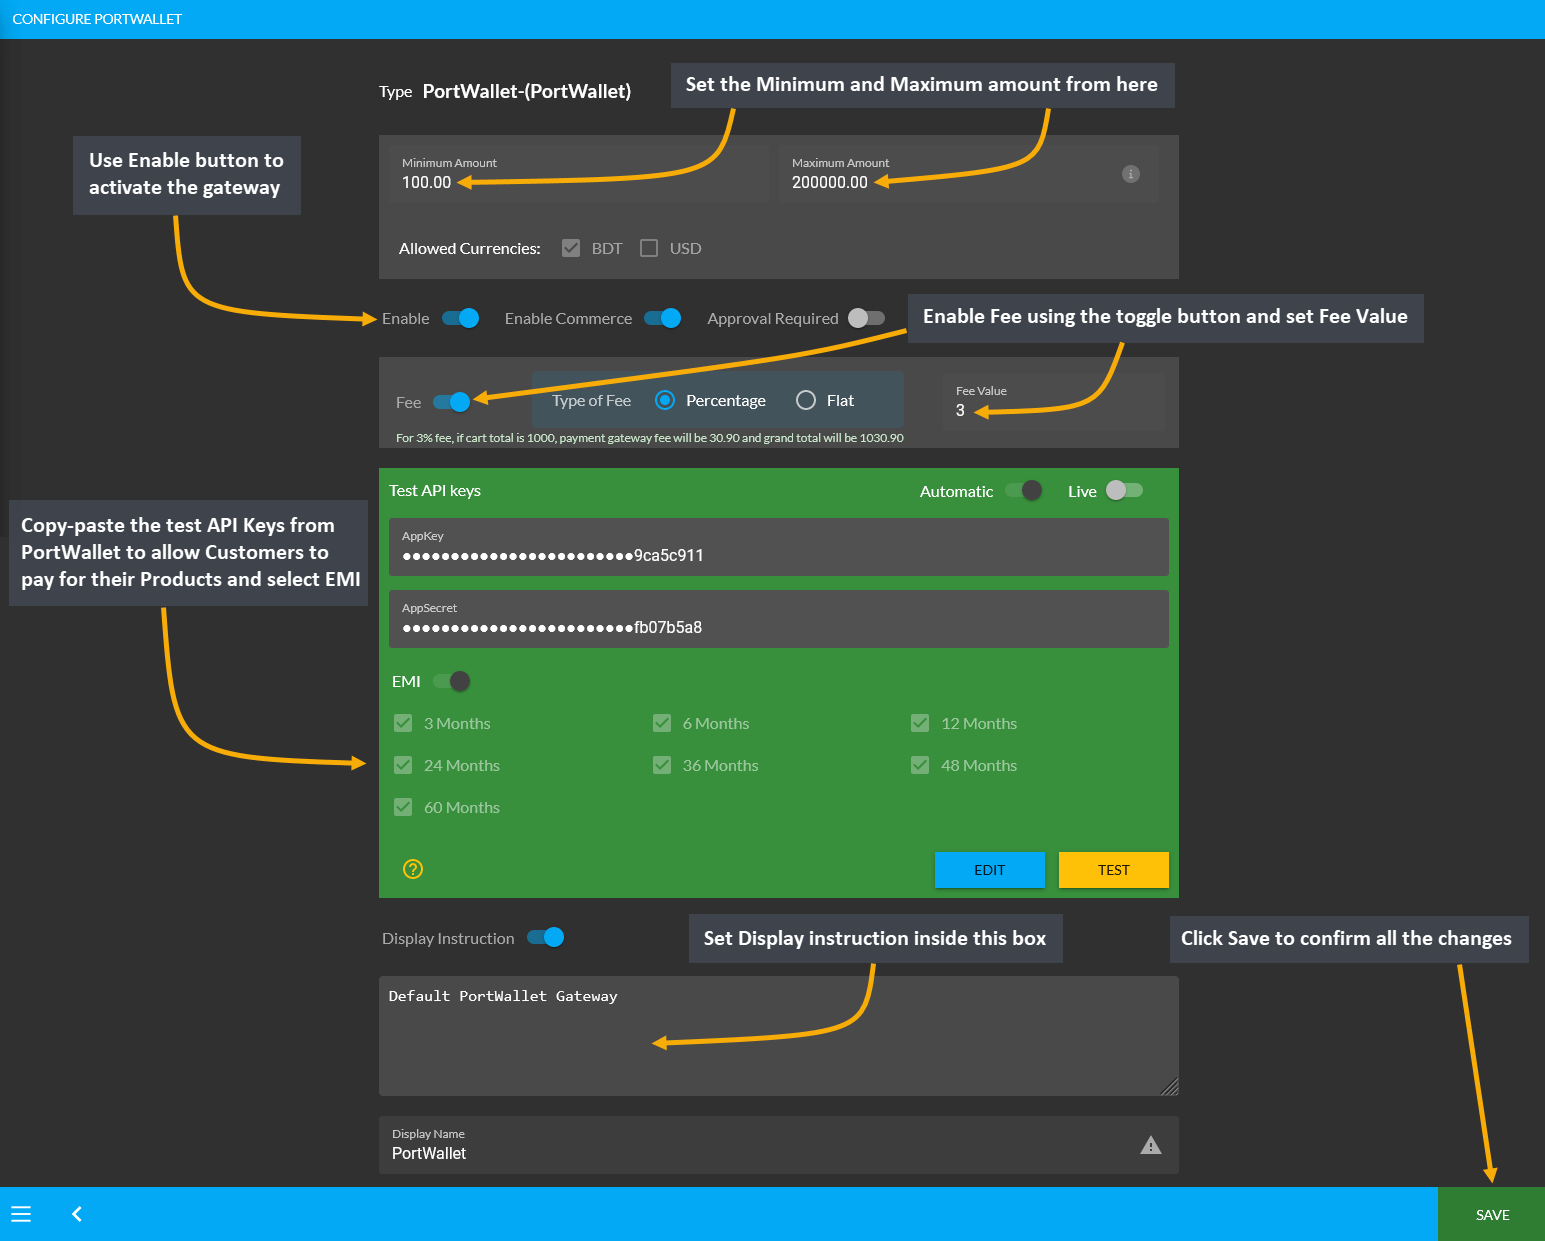
Image 1: Setup PortWallet with minimum and maximum amounts, fees, Test API keys, and display instructions.
SSLCommerz
Configure the payment gateway for SSLCommerz by setting up a Minimum and Maximum amount for Customer’s payment. Use Enable button to activate the gateway. Then, use the toggle button to enable Fee and set Fee Value. Within the Test API Keys section, copy-paste test API Keys from SSLCommerz to allow Customers to pay for their Products. Also, select the monthly EMI that will be applicable.
Providing these API keys will allow to verify them with SSLCommerz automatically. Finally, there is a box to set the Display Instruction as shown in the example screenshot. Click the Save button after all steps are done.
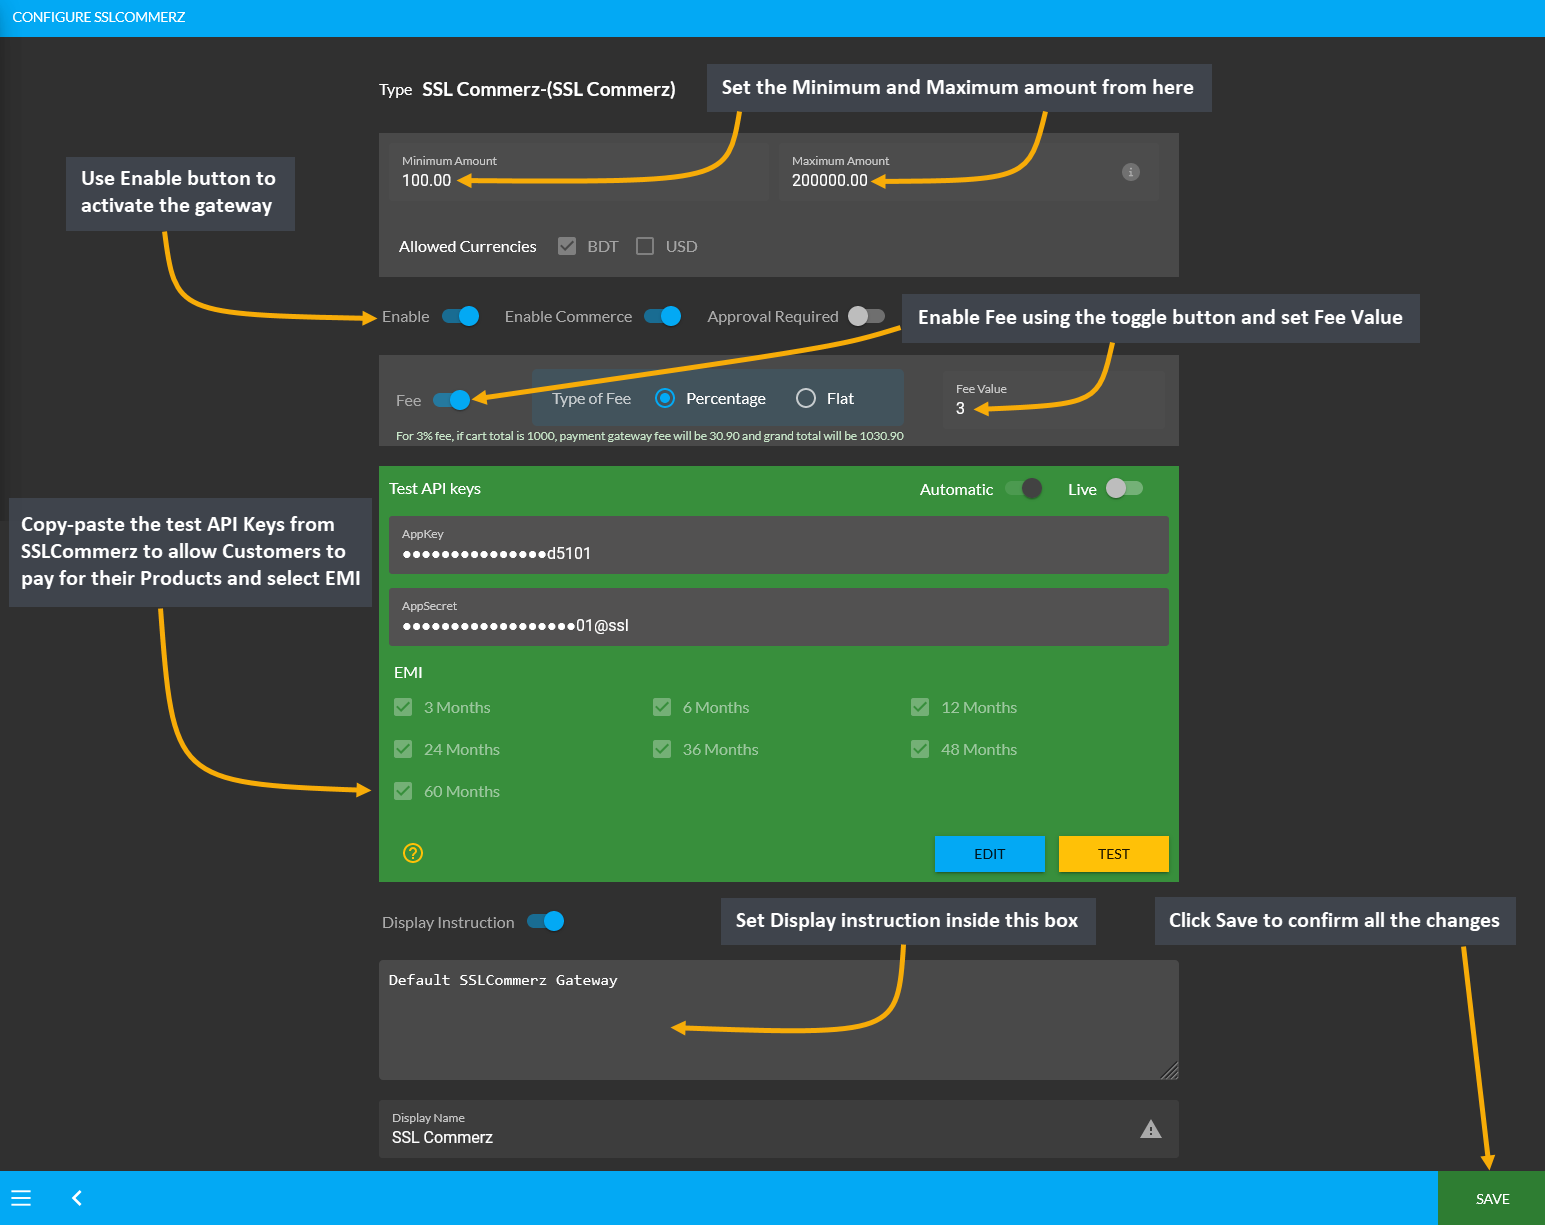
Image 1: Setup SSLCommerz with minimum and maximum amounts, fees, Test API keys, and display instructions.
7.3 - Shipping Gateway Settings
Learn more about the configuration of Shipping Gateways and how to activate them for Order deliveries.
Shipping Gateway Settings
Configure Shipping Gateways from Gateways under All Settings tab. The Shipping Gateways that are embedded in the system include RedX, FedEx, UPS, PaperFly, Aramex, In Store Pickup, Direct, DHL, Now, Ecourier, GoGoBangla, and Koopon. Shop Owners can activate or enable them whenever needed.
Click the Configure button beside each Shipping Gateway to configure them. If any gateway is enabled, they will be marked as green, if any gateway is disabled, they will be marked as red. So, the Shop Owner can enable and disable any shipping gateway to use for shipping Orders via any of these gateways on The Website.
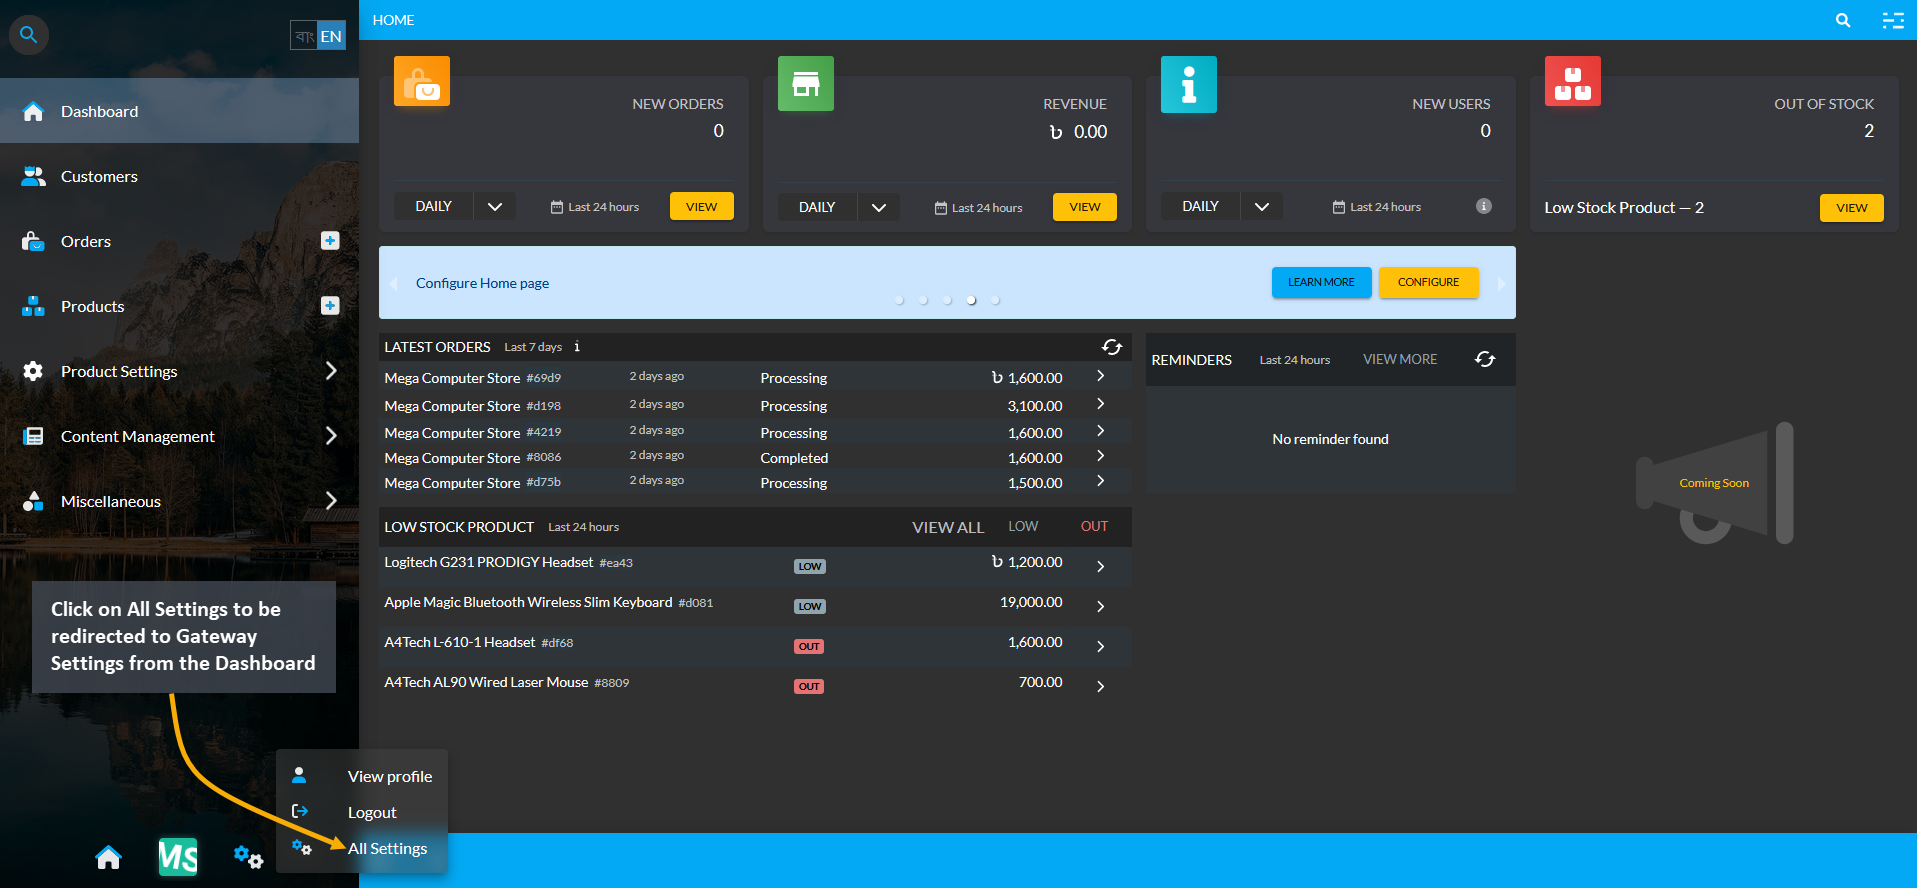
Image 1: Click on All Settings to be redirected to Gateway Settings from the Dashboard.
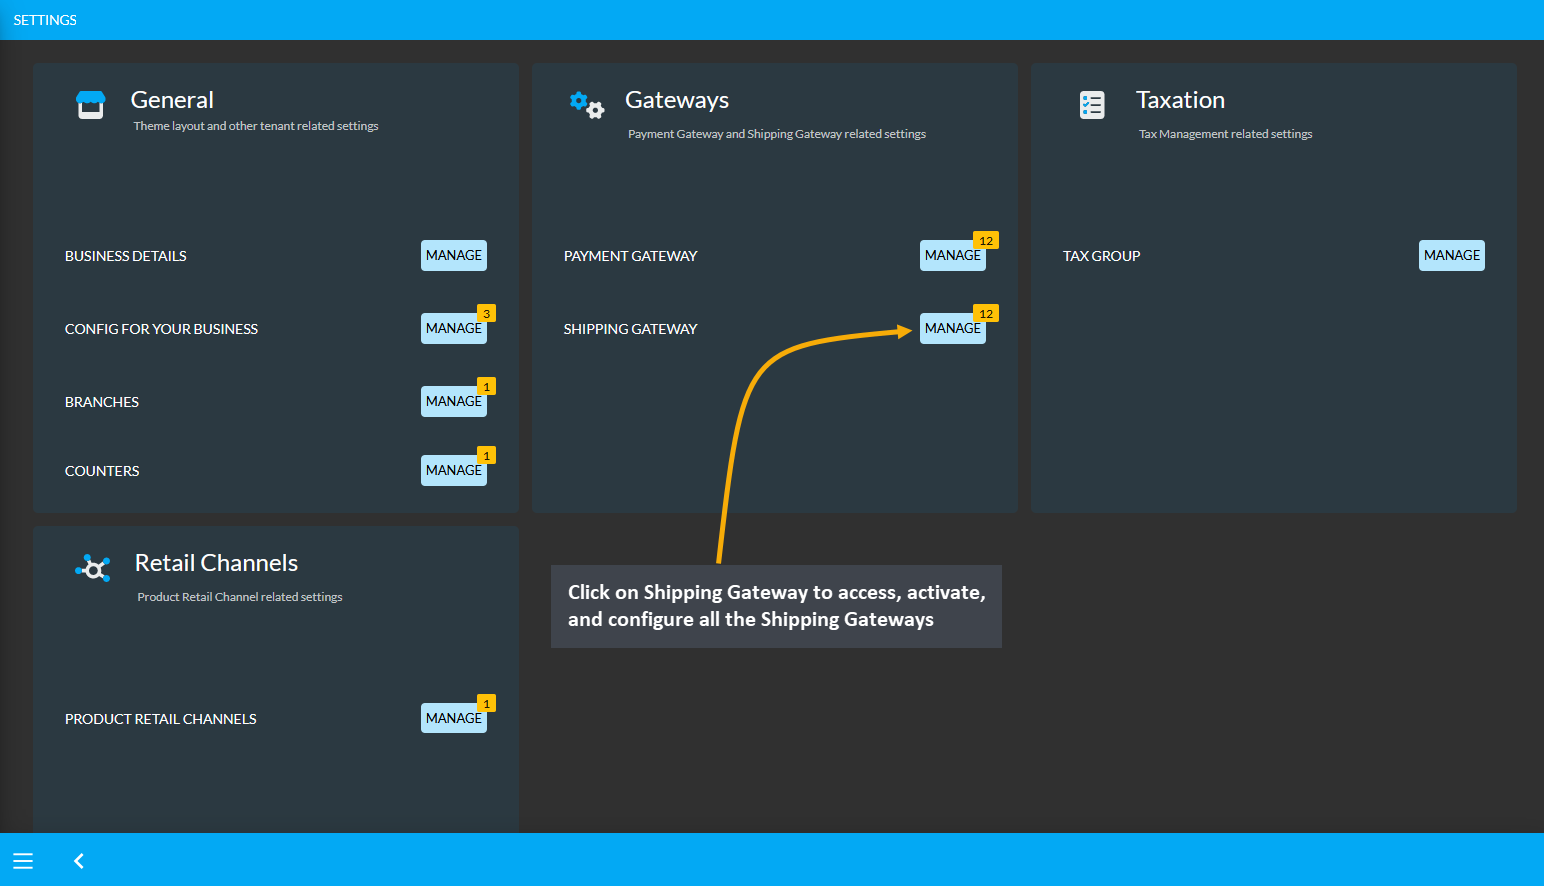
Image 2: Click on Shipping Gateway to access, activate, and configure all the Shipping Gateways.
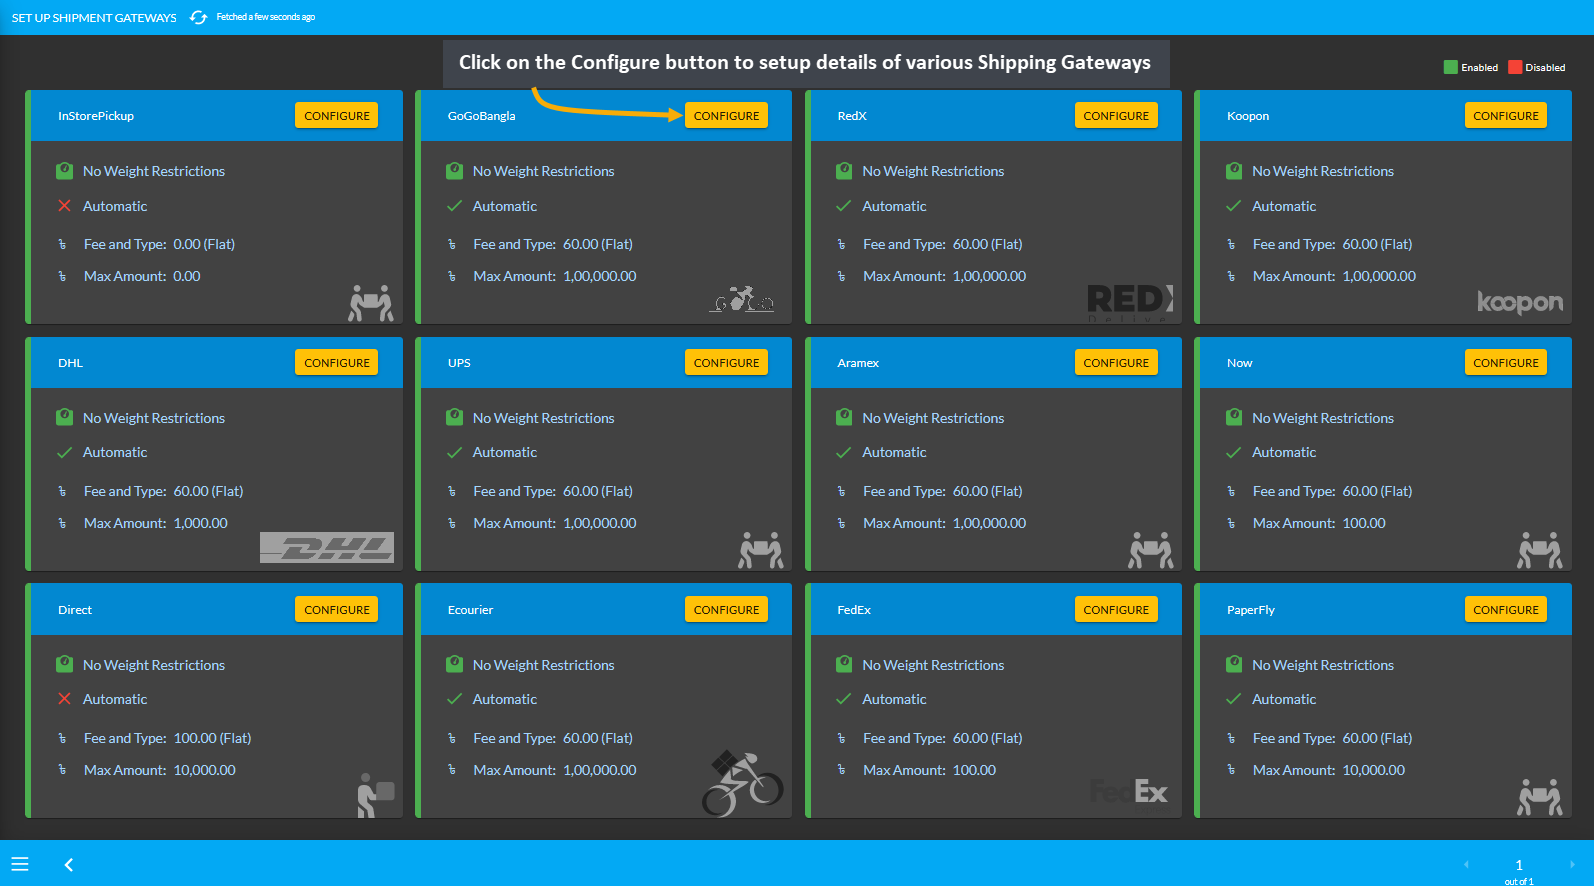
Image 3: Click on the Configure button to setup and activate various Shipment Gateways from the list.
For the configuration of Shipping Gateways, there are options to set gateway name, maximum value of shipping, fees, minimum weight, maximum weight, and display instruction etc. There are separate toggle buttons to enable or disable gateways for Admin Panel and Website. One shipping gateway configuration will vary from another.
New Feature: Website Enabled
Enable Website is a new feature that was introduced on the Admin Panel. Enabling or disabling this option will display or not display the selected Shipping Gateway on The Website for Customers.

Image 1: Enable or disable Website feature to display Shipping Gateway on The Website for Customers.
If the Enable Website option is disabled, then the selected Shipping Gateways will show as disabled like RedX, Koopon, Now, Aramex, GoGoBangla, PaperFly, and Ecourier as shown in the example.
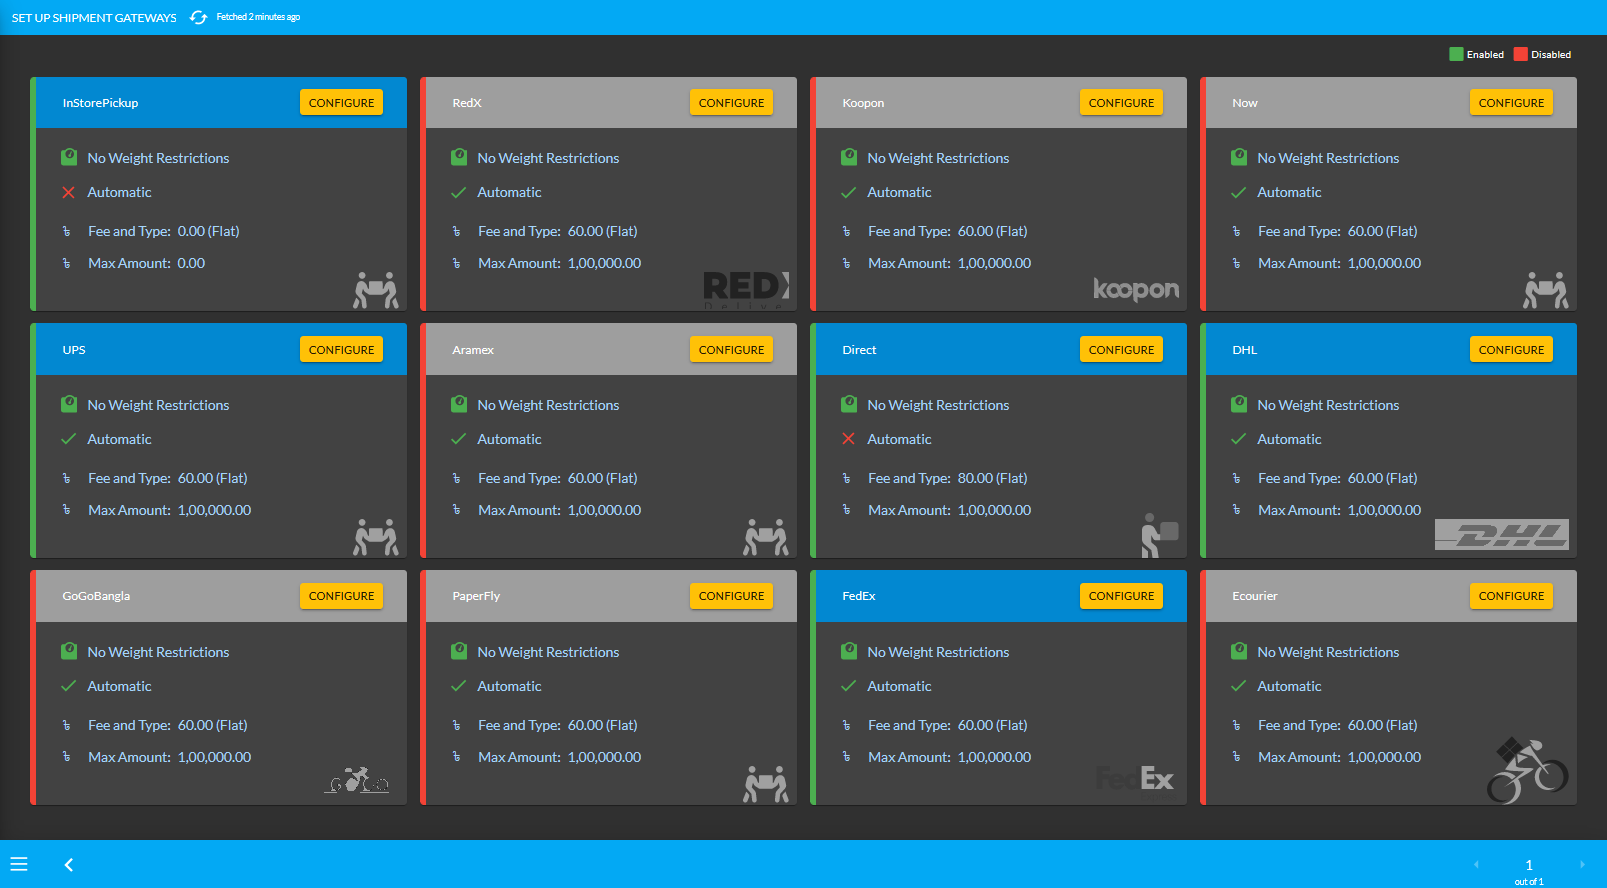
Image 2: Website feature disabled for few Shipping Gateways that will not display on The Website.
With the Enable Website option turned on from the Admin Panel for selected Shipping Gateways, the Website will display those Shipping Gateways when Customer checks out from their Cart to place a New Order as shown.
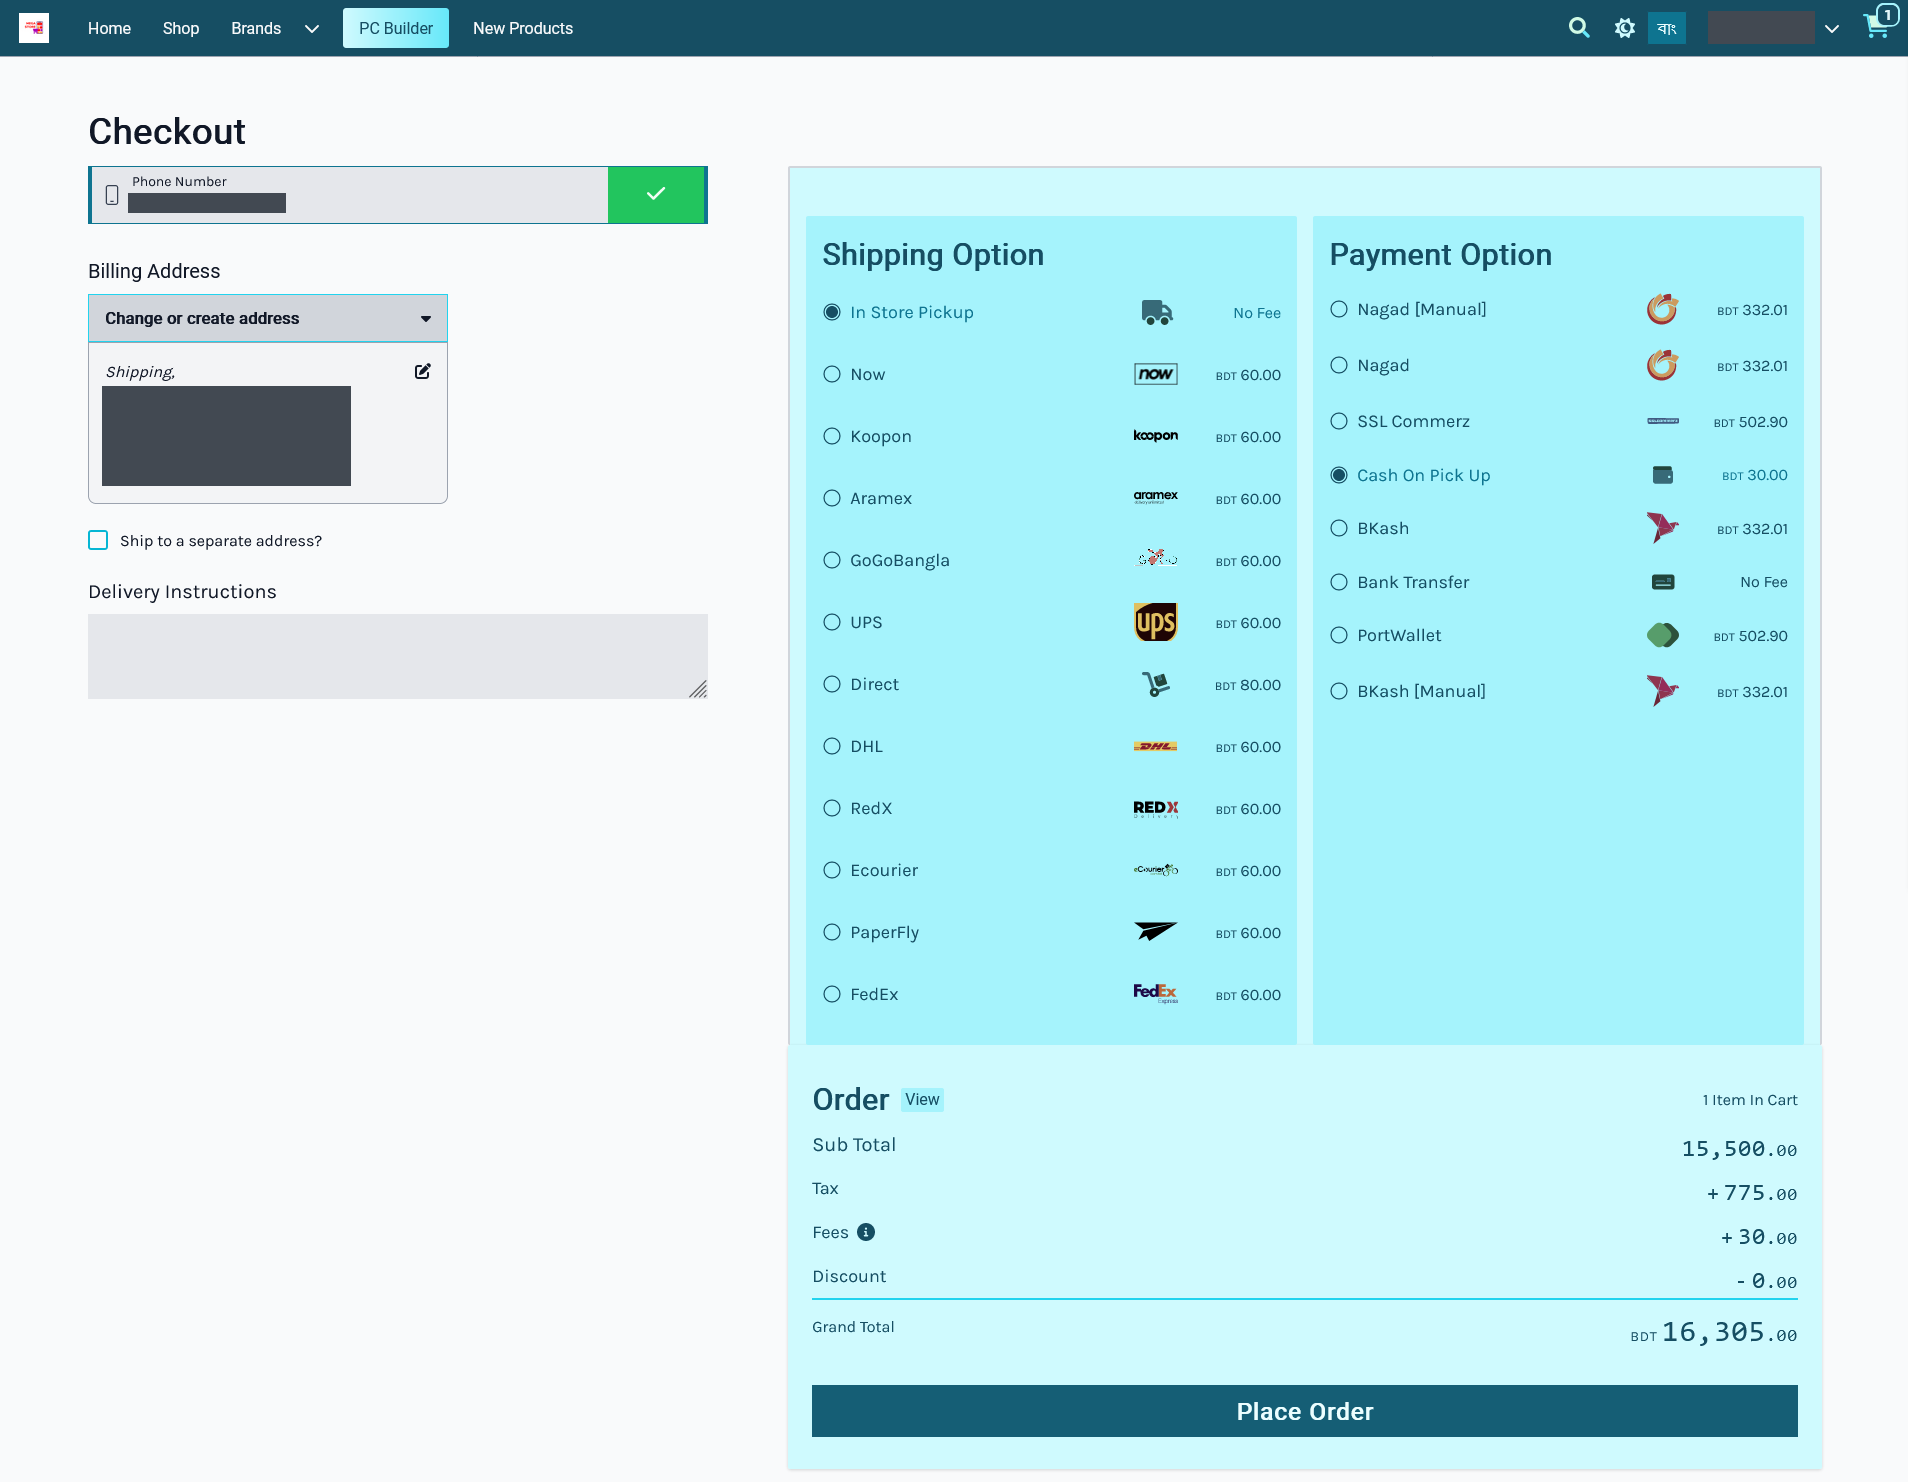
Image 3: Website feature disabled for few Shipping Gateways that will not display on The Website.
Conversely, with the Enable Website option turned off from the Admin Panel for selected Shipping Gateways, the Website will not display those Shipping Gateways when Customer checks out from their Cart to place New Order.
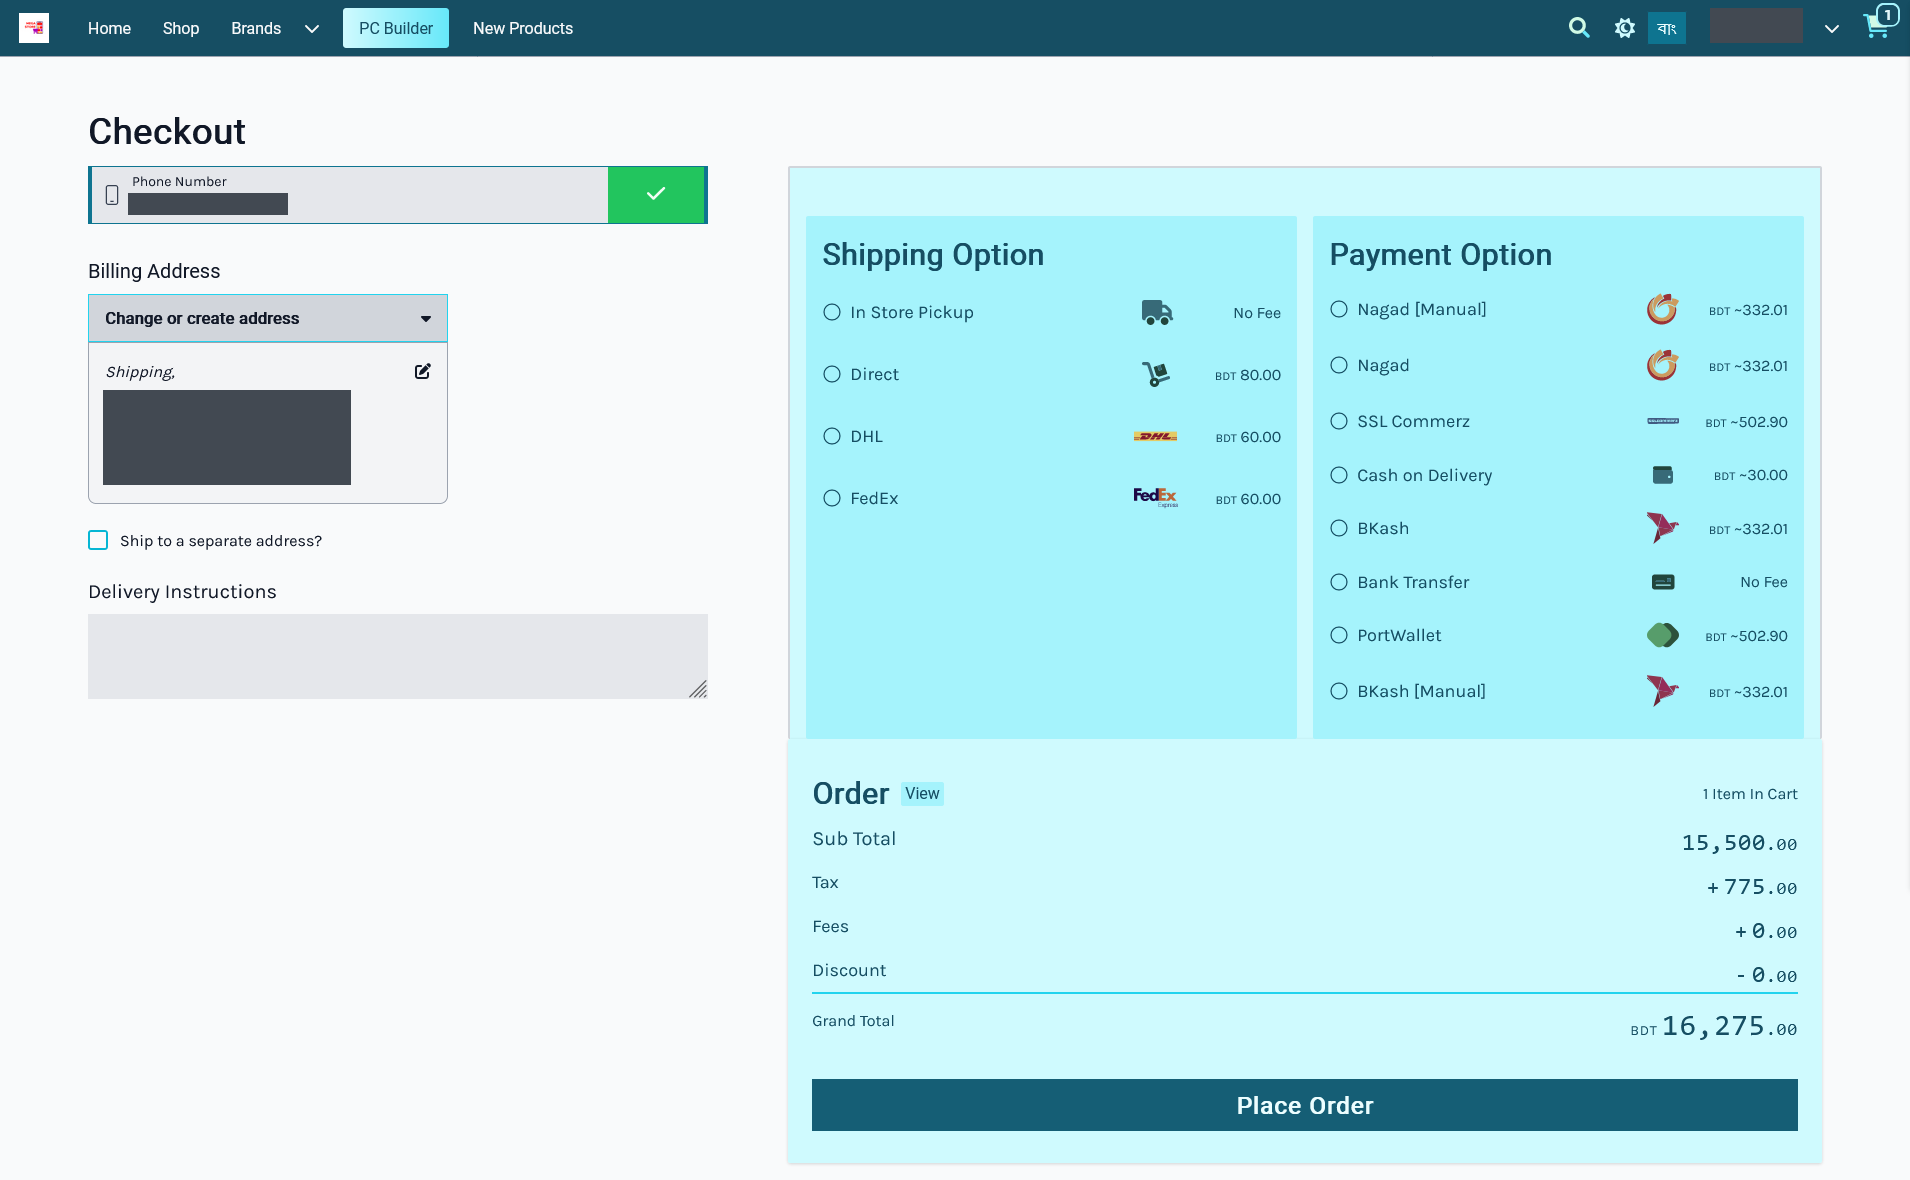
Image 4: The Website will not display selected Payment Gateways when Enabled Commerce is turned off.
Manual Shipping Gateways
Shipping Carriers like RedX, FedEx, UPS, PaperFly, Aramex, Ecourier, DHL, Now, Koopon, and GoGoBangla are all Manual Shipping Gateways that needs to be manually managed or handled. Every single time the Shop Owner makes a shipment with any manual Shipping Gateway, they need to add the shipment manually. If there is any update for these manual Gateways, then it has to be done manually too, because there is no automation. Our team is working on gateway automation with a selected few carriers. So, stay tuned for more information.
Configure Manual Shipping Gateways by setting a Maximum Value of shipping. Use the Enable and Website features to activate the Shipping gateway on Admin Panel and on Website. Then, use the toggle button to enable Fee and set the Fee Value as Flat or Weight based. After that, set Minimum Weight and Maximum Weight in Grams. Finally, use toggle button to enable Display Instruction and there will be a box to set the Display Instruction. Click Save to confirm all changes and use these Manual Shipping Gateways.
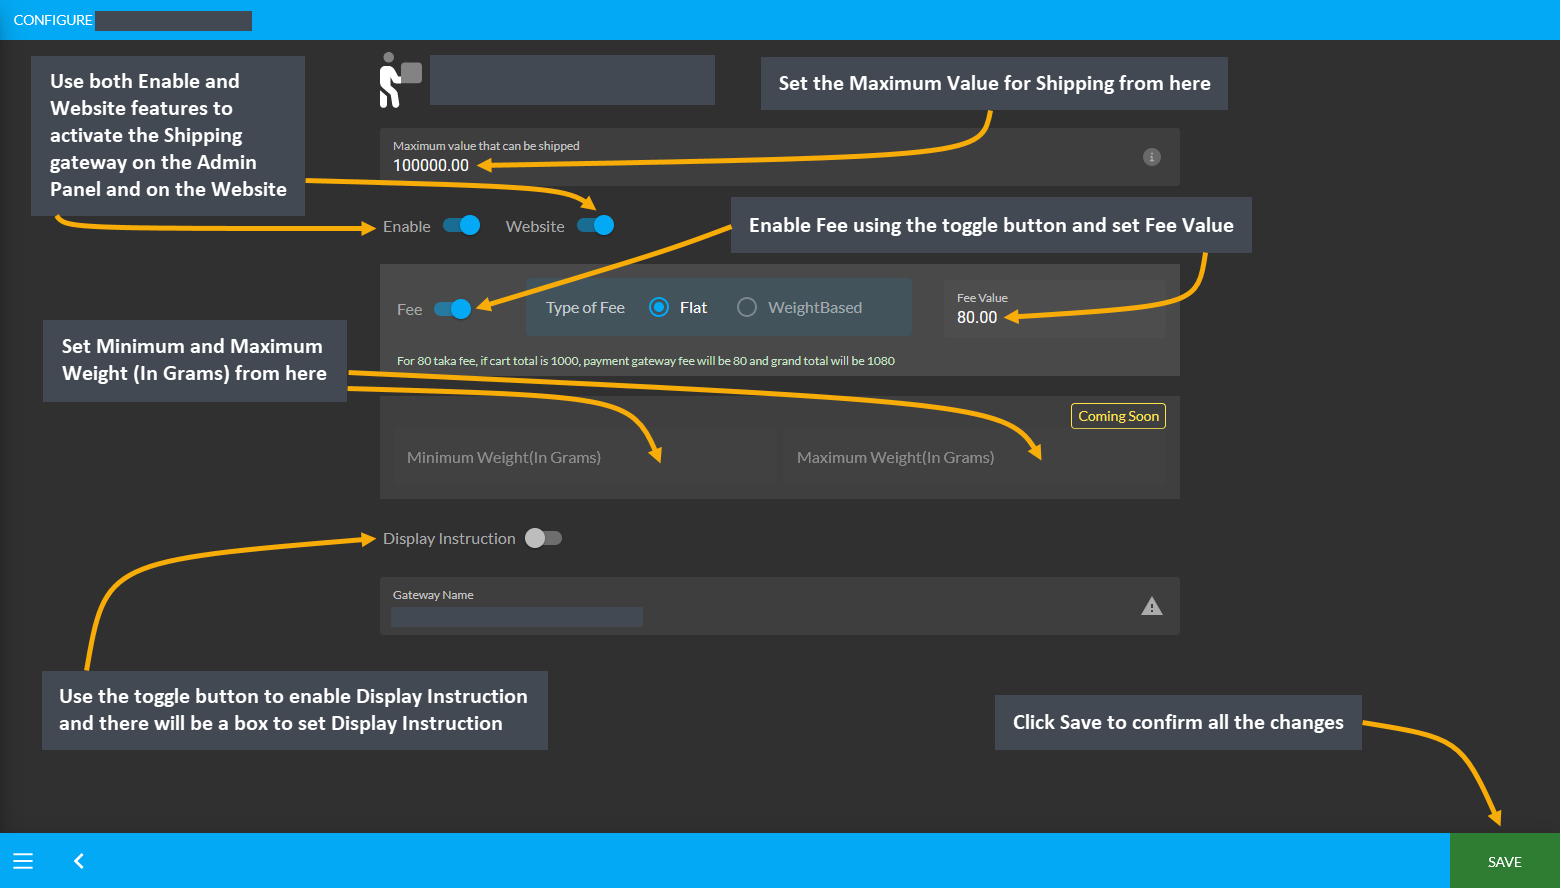
In Store Pickup
Configure the shipping gateway for In Store Pickup by setting a Maximum Value of shipping. Then, use the Enable and Website features to activate the Shipping gateway on the Admin Panel and on the Website. After that, use the toggle button to enable Fee and set the Fee Value as Flat or Weight based. The next step is to set Minimum Weight and Maximum Weight in Grams for Products. Finally, use the toggle button to enable Display Instruction and there will be a box to set Display Instruction. Click Save to confirm all changes and use the Shipping gateway.
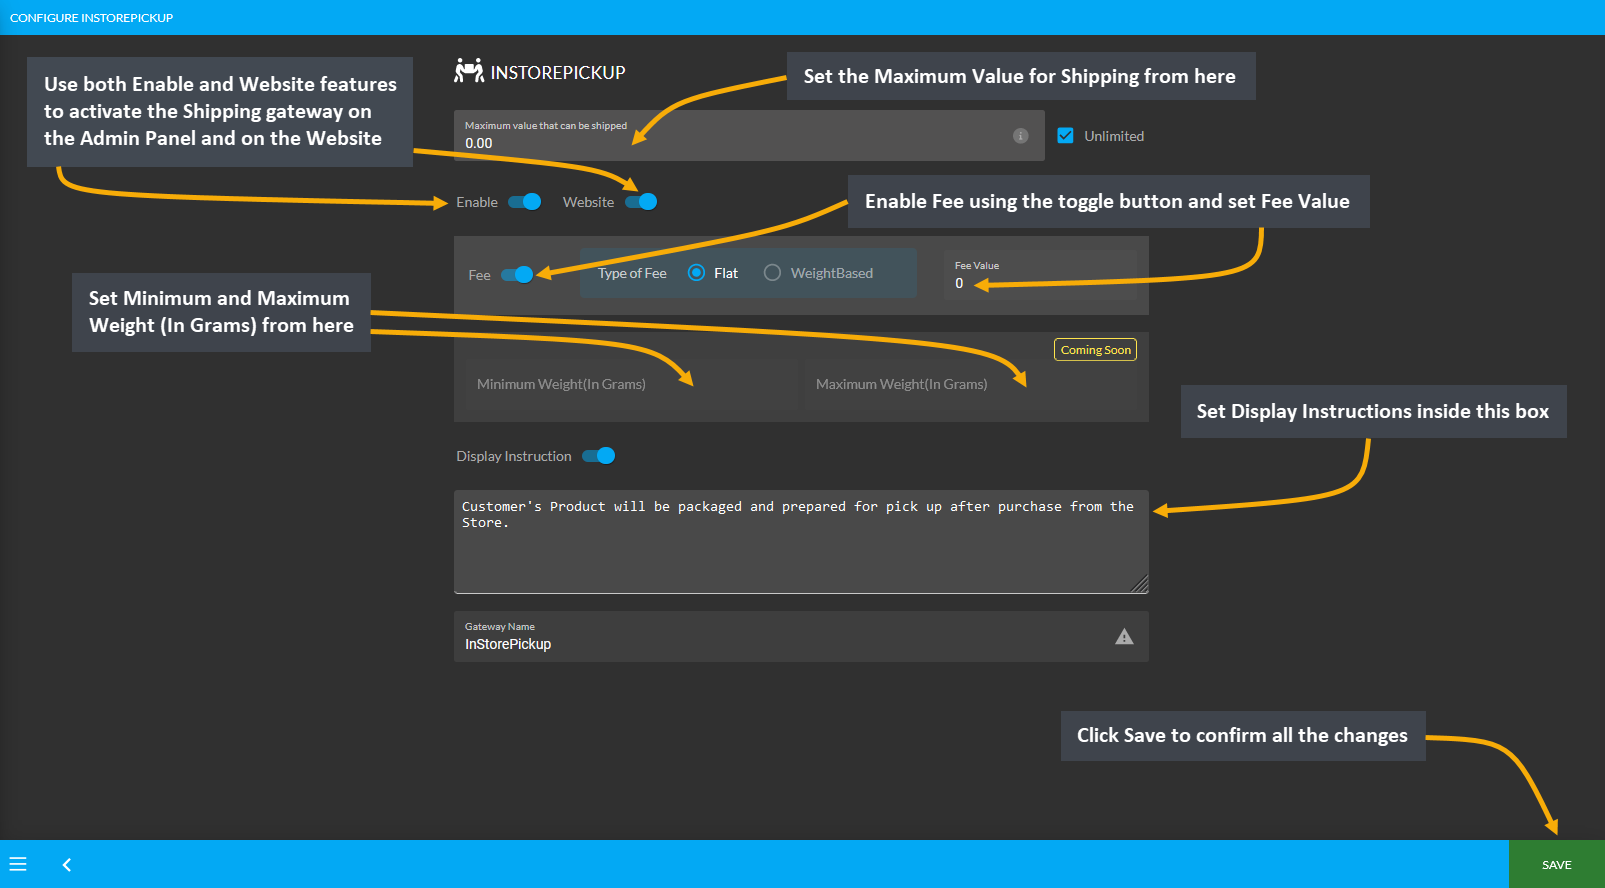
Direct
Configure the shipping gateway for Direct by setting a Maximum Value of shipping. Then, use the Enable feature to activate the Shipping gateway on the Admin Panel and on the Website. After that, use the toggle button to enable Fee and set the Fee Value as Flat or Weight based. The next step is to set Minimum Weight and Maximum Weight in Grams for Products. Finally, use the toggle button to enable Display Instruction and there will be a box to set Display Instruction. Click Save to confirm all changes and use the Shipping gateway.
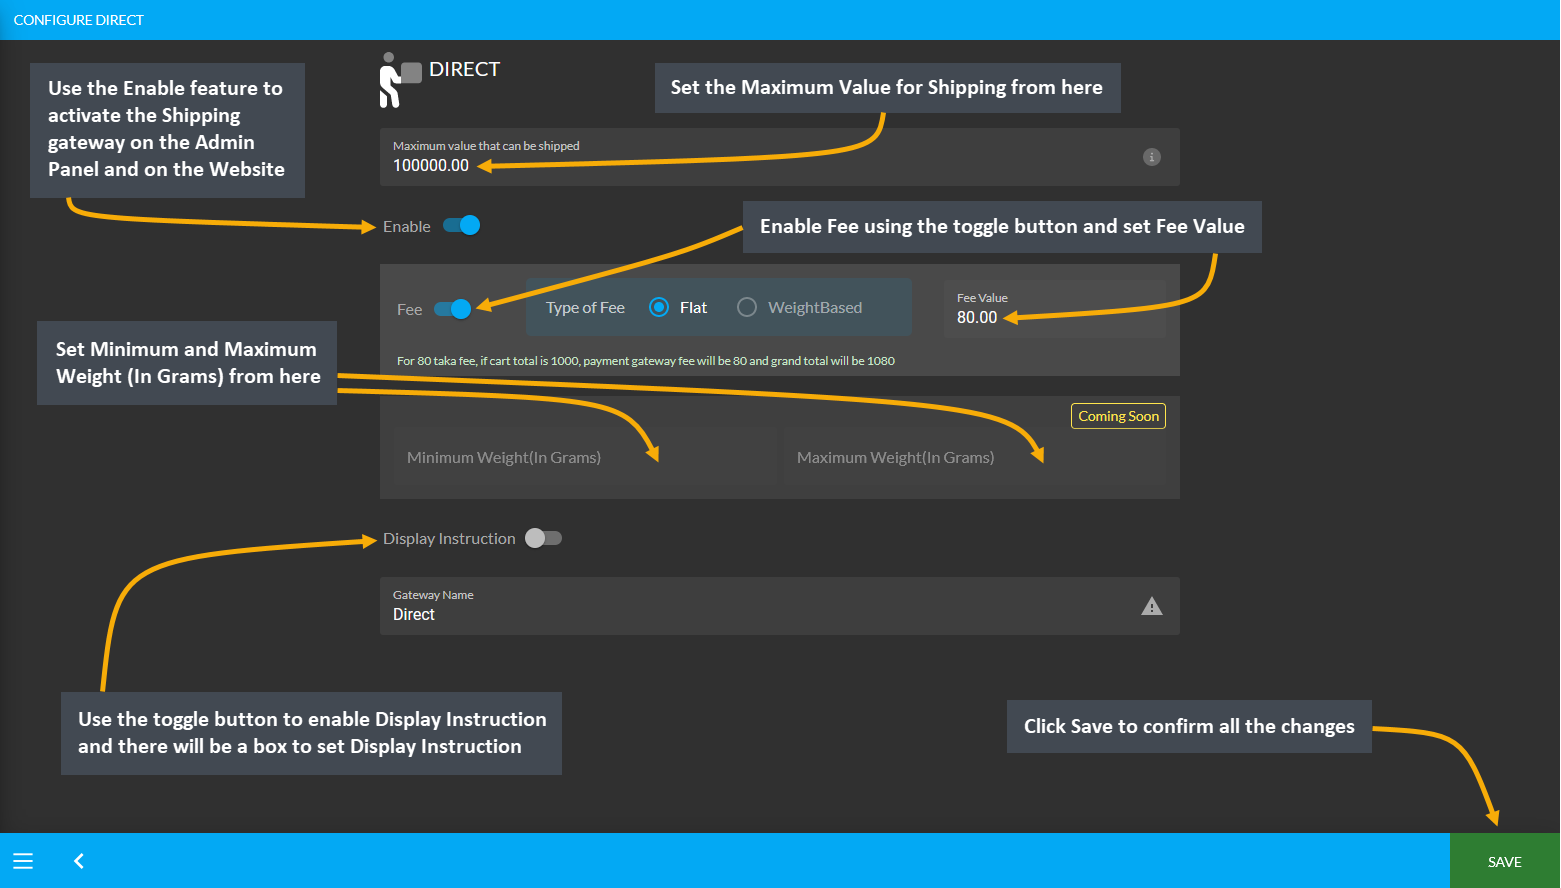
7.4 - Taxation Settings
Learn more about the configuration of Taxation based on pre-fined Tax Groups.
Taxation Settings
Configure Tax Group from Taxation under All Settings tab. Click the Manage button beside Tax Group to view the pre-defined Global Tax Groups. Within the Tax Management related settings, this list of Predefined Global Tax Groups in already created based on specific Product Categories with name, description, HS Code, and Tax Rules.
As the Admin, the Shop Owner can also create their own Tax Groups for any Product Category will show under My Tax Groups. They will also include the name, description, HS Code, and Tax Rules based on a Category.
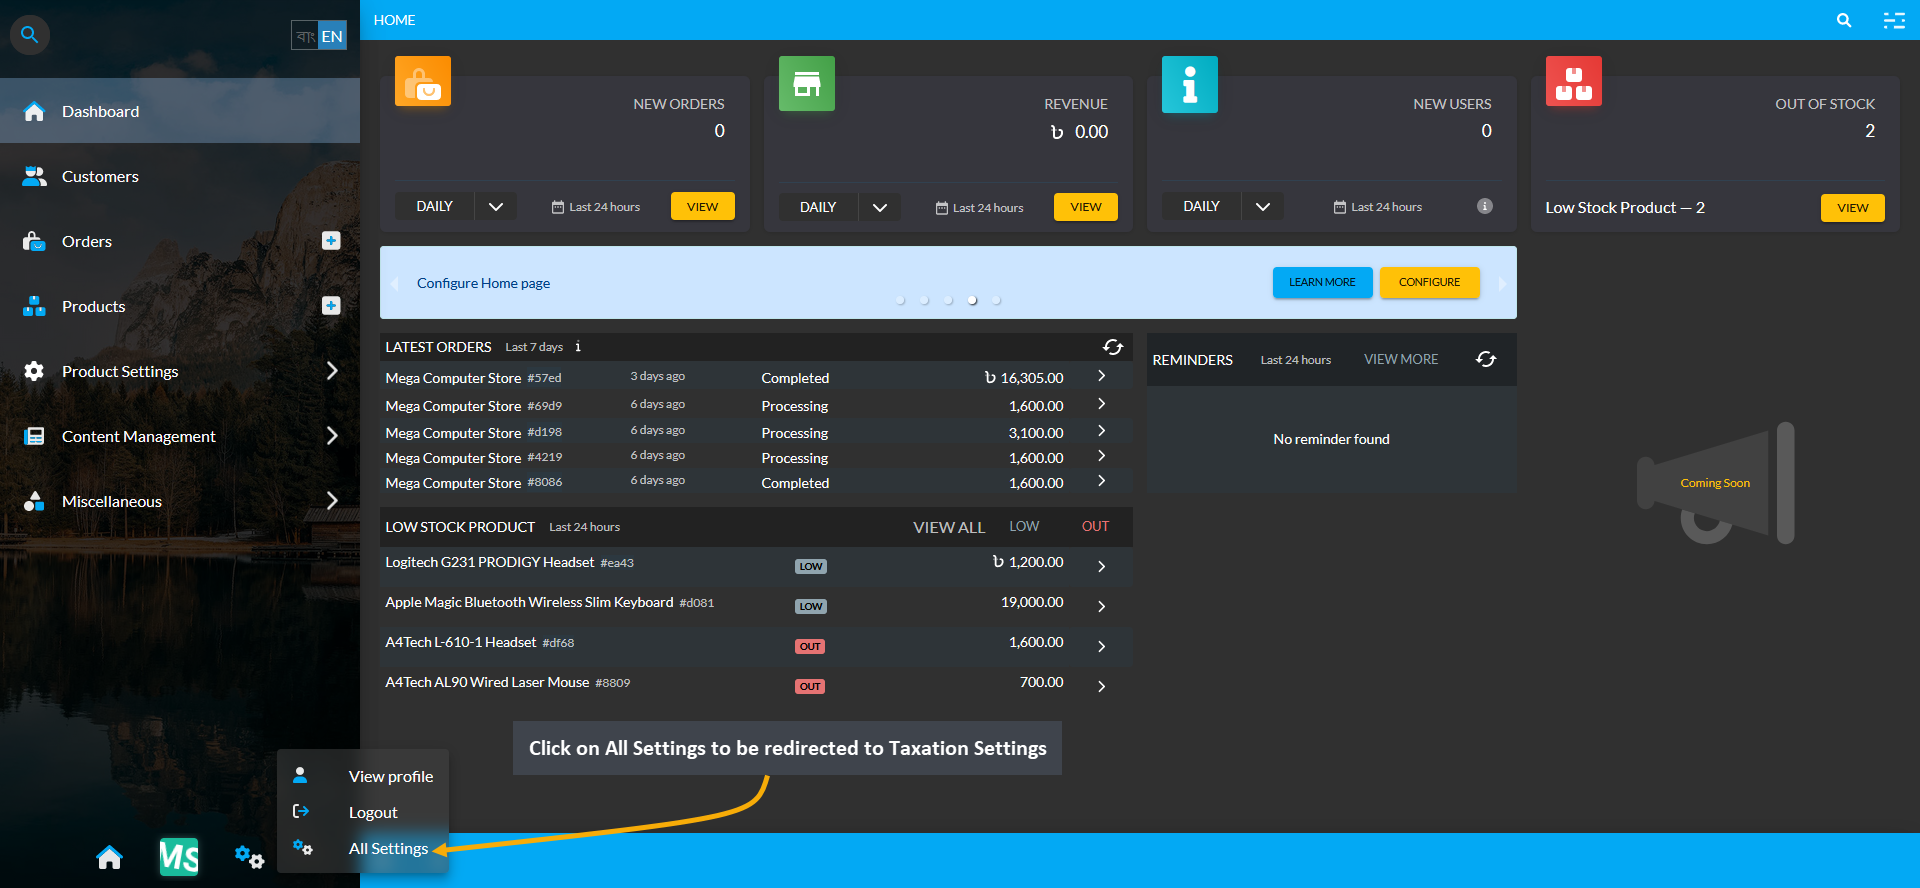
Image 1: Click on All Settings to be redirected to Taxation Settings from the Dashboard.
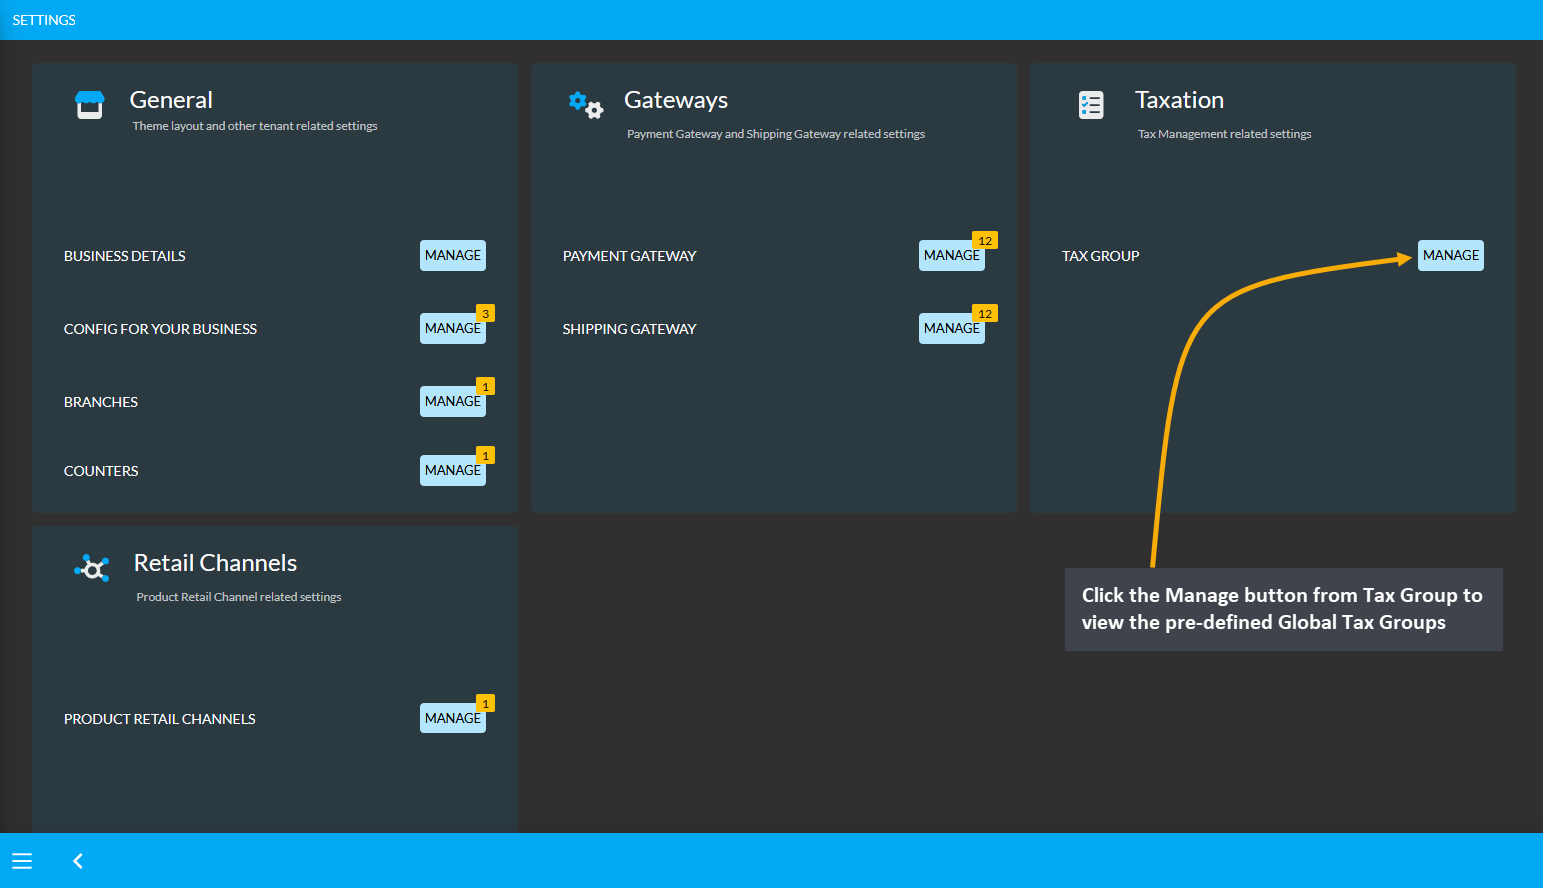
Image 2: Click the Manage button from Tax Group to view the pre-defined Global Tax Groups.
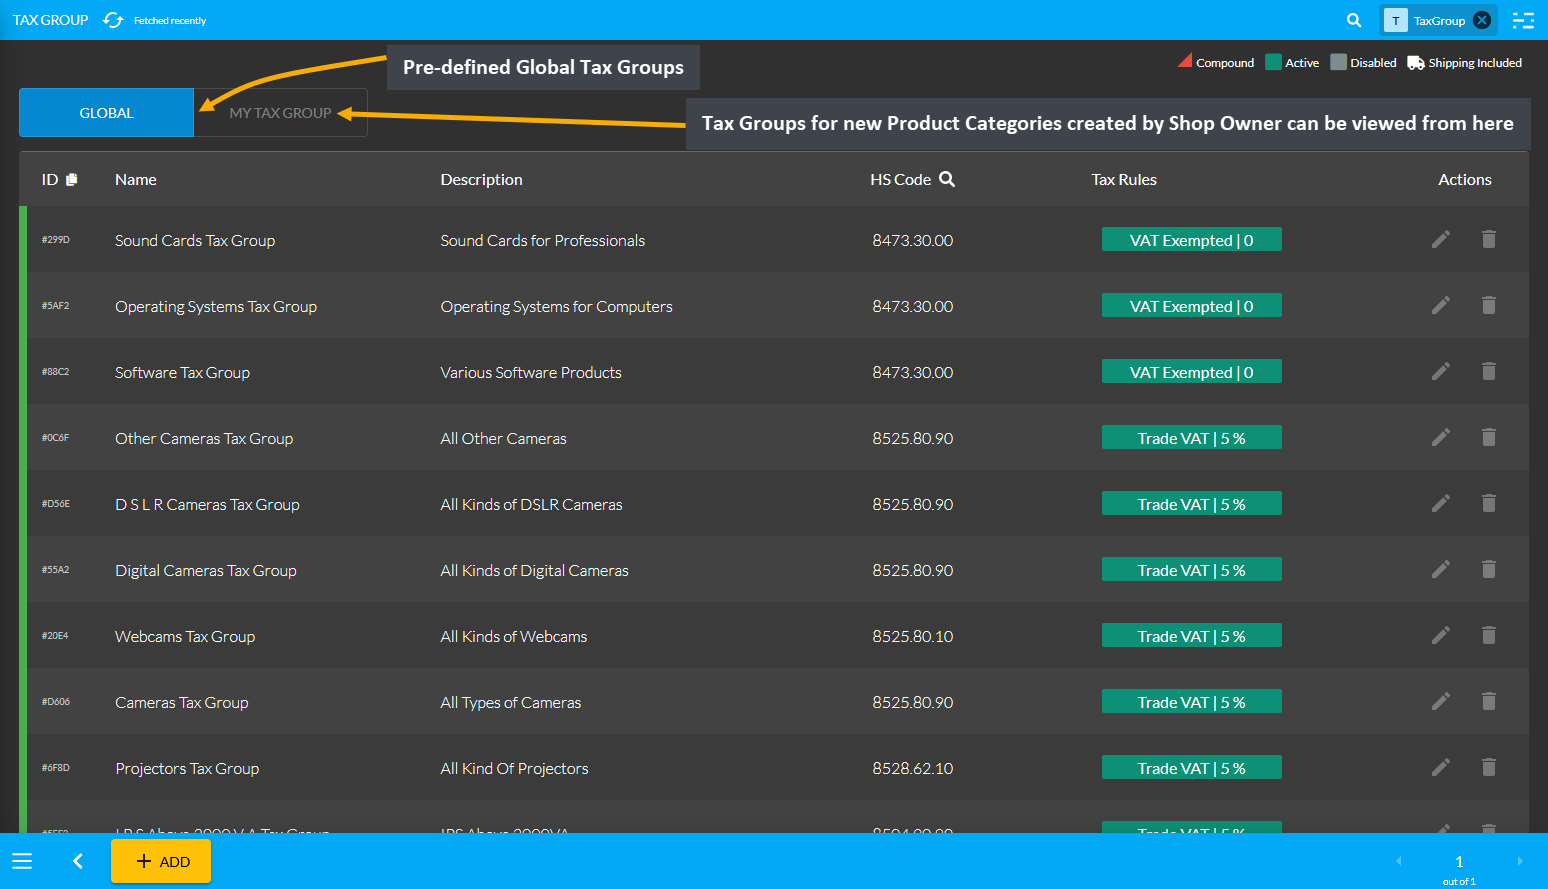
Image 3: View Pre-defined Global Tax Groups and self-created Tax Groups for new Product Categories.
Create New Tax Group
To create a new Tax Group, click on the Add button which will redirect to a new page for creating New Tax Group with tax rule. Create Tax Group Name, add a short description, use the toggle button to activate or deactivate it, input the HS Code for the target Product Category, and create New Tax Rule for the Tax Group.
The HS (Harmonized System) Codes are a standardized numerical method of classifying traded products, used by customs authorities around the world to identify products when assessing duties and taxes. Similarly, Tax Rules include the taxes or VAT which is required to be paid to the government by businesses.
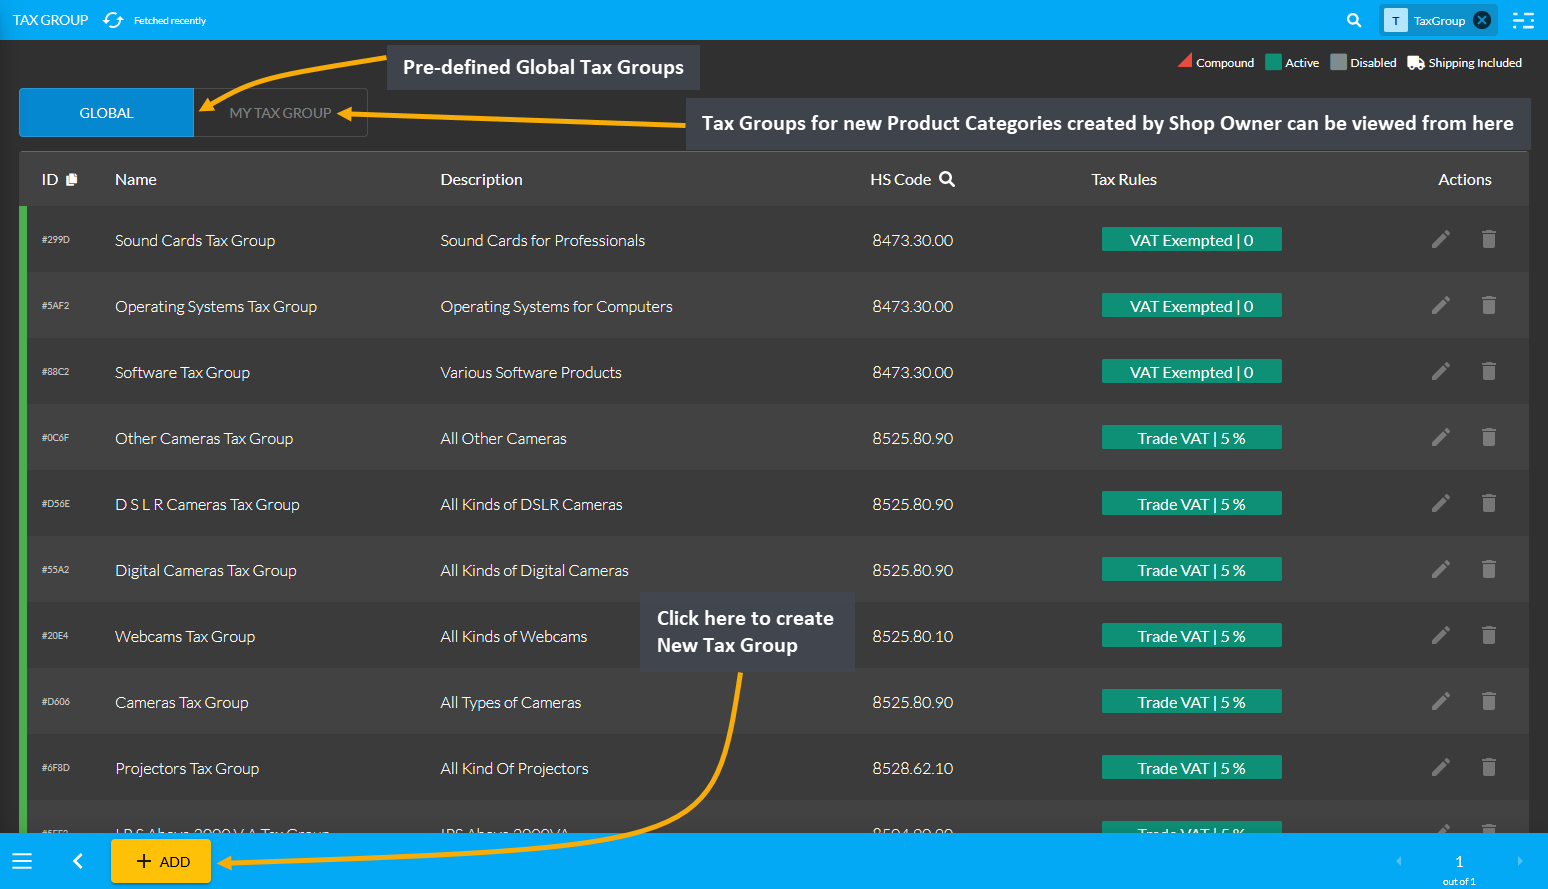
Image 1: Click the Add button which will redirect to a new page for creating New Tax Group with tax rule.
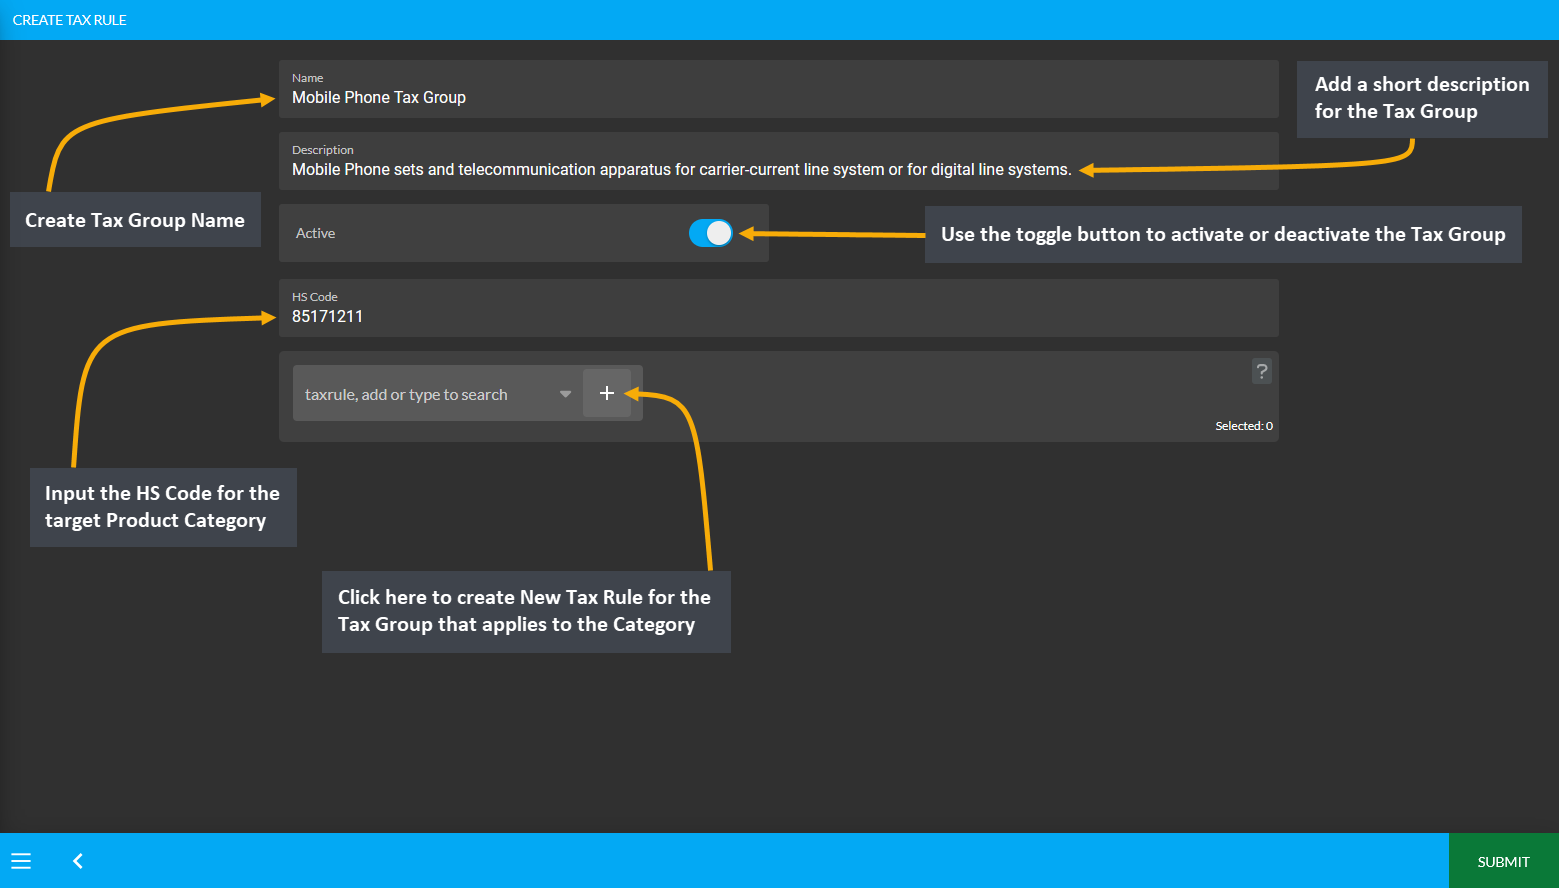
Image 2: Create New Tax Group with Name, Description, HS Code, and Tax Rule that applies to the Category.
Create New Tax Rule
Click the + button beside the Tax Rule search box on Tax Group create Page which will redirect to a new page where New Tax Rule can be created for the target Tax Group. Create Tax Rule Name, add a short description, select a Tax Variant which applies to the Tax Rule, enable Fee and select the type of Fee, use toggle button to activate or deactivate it, add Compound or Priority attributes, and click Submit to create New Tax Rule.
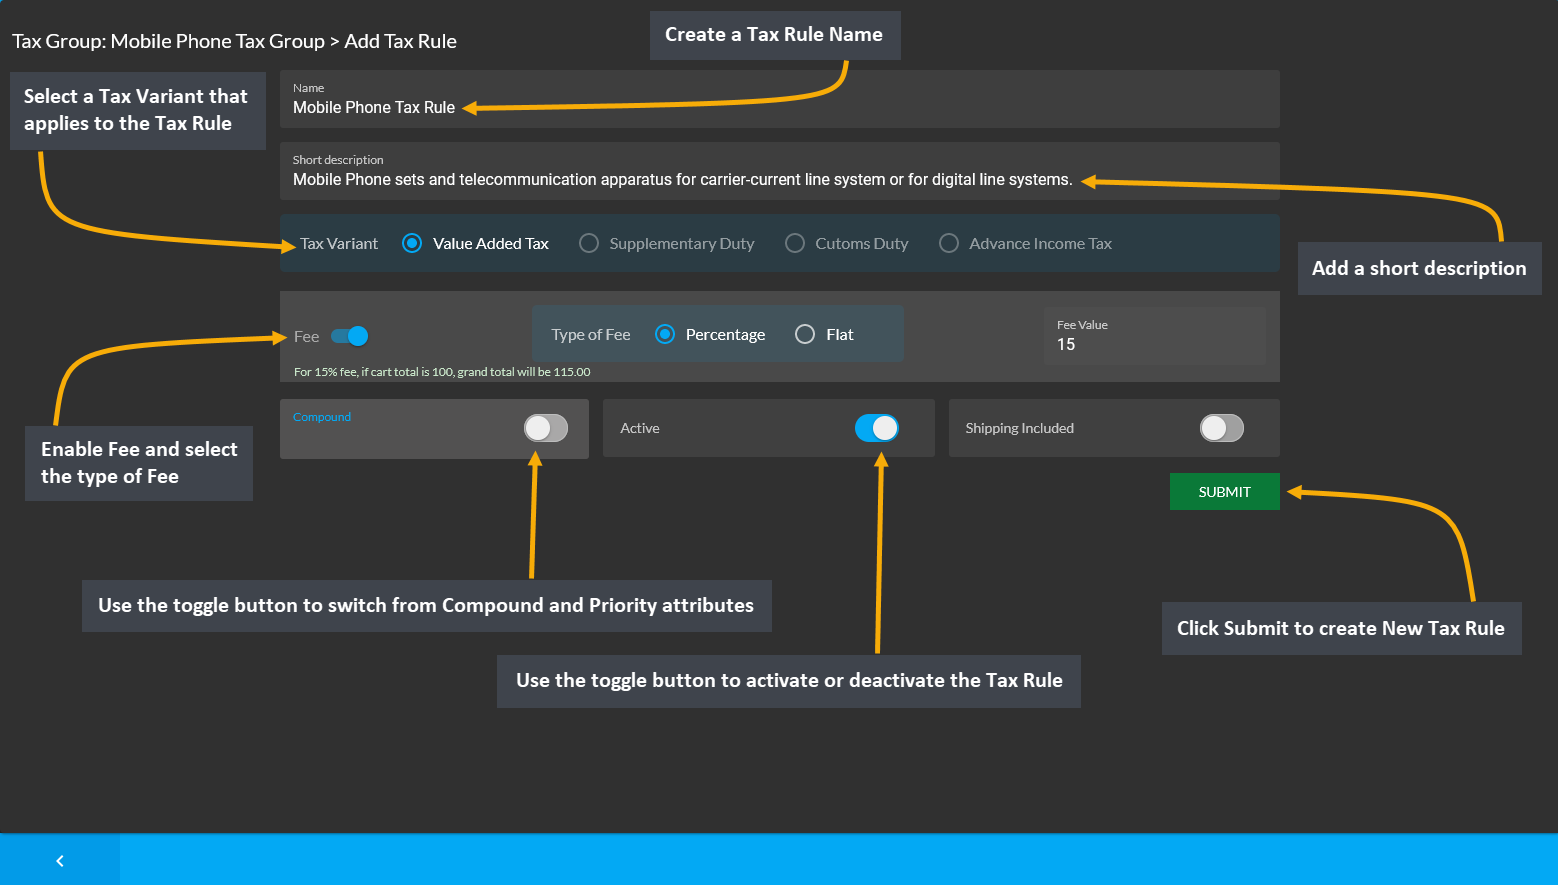
Image 1: Create a Tax Rule with Name, Description, Tax Variant, Fee, Compound, and Priority attributes.
Compound and Priority Attributes
Below the Fee section, there is a toggle button to switch from Compound and Priority attributes. Compound rules will calculate the sale with the first Tax Rule when using the second Tax Rule. Priority is giving which Tax Rule is to be prioritized. Both Compound and Priority are actually considered as the attributes of the Tax Group.
So, if the Shop Owner is working on a 100 Taka sale and the first Tax Rule applied is a static 10 Taka rule, then the output will be 110 Taka. Similarly, if a second Tax Rule applied for 100 Taka sale has 2% tax rule included, then by default it will be 102 Taka. However, if the second rule in the tax group is a Compound rule, then it will calculate the rule with 110 Taka instead of 100 Taka. If the Compound rule is turned off, then it will be 2% of 100 Taka.
Therefore, in this Tax Group, the first Tax Rule applied is static 10 Taka rule and second Tax Rule applied is 2% (Compound), so the Shop Owner will get 110 + 110 x 0.02 (2% of 110 Taka). If the Compound rule is turned off, then it will be 2% of 100 Taka instead of 110 Taka when calculating the sale.
Tax Group and Tax Rule Successfully Created
After Tax Rule is created, it will automatically be added to the Tax Group. Now, click Submit button to complete creating the Tax Group. All the New Tax Groups that were successfully created by the Shop Owner will be visible under My Tax Group List. In this way, the Shop Owner can create their own Tax Groups for any Product Category apart from the already existing pre-defined Global Tax Groups.
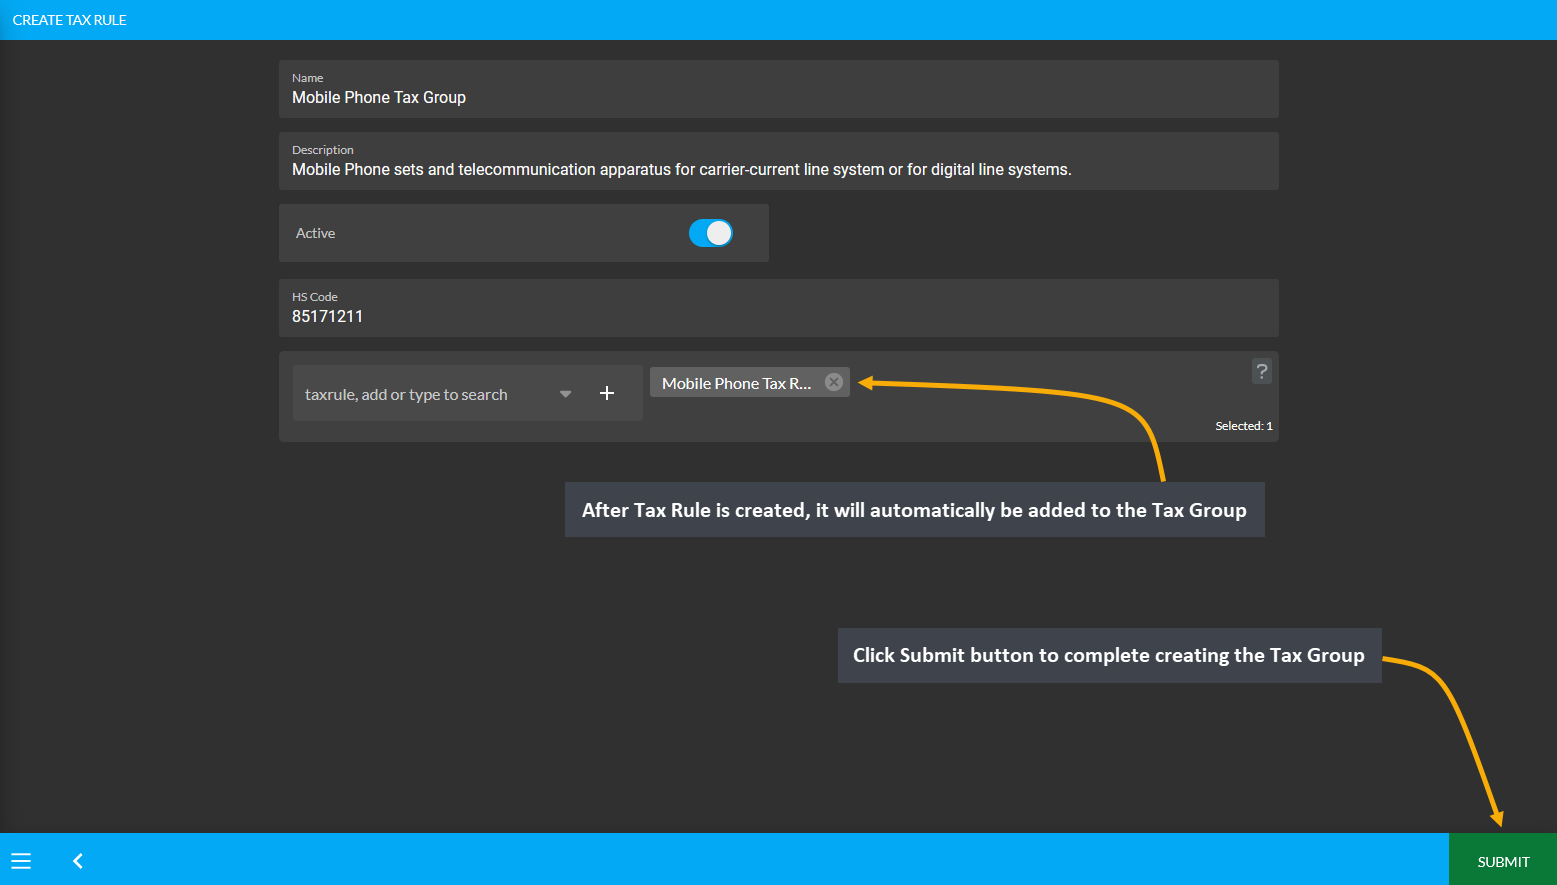
Image 2: After Tax Rule is created, it will automatically be added to Tax Group, click Submit to proceed.
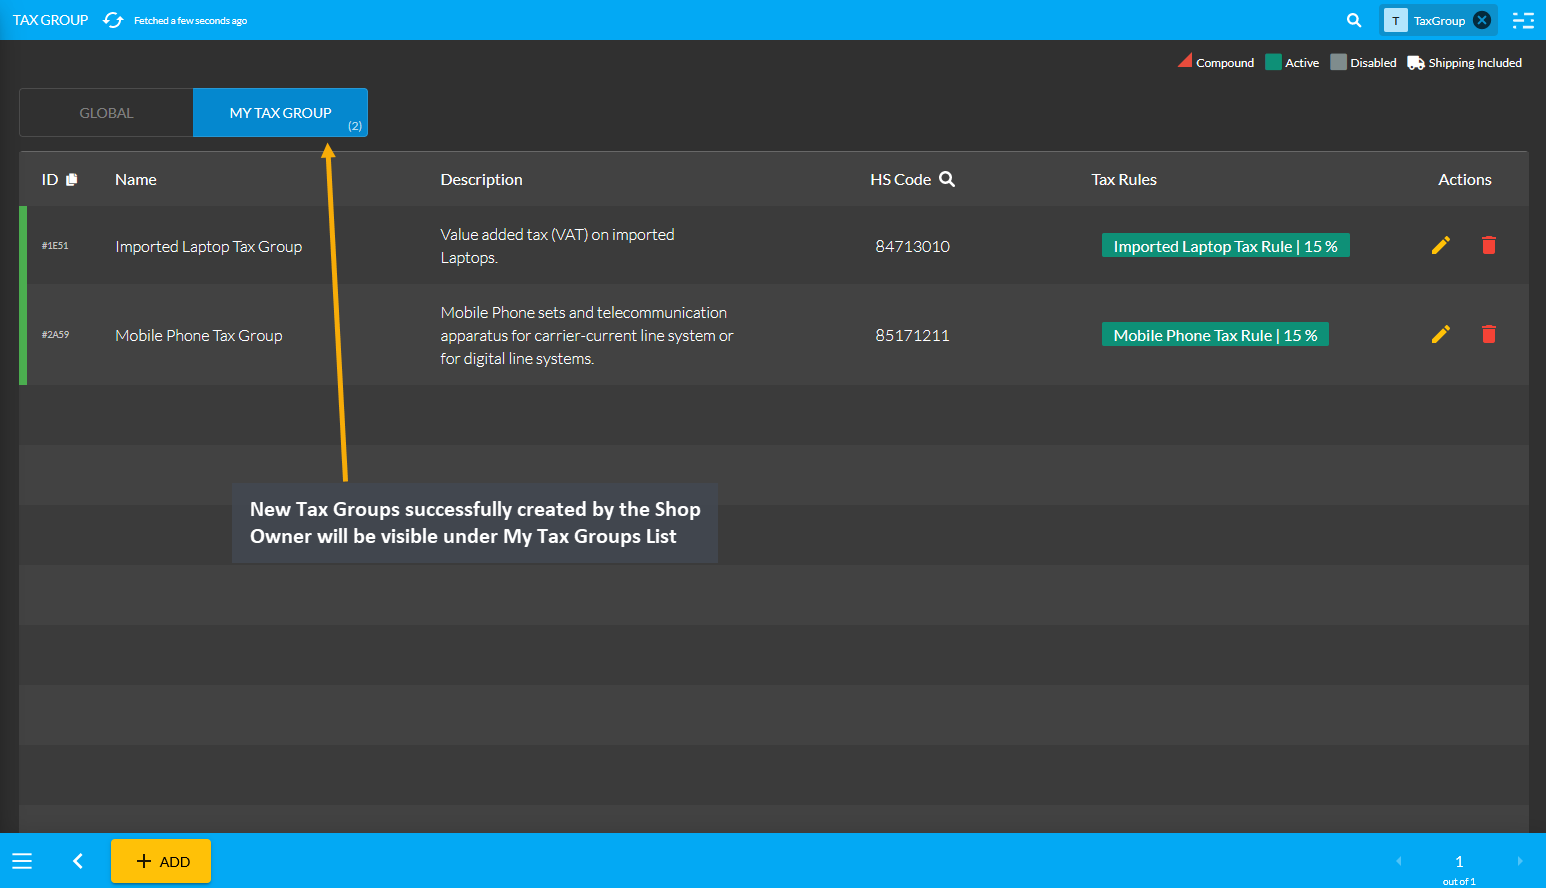
Image 3: New Tax Groups successfully created by the Shop Owner will be visible under My Tax Group List.
7.5 - Configure Product Retail Channel
Learn more about the configuration of Product Retail Channel from Settings.
Configure Product Retail Channels from Retail Channels under All Settings tab. Click on All Settings to be redirected to Retail Channel Settings from the Dashboard. Click on Manage button under Retail Channels to access, create, activate, and configure all the Retail Channels or Websites that are maintain by the Tenant Admin.
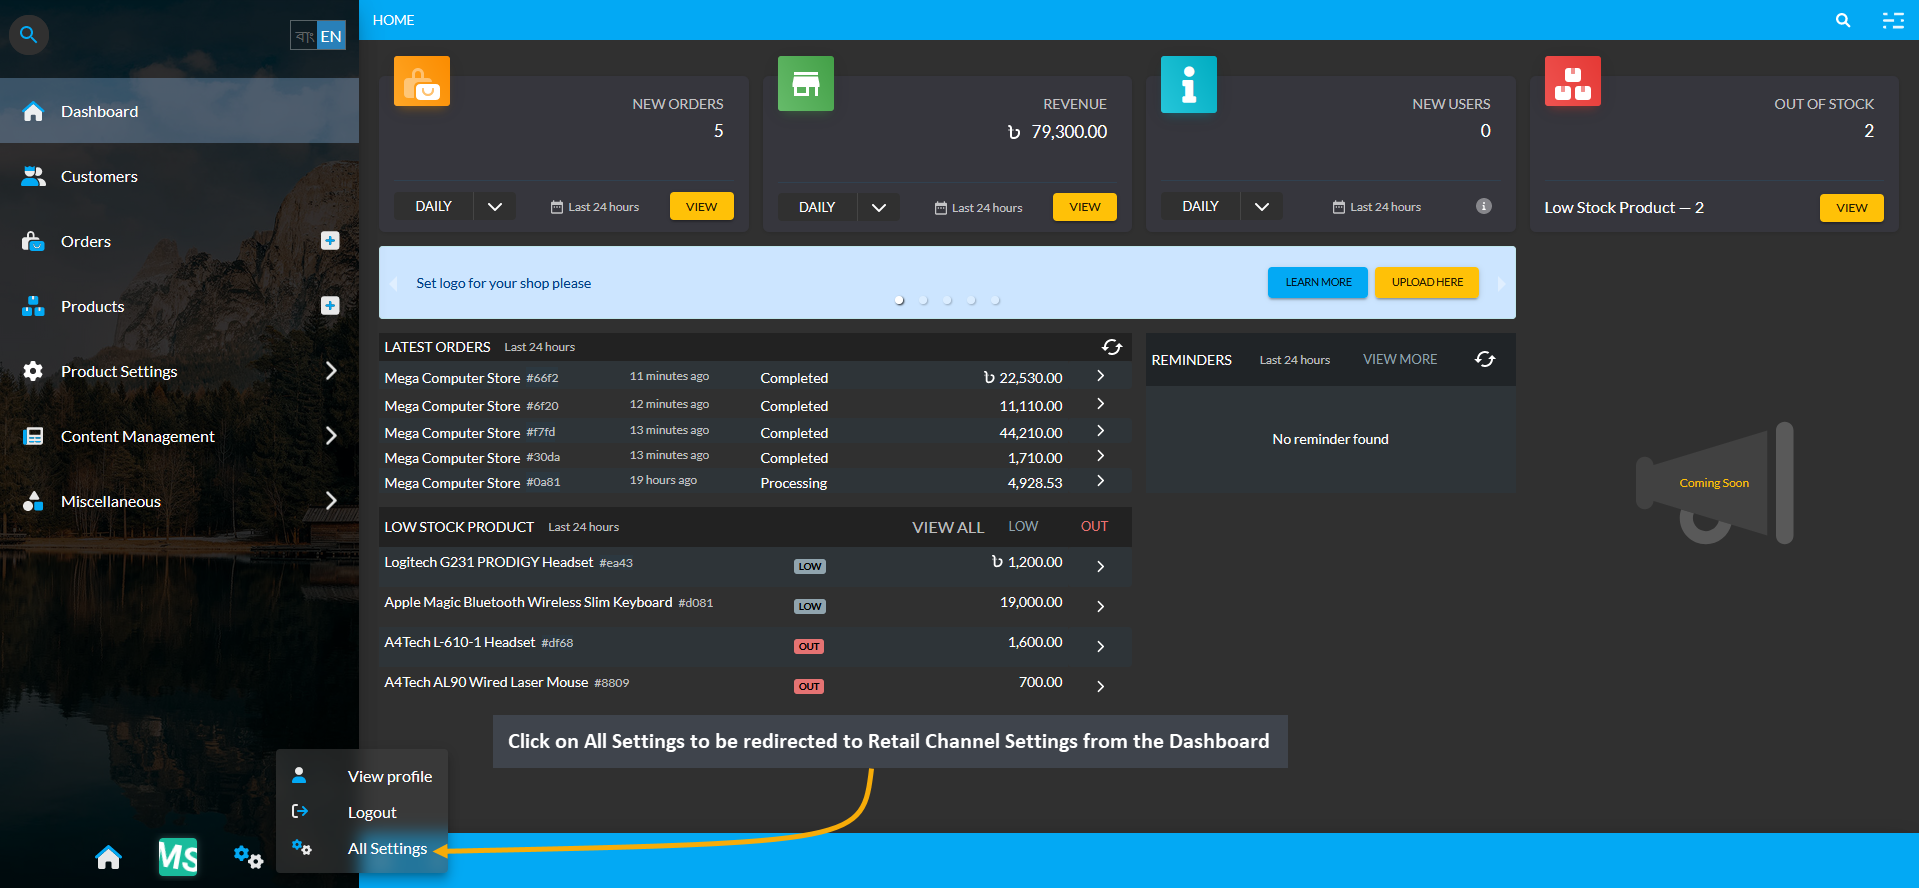
Image 1: Click on All Settings to be redirected to Retail Channel Settings from the Dashboard.
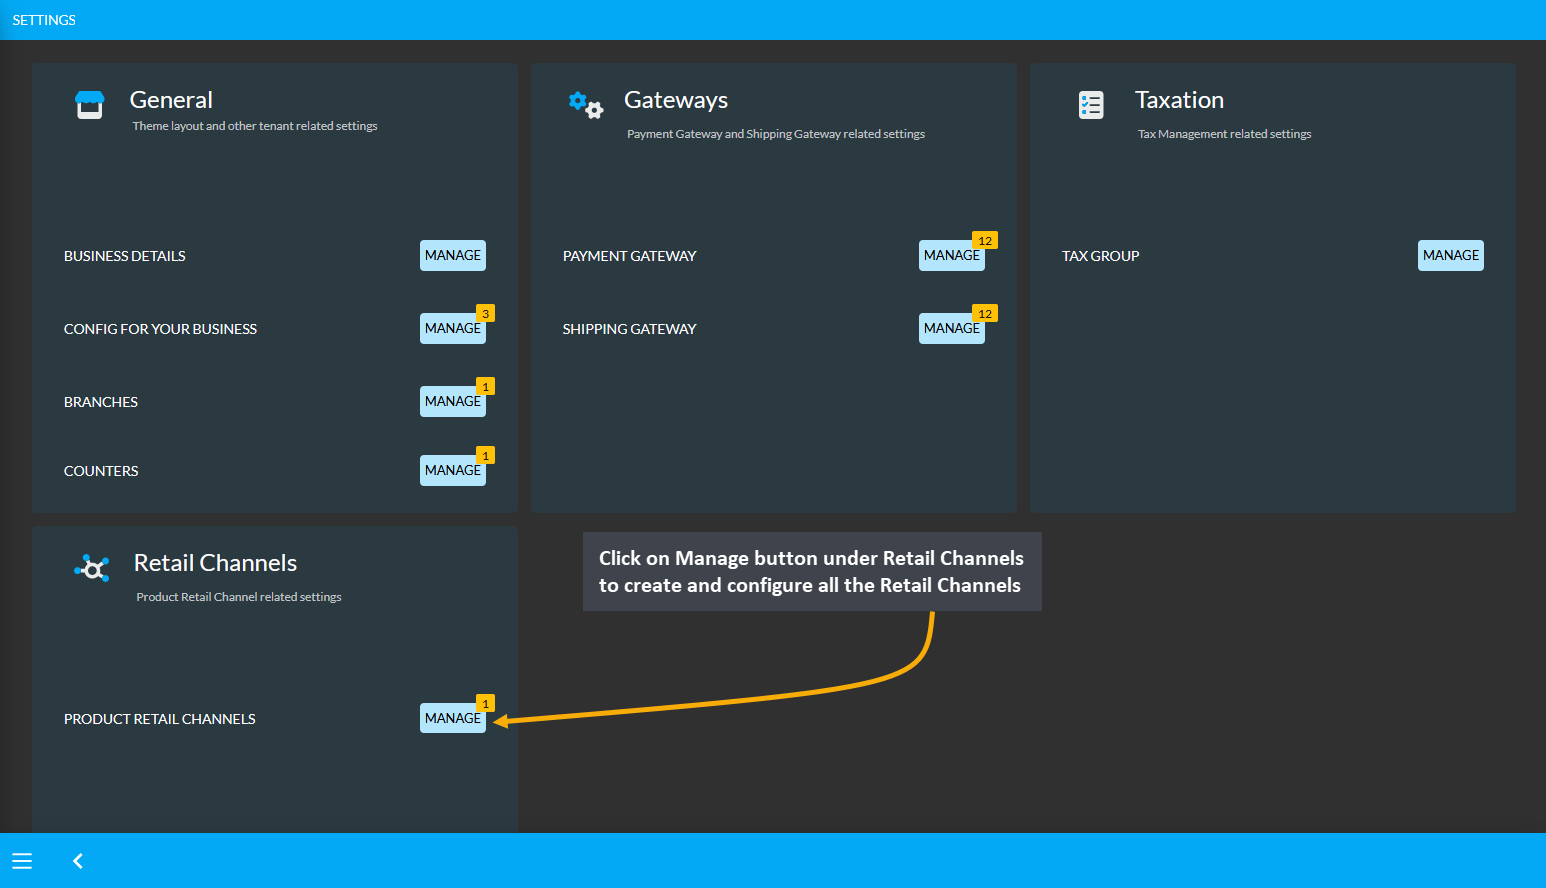
Image 2: Click on Manage button under Retail Channels to create and configure Retail Channels.
Create Product Retail Channel
On Retail Channels Page, list of available channels will show and new Retail Channel can be added by clicking the Add button. The Shop Owner can create or update Product Retail Channels by setting up name and avenues.
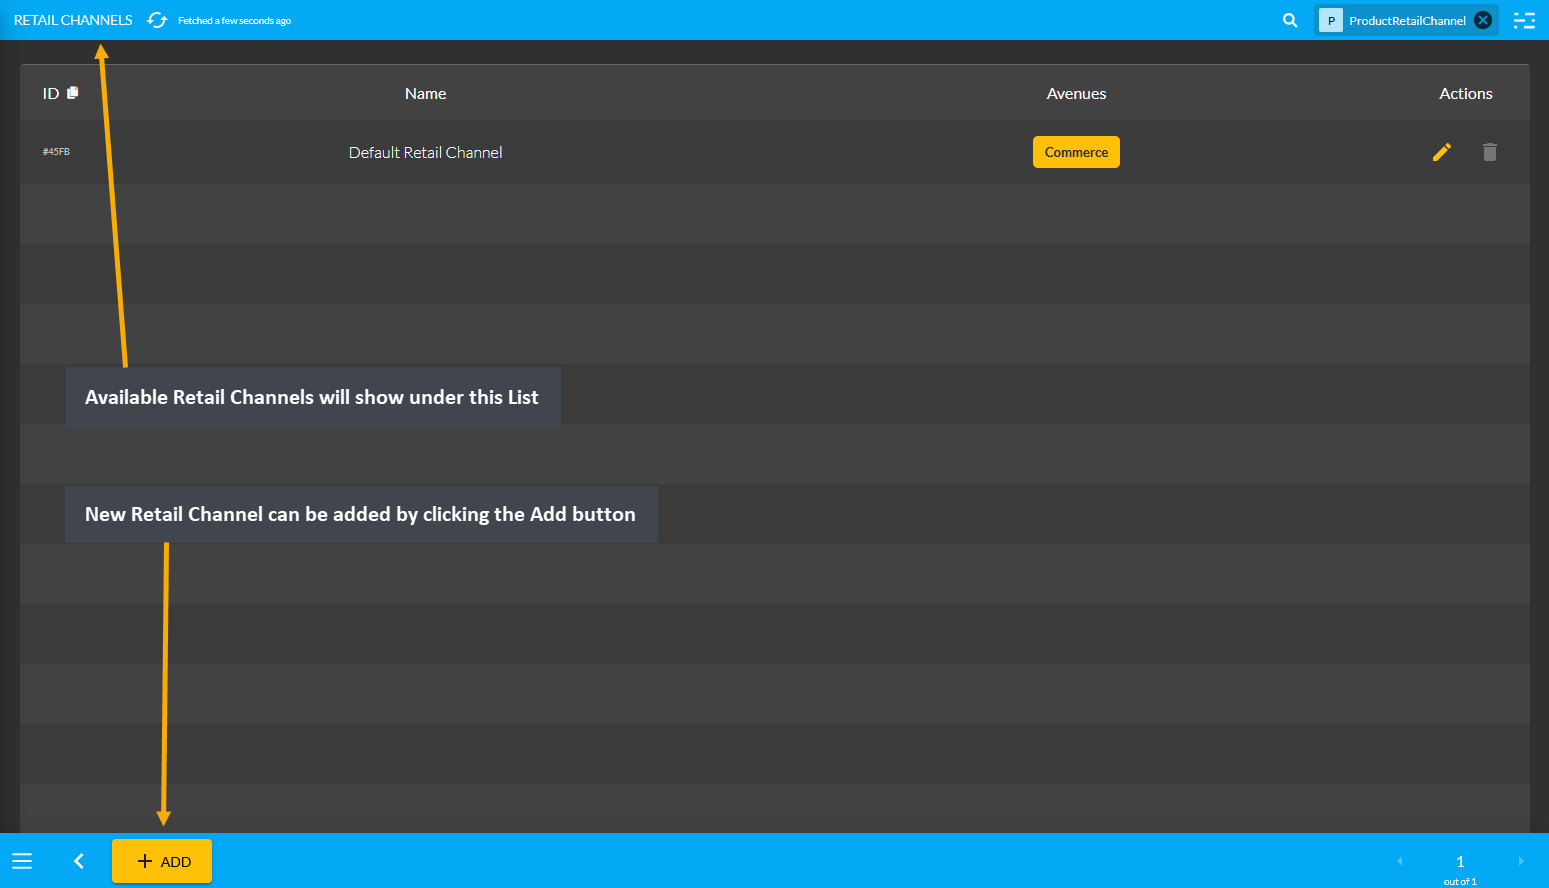
Image 3: Click on All Settings to be redirected to Retail Channel Settings from the Dashboard.
Edit Product Retail Channel
When editing a Retail Channel, there is an option for Commerce with a checkbox under Avenues. This option controls whether the Shop Owner want their Products to be shown or hide on the Website.
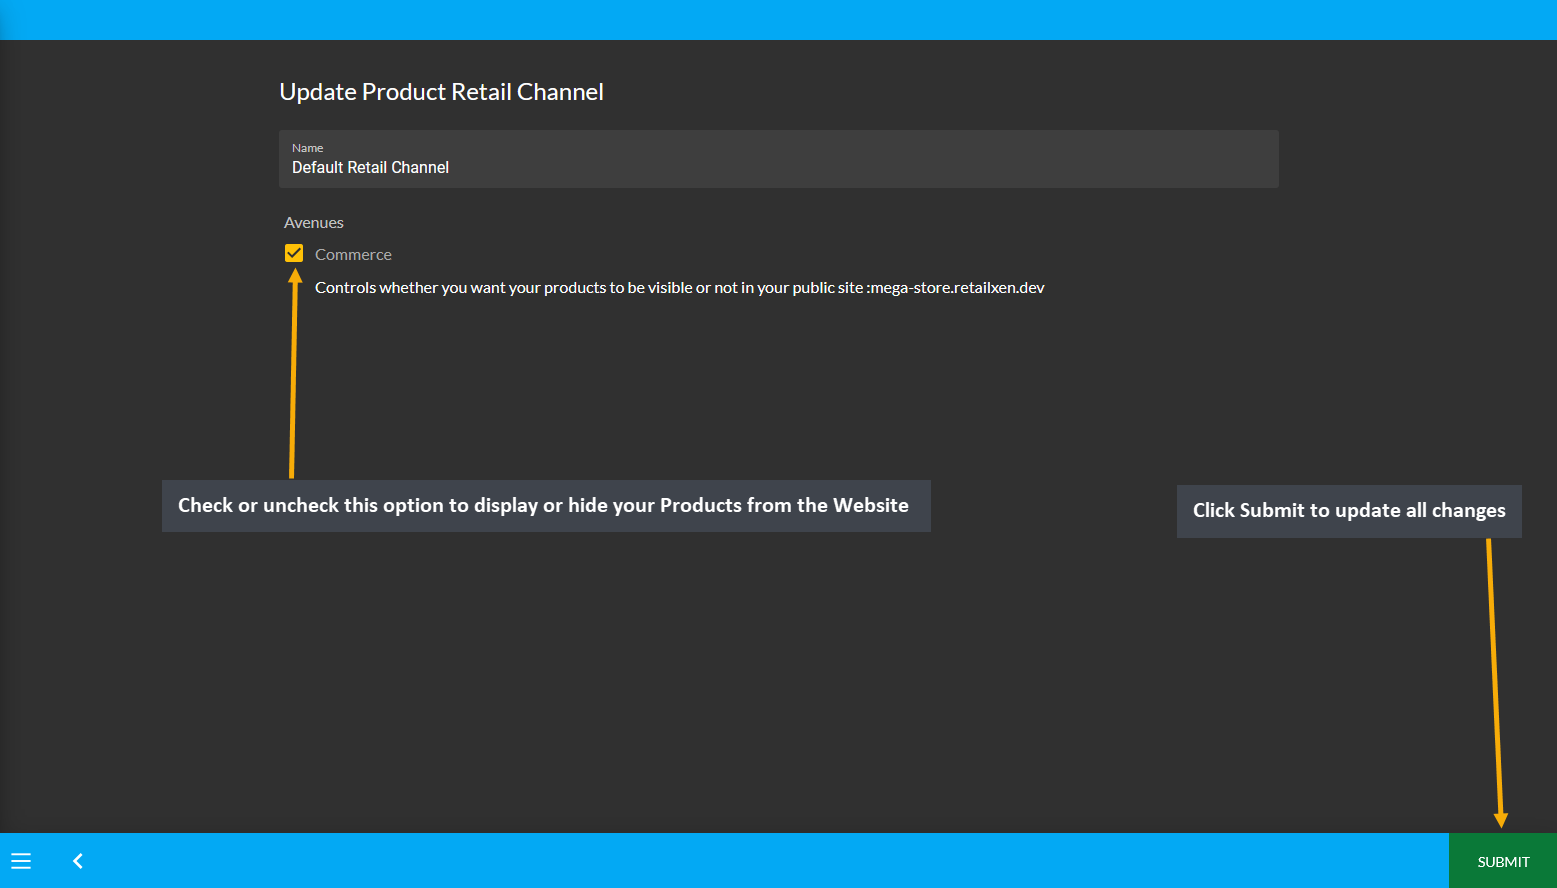
Image 4: Shop Owners can check or uncheck Commerce option to display or hide their Products on the Website.
Select Retail Channel
Retail Channels are where Products can be sold like Facebook, Google, or Website. Products can be assigned on other Retail Channels than the Default Retail Channel, which is the Website. After selecting other Avenues like Facebook or Google, Products will show in selected avenue of the Retail Channel, but not on the Website. Enabling or disabling any avenue will show or hide the Products within that avenue.
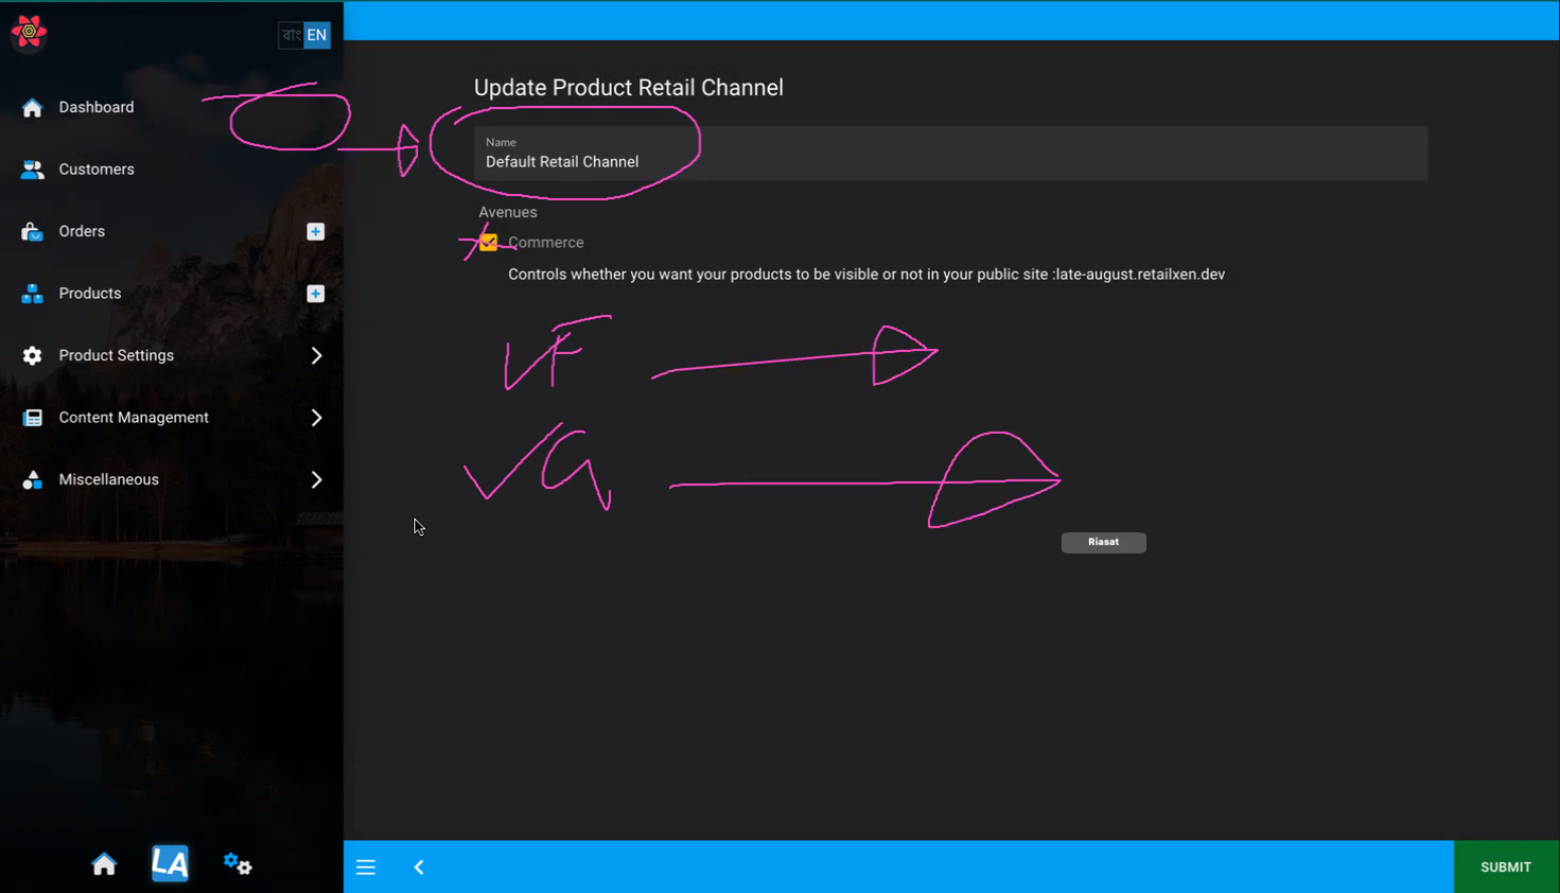
Image 5: Products can be assigned on other Retail Channel and their Avenues than on Default Retail Channel.
8 - Gateway Display Names
The importance of keeping Gateway names to their default values.
Gateway Display Names
Payment Gateway: Cash
While configuring the Cash Payment Gateway, it is recommended that the Shop Owner makes no change to the Display Name. Therefore, please keep the default name specified because it enables localization on your public, customer facing Website. For instance, if the language is switched from English to Bangla, it will actually change to Bangla. However, if the Display Name is changed, then the Shop Owner will lose all these features.
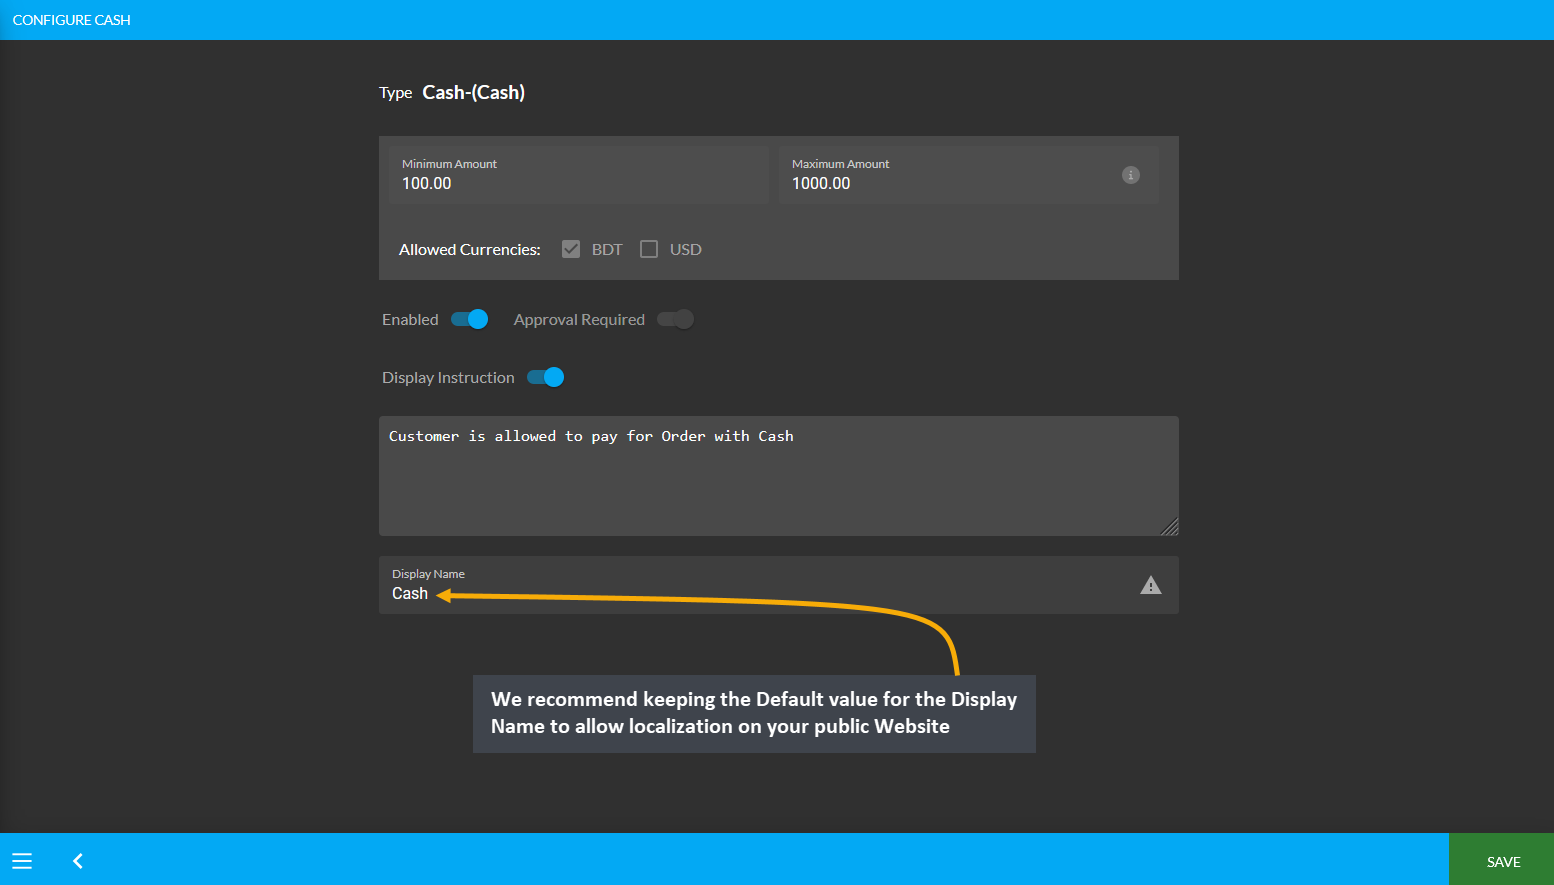
Payment Gateway: Cheque
While configuring the Cheque Payment Gateway, it is recommended that the Shop Owner makes no change to the Display Name. Therefore, please keep the default name specified because it enables localization on your public, customer facing Website. For instance, if the language is switched from English to Bangla, it will actually change to Bangla. However, if the Display Name is changed, then the Shop Owner will lose all these features.
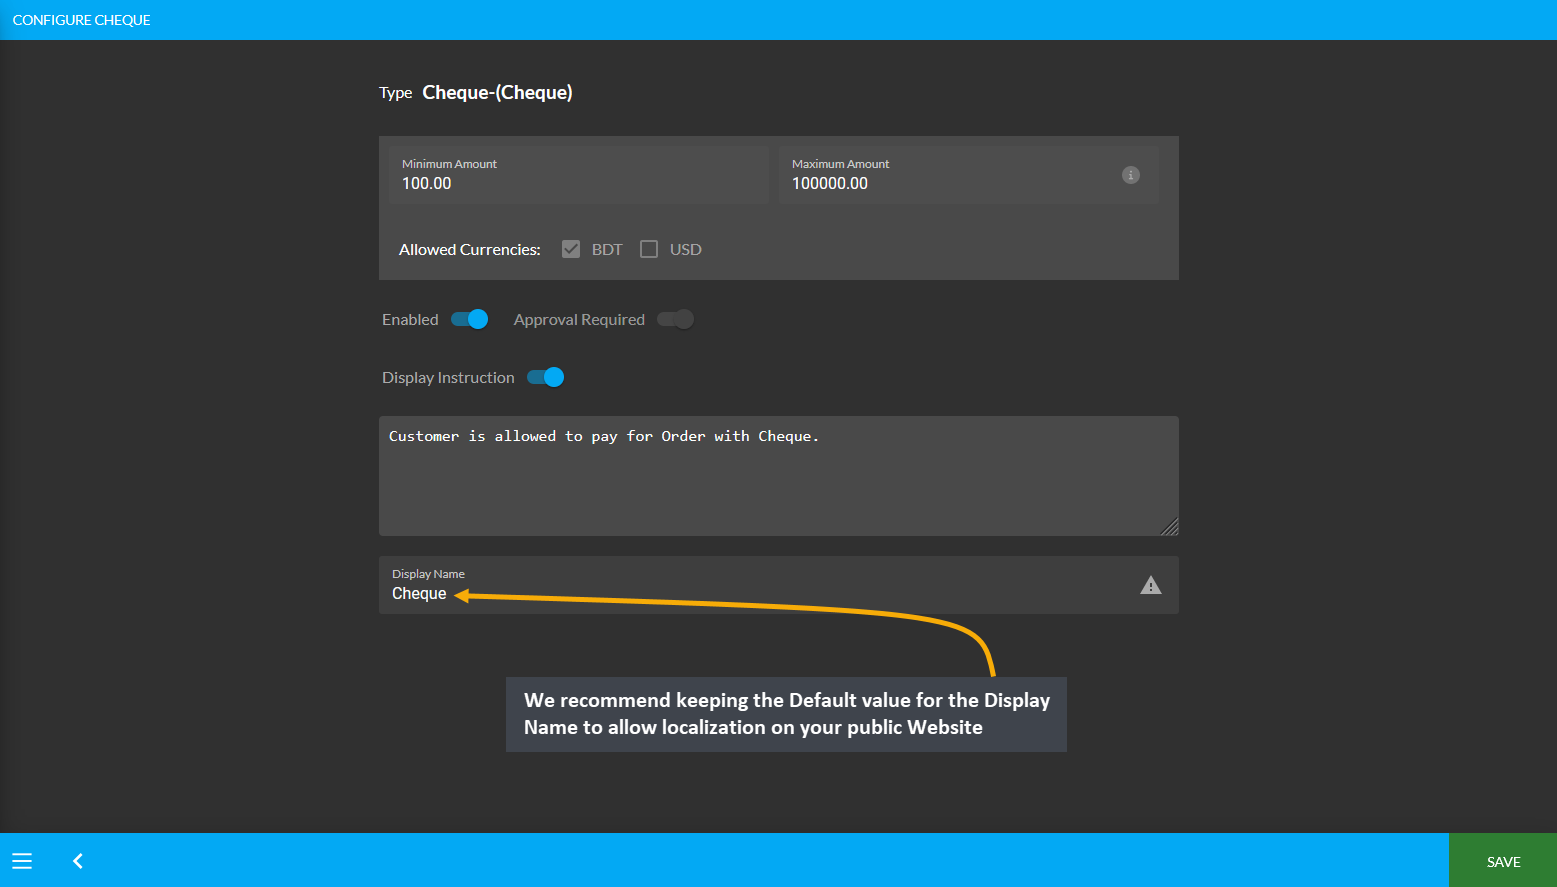
Payment Gateway: Cash On Delivery
While configuring the Cash On Delivery Payment Gateway, it is recommended that the Shop Owner makes no change to the Display Name. The Cash On Delivery is shown as Cash On Pickup if the Shop Owner chooses ‘In-Store Pickup’ Shipment Gateway. This is why changing the Display Name will not make this feature work.
Therefore, please keep the default name specified because it enables localization on your public, customer facing Website. Also, if the language is switched from English to Bangla, it will actually change to Bangla. However, if the Display Name is changed, then the Shop Owner will lose all these features.
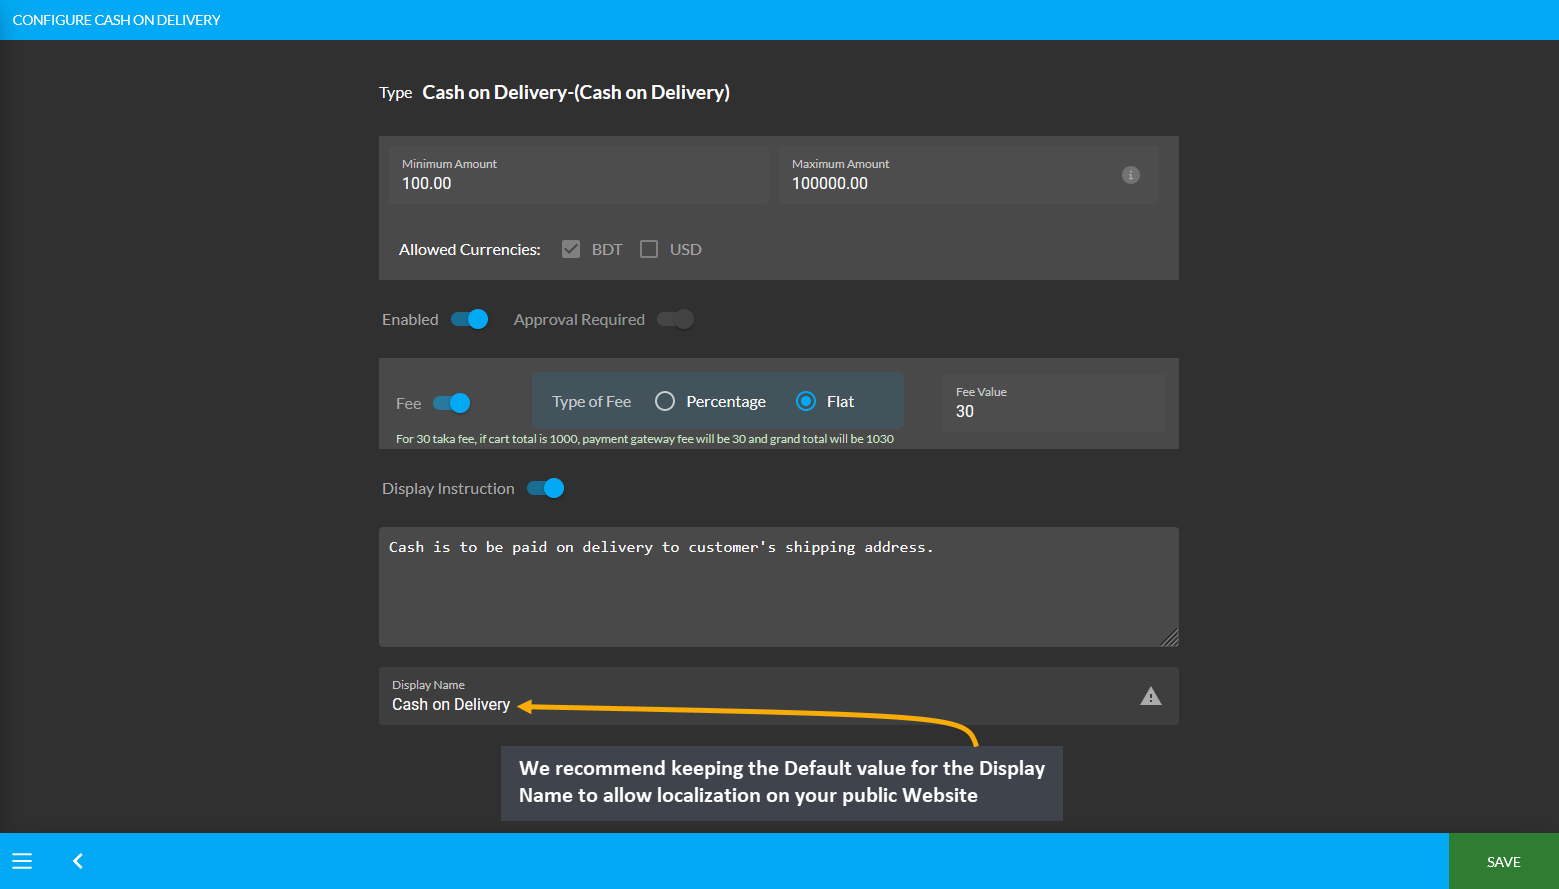
Payment Gateway: Bank Transfer
While configuring Bank Transfer Payment Gateway, the Shop Owner is recommended not to make any change to Display Name. Therefore, please keep the default name specified because it enables localization on your public, customer facing Website. For instance, if the language is switched from English to Bangla, it will actually change to Bangla. However, if the Display Name is changed, then the Shop Owner will lose all these features.
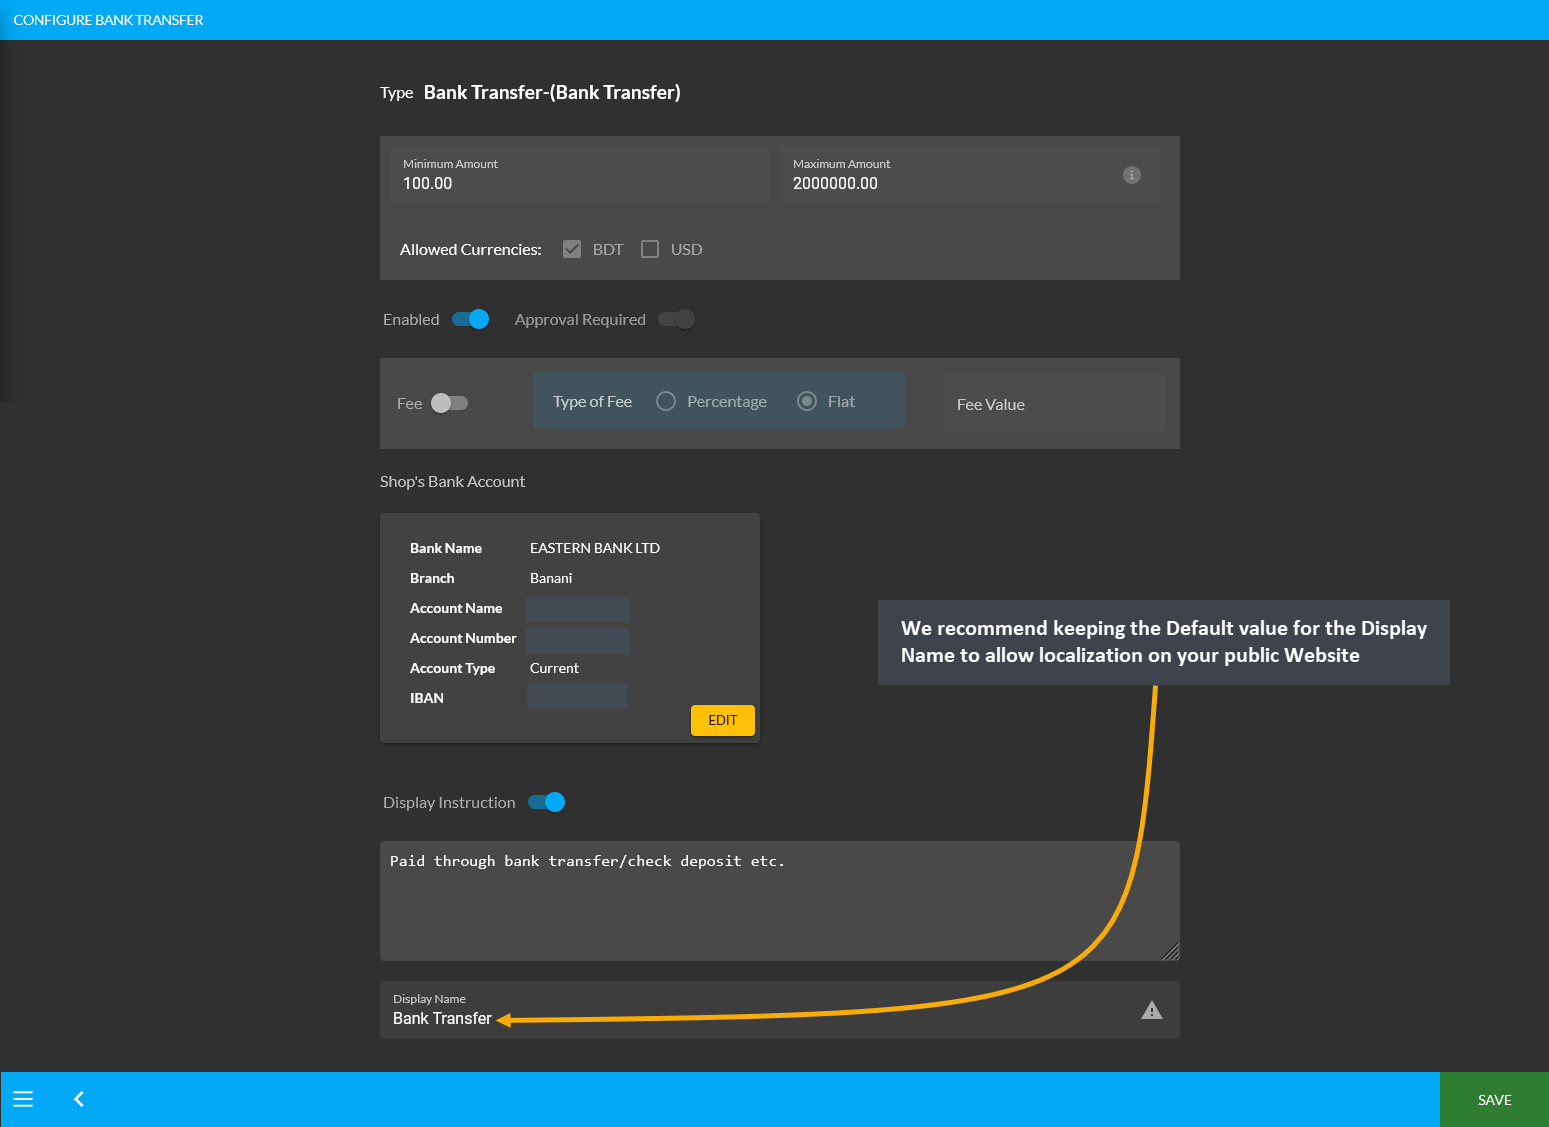
Payment Gateway: Credit Card
While configuring the Credit Card Payment Gateway, it is recommended that the Shop Owner makes no change to the Display Name. Therefore, please keep the default name specified because it enables localization on your public, customer facing Website. For instance, if the language is switched from English to Bangla, it will actually change to Bangla. However, if the Display Name is changed, then the Shop Owner will lose all these features.
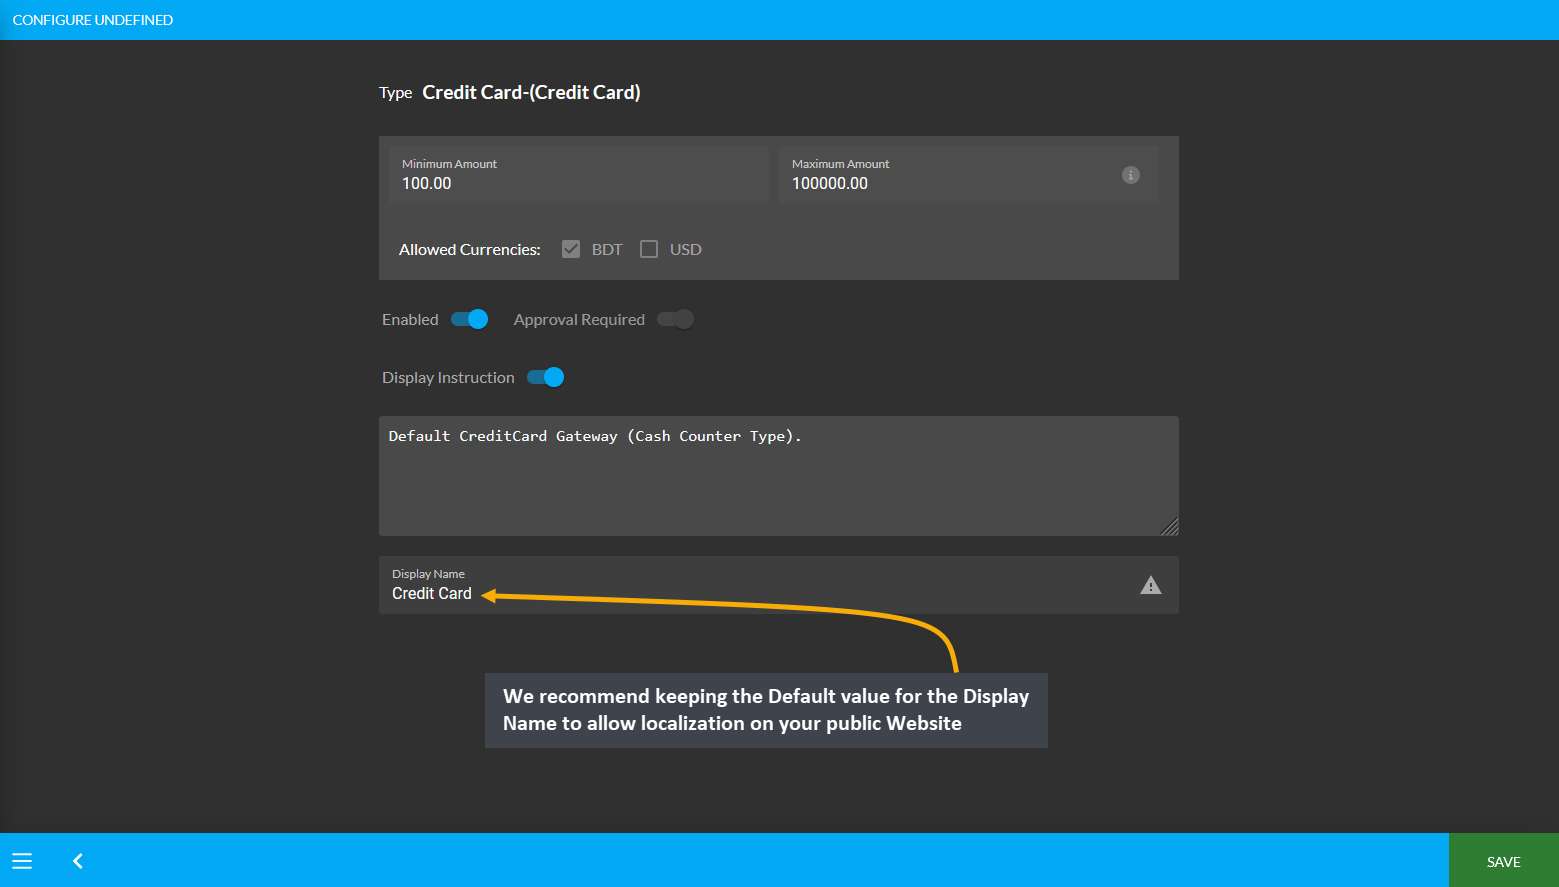
Payment Gateway: On Credit (Due)
While configuring the On Credit (Due) Payment Gateway, it is recommended that the Shop Owner makes no change to the Display Name. Therefore, please keep the default name specified because it enables localization on your public, customer facing Website. For instance, if the language is switched from English to Bangla, it will actually change to Bangla. If the Display Name is changed, then the Shop Owner will lose all these features.
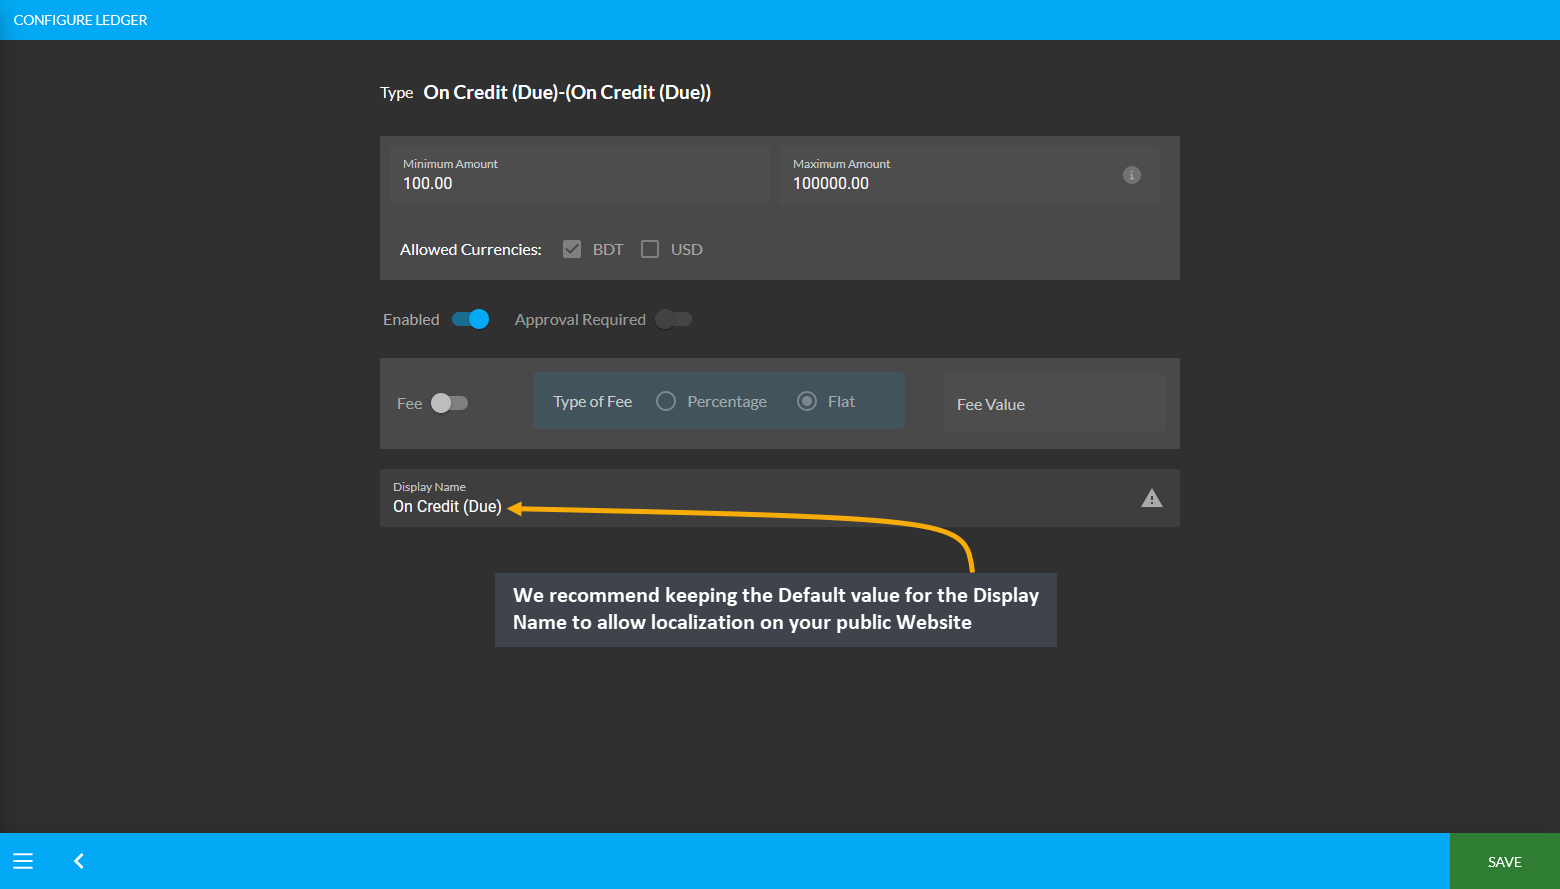
Payment Gateway: Nagad
While configuring the Nagad Payment Gateway, it is recommended that the Shop Owner makes no change to the Display Name. Therefore, please keep the default name specified because it enables localization on your public, customer facing Website. For instance, if the language is switched from English to Bangla, it will actually change to Bangla. However, if the Display Name is changed, then the Shop Owner will lose all these features.
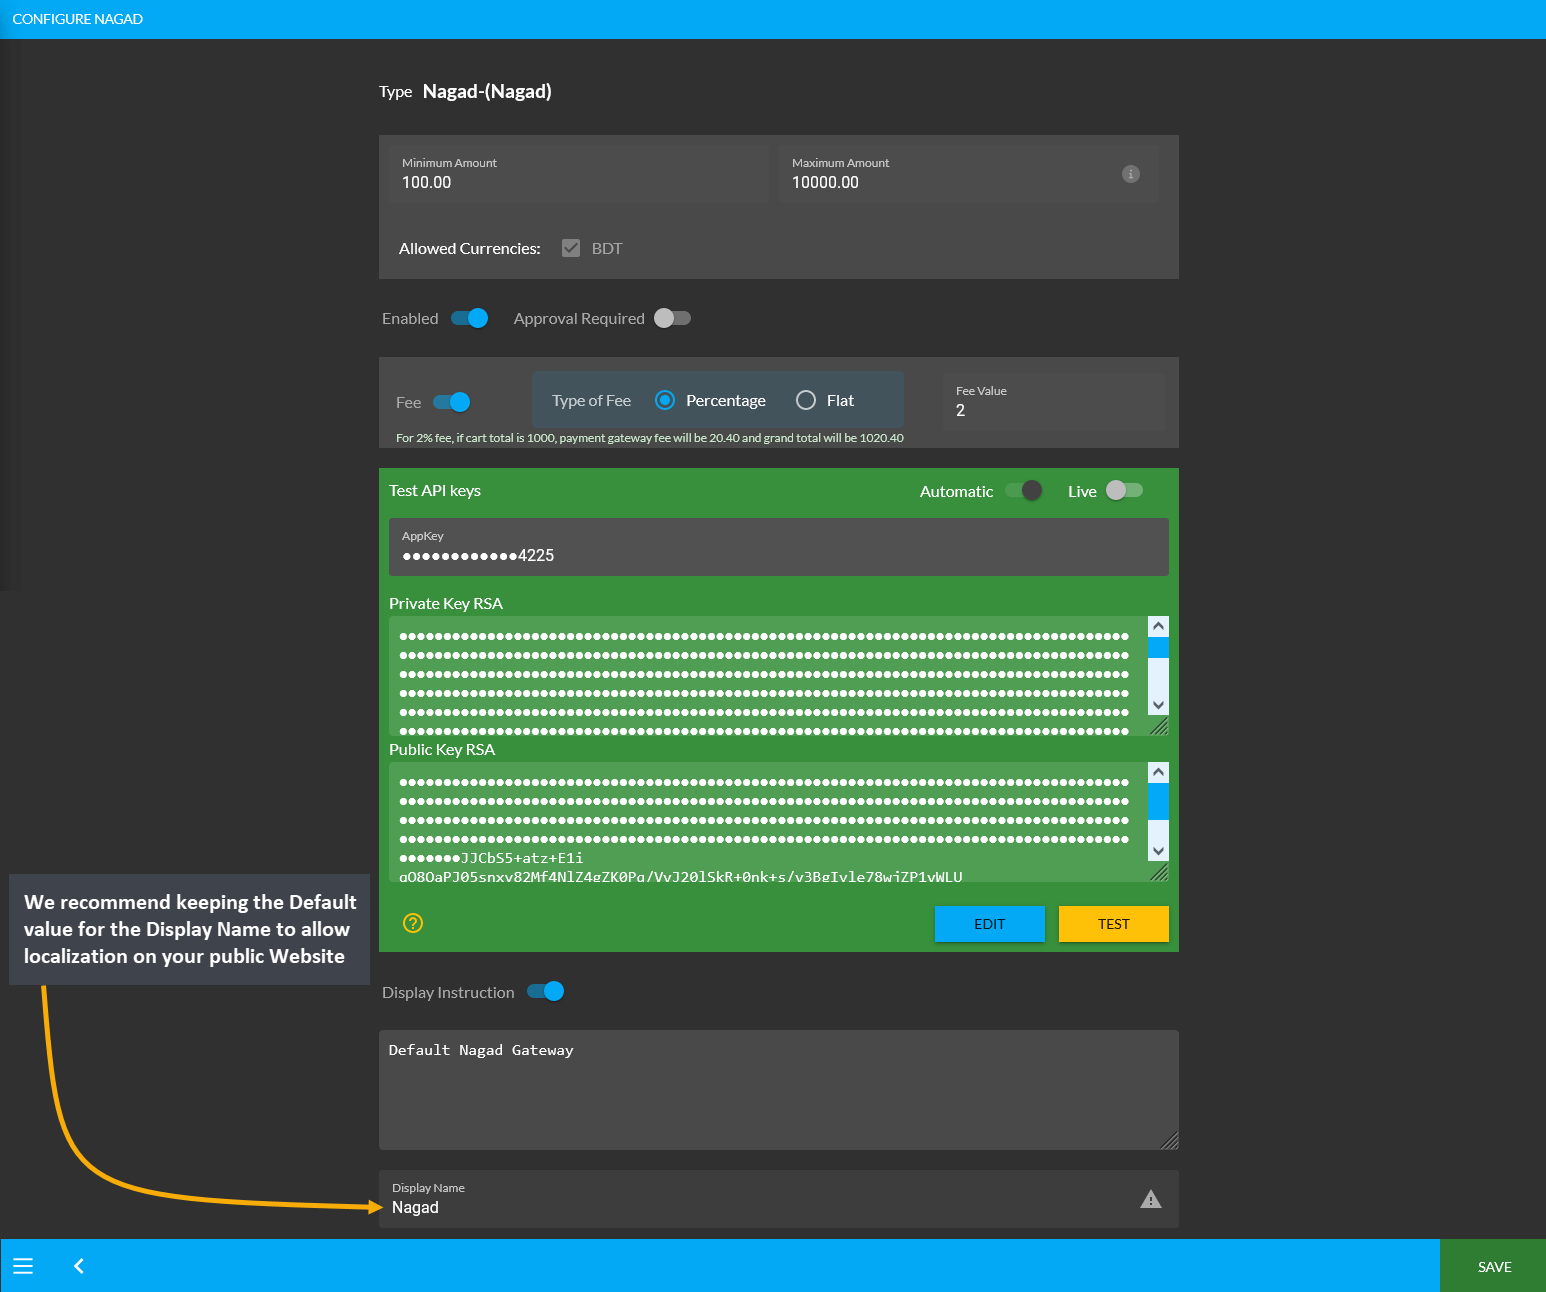
Payment Gateway: Port Wallet
While configuring the Port Wallet Payment Gateway, it is recommended that the Shop Owner makes no change to the Display Name. Therefore, please keep the default name specified because it enables localization on your public, customer facing Website. For instance, if the language is switched from English to Bangla, it will actually change to Bangla. However, if the Display Name is changed, then the Shop Owner will lose all these features.
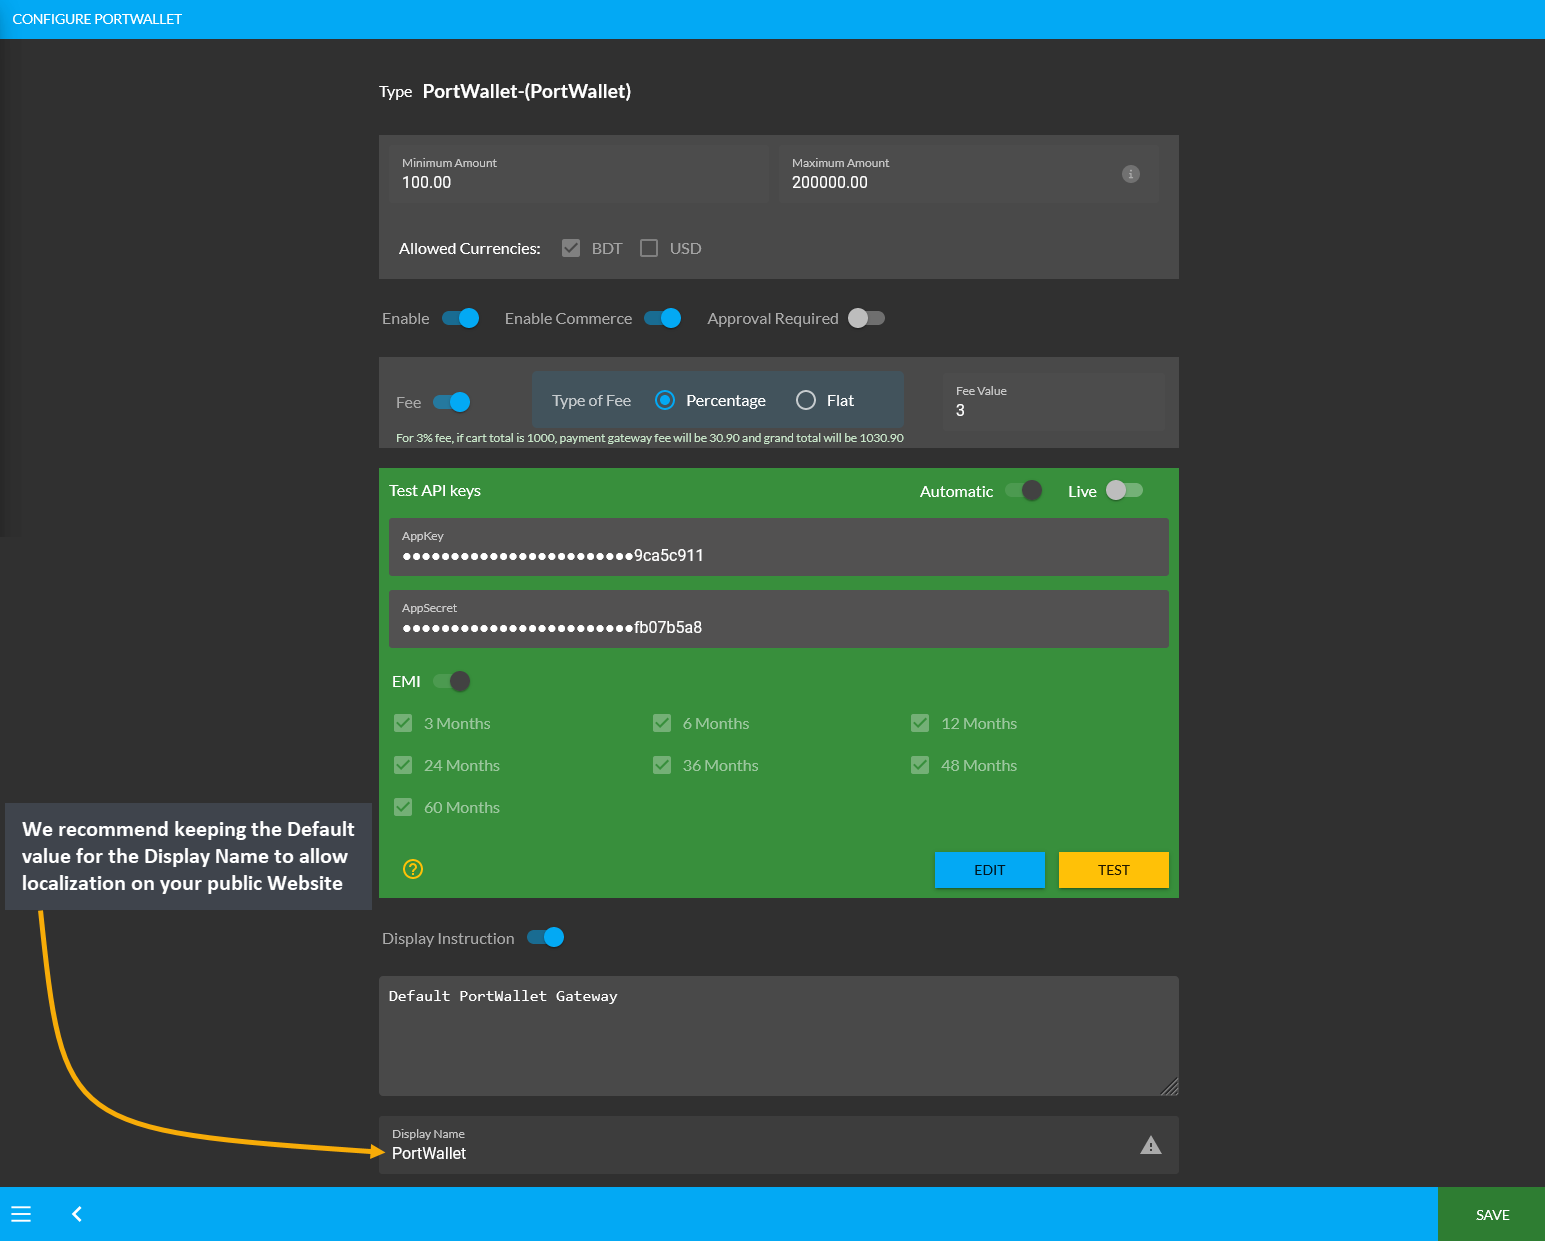
Payment Gateway: SSL Commerz
While configuring the SSL Commerz Payment Gateway, Shop Owner is recommended not to make any change to the Display Name. Therefore, please keep the default name specified because it enables localization on your public, customer facing Website. For instance, if the language is switched from English to Bangla, it will actually change to Bangla. However, if the Display Name is changed, then the Shop Owner will lose all these features.
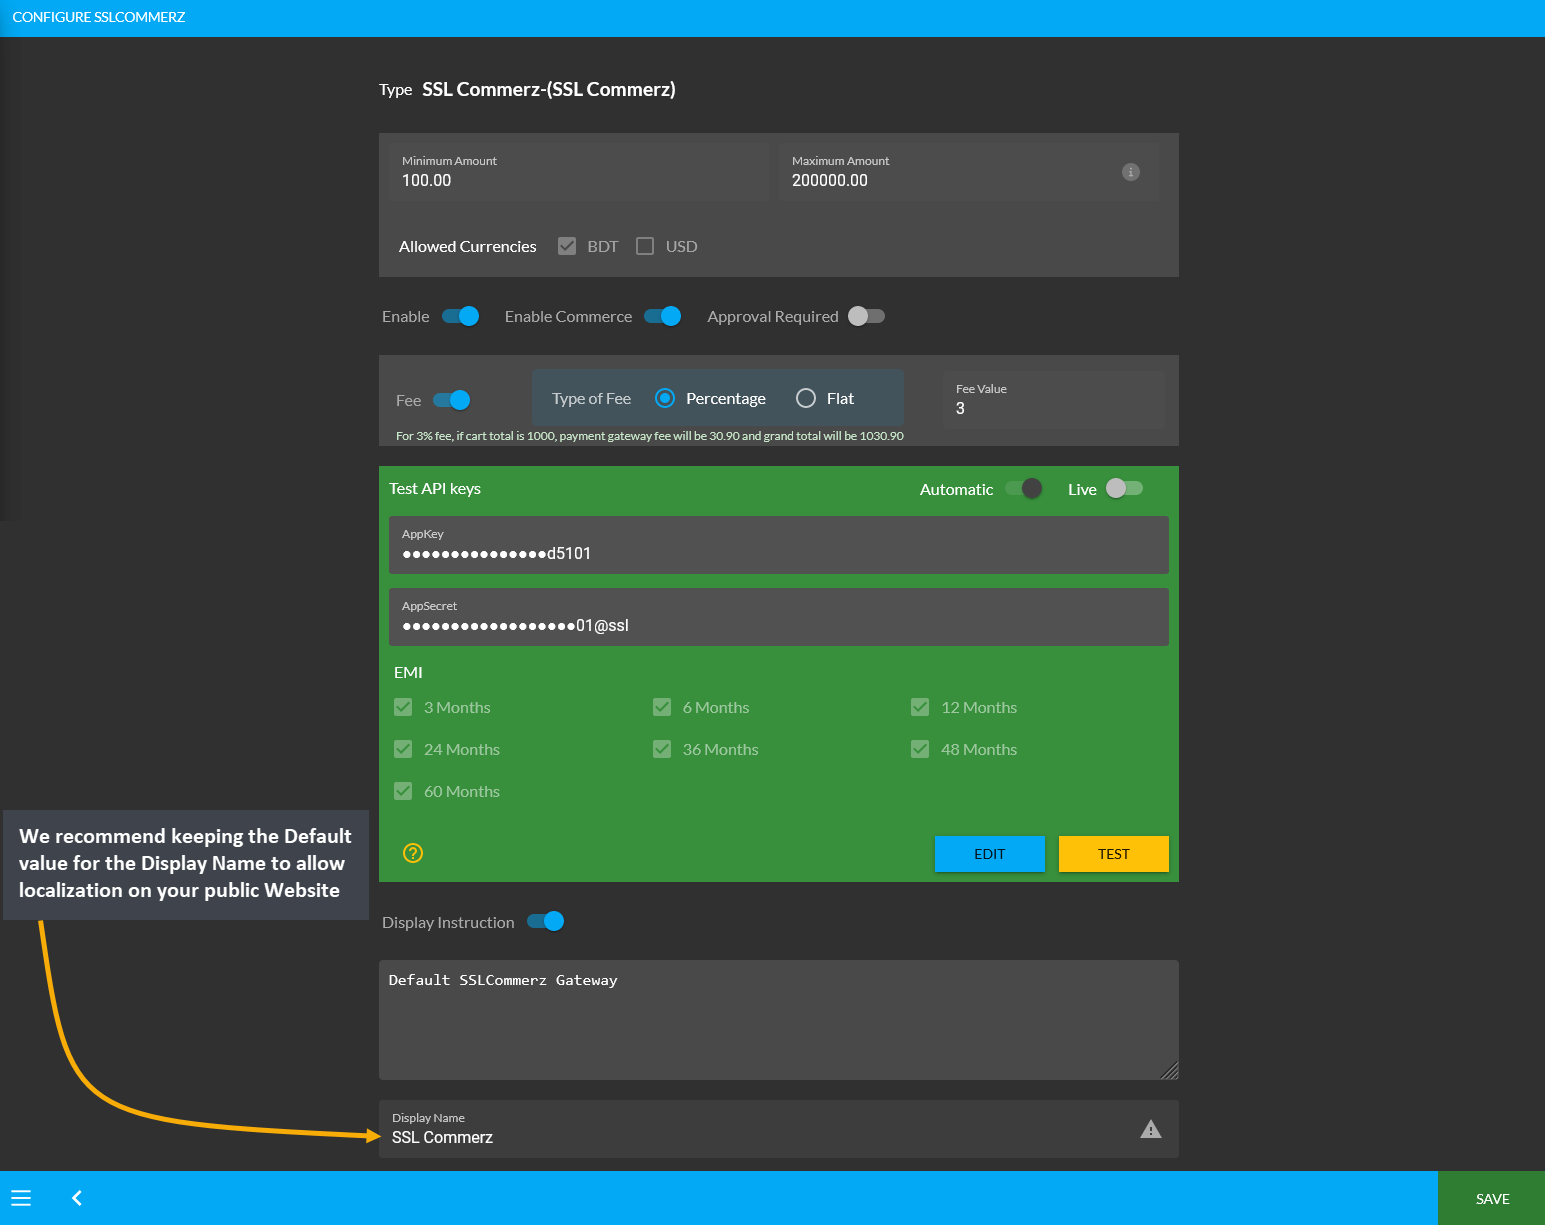
Payment Gateway: BKash
While configuring the BKash Payment Gateway, it is recommended that the Shop Owner makes no change to the Display Name. Therefore, please keep the default name specified because it enables localization on your public, customer facing Website. For instance, if the language is switched from English to Bangla, it will actually change to Bangla. However, if the Display Name is changed, then the Shop Owner will lose all these features.
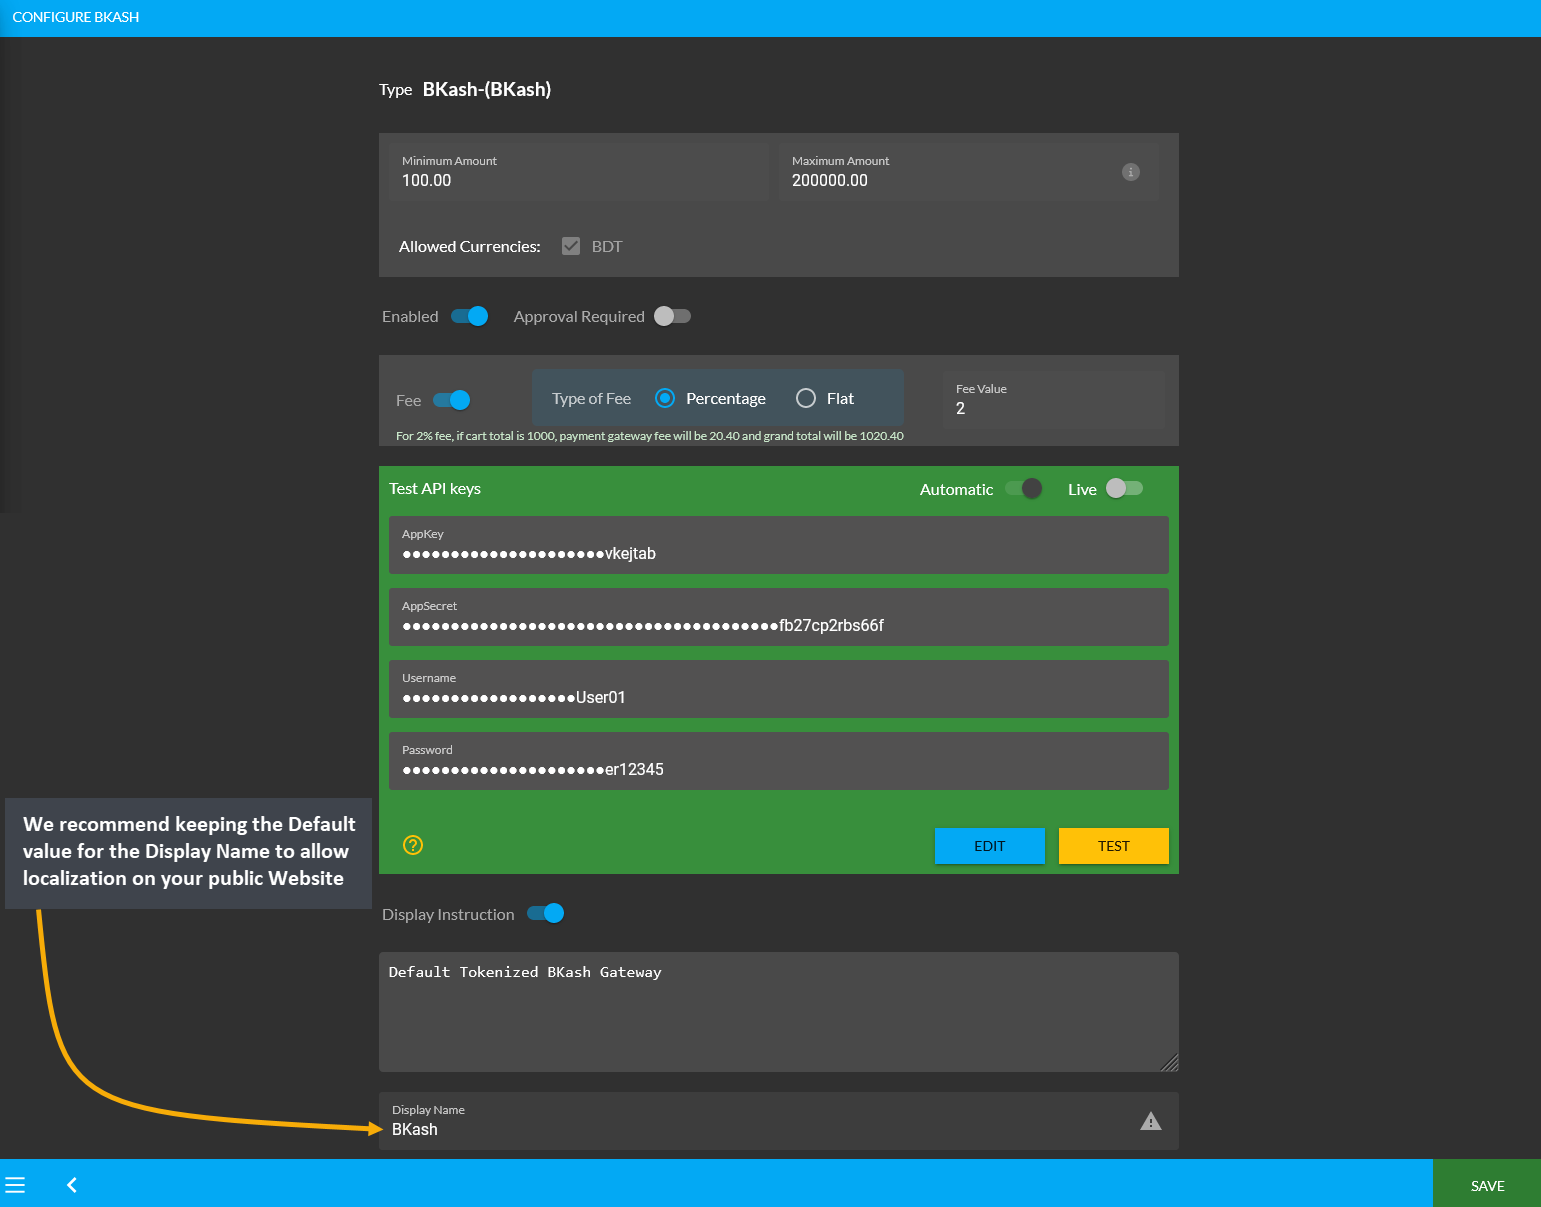
Payment Gateway: Nagad (Manual)
While configuring the Nagad (Manual) Payment Gateway, it is recommended that the Shop Owner makes no change to the Display Name. Therefore, please keep the default name specified because it enables localization on your public, customer facing Website. For instance, if the language is switched from English to Bangla, it will actually change to Bangla. However, if the Display Name is changed, then Shop Owner will lose these features.
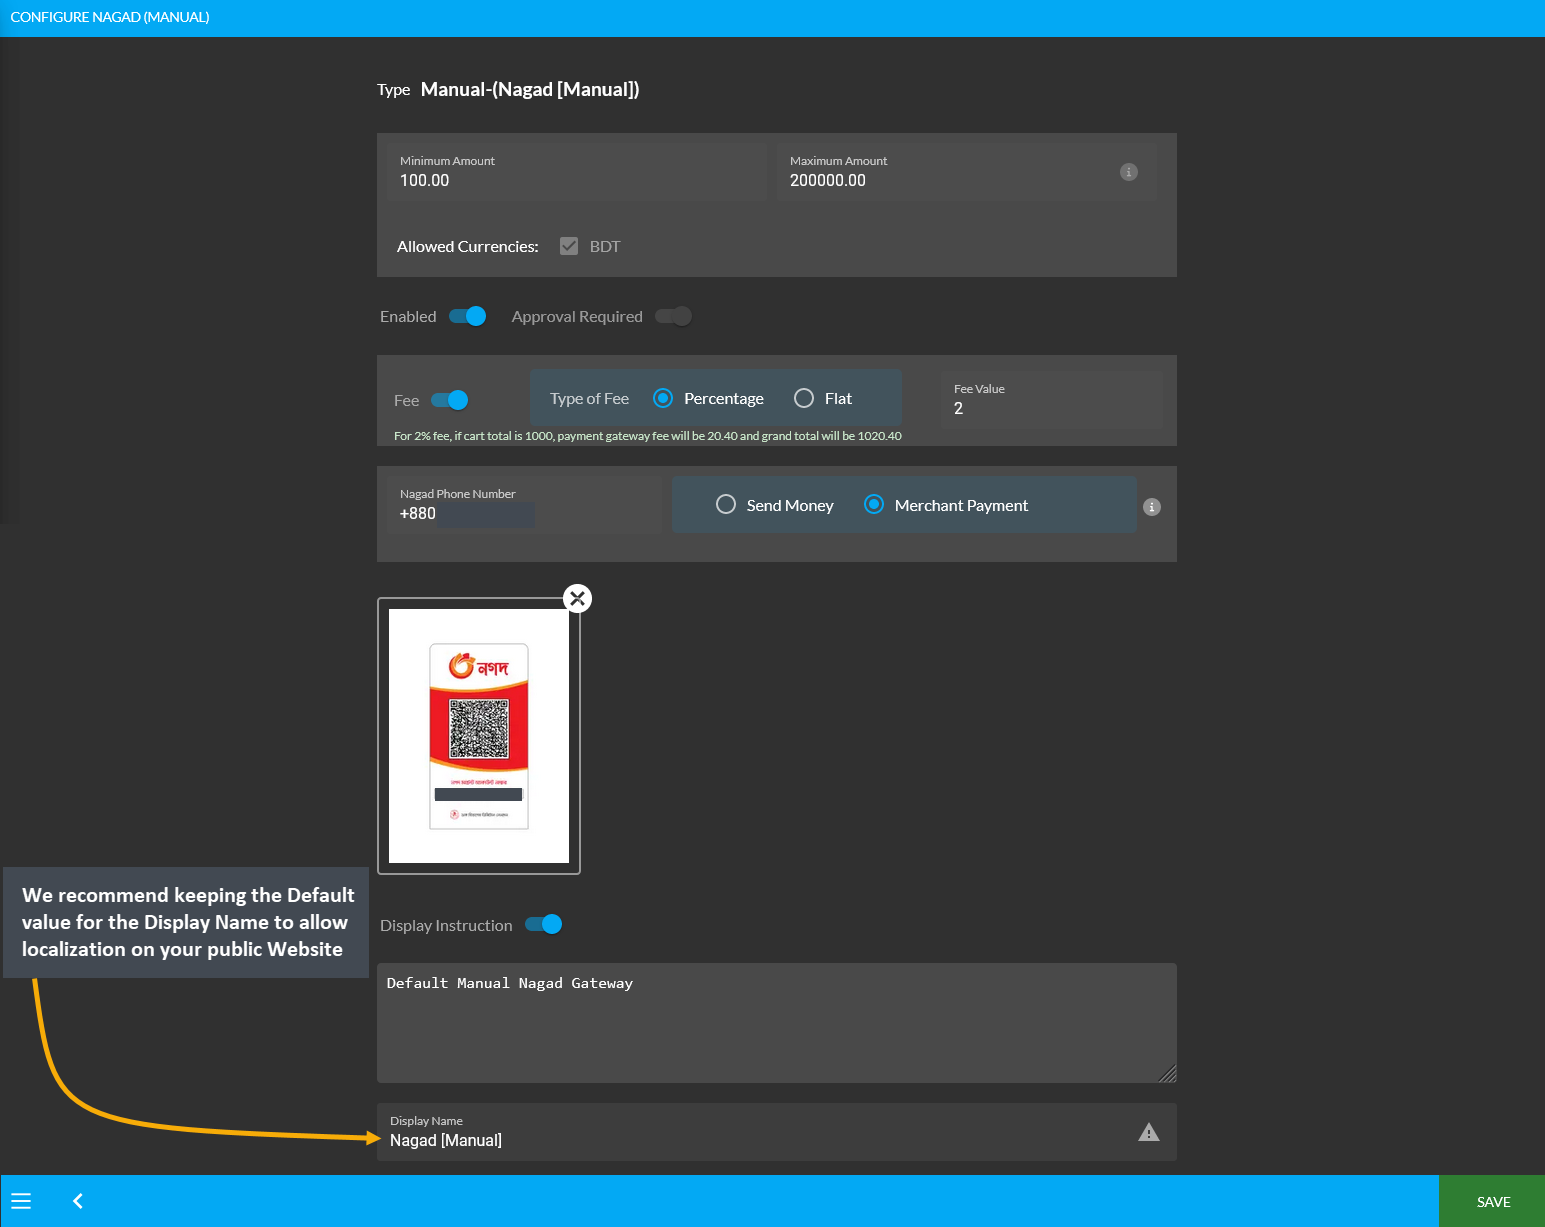
Payment Gateway: BKash (Manual)
While configuring the BKash (Manual) Payment Gateway, it is recommended that the Shop Owner makes no change to the Display Name. Therefore, please keep the default name specified because it enables localization on your public, customer facing Website. For instance, if the language is switched from English to Bangla, it will actually change to Bangla. However, if the Display Name is changed, then Shop Owner will lose these features.
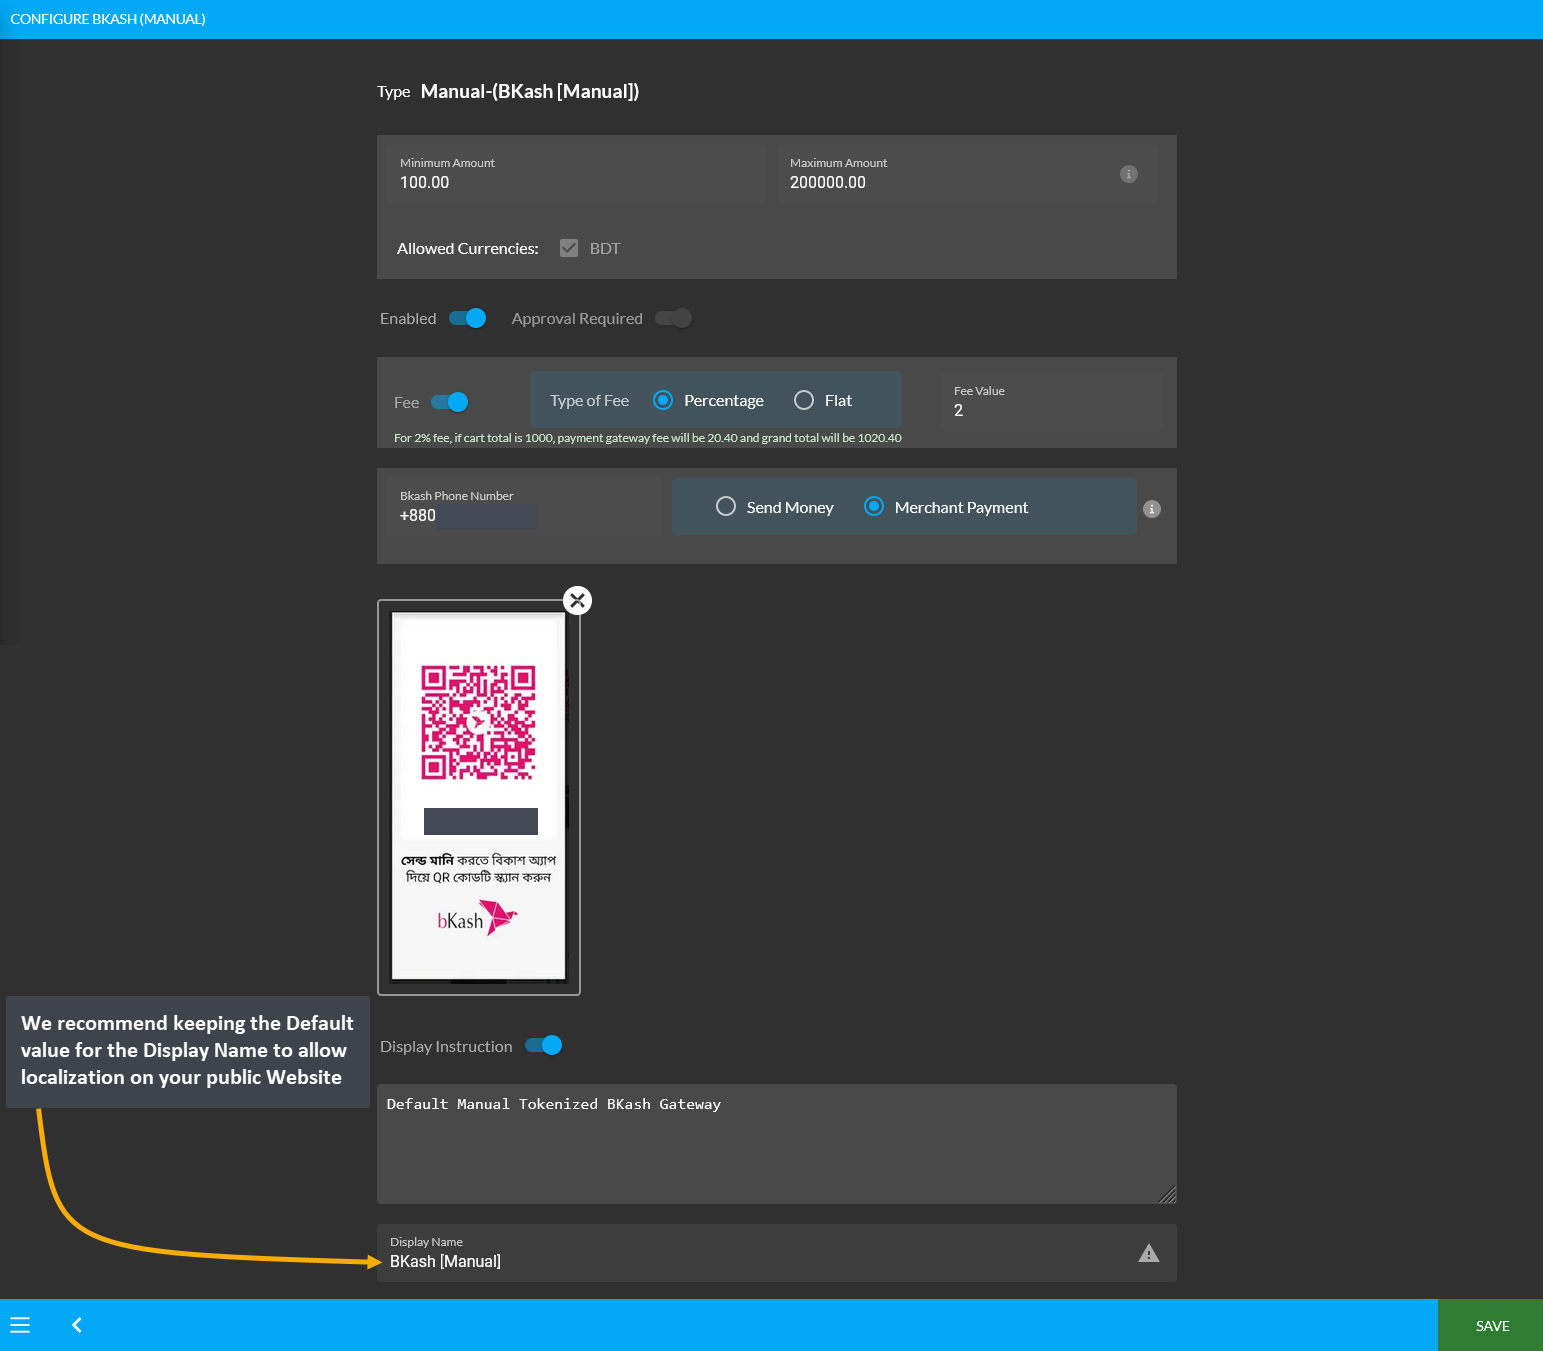
Shipment Gateway: Direct
While configuring the Direct Shipment Gateway, it is recommended that the Shop Owner makes no change to the *Display Name. Therefore, please keep the default name specified because it enables localization on your public, customer facing Website. For instance, if the language is switched from English to Bangla, it will actually change to Bangla. However, if the Display Name is changed, then the Shop Owner will lose all these features.
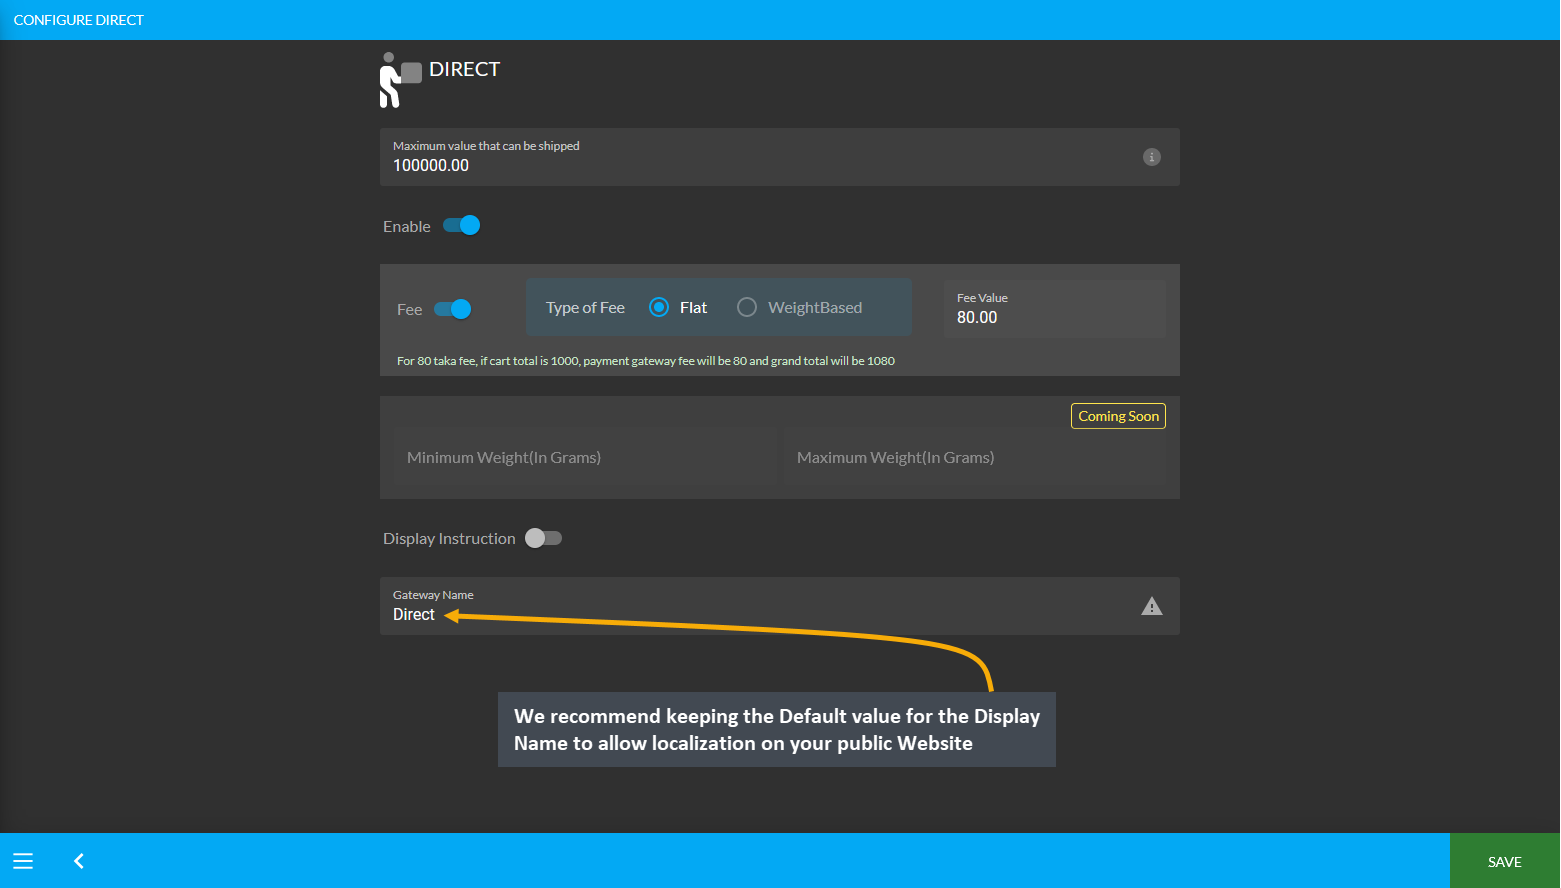
Shipment Gateway: In Store Pickup
While configuring the In Store Pickup Shipment Gateway, it is recommended that the Shop Owner makes no change to the Display Name. Therefore, please keep the default name specified because it enables localization on your public, customer facing Website. For instance, if the language is switched from English to Bangla, it will actually change to Bangla. However, if the Display Name is changed, then Shop Owner will lose these features.
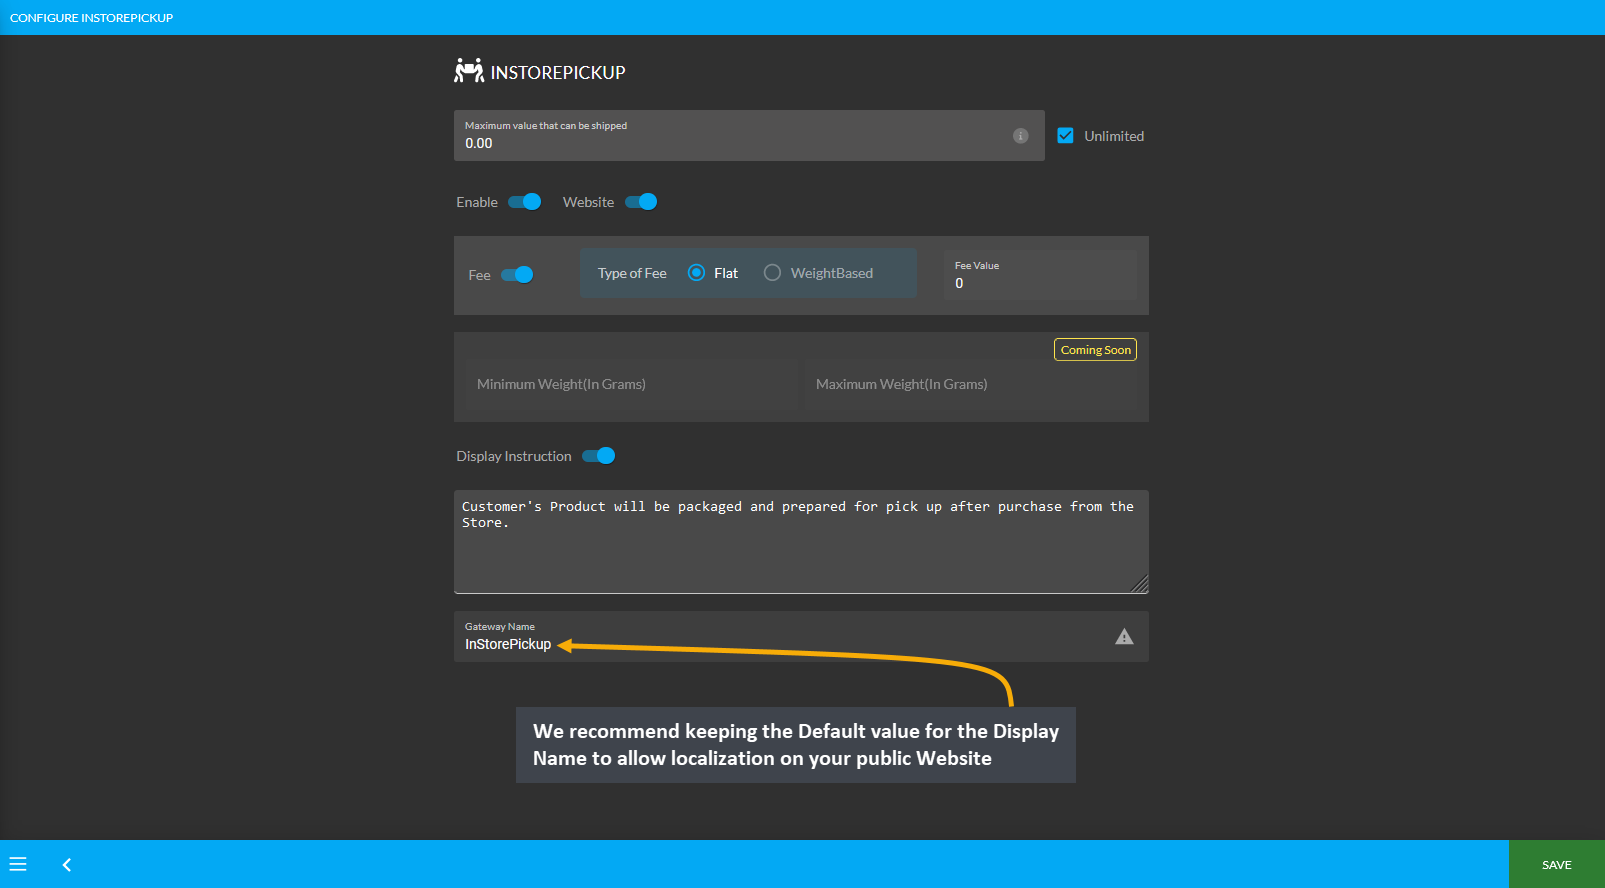
Shipment Gateway: All Carrier
While configuring the Shipment Gateway for All Carriers, it is recommended that the Shop Owner makes no change to the Display Name. Therefore, please keep the default name specified because it enables localization on your public, customer facing Website. For instance, if the language is switched from English to Bangla, it will actually change to Bangla. However, if the Display Name is changed, then Shop Owner will lose these features.
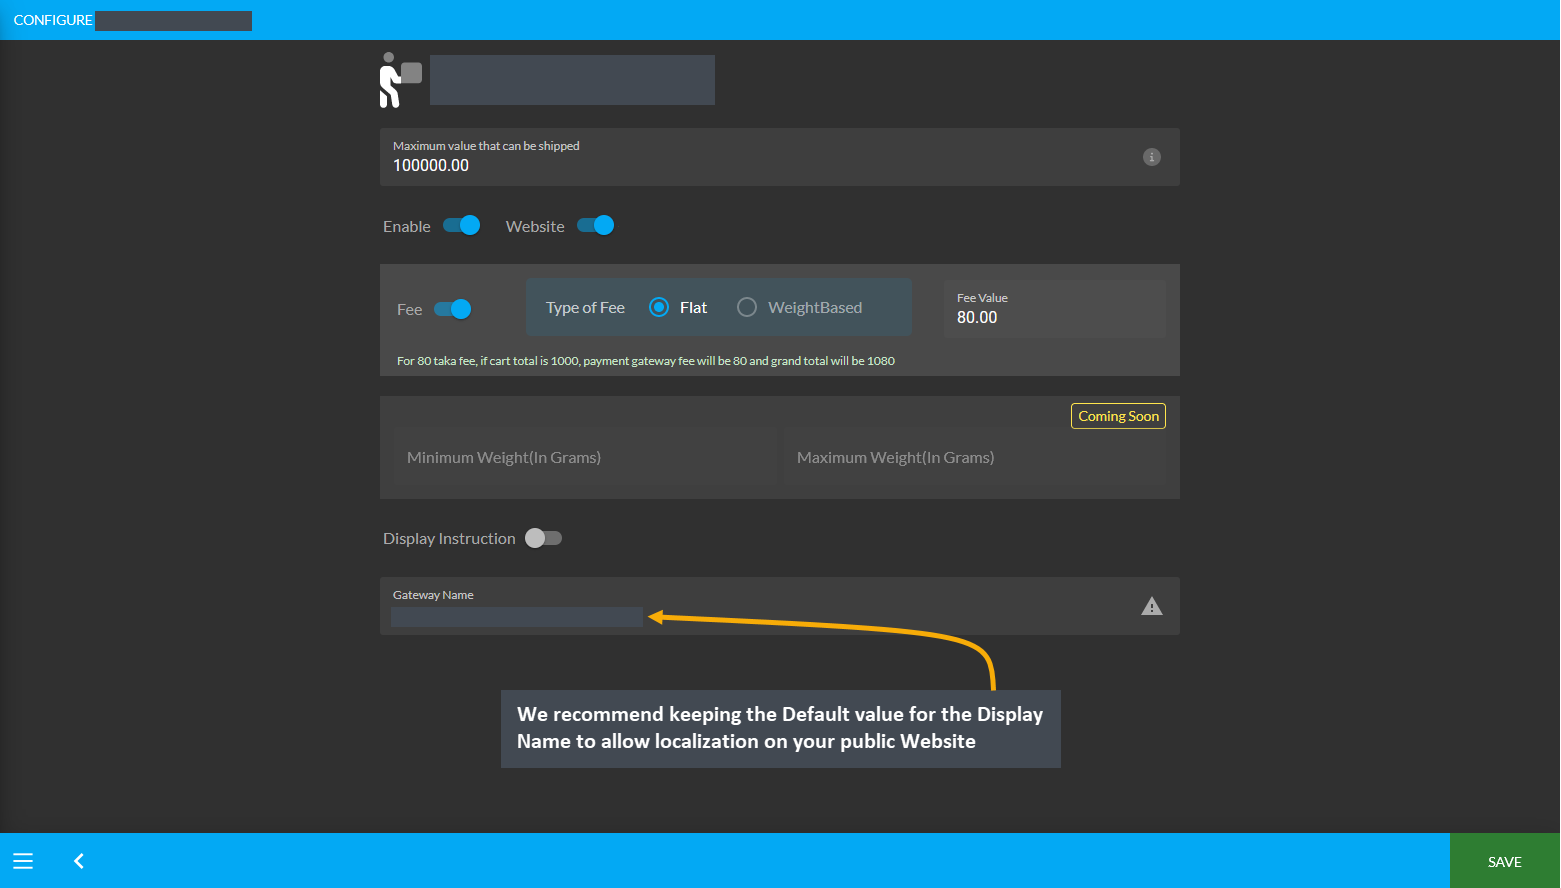
9 - User Profile
Configure basic User Information from View Profile tab.
Click on the View Profile option to configure basic User information like Name, Phone Number, Email, and Password.
Open the Settings menu by clicking on the icon, and click on View Profile to edit User Information that will redirect to this Page. Here, there are options to edit First and Last Name, Phone Number and Email Address changes are not supported at this moment. To change the Password, click the Change Password button.
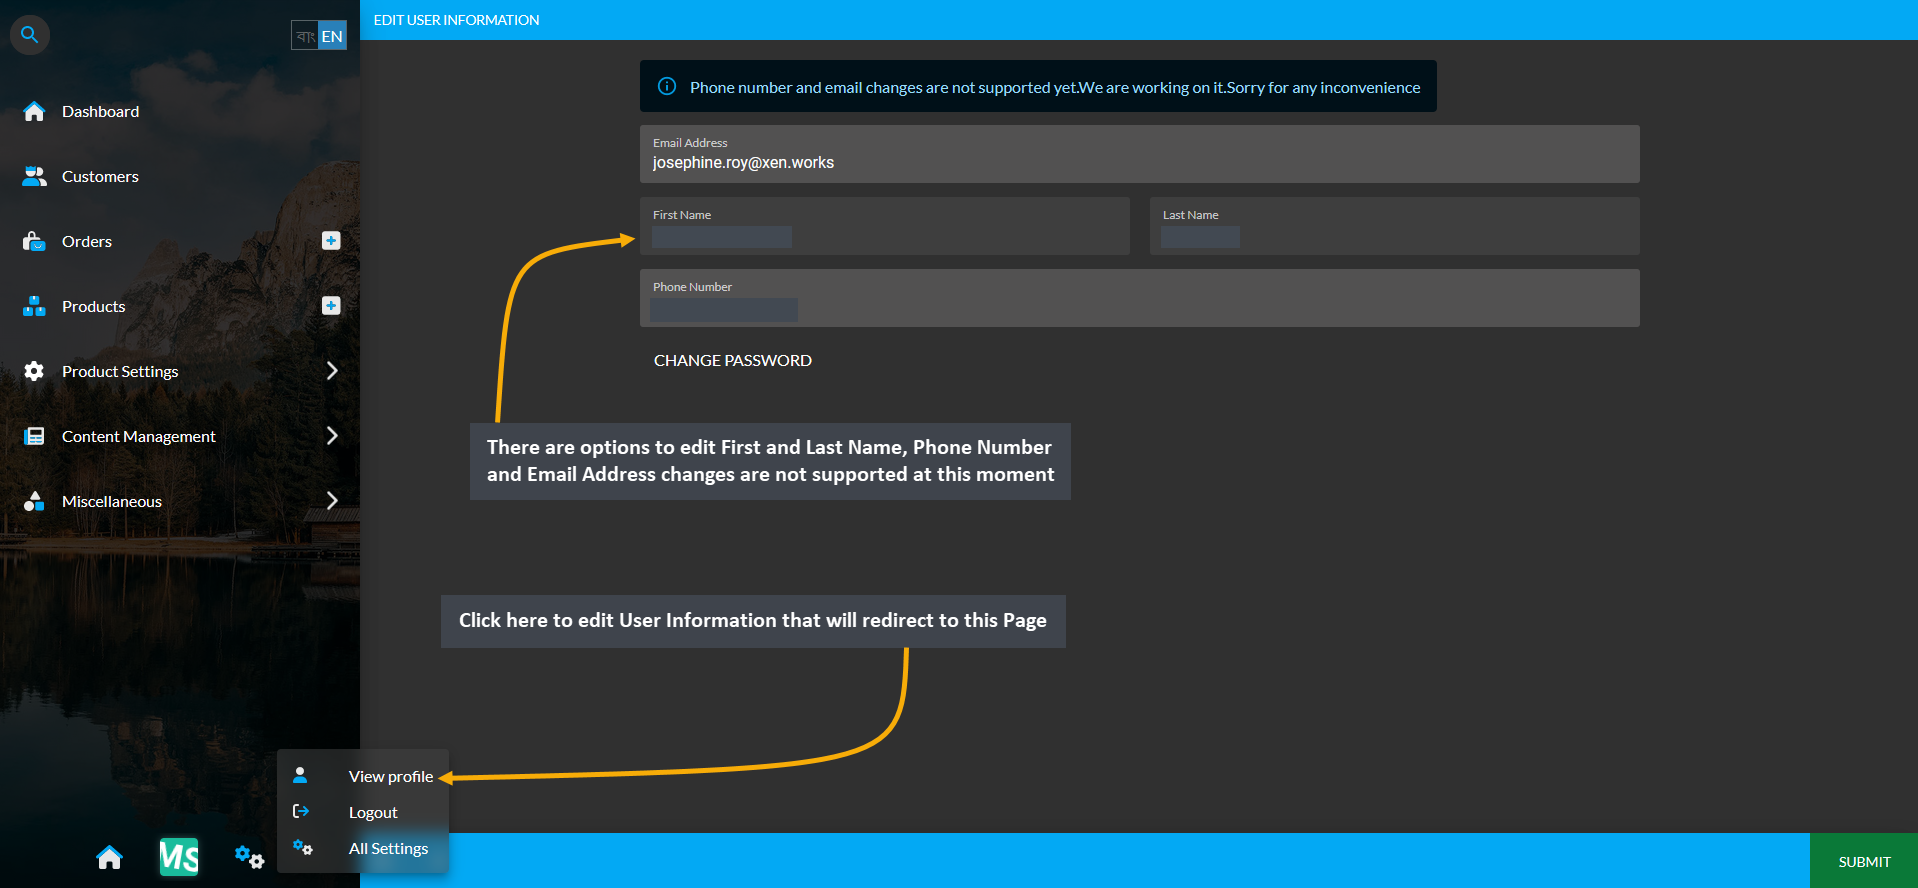
Image 1: Click on View Profile option to edit all the basic User Information from the Settings menu.
From there, set the target Password with upper case letters, lower case letters, and numerical characters. Confirm the Password again and click Submit to save all the changes. This Password can be used to Login by the User now.
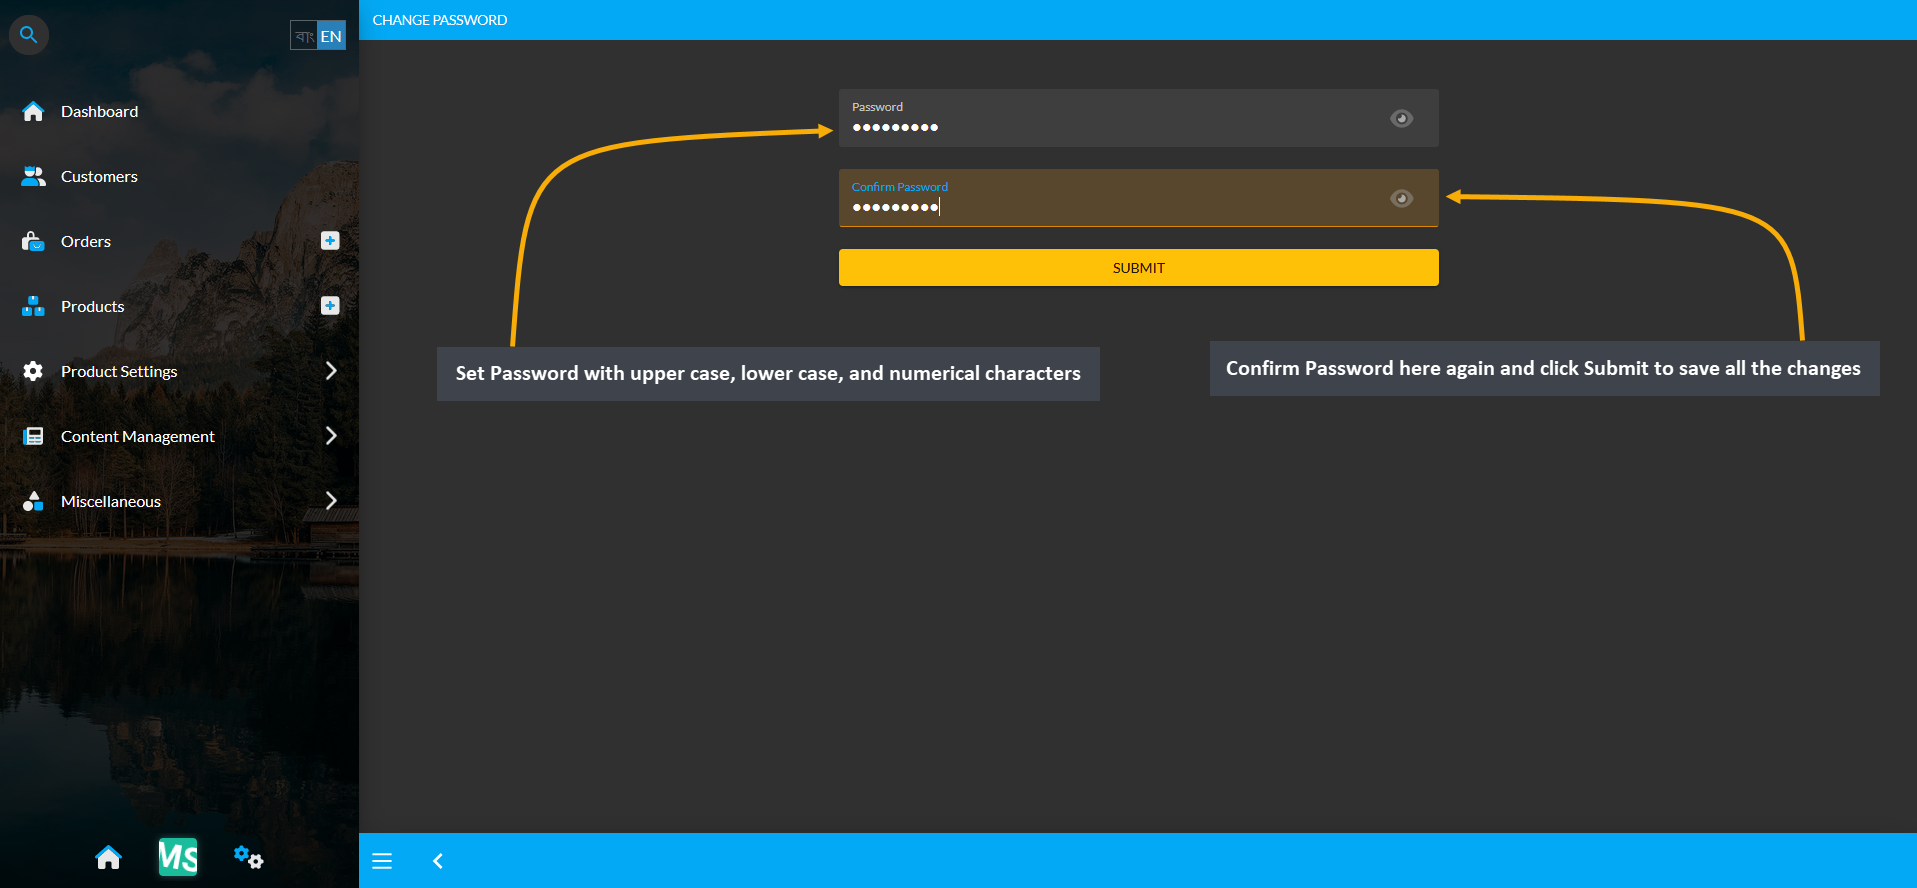
Image 2: Set the target Password with upper case, lower case, and numerical characters for Login.
10 - Customers
Learn More about Regular Customers, Credit Customers, and Credit Suppliers.
Click on the Customers Tab to view Customer details, Orders, Cost Basis, and their PC builds etc.
Customer Types
Click on Customers tab that will show all types of Customers by default. On the Admin Panel, the Shop Owner can view three types of Customers - All Customers (Regular Customers), Credit Customers, and Credit Suppliers. Regular Customers can purchase Products from the Website using all types pf Payment Methods like Cash, Cash On Pickup, Cheque, Credit Card, SSL Commerz, PortWallet, Bank Transfer, Nagad, and BKash except On Credit (Due).
Among these three Customer types, only Credit Customer and Credit Supplier has Credit Limit and they can use On Credit (Due) to purchase Products. Regular Customer does not have a Credit Limit and they cannot use On Credit (Due) to purchase Products, but all other types of Payment methods as mentioned above.
List of Customers
| Customers Types on the Admin Panel: |
|---|
| Regular Customers: Can purchase Products using different Payment Gateways except On Credit (Due). |
| Credit Customers: Are given a Credit Limit through which they can buy Products with On Credit (Due). |
| Credit Suppliers: Can both buy and sell Products with Credit Limit and all other Payment Gateways. |
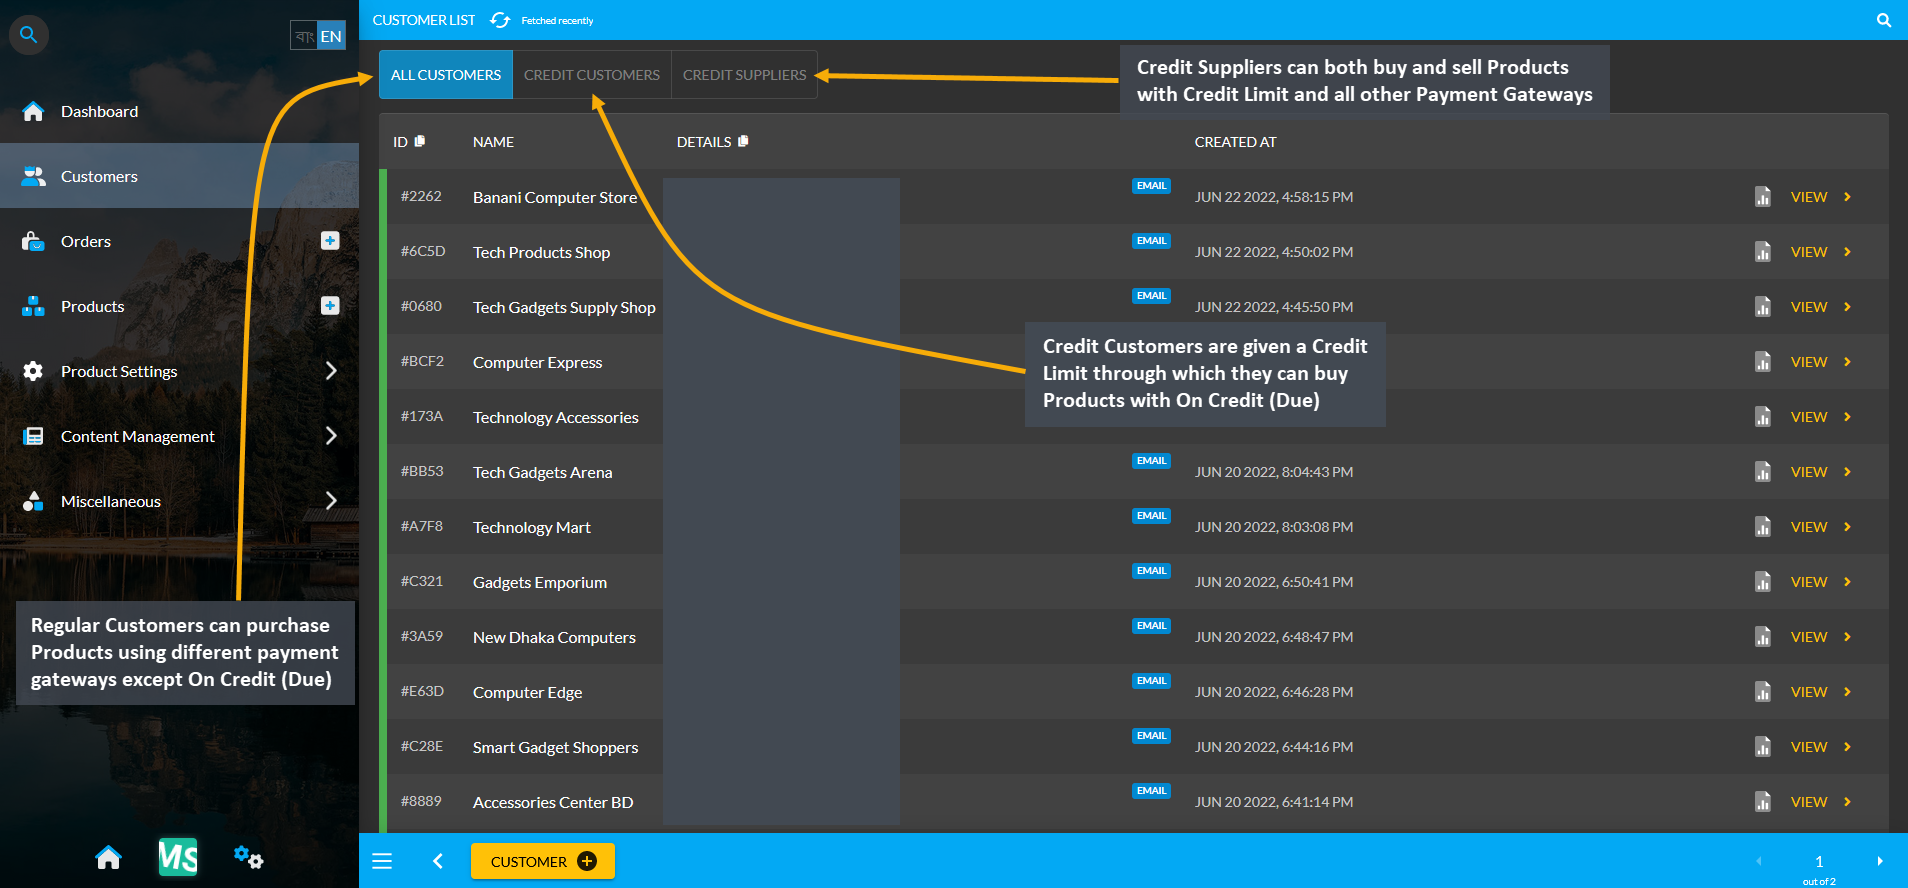
Image 1: Shop Owners can create and manage Regular Customers, Credit Customers, and Credit Suppliers.
Credit Customers
Customers who are granted an amount of Credit Limit will only turn into Credit Customers which differentiates them from regular Customers. The list of Credit Customers can be found under Customers module where the issued Credit Limit will be visible for each Credit Customer, i.e. here Farmgate PC Retailers has a Credit of 15,000 BDT. Check their Credit Information by clicking on View that will redirect to the Customer Dashboard.
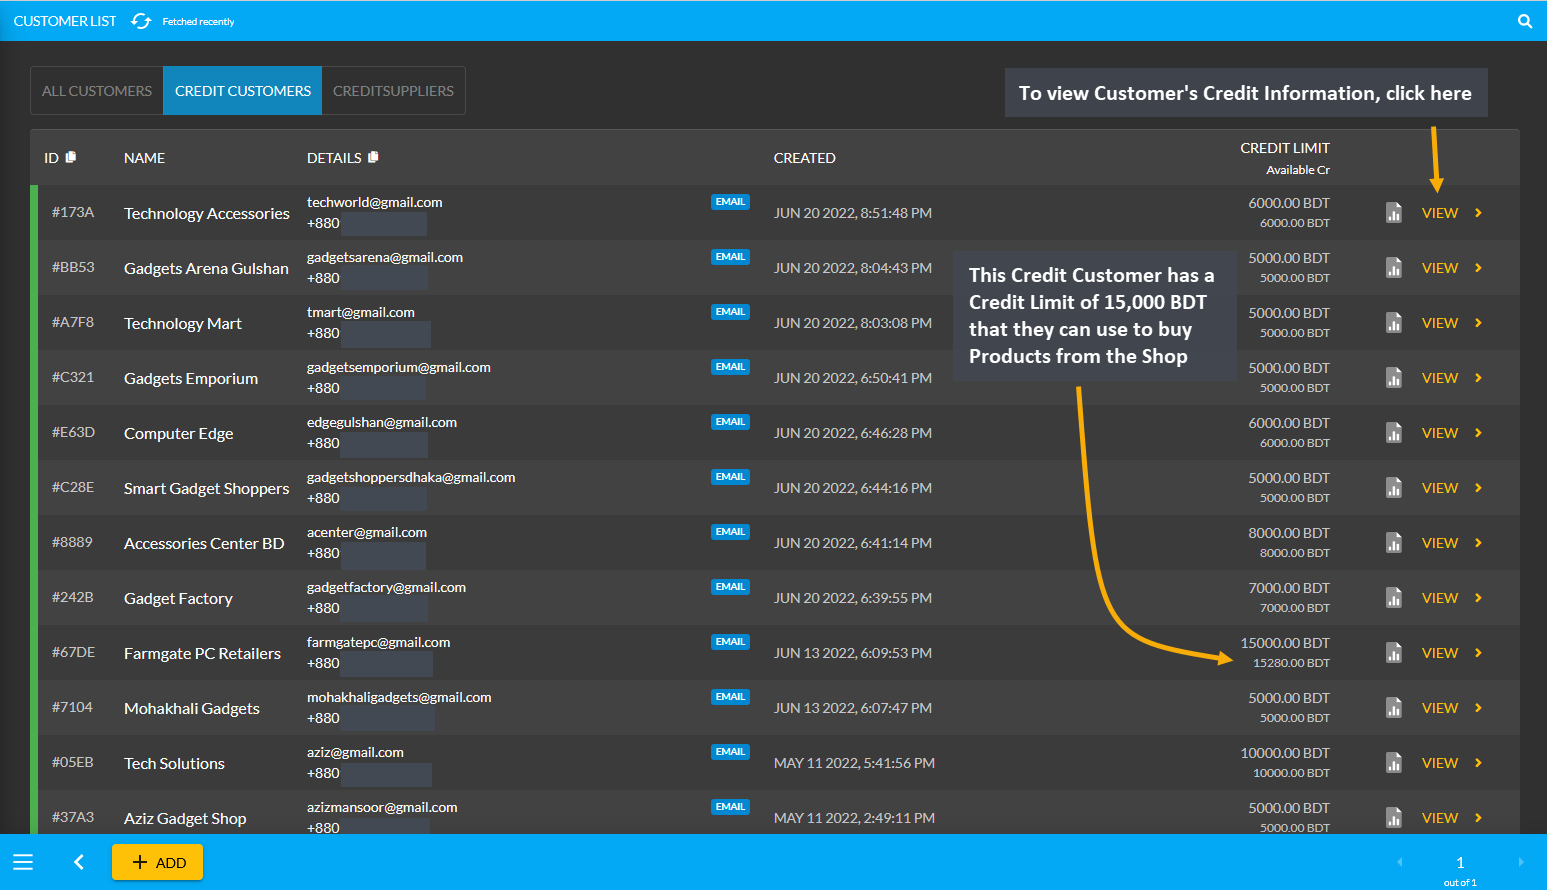
Image 2: Customers granted an amount of Credit Limit by Shop Owners will only turn into Credit Customers.
Credit Suppliers
Credit Suppliers are companies who can buy Product(s) from and also sell Product(s) to the Shop Owner. They will be granted Credit Limit and also permission to Sell Product(s) to the Shop Owner. With the Credit Limit, the Credit Suppliers can purchase Product(s) from the Shop Owner. Similarly, as the Supplier, they can sell Per Unit Product(s) to the Shop Owner. Both types of transactions will reflect on their Ledger Breakdown section.
Credit Suppliers could be selling Per Unit Product(s) like RAMs, Mice, Keyboards, and flash drives etc. Suppliers are renowned brands like Ryans Computer, UCC, or Star Tech. What differentiates the Credit Suppliers from the Credit Customers is that they have the permission to sell Product(s) which Credit Customers do not have.
The list of Credit Suppliers can be found under Customers module where Owed amount, Due amount, and issued Credit Limit will be visible for each Credit Supplier. Here, New Dhaka Computers has Credit Limit of 5,000 BDT and Due amount of 1,100 BDT which means they will get 1,100 BDT from the Shop Owner. Conversely, Mohammadpur Computers has Credit Limit of 5,000 BDT and Owed amount of 2,000 BDT which means they will pay 2,000 BDT to the Shop Owner. Check their Credit Information by clicking on View that will redirect to the Customer Dashboard.
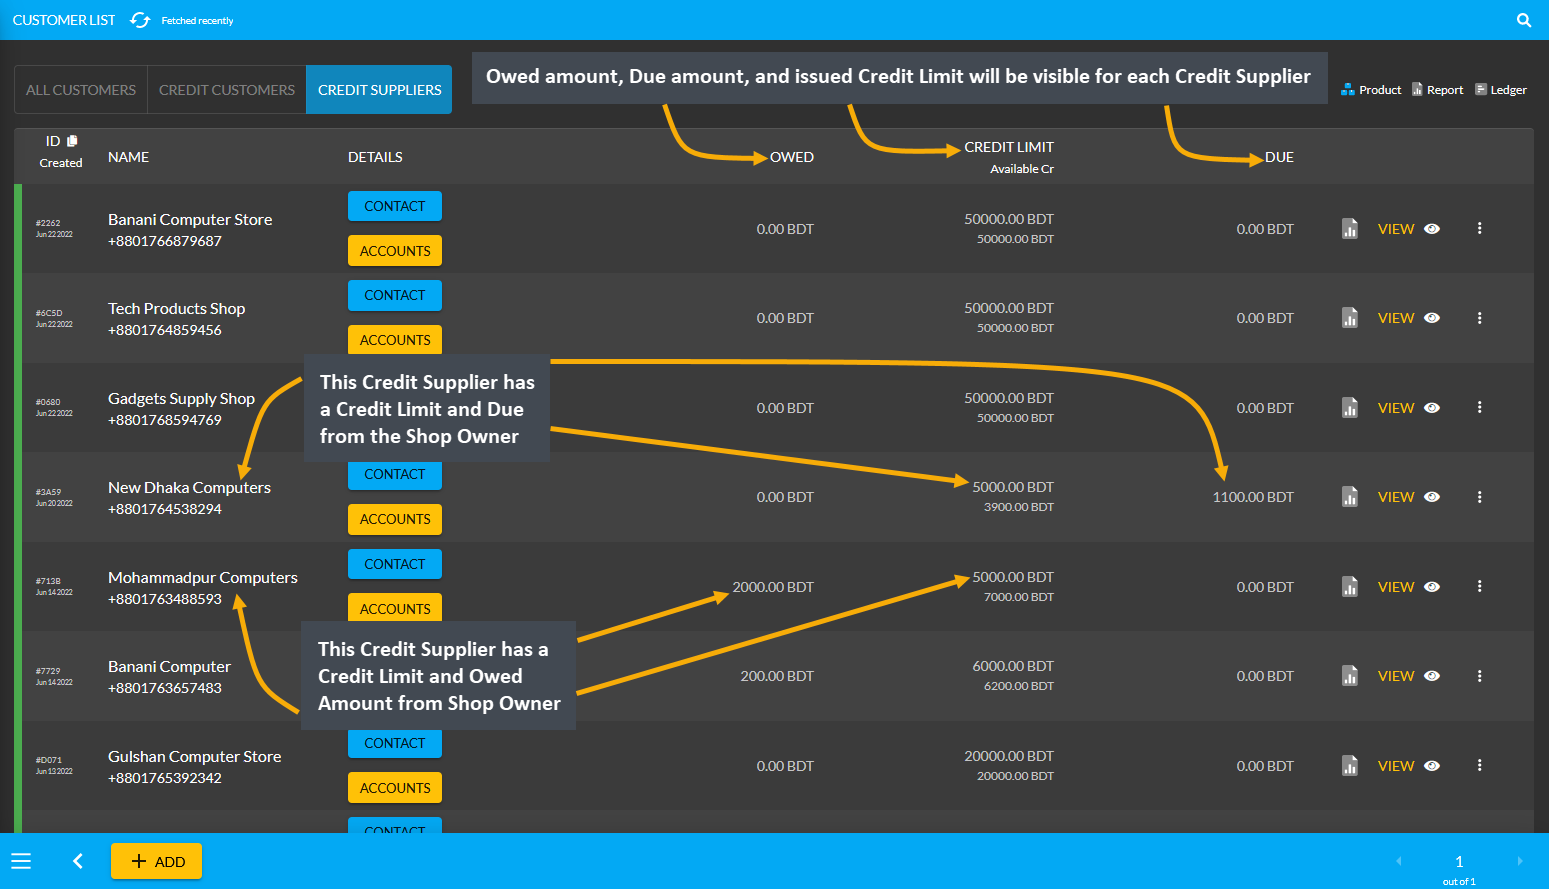
Image 3: Credit Suppliers are companies who can buy Products from and also sell Products to Shop Owner.
10.1 - Create New Customer
Learn More about how to create New Customer, view their Cost Basis, and manage Customer Dashboard.
Create New Customer
To create New Customer, a new Order needs to be placed which will automatically create a New Customer. In order to create a New Order, go to the Orders tab, and click on the + or Order button that will open the Order Cart.

Image 1: Click the + or Order button to place a New Order which will automatically create a New Customer.
Create New Order
Clicking the Order create button will open a New Cart to place New Order. The Create Order page will open a Cart, where Customer’s contact information with name, phone, email, and shipping address needs to be filled out first. Then, search for Products under Cart and add Quantity of Products that needs to be ordered. Check the Product rate, item total, subtotal, and total. Click the Proceed button to save all changes and move to the next step.
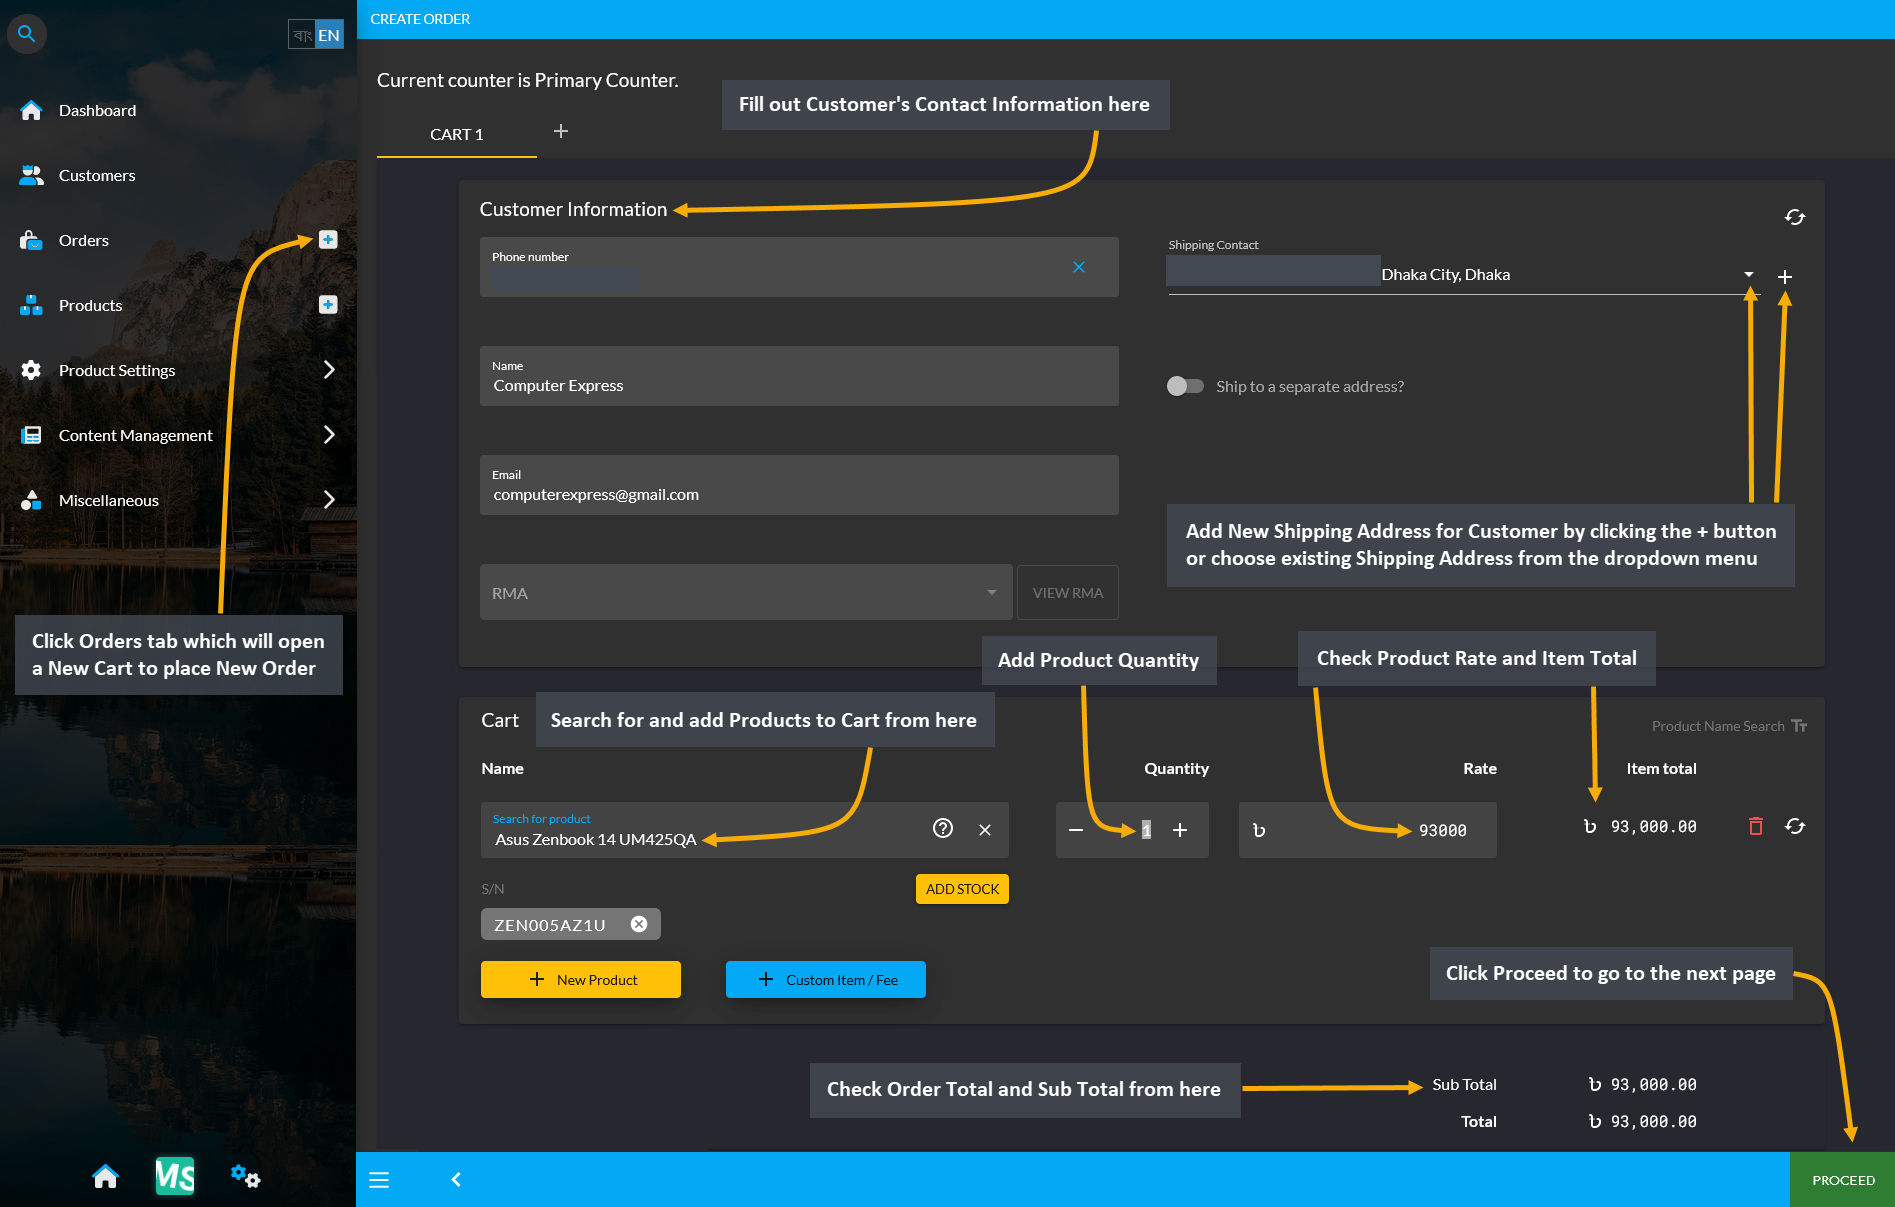
Image 2: Complete the Order Cart with Customer information and add Products to Cart with target Quantities.
Add Shipping Address
While updating the Cart, Shipping Address needs to be manually added for the first time for the Customer. Add a New Shipping Address by clicking the + button or choose existing Shipping Address for already created Customers from the dropdown menu. Fill out address, area, city, and post code fields. Click Submit to save all the changes. The Shipping details updated for Customer will automatically be added to their profile.
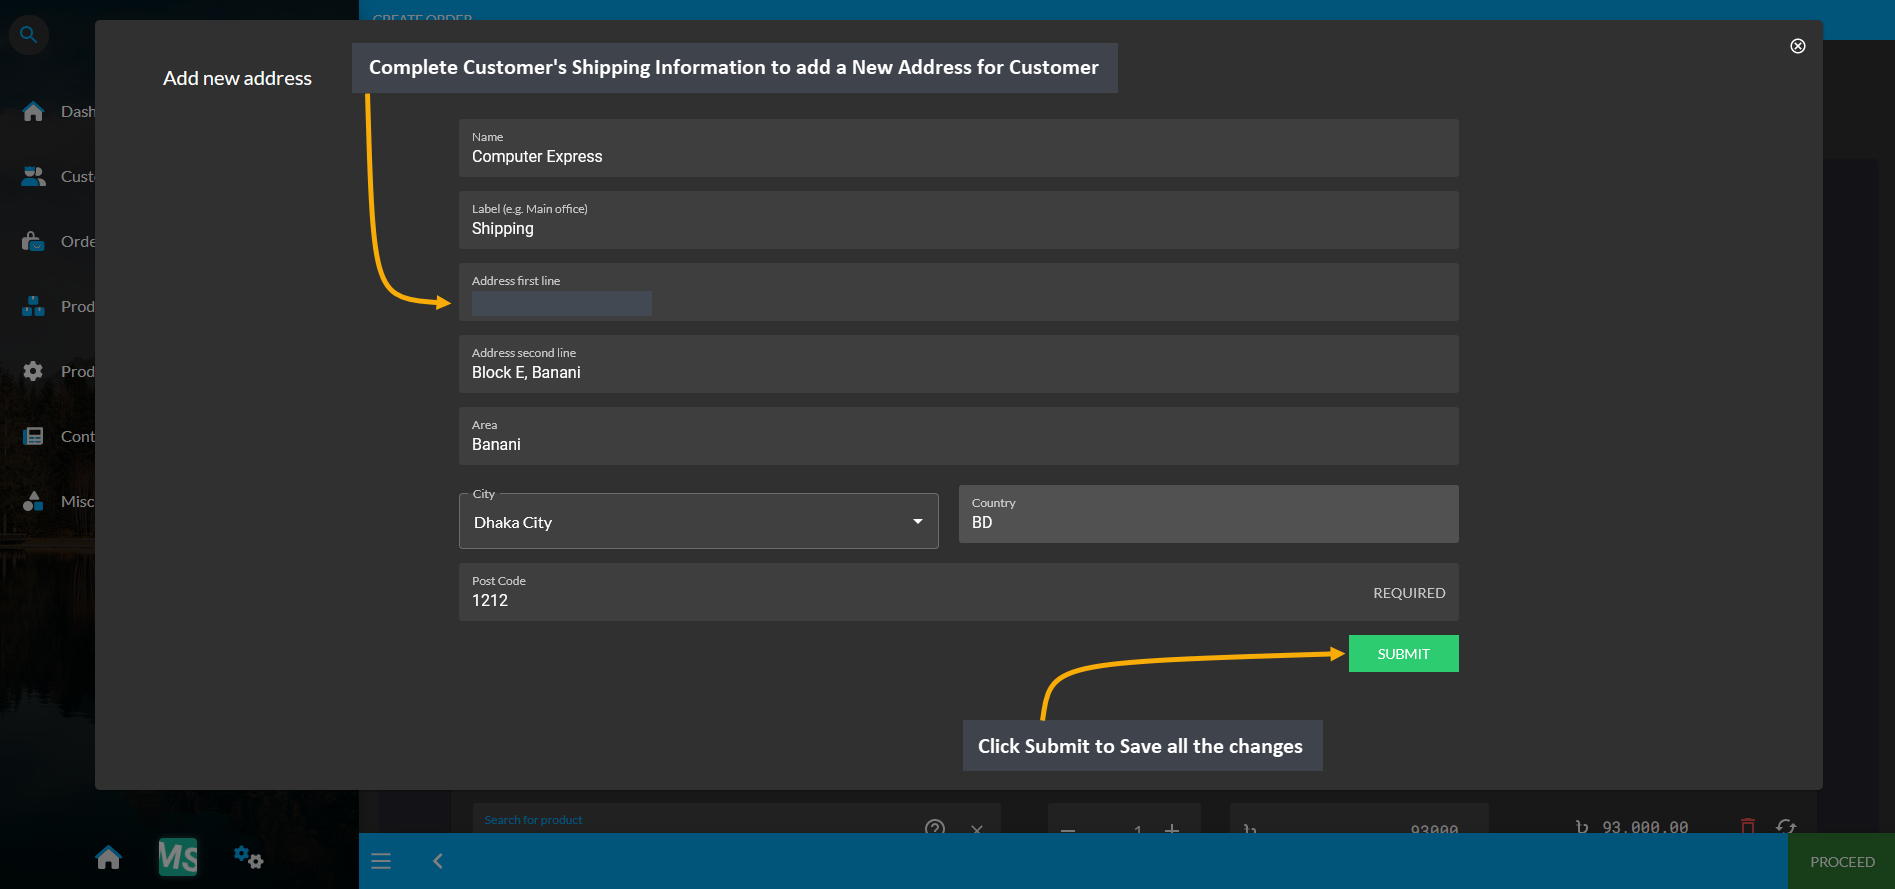
Image 3: Add New Shipping Address by clicking the + button and fill out address, area, city, and post code.
Select Shipment and Payment Options
In the next page, select a preferred Shipment and a Payment option, check Order total, and click the Confirm Order button to complete the New Order. As a result, a New Order will be placed and a New Customer will be created.
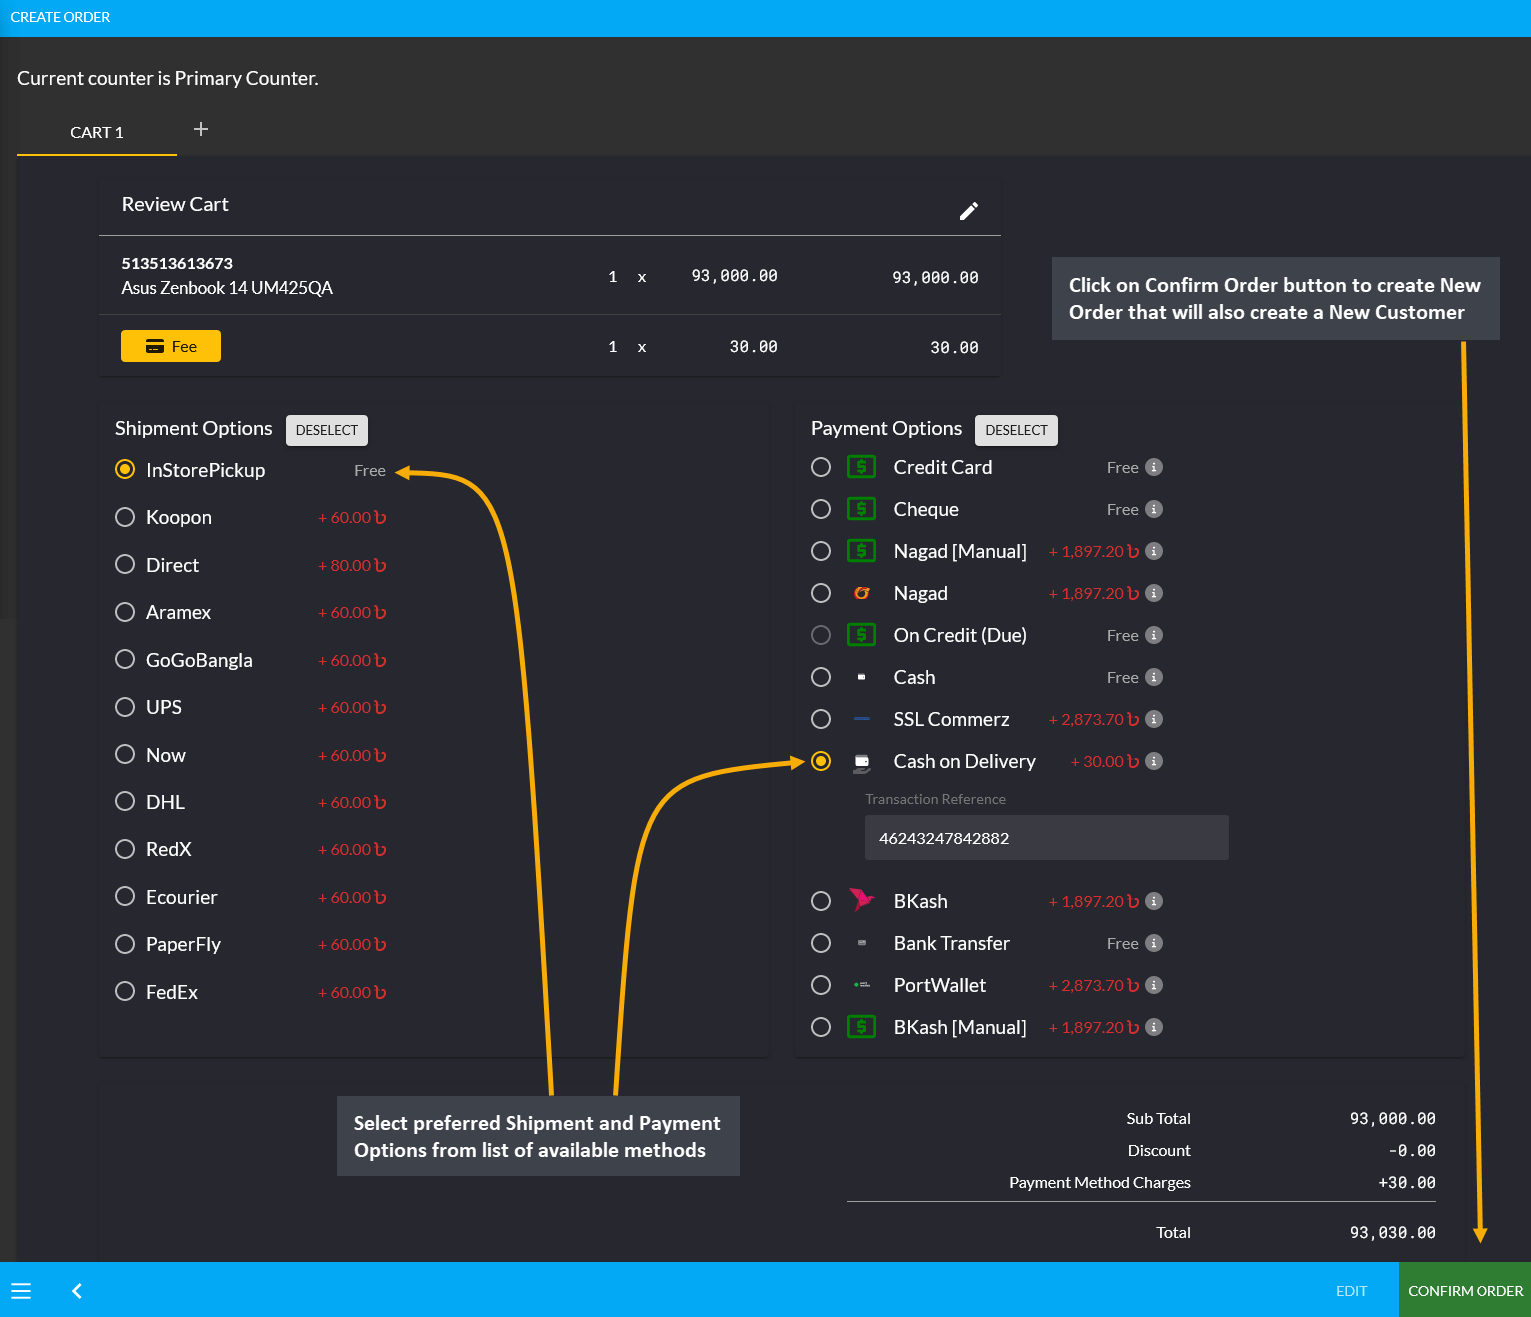
Image 4: Select preferred Shipment and Payment option, check Order total, and click Confirm Order button.
New Customer Created
Creating a New Order will automatically create a New Customer. The New Customer will now be enlisted under the All Customers List. To create a Credit Customer, click the View button that will redirect to the Customer Dashboard.
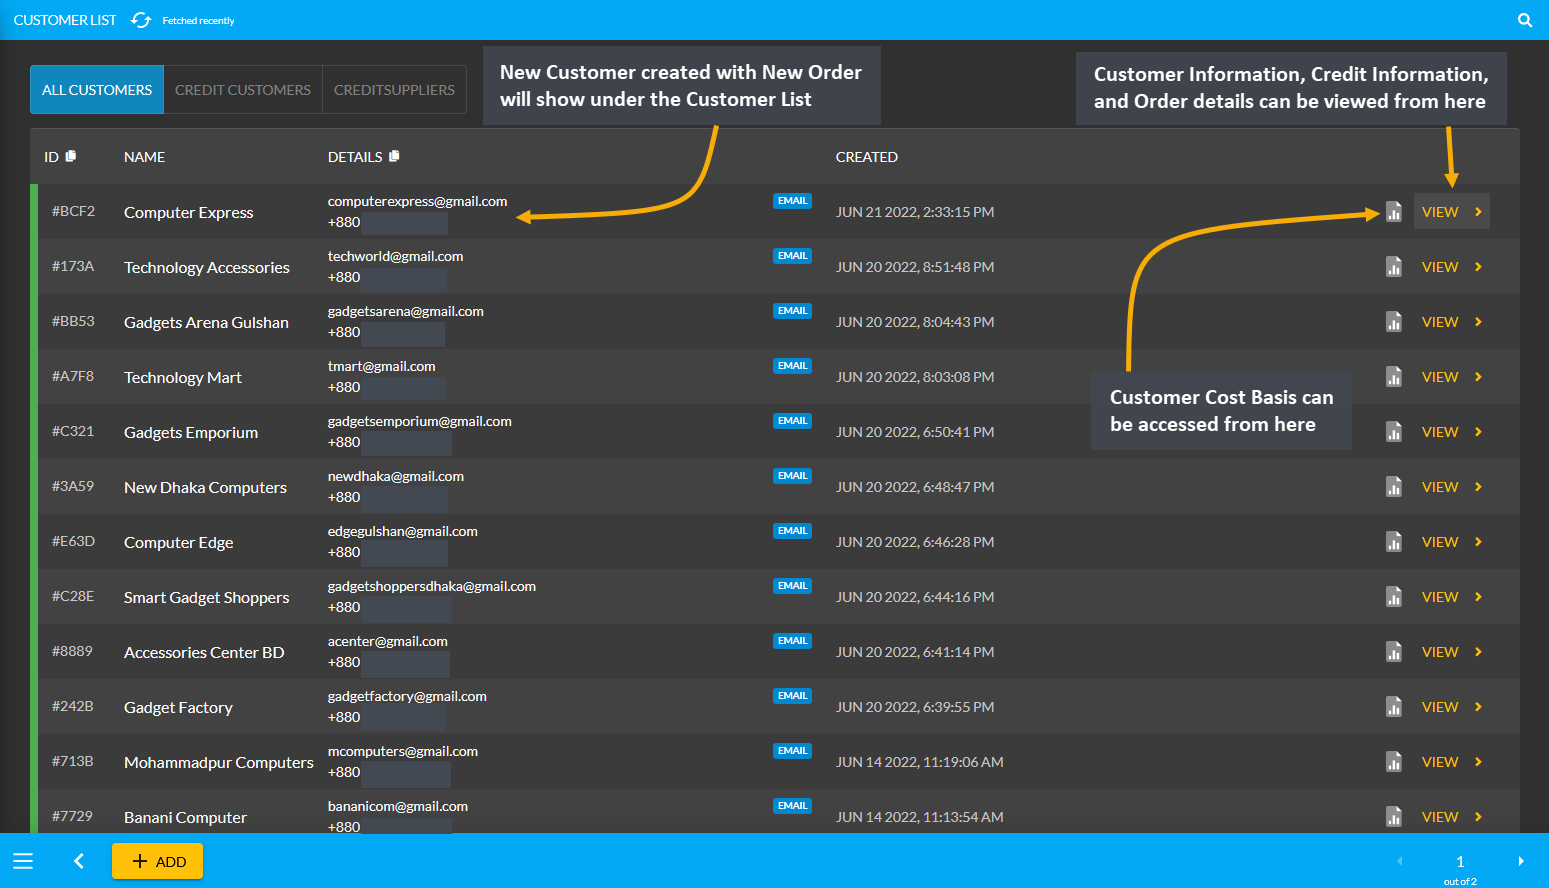
Image 5: Creating New Order will automatically create a New Customer that will be under All Customers List.
Create a Credit Customer
Customers who are granted an amount of Credit Limit will convert into Credit Customers which differentiates them from regular Customers. The list of Credit Customers can be found under Customers tab where the issued Credit Limit will be visible for each Credit Customer. Check their Credit Information by clicking on View that will redirect to the Customer Dashboard. A New Customer that is created can be converted into a Credit Customer. To create a Credit Customer, click View to go to the Customer Dashboard.
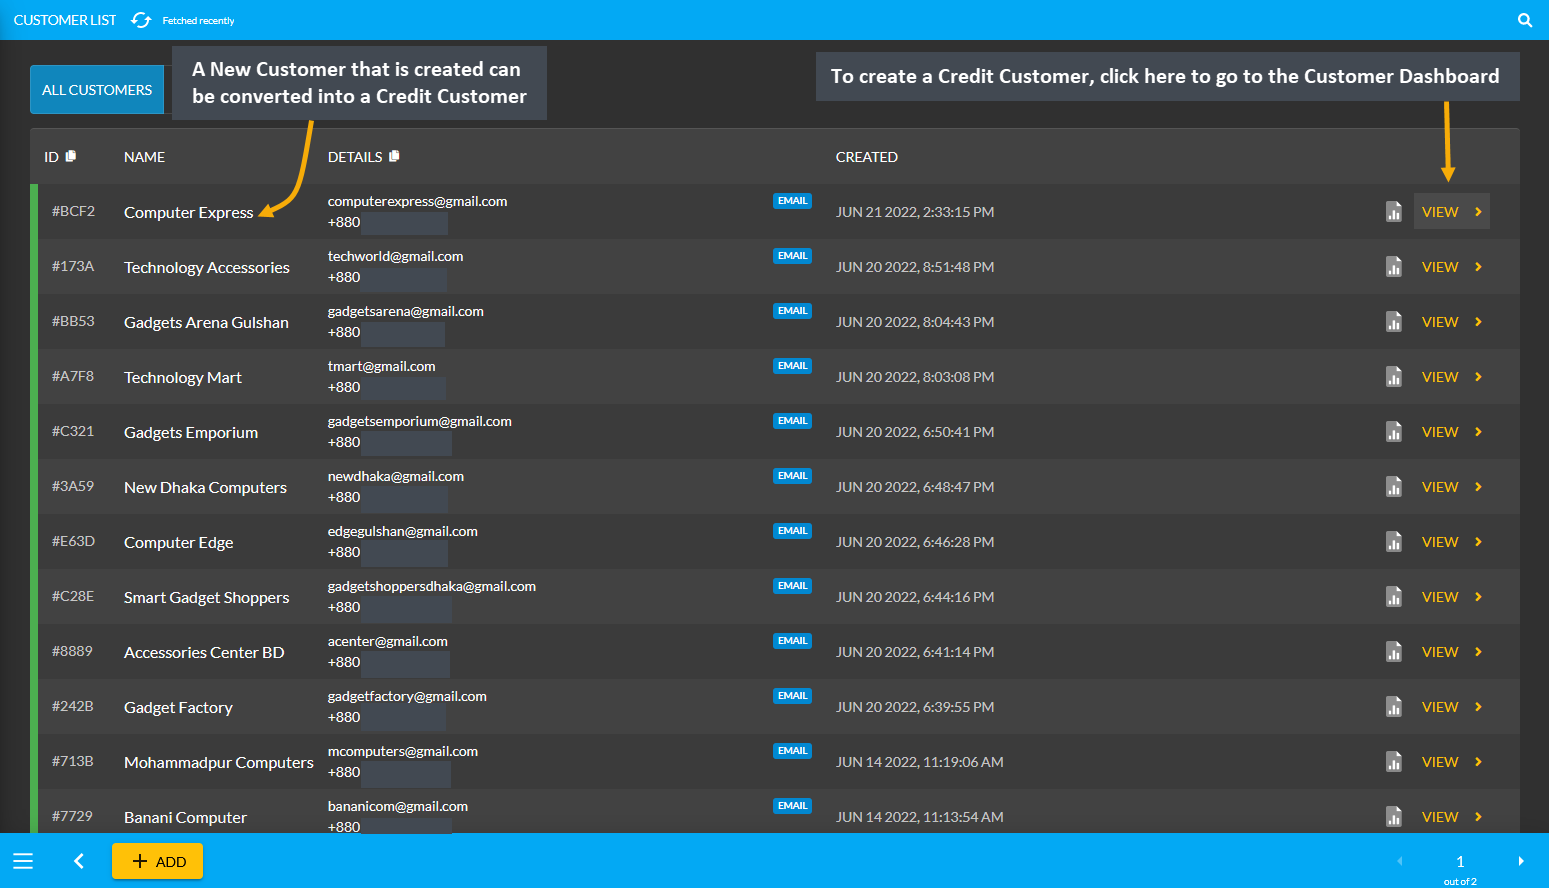
Image 6: Customers granted Credit Limit will convert into Credit Customers to use Credit to buy Products.
There is a Credit Information section in the Customer Dashboard that will display the Customer’s Credit balance. For instance, the Shop Owner trusts this Customer Computer Express (in the example), and wants to give them a Credit Limit of 15,000 BDT. To do this, the Shop Owner needs to click on the Edit icon as shown in the screenshot to open a new pop-up through which they can provide any amount of Credit Limit to this Customer.
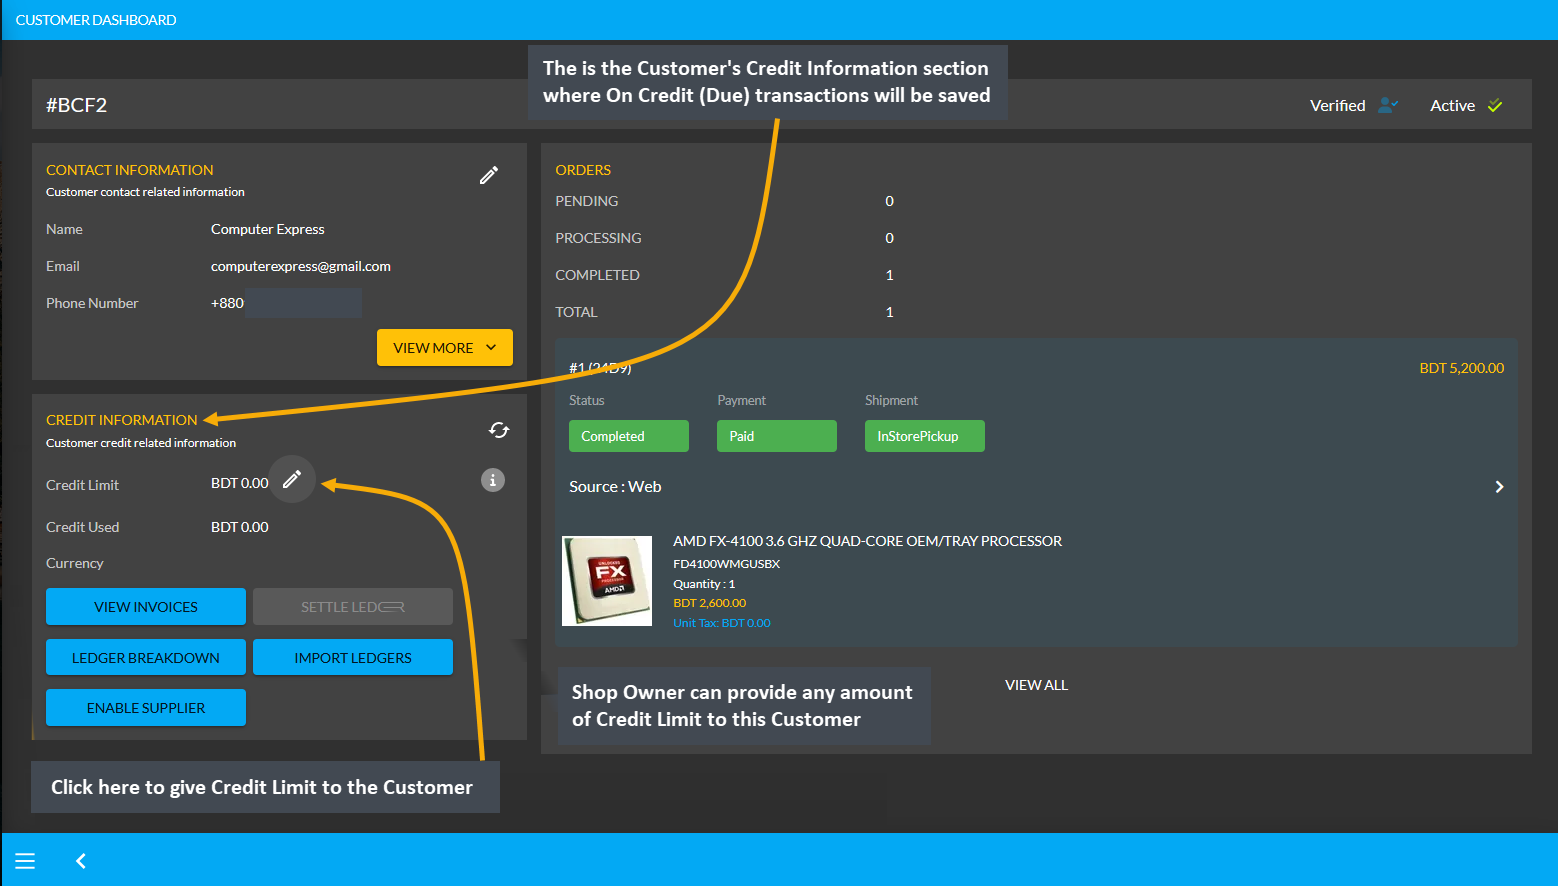
Image 7: The Credit Information section will display the Customer’s Credit balance in Customer Dashboard.
Clicking the Credit Limit icon will open a pop-up with the Customer’s details. There is a box for Credit Limit, click on it and input 15,000 BDT to provide this Credit Limit to the Customer. Also, fill out the Company Name and turn on the toggle Allowed to Use Credit to convert this Customer into a Credit Customer. Now, this Credit Customer Computer Express will be able to make purchases with Credit Limit of worth 15,000 BDT without paying upfront. The final action is to click on the Submit button to save all the changes as shown in the screenshot below.
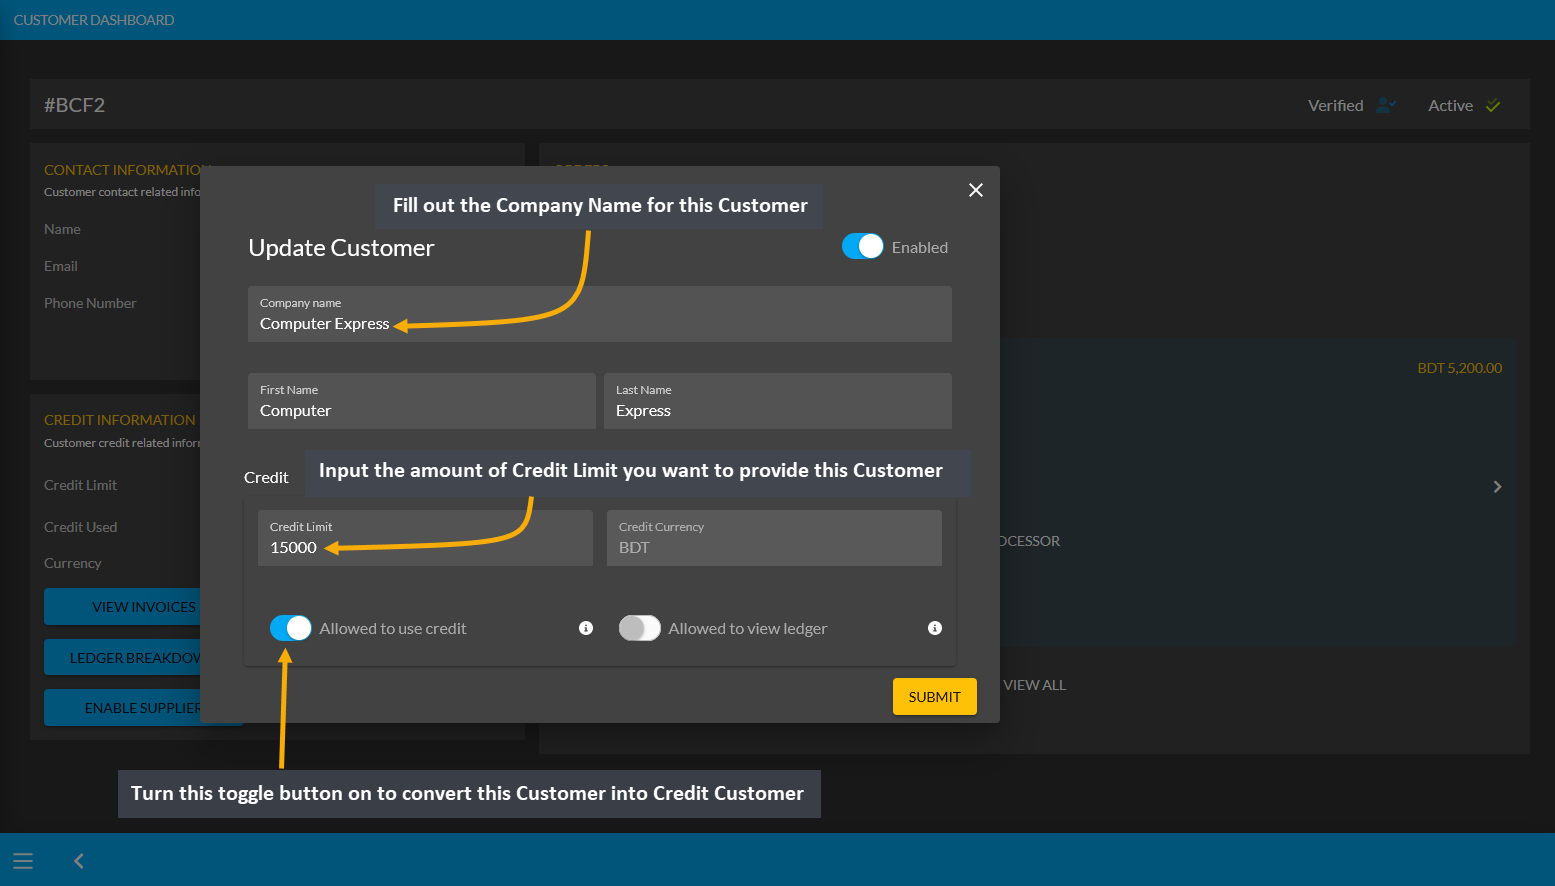
Image 8: Turn on the toggle Allowed to Use Credit to convert a Customer into a Credit Customer with Credit.
Being converted into a Credit Customer, this Customer now has a Credit Limit of 15,000 BDT. They will be able to spend this Credit Limit to make purchases without instantly paying. The Credit Limit spent will show within the Credit Used section. Customer can restore their Credit Limit of 15,000 BDT back to the Shop Owner by settling Ledger through different Payment Gateways which will clear out the Credit Used section back to 0.00 BDT.
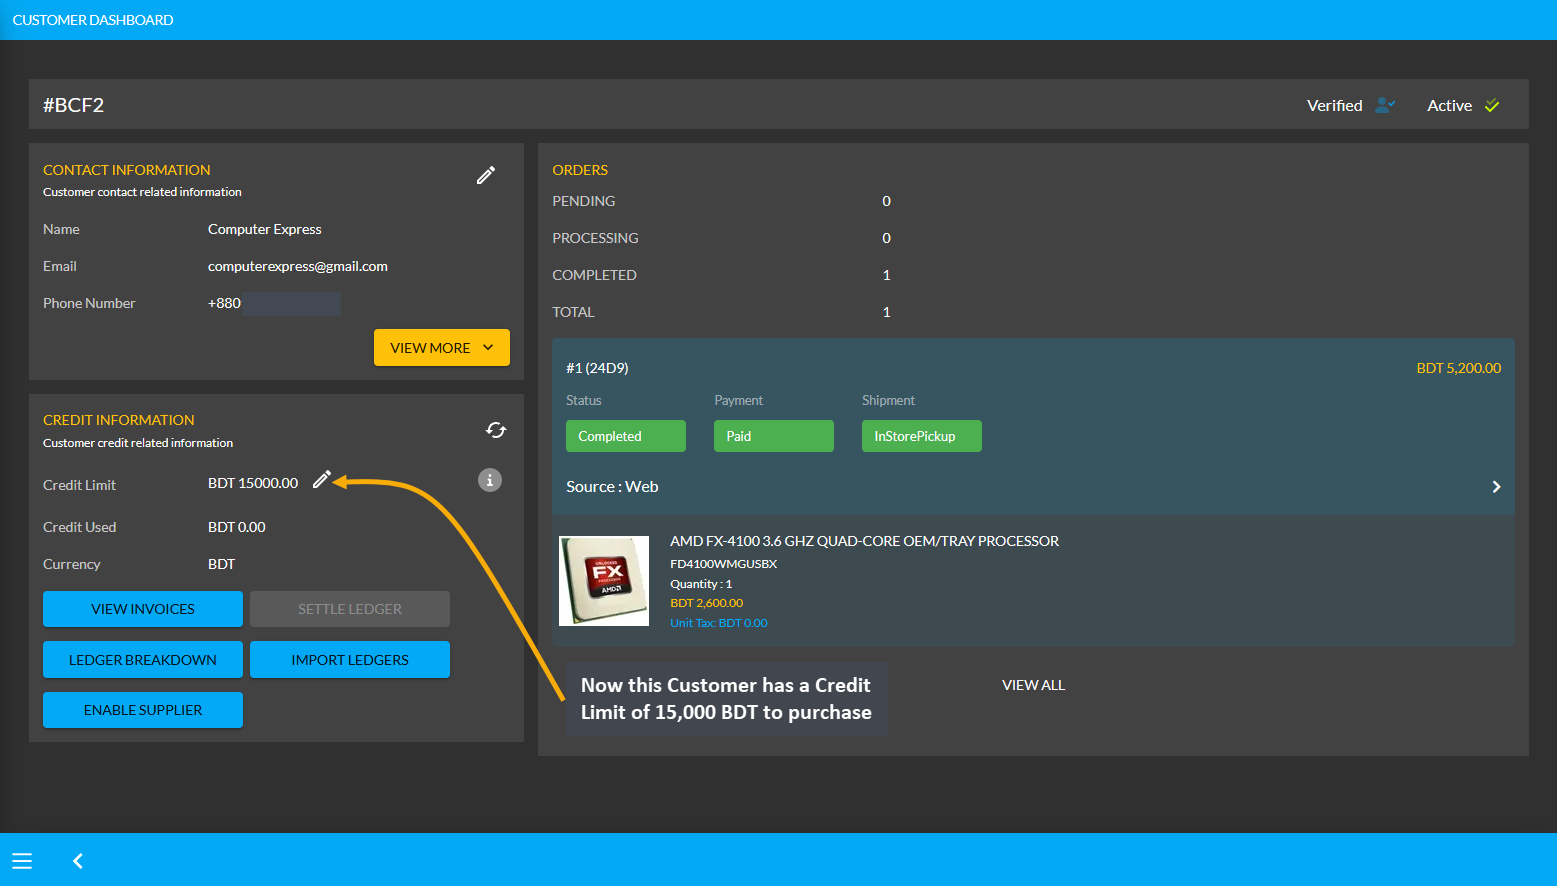
Image 9: Credit Customers will be able to spend Credit Limit to make purchases without instantly paying.
However, this Credit Limit can only be used by Customer for In Store Pickup and can be used in transaction only from the Admin Portal. The Shop Owner and their staff can only use this Credit Limit for Credit Customer during making payments with On Credit (Due) Payment Gateway for Customer’s Product purchase for In Store Pickup. Instead of showing under the All Customers List, this Customer will now show under the Credit Customers list.
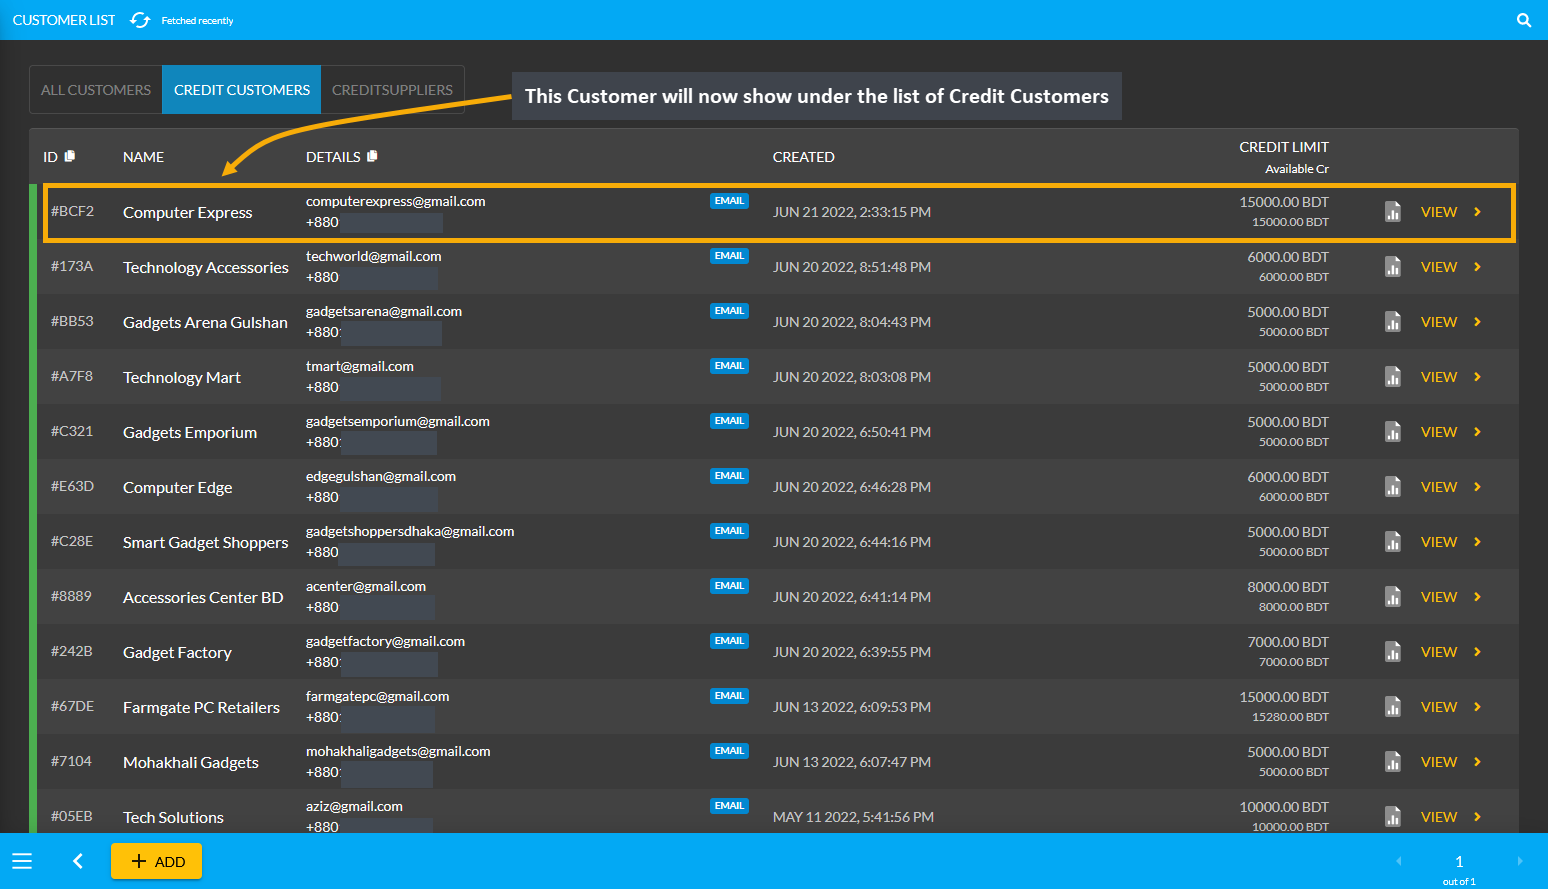
Image 10: Credit Limit can only be used for In Store Pickup and in transaction only from the Admin Portal.
Create a Credit Supplier
Credit Suppliers are companies who can buy Products from and also sell Products to the Shop Owner. They will be granted Credit Limit and also permission to Sell Products to the Shop Owner. With Credit Limit, Credit Suppliers can purchase Product(s) from the Shop Owner. Similarly, as the Supplier, they can sell Per Unit Products to the Shop Owner. Both types of transactions will reflect on their Ledger Breakdown section. Credit Suppliers could be selling Per Unit Products like RAMs, Mice, Keyboards, and flash drives etc.
Suppliers are renowned brands like Ryans Computer, UCC, or Star Tech. What differentiates the Credit Suppliers from the Credit Customers is that they have the permission to sell Products which Credit Customers do not have. Credit Suppliers can be found under Customers module where Owed amount, Due amount, and issued Credit Limit will be visible for each Credit Supplier. Create a Credit Supplier or check their Credit Information by clicking the View button to go to the Customer Dashboard.
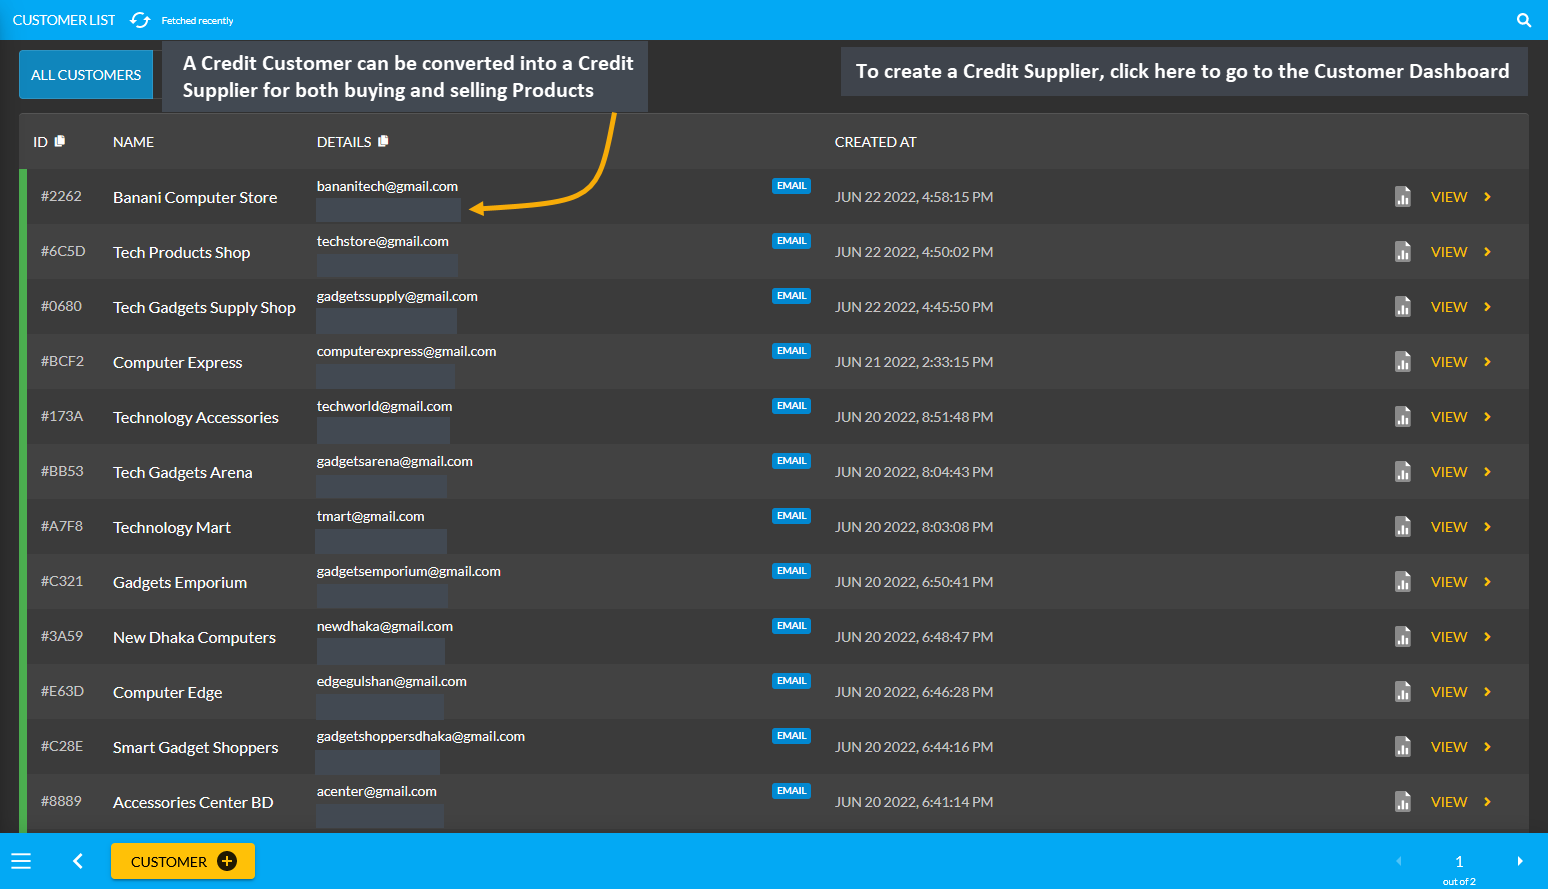
Image 11: Credit Suppliers are companies who can buy Products from and also sell Products to Shop Owner.
As discussed before, a Credit Customer will automatically be created after a New Order is placed for a Customer. Activate and provide Credit Limit to the New Customer from the Credit Information section that will convert them into a Credit Customer. Now, to convert this Credit Customer Technology Accessories into Credit Supplier, click the Enable Supplier button from Credit Information on Customer Dashboard as shown in the example below.
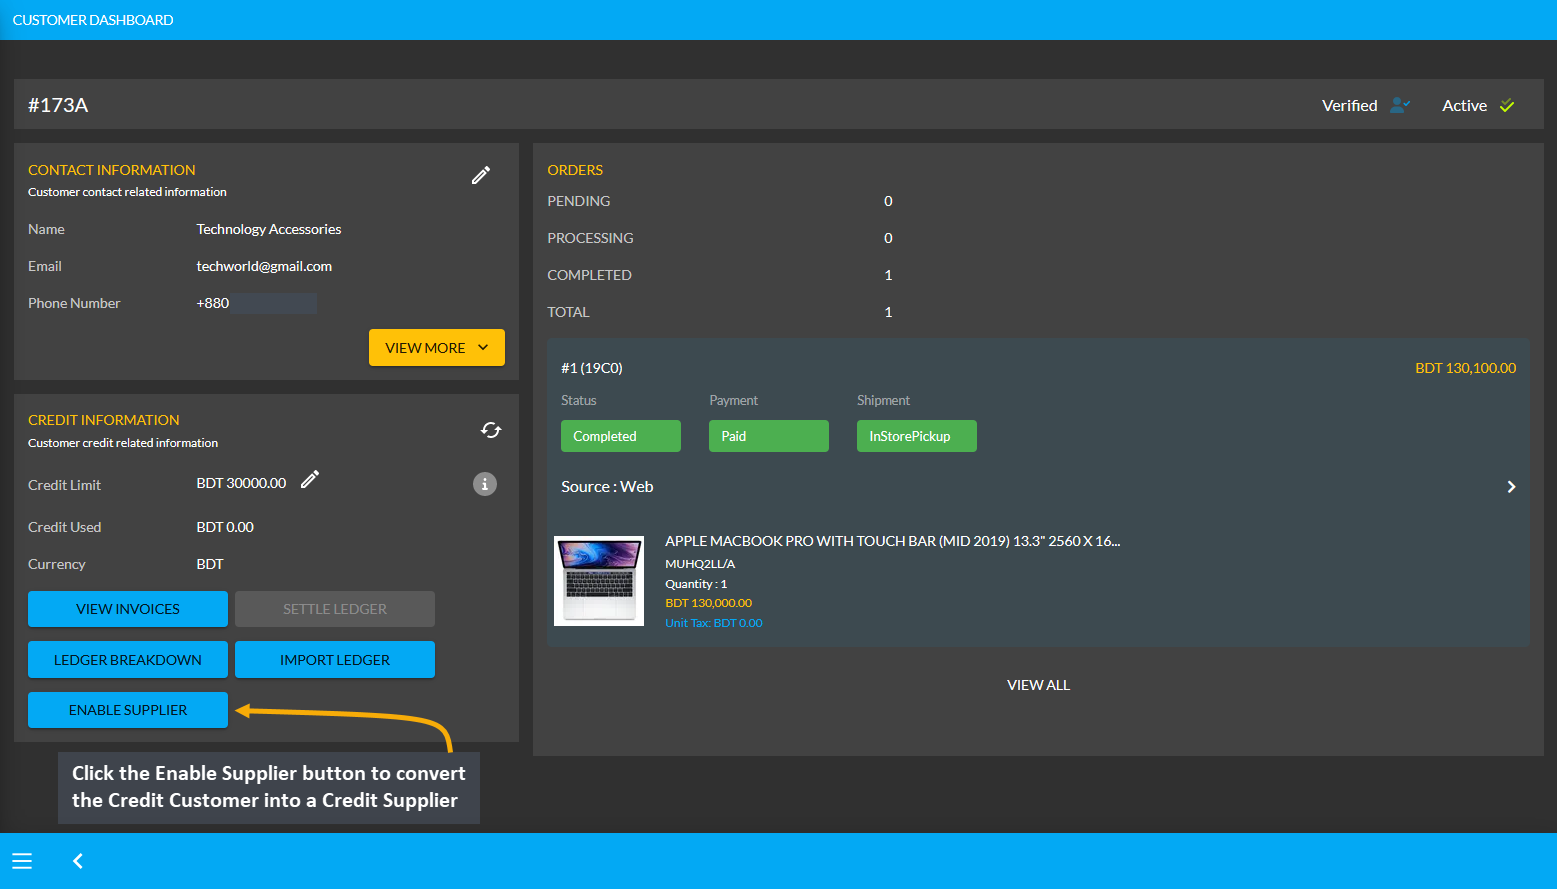
Image 12: Click Enable Supplier button to convert Credit Customer into a Credit Supplier from Dashboard.
The New Supplier will appear as a Credit Supplier under the Credit Supplier List as shown in the example below.
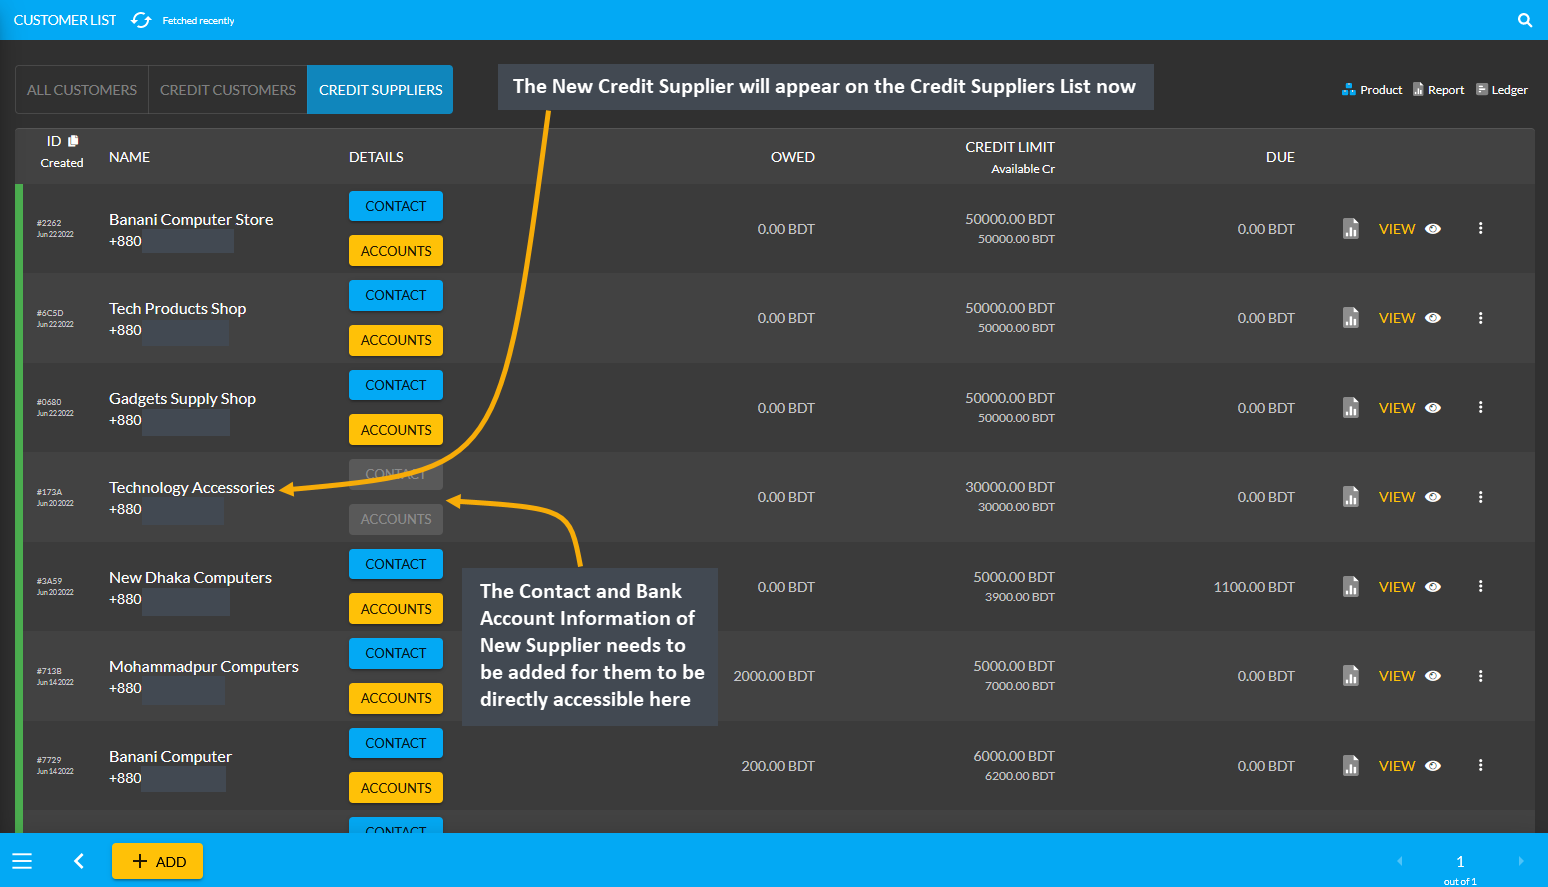
Image 13: The New Supplier will appear under the Credit Supplier List with Contact and Bank Information.
When the Credit Supplier is created, they will have a Supplier Information section added to their Dashboard. From here, the Contact information and Bank Account information can be added for the Credit Supplier. Click the Edit icon on the Supplier Information section that will redirect to a new page to update contact and bank details.
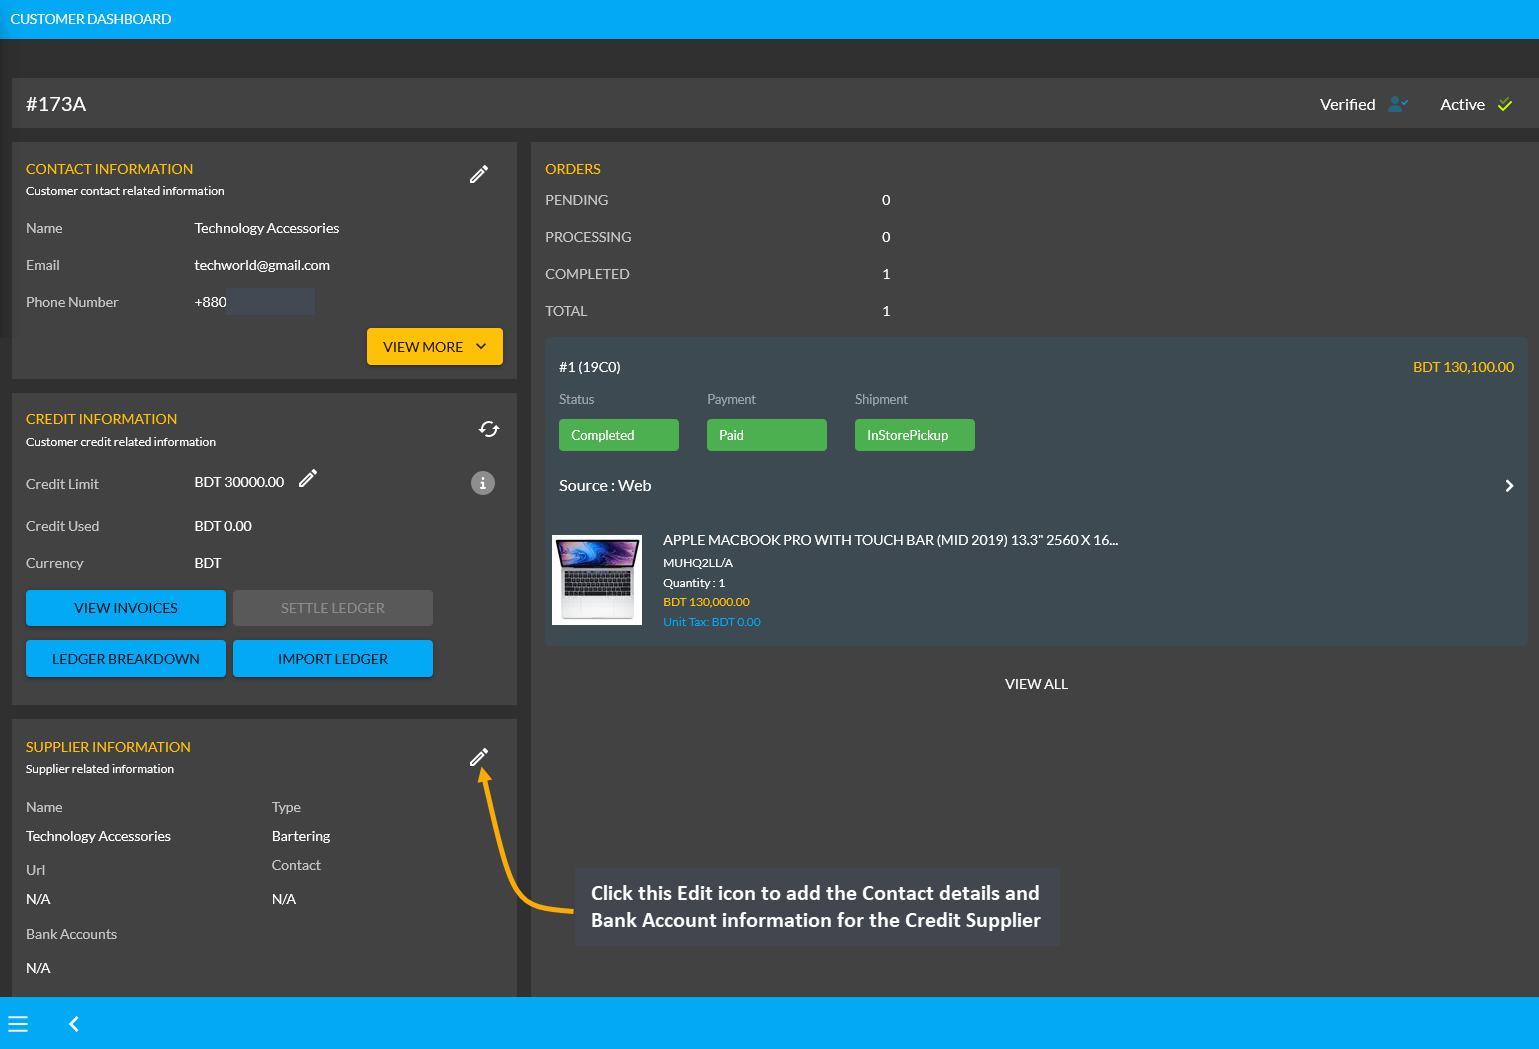
Image 14: A Credit Supplier will have a Supplier Information section on their Dashboard that can be edited.
On Edit Supplier page, the first field is to fill in the Name and Website Address of Credit Supplier. After that, there are Contact and Bank Account boxes with the + button, clicking on which will allow adding Contact Details and Bank Accounts of the Supplier. Several bank account information can be added if they have various bank accounts.
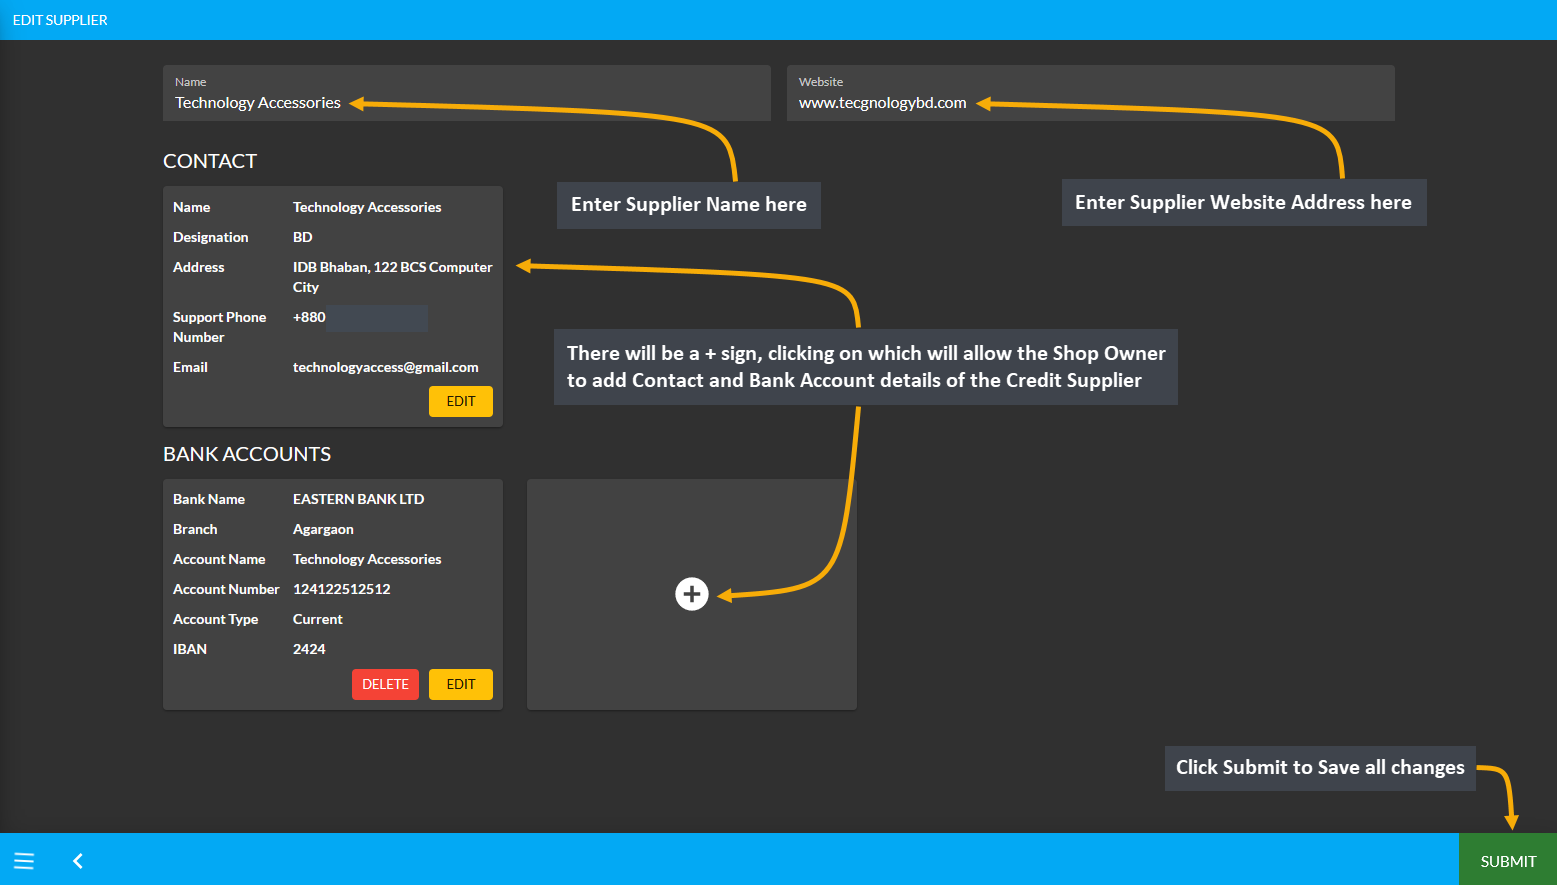
Image 15: On Edit Supplier page, fill out Name, Website, Contact Details, and Bank Accounts of Supplier.
Clicking the + button over Contact Details will open a pop-up to edit Contact List. Fill the First Name, Last Name, and Current Designation, Phone and Email first. Then, select the type of Contact for Supplier like Home, Work, Shipping, Billing, Support, Other, or Supplier that best describes the Supplier contact type. On Address Section, write down the address in first line and second line. Set the Label, Area, Post Code, City, and Country for the Supplier Address. Then, click Add to save all changes for the contact information of the Credit Supplier.
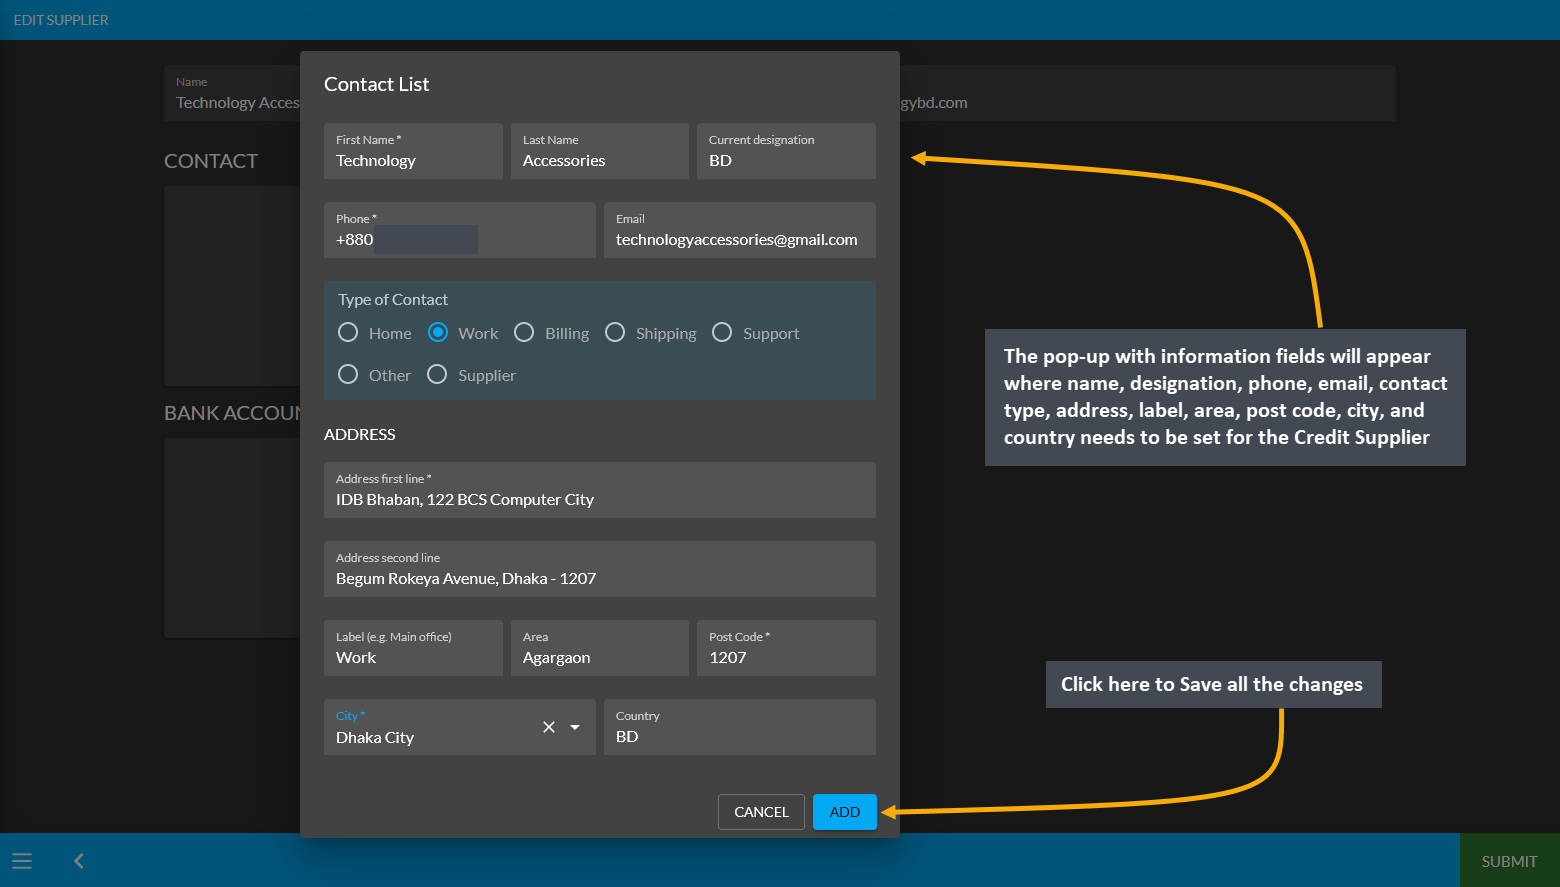
Image 16: Fill out First Name, Last Name, Current Designation, Phone, Email, and Address of the Supplier.
Edit Credit Supplier Bank Details
Now, click the + button on Bank Account to open a pop-up for editing details of Bank Accounts. Fill out the Bank Account Name, Bank Account Number, Bank Name, Country, Bank Branch, Bank Swift, Bank Routing Number, and IBAN. Select if the Bank Account is Savings or Current and click Add to save all the changes as shown.
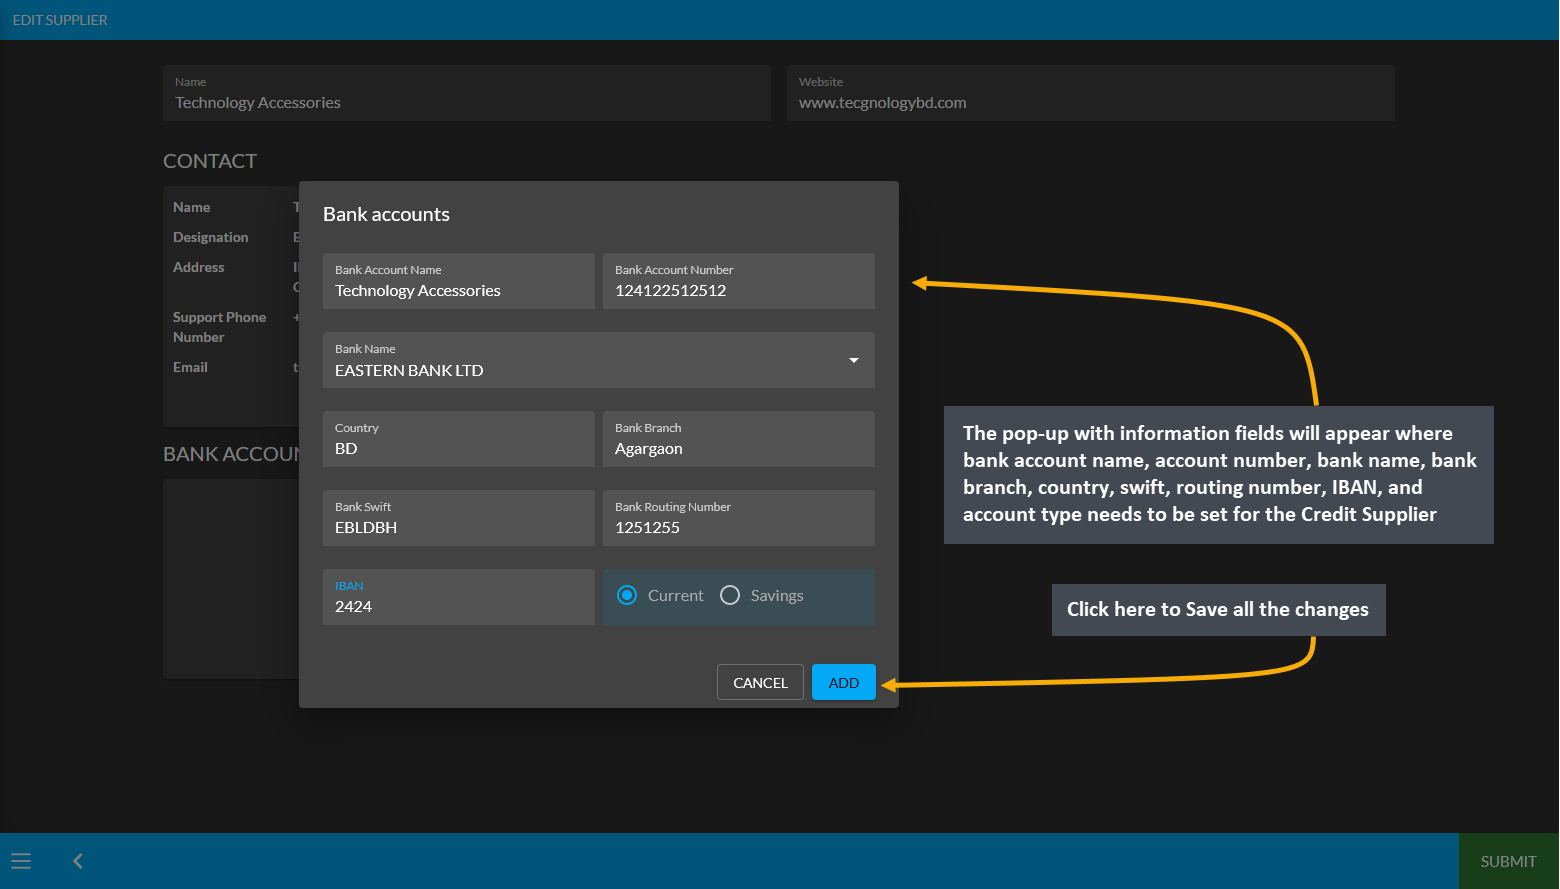
Image 17: Fill out Bank Account Name, Number, Bank Name, Country, Branch, Swift, Routing Number, and IBAN.
10.2 - Customer Cost Basis
Learn More about how to create New Customer, view their Cost Basis, and manage Customer Dashboard.
Customer Cost Basis
Click the Customers module which will open the Customer List. From here, go to any Customer and click on the small gray graph icon that will redirect to the Customer Cost Basis page showing total profit, total revenue, total cost, total vat, and total discount of that Customer within different time frame ranges.
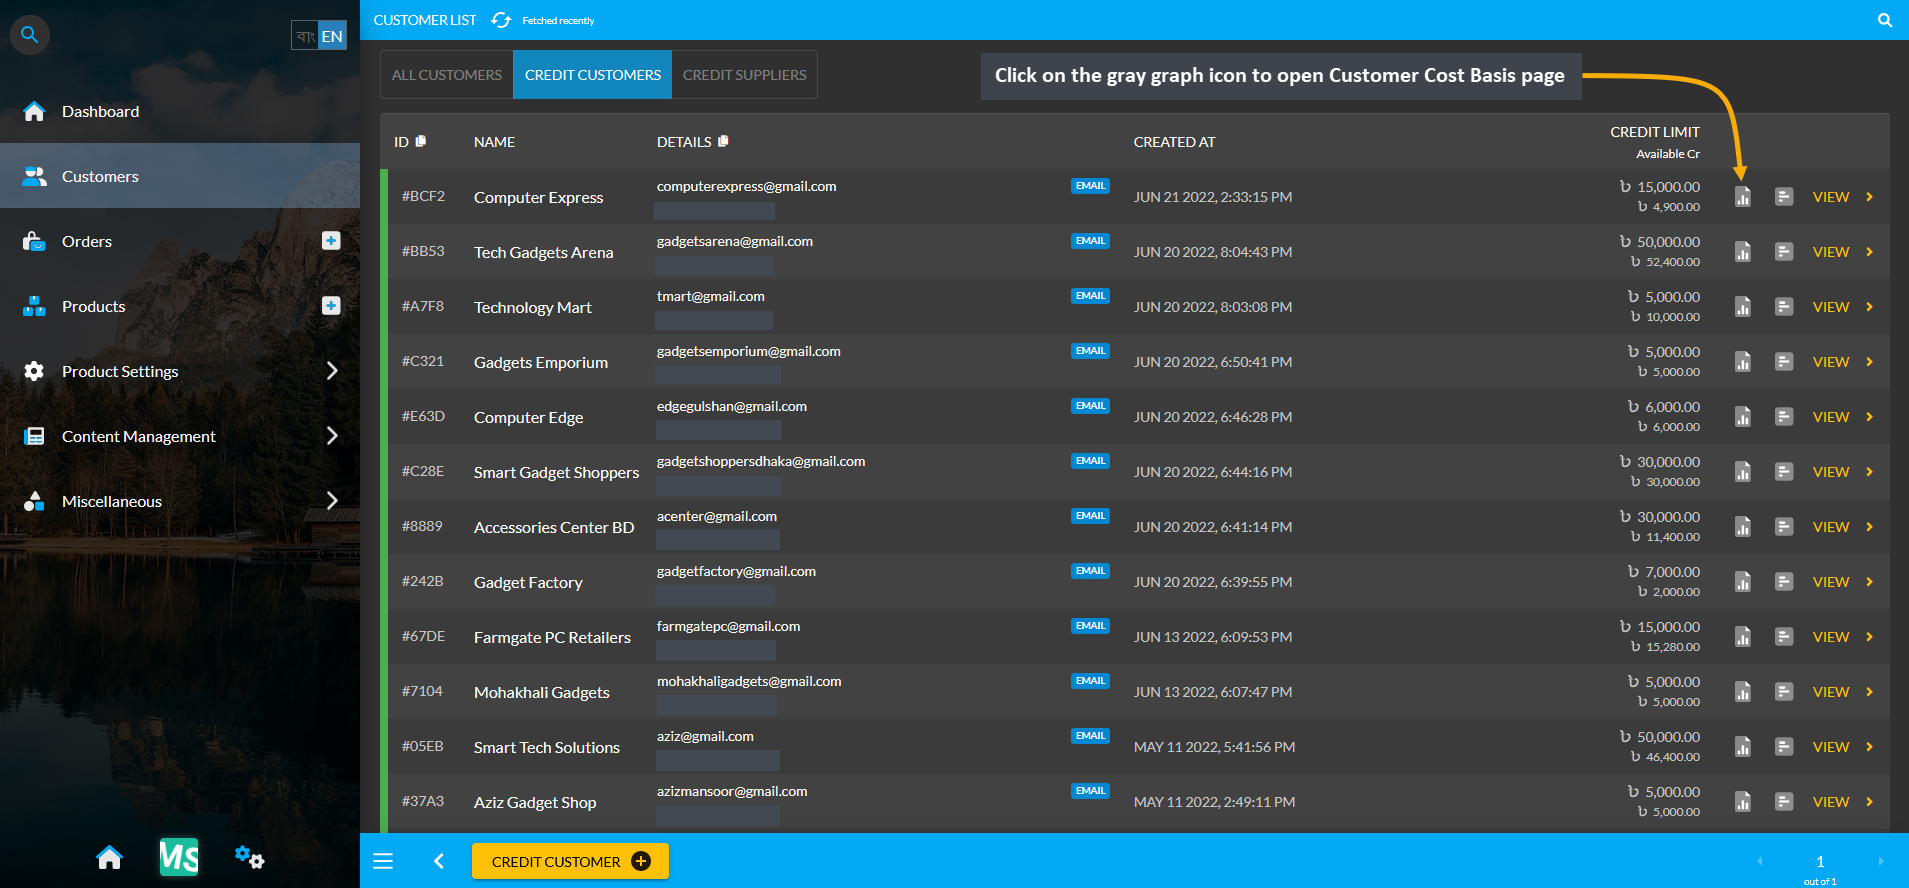
Image 1: Click the small gray graph icon on Customer List that will redirect to Customer Cost Basis page.
Cost Basis Summary Section
Clicking the small gray graph icon from Customer List will redirect to Customer Cost Basis page. On the top is the Customer cost basis summary showing total profit, total revenue, total cost, total vat, total tax, and total discount and below it is a Customer profile box with basic customer information. For Customer Cost Basis, the Pick a Range or range filtering option will show Customer’s Cost Basis on Daily, Monthly, Hourly, Weekly, Half Yearly, or Yearly basis. Below is a long list of entries showing calculations of profit, cost, revenue, vat, tax, and discount separately.
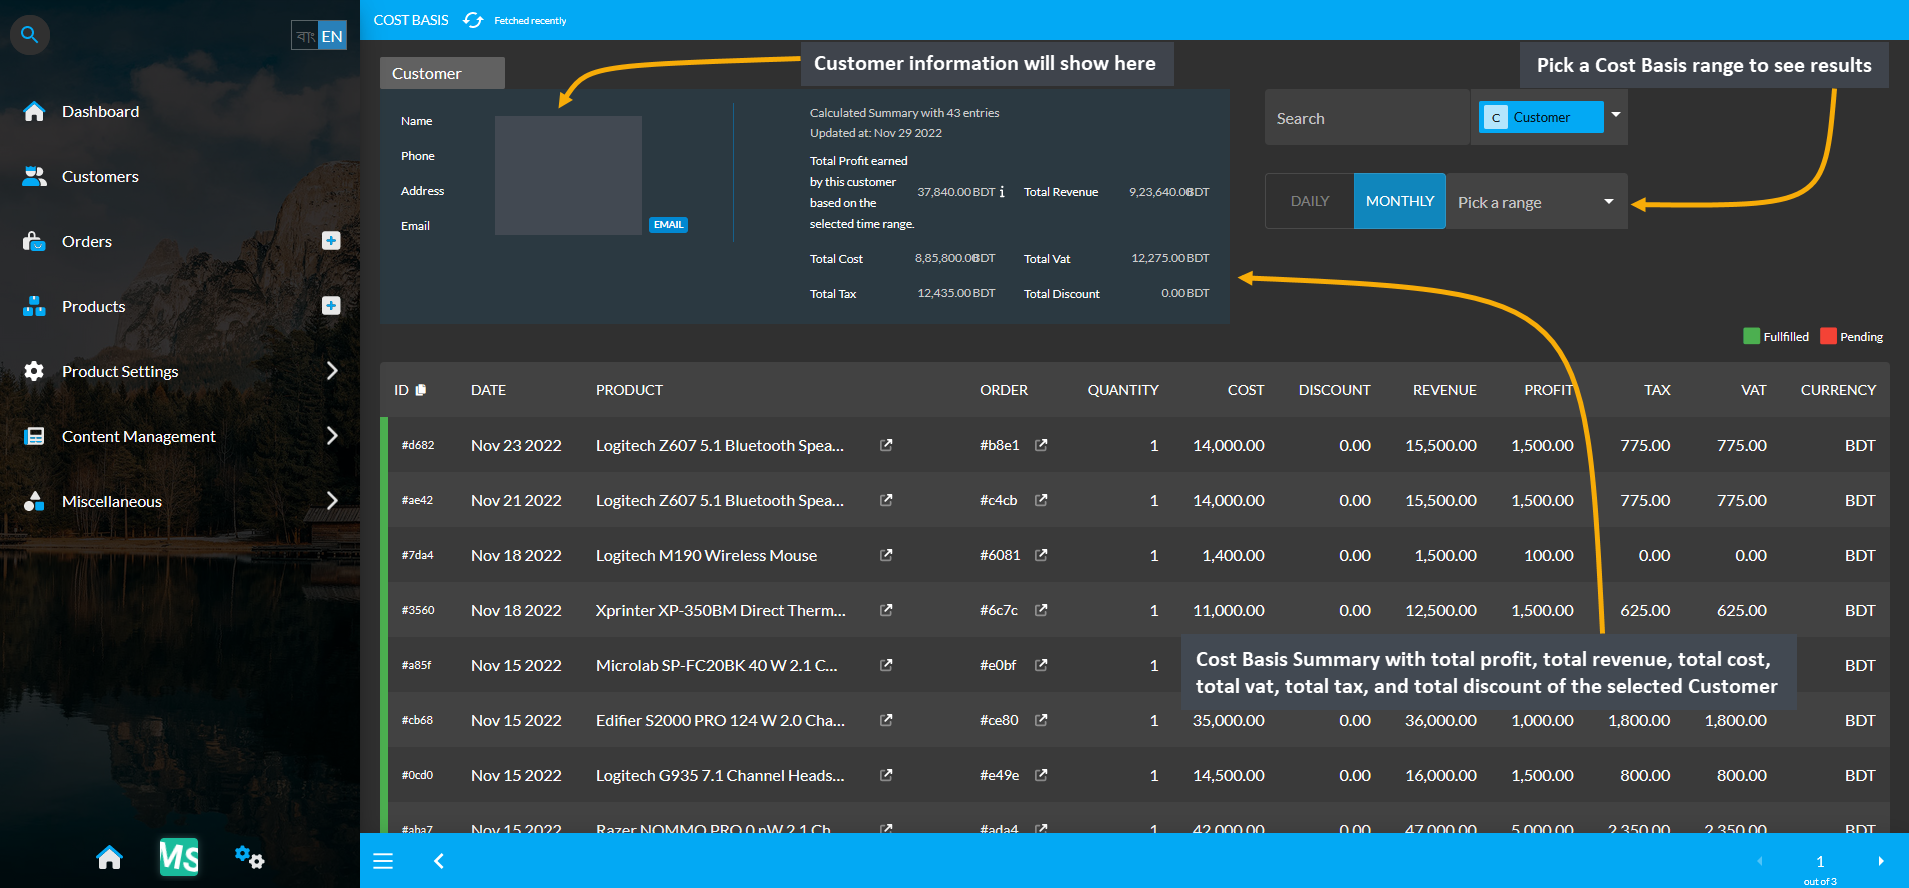
Image 2: Customer Cost Basis shows Customer profile, Cost Basis summary and detailed Order breakdown.
Cost Basis Search and Range Selection
The Customer Cost Basis page have a Search button with a dropdown menu with four options for Order, Customer, Product, and Product Batch on the top right. Clicking each of these options will bring cost basis summary results of Order, Customer, Product, and Product Batch whichever is selected by redirecting to those pages.
For example, to search and find a Customer’s Cost Basis result, select Customer from the dropdown and type the Customer’s name in the Search box which will bring in the selected Customer’s Cost Basis result. From the Pick a Range box, select - Daily, Monthly, Hourly, Weekly, Half Yearly, and Yearly to view the results of chosen cost basis summary. In this way, the Shop Owner can search for any Customer’s Cost Basis result.
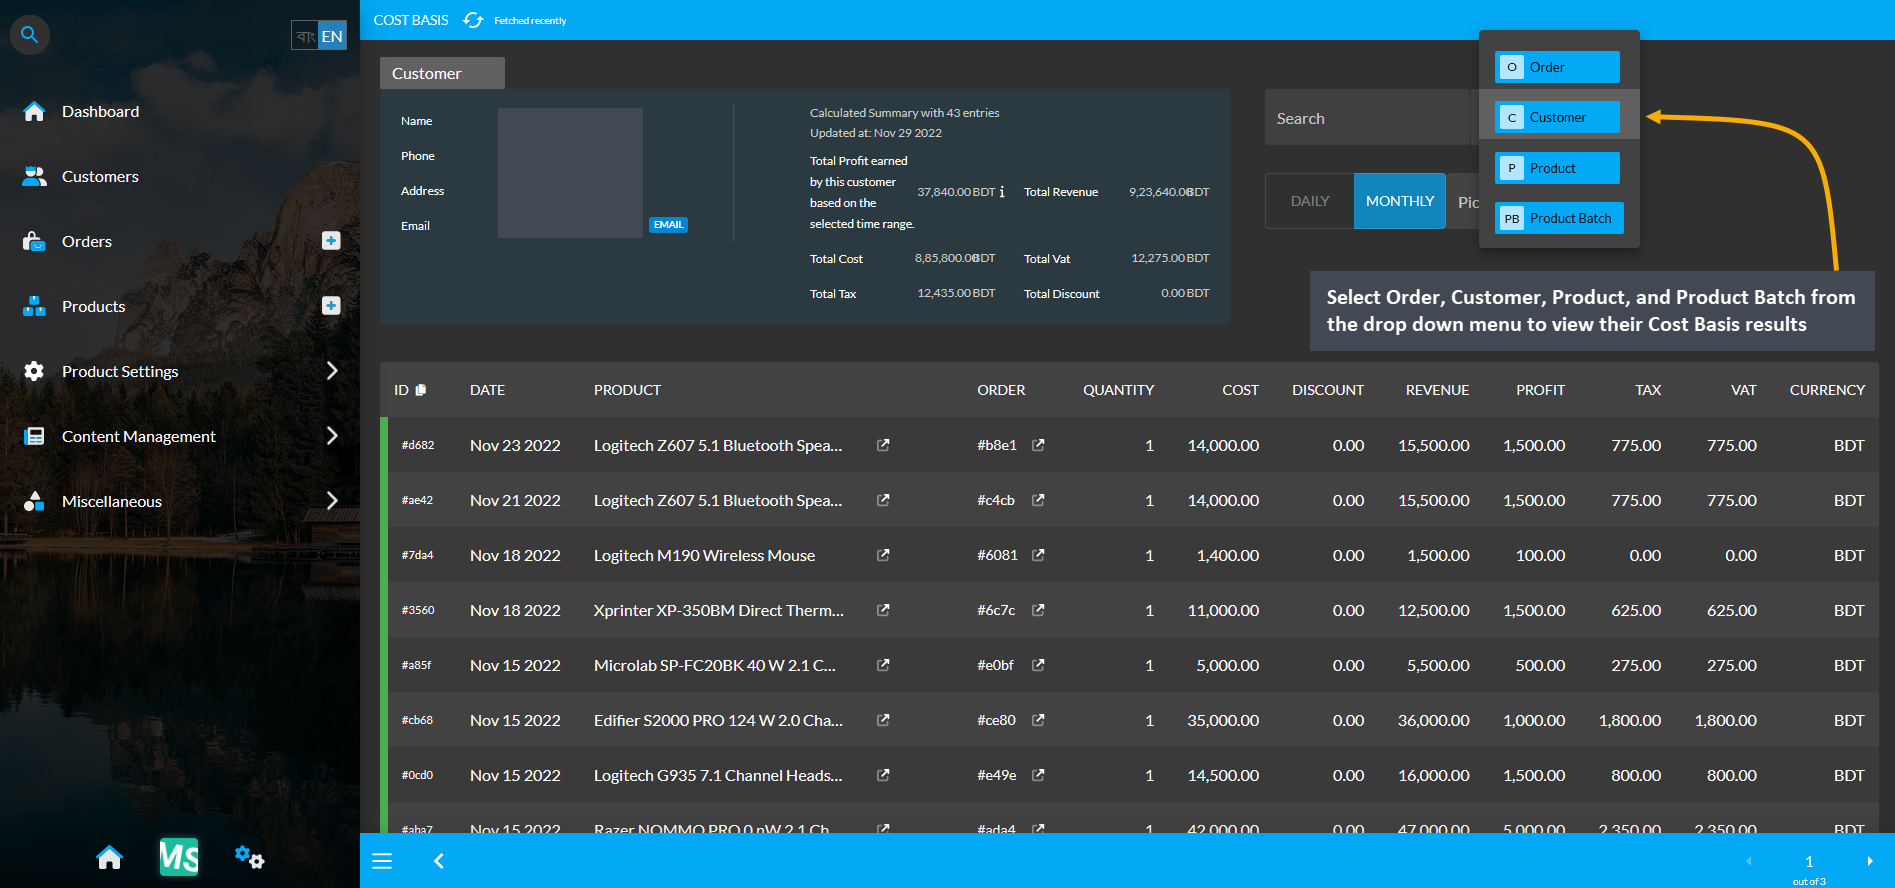
Image 3: Range Filtering option is enabled for Customer, select an option to view their Cost Basis result.
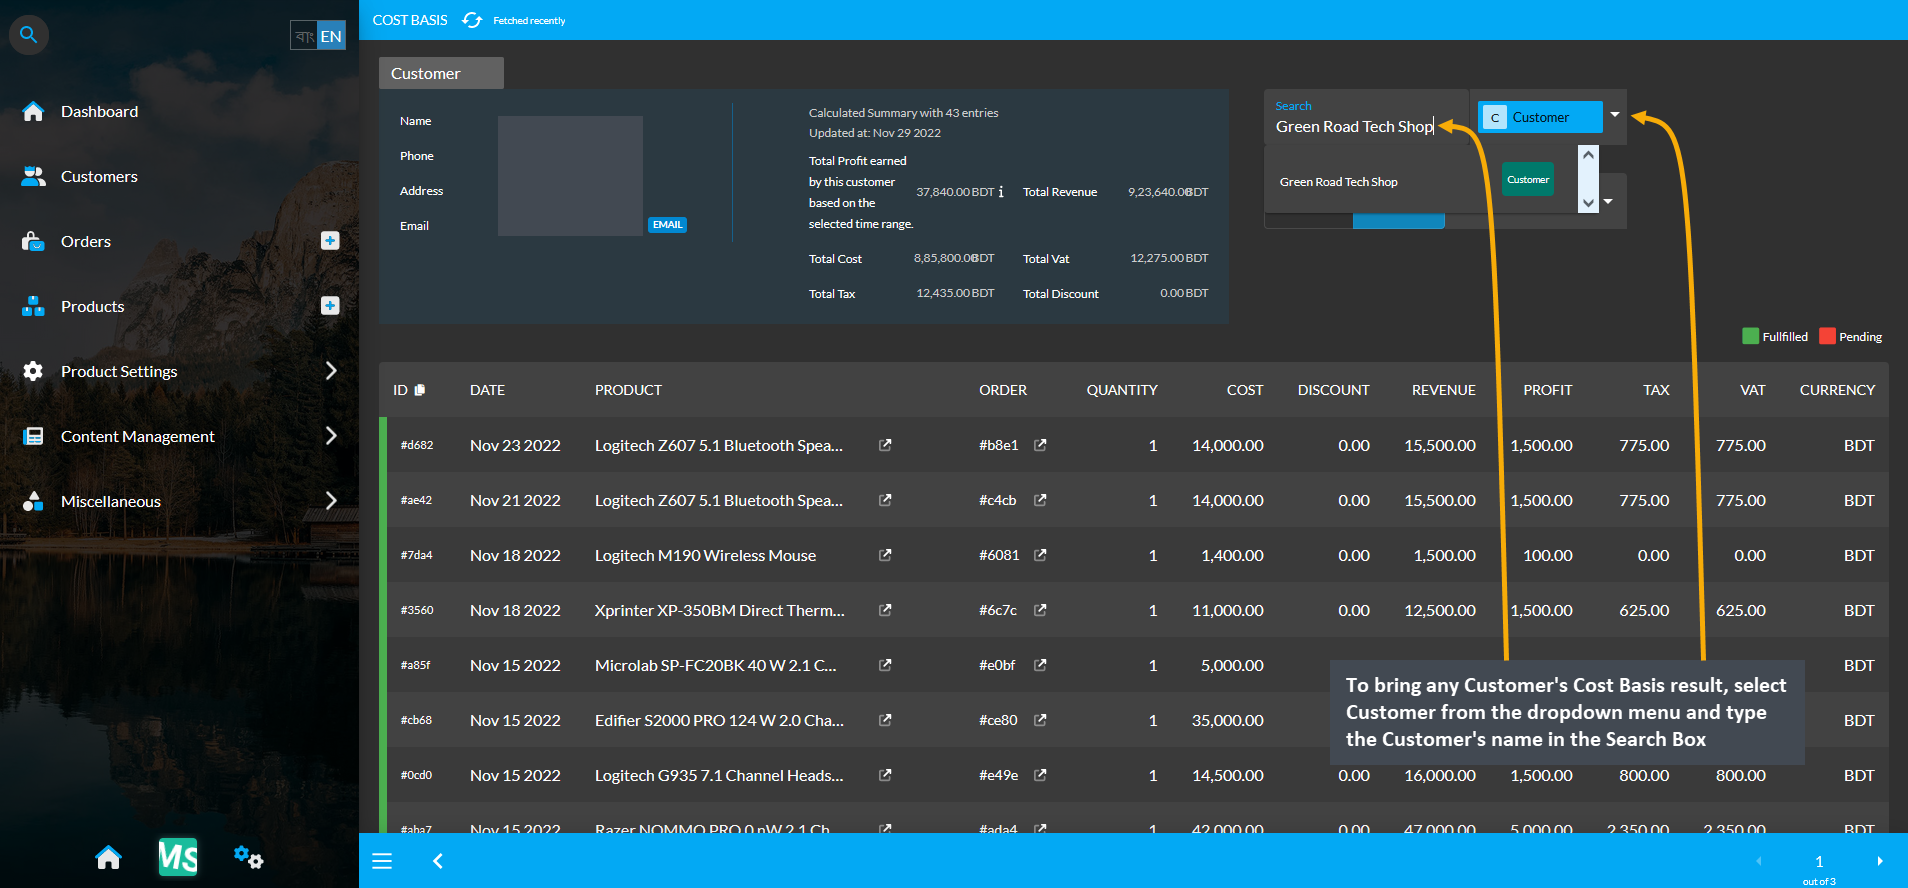
Image 4: Select Customer from dropdown and type Customer's name in Search Box to view their Cost Basis.
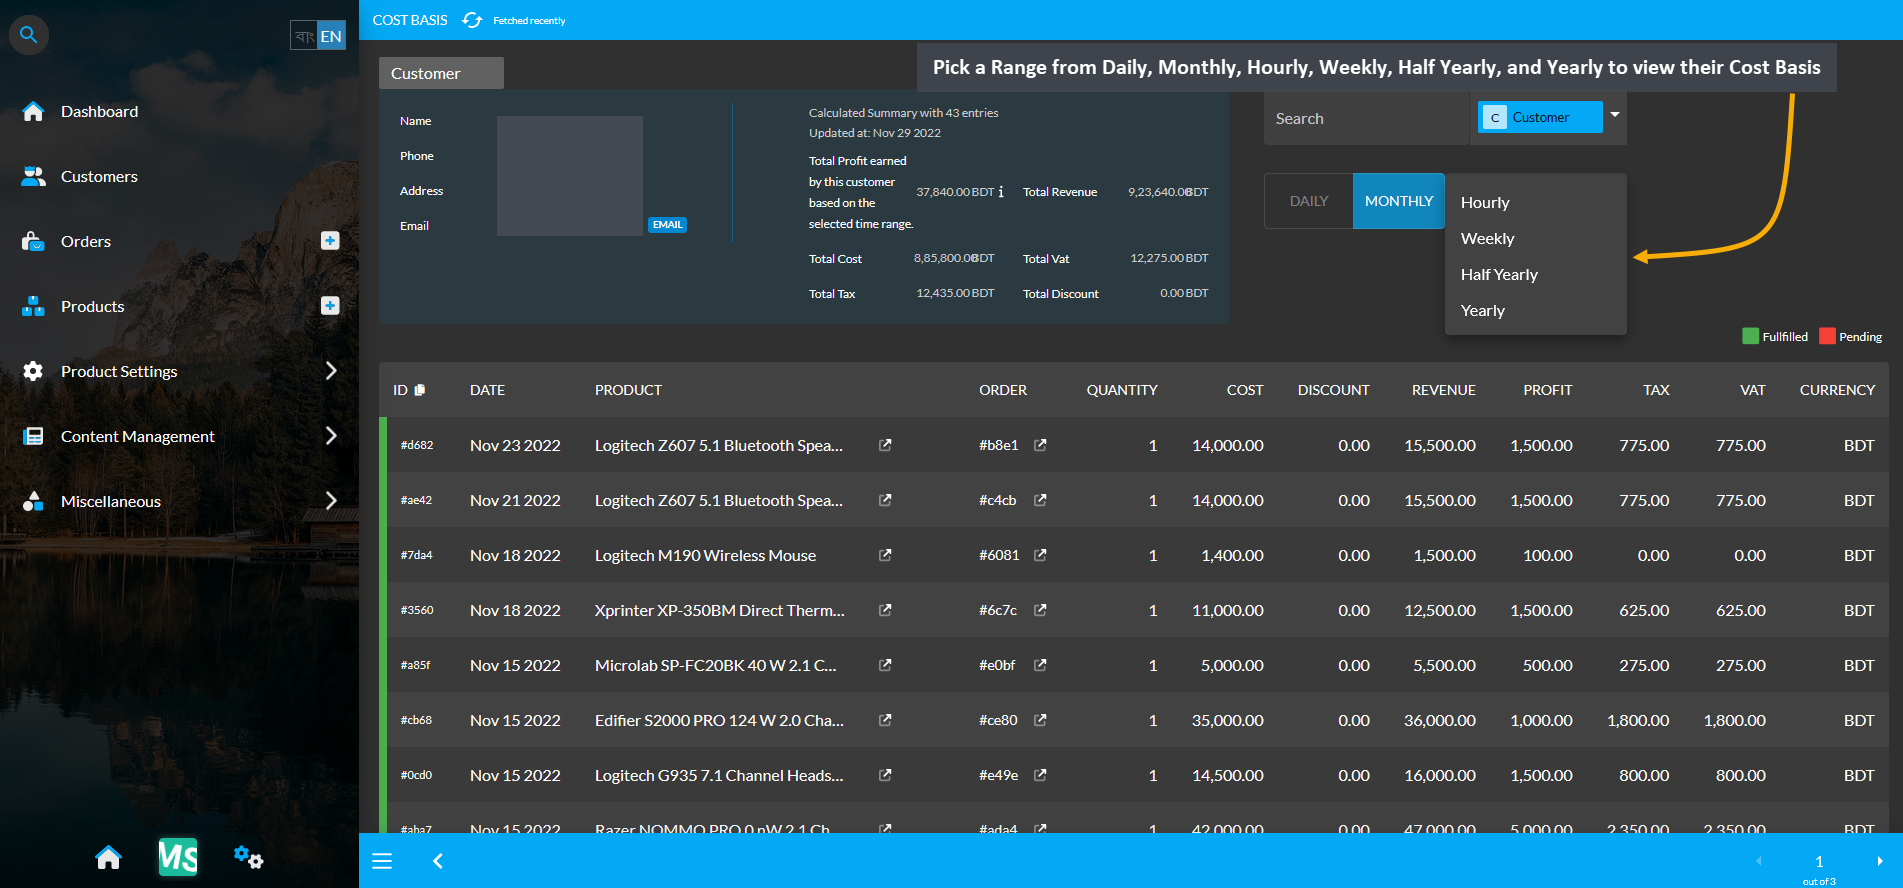
Image 5: Pick a Range from Daily, Monthly, Hourly, Weekly, Half Yearly, or Yearly to view their Cost Basis.
10.3 - Customer Contact List
Learn More about how to create New Customer, view their Cost Basis, and manage Customer Dashboard.
Customer Dashboard
In the Customer Dashboard, there is a Contact Information section on the top left which displays Name, Email, and Phone Number of the Customer. These information can be edited and updated with the Edit Button as shown.
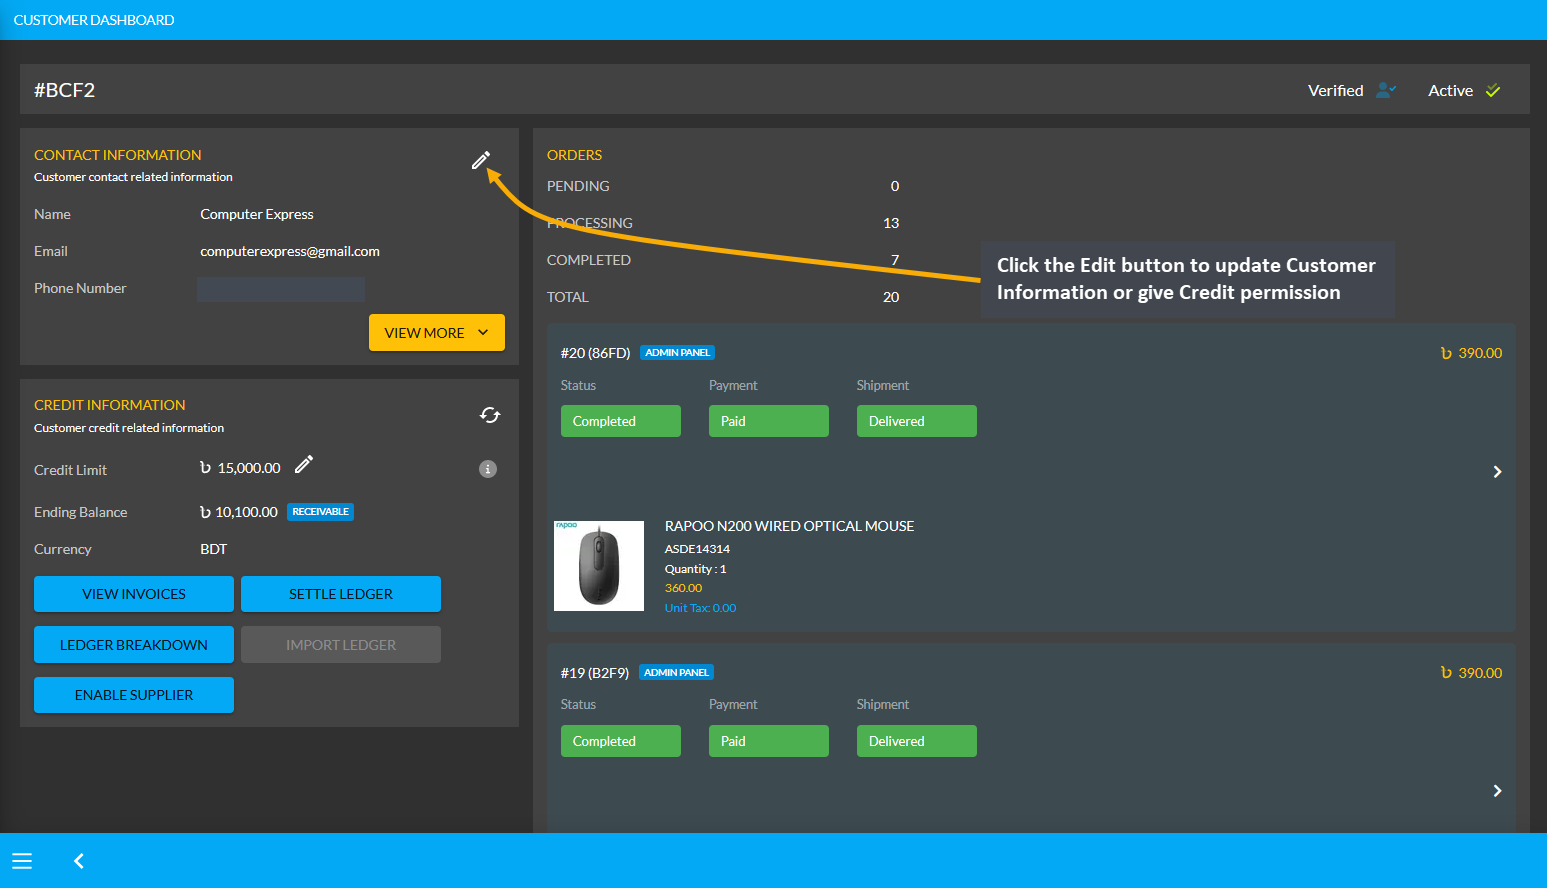
Image 1: Contact Information section on Dashboard displays Name, Email, and Phone Number of the Customer.
Clicking the edit icon from Customer Information section will open a pop-up to edit Customer’s details. First, fill out the Customer’s Company Name and update their First Name and Last Name. After that, turn on the toggle Allowed to Use Credit to allow Customer to use Credit Limit for Product purchase without paying upfront. On Credit Limit box, input any amount of Credit Limit to provide to the Customer. Click the Submit button to save all the changes.
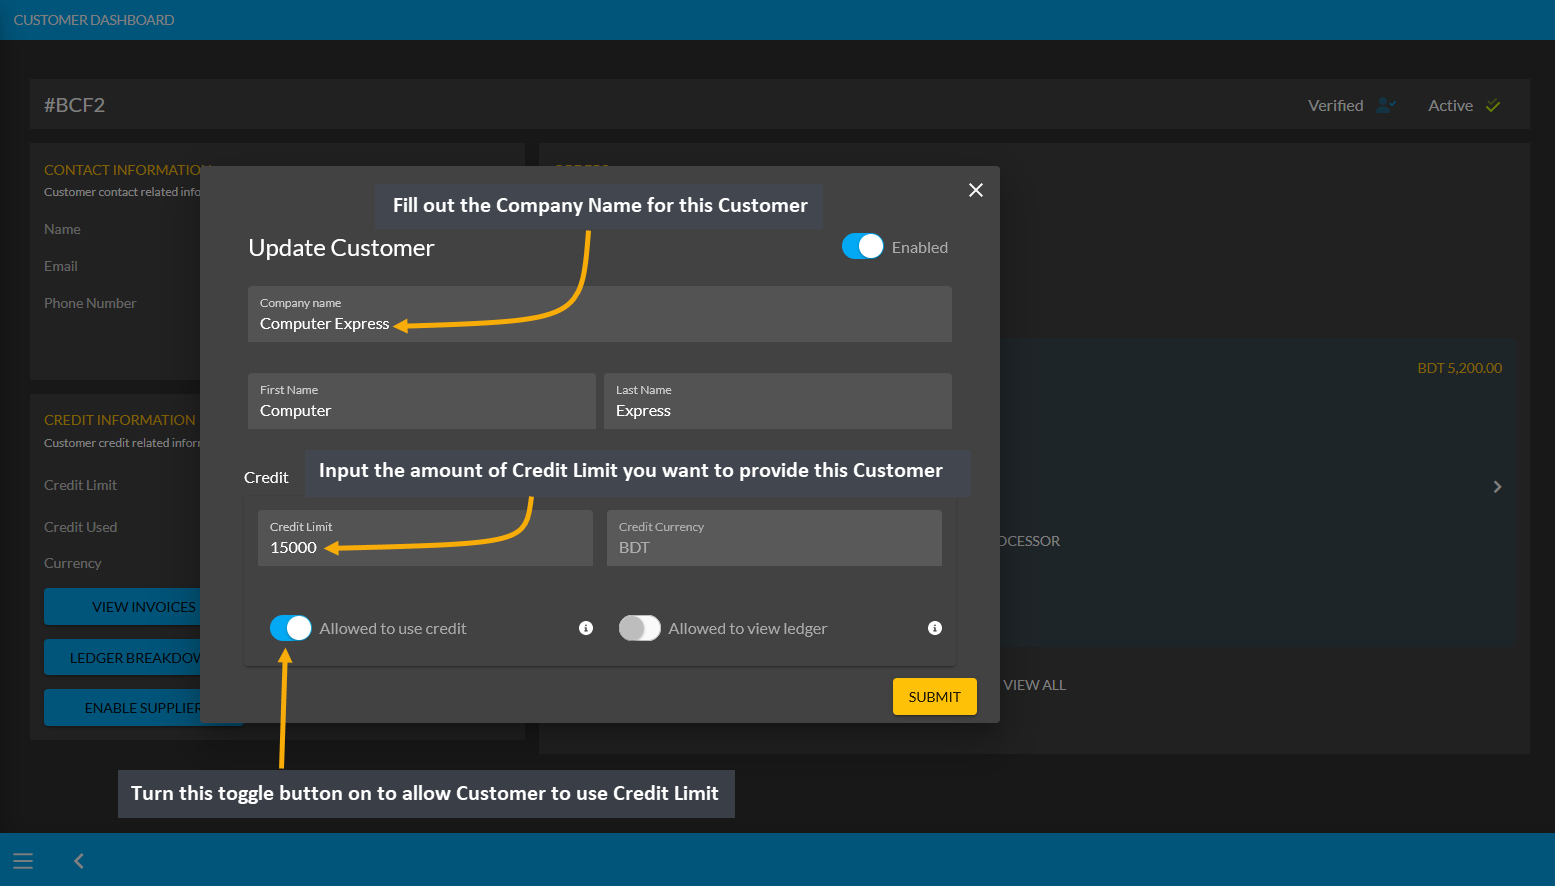
Image 2: Fill out Customer’s Company Name, First Name, Last Name and turn on Allowed to Use Credit toggle.
Click the View More button from Customer Information section that will expand and open the Contact List with a dropdown menu where different addresses saved from a single Customer can be viewed and selected. Thus, if a Customer has different home, work, or office addresses, they will be available under the Contact List dropdown. These list of addresses can be used as billing and shipping addresses for separate Orders. The selected address will display Name, Designation, Address, Phone, and Email of the Customer as shown in the example.
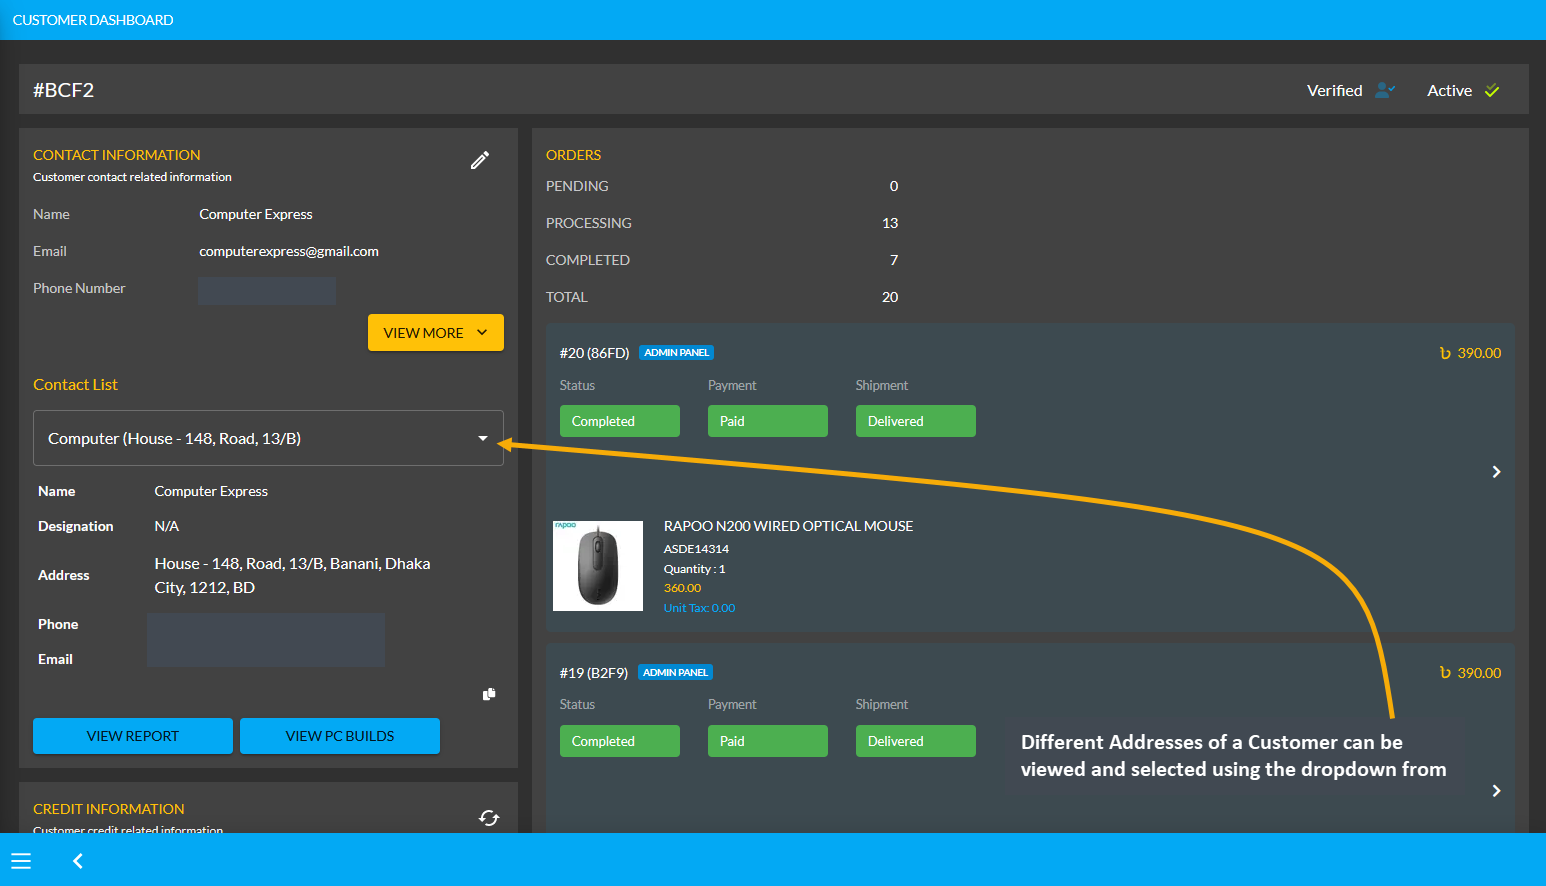
Image 3: Different Addresses of a Customer can be viewed and selected using the dropdown from Contact List.
View Report and View PC Builds
There are two options below the Contact List section - View Report and View PC Builds. View Report button redirects to the Customer’s Cost Basis page, where Cost Basis Summary is displayed with total profit, revenue, cost, vat, tax, and discount with Customer information below. Please explore all the details about Customer’s Cost Basis here.
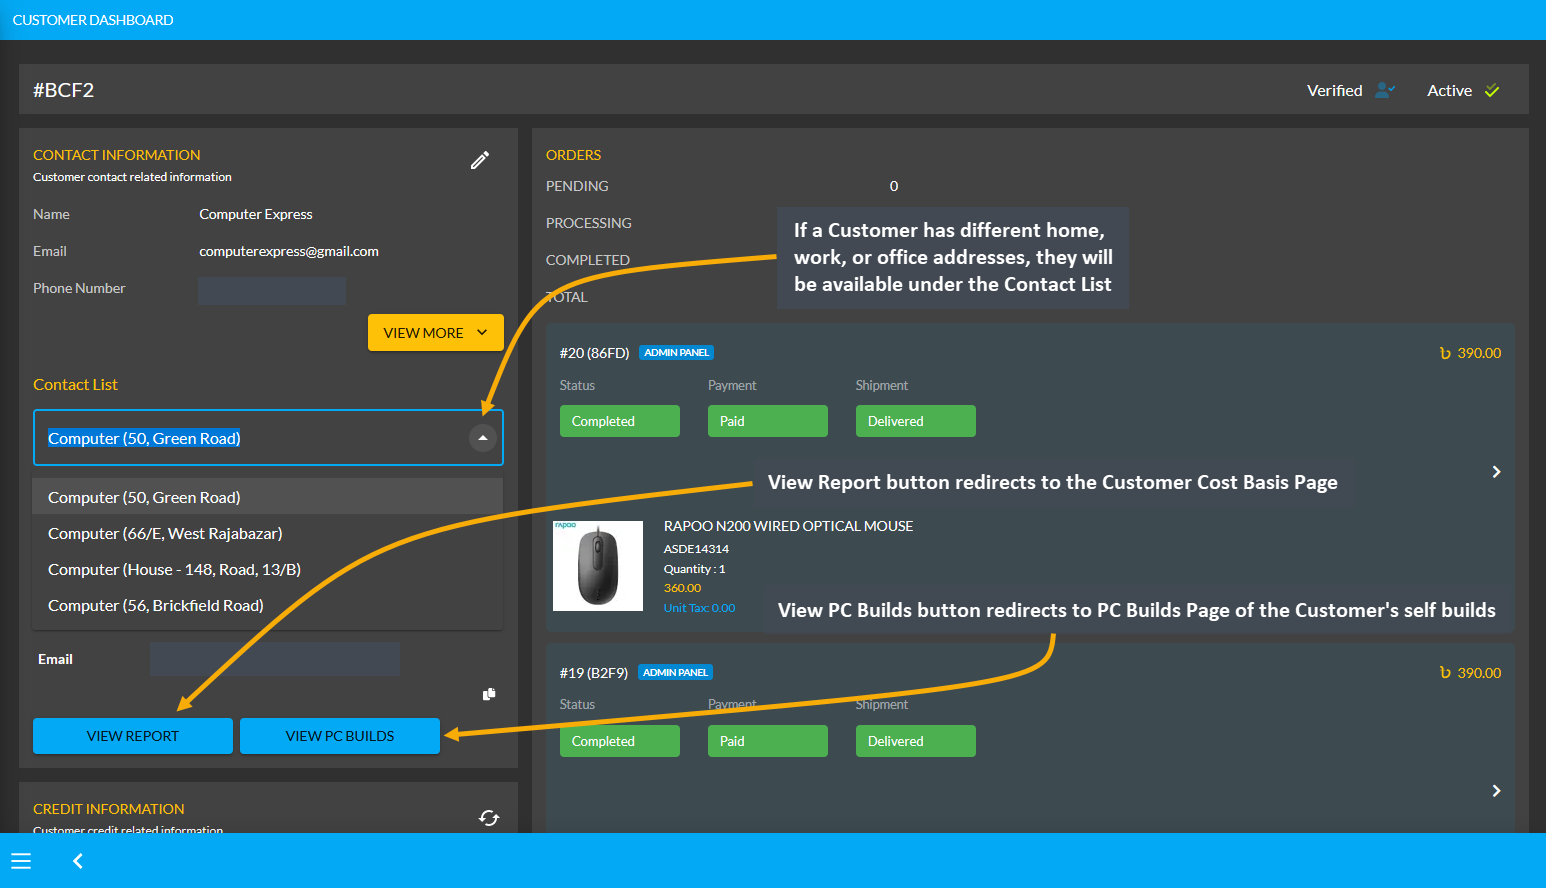
Image 4: If Customer has different home, work, or office addresses, they will display under Contact List.
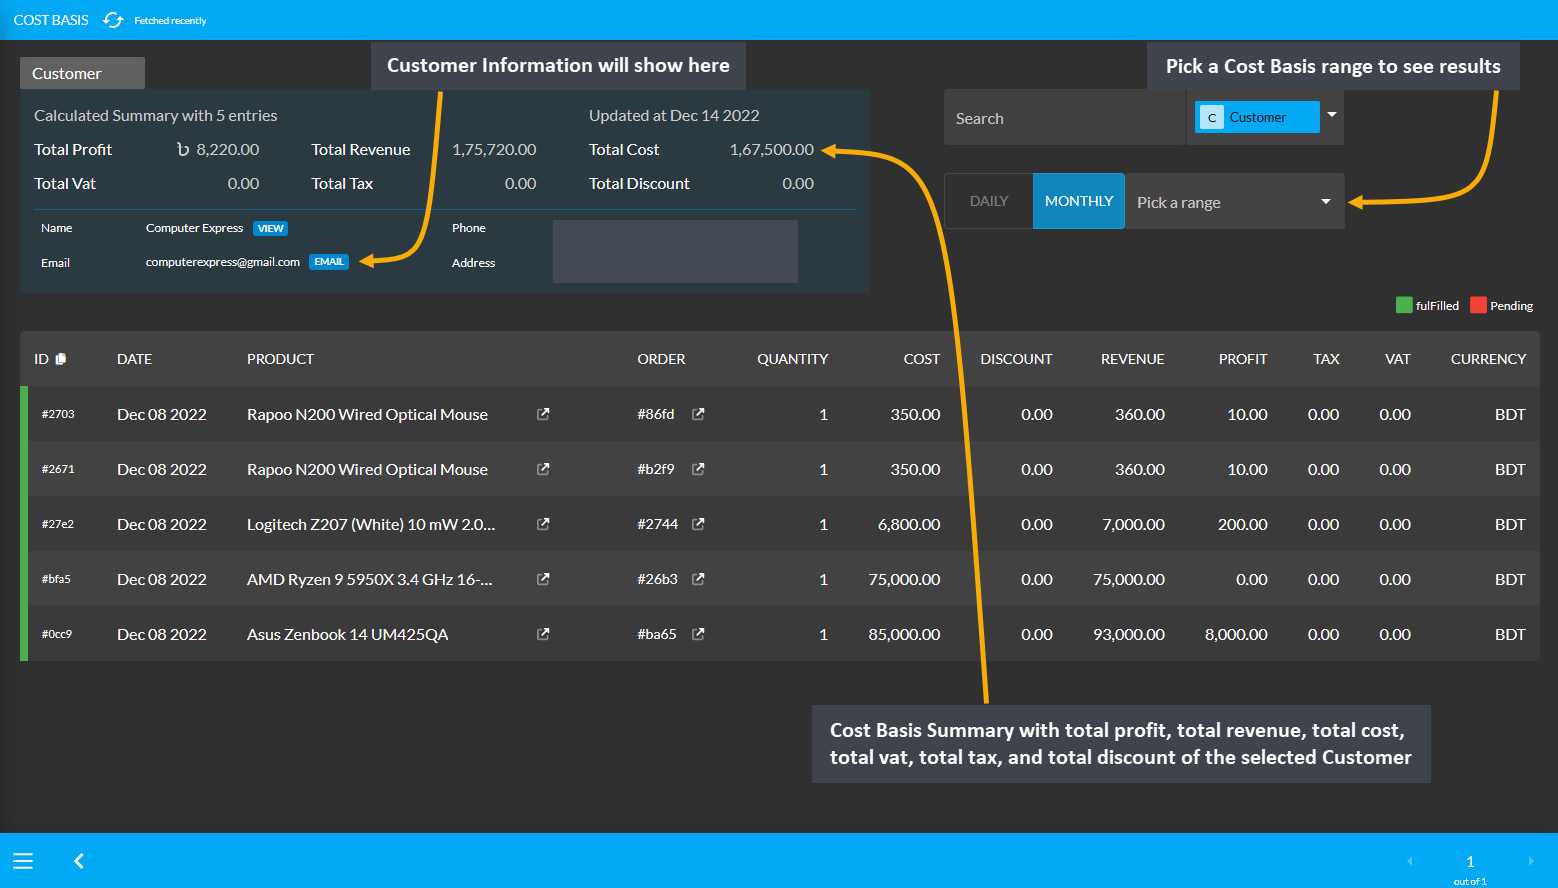
Image 5: Overall Cost Basis Summary will be shown with total profit, revenue, cost, vat, tax, and discount.
View PC Builds button redirects to the Customer’s PC Builds page that displays all the PC Build configuration details that Customer have added and saved from the Website. These PC Builds will show under the list of User Builds.
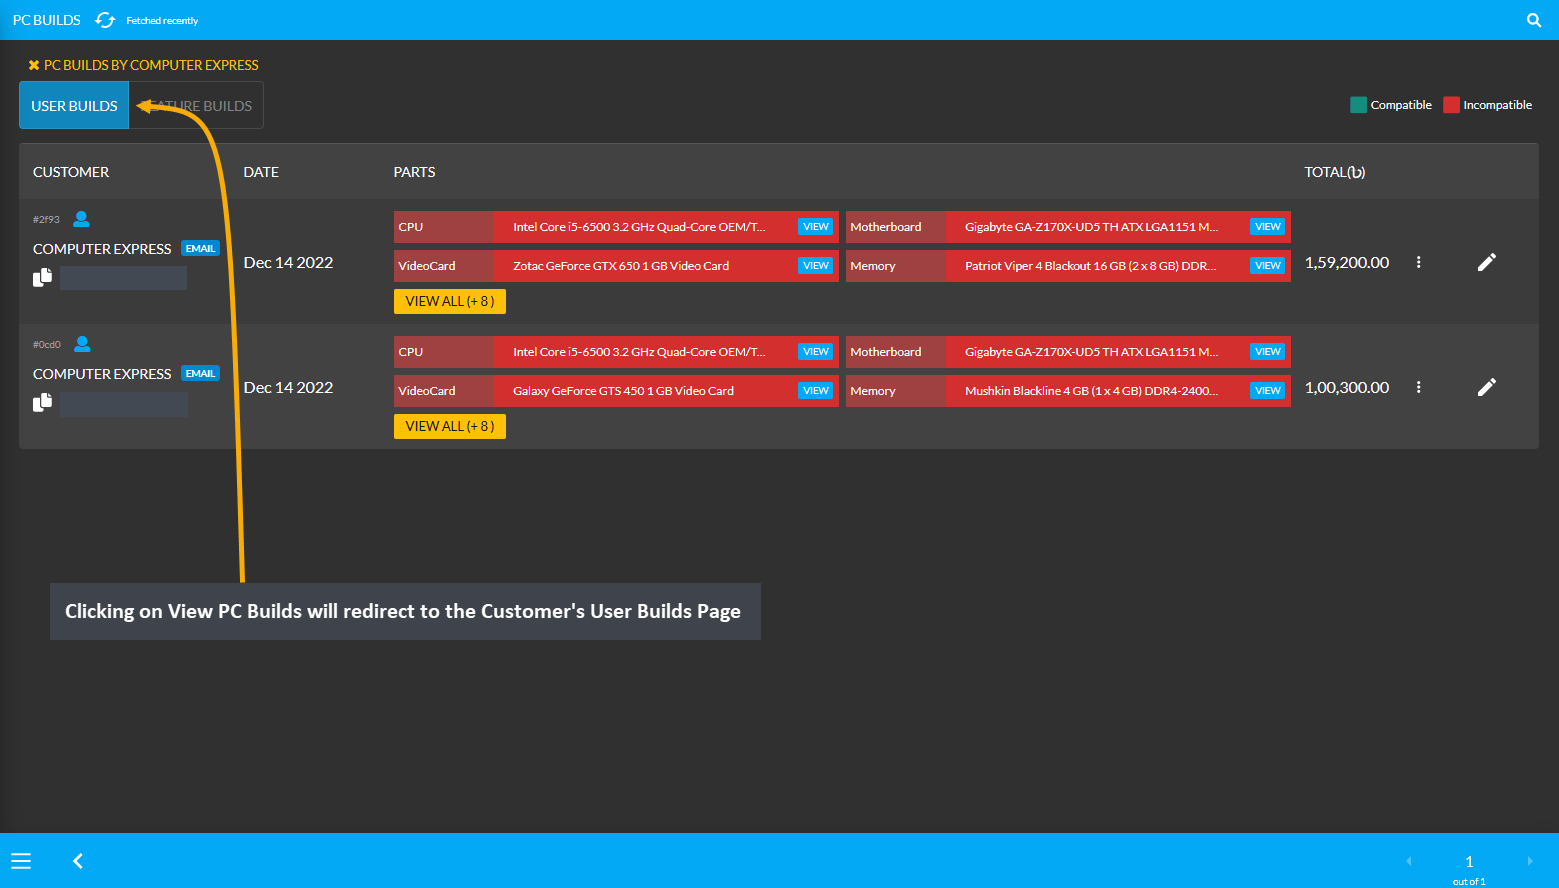
Image 6: Customer’s PC Builds page displays all PC Build configurations that Customer have added and saved.
10.4 - Customer Orders List
Learn More about how to create New Customer, view their Cost Basis, and manage Customer Dashboard.
Dashboard Customer Order List
The top right side of Customer Dashboard displays the Customer’s Orders (Pending, Processing, and Complete) in details. All recent to previous Orders are shown in chronological order. At the bottom of the Order List, there is a View All button. Clicking on it will redirect to another page showing all Orders of the Customer placed in a lifetime.
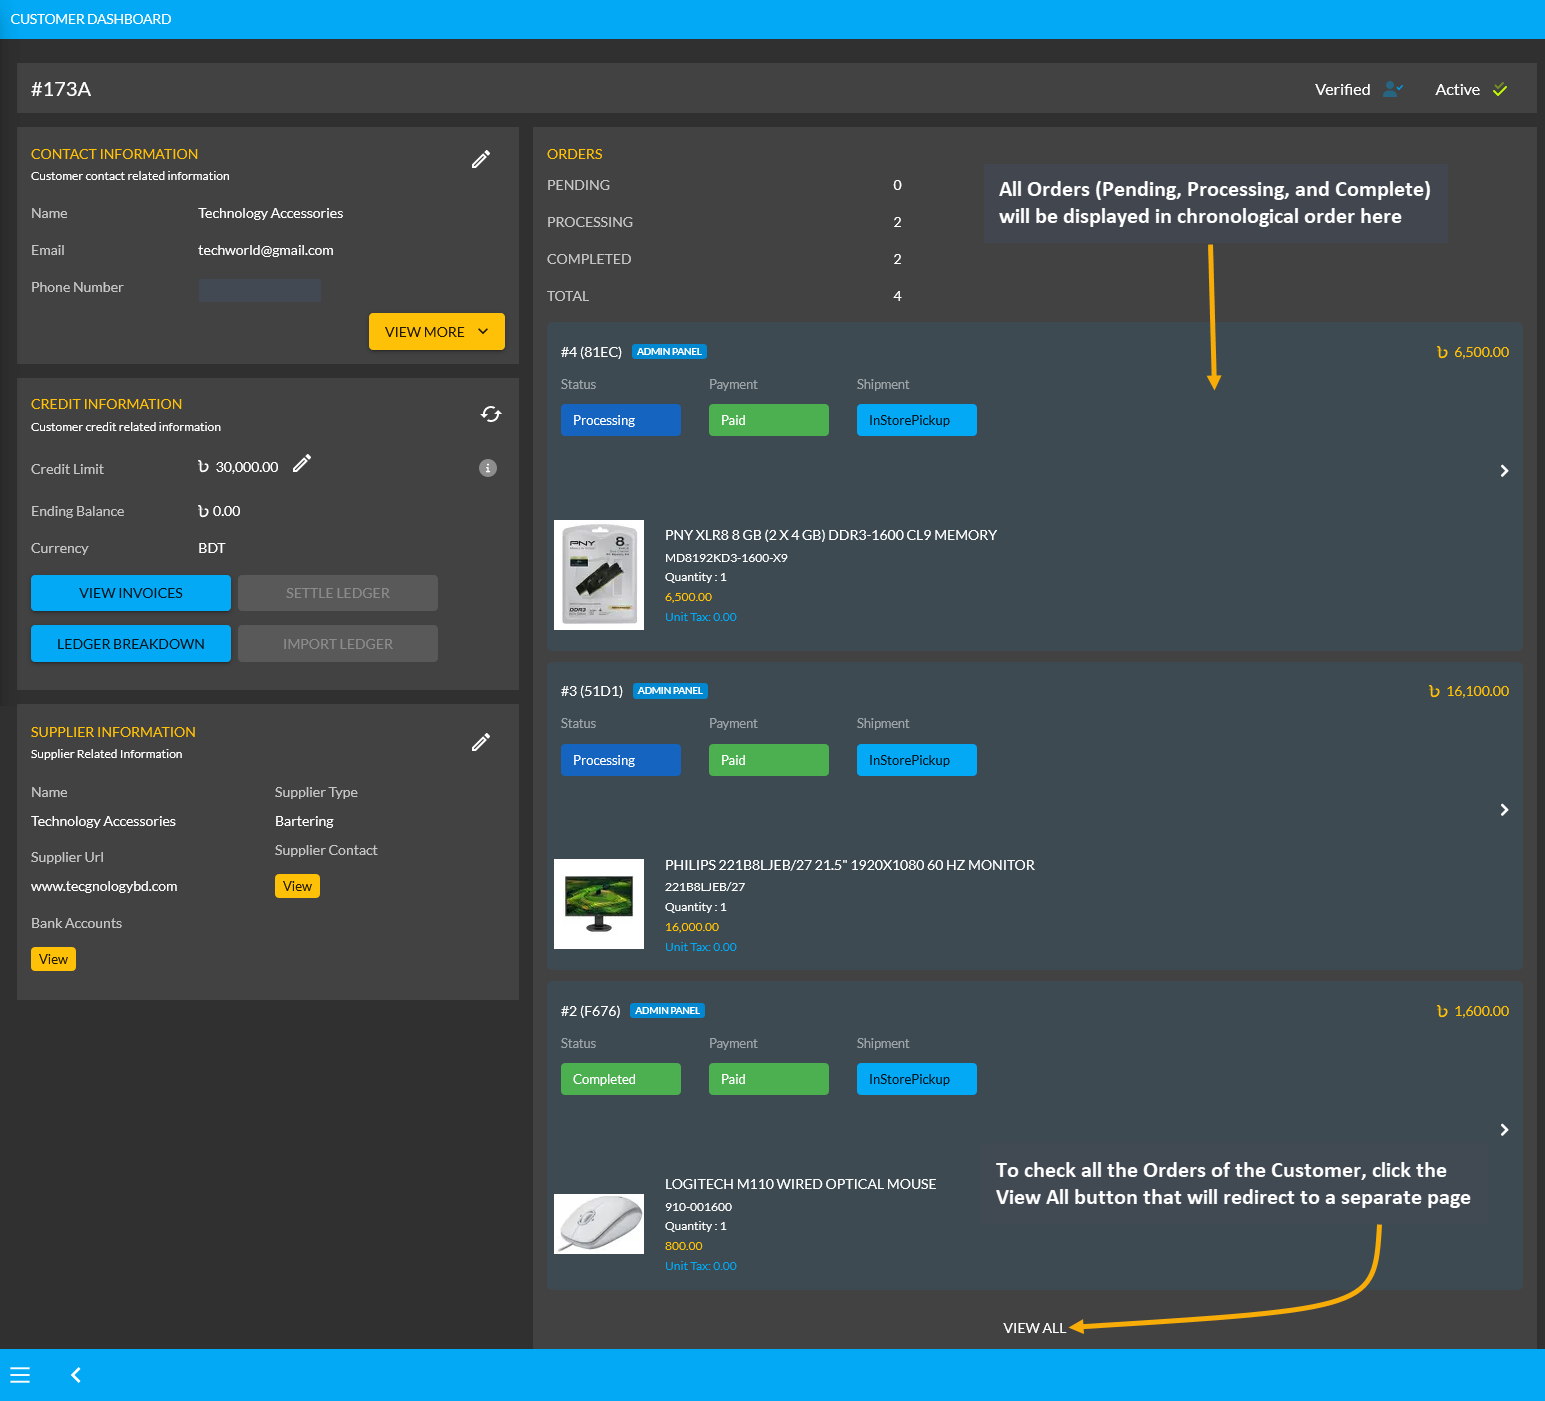
Image 1: All Orders (Pending, Processing, and Complete) will show in the chronological order on Dashboard.
View All Orders of Customer
On the page redirected from clicking the View All button, all Orders of the Customer will display in long list which they have placed in their lifetime. If they have numerous Orders, they can be viewed on different pages by using the page arrow button on the bottom. Invoices can be printed for old Orders by clicking the Print Invoice button.
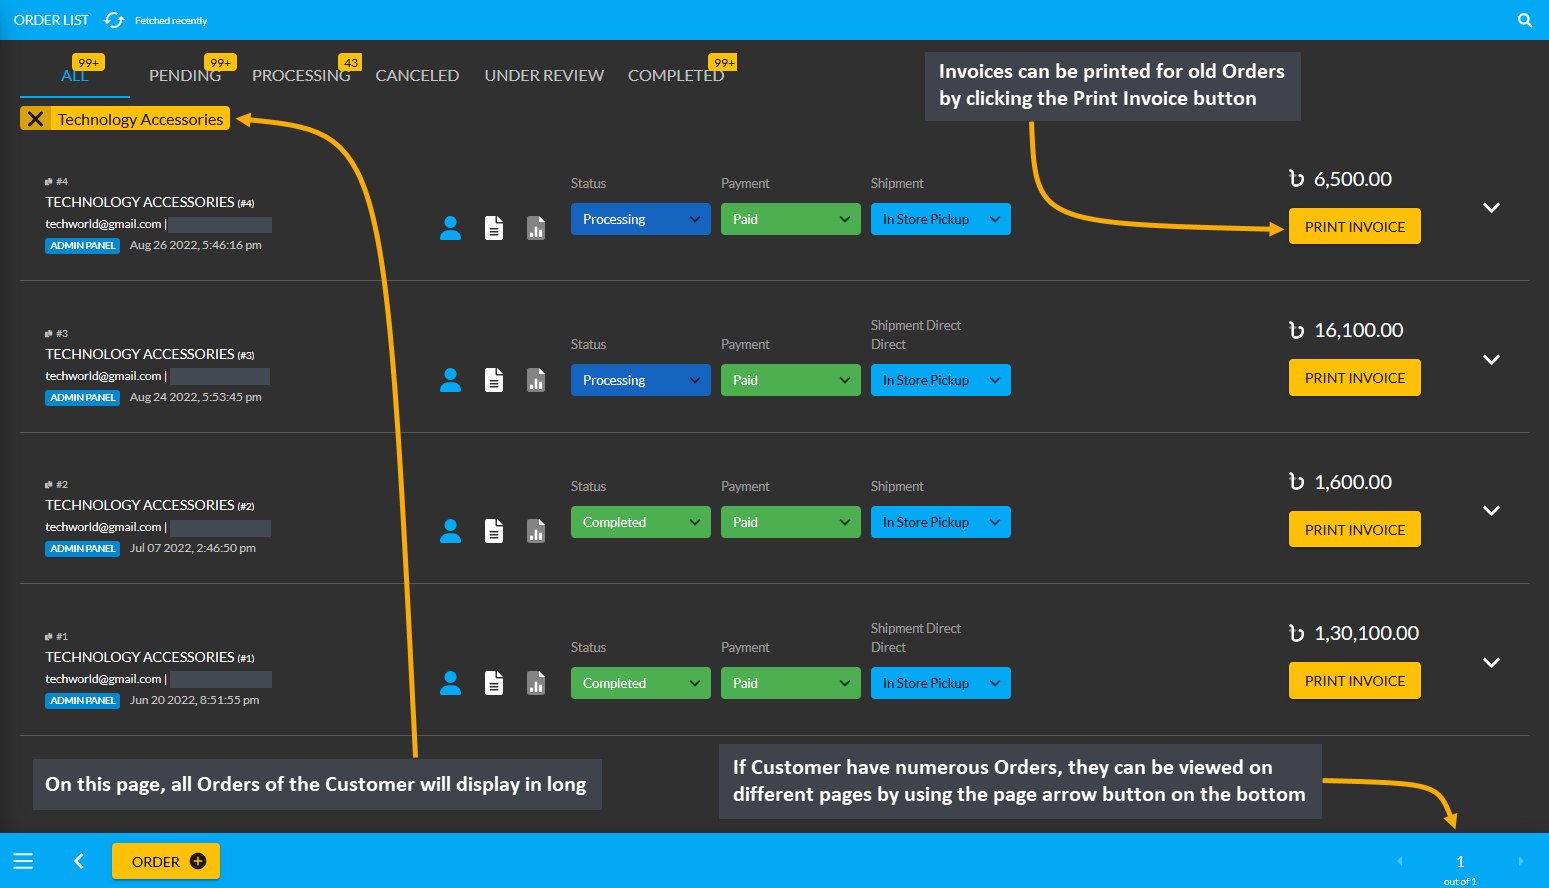
Image 2: View All button will redirect to all Orders of the Customer on a separate page in long list.
10.5 - Customer Credit Information
Learn More about how to activate Credit and provide Credit Limit to Customer.
There is a Credit Information section in the Customer Dashboard that will display the Customer’s Credit balance with Credit Limit and Credit Used. For instance, the Shop Owner trusts this Customer Computer Express and wants to give them a Credit Limit of 15,0000 BDT. Therefore, the Shop Owner needs to click on the Edit icon to open a pop-up where they can provide any amount of Credit Limit to this Customer that they can use it to buy Products.
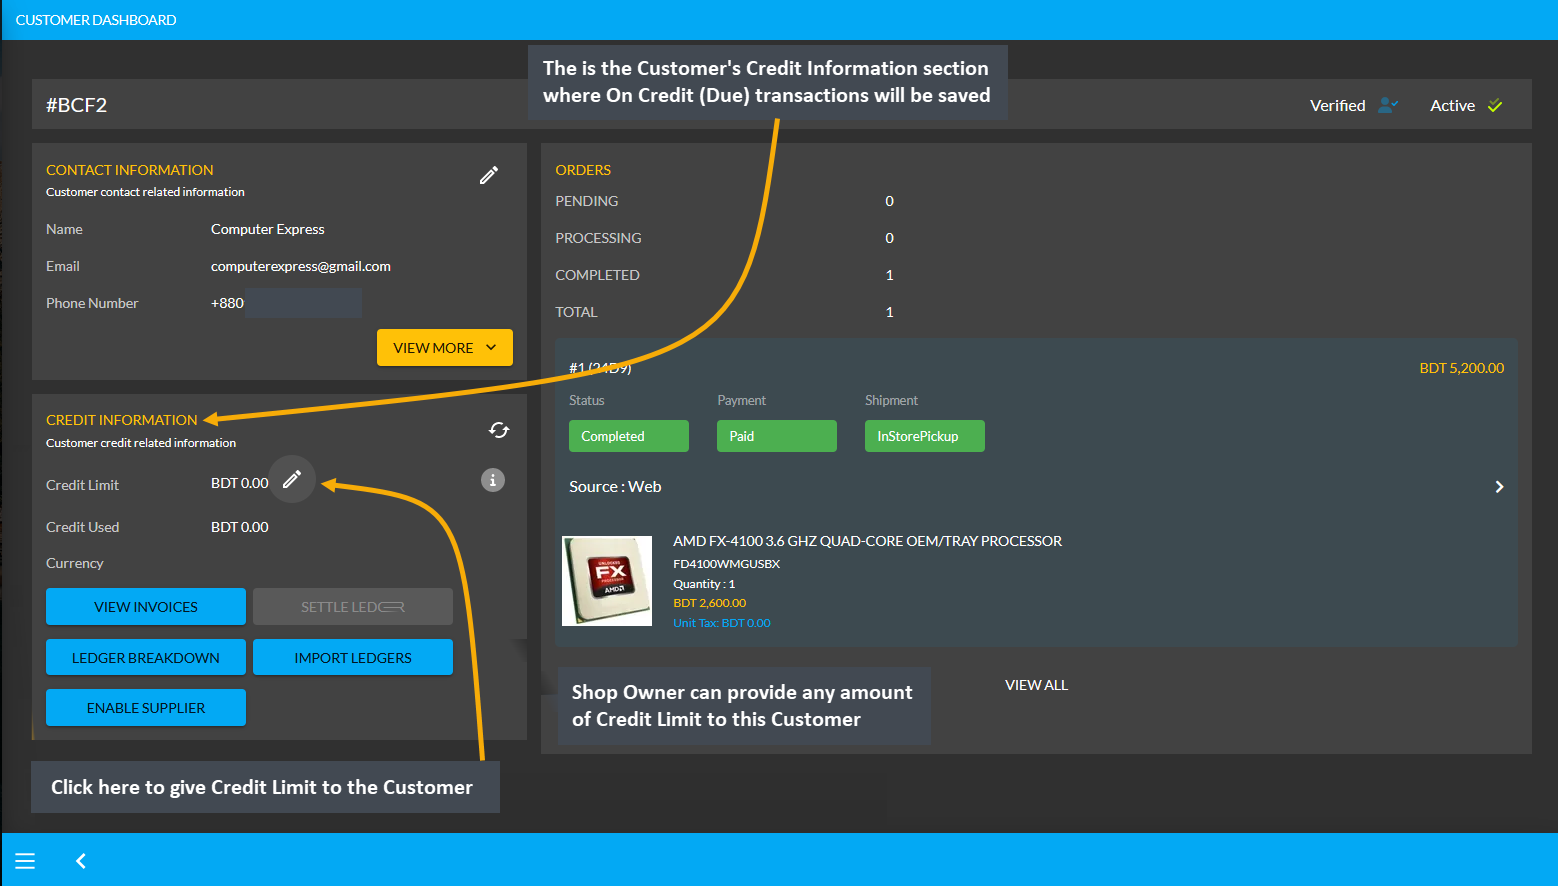
Image 1: Shop Owners can give permission to use Credit Limit to Customer from Credit Information section.
Set Customer’s Credit Limit
Clicking the Credit Limit icon will open a pop-up with Customer’s details. There is a box for Credit Limit, click on it and input 15,000 BDT to provide this Credit Limit to the Customer. Turn on the toggle Allowed to Use Credit to allow Customer to use the Credit Limit. Now, this Credit Customer will be able to buy Products within Credit Limit of 15,000 BDT without paying upfront. The final action is to click on the Submit button to save all the changes.
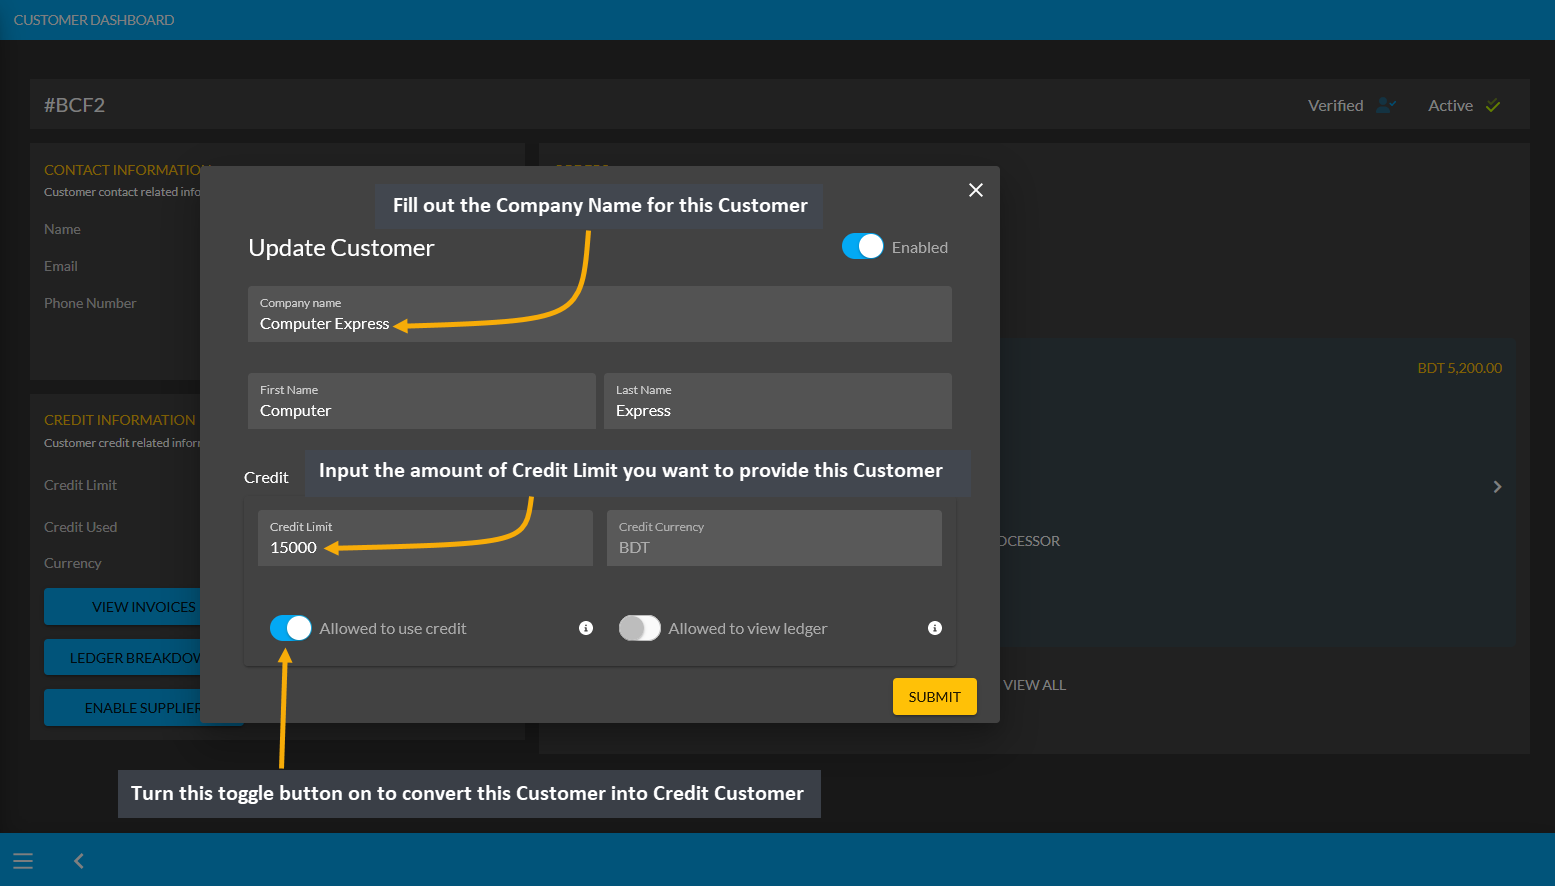
Image 2: Set Customer's Credit Limit by turning on the toggle button Allowed to Use Credit and set amount.
Credit Limit to Apply on Orders from Admin Panel
Now, this Customer have a Credit Limit of 15,000 BDT on their balance to use as On Credit (Due) for Admin Orders. However, this Credit Limit can only be used in person for In Store Pickup and for transactions only from the Admin Portal. The Shop Owner and their staff can only use the Credit Limit for selling Products to the Customer during In Store Pickup using the On Credit (Due) Payment Gateway. The Credit Limit cannot be applied on Website checkout.

Image 3: After being issued Credit Limit, it will show under the Customer's Credit Information section.
11 - Order Management
Utilize order tab to keep track of orders and modify order status and details.
Click Orders to get access to order configurations and edit Order status, Payment status, and Shipment status.
List of Orders
The Order List page show different types of Orders - Draft, Pending, Processing, Cancelled, Under Review, and Completed. Clicking on each Order, Shop Owners can visit the Order Dashboard to update order and payment statuses according to Customer commitments. On top, is a refresh button to refresh the Page.
Order List page shows each Order with Customer details on the left, with Order total beside it, then Order Status, Payment Status, and Shipment Status that can be updated if Order is in Draft, Pending, or Processing statuses and when Customer makes full payment or when shipment is delivered. Beside statuses, there is a Print Icon, clicking on it will open a dropdown with options to select an automatically generated Invoice or a Challan that can be printed whenever needed. Click View to visit Order Dashboard and see full details.
On the left side beside Customer details within the Order List, there is a dropdown clicking on which will open options to visit the Customer Dashboard, Report, Ledger Breakdown, and Orders on a separate tab.
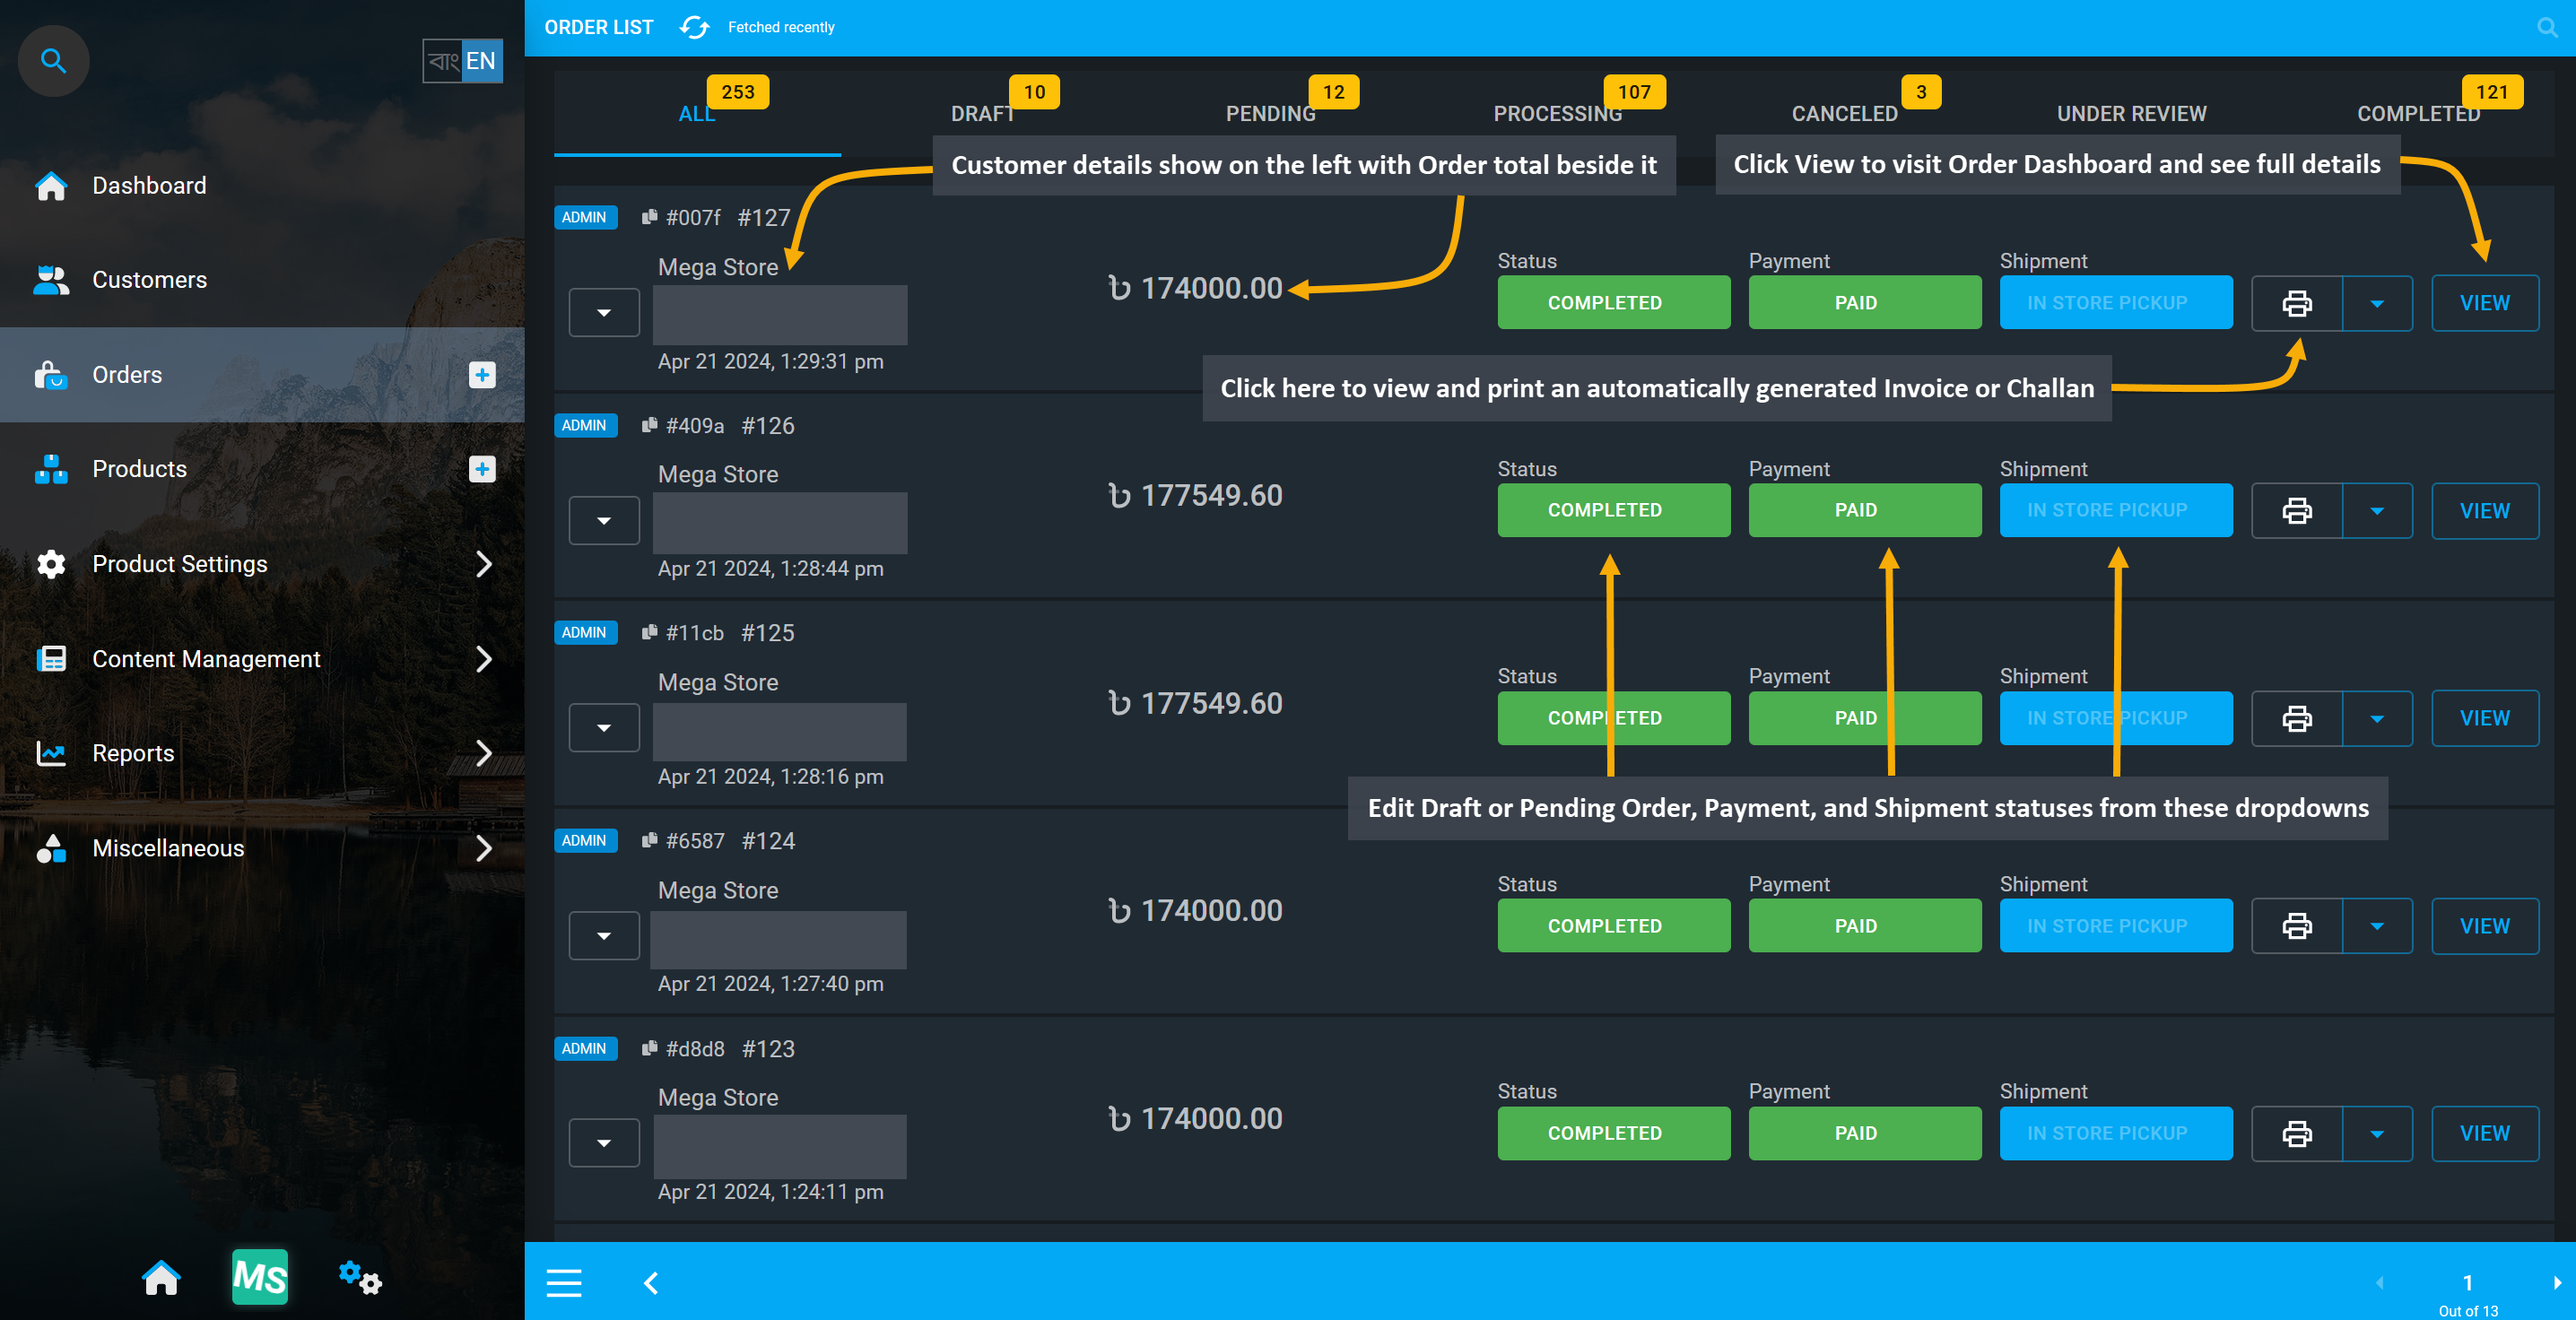
Image 1: Order List show Draft, Pending, Processing, Cancelled, Under Review, and Completed Orders.
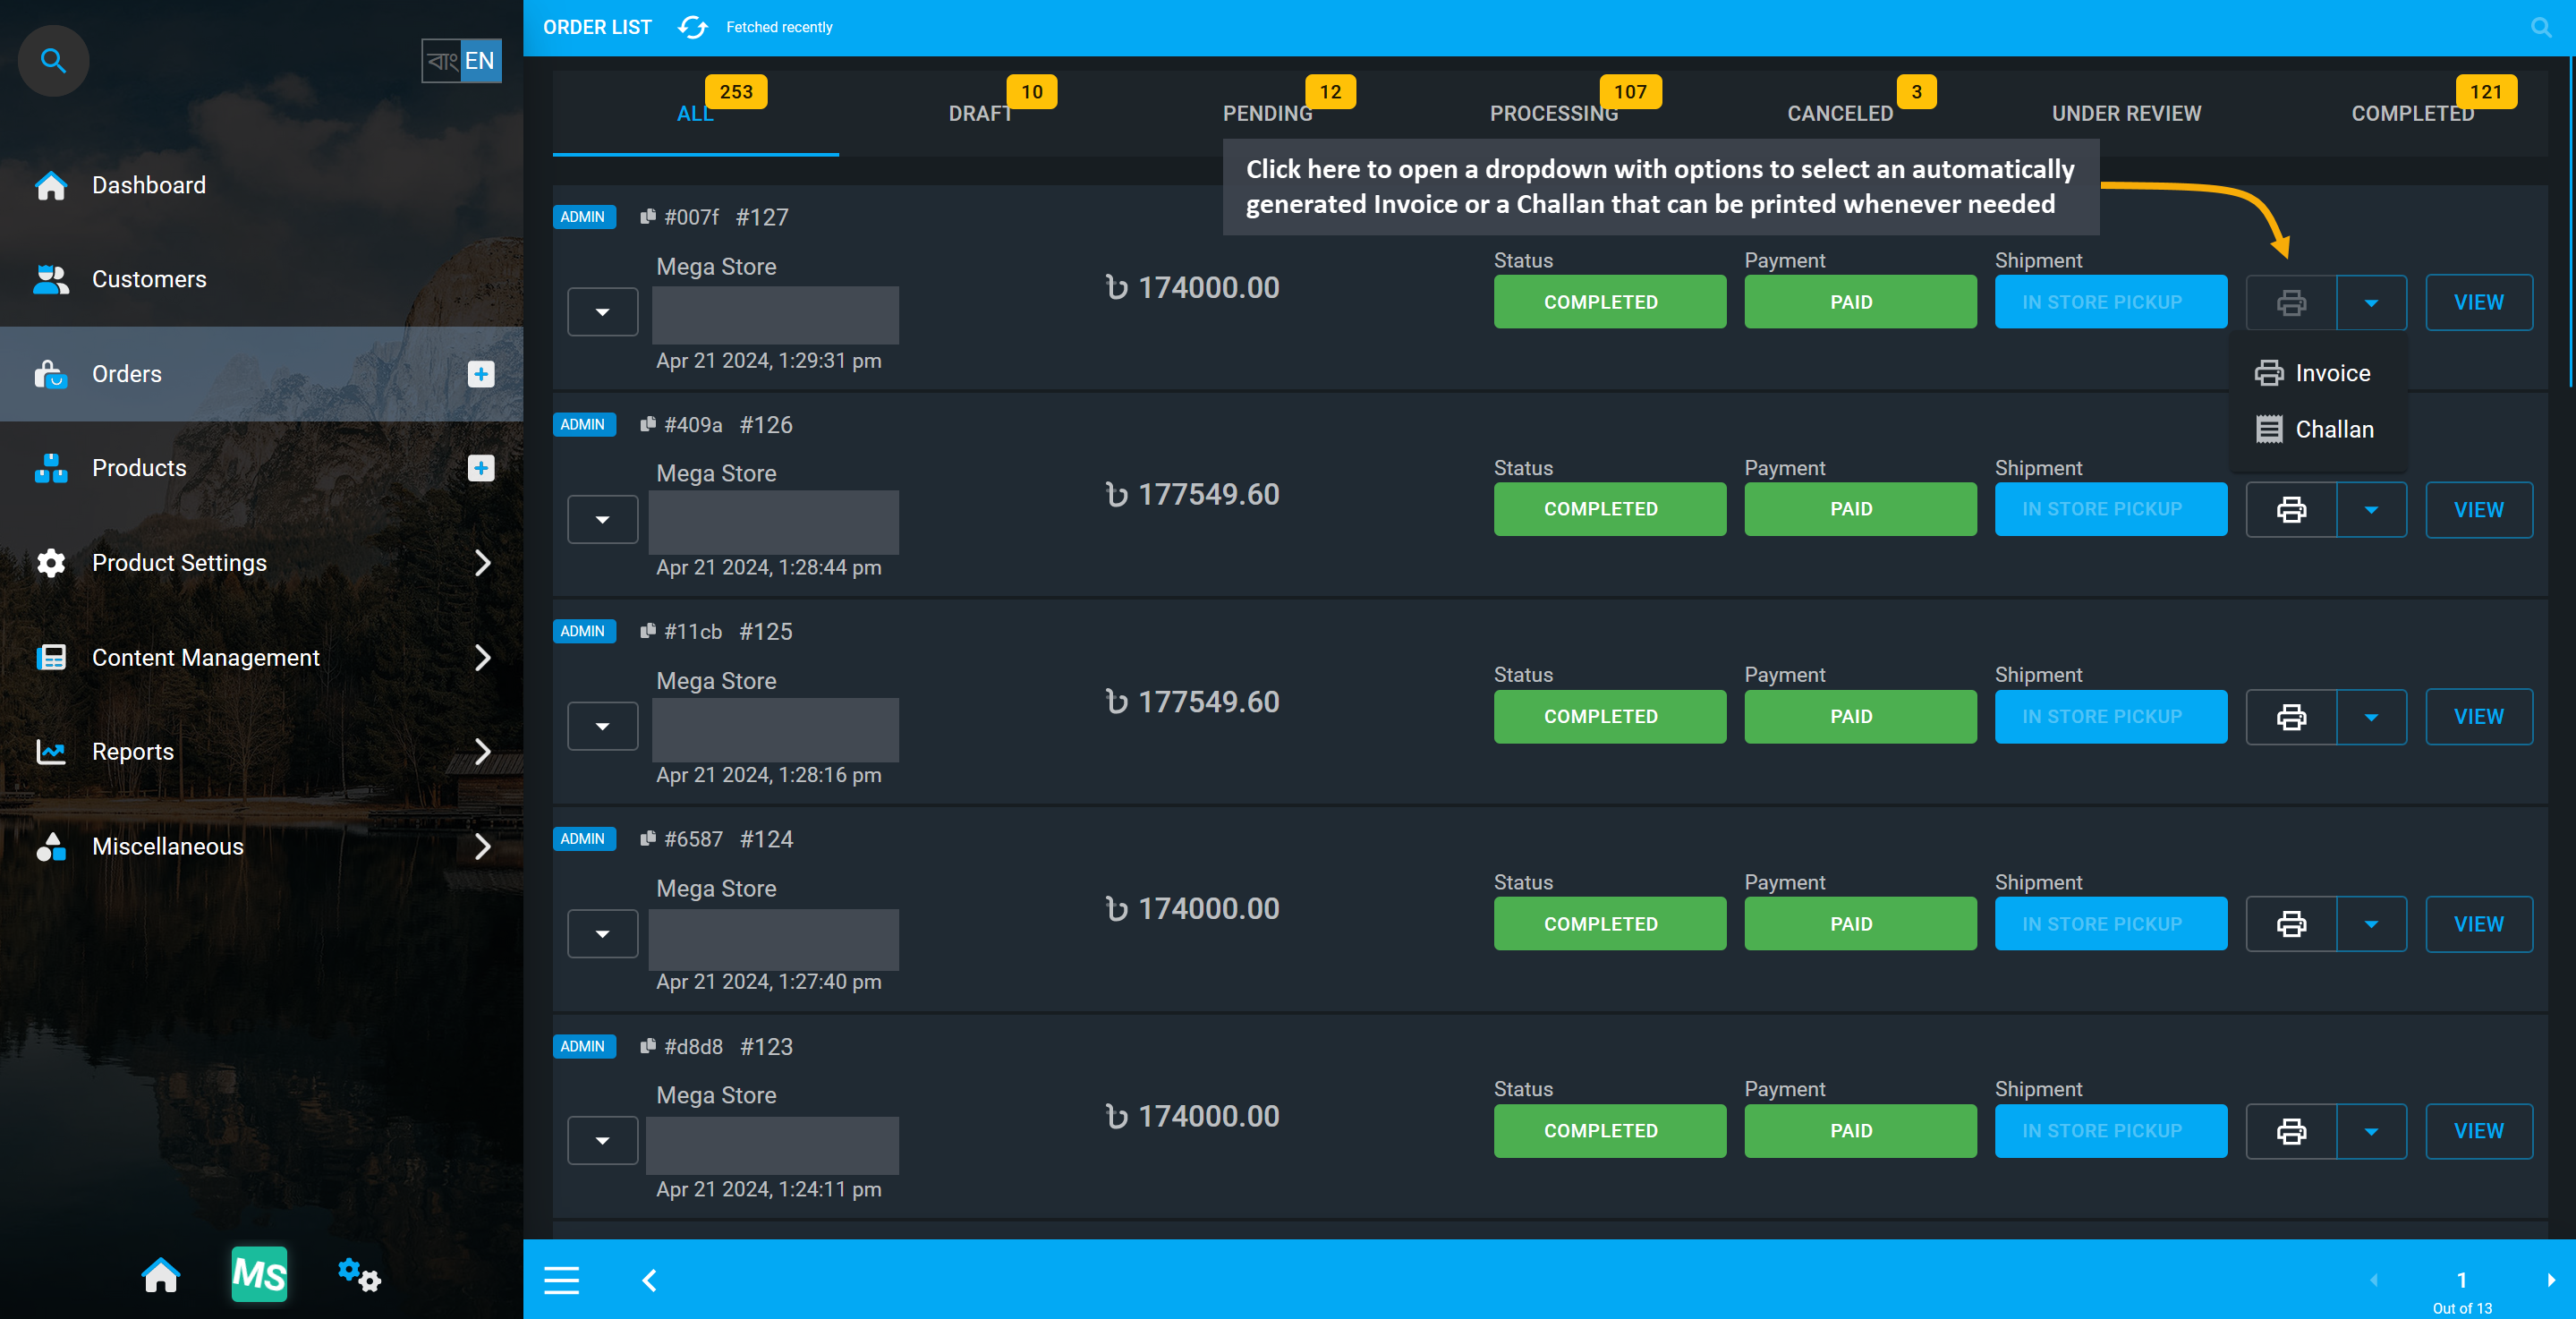
Image 2: Open an automatically generated Invoice or a Challan that can be printed whenever needed.
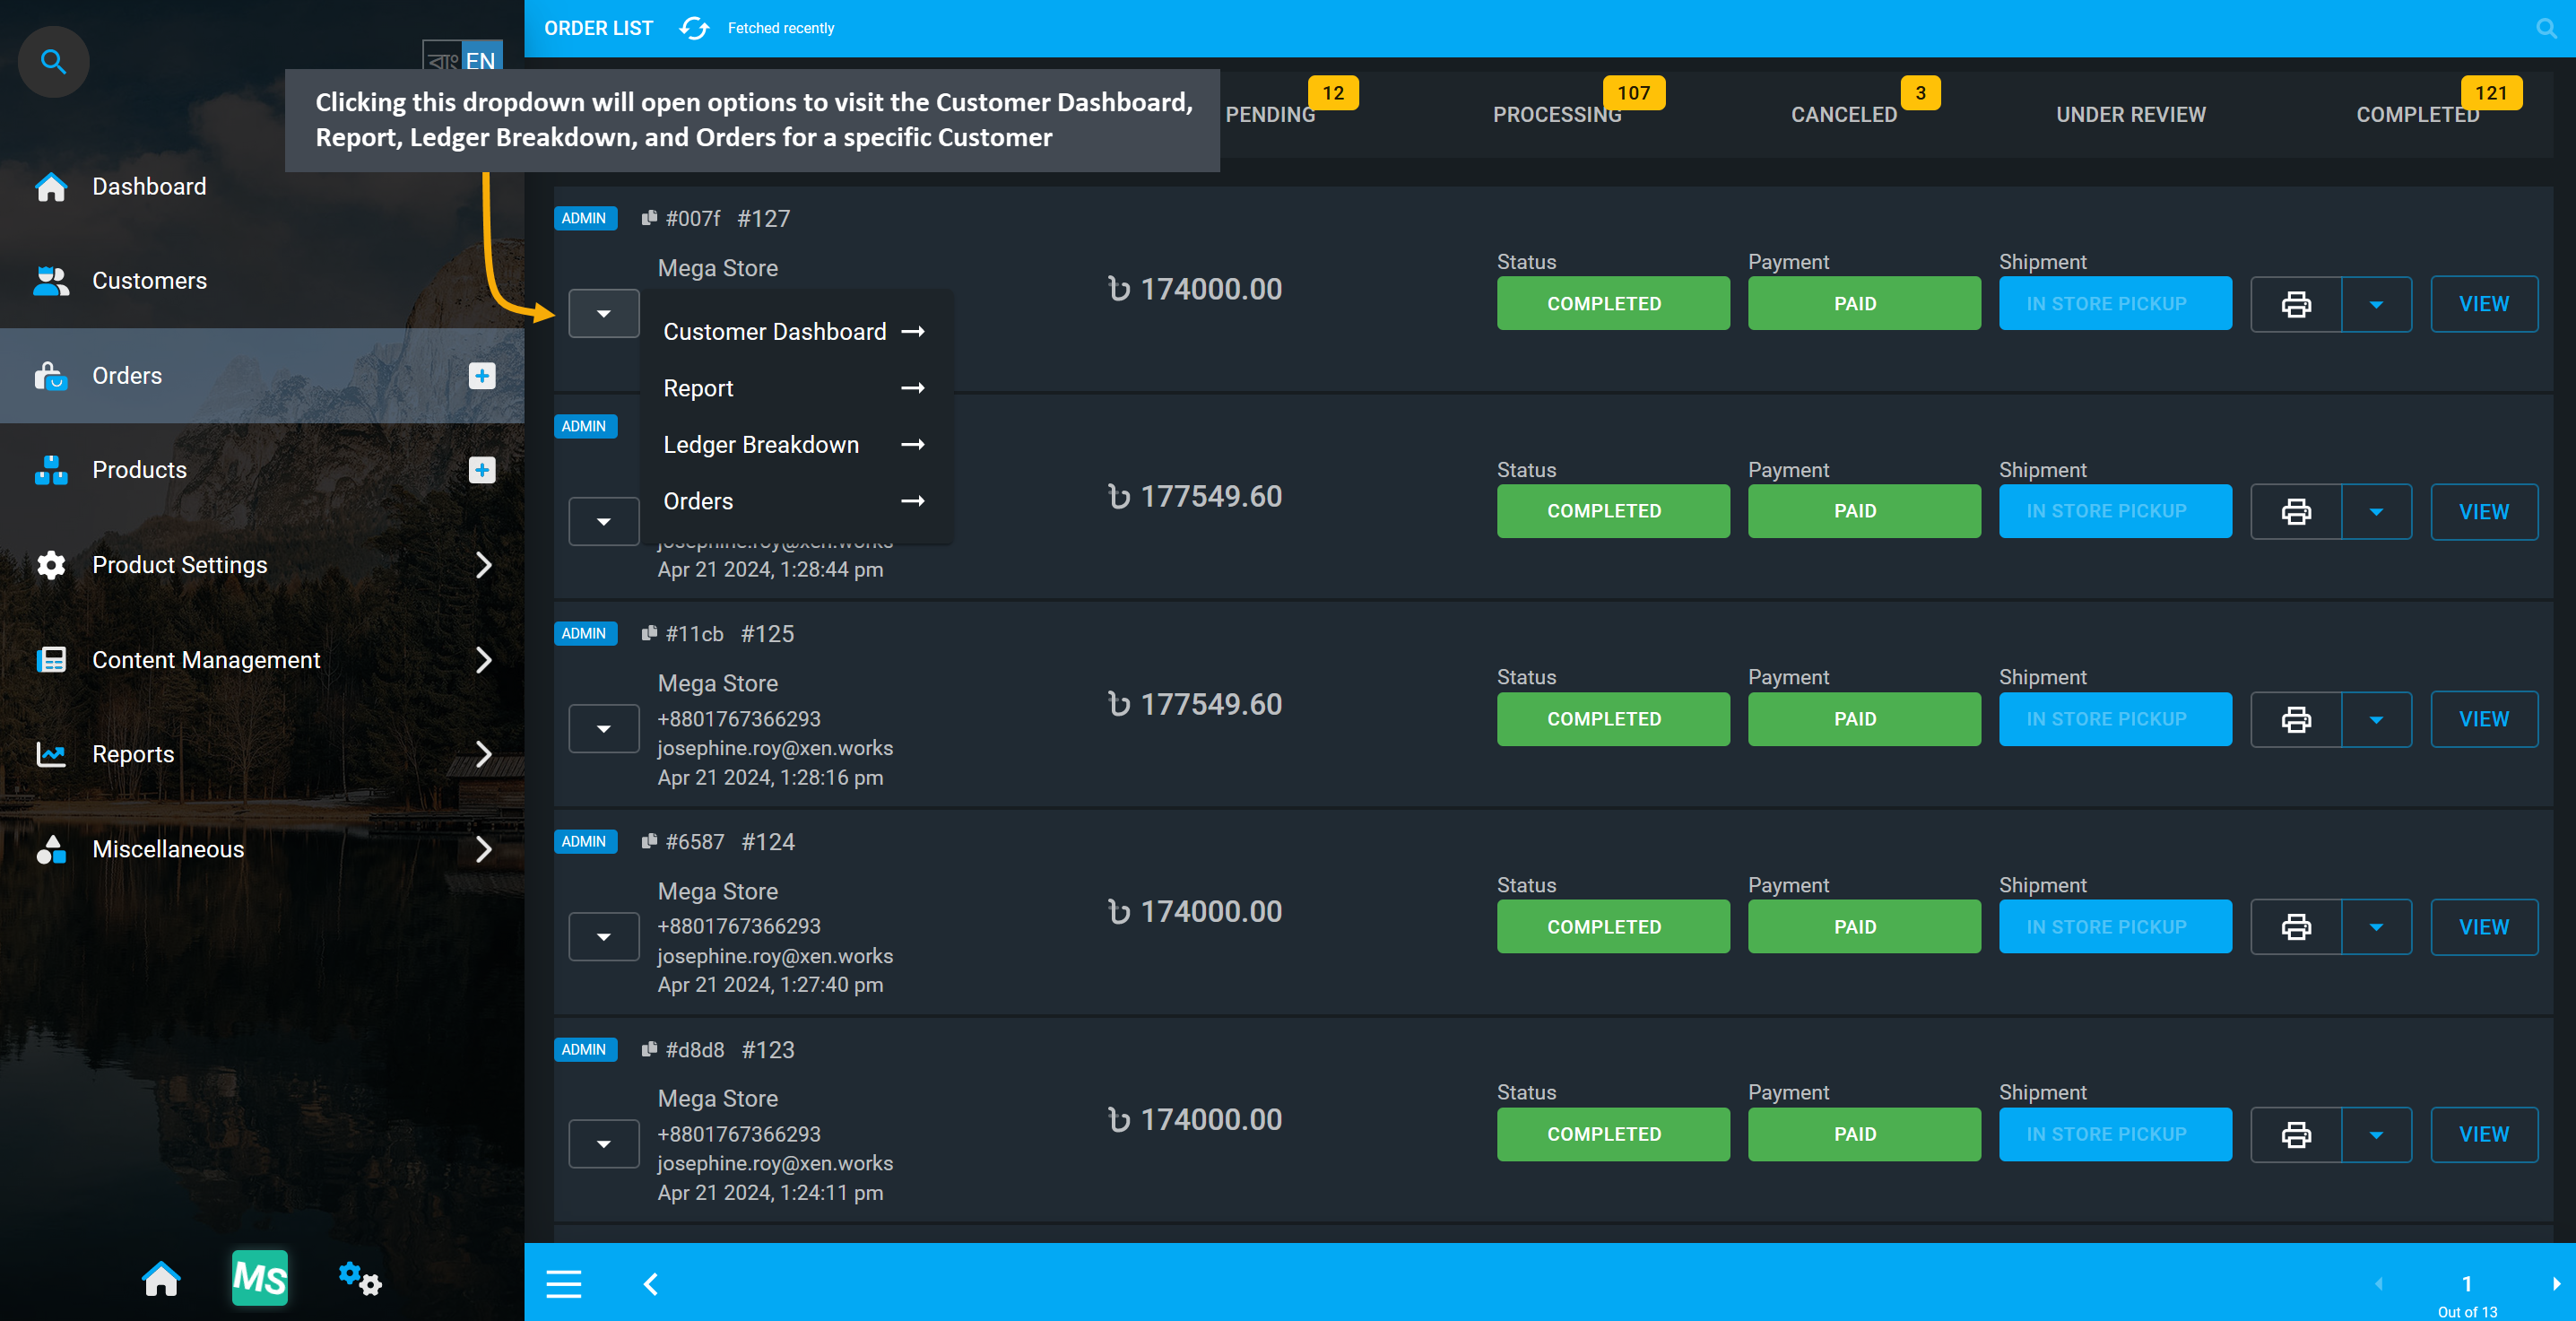
Image 3: Clicking dropdown will open options to visit different navigations for selected Customer.
Automatic and Manual Orders
Automatic Orders created by Customers from the Website will be displayed under All, Pending, Processing, Cancelled, Under Review, and Completed. Besides, Shop Owner can create Manual Orders at their Customer’s request from the Admin Panels by clicking on the Order + button at the bottom of the page or the + button beside Orders tab. Automatic Website Orders will have the label Website beside them and Manual Admin Panel Orders placed by the Shop will have the label Admin beside them to differentiate both Order types.
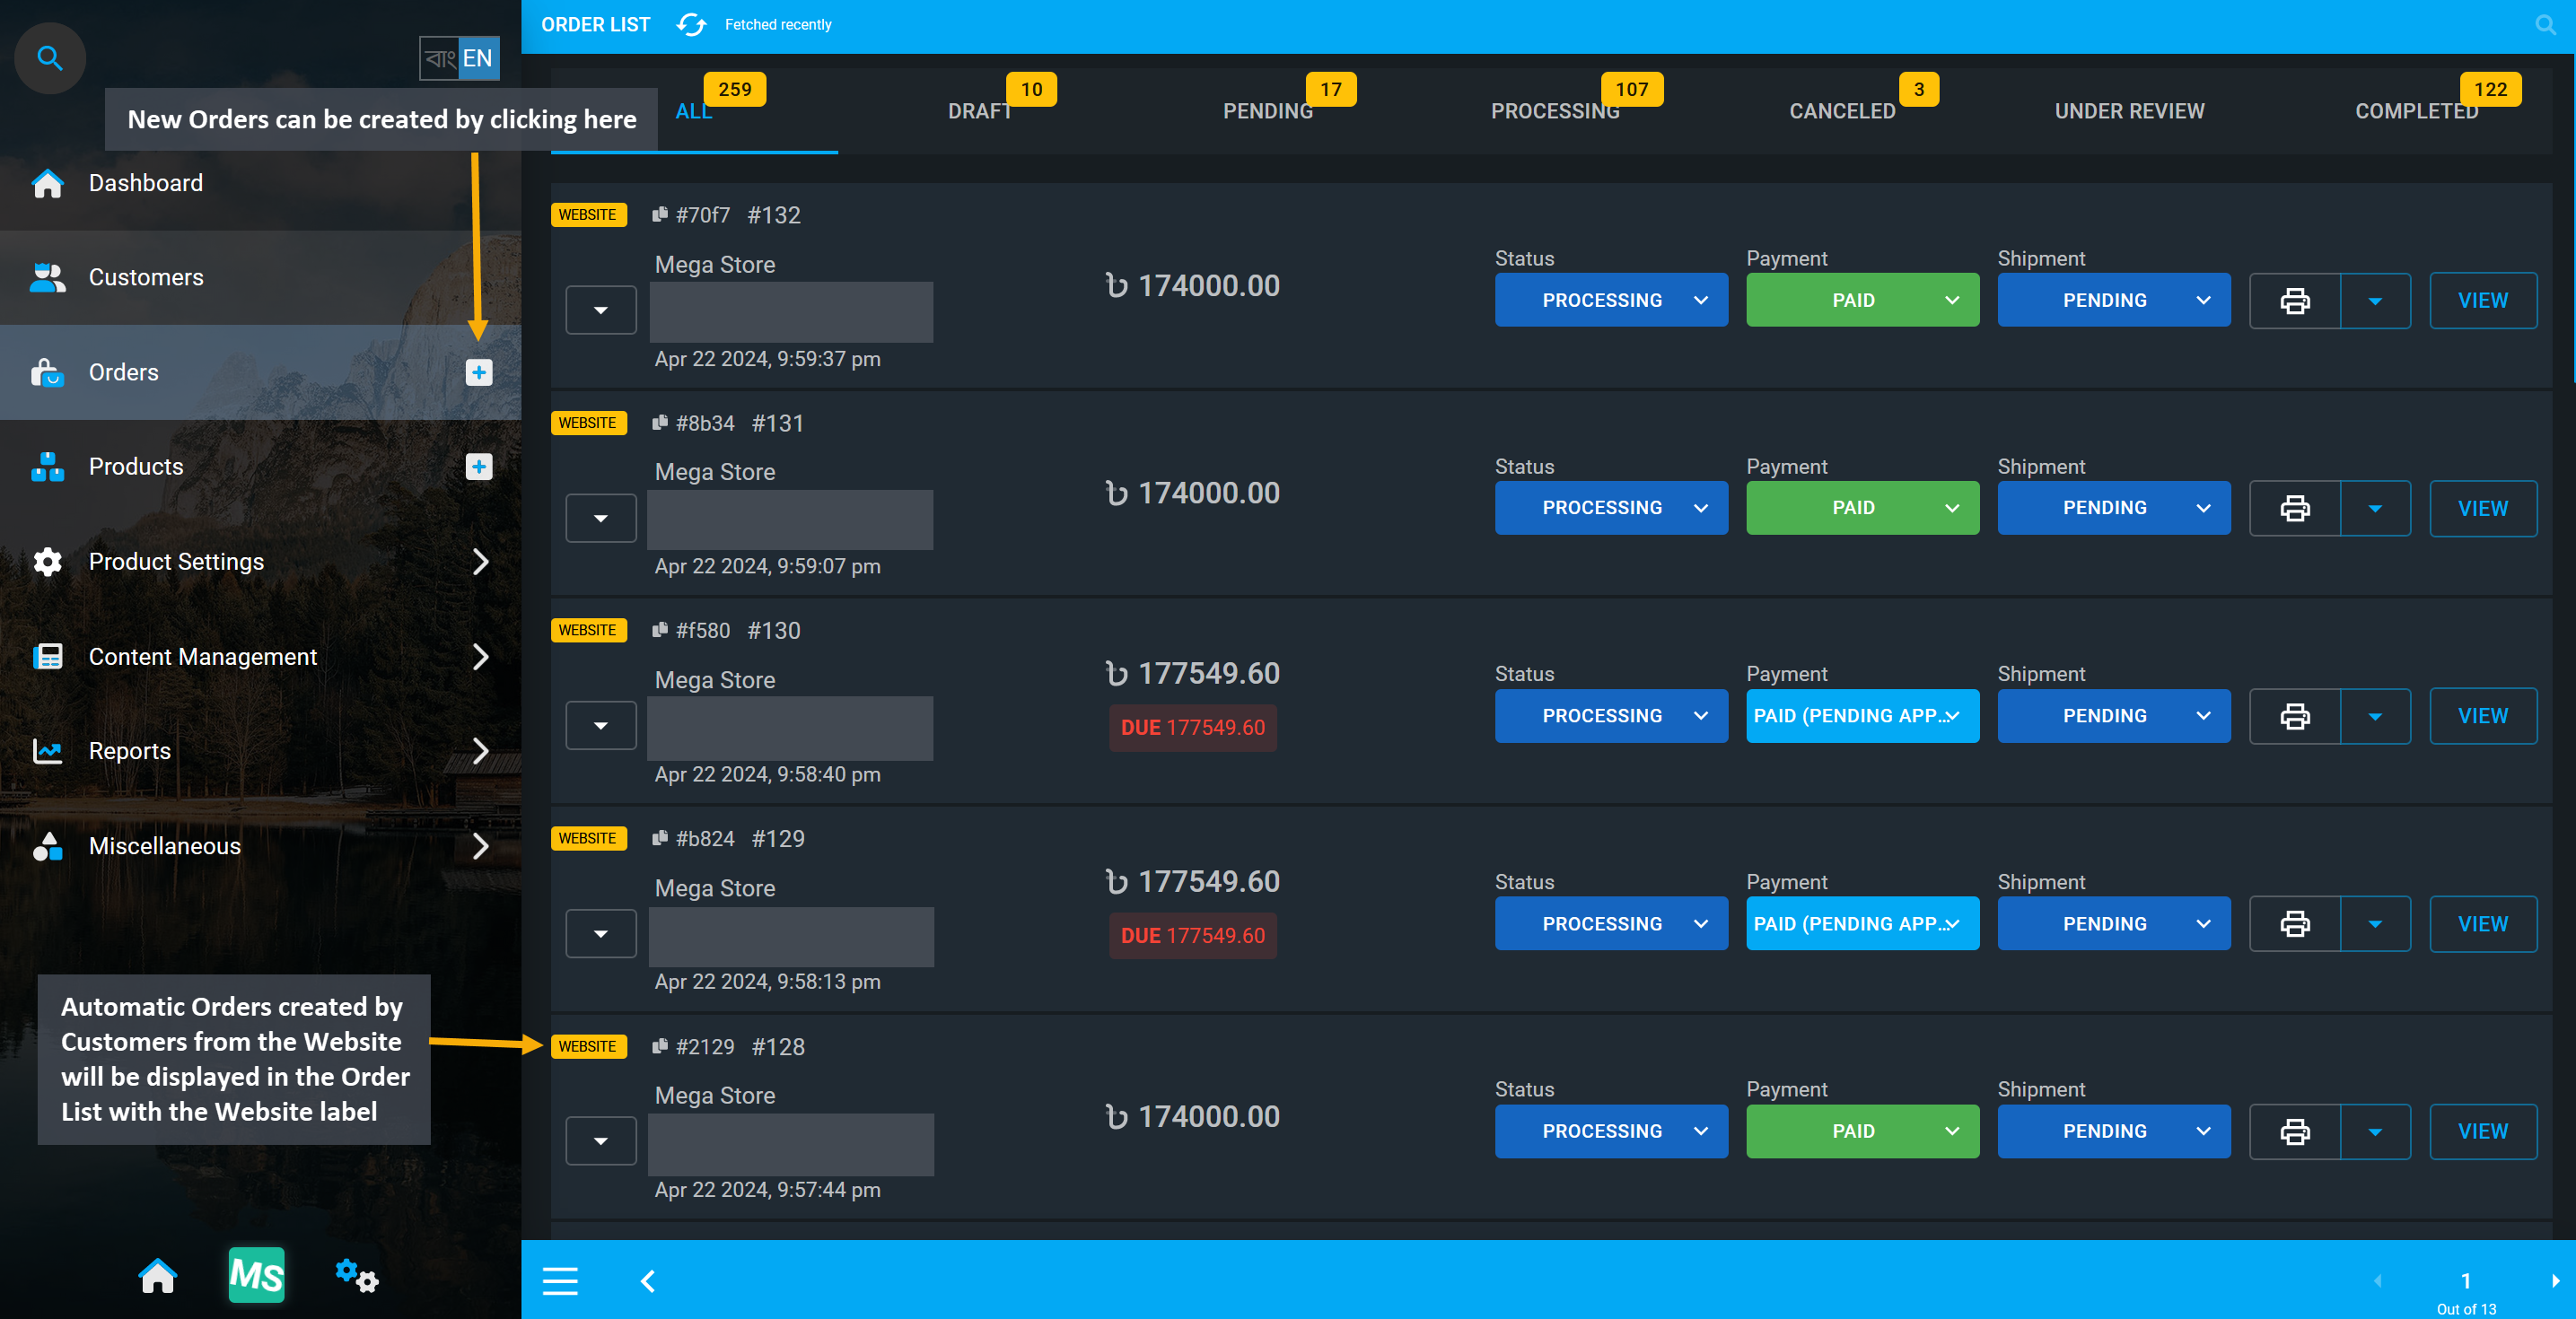
Image 4: Automatic Orders created by Customers from the Website will be displayed with Website label.
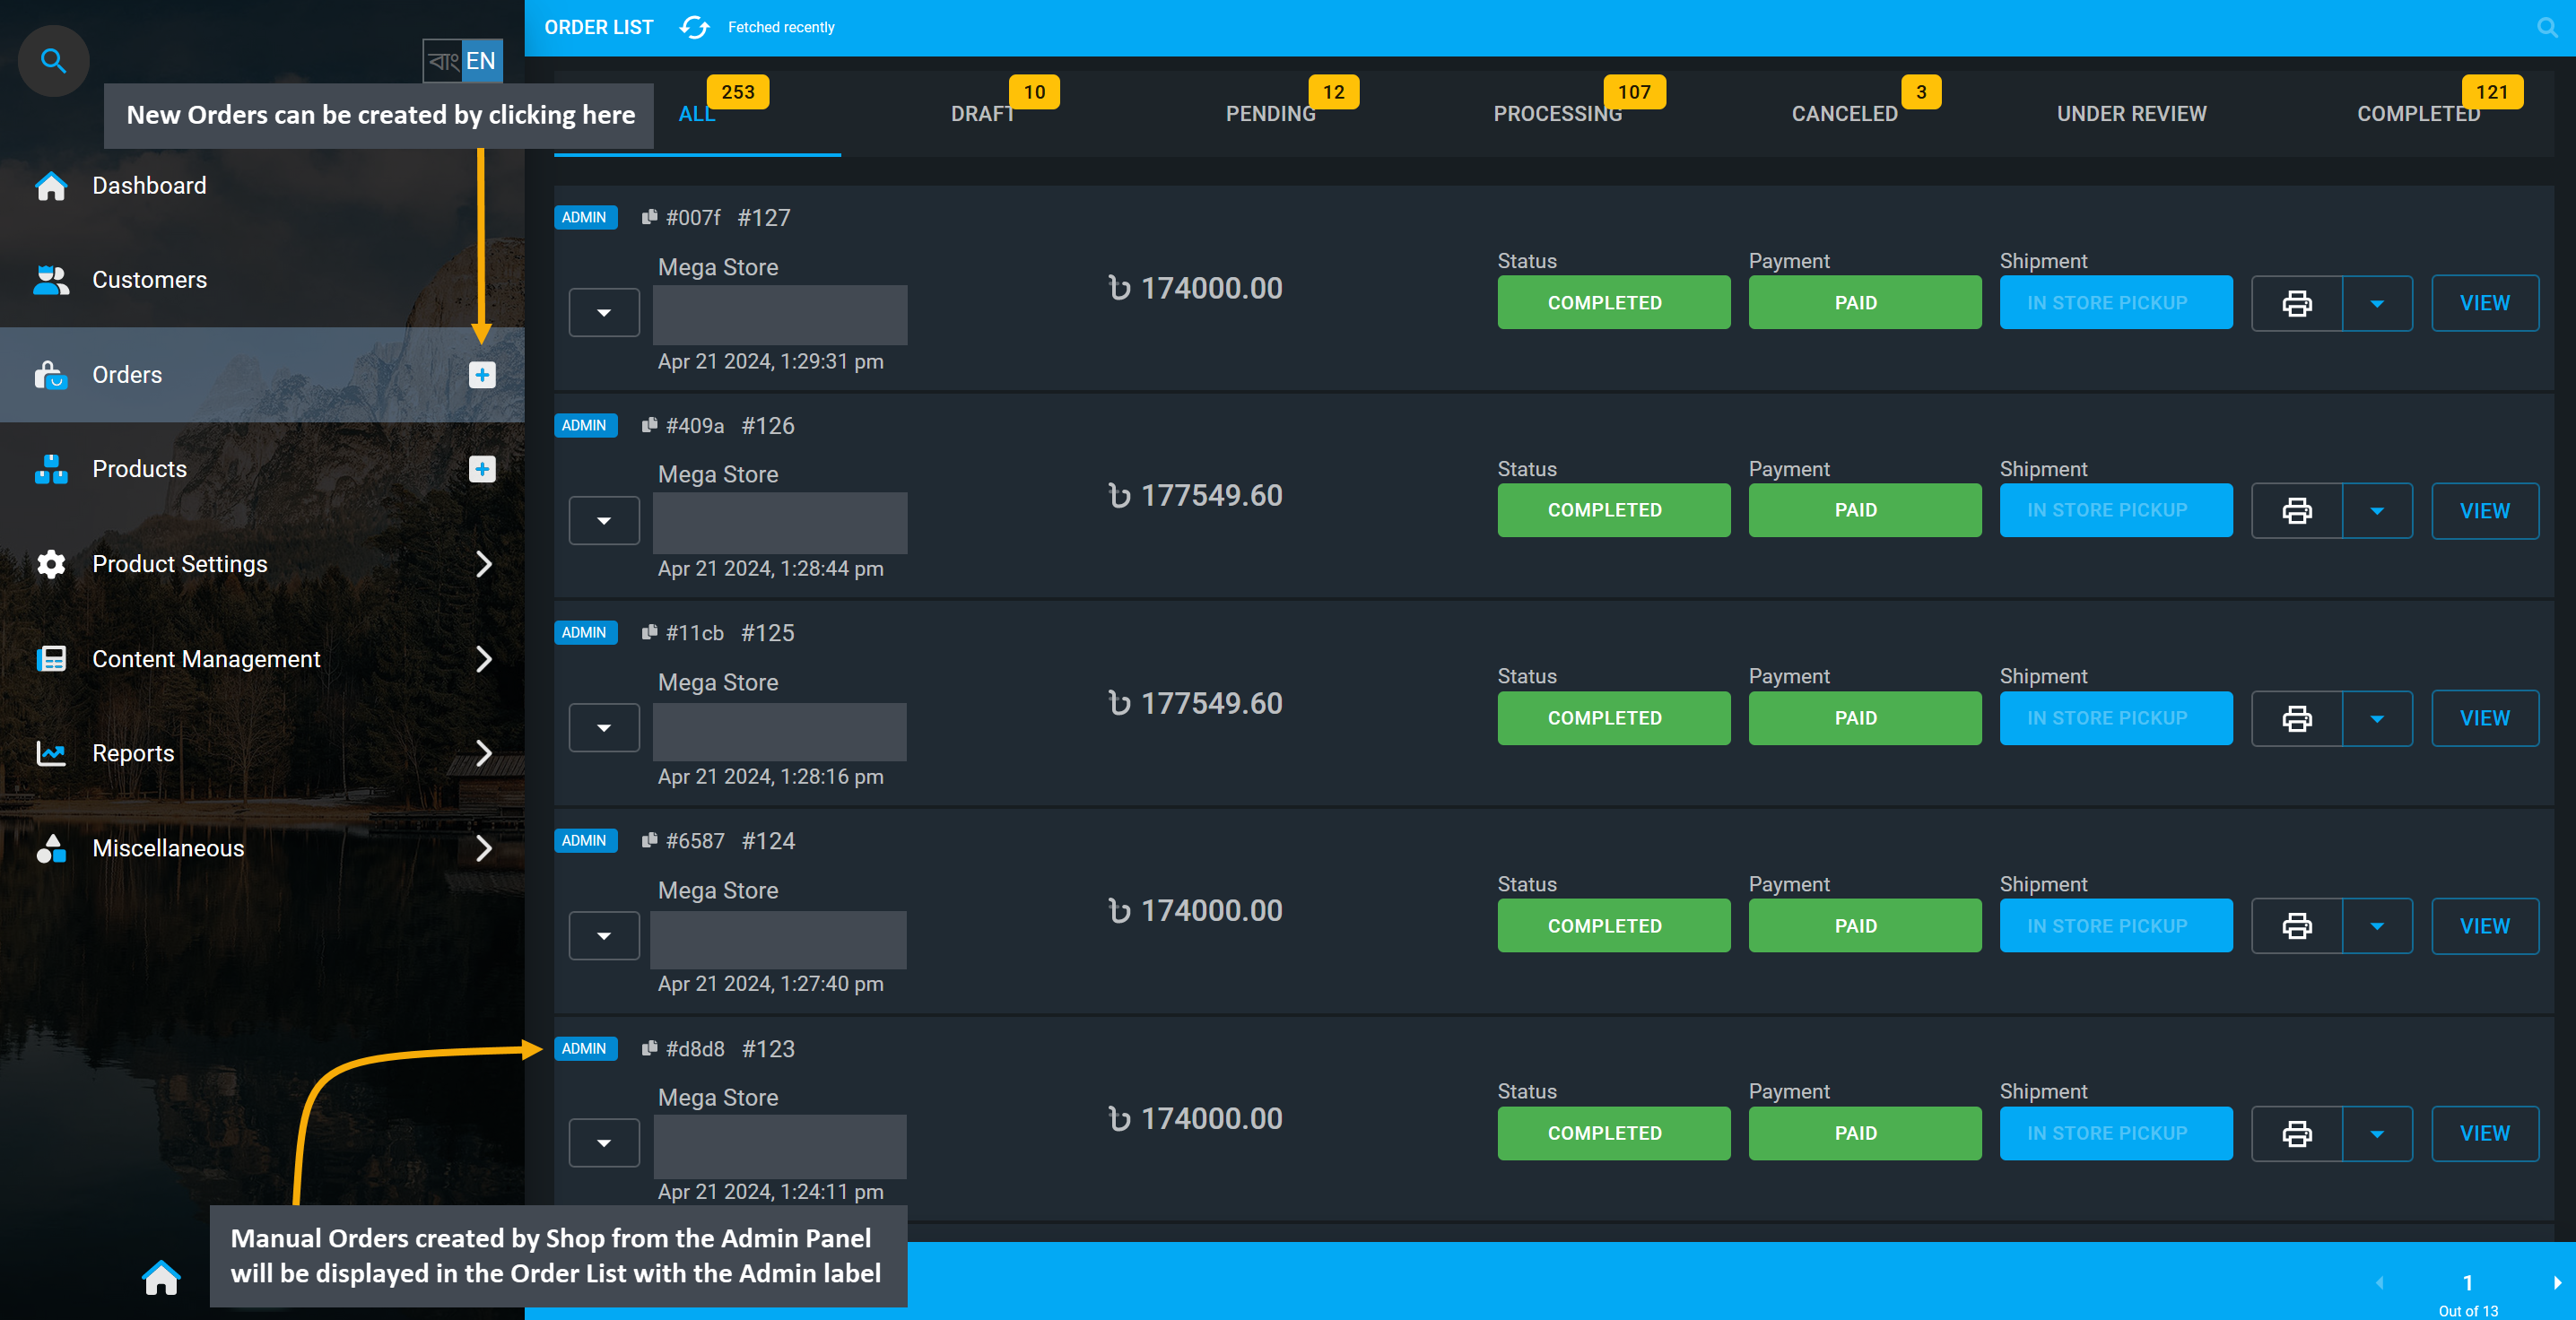
Image 5: Manual Orders created by Shop from the Admin Panel will be displayed with the Admin label.
Create New Order from Admin Panel
New Orders can be created by clicking on the + button on the main Orders tab by the Shop Owner.
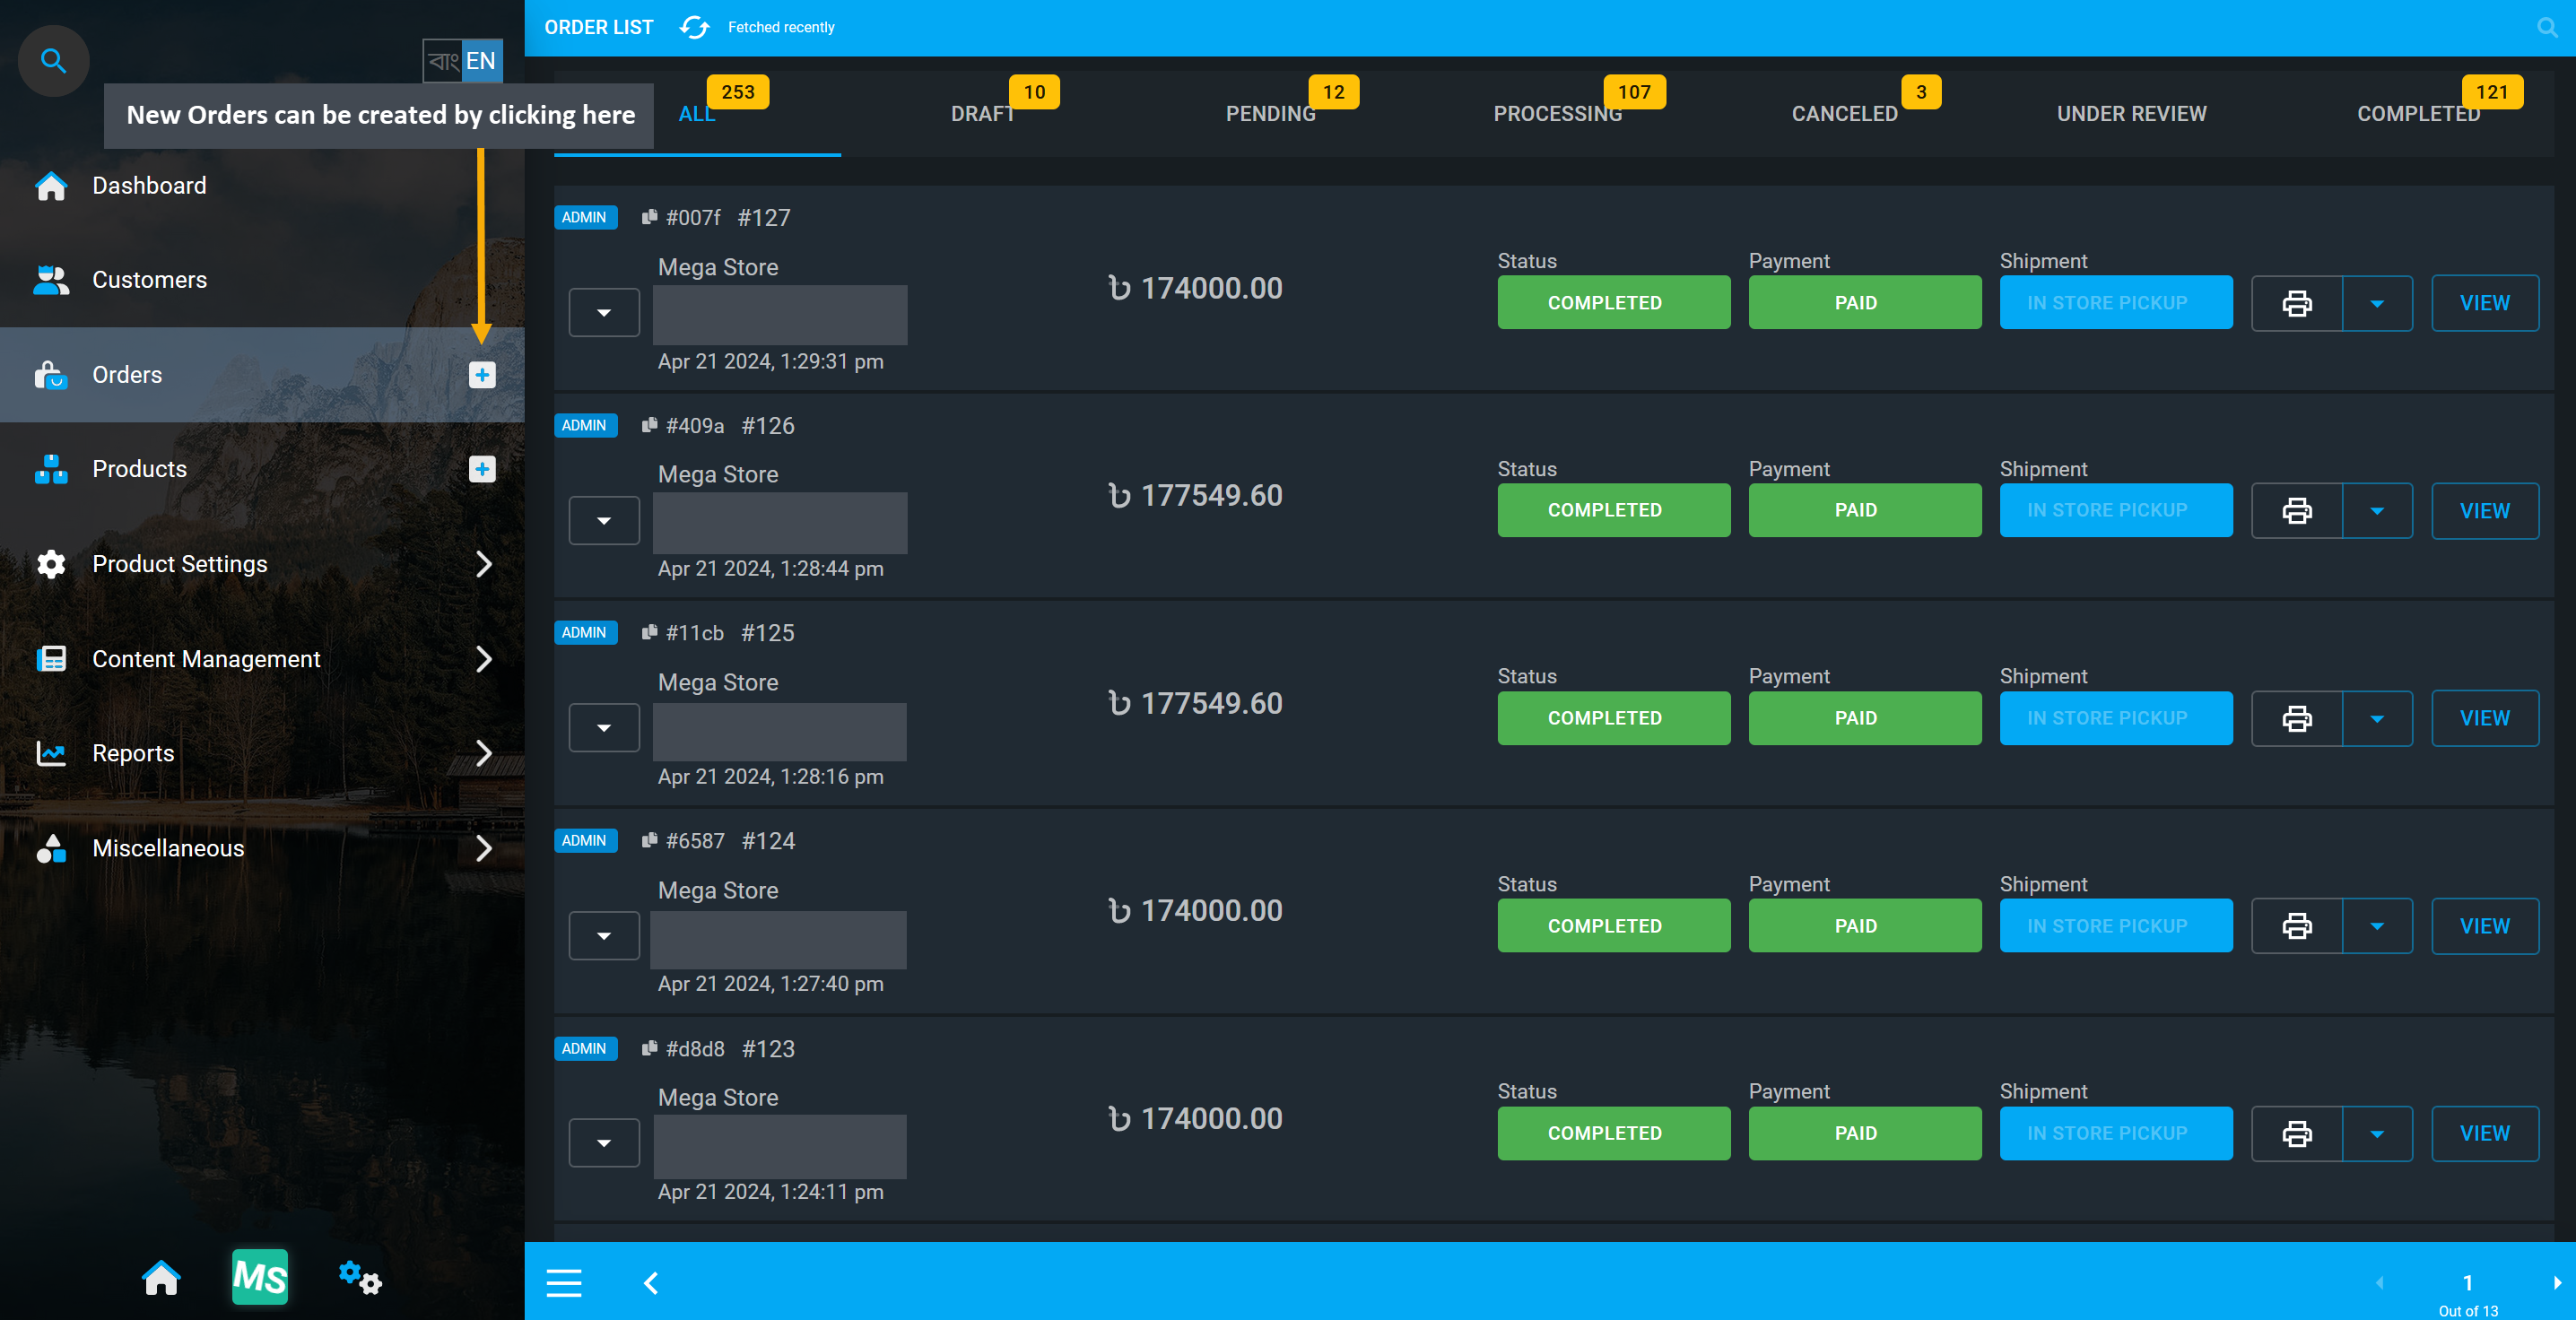
Image 6: Shop Owners can create New Orders by clicking on the + button on the main Orders tab.
The first step towards creating New Order from Admin Panel is to select the Branch and Counter for the Shop. Click Proceed when done. Several Manual Orders can be created for multiple Customers by adding Products to different Carts which can be checked out individually from the Admin Panel at any time.
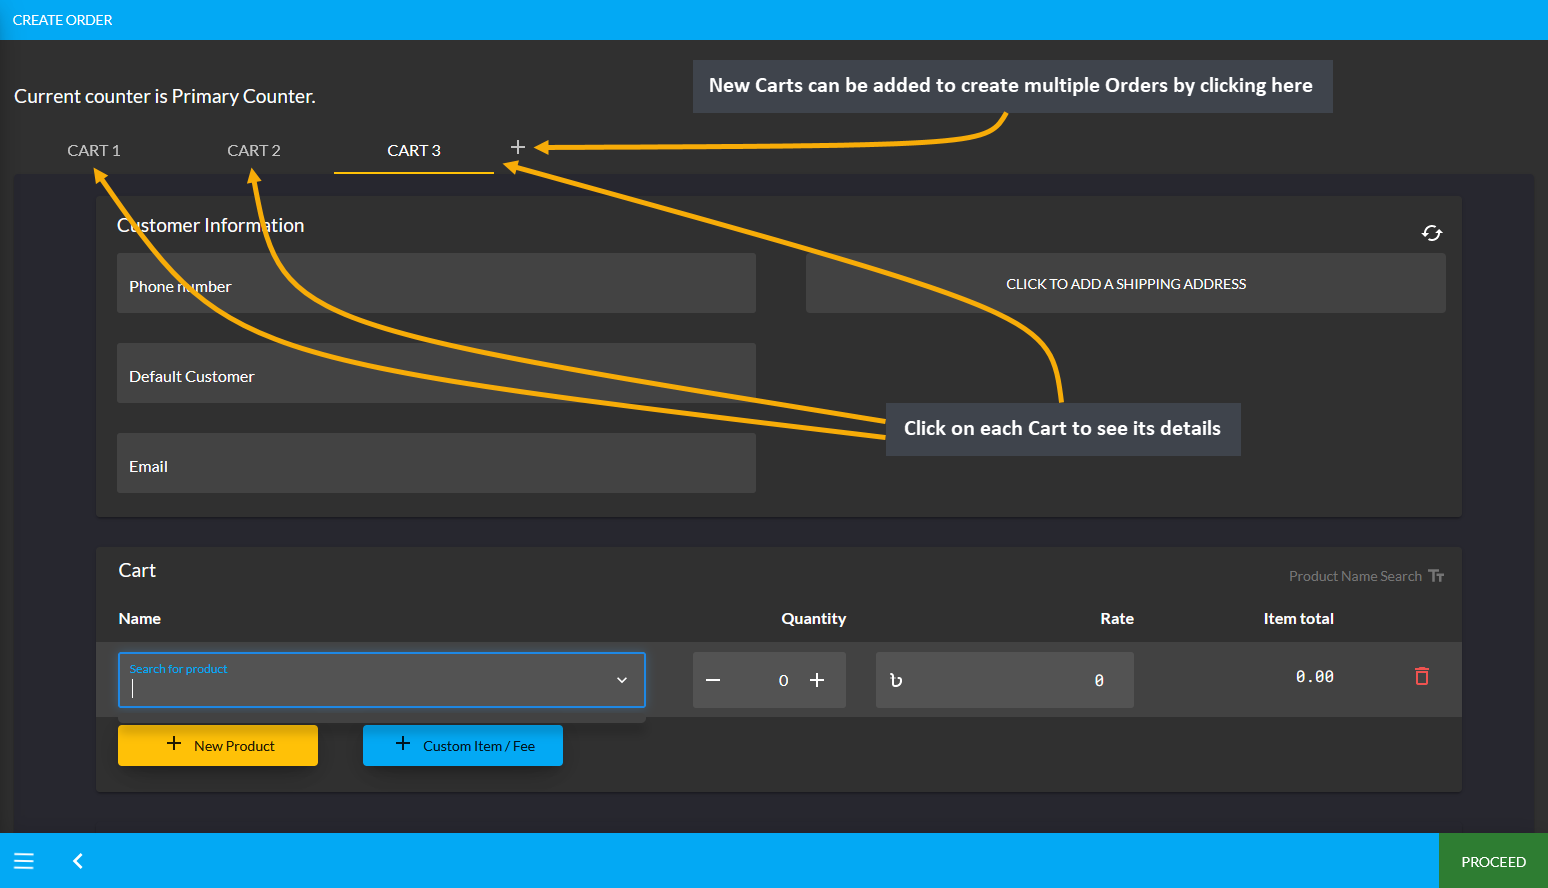
Image 4: Several Orders can be created for multiple Customers by adding Products to different Carts.
On Order Cart, fill in basic Customer information like phone number, name, and email from the Customer Information tab. Then Billing or Shipping Contact which will redirect to a new pop-up to add a new address with the Label (Billing or Shipping), Address, Area, City, Country, and Zip Code. After clicking the Submit button, Shipping Address will be added for Customer. New address can be added by clicking the + button.
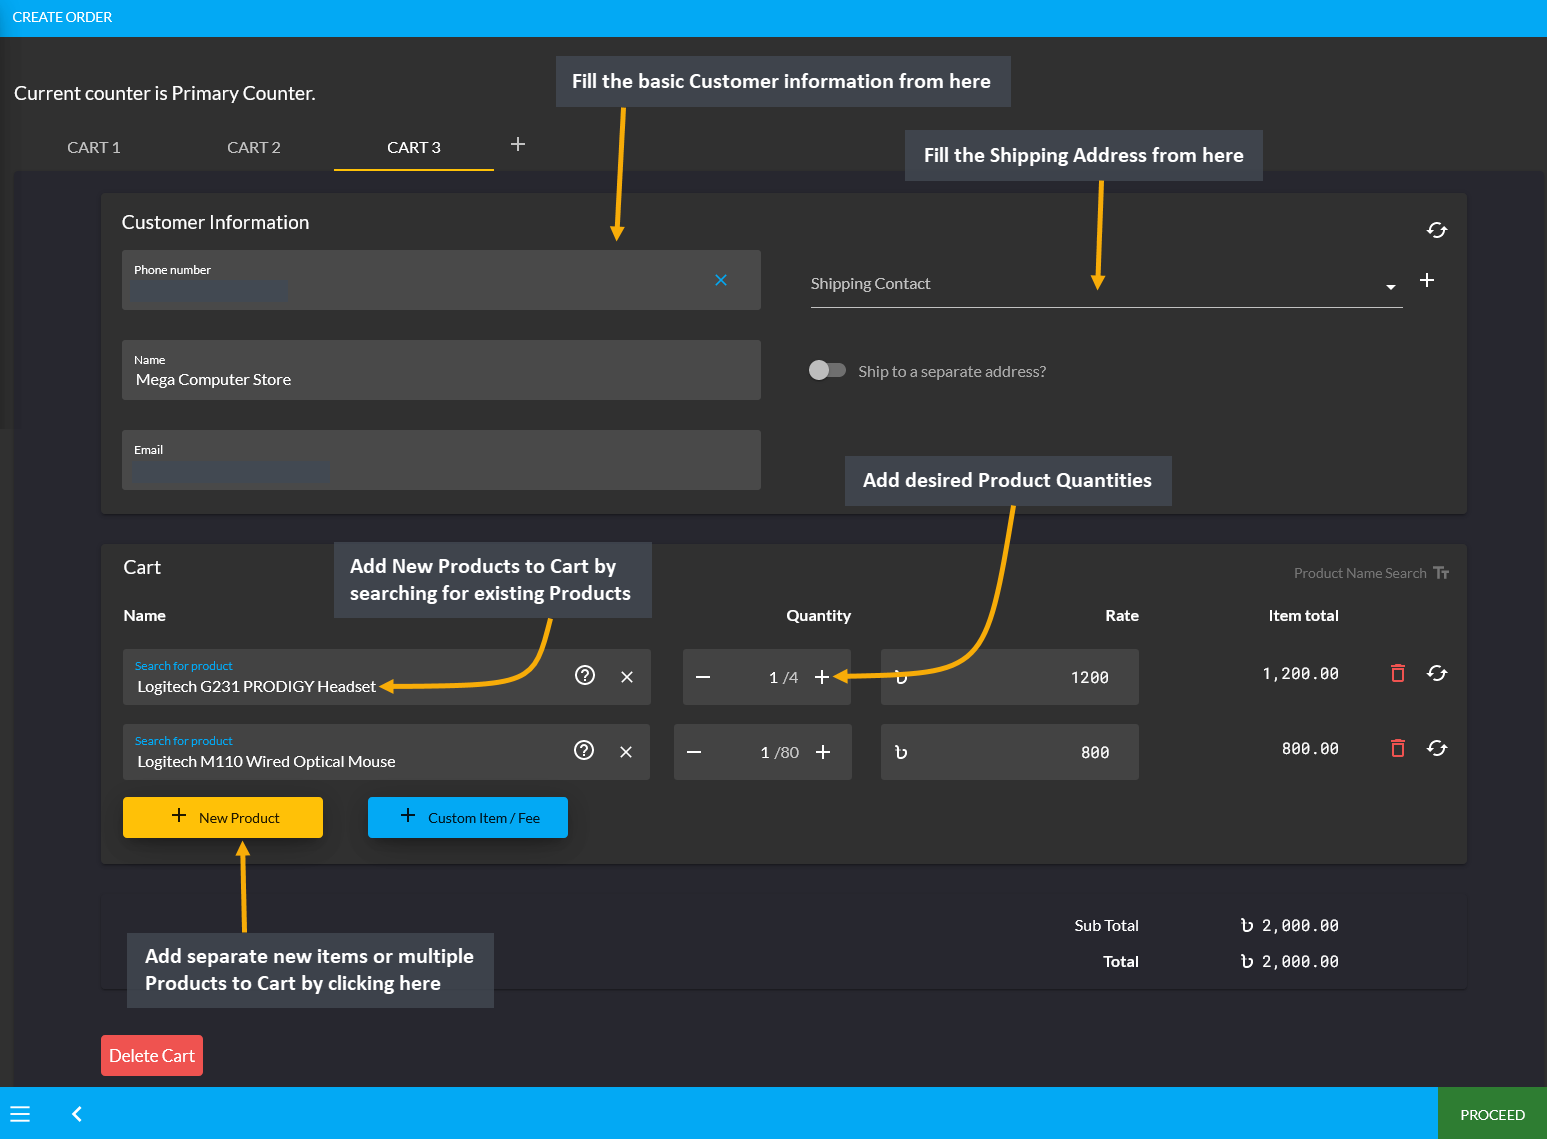
Image 5: Fill out Customer information i.e. phone , name, and email from Customer Information tab.
Add Products to Cart
After confirming the Billing and Shipping address, new Products can be added to the Cart. For this, click the New Product button and a box will appear from which new Product can be added to Cart. Within it, search for existing Products from the Product List and add desired quantities that will automatically calculate the item total. To add multiple Products, click New Product that will add a separate new item to cart each time.
There is a separate option to add Custom Products to Cart that are not on general Product list. For this, click the Custom Item/ Fee button that will let you add Custom Products to Cart which are unavailable on existing product list. Clicking this button will create a new line item box to add a full Custom Product that needs to be added to Cart instantly like laptop screen repair, laptop keyboard repair, audio, or network cable etc.
To add multiple Custom Products, click the Custom Item/ Fee button with desired quantities and rate/ fees. Use Delete Cart button to delete any Cart among multiple carts already opened. Click the Bin Icon to delete Products from the Cart. When cart is fully ready, click Proceed to continue to the next step.
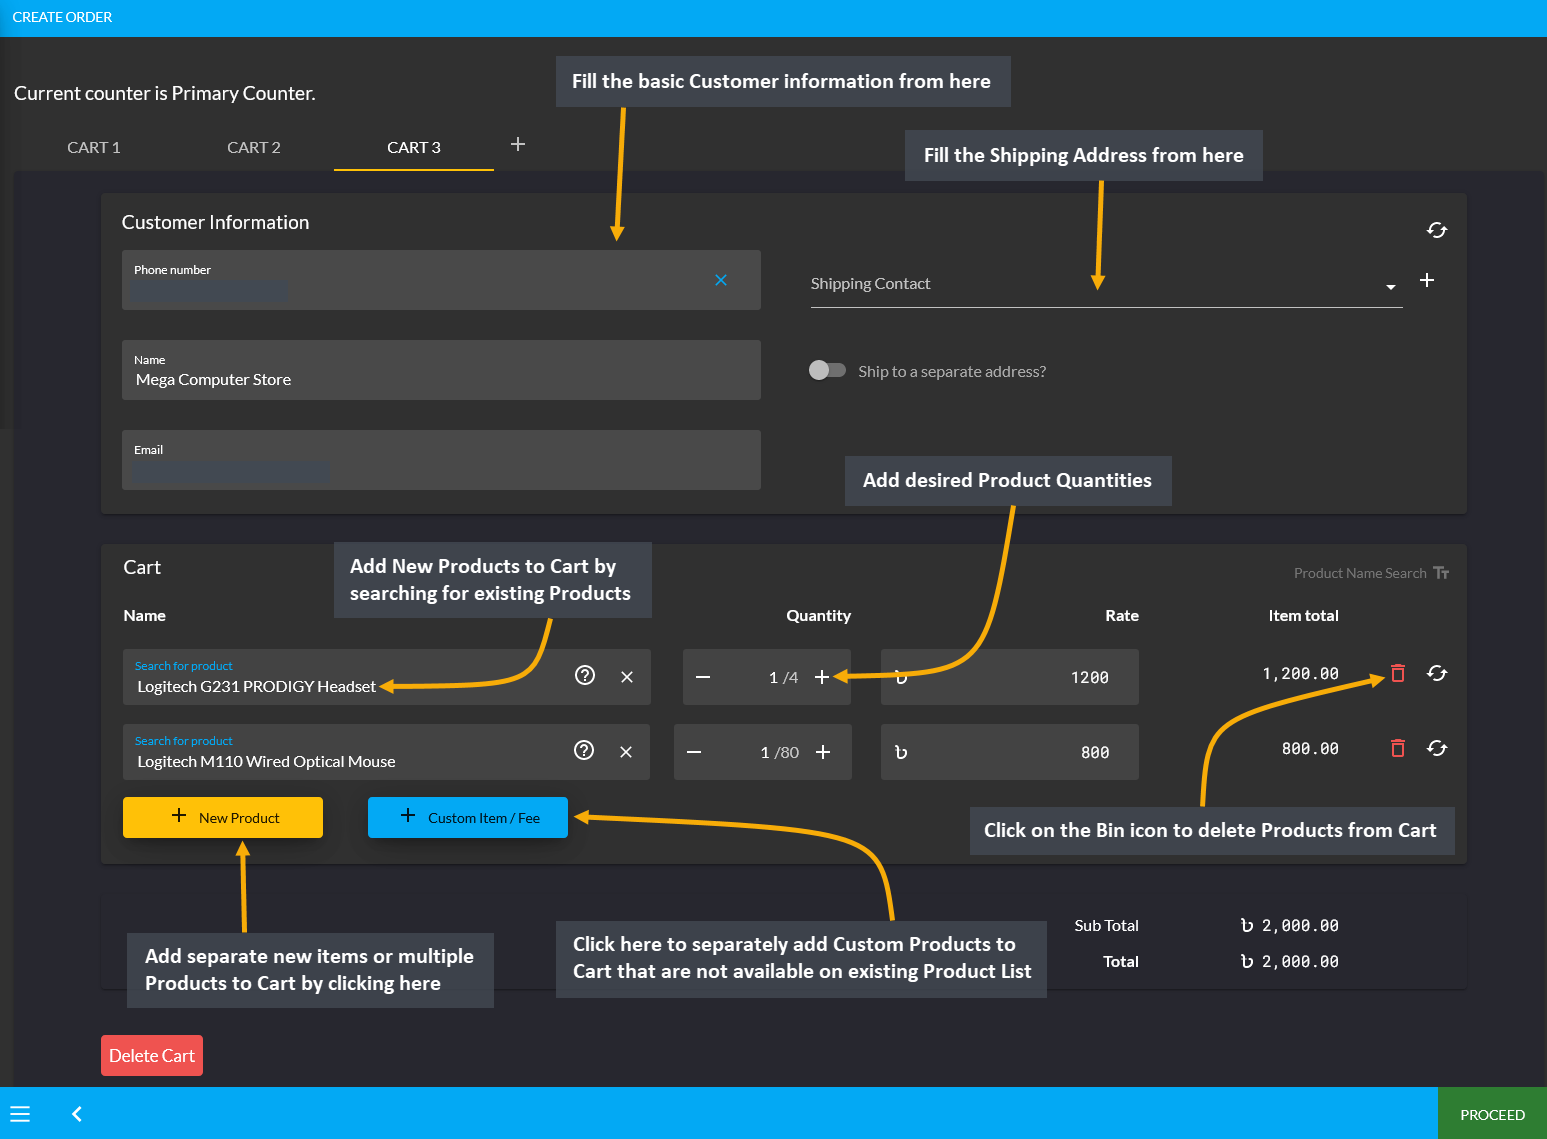
Image 6: Add Multiple Products or add Custom Products to Cart with desired quantities and rates.
Select Shipment and Payment Options
In the next page, review the Cart, and select Shipment and Payment options. To make any change, click the Click here to Deselect button. If all the information is correct, click Confirm Order that will redirect to a new page stating that the Order has been confirmed. From here, you can choose to Print Invoice or Close Tab.
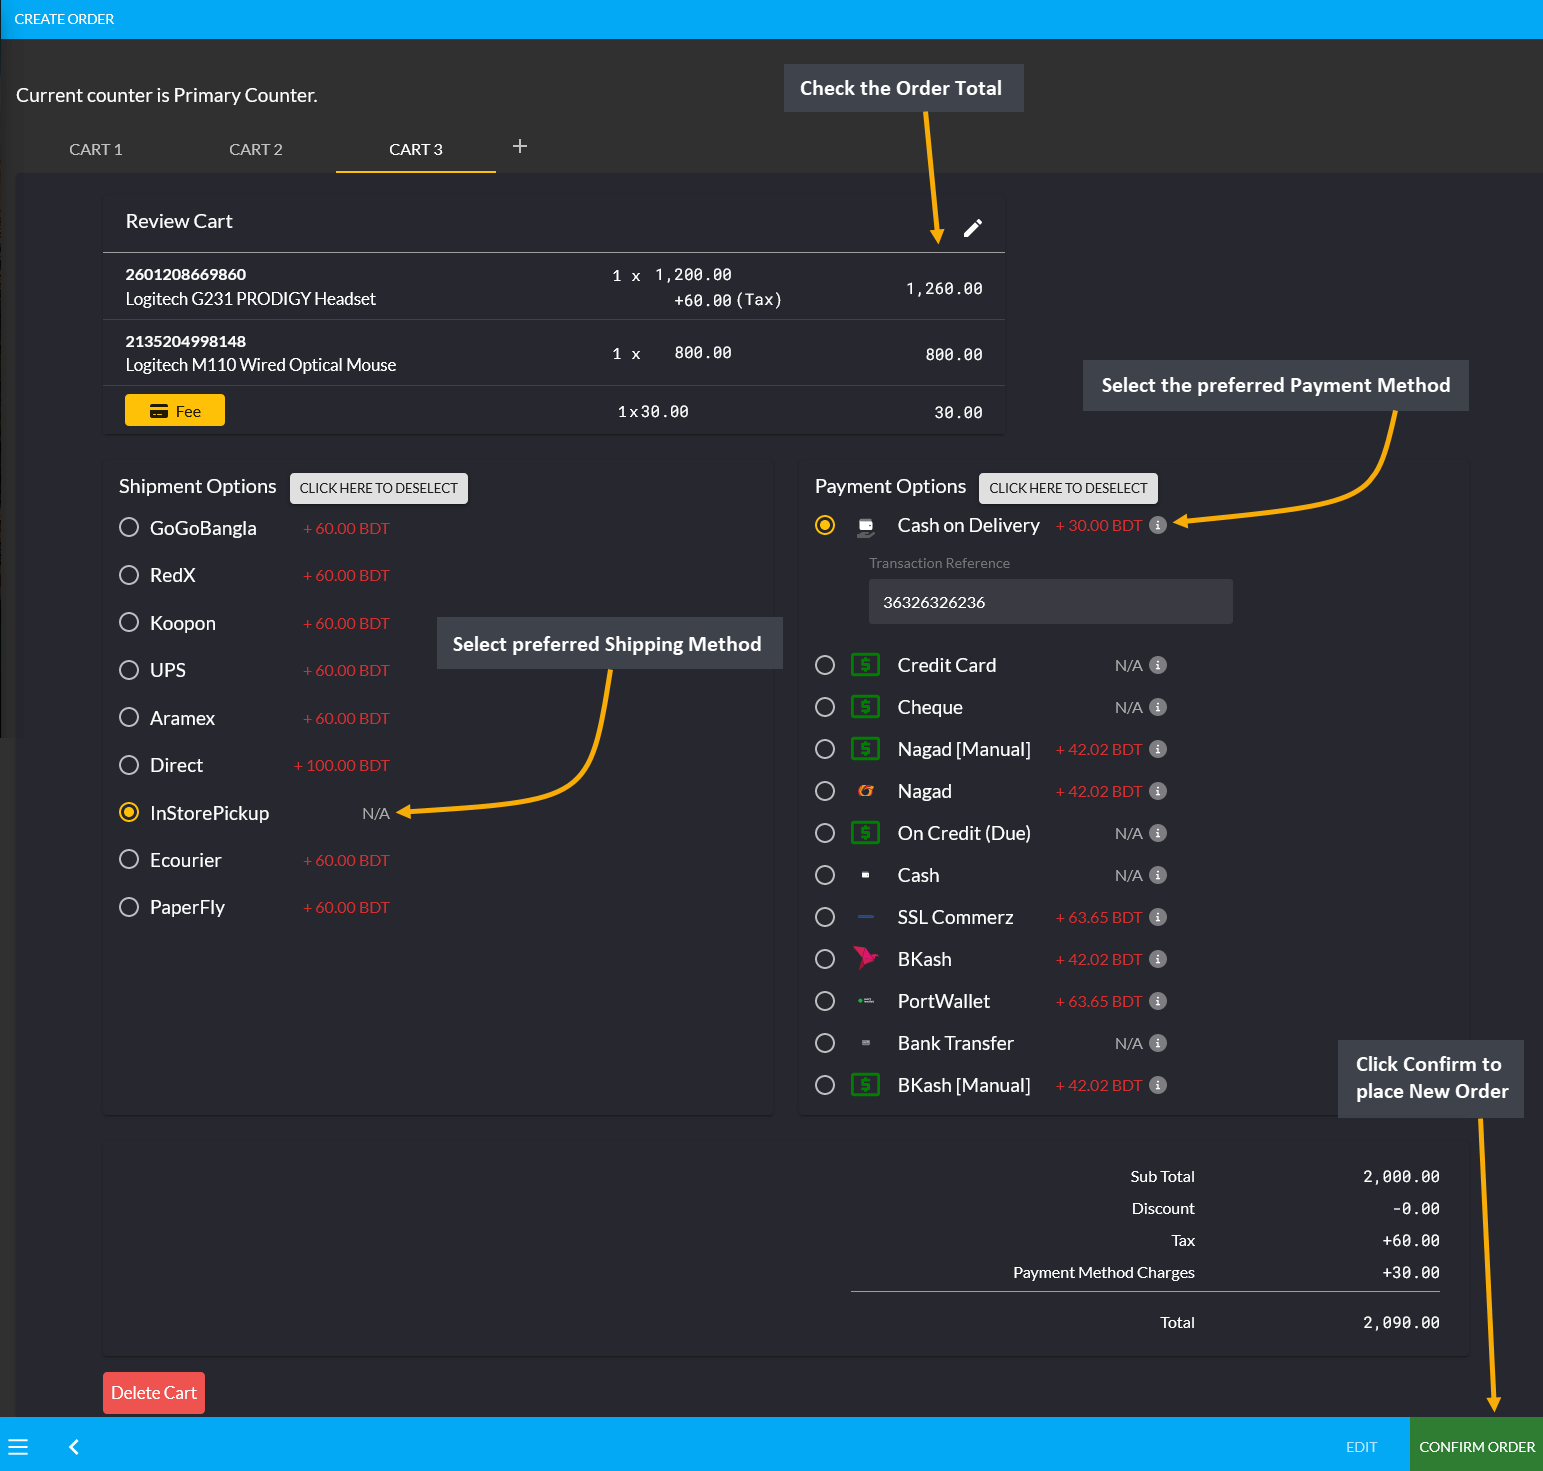
Image 7: Review Cart, select Shipment and Payment options, and click Confirm Order to place Order.
Print Invoice
After Order is placed, go to Order List from where Order Invoice can be printed clicking the Print icon that will open full view invoice with Order details and Payment information to print. Set Printer, Pages, Layout, and Colors from the print settings as needed. Then, click Print button to print copies of the Order Invoice.

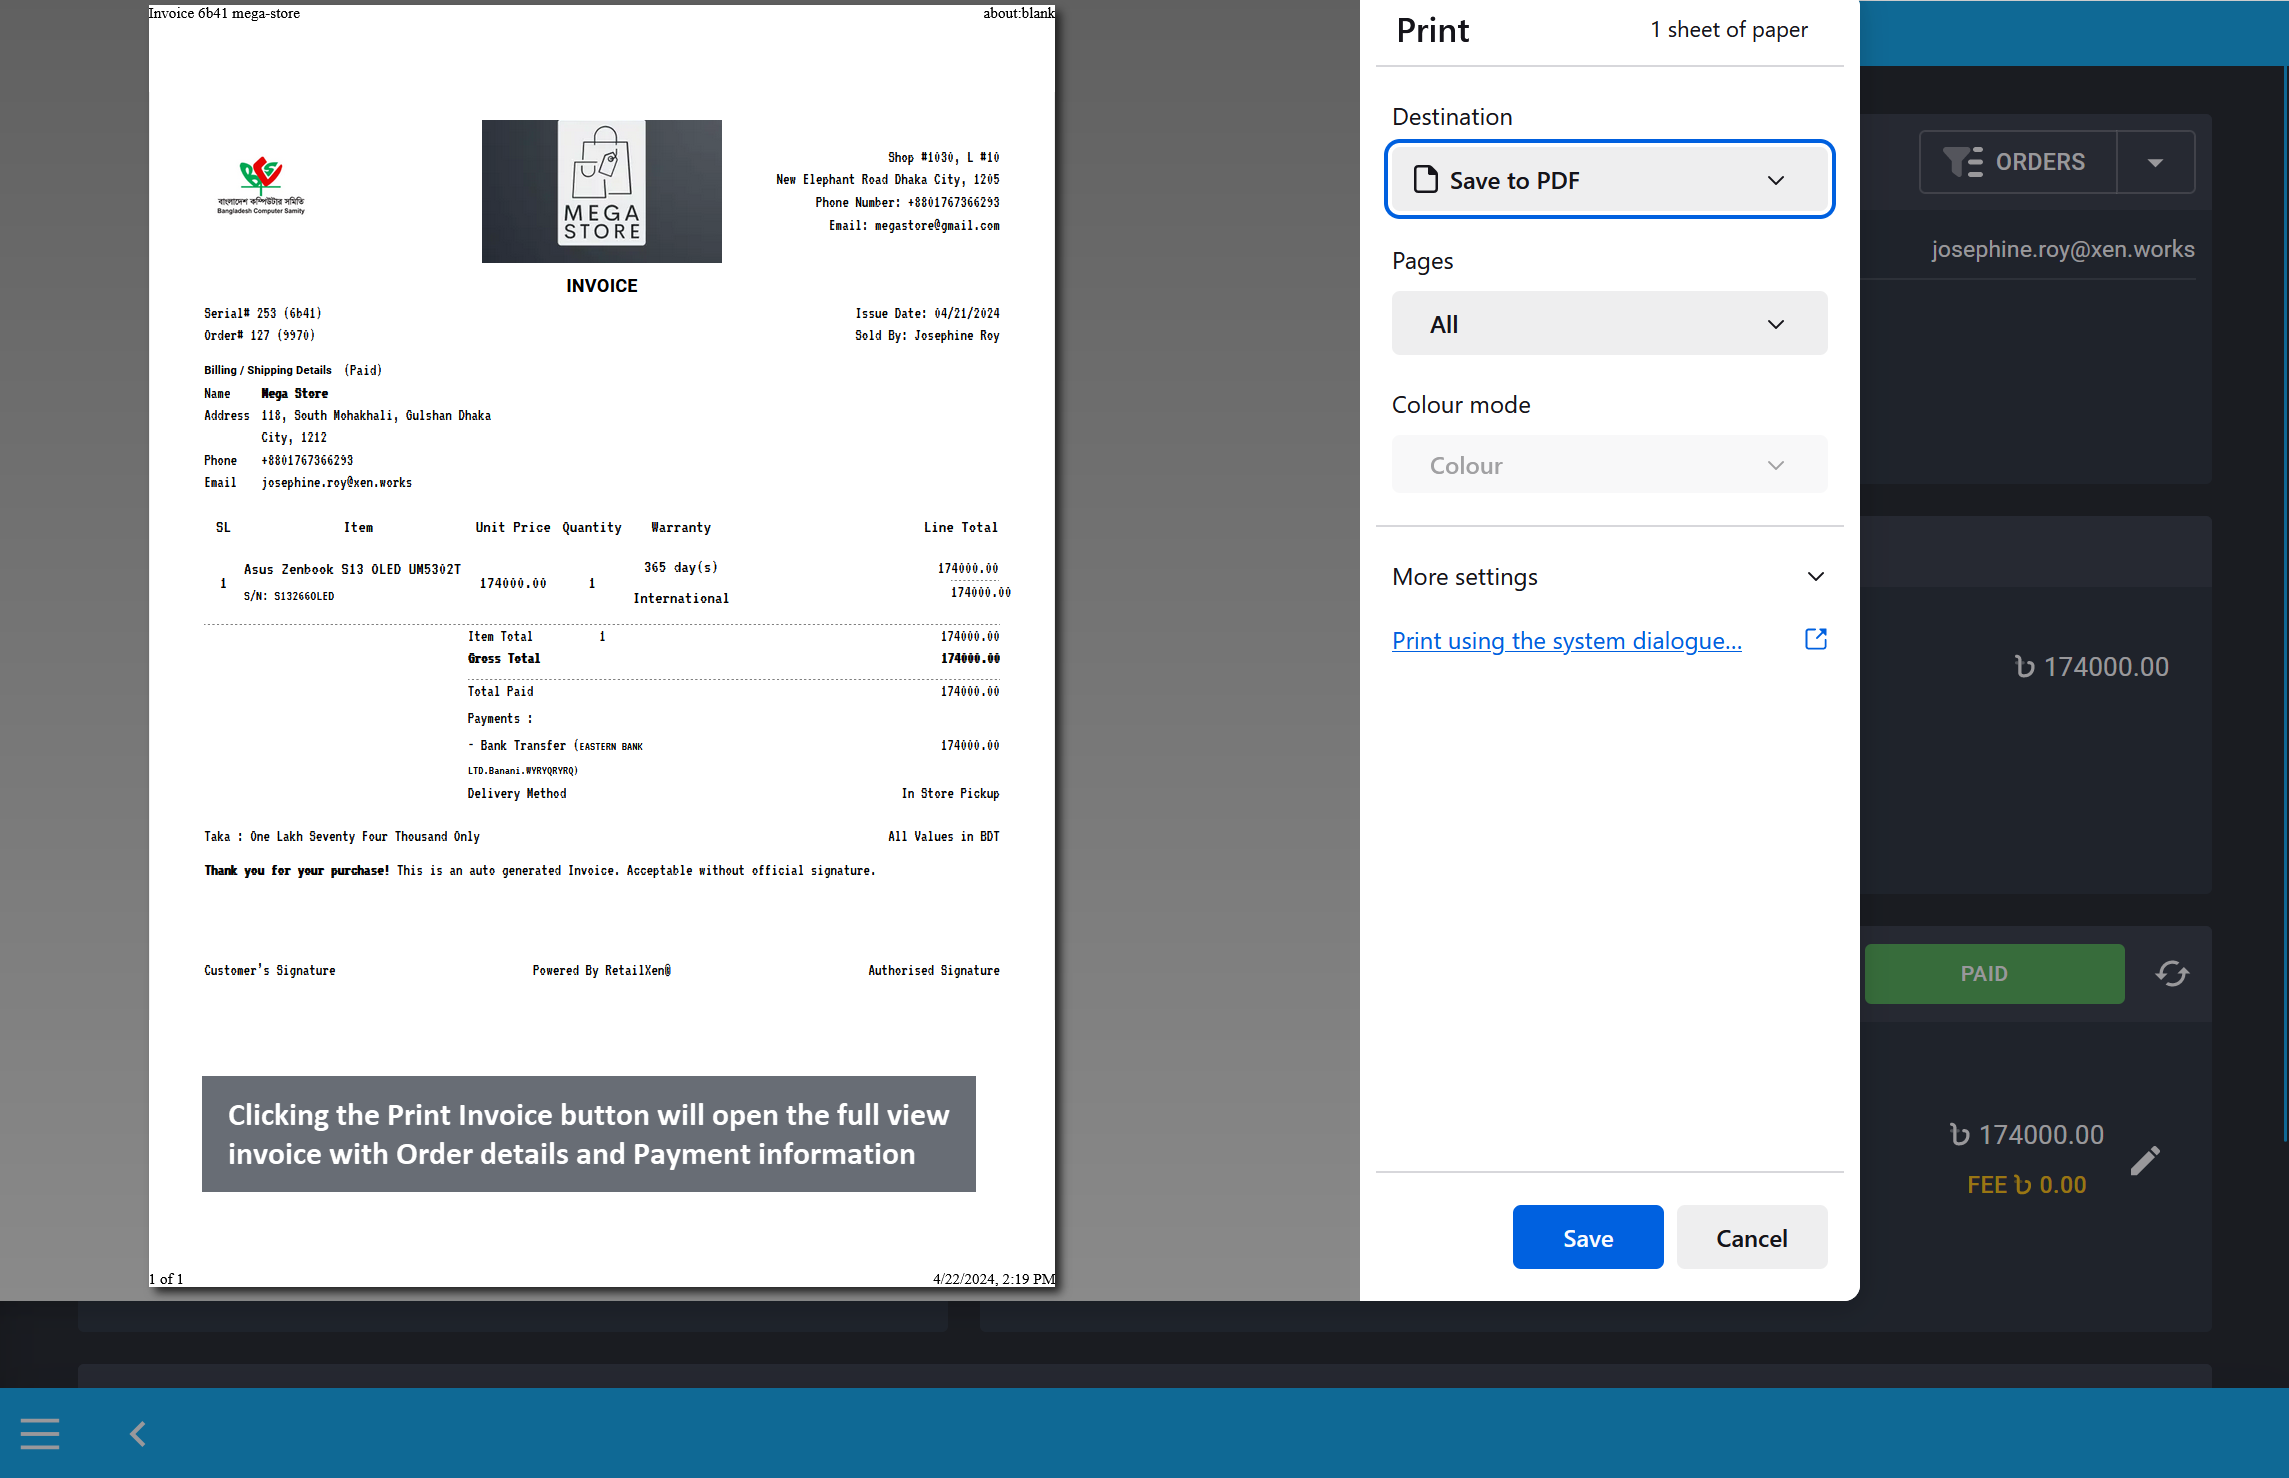
Image 8: Clicking the Print Invoice button will open the full view invoice with full Order details.
Order Invoice can also be viewed and printed from the Order Dashboard. Full Order details including Order total, Customer information, line item, payment, and shipment details will be displayed on the dashboard.
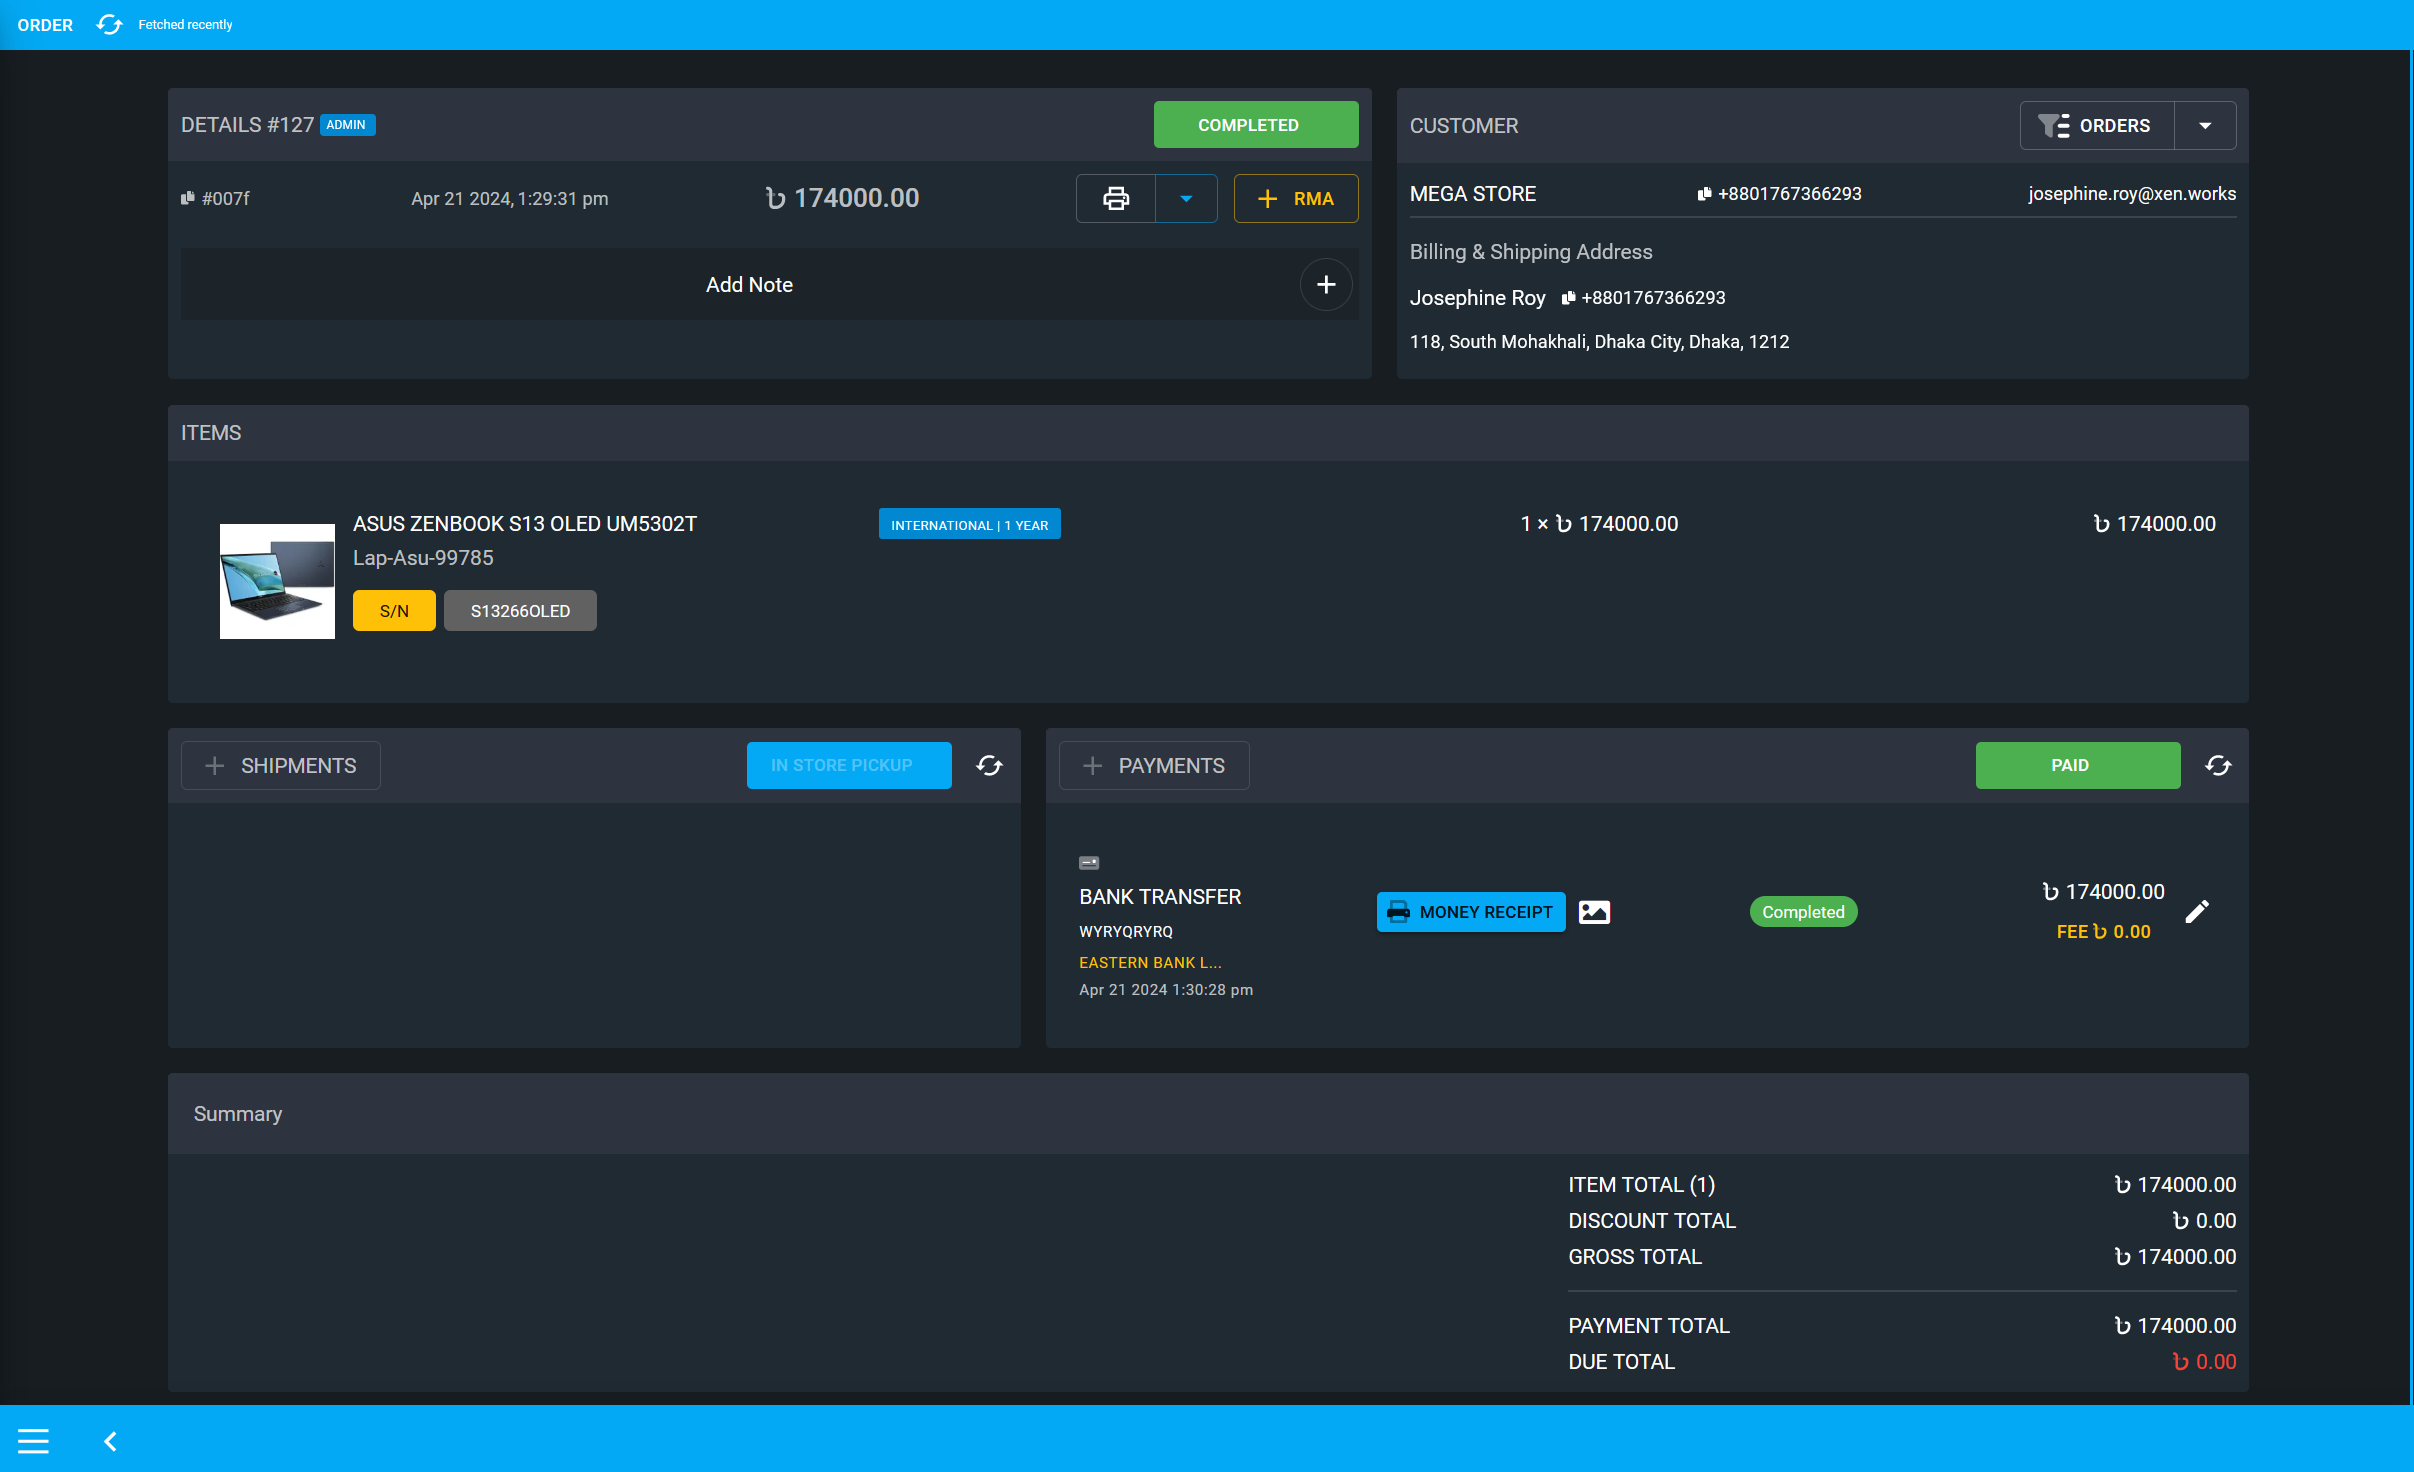
Image 9: Order Dashboard will have full view of Order total, Customer, Payment, and Shipment details.
To print Invoice from Order dashboard, click the print icon and select Invoice from there that will open full view invoice with Order details and Payment information to print. Invoice can also be saved as PDF file.
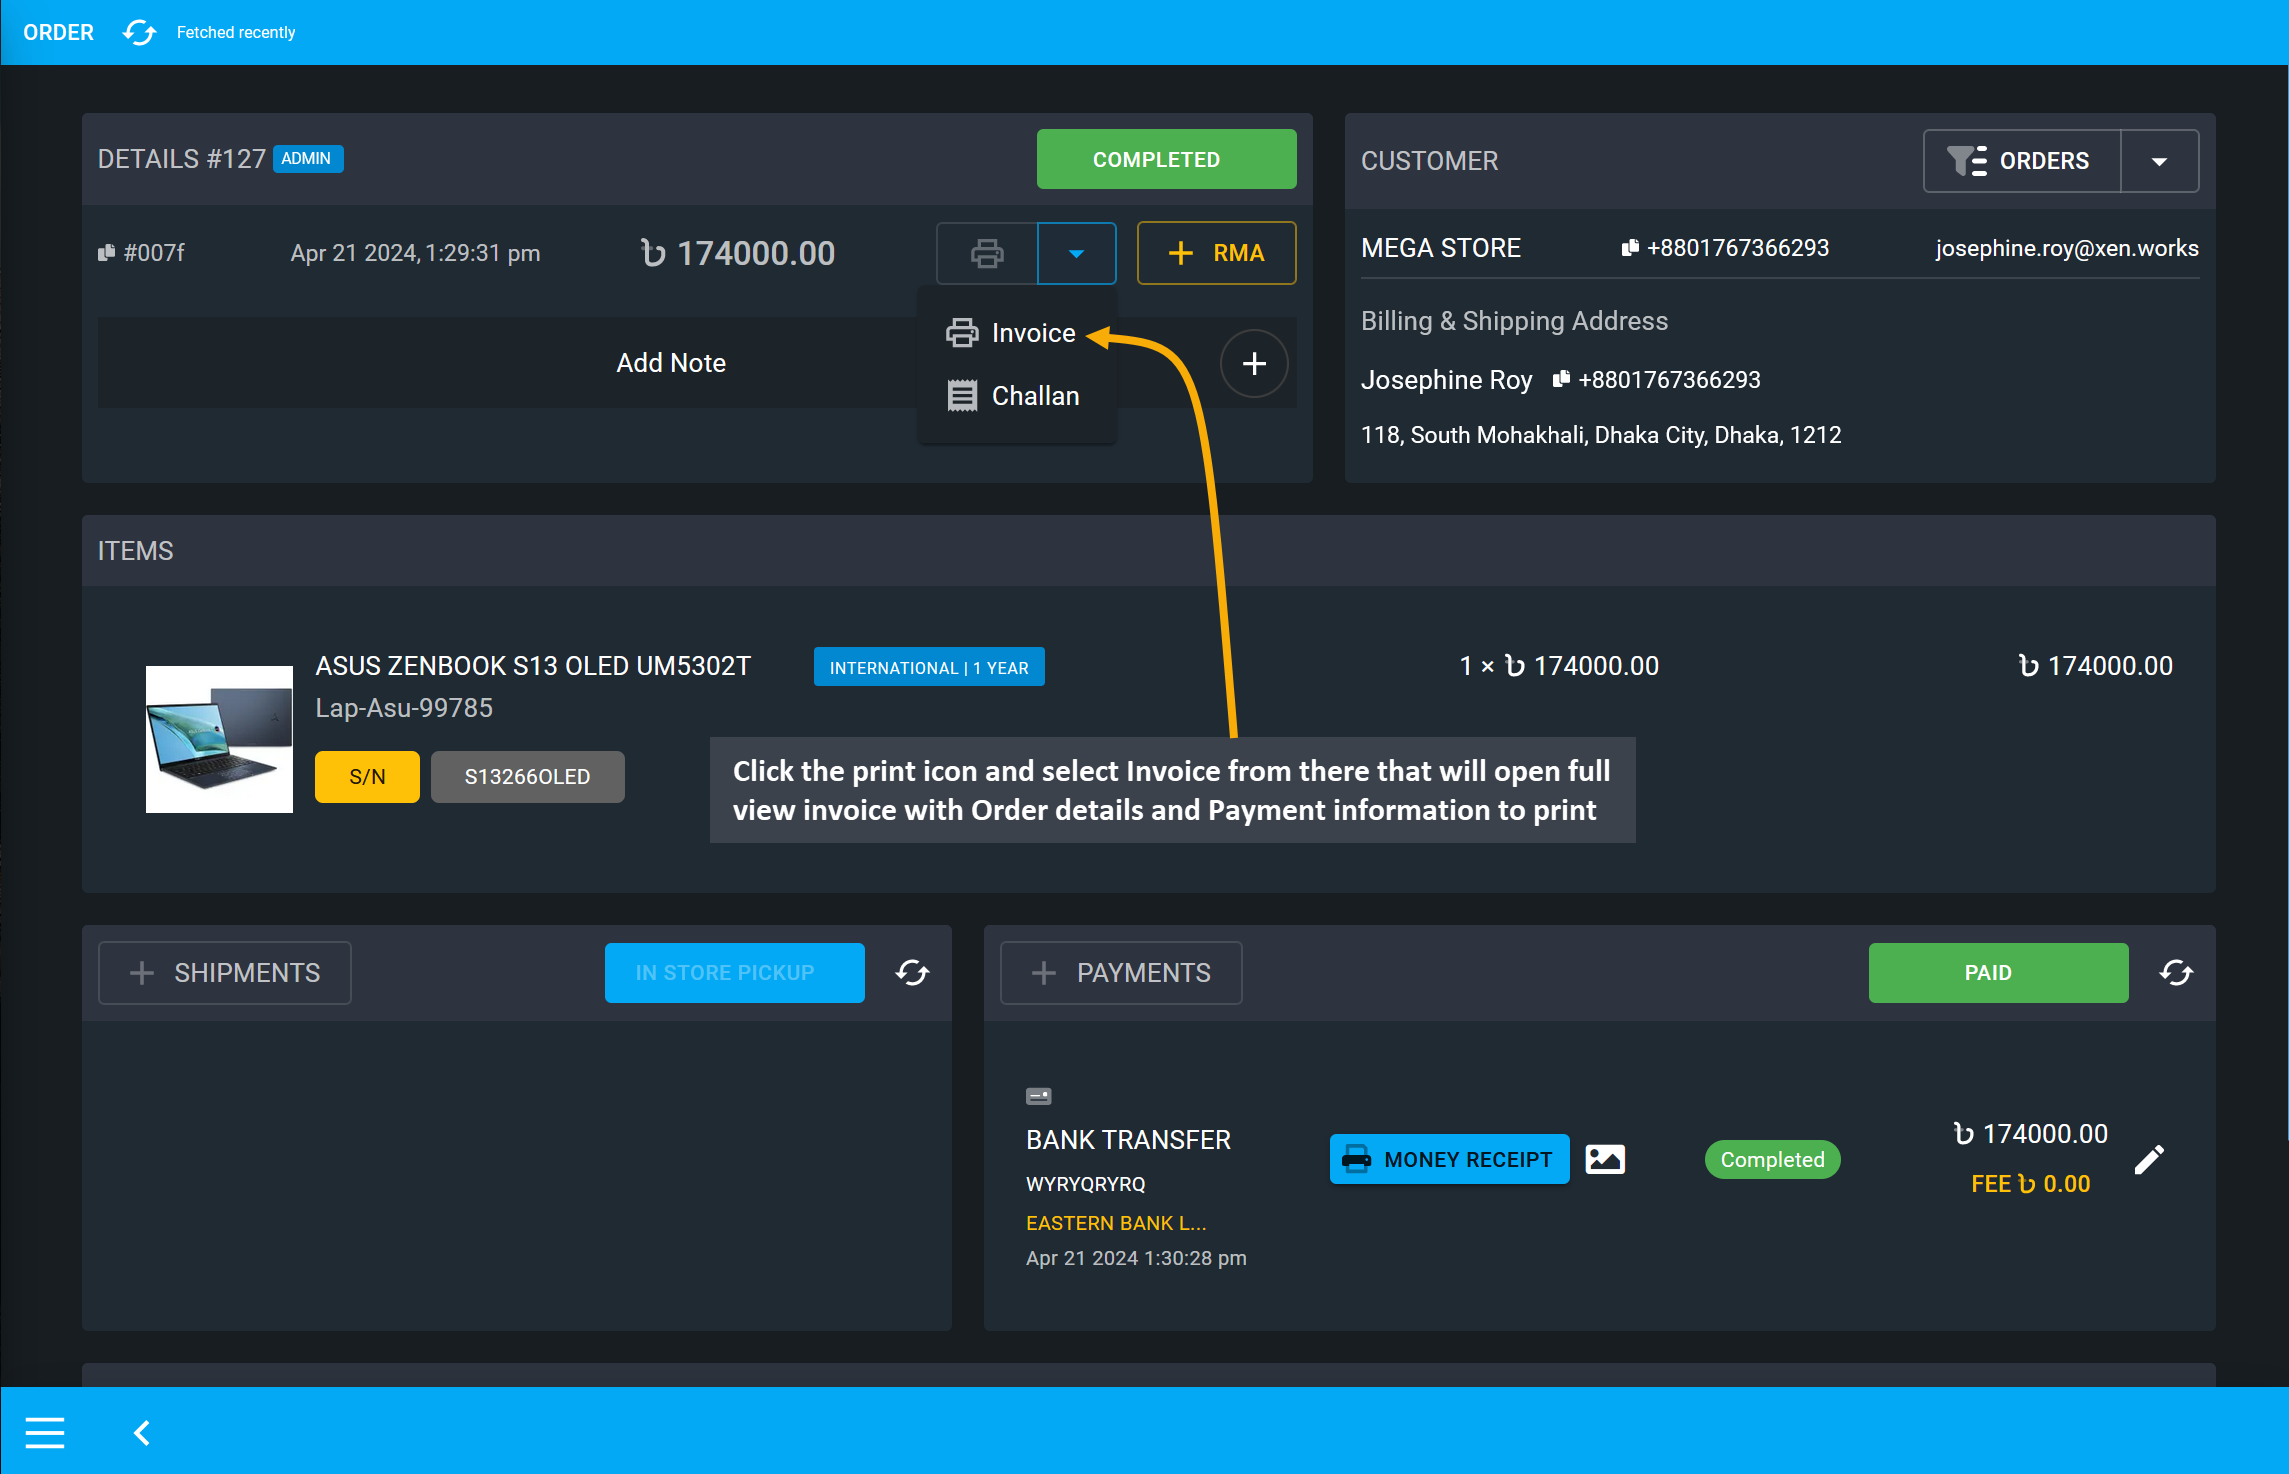 s
s
Image 10: Click print icon and select Invoice that will open full view Invoice with Order details.
Set Printer, Pages, Layout, and Colors from the print settings as needed. Then, click Print button to print copies of the Order Invoice or click Save to PDF to save a copy of the invoice within your device.

Image 11: Clicking the Print Invoice button will open the full view invoice with full Order details.
Print Challan
Order Challan can also be viewed and printed from the Order Dashboard. Full Order details including Customer information, and line items will be displayed on the challan. Click the Challan icon that will open full view challan with Order details to print. It can also be saved as PDF file.
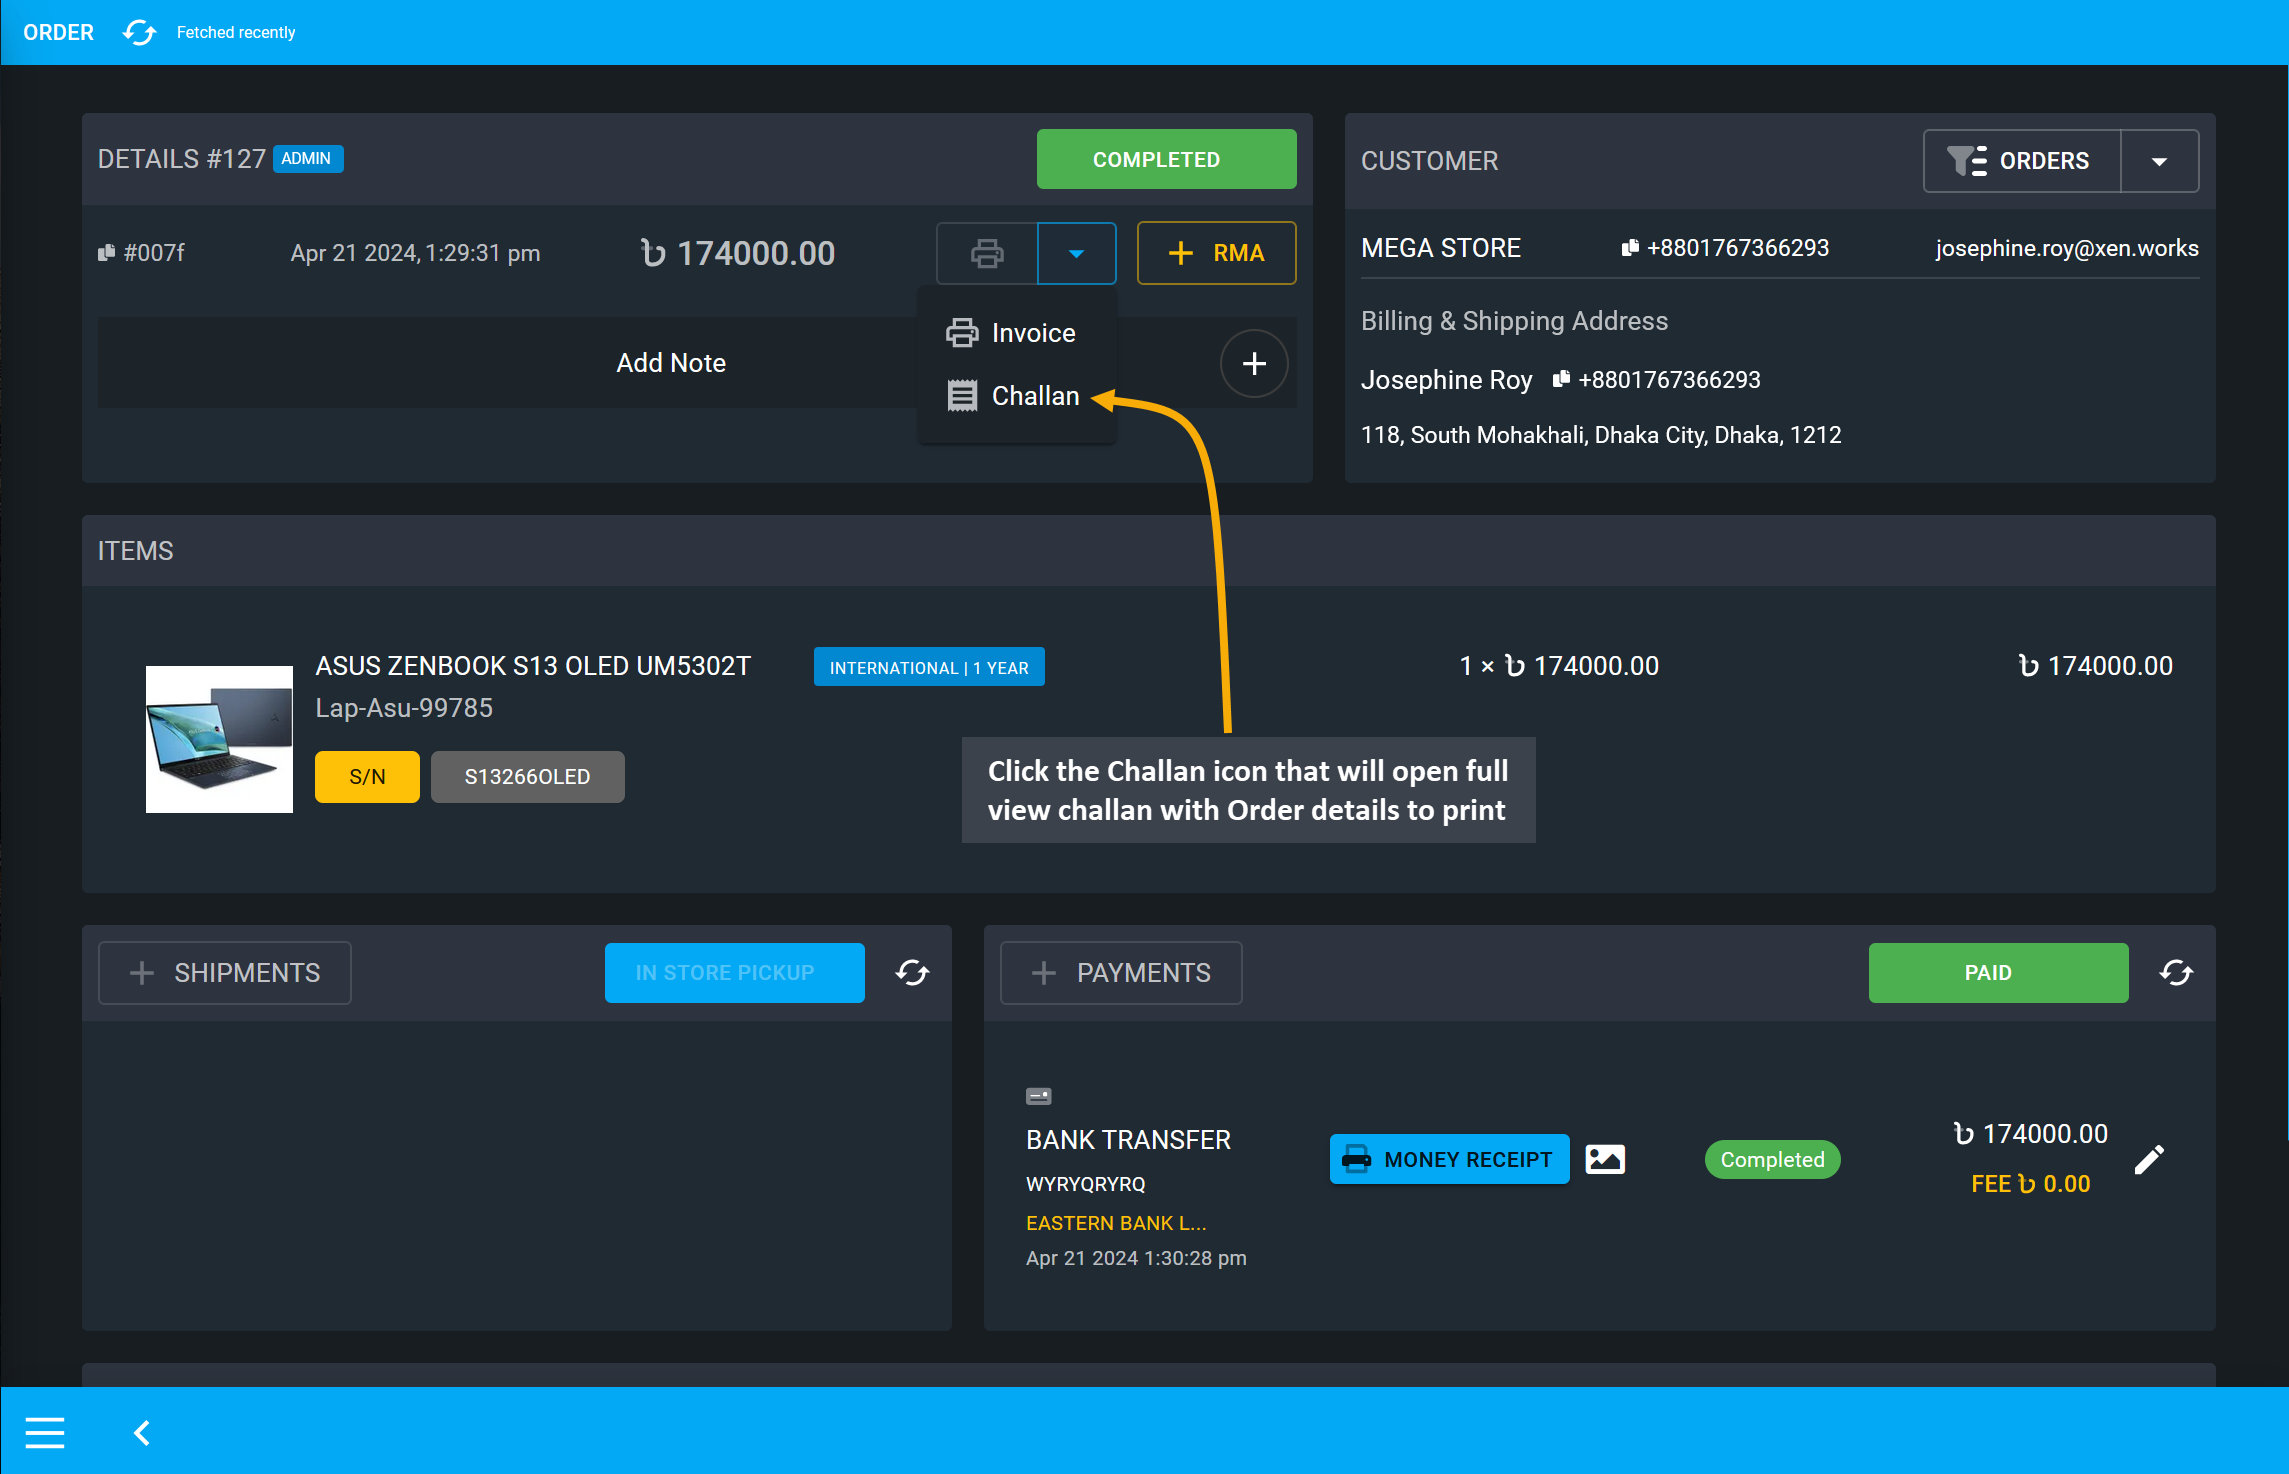
Image 12: Click print icon and select Challan that will open full view Challan with Order details.
Set Printer, Pages, Layout, and Colors from the print settings as needed. Then, click Print button to print copies of the Order Challan or click Save to PDF to save a copy of the challan within your device.
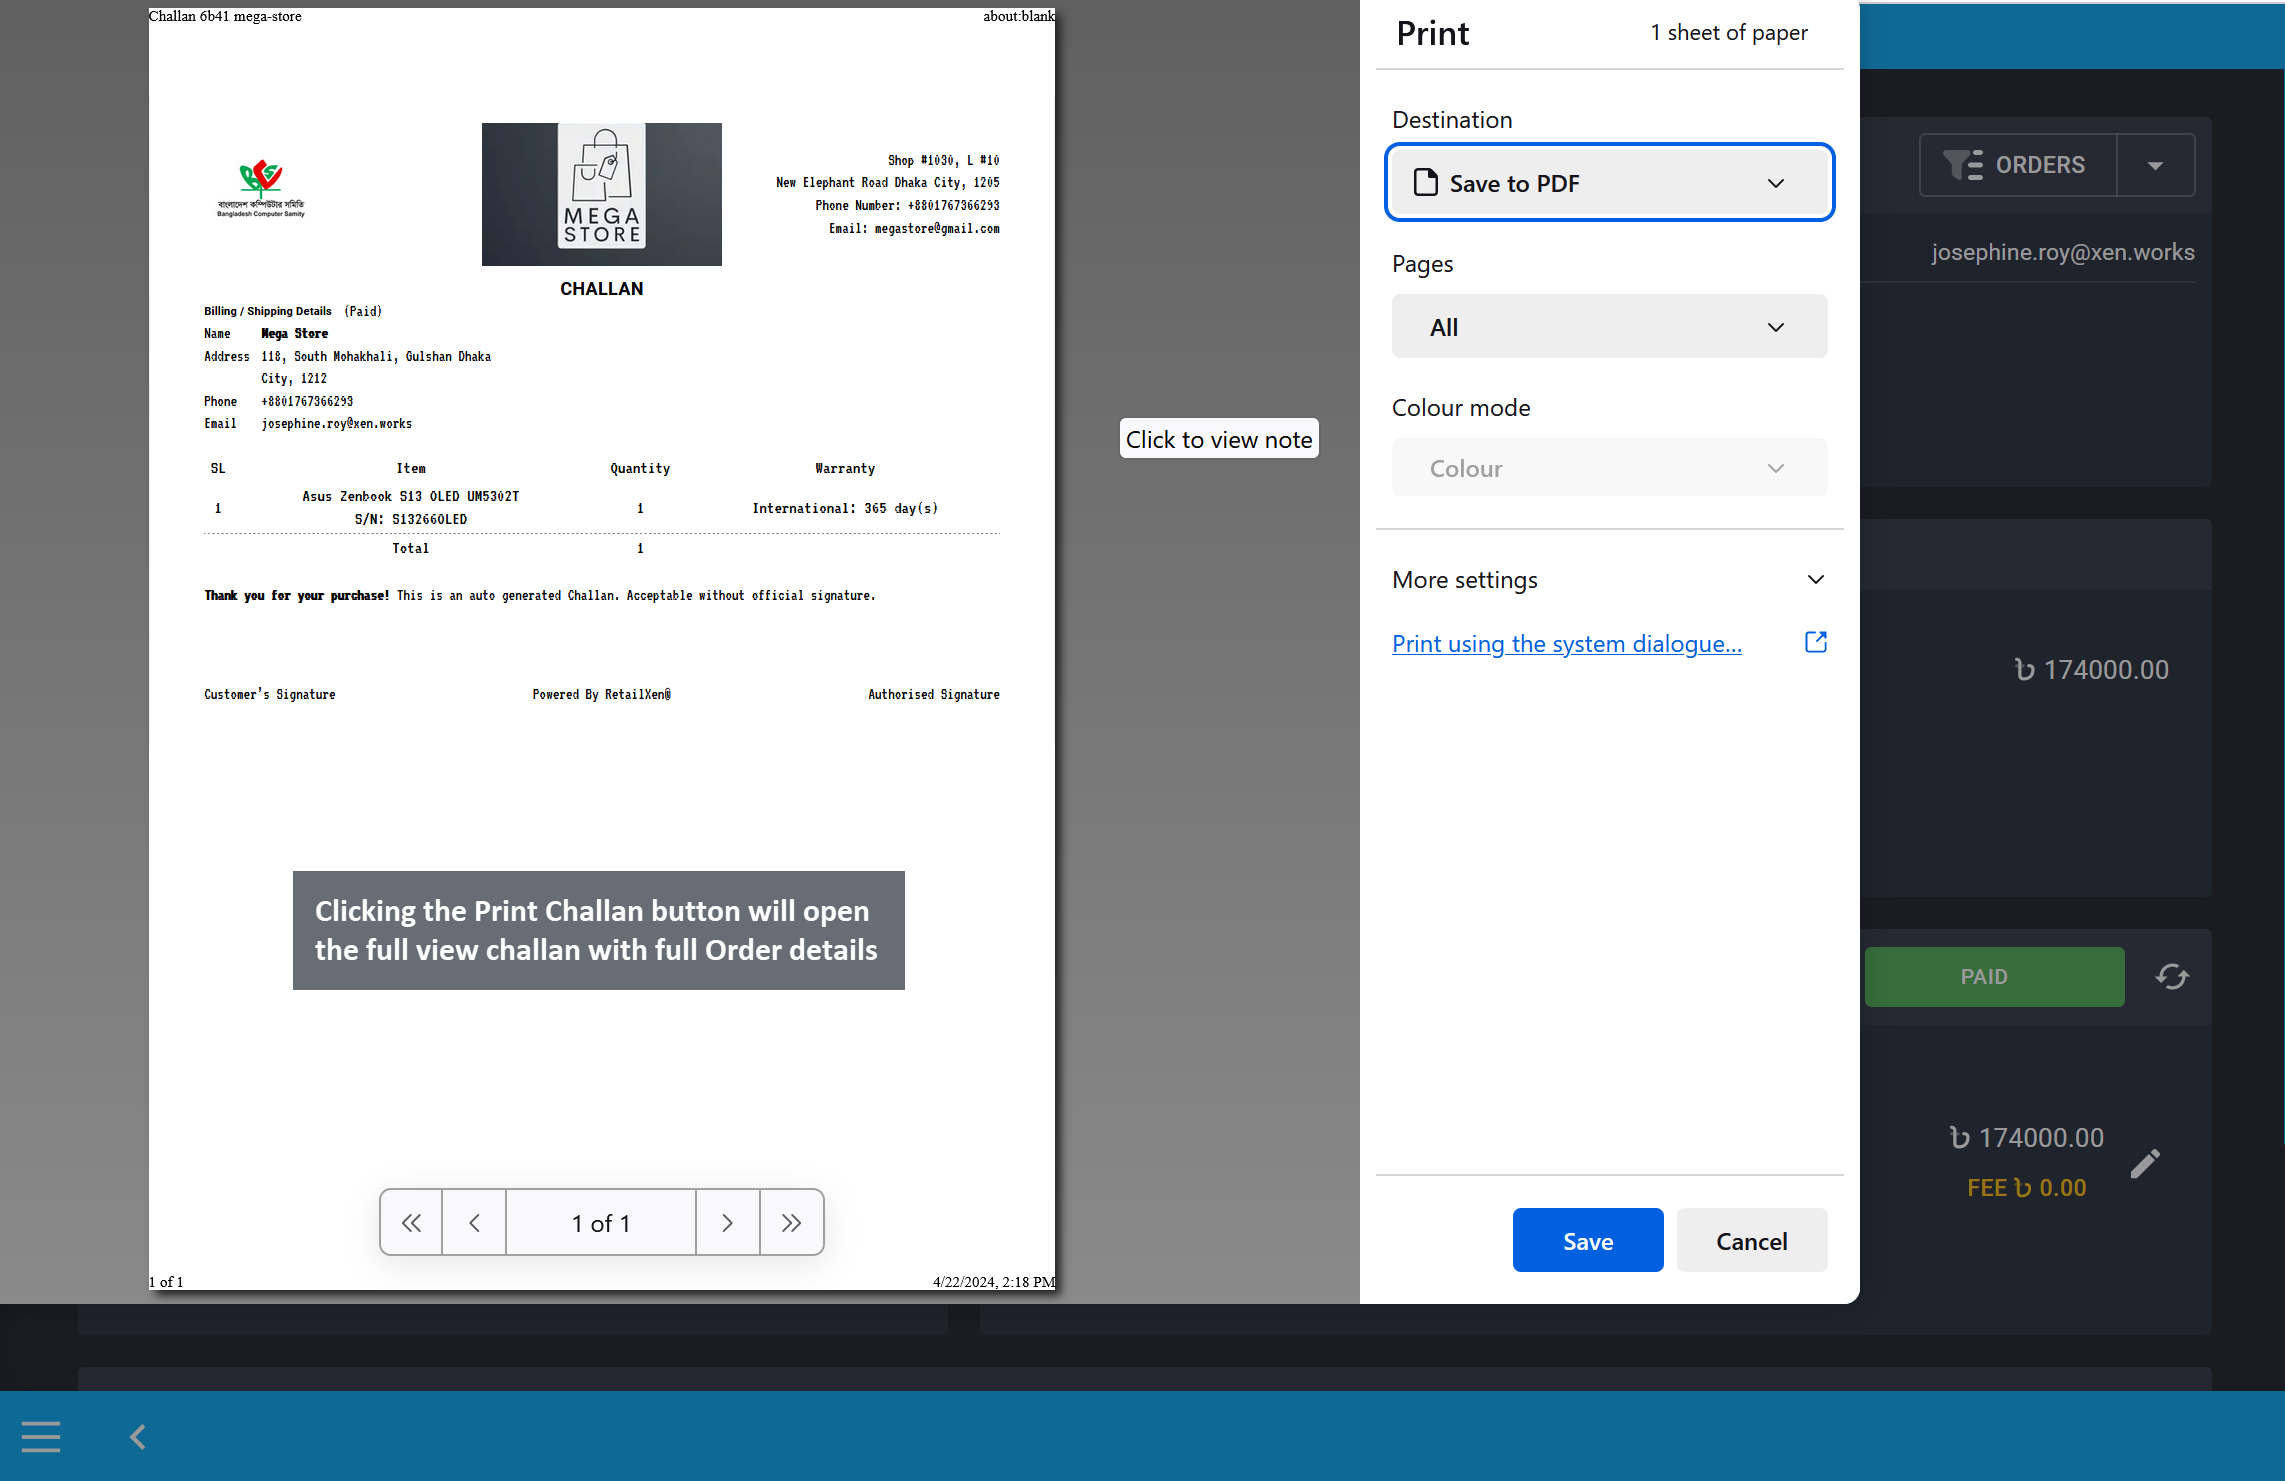
Image 13: Clicking the Print Challan button will open the full view challan with full Order details.
Order Note
There is a special feature called the Order Note which can be used to note down important Order details for sales team, customer service team, admins, or managers to follow up. Order Note can be written during placing the Order on Cart. The option to write an Order Note is on the second page of the Cart after selecting Shipping and Payment gateways. Use the Note (Optional) field to write important information related to Order that will later show on Order Dashboard.
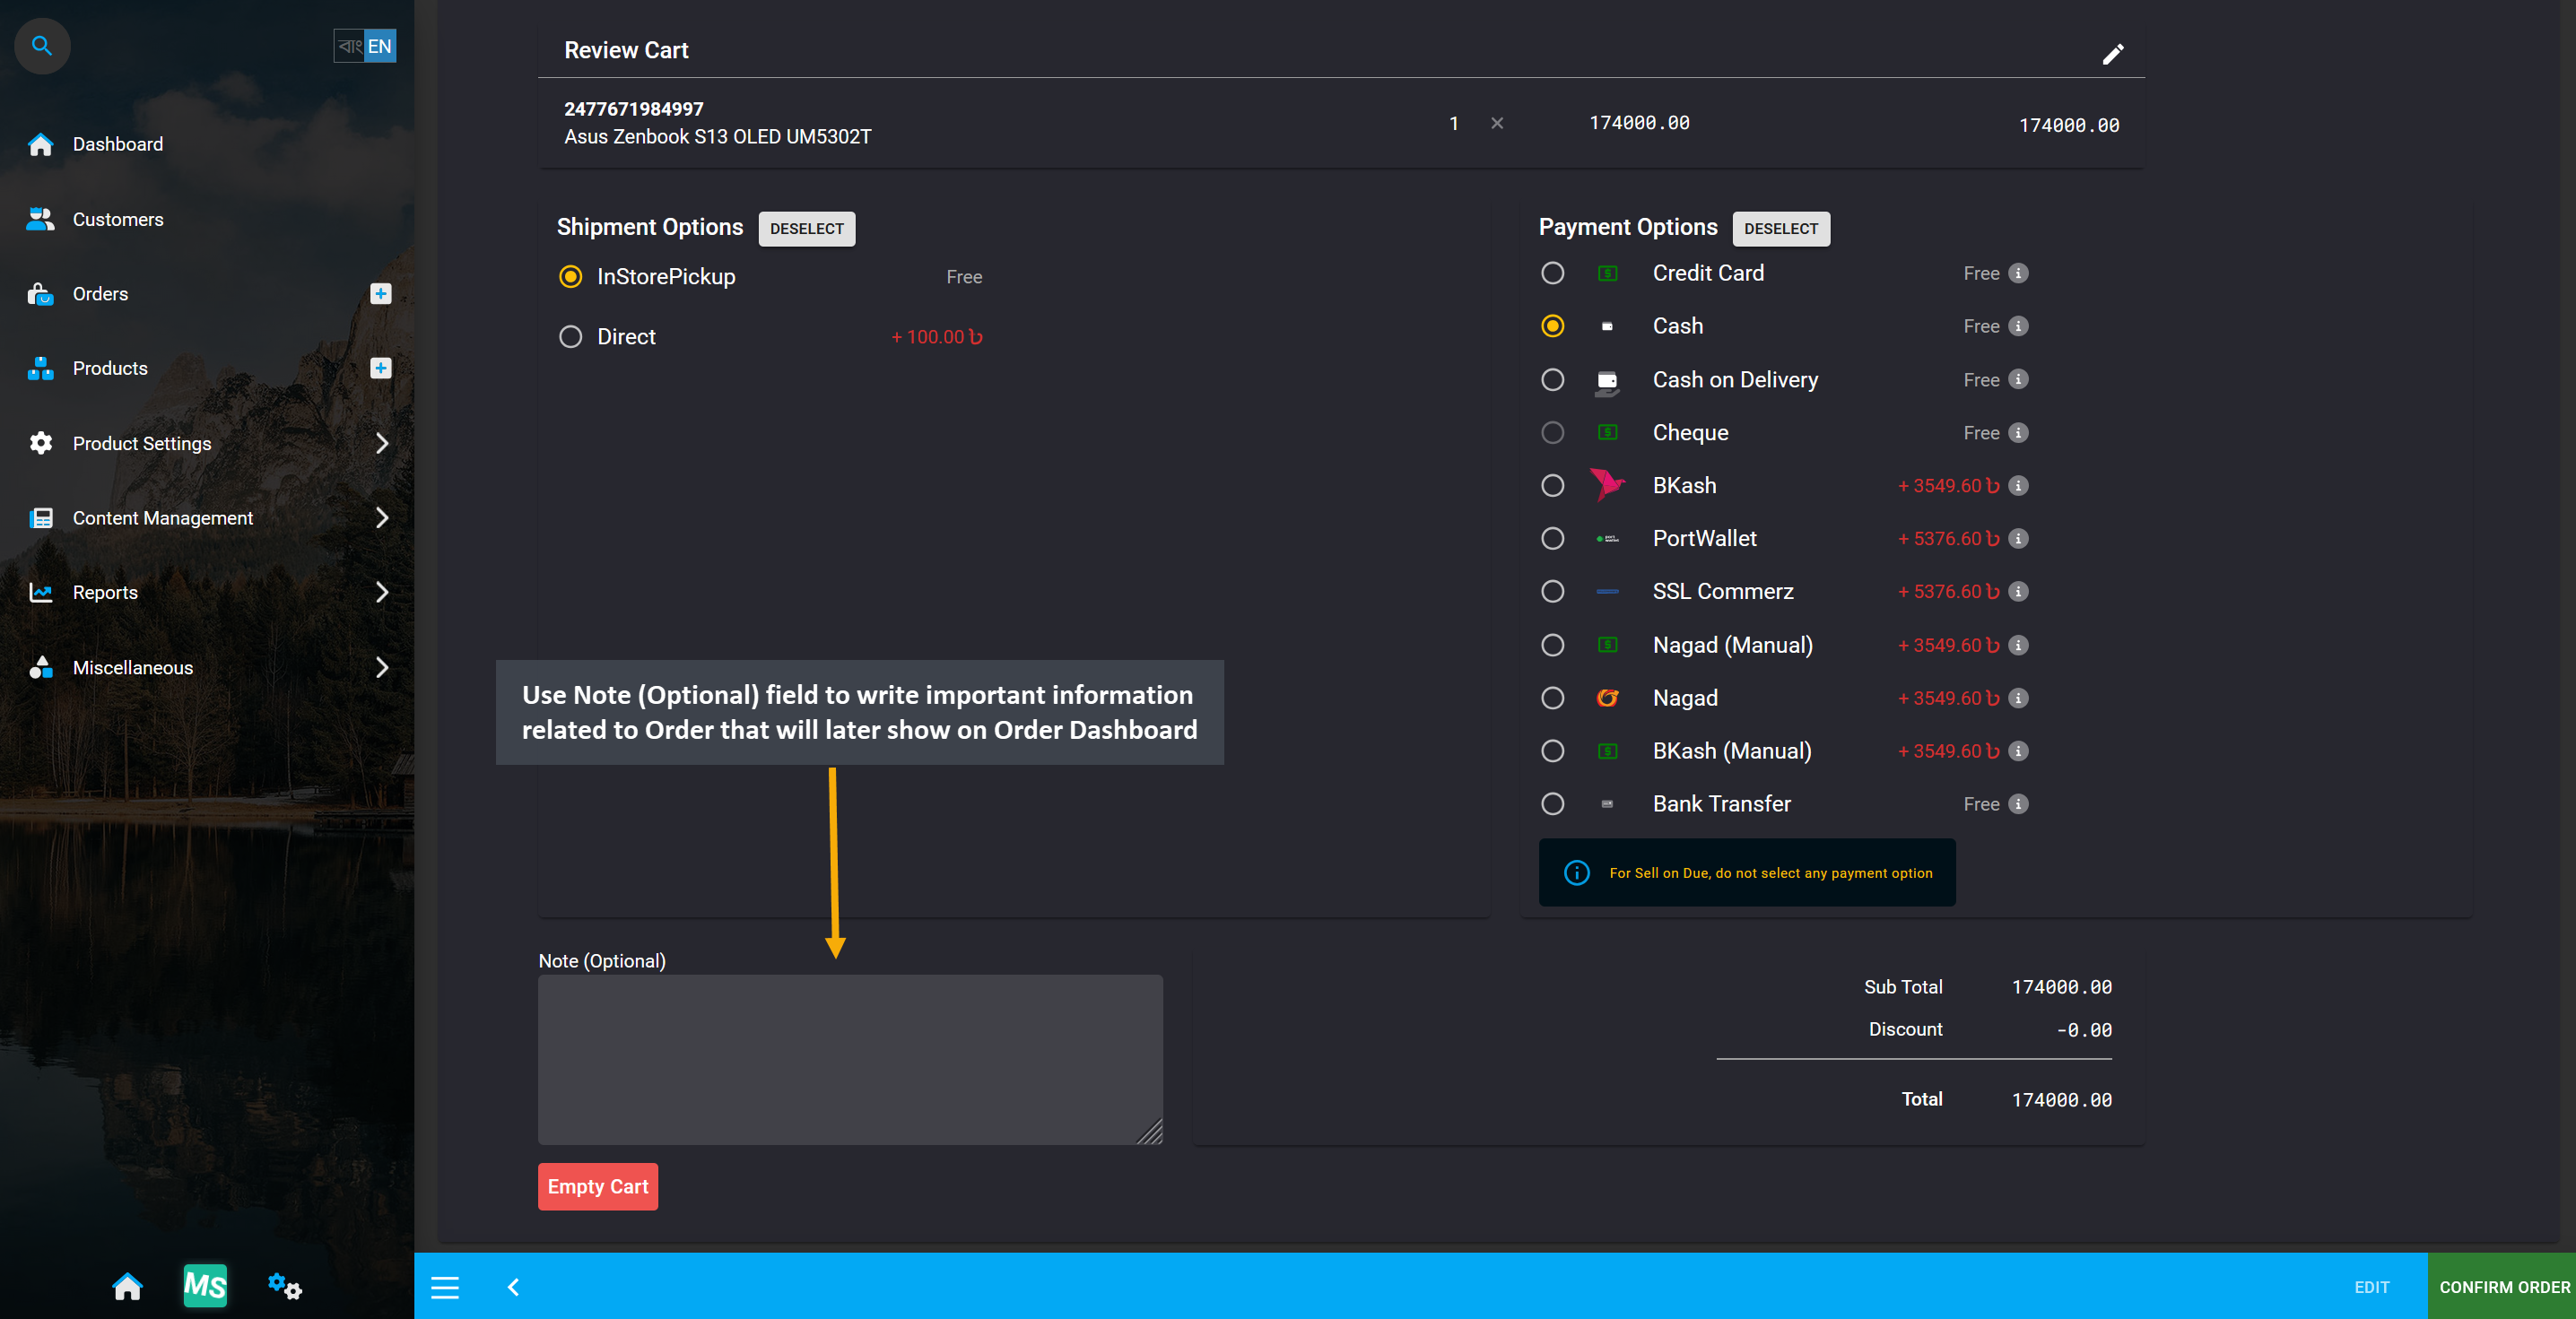
Image 14: Use Note (Optional) field to write important information related to Order on Cart checkout.
If Order Note is not added to Order Cart, then it can also be added later on Order Dashboard. On Order Dashboard, there is a separate section for Note which can be added and edited with important Order details for sales team, customer service team, admins, or managers to follow up. So, add Order Notes according to needs.
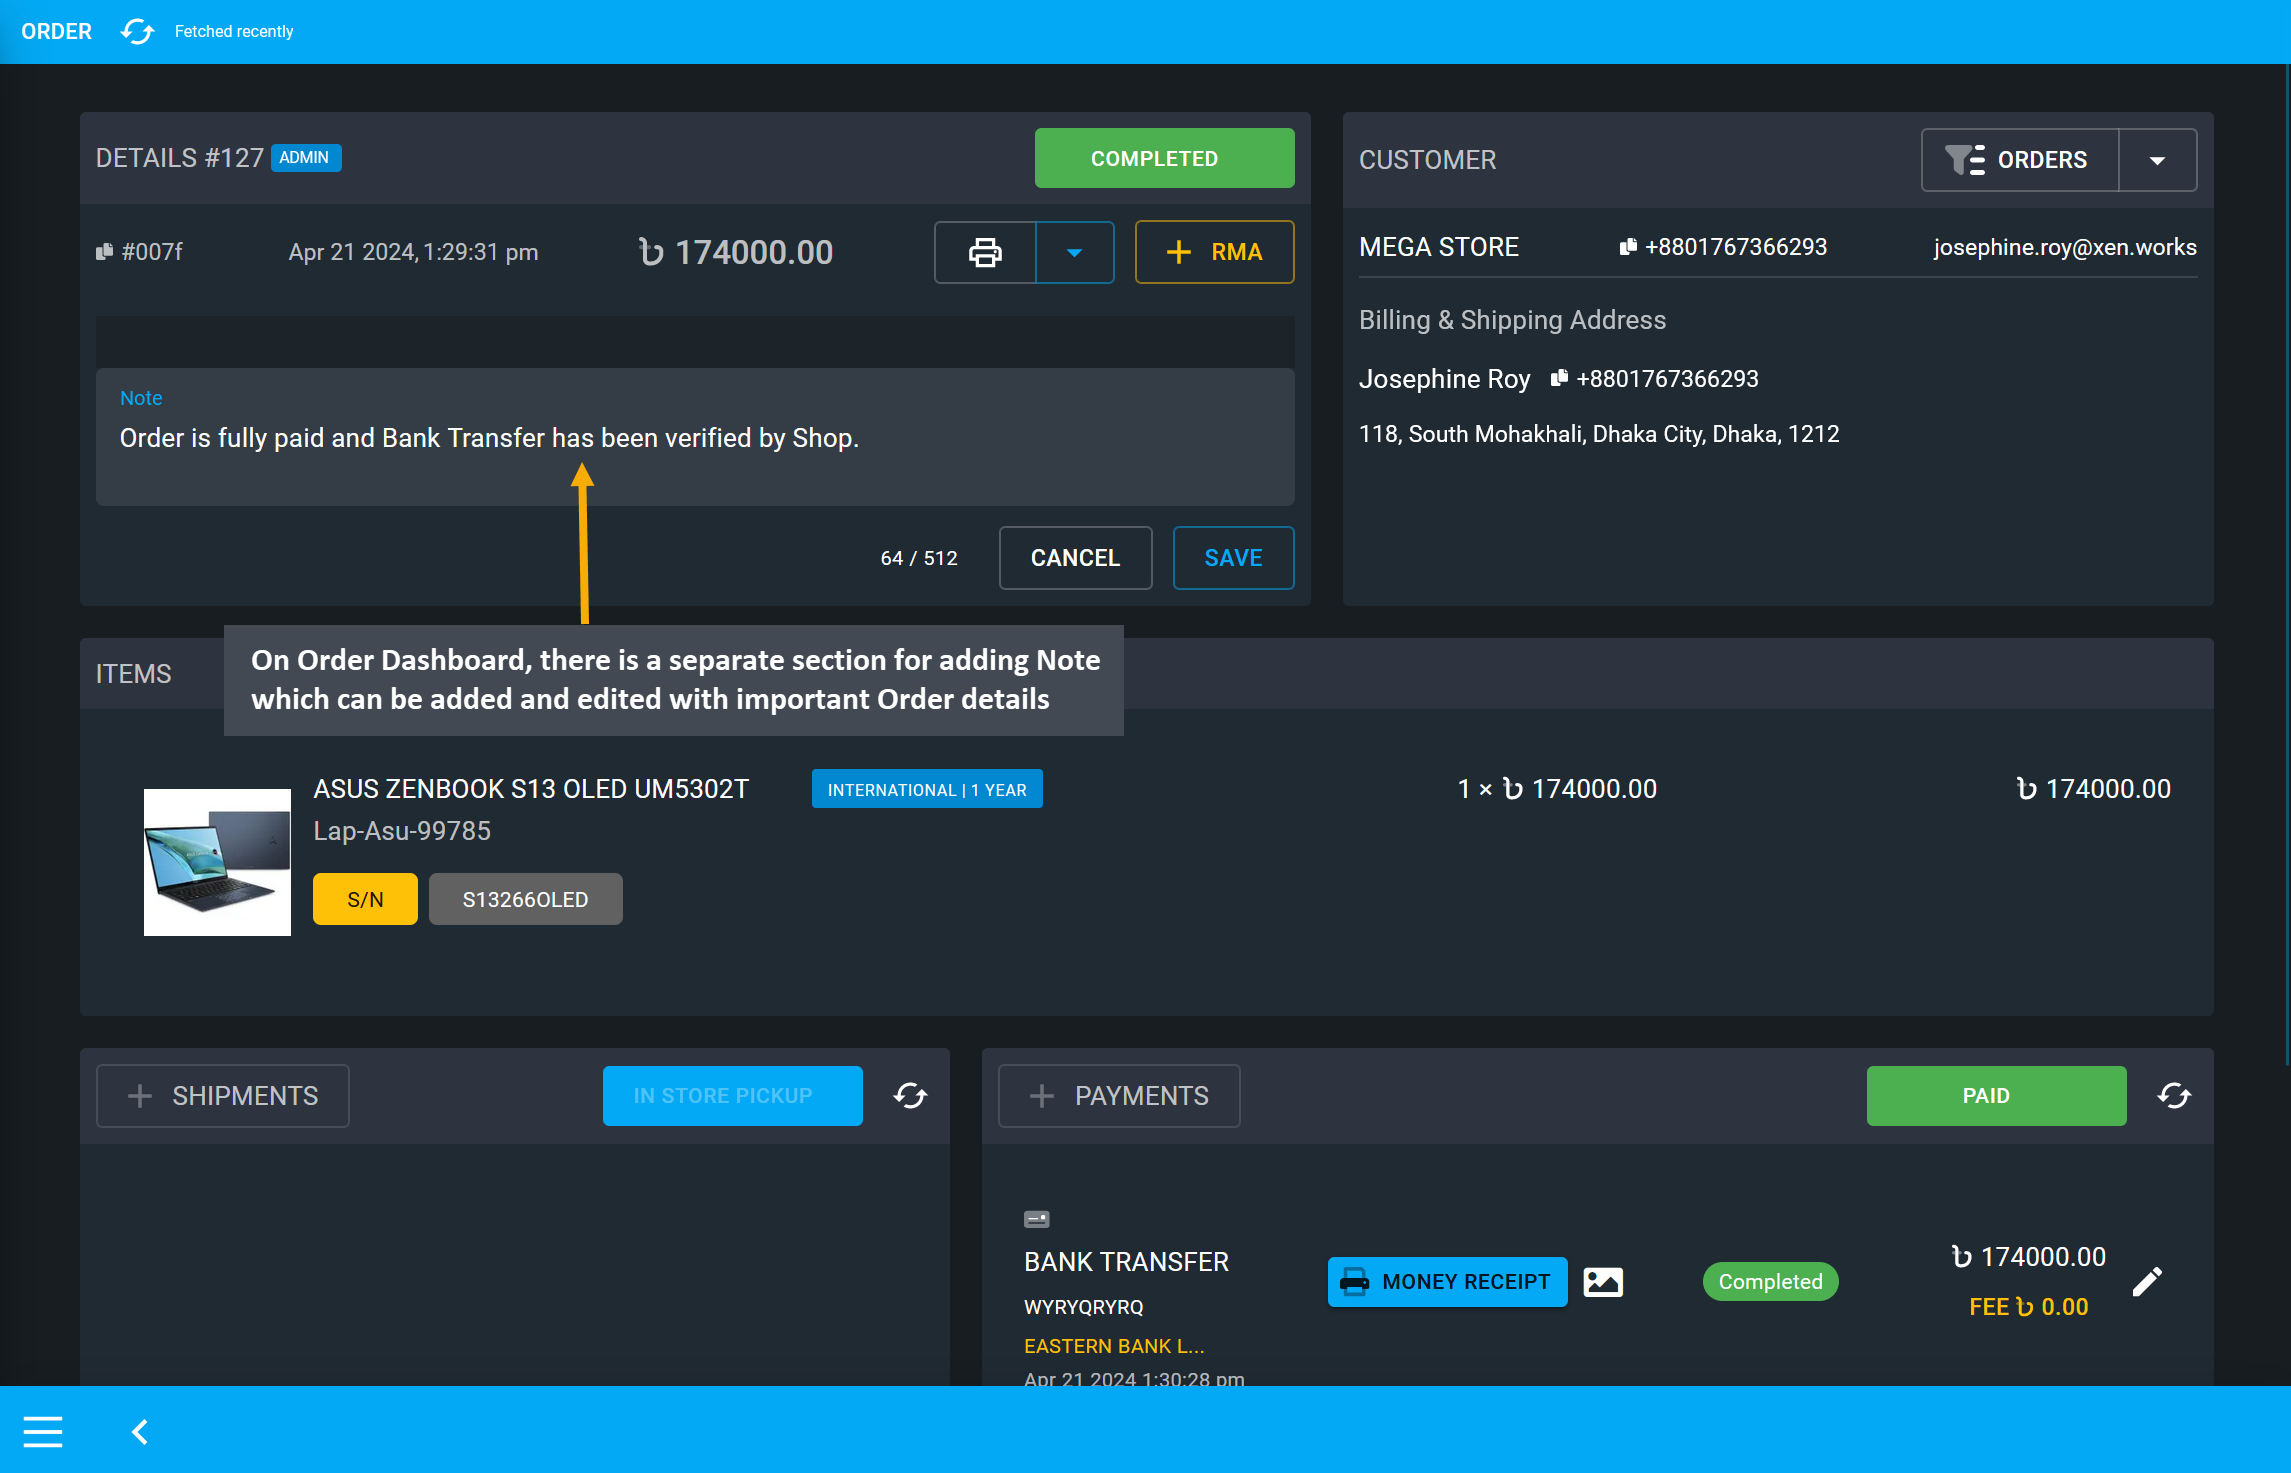
Image 15: Order Dashboard has a Note section that can be added and edited with important details.s
Payment Verification and Money Receipt
After Bank Transfer, Cheque, or Cash on Delivery, after payment proofs are checked, they can be verified by clicking on the Verify button which will open a modal to set the payment as Completed or Failed.
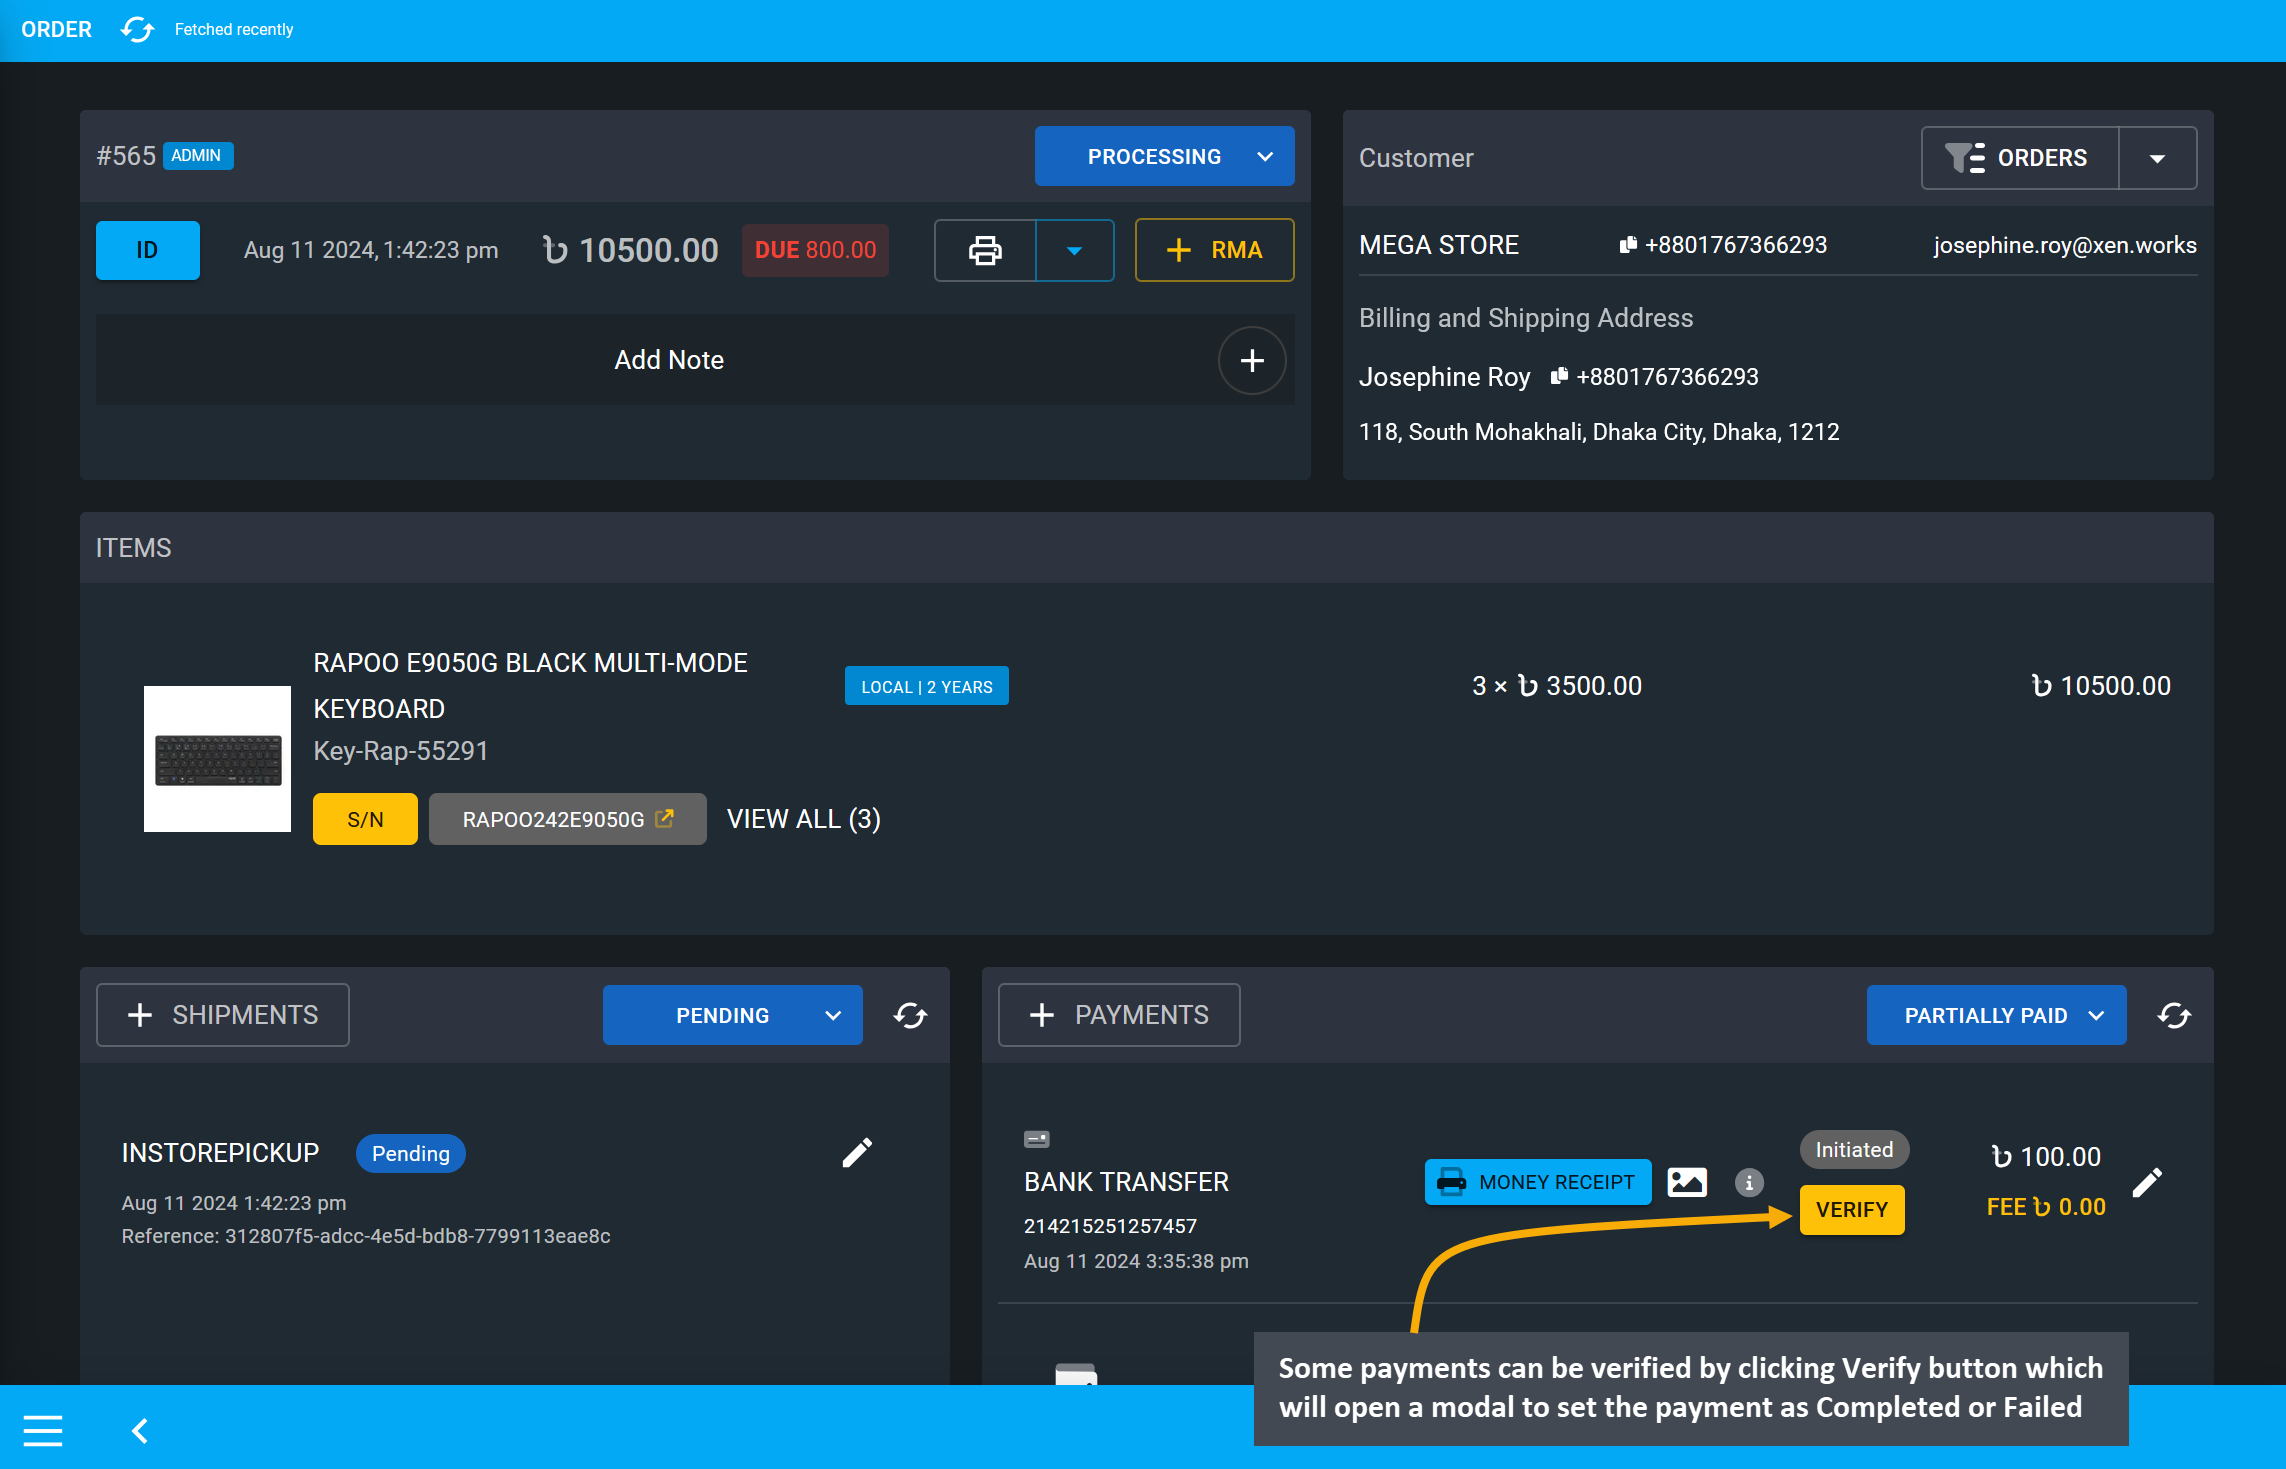
Image 16: Click Verify button on Payments to open a modal to set the payment as Completed or Failed.
After Verify button is clicked, a modal will open, where the transaction can be completed by selecting the option Set as Completed that will verify Order Due and set payment as Paid.
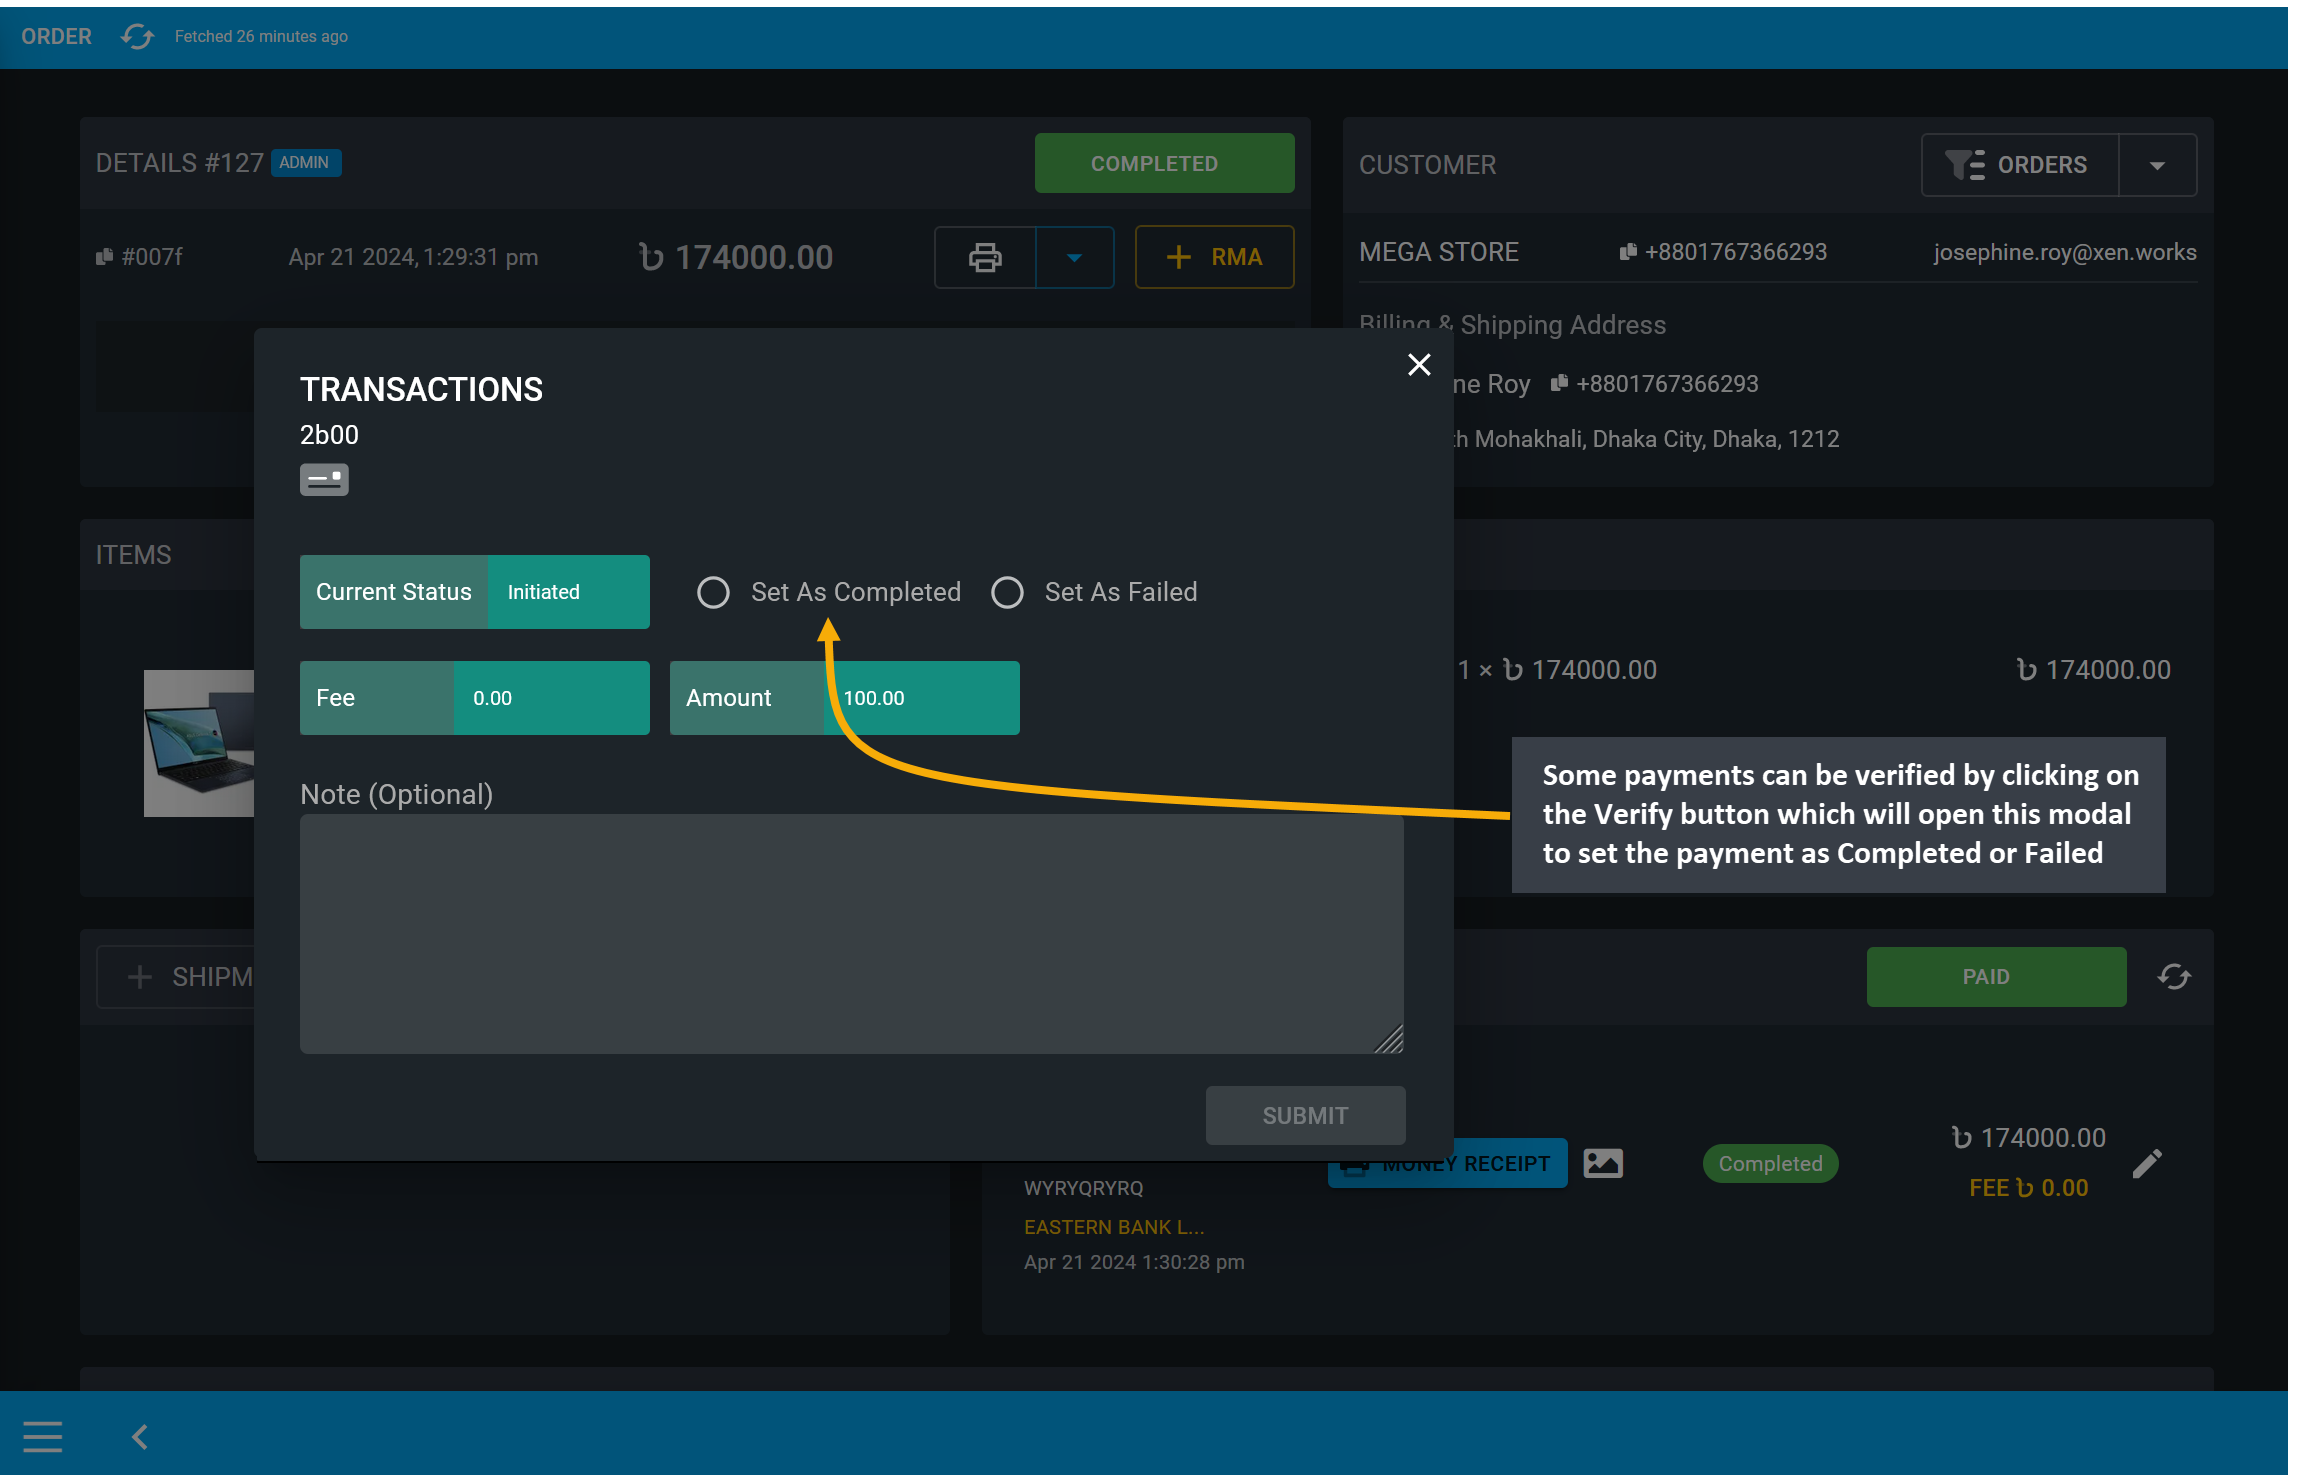
Image 17: Verify a transaction by selecting Set as Completed on the veification transaction modal.
Once payment or transaction verification is completed, the Verify button will convert into a Completed label and the Order Due will be cleared and Payment status will become Paid.
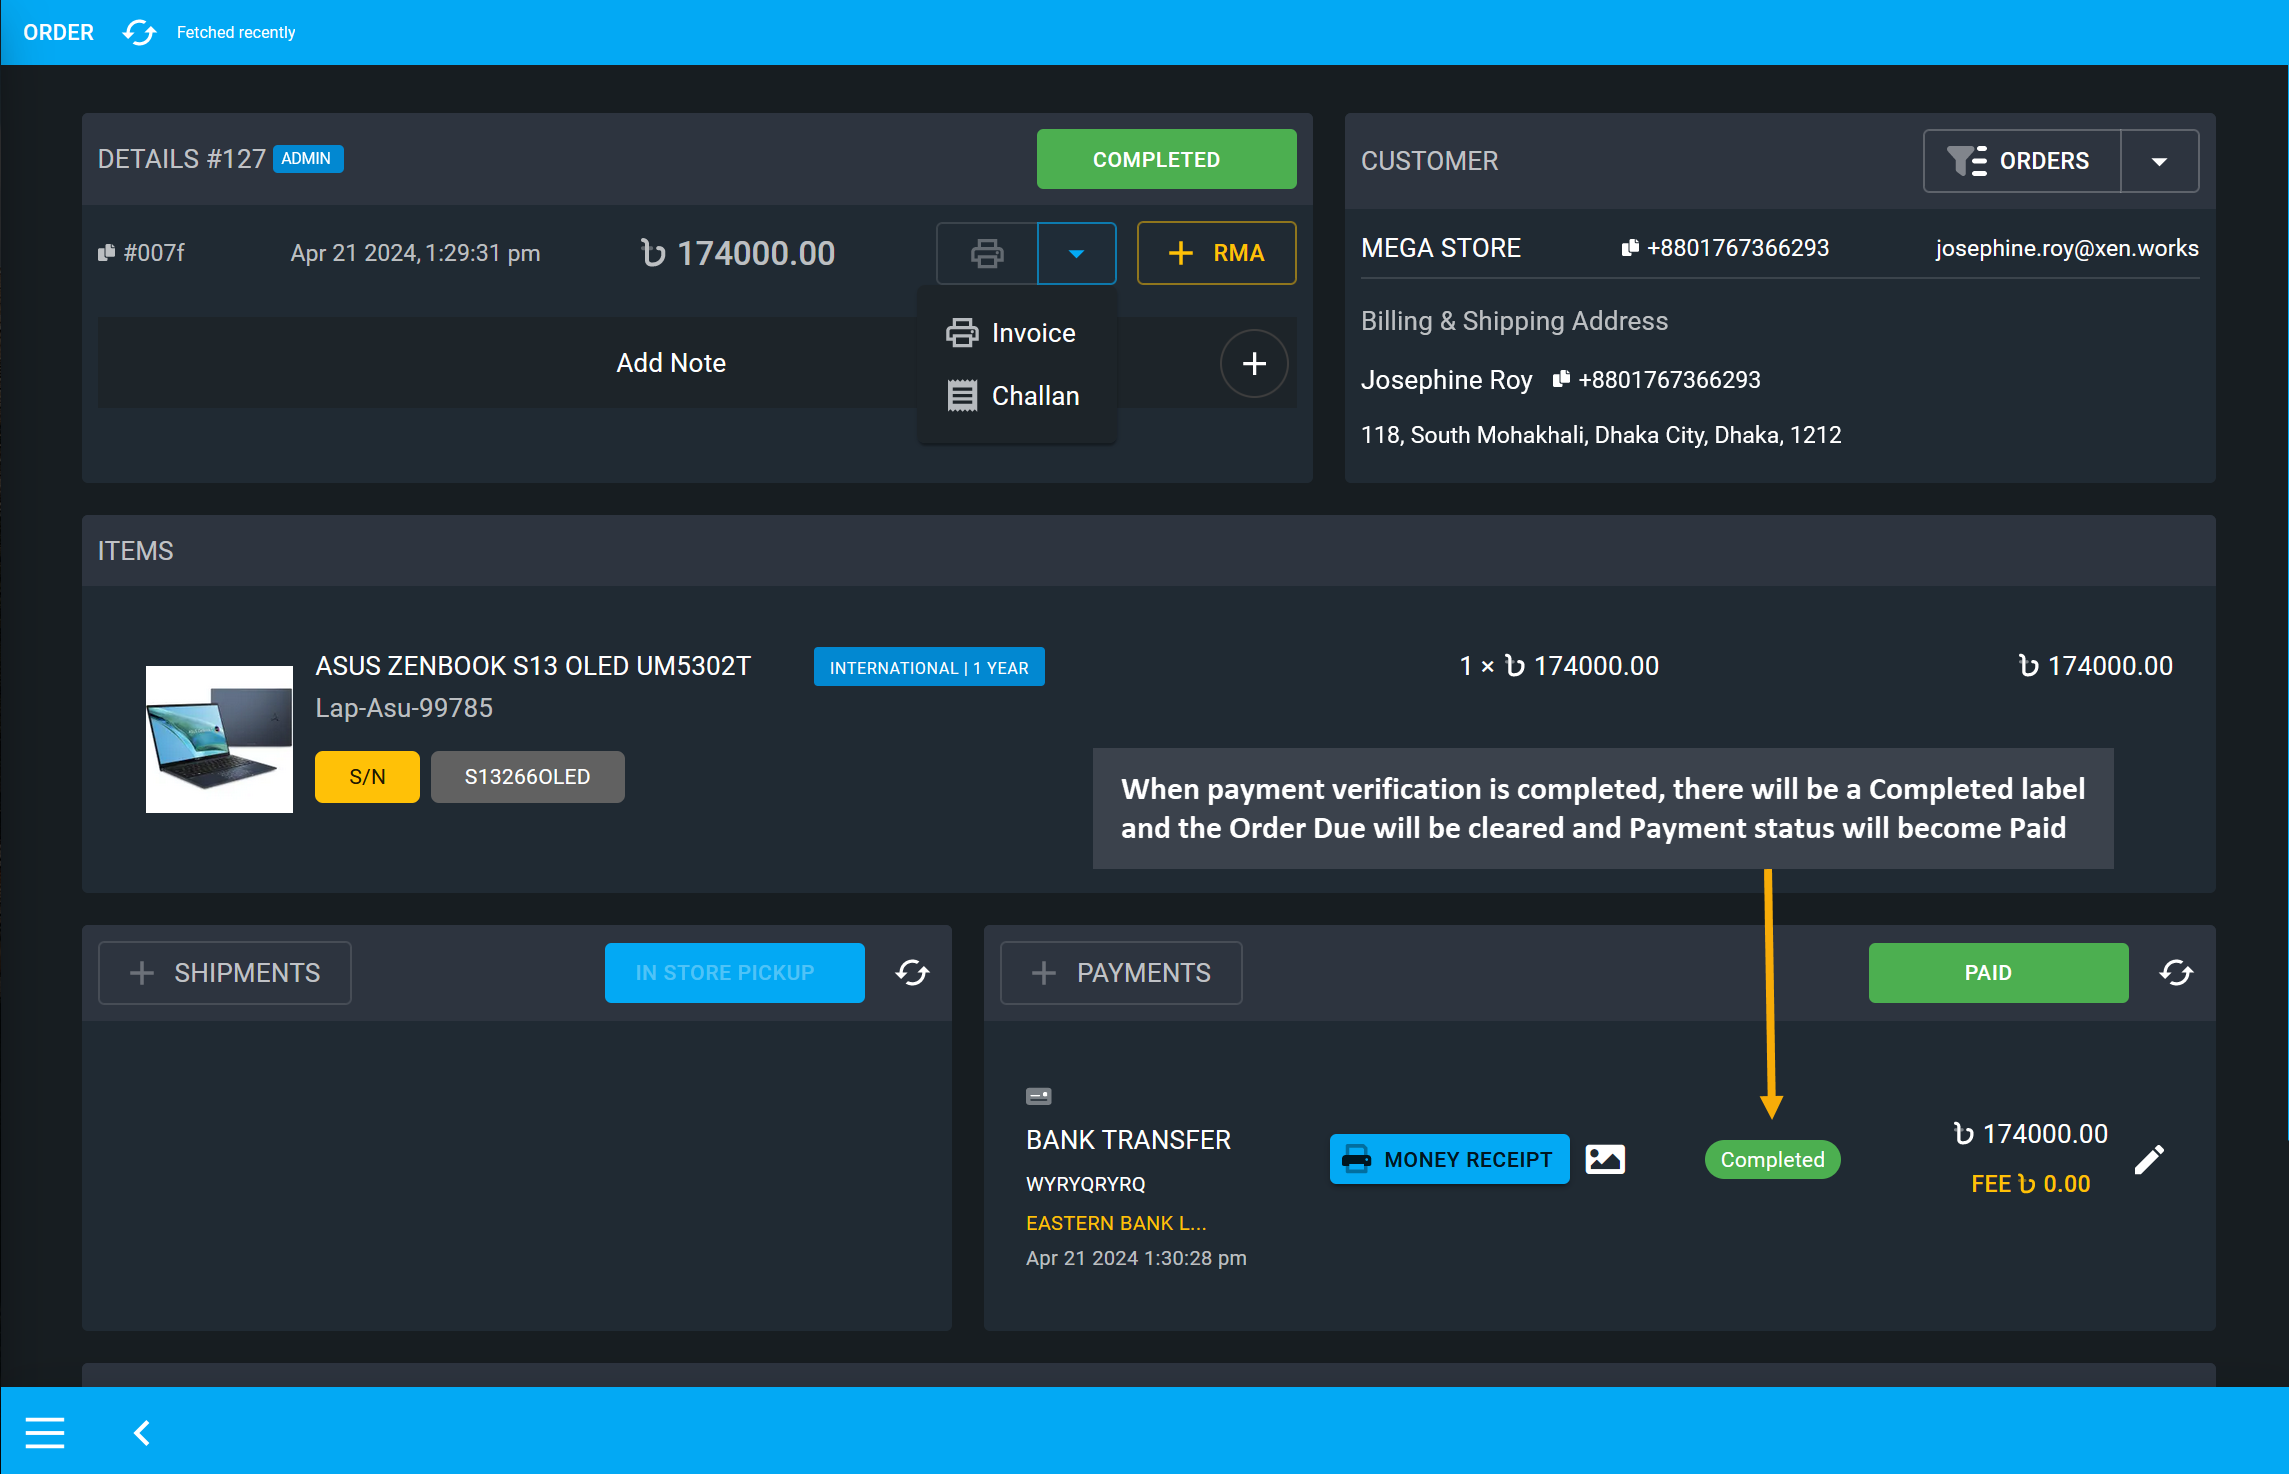
Image 18: When payment verification is completed, Payment status will become Paid on Order Dashboards.
After transaction is completed, a Money Receipt will be available to view and download from the Payments section, click on the Money Receipt label to open and print it for reference.
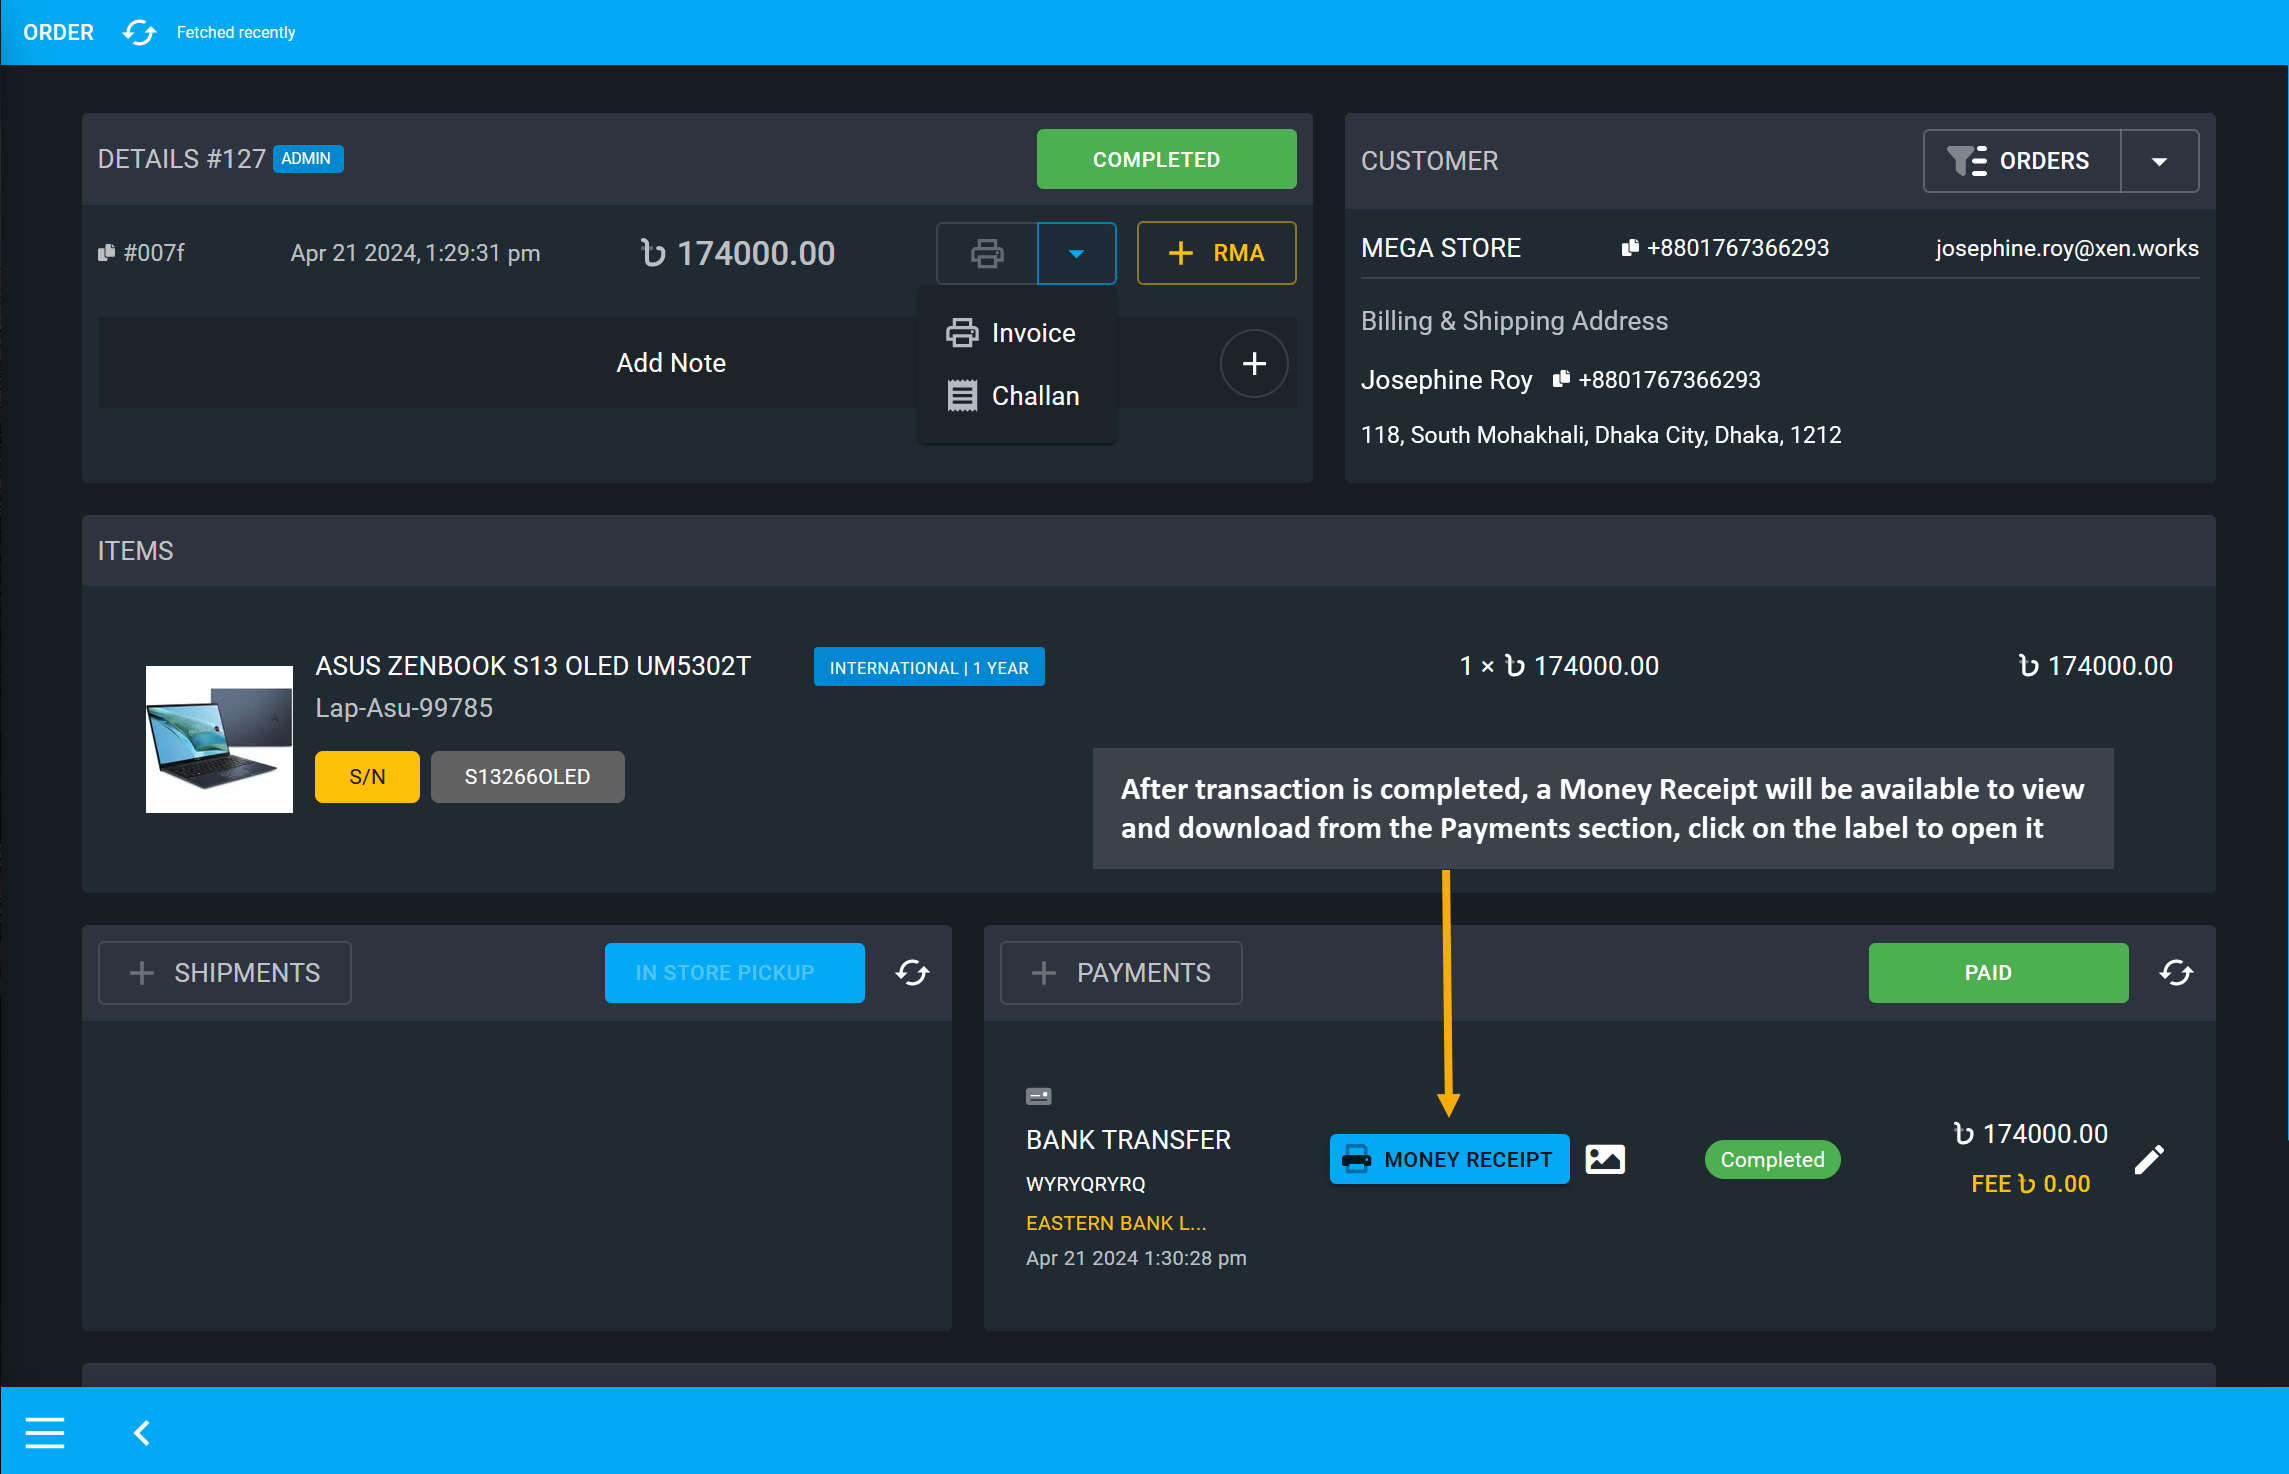
Image 19: After completion of transaction, payment details can be checked from the Money Receipt.
Clicking on the Money Receipt button will open a print view of the payment transaction details.
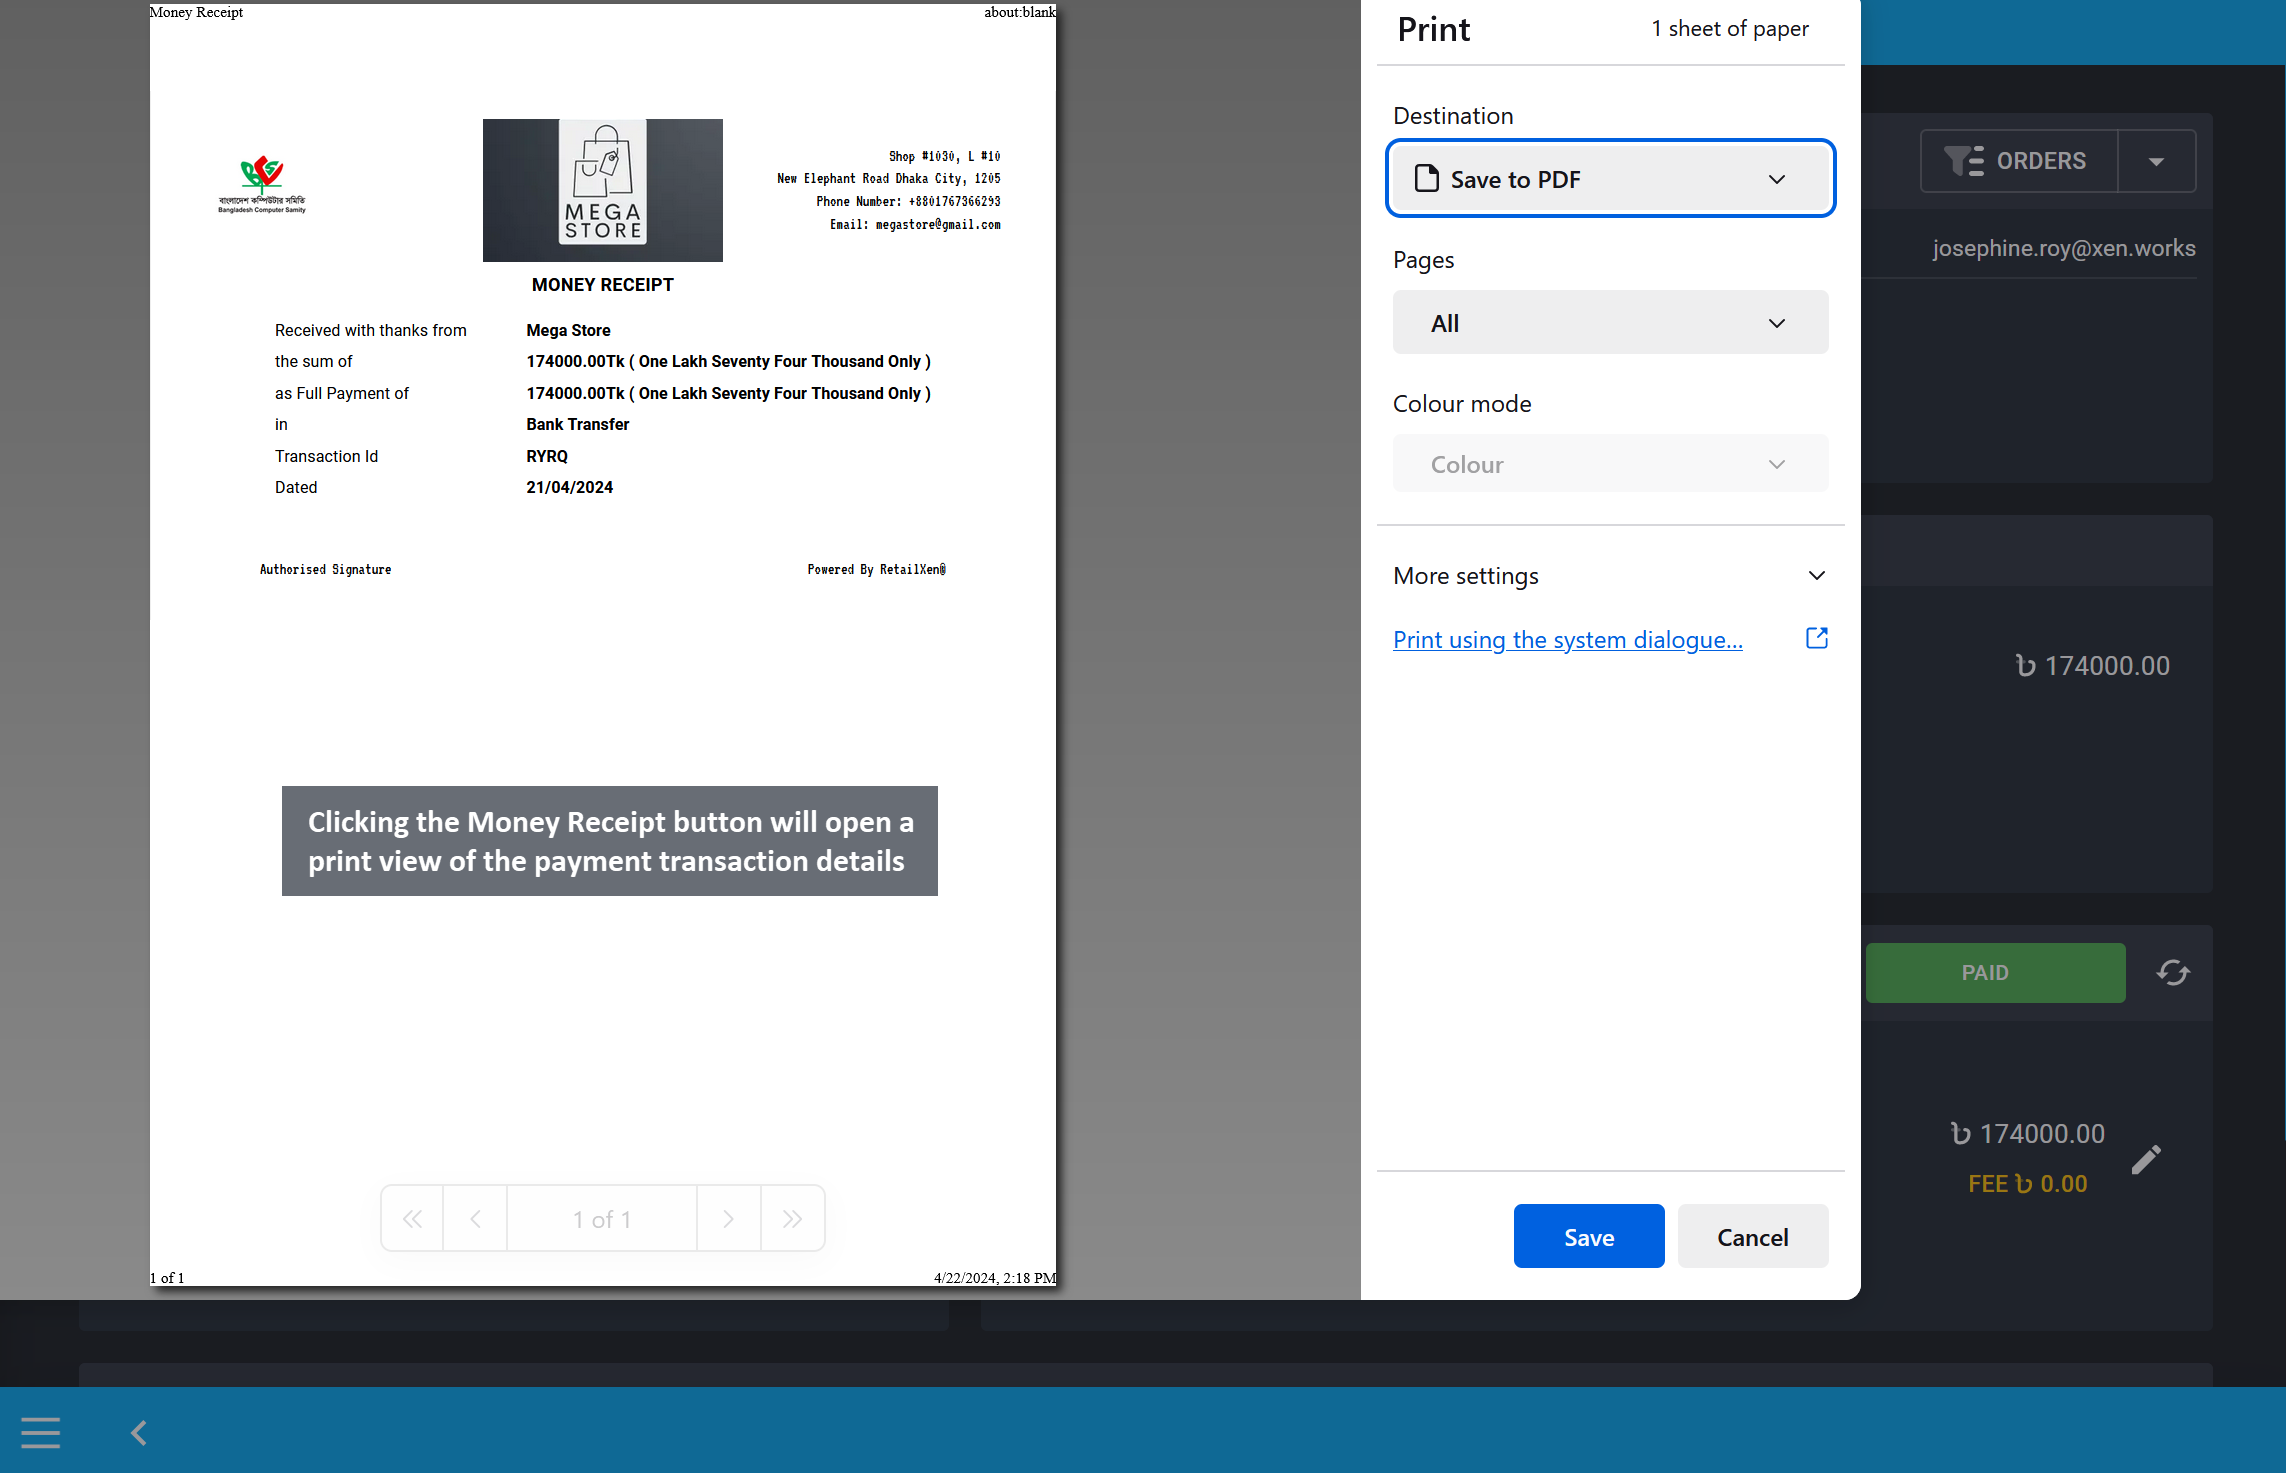
Image 20: Clicking the Money Receipt button will open a print view of payment transaction details.
Order Dashboard Shortcuts
Within the Order Dashboard, beside the Customer details box, there are dropdown shortcuts to redirect to pages like Customer Dashboard, Report, and Ledger Breakdown. Click pages from the dropdown to visit them directly from the Order Dashboard.
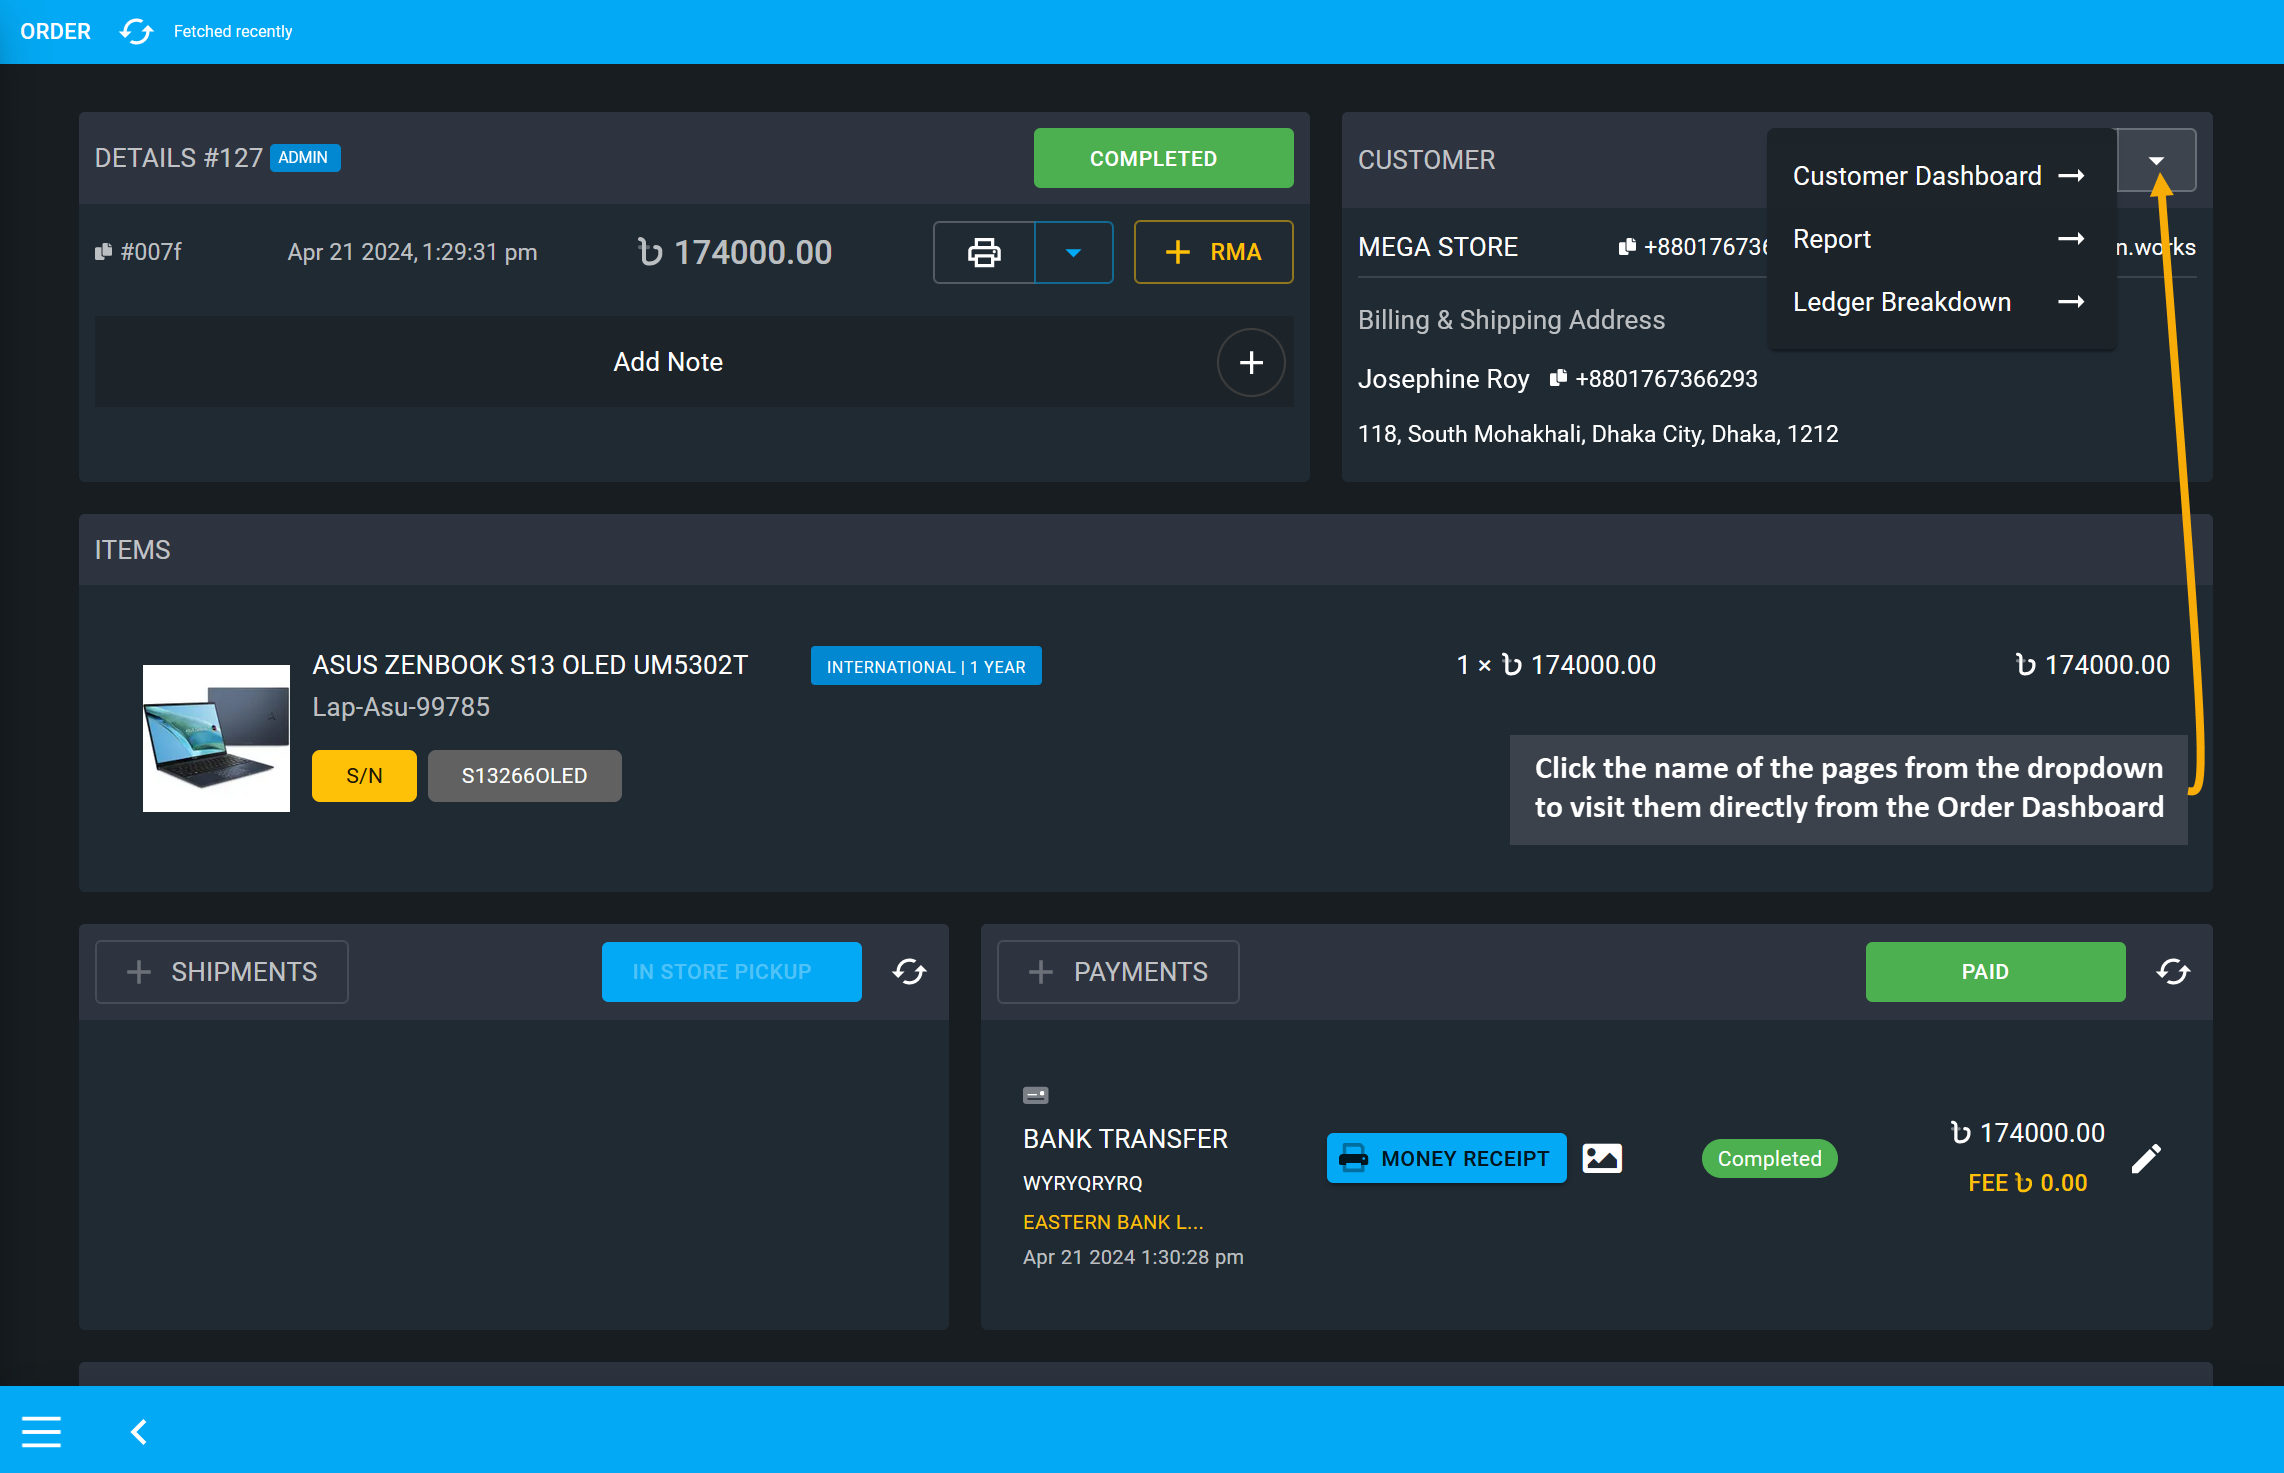
Image 21: Click the name of the pages from the dropdown to visit them directly from Order Dashboard.
Clicking on Customer Dashboard will redirect to the Customer’s Dashboard from Order Dashboard on a separate new tab. So, access to any option related to Customer after checking with the Order.
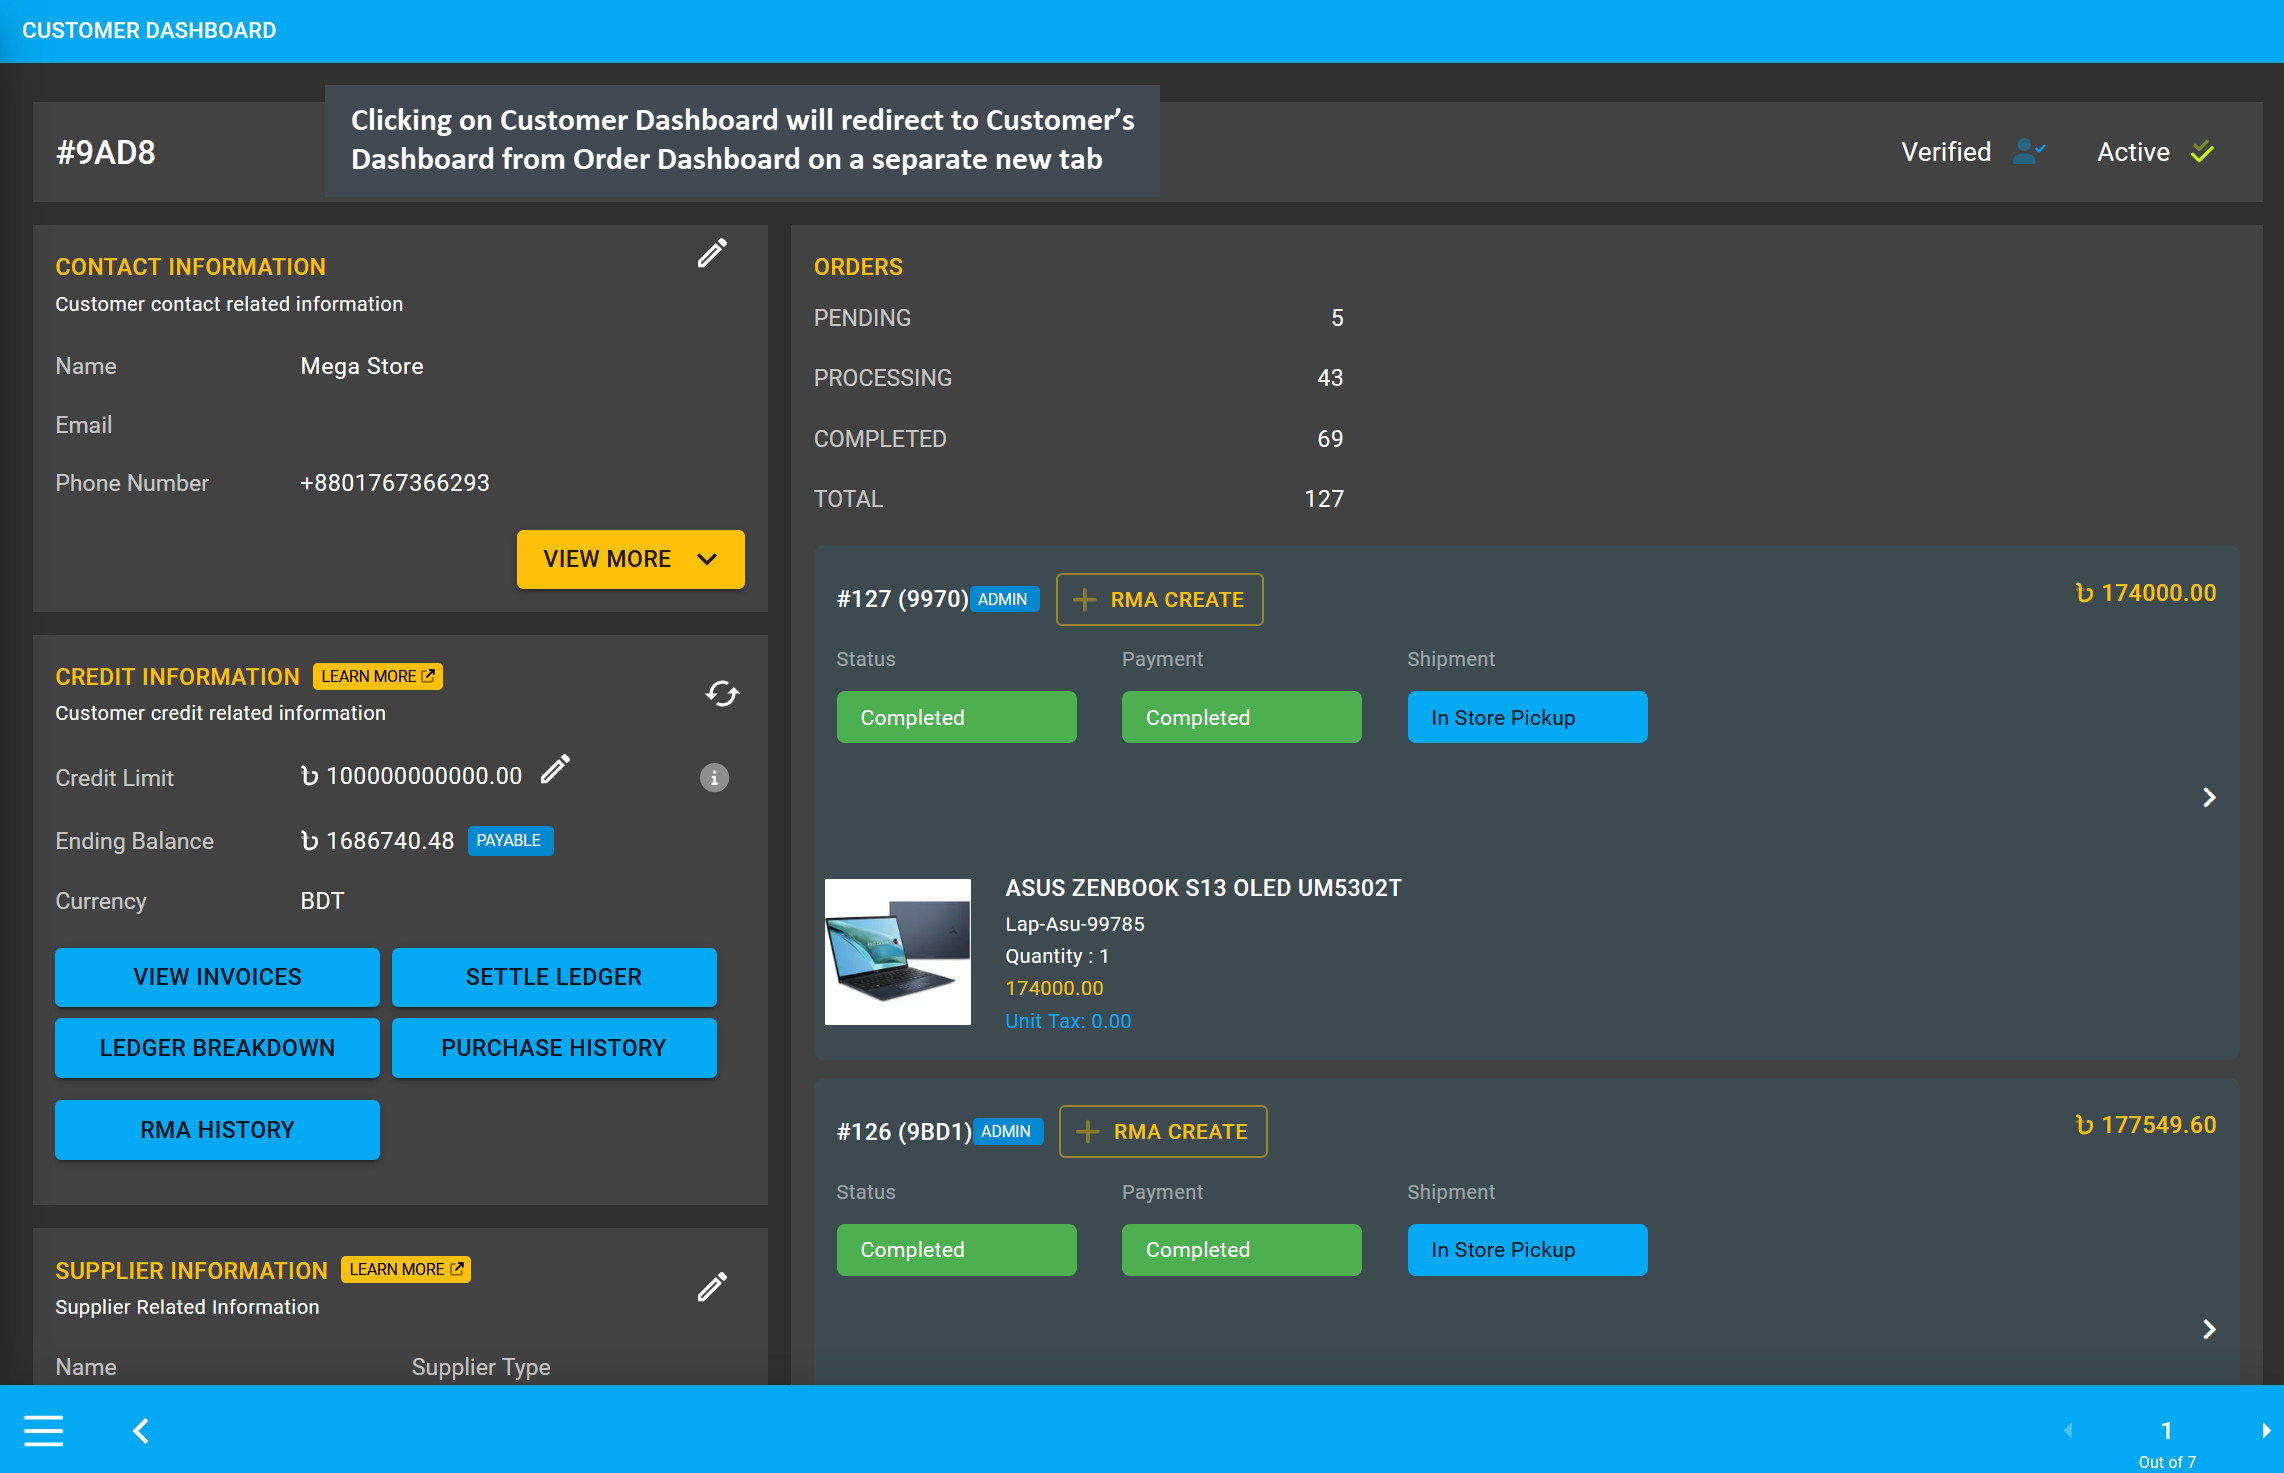
Image 22: Redirect to the Customer’s Dashboard from Order Dashboard by clicking on Order shortcut.
Another Order shortcut is Report that will show the profit loss of an Order, Product, Customer’s selected range. Clicking on Report will redirect to the Cost Basis page showing total profit, revenue, and cost.
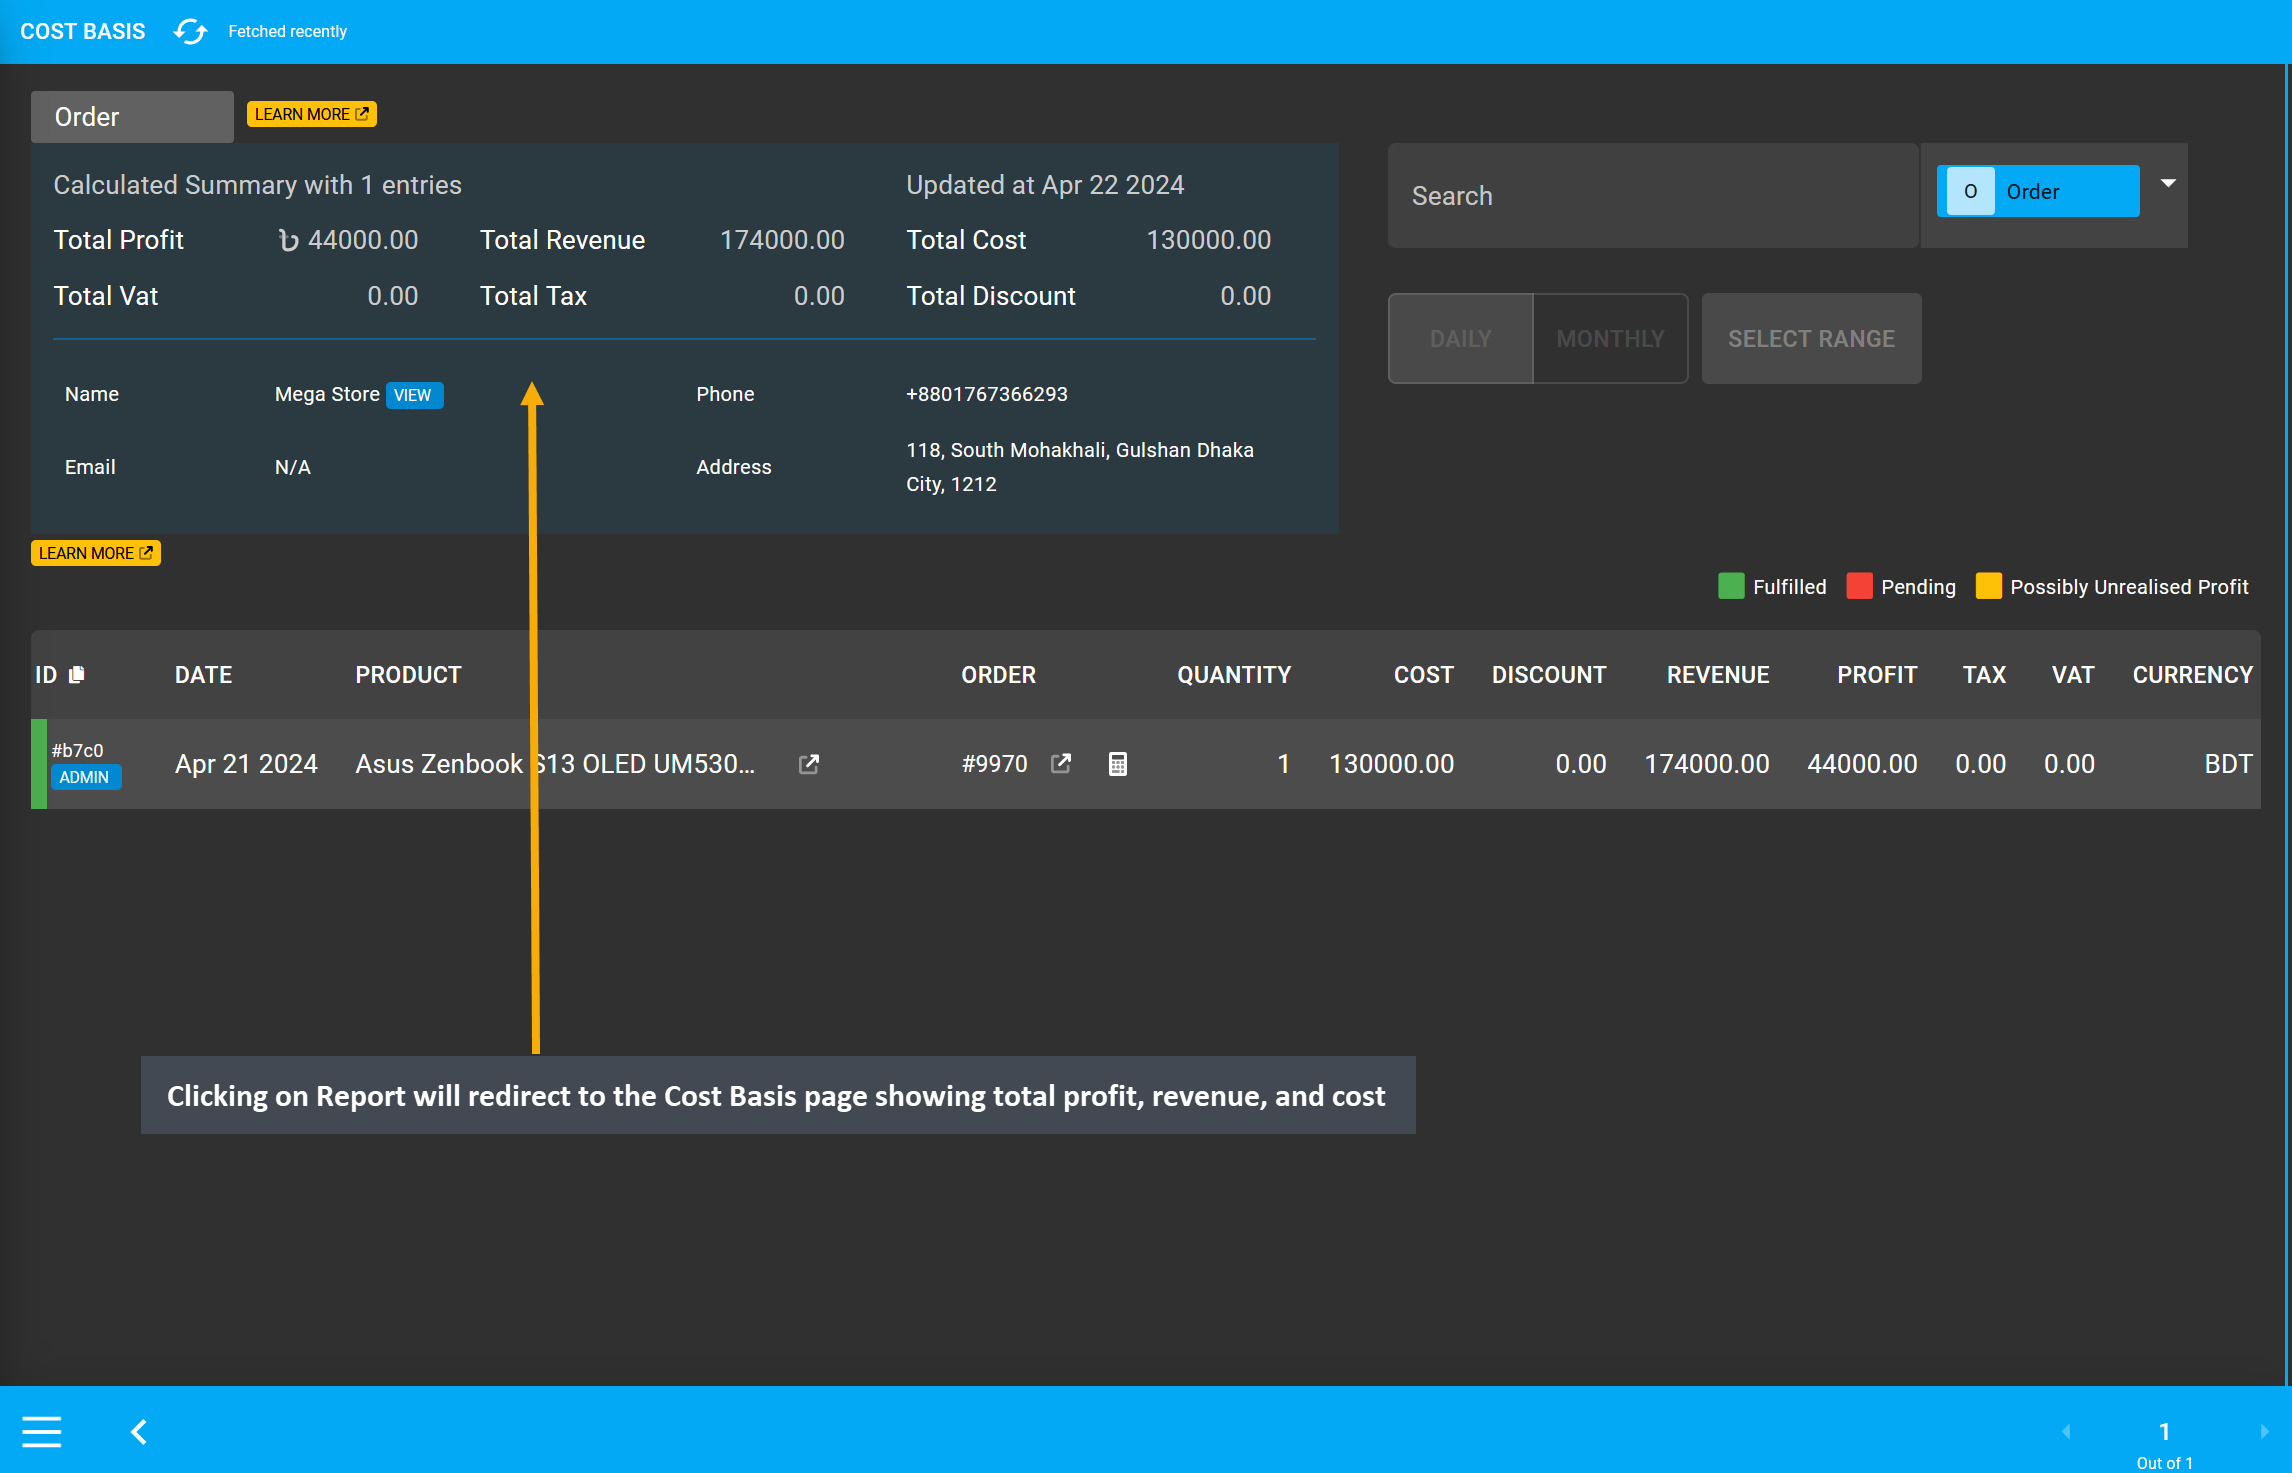
Image 23: Clicking Report will redirect to Cost Basis page showing total profit, revenue, and cost.
The other shortcut is Ledger Breakdown that will show the overall transactions of a Credit Customer and a Credit Supplier. Clicking on Ledger Breakdown will redirect to Ledger showing details of all transactions.
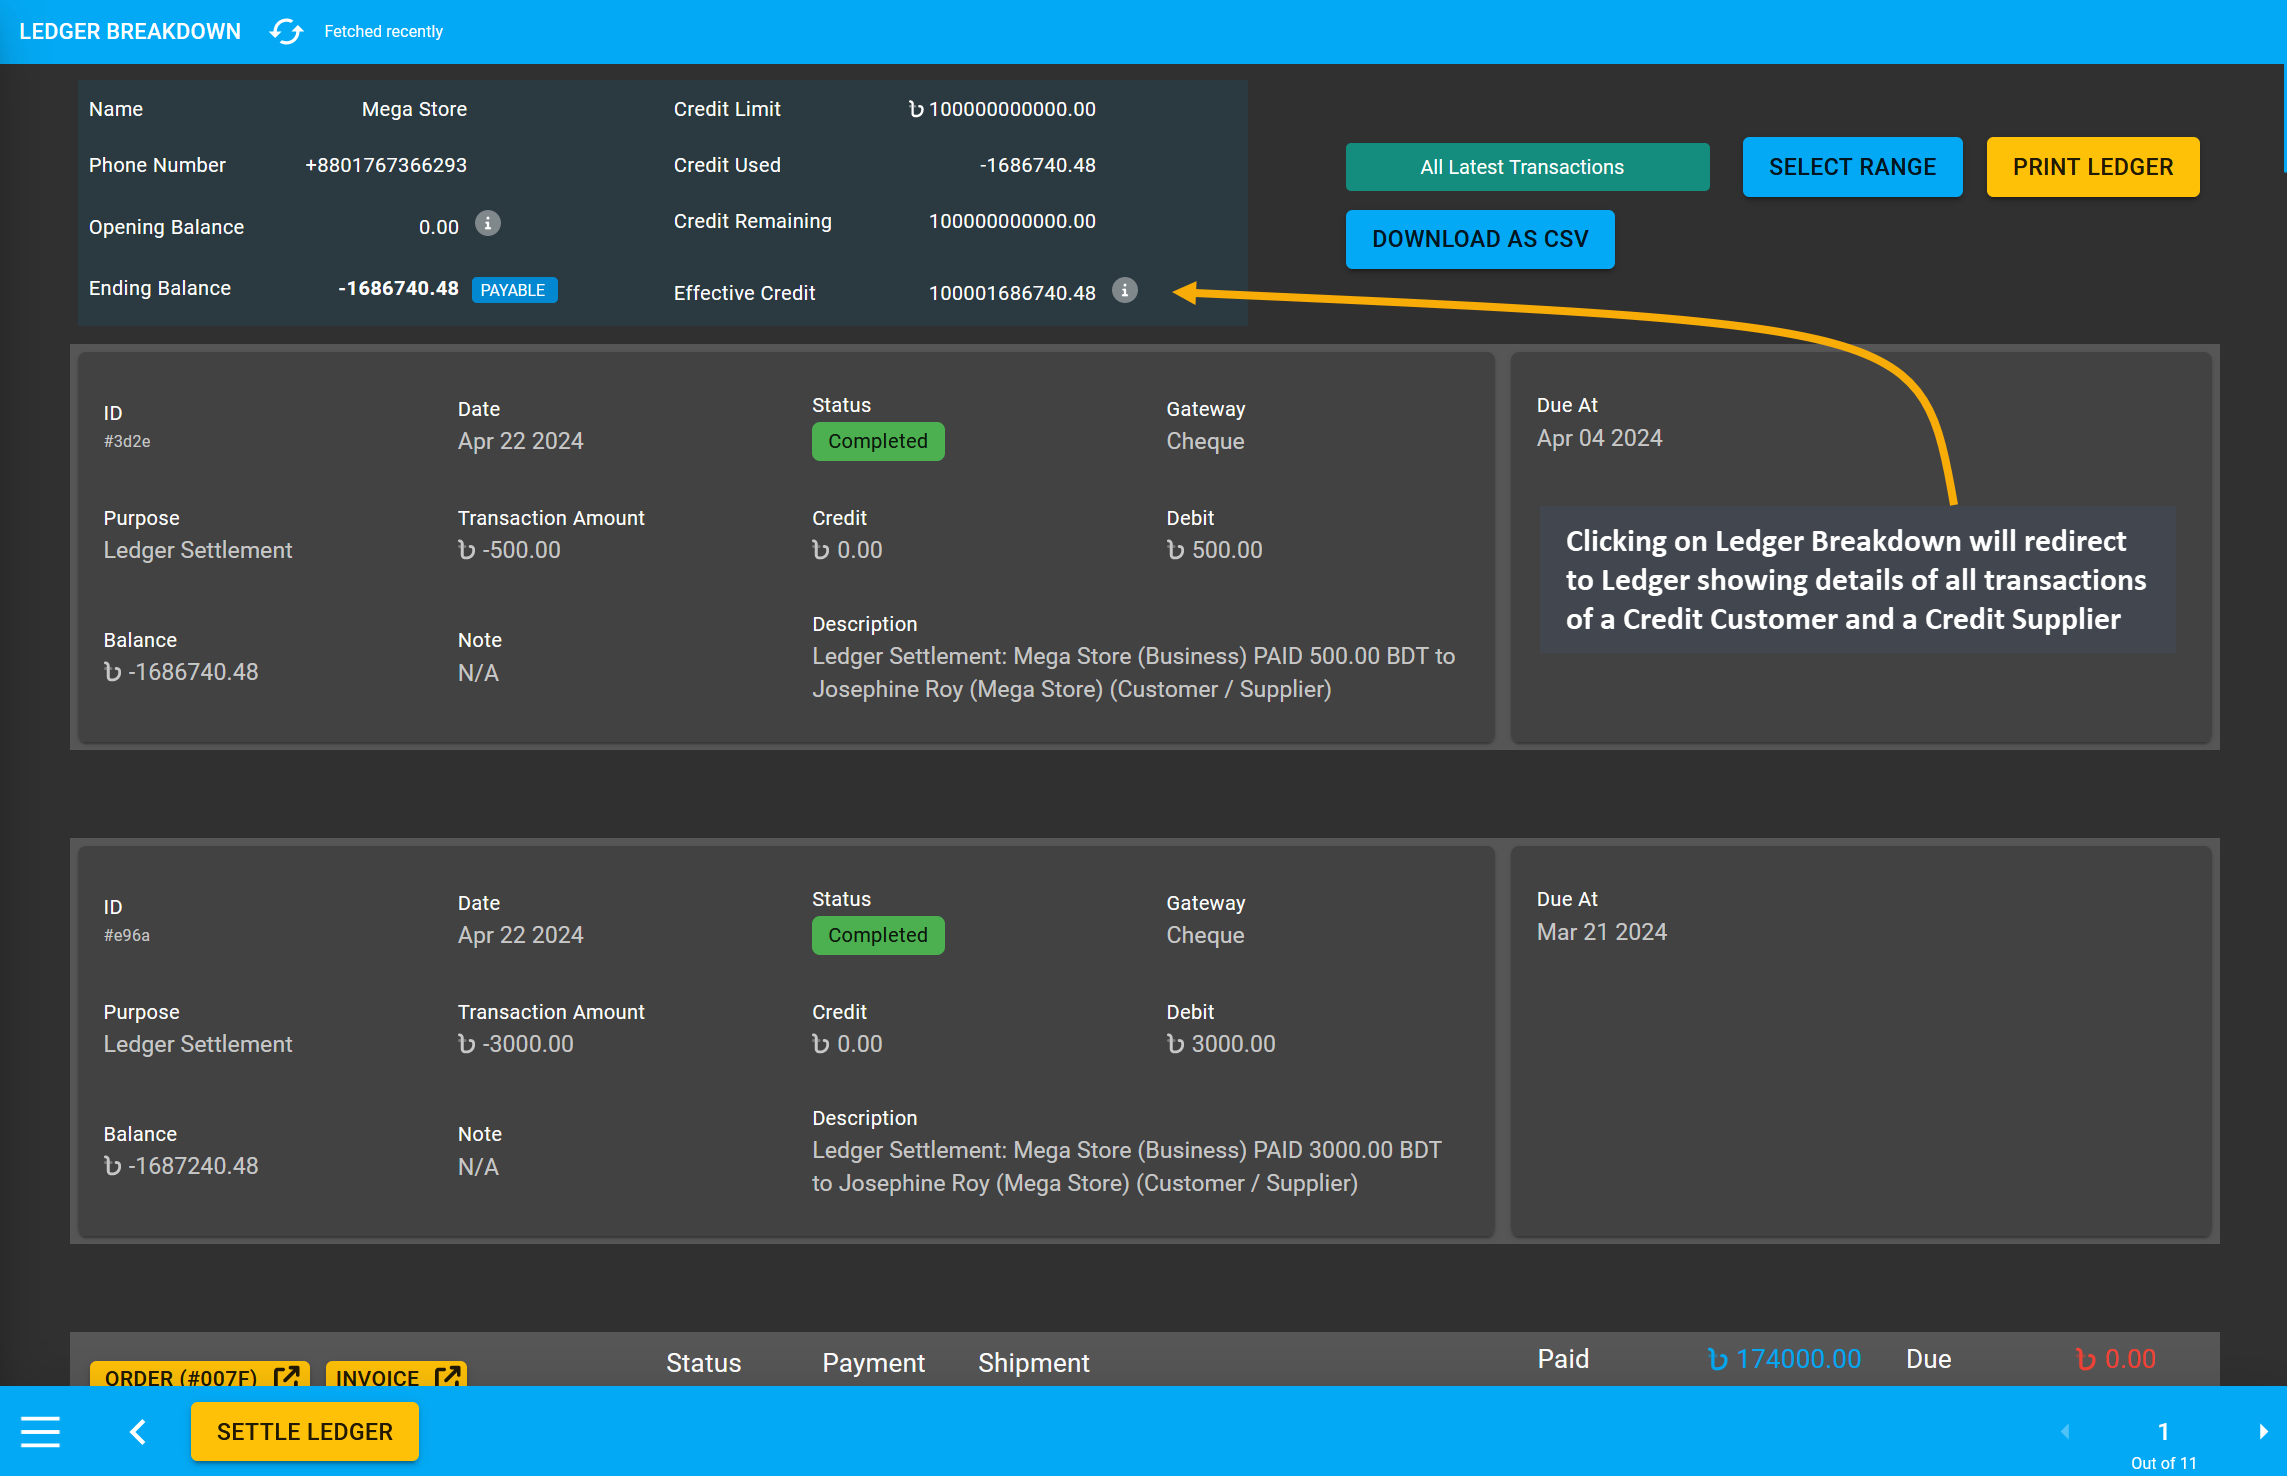
Image 24: Clicking on Ledger Breakdown will redirect to Ledger showing details of all transactions.
11.1 - Edit Payment Status
Update Payment Status based on customer payment using these options
Update Payment Status
If an Order is made without payment from Cart, the payment will remain Draft on Order Dashboard. For adding payments to the Draft Order, Order status needs to be changed from Draft to Pending and payments can be added by clicking + Payments from the order payment section.
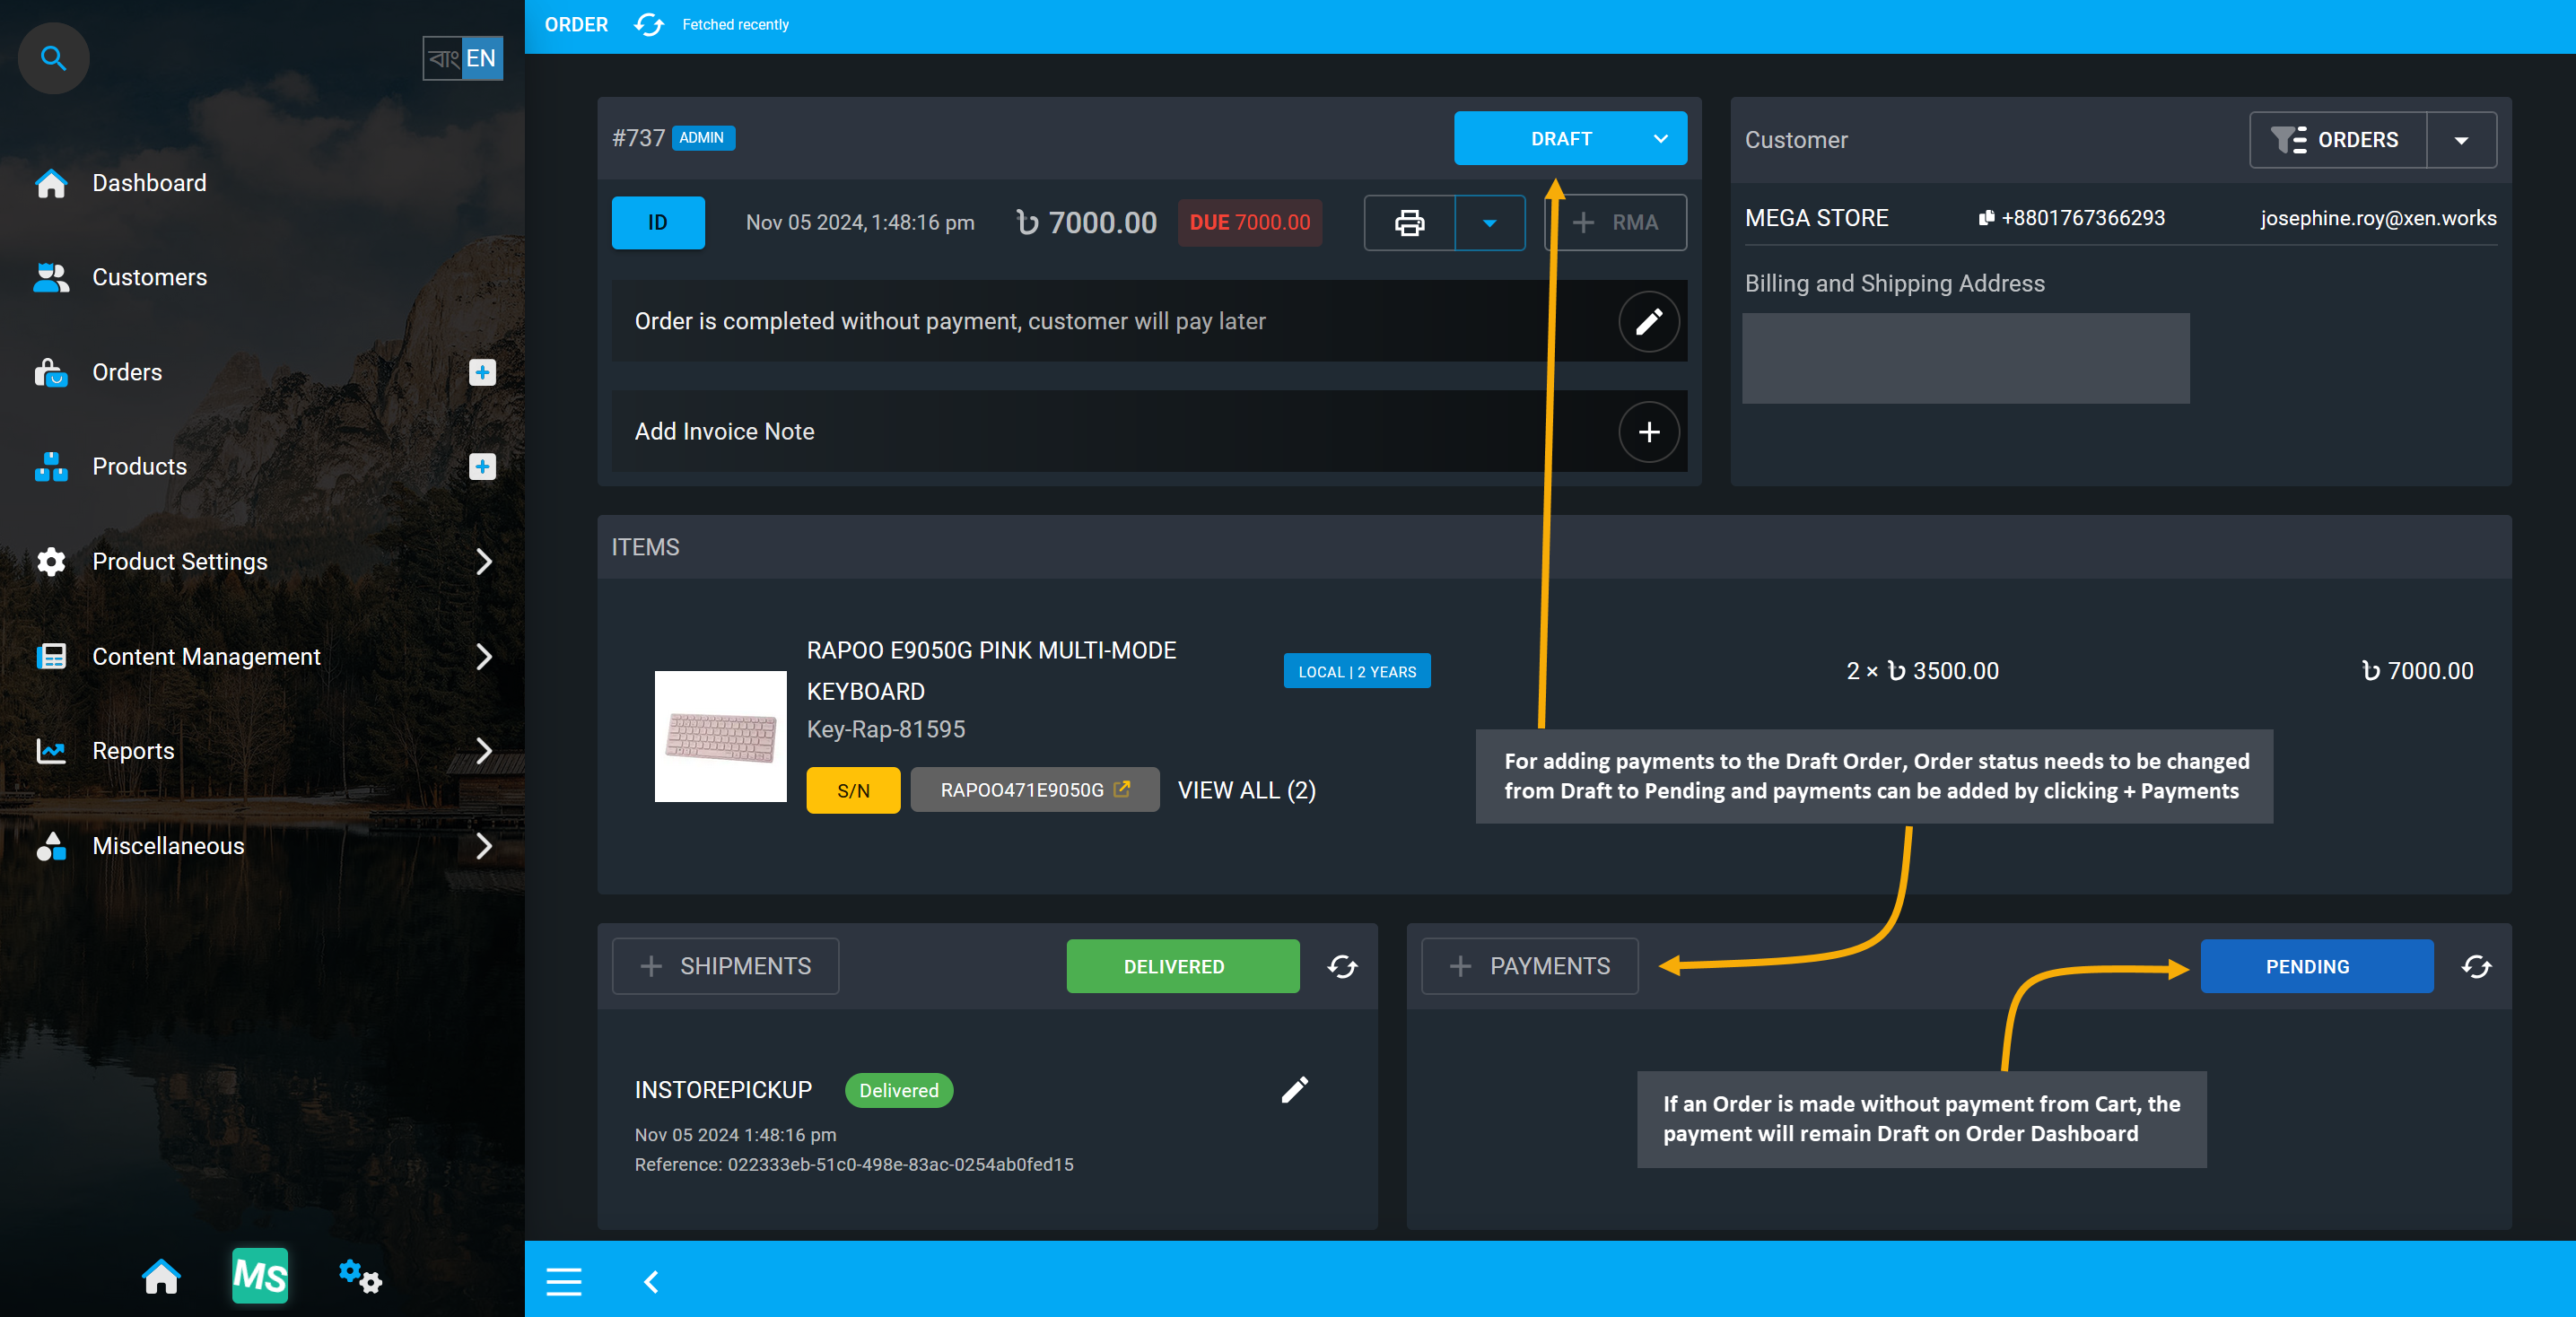
Image 1: Order status need to be updated from Draft to Pending to add payments to unpaid Order.
When an Order is placed, it may have pending Payments or require Payment verification. Usually, when a payment is added from Order dashboard for an unpaid order, it will automatically change the payment status. However, Shop Owner can also manually update to different Payment statuses. Select from various statuses for Payment to update such as Pending, Partially Paid, Free, Paid (Pending Approval), Paid, Refunded, Partially Refunded, and Canceled, based on what action needs to be taken for the transaction status and to keep record of Payment status for an Order.
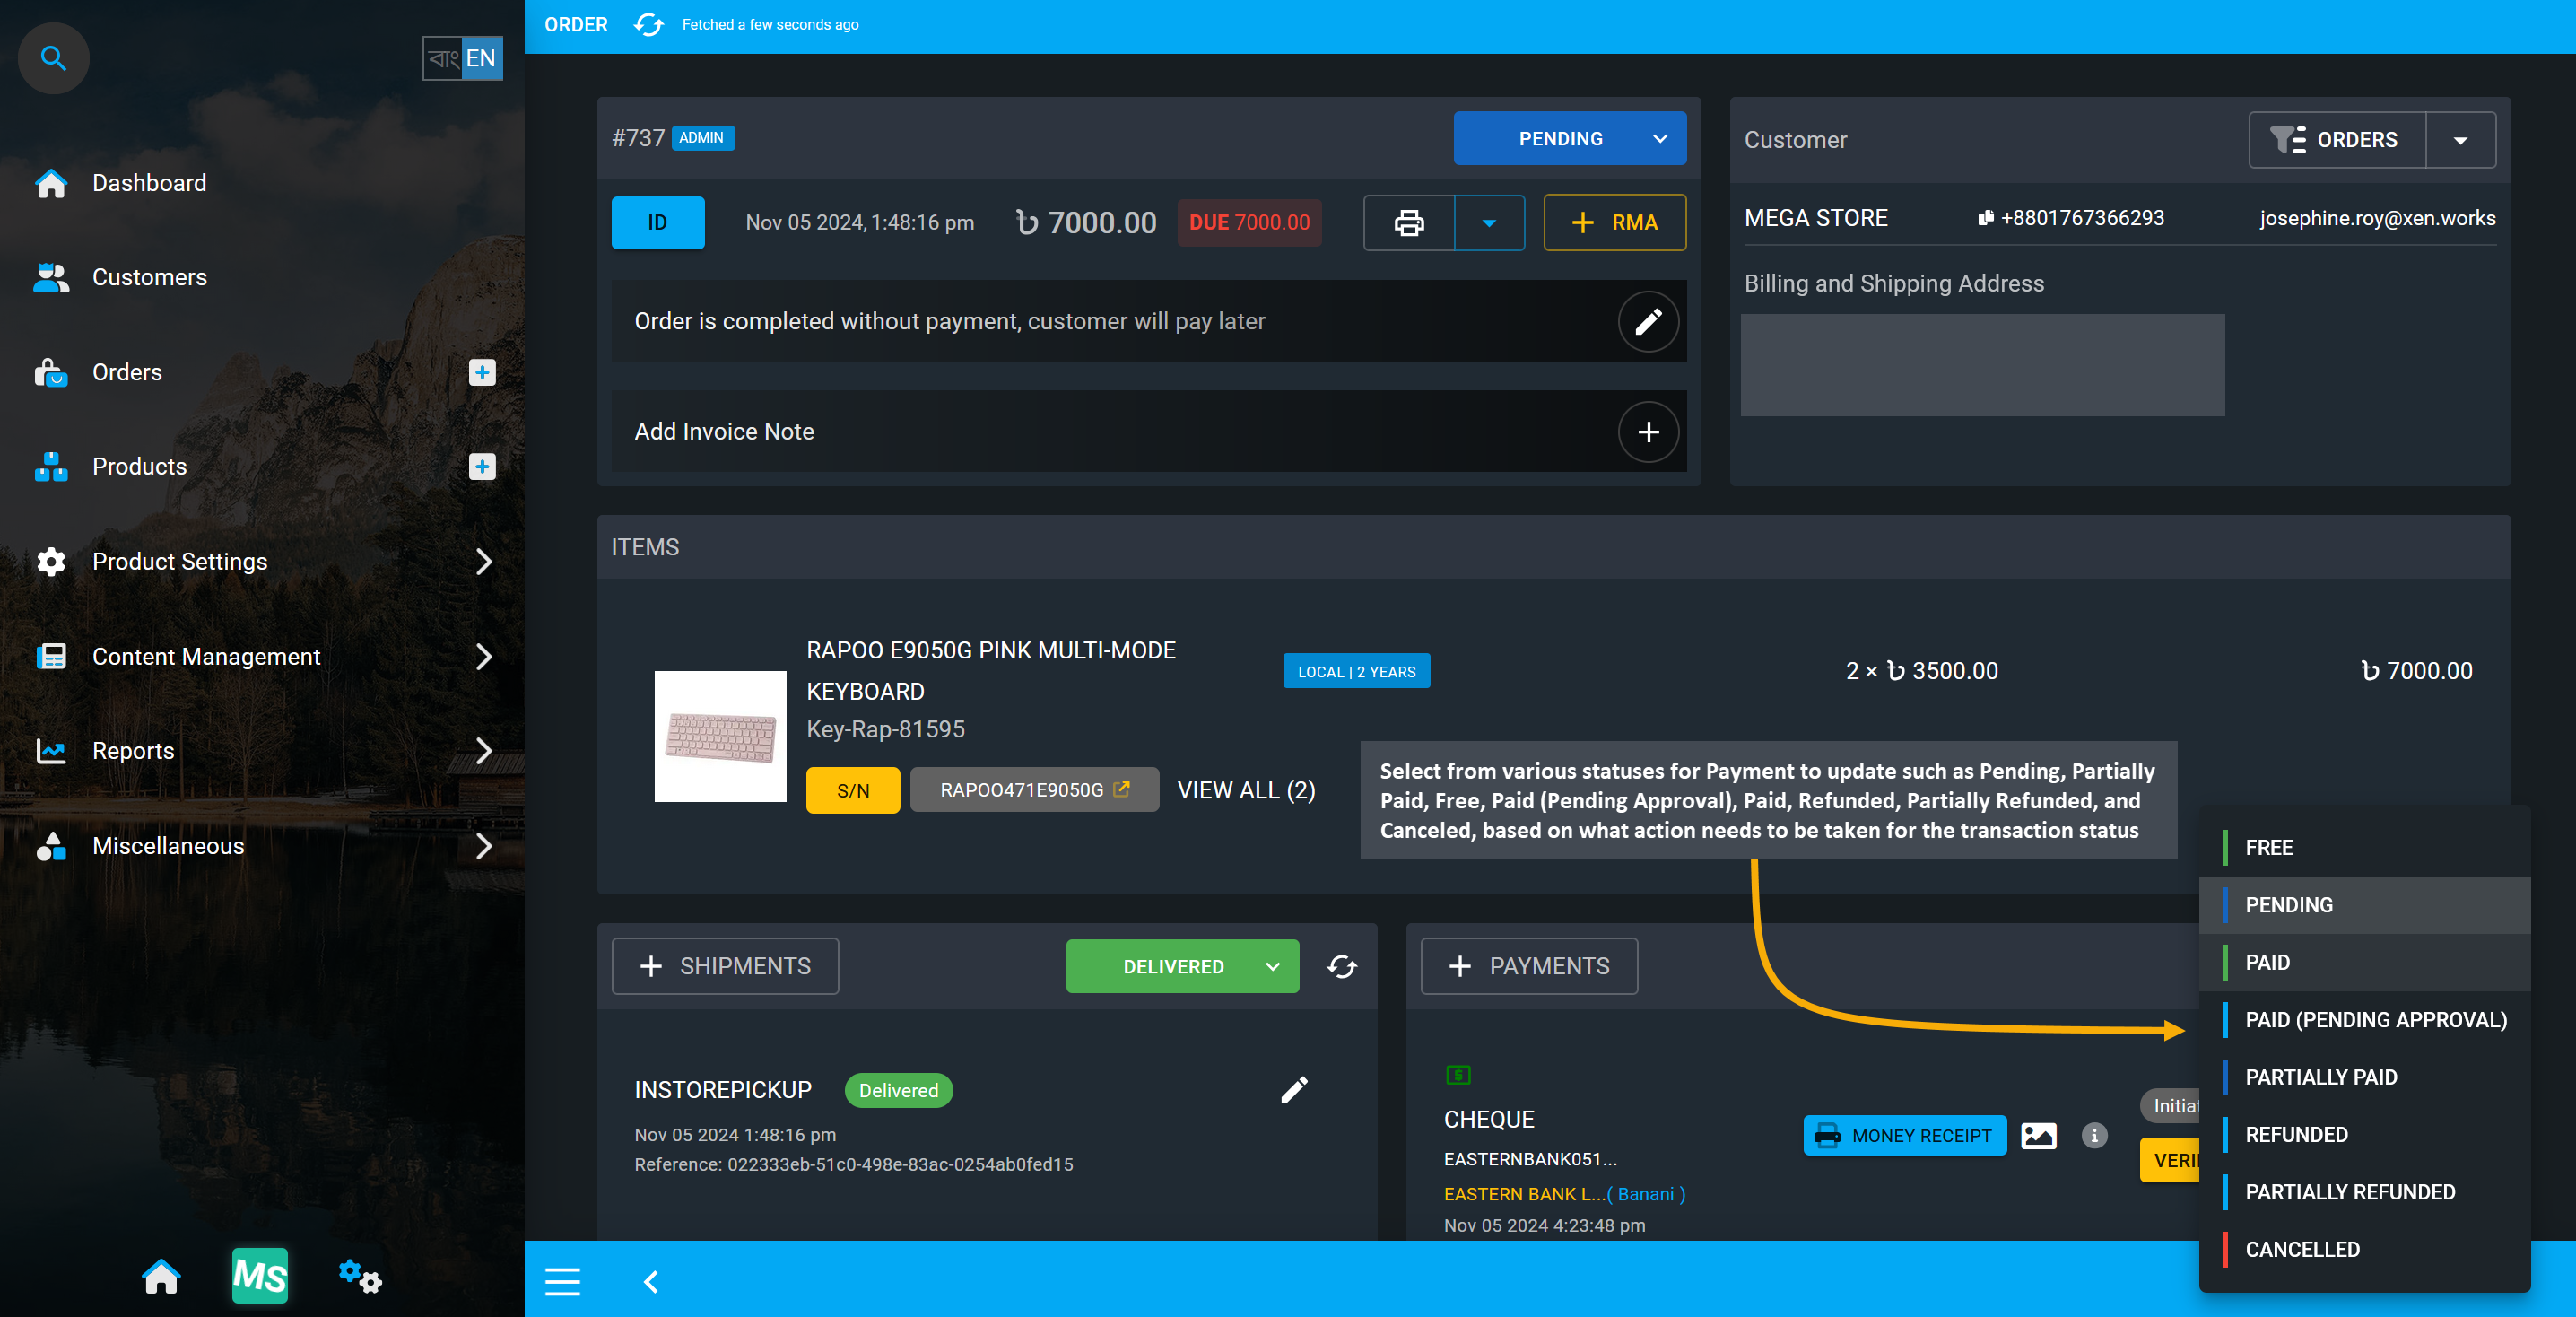
Image 2: Payment statuses can be updated to based on transaction verification and completion.
Payment Status: Free
If any agreement has been made between Seller parties, or between a Shop Owner and a Customer for the other party to receive certain Products as samples or gifts, then the Shop Owner will have to mark them as Free on the Payment status which will automatically reflect on the Order invoice. Seller can set the payment status as Free when they provide gift to customers with purchase, such as laptop bags as free with laptops.
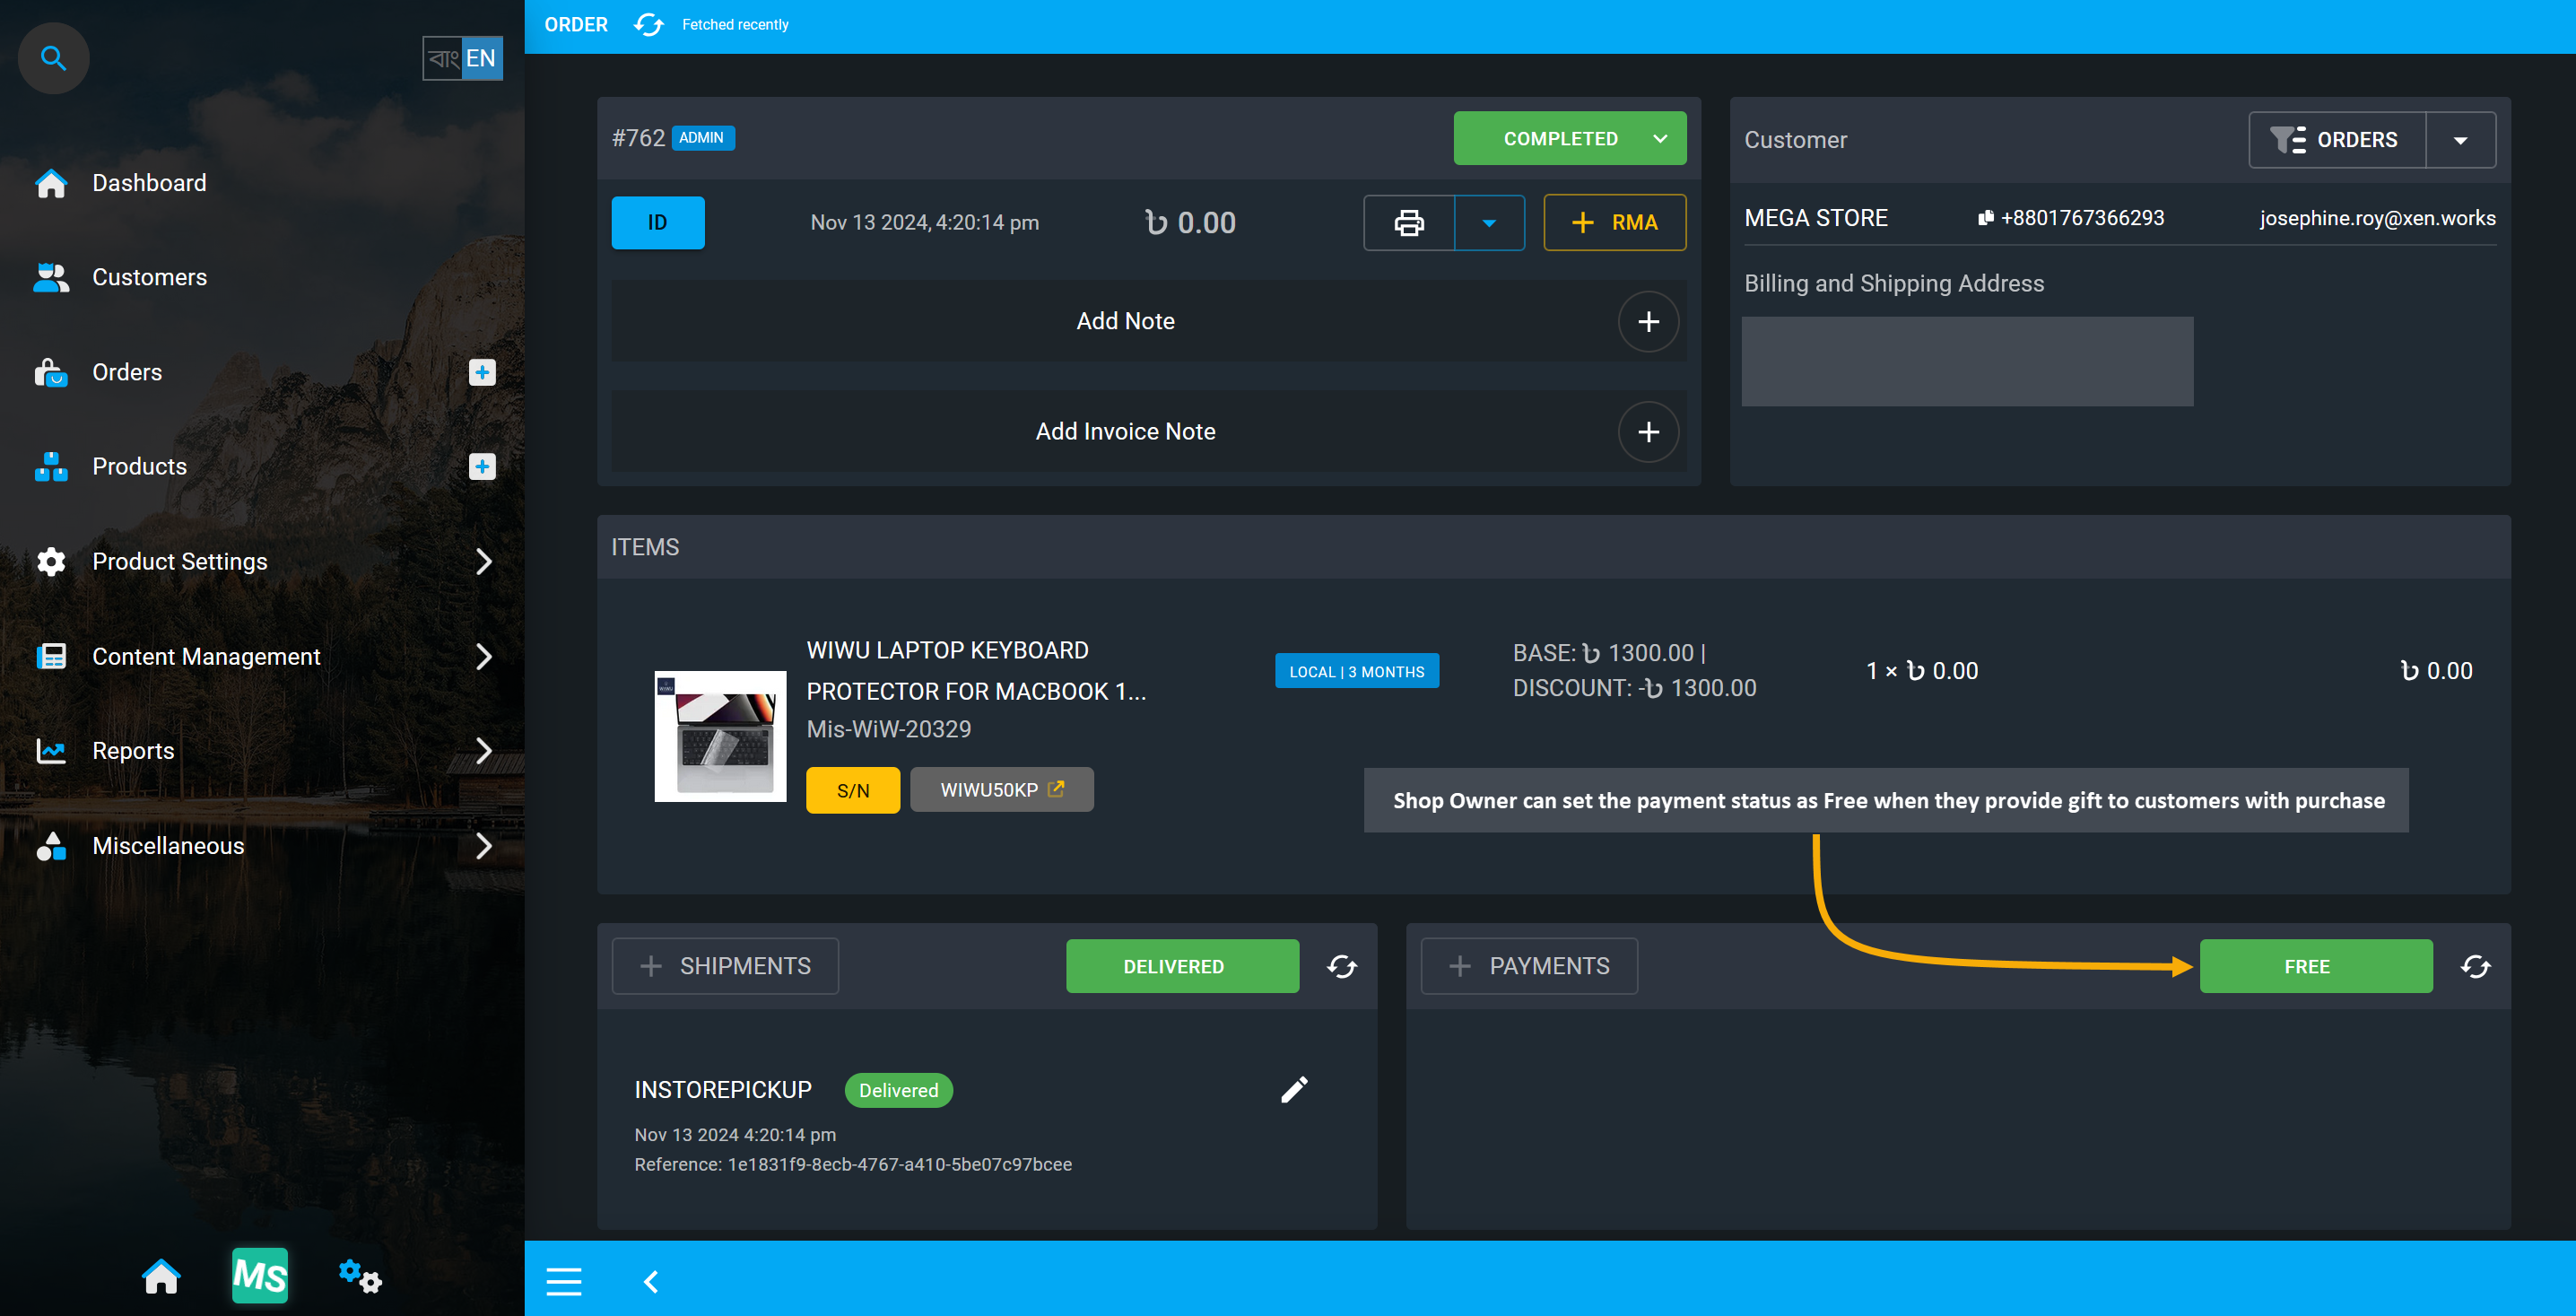
Image 2: Seller can set payment status as Free when they provide gift to customers with purchase.
Payment Status: Pending
Orders having Pending payment status means no payment has been made for the Order. Usually, Orders placed without payment from Order Cart will automatically have Pending payment status. Orders without any payment will show Order status as Draft, which will not allow adding any payments to Order. Hence, for adding payments for Order, Order status needs to be changed from Draft to Pending first.
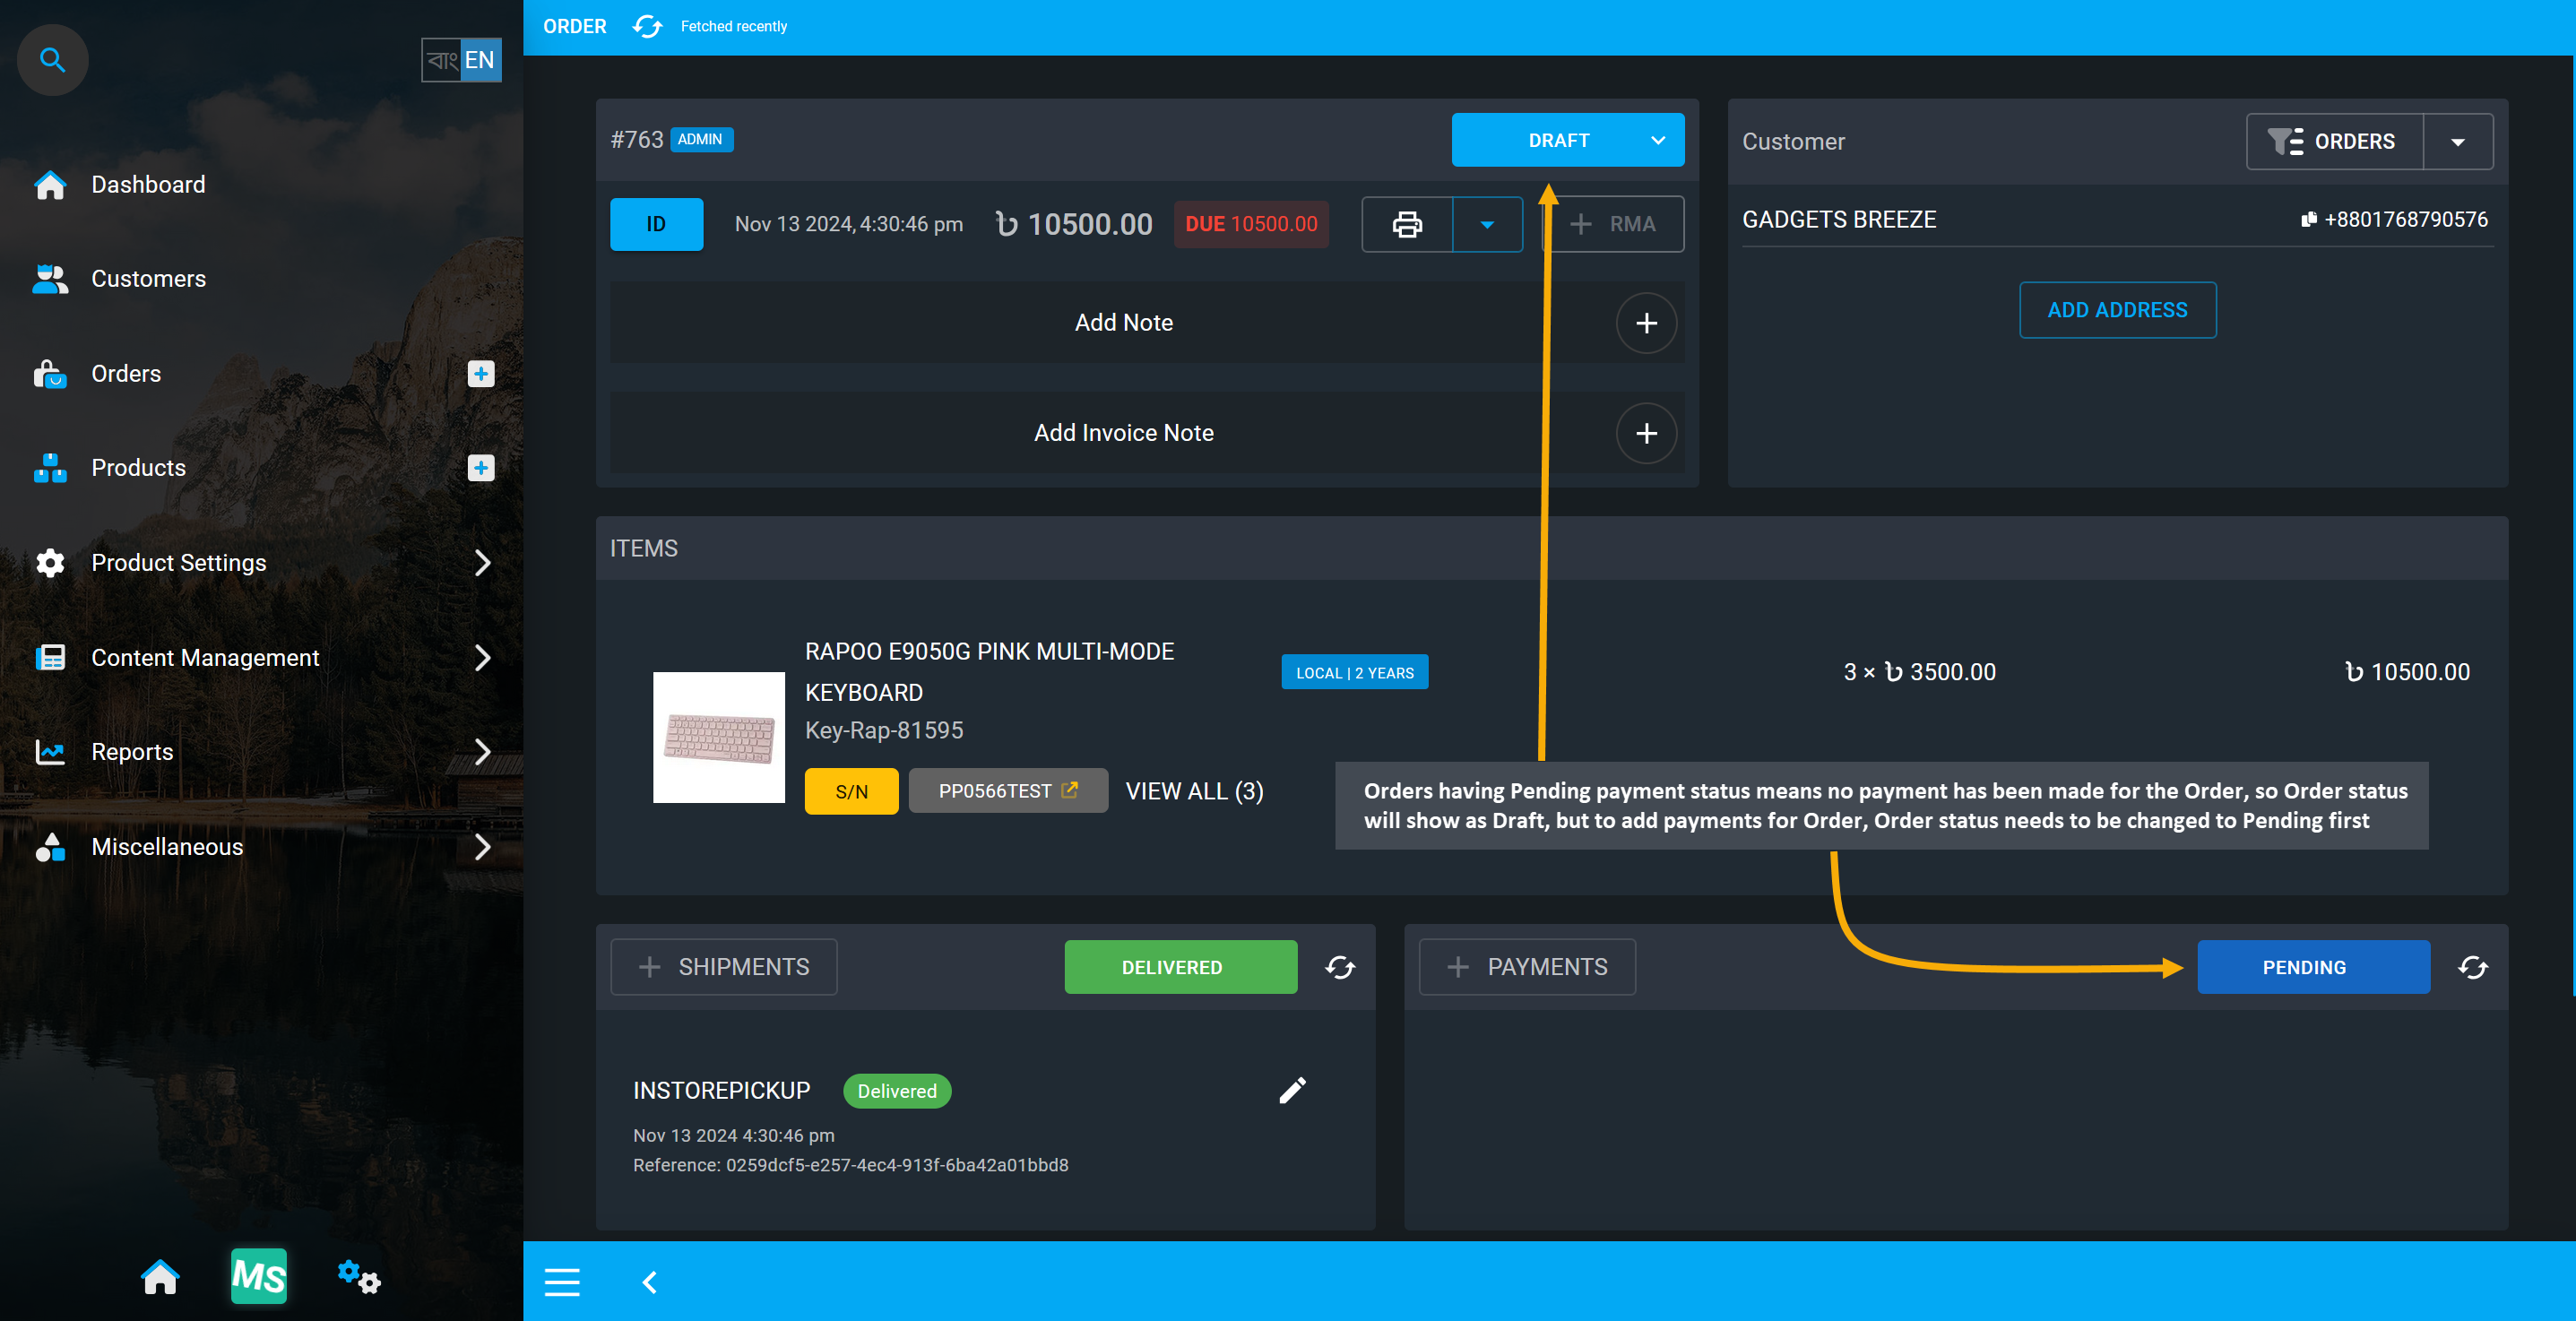
Image 3: Orders having Pending payment status means no payment has been made for the Order.
So, after changing Order Status from Draft to Pending, Shop Owner can add payments to Order. However, if previous Cheque payment or Bank Transfer has failed, then the Shop Owner can change Payment status back to Pending again until a new payment method is added again on Order to clear order dues.
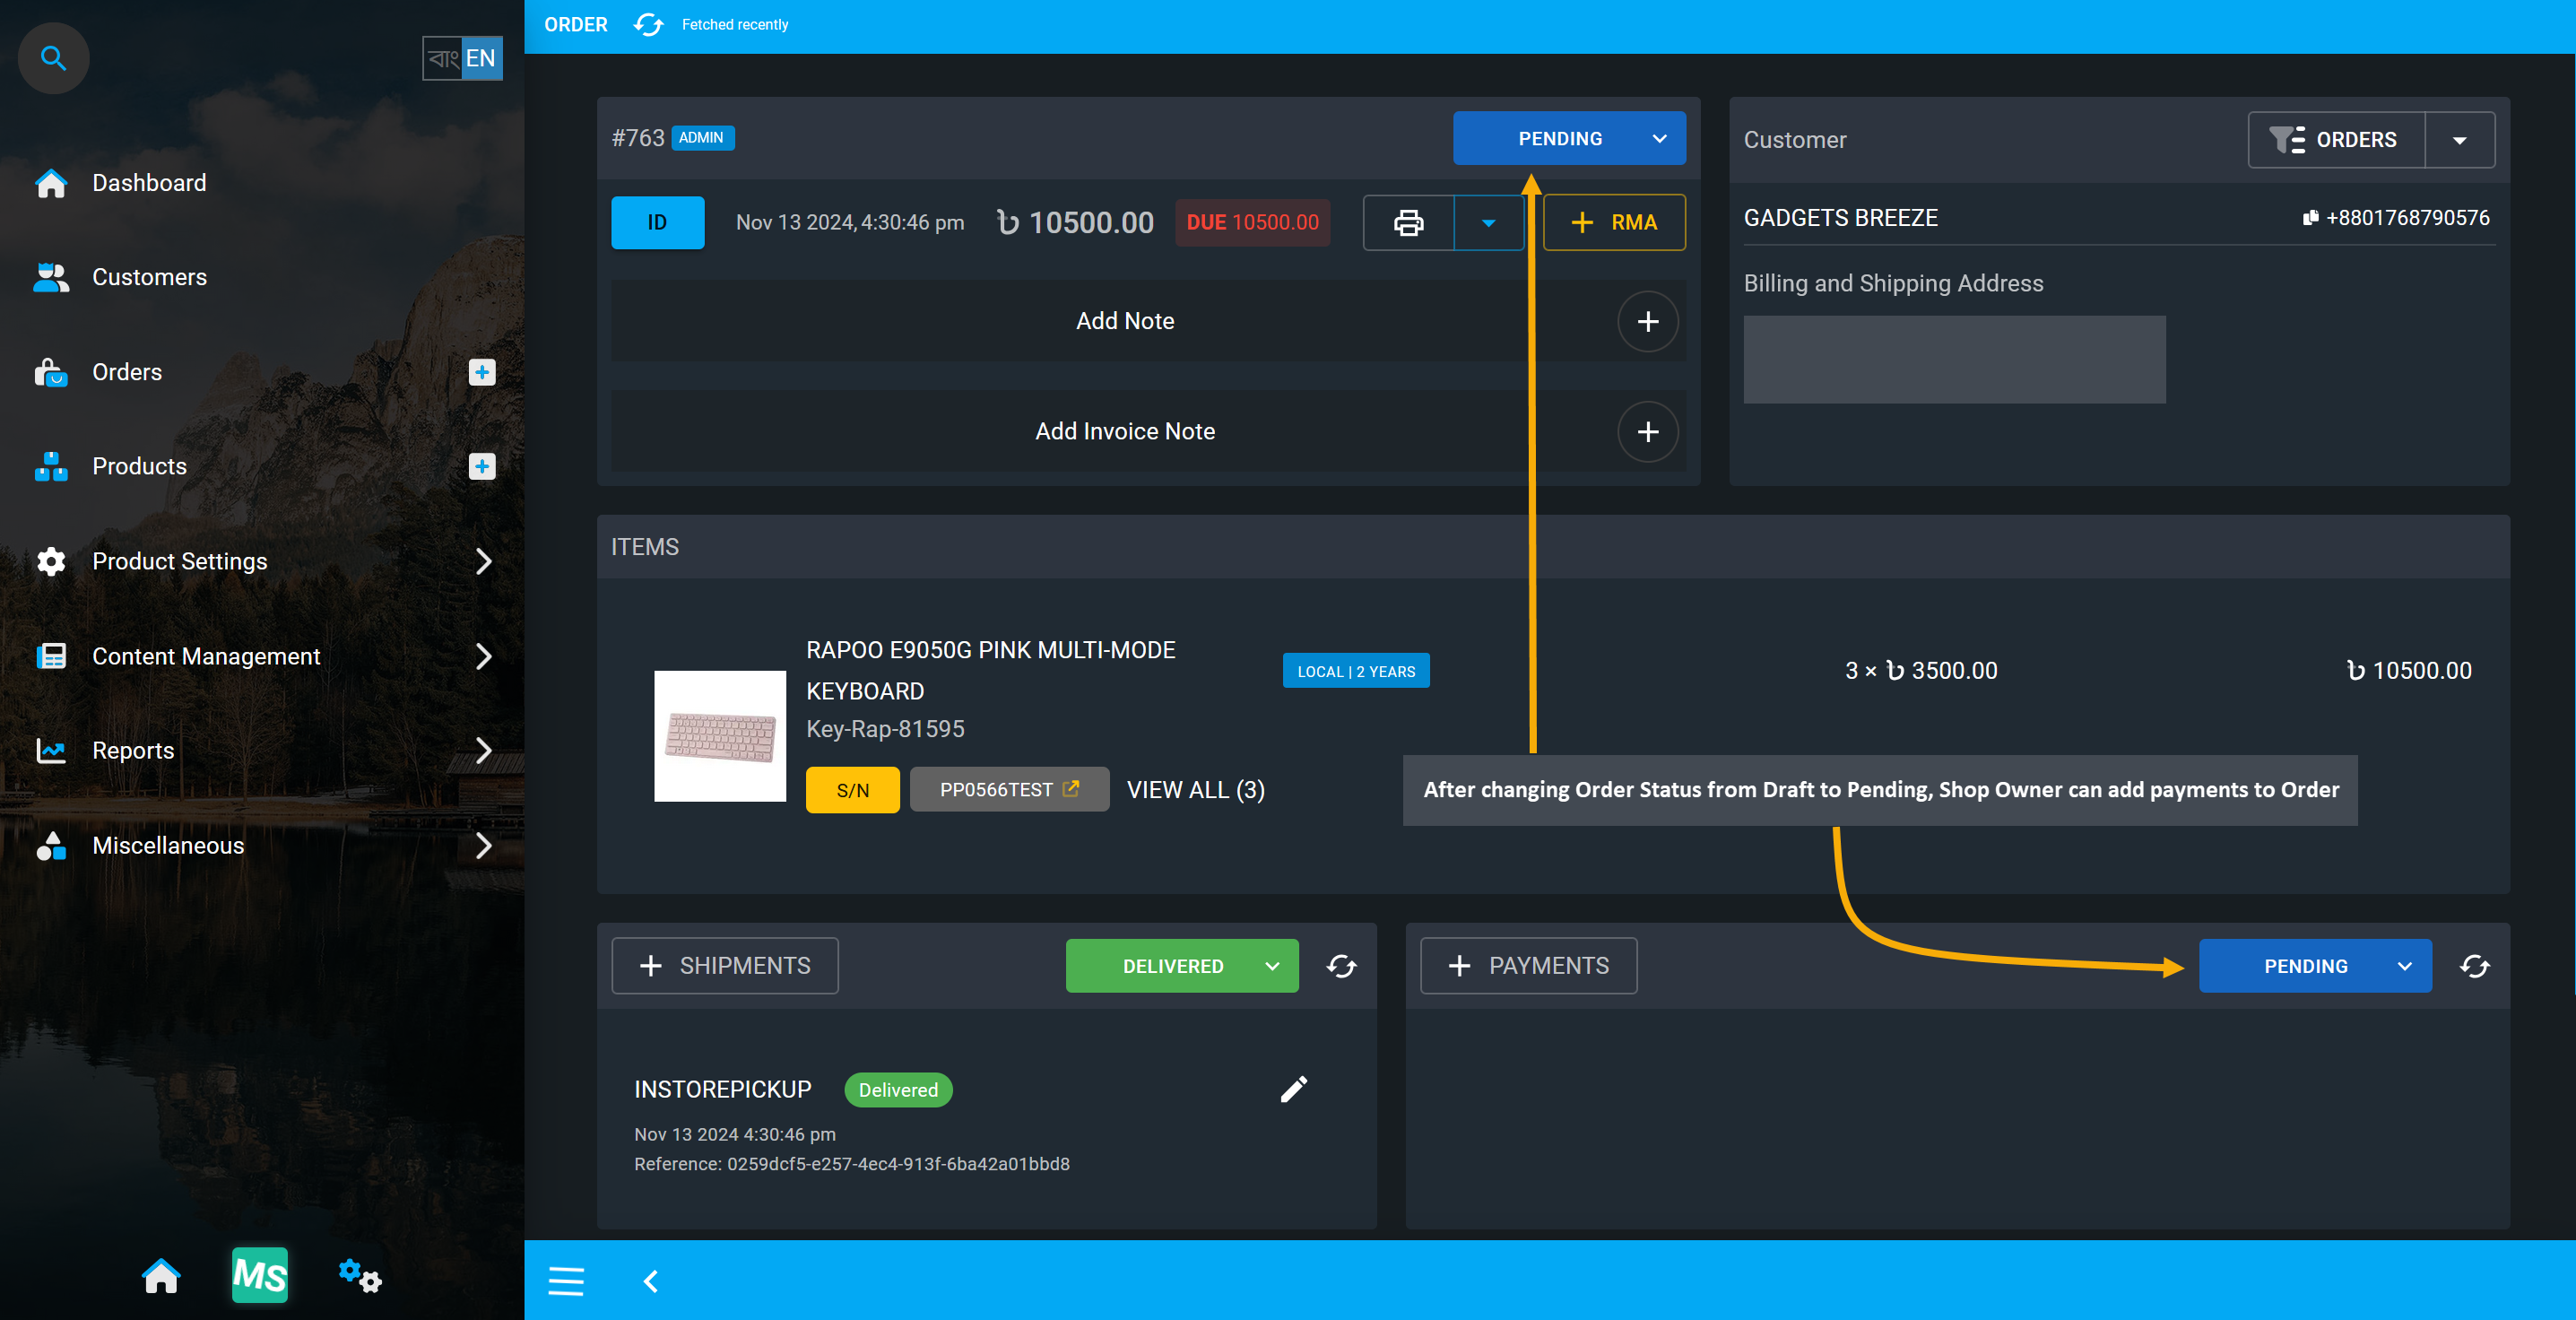
Image 4: After changing Order Status from Draft to Pending, Shop Owner can add Order payments.
Payment Status: Paid
When a Payment is marked as Paid, it means that full payment has been made for the Order or payments have been Verified by the Shop Owner. If Customers have completed their payment using one or multiple Payment Gateways, then Shop Owner can change the Payment status to Paid after Customer have fulfilled all the Order Payment steps from their end and Shop Owner have verified those payments.
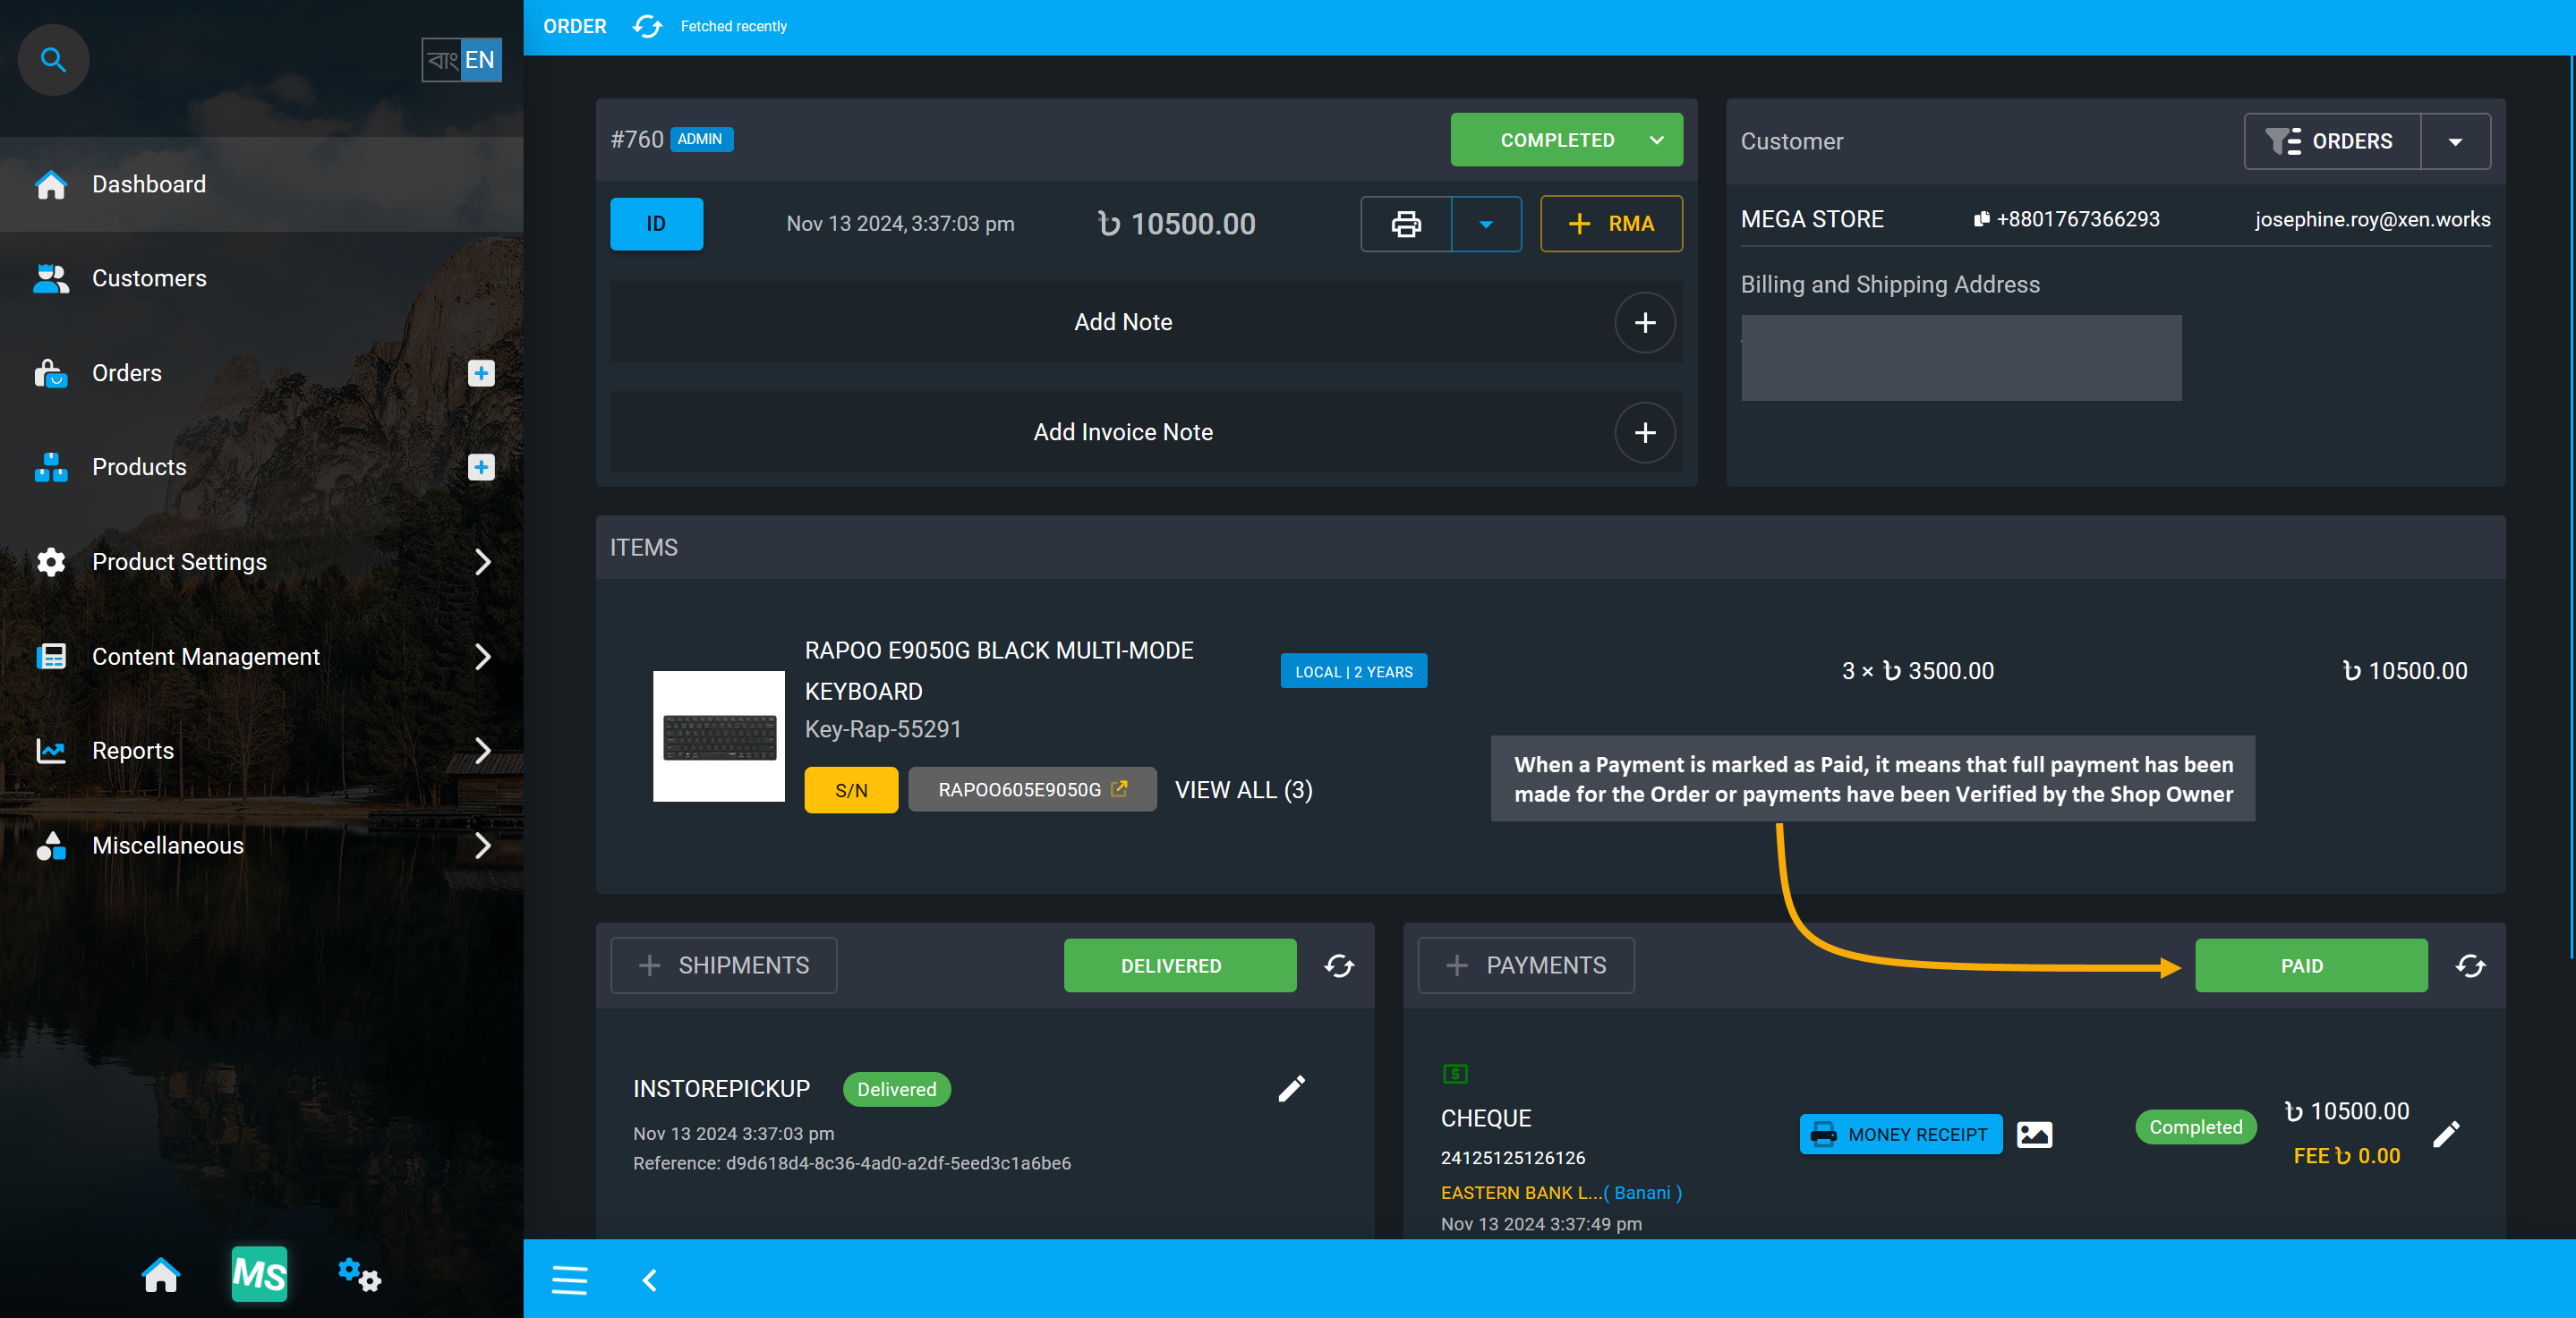
Image 5: When a Payment is marked as Paid, it means that full payment has been made for the Order.
Payment Status: Paid (Pending Approval)
If a payment like Cheque, BKash, Nagad, or Bank Transfer is added on Cart, then payment will need to be verified from Order Dashboard after Order is placed. The Order will have payment status as Paid (Pending Approval). After checking and verifying the payment details, Shop Owner can click the Verify button to set the payment as completed. It will make the payment status automatically paid when it is verified.
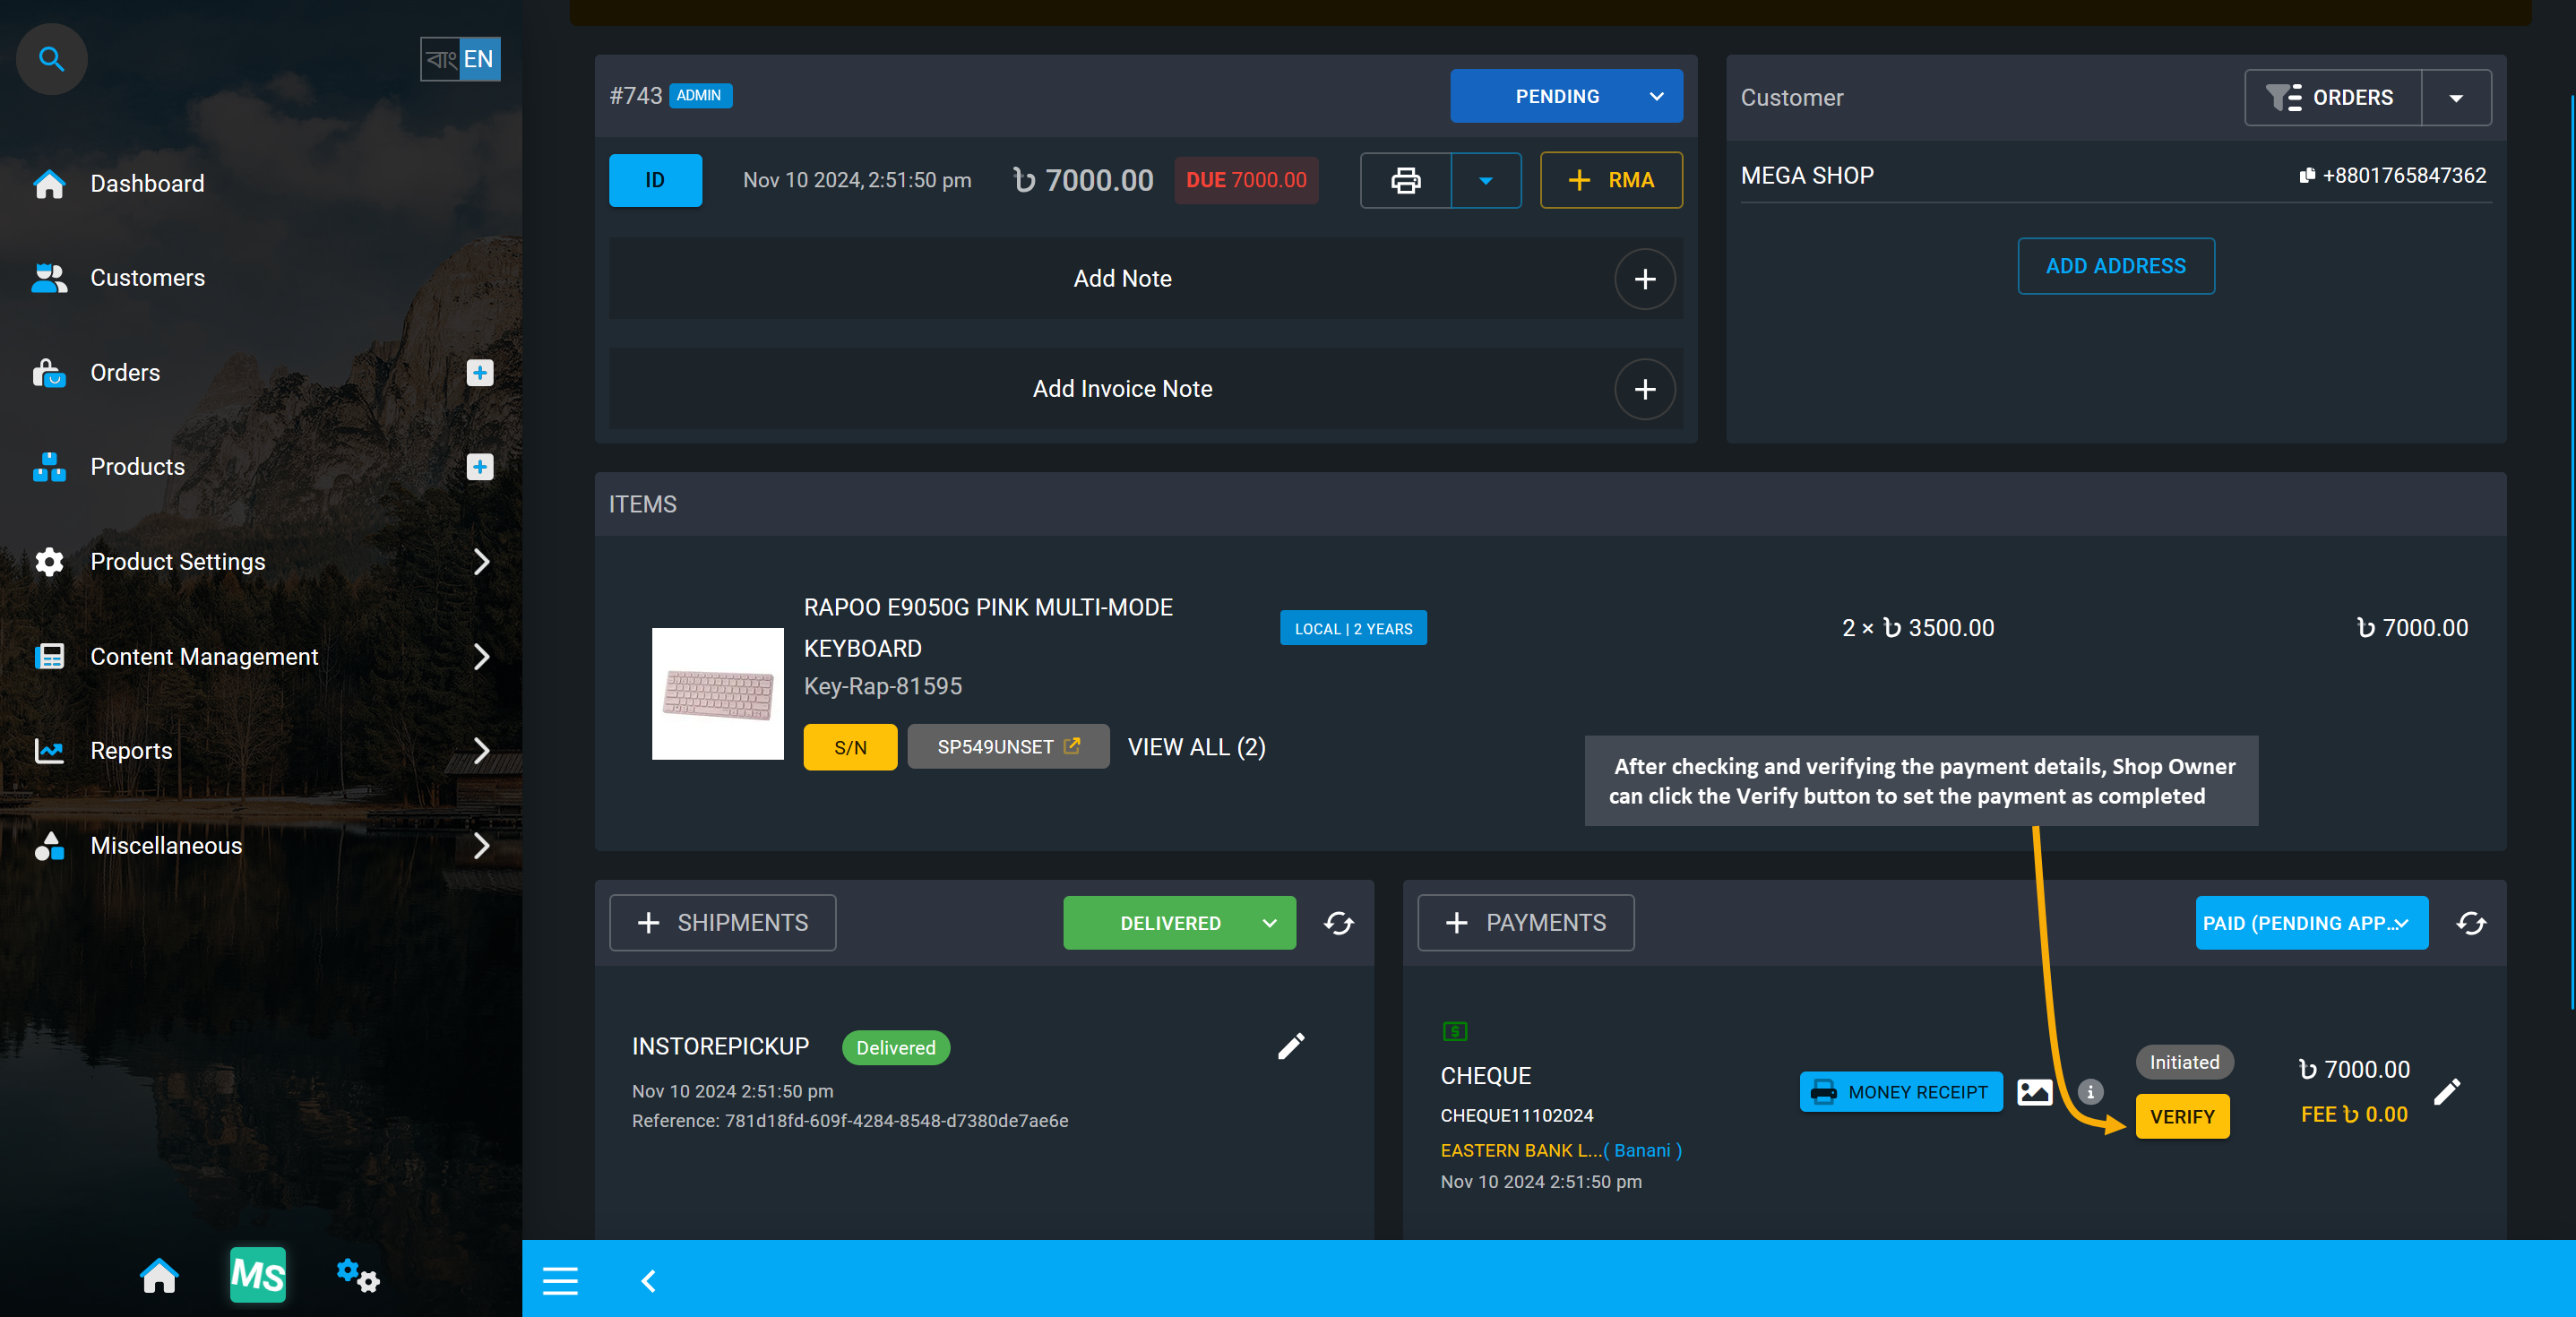
Image 6: Shop Owner can click the Verify button to set the payment as completed after checking.
Payment Status: Partially Paid
If the system capture less than the full amount of the order through card payment, offline, or custom payment method, then the Order’s payment status can be marked as Partially Paid by the Shop Owner. In this case, Order from Cart will usually be made without payment and allow Shop Owner to add payments later from Order Dashboard. Order will remain in Draft status and needs to change to Pending.
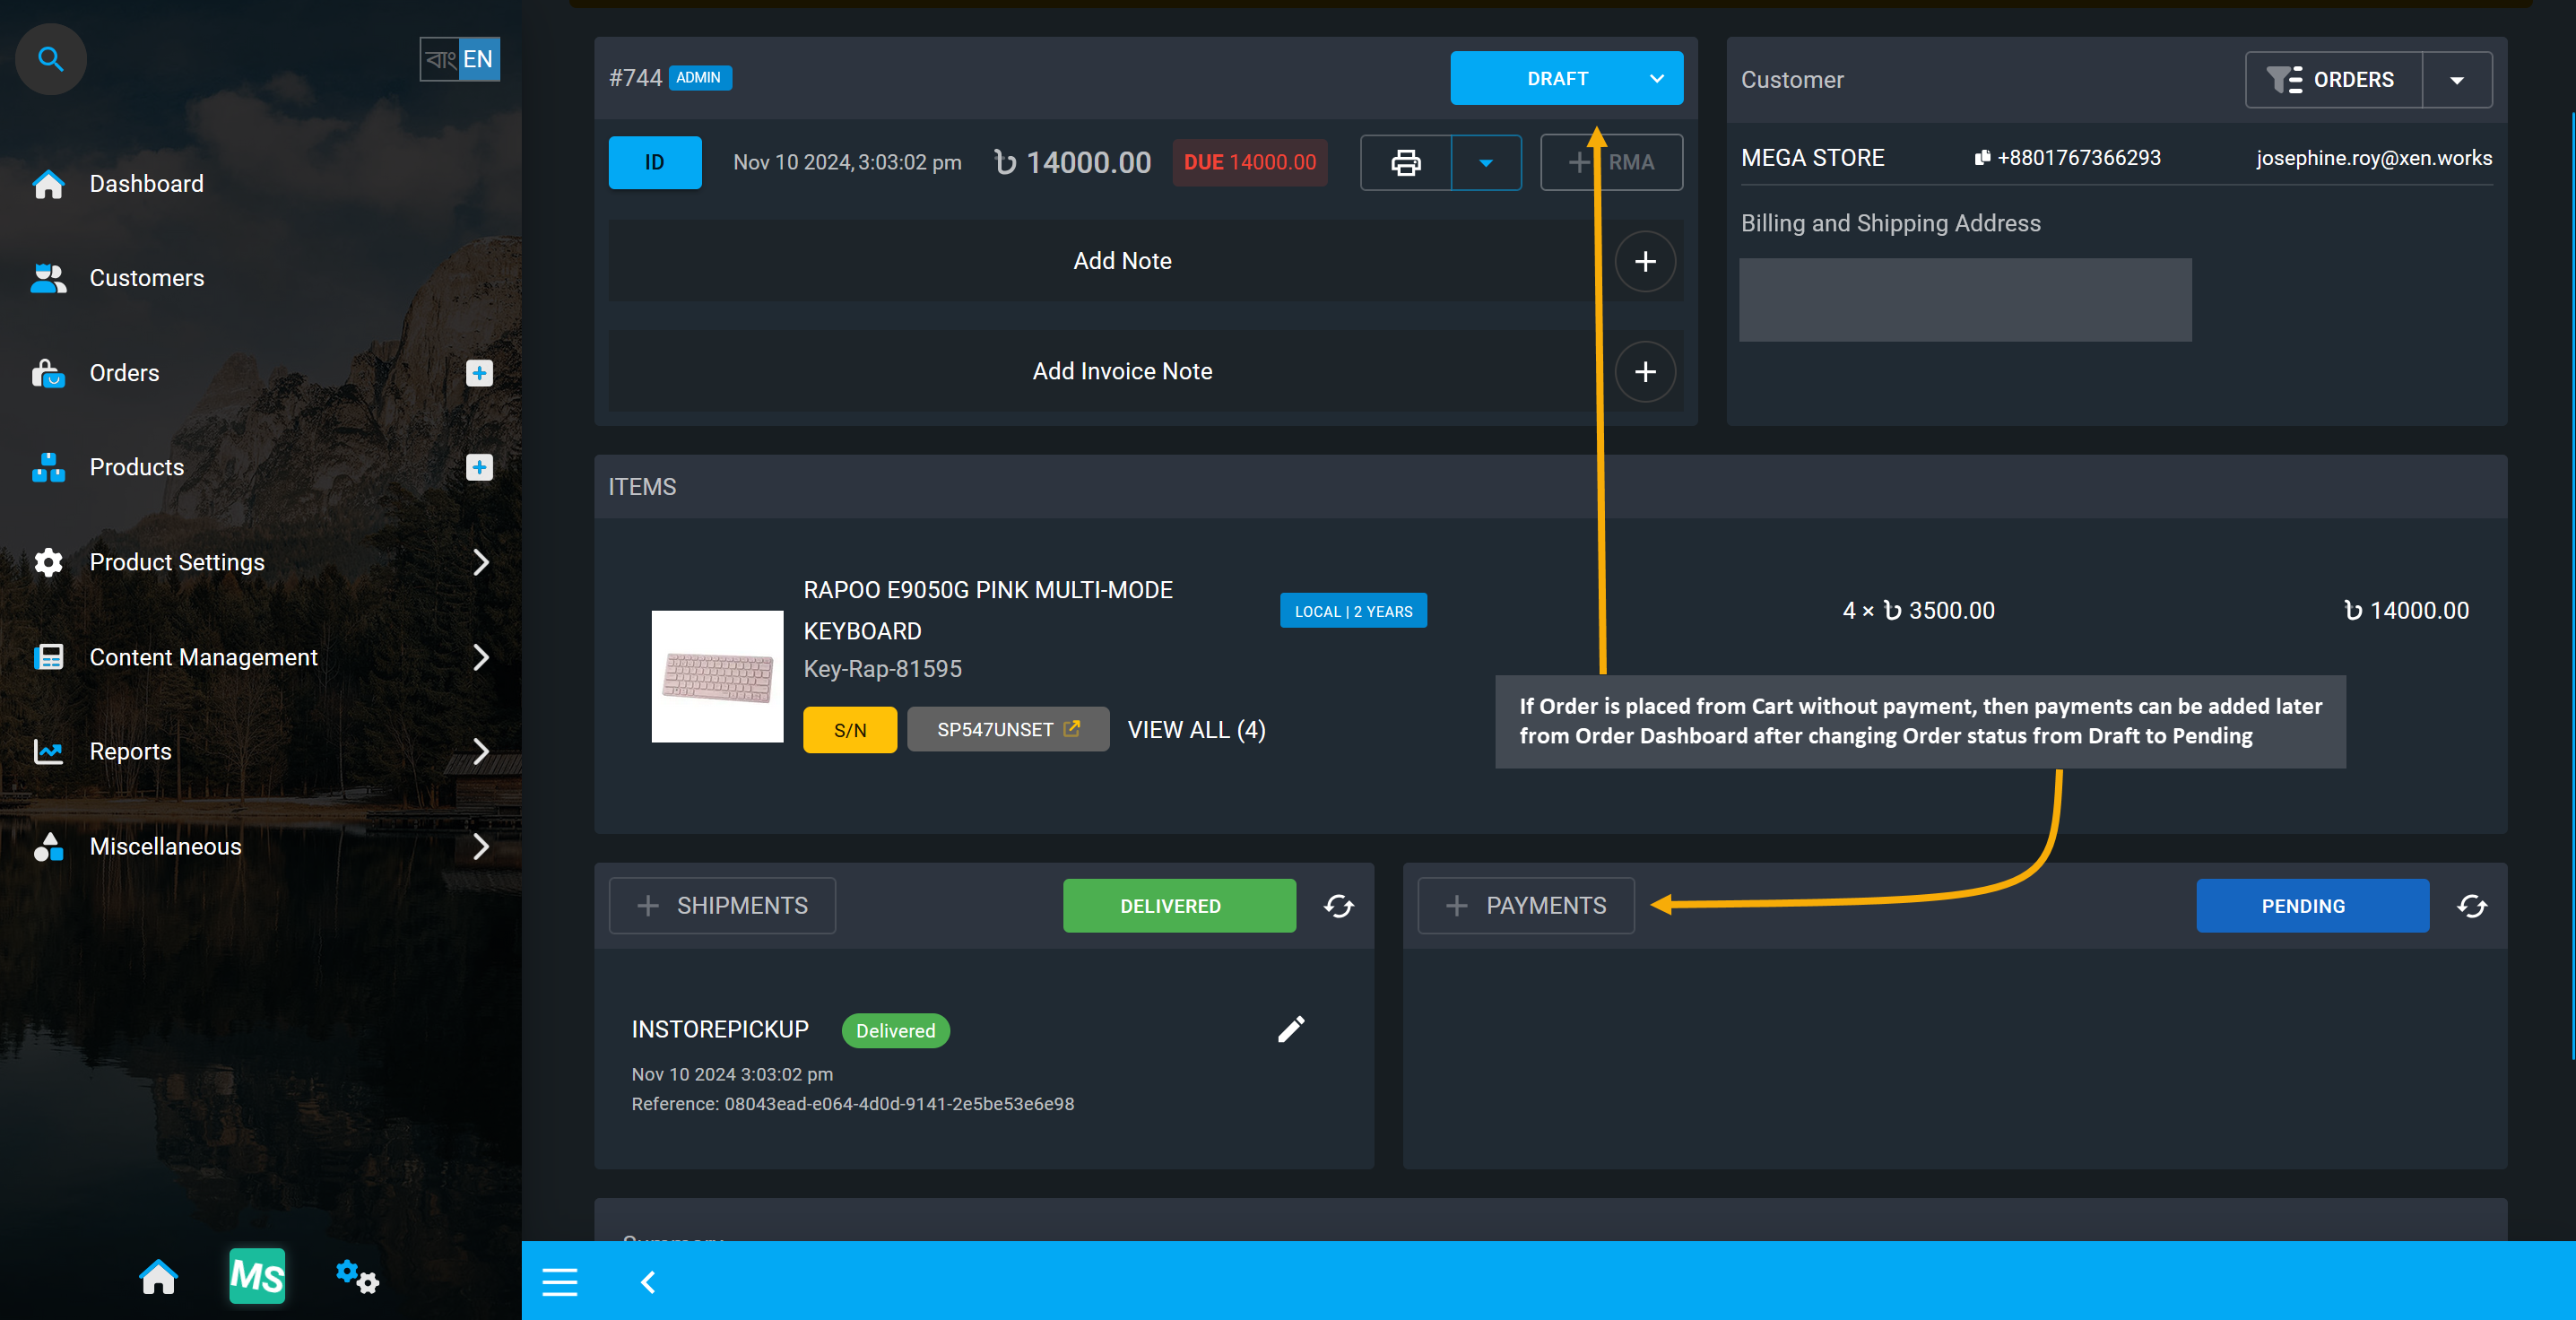
Image 7: Order placed from Cart without payment can have payments added later from Order Dashboard.
After changing Order status from Draft to Pending, Shop Owner can add partial payment from Payments tab. So, after adding payments partially, payment status will automatically show as Partially Paid.
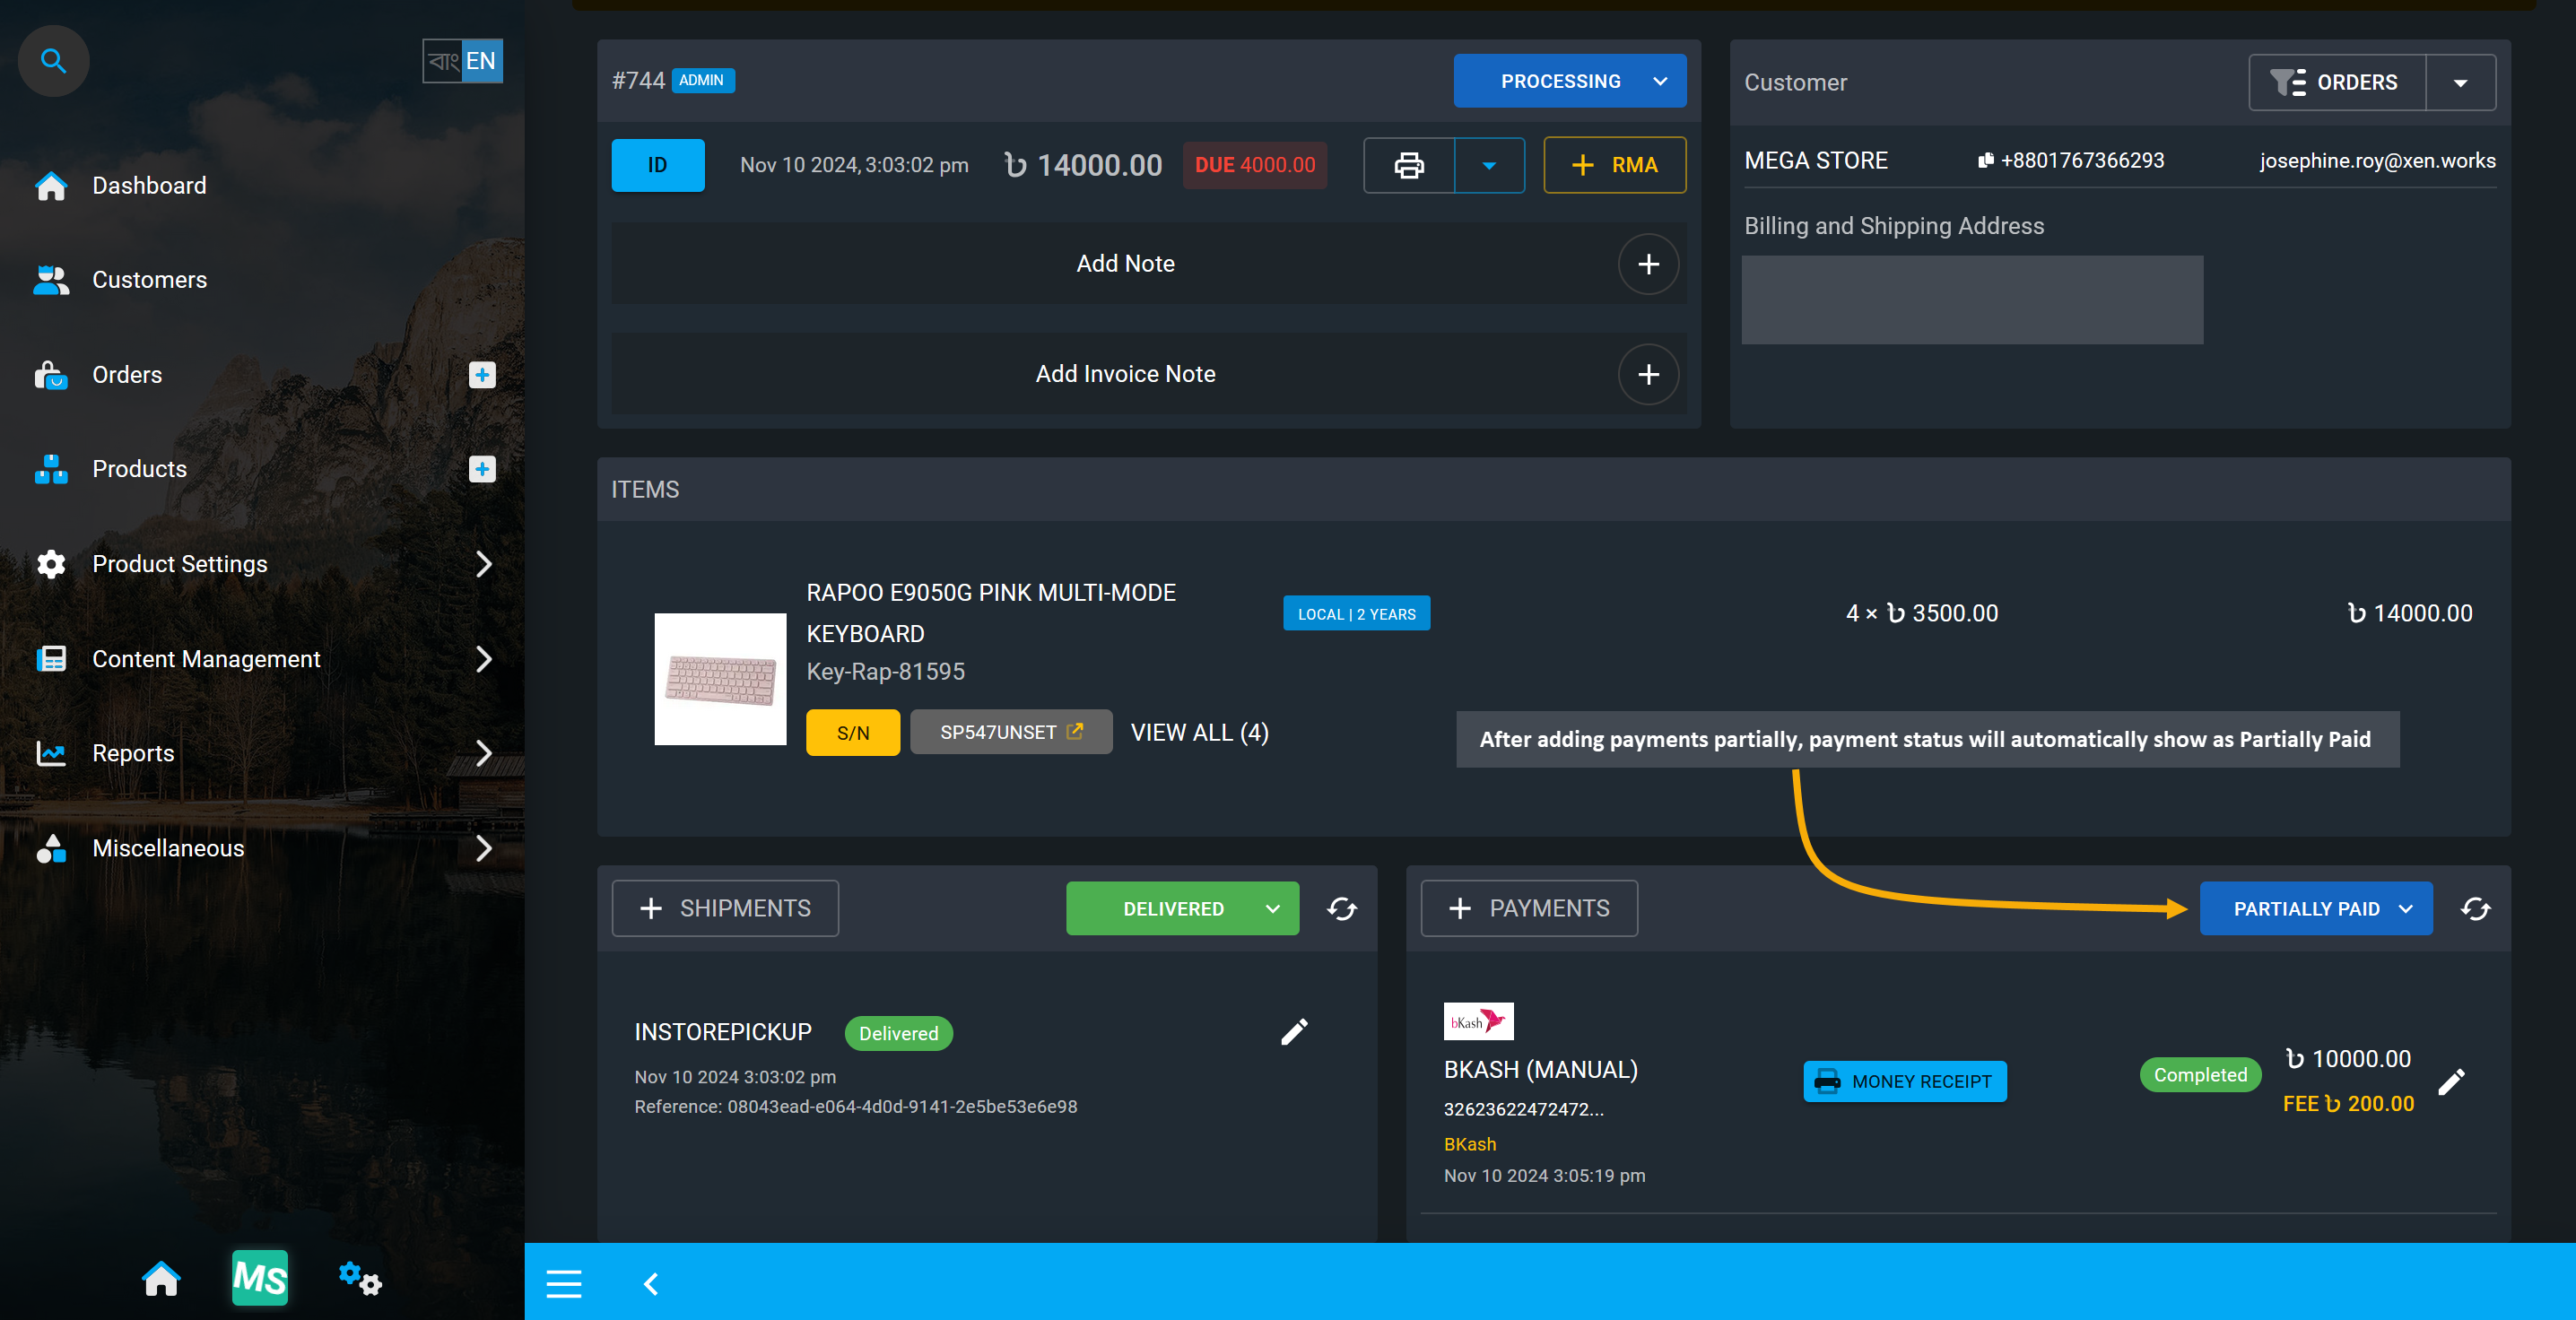
Image 8: After adding payments partially, payment status will automatically show as Partially Paid.
Payment Status: Refunded
If an Order is canceled from Order Dashboard after selecting cancelation options of Refund Payment, return stock, cancel shipments and clicking Proceed, payment status will automatically be changed to Refunded.
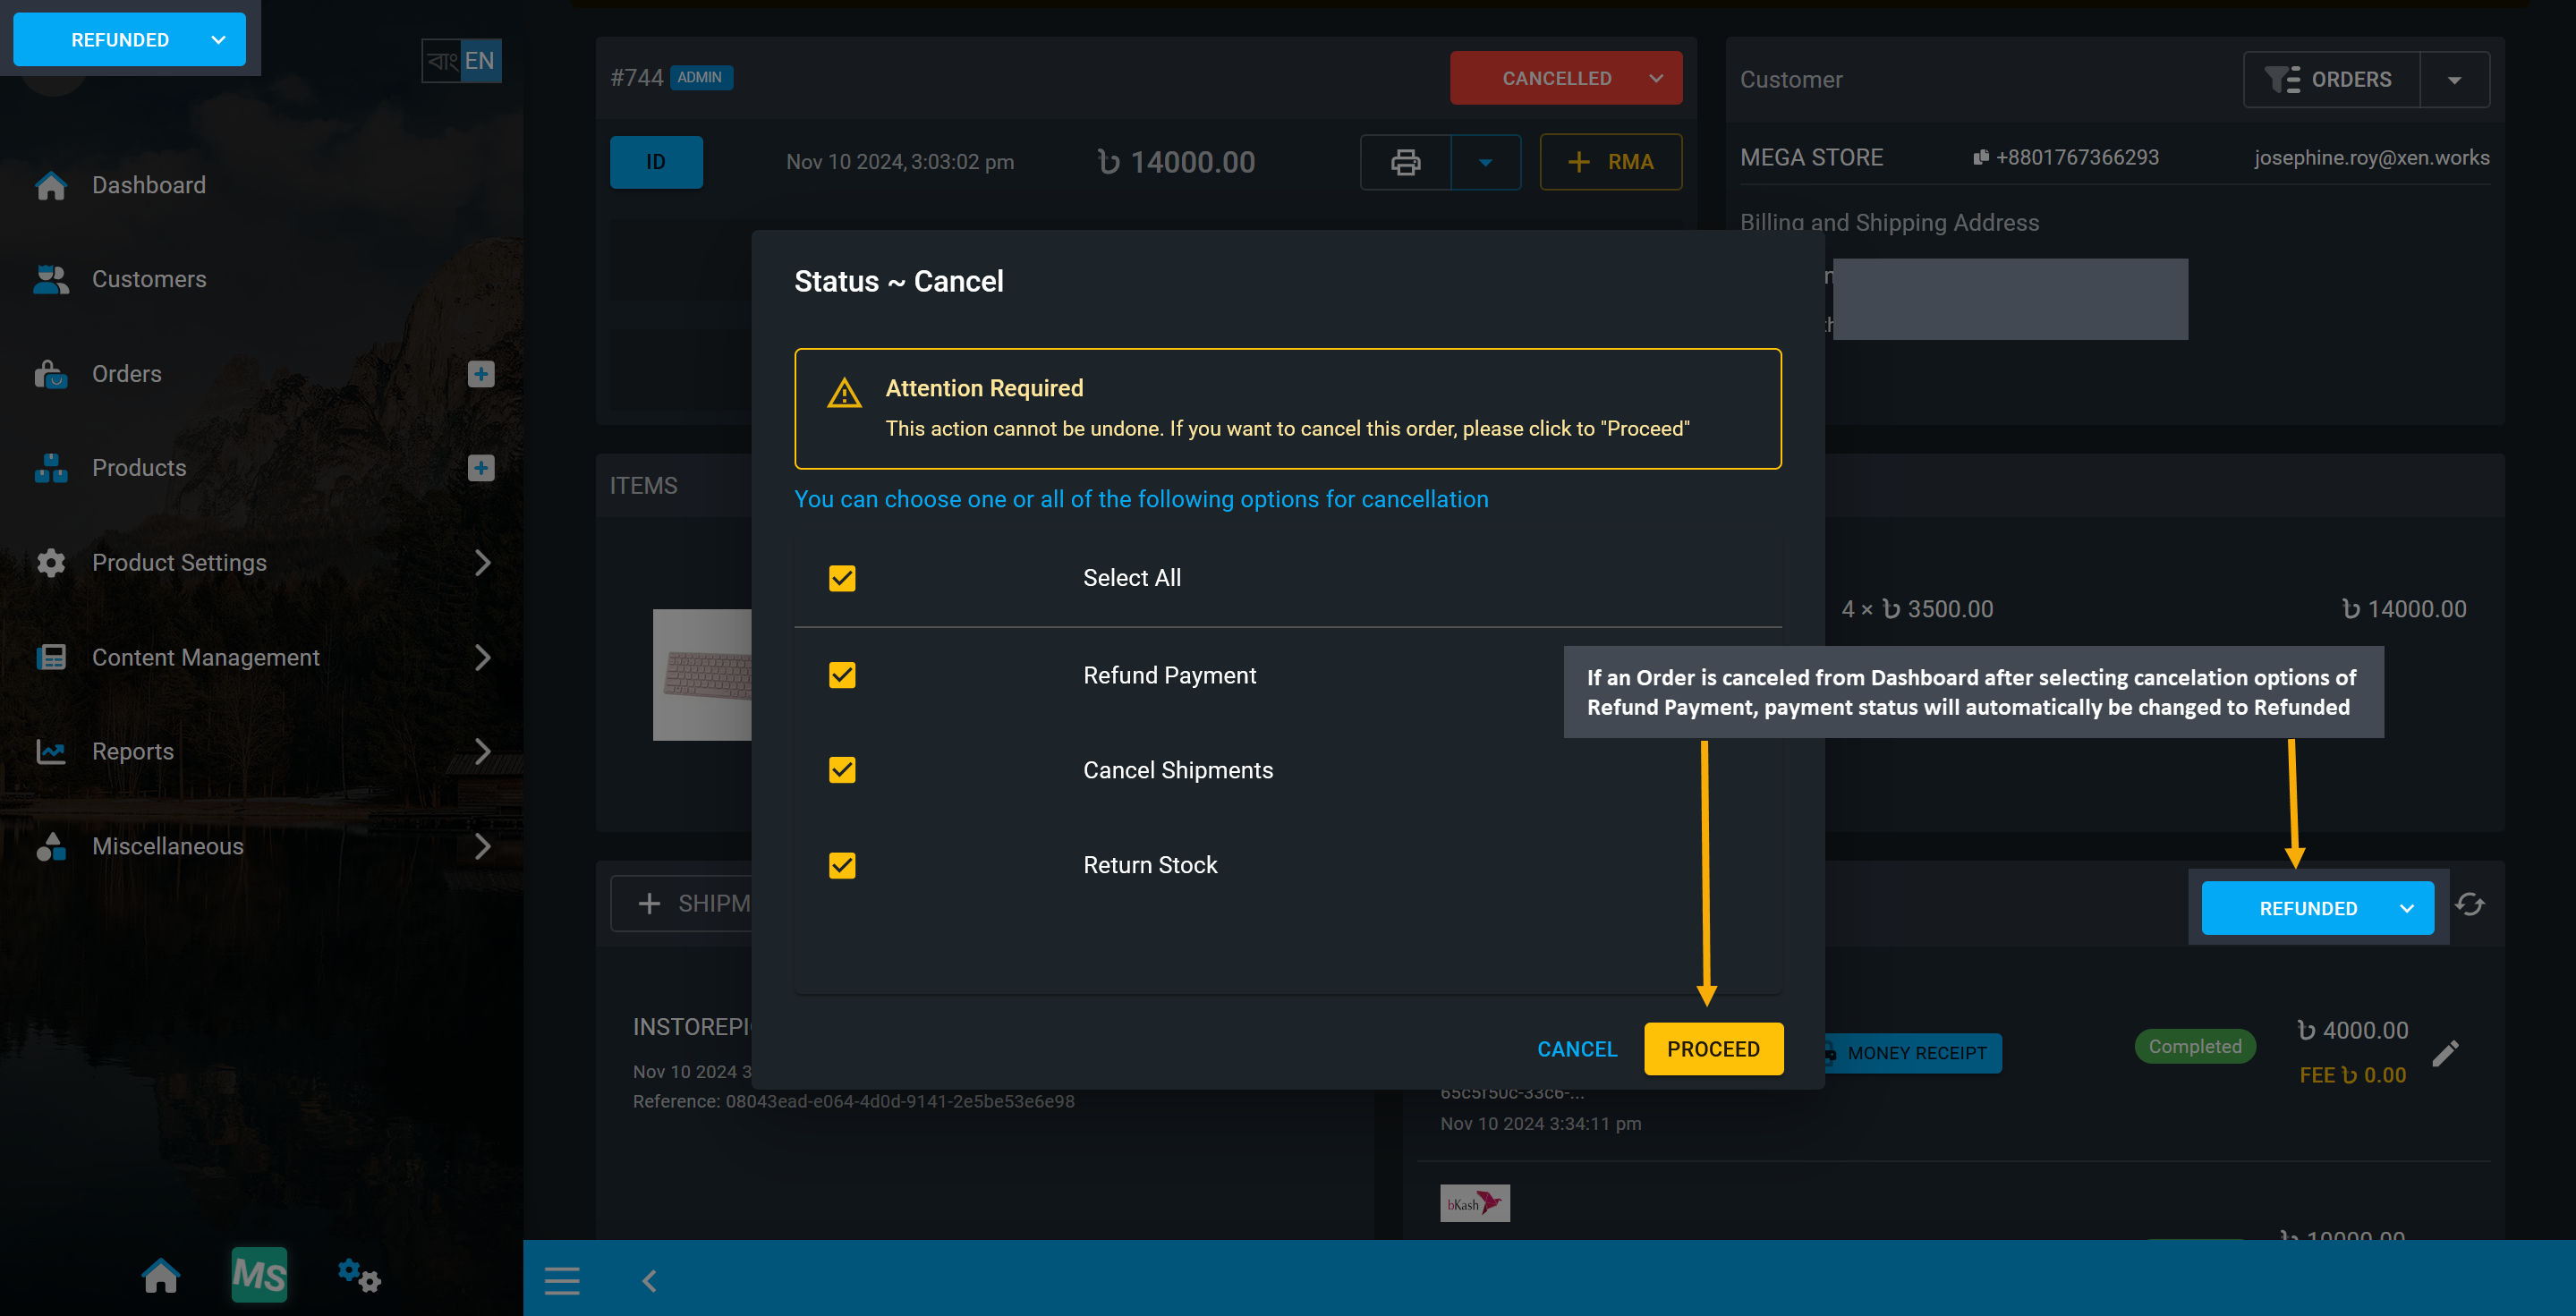
Image 9: If an Order is canceled from Order Dashboard, payment status will be changed to Refunded.
When an Order is canceled and refund, Order status cannot be changed and no payments can be added.
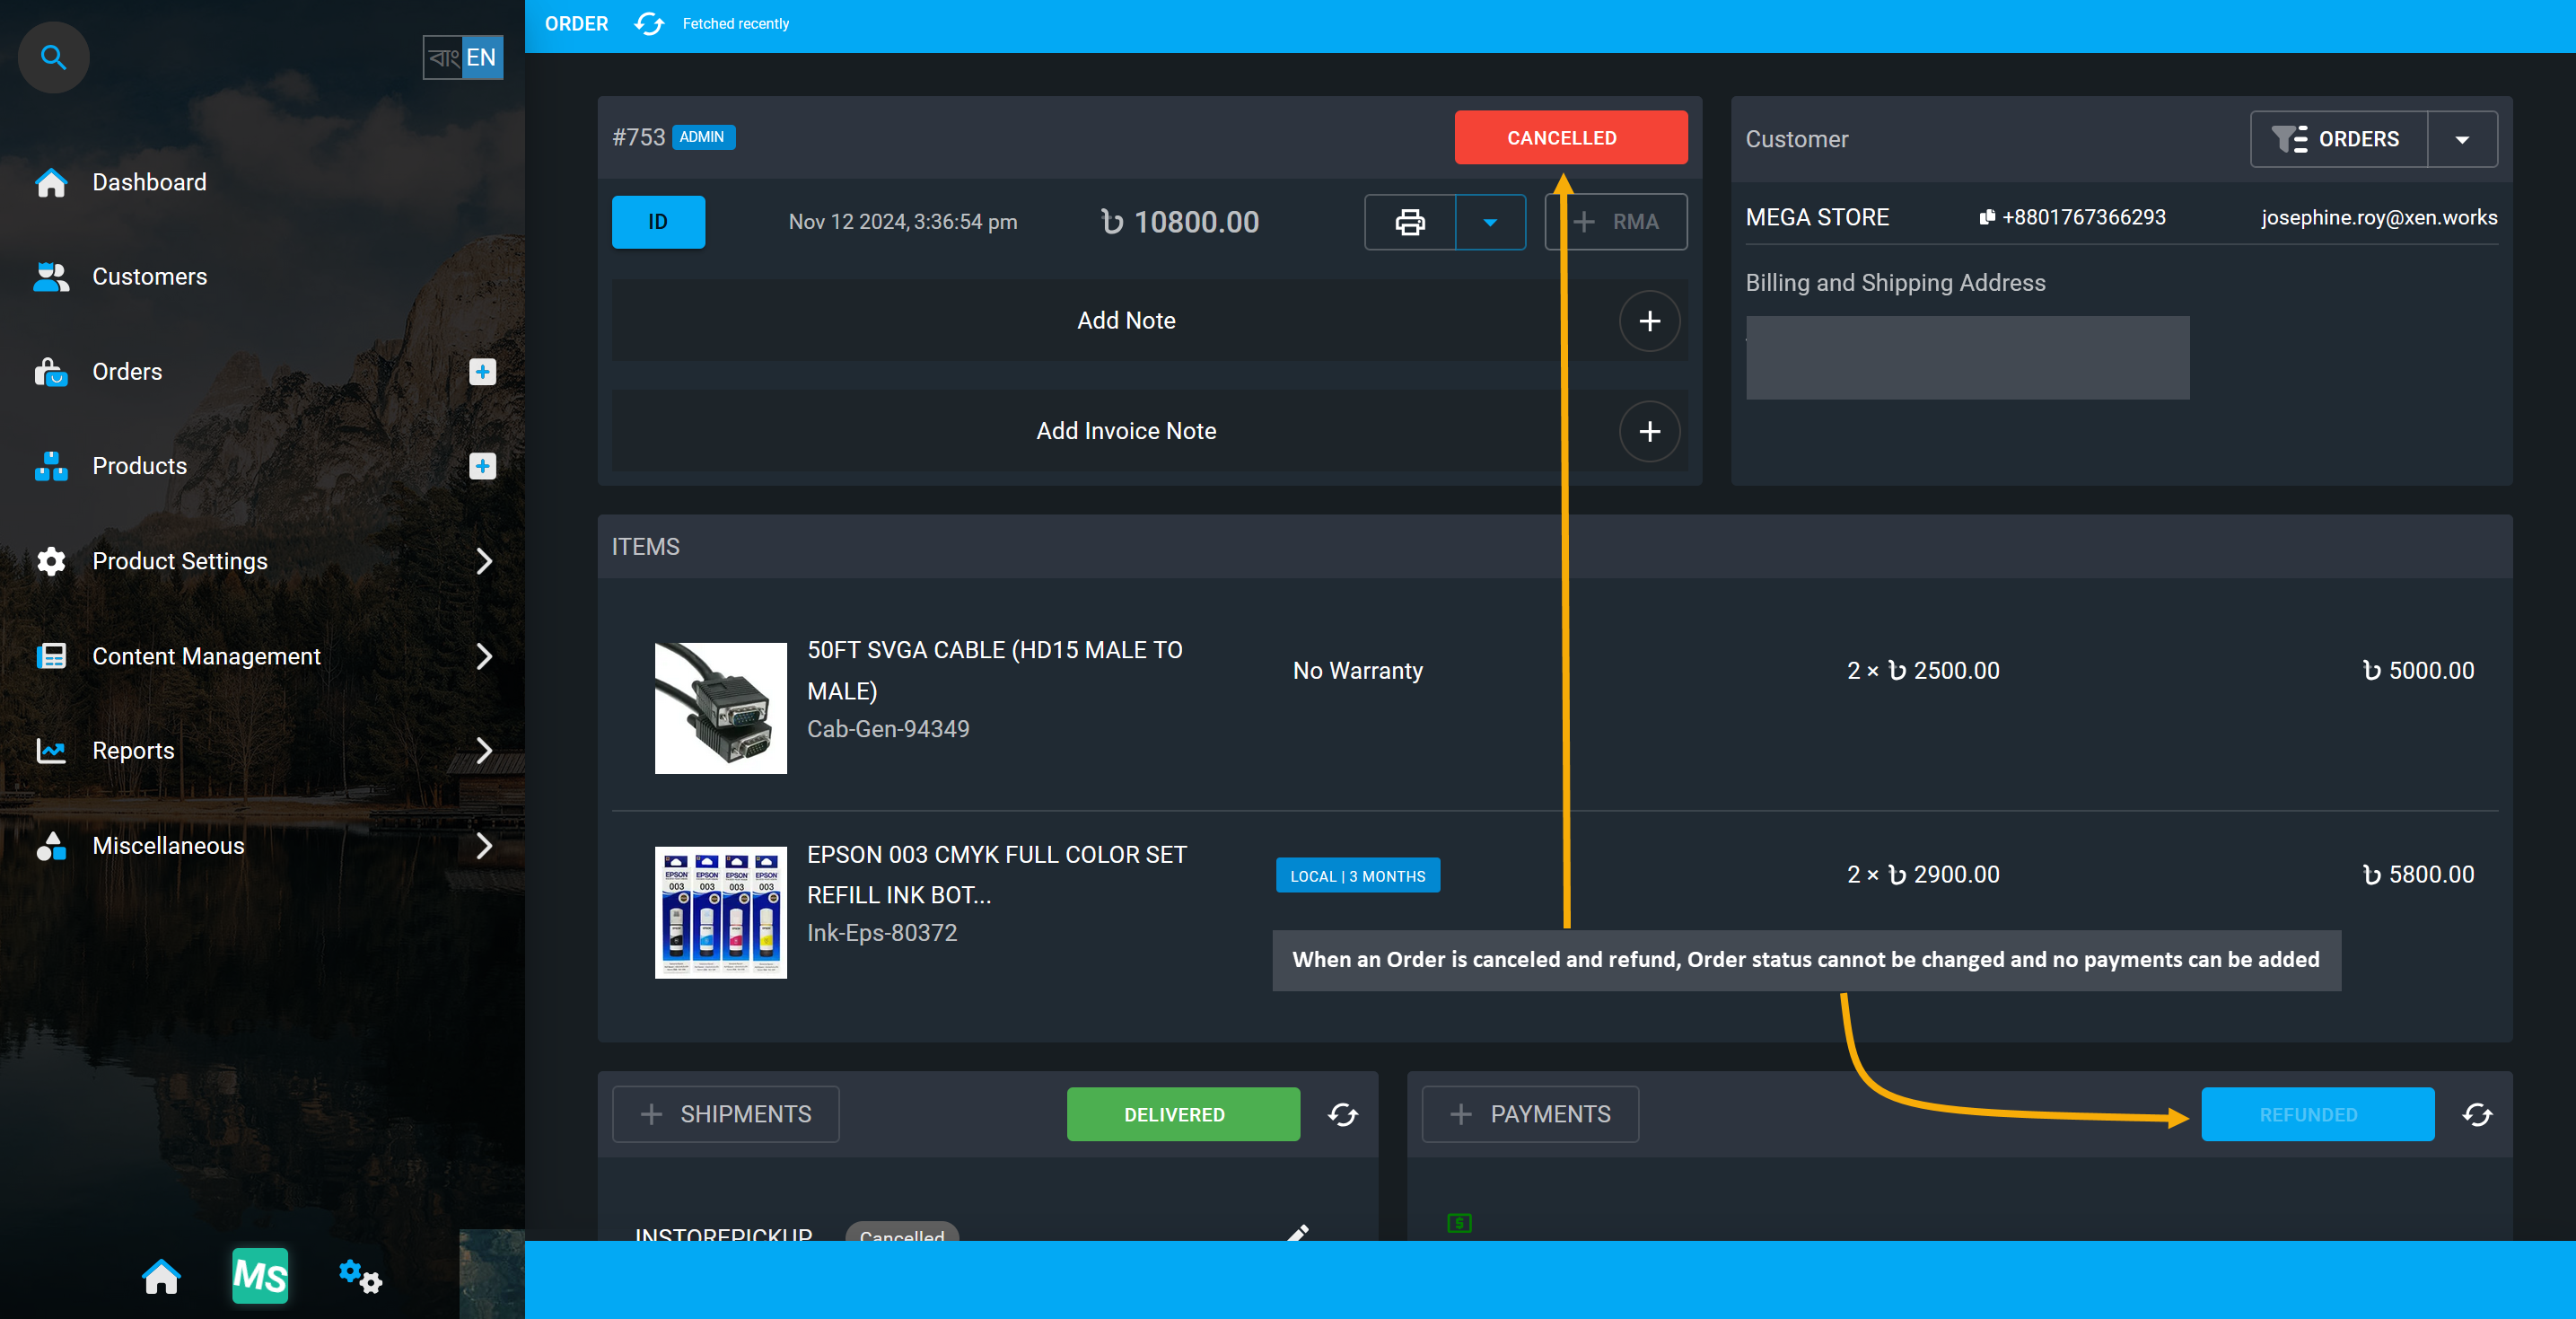
Image 10: Order status cannot be changed and no payments can be added after Order cancelation.
11.2 - Edit Order Status
Learn how to update Order status based on customer payment and delivery.
Update Order Status
After an Order is placed, it could have pending Payments, pending payment verification, awaiting shipment confirmation, or product under processing. Based on the current status of the order, there are options to update to different Order statuses from Order dashboard. Select from different statuses to update order like Pending, Processing, Canceled, Under Review, and Completed along with Draft status for unpaid orders.
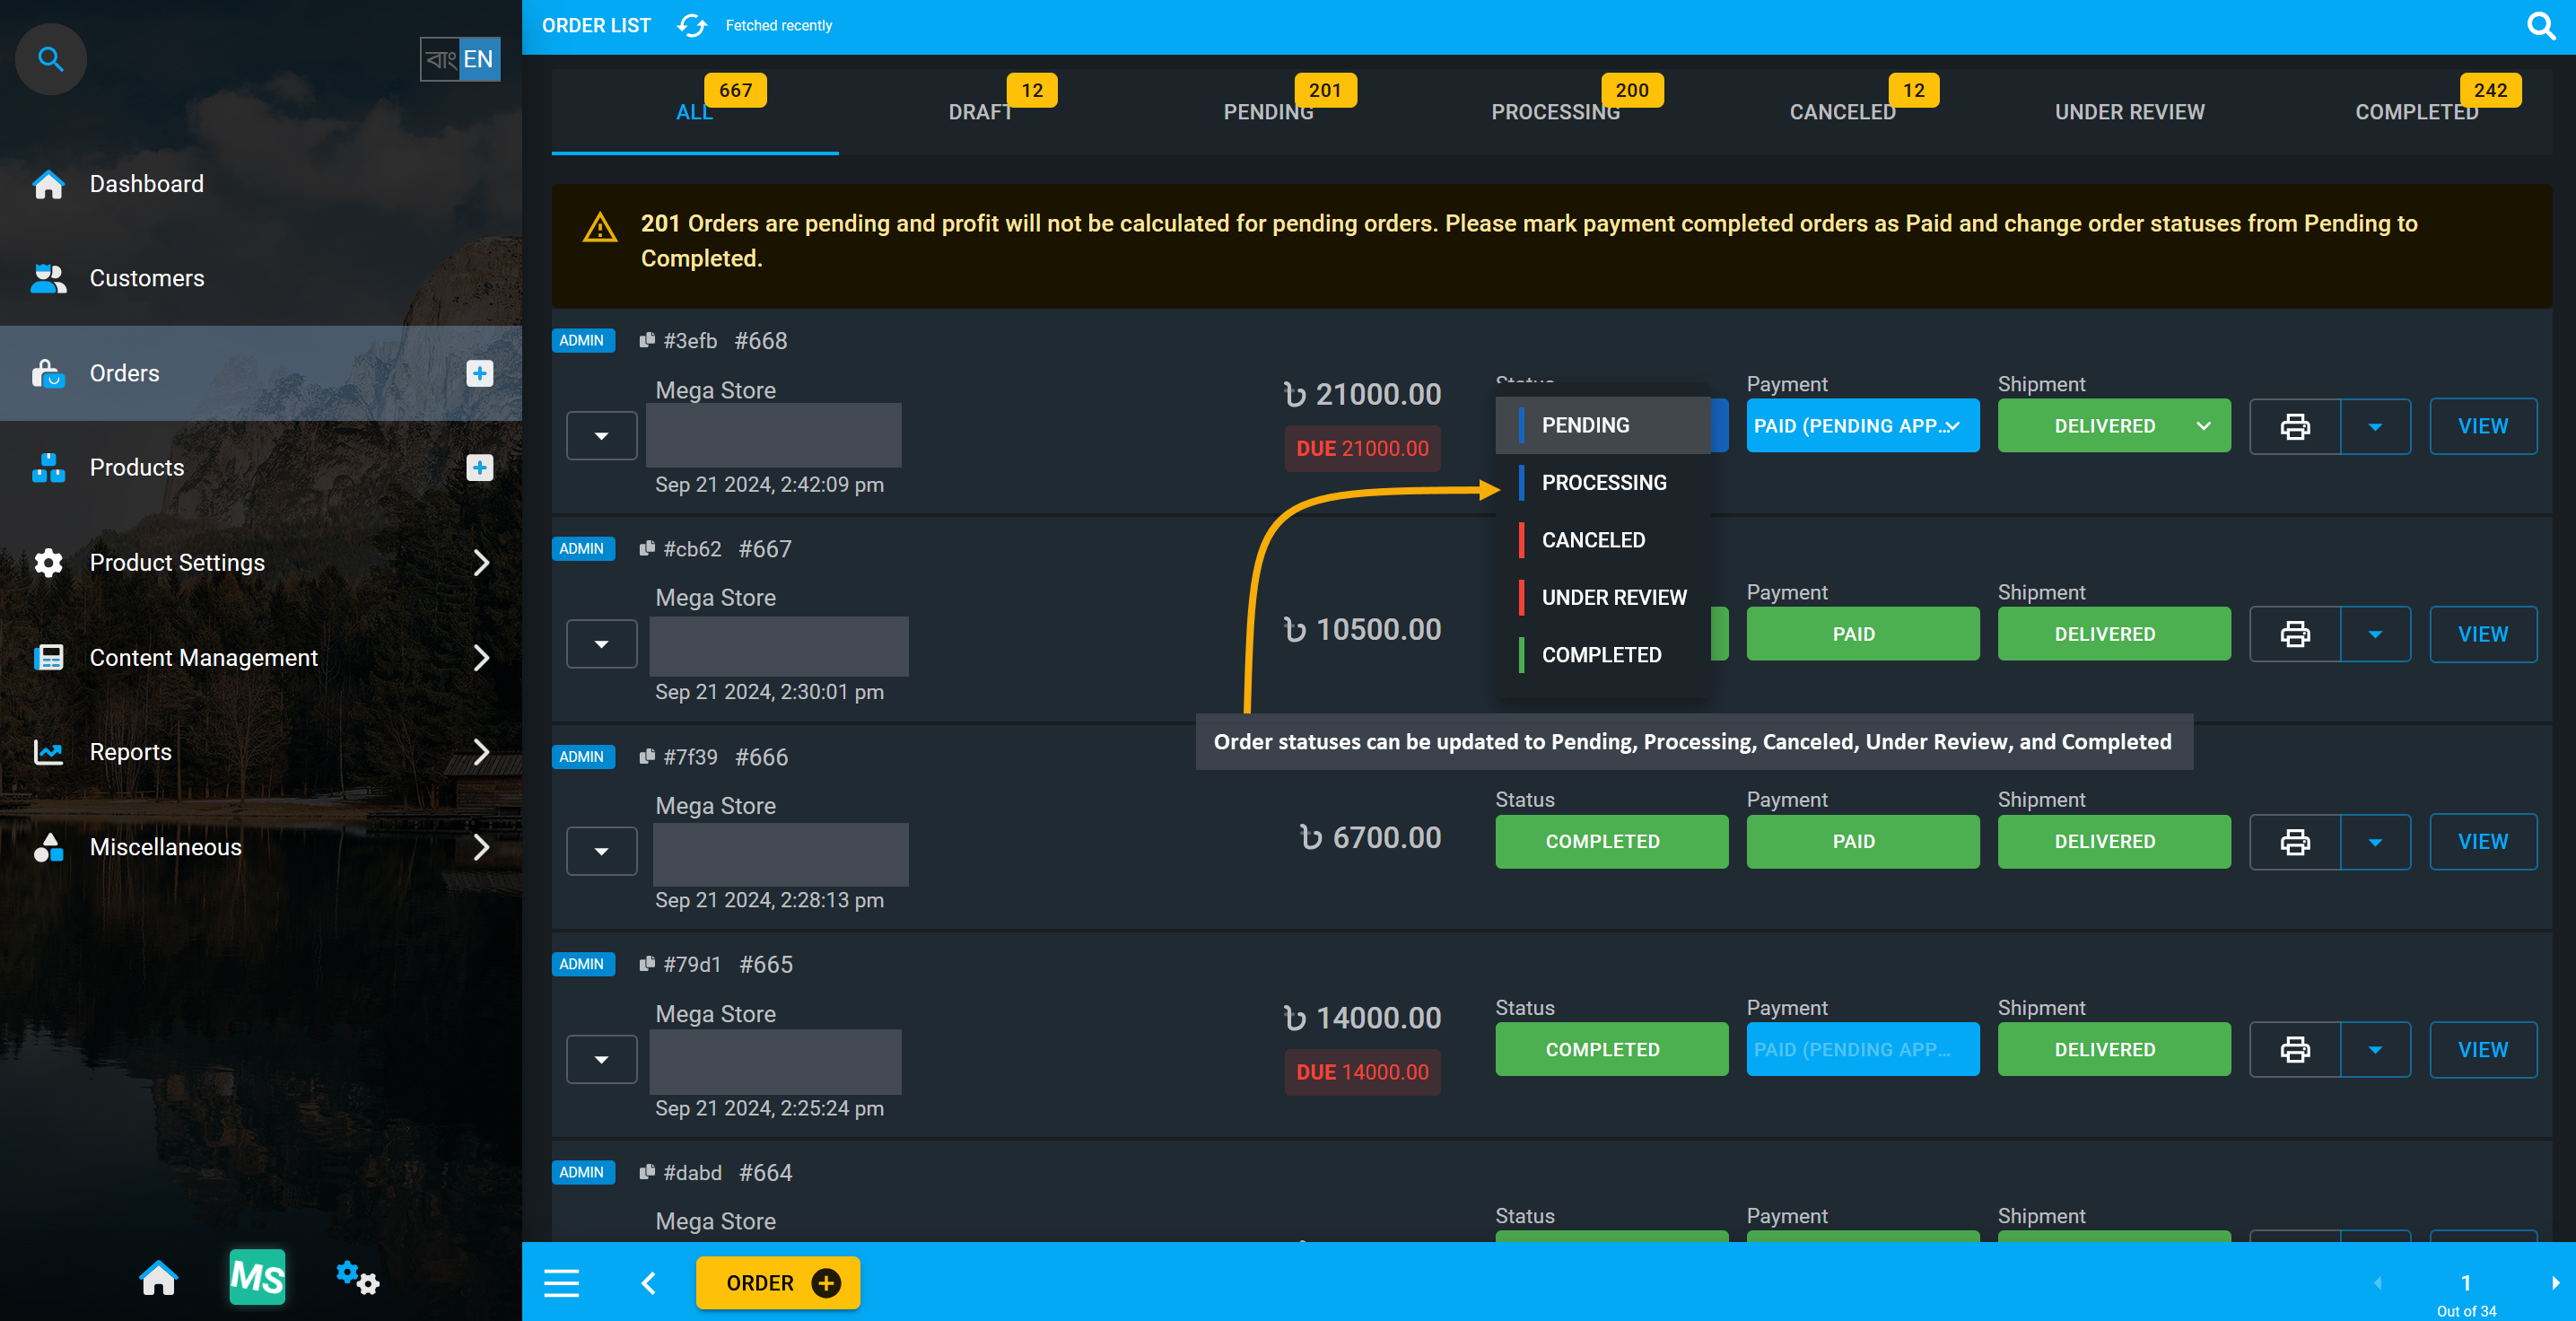
Image 1: Order status can be updated to Pending, Processing, Canceled, Under Review, and Completed.
Order Draft
A Draft Order is an order that is created without payment from the Order Cart. As no payment is added for draft order, it will not reflect on Ledger until the order status is changed to Pending. However, Draft order will allow printing the invoice for customer before payment is made. Draft order can also be canceled.
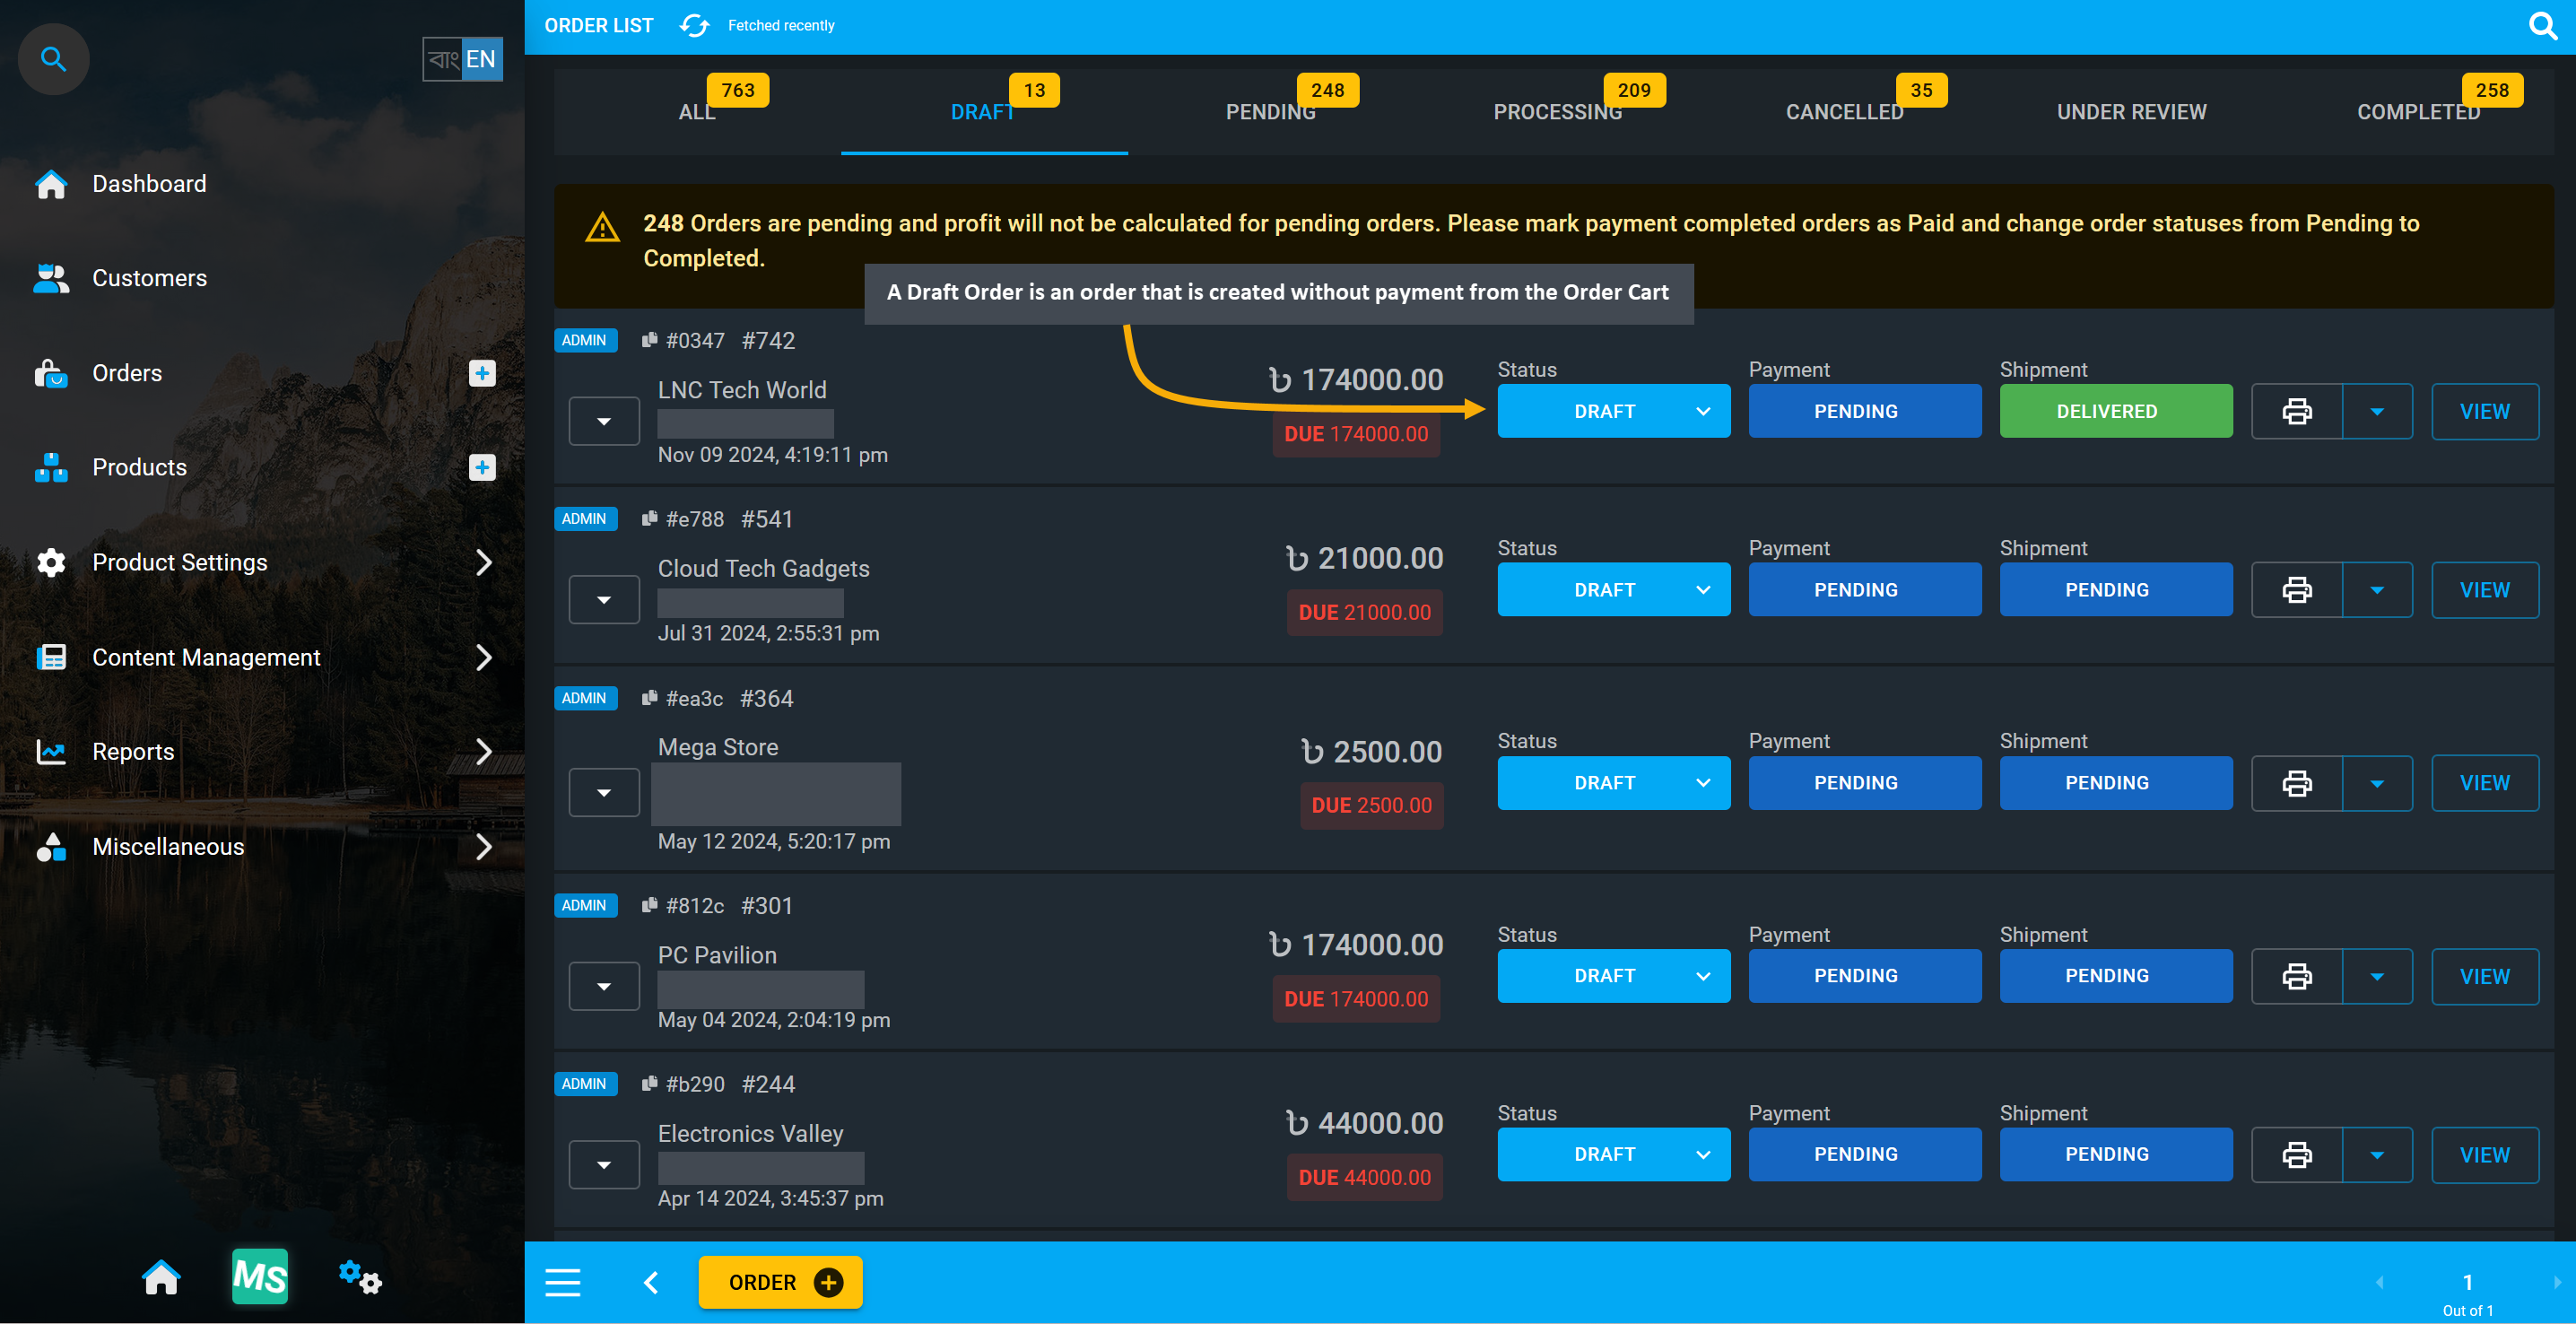
Image 2: Order created from cart without payment is a Draft Order that does not reflect on Ledger.
Order Pending
A Pending Order is an an Order that was not yet executed. It can, for example, be an Order that may have pending Payment from the Customer’s end or delivery pending from the Shop Owner’s end. If an order is Pending, it will still require payment and shipping confirmation to start being processed for the customer.
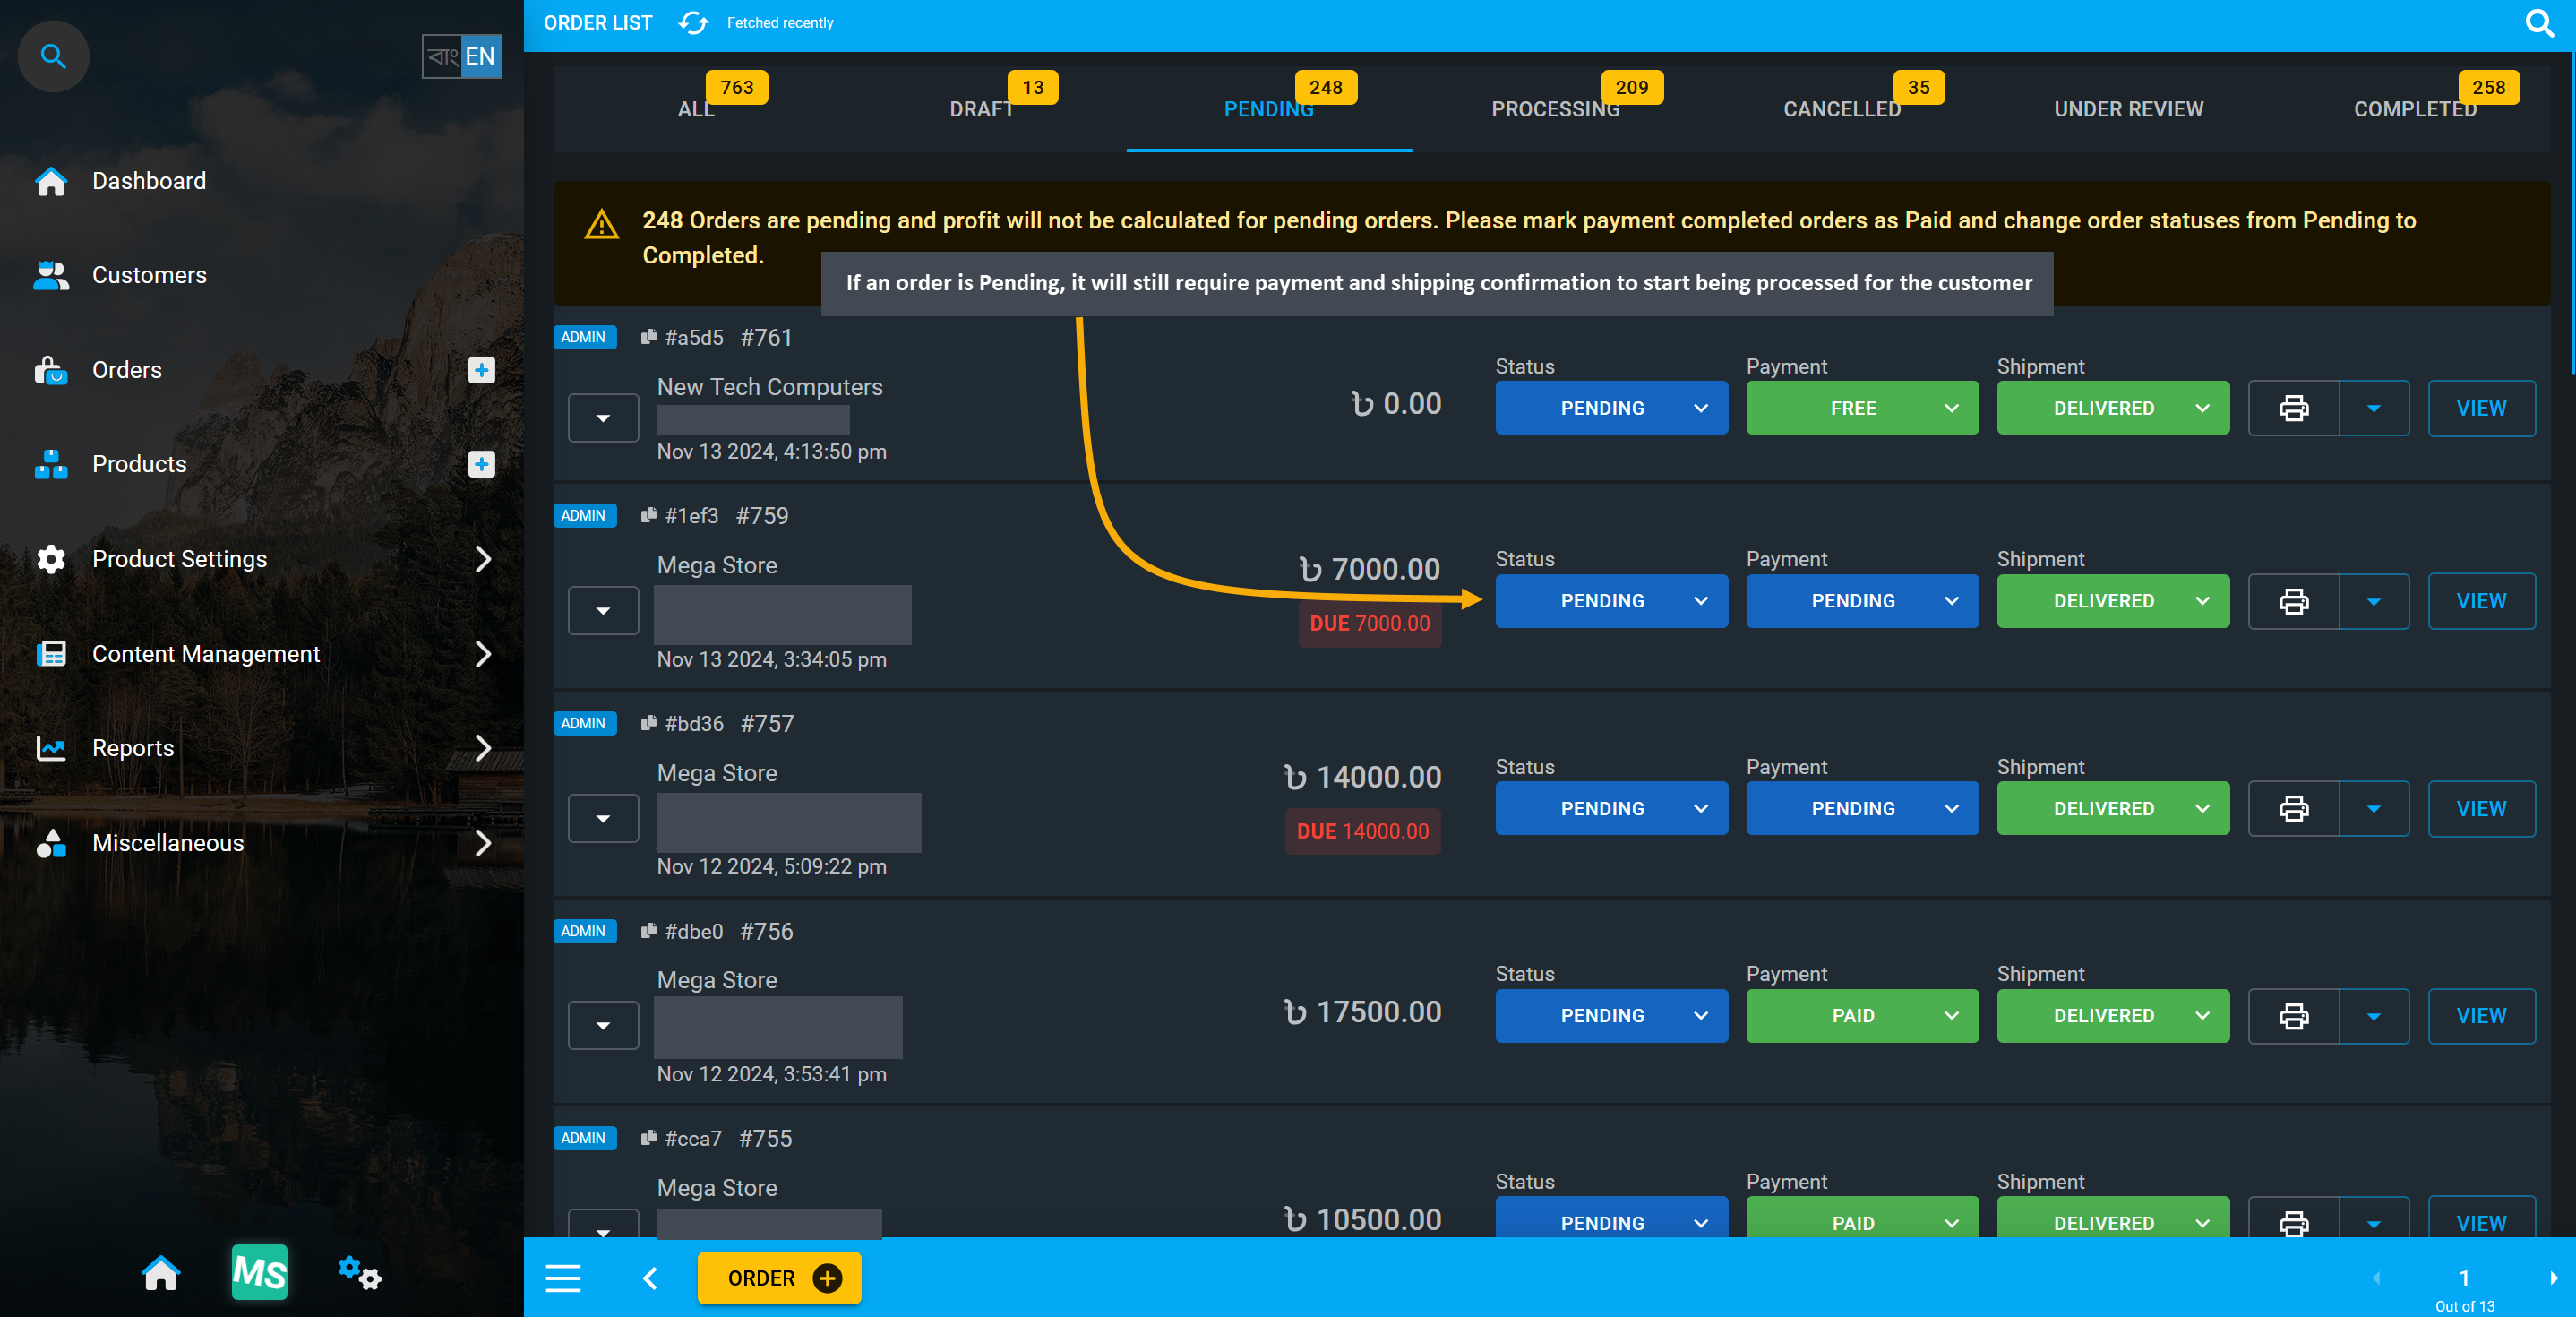
Image 3: Pending orders will require payment and shipping confirmation to start being processed.
Order Processing
Shop Owners can mark Orders as Processing if they are preparing the Product for delivery, indicating the stage where the Order has not been handled to the shipping carrier for delivery, but the product is ready. So, when payment for an Order is completed, the Order status is automatically changed to Processing.
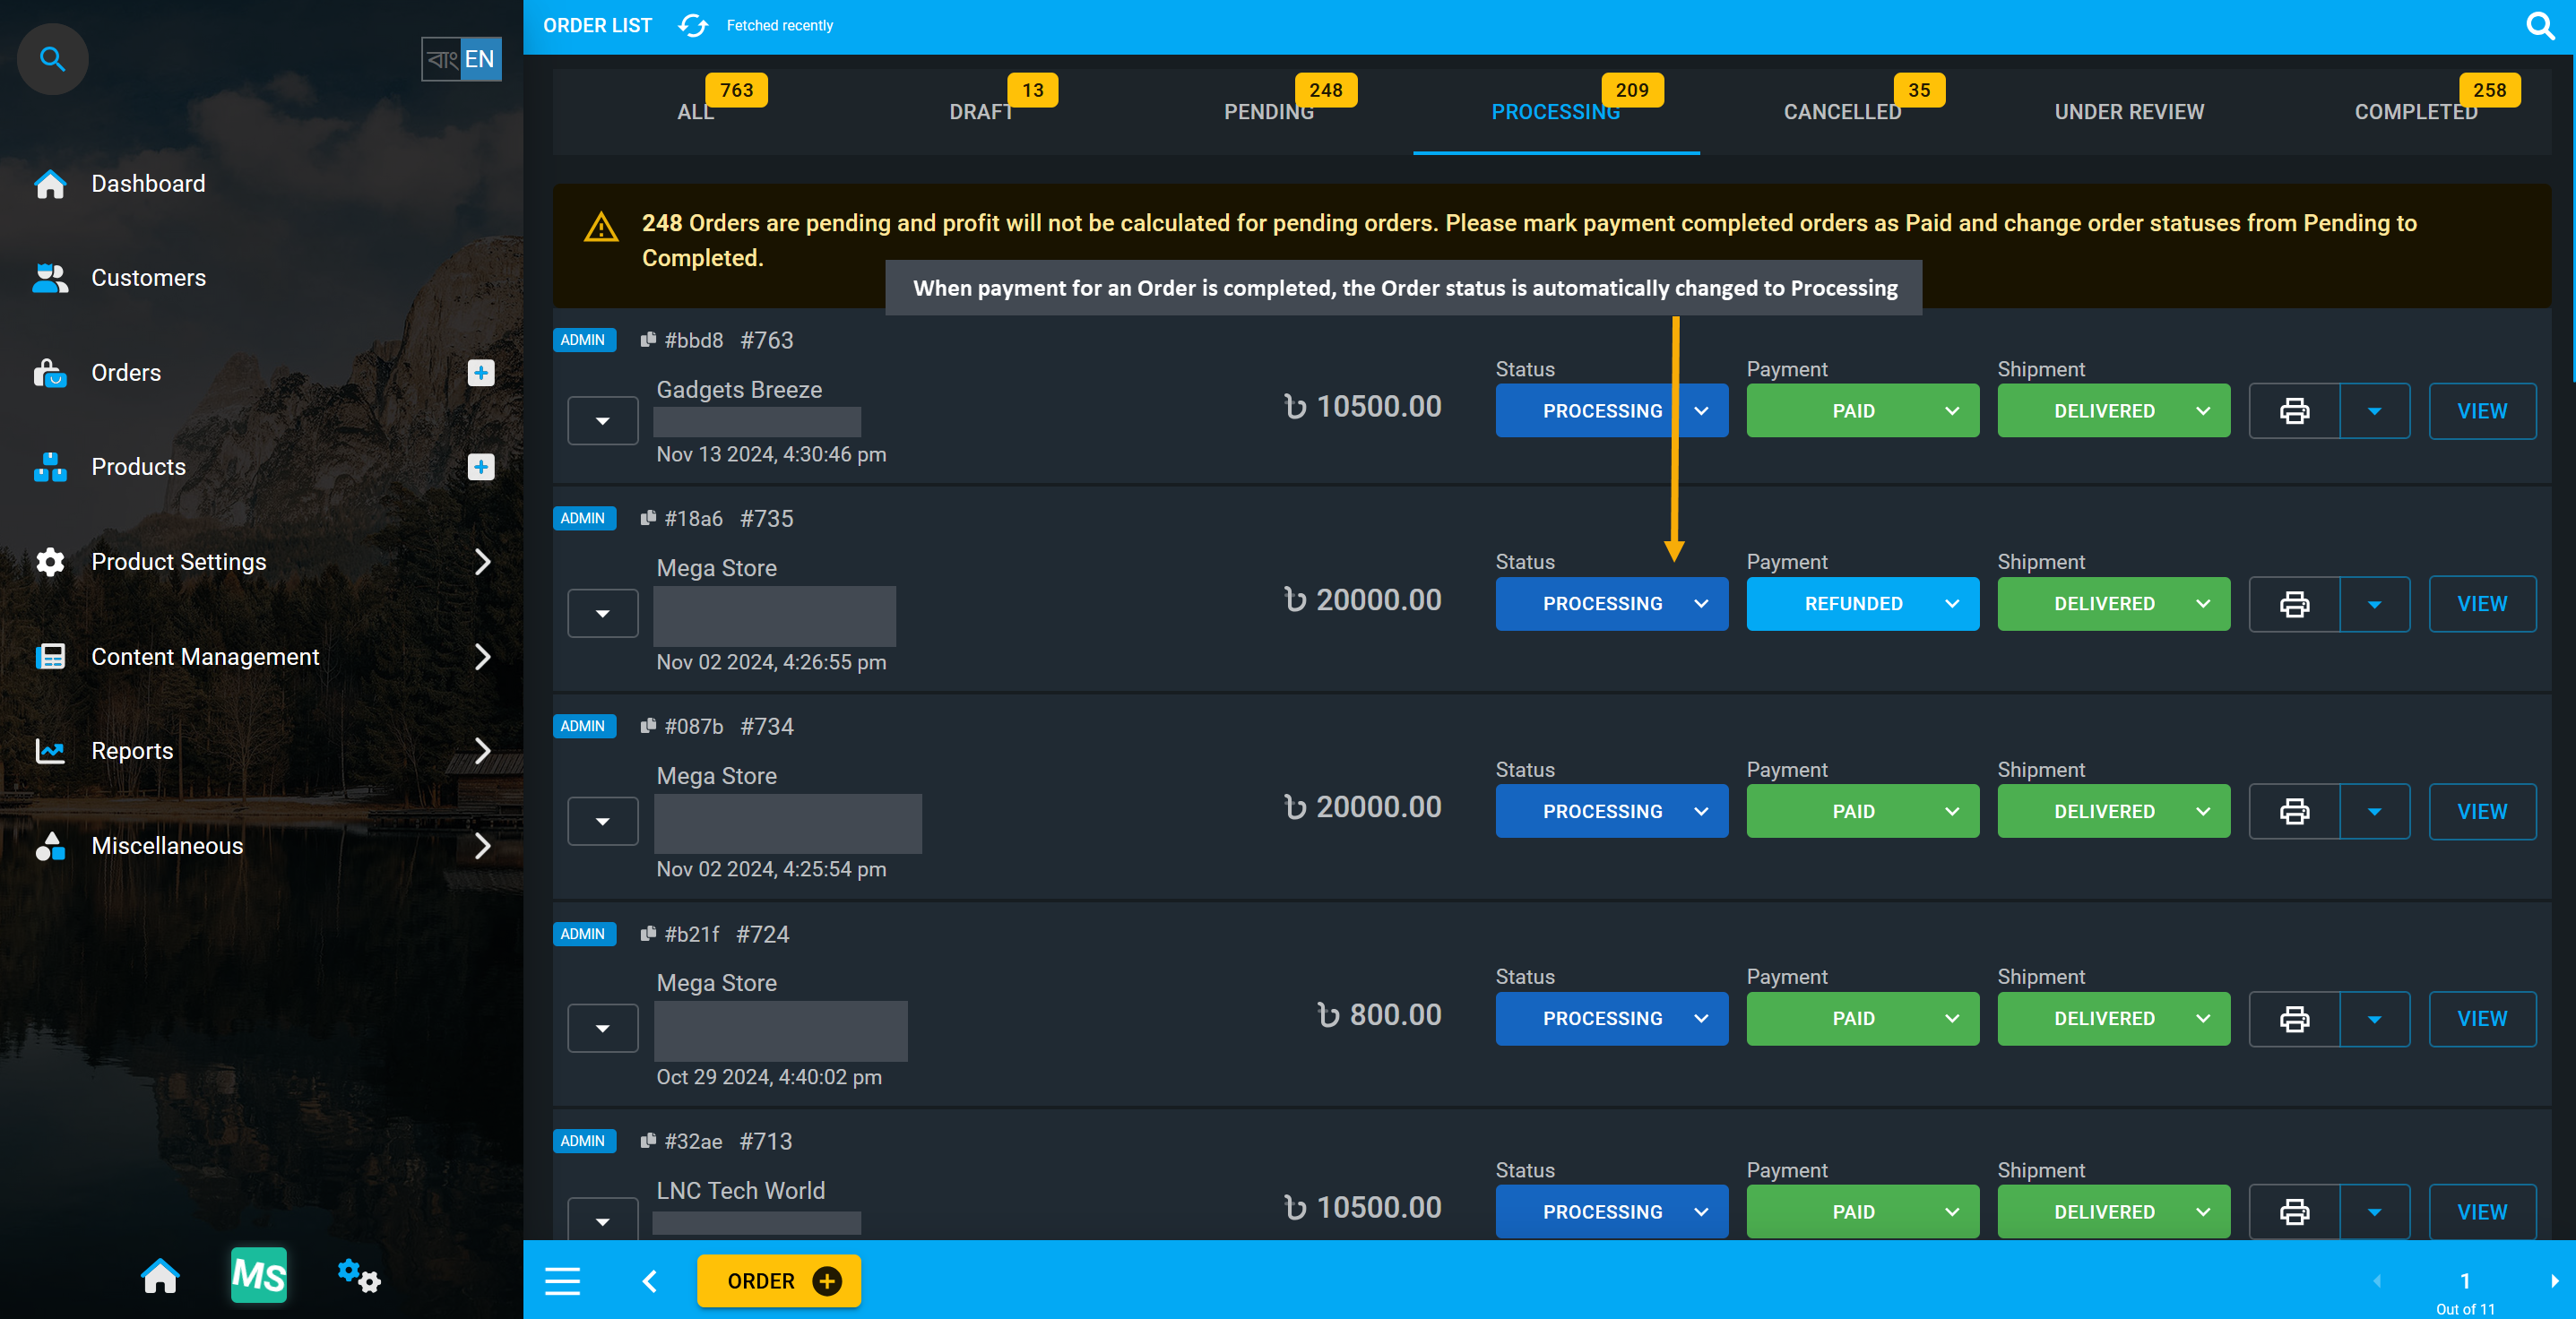
Image 4: When payment for an Order is completed, Order status is automatically changed to Processing.
Order Canceled
Canceled Orders are ones that have been submitted but are no longer in effect in the system. Shop Owner can Cancel Orders that have not been paid by the Customer or entered the shipping process yet. Likewise, paid Orders can also be refunded after confirming return of stock and refunding of payment.
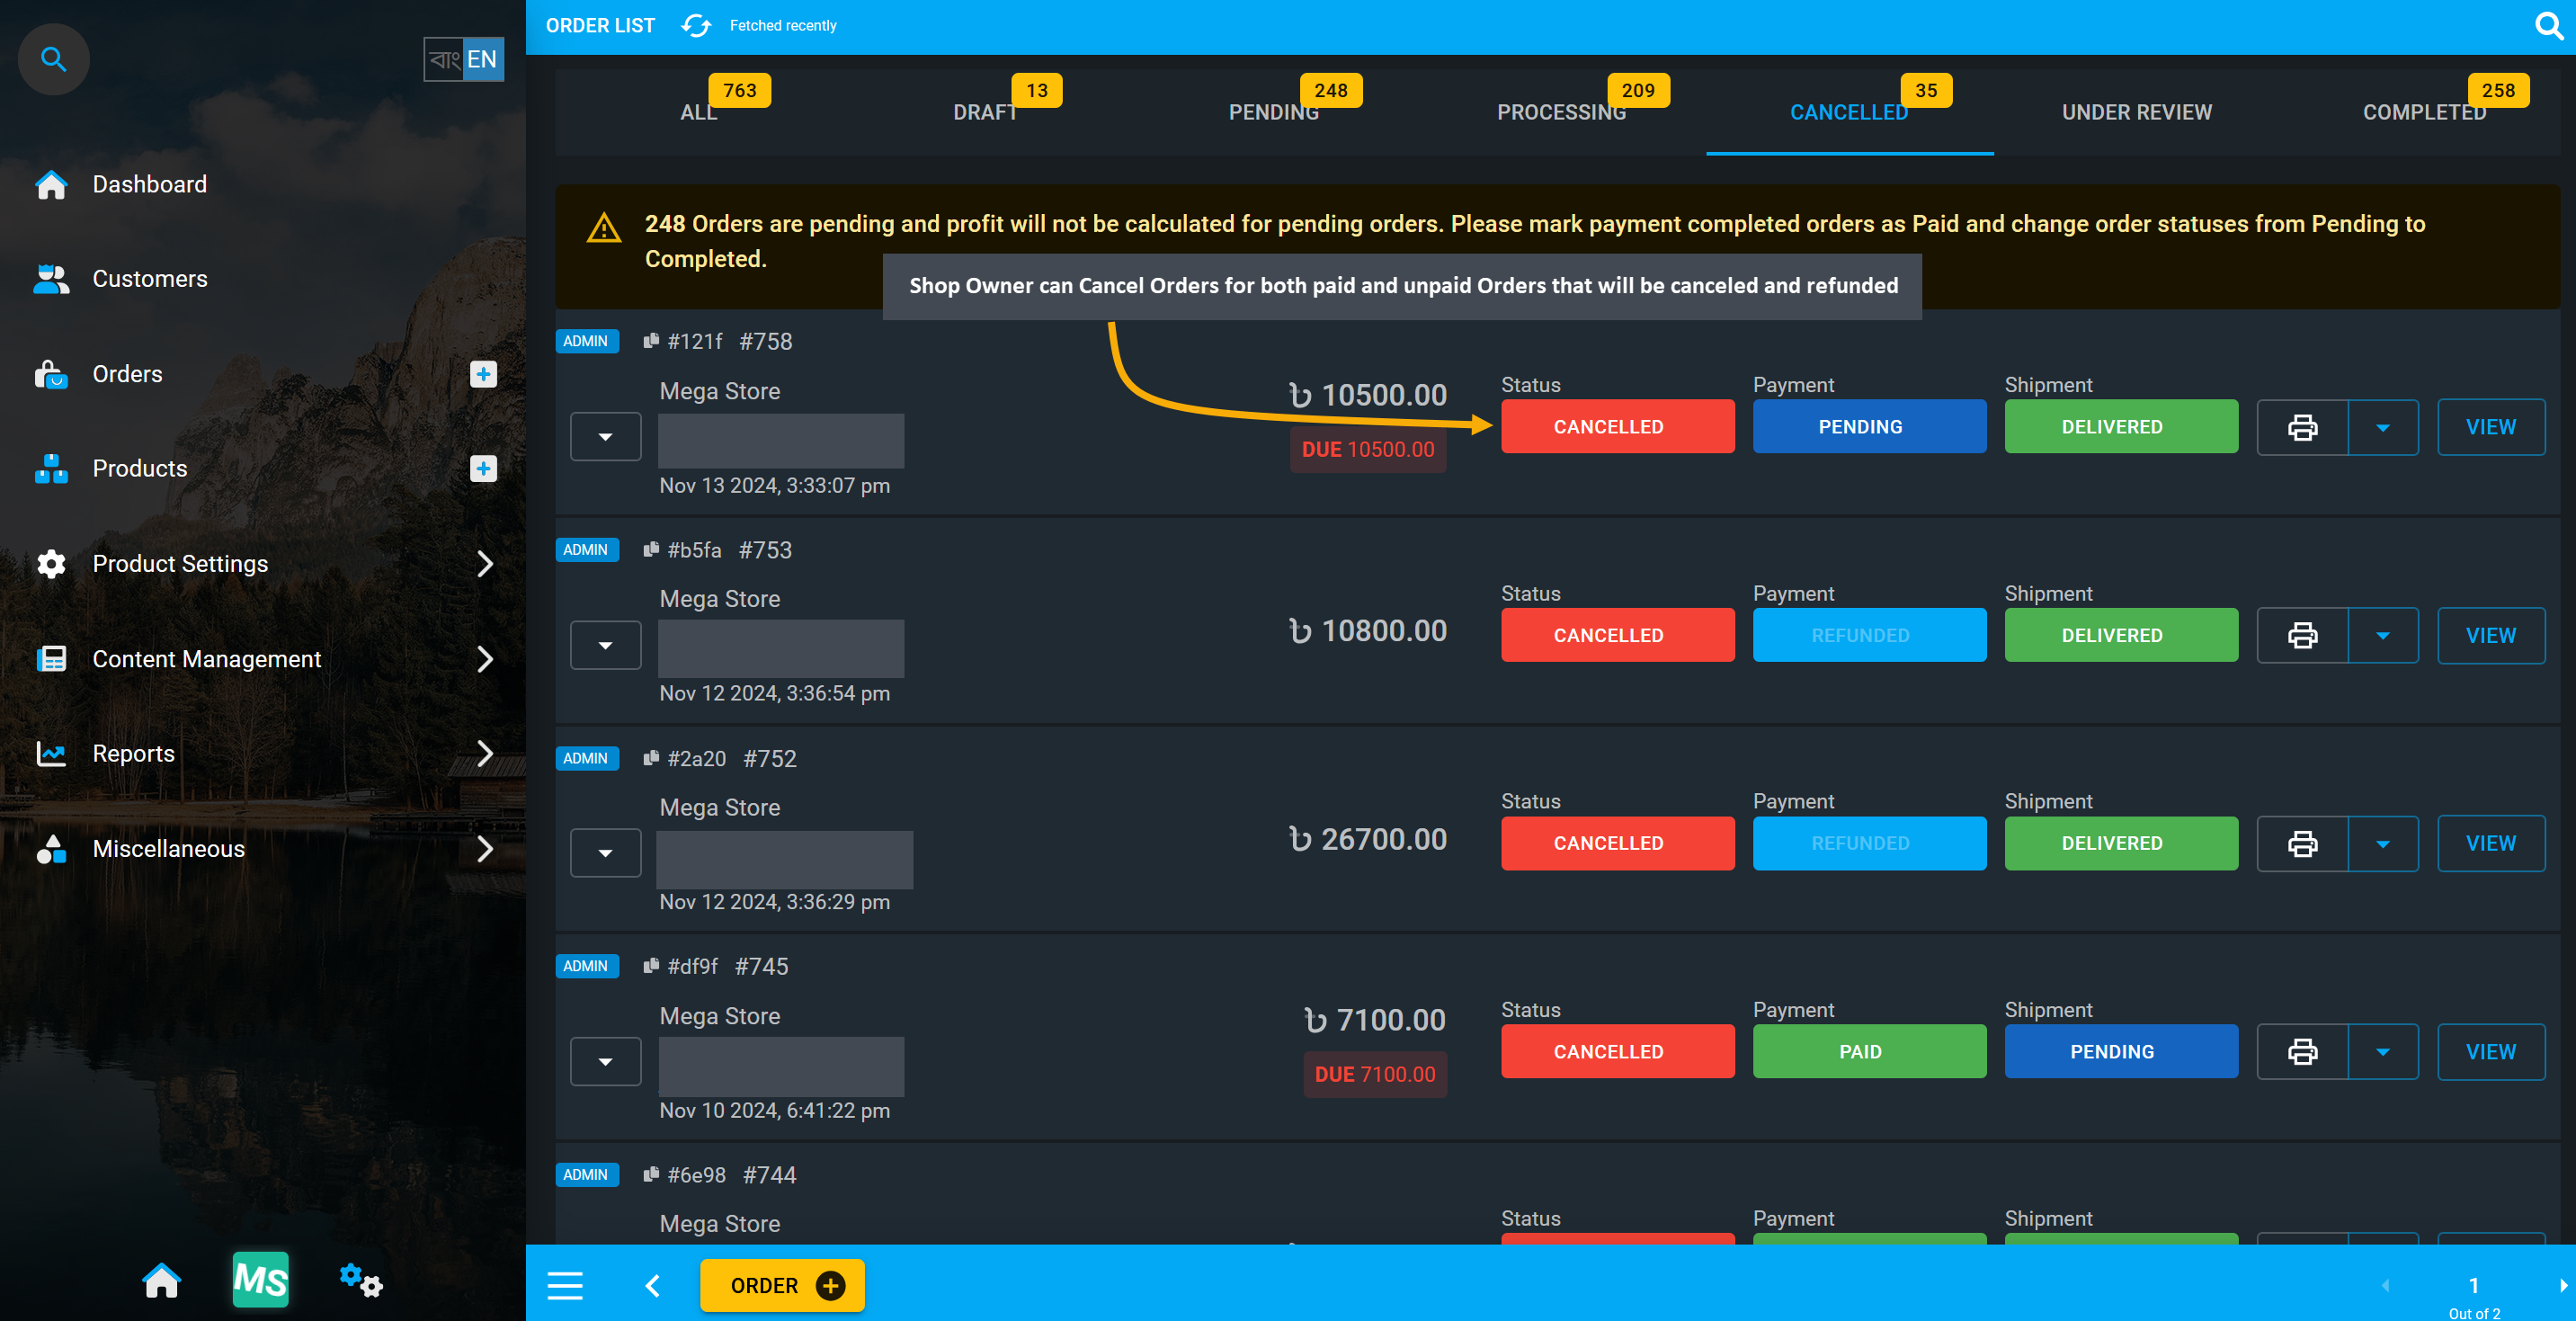
Image 5: Shop Owner can Cancel both paid and unpaid Orders which will be canceled and refunded.
Order Under Review
Order status Under Review means when the Order possess a variety of attributes that require them to be manually released by the Shop Owner. They can put any Order under review and manually review Order information later or request for additional information from the Customer to process order if needed.
Order Completed
When an Order is marked as Completed, it means that the Shop Owner have processed the Order, labeled the package and handed it to the Customer using the In Store Pickup option or handed over to the shipping carrier. Shop Owner can set Orders as Complete when they have fulfilled all the Order steps from their end.
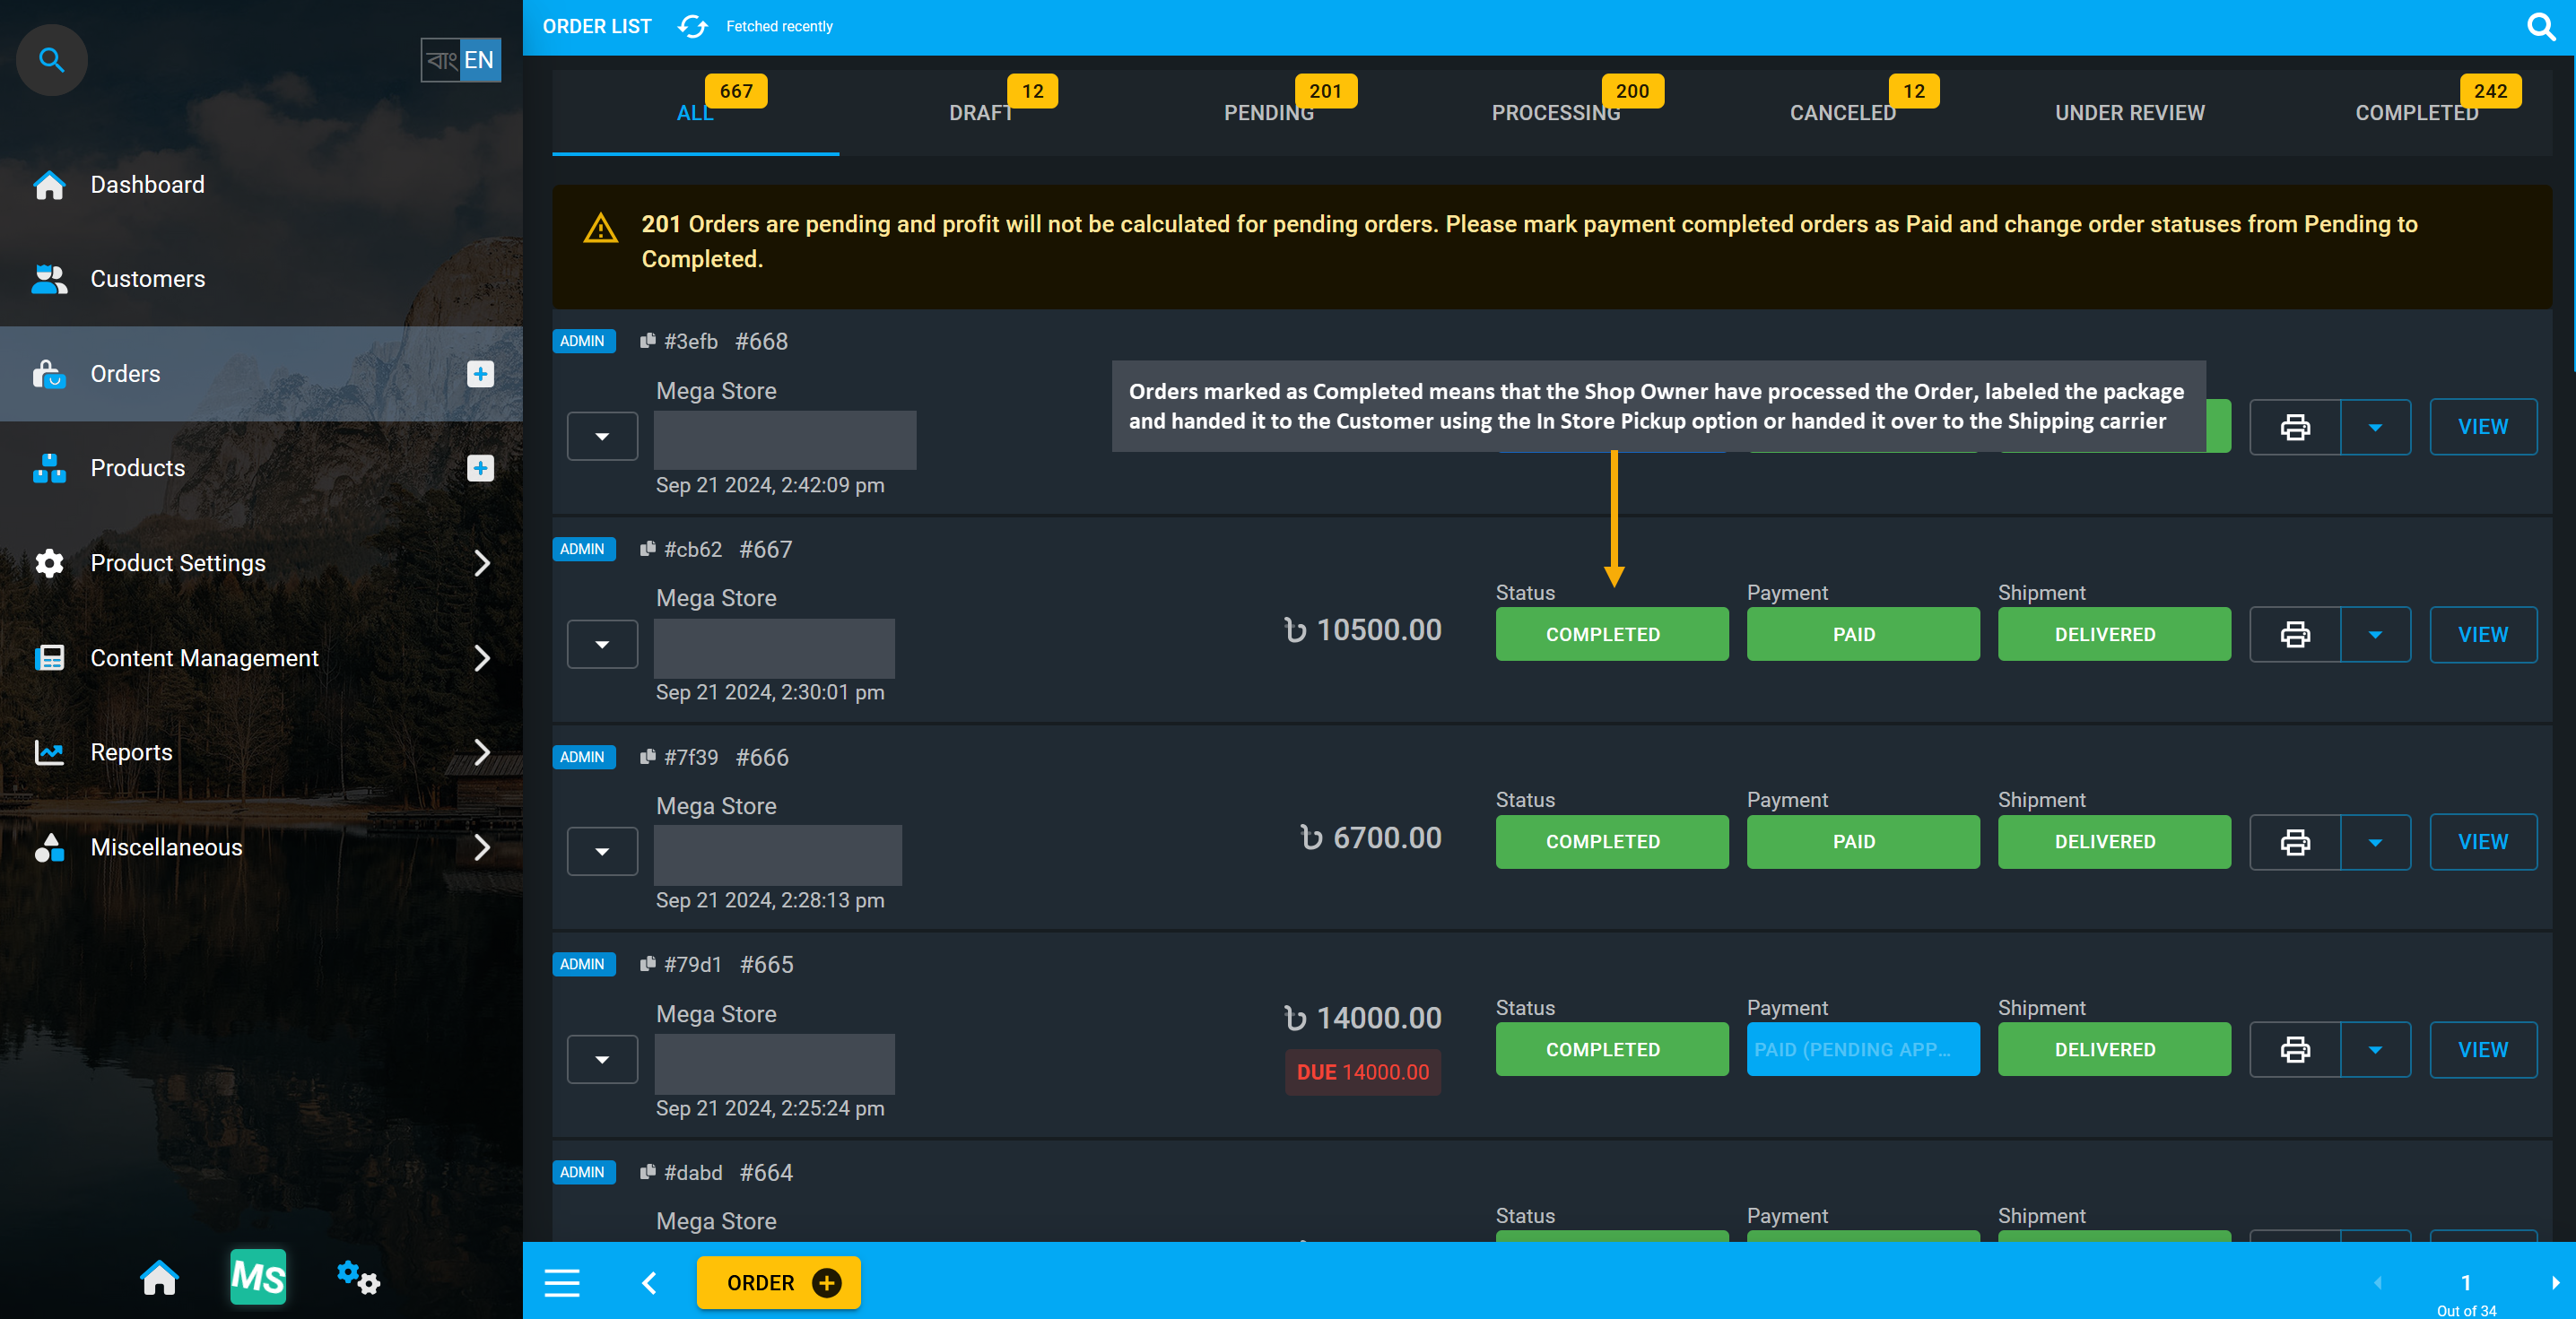
Image 2: Order marked as Completed means Payment was successful and Product is ready for shipping.
Add Transaction and Verify Pending Orders
To convert Pending Orders with Pending Payment, the Shop Owner has to go to Order Dashboard, check, complete, or verify Payment to change the Payment Status to Paid if full order due is cleared.

Image 3: To convert Pending Orders, Shop Owner has to go to Order List to complete their payment.
To open Order details, click on the View button to be redirected to Order Dashboard to complete Payment for the Pending Orders and change their status to Completed. Order Payments can be added from there.

Image 4: Click View button to redirect to Order Dashboard to complete Payment for Pending Orders.
For no payments added to an Order from cart, go to Order Dashboard and click on Payments to select any Payment Gateway and make partial or full payment adding payment details multiple times if needed.
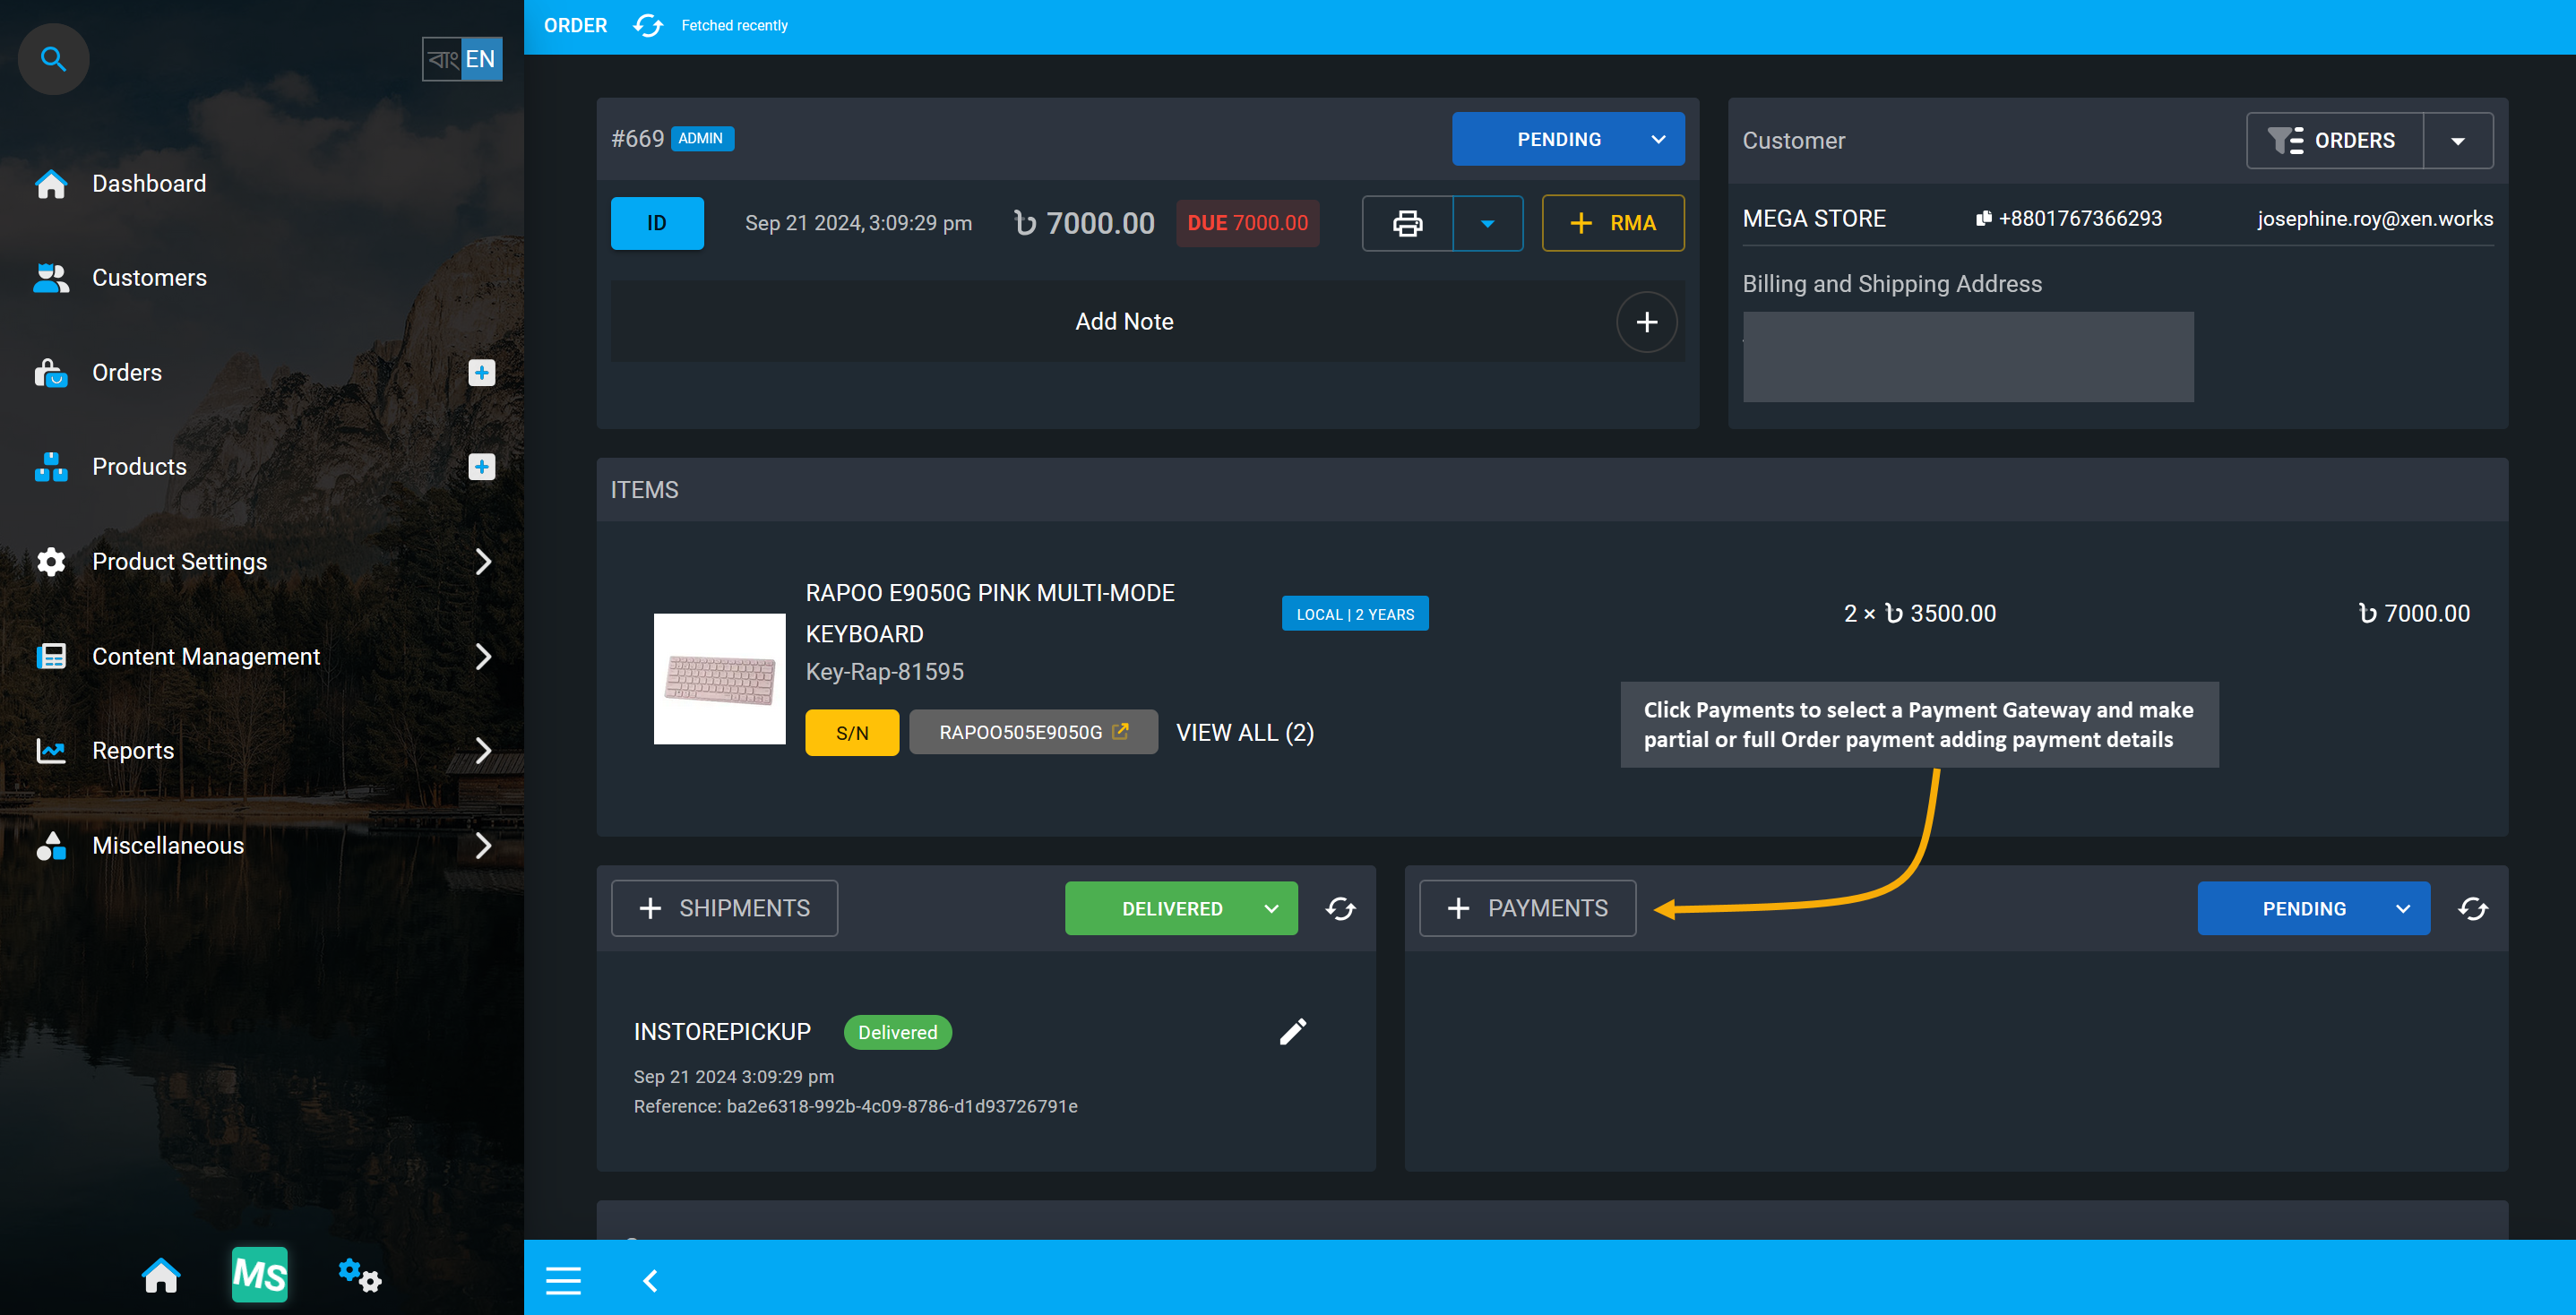
Image 5: Click on Payments to select a Payment Gateway and make partial or full Order payment.
Clicking on Payments will open a modal with different payment gateways to select and make payment for Order. Select a specific payment gateway, set payment amount, fill in the details, and click Submit.
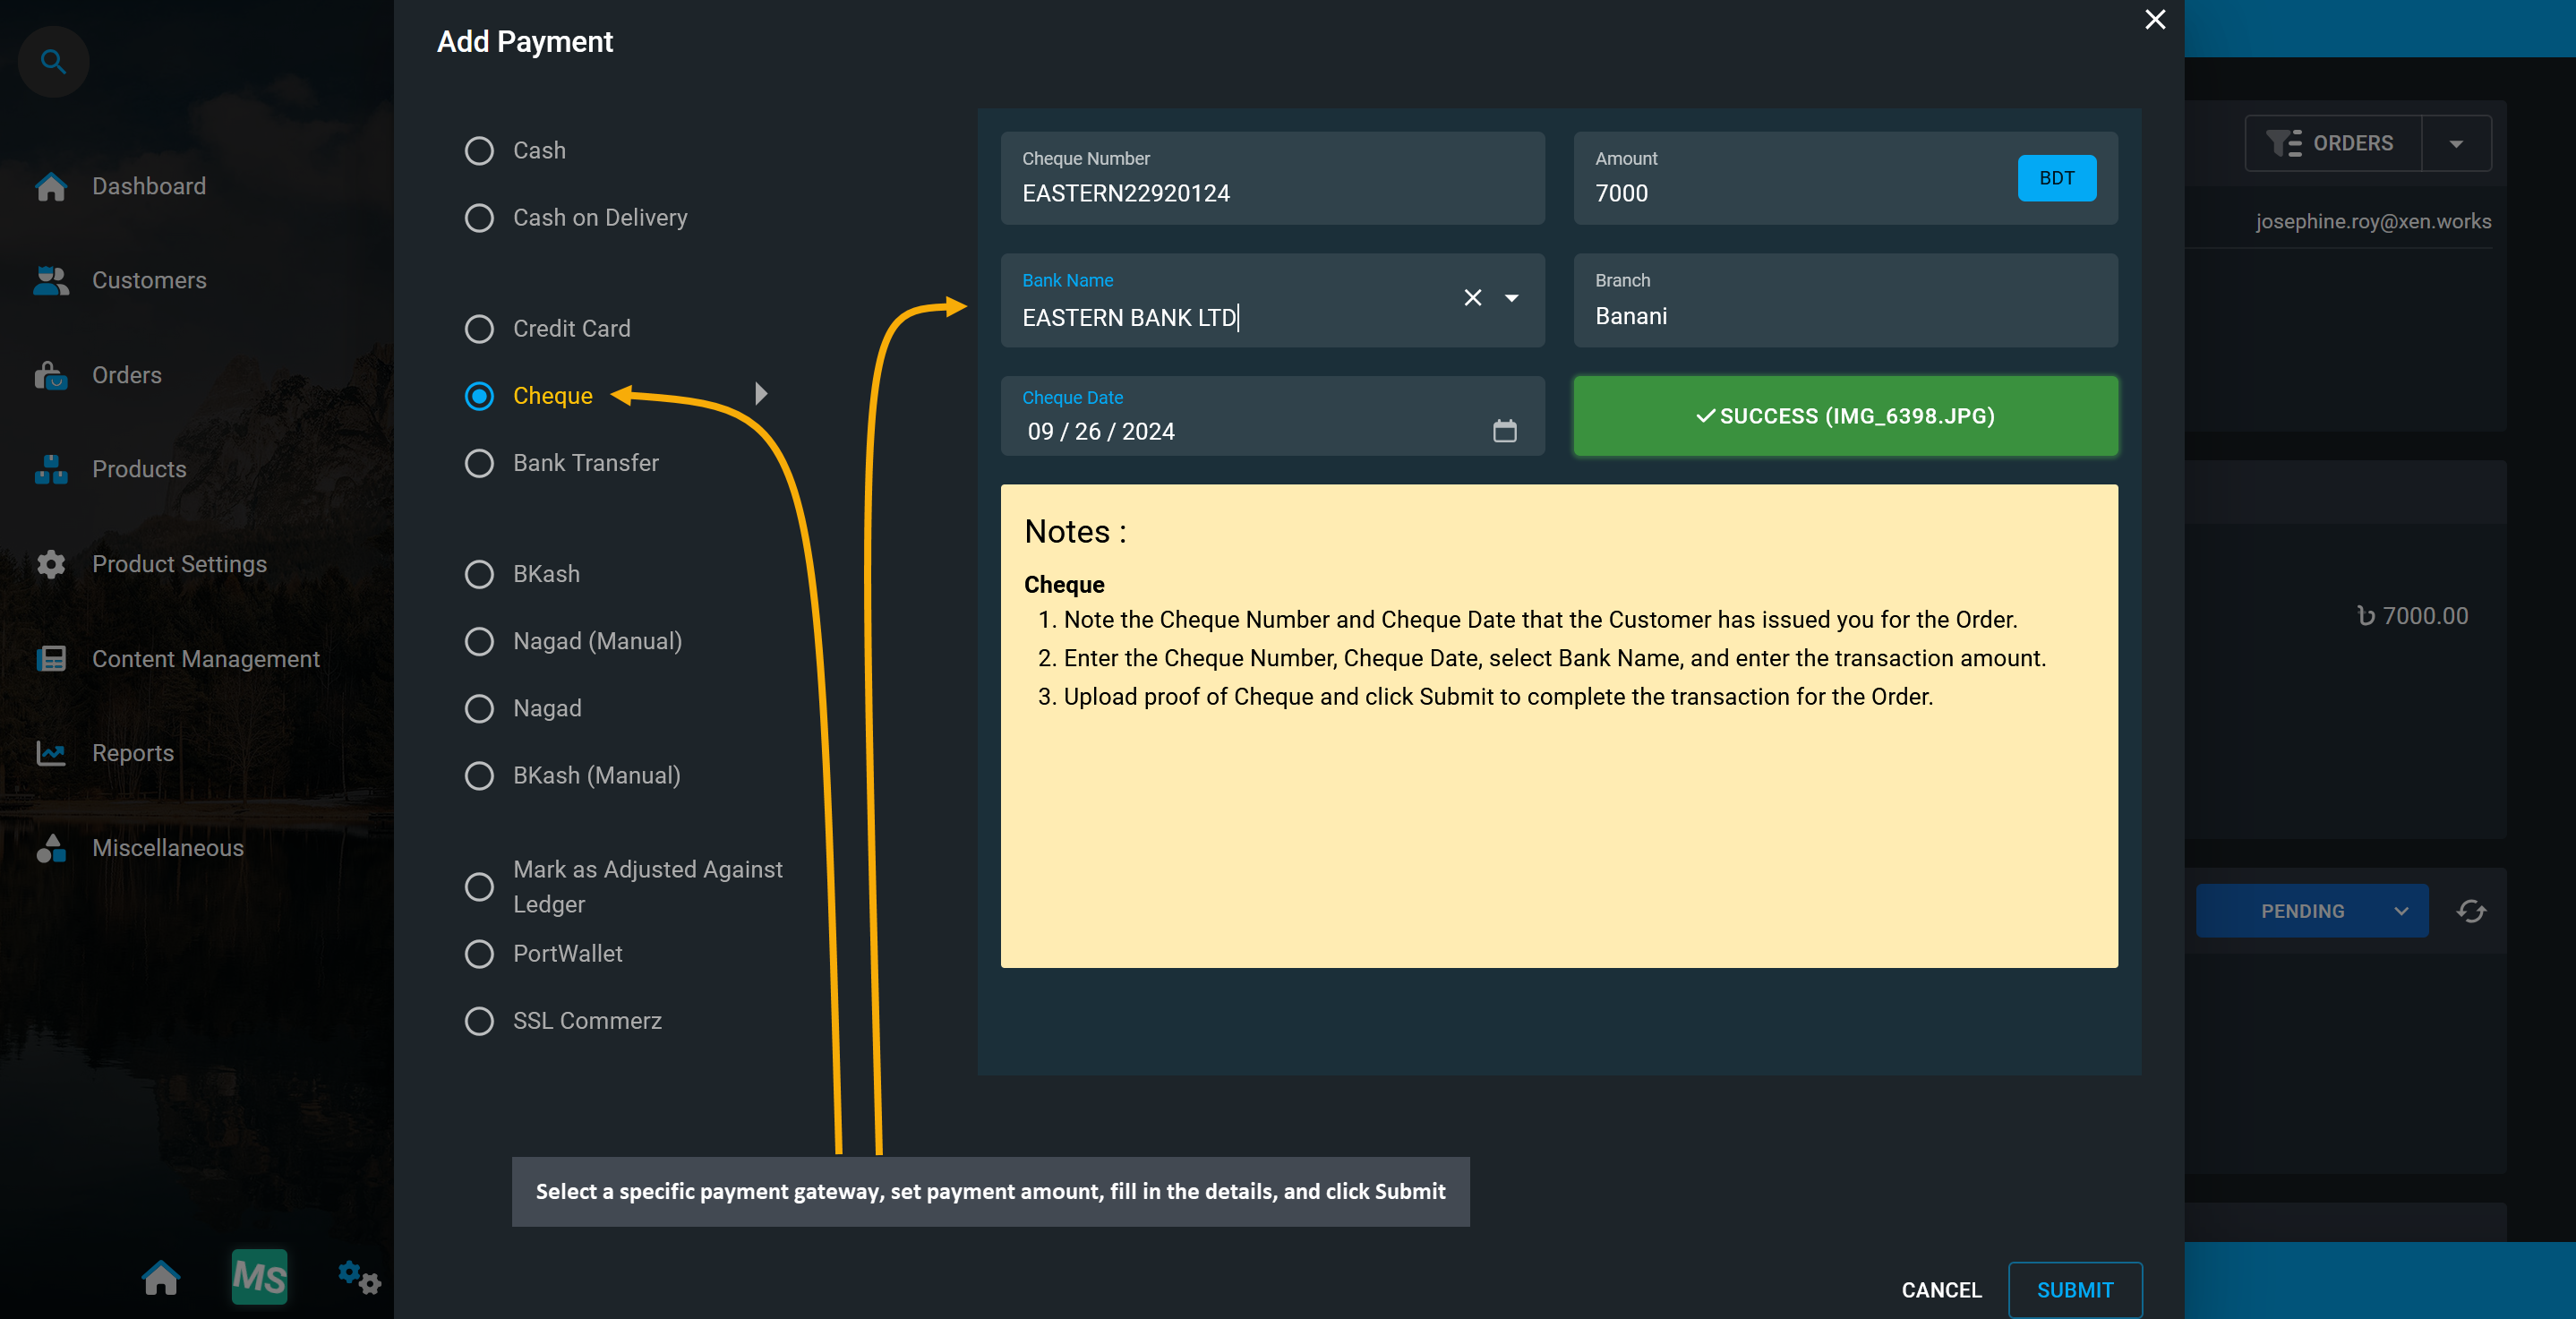
Image 6: Select a specific payment gateway, set payment amount, fill in details, and click Submit.
There will be a confirmation modal to Proceed with the transaction. Carefully recheck transaction amount, transaction reference, and other details, before clicking Proceed to complete the payment.
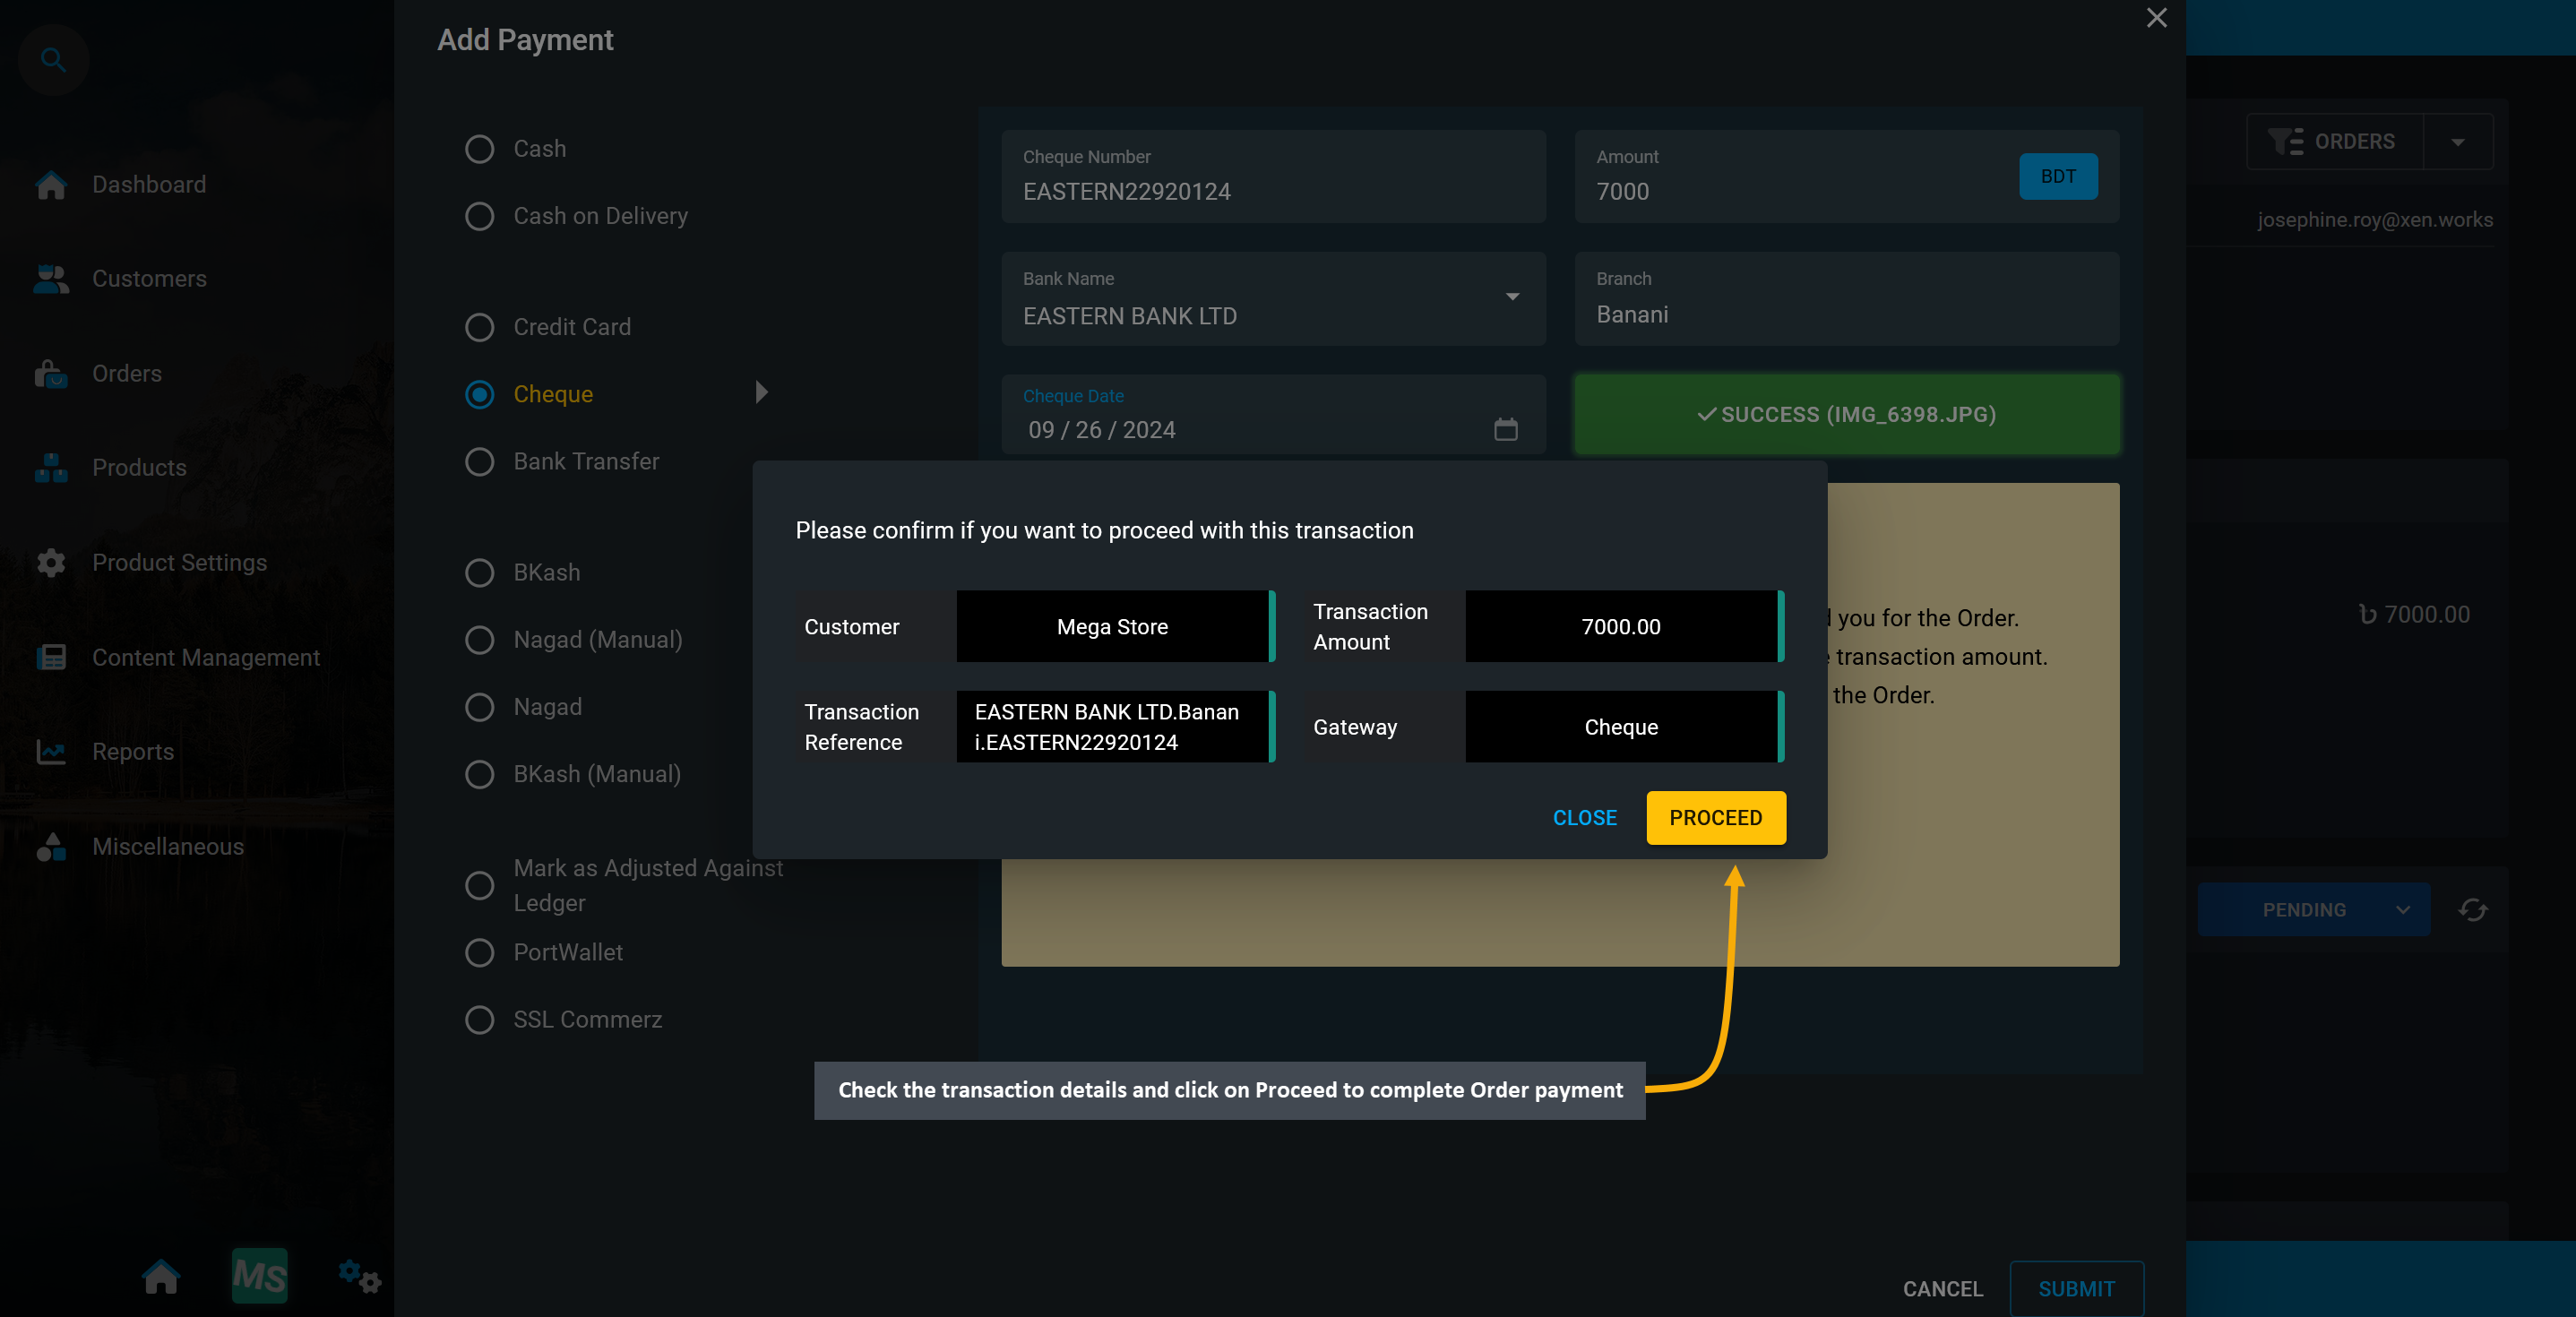
Image 7: There will be a confirmation modal to Proceed with the transaction and complete payment.
Payment Status will show Pending, because though payment is added, its transaction status is technically Initiated, but not yet Verified. Hence, the current status of the transaction will show as Initiated. However, to change the transaction status, it needs to be confirmed, which can be done by clicking the Verify button, or else the transaction will not be completed and add to Revenues. Follow these few steps as shown below.

Image 7: Transaction status will show as Initiated until it is completed using the Verify button.
After clicking the Verify button, a modal will show where the transaction needs to be Set As Completed by selecting the option, adding optional Note to input details, and clicking Submit to clear payment dues.

Image 8: Transaction needs to be Set As Completed by selecting the option and clicking Submit.
Once the payment is Verified, the payment method will show as Completed and payment status will change to Paid. A Money Receipt can also be viewed and printed for the verified transaction to provide to customer.
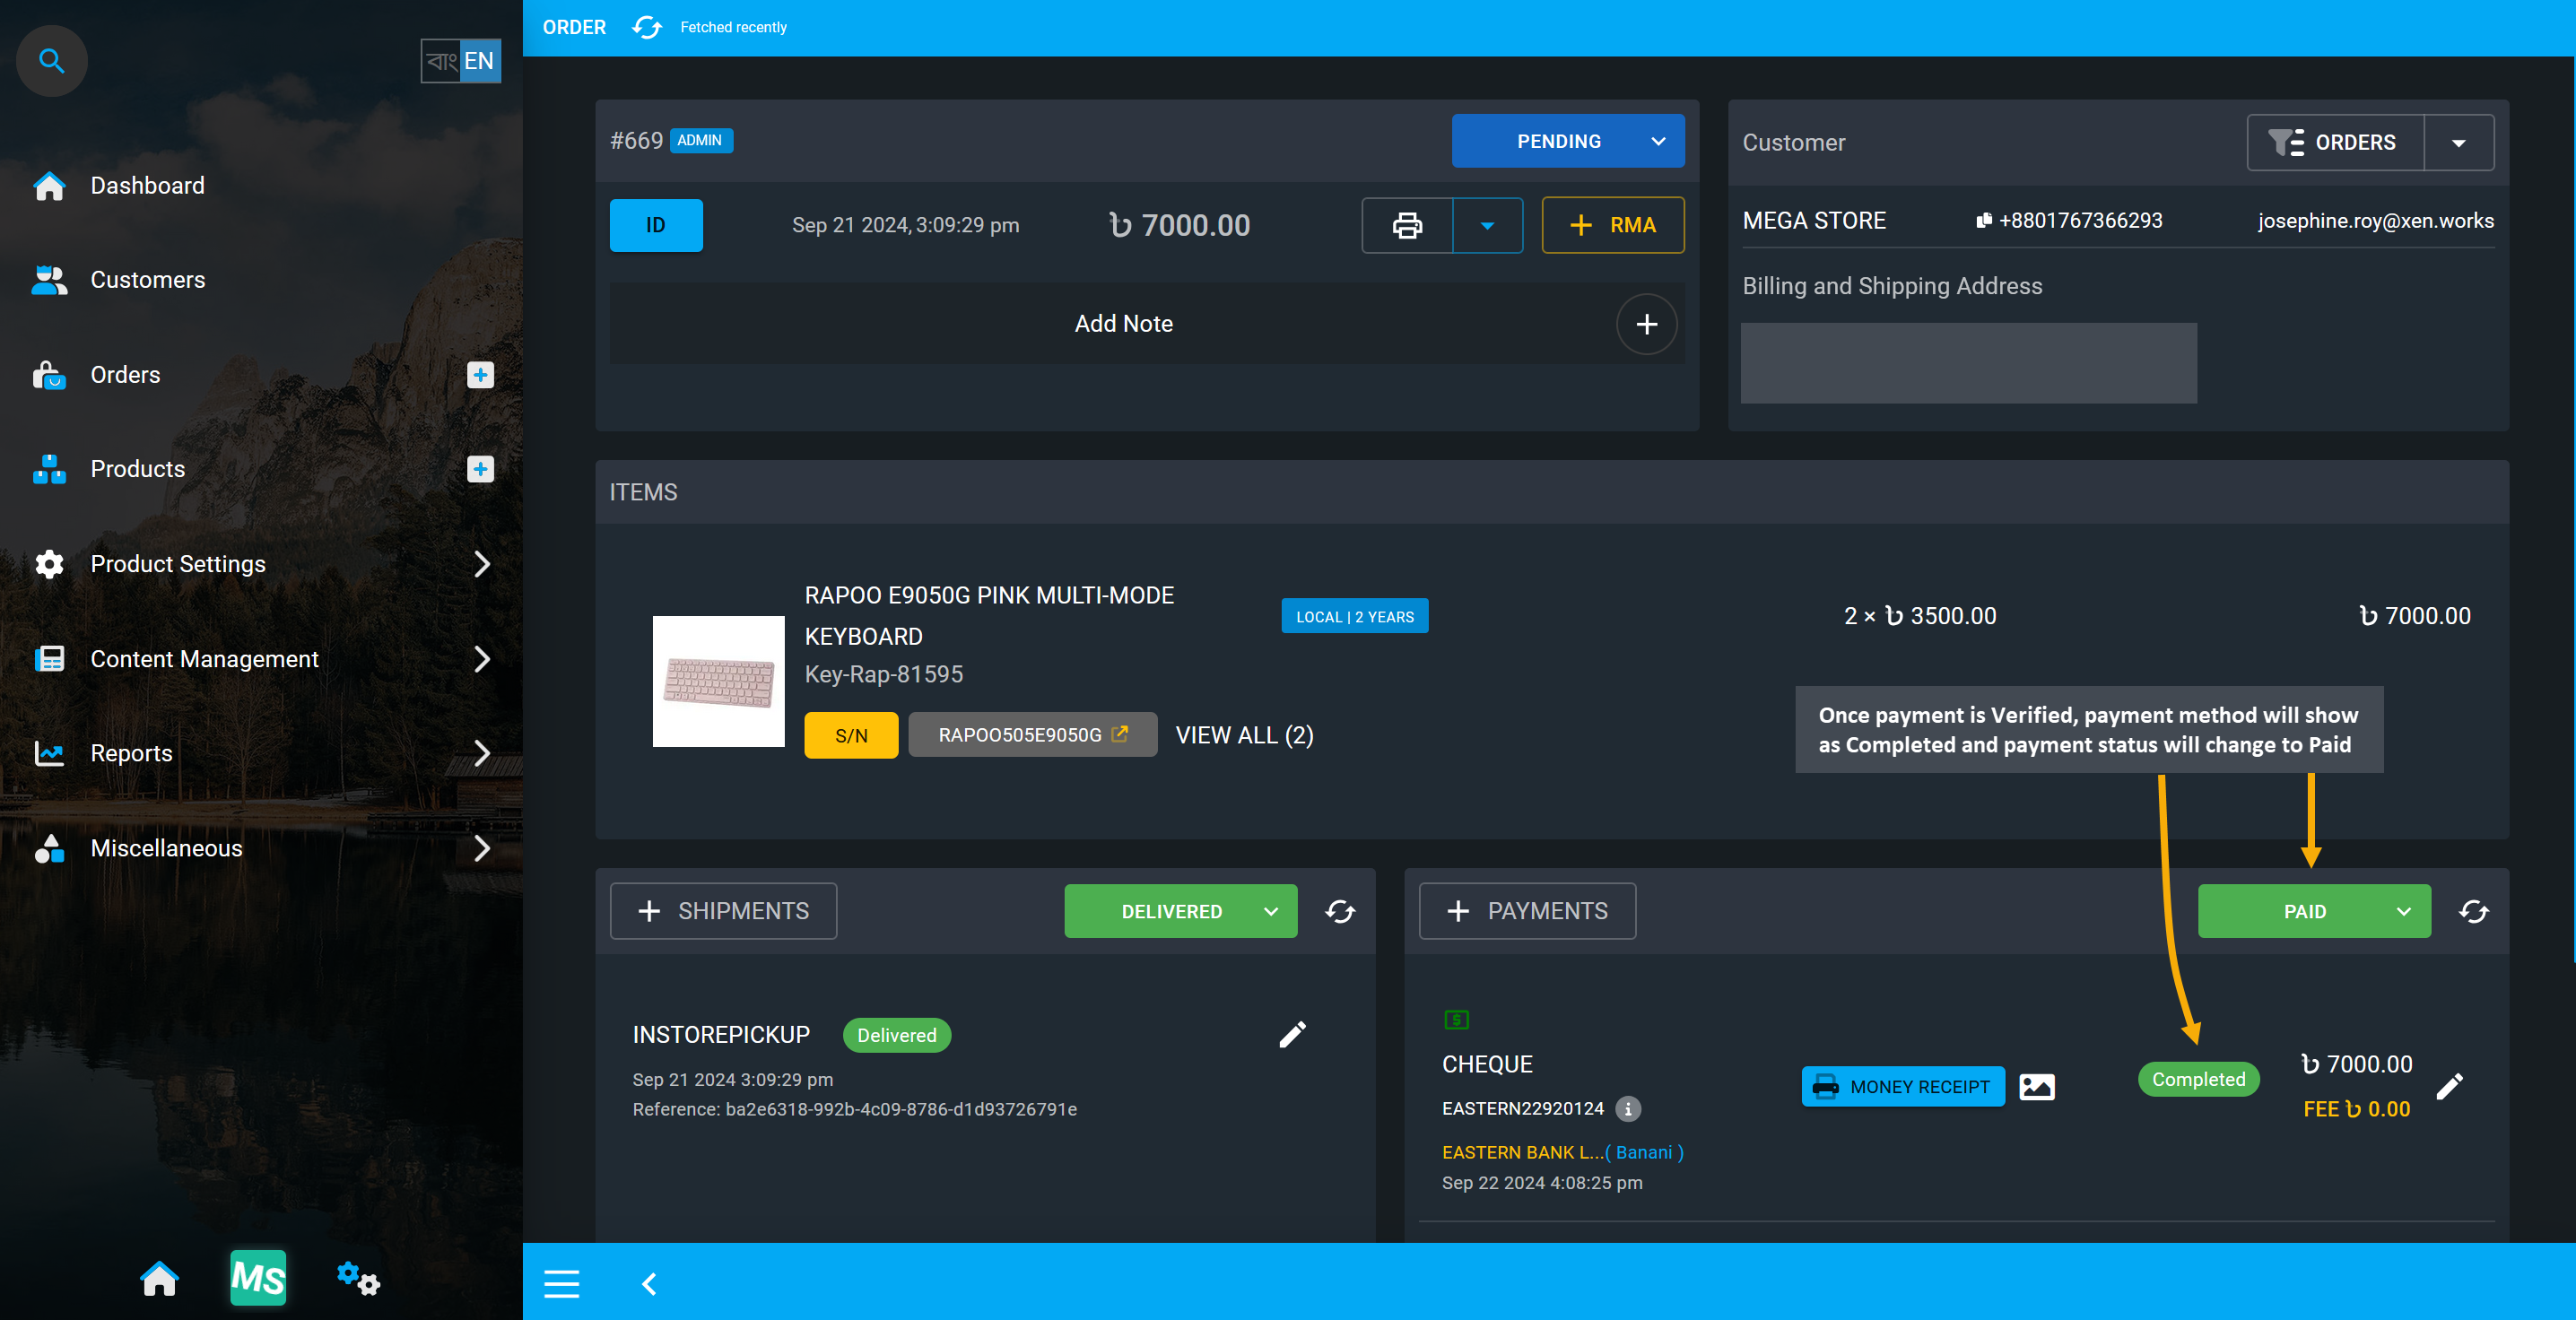
Image 9: Payment method will show as Completed and payment status will be Paid when verified.
After completing payment, if there is no remaining transaction and payment status is Paid, then Order status can be updated to Completed and later changed to only Canceled if customer requests cancelation.
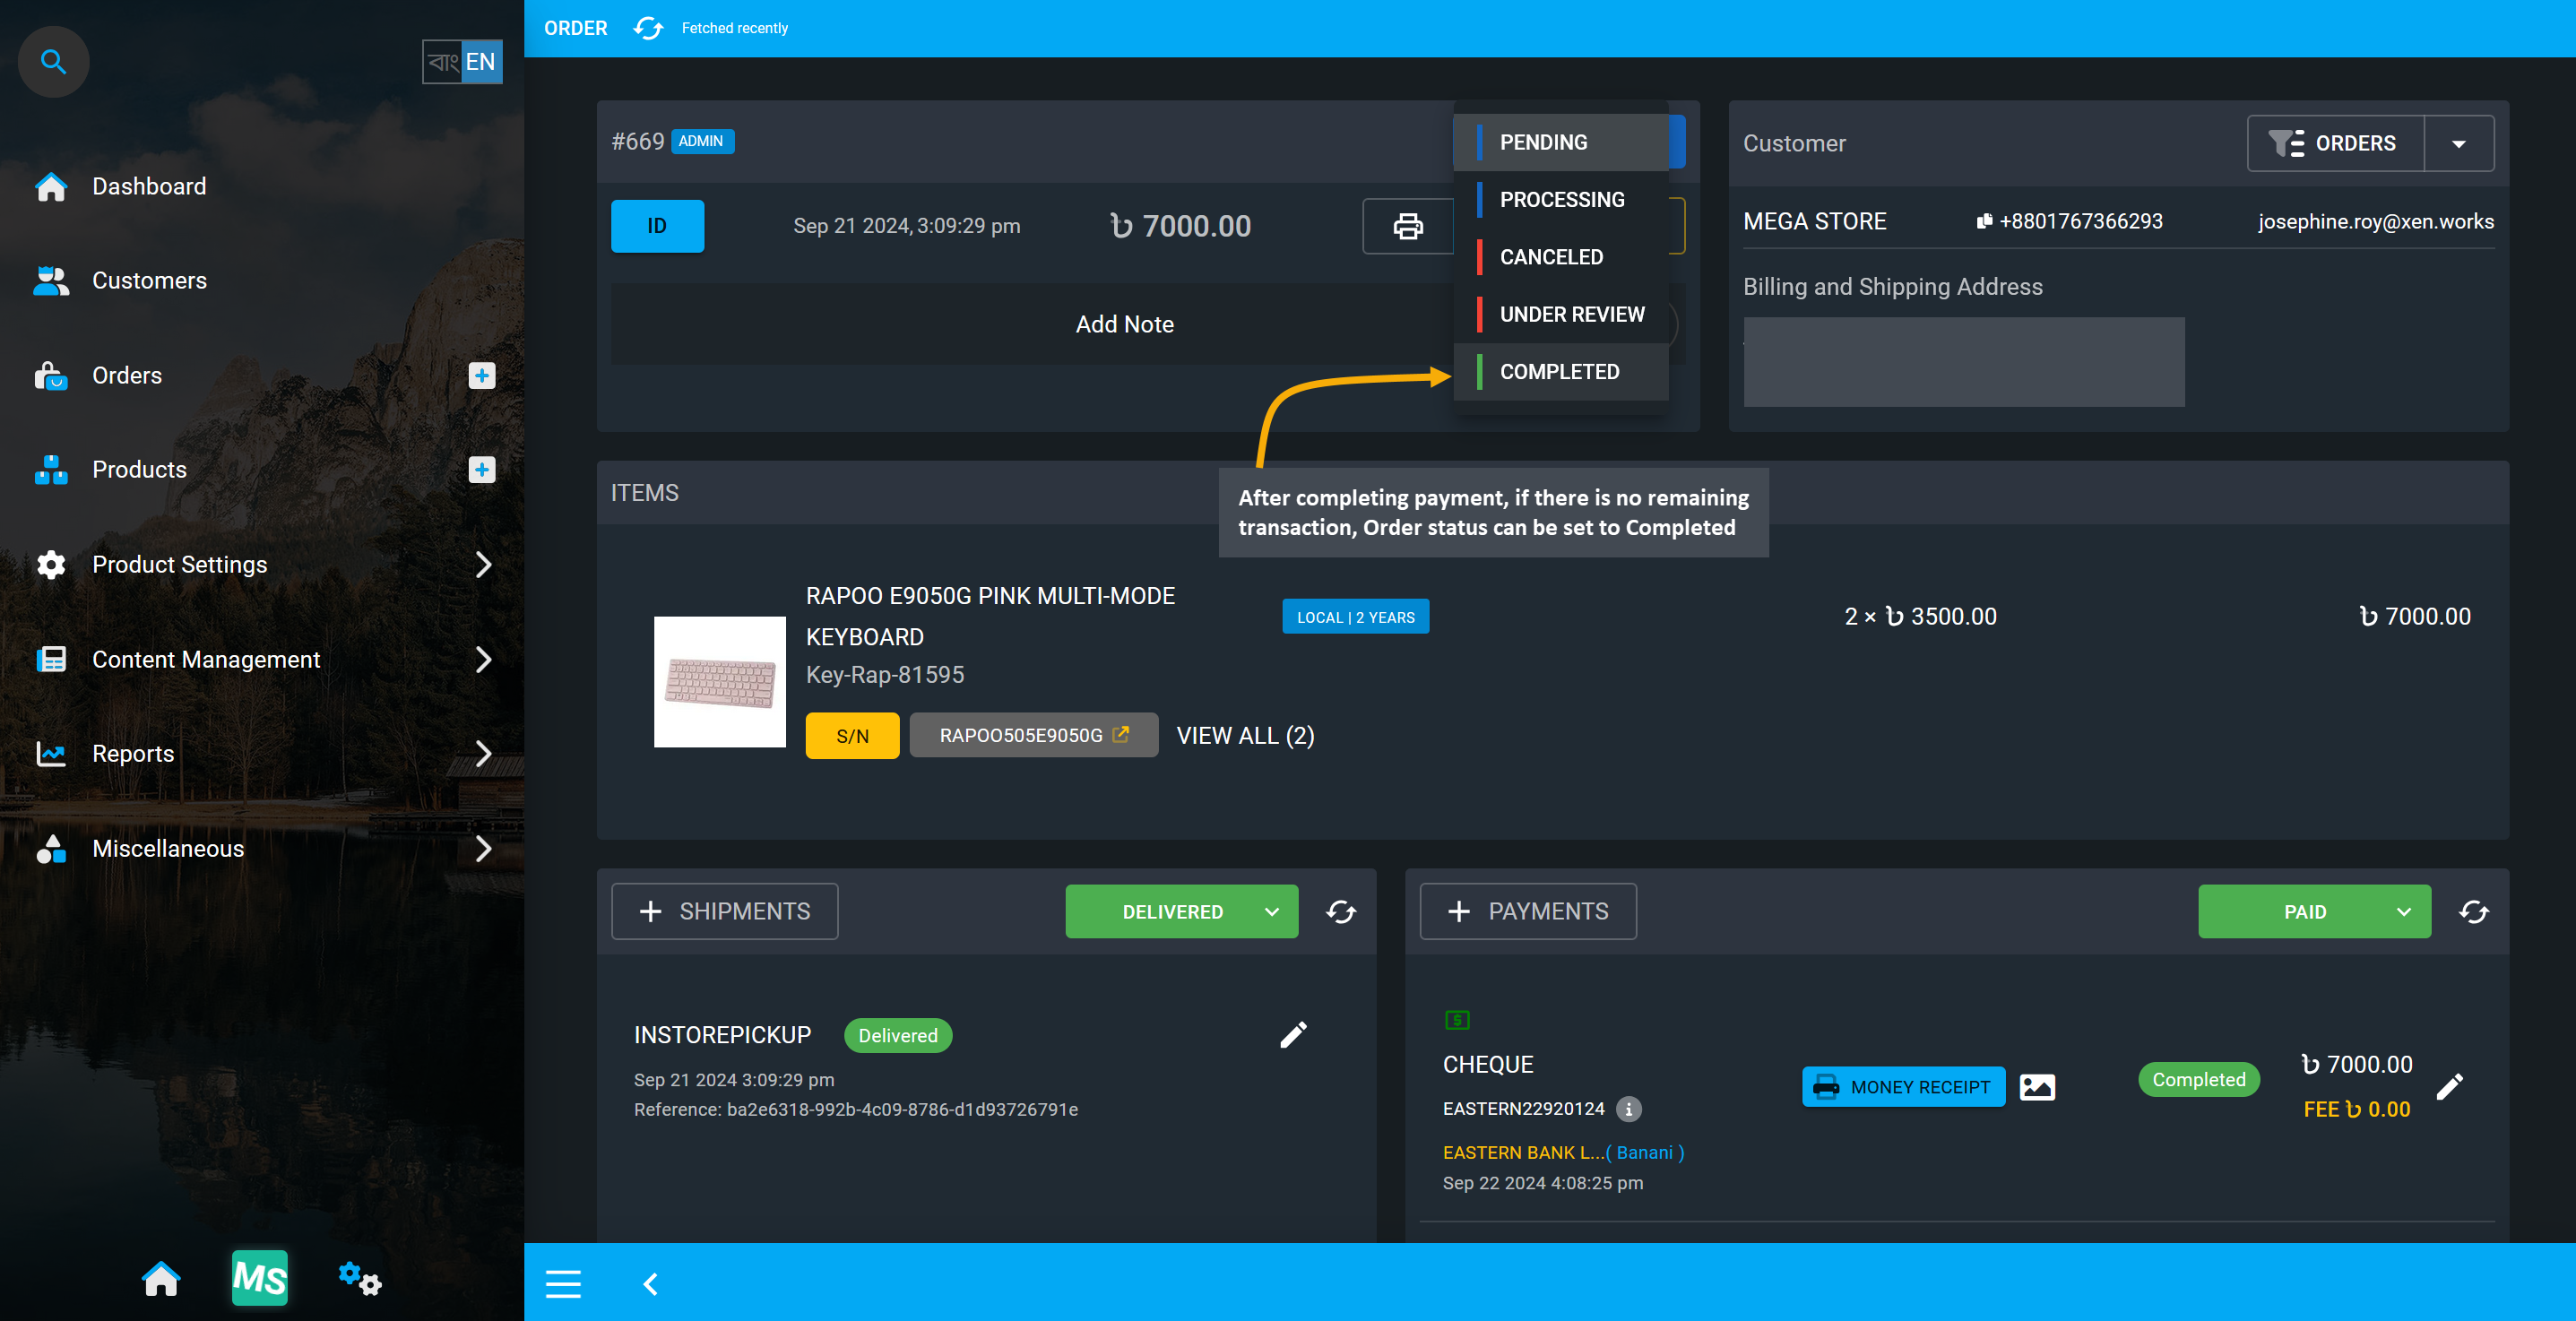
Image 10: If there is no remaining transaction for order, Order status can be set to Completed.
A modal will show up asking to confirm that the transaction status is updated, and if Order status should be updated to Completed too. Order status can no longer be changed after they are marked as Completed. Click Agree to update Order status to Completed after confirming that Order payment is completed.

Image 11: Click Agree to update Order status to Completed after confirming payment is completed.
Upon successfully confirming to update the Order status, Order status will now show as Completed, which means that the Order transaction is completed and the Order’s profit-loss will be added to Revenues.
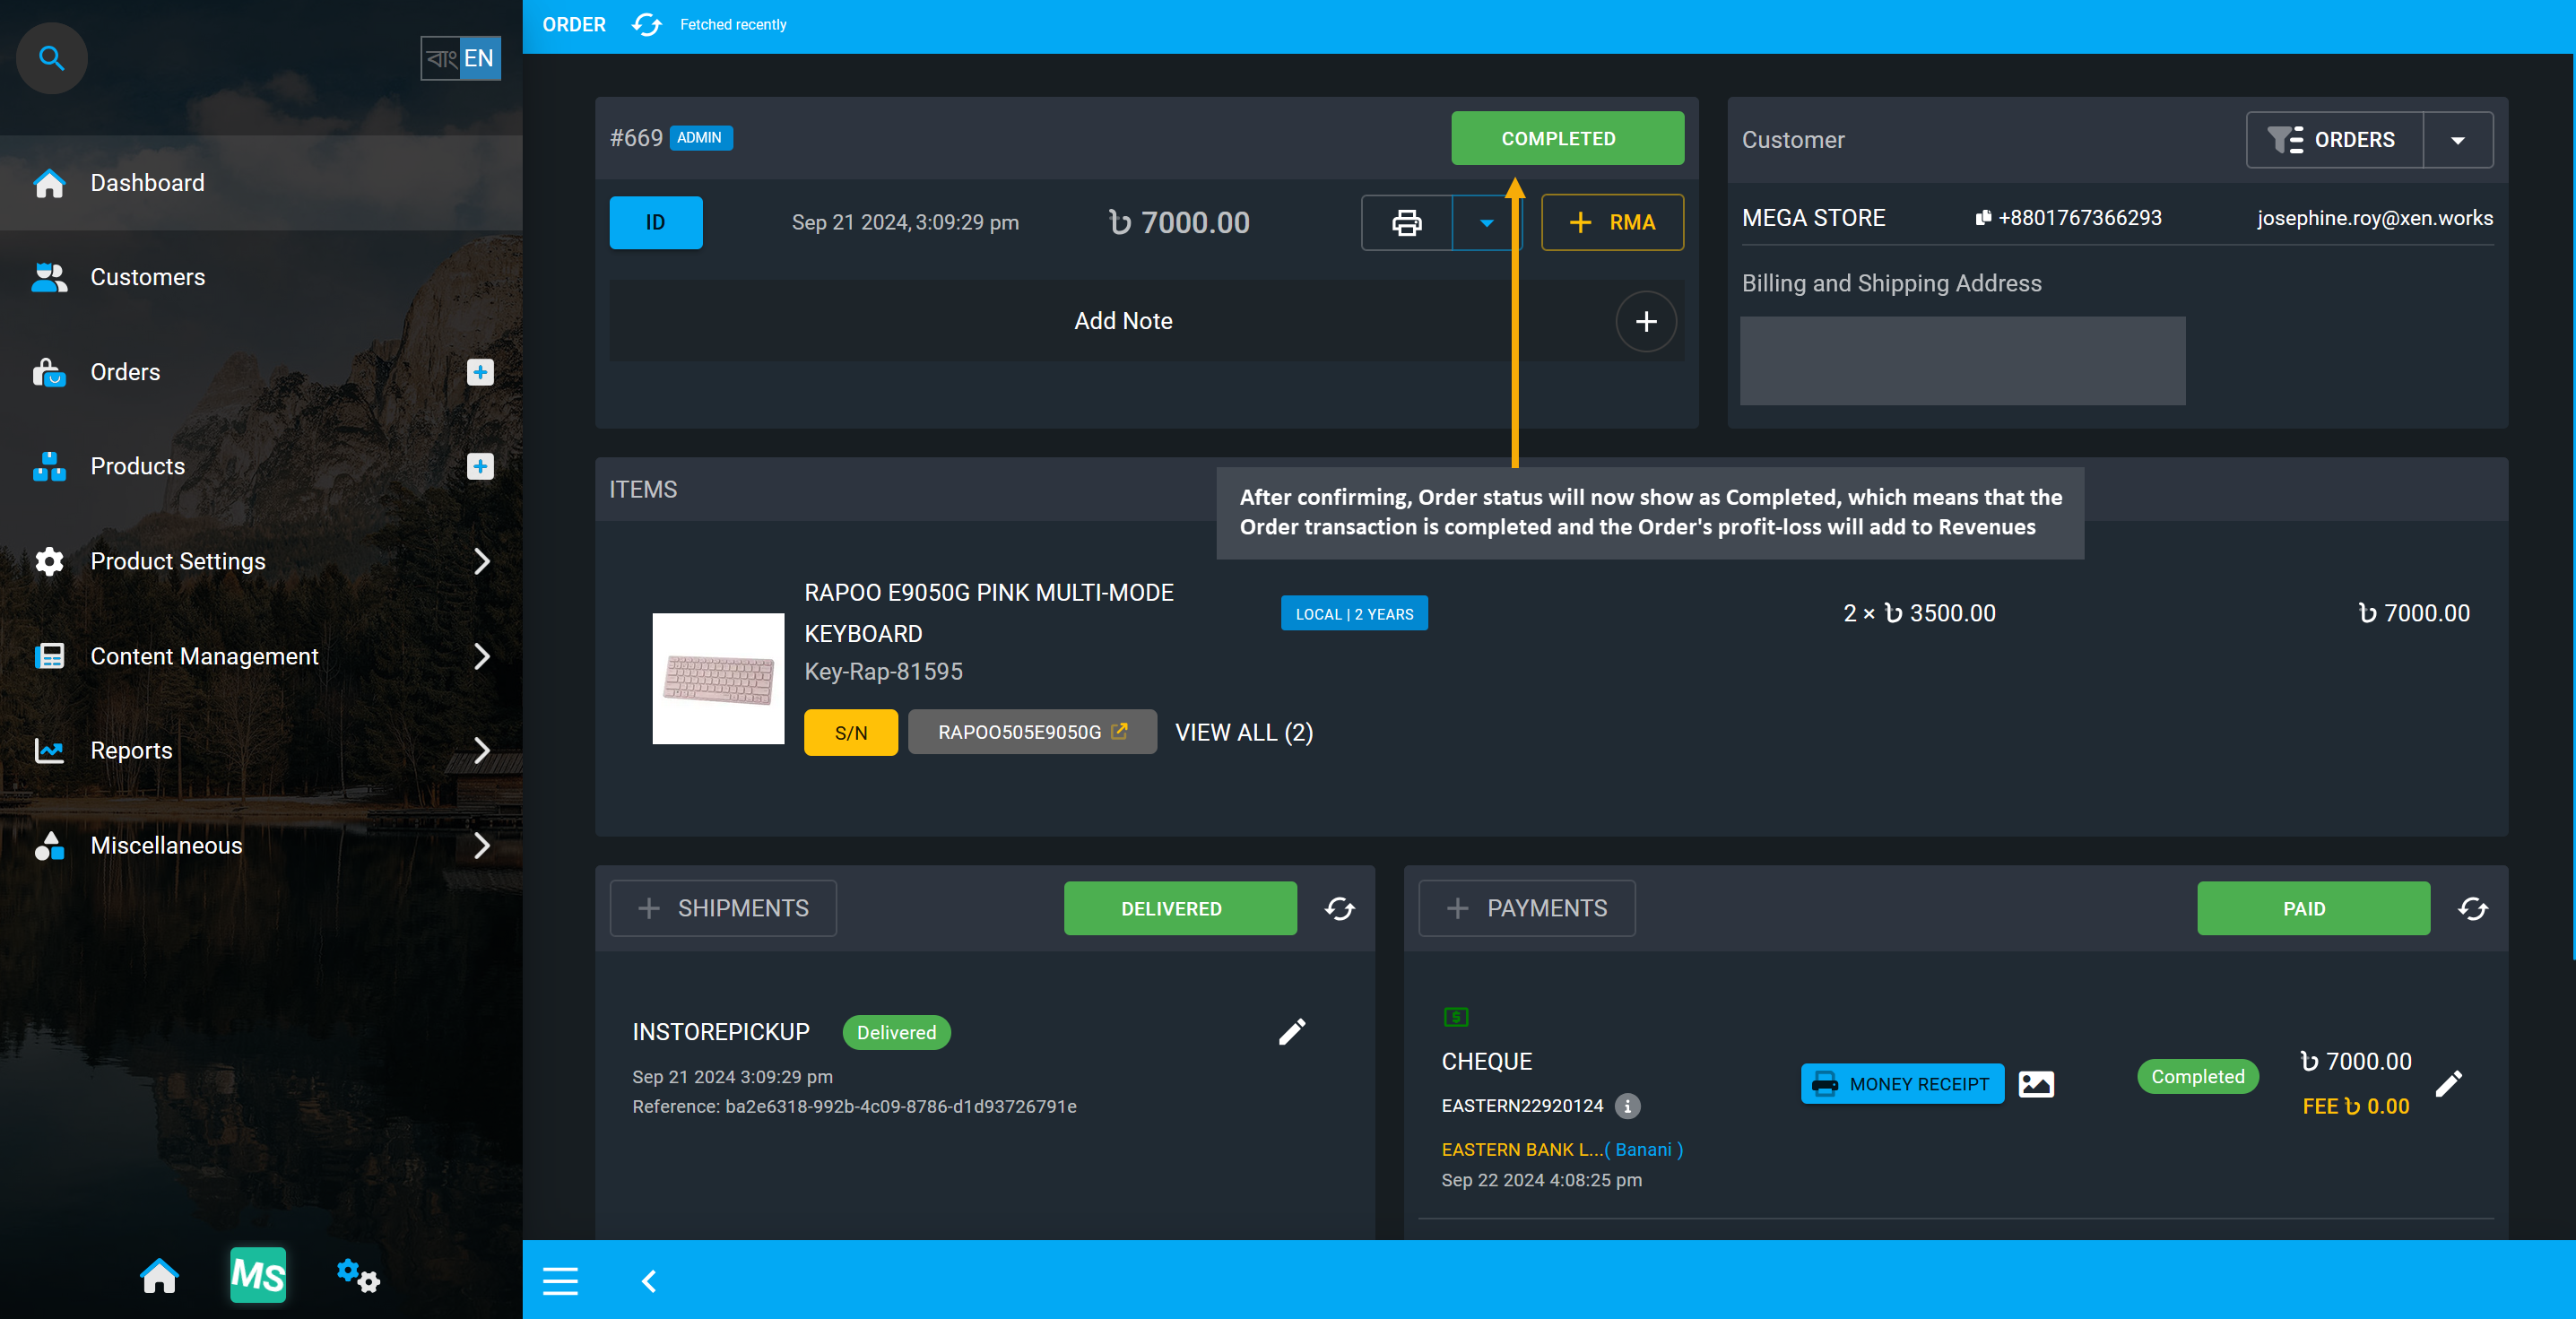
Image 12: Order status will now show as Completed, which means its profit-loss will add to Revenues.
Completed Orders on Order List Page will show Payment status as Paid and Shipment status as delivered.
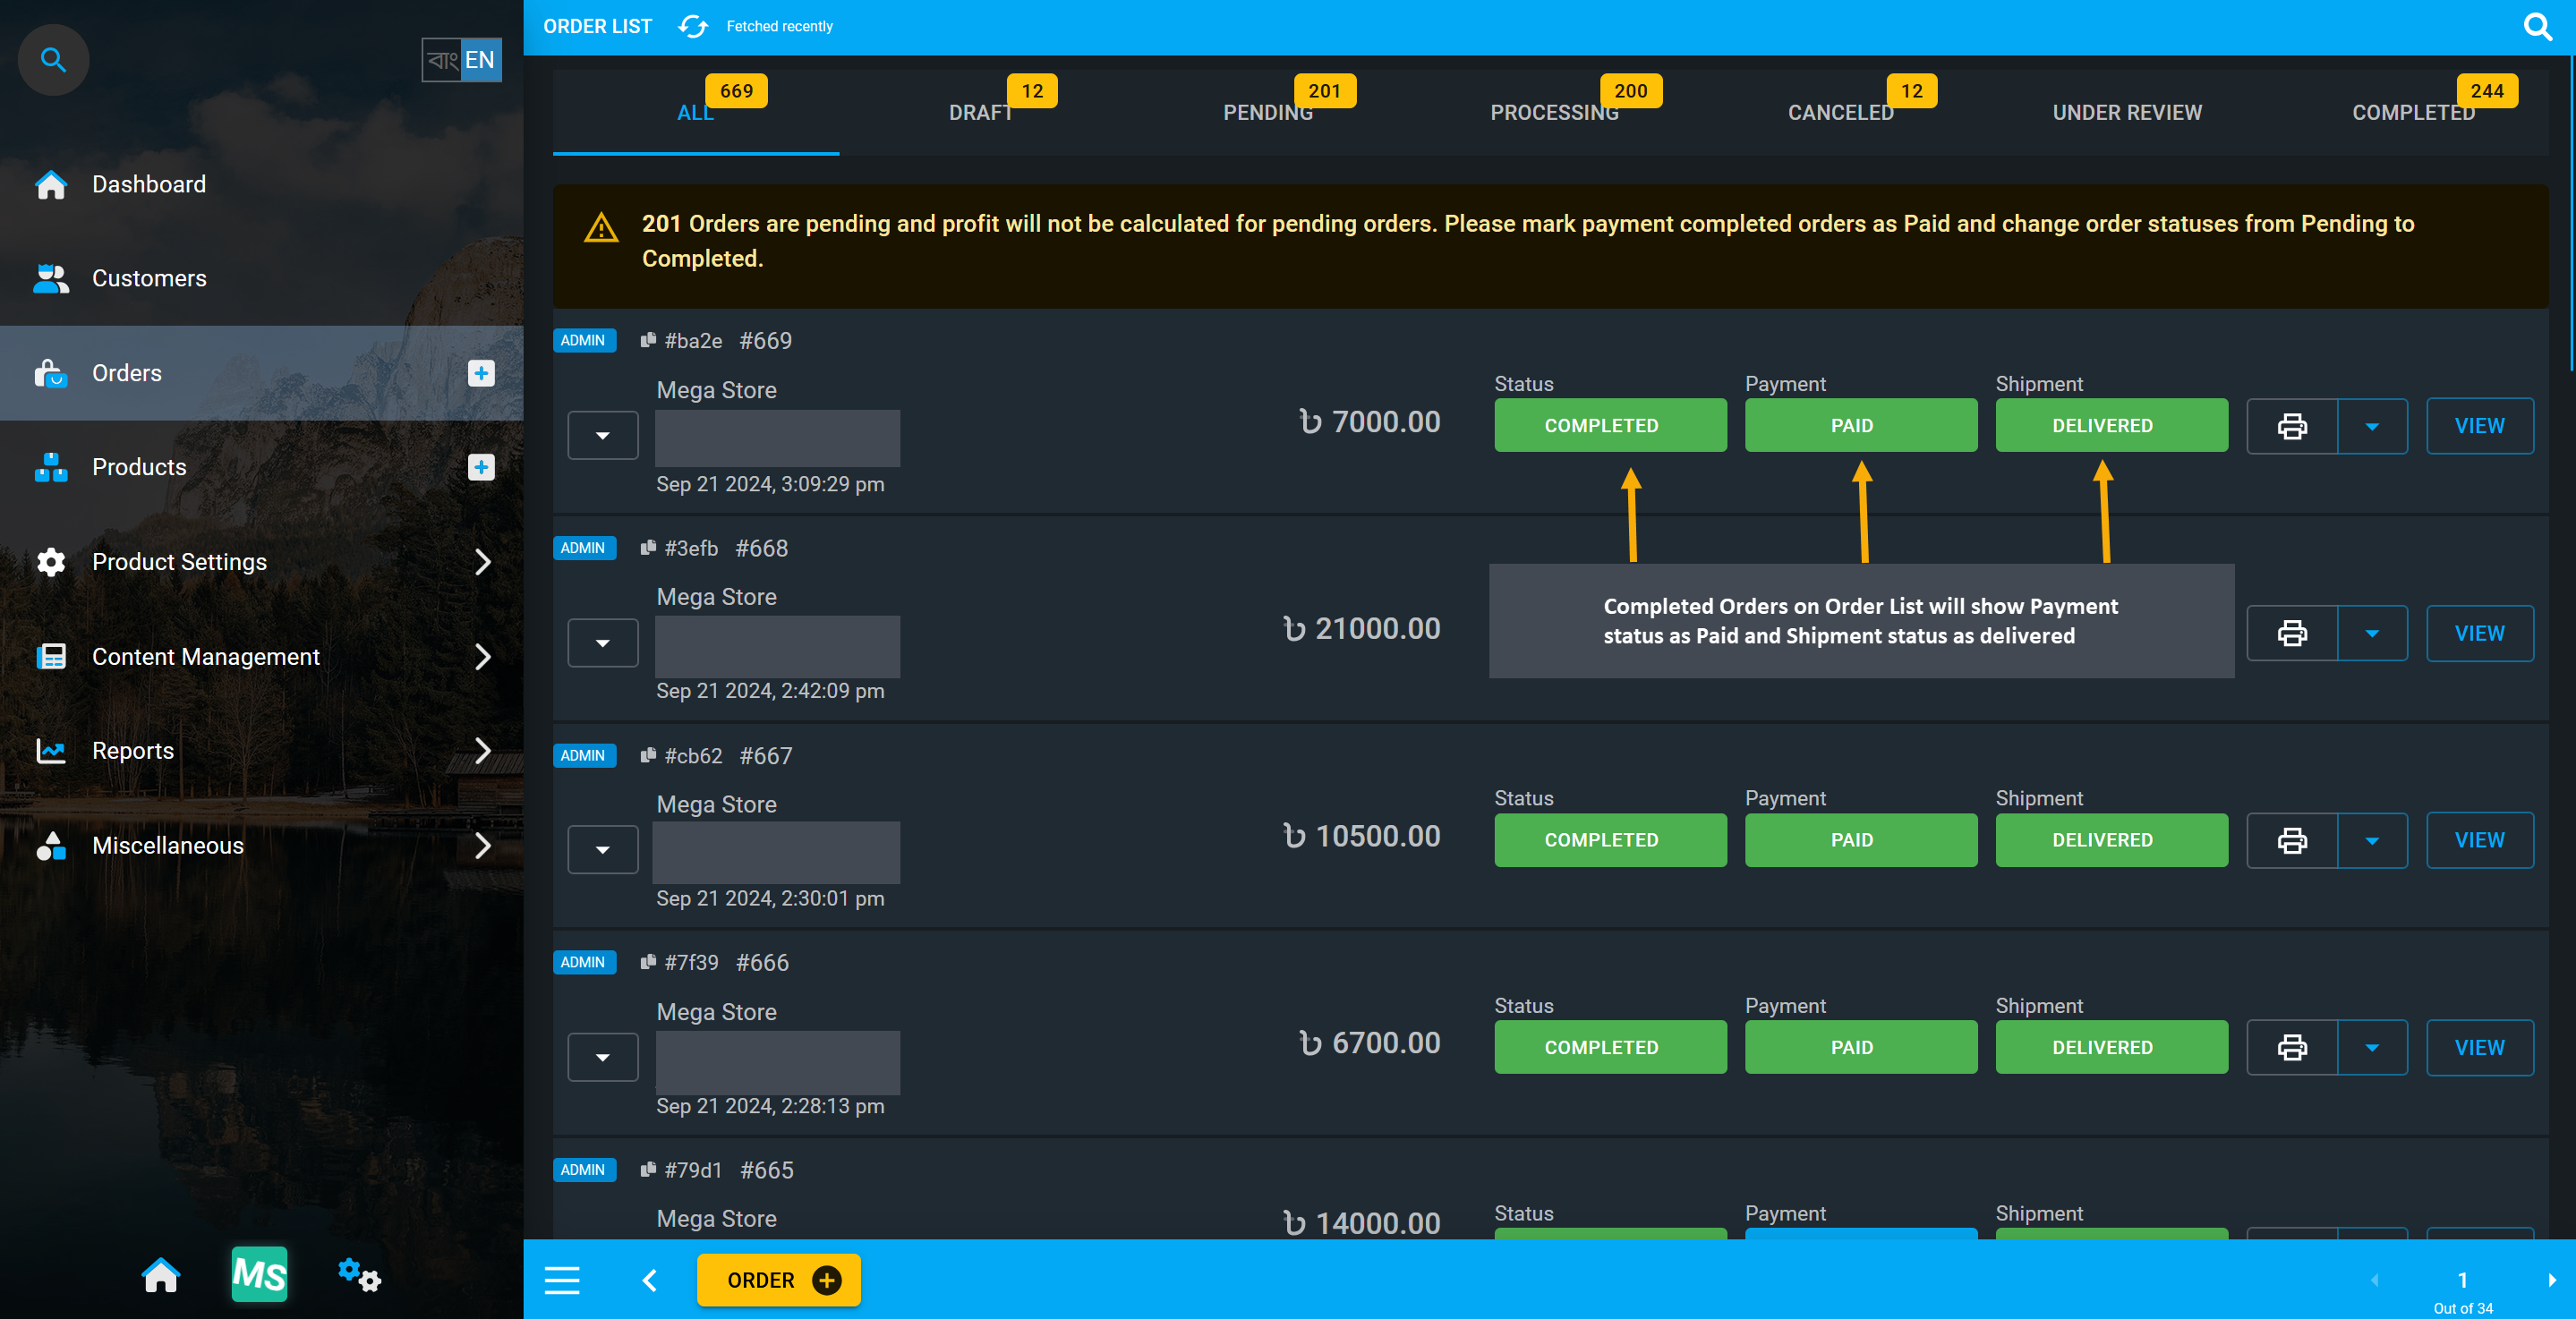
Image 13: All Completed Orders will show Payment status as Paid and Shipment status as delivered.
Enable Draft Order (Order Without Payment)
If an Order is created without payment, with the Enable Draft Order option enabled from Settings, then the Order will be held in a Draft status and cannot have payments or shipments added. Draft Order will not also show on Ledger unless the Order status is changed to Pending. The Enable Draft Order option can be found from Web Settings under Config your Business of All Settings.
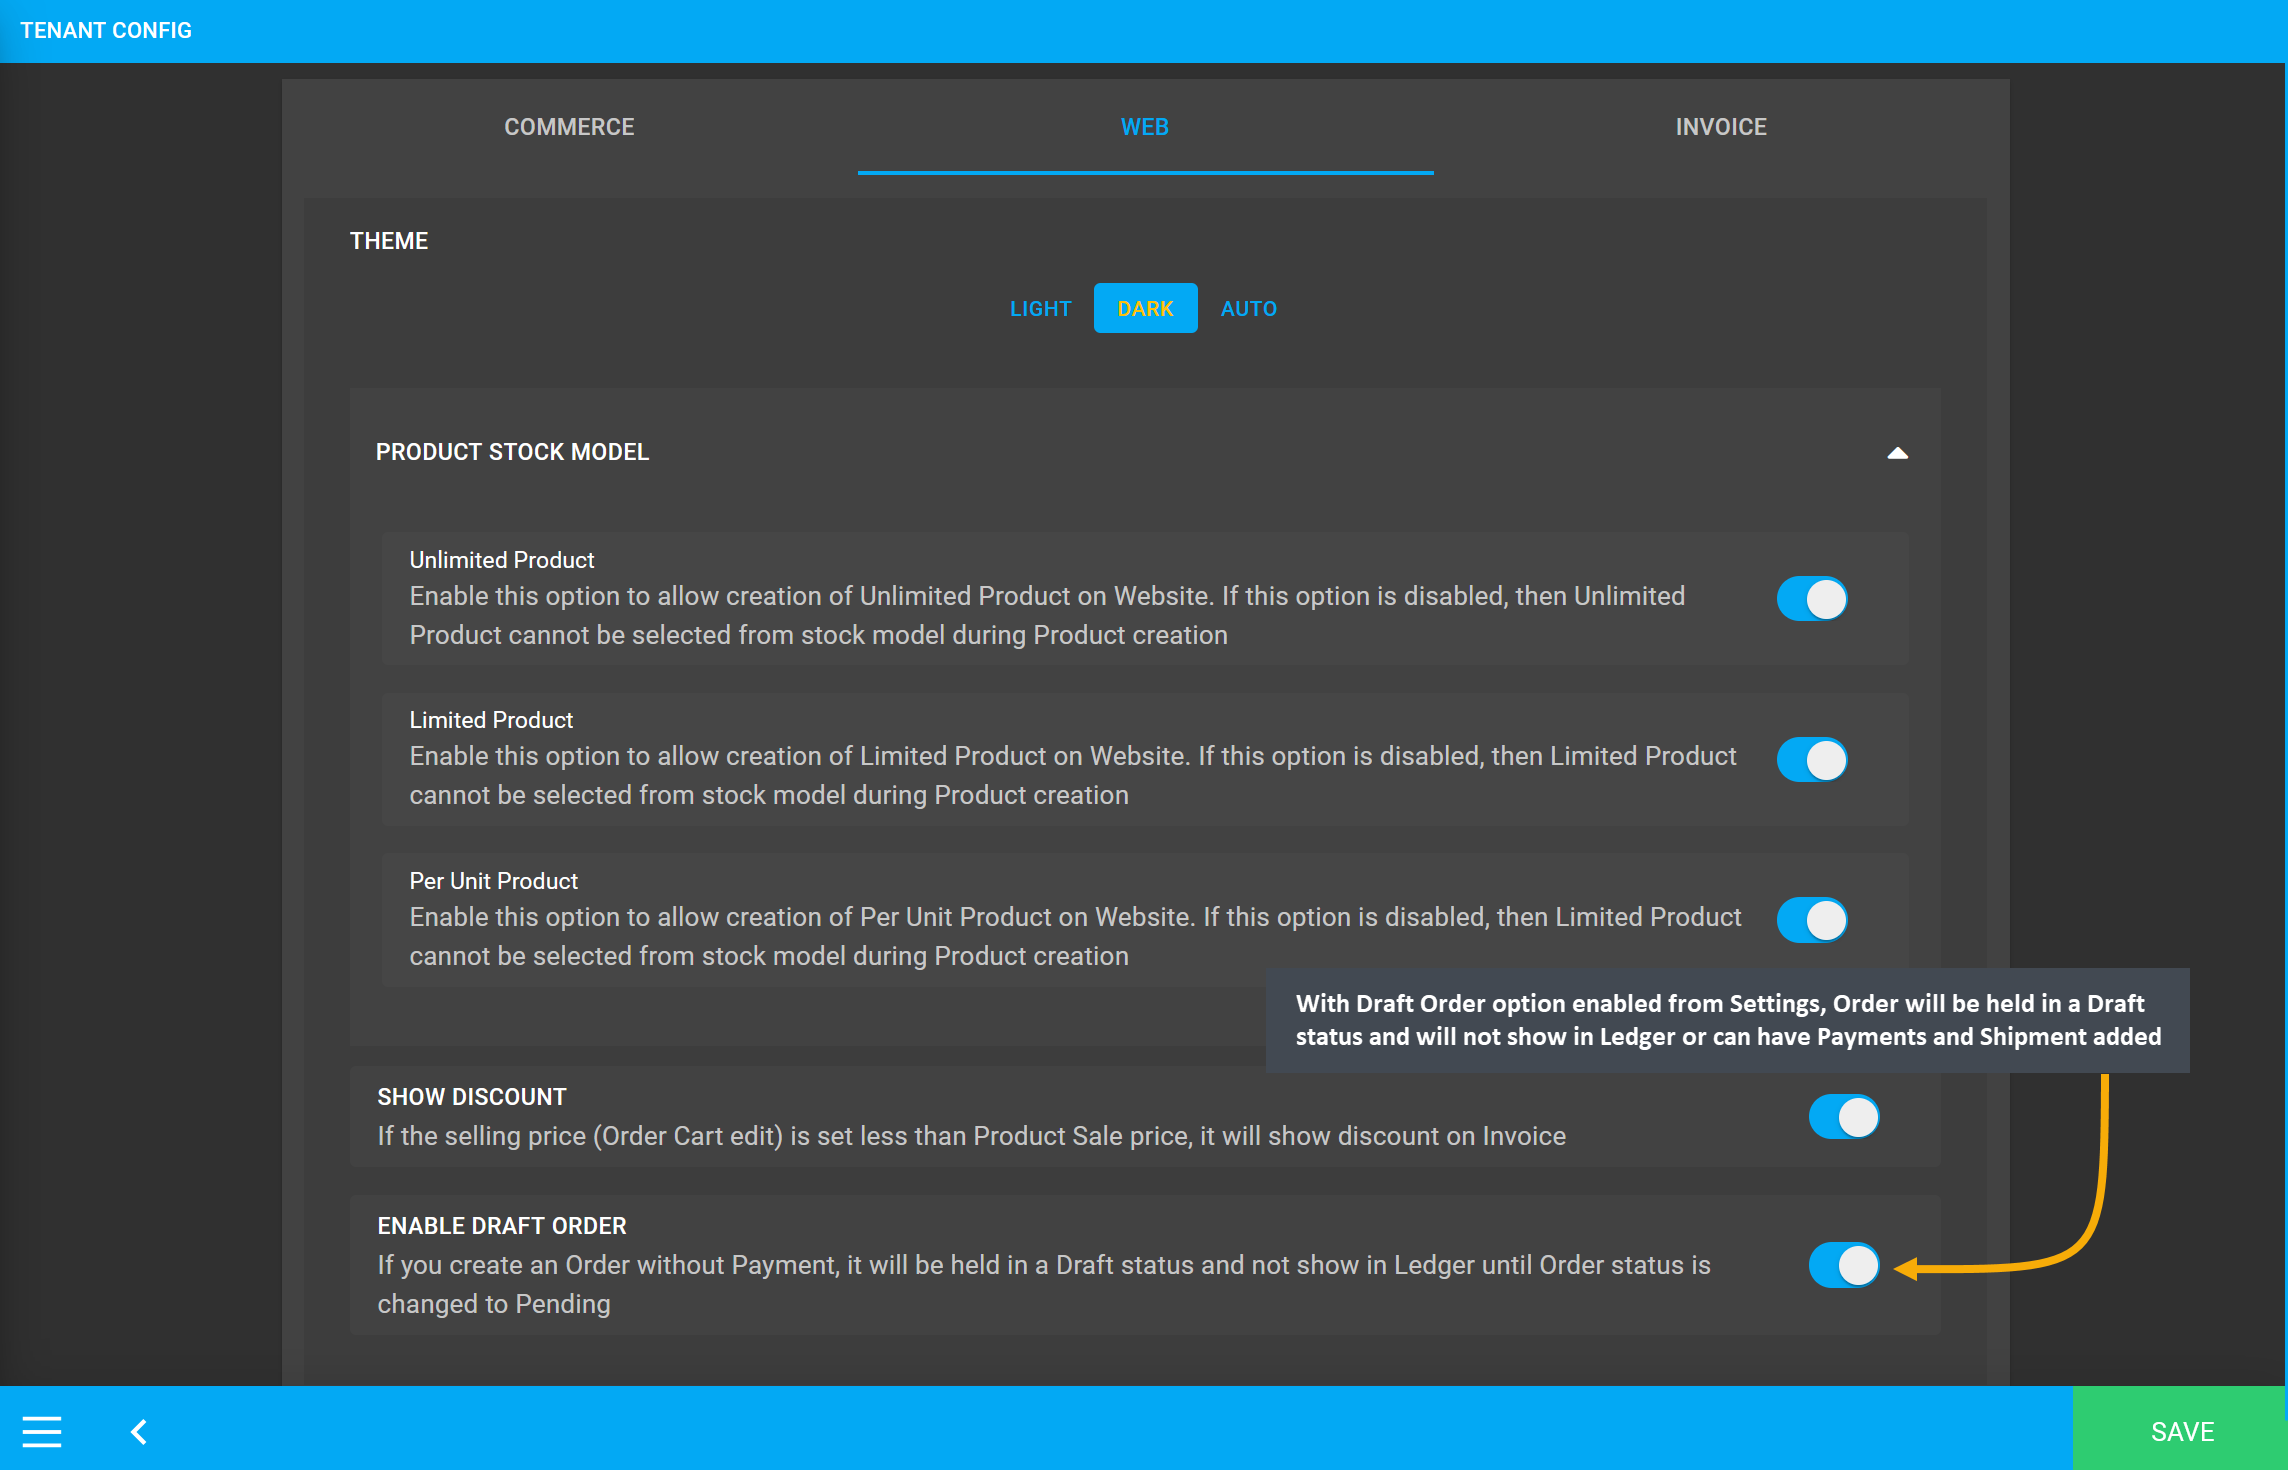
Image 14: With Draft Order option enabled from Settings, Order will be held in a Draft status.
When an Order is completed without selecting any payment on Order Cart, the Order will be created as a Draft Order. Payments and Shipment cannot be added for a Draft Order, unless Order status is changed to Pending. Draft Order will not also show on Ledger, it will show on Ledger only after Order status is changed to Pending. Example screenshots are provided in following steps.
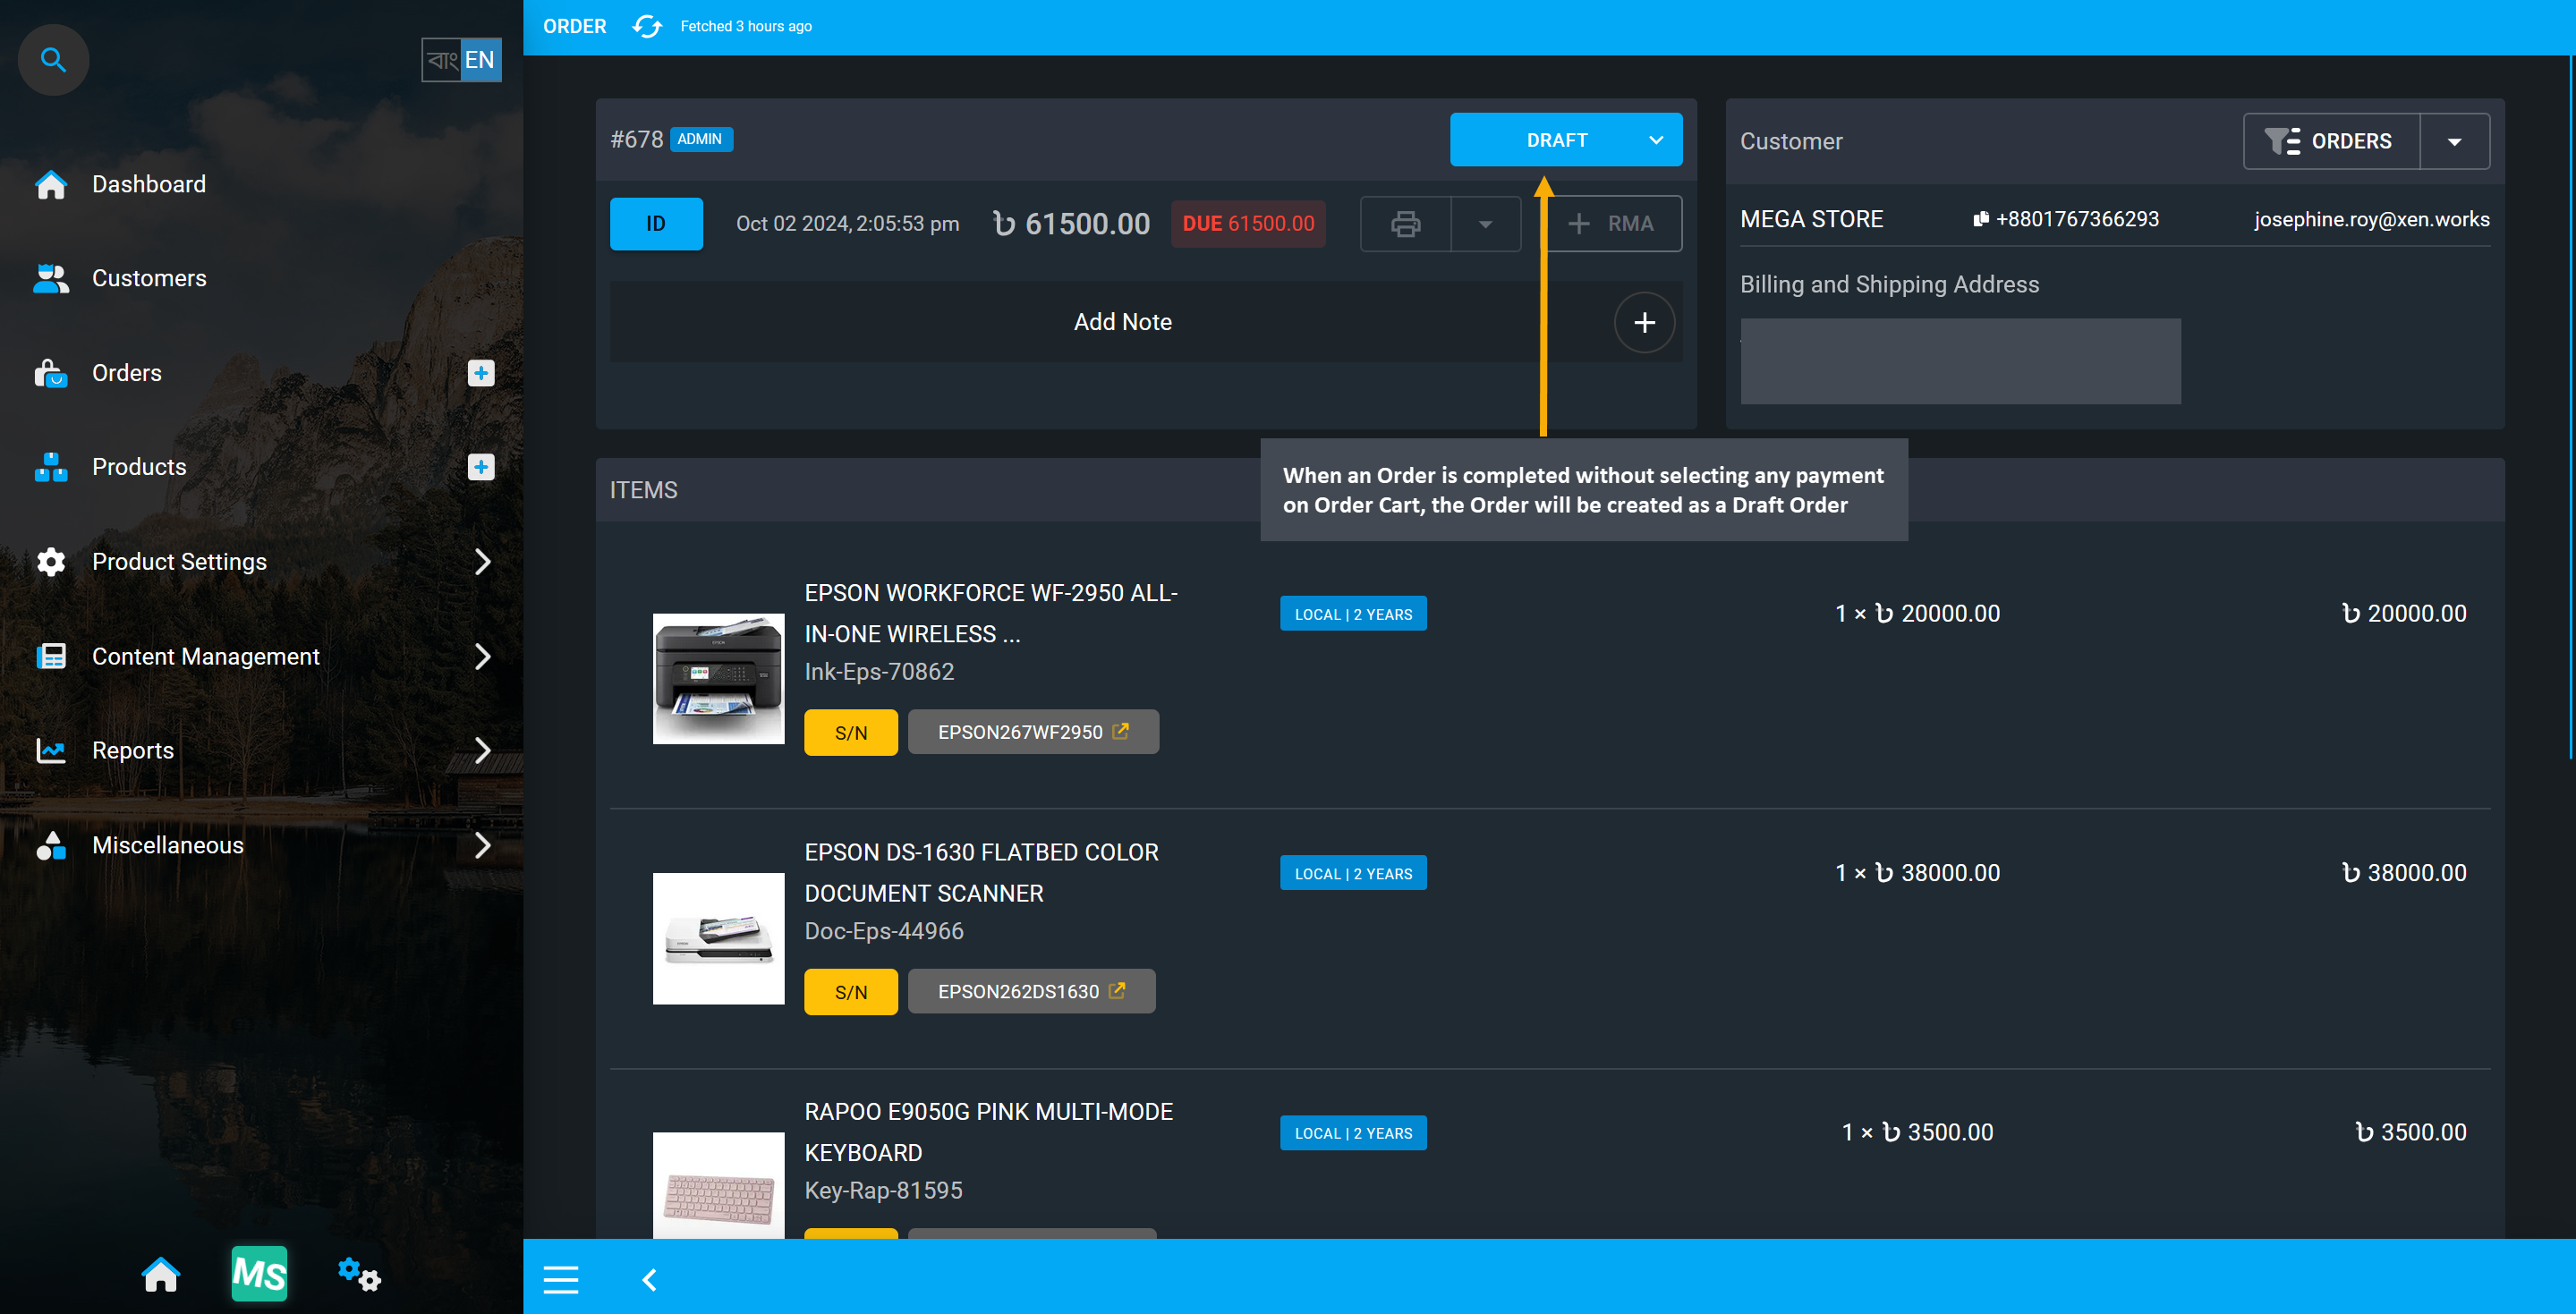
Image 15: Order will be created as a Draft Order when it is completed without selecting any payment.
When an order is a Draft Order, no Payments or Shipments can be added to it unless the Order status is changed to Pending. Payments and Shipments tabs are disabled for Draft Orders.
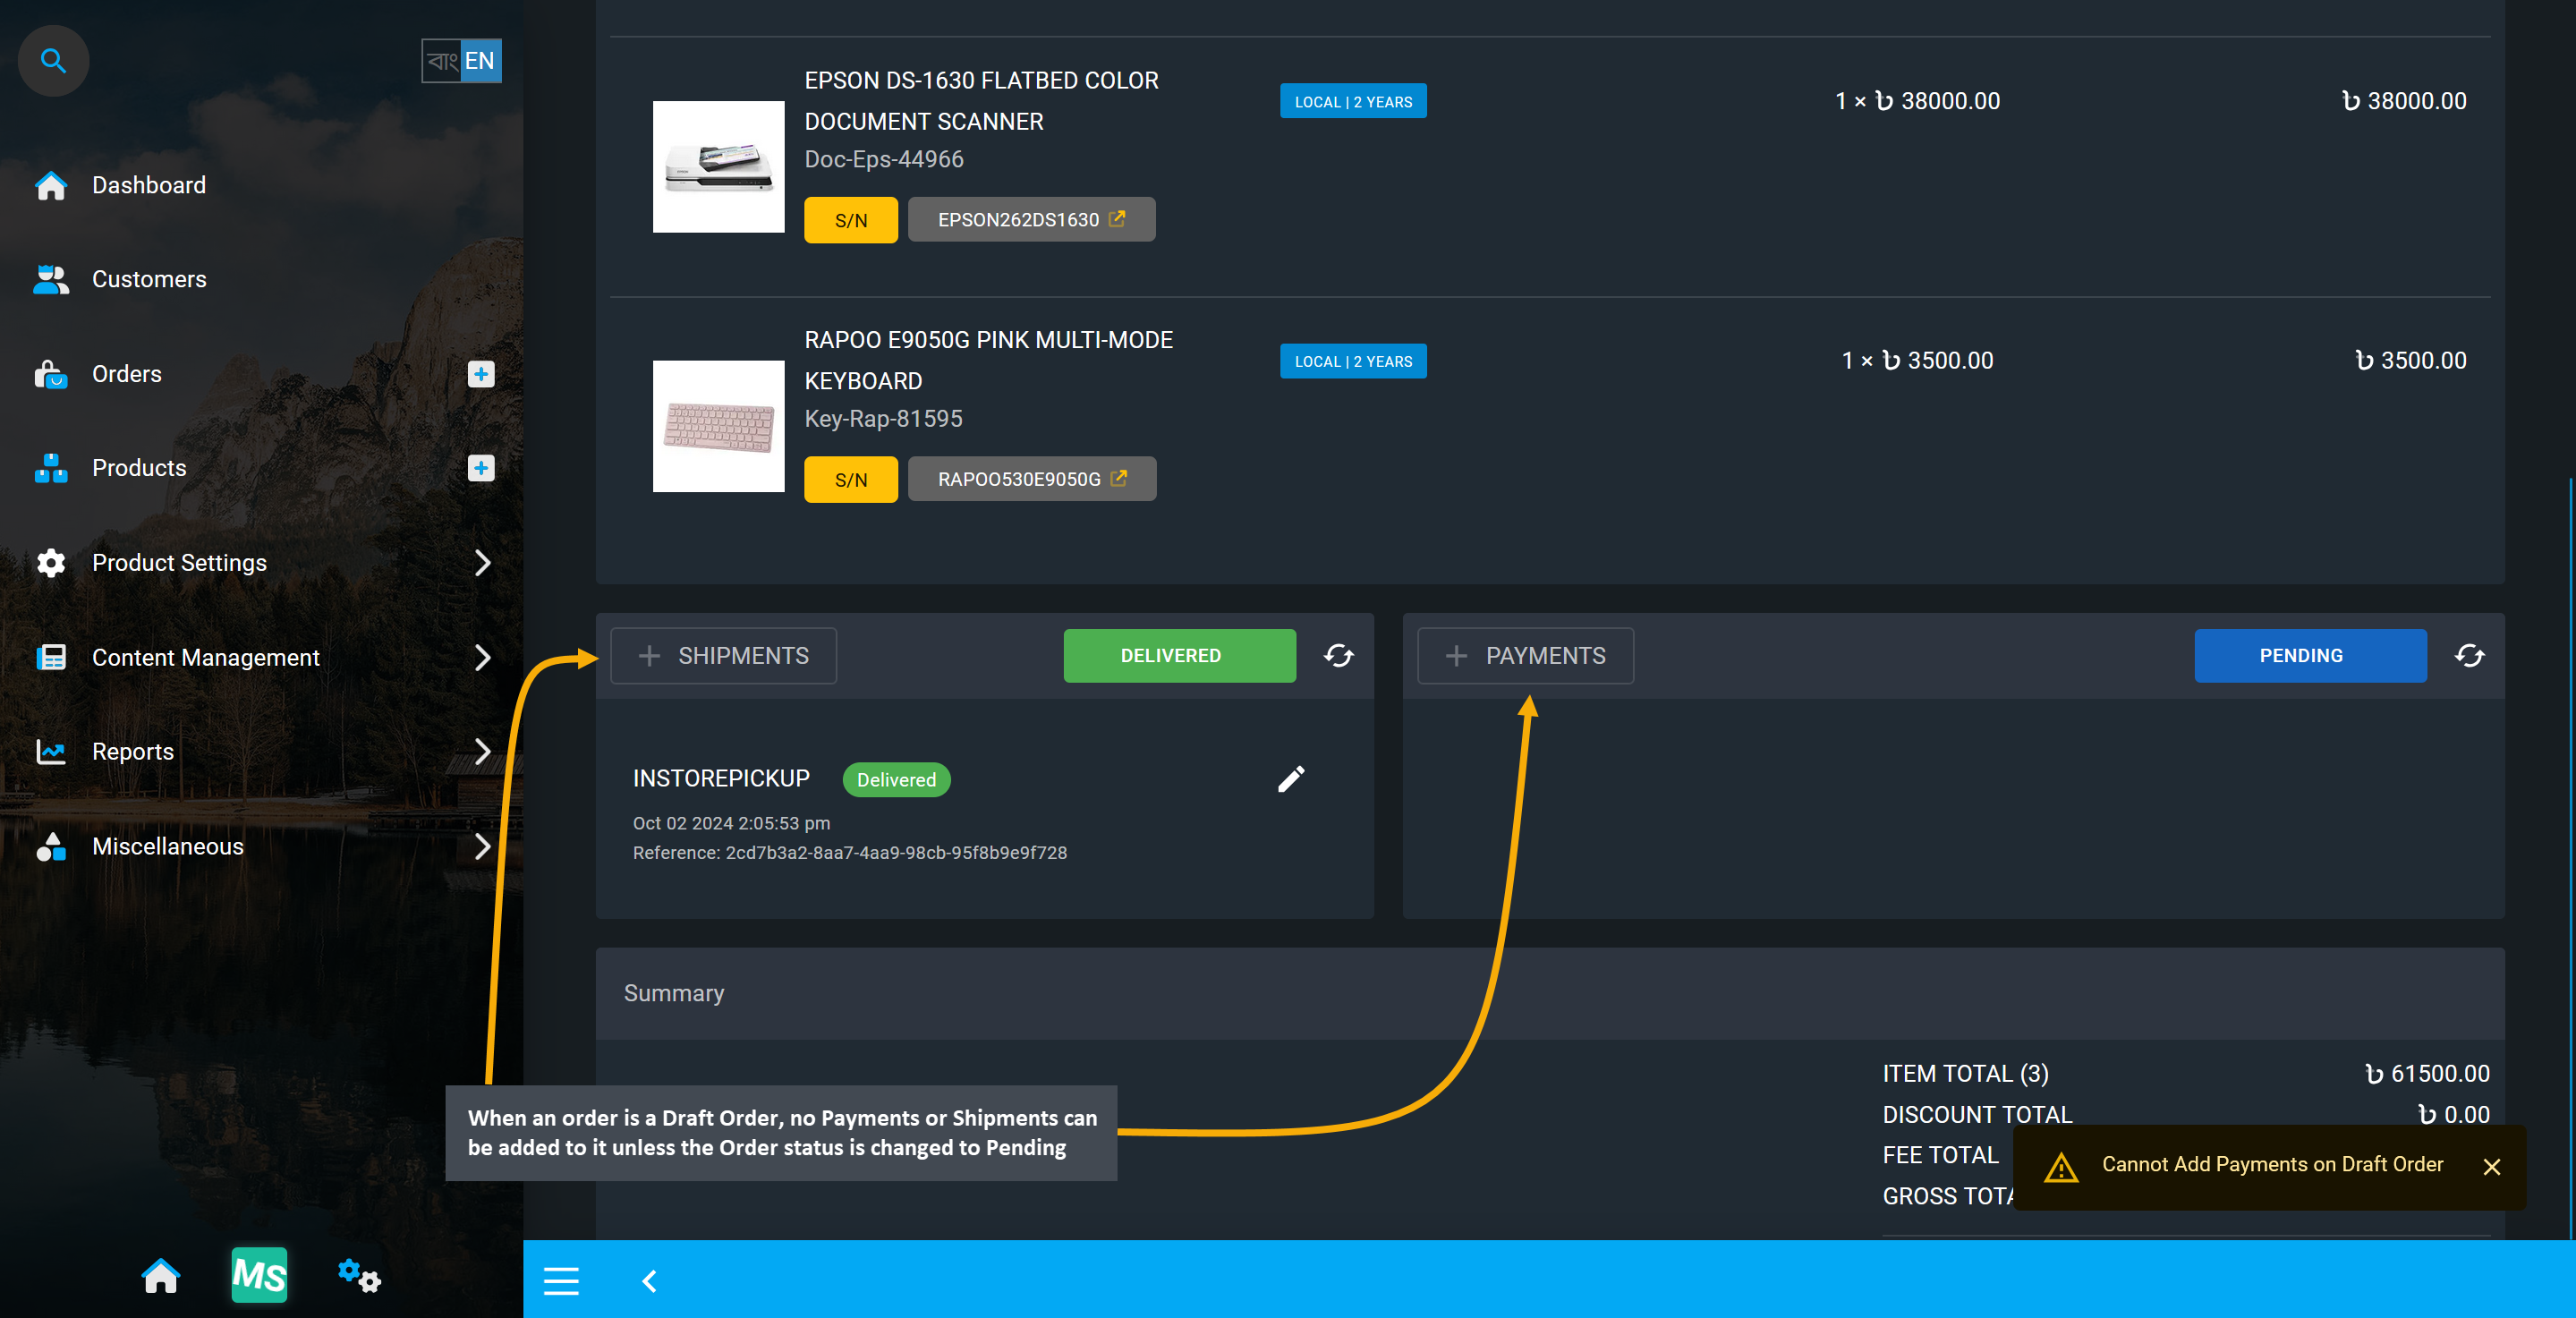
Image 16: Payments or Shipments are blocked for Draft Order till Order status is changed to Pending.
So, after Order status is changed to Pending, Payments and Shipments can be added to Order to view and print invoice. With Pending Order status, order transaction details will also show on Ledger.
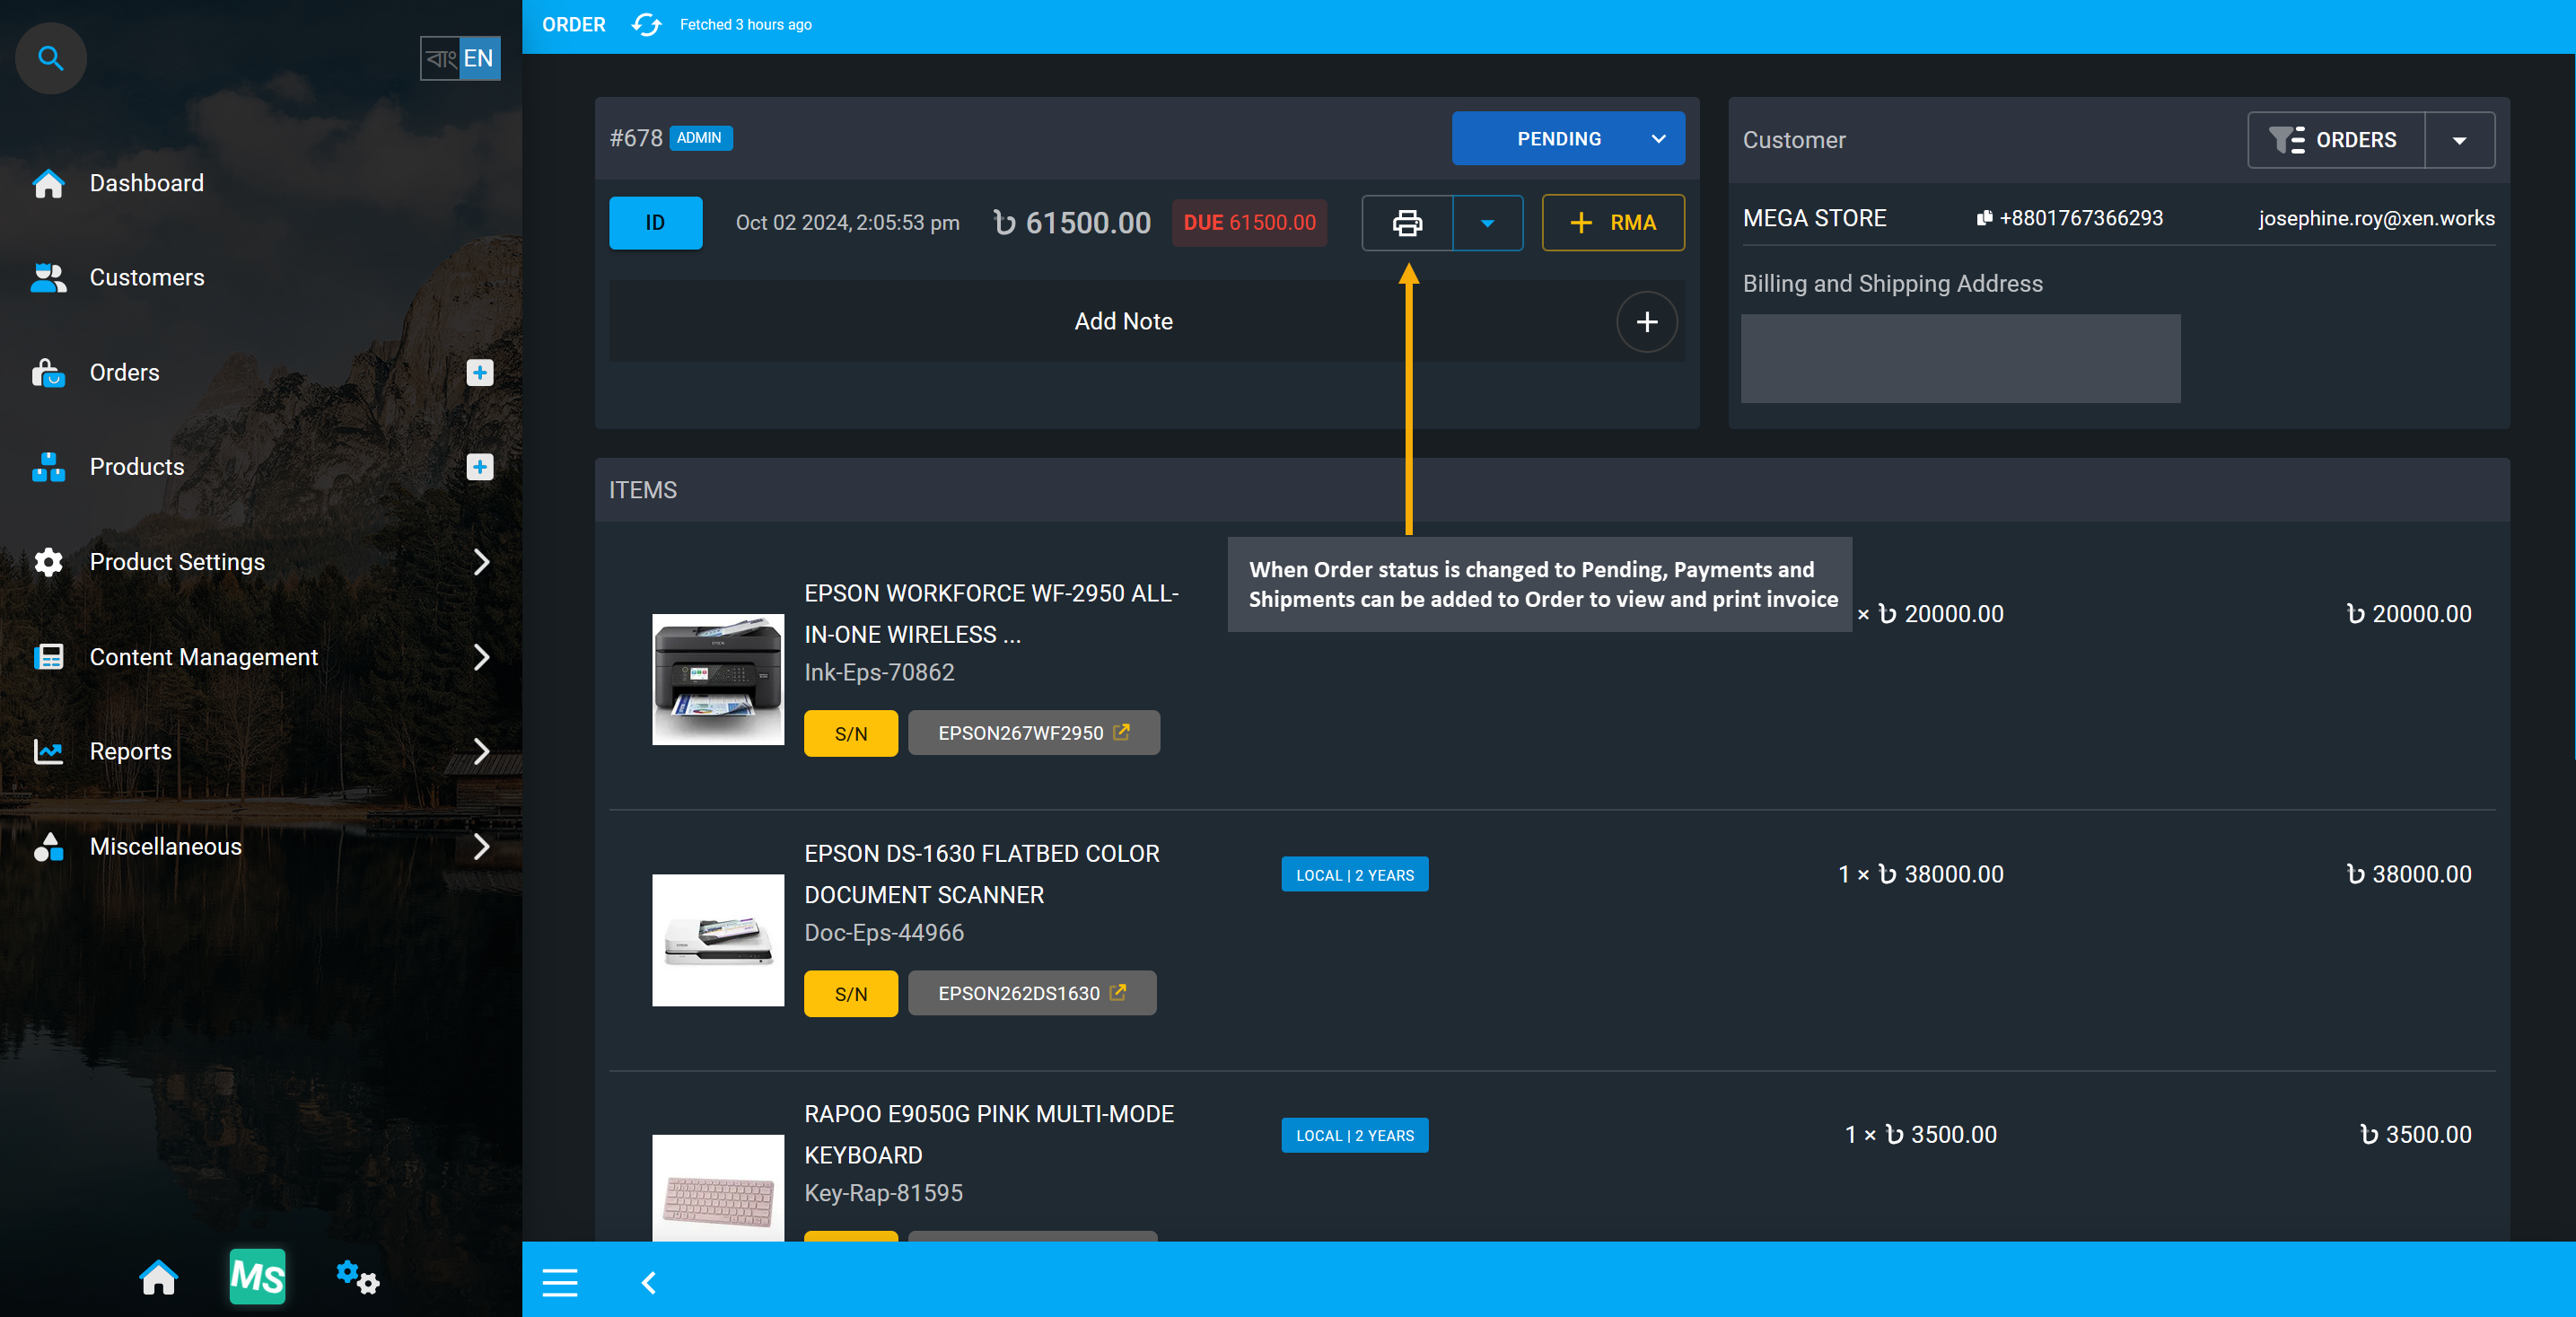
Image 17: When Order status is changed to Pending, Payments and Shipments can be added to Order.
Create Multiple Transactions for Payment
In certain cases, a Shop Owner may need to add Multiple Transactions if one transaction could not have successful verification and is Failed, while another transaction may work to be successfully Completed for an Order’s payment. So, seller can use the Payments button to add multiple transactions like Cash, Cheque, or BKash (Manual) to complete total Order payment on behalf of the Customer from Admin Panel. Using the Edit button, they can change Transaction Status by selecting from Completed or Failed to keep number of transactions that were successful and click Submit to complete the payment process.
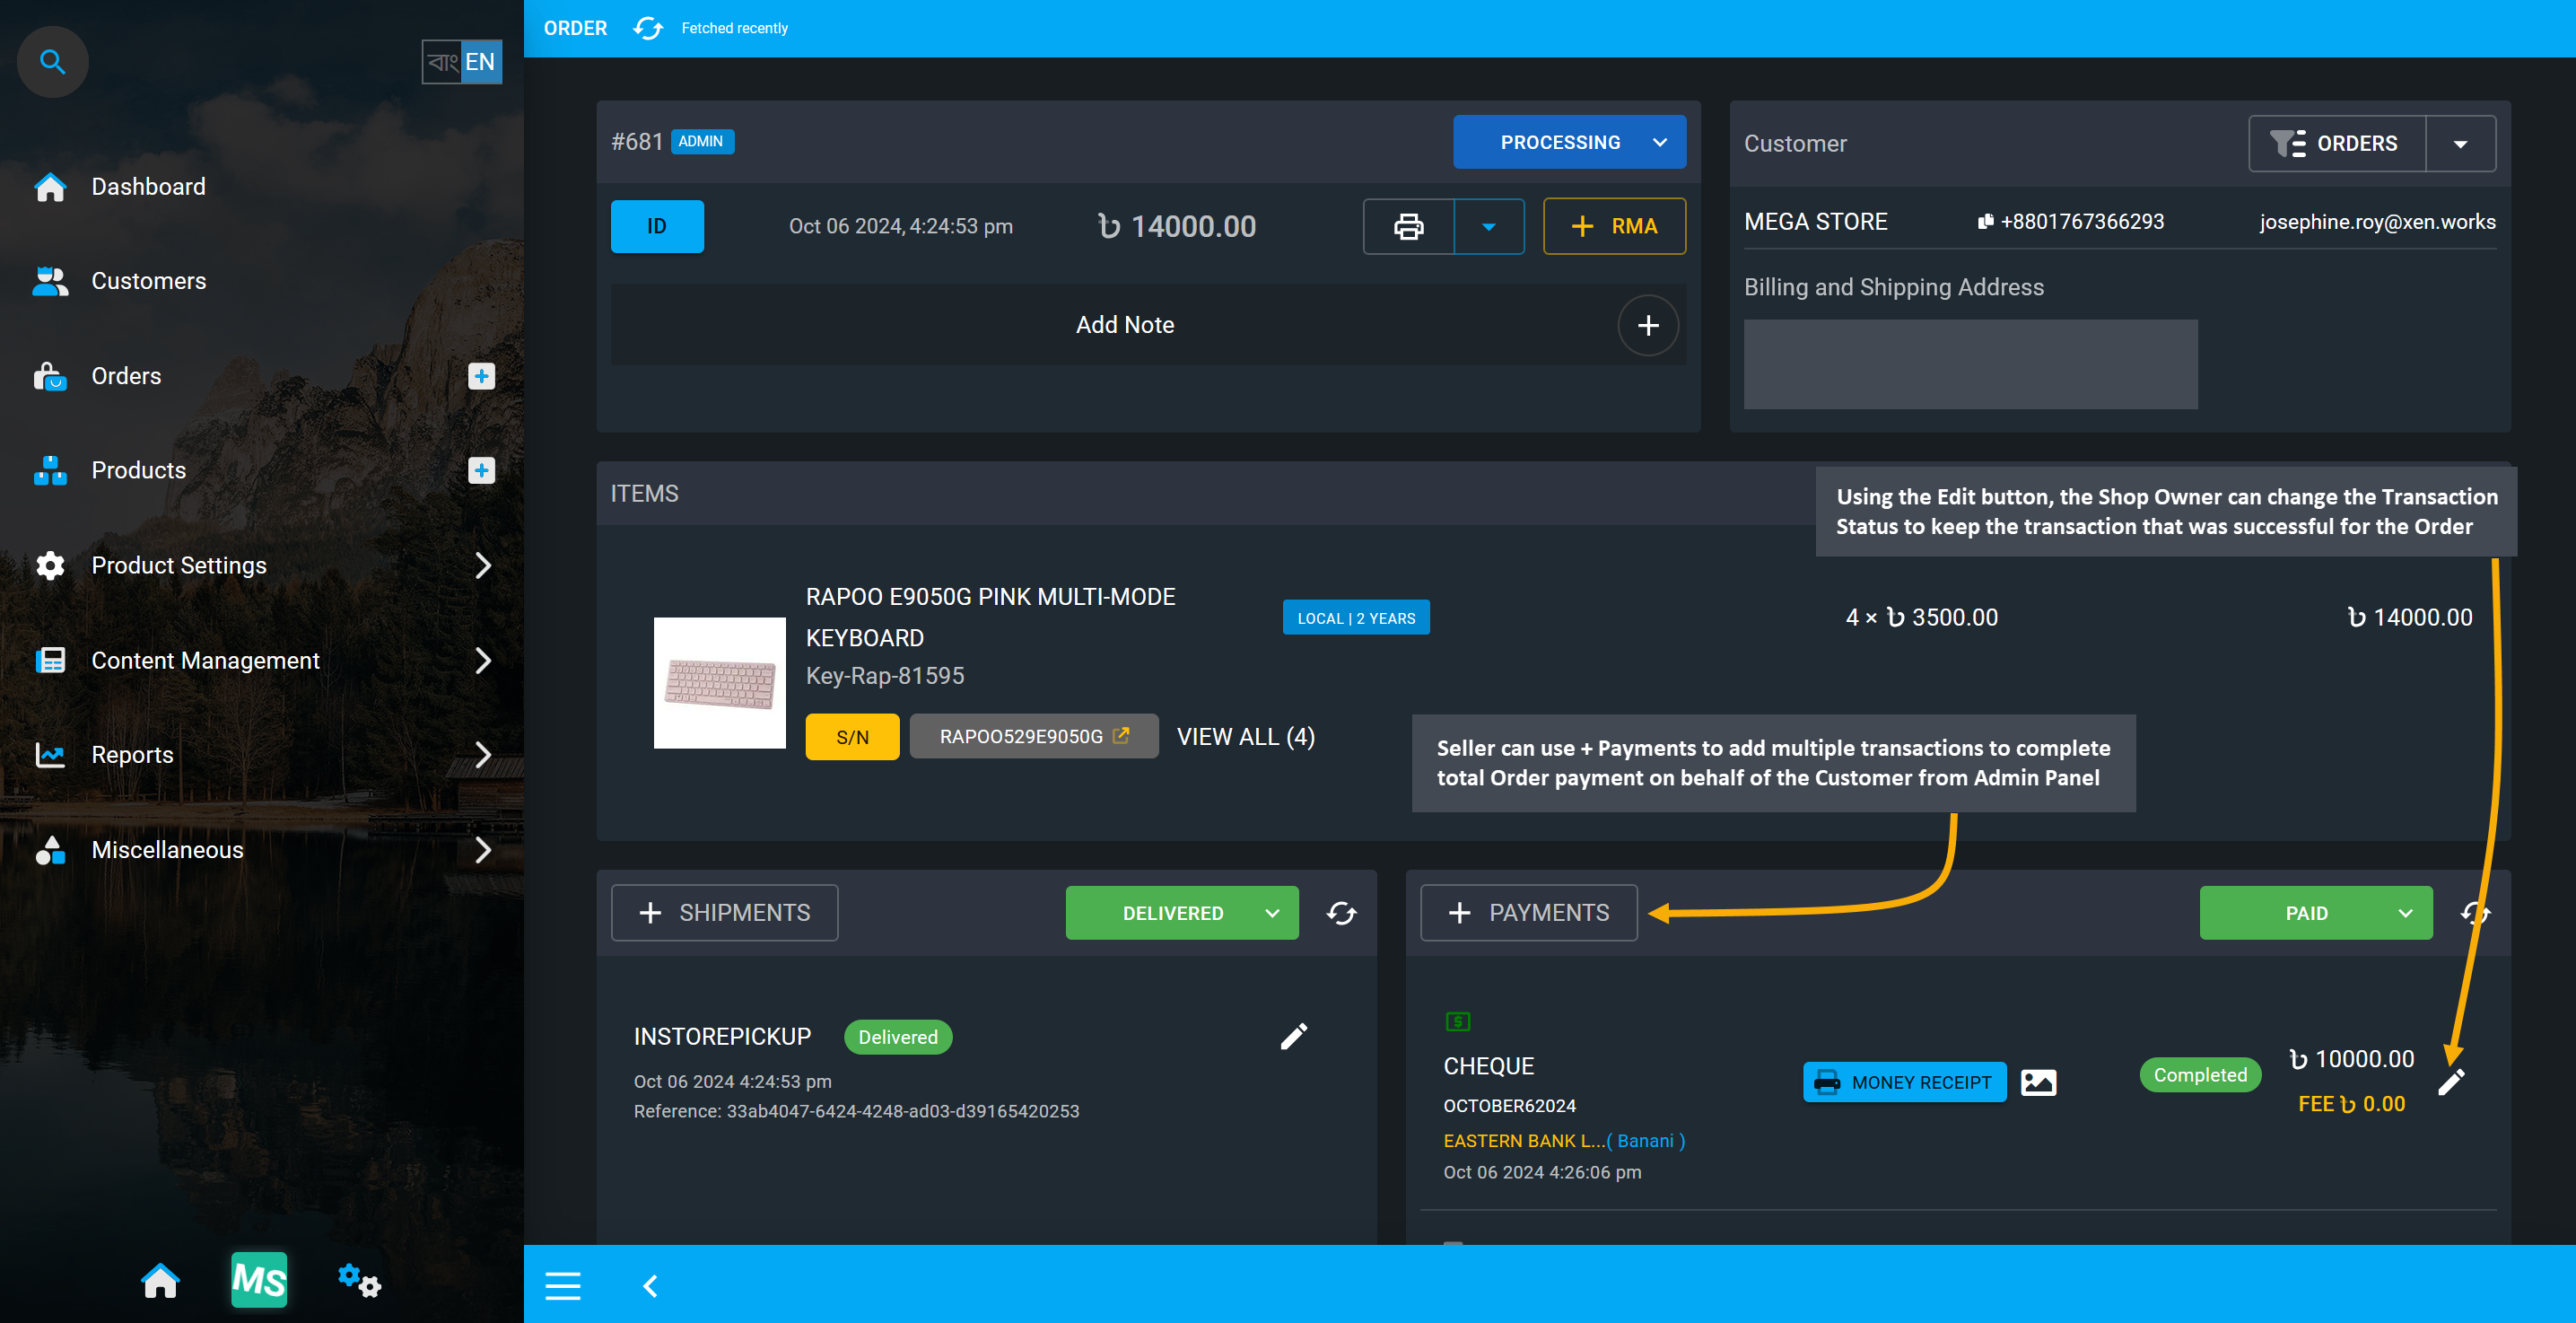
Image 18: The Shop Owner can add Multiple Transactions by clicking + Payments button on Dashboard.
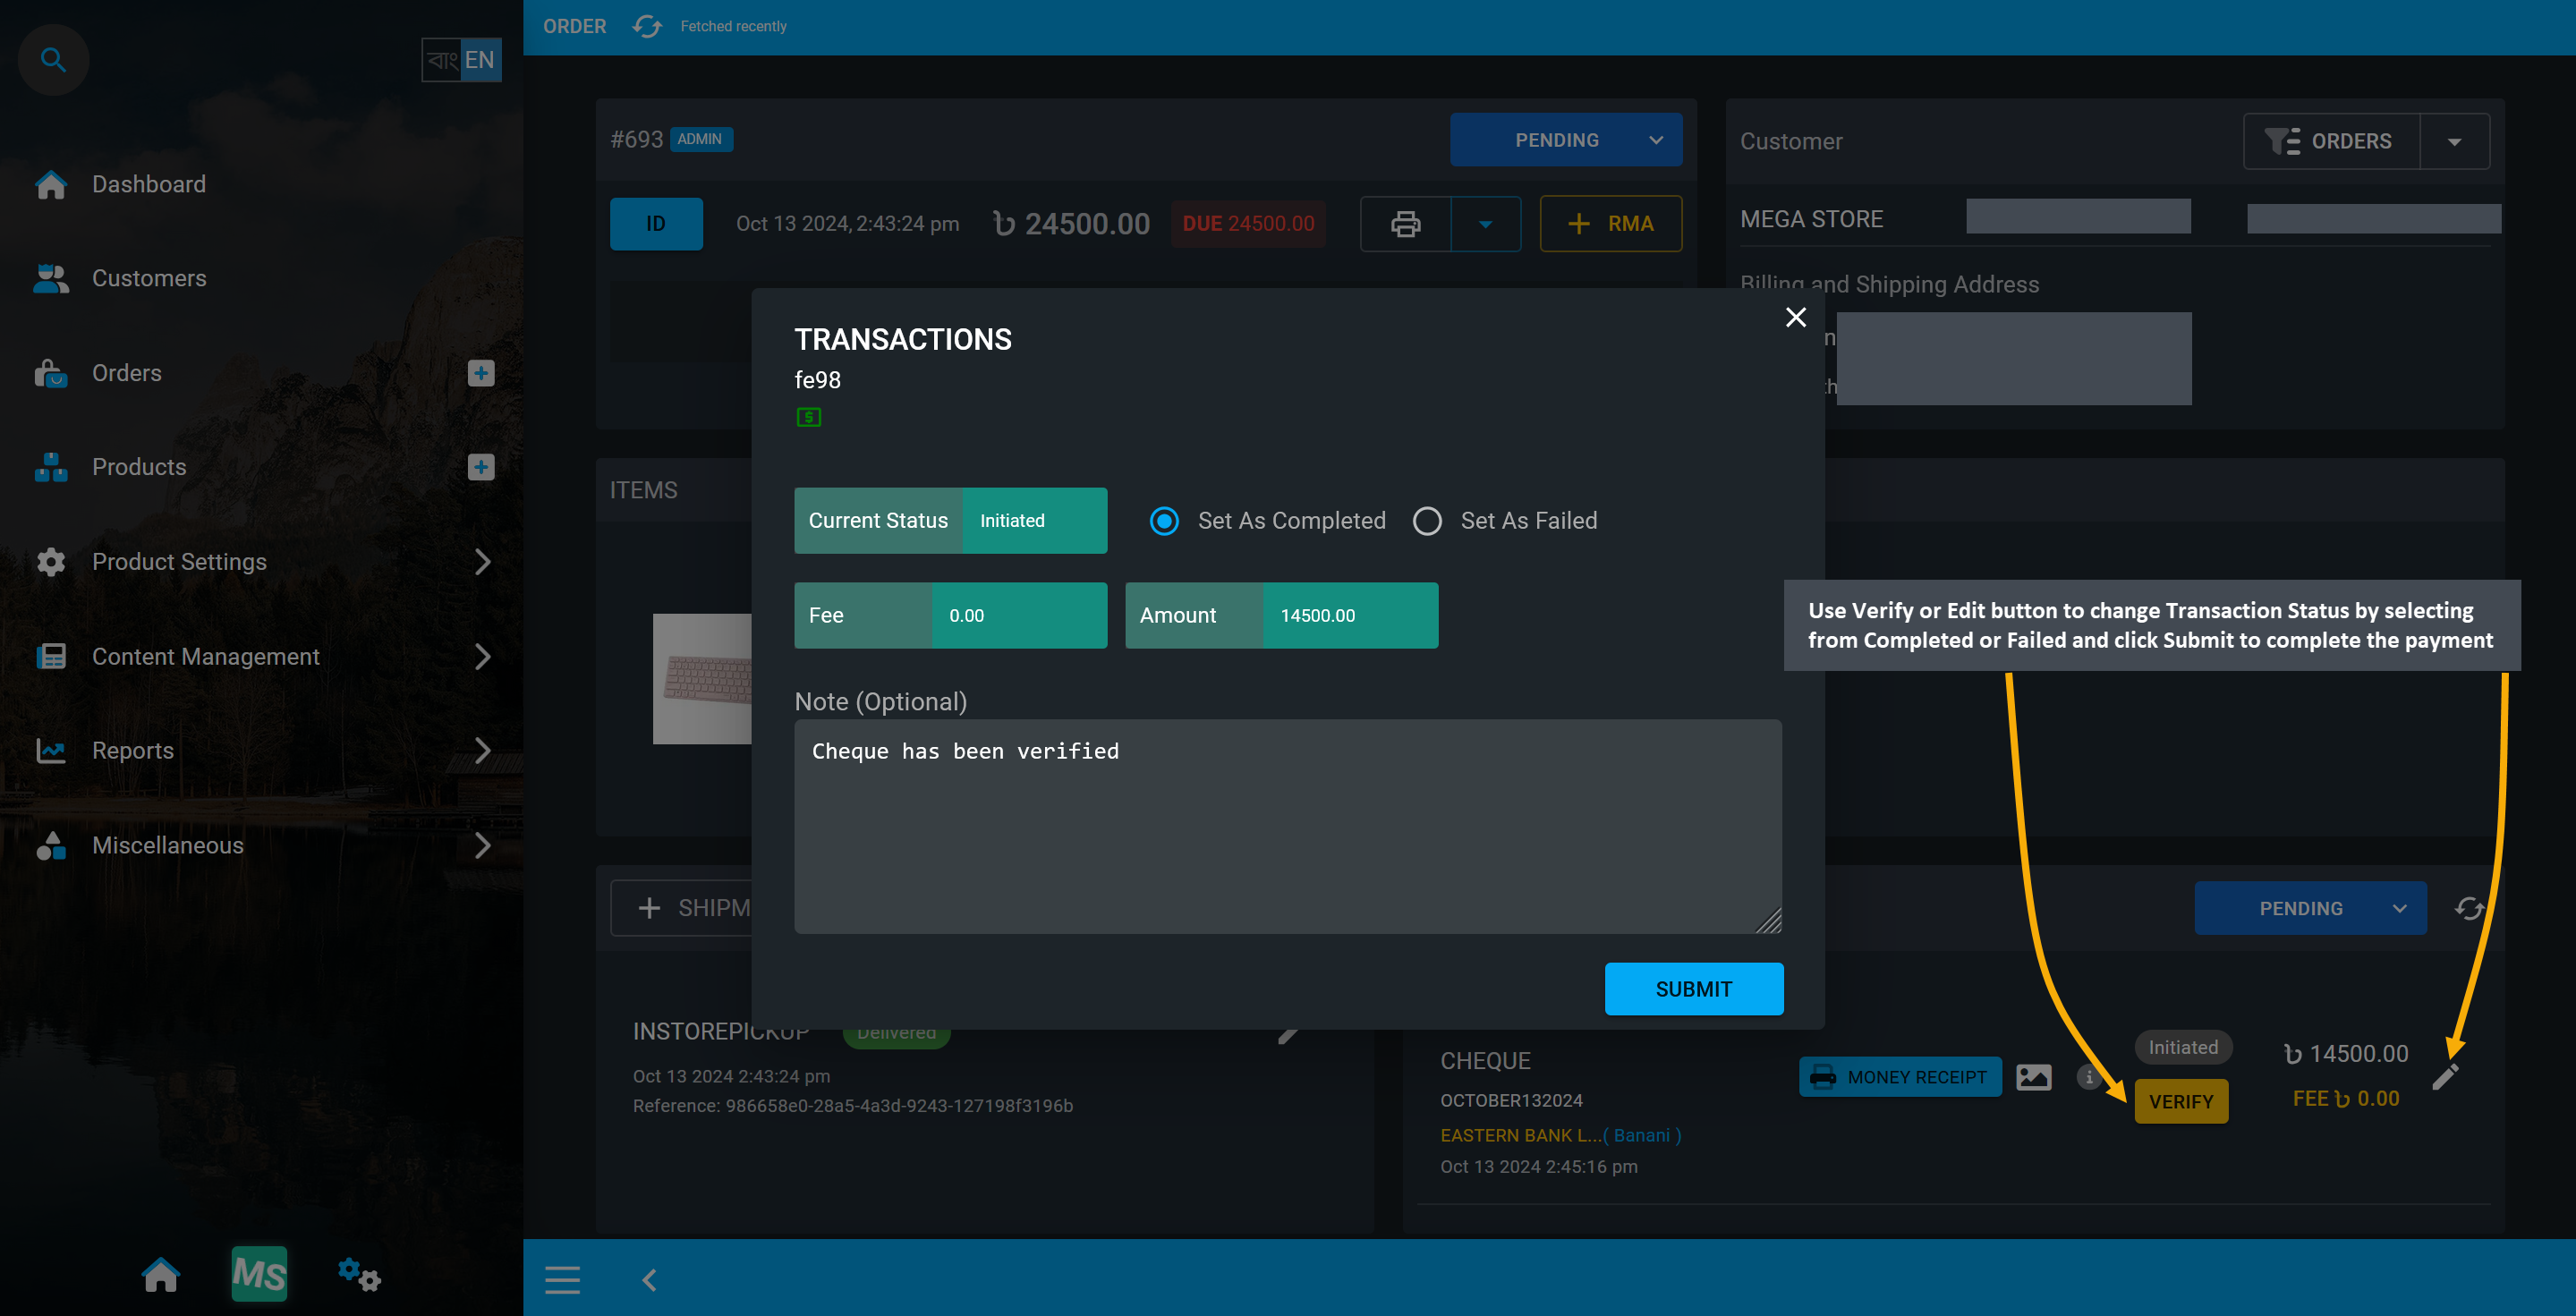
Image 19: Use Verify or Edit button to change the Transaction Status as Completed or Failed.
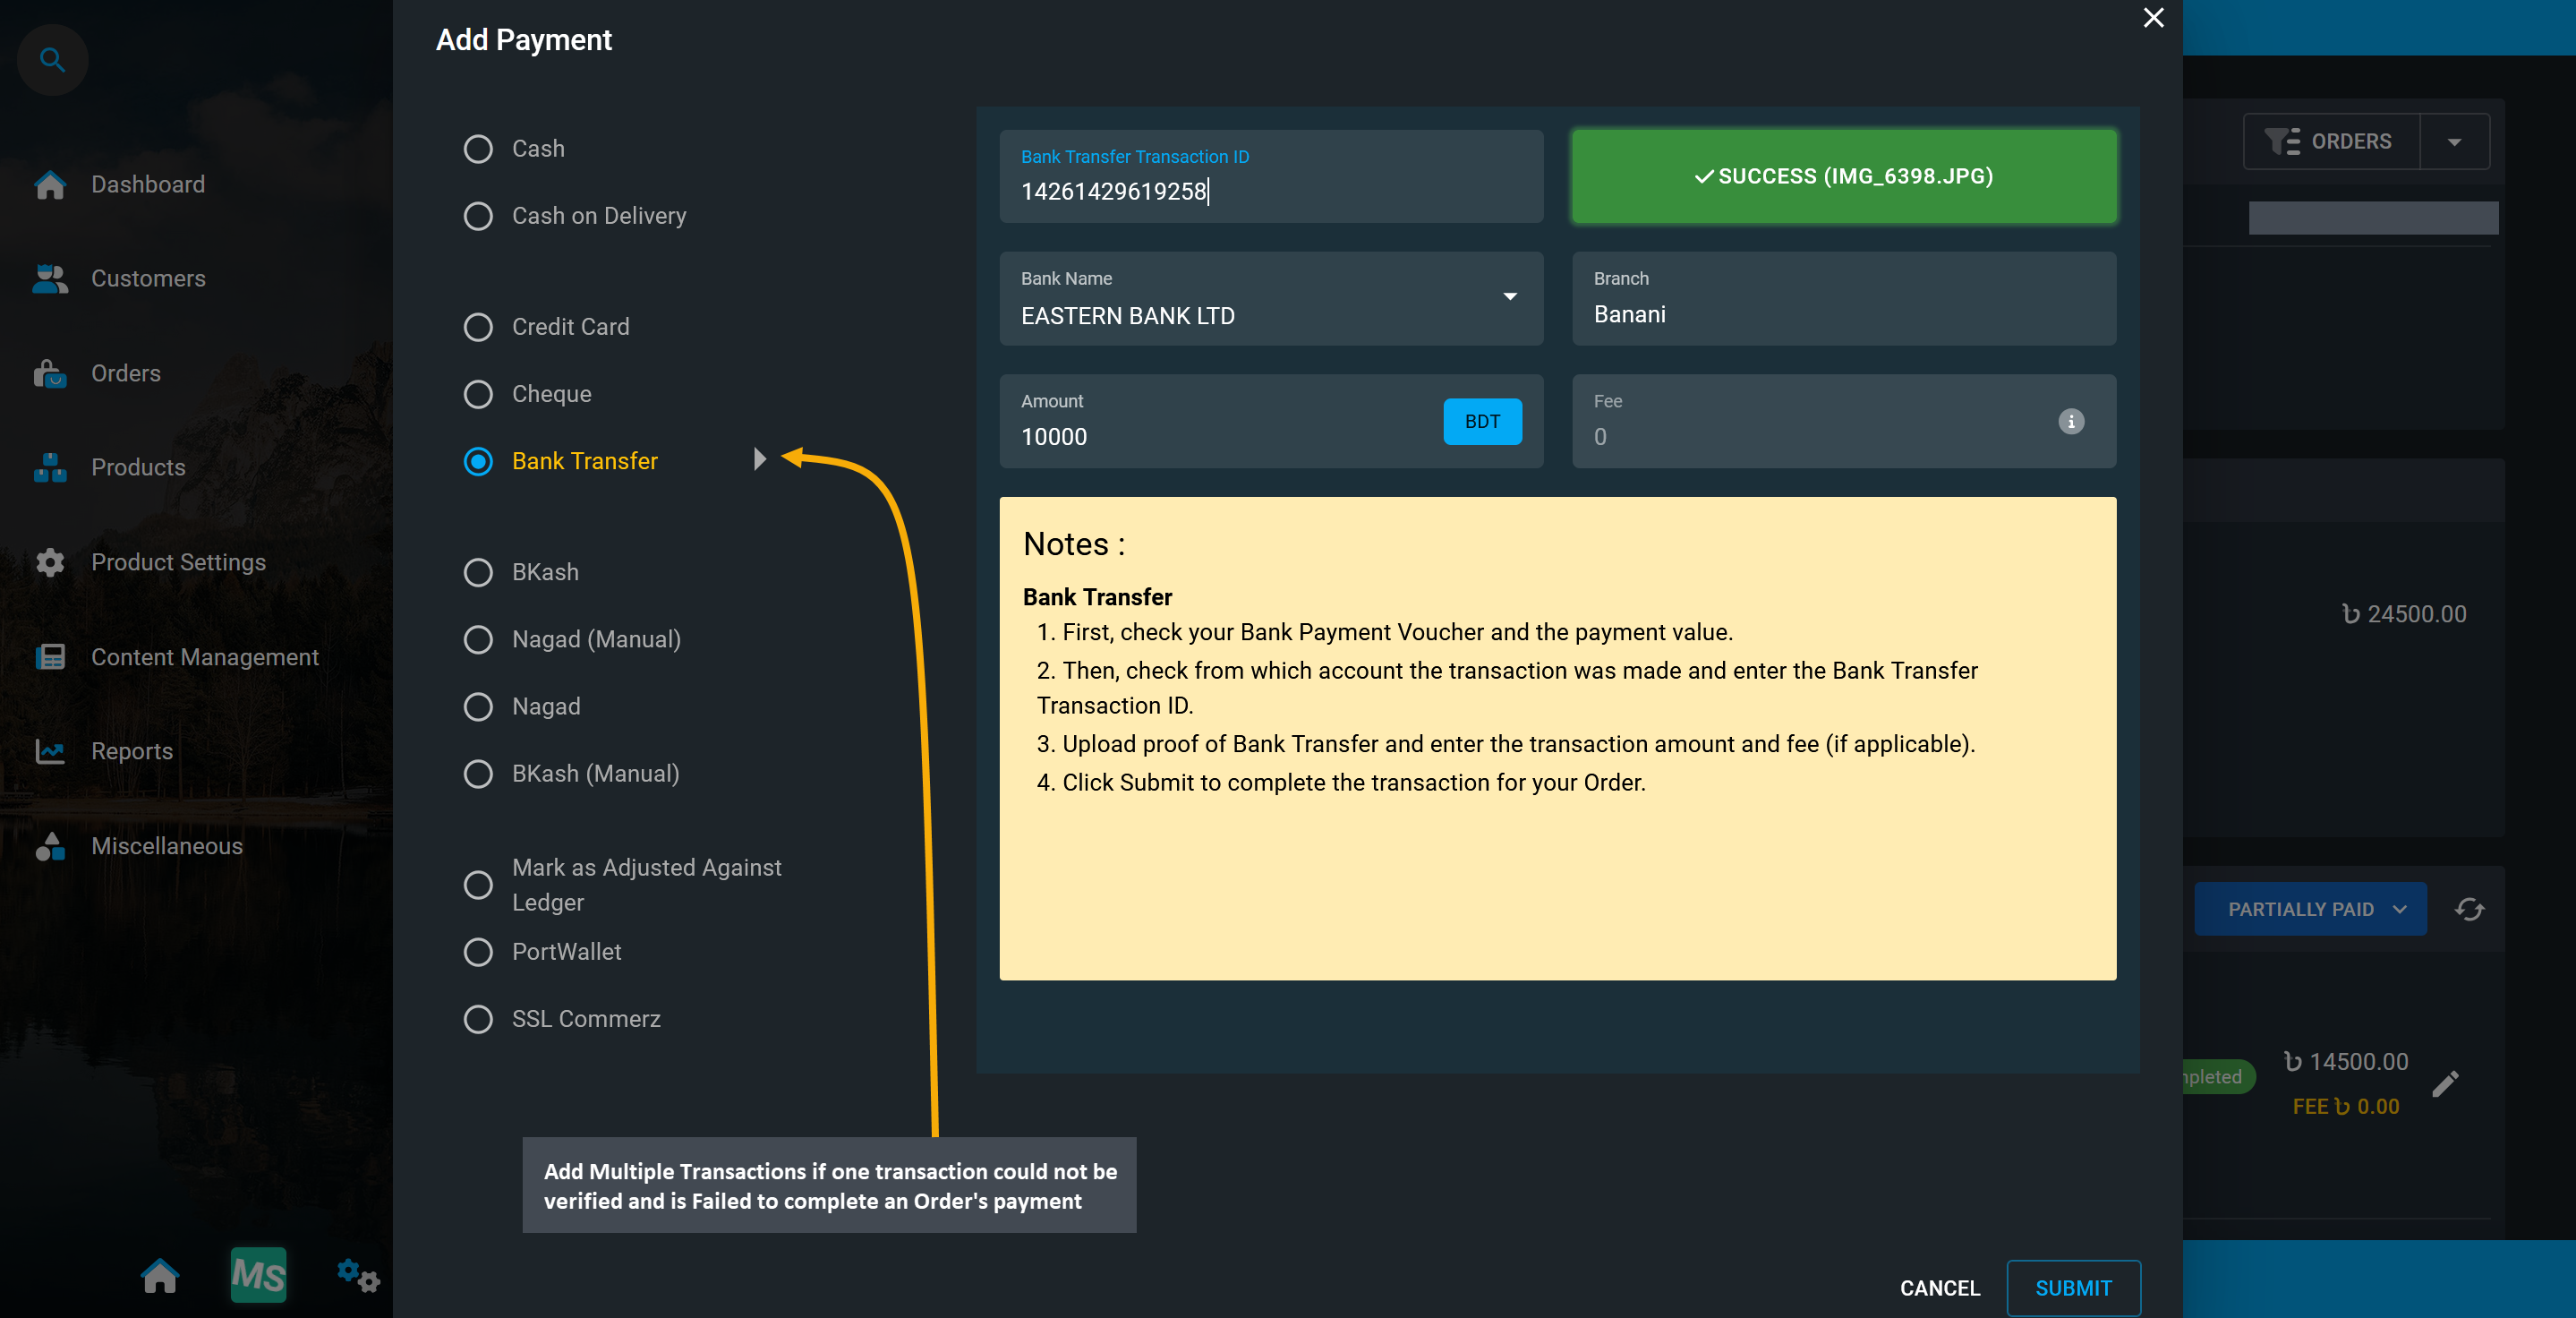
Image 20: Add Multiple Transactions if one transaction could not be verified and is Failed.
Using the Edit button, the Transaction statuses can be changed. Clicking the Edit button will open a modal where Completed or Failed Transaction statuses can be changed to Set As Failed or Set As Completed. Select the desired option according to the Payment status and update it by clicking the Submit button.
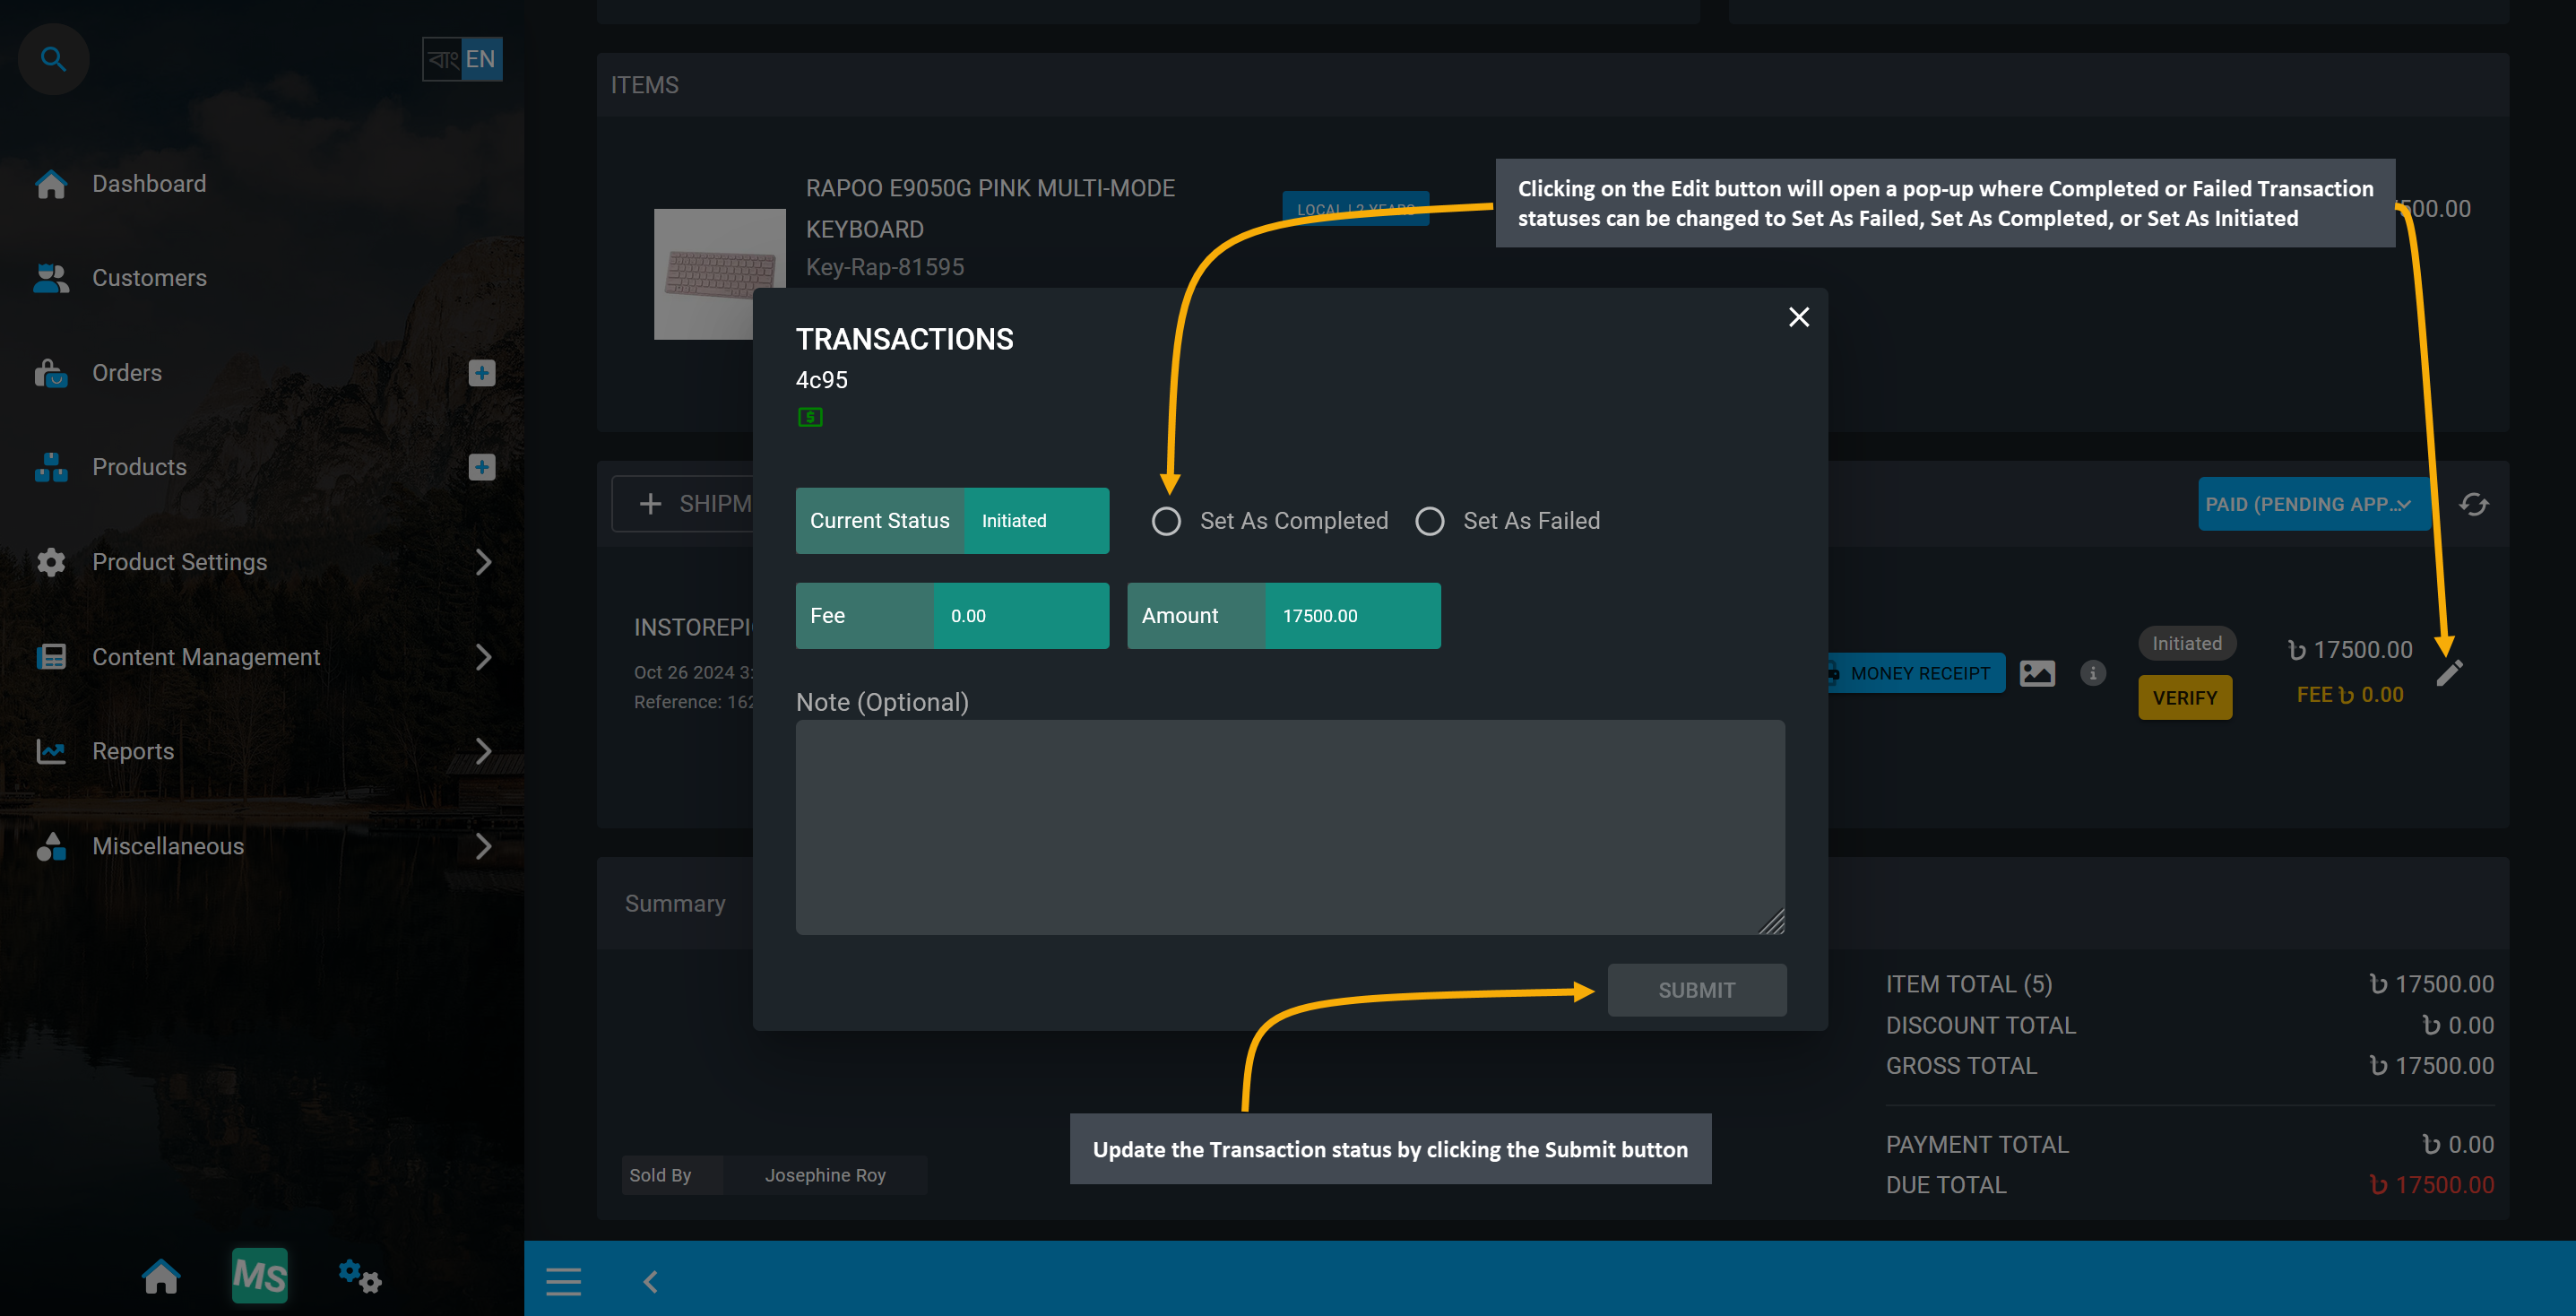
Image 19: Transaction statuses can be changed to Set As Failed, Set As Completed, or Set As Initiated.
Add Shipment Manually for Order
Usually, when placing the Order through Cart, Shipment is automatically selected as InStorePickup which is free of charge as this option is selected for Customers purchasing product directly from shop.
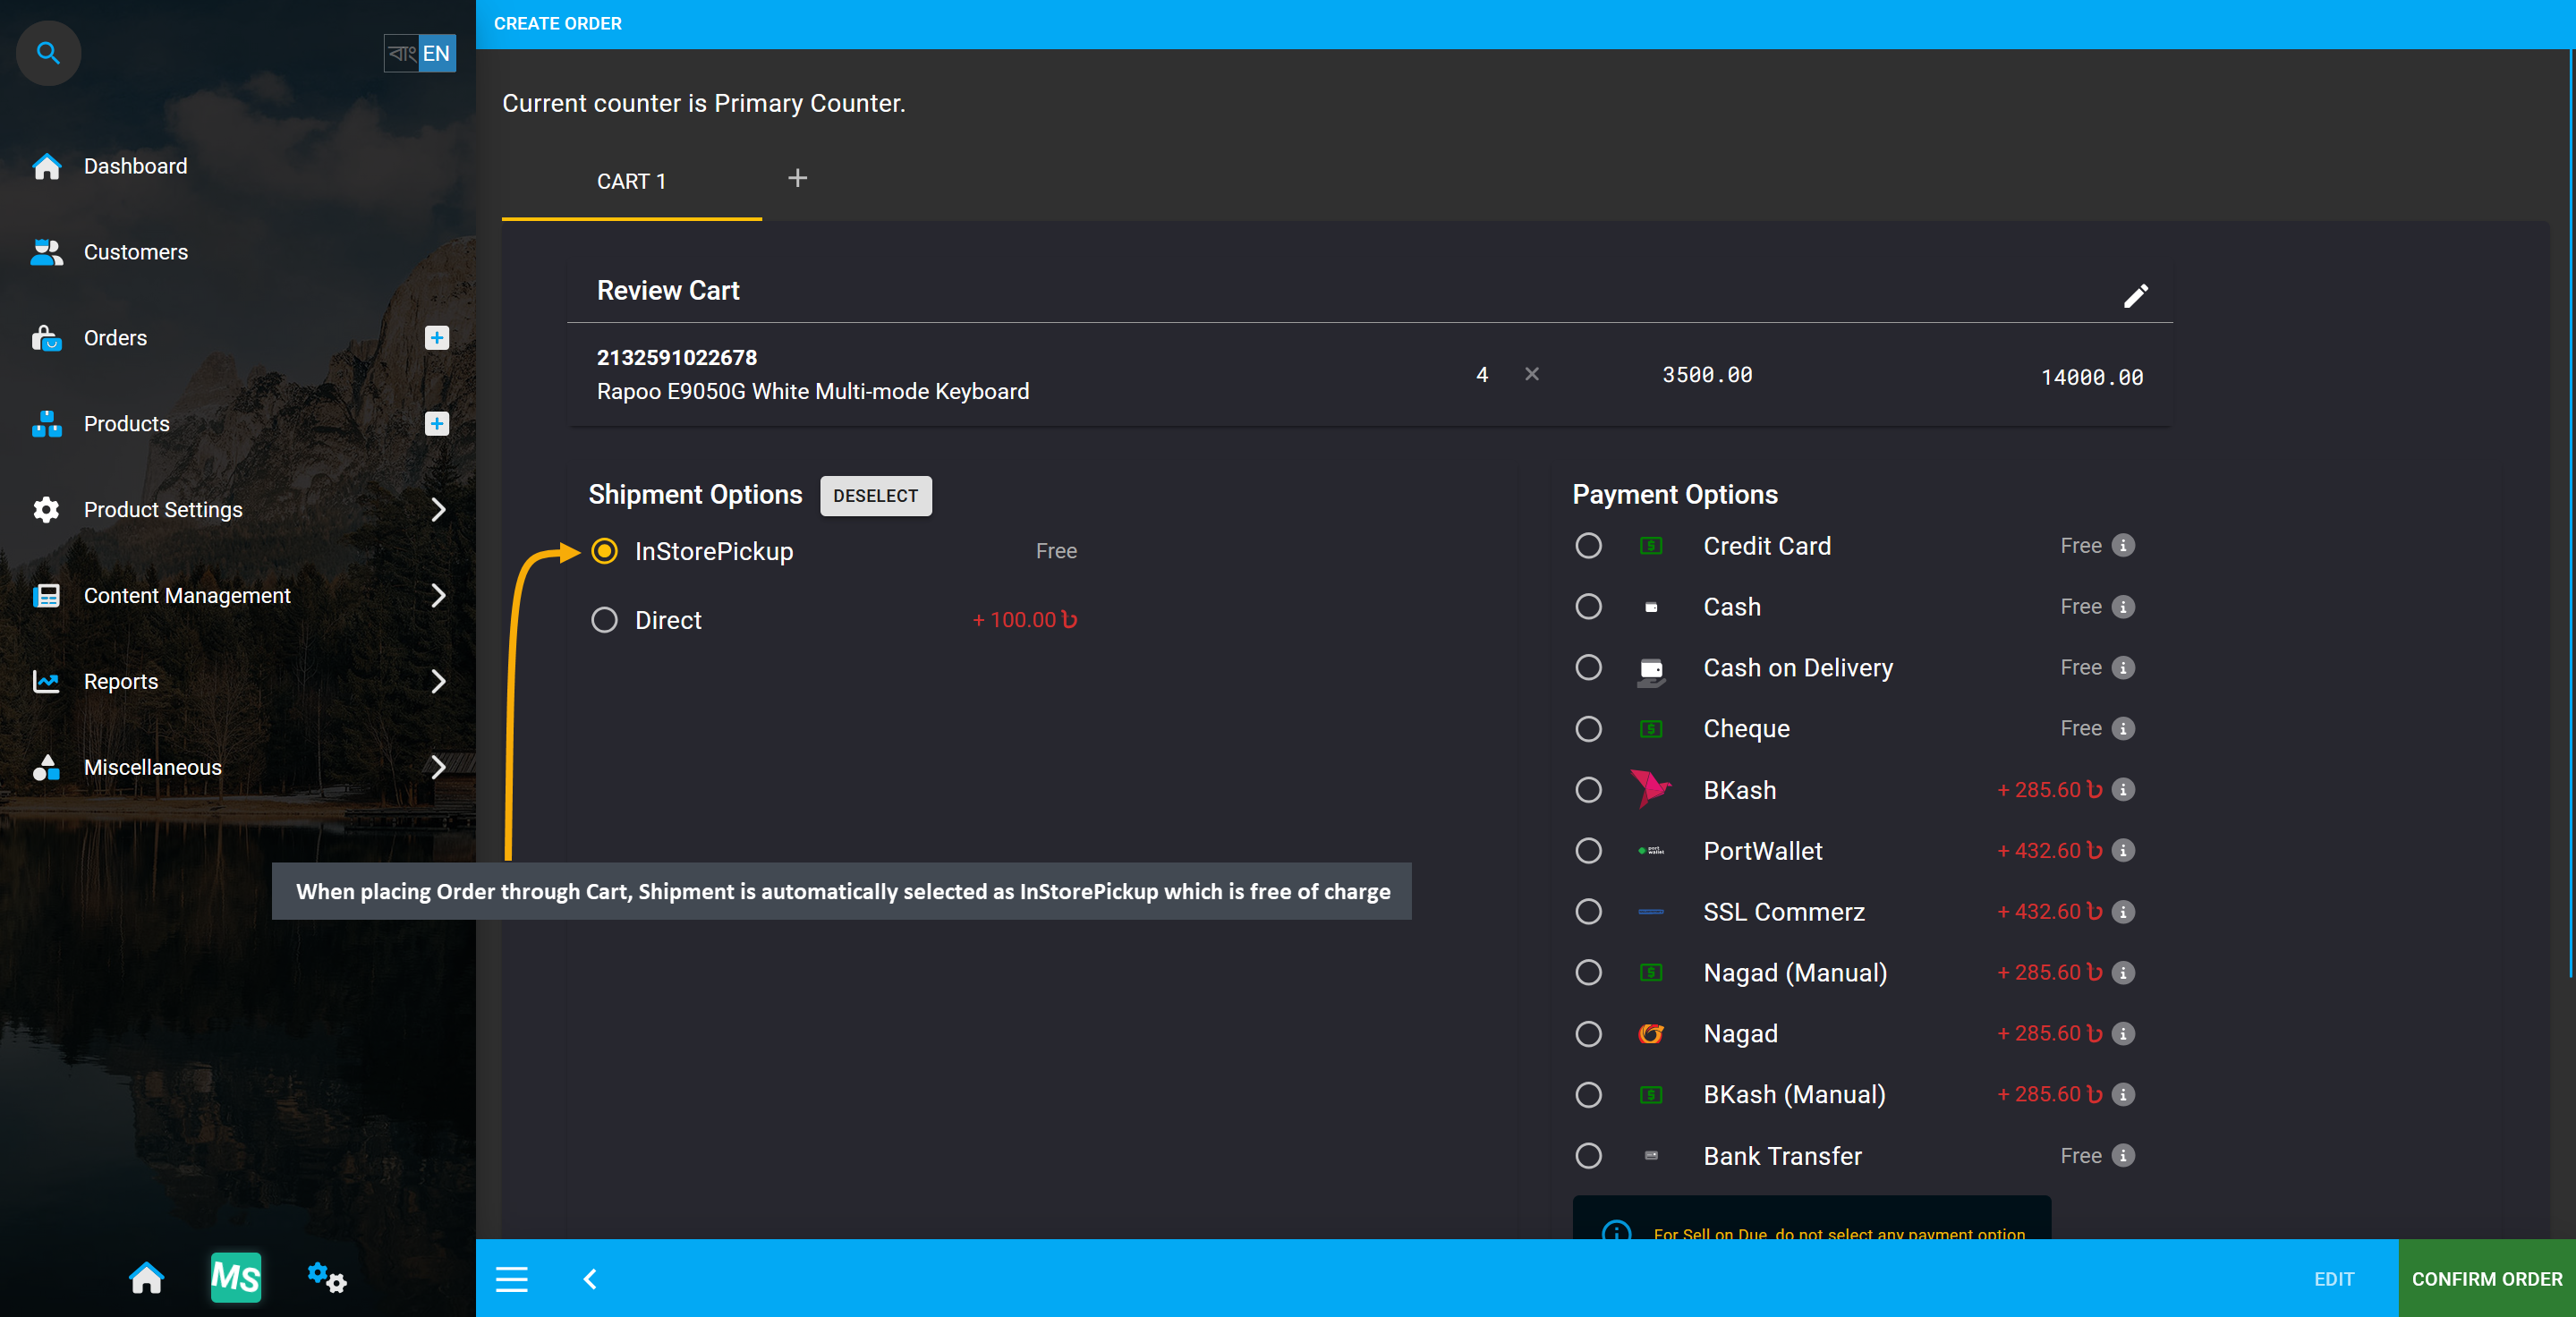
Image 20: When placing Order through Cart, Shipment is automatically selected as InStorePickup.
The Shop Owner can add a Shipment Gateway manually after placing the Order from the Admin Panel. To select a specific Shipping Carrier, they need to click on the + Shipment button which will open a modal.
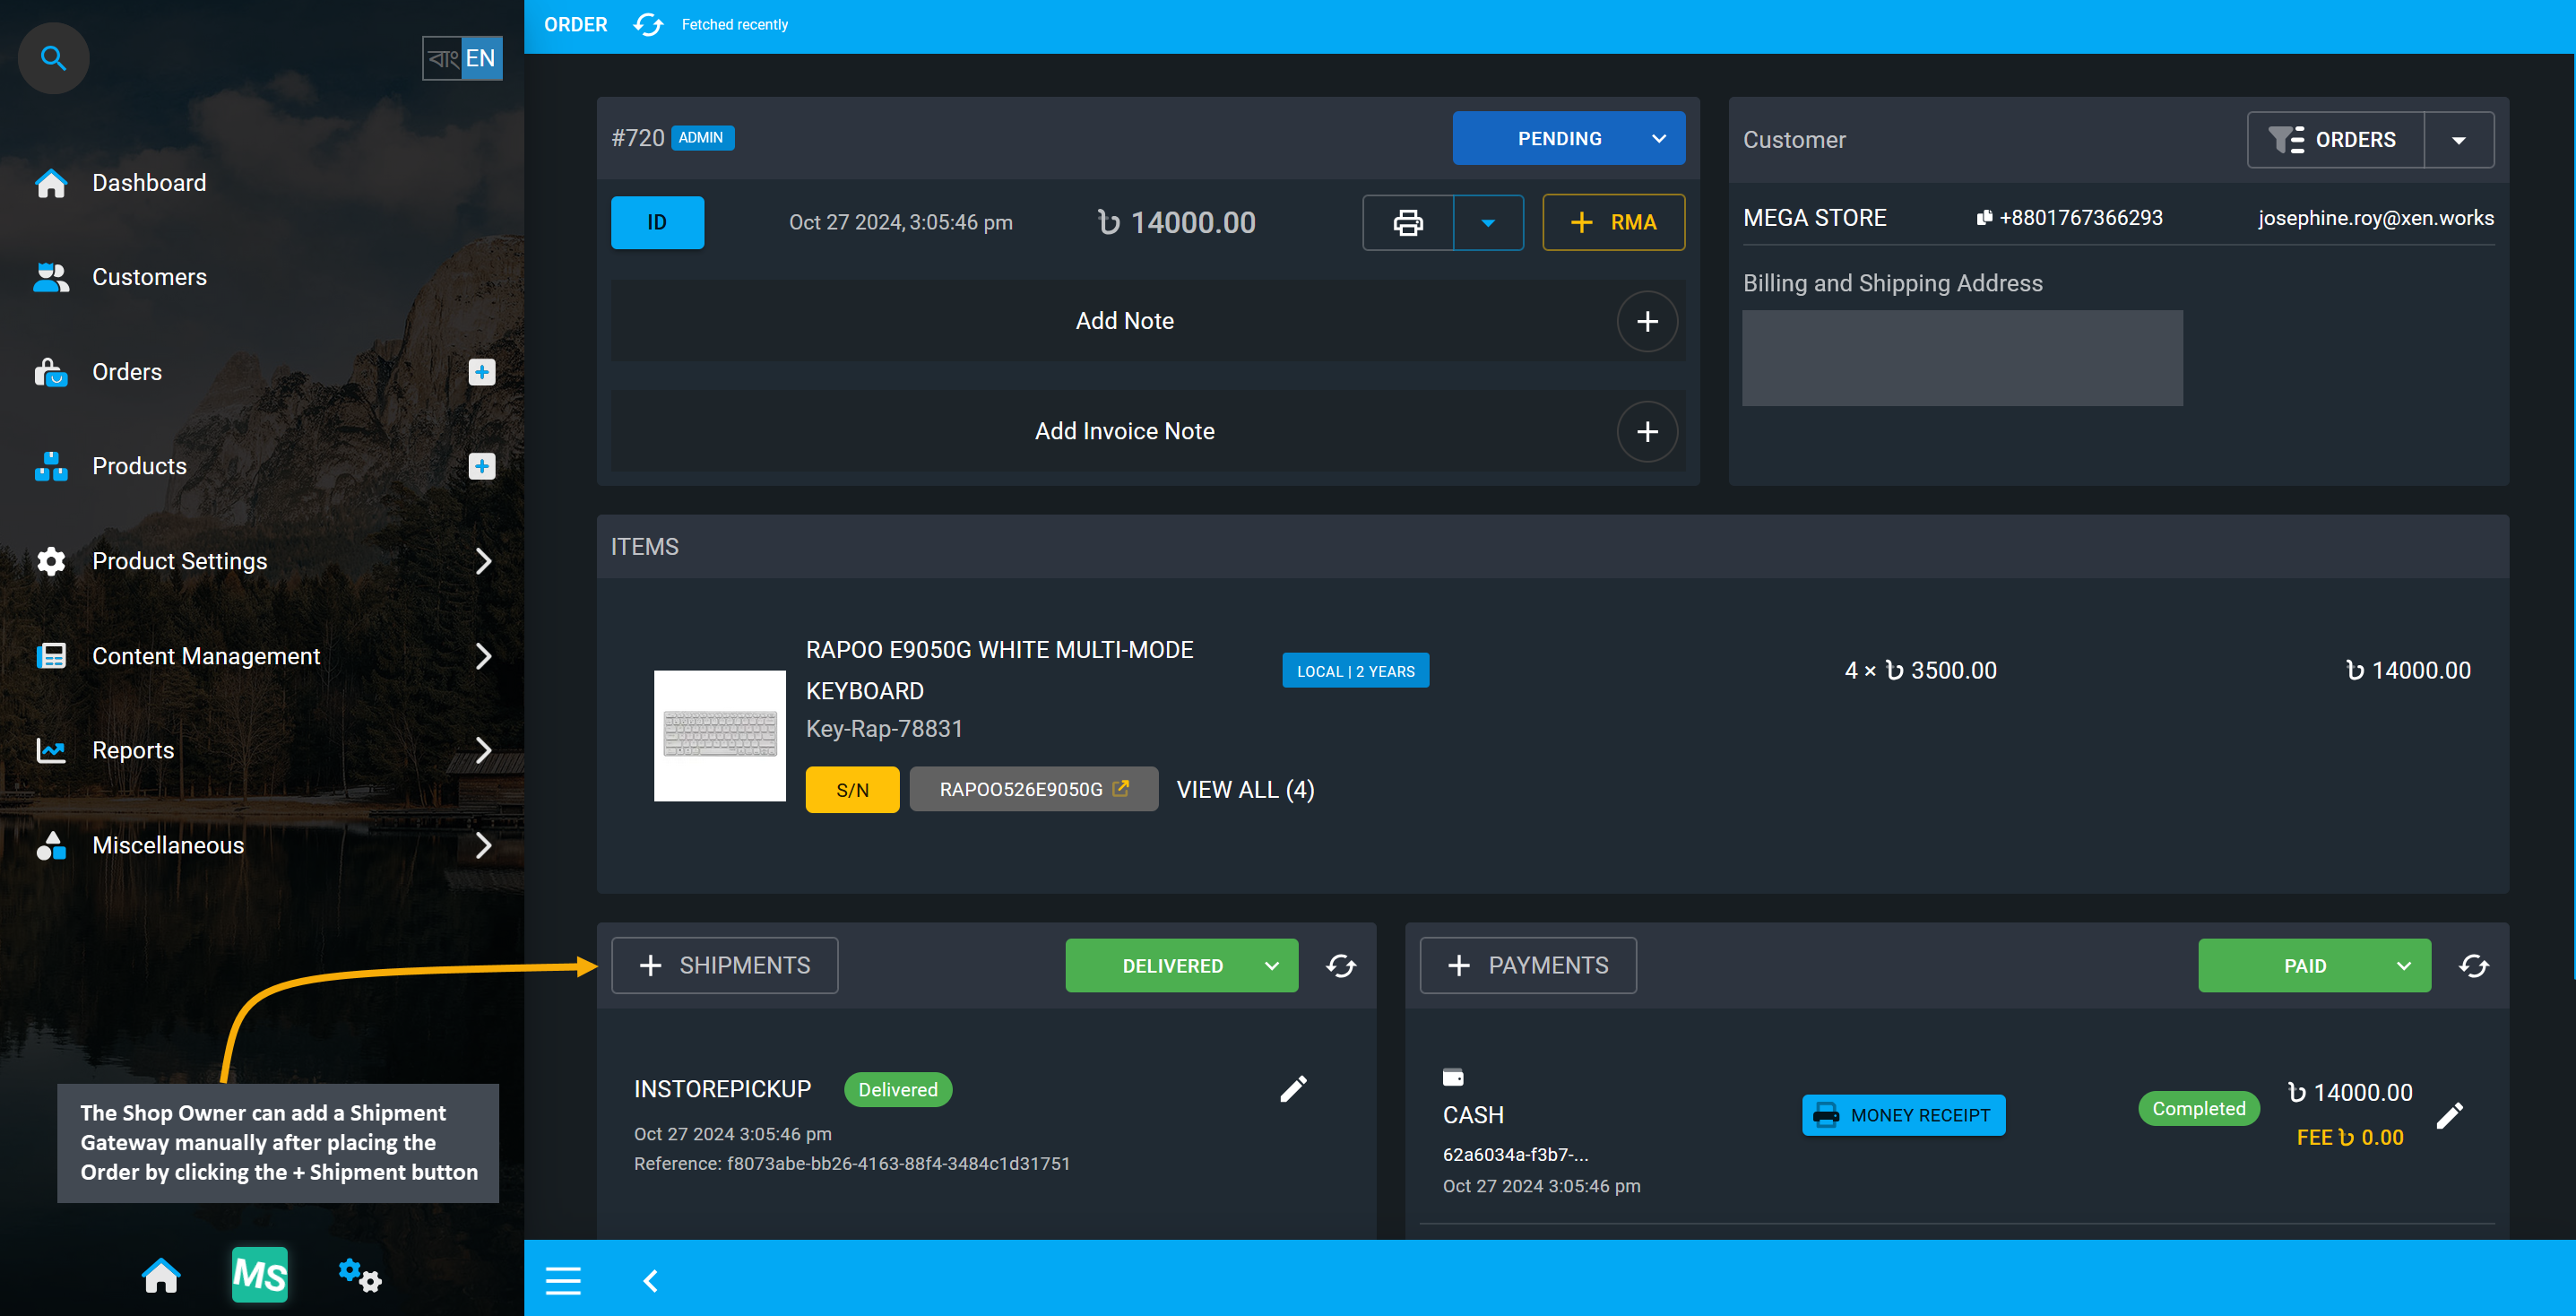
Image 21: Add a Shipment Gateway manually after placing the Order by clicking the + Shipment button.
If specific Shipment Gateways are enabled from settings, then a gateway can be selected for the Order. However, when the order is placed from cart, In Store Pickup is selected as the default Shipping Gateway. However, if a new shipment gateway is added later from Order dashboard, then its status can be updated. Also, tracking number and notes can be added for instruction for shop staff to follow up.
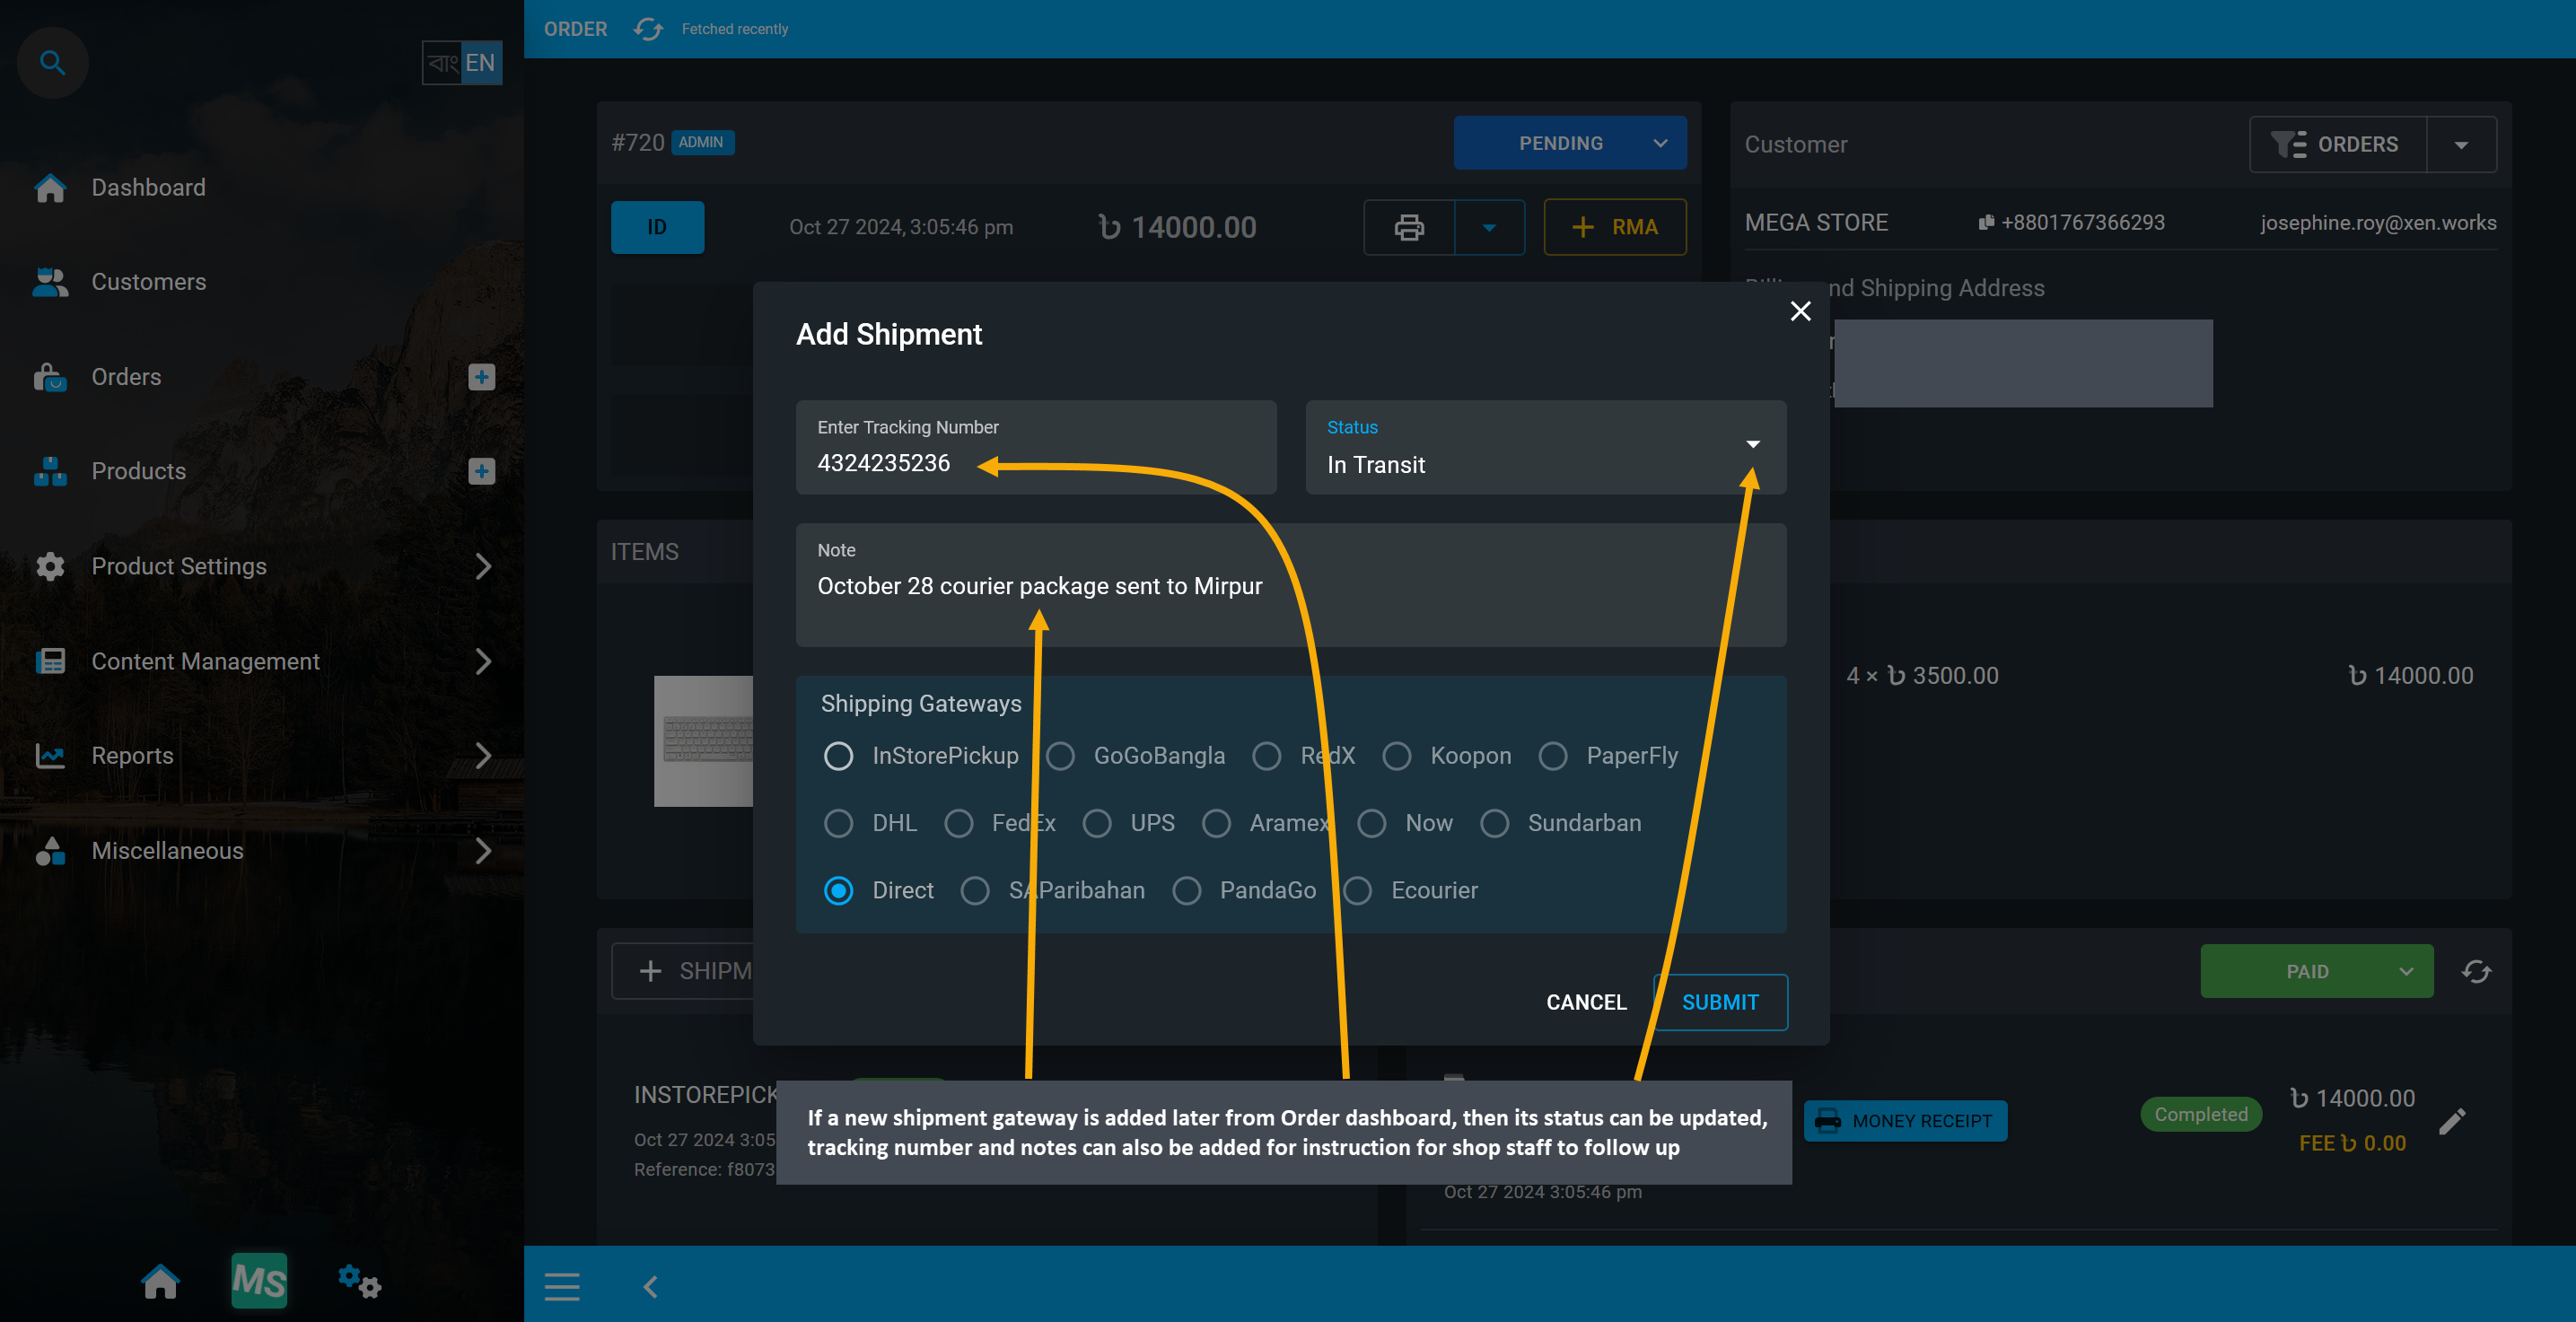
Image 22: If new shipment gateway is added on Order dashboard, then its credentials can be updated.
Status for already added Shipment Gateway can be updated similarly from the Shipments tab. Tracking Number and status can be updated, and notes can also be added.
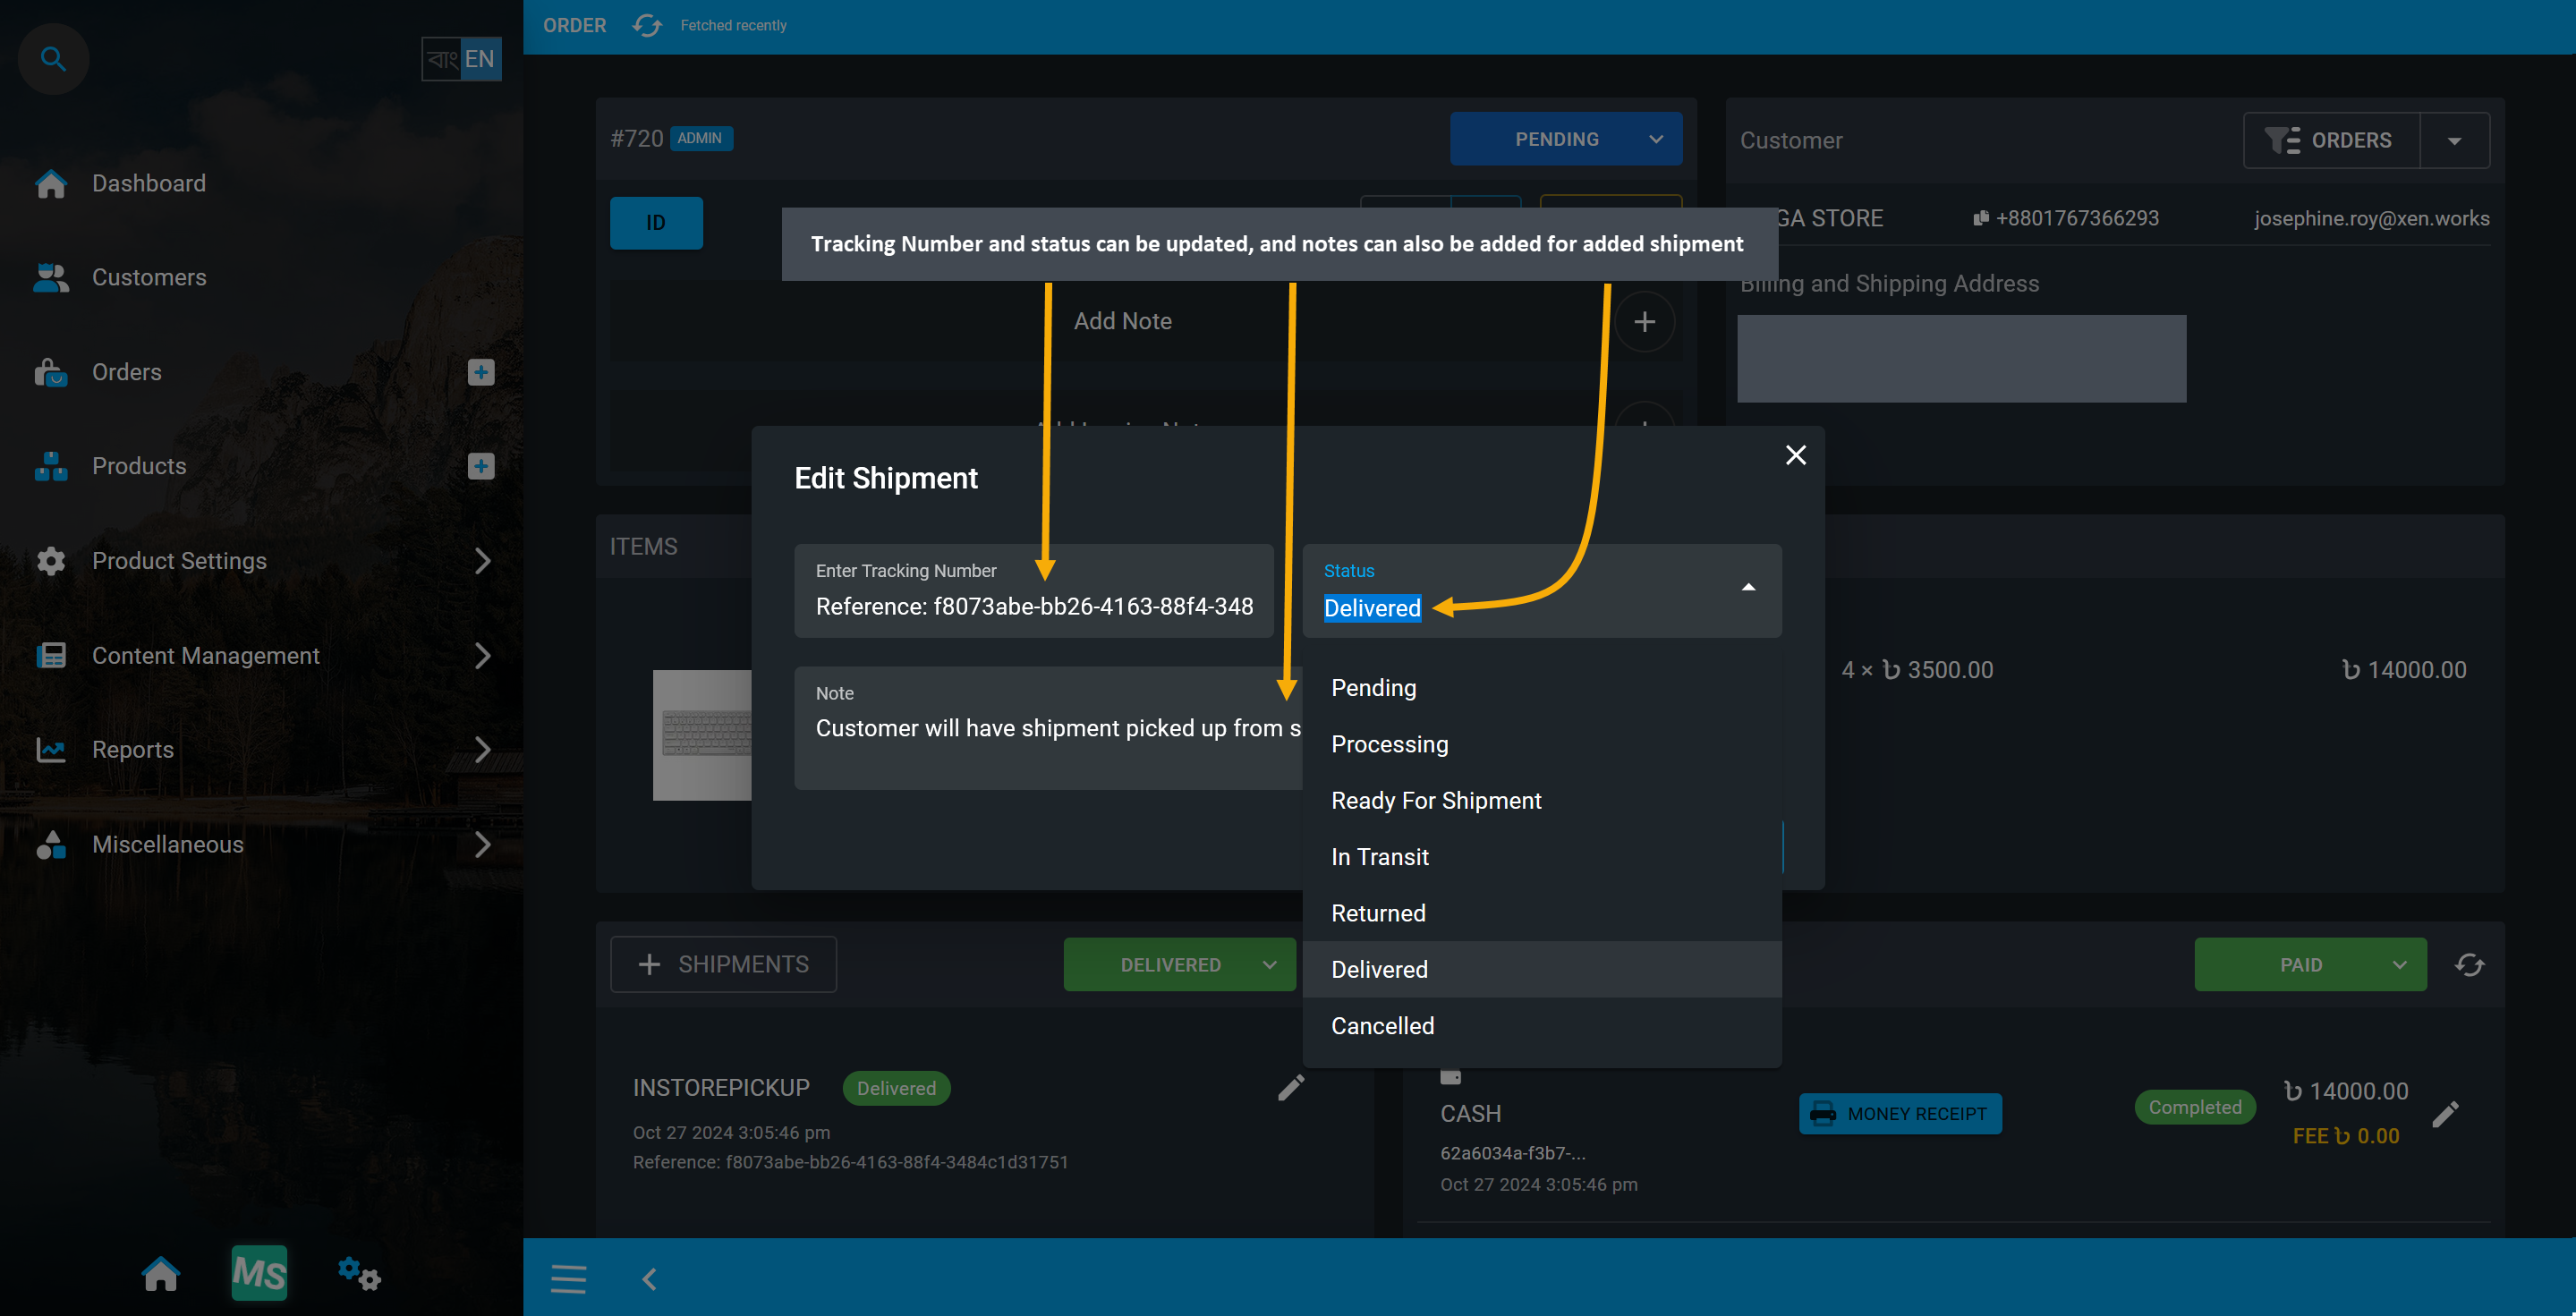
Image 23: Add Shipment Gateway, fill out the Tracking Number, add Notes, and select Shipping status.
Shipment Status will be updated under Shipment tab. Use Edit button to make changes of Shipment details.
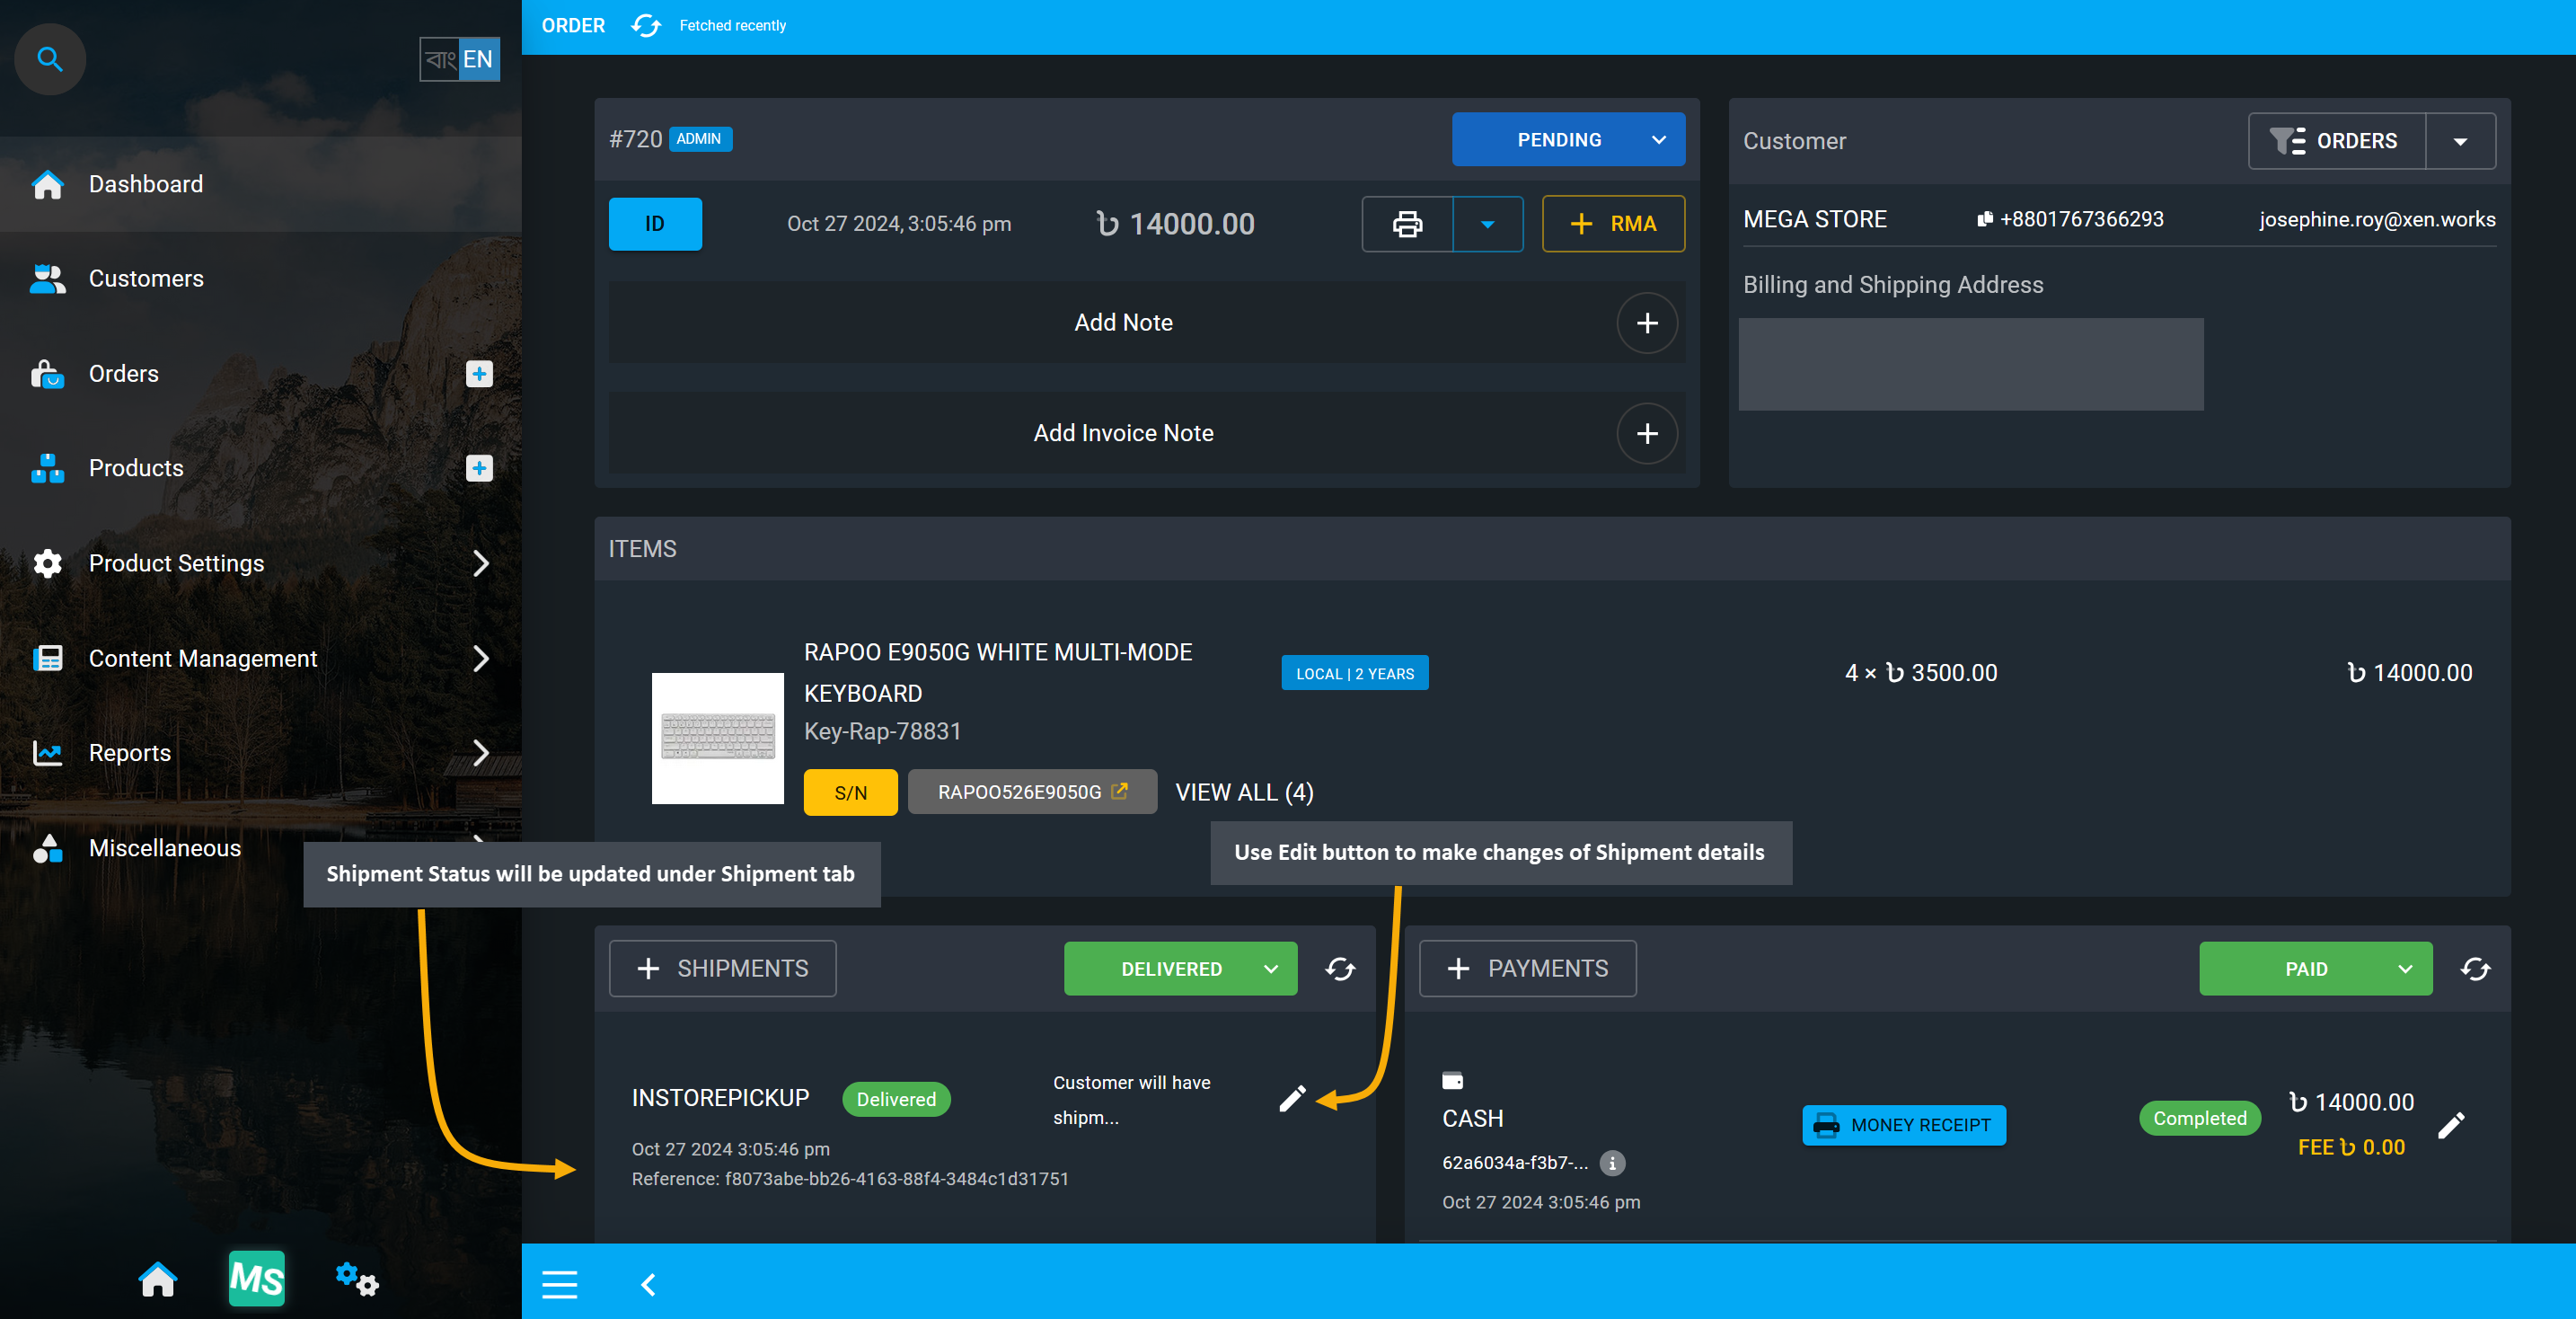
Image 24: Make changes on Shipment status with Edit button to add further shipping information.
11.3 - Order Shortcuts
There are three Order shortcuts which can be used to access Customer information, filter Orders, and examine Cost Basis of Orders.
Within the Orders tab, there are three shortcut buttons which can be used to access different Order sections. The first blue human icon redirects to Customer Dashboard. The white page icon in the middle acts as the Filter Button to filter out all the Orders of a specific Customer. The grey graph icon shows the calculation of Order Cost Basis.
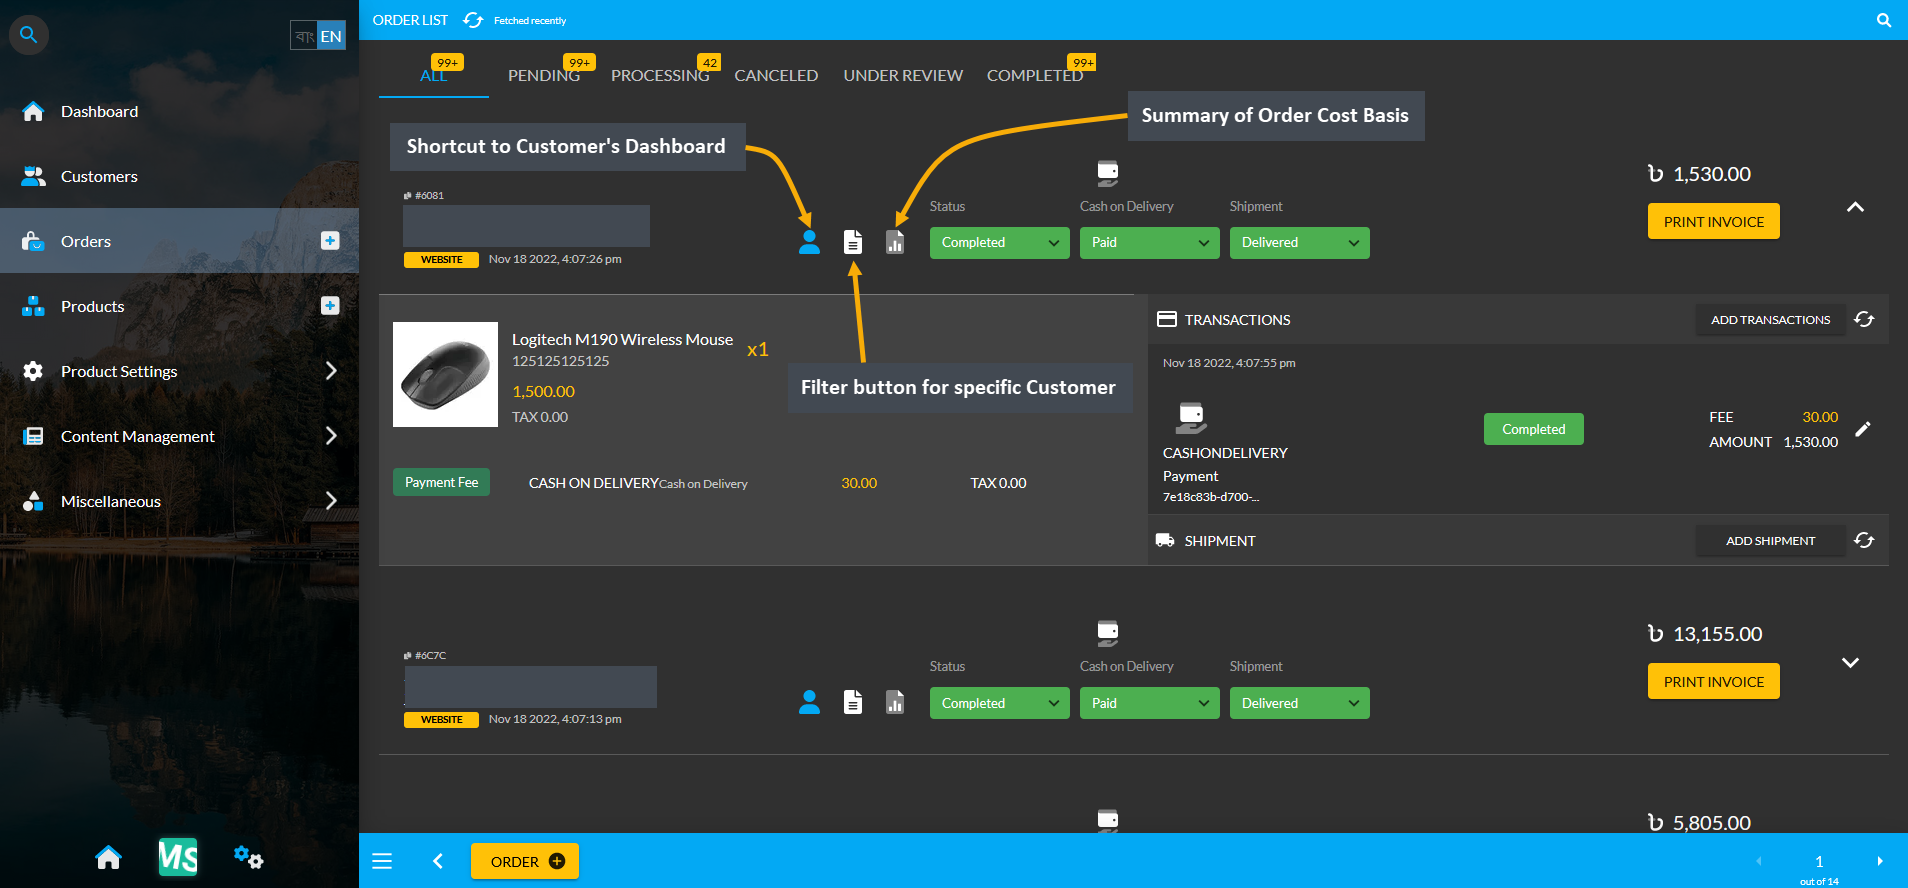
Image 1: Order Shortcut Buttons will redirect to Customer Dashboard, Filter Orders, and show Cost Basis.
Customer Dashboard
In the Customer Dashboard, there is a Contact Information section on the top left side which displays Name, Email, and Phone Number of the Customer. These information can be edited by clicking the Edit button. Clicking it will open a pop-up where the Customer’s Company Name, First Name, Last Name and Credit Limit can be updated, permission to use Credit Limit and permission to view Ledger on the Website can be activated.
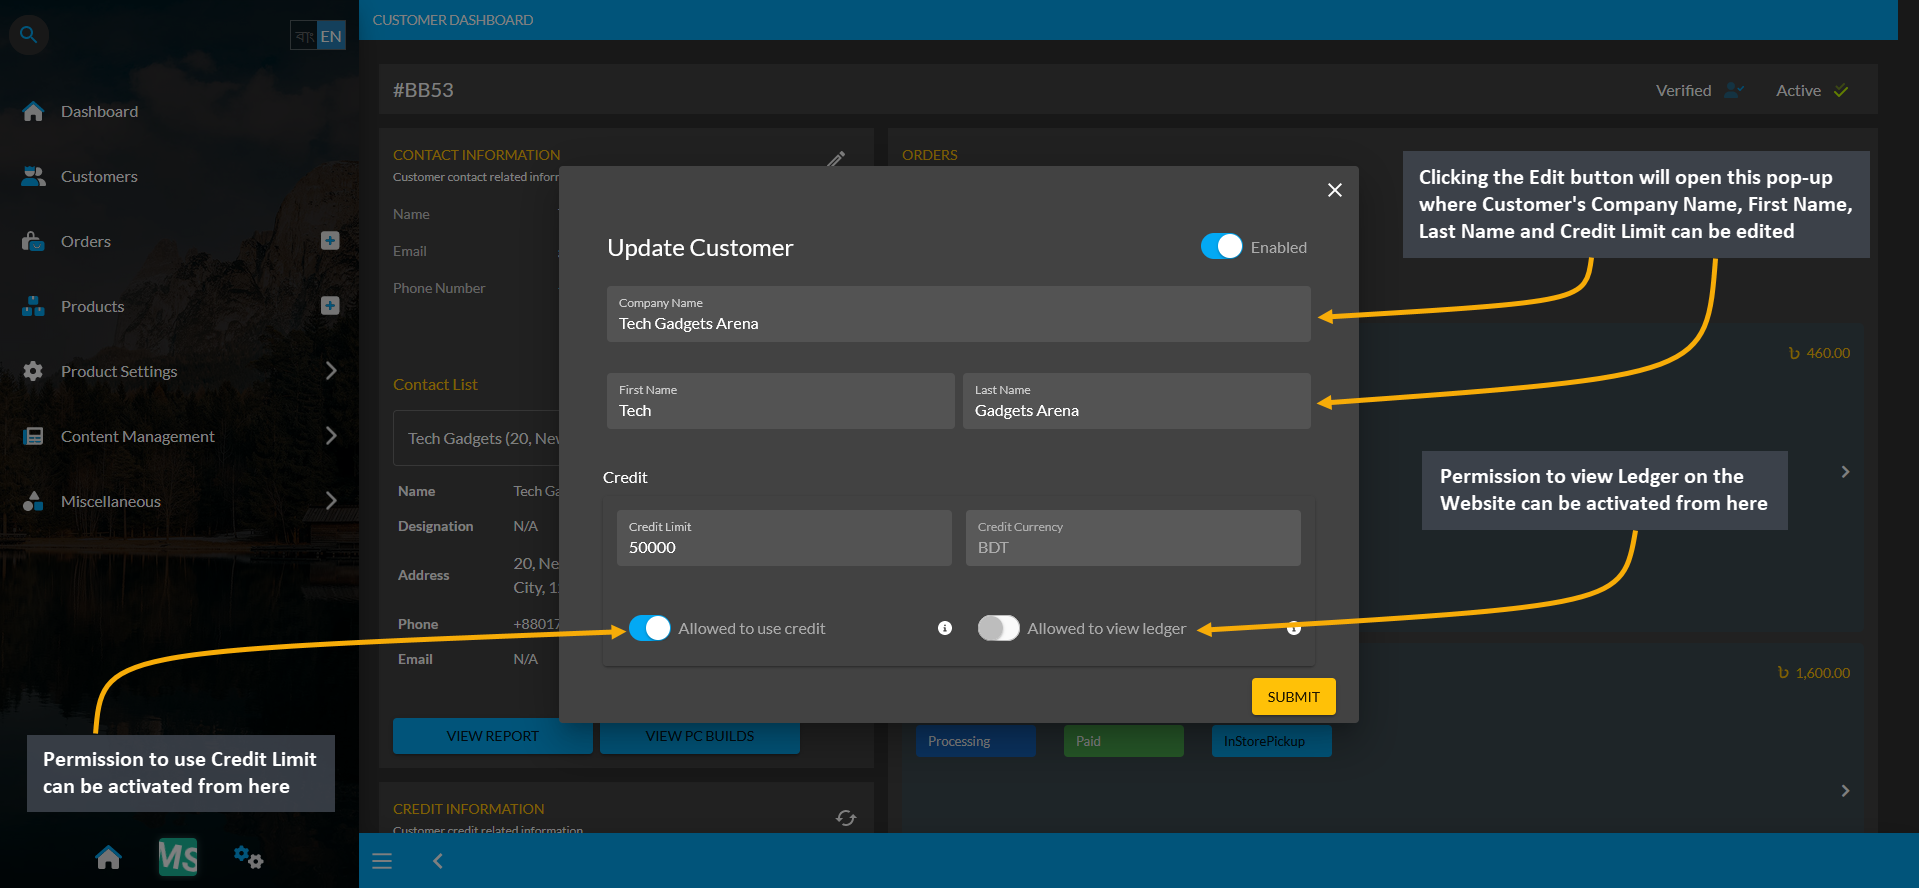
Image 2: Update Customer's Contact Information, Credit Use, and Ledger View permission from the Dashboard.
Clicking the dropdown will open the Customer’s Contact List where different addresses saved from the Customer can be viewed and selected. For instance, if a Customer has different addresses for home, work, and office, they will all be available under the Contact List. This list of addresses can be used as Billing and Shipping addresses during checkout. The selected address will display Name, Designation, Address, Phone, and Email of the Customer.
The entire right side of the Dashboard shows all the Pending, Processing, and Completed Orders of Customer. All recent to previous Orders will show in chronological order with details here. The View Report button will redirect to the Customer’s Cost Basis page and the View PC Builds button will redirect to the PC Build page of the Customer where they have configured, added and saved their own Builds, Customer’s Credit Information section will show Credit Limit, Ending Balance, options to view all Invoices, Ledger Breakdown, and settle Ledger.
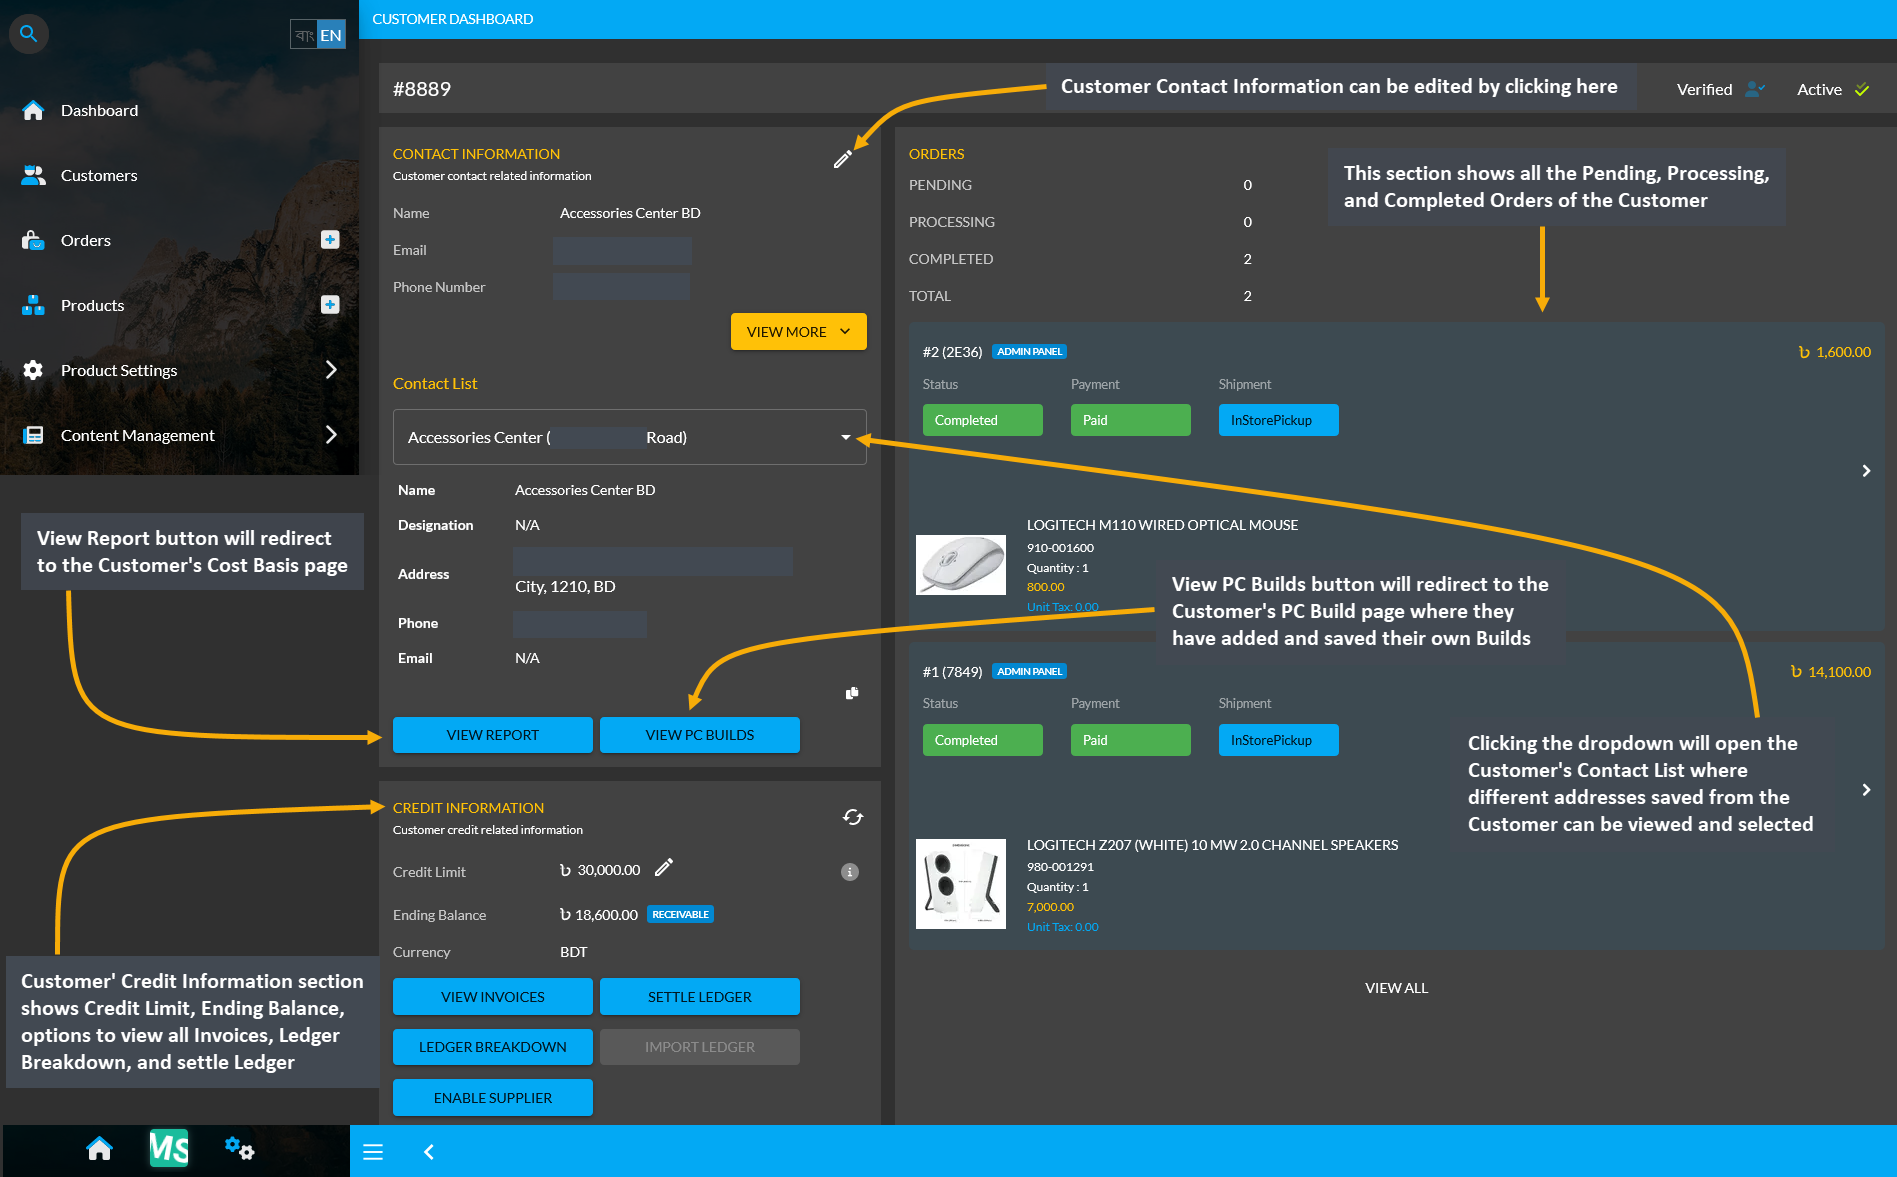
Image 3: Customer Dashboard shows their Contact List, Orders, Report, PC Builds, and Credit Information.
The Customer Filter Button which looks like a white page icon can filter all the current and previous Orders of the selected Customer. Clicking the Filter Button will bring the search results of the selected Customer’s Orders.
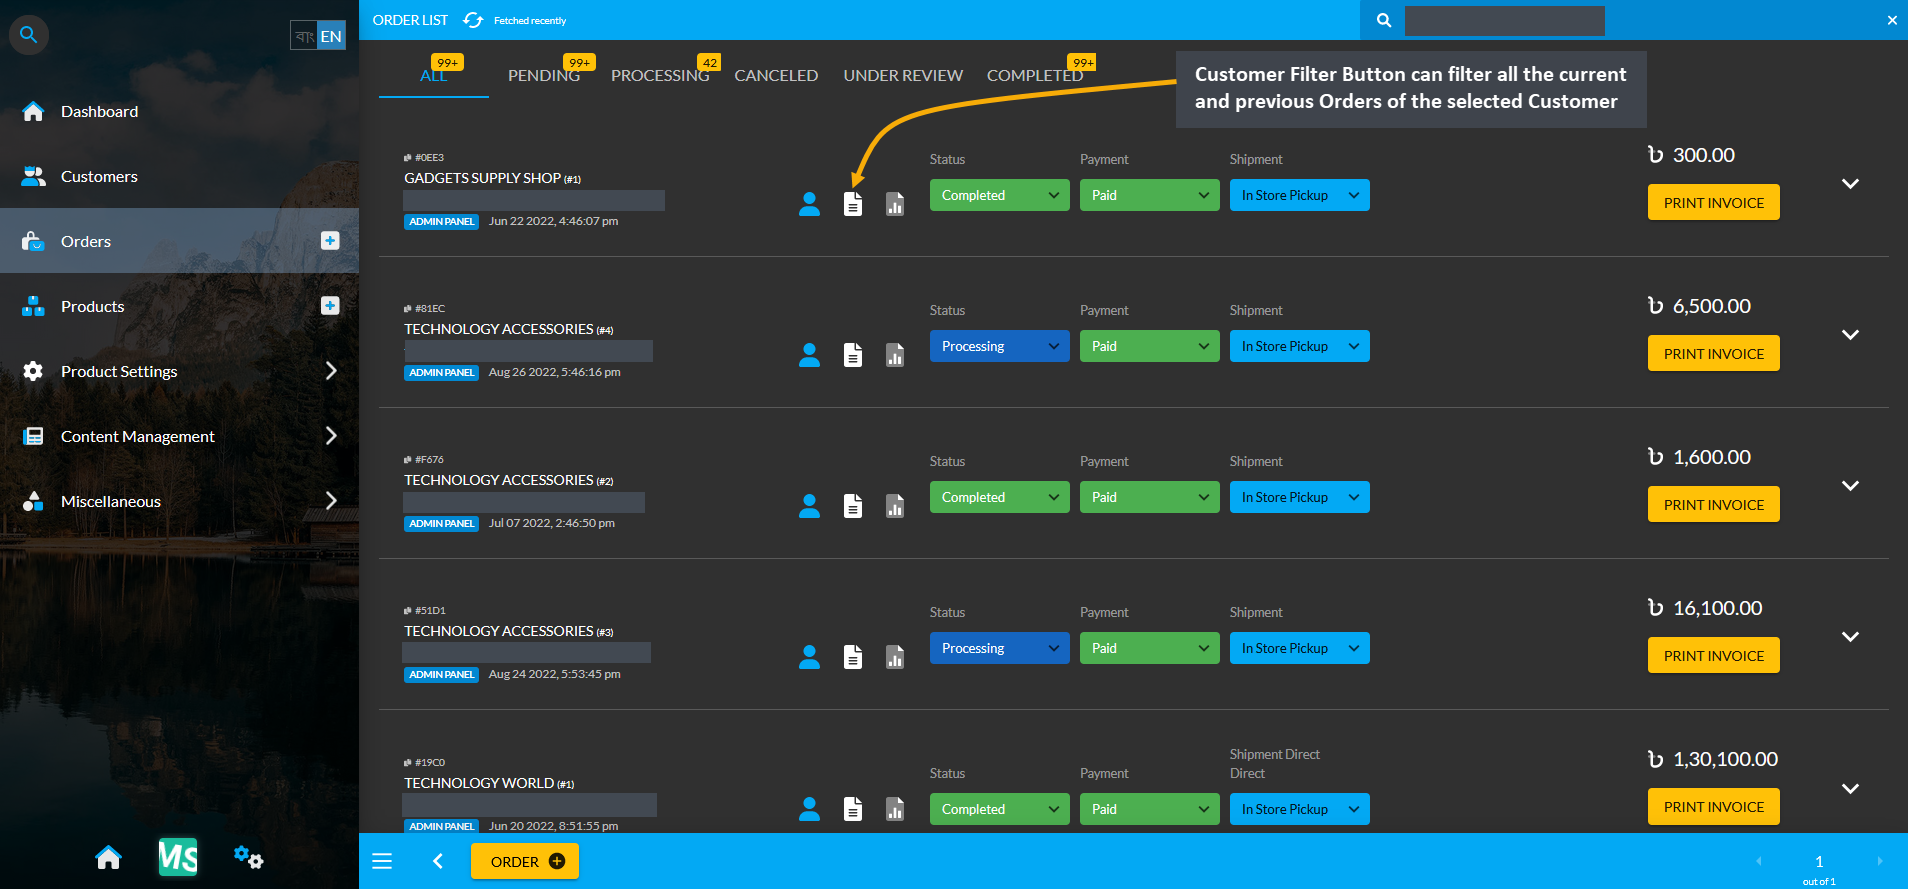
Image 4: Customer Filter Button can filter all the current and previous Orders of the selected Customer.
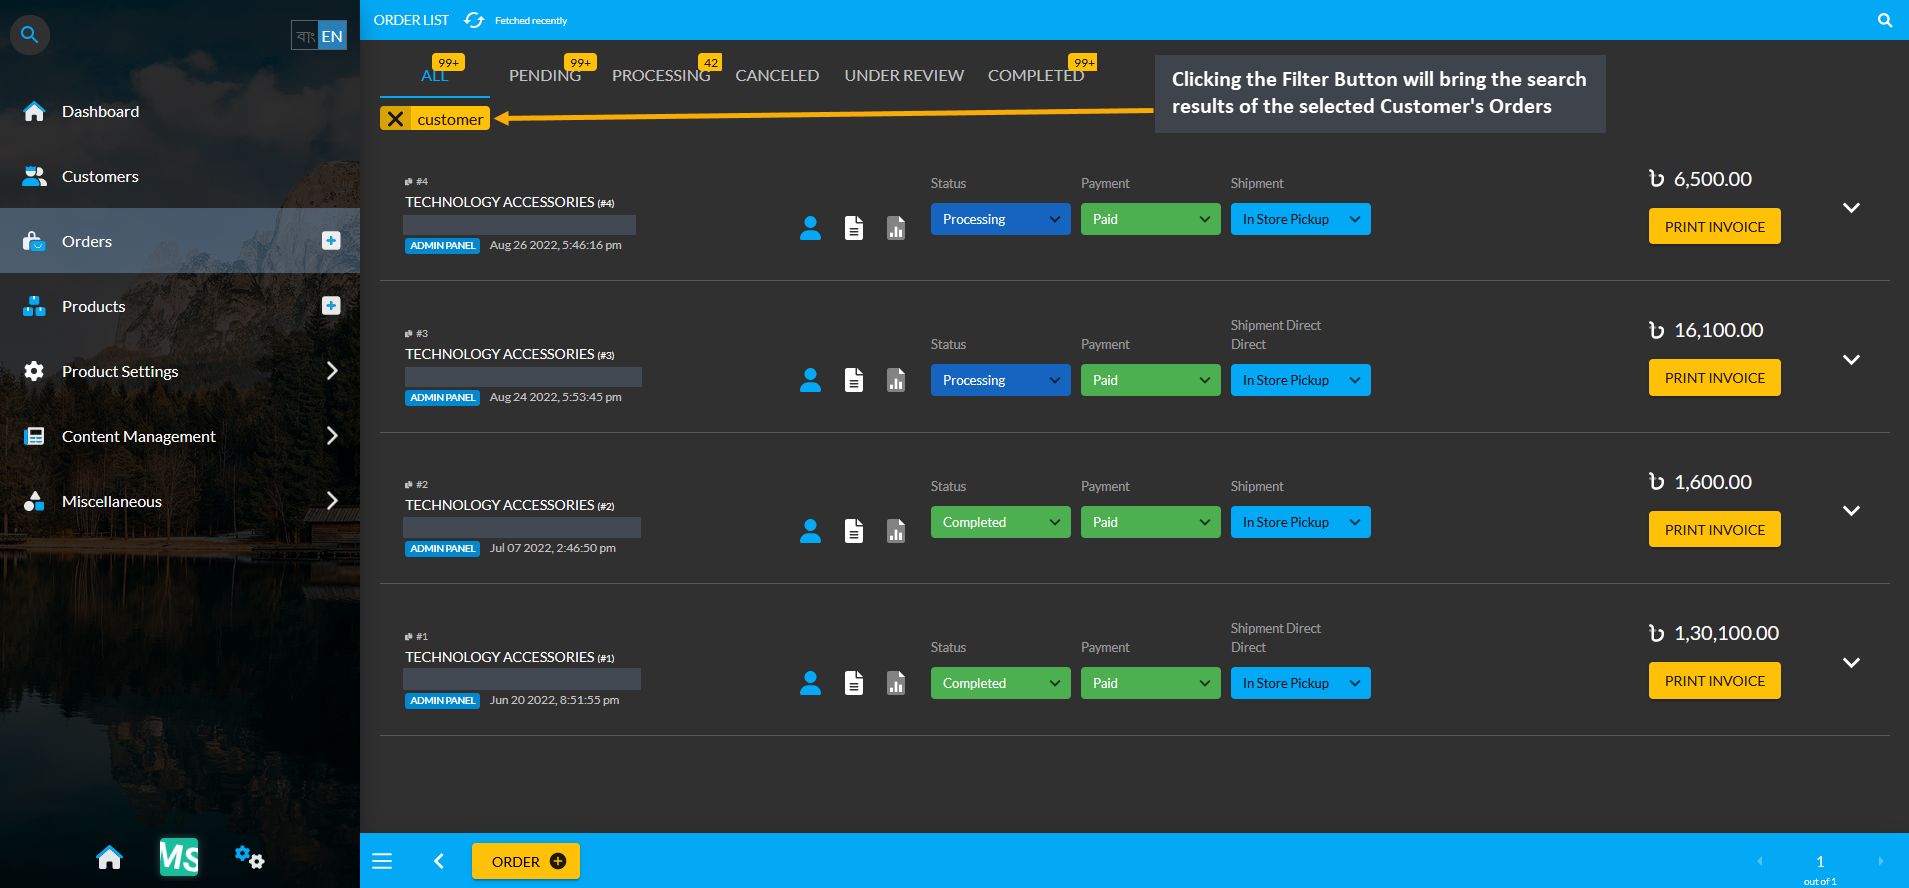
Image 5: Clicking the Filter Button will bring the search results of the selected Customer's Orders.
Order Cost Basis Summary
Click the Orders module which will open the Order List. From there, click on the small gray graph icon that will redirect to the Order Cost Basis page showing total profit, total revenue, total cost, total vat, and total discount.
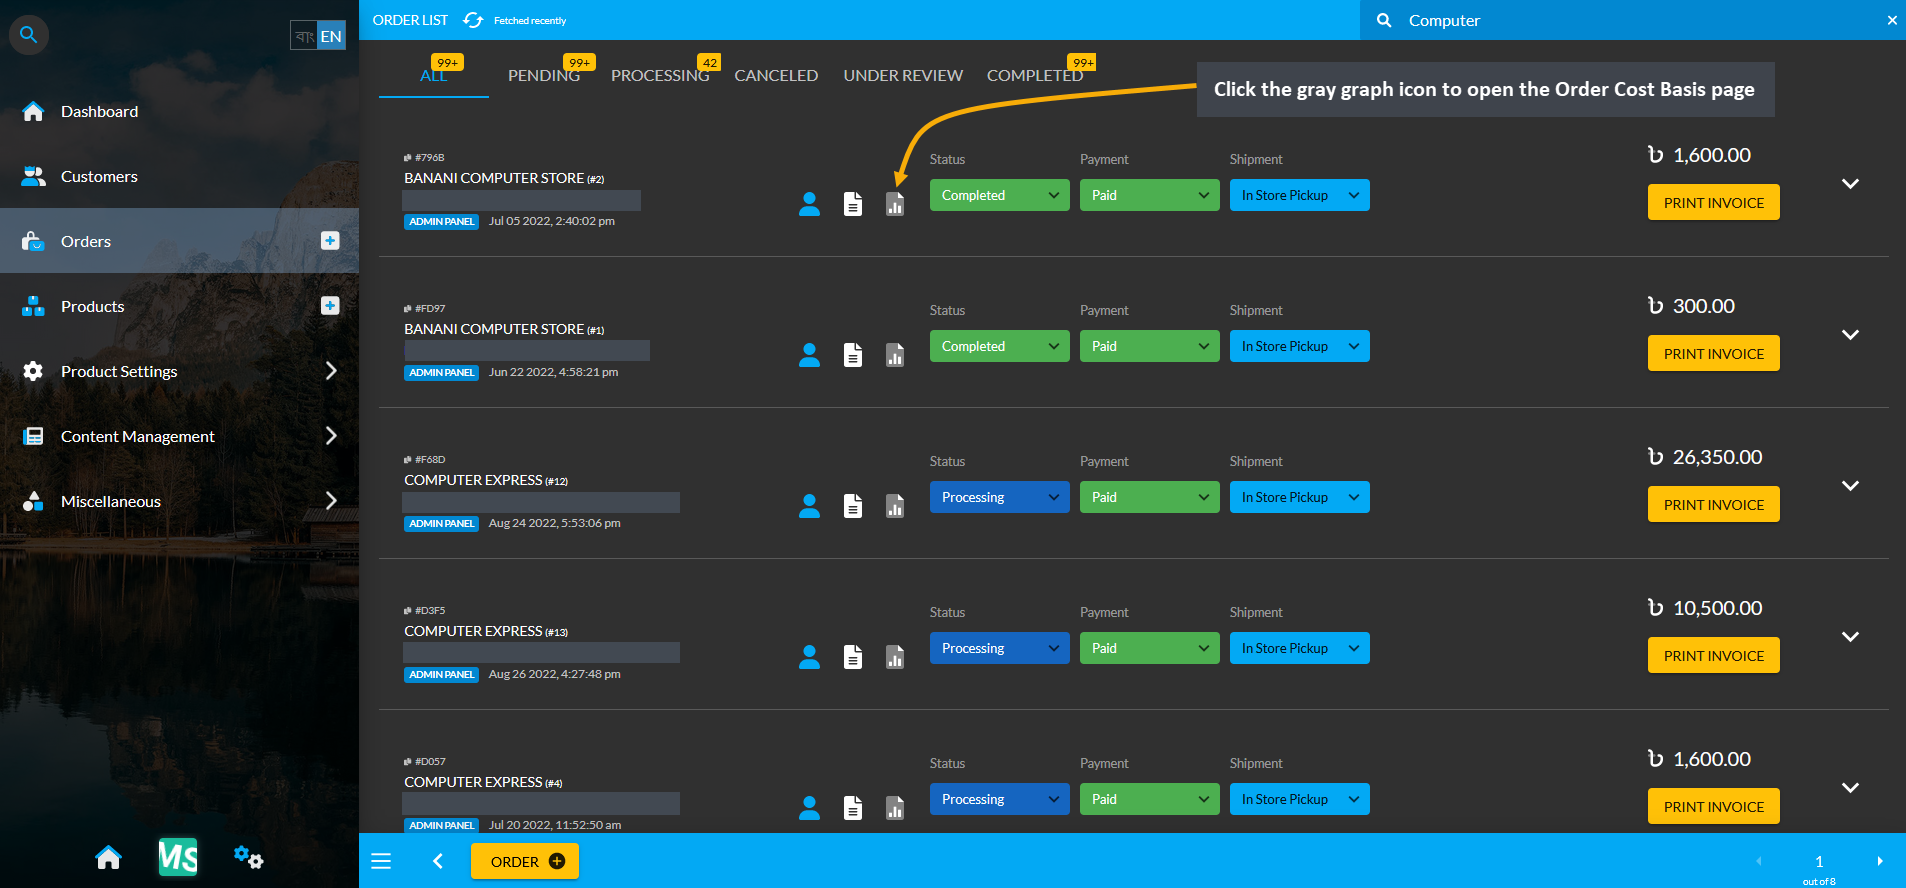
Image 6: Click the small gray graph icon on Order List that will redirect to the Order Cost Basis page.
Cost Basis Summary Section
For Order Cost Basis, the Pick a Range or range filtering option is disabled, because Orders do not have multiple cost basis. Clicking the small gray graph icon from Order List will redirect you to Order Cost Basis page. On the top left of the page is an Order profile box with basic customer information and Order cost basis summary showing total profit, total revenue, total cost, total vat, total tax, and total discount of the selected Order. Below shows the Order date, ordered Product, line item ID, quantity, cost, discount, revenue, profit, tax, vat, and currency.
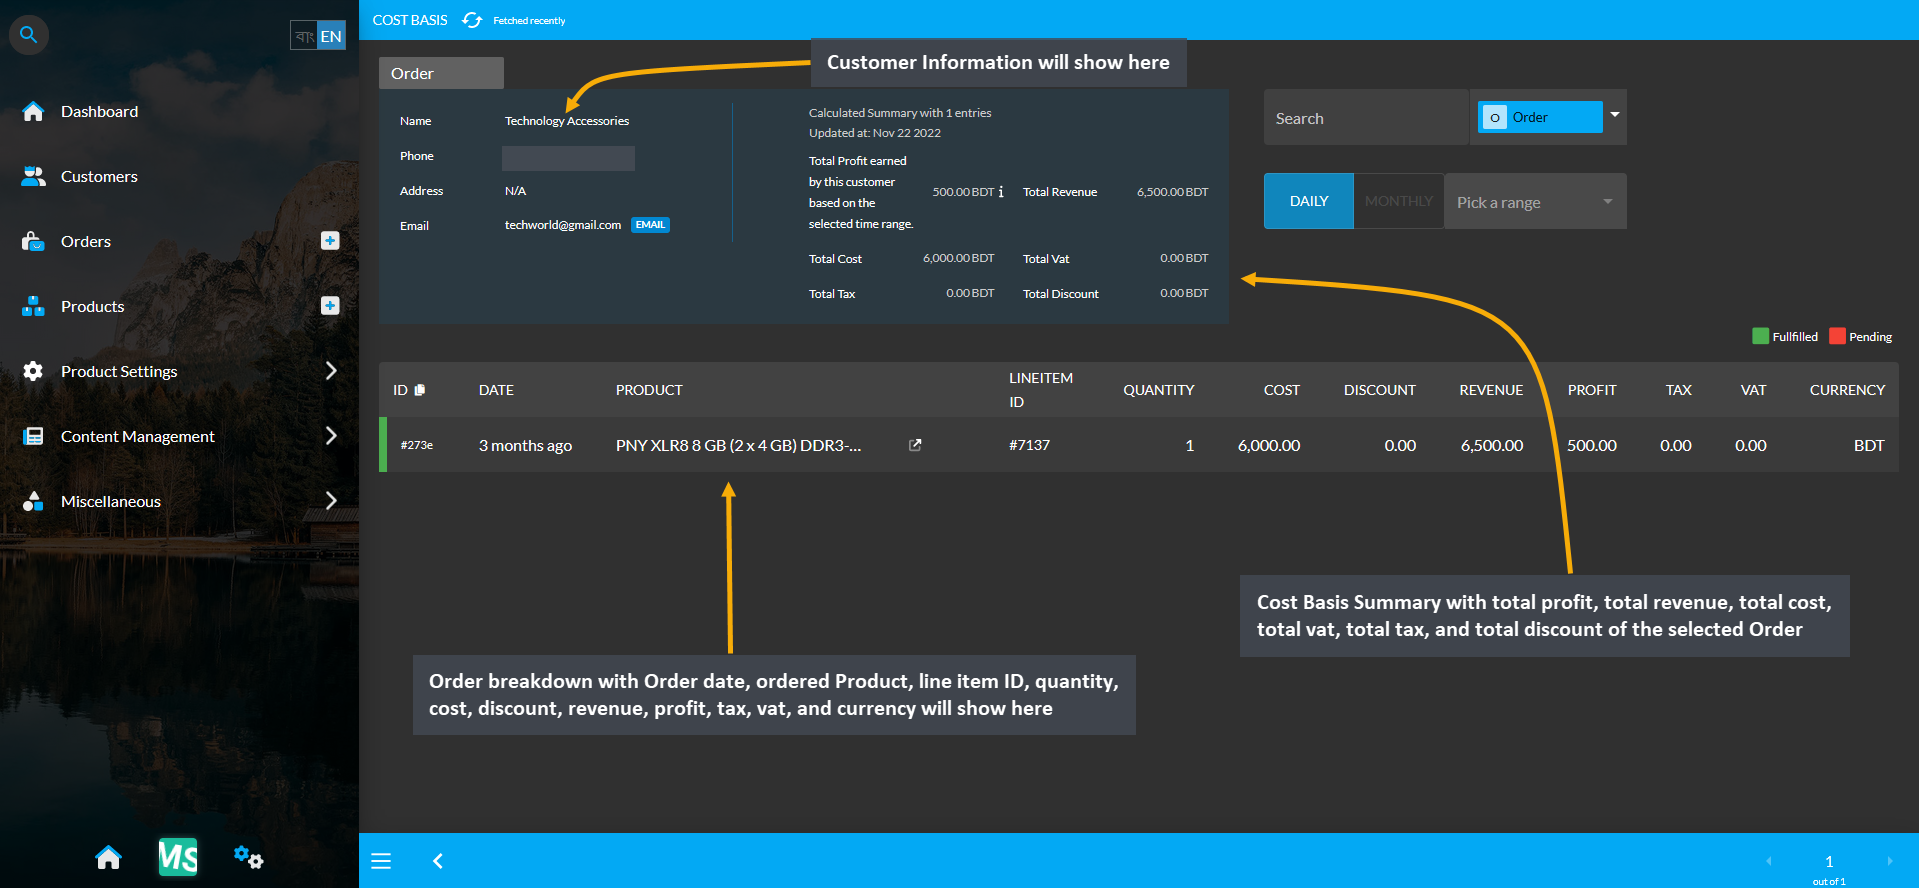
Image 7: Order Cost Basis shows Customer profile, Order Cost Basis summary and detailed Order breakdown.
Cost Basis Search and Range Selection
The Order Cost Basis page also have a Search button with a dropdown menu with four options of Order, Customer, Product, and Product Batch on the top right. Clicking each of these options will bring cost basis summary results of Order, Customer, Product, and Product Batch whichever is selected. For example, to search and find an Order’s Cost Basis result, select Order from the dropdown and type the Customer’s name in the Search box which will bring in the selected Order’s Cost Basis result. In this way, the Shop Owner can search for any Order’s Cost Basis result.
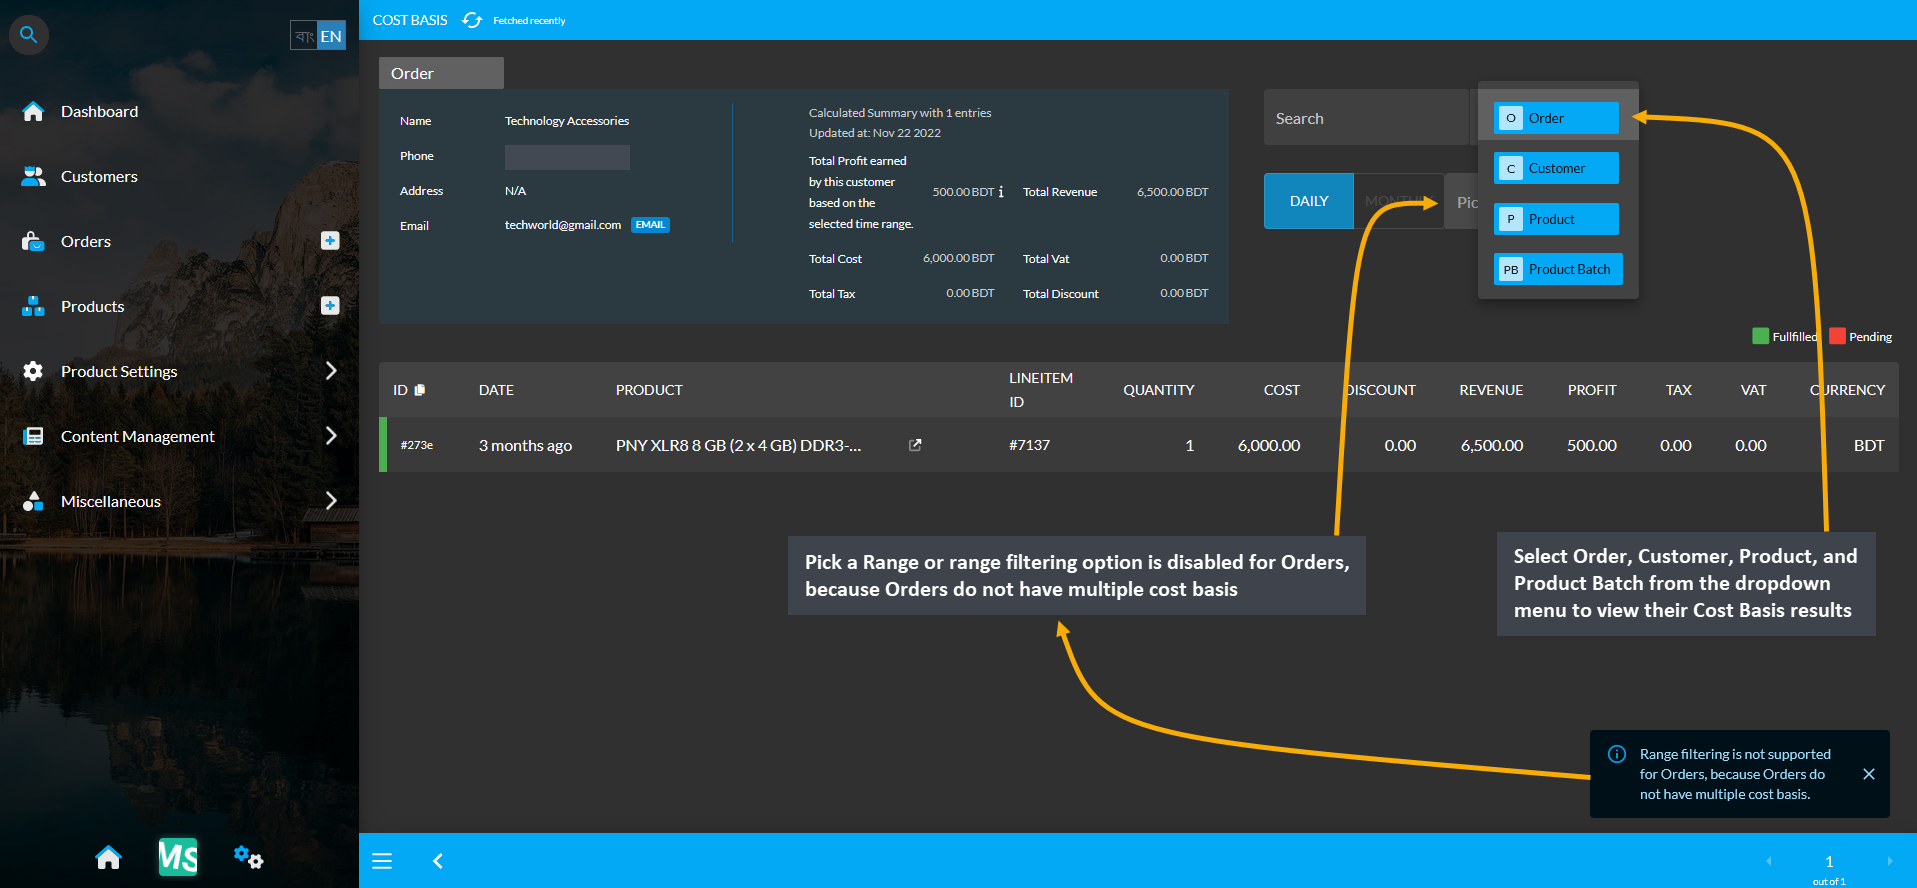
Image 8: Range Filtering option is disabled for Orders, select an option to view their Cost Basis result.
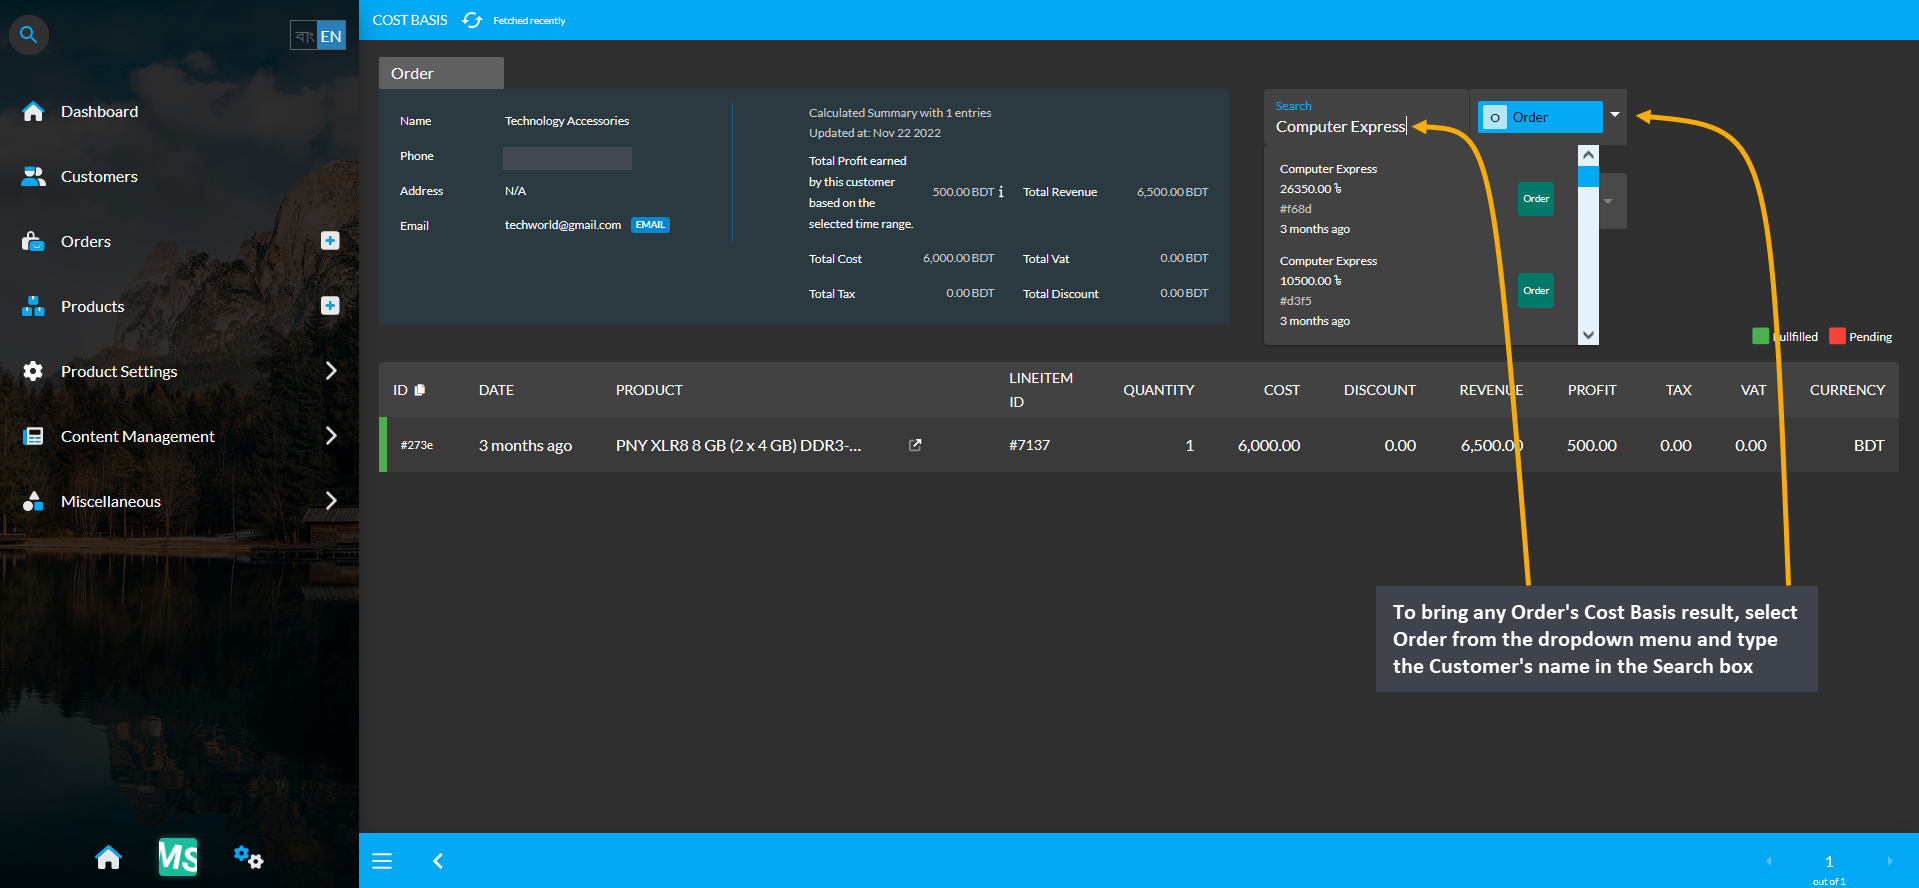
Image 9: Select Order from dropdown and type Customer’s name in Search box to view their Cost Basis result.
11.4 - Edit Shipment Status
Update Shipment status after Payment has been confirmed by the Customer.
Update Shipment Status
After Payment has been completed by the Customer and the preferred Shipping Carrier has been selected, the Shop Owner can set different Shipping Status based on their progress. Based on Product and Shipping Carrier availability, the Order may remain Pending or Processed (scanned, packed and labelled).
Until Payment is confirmed, Shipping status will show as Pending. However, after Payment is completed, it will automatically changed to Delivered if the option Cash on Delivery is selected. If In Store Pickup is selected, the Shipping status will show as In Store Pickup after Payment confirmation.
There are several options to update to different Shipping statuses by the Admin. Select from five different statuses for Shipment to update like Pending, Processing, In Store Pickup, In Transit, Returned, or Delivered.
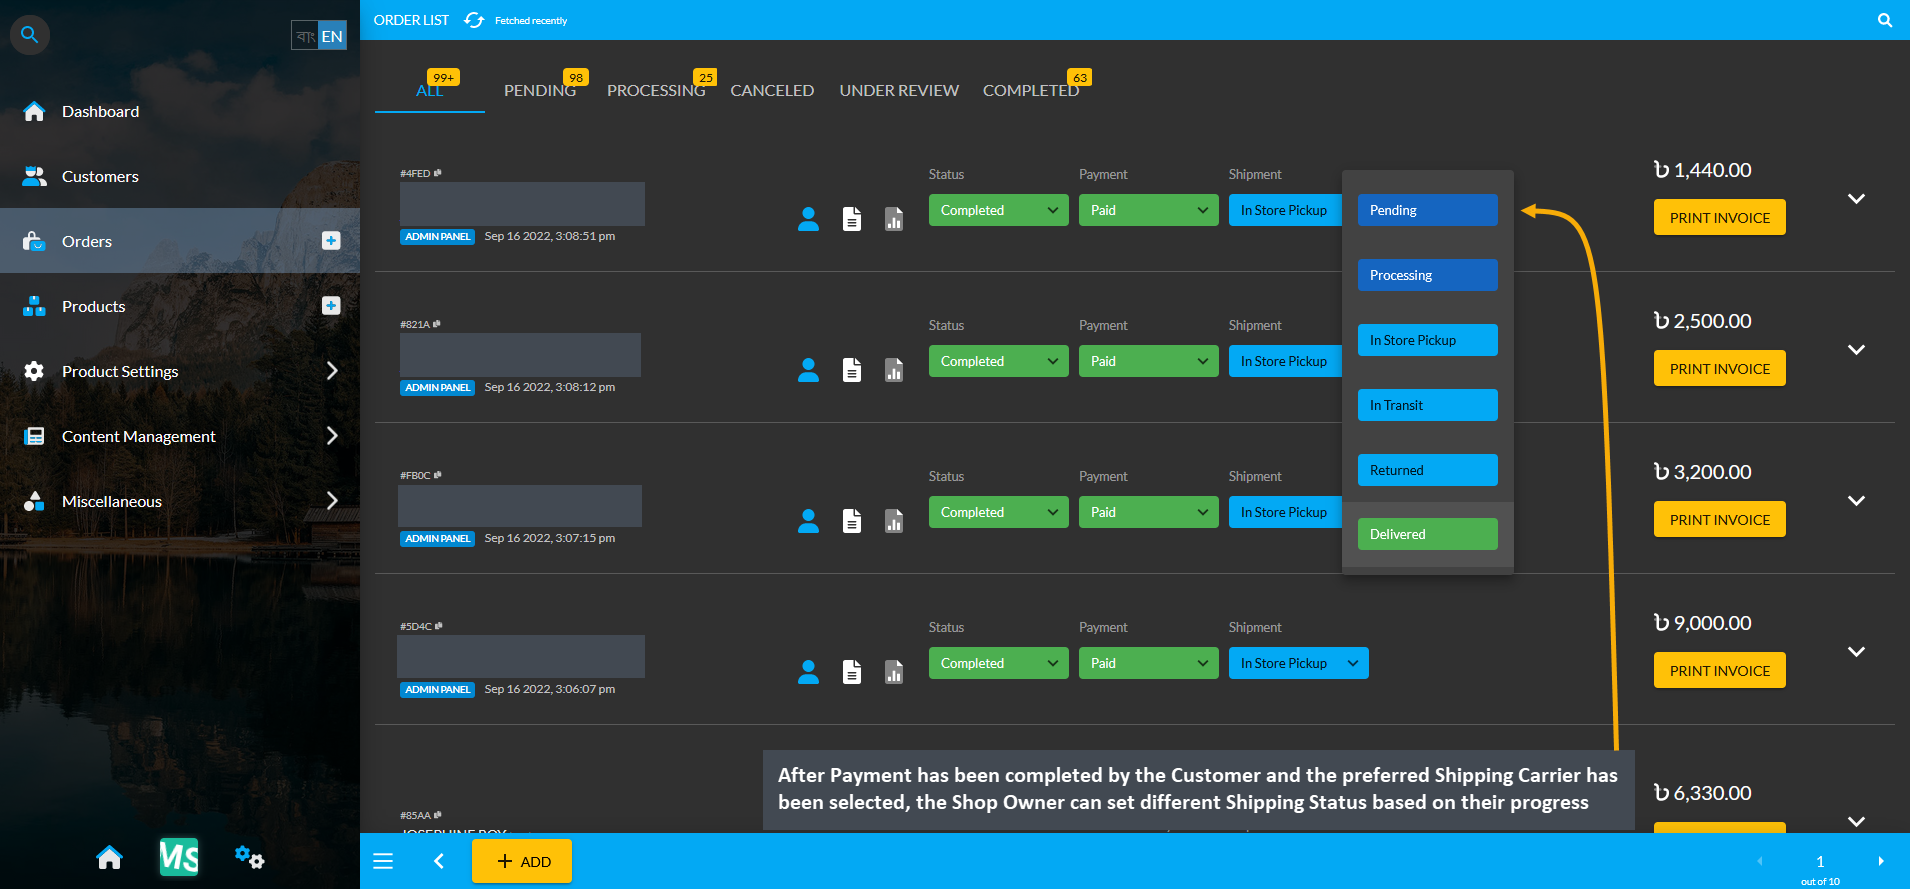
Image 1: After Payment has been completed by the Customer, Shop Owner can set different Shipping Statuses.
Shipment Pending
Shipment status Pending means that the Shop Owner is aware of the Order being placed and will process and ship it soon. So, Shipment status will be marked as Pending as soon as Customer placed Order on the Website.
Shipment Processing
Shipment status Processing means that the Shop Owner has received the Customer’s Order and is preparing it for shipping. If Customer ordered a custom made product, this status means that production for it has started. Thus, the Shop Owner can mark the Shipment status as Processing when they are done packaging the Product which is ready for shipping and to be handed over to the Shipping Carrier.
Shipment In Store Pickup
Shipment status In Store Pickup means that the Customer selected the option to collect their Order themselves from the Shop Owner’s store instead of selecting a home delivery. So, if Customer selected this option, the Shop Owner can set Shipment status to In Store Pickup as the Customer will visit and buy from the store. The In Store Pickup for online Orders will give local Customers a convenient alternative to shipping. Also, this option could allow Customers to purchase certain Products only in the store and not online.
Shipment In Transit
Shipment status In Transit means that the Shop Owner has shipped the Order or handed the package over to the Shipping Carrier. For this, the Shop Owner may choose to provide Shipping Carrier name and Tracking Number of the package for Customer to check their progress and stay updated about when their Product will be delivered.
Shipment Returned
Shipment status Returned means that a Customer chose to return a Product based on its quality or visual defects. Based on the Customer’s request to return the Product, Shop Owner can mark the Shipment status as Returned.
Shipment Delivered
Shipment status Delivered means the delivery person has dropped off the package at Customer’s delivery address and updated all associated tracking systems to complete the transaction. After Shipping Carrier confirms that the Customer have received their Order, the Shop Owner can update the Shipment status to Delivered.
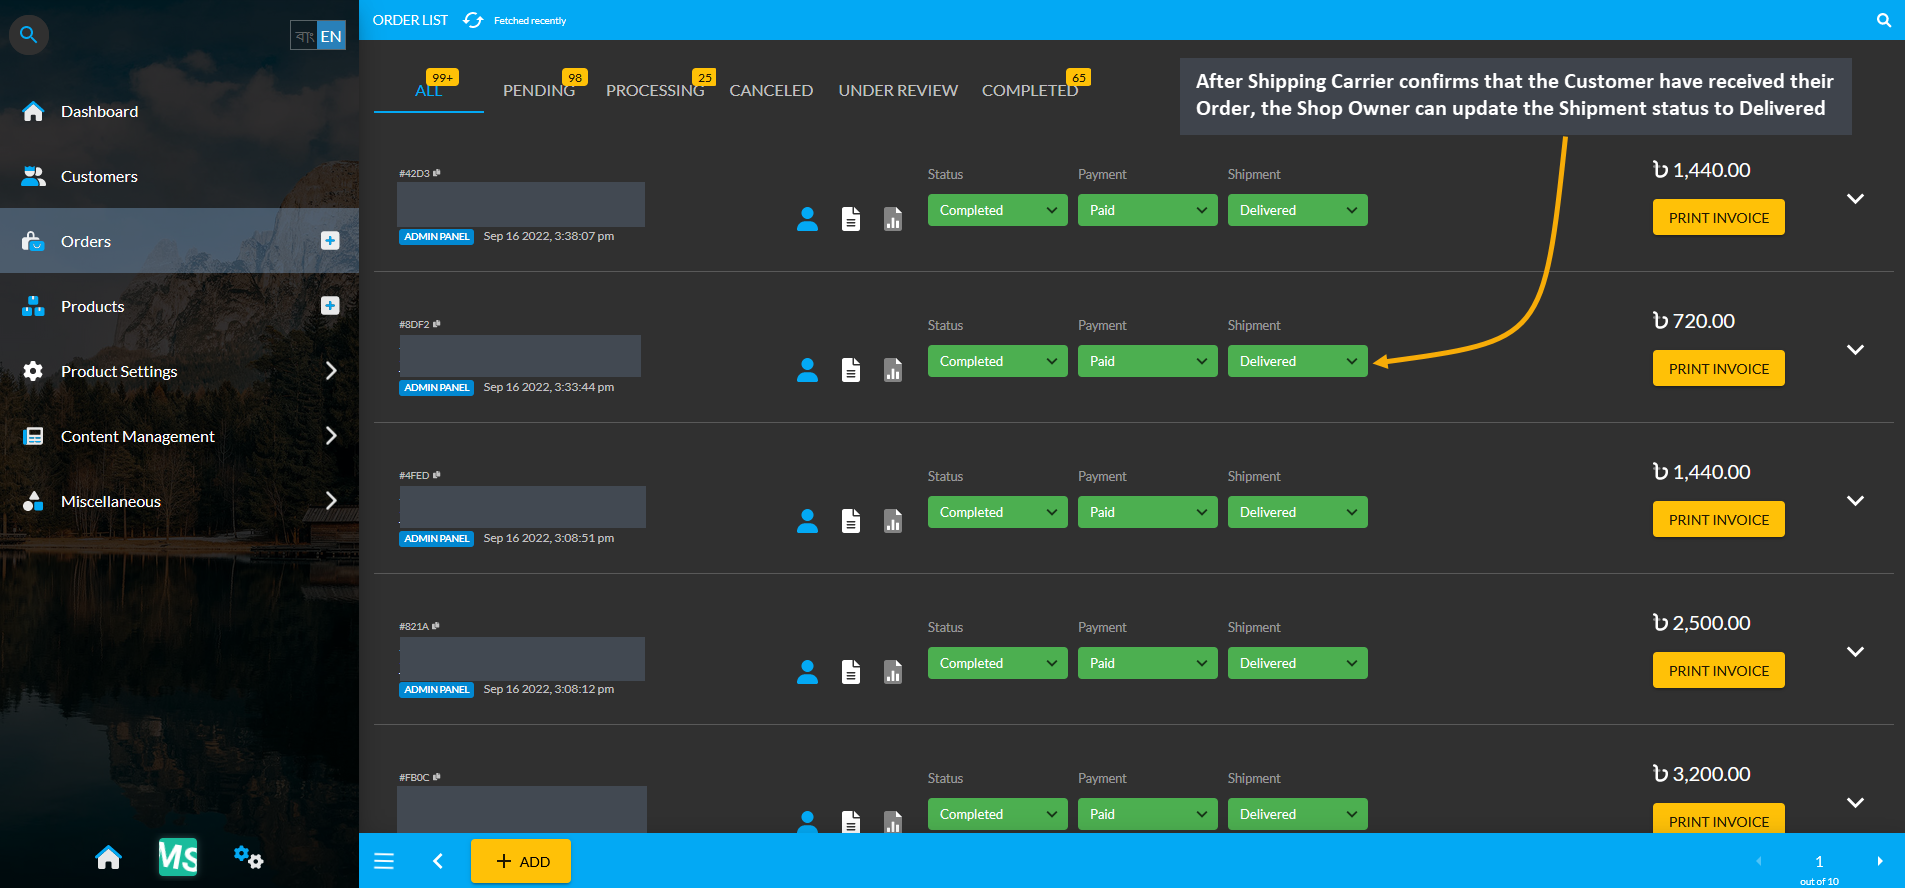
Image 2: After Customer receives their Order, the Shop Owner can update the Shipment status to Delivered.
12 - Transaction Modals for Three Customer Types
Functionality of Transaction Modals for 3 Customer Types on Cart and Order Page.
Transaction Modals for Customer Types
Cash Customer Transaction Flow
Cash Customer transaction workflow is different from Credit Customers because they are allowed to make Order payment with all Payment Gateways, except On Credit (Due). As Cash Customers place Orders without any account information, they are not provided with any Credit Limit. Therefore, they will not be able to make Order payment with Credit Limit i.e. On Credit (Due), but all other Payment Gateways.
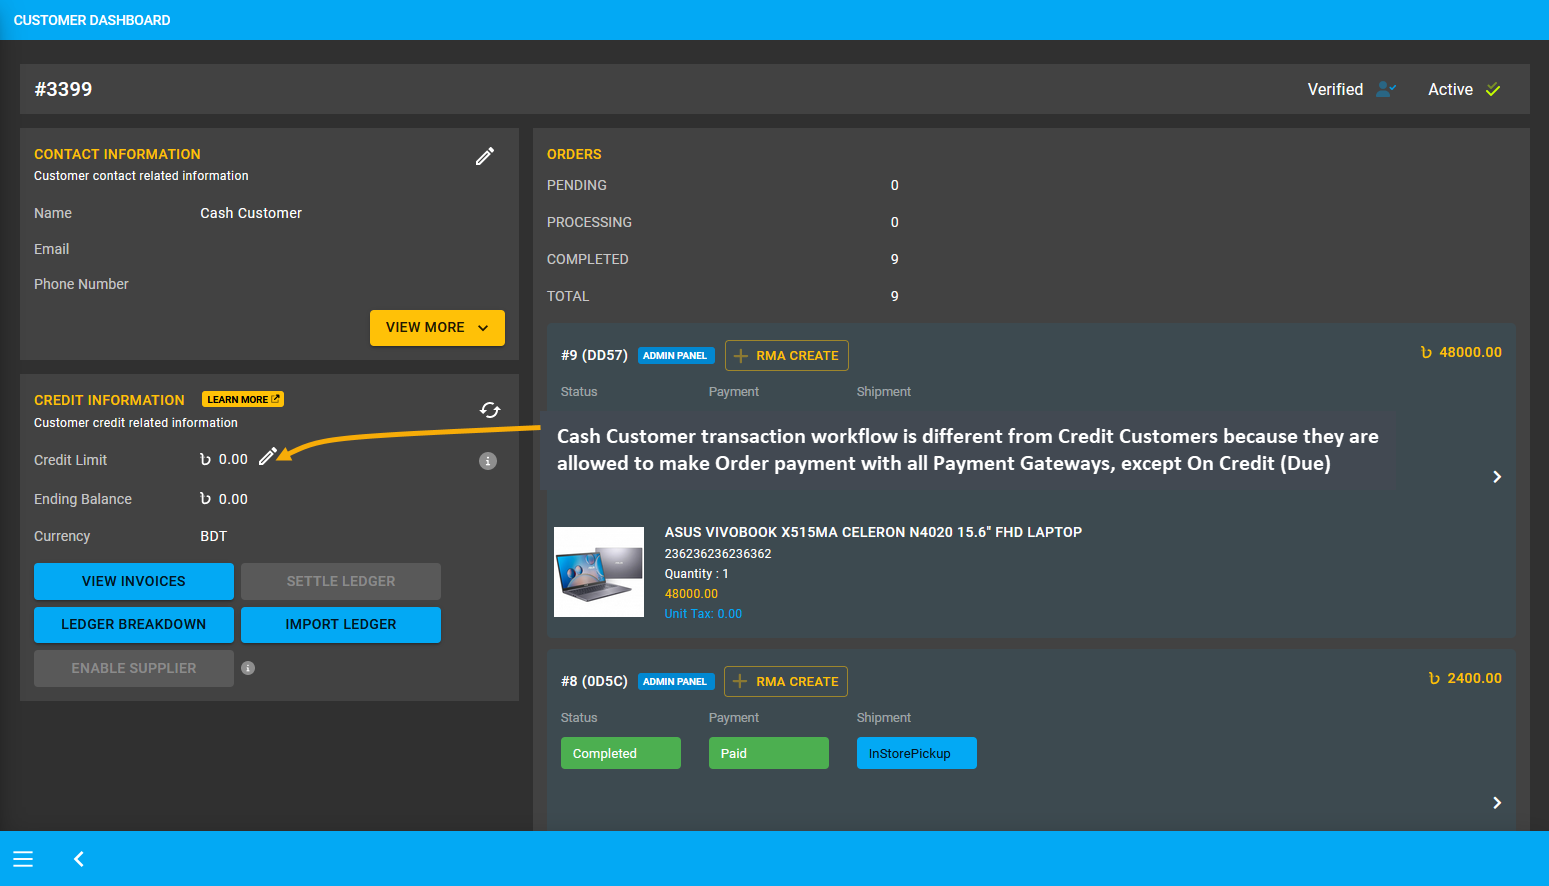
Image 1: Cash Customer can make Order payment with all types of Payment Gateways, except On Credit (Due).
Regular Customer Transaction Flow
Regular Customer transaction workflow is different from Credit Customers because they are allowed to make any Order payment with all Payment Gateways, except On Credit (Due). So, as Regular Customer are not provided with any Credit Limit, they will not be able to make Order payment with Credit Limit, but all other Payment Gateways.
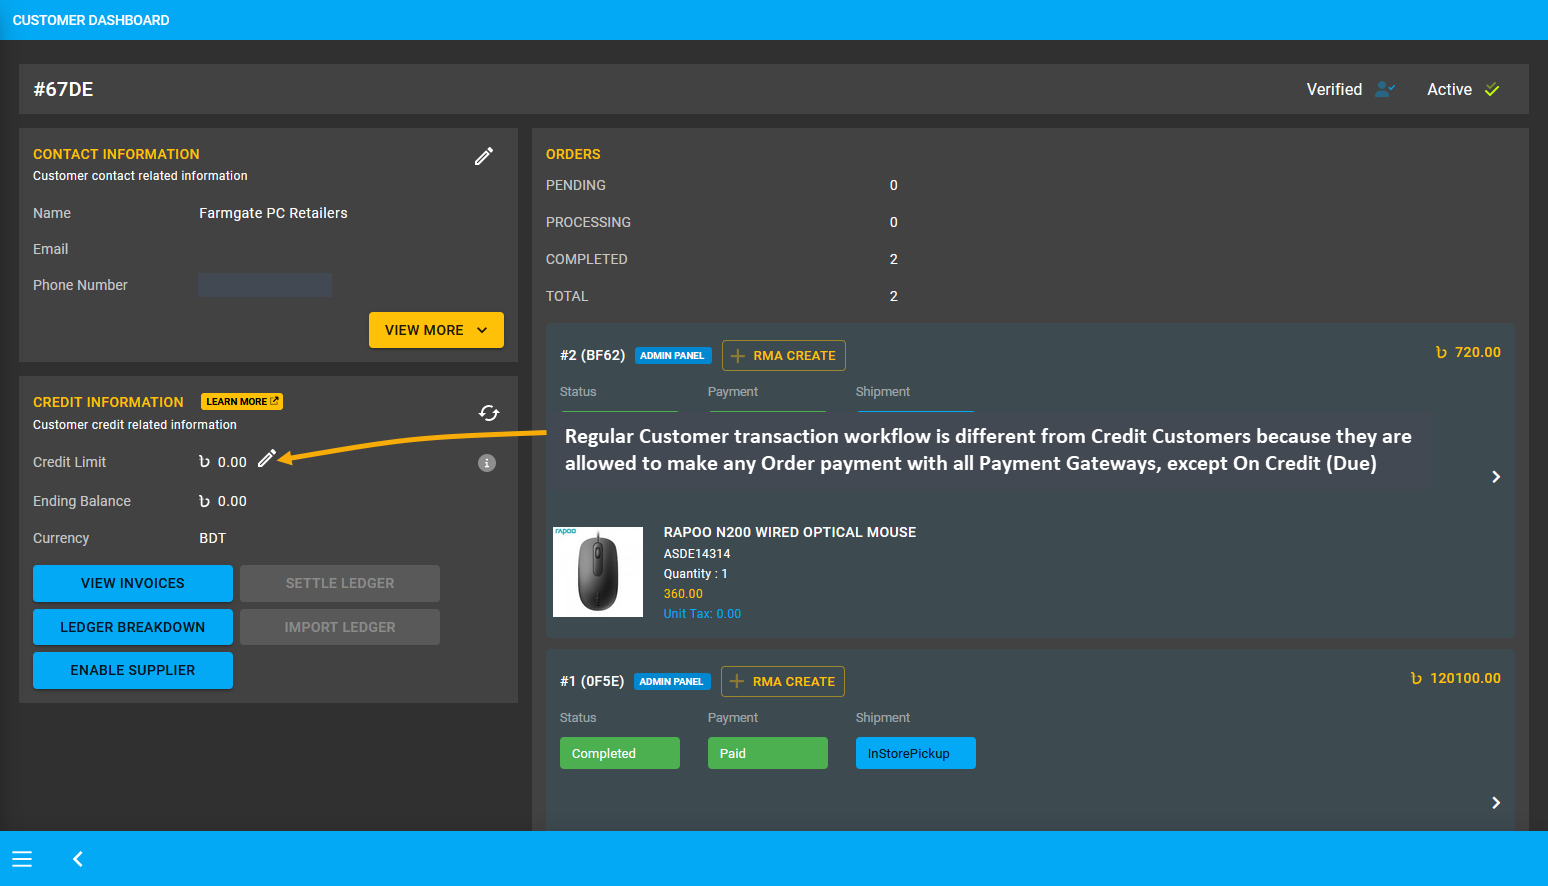
Image 2: Regular Customer can make Order payment with all Payment Gateway types, except On Credit (Due).
Credit Customer Transaction Flow
Credit Customer transaction workflow is different from both Regular or Cash Customers because they are allowed to make Order payment with all types of Payment Gateways, including Credit Limit i.e. On Credit (Due).
If a Credit Customer has enough Credit Limit, they will be able to make Order payment with Credit Limit. Therefore, if the available Credit Limit is enough to cover Full Order Payment, then they can place Order using On Credit (Due) gateway. Despite having Credit Limit on their account, a Credit Customer may still not be able to use Credit Limit to cover a Full Order Payment if Order Total exceeds the allotted Credit Limit. Also, if a Credit Customer has NO Credit Limit on their account, they will not be able to use Credit Limit for making Order payment.
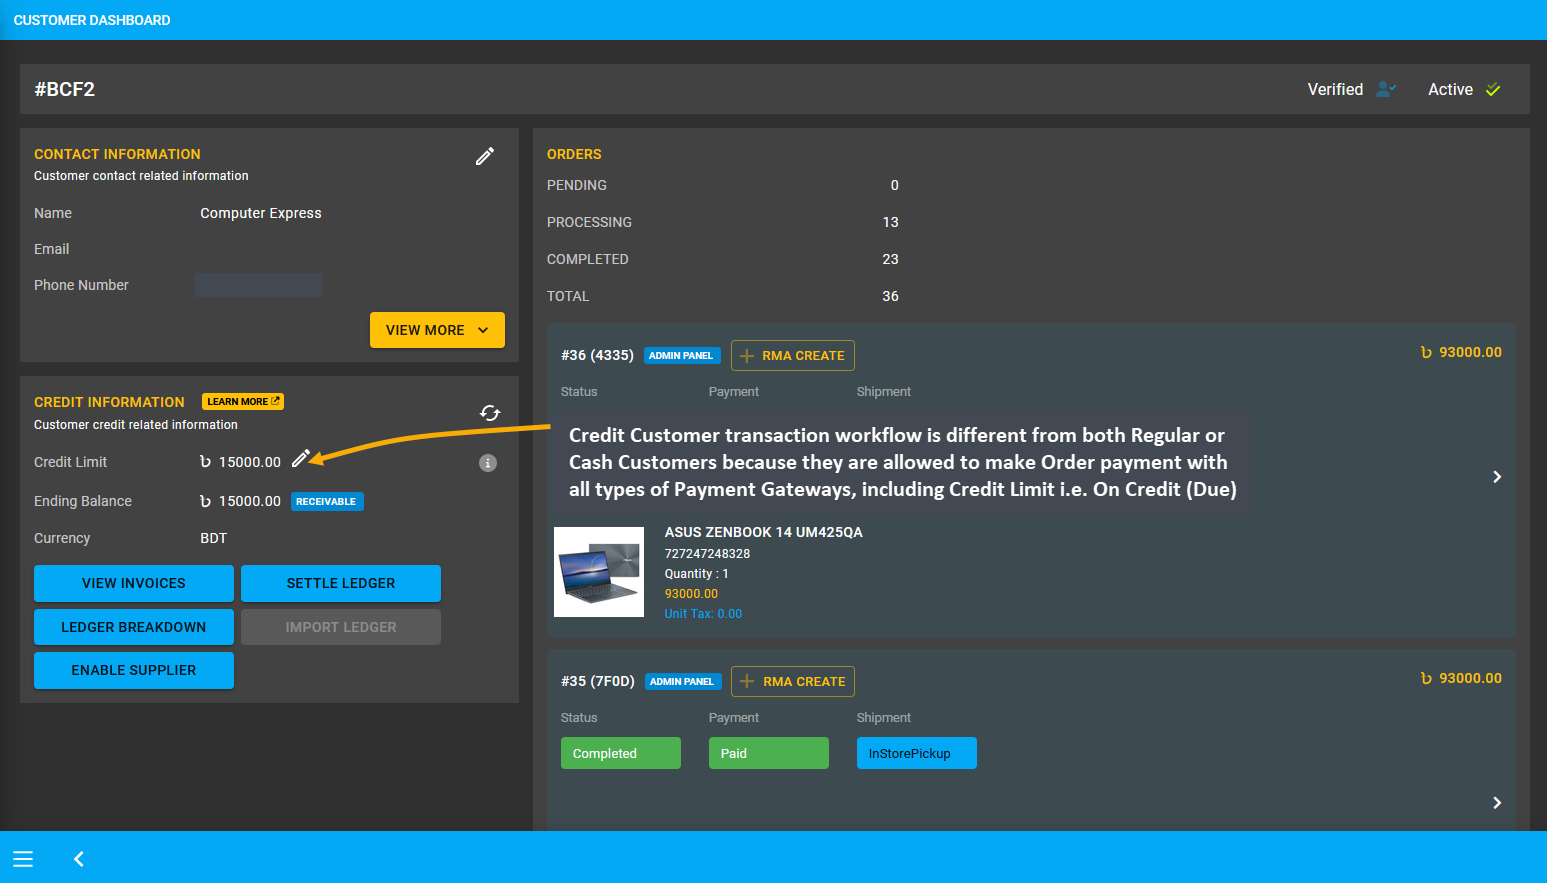
Image 3: Credit Customer can make Order payment with all Payment Gateway types, including On Credit (Due).
12.1 - Cash Customer Transaction Flow
Functionality of Cash Customer’s Transaction Modals on Cart and Order Page.
Cash Customer Transaction Flow
Cash Customer transaction workflow is different from Credit Customers because they are allowed to make Order payment with all types of gateways, except On Credit (Due). As Cash Customers do not require any account details, placing an Order by filling basic Customer Information and Shipping Address in not necessary. Thus, search for and add Products. Check Product rate, Order total, subtotal, and click Proceed to select payment and shipping option.
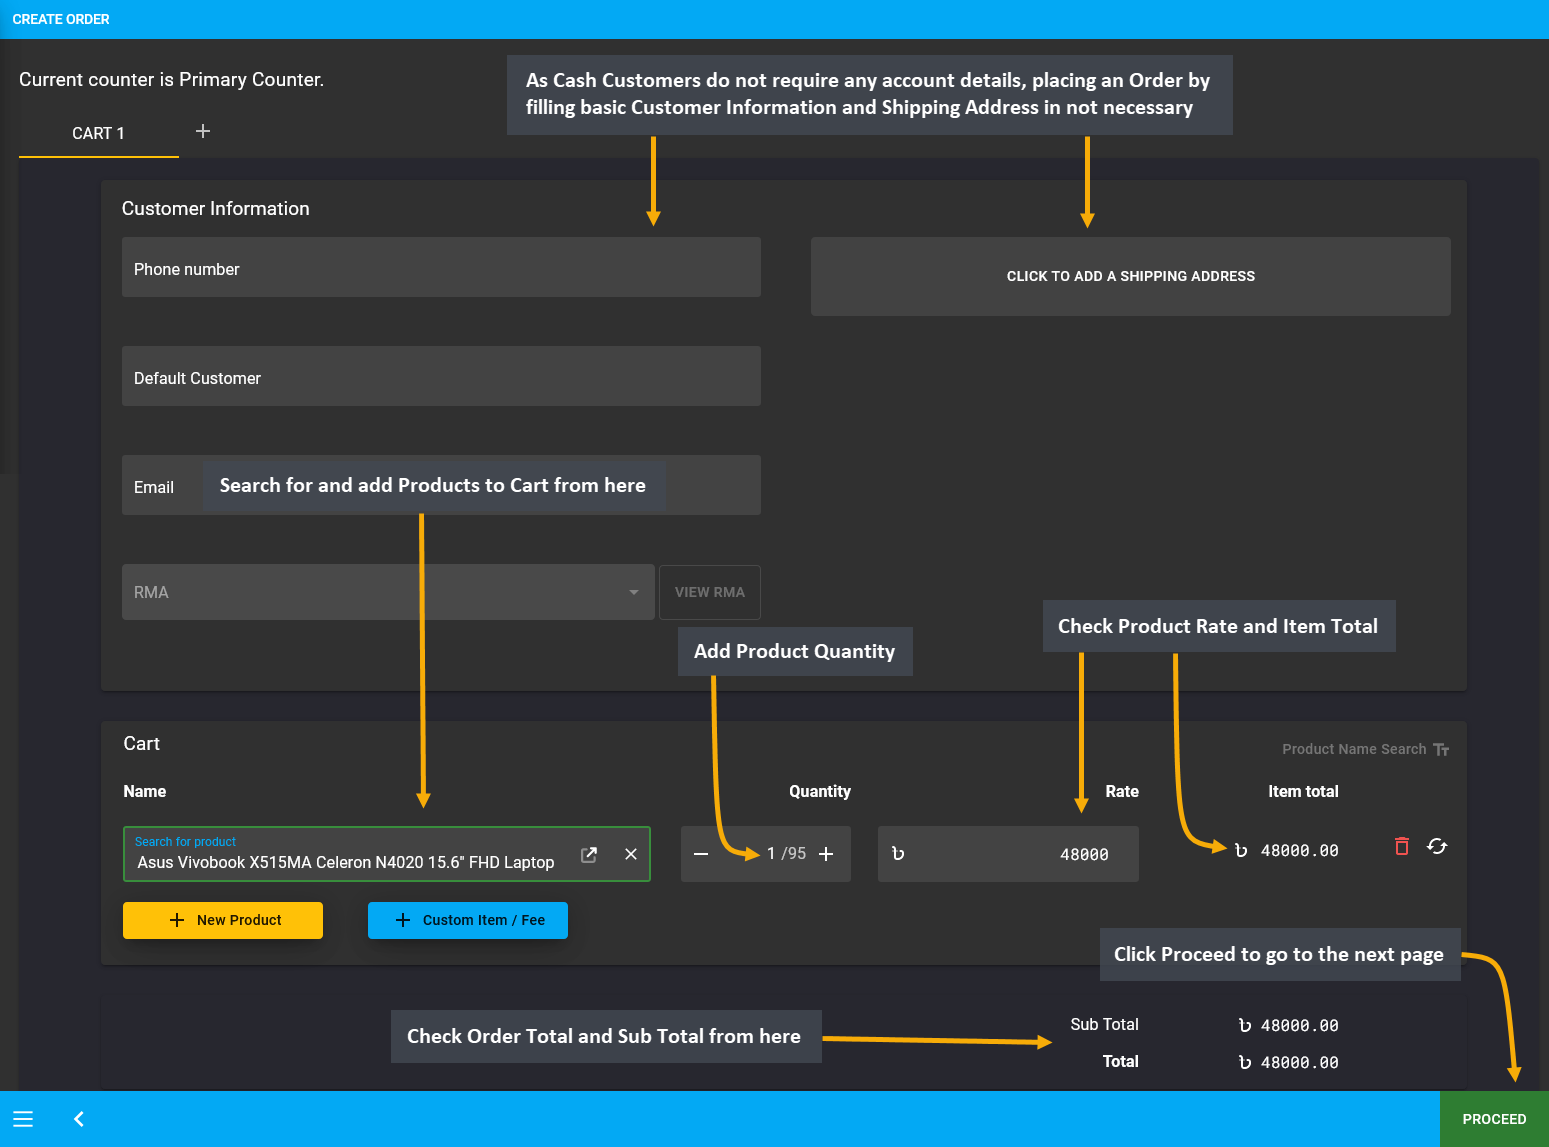
Image 1: Cash Customer can make Order payment with all types of Payment Gateways, except On Credit (Due).
If the Cash Customer wants to place Order without payment, then they can complete Order without selecting any payment options. In the example, In Store Pickup was selected as the Shipment without selection of any payment option. Add a Note to keep record that Order was placed without Payment and the transaction will be completed later. Thus, proceed without selecting any payment option and click on Confirm Order to proceed to the next step.
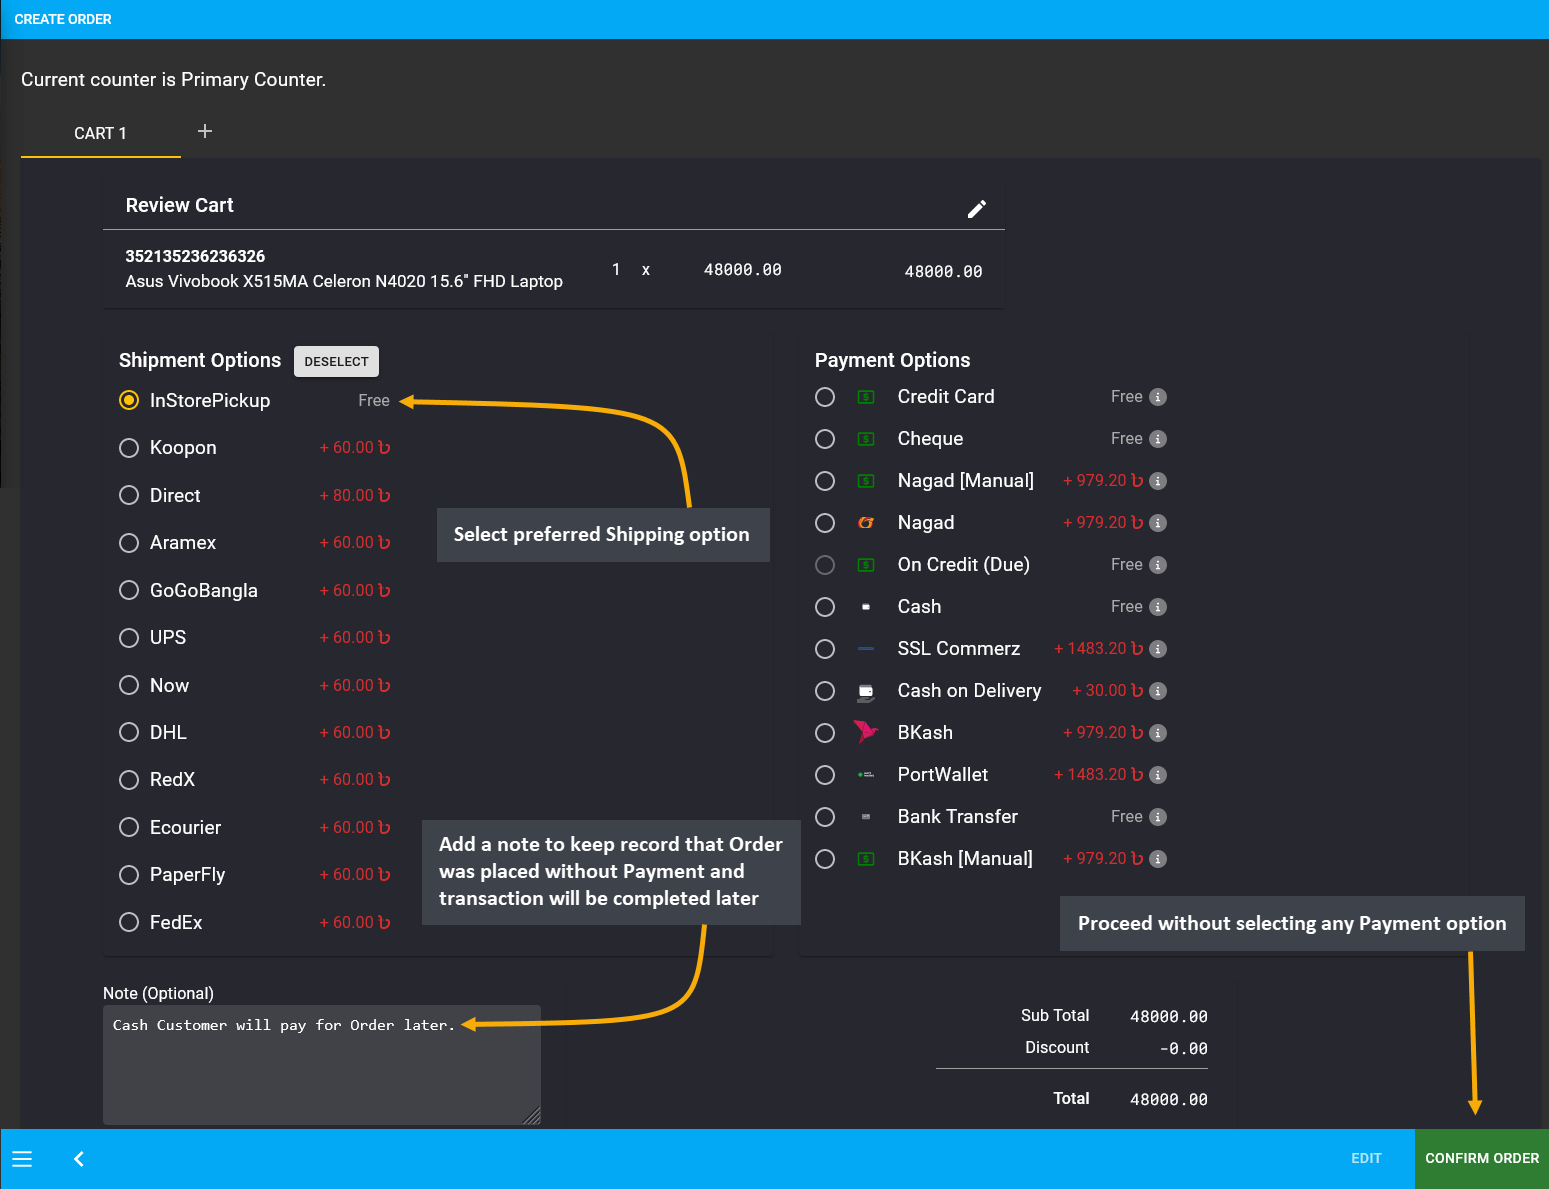
Image 2: Cash Customer can complete Order without selecting any payment options and make payment later.
As Order will be placed for Cash Customer without payment, so select the option Yes to continue without payment information for the Order. Click the Submit button to proceed and confirm the Order without any payment.
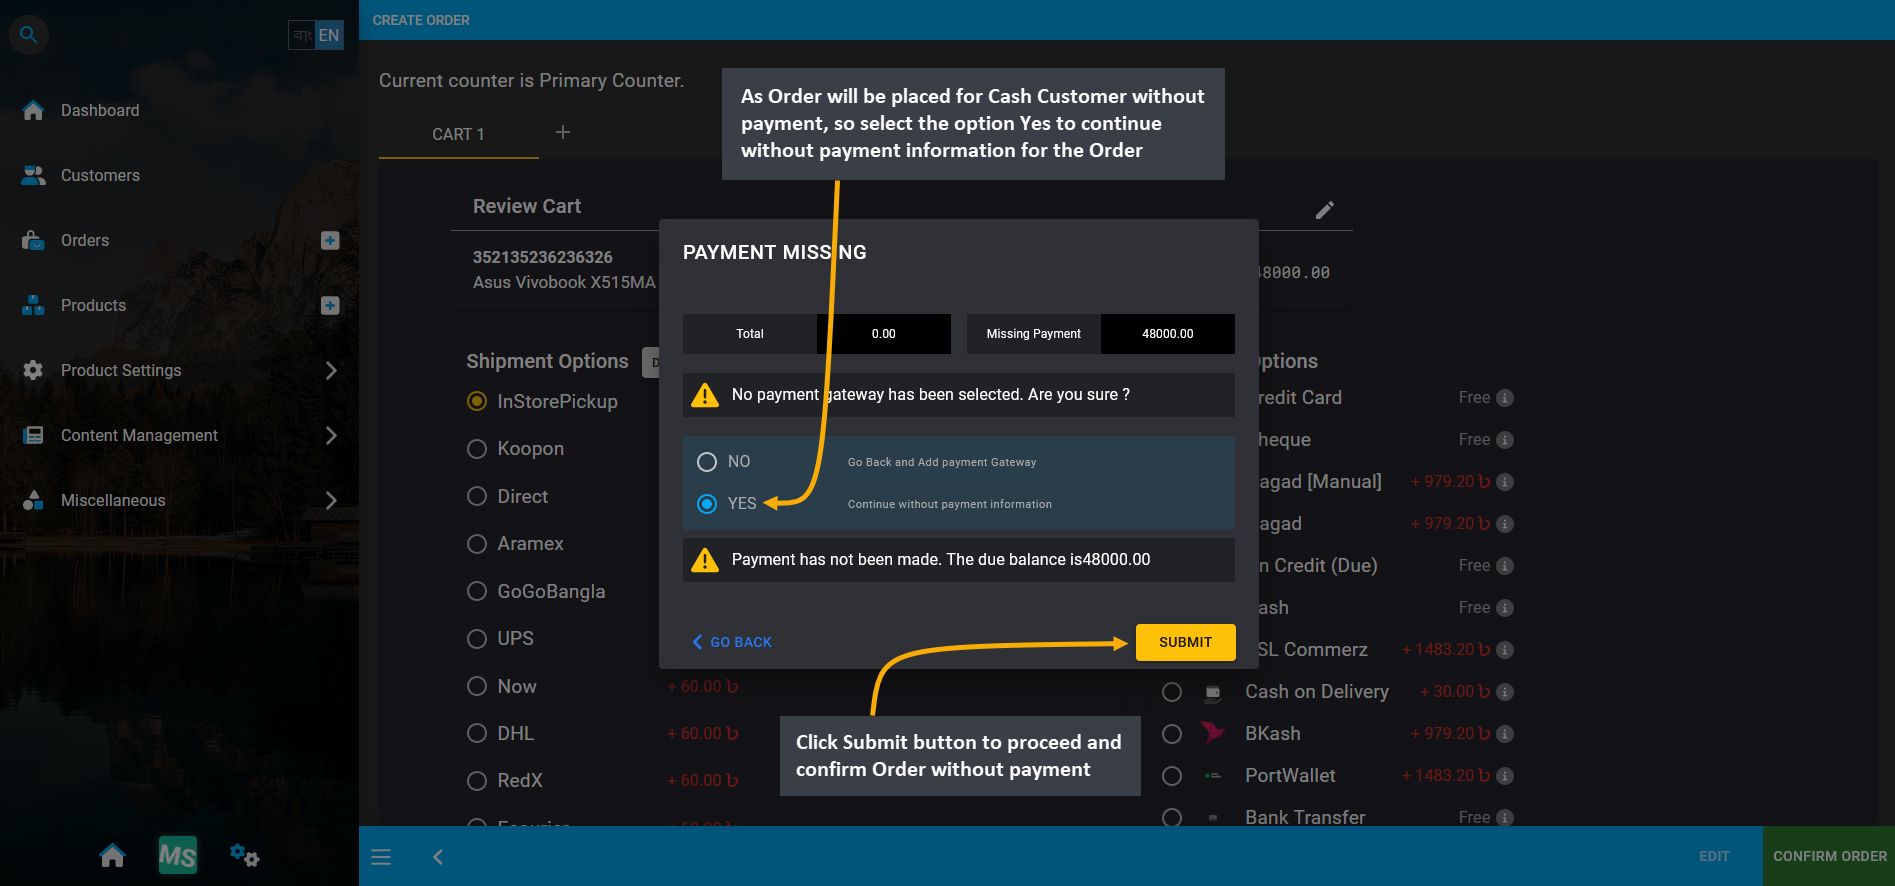
Image 3: Select the option Yes to continue without payment information for the Order for Cash Customer.
To add payment details to this Order, go the Orders Tab. The newly created Order will appear on top of the list. It has incomplete payment which needs to be completed. For this, click the Transaction + button which will redirect to the Payment Gateway from where transaction can be completed for this Order with Multiple Transactions.
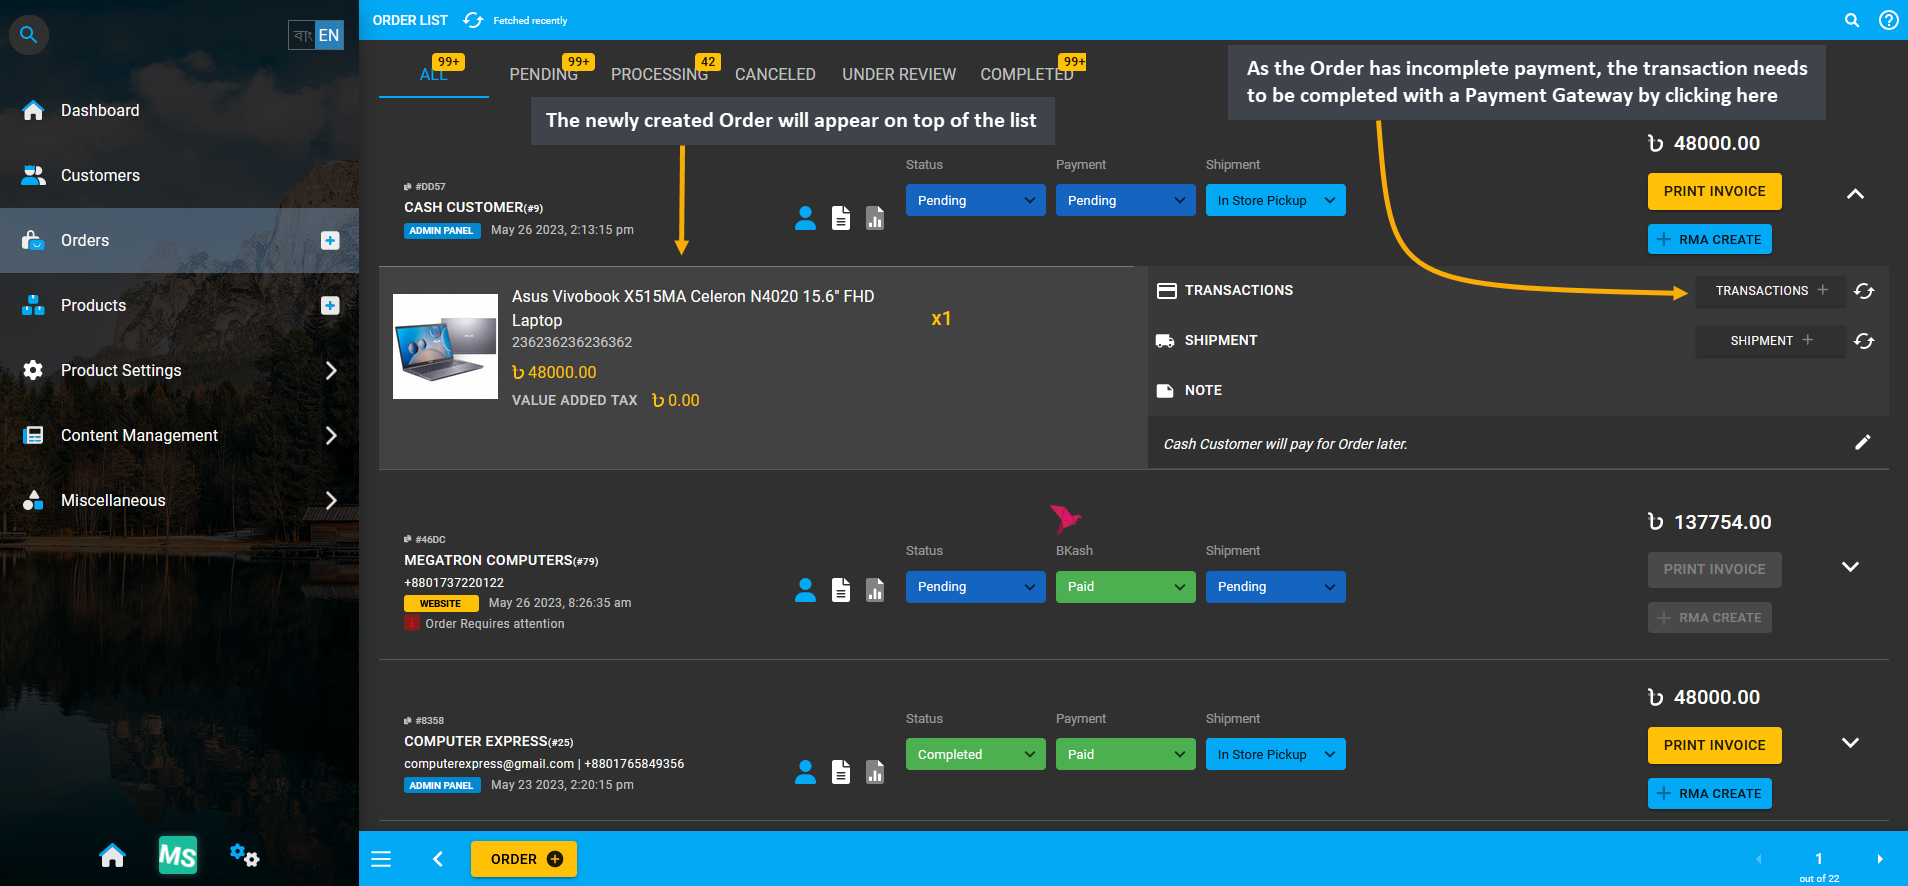
Image 4: Click the Transaction + button to complete Transaction for this Order with Multiple Transactions.
To resolve this Pending Order for Cash Customer, complete the Order payment by selecting any Payment Gateway. Cash payment gateway is selected here to make payment for Order total 48,000 BDT which will automatically be stated within the Amount box. Click Submit to complete the payment transaction for Cash Customer’s Order.
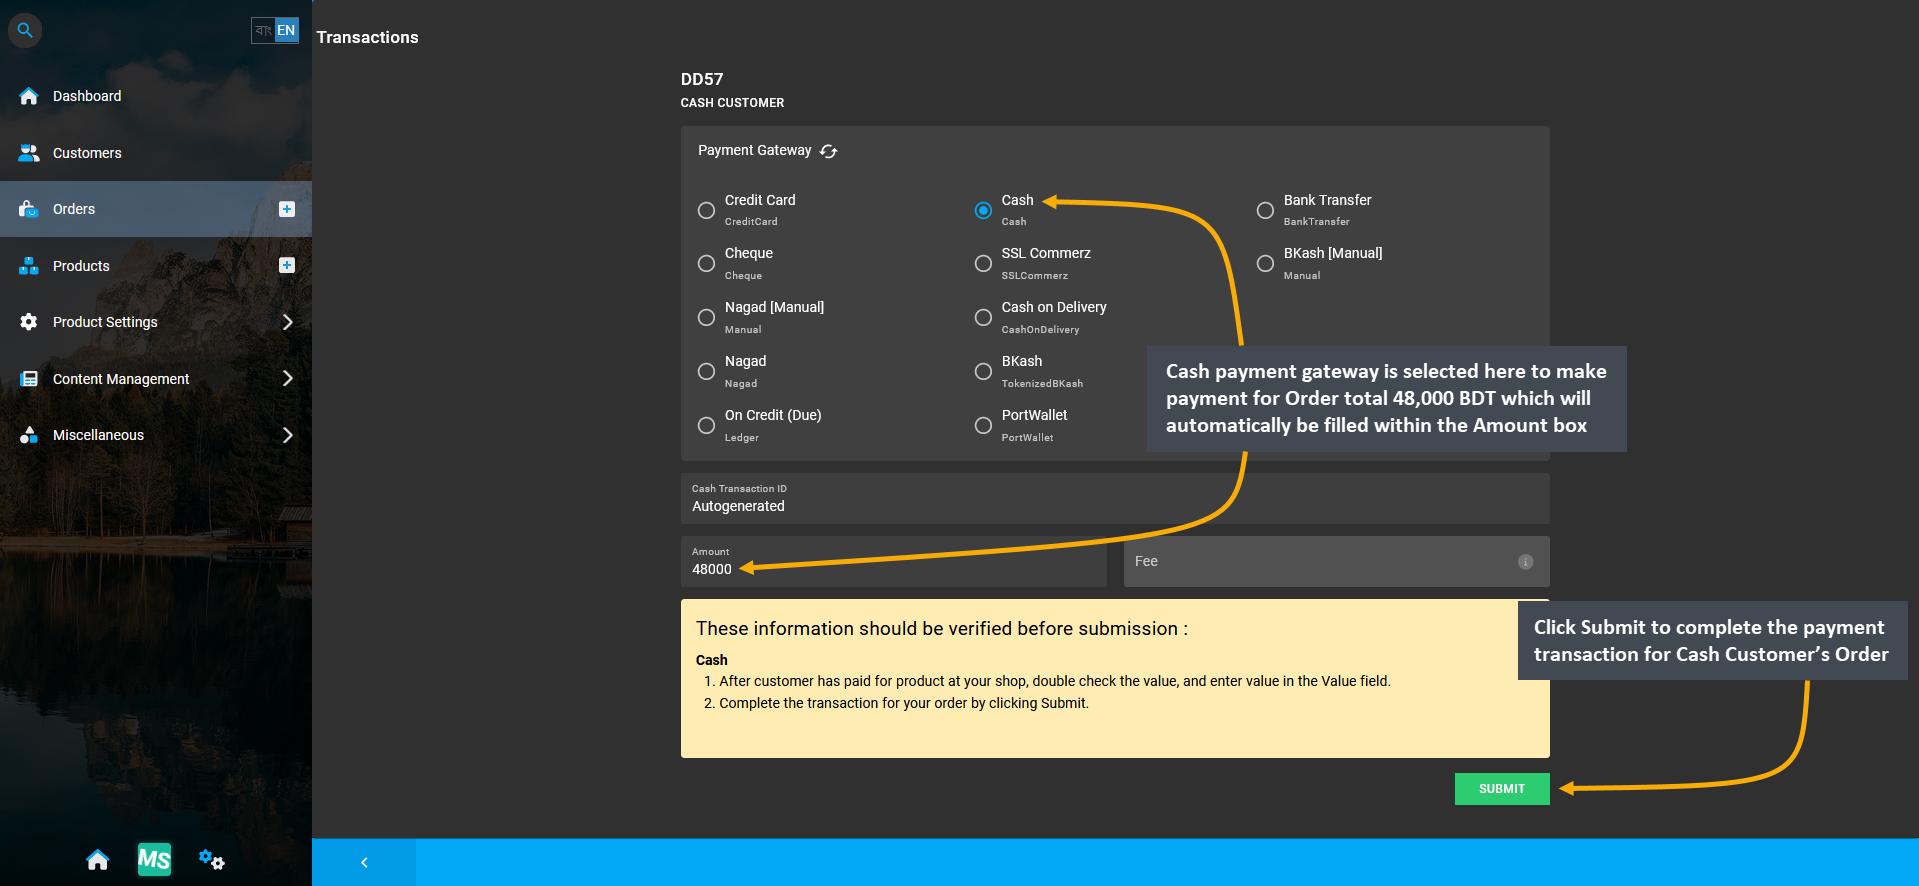
Image 5: To resolve Pending Order for Cash Customer, complete payment by selecting any Payment Gateway.
Before completing the pending payment of 48,000 BDT with Cash, a pop-up will ask for confirmation to proceed with the transaction. Click Proceed to confirm payment with Cash that will be saved under Transactions.
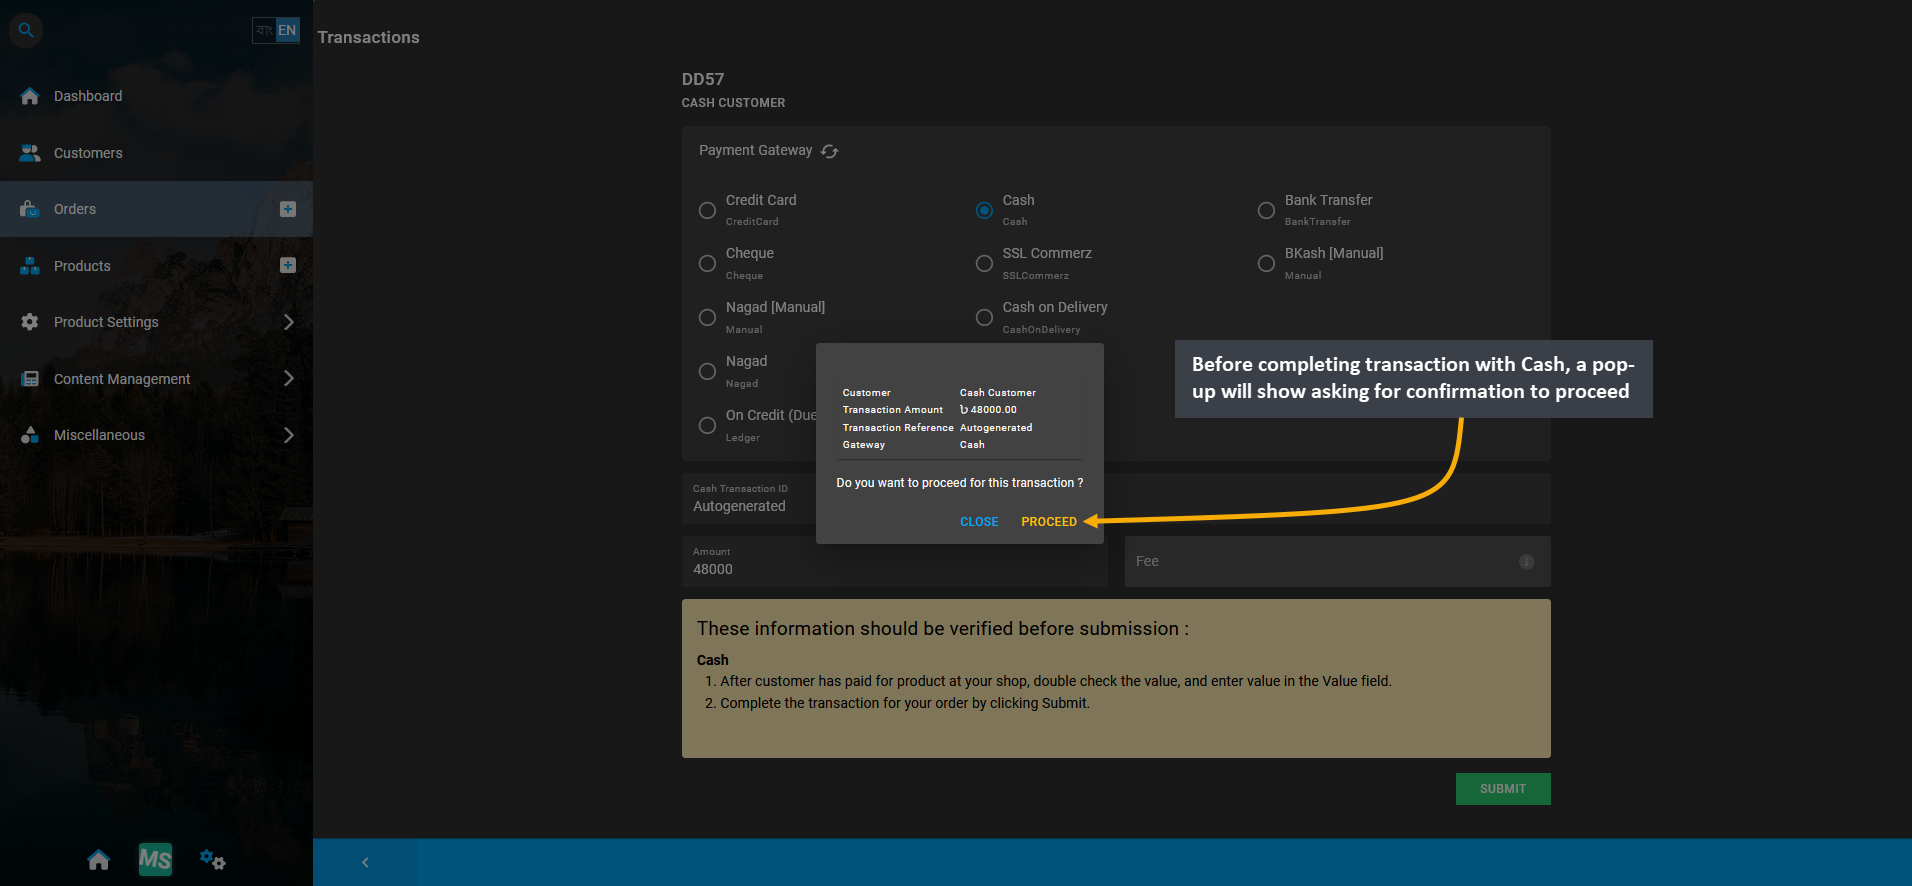
Image 6: Before completing transaction with Cash, a pop-up will show asking for confirmation to proceed.
After payment is completed with Cash for Cash Customer, it will show within the Transaction history of the Order. 48,000 BDT was paid with Cash here that will show status as Completed with no Fee Amount for Cash payment.
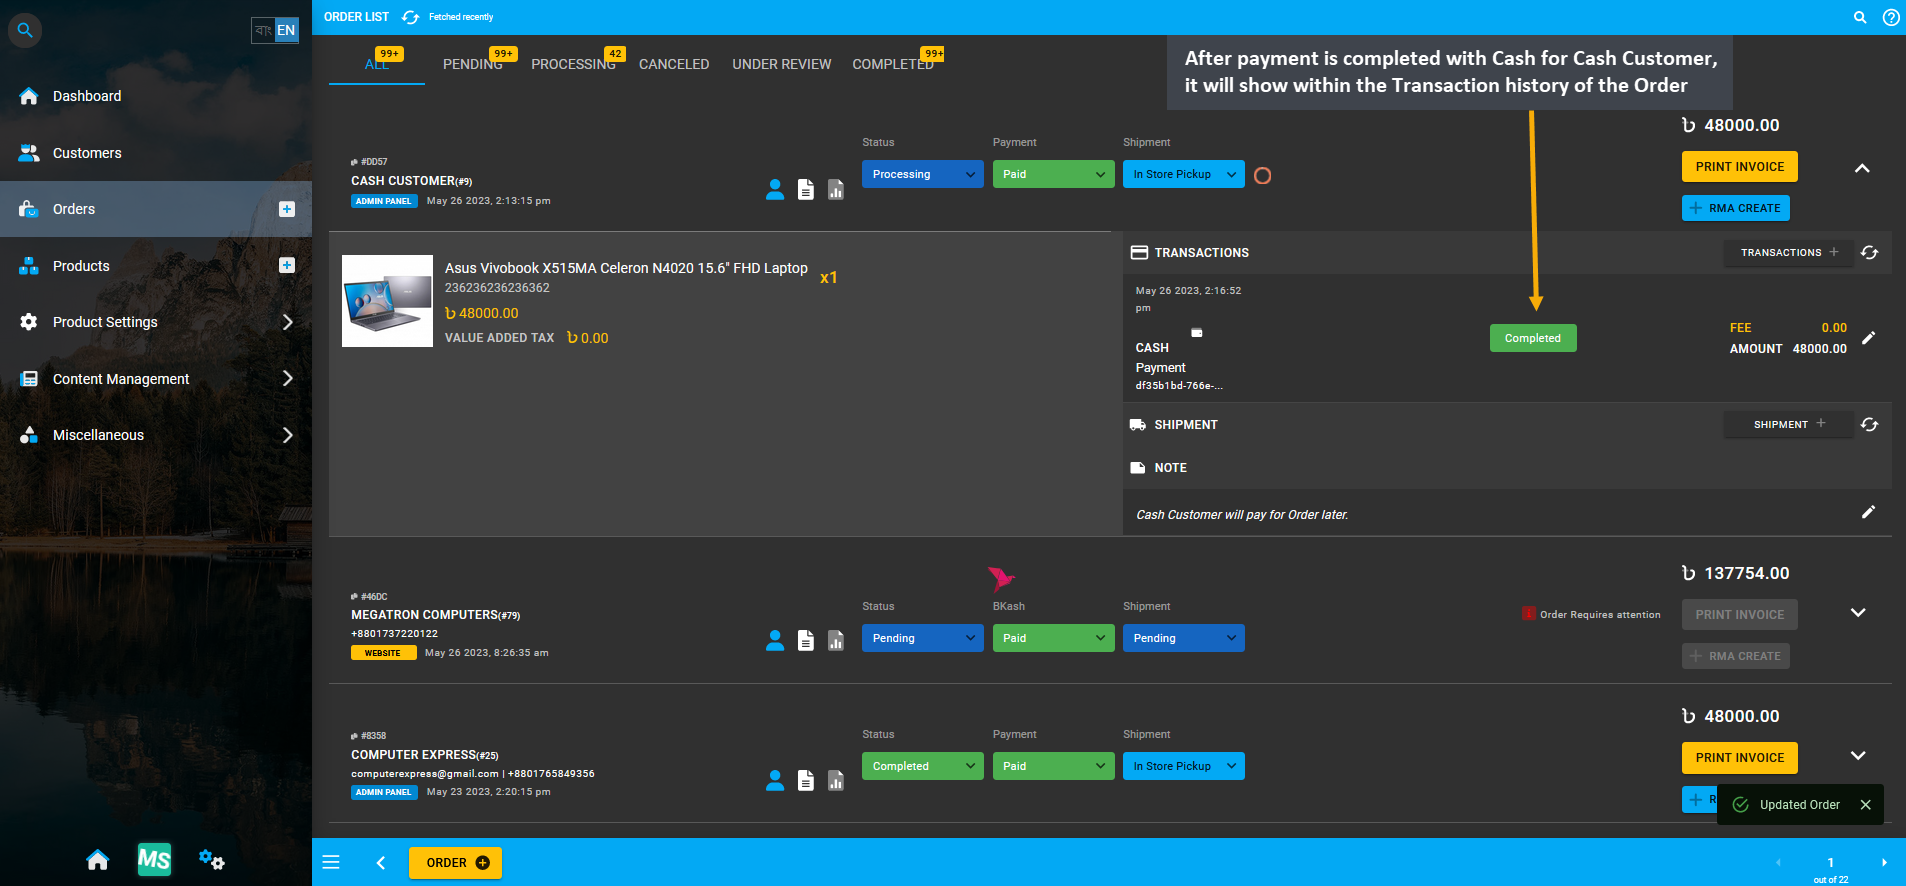
Image 7: Transaction status will be marked as Completed with no Fee for Cash payment on Order history.
12.2 - Regular Customer Transaction Flow
Functionality of Regular Customer’s Transaction Modals on Cart and Order Page.
Regular Customer Transaction Flow
Regular Customer transaction workflow is different from Credit Customers because they are allowed to make any Order payment with all types of gateways, except On Credit (Due). As Regular Customer are not provided with any Credit Limit, they will not be able to make Order payment with Credit Limit, but all other Payment Gateways.
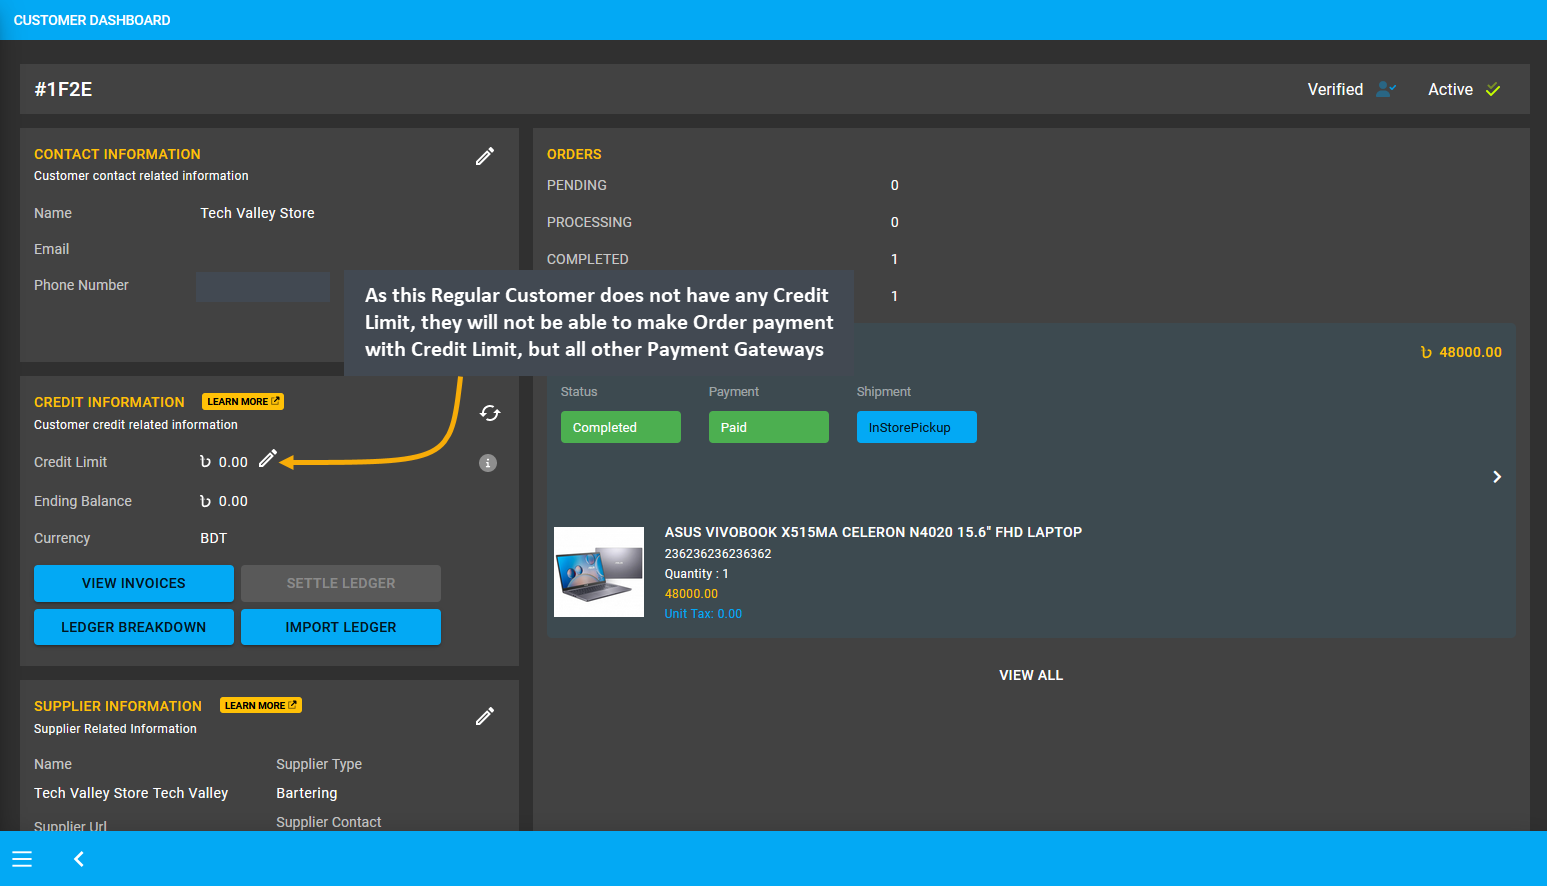
Image 1: Regular Customers can make any Order payment with all types of gateways, except On Credit (Due).
Create an Order for Regular Customer by filling basic Customer Information and Shipping Address. In the Order Cart, search for and add Products from the drop down menu. Check the Product quantity, rate, item total, Order total, subtotal, and click the Proceed button to select payment option and shipping option on the next page.
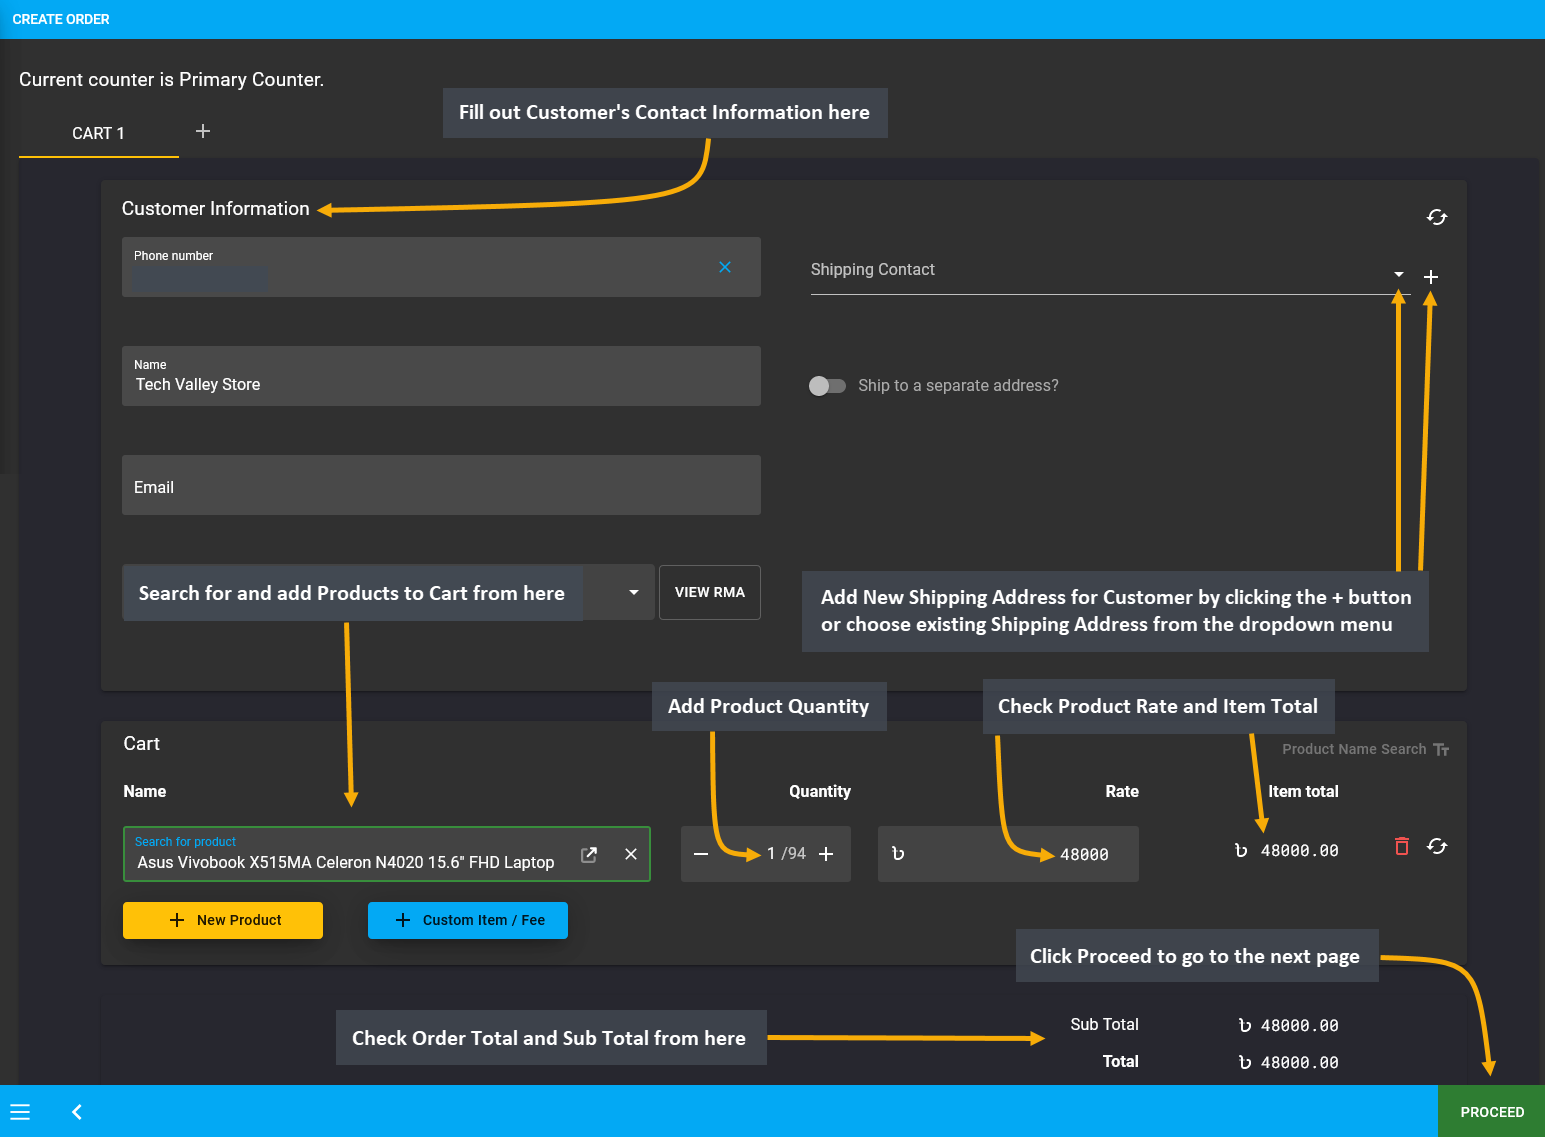
Image 2: Create an Order for Regular Customer by filling basic Customer Information and Shipping Address.
If the Regular Customer wants to place Order without completing payment, then they can complete Order without selecting any payment options. Here, In Store Pickup was selected as the Shipment option, but no Payment option was selected to allow making Payment later. Add Note to keep record that Order is being placed without Payment and transaction will be completed later. Click the Confirm Order button to proceed to the next step.
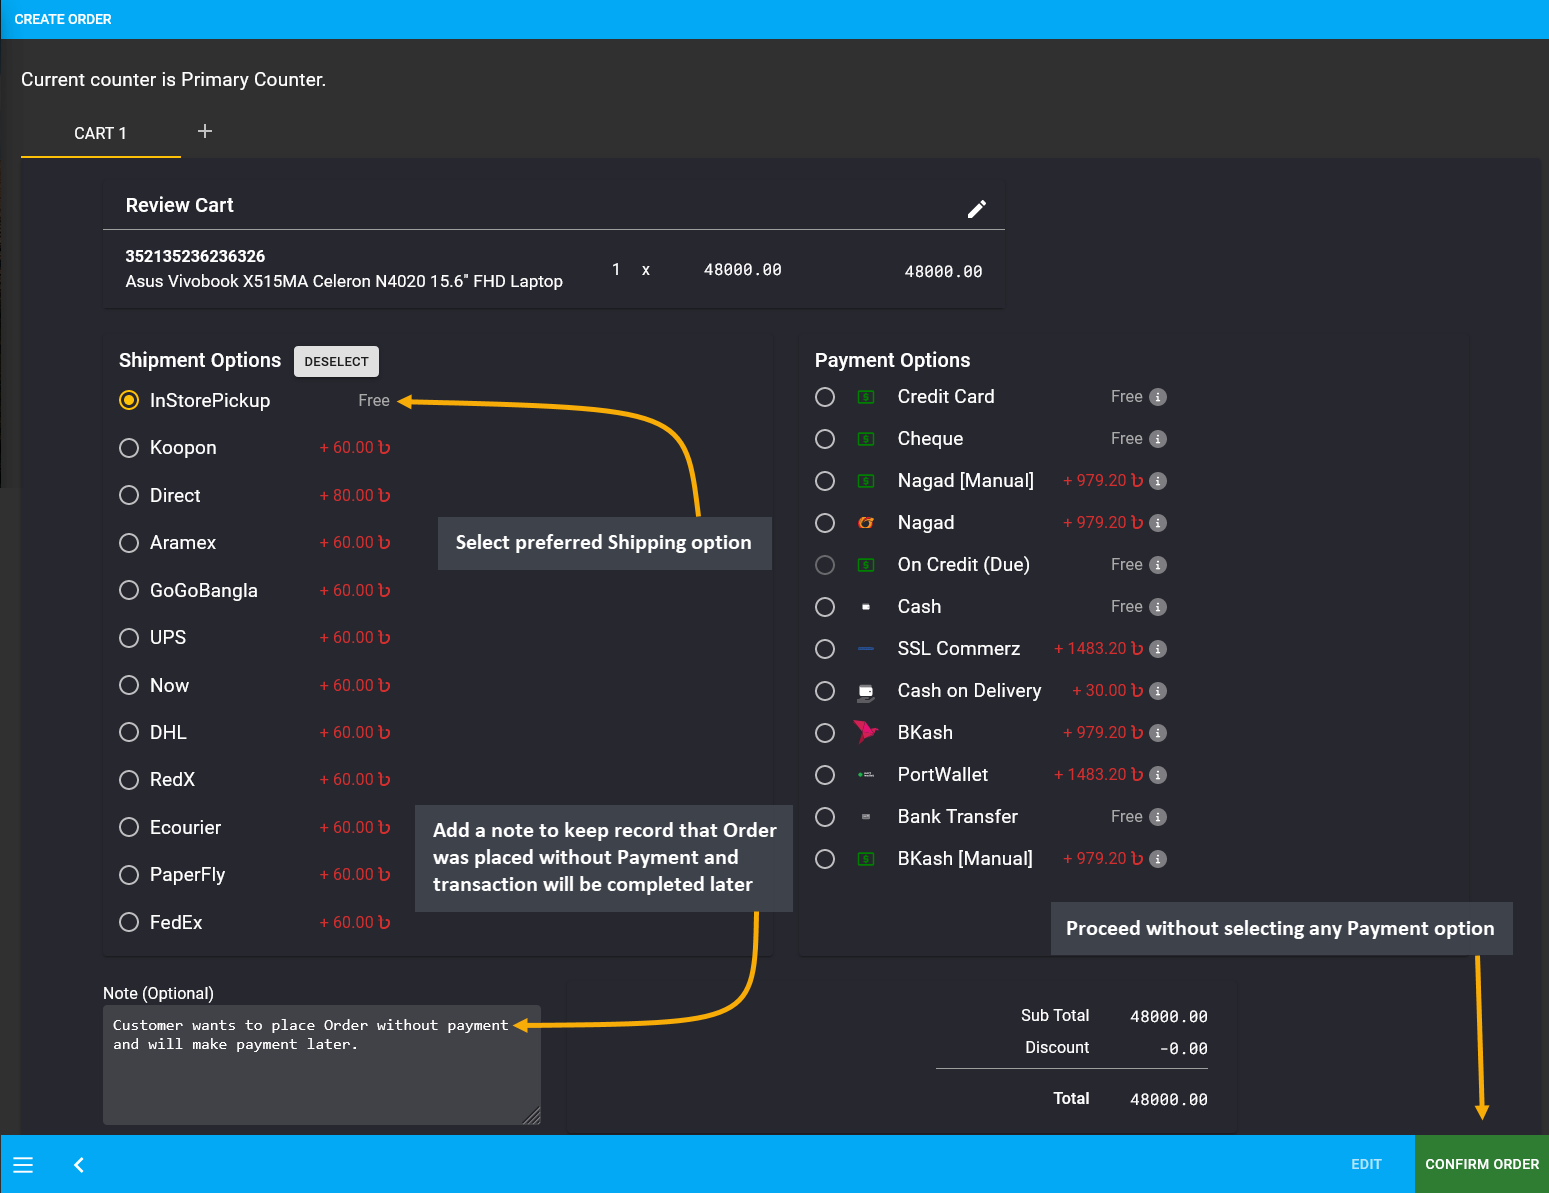
Image 3: Regular Customer can complete Order without selecting any Payment and complete transaction later.
As Order will be placed for Regular Customer without payment, so select option No to continue without payment information for the Order as Regular Customer was not provided Credit Balance to purchase with Credit.
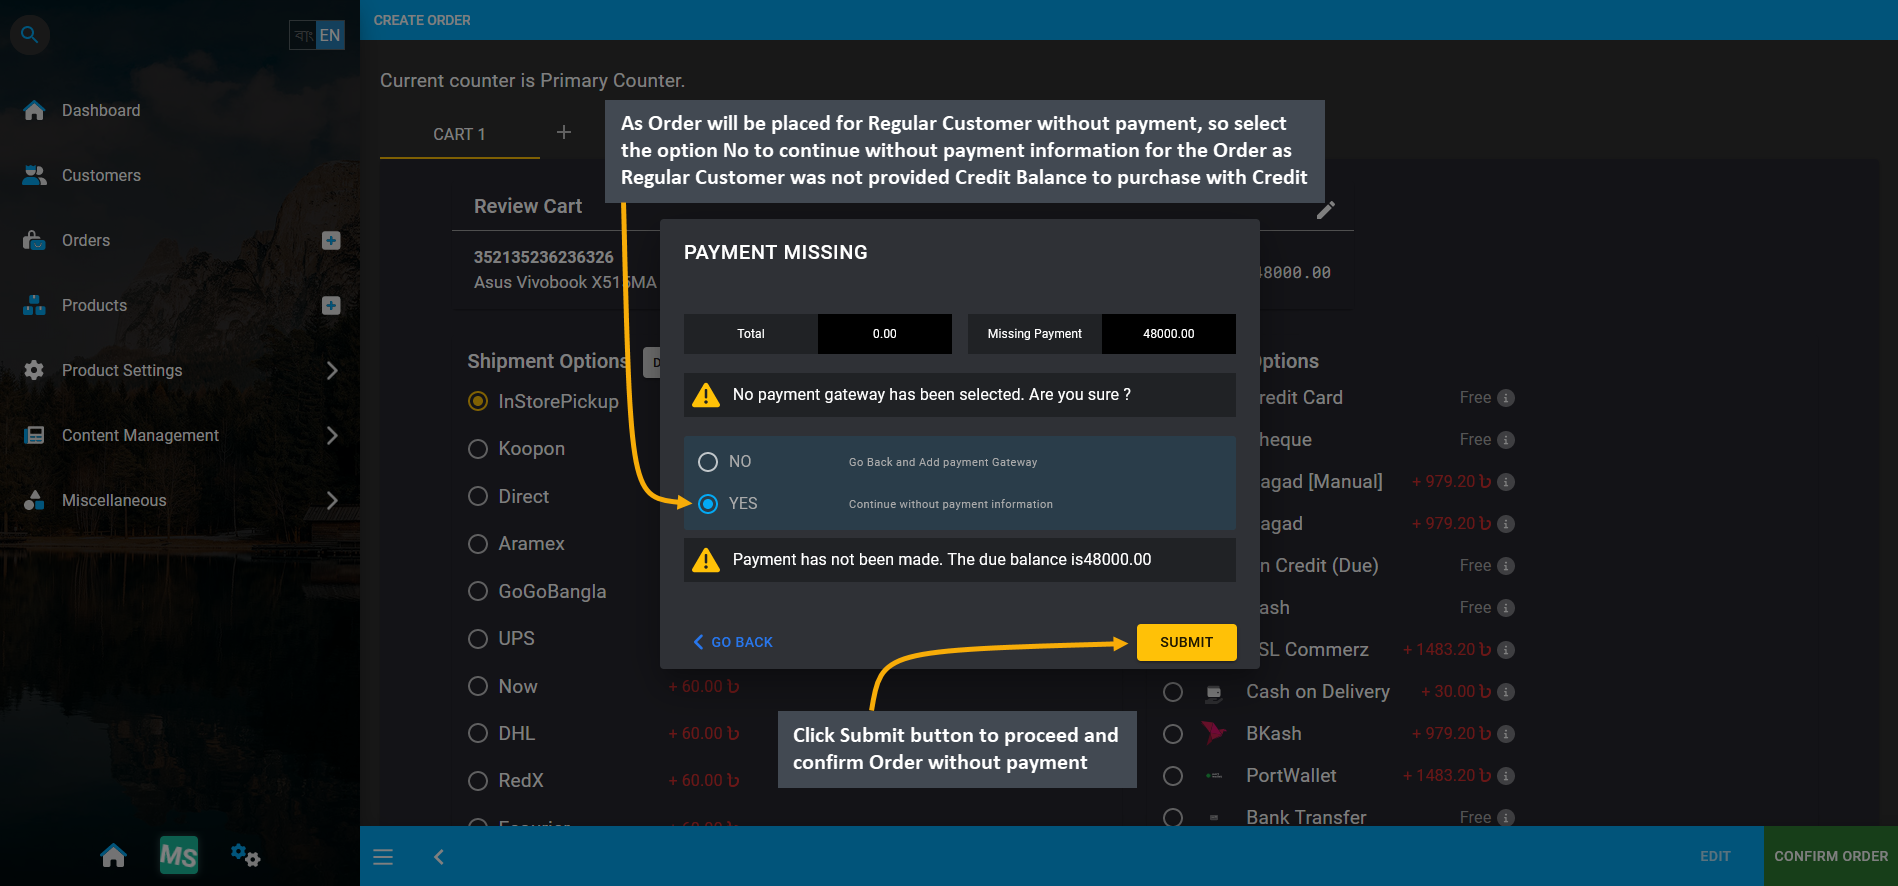
Image 4: As Regular Customer will place Order without payment, so select No to continue without payment.
In order to add payment details to this Order, go the the Orders Tab. The newly created Order will appear on top of the list. It has incomplete payment which needs to be completed. For this, click the Transaction + button which will redirect to the Payment Gateway from where transaction can be completed for this Pending Order.
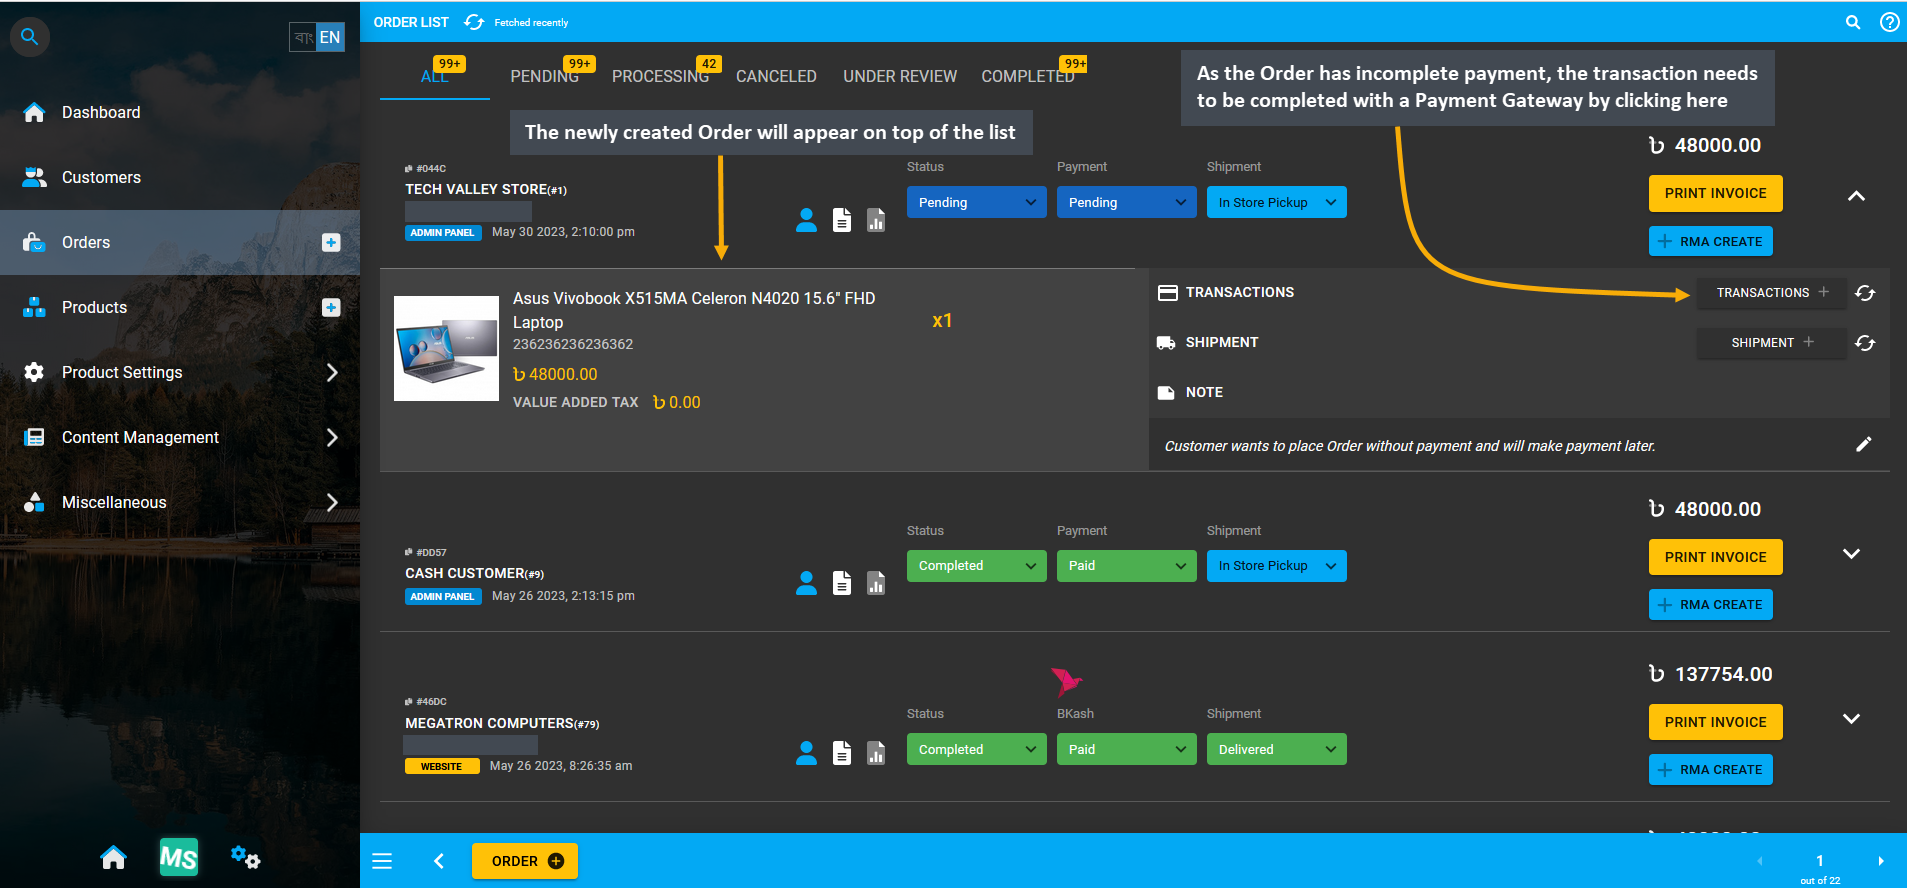
Image 5: Click Transaction + to select Payment Gateway and complete transaction for this Pending Order.
To resolve this Pending Order for Regular Customer, complete Order payment by selecting any Payment Gateway. As Regular Customer does not have any Credit Limit approved and allowed, they will not be able to make Order payment with On Credit (Due). For this reason, this option will be disabled on Payment Gateway selection.
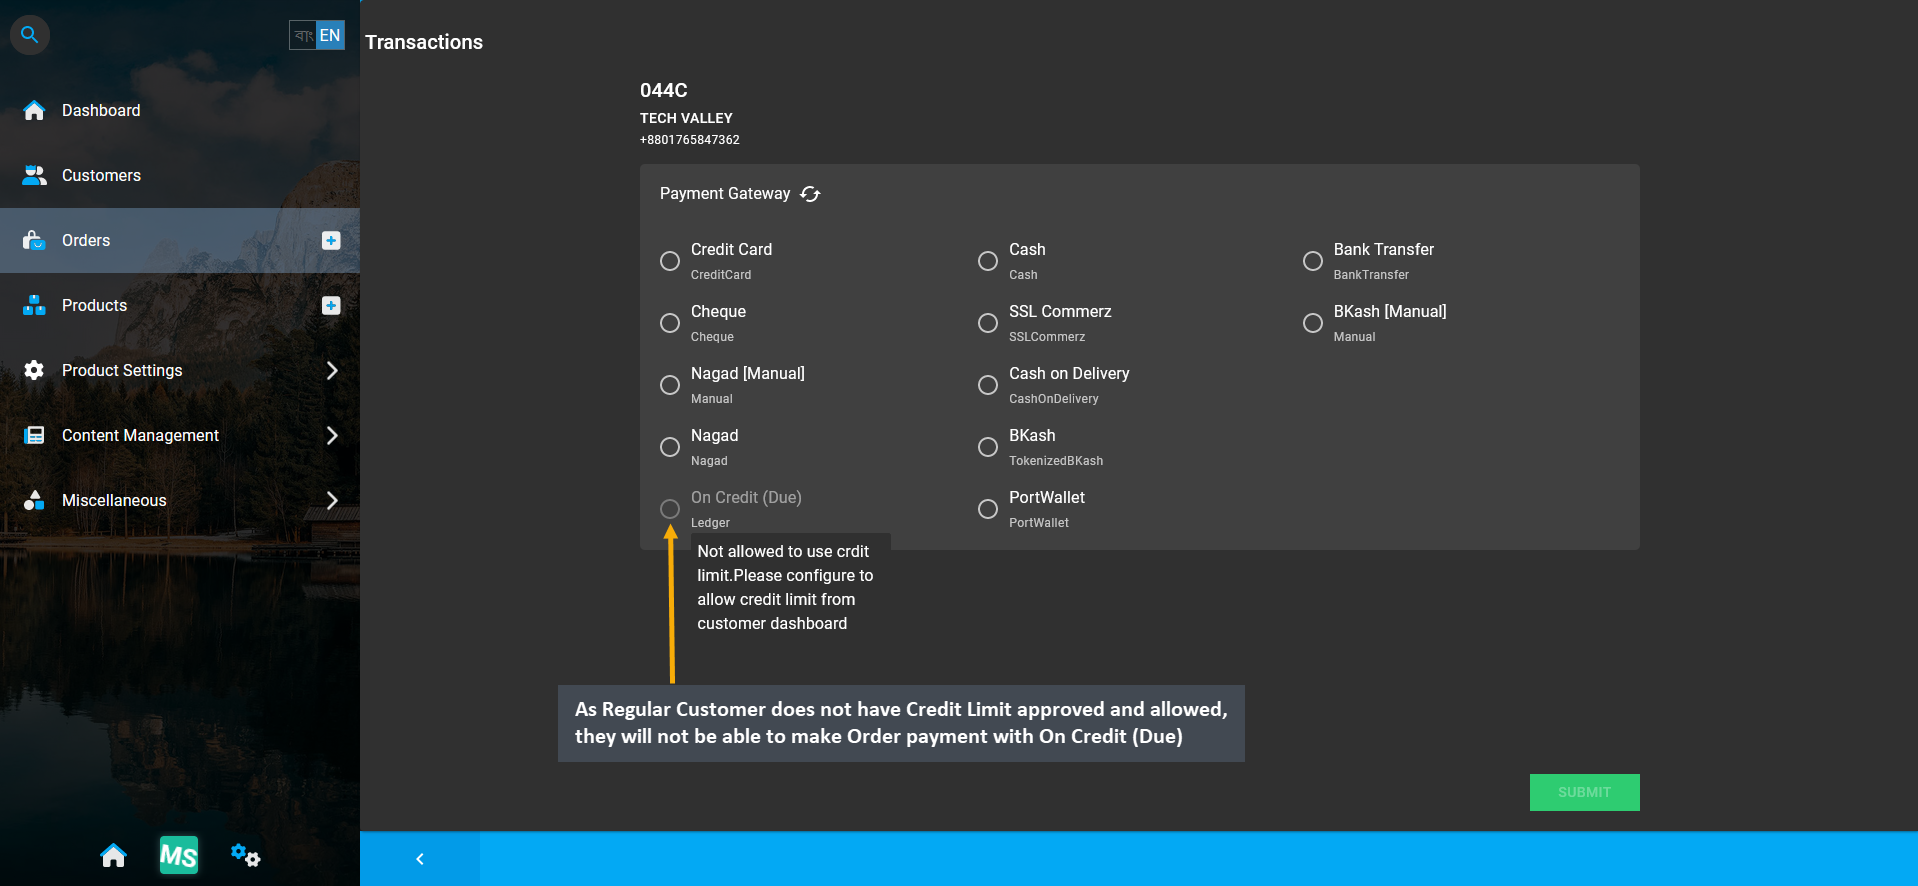
Image 6: To resolve Pending Order for Regular Customer, complete payment by selecting a Payment Gateway.
BKash (Manual) is selected here to make payment for Order total 48,000 BDT which will automatically be stated in the Amount box. Enter the BKash (Manual) Transaction ID and check the fee applied. Click Submit to complete the payment transaction for Regular Customer’s Order. Instructions for the selected Gateway will be shown below.
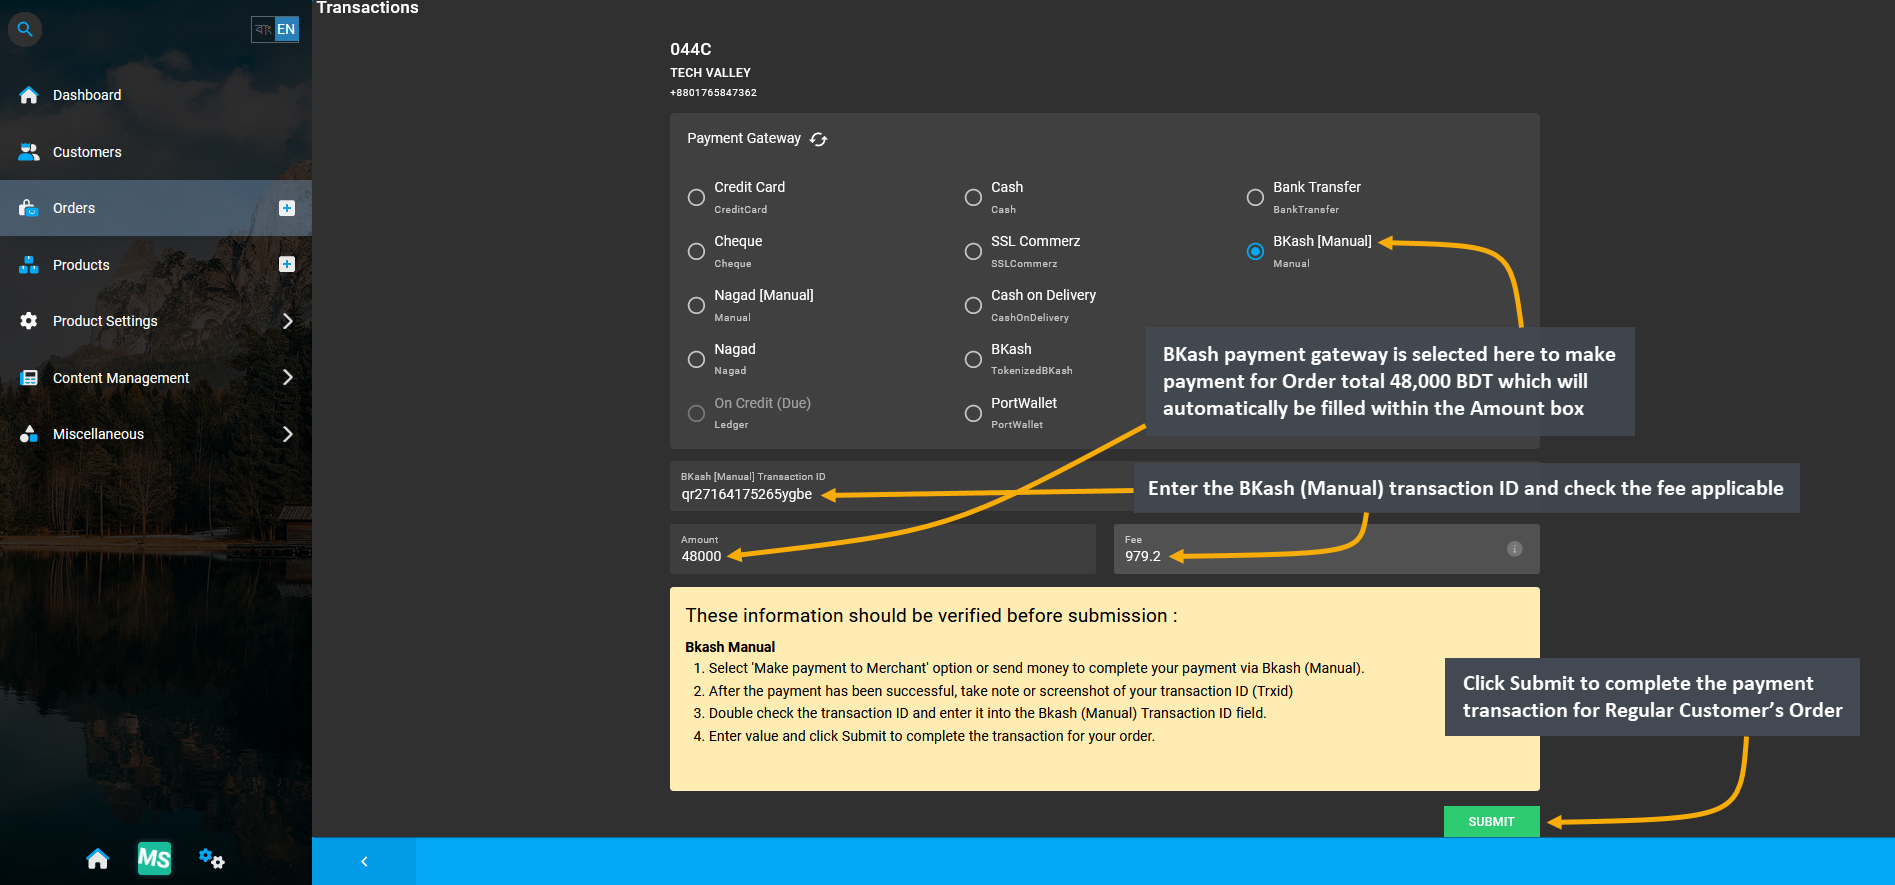
Image 7: BKash (Manual) payment gateway is selected here to make payment for Order total 48,000 BDT here.
Before completing the remaining payment of 48,000 BDT with BKash (Manual), a pop-up will ask for confirmation to proceed with the transaction. Click the Proceed button to confirm payment with BKash (Manual).
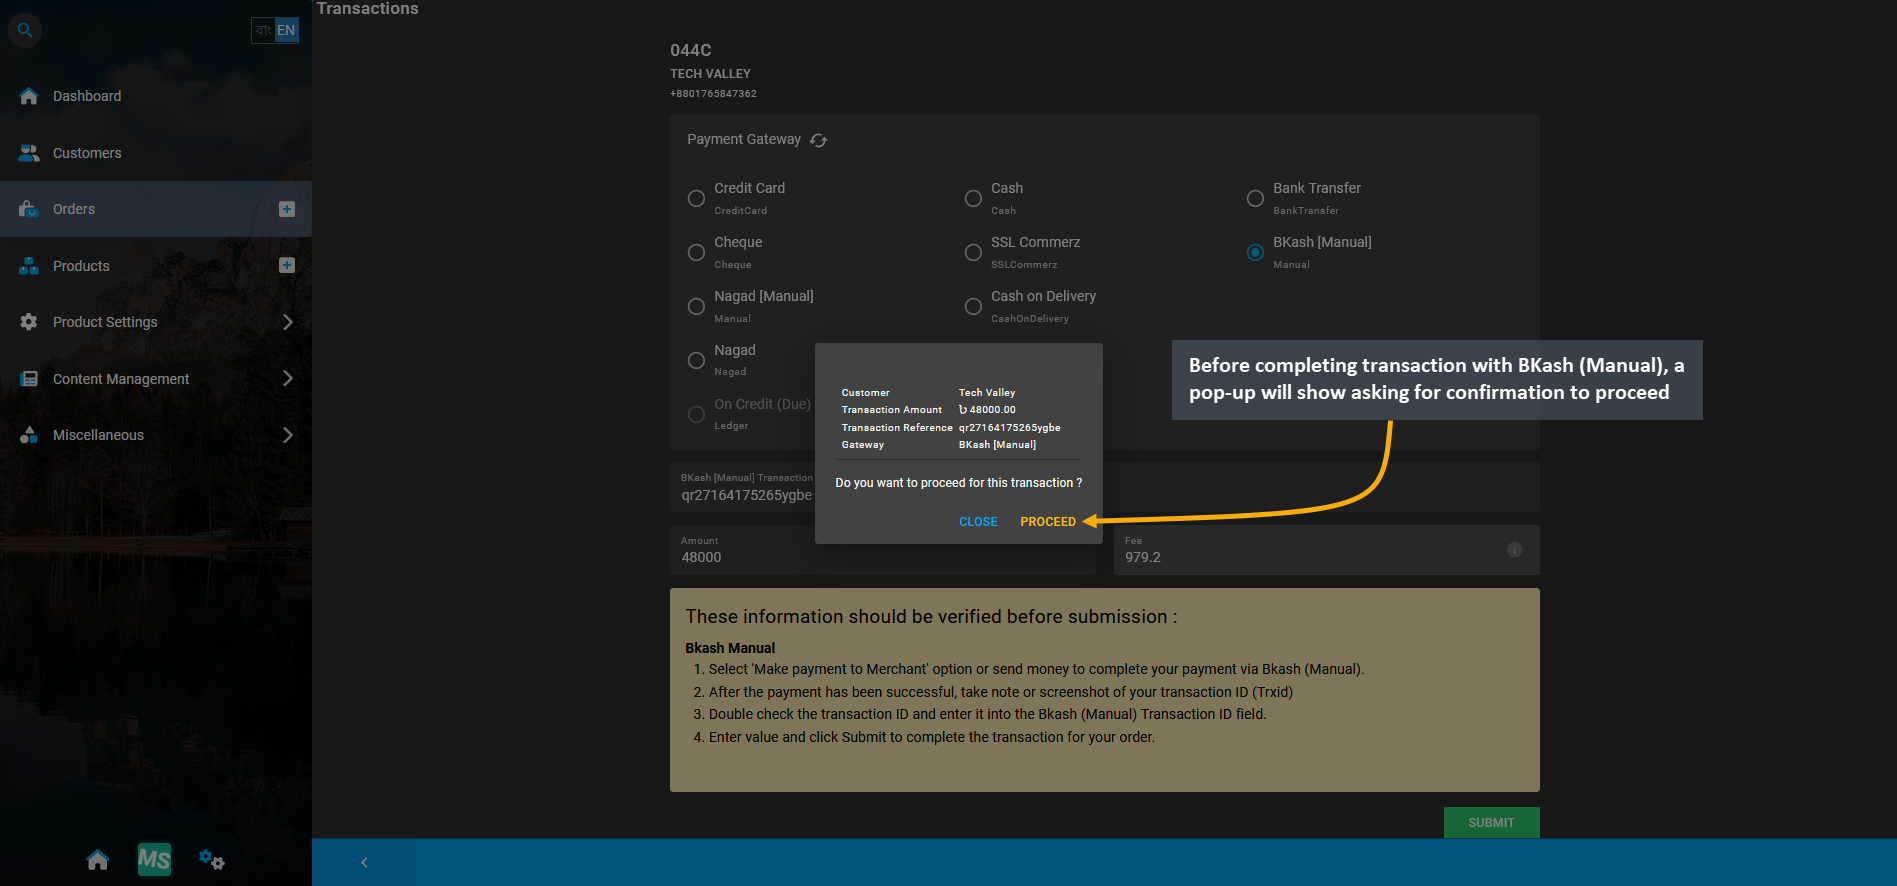
Image 8: Before completing transaction with BKash (Manual), a pop-up will ask for confirmation to proceed.
After payment is completed with BKash (Manual) for Regular Customer, it will show within the Transactions history of the Order. As 48,000 BDT was paid with BKash (Manual), the transaction status will show as Completed with no Fee Amount for Cash payment. This is how Order payment can be completed with gateways for Regular Customer.
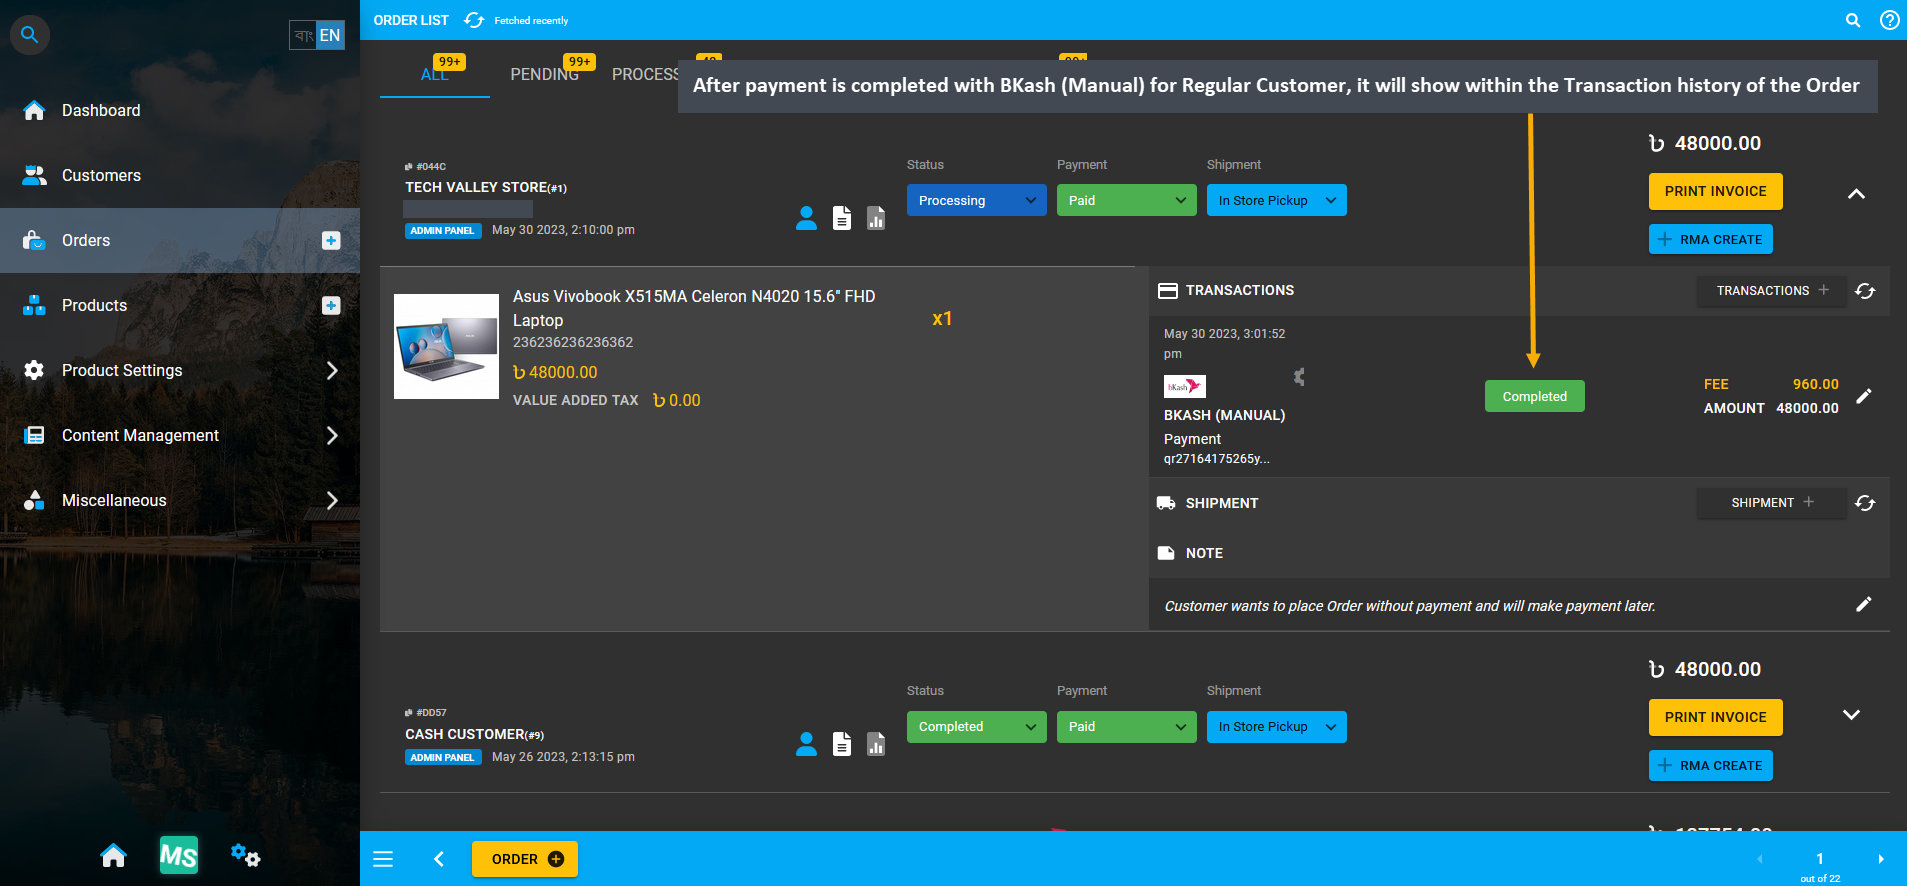
Image 9: As 48,000 BDT was paid with BKash (Manual), its status will show as Completed under Transactions.
12.3 - Credit Customer Transaction Flow
Functionality of Credit Customer’s Transaction Modals on Cart and Order Page.
Credit Customer Transaction Flow
Credit Limit available to cover Full Order Payment
Credit Customer transaction workflow is different from both Regular or Cash Customers because they are allowed to make Order payment with all types of gateways, including Credit Limit i.e. On Credit (Due) payment gateway. So, as this Credit Customer has a Credit Limit of 30,000 BDT, they will be able to make Order payment with Credit Limit, if the available Credit Limit is enough to cover Full Order Payment. Their Credit Limit can cover this Order payment.
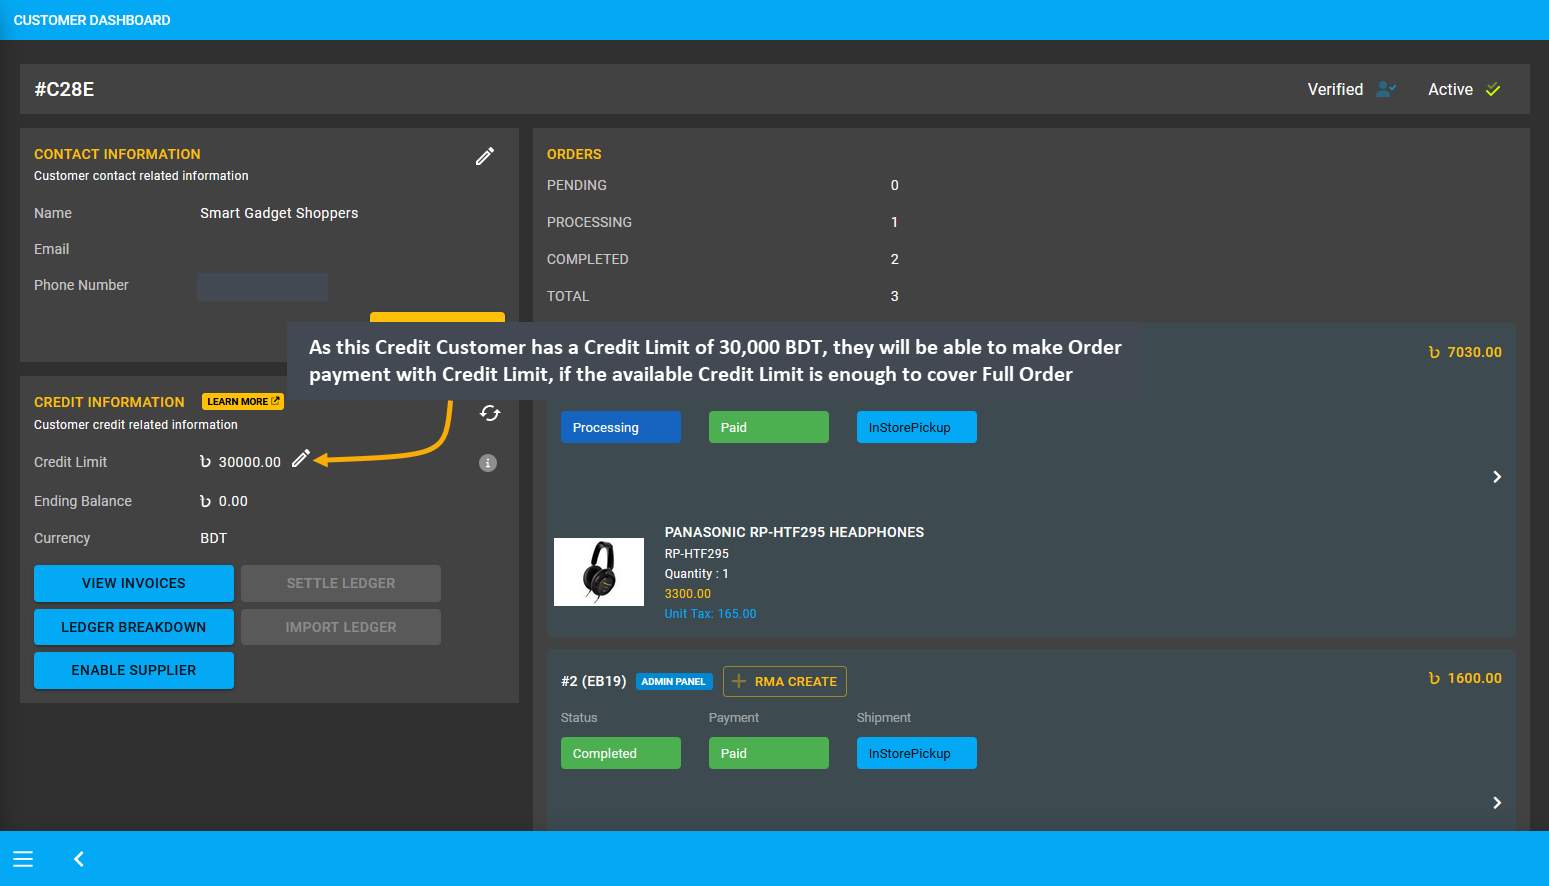
Image 1: Credit Customer can pay for Order with Credit Limit, if it is enough to cover full Order Payment.
To place an Order and make payment with Credit Limit, start by filling the basic Customer Information and Shipping Address. Search for and add Products to Cart from the dropdown. Check Product quantity, rate, item total, Order total, and subtotal. Click the Proceed button to select payment and shipping options on the next page.
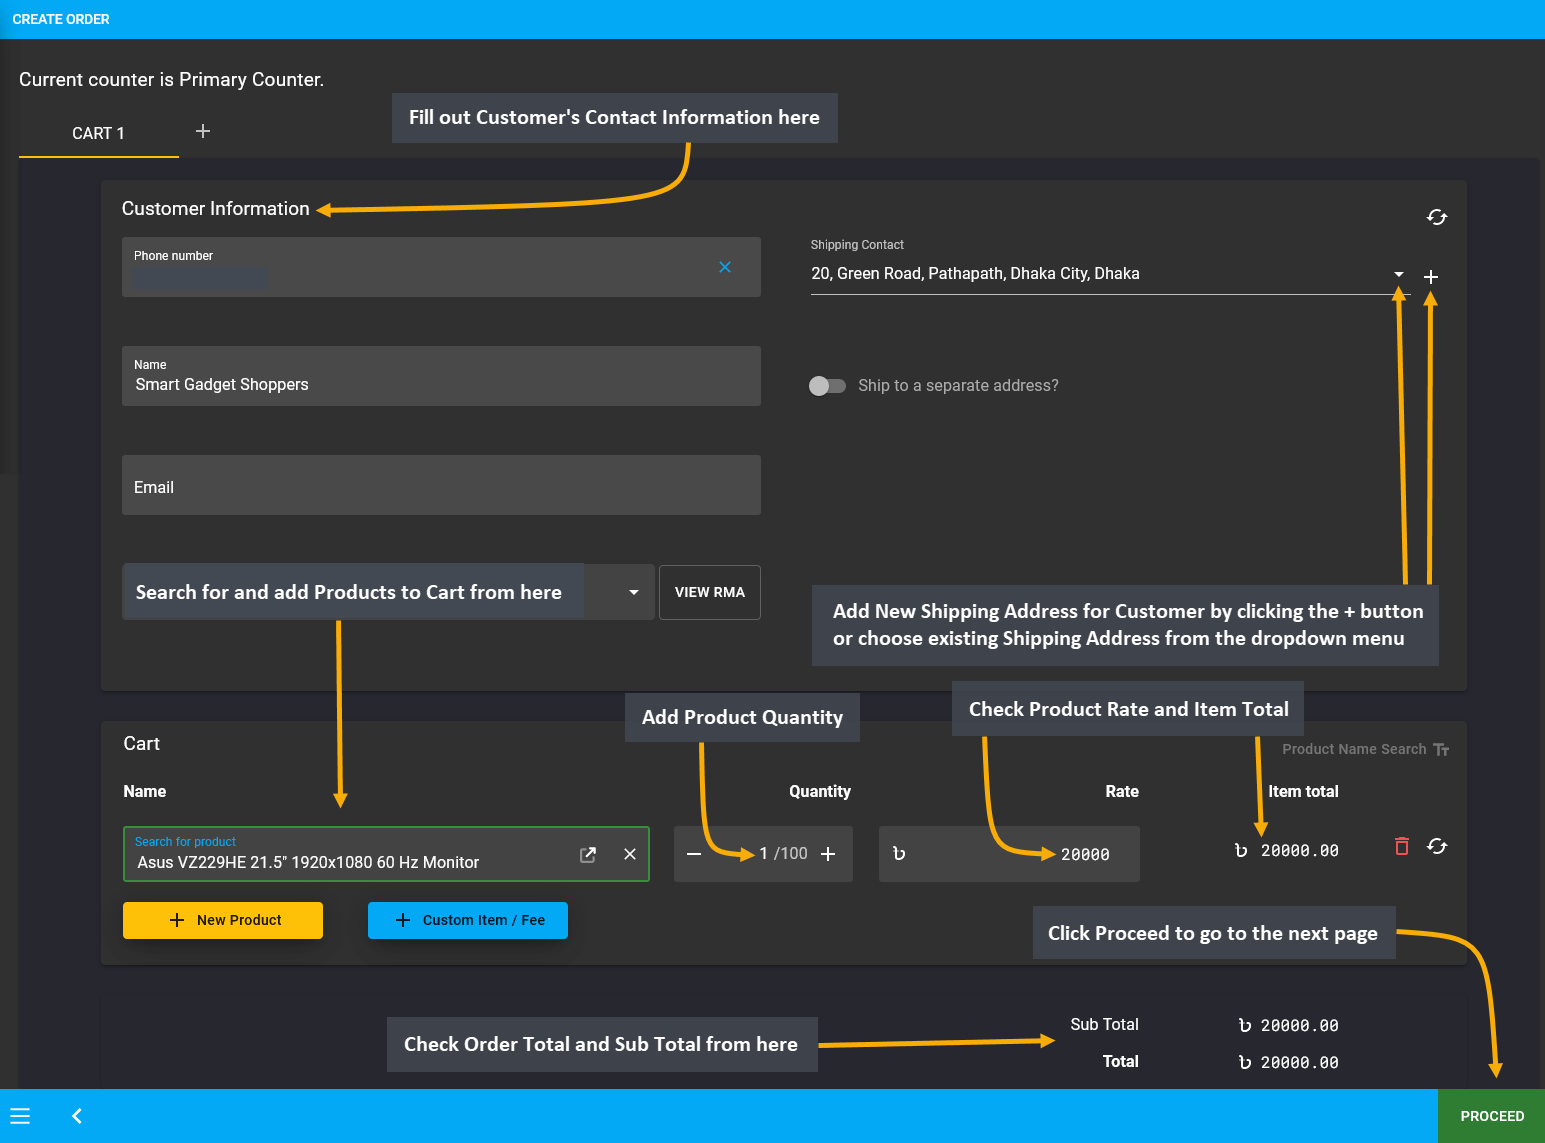
Image 2: Create Order Cart by adding Product and checking Product quantity, Order total, and subtotal.
If the Credit Customer wants to place Order without payment, then they have to complete Order without selecting any payment option. Here, In Store Pickup was selected as shipment option without selecting any payment option. Add a Note to keep record that Order was placed without Payment and transaction will be completed later. Thus, proceed without selecting any payment option and click the Confirm Order button to proceed to the next step.
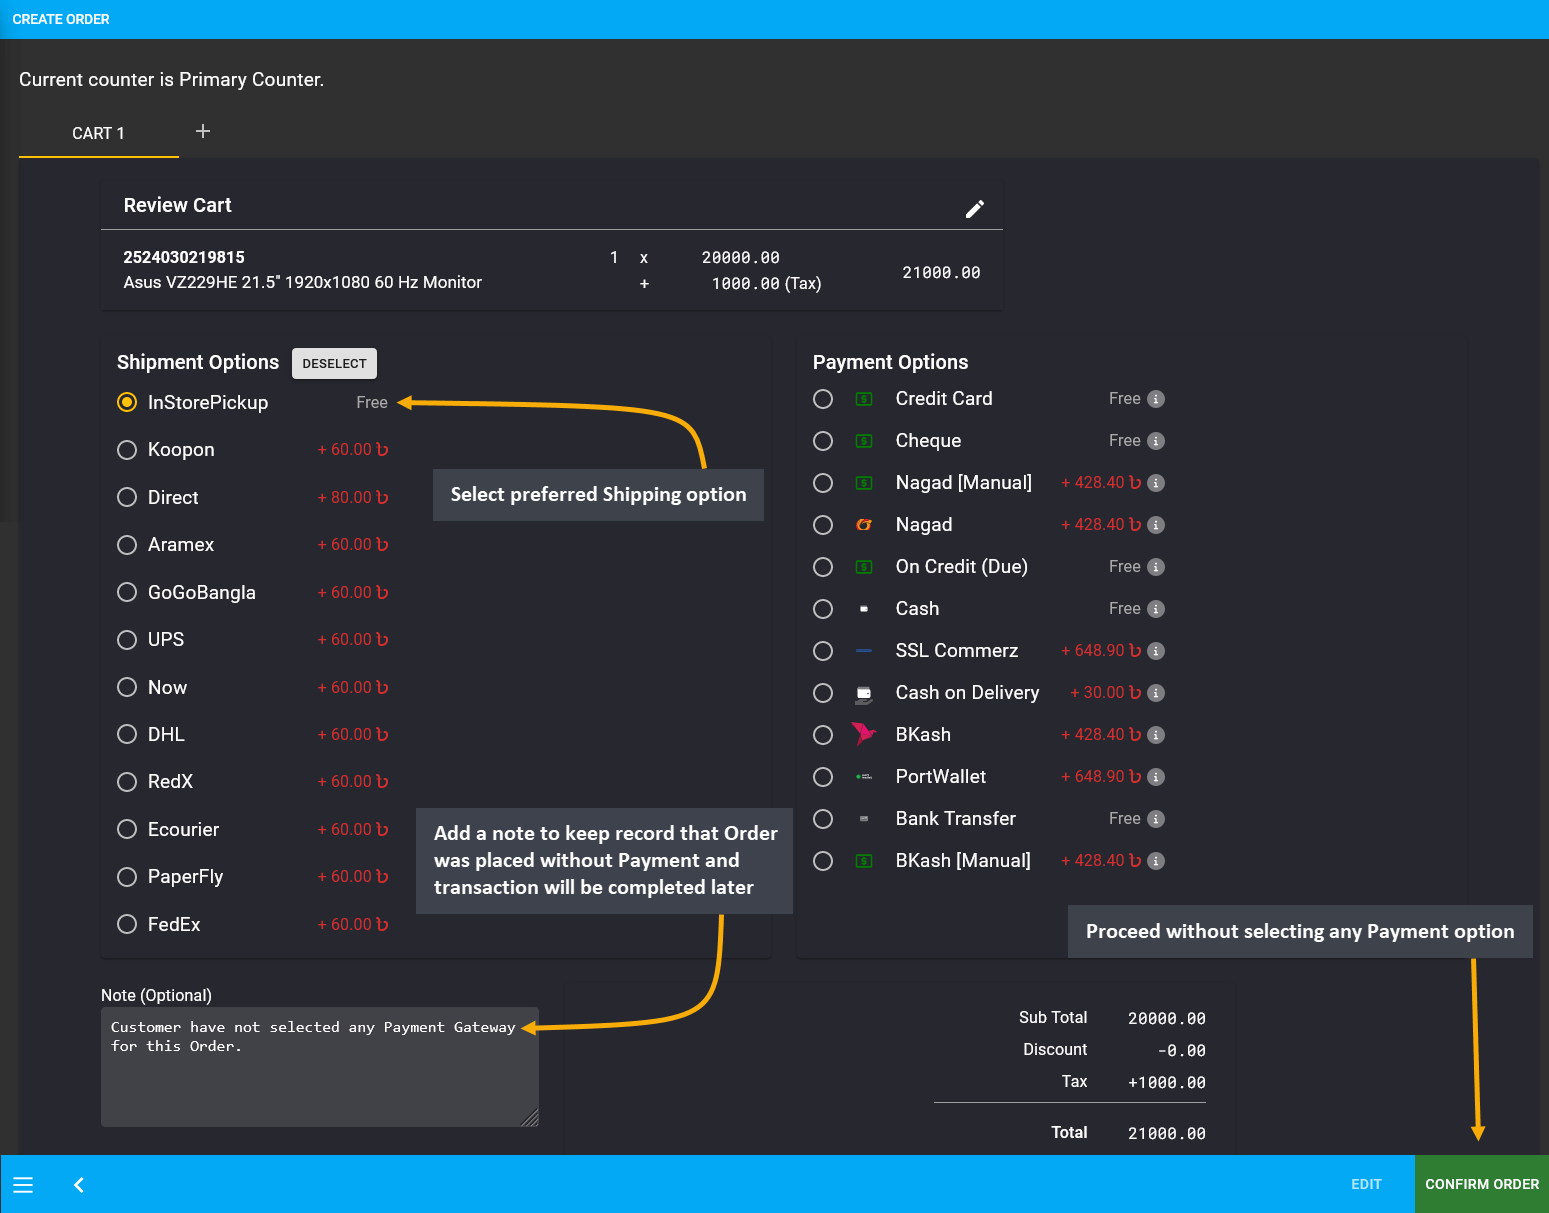
Image 3: Credit Customer can proceed without selecting payment option to complete Order without payment.
As Credit Customer proceeded to place Order without payment, a pop-up of Full Payment Incomplete will show and inform that Customer has available Credit Limit which they can use to complete Order payment or they can ignore to use Credit Limit and complete Order payment later. The Order total is 21,000 BDT and Customer have available Credit Limit 30,000 BDT to cover Full Order Payment, so they can select Use Credit to proceed and make full Order Payment. Therefore, click the Submit button to use the Credit Limit and complete Order payment.
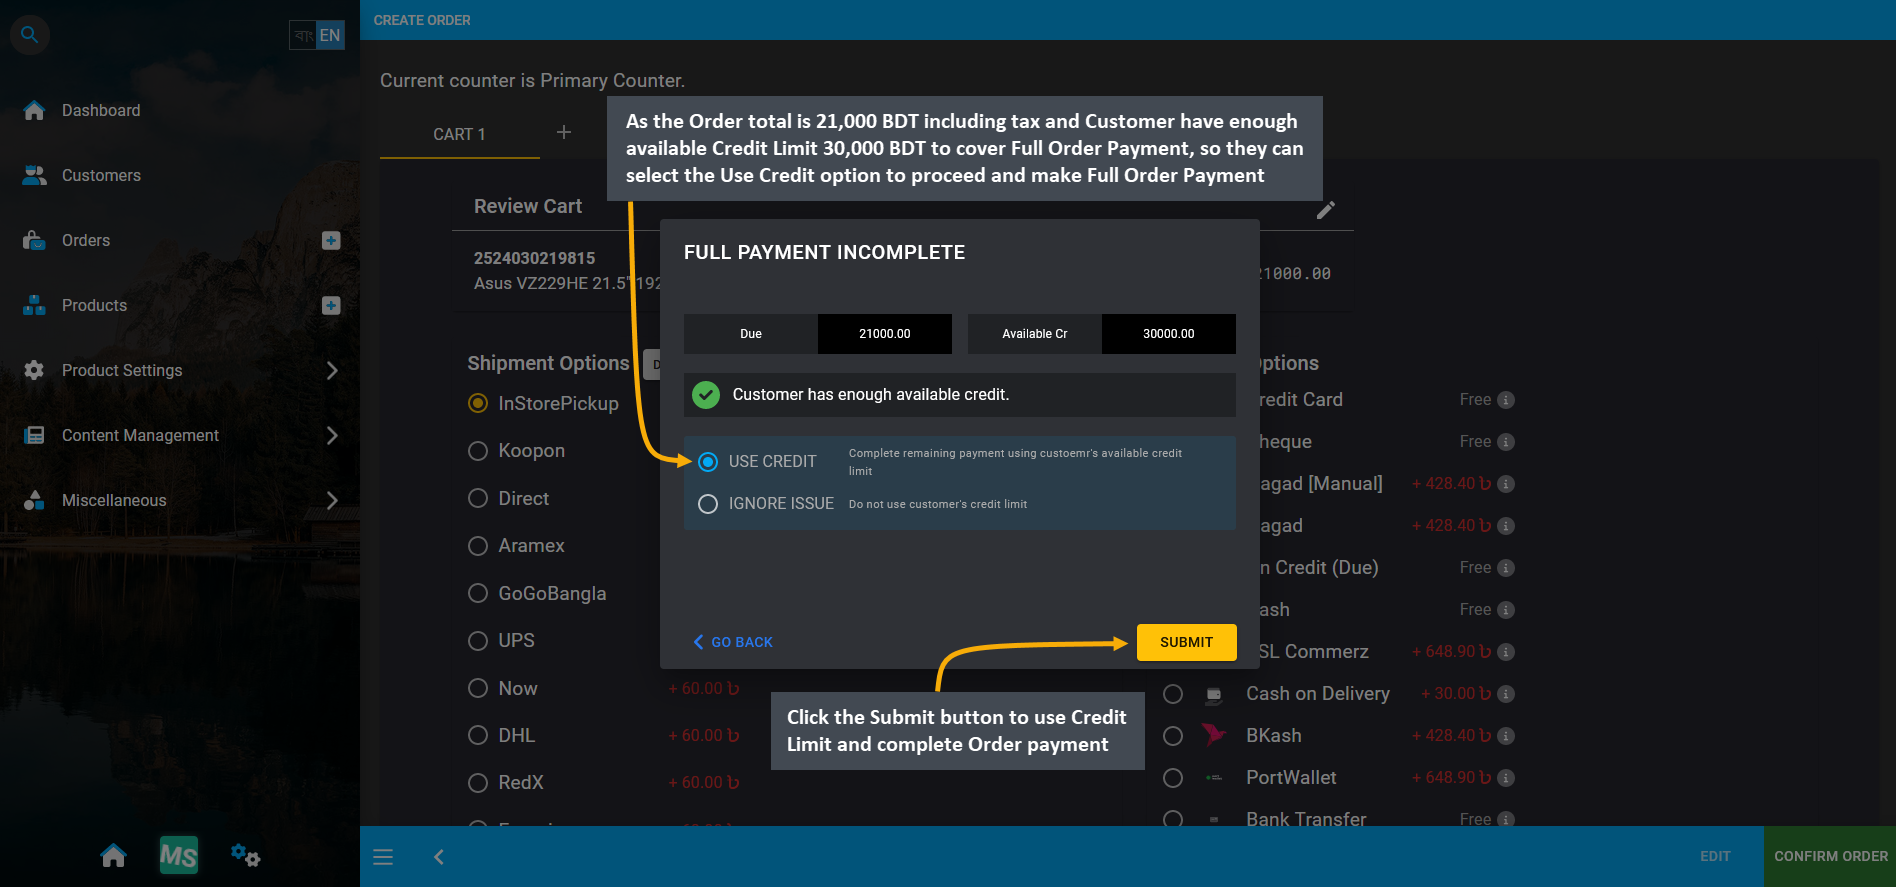
Image 4: Customer have available Credit Limit to cover Full Order Payment, so select Use Credit option.
To check the payment details to this Order, go the the Orders Tab. The newly created Order will appear on top of the list. The payment completed with Credit Limit i.e. On Credit (Due) will show as Completed within Transactions.
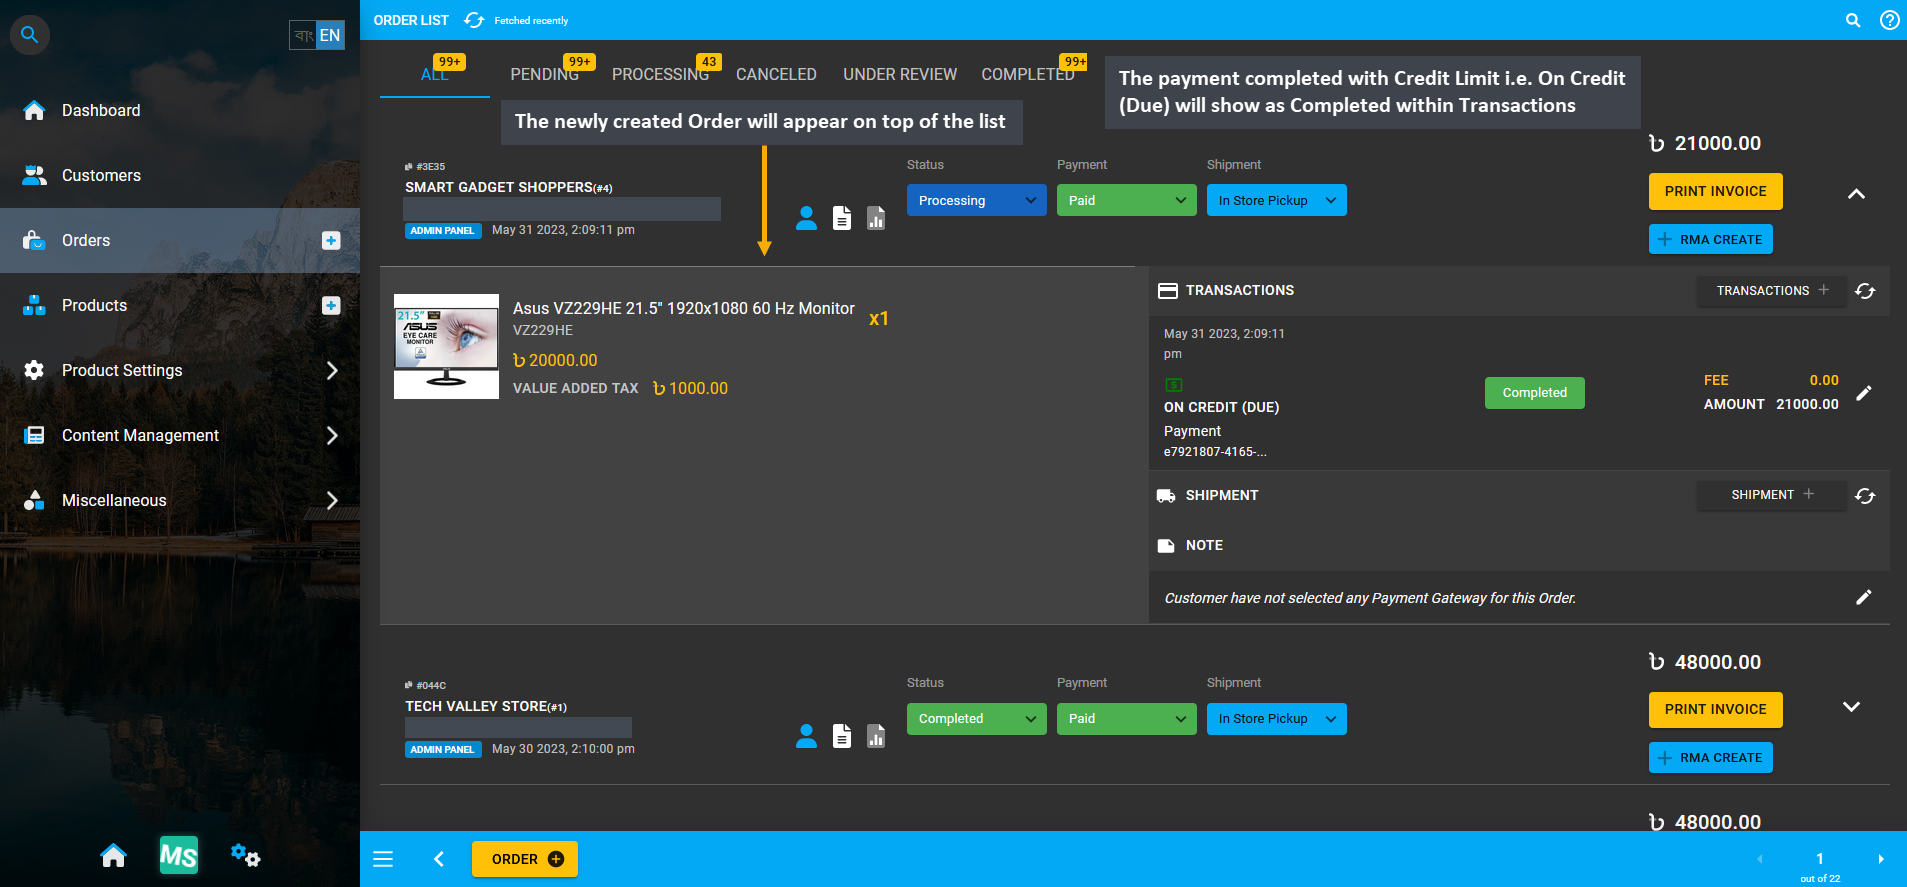
Image 5: Payment completed with On Credit (Due) will show as Completed within Transactions on Order List.
As the Order payment was made with On Credit (Due), it will show under Ending Balance within Credit Information on Customer Dashboard. To resolve this Ending Balance for Credit Customer, use the Settle Ledger option.
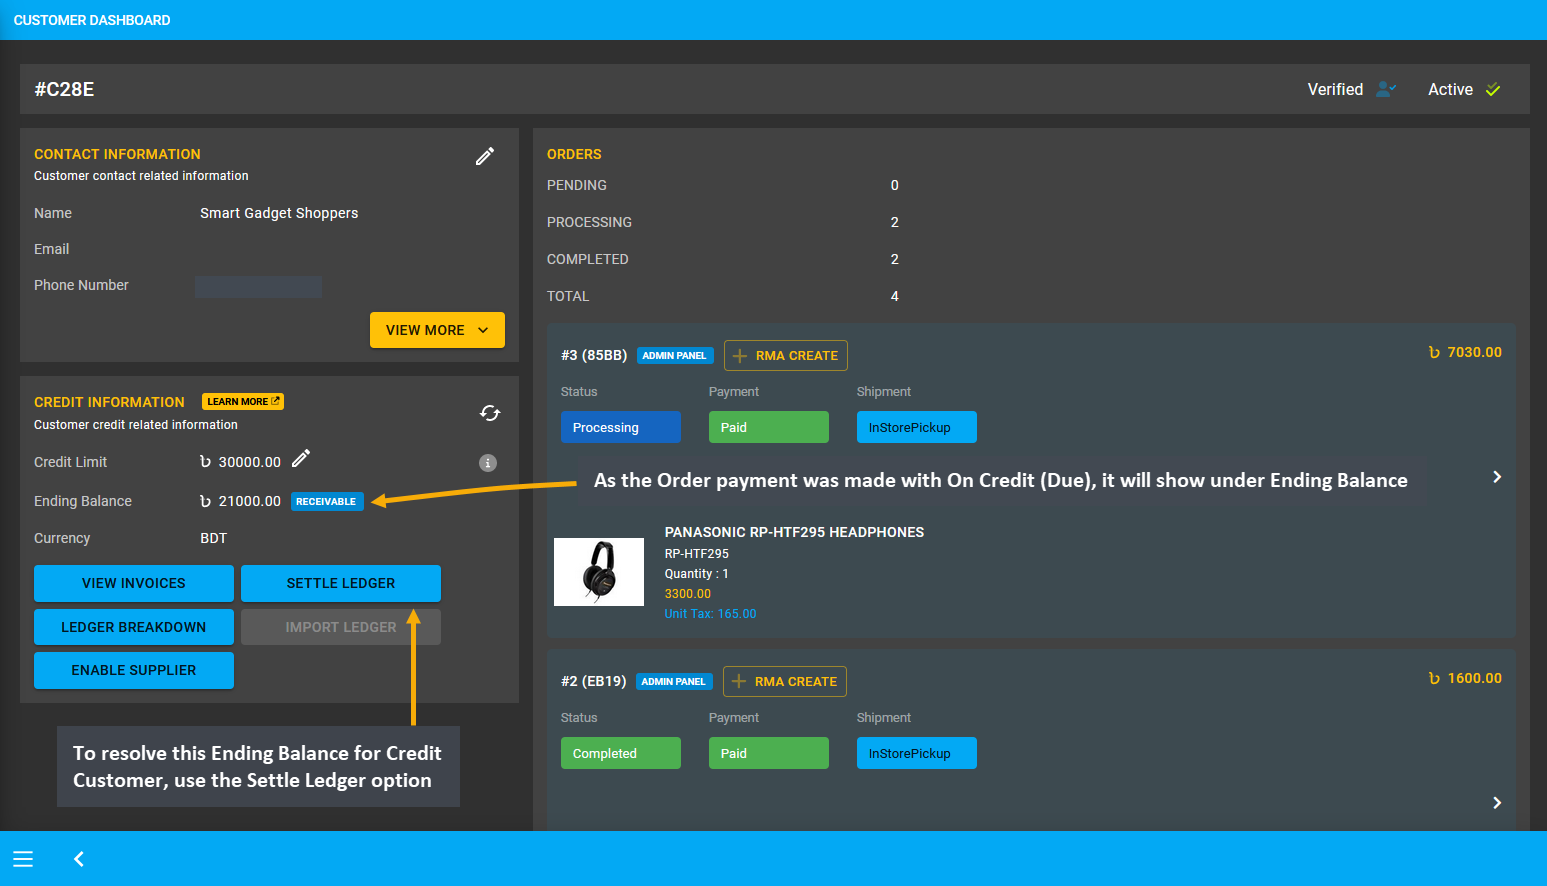
Image 6: To resolve Ending Balance for On Credit (Due), use Settle Ledger option from Credit Information.
After clicking on Settle Ledger, a pop-up will ask to confirm the amount of payment to settle the Ending Balance.
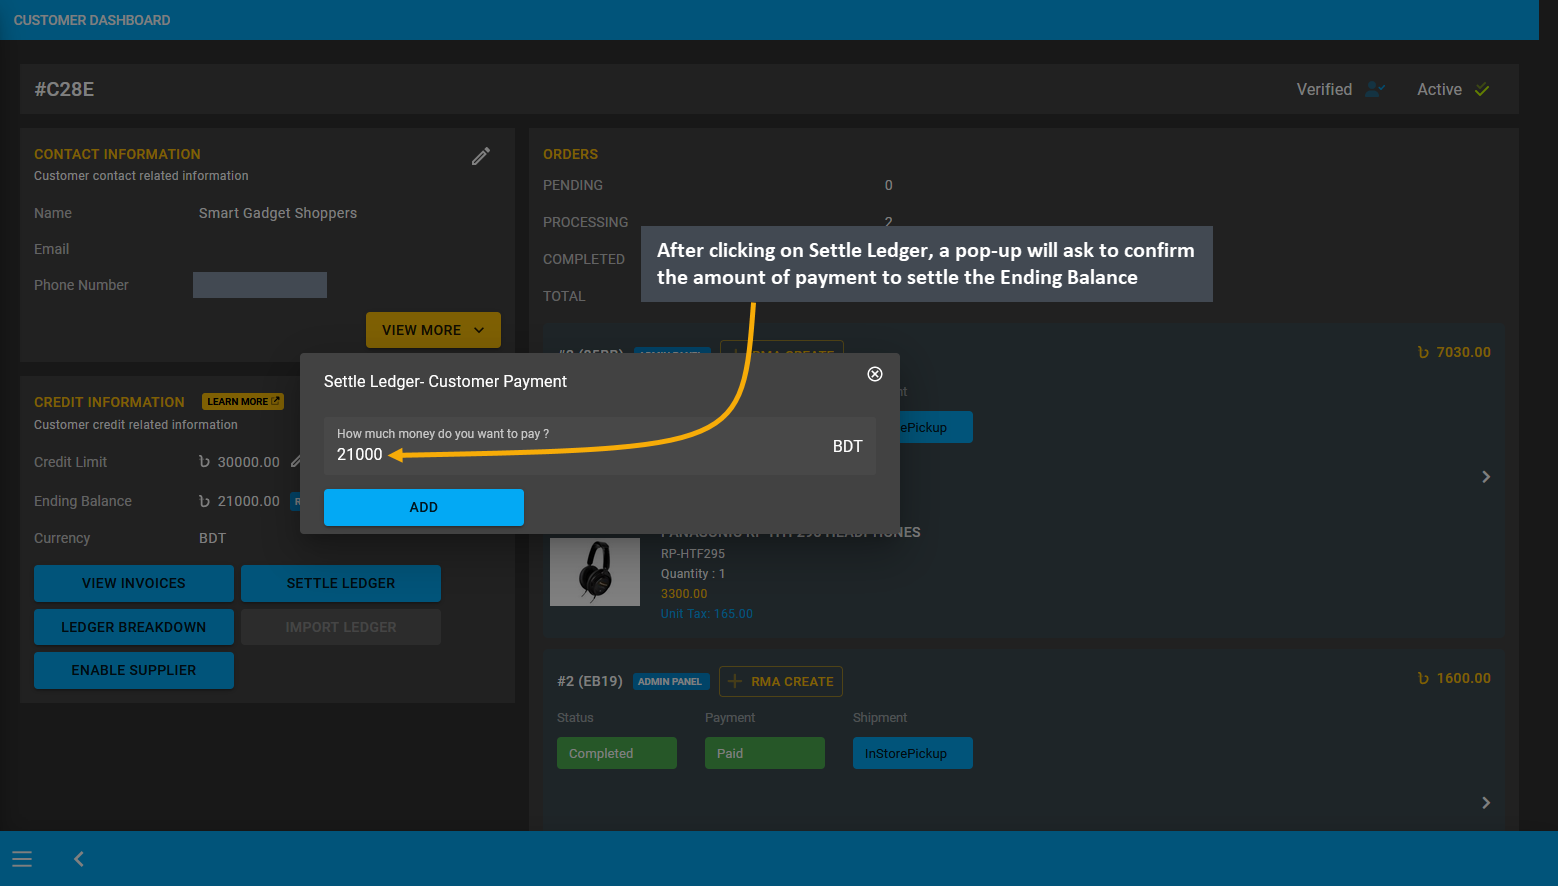
Image 7: When Settling Ledger, confirm the amount of payment to proceed with to settle the Ending Balance.
Select a Payment Gateway to settle the Ending Balance for Ledger. For instance, Cash is selected here to settle the 21,000 BDT Ending Balance. Other payment gateways can also be used. Click Submit to complete the transaction.
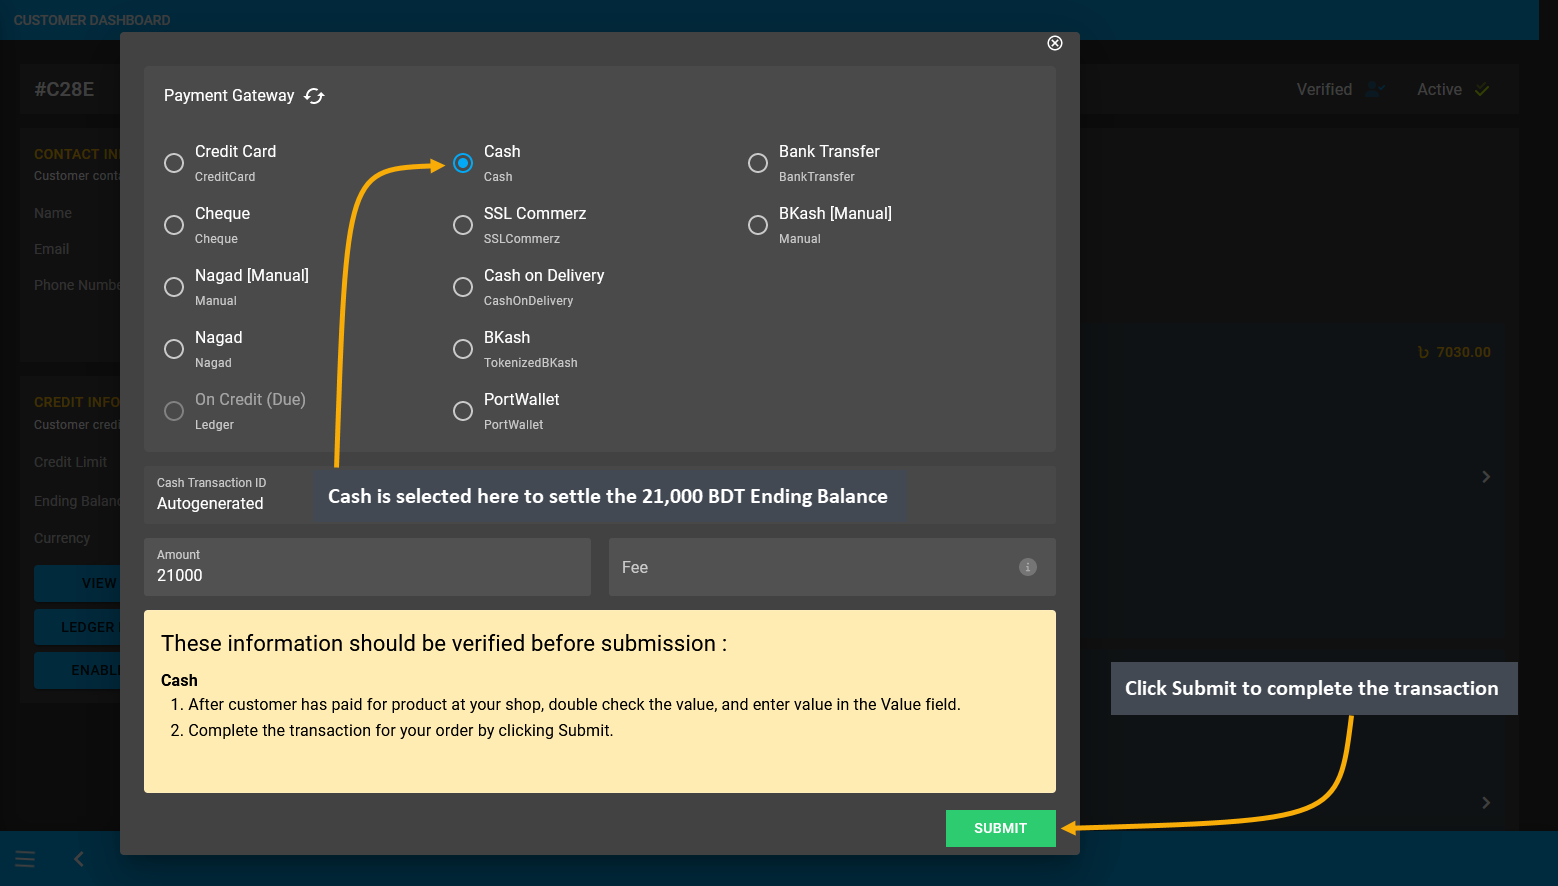
Image 8: Select a Payment Gateway to settle the Ending Balance and click Submit to complete transaction.
Before completing transaction, a pop-up will ask to confirm settling the Ledger with selected Payment Gateway showing the Transaction Amount and Reference. Click the Submit button to complete the process.
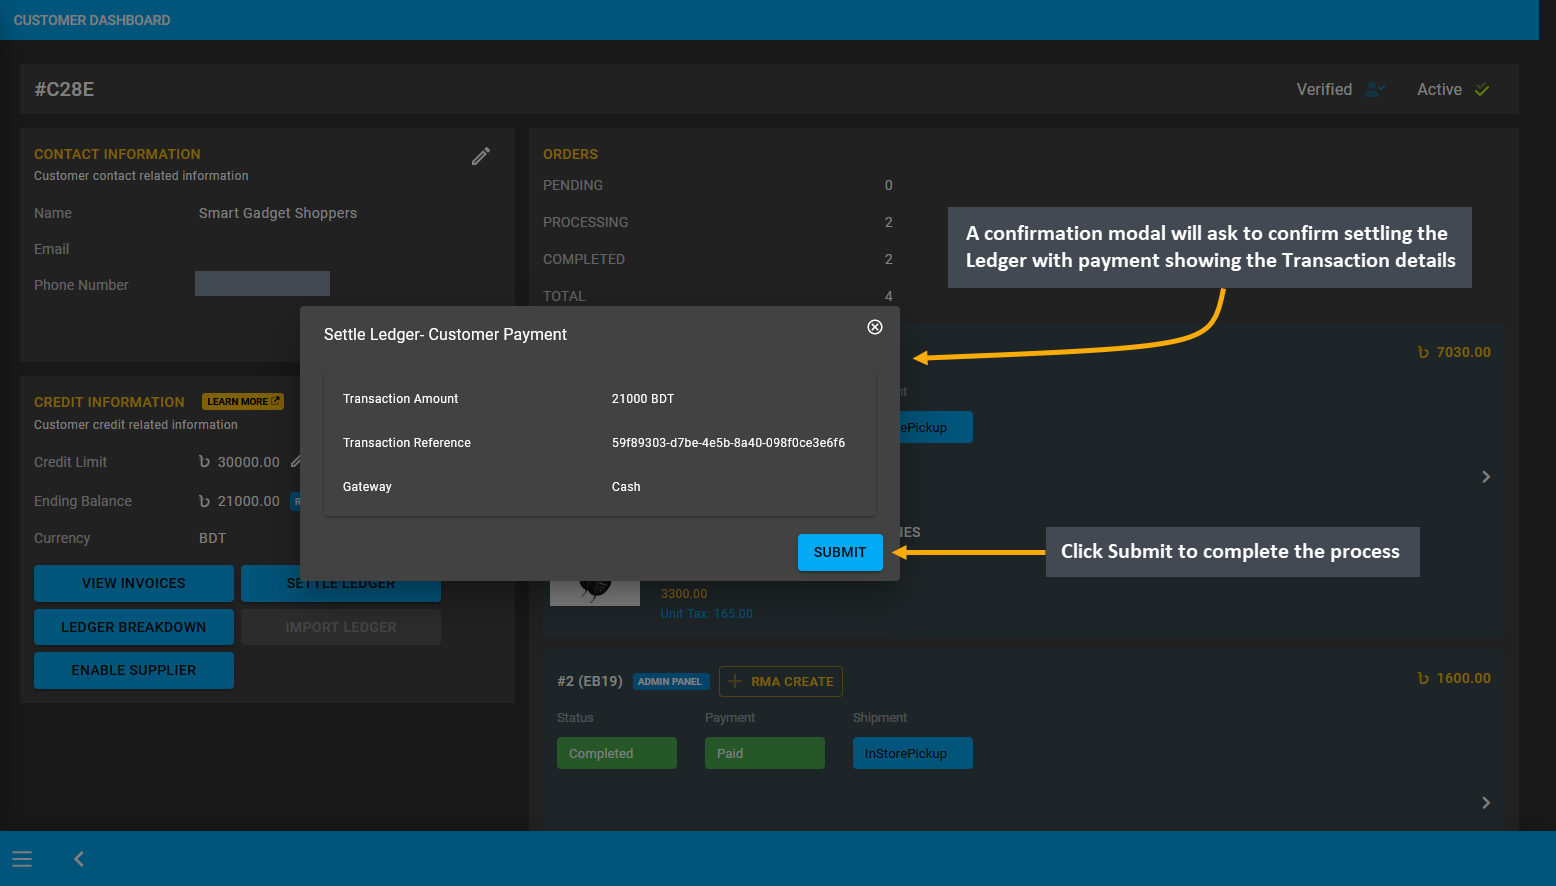
Image 9: Before confirming to Settle Ledger, the Transaction Amount, Reference, and Gateway will be shown.
When Ledger is settled with Payment Gateway, the Ending Balance will become 0 BDT, which means Customer’s Credit Limit is restored to 30,000 BDT again. So, they will be able to make purchase with this Credit Limit again.
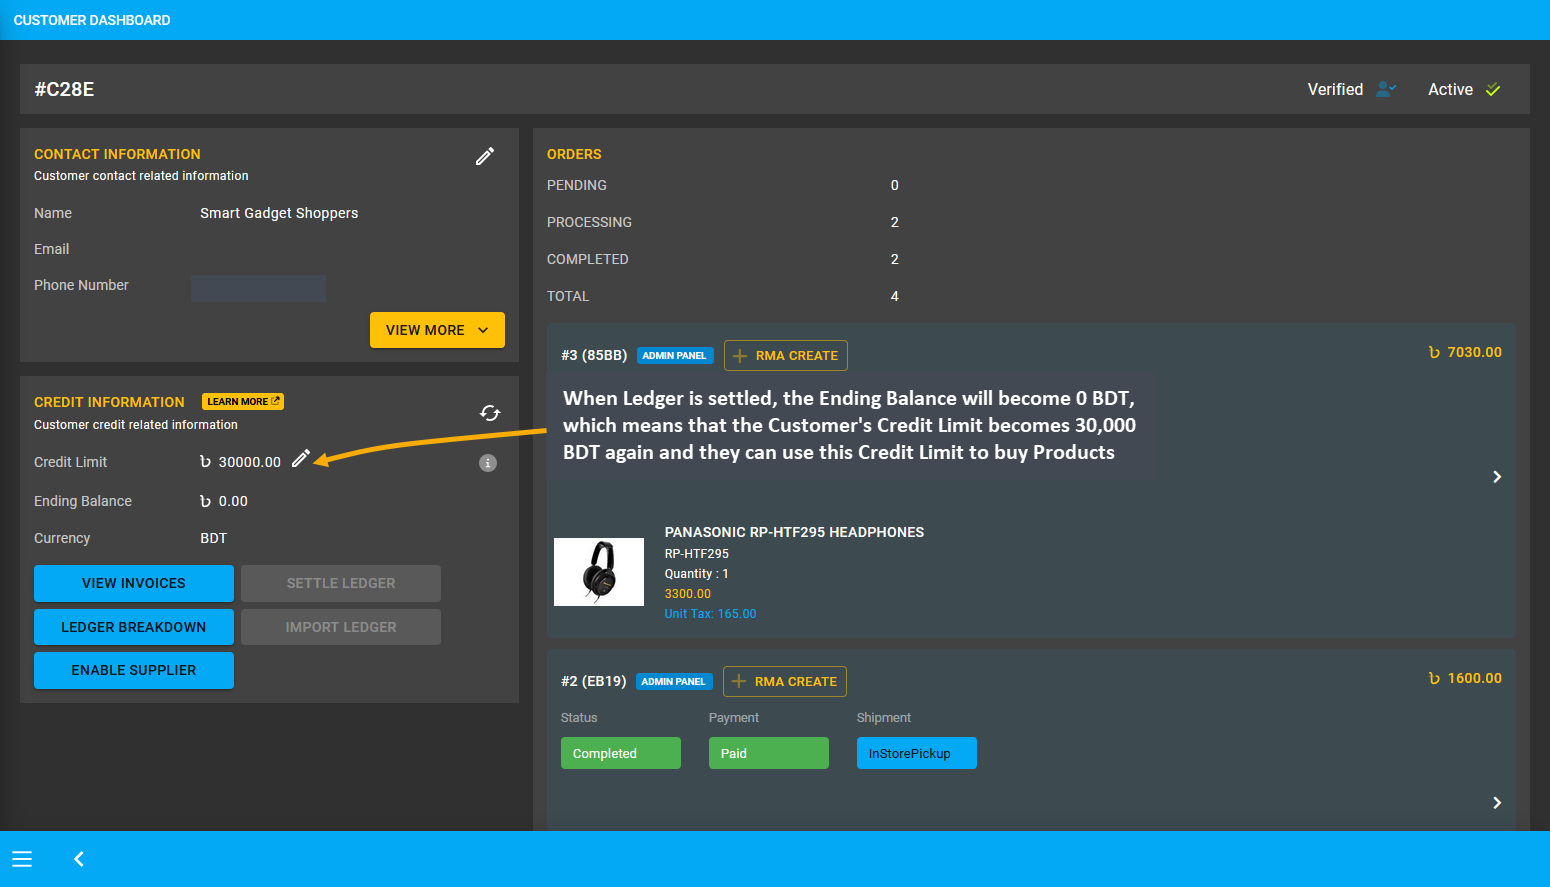
Image 10: When Ledger is settled, the Ending Balance will become 0 BDT and Credit Limit will be restored.
Credit Limit not available to cover Full Order Payment
Despite having Credit Limit on their account, a Credit Customer may still not be able to use it for placing Order. So, they will not be able to make Order payment with Credit Limit, if the available Credit Limit is not enough to cover Full Order Payment. For instance, this Credit Customer has an available Credit Limit of 15,000 BDT. However, this Credit Limit may not be enough to cover a Full Order Payment that exceeds 15,000 BDT.
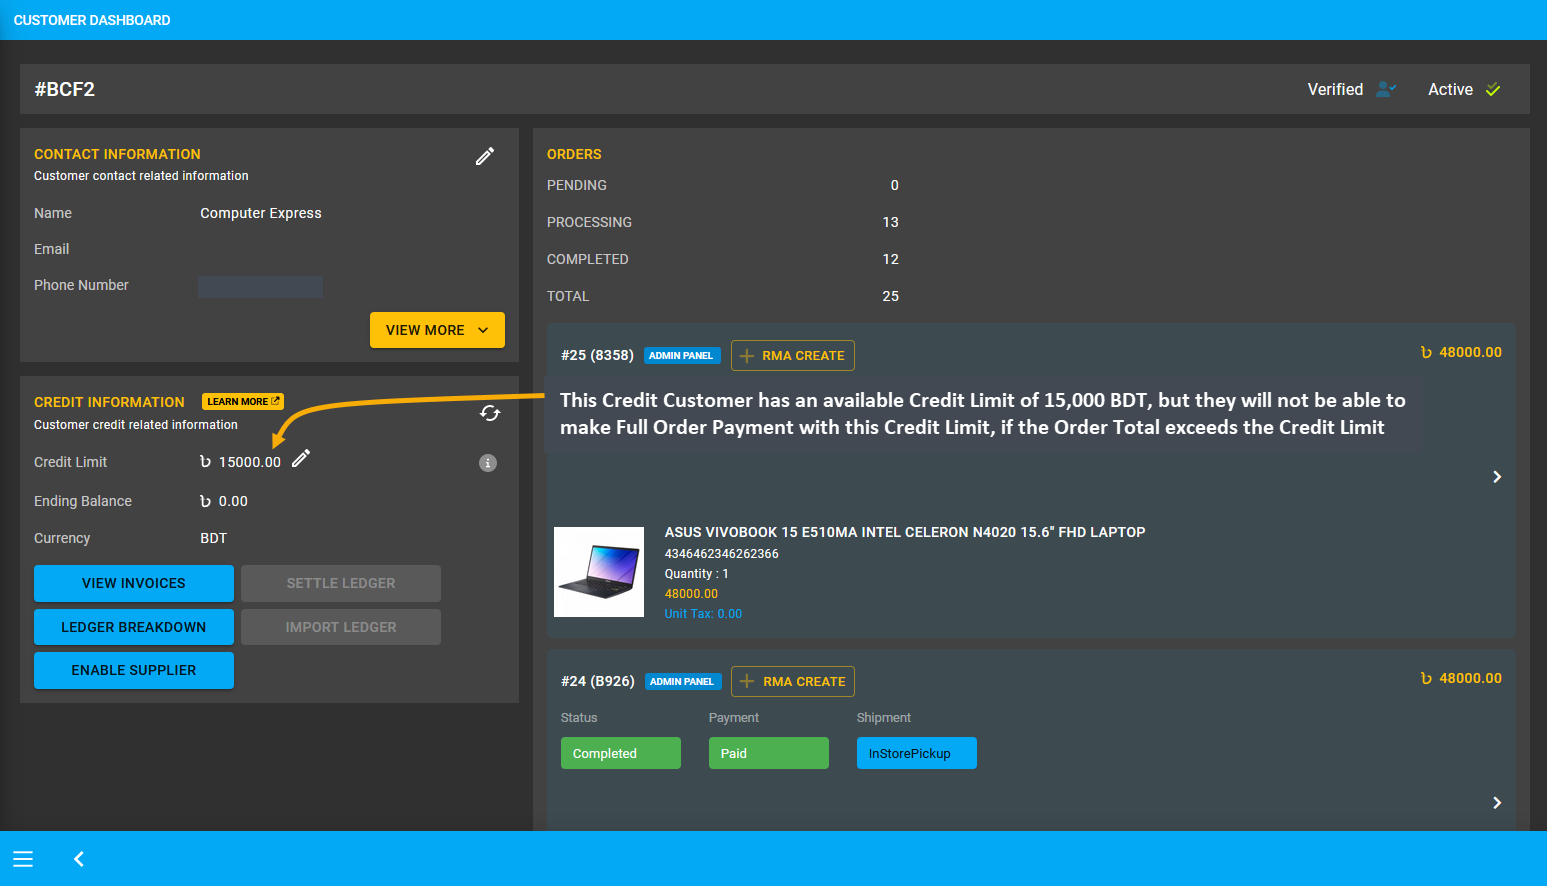
Image 11: Credit Customer cannot pay for Order with Credit Limit, if Order Total exceeds the Credit Limit.
Therefore, an example Order will be placed with Order Total that exceeds the Credit Limit, to complete Full Order Payment with On Credit (Due). Start Order by filling basic Customer Information and Shipping Address. Then, search for and add Products to Cart from dropdown. Check Product quantity, rate, item total, Order total, and subtotal. Click the Proceed button to select payment and shipping options on the next page.
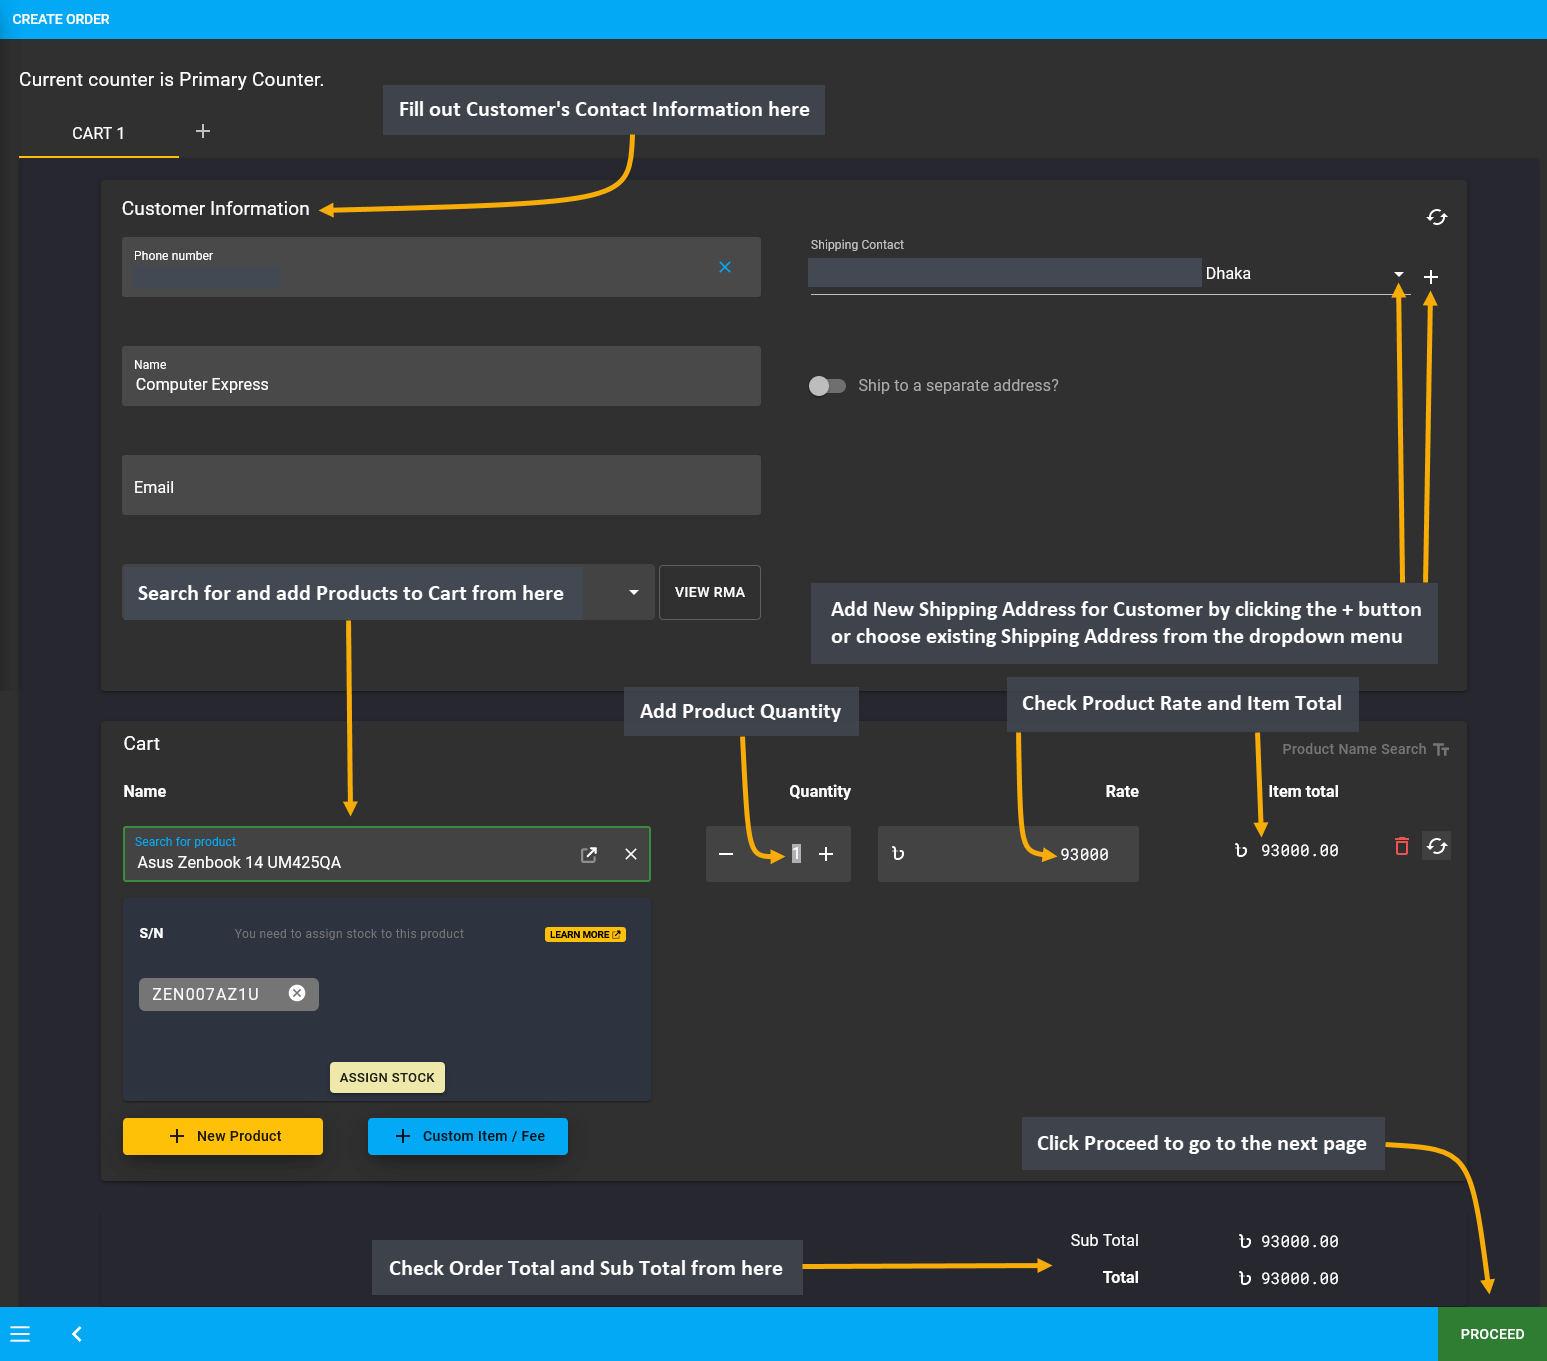
Image 12: Create Order Cart by adding Product and checking Product quantity, Order total, and subtotal.
If the Credit Customer wants to place Order without payment, then they have to complete Order without selecting any payment option. Here, In Store Pickup was selected as shipment option without selecting any payment option. Add a Note to keep record that Order was placed without Payment and transaction will be completed later. Thus, proceed without selecting any payment option and click the Confirm Order button to proceed to the next step.
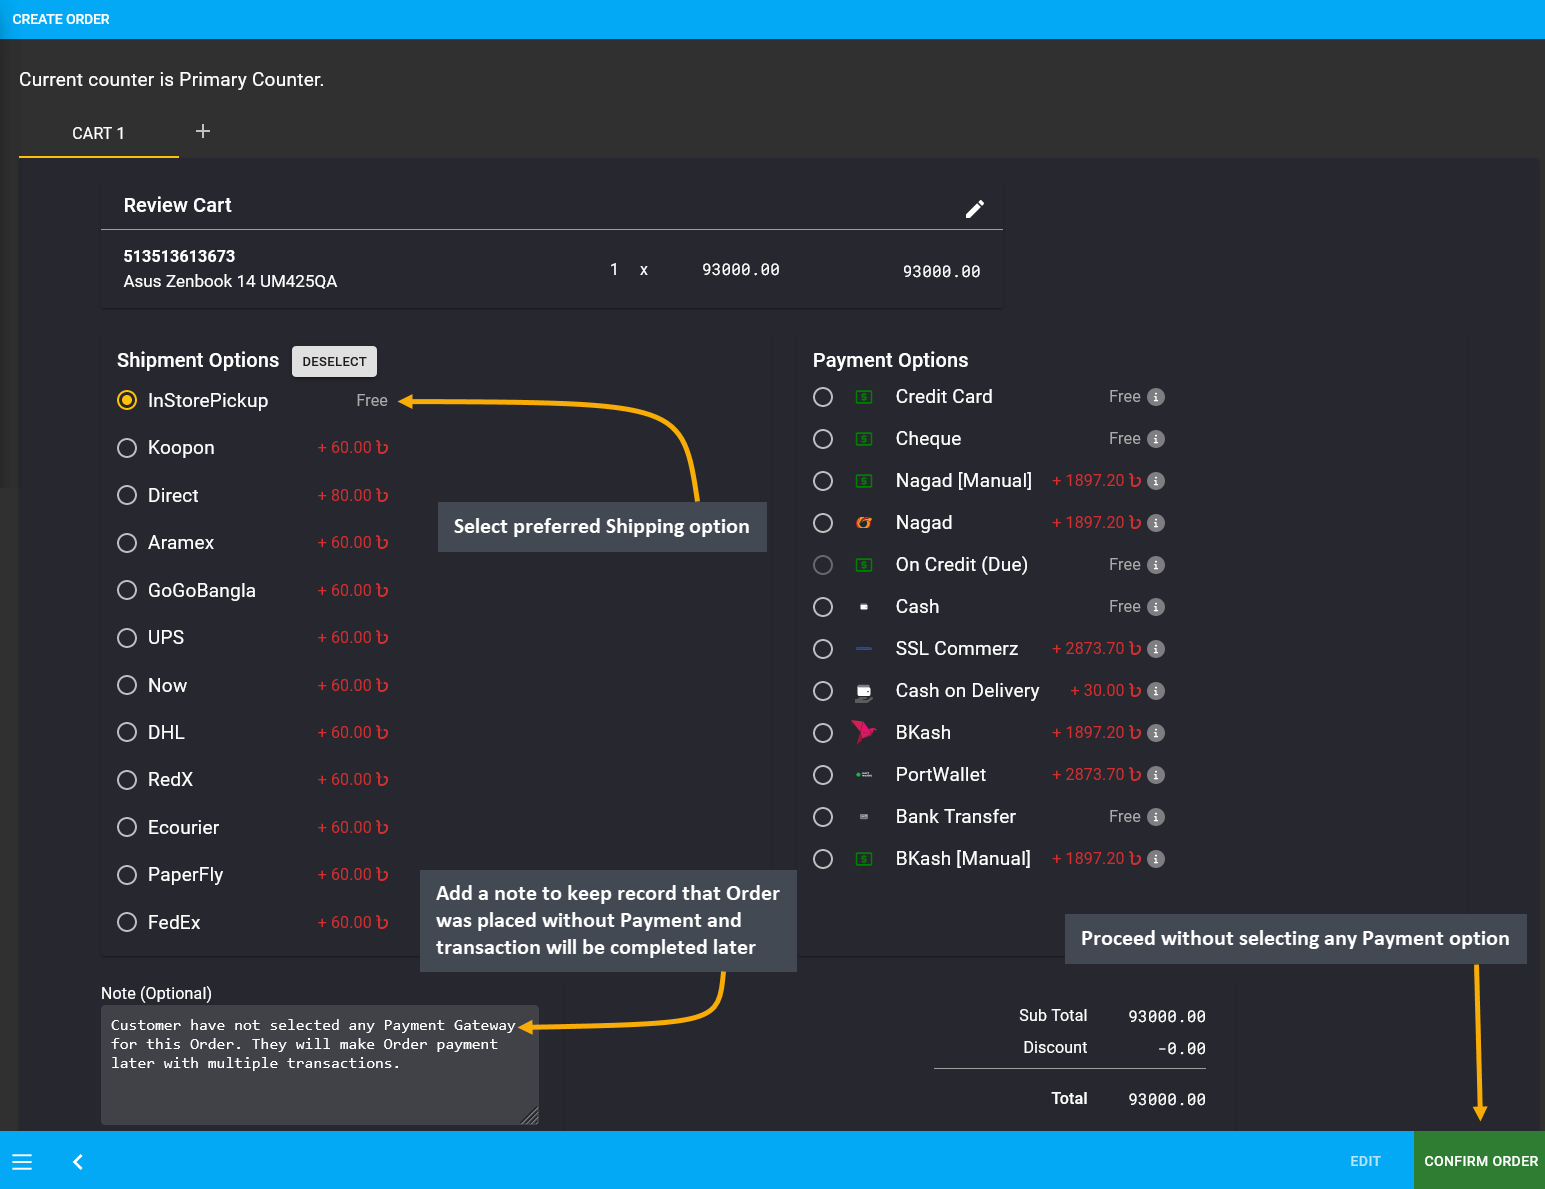
Image 13: Credit Customer can proceed without selecting payment option to complete Order without payment.
As Credit Customer proceeded to place Order without payment, a pop-up of Full Payment Incomplete will show two options. The first option to Use Credit will remain disabled because Customer does not have available Credit Limit to complete Order payment. The second option which remains enabled is Ignore Issue, selecting which will allow Customer to complete Order payment later. Therefore, click the Submit button to place Order without payment.
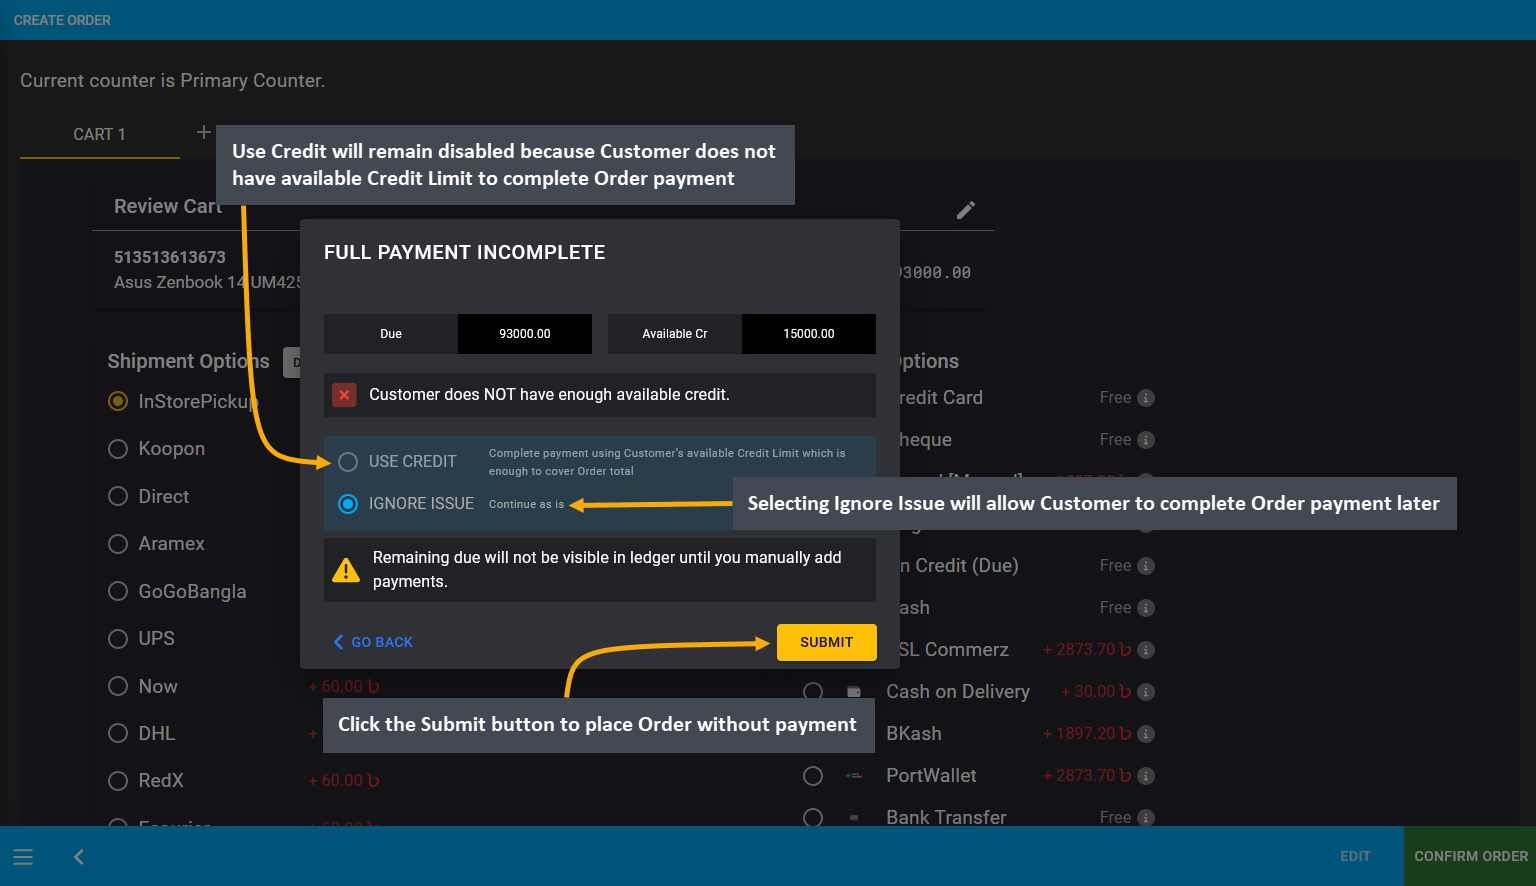
Image 14: Customer does not have enough Credit Limit to cover Full Order Payment, so select Ignore Issue.
In order to add payment details to this Order, go the the Orders Tab. The newly created Order will appear on top of the list. It has incomplete payment which needs to be completed. For this, click the Transaction + button which will redirect to the Payment Gateway from where transaction can be completed for this Pending Order.
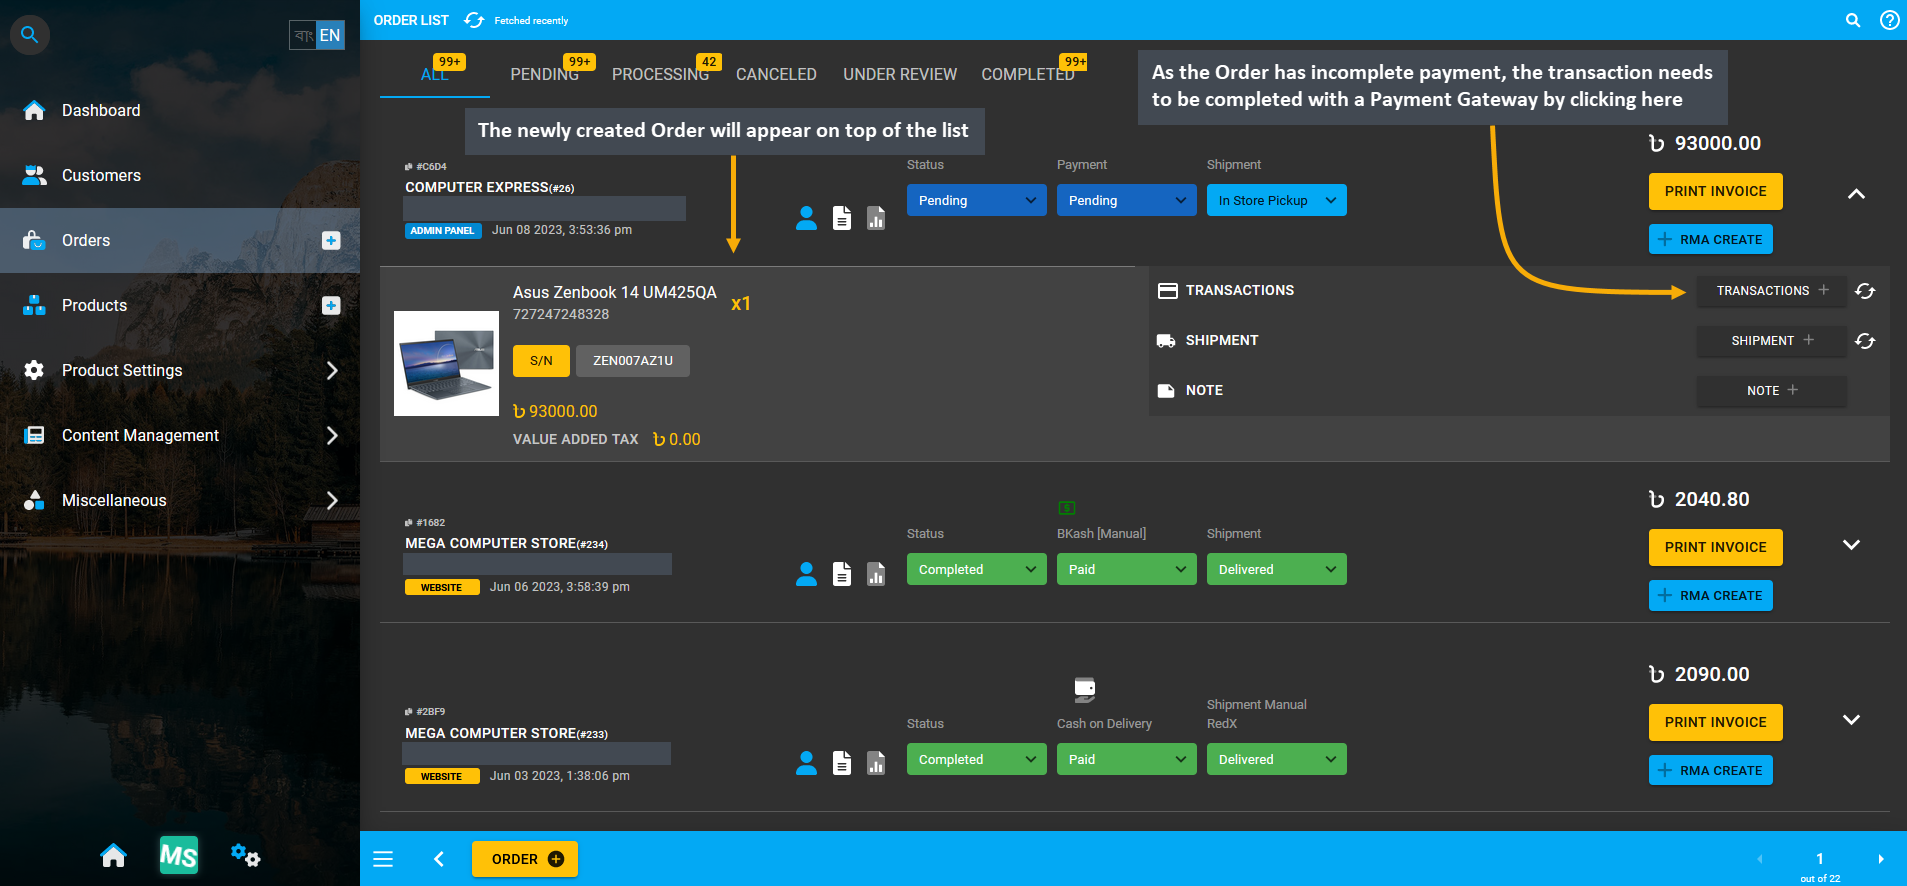
Image 15: Click Transaction + to select Payment Gateway and complete transaction for this Pending Order.
To resolve this Pending Order for Credit Customer, complete Order payment by selecting any Payment Gateway. As the Credit Customer have Credit Limit approved and allowed, they can make partial Order payment with On Credit (Due). Click the Submit button to complete partial payment transaction for this Credit Customer’s Order.
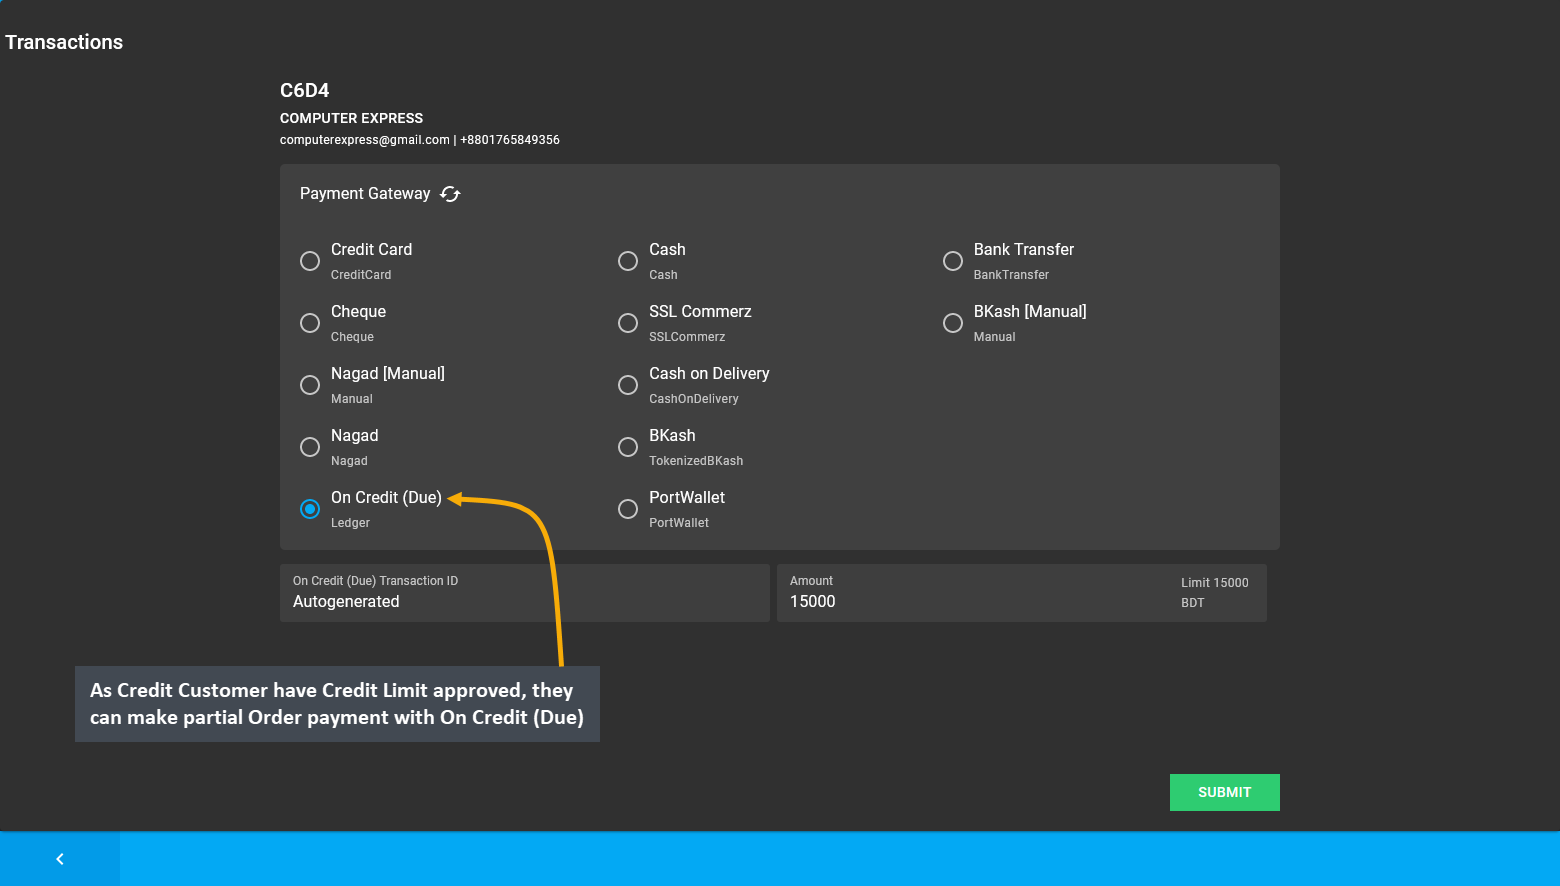
Image 16: Credit Customer can make partial Order payment with On Credit (Due) as they have Credit Limit.
Before completing the partial payment of 15,000 BDT with On Credit (Due), a pop-up will ask for confirmation to proceed with the transaction. Click the Proceed button to confirm payment with On Credit (Due). After confirming to pay the 15,000 BDT with On Credit (Due), the amount will be deducted from total Due, and remaining Due will show as 78,000 BDT that needs to be completed later with other Payment Gateways to complete Order payment.
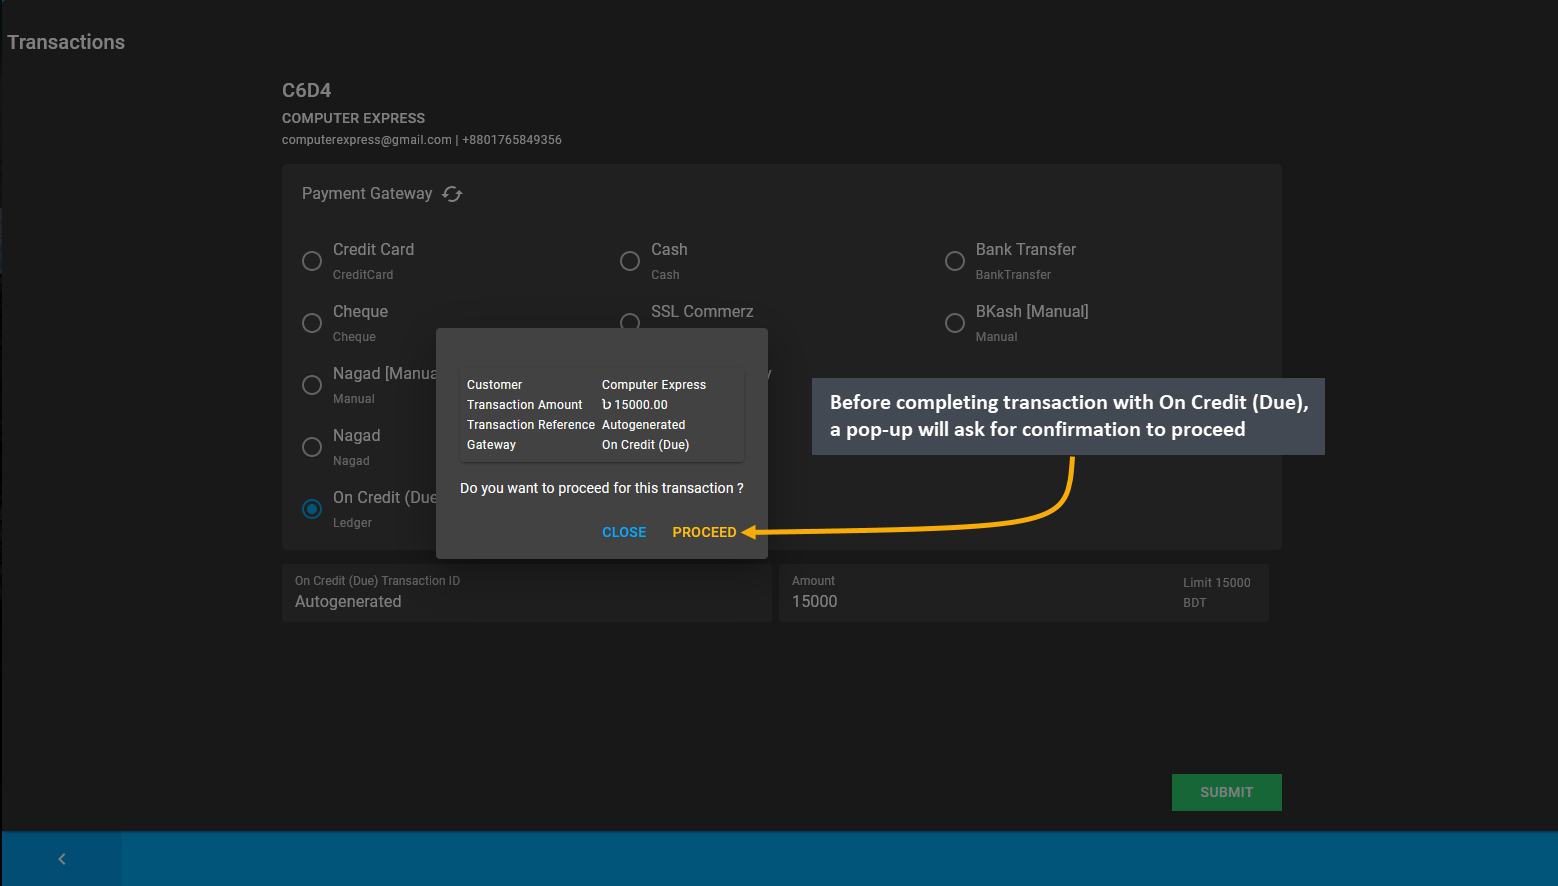
Image 17: Before completing transaction with On Credit (Due), pop-up will ask for confirmation to proceed.
After completing partial payment with On Credit (Due) i.e. Credit Limit, a Full Payment Incomplete pop-up will show the remaining Due 78,000 BDT and available Credit 0 BDT as the Credit Customer have already used their 15,000 BDT Credit Limit. Therefore, as Customer does not have enough available Credit Limit, the Use Credit option will remain disabled. Thus, select the other option Ignore Issue to complete transaction later with any other payment gateway. Notification will show that Due balance is 78,000 BDT. Click Submit to go back to Order and pay the rest.
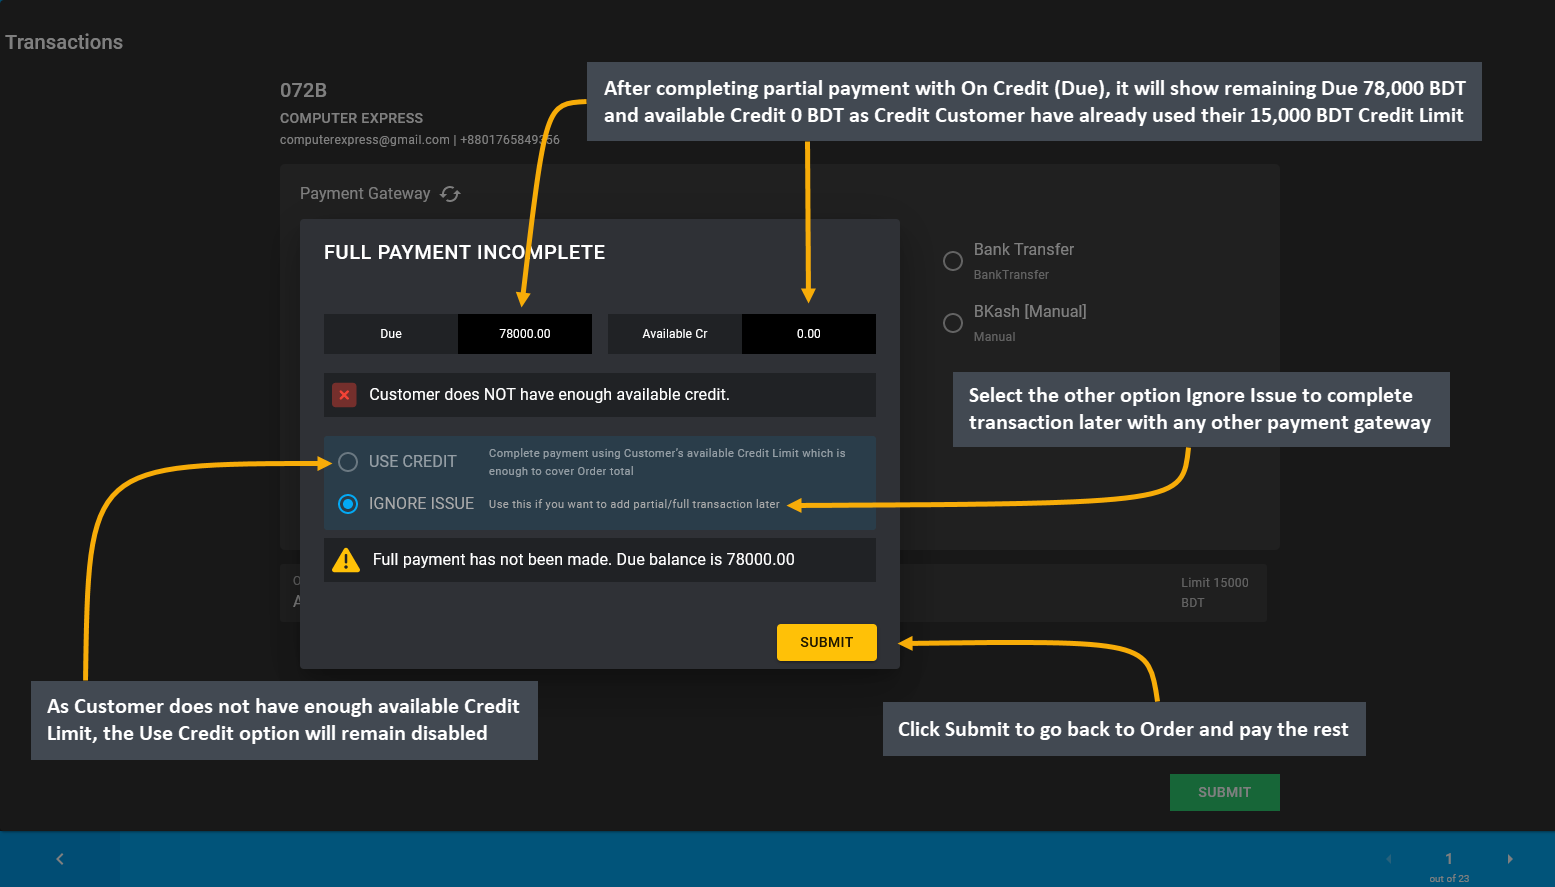
Image 18: After partial payment with On Credit (Due), remaining Due and available Credit Limit will show.
In order to complete remaining Due for this Order, go the the Orders Tab, which has partial payment 15,000 BDT completed with On Credit (Due). For completing remaining Due, click the Transaction + button which will redirect to Payment Gateways from where transaction can be completed for this Order with one or multiple gateways.
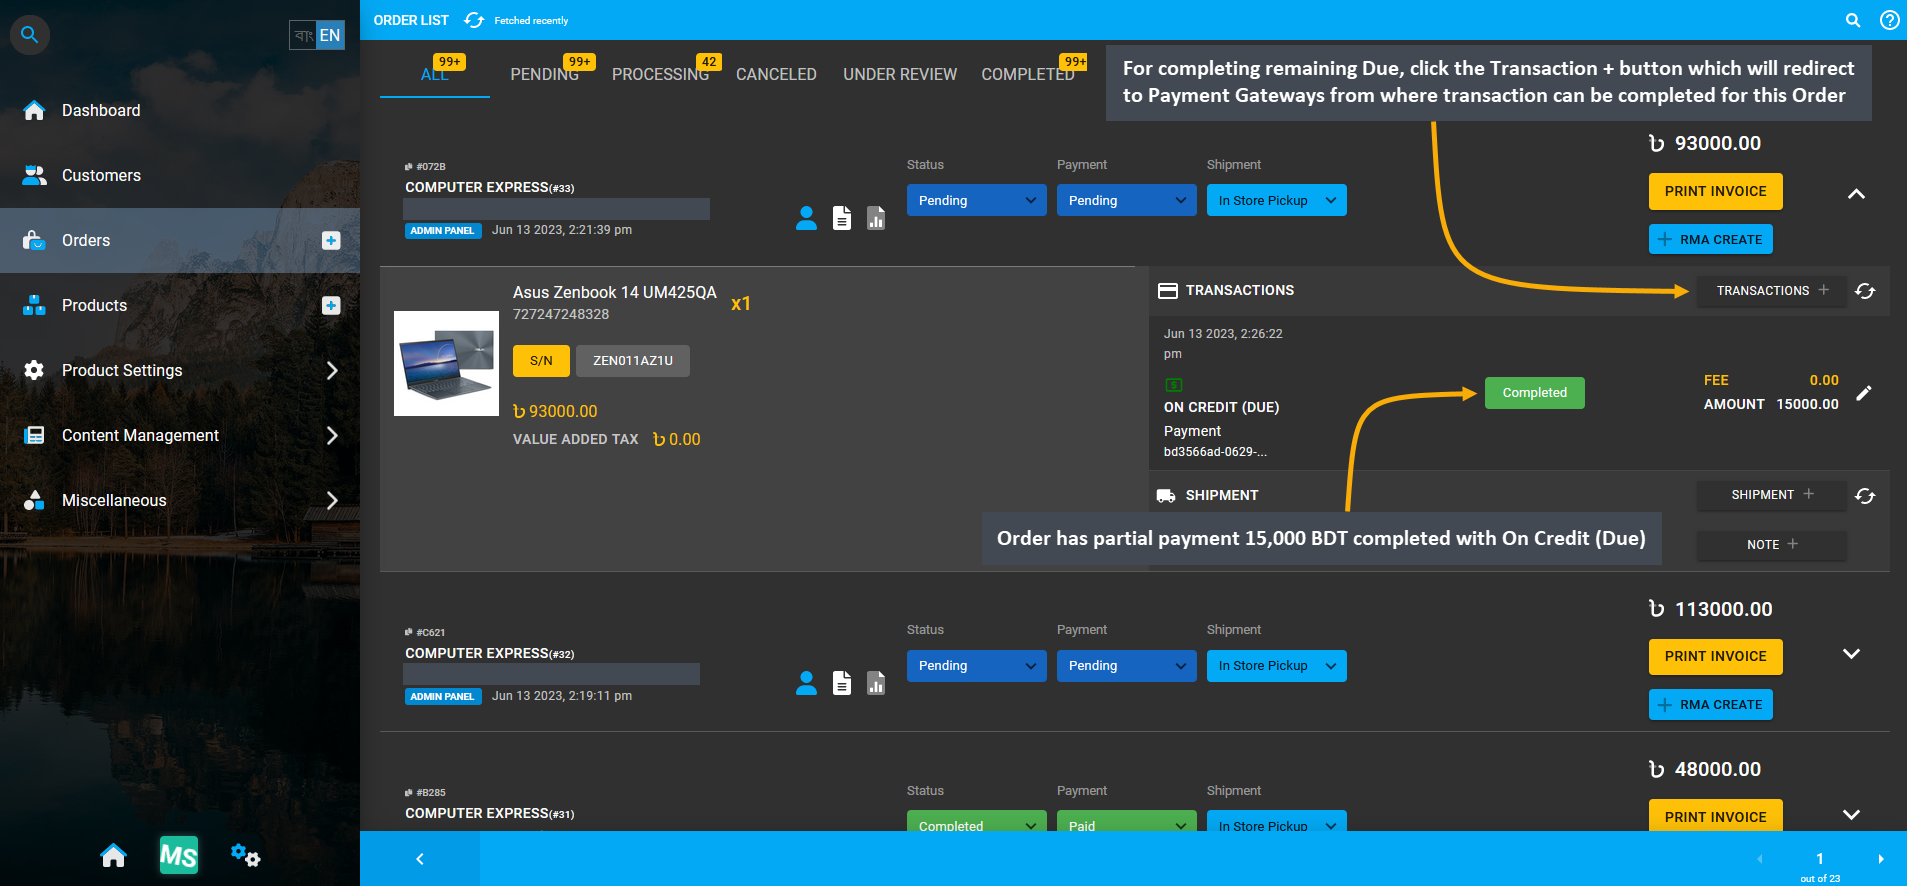
Image 19: Click Transaction + to be redirected to Payment Gateways from where Order due can be completed.
To resolve remaining Due for this Order, complete Order payment by selecting any other Payment Gateway. As Credit Customer have already used their Credit Limit, they will not be able to make Order payment with On Credit (Due). Therefore, another payment gateway Bank Transfer is selected to complete the remaining Due of this Order.
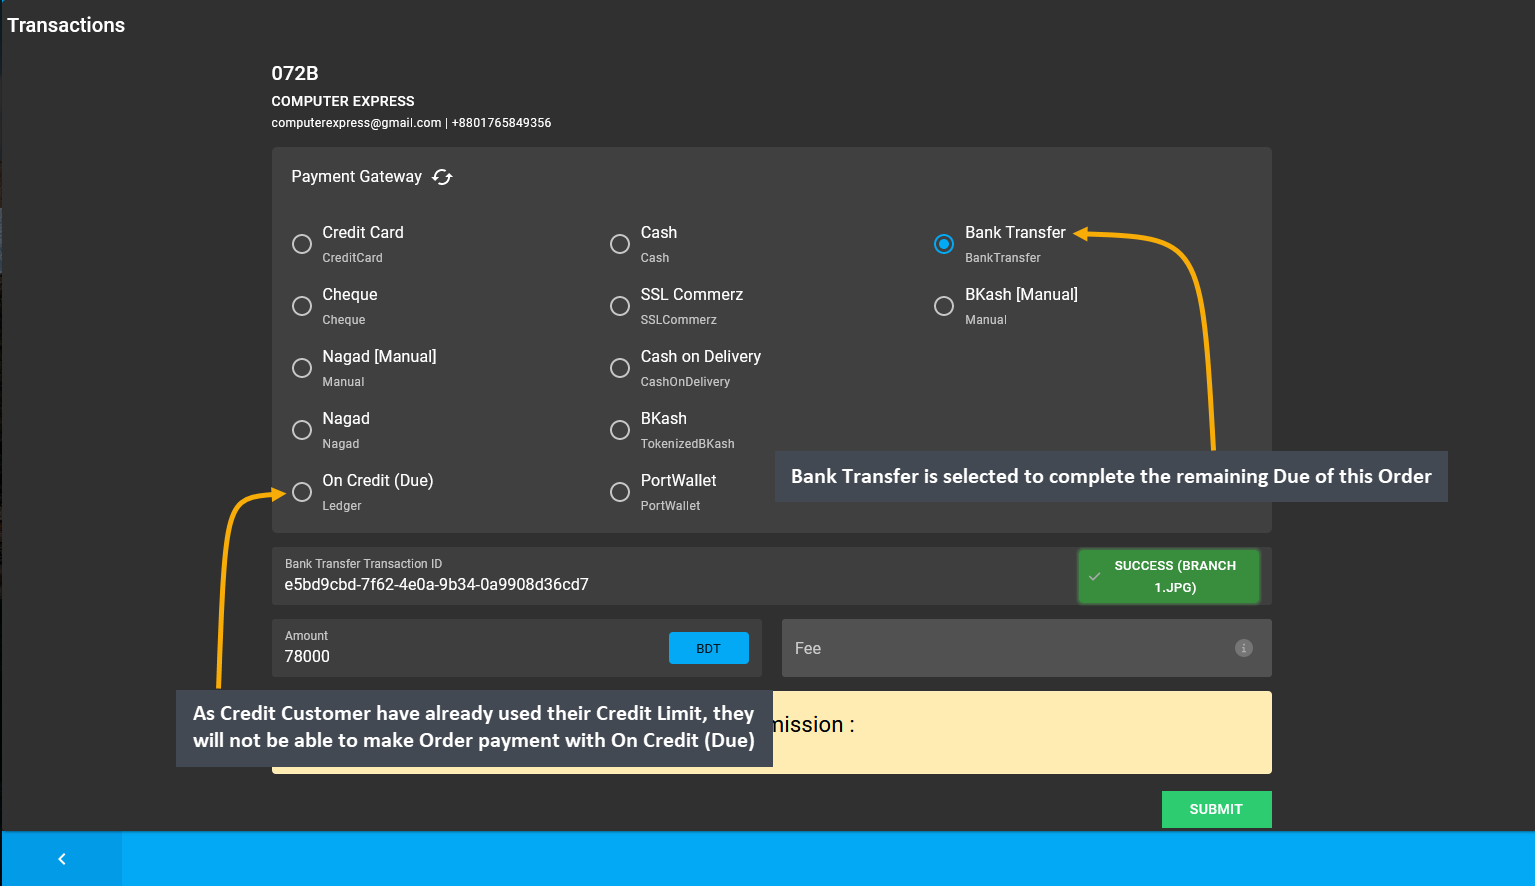
Image 20: To resolve remaining Due for this Order, complete payment by selecting another Payment Gateway.
Before completing the remaining Due of 78,000 BDT with Bank Transfer, a pop-up will ask for the confirmation to proceed with the transaction. Click the Proceed button to confirm payment with Bank Transfer. After completing Full Order Payment, it will redirect to the Order List, showing completed transactions for the Order.
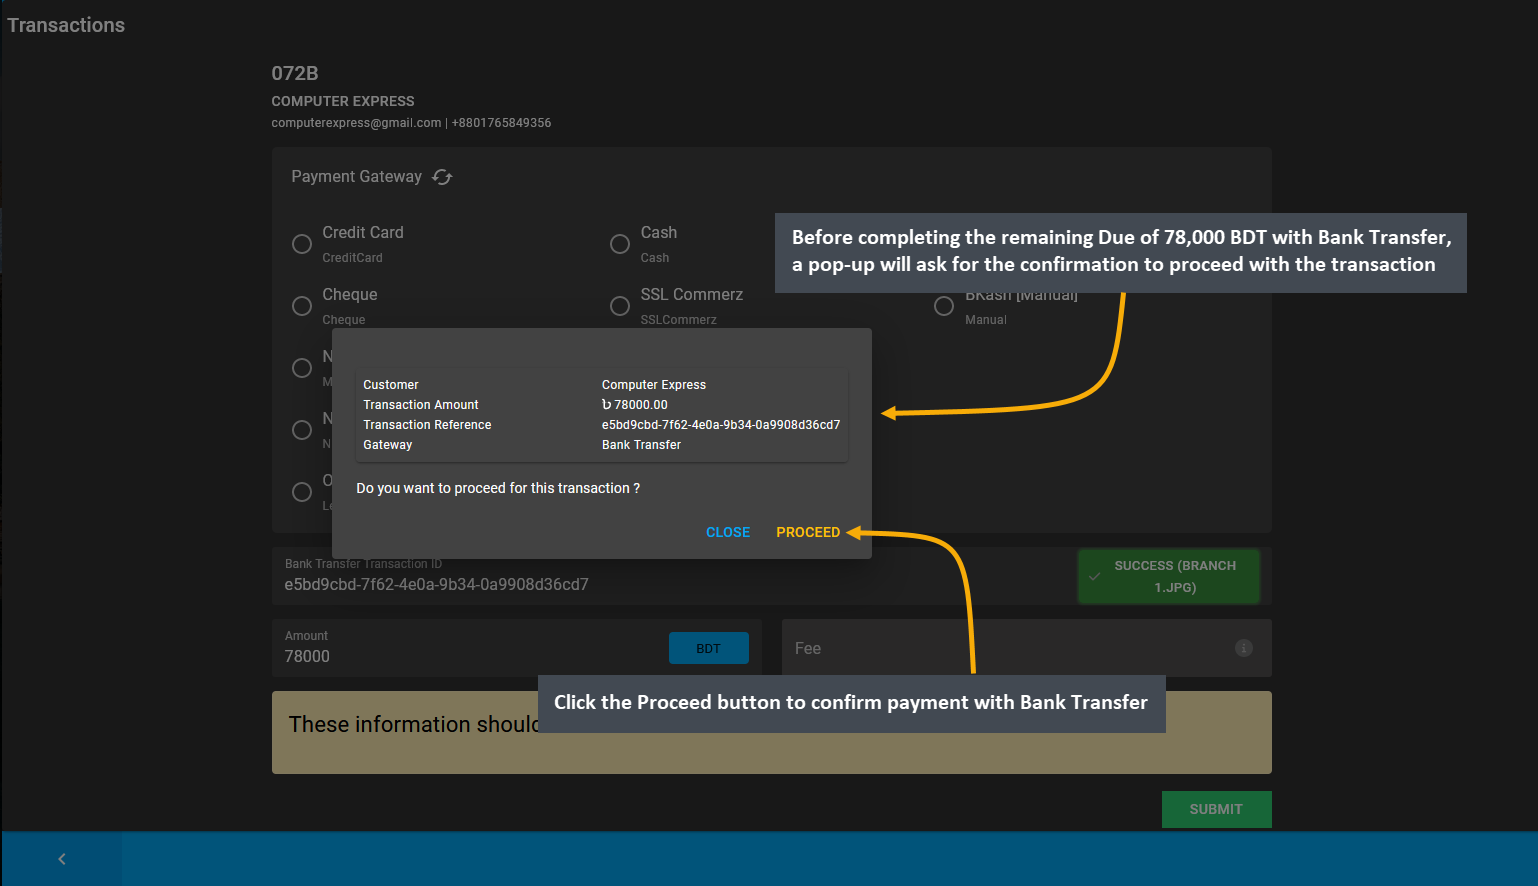
Image 21: Before completing transaction with Bank Transfer, pop-up will ask for confirmation to proceed.
After payment is completed with Bank Transfer for Credit Customer, it will show within the Transactions history. As Full Order Payment 93,000 BDT was paid with On Credit (Due) and Bank Transfer, the transaction statuses will show as Completed. This is how a Credit Customer can make Order payment with Credit Limit and Payment Gateways.
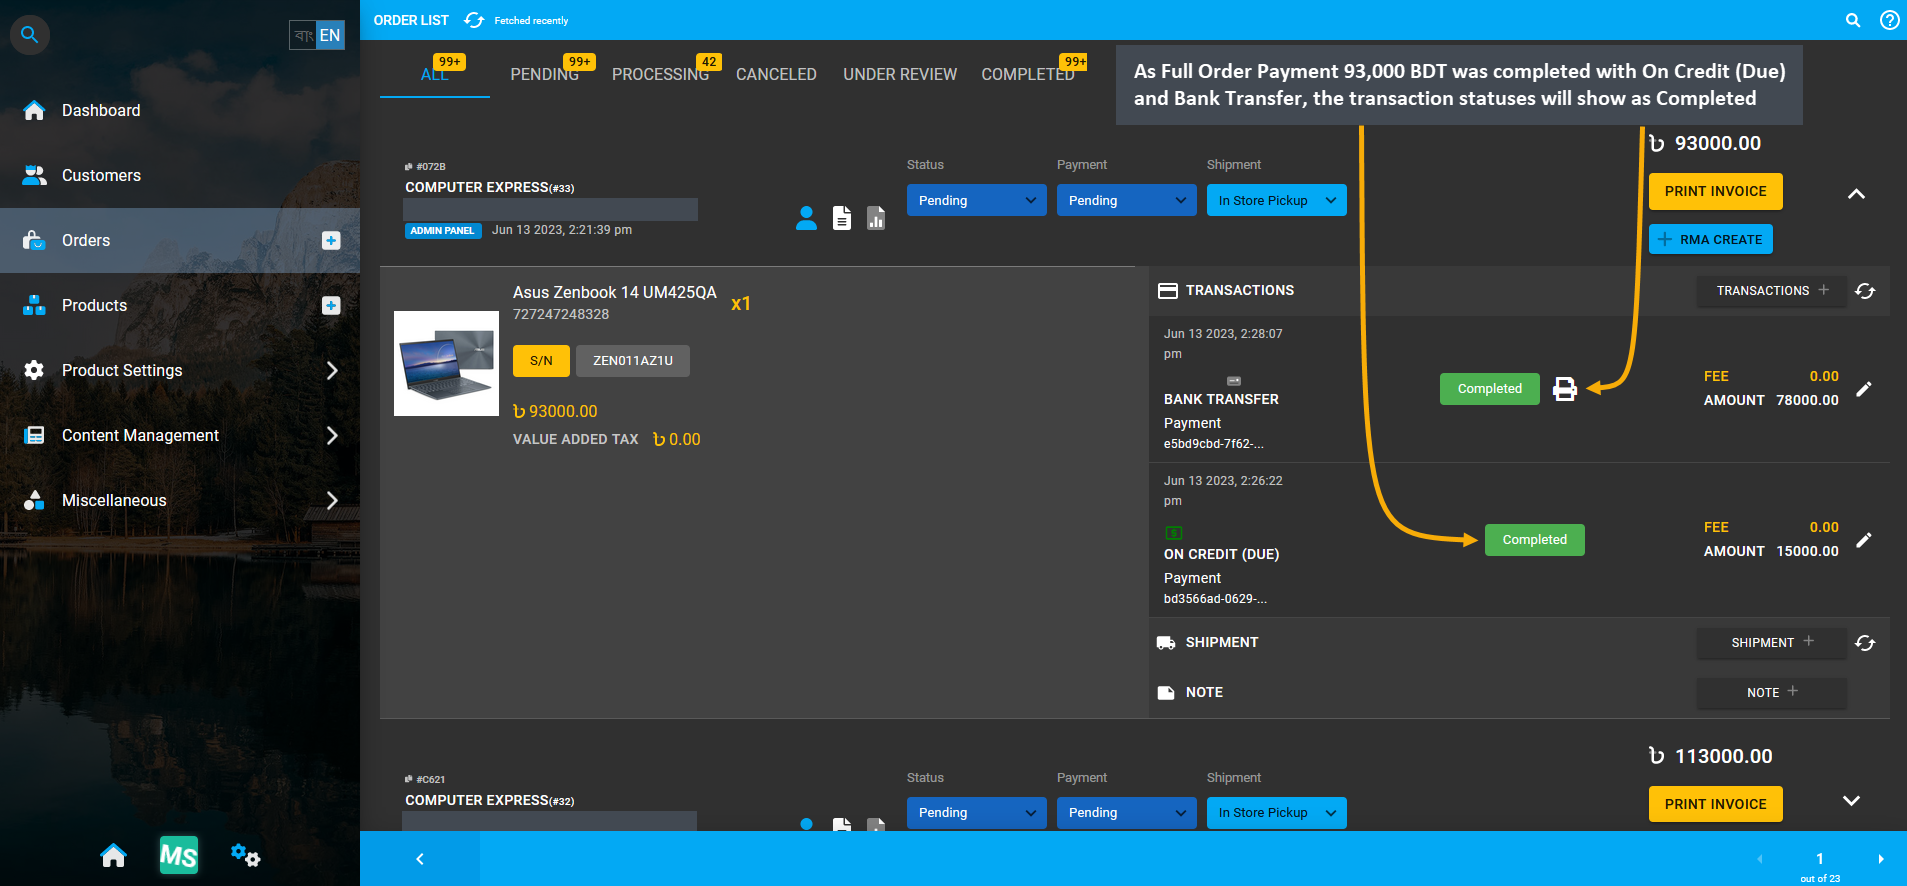
Image 22: As Full Payment was made with On Credit (Due) and Bank Transfer, transaction will show Completed.
Thus, manually change the Order status from Pending to Completed and Payment status from Pending to Paid as Full Order Payment is completed with multiple transactions. These statuses need to be updated manually.
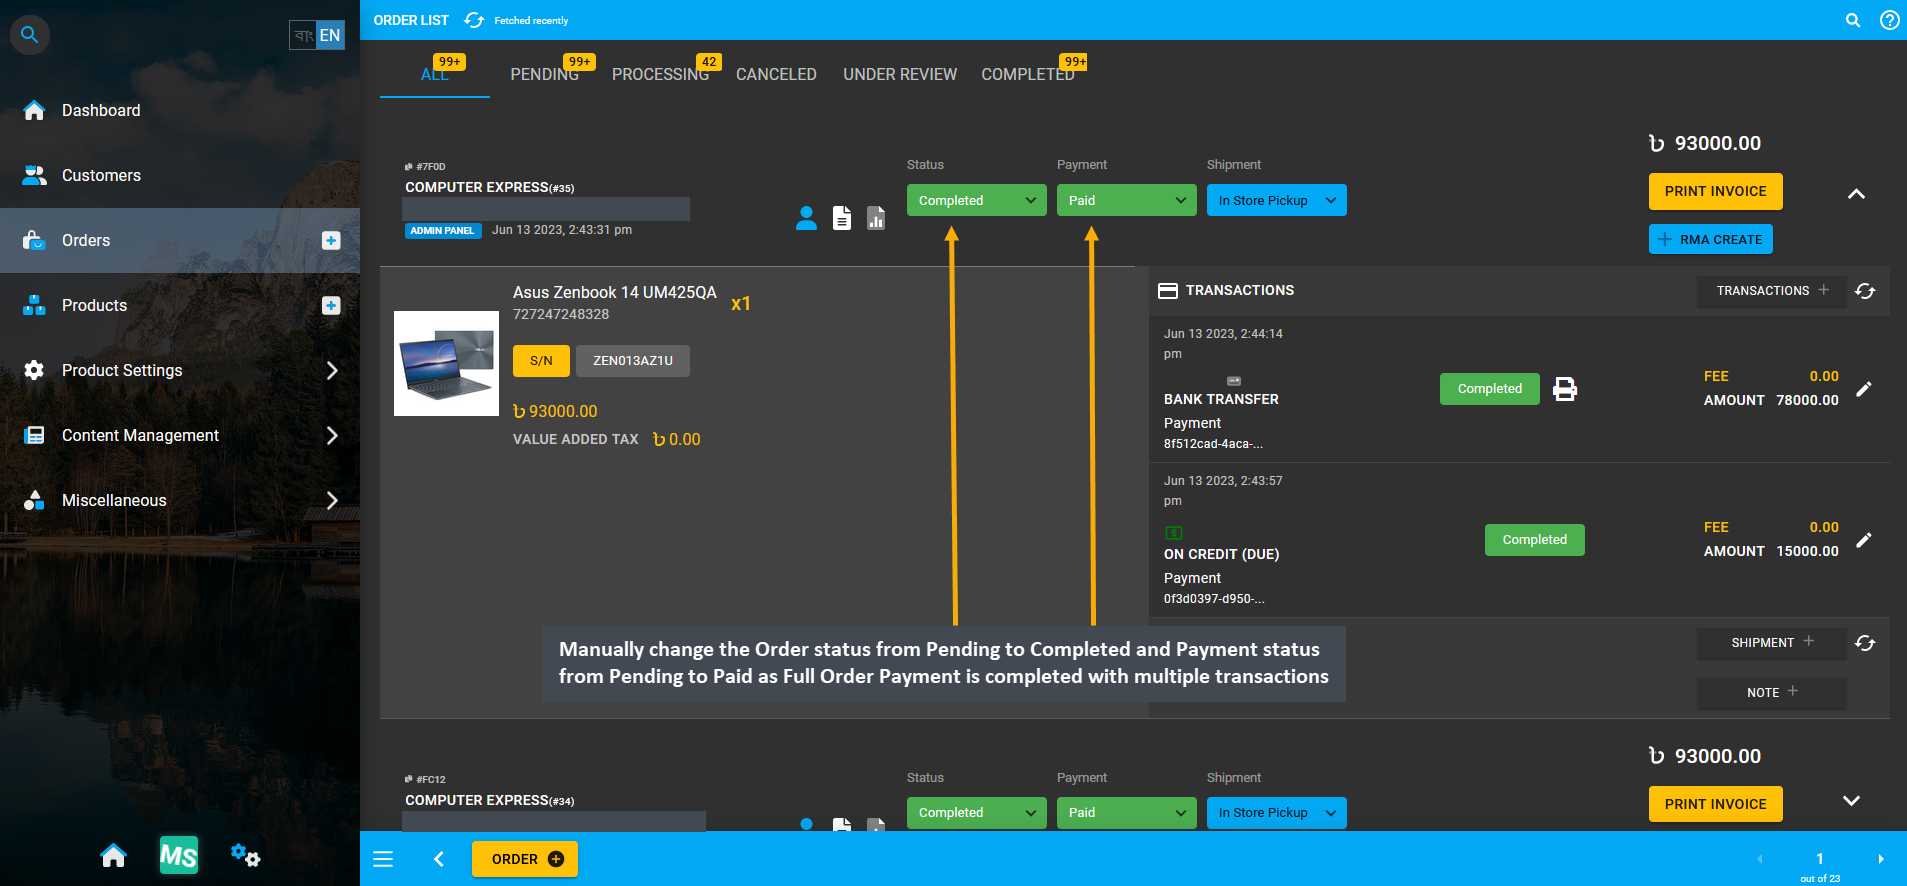
Image 23: As Full Order Payment was Completed, change Order status to Completed and Payment status to Paid.
No Credit Limit available to make Order Payment
If a Credit Customer has NO Credit Limit on their account, they will not be able to use Credit Limit for making Order payment. For example, this Credit Customer has NO available Credit Limit as they have already used their allotted 15,000 BDT Credit Limit. Thus, if they try to make Order payment later with Credit Limit, they will find the option to pay with On Credit (Due) disabled on Payment Gateways. They will be able to pay with other Payment Gateways.
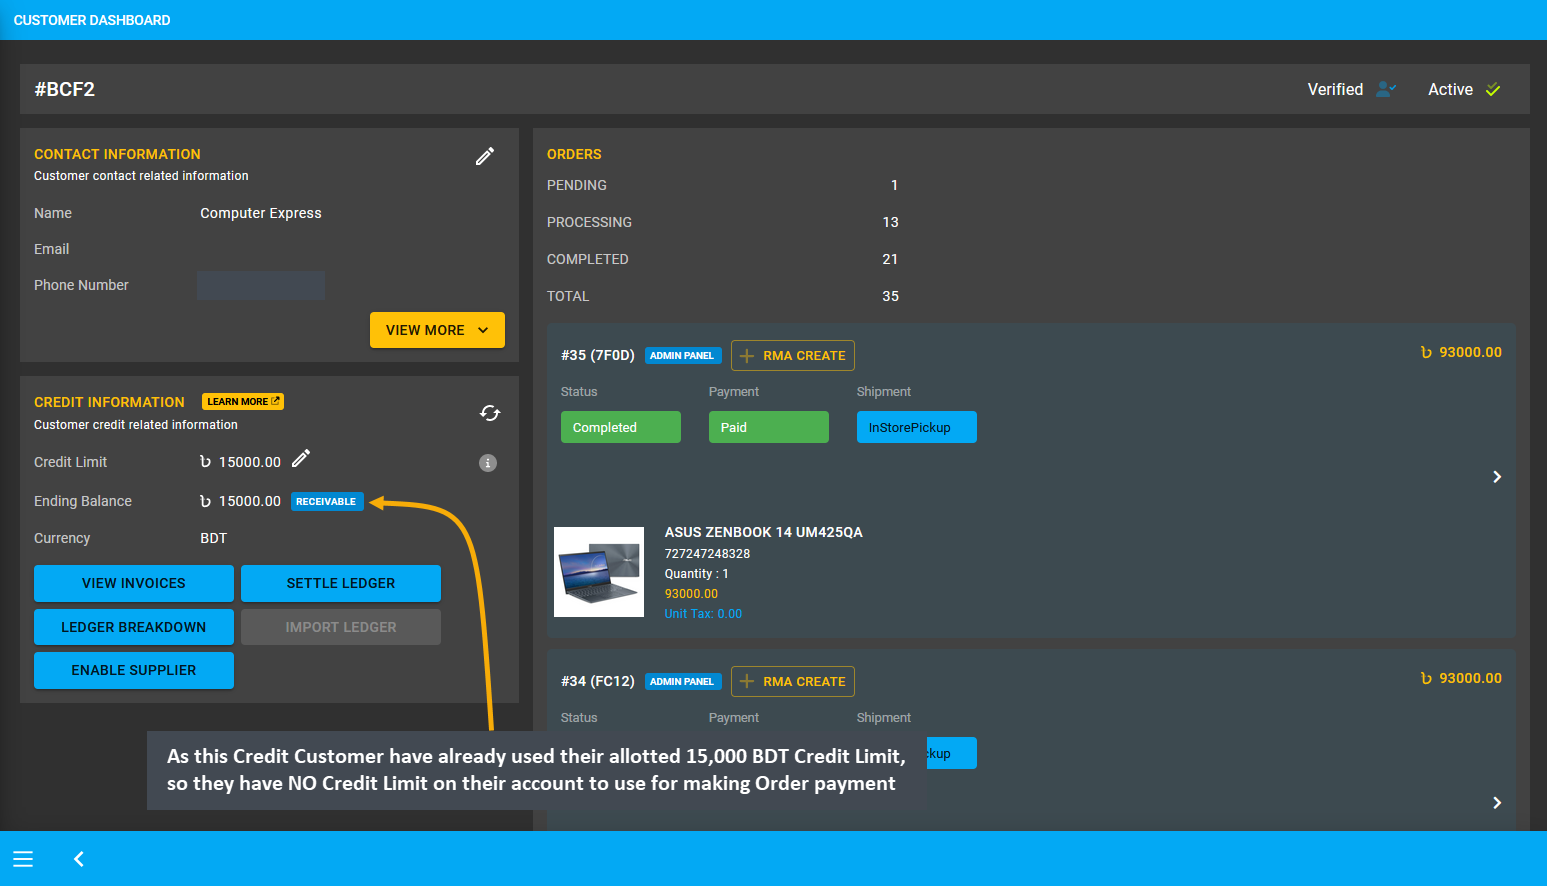
Image 24: Credit Customer cannot pay for Order with Credit Limit if they have NO Credit Limit available.
Therefore, an example Order will be placed and to complete Full Order Payment, other Payment Gateways can be used except On Credit (Due). Start Order by filling basic Customer Information and Shipping Address. Then, search for and add Products to Cart from dropdown. Check Product quantity, rate, item total, Order total, and subtotal. Click the Proceed button to select payment and shipping options on the next page and confirm Order.
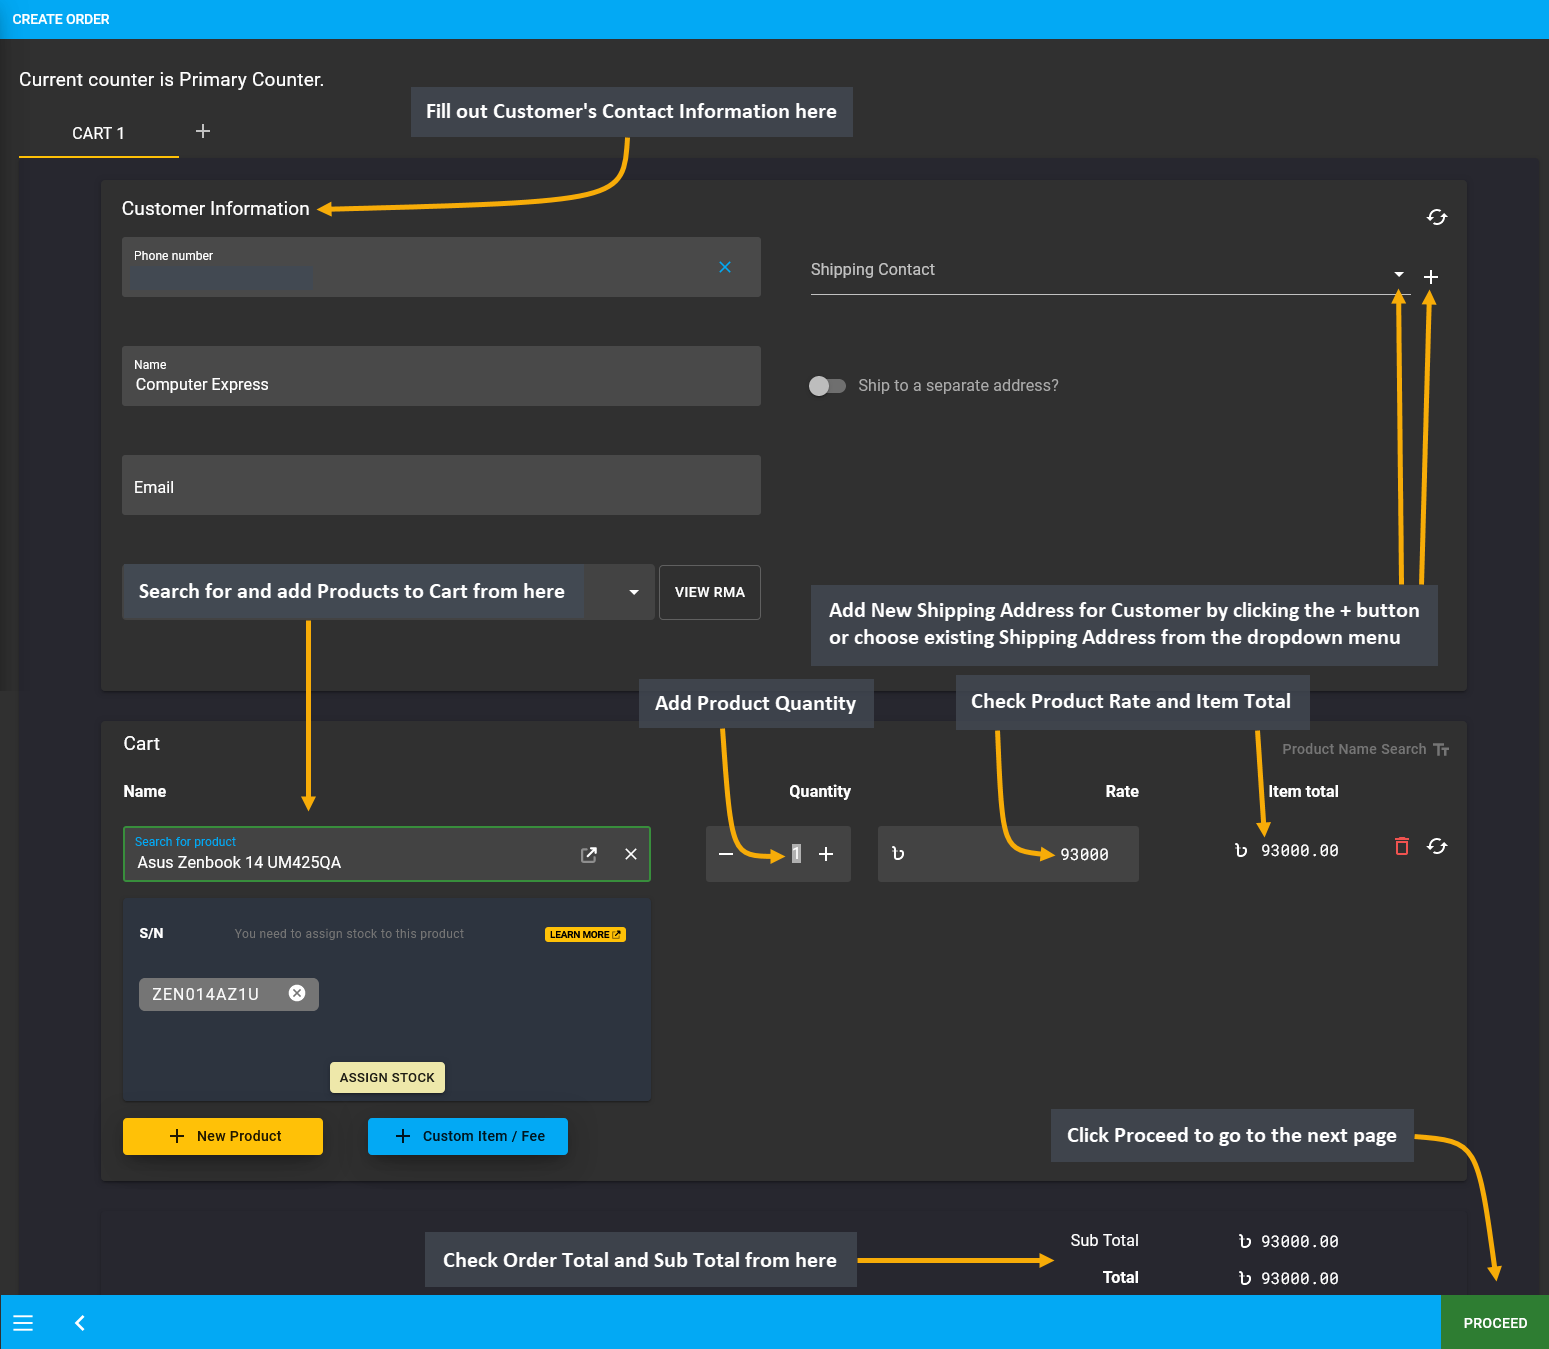
Image 25: Create Order Cart by adding Product and checking Product quantity, Order total, and subtotal.
If the Credit Customer wants to place Order without payment, then they have to complete Order without selecting any payment option. Here, In Store Pickup was selected as shipment option without selecting any payment option. Add a Note to keep record that Order was placed without Payment and transaction will be completed later. Thus, proceed without selecting any payment option and click the Confirm Order button to proceed to the next step.
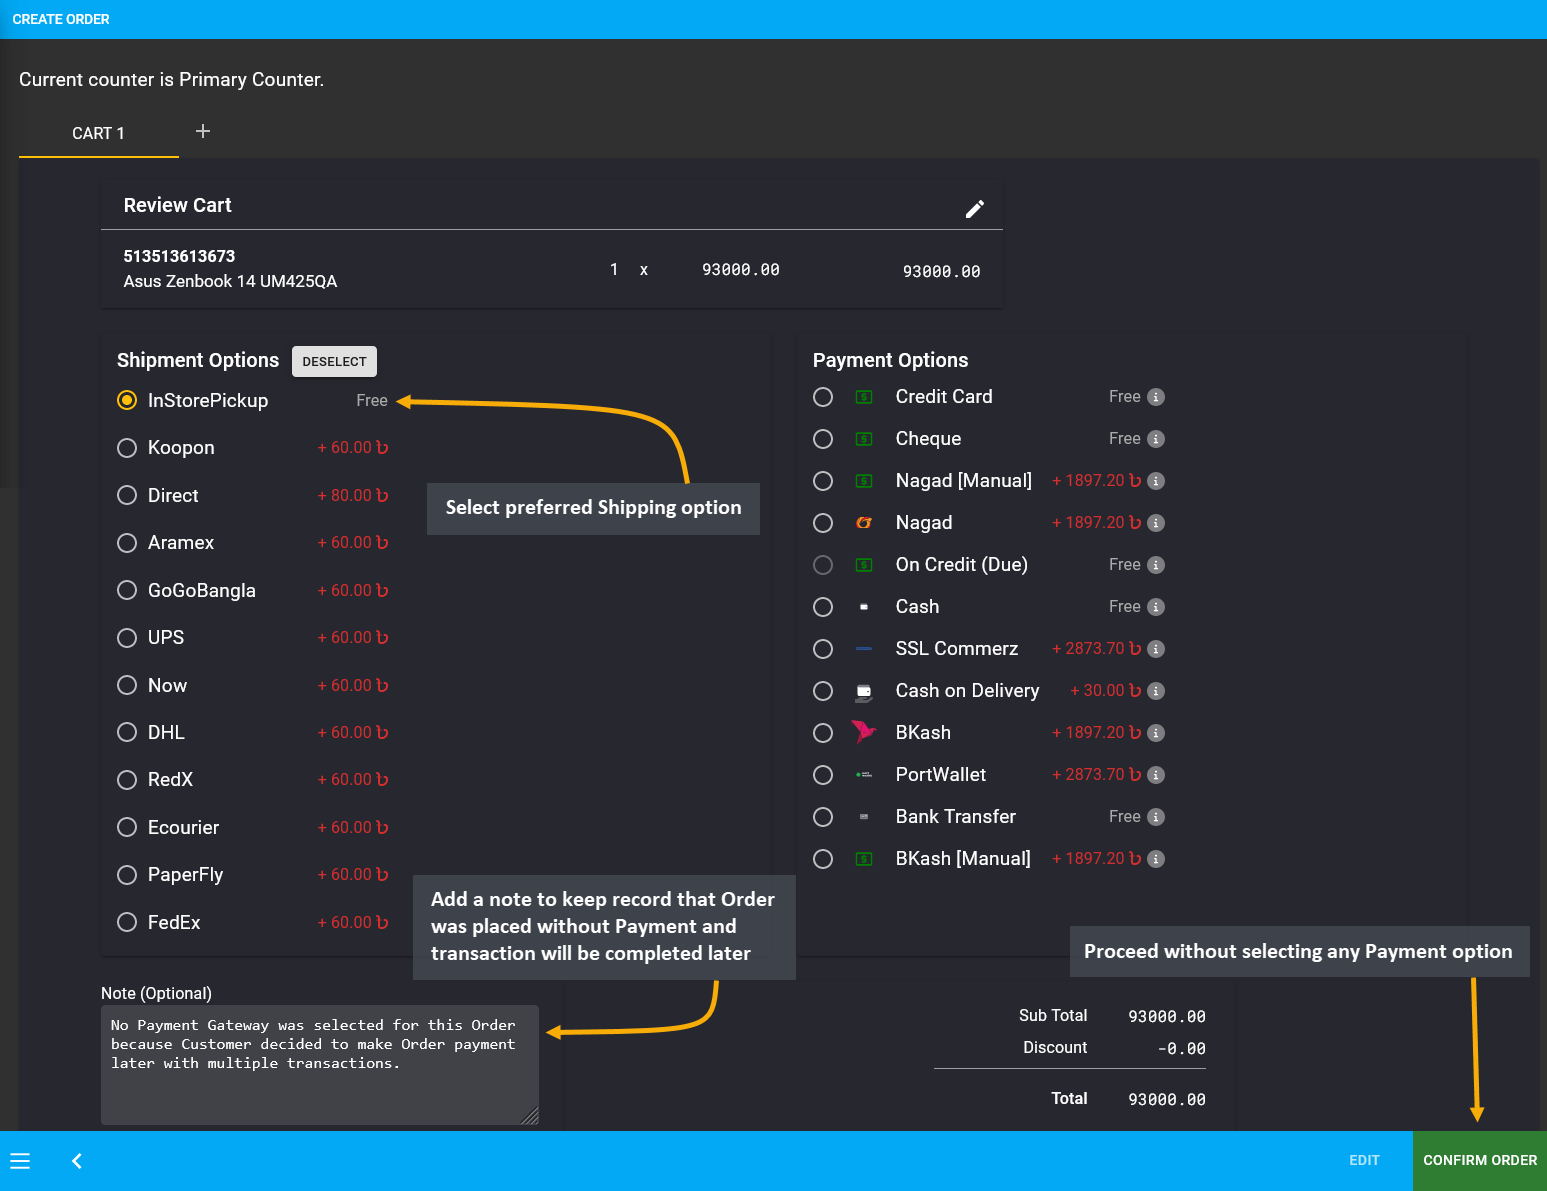
Image 26: Credit Customer can proceed without selecting payment option to complete Order without payment.
As Credit Customer proceeded to place Order without payment, a pop-up of Full Payment Incomplete will show two options. The first option to Use Credit will remain disabled because the Customer have NO Credit Limit available to complete Order payment. The second option which remains enabled is Ignore Issue, selecting which will allow the Customer to complete Order payment later with partial or full transaction. Therefore, click the Submit button to place Order without payment.
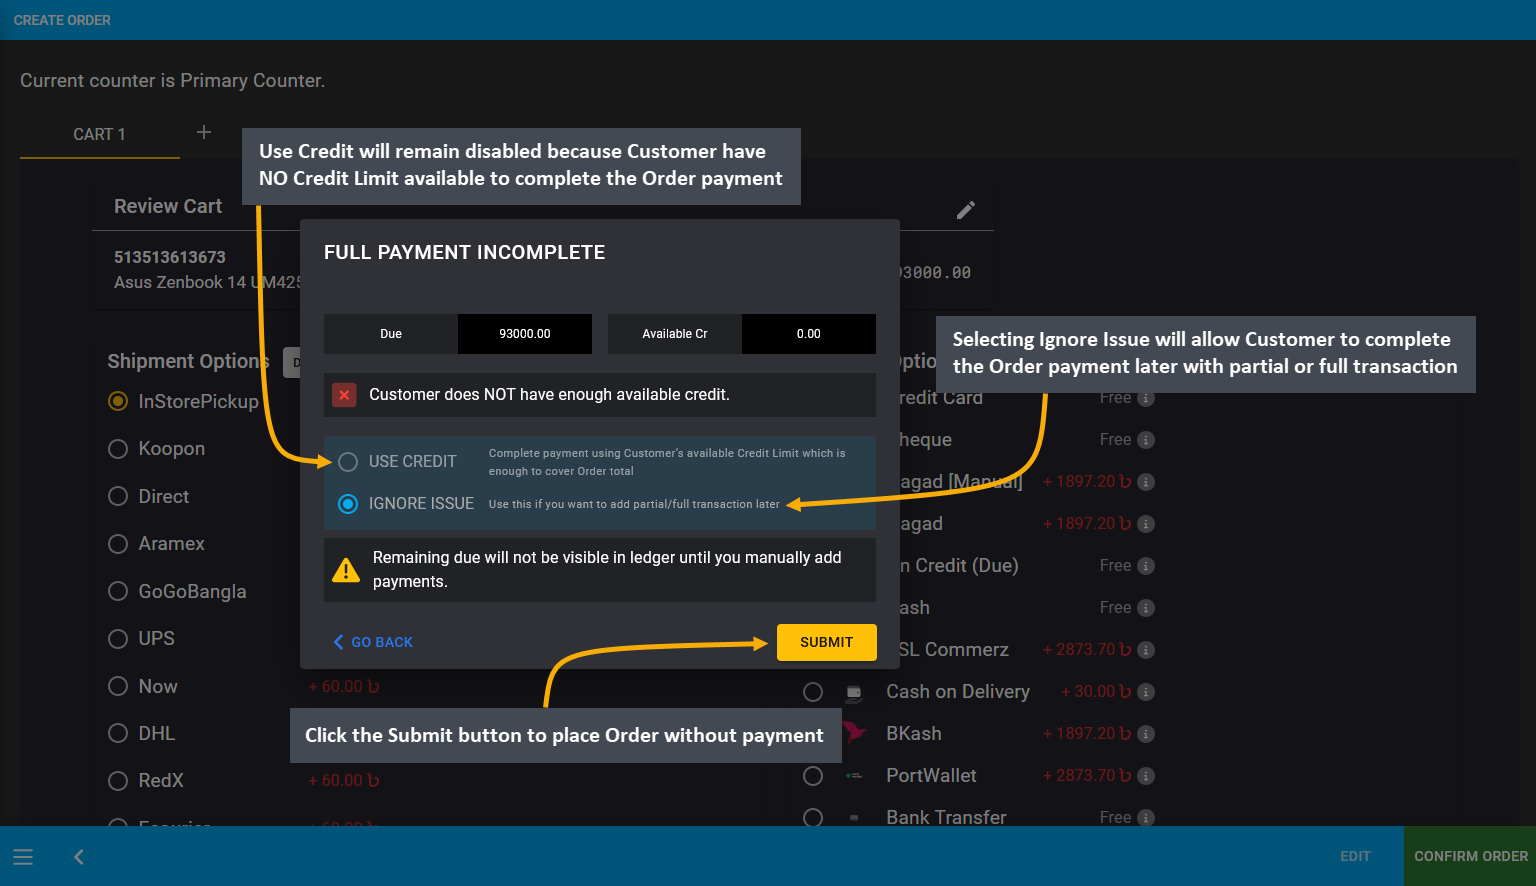
Image 27: Credit Customer have NO Credit Limit at all to cover Full Order Payment, so select Ignore Issue.
In order to add payment details to this Order, go the the Orders Tab. The newly created Order will appear on top of the list. It has incomplete payment which needs to be completed. For this, click the Transaction + button which will redirect to the Payment Gateway from where transaction can be completed for this Pending Order.
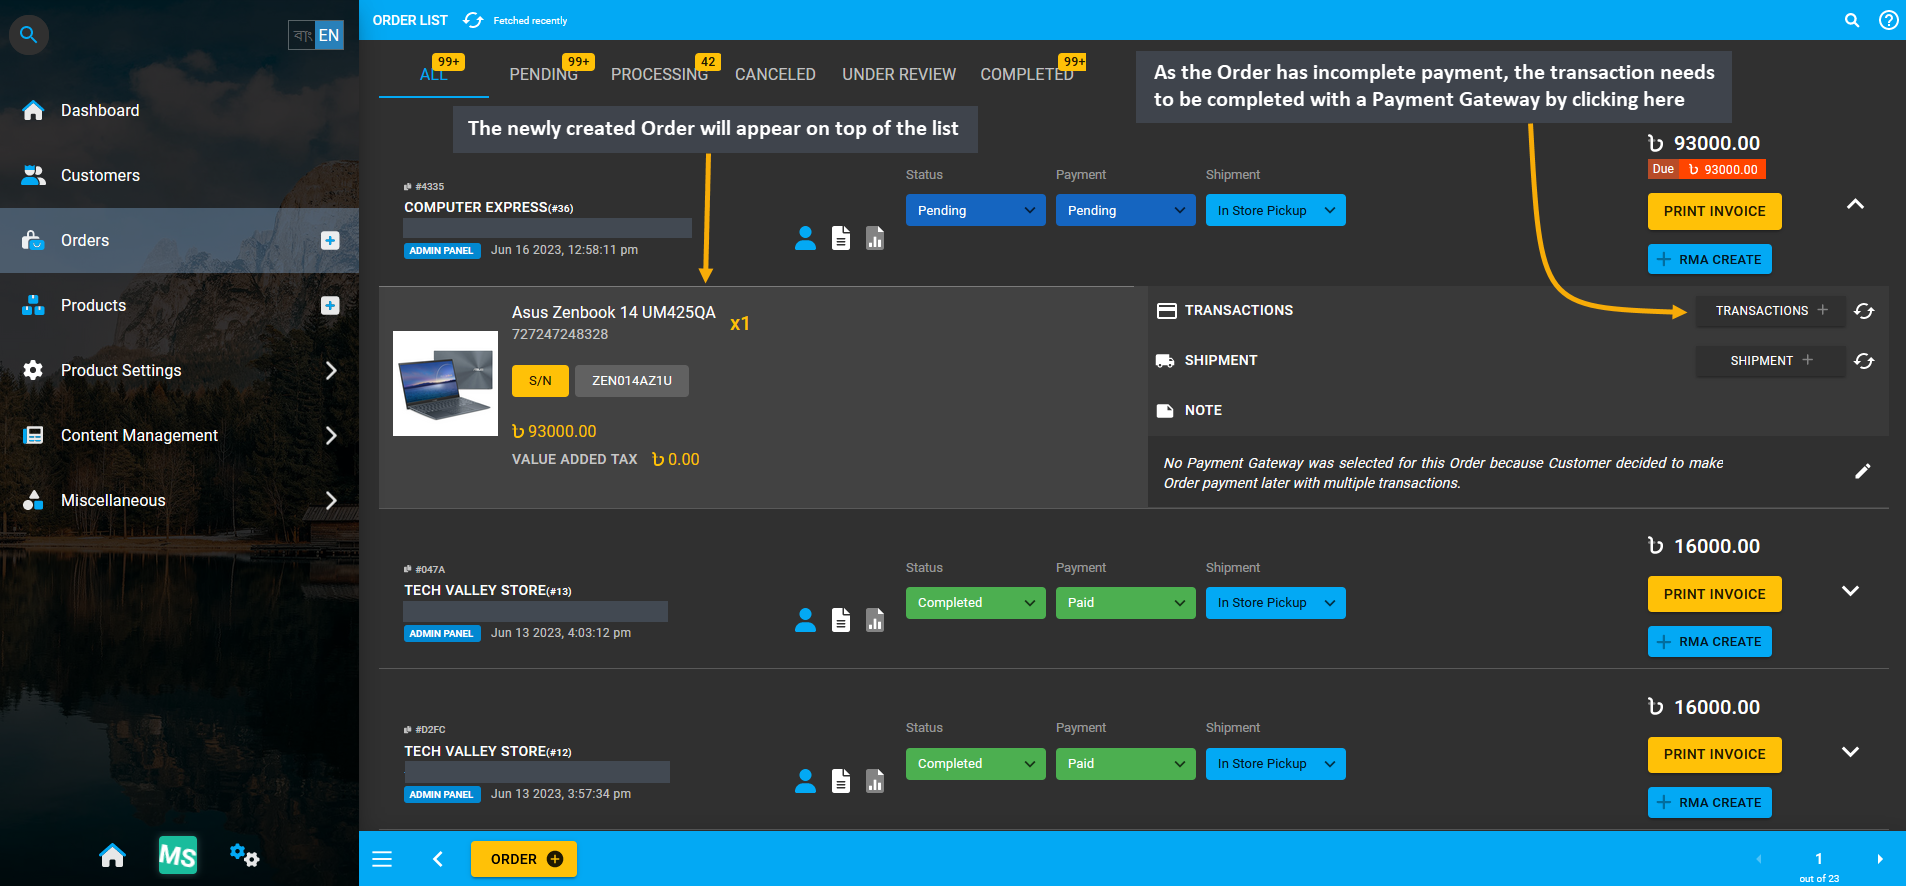
Image 28: Click Transaction + to select Payment Gateway and complete transaction for this Pending Order.
To resolve this Pending Order for Credit Customer, complete Order payment by selecting any Payment Gateway except On Credit (Due). As the Credit Customer have NO Credit Limit available, they cannot make Order payment with On Credit (Due). Click Submit to complete partial payment transaction for this Credit Customer’s Order.
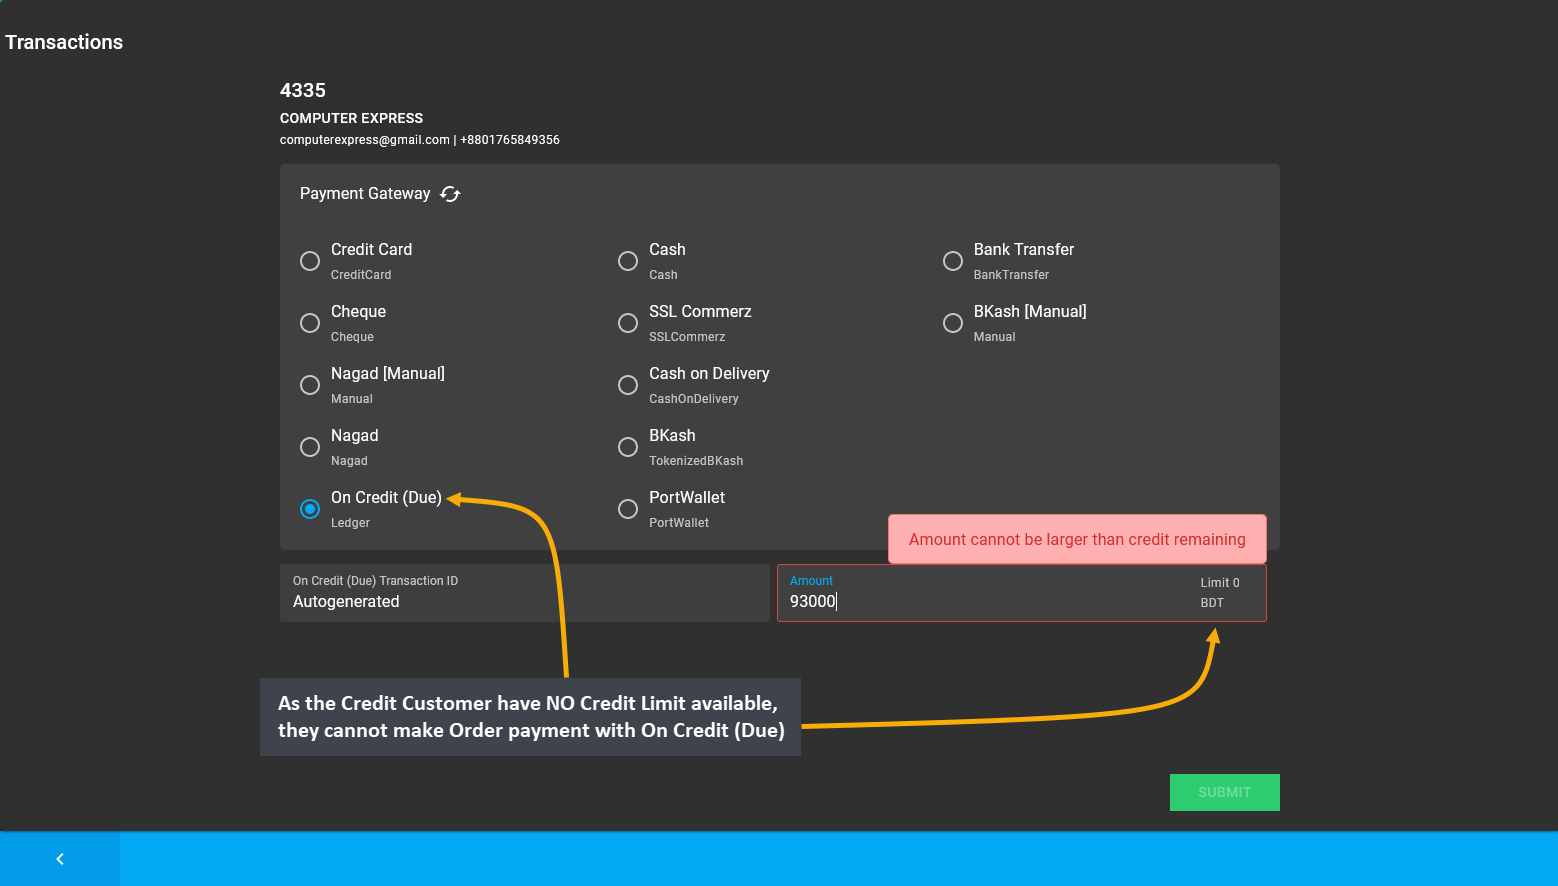
Image 29: As Credit Customer have NO Credit Limit available, they cannot make payment with On Credit (Due).
To resolve the remaining Due for this Order, complete Order payment by selecting any other Payment Gateway, as Credit Customer have NO Credit Limit available, so On Credit (Due) cannot be used. Therefore, Bank Transfer is selected to complete partial transaction of 90,000 BDT for paying the partial Due from Order Total.
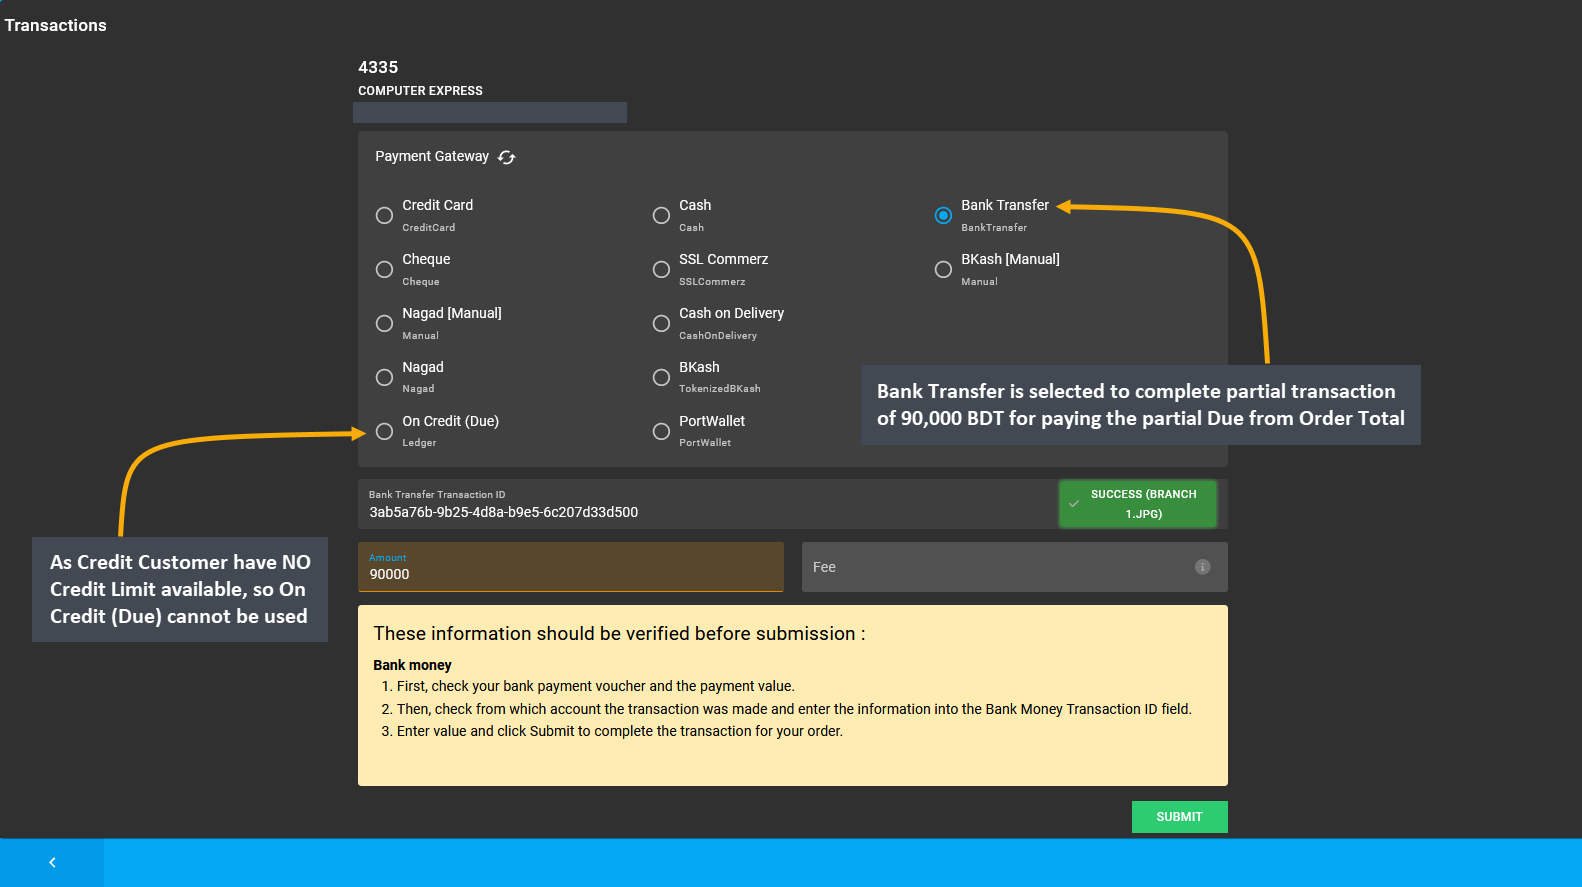
Image 30: To resolve remaining Due for this Order, complete payment by selecting another Payment Gateway.
Before completing the partial Due of 90,000 BDT with Bank Transfer, a pop-up will ask for confirmation to proceed with the transaction. Click the Proceed button to confirm payment with Bank Transfer. After completing the partial Order payment, it will redirect to the Order List, showing remaining Due for the Order.
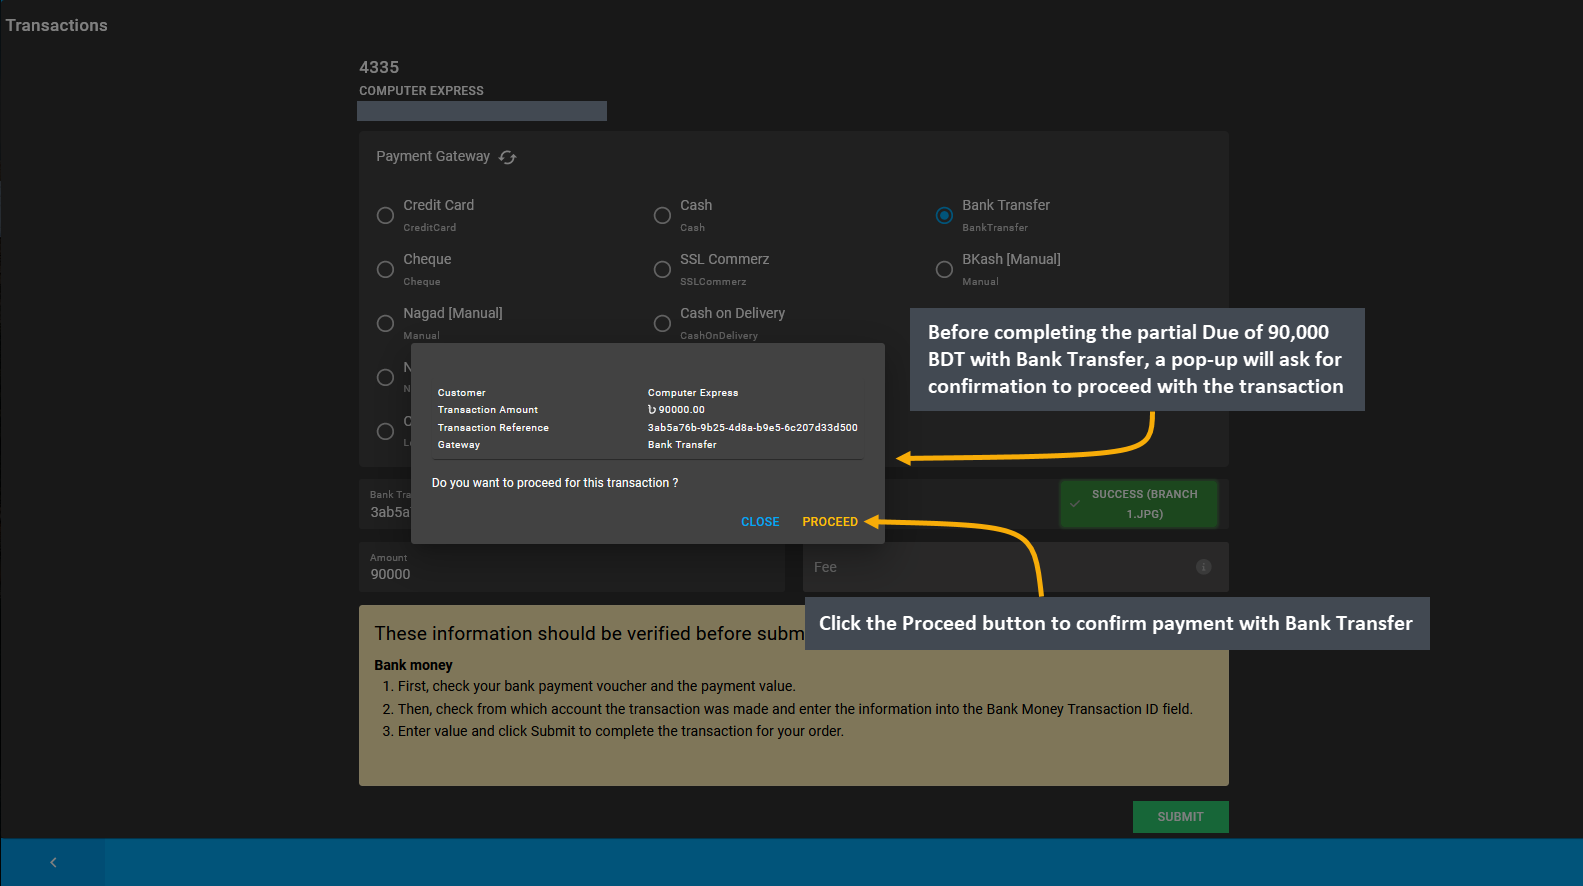
Image 31: Before completing transaction with Bank Transfer, pop-up will ask for confirmation to proceed.
After completing partial payment with Bank Transfer, a Full Payment Incomplete pop-up will show the remaining Due 3,000 BDT and available Credit 0 BDT as the Credit Customer have NO Credit Limit. Therefore, as Customer have NO Credit Limit, the Use Credit option will remain disabled. So, select other option Ignore Issue to complete transaction later with any other payment gateway. Notification will show that Due balance is 3,000 BDT. Hence, click the Submit button to go back to Order List and pay the remaining Order Due.
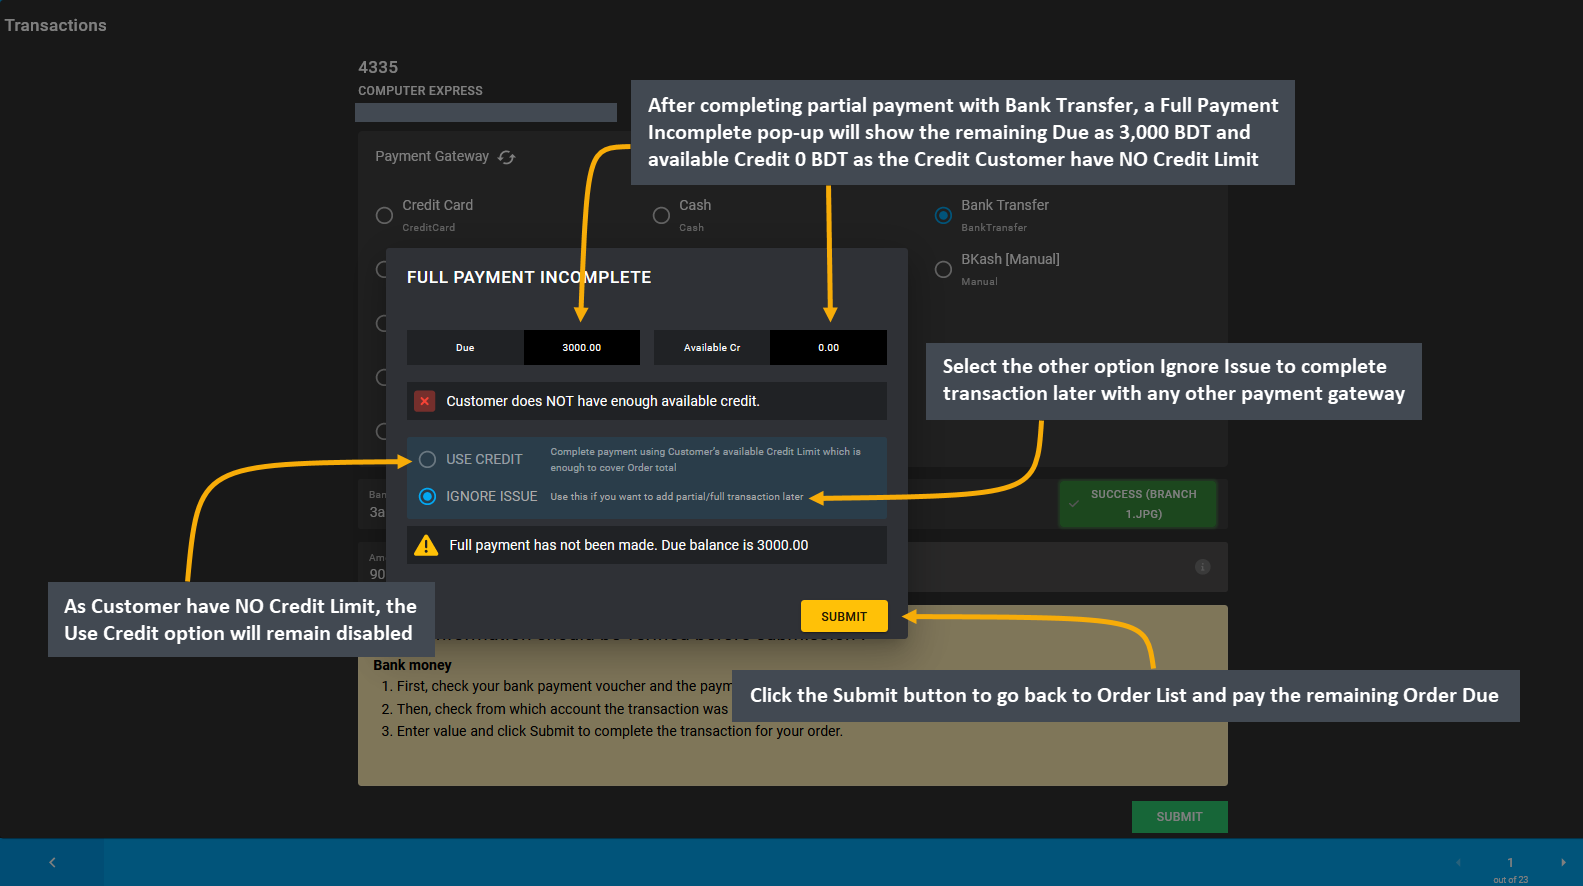
Image 32: After partial payment with Bank Transfer, remaining Due and available 0 Credit Limit will show.
In order to complete remaining Due for this Order, go the the Orders Tab, which has partial payment 90,000 BDT completed with Bank Transfer. For completing remaining Due, click the Transaction + button which will redirect to Payment Gateways from where transaction can be completed for this Order with one or multiple gateways.
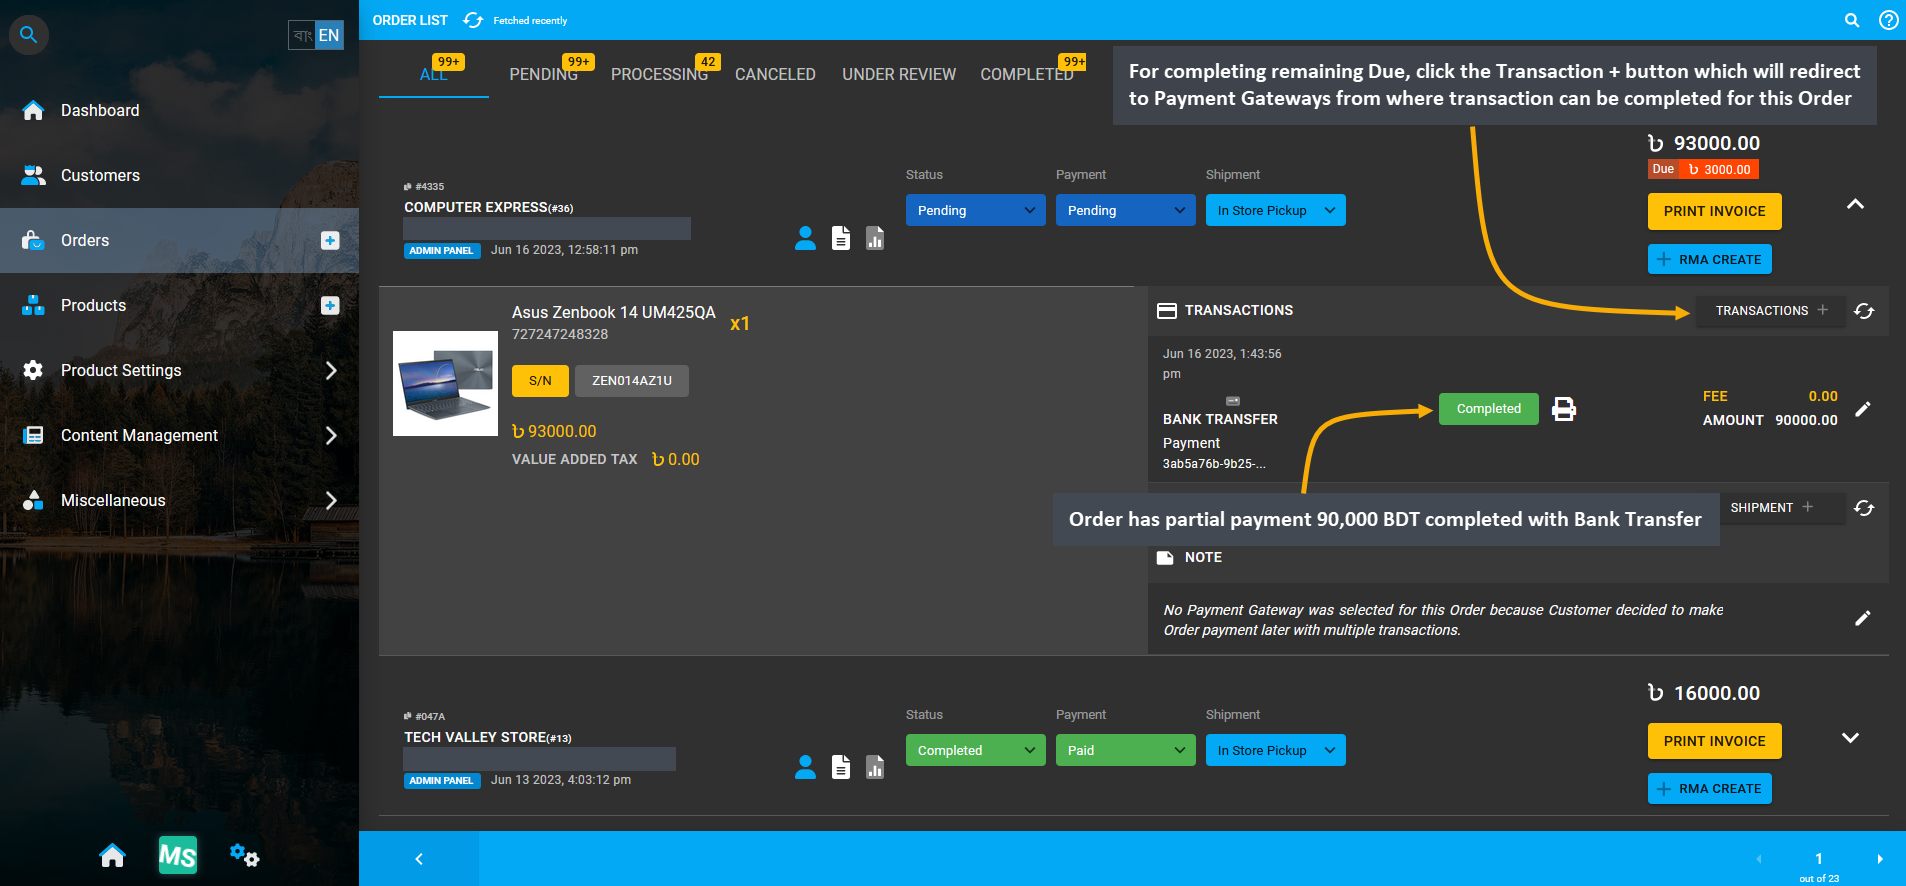
Image 33: Click Transaction + to be redirected to Payment Gateways from where Order due can be completed.
To resolve the remaining Due for this Order, complete Order payment by selecting any other Payment Gateway. As Credit Customer have NO Credit Limit, they will not be able to make Order payment with On Credit (Due). Thus, another payment gateway Cash is selected to complete the 3,000 BDT remaining Due of this Order.
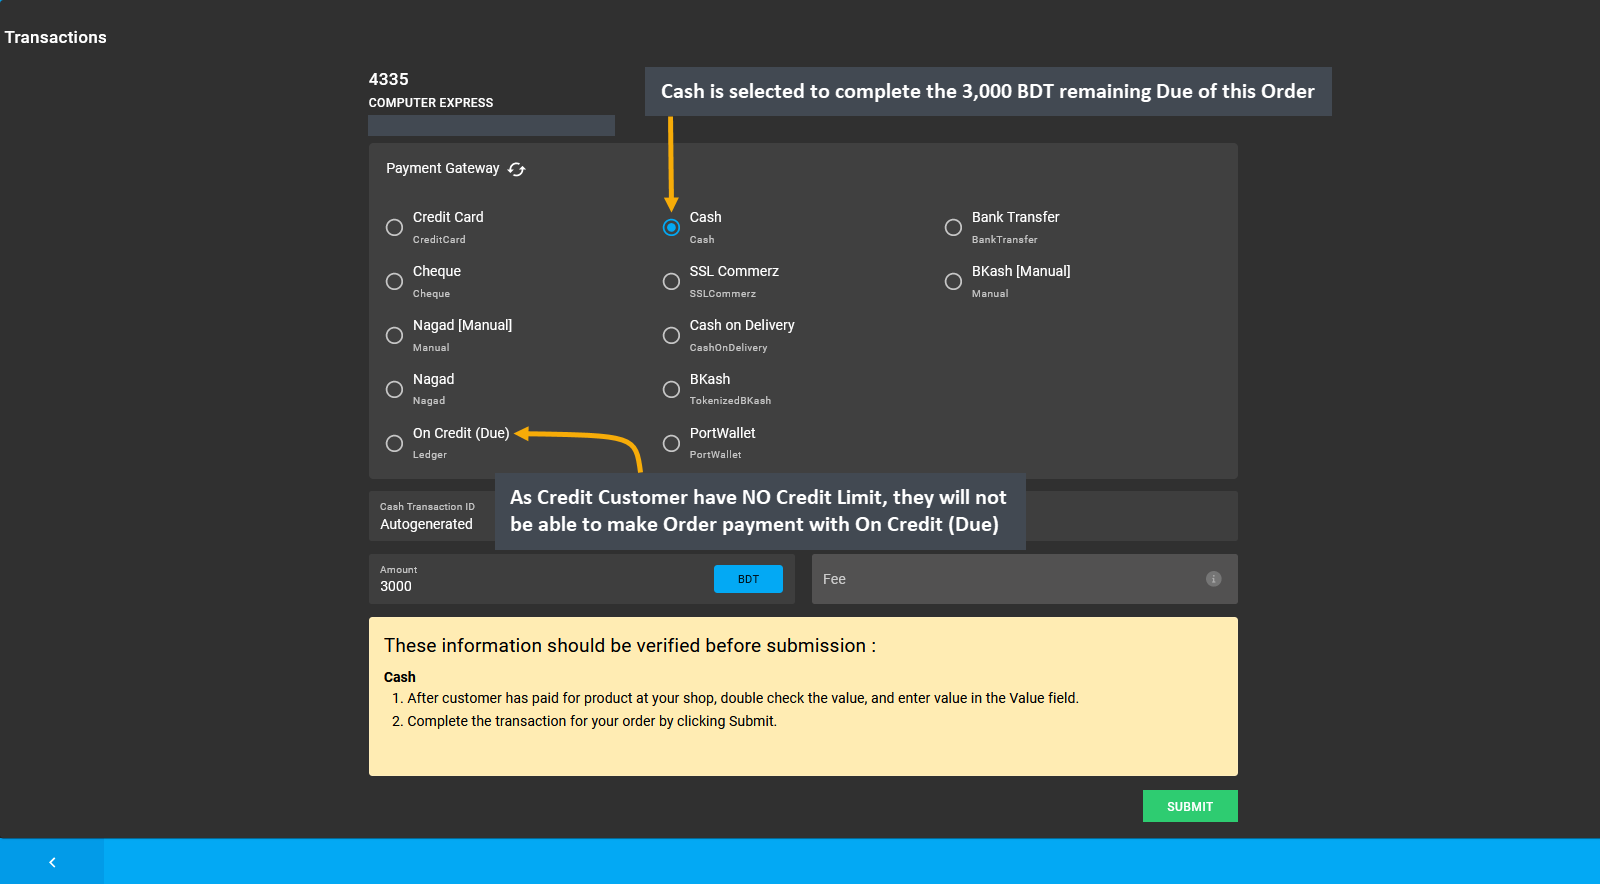
Image 34: To resolve remaining Due for this Order, complete payment by selecting another Payment Gateway.
Before completing remaining Due of 3,000 BDT with Cash payment gateway, a pop-up will ask for confirmation to proceed with the transaction. Click the Proceed button to confirm payment with Cash. After completing Full Order Payment, it will redirect to the Order List, showing multiple completed transactions for the Order.
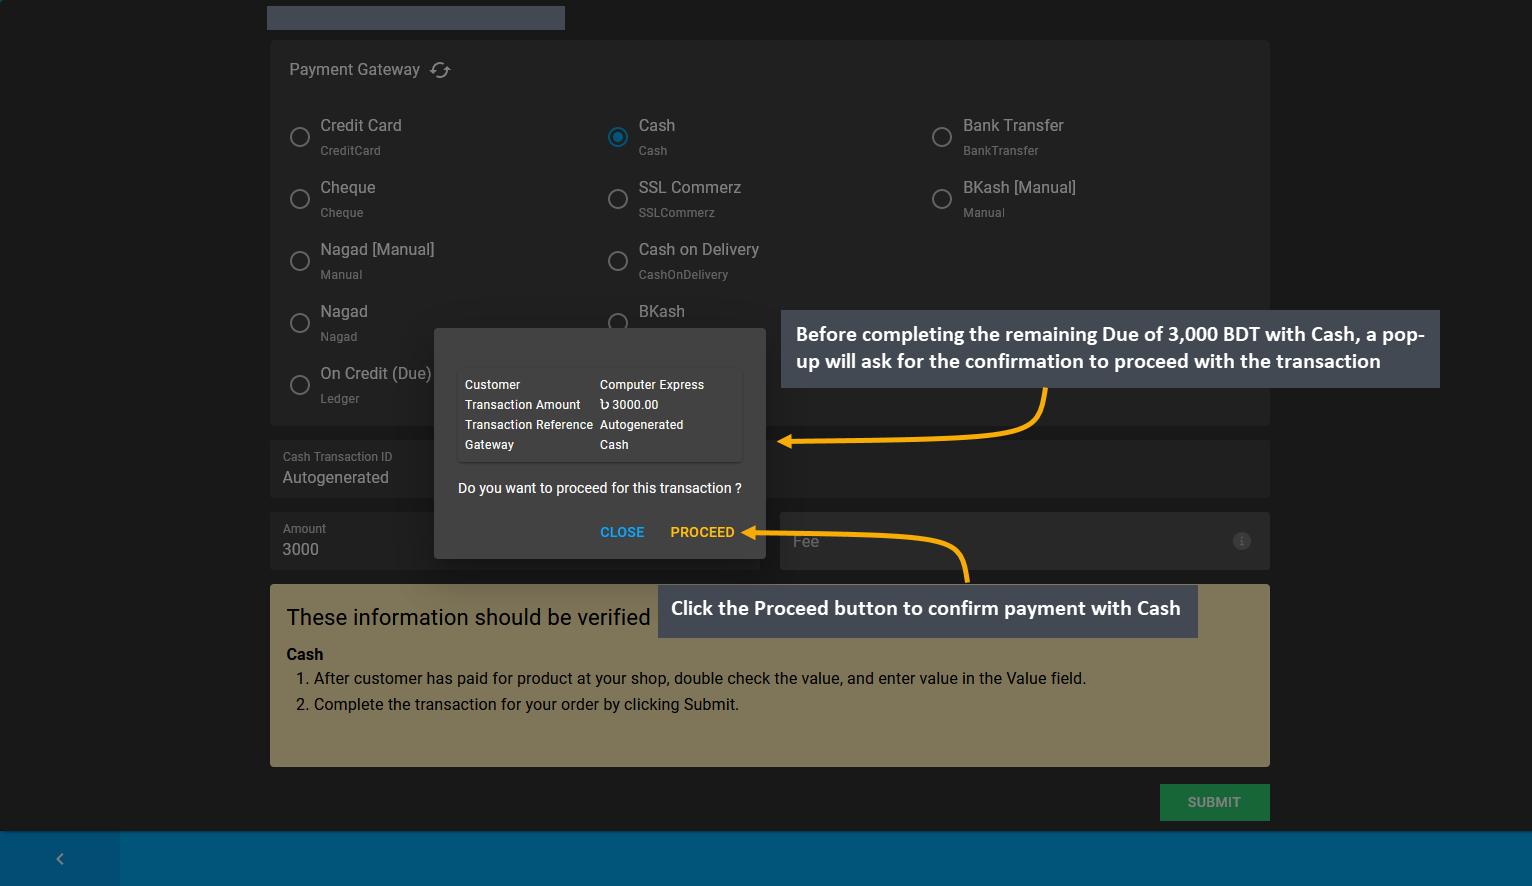
Image 35: Before completing transaction with Cash, a pop-up will ask for confirmation to proceed.
After payment is completed with Cash for Credit Customer, it will show within the Transaction history. As Full Order Payment 93,000 BDT was paid with Bank Transfer and Cash, the transaction statuses will show as Completed. This is how a Credit Customer can make Order payment with other Payment Gateways if they have NO Credit Limit.
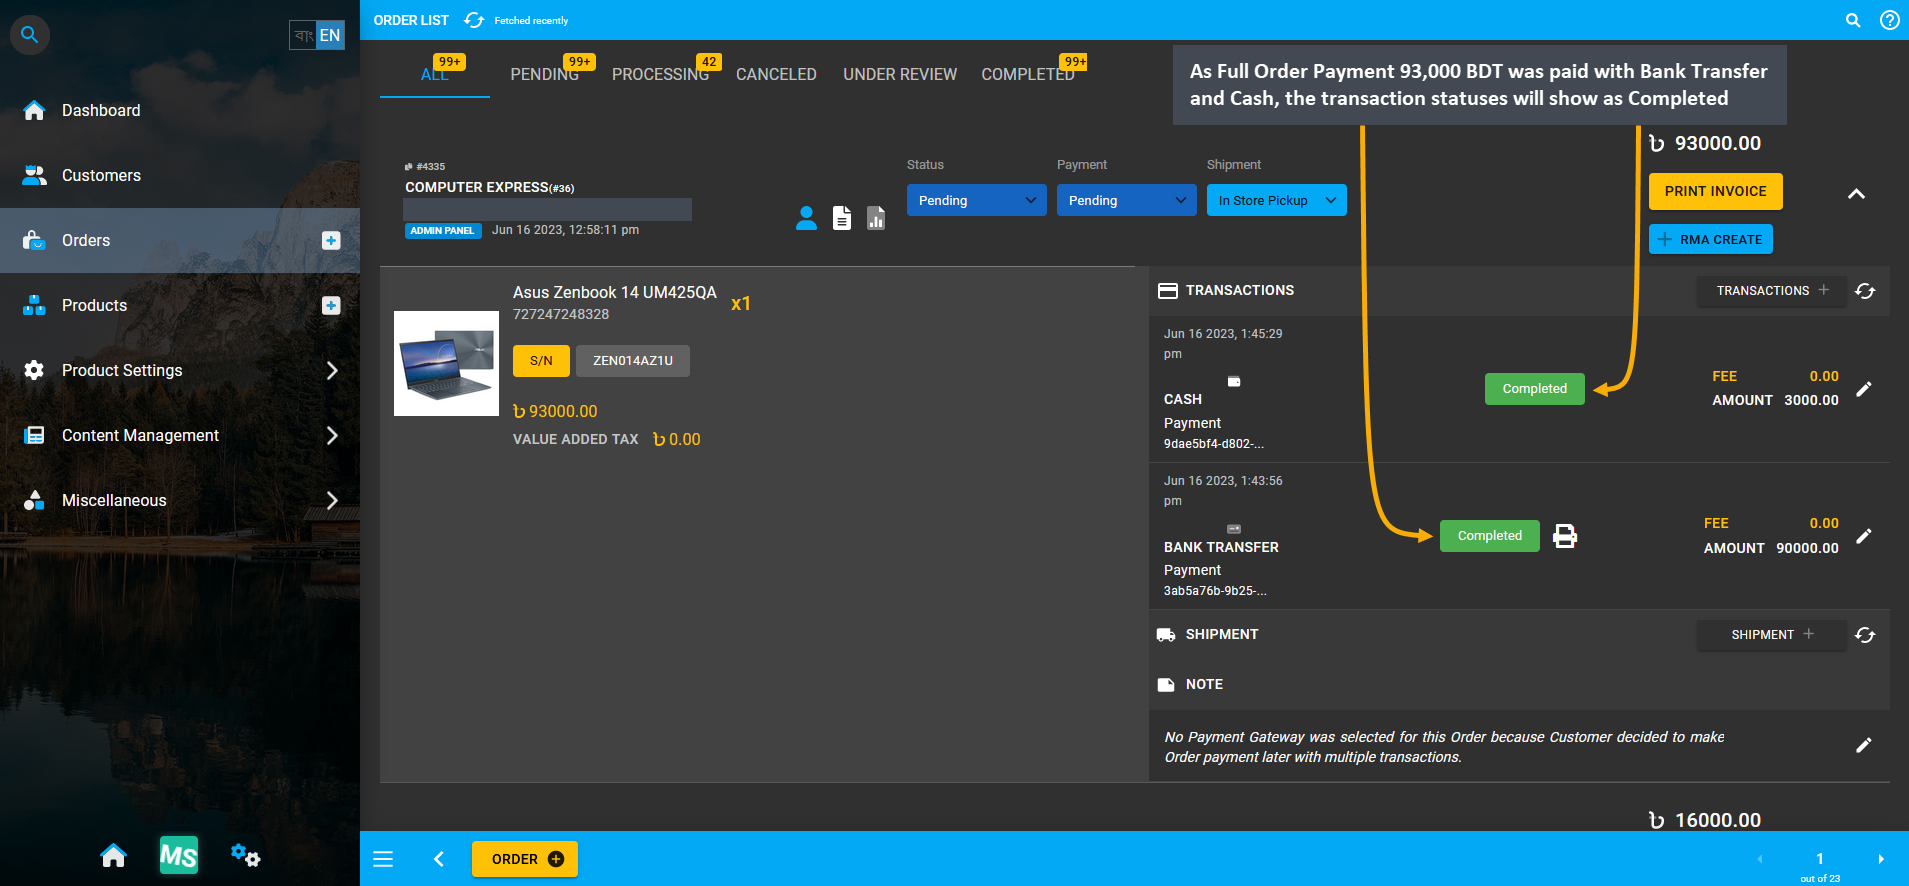
Image 36: As Full Payment was made with Bank Transfer and Cash, gateway transactions will show Completed.
Thus, manually change the Order status from Pending to Completed and Payment status from Pending to Paid as Full Order Payment is completed with multiple transactions. These statuses need to be updated manually.
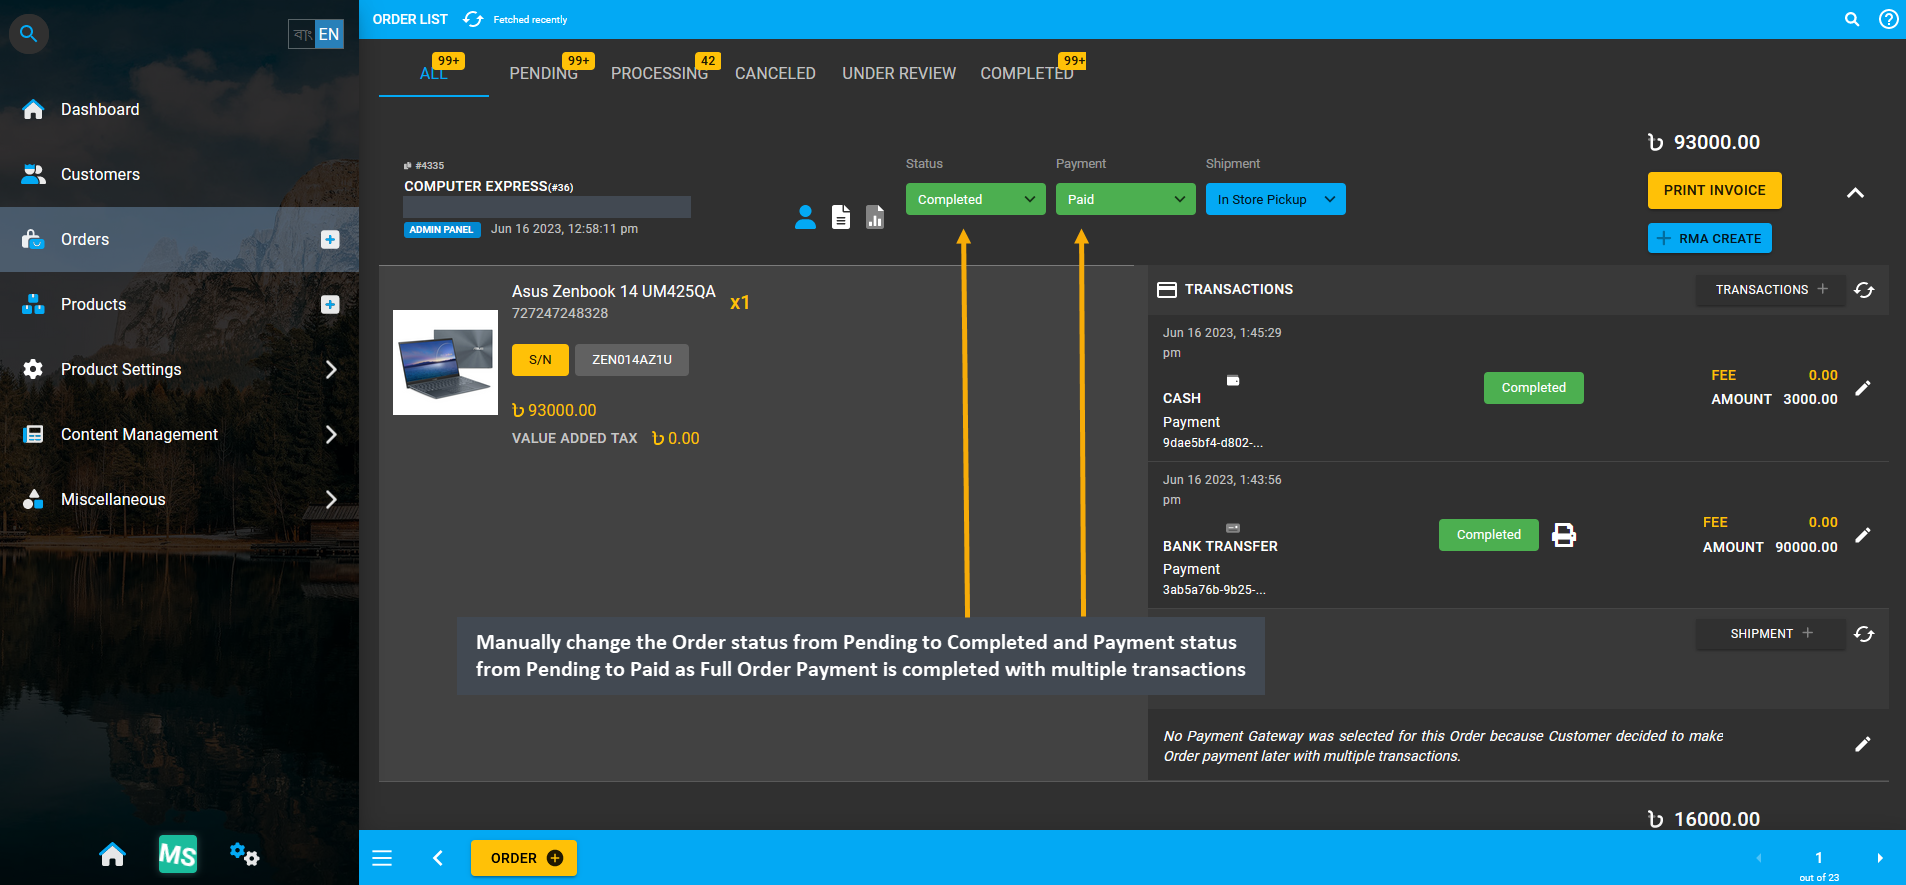
Image 37: As Full Order Payment was Completed, change Order status to Completed and Payment status to Paid.
13 - Cash Report
Learn how to make Order payment with Cash and view the Cash Report.
Click Orders module, create New Order, and make payment with Cash view them in Cash Report.
Cash Report
Shop Owners can keep track of all their Cash Orders from the Cash Report tab. Usually, Orders placed from the Admin Panel with Payment Gateway option selected as Cash will show in the report. The first step is to go to the Orders tab and create Order by clicking on the + button which will open the Order Cart.
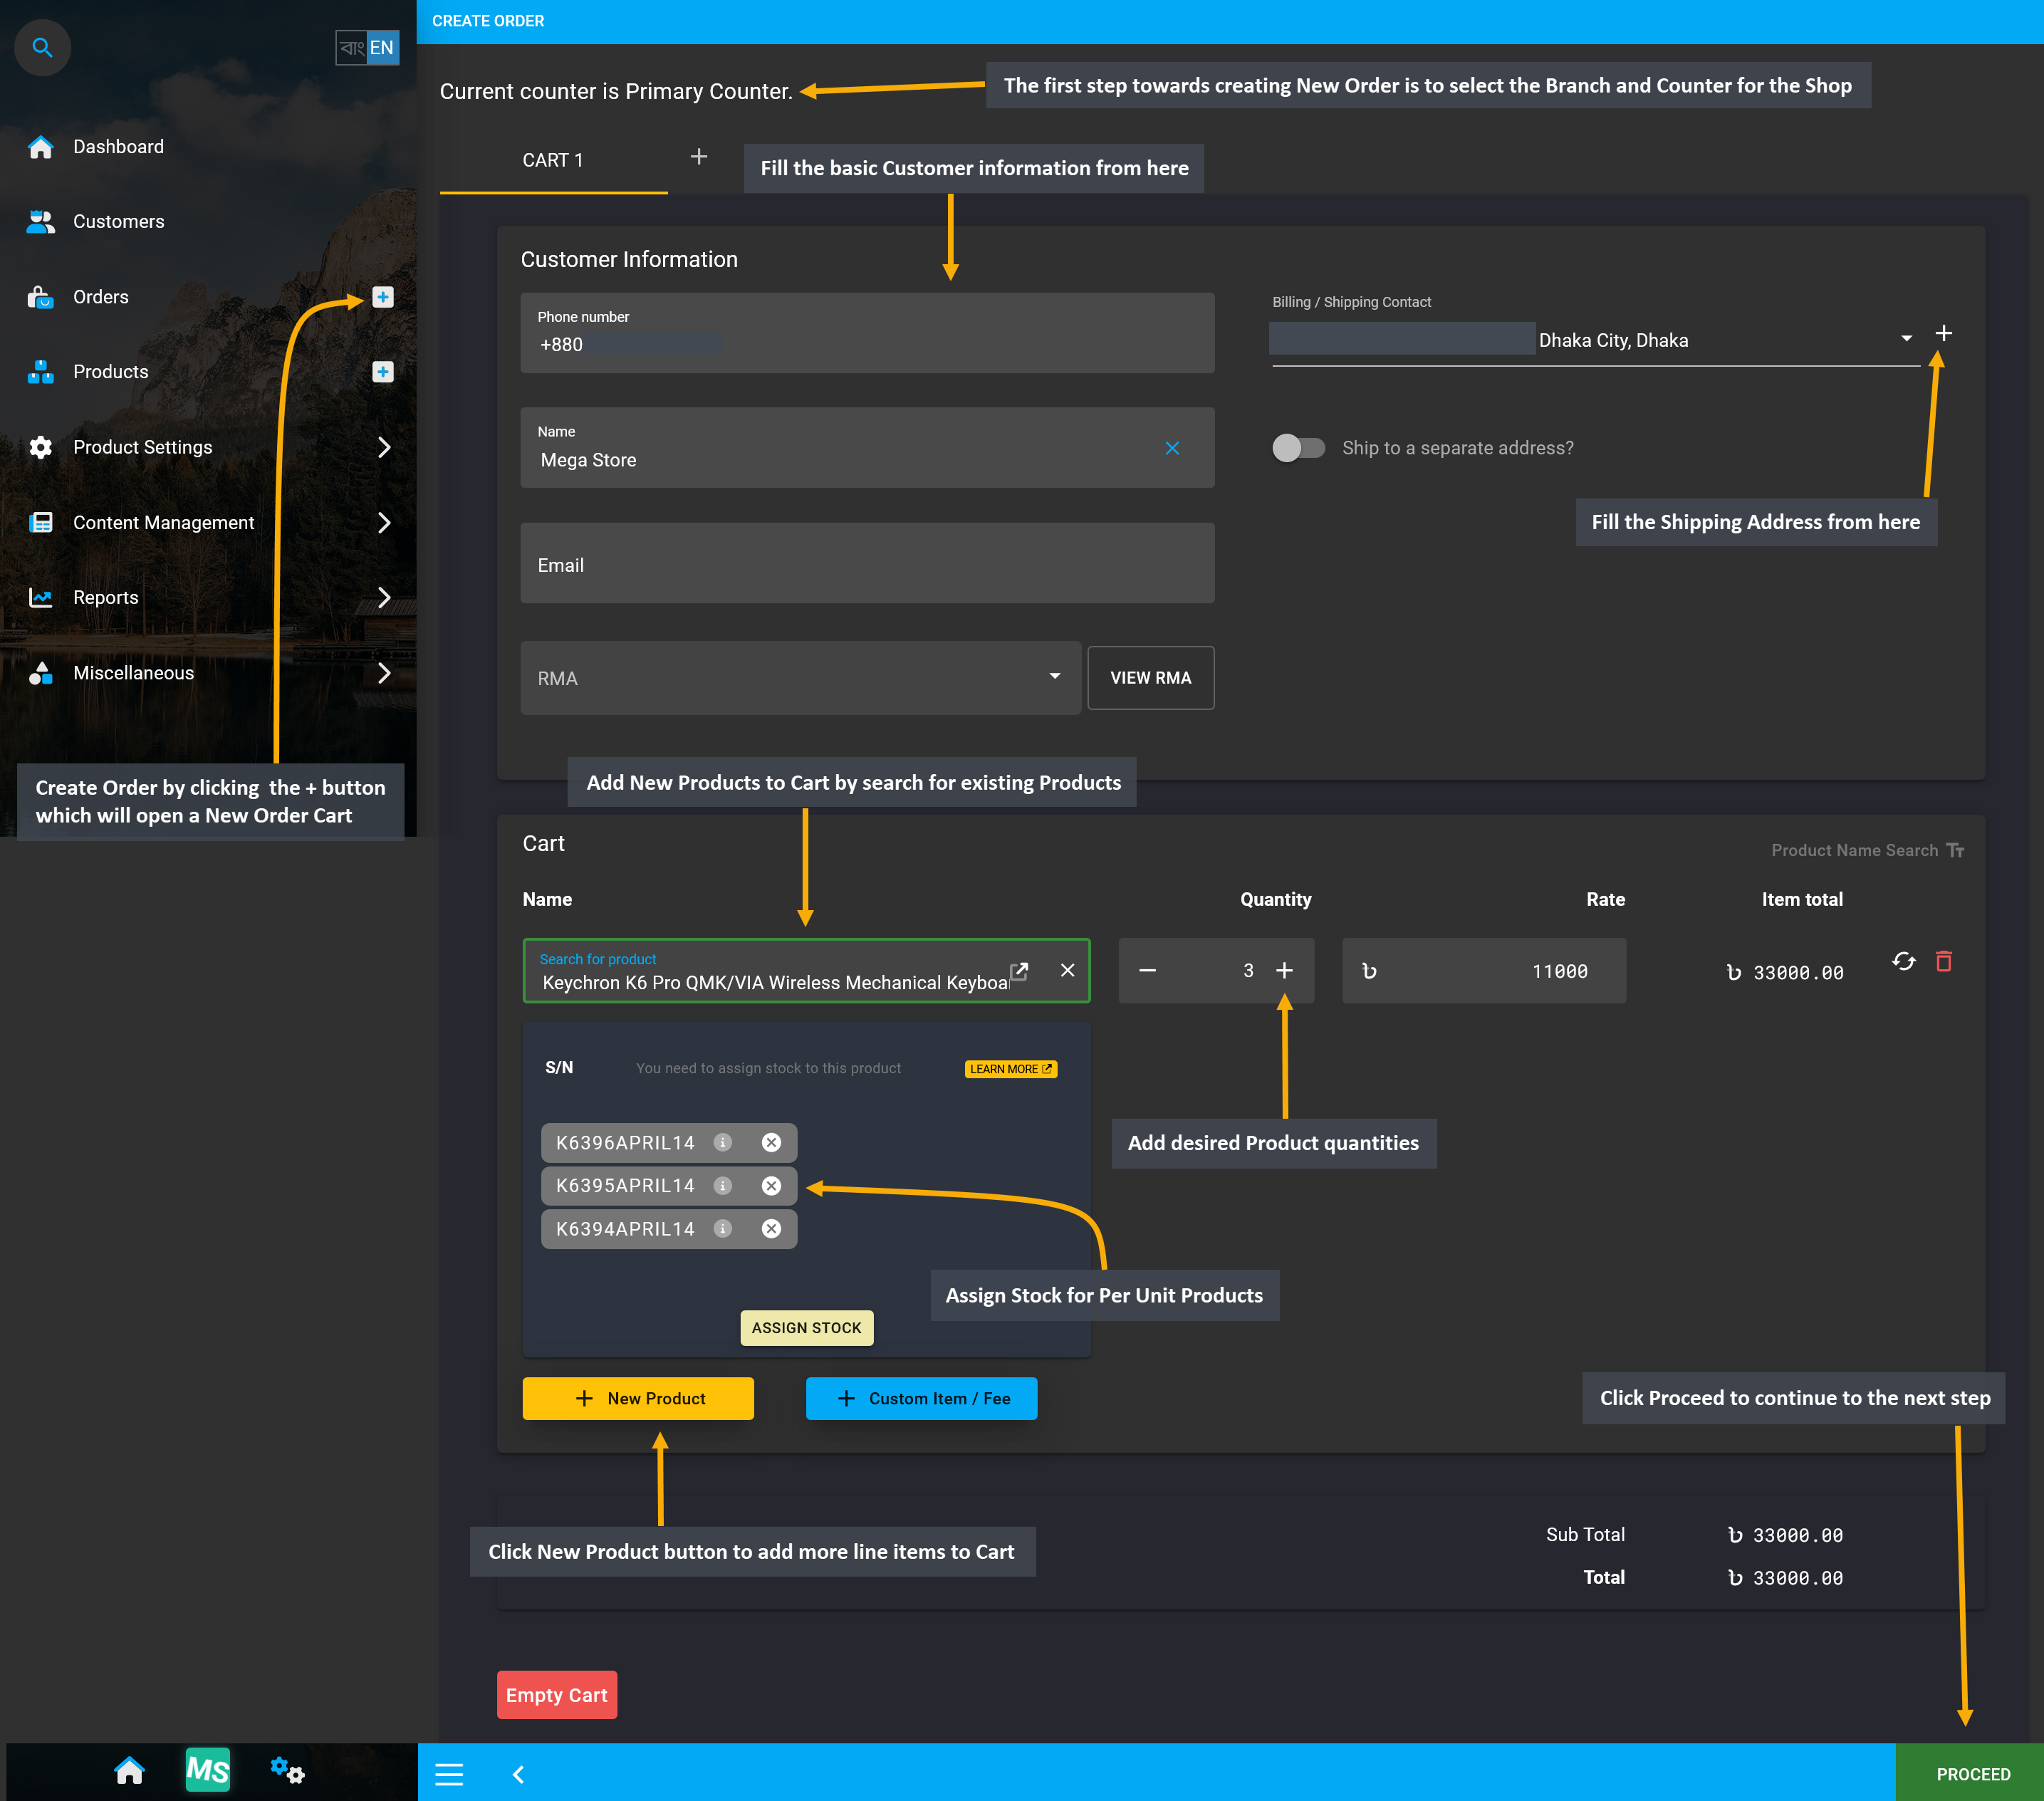
Image 1: Place New Order with Cash Payment Gateway to view Cash Total later on the Cash Report.
The first step towards creating New Order is to select the Branch and Counter for the Shop. Several Orders can be created for a Customer or multiple Customers by adding Products to different Carts which can be checked out individually from the Admin Panel. To create an Order, fill in basic Customer information like phone number, name, and email and Shipping Address with full address, area, city, country, and zip code.
To add Products to create the Order, click on the New Product button and a box will appear from which new Product can be added to Cart. Within it, search for existing Products from the Product List and add desired quantities that will automatically calculate the item total. To add multiple Products, click New Product that will add a separate new item to cart each time and Assign Stock for Per Unit Products. When done, click Proceed to continue to the next step for completing the Order.
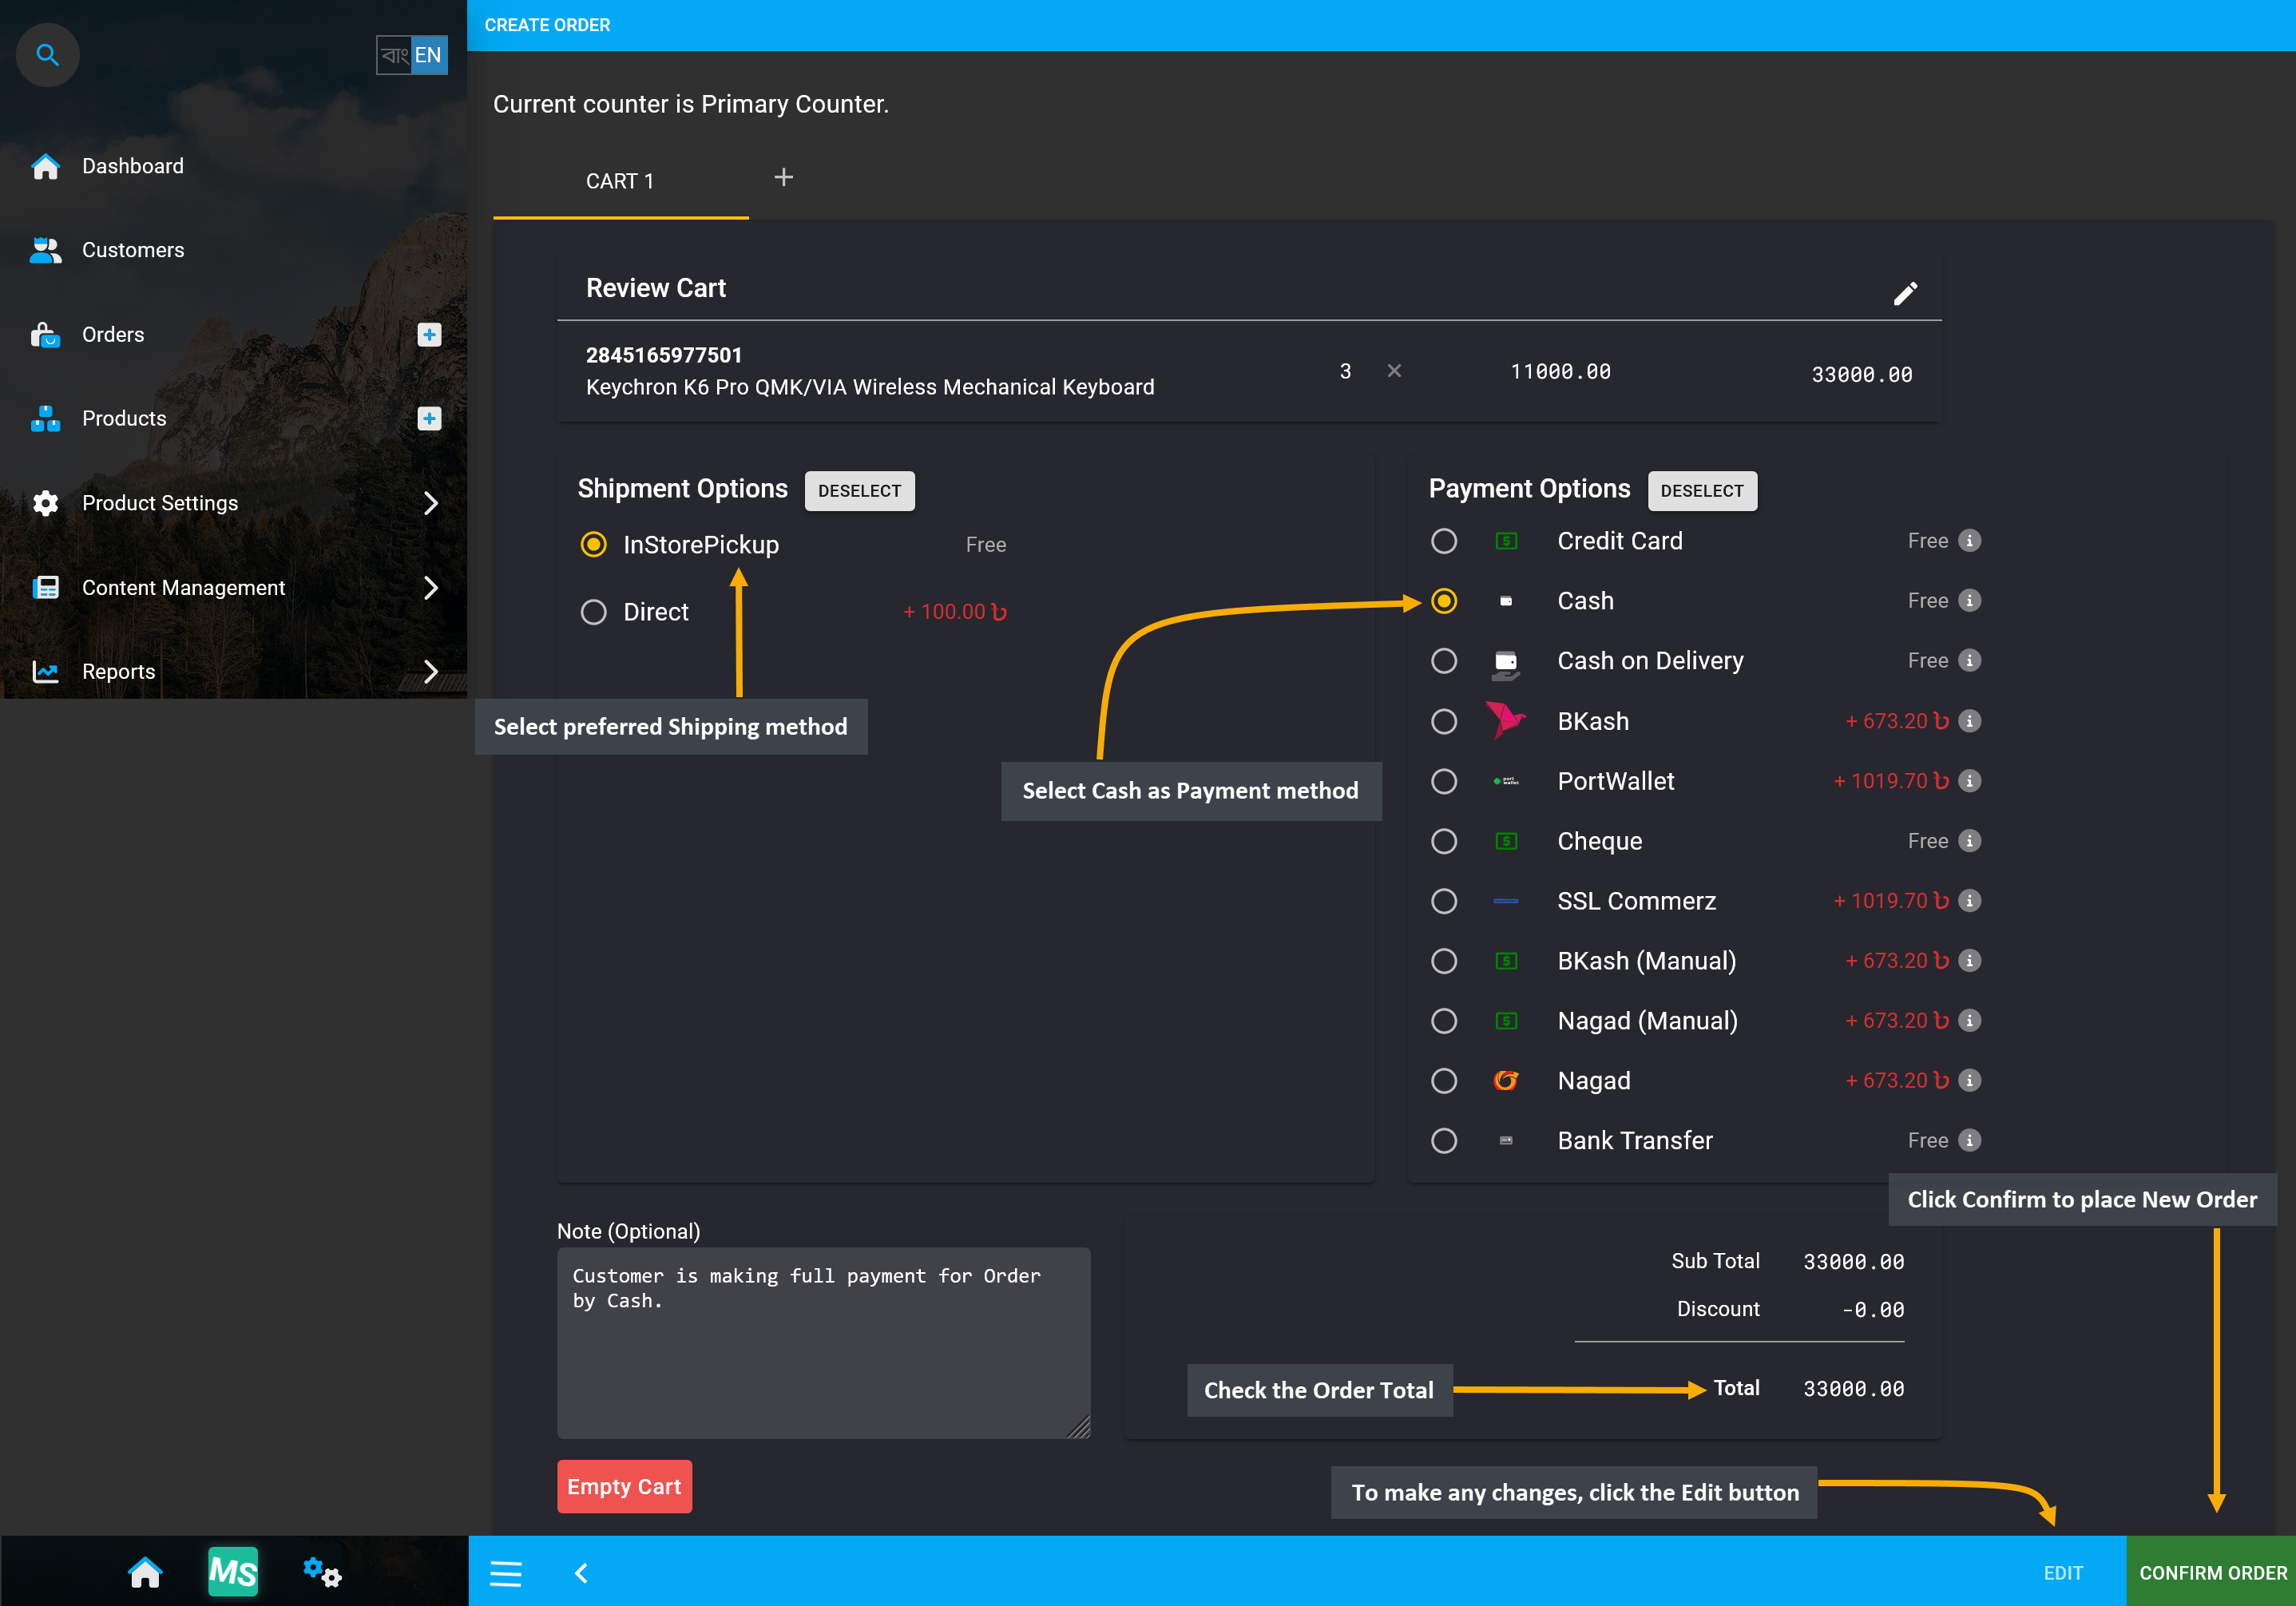
Image 2: Select preferred Shipping method and select Cash as Payment method before confirming Order.
In the next page, review the Cart, and select Shipment and Payment options. To make any changes, click the Edit button. If all the information is correct, click Confirm Order that will redirect to a new page with the message that the Order has been confirmed. From here, you can choose to Print Invoice or Close Tab.
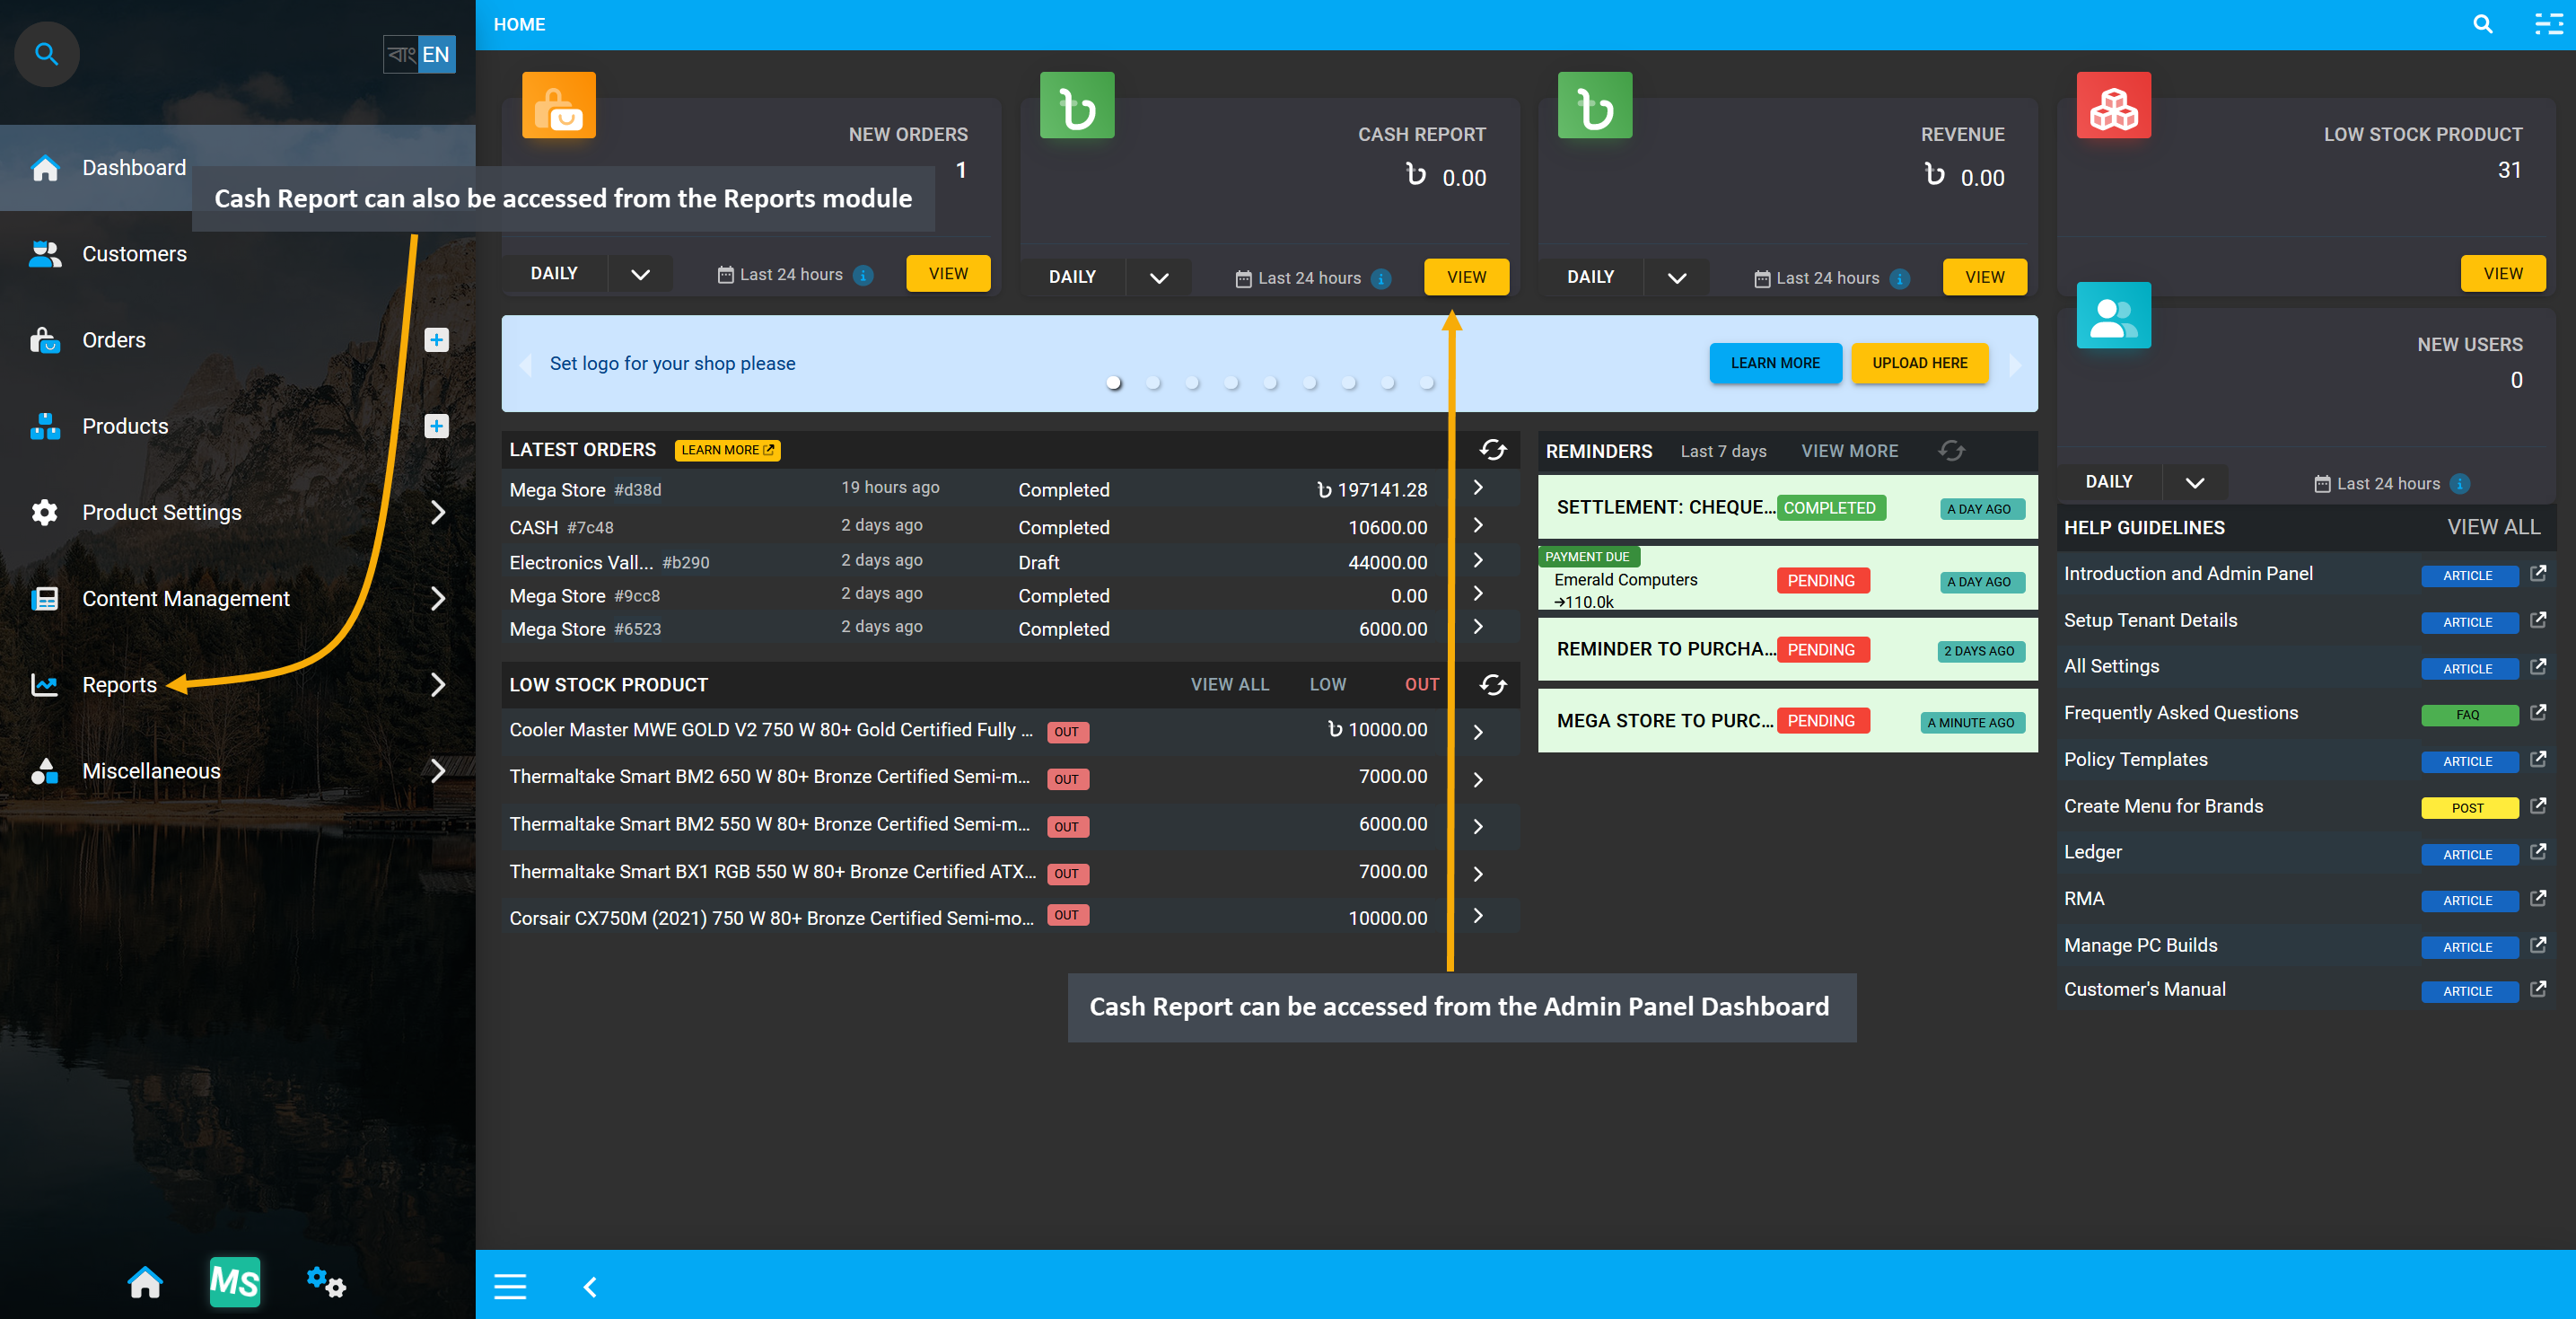
Image 3: Cash Report can be accessed from the Admin Panel Dashboard and from the Reports module.
Now, the Cash Report can be accessed from the Admin Panel Dashboard or from the Reports module.
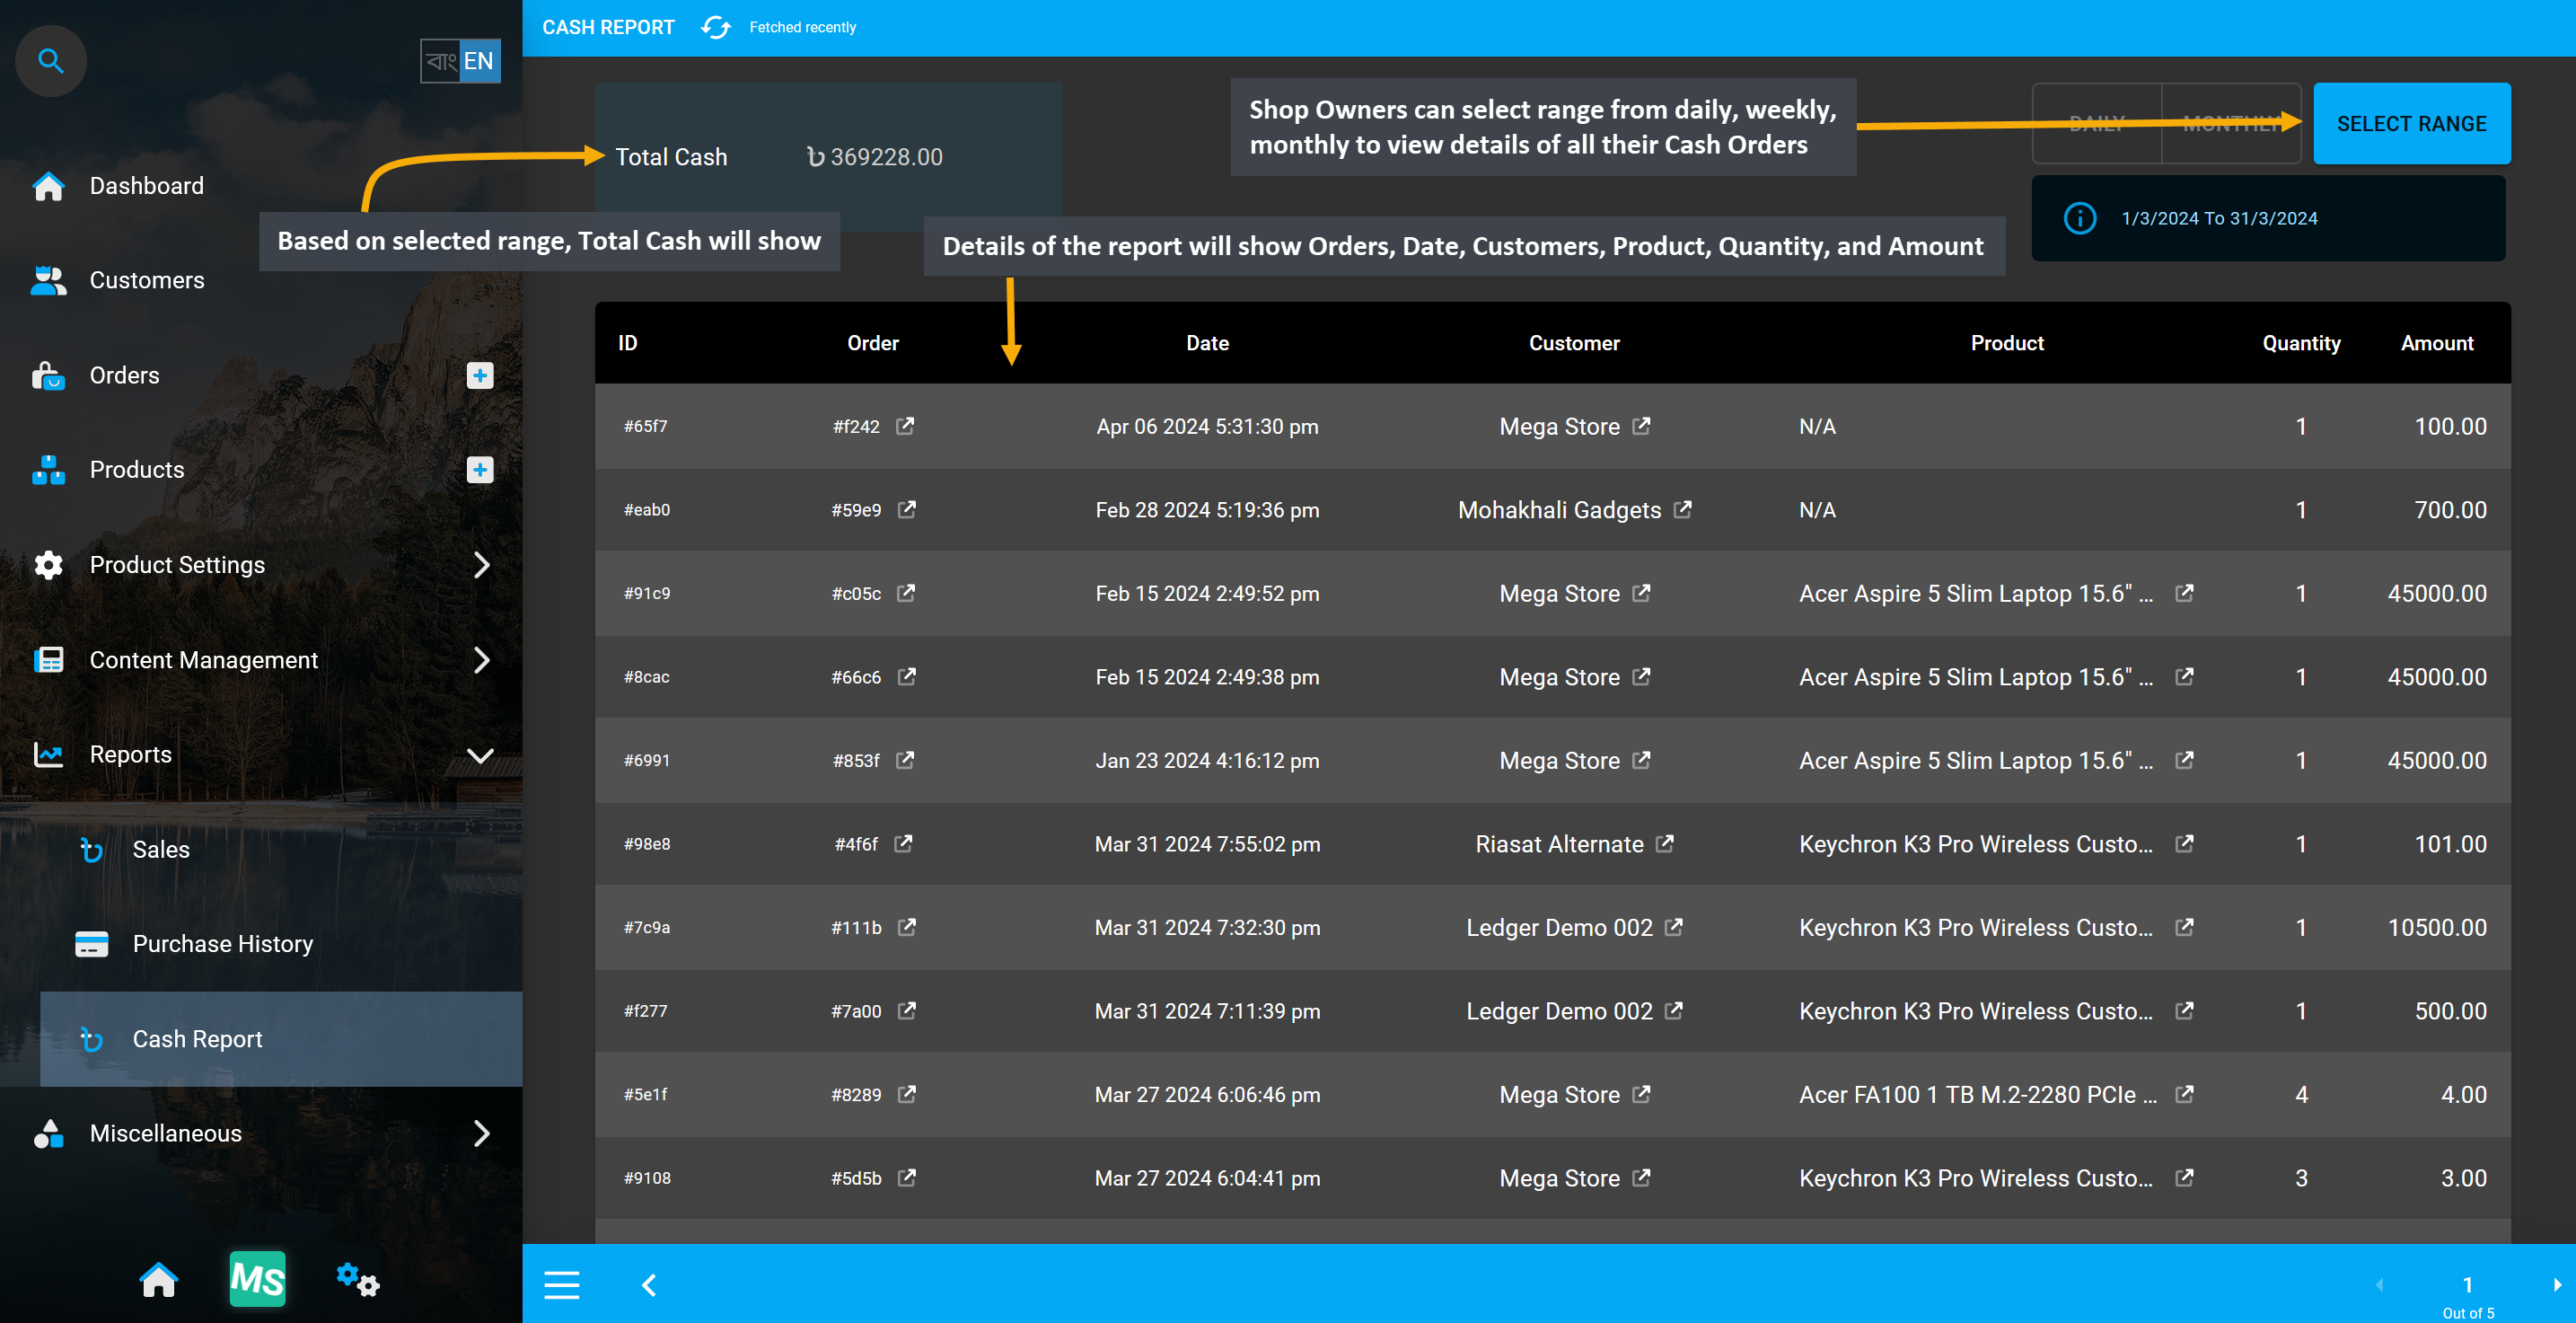
Image 4: Time Range can be selected for Cash Report and Total Cash will show on the top left corner.
On the Cash Report page, Shop Owners can select range from daily, weekly, monthly to view all their Cash Orders. Based on the selected range, Total Cash will show on the top left corner of the page. Details of the report will show Orders, Date, Customers, Product, Quantity, and Amount. This report will help the Shop Owners keep track of only their Cash purchases apart from other payment methods.
14 - Purchase History
Learn More about how to purchase Products and view the Purchase History.
Click Products module and use Stock Purchase option to buy new stock and view them in Purchase History.
Stock Purchase
After Stock Purchase from a Supplier, Shop Owner can view the history of stock purchase from Purchase History page. Select the Stock Purchase option for any Product by clicking ⋮ on the Products Page. Clicking this option will redirect to the Add Product Stock page from where Shop Owner can purchase the Per Unit Products with different payment methods from the target Credit Supplier.
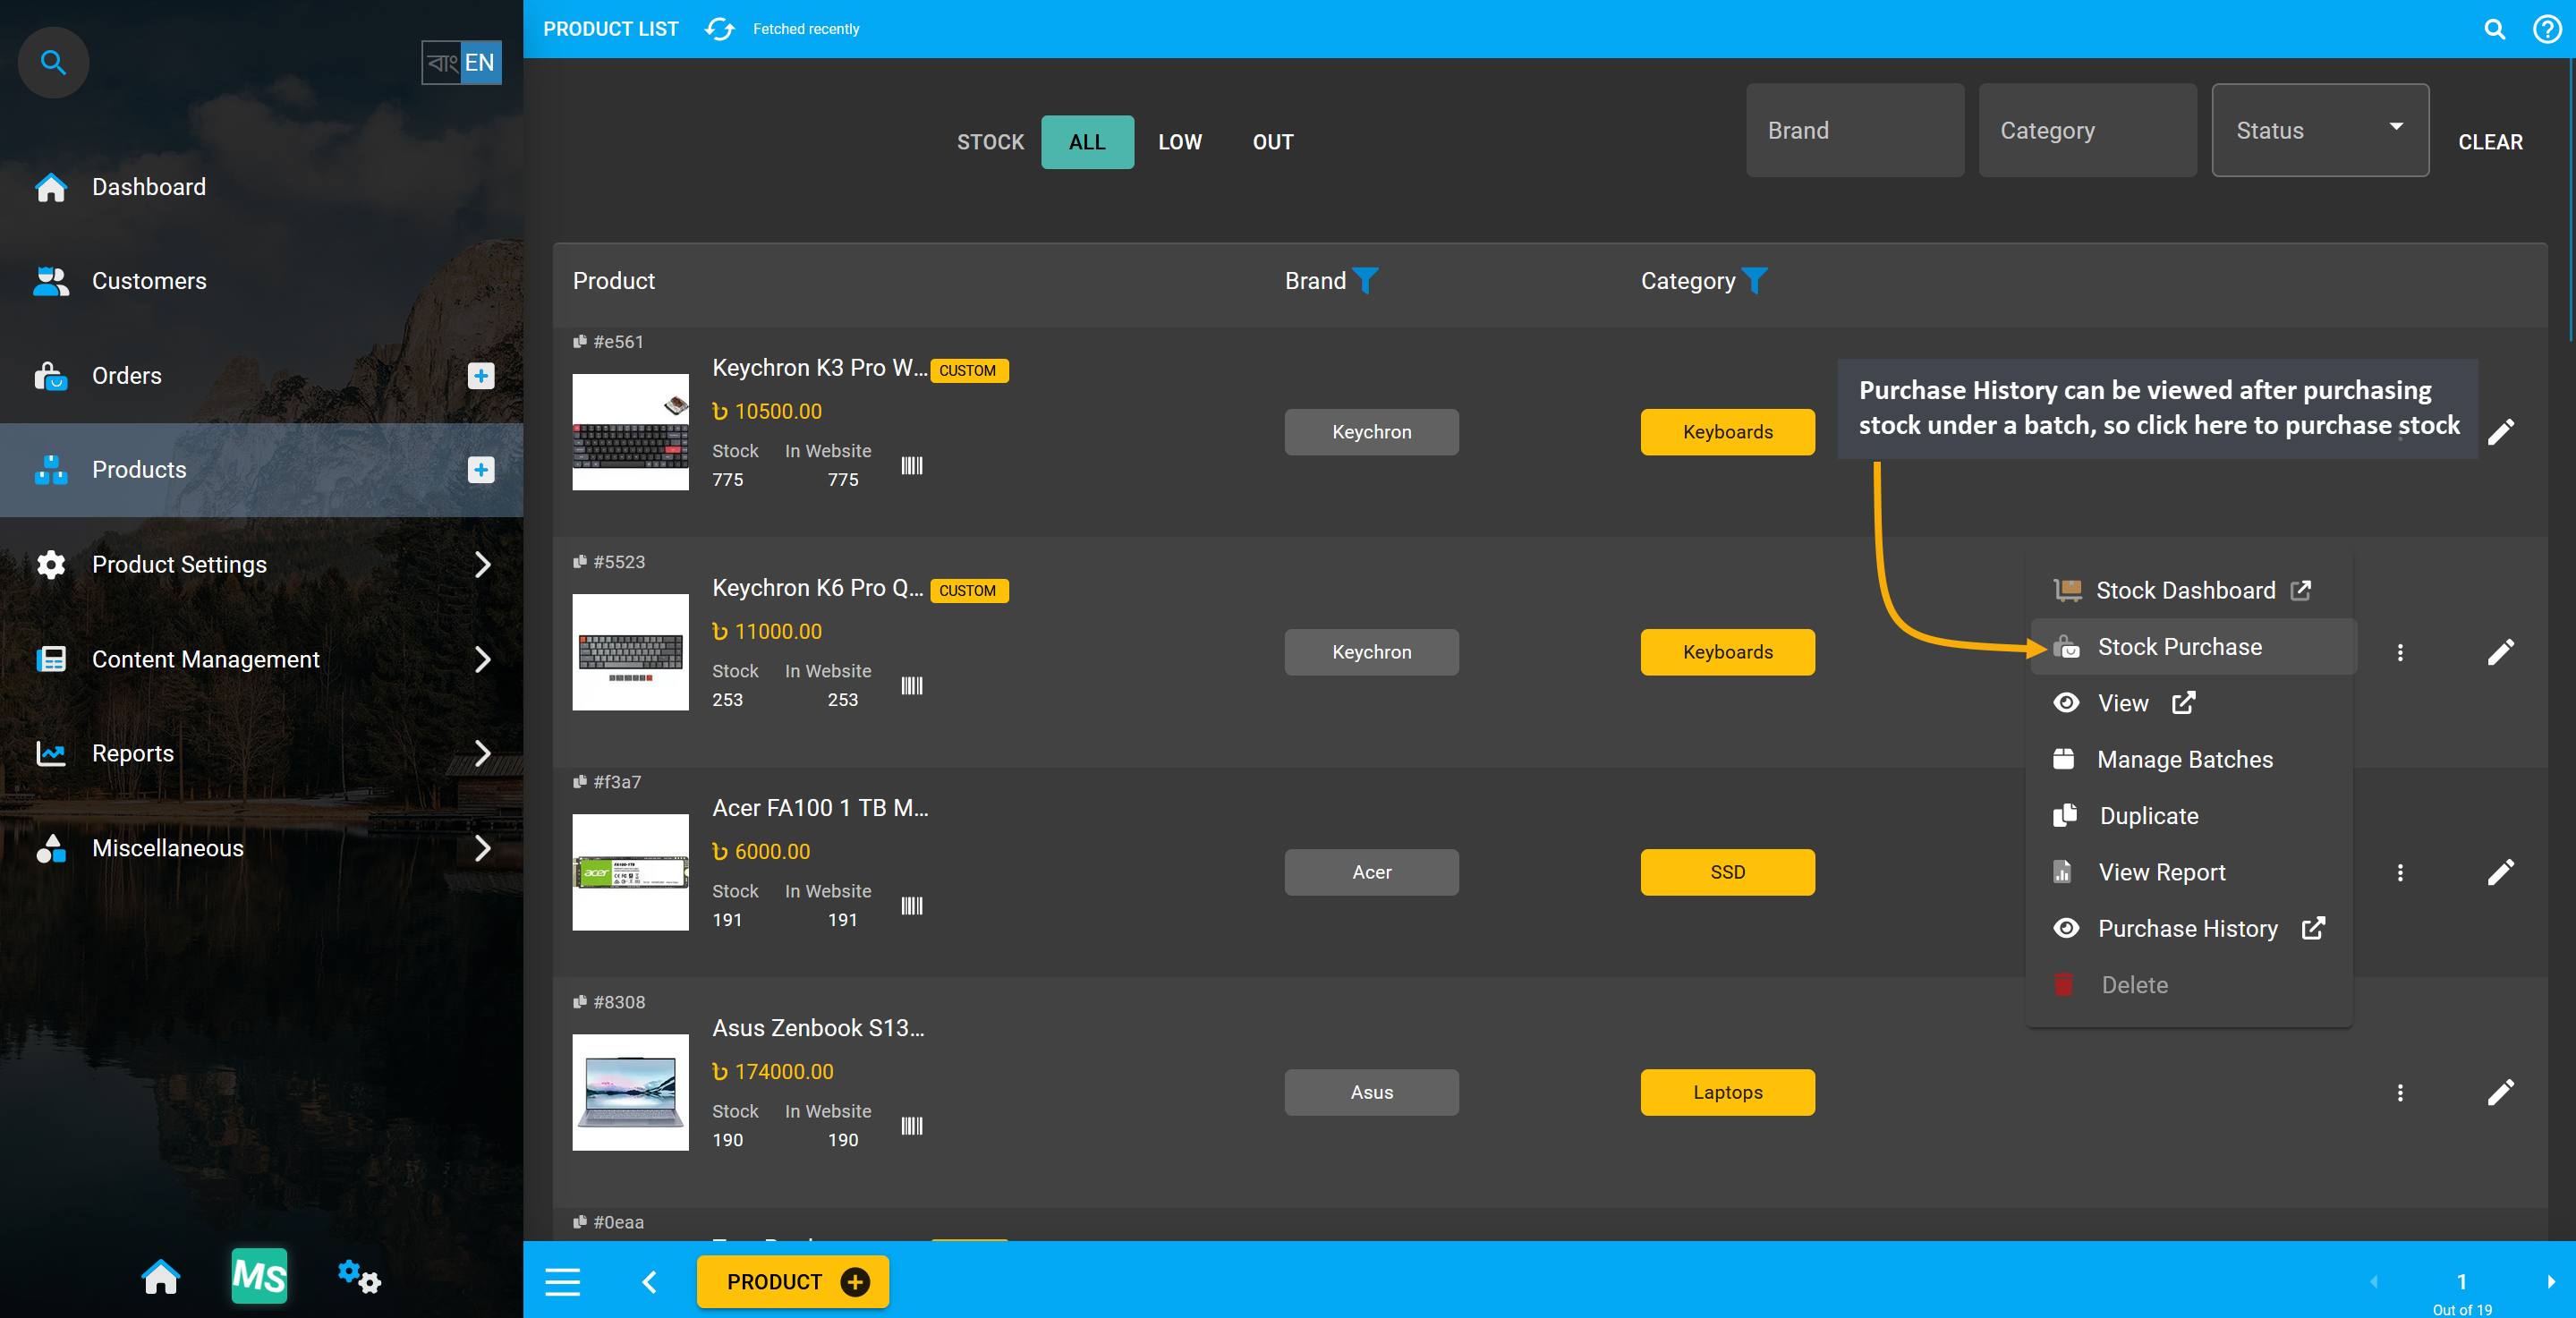
Image 1: Purchase History can be viewed after purchasing stock, so click to purchase product stock.
On the Add Product Stock page, select a Payment Method from Acquisition Options, set Purchase Price and Sell Price Per Unit, select Credit Supplier, and Warranty if it is not automatically selected. Add Settled Price if full payment is not selected. Then click Auto Generate Serial Numbers button to generate Quantity and Serial of Per Unit Product that Shop Owner will buy from Credit Supplier. Fill Prefix, Suffix, Start Counter, and End Counter on the pop-up that opens to generate Product Stock with individual serial numbers.
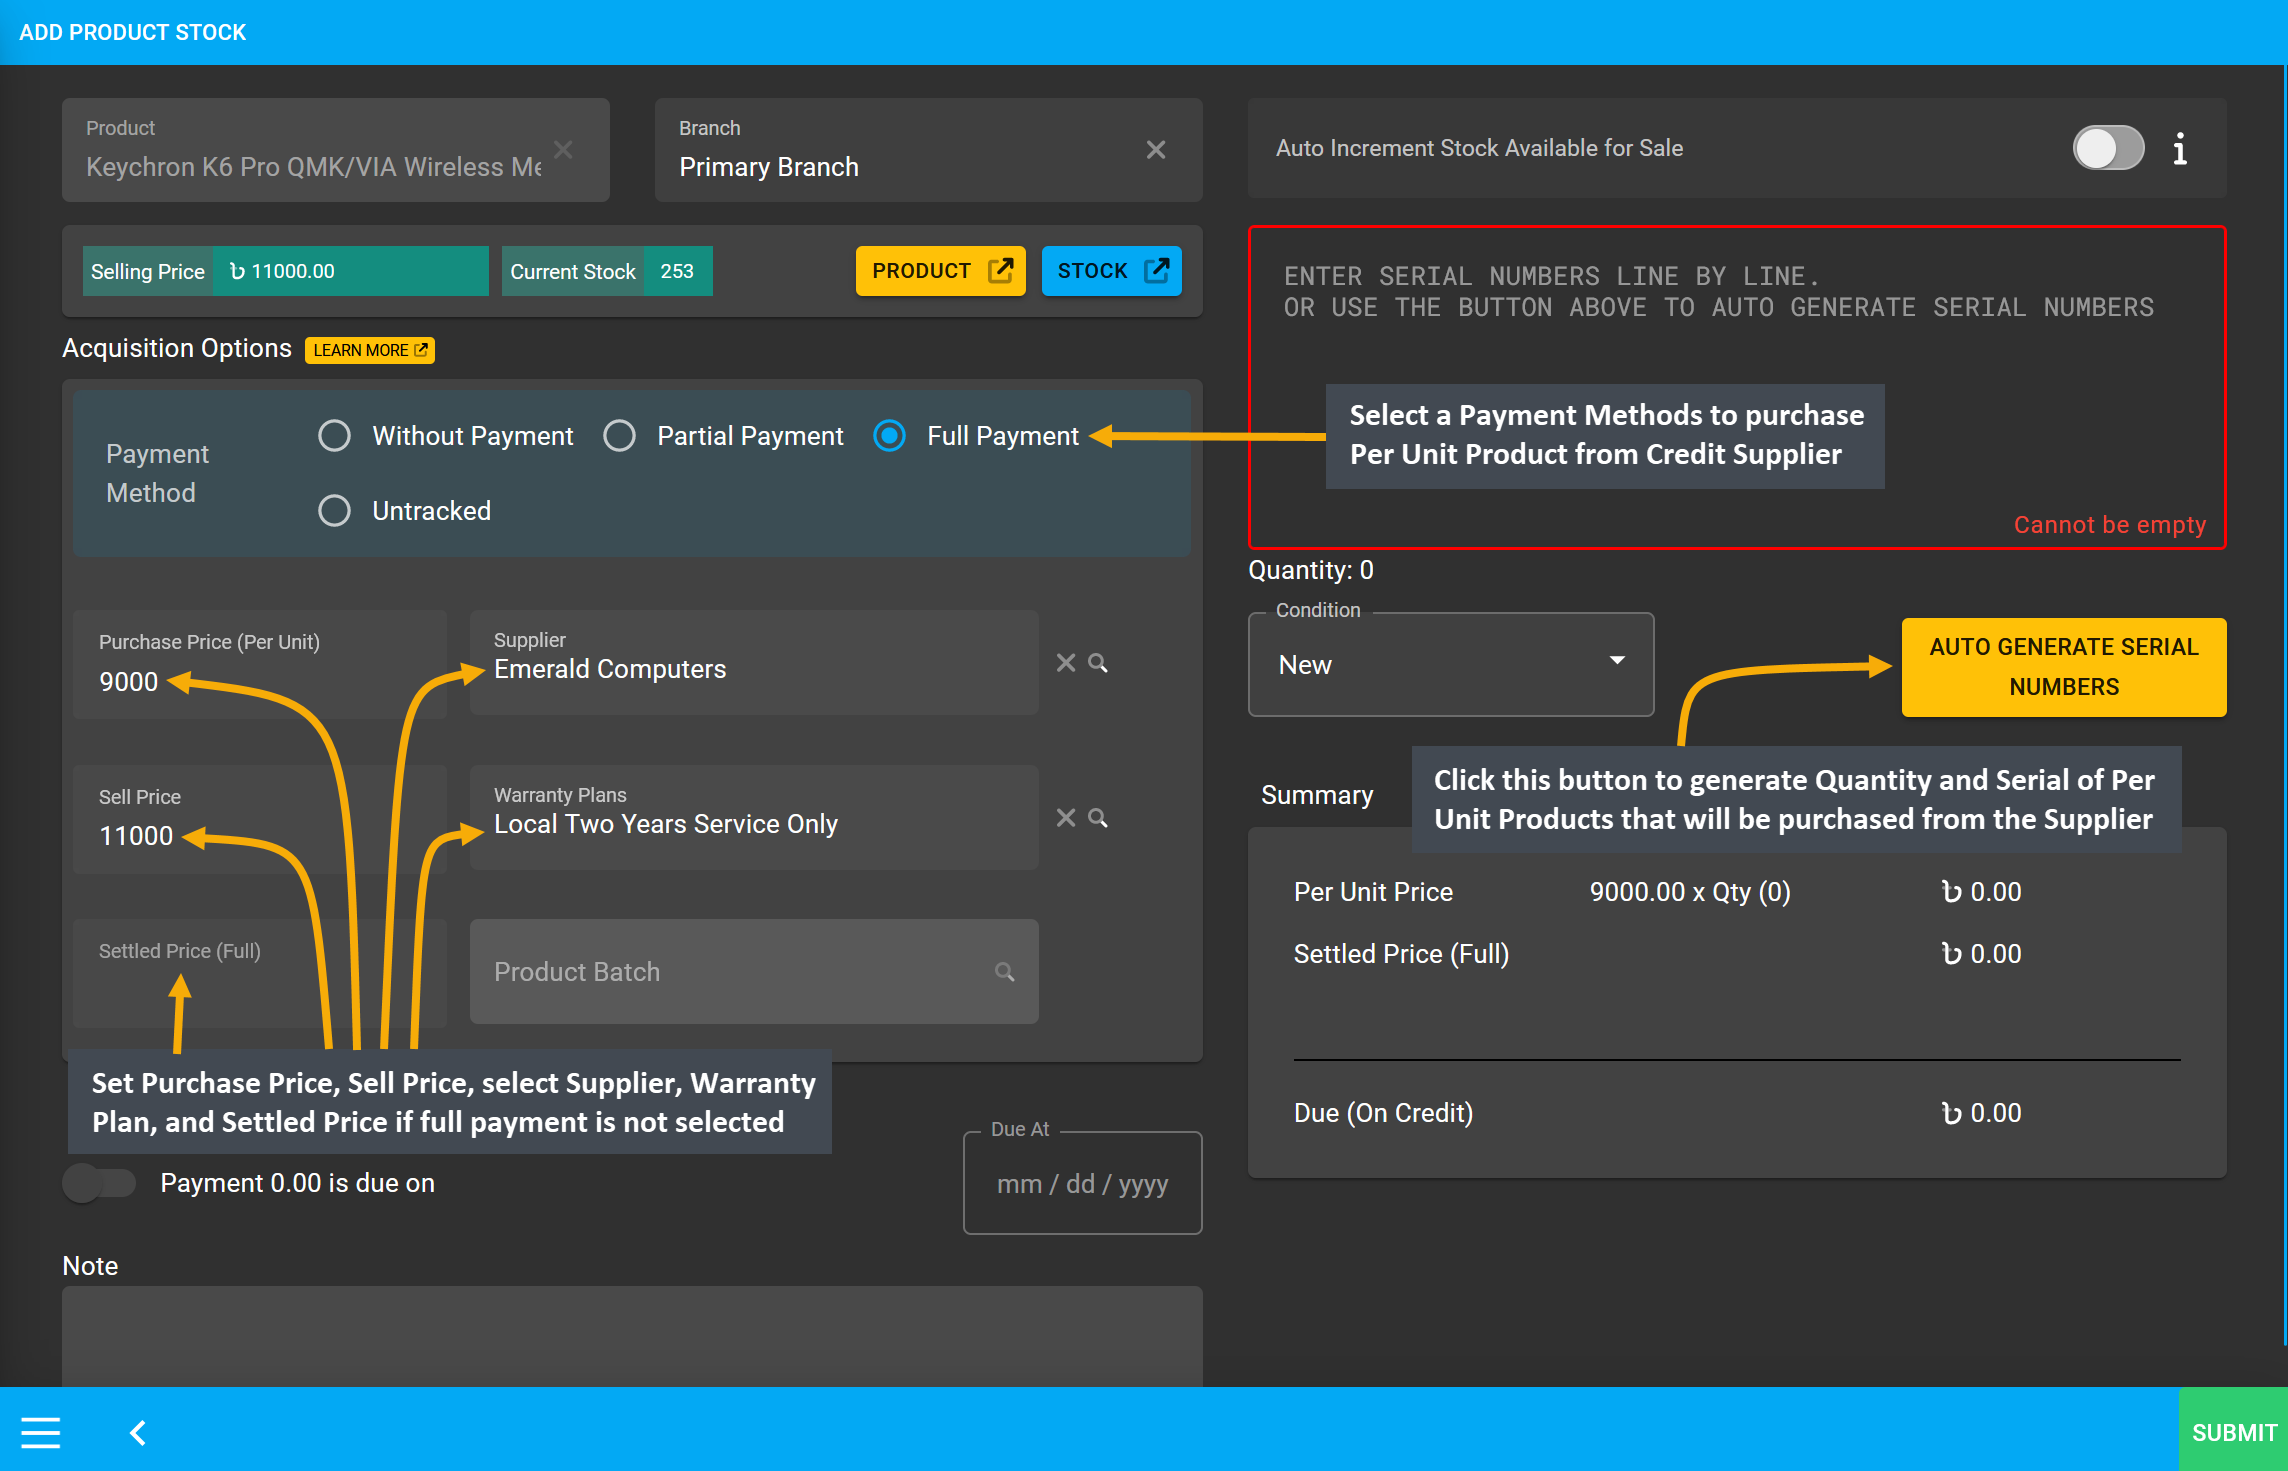
Image 2: Set Purchase, Sell Price, Supplier and Warranty, and click Auto Generate Serial Numbers.
After clicking the Auto Generate Serial Numbers button, a pop-up will appear where Product Serial Number and Quantity needs to be set with Prefix, Suffix, Start Counter, and End Counter. Click the Generate button to create the Per Unit Products purchased from Credit Supplier that will generate serial numbers.
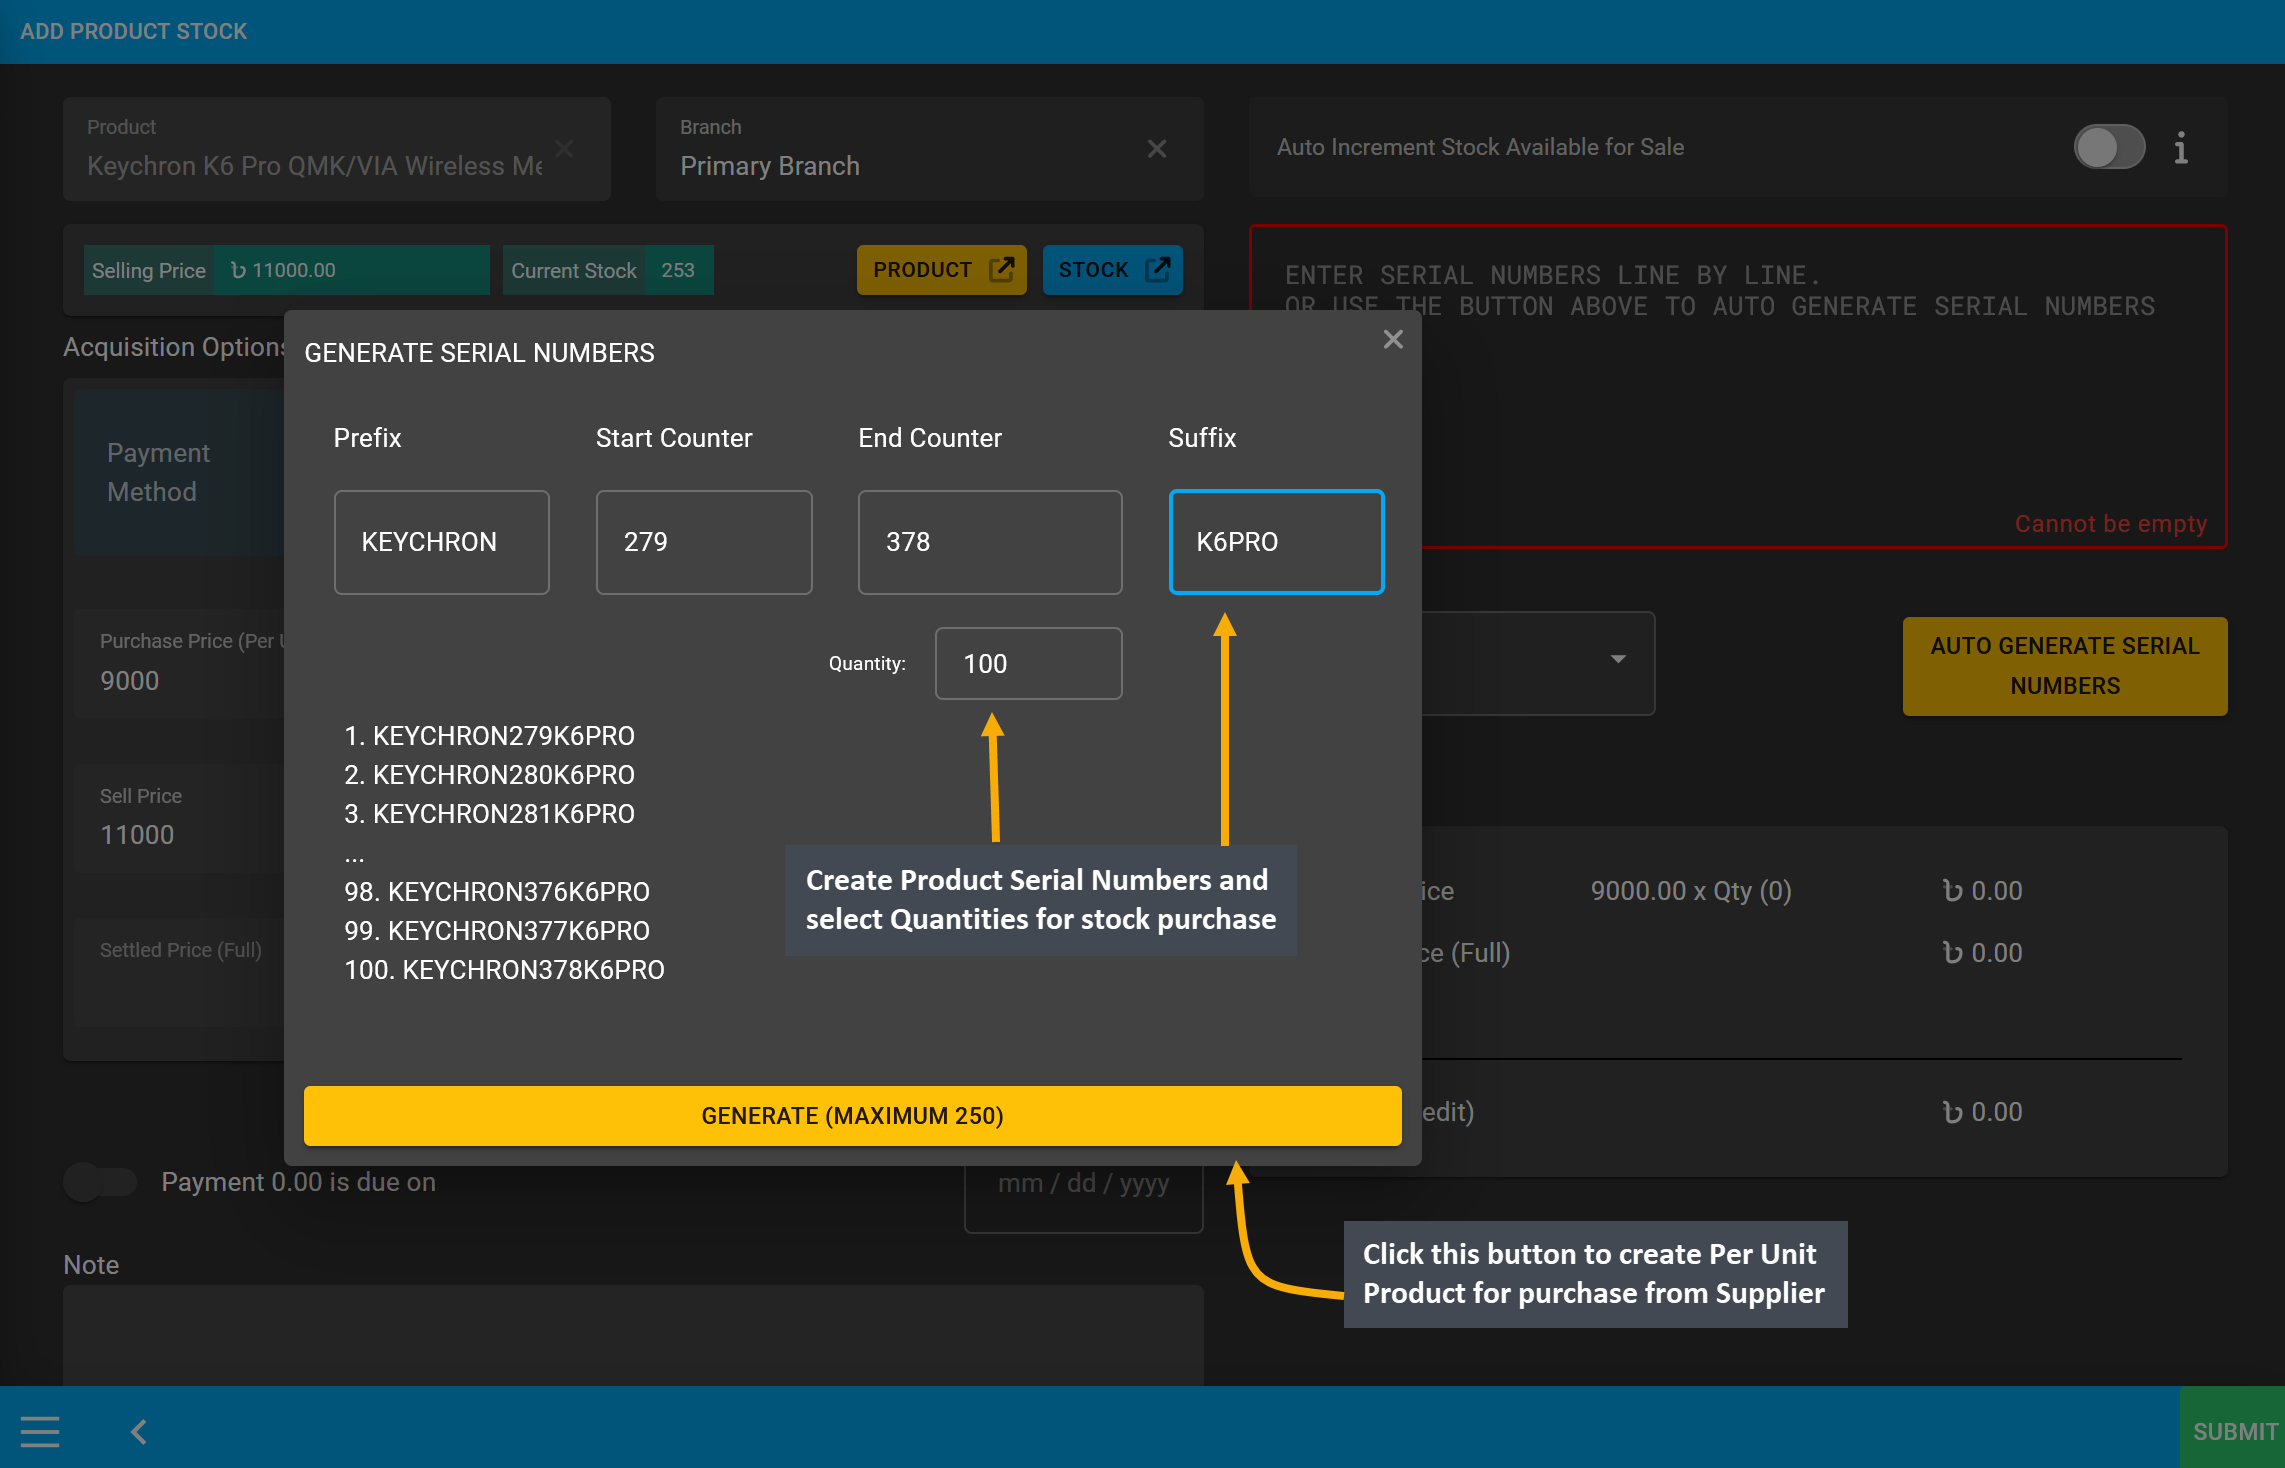
Image 3: Set Product Serial Number and Quantity with Prefix, Suffix, Start Counter, and End Counter.
After Product Serial Numbers and Quantities are generated for the target Per Unit Product, full payment amount will automatically be set on the Settled Price box. The autogenerated serial numbers for created Per Unit Product quantities will show inside the box. Click the Submit to complete the purchase process.
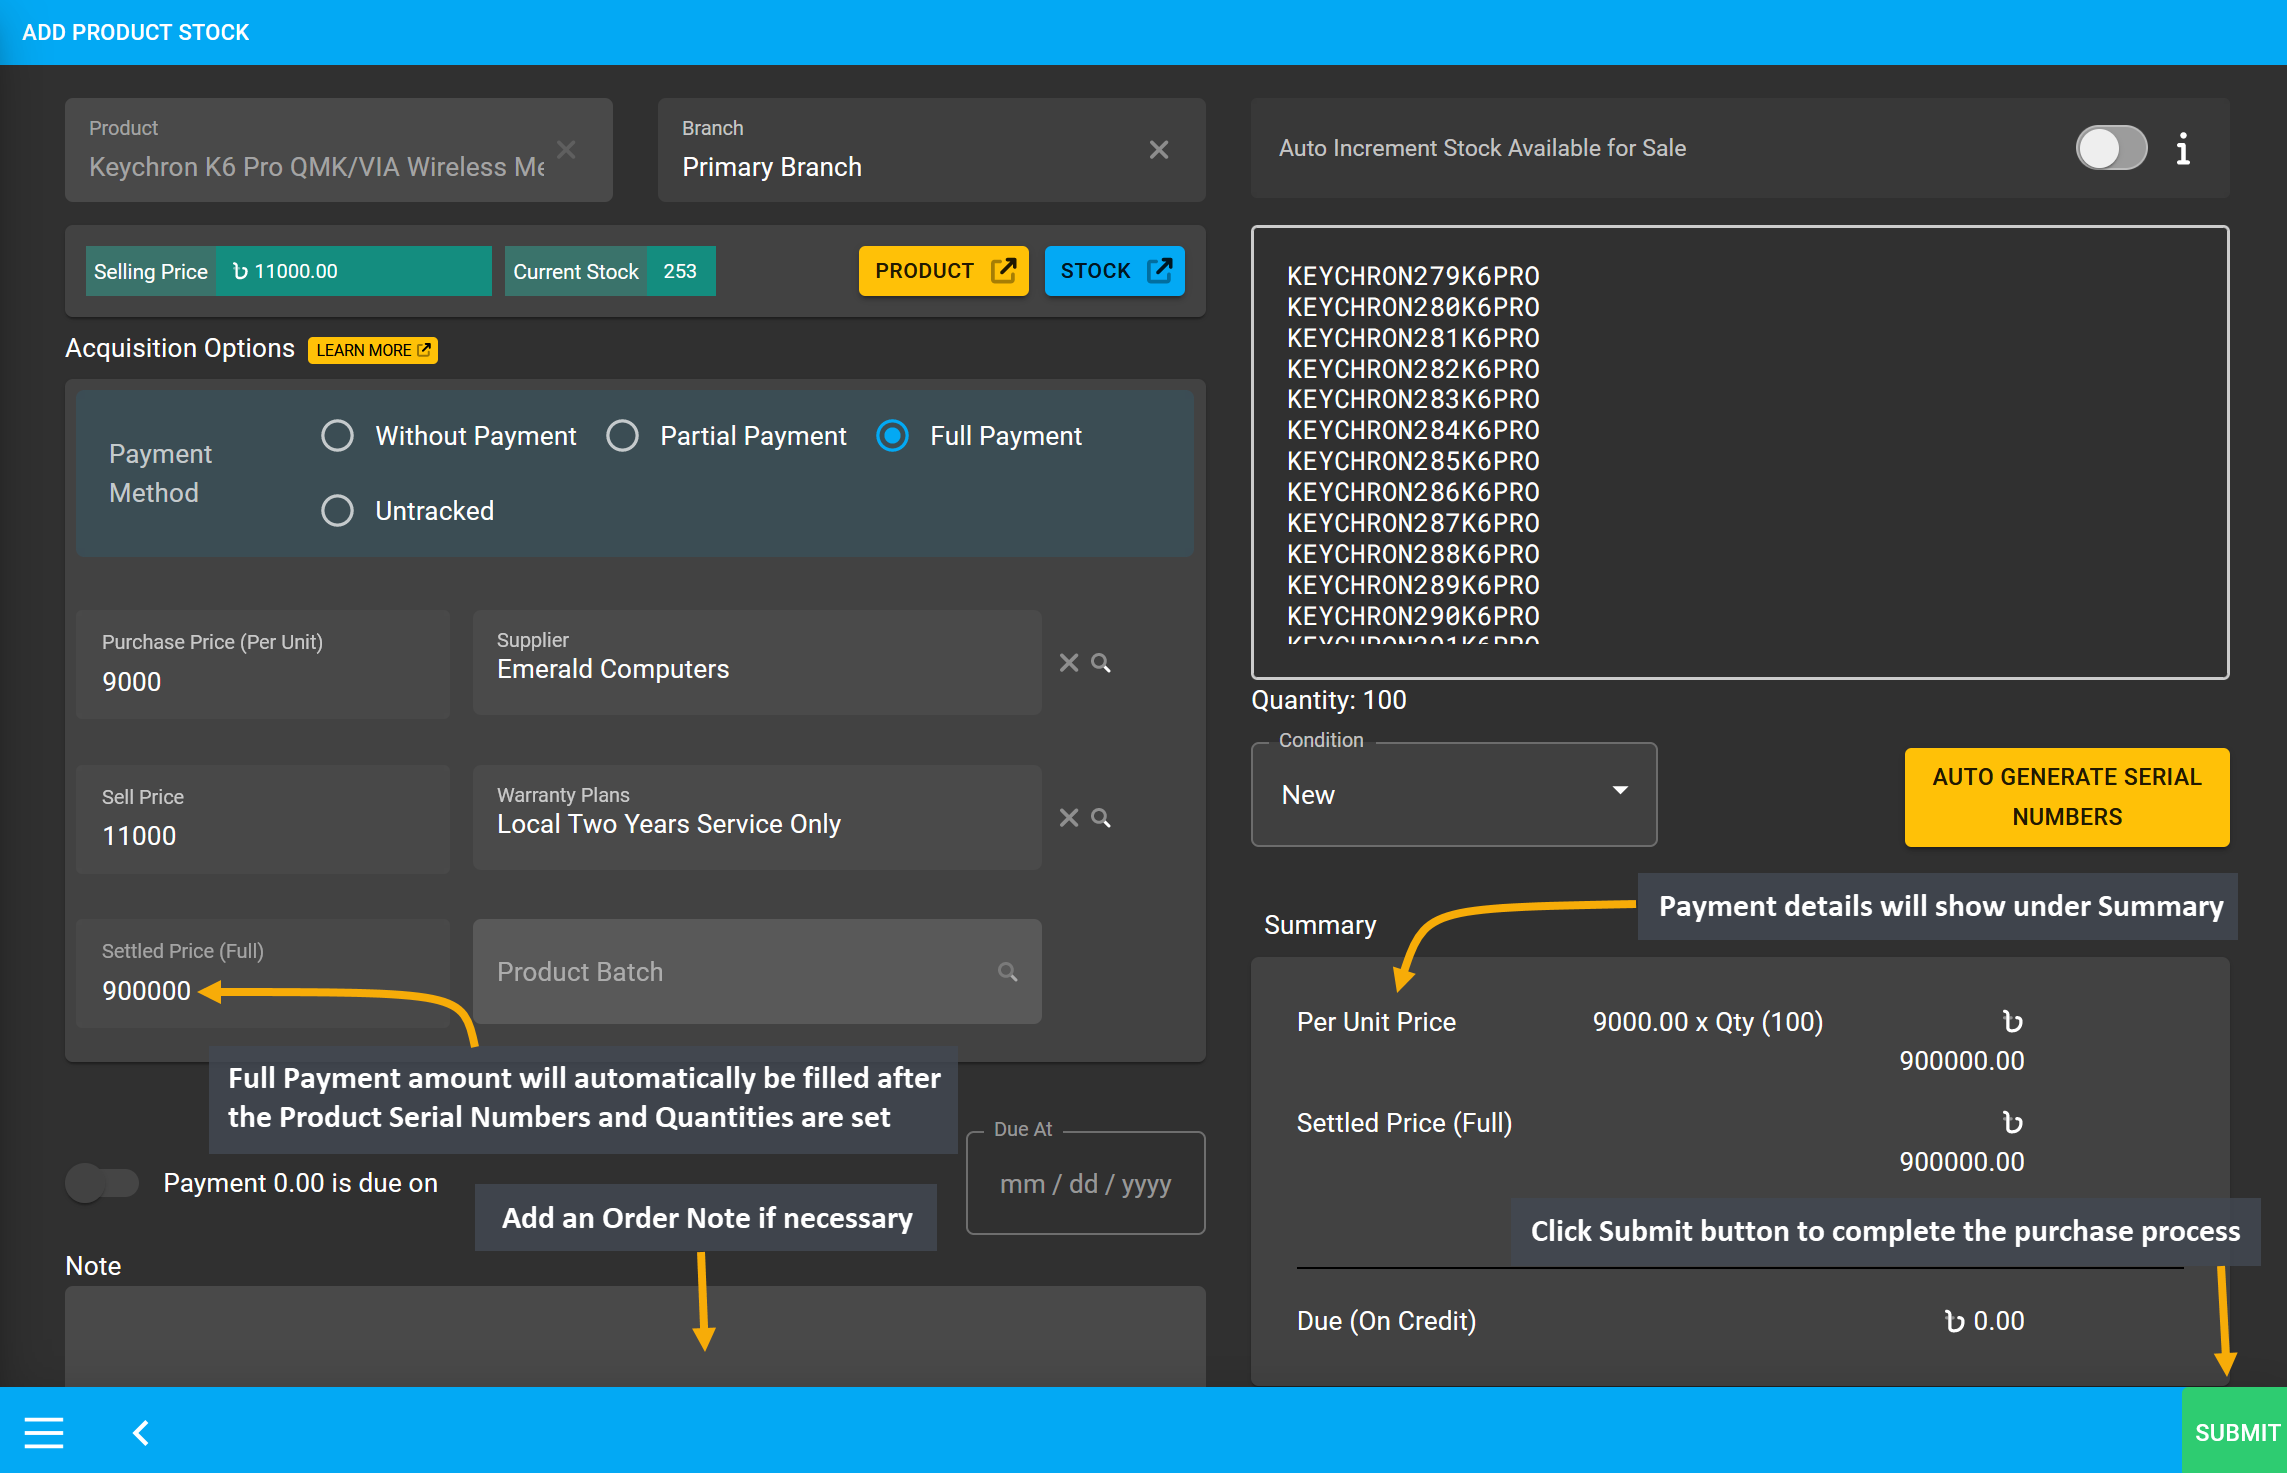
Image 4: After Payment amount is set, click Submit to complete purchase with selected Payment Method.
Then, a pop-up will show uploading with assigned Per Unit Product quantities and confirm when units are successfully created. Click Okay to save changes when auto generated serial numbers are 100% uploaded for completing the Per Unit Product purchase process from Credit Supplier. To purchase more quantities of same Per Unit Product from same Credit Supplier, click the Purchase Product from Same Supplier button.
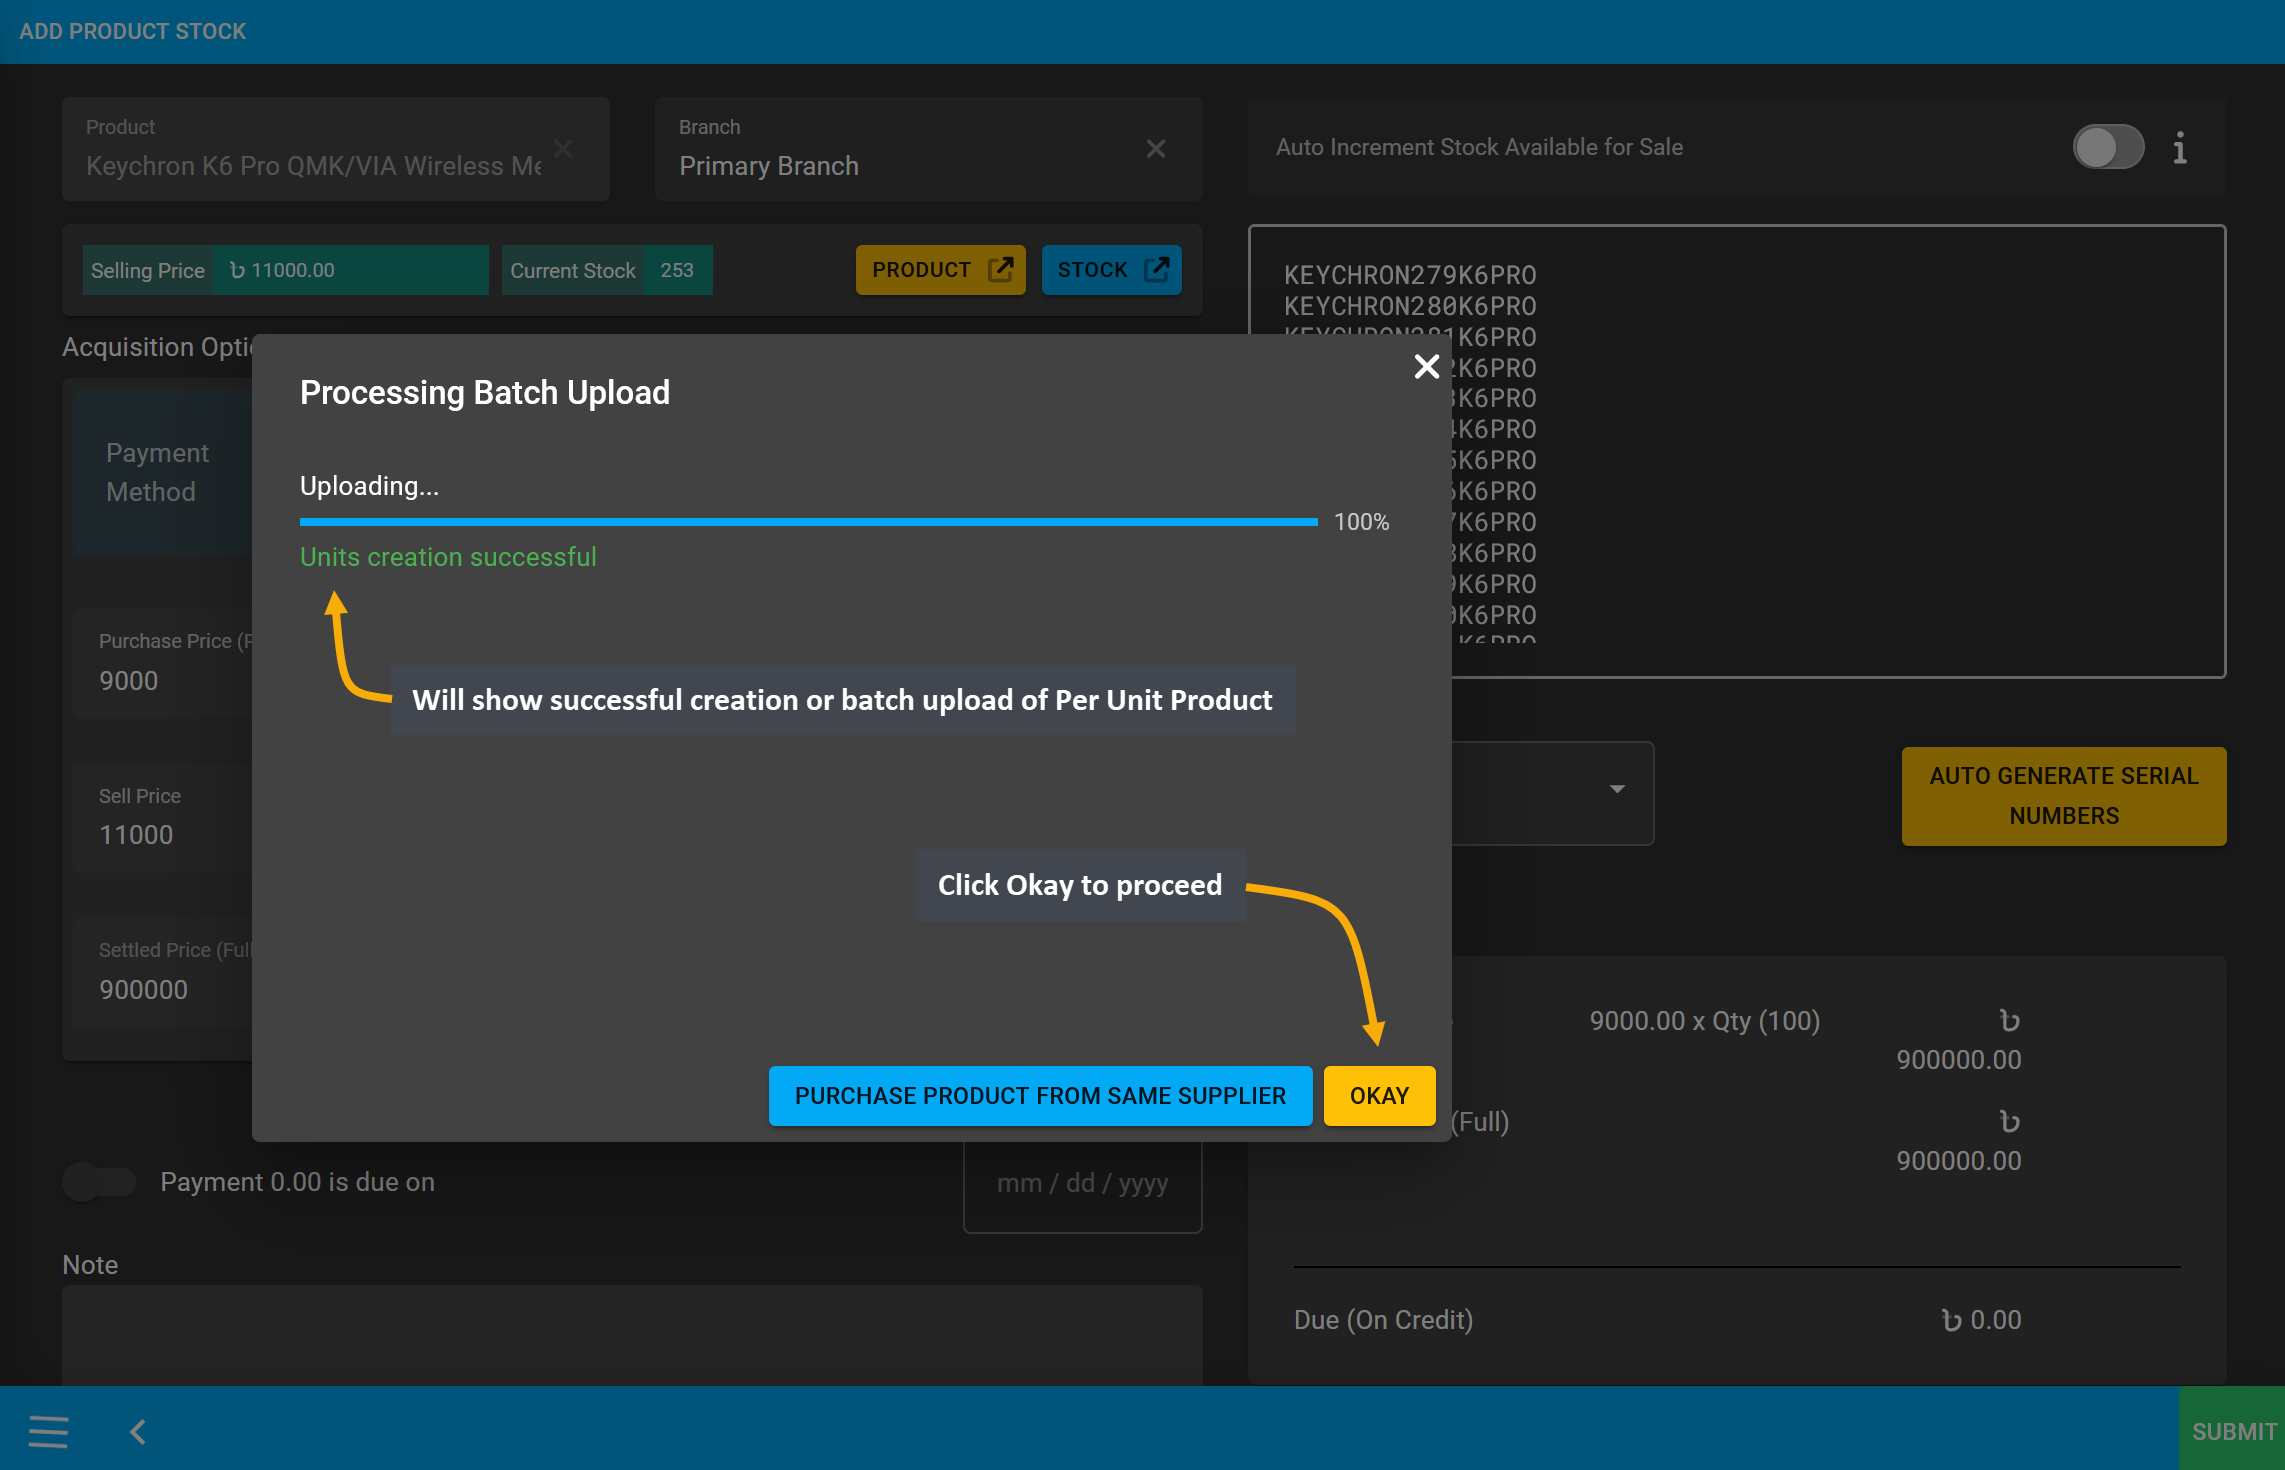
Image 5: Will show successful creation or batch upload of Per Unit Product, Click Okay to proceed.
Clicking on Okay will redirect to Unit Stock Management page where successfully created Batch of Per Unit Products will be displayed on the top of the list as marked in the example screenshot. All individual serial numbers will also be displayed as Product SKUs, through which stocks can be differentiated.
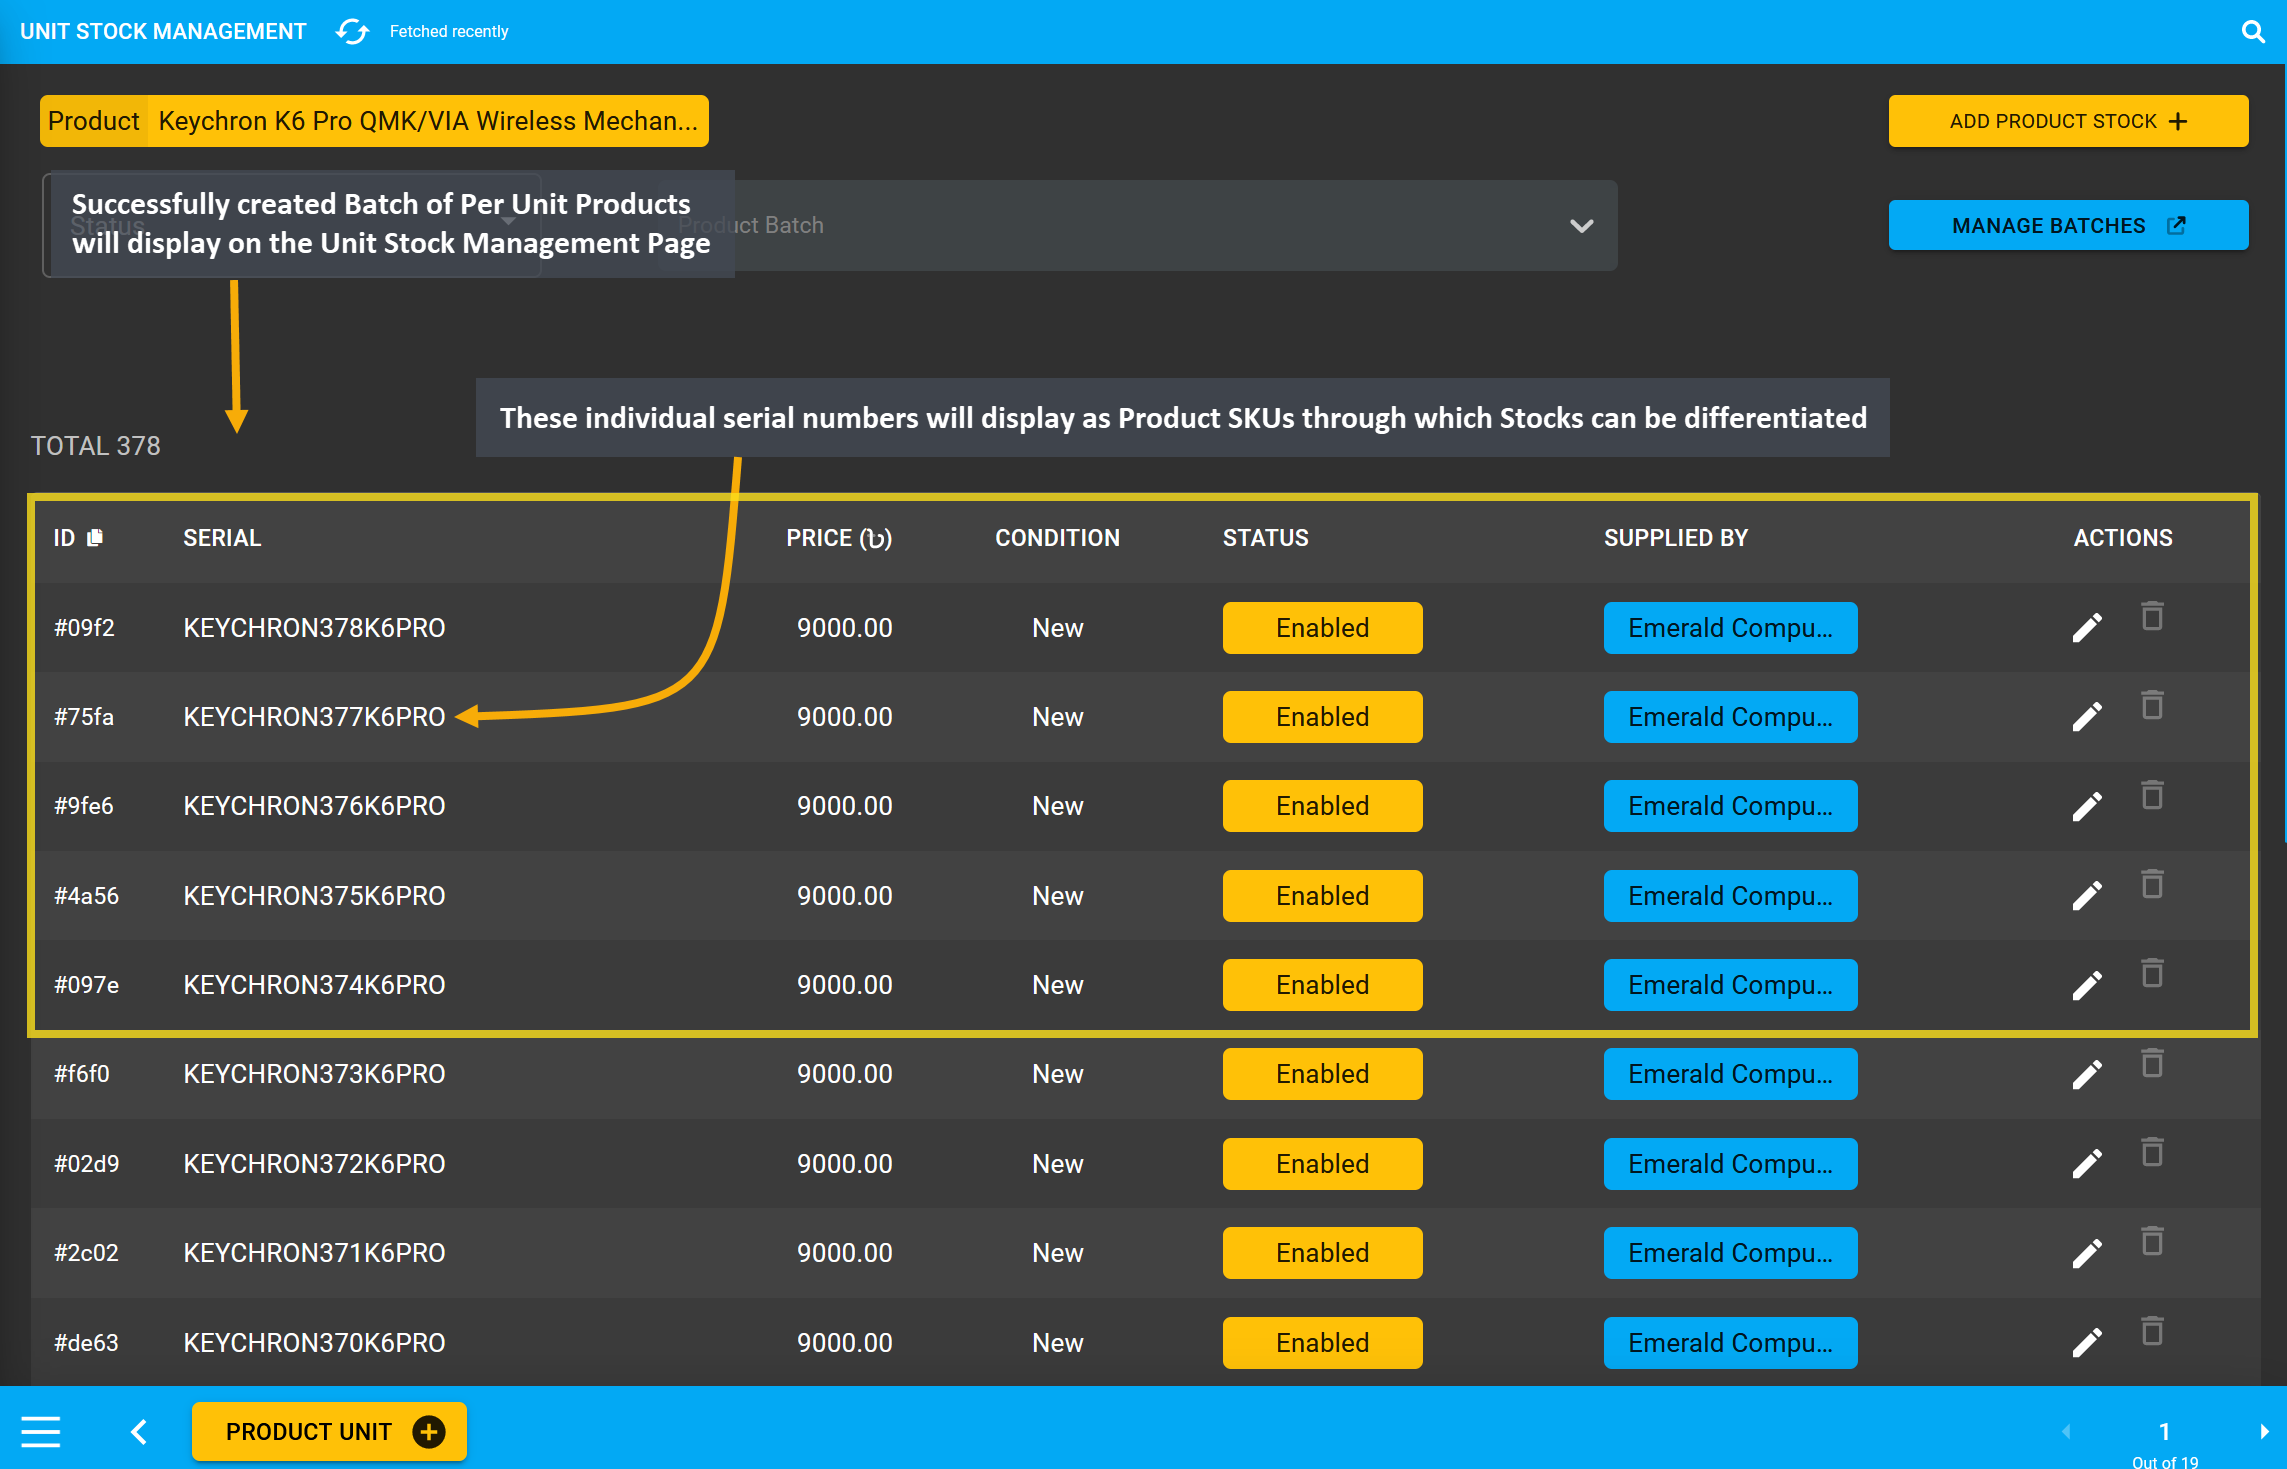
Image 6: Successfully created Batch of Per Unit Products will display on Unit Stock Management Page.
View Purchase History
Once Per Unit Product Stock has been purchased from the Supplier, the Shop Owner can check history of their purchase from Purchase History option under Reports section. It will redirect to Purchase History page.
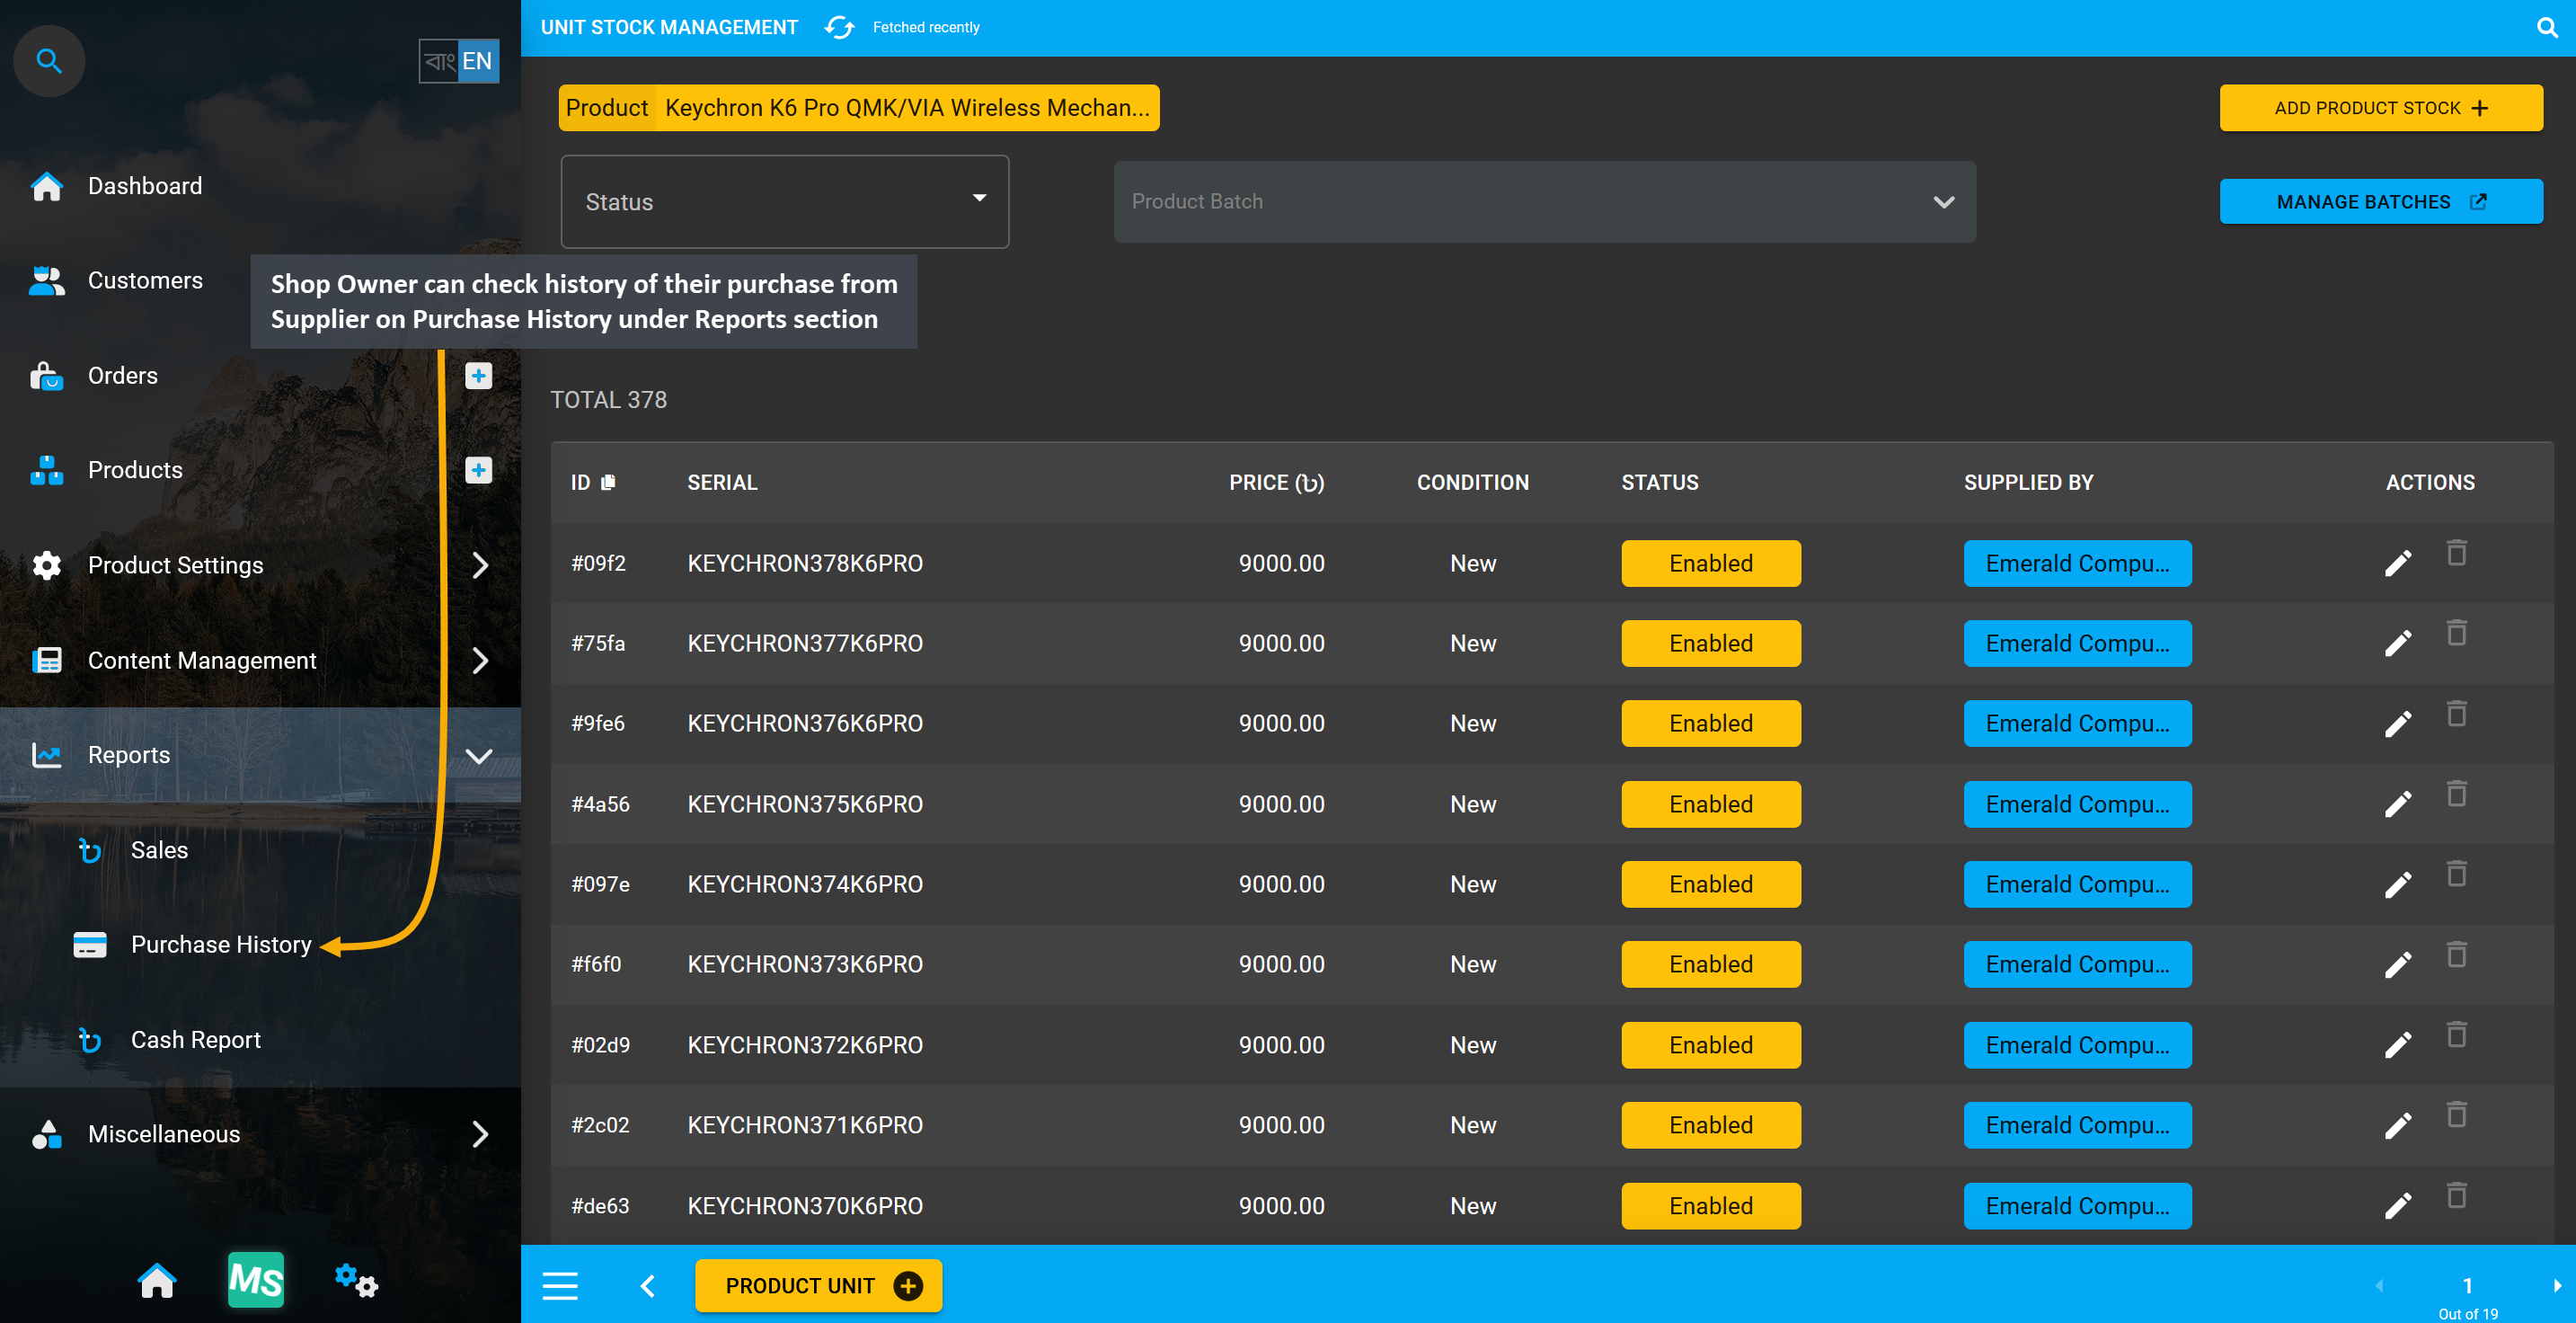
Image 7: Shop Owner can check history of their purchase from Supplier on the Purchase History page.
In the Purchase History page, Shop Owner can filter history by selecting Supplier and Product. Filtering can also be done with date range selection. Details will show Purchase Date, Order ID, Supplier Name, Product Name, Condition, Product Serial, Purchase Price, and Warranty. It can be printed to send to Supplier.
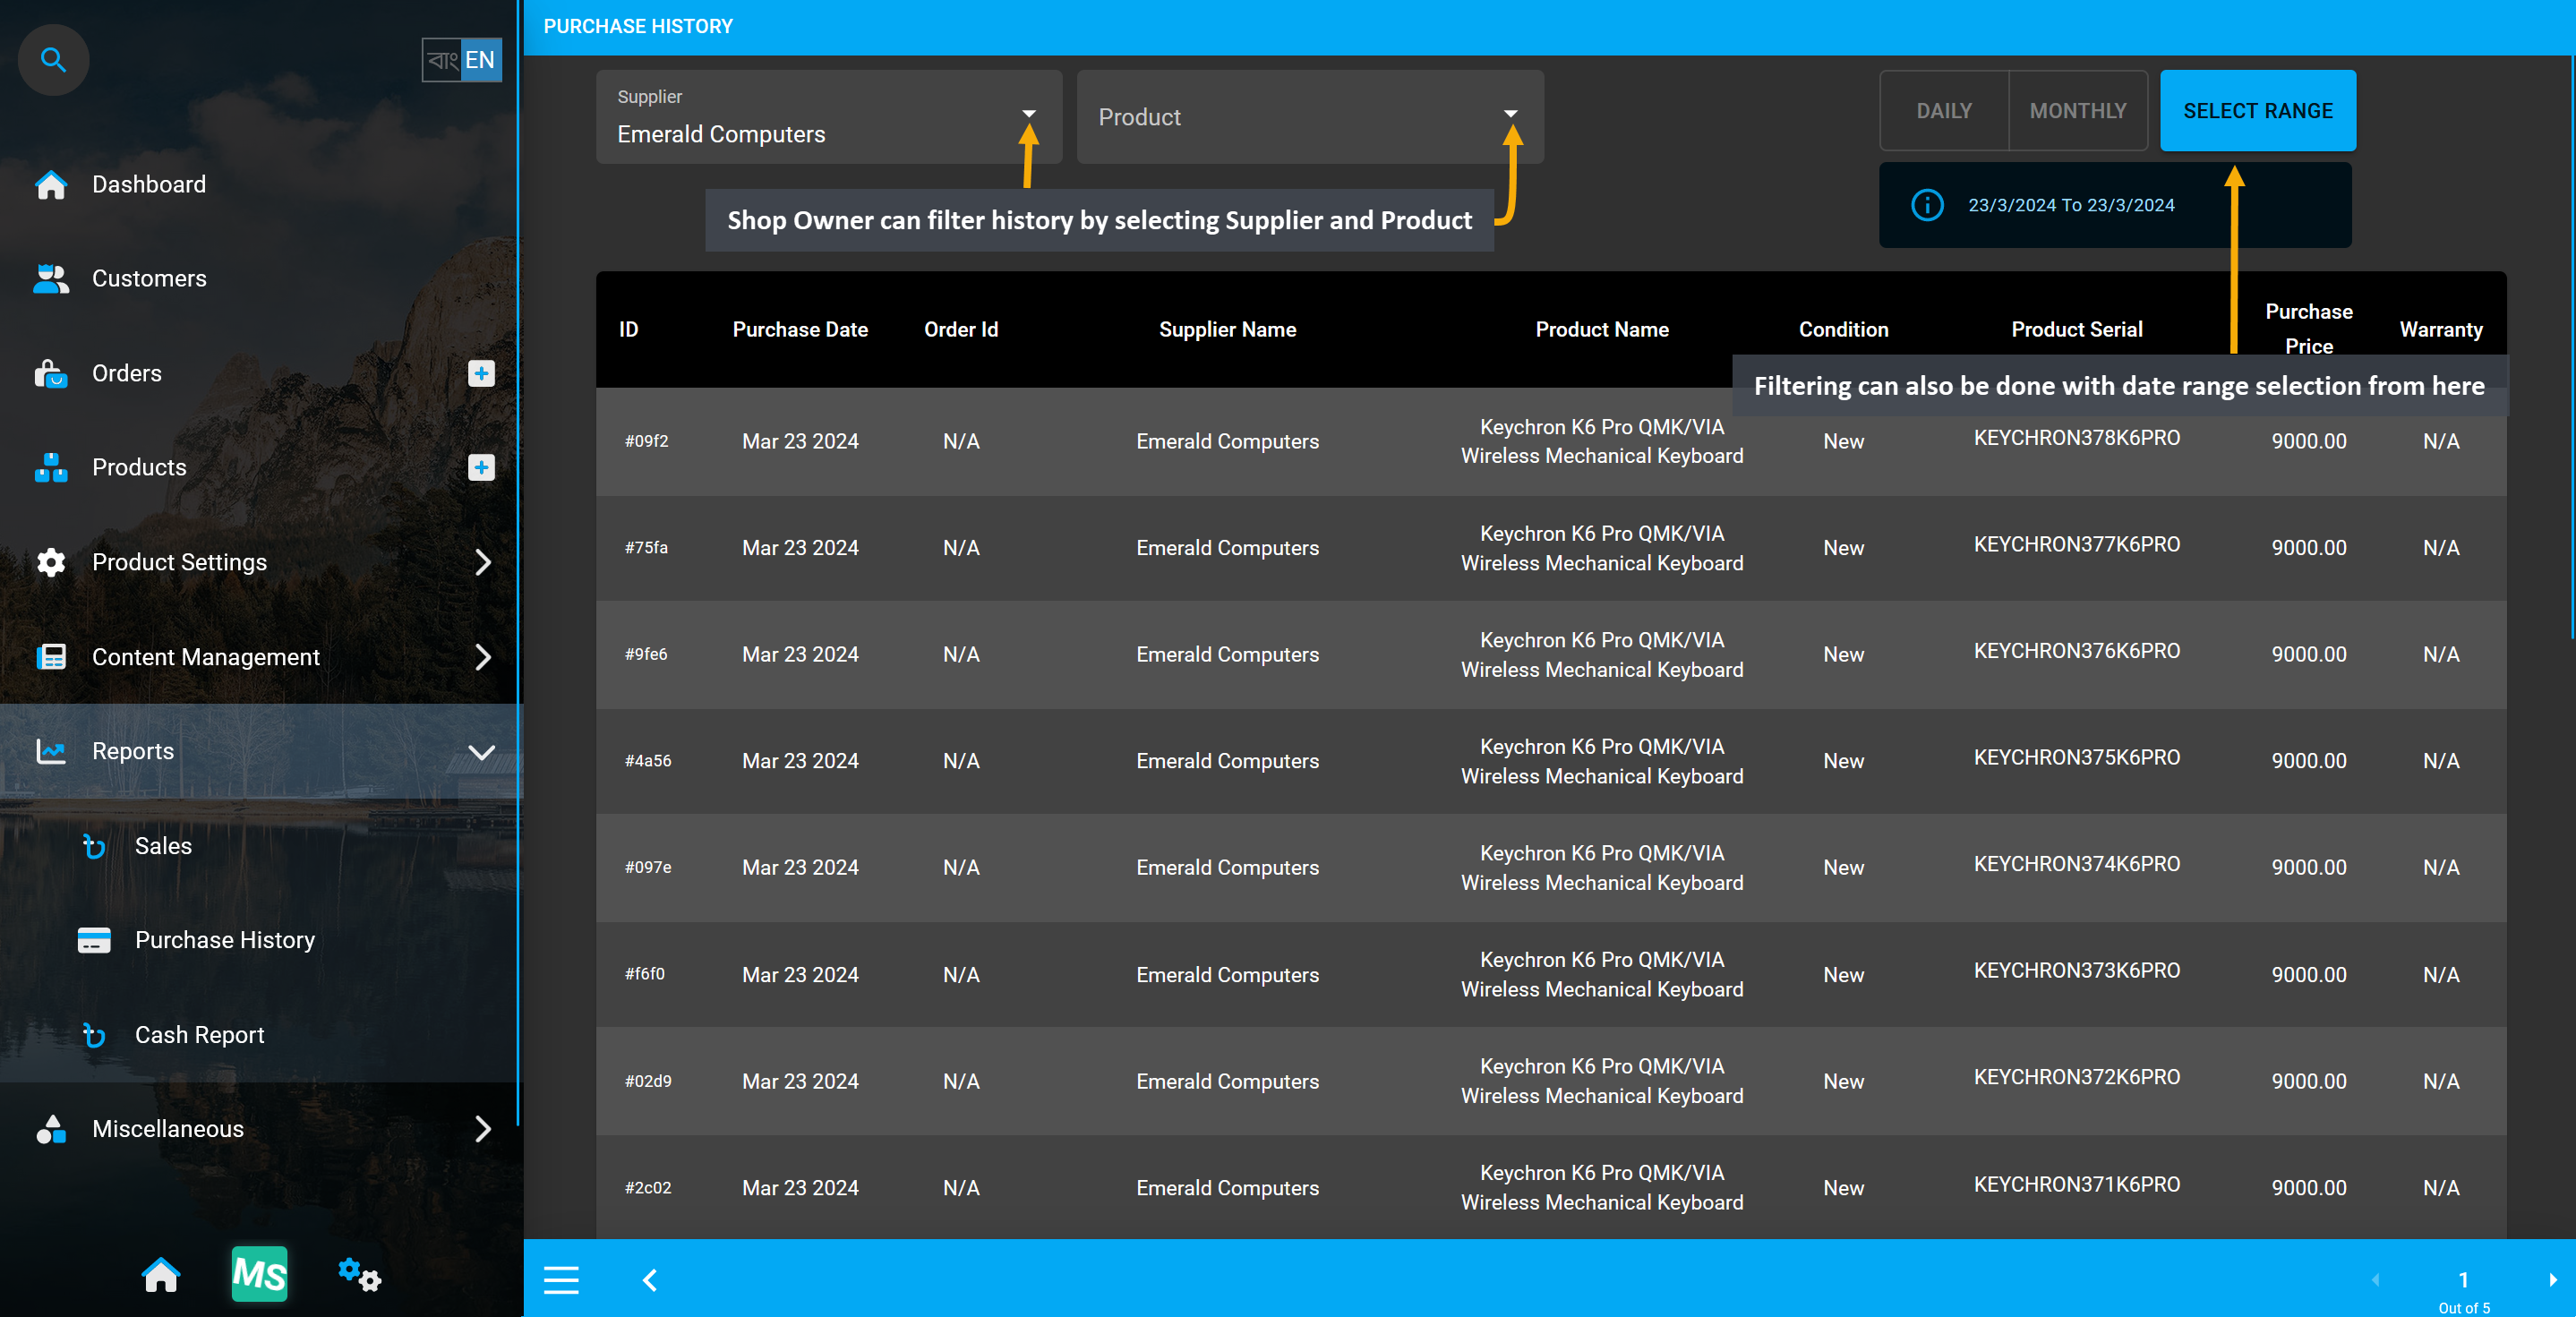
Image 8: Shop Owner can filter history by selecting Supplier and Product and also use date filter.
Purchase History can also be filtered with range selection. Click the Select Range button to find and view the purchase history of any week or month by clicking on the start and end range selector.

Image 9: Click the Select Range button to find and view the purchase history of any week or month.
15 - Products
Learn More about how to search for Products and create Products using pre-defined templates or create Custom Products from scratch.
Click on the Products module to view product stock by Brand and Categories. From here, you can create products, edit product details, entities, and cart messages.
Product List
The Products tab has Product List showing all the Products in Stock, as well as Products whose Stock are Low, or Out. On top right, there are two search boxes with dropdown to search listed Products by Brand and Category.
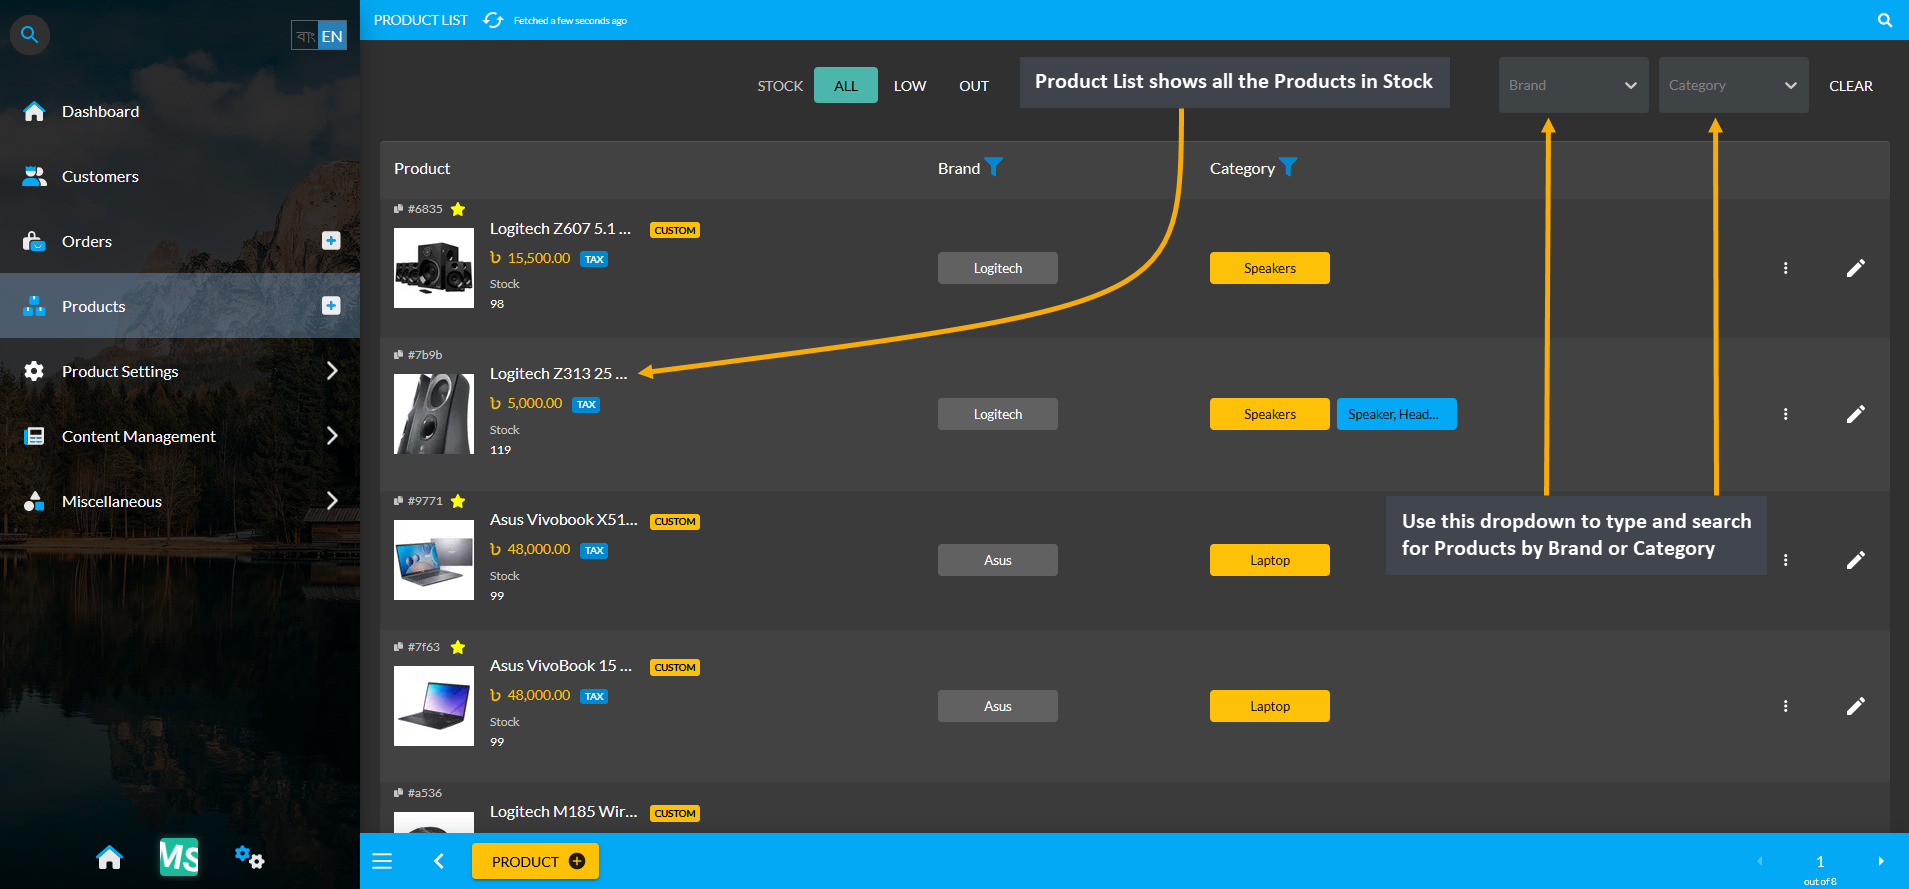
Image 1: Product List shows all the Products, Use dropdown to search Products by Brand or Category on list.
Filter Products by Low and Out
The Shop Owner can also filter Products by Low and Out. Low will bring search results for Low Stock Products and Out will bring search results for Out of Stock Products. Usually Per Unit Products will be Out of Stock when created unless the Units are purchase from a Supplier. Any Limited, Unlimited, or Per Unit Product can be Low in Stock.
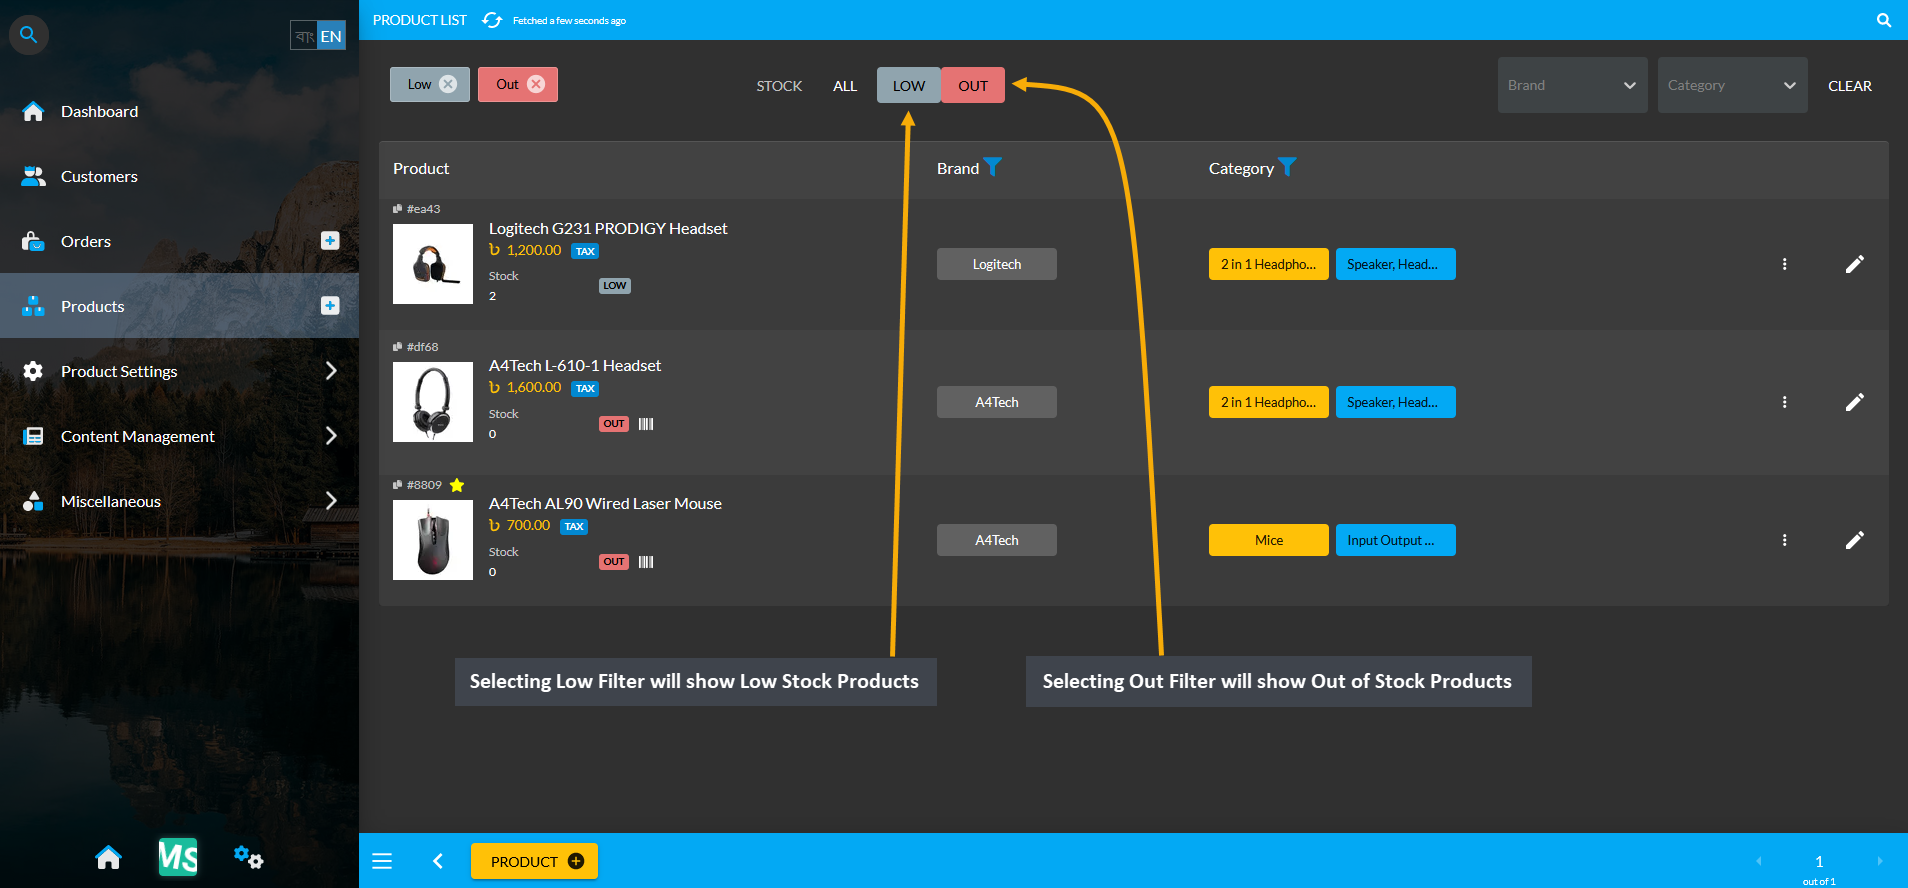
Image 2: Selecting Low Filter will show Low Stock Products and Out Filter will show Out of Stock Products.
Create New Products from Pre-Defined Templates
From the Products tab, New Products can be created from pre-defined templates or Global Products by clicking on the + or the Add button which will redirect to a separate search page for Product creation.
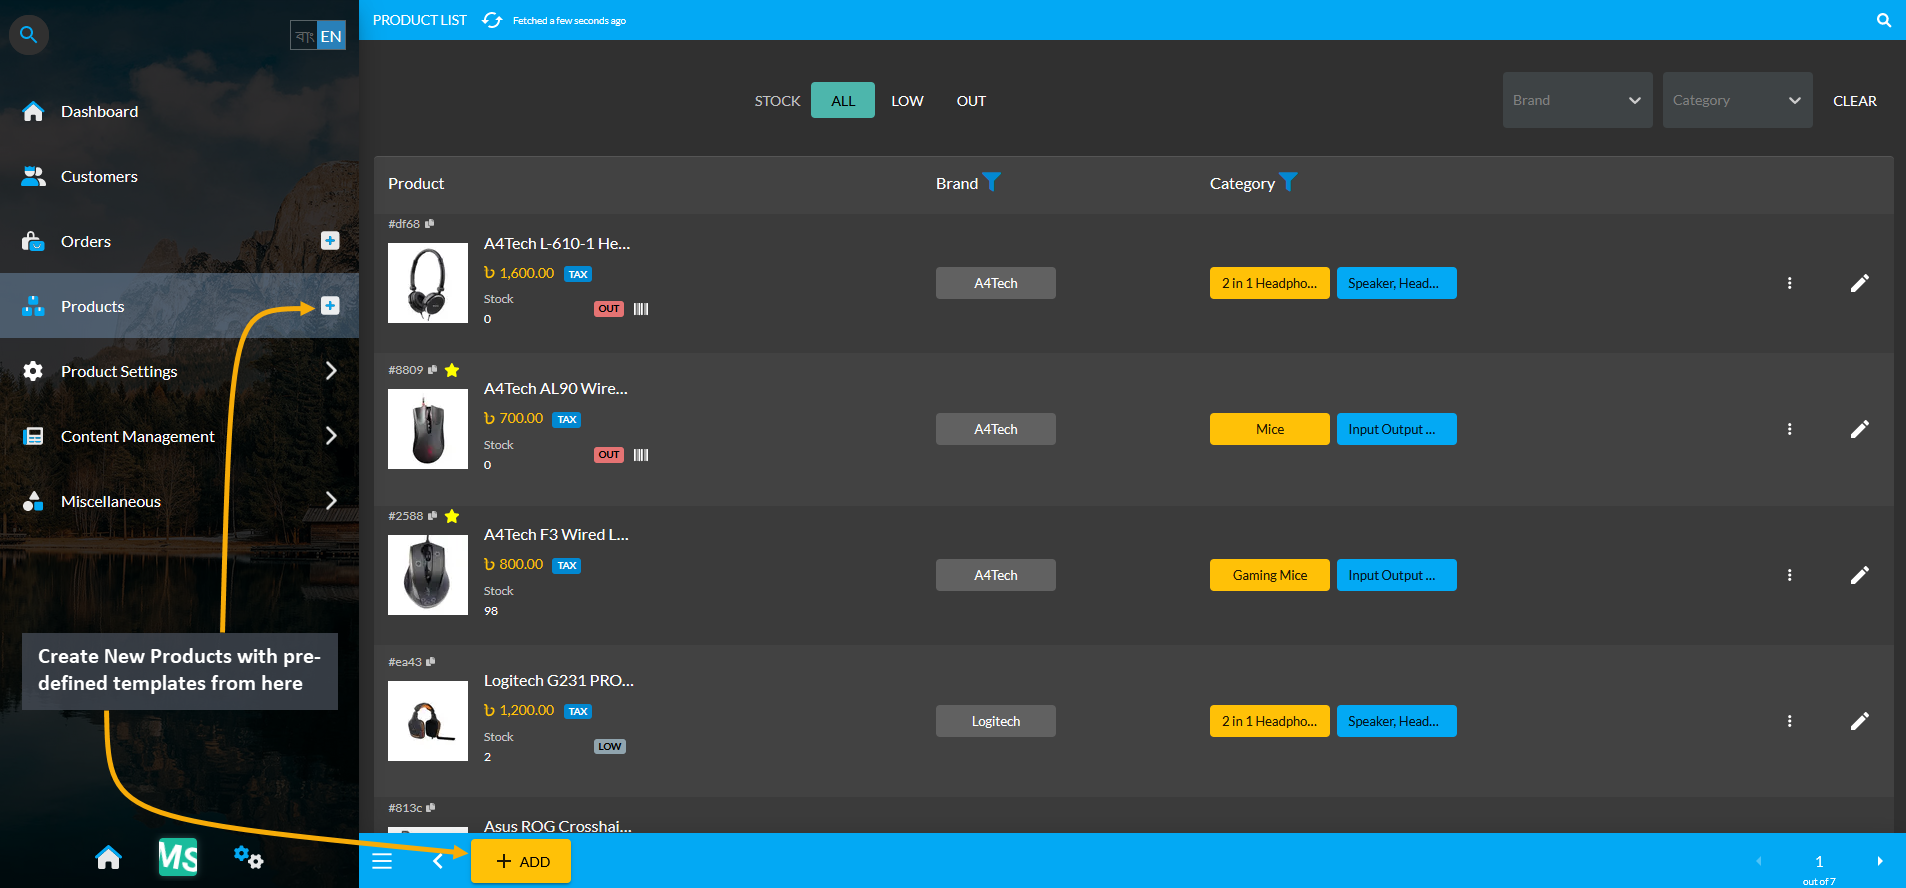
Image 3: Create New Products from Global Products or pre-defined templates by clicking on the ADD button.
There is a Search box in the search page, where typing generic Product names will bring results of the Pre-defined Product Templates if they are already in The Website. Select the target Product that comes up within the search box results. Click the Select button for the target Product that will redirect to a pre-defined Product information page. In this page, the selected Global Product template will have names, attributes, and images already filled out.
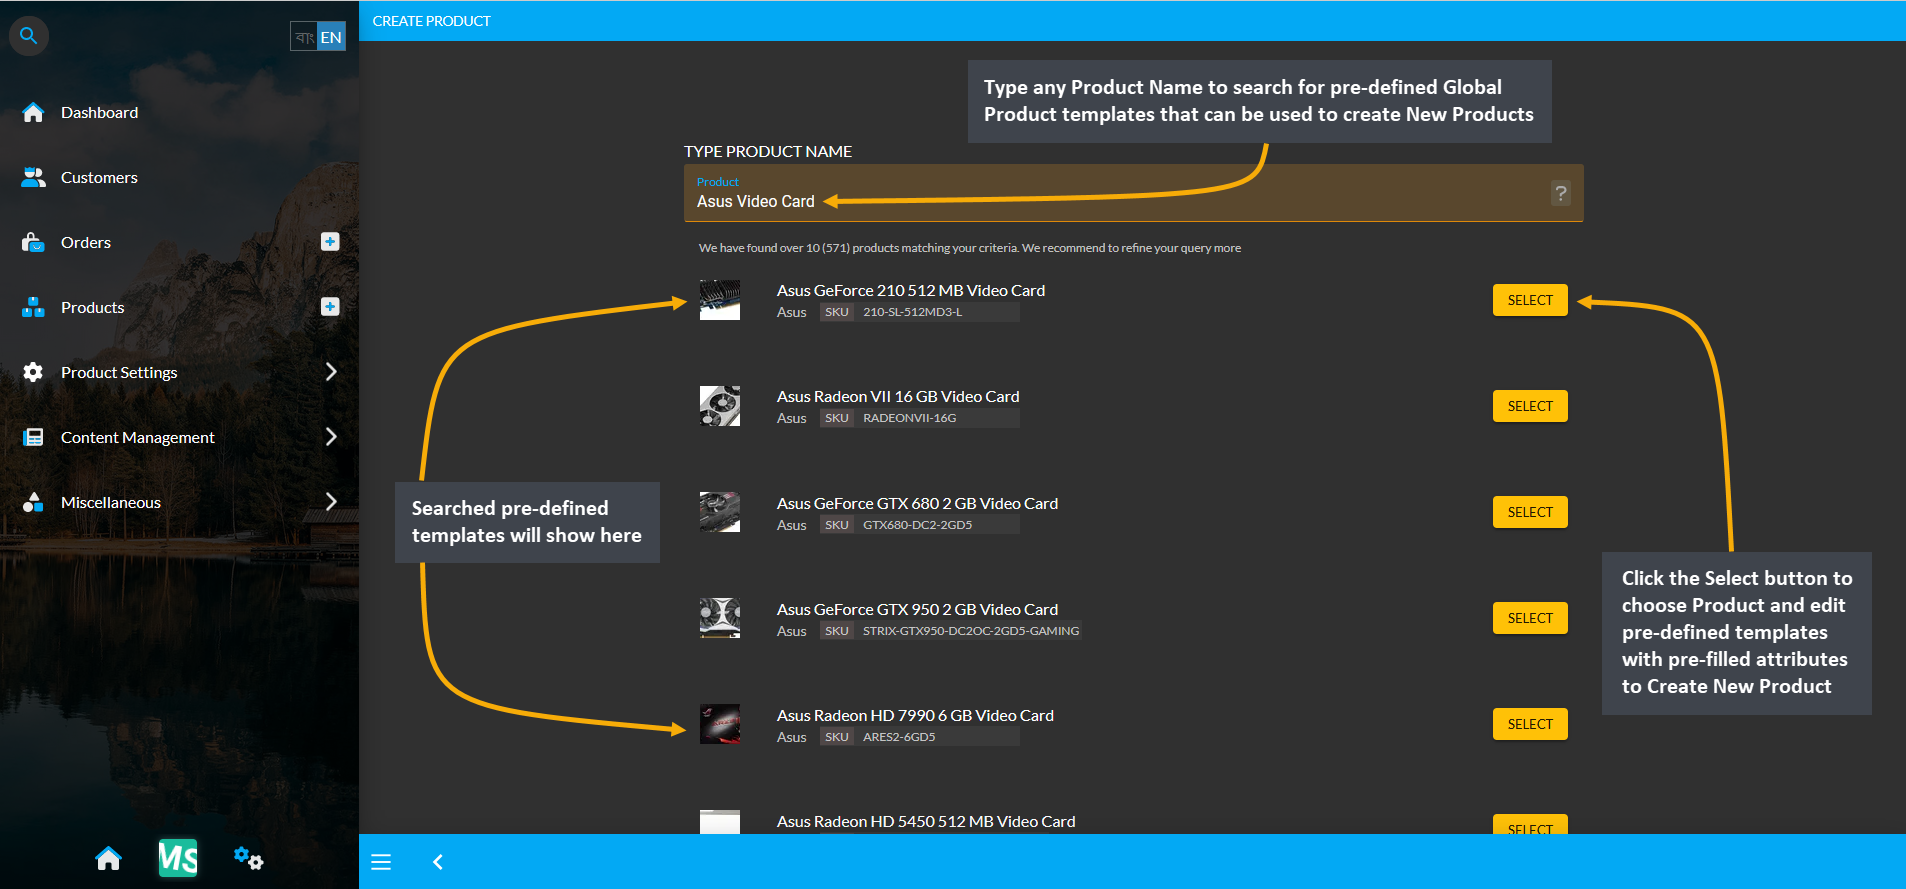
Image 4: Type generic Product name in the search box and select the target Product from search results.
Even though the Pre-defined Product Template will have pre-filled Product name, category, images, and attributes, other details like prices, warranties, Product stock model, Product condition, stock count and stock for sale needs to be filled out. Hit the Submit button to complete creating a New Product for the Shop or the Website.
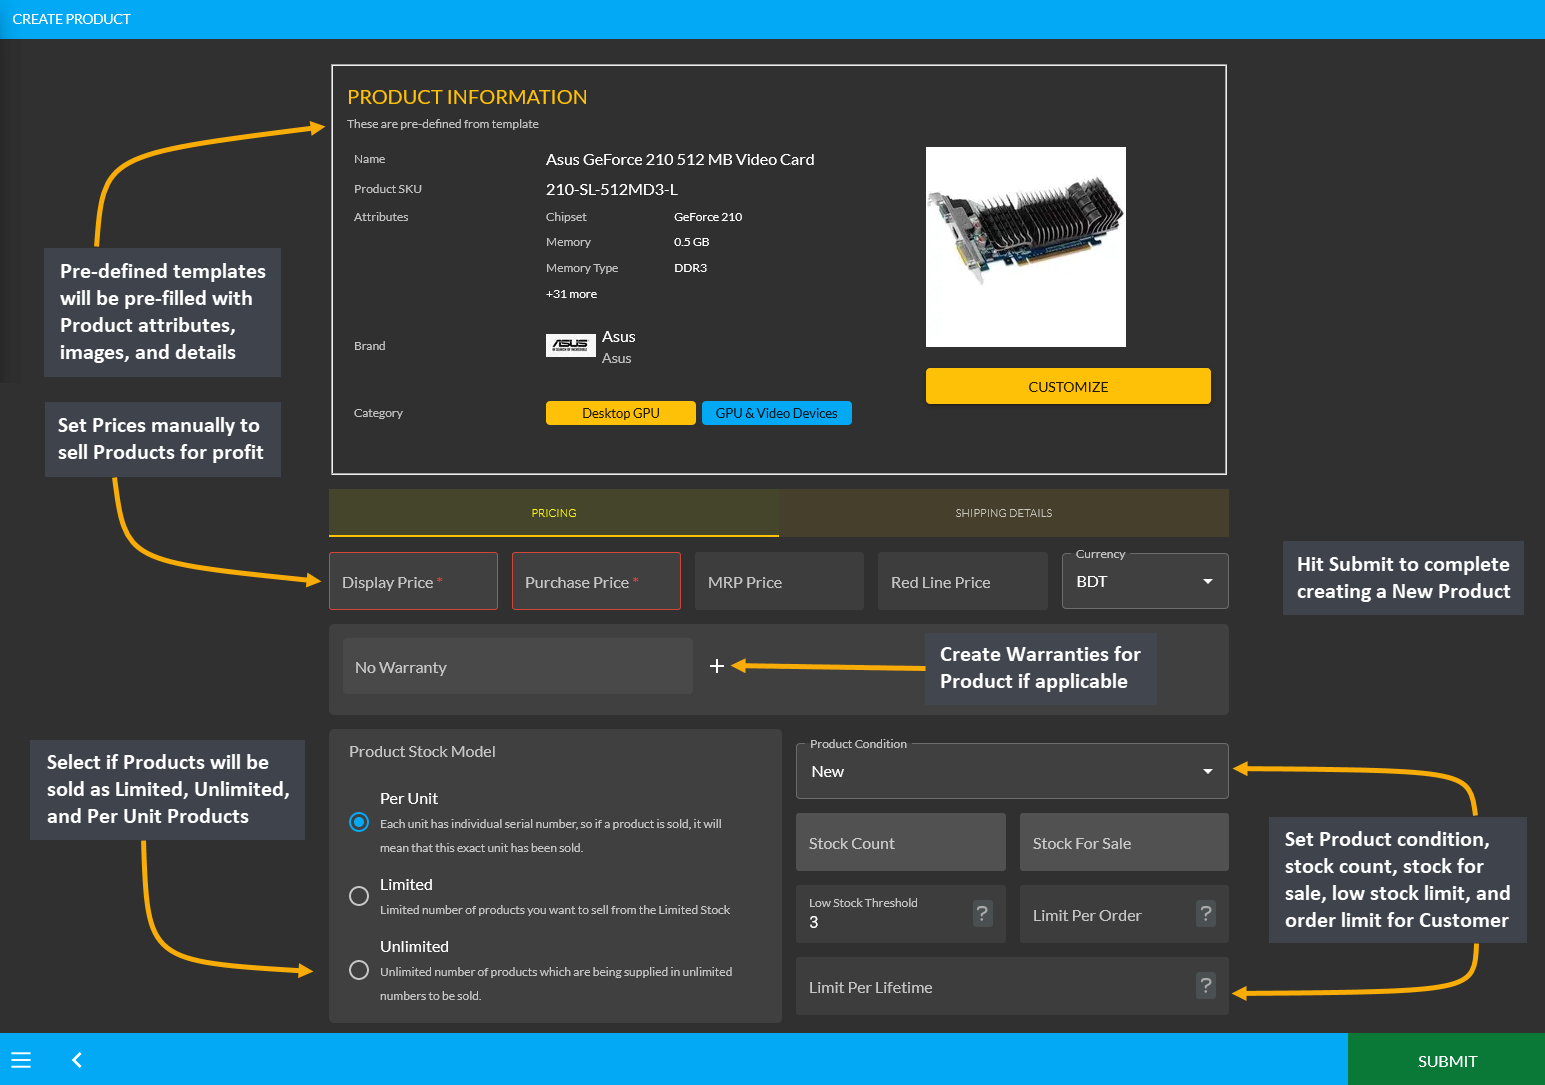
Image 5: Fill details in pre-defined templates information page and hit Submit to create New Product.
15.1 - Product Creation Template Types
Learn More about how to search for Products and create Products using pre-defined templates or create Custom Products using different templates.
New Blank Product Template
A New Blank Product Template will let the tenant user create a Standalone Product that will have no relation to the Global Product templates. When choosing to create a completely new blank Product from scratch, users will be redirected to the full blank Product Template form where they will be able to add all Product information and images. Products that are not on Global Product list can be created using this template.
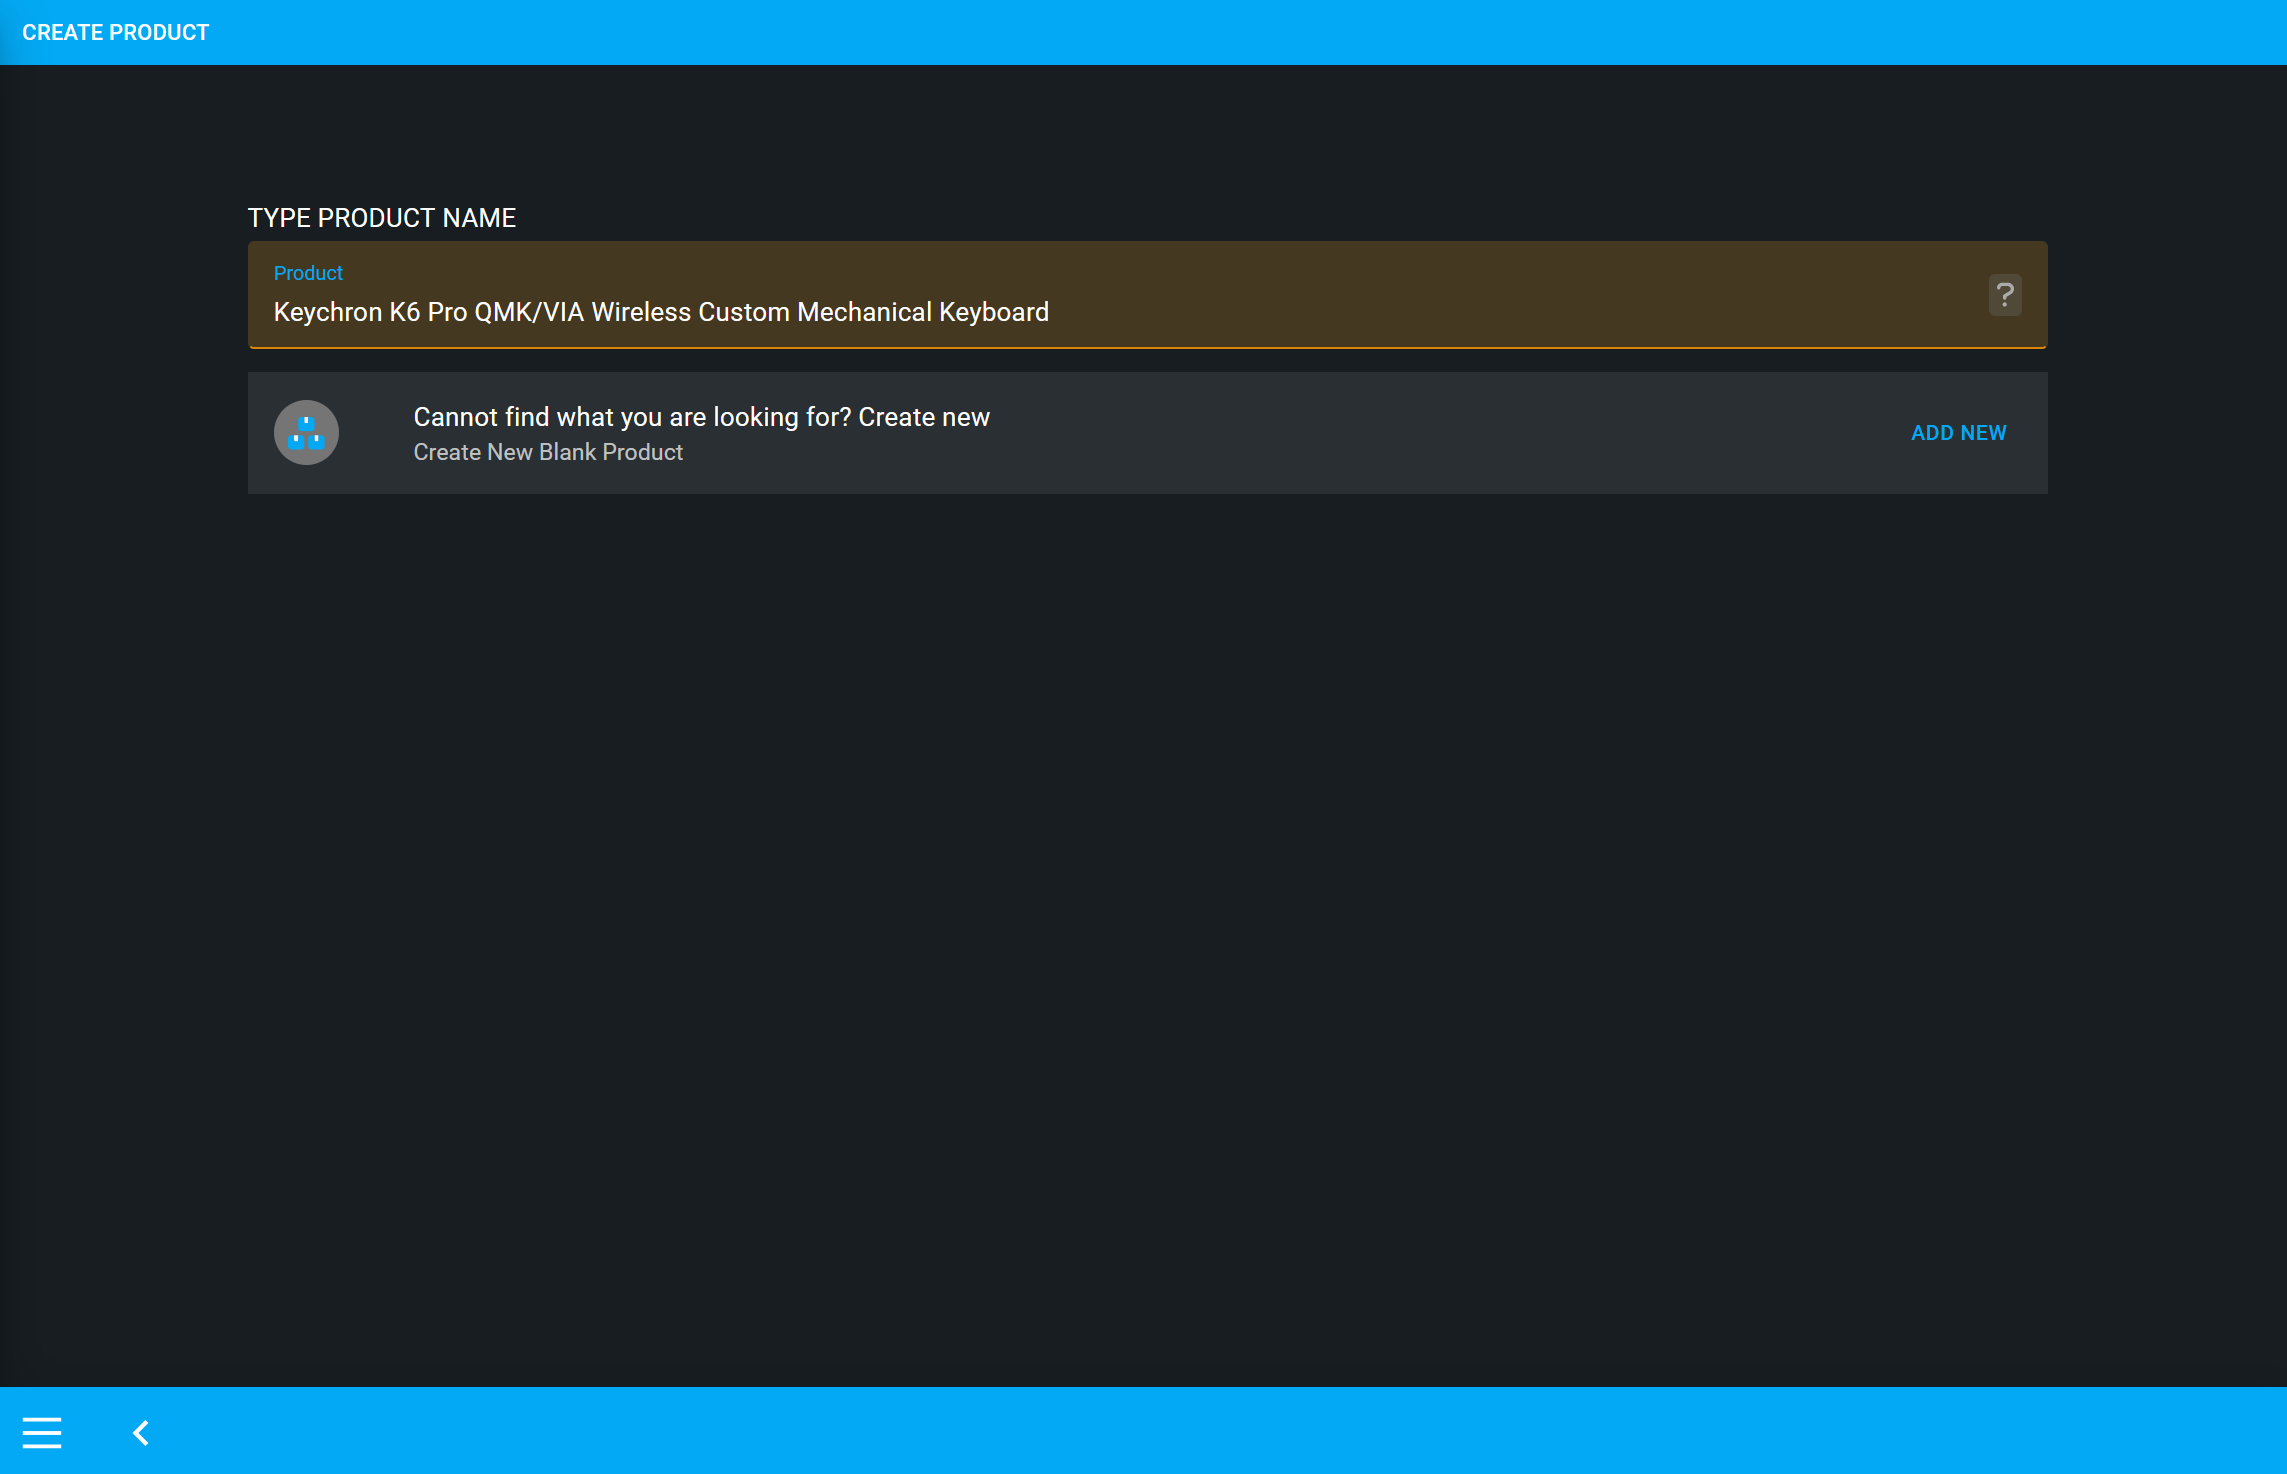
Image 1: When creating a new Product, users will be redirected to the full blank Product Template.
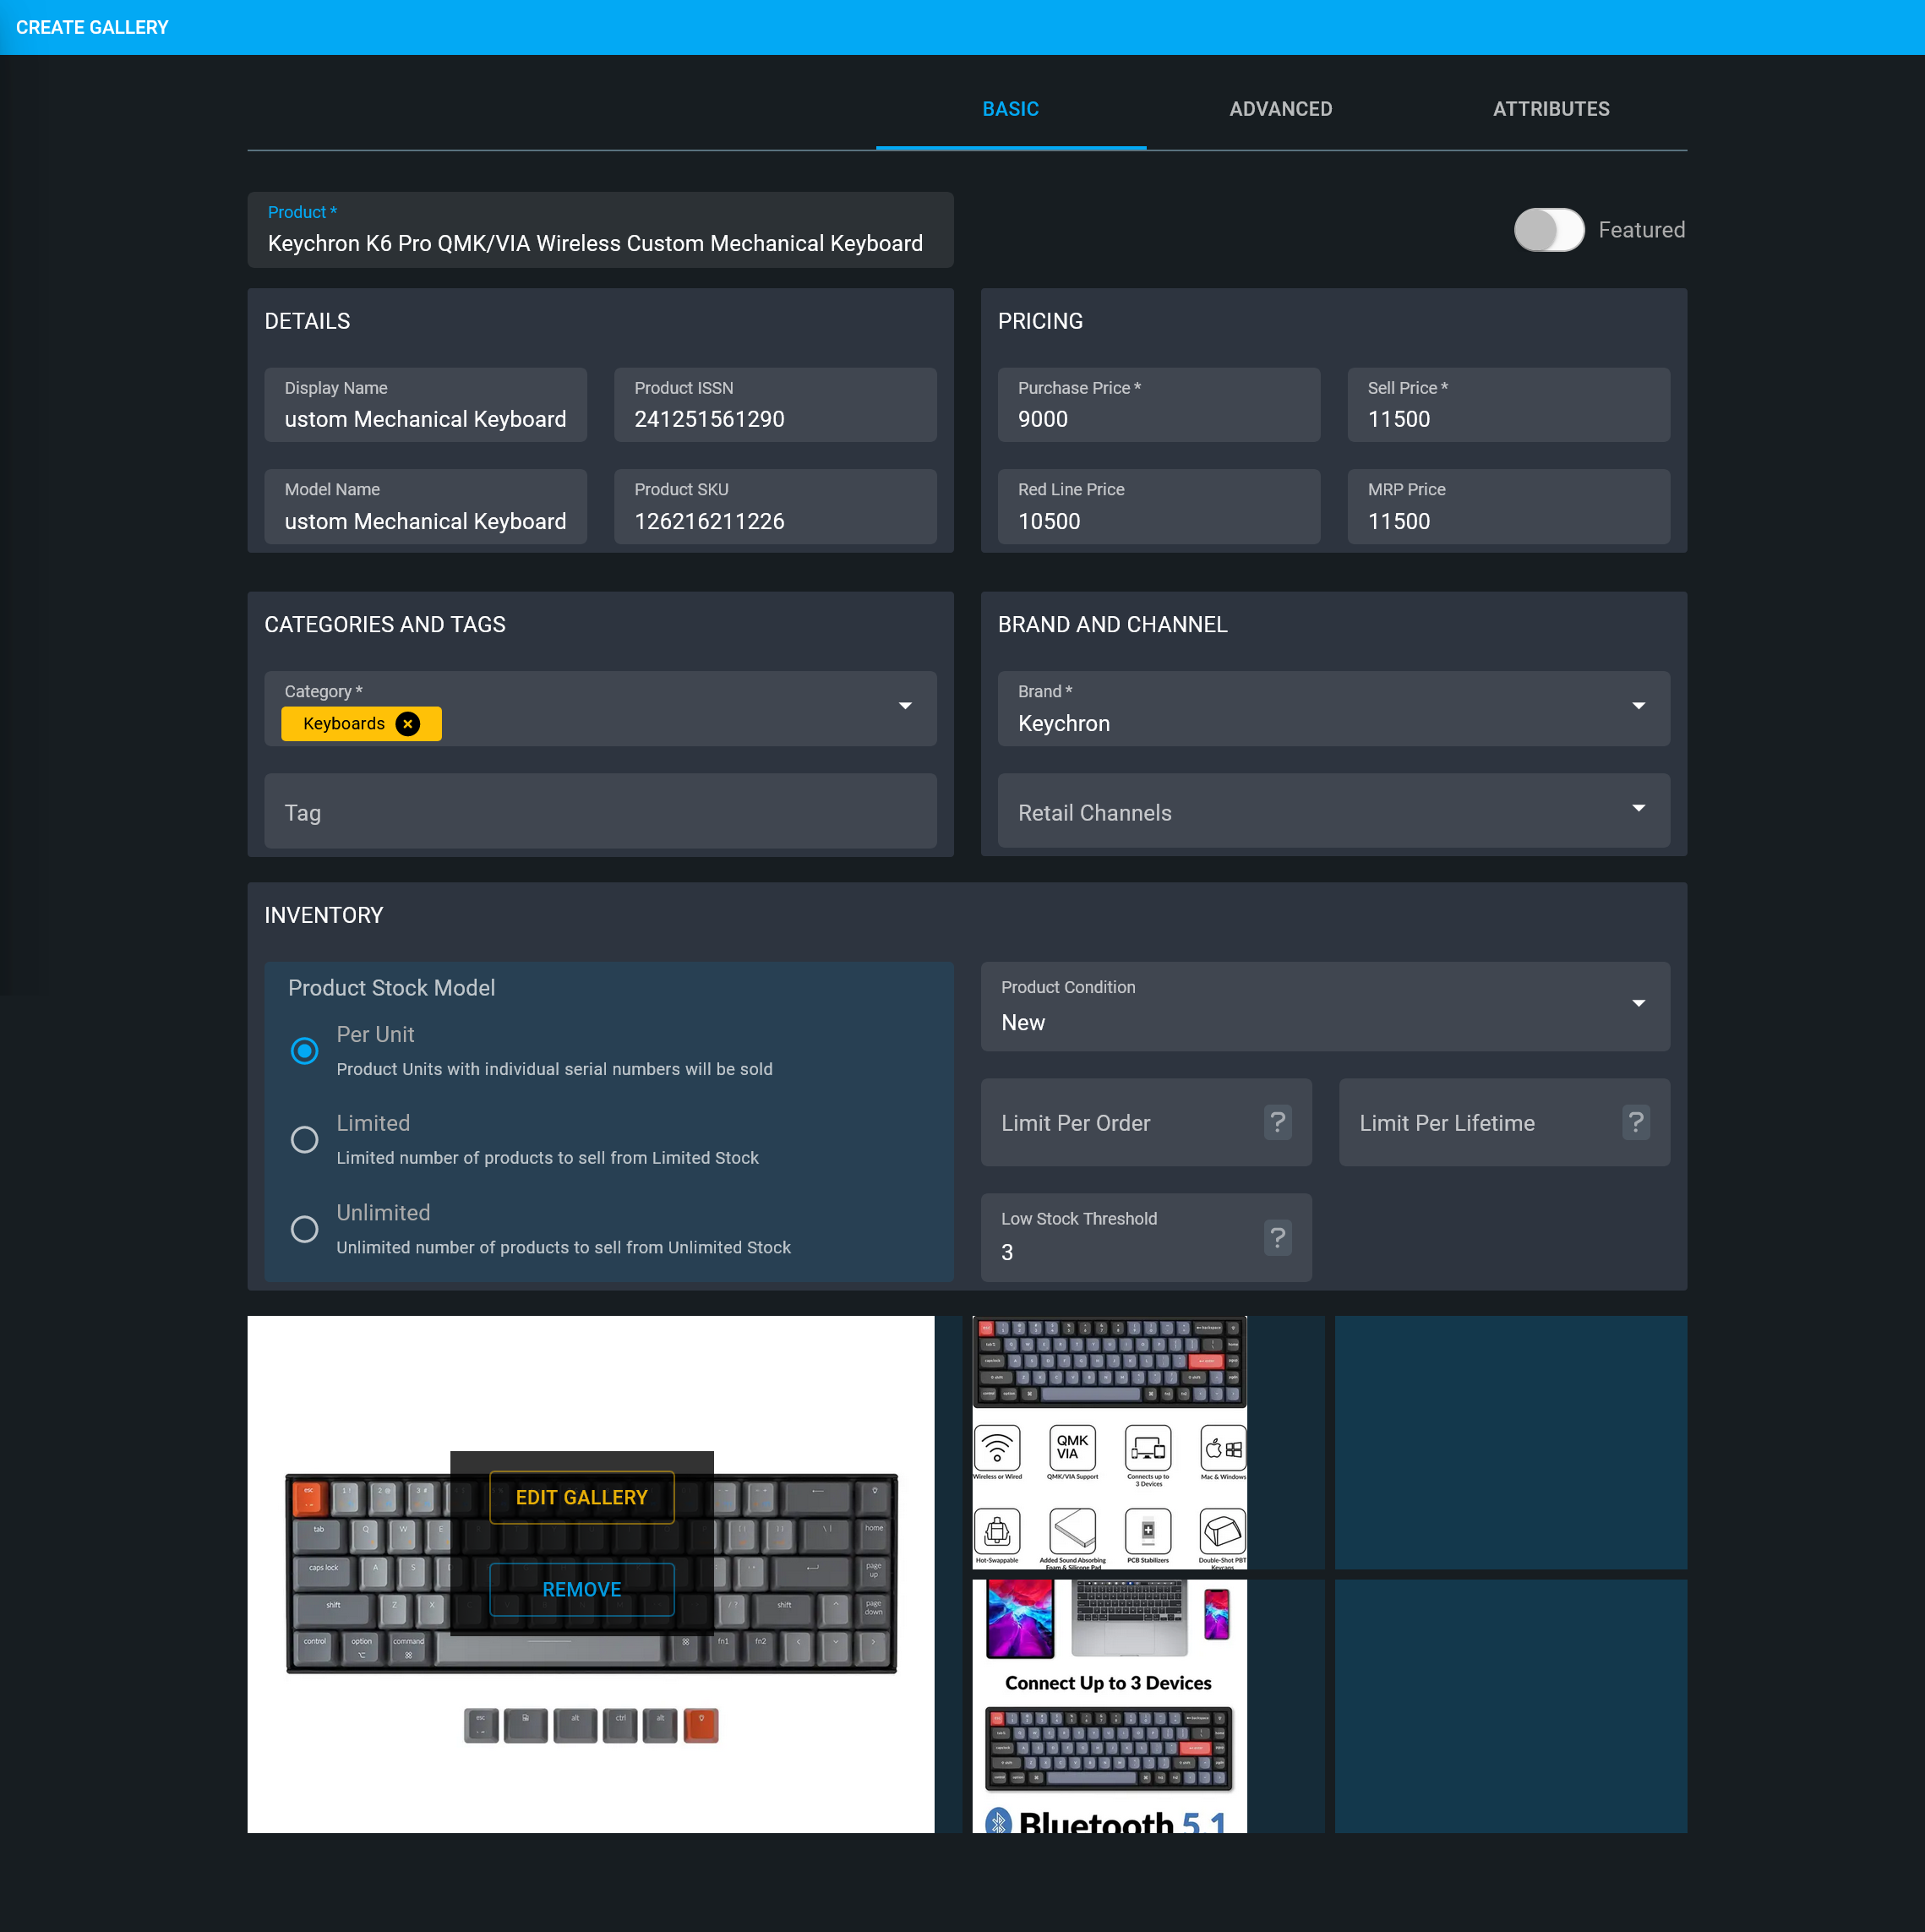
Image 2: Products that are not on Global Product list can be created with New Blank Product Template.
Global Product Template
A Global Product Template will let users create a Product directly from the list of Global Products. They can easily search for Branded Products on the product search bar and select the Global Product with pre-filled information. All they have to do is insert Product names and prices to enlist them on the tenant Product List. This is advantageous for Sellers as they will not have to perform data entry for Branded Products as most of them are already pre-filled in the system with details under Global Products (GP).
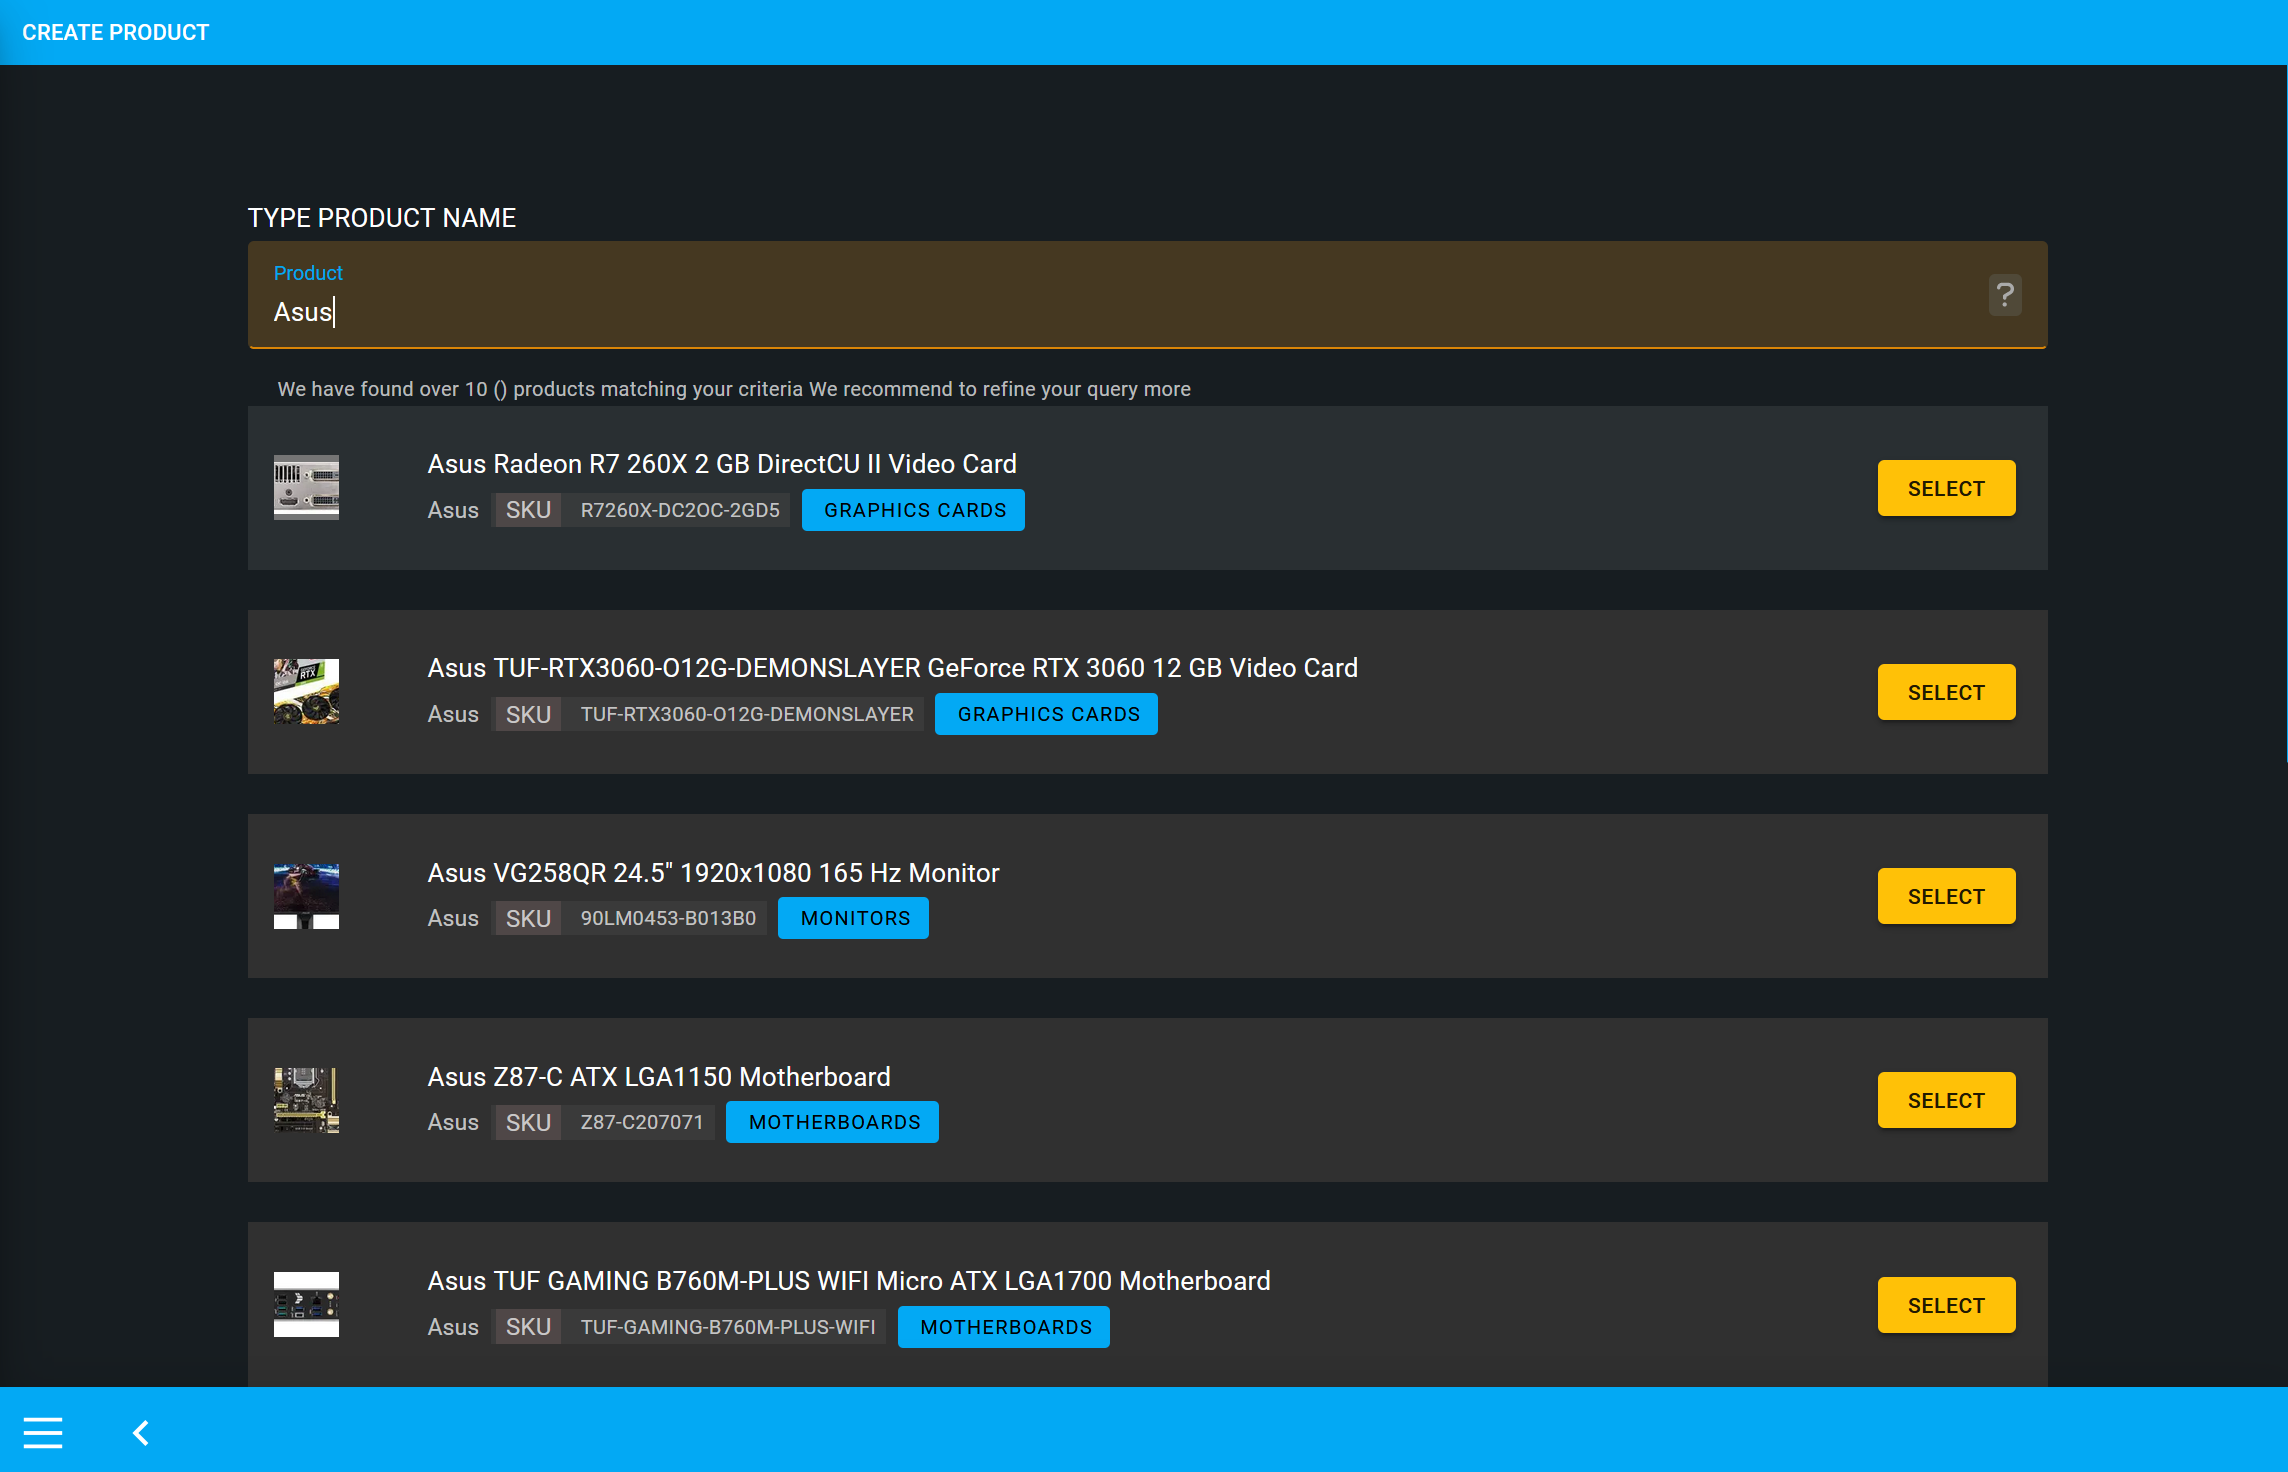
Image 3: Search for Products on search bar and select target Global Product with pre-filled details.
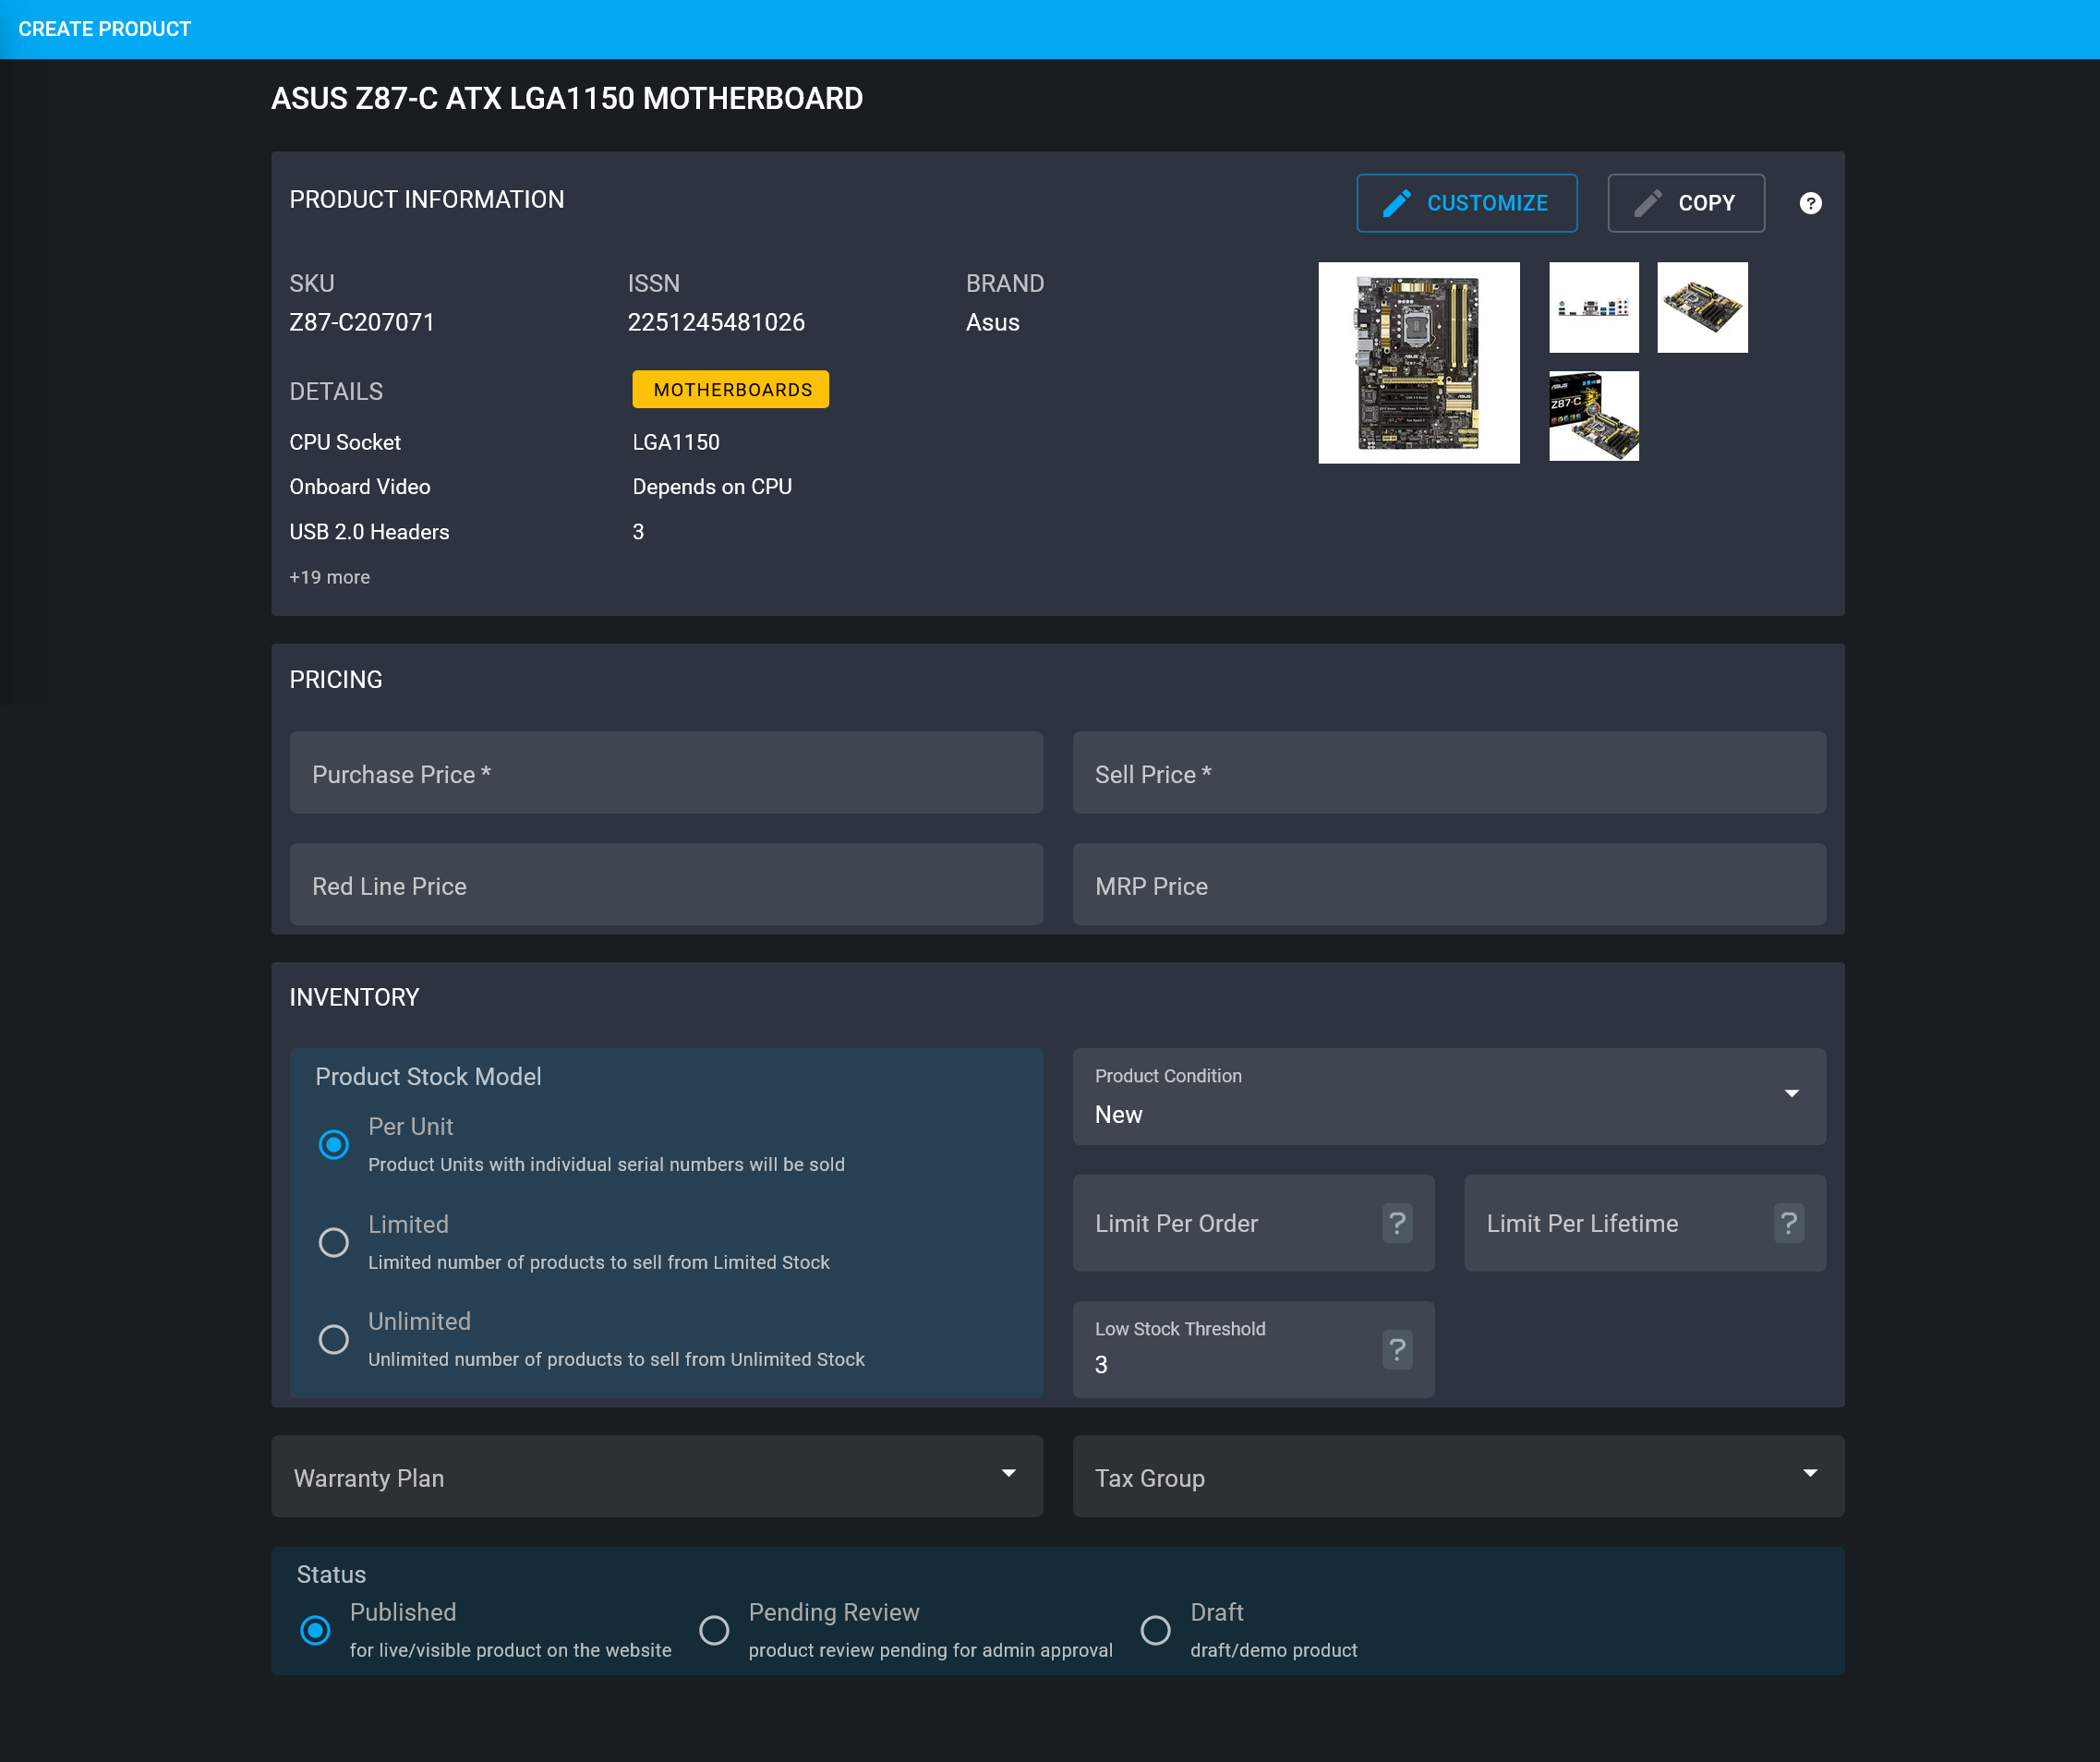
Image 4: Global Product Template will allow creatig a Product directly from Global Products list.
Global Product Template Customize
Customize option on Global Product Template will redirect to the Template Editor to allow customization of some product details, but not all information. So, if users want to customize few details of Global Product data on the template form, then they can select this option. Selecting Customize option will redirect to the full template form, but users will not be able to edit everything on it. Anything that will be changed will be saved, anything that will not be changed will not be saved for the customized Global Product.

Image 5: Select Customize to edit few details of the Global Product data on product template form.
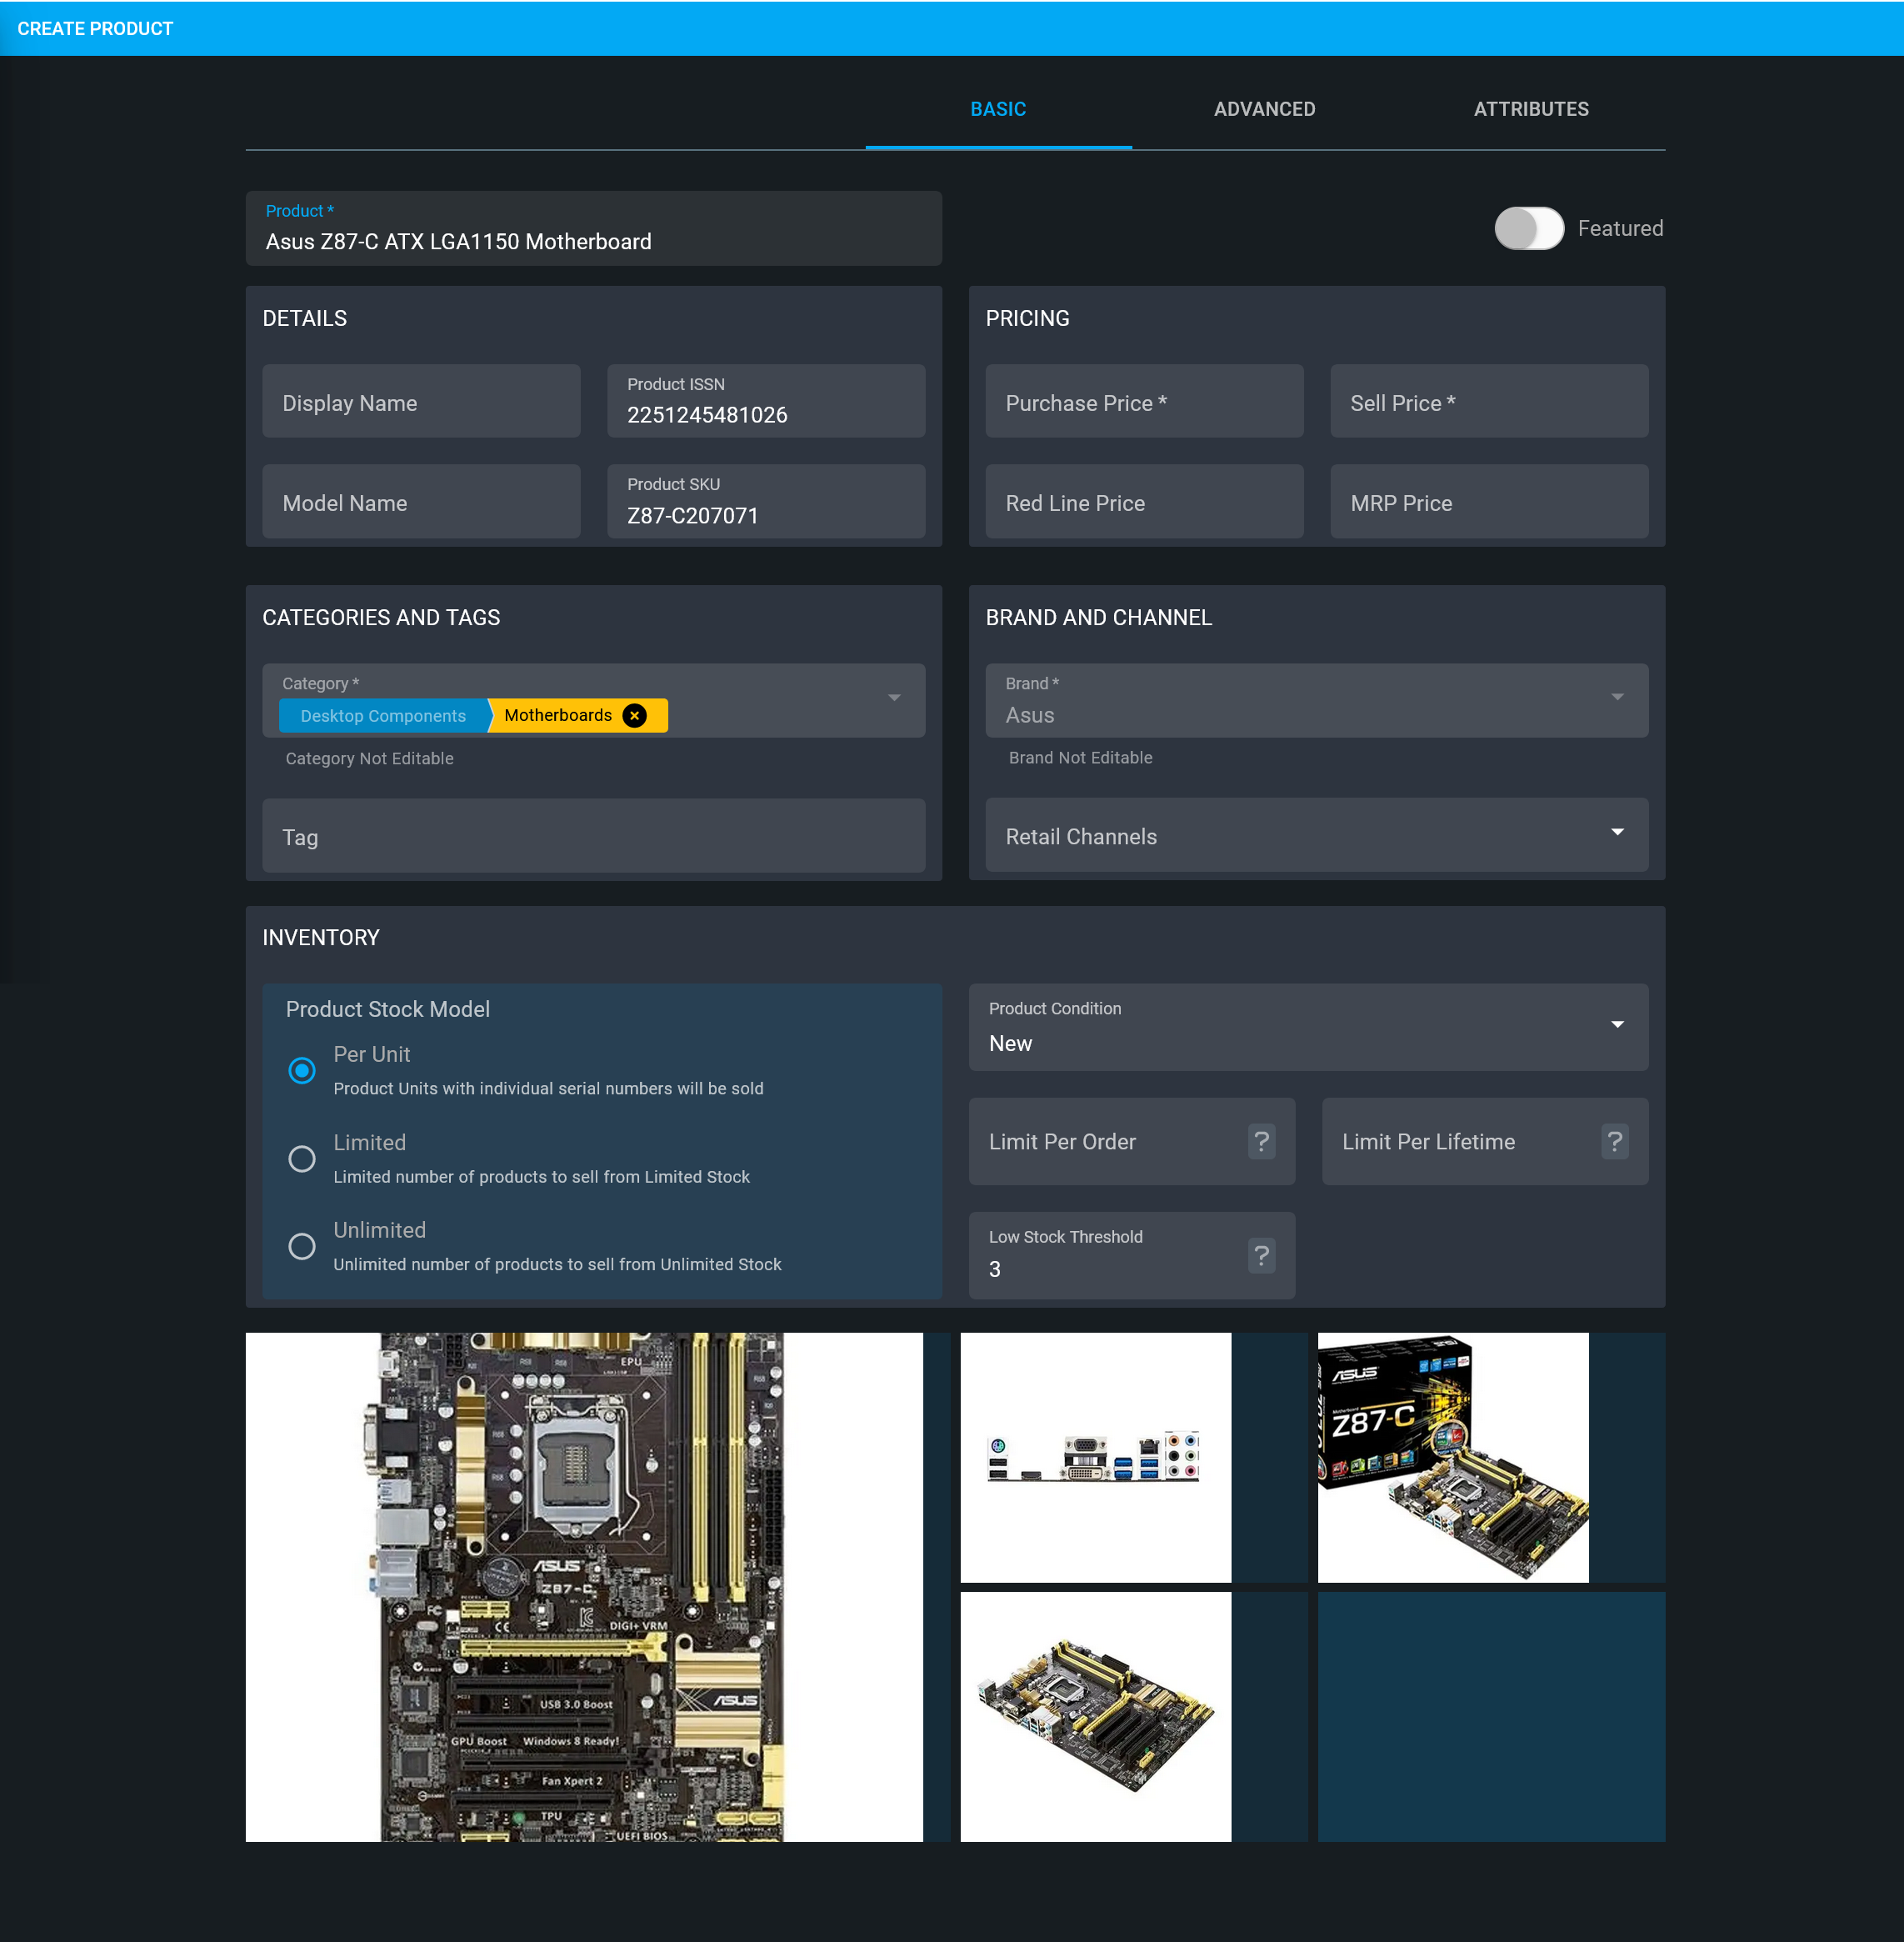
Image 6: Customize option will redirect to Template Editor to allow customization of some GP details.
Global Product Template Copy
Copy option on Global Product Template is a Detached Mode where all the Global Product information are copied from the product template. Hence, selecting Copy will detach the Global Product from the product template and make it a standalone product to edit any details and save those changes. Though product is created from Global Product, it will have no connection with Global Product, but redirect to the full form, so that users can edit all product details, images, and save everything as a standalone product.

Image 7: Select Copy to edit all product details, images, and save everything as standalone product.
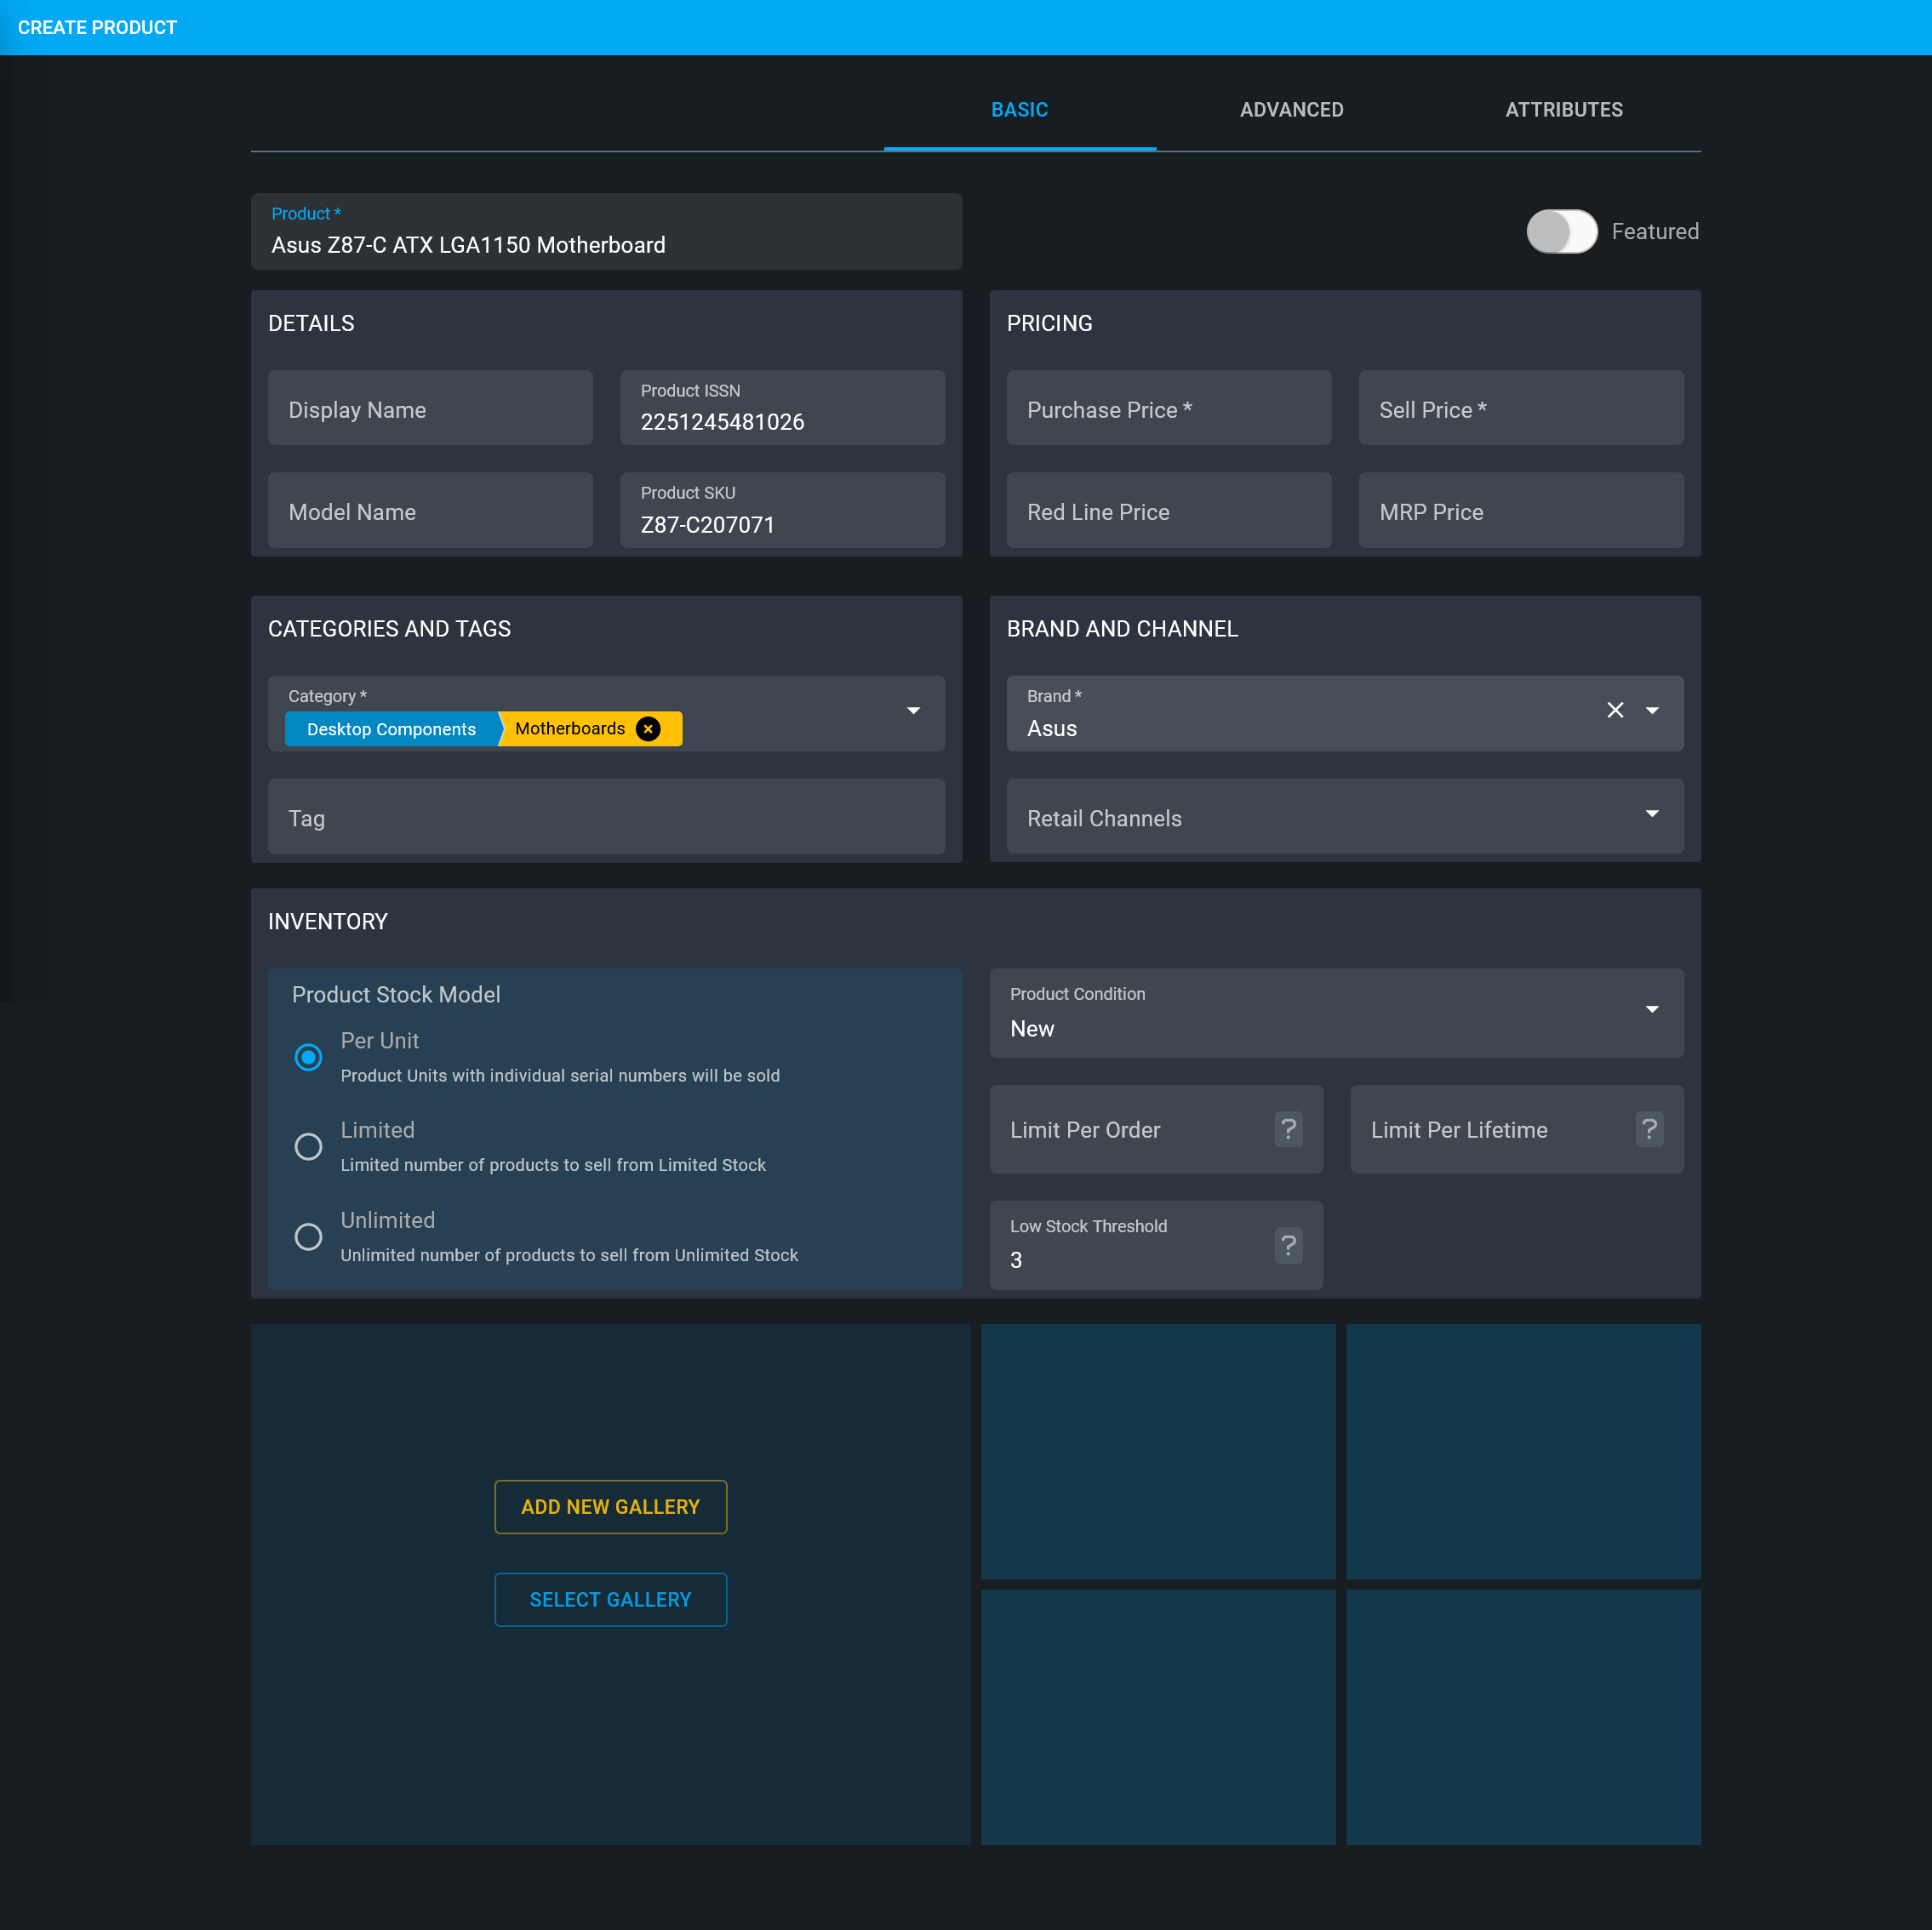
Image 8: Selecting Copy will detach a Global Product from template and make it a standalone product.
15.2 - Steps to Create New Product
Learn how to create a full Custom Product with details, images, and stock.
Create New Custom Product
If Shop Owner is searching for a target Product that is not available within the Pre-defined Global Product Templates, then they can create their own New Custom Product. For this, click the Products + tab or the + Add button that will redirect to a Product search Page. Type the target Product Name in the Search box. If the Product is not available in search results, then click the Add New button to redirect to a new page to create New Custom Product using a blank Product Template form with all Product information and images.
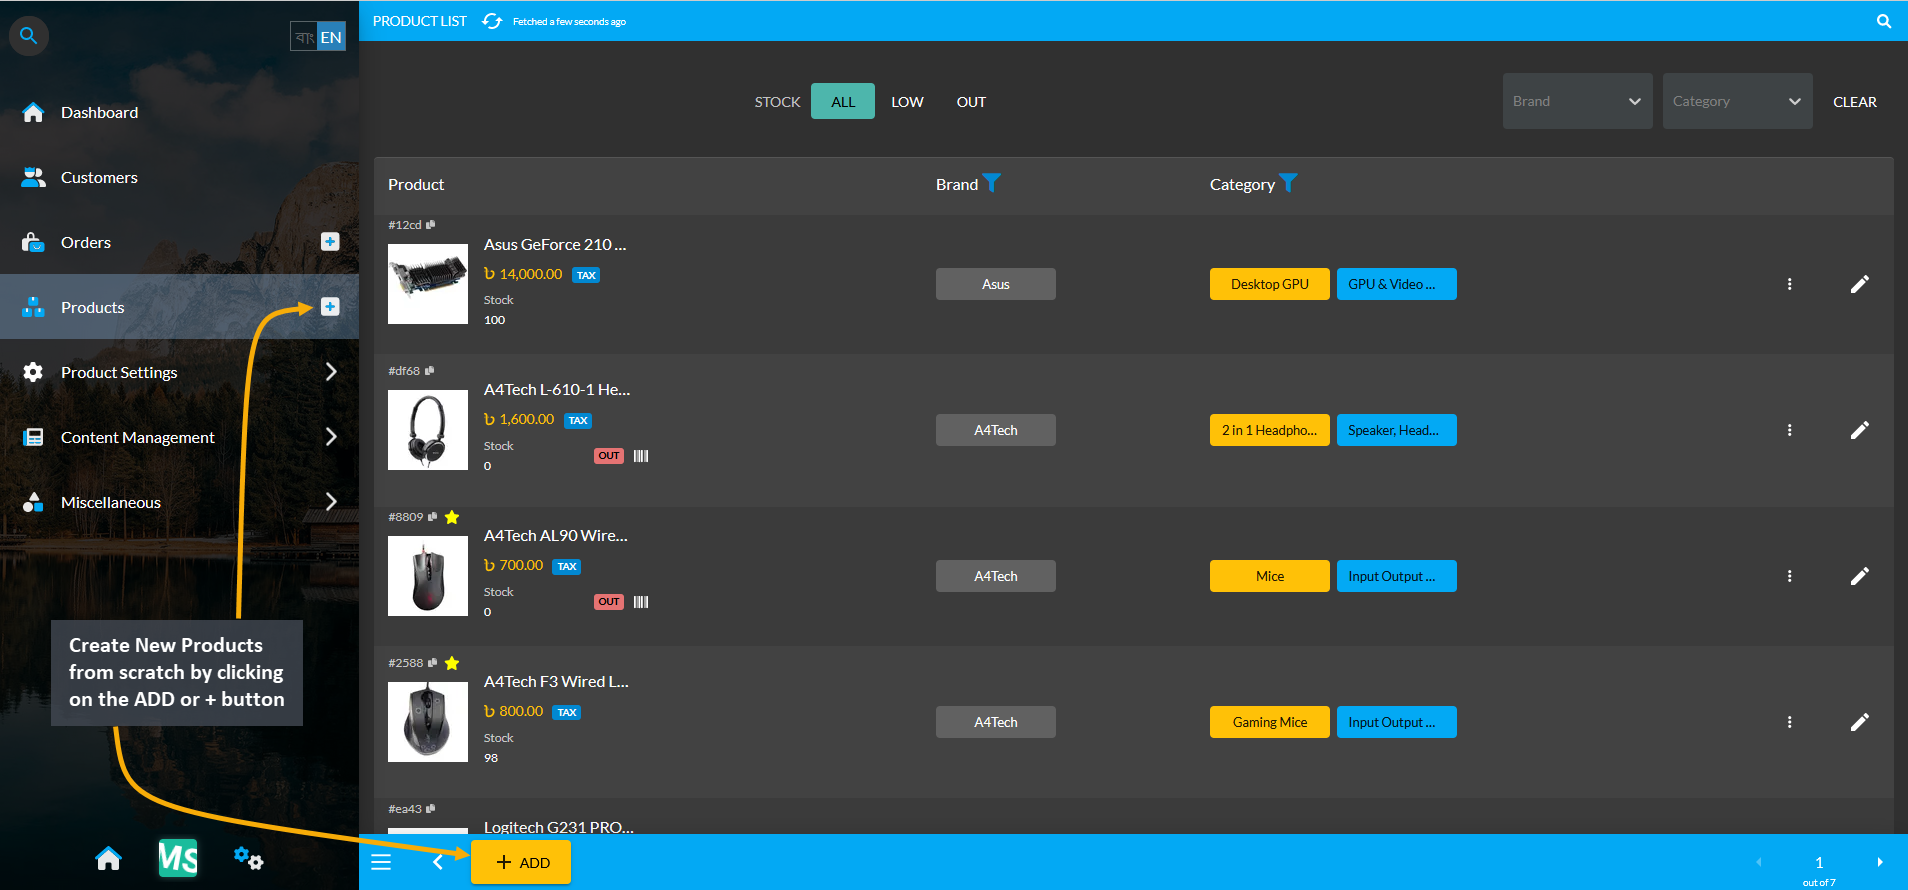
Image 1: Create New Products from scratch by clicking on the ADD or + button from the Products tab.
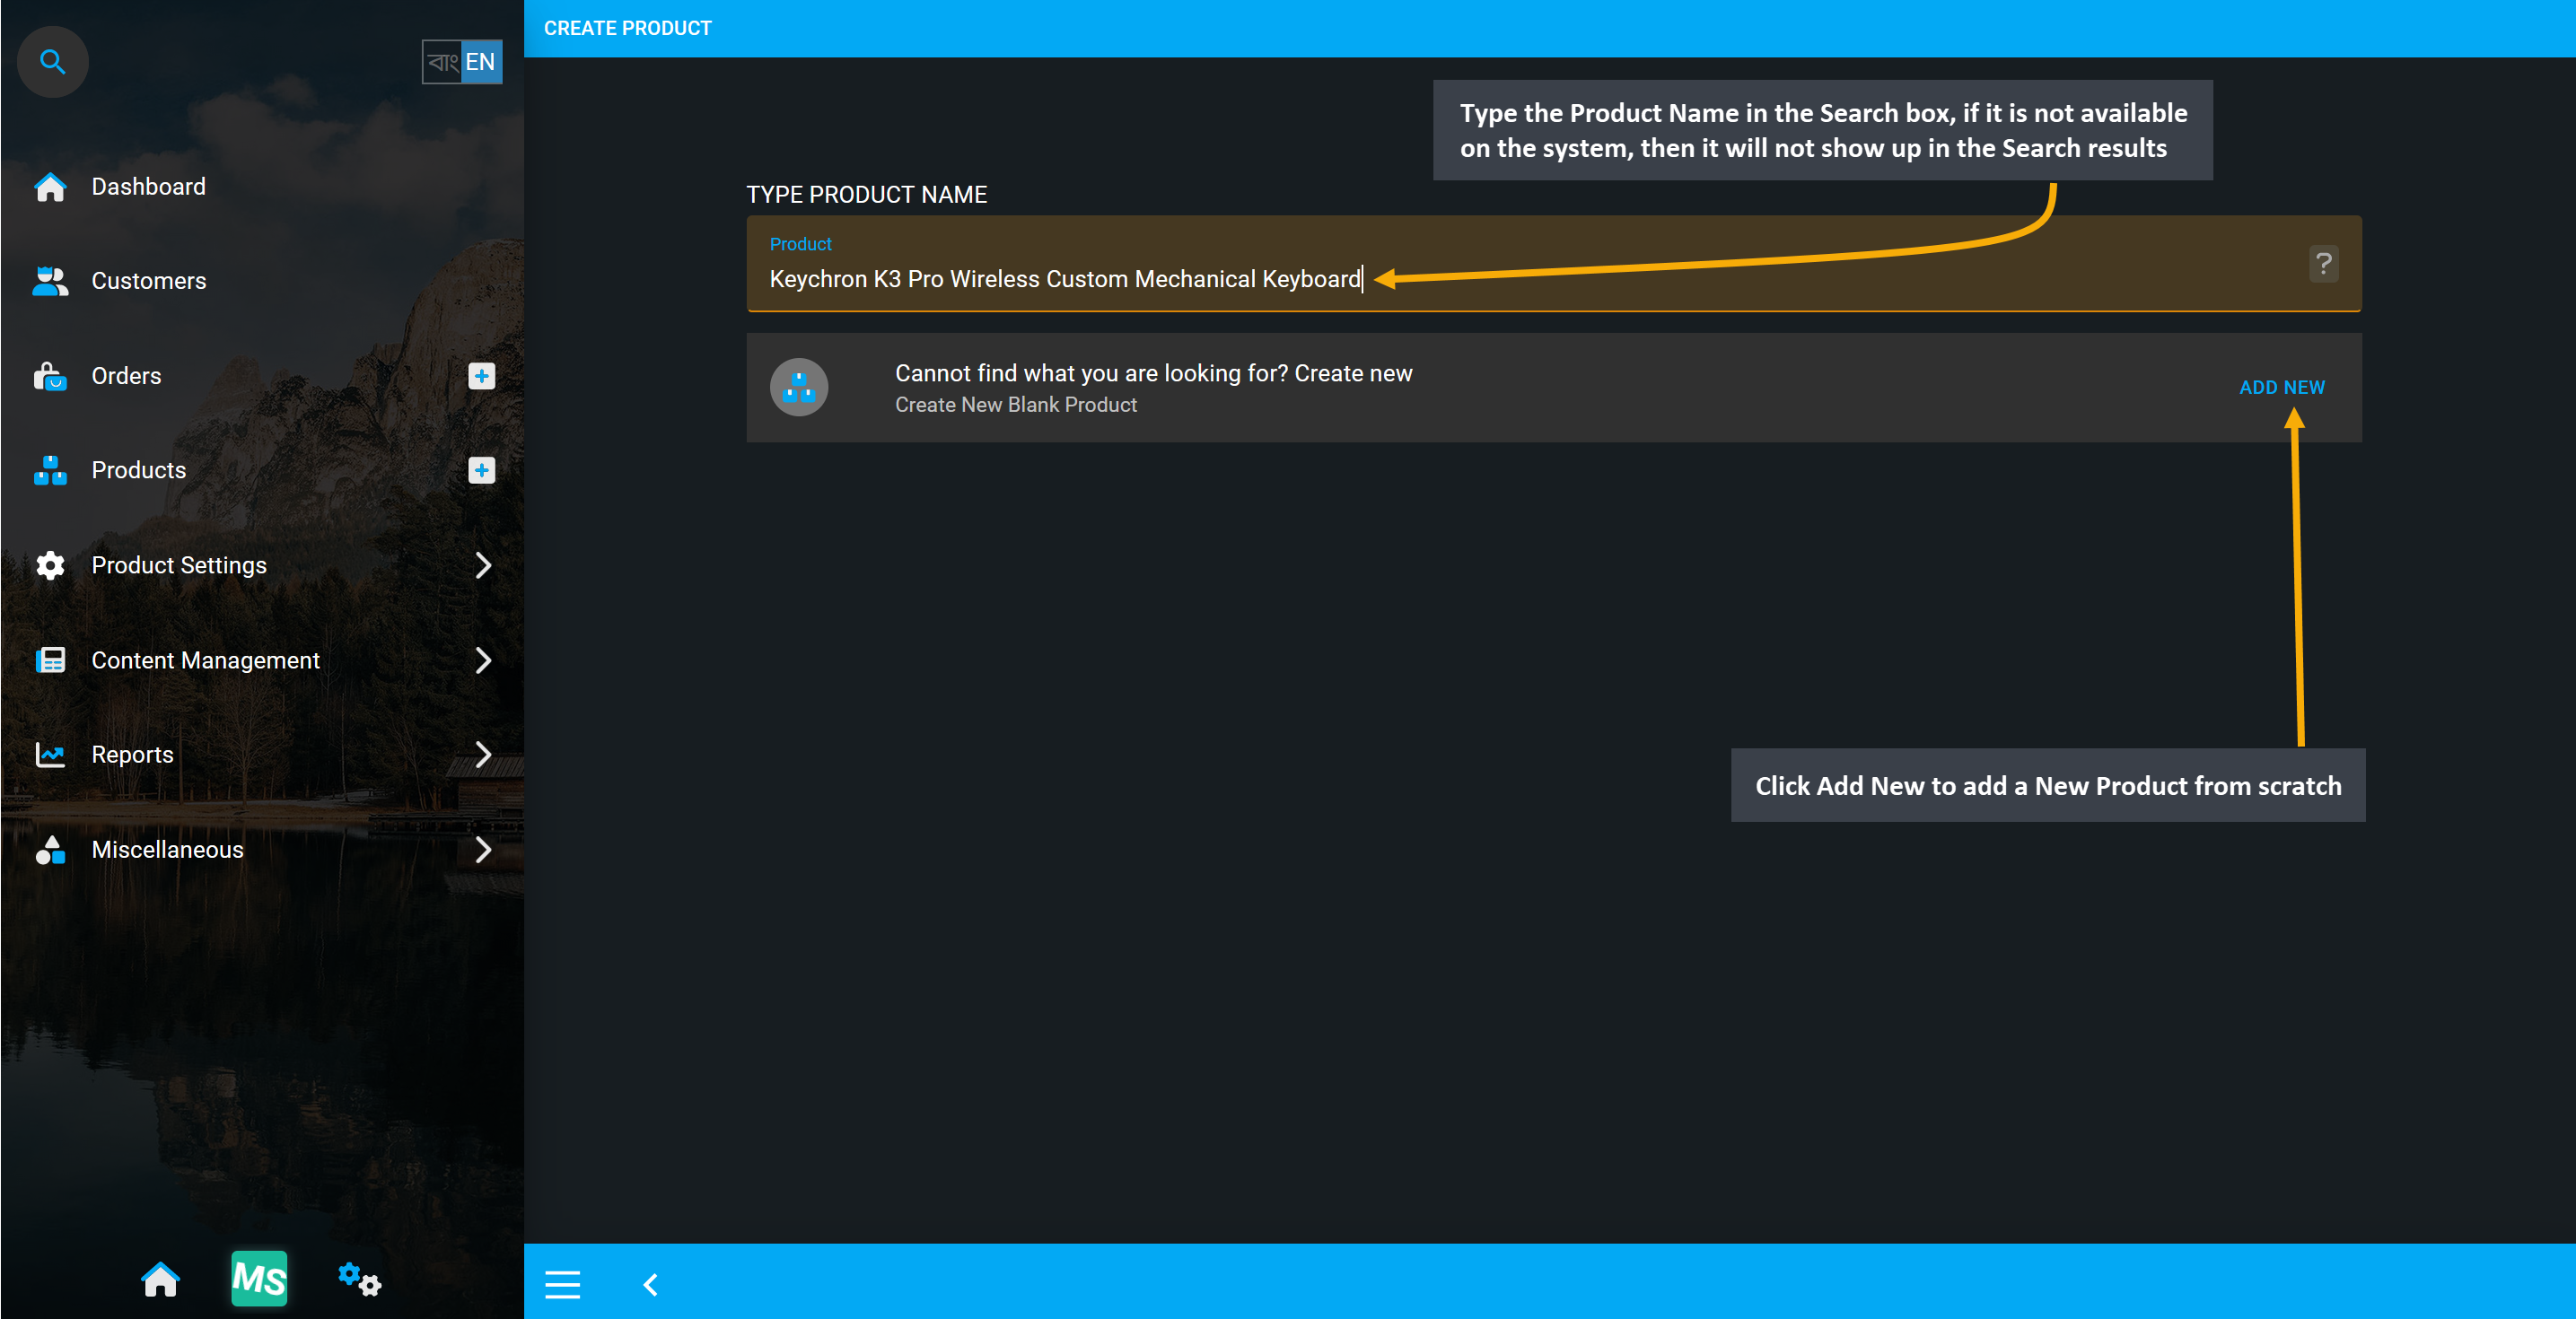
Image 2: Type Product name in search box, if Product is unavailable, click Add New to create Product.
The Create Product page consists of filling out all the main features of the Product i.e. Product Name, Display Name, Model Name, Product ISSN, Product SKU, Product Categories, Tags, Product Purchase Price, Sell Price, Red Line Price, MRP Price, Brand, Retail Channel, Product Gallery, Product Stock Model, and Inventory settings.
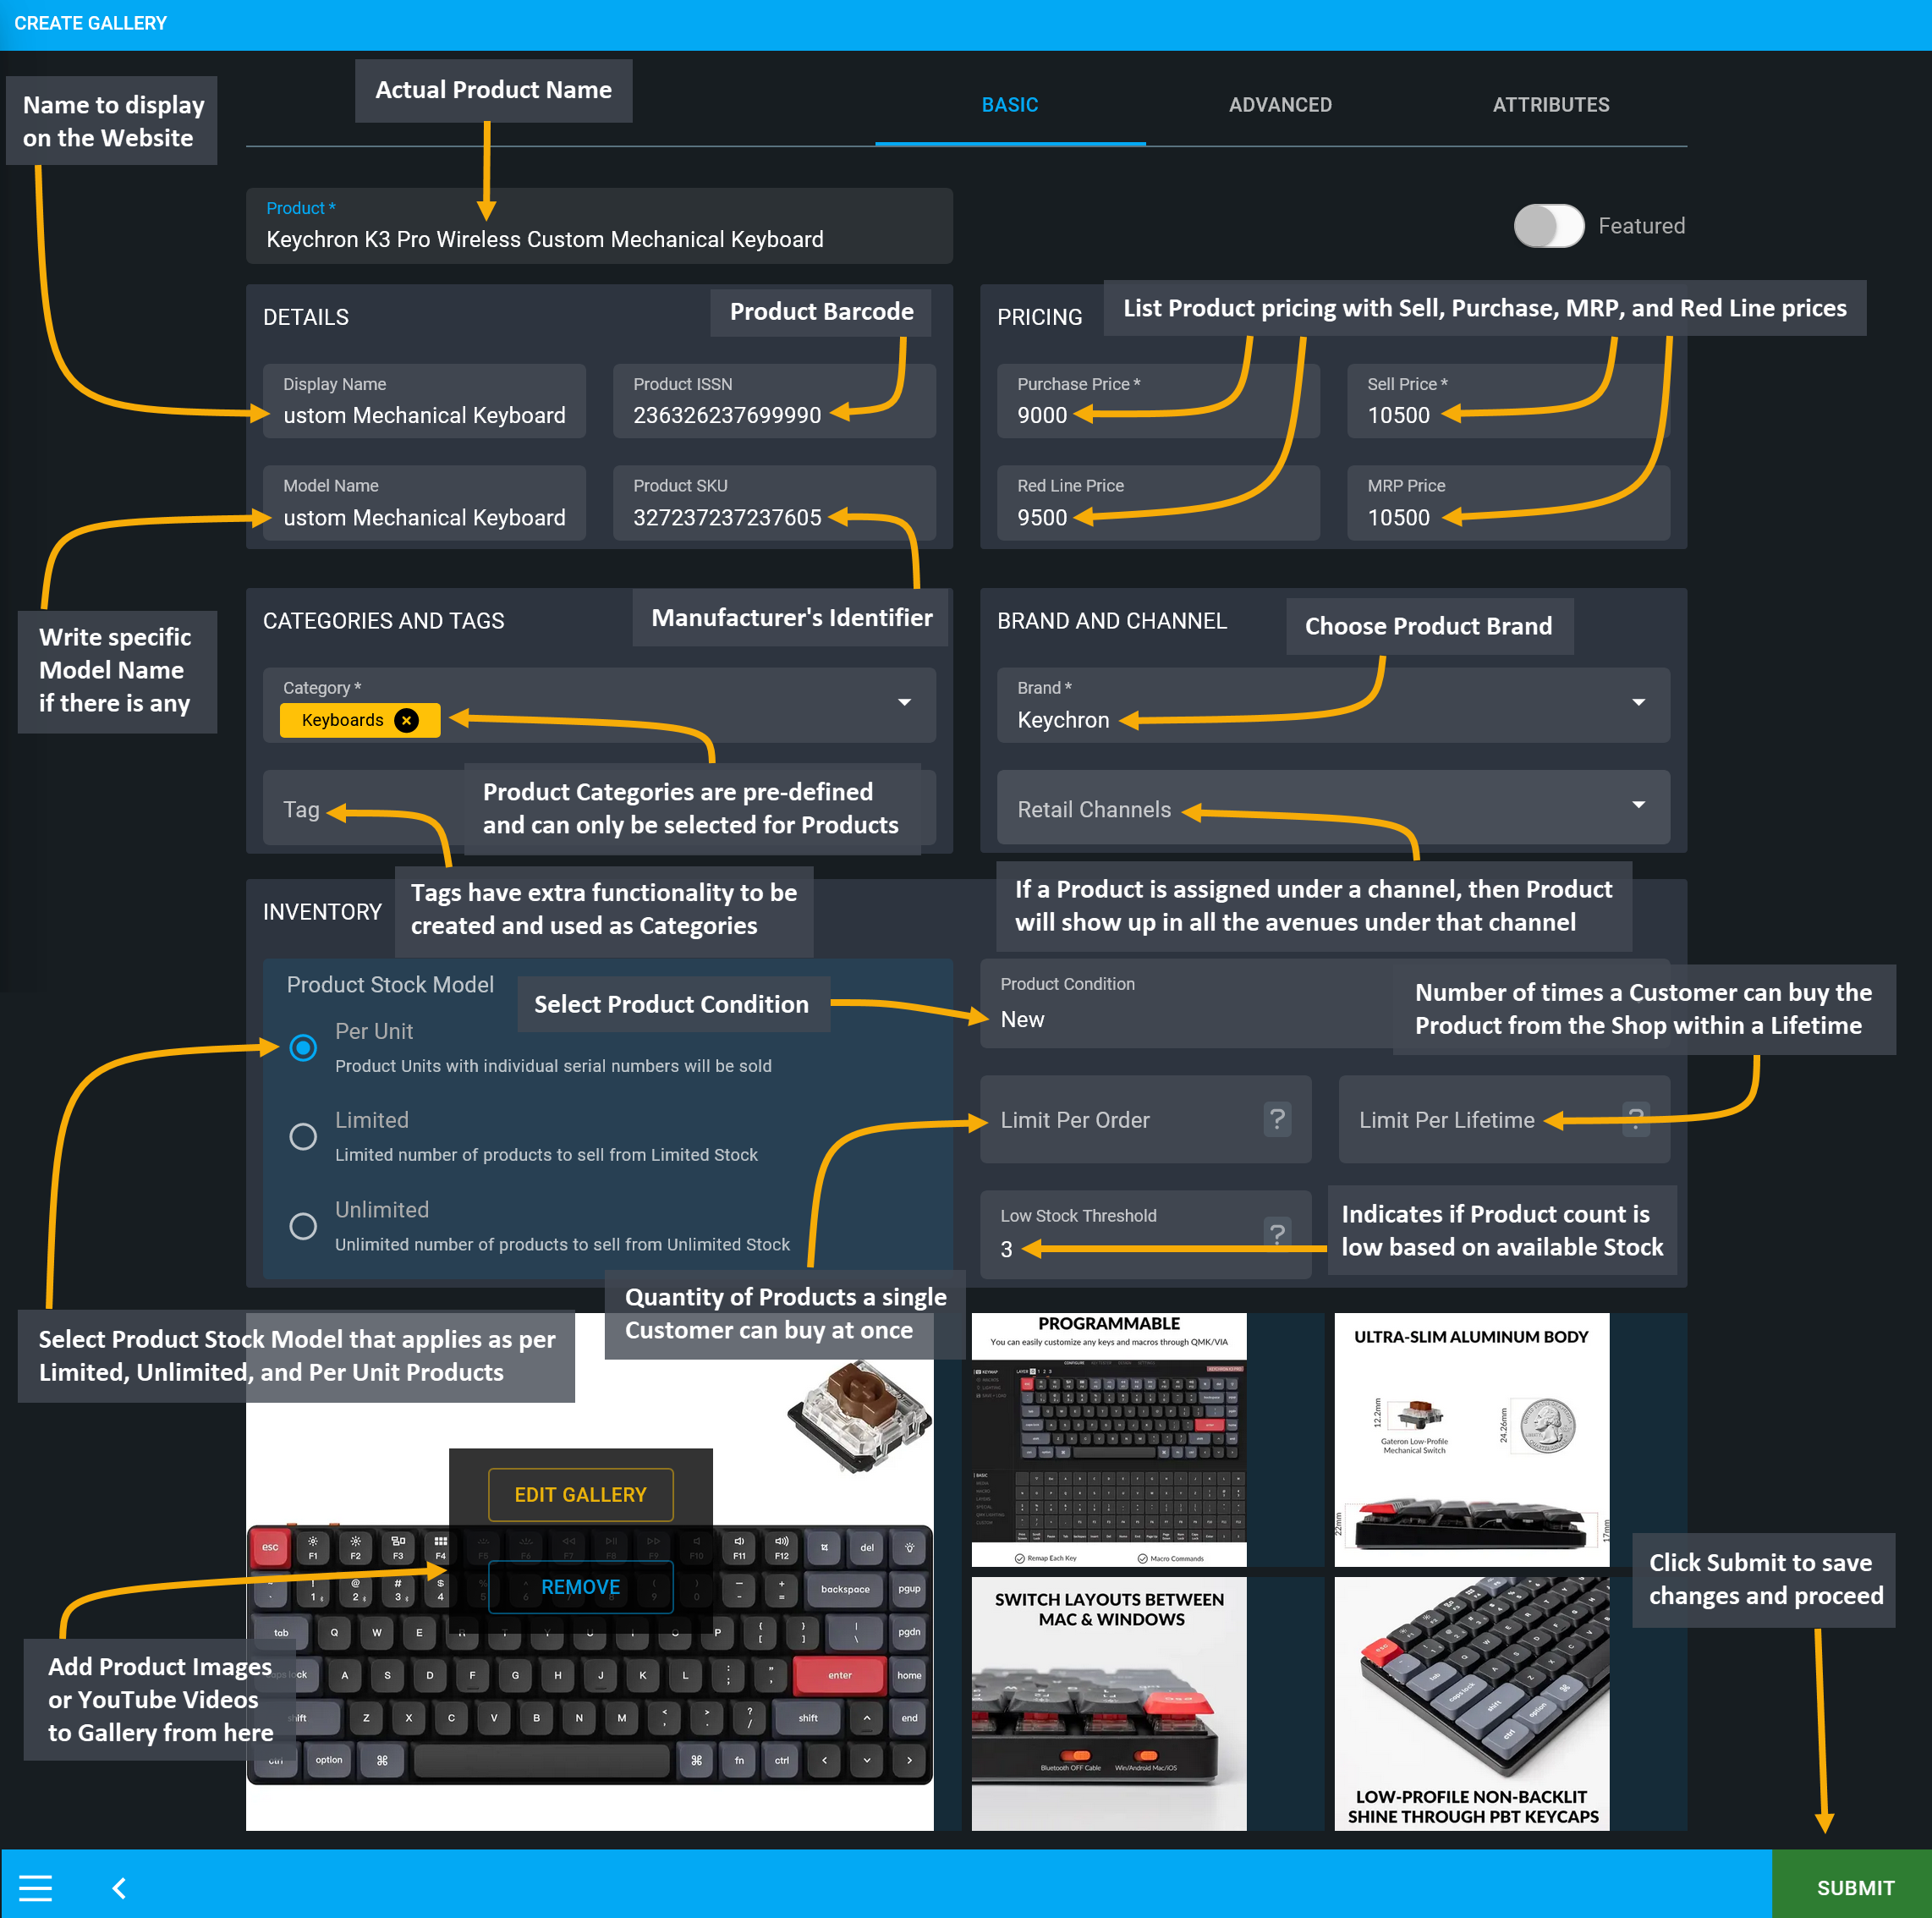
Image 3: Fill out all Product details, features, summary and attributes to create a Custom Product.
Product, Display, Model, ISSN, SKU, and Pricing
To manually create a New Custom Product from scratch, fill out the details like the Product field, which is the actual product name (i.e. Keychron K3 Pro Wireless Custom Mechanical Keyboard). Create Display Name to set name for the Product that will appear in The Website. Please note that, when choosing Products from Global Products template, if Product Name needs to be edited, then it can be done from this option.
Model Name serves as particular model or series of the Product. To create a series i.e. Keychron Pro, model name can be set as Keychron K3 Pro Wireless. Product ISSN is the actual Product barcode and Product SKU is the manufacturer’s identifier, so one Product can have many SKUs. When adding any product, look up with either the Product ISSN or the Product SKU. Global Products will have automatic prefills of Product ISSN and Product SKU. On the right, set the Purchase, Sell, Red Line, and MRP Price of the Product.
Sell Price is the price that will be displayed for Customers on The Website. If Sell Price is less than the Red Line Price, an error message will show. Also, if Sell Price is lower than MRP Price, then a discount tag will be automatically added. Purchase Price indicates the price used to purchase the Product which will have to be lesser than both Sell Price and Red Line Price, or a warning message will show. So, set prices accordingly.
The MRP Price is the official Product price that applies to net Product(s) in market. It is used for a discount tag on the Sell Price. On the other hand, Red Line Price is the price less than which the Shop Owner will not allow to sell the Product. Thus, Shop Owner needs to set these prices accordingly for Products to sell.

Image 4: Fill in Product Name, Display Name, Model Name, Product ISSN, Product SKU, and Pricing.
Product Categories are pre-defined which means that they are limitable, so Tenant Users will not be able to add Categories. So, they will have to use the Product Categories that are already provided in the system. If they need customizable Categories for Products, then they can use Tags as alternatives by turning on the Commerce Category as Tag option from Settings. Then, it will allow using Tags as Categories in the Website.
Tags are similar to Categories with extra functionality that can be used as Custom Categories. The system will enforce to use Categories, but disabling Categories and enabling Tags will allow Shop Owners to create and arrange their own Categories for Products in the Website Shop filter. Both Product Categories and Tags can be added to Product, where Categories will filter out Products and related Tags will show on Website.
Then, there is option to select designated Product Brand from the dropdown menu with renowned brands like HP, AMD, Asus, or Apple etc. Select a brand from the list of Global Brands for the Product or create a new Brand if the brand is not available within the list using the Add Brand option on Product creation page.
When creating a Product, there is another option to select Retail Channel, where Admin will be the default channel. Thus, if a Product is assigned under a retail channel, it will show up in all the avenues under that channel. For instance, Products will show on Facebook store if Facebook avenue is selected. If a channel does not have any avenue (Commerce, Facebook, Google), then it will only allow selling from Admin.

Image 5: Shop Owners need to set Categories, Tags, Brand, and Retail Channel when creating Product.
Product Stock Model, Stock Count, and Gallery
Select Product Stock Model according to the Product types. Per Unit means that each Product unit has an individual serial number. If a Product is sold in an Order, it will mean that this exact Unit has been sold. Limited refers to limited number of products, i.e., Shop Owner has 10 Products in stock, and they want to sell those 10 items. Unlimited refers to limitless Products, i.e. cables used for electronic devices or potato storage, where Products are being supplied in unlimited numbers to be sold.
When selecting Per Unit option, Shop Owner will need to add Units through separate stock purchase order. So, if they are selling 10 Processors and each unit has individual serial, then it will help identify all 10 units apart from each other. If a unit was in a specific order, then that target Product can also be identified by the tracking serial number of the specific unit. This model applies to products in the computer market.
Product Condition refers to the condition of Products whether it is new, used, or refurbished. Limit Per Order indicates the quantity of Products a Customer can buy at once in an Order on the Shop. Similarly, Limit Per Lifetime is the number of times a Customer can buy the Product from the Shop within a lifetime.
Low Stock Threshold indicates if the Product count is Low based on the available stock. For example, if the Shop Owner has 5 Products in stock, and they set the Low Stock Threshold as 3, then nothing will happen. However, if Stock Count is set to 3, then the Stock Status will be set to Low. When Stock Count is set to 0, then the Stock Status will display as Out on The Website.
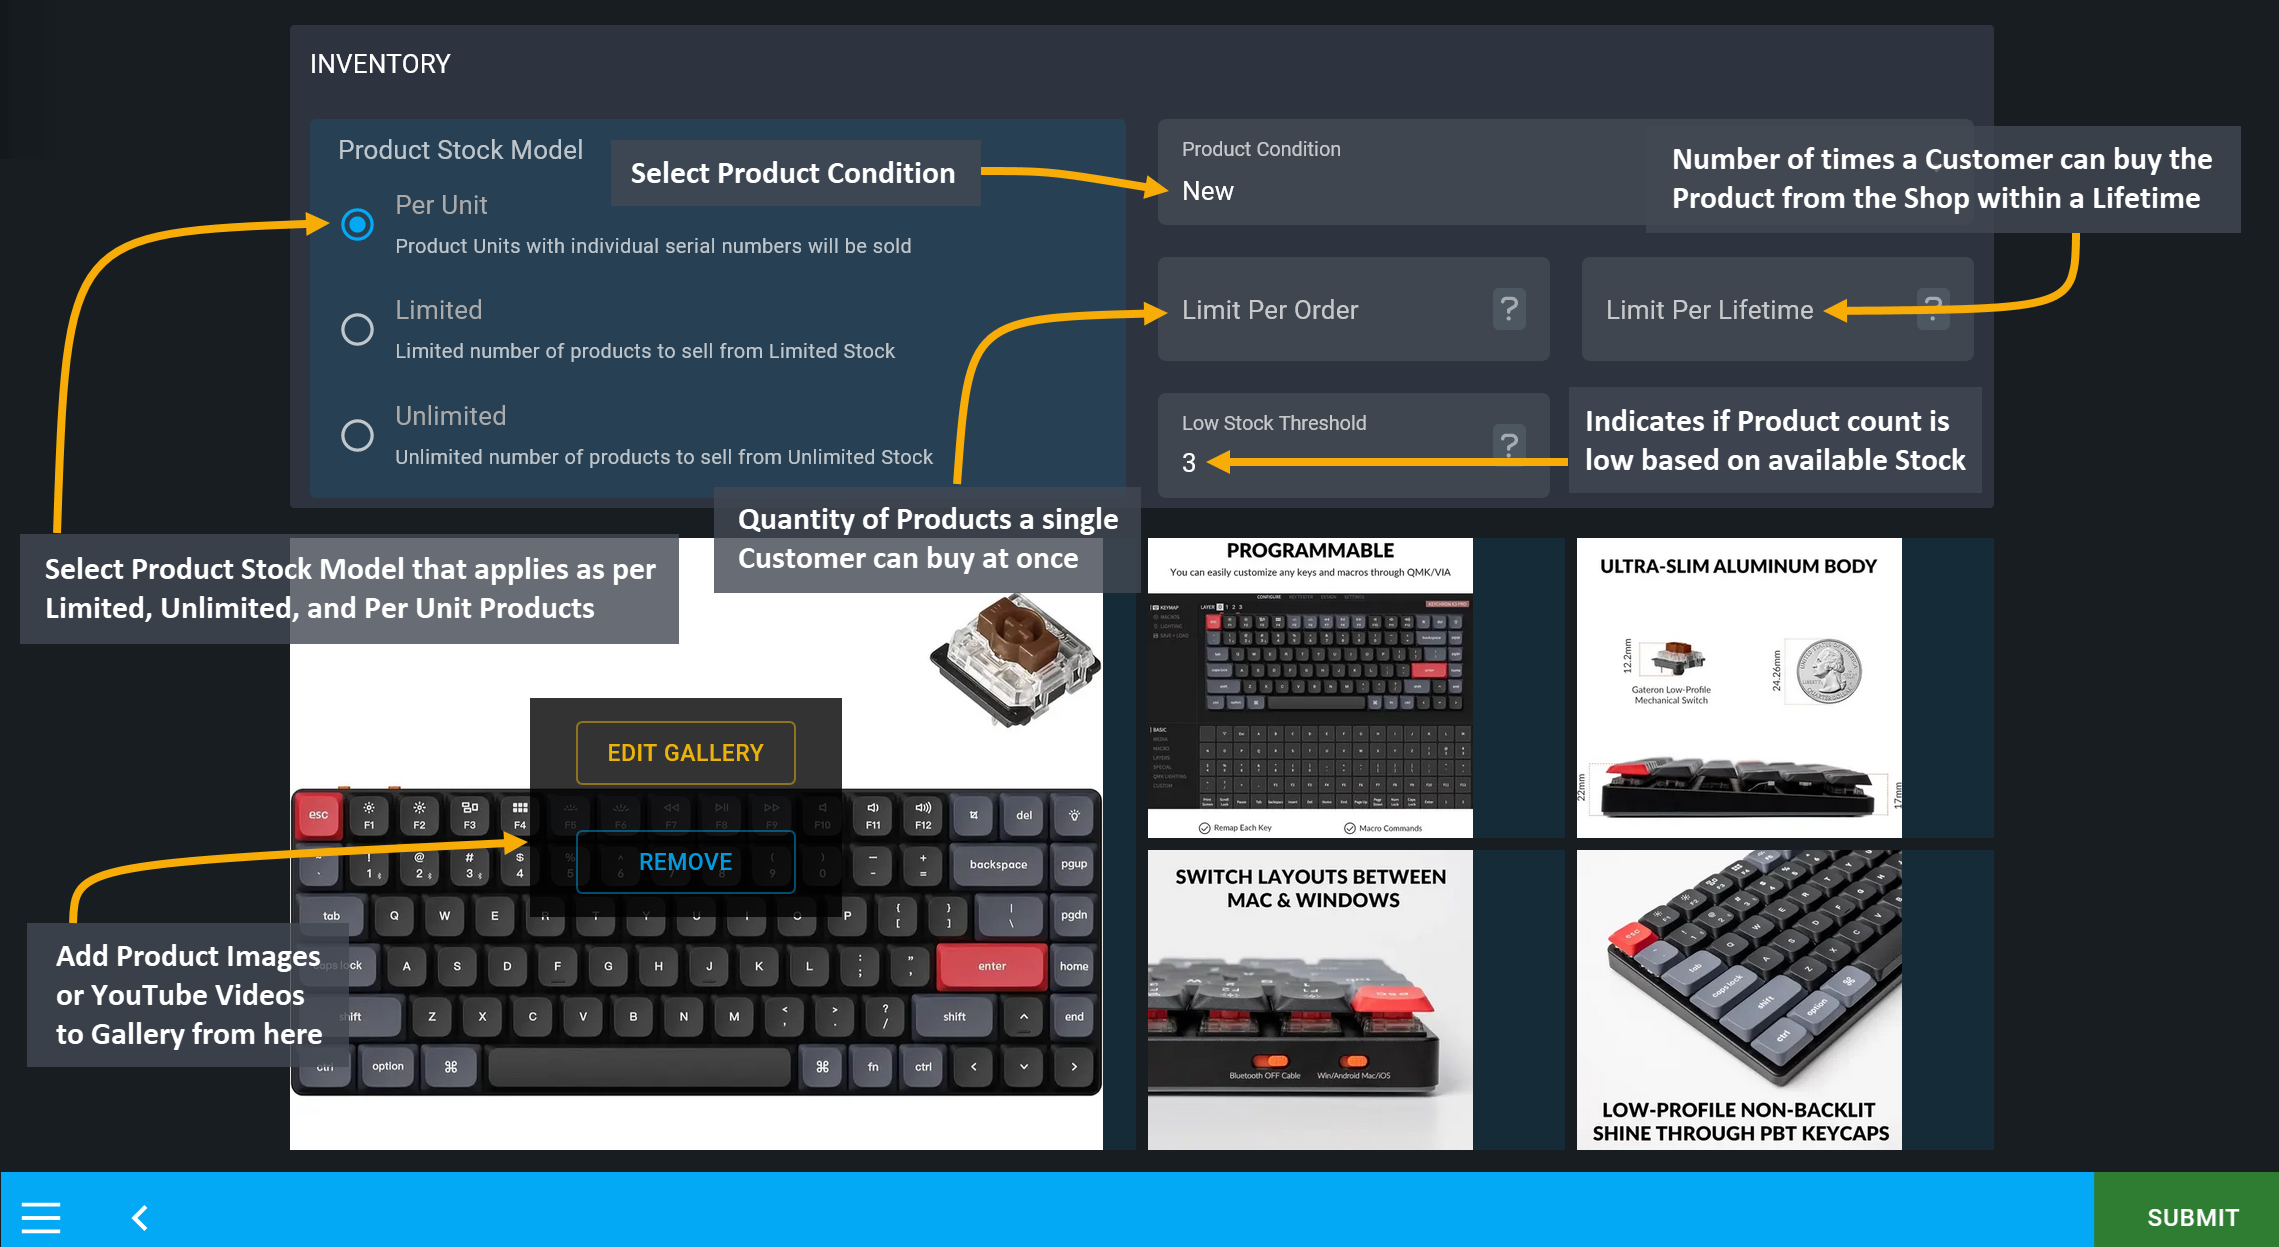
Image 6: Set Product Stock Model, Low Stock Count, Product Condition, and Order limitation options.
Inventory Count applies to Limited Products only, but not for Unlimited Products as the stock in unlimited or Per Unit Products as it has a different inventory system. For example, if Shop Owner has 250 Products, but they do not want to sell more than 200 Products, then Inventory Count will allow limiting the sell of the number of Products from those available Stock. Stock for Sale refers to the total stock available for sale.
Add Images and Videos to Product Gallery
Click Add New Gallery button to add Product images and videos to the gallery. It will redirect to a new page, where Product images can be added by clicking on Upload from Device icon. Add YouTube videos related to the Product in the Gallery by clicking on Embed YouTube Video button and paste YouTube links to embed. Set Gallery Name, Gallery Description, and select Gallery Type using the dropdown. Use Name and Description fields for each image and use delete icon to delete any image. Click Update button to save all the changes.
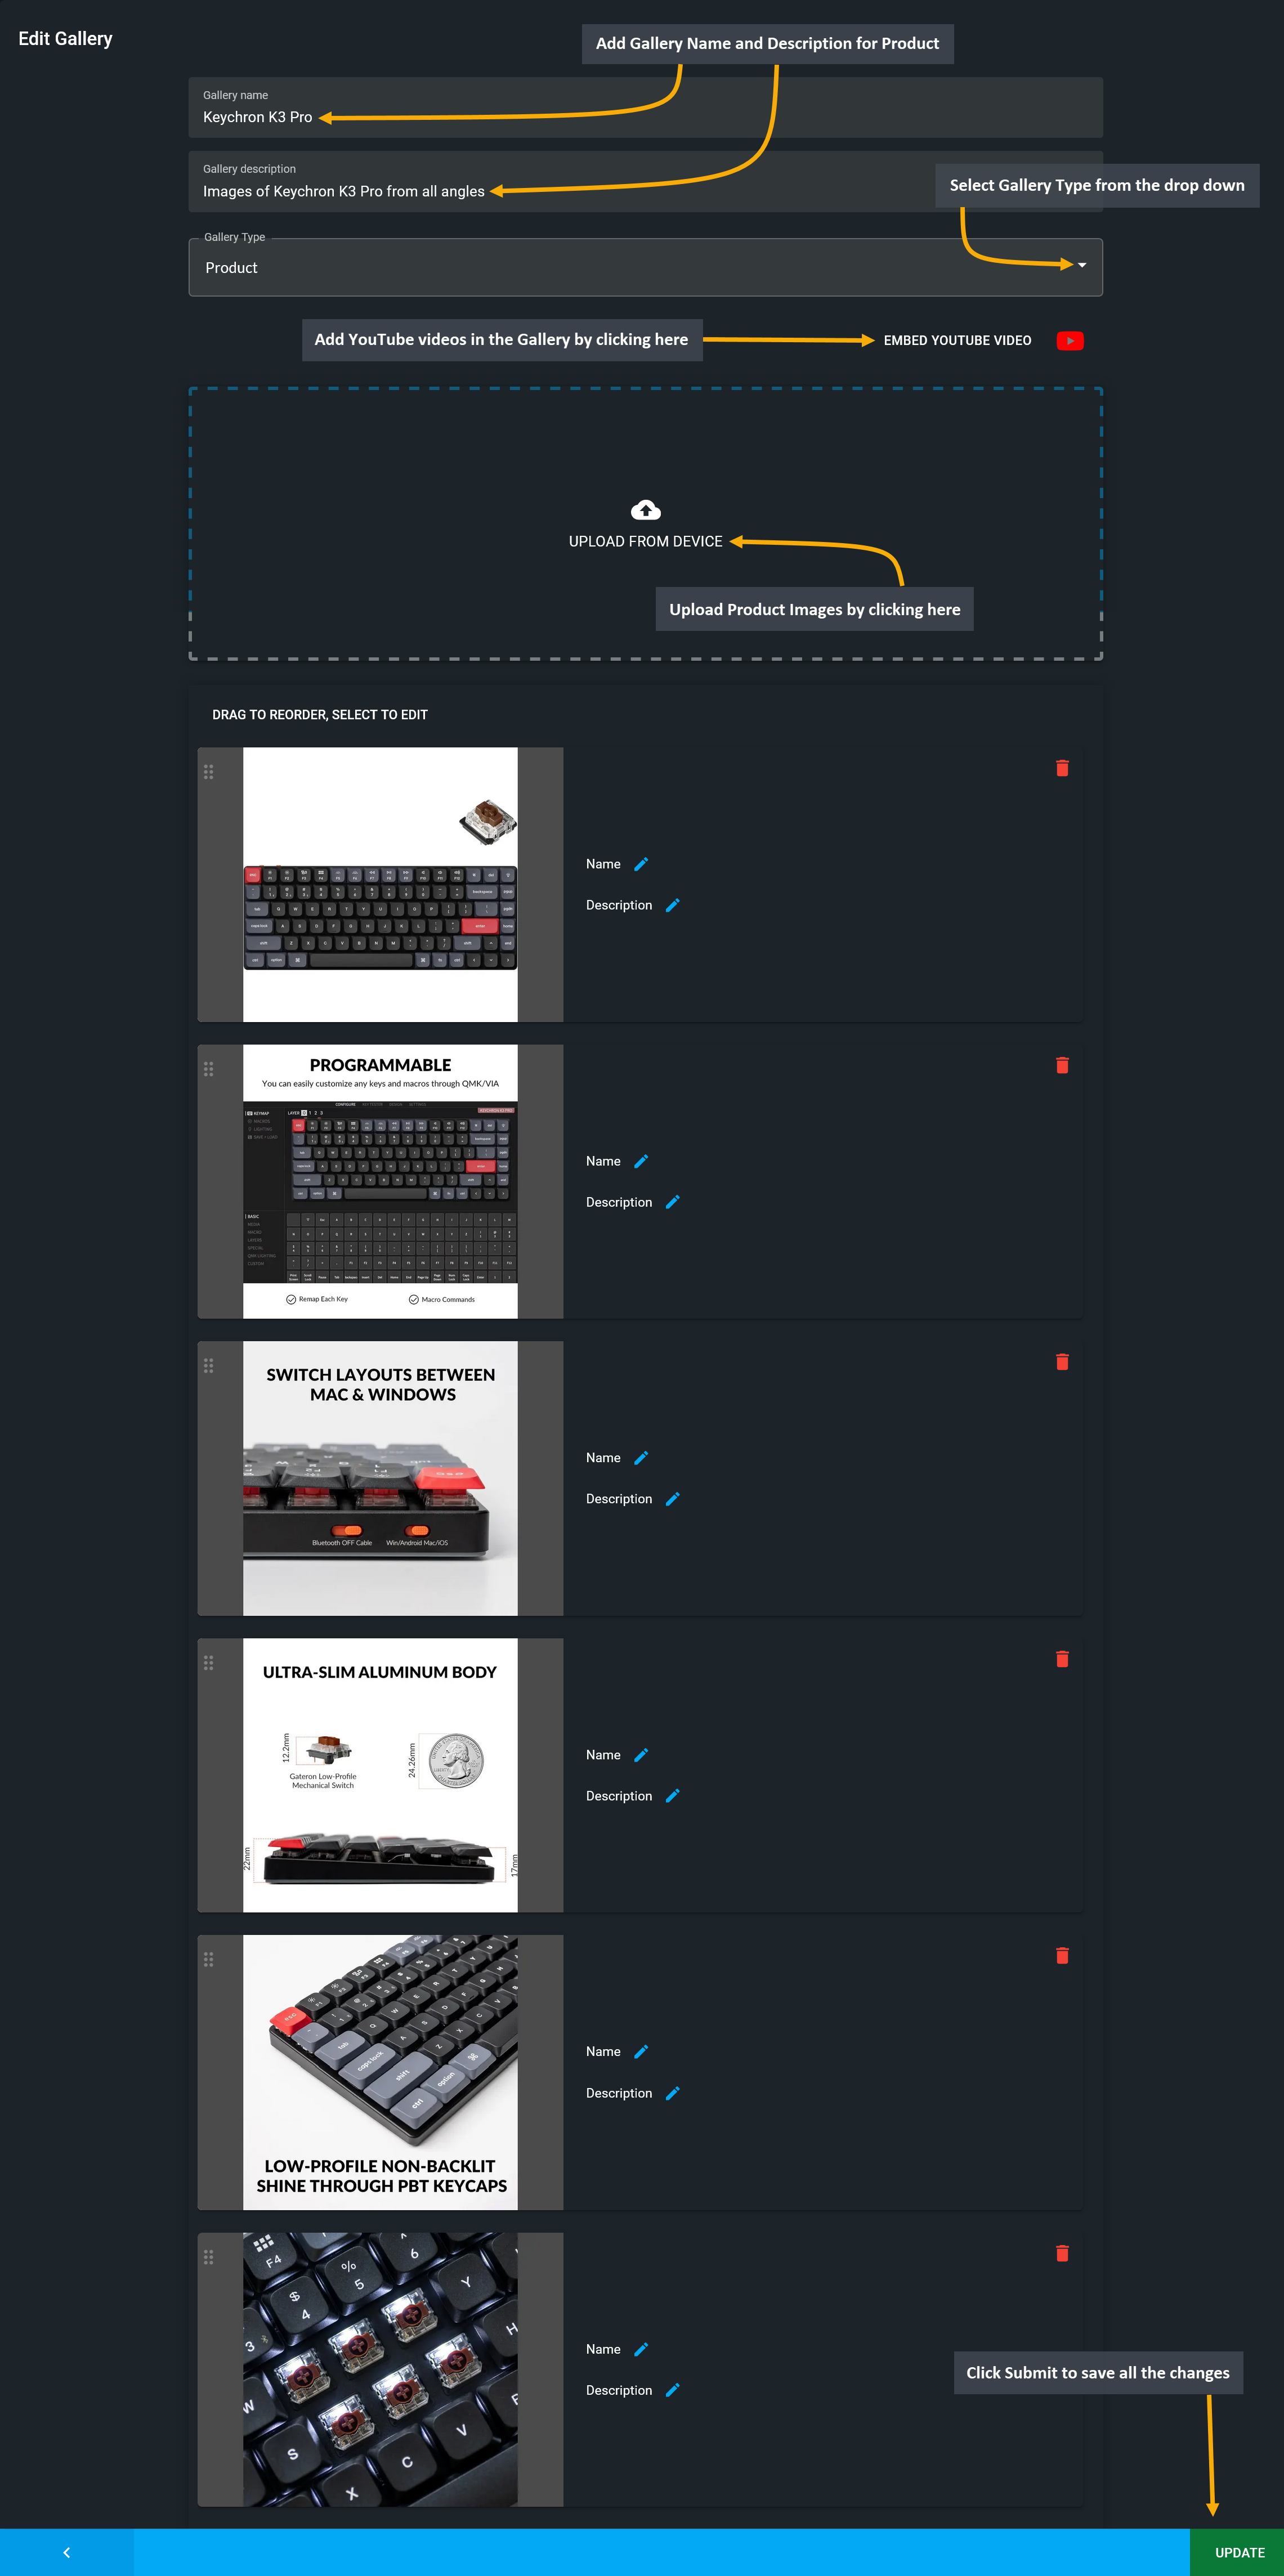
Image 7: Add YouTube videos and Upload Product Images to the Gallery by clicking on the icons.
15.3 - Product Summary and Attributes
Learn how to set Product entities and Add Images and Videos to Product Gallery.
Product Summary, Warranty, and Tax
The next step is adding Product Summary. Within Summary tab, Shop Owner can add Product summary on different sections using the + option. Each description tab has a word limit of 512 characters.
Existing Warranty Plans can be selected from the dropdown and new Warranty plans can be created using the + button beside dropdown. If any warranty plan cannot be found within dropdown, then new Warranty Plans like Lifetime, International, Local, Parts, can be created by Shop Owner. Different types of warranty can be created and list of Warranties can be found within Global Warranty Plan List under Product Settings.
Tax Group is also pre-defined, so when Tax Group is assigned for a Product during its creation, tax will be charged for that specific Product and the details will be mentioned in the invoice. When CMS page or block is created, only Featured products will be shown within this block. The Featured button allows to filter those featured products.
Assign pre-defined Tax Group for Products, Featured button allows filtering the featured products.
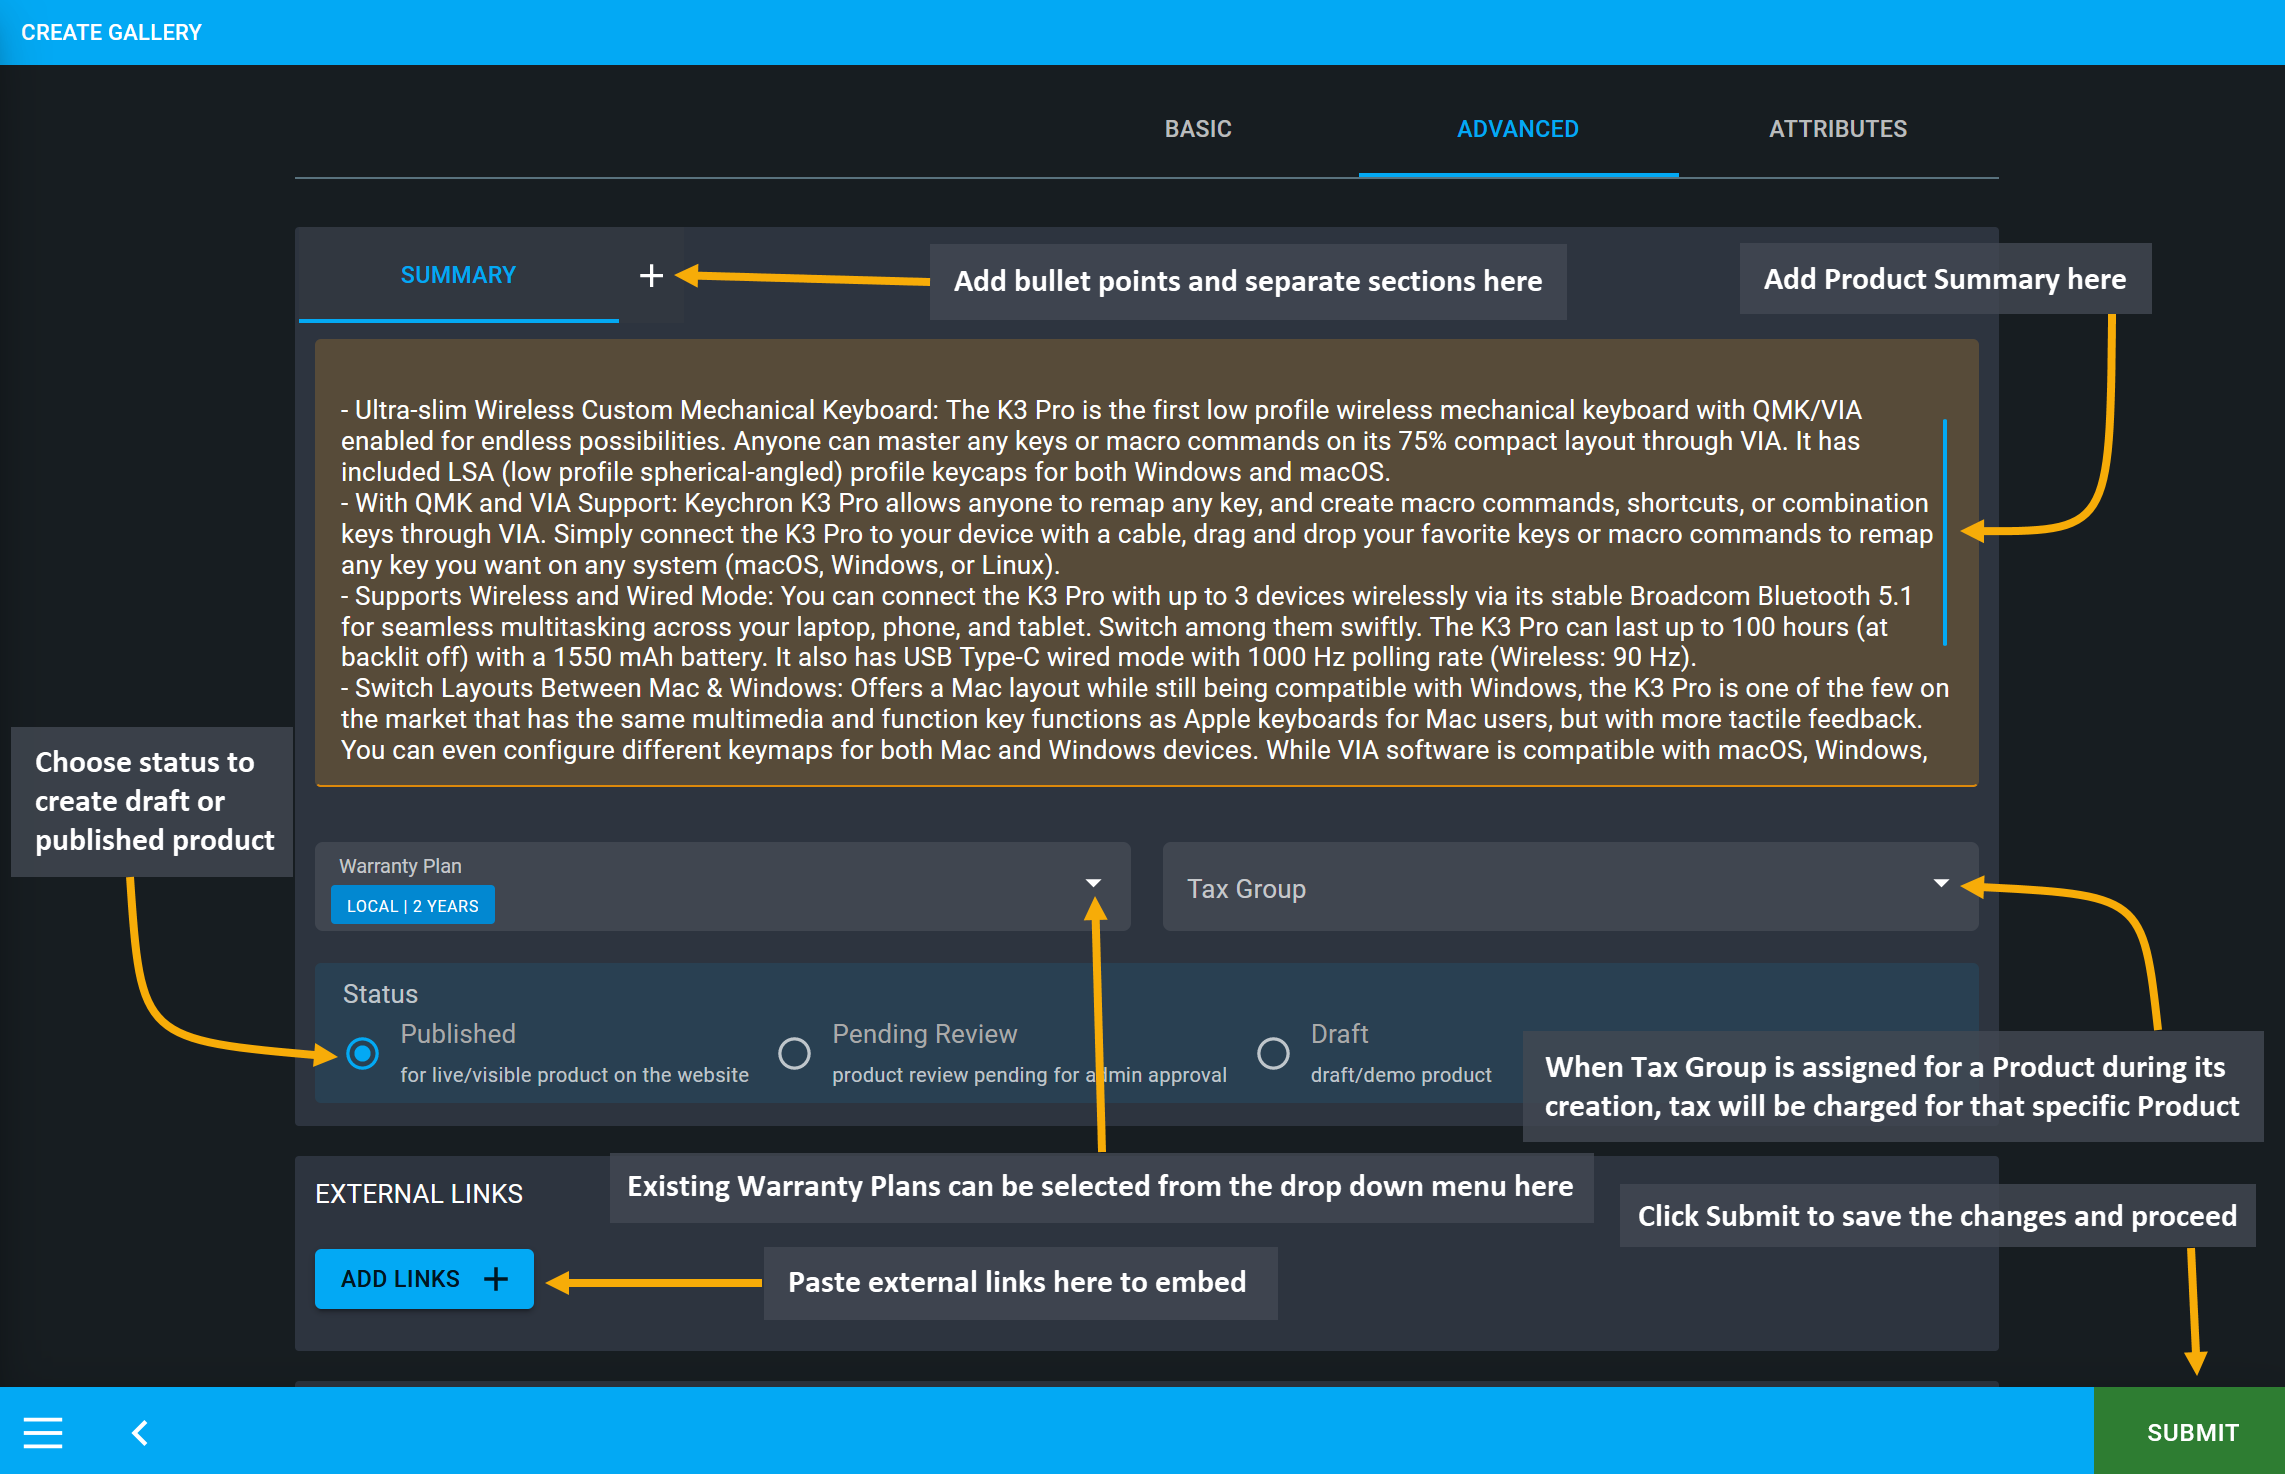
Image 1: List Product pricing with Sell, Purchase, MRP, and Red Line prices and select Warranty Plans.
Select Shipping Details
After Pricing, Shipping Details needs to be set before proceeding to the Cart. The Delivery Type has three options. Physical Products refer to items that will have to be shipped to Customer. Virtual and Downloadable Products refer to items that can be emailed to Customer. The Material State can be selected as Solid, Liquid, and Gas similarly.
Set Product Unit Size according to different Measurement Units. For example, the Shop Owner can sell Products by Carton, 1 Piece, or 1 kg. For example, if Product Unit Size is set as 1, it will indicate 1 Piece. Similarly, if Product Unit Size is set as 1000 Milligram, Milliliter, Millimeter, then it will indicate as Quantity 1 = 1 kg, 1 Liter, or 1 Meter.
Toggle on or off the Is Fragile button to indicate if the Products are brittle or delicate in nature and likely to break which includes without limitation - glass, china and castings. Weight indicates the weight of a single Product with designated measurement unit. Dimension includes setting Length, Width, Height, and Measurement Unit of the Product. See the example screenshot below to understand how to select all the important shipping details.
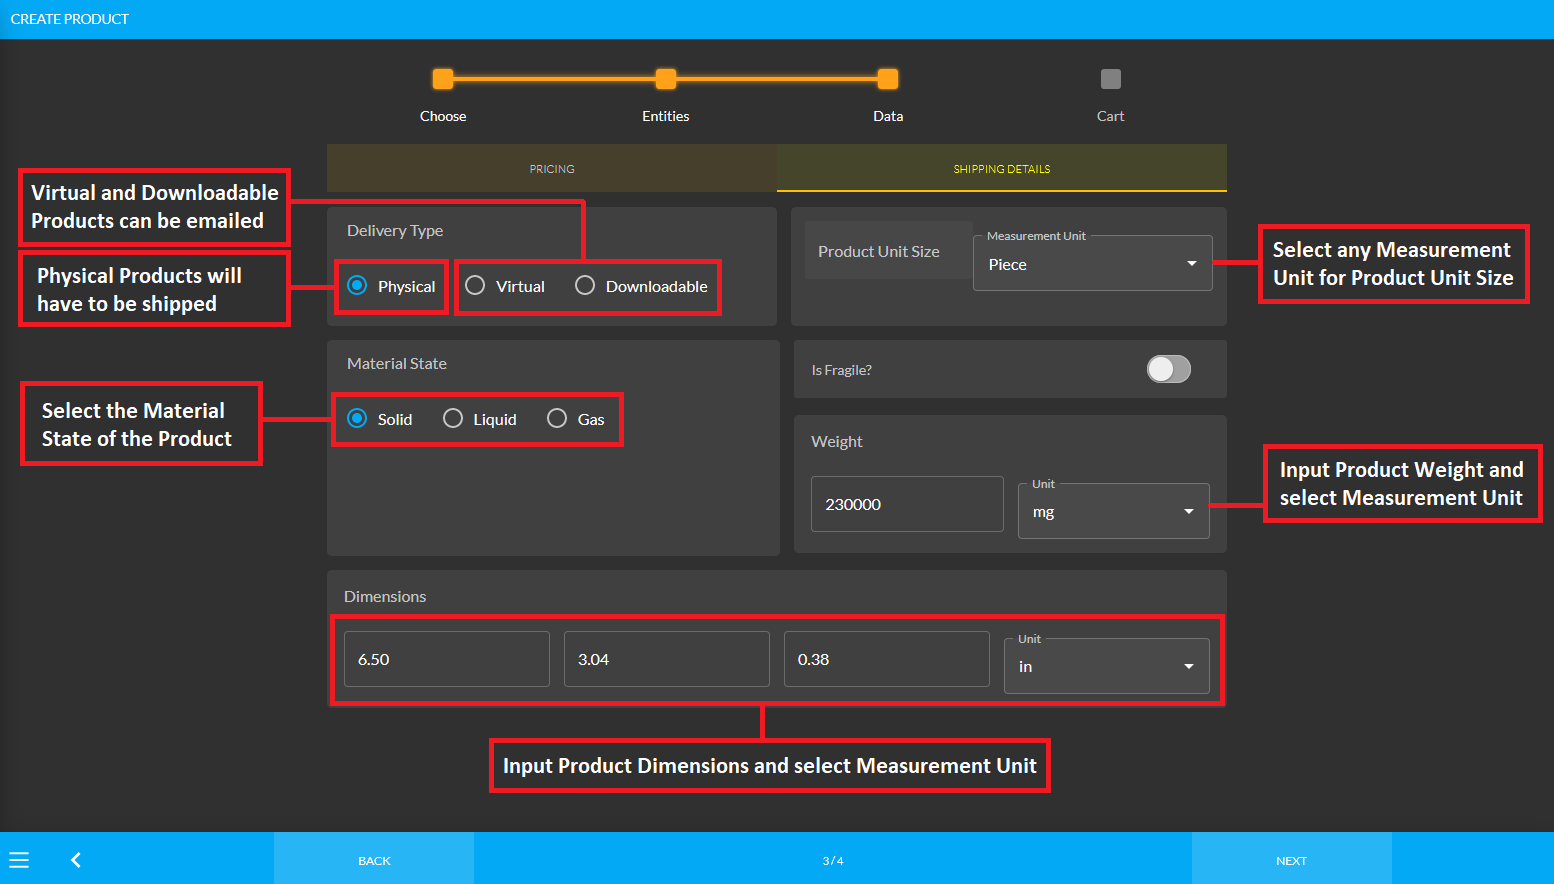
Image 2: Fill out the Shipping Details, Delivery Type, Material State, Product Unit Size, and Dimensions.
Set Product Attributes
Attributes can be created with Single or Multi Value. For example, the screen size of iPhone 14 Pro is 6.1 Inches which is the Single Value attribute of the Product. So, if the Shop Owner wants to add a Product under a specific Category, then they will have to use these specific attributes. Three attributes will show in Product List view and are a Product’s Featured attributes.
Product Images can be added through the Gallery System through the Add New Gallery or Change Gallery buttons. Besides, videos from YouTube or own Product images can be added to the gallery and there is no limit to it. The Product Status have three options: Published Products can actually be bought and sold, Pending Review means the Product is ready to be published but pending for admin approval, and Draft means Demo Product. External Links can be added to redirect Customers to detailed description. Paste external links to embed using the ADD button.
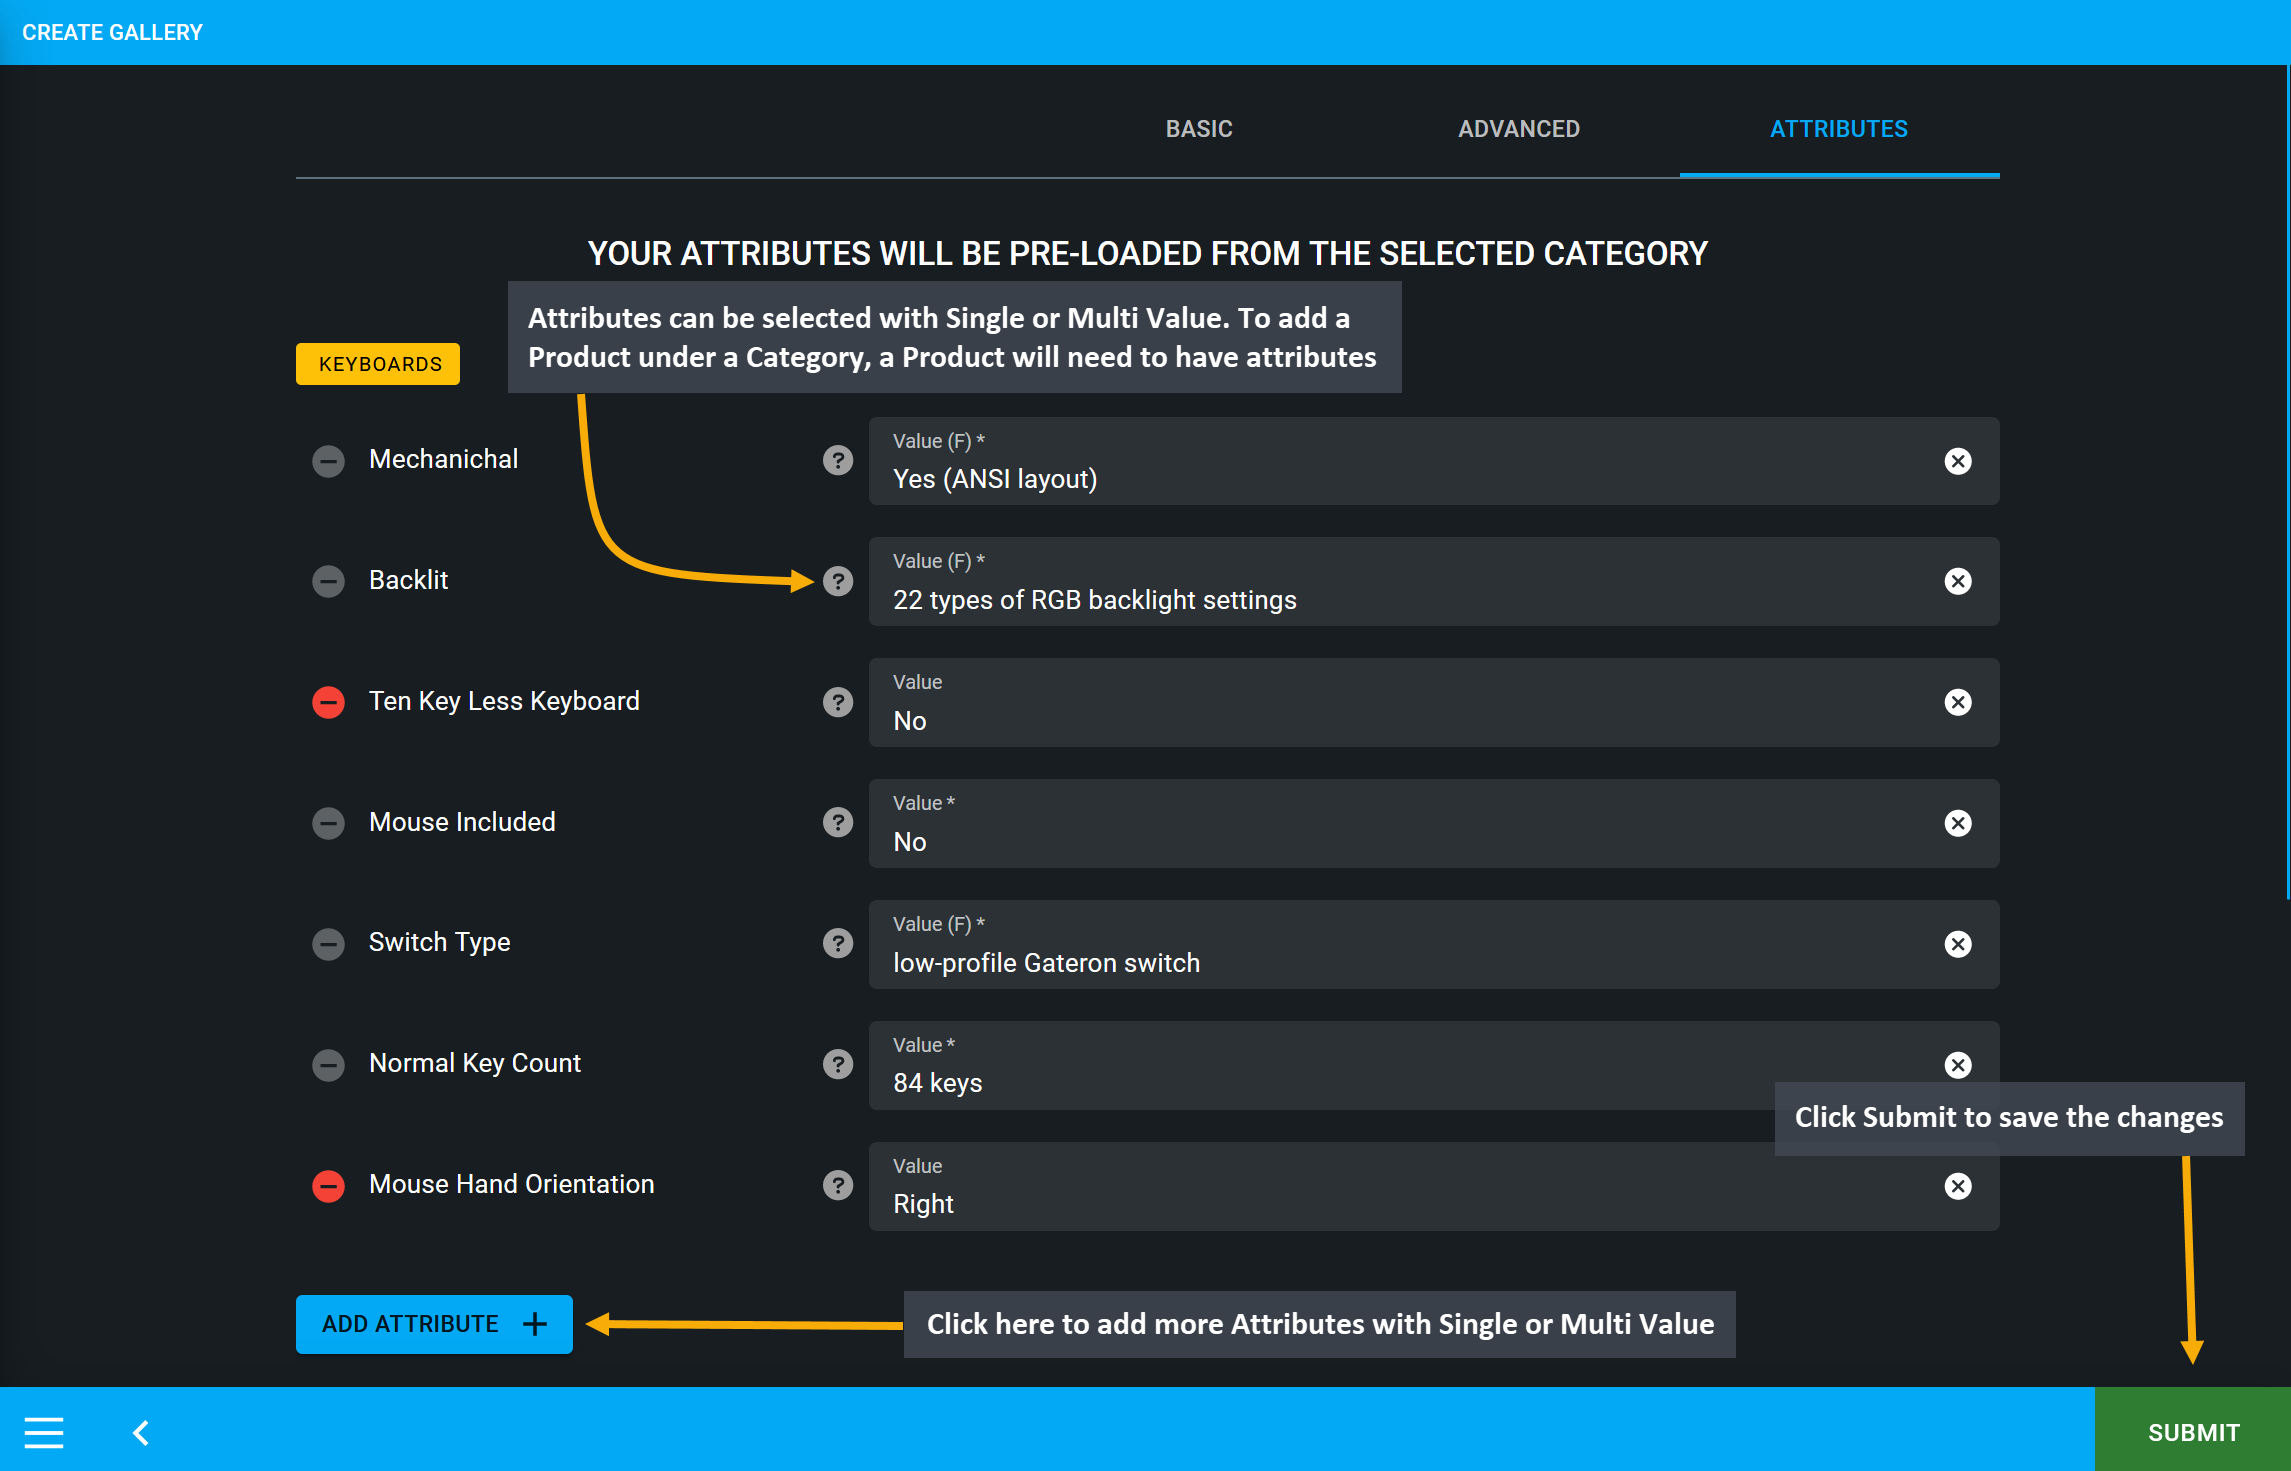
Image 3: Shop Owner can add Product Summary and Attributes can be created with Single or Multi Value.
15.4 - Create Product Cart
Create Product Cart with Cart Notice, Button Label, After Sales Message, and Notes.
Create Product Cart
Create Product Cart with important details that will show during checkout to the Customers. The Cart Notice is the notice which is shown to Customers after successfully adding Products to cart. Button Label is an alternate to Add to Cart, so if the Shop Owner wants to show something else other than Add to Cart like ‘Buy It Now’ or ‘Follow our Facebook Page’, or ‘On Sale’, then they can do so using this option.
After Sales Message is the message sent to Customer after a successful Product purchase. Include a message like, ‘Thank you so much for your Purchase! Your Order is being processed and will be shipped soon.’ The Notes can be used for displaying important details like, ‘All Orders will be processed in BDT.’
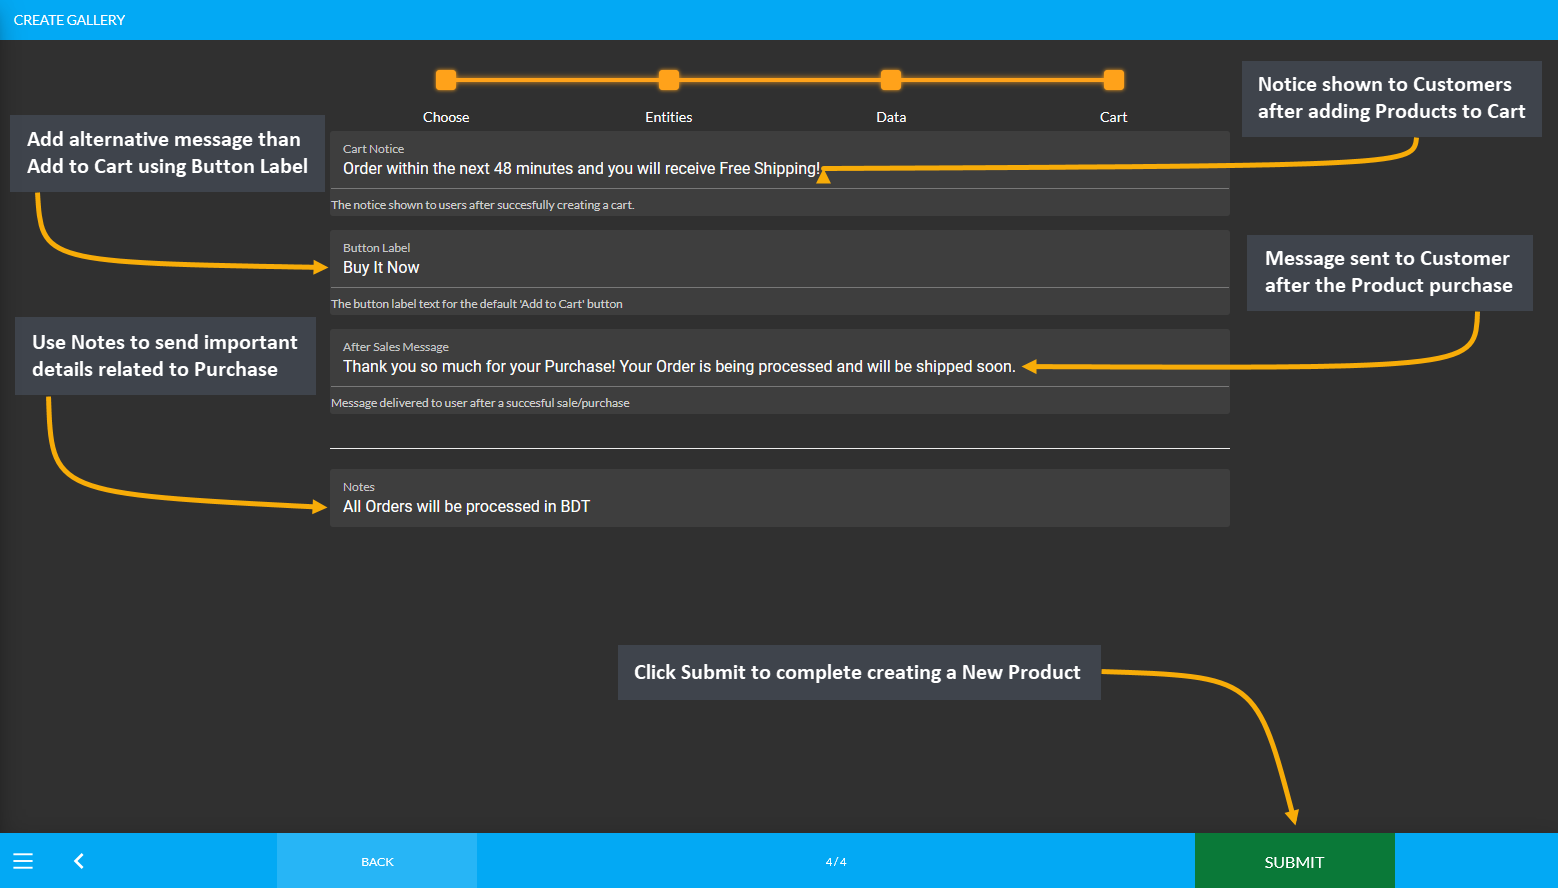
Image 1: Create Product Cart Messages with Cart Notice, Button Label, After Sales Message, and Notes.
New Product Created
After clicking Submit, it will redirect to the Product List where the New Product will show to be successfully created. The Shop Owner can search any Product they have created by going to different pages on the Product List.
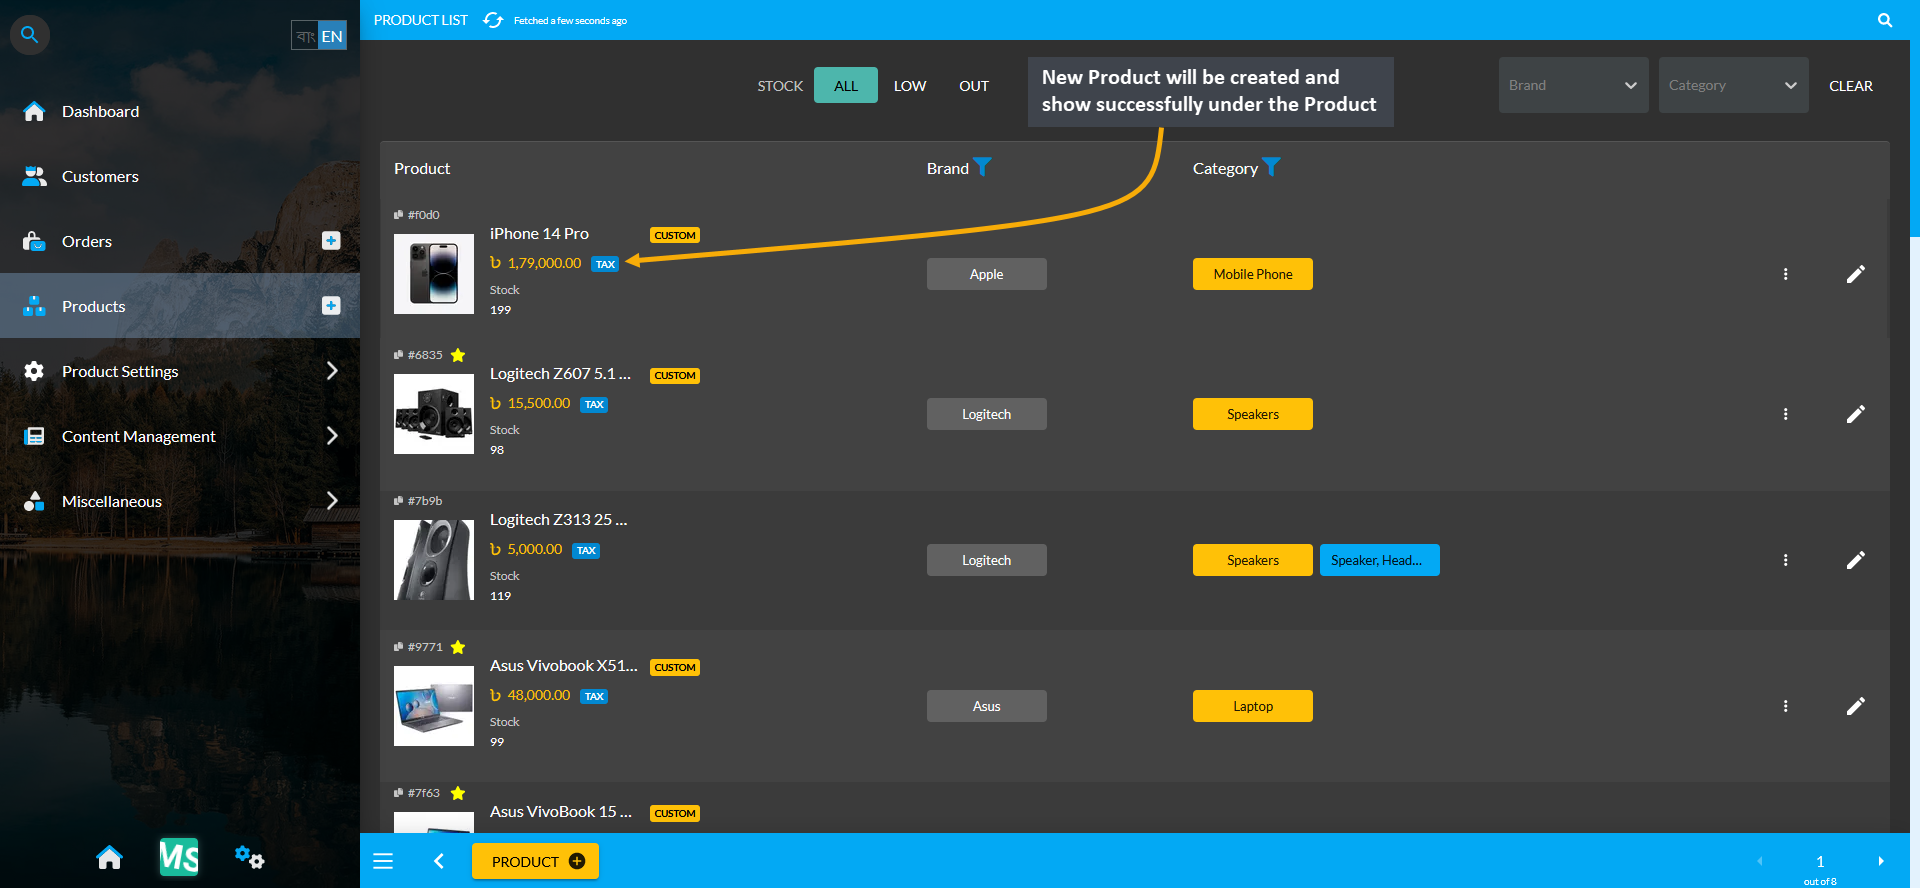
Image 3: The New Product that will be created will show successfully under Product List after creation.
16 - RMA
Learn more about creating and managing RMA for Limited, Unlimited, and Per Unit Products.
What is RMA?
For effective Warranty management, Retail Xen provides a Return Merchandise Authorization (RMA), through which Shop Owners can track all the Product related claims, return process, warranty process, refund claims, custom service warranty, and Product exchange process. Using RMA workflow, the Shop Owners will be able to receive a Product, arrange exchange or refund, track warranties, and Product claims.
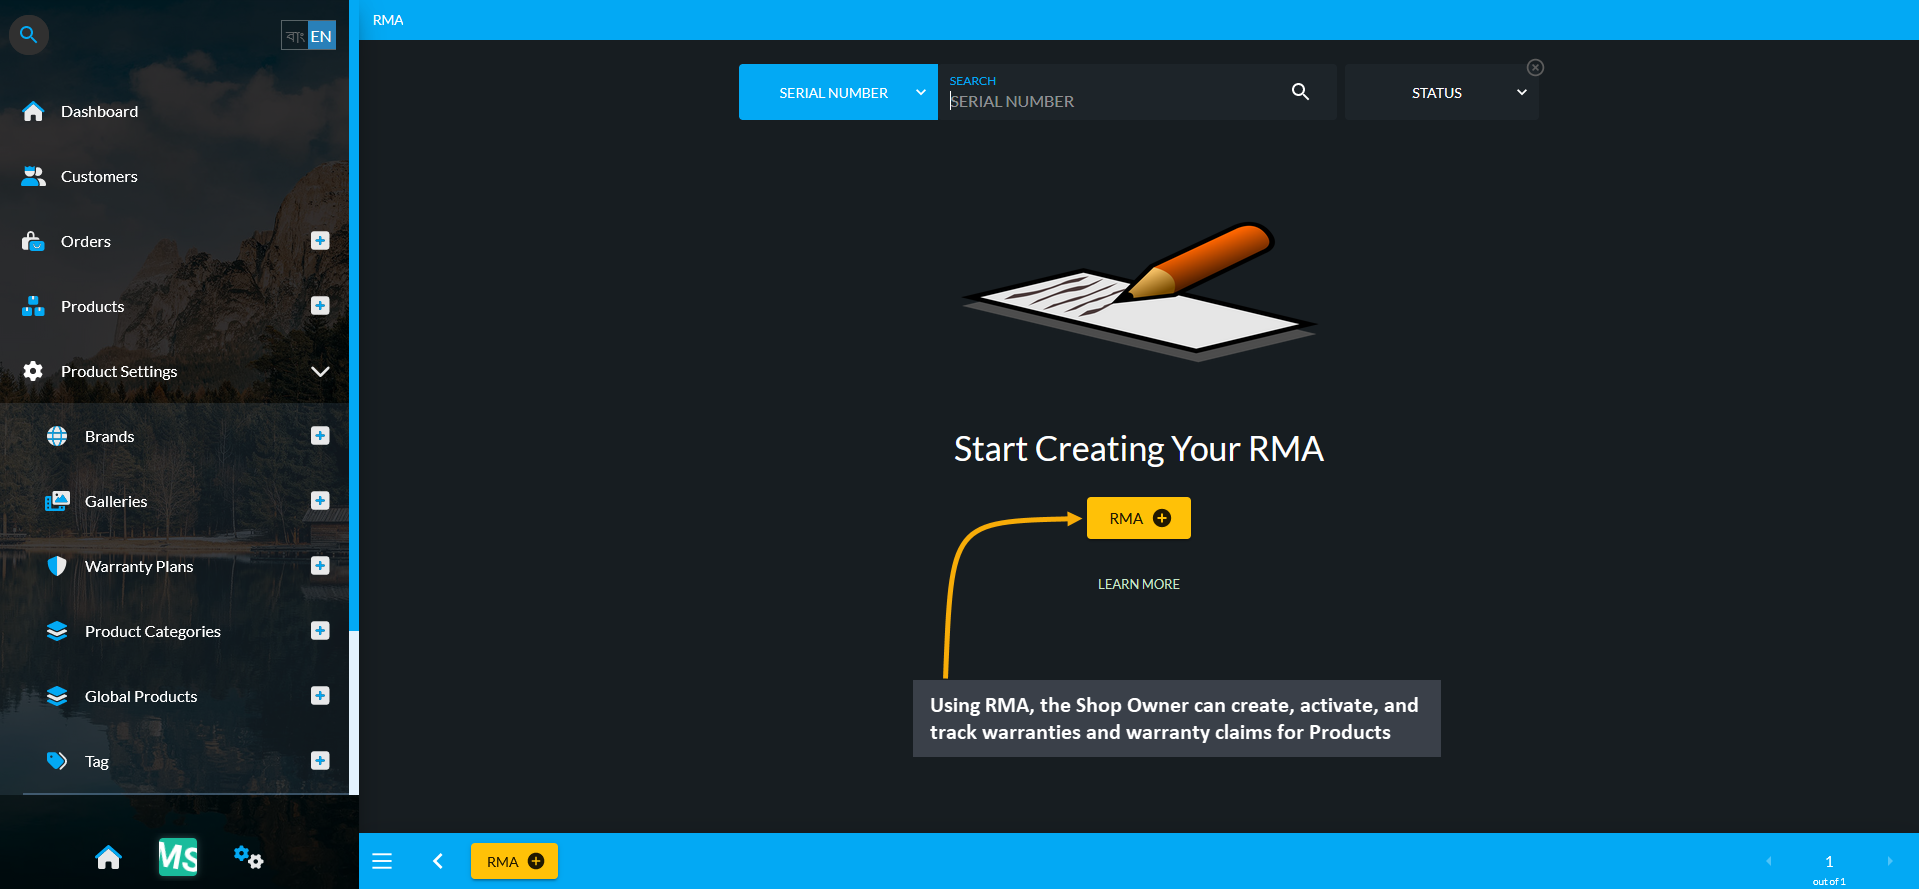
Image 1: Using RMA, Shop Owner can create, activate, and track warranties and warranty claims for Products.
RMA can be created for Limited Products, Unlimited Products, and also Per Unit Products. Limited Products can be sold from the Limited Stock. Unlimited Products are being supplied in unlimited numbers to be sold. Each unit of Per Unit Product has an individual serial number, so if a product is sold, it will mean that an exact unit is sold.

Image 2: RMA can be created for Orders of Limited Products, Unlimited Products, and also Per Unit Products.
Allocate RMA for an Order
RMA can be allocated only for defective or faulty Products from an existing Order. Therefore, Shop Owner will have to have a New Order to allocate RMA. For instance, a New Order is placed for the Per Unit Product A4Tech B120 Wired Gaming Keyboard here. Order can be created for previous Customer or a completely New Customer.

Image 3: RMA can be allocated for faulty Products from existing Order, so a New Order is placed as example.
So, clicking on Orders tab will open a New Cart from where New Order can be placed. Fill out Customer’s Contact Information and add New Shipping Address for Customer by clicking the + button or choose existing Shipping Address from the dropdown menu. Then, search and add Products to Cart, add Product Quantity, assign Stock for the Per Unit Product, check Product Rate, Item Total, Order Total and Sub Total. After completing all steps, click Proceed. In the next page, select preferred Shipping and Payment options, and click Confirm Order.
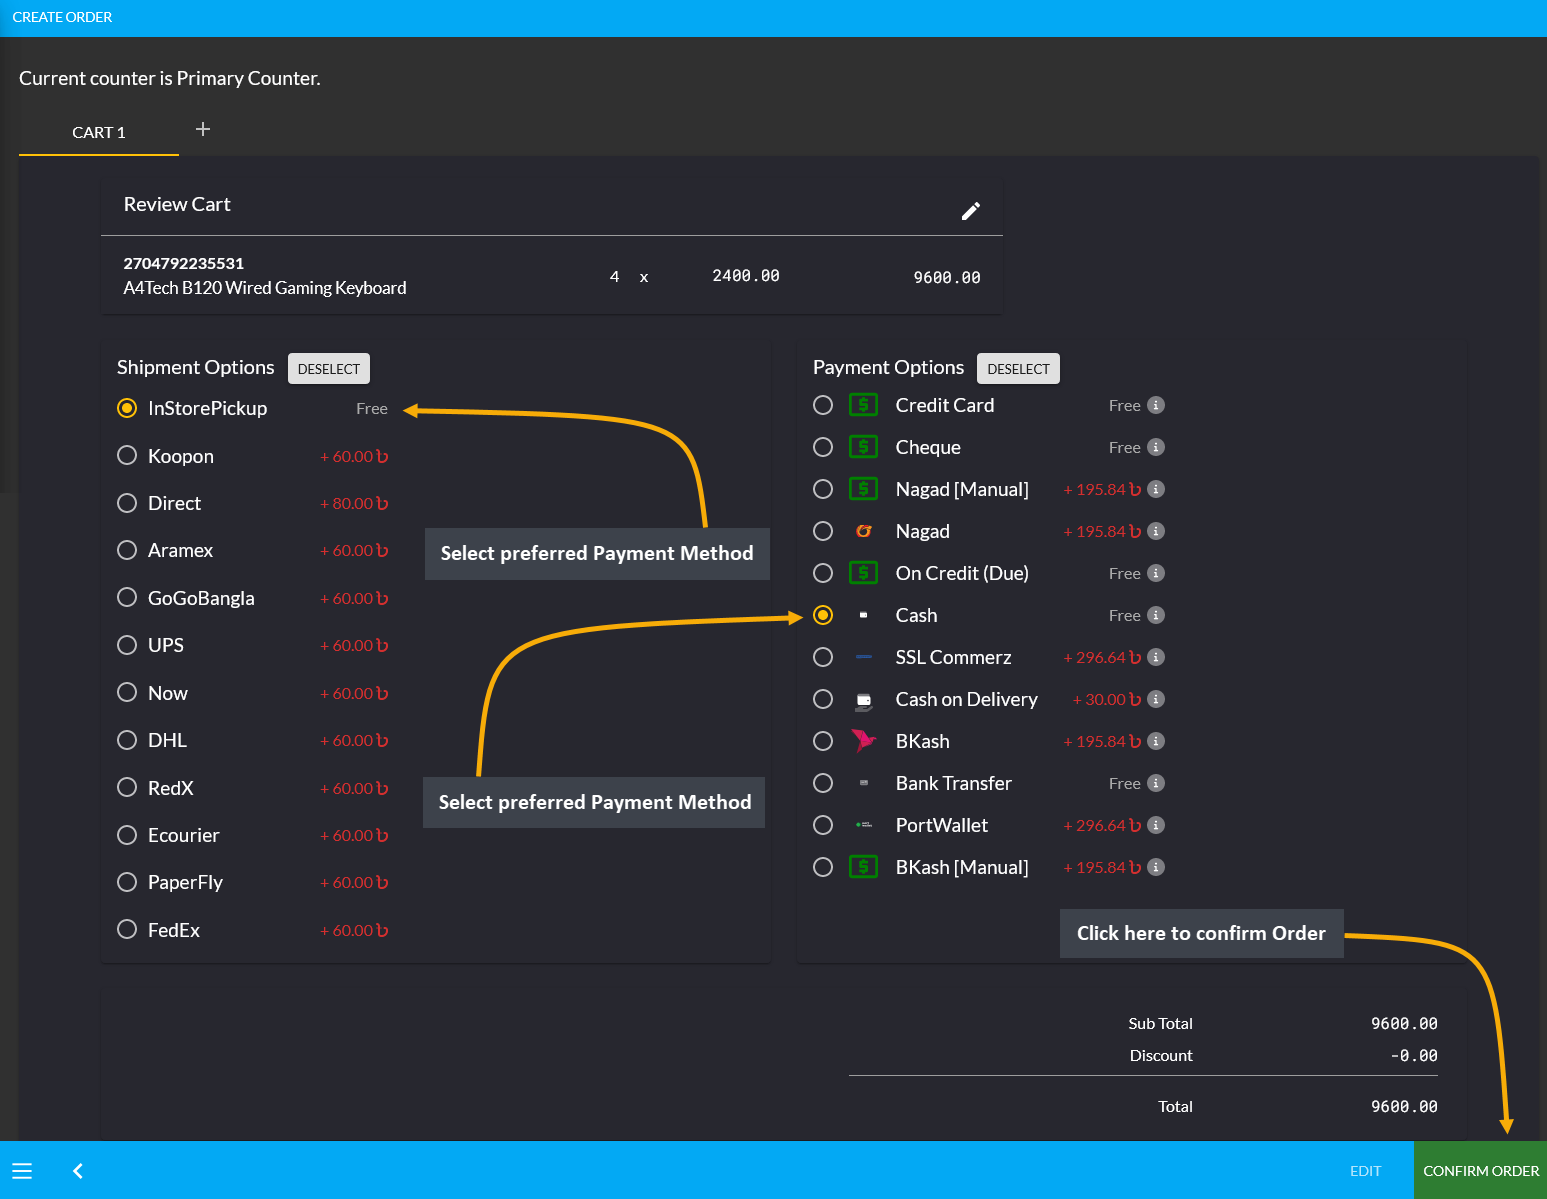
Image 3: Select preferred Shipping Method and Payment Method and click Confirm Order to place New Order.
From four Per Unit Products that Customer have purchased, Serial Numbers PLC021ABWGK, PLC022ABWGK, and PLC023ABWGK for A4Tech B120 Wired Gaming Keyboard were not faulty. However, Serial Number PLC020ABWGK for A4Tech B120 Wired Gaming Keyboard Per Unit Product was found to be faulty, so Customer wants to claim their Warranty for this Product. Therefore, Shop Owner will have to report an RMA to help the Customer return this Product and exchange them with another Per Unit Product of the same Batch.
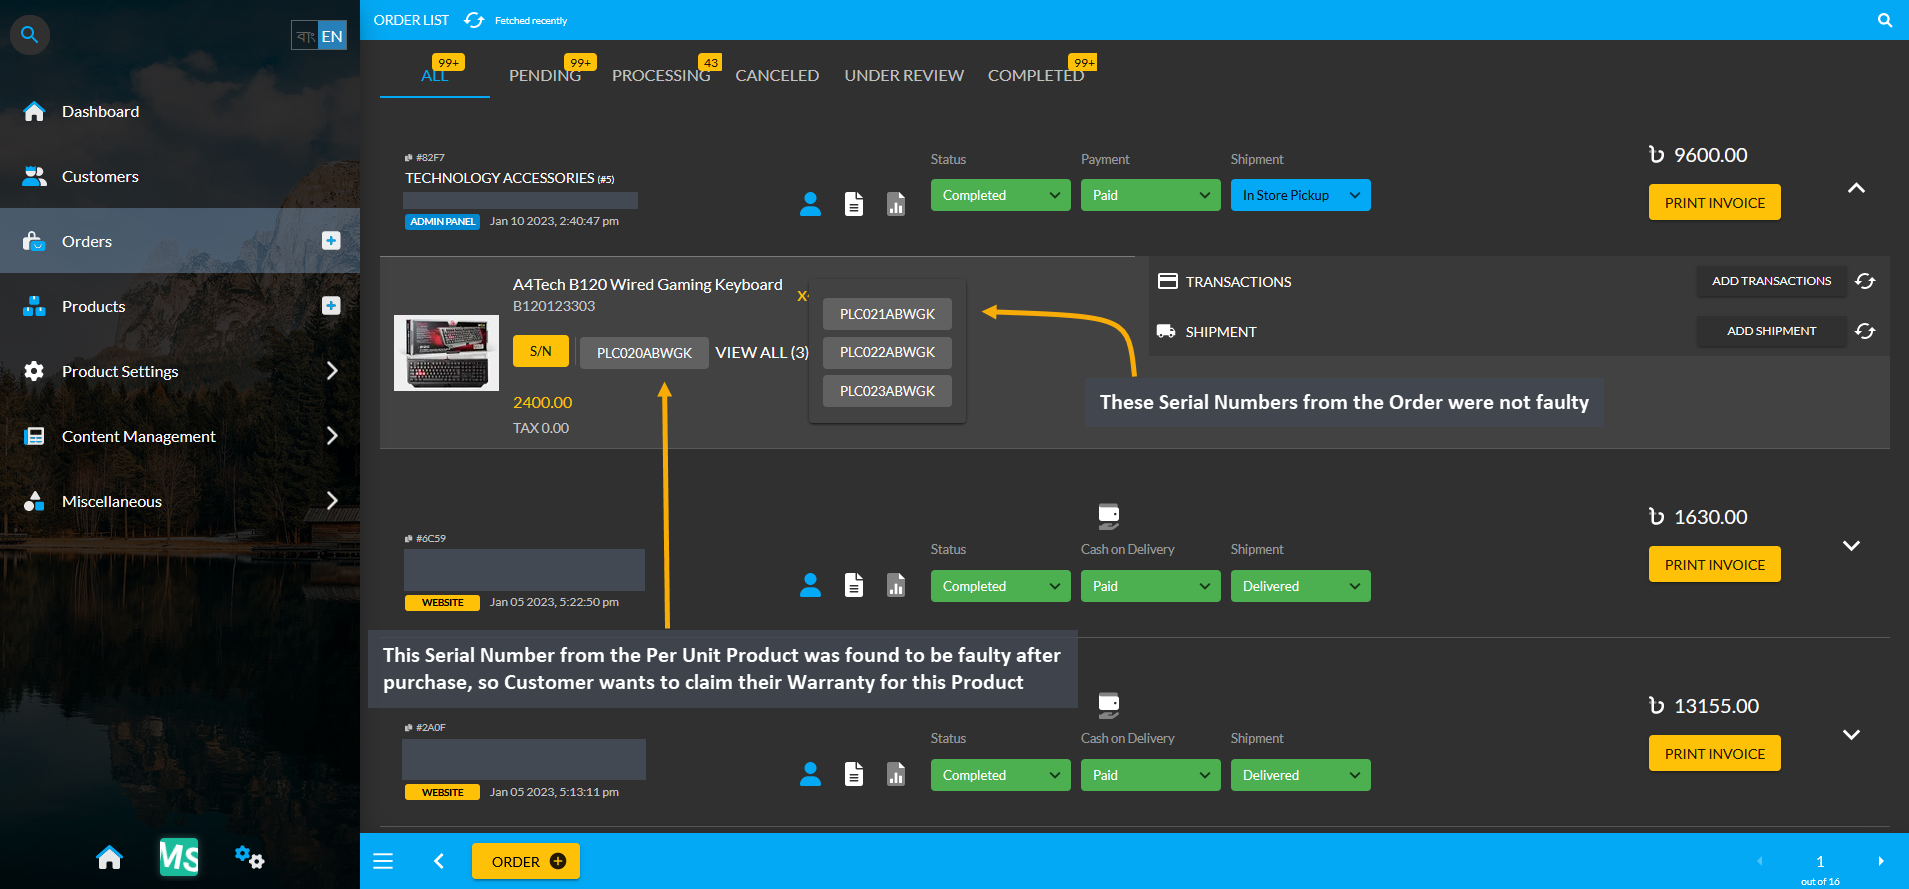
Image 4: A Serial Number for the Per Unit Product A4Tech B120 Wired Gaming Keyboard was found to be faulty.
Create RMA for an Order
Now, in order to allocate an RMA, go to RMA from Product Settings, where the list of existing RMA cases will show on the search page. In this RMA list page, existing RMA can be specifically searched with Product Serial Number, Customer Phone, or Customer Email. Select any one of these three options and type the serial number, phone, or email in the search box. Beside it, there is a Status bar that will allow checking the RMA based on their statuses.
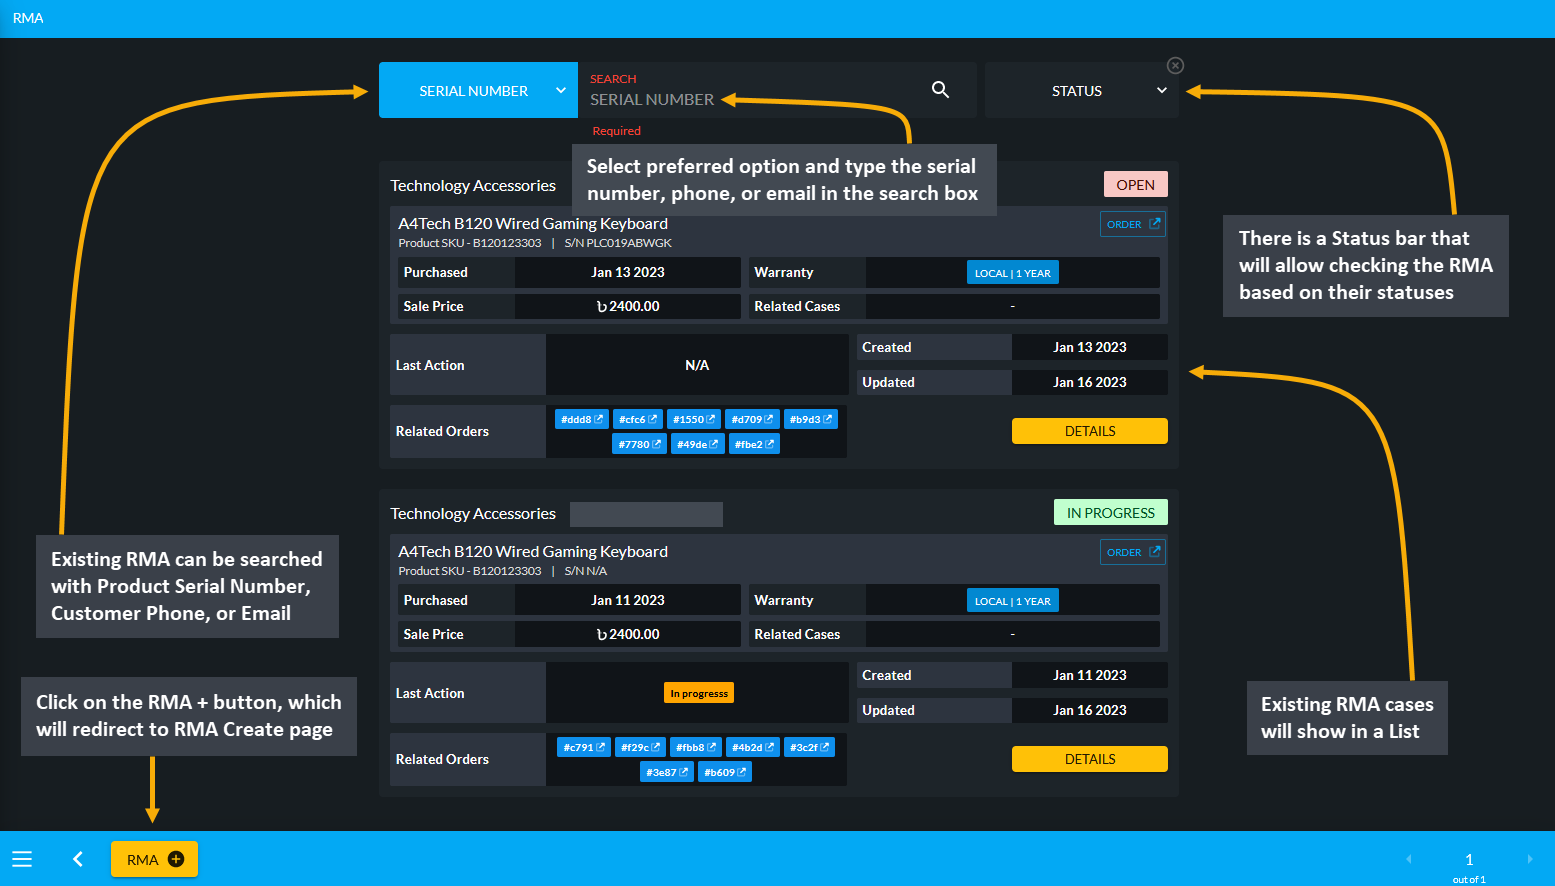
Image 5: Existing RMA cases can be searched with their Product Serial Number, Customer Phone, or Email.
To create a new RMA, click on the RMA + button, which will redirect to the RMA Create page. Here, new RMA can be created with Product Serial Number, Customer Phone, or Customer Email. Select the preferred option and type the serial number, phone, or email in the search box. Copy them from Order List page, paste them in the search box, and click on the search icon. This will bring the details of the Order on the RMA create page.
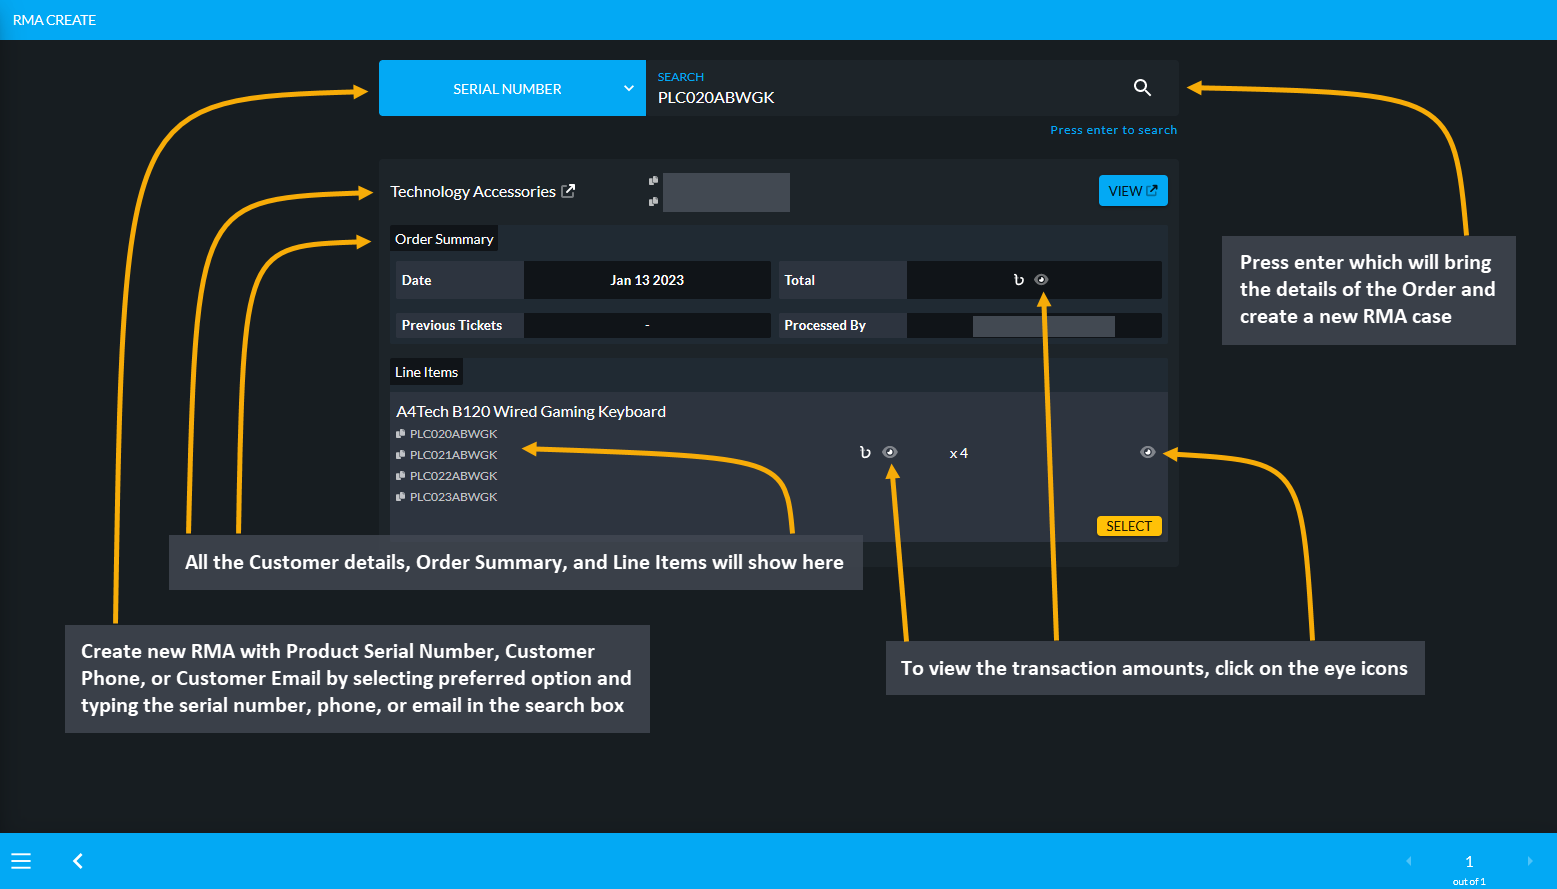
Image 6: Create new RMA with Product Serial Number, Customer Phone, or Customer Email by typing on search.
For instance, when searched with the Serial Number of the Per Unit Product, it will show all the Customer details, Order Summary, and Line Items. To view the transaction amounts, click on the eye icons. Click the Select button or click within the line item box that will open a pop-up, from where Serial Number of the faulty Product needs to be selected. Check the details below and click the Create button to create new RMA.
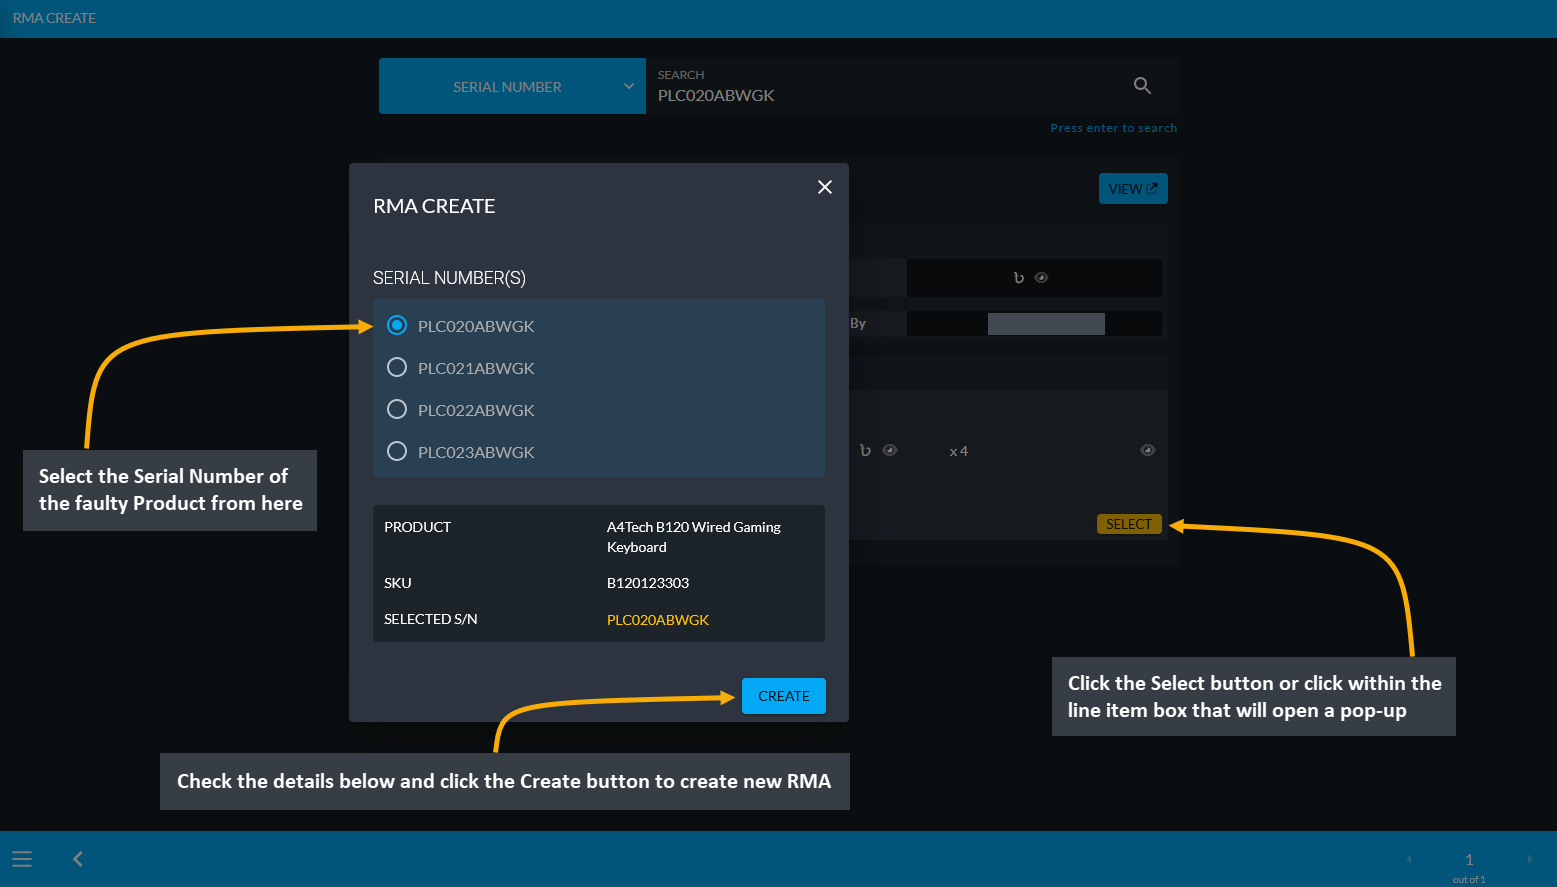
Image 7: Select Serial Number of faulty Product, check details and click Create button to create new RMA.
After RMA is created, the Order and RMA case details will show on the RMA View page. Within Product details, the purchased date, warranty date, sale price, and Related Cases will show. Below it are the RMA Workflow, which will allow Shop Owner to take action for the Product with different actions. There are several workflow actions like Comment, Denial, Supplier, Service, Return, Exchange, Refund, and Warranty. Click on each of these workflows for adding comment, uploading images, and updating status to save the workflow update for the RMA case.

Image 8: Product details, Order details, RMA case details, RMA workflow actions, and status can be updated.
Predefined Suggestions
After an RMA is created, the Shop Owner can use the Suggestions button to add predefined suggestions that can be used for explaining Product defect issues. These suggestions will be handy for Warranty or Service workflows.
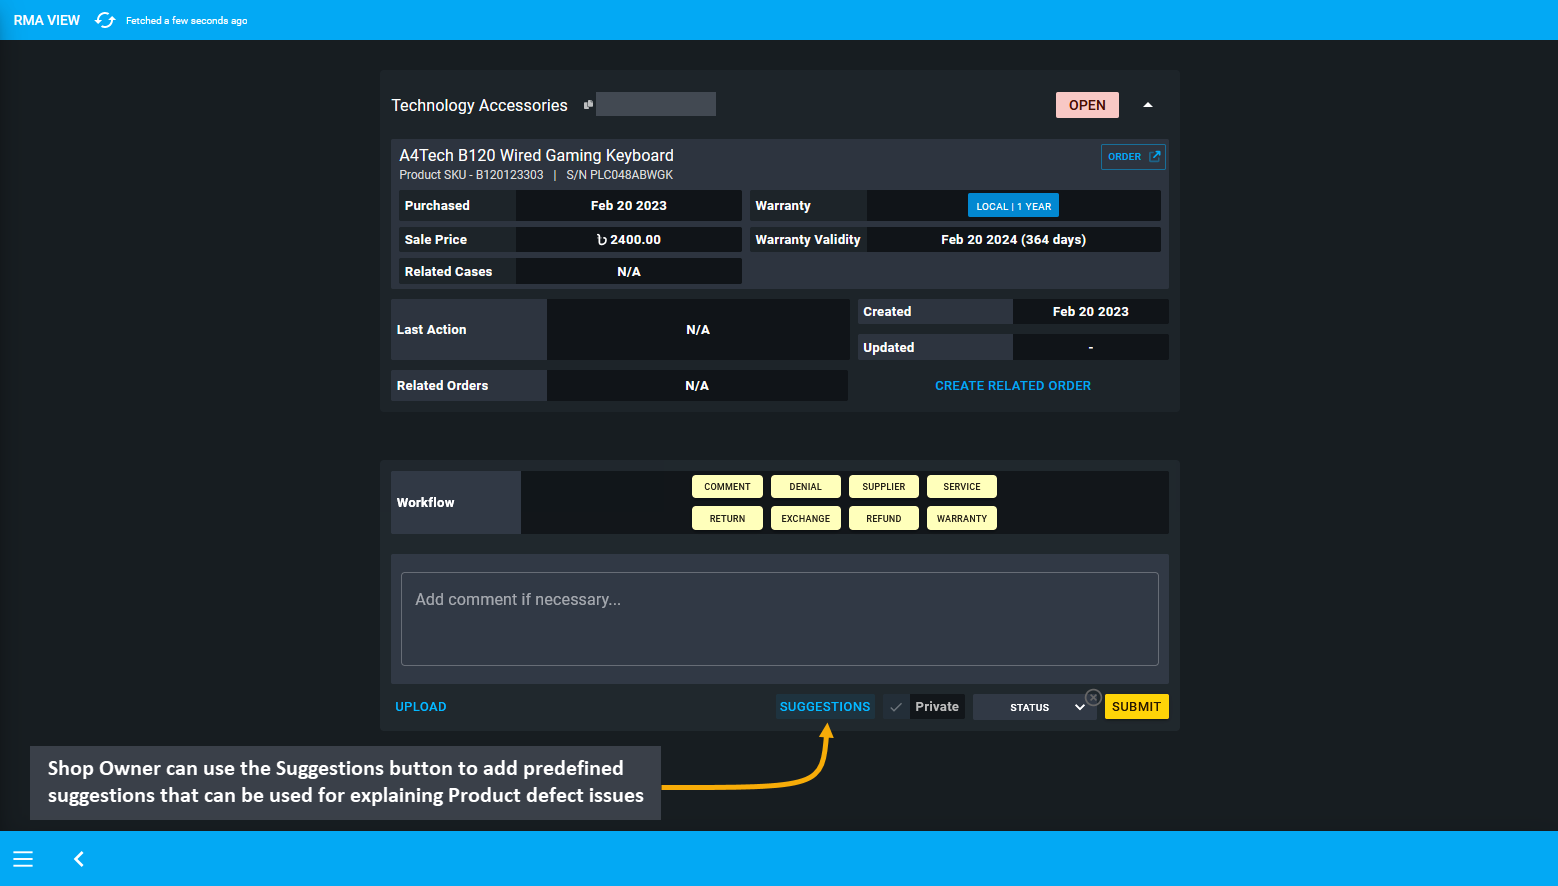
Image 9: Shop Owner can use Suggestions button to add predefined suggestions that explain Product issues.
When the Suggestions button is clicked, a pop-up will open with all the predefined suggestions for generally faced Product defect issues. The Shop Owner can select their target suggestion by clicking on it which will automatically add in the comment box. Some common issues regarding faulty computer related Products are provided.
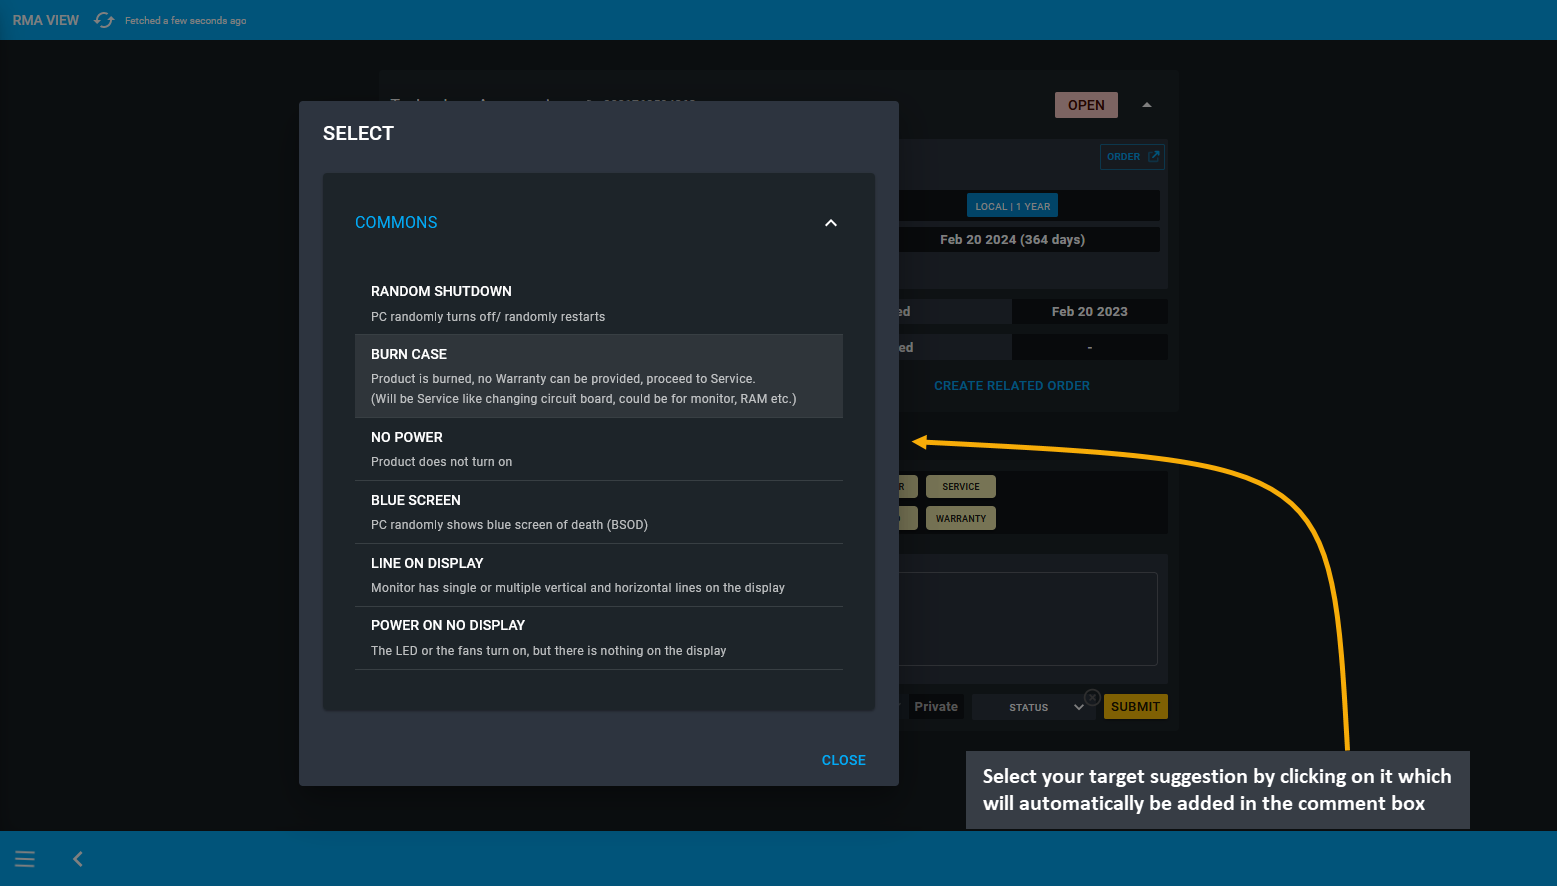
Image 10: Select your target suggestion by clicking on it which will automatically add in the comment box.
After the selected predefined suggestion is automatically added in the comment box, select the RMA workflow as Warranty or Service, select status as In Progress from the dropdown and hit Submit to save the changes. Generally, if there is any active Warranty and if any suggestion is selected, then Warranty will automatically be preselected as workflow. Conversely, if there is no active Warranty, then other options can be selected from the workflow list.
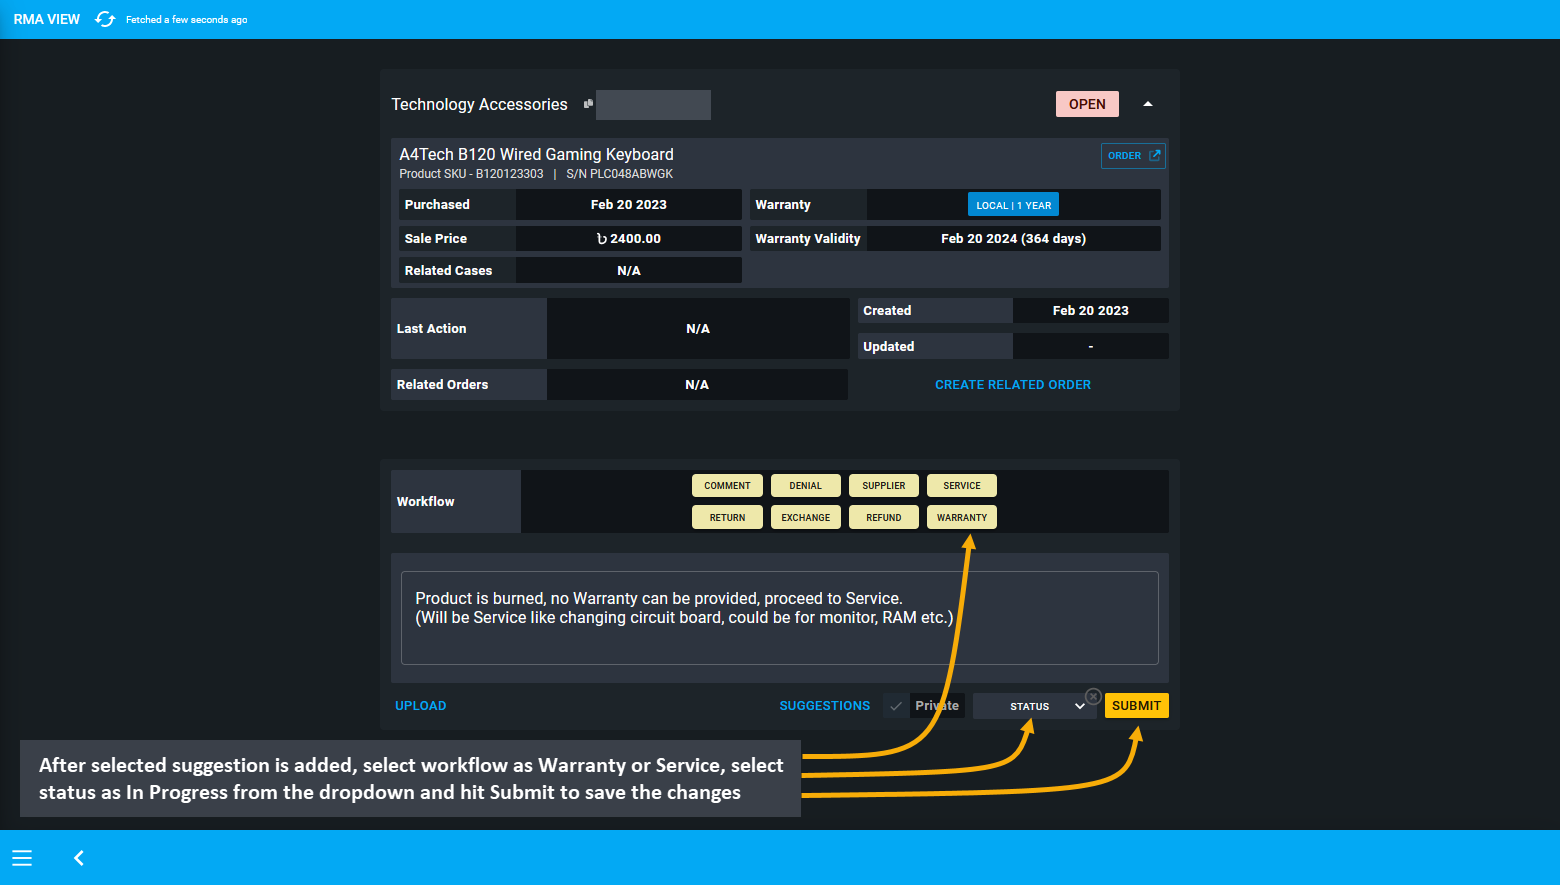
Image 11: After selected suggestion is added, select workflow, status and hit Submit to save all changes.
Workflow Terms Explained
No Action indicates adding a comment about the Product or the RMA case. Denial indicates that Shop Owner will deny the claim of the defective Product from the Customer. Supplier indicates that to claim the warranty, Product has been sent to the Supplier and all updates associated with it can be updated using this. Service indicates any repairing done for the Product with payment from the Customer. Return indicates the Product being returned by the Customer to the Shop Owner. Exchange indicates that Product will be exchanged with another Product by the Shop Owner. Refund indicates that full or partial refund will be made to the Customer if Shop Owner is unable to repair or exchange the Product. Warranty indicates the progress of warranty service for the faulty Product.
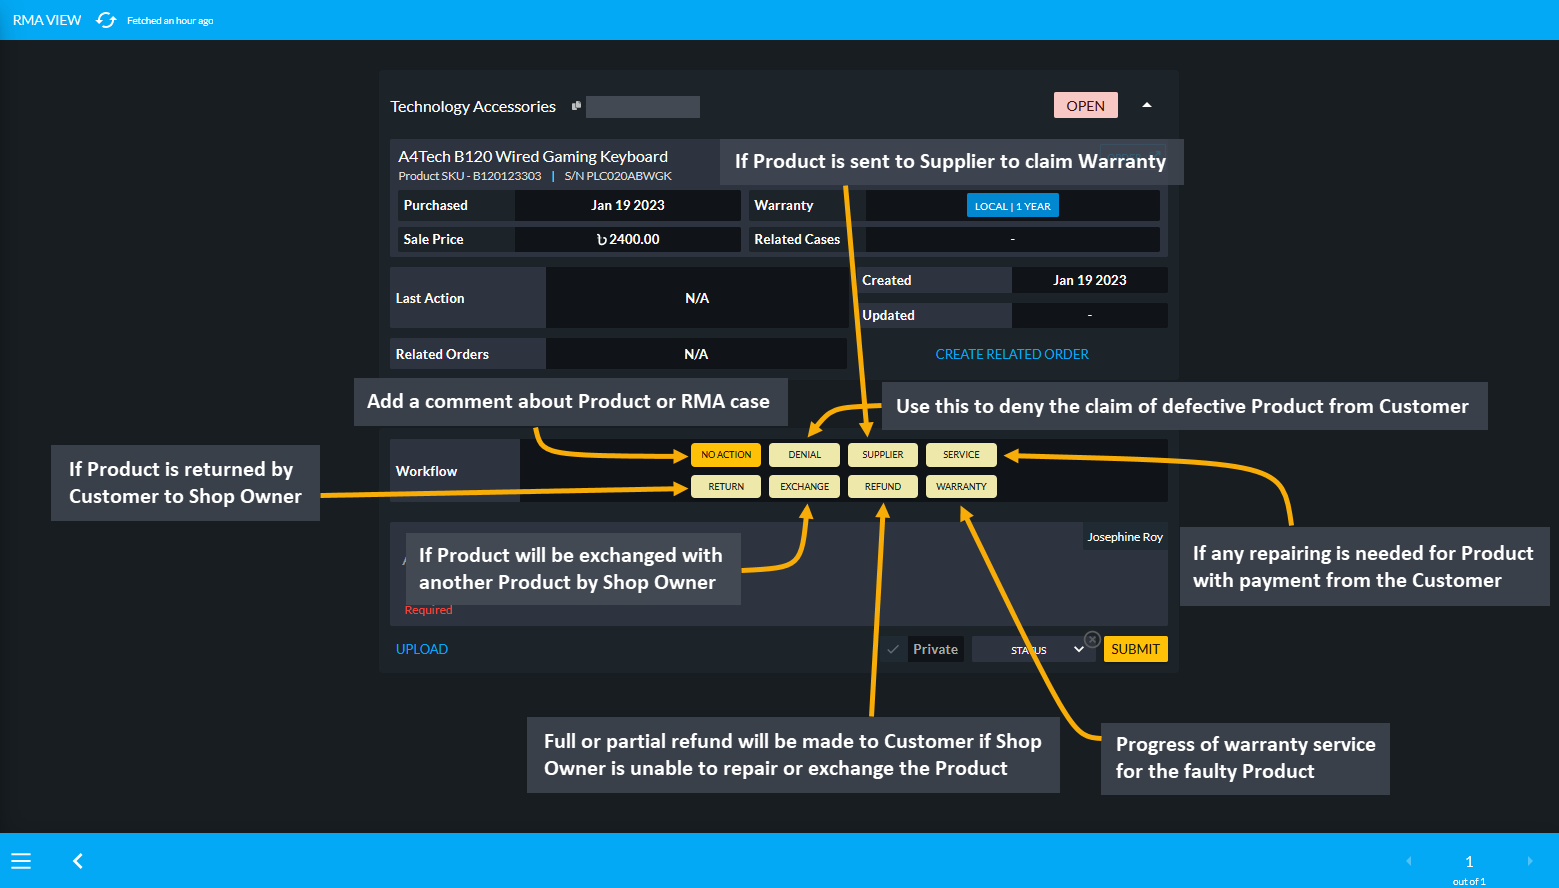
Image 12: There are several workflow actions that Shop Owner can use to take action and update RMA case.
RMA for a Product can be created by using the RMA Create button from Order List. For this, go to the target Order and click the RMA Create button that will redirect to the RMA Create page to start a new RMA case. The RMA Create button on Order List will skip initial search on RMA page needed to create an RMA.
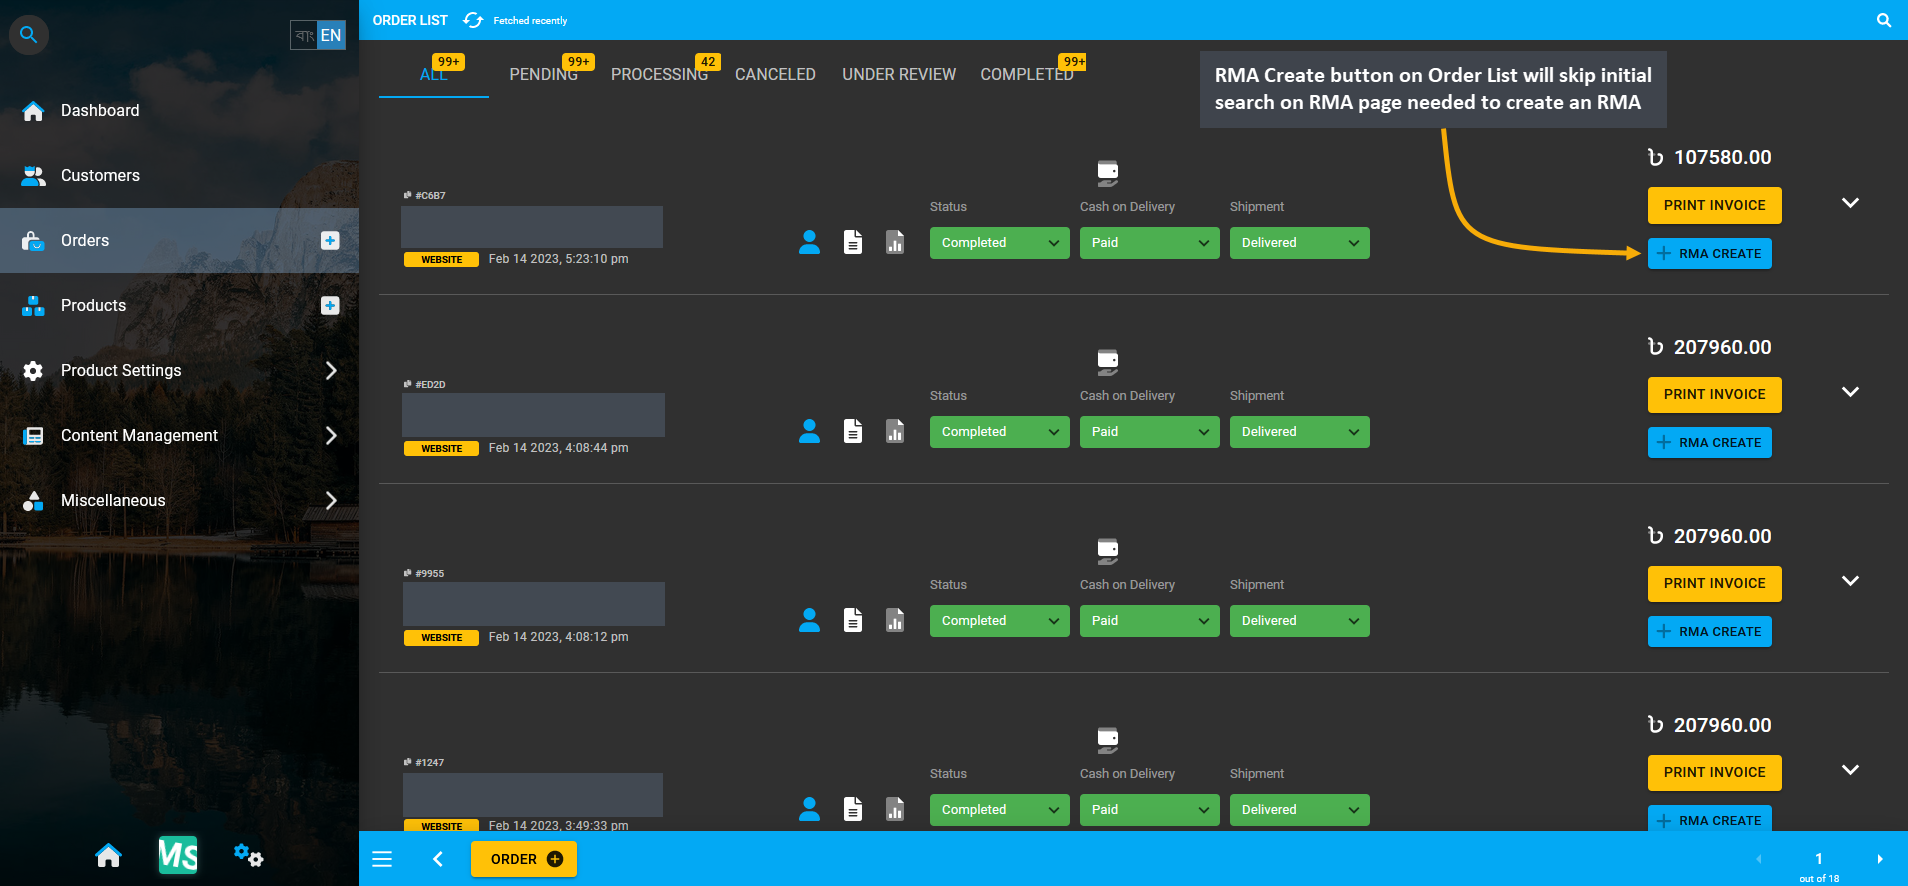
Image 13: RMA Create button on Order List will skip initial search on RMA page needed to create an RMA.
The RMA Create page will open from where the target faulty Product can be selected to create a new RMA case.
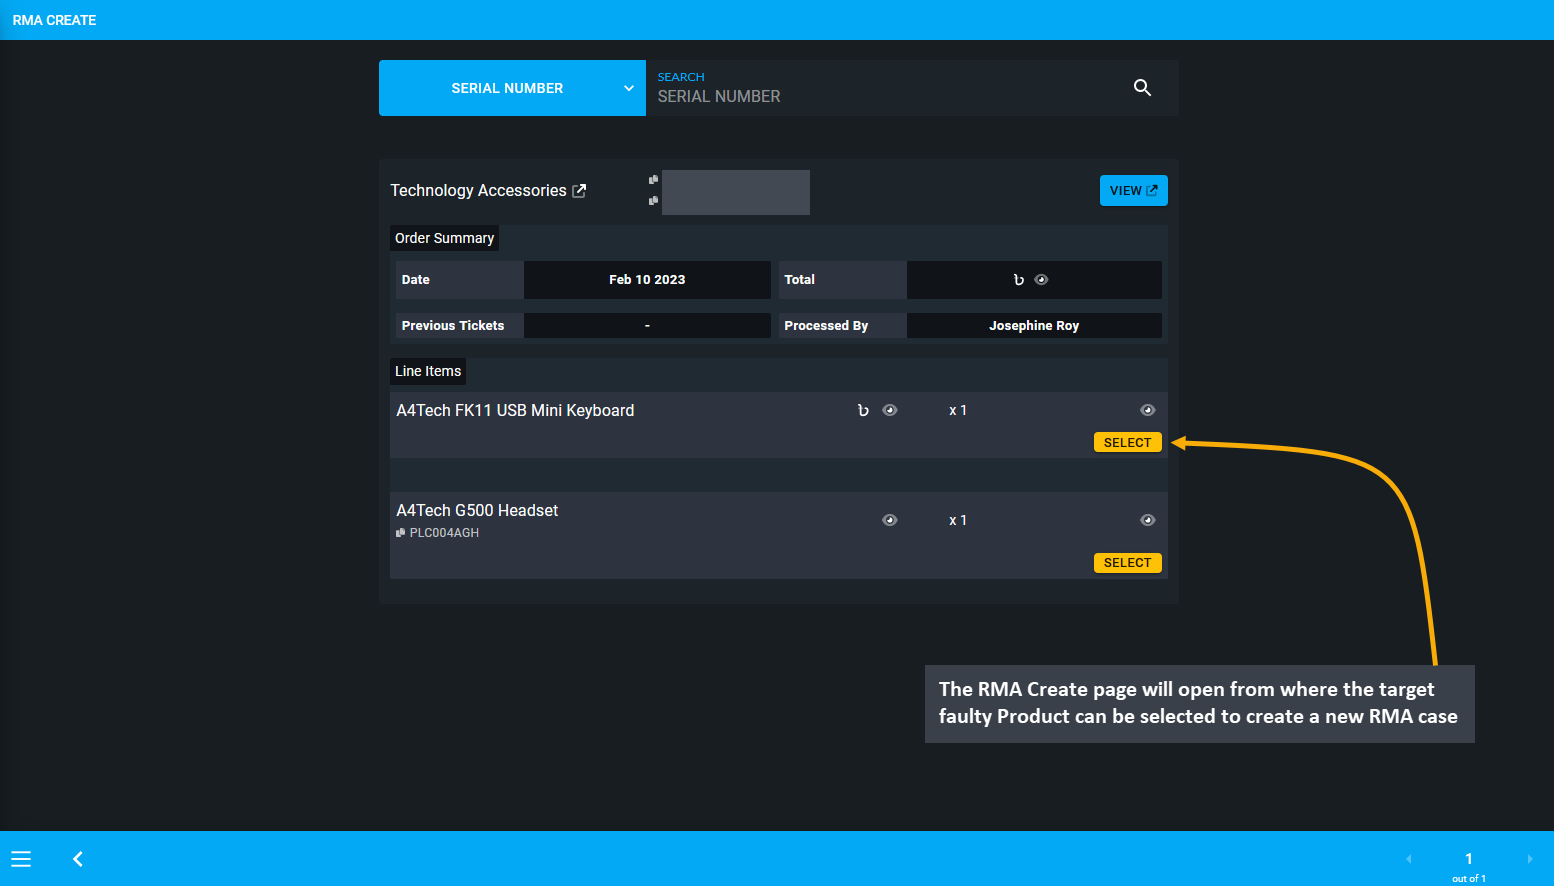
Image 14: Select the target faulty Product from list to create a new RMA case from the he RMA Create page.
RMA for a Product can be created by using the RMA Create button from the Order List on Customer Dashboard. For this, go to the Customer Dashboard and click the RMA Create button beside the target Order that will redirect to the RMA Create page to start a new RMA case. The RMA Create button on Customer Dashboard will skip initial search on RMA page needed to create an RMA.
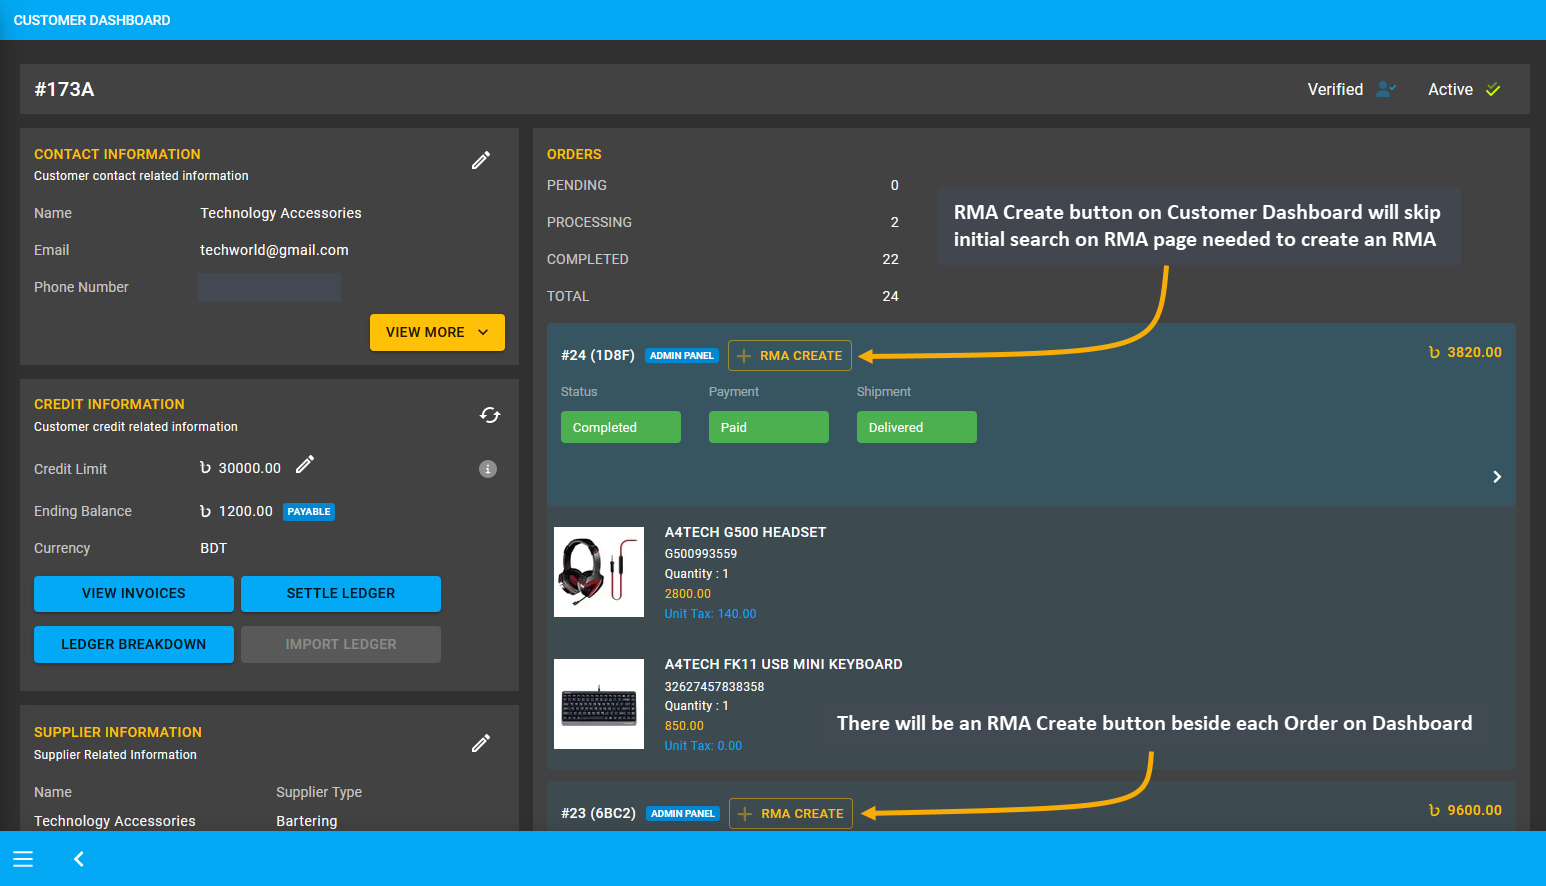
Image 15: RMA Create button on Dashboard will skip the initial search on RMA page needed to create an RMA.
The RMA Create page will open from where the target faulty Product can be selected to create a new RMA case.
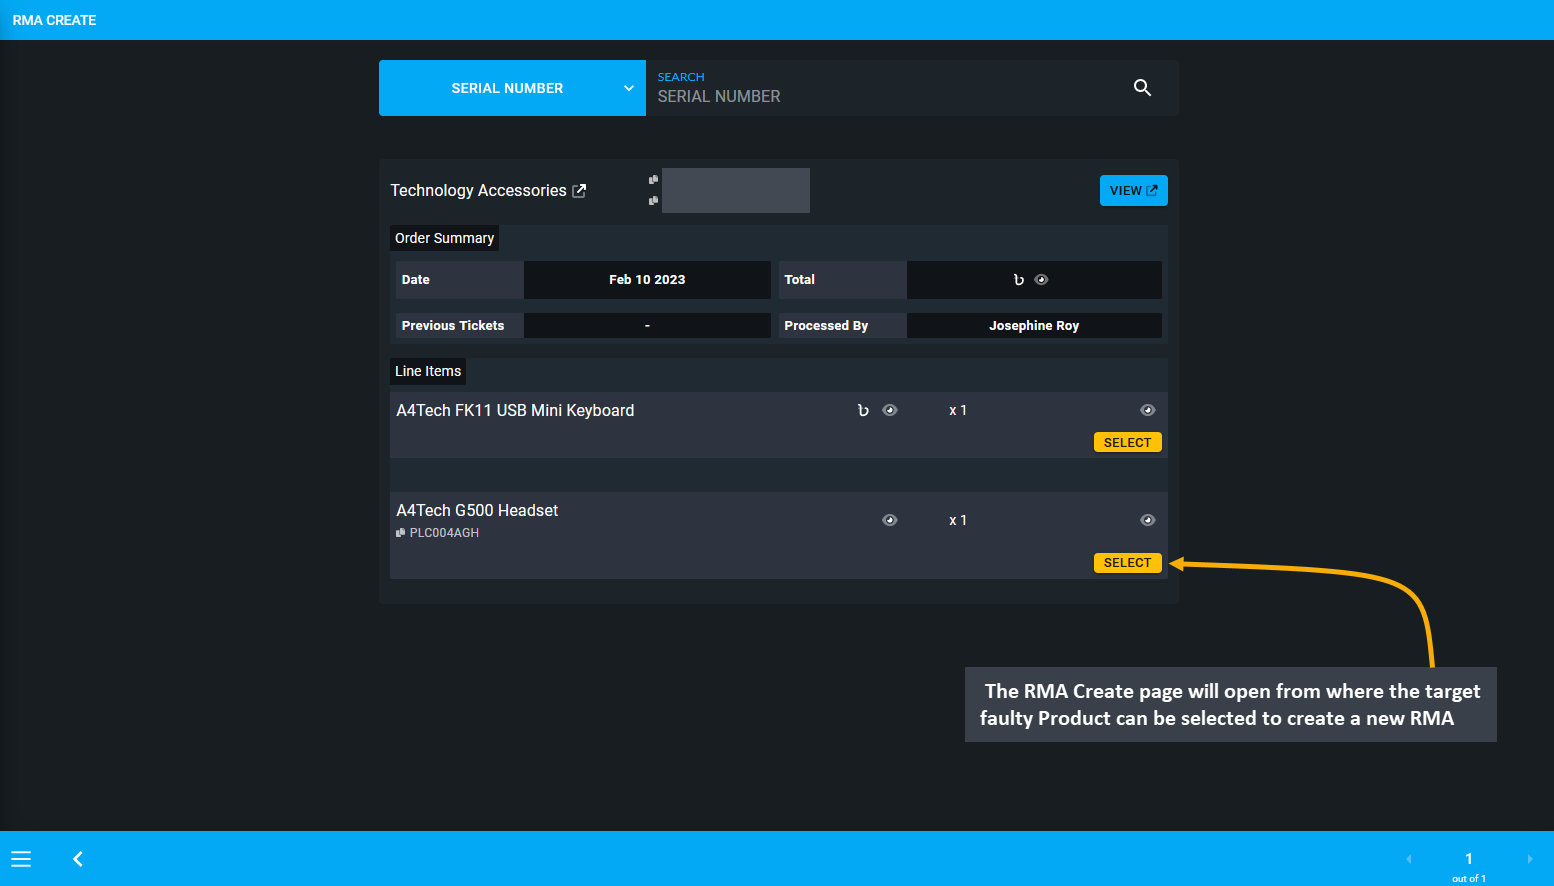
Image 16: Select the target faulty Product from list to create a new RMA case from the he RMA Create page.
16.1 - Comment
Learn more about creating and managing RMA’s Comment workflow actions for Products.
Comment means that the Shop Owner is adding a comment about an update on the Product or the RMA case. This workflow only allows adding a comment than performing any other action.
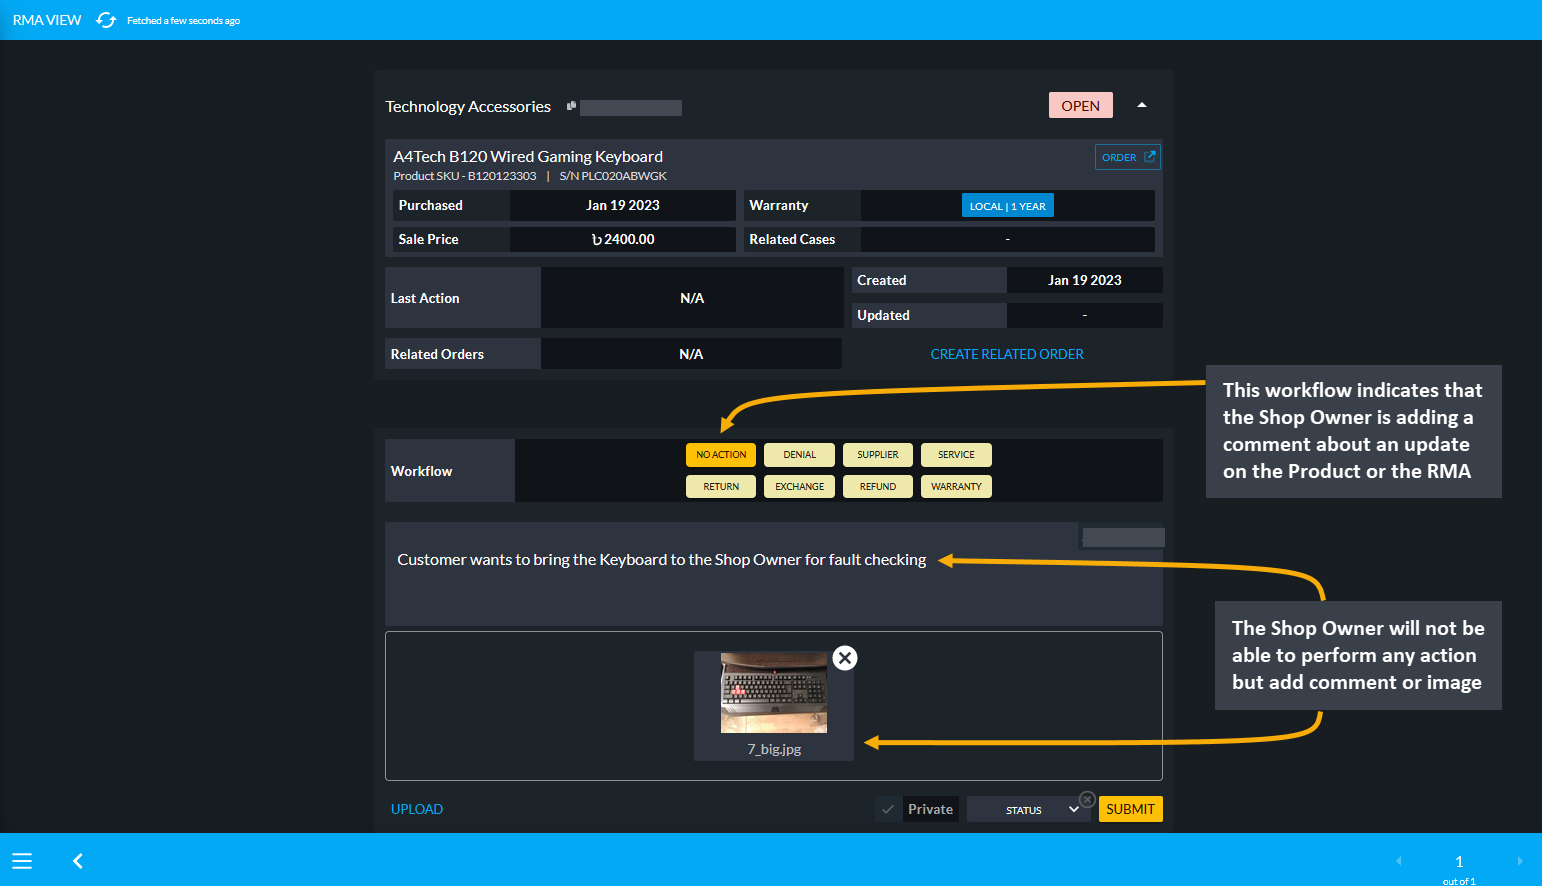
Image 1: Indicates that Shop Owner is adding a comment about an update on the Product or the RMA case.
16.2 - Denial
Learn more about creating and managing RMA’s Denial workflow actions for Products.
Denial of RMA
Denial means that the Shop Owner has denied the claim from the Customer and they will not provide RMA to the Customer and the RMA case will be closed. It could be denying the warranty claim, or defective Product claim etc. After an RMA case is denied, the case will close and status will automatically be changed from Open to Resolved.
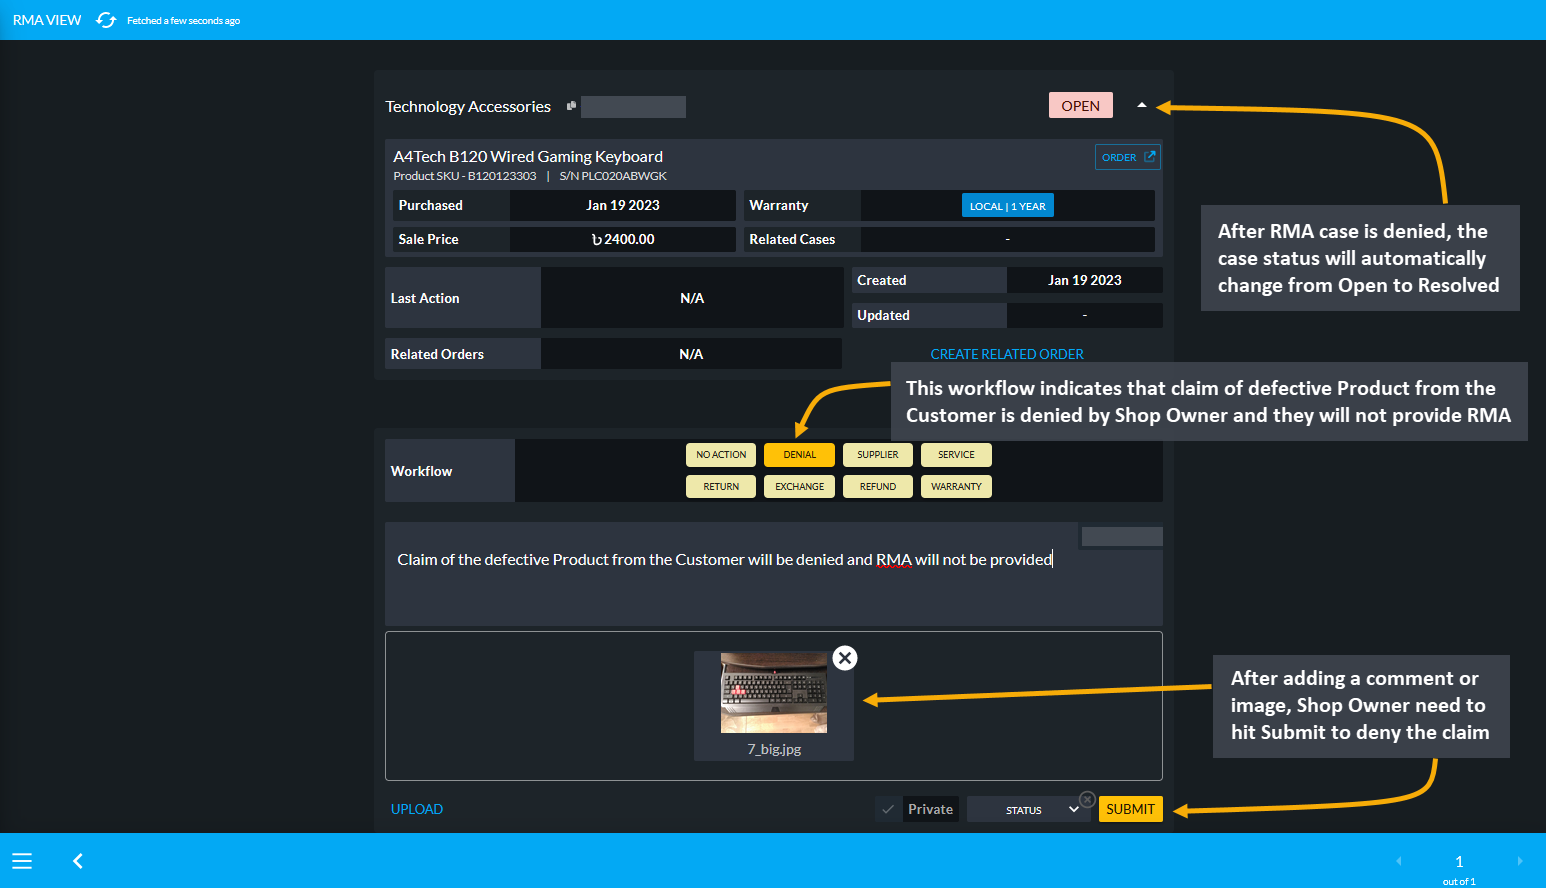
Image 1: Indicates that Shop Owner Shop Owner has denied the Customer's claim and will not provide RMA.
For instance, if a Per Unit Product i.e. A4Tech FM12 FSTYLER USB Mouse was sold without a Warranty, but Customer came back after three months claiming that the mouse is not working properly. Then the Shop Owner can inform them that the Product was sold without any Warranty, so claim for any Product exchange will be denied.
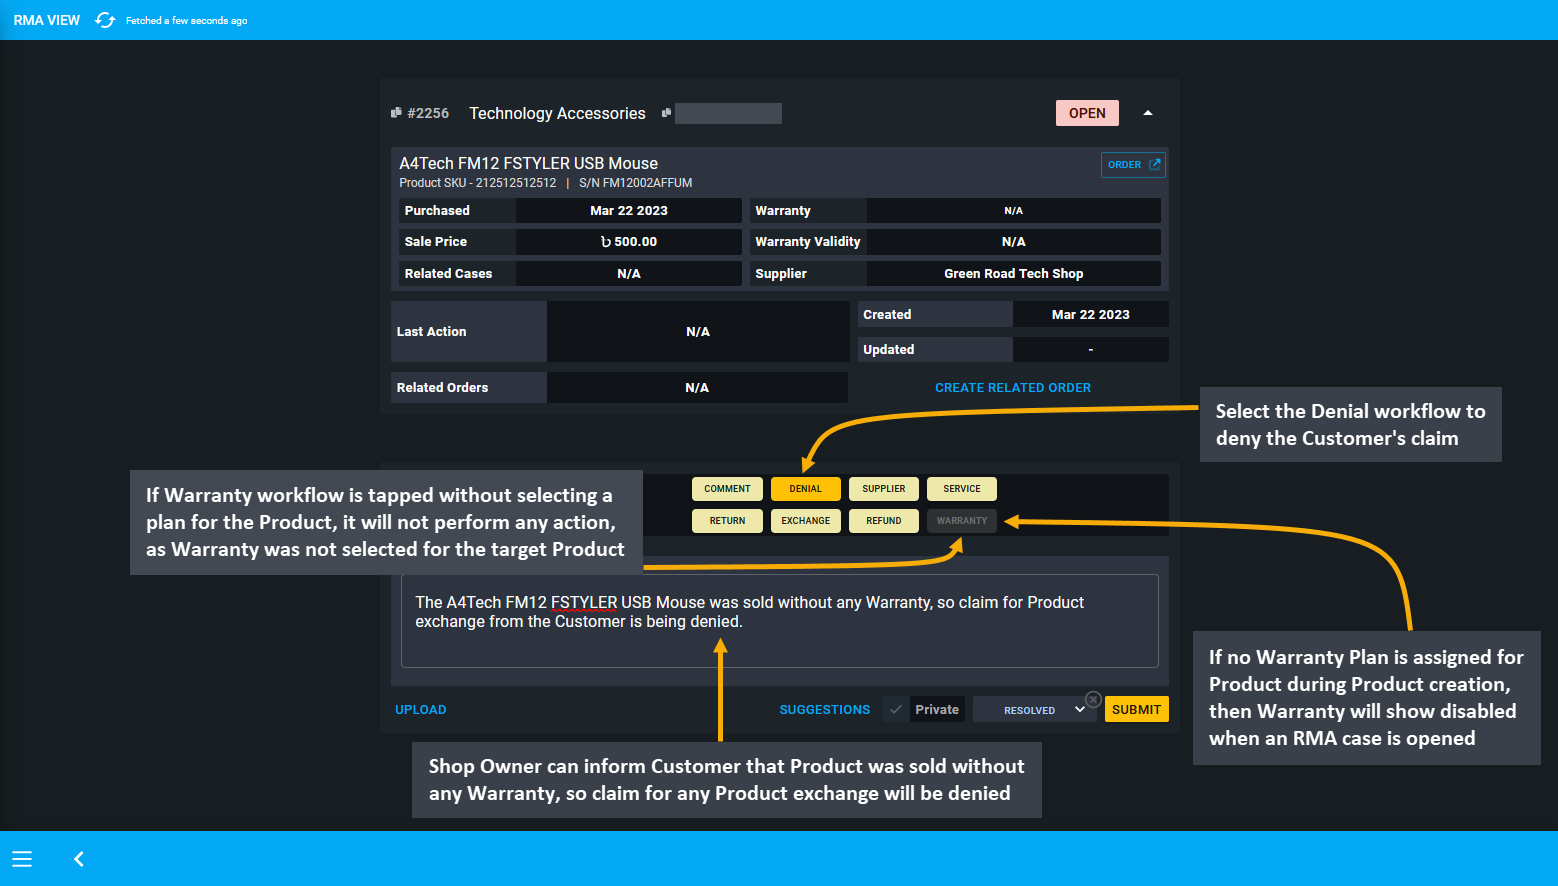
Image 2: If no Warranty Plan is assigned for Product during creation, then Warranty will show disabled.
In this case, it must be noted that if no Warranty Plan is assigned for the Product during Product creation, then the Warranty will show disabled when an RMA case is opened. Thus, if the Warranty workflow is tapped without selecting a plan for the Product, it will not perform any action, as Warranty was not selected for the Product. So, after selecting Denial as workflow and selecting status as Resolved, the RMA case will be automatically Resolved.
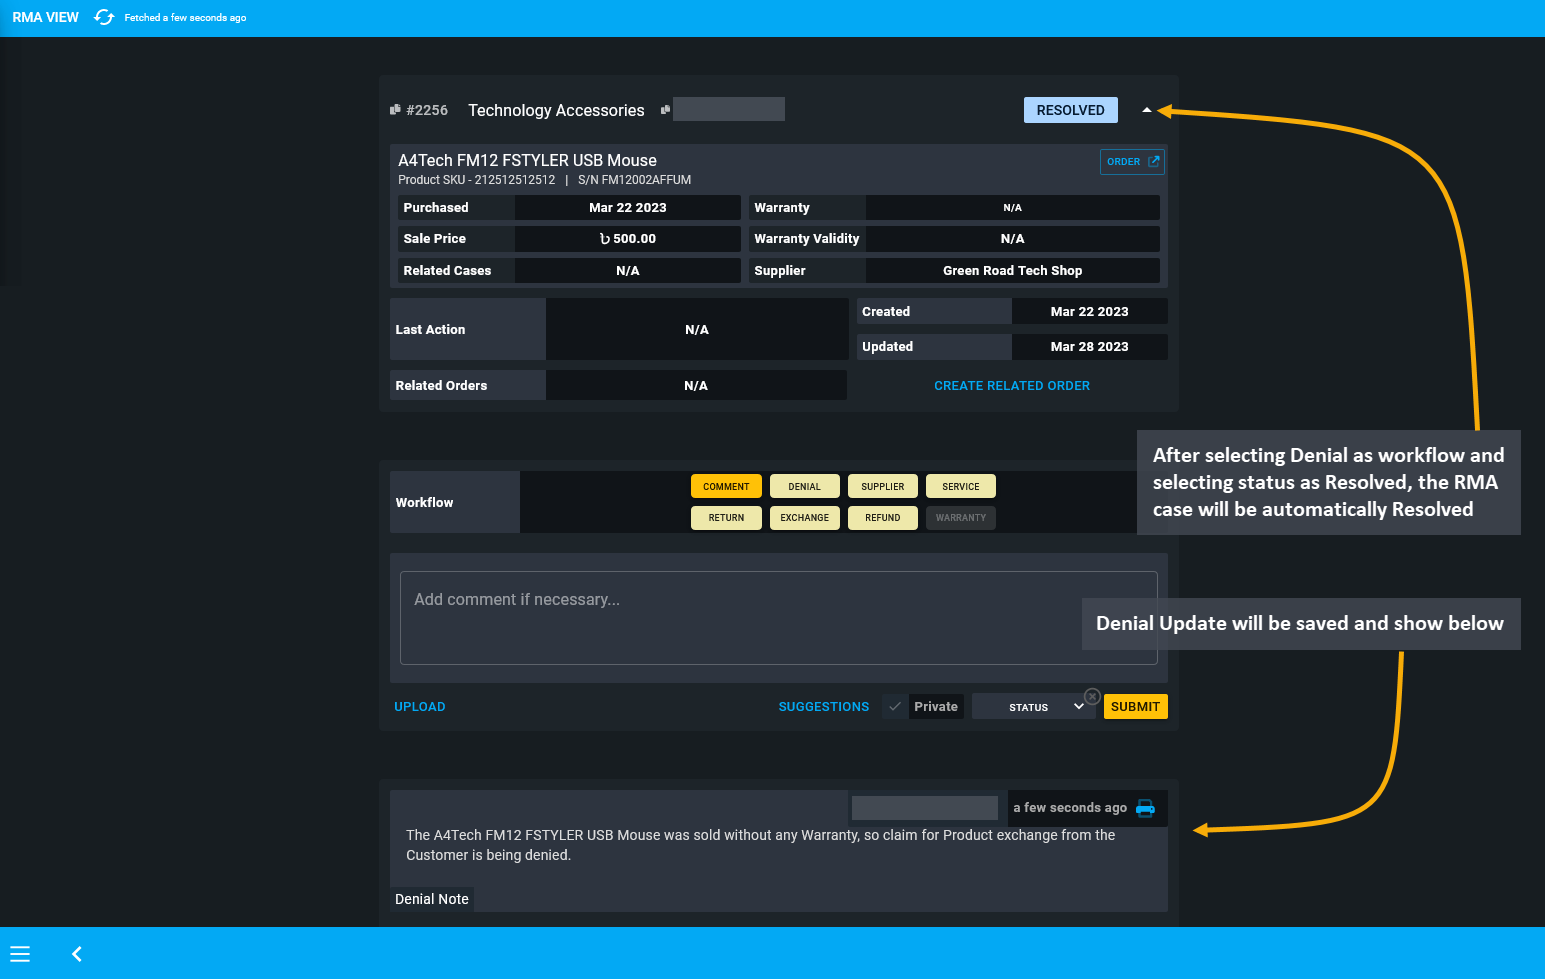
Image 3: After selecting Denial as workflow and selecting status as Resolved, RMA case will be Resolved.
16.3 - Supplier
Learn more about creating and managing RMA’s Supplier workflow actions for Products.
Supplier provides Warranty
Supplier indicates tracking all the communications with the Supplier. For instance, Shop Owner can update that to claim warranty, Product has been sent to the Supplier and all updates associated with it can be added within this workflow. Within the market, there are very few importers or Suppliers from whom the Shop Owner purchases their Products. Therefore, Shop Owners do not have the ability to provide warranty directly to their Customers.
In this case, the Shop Owner will communicate with Supplier regarding the Customer’s Product based on which they will add an update within this workflow. The Shop Owner will use this workflow to internally track the update by adding a comment provided by the Supplier. It could be uploading a file or adding a custom comment.
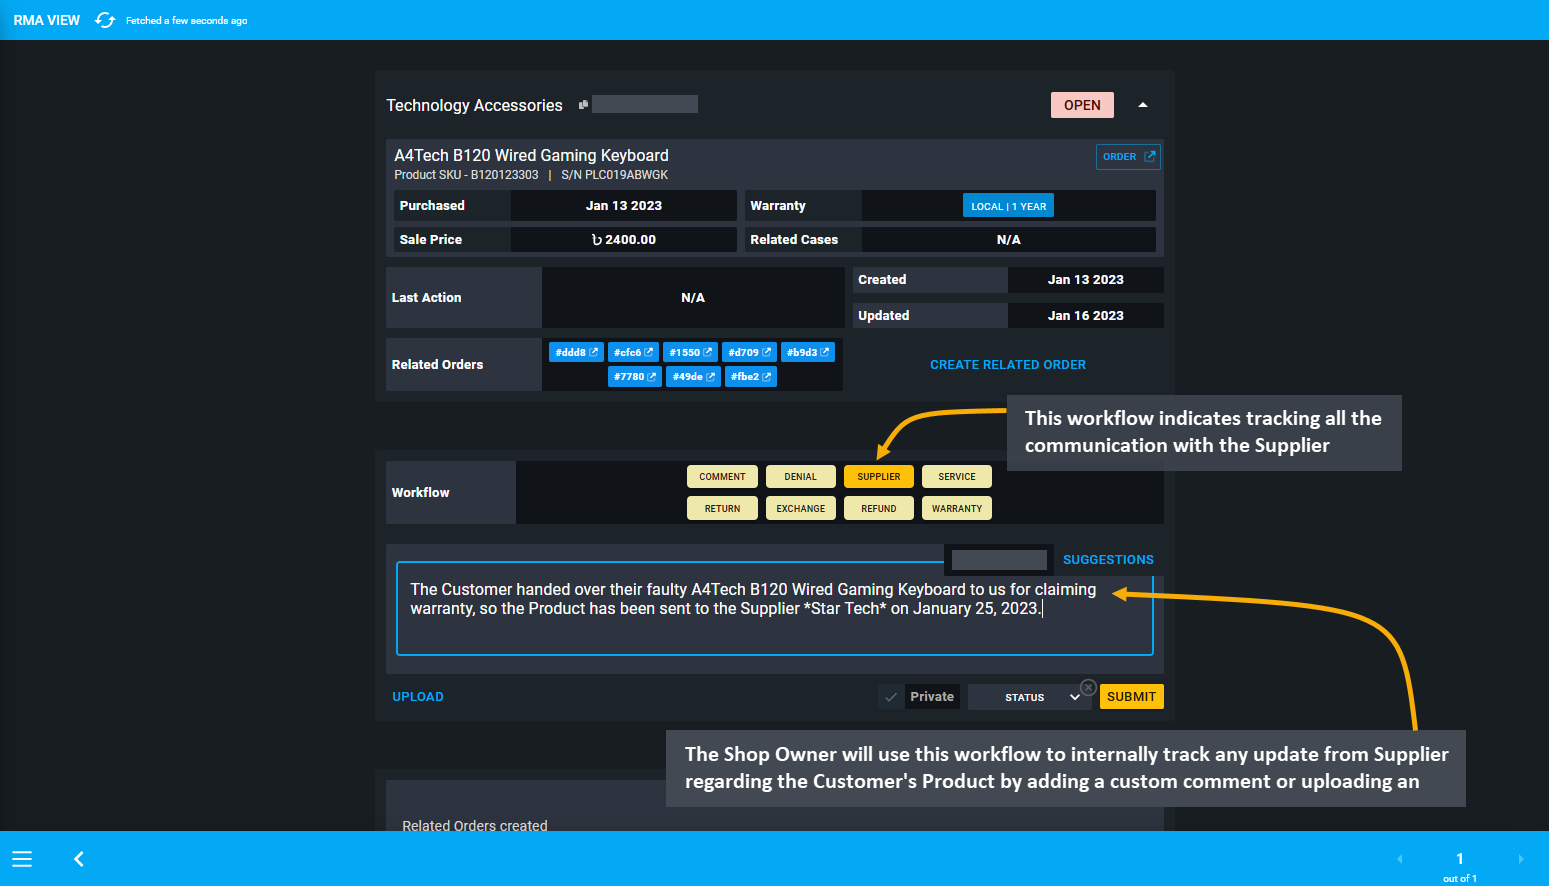
Image 1: This workflow indicates that the Shop Owner is tracking all the communication with the Supplier.
For instance, the Shop Owner purchased Products from Supplier Green Road Tech Shop to resell to Customers. So, if for any reason, the Customer handed over the Product to the Shop Owner for claiming warranty, they will send it to the Supplier. If the Supplier provides an update on the Customer’s Product after a week, then Shop Owner will add it under the comments within the Supplier’s workflow to keep record of communication.
Exchange of Faulty Product by Supplier
In another case, the Shop Owner purchased the Product A4Tech B120 Wired Gaming Keyboard from the Supplier Green Road Tech Shop and sold it to a Customer who found problems with keys on the keyboard after purchase. So, the Shop Owner will receive the faulty Product from Customer and write a note under the Supplier workflow after sending the Product back to Supplier for review and resolution.
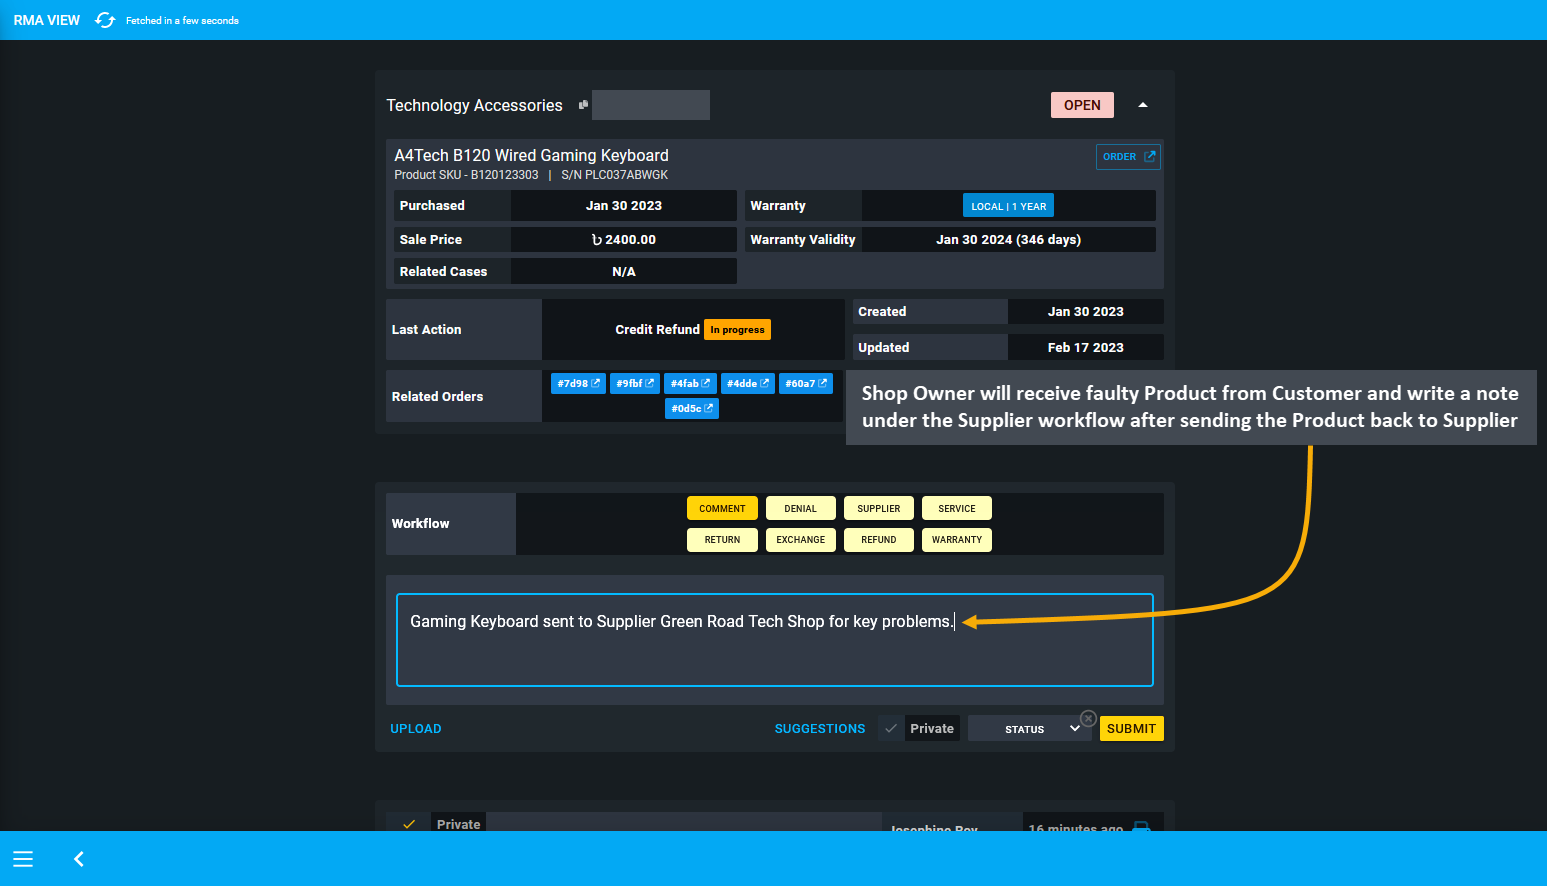
Image 2: Shop Owner will receive faulty Product from Customer and write an update under Supplier workflow.
The Supplier communicated back with Shop Owner and confirmed that the Product A4Tech B120 Wired Gaming Keyboard with Serial Number PLC037ABWGK was indeed faulty. Therefore, they are going to provide Shop Owner with another New Product A4Tech B120 Wired Gaming Keyboard. So, Shop Owner will have to purchase this as a New Product Stock. To do this, select Stock from Product A4Tech B120 Wired Gaming Keyboard on Product List.
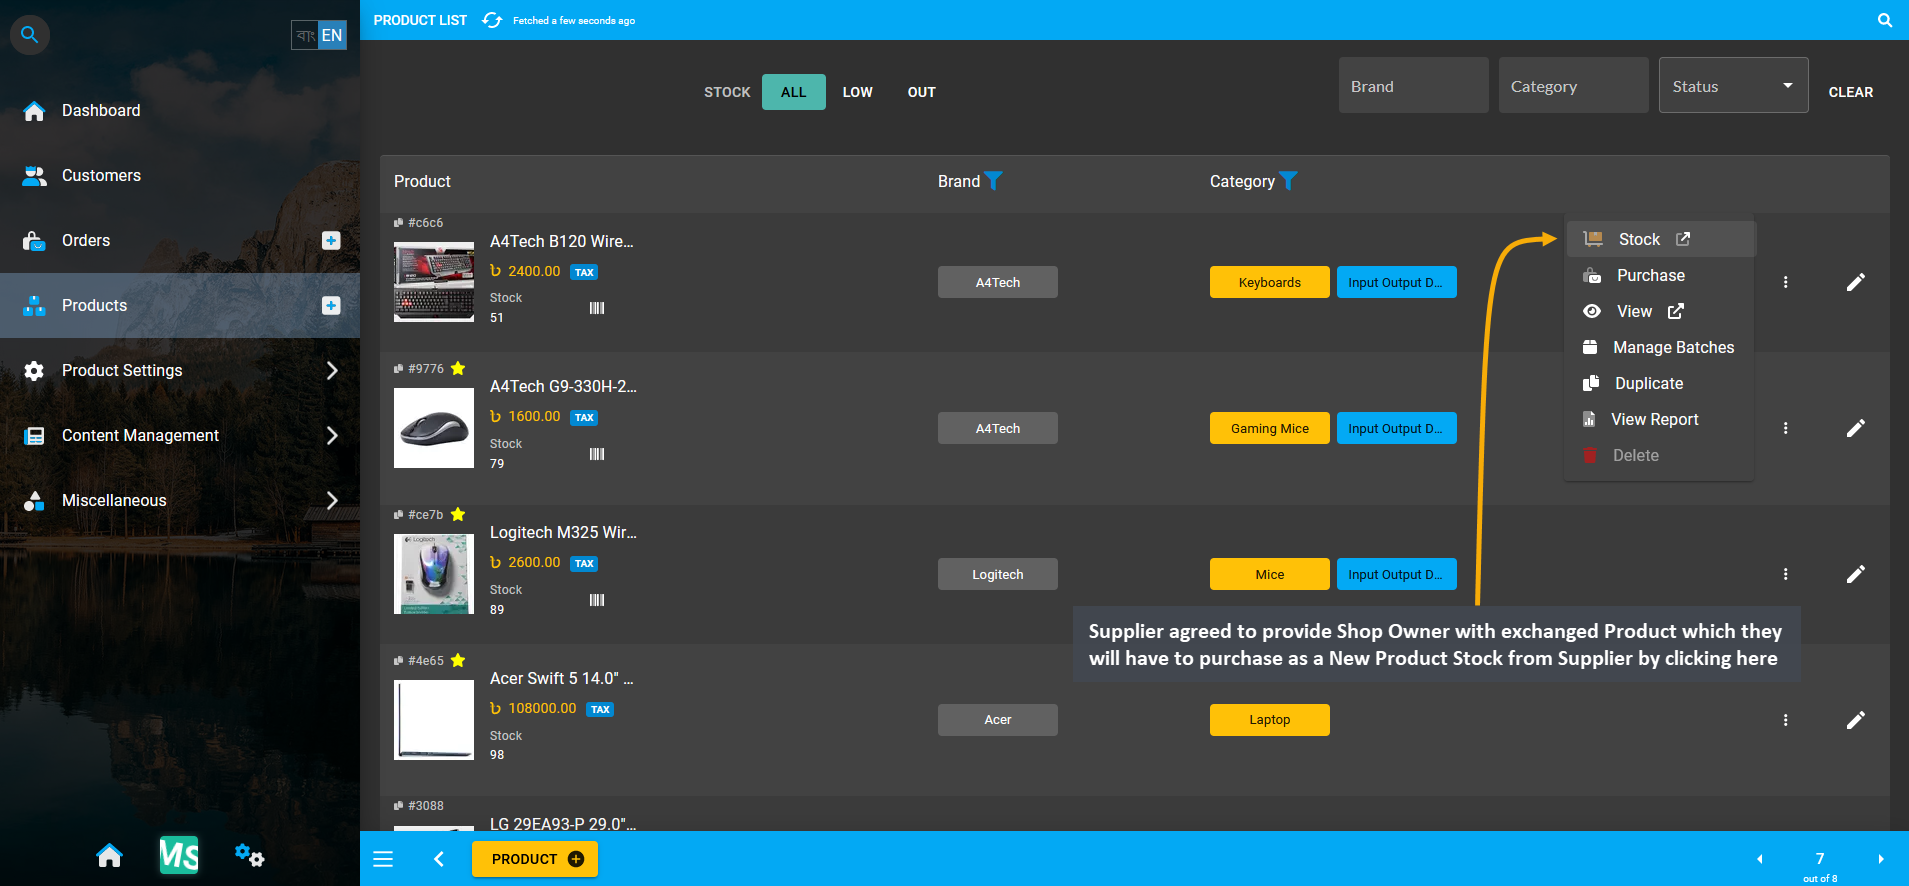
Image 3: Select Stock from target Product on Product List to purchase exchanged Product from the Supplier.
This will redirect to the Unit Stock Management page, so click Add Product Stock button that will redirect to Product Stock purchase page. Here, Shop Owner will purchase the New Product A4Tech B120 Wired Gaming Keyboard from the Supplier Without Payment as the Supplier Green Road Tech Shop is providing it as an exchange for the originally faulty Product with Serial Number PLC037ABWGK. So, set purchase price, select the Supplier and warranty plan.
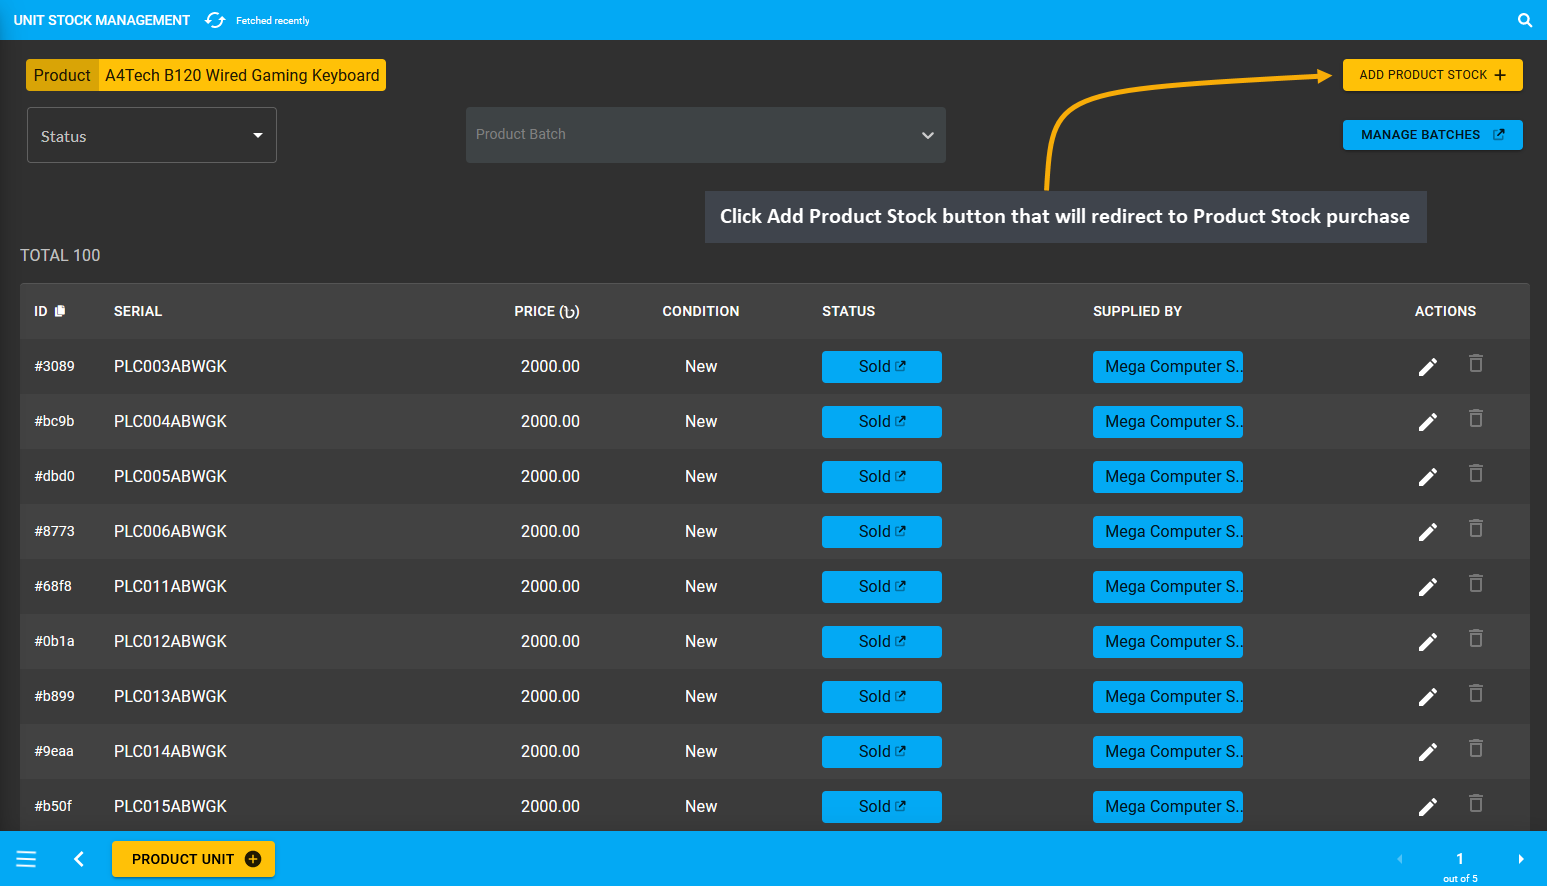
Image 4: Click Add Product Stock to be redirected to the Product Stock purchase page to buy from Supplier.
Then, add New Product Stock which Supplier will provide to Shop Owner by clicking Auto Generate Serial Numbers. Here, a New Product Stock from Supplier was generated with the Serial Number SUPPLIER1EXCHANGE. Add a note that, the Supplier has provided Shop Owner with a New Product mentioning the Product Serial and RMA Case ID.
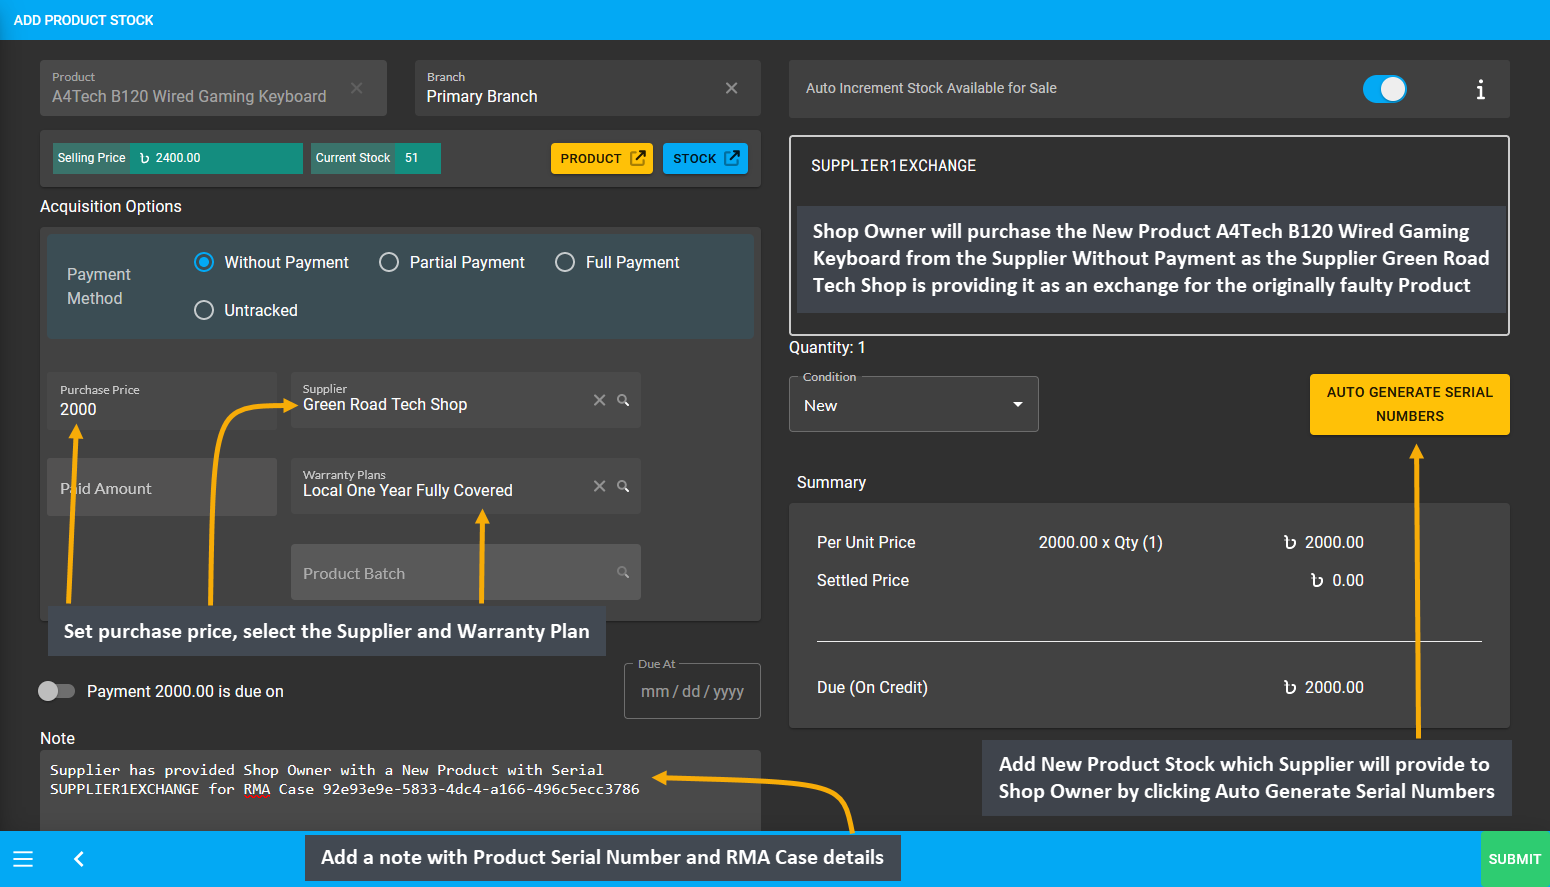
Image 5: Purchase exchanged Product from Supplier by adding Stock, selecting Supplier, and adding details.
After clicking Submit, the New Product Stock with Serial Number SUPPLIER1EXCHANGE will be updated on the Unit Stock Management page. Copy the Product Serial Number that will be exchanged with faulty Product on RMA case.
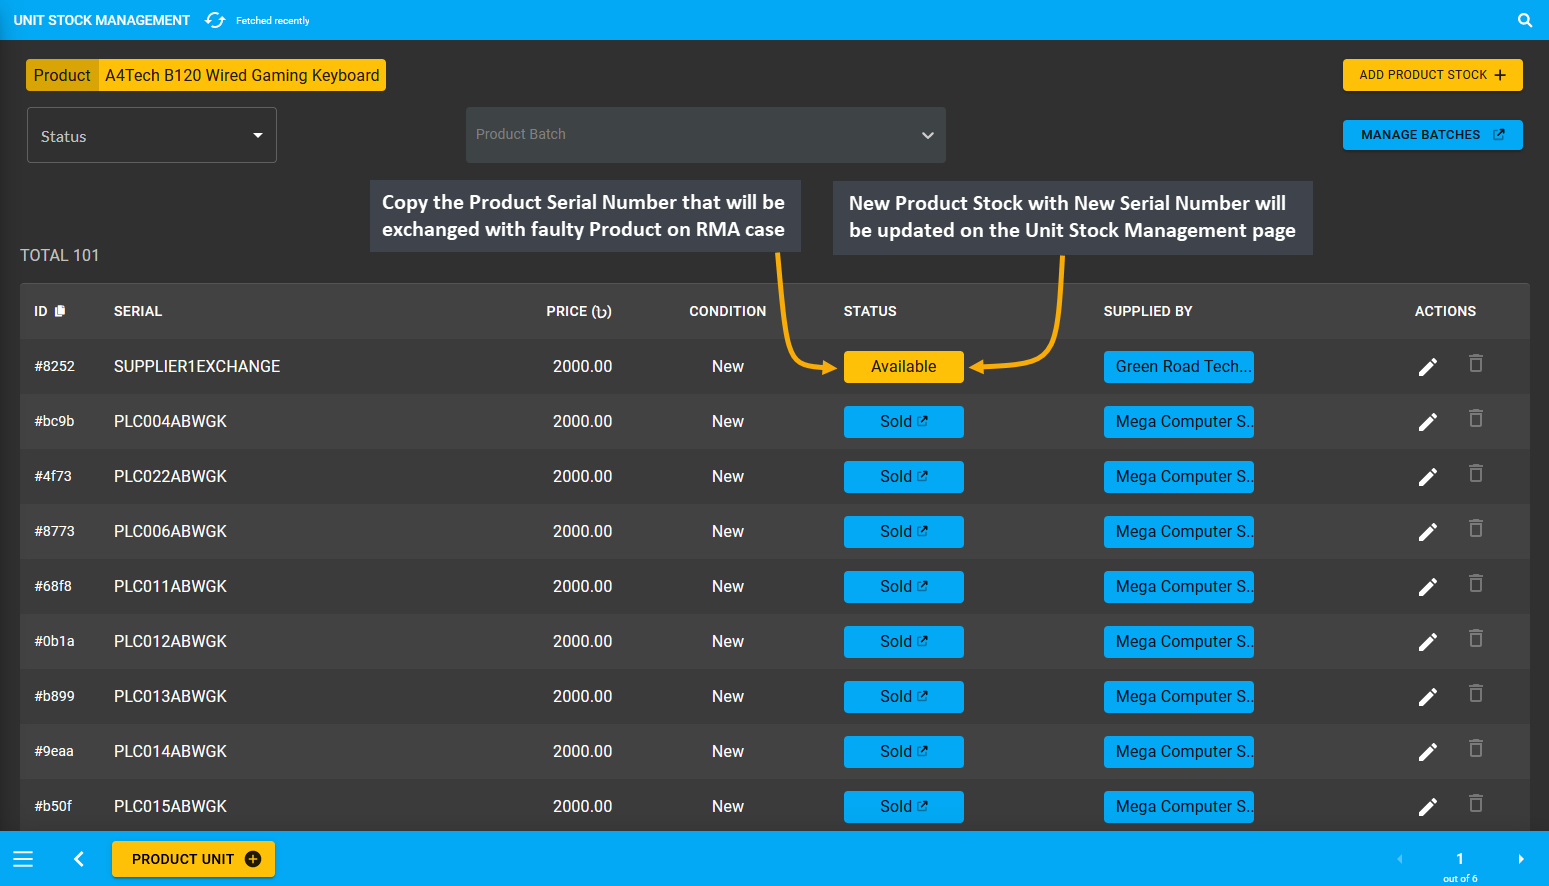
Image 6: New Product with Serial Number will be updated on Inventory, copy its Serial to use for Exchange.
Now, back in the RMA View page, the Shop Owner will have to open the Exchange workflow to give the exchanged Product to Customer that they have received from the Supplier. Within exchange details, input the Serial Number SUPPLIER1EXCHANGE and select Returned to indicate that the Faulty Product with Serial Number PLC037ABWGK has been returned back to the Supplier. Add a comment to indicate that the Shop Owner has received the exchanged Product from Supplier to provide it to Customer. Select Resolved as status to close the RMA case and click Submit.
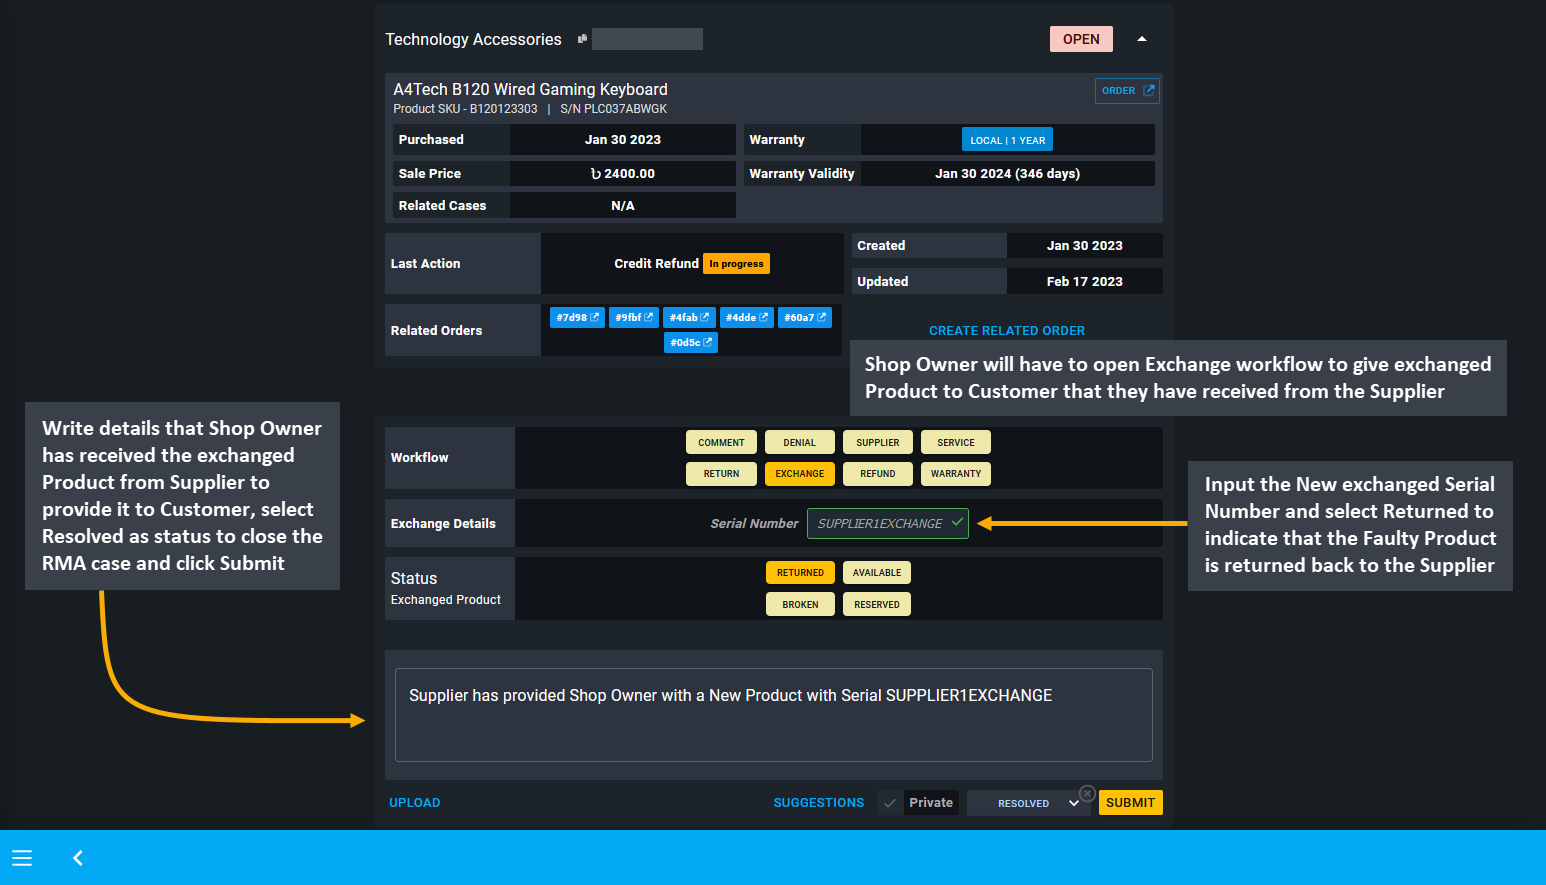
Image 7: Input the Serial Number of the New Product within Exchange Details box and select Returned status.
16.4 - Service
Learn more about creating and managing RMA’s Service workflow actions for Products.
Service Warranty for Repairing
Service means custom service warranty, it indicates any repairing done for the Product with payment from the Customer. Service warranty will be provided to Customer by the Shop Owner if their Product warranty is over. Hence, this option needs to be selected when the warranty period for the Customer’s Product is over.
If the Shop Owner wants to charge the Customer regarding non-warranty related services, they can also use the option to Create Related Orders. Creating a related Order or several related Orders for the RMA case will allow the Shop Owner to charge Customer for additional service for the Product. Related Orders can be created by the Shop Owner to sell a Product or a Product’s part to the Customer, or charge payment for service from the Customer.

Image 1: This workflow indicates any repairing done for the Product with payment from the Customer.
Related Orders can be created by the Shop Owner to sell a Product or a Product’s part to the Customer, or charge payment for Service from the Customer. For instance, if an RMA case needs to be resolved through Payment, then the Shop Owner can Create Related Order to charge Customer for Service or Product that they need to purchase.
For instance, if Customer contacted the Shop Owner about a Product that is having technical problems and asked for a replacement, but Warranty has expired, then Shop Owner will not provide exchange for the Product even if they are facing problems with it. In this case, if Customer wants to purchase the same Product, then they can ask for Service for which a Related Order can be created with additional payment from the Customer.
The Related Order that will be created under the Service workflow will get recorded under Related Orders on RMA case. To create a Related Order, the Shop Owner can add a Comment to keep record of why the Related Order was created. After clicking the Create Related Order button, Order Cart will open with Customer’s information prefilled.
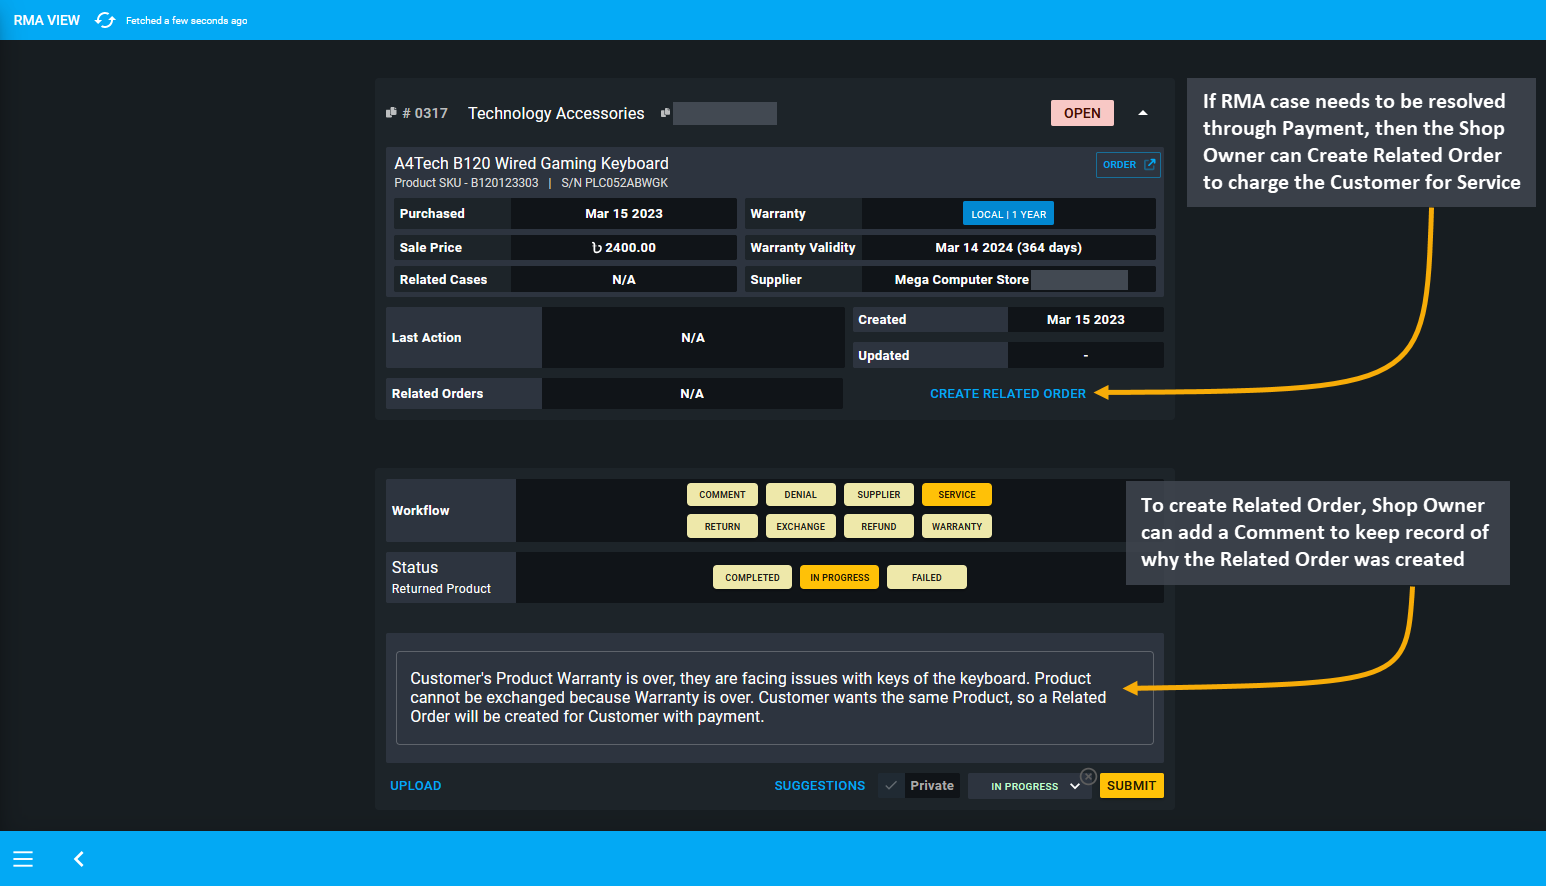
Image 2: If an RMA case needs to be resolved through Payment, then Shop Owner can Create a Related Order.
Therefore, Shop Owner will now have to add the Product to Cart for which additional payment will be charged. Assign the Stock for the Per Unit Product and check Product quantity, Order total, subtotal. Click on the Proceed button to charge Product payment from the Customer for the Related Order of the RMA case.
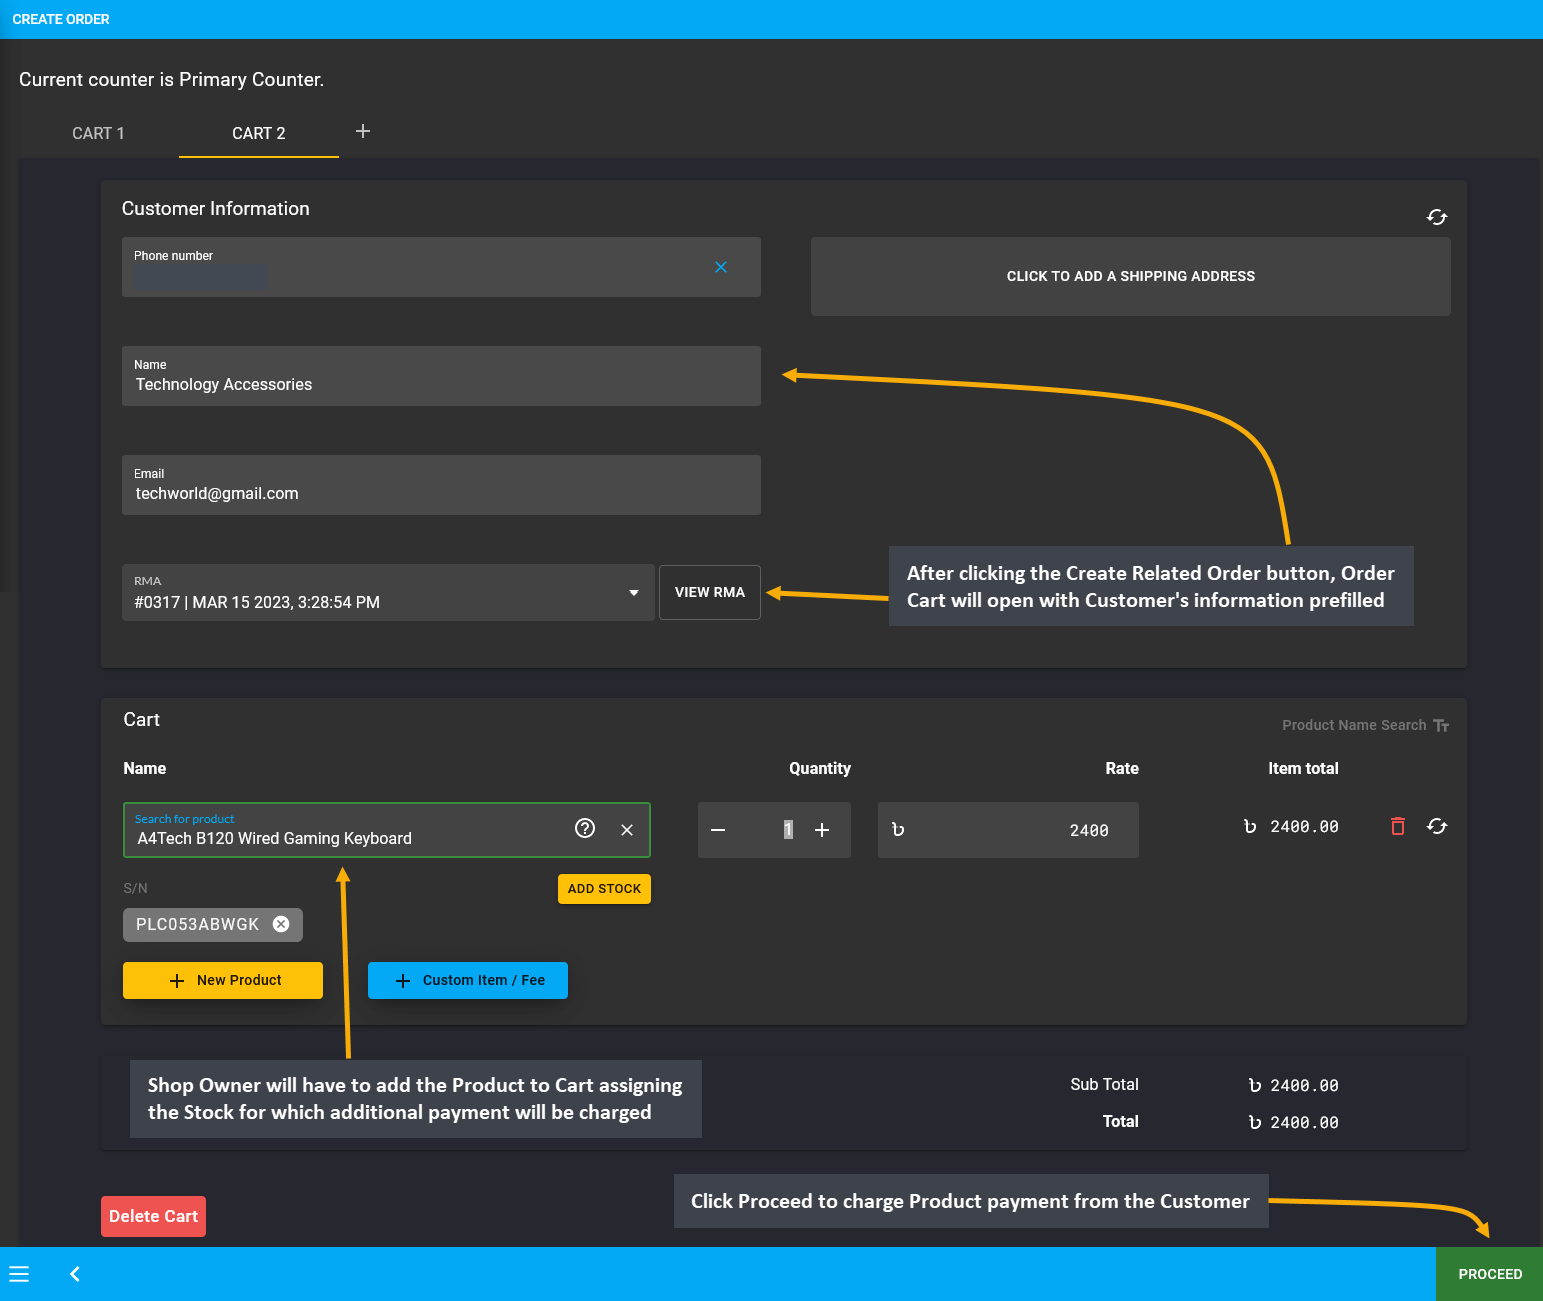
Image 3: The Shop Owner will have to add the Product to Cart for which additional payment will be charged.
In the following page, select Customer’s preferred Shipment and Payment options. Add a note stating that Related Order was created upon Customer’s request for the RMA case to purchase the same Product with payment under Service as the original Product is out of Warranty. Click Confirm Order to create the Related Order for RMA case.
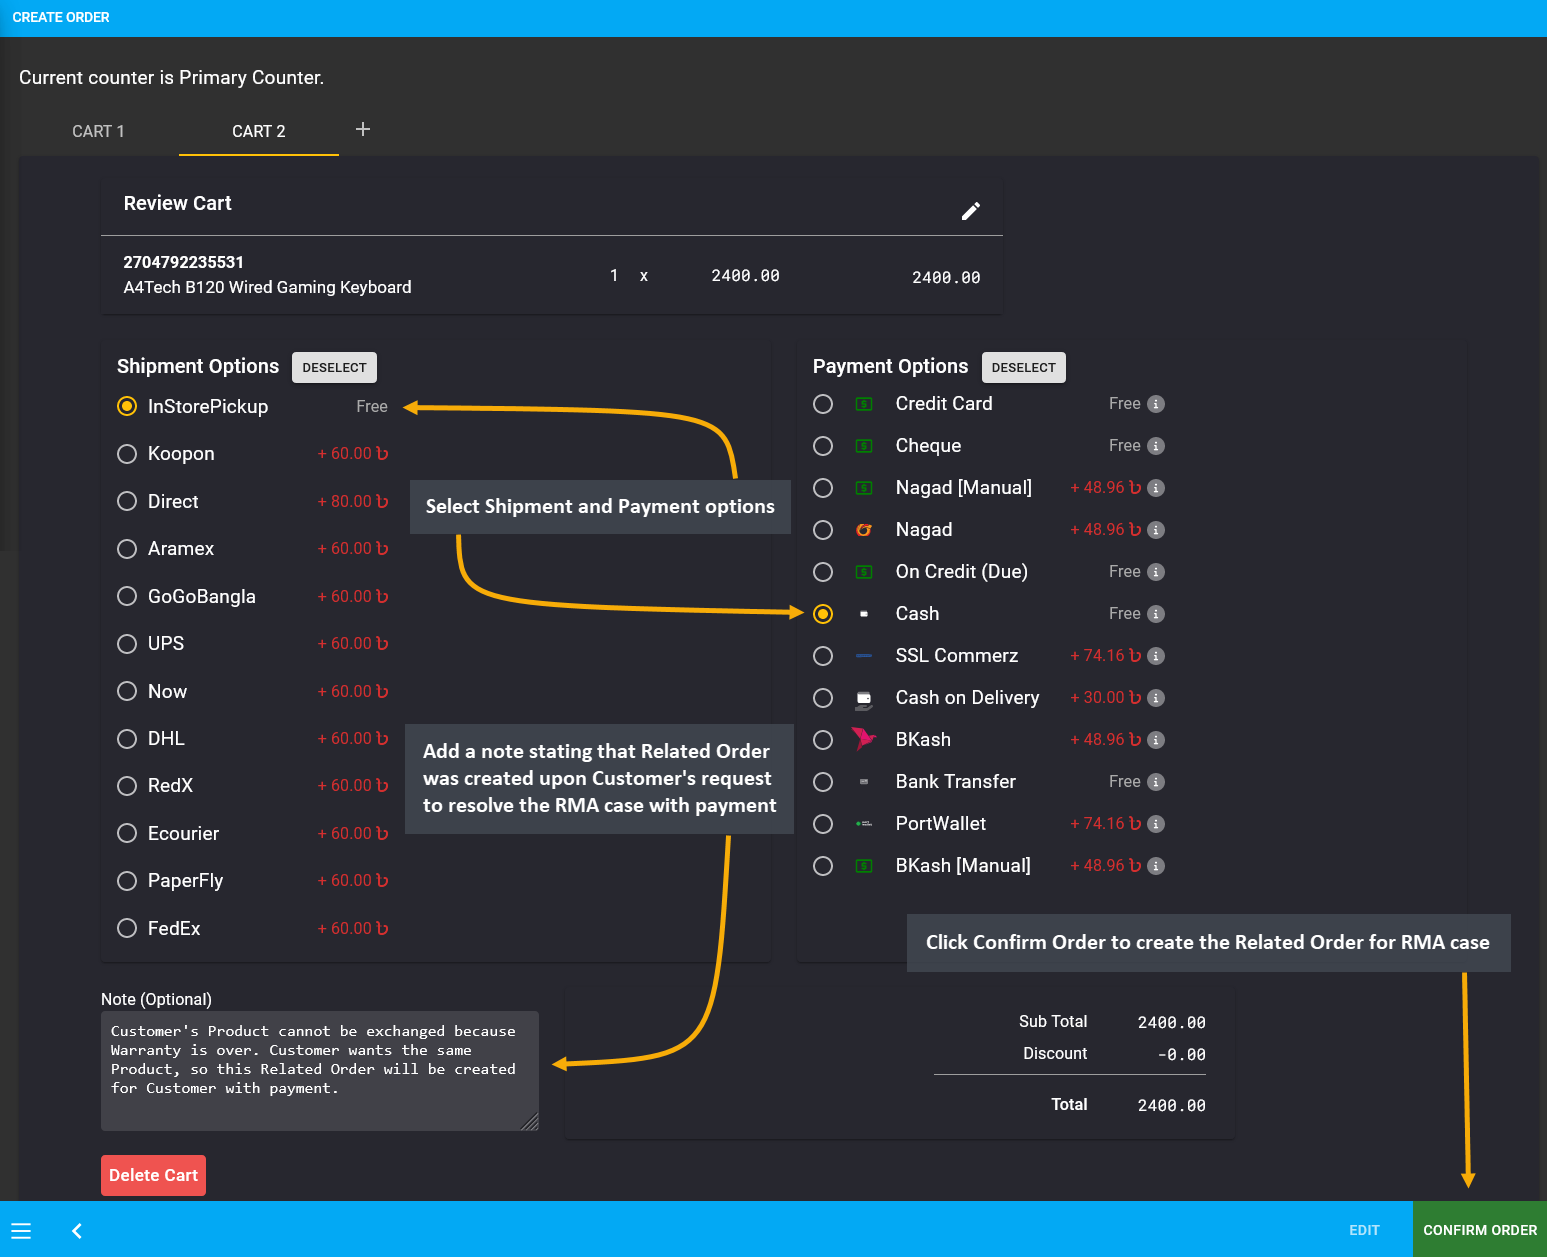
Image 4: Related Order was created upon Customer's request to resolve the RMA case Warranty with payment.
After Order is completed, Shop Owner can click View Order button that will automatically redirect to the Related Order on the general Order List. It will display the note which explains that the Order is related to RMA case.
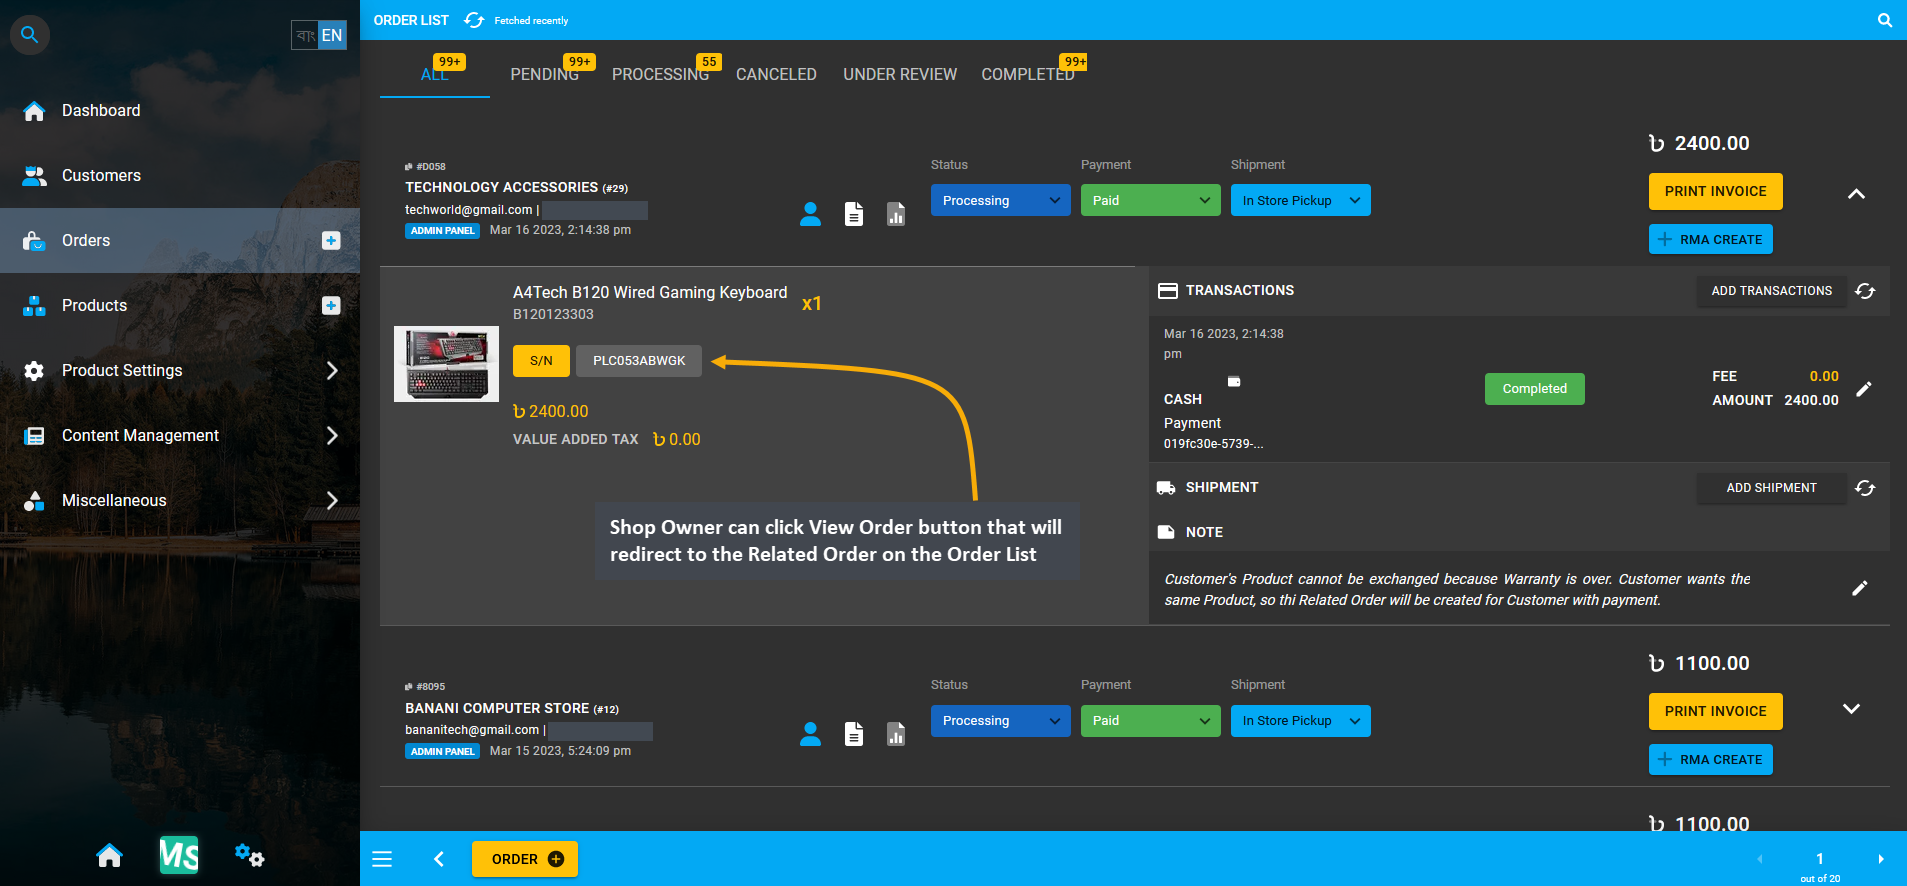
Image 5: Shop Owner can click View Order button that will redirect to the Related Order on the Order List.
Back in the RMA case, the Related Order created as Service with payment for the expired Warranty case will show under Related Orders tab. For convenience, Shop Owner can select Completed status under Service workflow. They need to select the final status as Resolved to close the RMA case as non-warranty related Service was provided to the Customer with additional payment through purchase of another A4Tech B120 Wired Gaming Keyboard.
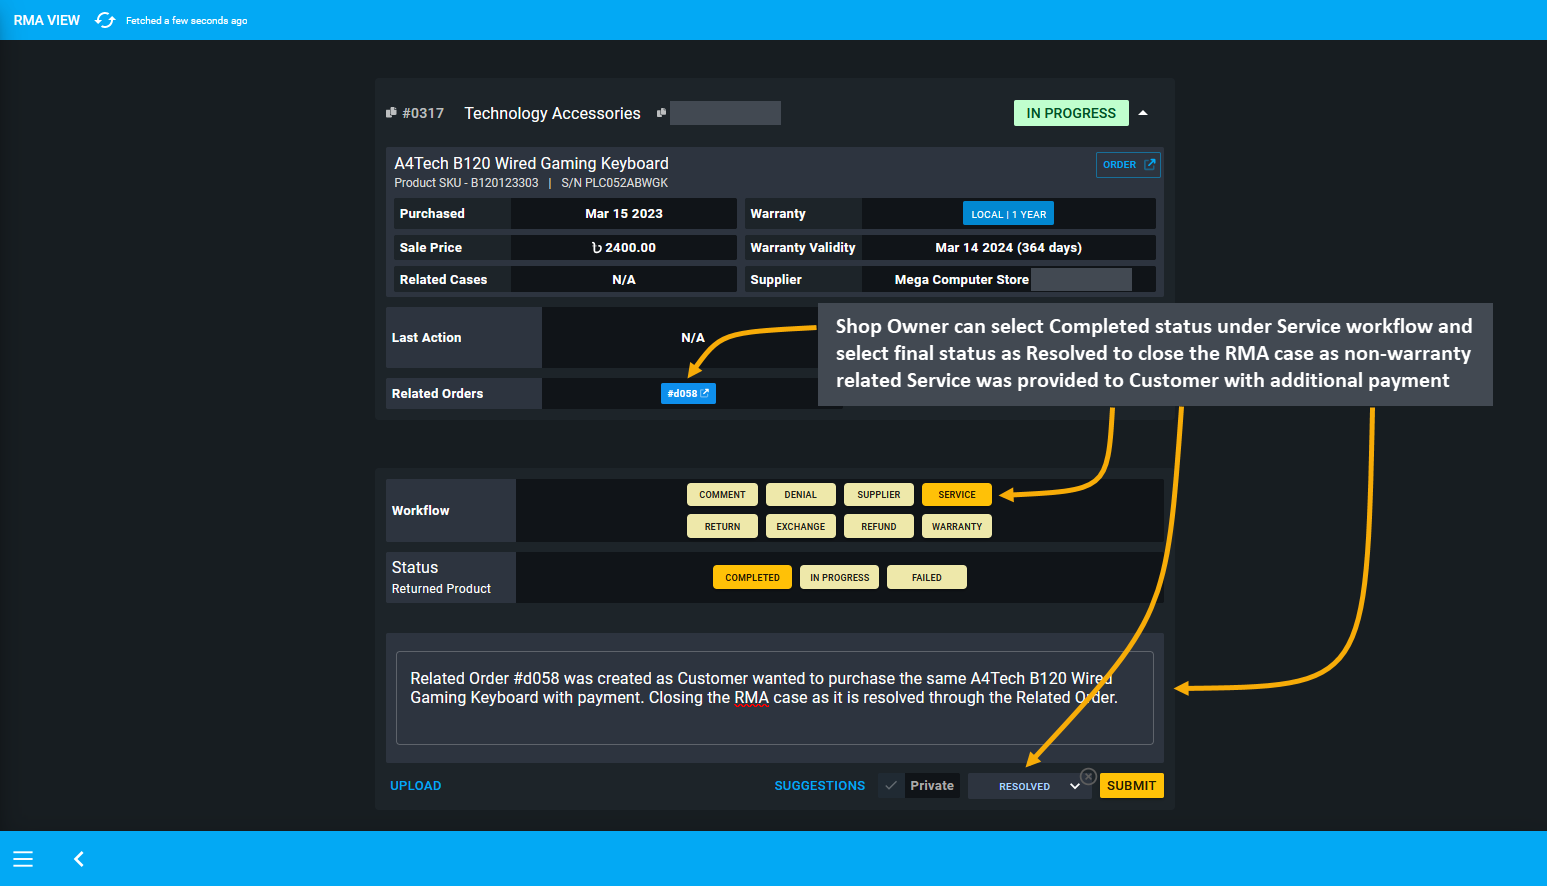
Image 6: Shop Owner can add a Comment stating details and select status as Resolved to close the RMA case.
16.5 - Return
Learn more about creating and managing RMA’s Return workflow actions for Products.
Return of Product by Customer
If the Customer wants to return a Product back to the Shop Owner for some reason, the Shop Owner can restock it back. When Return is selected as the workflow, the Shop Owner will have to select how they want to restock the Product from Returned, Available, Broken, and Reserved which will determine the status of the restocked Product.
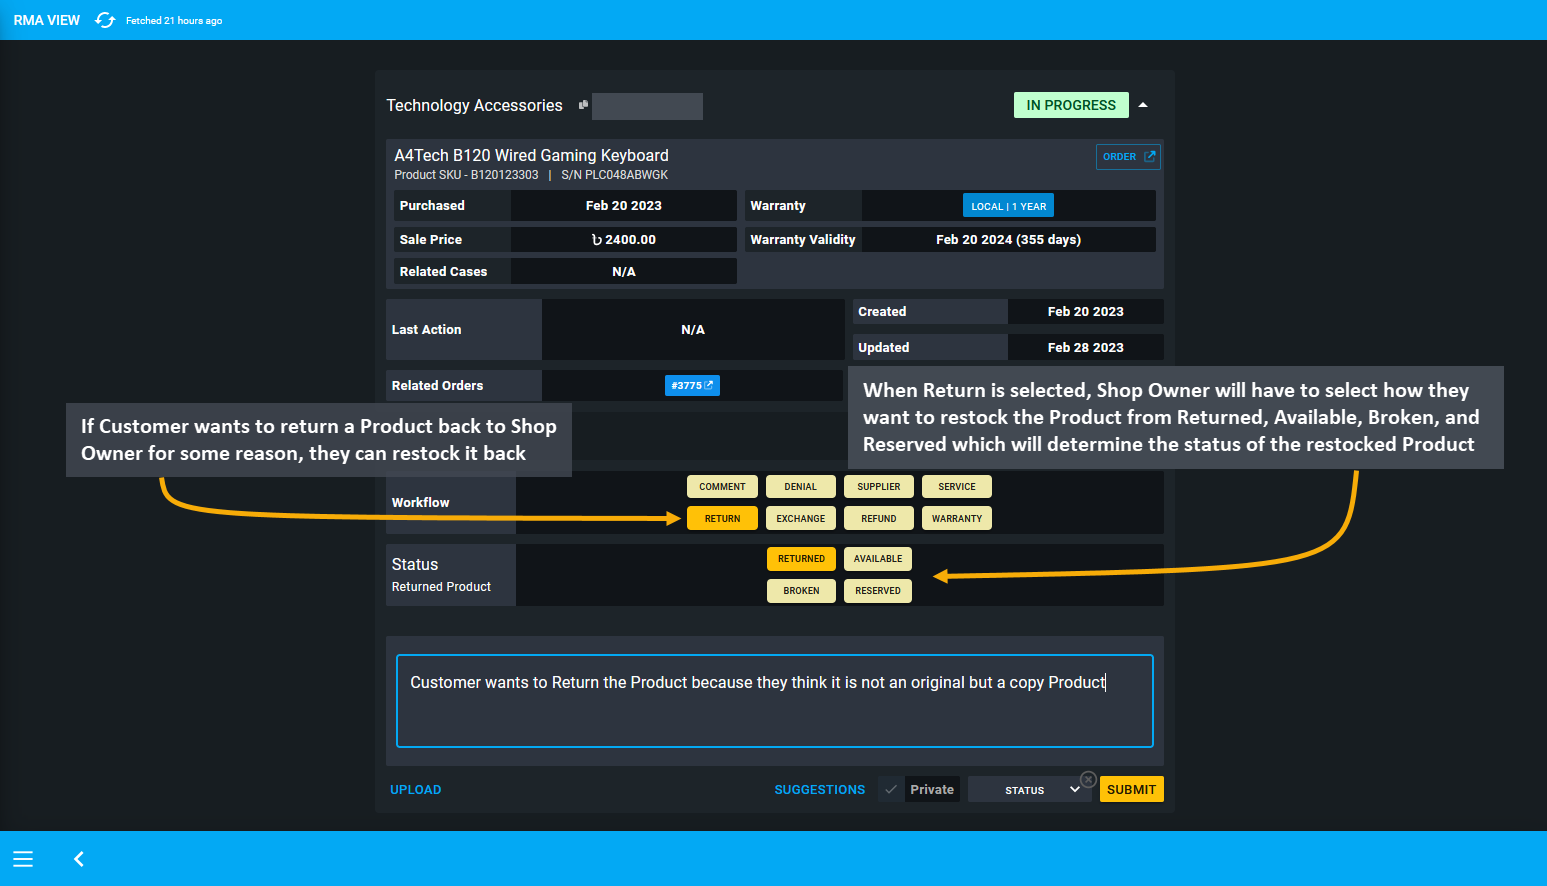
Image 1: When Return is selected, Shop Owner will have to select how they want to restock the Product.
Restock Product under Returned and Available
If the Customer wants to return the Product completely, then Shop Owner will have to select Returned and then refund Customer upon the return of their Product, because a Refund will typically follow after Return. Selecting Available will allow Shop Owner to restock the Product and resell it. Selecting Returned or Available will allow them to restock and resell the Product from the system, but selecting Broken or Reserved will not allow reselling.
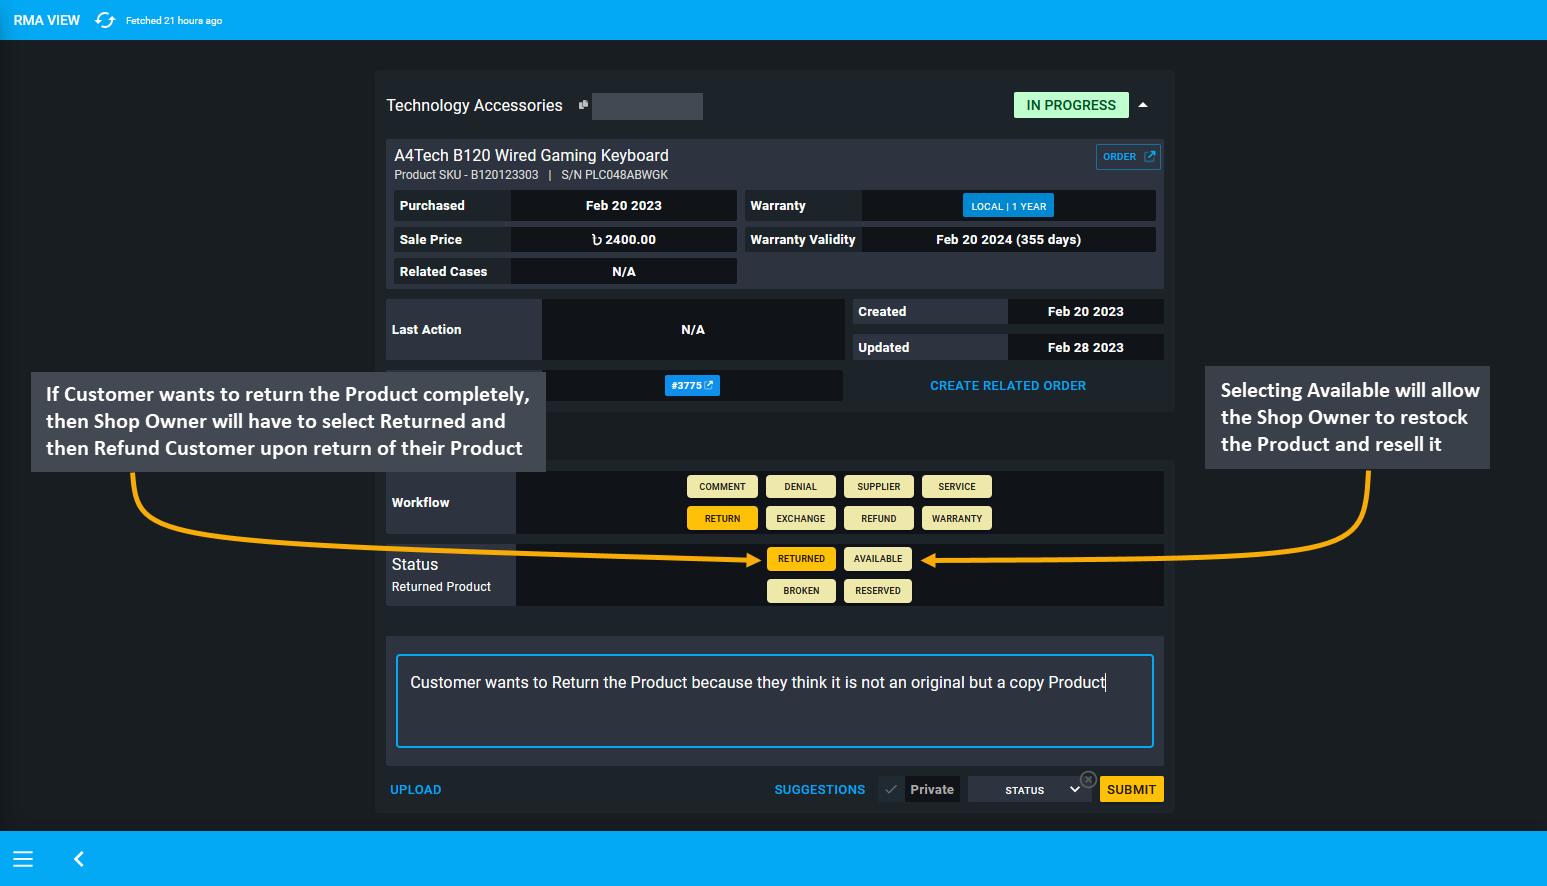
Image 2: Selecting Returned or Available will allow Shop Owner to restock and resell Product from system.
Restock Product under Broken and Reserved
If the Shop Owner does not want to resell the returned Product from the Customer, then they will have to select Reserved which will not allow selling the Product from the system. When Shop Owner wants to keep the returned Product as Reserved, it could mean that they want to test the Product to find out the cause of its defect etc. Also, selecting the option Broken will mean that the Product is completely broken beyond repair and cannot be reused.
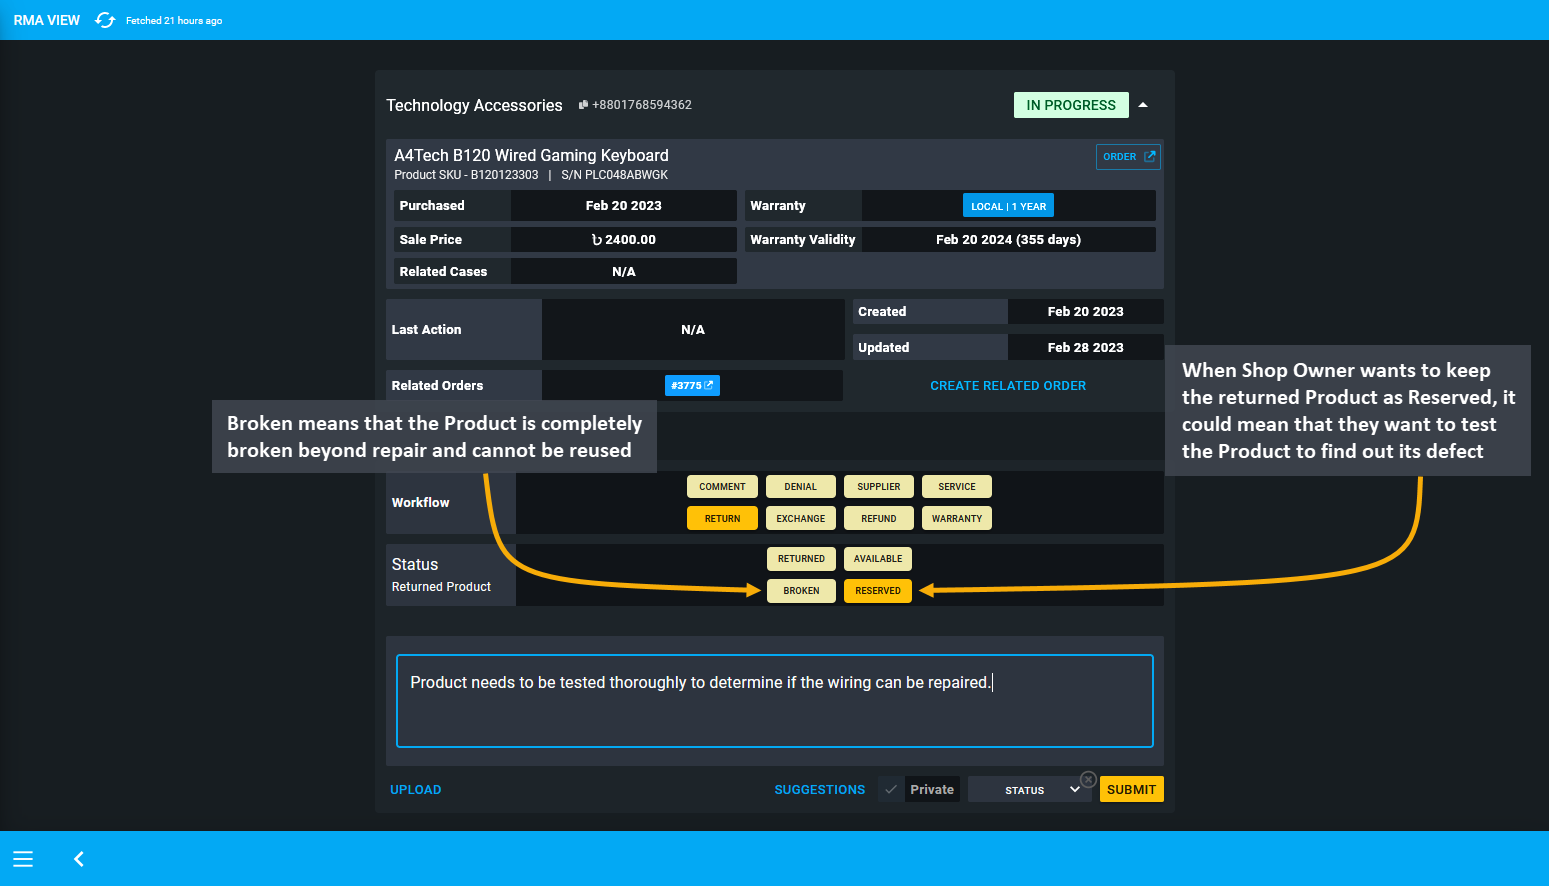
Image 3: Selecting Reserved or Broken will mean that Product has defects or it is broken beyond repair.
If the Shop Owner takes the Product Returned from Customer and resell it to another Customer, then it should display under the Related Orders on the RMA case.
Refund Customer after Product Return
After Customer have Returned their Product, Shop Owner will have to refund them in Full or Partial amount based on the Product condition. Typically, a Refund will always follow after Product Return. For this, the Shop Owner will have to select Refund as workflow and select the refund amount. If they want to issue Full Refund, they will have to select Full from Refund Amount, which will be highlighted under Refund Summary before refund is requested.
If they want to issue a Partial Refund, they will have to select Partial from Refund Amount and input partial refund amount that they would like to issue in the box beside it. Add a comment and click Submit to issue the refund.
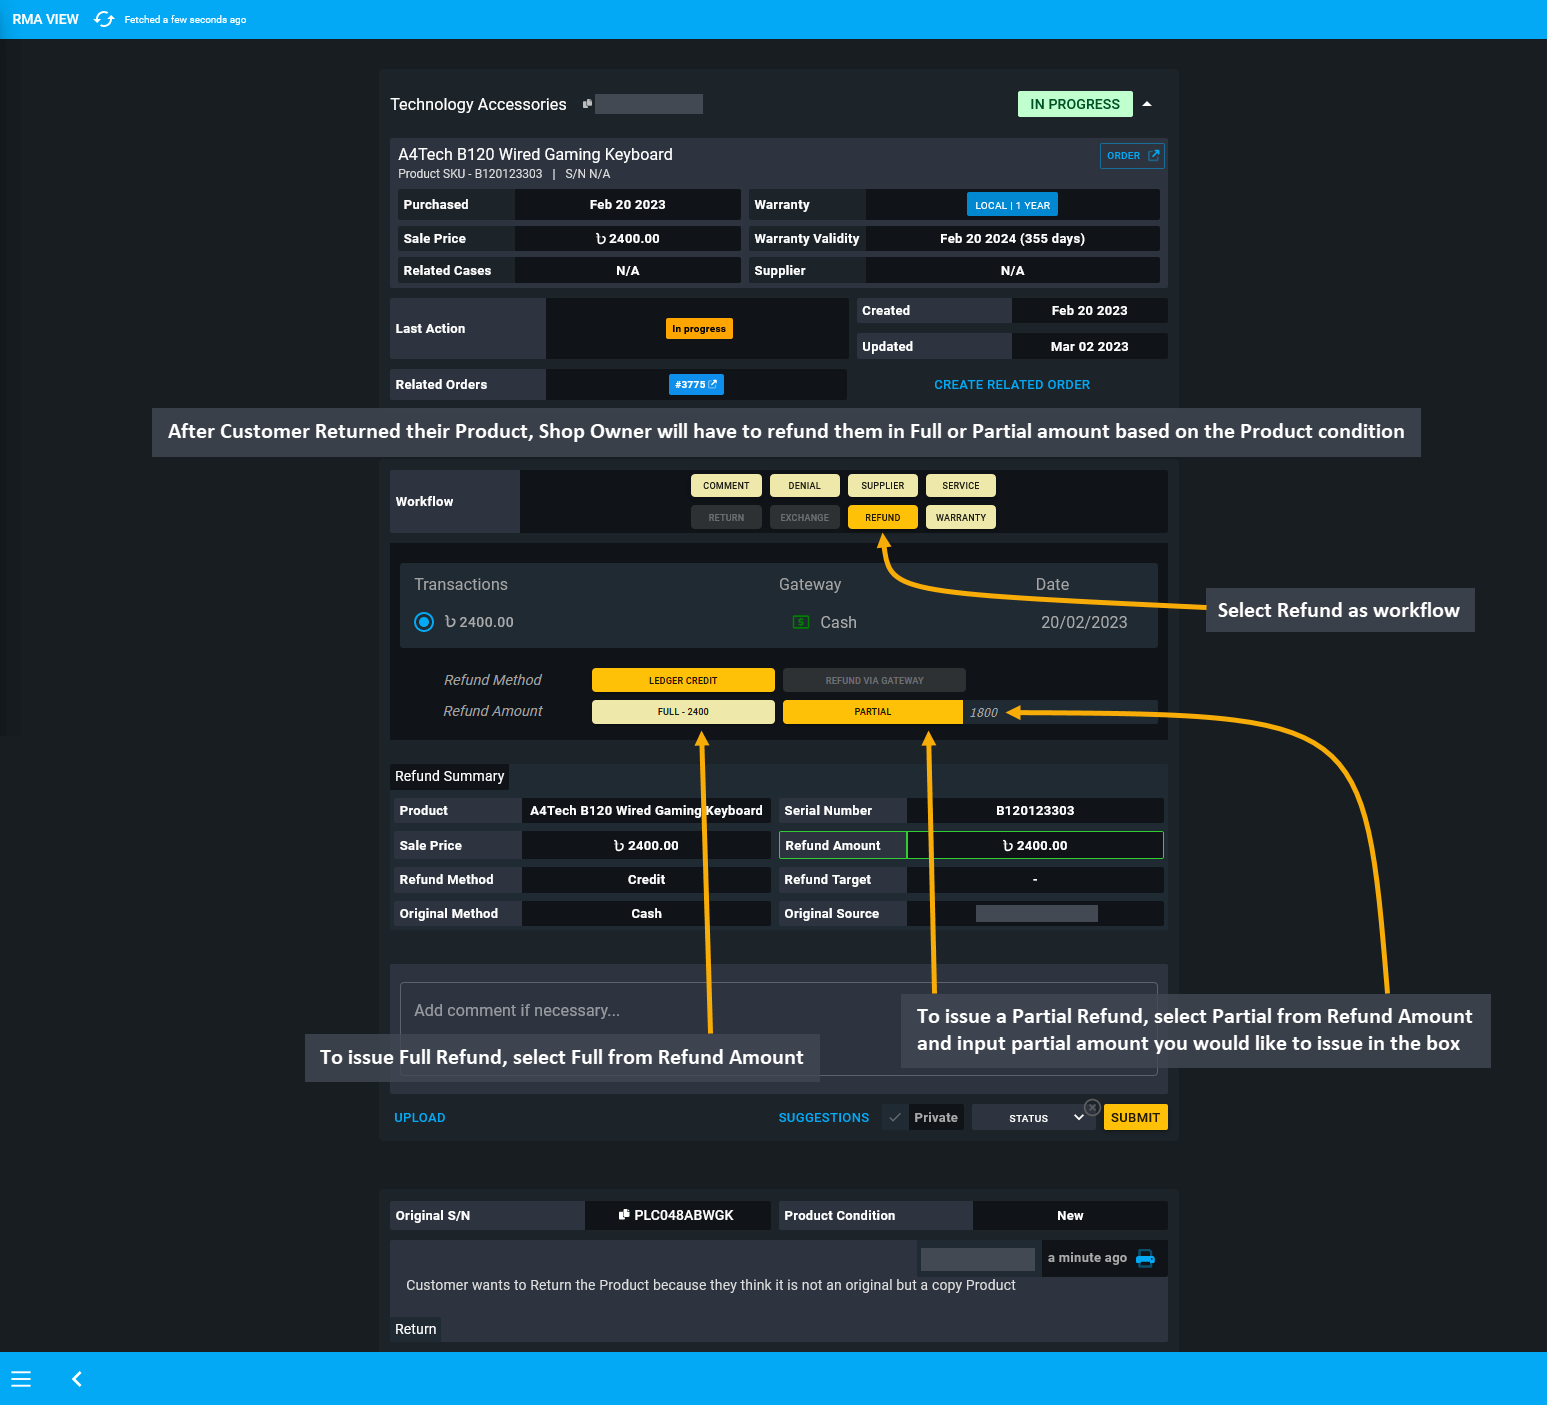
Image 4: Shop Owner will have to refund them in Full or Partial amount based on the Product condition.
Shop Owner must record under Comments the reason behind the Refund to refer back in future. If Full Refund is issued after Customer Returned their Product, then Shop Owner can select RMA case status as Resolved to close it.
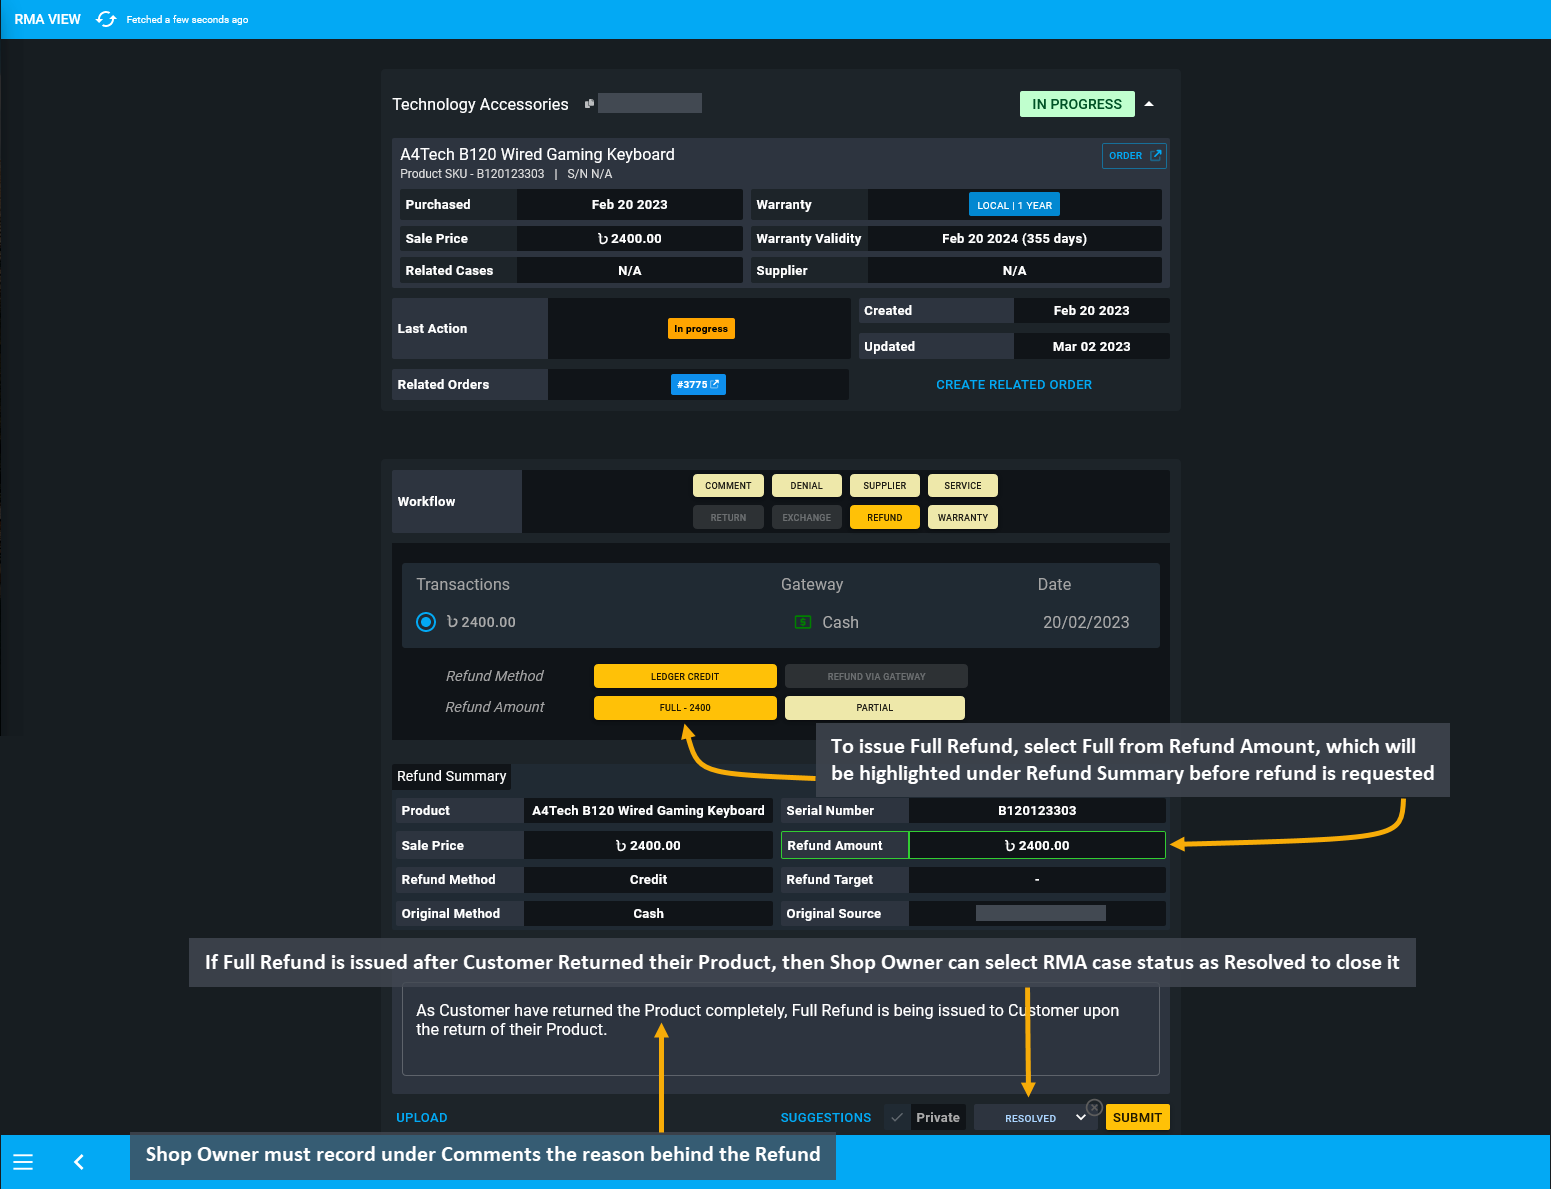
Image 5: Shop Owner must record under Comments the reason behind the Refund to refer back in future.
Once the Shop Owner selects RMA case status as Resolved, the case will be closed. Also, as Refund was issued to resolve the case, it will be recorded under Last Action, displaying Credit Refund as Completed. Furthermore, as the Product was Returned completely to Shop Owner, the Per Unit Product Serial Number will show as N/A.
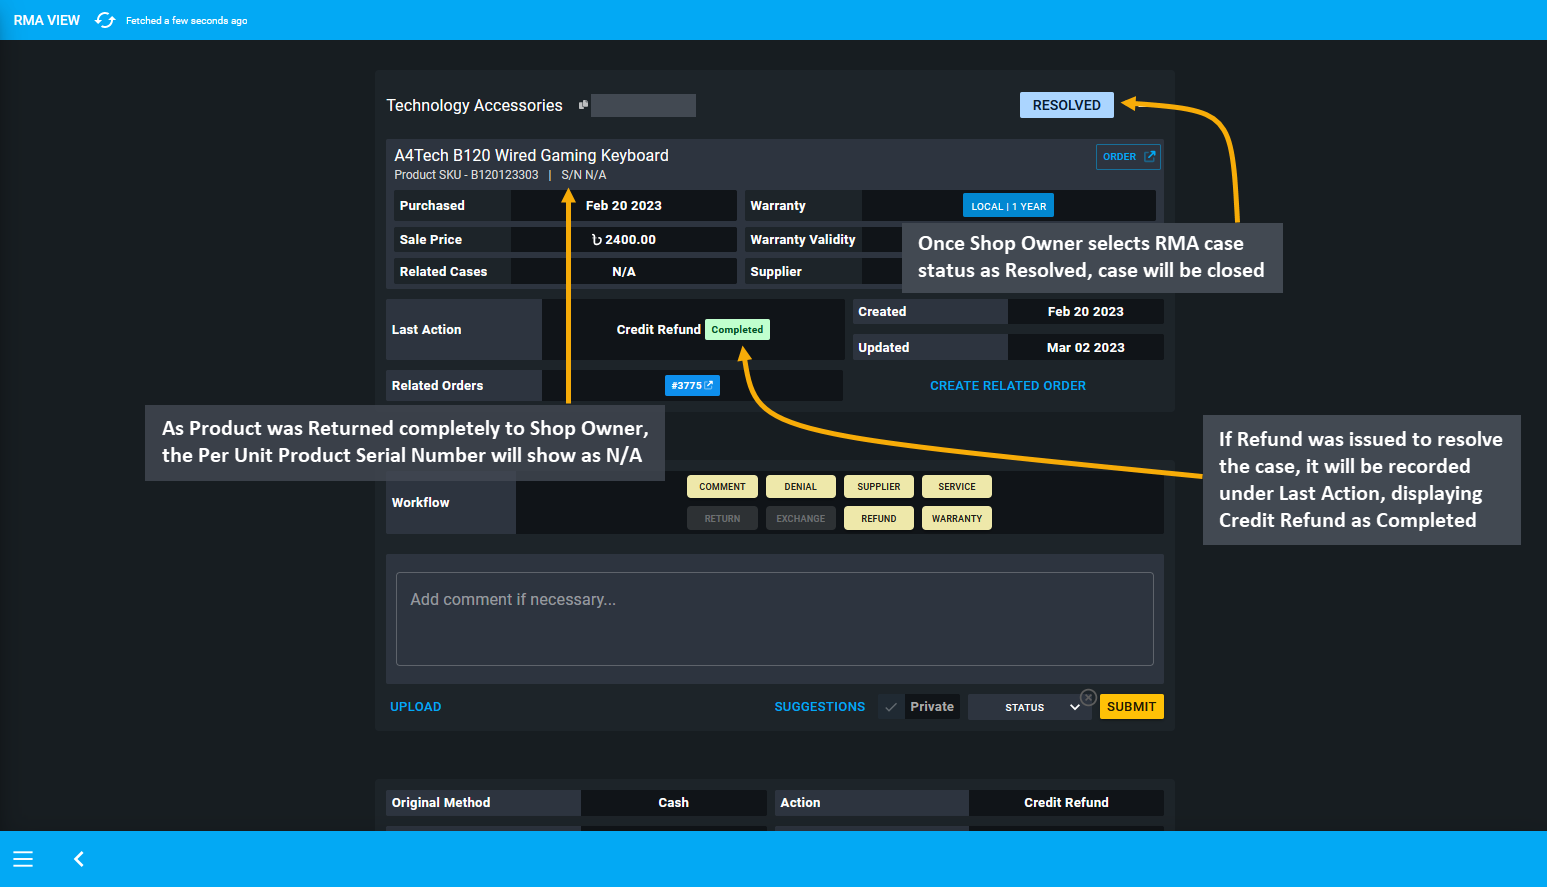
Image 6: If Refund was issued to resolve the case, it will display Last Action Credit Refund as Completed.
Returned Product Restocked
If the Shop Owner wants to find the Customer’s Returned Product at the inventory, then they will have to go to the Product List page and select Stock from target Per Unit Product, which will redirect to Unit Stock Management Page.
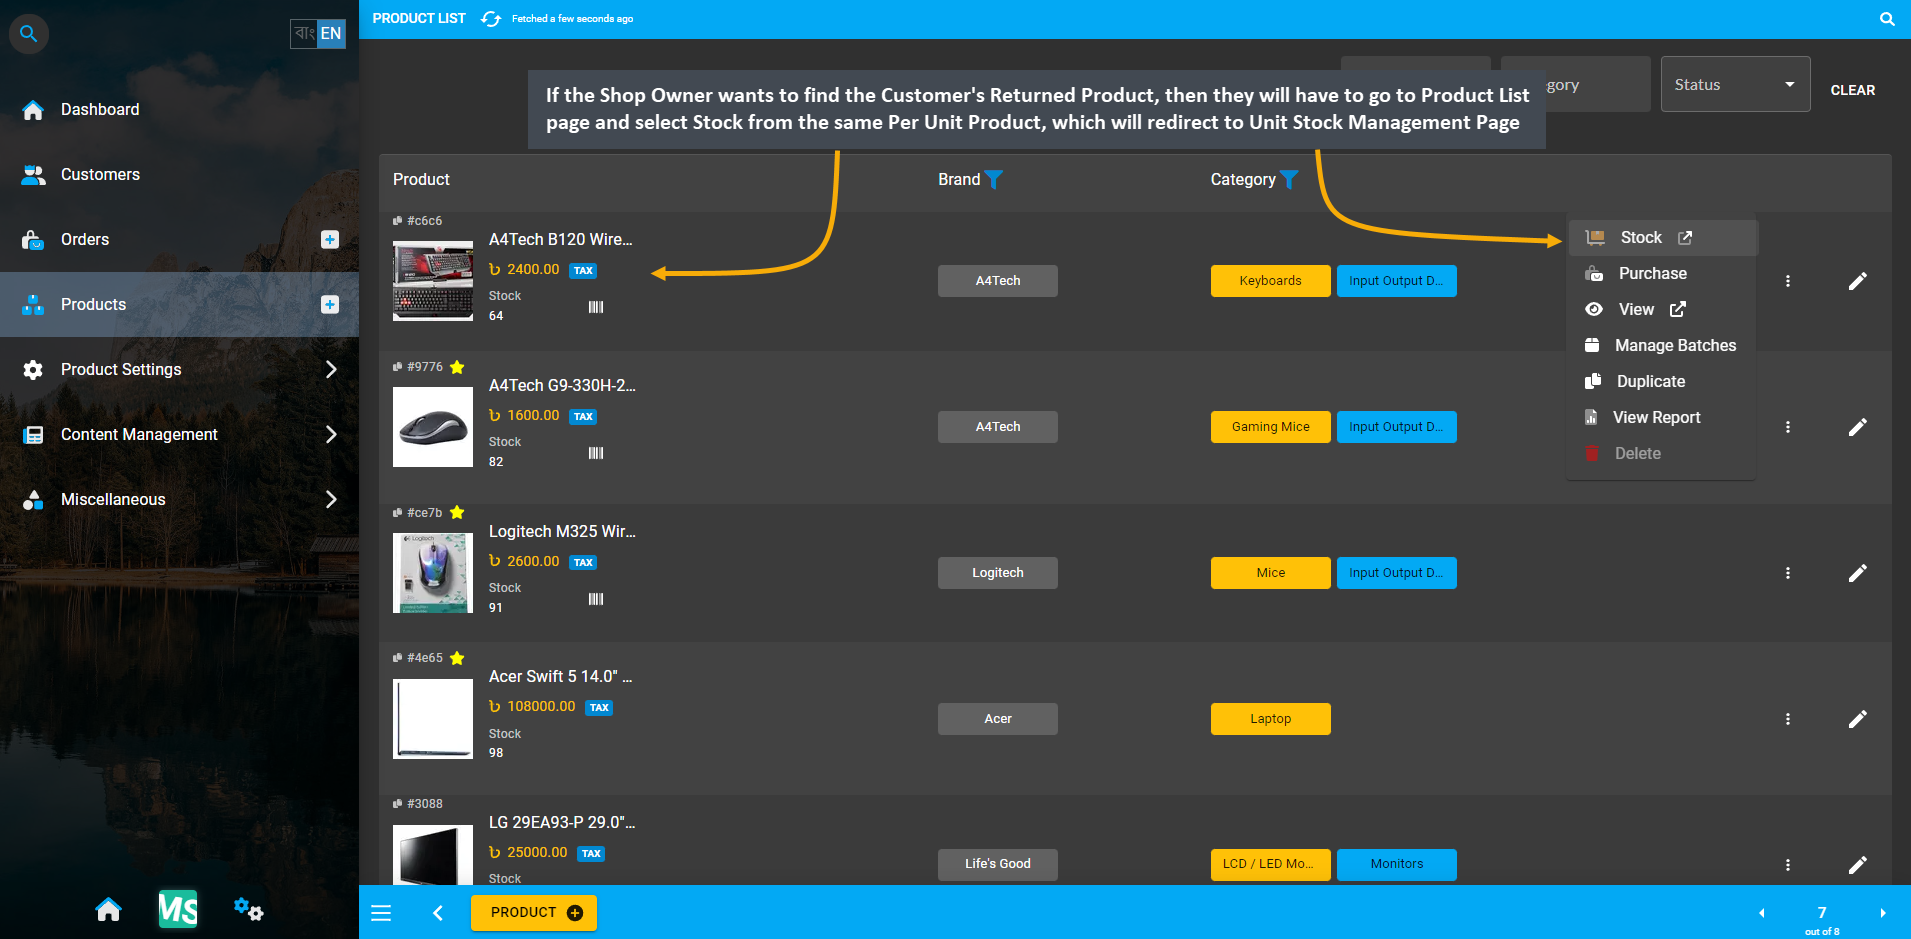
Image 7: If Shop Owner wants to find Customer's Returned Product, it will be in Unit Stock Management Page.
In the Unit Stock Management Page, there is a dropdown menu for selecting Stock status from Available, Broken, Reserved, Sold, Returned, and RMA. From here, select Returned to bring only the Returned Product results.
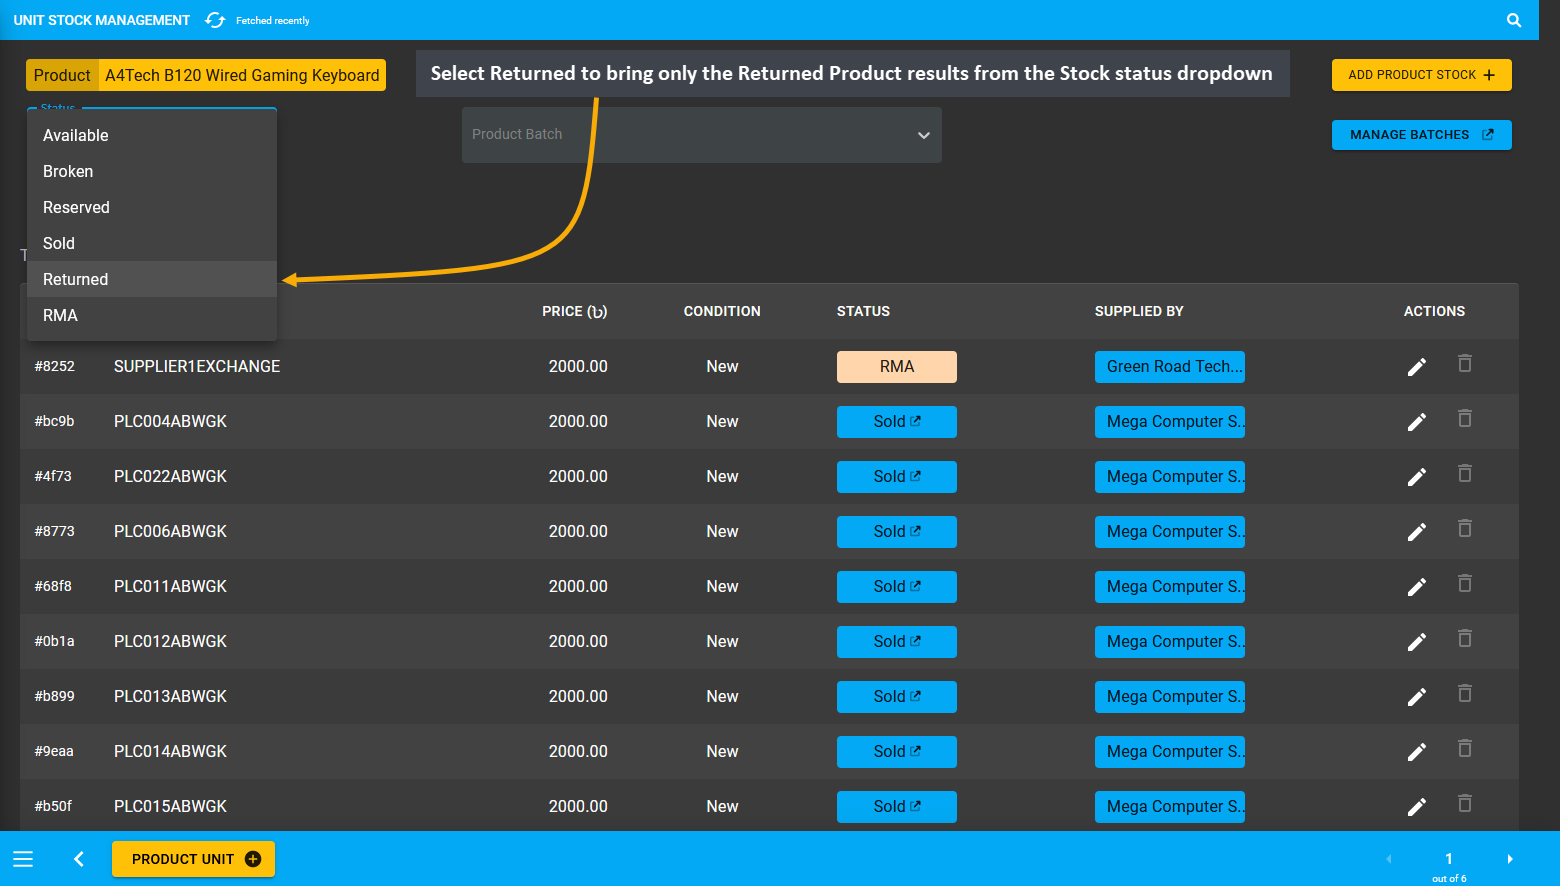
Image 8: Select Returned option to bring only the Returned Product results from the Stock status dropdown.
Selecting Returned from Stock status dropdown will bring results of all the Returned Products from the Customers. Here, Shop Owner will find the Returned Per Unit Product Serial PLC048ABWGK for which full refund was issued.
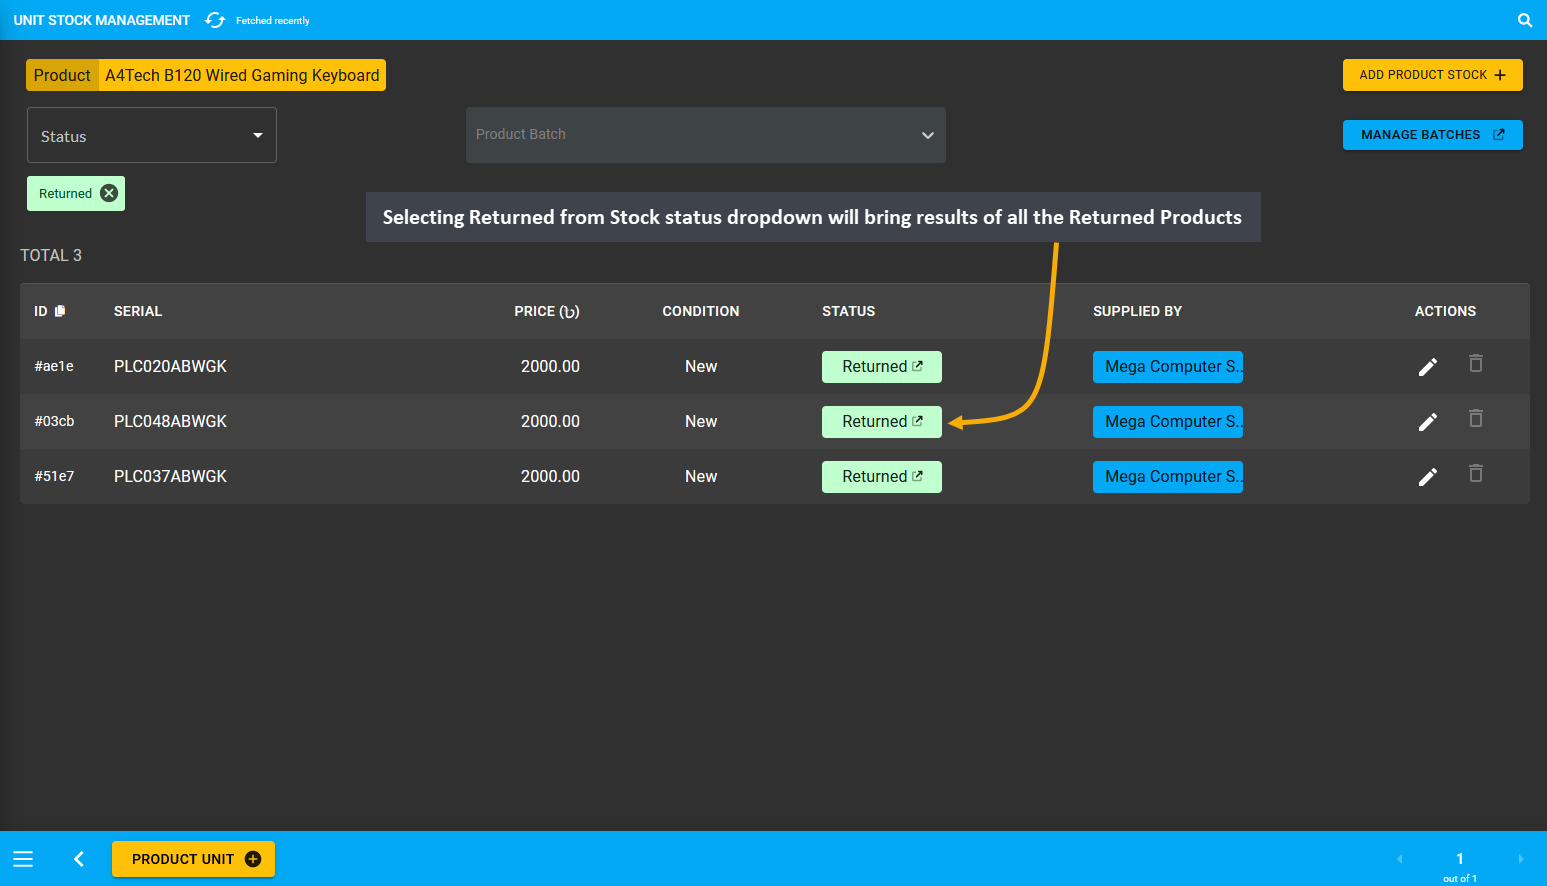
Image 9: Selecting Returned from Stock status dropdown will bring results of all the Returned Products.
Sell Returned Product as New Product
Related Cases will be created from Returned Orders. For example, if a Returned Product from one RMA case is sold as a New Product on a New Order, and if a New RMA Case is created for this Order, then the original RMA Case ID of the Returned Product will show under the Related Cases on the New RMA Case. So, click the + button from the Orders tab to open New Cart and place New Order with the Returned Product by adding it as the Product Stock.
Now, fill in the basic Customer information like phone number, name, and email from Customer Information tab. Then click the + button beside Shipping Contact that will redirect to a new pop-up to add new address with Label (Billing or Shipping), Address, Area, City, Country, and Zip Code. After clicking the Submit button, Shipping Address will be added to the Customer information. New address can be added by clicking the + button.
After confirming Billing and Shipping addressed, new Products can be added to the Order Cart. To add a Per Unit Product to Cart, search for the Returned Product i.e. A4Tech B120 Wired Gaming Keyboard from the Product List, 1 quantity will be added that will automatically calculate the item total. Click Add Stock to add a Per Unit Product.
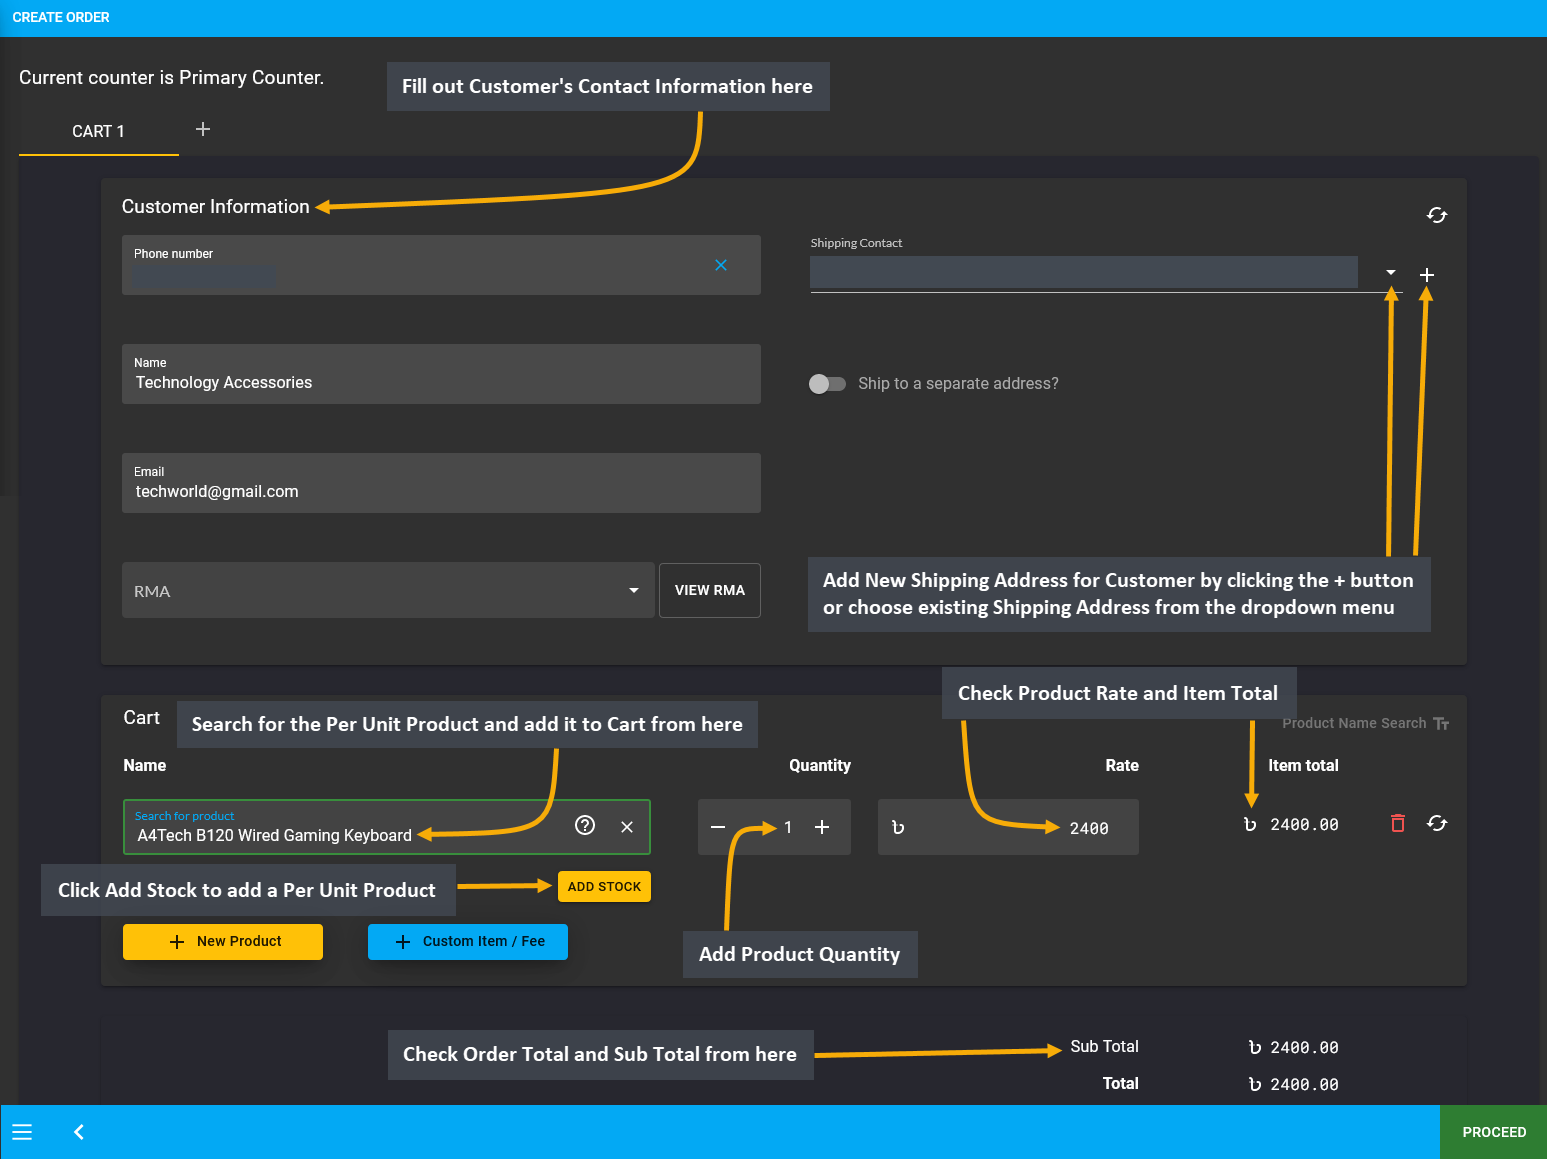
Image 10: Fill out Customer information, search for the Returned Product from Product List to add to Cart.
Clicking the Add Stock button will open a new pop-up, from where a Serial Number for the Per Unit Product needs to be selected. As the Shop Owner intends to sell the Returned Product with Serial Number PLC048ABWGK, they will have to type in the serial number on the Search box. This will bring the Returned Product with Serial Number PLC048ABWGK in search results with the tag Returned. Click on the Serial Number PLC048ABWGK to add to Cart.
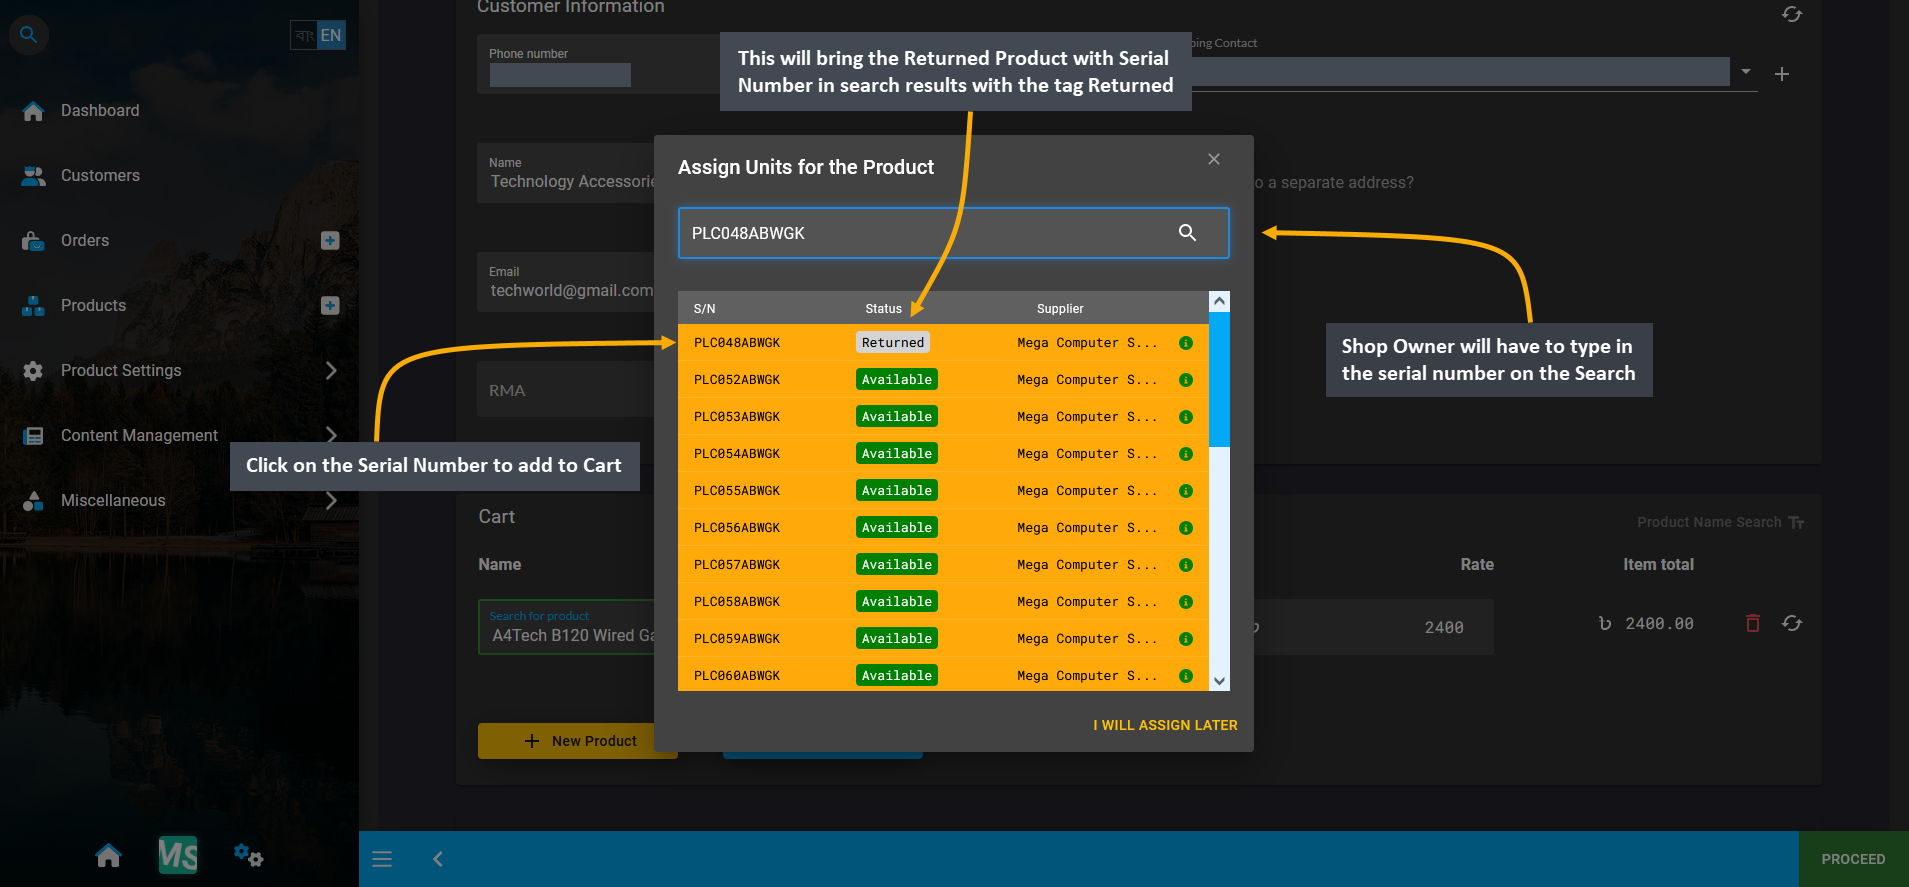
Image 11: Type the Serial Number on the Search box that will bring the Returned Product Serial as result.
After the Returned Product with selected Serial Number PLC048ABWGK is clicked from Stock List, it will show as added Stock on the pop-up. Now, click Okay to complete assigning Stock for the target Per Unit Product.
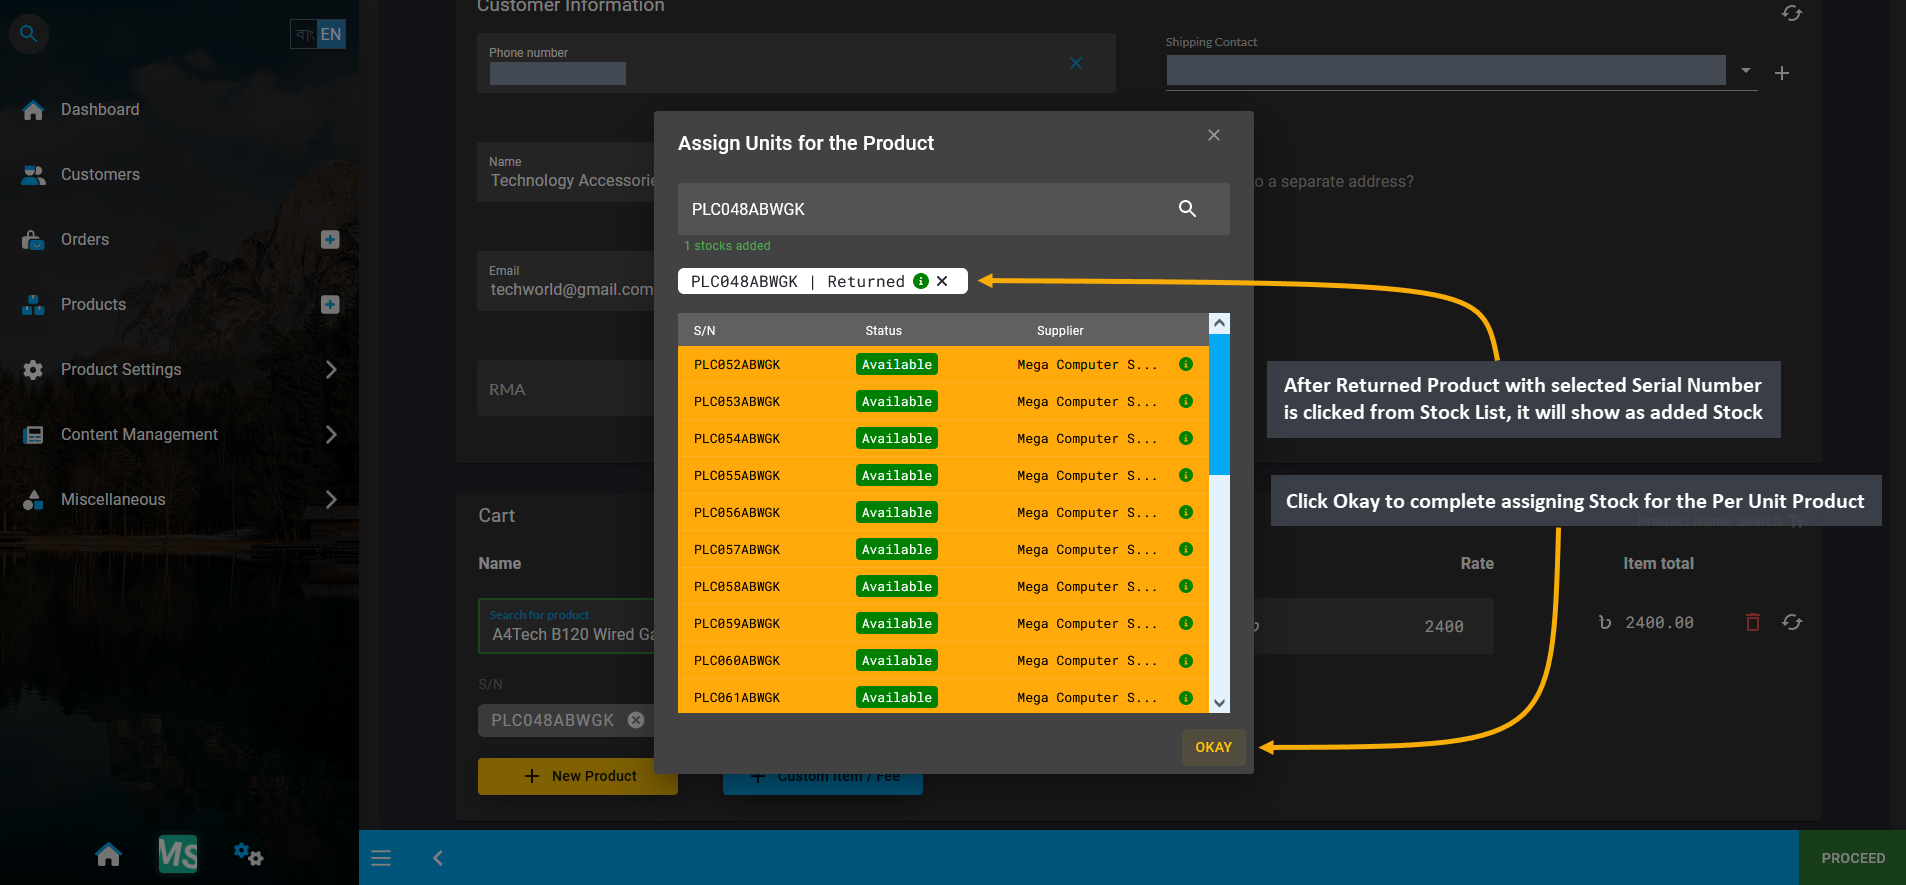
Image 12: After Returned Product with Serial Number is clicked, it will show as added Stock on the pop-up.
Now, the Returned Product with selected Serial Number PLC048ABWGK from the previous RMA case will be sold as New Product on this New Order. It is assumed that the Returned Product was fixed by the Shop Owner to resell as a New Product. As the Returned Product Serial was added to the Product on Cart, click Proceed to go to next page.
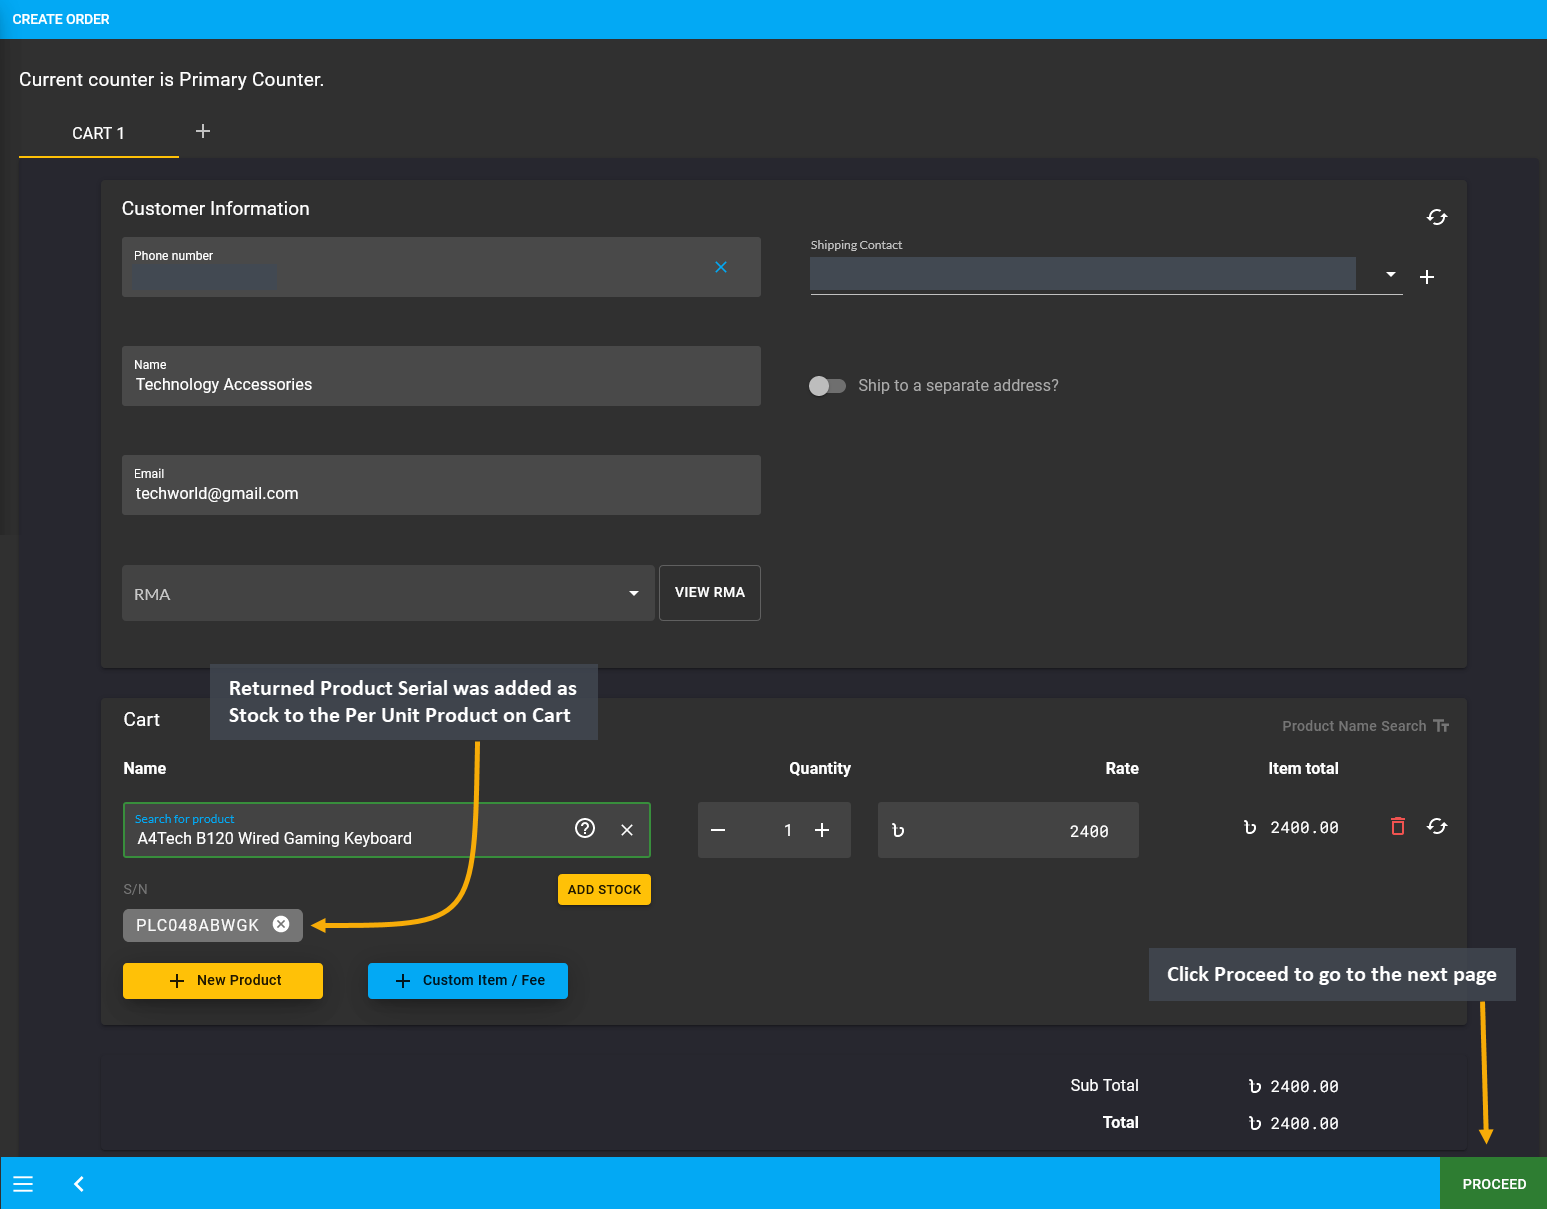
Image 13: After Returned Product Serial was added as Stock on Cart, Click Proceed to go to the next page.
In the next page, review the Cart, and select Shipment and Payment options. To make any changes, click the Edit button. If all the information is correct, click Confirm Order that will redirect to a new page with the message that the Order has been confirmed. From here, you can choose to Print Invoice, Close Tab, or View Order.
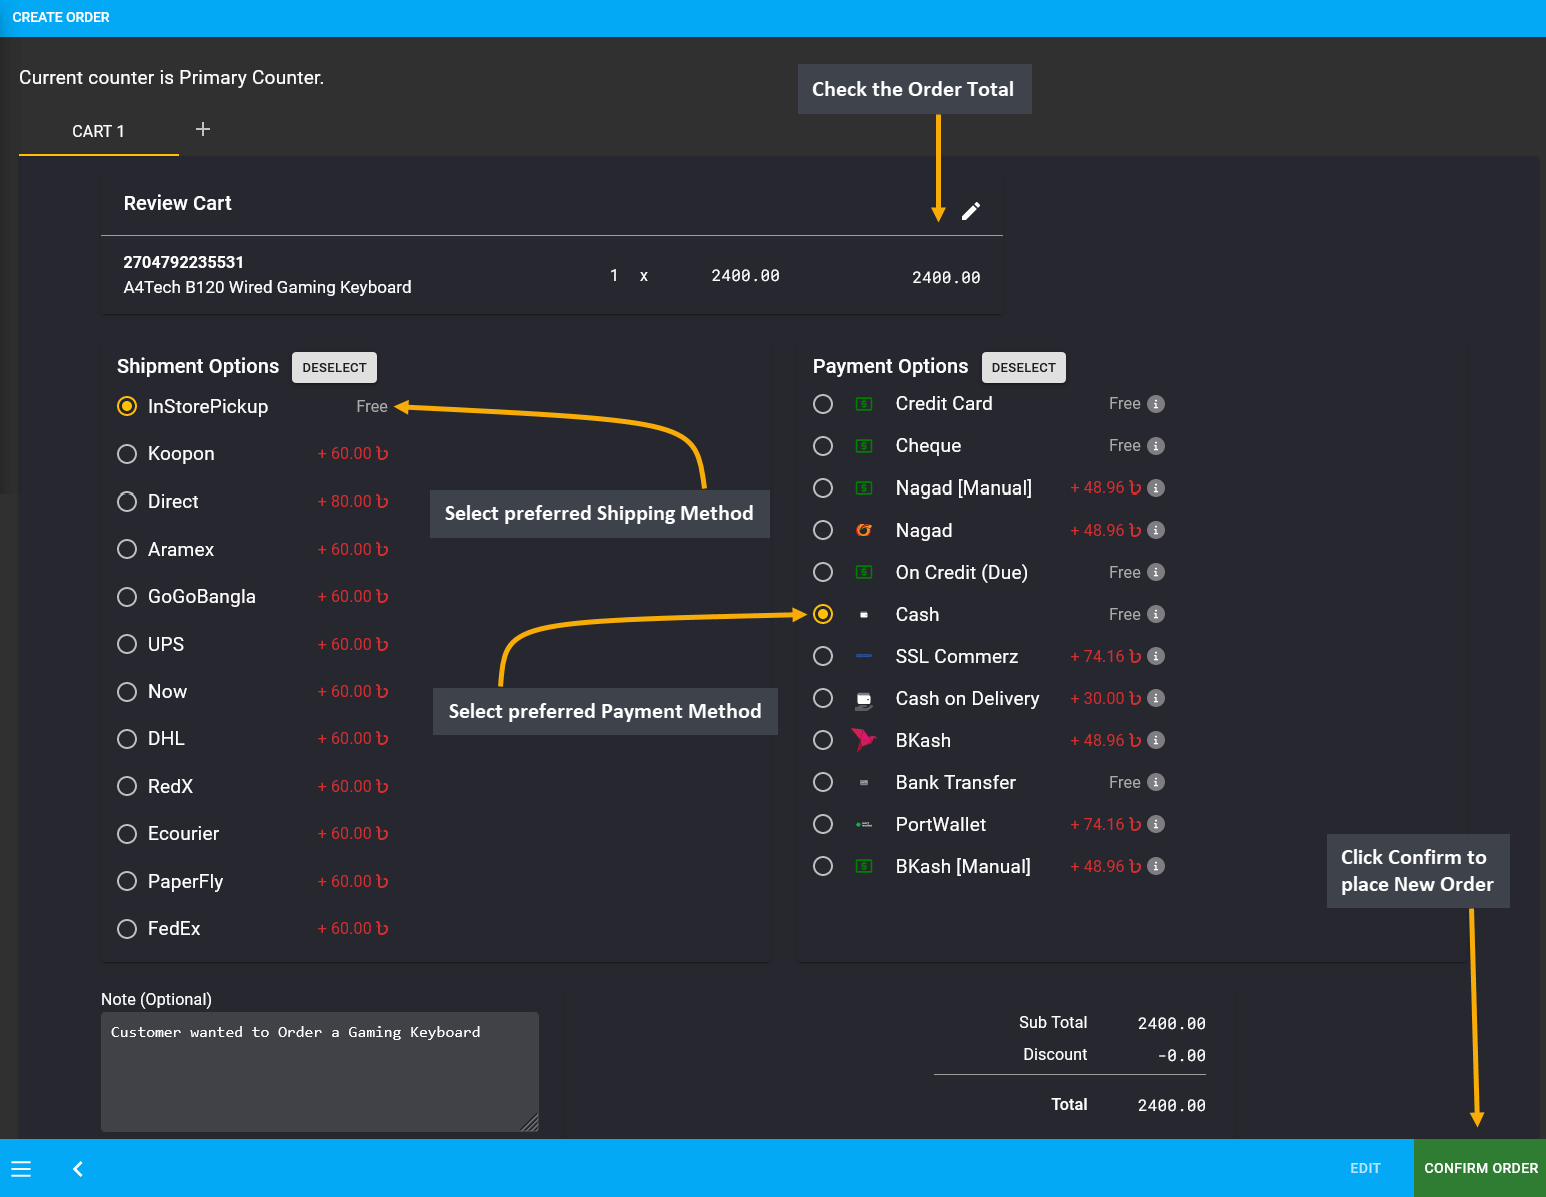
Image 14: Review the Cart, select Shipment and Payment options, and click Confirm Order to place the Order.
In this way, the Returned Product was sold as a New Product on a New Order which can be seen on the Order List.
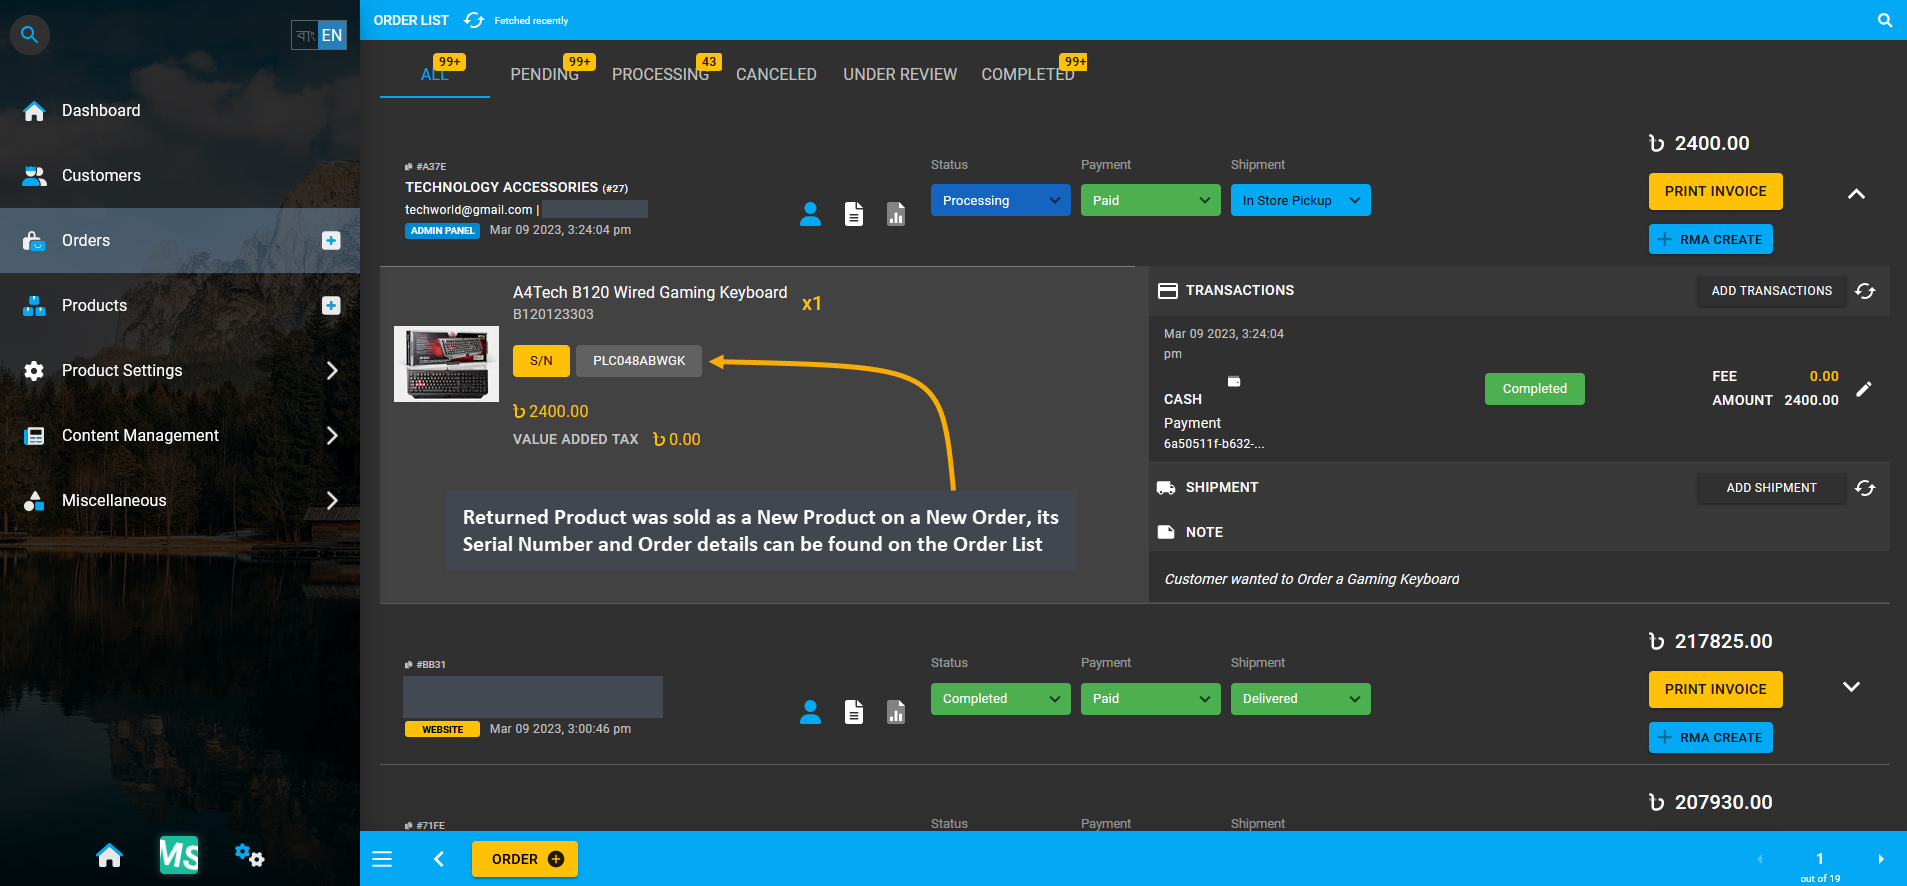
Image 15: Returned Per Unit Product sold as New Product on a New Order will be on Order List with details.
Create Returned Product New Order RMA Case
If Returned Product from one RMA case is sold as a New Product, and if a New RMA Case is created for this Order, then the original RMA Case ID of the Returned Product will show under the Related Cases on the New RMA Case. So, for example, an RMA Case will be created for New Order that was placed with Returned Product PLC048ABWGK.
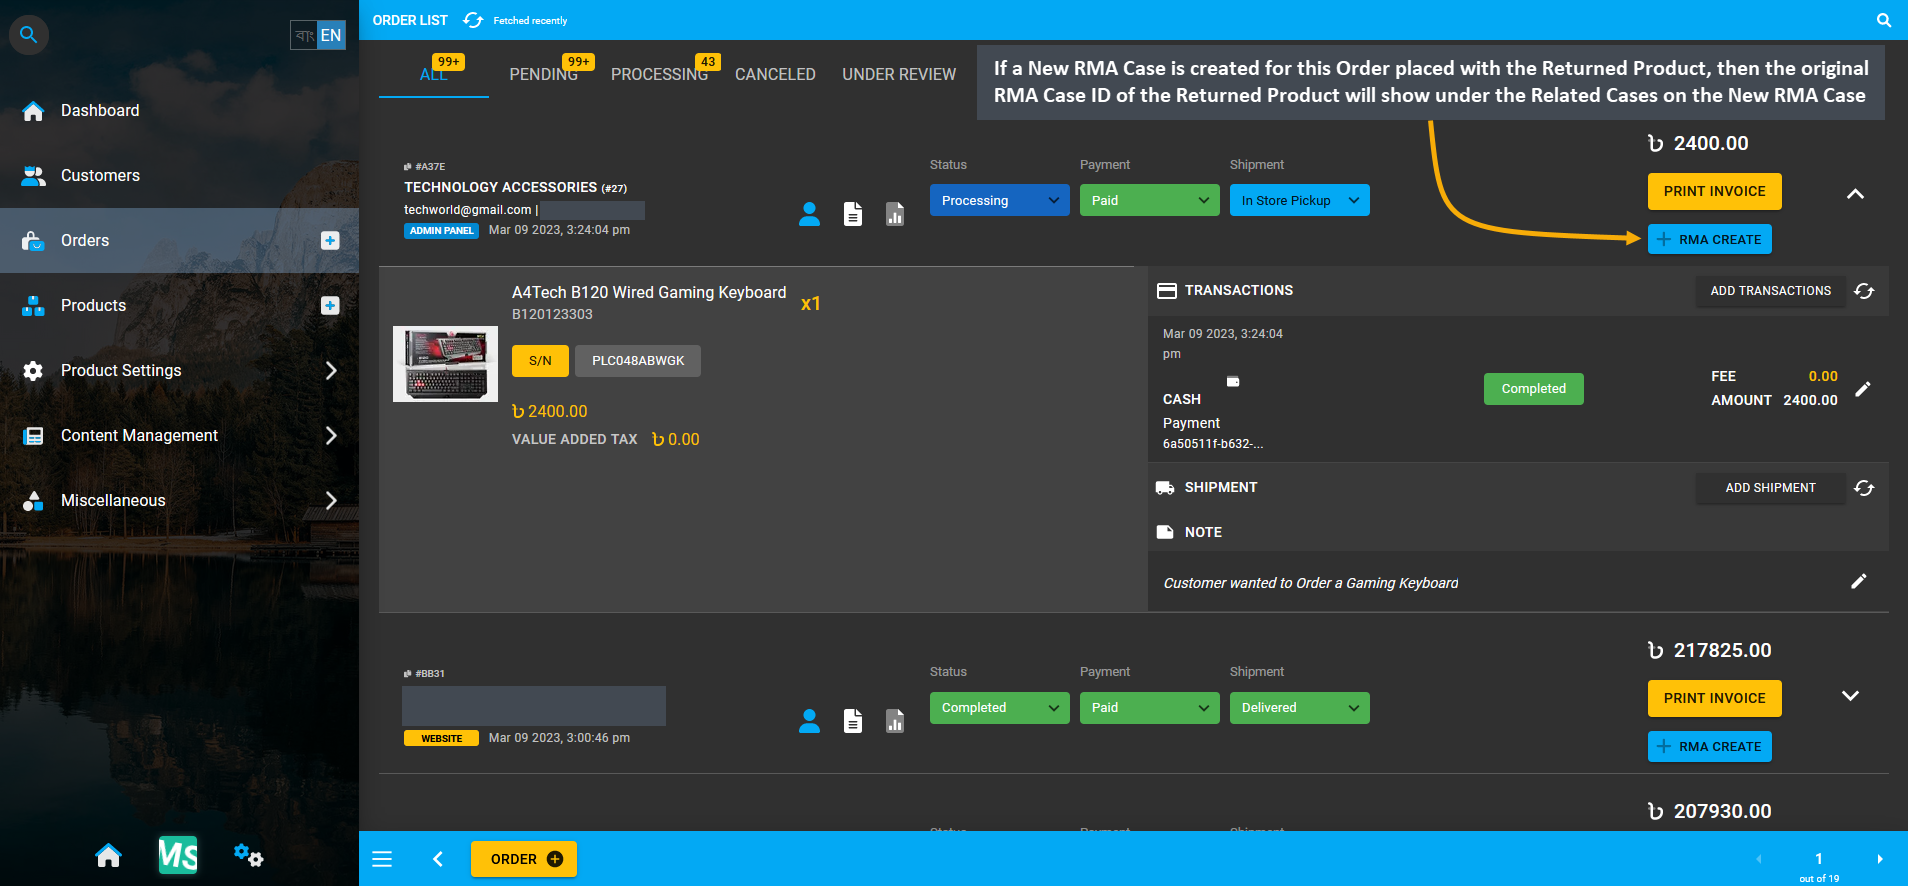
Image 16: New RMA Case for Returned Product New Order will show original RMA Case ID under Related Cases.
Therefore, when the + RMA Create button will be clicked, it will redirect to creating a New RMA Case for the New Order of Returned Product PLC048ABWGK. The New RMA Case ID is #6a71 and the Original RMA Case ID #cbb5 of the Returned Product will show under Related Cases of this New RMA Case. With the Original RMA Case ID #cbb5 showing under Related Cases, the Shop Owner will be able to track back the Product history through it if needed.
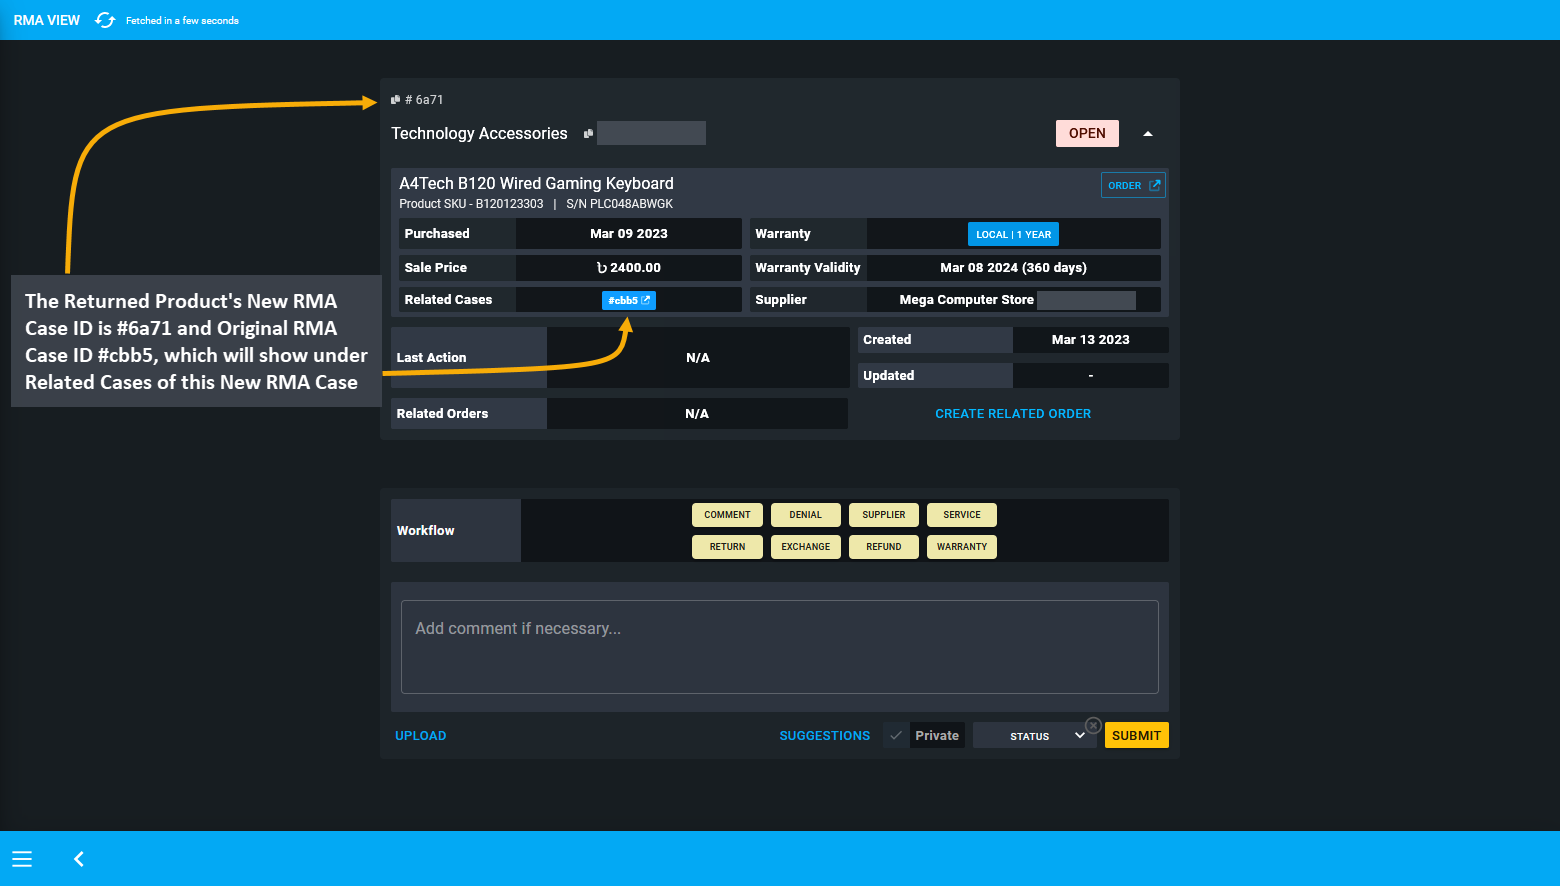
Image 17: New RMA Case ID is #6a71 and Original RMA Case ID #cbb5 which will show under its Related Cases.
16.6 - Exchange
Learn more about creating and managing RMA’s Exchange workflow actions for Products.
Exchange Faulty Per Unit Product
If the Shop Owner wants to Exchange the Customer’s faulty Product with another Per Unit Product, then they will have to go to the Product List page and select Stock from the Per Unit Product i.e. the A4Tech B120 Wired Gaming Keyboard. This will redirect to the Unit Stock Management Page, from where the Shop Owner can select another Per Unit Product that is not sold to exchange with the faulty Product. Here, Products marked as Enabled means that they can be sold or used as an exchange Product for the Customer.
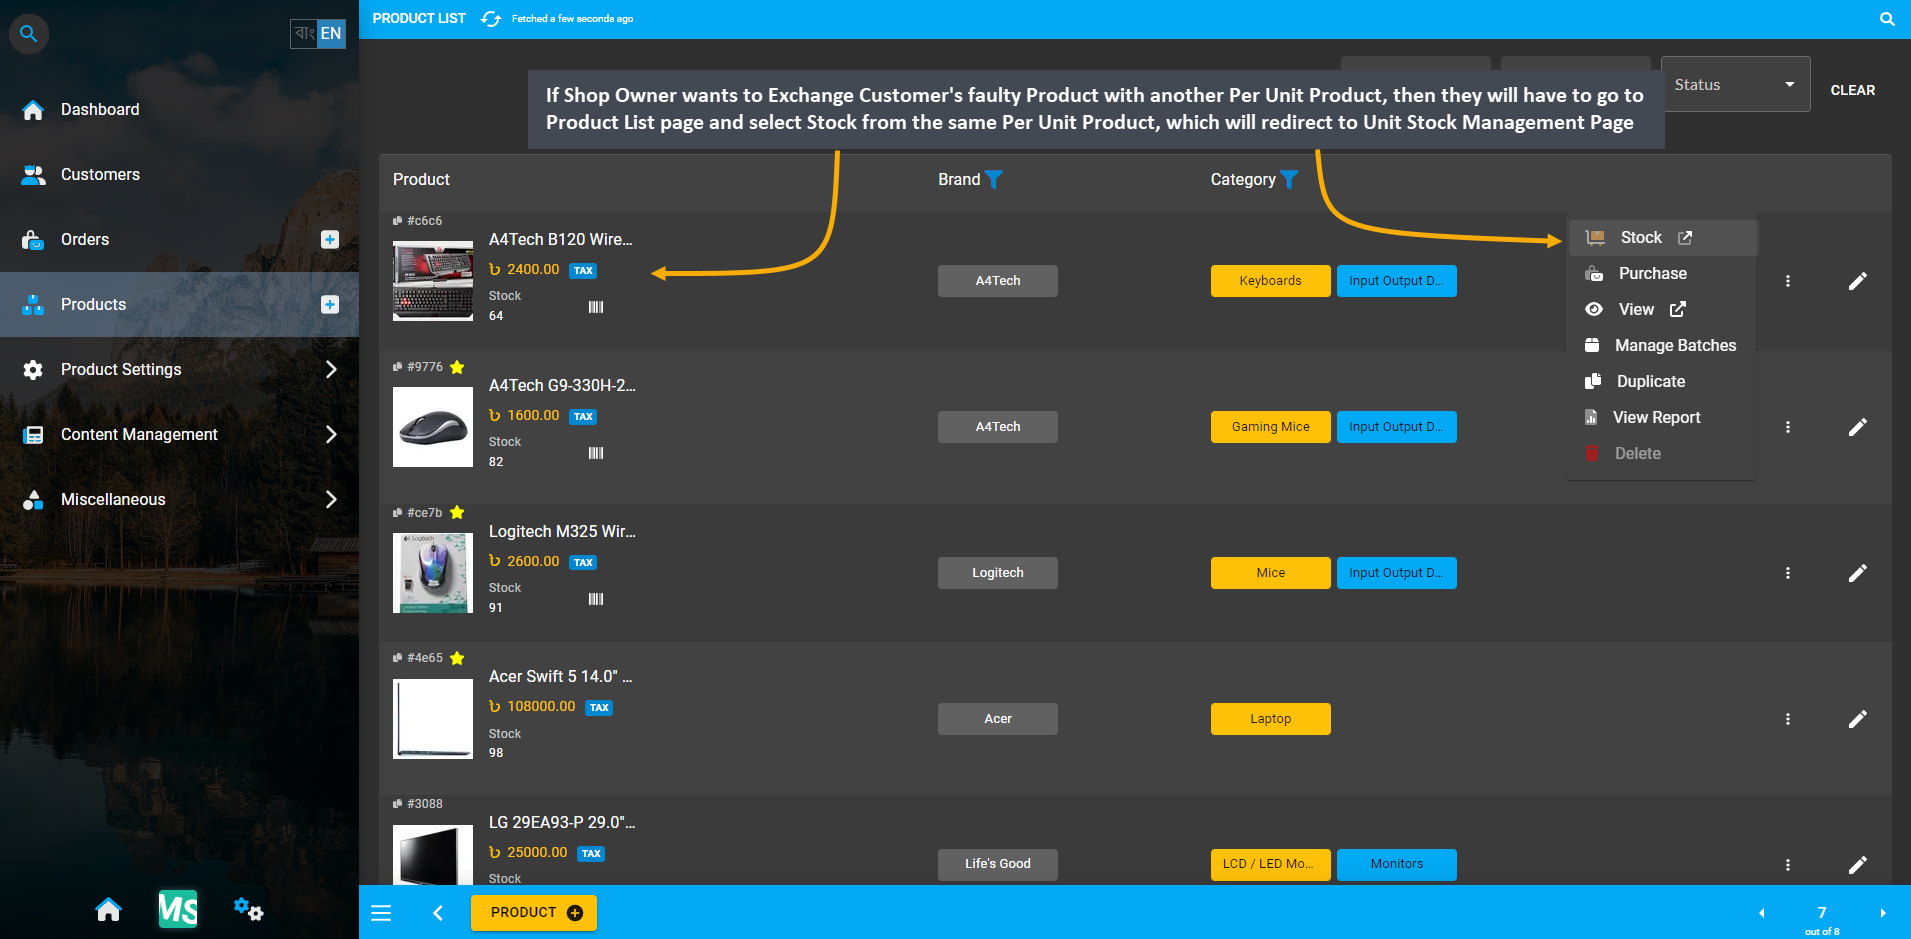
Image 1: Select Stock from the Per Unit Product on Product List page to go to Unit Stock Management Page.
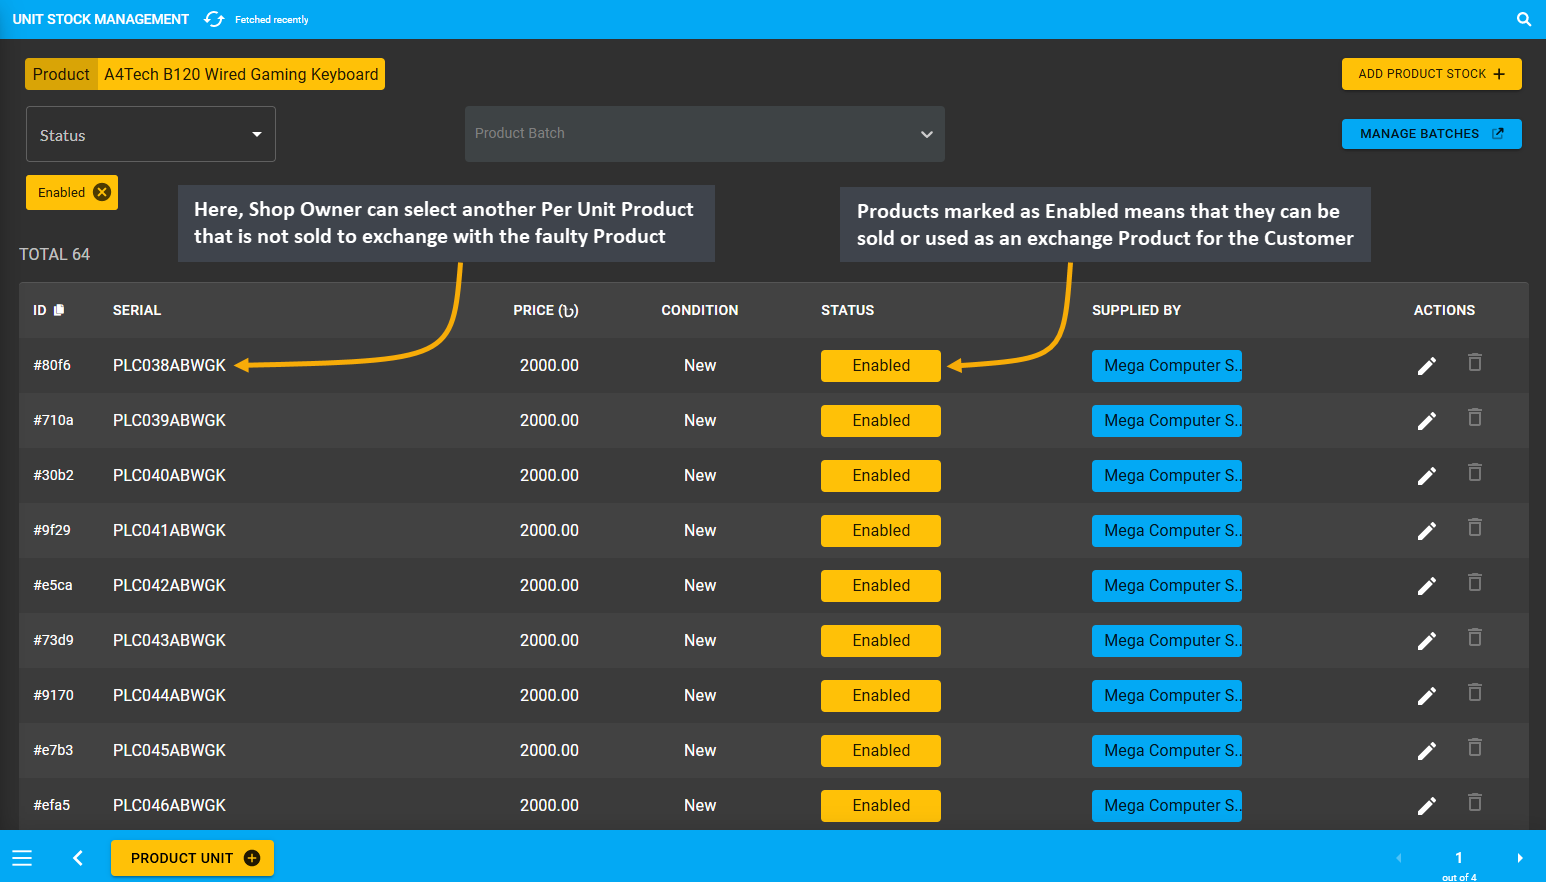
Image 2: Shop Owner can select another Per Unit Product that is not sold to exchange with faulty Product.
Therefore, after copying the Serial Number of the available Per Unit Product from Unit Stock Management Page, the Shop Owner needs to input that number within the Serial Number box under Exchange Details on RMA View page. Products that are only available or shows as Enabled on the Unit Stock Management Page can be used to exchange with faulty Products for RMA cases. If unavailable Product serial number is added, it will show error.
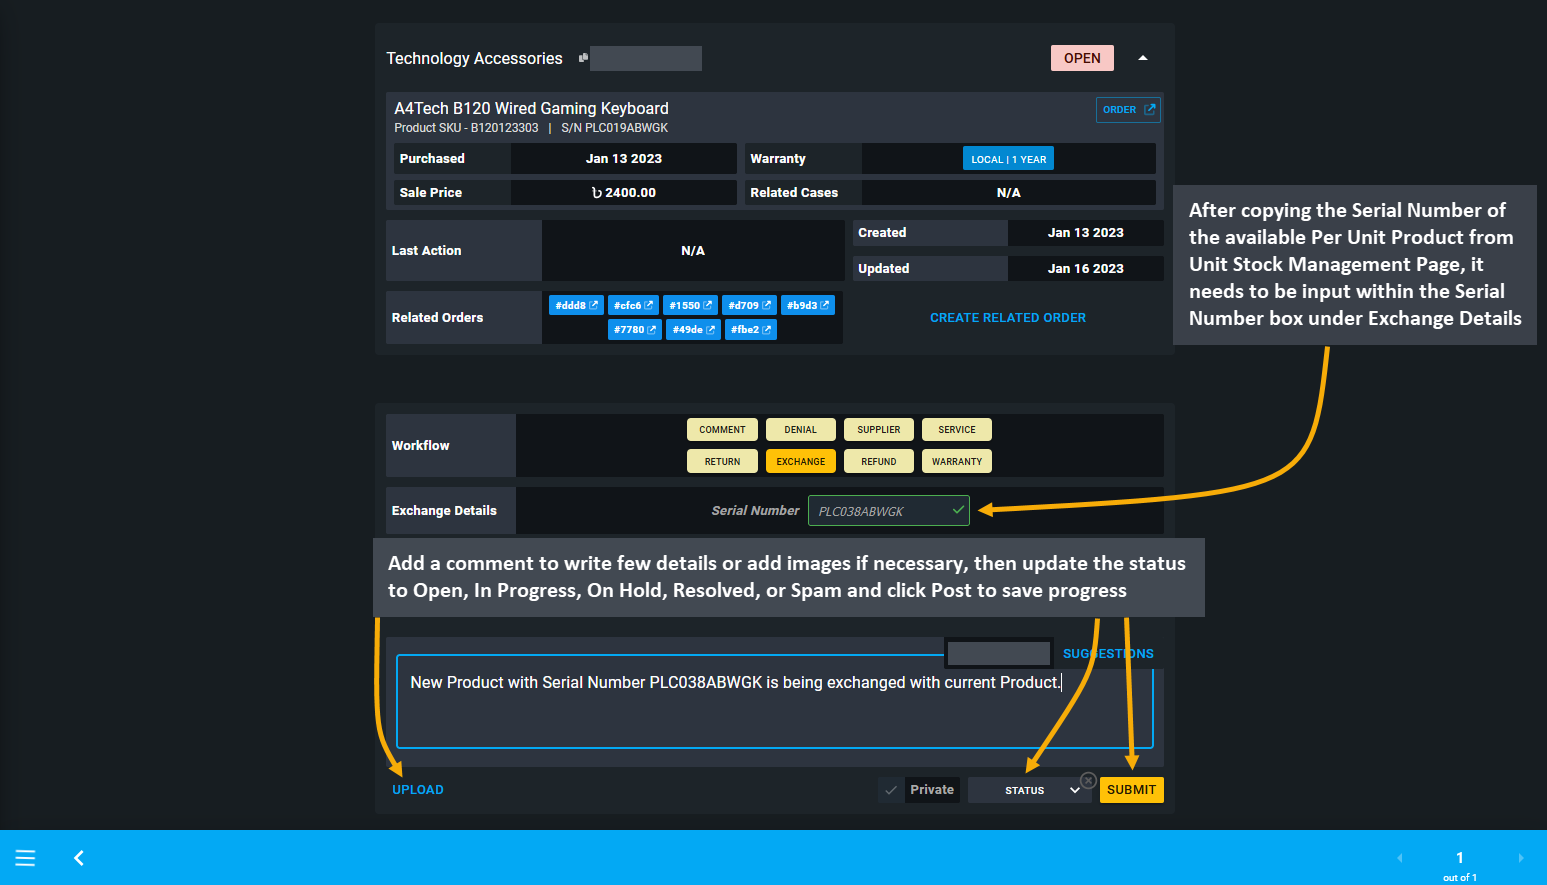
Image 3: Input the Serial Number of the exchanged Product on the Serial Number box under Exchange details.
Add a comment to write few details or add images if necessary, then update the status to Open, In Progress, On Hold, Resolved, or Spam and click the Post button to save the progress. Saved details will show below with Original Serial Number and Exchanged Serial Number for the Per Unit Products.
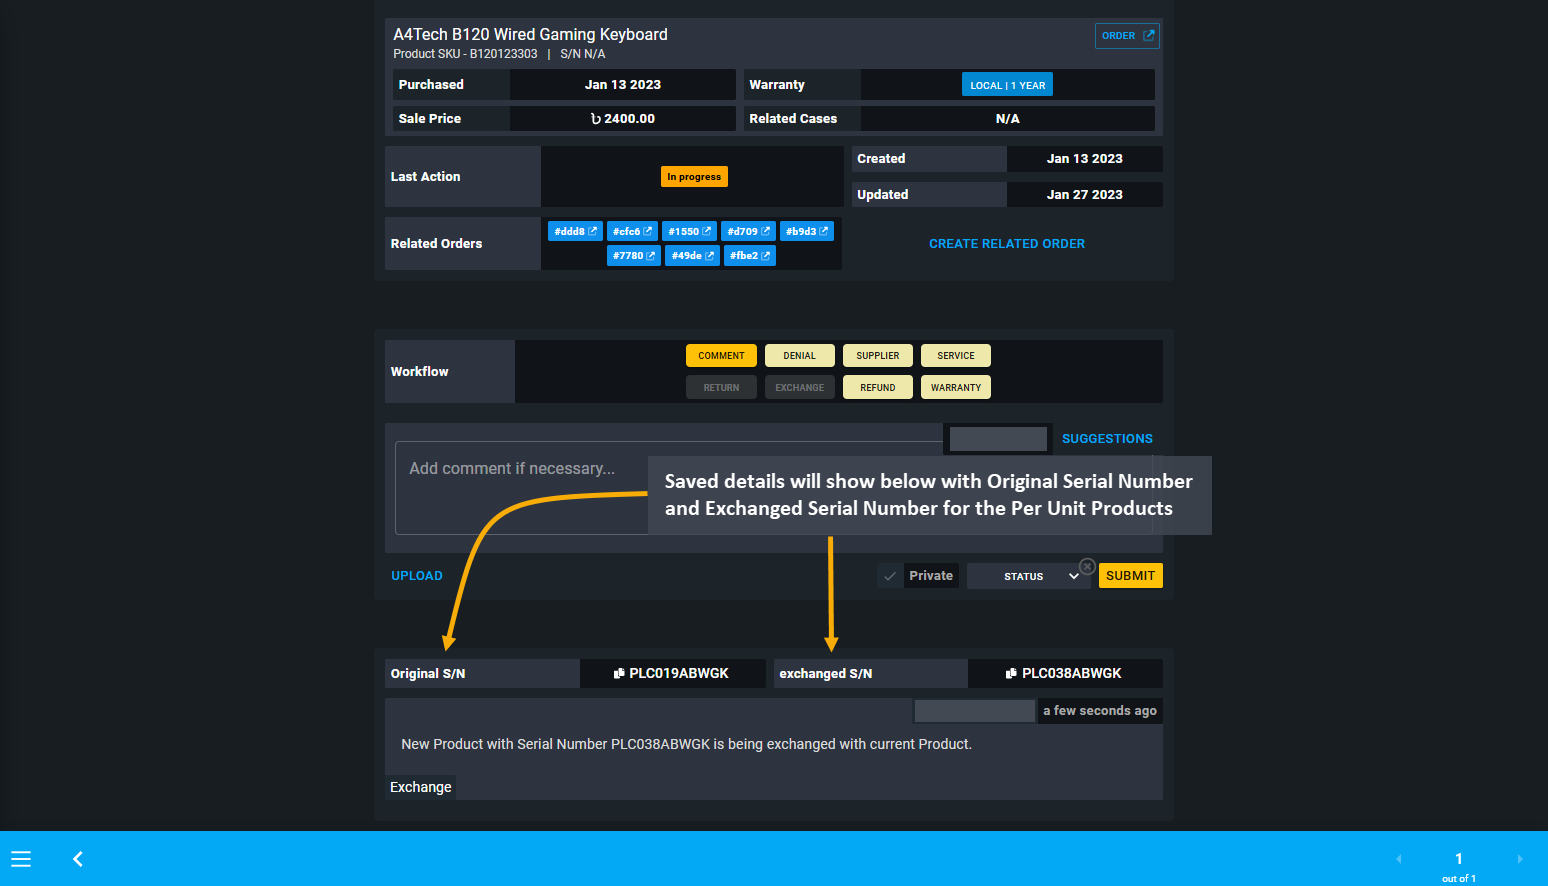
Image 4: Details will be saved with Original and Exchanged Serial Number for Per Unit Products on update.
16.7 - Refund
Learn more about creating and managing RMA’s Refund workflow actions for Products.
Refund for Faulty Product
If the Shop Owner needs to provide Refund to Customer, it can be done through the Ledger Credit option from the refund methods. Actual Gateway Refund is not supported yet, so Refund will go to the Customer’s Ledger Credit. Refund amount can be paid in partial or full depending on the Customer’s claim on the RMA case.
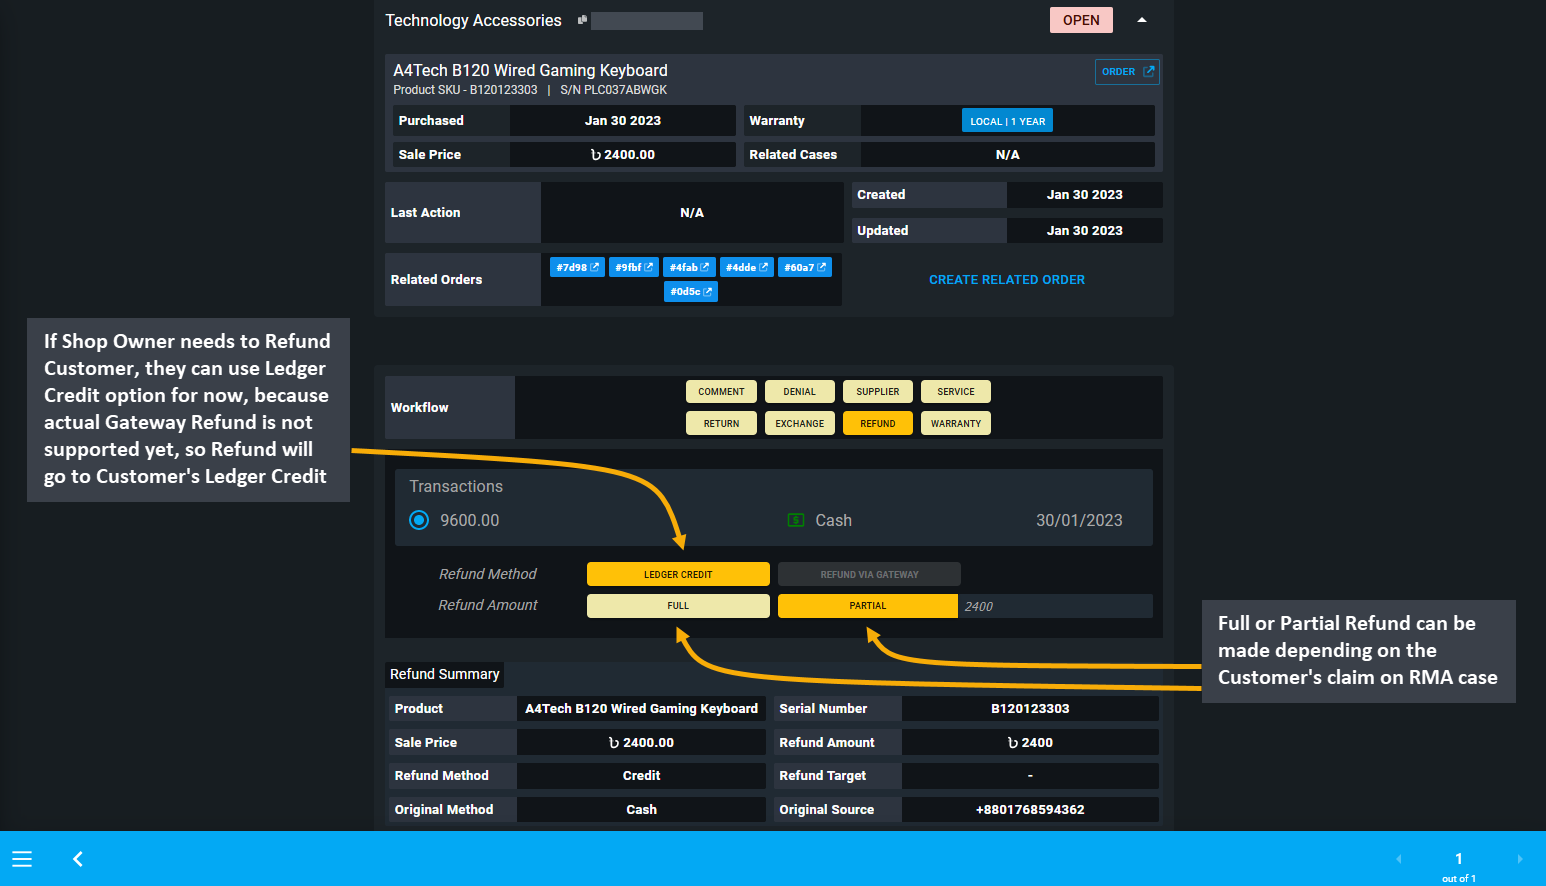
Image 1: If Shop Owner needs to Refund Customer, they can use Ledger Credit option for Regular Customers.
Full Refund and Override Feature
Shop Owner can provide Full Refund if the situation requires. For instance, if Customer purchased 2 Quantities of Keyboards, 1 Quantity of Mouse, and found the 2 Quantities of Keyboards faulty, they may ask for a full refund. In this case, the Shop Owner will have to select the Full Refund option and use the Override feature to refund the Customer if refund amount is greater than the Product sale price as Customer requested refund for full Order.
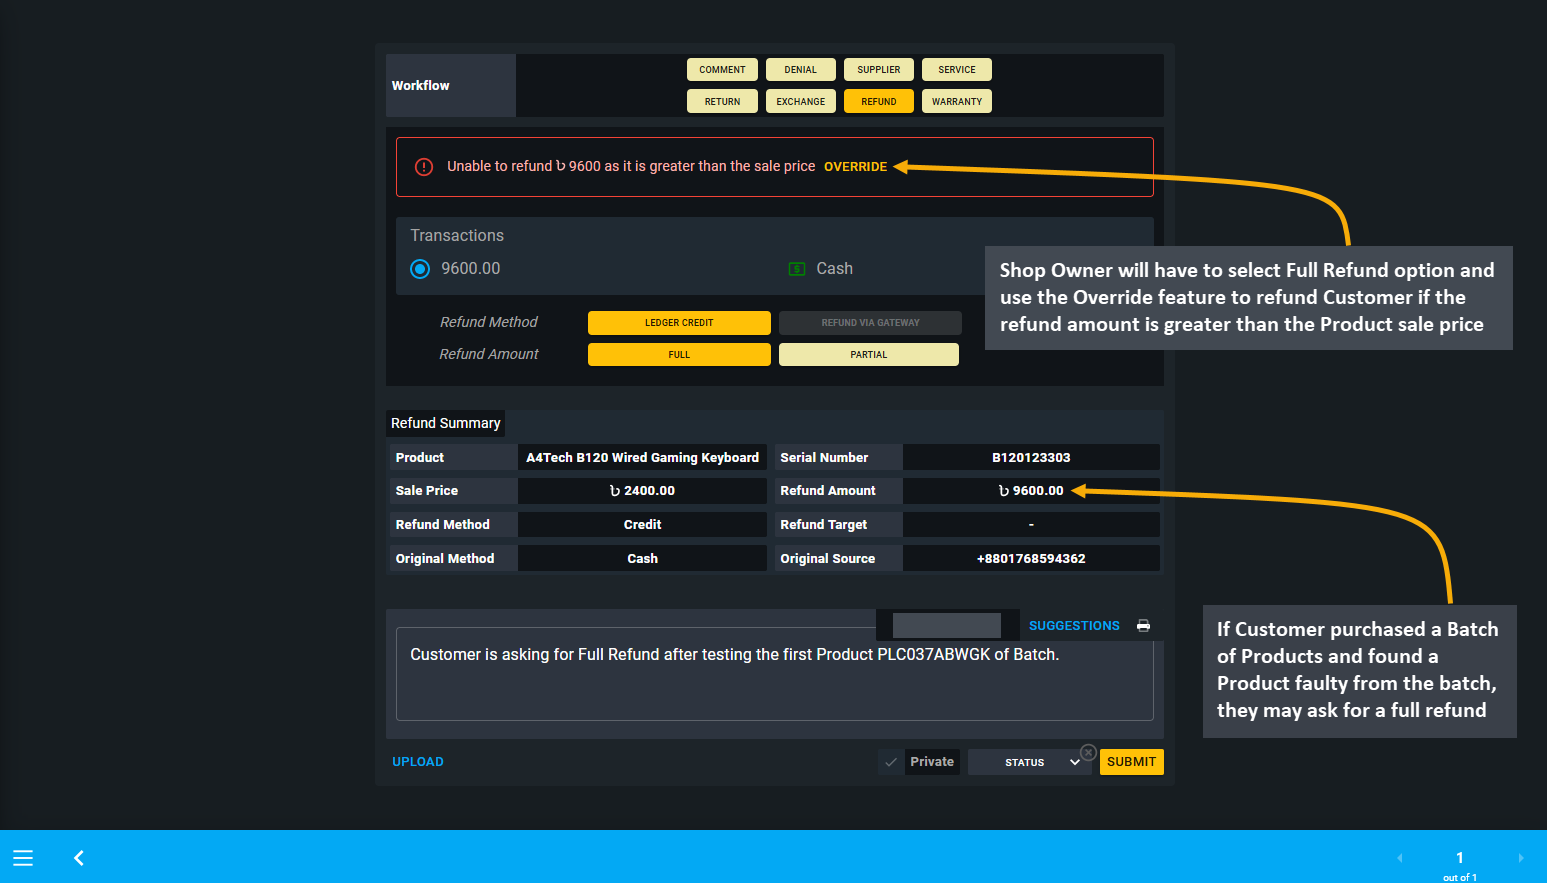
Image 2: Override feature to refund Customer if the refund amount is greater than the Product sale price.
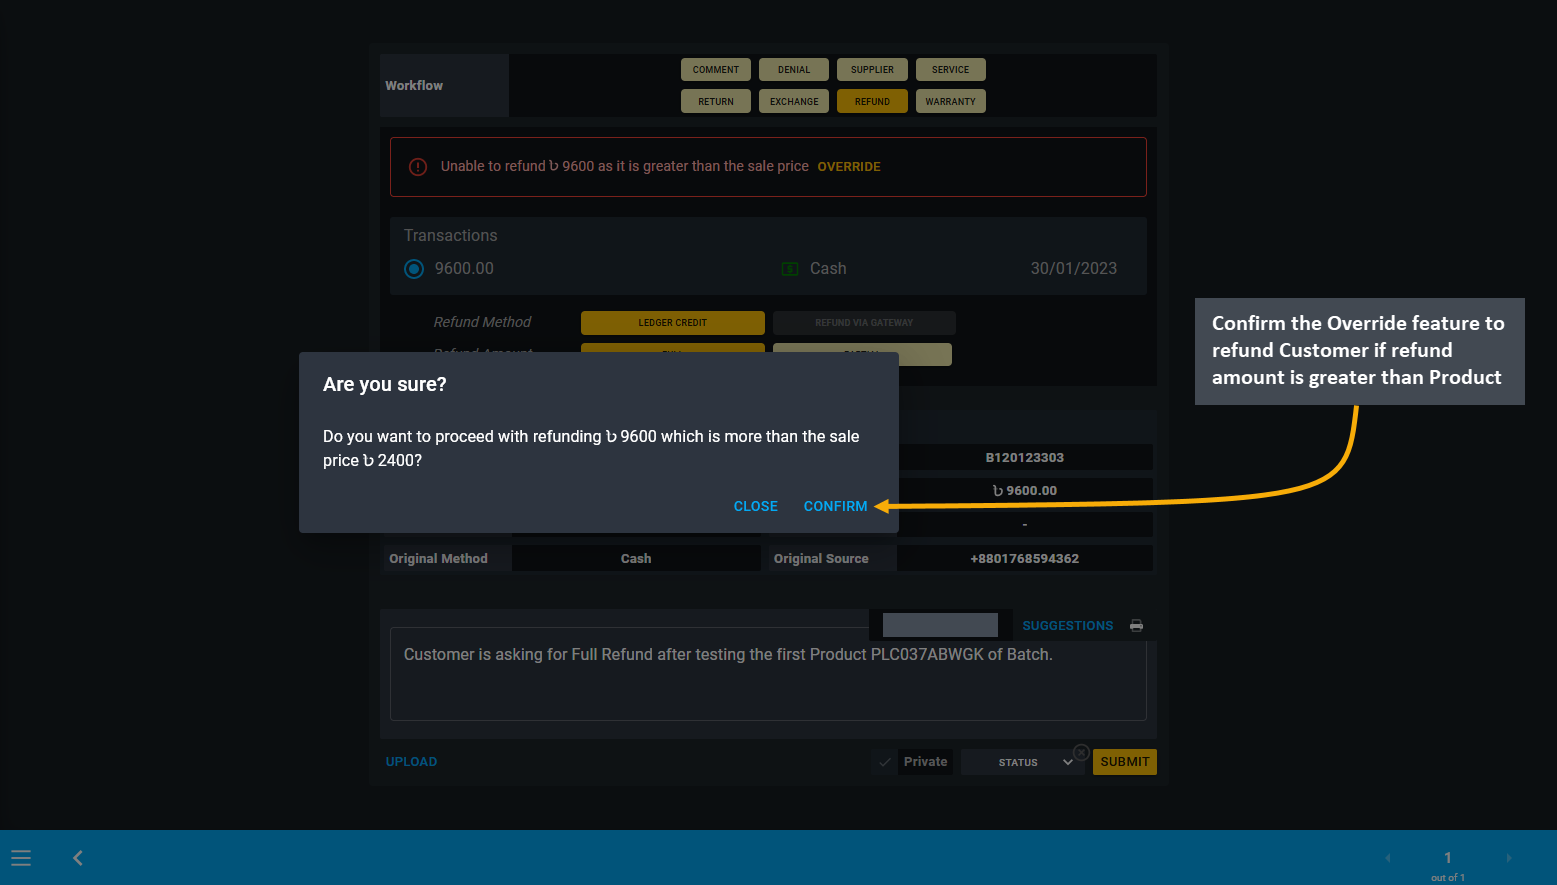
Image 3: Confirm Override feature to refund Customer if refund amount is greater than Product sale price.
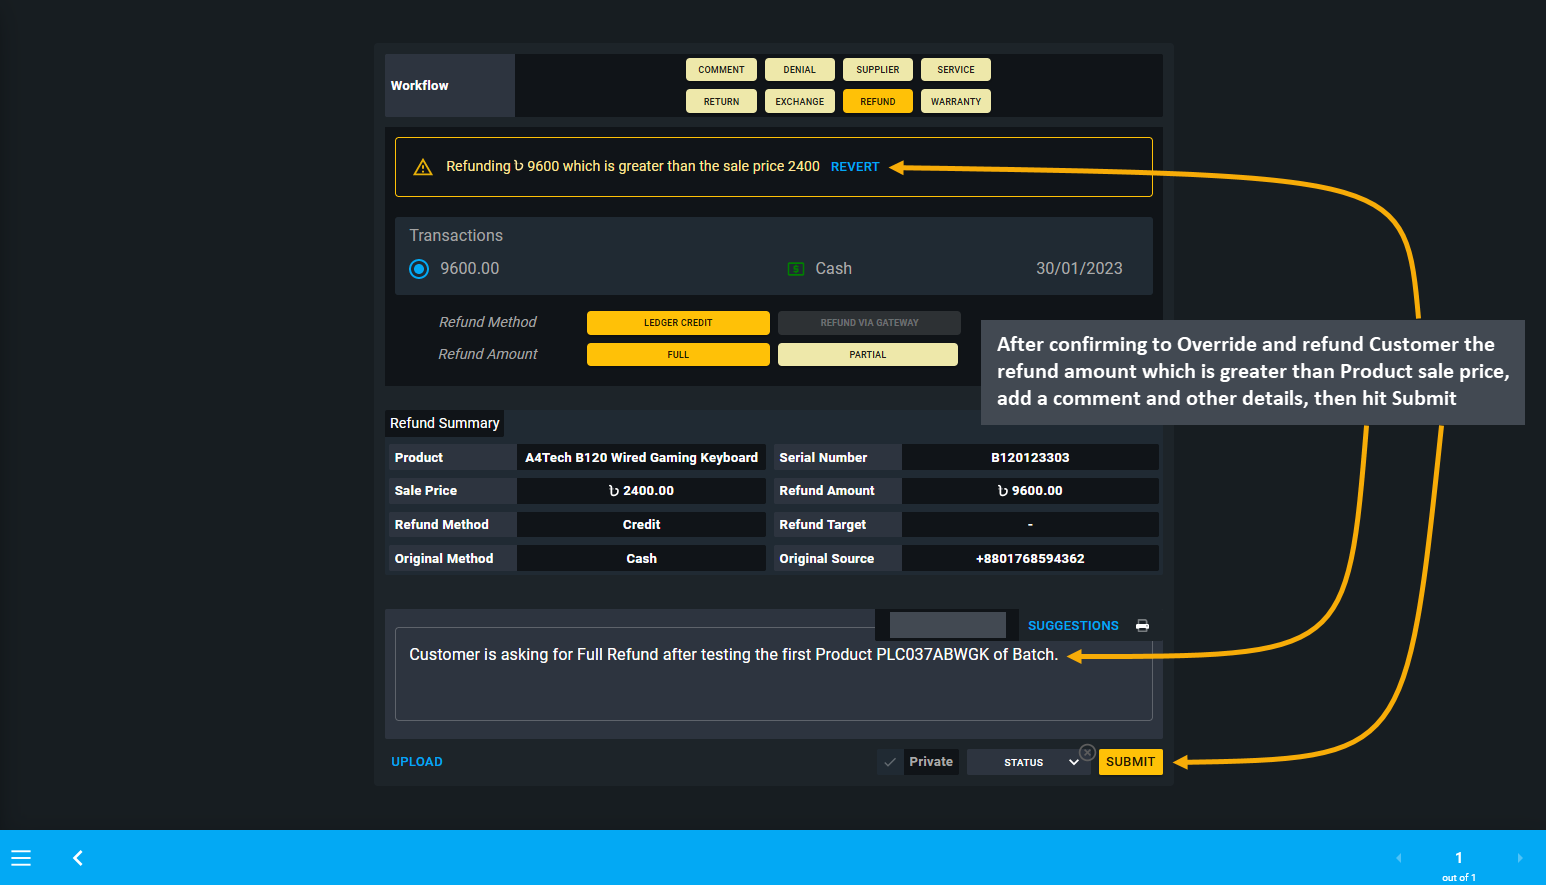
Image 4: After confirming to Override to refund Customer, add a comment or other details, then hit Submit.
Partial Refund
Shop Owner can also provide Partial Refund if the situation requires. For instance, if Customer still wants to keep the faulty Product and ask for a partial Refund, then Shop Owner can select Partial Refund option to give a partial refund and input the amount within the Refund Amount box. Write the refund reason in the comment box, upload image, and select Status before clicking Submit to complete the process of Partial Refund for RMA Case.
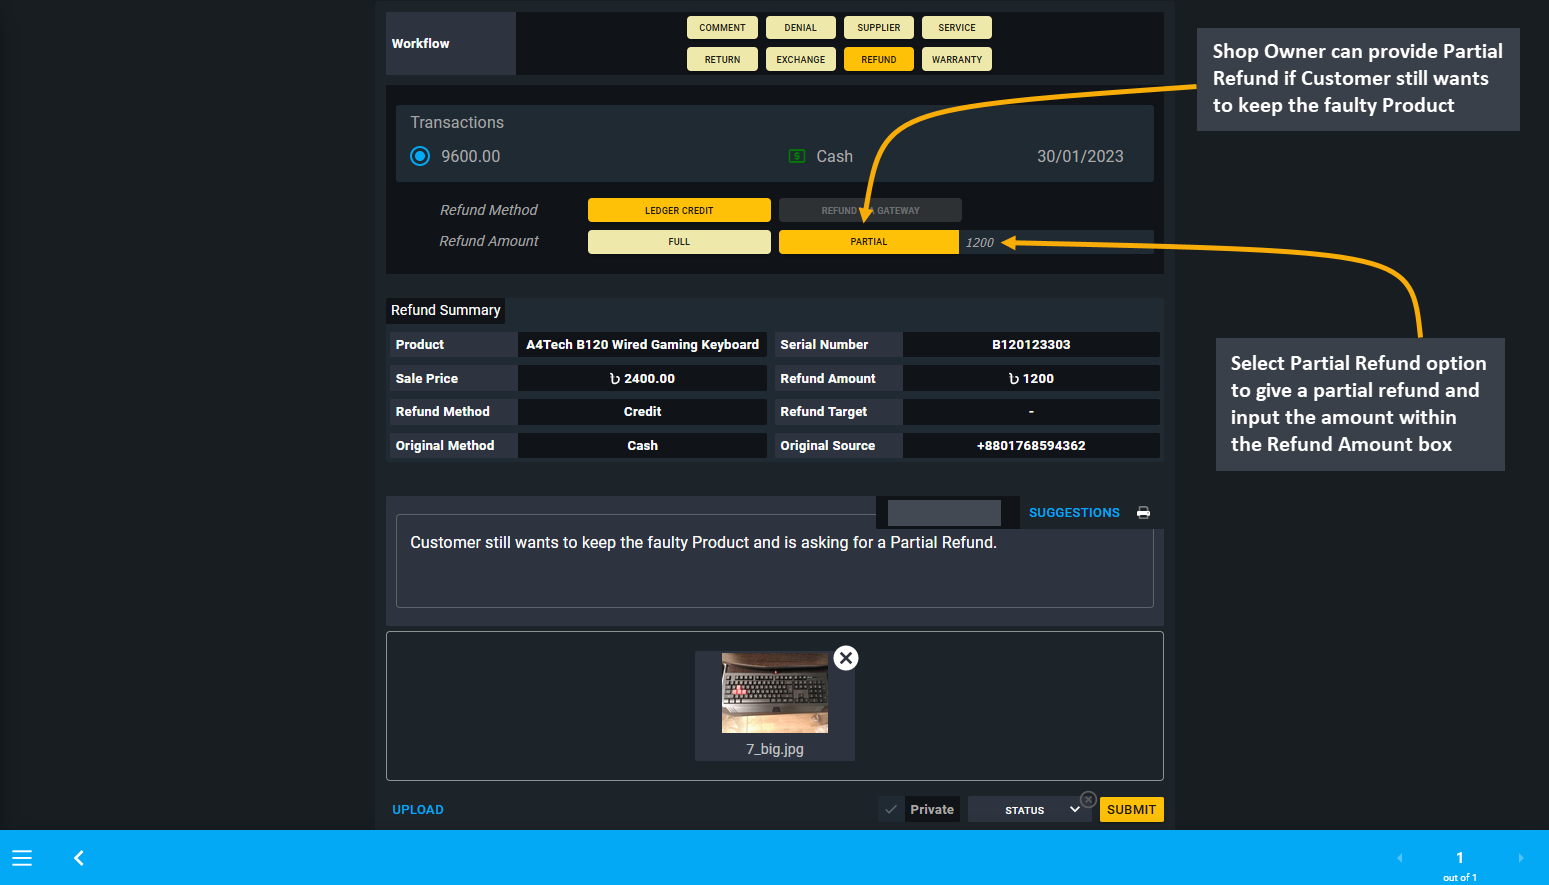
Image 5: Shop Owner can provide Partial Refund if the Customer still wants to keep the faulty Product.
Cash Customer Refund not Supported
Regular Customers can be refunded via Ledger Credit or any other Payment Gateways. However, Refund for Cash Customers are not supported yet at this moment, because they do not have specific contact details and payment information associated with their account. So, the best way to issue refund for any Cash Customer is to create a Regular Customer Profile for them and them send them the Refund amount on that account as Ledger Credit.
If the Shop Owner tries to open RMA against a Cash Customer, they will be notified that the Cash Customer does not have any phone number, address, or payment details available. Therefore, to refund a Cash Customer, they will be automatically suggested to make a New Regular Customer with phone number, full address, and payment details. Then, the Cash Customer’s Order will be assigned to this New Regular Customer and RMA can be created under this Customer and Refund can be issued as Ledger Credit which is only currently supported.
16.8 - Warranty
Learn more about creating and managing RMA’s Warranty workflow actions for Products.
Create RMA based on Warranty
Warranty will be applicable when Warranty Plan will be applied to the target Product. If the Warranty workflow shows disabled, it will mean that no Warranty Plan was added for the Product. Therefore, for processing any warranty case within or after Product warranty period, the Shop Owner will have to select this option.
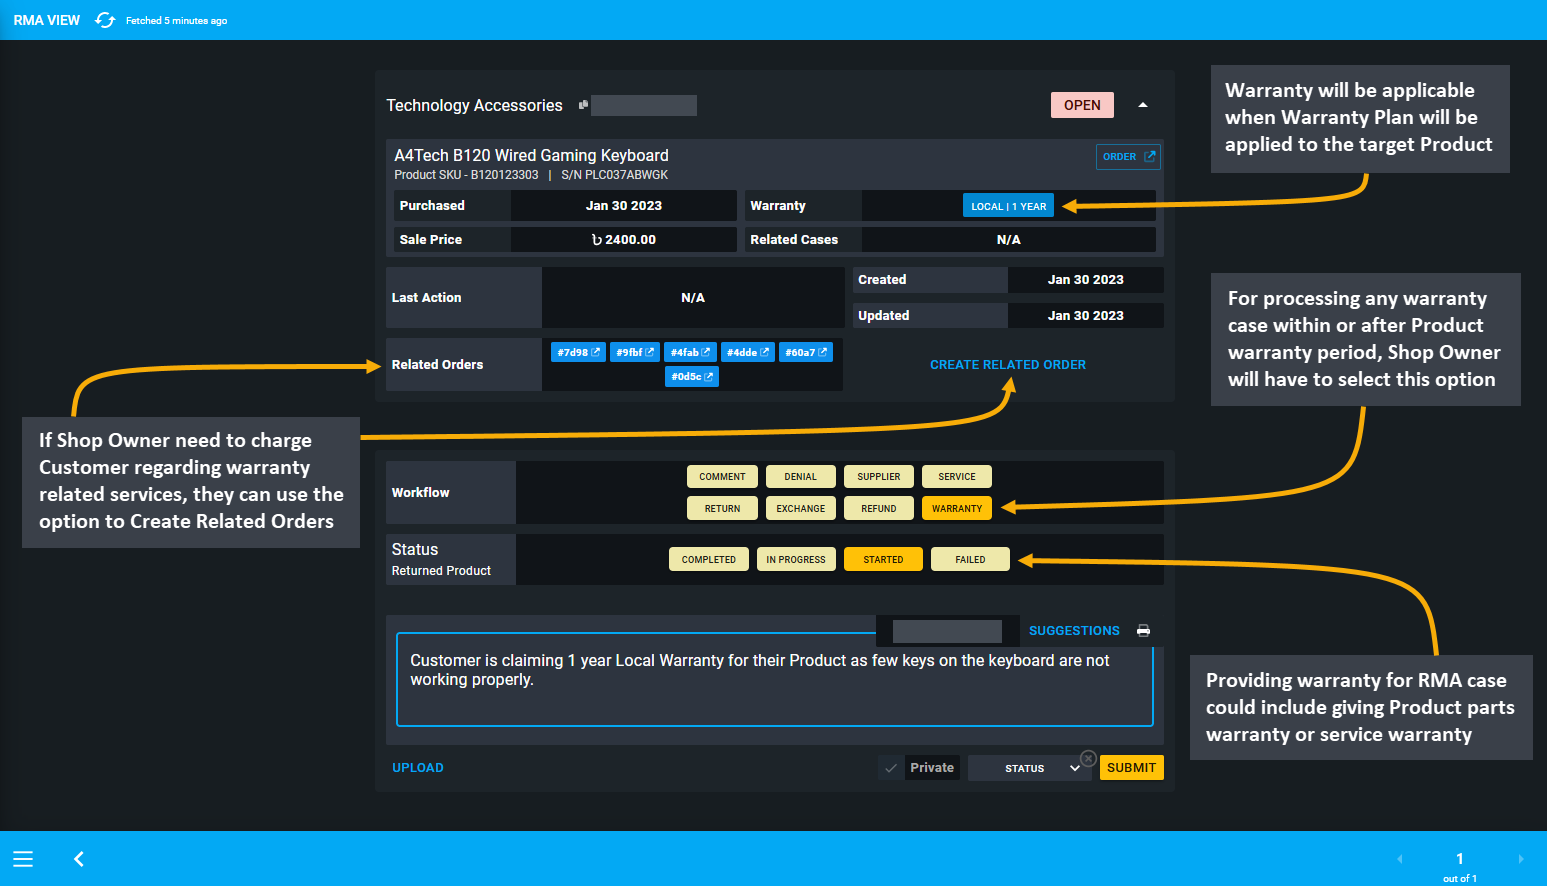
Image 1: Use Warranty to process any warranty case within or after Product warranty period that applies.
Receiving and Denying Warranty Claim
Customer could be requesting for Warranty claim on their Product within the warranty period from Shop Owner. For example, when Customer approached Shop Owner to claim Warranty on their gaming keyboard, they must record it under the Warranty workflow. So, select workflow as Warranty and status as In Progress and click Submit with the comment when receiving the Warranty claim from the Customer. This will start the warranty case.
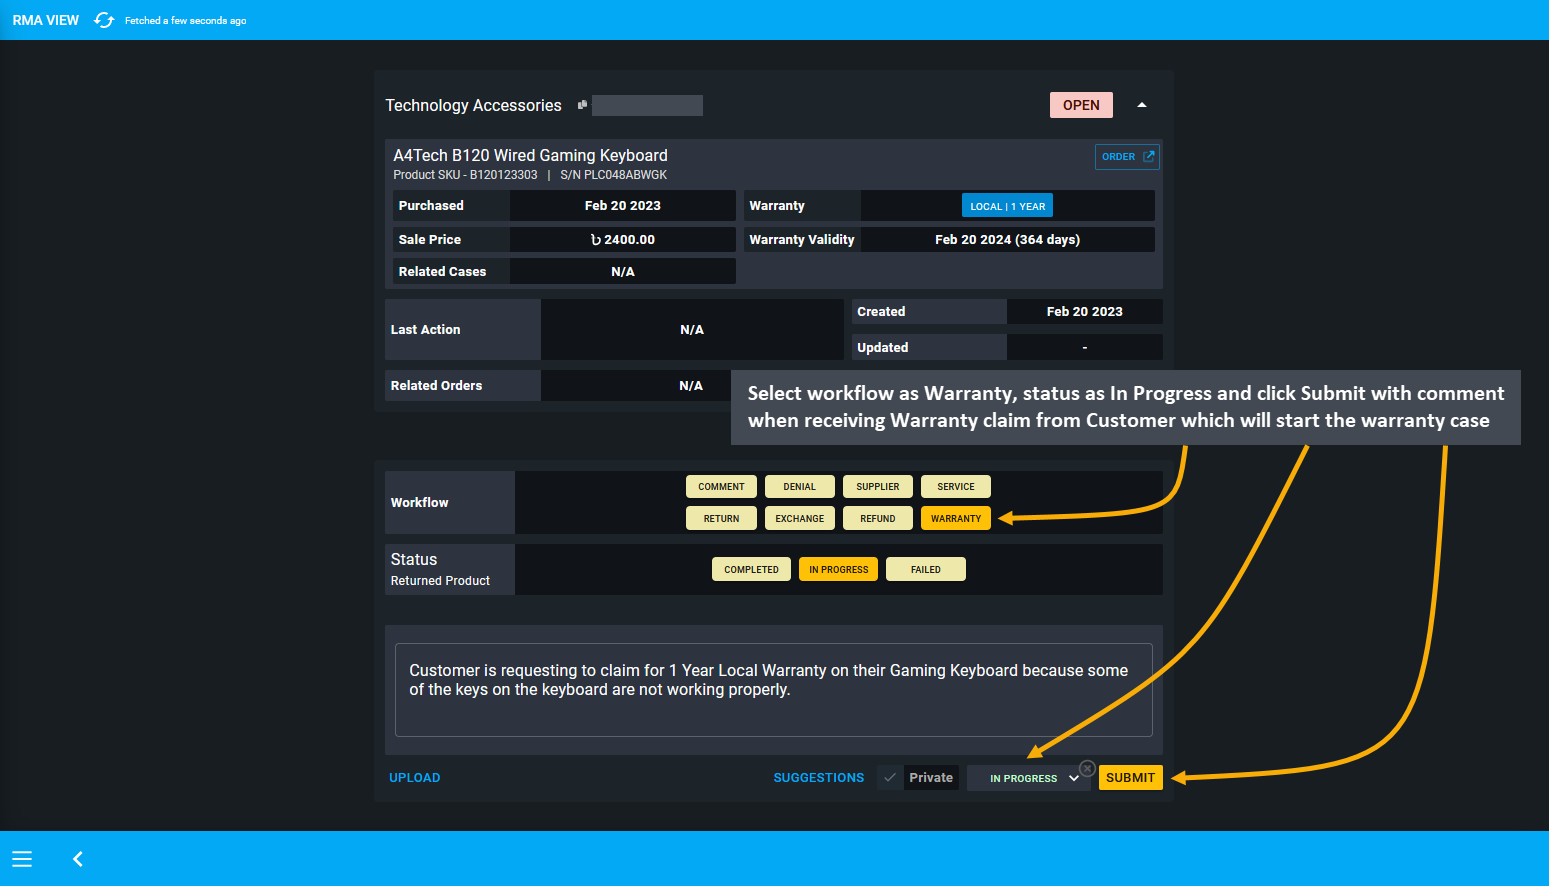
Image 2: When receiving Warranty claim from Customer, record it with comment which will start the case.
If, after thorough evaluation, the technical team found the Product to not be defective, then the Shop Owner can deny the Customer’s claim. In this case, they need to select workflow as Denial, select status as Resolved, and click Submit before closing the RMA case with comments. In this way, a Shop Owner can deny any Warranty claim.
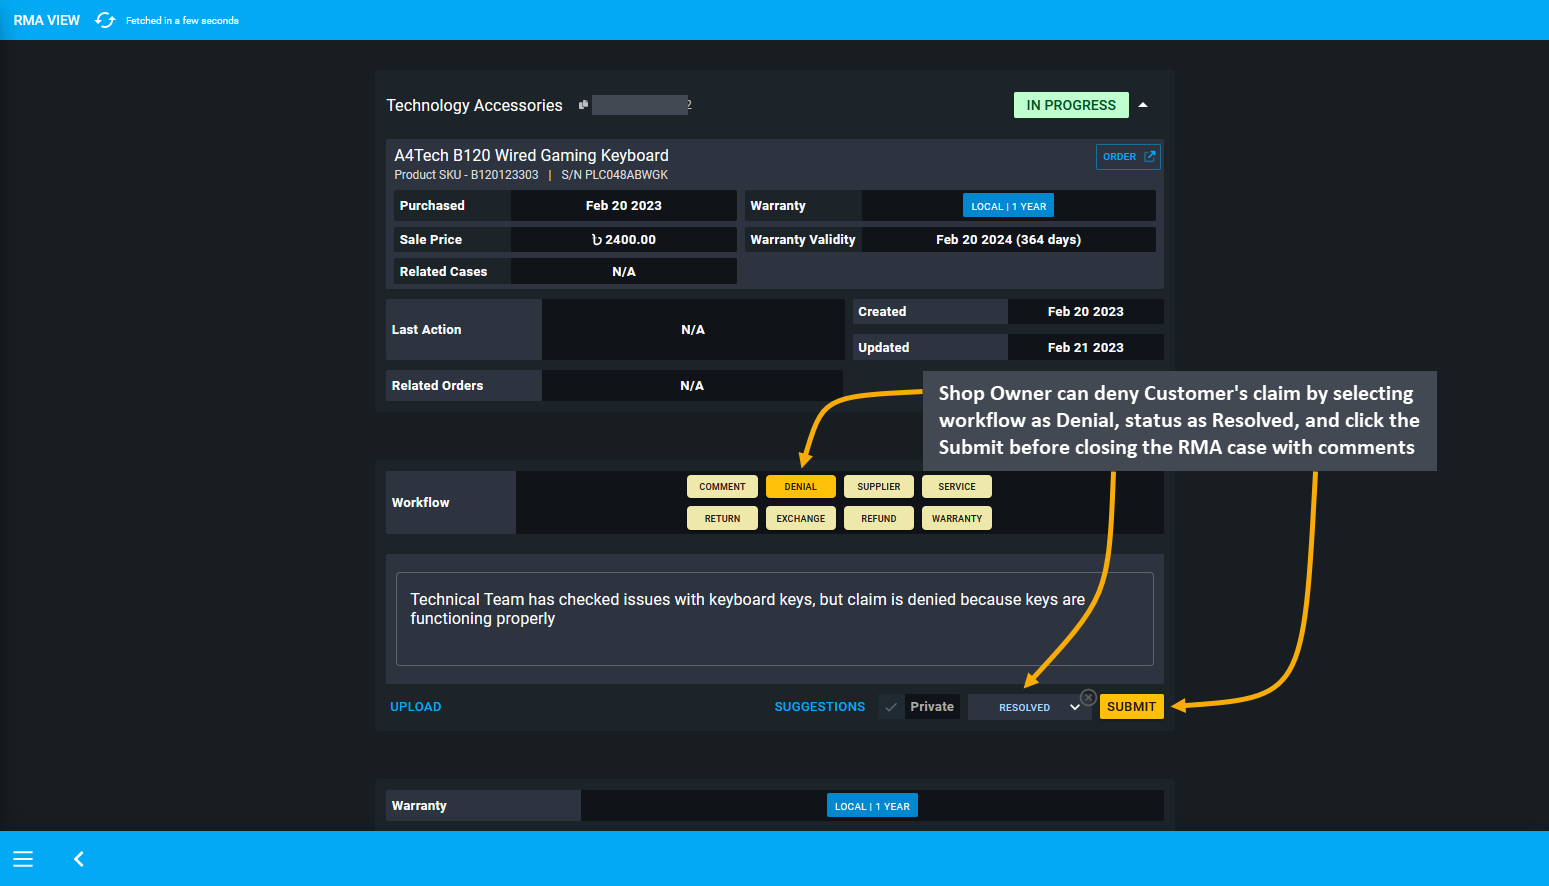
Image 3: Shop Owner can deny a Customer's claim by selecting workflow as Denial and status as Resolved.
Providing Warranty for an RMA case could include giving 3 months’ Product parts warranty or 6 months’ service warranty. So for instance, if parts warranty is expired for the Product, Shop Owner will have to charge Customer to provide the service for Product parts. Similarly, if they need to charge a Customer regarding warranty related services, they can use the option to Create Related Orders. Creating a related Order or several related Orders for the RMA case will allow the Shop Owner to charge Customer for additional service for the Product.
Related Orders can be created by Shop Owner to sell a Product or a Product’s part to the Customer, or charge payment for service from the Customer. For instance, if an RMA case needs to be resolved through Payment, then Shop Owner can Create Related Order to charge the Customer for the Product they need to purchase.
In order to create a Related Order, the Shop Owner can add a Comment to keep record of why the related Order was created. For example, if the Customer contacted the Shop Owner about a Product that is having technical problems and asks for a replacement, the Shop Owner will have to check if the Product is still under warranty. If the Product’s Warranty has expired, but Customer still wants the same Product, then Shop can provide another Product to them with payment for it. In this case, the Shop Owner can create a Related Order as they will provide a similar Product to Customer with additional payment that will get recorded under Related Orders on RMA case.
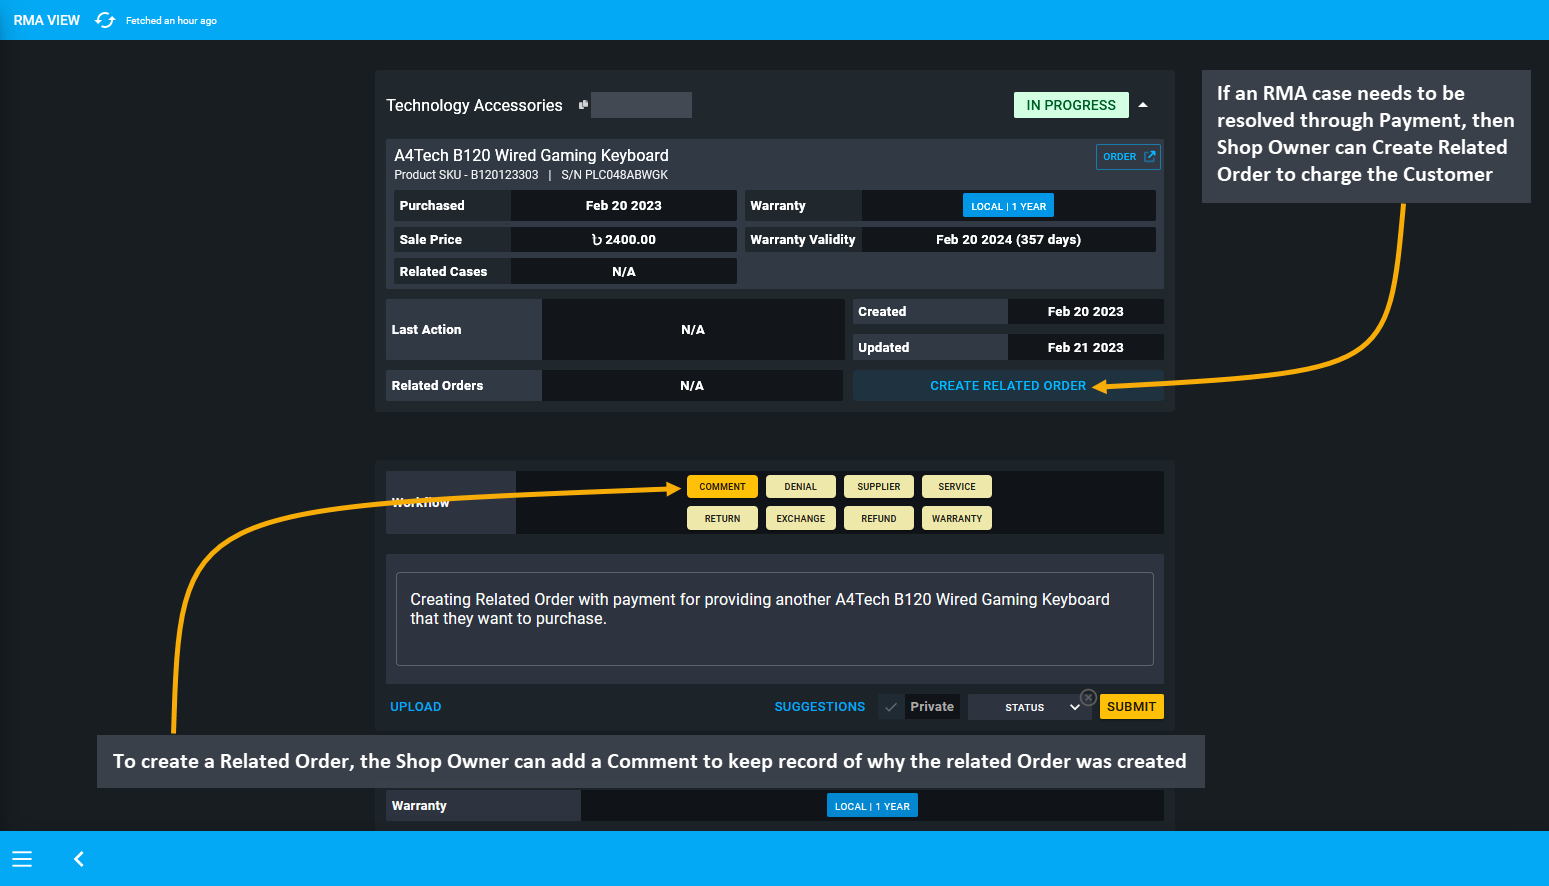
Image 4: If an RMA case needs to be resolved through Payment, then Shop Owner can Create a Related Order.
After clicking the Create Related Order button, the Order Cart will open with Customer’s information automatically prefilled, the Shop Owner will now have to add the Product to Cart for which additional payment will be charged. Check Product quantity, Order total, subtotal, and click Proceed to charge Product payment from the Customer.
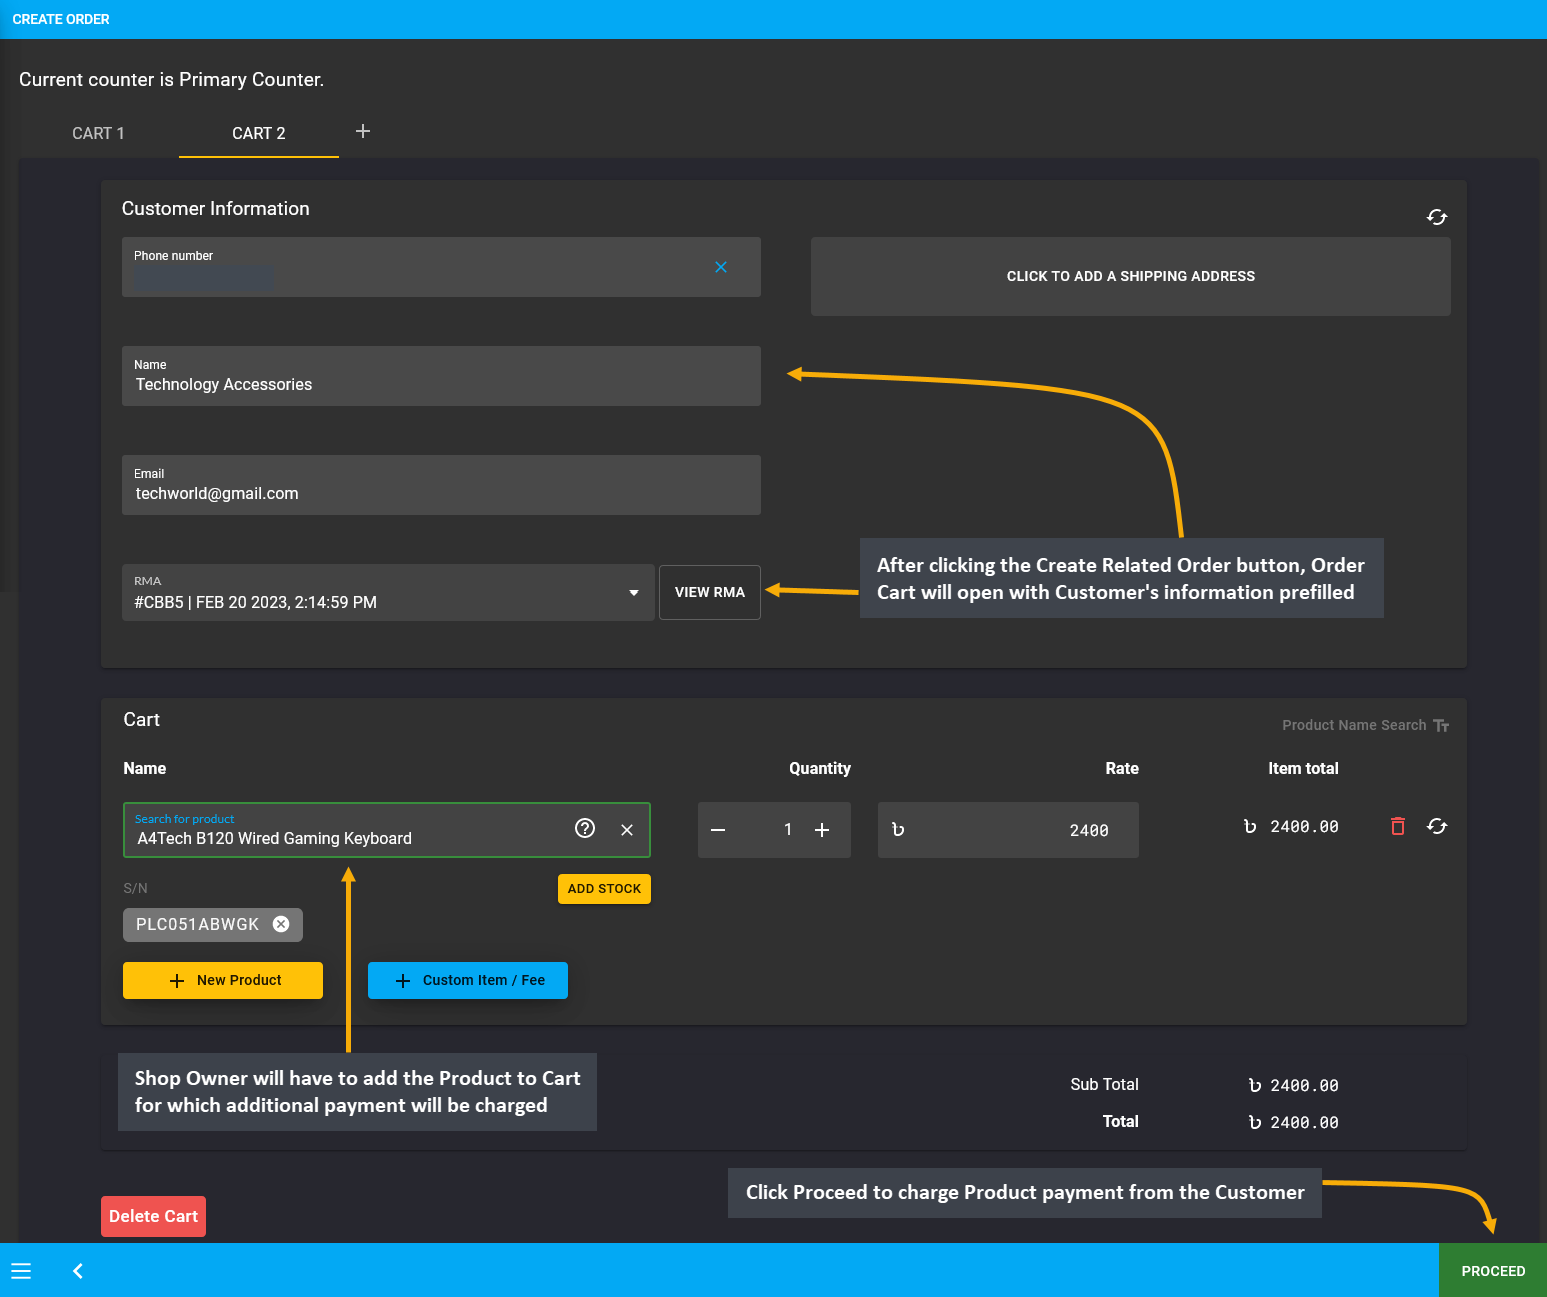
Image 5: The Shop Owner will have to add the Product to Cart for which additional payment will be charged.
In the following page, select Customer’s preferred Shipment and Payment options. Add a note stating that Related Order was created upon Customer’s request for the RMA case to purchase the same Product with payment as the original Product is out of Warranty. Click Confirm Order to complete creating the Related Order for the RMA case.
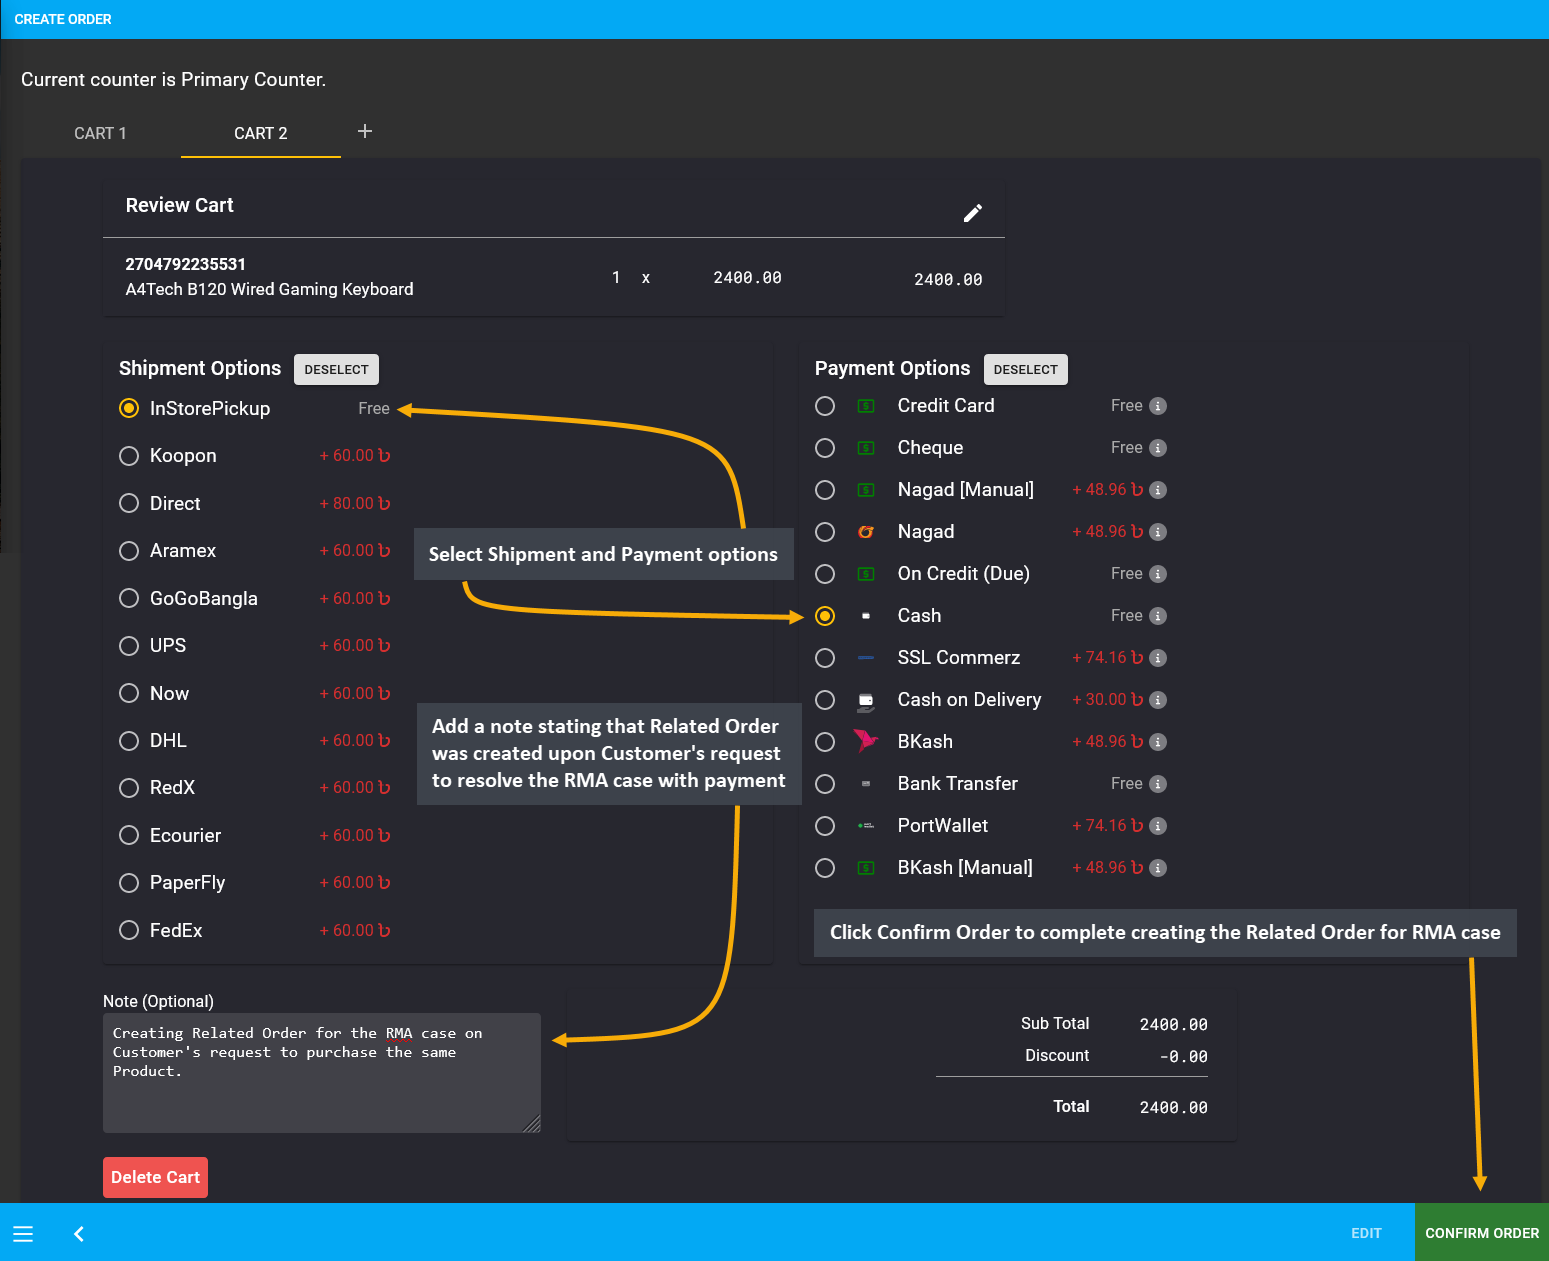
Image 6: Related Order was created upon Customer's request to resolve the RMA case Warranty with payment.
After Order is completed, Shop Owner can click View Order button that will automatically redirect to the Related Order on the general Order List. It will display the note which explains that the Order is related to RMA case.
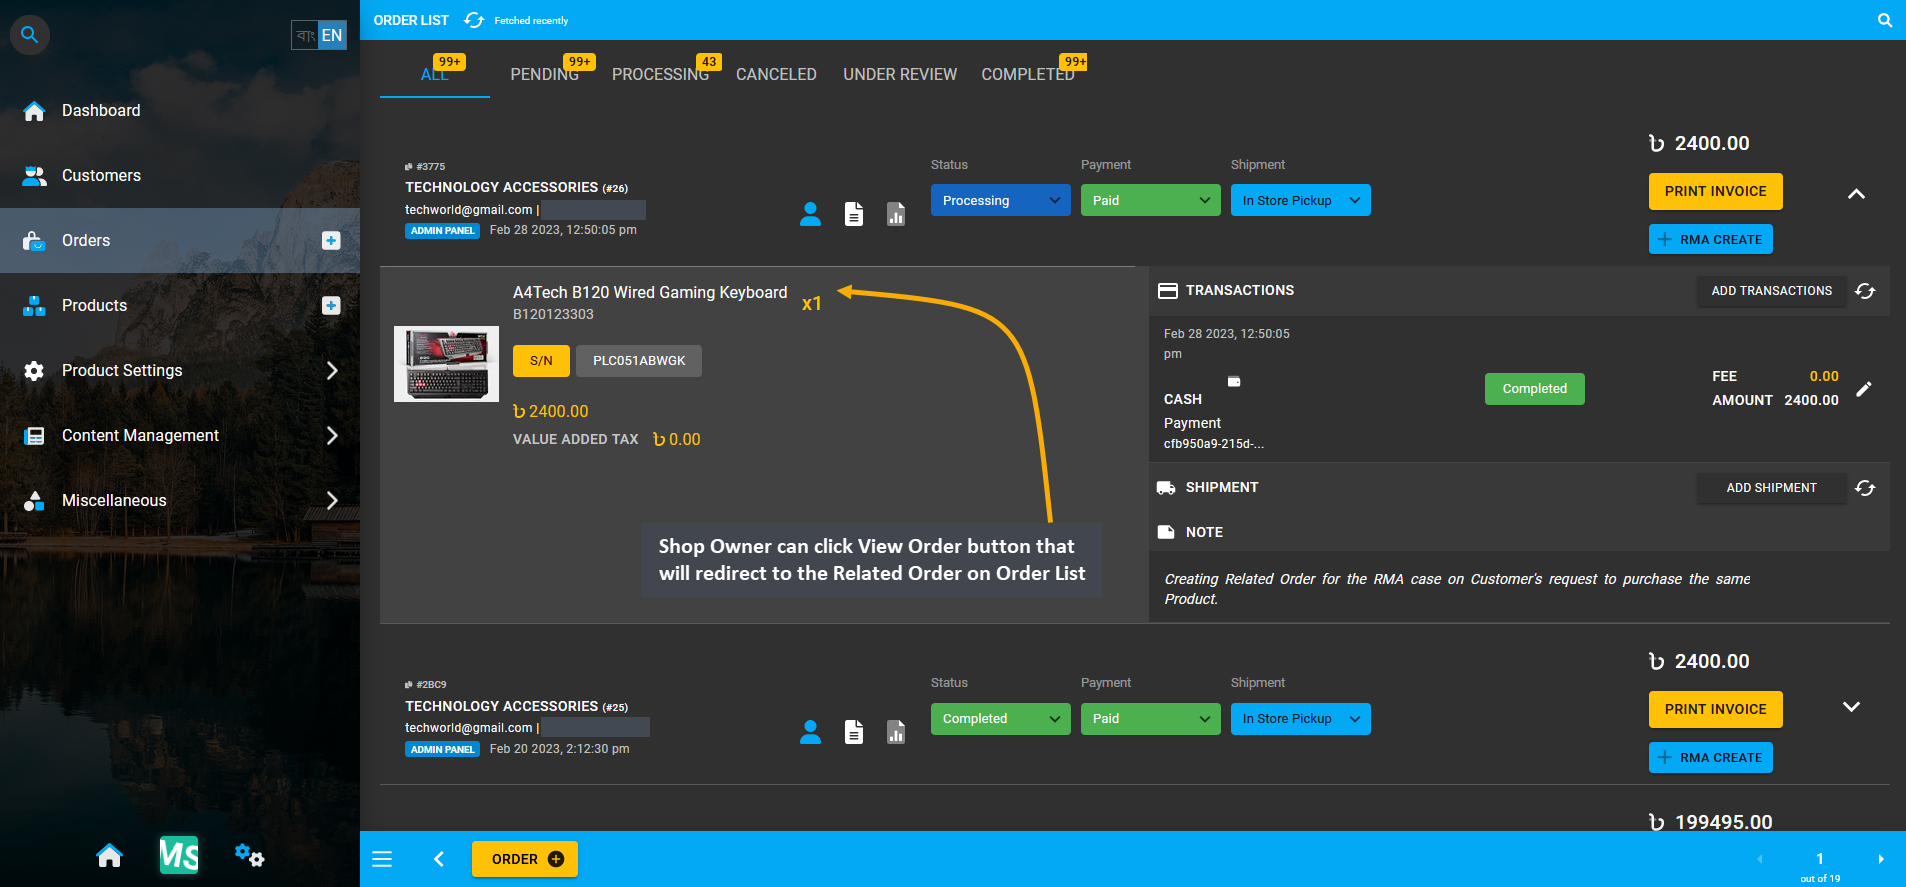
Image 7: Shop Owner can click View Order button that will redirect to the Related Order on the Order List.
Back in the RMA case, the Related Order created for the expired Warranty case will display under Related Orders tab. If more related Orders are created, they will be recorded under the same tab. For convenience, Shop Owner can add a Comment and select status as Resolved to close the RMA case as the Customer’s expired Warranty claim was successfully resolved with purchase of another A4Tech B120 Wired Gaming Keyboard.
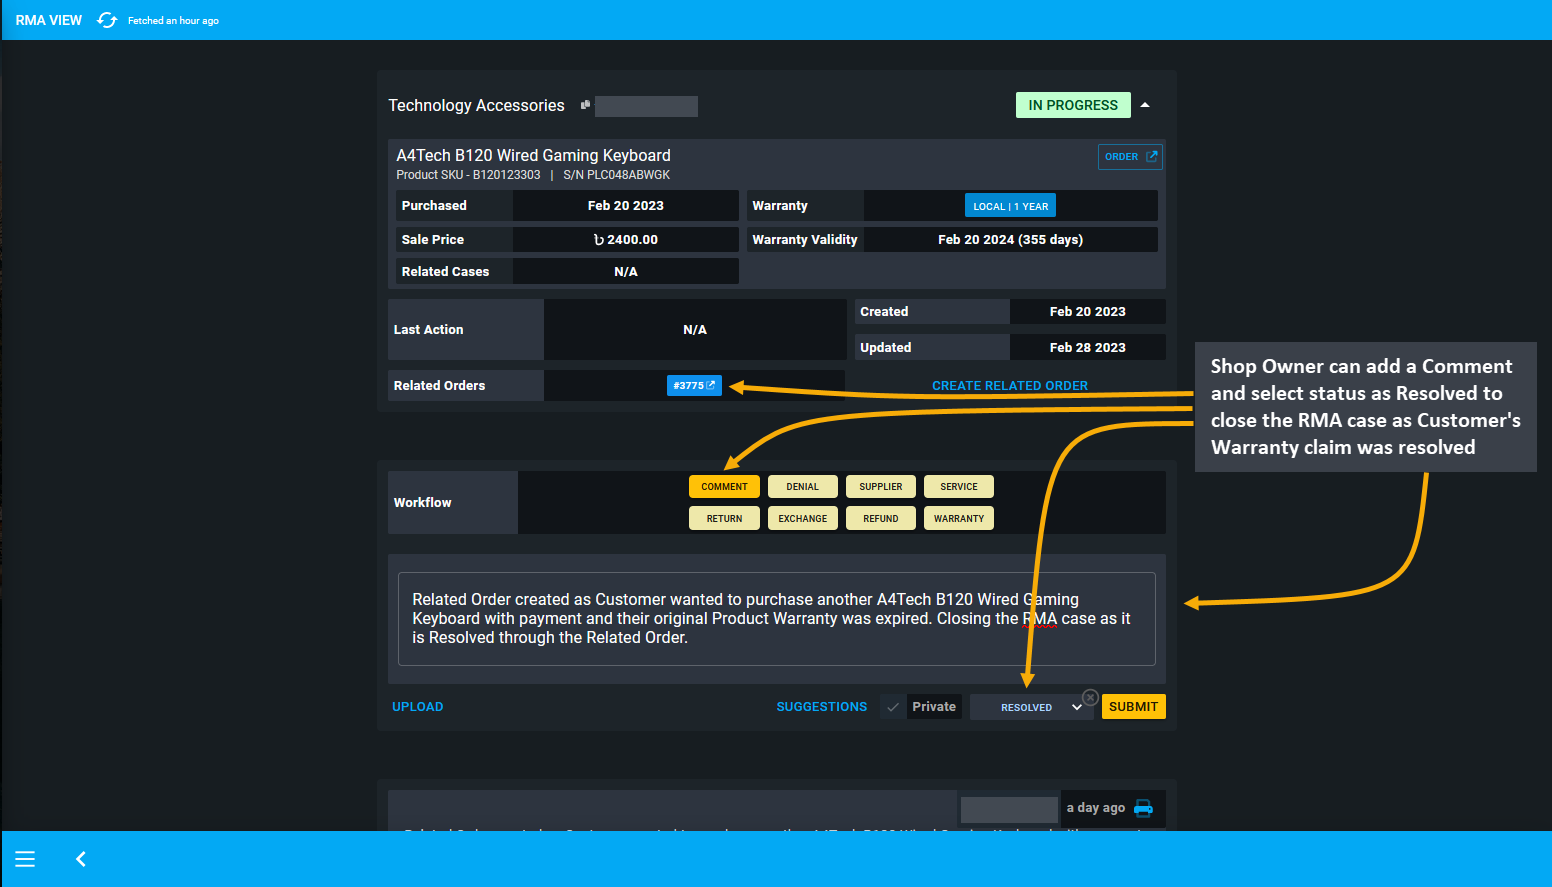
Image 7: Shop Owner can add a Comment stating details and select status as Resolved to close the RMA case.
16.9 - PC Build RMA
Learn how to create and manage RMA for individual component of the PC Build.
RMA for PC Build
RMA Case for PC Build can be created for its individual items, but not for the full Order. For instance, an Order was created with 10 PC Build components, but for now RMA can be created for individual component of the PC Build. Creating an RMA for the full Order is not yet supported in RMA, but Shop Owner can always create an RMA based on i.e. a motherboard product and write down that the full system has been received from the Customer.
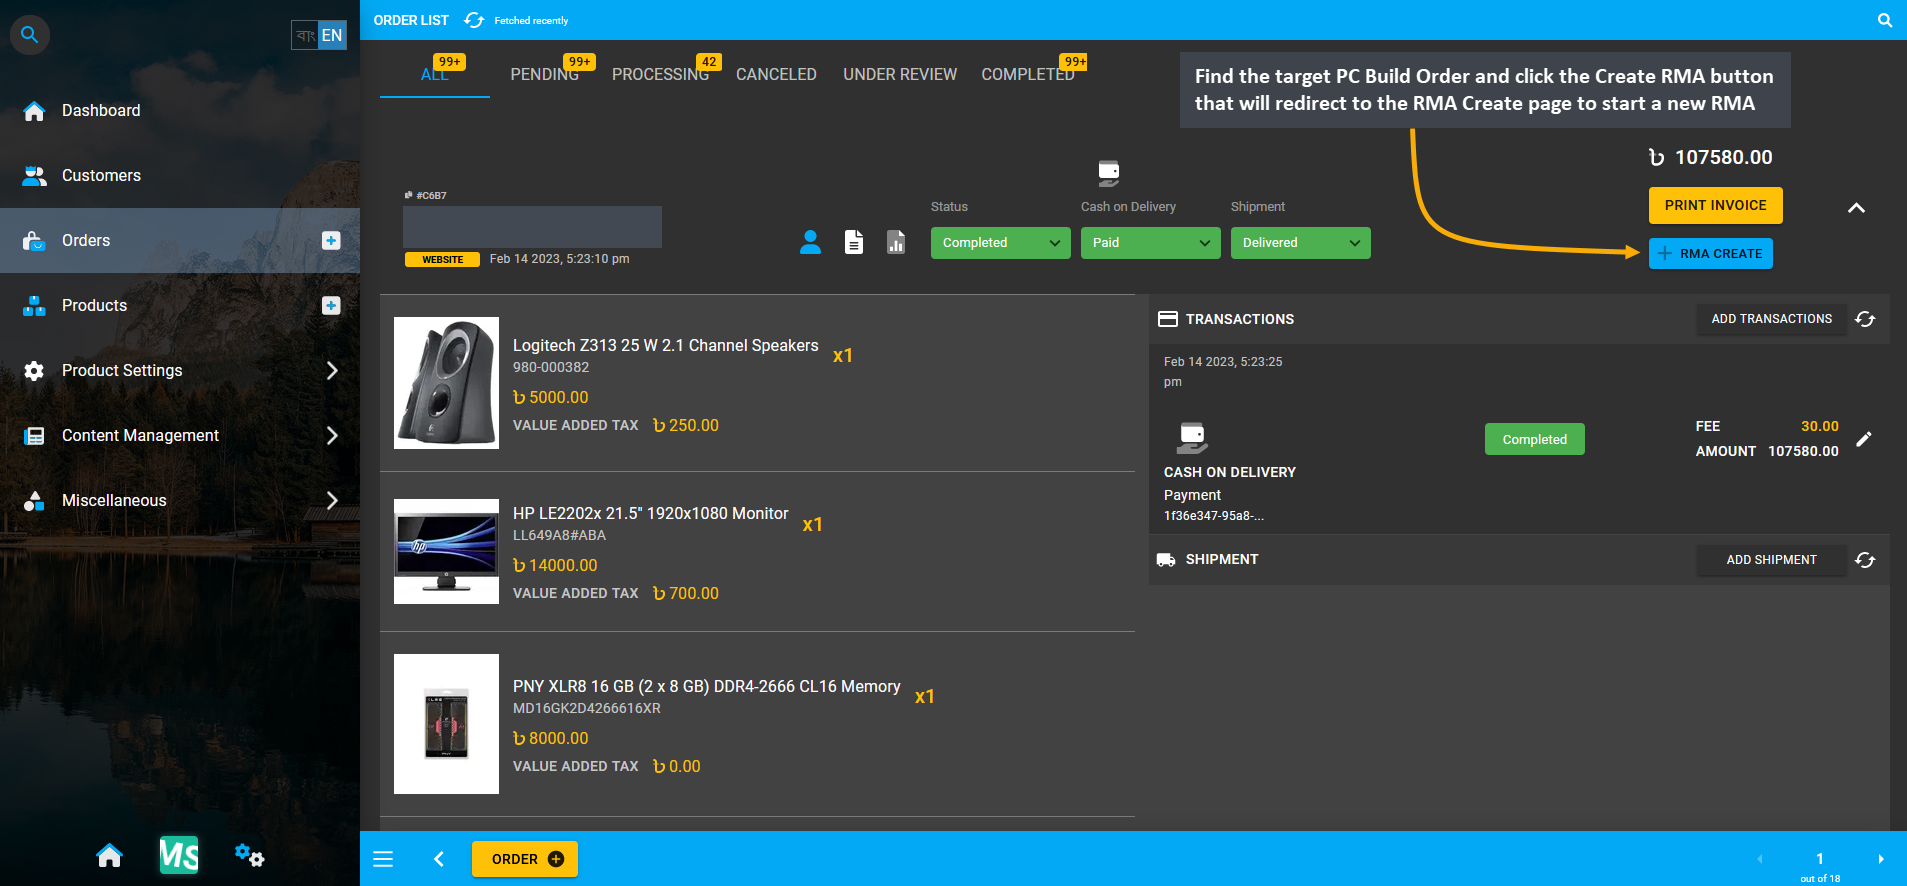
Image 1: Find target PC Build Order and click Create RMA button that will redirect to the RMA Create page.
RMA for an individual component of the PC Build can be created by using the RMA Create button from Order List for any PC Build Order. For this, go to the target PC Build Order and click the Create RMA button that will redirect to the RMA Create page to start a new RMA case for the faulty PC Build component.
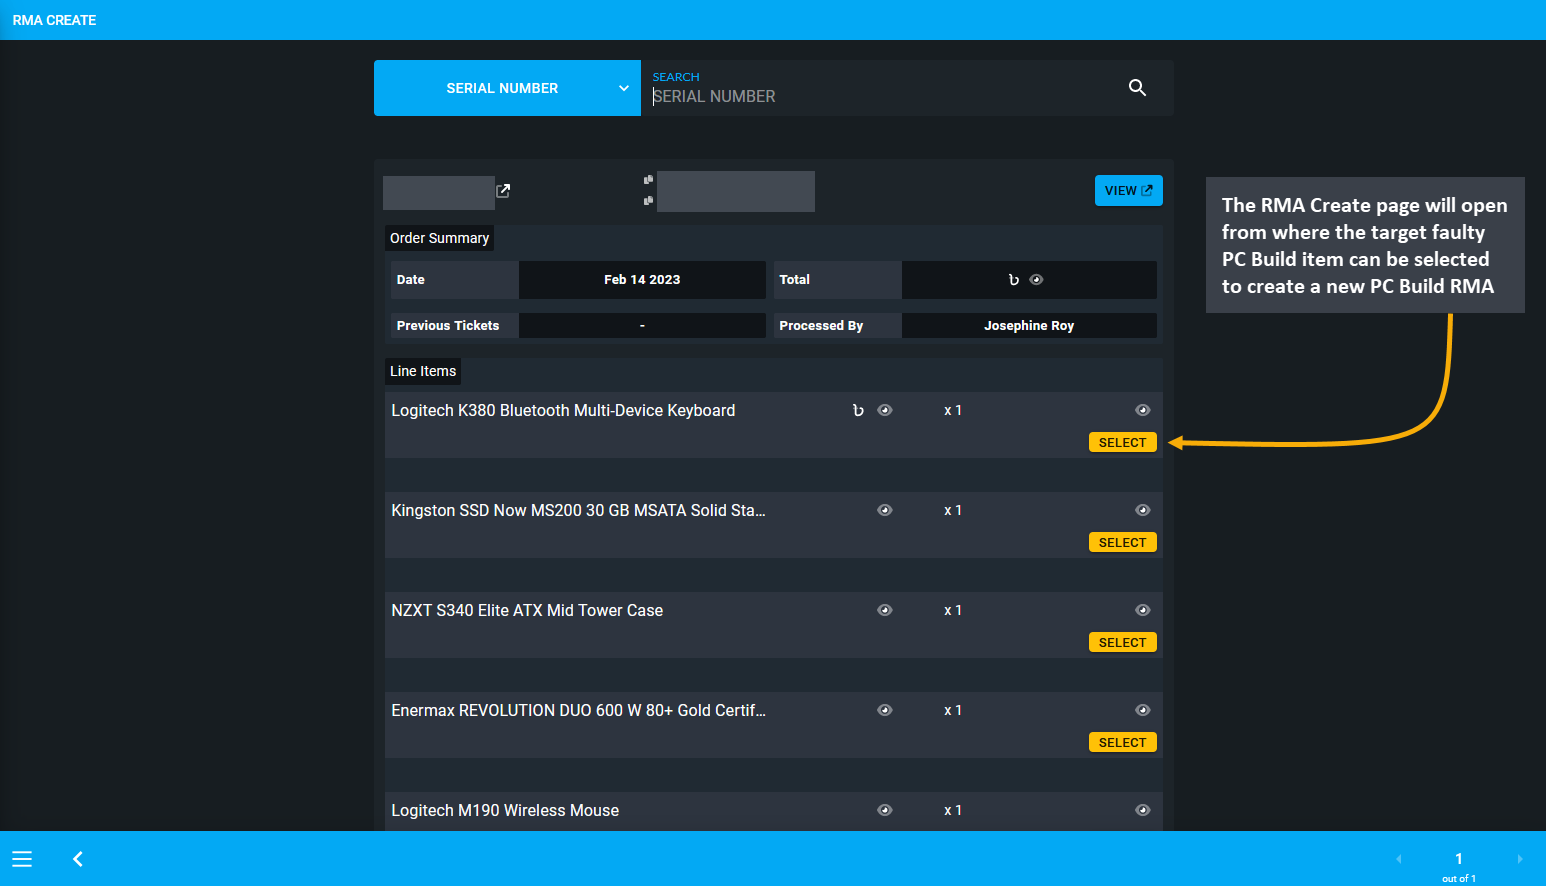
Image 2: Select the faulty PC Build Item from list to create a new RMA case from the he RMA Create page.
RMA Create page will open from where the target faulty PC Build item can be selected to create a new RMA case. After the target PC Build component is selected, a pop-up will ask to confirm before creating the new RMA case.
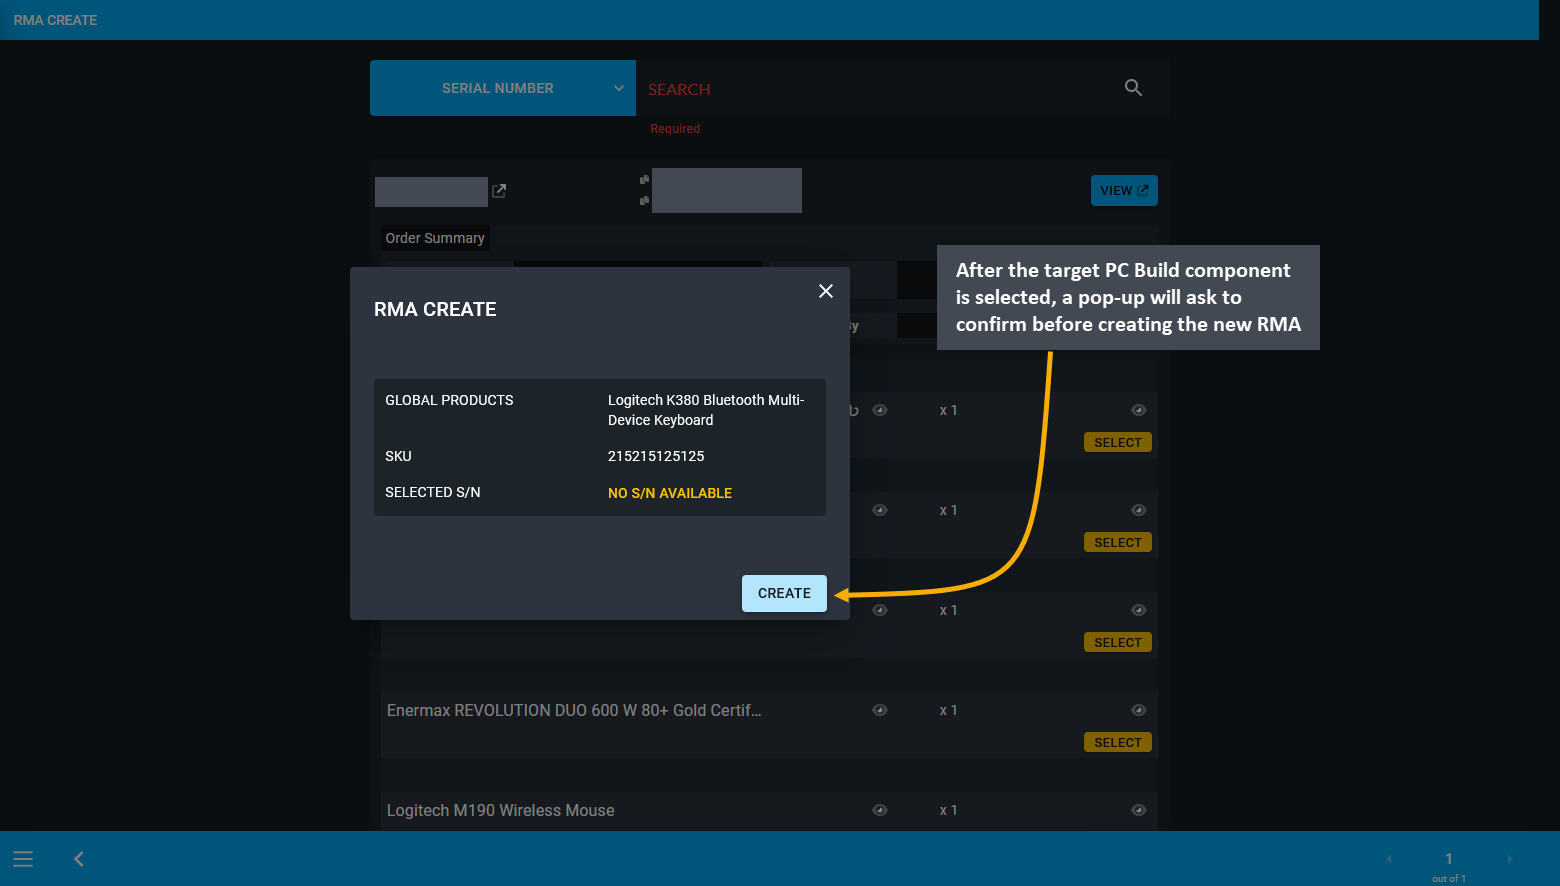
Image 3: After PC Build component is selected, a pop-up will ask to confirm before creating new RMA case.
After the new PC Build RMA Case is created based on faulty PC Build component, the Shop Owner can write down that the full system has been received from the Customer and mention the PC Build component that is faulty.
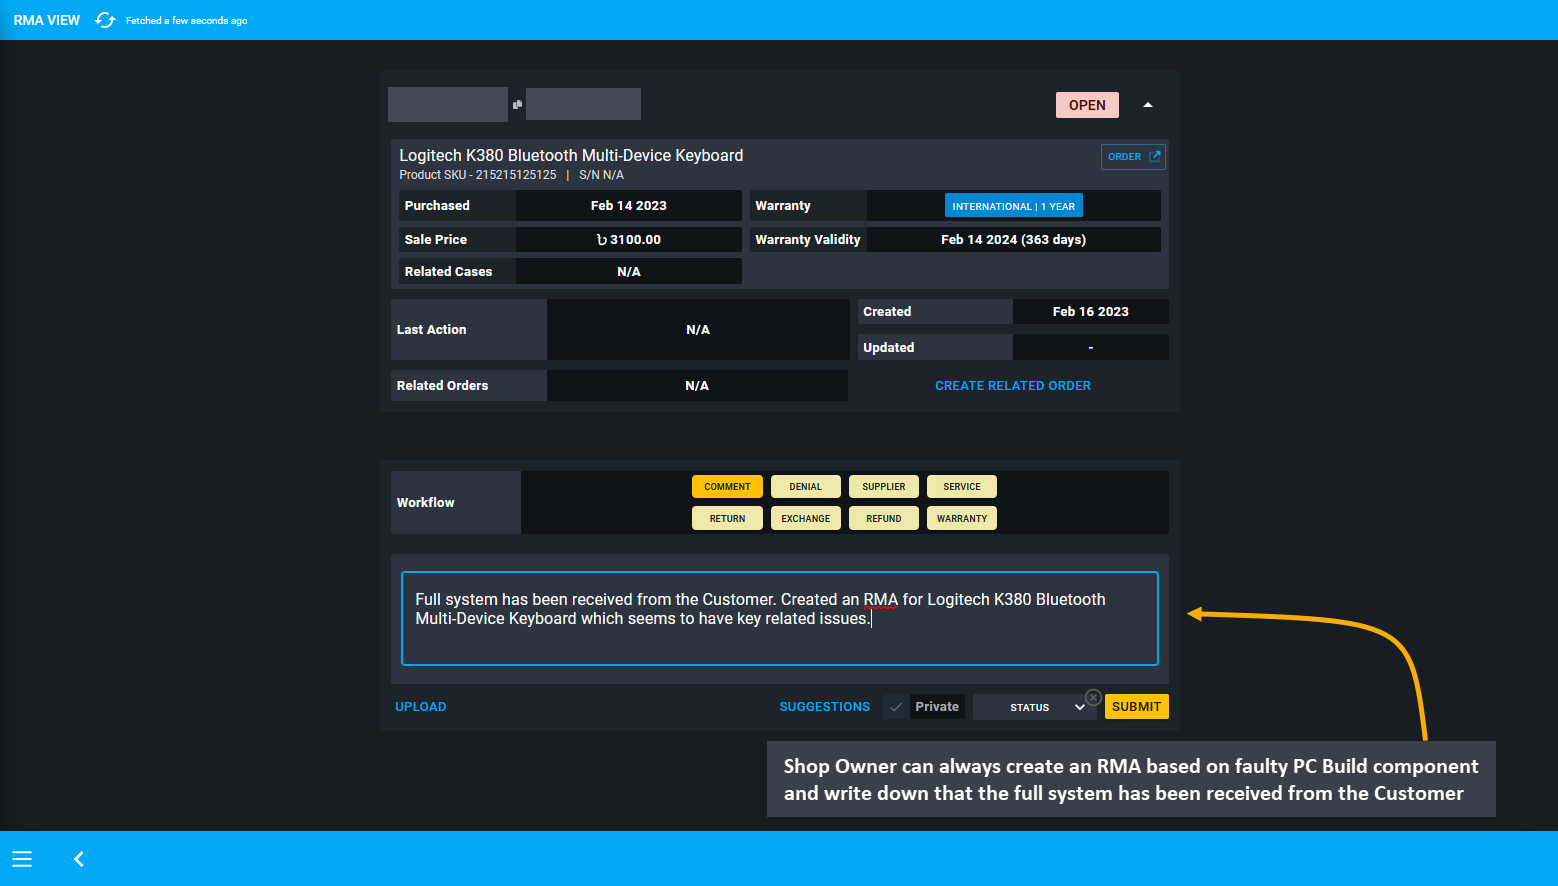
Image 4: Create RMA for faulty PC Build component and write down that the full system has been received.
17 - Product Settings
Learn more about creating and managing Brands, Galleries, Warranty Plans, Product Categories, Tags, and RMA within Product Settings.
Product Settings
Product Settings include important modules that can be used to set important aspects of Product such as Brands, Galleries, Warranty Plans, Product Categories, RMA and Tags. Below are some short descriptions about them.
Brands
The Brands section consists of Global Brands and My Brands. Global Brands are pre-defined Brands which can be selected during Product creation. My Brands are Custom Brands that Shop Owner can create which are generally local Brands and which are not already under the list of Global Brands.
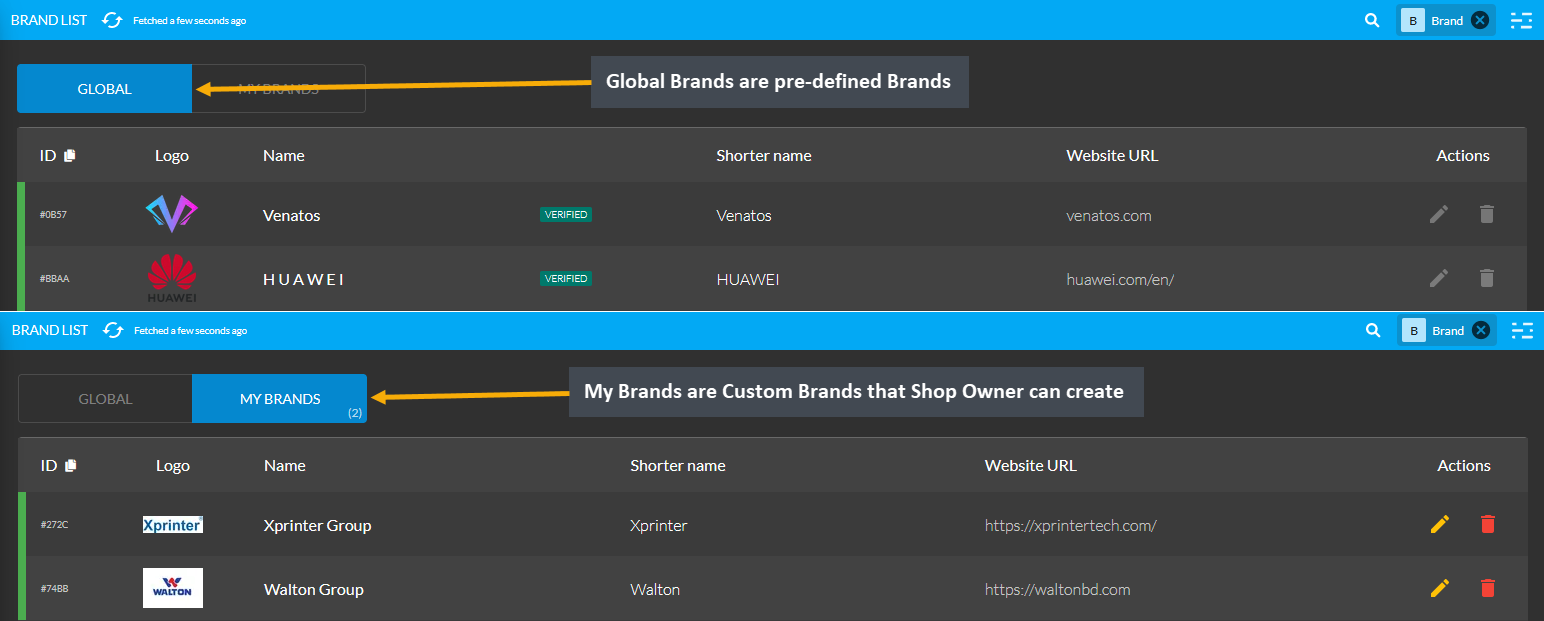
Image 1: Global Brands are pre-defined Brands and My Brands are Custom Brands created by the Shop Owner.
Galleries
Galleries allow adding Images for Products and Branches beforehand to use later to create Product and Branch. Product Images or YouTube videos can be added in advance through Galleries. The already created Gallery List will show up under My Galleries. Gallery items can be dragged and reordered as needed.
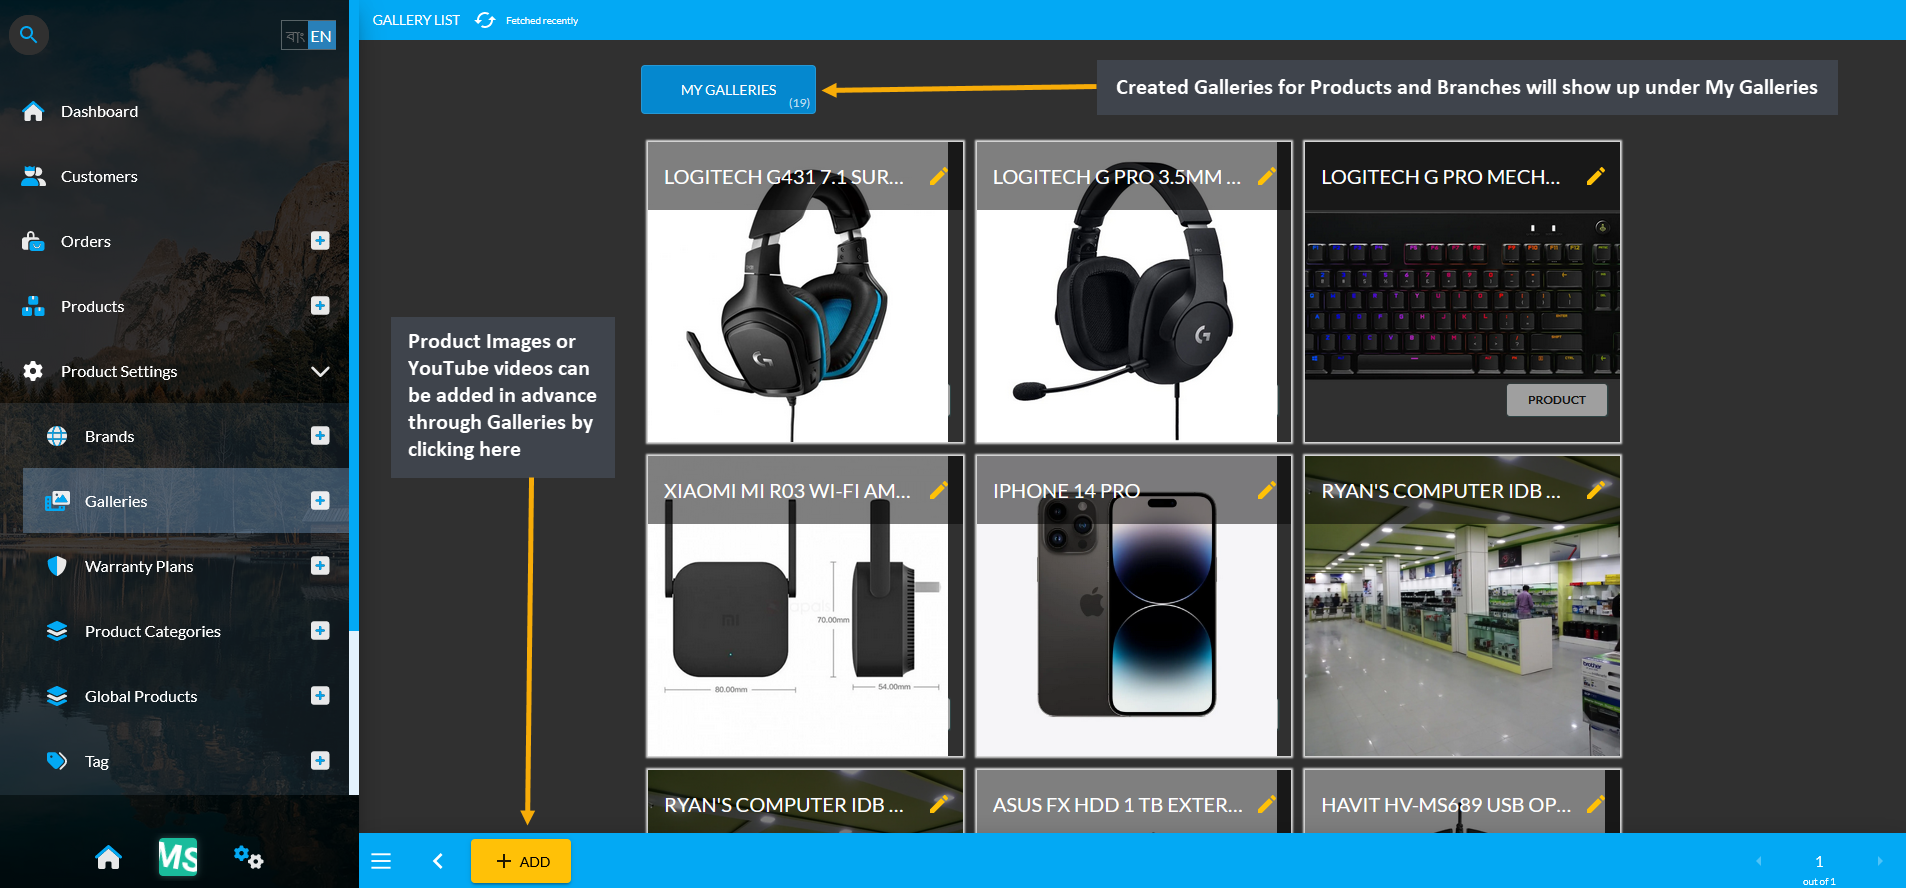
Image 2: Galleries allow adding Images and Videos for Products and Branches beforehand to use later.
Warranty Plans
The Warranty Plans section consists of Global Warranty Plans and My Warranty Plans. Global Warranty Plans are pre-defined warranty or service contracts for Products. My Warranty Plans are custom-made warranty or service contracts that Shop Owner can create which are not already under Global Warranty Plans.
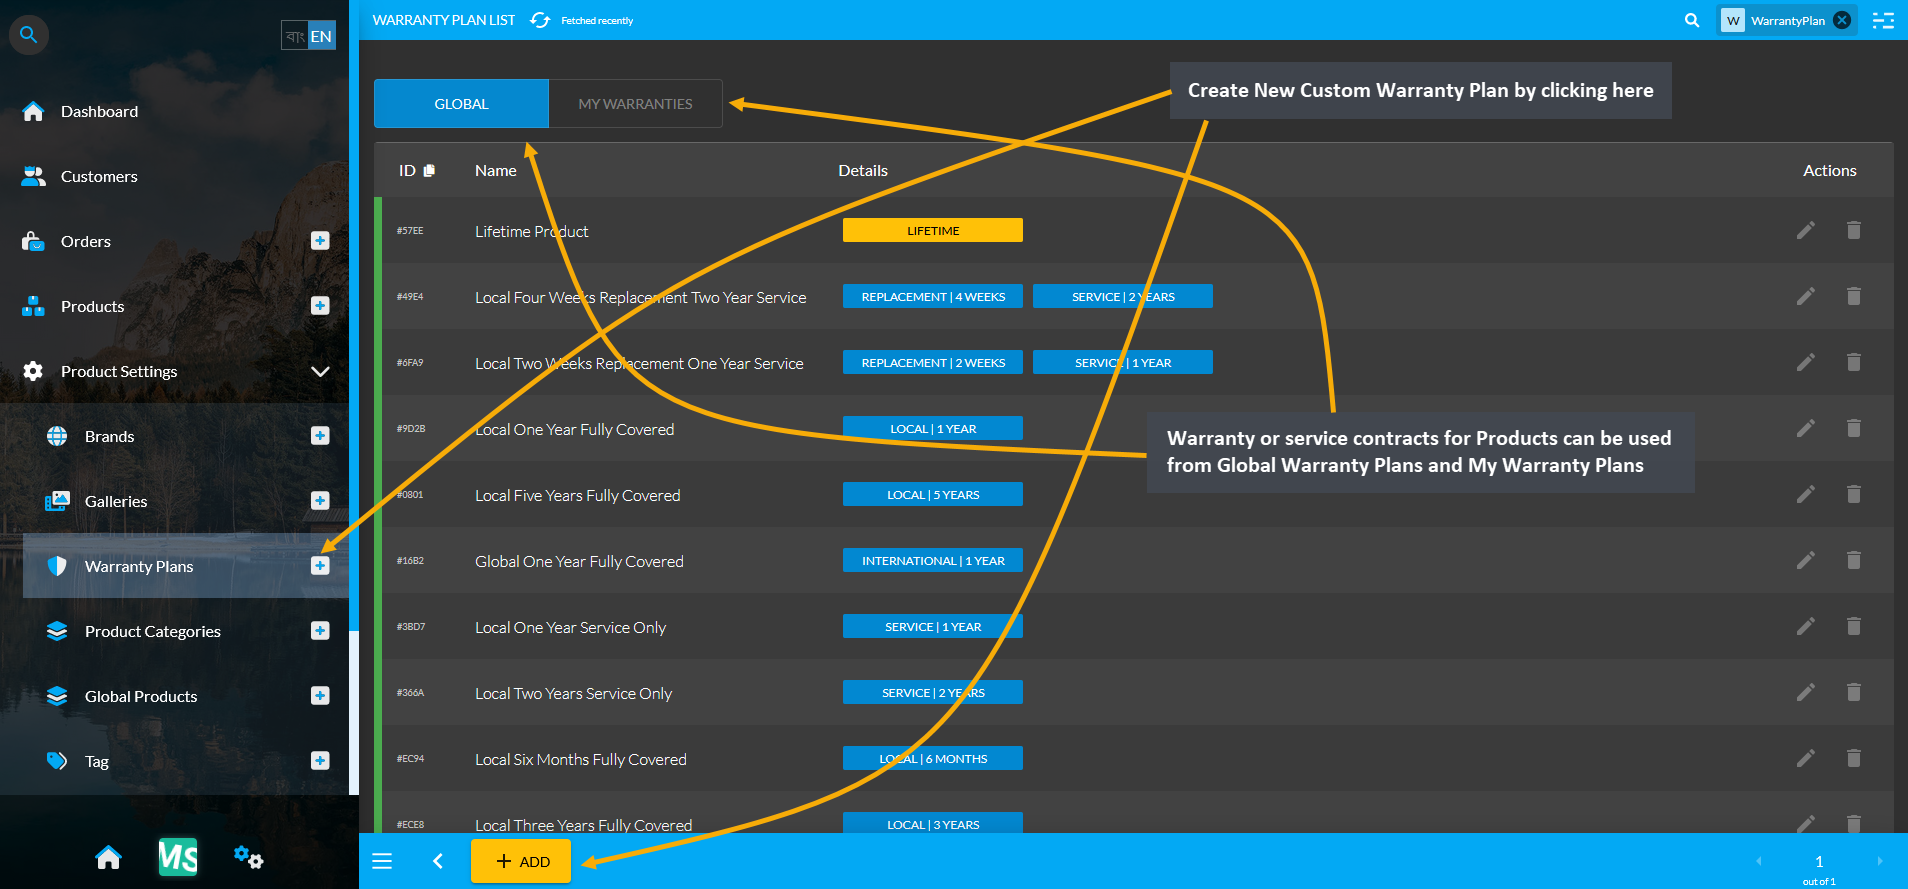
Image 3: Create service contracts for Products from Global Warranty Plans and and My Warranty Plans list.
Product Categories
Product Categories are Pre-defined, so Shop Owners will not be able to create Categories. The Shop Owners will have to use the Product Categories that are provided in the system. During Product creation, Product Category can be selected from the dropdown menu provided. The full list of Categories can be checked by opening the Product Categories tab from under the Product Settings. The list can also be reordered by dragging.
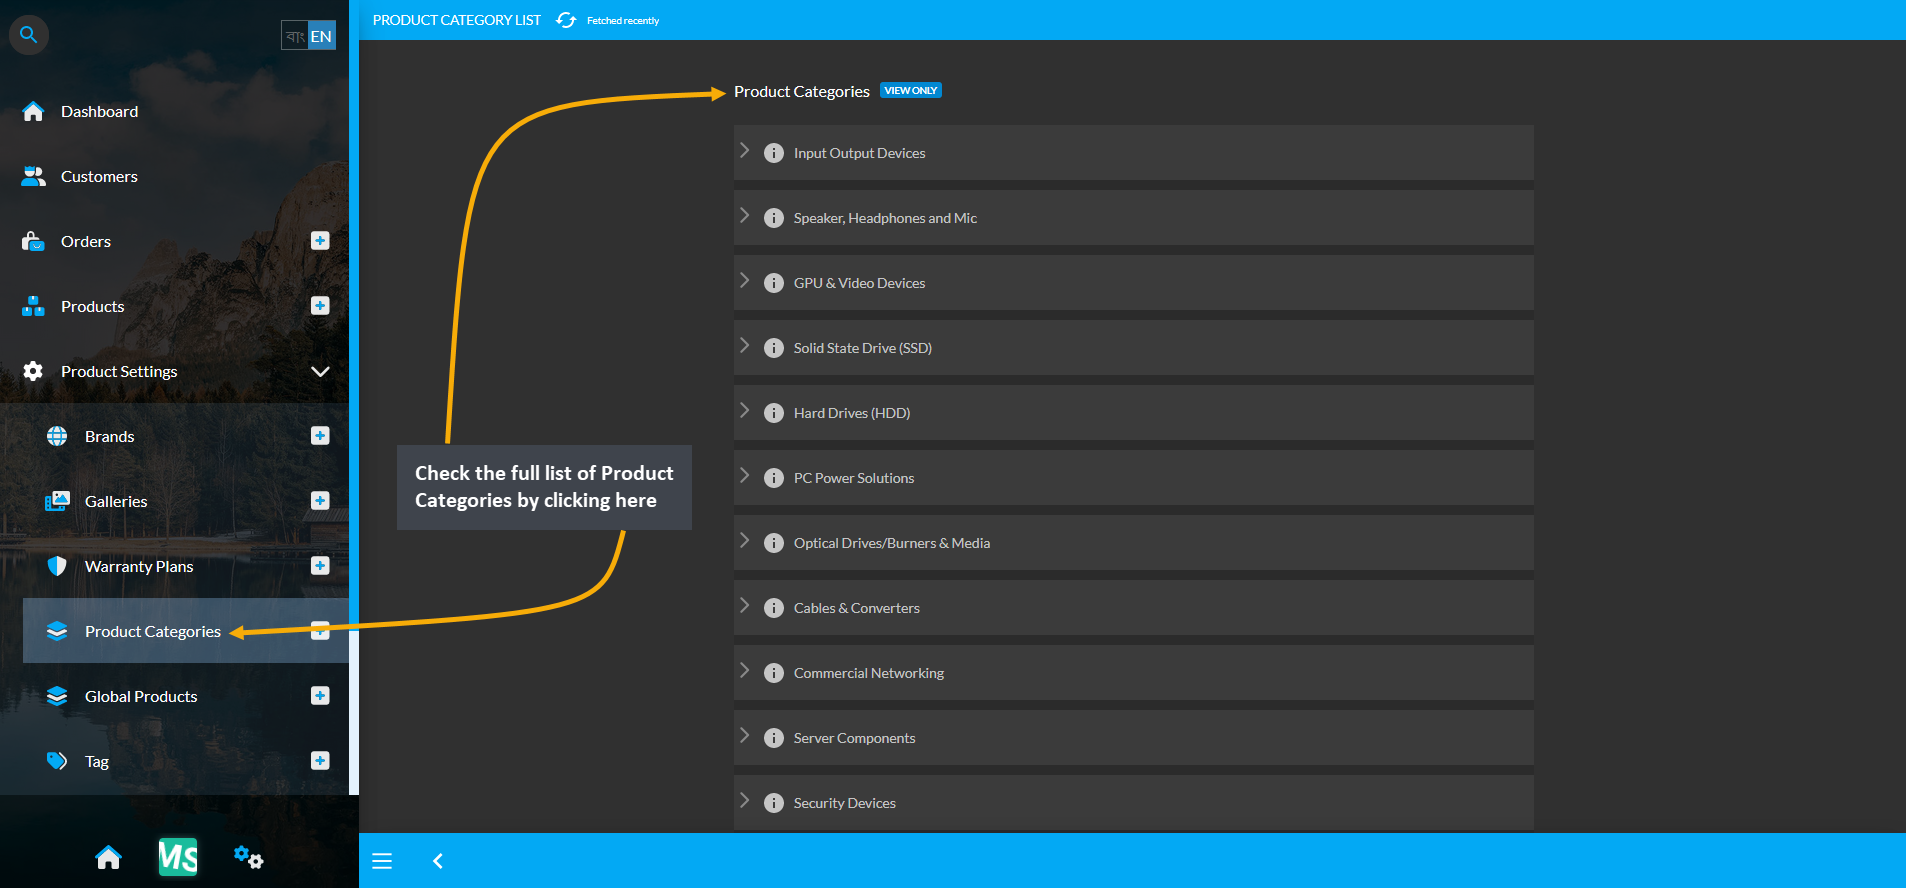
Image 4: Check the full list of Product Categories from the Product Categories tab under Product Settings.
Global Products
Global Products contain pre-defined templates that can be duplicated to create New Products. They contain pre-filled information like name, SKU, attributes, brand, category, and images. The Shop Owner can list and sell the Global Products i.e. branded Products instantly on the Shop using pre-defined Global Product templates.
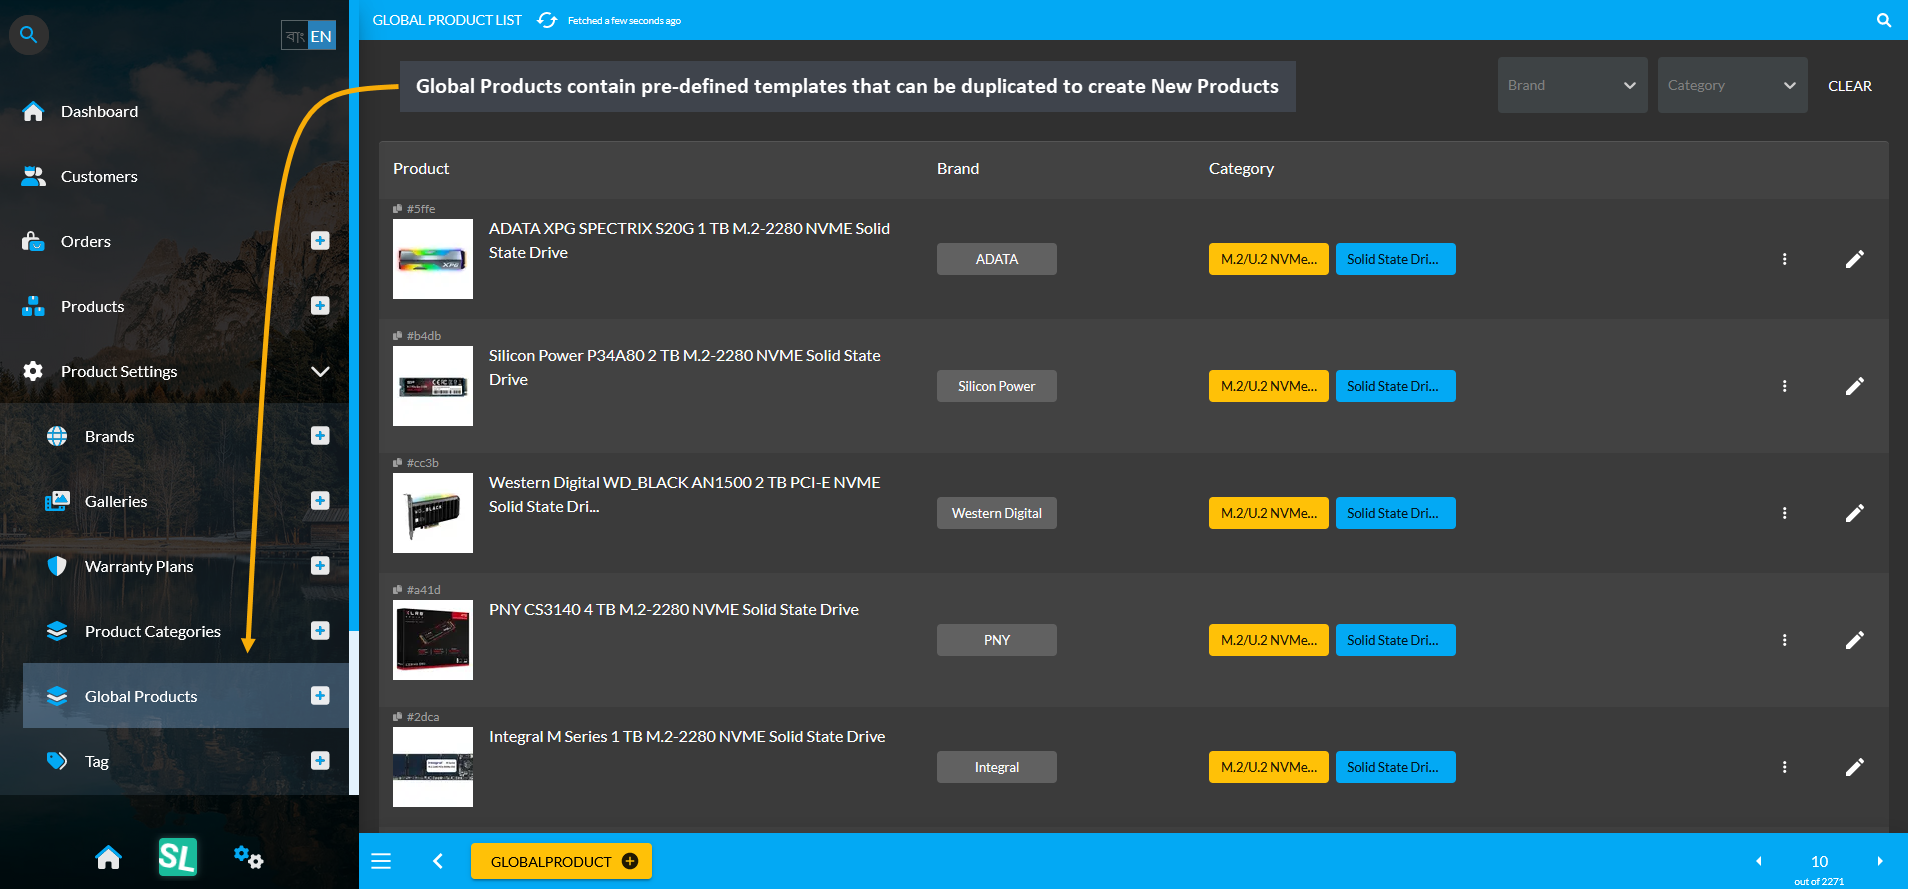
Image 5: Global Products contain pre-defined templates that can be duplicated to create New Products.
Tags are similar to Categories with extra functionality, so the Shop Owners can build their own Custom product category hierarchy using Tags. Child Tags can also be created under the Parent Tags for tagging Products.

Image 6: Shop Owners can build their own Custom product category hierarchy using Tags instead of Category.
RMA
For effective Warranty management, Retail Xen provides a Robust Warranty Management System (RMA), through which Shop Owners can track all warranties of any Product throughout its lifecycle. Using the system, the Shop Owners will be able to create, activate, and track warranties and warranty claims for Products.
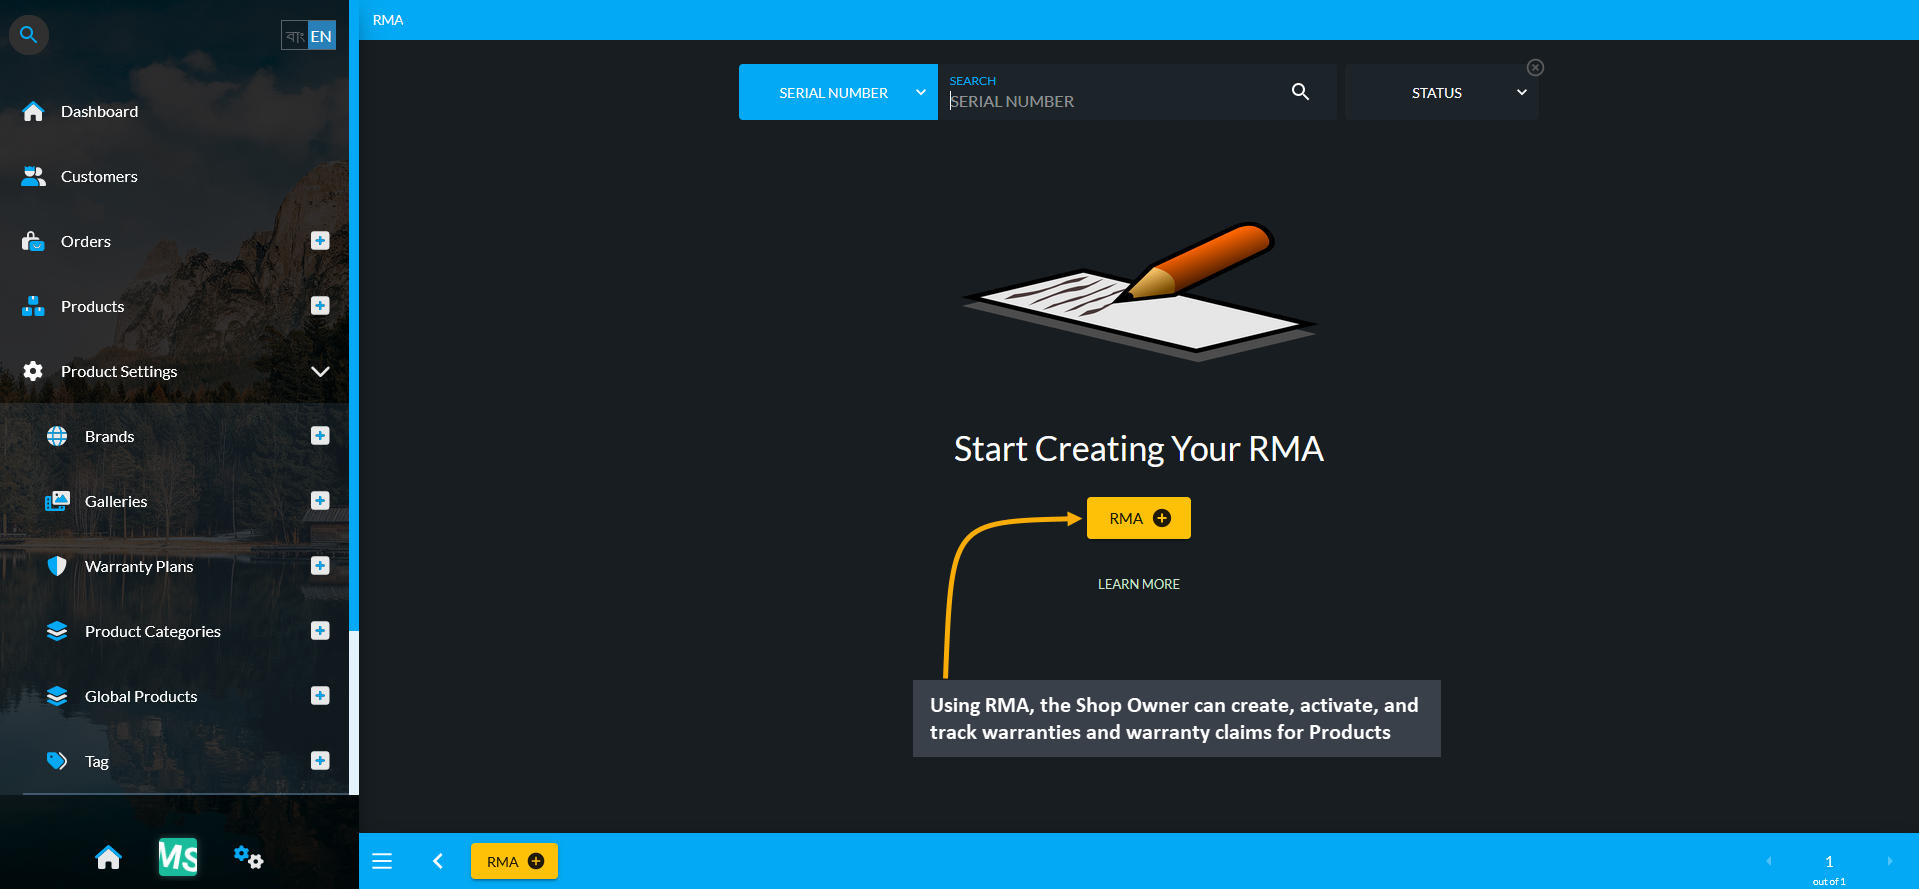
Image 7: Using RMA, Shop Owner can create, activate, and track warranties and warranty claims for Products.
17.1 - Brands
Learn more about how to manage Global Brands and create My Brands.
Difference: Global Brands and My Brands
Global Brands are pre-defined Brands which can be selected during Product creation. Conversely, My Brands are Custom Brands that Shop Owner can create which are not already under Global Brands. Please note that, Shop Owner can not make any changes to Global Brands but they can make changes for their own Brands.
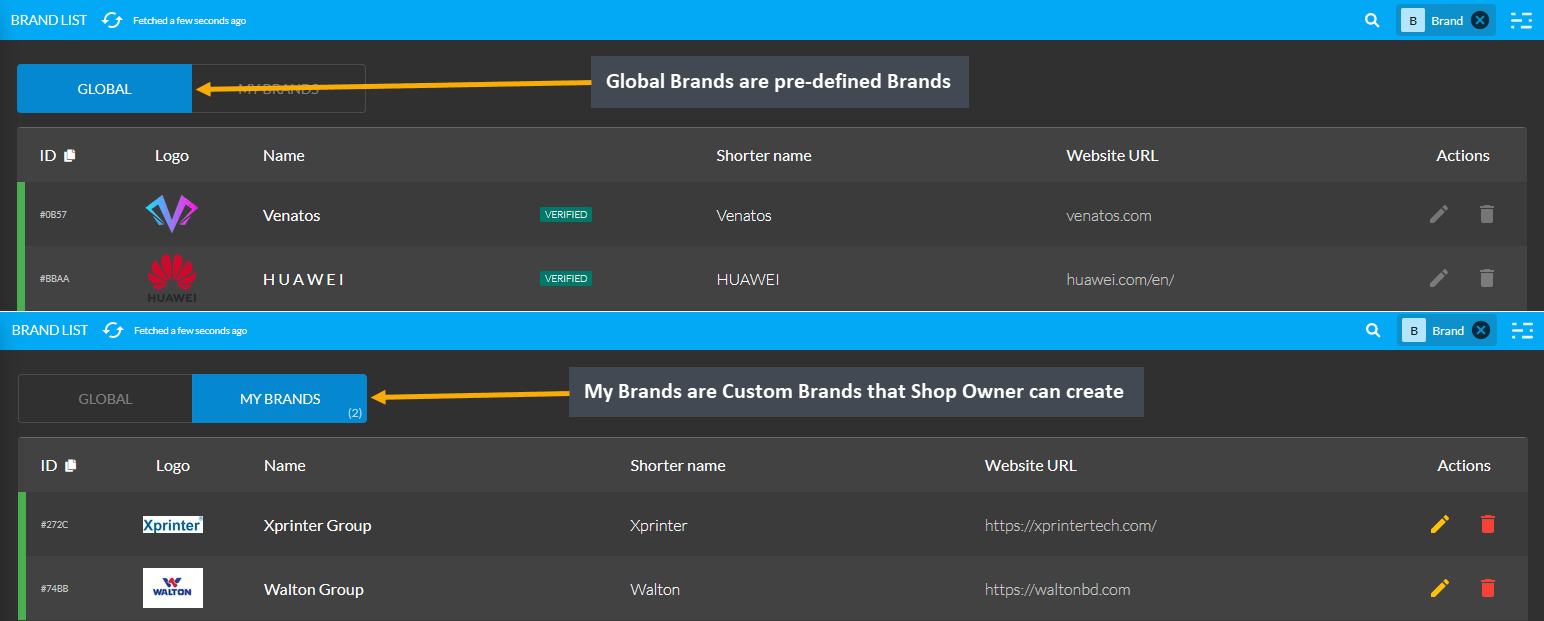
Image 1: Global Brands are pre-defined Brands and My Brands are Custom Brands created by the Shop Owner.
Global Brands
Global Brands are pre-defined Brands which can be selected during Product creation. Check the full list of Global Brands from the Brands tab under Product Settings. Global Brands can only be incorporated during any Product creation, they do not have any permission to edit or delete. Renowned Brands can be found under this list.
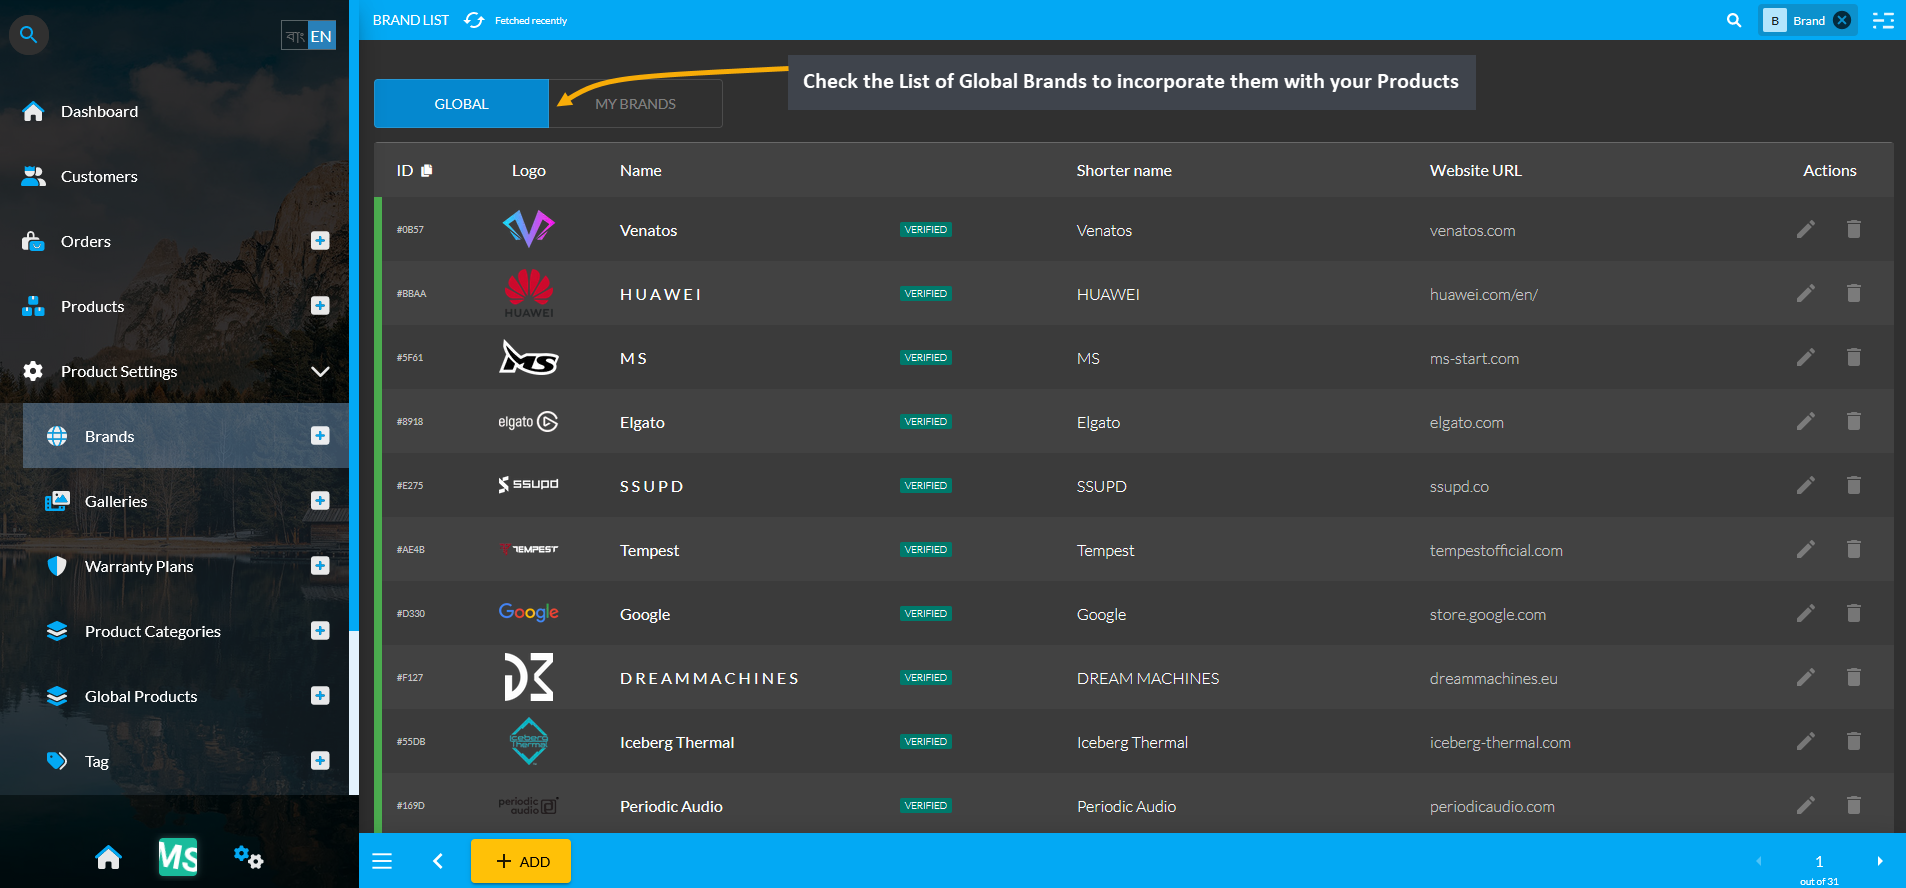
Image 2: Check the List of Global Brands to incorporate them with your Products from the Brands tab.
Search Global Brands
Shop Owners can search for pre-defined Global Brands by clicking on the + or Add button which will redirect to a search page from where existing Brands can be searched. In the Search page, there is a Search Box where typing Brand Name will bring result of the target pre-defined Global Brand if they are already in The Website. The name of the searched Brands will show up under the Search box as shown in the example.
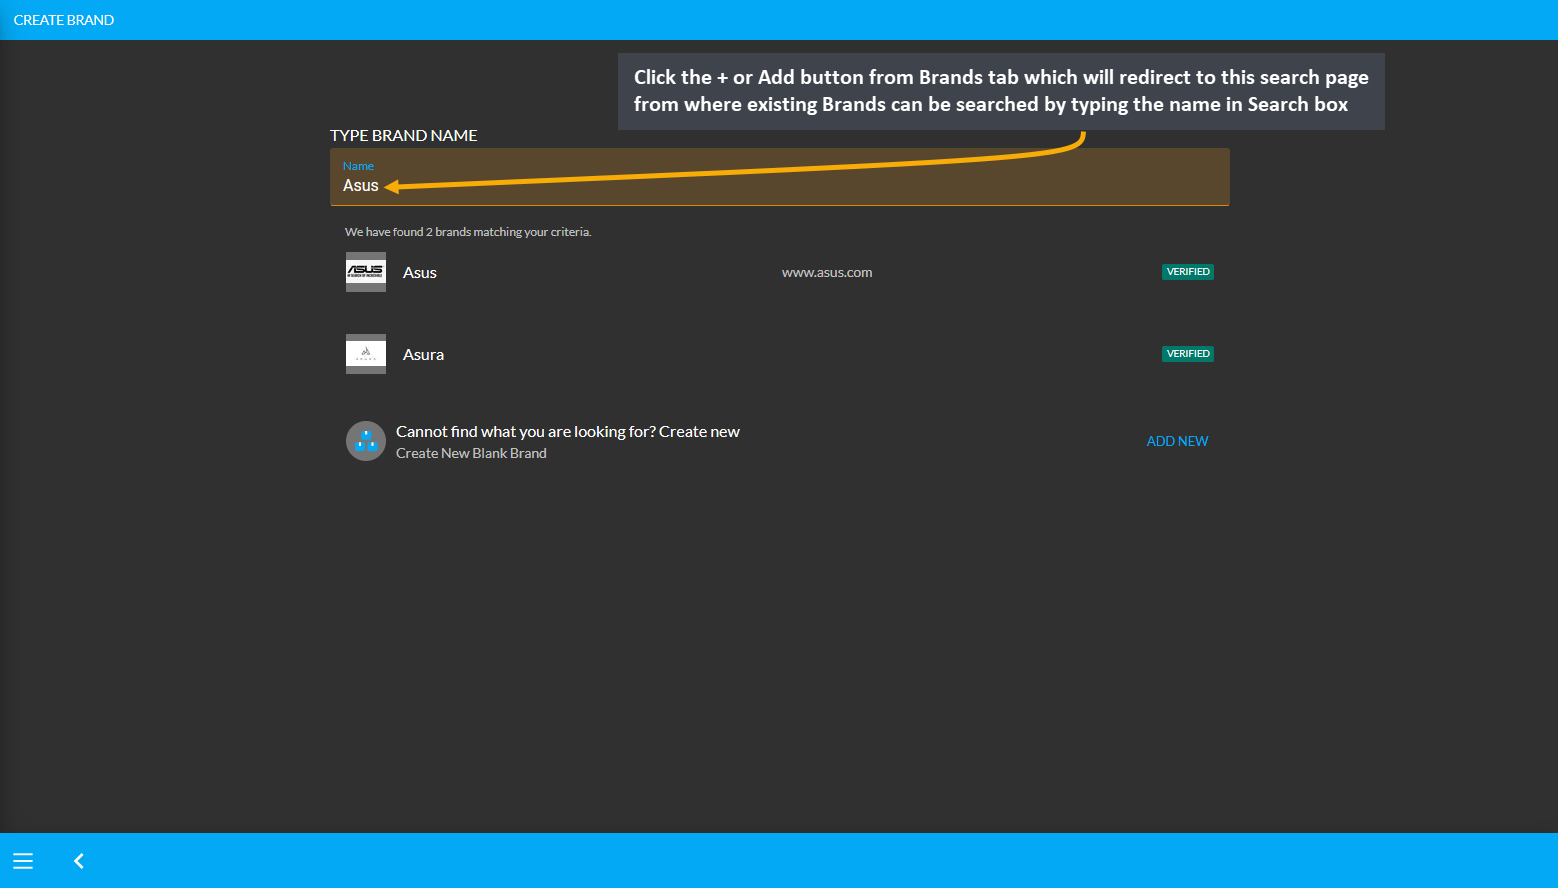
Image 3: Search Global Brands by clicking the + or Add button which will redirect to a new Search page.
Create a New Brand
Shop Owners can create a New Brand by clicking on the + or Add button which will redirect to a separate search page from where New Brands can be created. Any New Brands created will be under the My Brands List.
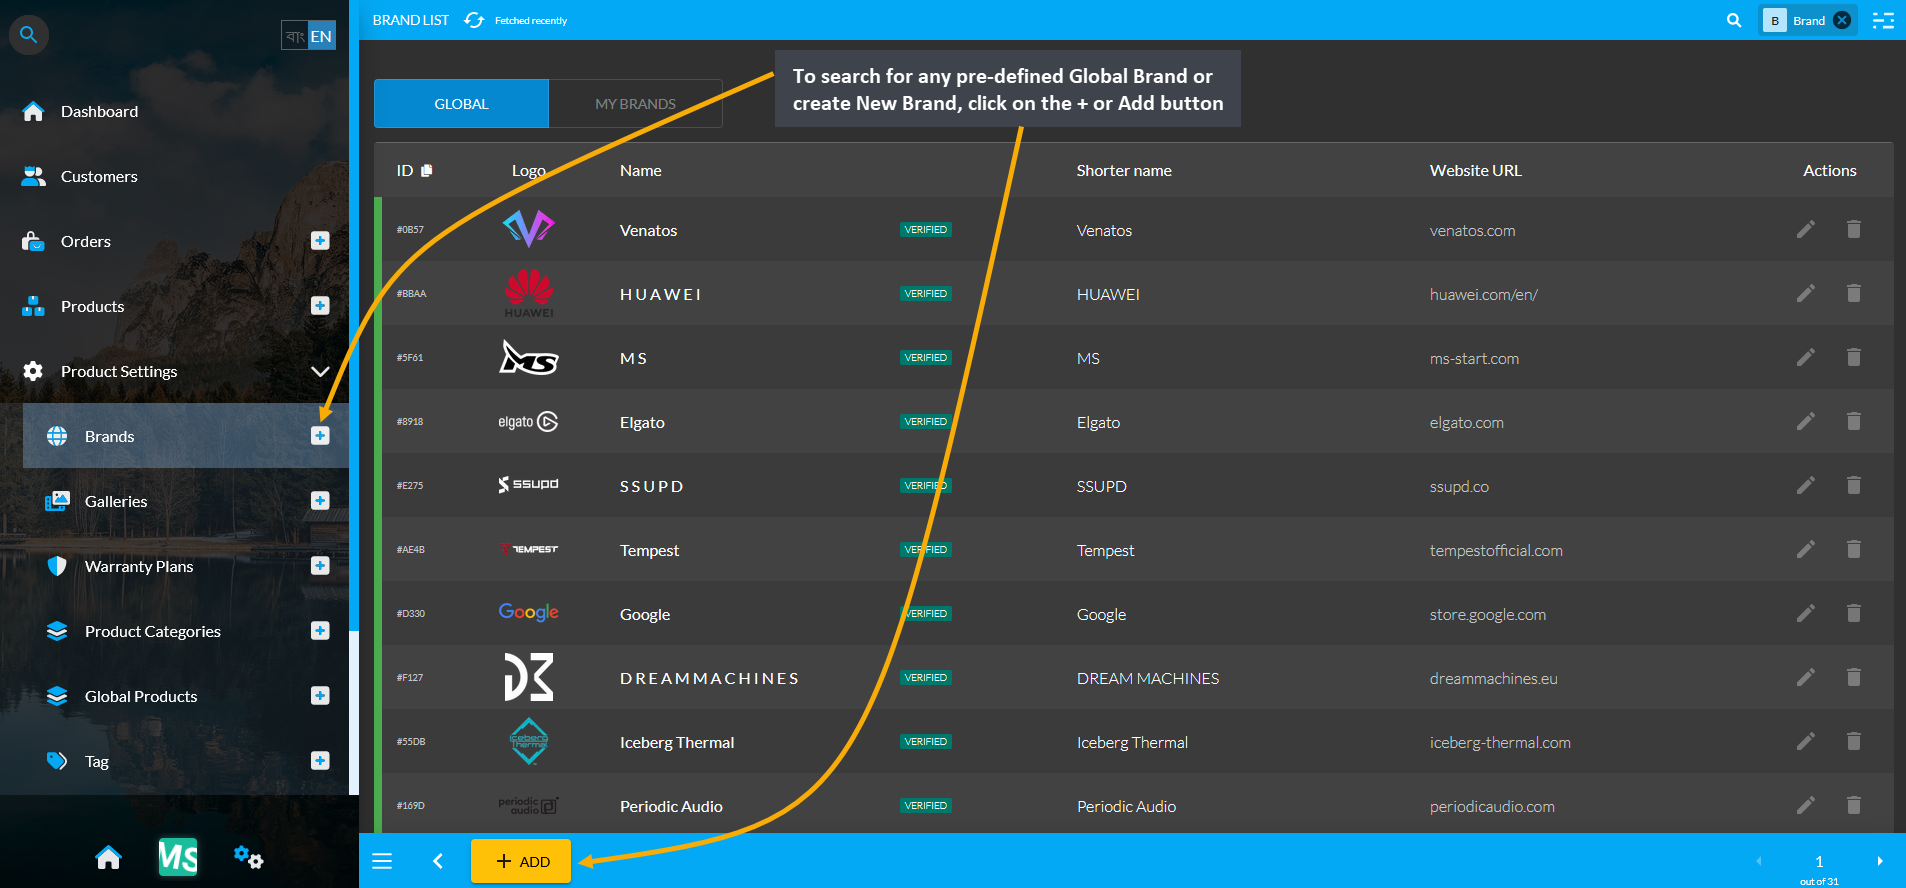
Image 4: Click the + or Add button to redirect to the Search page from where New Brands can be created.
To create a New Brand, type the target Brand Name on the Search Box in the Search page. If the Brand Name does not show up in the search results, it will mean that the typed Brand Name is not available on the Website. In this case, click the Add New button which will redirect to a new page for creating a New Brand from scratch.
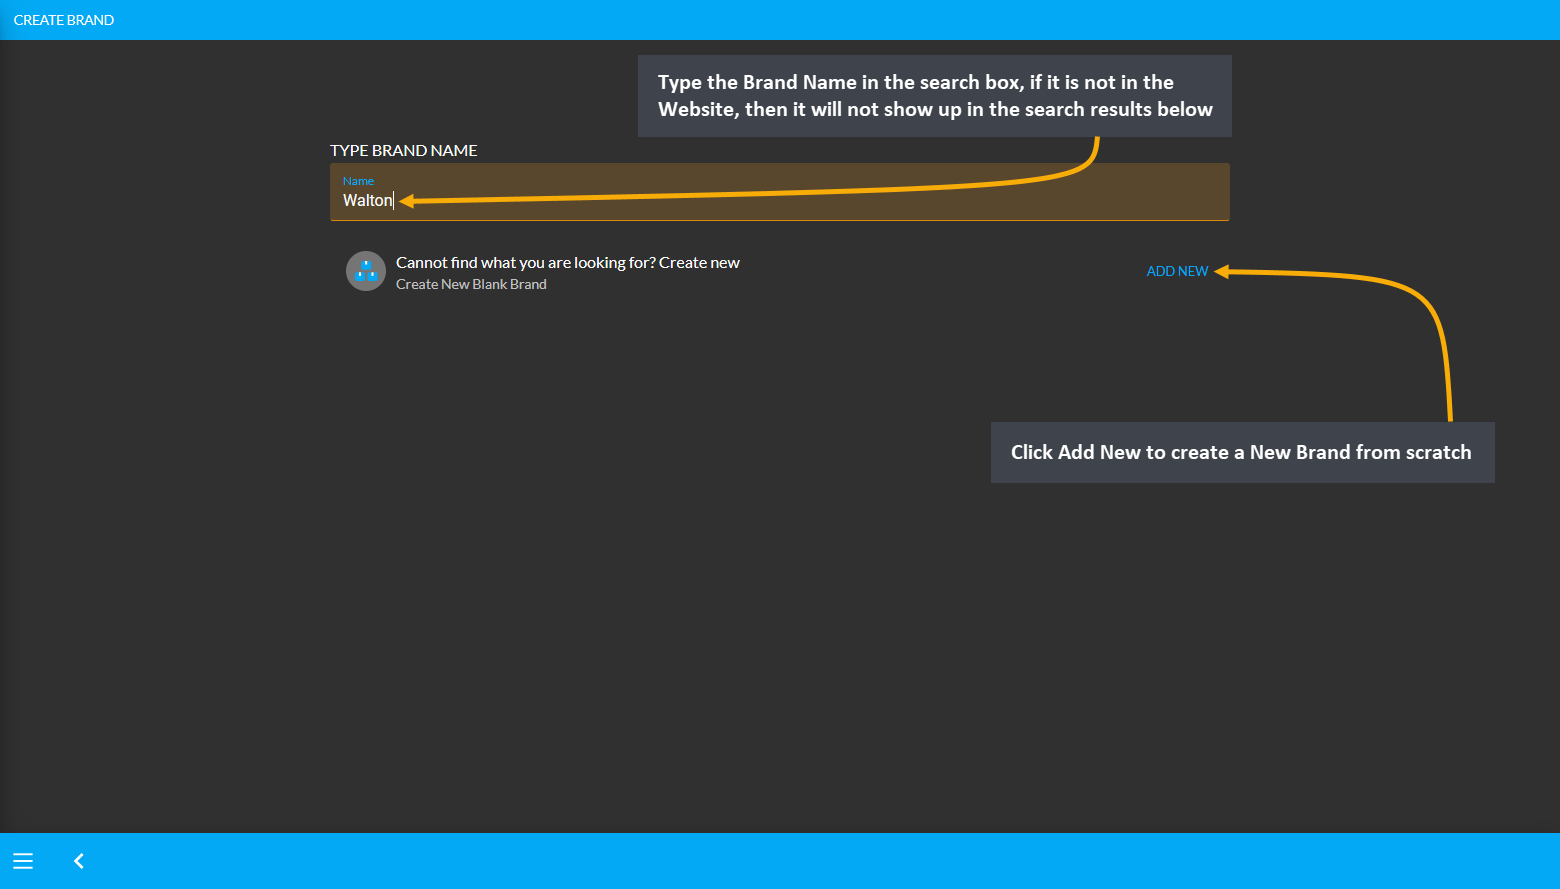
Image 5: Create a New Brand by clicking the Add New button after typing the Brand Name on the Search box.
In the Create Brand page, fill out the Full Name of the Brand. The Shorter Name refers to the abbreviation of Brand Name which needs to be filled in as well. Aliases are used to indicate additional names associated with the Brand like its subsidiaries. Enter the Brand’s website address in the Website URL field. Below this, there is an upload box to upload the Brand Logo. Make a Brand active or inactive by using the toggle button. Click Submit to save changes.
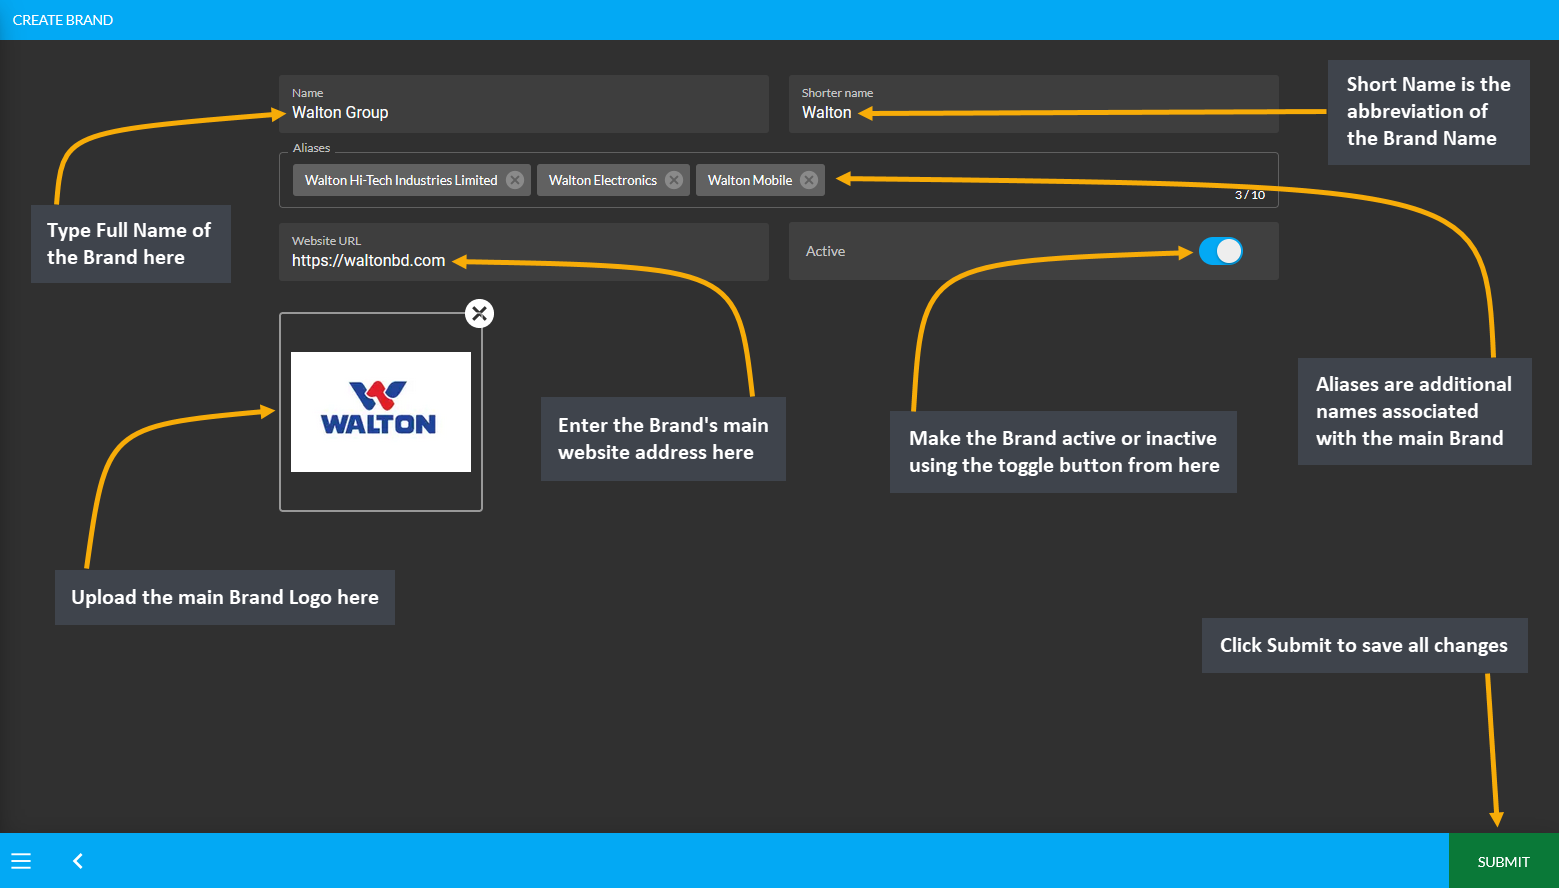
Image 6: Create New Brand with Names, Aliases, Website Address, and Brand Logo on the Create Brand page.
Brands Search Shortcut
Brands can be searched within the Search Box on the top right corner of the Brand List page. Here, typing both the Brand Name and Aliases will bring the target Brand Name on the search results that the Shop Owner needs to find.
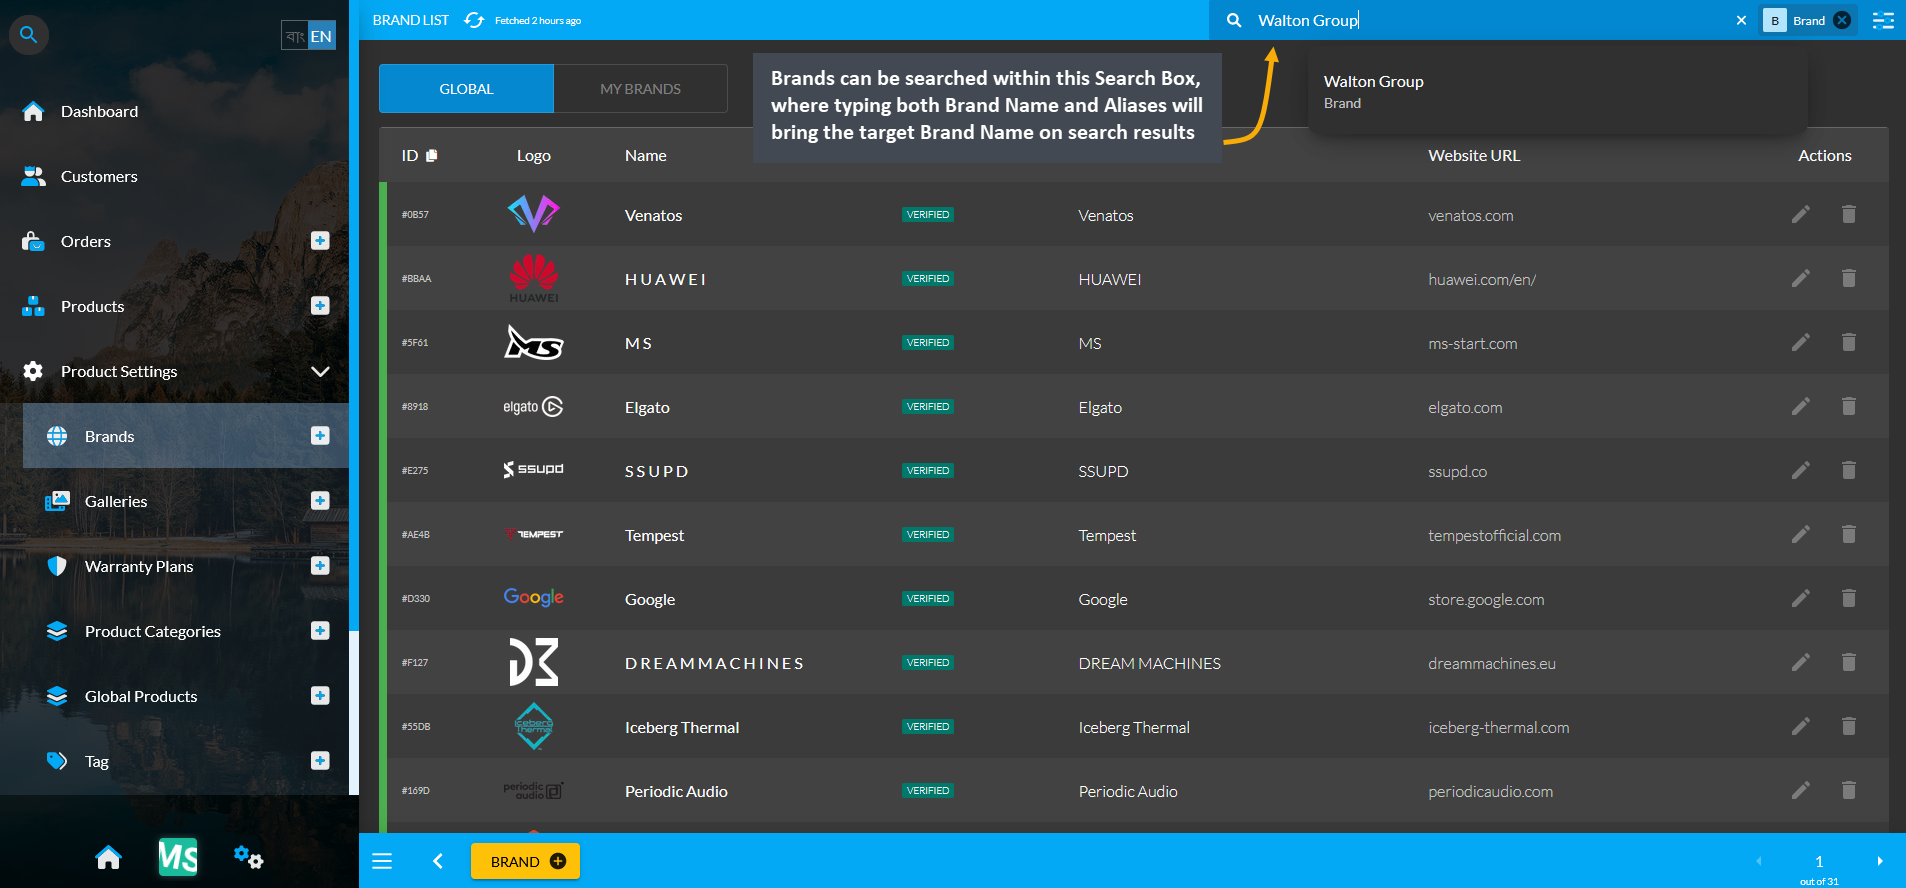
Image 7: Brands can be searched within the Search Box on the top right corner on the Brand List Page.
My Brands (Custom Brands)
My Brands are Custom Brands that the Shop Owner has created which were not already under Global Brands List. After the Shop Owner successfully creates their own Brand, it will show up within My Brands List under the Brands tab. Shop Owners can make changes for their own Brands by clicking the Edit and Delete icons which will let them modify or delete the Brands they have created. A Shop Owner can create as many Custom Brands as they need.
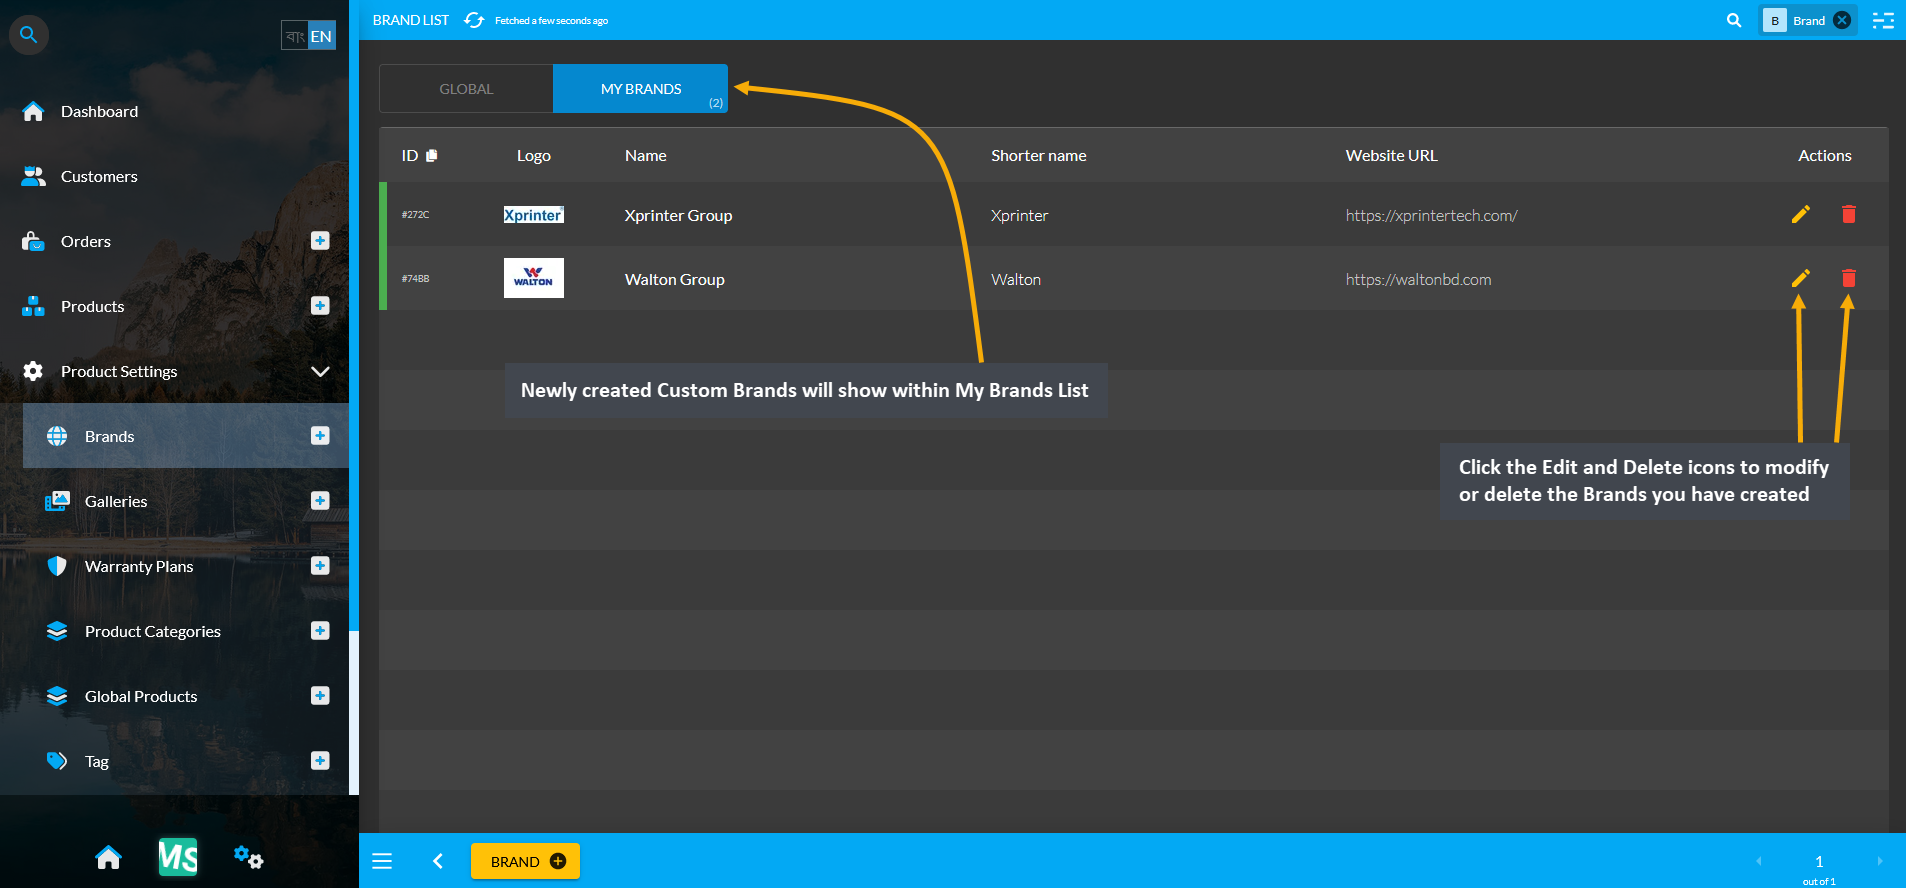
Image 8: Newly created Custom Brands will show under My Brands List, modify them with Edit or Delete icons.
17.2 - Galleries
Learn more about creating Galleries for Products and Branches in advance.
Product Gallery
Galleries allow adding Images for Products and Branches beforehand to use later to create Product and Branch. Product Images or YouTube videos can be added in advance through Galleries under Product Settings. The already created Gallery List will show up under Galleries. Gallery items can be dragged and reordered as needed. Create a New Gallery, click on the + or ADD button which will redirect to a new page for Gallery creation.
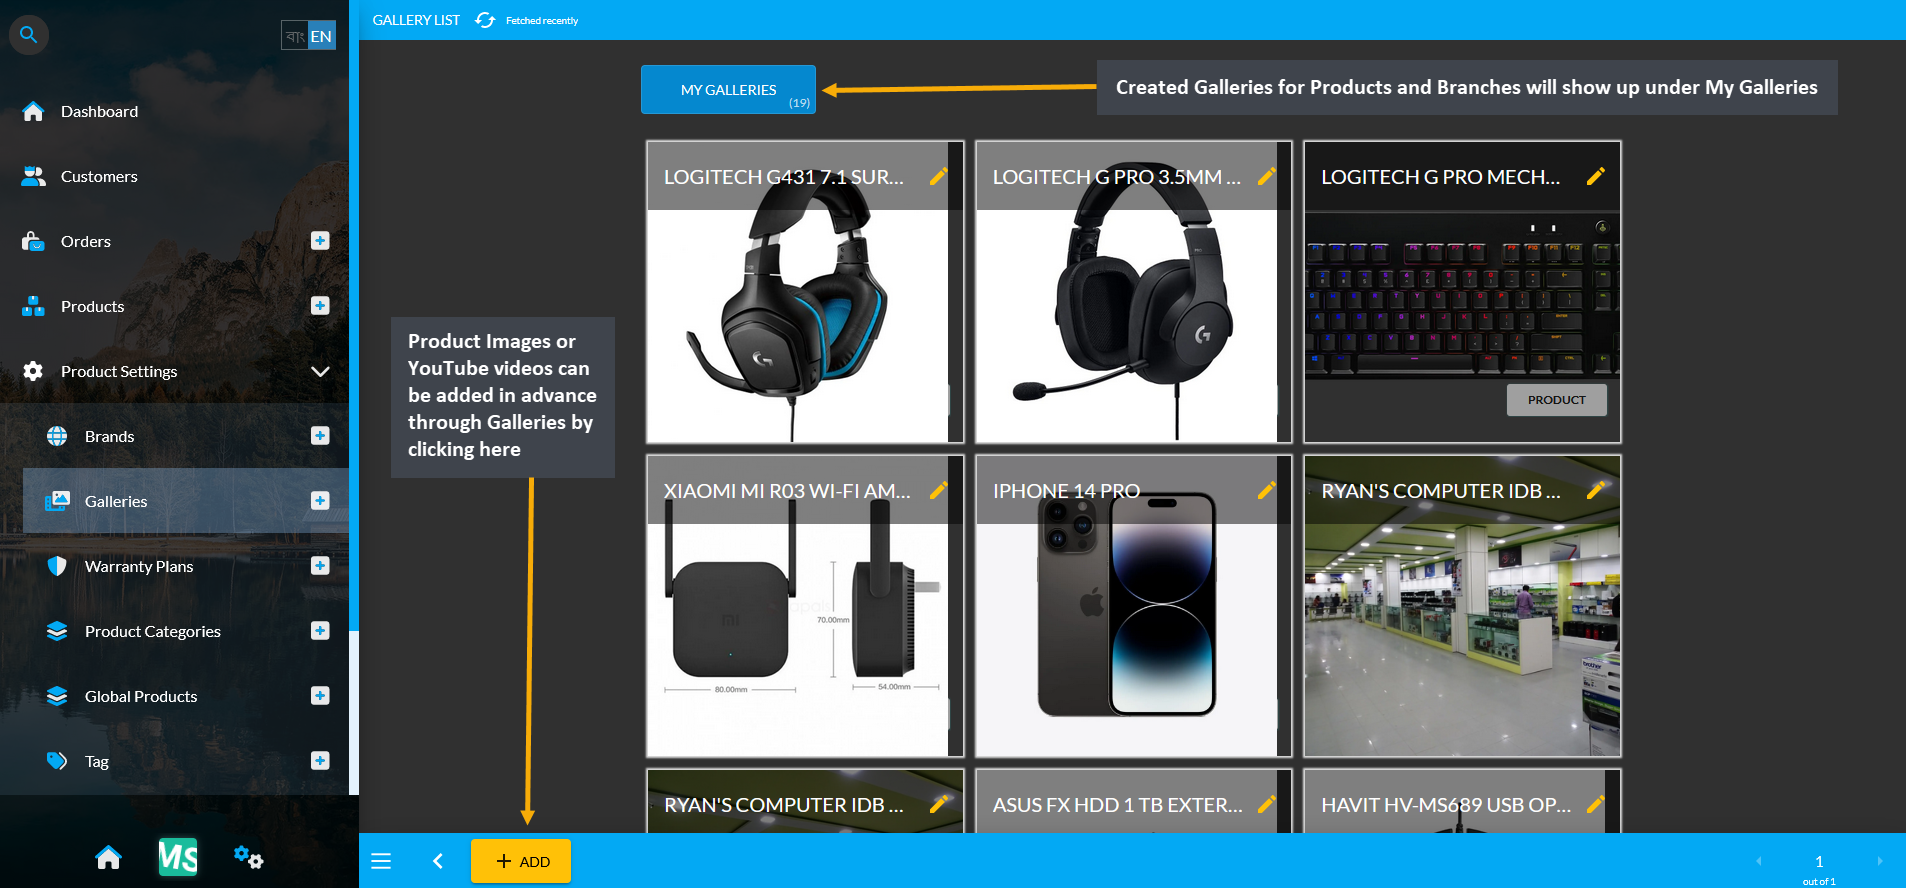
Image 1: Galleries allow adding Images and Videos for Products and Branches beforehand to use later.
Create Product Gallery
To create Gallery for Product, click on the + or ADD button from the Galleries tab that will redirect to a new page.
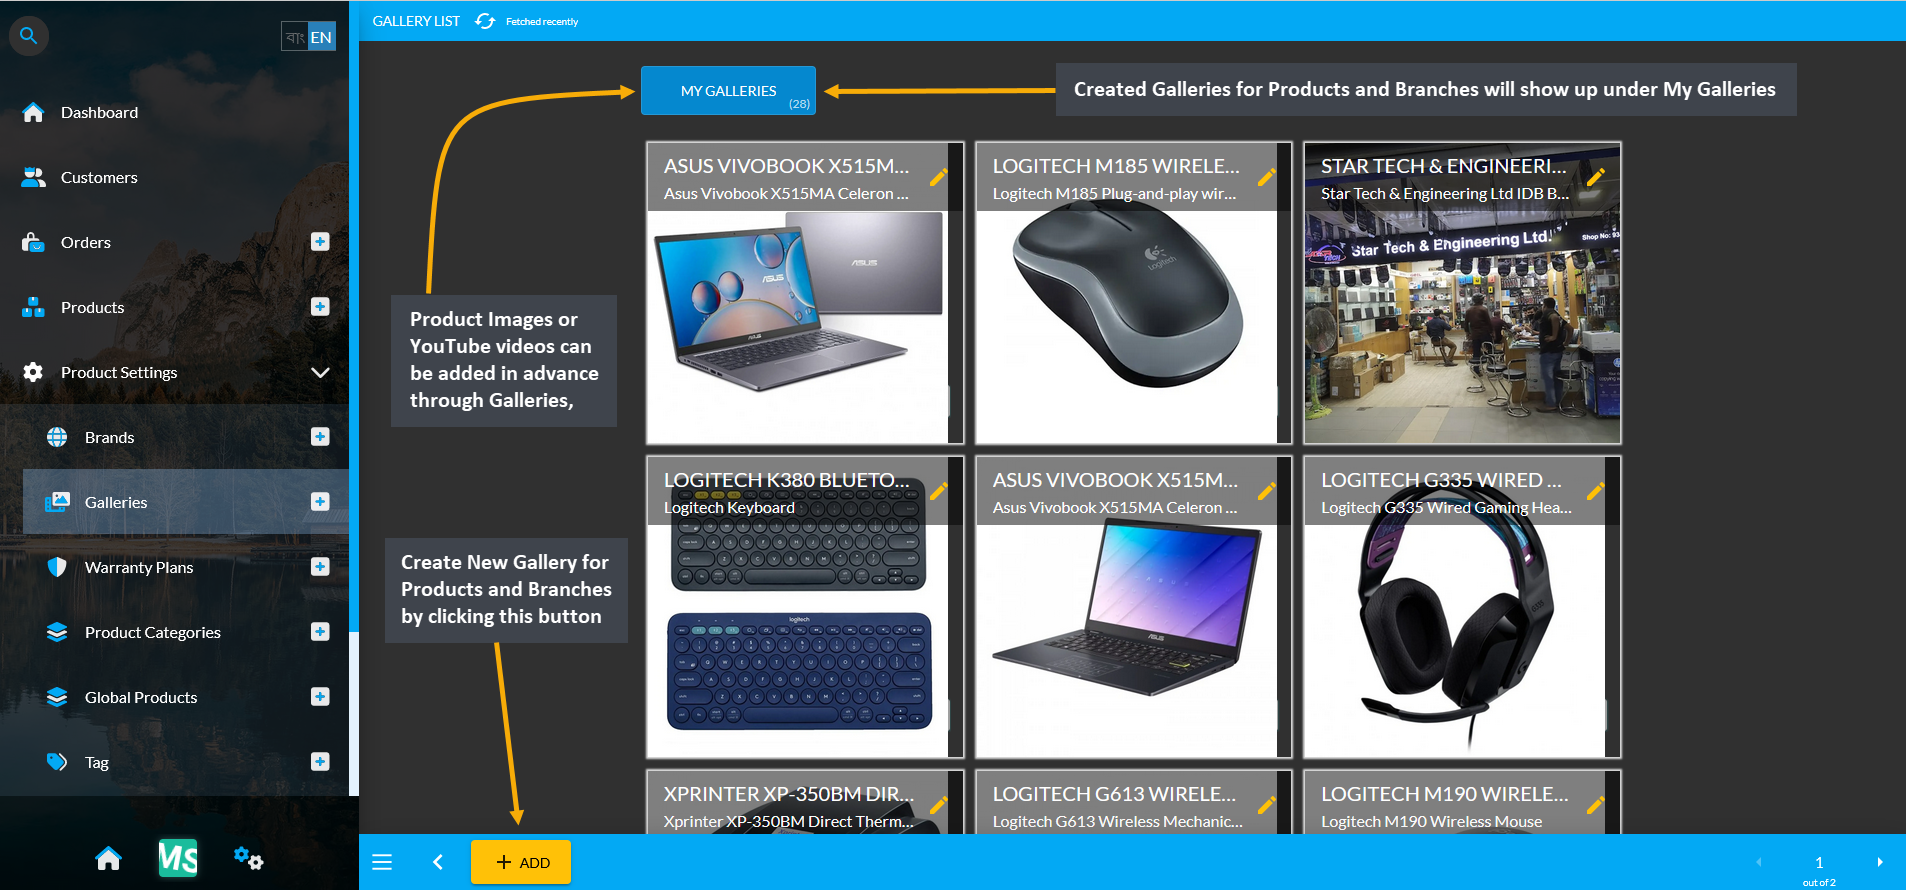
Image 2: Click on the + or ADD button from the Galleries tab that will redirect to Gallery creation page.
The first step is to fill out Gallery Name and Gallery Description. Then, select Product from the dropdown menu of Gallery Type. After this, add Product images by clicking on the Upload from Device icon. To include YouTube video in the Product gallery, click on Embed YouTube Video icon and paste external link to embed. Gallery items can be dragged and reordered as needed. Click Submit button to save all the changes and create new Gallery.
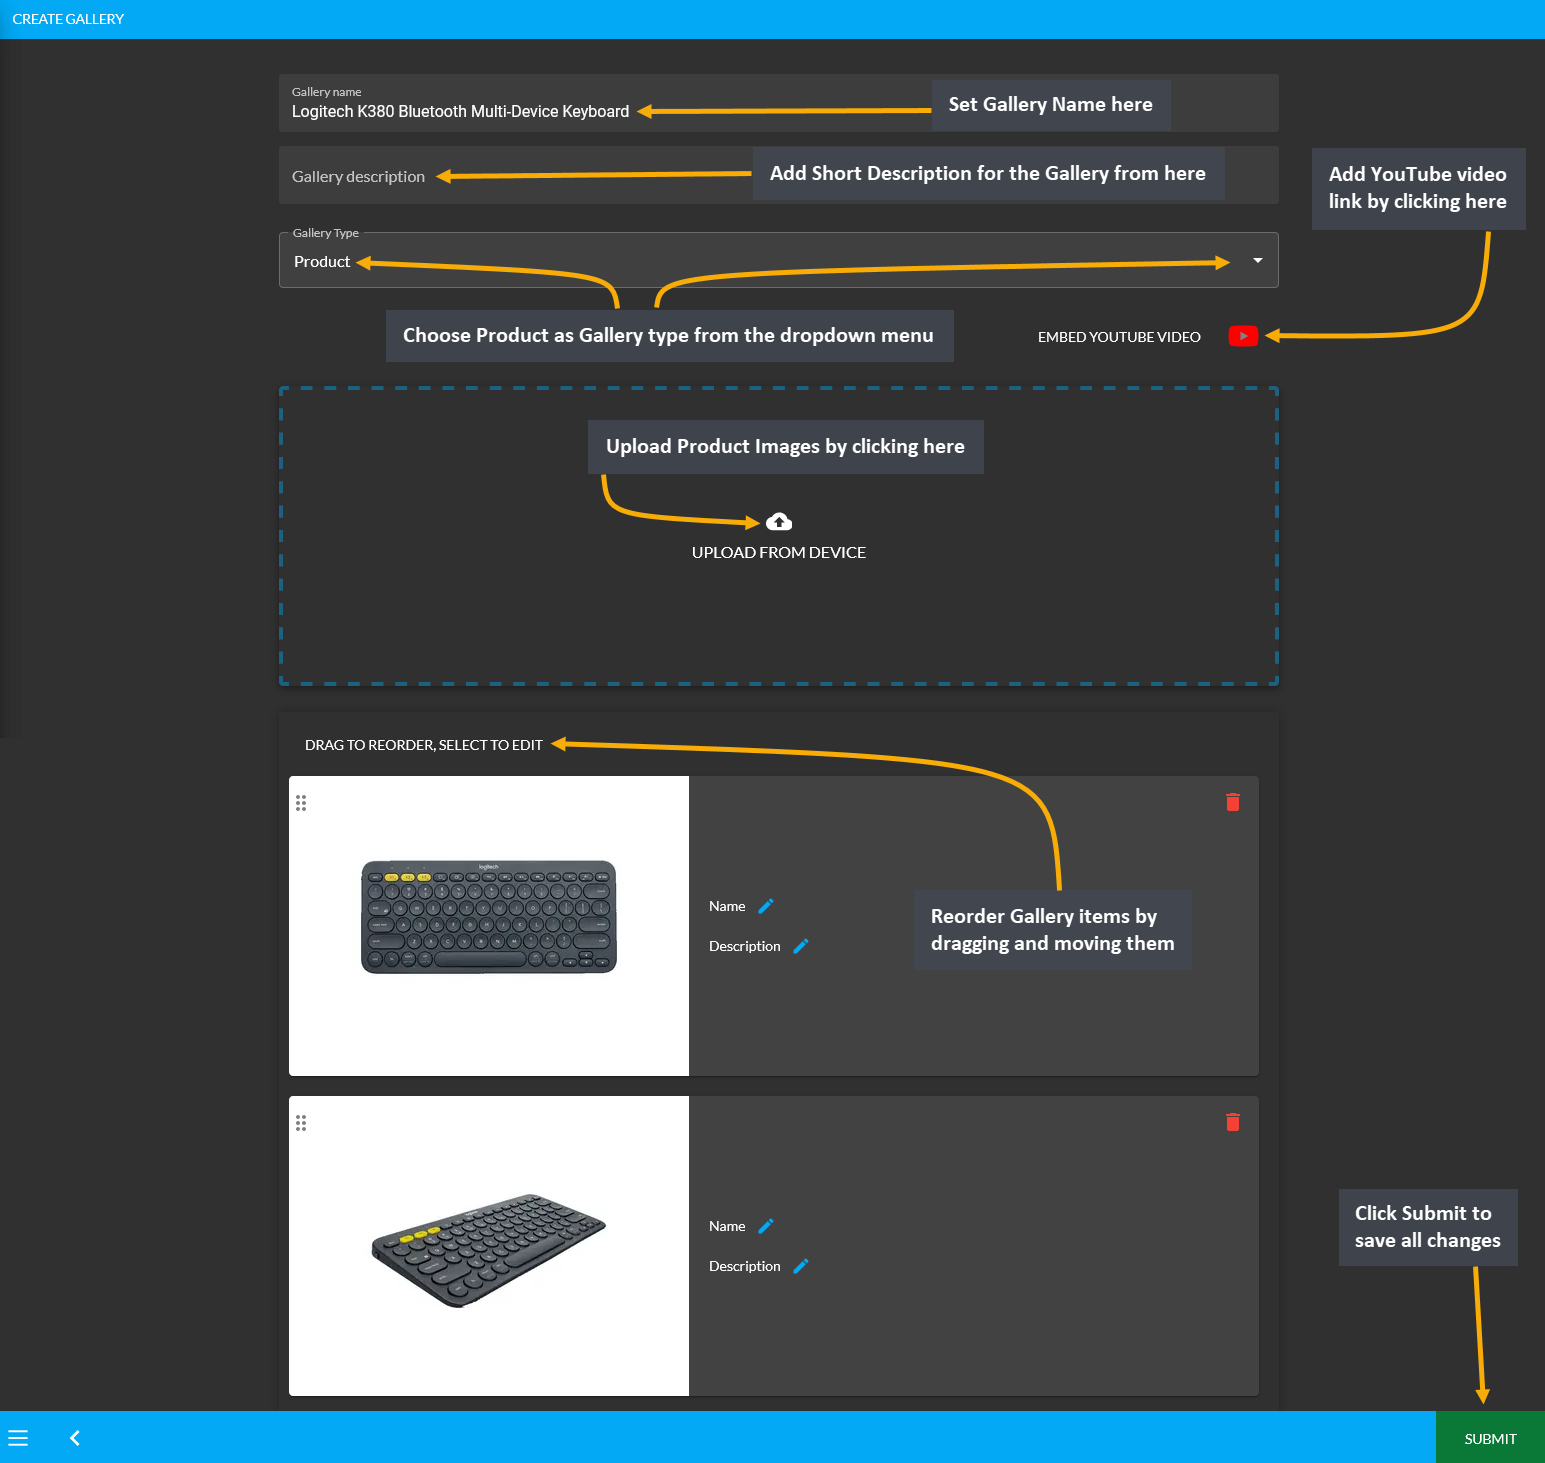
Image 3: Fill out the Gallery Name, Description, select Gallery type, add Product images, and videos.
Create Branch Gallery
To create Gallery for Branch, click on the + or ADD button from the Galleries tab that will redirect to a new page.

Image 4: Click on the + or ADD button from the Galleries tab that will redirect to a new page.
The first step is to fill out Gallery Name and Gallery Description. Then, select Branch from the drop down menu of Gallery Type. After this, upload Branch images by clicking on the Upload from Device icon. To include YouTube video in the Product gallery, click on Embed YouTube Video icon and paste external link to embed. Gallery items can be dragged and reordered as needed. Click the Submit button to save all the changes.
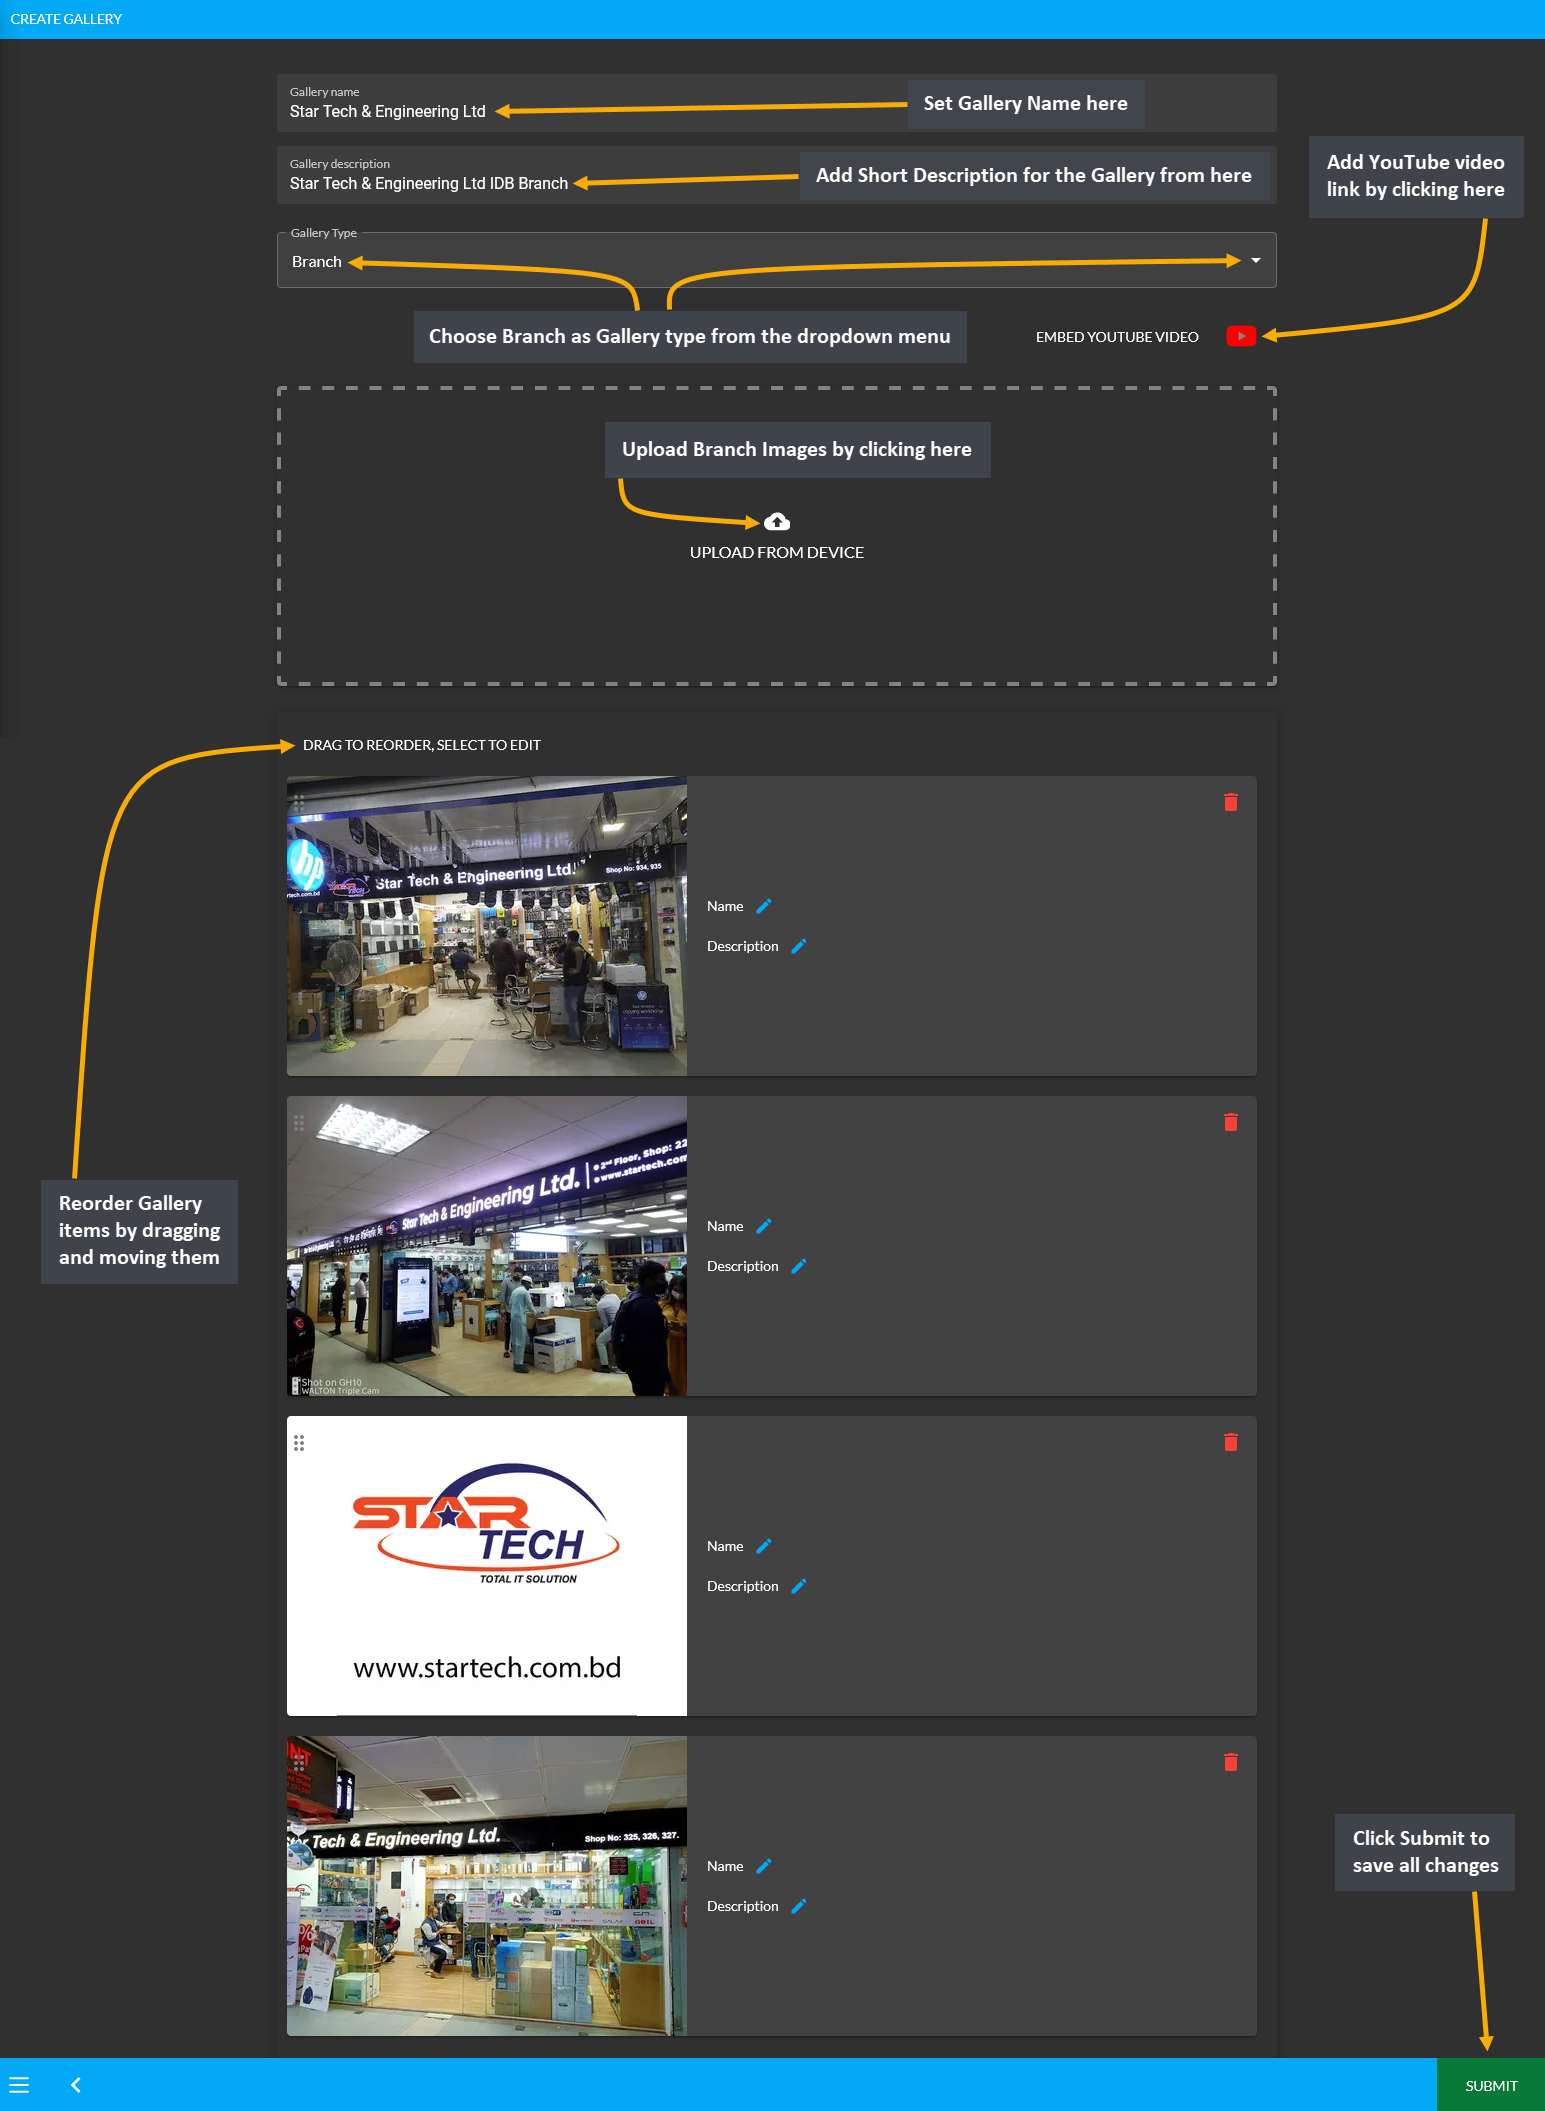
Image 5: Fill out the Gallery Name, Description, select Gallery type, add Branch images, and videos.
Newly created Product and Branch galleries will show under My Galleries as shown in the screenshot below.
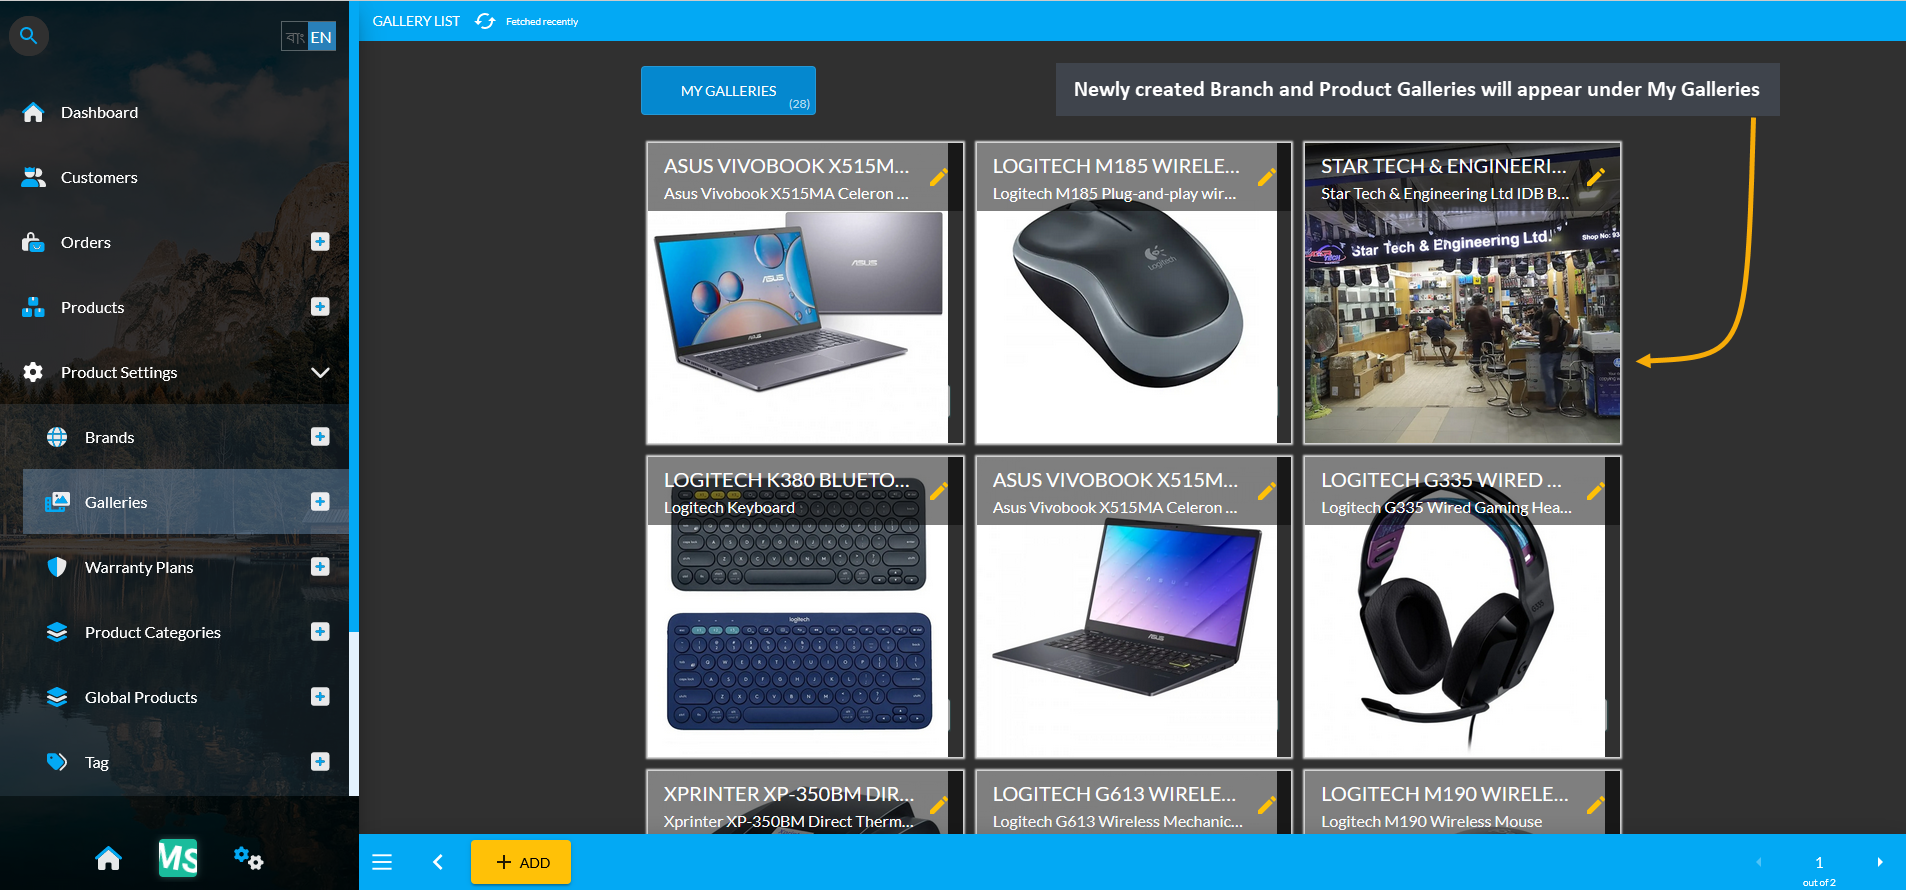
Image 6: Newly created Branch and Product Galleries will appear under My Galleries that can be used later.
17.3 - Warranty Plans
Learn more about how to manage and create individual Product Settings.
What are Warranty Plans?
Warranty Plans are extended warranty or service contracts which offers extended repairs or additional features and benefits for Products. This warranty is a form of guarantee that a manufacturer offers to repair or replace a faulty Product within a window of time after purchase. Shop Owners can select and create own Warranty Plans.
The Warranty Plans section consists of Global Warranty Plans and My Warranty Plans. Global Warranty Plans are pre-defined warranty or service contracts for Products. My Warranty Plans are custom-made warranty or service contracts that Shop Owner can create which are not already under Global Warranty Plans.
Pre-defined Global Warranty Plans
The Warranty Plan List displays pre-defined Global Warranties by default in Warranty Plans page that Shop Owner can apply for Products to show in the Website. The list of Warranties can be found under Global Warranty Plan under Product Settings. Global Warranty Plans can be selected during Product creation in the Product Edit page.
Under Pricing tab, pre-defined Global Warranty Plans can be selected for Product from the dropdown. If the target Warranty Plan cannot be found under the Global Warranty Plans, then the Shop Owner can create new Warranty Plans by clicking the + button. The selected Warranty plan will show in blue color. So, add Warranty like Lifetime, International, Local, Parts, and Service etc. from pre-defined Global Warranties when creating Products.
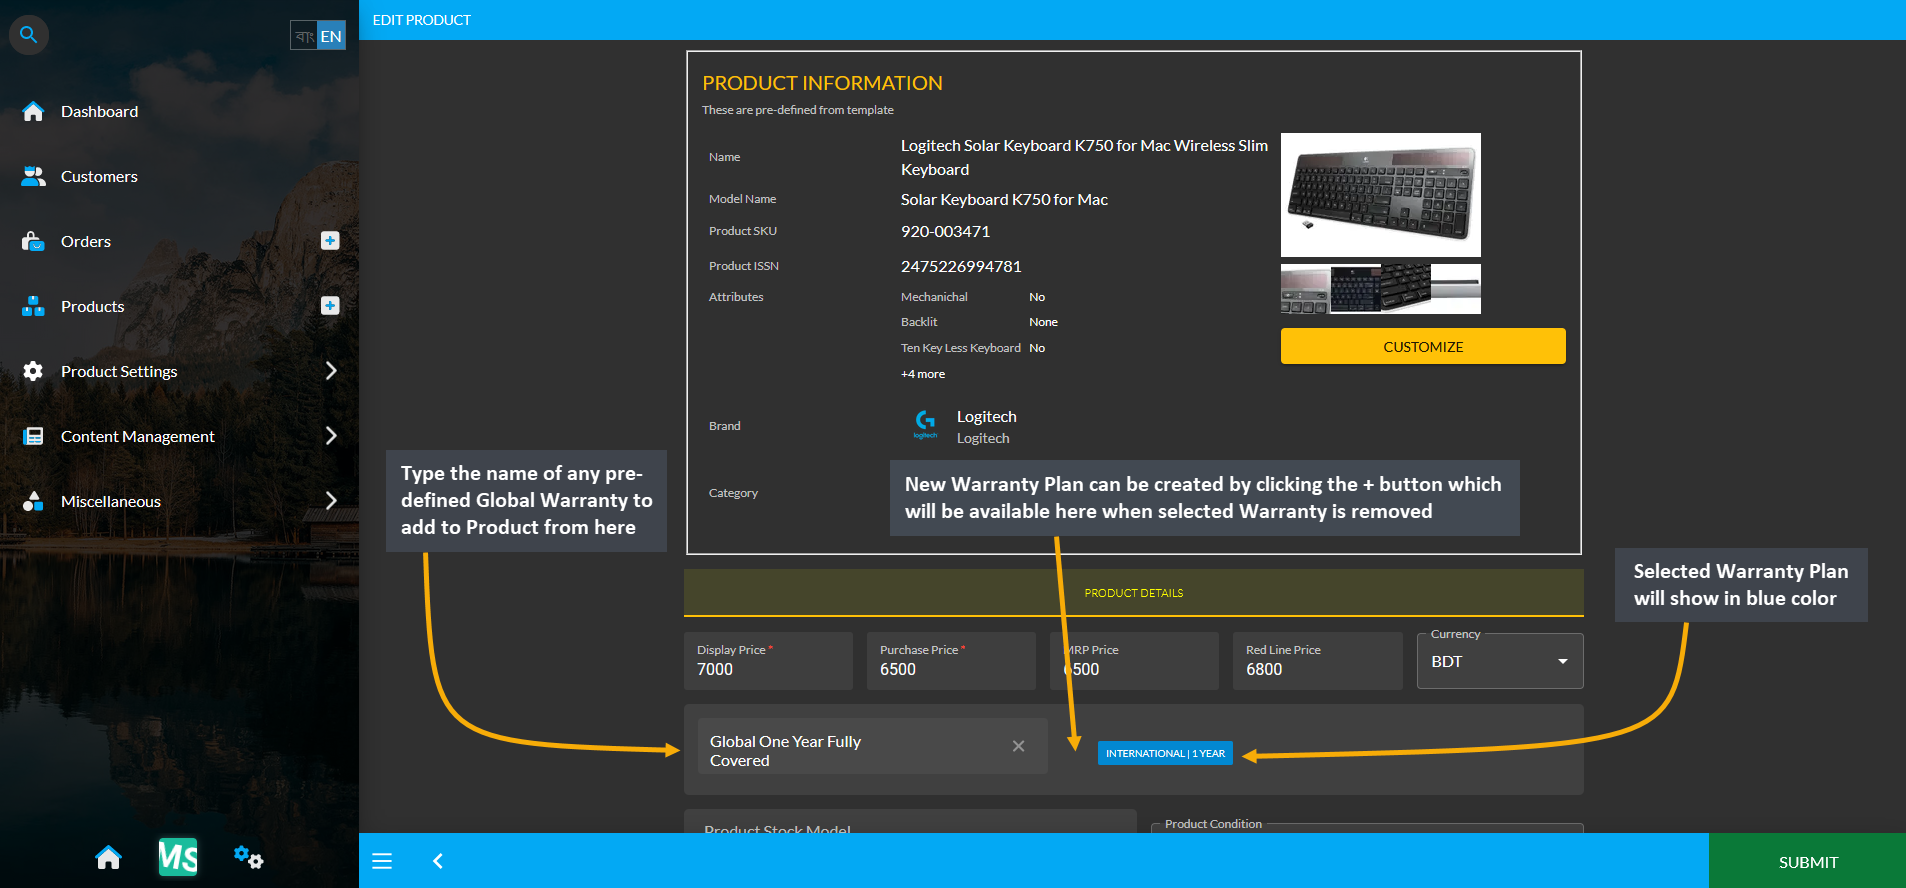
Image 1: Select Global Warranty Plan during Product creation or create new Warranty Plan from scratch.
Create New Warranty Plans
On the Warranty Plan List page, click on the + or ADD button to create New Warranty Plan for Products. The Global Warranty Plans will be displayed by default. The newly created Warranty Plans will show under My Warranties.
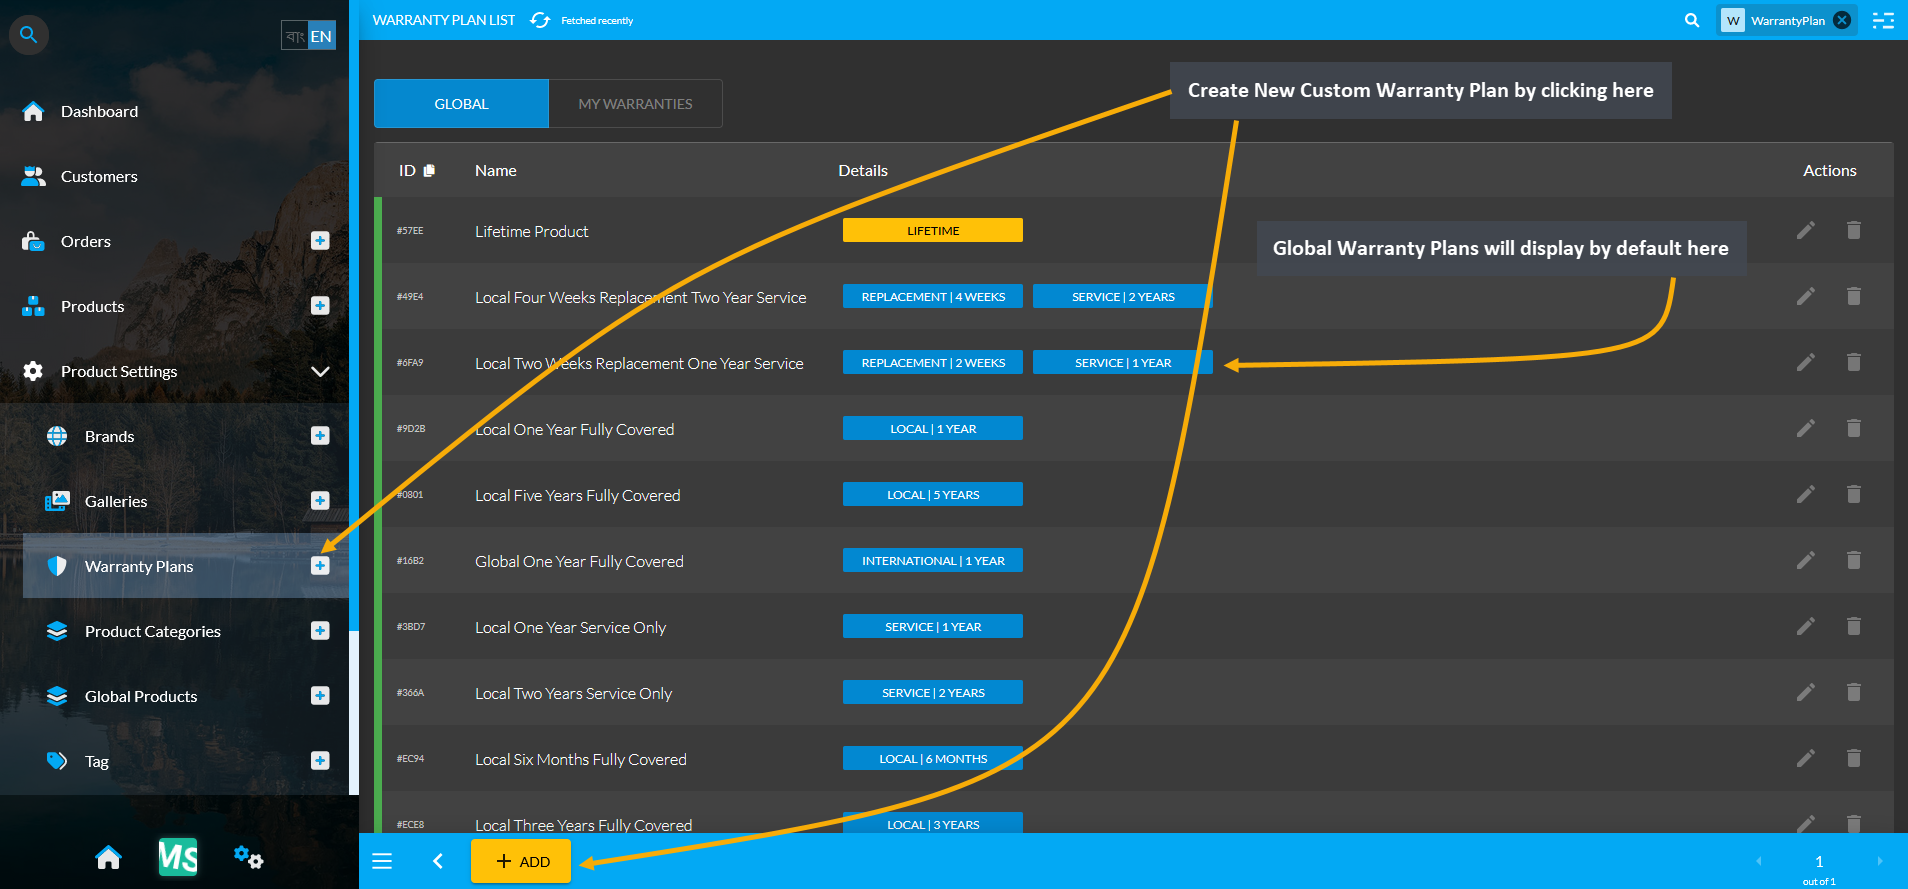
Image 2: From Warranty Plans tab, click the + or ADD button to redirect to Create Warranty Plan page.
When being redirected to the new page to Create Warranty Plan, first type in the full name of the Warranty that will be displayed on The Website. Use the blue toggle button to keep the warranty active. Choose warranty plans that apply to the new warranty by clicking on the Select button for each as shown in the example screenshot.
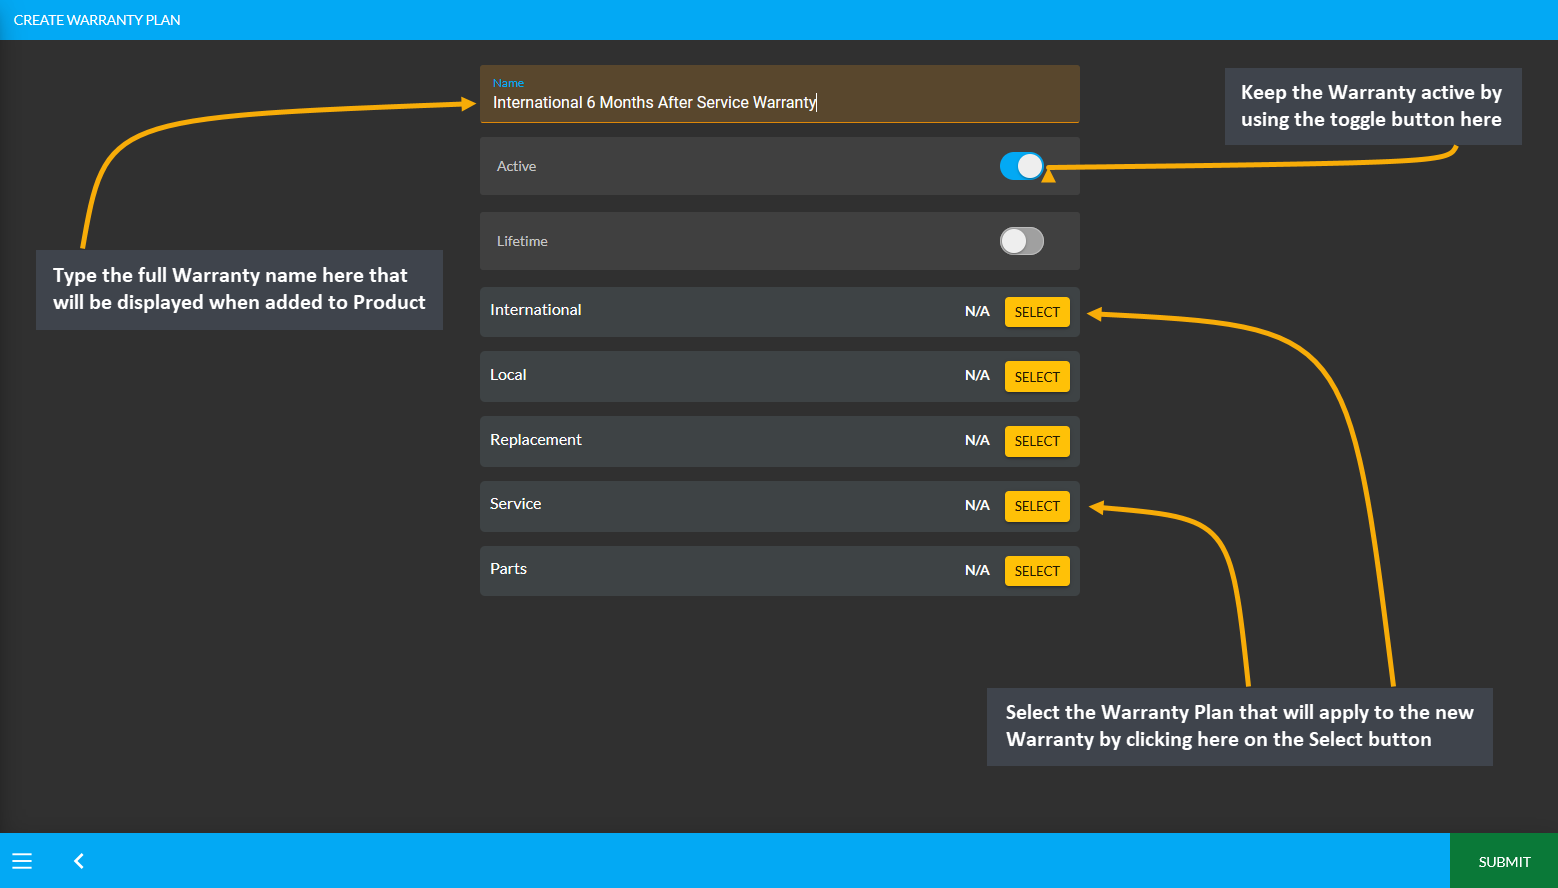
Image 3: Type full Warranty Name for display, use toggle button to keep warranty active, and select plans.
Clicking on the yellow Select button will open a pop-up from where desired warranty plan can be selected. Select the Warranty Plan and click Save to add the plan to the newly created Warranty. Like this, several Warranty Plans can be added to the main Warranty for International, Local, Replacement, Service, and Parts.
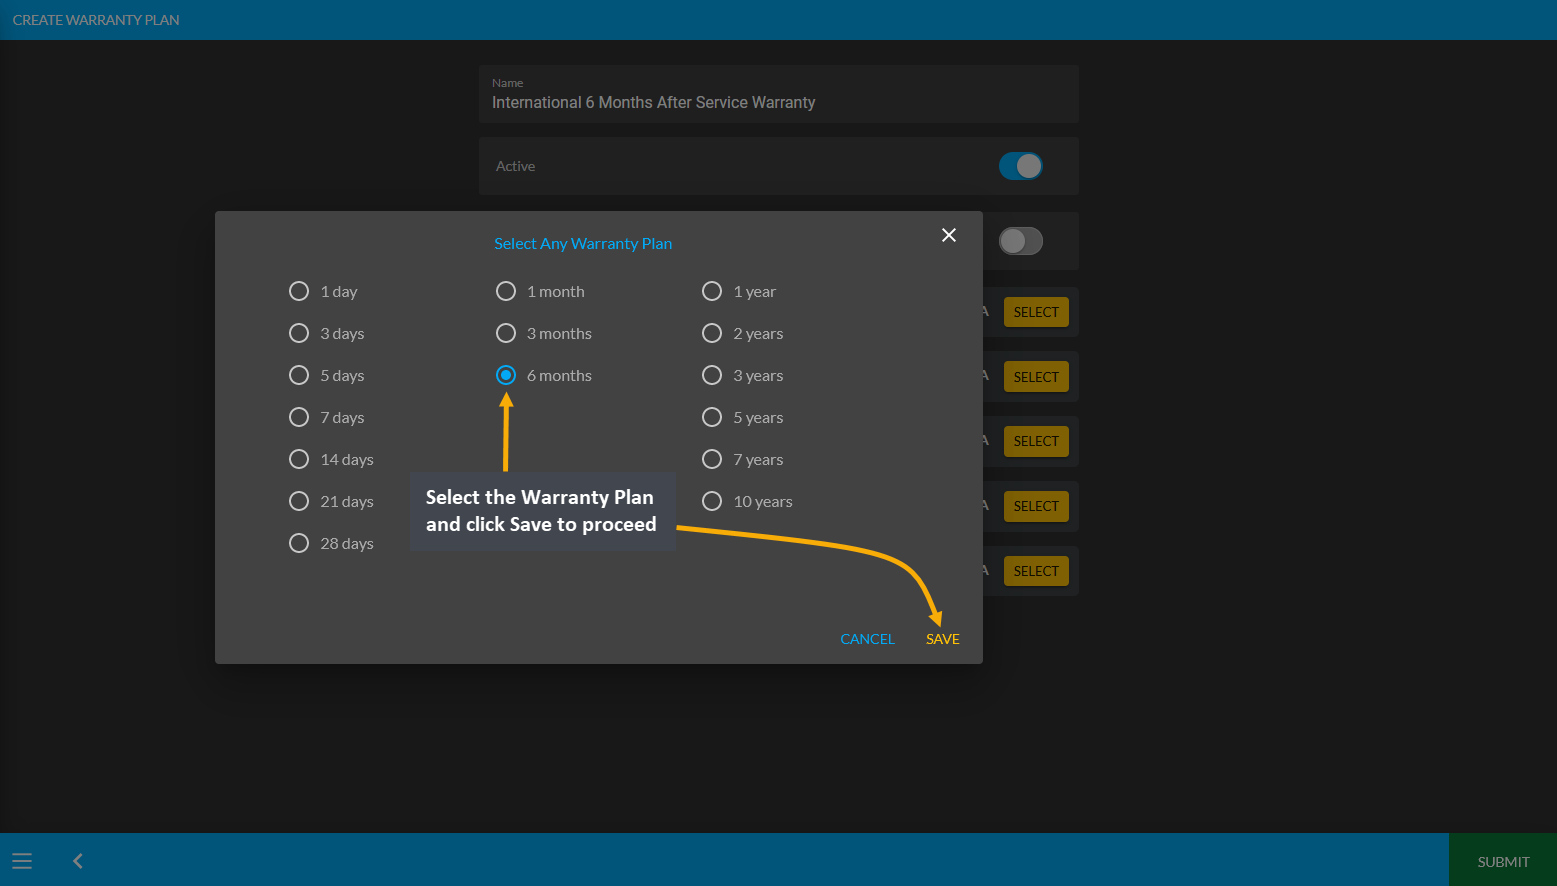
Image 4: Clicking the Select button will open a pop-up from where desired warranty plan can be selected.
After selecting the applicable Warranty Plans, click Submit to save all the changes and create new Warranty Plan.
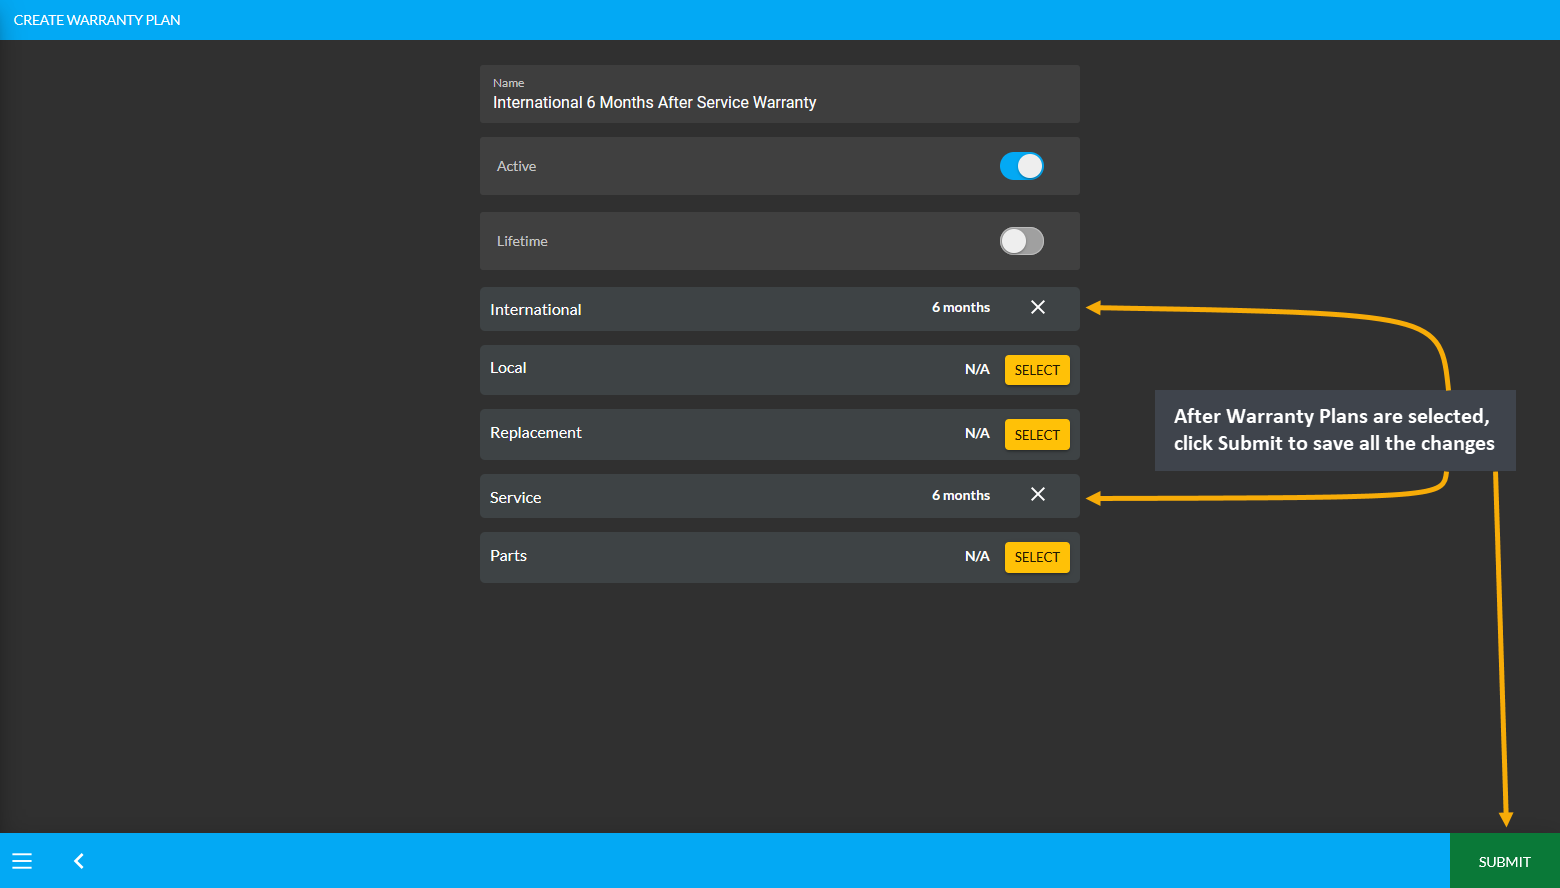
Image 5: After selecting Warranty Plans, click Submit to save all the changes and create new Warranty Plan.
Create Lifetime Warranty Plan
Lifetime Warranty can also be created by selecting the Lifetime toggle button that will disable other Warranty Plans. Type the full name of the Lifetime Warranty Plan and click Submit to save all the changes. The Lifetime Warranties will not require any duration input like others.
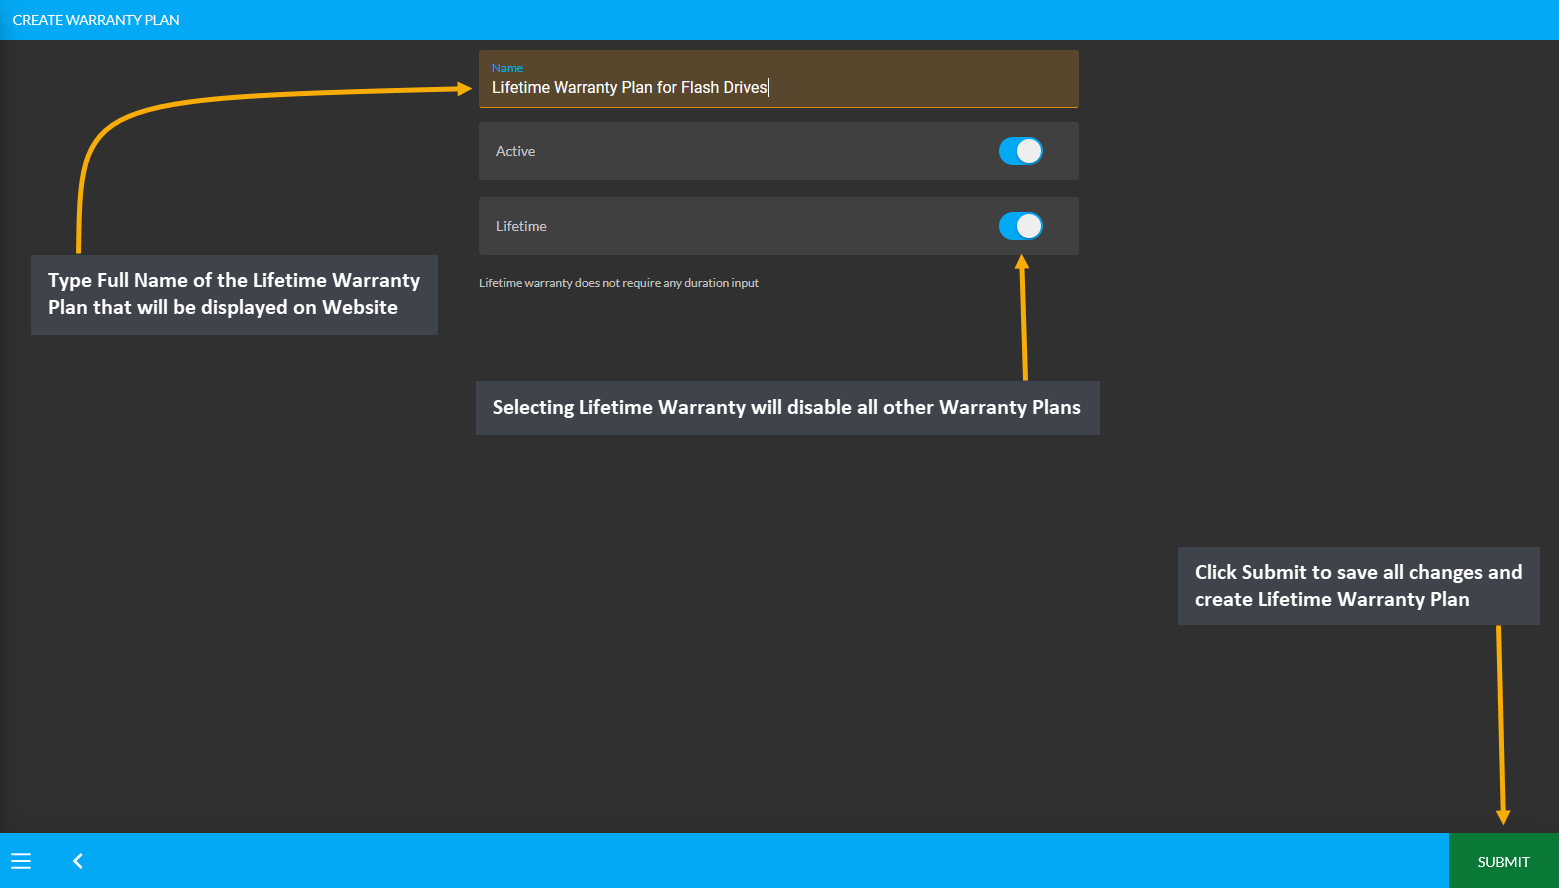
Image 6: Create Lifetime Warranty by enabling the Lifetime toggle that will disable other Warranty Plans.
All the newly created Warranty Plans can be found under My Warranties on the Warranty Plan List page from where they can be edited or deleted using the Edit and Delete icons.
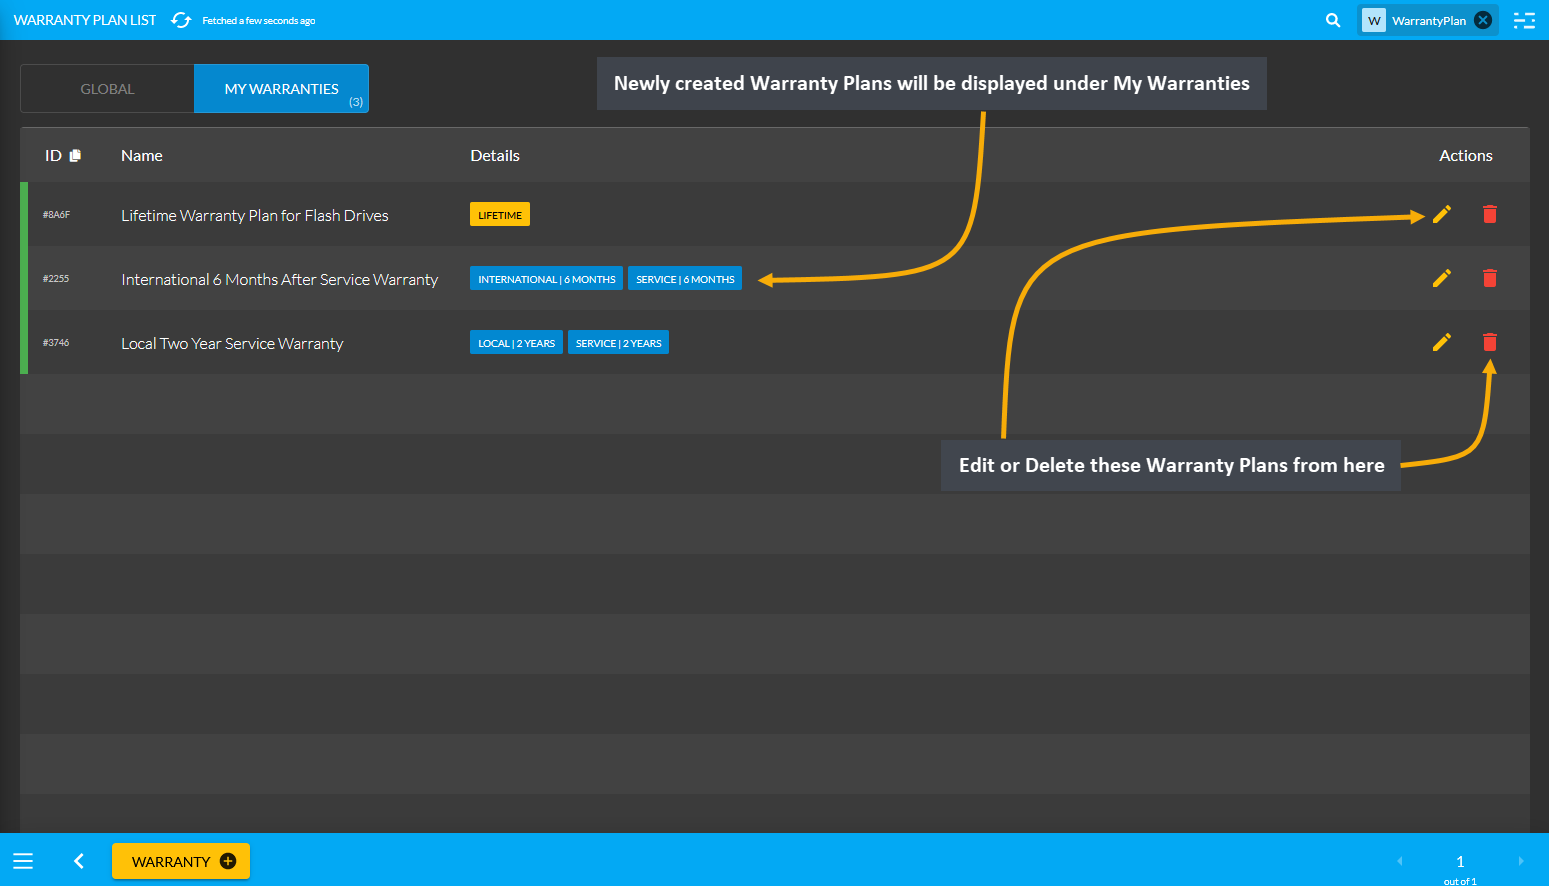
Image 7: All newly created Warranty Plans can be found under My Warranties on the Warranty Plan List Page.
17.4 - Product Categories
Learn more about how to manage Categories and add them when creating Products.
Product Categories
Product Categories are Pre-defined which means that, the Categories are limitable, so users will not be able to add Categories. The Shop Owners will have to use the Product Categories that are already provided in the system. So, Categories are available by Product Types and the entire list of Product Categories can be checked by opening the Product Categories from under Product Settings. Product Categories will be displayed in View Only List by default.
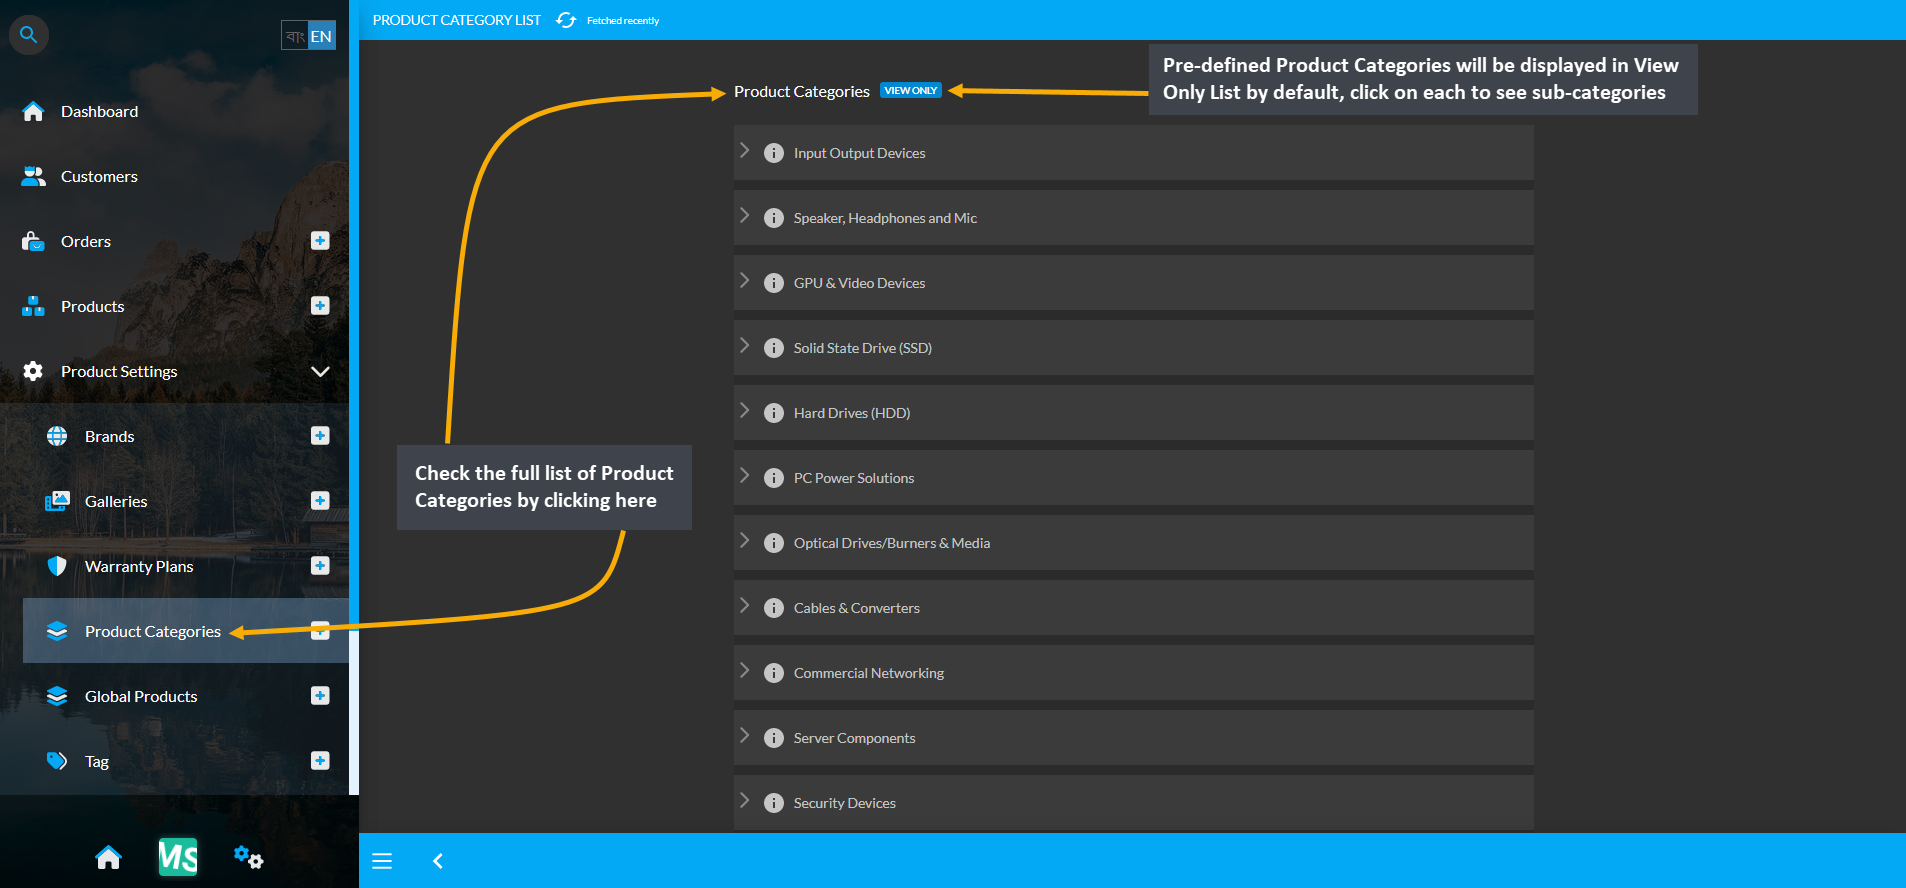
Image 1: Check the full list of Product Categories from the Product Categories tab under Product Settings.
Clicking on each Product Category will open their sub-categories on a new page. As shown in the example below, clicking on the main Category Input Output Devices will redirect to a new page displaying its Sub-Categories in list.
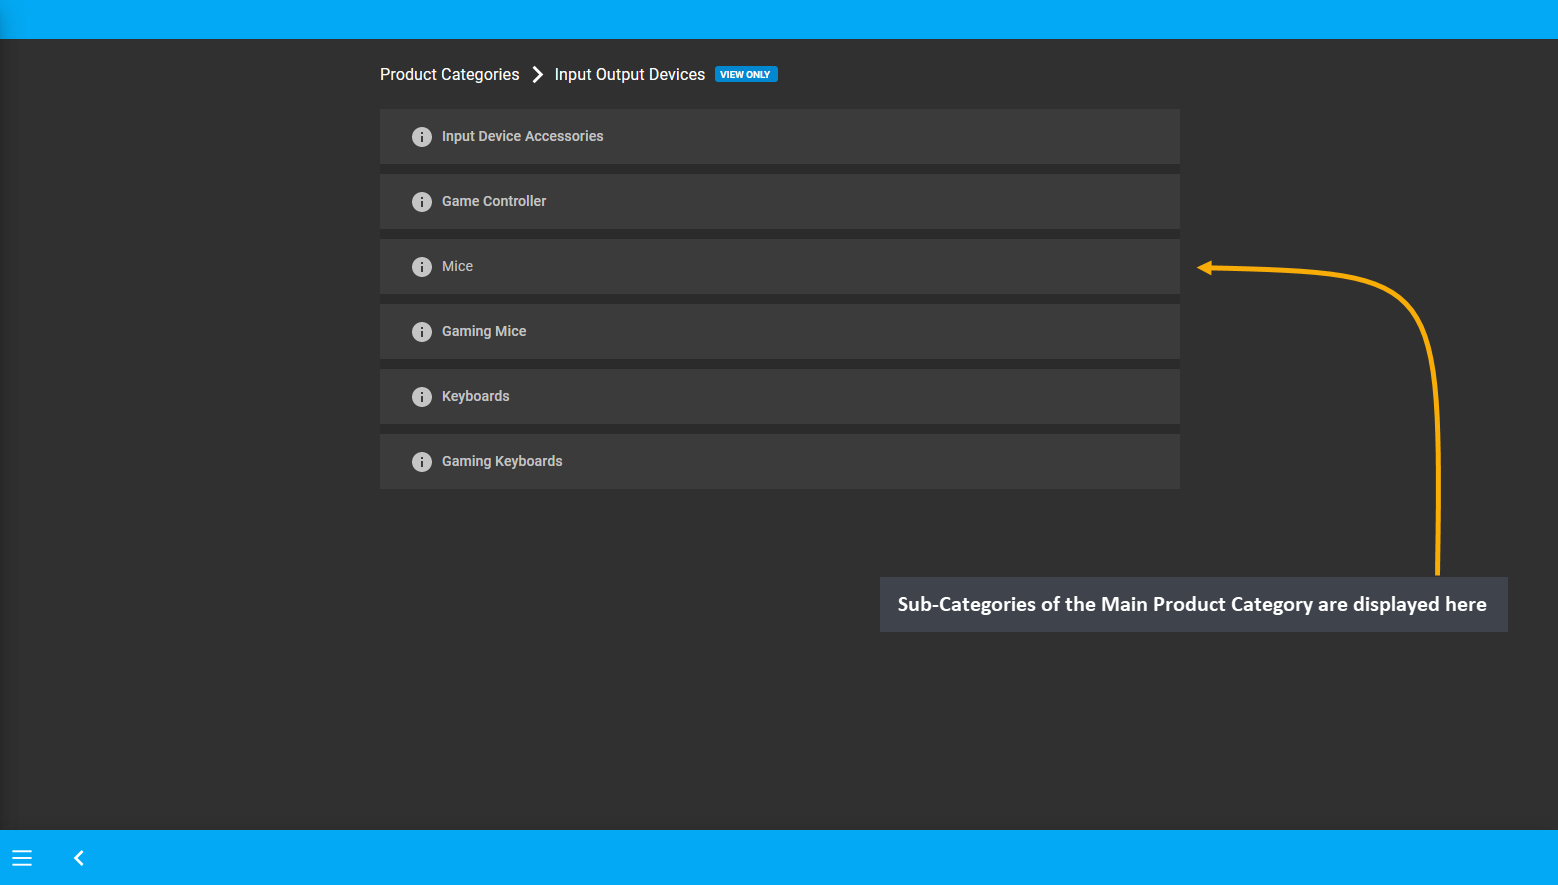
Image 2: Clicking on each Product Category will open their Sub-Categories on a new page within a List.
During Product creation, Product Category can be selected for each Product from the dropdown menu provided.
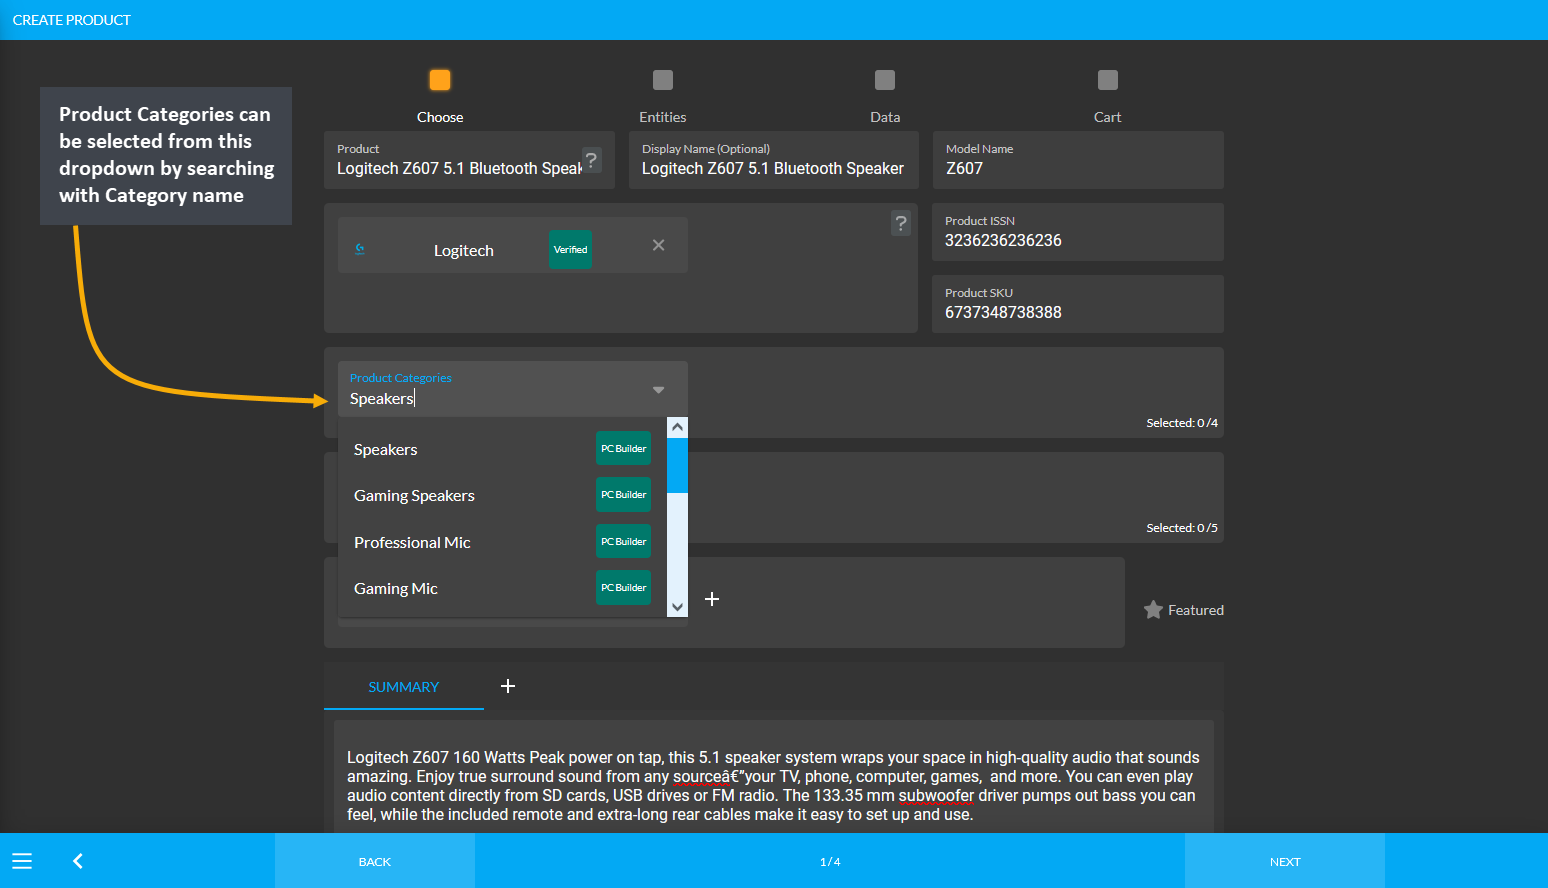
Image 3: During Product creation, Product Category can be selected for Product from dropdown menu provided.
17.6 - Tags
Learn more about how to manage and create individual Product Settings.
Tags are similar to Categories with extra functionality. These entities that can be used to build custom collections of other entities. Currently the system support using them with Products, Global Products, and Orders. So, apart from pre-defined Product Categories in the system, Shop Owners can build their own custom product category hierarchy using Tags when needed. For instance, both 4g and 5g phones have been released in 2021, so tags can be created as 4g and 5g to define those Product(s).
In the system, Product Categories are pre-defined, the Shop Owners cannot create them. For instance, the Office Solutions category has several sub-categories. So, if a Shop Owner wants to sell Printer-Scanner combo Product, they will have to create a New Category because such category does not exist under Office Solutions category. Tags allow creating New Categories like 3D printer-scanner, receipt printer-scanner, or barcode printer-scanner etc.

Image 1: Shop Owners can create and enable Tags to use as Product Categories in the Website Shop filter.
Enable use of Tags as Categories in the Website Shop filter by turning on the Commerce Category as Tag option using the toggle button from the Basic Settings under Config Your Business from All Settings.

Image 2: Enable use of Tags as Categories in Website Shop filter by turning on Commerce Category as Tag.
When Tag is enabled to use as Commerce Category, Products created with those Tags will show as Categories on the Website Shop Filter. In the example, the Tags Apple, Gaming Mouse, Gaming Keyboard, Gaming Headphone, Laptop, and Apple which were added to Products are showing as main Categories on the Website as Tag has been enabled to use as Commerce Category.

Image 3: When Tag is enabled as Category, Products created with Tags will show as Categories on Website.
If a specific Tag Category is selected, then Products created under those Tags will show on Website Shop Filter.

Image 4: If a specific Tag Category is selected, then Products created under those Tags will show.
To add Tags to any Product, first click on the Products module and from there, click on the + icon which will open the page to add New Product(s). For existing Product(s), search Product Name on the search bar. If the Product is not available, the search bar will suggest adding a new product with Add New button.
Clicking on it will redirect to Create Product page where Tags can be added to that Product. Type any existing Tag Names in the search bar and click on it, which will automatically add that tag to the Product. Here, Shop Owners can add a maximum of 5 Tags to any Product.

Create Child Tag
Child Tag can be created within a Parent Tag from the Tags List. Click on the + icon to create a Child Tag for the selected Parent Tag. It will redirect to a new page where new Child Tag can be created by adding Tag Name, Tag Description, Images, and selecting Tag Type as illustrated in the example screenshot below.
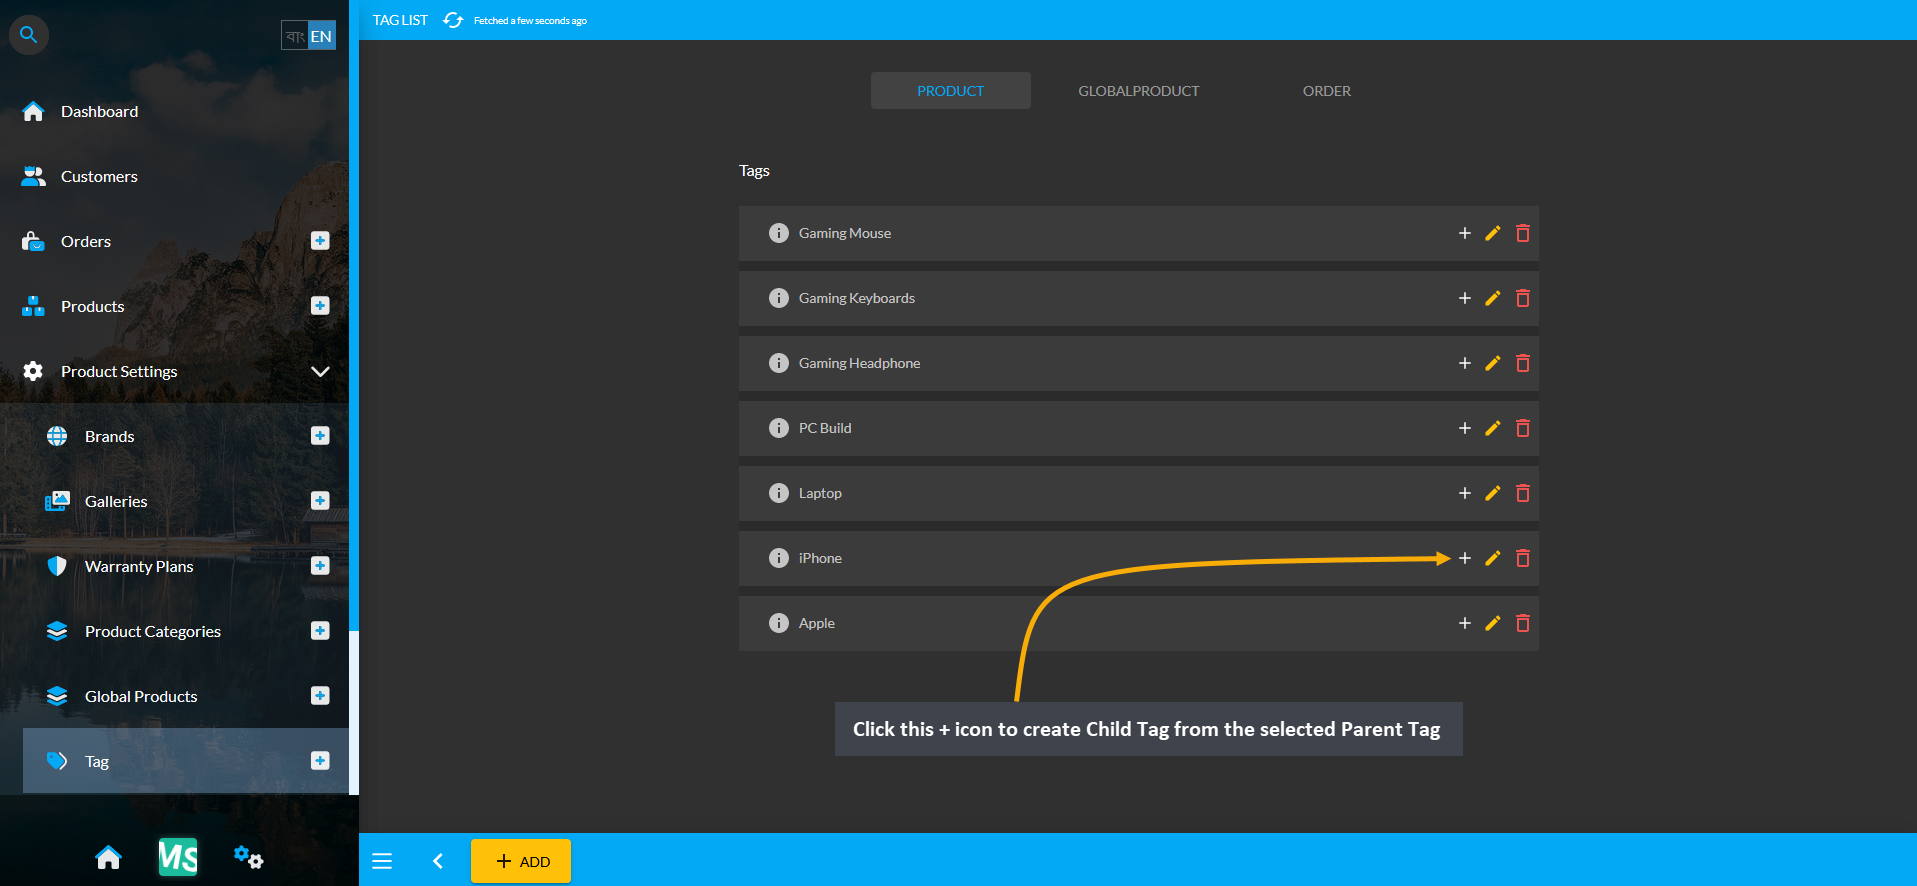
Image 1: Click on the + icon to create a Child Tag from the selected Parent Tag.
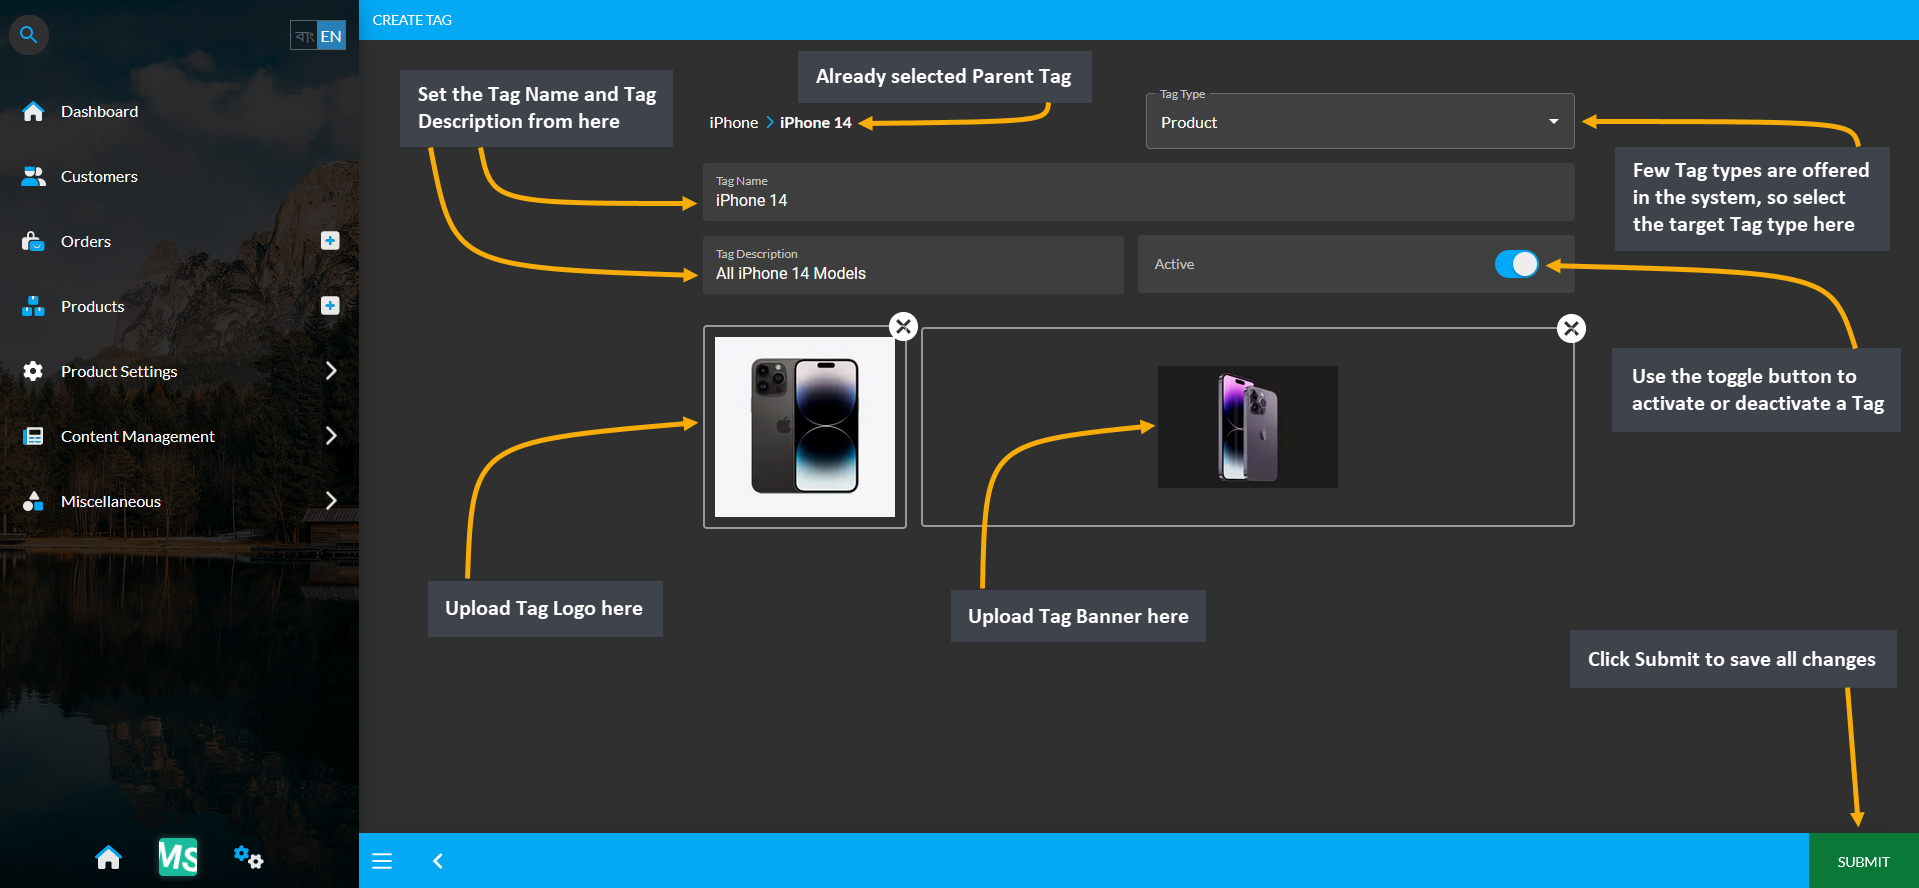
Image 2: Select Tag Type, set Tag Name, Description and upload Logo and Banner to create Child Tag.
The Child Tag or Tags created under the Parent Tag will display in a list and they can be edited if needed.

Image 3: Child Tag or Tags created under the Parent Tag will display in a list and they can be edited.
Options to create tags can be found under Product Settings. Choose Tags from there and click on the + icon to create new tags for the shop. On the Create Tag page, there are options to select Tag Type. Also, set Tag Name and Tag Description below which are two boxes to upload logo and banner for tags. There is a toggle button to activate and deactivate tags. Click Submit to save all the changes as shown in the example screenshot.
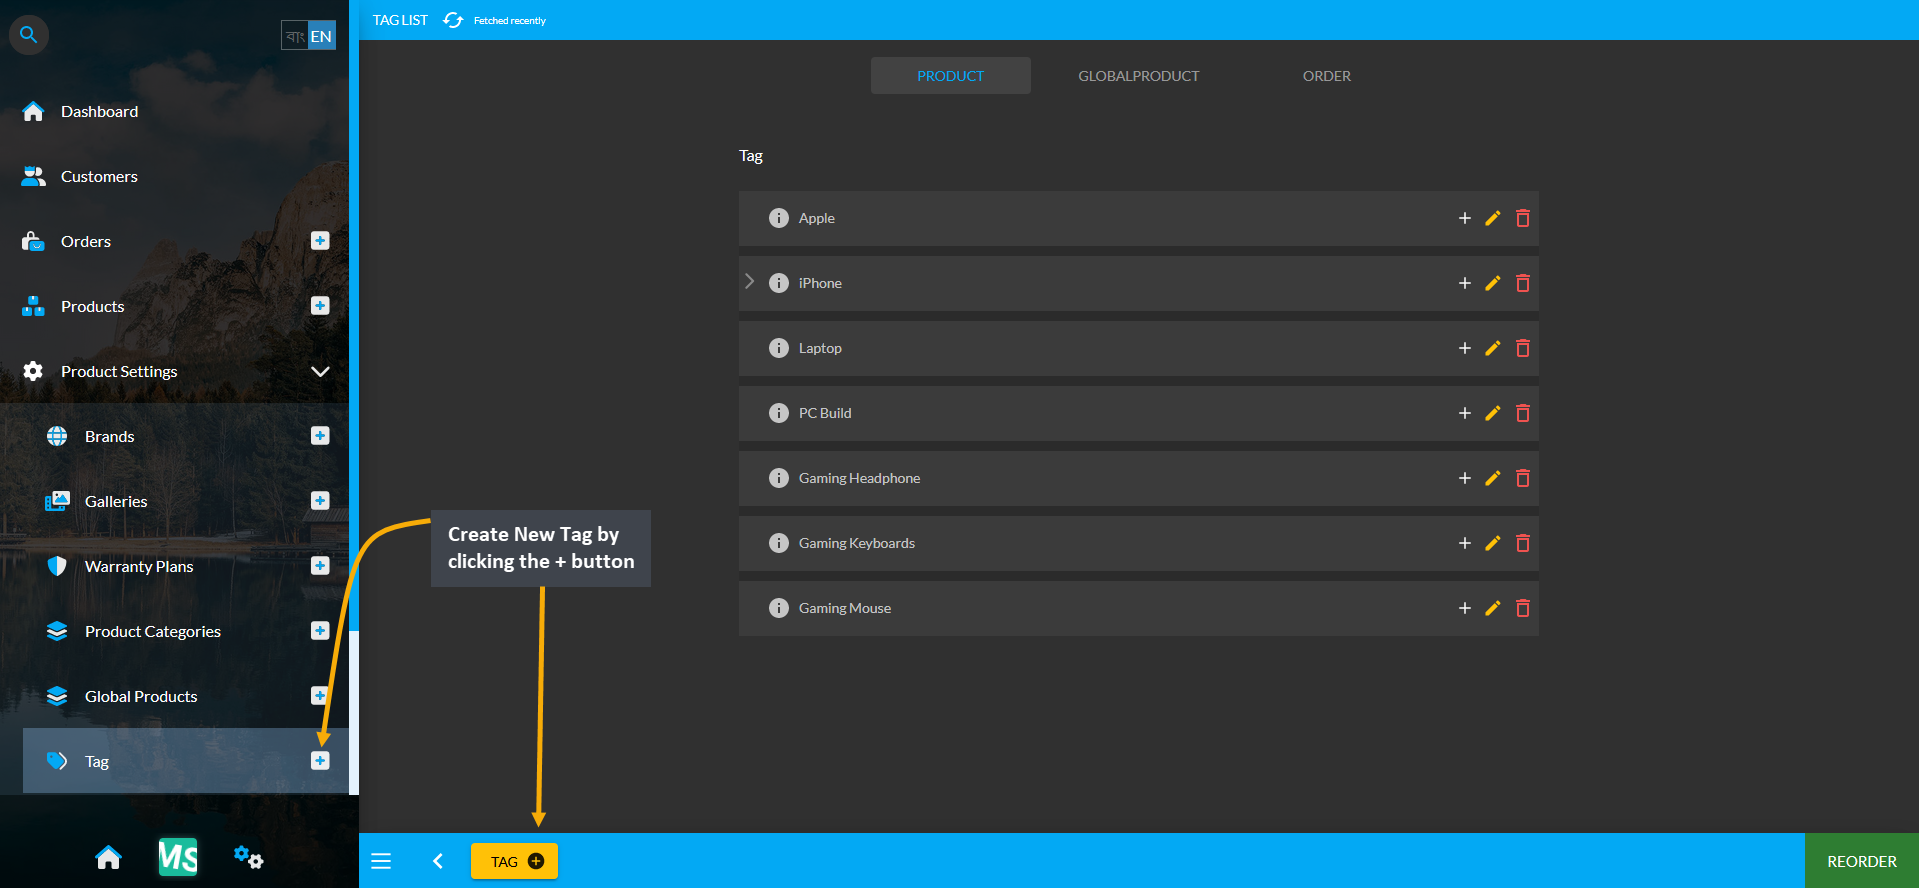
Image 1: Click the + button to create New Tags for the Shop filter from Tags tab under Product Settings.
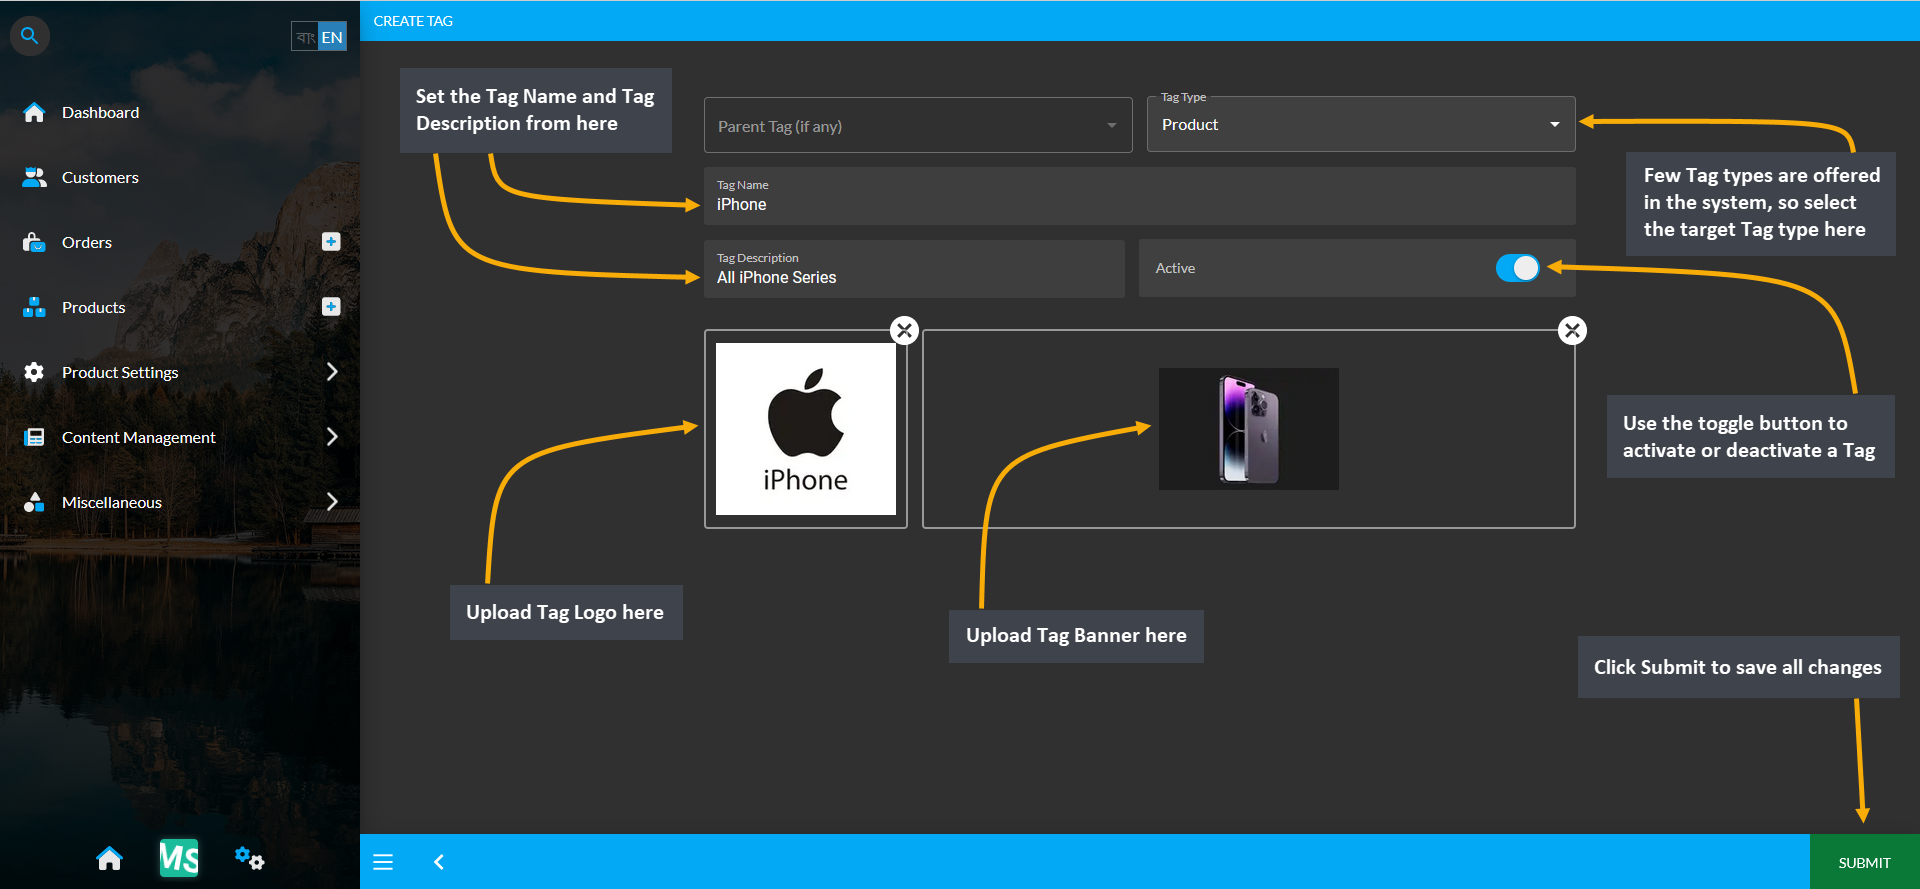
Image 2: Select Tag Type, set Tag Name, Description and upload Logo and Banner to create Parent Tag.
The Tags created in the system will display on The Website. For instance, if Apple Tag is selected, it will bring the search results of all the Product(s) with Apple tags in The Website as shown in the screenshot below.
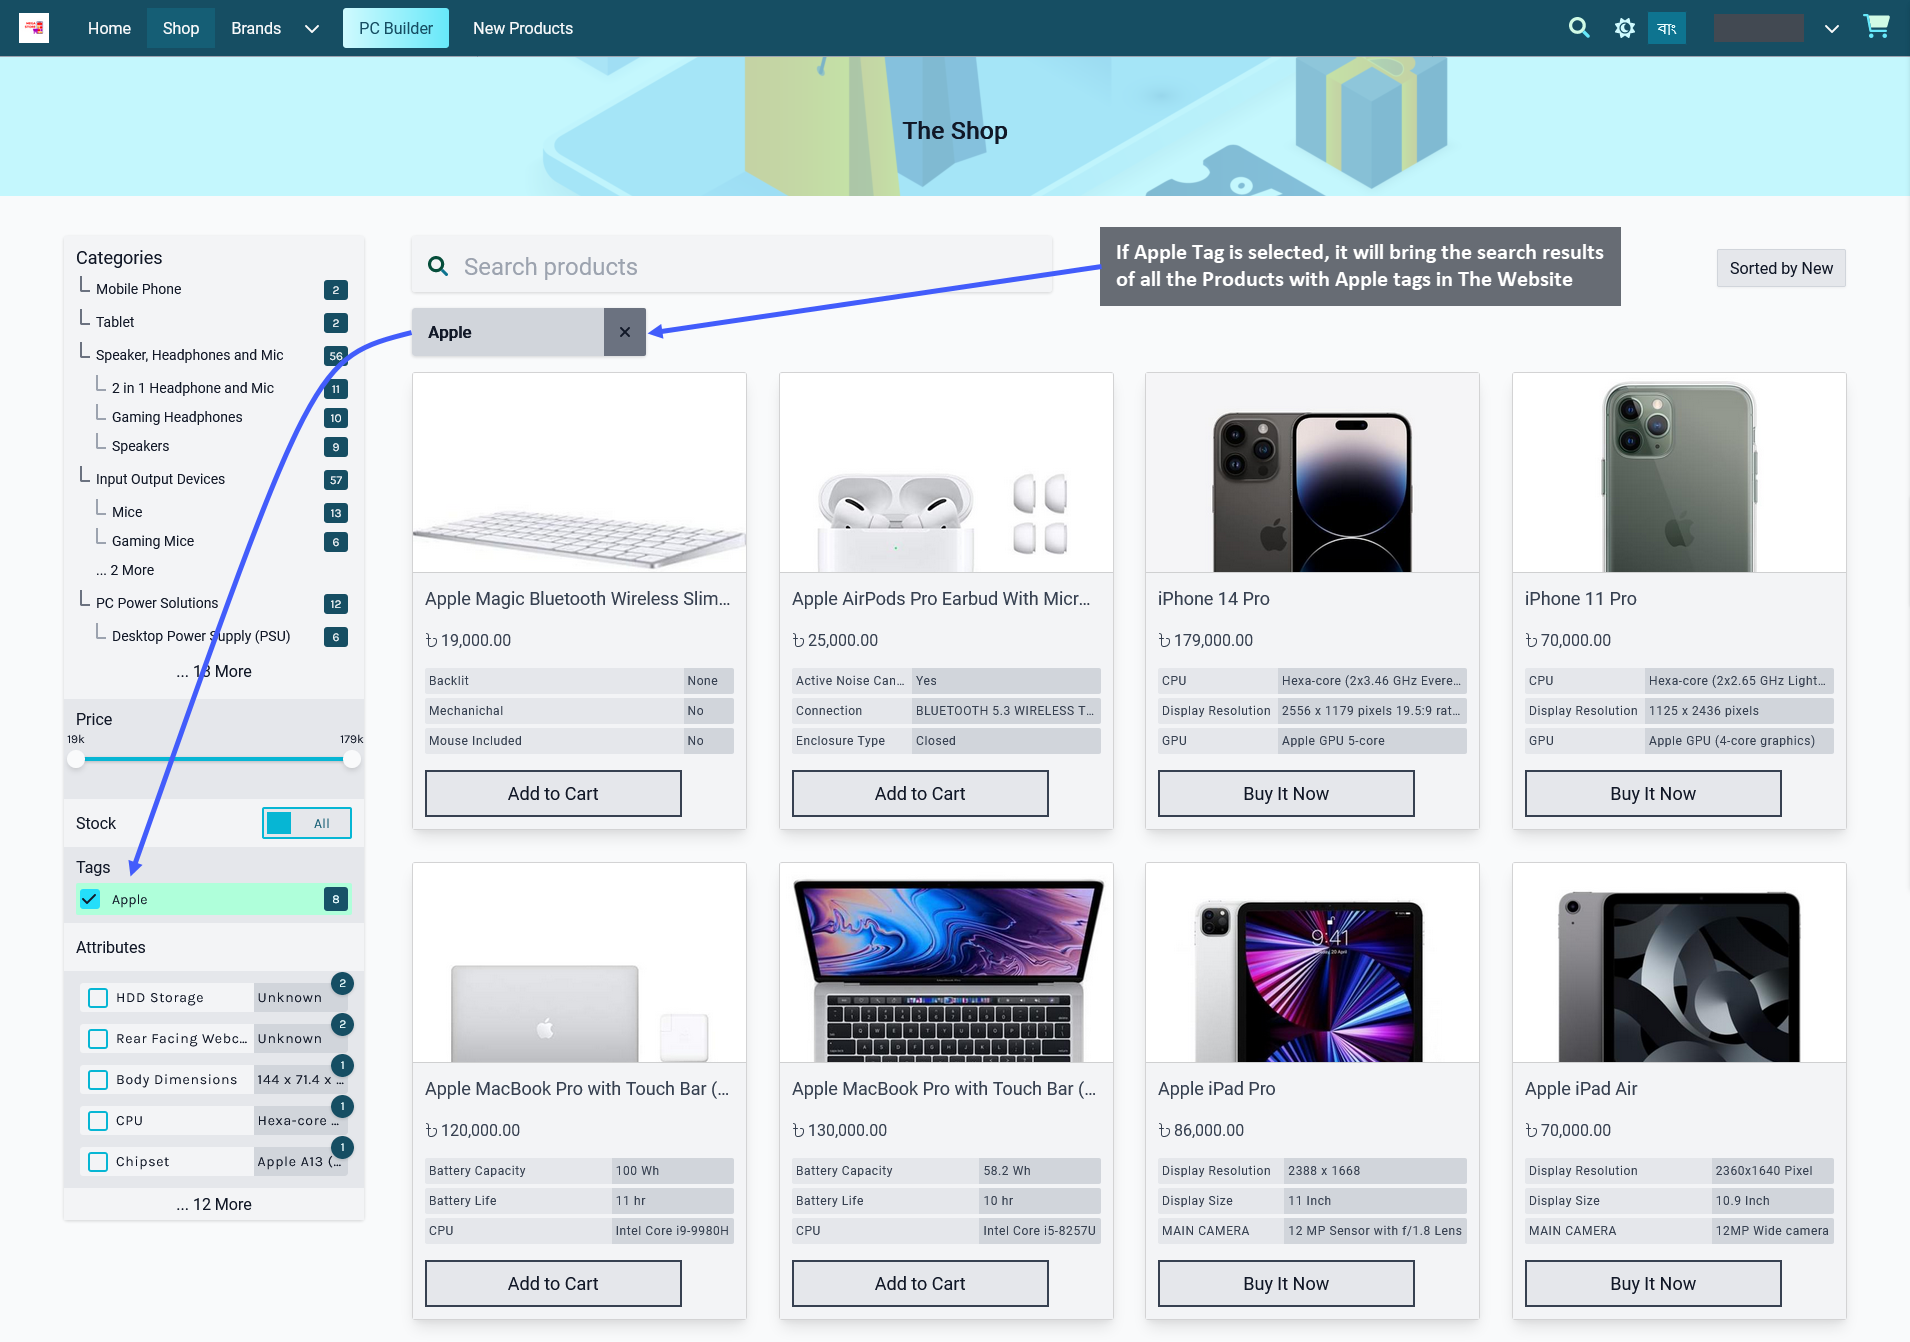
Image 3: If a Tag is selected, it will bring search results of all Products with that Tag in The Website.
View the list of existing tags by clicking on the Tags module from the left side panel. The page will display the list of Tags created. To delete any tag individually, click the Delete Button to immediately delete the tag. There is an Edit Button beside the Delete Button through which details for Tags can be edited and updated.
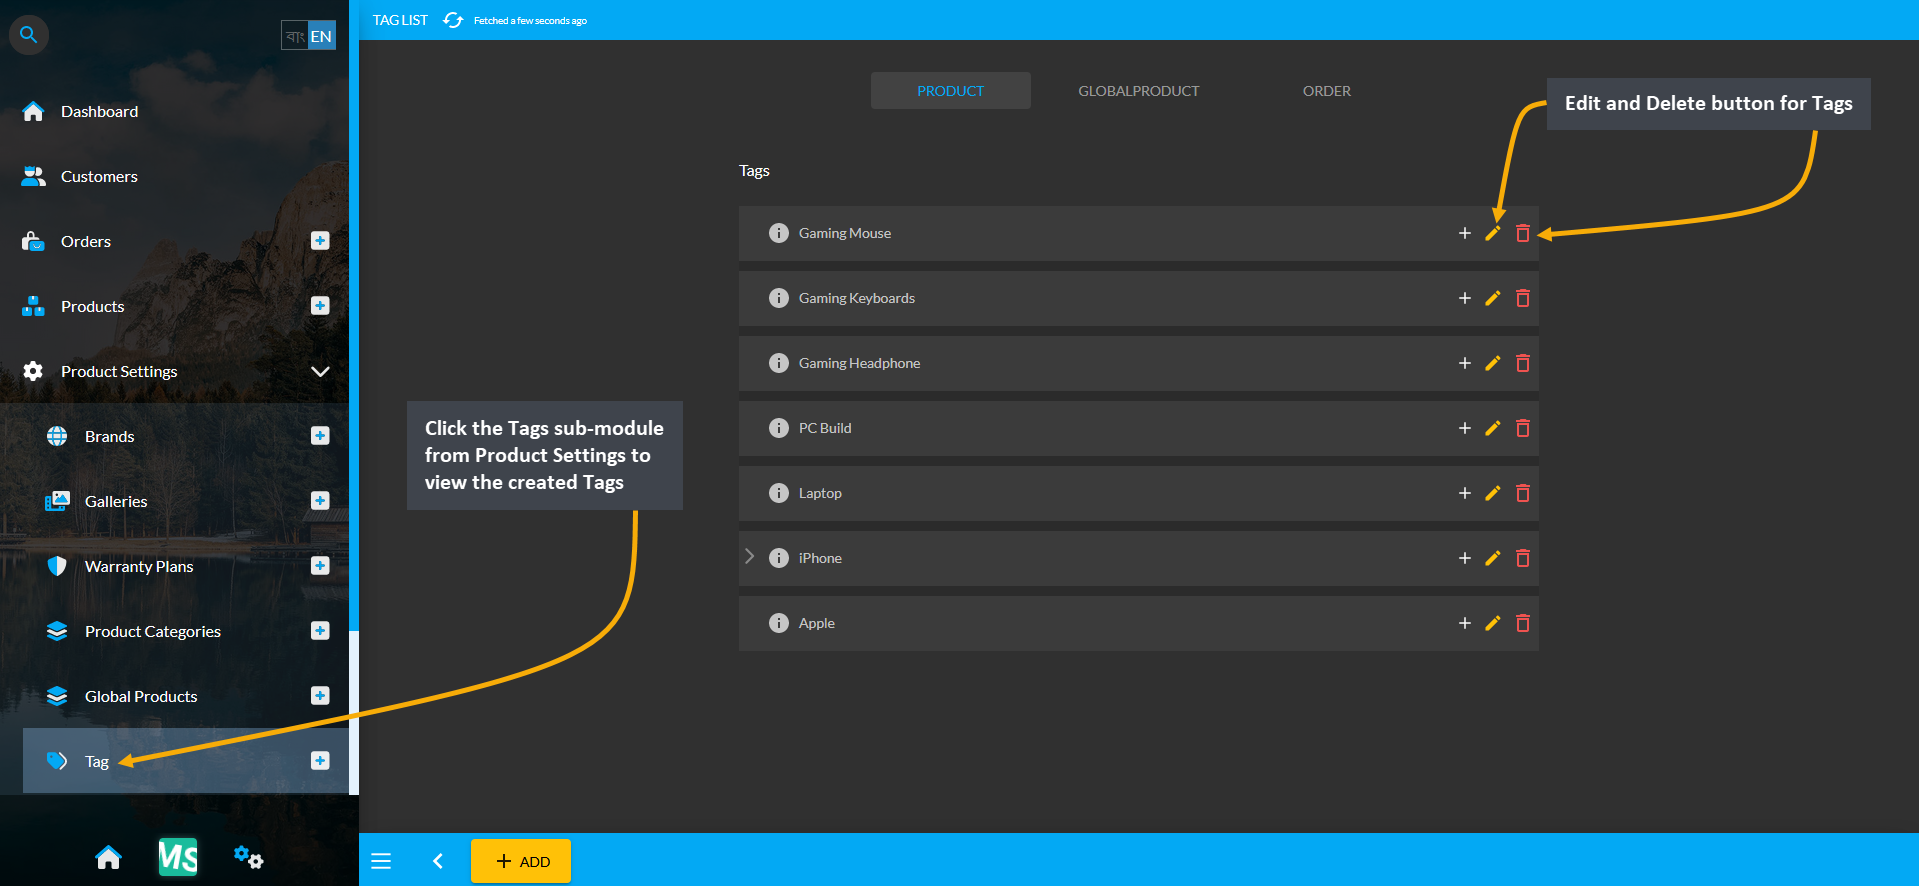
Image 4: View the list of already created Tags from Tags module under Product Settings.
Clicking on the Edit Button will redirect to this page where details for any Tags can be edited and updated.
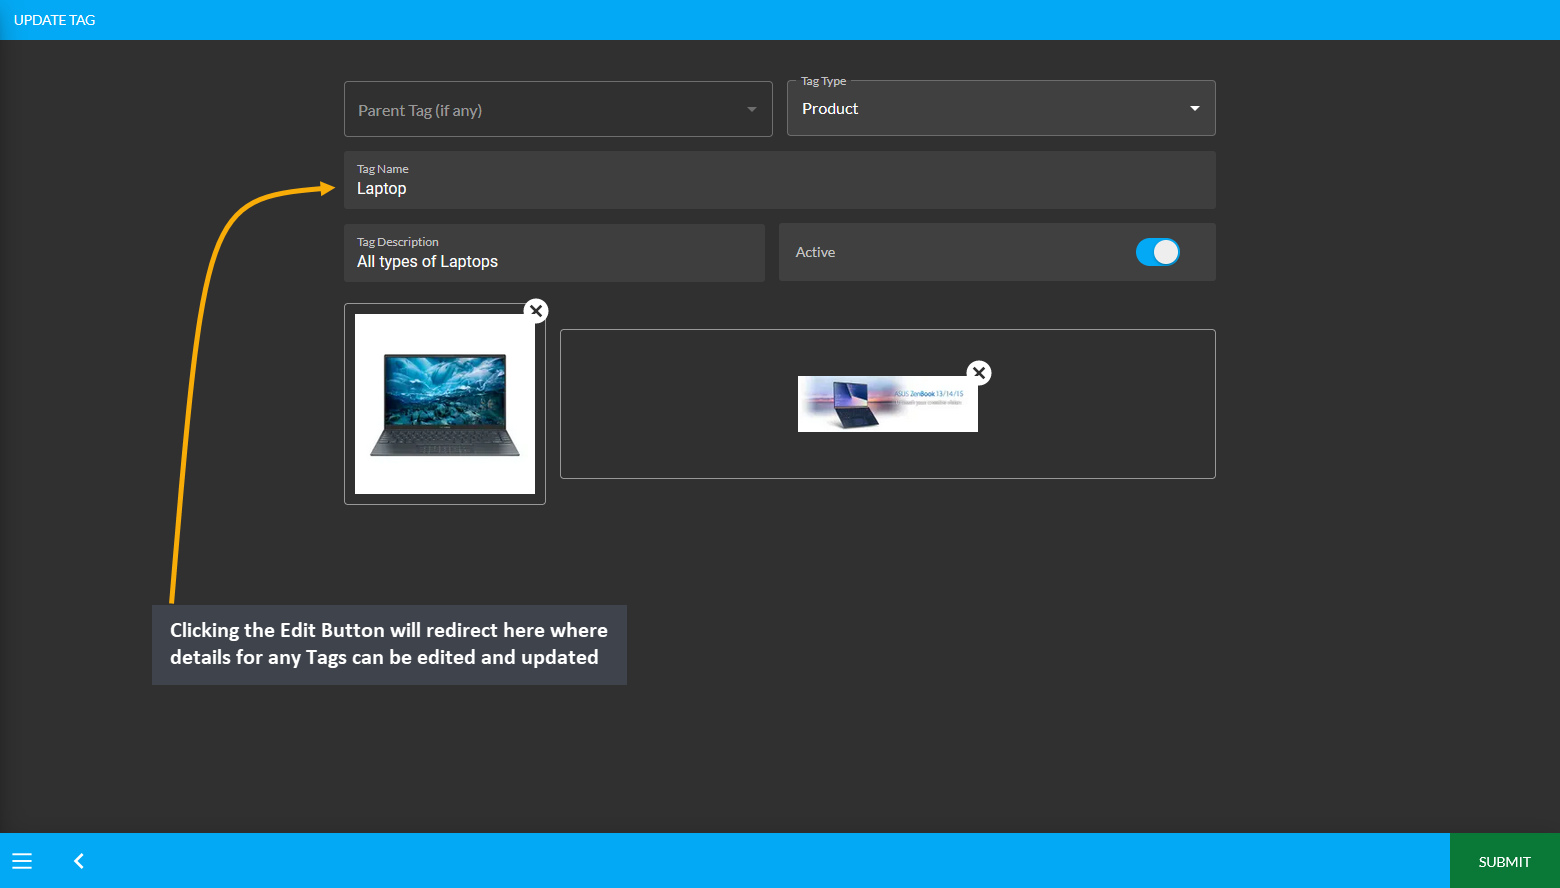
Image 5: Clicking the Edit Button will redirect here where details for any Tags can be edited and updated.
18 - Product Batch and Stock
Learn More about how to search, create, and modify details of Product Batch and Stock of Per Unit Product(s).
What are Per Unit Products?
Per Unit Products are sold in Stocks where each unit has an individual serial number which will help to identify individual units apart. So, if a Per Unit Product is sold in an Order, then it will mean that this exact unit has been sold. When choosing this option, the Seller will need to add units individually. Product Stocks with individual serial numbers can be added under a Product Batch.
For instance, the Shop Owner has the Per Unit Product Asus Chromebook Flip C214 11.6" 1366x768 Celeron N4000 1.1 GHz 4GB Memory 32GB eMMC Storage 2-in-1 Laptop to sell. In this case, each of them have an individual serial, based on which the separate Units can be identified apart from each other. Hence, to find, if a certain unit was in a certain order, tracking individual serial numbers will help Shop Owner to identify and verify individual Products.
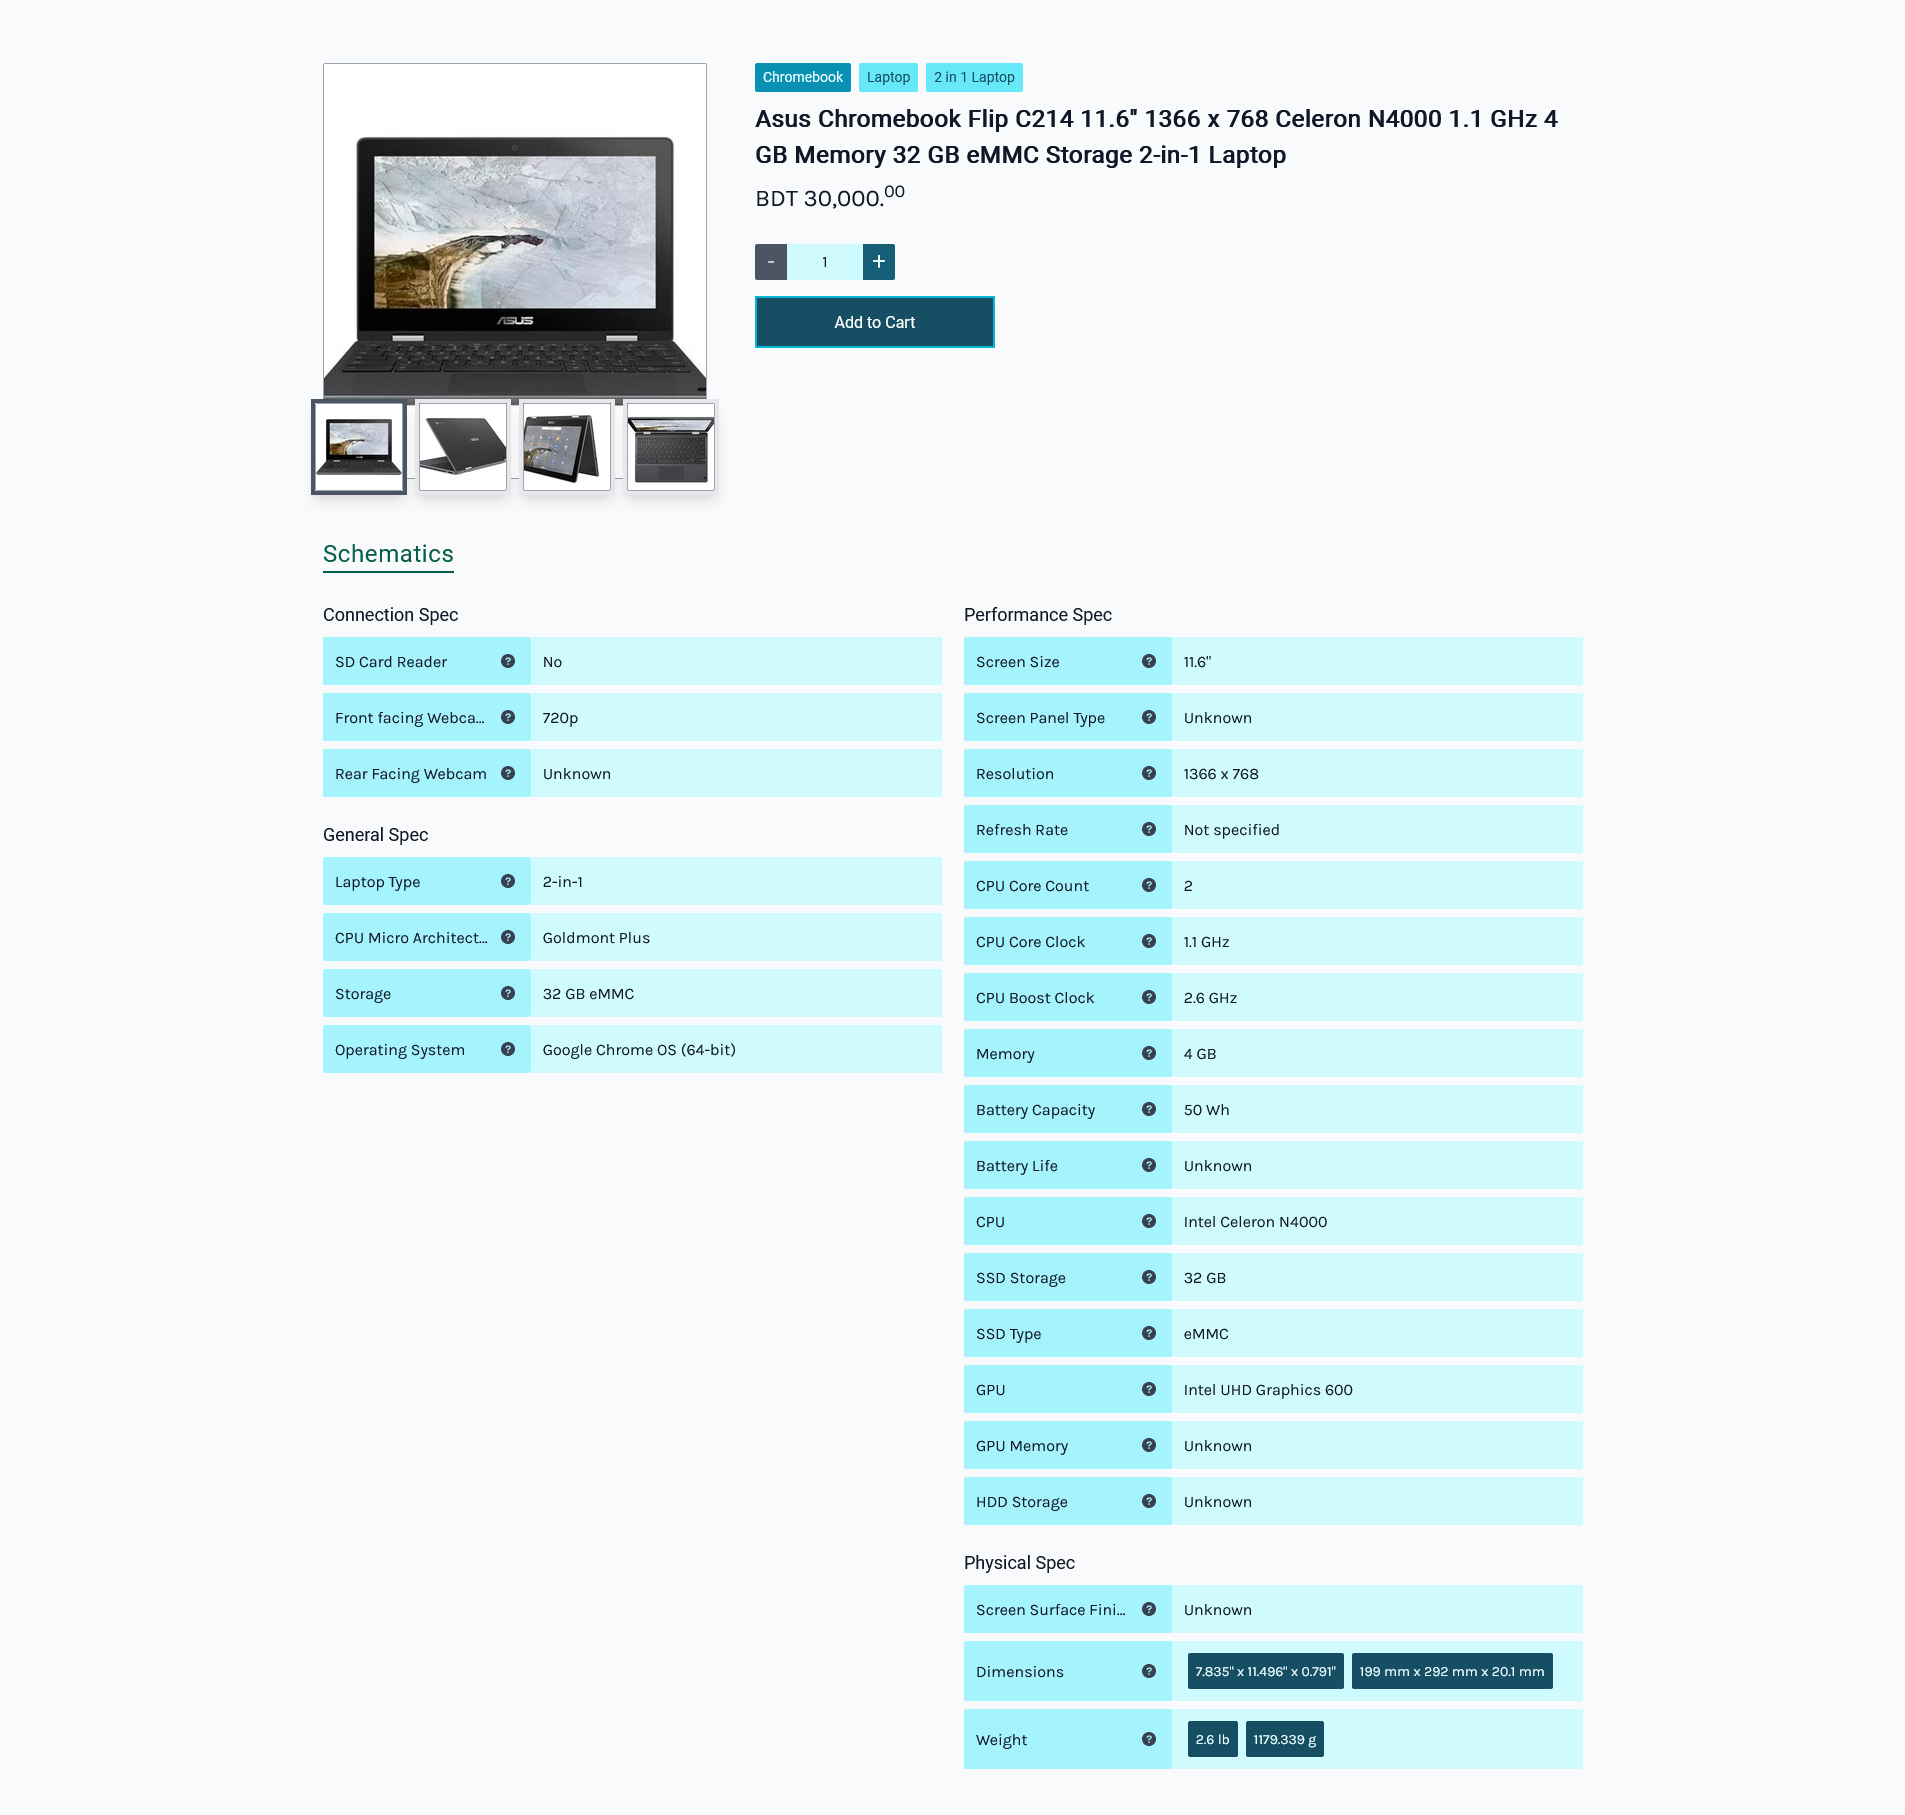
Image 1: Per Unit Products are sold in Stocks where each unit has an individual serial numbers.
18.1 - Manage Per Unit Products
Learn More about how to search, create, and modify details of Product Batch and Stock of Per Unit Product(s).
Manage Per Unit Products
Under the Product List, Per Unit Products can be identified through the barcode icon. On the very right, there is an Edit icon through which the Per Unit product can be edited. The options to edit, create, and manage Product Batch and Product Stock for Per Unit Products can be accessed by clicking the ellipsis ⋮ button.
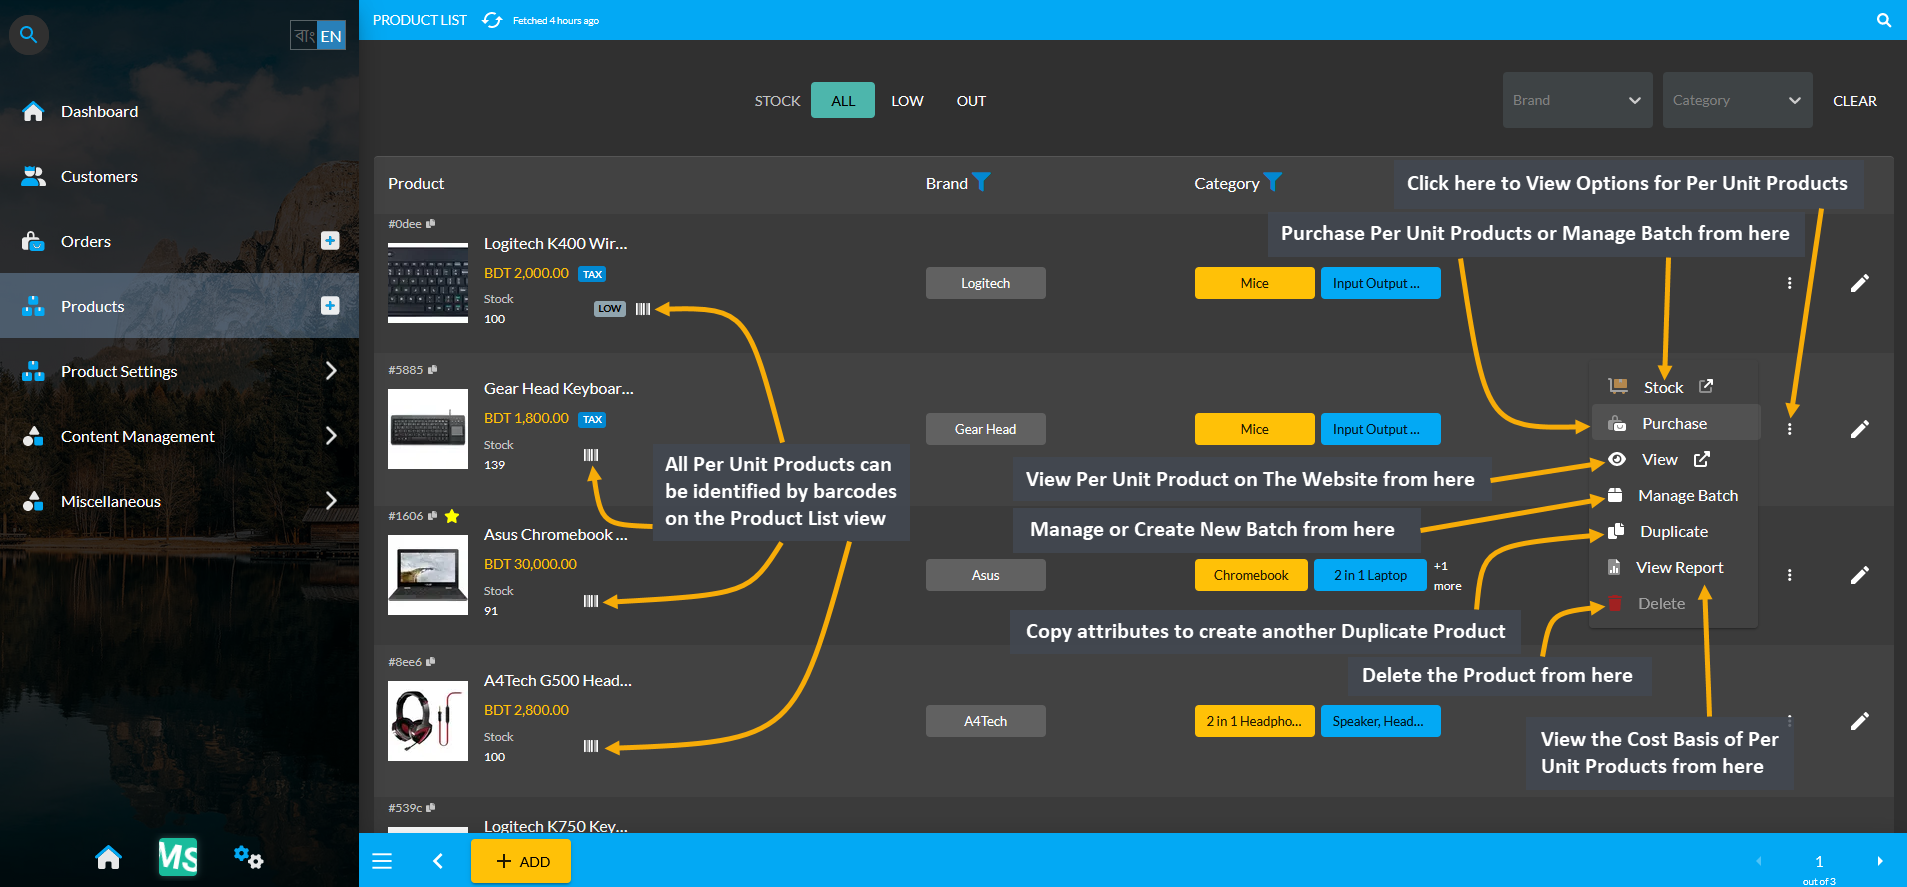
Image 1: Product List view have several options to create and edit Stock and Batch for Per Unit Products.
The first option is the Stock clicking on which will allow adding Product Stock and managing Product Batch. After this is the option to Purchase clicking on which will allow purchasing the Per Unit Product from a Credit Supplier through four Acquisition Methods: Without Payment, Partial Payment, Full Payment, and Untracked. Then, there is a View option clicking on which will redirect to the Product advertised on The Website. Next, is the Manage Batch option, through which new Batches can be created and current Batches can be managed.
The fifth option is a Duplicate button using which Product attributes can be copied to create another Duplicate Product with different properties. The View Report option will allow viewing the Cost Basis of Per Unit Products. Finally, the Delete option will allow deleting the Product. All these functions are marked separately above.
Back Stock Feature
Within the Product List view, clicking on the Barcode icon will open a shortcut menu from which the Stock for Per Unit Product can be instantly updated. Using the Add Product Stock button will allow adding Product Unit under a Product Batch with auto generated serial numbers. These are all the shortcut options on the Product List View.
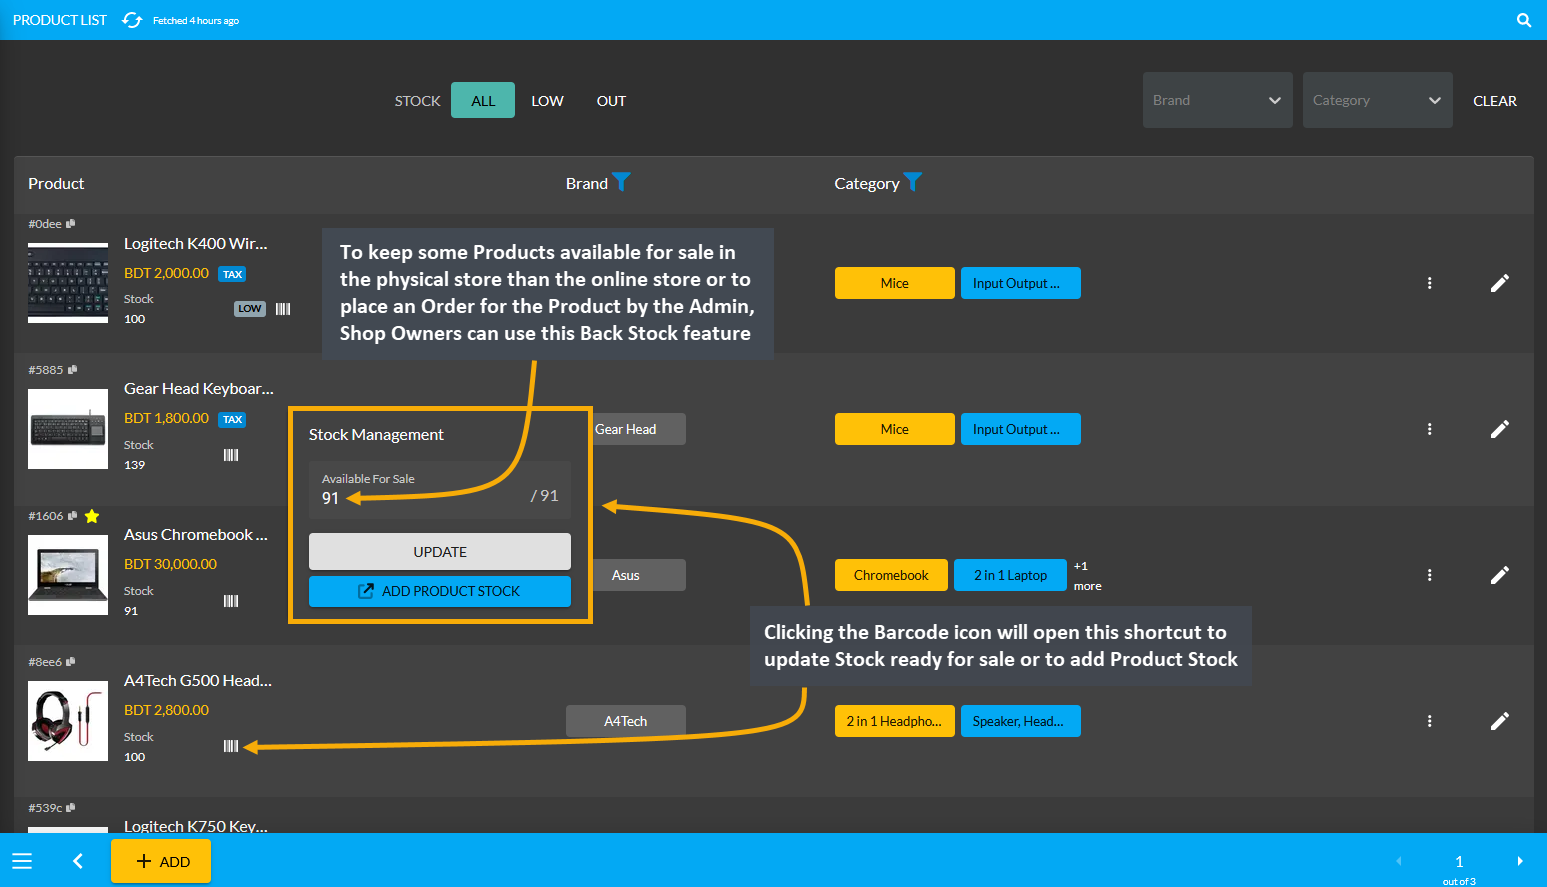
Image 2: On Product List view, Per Unit Product Stock can be instantly updated by clicking on barcode icon.
18.2 - Create and Manage Product Batch
Learn More about how to search, create, and modify details of Product Batch and Stock of Per Unit Product(s).
Create and Manage Product Batch
Creating Product Batch will make it easier for the Shop Owner to remember when a specific Batch with a specific Product Stock was purchased and with how much price. For instance, they bought 50 Per Unit Products of Gear Head Keyboard Wired Slim Keyboard With Touchpad for 800 BDT on August 15 and purchased another 60 Per Unit Products of Gear Head Keyboard Wired Slim Keyboard With Touchpad for 700 BDT on August 18. Creating separate Product Stock of these Per Unit Products under individual Product Batches will make it convenient to keep count of which Product Stock were sold later.
Manage Product Batch
The options to Manage Product Batches can be accessed from within the Per Unit Product under Product List. Click on the ellipsis ⋮ button and then select Stock that will redirect to the Unit Stock Management page.
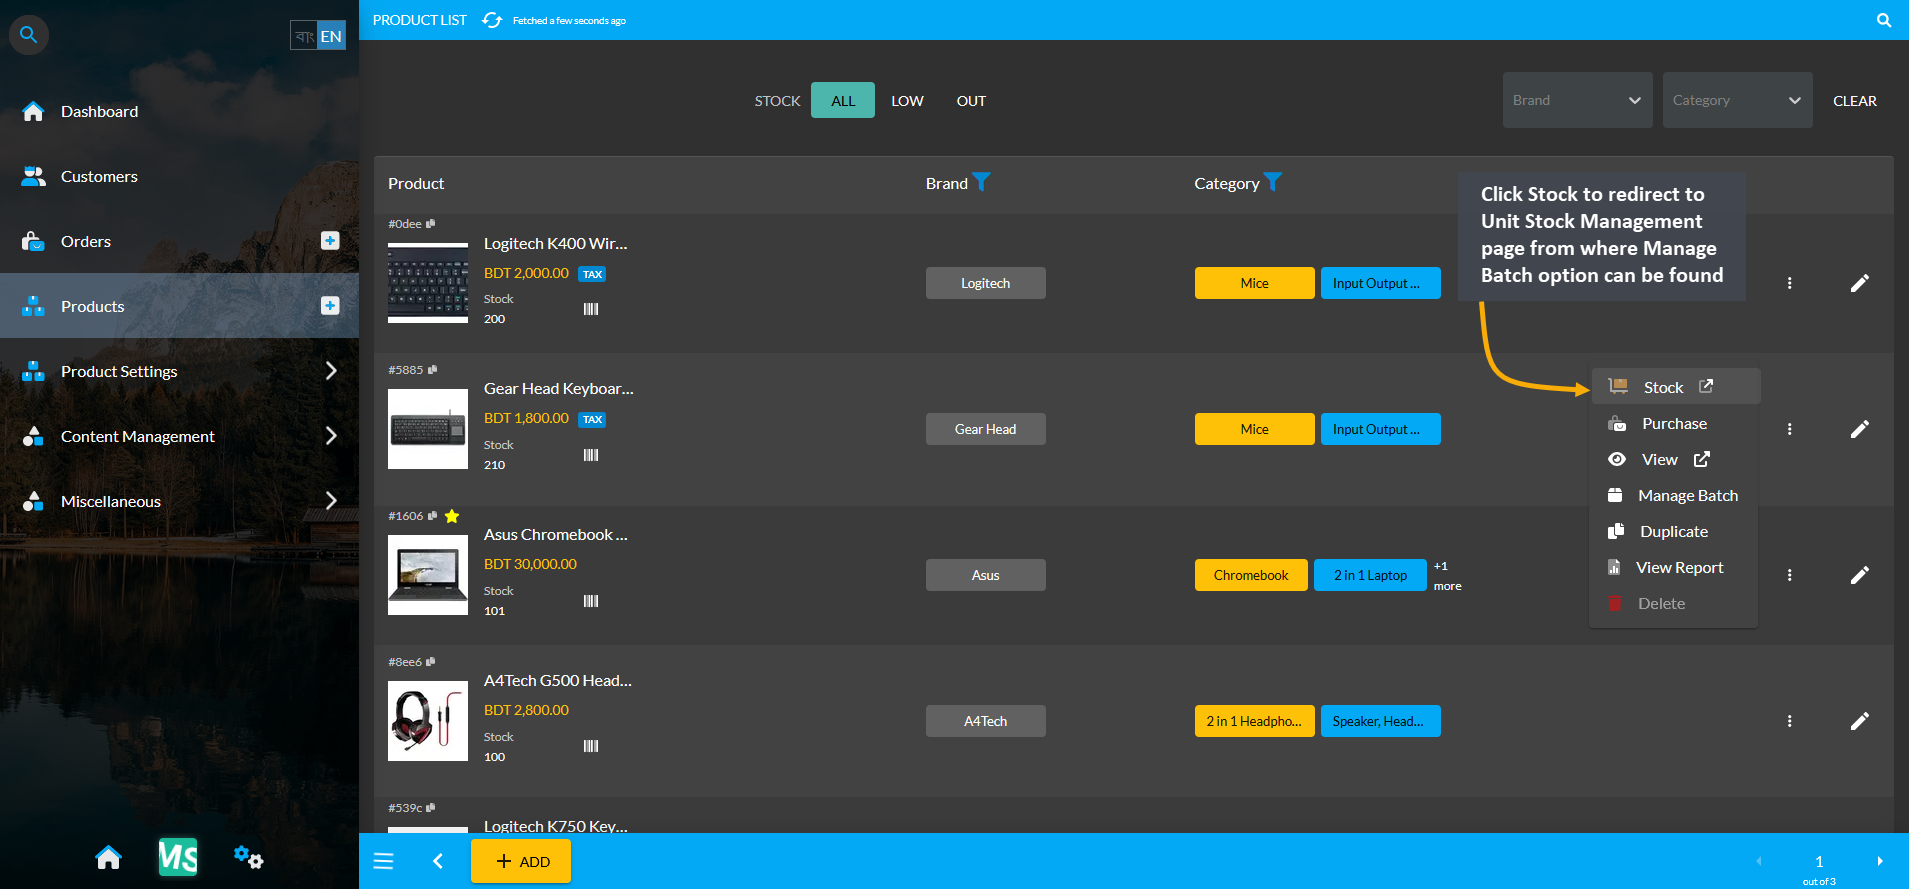
Image 1: Click the ⋮ button and select Stock that will redirect to the Unit Stock Management page.
On the Unit Stock Management page, click Manage Batches button to edit Batches from the Product Batch List.
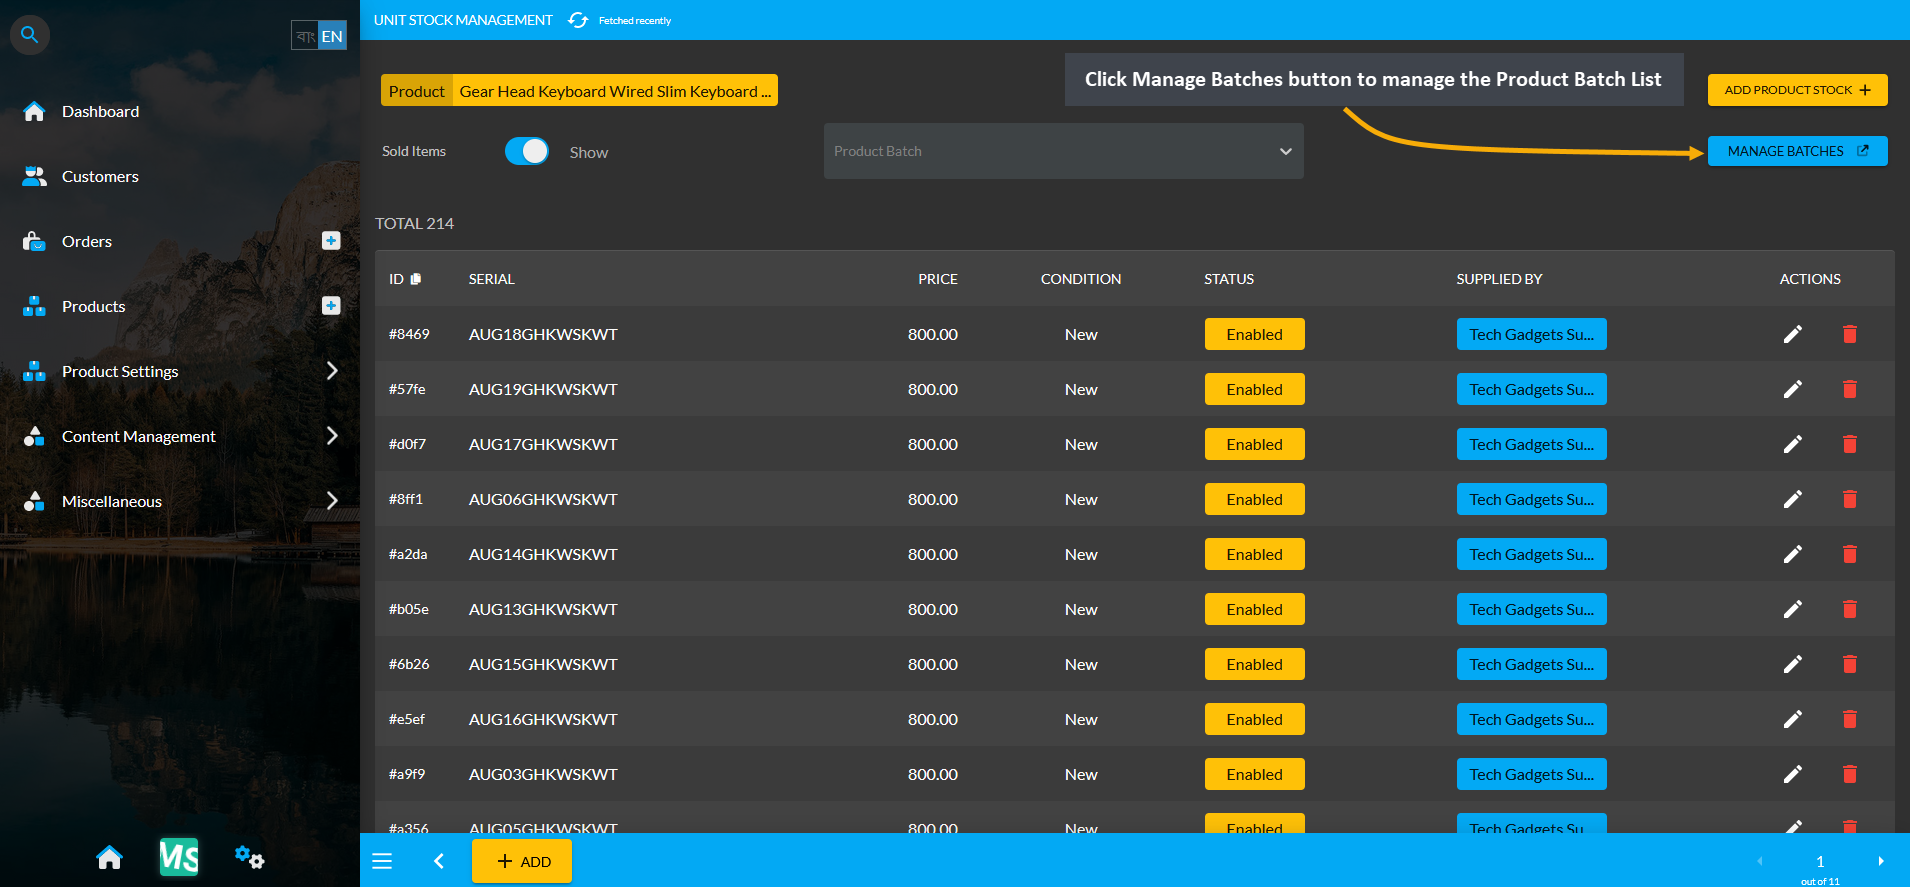
Image 2: Click the Manage Batches button on Unit Stock Management Page to edit Batches from Product List.
Another option to Manage Product Batches can be found by directly clicking on Manage Batches button within the Per Unit Product on the Product List page. This will redirect to the Product Batch List page.
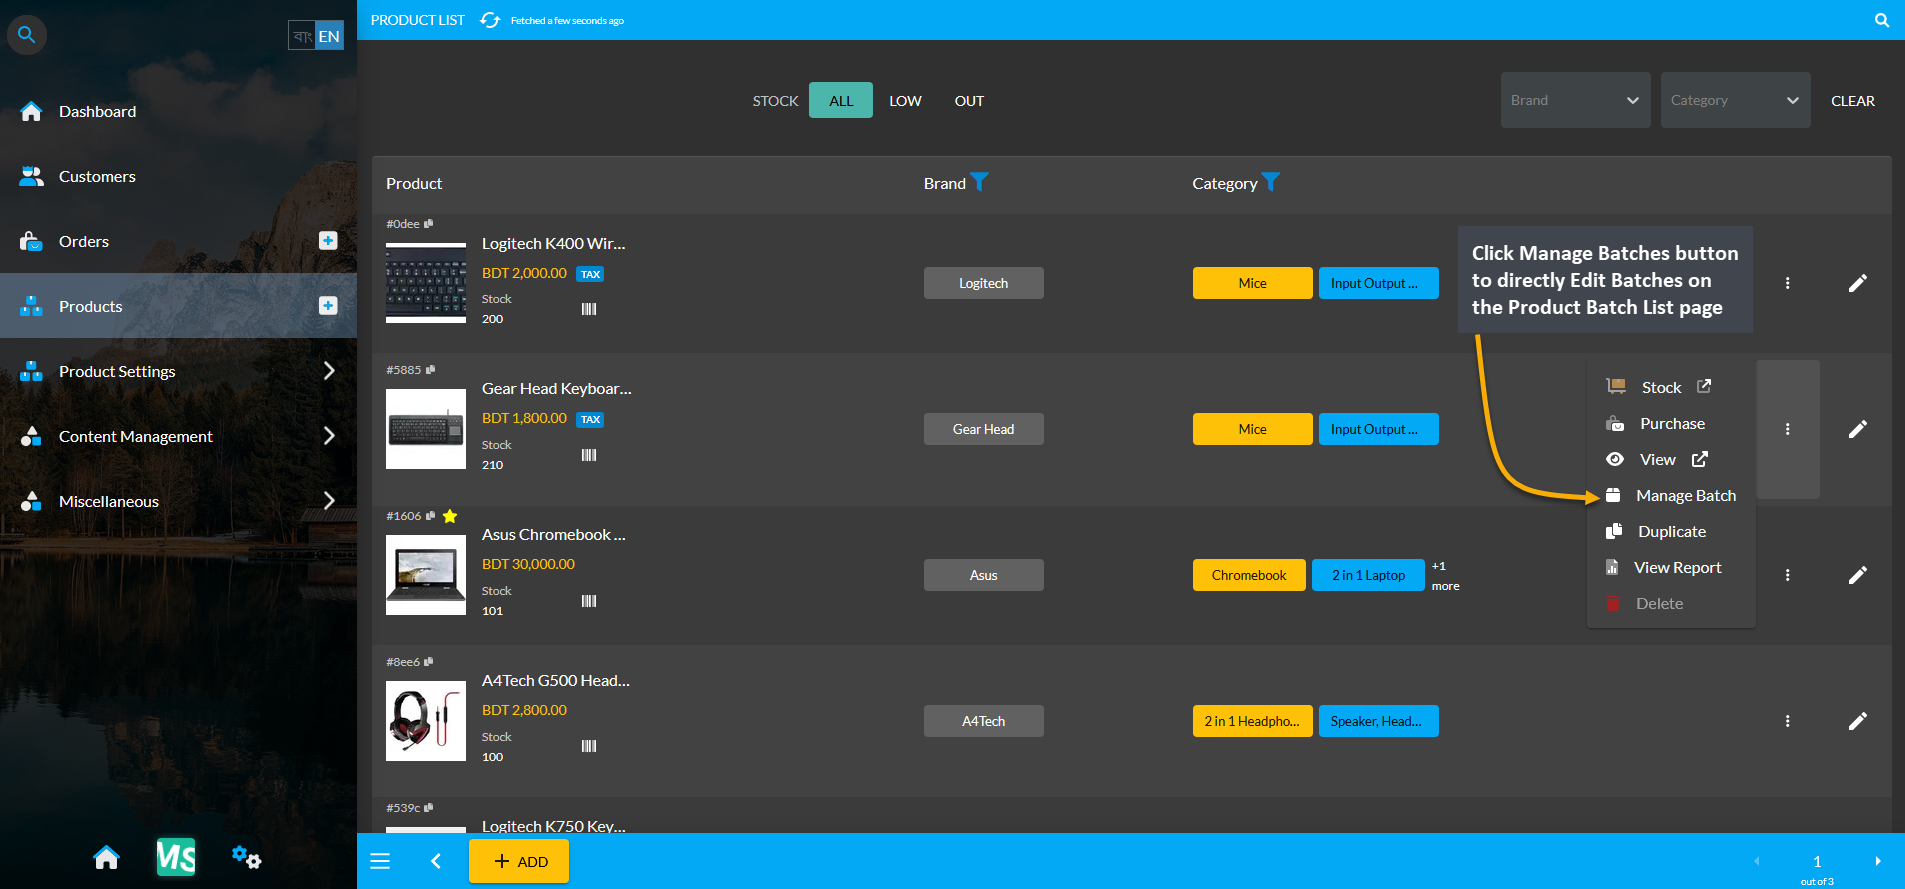
Image 3: Click the Manage Batches button from Product List to directly view the Product Batch List page.
Cost Basis on Product Batch List Page
On the Product Batch List page, the Shop Owner can view the history of Per Unit Product Stock purchases. There is a gray graph icon, clicking on which will open the Cost Basis for the selected Product Batch as shown below.
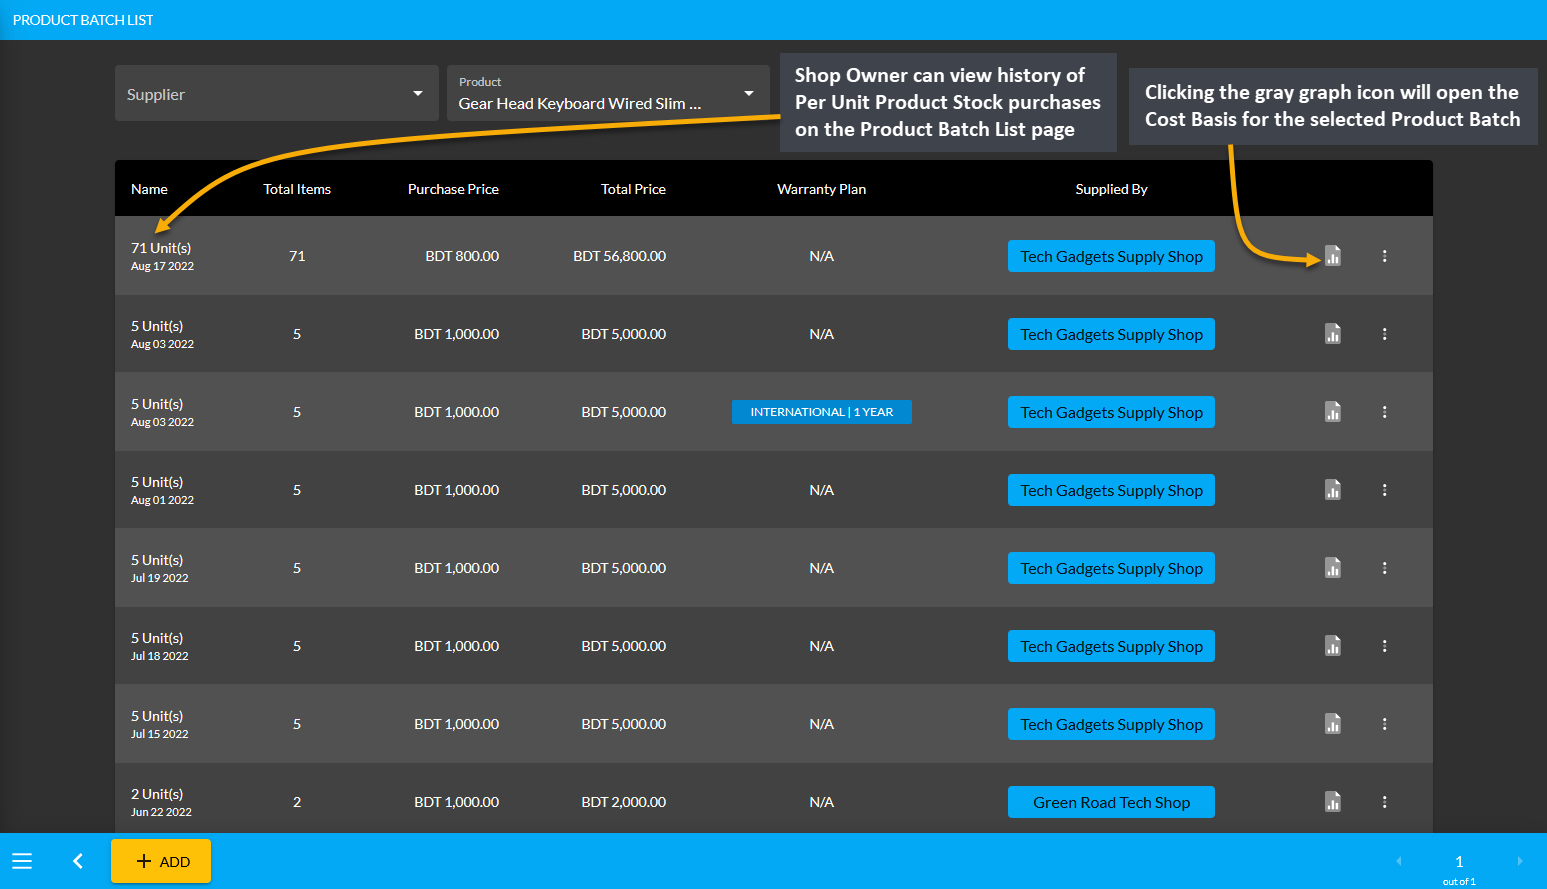
Image 4: View history of Per Unit Product Stock purchases from the Product Batch List page.
When redirected to the Cost Basis page of the Product Batch by clicking on the gray graph icon, the Shop Owner will be able to see Daily, Monthly, Hourly, Weekly, Half Yearly, and Yearly revenues and profits. The example shows the Cost Basis of 71 Units of Gear Head Keyboard Wired Slim Keyboard With Touchpad bought on August 17, 2022.
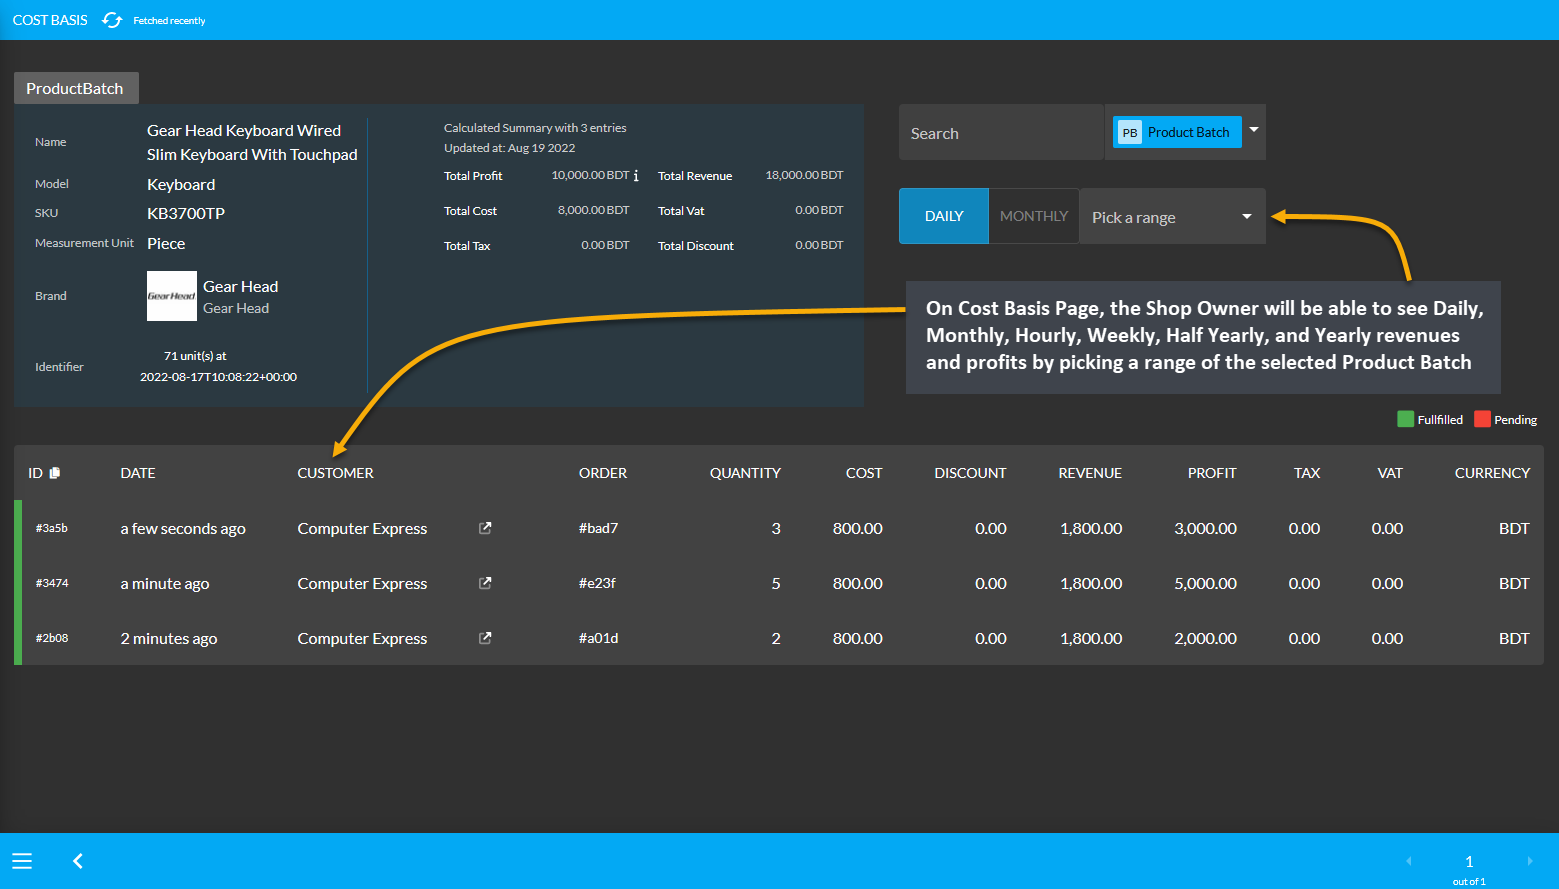
Image 5: Clicking on the gray graph icon will redirect to the Cost Basis page of selected Product Batch.
View and Edit Product Batch
On the Product Batch List page, clicking on the ellipsis ⋮ button will open View, Edit, and Delete options of Per Unit Product Batches. Using these options, the Shop owner can edit or delete selected Product Batch information.
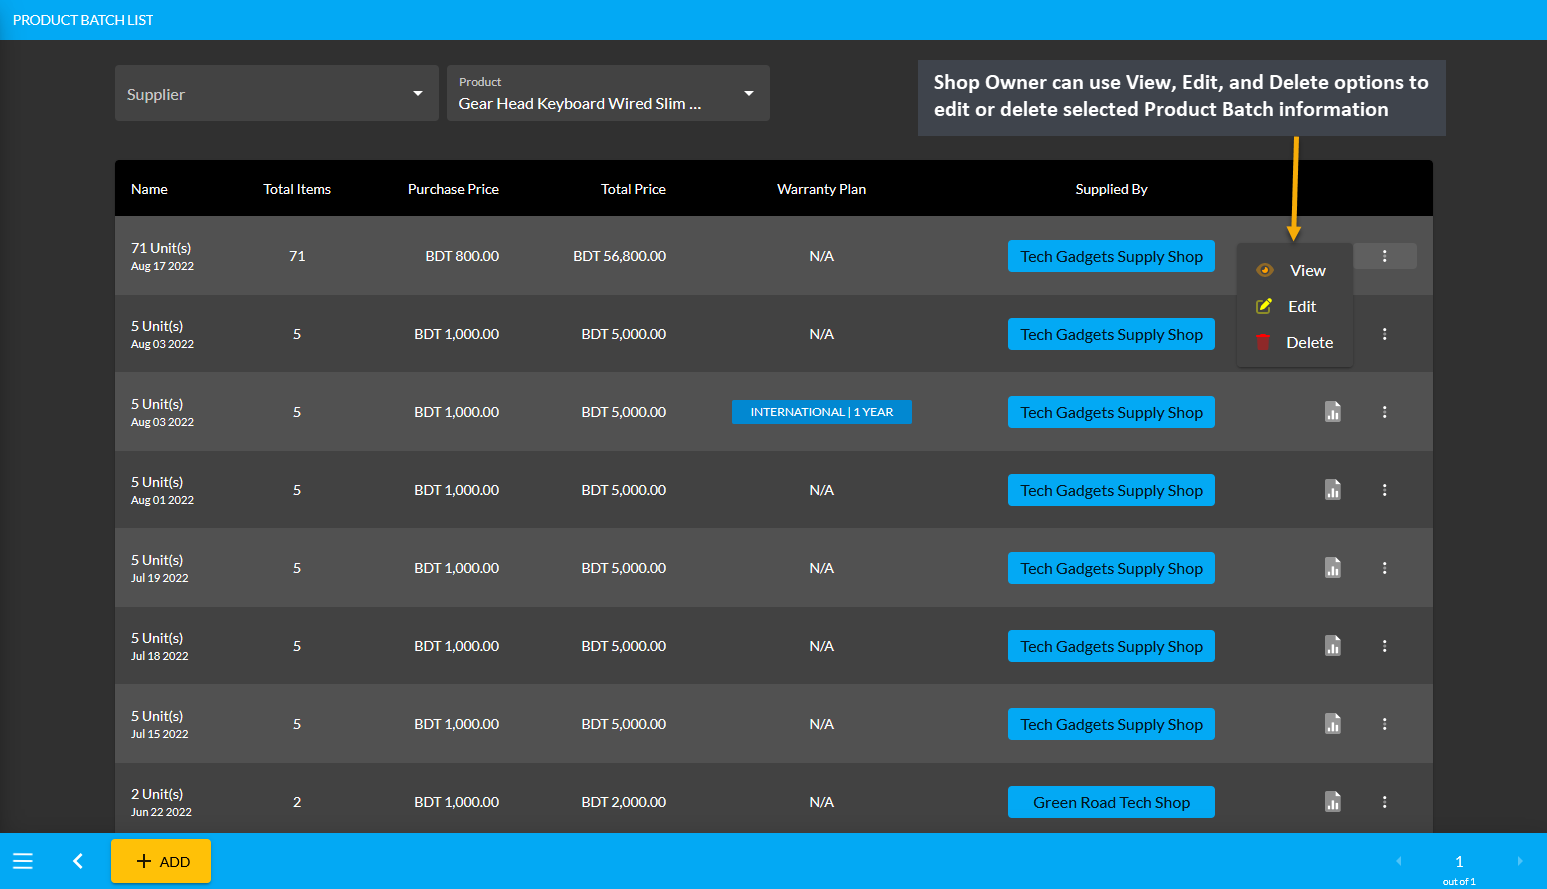
Image 5: Clicking on the gray graph icon will redirect to the Cost Basis page of selected Product Batch.
Clicking the View button will redirect to the Unit Stock Management page, where the Shop Owner can see all the Product Stock details of the selected Per Unit Product and their Enabled or Sold statuses.
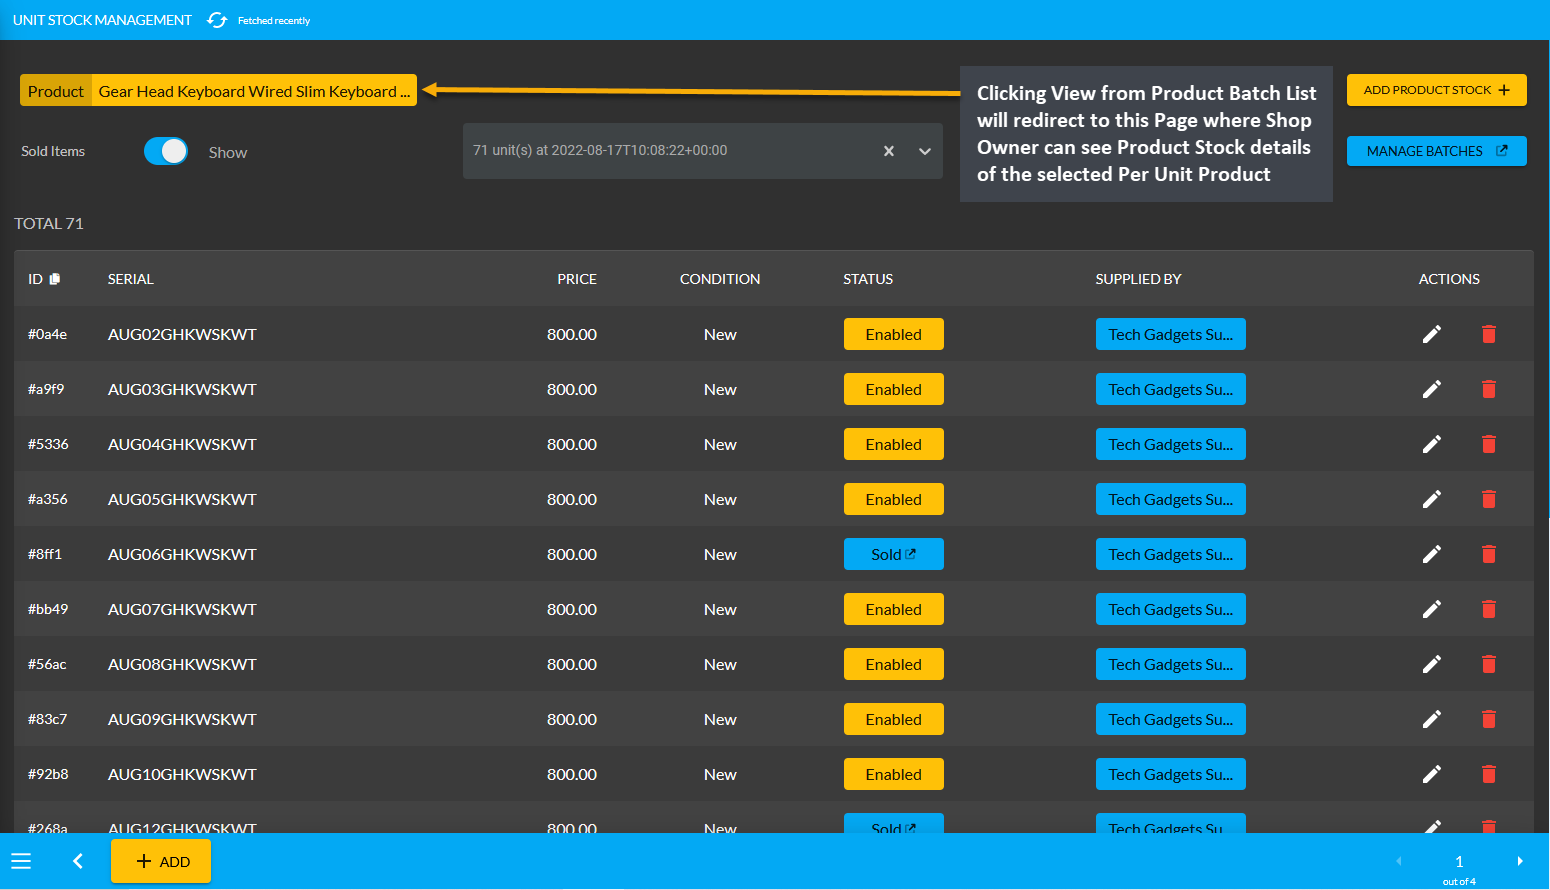
Image 6: Click View from Product Batch List to view Per Unit Product stock on Unit Stock Management page.
Clicking the Edit button will redirect to Update Product Batch page, where the Shop Owner can edit Batch name, purchase price, warranty, Supplier name, and expiry date of the selected Product Batch.
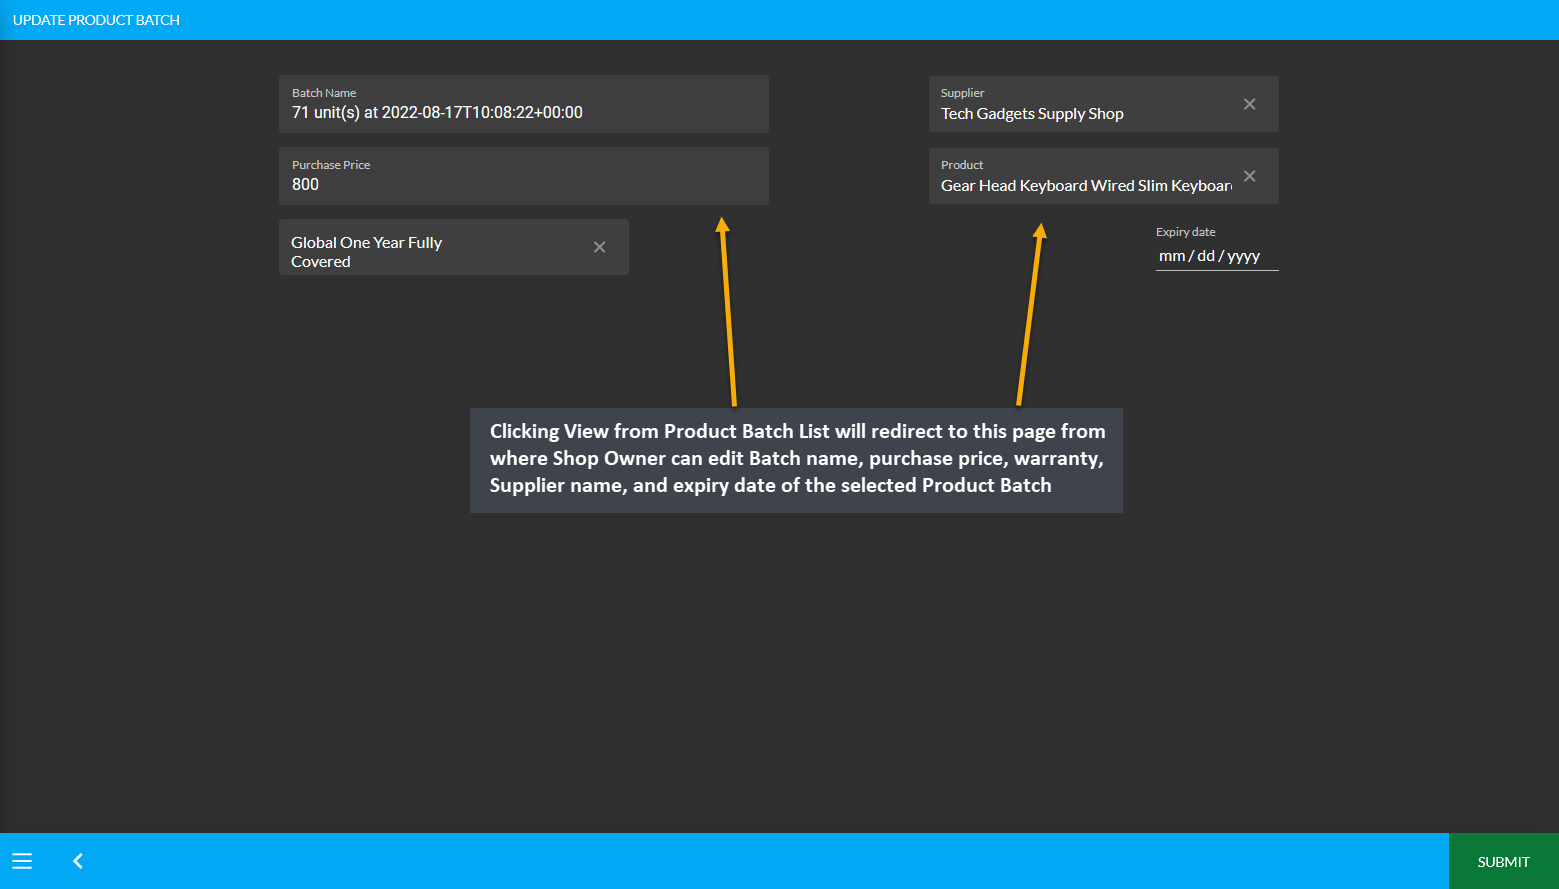
Image 7: Click Edit from Product Batch List to edit Product Batch details on Product Batch Update page.
Create New Product Batch
The Unit Stock Management page can be accessed by clicking on Stock. This will give Shop Owner access to create New Product Batch or purchase Per Unit Products directly from Credit Supplier. From there, click Add Product Stock button to purchase Per Unit Products in Batches which will redirect to the Add Product Stock page.
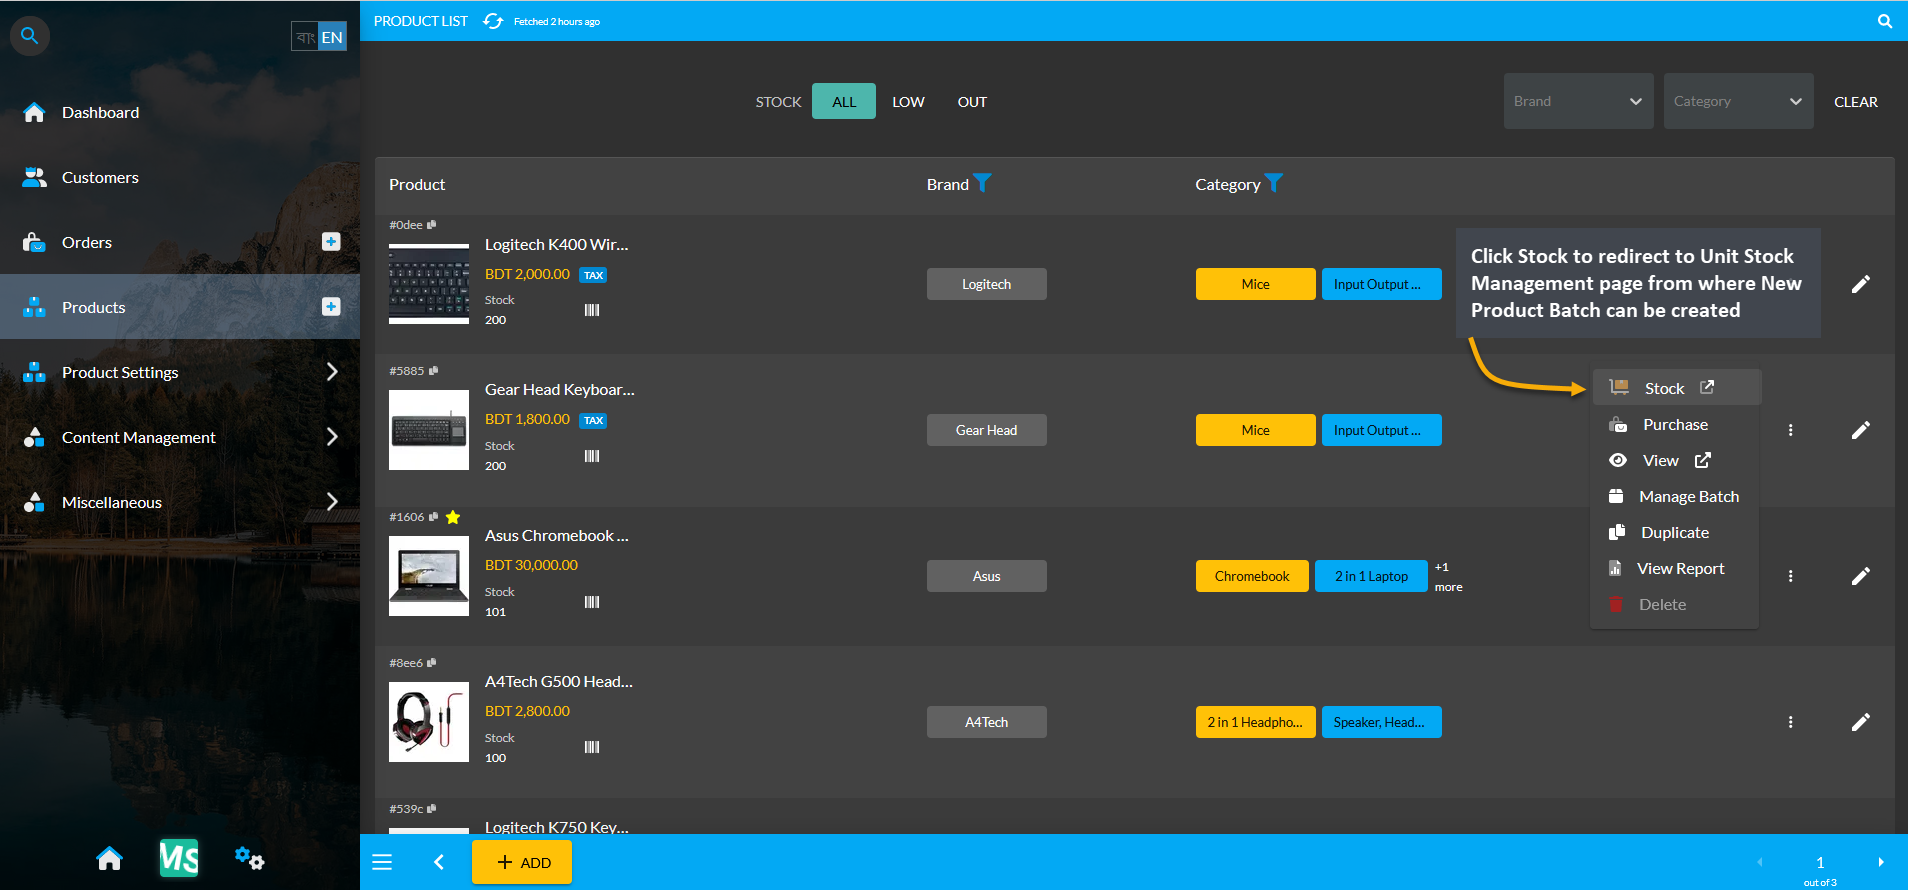
Image 8: Click Stock to access option to create New Product Batch from Unit Stock Management Page.
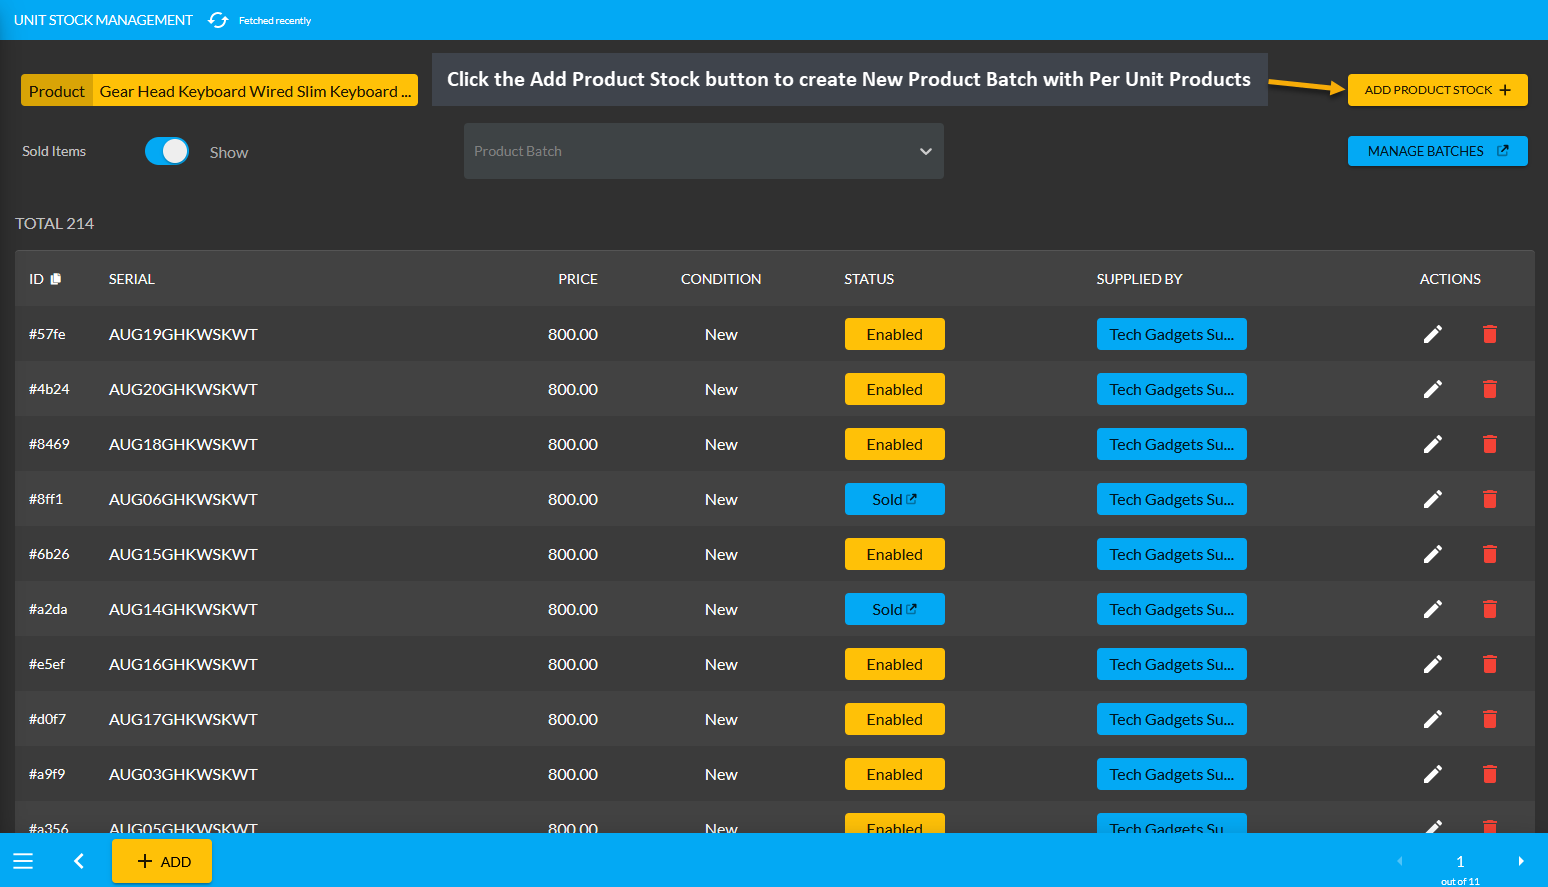
Image 9: Click the Add Product Stock button to create New Product Batch with Per Unit Products.
Purchase Per Unit Products in Batches
On the Add Product Stock page, the Shop Owner can purchase Per Unit Products from the Credit Supplier Without Payment, with Full Payment, or with Partial Payment. Another option is Untracked, purchasing through which will leave no records of purchase. Select any of the Payment Methods from Acquisition Options. After that, set the Purchase Price Per Unit, select Credit Supplier, and select Warranty if it is not automatically selected.
Turn on the toggle button to enable auto increment for sale stock count. Then click Auto Generate Serial Numbers button to generate Quantity and Serial of Per Unit Product that Shop Owner will buy from Supplier. It will open a pop-up, where Prefix, Suffix, Start Counter, and End Counter needs to be filled to generate Product Stock with individual serial numbers.
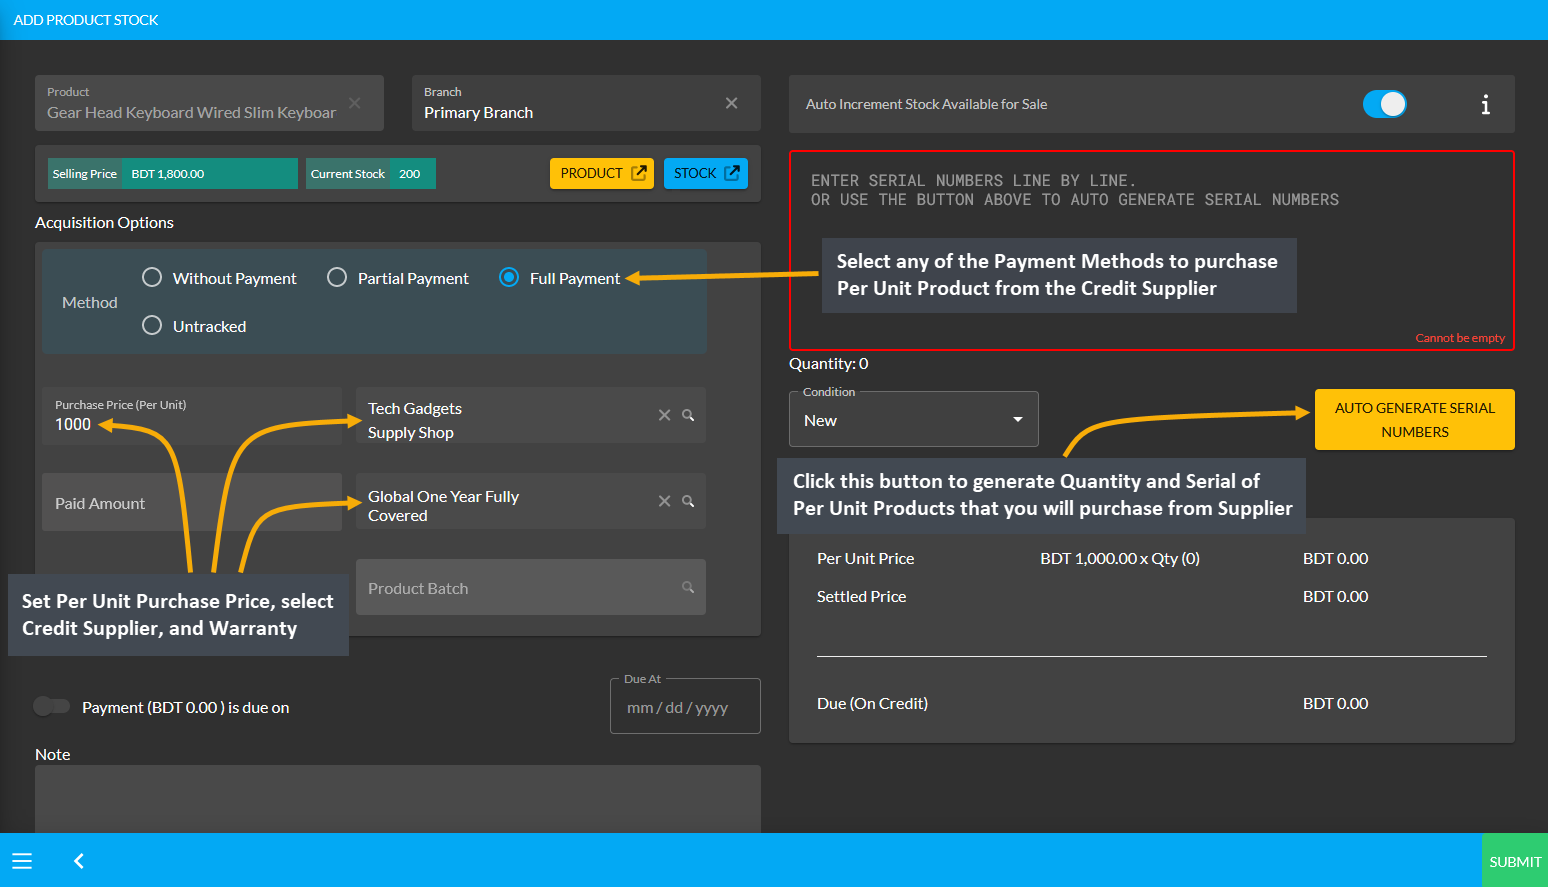
Image 10: Set Purchase Price, select Supplier and Warranty, and click Auto Generate Serial Numbers button.
After clicking the Auto Generate Serial Numbers button, a pop-up will appear where Product Serial Number and Quantity needs to be set with Prefix, Suffix, Start Counter, and End Counter. Click the Generate button to create the Per Unit Products for purchase from the Credit Supplier that will add the serial numbers inside the box.
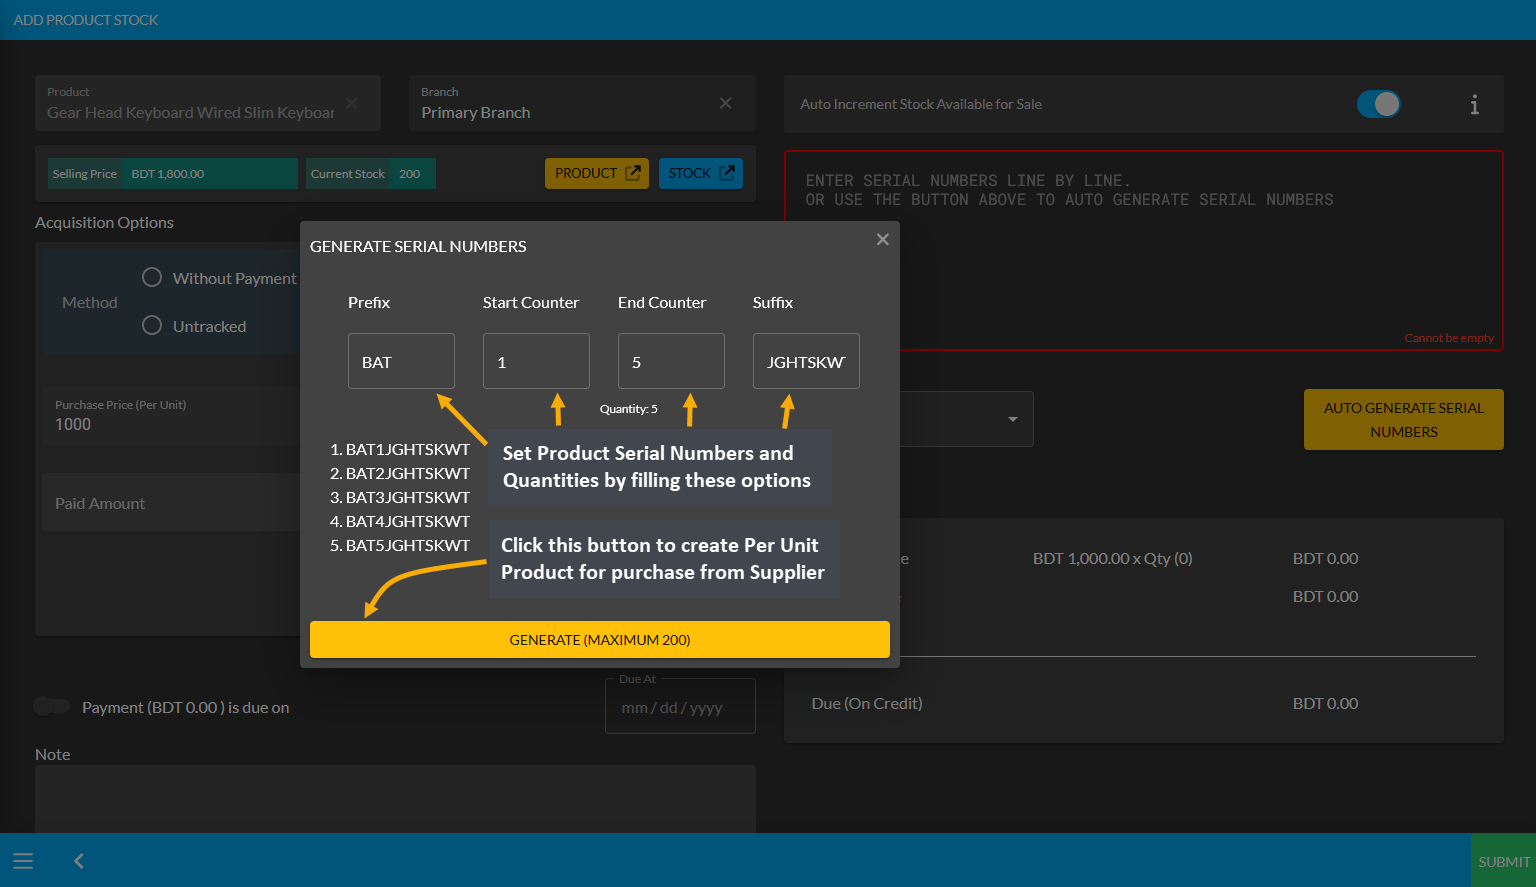
Image 11: Set Product Serial Number and Quantity with Prefix, Suffix, Start Counter, and End Counter.
After Product Serial Numbers and Quantities are generated for the target Per Unit Product, full payment amount will automatically be set on the Paid Amount box. For other payment options, turn on Payment Due toggle button and select the Due Date or add Note as needed. The autogenerated serial numbers for created Per Unit Product quantities will show inside the box. Click the Submit button to complete the purchase process.
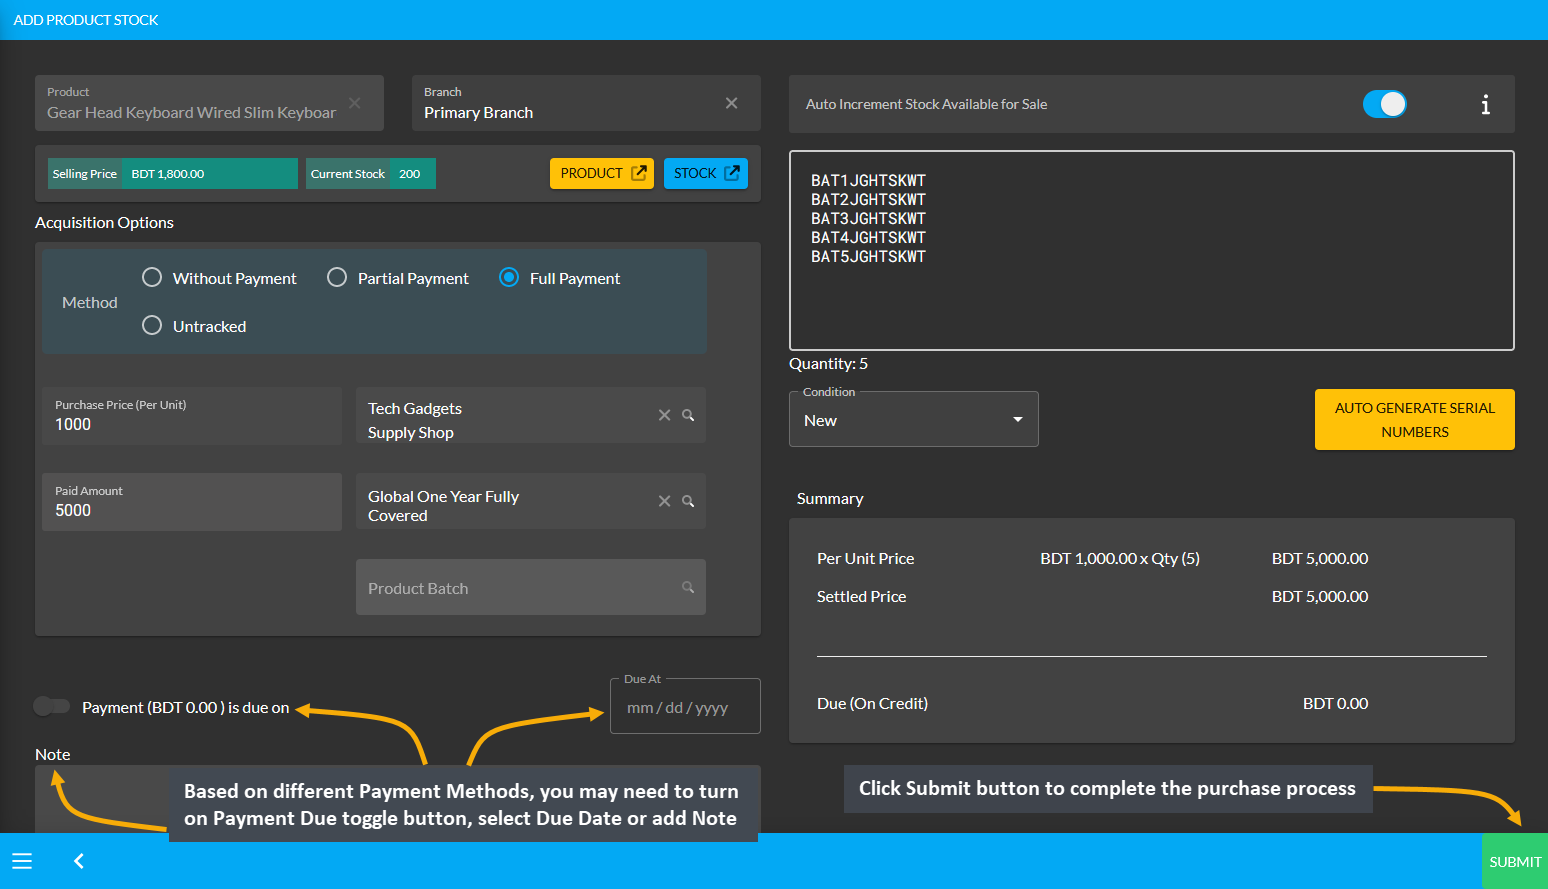
Image 12: After all necessary purchase details are set, click Submit to complete the purchase process.
Then, a pop-up will show uploading assigned Per Unit Product quantities and confirm when units are successfully created. Click Okay to save changes when auto generated serial numbers are 100% uploaded for completing the Per Unit Product purchase process from Credit Supplier. If Shop Owner wants to purchase more quantities of the same Per Unit Product from the same Credit Supplier, then they need to click the Purchase Product from Same Supplier button as shown in the example screenshot.
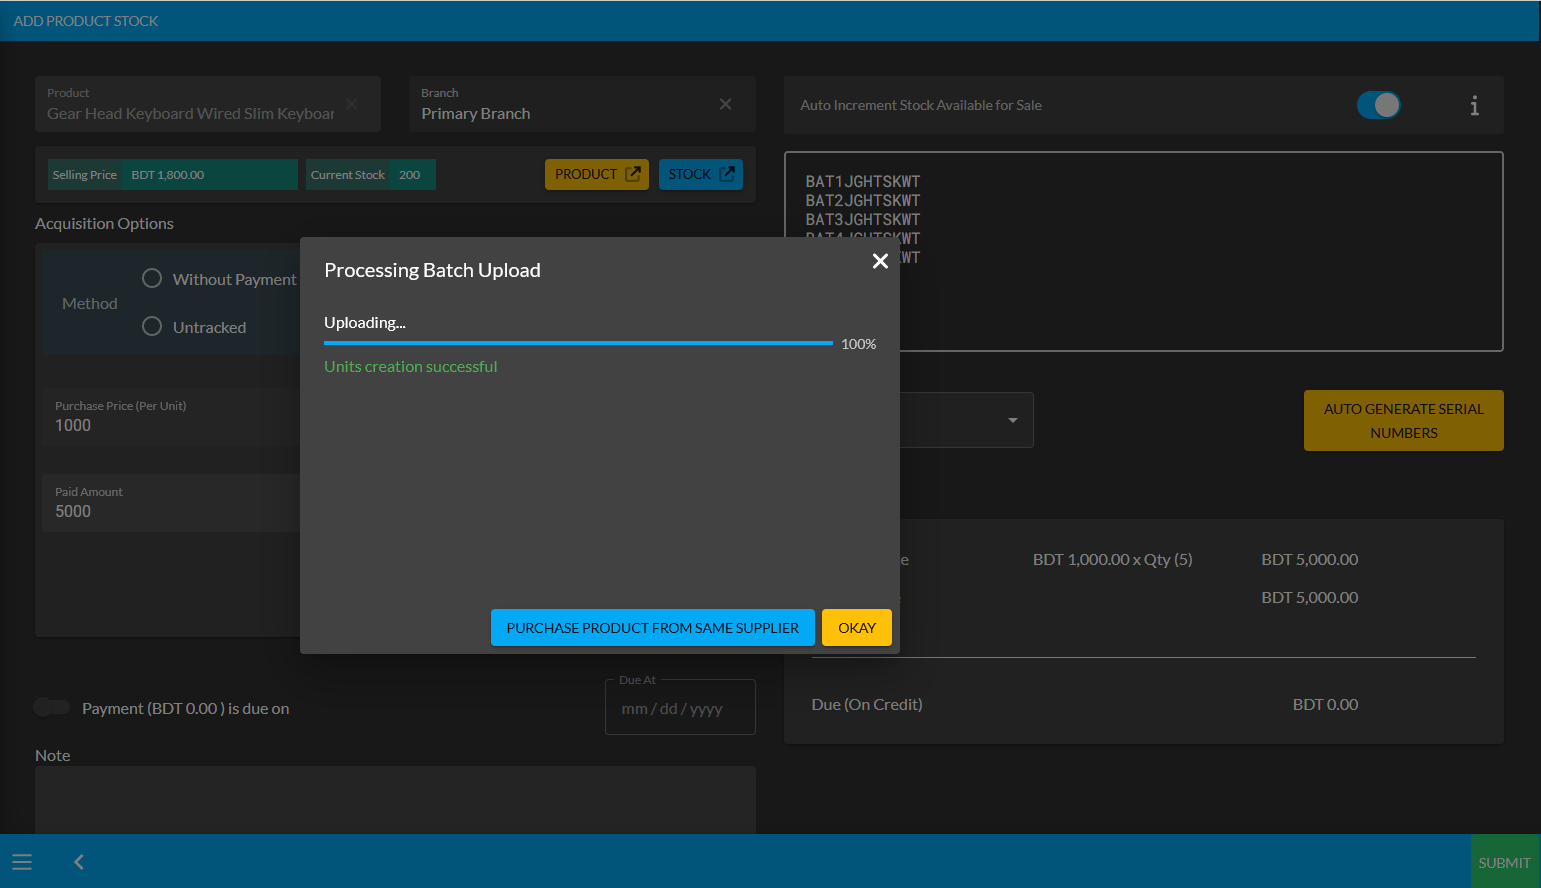
Image 13: Pop-up showing successful creation or batch upload of Per Unit Product. Click Okay to proceed.
Clicking on Okay will redirect to the Unit Stock Management page where the successfully created Batch of Per Unit Products will be displayed on the top of the list. For Per Unit Products, the individual serial numbers will also be displayed with Product SKUs, through which stocks can be differentiated. Click here to learn in details about Per Unit Product Purchase of all types using different Payment Methods to create New Product Batches.
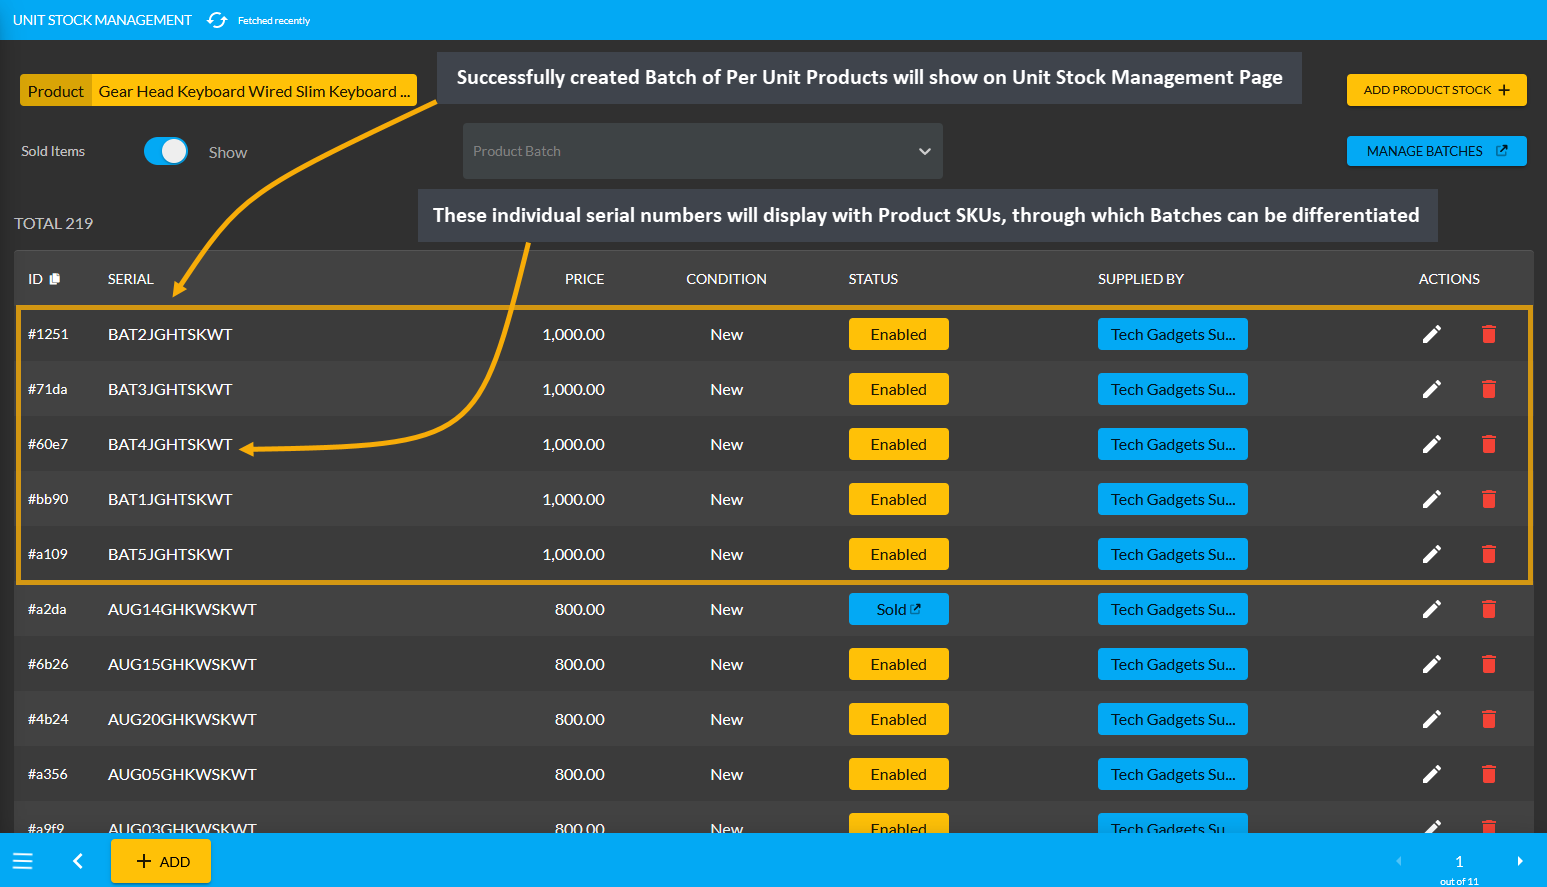
Image 14: Successfully created Batch of Per Unit Products will display on the Unit Stock Management Page.
Available Stock for Sale Explained
When the Shop Owner turns on the Auto Increment Stock Available for Sale toggle button, it will determine if the added Product Units will be added within the main available Stock for sale or not. For instance, a Shop Owner has 10 Processors to sell both at store and online, but they were already sold online. Later, when a Customer visits the store to Order 2 Processors, they will not be able to buy them even though the Processors were stacked in the store shelves, because those 10 Processors were already sold online.
Therefore, to avoid such negative situations, the Shop Owner can sell maximum 6 Processors online and keep 4 Processors in Back Stock. For Customers who visits in-person at the store, the Shop Owner can place Order for them and assign Stock from these 4 Processors without facing any Out of Stock issue. Thus, if they turn off the Auto Increment Stock Available for Sale toggle button beforehand, the 4 Processors will be unavailable or show Out of Stock for automated sale online after 6 Processors are sold out of 10 Processors.
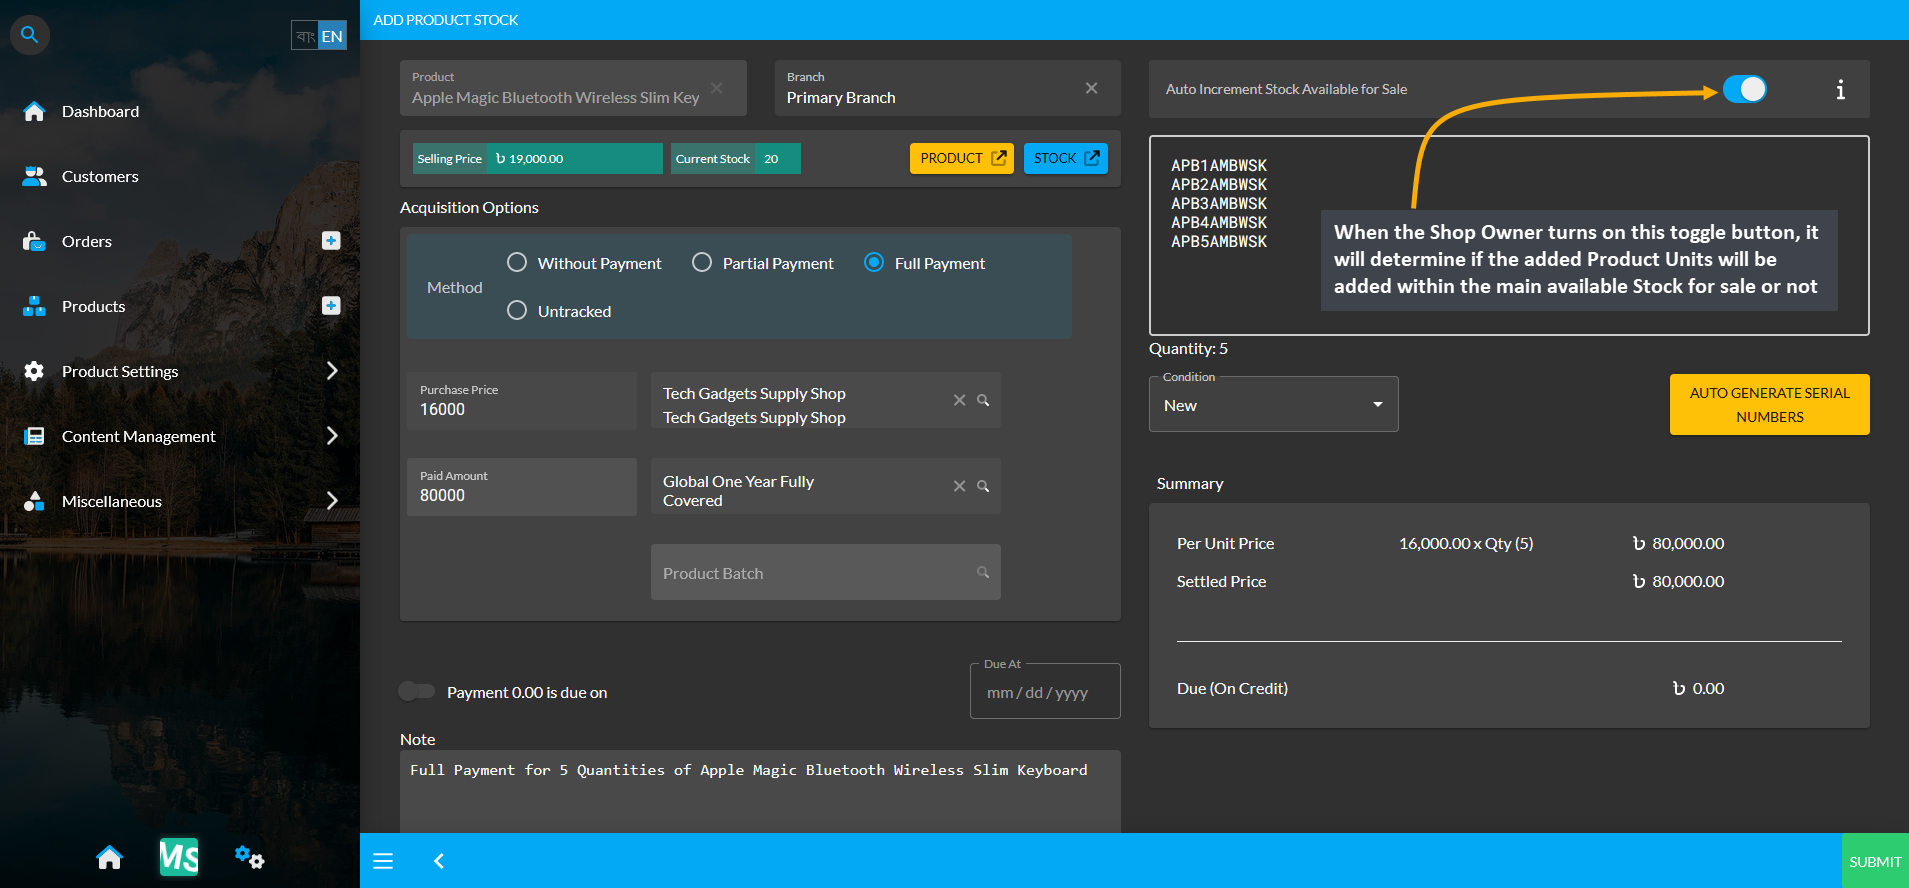
Image 15: Determine if added Product Units will be added within the main available Stock for sale or not.
18.3 - Add Stock for Per Unit Products
Learn More about how to search, create, and modify details of Product Batch and Stock of Per Unit Product(s).
Steps to Create Stock for Per Unit Products
Add Stock for Per Unit Products by selecting Stock that will redirect to the Unit Stock Management page where the list of available and sold Product Stock will be displayed. There is a drop down search box for Product Batch where selecting a specific Batch will display the Product Stock available or sold under it as exemplified below.
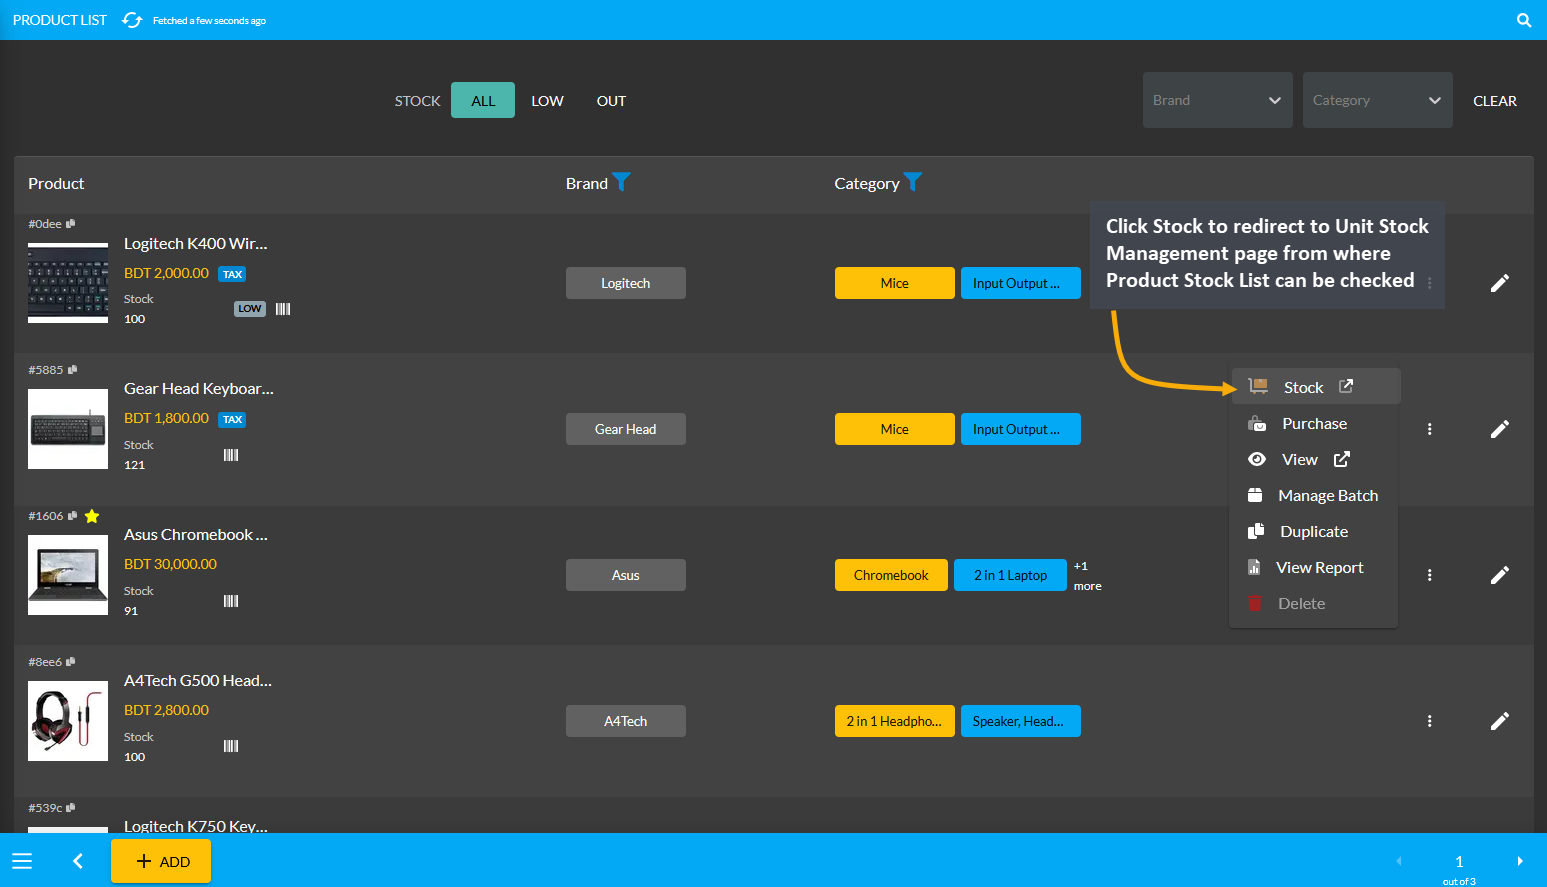
Image 1: Click Stock to go to Unit Stock Management page from where Product Stock List can be checked.
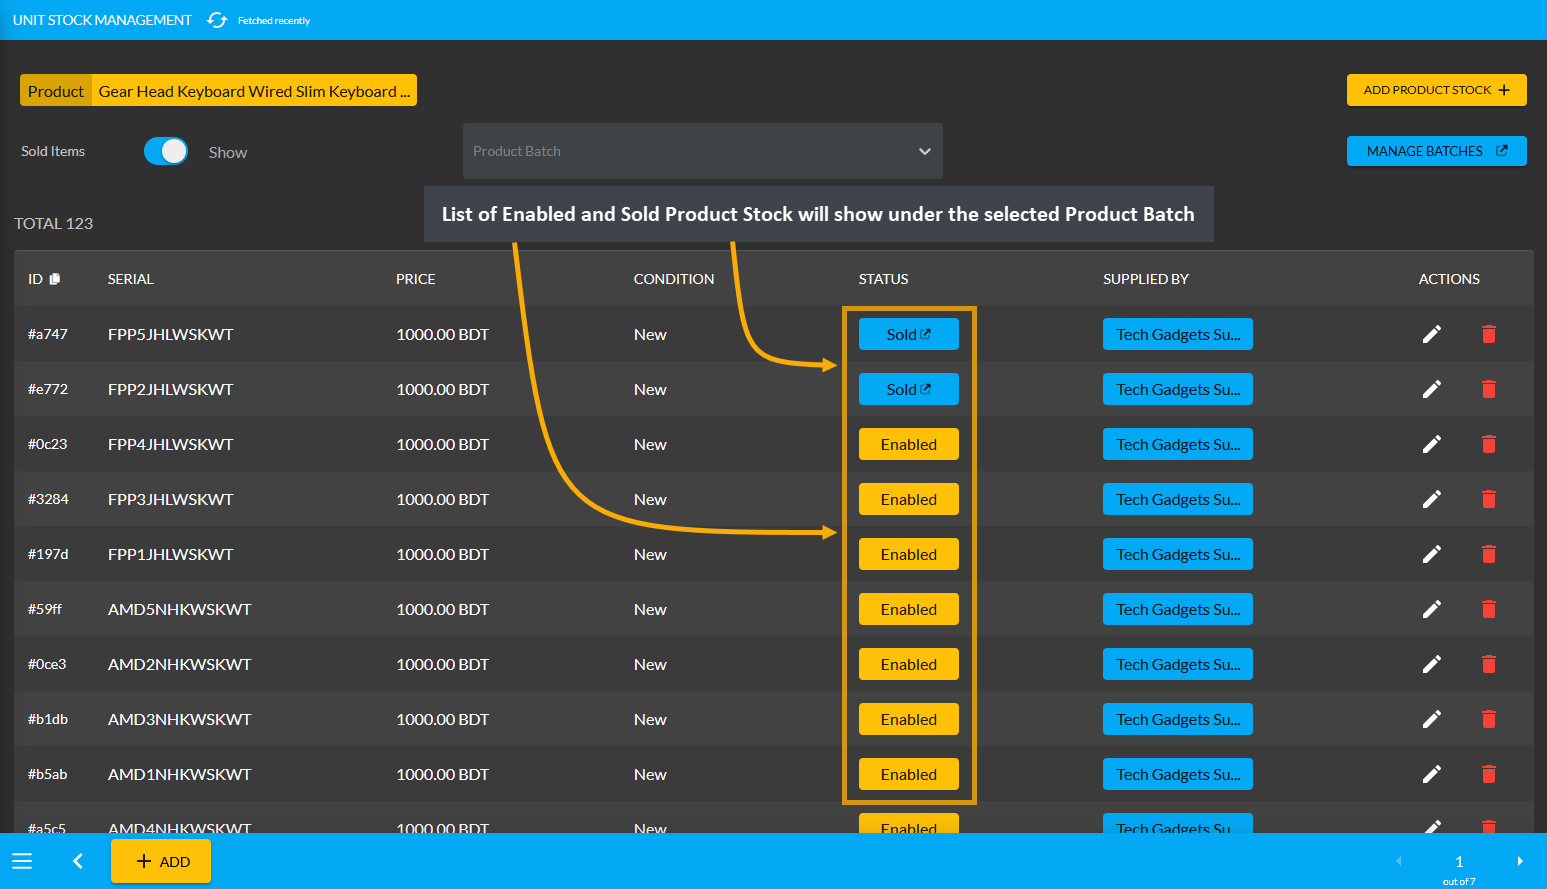
Image 2: List of Enabled and Sold Product Stock will be displayed under the selected Product Batch.
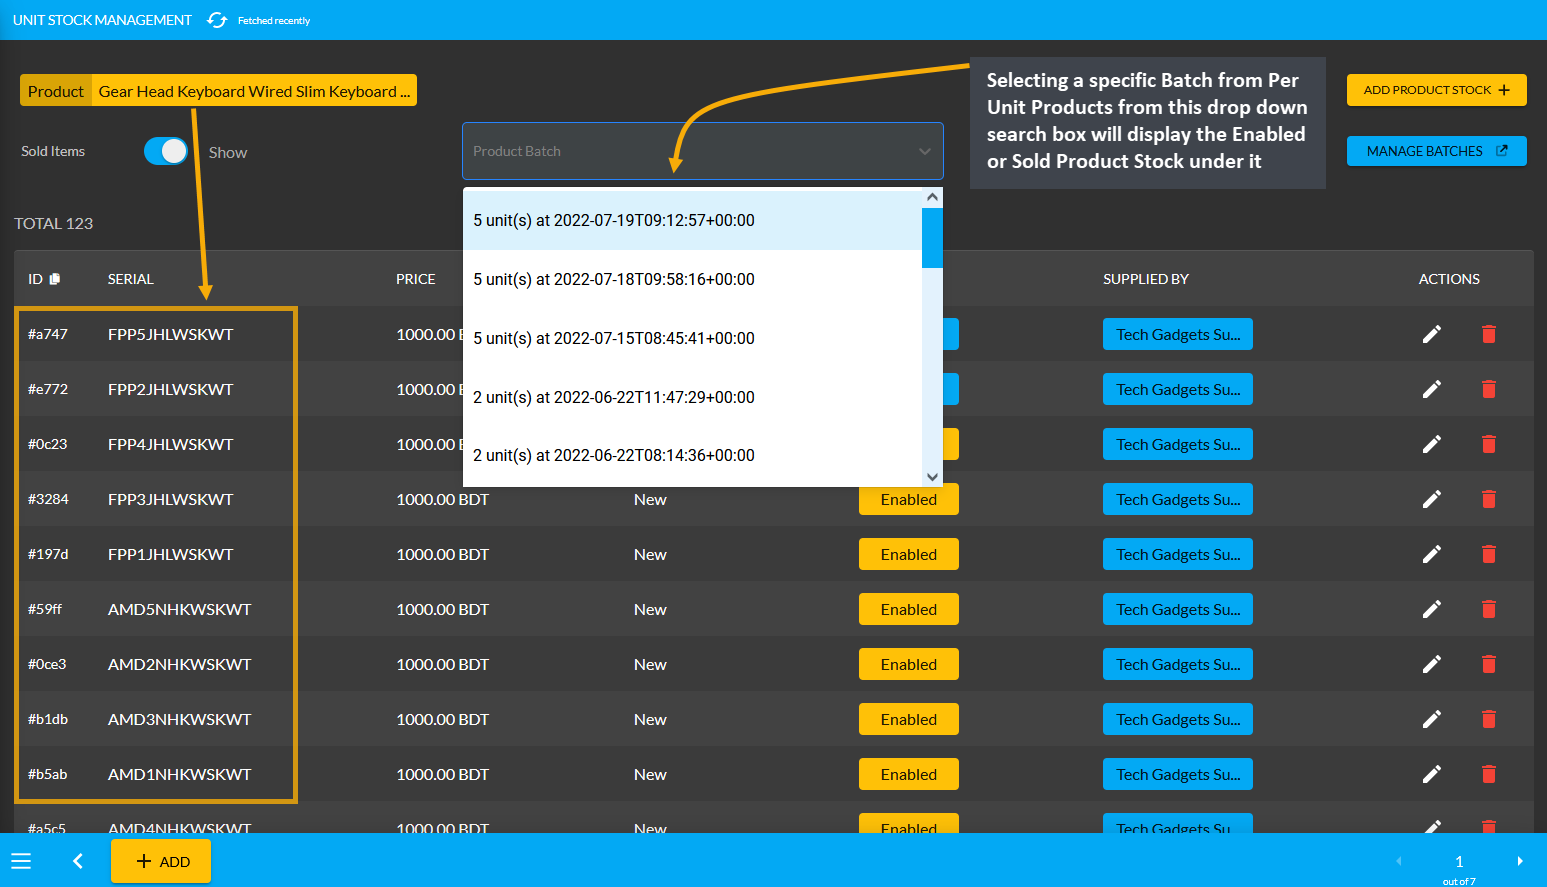
Image 3: Selecting a specific Batch from Per Unit Products will show Enabled or Sold Stock under it.
On the top left corner, there is a Sold Items Toggle Button turning on which will display both the Sold and Enabled Product Stock. While turning it off will only display available or Enabled Product Stock. For creating new Per Unit Product Stock, click the Add Product Stock button that will redirect to the Add Product Unit page.
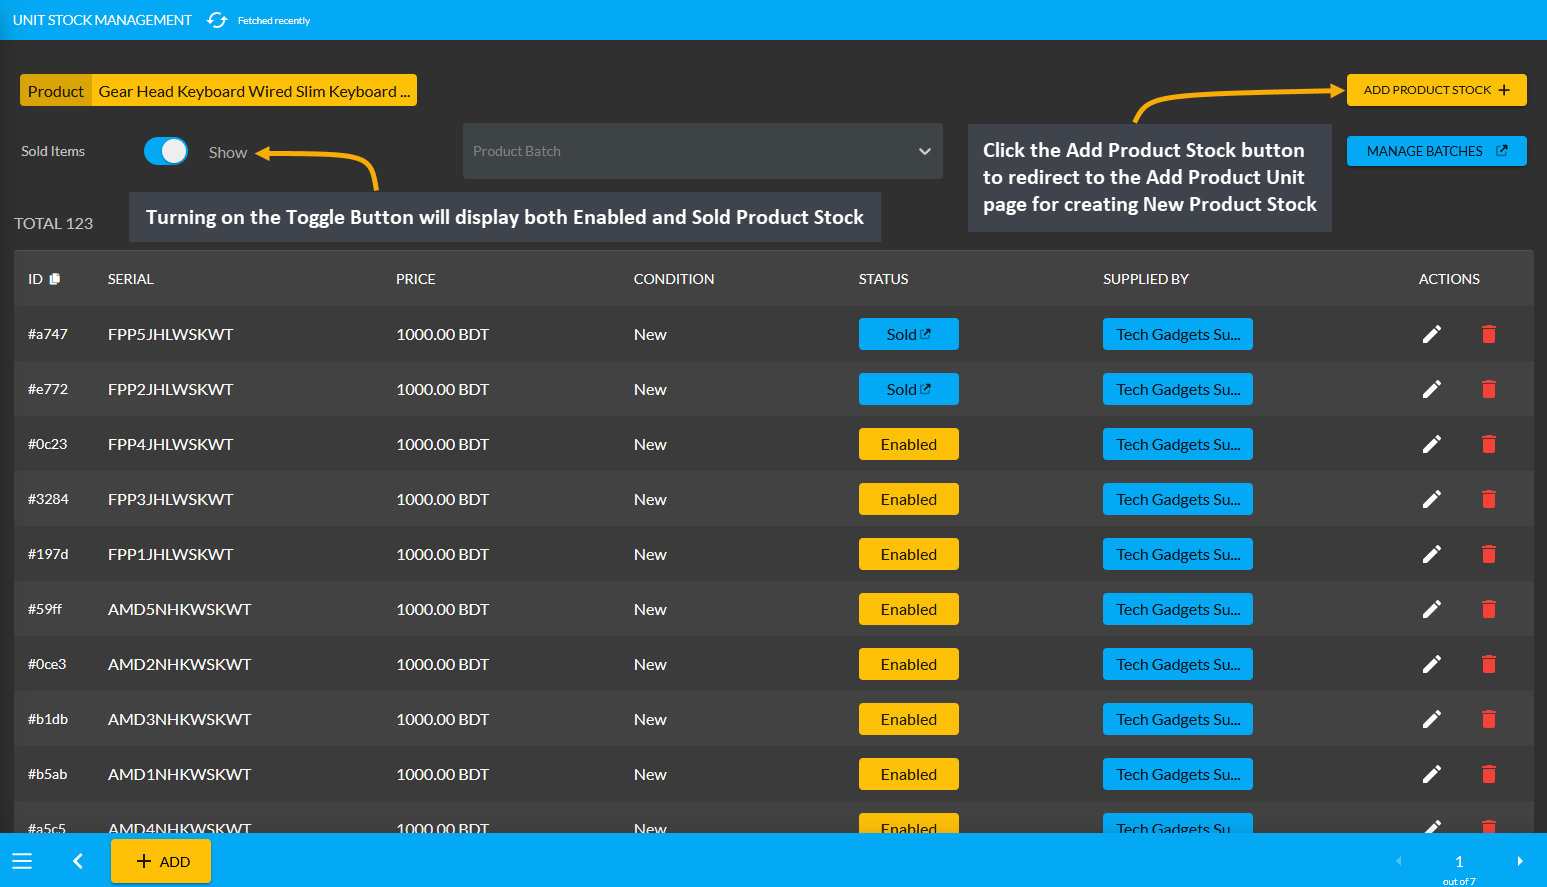
Image 4: Turning on the Toggle Button will display both the Enabled/ available and Sold Product Stock.
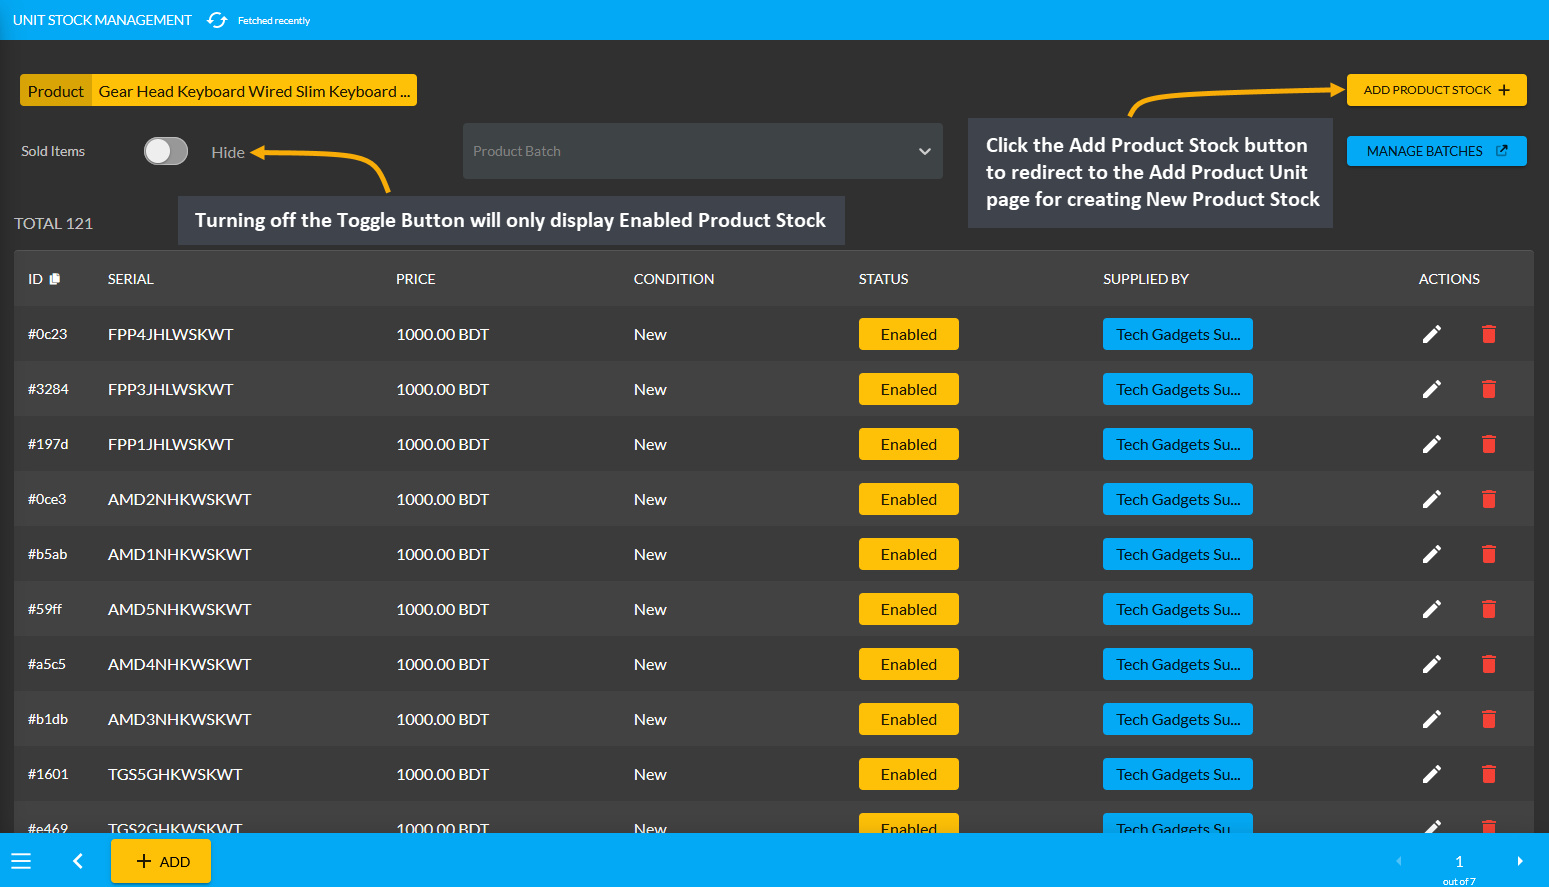
Image 5: Turning off the Toggle Button will display only the Enabled/ available Product Stock.
Per Unit Product Purchase: Four Types
The Shop Owner can purchase Per Unit Products from the Credit Supplier Without Payment, with Full Payment, or with Partial Payment which will be reflected under the Credit Information section on Supplier’s Payable. There is another acquisition option, which is Untracked, purchasing through which will leave no records of purchase. Only Without Payment, Full Payment, and Partial Payment of Per Unit Product purchases will be updated with details on the Credit Supplier’s Ledger Breakdown page. Untracked will not be updated on Supplier’s Ledger Breakdown page.
Per Unit Product purchase Without Payment
The Shop Owner can purchase Per Unit Products from the Credit Supplier without payment by using the Purchase option. From the Products tab, go to the Product List View and select the Purchase option from the target Per Unit Product. Clicking this option will redirect to the Add Product Stock page from where Shop Owner can purchase the Per Unit Product without payment which can be paid later on a due date.
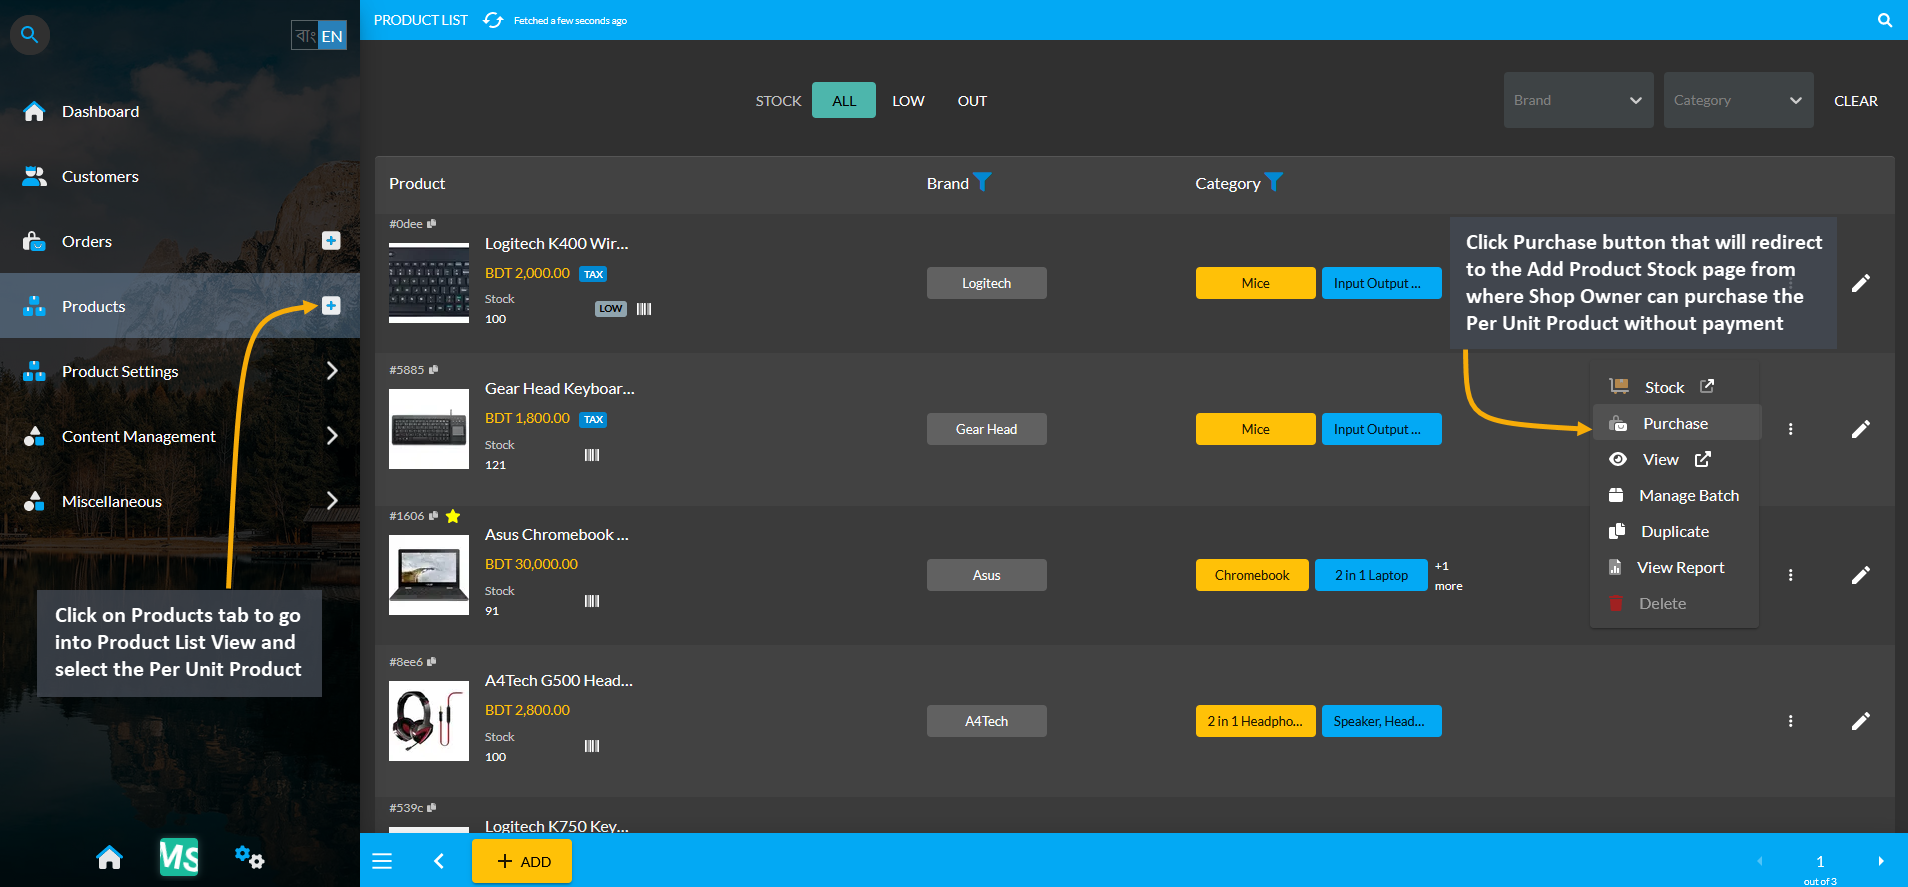
Image 1: Select target Per Unit Product and click the Purchase button to buy from Credit Supplier.
On the Add Product Stock page, select Without Payment Method from Acquisition Options, set the Purchase Price Per Unit, select Credit Supplier, and select Warranty if it is not automatically selected. Turn on the toggle button to enable auto increment for sale stock count. Then click Auto Generate Serial Numbers button to generate Quantity and Serial of Per Unit Product that Shop Owner will buy from Supplier. It will open a pop-up, where Prefix, Suffix, Start Counter, and End Counter needs to be filled to generate Product Stock with individual serial numbers.
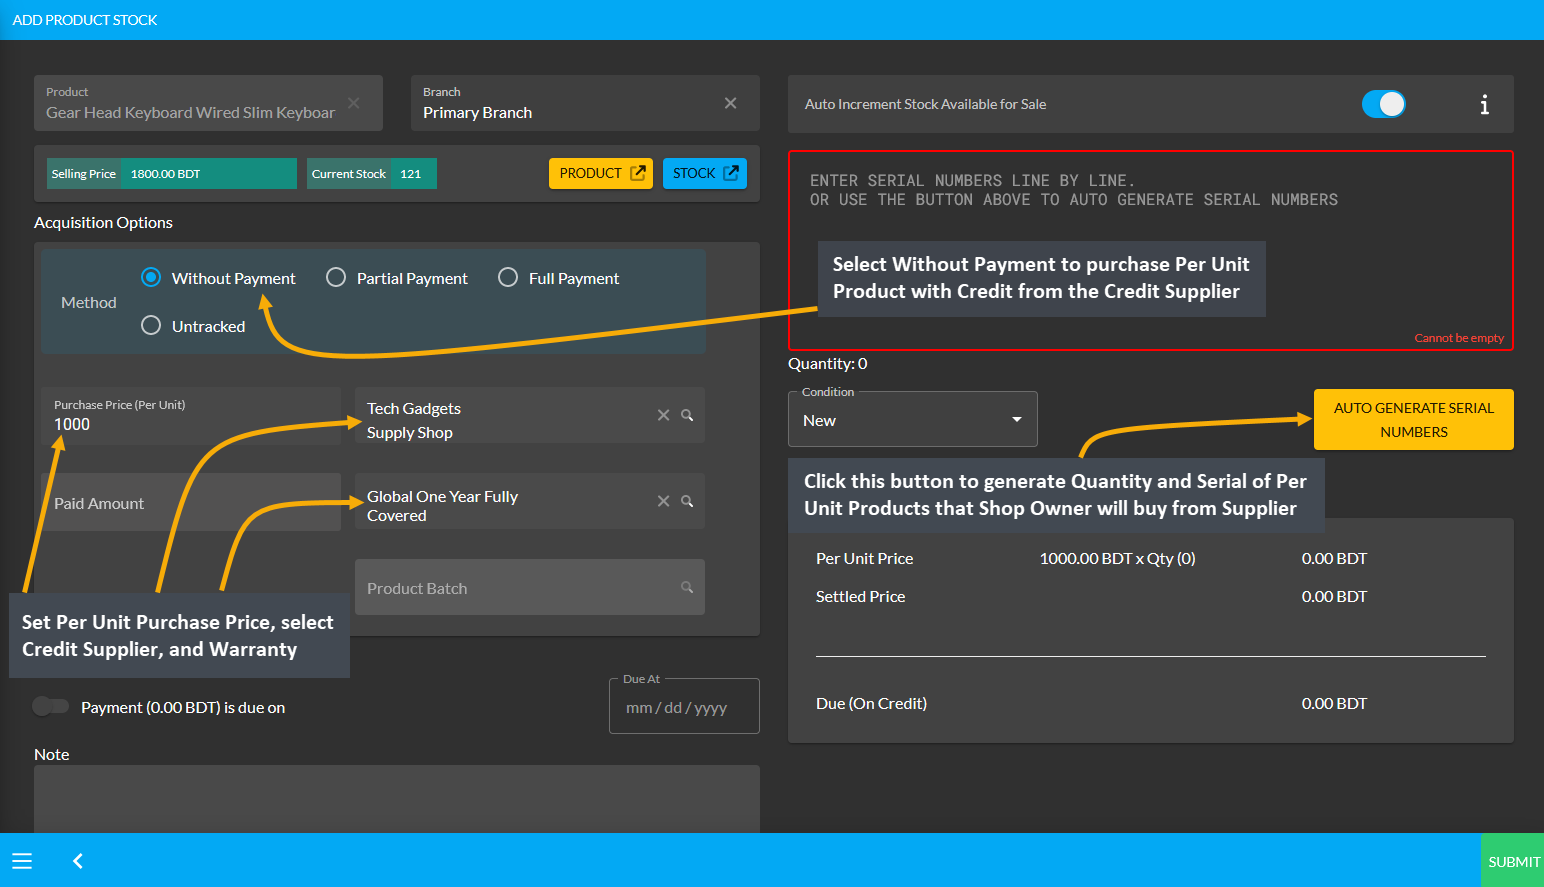
Image 2: Set Purchase Price, select Supplier and Warranty, and click Auto Generate Serial Numbers button.
After clicking the Auto Generate Serial Numbers button, a pop-up will appear where Product Serial Number and Quantity needs to be set with Prefix, Suffix, Start Counter, and End Counter. Click the Generate button to create the Per Unit Products for purchase from the Credit Supplier that will add the serial numbers inside the box.
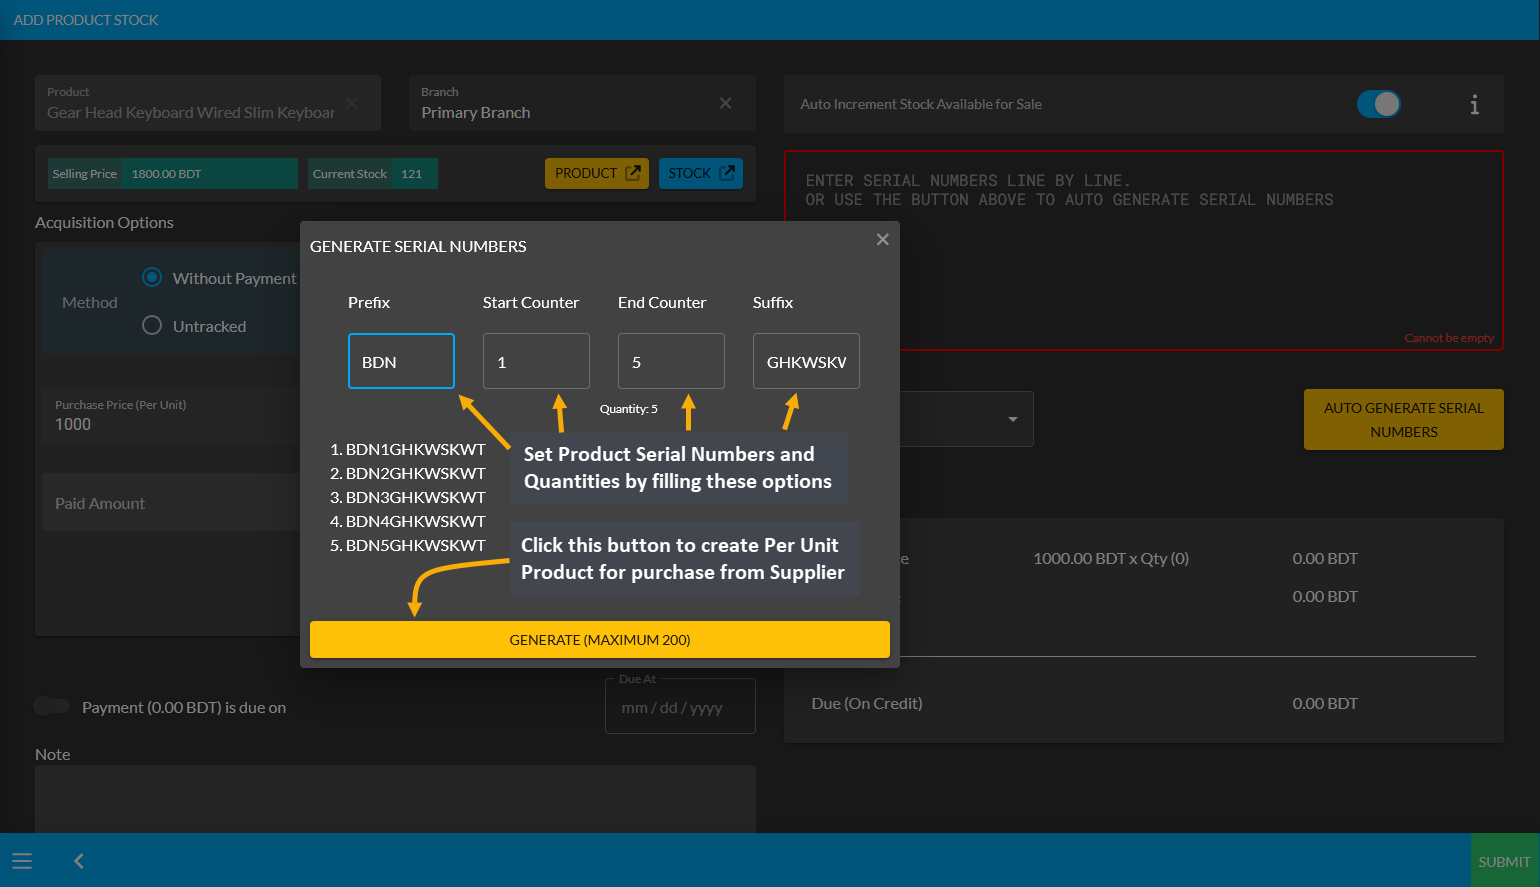
Image 3: Set Product Serial Number and Quantity with Prefix, Suffix, Start Counter, and End Counter.
After Product Serial Numbers and Quantities are generated for the target Per Unit Product, turn on the Payment Due toggle button and select the Due Date. The autogenerated serial numbers for the Per Unit Product quantities will show inside the box. Click the Submit button to complete the purchase process Without Payment.
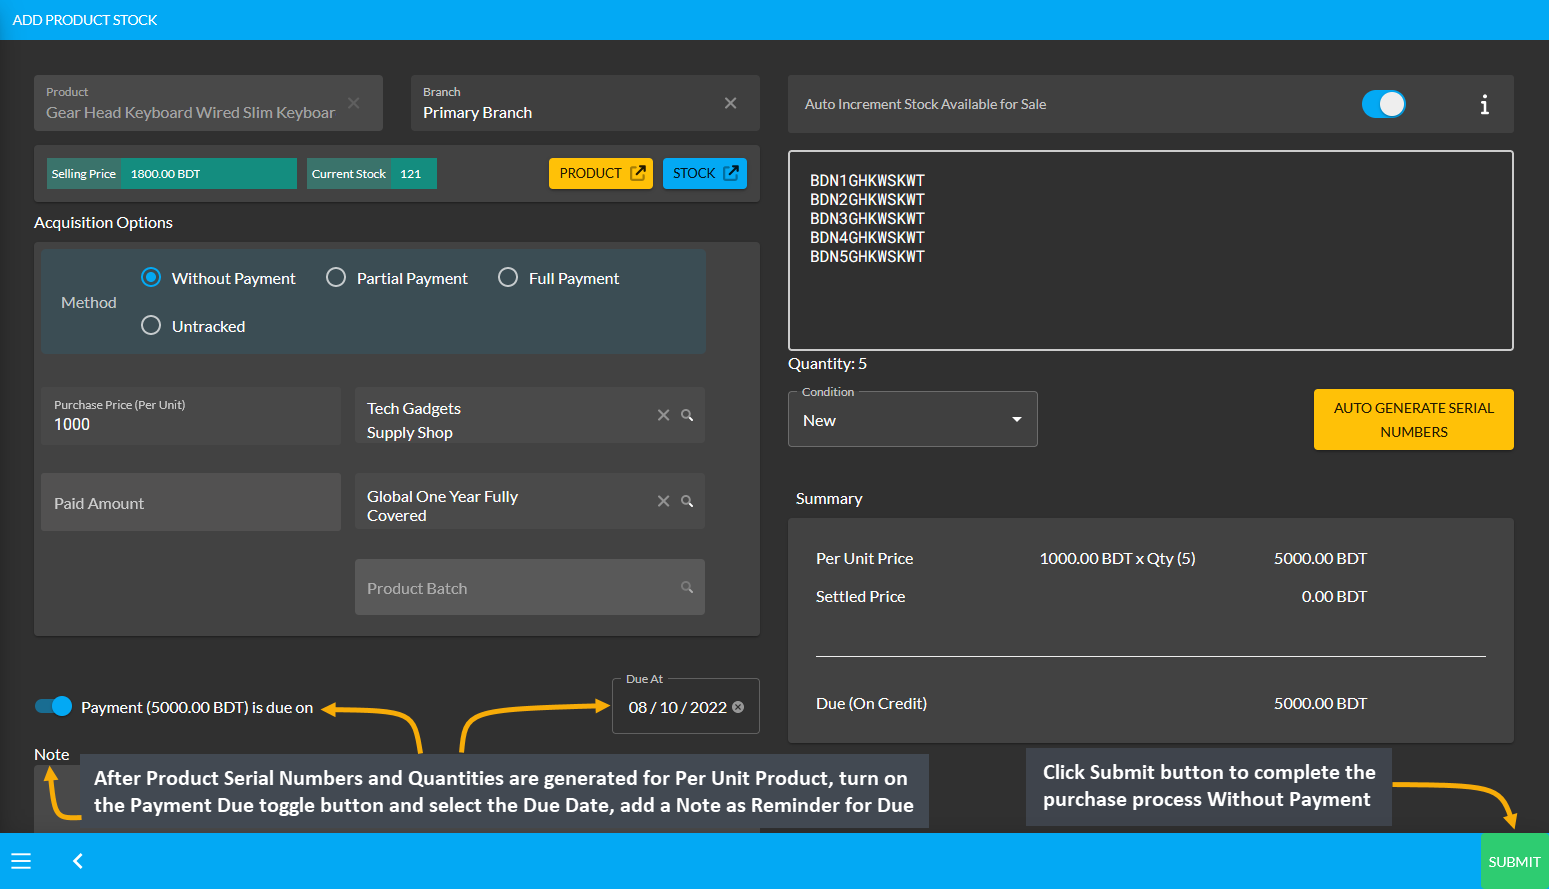
Image 4: Turn on the Payment Due toggle button and set the Due Date for Without Payment Method.
Then, a pop-up will show uploading assigned Per Unit Product quantities and confirm when units are successfully created. Click Okay to save changes when auto generated serial numbers are 100% uploaded for completing the Per Unit Product purchase process from Credit Supplier. If Shop Owner wants to purchase more quantities of the same Per Unit Product from the same Credit Supplier, then they need to click the Purchase Product from Same Supplier button as shown in the example screenshot.
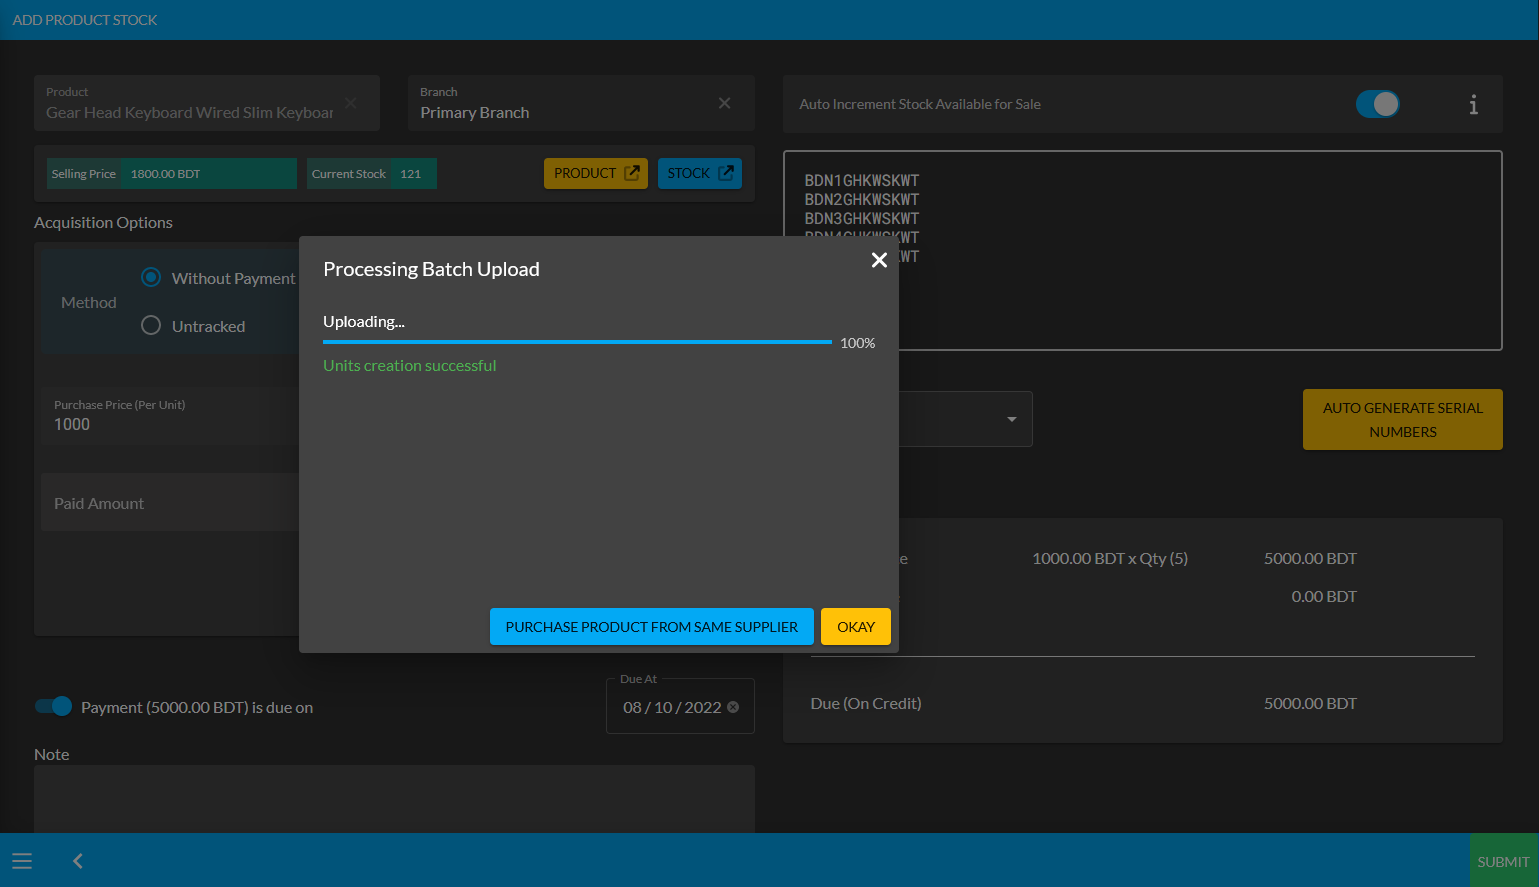
Image 5: Pop-up showing successful creation or batch upload of Per Unit Product. Click Okay to proceed.
Clicking on Okay will redirect to the Unit Stock Management page where the successfully created Batch of Per Unit Products will be displayed on the top of the list as marked in the example screenshot. For Per Unit Products, the individual serial numbers will also be displayed with Product SKUs, through which stocks can be differentiated.
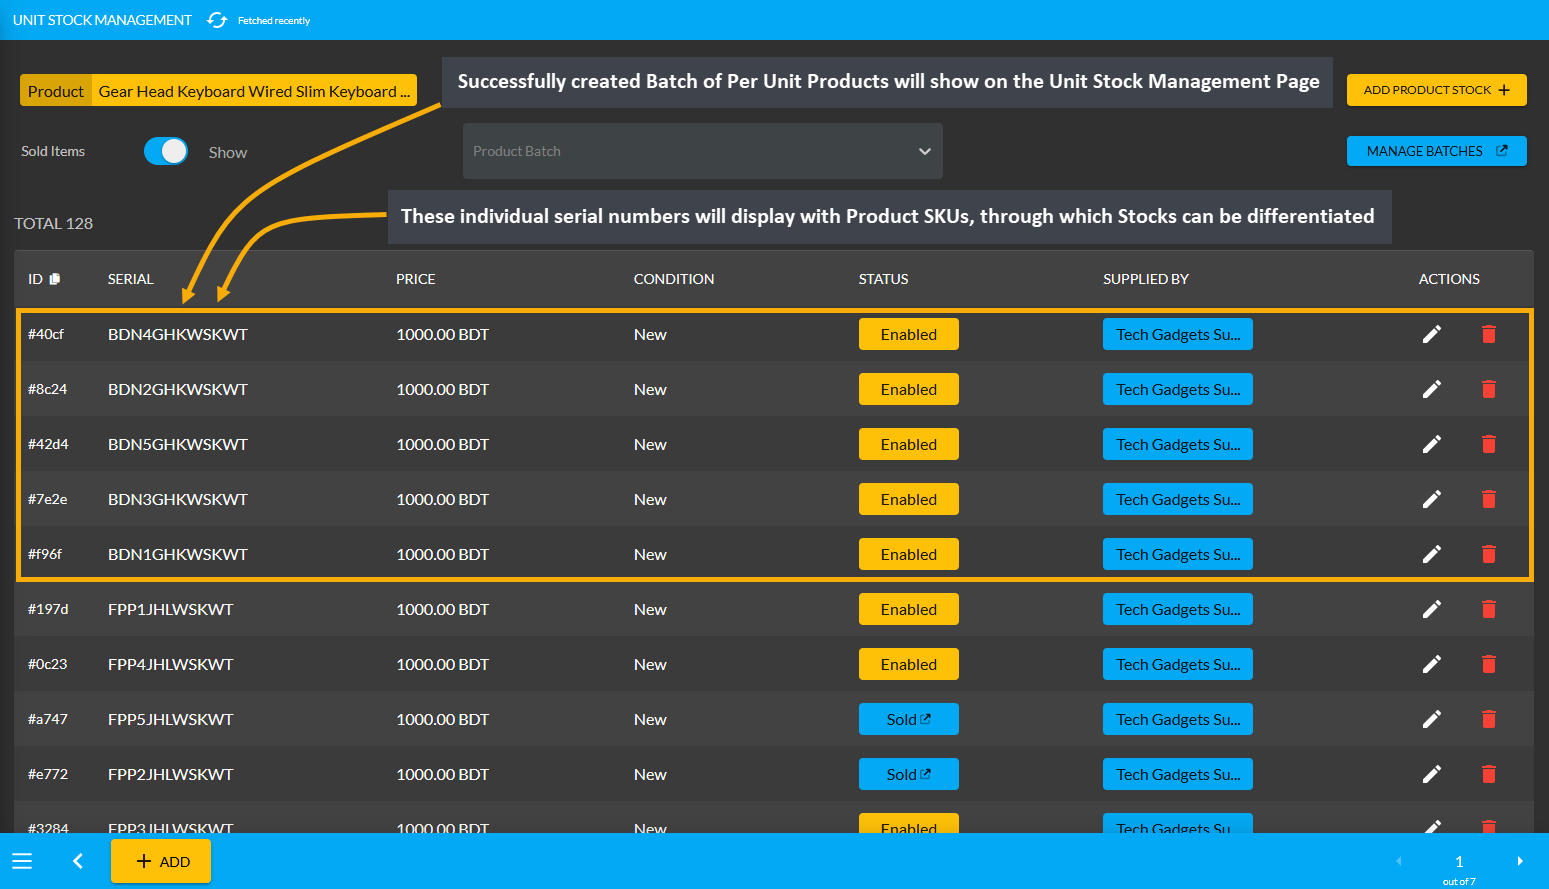
Image 6: Successfully created Batch of Per Unit Products will display on the Unit Stock Management Page.
Per Unit Product purchase with Partial Payment
The Shop Owner can purchase Per Unit Products from Credit Supplier with partial payment by using the Purchase option. From the Products tab, go to the Product List View and select the Purchase option from the target Per Unit Product. Clicking this option will redirect to the Add Product Stock page from where Shop Owner can purchase the Per Unit Product with partial payment which can be paid later on a due date.
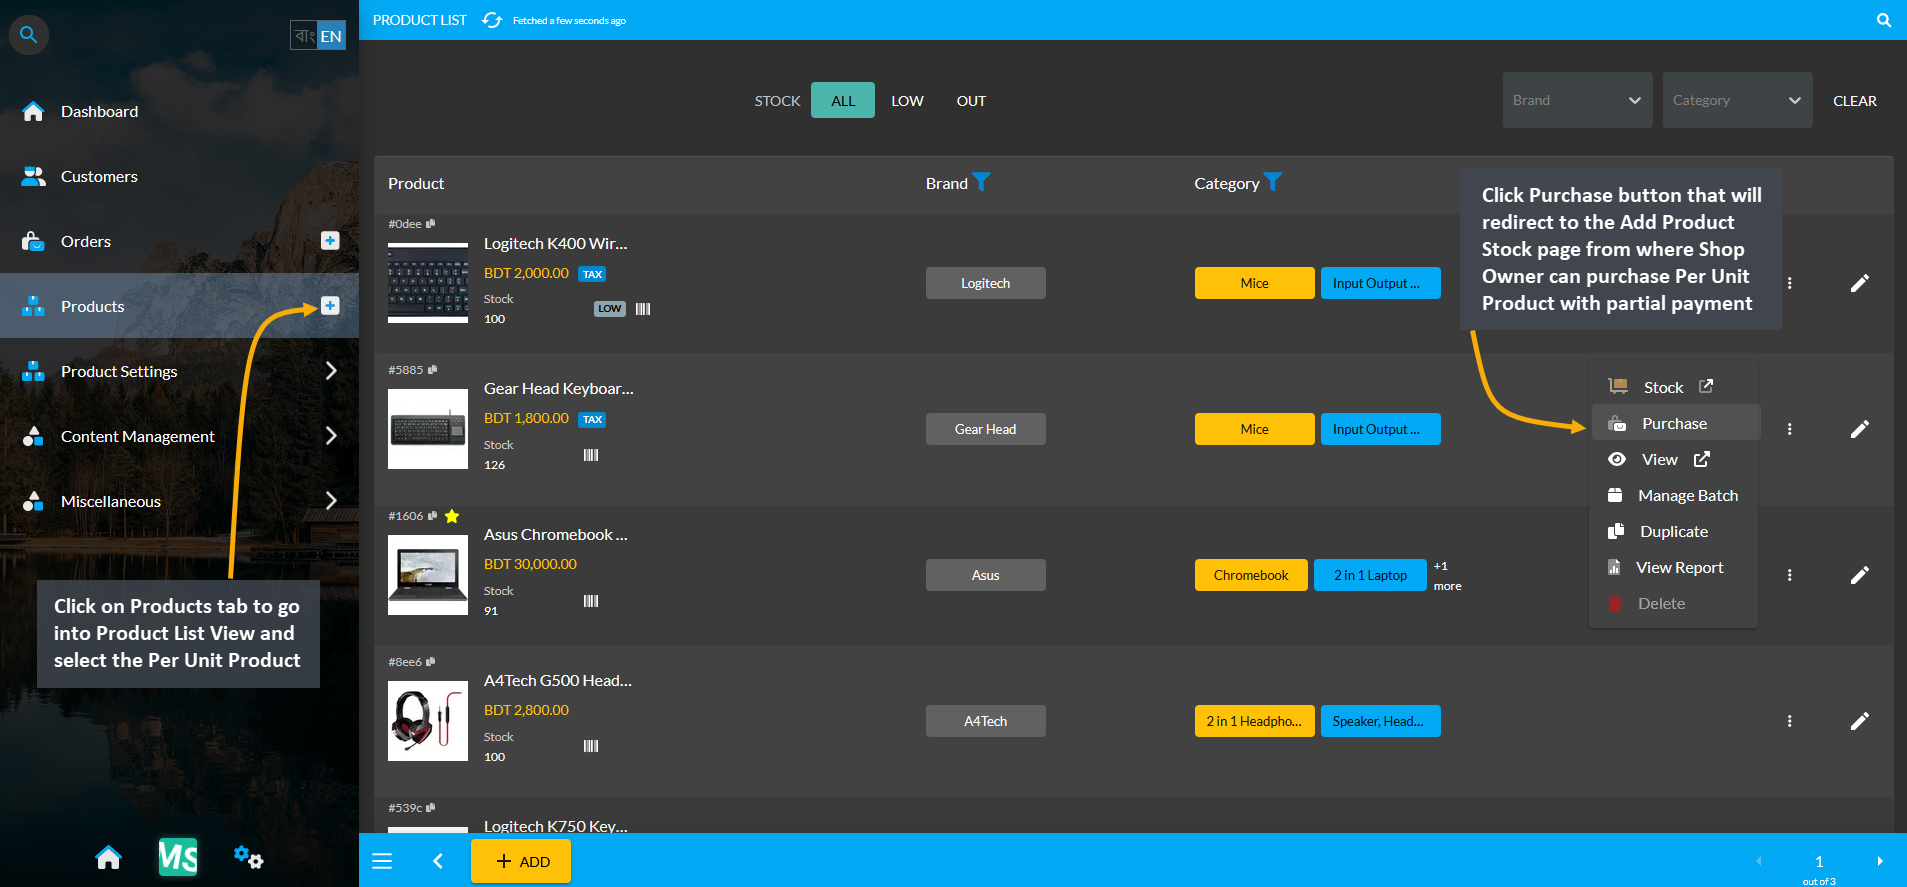
Image 1: Select target Per Unit Product and click the Purchase button to buy from Credit Supplier.
On the Add Product Stock page, select Partial Payment Method from Acquisition Options, set the Purchase Price Per Unit, select Credit Supplier, and select Warranty if it is not automatically selected. Turn on the toggle button to enable auto increment for sale stock count. Then click Auto Generate Serial Numbers button to generate Quantity and Serial of Per Unit Product that Shop Owner will buy from Supplier. It will open a pop-up, where Prefix, Suffix, Start Counter, and End Counter needs to be filled to generate Product Stock with individual serial numbers.
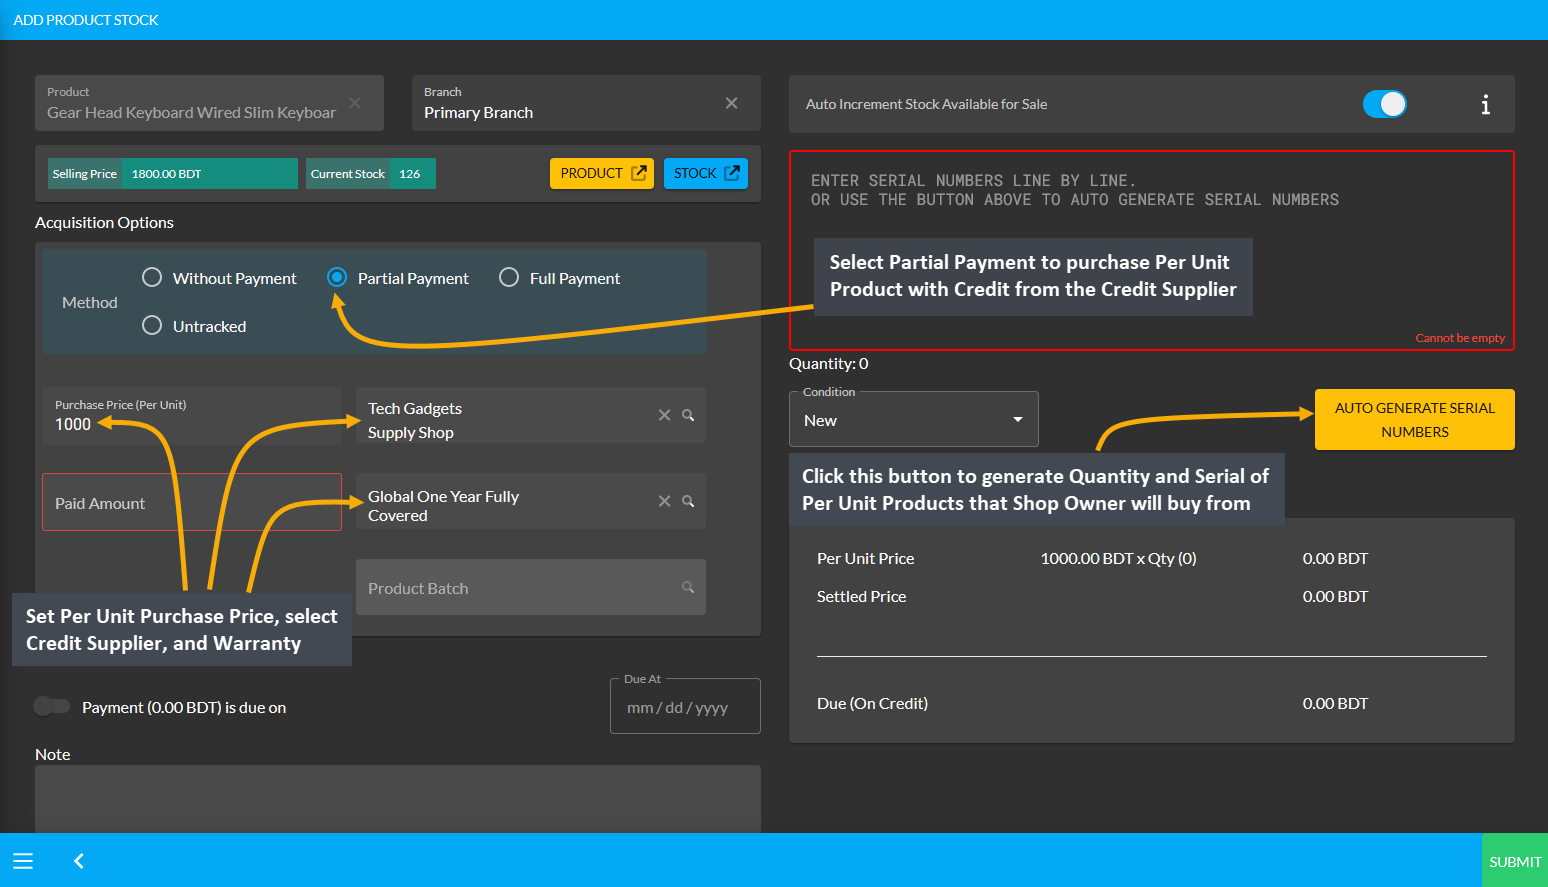
Image 2: Set Purchase Price, select Supplier and Warranty, and click Auto Generate Serial Numbers button.
After clicking the Auto Generate Serial Numbers button, a pop-up will appear where Product Serial Number and Quantity needs to be set with Prefix, Suffix, Start Counter, and End Counter. Click the Generate button to create the Per Unit Products for purchase from the Credit Supplier that will add the serial numbers inside the box.
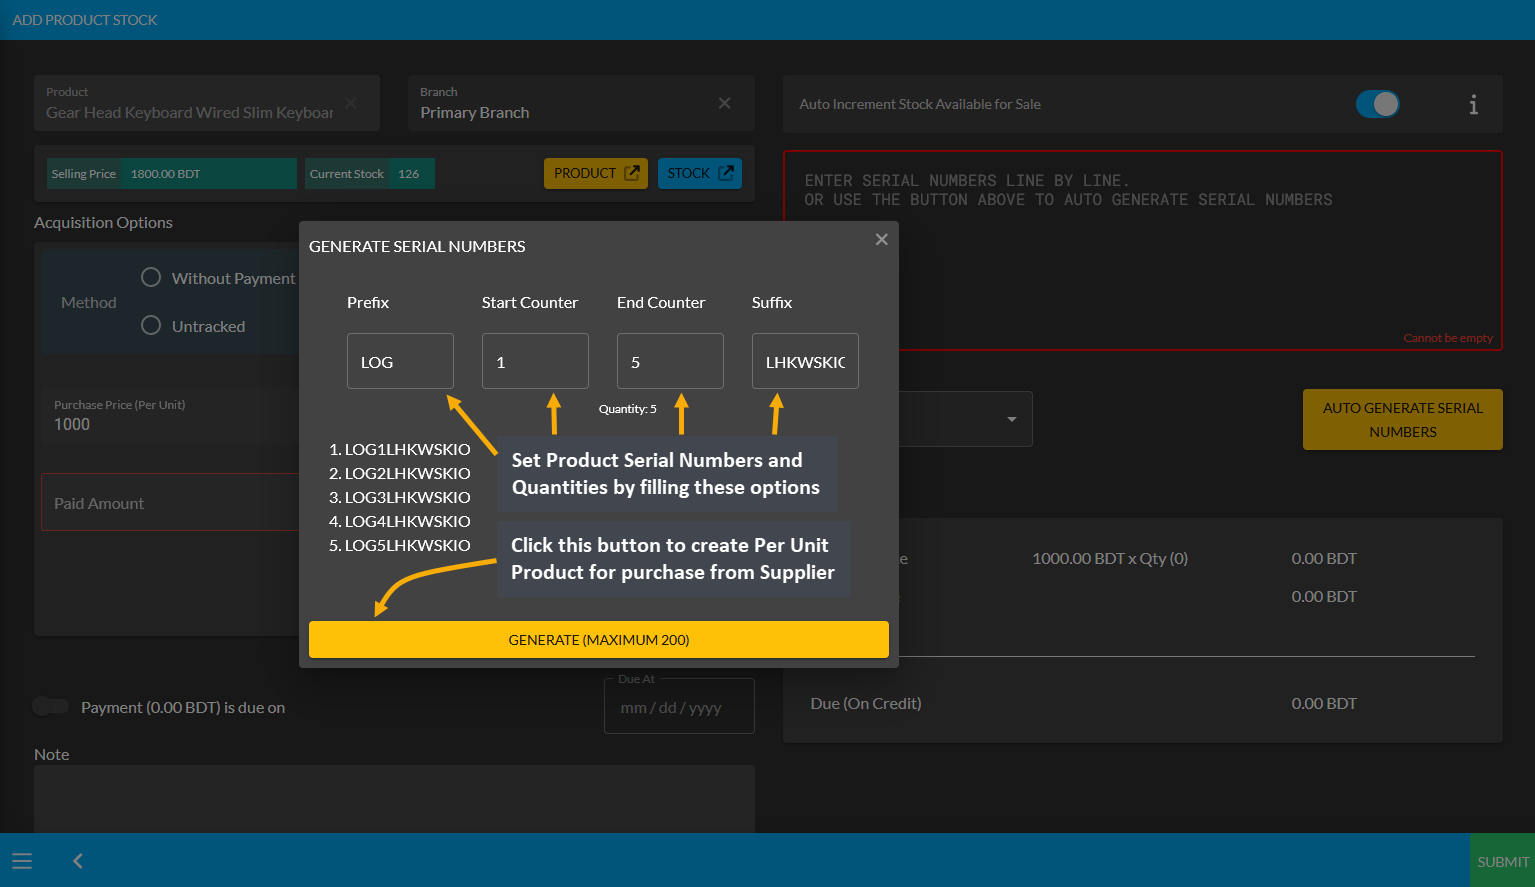
Image 3: Set Product Serial Number and Quantity with Prefix, Suffix, Start Counter, and End Counter.
After Product Serial Numbers and Quantities are generated for the target Per Unit Product, set partial payment amount on the Paid Amount box based on the amount that will be paid partially. Then, turn on the Payment Due toggle button and select the Due Date. Click Submit to complete the purchase process with Partial Payment.
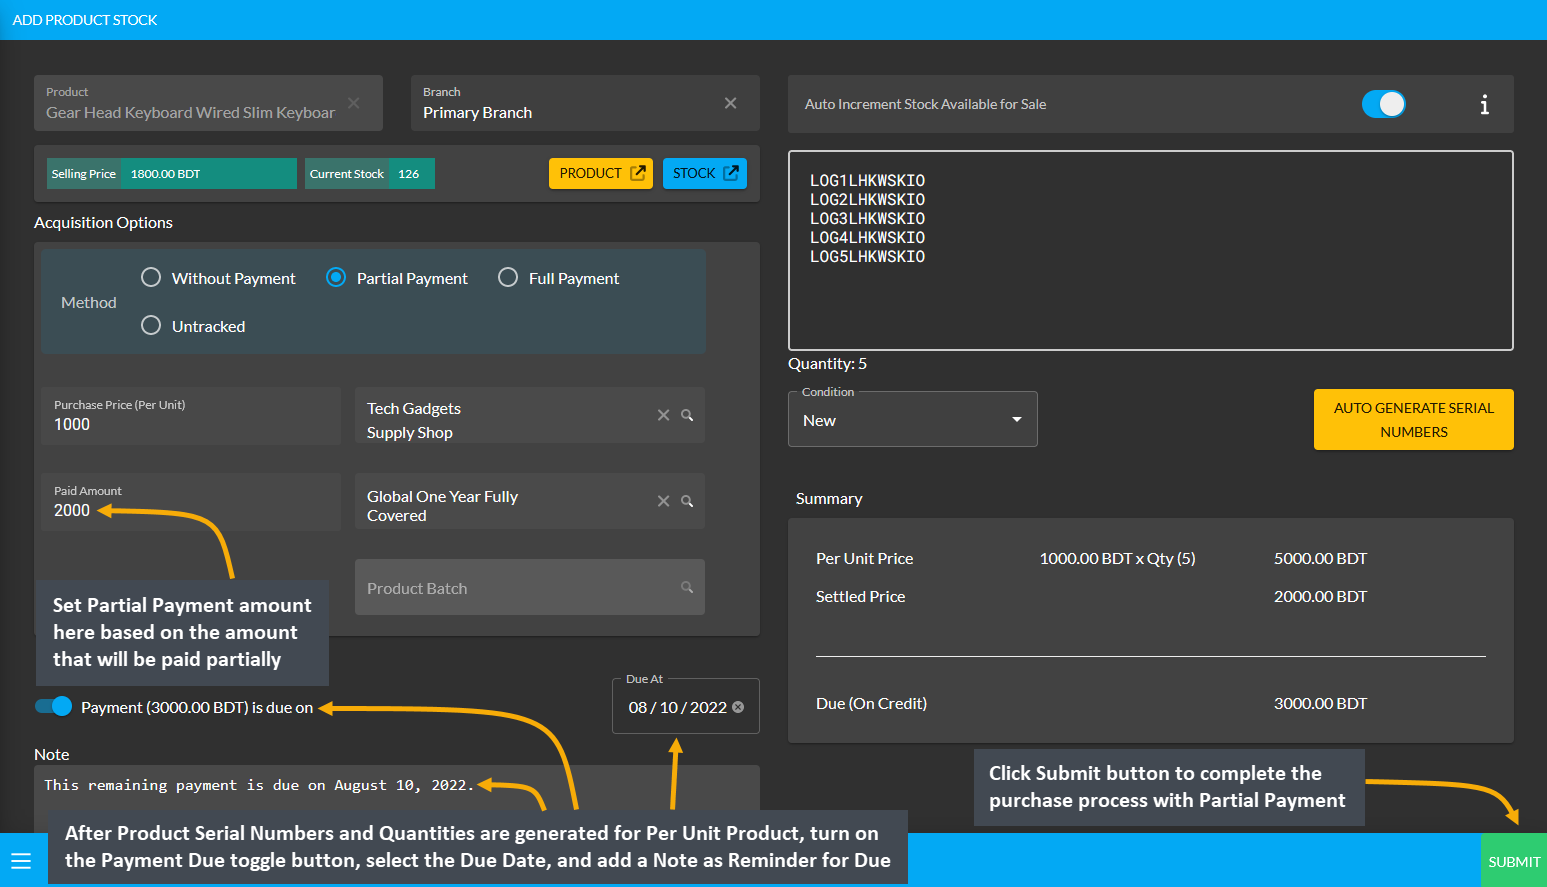
Image 4: Set Partial Payment, turn on Payment Due toggle and set Due Date for Partial Payment Method.
Then, a pop-up will show uploading assigned Per Unit Product quantities and confirm when units are successfully created. Click Okay to save changes when auto generated serial numbers are 100% uploaded for completing the Per Unit Product purchase process from Credit Supplier. If Shop Owner wants to purchase more quantities of the same Per Unit Product from the same Credit Supplier, then they need to click the Purchase Product from Same Supplier button as shown in the example screenshot.
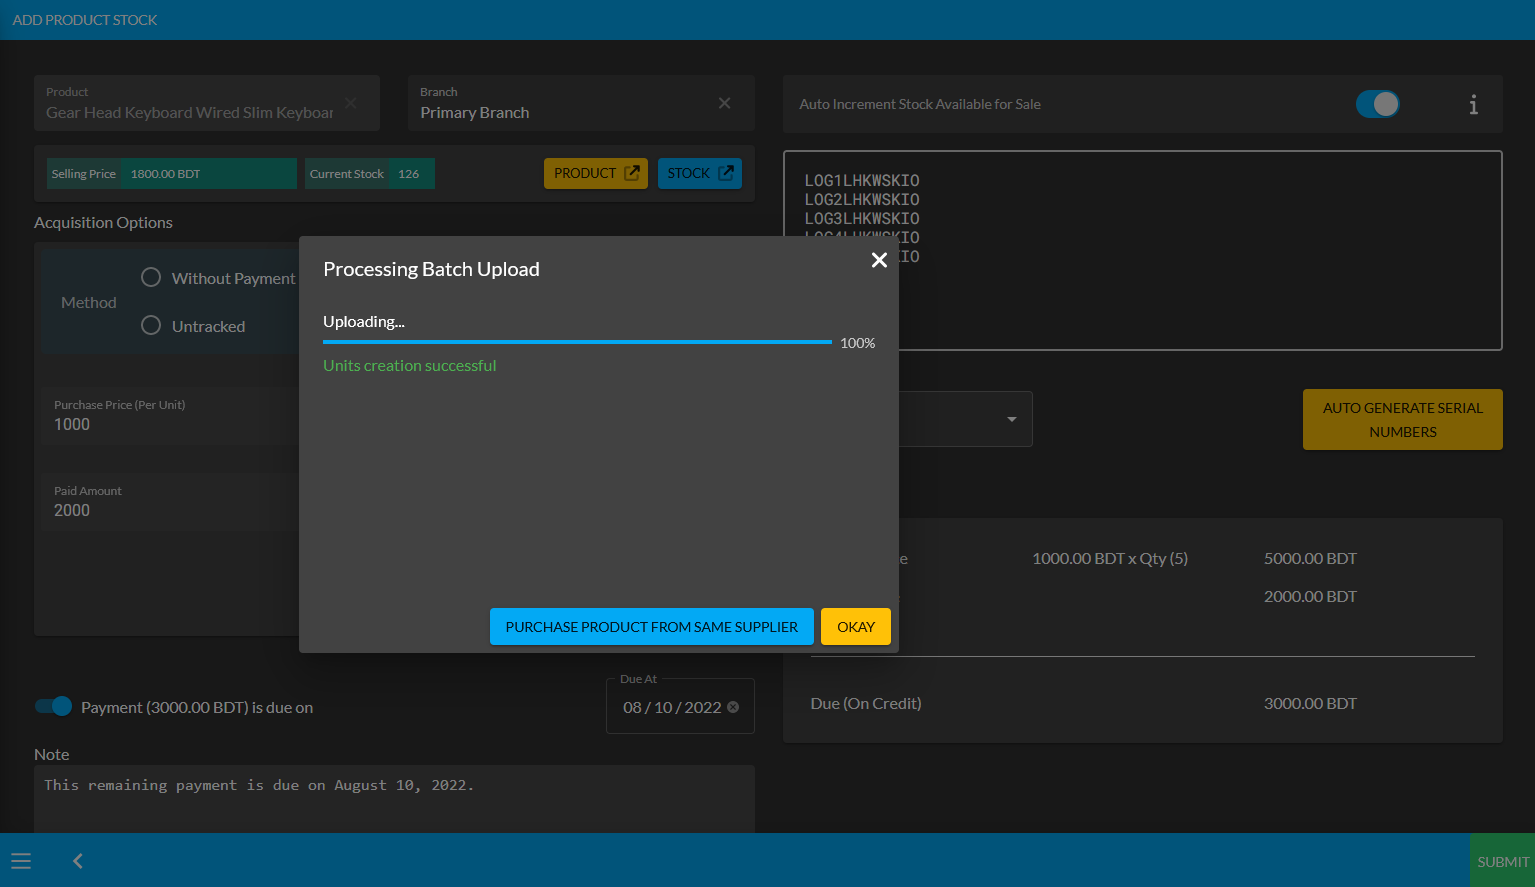
Image 5: Pop-up showing successful creation or batch upload of Per Unit Product. Click Okay to proceed.
Clicking on Okay will redirect to the Unit Stock Management page where the successfully created Batch of Per Unit Products will be displayed on the top of the list as marked in the example screenshot. For Per Unit Products, the individual serial numbers will also be displayed with Product SKUs, through which stocks can be differentiated.
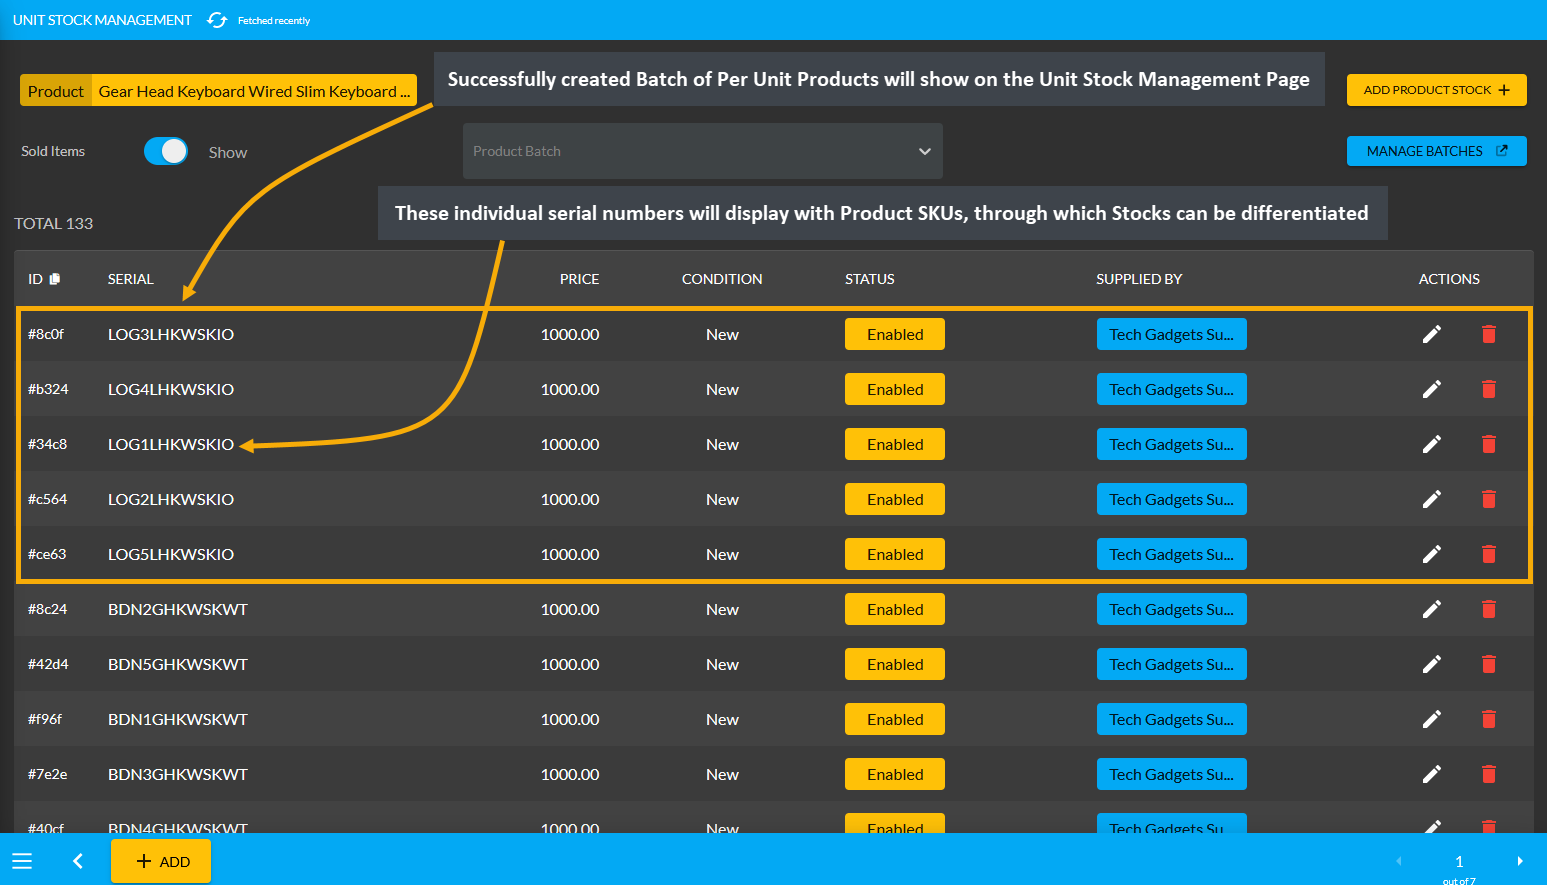
Image 6: Successfully created Batch of Per Unit Products will display on the Unit Stock Management Page.
Per Unit Product purchase with Full Payment
The Shop Owner can purchase Per Unit Products from the Credit Supplier with full payment by using the Purchase option. From the Products tab, go to the Product List View and select the Purchase option from the target Per Unit Product. Clicking this option will redirect to the Add Product Stock page from where Shop Owner can purchase the Per Unit Products with full payment from the Credit Supplier.
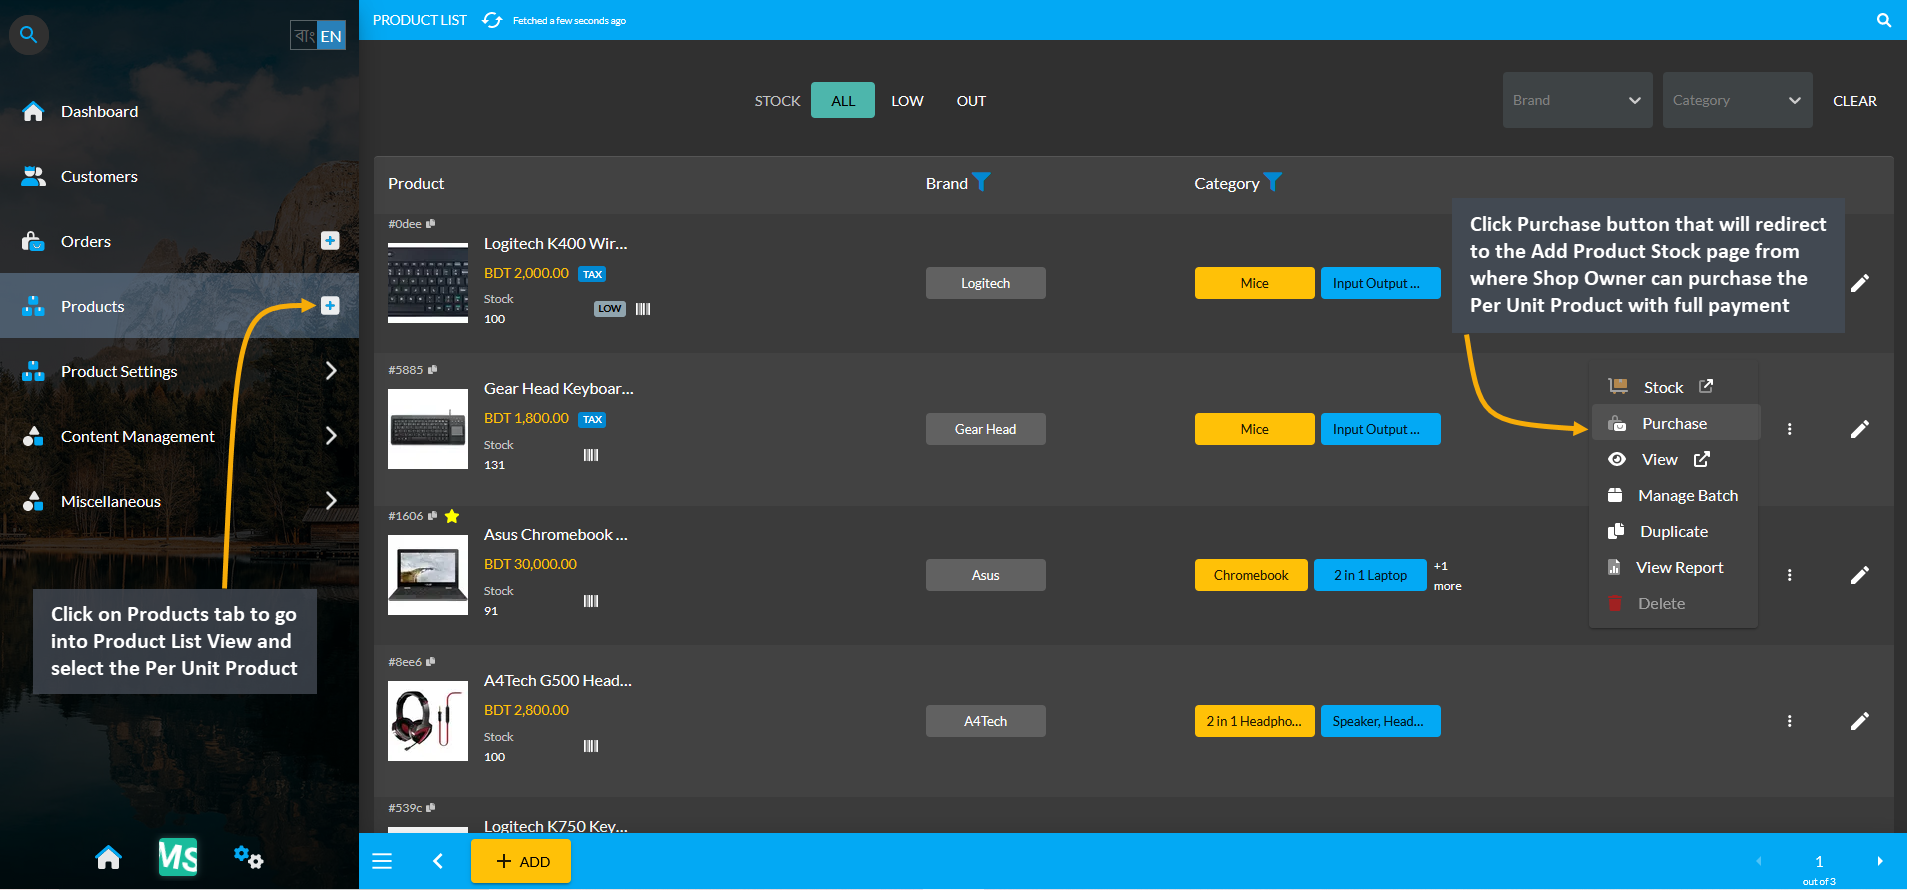
Image 1: Select target Per Unit Product and click the Purchase button to buy from Credit Supplier.
On the Add Product Stock page, select the Full Payment Method from Acquisition Options, set the Purchase Price Per Unit, select Credit Supplier, and select Warranty if it is not automatically selected. Turn on the toggle button to enable auto increment for sale stock count. Then click Auto Generate Serial Numbers button to generate Quantity and Serial of Per Unit Product that Shop Owner will buy from Supplier. It will open a pop-up, where Prefix, Suffix, Start Counter, and End Counter needs to be filled to generate Product Stock with individual serial numbers.
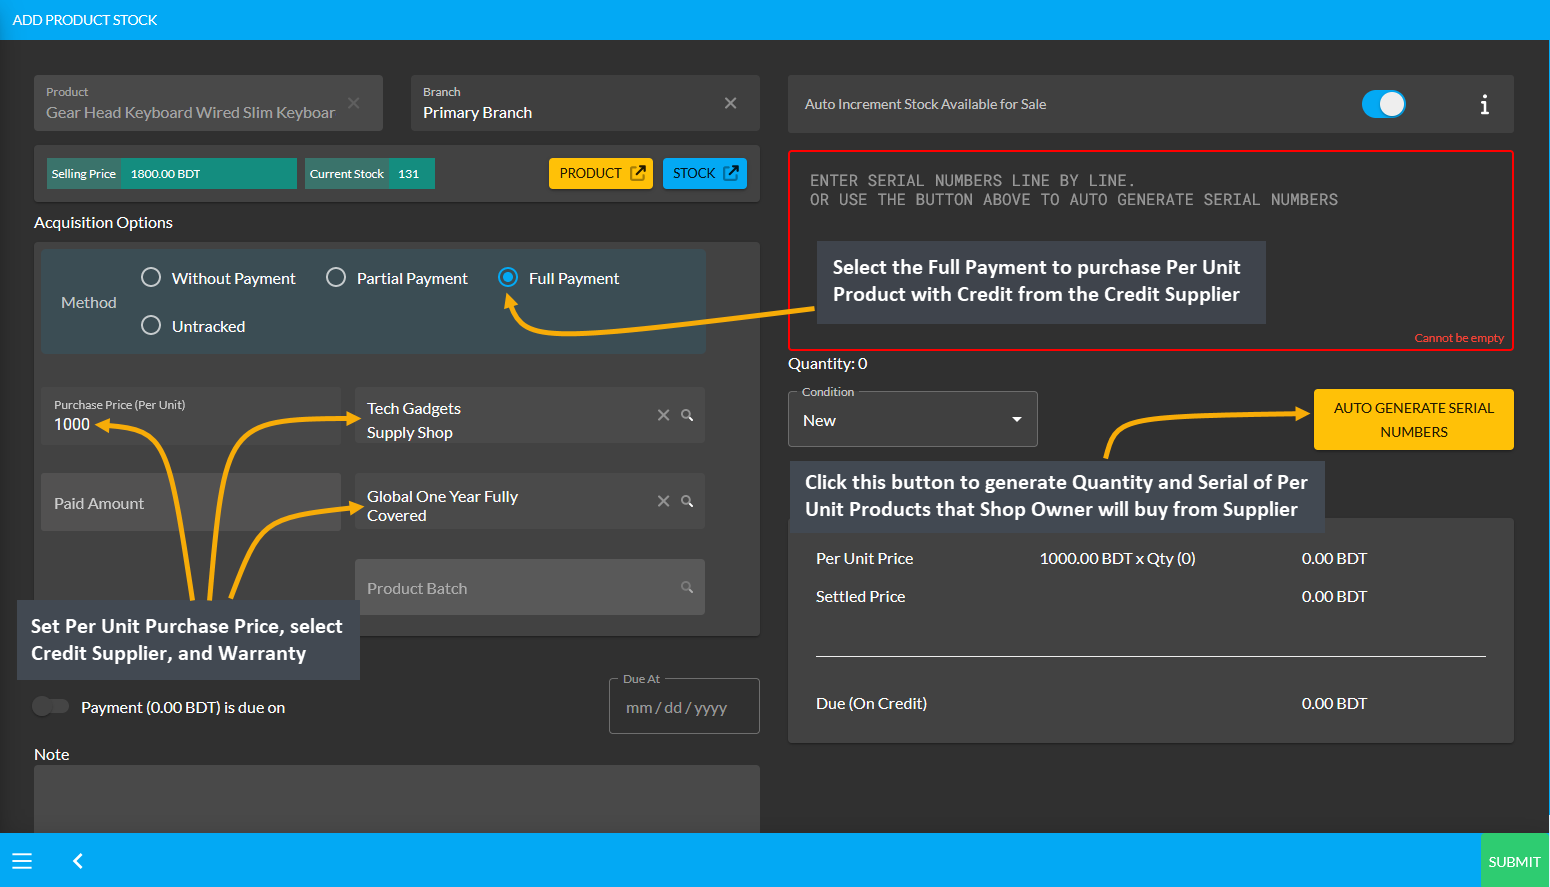
Image 2: Set Purchase Price, select Supplier and Warranty, and click Auto Generate Serial Numbers button.
After clicking the Auto Generate Serial Numbers button, a pop-up will appear where Product Serial Number and Quantity needs to be set with Prefix, Suffix, Start Counter, and End Counter. Click the Generate button to create the Per Unit Products for purchase from the Credit Supplier that will add the serial numbers inside the box.
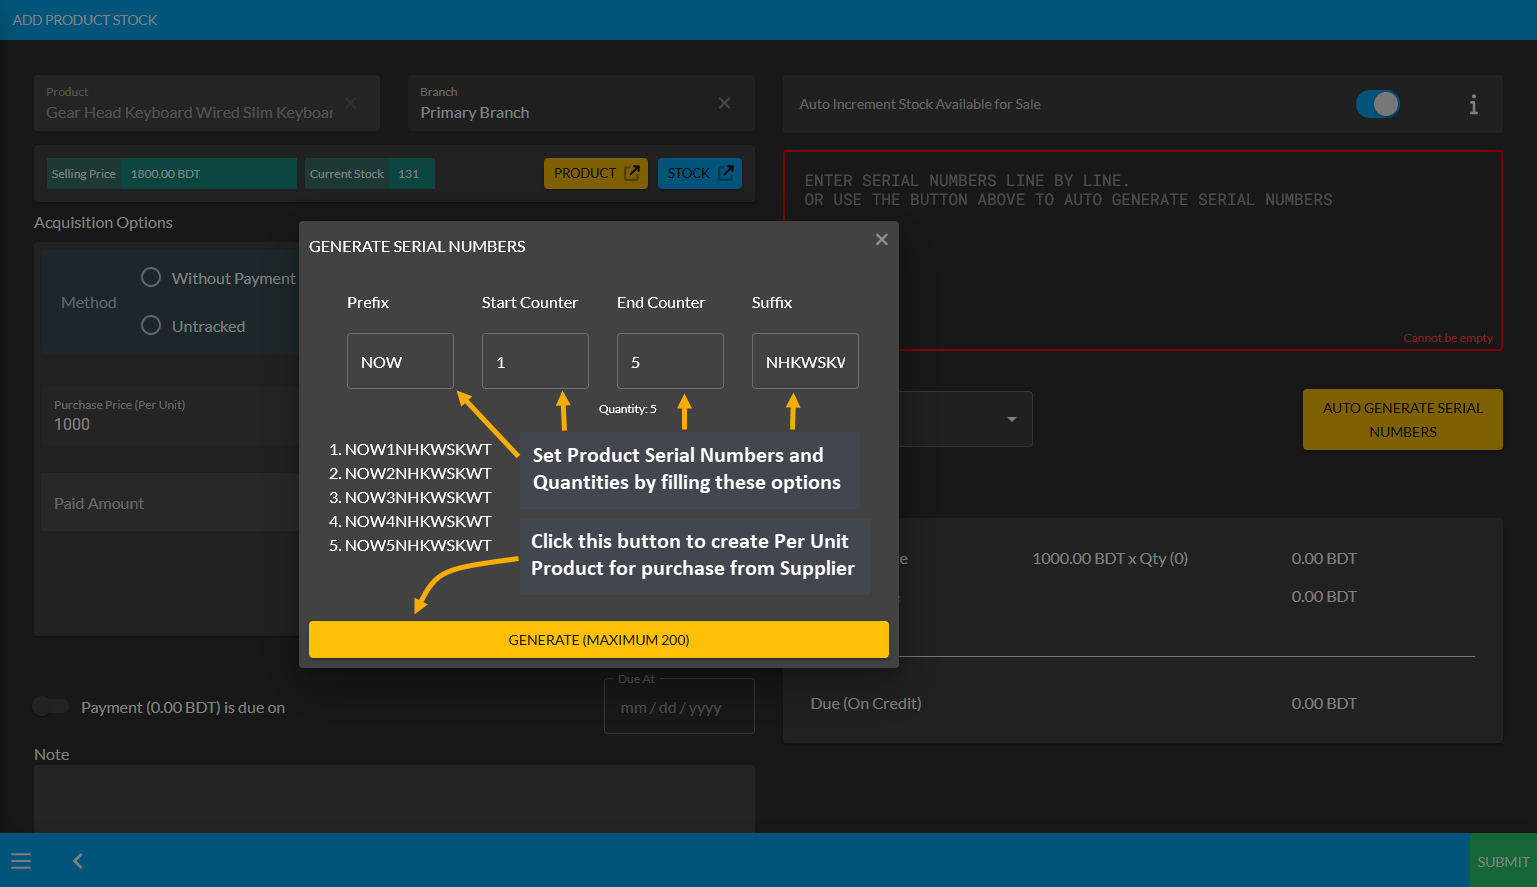
Image 3: Set Product Serial Number and Quantity with Prefix, Suffix, Start Counter, and End Counter.
After Product Serial Numbers and Quantities are generated for the target Per Unit Product, full payment amount will automatically be set on the Paid Amount box. The autogenerated serial numbers for created Per Unit Product quantities will show inside the box. Click the Submit button to complete the purchase process with Full Payment.
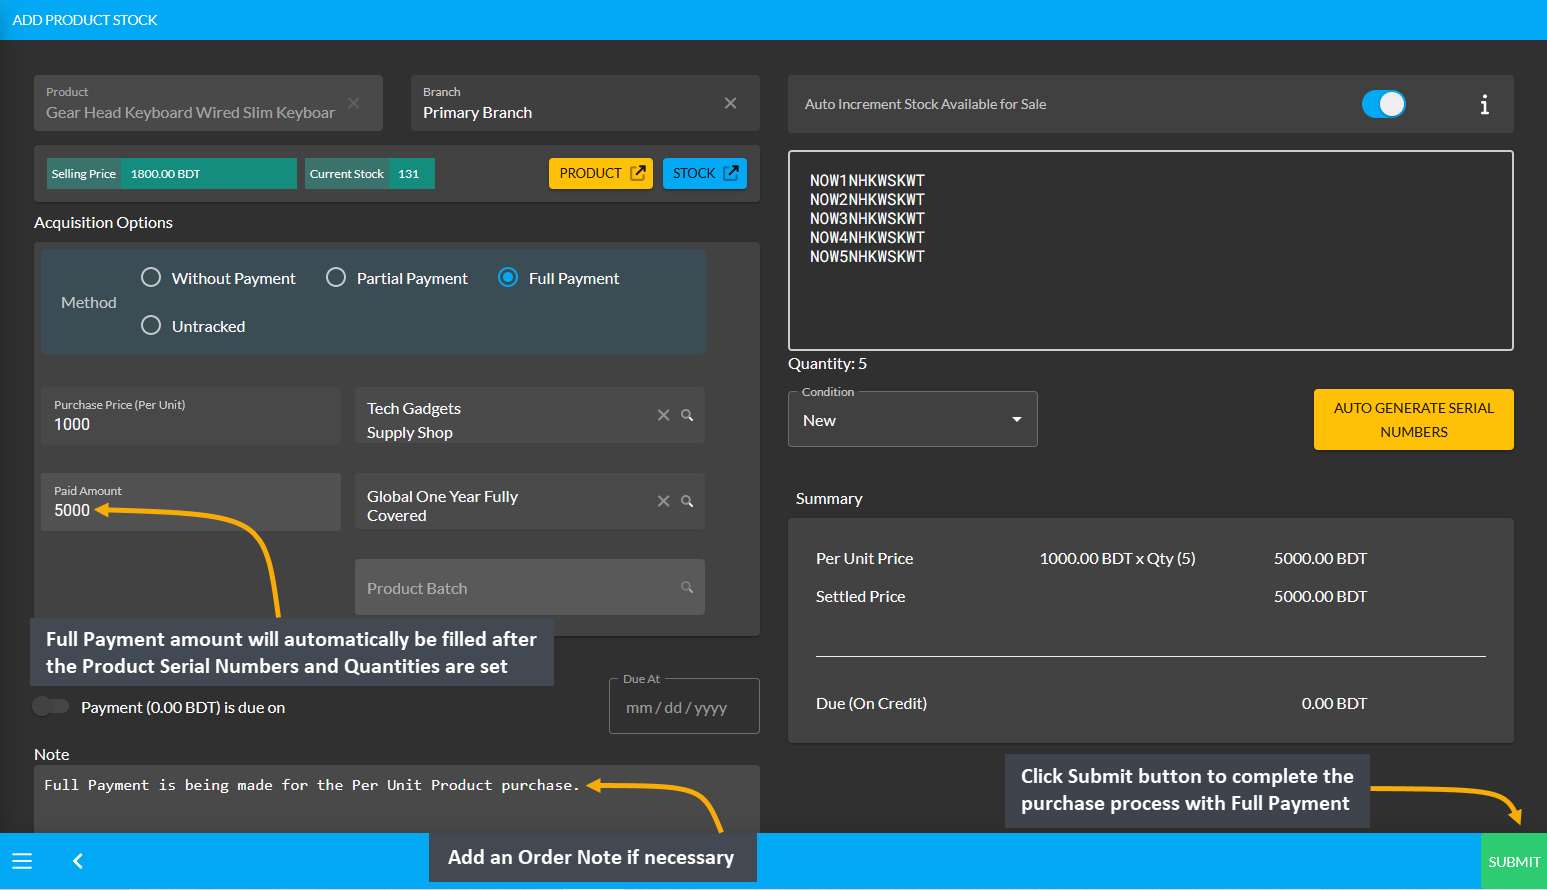
Image 4: After Full Payment amount is set, click Submit to complete purchase with Full Payment Method.
Then, a pop-up will show uploading assigned Per Unit Product quantities and confirm when units are successfully created. Click Okay to save changes when auto generated serial numbers are 100% uploaded for completing the Per Unit Product purchase process from Credit Supplier. If Shop Owner wants to purchase more quantities of the same Per Unit Product from the same Credit Supplier, then they need to click the Purchase Product from Same Supplier button as shown in the example screenshot.
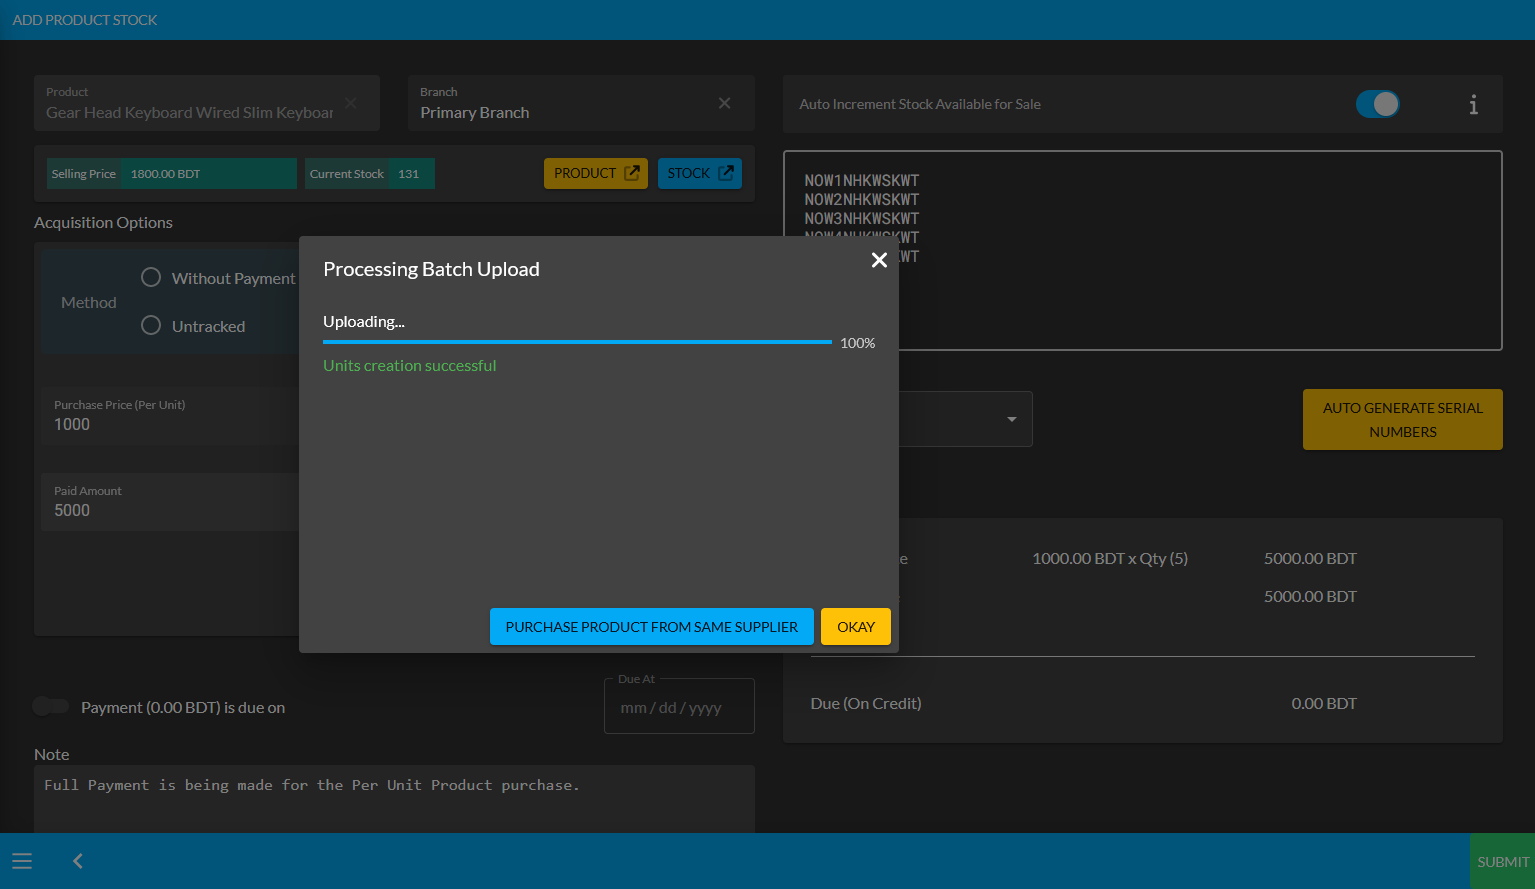
Image 5: Pop-up showing successful creation or batch upload of Per Unit Product. Click Okay to proceed.
Clicking on Okay will redirect to the Unit Stock Management page where the successfully created Batch of Per Unit Products will be displayed on the top of the list as marked in the example screenshot. For Per Unit Products, the individual serial numbers will also be displayed with Product SKUs, through which stocks can be differentiated.
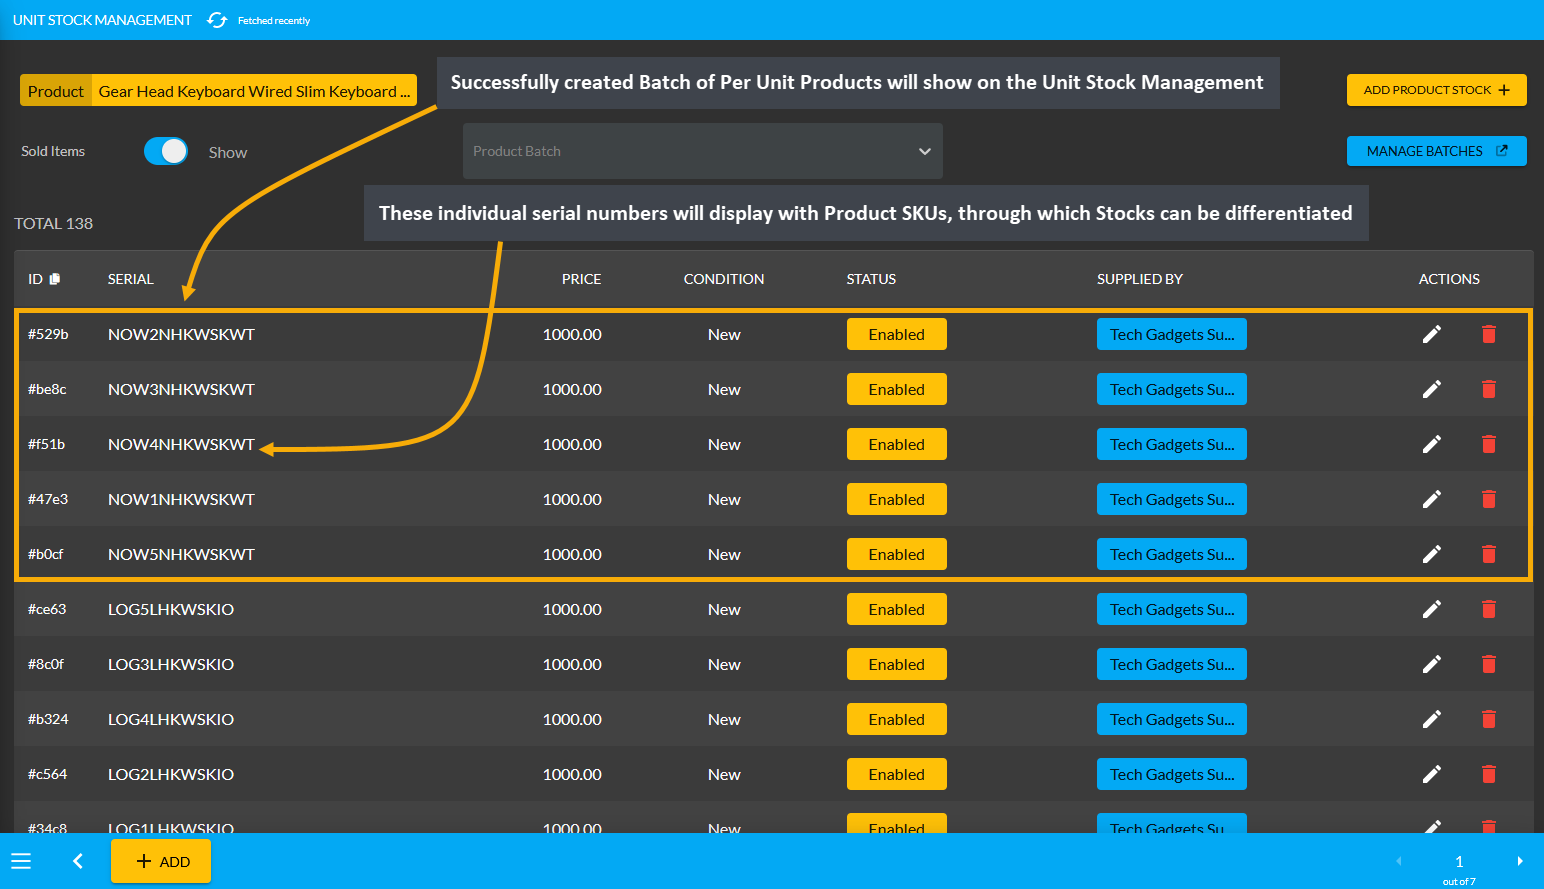
Image 6: Successfully created Batch of Per Unit Products will display on the Unit Stock Management Page.
Per Unit Product purchase with Untracked
The Shop Owner can buy Per Unit Products from the Credit Supplier with Untracked Method by using the Purchase option. If the Shop Owner wants to purchase Per Unit Products from Credit Supplier without Tracking, such as who they have purchased it from and with what amount of money, then Untracked Method is the option they need to select. They can use this option if they do not want Retail Xen to track their purchase history.
From the Products tab, go to the Product List View and click on the Purchase option from target Per Unit Product. Clicking this option will redirect to the Add Product Stock page from where Shop Owner can purchase the Per Unit Products with Untracked method from the Credit Supplier to make their purchase information unavailable.
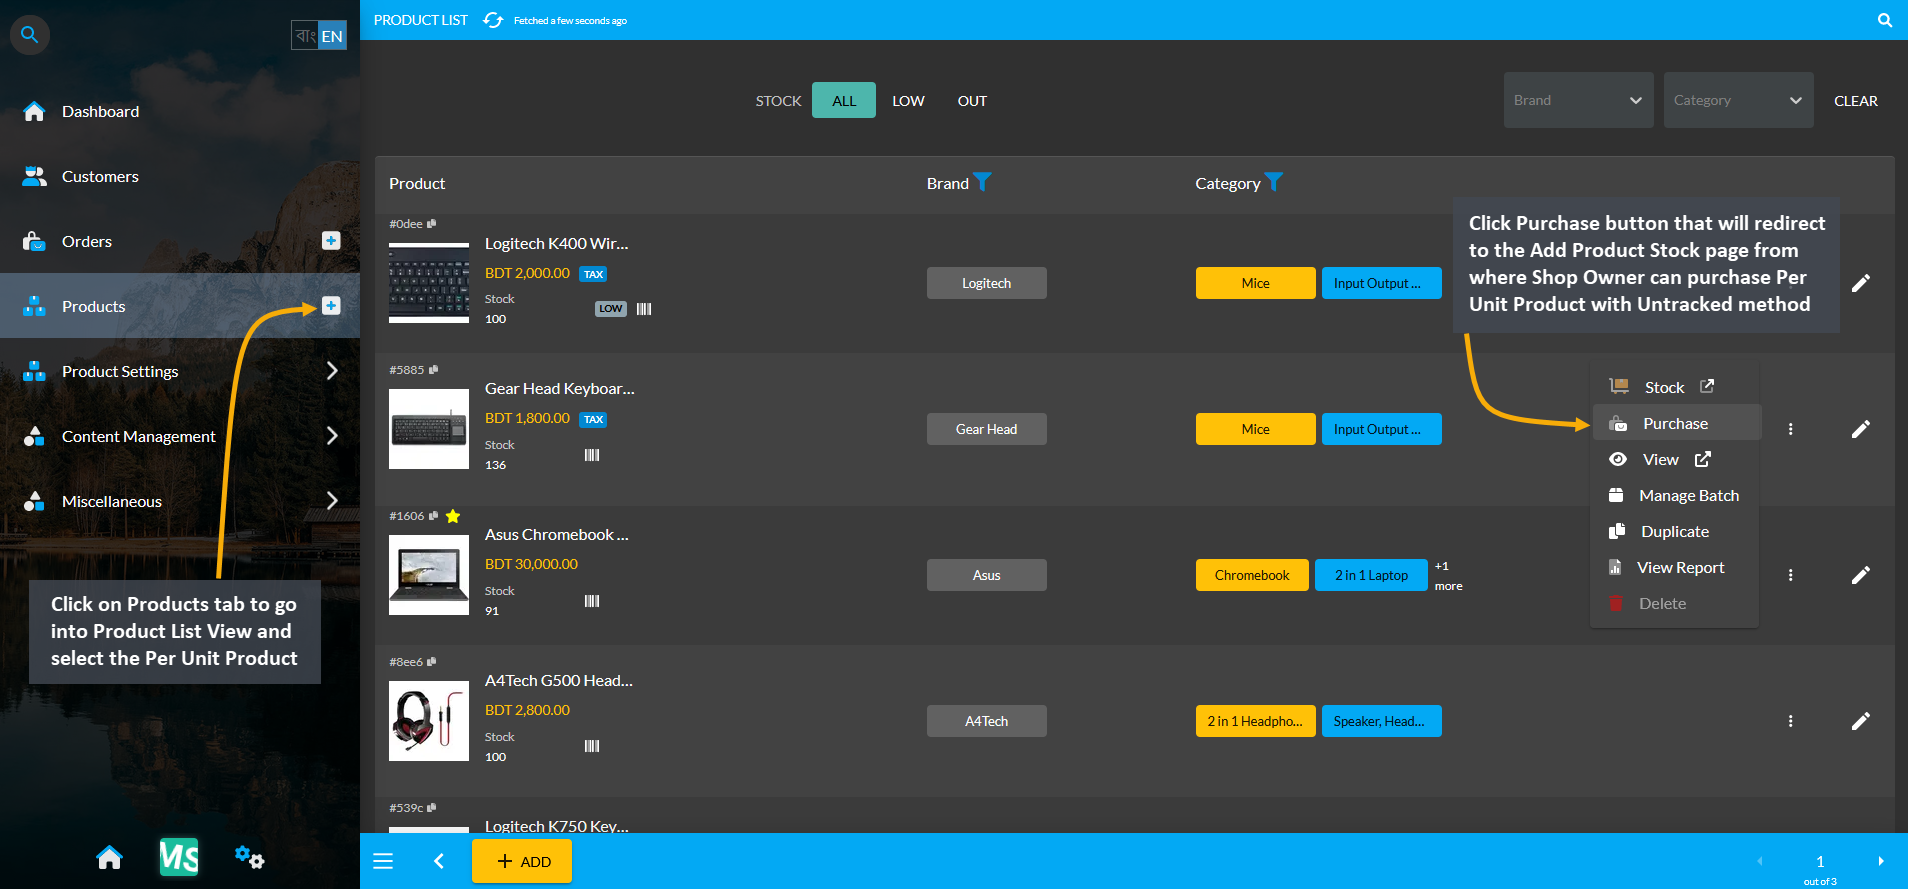
Image 1: Select target Per Unit Product and click the Purchase button to buy from Credit Supplier.
On the Add Product Stock page, select the Untracked Method from Acquisition Options. Turn on toggle button to enable auto increment for sale stock count. Then click Auto Generate Serial Numbers button to generate Quantity and Serial of Per Unit Product that Shop Owner will buy from Supplier. It will open a pop-up, where Prefix, Suffix, Start Counter, and End Counter needs to be filled to generate Product Stock with individual serial numbers.
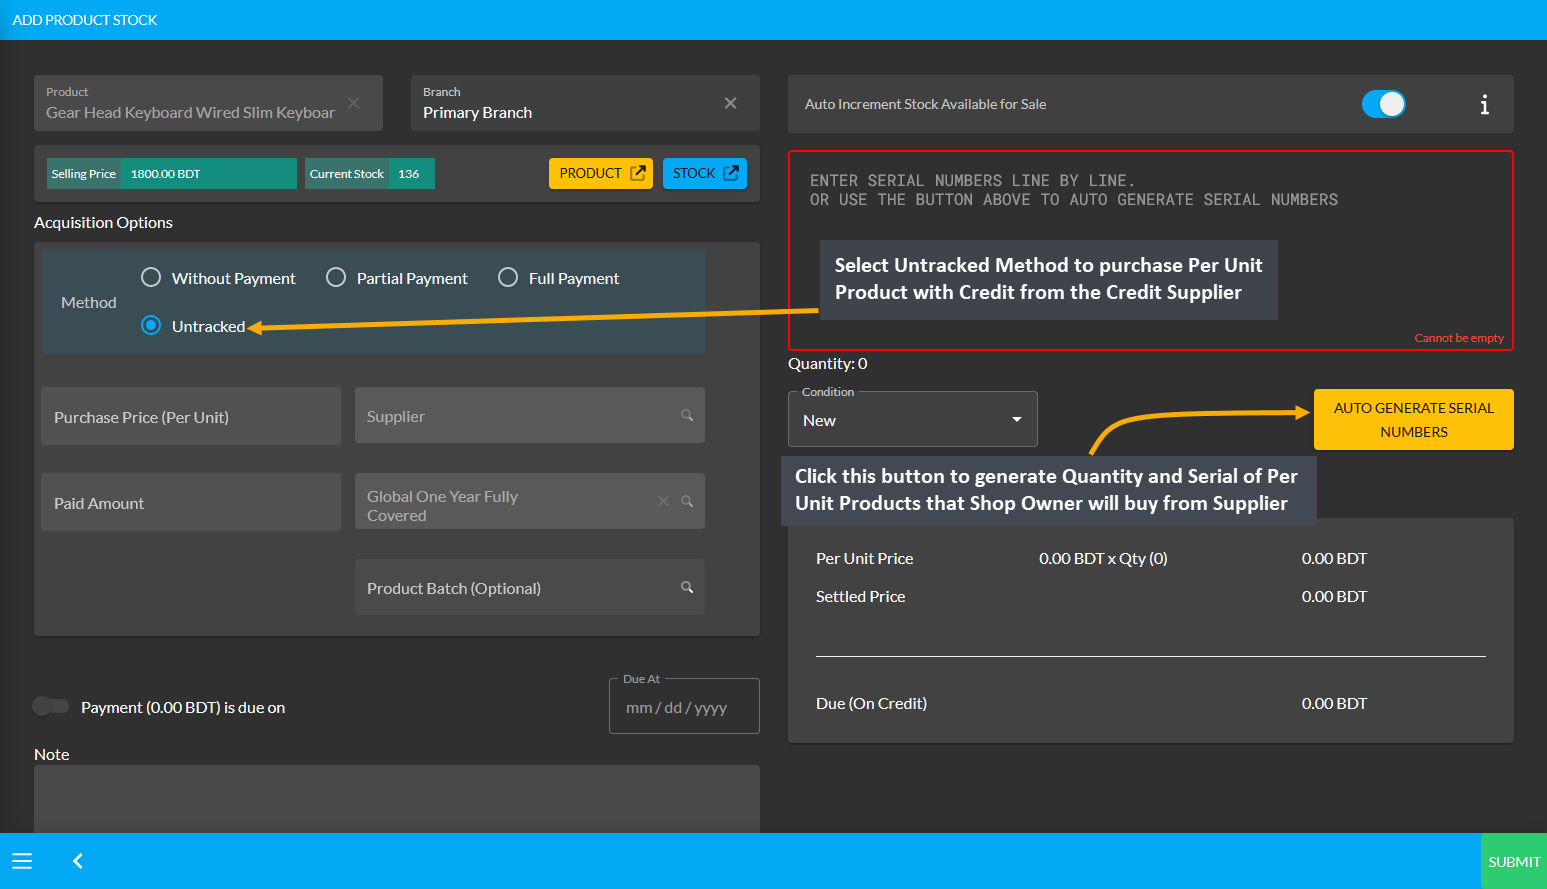
Image 2: Select Untracked Mthod as Acquisition Option and click Auto Generate Serial Numbers button.
After clicking the Auto Generate Serial Numbers button, a pop-up will appear where Product Serial Number and Quantity needs to be set with Prefix, Suffix, Start Counter, and End Counter. Click the Generate button to create the Per Unit Products for purchase from the Credit Supplier that will add the serial numbers inside the box.
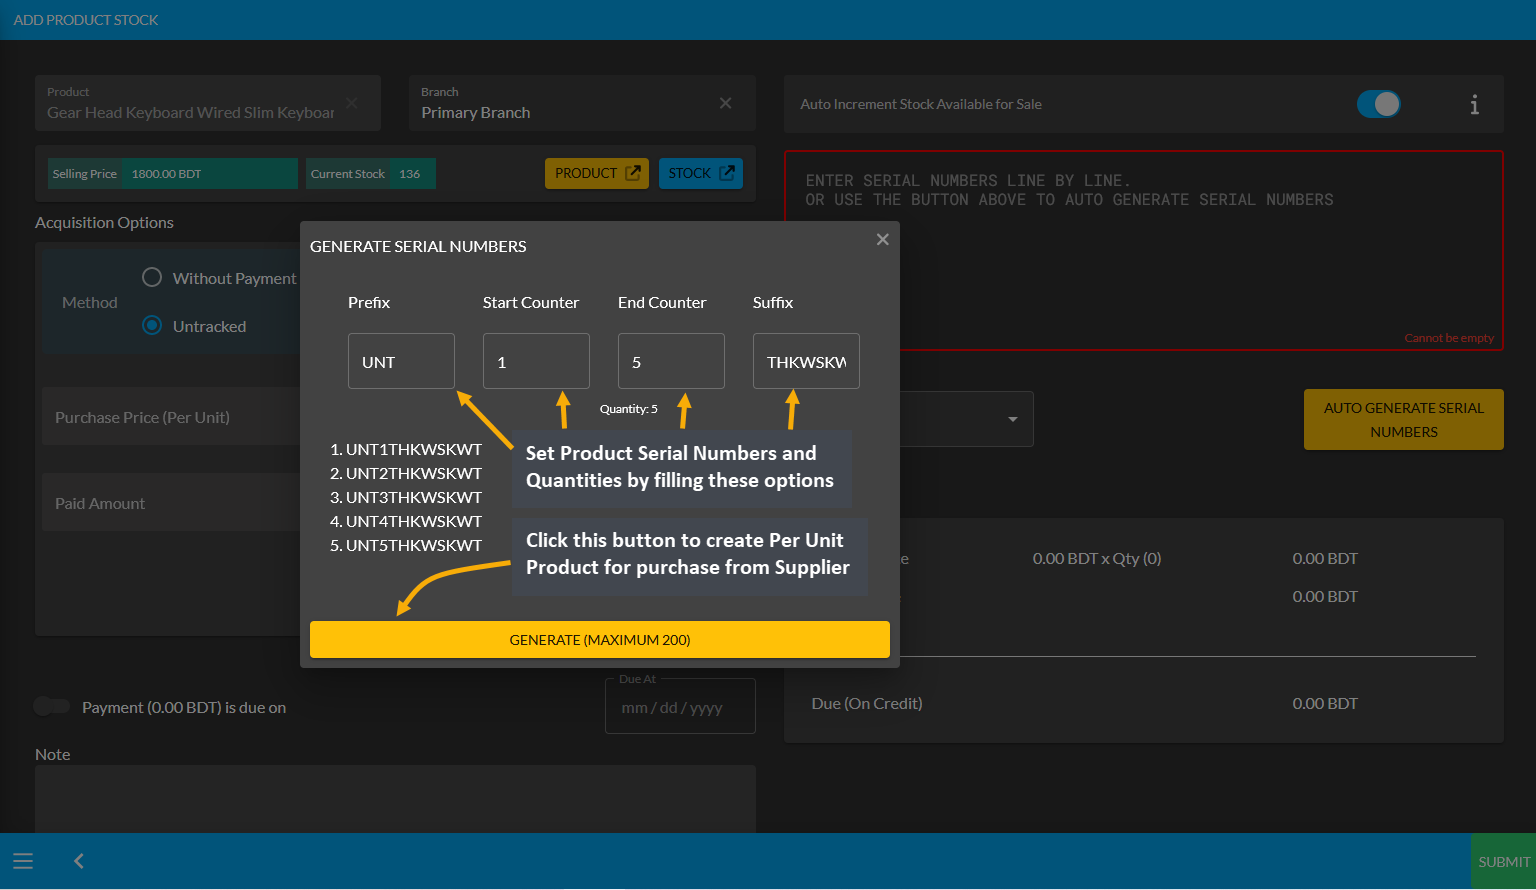
Image 3: Set Product Serial Number and Quantity with Prefix, Suffix, Start Counter, and End Counter.
After Product Serial Numbers and Quantities are generated for the target Per Unit Product, these autogenerated serial numbers for created Per Unit Product quantities will show inside the box. Click Submit button to complete the purchase process with Untracked Method which will not have the Shop Owner’s purchase information.
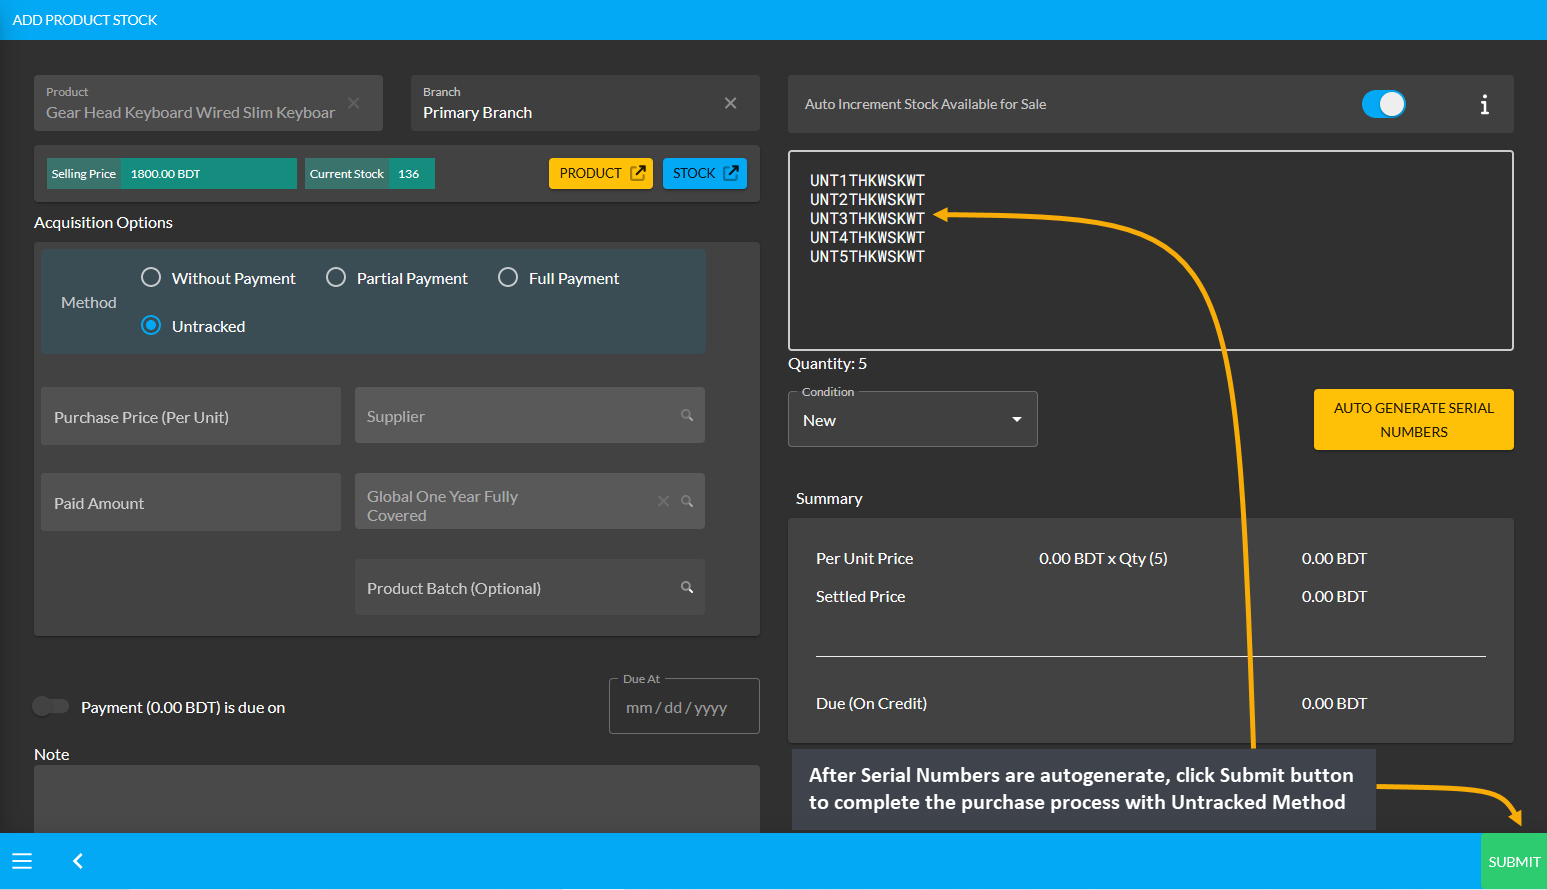
Image 4: After Serial Numbers are autogenerated, click Submit to complete purchase with Untracked Method.
Then, a pop-up will show uploading assigned Per Unit Product quantities and confirm when units are successfully created. Click Okay to save changes when auto generated serial numbers are 100% uploaded for completing the Per Unit Product purchase process from Credit Supplier. If Shop Owner wants to purchase more quantities of the same Per Unit Product from the same Credit Supplier, then they need to click the Purchase Product from Same Supplier button as shown in the example screenshot.
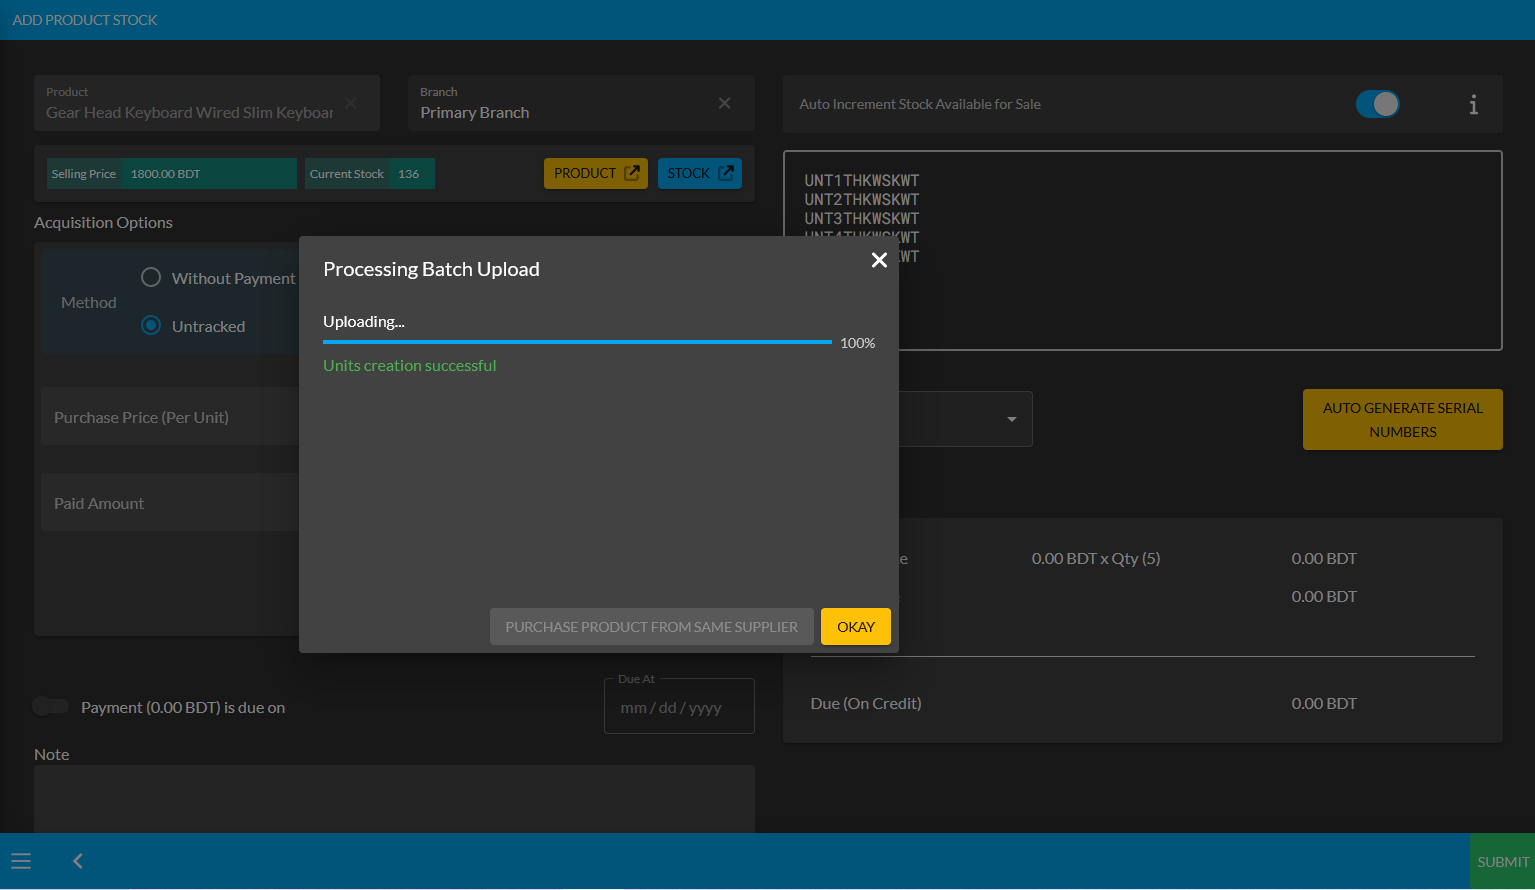
Image 5: Pop-up showing successful creation or batch upload of Per Unit Product. Click Okay to proceed.
Clicking on Okay will redirect to the Unit Stock Management page where the successfully created Batch of Per Unit Products will be displayed on the top of the list as marked in the example screenshot. For Per Unit Products, the individual serial numbers will also be displayed with Product SKUs, through which stocks can be differentiated.
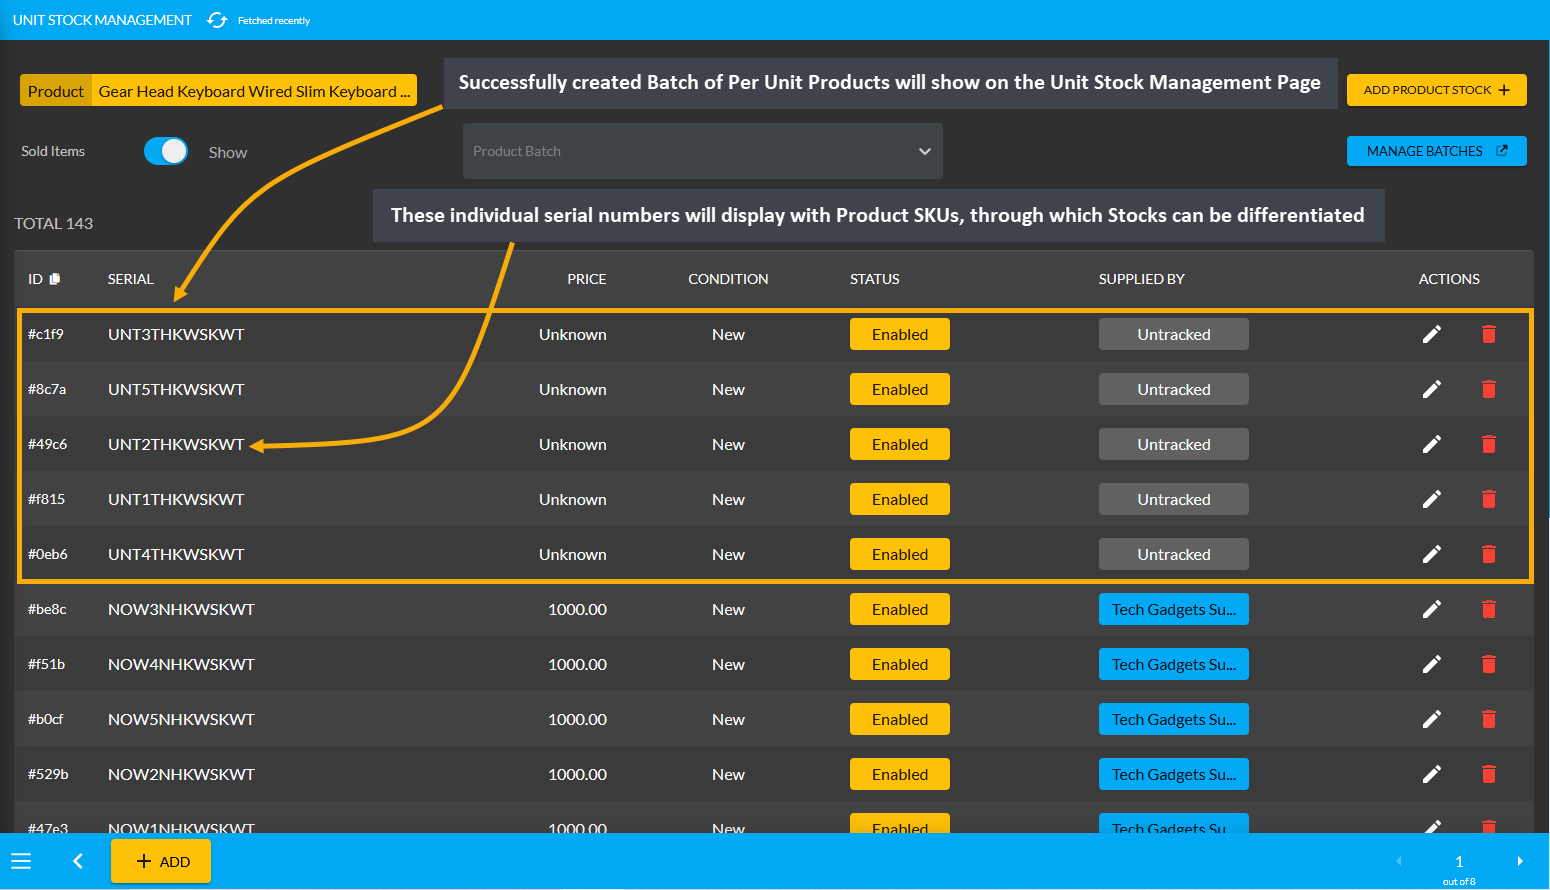
Image 6: Successfully created Batch of Per Unit Products will display on the Unit Stock Management Page.
18.4 - Create New Order with Product Stock
Learn More about how to search, create, and modify details of Product Batch and Stock of Per Unit Product(s).
Assign Per Unit Products to Create New Order
To create New Order with Per Unit Products, click on + button from Orders tab that will open New Product Cart. Now, search and select any Per Unit Product on the search bar. Then, click the Add Stock button to assign or add stock to Cart in desired quantities. Here, Gear Head Keyboard Wired Slim Keyboard With Touchpad was selected as the Per Unit Product where units need to be assigned to proceed with the order.
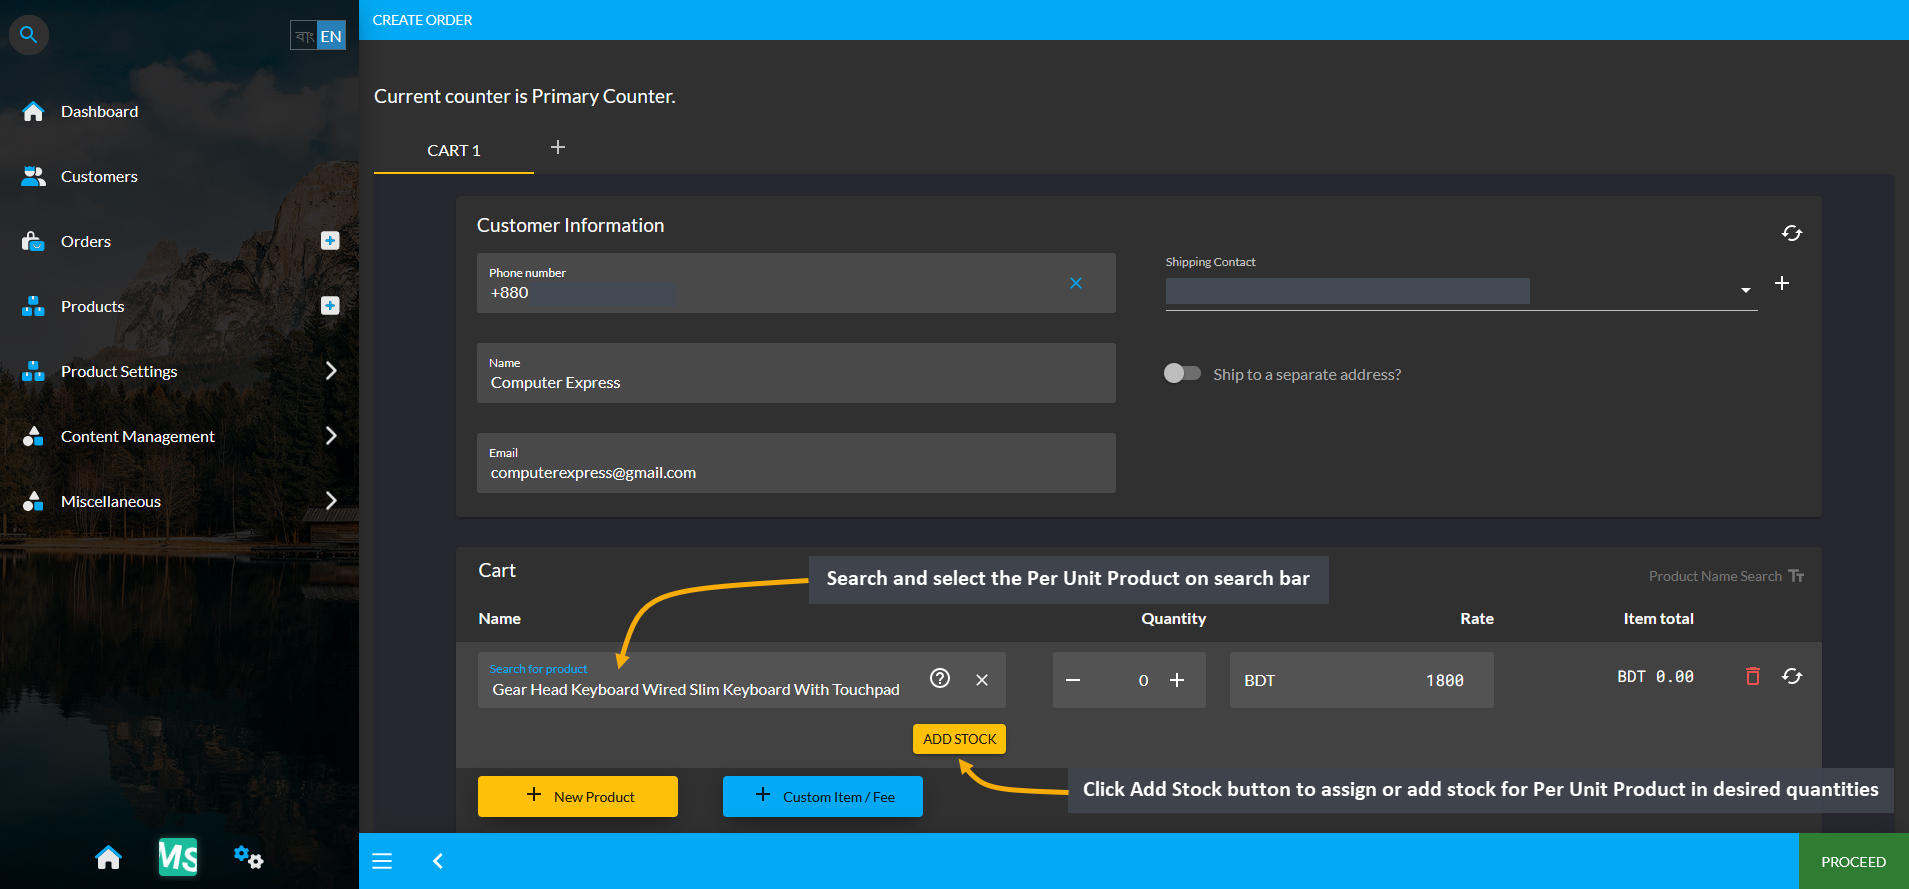
Image 1: Search and select Per Unit Product on the search bar in Order Cart in desired quantities.
Add Available Units to Cart
After clicking the Add Stock button, a pop-up will appear where available Units for selected Per Unit Product will show. From here, select Per Unit Product quantities and assign them for the Product to Order. In this example, four units were assigned to the Per Unit Product Gear Head Keyboard Wired Slim Keyboard With Touchpad. Click Okay to proceed to the next step as shown in the screenshot.
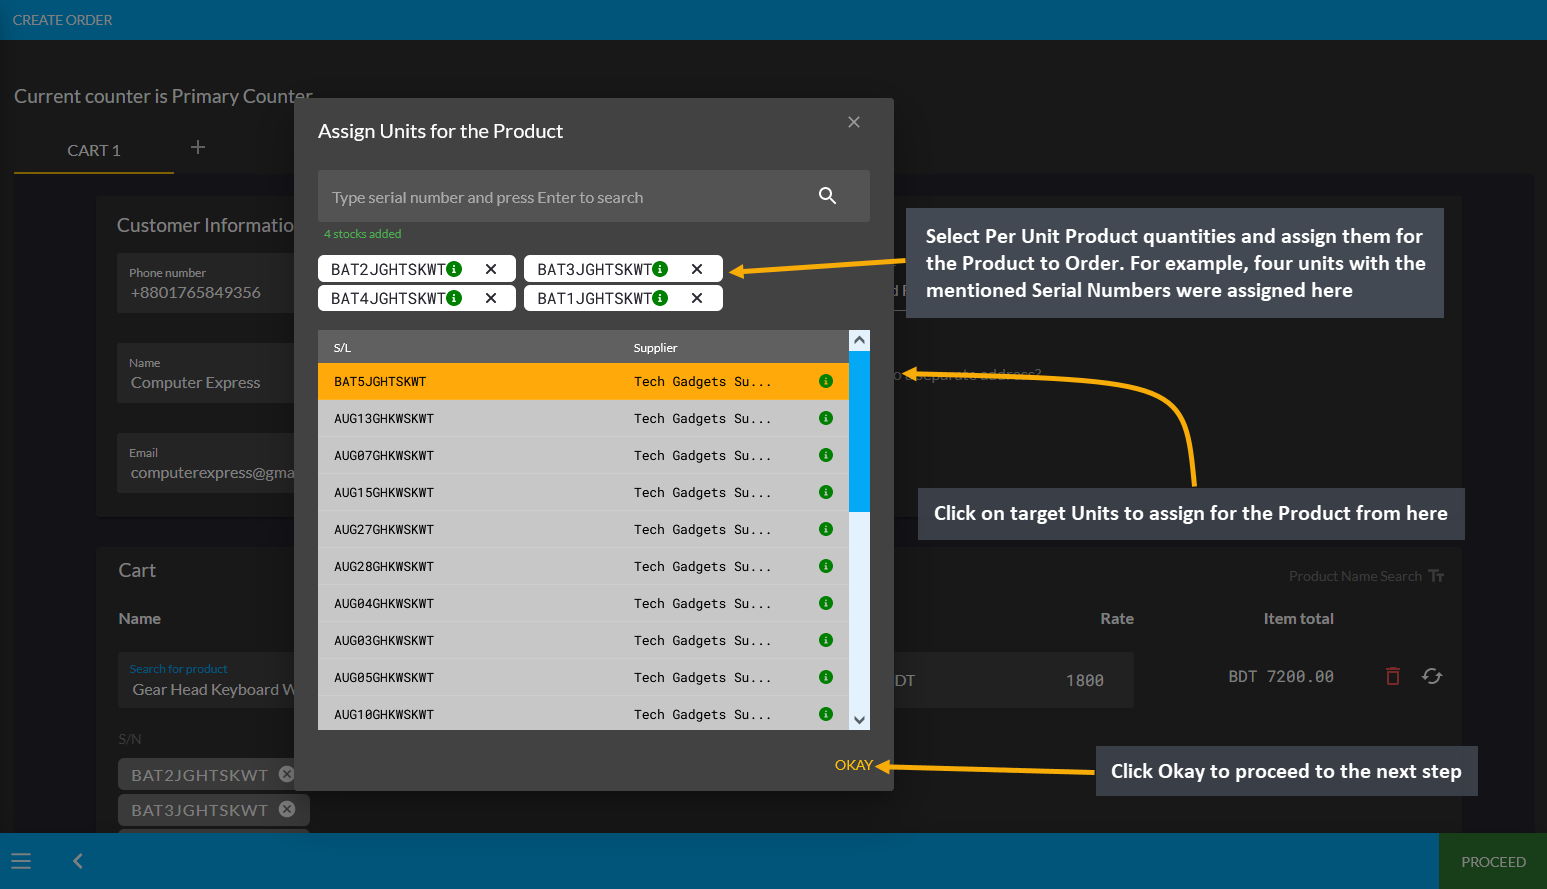
Image 2: Select Per Unit Product quantities and assign them for the selected Per Unit Product to Order.
Assigned Units on Cart
The Assigned Units will show below the Per Unit Product along with their quantities and prices. Check the Unit rates and Order Total. Then, click Proceed button to save all the changes for reviewing shipment and payment options.
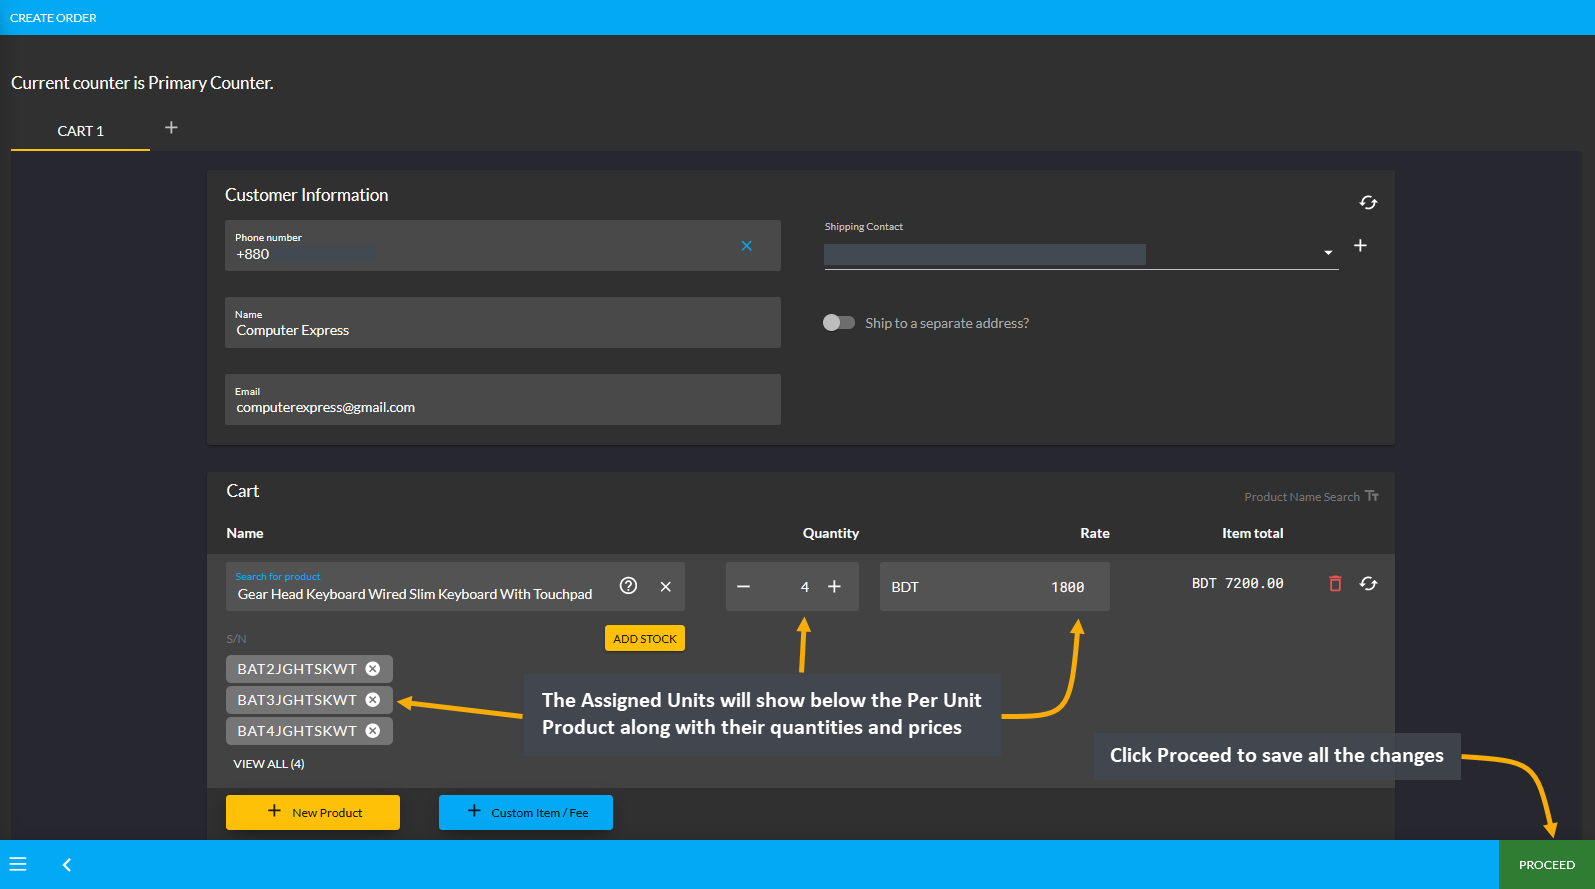
Image 3: Assigned Units will show below the Per Unit Product along with their quantities and prices.
Review Shipment and Payment Options
Now, Review Cart by choosing the Shipment and Payment Options for the Order. Complete the Order by clicking on the Confirm Order button. It will redirect to a new page, where clicking on Print Invoice will show the details of the Per Unit Product ordered with Assigned Units from the Per Unit Product Stock as shown in few steps below.
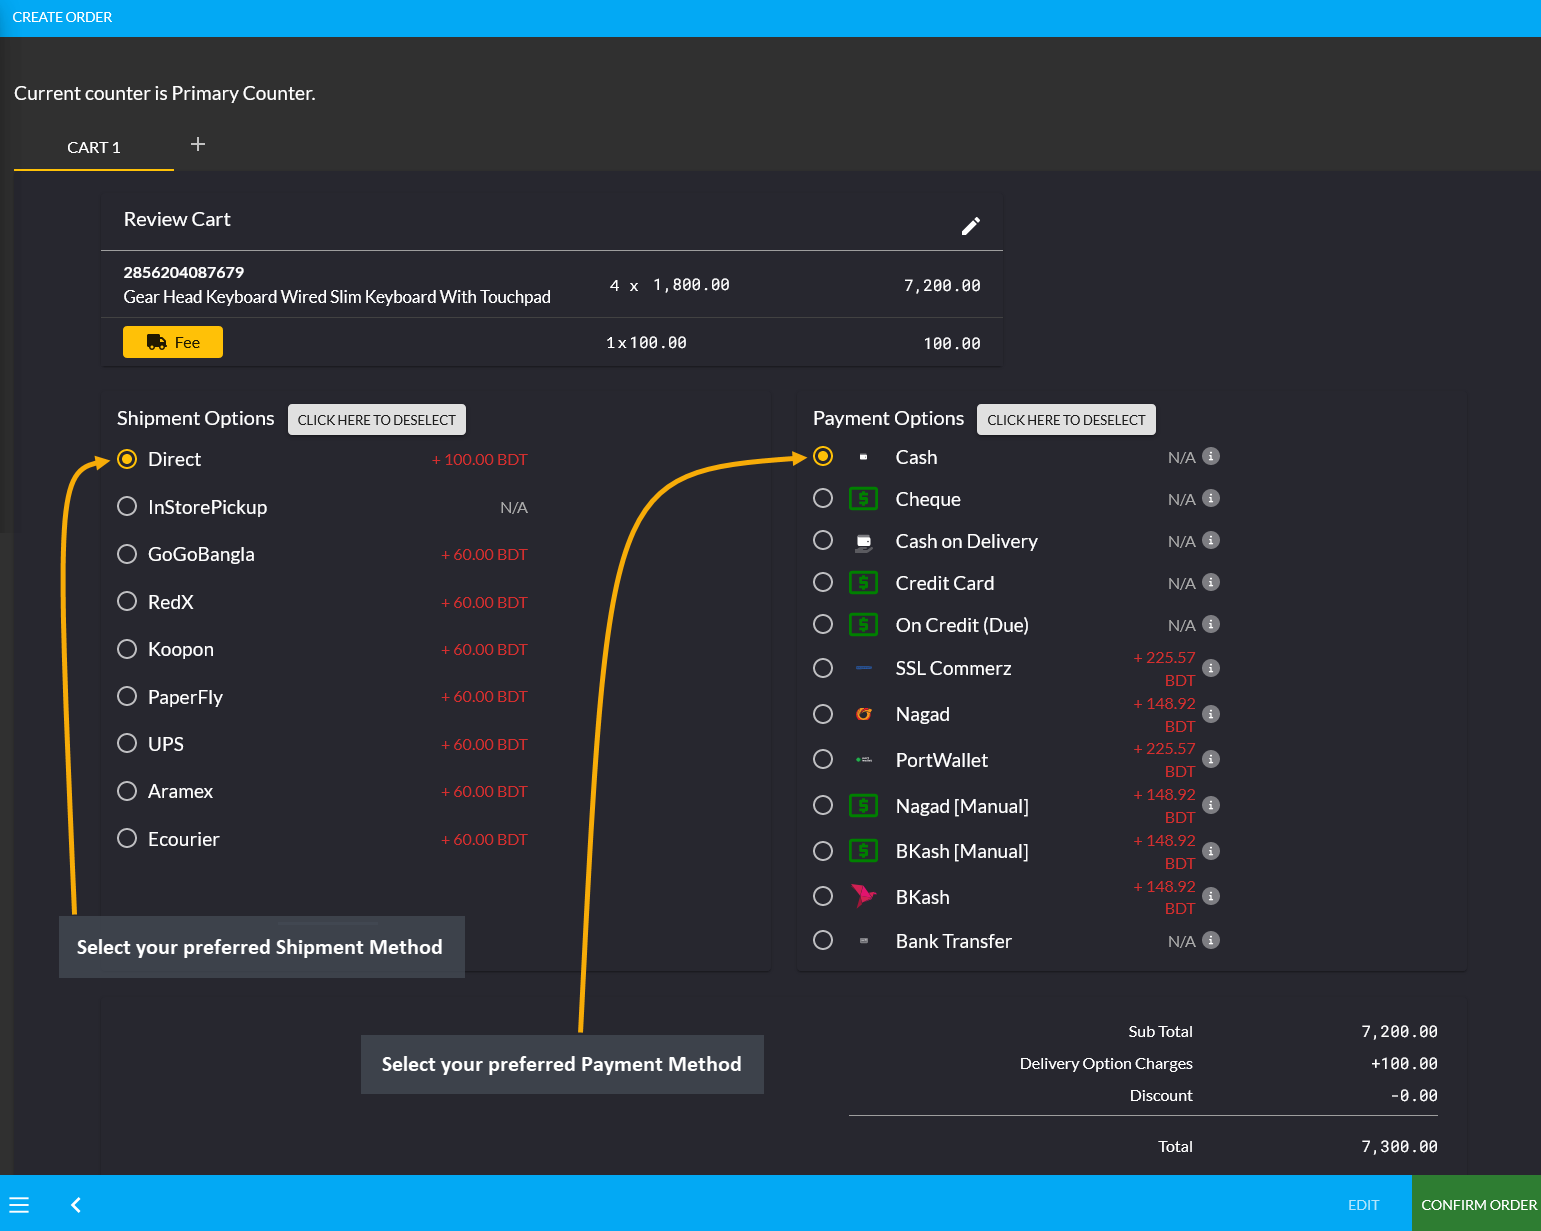
Image 4: Select preferred Shipping and Payment Methods to complete the Per Unit Product Order.
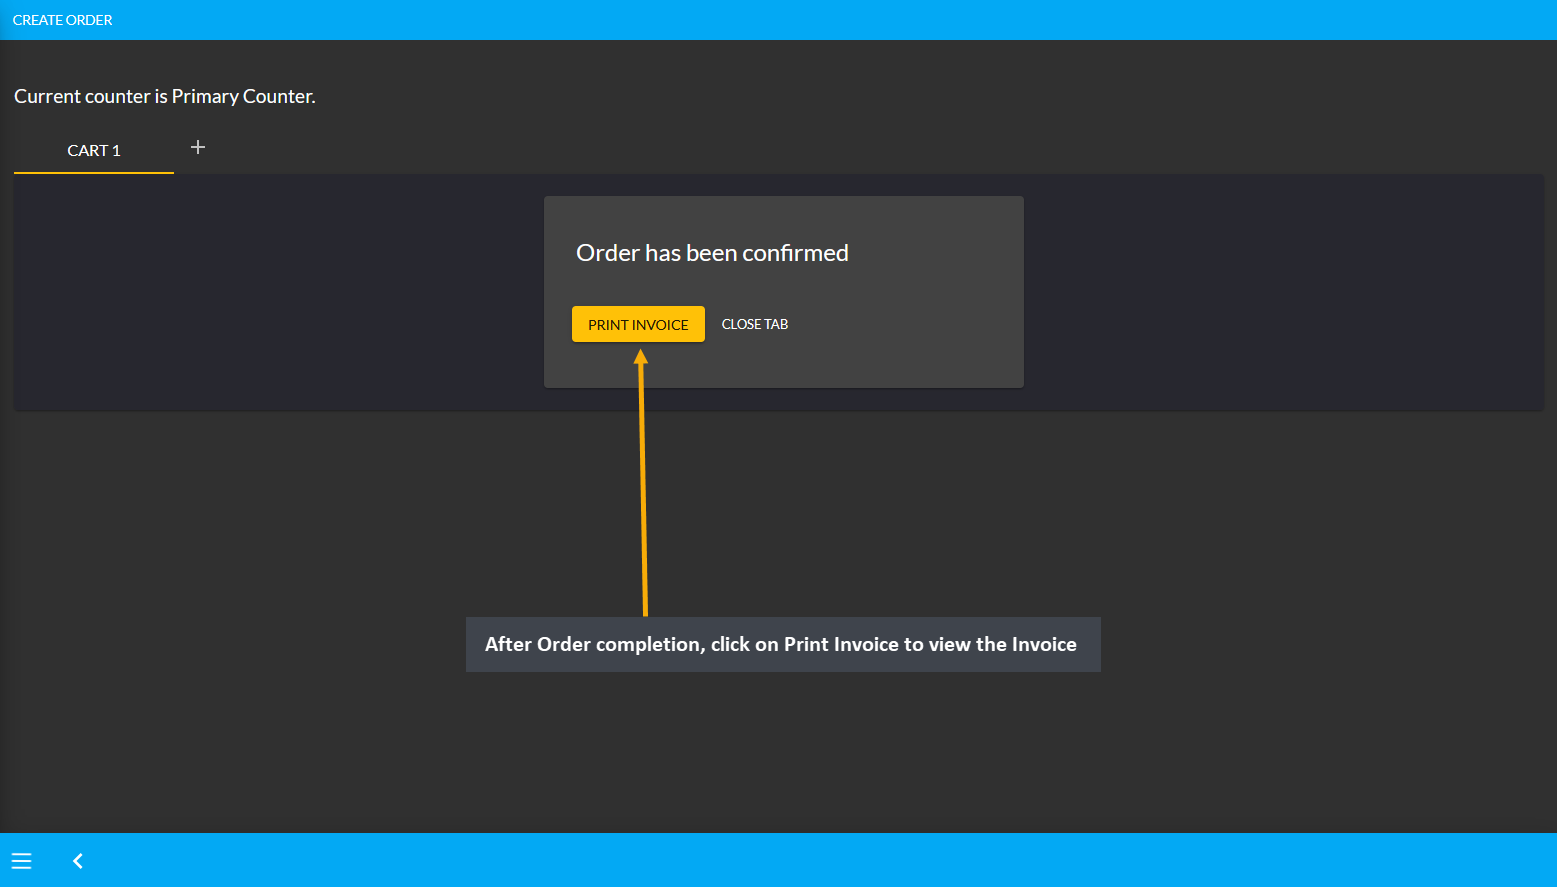
Image 5: After Order completion, click on Print Invoice to view the Order Invoice.
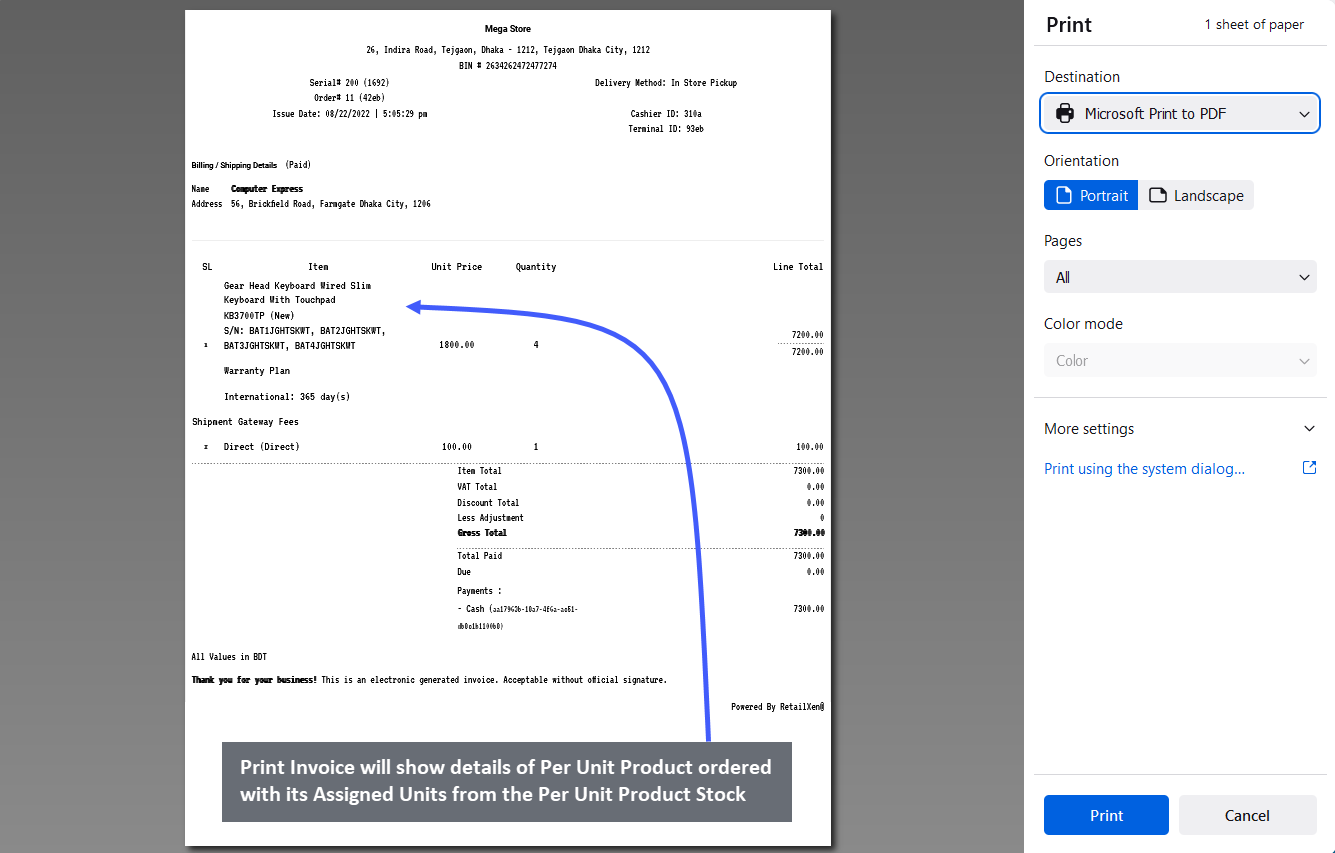
Image 6: Print Invoice will show details of Per Unit Product ordered with its Assigned Units.
19 - Reports
Detailed overview of various reports are given with screenshots here.
This section is a useful feature in the content management system designed to provide an overview of reports. It contains in-depth quantitative analysis of orders, customers, products, and product batches modules.
The first few section of the report includes explanation of cost basis of orders, customers, products, and product batches. Understanding the cost basis is important for tax purposes as it calculates the amount of total profit, cost/ purchase price, and revenue to understand capital gain or loss. Determining the difference between selling price and purchase price, the cost basis value will help the shop owner to understand if their investment is profitable or not. By keeping track of the business’ performance, cost basis reports will help calculate possible tax consequences.
The Cost Basis sections in our system can be accessed from four modules - Customers, Orders, Products, and Product Batch. Keep track of cost basis calculations to bring more revenues and profits.
19.1 - Customer Cost Basis
Detailed overview of cost basis for Customer Section.
This section discusses the importance of cost basis for tax purposes as it calculates the amount of total profit, cost/ purchase price, and revenue to understand capital gain or loss.
Customer Cost Basis
Click the Customers module which will open the Customer List. From here, go to any Customer and click on the small gray graph icon that will redirect to the Customer Cost Basis page showing total profit, total revenue, total cost, total vat, and total discount of that Customer within different time frame ranges.

Image 1: Click the small gray graph icon on Customer List that will redirect to Customer Cost Basis page.
Cost Basis Summary Section
Clicking the small gray graph icon from Customer List will redirect to Customer Cost Basis page. On the top is the Customer cost basis summary showing total profit, total revenue, total cost, total vat, total tax, and total discount and below it is a Customer profile box with basic customer information. For Customer Cost Basis, the Pick a Range or range filtering option will show Customer’s Cost Basis on Daily, Monthly, Hourly, Weekly, Half Yearly, or Yearly basis. Below is a long list of entries showing calculations of profit, cost, revenue, vat, tax, and discount separately.

Image 2: Customer Cost Basis shows Customer profile, Cost Basis summary and detailed Order breakdown.
Cost Basis Search and Range Selection
The Customer Cost Basis page have a Search button with a dropdown menu with four options for Order, Customer, Product, and Product Batch on the top right. Clicking each of these options will bring cost basis summary results of Order, Customer, Product, and Product Batch whichever is selected by redirecting to those pages.
For example, to search and find a Customer’s Cost Basis result, select Customer from the dropdown and type the Customer’s name in the Search box which will bring in the selected Customer’s Cost Basis result. From the Pick a Range box, select - Daily, Monthly, Hourly, Weekly, Half Yearly, and Yearly to view the results of chosen cost basis summary. In this way, the Shop Owner can search for any Customer’s Cost Basis result.

Image 3: Range Filtering option is enabled for Customer, select an option to view their Cost Basis result.

Image 4: Select Customer from dropdown and type Customer's name in Search Box to view their Cost Basis.

Image 5: Pick a Range from Daily, Monthly, Hourly, Weekly, Half Yearly, or Yearly to view their Cost Basis.
19.2 - Order Cost Basis
Detailed overview of cost basis for Order Section.
This section discusses the importance of cost basis for tax purposes as it calculates the amount of total profit, cost/ purchase price, and revenue to understand capital gain or loss.
Order Cost Basis Summary
Click the Orders module which will open the Order List. From there, click on the small gray graph icon that will redirect to the Order Cost Basis page showing total profit, total revenue, total cost, total vat, and total discount.

Image 1: Click the small gray graph icon on Order List that will redirect to the Order Cost Basis page.
Cost Basis Summary Section
For Order Cost Basis, the Pick a Range or range filtering option is disabled, because Orders do not have multiple cost basis. Clicking the small gray graph icon from Order List will redirect you to Order Cost Basis page. On the top left of the page is an Order profile box with basic customer information and Order cost basis summary showing total profit, total revenue, total cost, total vat, total tax, and total discount of the selected Order. Below shows the Order date, ordered Product, line item ID, quantity, cost, discount, revenue, profit, tax, vat, and currency.

Image 2: Order Cost Basis shows Customer profile, Order Cost Basis summary and detailed Order breakdown.
Cost Basis Search and Range Selection
The Order Cost Basis page also have a Search button with a dropdown menu with four options of Order, Customer, Product, and Product Batch on the top right. Clicking each of these options will bring cost basis summary results of Order, Customer, Product, and Product Batch whichever is selected. For example, to search and find an Order’s Cost Basis result, select Order from the dropdown and type the Customer’s name in the Search box which will bring in the selected Order’s Cost Basis result. In this way, the Shop Owner can search for any Order’s Cost Basis result.

Image 3: Range Filtering option is disabled for Orders, select an option to view their Cost Basis result.

Image 4: Select Order from dropdown and type Customer’s name in Search box to view their Cost Basis result.
19.3 - Product Cost Basis
Detailed overview of cost basis for Product Section.
This section discusses the importance of cost basis for tax purposes as it calculates the amount of total profit, cost/ purchase price, and revenue to understand capital gain or loss.
Product Cost Basis
Click the Products module which will open the Product List. From here, go to any Product and click on the small gray graph icon marked as View Report that will redirect to the Product Cost Basis page showing total profit, total revenue, total cost, total vat, and total discount of that Product within different time frame ranges.
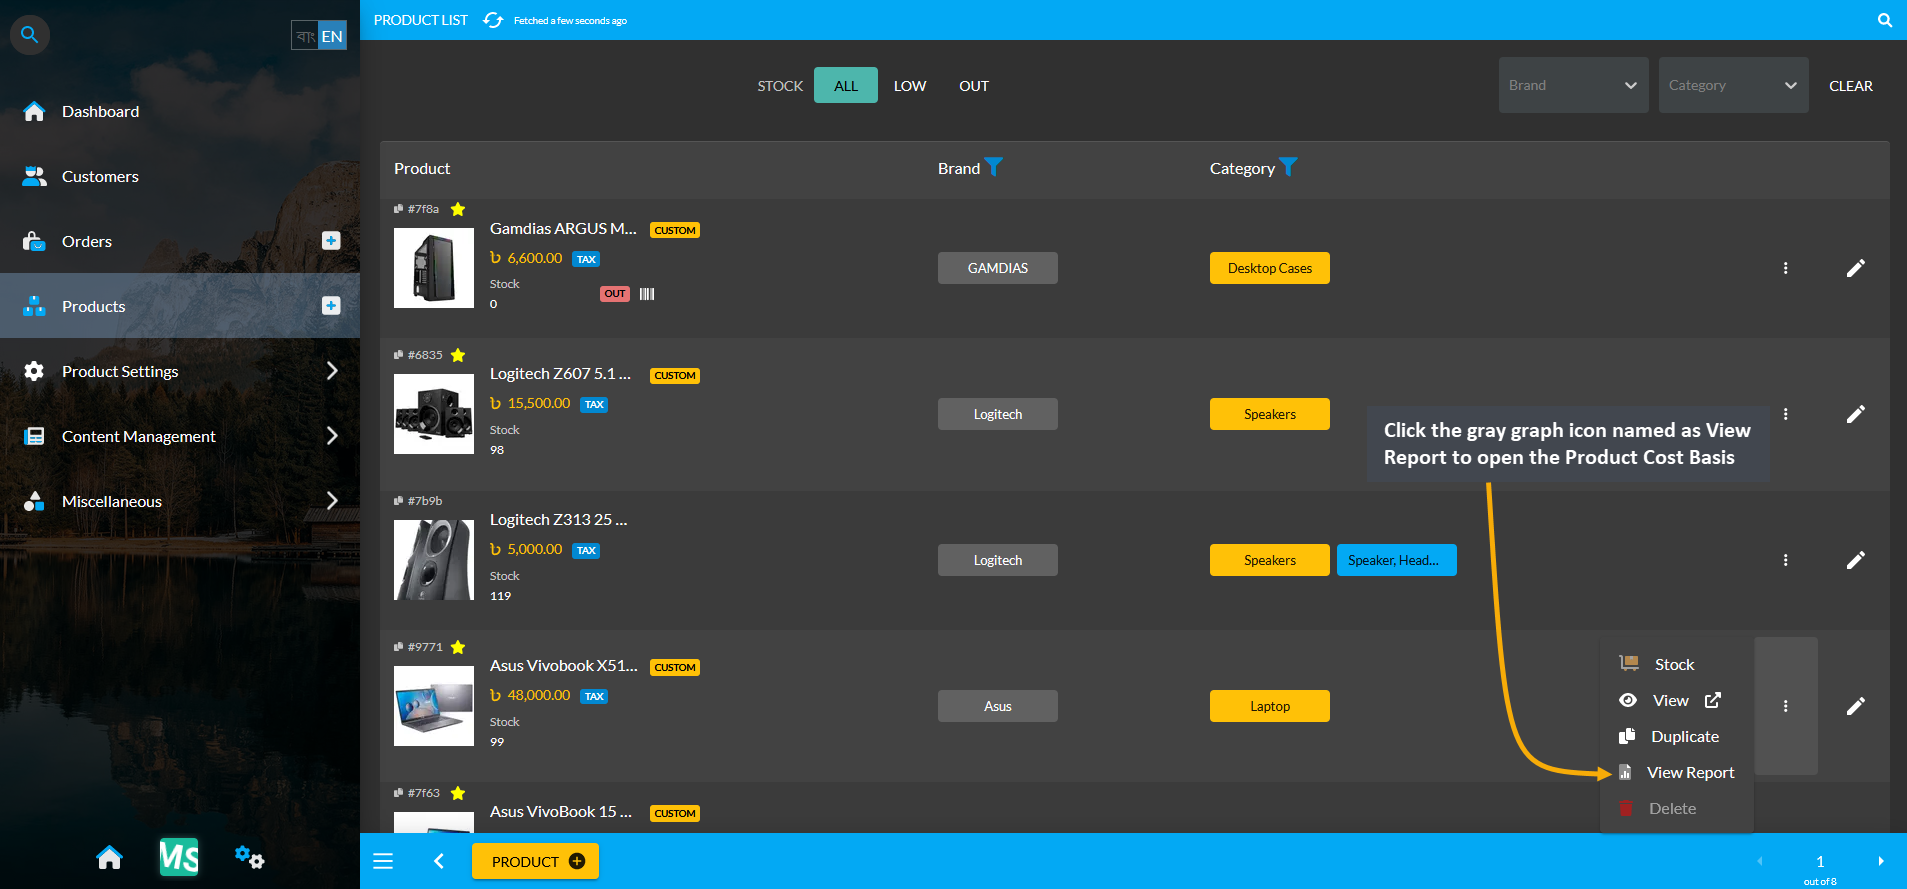
Image 1: Click the small gray graph icon on Product List that will redirect to the Product Cost Basis page.
Cost Basis Summary Section
Clicking the small gray graph icon from Product List will redirect to Product Cost Basis page. On the top is Product cost basis summary showing total profit, total revenue, total cost, total vat, total tax, and total discount and below it is the detailed description of the Product. For Product Cost Basis, the Pick a Range or range filtering option will show the Product’s Cost Basis on Daily, Monthly, Hourly, Weekly, Half Yearly, or Yearly basis. Below is a long list of entries showing calculations of profit, cost, revenue, vat, tax, and discount separately.
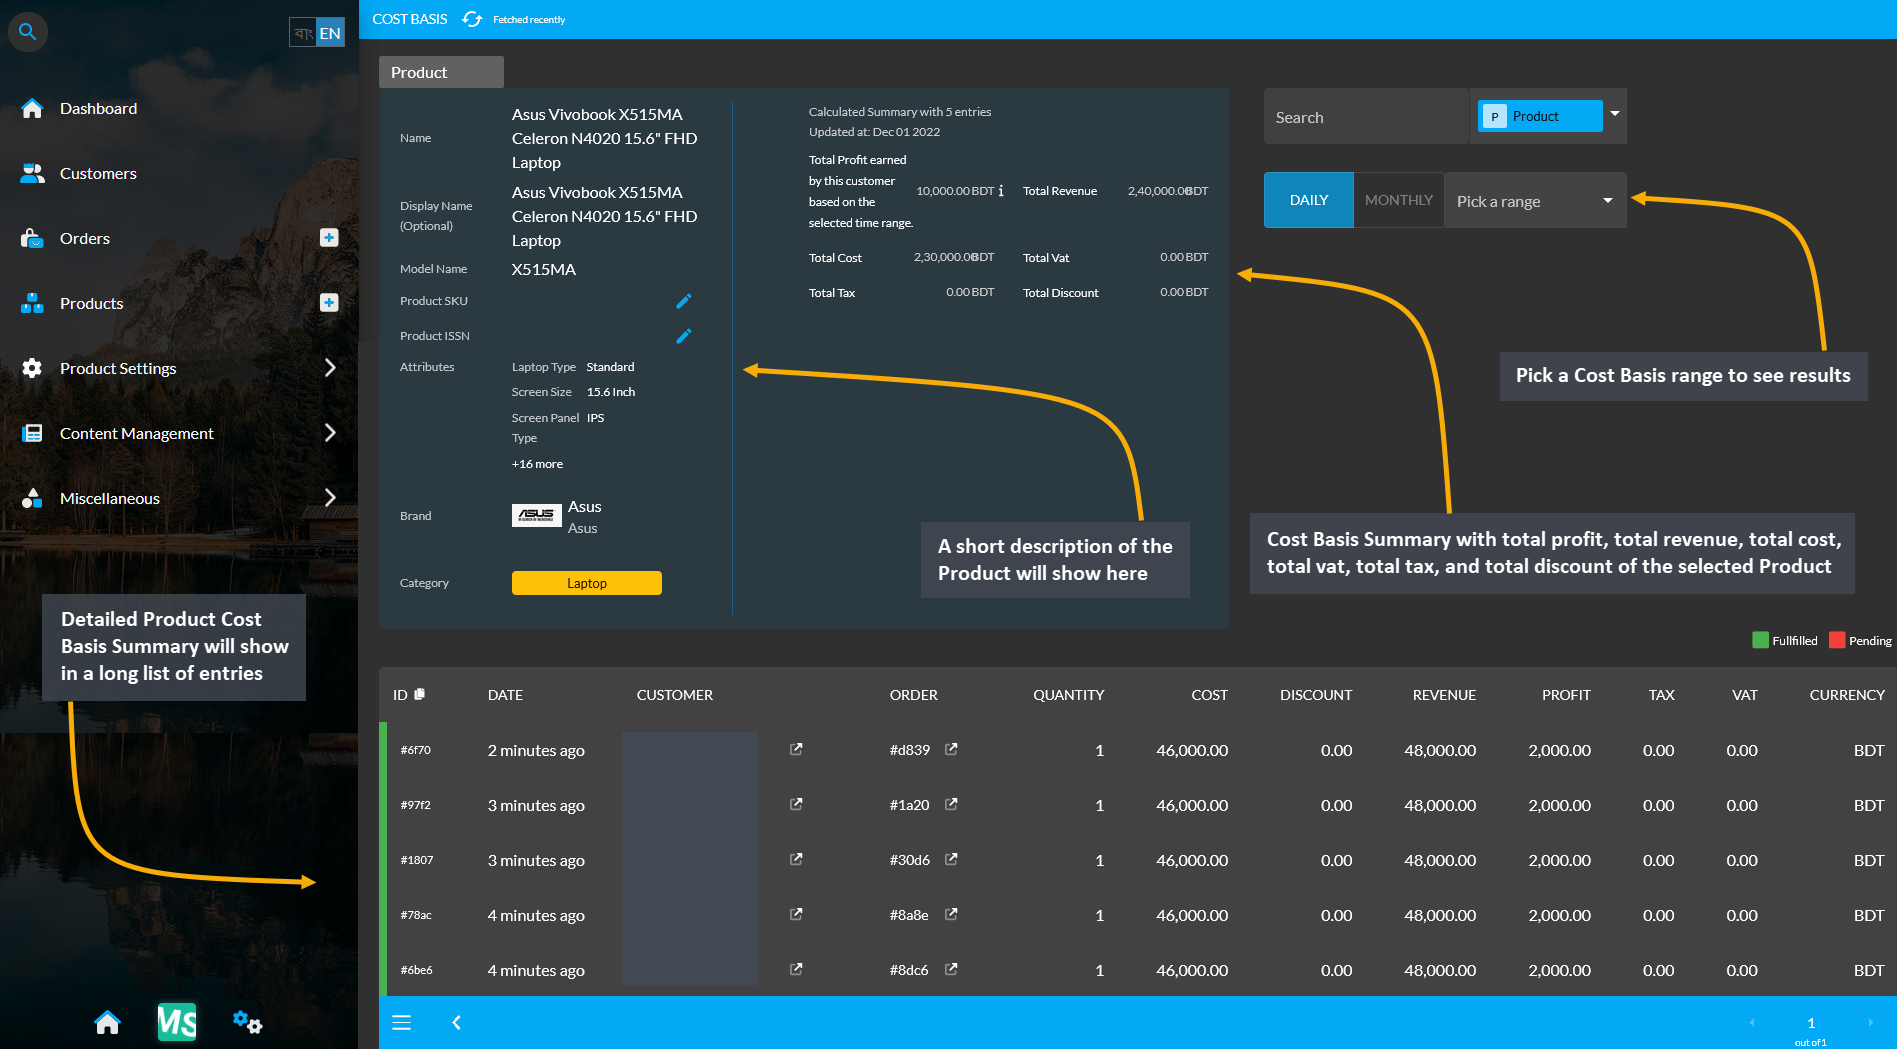
Image 2: Product Cost Basis shows Product info, Product Cost Basis summary and detailed Order breakdown.
Cost Basis Search and Range Selection
The Product Cost Basis page have a Search button with a dropdown menu having four options for Order, Customer, Product, and Product Batch on the top right. Clicking each of these options will bring cost basis summary results of Order, Customer, Product, and Product Batch whichever is selected by redirecting to those pages.
For example, to search and find a Product’s Cost Basis result, select Product from the dropdown and type a target Product’s name in the Search box which will bring in the selected Product’s Cost Basis result. From the Pick a Range box, select - Daily, Monthly, Hourly, Weekly, Half Yearly, and Yearly to view results of chosen cost basis summary. In this way, the Shop Owner can search for any Product’s Cost Basis result.
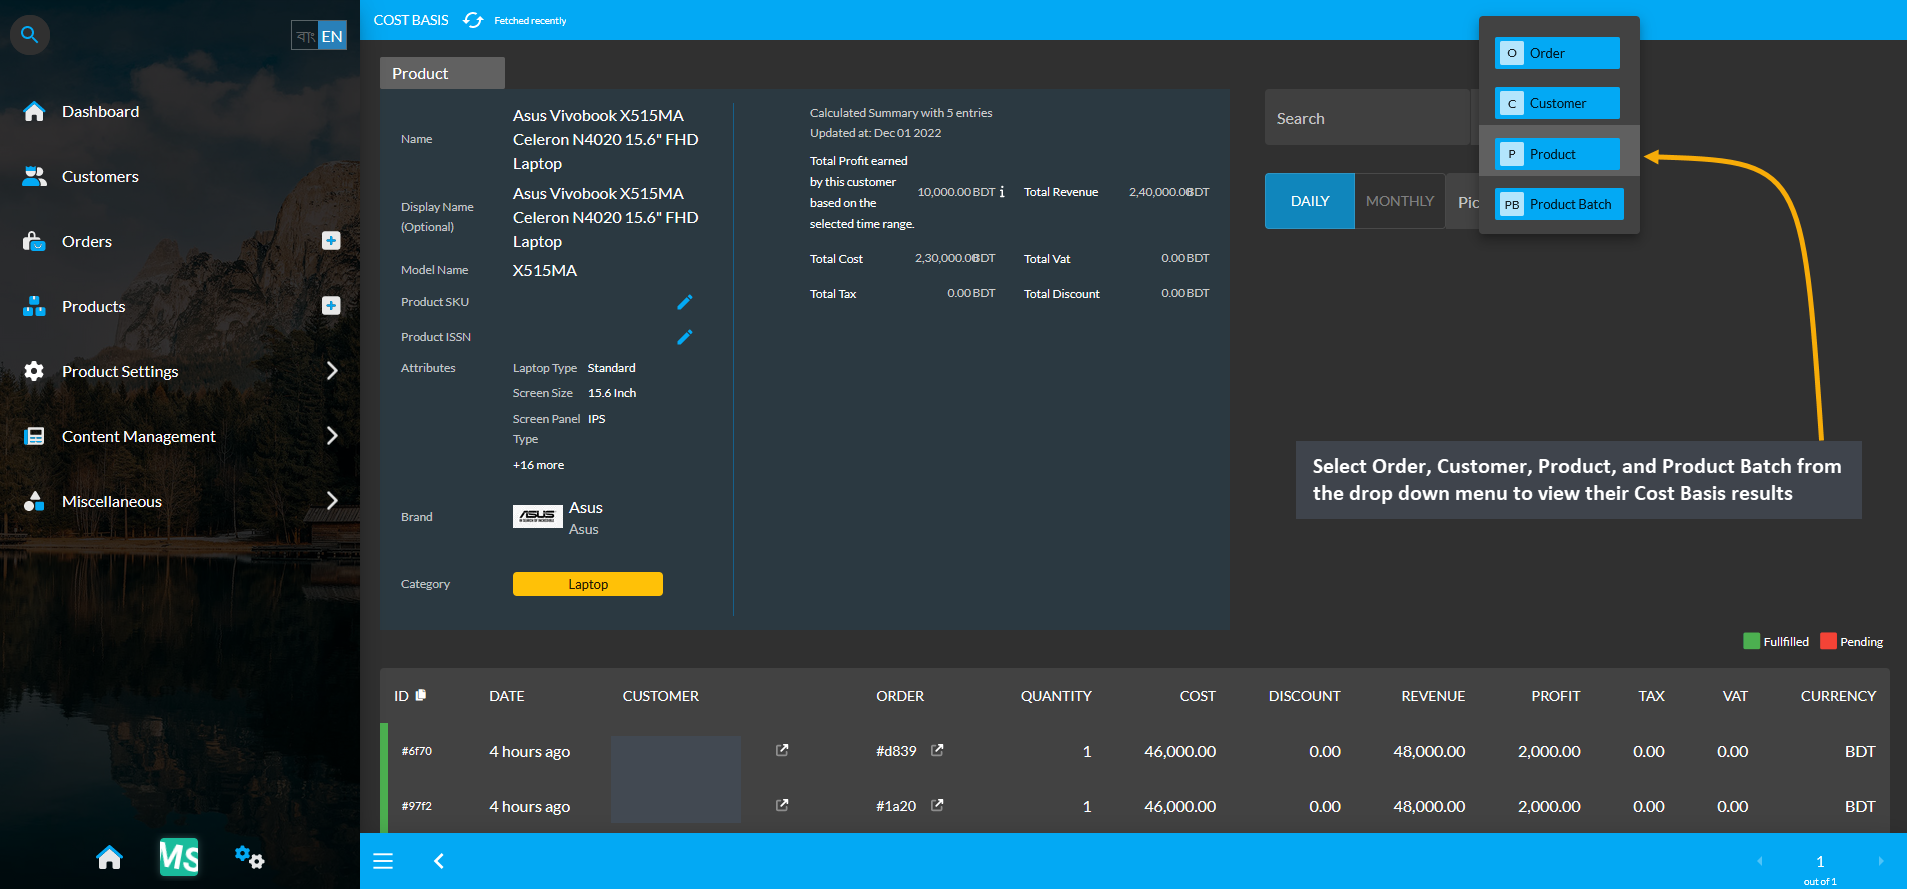
Image 3: Range Filtering option is enabled for Product, select an option to view their Cost Basis result.
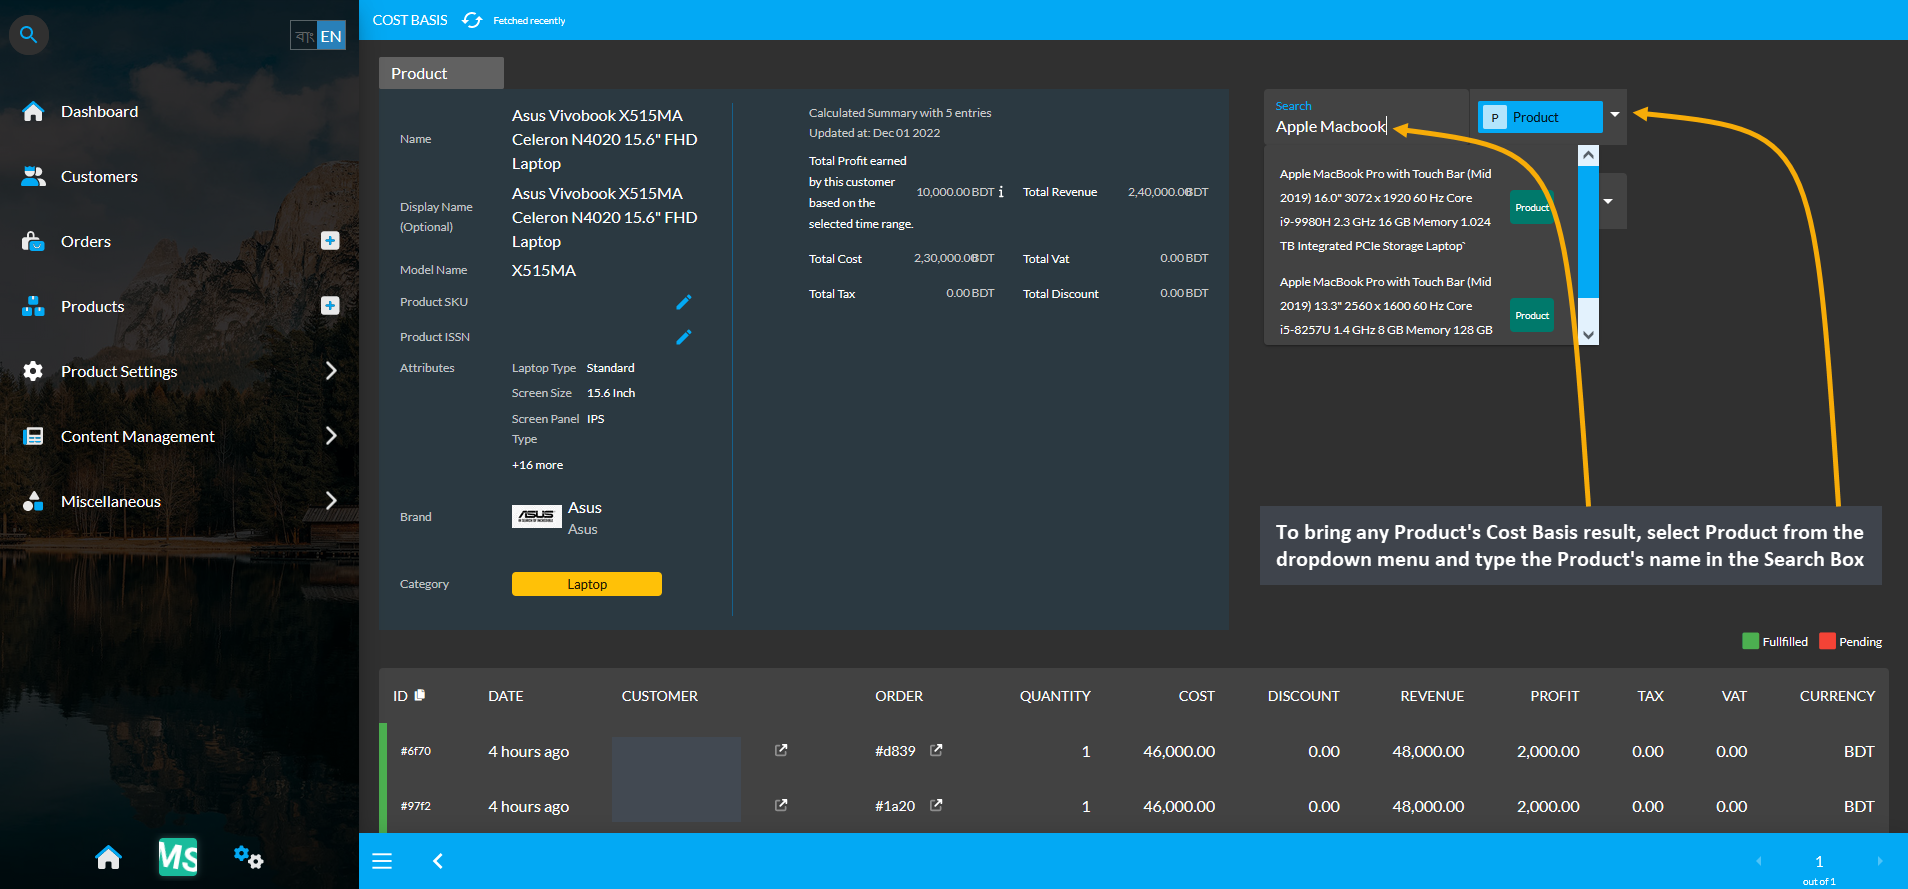
Image 4: Select Product from dropdown and type Product's name in Search Box to view their Cost Basis.
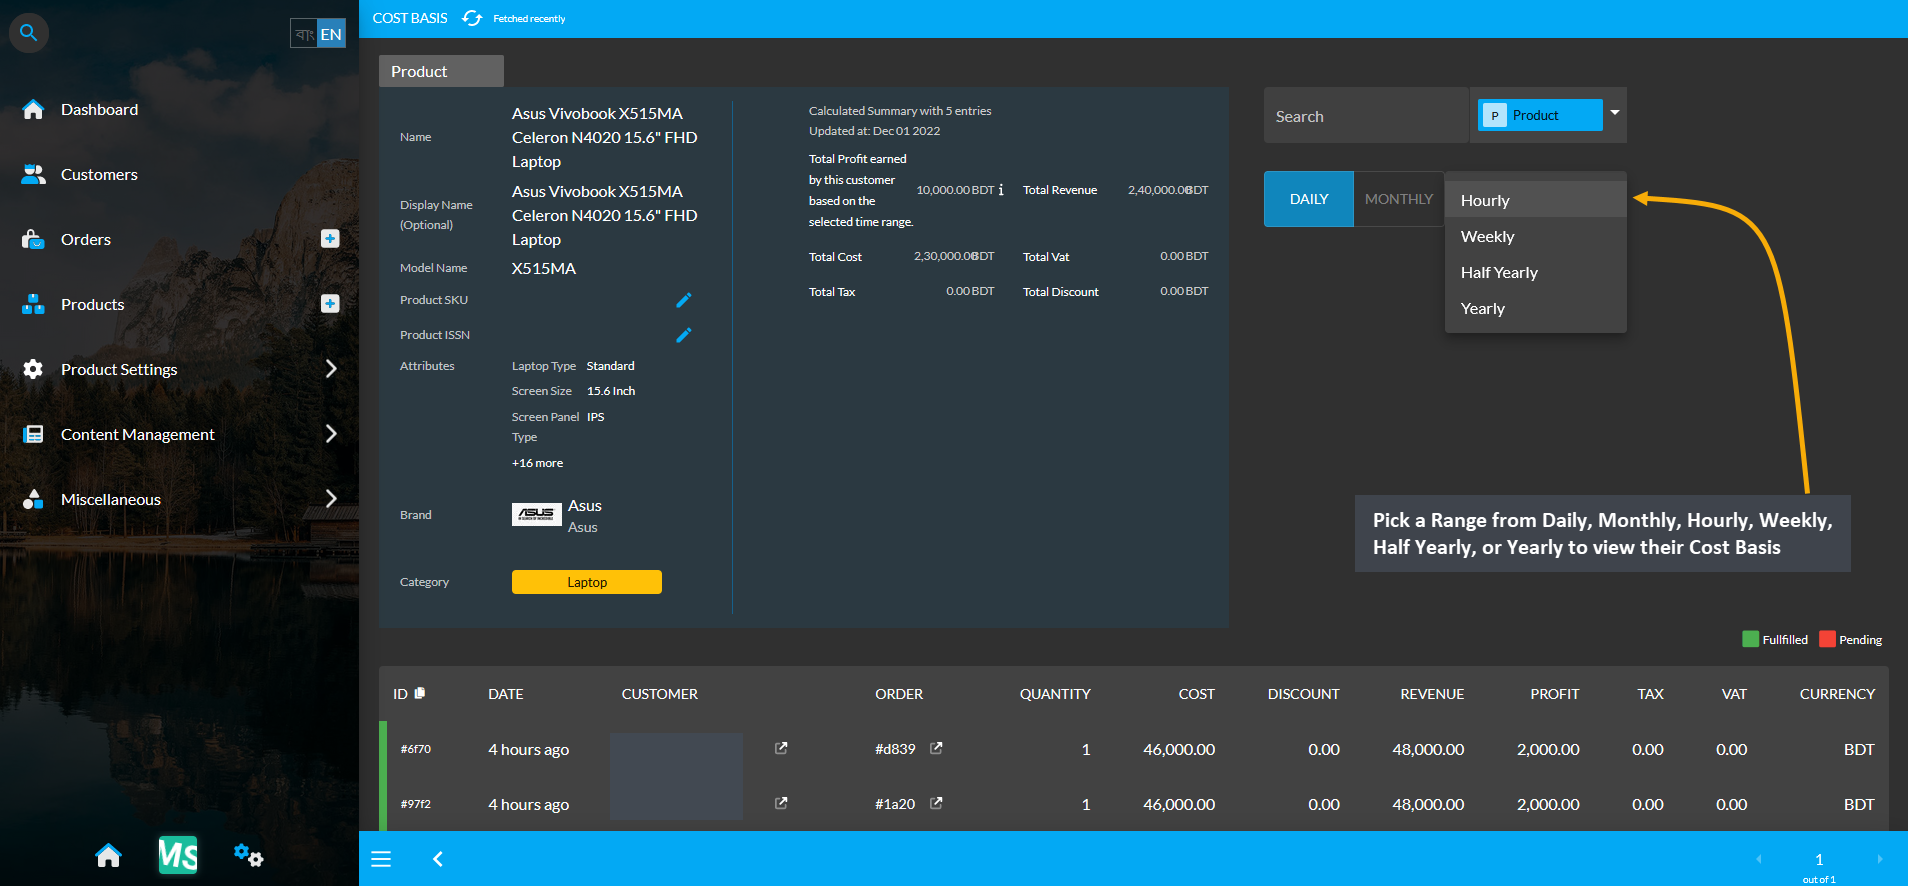
Image 5: Pick a Range from Daily, Monthly, Hourly, Weekly, Half Yearly, or Yearly to view their Cost Basis.
19.4 - Product Batch Cost Basis
Detailed overview of cost basis for Product Batch Section.
This section discusses the importance of cost basis for tax purposes as it calculates the amount of total profit, cost/ purchase price, and revenue to understand capital gain or loss.
Product Batch Cost Basis
View Cost Basis for all Product Batches
Click the Products module which will open the Product List. From here, go to any Product and click the small gray graph icon marked as View Report that will redirect to the Product Batch Cost Basis page for all Batches created of the selected Per Unit Product. The cost basis report will show total profit, total revenue, total cost, total vat, and total discount of that Per Unit Product within different time frame ranges.
A short description of the Product Batch will show below the cost basis summary. Pick a Cost Basis range from the dropdown menu to see results on Daily, Monthly, Hourly, Weekly, Half Yearly, or Yearly basis. Also, detailed Product Batch Cost Basis Summary for all Batches of a Per Unit Product will show in a long list of entries.
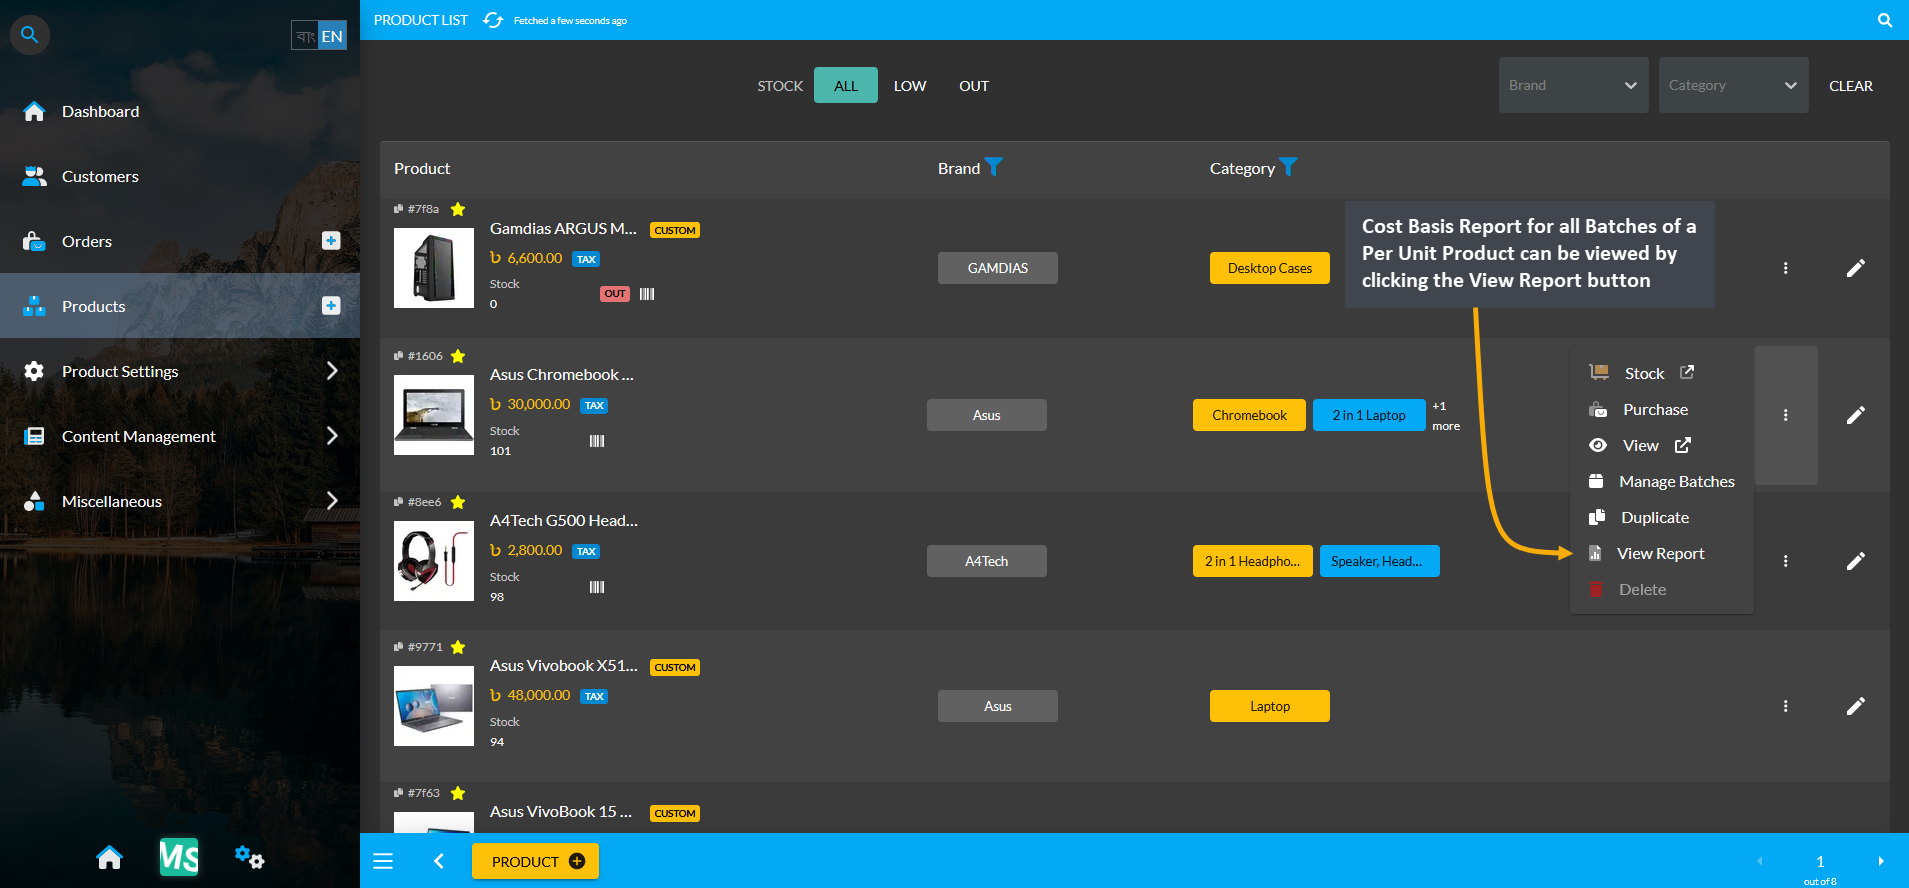
Image 1: Cost Basis Report for all Batches of a Per Unit Product can be viewed by from View Report button.
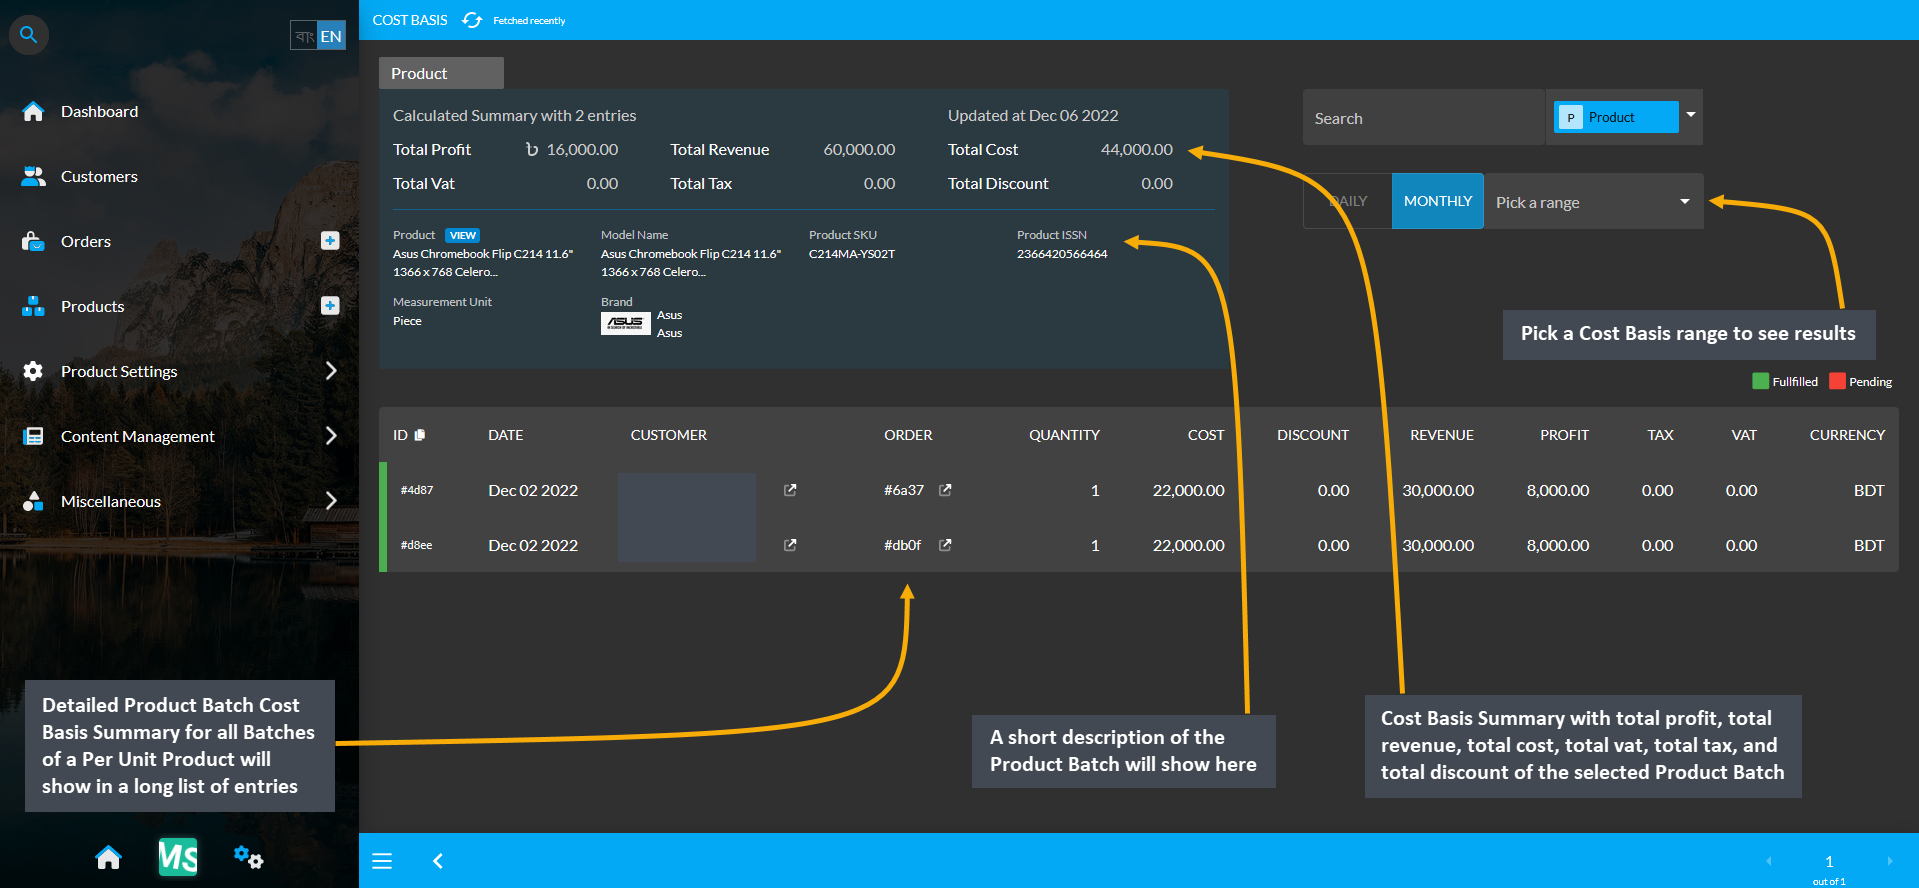
Image 2: Product Batch Cost Basis shows Per Unit Product info and detailed summary of all Product Batches.
View Cost Basis for a Specific Product Batch
Product Batch Cost Basis Report for a specific Batch of the selected Per Unit Product can be viewed by clicking the Manage Batches button on the Product List page. This will redirect to the Product Batch List page where clicking on the View button will show which Serial Numbers for a specific Batch of the Per Unit Product were sold. In Product Batch List page, click the gray graph icon to open Cost Basis for a specific Batch of the Per Unit Product.
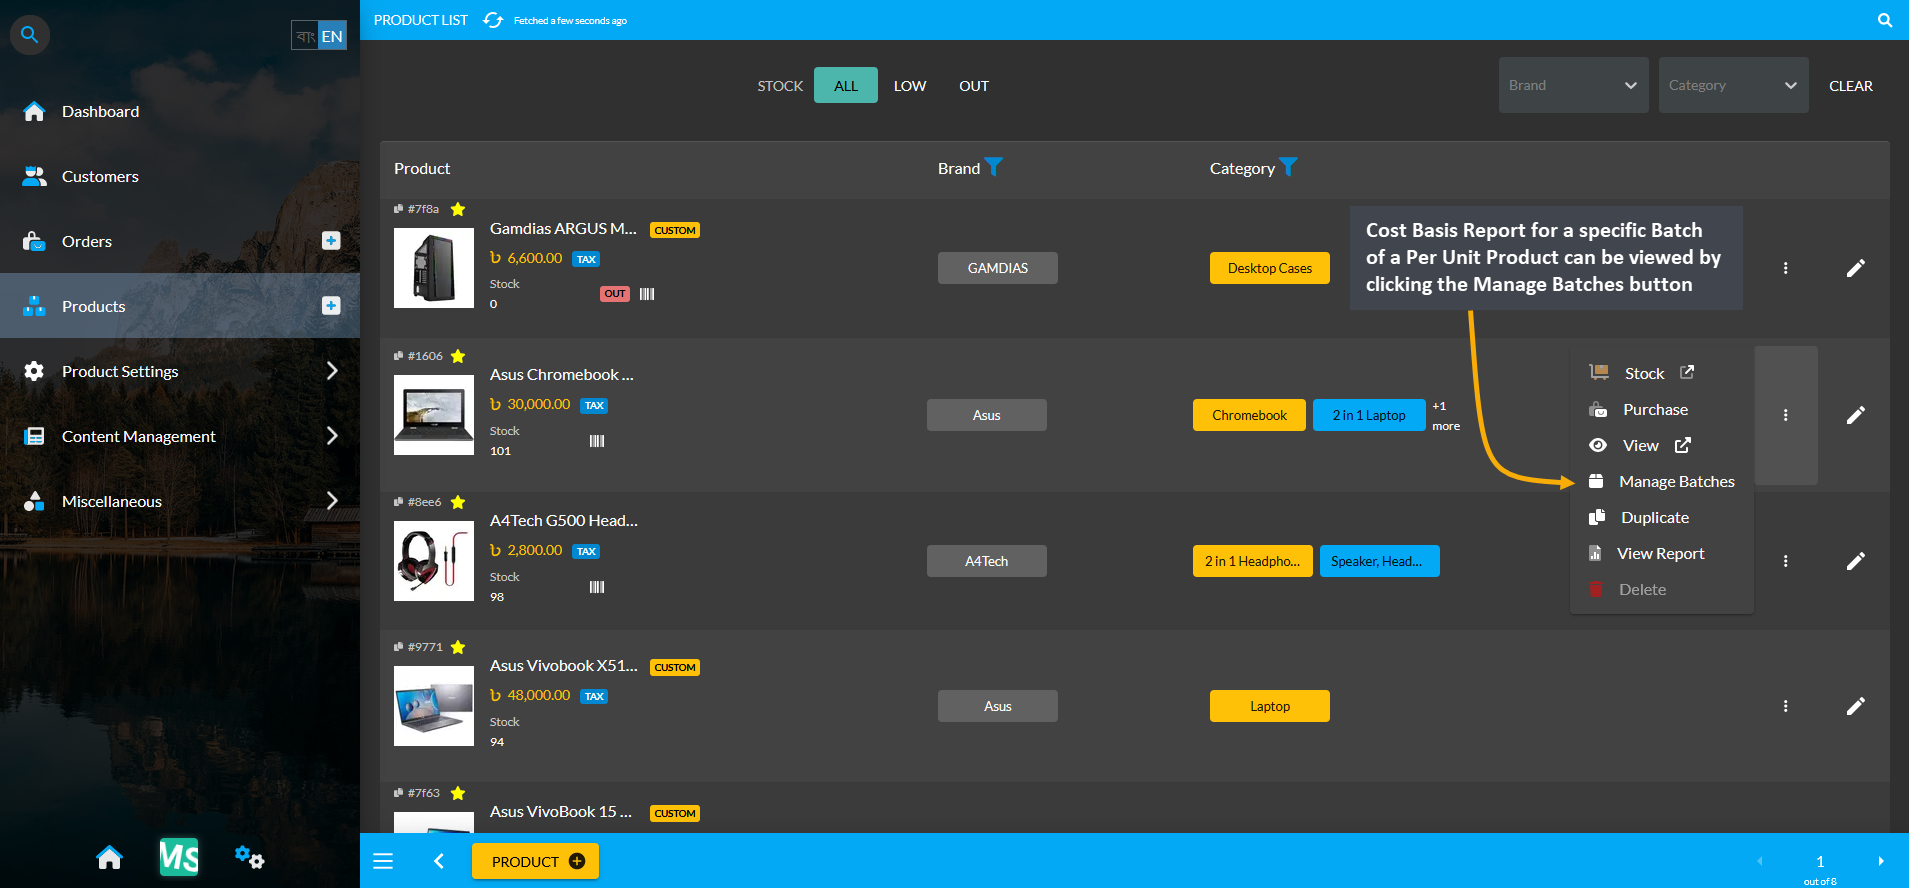
Image 3: View Cost Basis Report for a specific Batch of a Per Unit Product from the Manage Batches button.
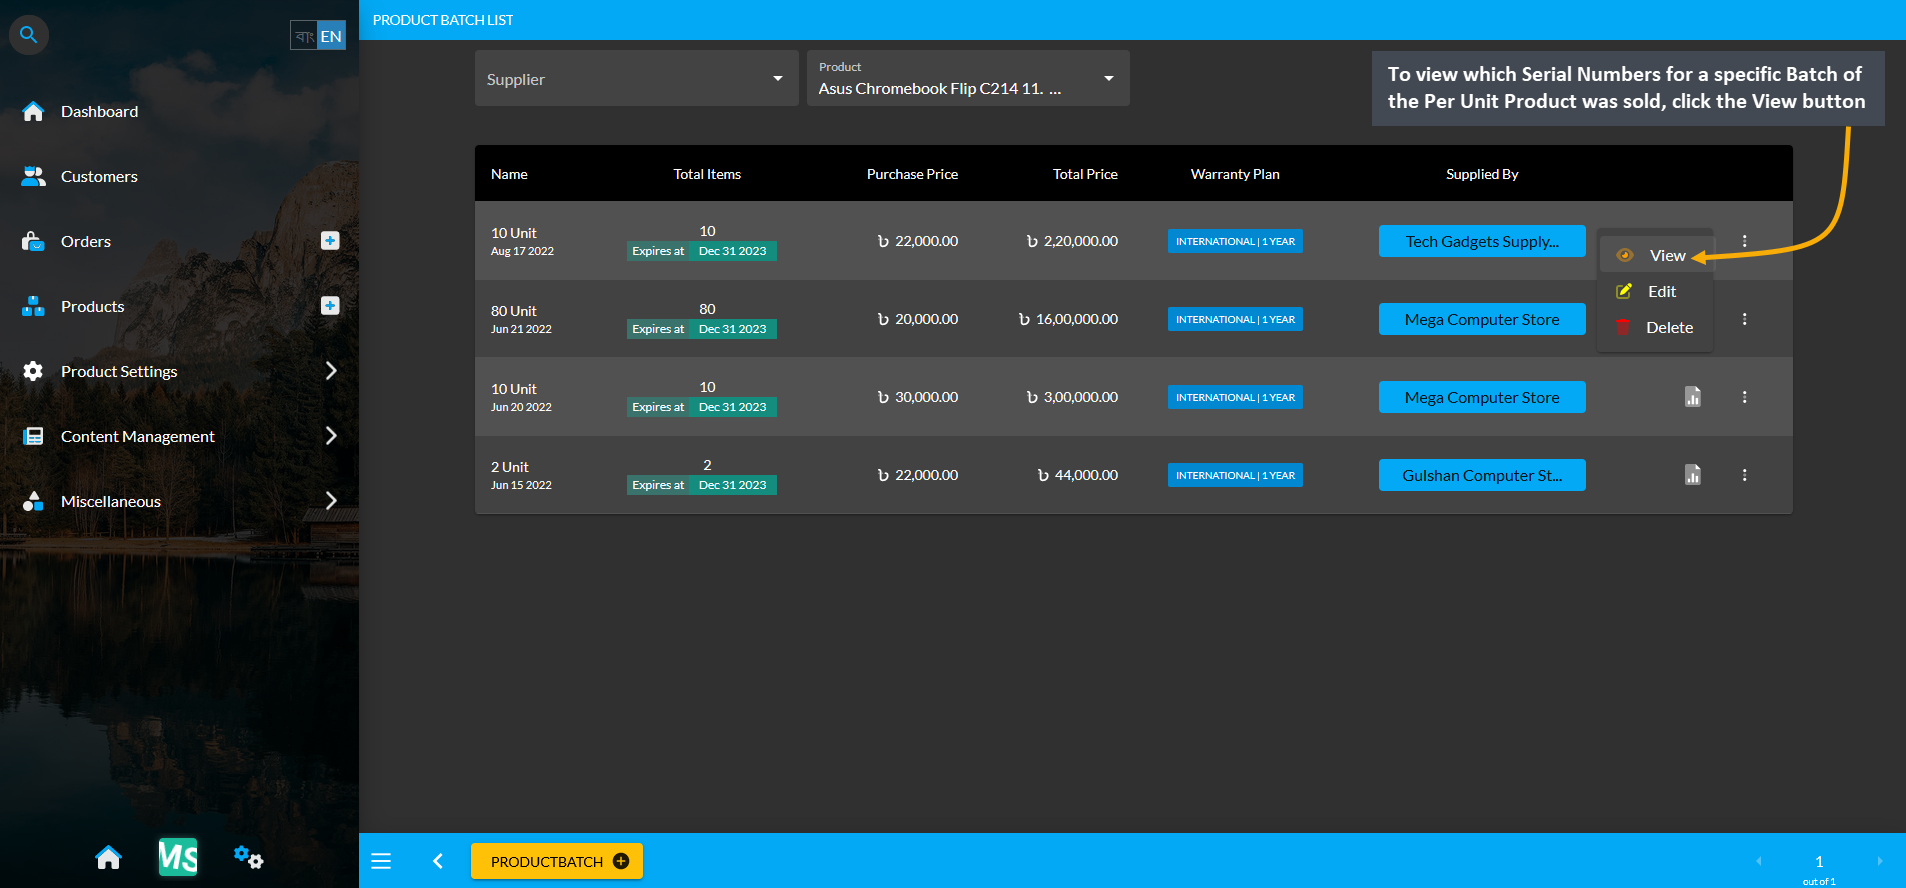
Image 4: Click the View button to see which Serial Numbers of a specific Per Unit Product Batch was sold.
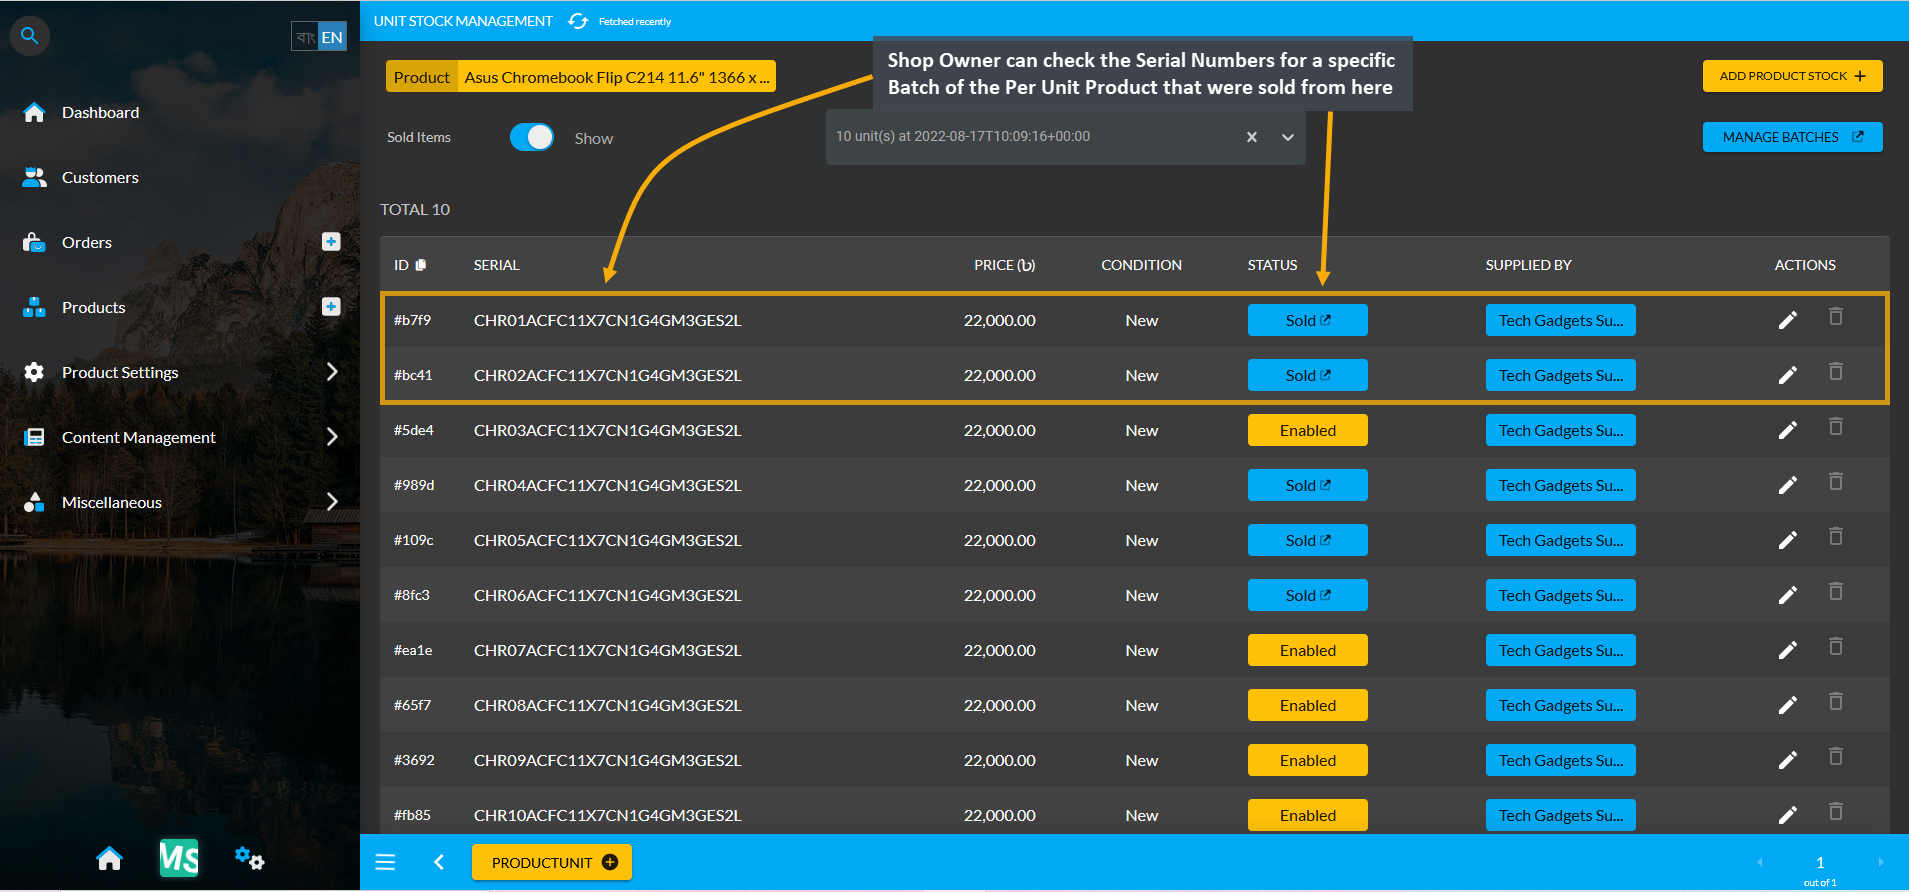
Image 5: Check all the sold Serial Numbers or Units for a specific Per Unit Product Batch marked in blue.
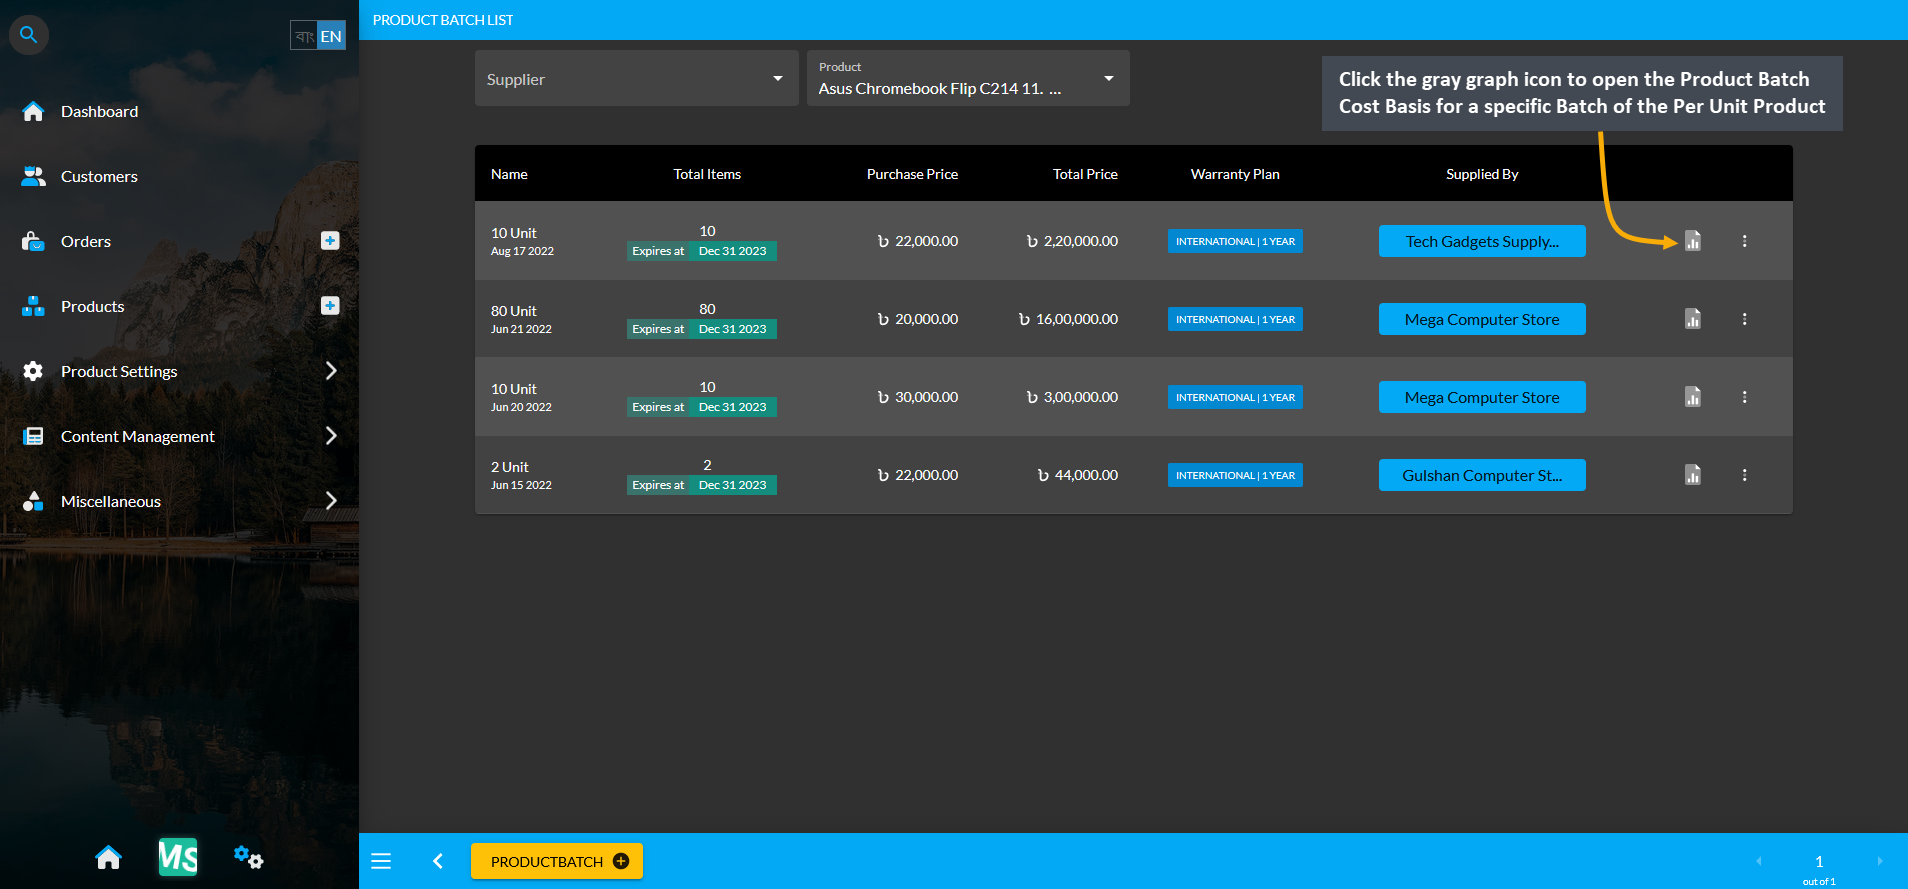
Image 6: Click the gray graph icon to open Cost Basis for a specific Product Batch of the Per Unit Product.
Cost Basis Summary Section
Clicking the small gray graph icon from Product List will redirect to Product Cost Basis page. On the top is Product cost basis summary showing total profit, total revenue, total cost, total vat, total tax, and total discount and below it is the detailed description of the Product Batch. For Product Batch Cost Basis, the Pick a Range or range filtering option will show the Product’s Cost Basis on Daily, Monthly, Hourly, Weekly, Half Yearly, or Yearly basis. Below is a long list of Product Batch entries showing calculations of profit, cost, revenue, vat, tax, and discount separately.
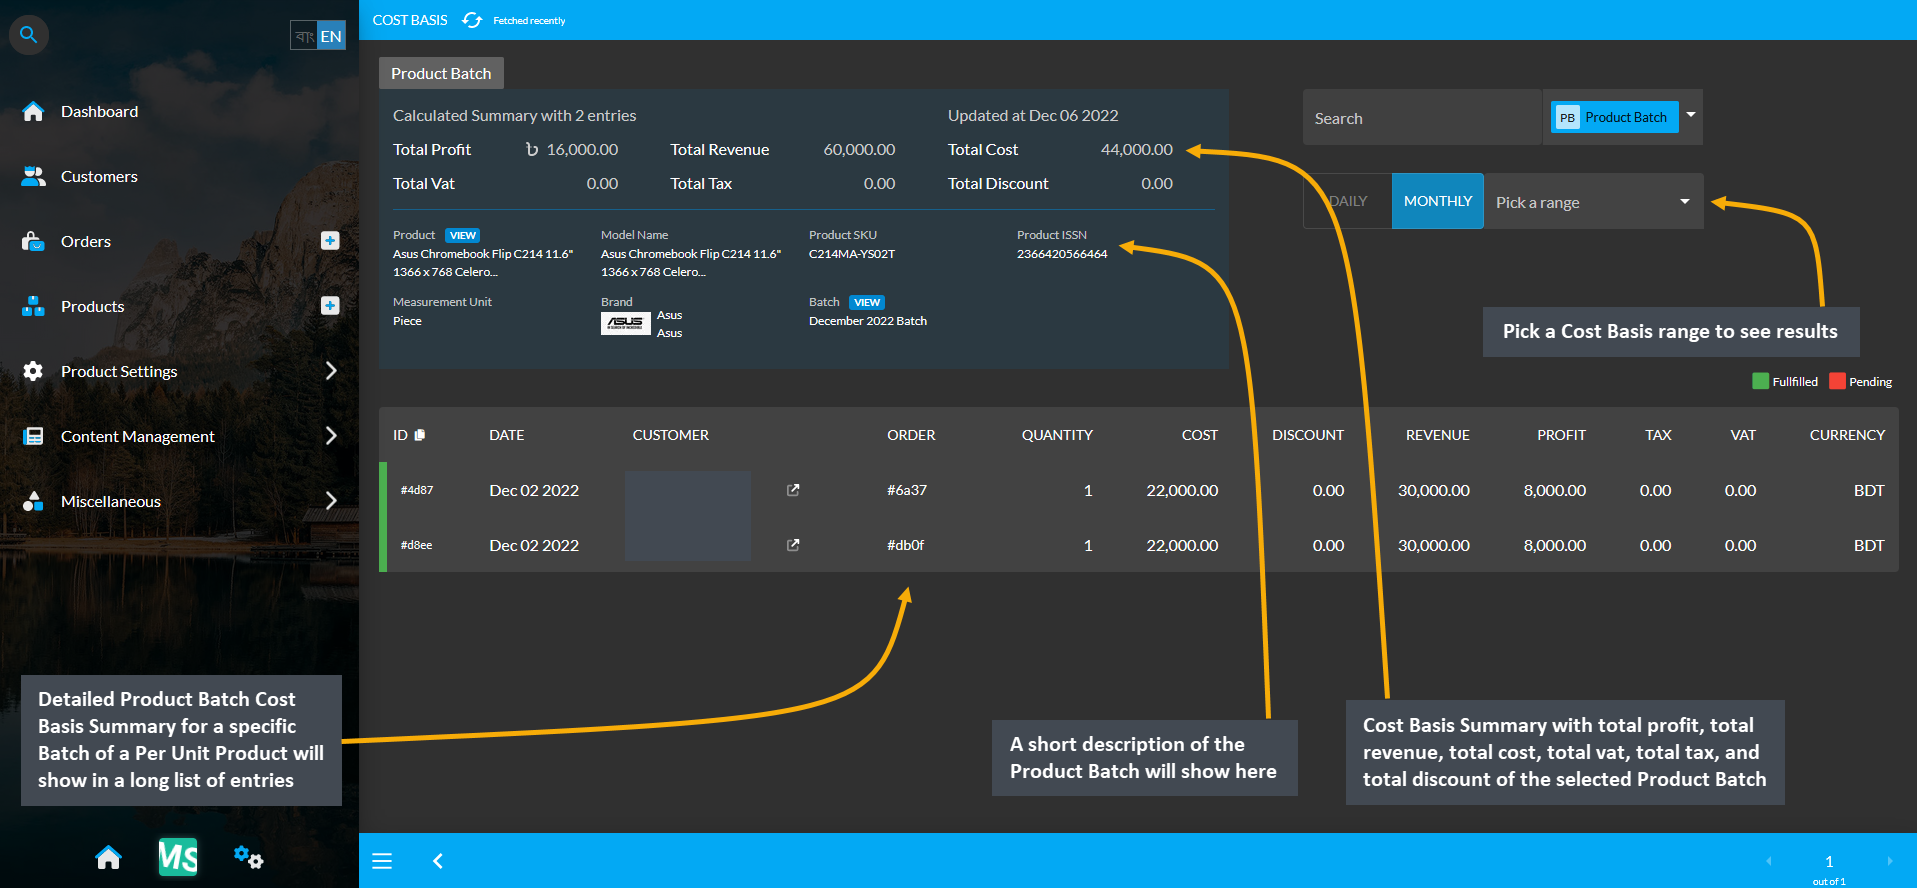
Image 7: Product Batch Cost Basis shows Cost Basis summary, Product Batch info and detailed breakdown.
Cost Basis Search and Range Selection
The Product Batch Cost Basis page have a Search button with a dropdown menu for four options - Order, Customer, Product, and Product Batch on the top right. Clicking each of these options will bring cost basis results of Order, Customer, Product, and Product Batch whichever is selected by redirecting to those pages.
For example, to search and find a Product Batch’s Cost Basis result, select Product Batch from the dropdown and type a target Product Batch’s name in the Search box which will bring in the selected Product Batch’s Cost Basis result. From the Pick a Range box, select - Daily, Monthly, Hourly, Weekly, Half Yearly, and Yearly to view results of chosen cost basis summary. In this way, the Shop Owner can search for any Product’s Cost Basis result.
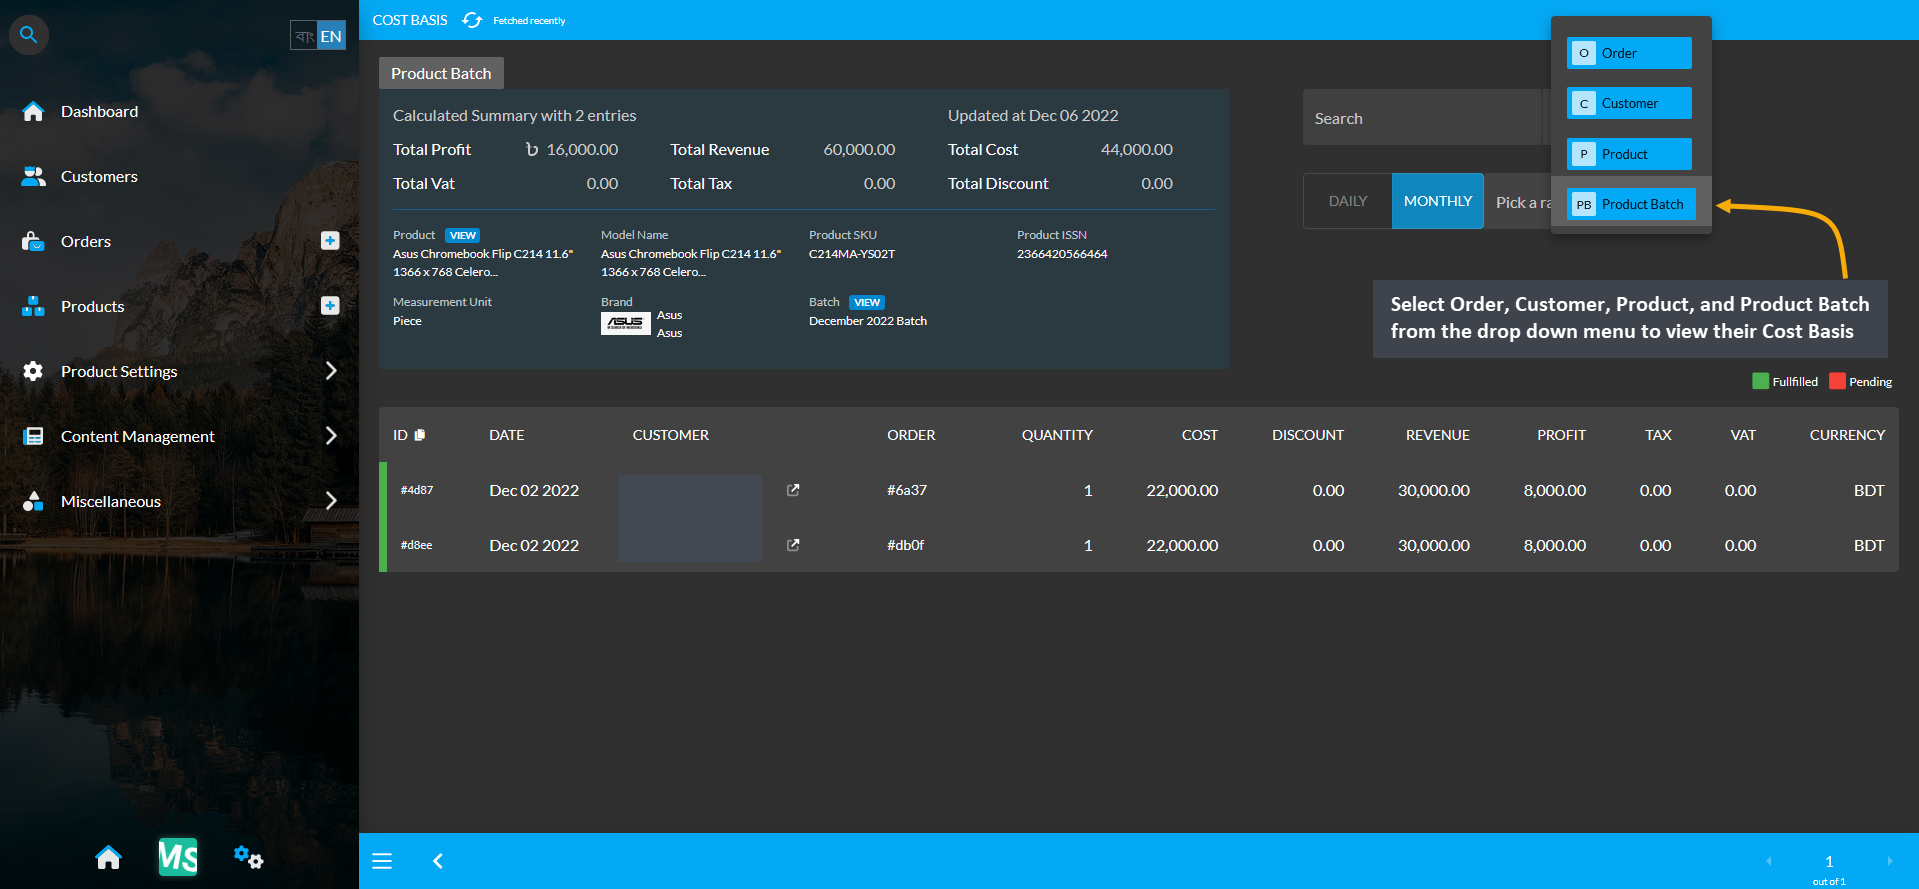
Image 8: Range Filtering option is enabled for Product Batch, select an option to view their Cost Basis.
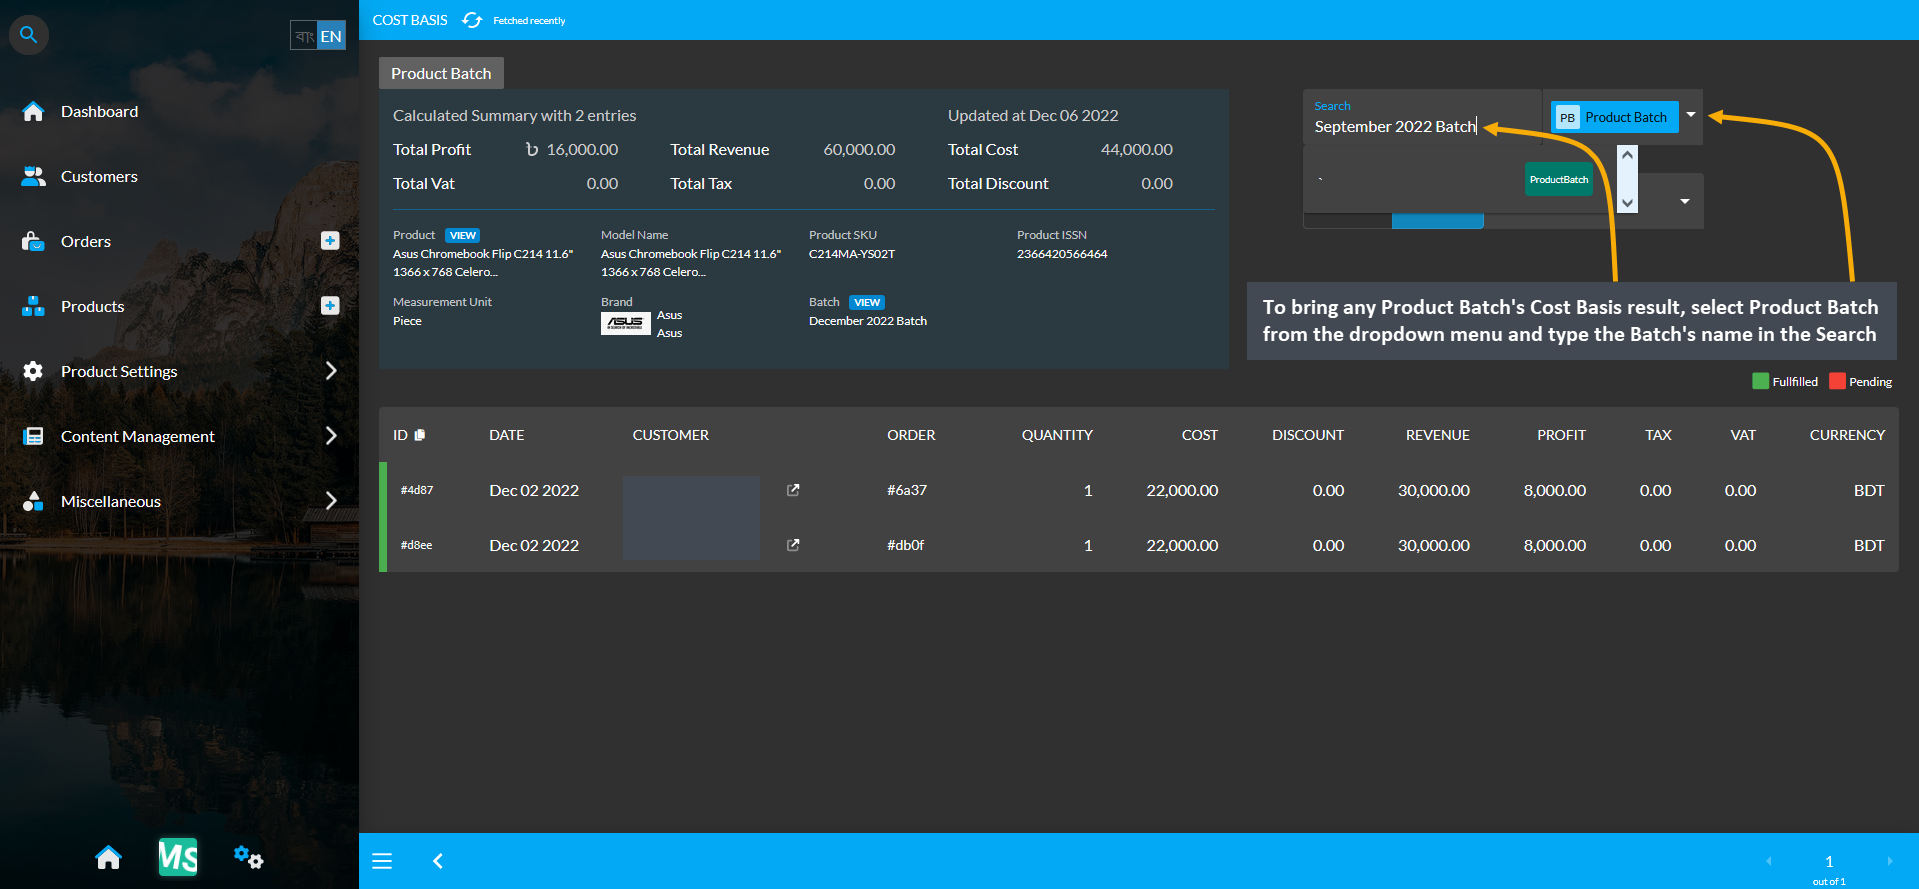
Image 9: Select Product Batch from dropdown and type Batch's name in Search Box to view their Cost Basis.
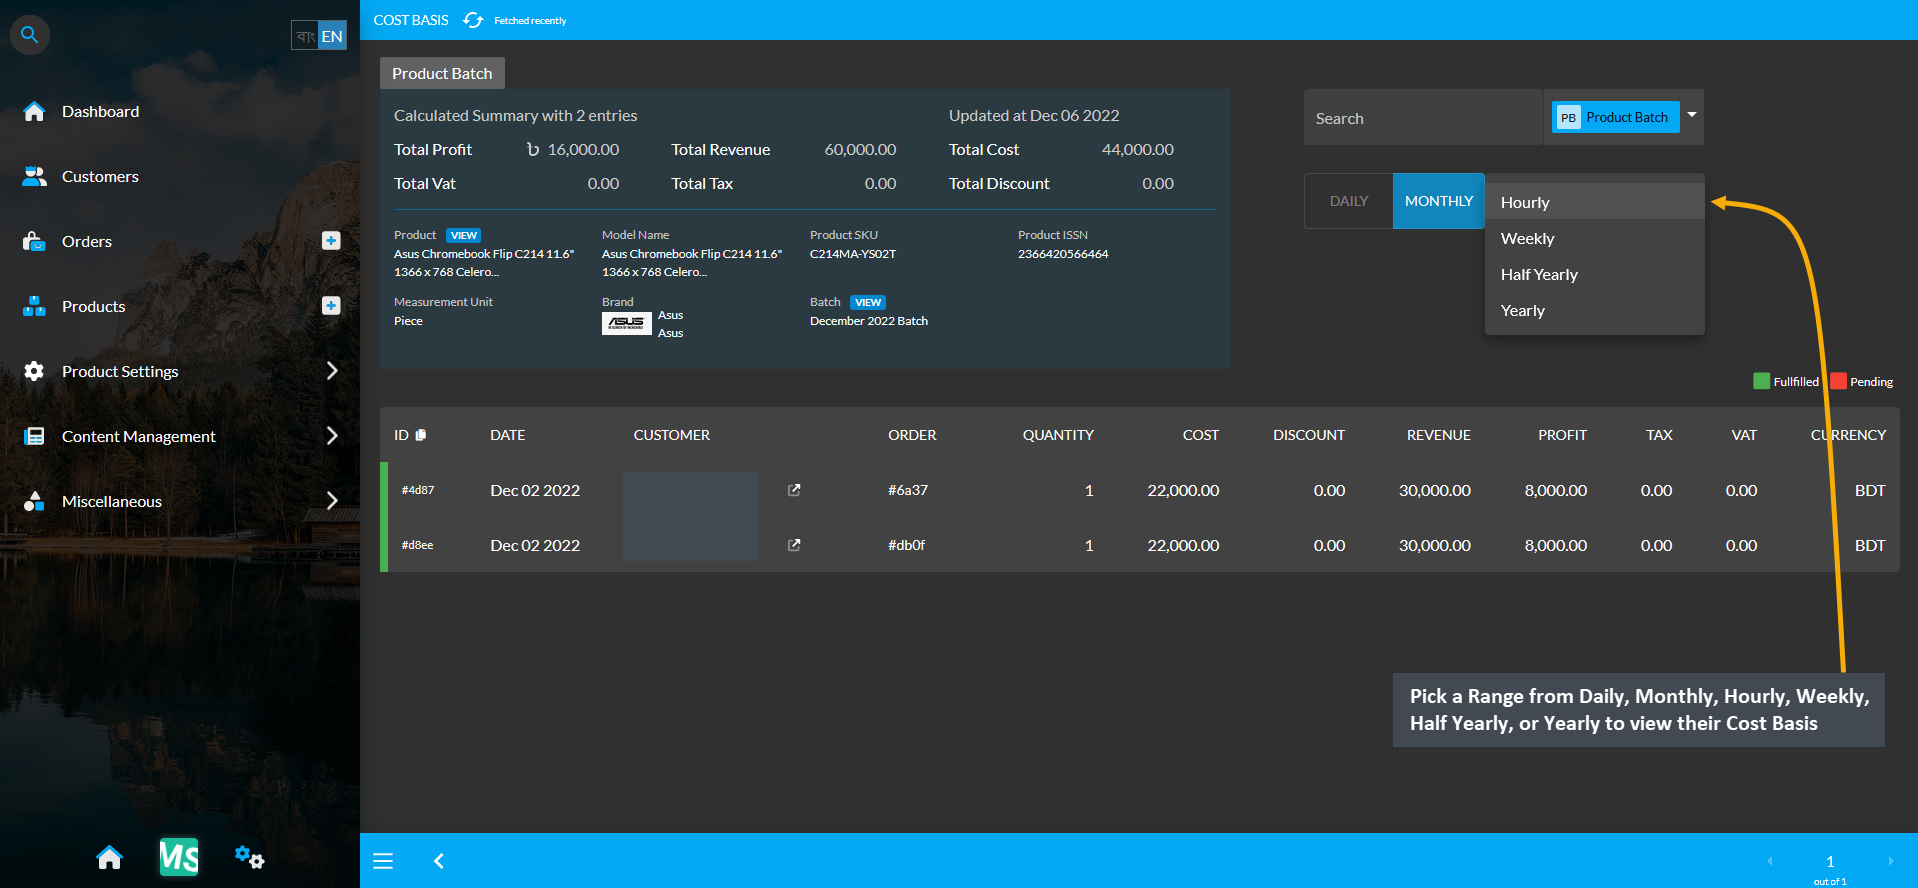
Image 10: Pick Range from Daily, Monthly, Hourly, Weekly, Half Yearly, or Yearly to view their Cost Basis.
20 - Content Management
Create and manage Pages and Widgets for promoting Products on The Website.
Website Pages and Widgets
The Content Management section includes Pages and Widgets which can be added on The Website to promote Products and highlight ongoing sales offers. Shop Owners can create, edit, and publish Pages with Widgets to promote their Shop, Brands and Products. Particularly, non-technical people will find it easier to navigate the content management system to design their own Website pages to draw Customers towards their Shop.
Website Default and Custom Pages
Therefore, when the Shop Owner will utilize the Content Management section to make changes to their Website, they can quickly do it with the help of Pages and Widgets. The Pages section usually consists of some pre-defined Default Pages, which can be edited by adding different Widgets. In the same way, the Shop Owner can also create, edit, and publish their own Custom Pages and add different Widgets on them that will fill up the Website.
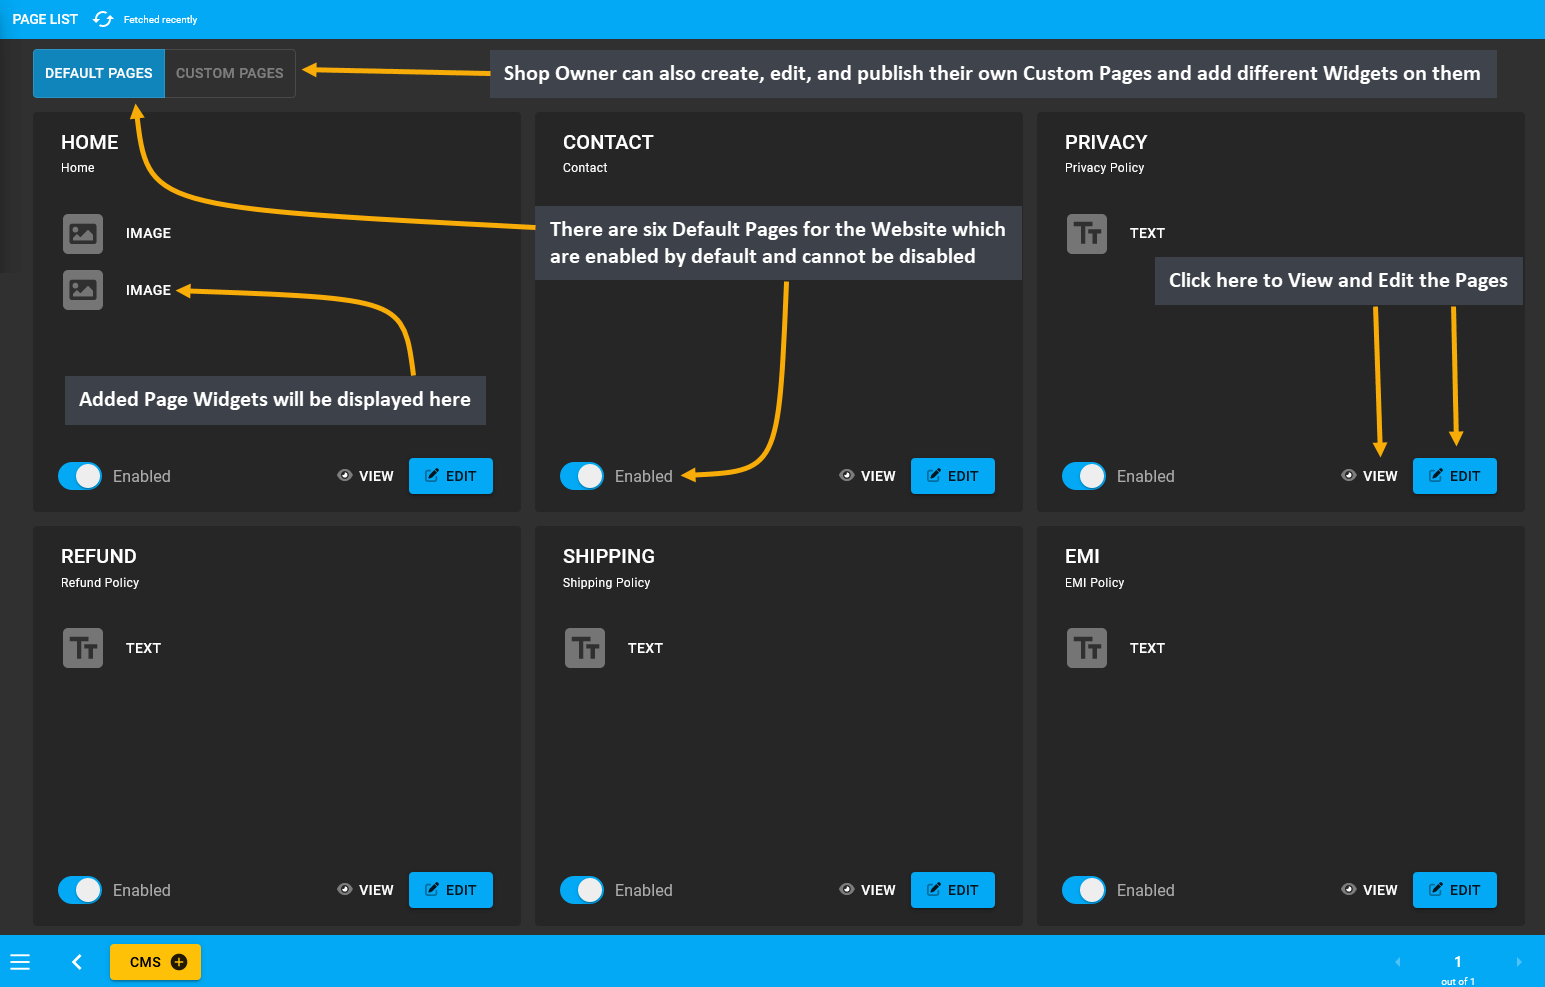
Image 1: The six Default Pages for the Website are enabled by default and Custom Pages can also be added.
The Widgets section consist of five different Widgets types - Text Widget, Image Widget, Banner Widget, Product Widget, and Category Widget. These Widgets can be created beforehand that will automatically be added as the Library Elements. The Shop Owner can create or edit Widgets instantly and enable or disable them using the toggle button. Already created Widgets can be added instantly on different Pages from the Library Elements section.
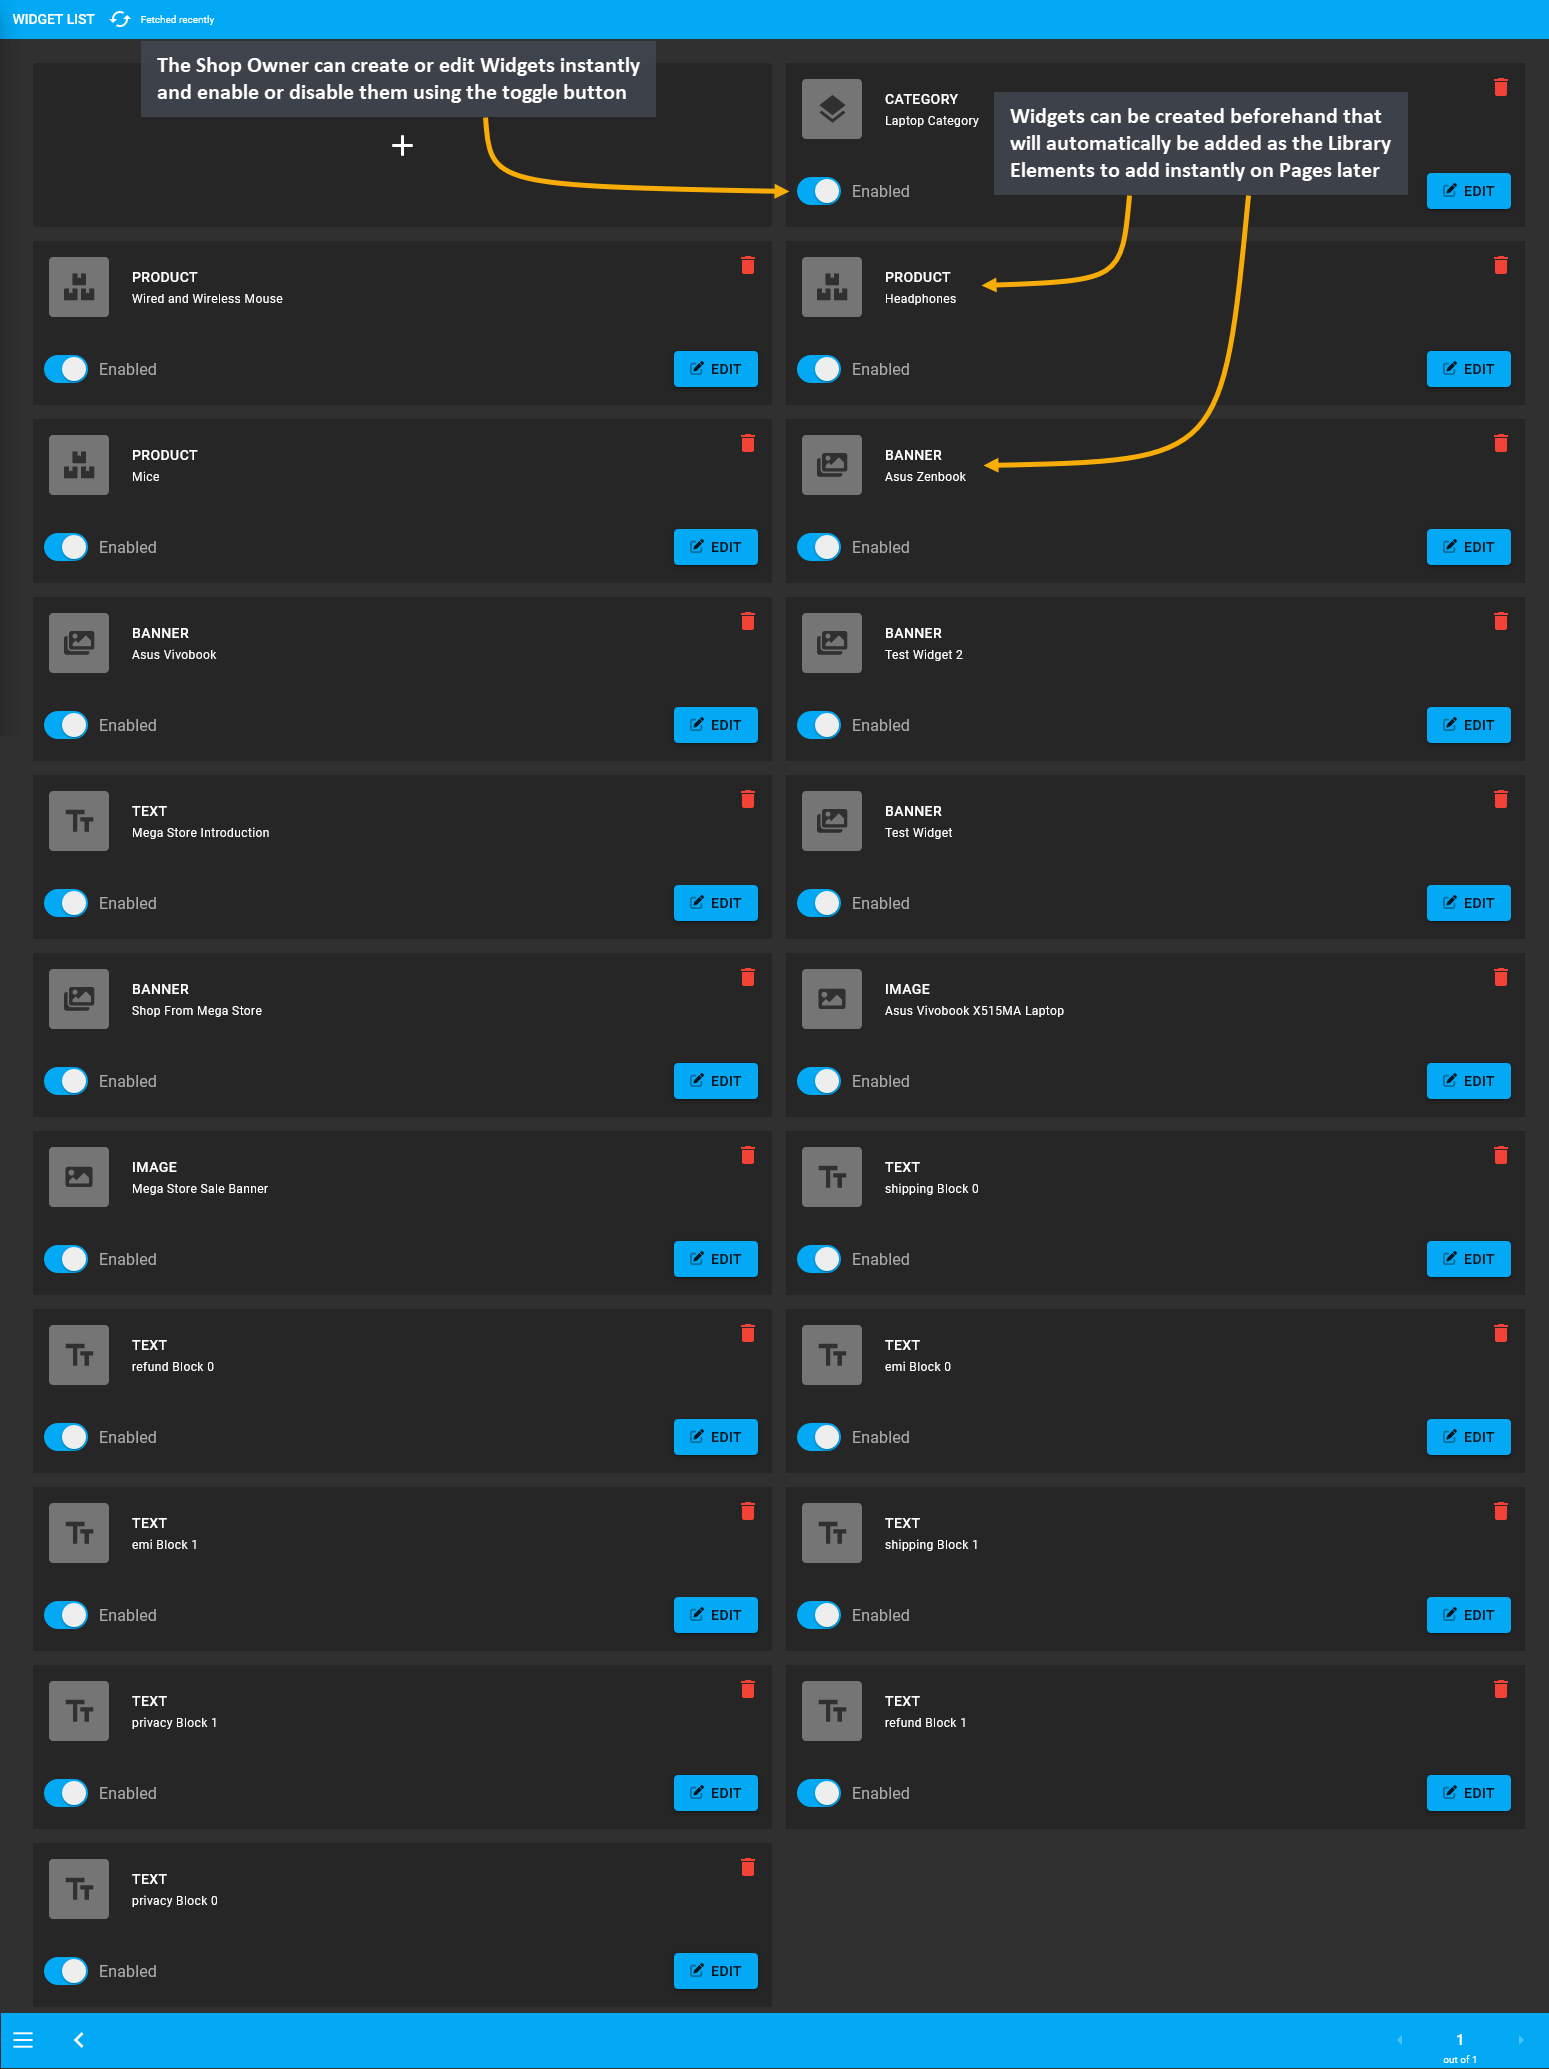
Image 2: The six Default Pages for the Website are enabled by default and Custom Pages can also be added.
20.1 - Default Pages
Create and manage Pages for promoting the Shop and Products on The Website.
What are Pages?
Pages in The Website are documents that are commonly written in HTML formats. Each Page have a URL address which can be accessed by entering it into a Browser’s address bar. These Pages contain titles, subtitles, texts, call-to-action buttons, images, videos, and hyperlinks. The Shop Owner can utilize Default Pages by adding Widgets and make their own Custom Pages to sell or advertise Products to the Customers. Several Custom Pages can be created for different purposes such as giving a virtual welcome to the Visitors or telling a compelling story.
Generally, Default Pages will be displayed on the Page List. The Default Pages include the EMI Page with EMI Policy, Refund Page with Refund Policy, Shipping Page with Shipping Policy, Privacy Page with Privacy Policy, Home Page, and Contact Page with Contacts. They will remain enabled by default and cannot be disabled by Shop Owner.
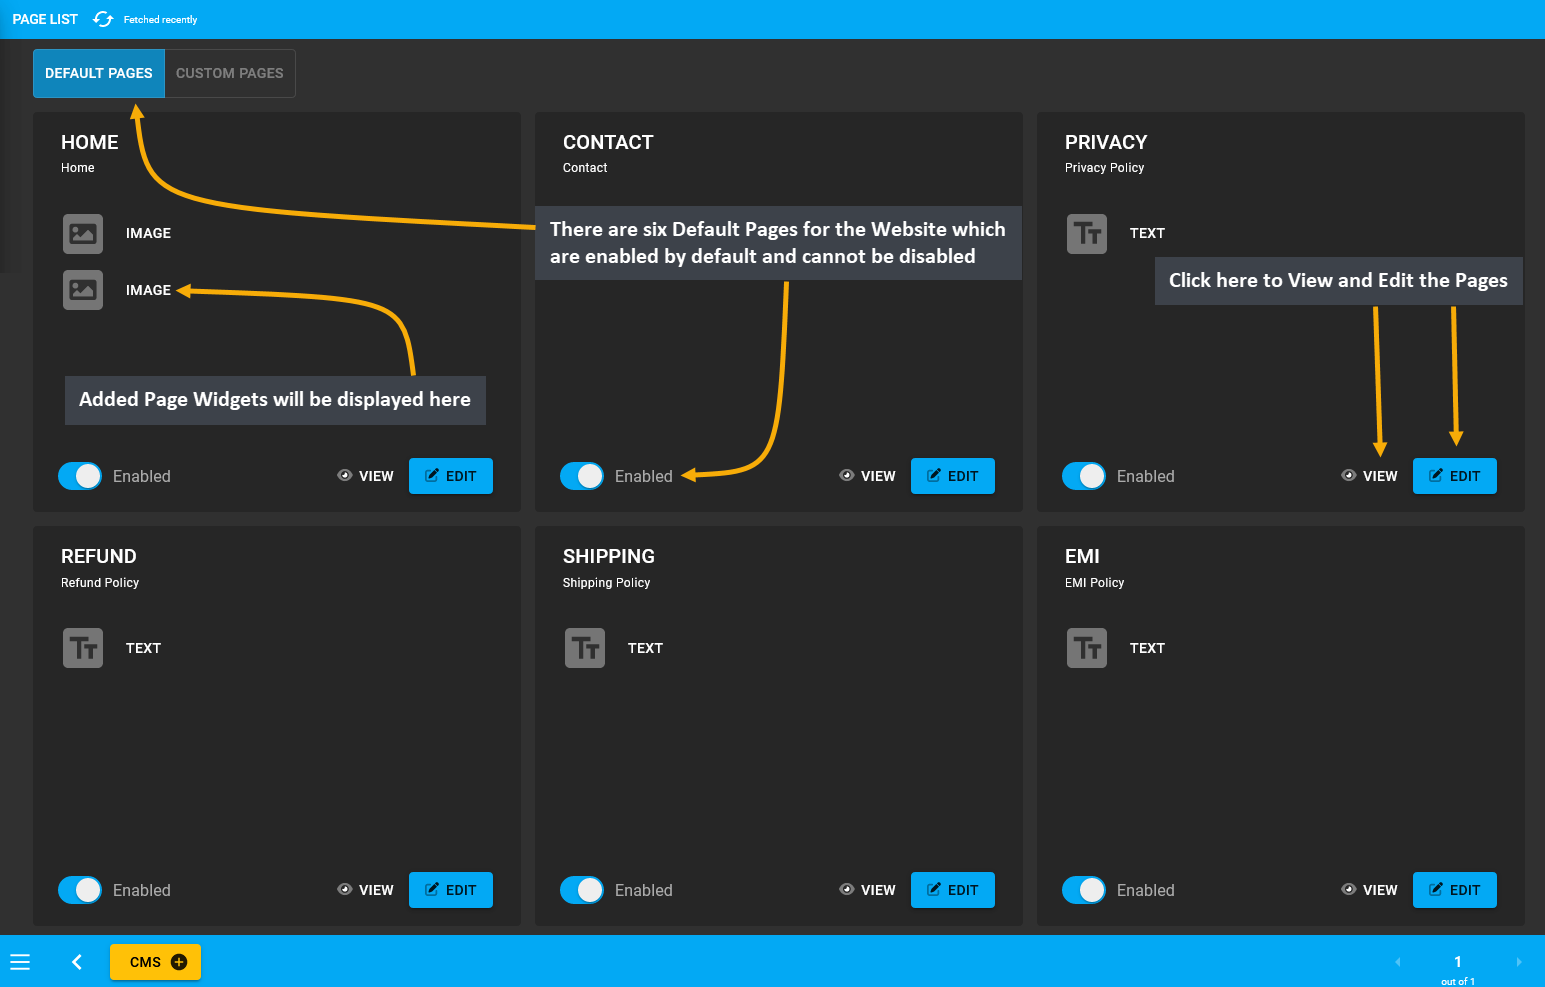
Image 1: There are six Default Pages for the Website which are enabled by default and cannot be disabled.
Home Page
The Home Page is where all the actions happens and it is the first Page that the visitors will see. Therefore, how the Home Page is organized will determine if page visitors will turn into potential Customers. When crafting the Home Page, the Shop Owner should think from the Customers’ perspectives to create a first impression. Make sure to highlight the Shop Logo with a visible Call to Action button and Products listed with promotional prices.
Build the Home Page by clicking Edit from Page List that will redirect to this page where details can be setup using Text Widget, Banner Widget, Image Widget, Product Widget, or Category Widget to make it promote the Shop and its Products. Set Name, Slug which will automatically be created from the name. Create the Page Title, and Subtitle and enable them to be visible. Then, add several Widgets and rearrange them to design the target Page.
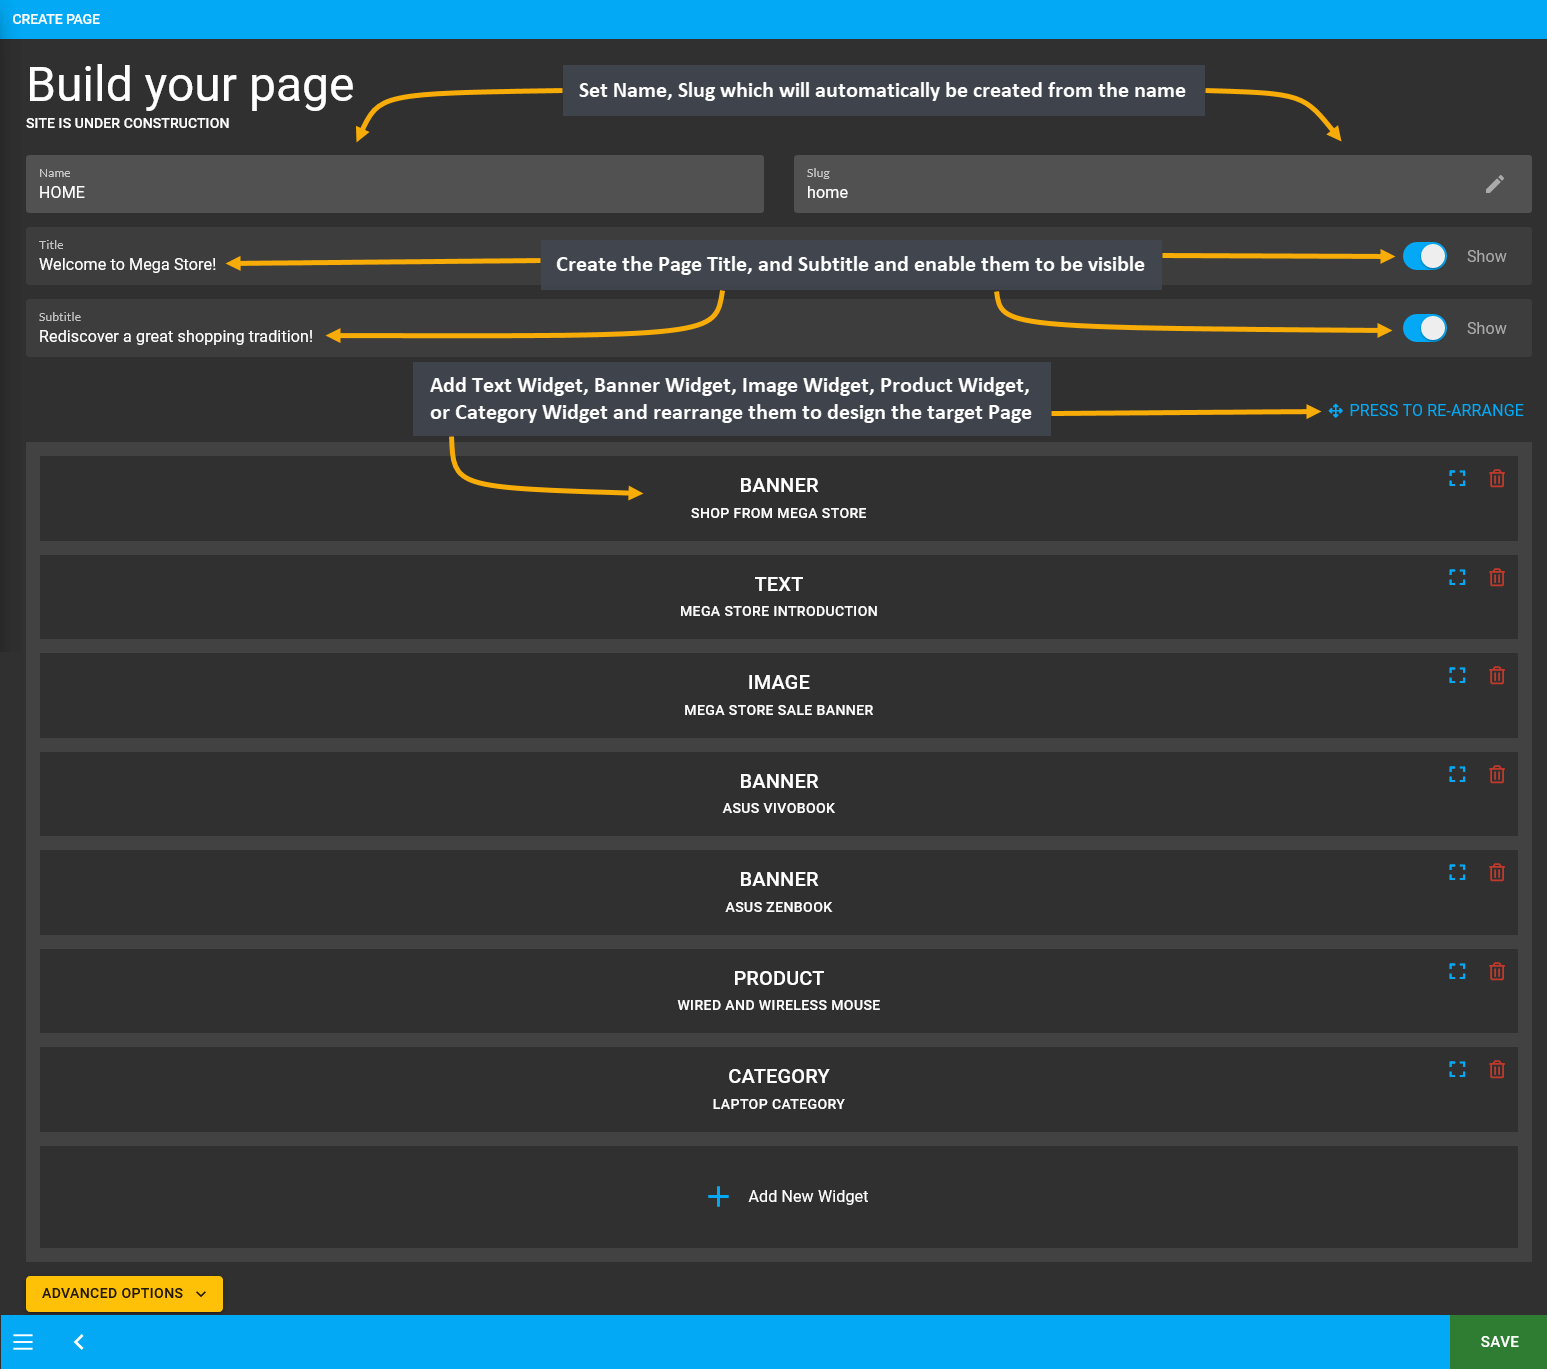
Image 2: Setup Home Page with Text Widget, Banner Widget, Image Widget, Product Widget, or Category Widget.
A complete Home Page will not only look compelling to potential visitors but also guide daily Customers to check promotional offers and newest Products that the Shop Owner is selling. Exemplified below is a full Home Page.

Image 3: A complete Home Page will guide daily Customers to check promotional offers and newest Products.
Contact Page
The Shop Owner should display their Contact Address, Email Address, and Phone Number on the Contact Page for Customers and Suppliers to reach out to them. If the Shop remains open on the weekdays and remains closed on the weekends, then it is better to show the Shop Opening Hours on the Contact Page for everyone’s convenience. Create Contact Page by clicking the Edit option from Page List that will redirect to this page where details like the Page title or subtitle can be setup. There are options to add Widgets on the page which is currently supported.
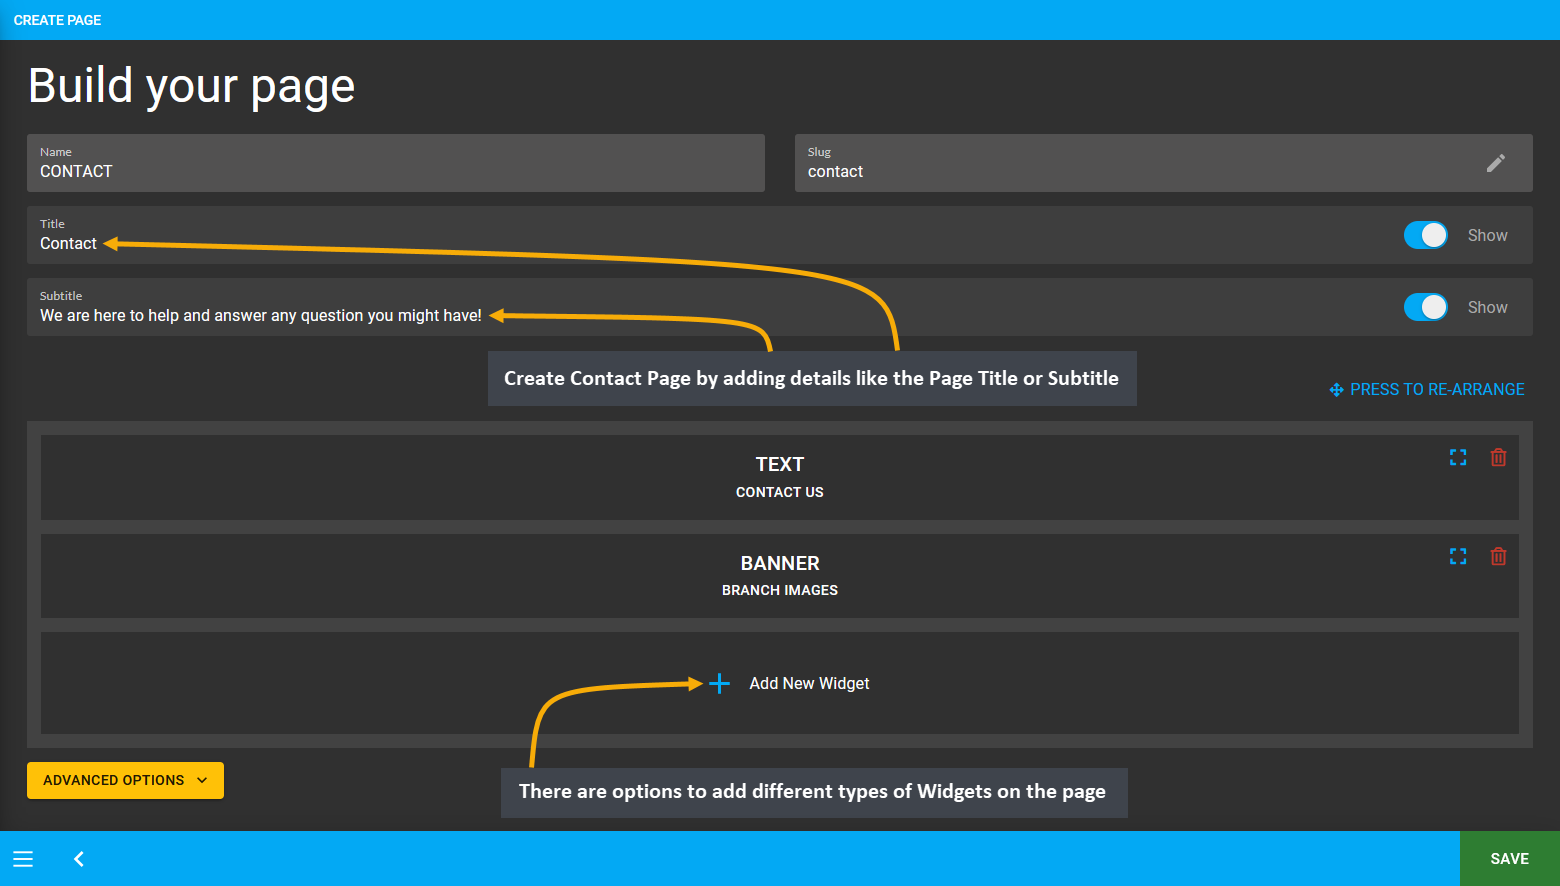
Image 4: Create Contact Page by adding details like the Page Title, Subtitle, and different Widgets types.
When Contact Page is updated by adding Widgets, the Shop Owner can visit the Website to view the edited Page. However, the Address, Contact information, and Opening Hours of the Branches can only be edited from the Branch Page. For the Shop Owner’s convenience, there is an Edit button added beside Branches on the Website, clicking on which will redirect the Shop Owner directly to the Branch page only if they are logged in as Admin.
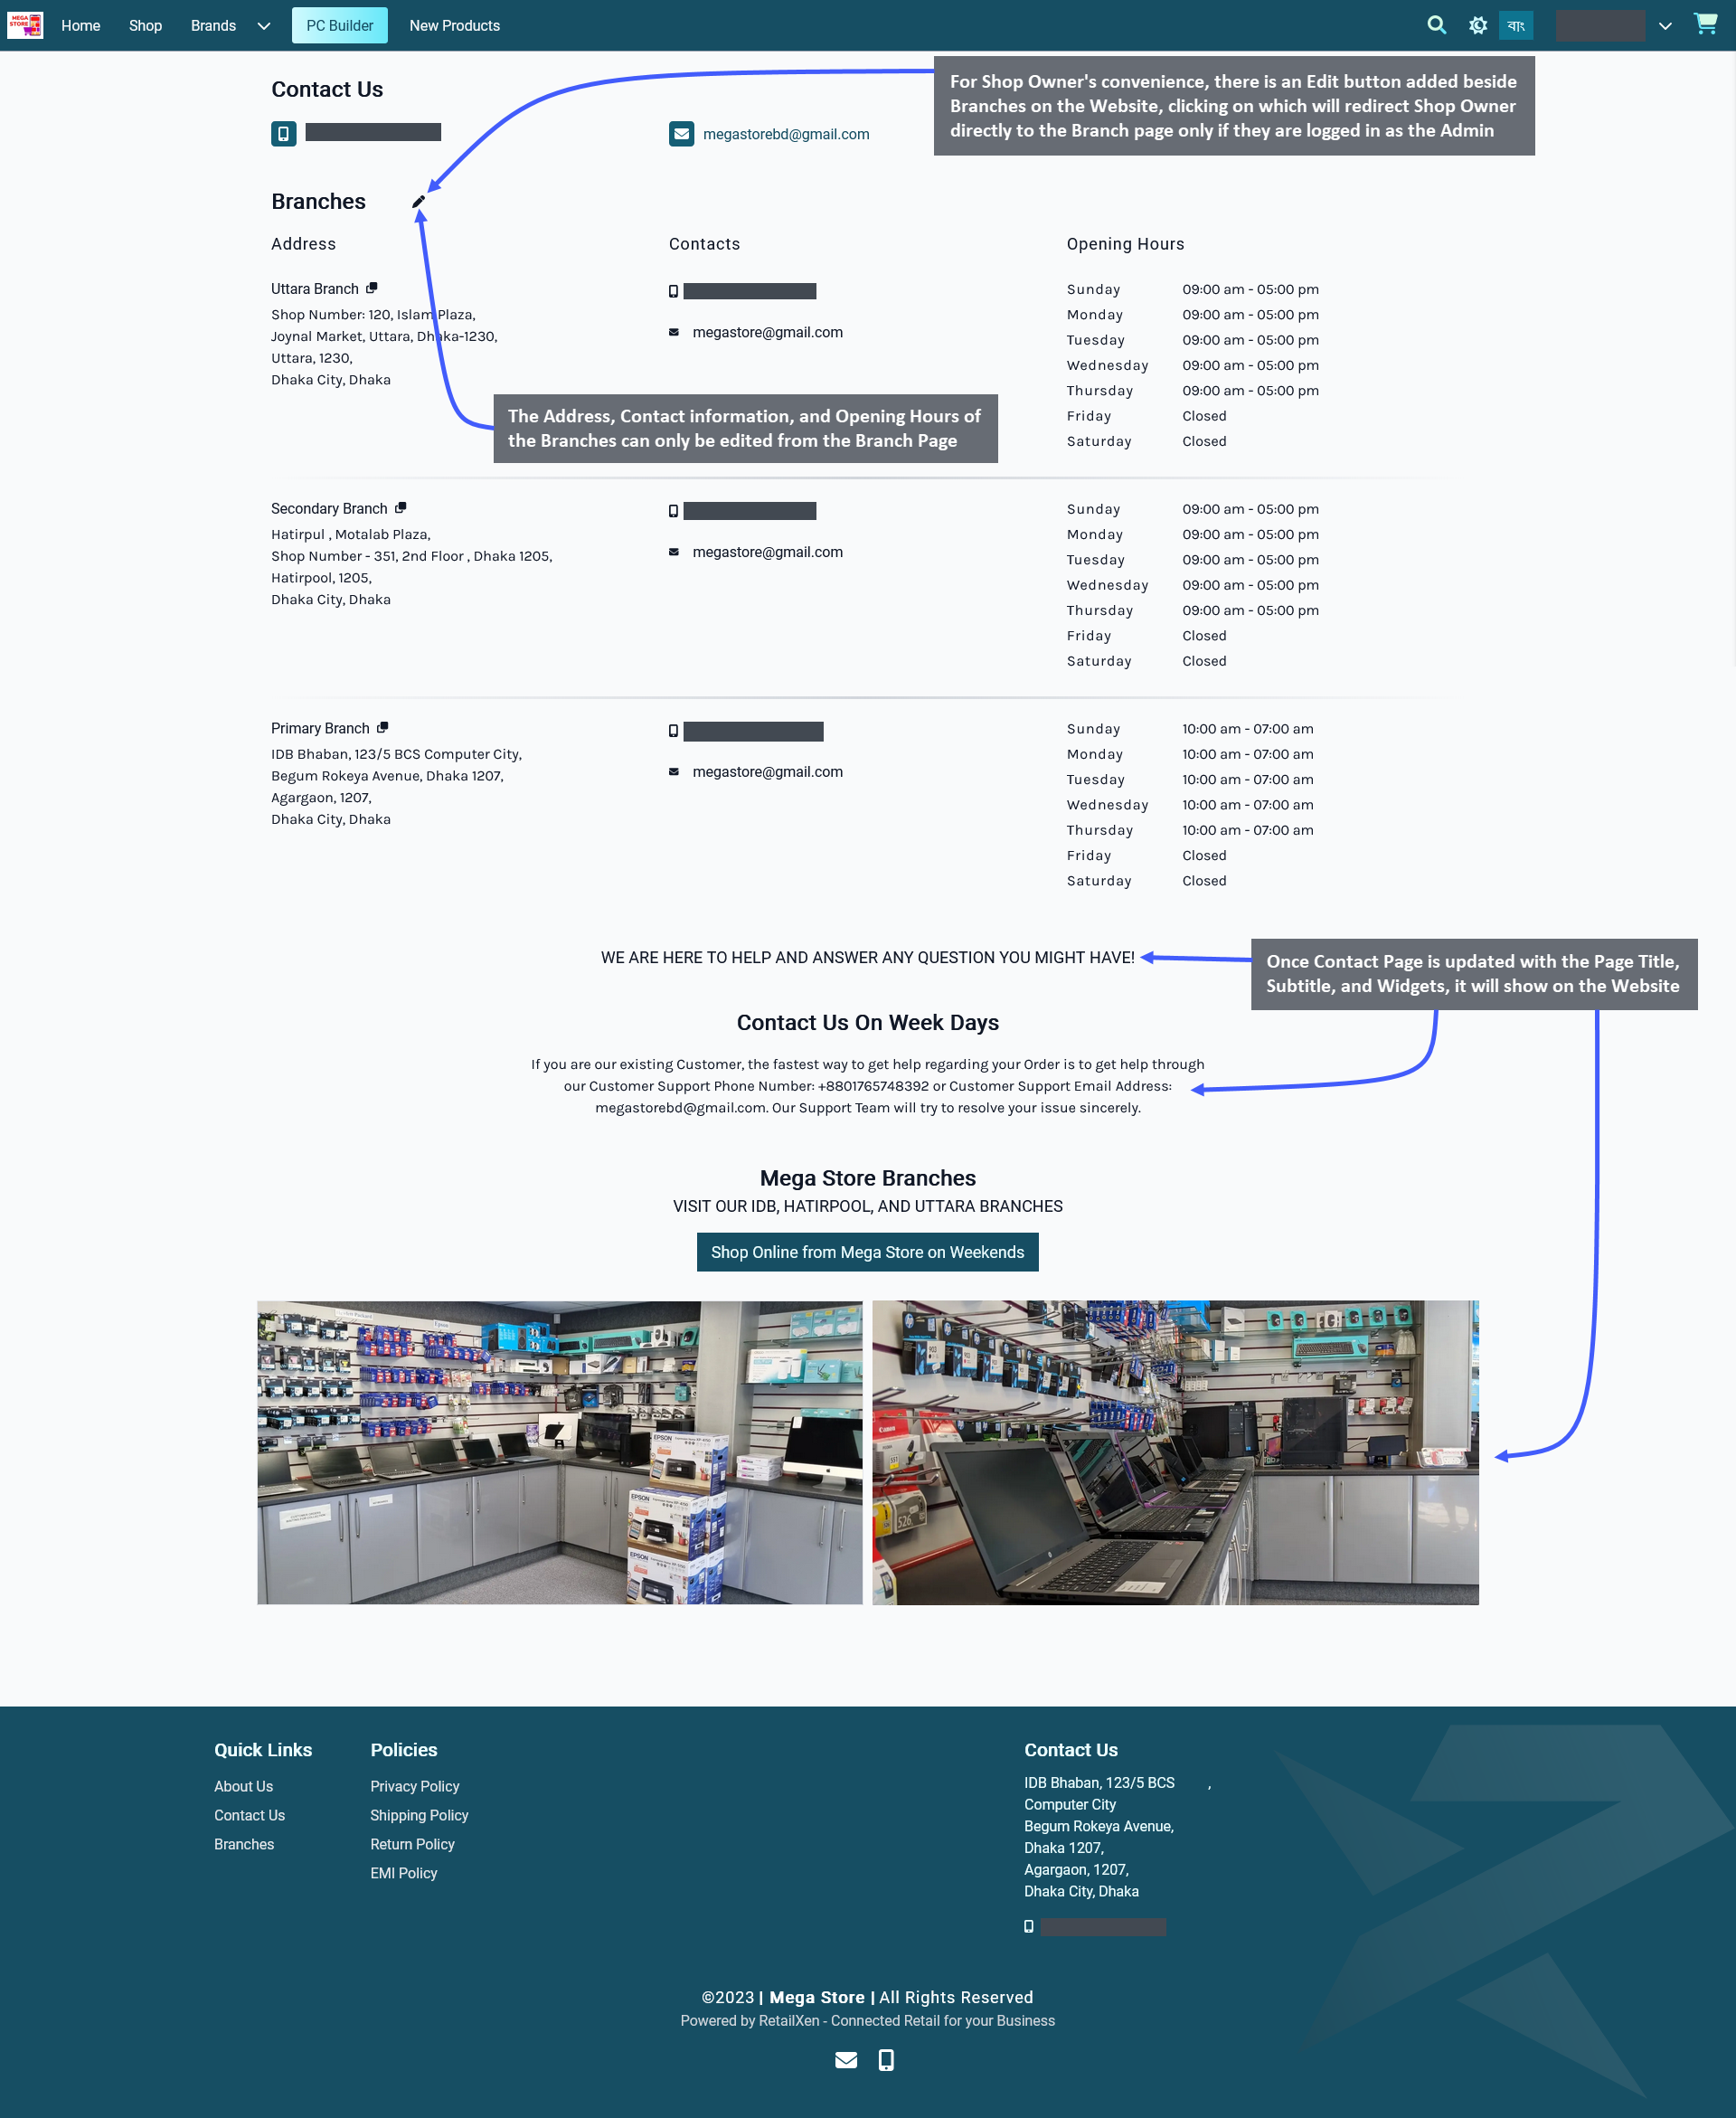
Image 5: Once Contact Page is updated with Page Title, Subtitle, and Widgets, it will show on the Website.
When the Shop Owner is redirected to the Branch page when they are already logged in as Admin, they can use the Edit option to enter each Branch and add the Address, Contact information, Opening Hours, and Branch Images.
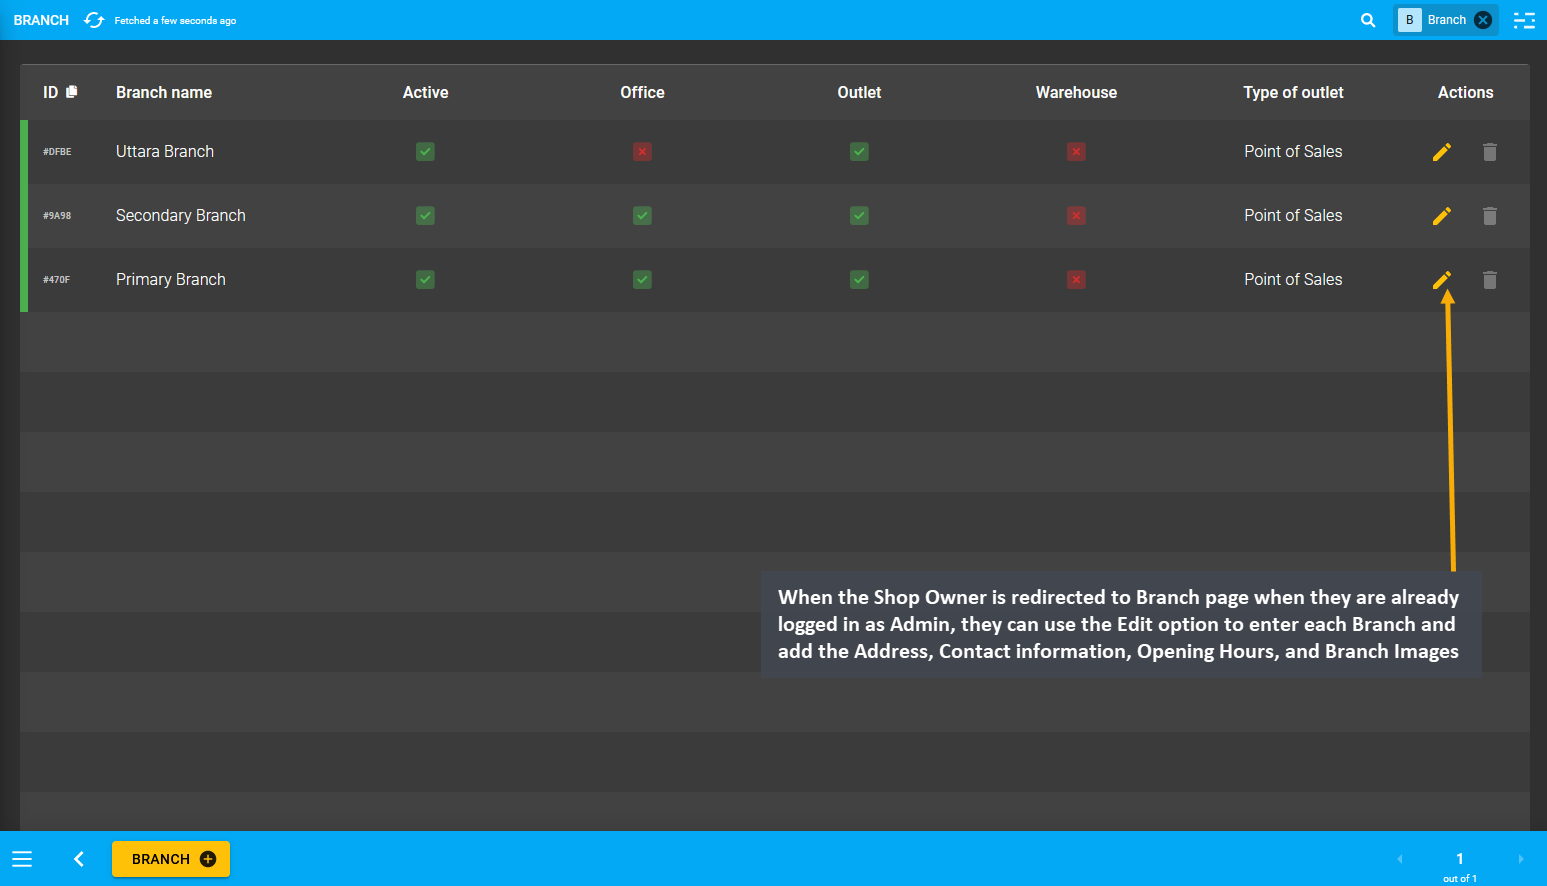
Image 6: Shop Owner can edit Branch List after being redirected when they are already logged in as Admin.
Clicking the Edit icon will let Shop Owner to edit individual Branches, where the first field to fill out for the Branch is the Branch Name. Below branch name is the Gallery where Shop Owner can add photos of their Branch outlets and add multiple images for Branch gallery. There are two toggle buttons to set Branch as Office or Warehouse. To best describe their Branch, the Shop Owner can select if their Outlet is a Point of Sales or Restaurant from below.
Fill out the email address, phone number, and detailed address of the Branch. Then, set Branch operating Schedule for Customers to visit or make Product purchase. Set business days and holidays with Start and End times. Use the toggle button to show when the Branch is open or closed. Add Primary Note or Secondary Note as needed.
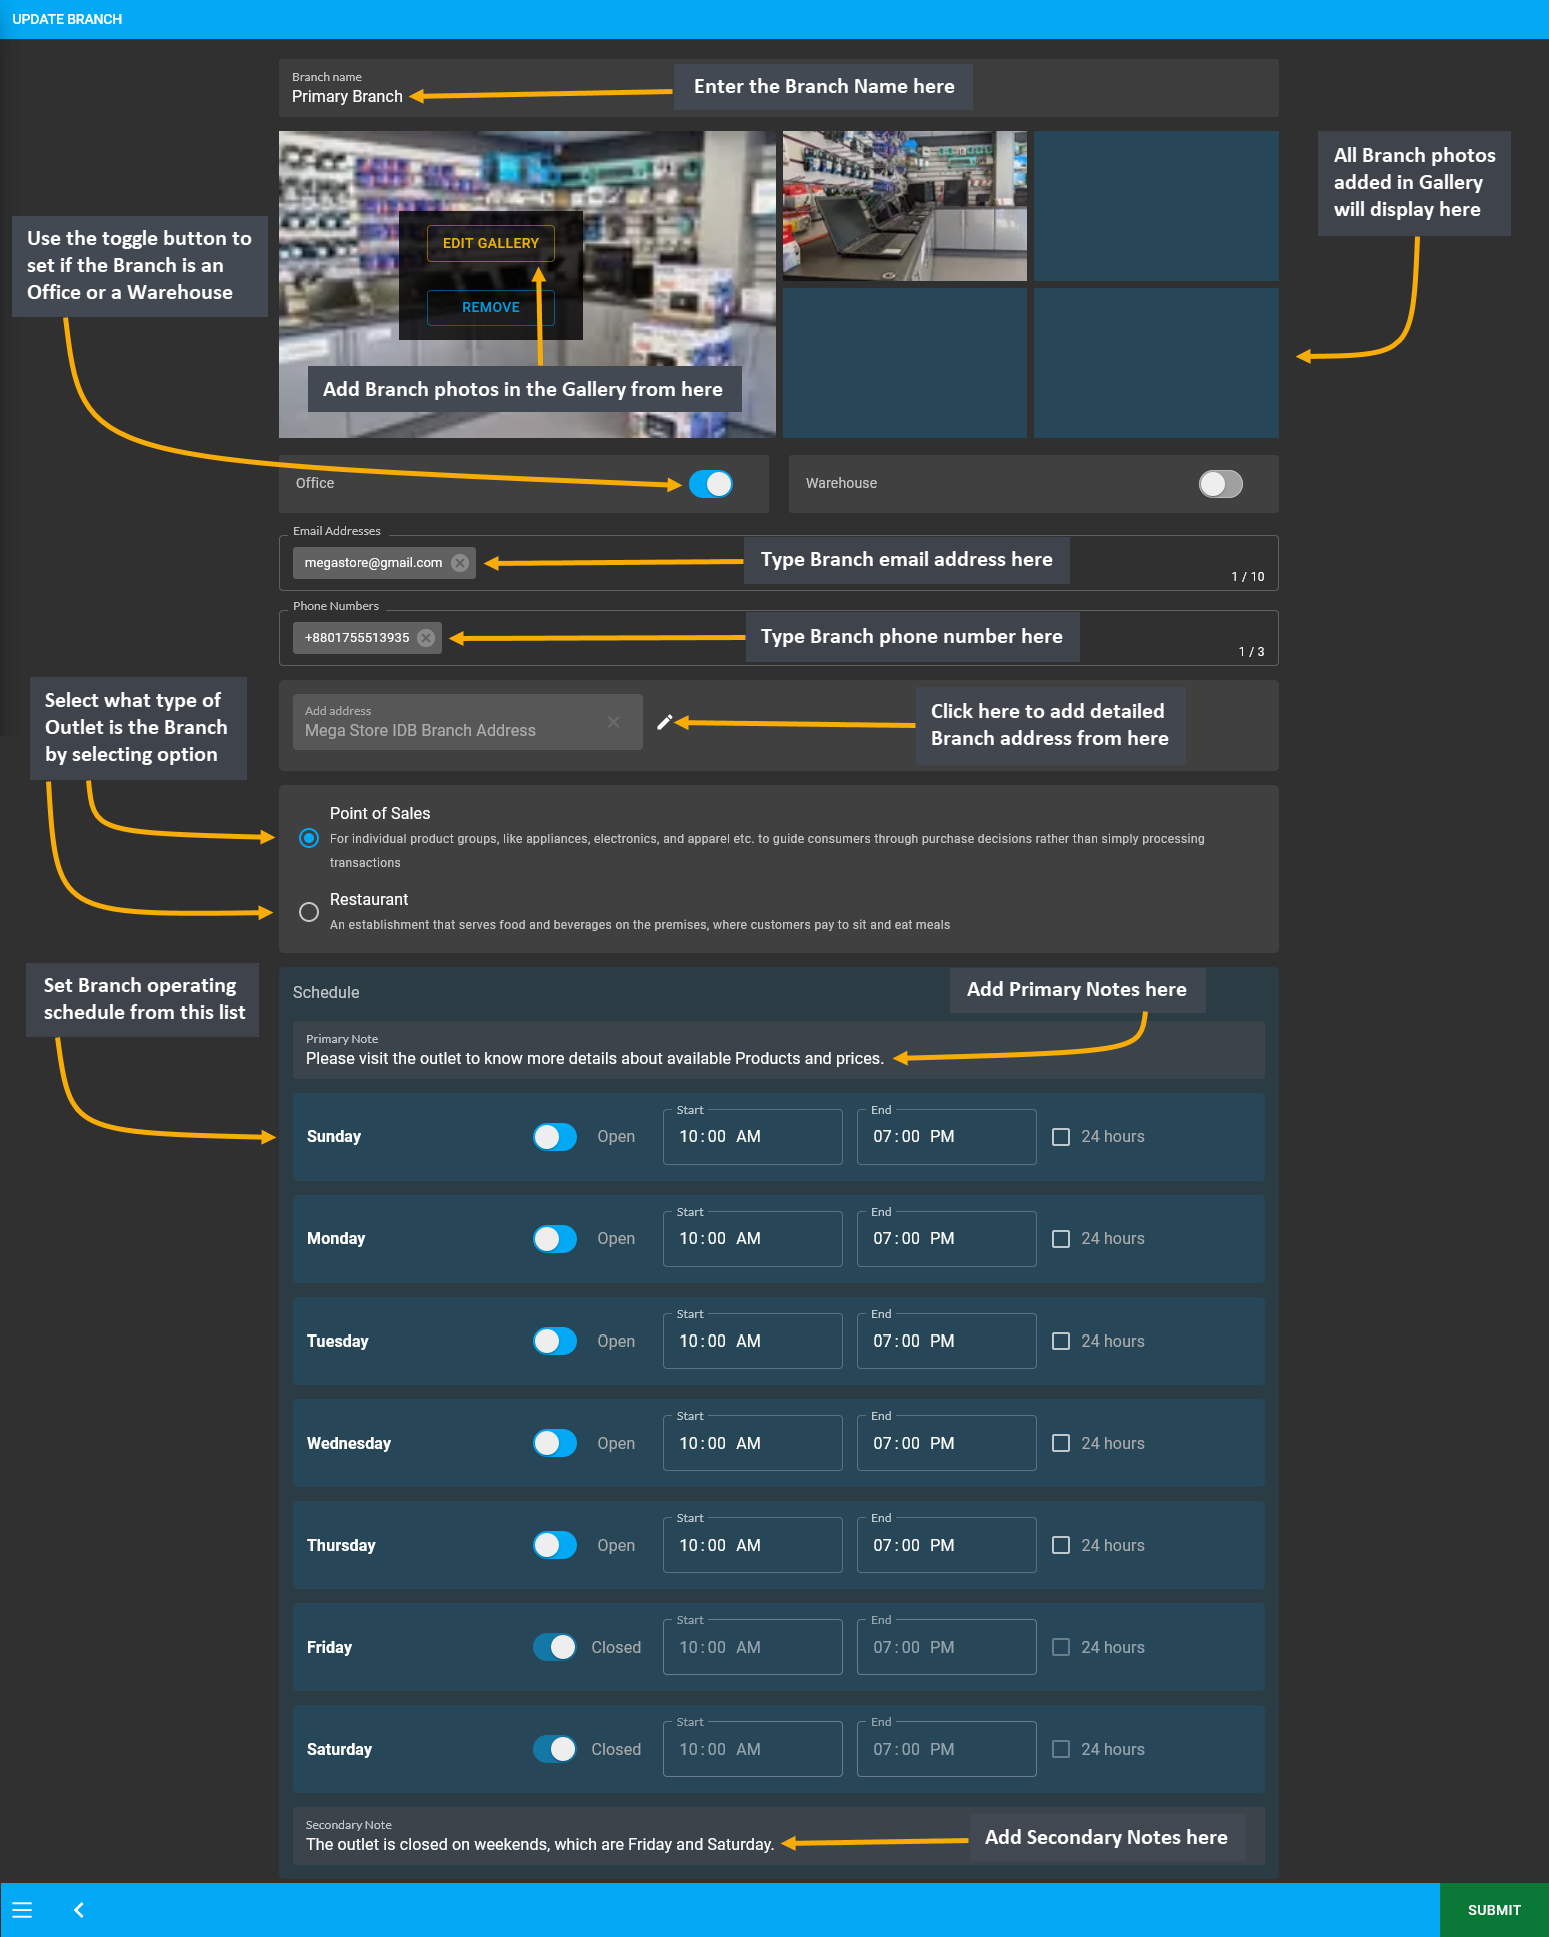
Image 7: Shop Owner can edit Branch List after being redirected when they are already logged in as Admin.
Privacy Policy Page
Setup the Privacy Policy Page explaining the Shop Owner’s policies regarding the collection, use, and disclosure of the Customer’s Personal Information that they receive from The Website. Build the Privacy Policy Page by clicking Edit from Page List that will redirect to this page where the details can be setup. The Shop Owner can compile the Privacy Policy clearly to better serve the Customers who may be concerned with how their personal information will be used online. Shop Owners can refer to this Privacy Policy Template to create their own Website policy.
The first step is to create a precise Title and Subtitle that will give Customers an idea about what to expect from the Website’s Privacy Policy as they register as Customers, provide their personal information and buy Products. If they are explaining the policy using a Text Widget, then they can describe the Privacy Policy within the Content box after adding Widget name, title, and subtitle. If they need to redirect Customers towards more information regarding Privacy Policy, they can enable and use the Call to Action button to redirect to a detailed policy page.
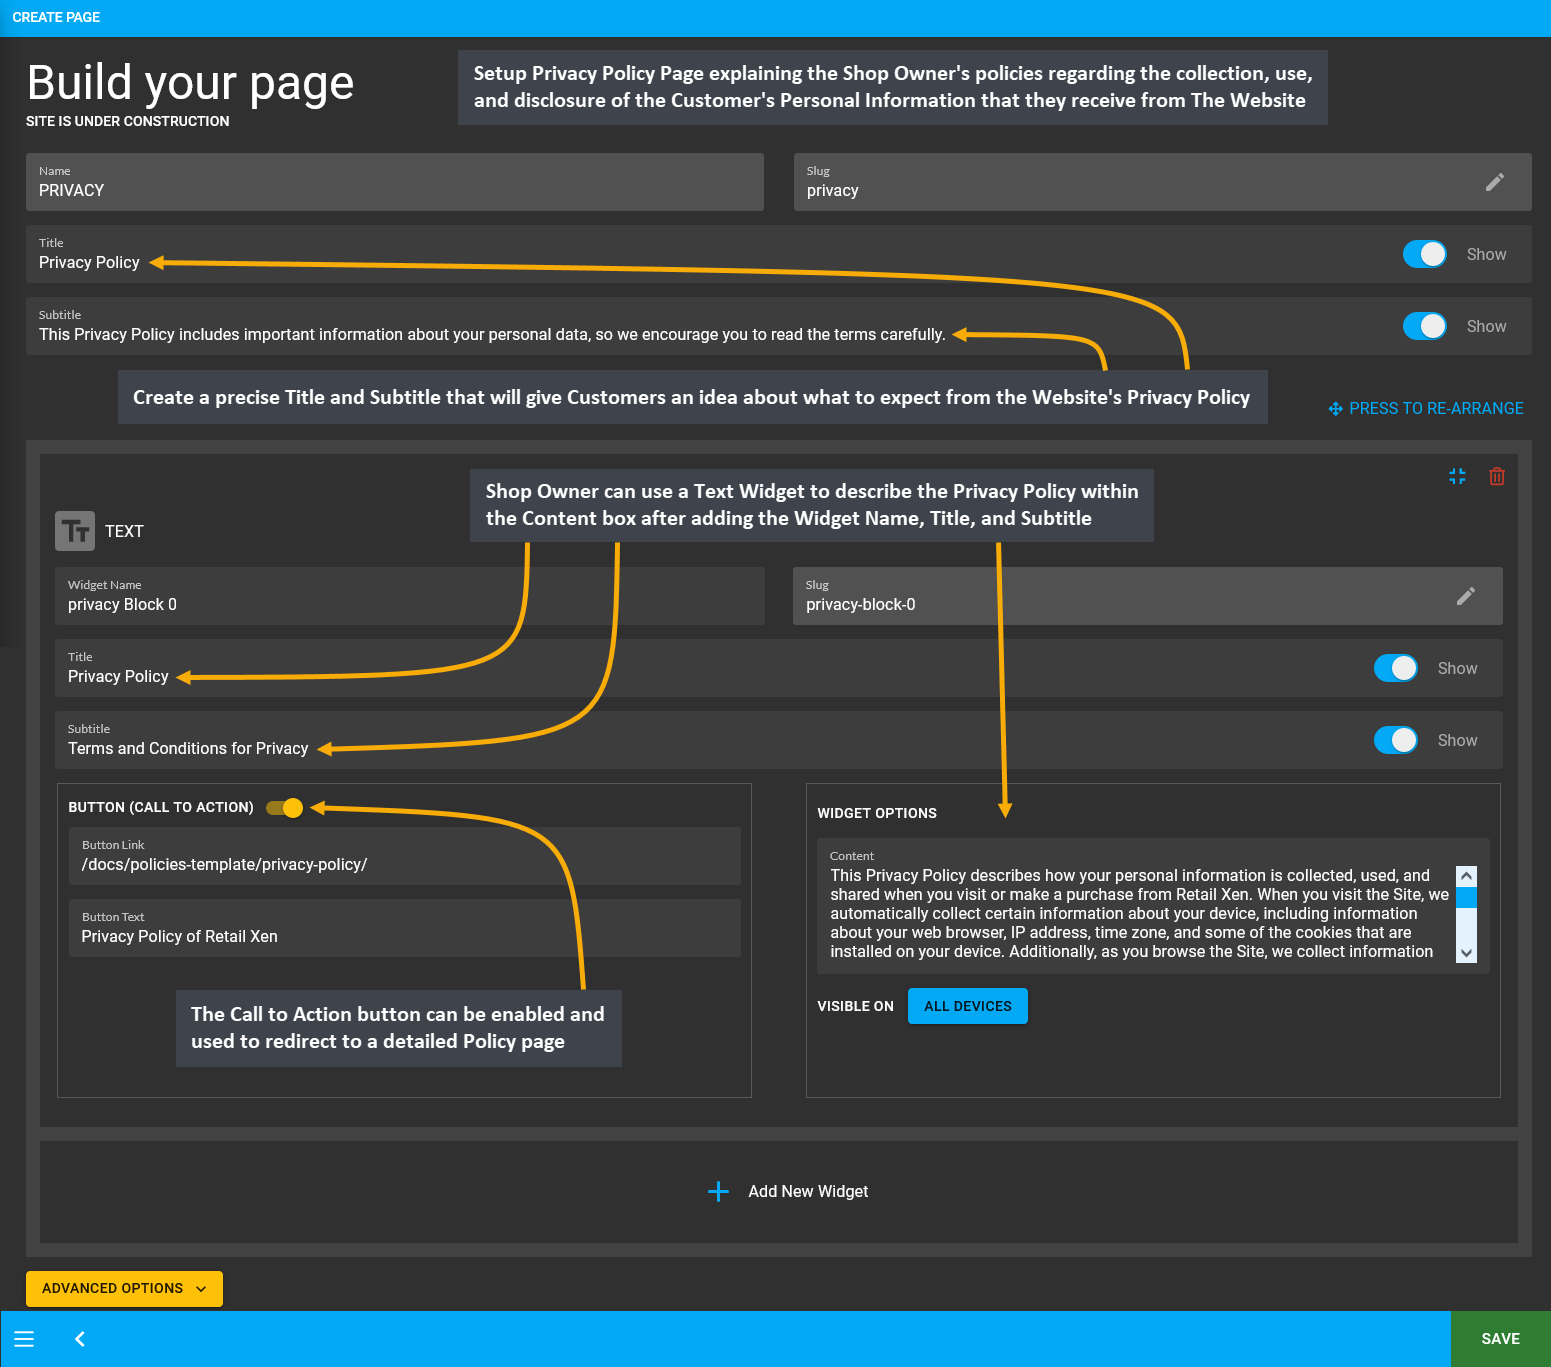
Image 8: Setup Privacy Policy Page explaining collection, use, and disclosure of Customer's information.
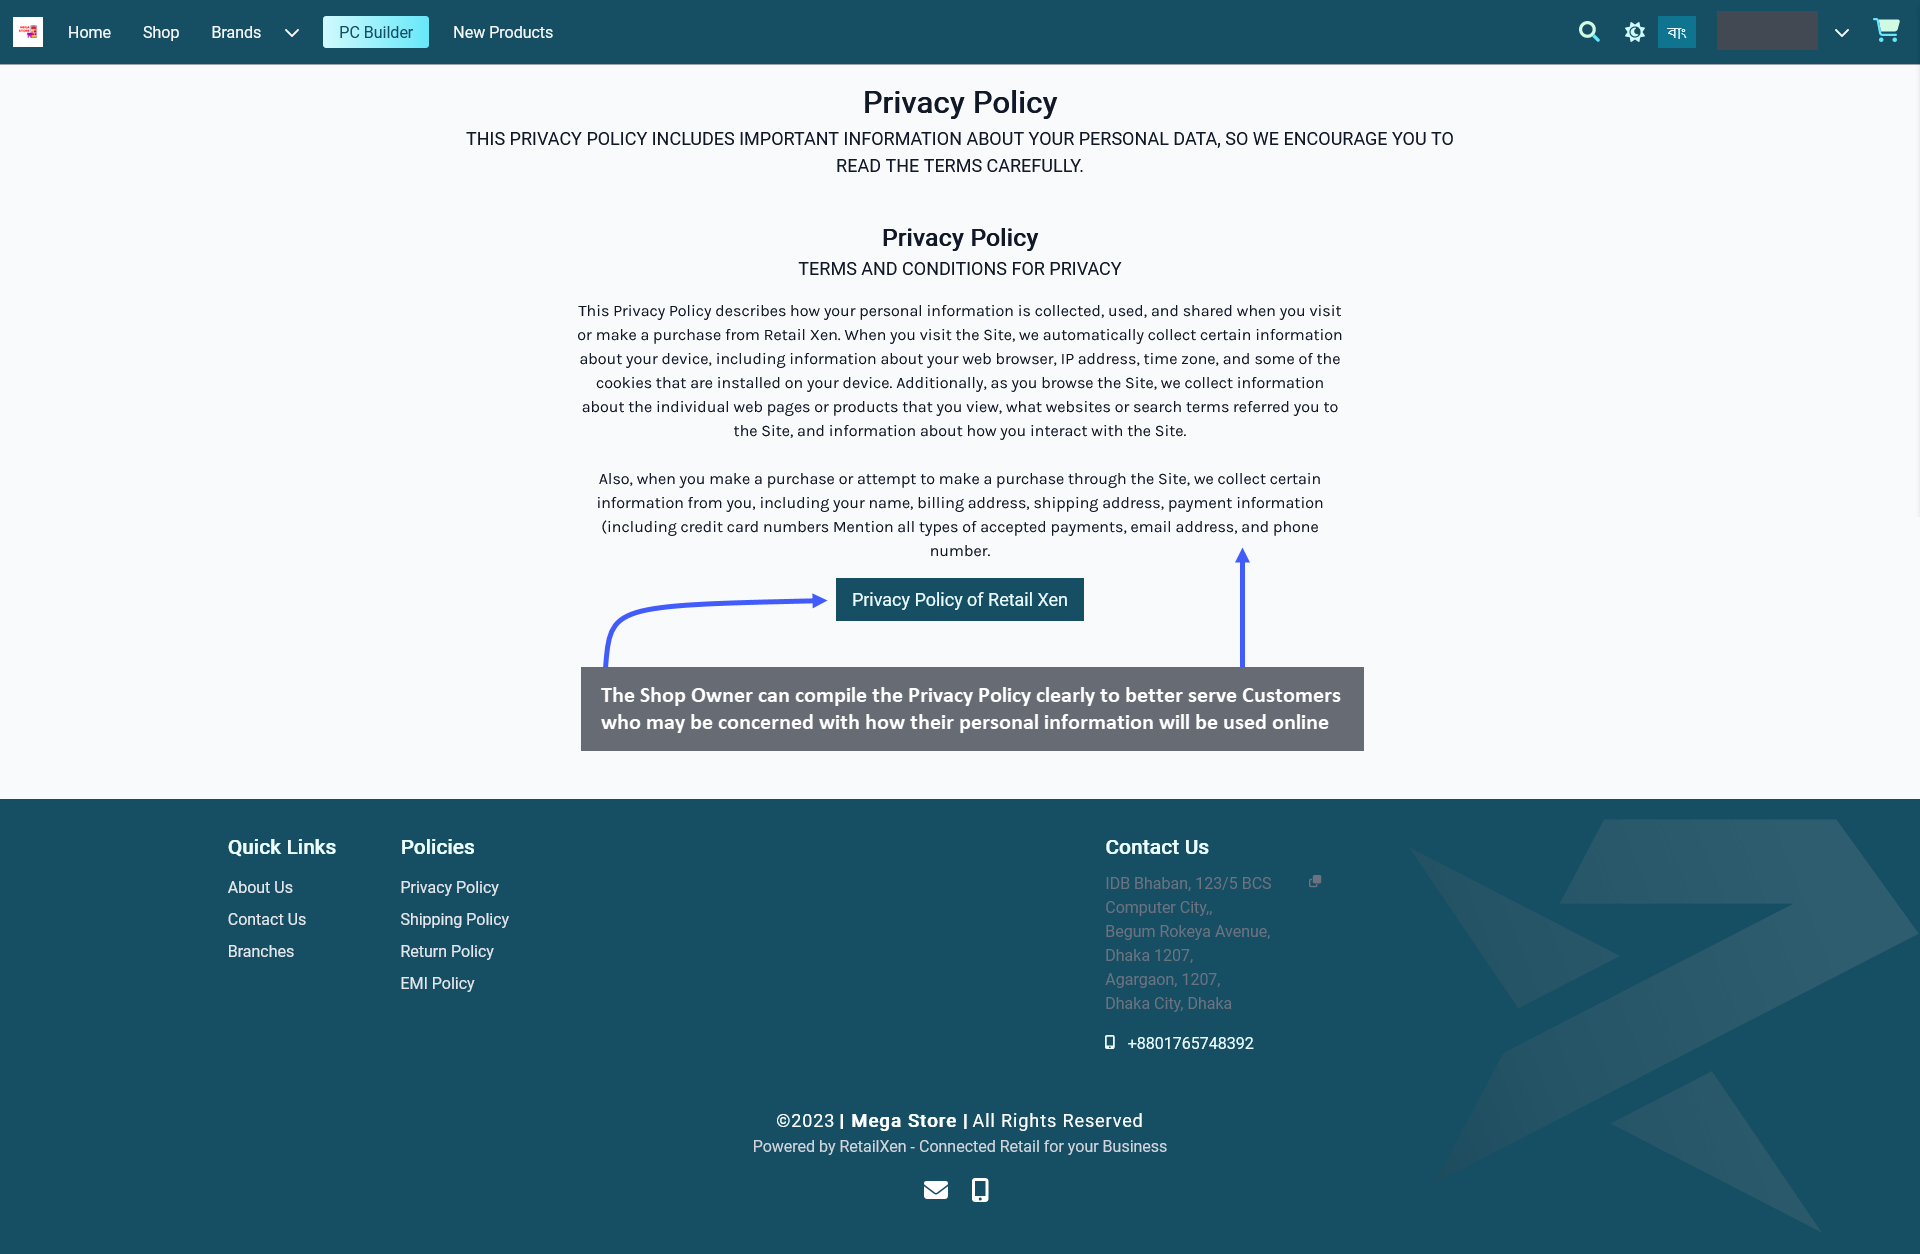
Image 9: The Shop Owner can compile the Privacy Policy on the Website to clearly explain information use.
Refund Policy Page
Explain the Refund Policy for Customers as they purchase Products from The Website through the explanation of policies in the Refund Page. The policies must clearly mention how the Customers can request for Product Return if the Product is faulty through the RMA case. Explain the procedure of the verification of Customer’s claim by the Shop Owner after opening the RMA case, and if the claim is accepted, then how the Full or Partial Refund will be processed through original payment method (which is currently not supported yet) or a Ledger Credit equivalent.
Setup the Refund Policy Page by clicking the Edit option from Page List that will redirect to this page. Create a Title and Subtitle first that will give the Customers an idea about what to expect from the Website’s Refund Policy as they purchase Products. If they are explaining the policies using a Text Widget, then they can describe the Refund Policy within the Content box after adding Widget name, title, and subtitle. If they need to redirect the Customers towards more information regarding Refund Policy, they can enable and use the Call to Action button to redirect to a detailed policy page. Shop Owners can refer to this Refund Policy Template to create their Website policy.
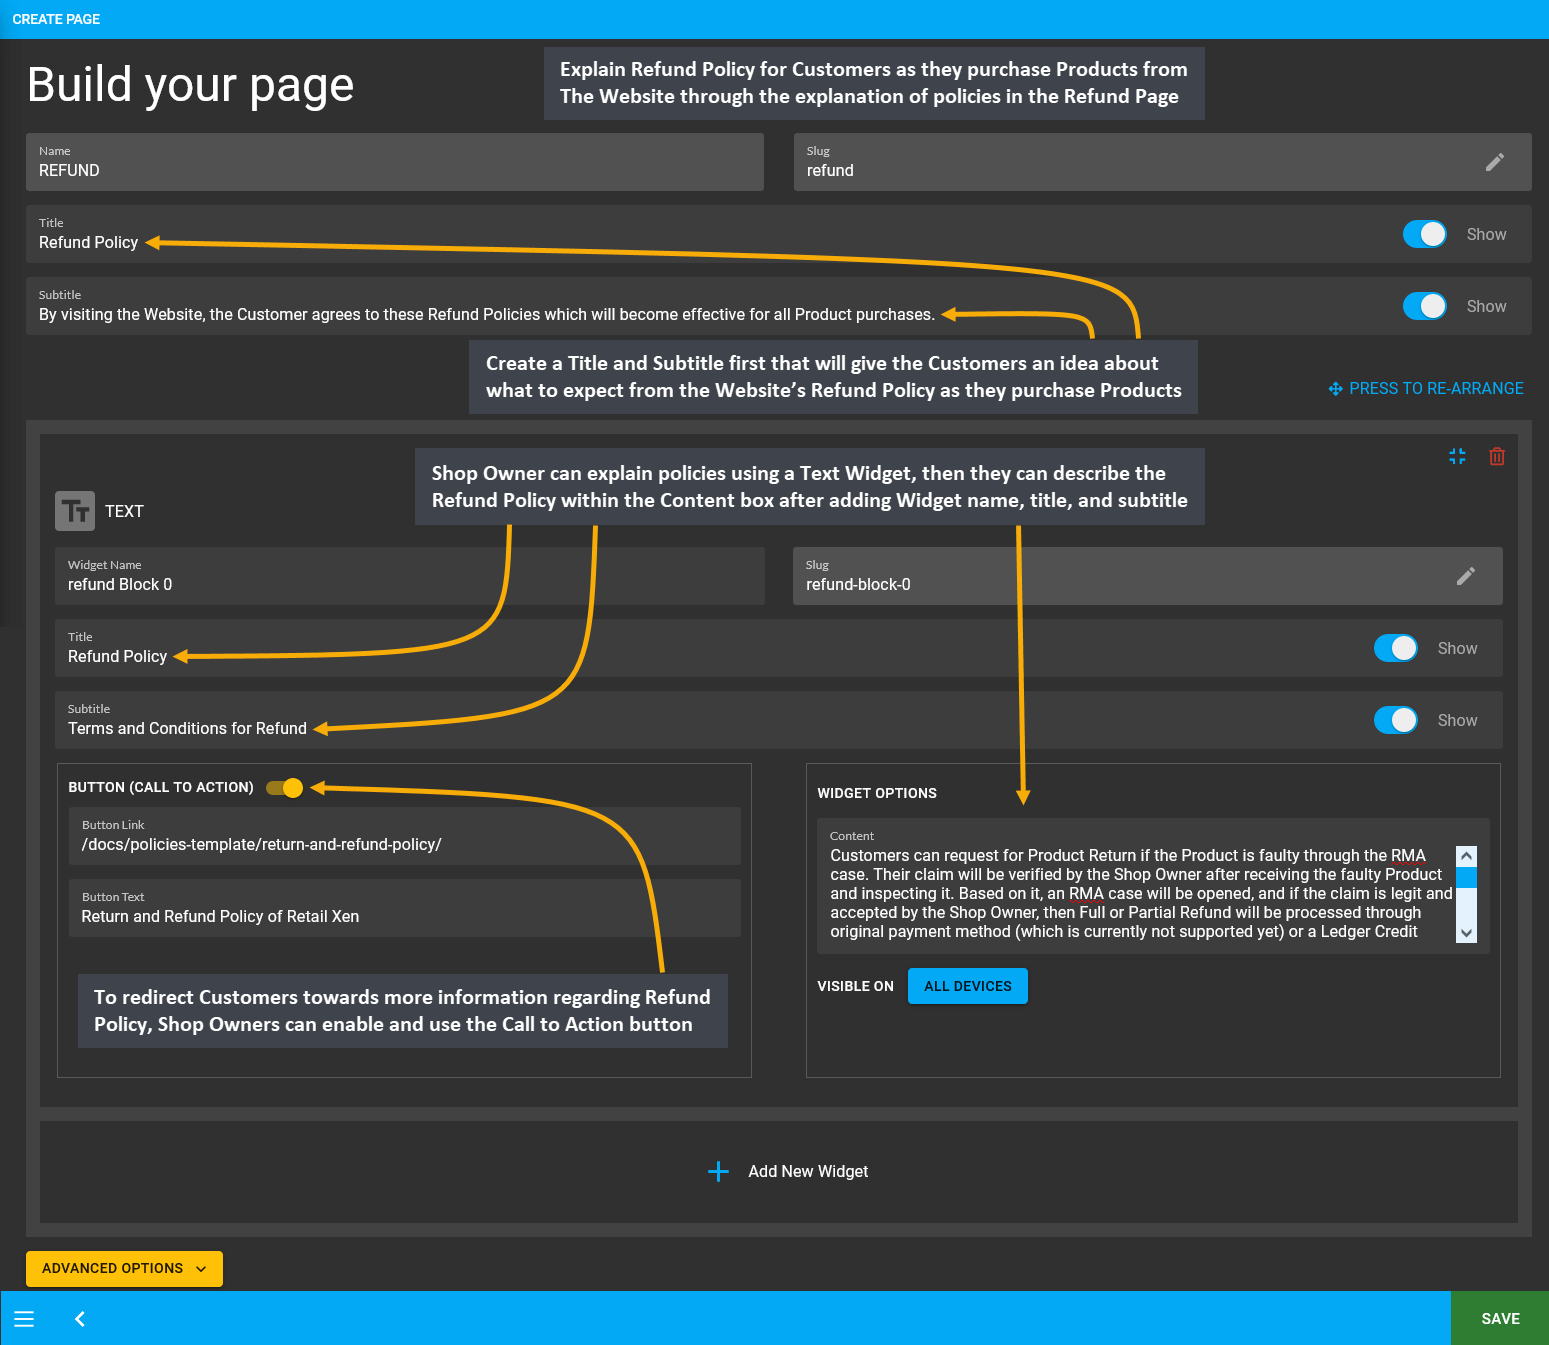
Image 10: Setup Refund Policy Page explaining Refund procedure that will follow from RMA case resolution.
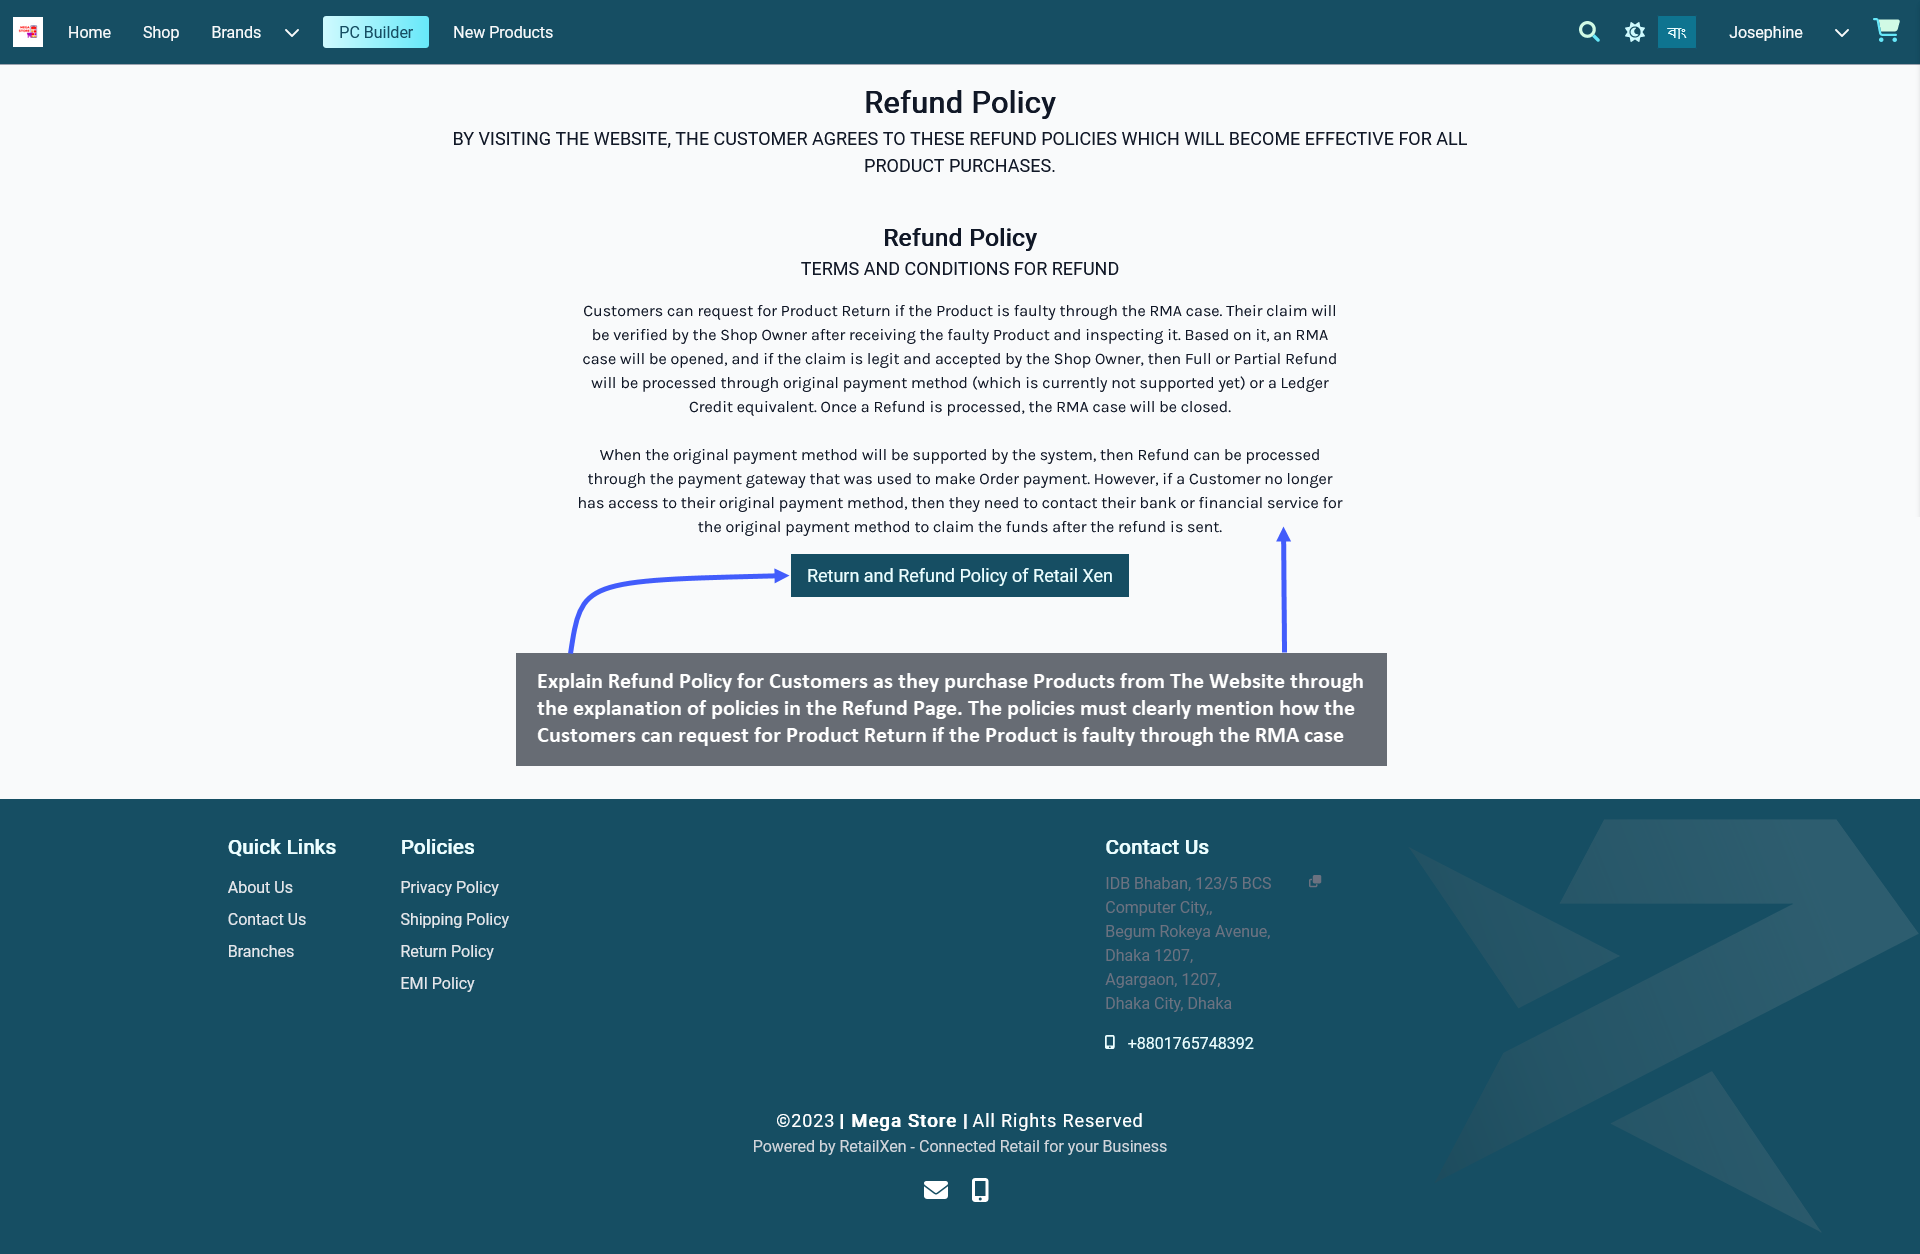
Image 11: The Shop Owner can compile the Refund Policy on the Website to clearly explain Refund procedures.
Shipping Policy Page
Setup Shipping Policy Page by describing the Shipping Policies for Customers which will explain how they are going to receive their Products from the Shop Owner. Explain how the Shipping Fees will be calculated for inside the city and outside the city during checkout based on the weight, dimension, and destination of Products. Elaborate how delivery will be arranged based on the delivery location with Tracking Number and estimated delivery date.
Edit the Shipping Policy Page by clicking the Edit option from Page List that will redirect to this page. Create a Title and Subtitle first that will give the Customers an idea about the Shipping process after they place Orders. If they are explaining the policies using a Text Widget, then they can describe the Shipping Policy within the Content box after adding Widget name, title, and subtitle. If they need to redirect the Customers towards more information regarding Shipping Policy, they can enable and use the Call to Action button to redirect to a detailed policy page. Shop Owners can refer to this Shipping Policy Template to create their Website Shipping policy.
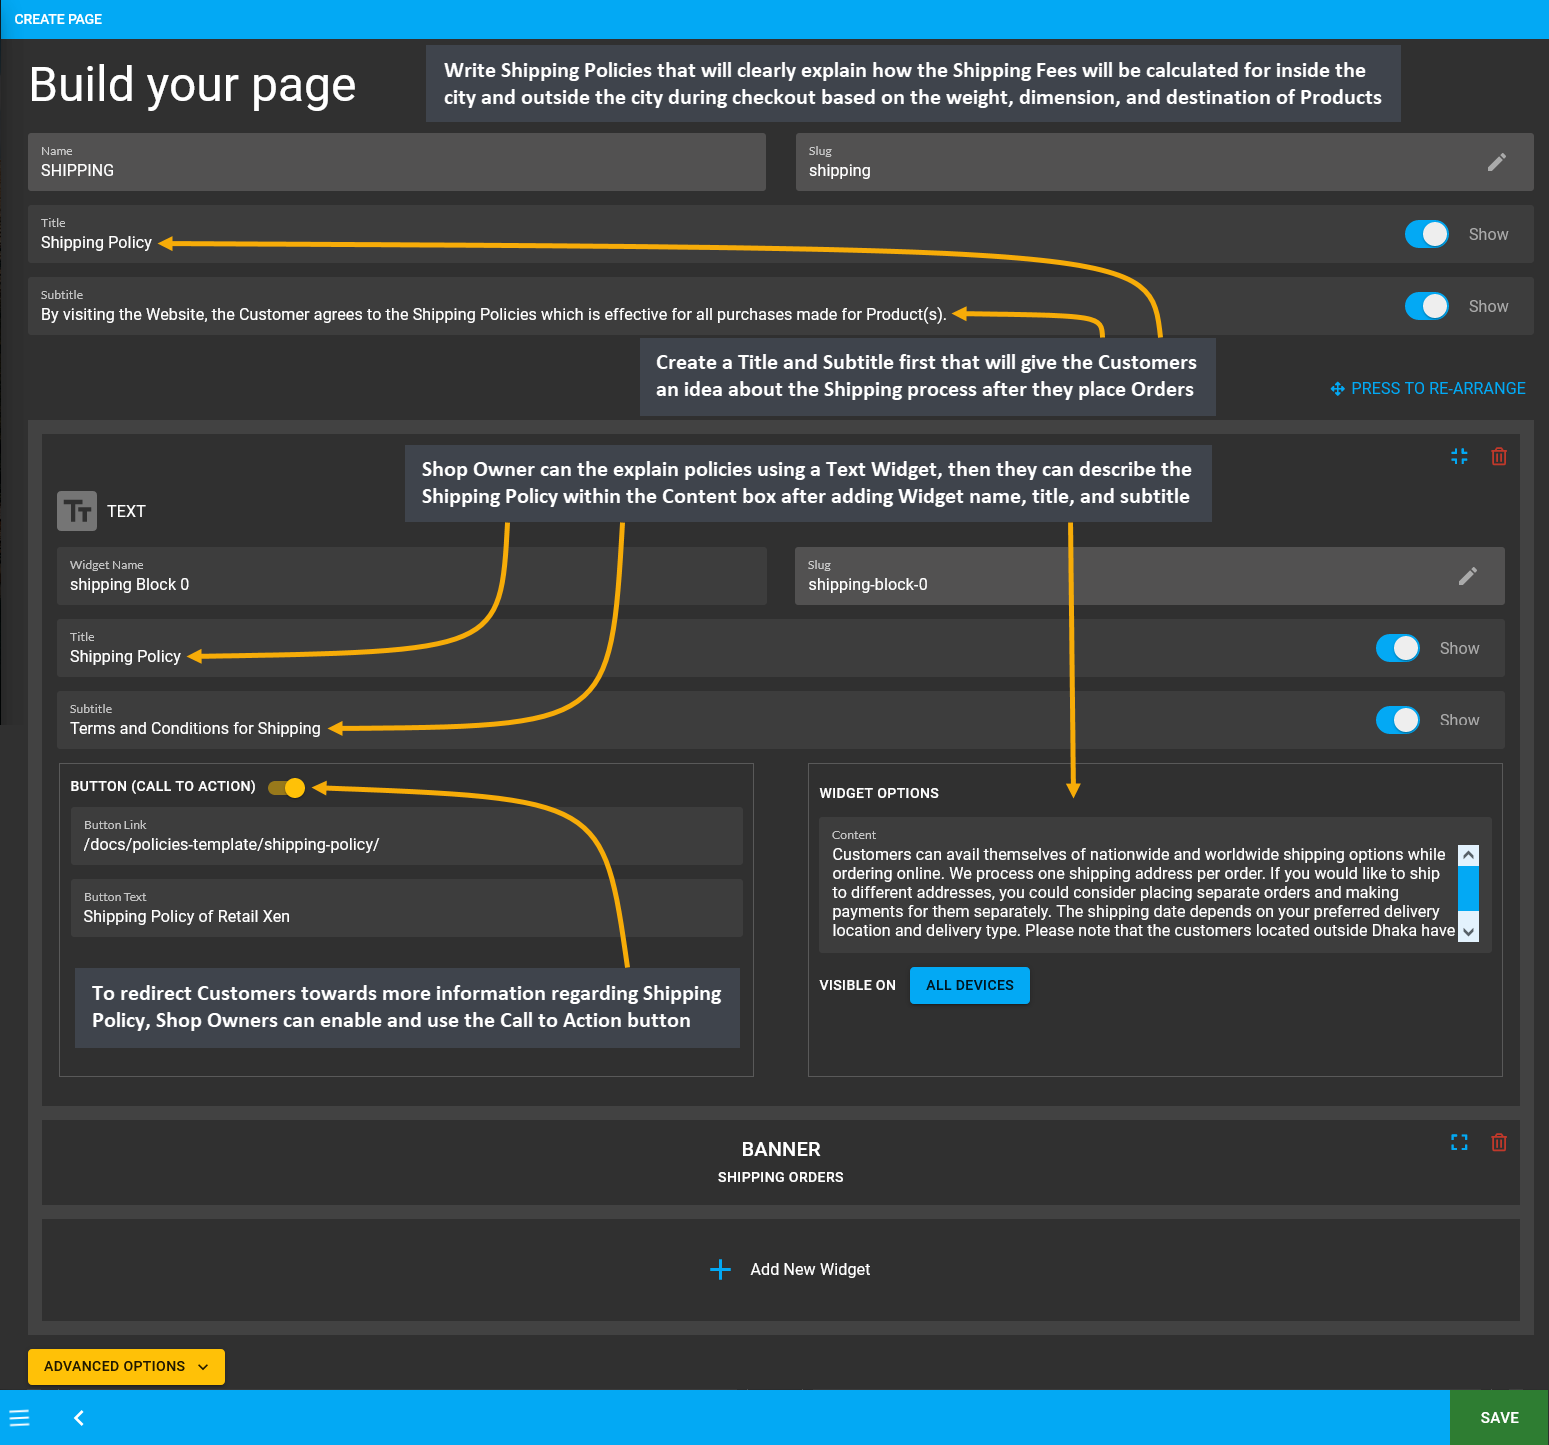
Image 12: Setup Shipping Policy Page explaining Shipping process and how Shipping Fees will be calculated.
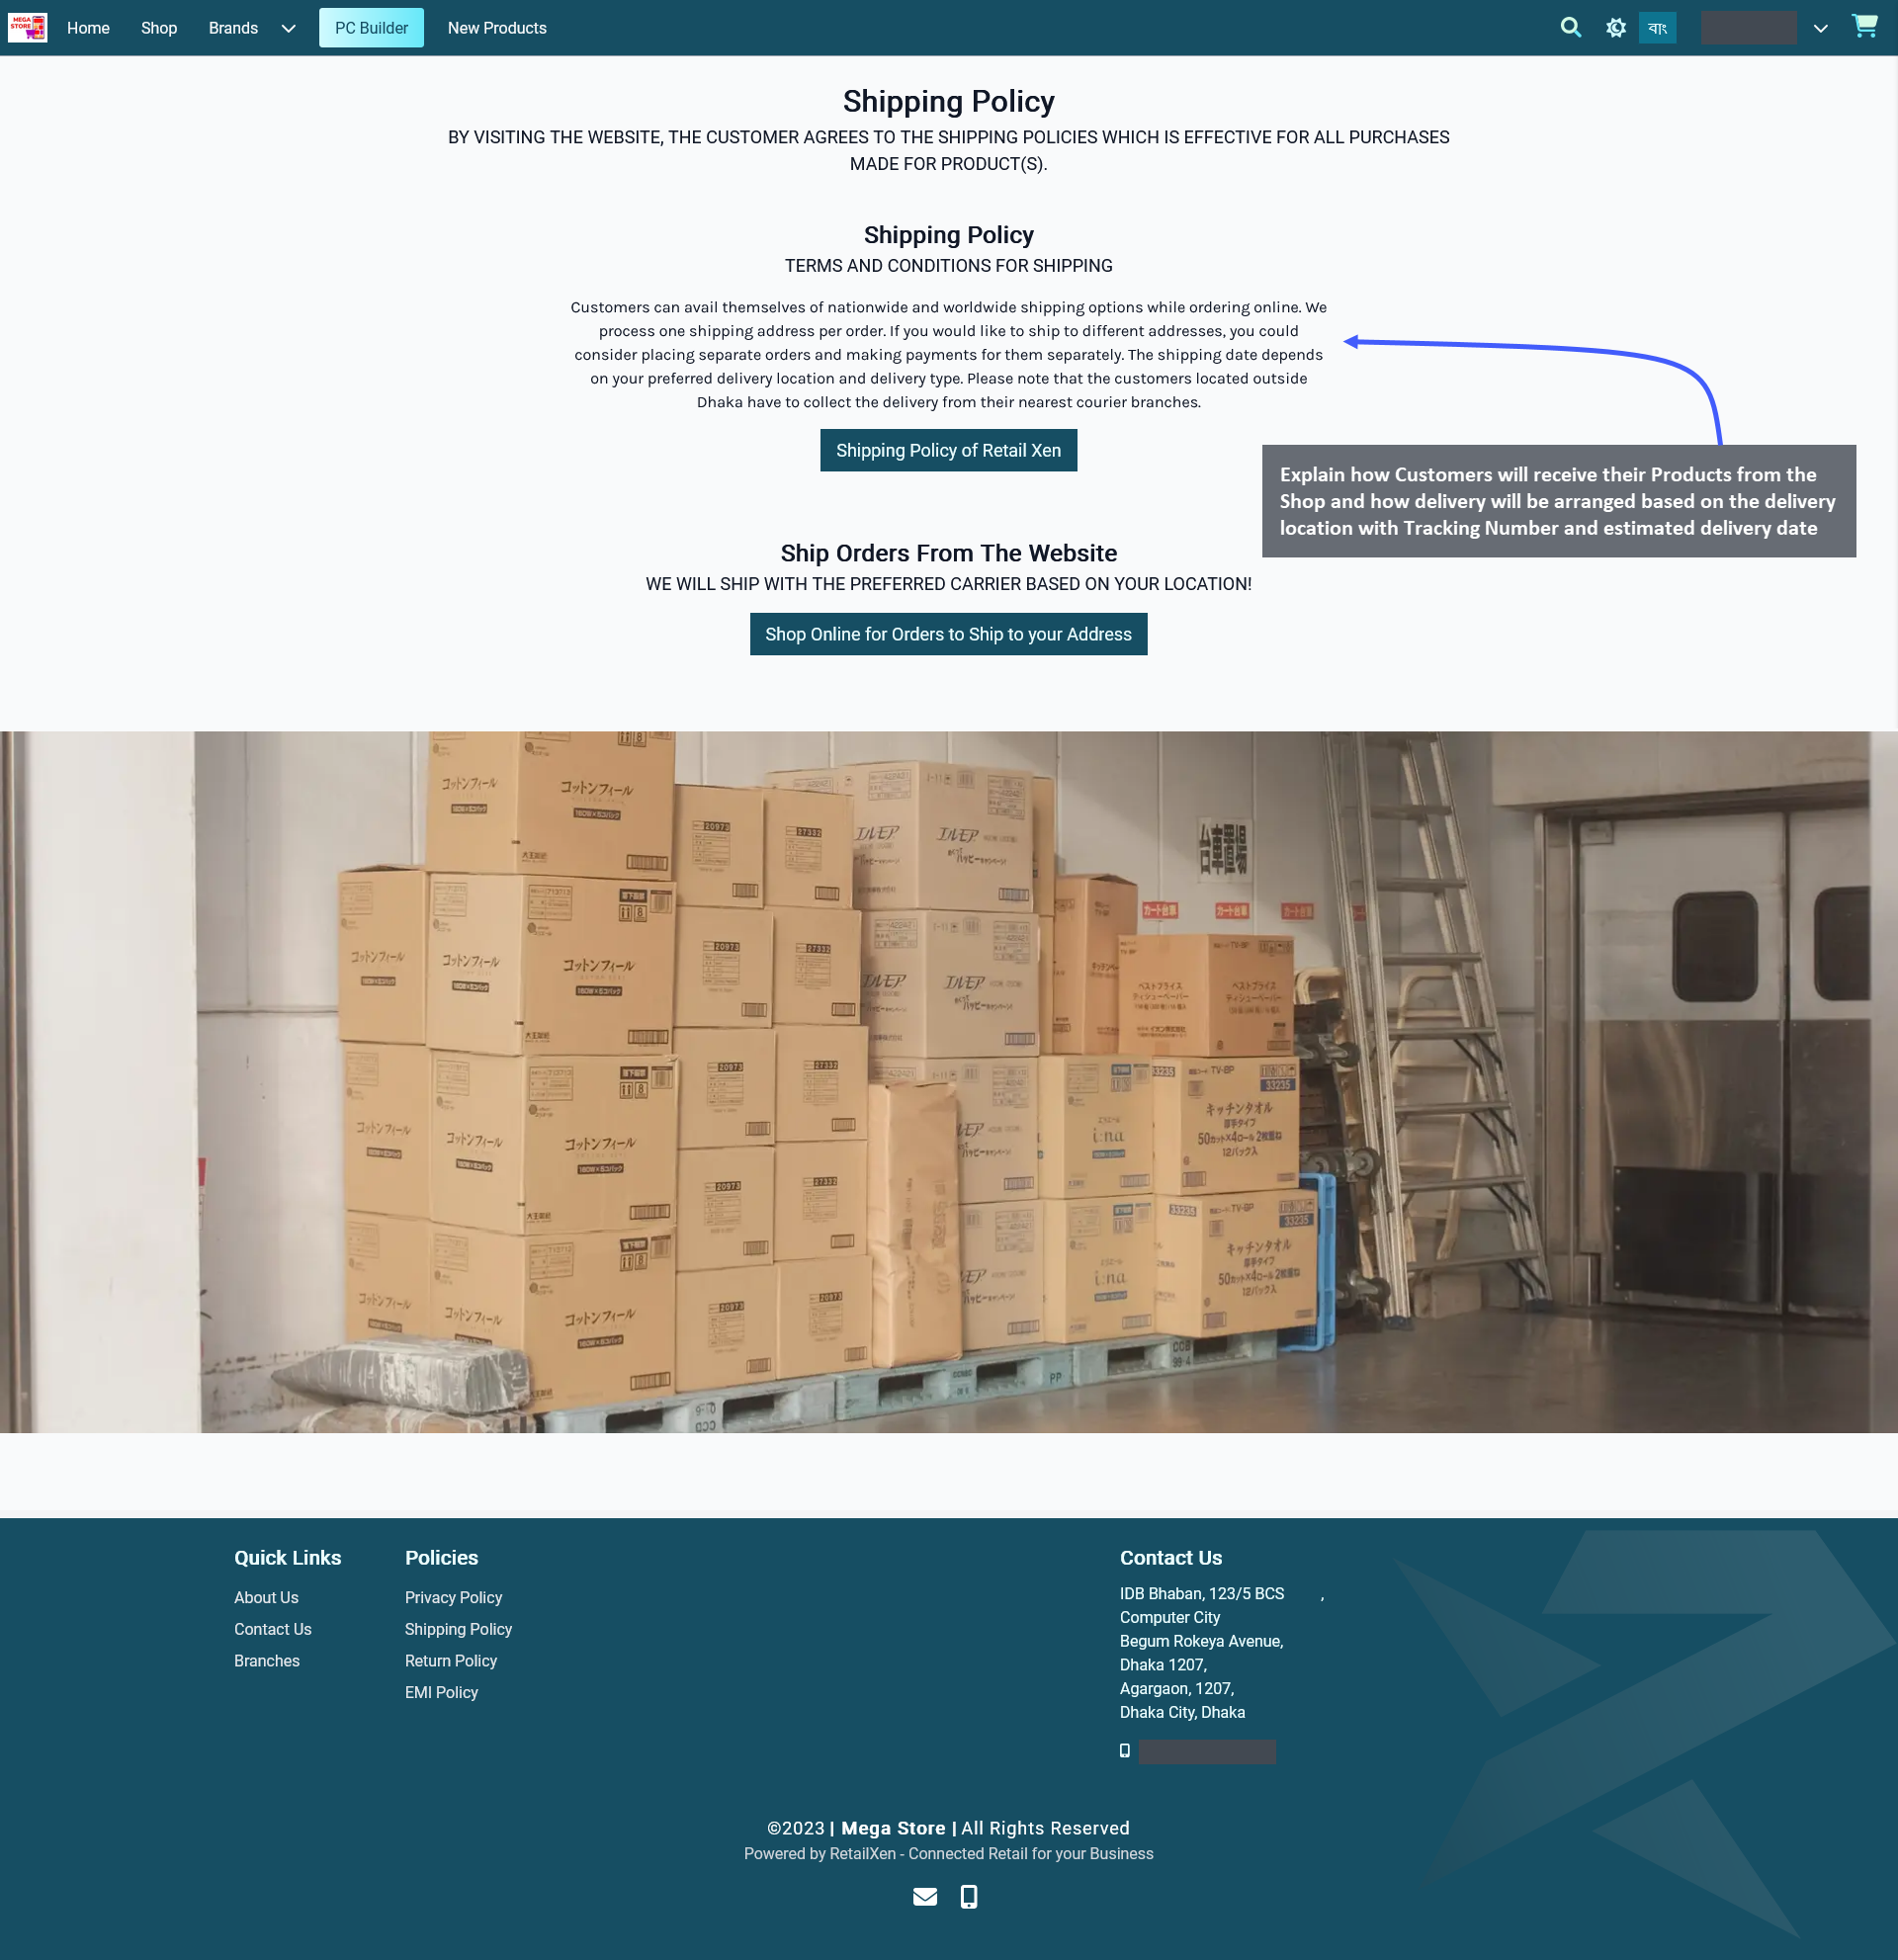
Image 13: Explain how Customer will receive their Products from the Shop and how delivery will be arranged.
EMI Policy Page
Customers may often feel reluctant to purchase expensive Products from The Website if they do not have option to place Order with installments. With EMI facilities, Customers will feel comfortable to purchase Products of any value and select their preferred payment terms. EMI Policy Page will give them idea on how to make the purchase through EMI. Using any of the accepted bank Credit Cards on The Website, Customers will be able to pay for their Orders in easy and equal monthly installments with the issuing Bank’s assistance and make successful purchase.
Setup the EMI Policy Page by clicking the Edit option from Page List that will redirect to this page. Create a Title and Subtitle first that will give the Customers an idea about how to follow the EMI Policy as they purchase Products. If explaining the policies using a Text Widget, then describe the EMI Policy within the Content box after adding Widget name, title, and subtitle. Enable and use the Call to Action button to redirect Customers to a detailed policy page. If needed, the Shop Owners can refer to this EMI Policy Template to create their own Website EMI policy.
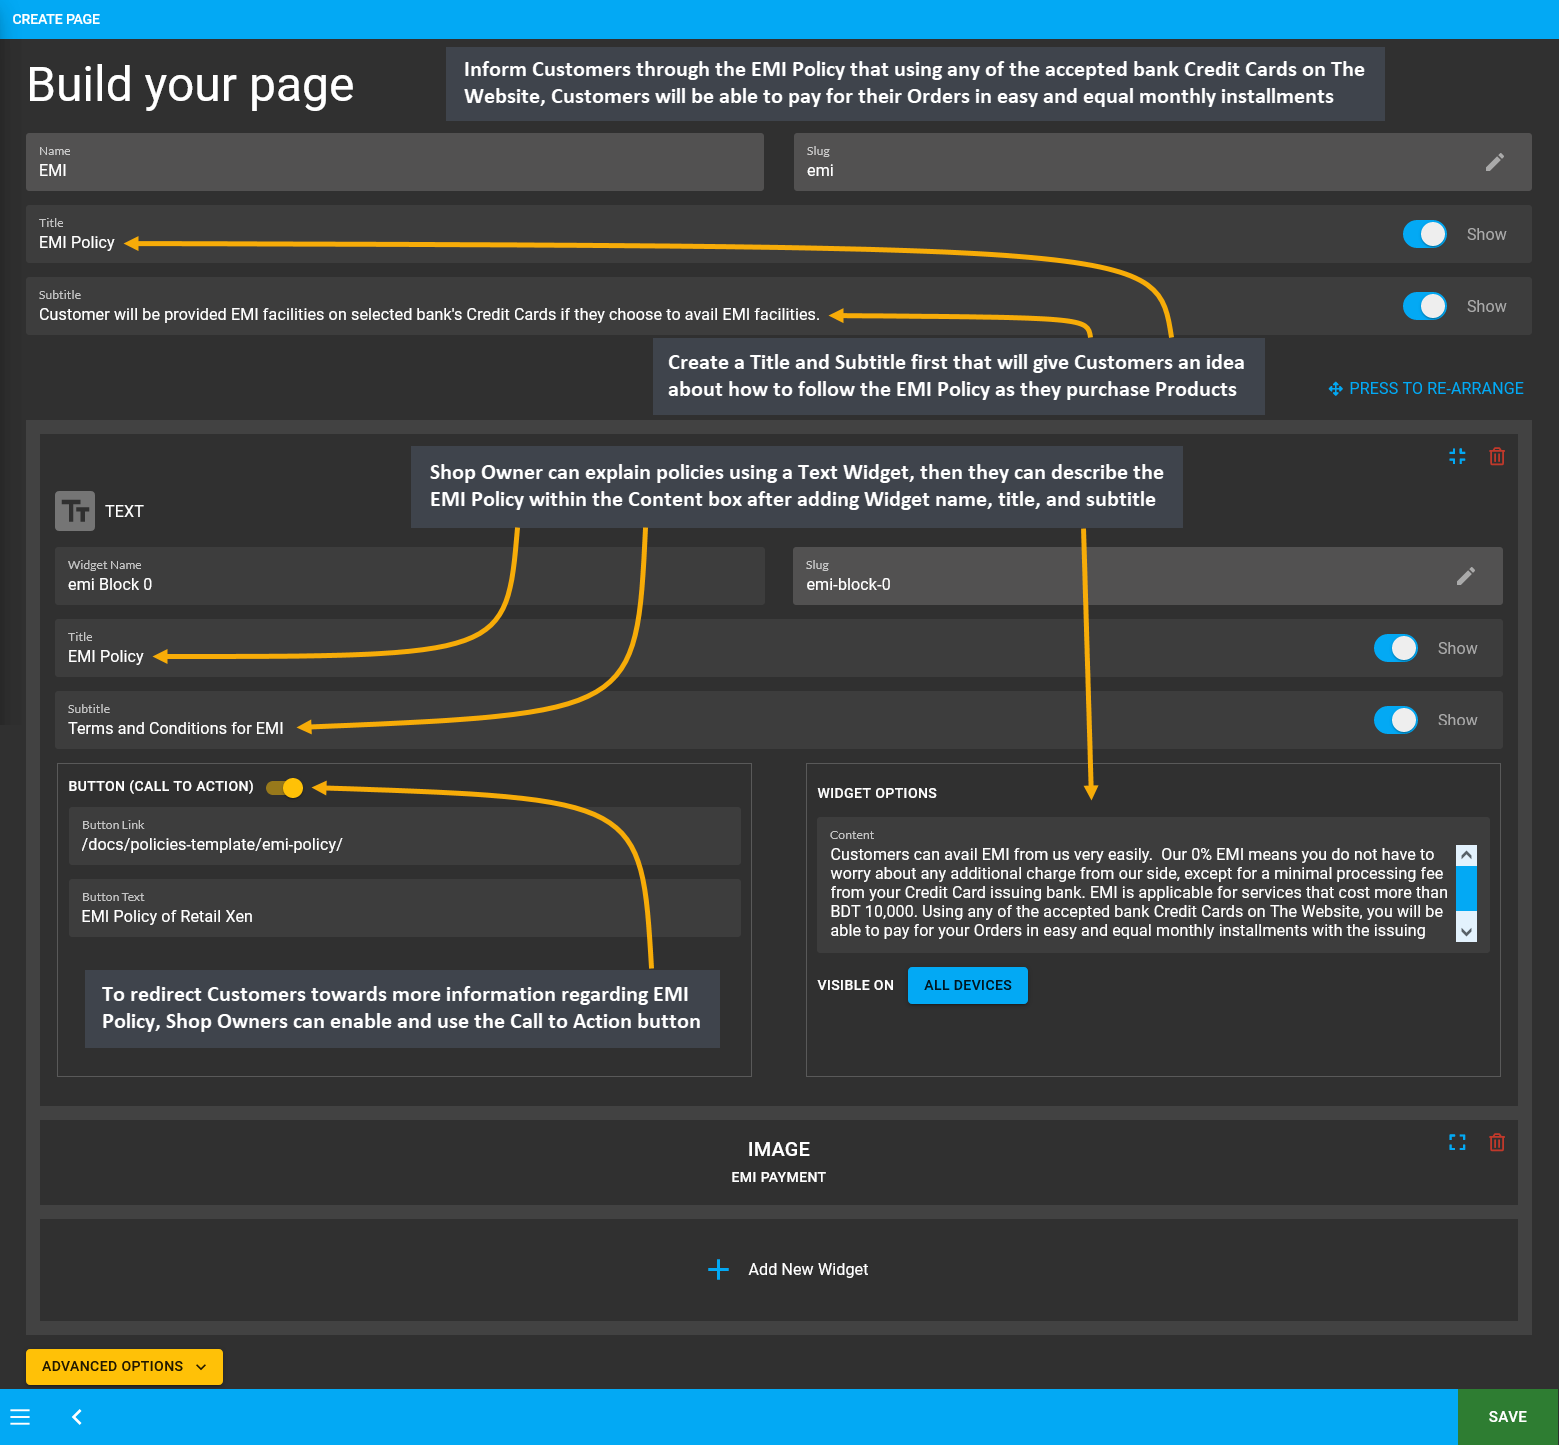
Image 14: Setup EMI Policy Page explaining how the Customers can make their Product purchase through EMI.
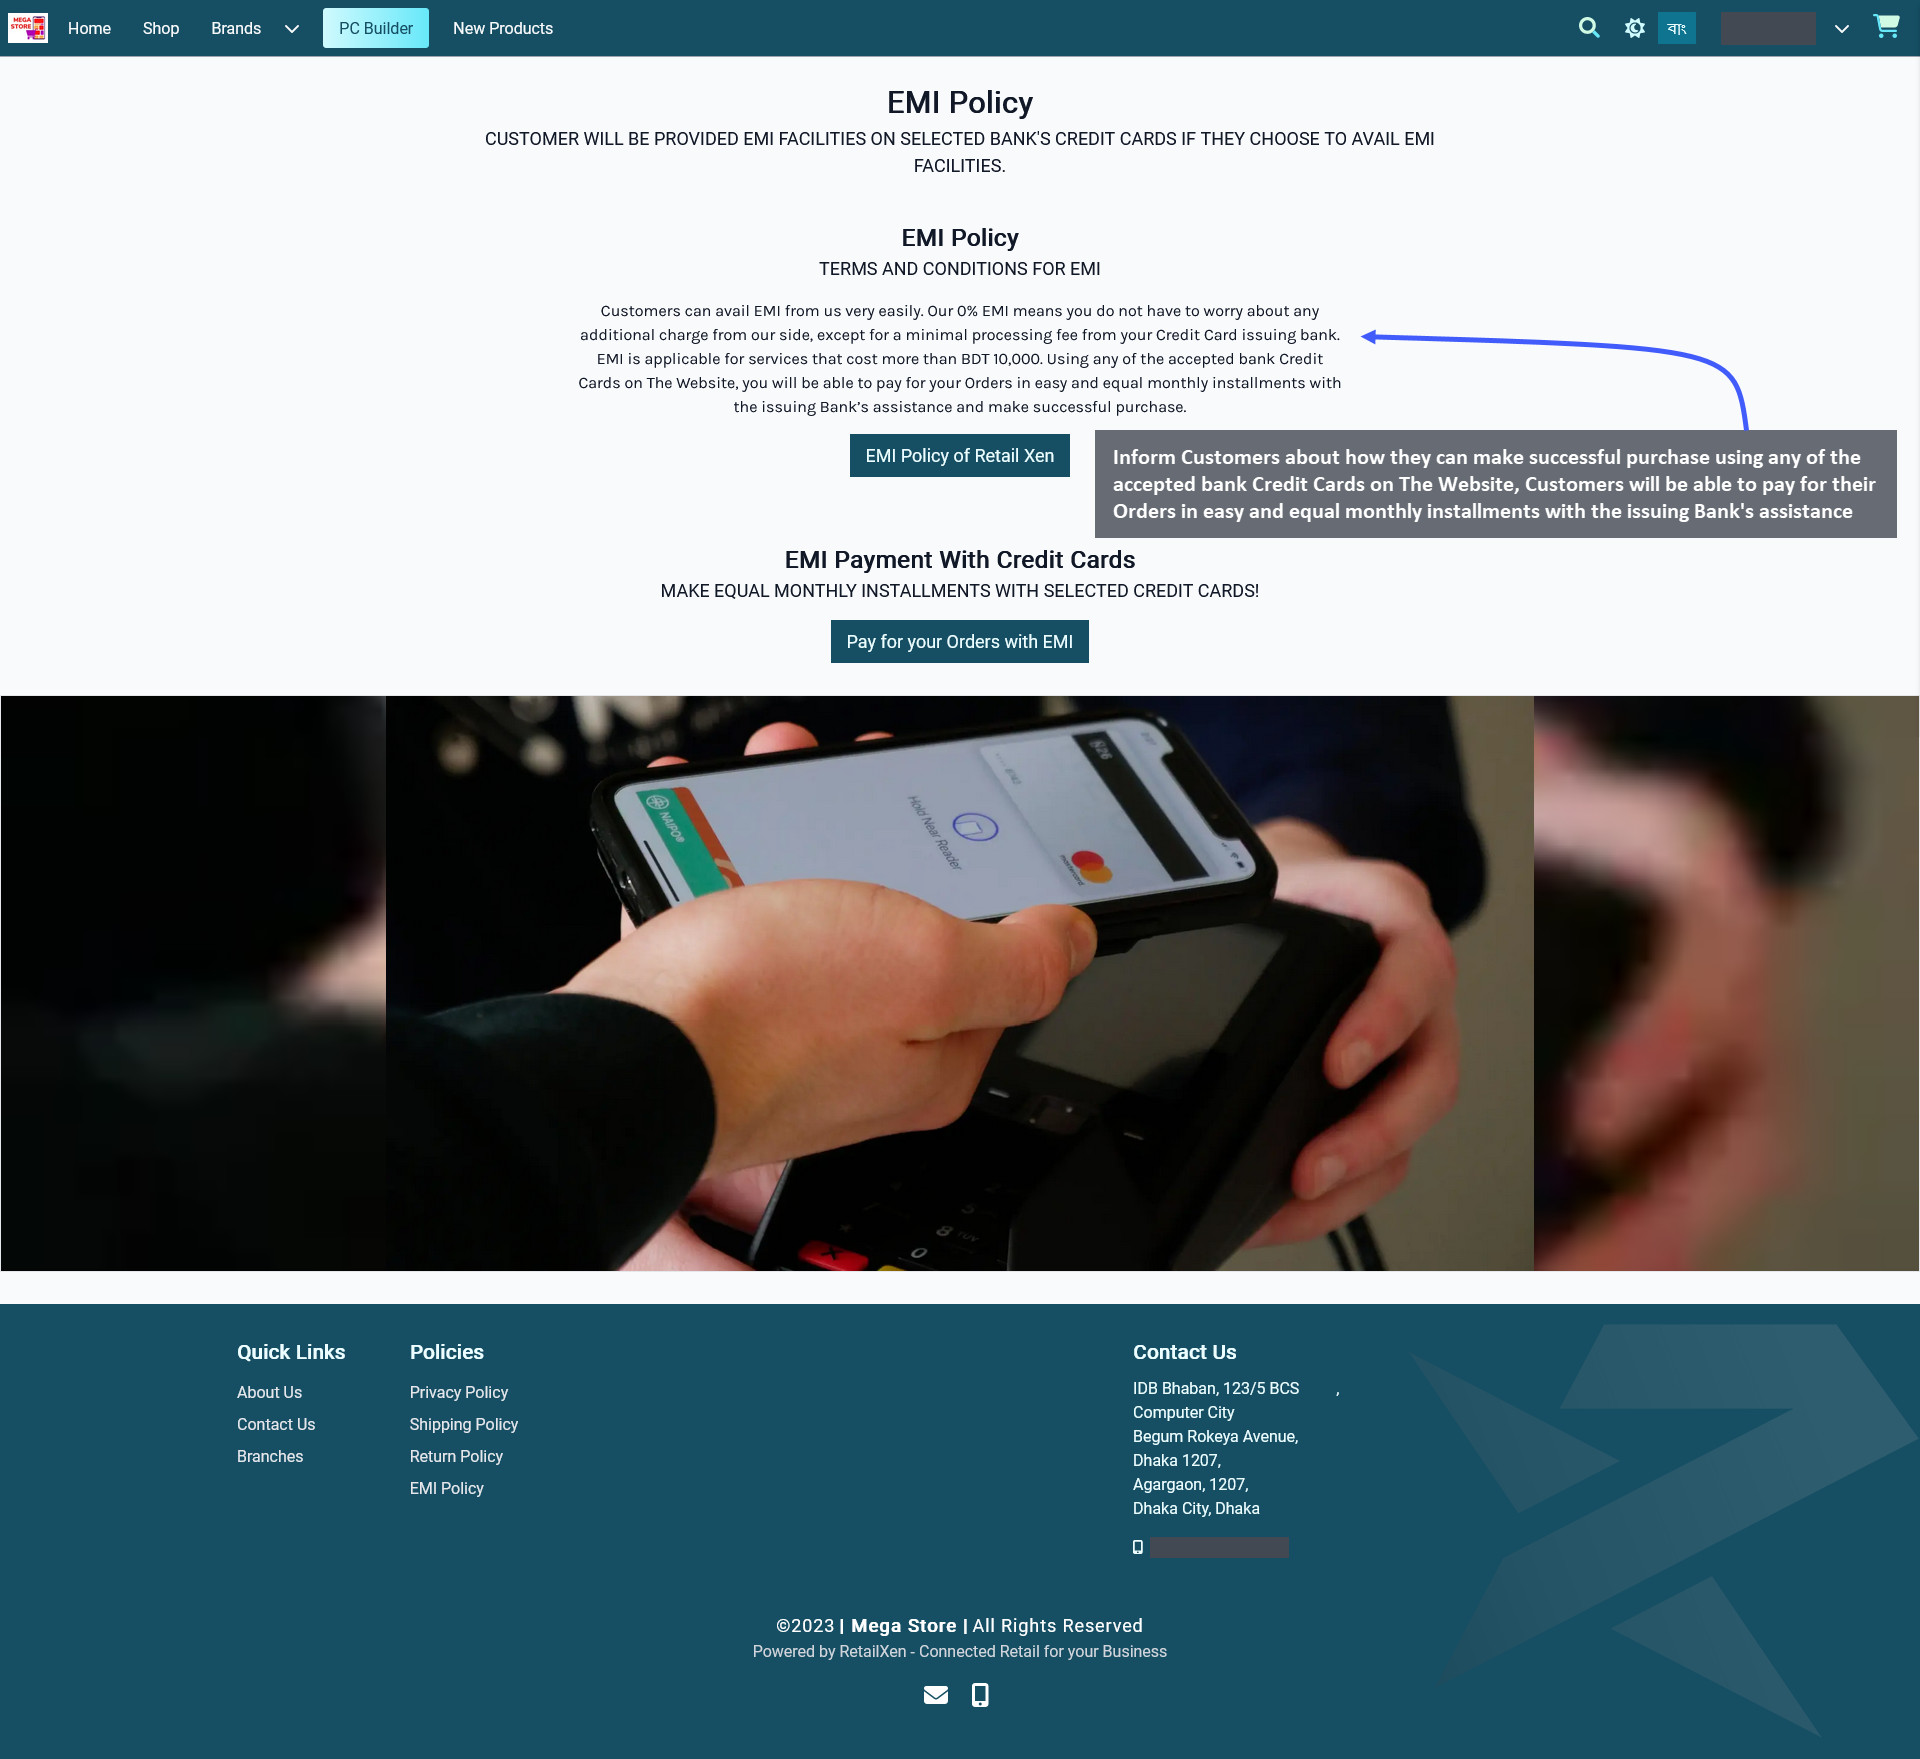
Image 15: Explain how the Customers can purchase their Product by selecting the EMI policy to make payment.
20.2 - Widgets
Create and manage Widgets for promoting the Shop and Products on The Website.
Click the Content Management module to create Pages with five different types of Widgets for The Website.
Widgets are small functional blocks or applications that are embedded into the body of The Website Pages. In the Website Shop Page, they are ideal for posting important information, promotional offers, and advertisements of Products. For instance, the Shop Owners can setup Widgets on both Default Pages and Custom Pages to direct the Customers to shop for their Products. Widgets can appear on one Page or on multiple Pages on The Website.
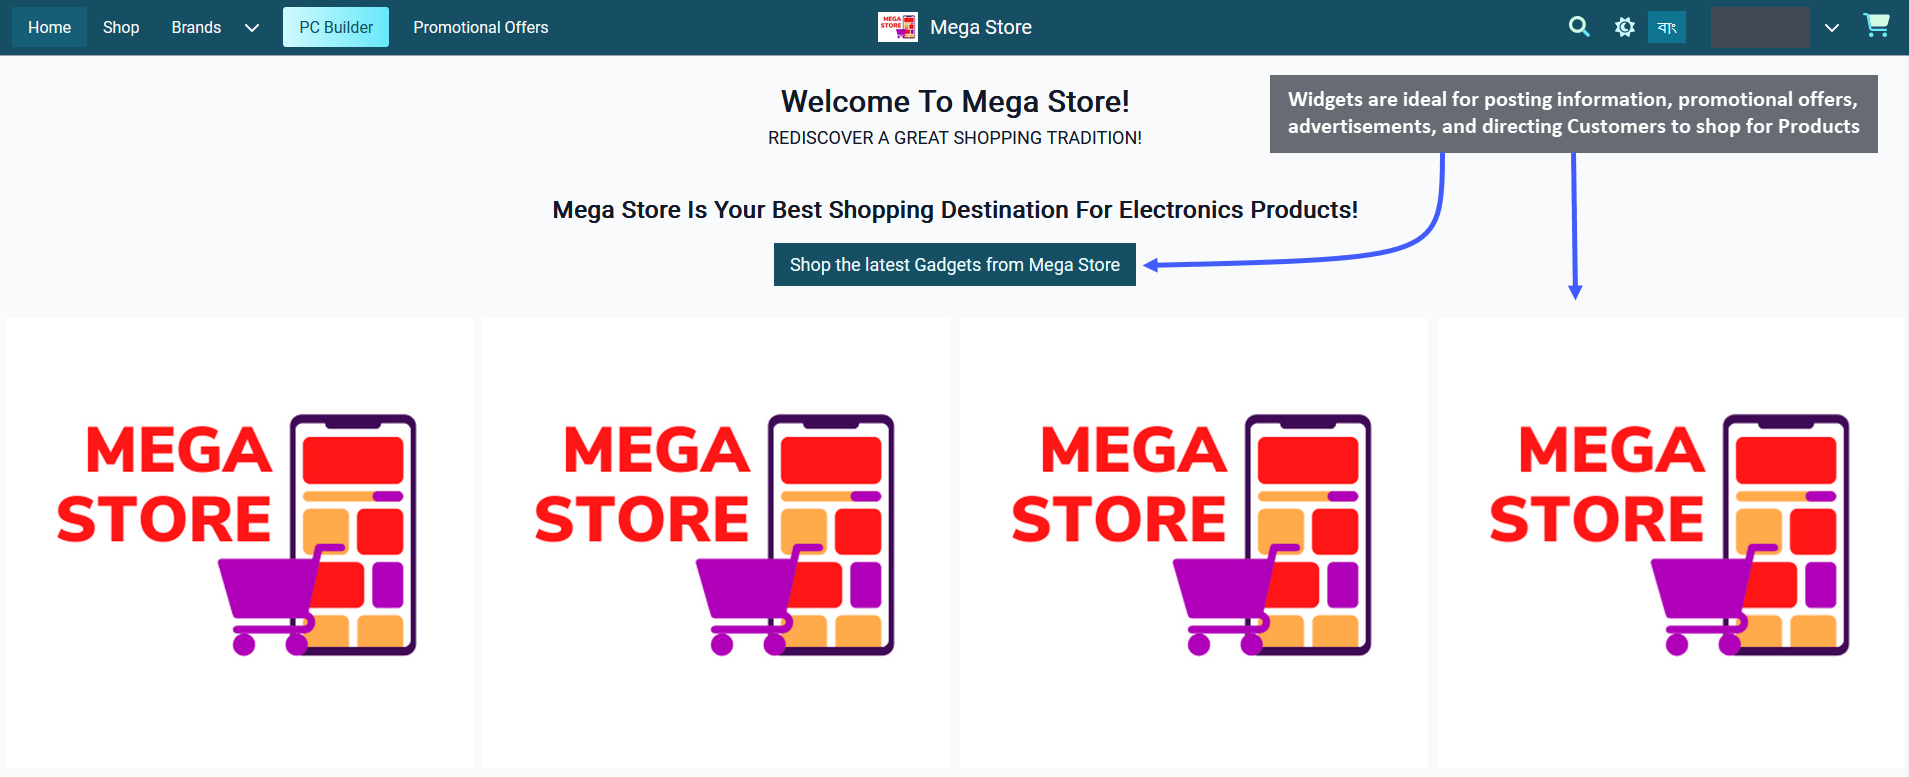
Image 1: Widgets are best for posting offers, advertisements, and directing Customers to shop for Products.
In the Retail Xen CMS, there are five different types of Widgets available: Banner, Product, Category, Text, and Image Widgets. Widgets will add features and functionality to the Shop Owner’s Website. For example, a Banner Widget can introduce the Brand Logo of the Shop, an Image Widget can be used to announce promotional offers or Shop advertisement, a Text Widget can display an introduction about the Shop, a Product Widget can list all the selected Products for sale, and a Category Widget can list all types of pre-defined Product Categories from the system. Each Widget has its own function to promote Products or advertise the Shop, so setup Widgets accordingly on Pages.
Add Widgets on Home Page
Using the CMS, Shop Owners can customize Home Page with Widgets. It will allow them to decide on what should appear in each section of their Home Page. The same type of Widget can be used multiple times on a same page. In the following example, different Widget types have been used with Call to Action buttons to direct Customers.

Image 2: Five different types of Widgets are available: Banner, Product, Category, Text, and Image Widgets.
20.3 - Custom Pages
Create and manage Pages for promoting the Shop and Products on The Website.
Create Custom Pages
Shop Owners can make their own Custom Pages to sell or advertise Products to Customers. Several Custom Pages can be created for different purposes such as welcoming Visitors to the Shop, highlighting promotional offers, or showcasing new Products. Custom Pages can be created as additional Pages on The Website to show promotional offers, limited edition Product pages, or advertisements of new Shop branches etc. A Custom Page include Titles, Subtitles, Texts, Call to Action buttons, images, banners, Products, and hyperlinks within the added Widgets.
Within the Page List, Custom Pages can be accessed from the tab beside Default Pages. The newly created Custom Pages will be under this tab and there is a toggle button to enable or disable the pages. Use View or Edit button to see the Pages updated on the Website or modify them. Add several Widgets on Custom Pages to decorate them.
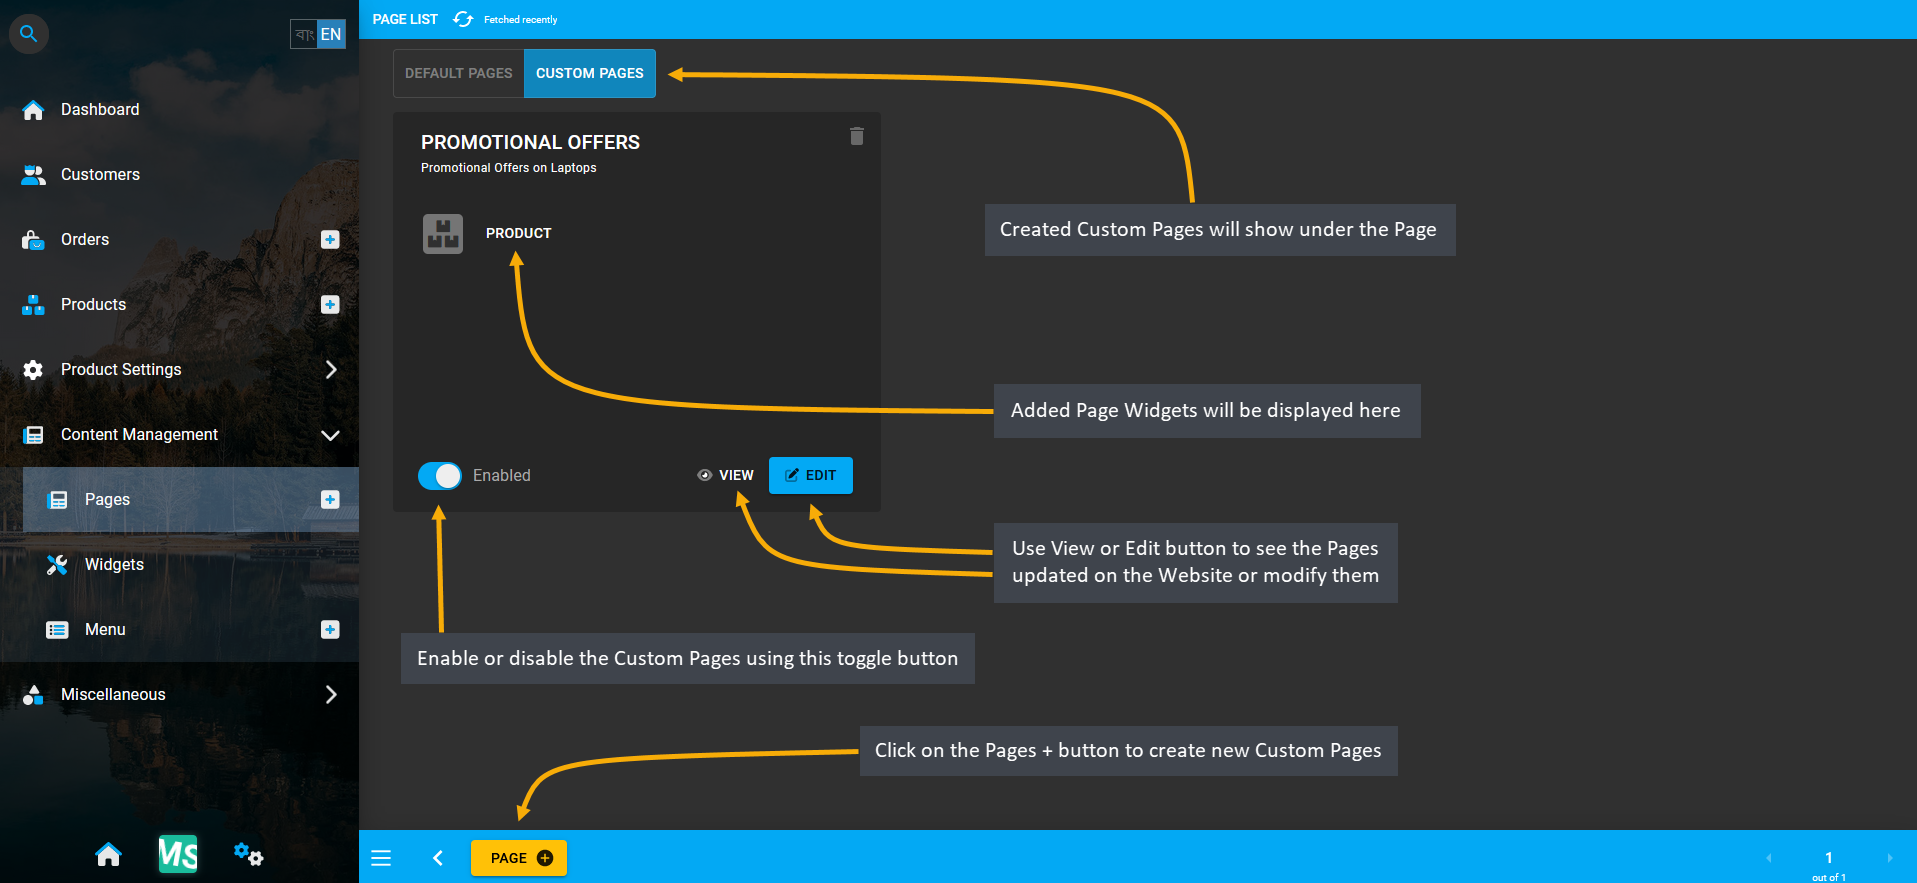
Image 1: Shop Owners can make their own Custom Pages on Website to sell or advertise Products to Customers.
Steps to Create Custom Pages
To create new Custom Pages, click on the New Page or Page button from the Page List. This will redirect to Create Page, where the Custom Page can be built with the following configurations. First, set a Page Name and Slug that will clearly show the function of the Custom Page. Then, create a Title and Subtitle that will give the Customers an idea about what to look for in the Custom Page. To display or hide the Title and Subtitle, there is a toggle button which can be enabled or disabled to display or hide the Title or Subtitle on the Custom Page.
To highlight the promotional offers on laptops, for instance, add a Product Widget and create Widget name, title, and subtitle. Enable and use the Call to Action button within the Widget to redirect Customers to Shop’s Laptop page. Select a Category within the Product Widget and select the max quantities of Products to display within it.
Several Widgets can be added to customize the Page like this. Existing Widgets will show from the top to bottom and below it, there will be an Add New Widget button using which New Widgets can be added to the Custom Page. At the bottom of the page, there is an Advanced Options to set Refresh Frequency for automatic page refreshing.
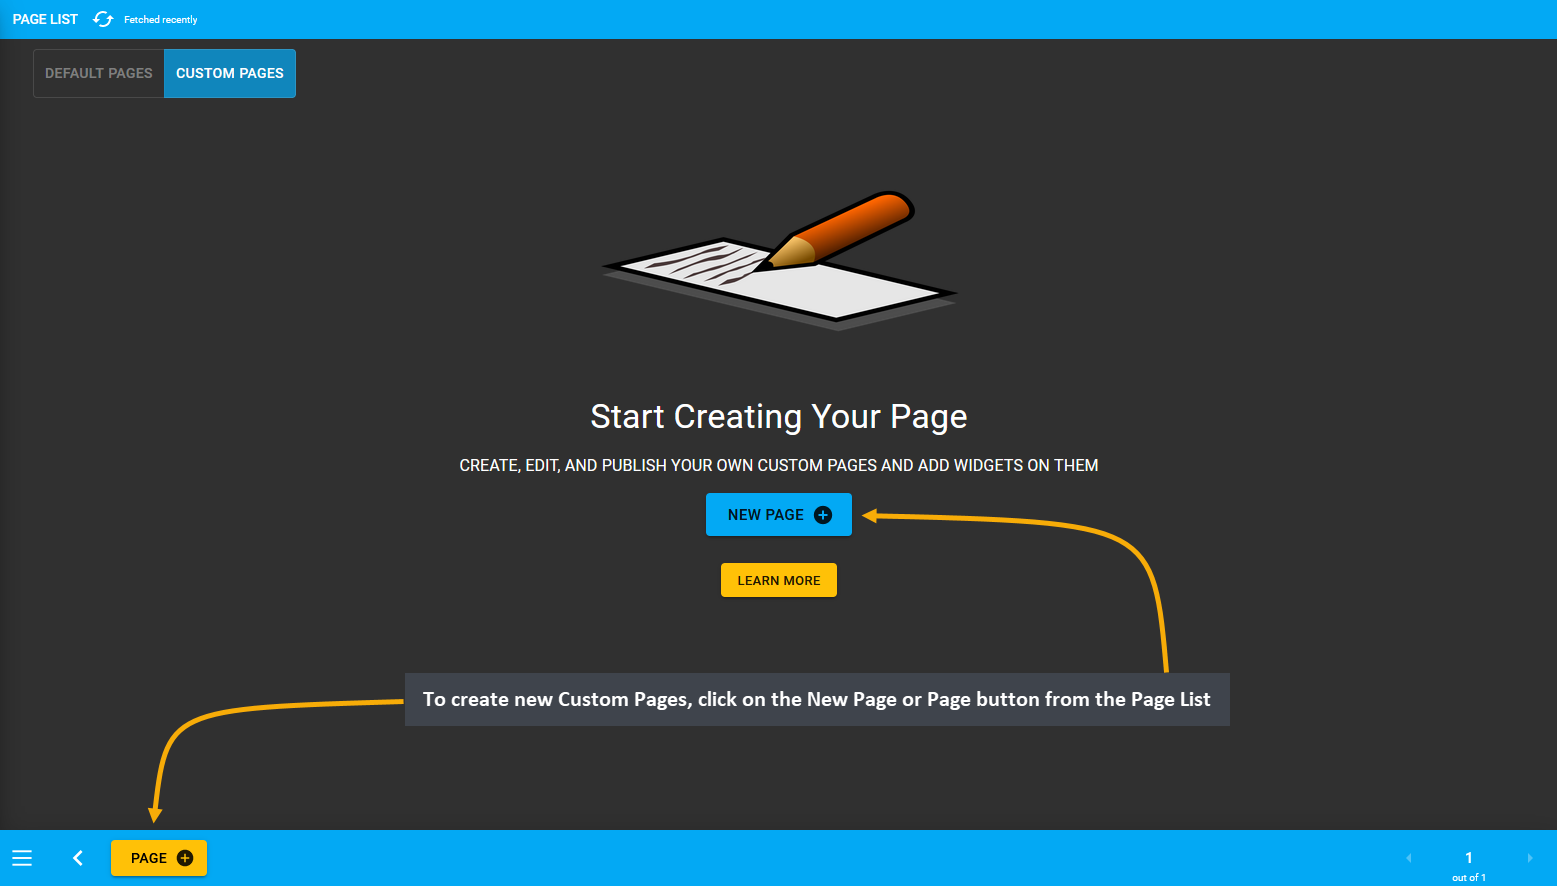
Image 2: Create New Custom Pages by clicking the New Page or Page button that will redirect to Create Page.
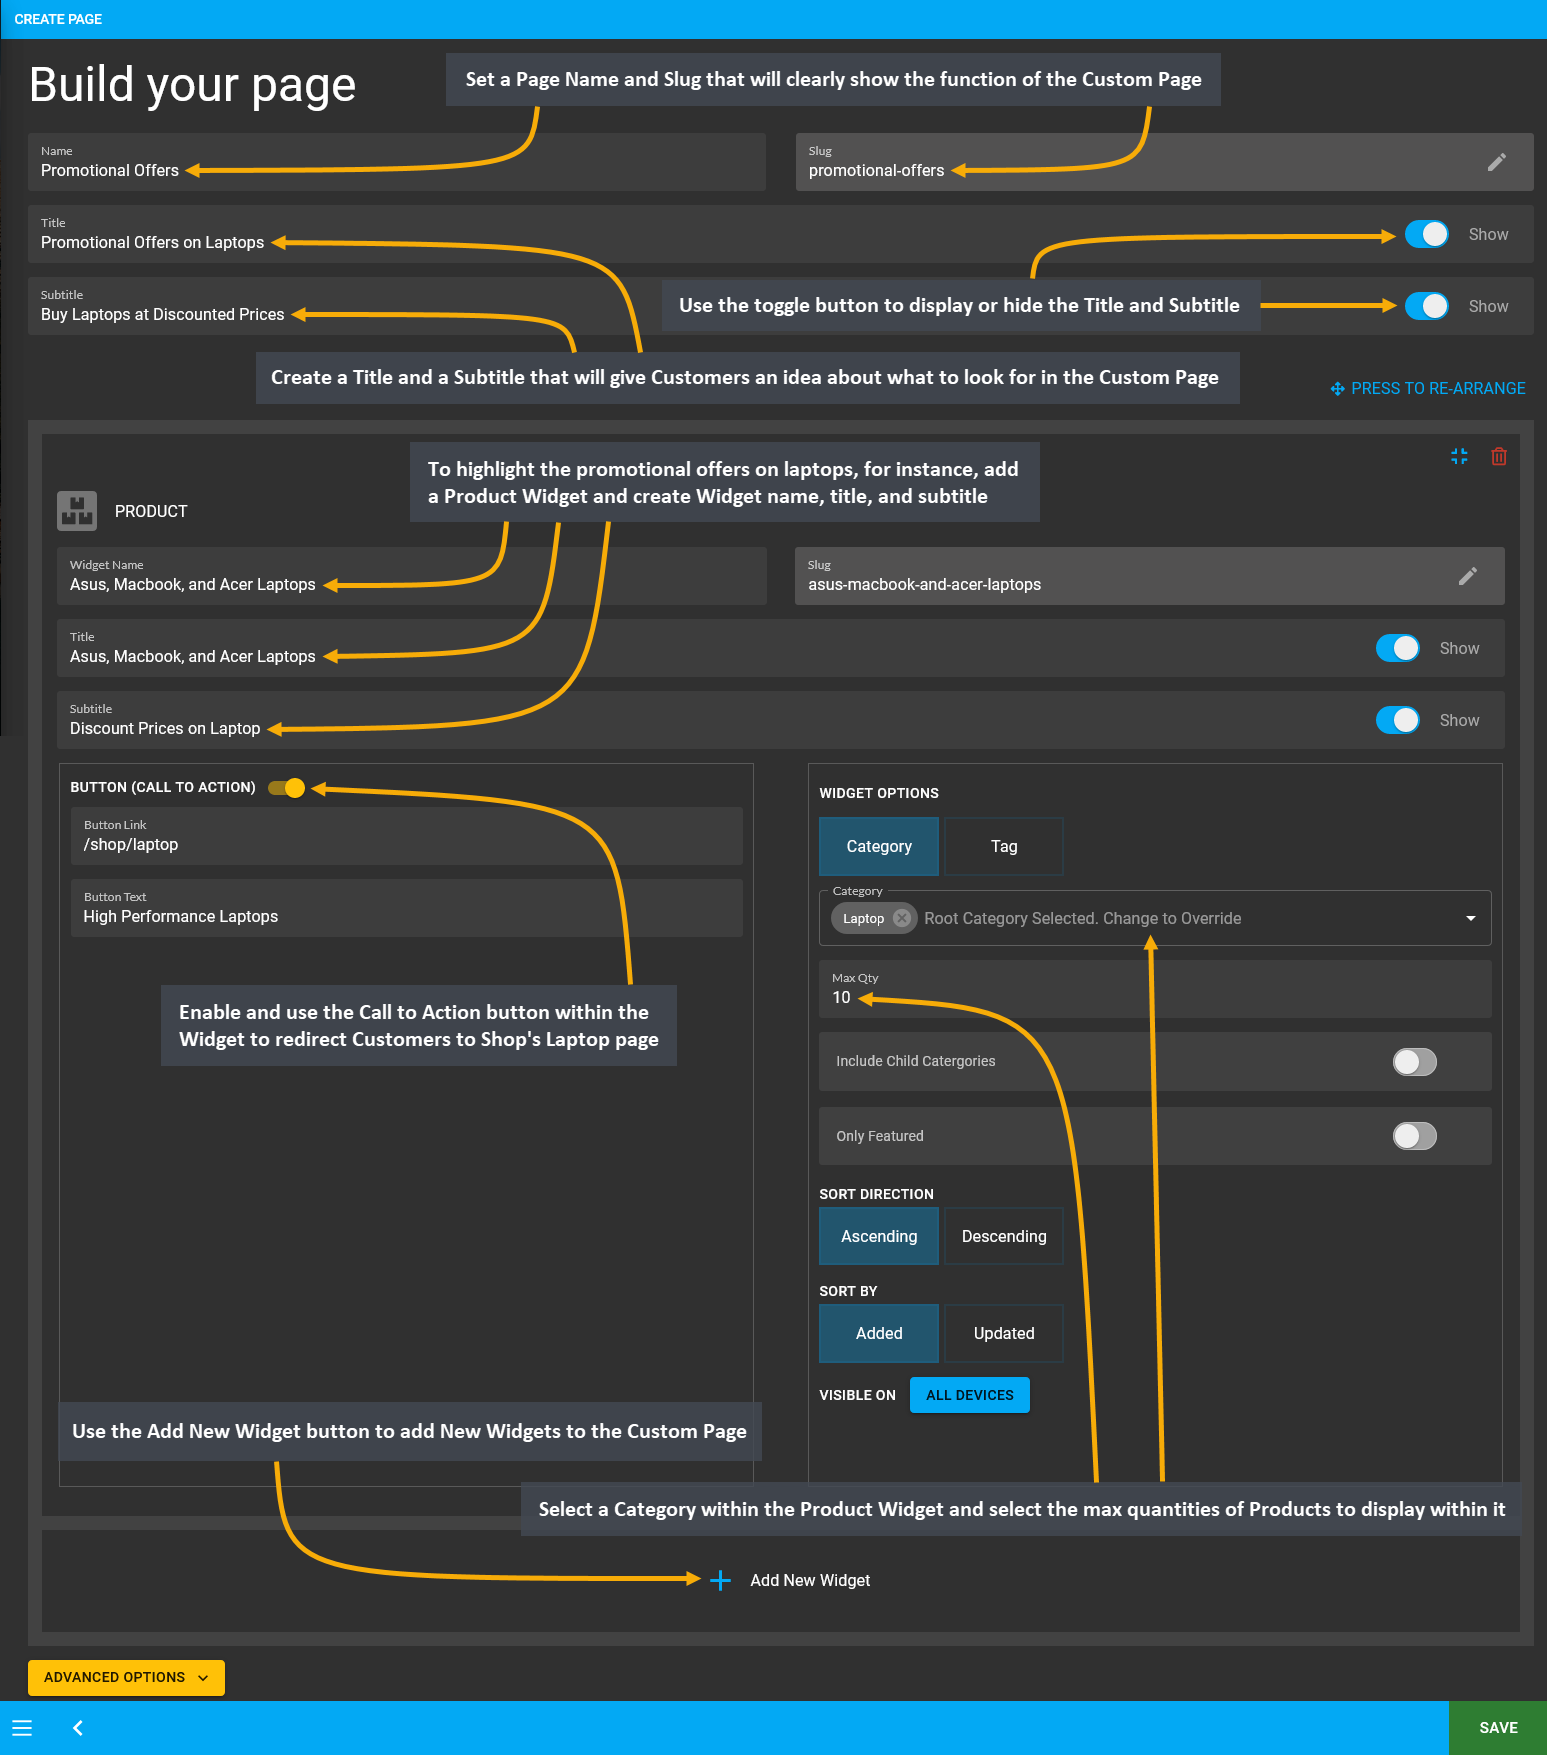
Image 3: Setup Custom Page with Title, Subtitle, and Widgets that will highlight what the Page is about.
When all the customization is done for the Custom Page, click Save to proceed with the changes. After saving the changes, a pop-up message will show with a View button to check the new Custom Page created, click on it. This will redirect to the Custom Page that was created with necessary Widgets. To make the Custom Page accessible on the Website, add the Custom Page under the Menu within the Website Header using the Menu module.
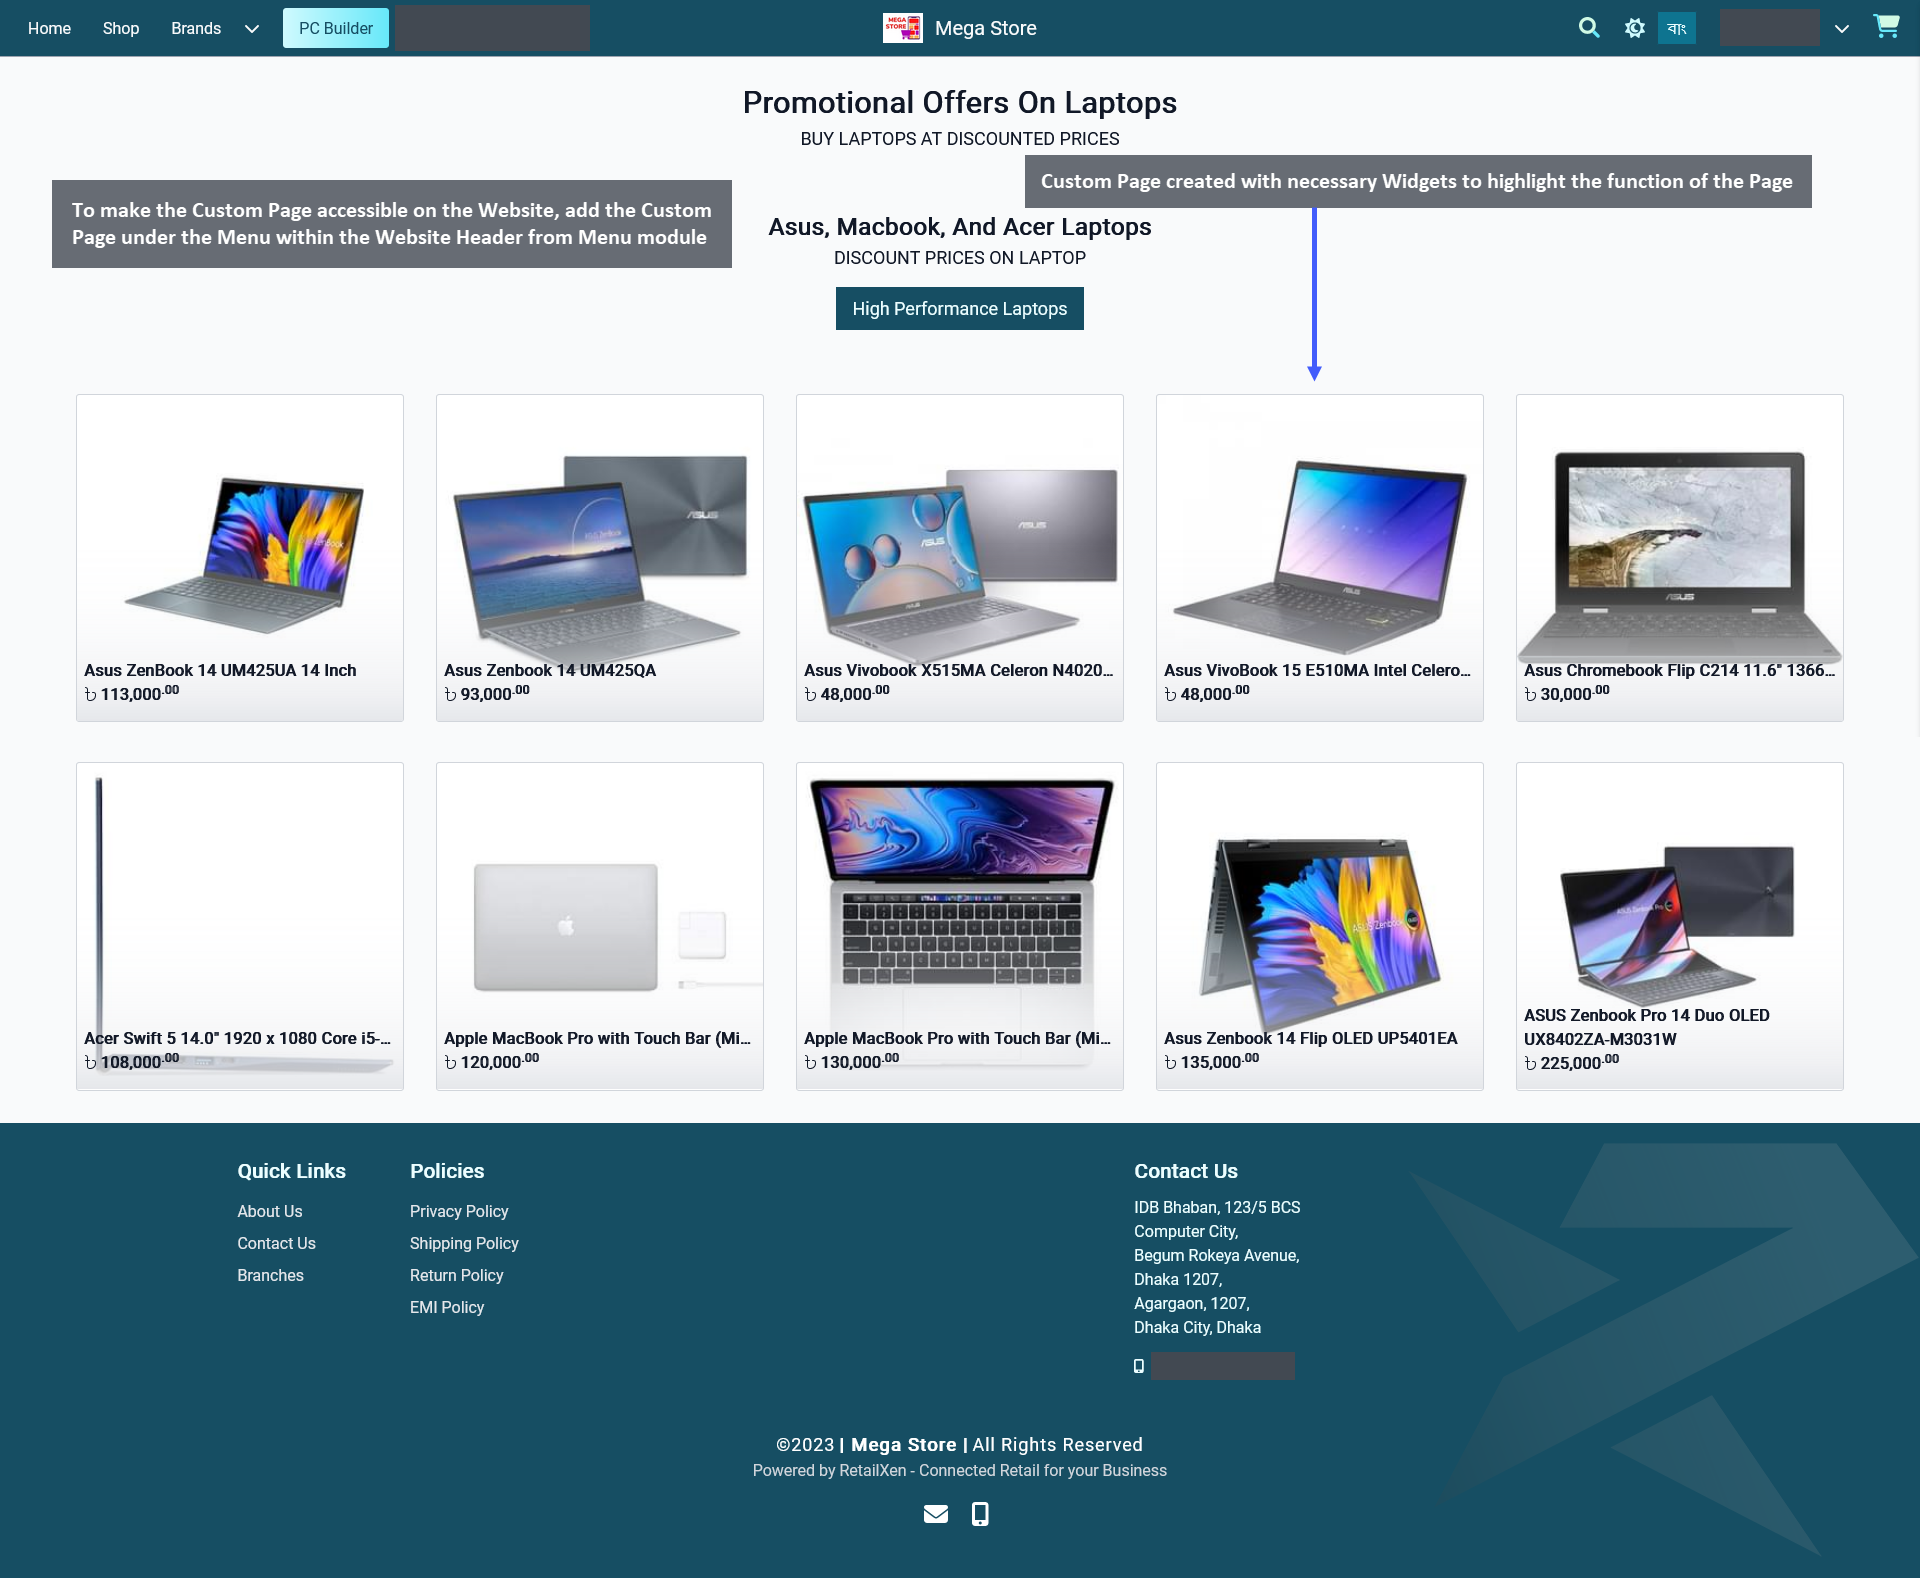
Image 4: To make Custom Page accessible on the Website, add the Page under the Menu within Website Header.
Create a Custom Page Menu on the Website Header for the page to be accessible on the Website. To perform this action, go to the Menu module from Content Management. Here, click the Edit icon on Default Header (Commerce). Using this option, Shop Owners can create Menu within Default Header and display the Custom Page created.
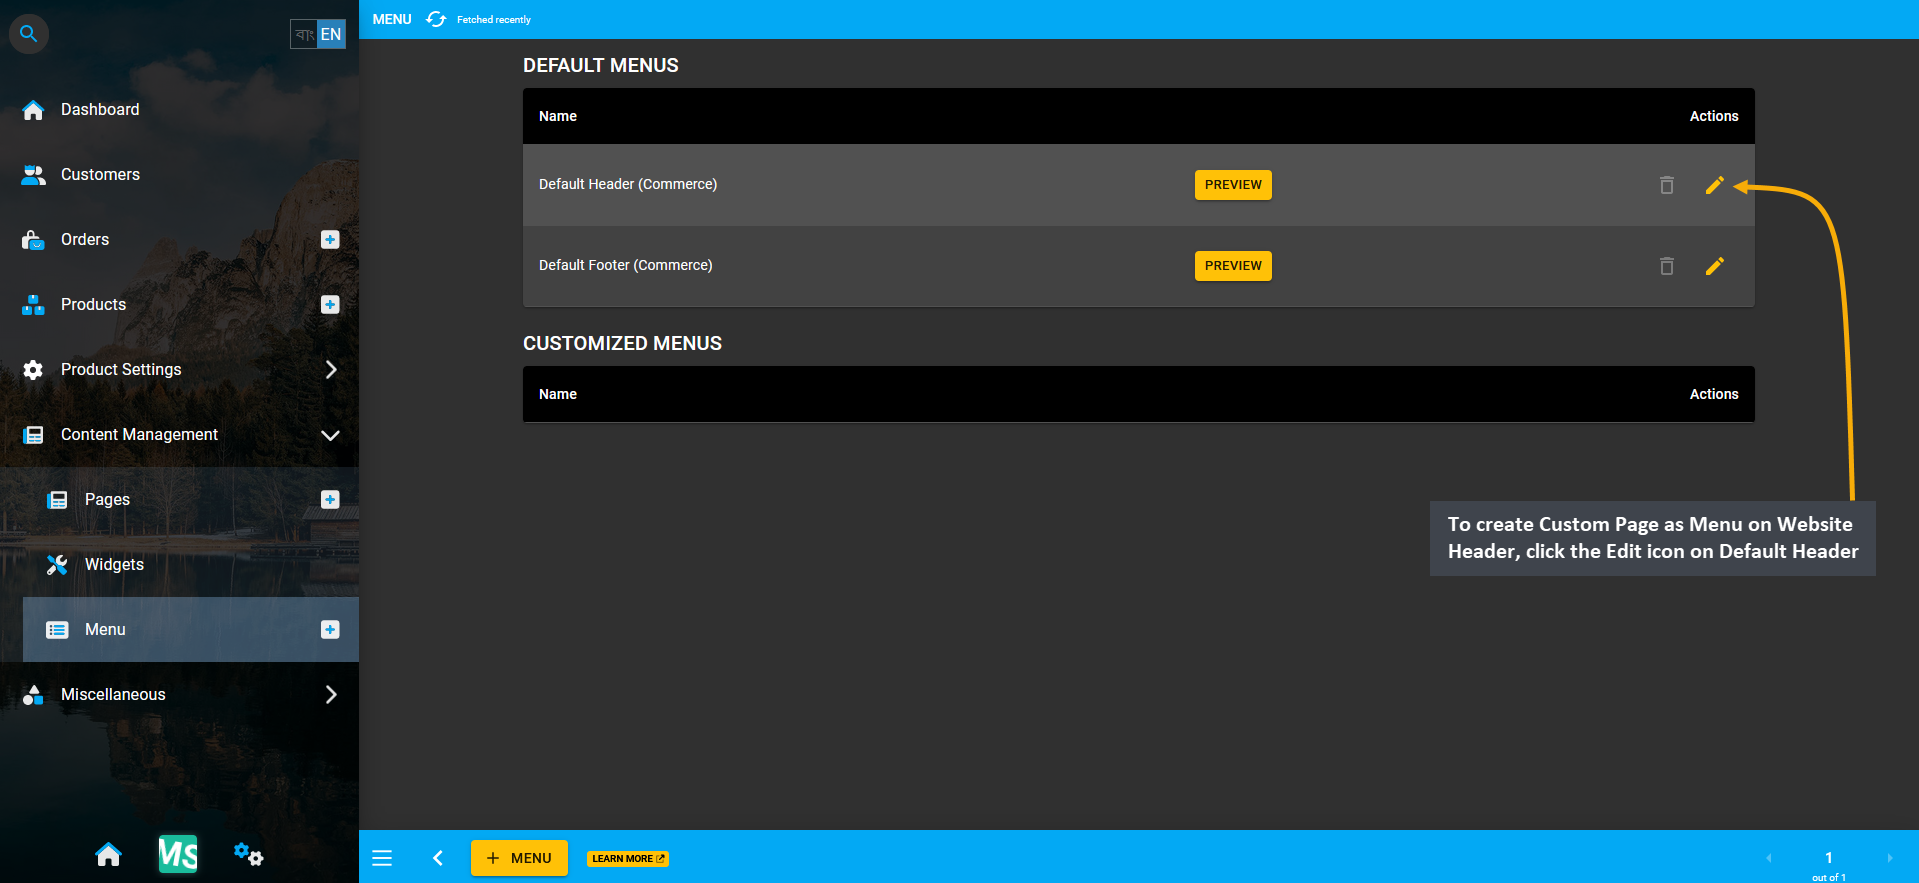
Image 5: To create Custom Page as Menu on Website Header, click the Edit icon on Default Header (Commerce).
From the Default Header (Commerce) menu, click the ADD button from Link (Custom) to create new menu for the Custom Page. Clicking ADD button will allow Shop Owner to create a Menu for Custom Page on Website Header.
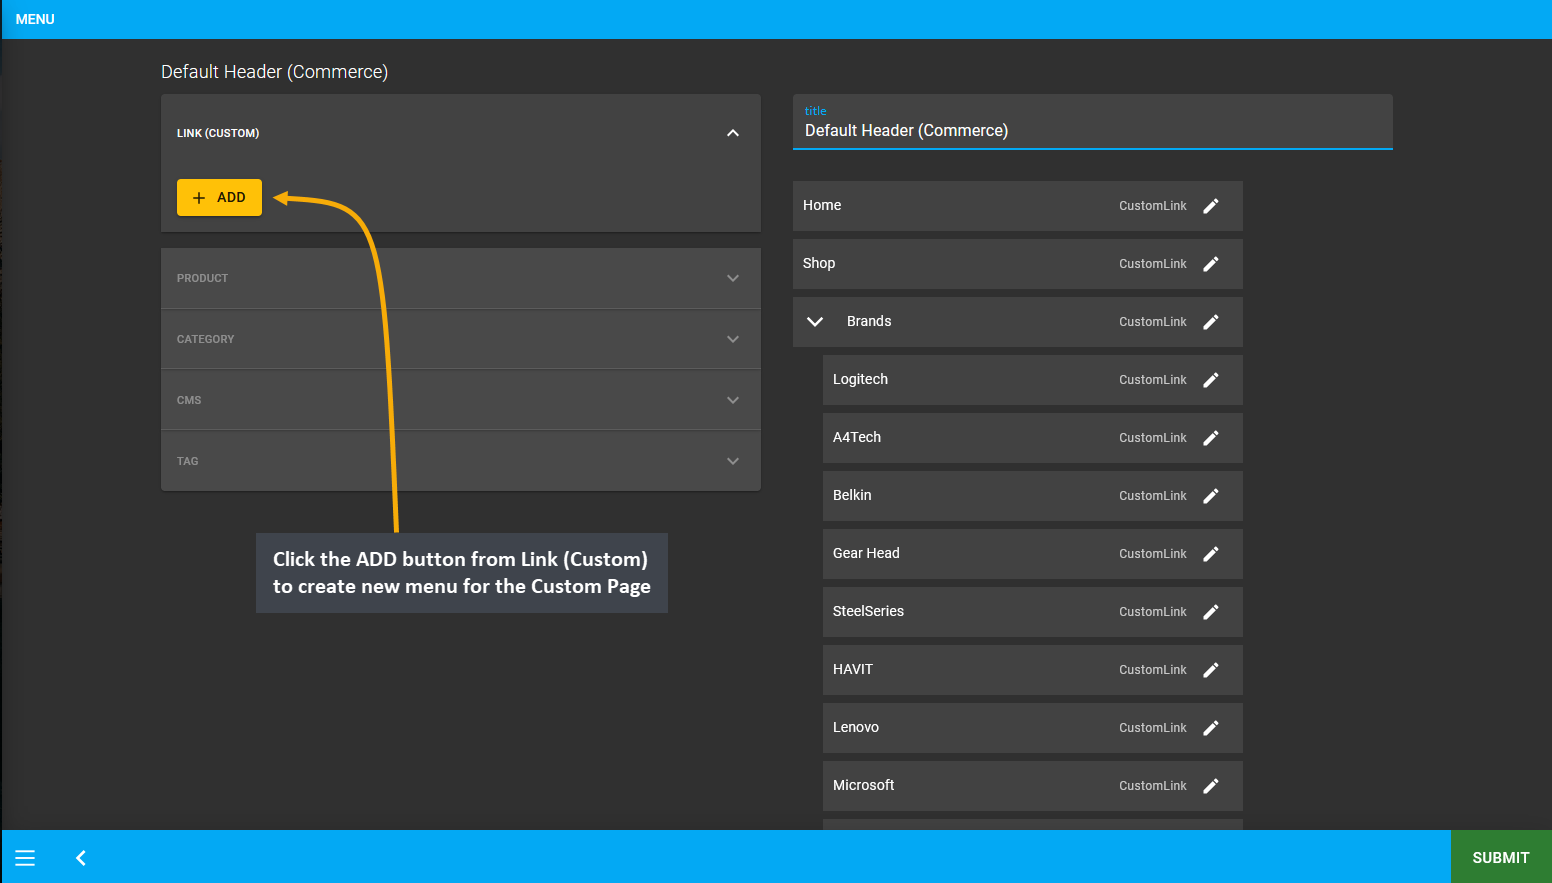
Image 6: Click the ADD button from Link (Custom) to create new menu for the Custom Page for Website Header.
When the New Menu is created, it will appear under the List of menus within the Default Header (Commerce). Now, to change Menu Name to the Custom Page Name and add the Custom Page Link on the menu, click the Edit icon.
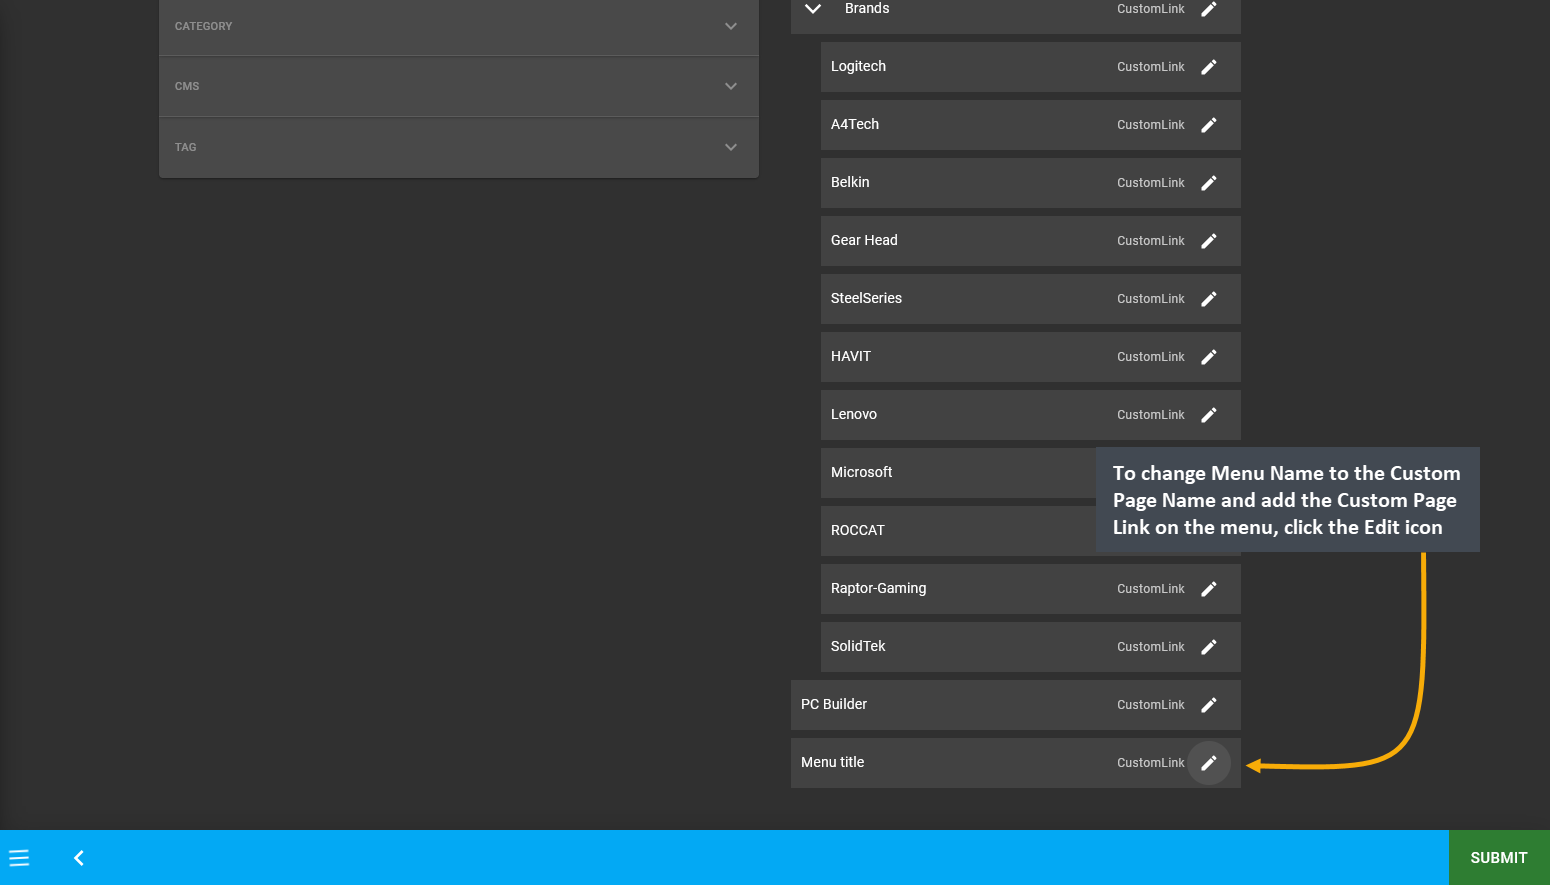
Image 7: To change Menu Name to Custom Page Name and add Custom Page Link on the menu, click the Edit icon.
After creating the New Menu, click its Edit button and a pop-up will appear to edit the details of the menu. When the New Menu is created, name its Title as Promotional Offers similar to the Custom Page name. To activate the Custom Page Menu, copy the Relative Link from Website and click Update button to create Custom Page’s Menu.
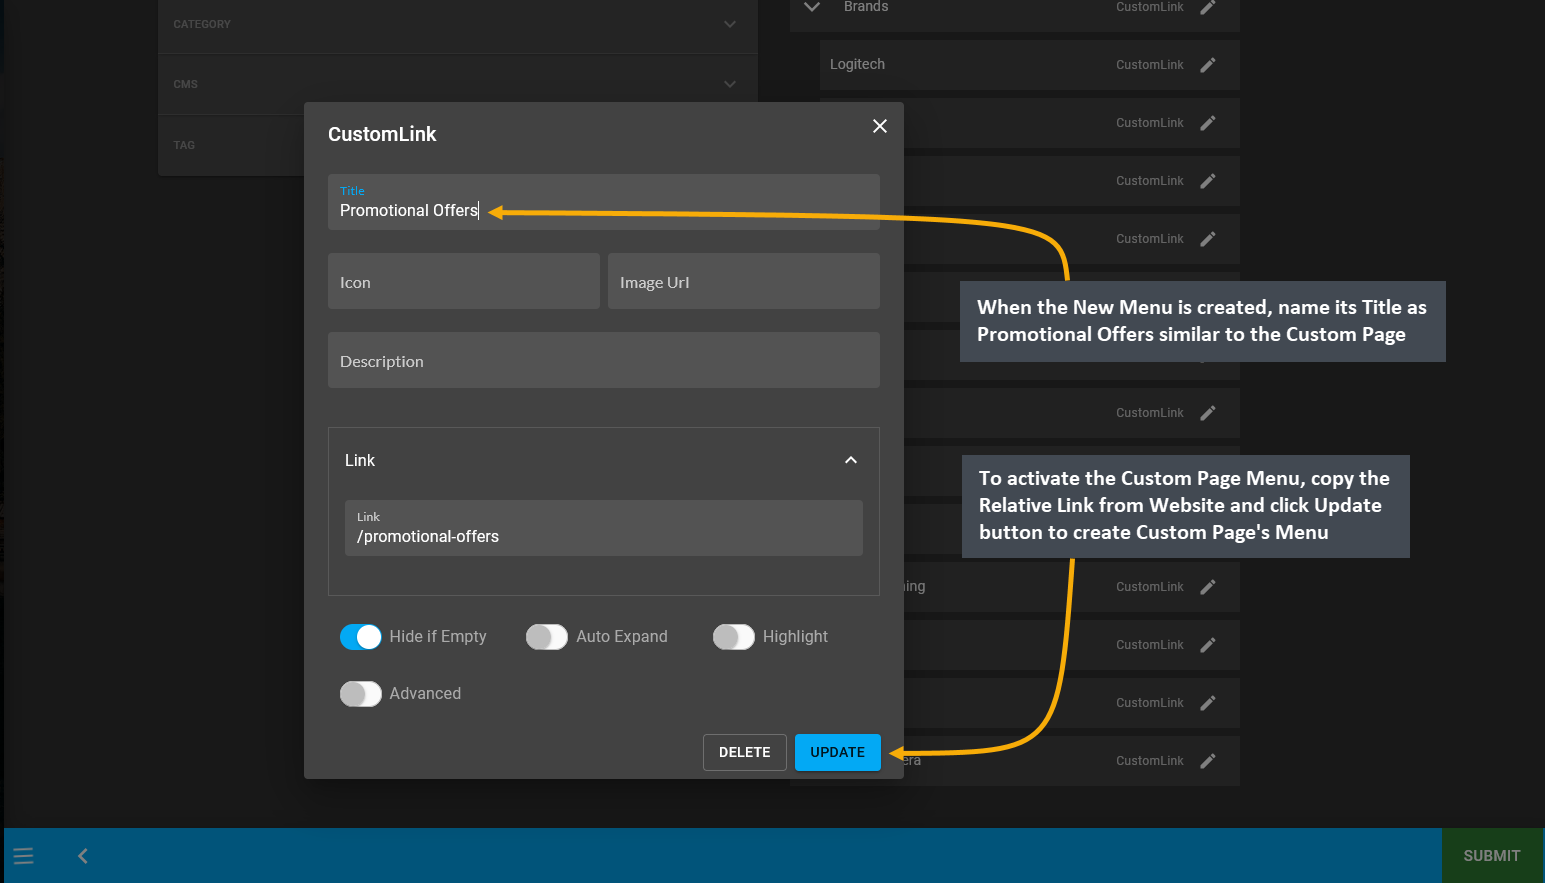
Image 8: Edit the Custom Page Menu by clicking the Edit button and name the Title and the Link on pop-up.
The newly created Custom Page Menu will now show at the bottom of the Default Header (Commerce) menu list.
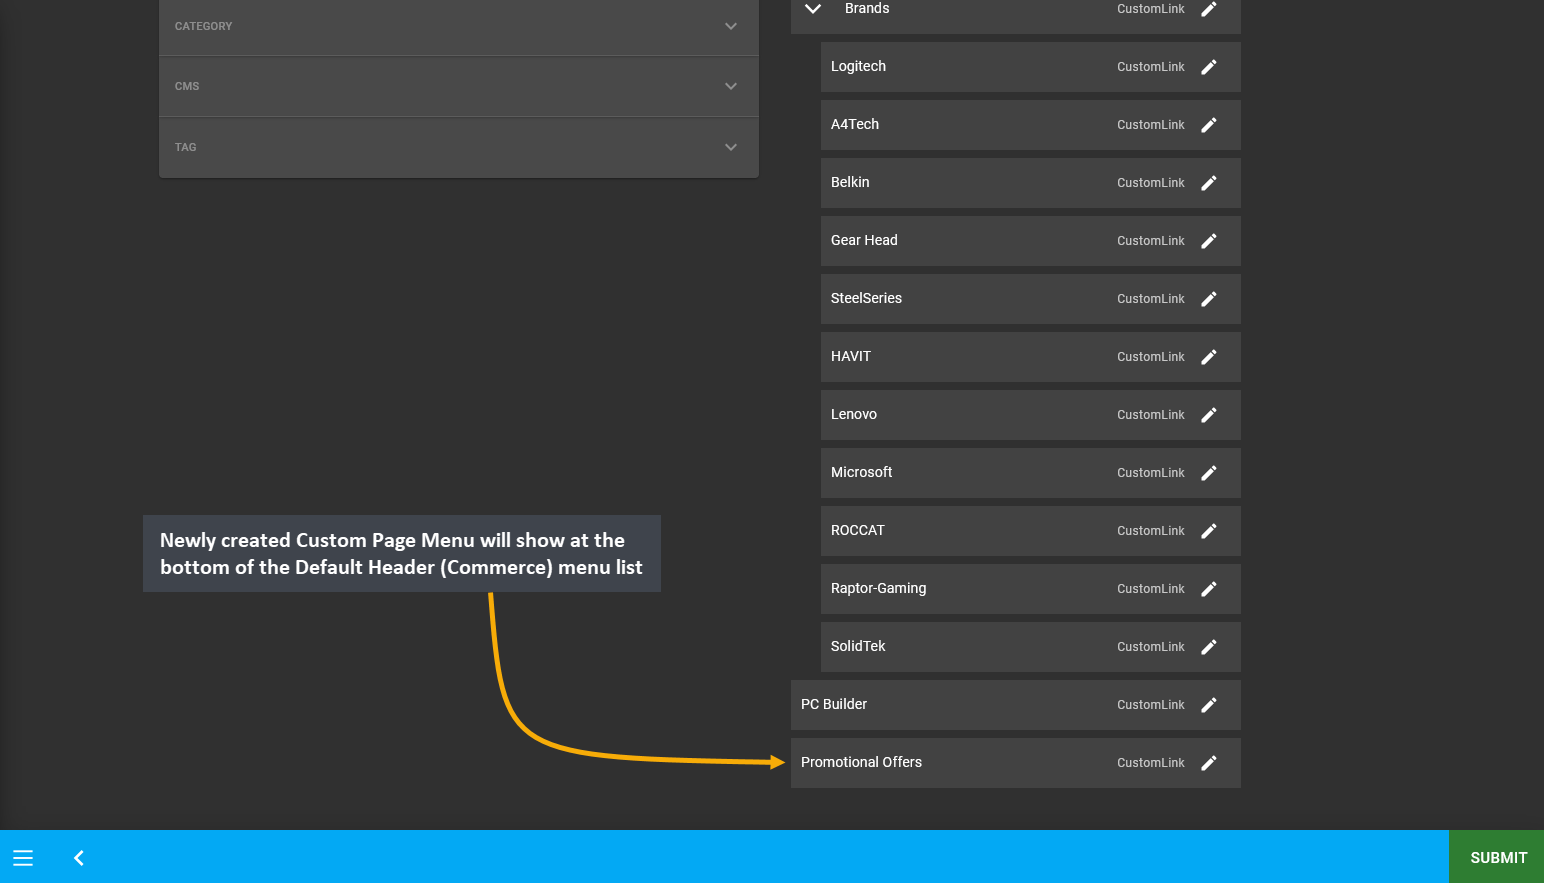
Image 9: Newly created Custom Page Menu will show at the bottom of the Default Header (Commerce) menu list.
Retrieving the Relative Link from the Custom Page on Website can be done in a few simple steps. First, try to Edit the Custom Page from Page List and click Save which will show a pop-up with a VIEW button to check the updated Custom Page. So, clicking the VIEW button will open the Custom Page on Website and they will have a URL address which can be accessed from the Browser’s URL search bar. Copy Relative Link /promotional-offers from the whole URL https://mega-store.retailxen.dev/promotional-offers and paste it within Link field on Custom Page Menu.
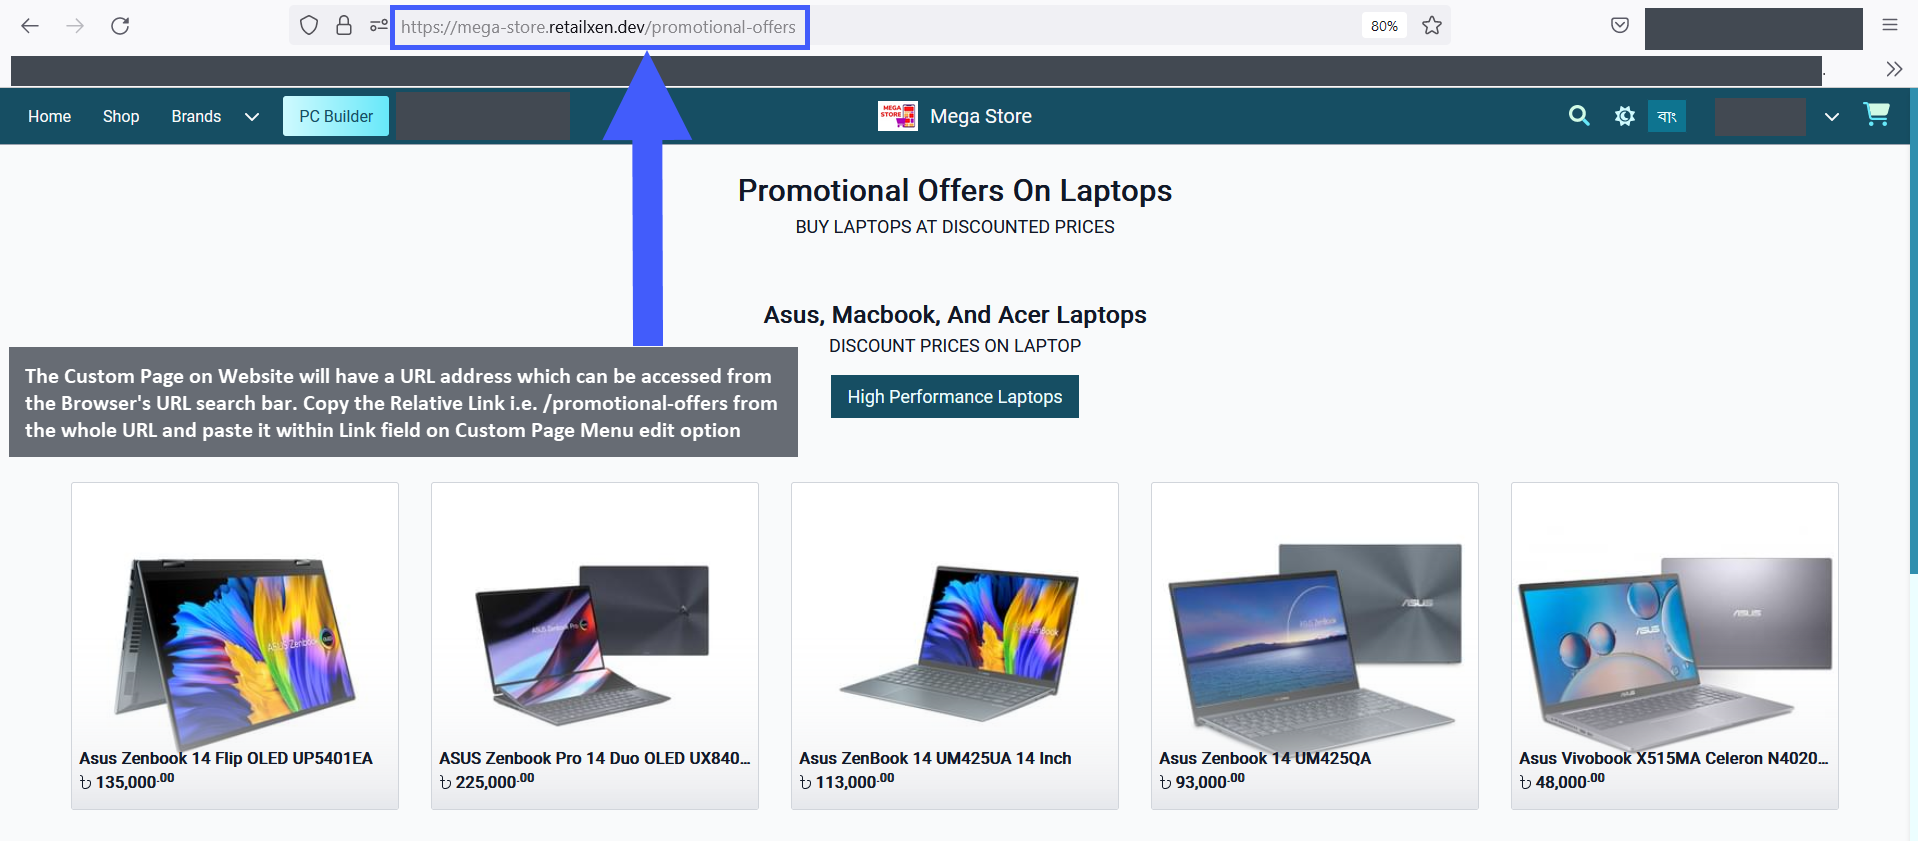
Image 10: Copy Relative Link from Browser's URL search bar and paste it within Link field on Menu Edit.
Therefore, simply copying and pasting the Relative Link within the Link field on Custom Page Menu’s editing pop-up window will activate the Custom Page Menu on the Website Header, click Update to complete the process.
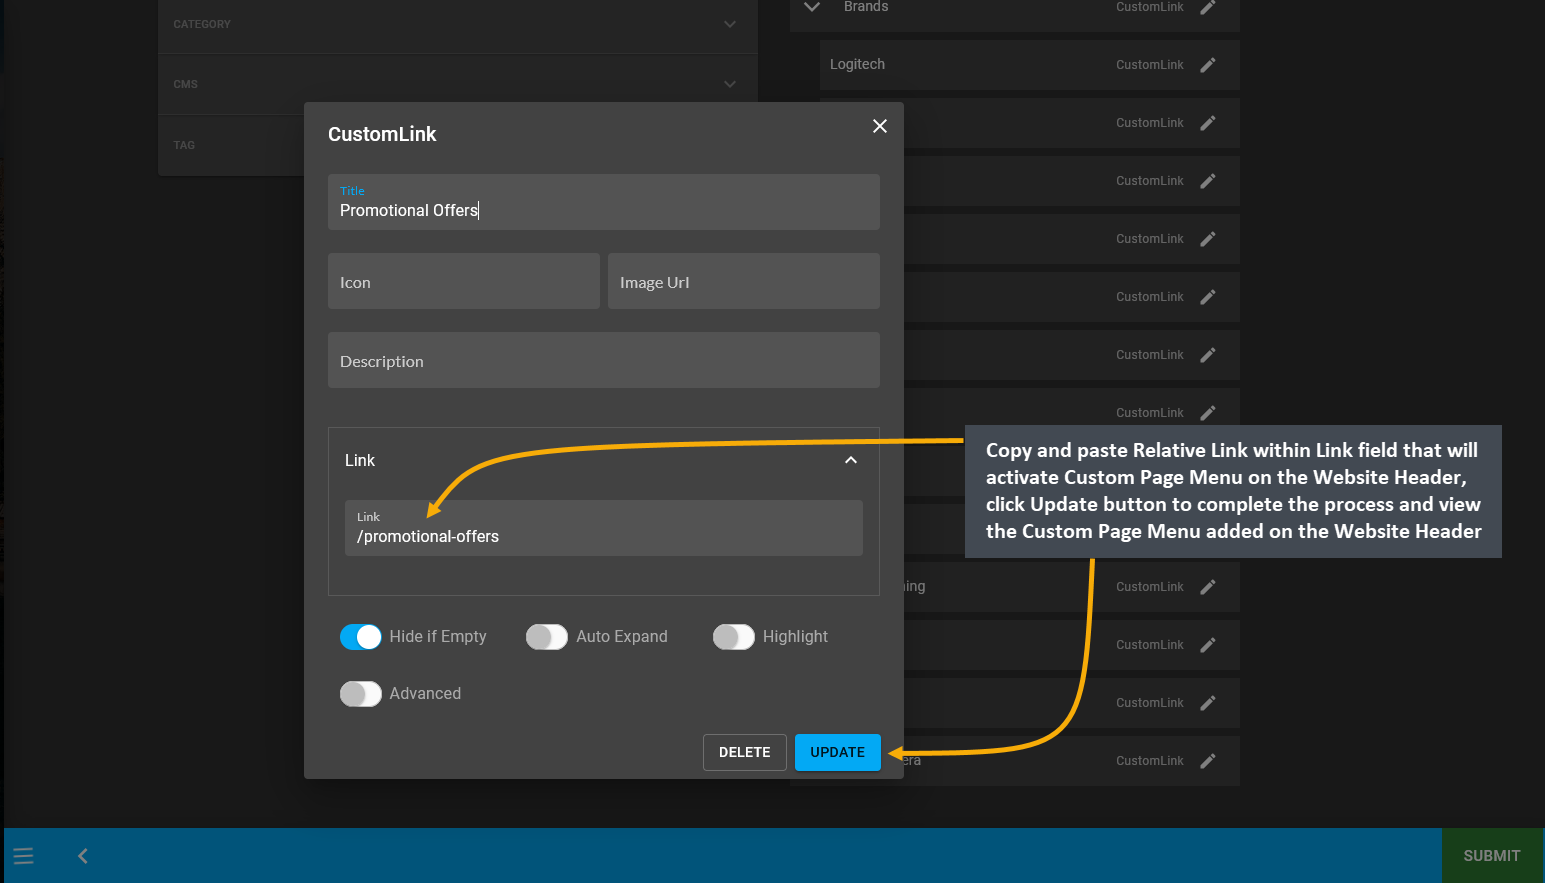
Image 11: Copy-paste Relative Link within Link field that will activate Custom Page Menu on Website Header.
After creating the Custom Page Menu and assigning the Relative Link within the menu, the created Custom Page will be visible and accessible on the Website Header. So, Shop Owner can add more Custom Pages on Website like this.
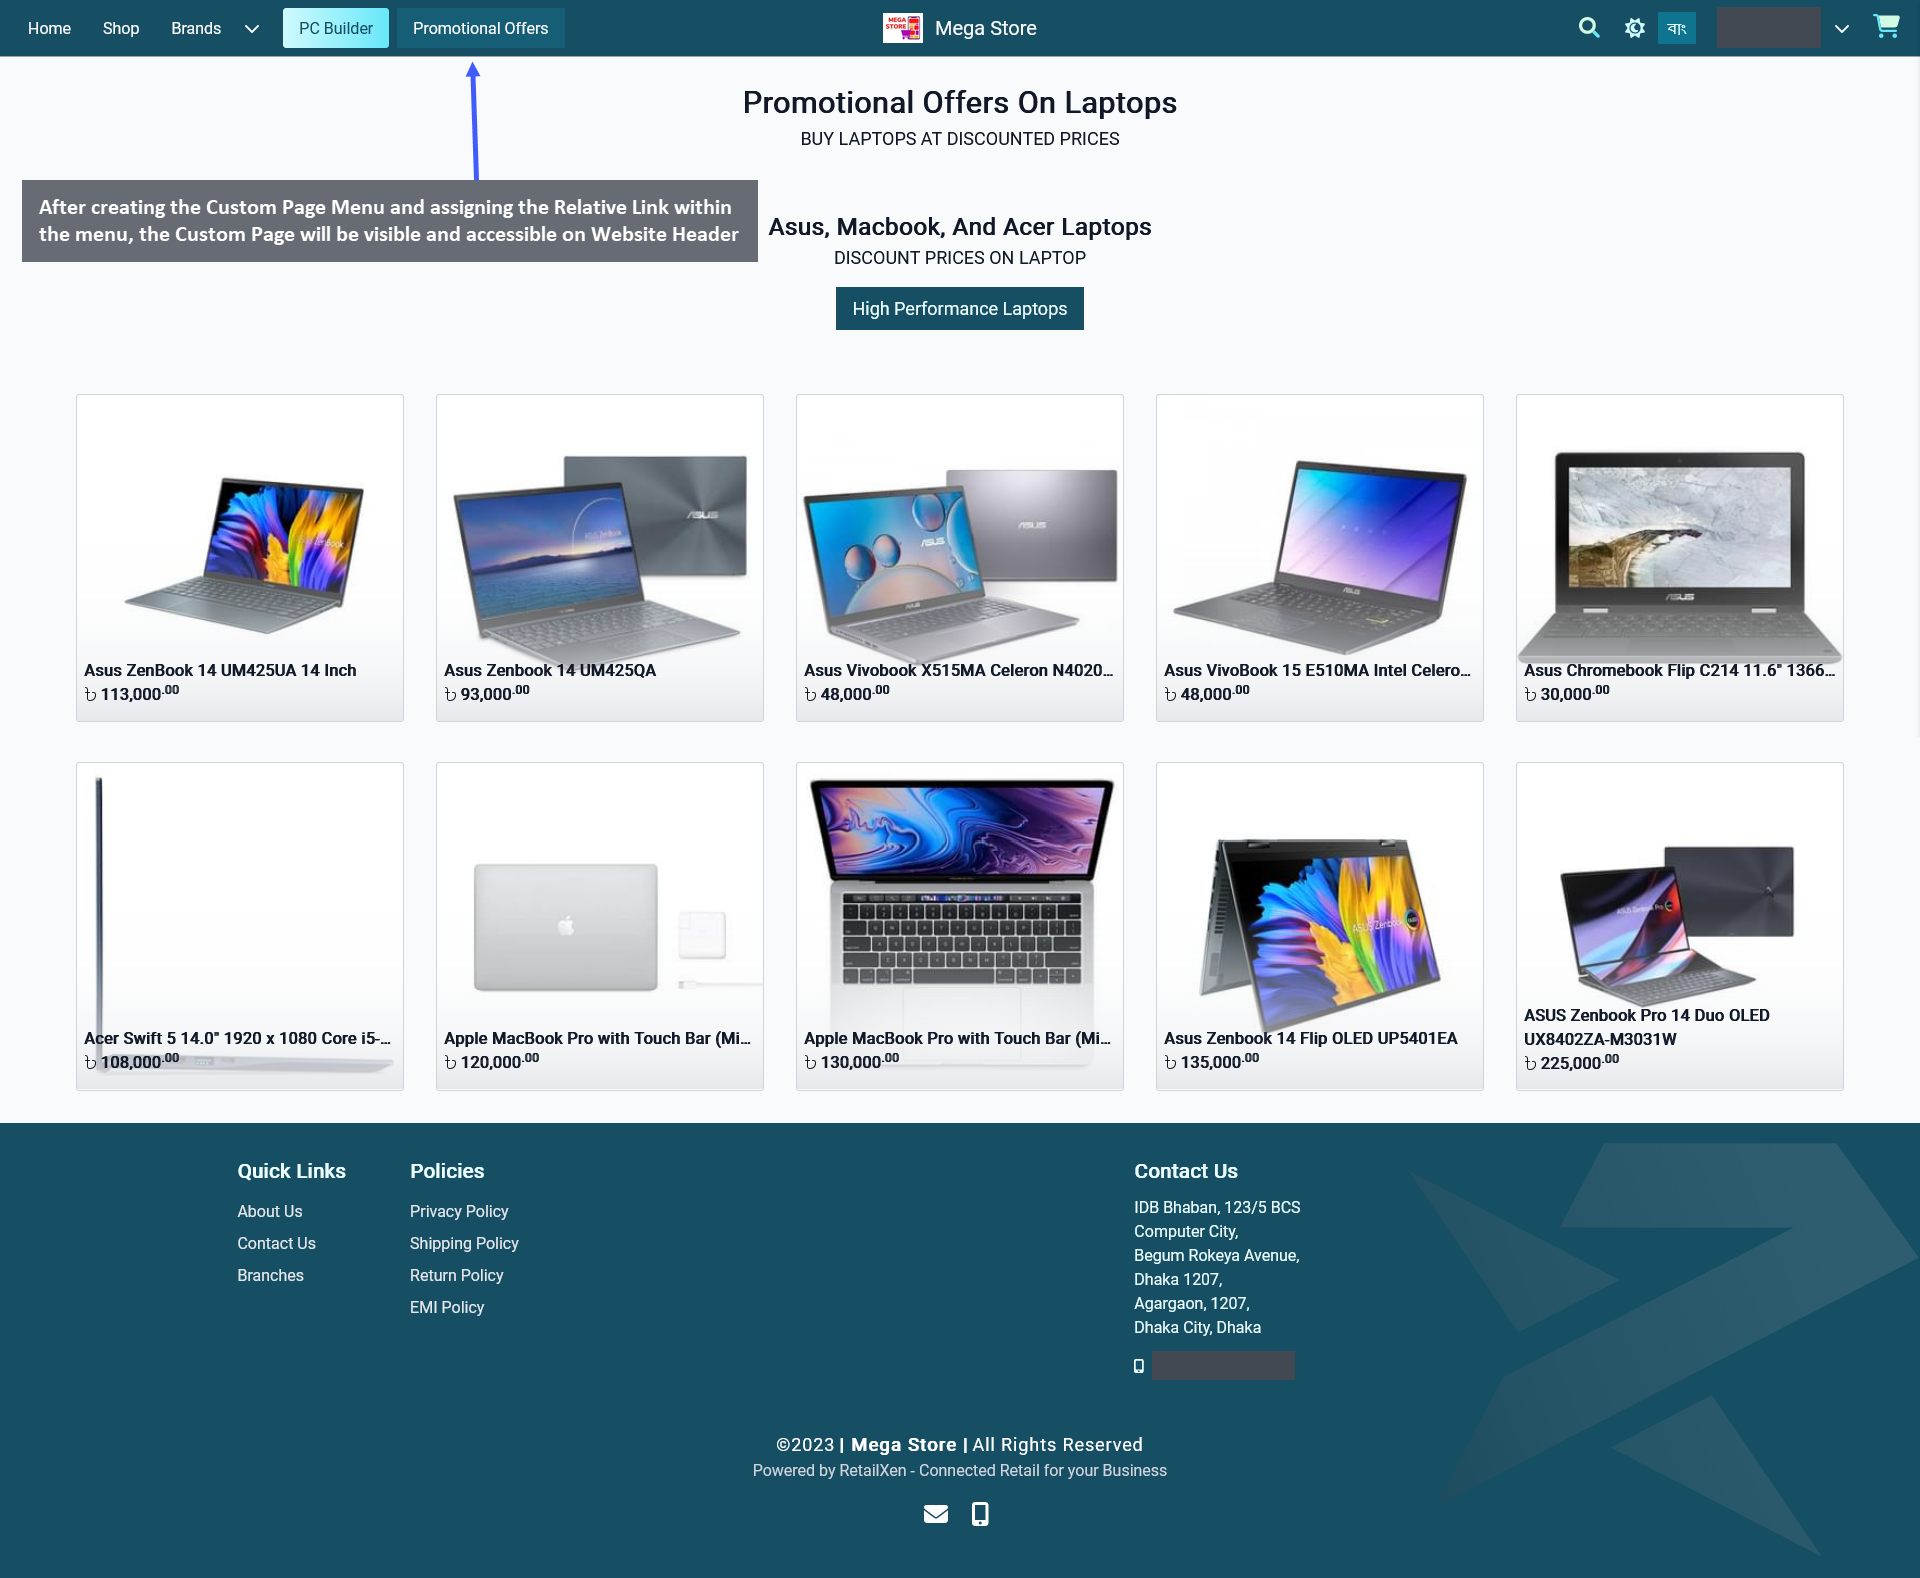
Image 12: Custom Page will be visible on the Website after assigning Relative Link within Custom Page Menu.
Add New Widgets to Page
To add New Widgets to a Page, click on the Add New Widget Button which will redirect to a new pop-up containing the Default Elements. Default Elements include five Widget Blocks types - Banner Widget, Product Widget, Category Widget, Text Widget, and Image Widget which can be individually selected by clicking on each one of these blocks.
Therefore, click on each of Widget Block types to add them as New Widgets for the Page. There is another tab that contains the Library Elements which are existing Widgets already created beforehand by the Shop Owner. Library Elements can be added instantly as Widgets to a Page. They were already created before from the Widgets menu.
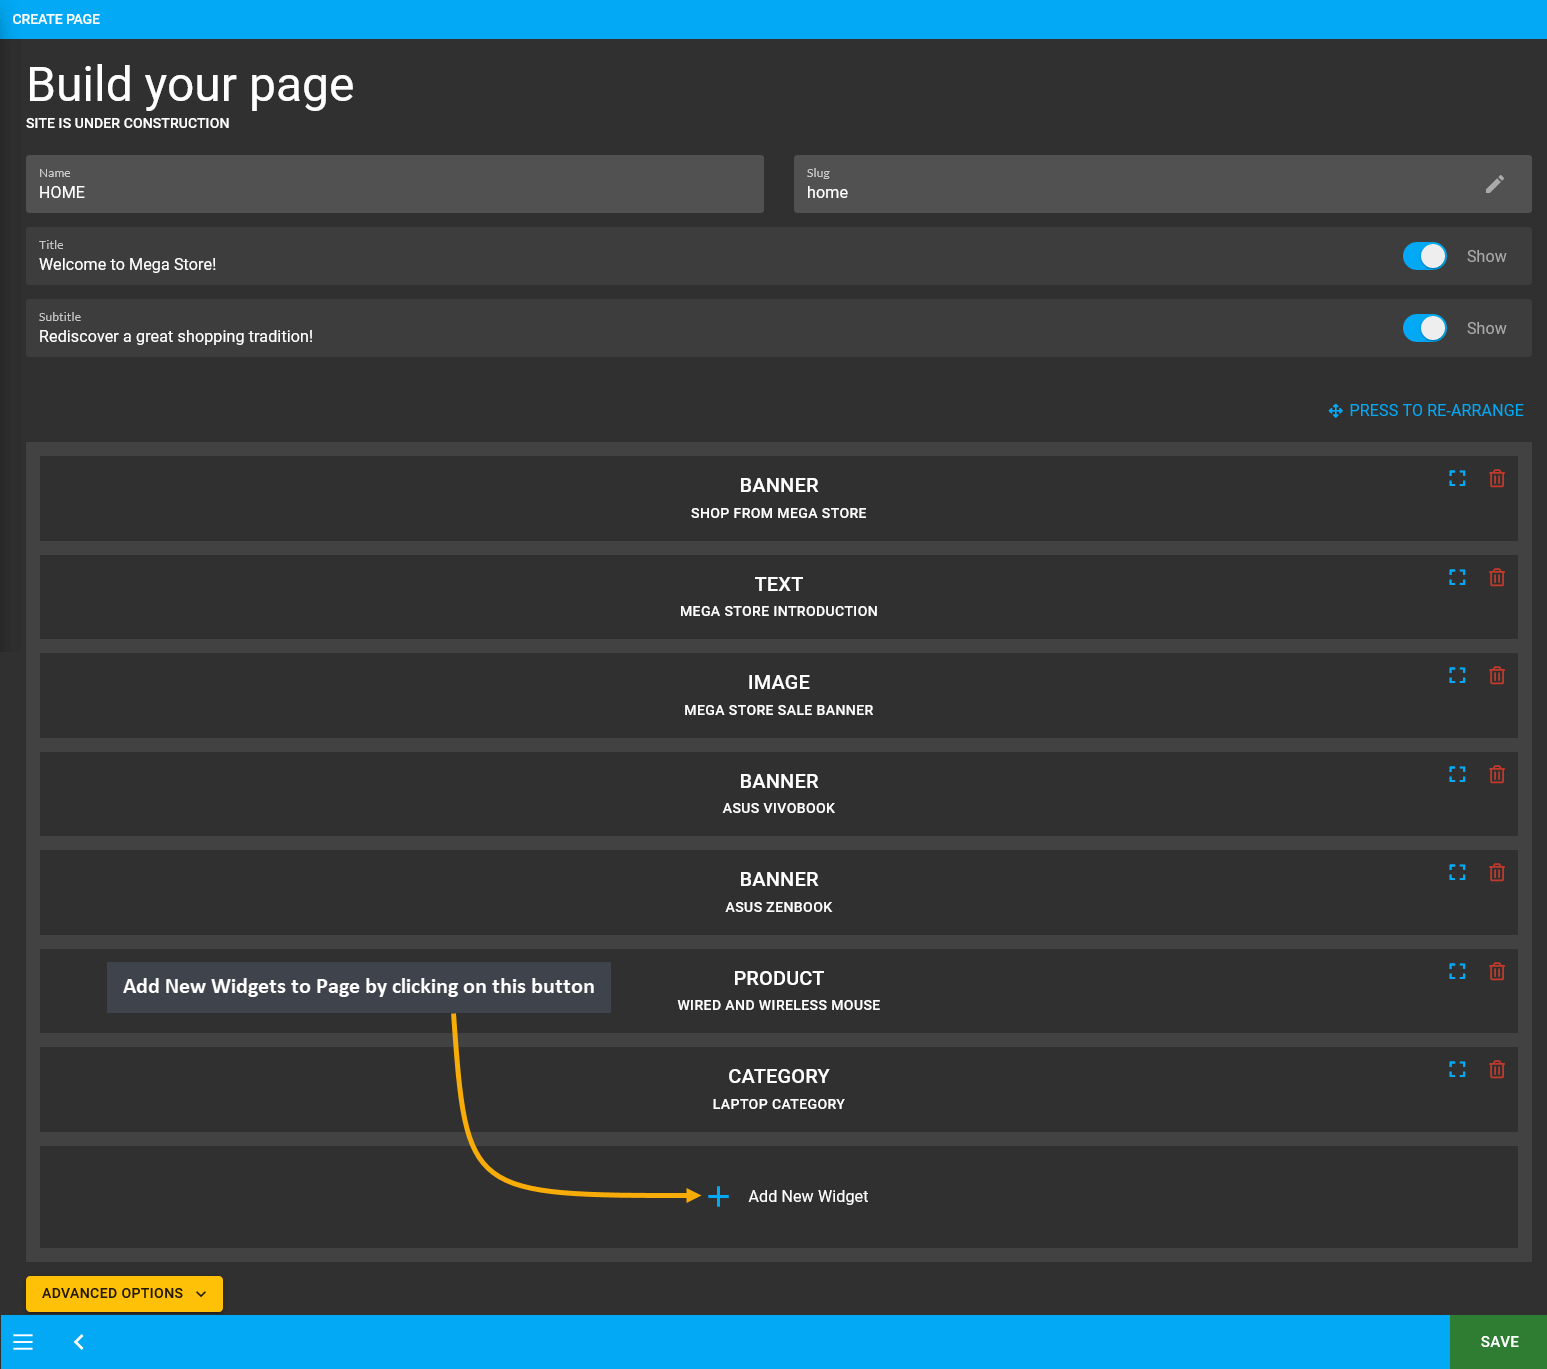
Image 13: Add New Widgets to Page by clicking on the Add New Widget button from the bottom on the page.
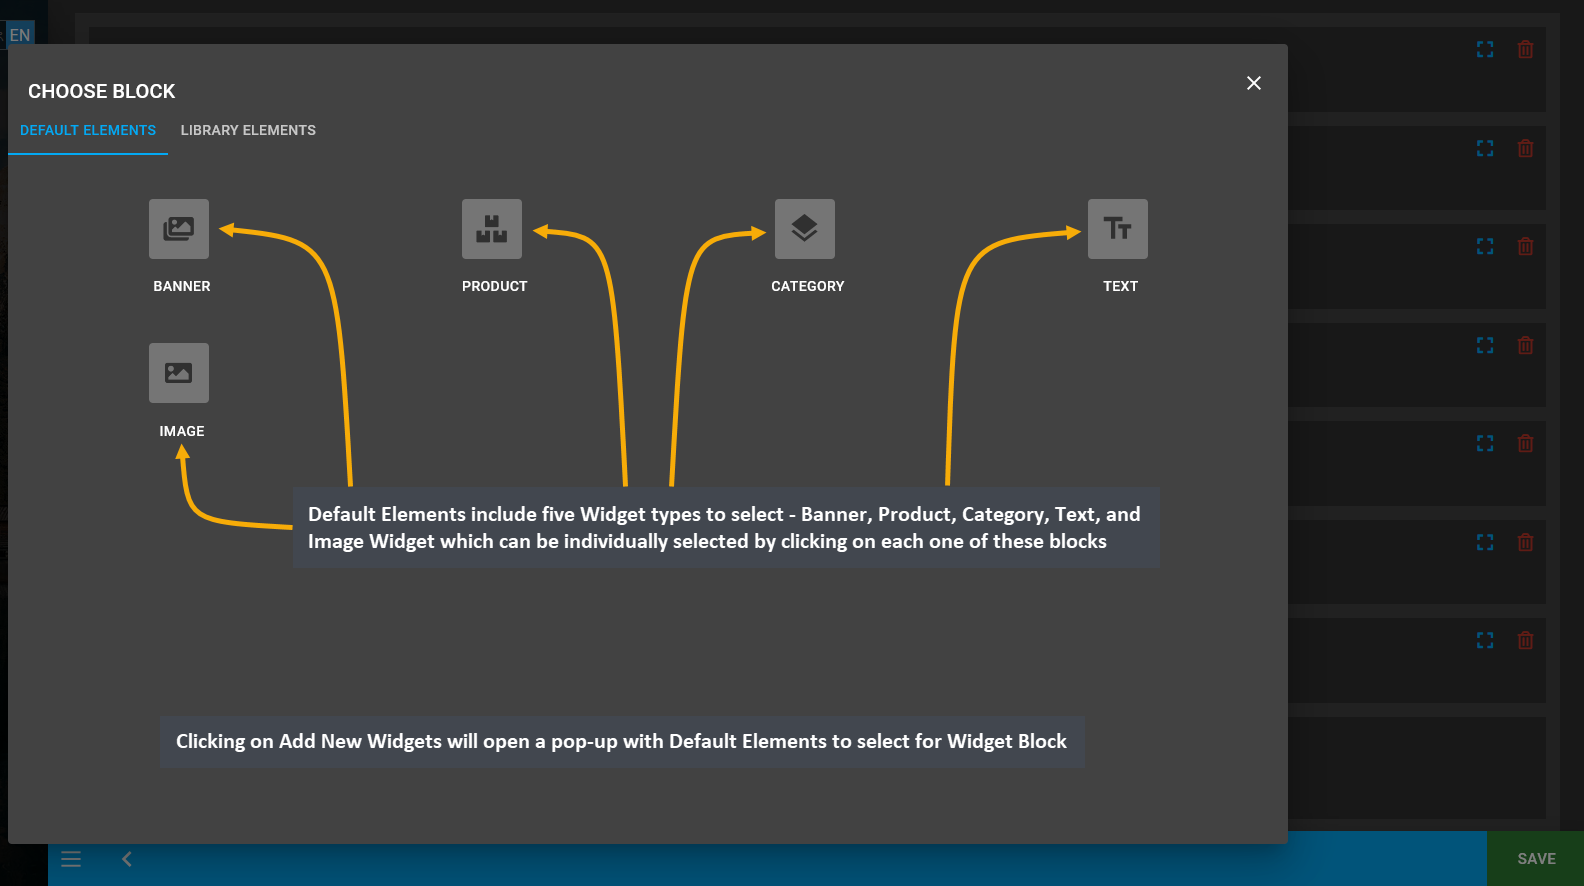
Image 14: Clicking on Add New Widgets will open a pop-up with Default Elements to select for Widget Block.
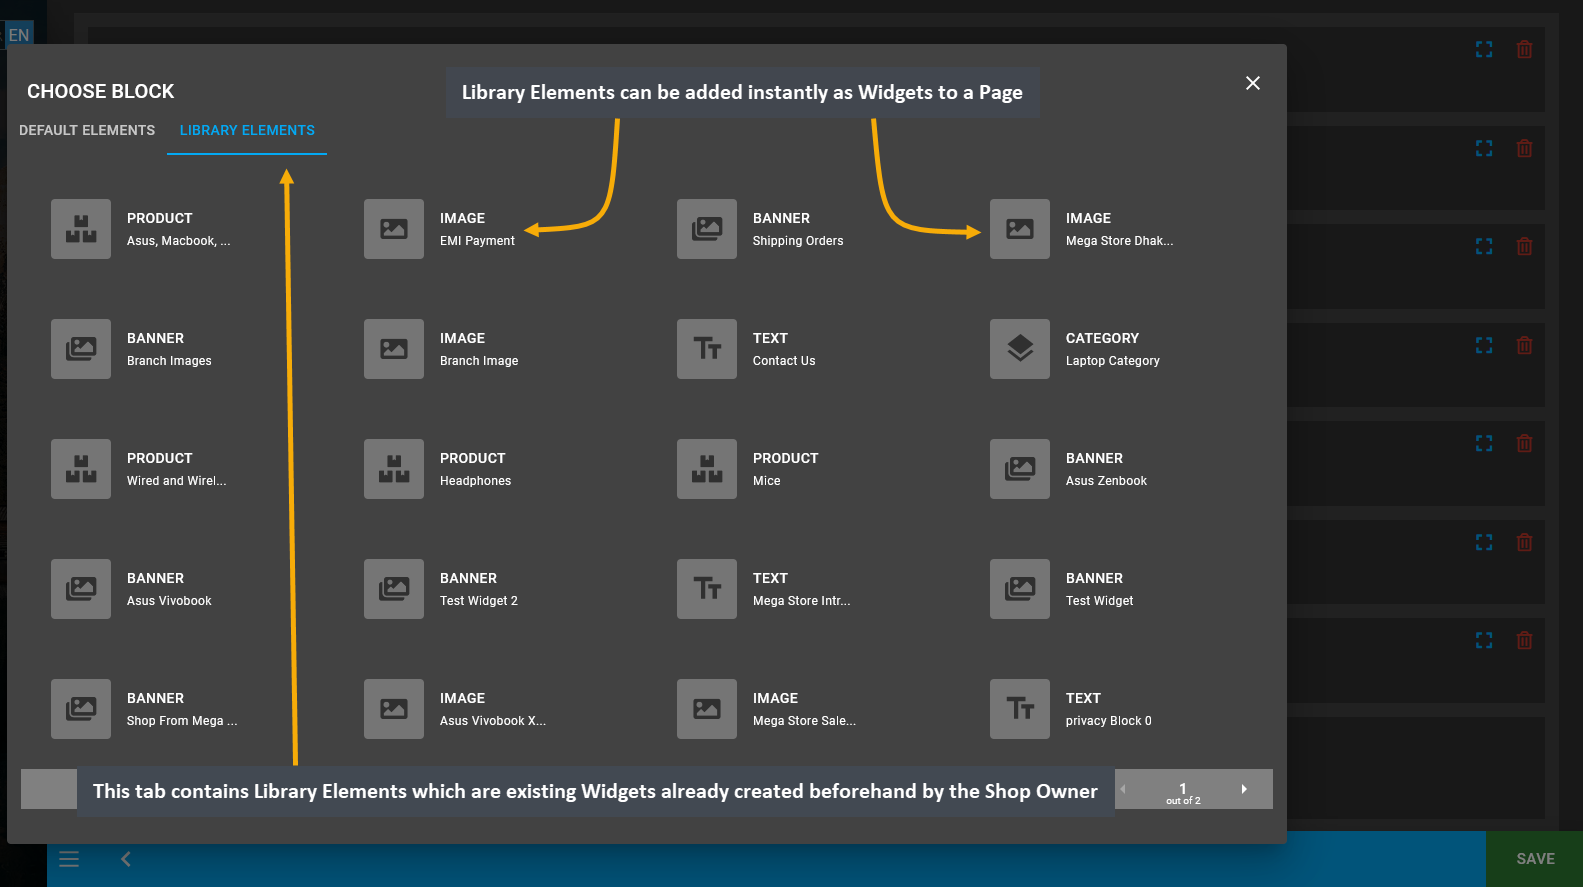
Image 15: Library Elements are existing Widgets already created beforehand by Shop Owner to add on Page.
Widgets already created under a Page can be rearranged using the Press to Re-Arrange button. To rearrange the Widgets, the Press to Re-Arrange button needs to be clicked twice to complete the full Widget rearranging process. Clicking the button once will allow the Widgets to become movable for rearranging. The Save button will become disabled when the Press to Re-Arrange button is clicked. During this time, rearrange all the Widgets as needed.
After completing the Widget rearrangement, click the Press to Re-Arrange button again for the rearranged Widgets to set in. Use the Edit or Delete button to make any changes or delete any Widget. When rearranging of Widgets is done, click the Save button and the Widgets rearrangement will be saved. Instantly, a pop-up with View button will show to view changes made on the Page. Clicking it will redirect to the Updated Page where Widgets were added.
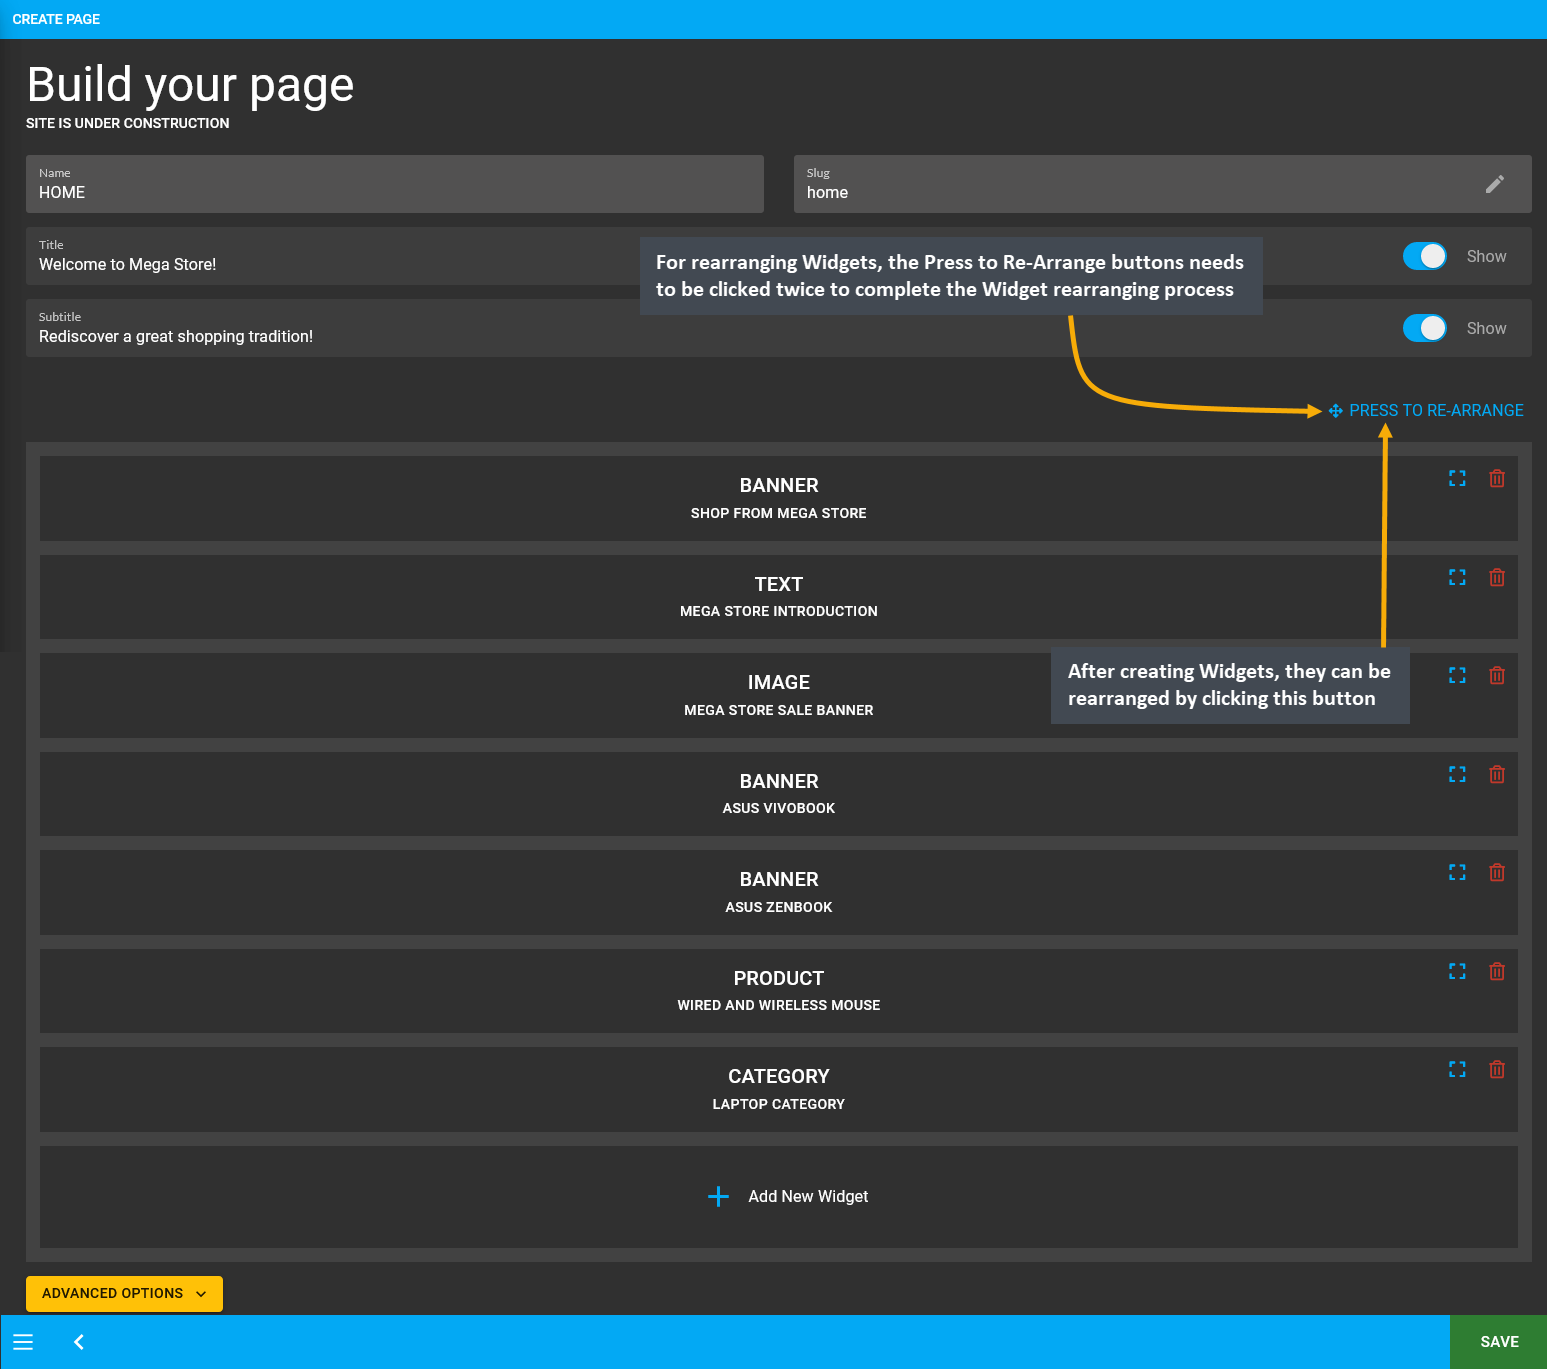
Image 16: Click the Press to Re-Arrange button twice to complete Widget rearranging process within a Page.
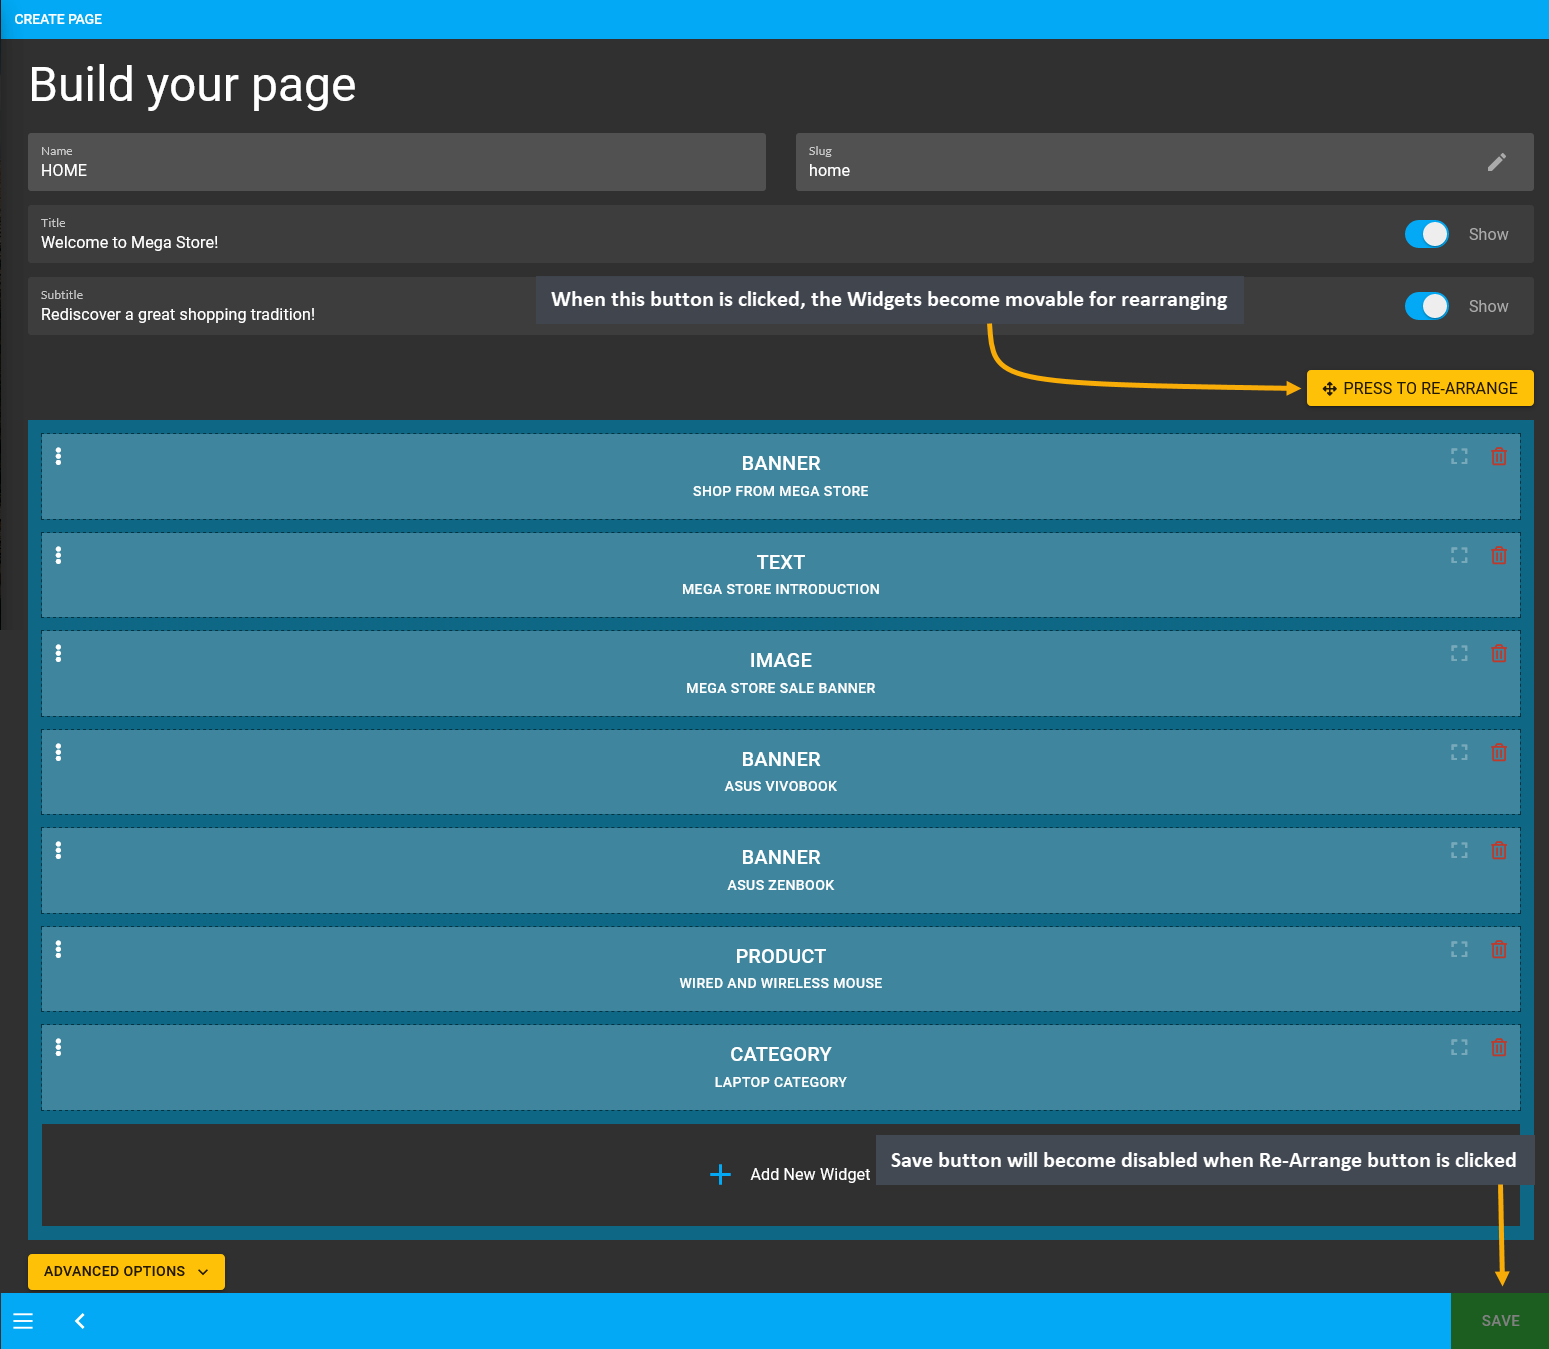
Image 17: When the Press to Re-Arrange button is clicked, all the Widgets become movable for rearranging.
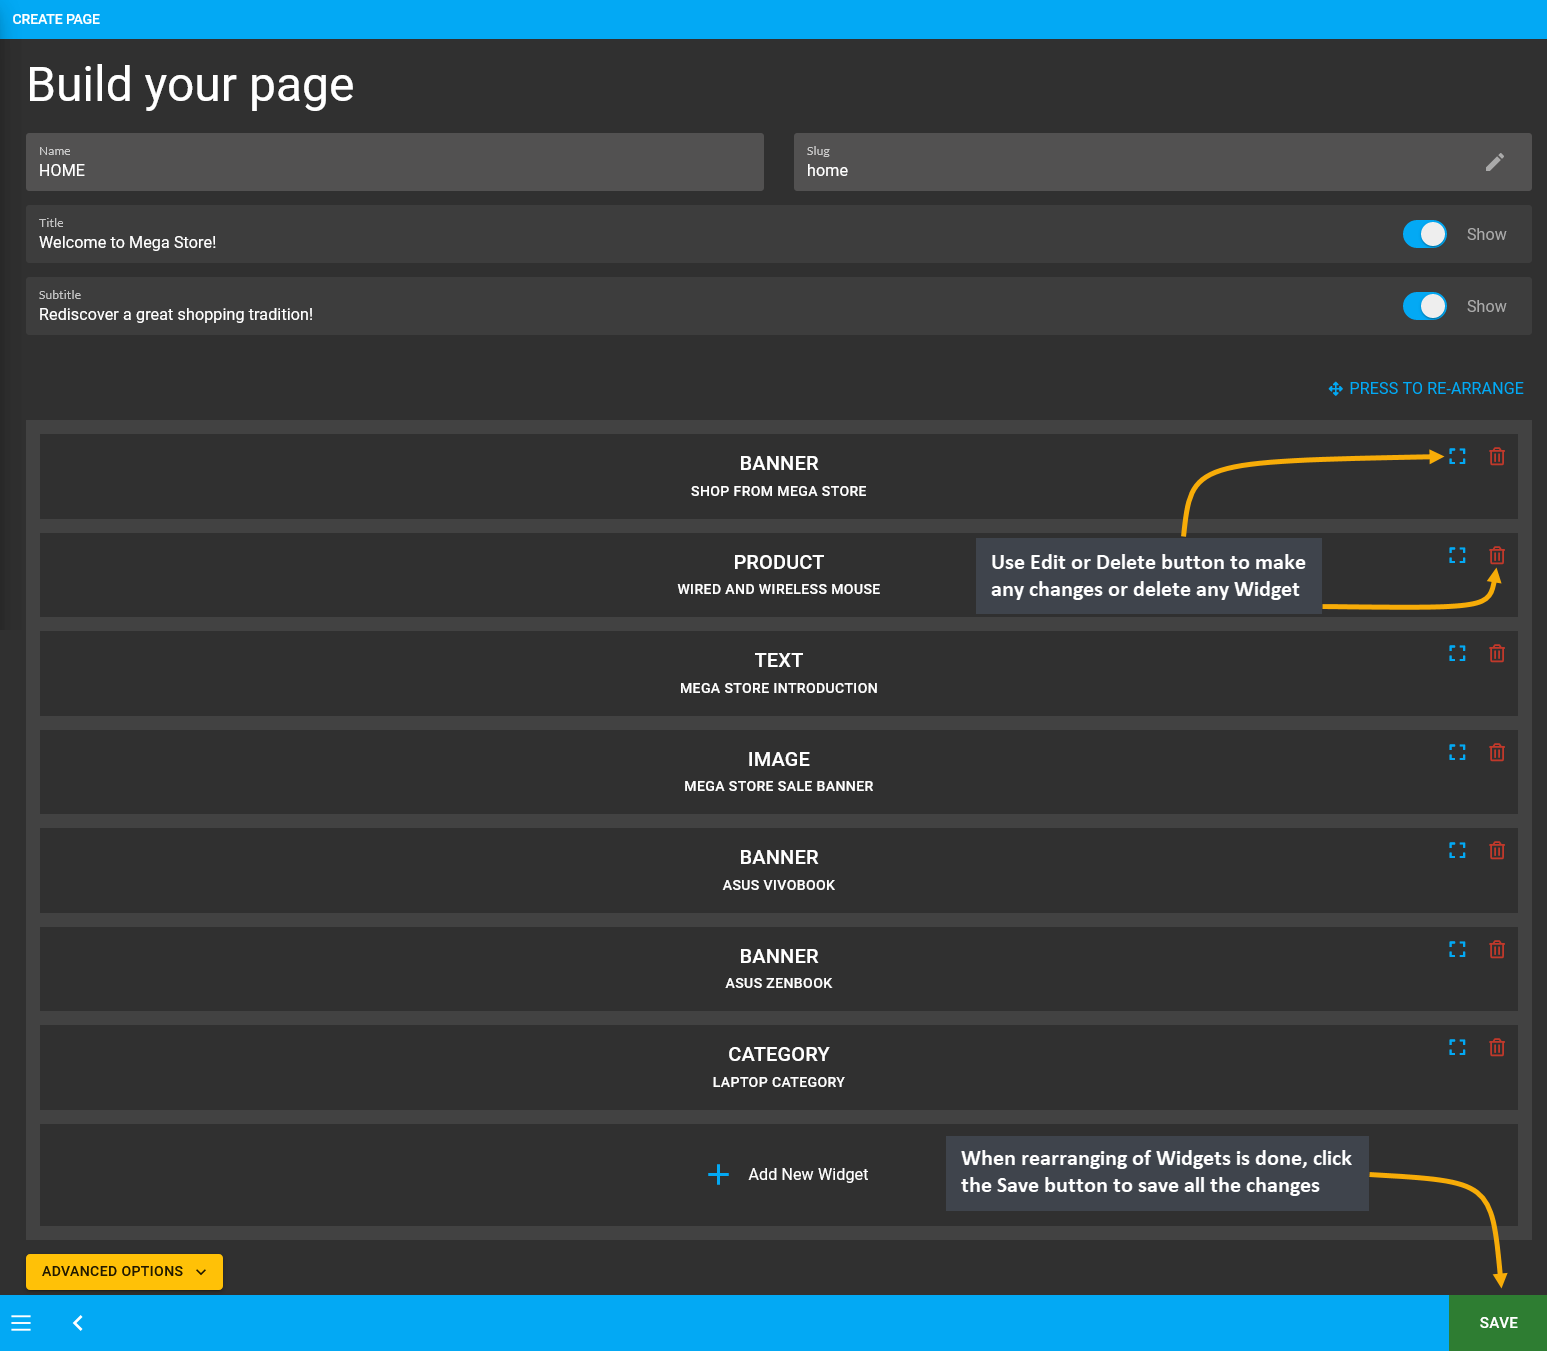
Image 18: Use Edit or Delete button to make changes or delete a Widget, click Save button to save changes.
Delete Widget after Removing from Page
If a Widget is attached to a Page, it can only be deleted after it is removed from under the Page it is assigned. For instance, the Image Widget here is assigned to the Home Page, so clicking Delete button will not allow deleting it.
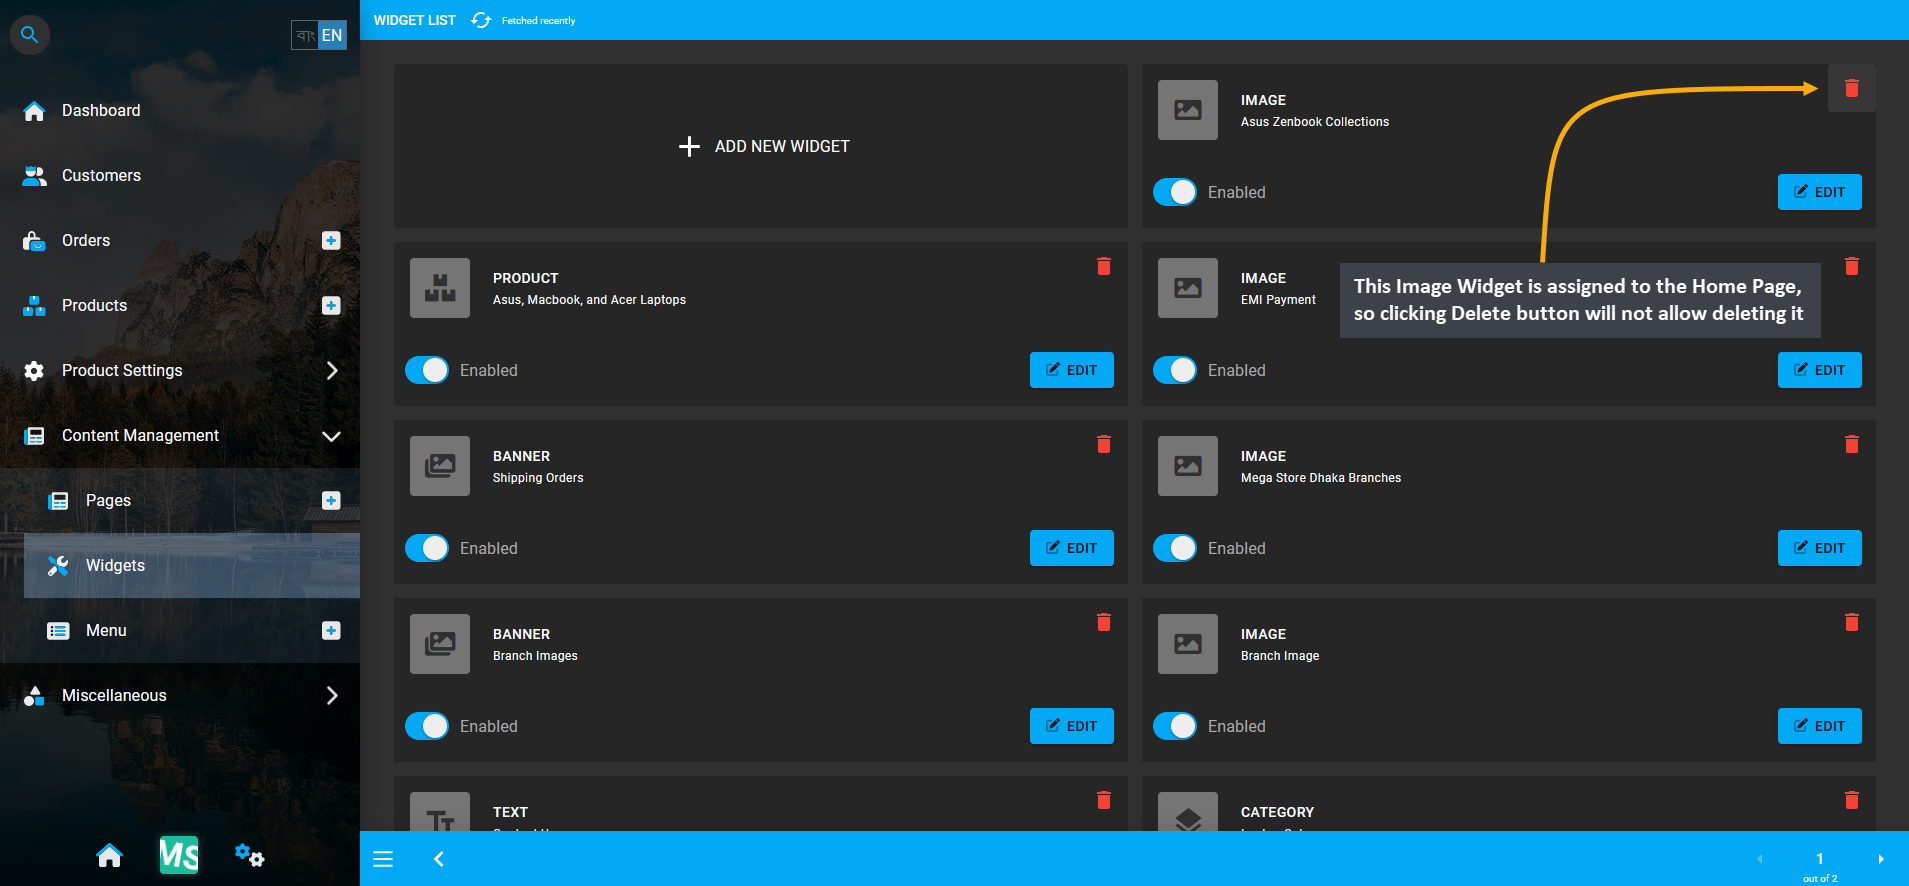
Image 19: Image Widget is assigned to the Home Page, so clicking Delete button will not allow deleting it.
So, after clicking the Delete button, a confirmation pop-up will ask if the Shop Owner wants to delete the Widget.
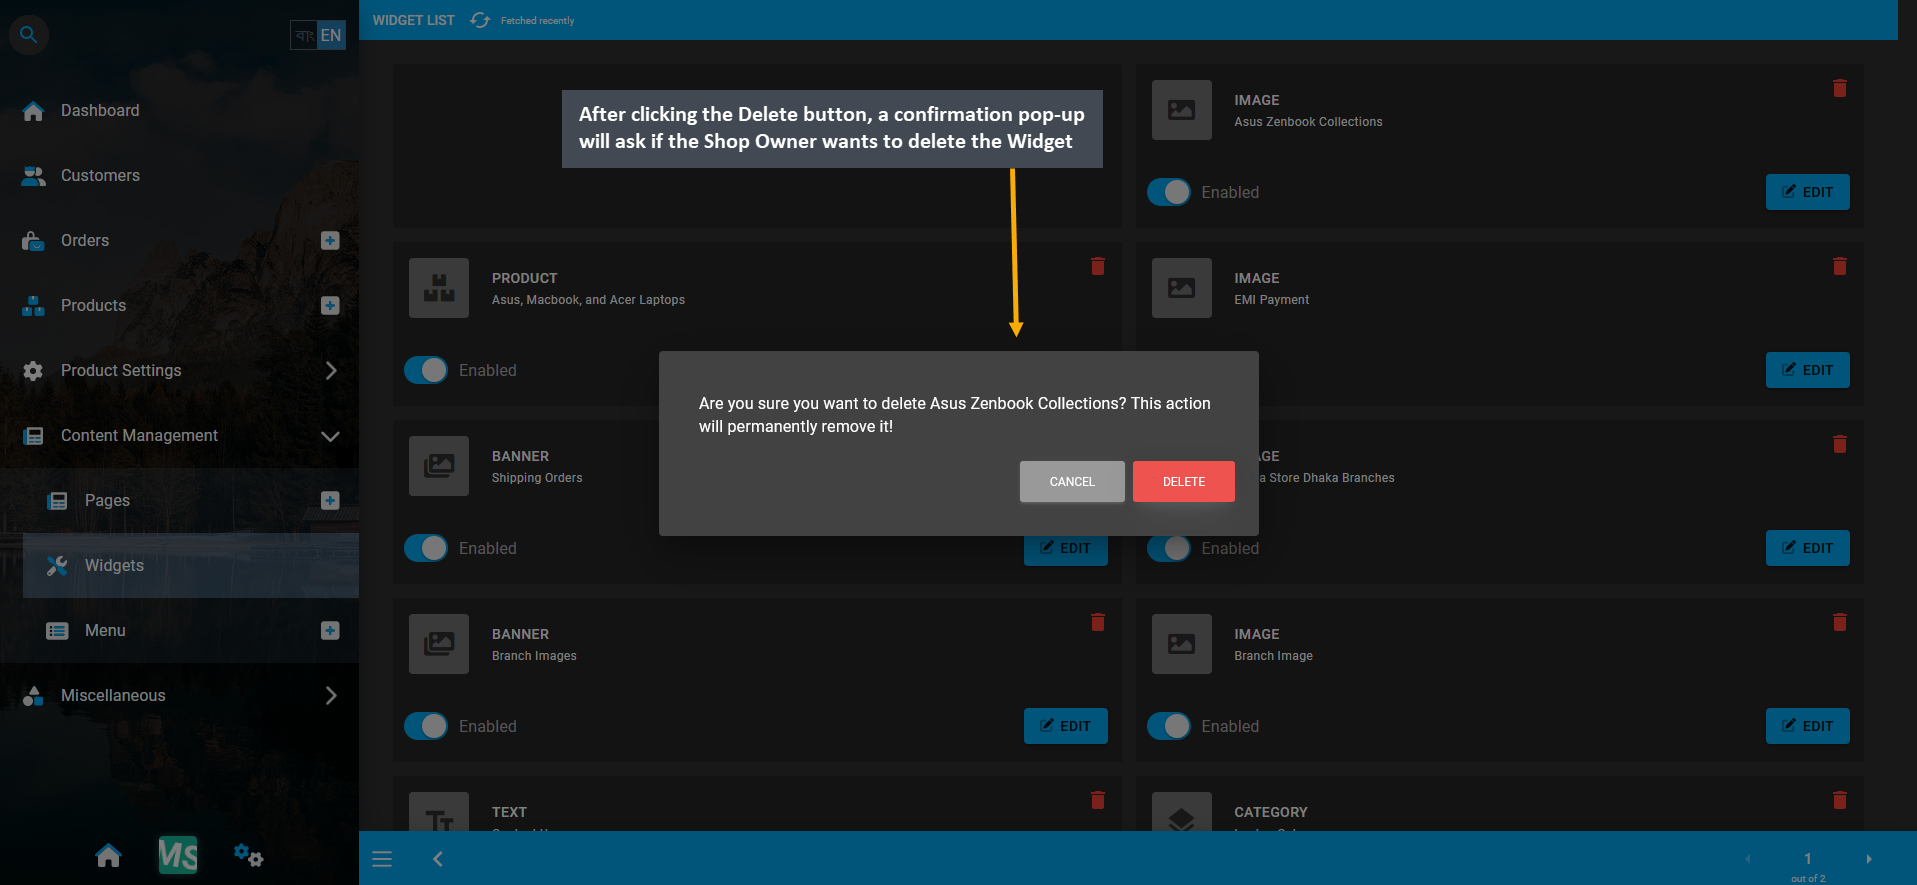
Image 20: After clicking Delete button, confirmation pop-up will ask if Shop Owner wants to delete Widget.
However, even after confirming to delete the Widget, an error message will show stating that the Widget or CMS Block cannot be deleted because it is already assigned under a Page. The Widget have to be removed from Page.
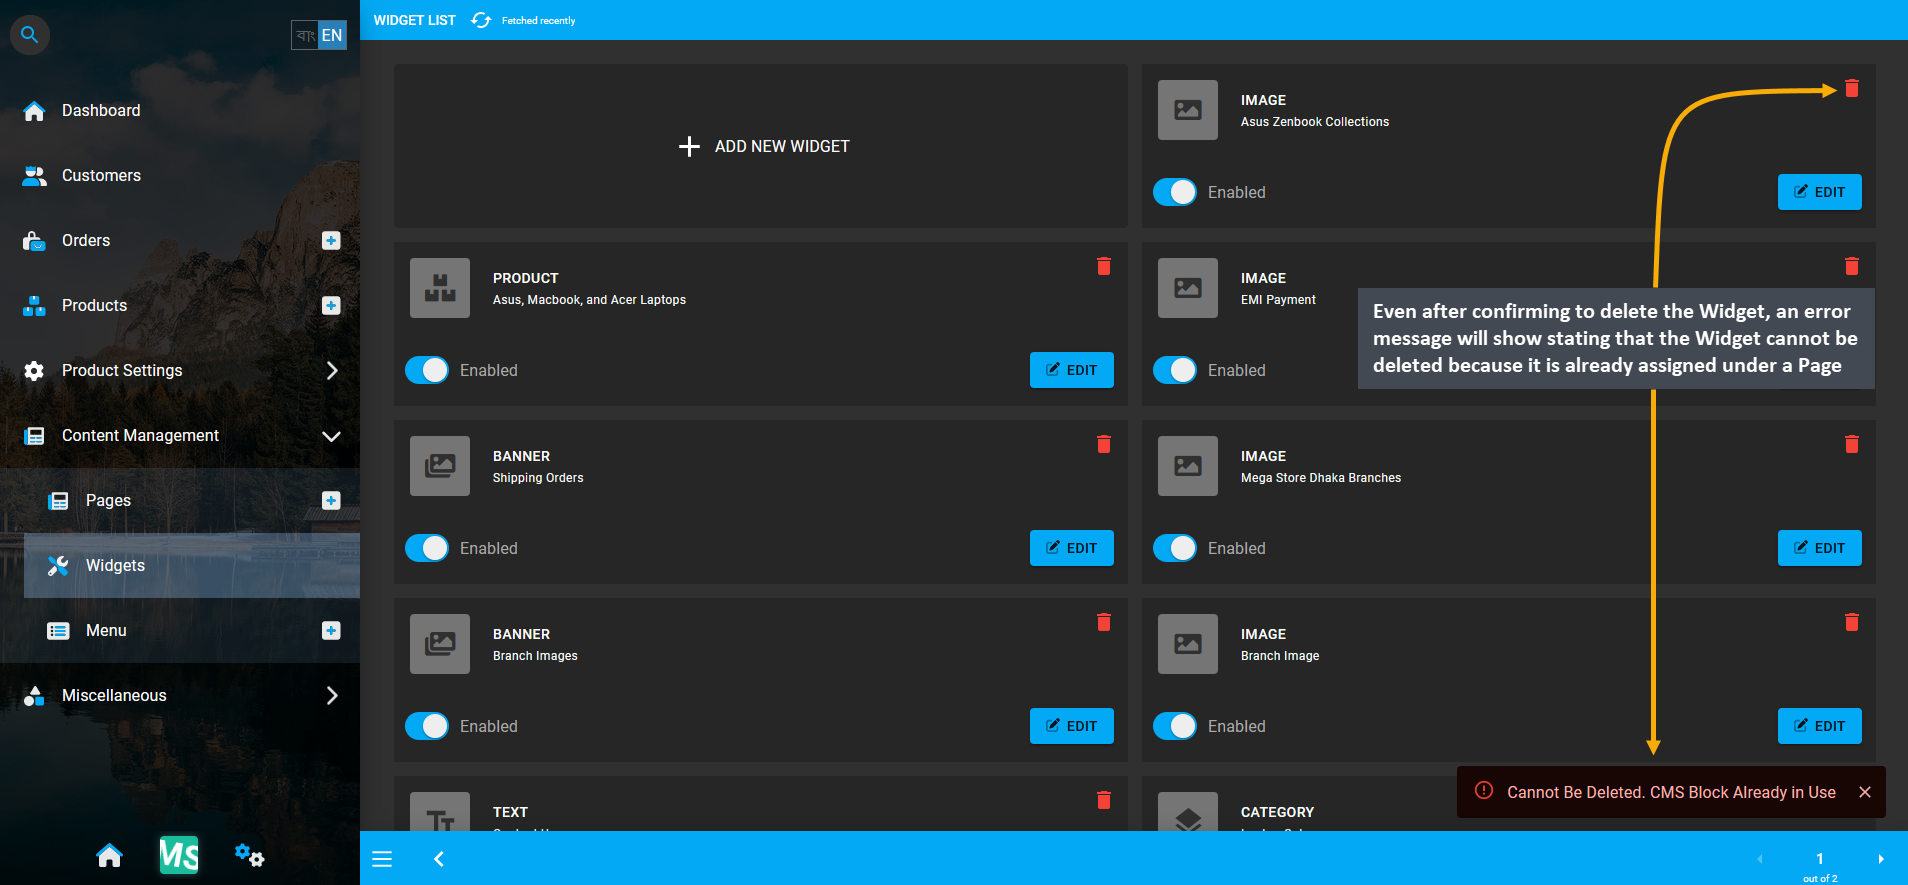
Image 21: Error message will state that Widget cannot be deleted as it is already assigned under a Page.
Therefore, a Widget attached to a Page can only be permanently deleted after it is removed from under the Page is it assigned. Only then, the Shop Owner can completely delete the target Widget from the list of Widgets. Thus, to remove the Widget from under the Page it is assigned, click Edit to edit the Page and remove Widget from it.
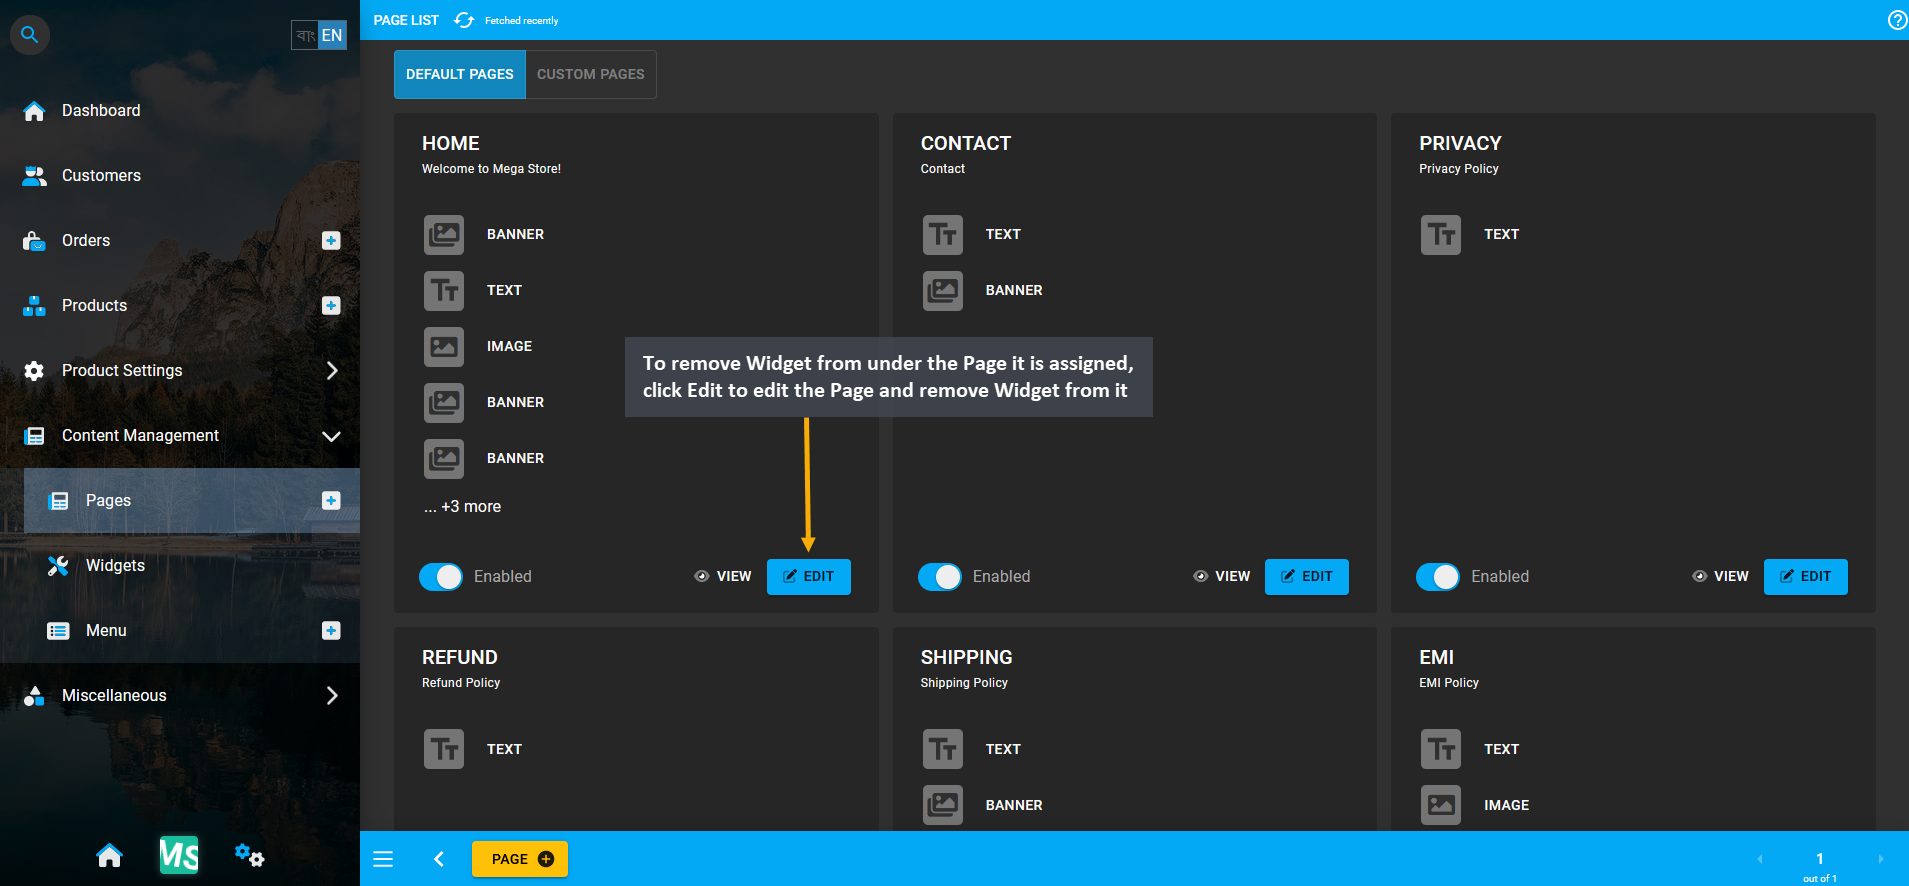
Image 22: To remove the Widget from under the Page it is assigned, Edit the Page and remove Widget from it.
Inside the Page, click the Delete button for the target Widget that needs to be deleted. It will remove the assigned Widget from the Page and allow it to be deleted permanently from under the List of Widgets.
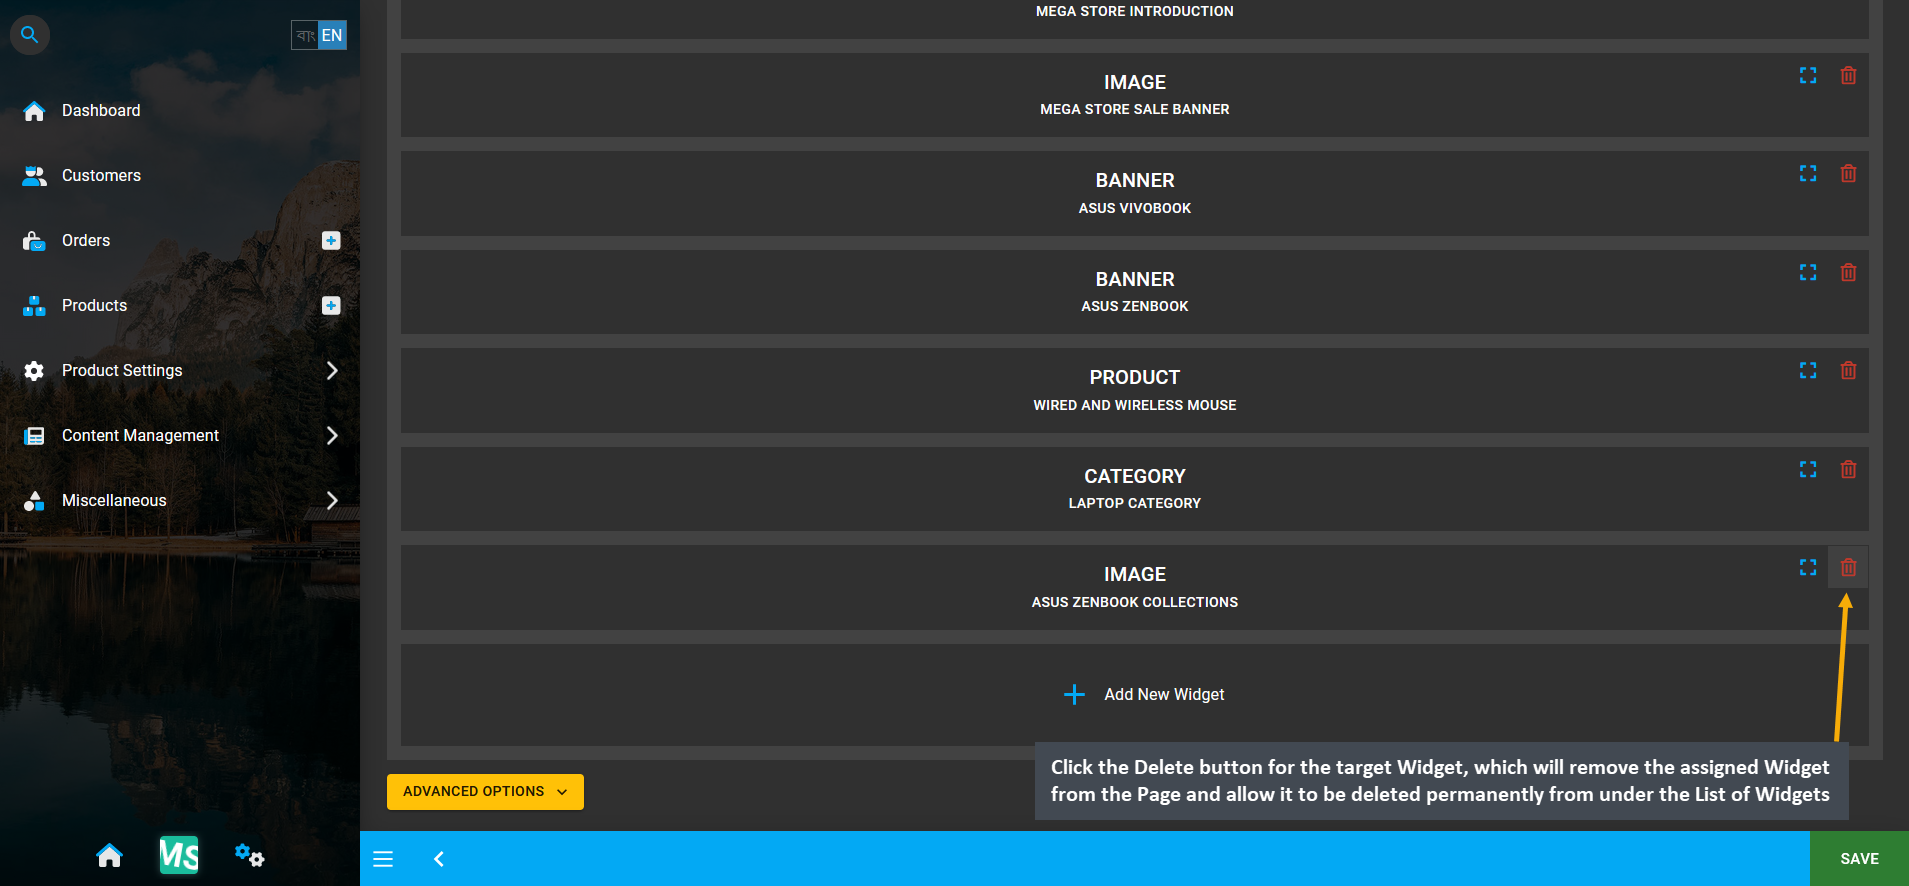
Image 23: Click Delete to remove assigned Widget from Page that will allow it to be deleted permanently.
After Widget is removed from Page, click Save button to update the Page. Widget is no longer assigned to Page.
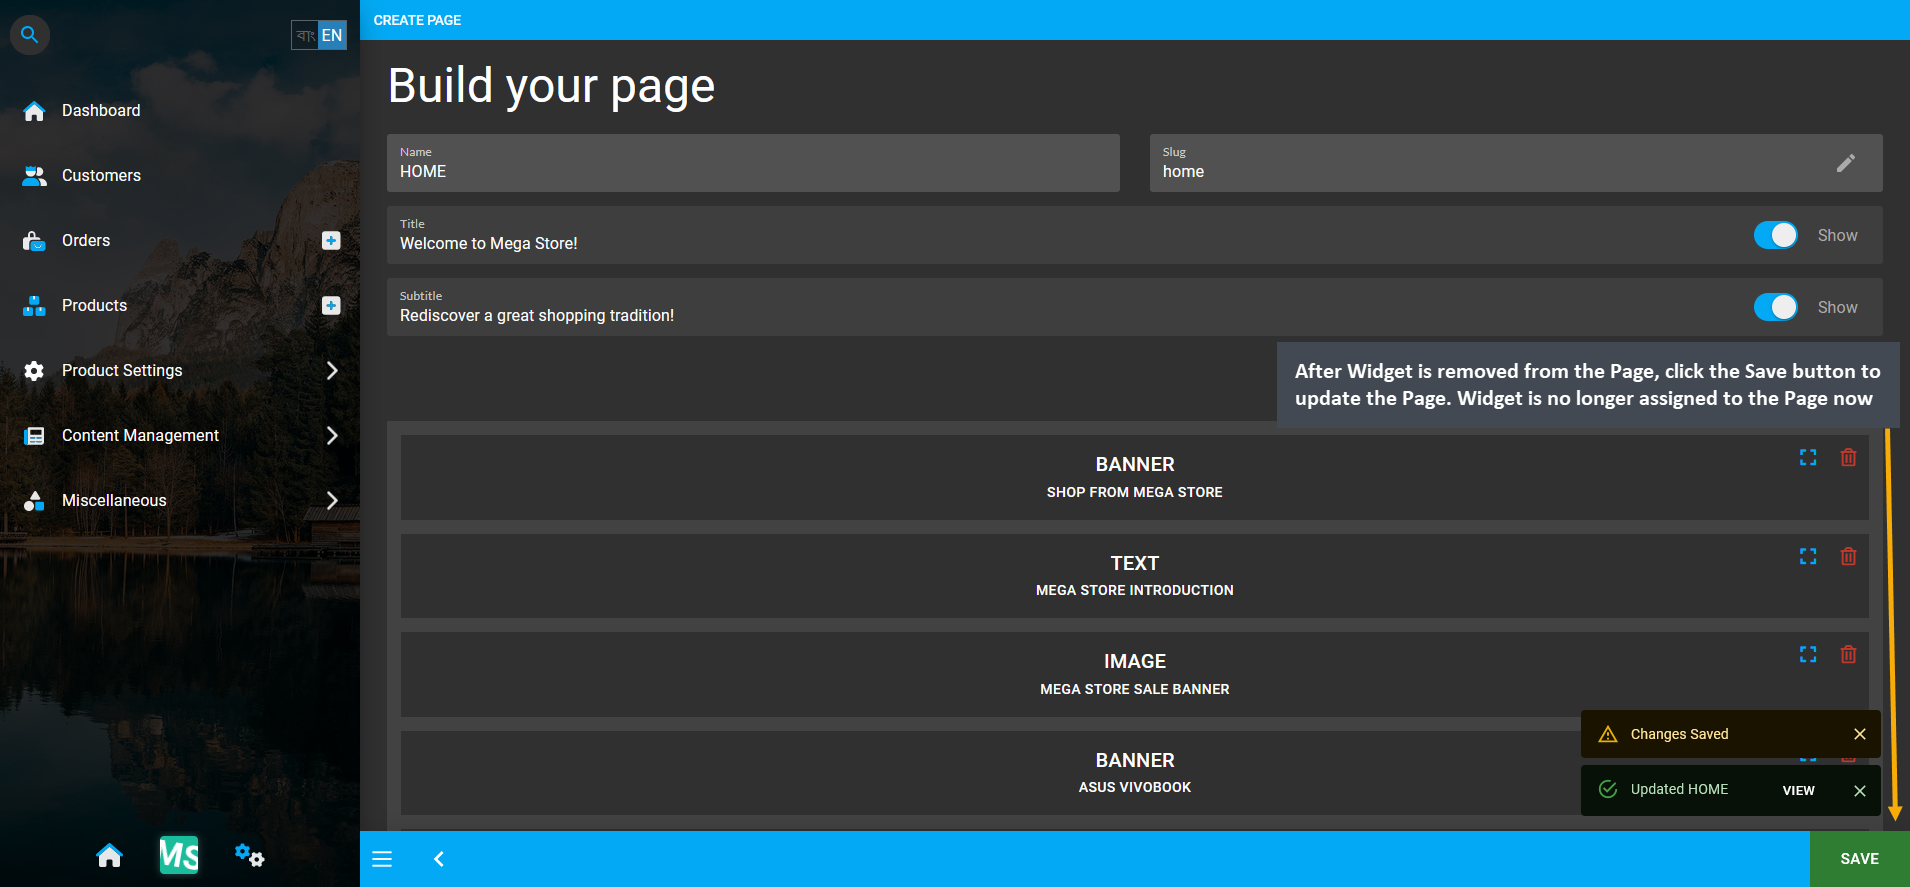
Image 24: After Widget is removed, click Save to update the Page. Widget is no longer assigned to Page.
Now, go back to the Widget List Page, and click the Delete button on the target Widget. This will allow the the Shop Owner to completely delete the target Widget from the list of Widgets as it is not assigned to a Page anymore.
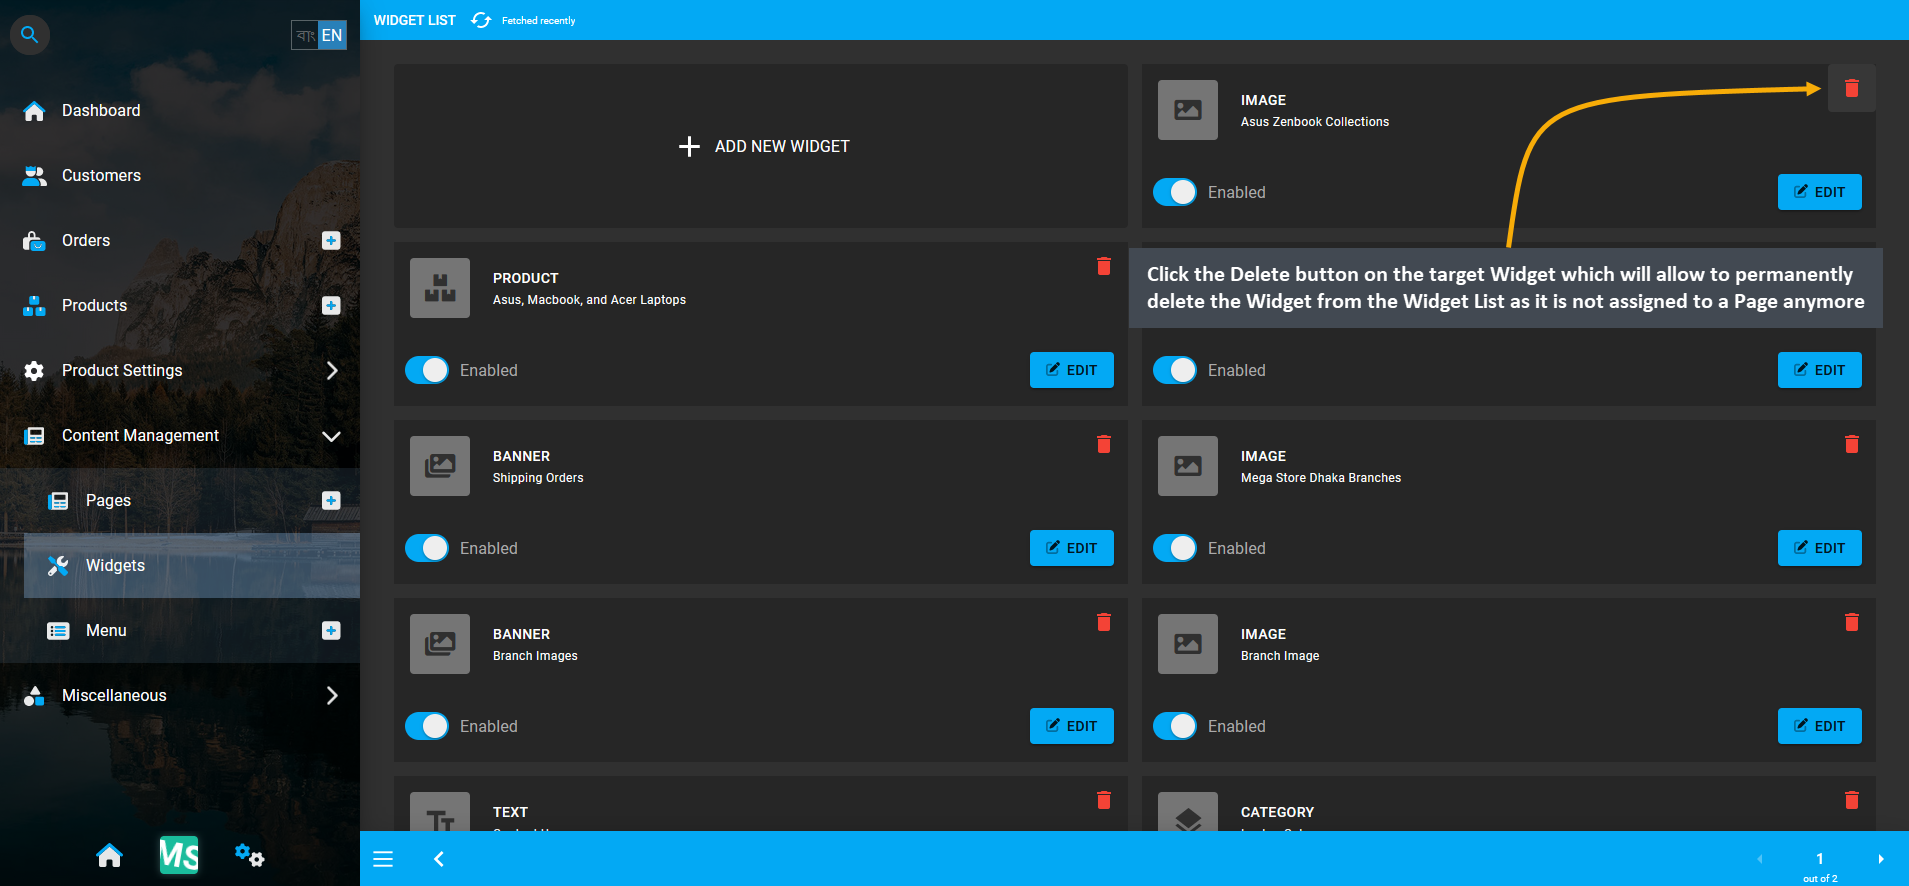
Image 25: Click Delete for target Widget that will allow to completely delete the Widget from Widget List.
So, after clicking the Delete button, a confirmation pop-up will ask if the Shop Owner wants to delete the Widget.
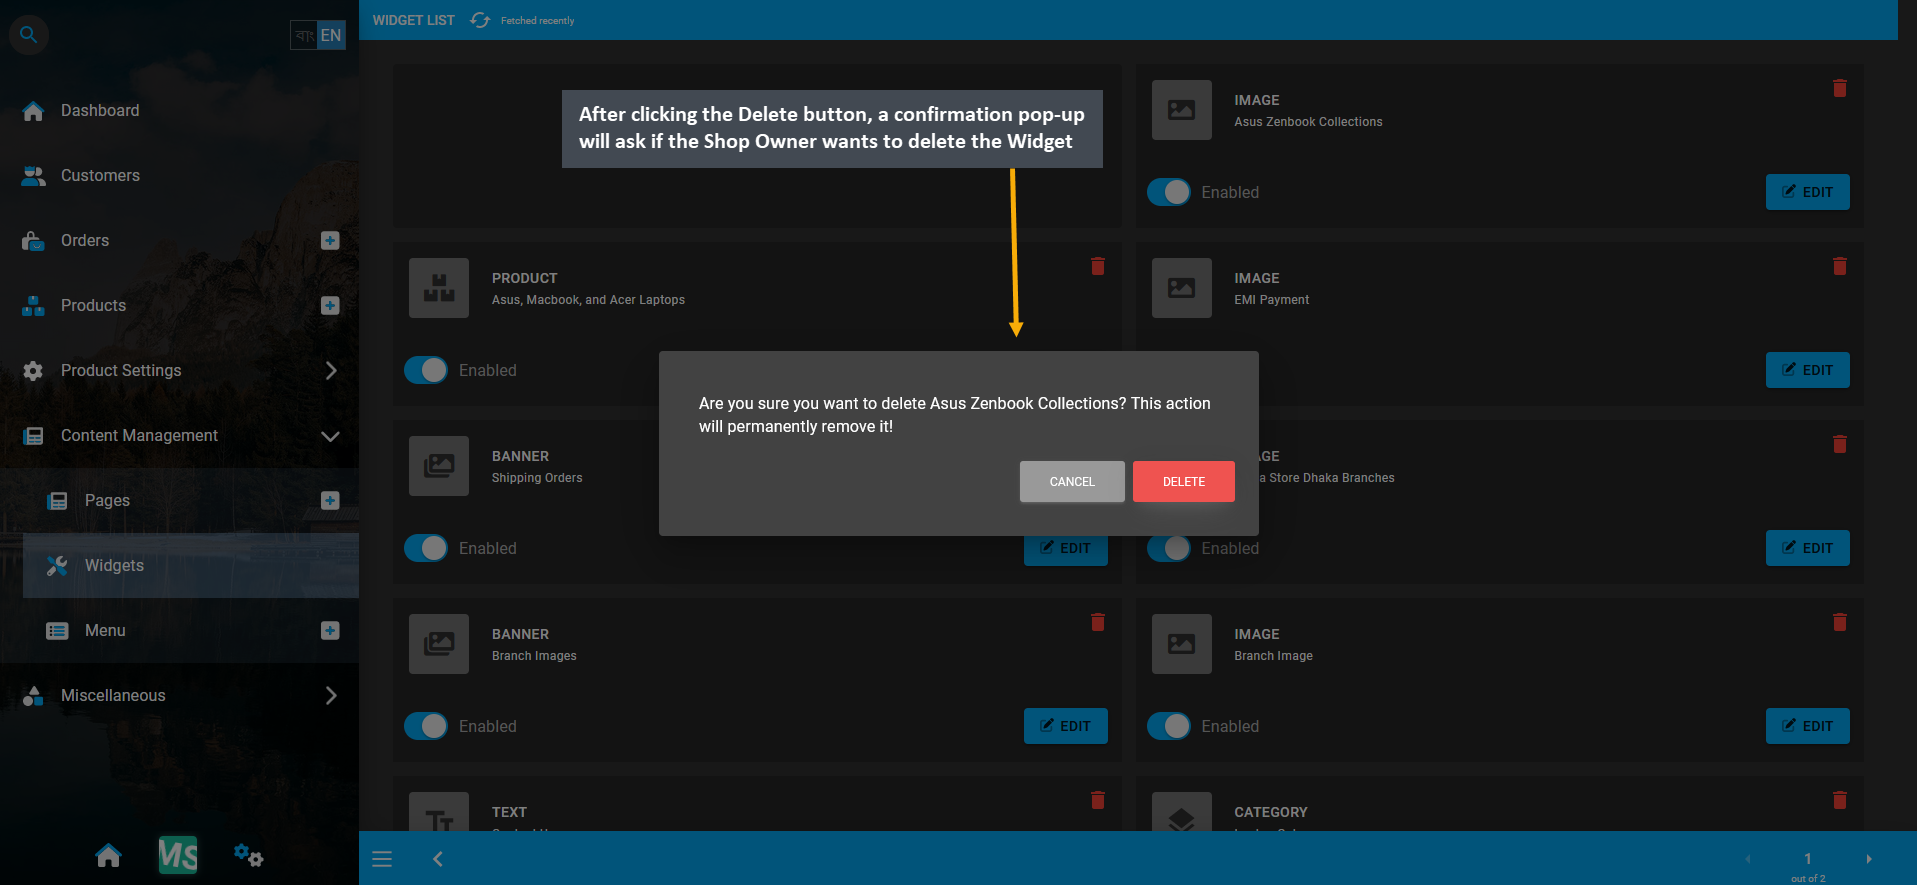
Image 26: After clicking Delete button, confirmation pop-up will ask if Shop Owner wants to delete Widget.
Confirmation pop-up will show that Widget has been deleted from Widget List which means that it can no longer be retrieved. In this way, Shop Owner can permanently delete a Widget after having it unassigned from a Page.
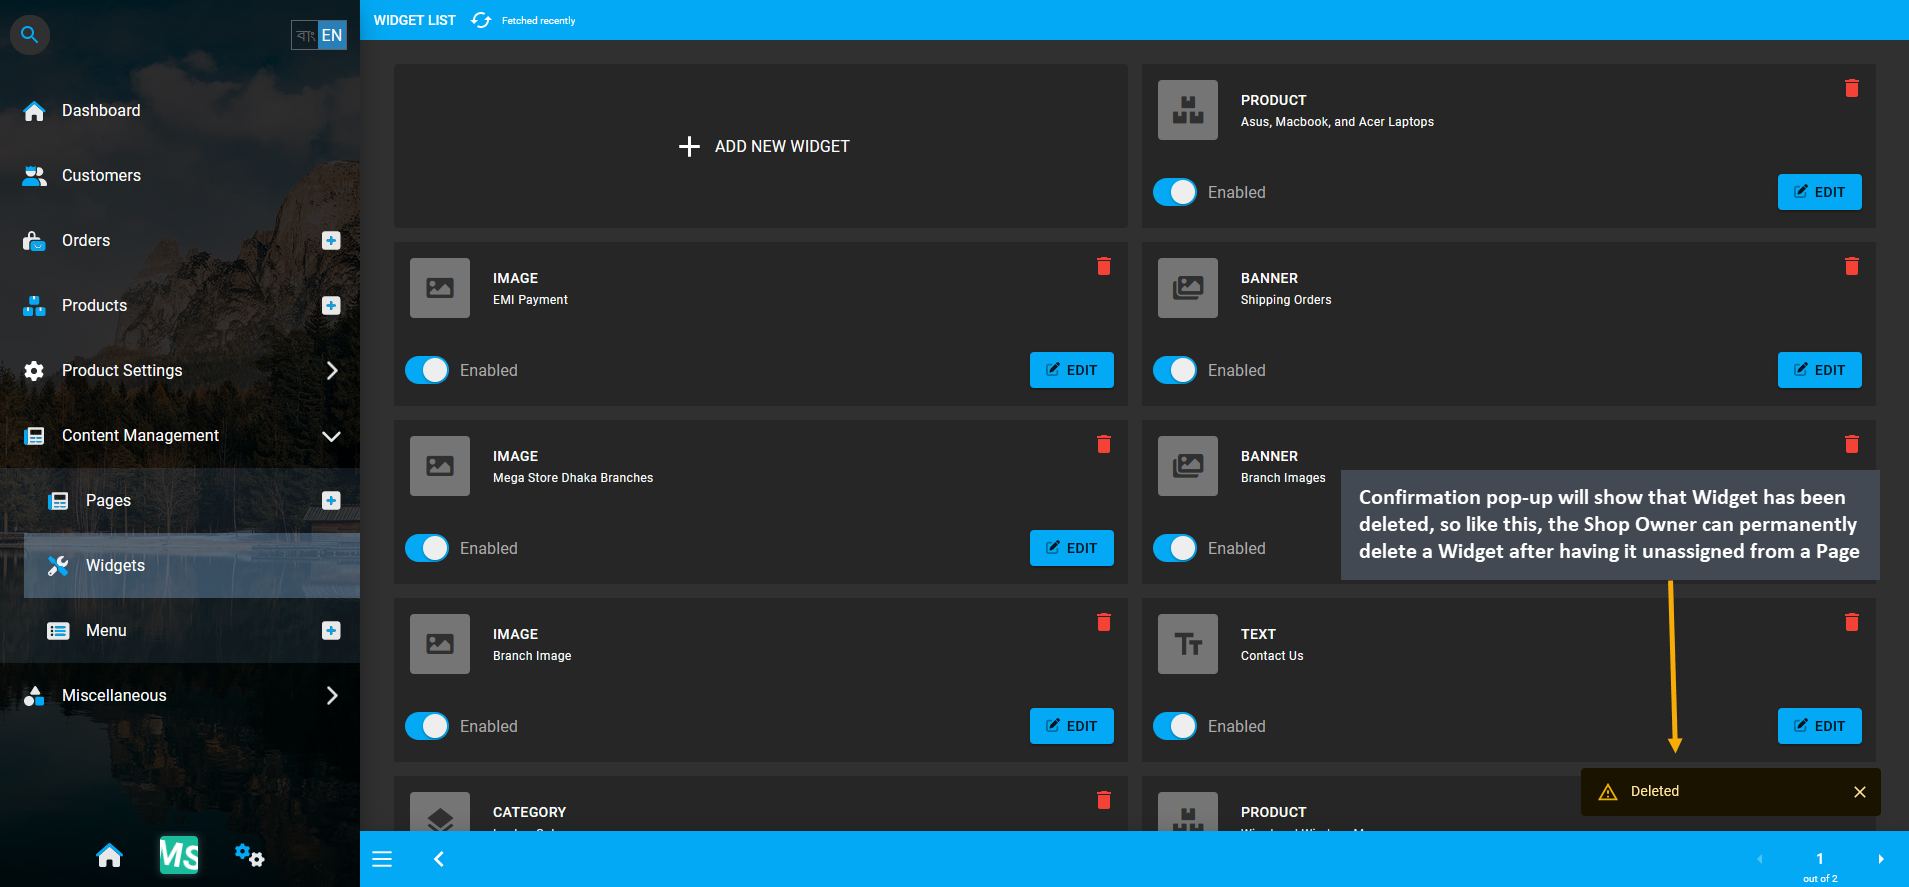
Image 27: Like this, the Shop Owner can permanently delete a Widget after having it unassigned from a Page.
20.4 - Text Widget
Create and manage Widgets for promoting the Shop and Products on The Website.
Text Widgets
Text Widgets can be added on different Pages of The Website to write short introductory paragraph or explain the Shop policies for Customers. Text Widgets will automatically manage several aspects like font type, font size, text style, or even Markdown format copied from another source. Shop Owners can introduce page visitors and daily Customers to their own Brand and Products by adding short background or About Us Section using Text Widgets.
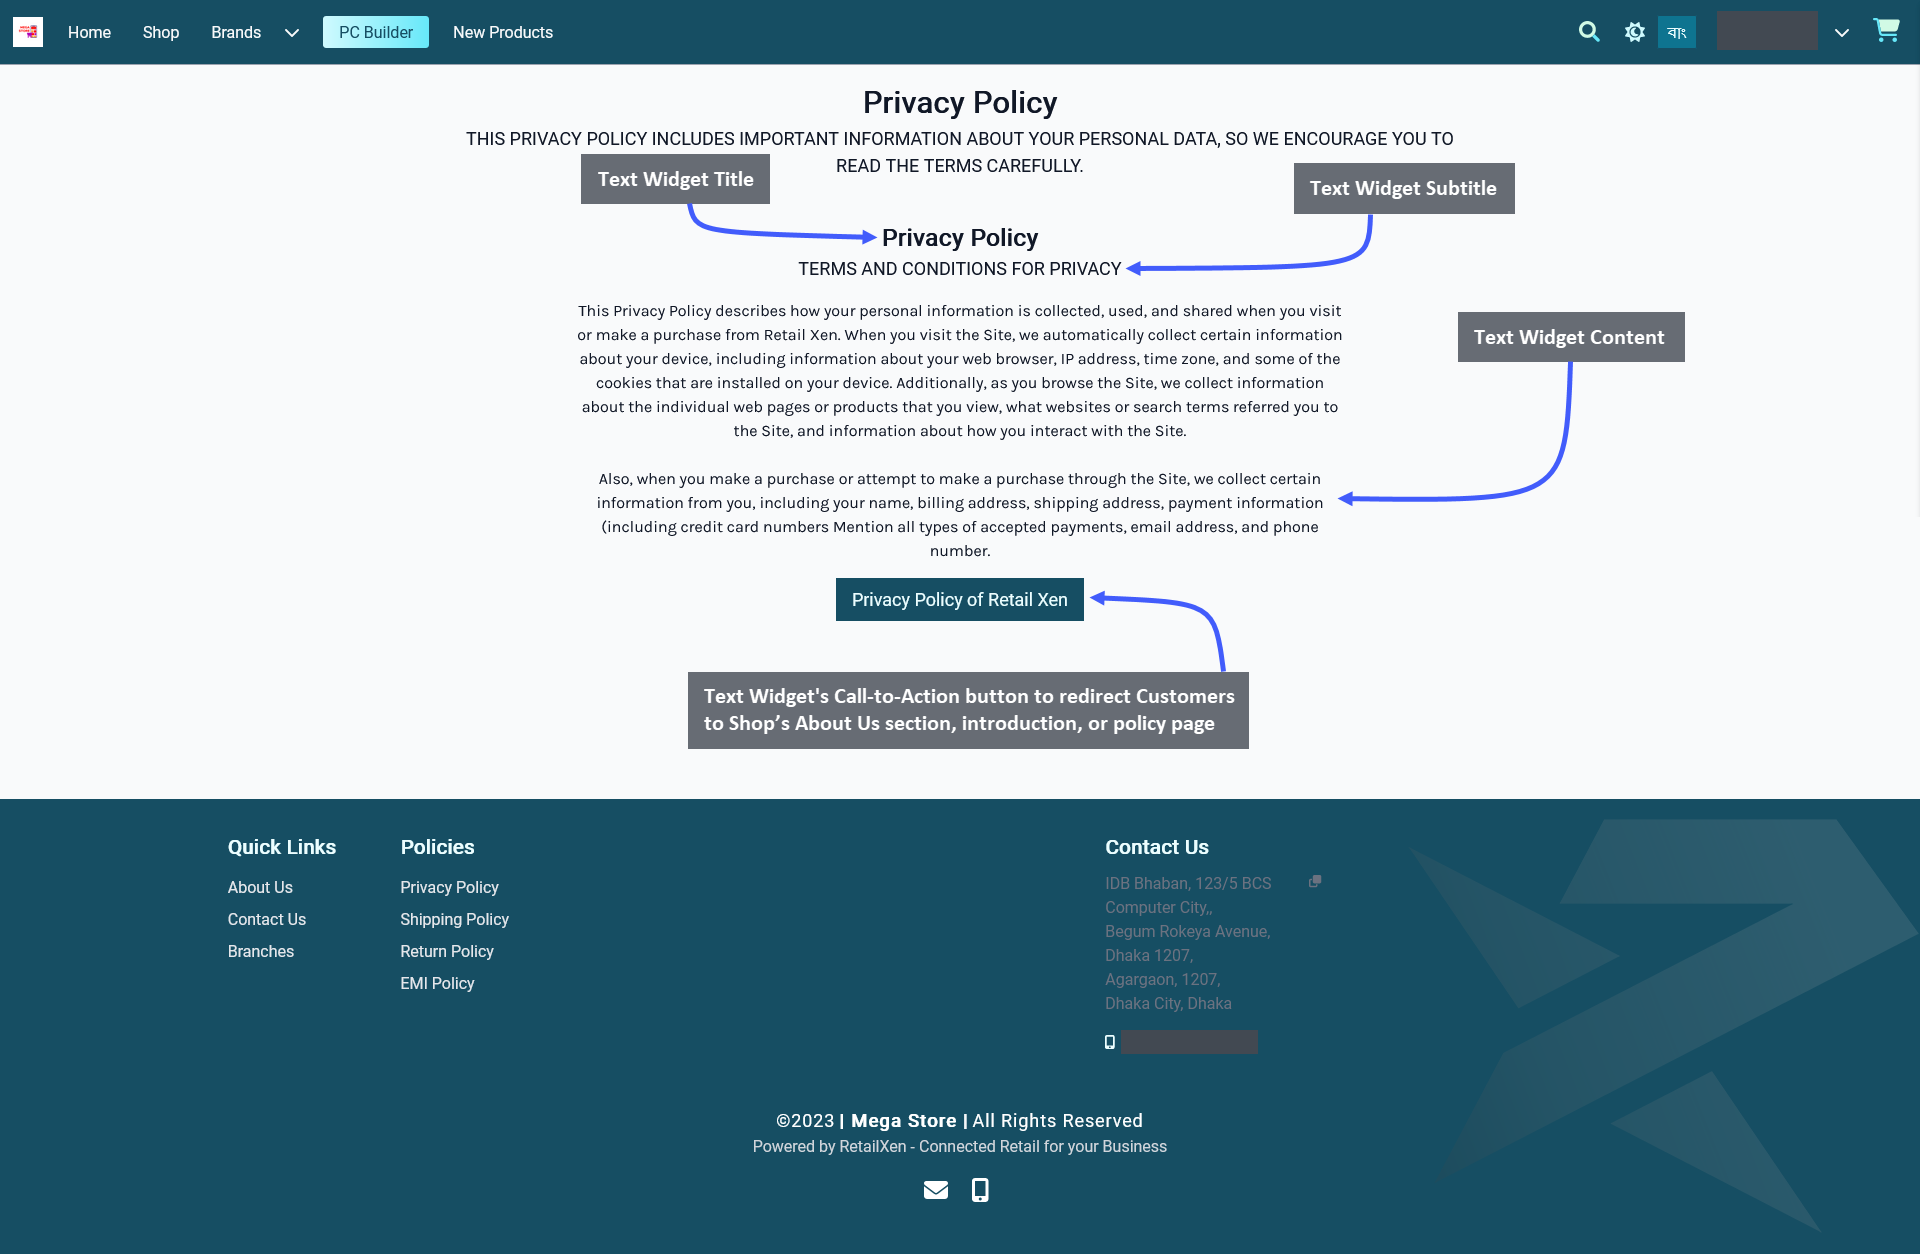
Image 1: Shop Owner can add and show Title, Subtitle, Content, Call-to-Action button using the Text Widget.
The options to setup Text Widget includes adding a Widget Name, Title, Subtitle, and Slug. There is a toggle button that can be used to enable or disable the Title or Subtitle. Enable and use the Call-to-Action button within Widget adding Button Link and Button Text to redirect Customers to Shop’s About Us section, introduction, or policy page.
Other Widget Options include the Content Box where the Shop Owner can add the main contents of Text Widget, like introduction or policies of their Shop. There is a button named All Devices which will make the Widget visible on all devices. To select specific devices, switch to Visible On and select Mobile, Table, MDPi, or HiDPi as requires. Click the Save button to save all settings. Click the Add New Widget button to add more Text Widgets within a Page.
There is a Call-to-Action Button that will redirect visitors and Customers to a Page, like a Shop’s About Us section, introduction, or policy page. Enable the Button Link (that will redirect visitors to that link) and Button Text (stating the function of the button) to be displayed. Use the toggle for Call-to-Action Button to turn it on and off.
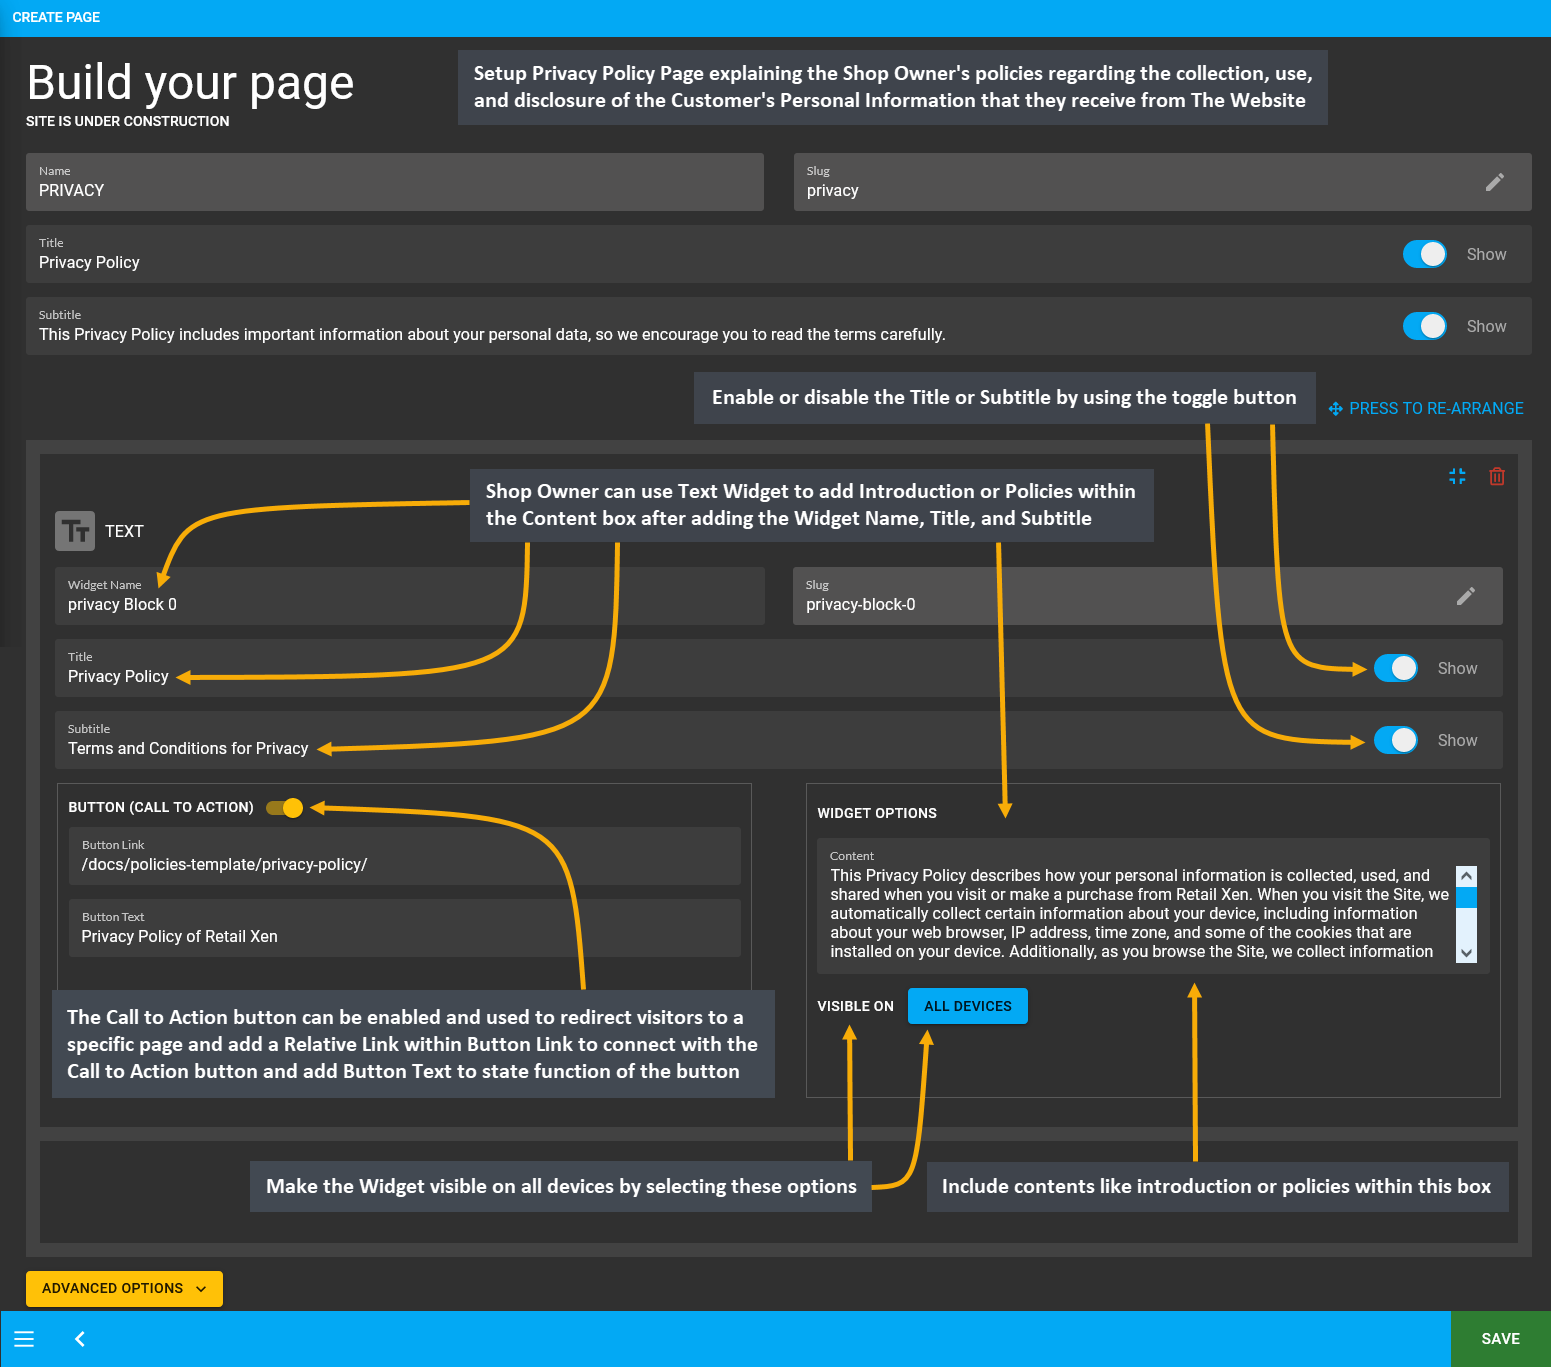
Image 2: Shop Owner can use Text Widget to add Introduction or Policies within the Content box for display.
20.5 - Image Widget
Create and manage Widgets for promoting the Shop and Products on The Website.
Image Widgets can be added on different Pages of The Website for adding graphic illustrations and visual contents to showcase brand logos and promotional advertisements. Shop Owners can introduce all page visitors and daily Customers to their own Brand and Products by adding colorful posters and Product images using Image Widgets.
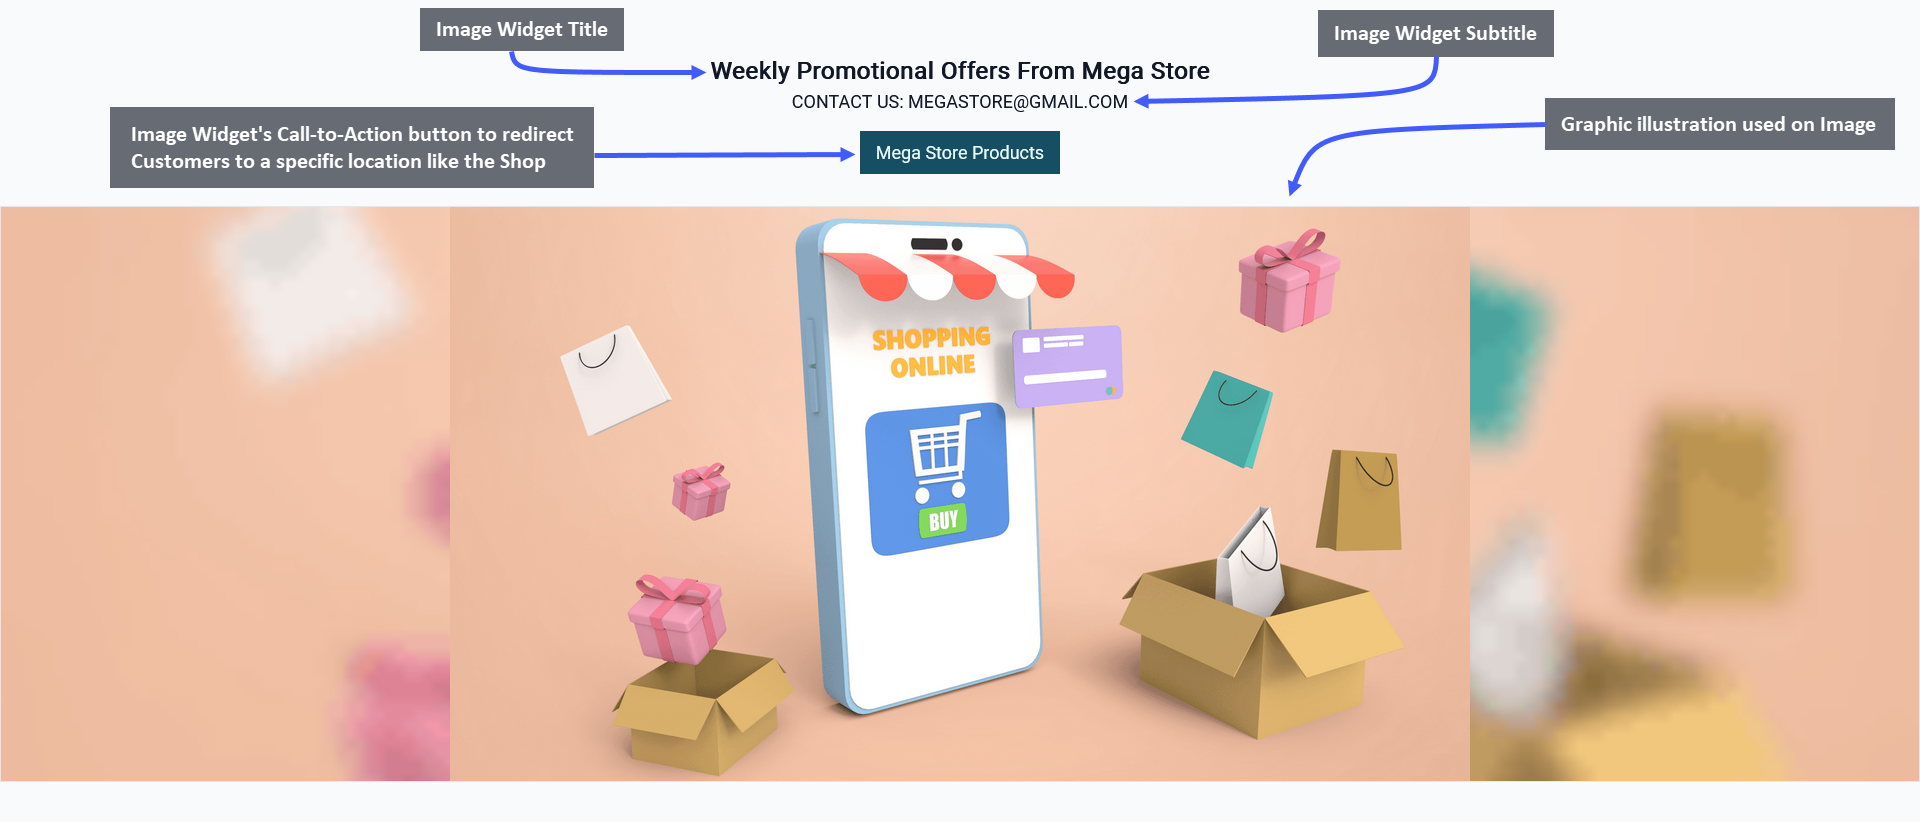
Image 1: Shop Owner can add and show Title, Subtitle, Image, Call-to-Action button using the Image Widget.
The options to setup Image Widget includes adding Widget Name, Title, Subtitle, and Slug. There is a toggle button that can be used to enable or disable the Title or Subtitle. Enable and use the Call-to-Action button within Widget adding Button Link and Button Text to redirect Customers to the Website to view the Shop Owner’s listed Products.
For Image Widget, there is option to upload a full Single Image where the Shop Owner can add their Brand Logo or Sales Banner. There is a box for Image Description where a short description of the image should be included. The Image Link should include a Relative Link that will direct the Customers to a specific page within The Website.
There is a button named All Devices which will make the Widget visible on all types of devices. Therefore, to select specific devices, switch to Visible On and select Mobile, Table, MDPi, or HiDPi as requires. Click the Save button to save all settings. Click the Add New Widget button to add more Image Widgets within a Page for Shop promotion.
There is a Call-to-Action Button that will redirect visitors and Customers to a Page, like visiting the Shop or Product page. Within the Call-to-Action Button, enable the Button Link (that will redirect visitors to that link) and Button Text (stating the function of the button) to be displayed. Use the toggle for Call-to-Action Button to turn it on and off.
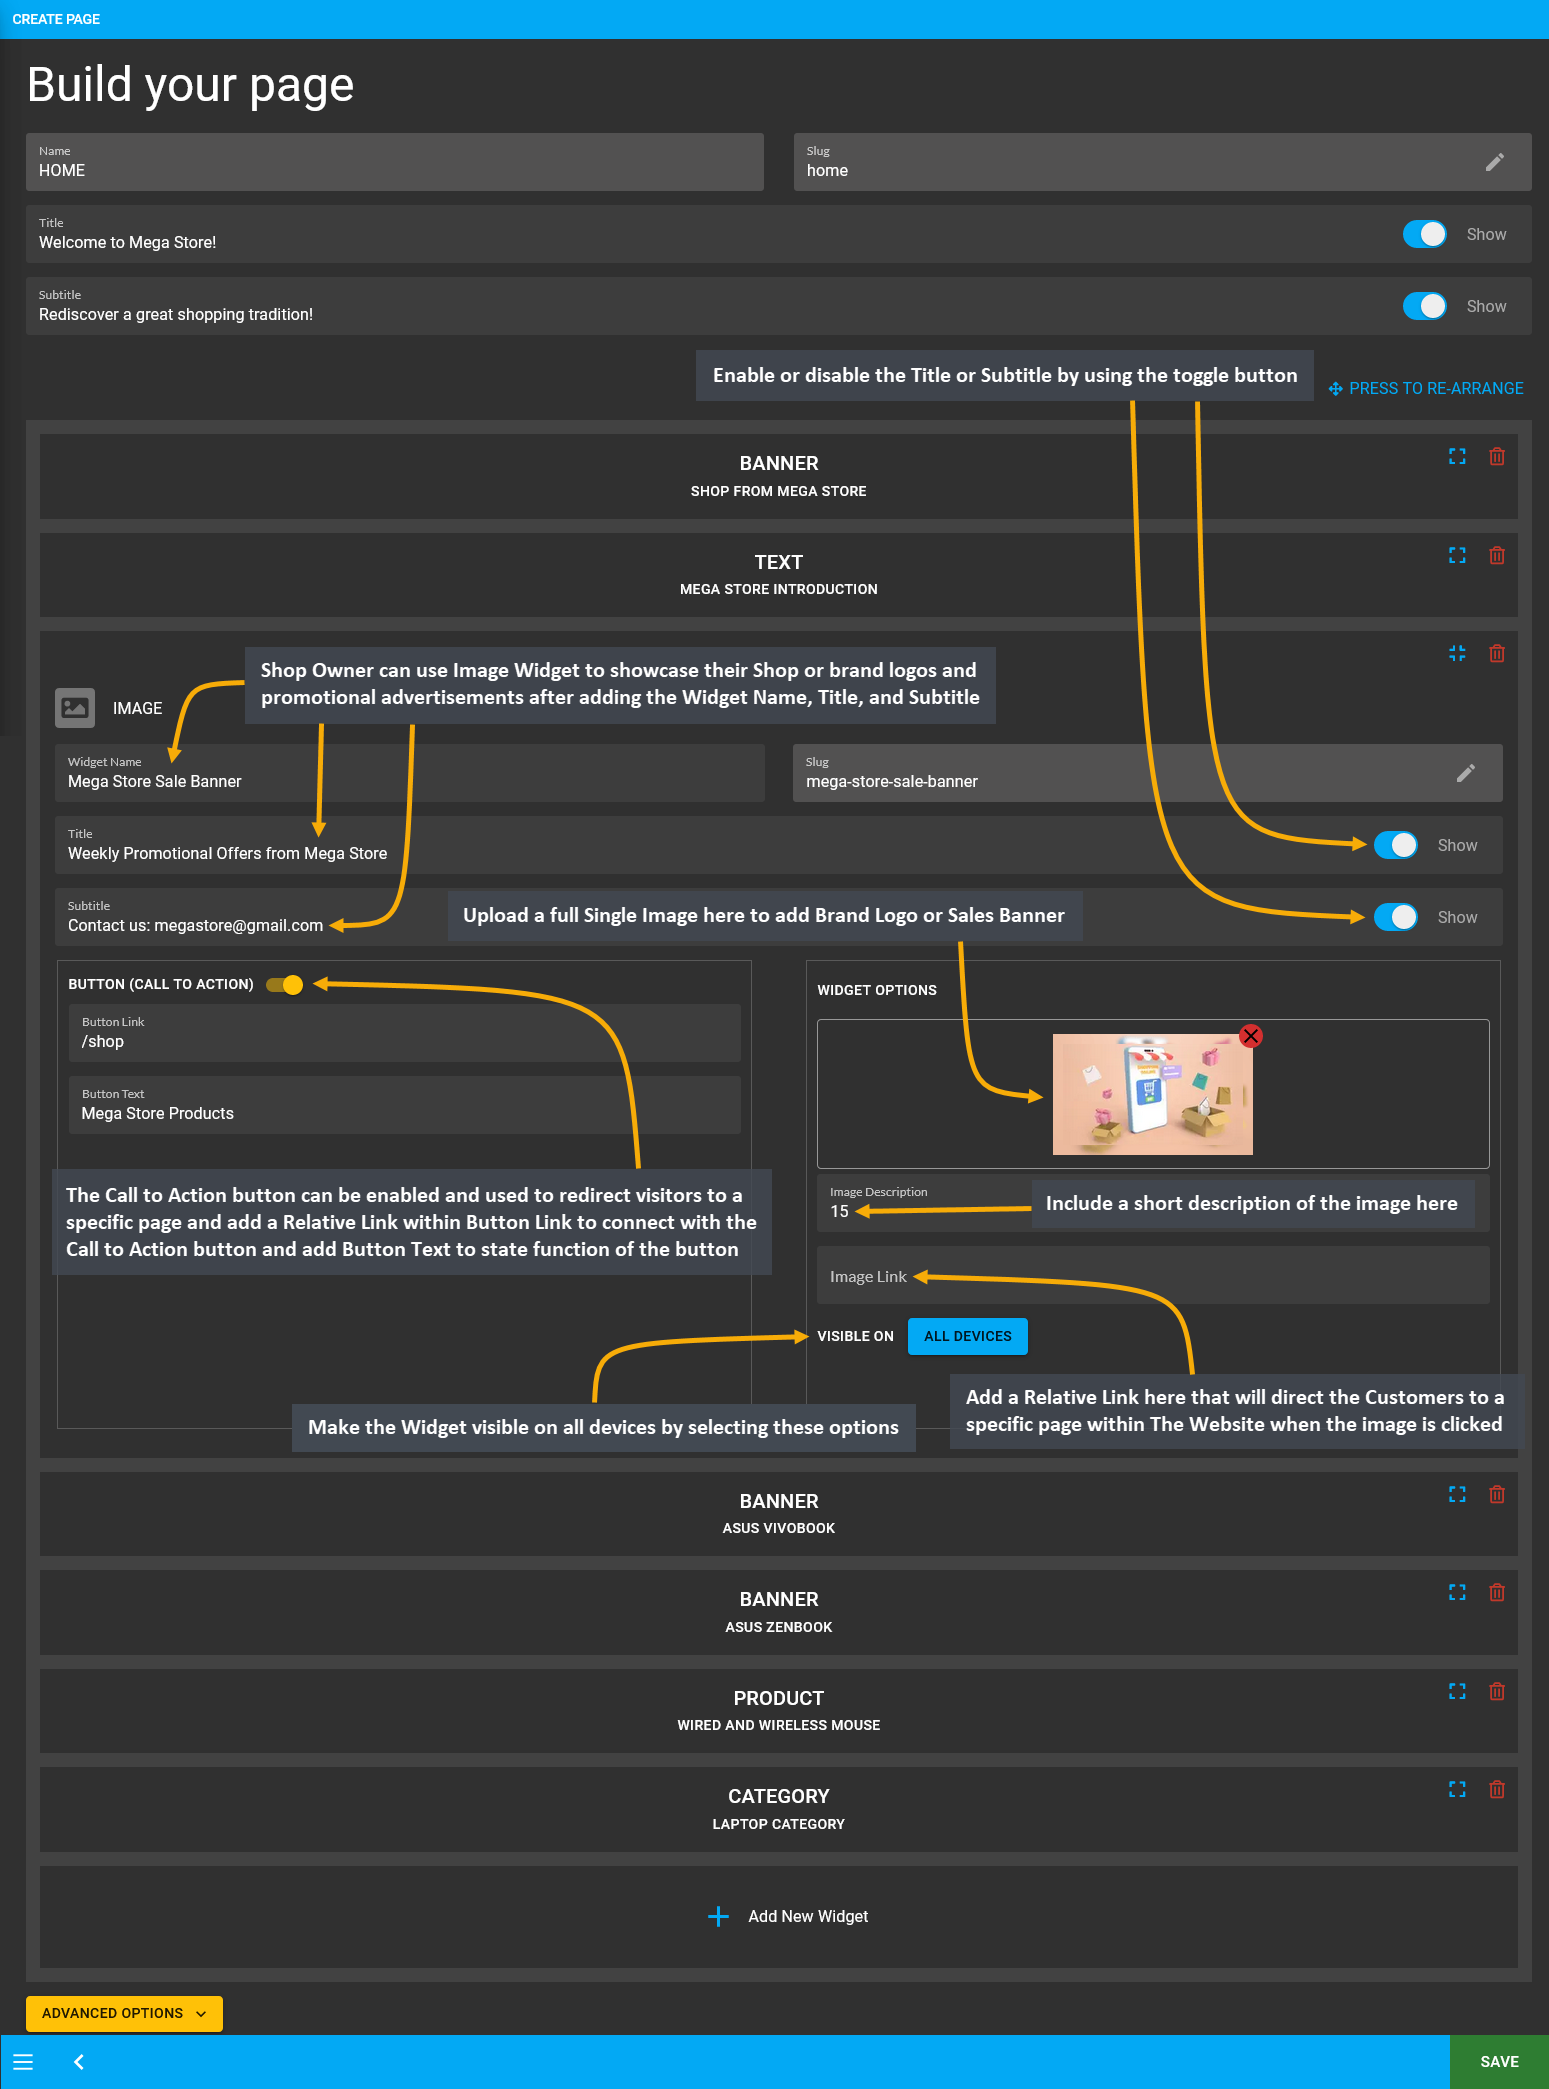
Image 2: Use Image Widget to showcase brand logos and promotional advertisements for display on Website.
Functions of Fit and Fill
Determine how the images on Image Widget will be cropped when showing on different devices. After an image is added on the widget, there is an option called Image Fit/ Fill with a toggle button to turn on to Fill and turn off to Fit the image. Selecting Fit will resize image to fit within the boundaries of the image box after cropping is done.
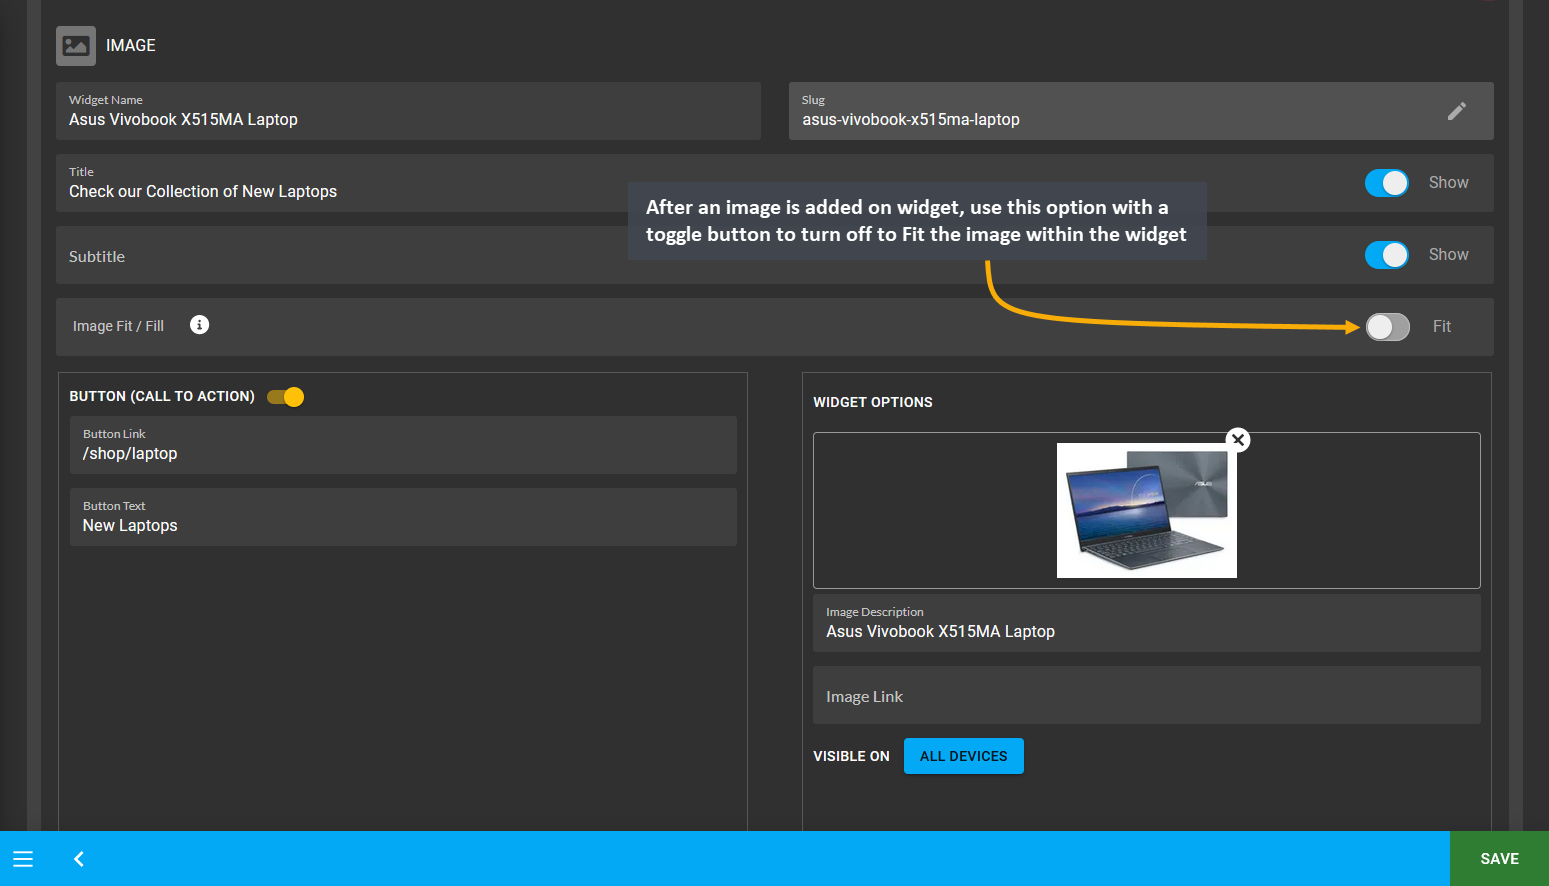
Image 3: After image is added on widget, use toggle button to turn off to Fit the image within the widget.
On the Website, it can be seen that the image was cropped to fit within the boundaries of Image Widget as Fit was selected for it. In this way, the Shop Owner can add several images with Fit option. For best results, try selecting Fit for logos or images that has a square view after cropping which will specifically highlight a single Product type.
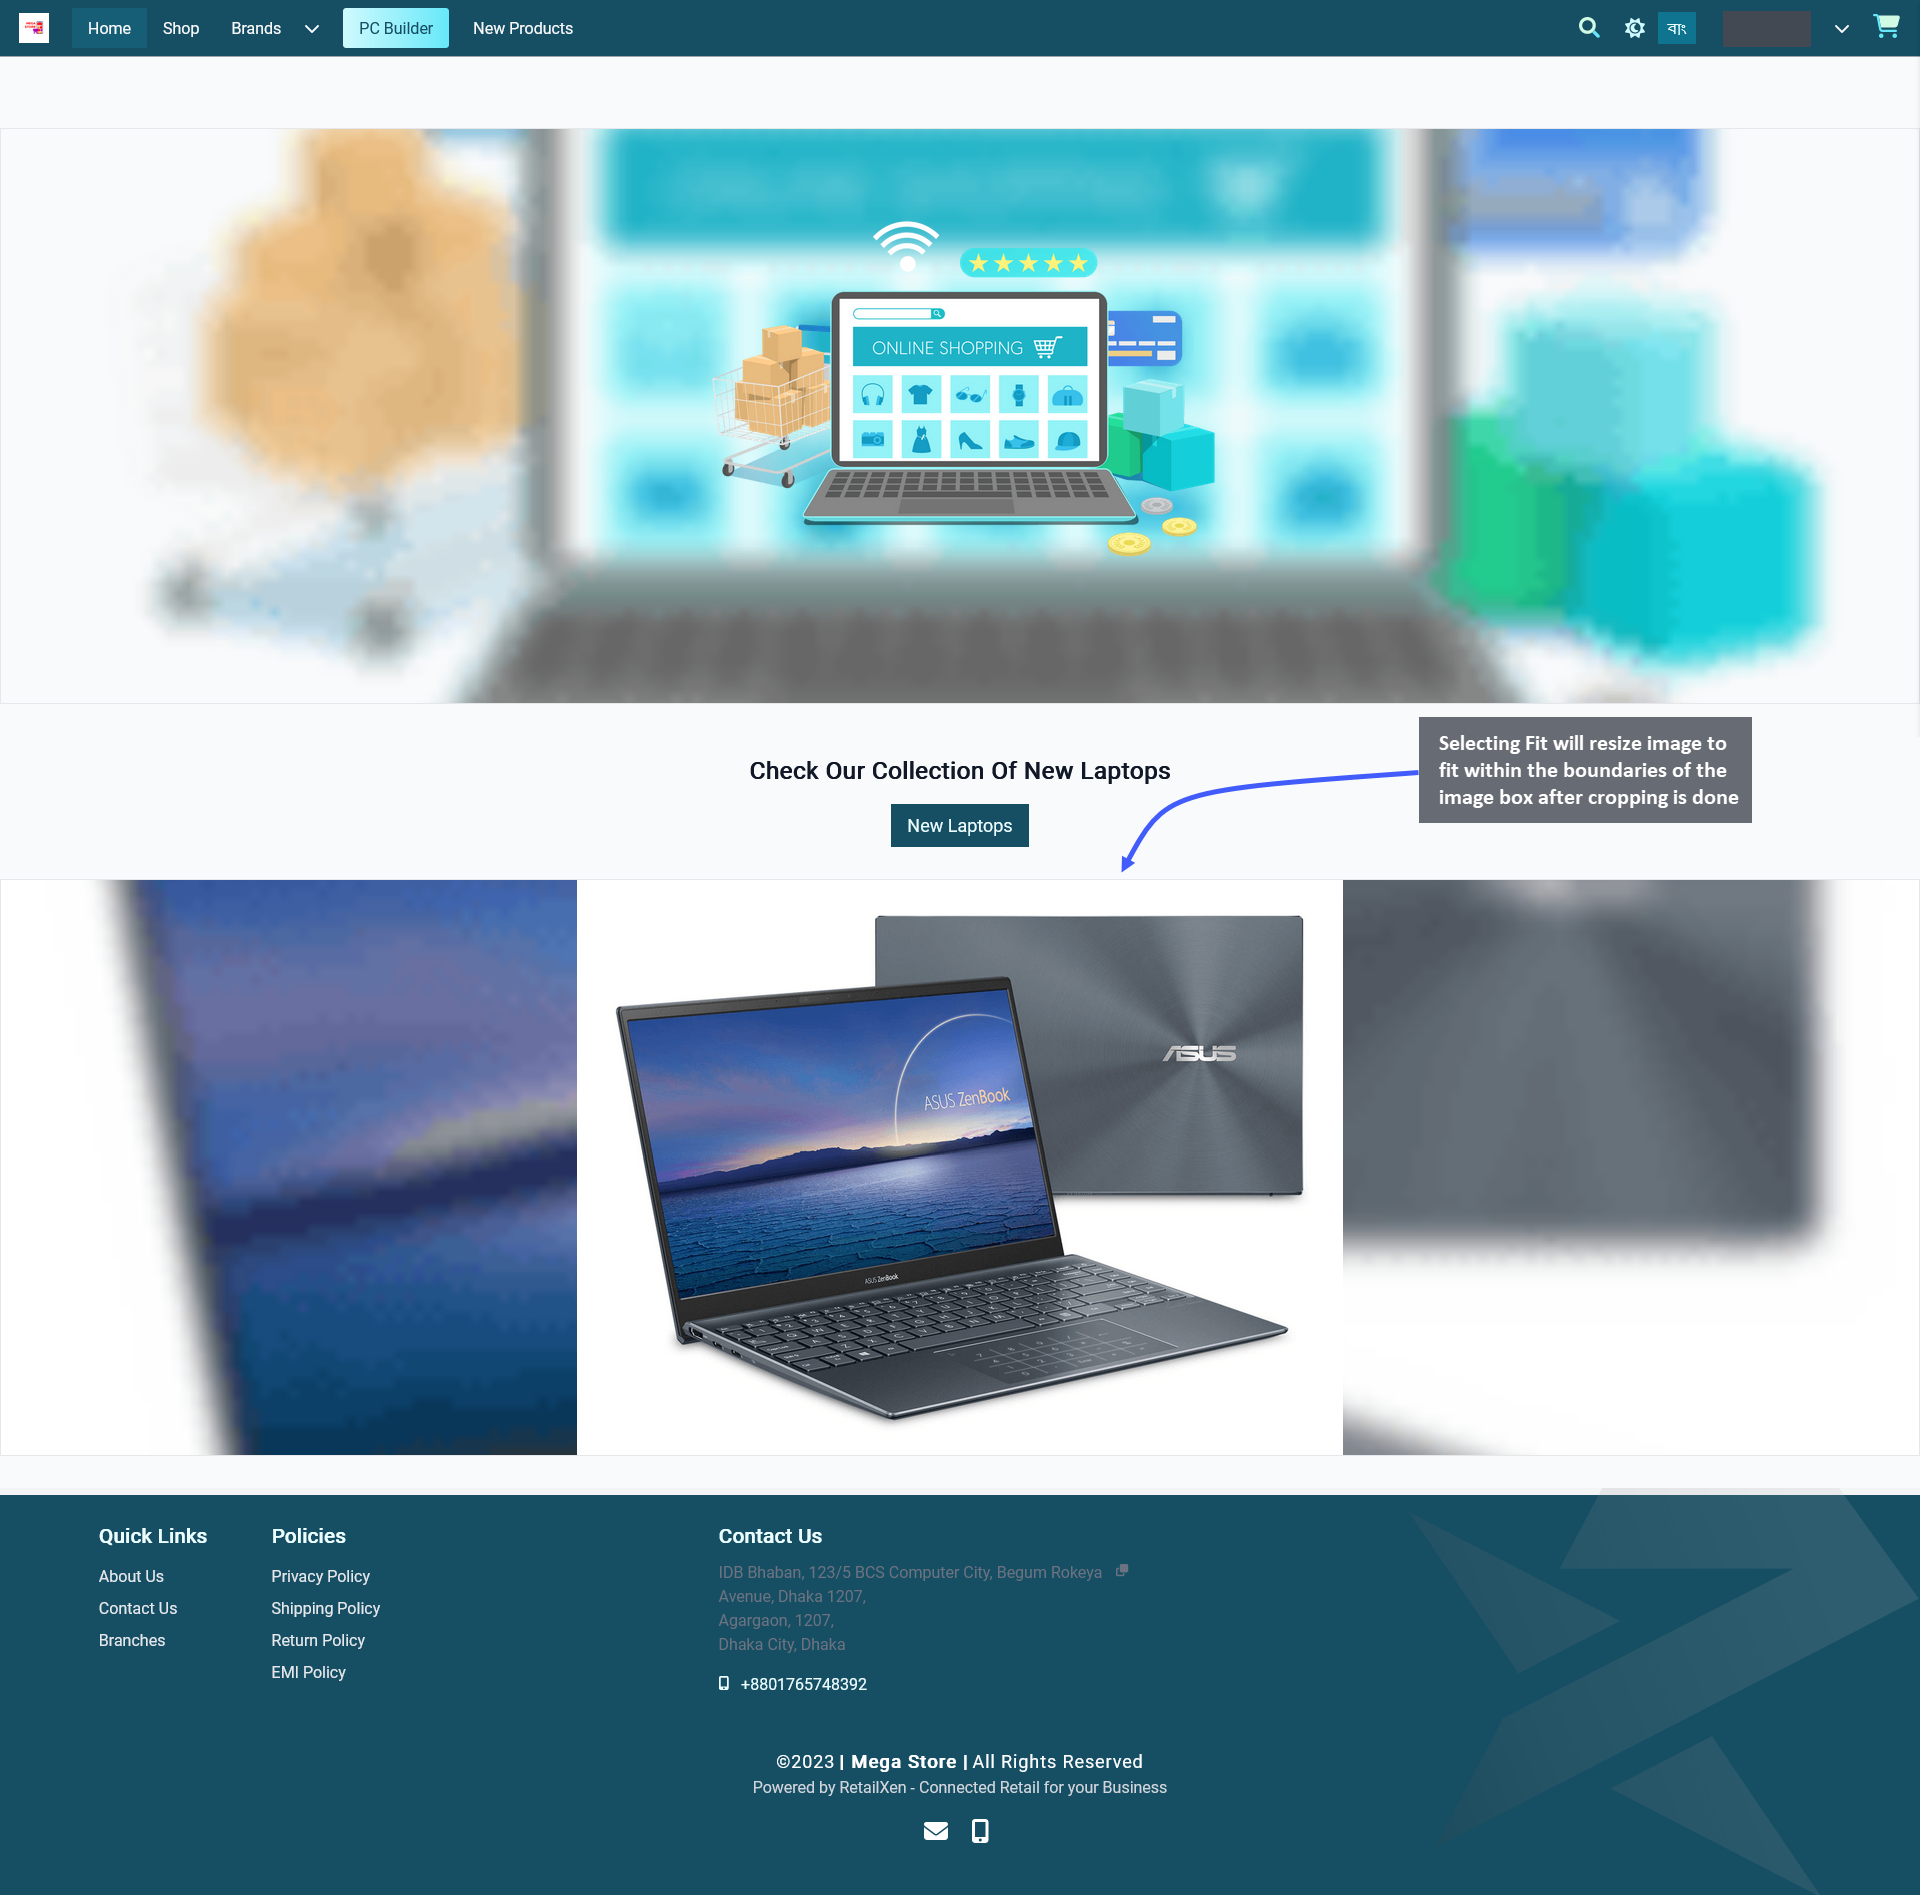
Image 4: Selecting Fit will resize image to fit within the boundaries of the widget box after the cropping.
Selecting Fill will expand an image to fill the whole boundary of the image box after cropping is done. Therefore, use the toggle button to turn on Fill to show the whole cropped portion of image within the widget boundary.
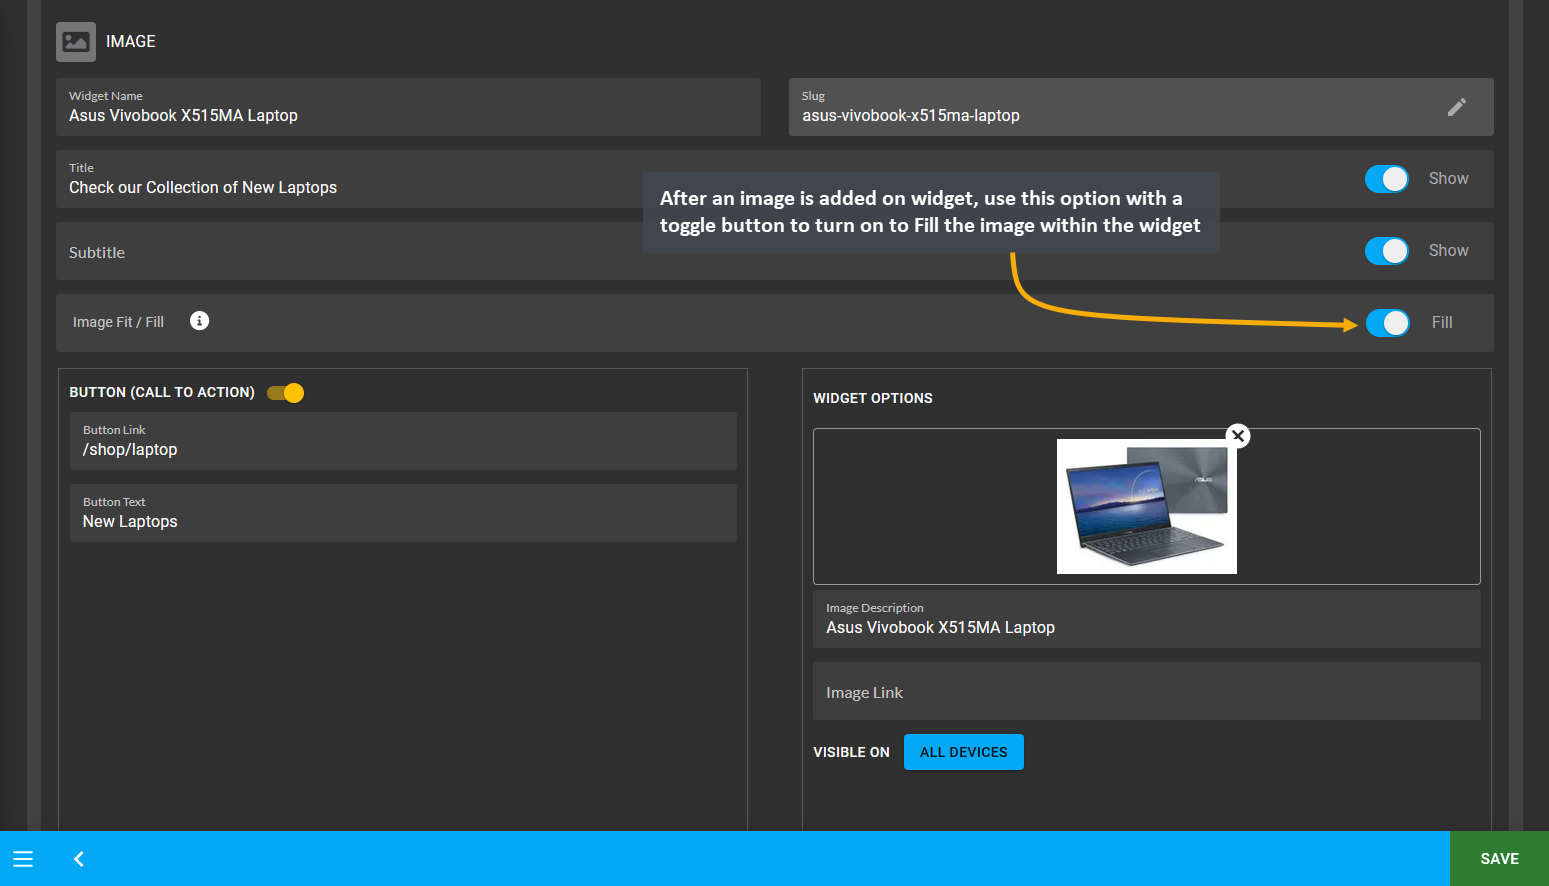
Image 5: After image is added on widget, use toggle button to turn on to Fill the image within the widget.
On the Website, it can be seen that the image was cropped to fill the whole boundary of Image Widget as Fill was selected for it. In this way, the Shop Owner can add several images with Fill option. For best results, try selecting Fill for photographs or banners that will promote a group of new Products, sales offers, or special discounts.
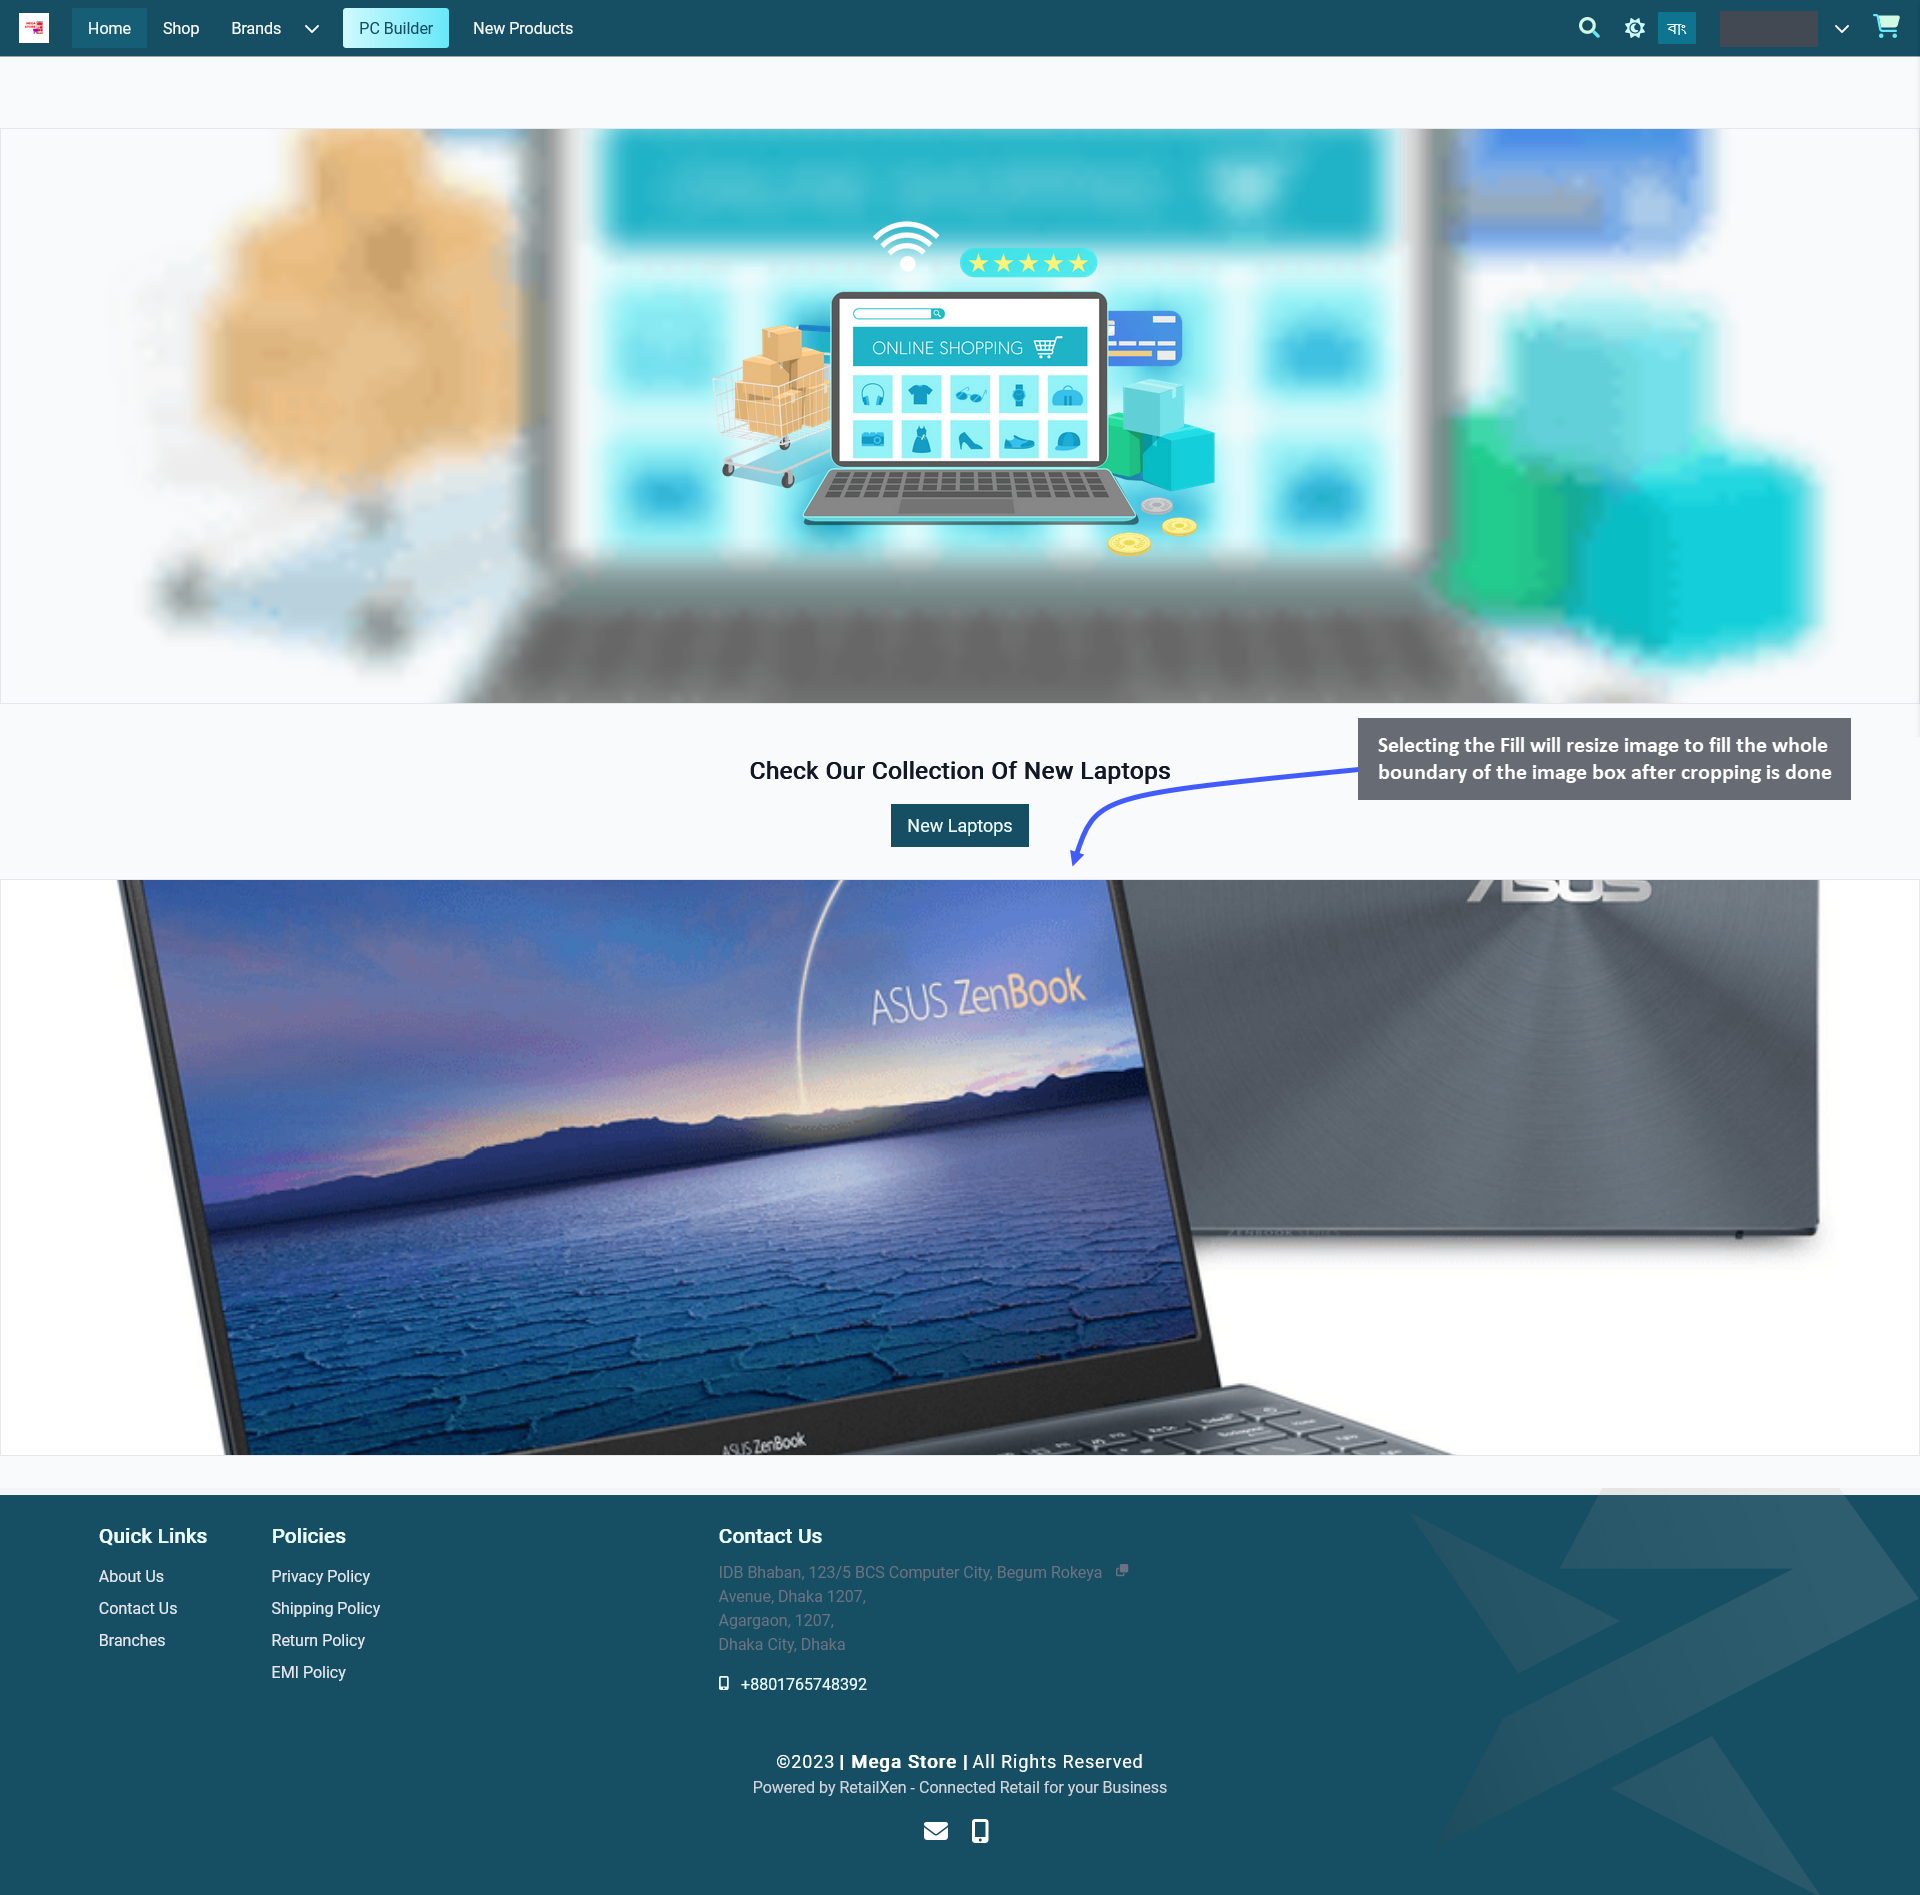
Image 6: Selecting Fill will resize image to fill the whole boundary of the widget box after the cropping.
20.6 - Banner Widget
Create and manage Widgets for promoting the Shop and Products on The Website.
Shop Owners can turn shop visitors into Customers by adding Banner Widgets on The Website. They can be used for digital storytelling, like promoting brand banners, or product sales as they will add design elements to a Page. Add them on different Pages of the Website to showcase Shop or brand logos, and promotional advertisements containing graphic illustrations and visual contents. Shop Owners can introduce page visitors and Customers to their own Brand and Products by adding eye-catching Product promotions using the Banner Widgets.
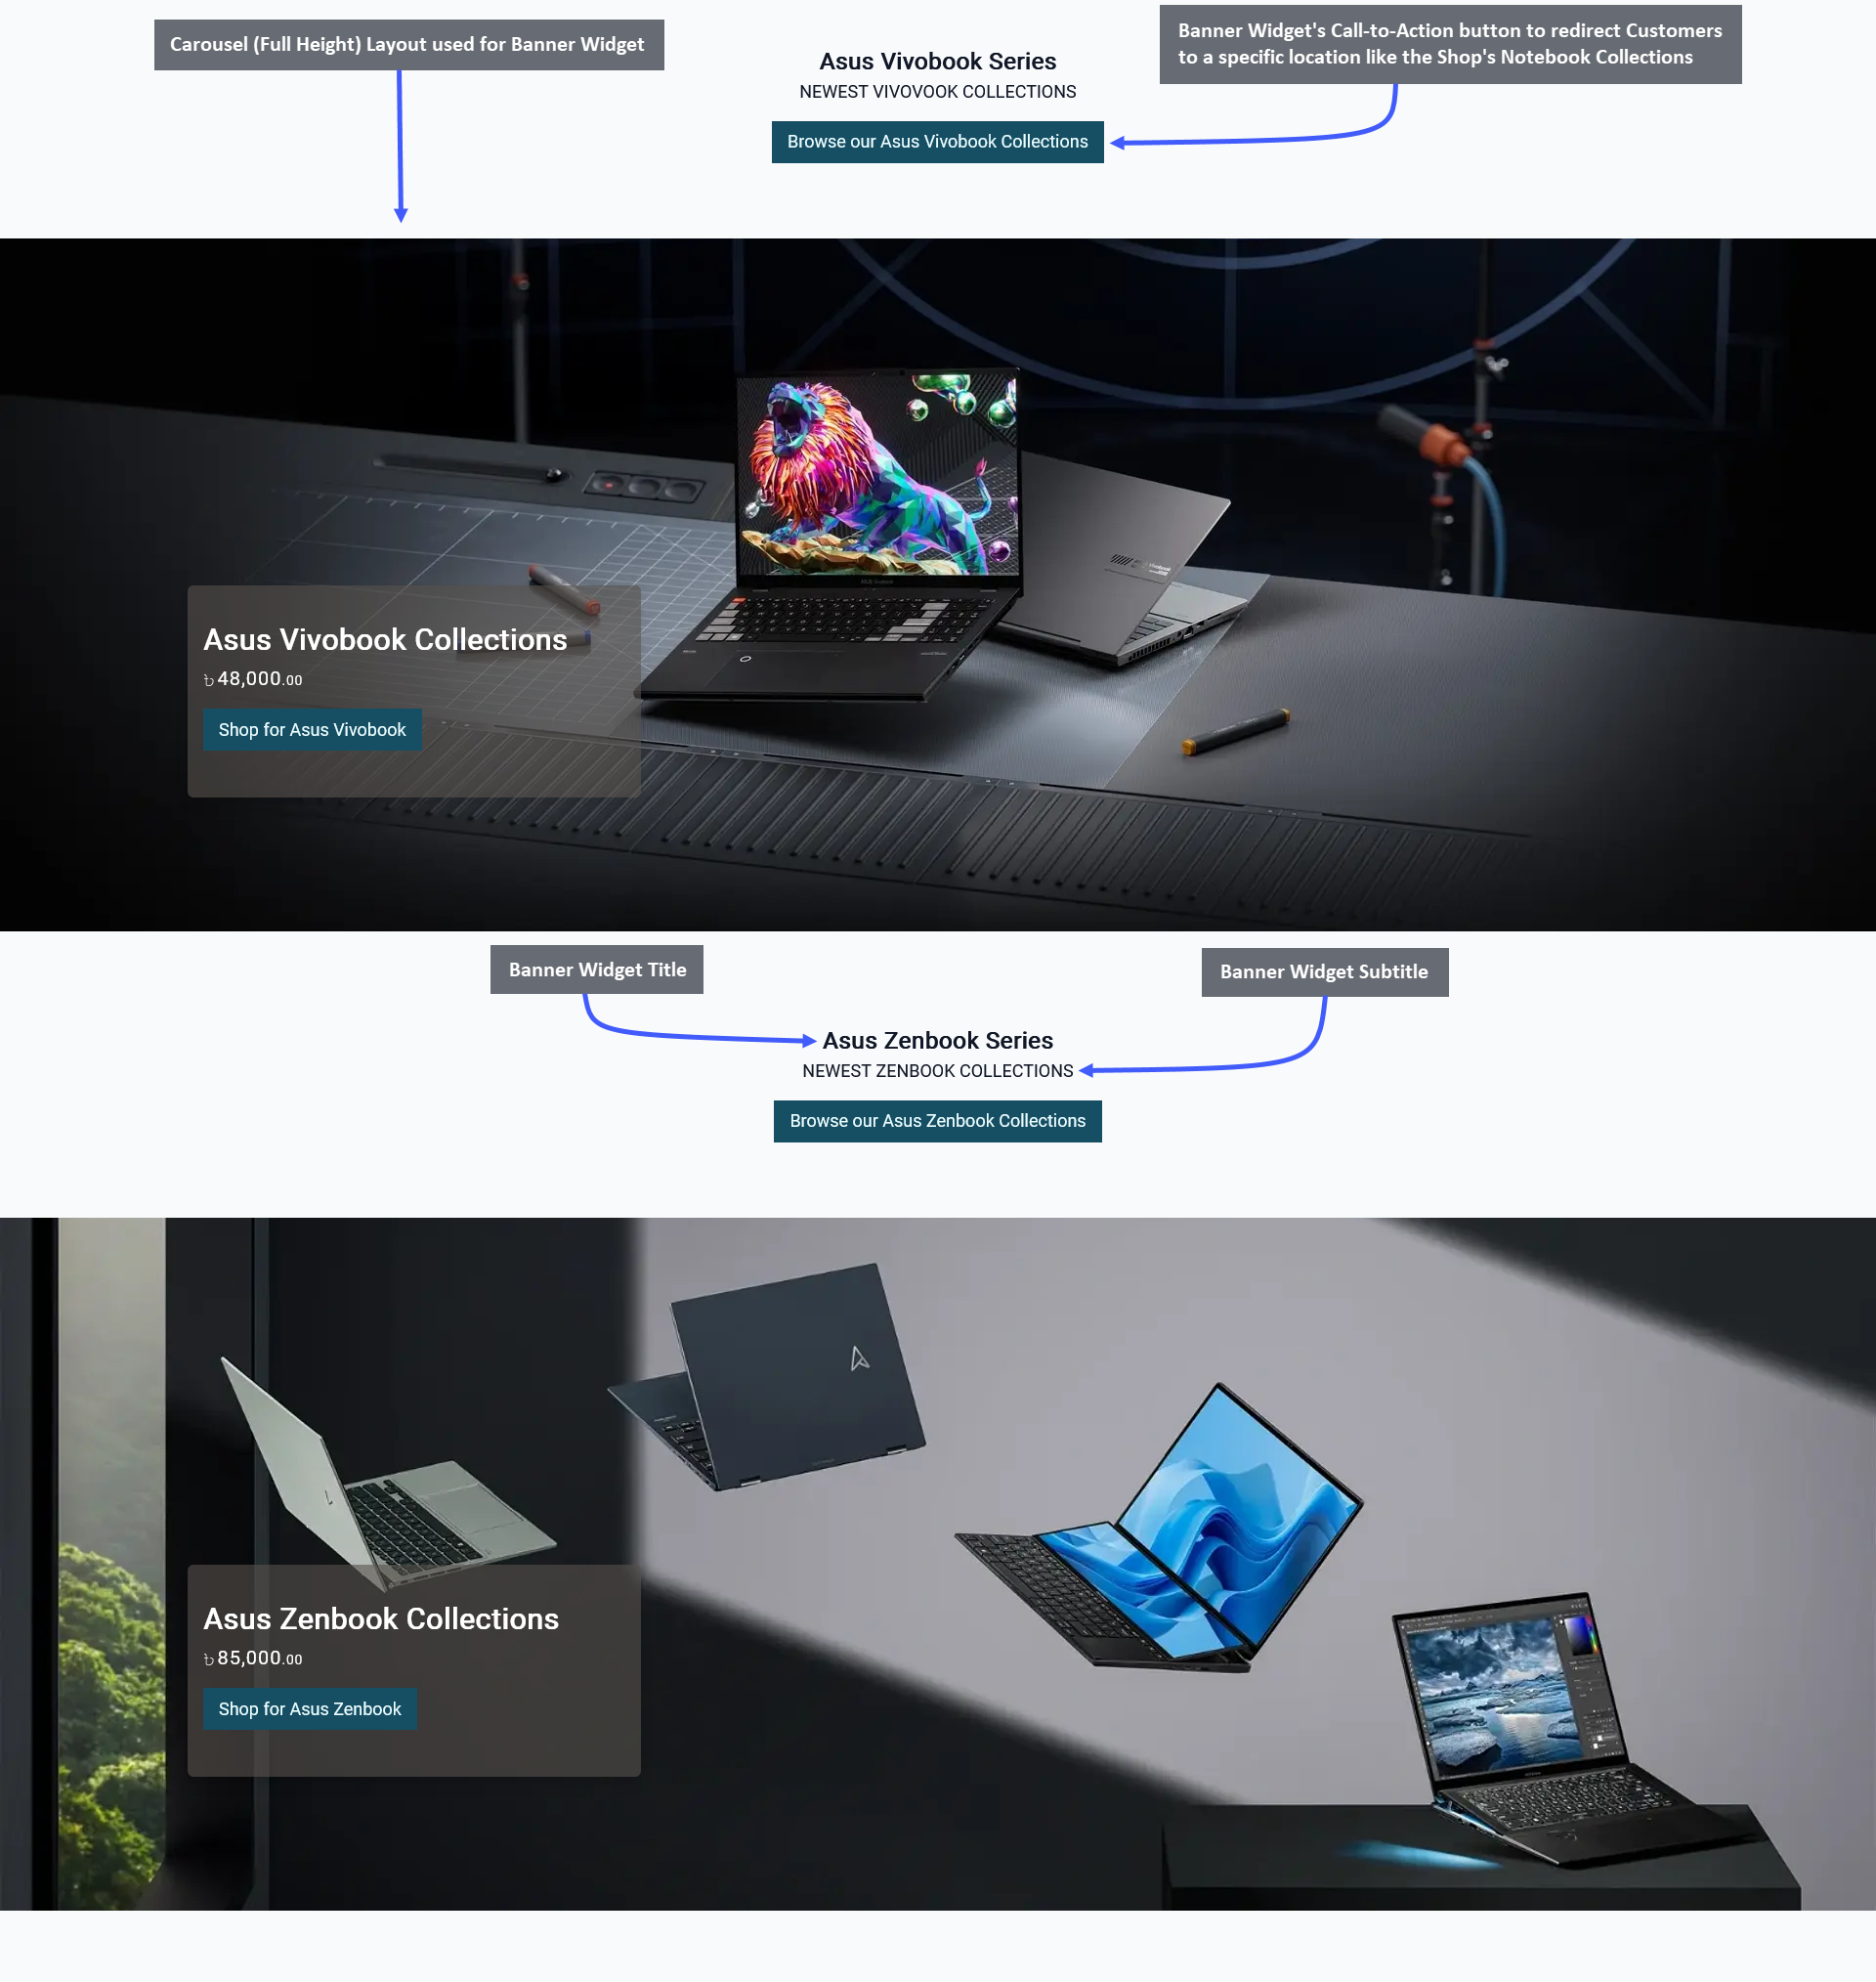
Image 1: Shop Owner can add and show Title, Subtitle, Image, Call-to-Action button using the Banner Widget.
The options to setup Banner Widget includes adding Widget Name, Title, Subtitle, and Slug. There is a toggle button that can be used to enable or disable the Title or Subtitle. Enable and use the Call-to-Action button within Widget adding Button Link and Button Text to redirect Customers to the Website to view the Shop Owner’s listed Products.
Within the Banner Widget, add up to 8 Images like Brand Logo or Sales Banner with the given layouts that include Carousel, Grid 1x2 Horizontal, Grid 1x2 Vertical, Grid 1x3 Horizontal, Grid 1x3 Vertical, Flex Horizontal Wrap, Flex Horizontal No Wrap, and Flex Vertical. Enable and use the Call-to-Action button within Widget adding Button Link and Button Text to redirect Customers to the Website to view the Shop Owner’s listed Products through Banner.
There is a button named All Devices which will make the Widget visible on all types of devices. Therefore, to select specific devices, switch to Visible On and select Mobile, Table, MDPi, or HiDPi as requires. Click the Save button to save all settings. Click the Add New Widget button to add more Banner Widgets within a Page for Shop promotion.
There is a Call-to-Action Button that will redirect visitors and Customers to a Page, like visiting the Shop or Product page. Within the Call-to-Action Button, enable the Button Link (that will redirect visitors to that link) and Button Text (stating the function of the button) to be displayed. Use the toggle for Call-to-Action Button to turn it on and off.
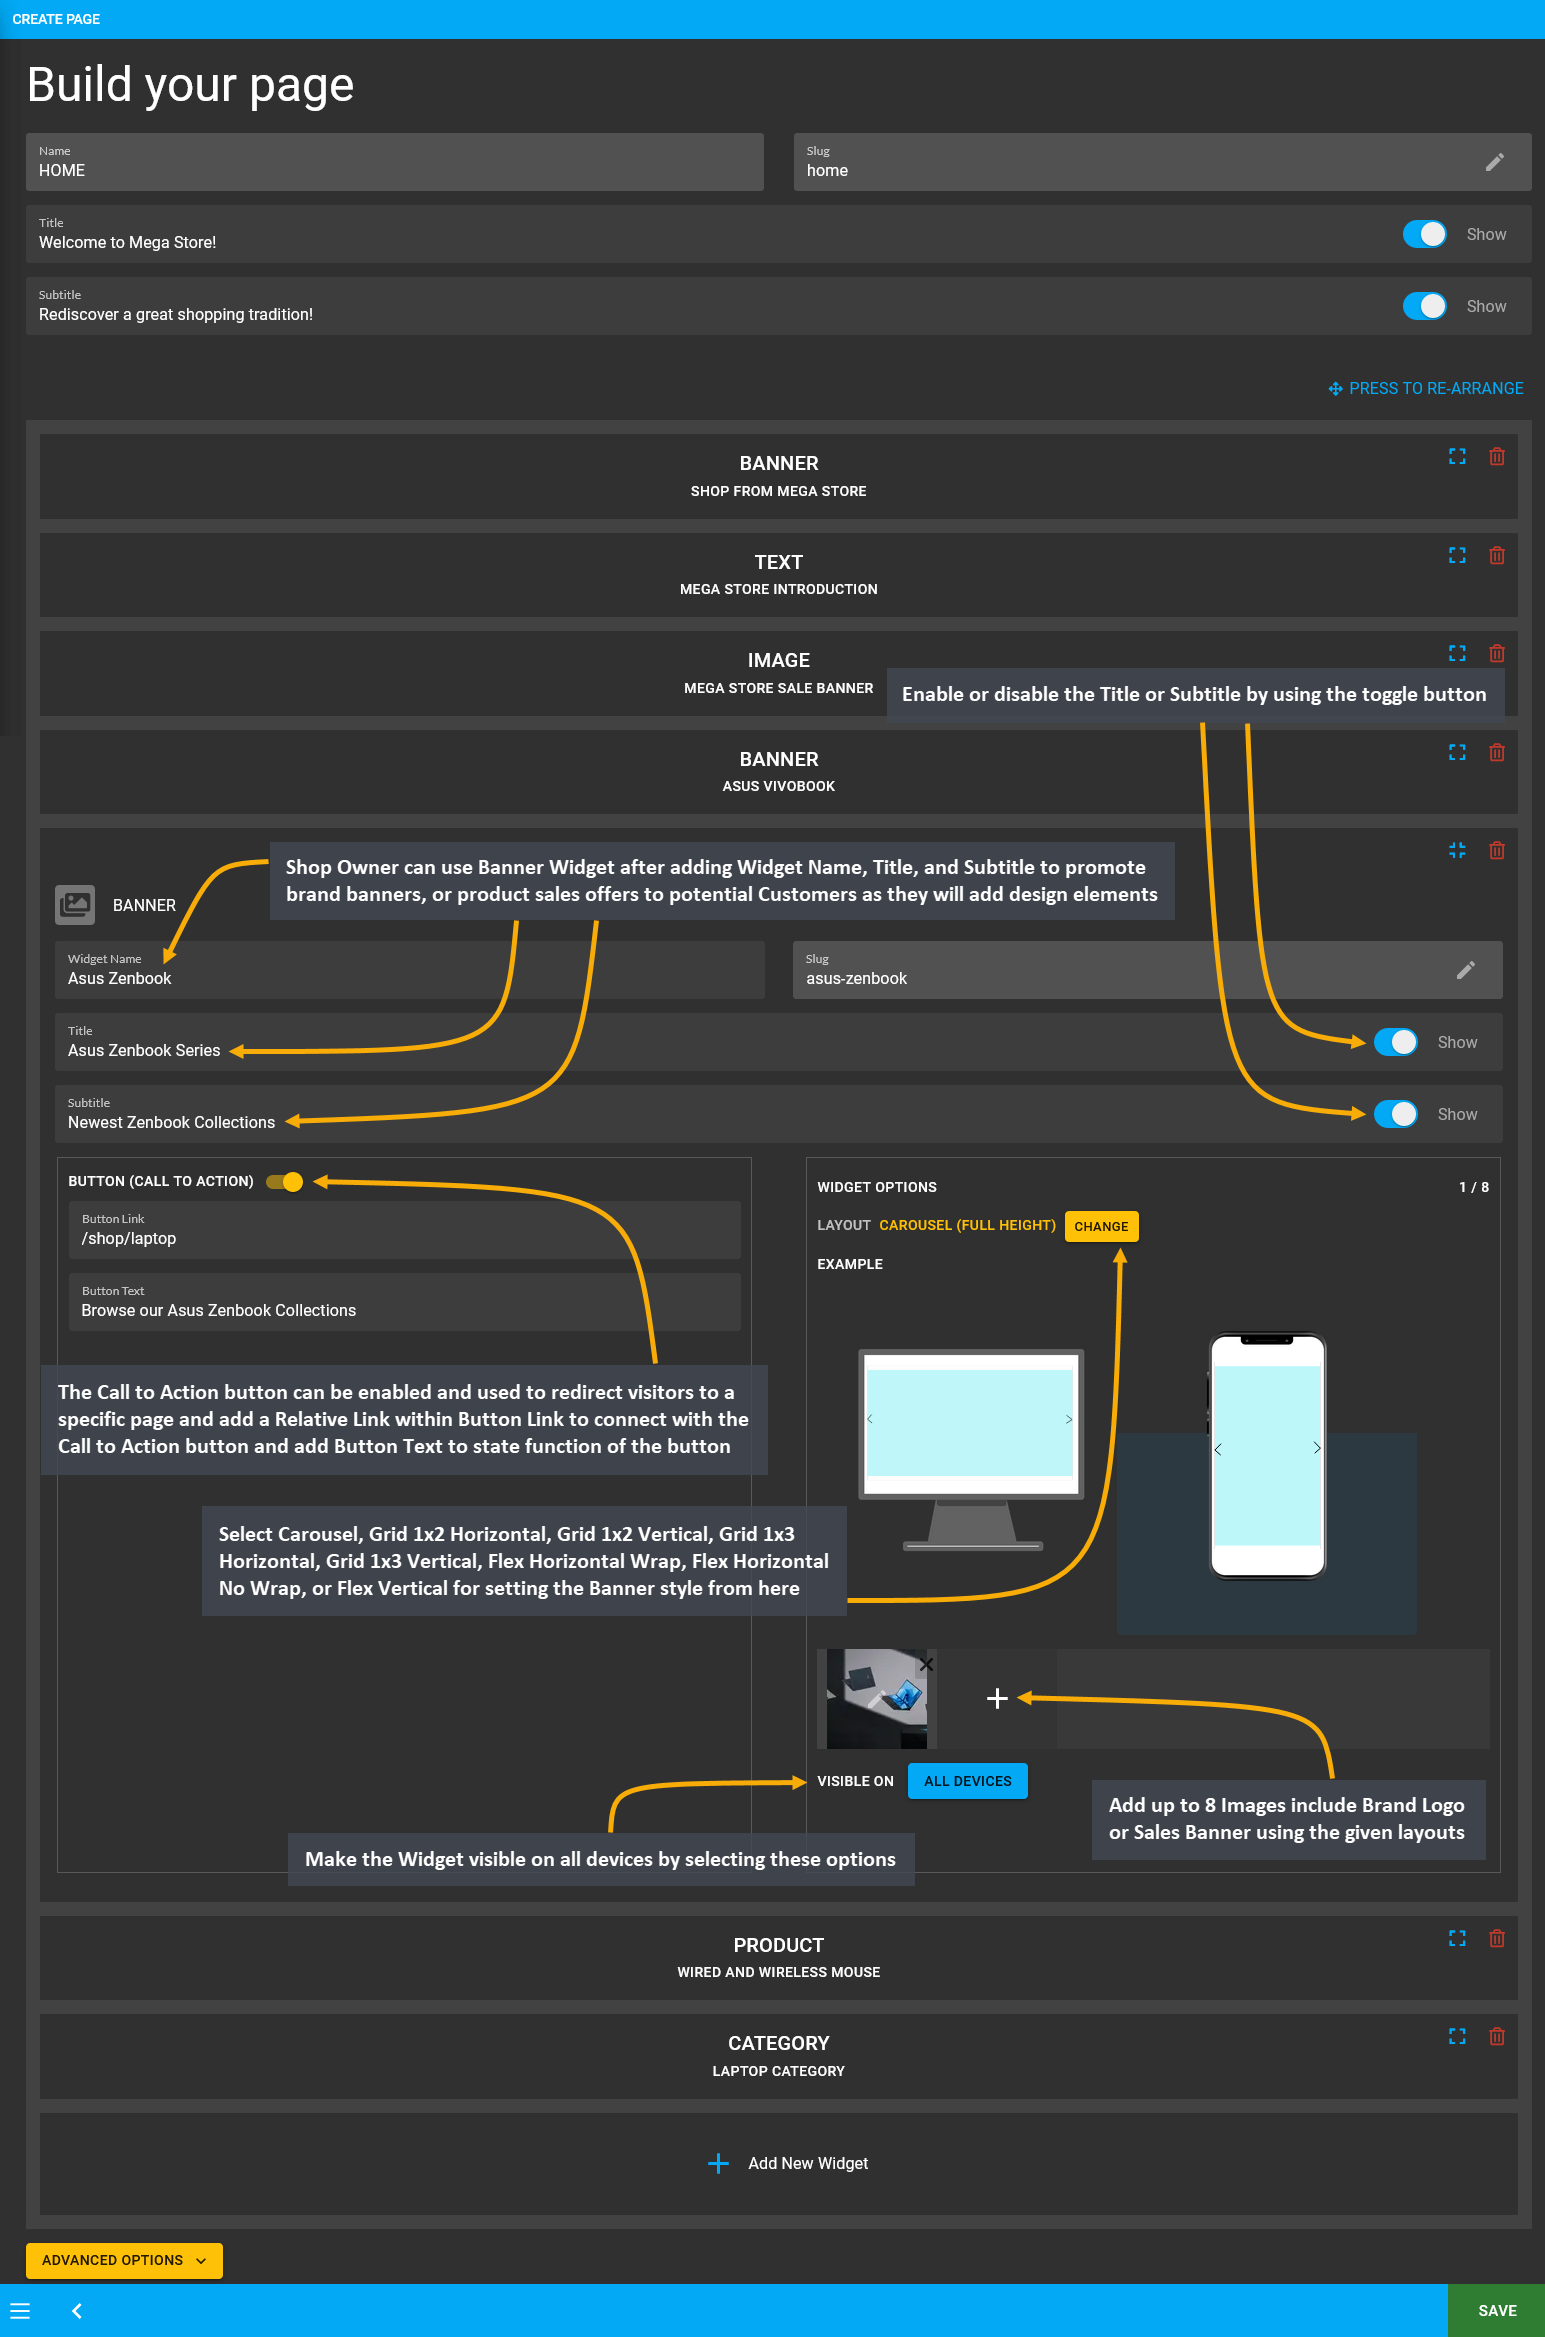
Image 2: Use Banner Widget to promote Brand banners, or Product sales offers to the potential Customers.
Banner Image Settings
When Banner Widget image upload option is clicked, it opens a pop-up for Banner image settings. A Call-to-Action Button can be set with Button Link and Button Text to show inside the Banner to redirect Customers to a specific location, like the Shop’s Notebook collections. Set Image Description and an Image Link to redirect Customers to a specific Page and make the Banner Widget clickable. Set Price to display Product pricing inside the Banner above the Call-to-Action Button. Also, set a Title and Subtitle to show above price. Click Save to proceed with changes.
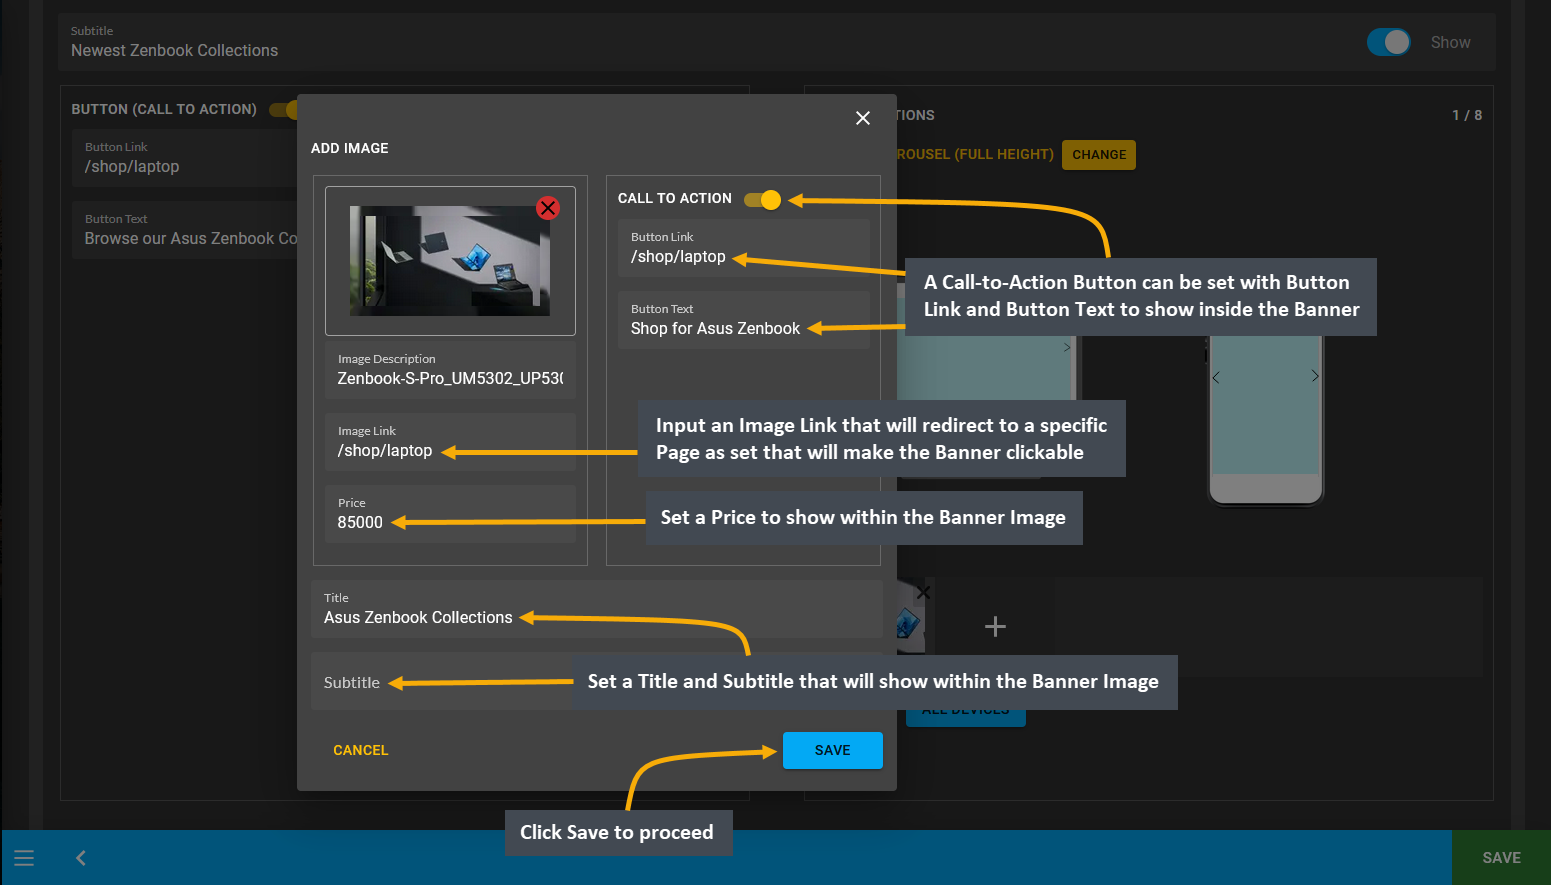
Image 3: Set Call-to-Action button, Image Description, Image Link, Price, Title, and inside Banner Image.
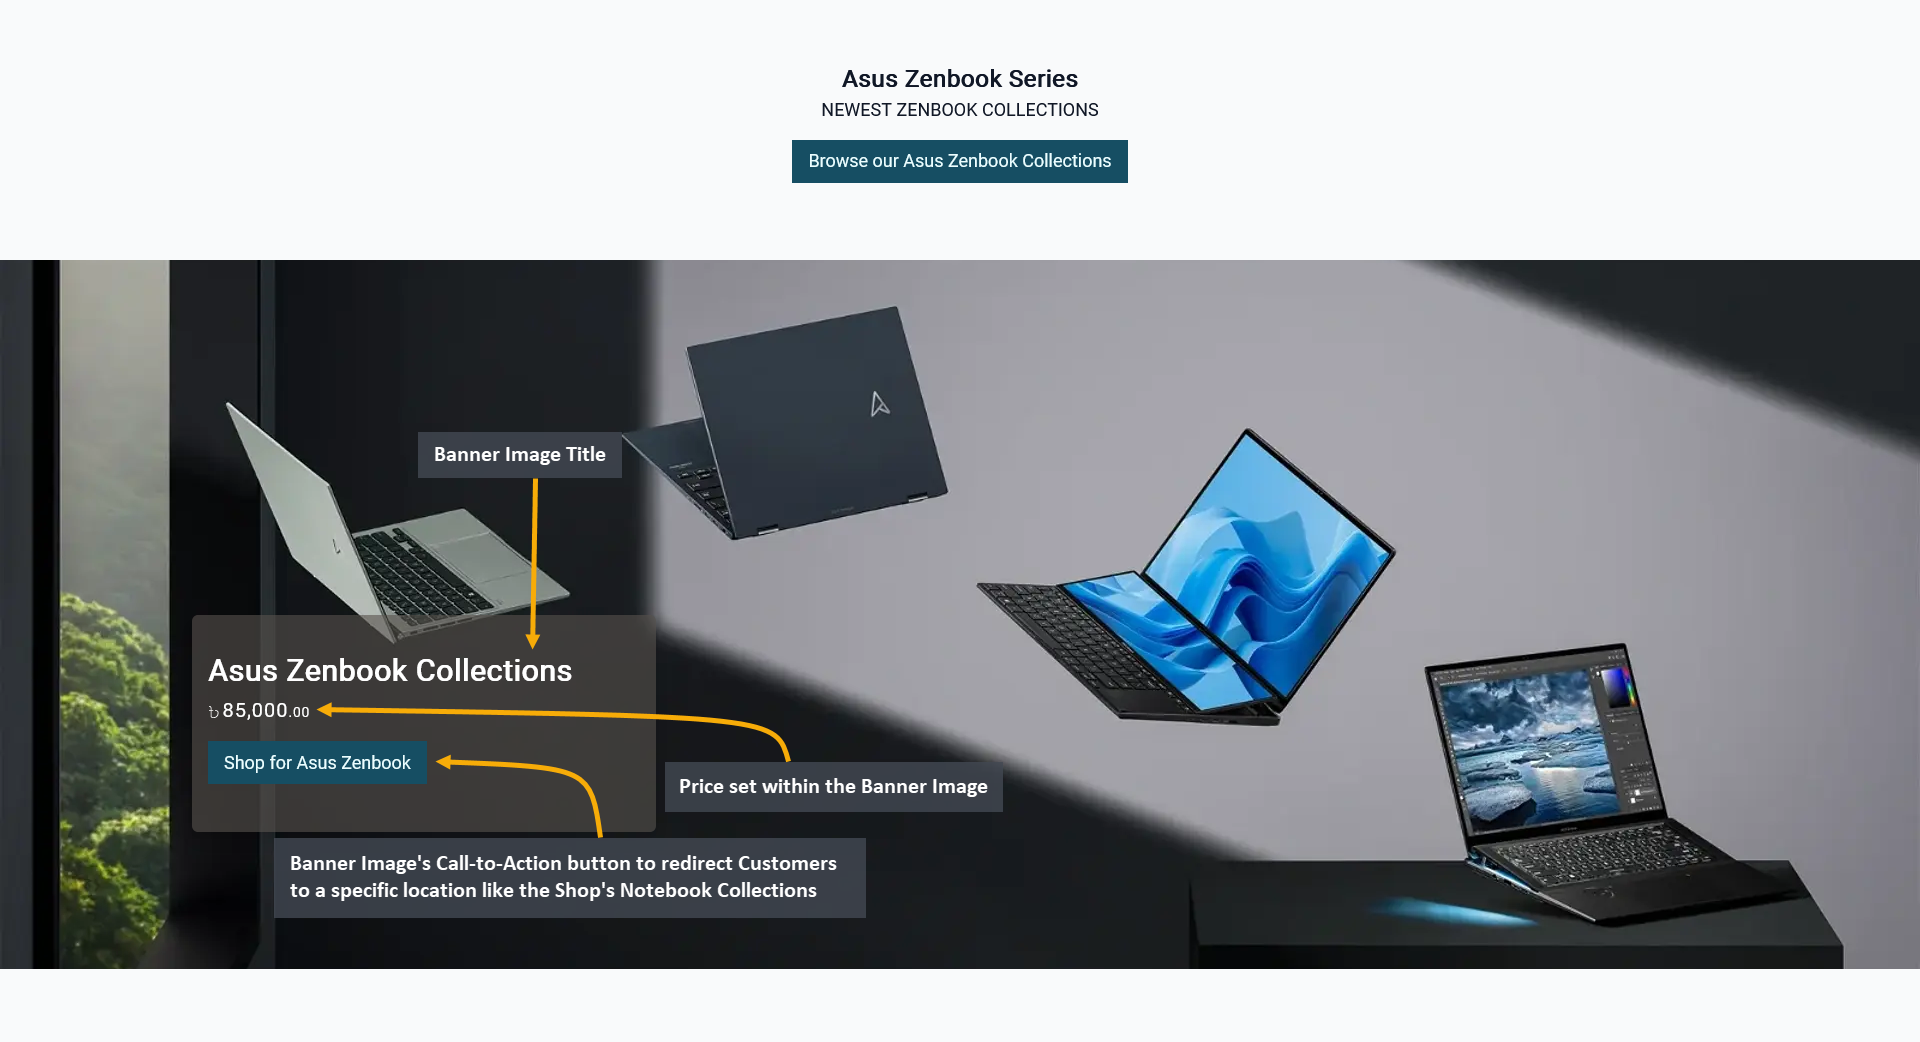
Image 4: Banner Image can have Title, Subtitle, Price, and Call-to-Action button to redirect the Customers.
20.7 - Product Widget
Create and manage Widgets for promoting the Shop and Products on The Website.
Product Widgets allow displaying specific Product groups on The Website assigned under any Category or Tag. To bring Customers’ attention to a specific batch of Products, Shop Owners can display Product Widgets. Featured Products from a specific Product Category or Tag can be advertised on the Website to boost sales for the Shop.
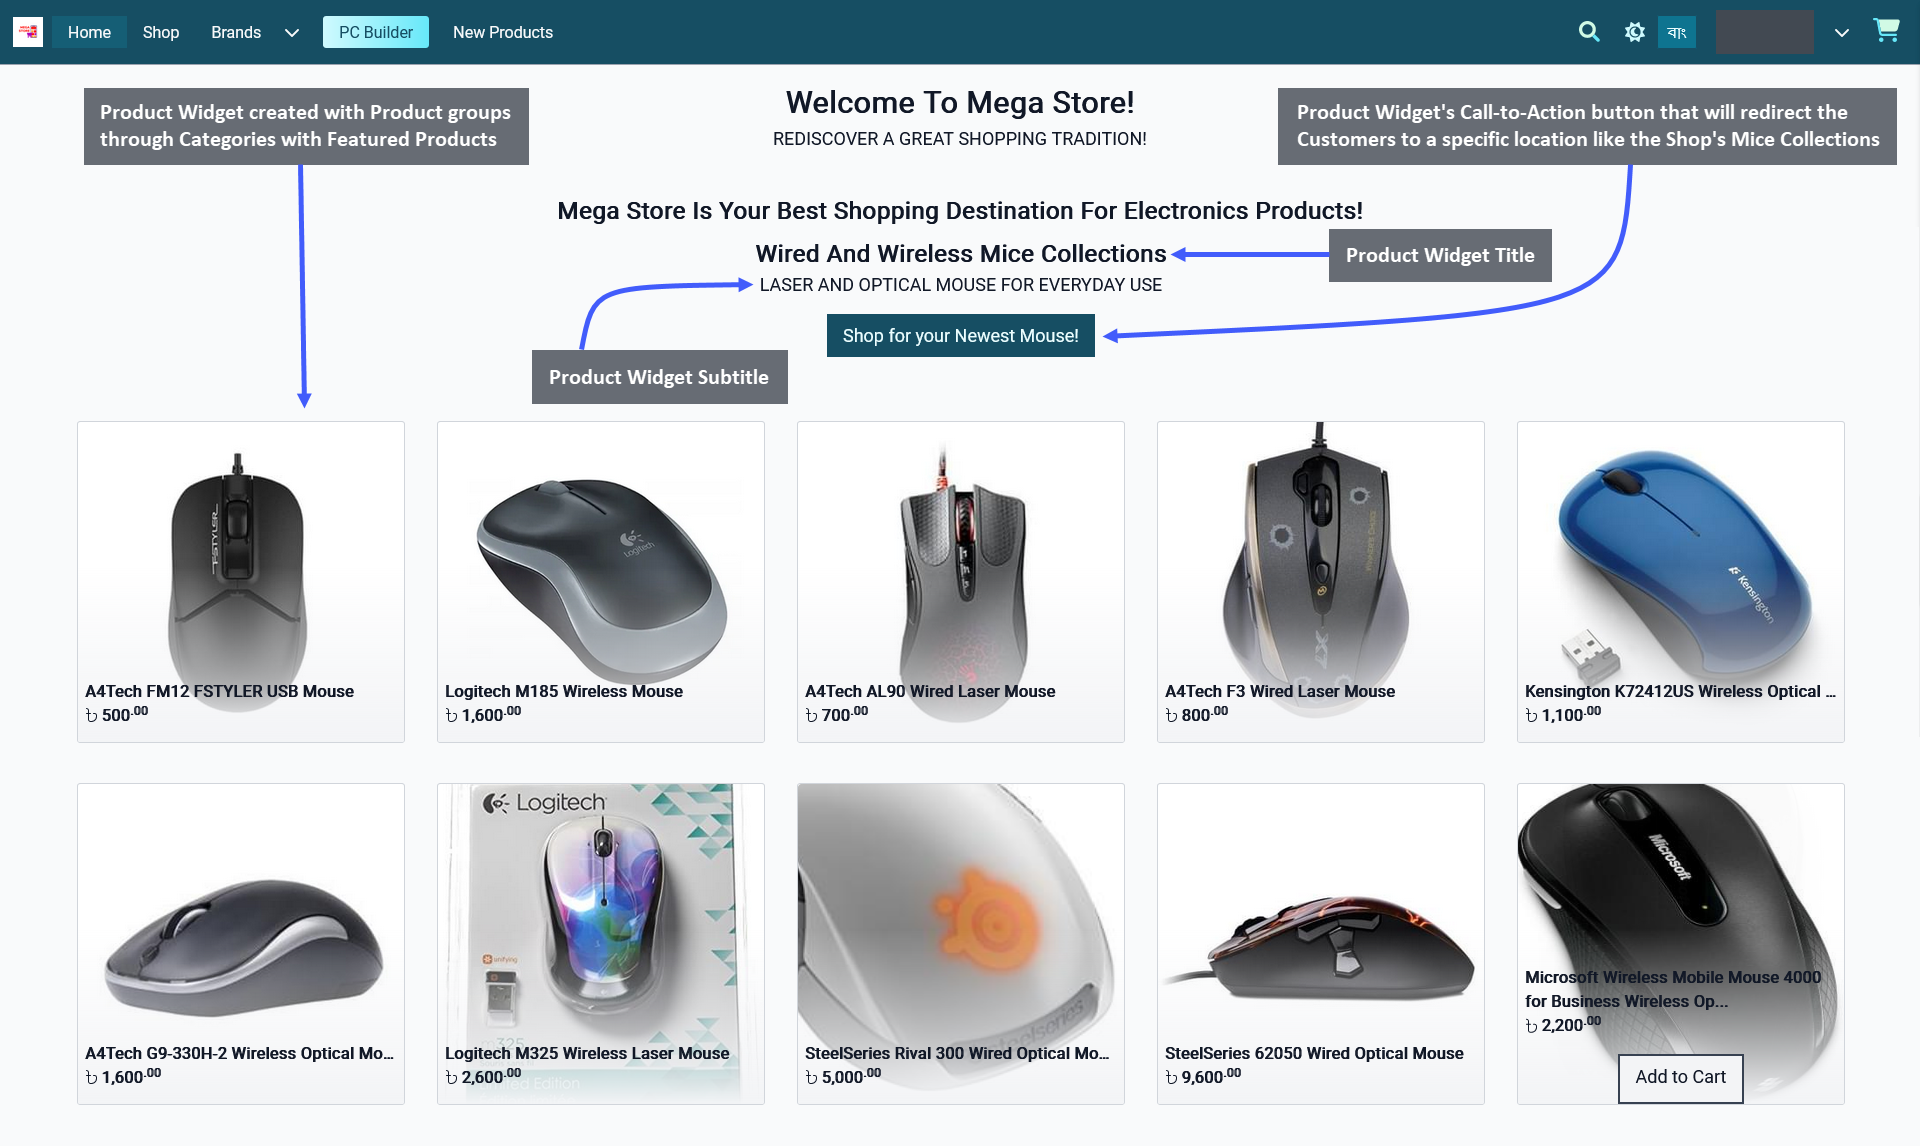
Image 1: Shop Owner can display Title, Subtitle, Products, and Call-to-Action button using Product Widget.
The options to setup Image Widget includes adding Widget Name, Title, Subtitle, and Slug. There is a toggle button that can be used to enable or disable the Title or Subtitle. Enable and use the Call-to-Action button within Widget adding Button Link and Button Text to redirect Customers to the Website to view the Shop Owner’s listed Products.
Select up to 5 Categories or 5 Tags for the Widget from the dropdown menu and set the Max Quantity for display up to 10 Products. Within widget options, Shop Owners can enable or disable Include Child Categories or Include Child Tags toggle to show Child Categories or Child Tags, and Only Featured toggle to show the Featured Products.
Child Categories under Categories or Child Tags under Tags can be displayed within a Product Widget by turning on the Include Child Categories or Include Child Tags toggle. Featured Products can be displayed from Product Category or Tag by turning on the Only Featured toggle. Turning off these toggles will not show the Child Categories, Tags, or Featured Products. Select the Sort Direction as Ascending or Descending and the Sort By as Added or Updated.
There is a button named All Devices which will make the Widget visible on all devices. To select any specific device, switch to Visible On and select Mobile, Table, MDPi, or HiDPi as requires. Click the Save button to save all settings. Click the Add New Widget button to add more Product Widgets within a Default or Custom Page.
There is a Call-to-Action Button that will redirect visitors and Customers to a Page, like visiting the Shop or Product page. Within the Call-to-Action Button, enable the Button Link (that will redirect visitors to that link) and Button Text (stating the function of the button) to be displayed. Use the toggle for Call-to-Action Button to turn it on and off.
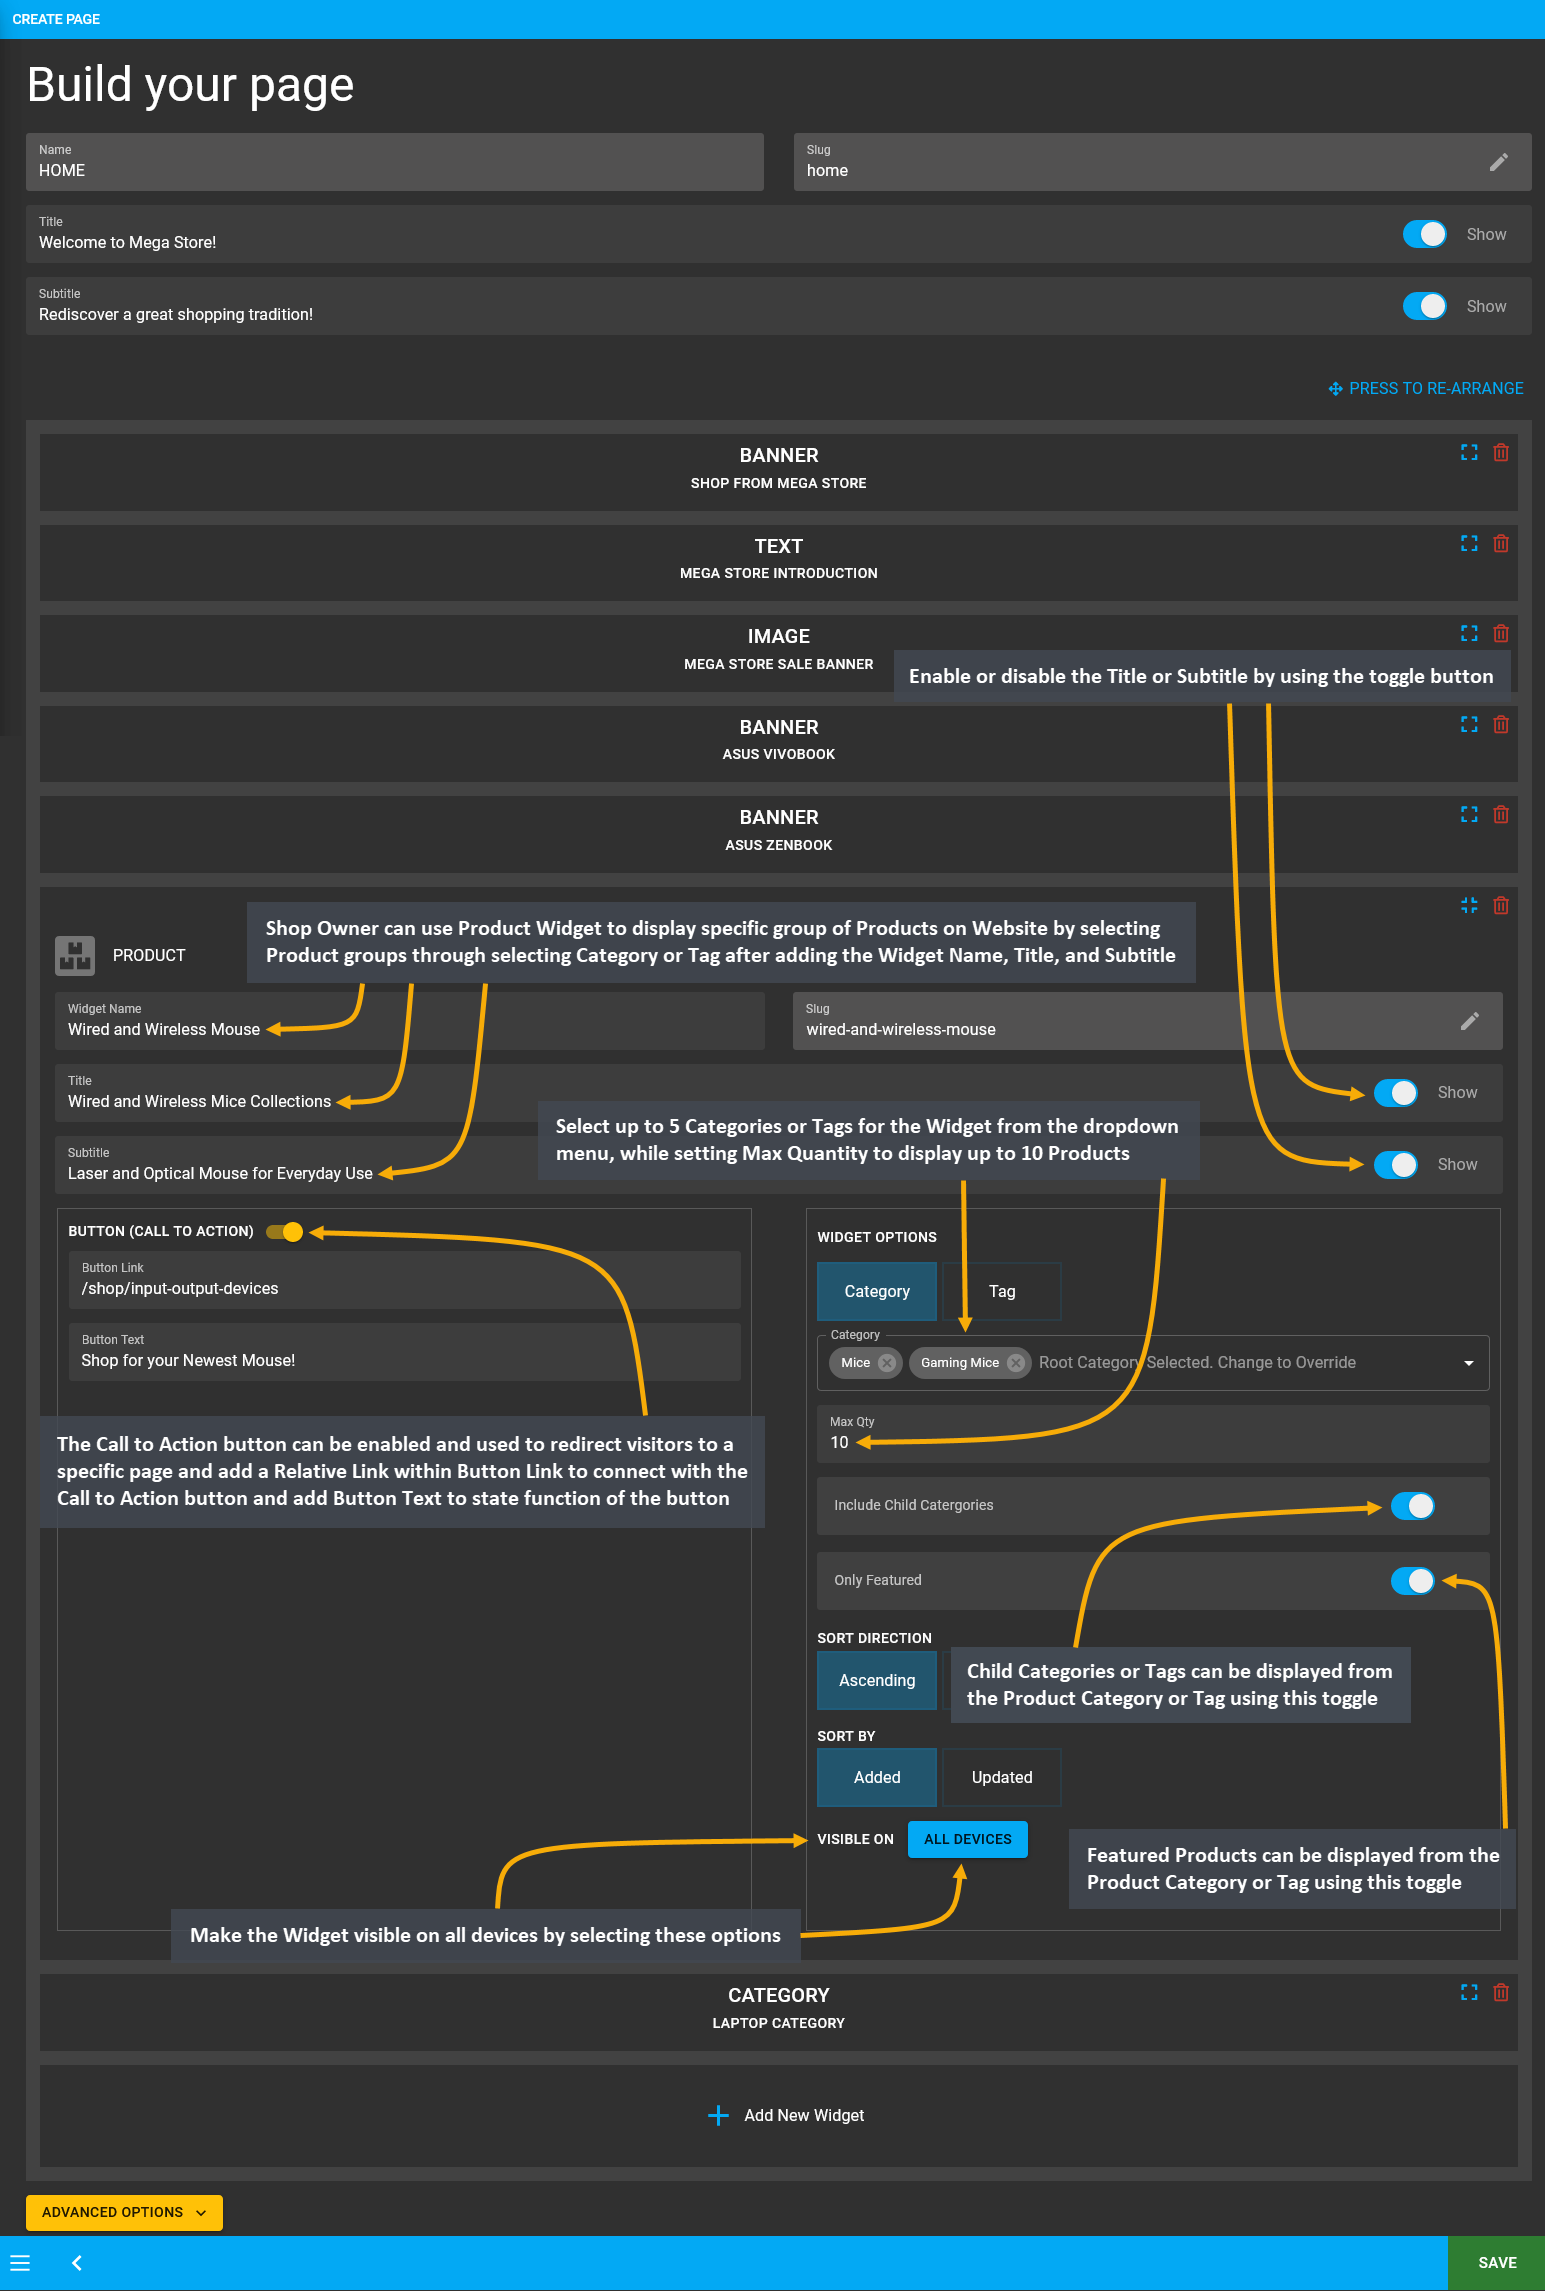
Image 2: Use Product Widget to display any Product group on The Website assigned under any Category or Tag.
20.8 - Category Widget
Create and manage Widgets for promoting the Shop and Products on The Website.
Display target Product Categories on The Website through Category Widgets. Customers can easily click on these Category Widgets to shop for Products under those Categories. Category Widgets can be used to show available Product Category or Tag on the Website that will give Shoppers an idea about where to find their target Products within Categories or Tags. Clicking on a Category will redirect Customers to its Product groups on the Shop.
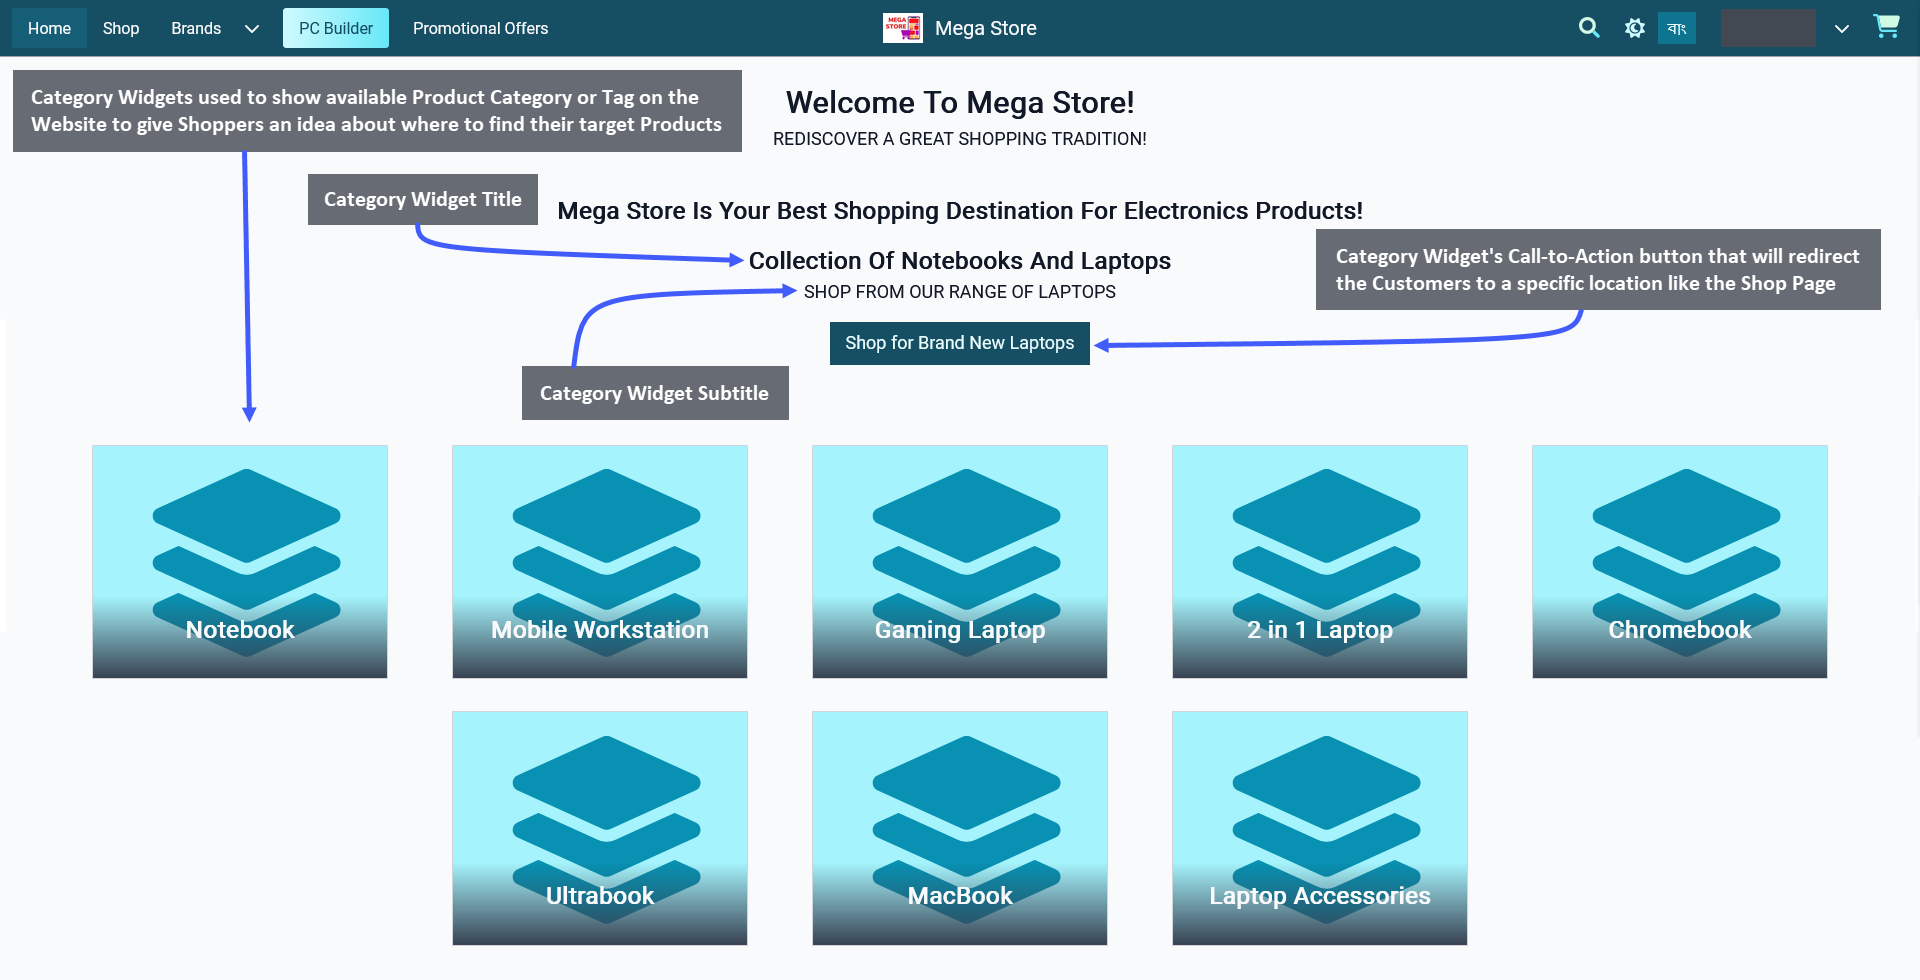
Image 1: Display Title, Subtitle, Categories, or Tags, and Call-to-Action button using the Category Widget.
The options to setup Category Widget includes adding Widget Name, Title, Subtitle, and Slug. Use the toggle button to enable or disable the Title or Subtitle. Enable and use the Call-to-Action button within Widget adding Button Link and Button Text to redirect Customers to the Website to view the Shop Owner’s listed Categories.
Category Widgets can be used to show Product Category or Tag on Website. Select a Category or Tag and add up to maximum 10 Quantities of Products under that Category or Tag to be on display. All the Child Categories or Child Tags will show if the Parent Category or Parent Tag is selected. However, if there are no Child Categories or Child Tags within the Parent Category or Parent Tag, then only the Parent Category or Parent Tag will show on Website.
From the Website example, it can be seen that several Child Categories that are assigned under the Main Laptop Category are being displayed. Select the Sort Direction as Ascending or Descending and Sort By as Name, Added, or Updated from the Category Widget setup option to display Categories or Tags under this widget.
There is a button named All Devices which will make the Widget visible on all types of devices. Therefore, to select specific devices, switch to Visible On and select Mobile, Table, MDPi, or HiDPi as requires. Click the Save button to save all settings. Click the Add New Widget button to add more Category Widgets within a Page for Shop promotion.
There is a Call-to-Action Button that will redirect visitors and Customers to a Page, like visiting the Shop or Product page. Within the Call-to-Action Button, enable the Button Link (that will redirect visitors to that link) and Button Text (stating the function of the button) to be displayed. Use the toggle for Call-to-Action Button to turn it on and off.
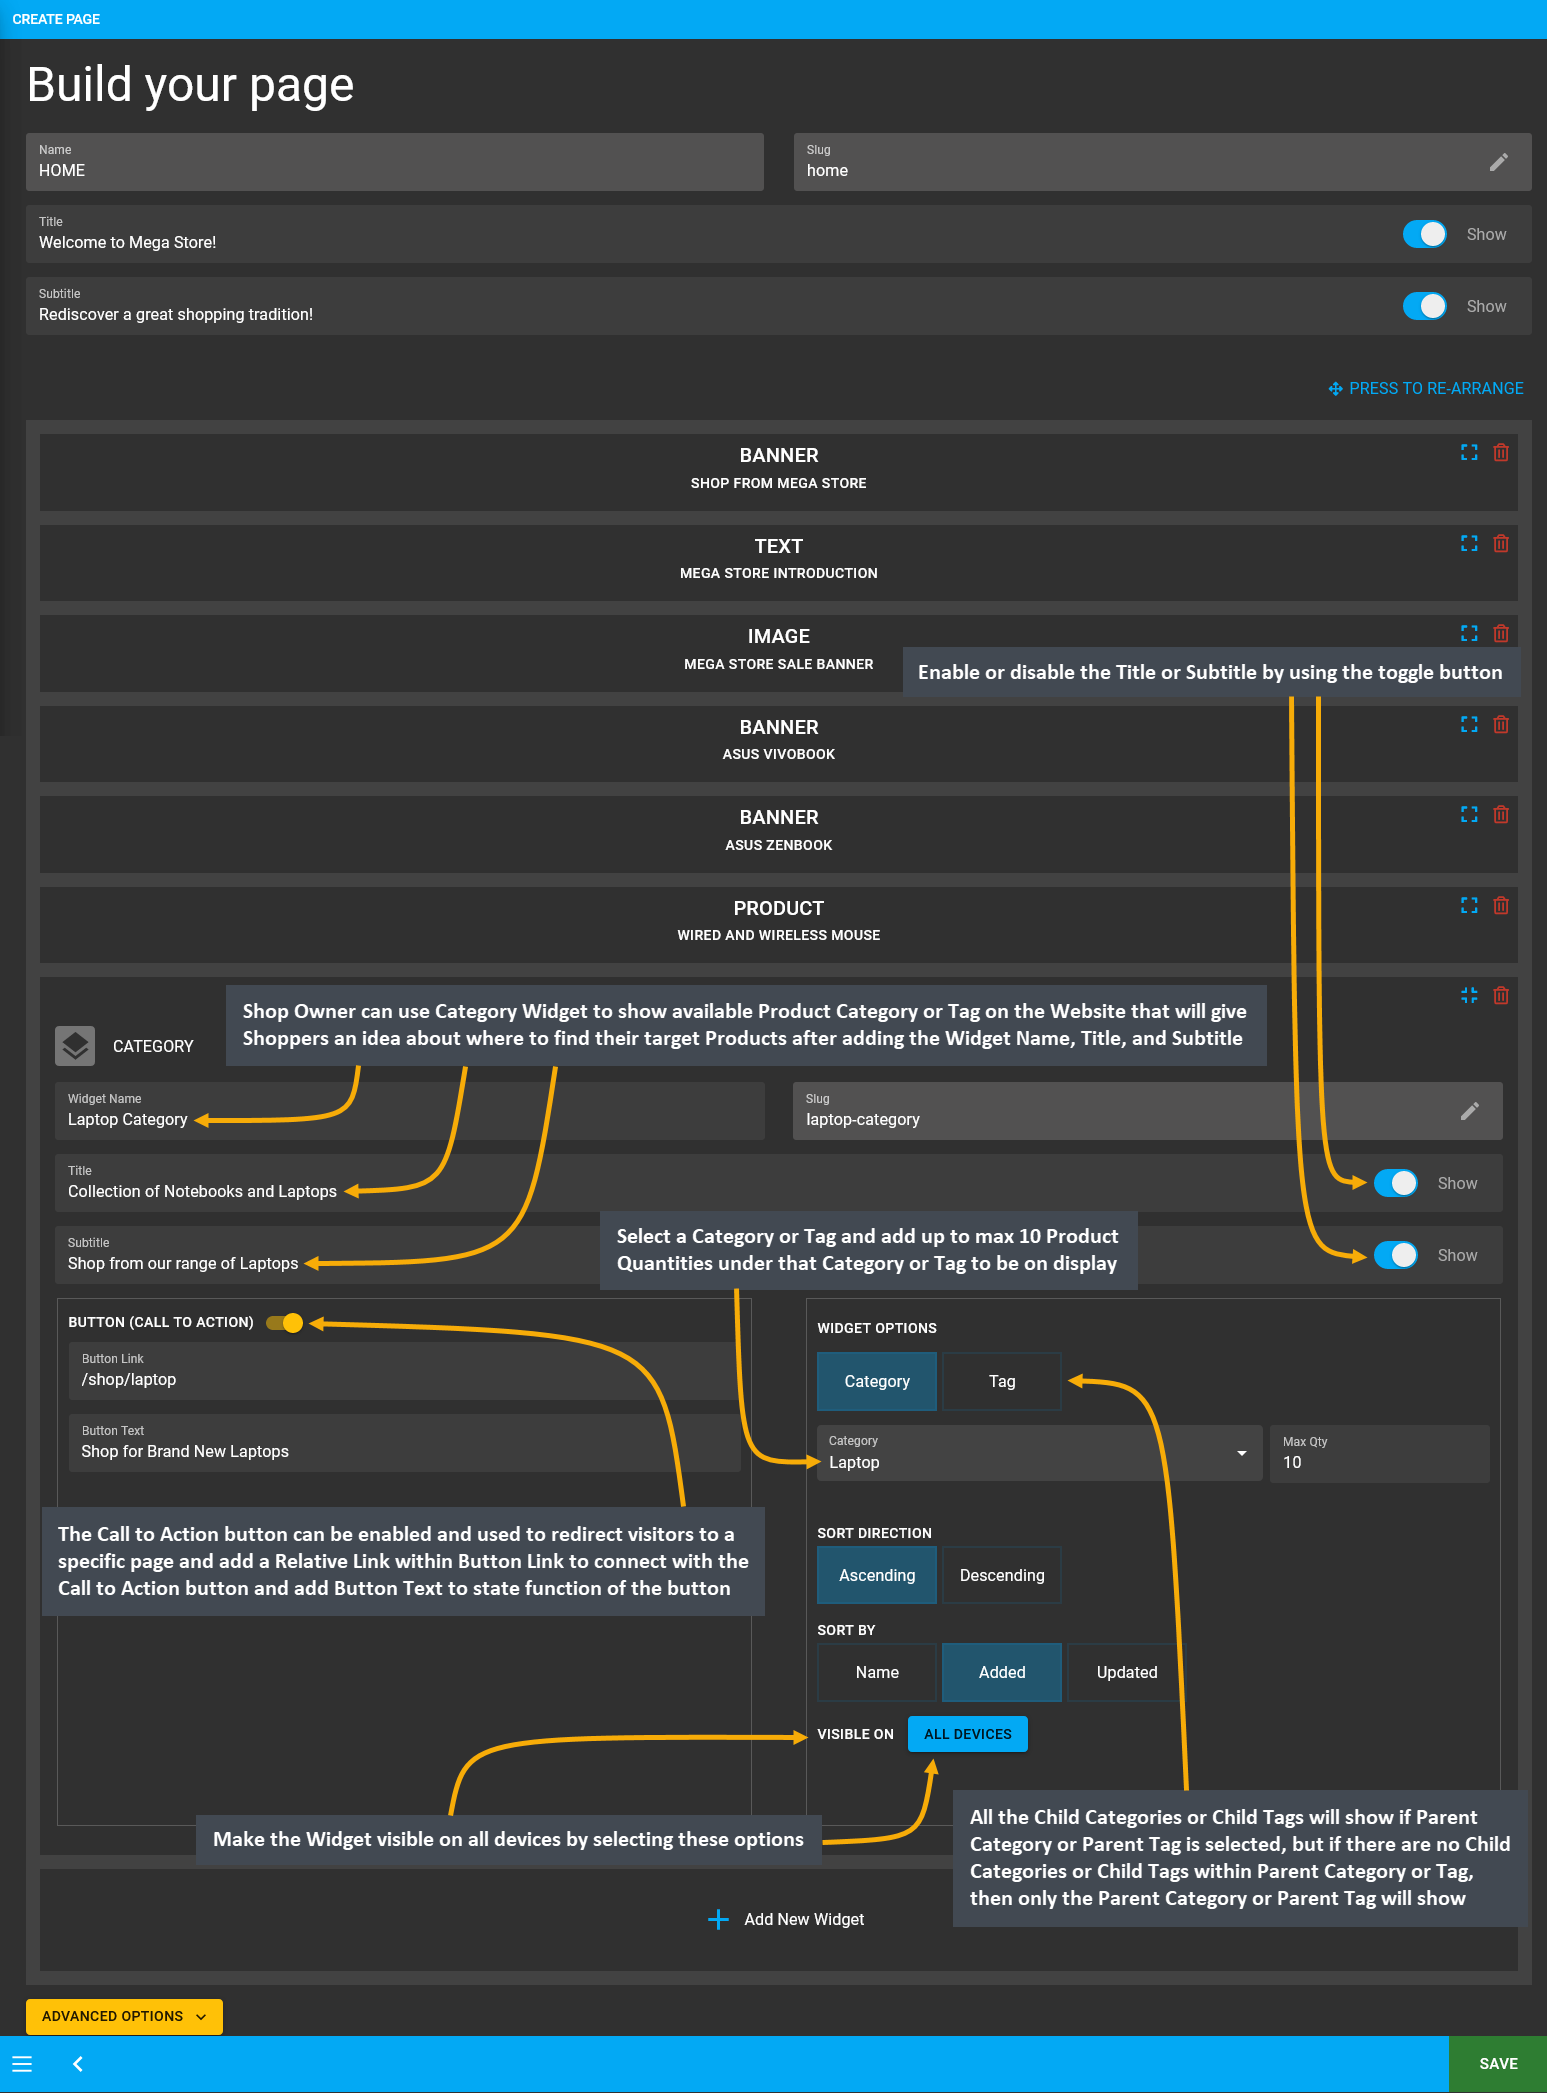
Image 2: Use Category Widget to show available Product groups within Product Category or Tag on Website.
21 - Manage PC Builds
Manage User and Featured PC Builds from the Miscellaneous tab.
Click on the Miscellaneous module to create, view, and modify PC Builds by adding components like CPU, memory, monitor, case, storage, motherboard, graphics card, cooler, power supply, mouse, keyboard, headphone, and speaker etc.
Create PC Builds on The Website
The Shop Owner can create their own PC Builds by logging into their account on The Website. A Customer can also create their private PC Builds by logging into their account and save it for placing Order.
Add Components to PC Build
On the PC Builds Page, components need to be selected one by one with CPU, Motherboard, Graphics Card, Memory, Storage, Case, Monitor, Power Supply, and Accessories. Selecting these components will create new PC Build.
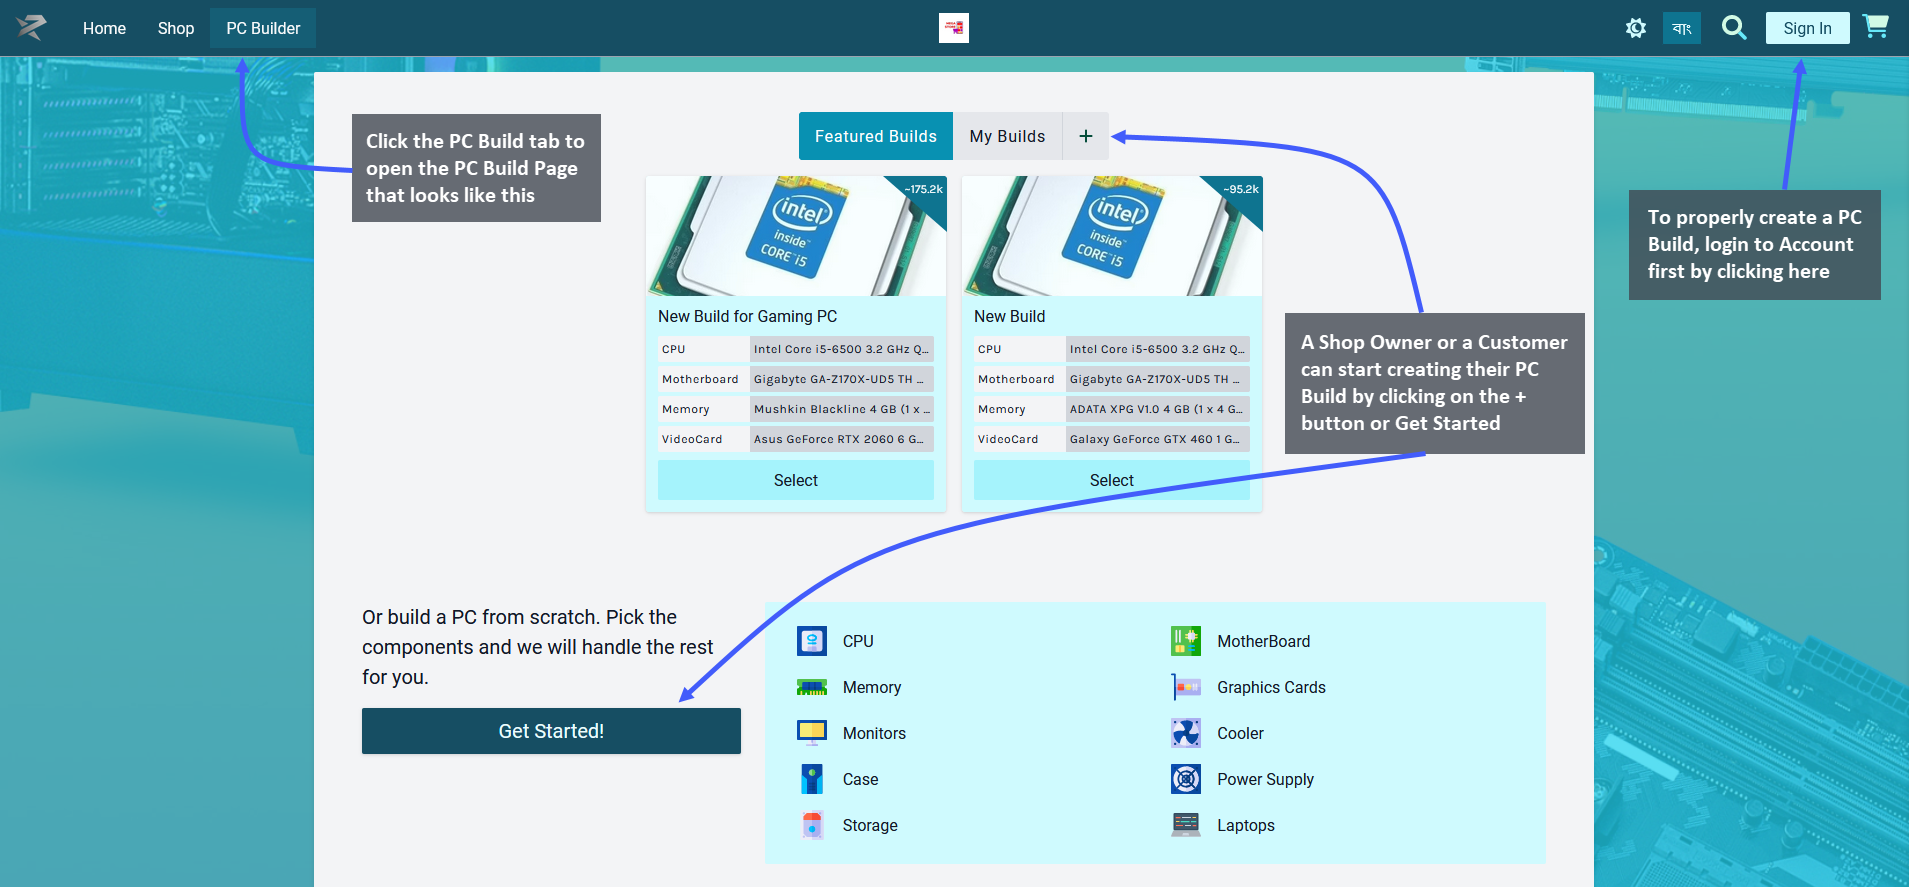
Add CPU to PC Build
The first component to choose for PC Build is the CPU or central processing unit or the main processor. Click on the Add button to add the Product to build. Below the Add Button is a View button clicking on which will open a pop-up to display Product price, general specifications, performance specifications, physical specifications, and power specifications along with detailed Product images.
There is a Search Box on the top right corner to help find specific Product(s). The Product features will show on top of the list. There is a Filter Compatibility button which can be toggled to Yes/ No to search by compatibility of PC components or not. Click on Expand to see a detailed view of added components and their prices.
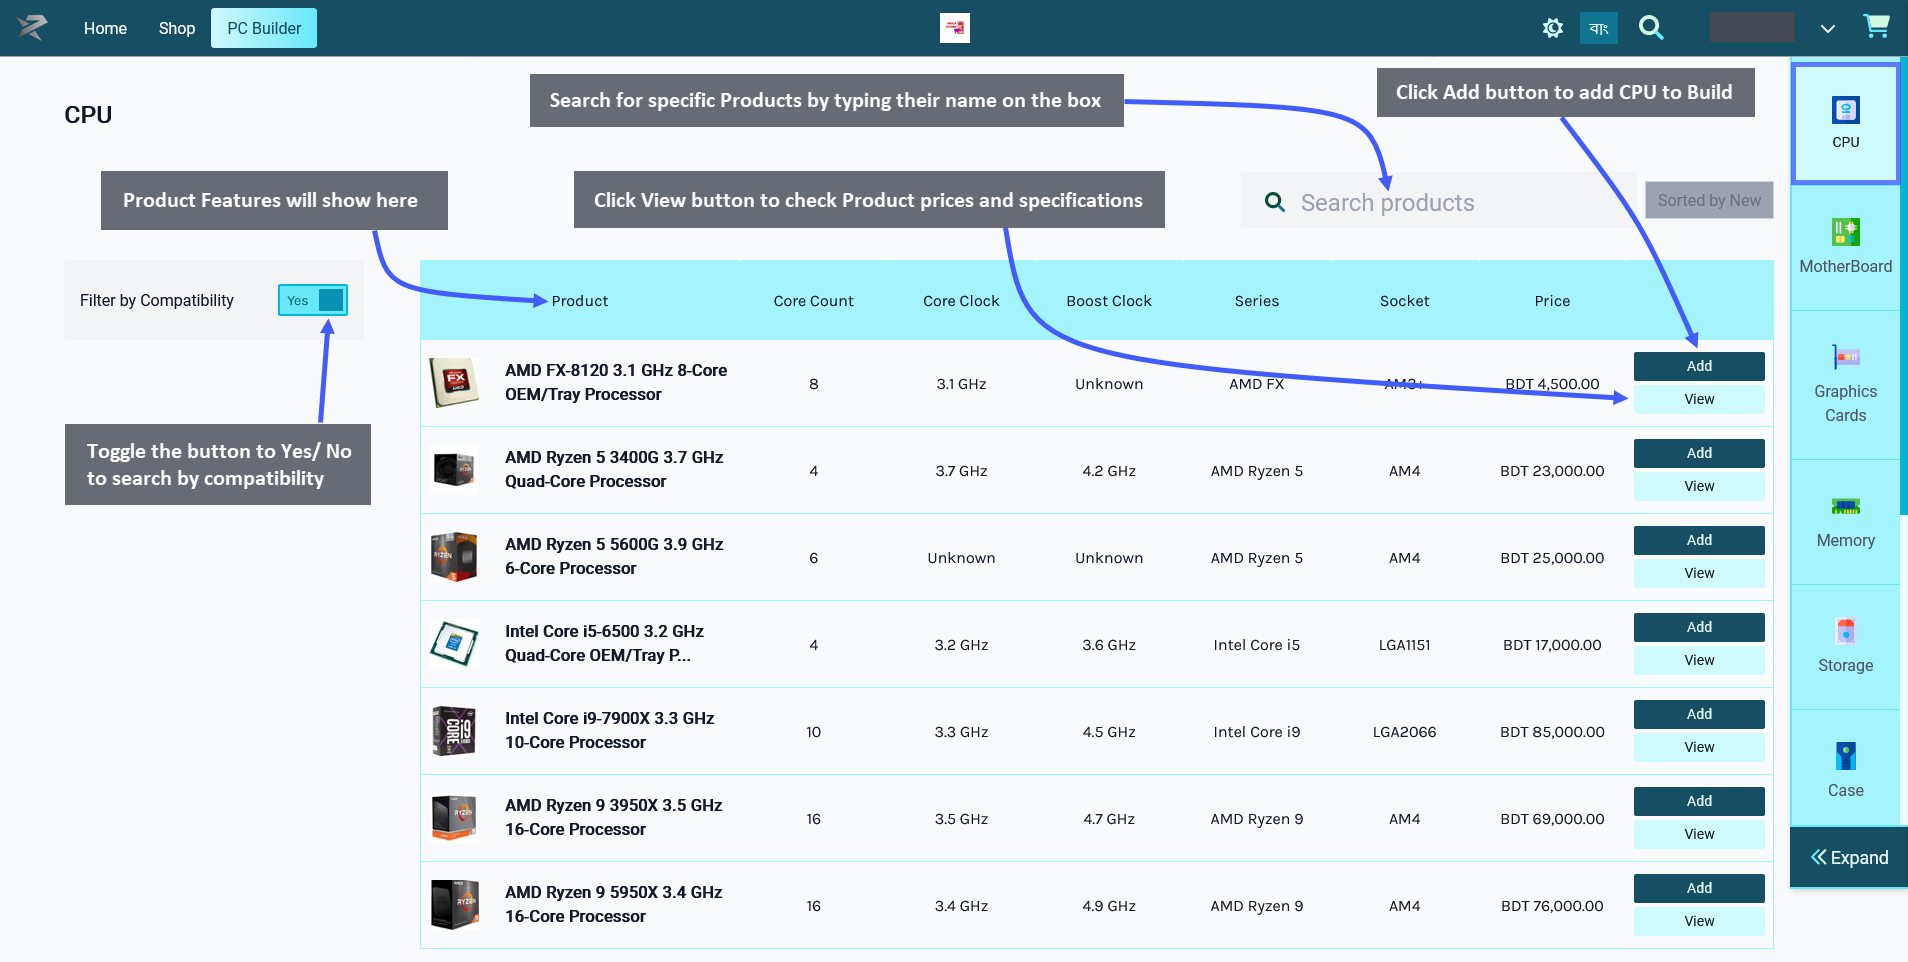
Add Motherboard to PC Build
After successfully adding CPU to PC Build, select Motherboard which is the main printed circuit board that allows communication between many of the crucial electronic components of a system. Click on the Add button to add the item to build. Below the Add Button is a View button clicking on which will open a pop-up to display Product price, general specifications, performance specifications, physical specifications, and power specifications along with detailed Product images.
There is a Search Box on the top right corner to help find specific Product(s). The Product features will show on top of the list. There is a Filter Compatibility button which can be toggled to Yes/ No to search by compatibility of PC components or not. For instance, in the example below, turning on the compatibility button did not bring any Product(s) for the Motherboard. However, when compatibility was turned off, all Motherboard Product(s) were displayed. Click on Expand to see a detailed view of added components and their prices.
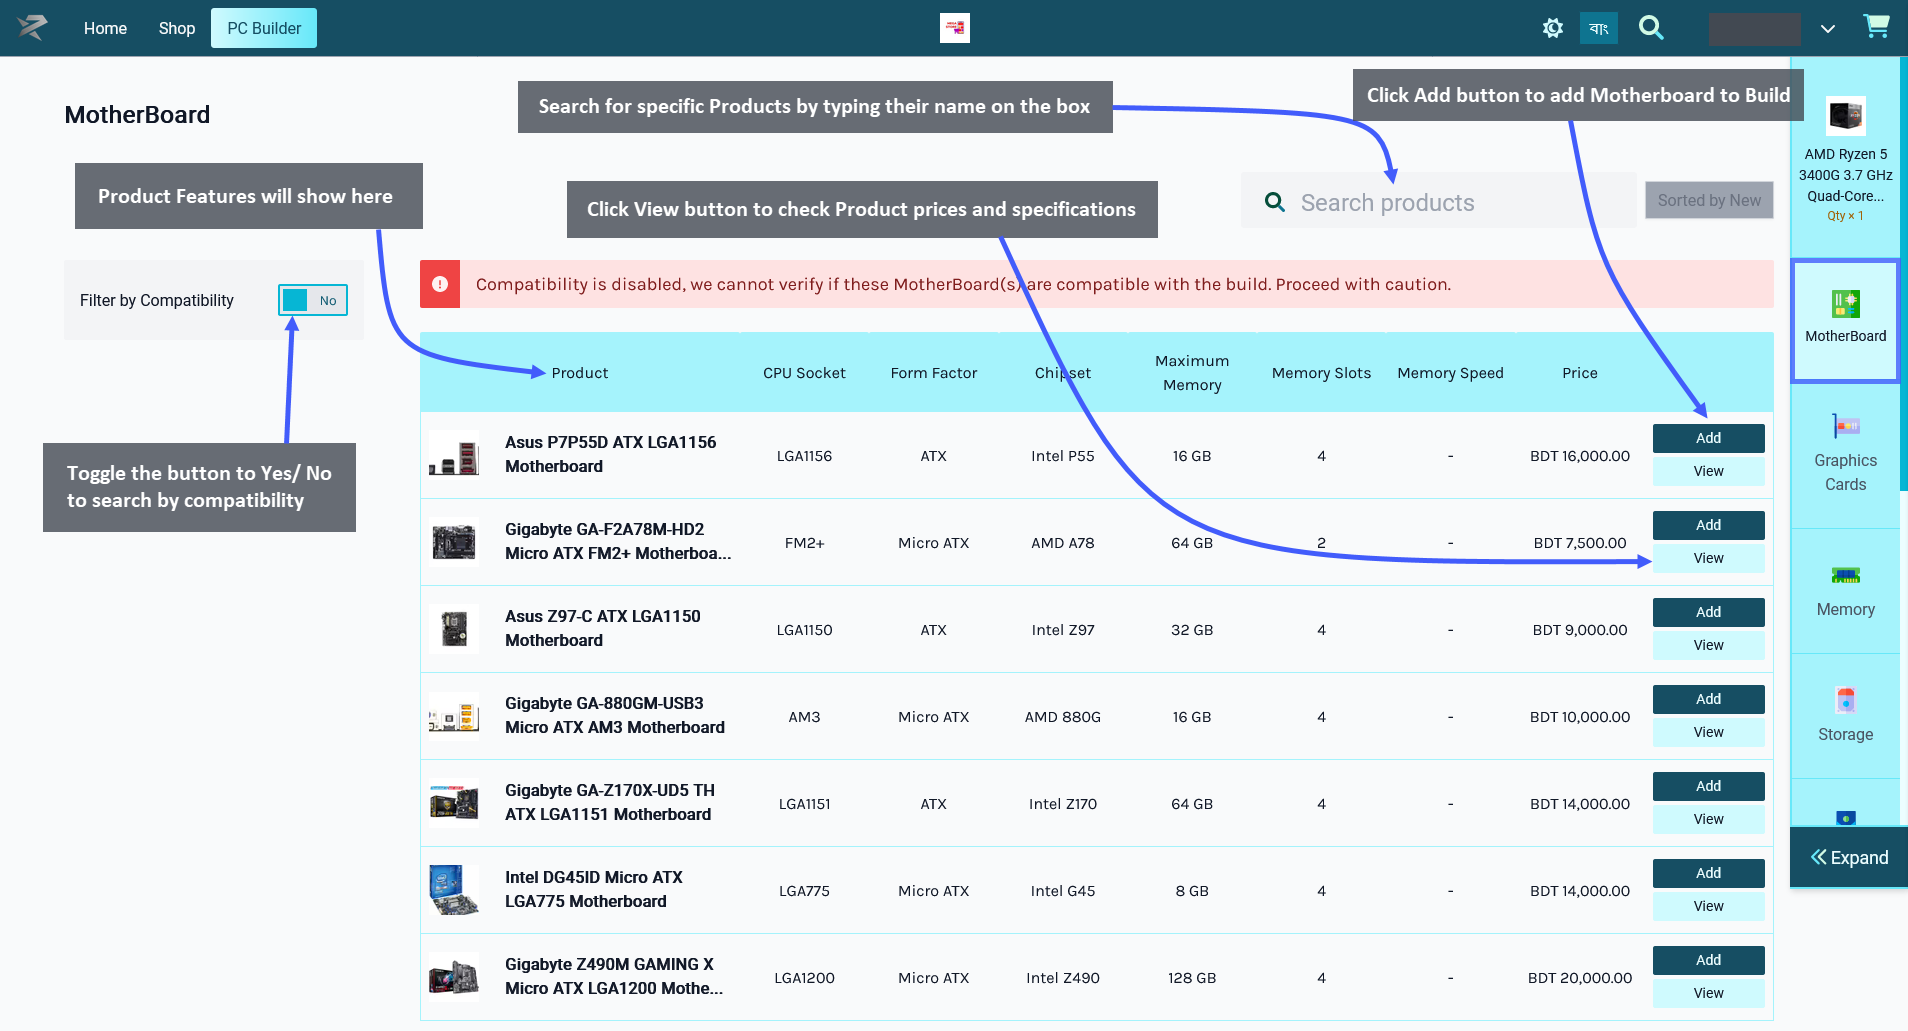
Add Graphics Card to PC Build
When Motherboard is added to PC Build, select Graphics Card which is the expansion card that generates a feed of output images to a display device. Click on the Add button to add the Product to build. Below the Add Button is a View button clicking on which will open a pop-up to display Product price, general specifications, performance specifications, physical specifications, and power specifications along with detailed Product images.
There is a Search Box on the top right corner to help find specific Product(s). The Product features will show on top of the list. There is a Filter Compatibility button which can be toggled to Yes/ No to search by compatibility of PC components or not. Click on Expand to see a detailed view of added components and their prices.
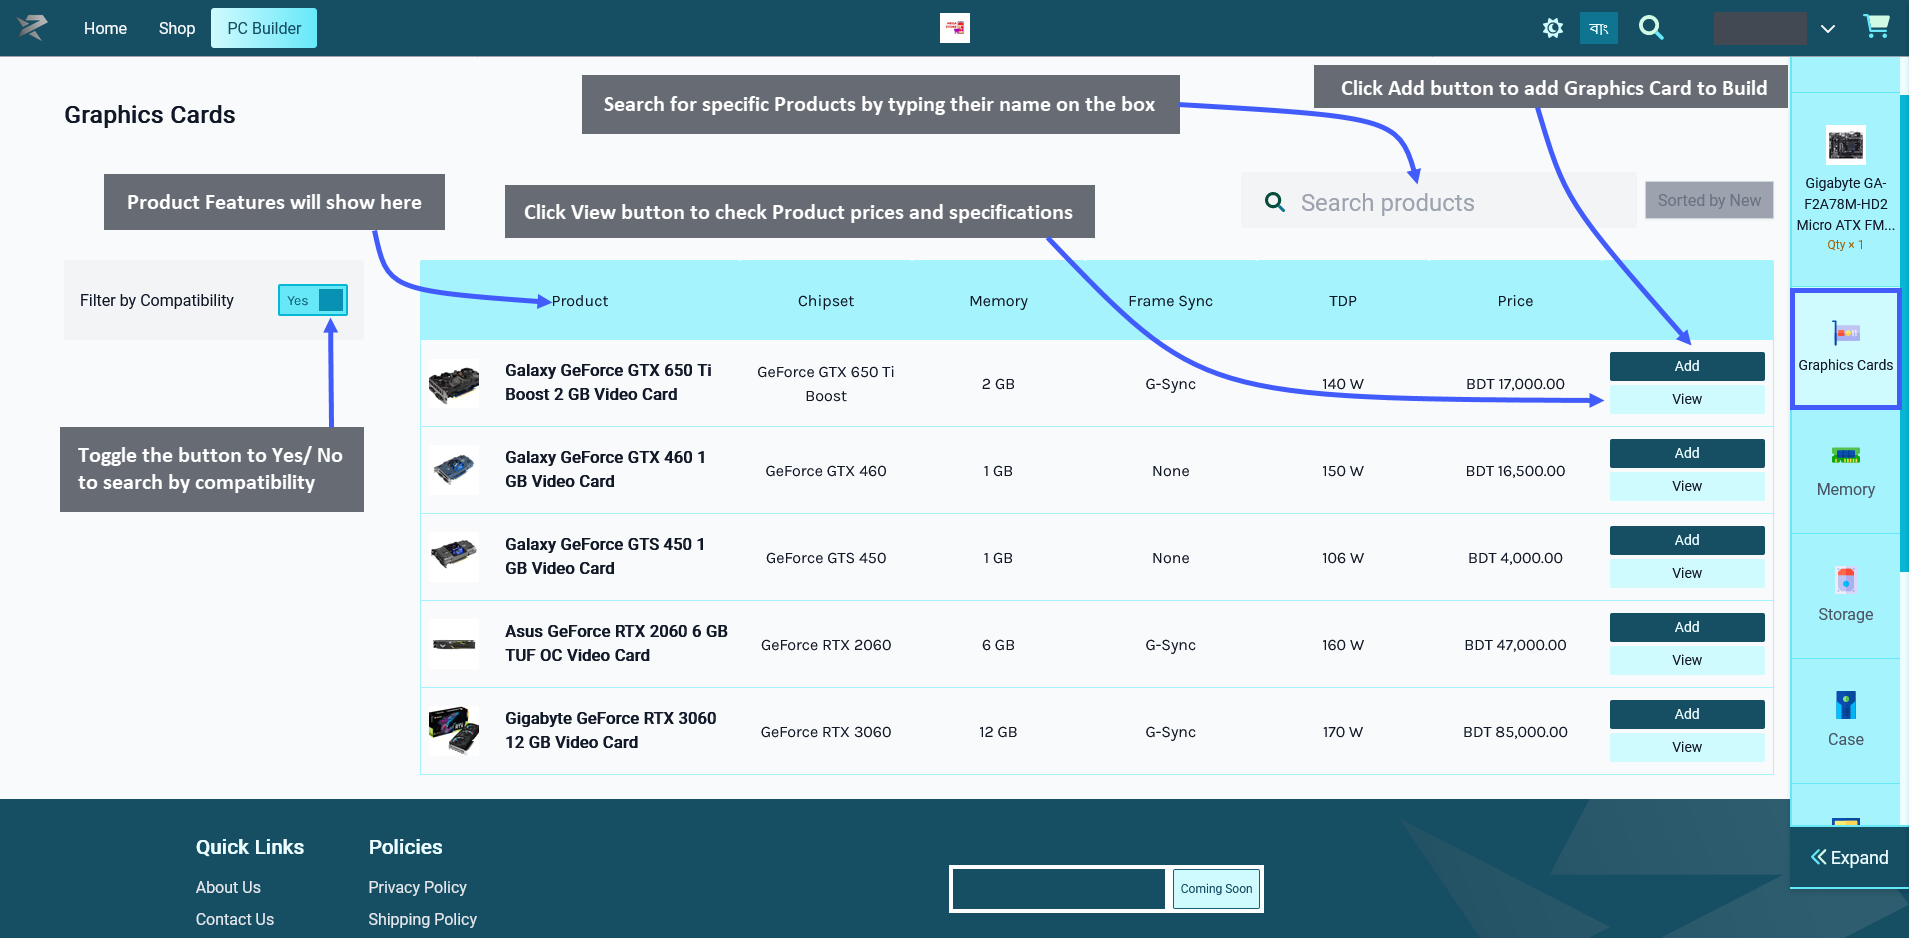
Add Memory to PC Build
The next step is to select Memory which is the system that stores information for immediate use. Click the Add button to add the item to build. Below the Add Button is a View button clicking on which will open a pop-up to display the Product price, general specifications, performance specifications, physical specifications, and power specifications along with detailed Product images.
There is a Search Box on the top right corner to help find specific Product(s). The Product features will show on top of the list. There is a Filter Compatibility button which can be toggled to Yes/ No to search by compatibility of PC components or not. For instance, in the example, turning on compatibility did not bring any Product(s) for the Memory. However, when compatibility was turned off, all the Memory Product(s) were displayed. Click on Expand to see a detailed view of added components and their prices.
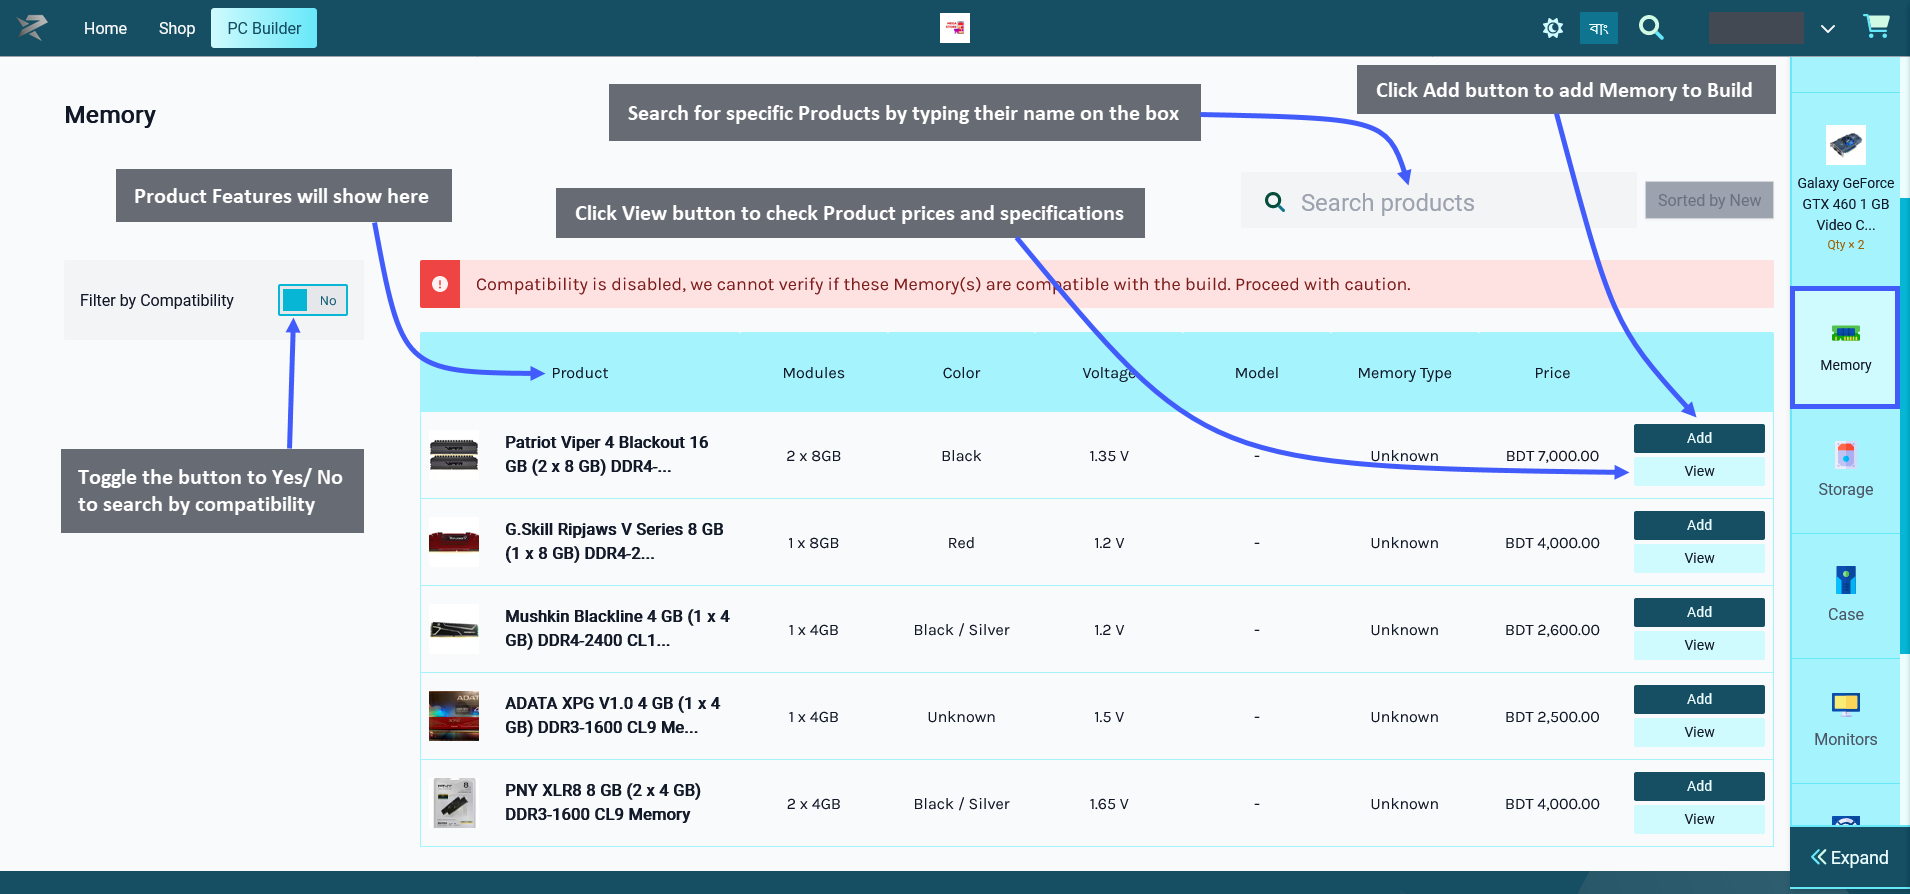
Add Storage to PC Build
After Memory is added successfully, select the Storage which are available in two options - Solid State Drive and Hard Disk Drive. Hard Disk Drives or HDDs is a traditional storage device that uses mechanical spinning platters and a moving read/write head to access data. Solid States Drive or SSDs are newer, faster drives that store data on instantly accessible memory chips. Each storages are provided from different brands to select.
Select any of the storage options, like SSD and click the Add button to add the Product to build. Below the Add Button is a View button clicking on which will open a pop-up to show the Product price, general specifications, performance specifications, physical specifications, and power specifications along with detailed Product images.
There is a Search Box on the top right corner to help find specific Product(s). The Product features will show on top of the list. There is a Filter Compatibility button which can be toggled to Yes/ No to search by compatibility of PC components or not. Click on Expand to see a detailed view of added components and their prices.
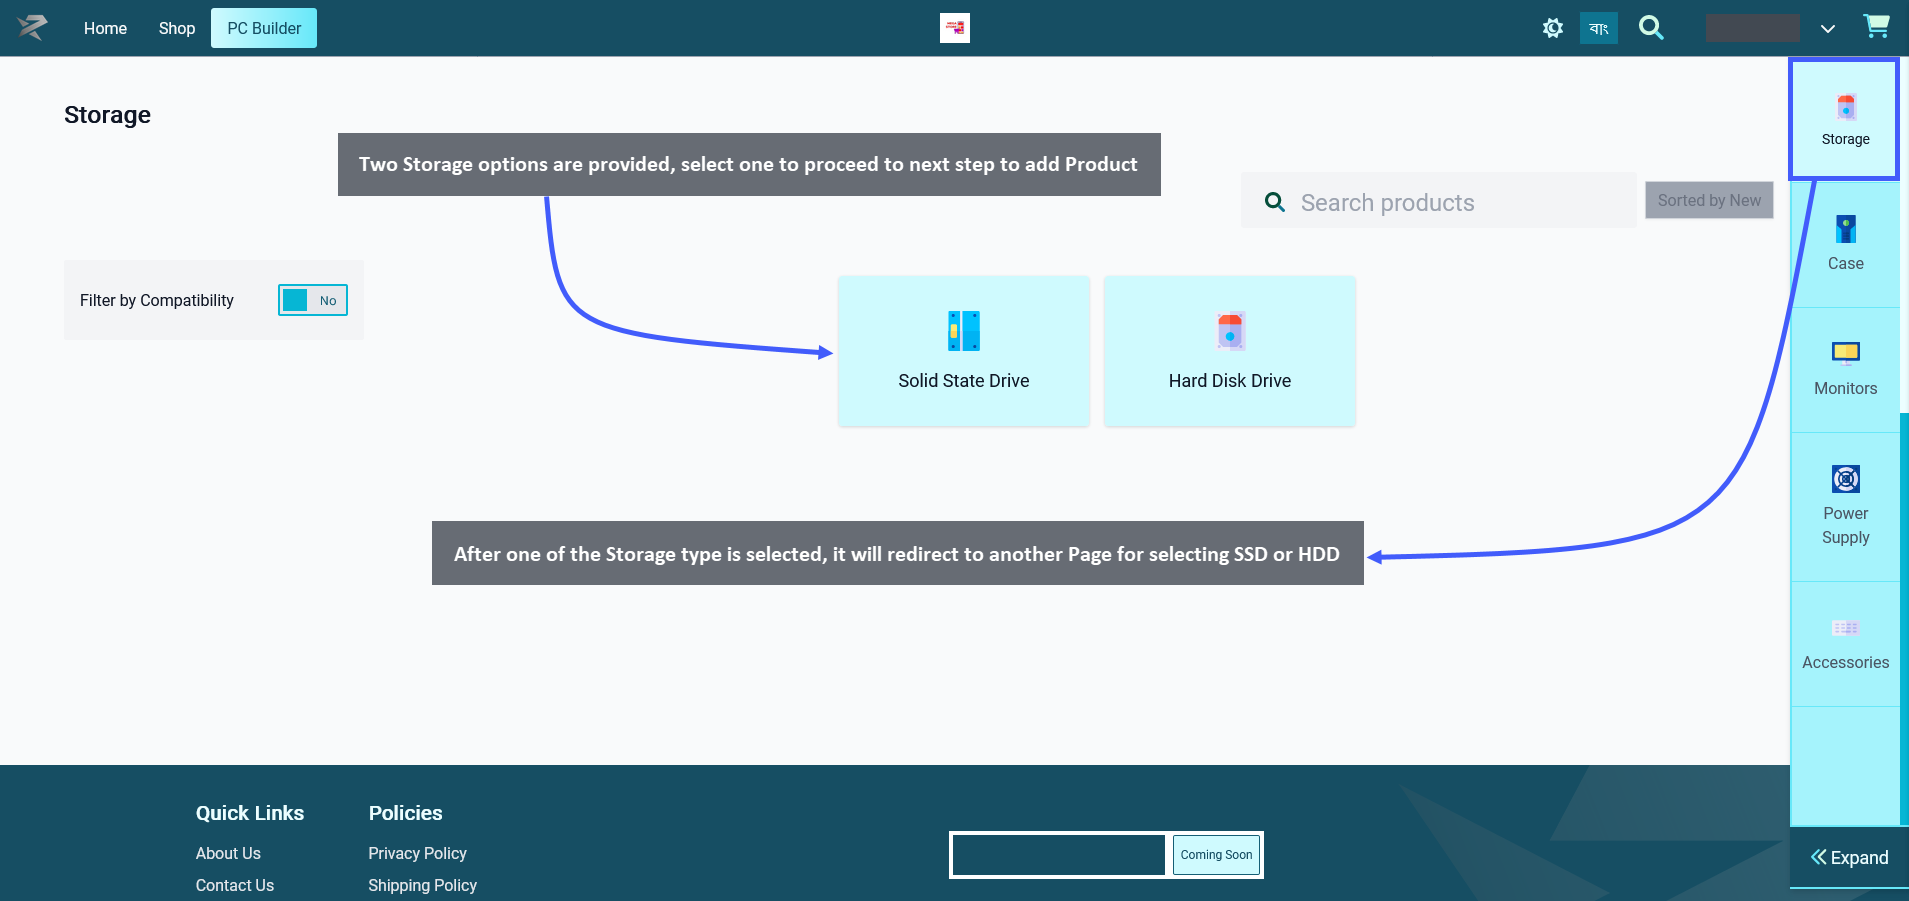
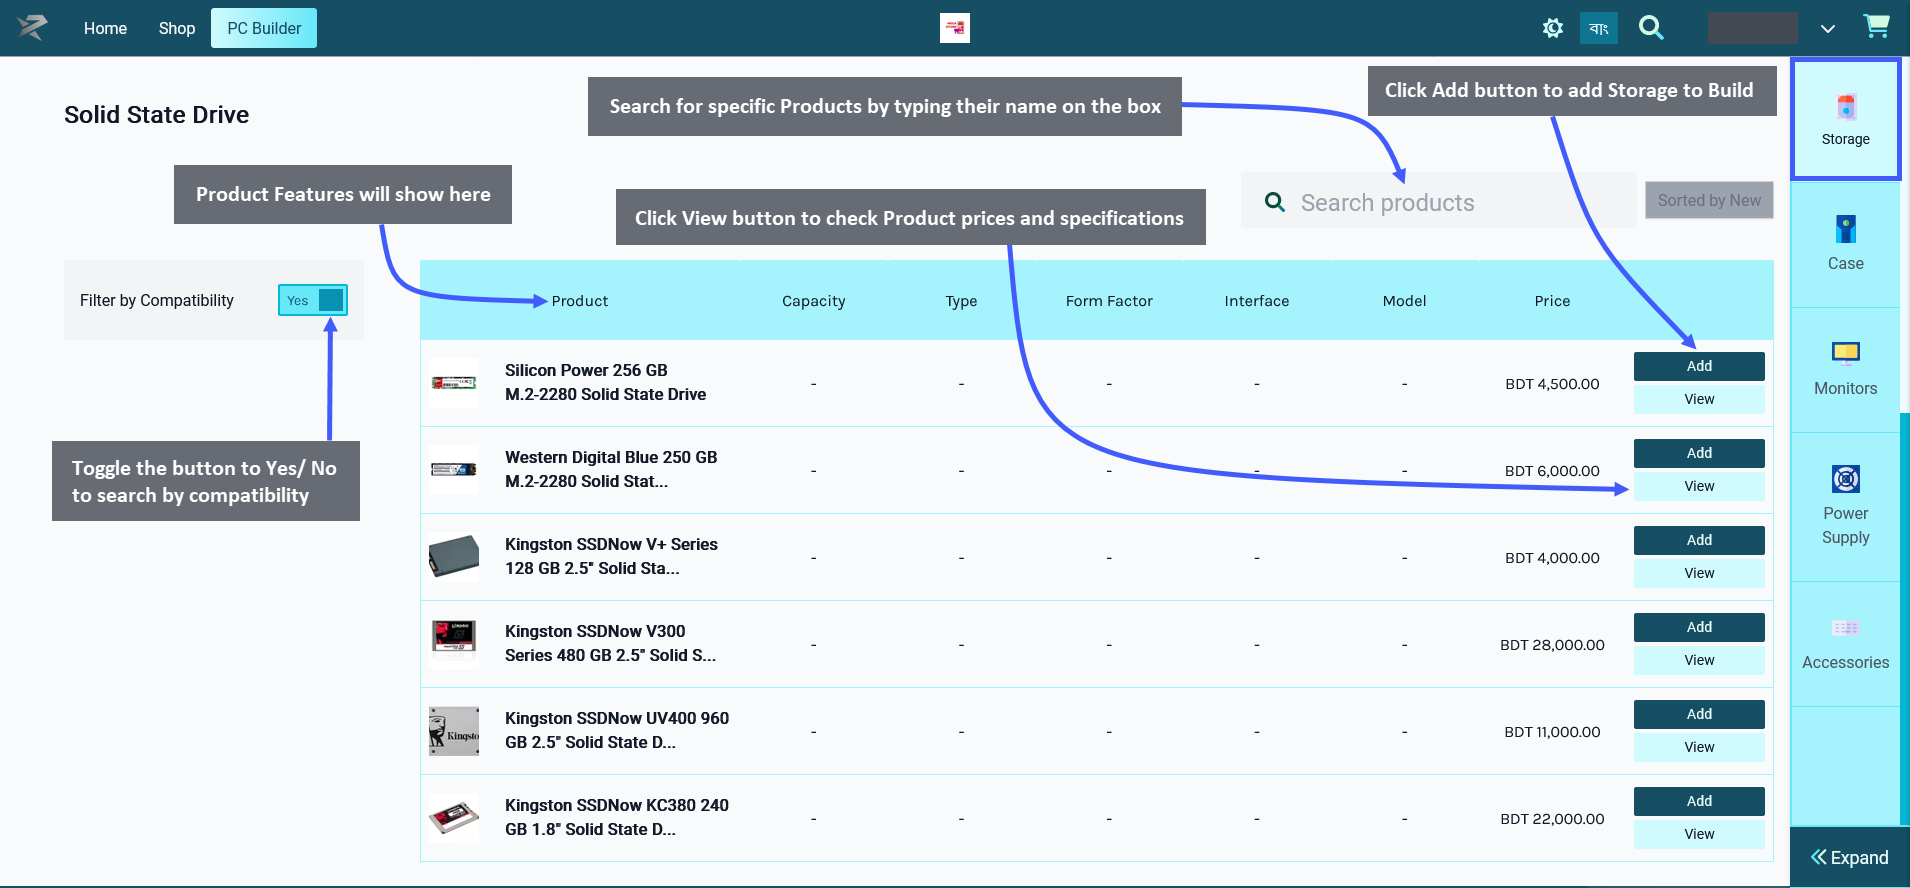
Add Case to PC Buils
When Storage is added, Case needs to be selected. A computer case serves mainly as a way to physically mount and contain all the actual components inside a computer. Click on the Add button to add the Product to build. Below the Add Button is a View button clicking on which will open a pop-up to display Product price, general specifications, performance specifications, physical specifications, power specifications, and Product images.
There is a Search Box on the top right corner to help find specific Product(s). The Product features will show on top of the list. There is a Filter Compatibility button which can be toggled to Yes/ No to search by compatibility of PC components or not. Click on Expand to see a detailed view of added components and their prices.
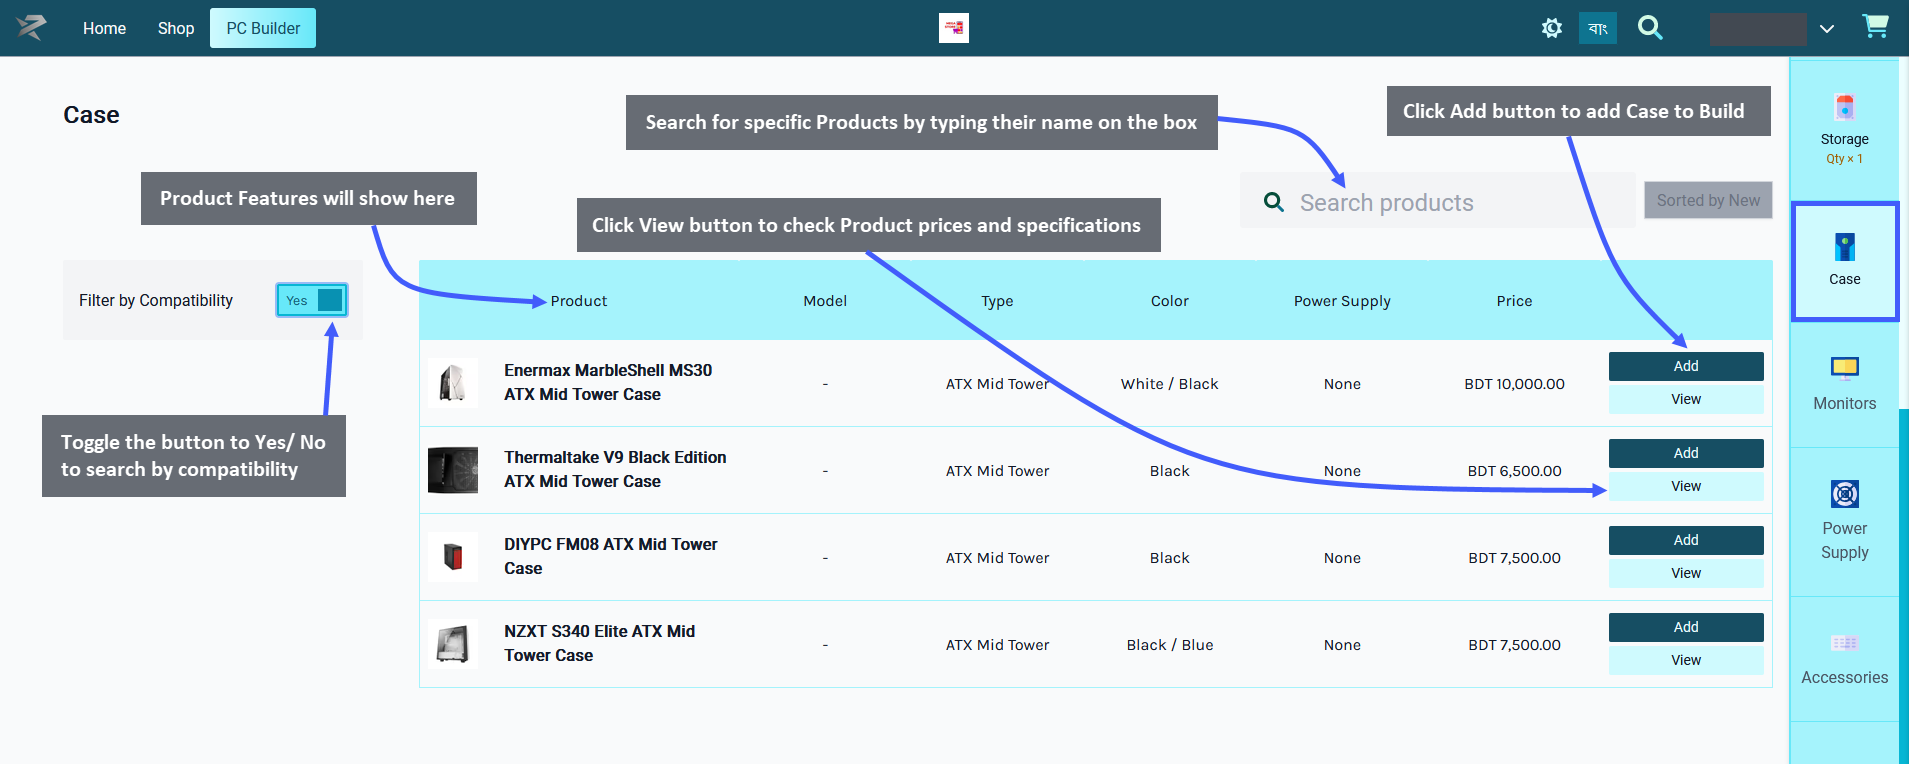
Add Monitor to PC Build
The next component to add after Case is Monitor. A monitor is an output device that displays information in the pictorial or text form. A monitor usually comprises a visual display, some circuitry, a casing, and a power supply. Click on the Add button to add the Product to build. Below the Add Button is a View button clicking on which will open a pop-up to show Product price, general specifications, performance specifications, physical specifications, and power specifications along with detailed Product images.
There is a Search Box on the top right corner to help find specific Product(s). The Product features will show on top of the list. There is a Filter Compatibility button which can be toggled to Yes/ No to search by compatibility of PC components or not. Click on Expand to see a detailed view of added components and their prices.
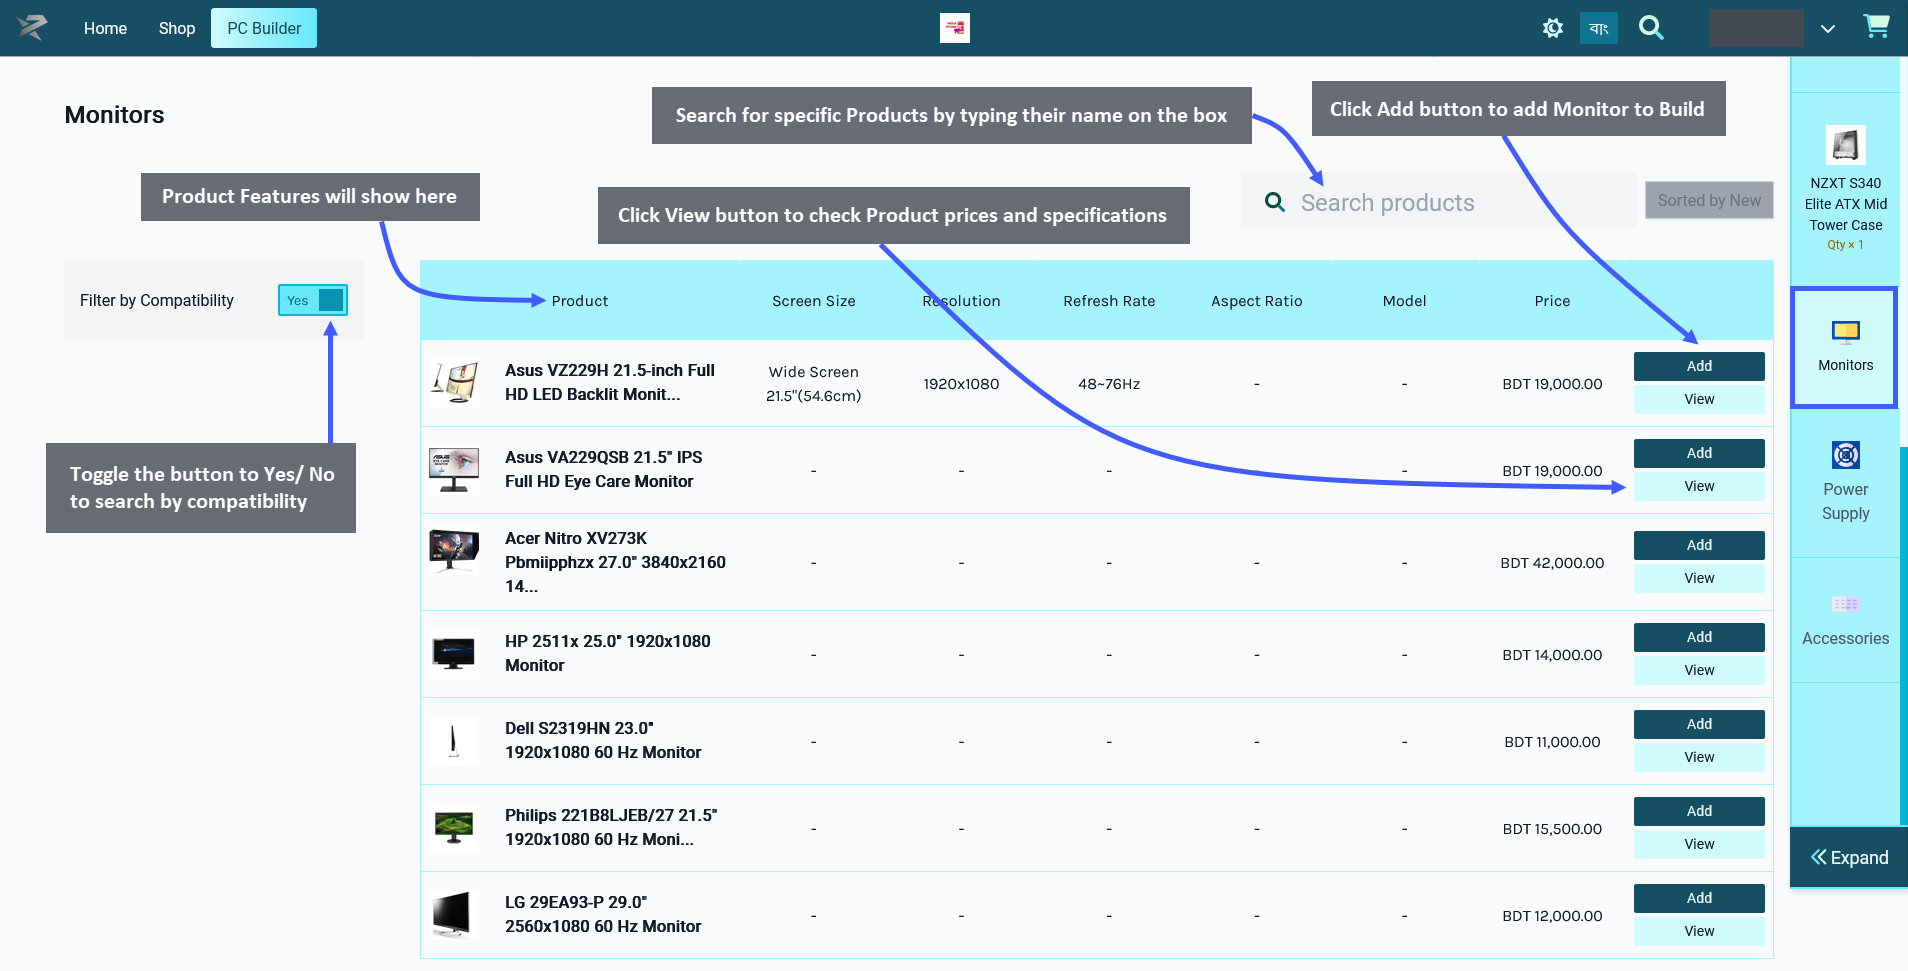
Add Power Supply to PC Build
After adding Monitor to the build, select Power Supply. A power supply is a unit converts mains AC to low-voltage regulated DC power for the internal components of a computer. Click the Add button to add the Product to build. Below the Add Button is a View button clicking on which will open a pop-up to display the Product price, general specifications, performance specifications, physical specifications, and power specifications with Product images.
There is a Search Box on the top right corner to help find specific Product(s). The Product features will show on top of the list. There is a Filter Compatibility button which can be toggled to Yes/ No to search by compatibility of PC components or not. For instance, in the example, turning on compatibility did not bring any Product(s) for the Power Supply. However, when compatibility was turned off, all the Power Supply Product(s) were displayed. Click on Expand to see a detailed view of added components and their prices.
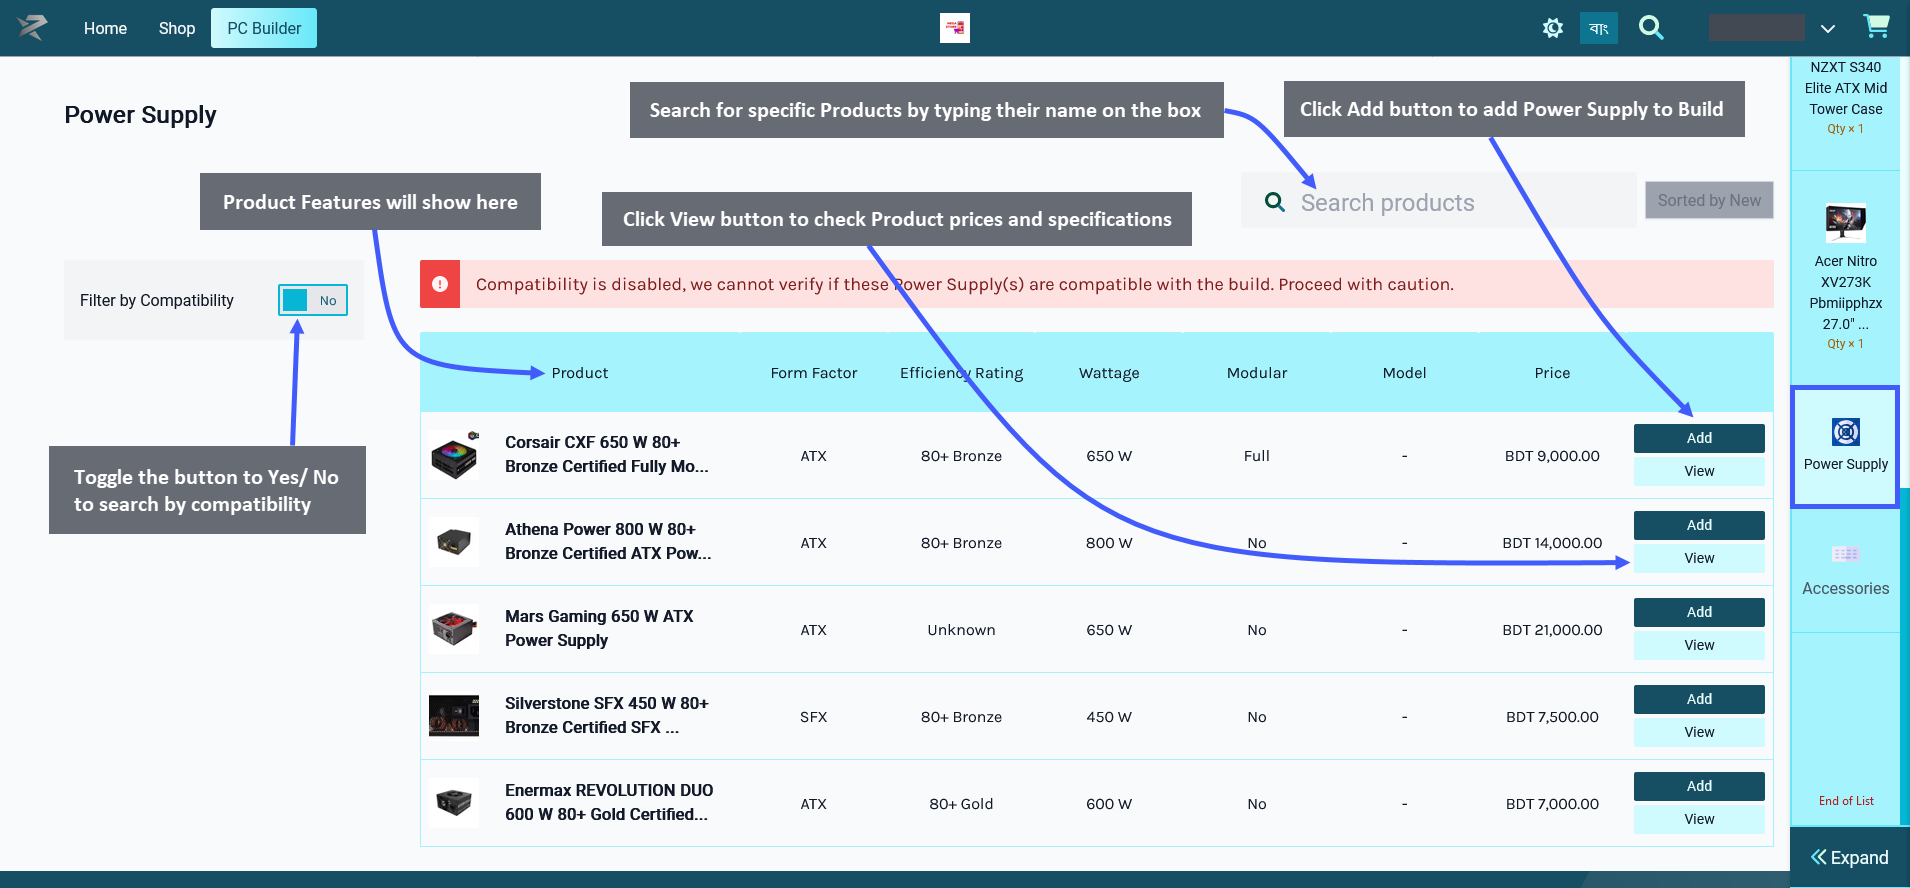
Add Accessories to PC Build
The last component to add to PC Build are accessories. The accessories Page includes four Product(s) to select - Mouse, Keyboard, Speaker, and Headphone. Click on each one of these to add them one by one to Cart.
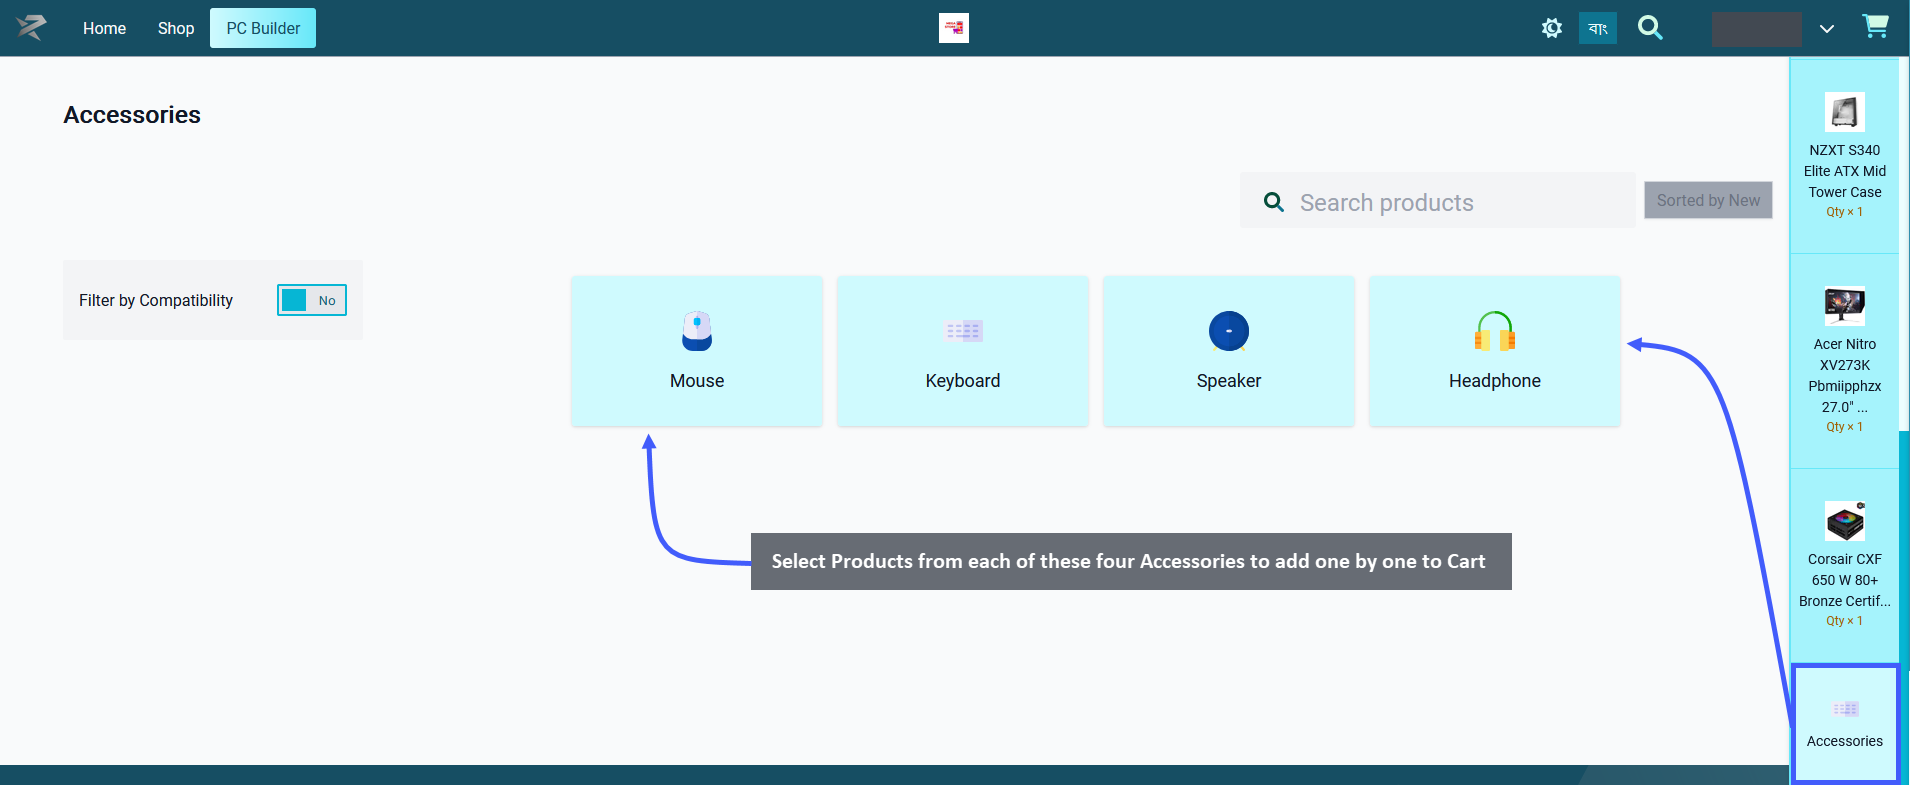
Add Mouse to PC Build
From these accessories, select the Mouse first which is a hand-held pointing device that detects two-dimensional motion relative to a surface. This motion is typically translated into the motion of a pointer on a display. Click on the Add button to add the Product to build. Below the Add Button is a View button clicking on which will open a pop-up to display Product price, general specifications, performance specifications, physical specifications, and power specifications along with detailed Product images.
There is a Search Box on the top right corner to help find specific Product(s). The Product features will show on top of the list. There is a Filter Compatibility button which can be toggled to Yes/ No to search by compatibility of PC components or not. Click on Expand to see a detailed view of added components and their prices.
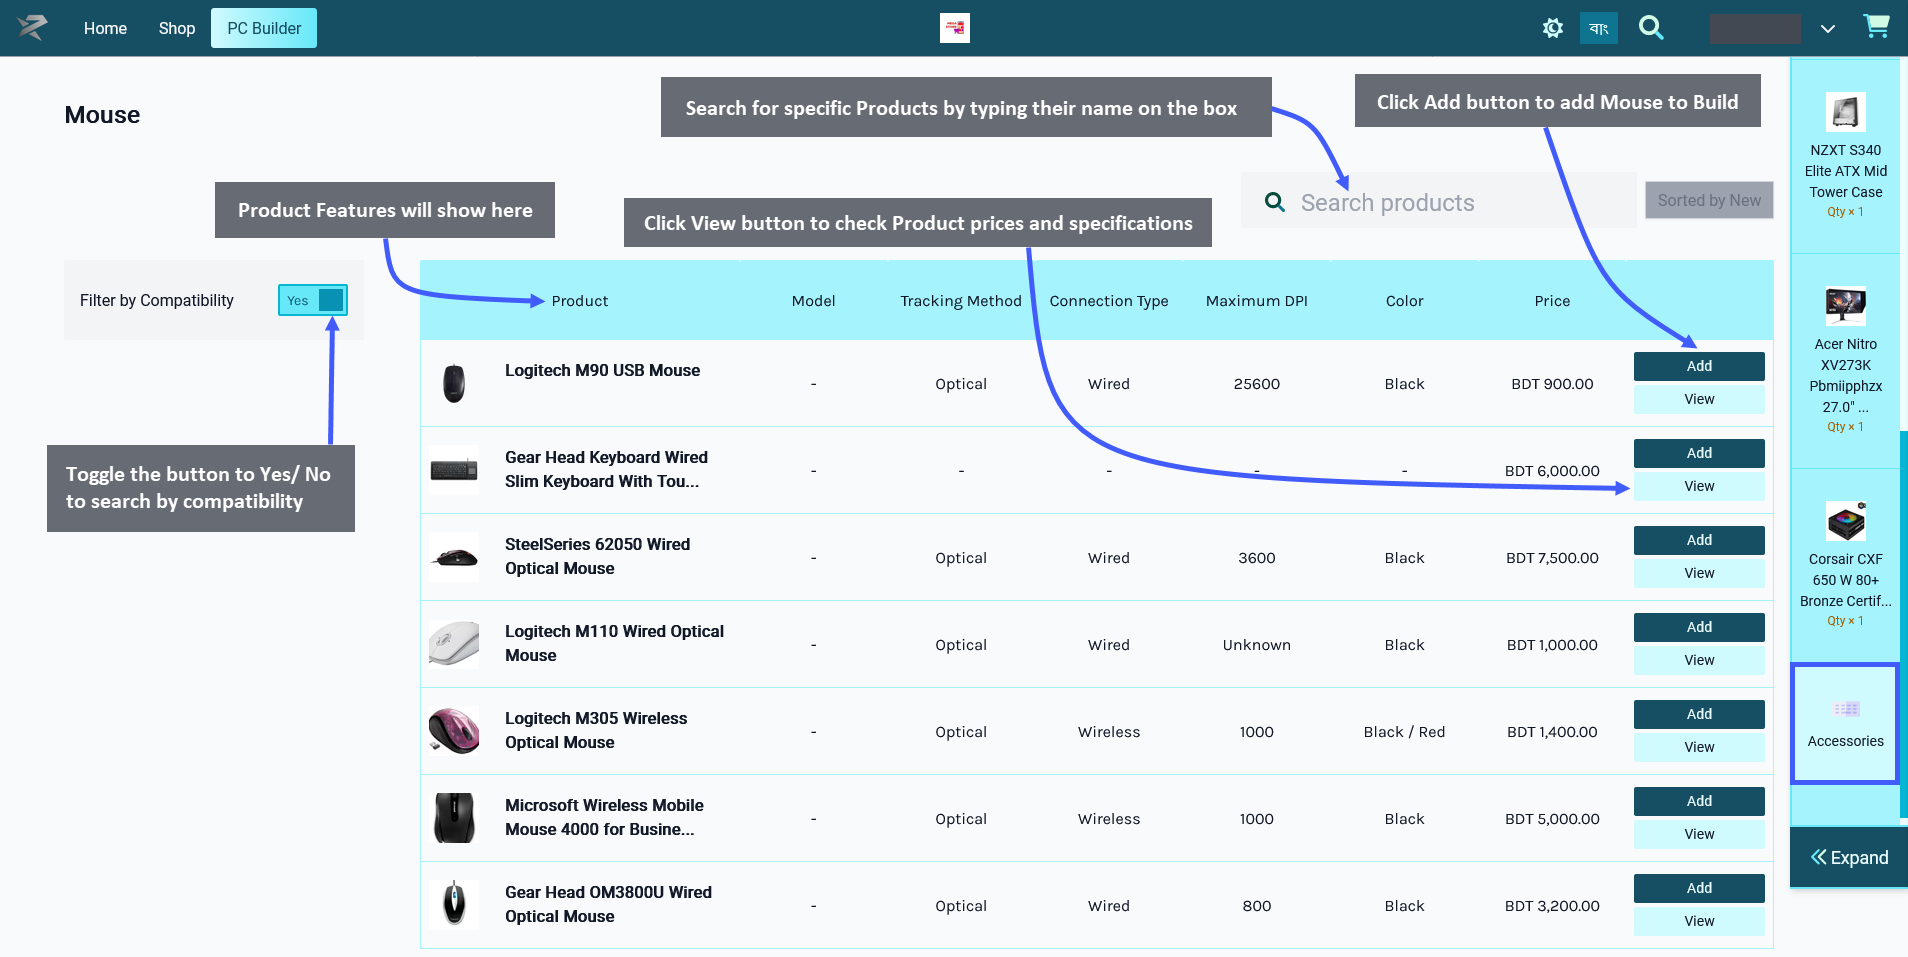
Add Keyboard to PC Build
After adding Mouse, click on Accessories button to go back to the accessories main page. Now, select the second component Keyboard. A Keyboard is a peripheral input device modeled after the typewriter keyboard which uses an arrangement of buttons or keys to act as mechanical levers or electronic switches. Click the Add button to add the Product to build. Below the Add Button is a View button clicking on which will open a pop-up to show Product price, general specifications, performance specifications, physical specifications, and power specifications along with detailed Product images.
There is a Search Box on the top right corner to help find specific Product(s). The Product features will show on top of the list. There is a Filter Compatibility button which can be toggled to Yes/ No to search by compatibility of PC components or not. Click on Expand to see a detailed view of added components and their prices.
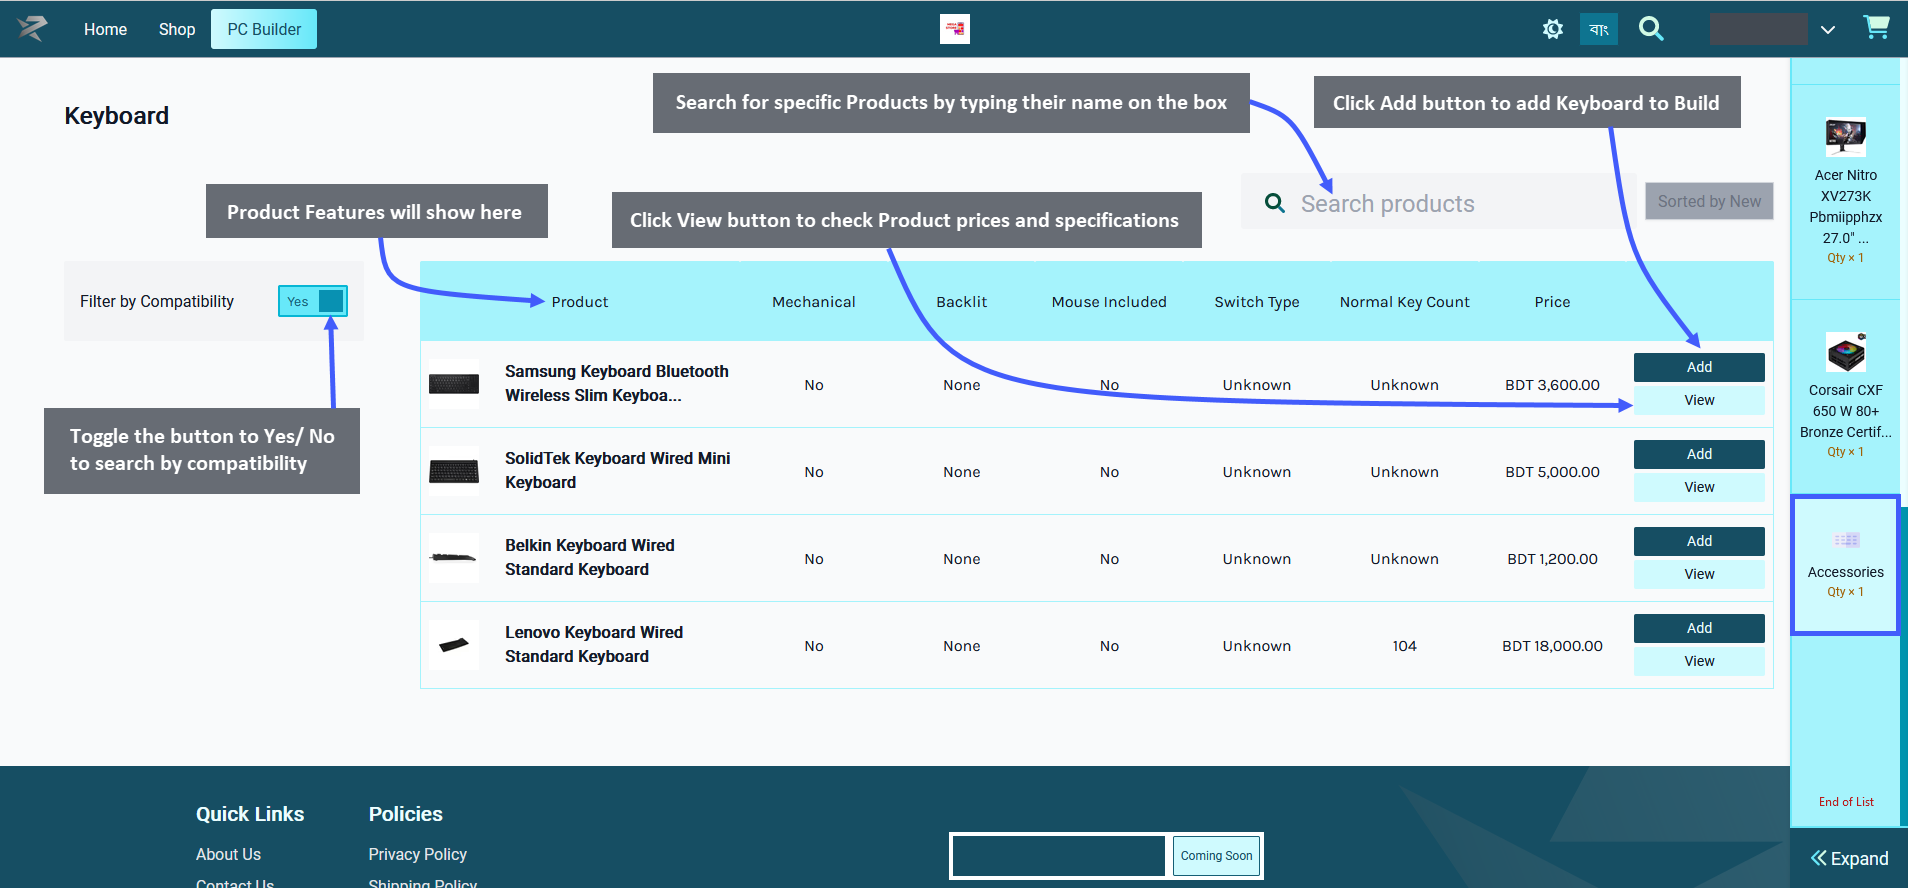
Add Speaker to PC Build
After adding Keyboard, click on Accessories button to go back to the accessories main page. Now, select the third component Speaker, which can be used to play sound or music. Click the Add button to add the Product to build. Below the Add Button is a View button clicking on which will open a pop-up to display the Product price, general specifications, performance specifications, physical specifications, and power specifications with Product images.
There is a Search Box on the top right corner to help find specific Product(s). The Product features will show on top of the list. There is a Filter Compatibility button which can be toggled to Yes/ No to search by compatibility of PC components or not. Click on Expand to see a detailed view of added components and their prices.
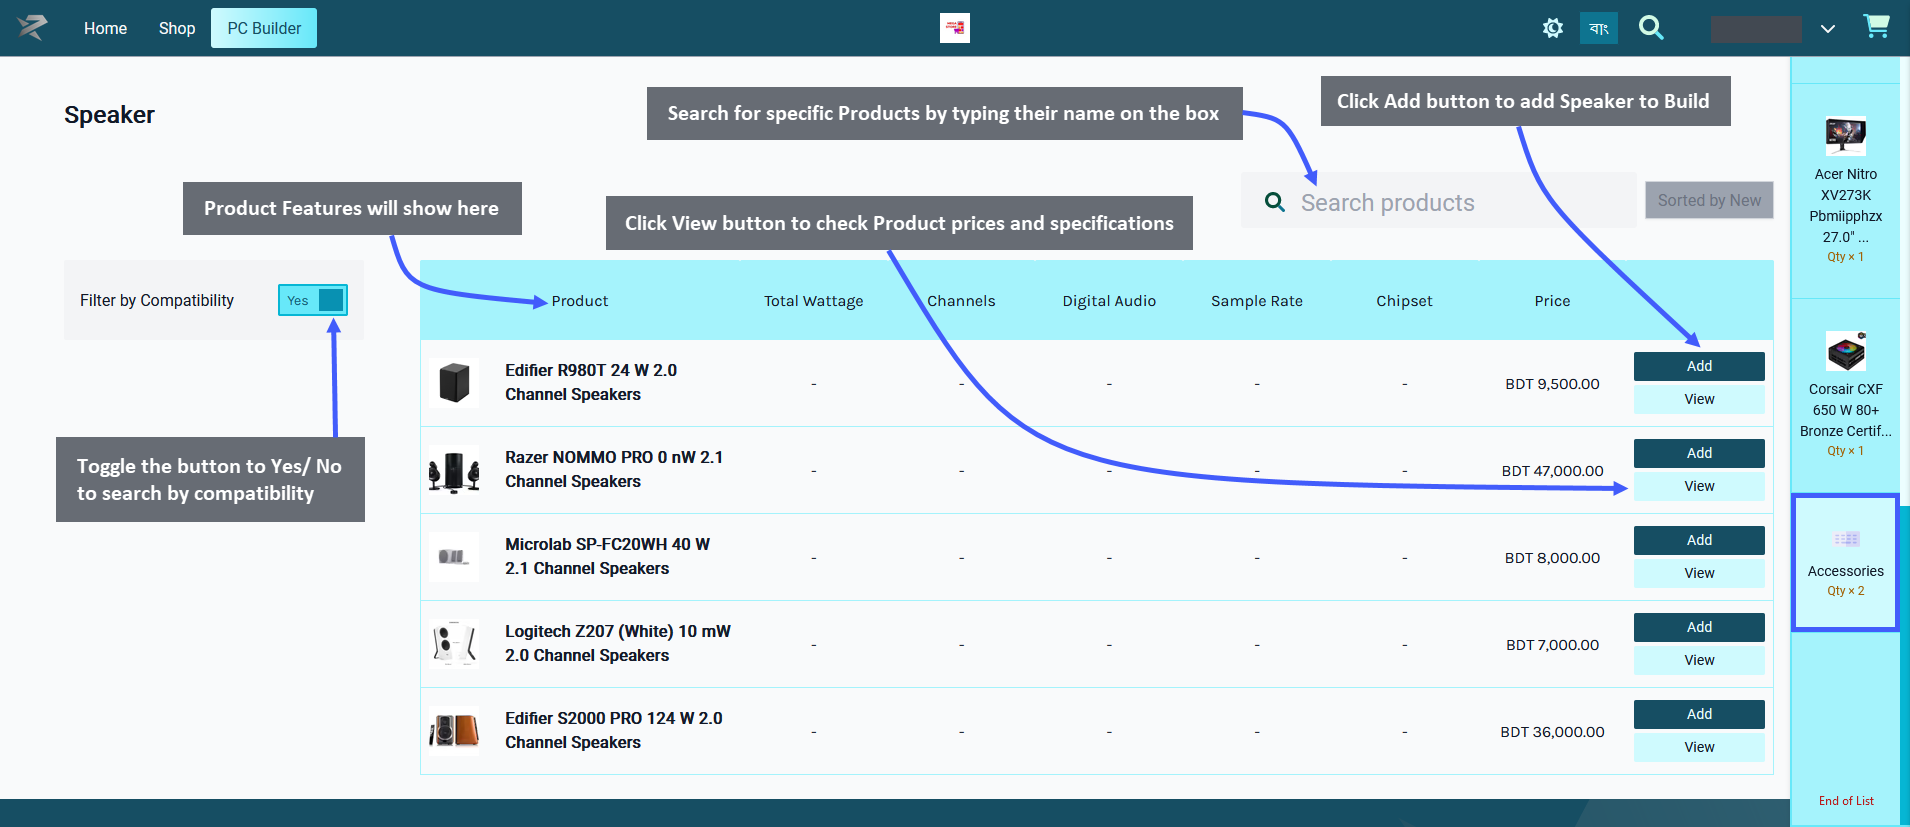
Add Headphone to PC Build
After adding Speaker, click on Accessories button to go back to the accessories main page. Now, select the fourth component headphones, which are output device that can be plugged into a computer to listen to audio. Click on the Add button to add Product to build. Below the Add Button is a View button clicking on which will open a pop-up to show Product price, general specifications, performance specifications, physical specifications, and power specifications along with detailed Product images.
There is a Search Box on the top right corner to help find specific Product(s). The Product features will show on top of the list. There is a Filter Compatibility button which can be toggled to Yes/ No to search by compatibility of PC components or not. Click on Expand to see a detailed view of added components and their prices.
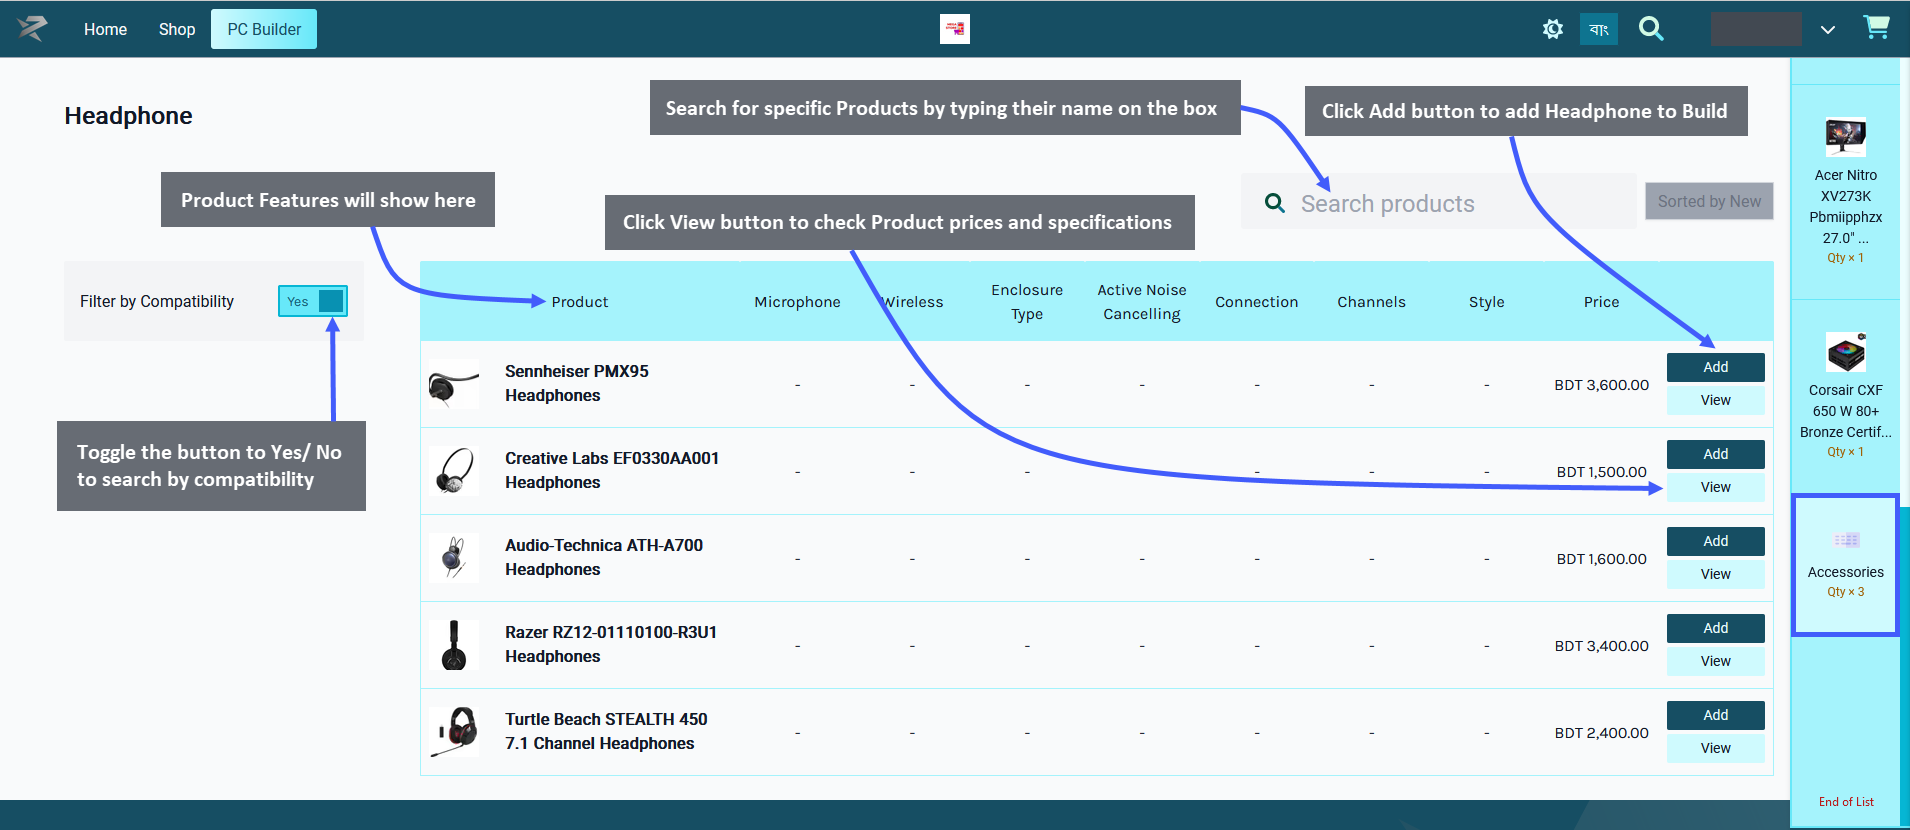
Place Order for Newly Created PC Build
When all the components will be successfully added to the PC Build, click on the Expand button from the bottom left to open the pop-up showing Cart details. From here, click on the Add to Cart button to complete the New PC Build and place a New Order. This PC Build will automatically be saved under Users Build on the Admin Panel.
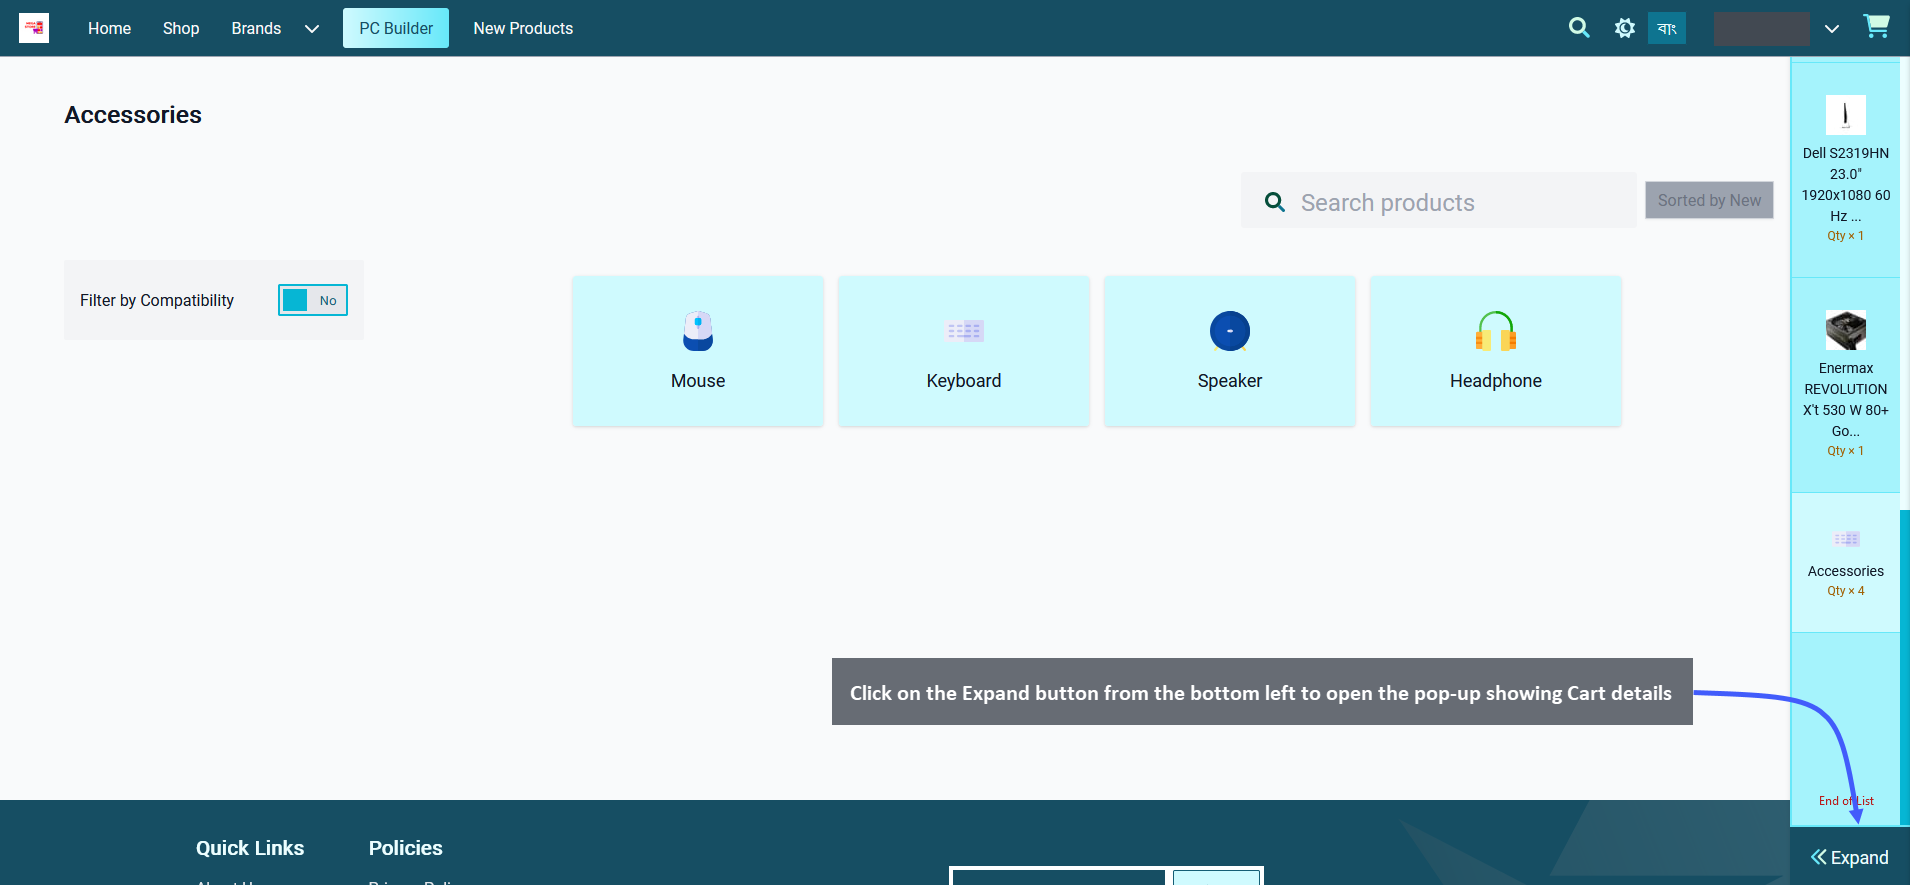
Image 1: Click on the Expand button from the bottom left to open the pop-up showing Cart details.
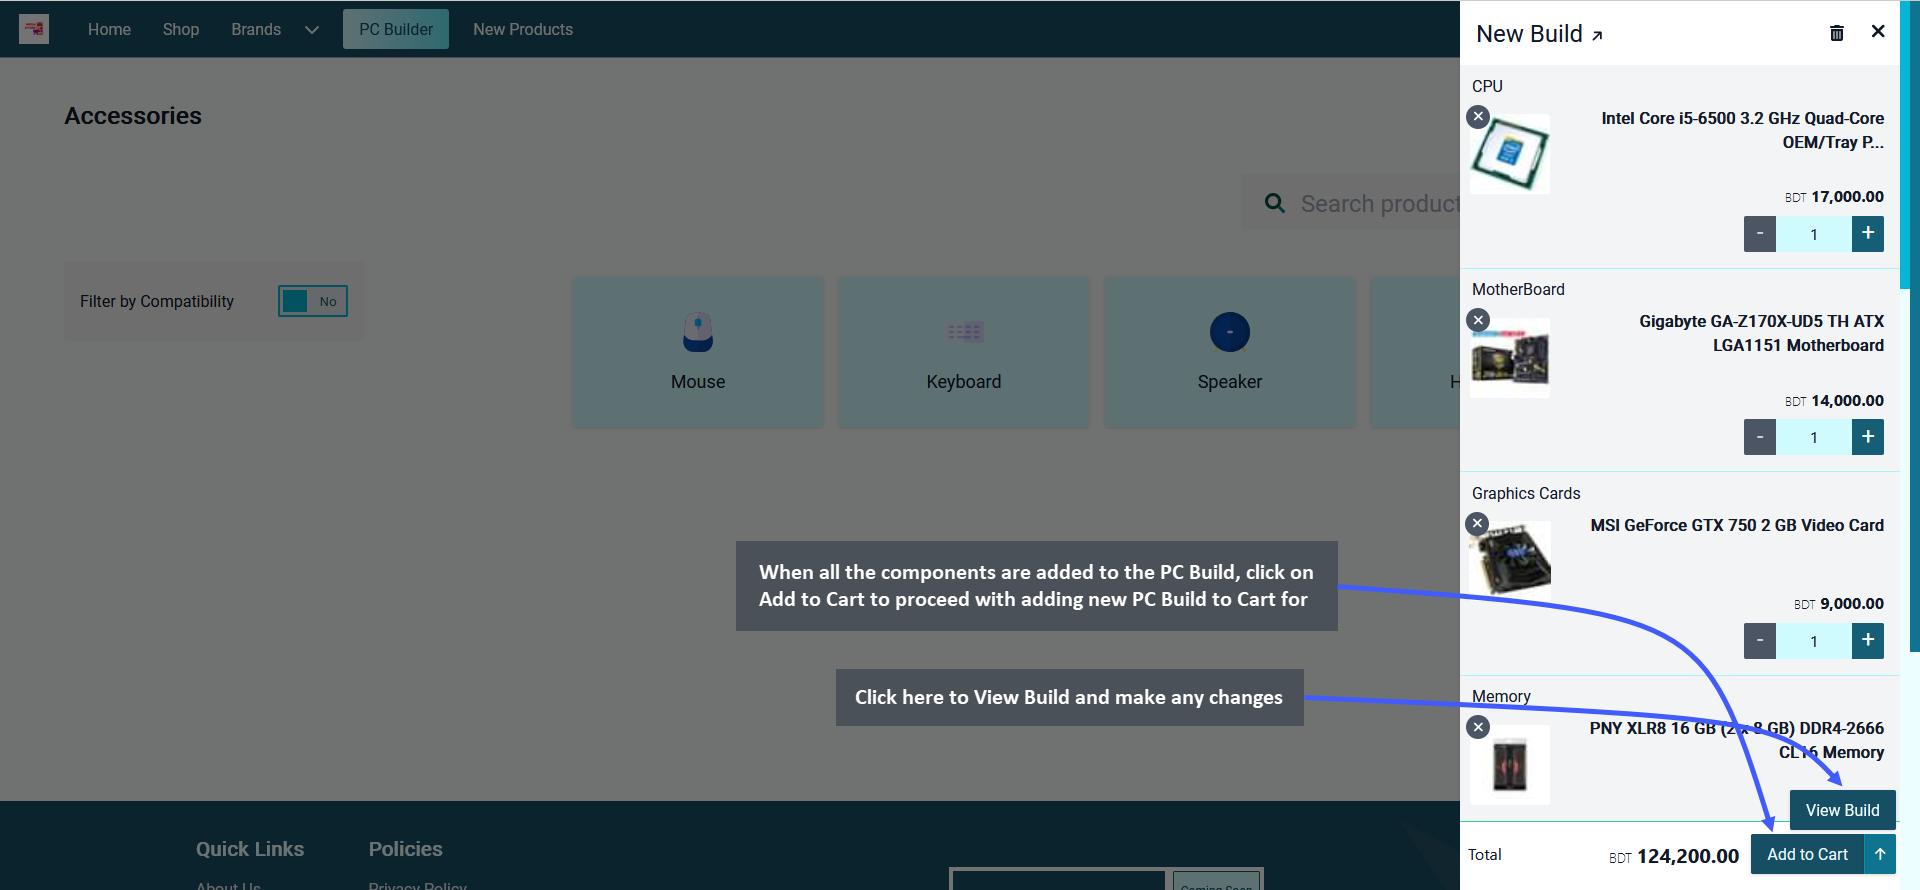
Image 2: When all the components are added to the PC Build, click on Add to Cart to proceed with Order.
Check Cart Details to Proceed to Checkout
Clicking on Add to Cart will redirect to a new Page showing full details of PC Build Cart. Beside each component, there are + and - buttons to increase and decrease quantities for the Build. After checking all the details, click on Proceed to Checkout button to proceed with filling in the Billing, Shipping, and Payment details for New Order.
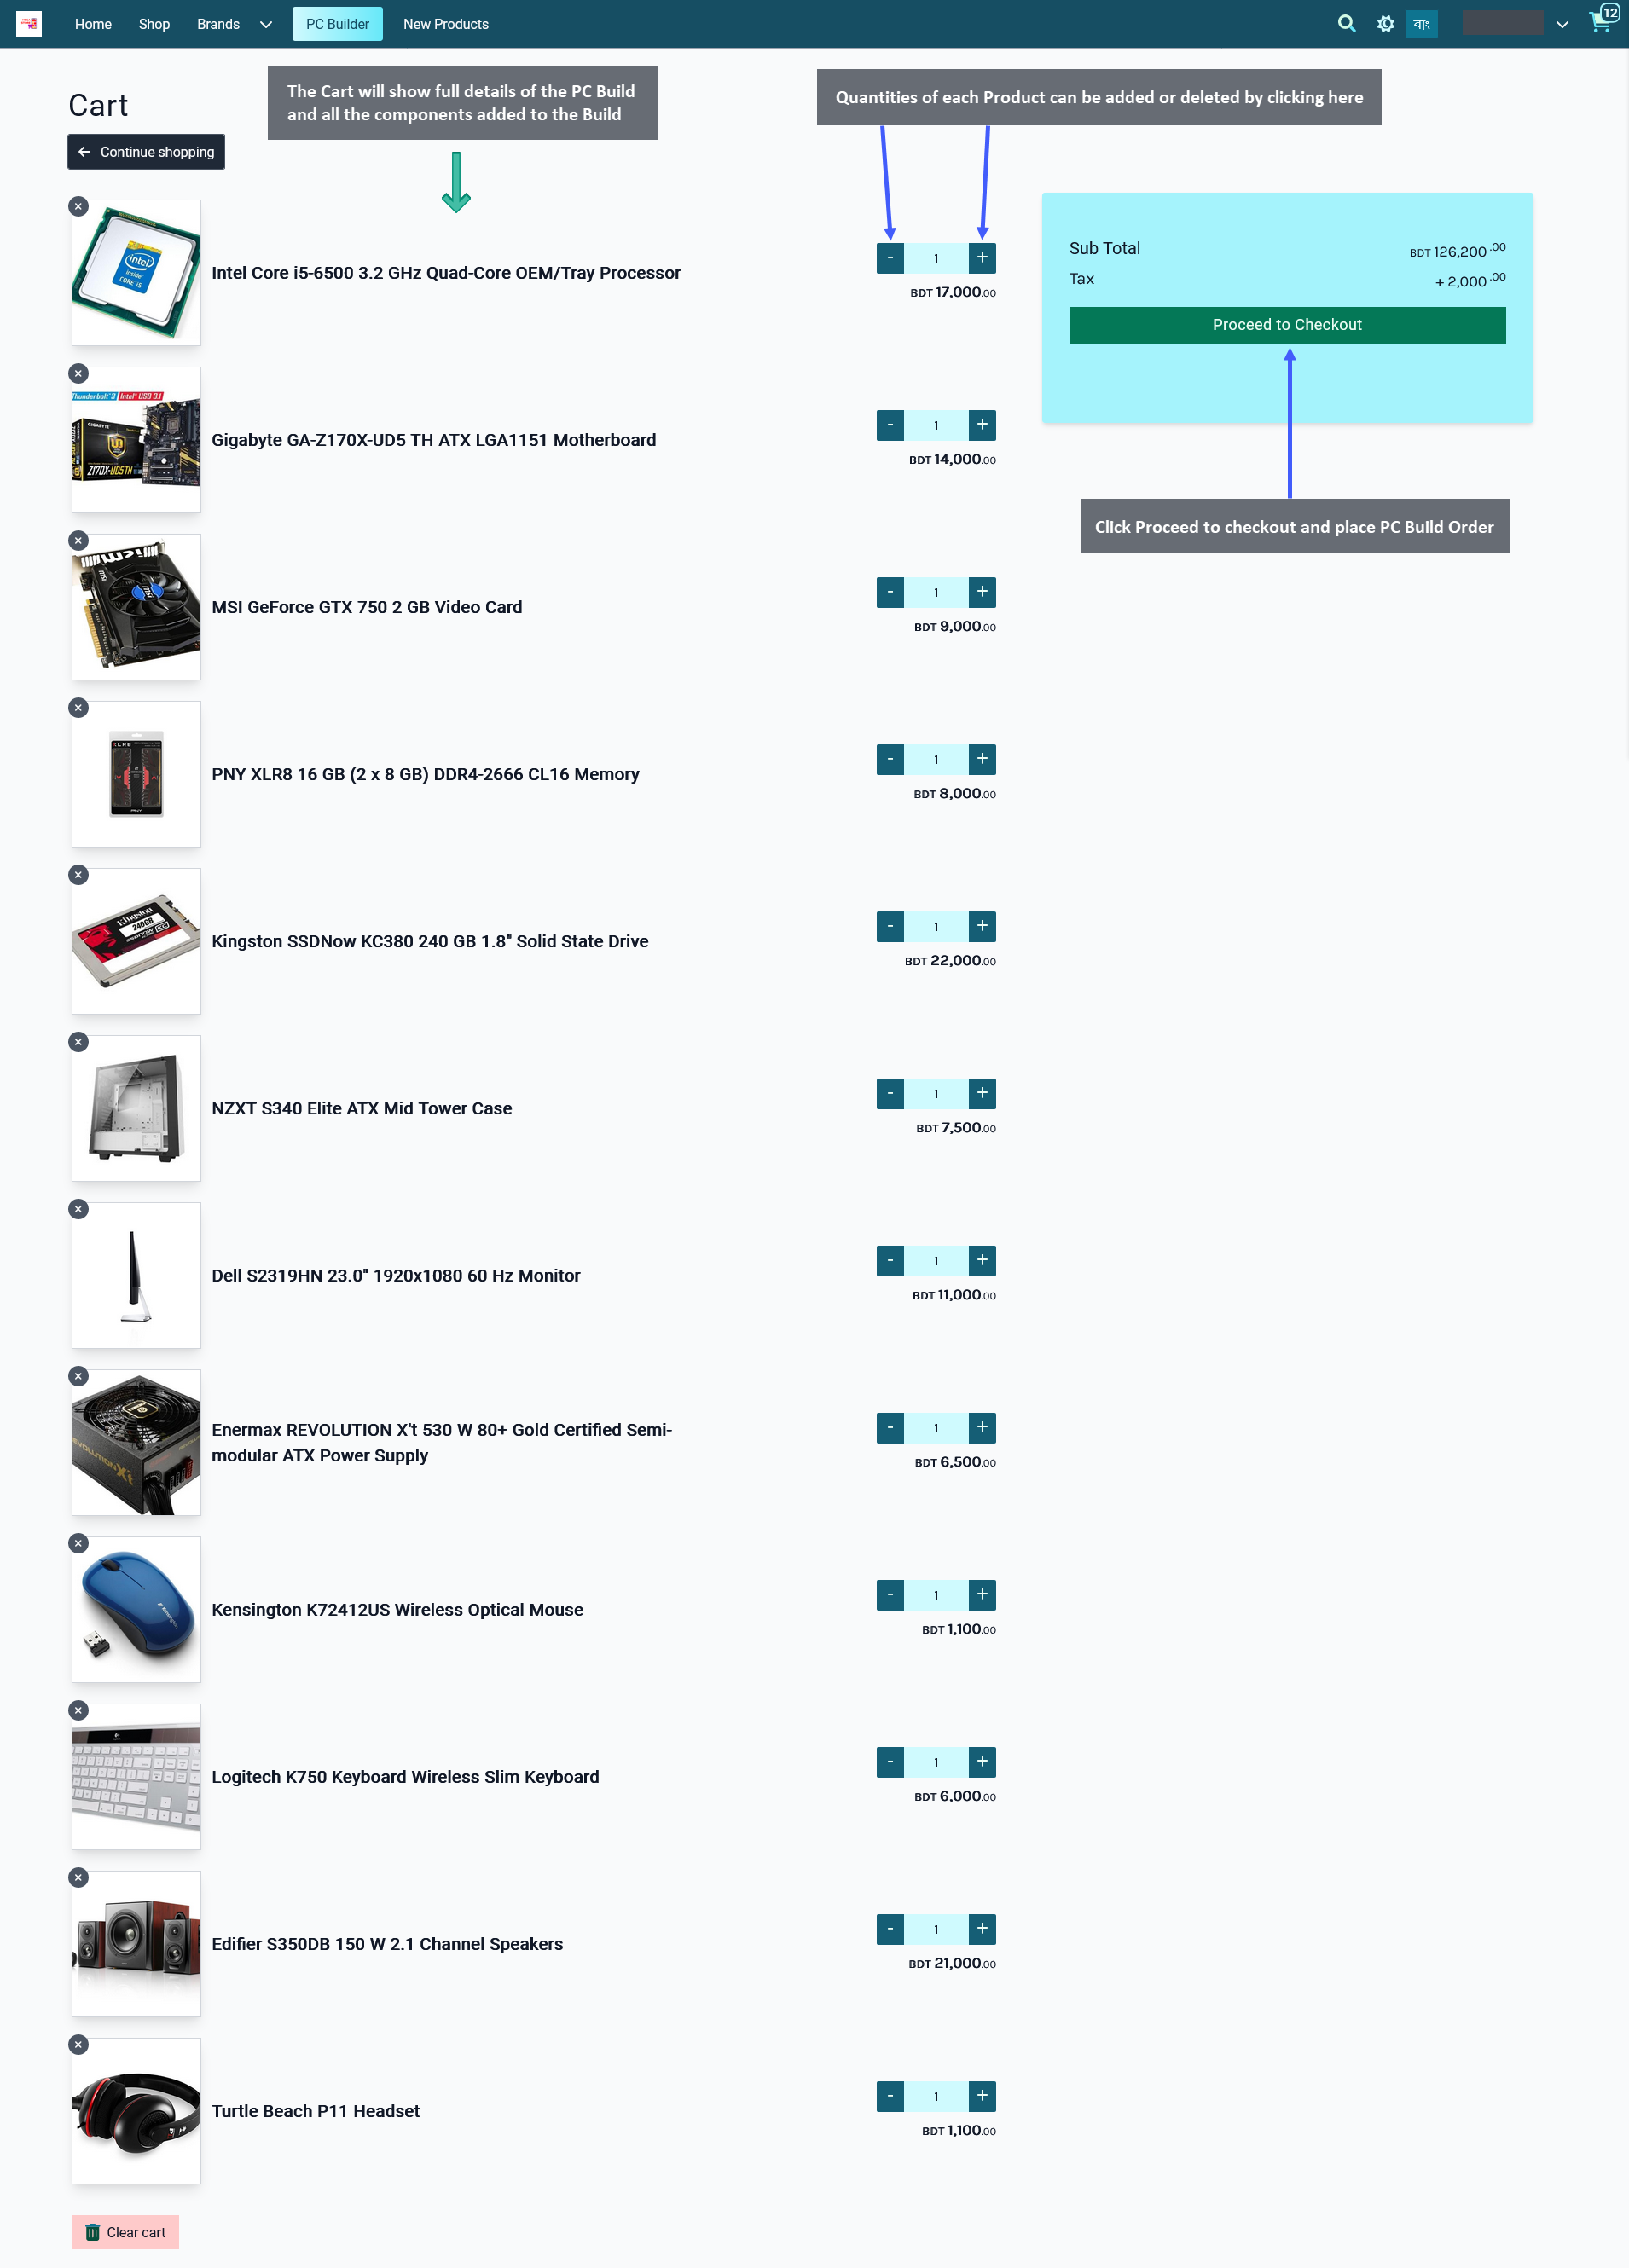
Complete Billing, Shipping, and Payment Details to Place Order
In the checkout page, fill in the Billing details to complete processing of the Order. Select preferred Shipping and Payment options, and click on Place Order button to confirm and place New Order for the User’s PC Build.
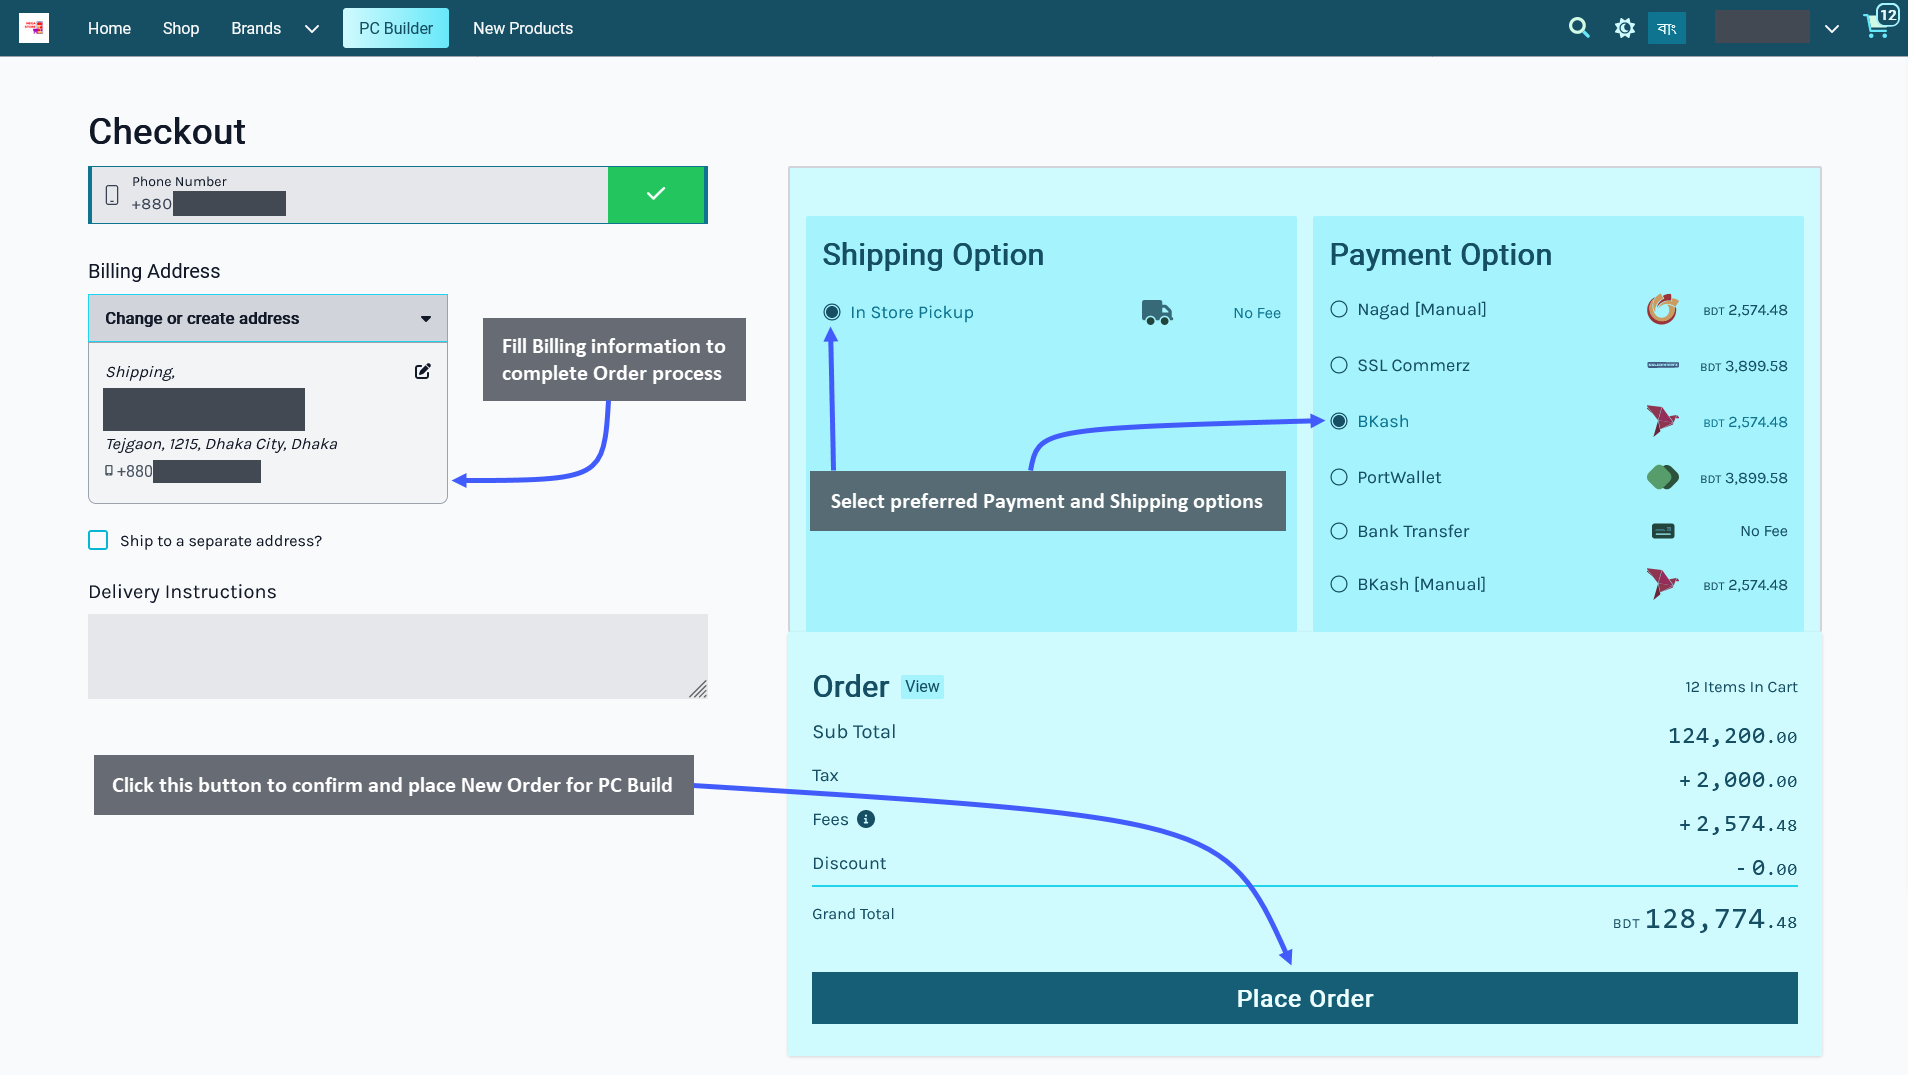
PC Build Order Confirmation Page
When the Order is sucessfully placed, it will redirect to the Order Confirmation Page showing the Order details. There are three options to view all the Order of the User, and go directly to Shop or Home. Using Print Invoice button, the User can print out the Order invoice for record containing the Billing, Shipping, and Order details.
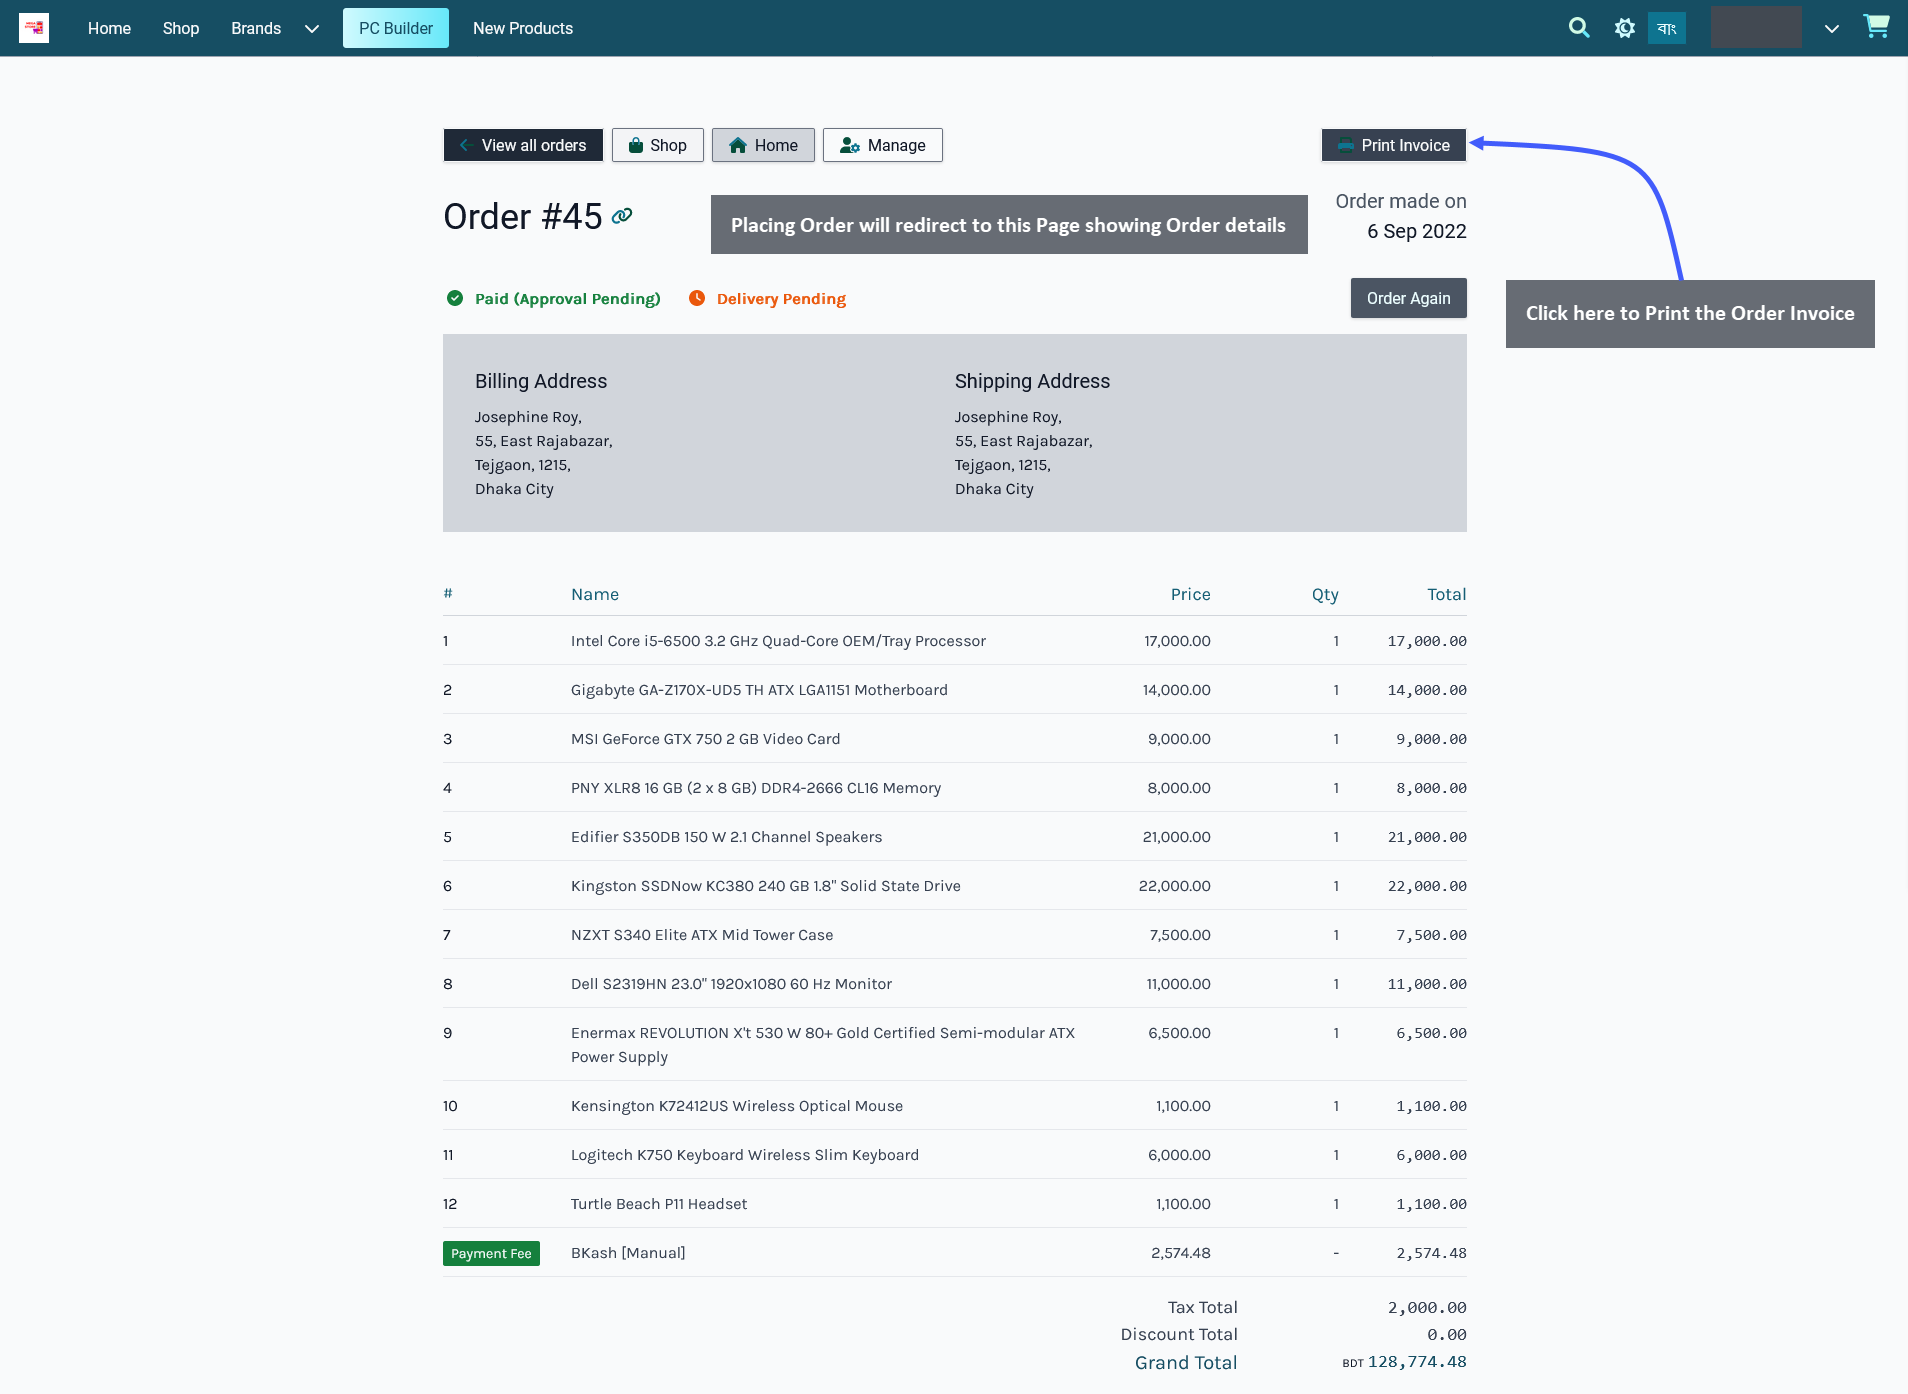
User PC Builds on Admin Panel
The newly created PC Build will automatically be listed under User Builds Section with Customer’s information, creation date, and PC Build parts added. The existing builds can be edited by clicking on the Pencil Icon which will redirect to The Website. From there, that particular build can be customized and changed to order again.
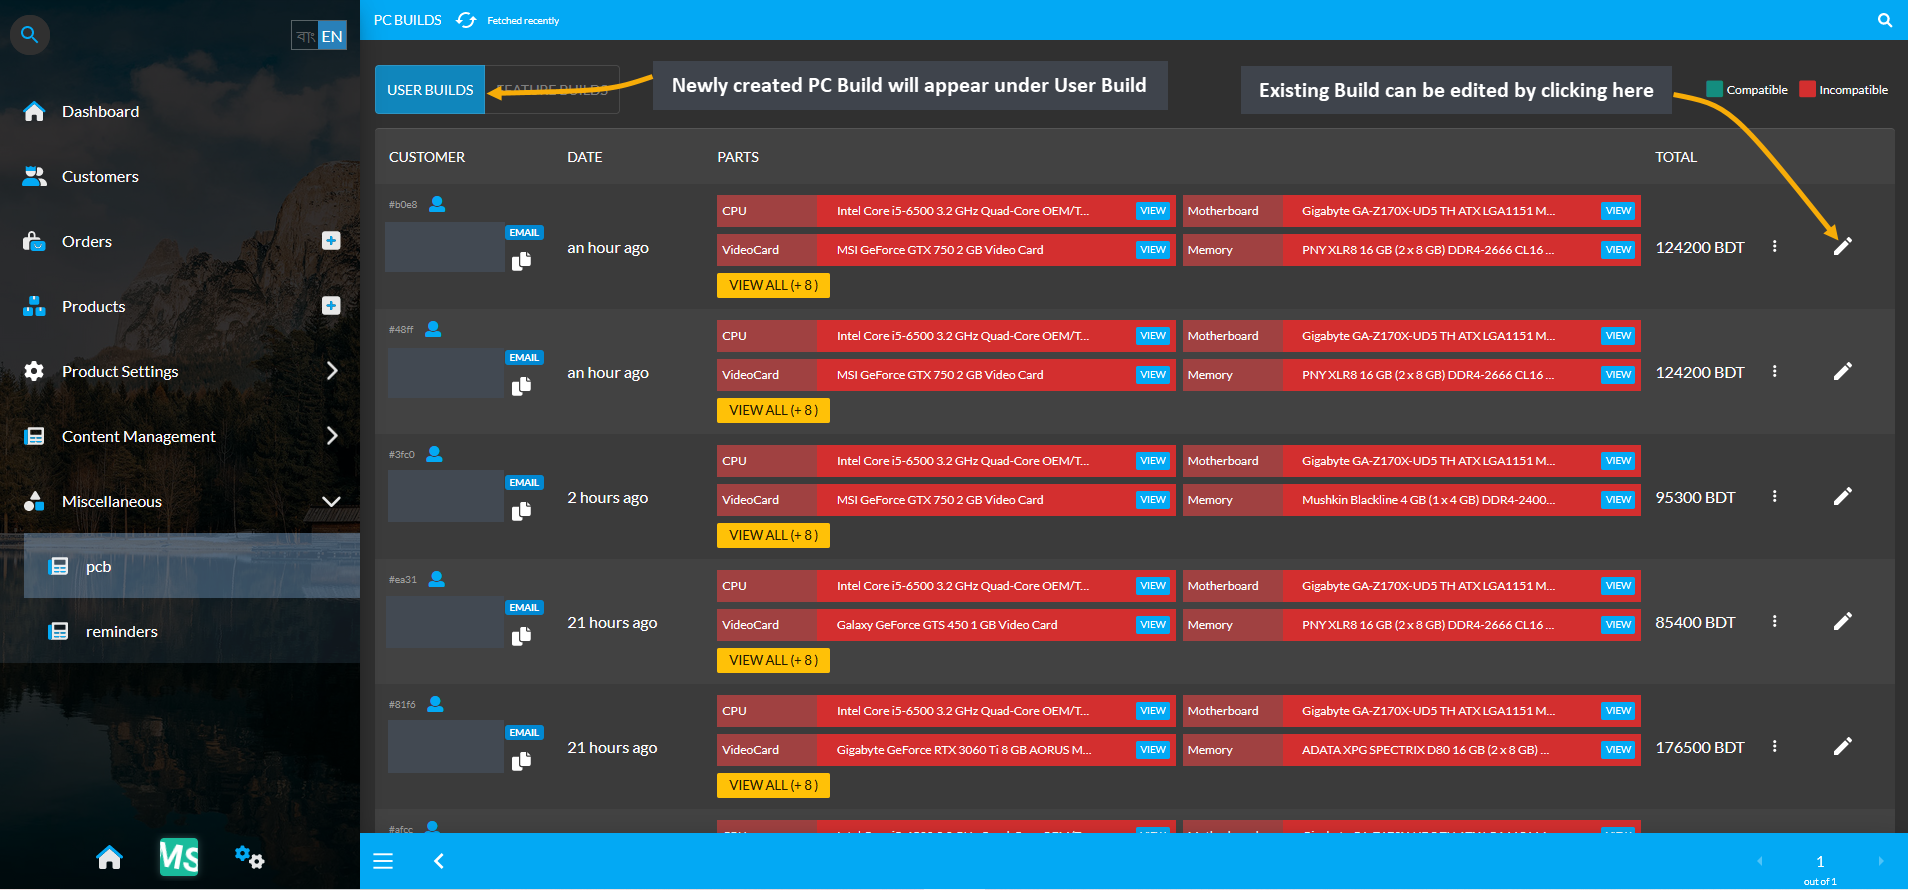
Customize Existing Build on The Website
Clicking on Edit button from Admin Panel will redirect to The Website’s saved PC Build Page. From there, the Build can be Customized and again added to Cart for a New Order. All the Builds can be made Public or Private with the use of Make It Public and Make It Private buttons. Switching from one to another will make the Build from Public to Private and vice versa. Below this, there is a box to Name the PC Build and a box to add description for the Build. Click the Save button to save all these settings successfully. Use Add to Cart button to Order this Build.
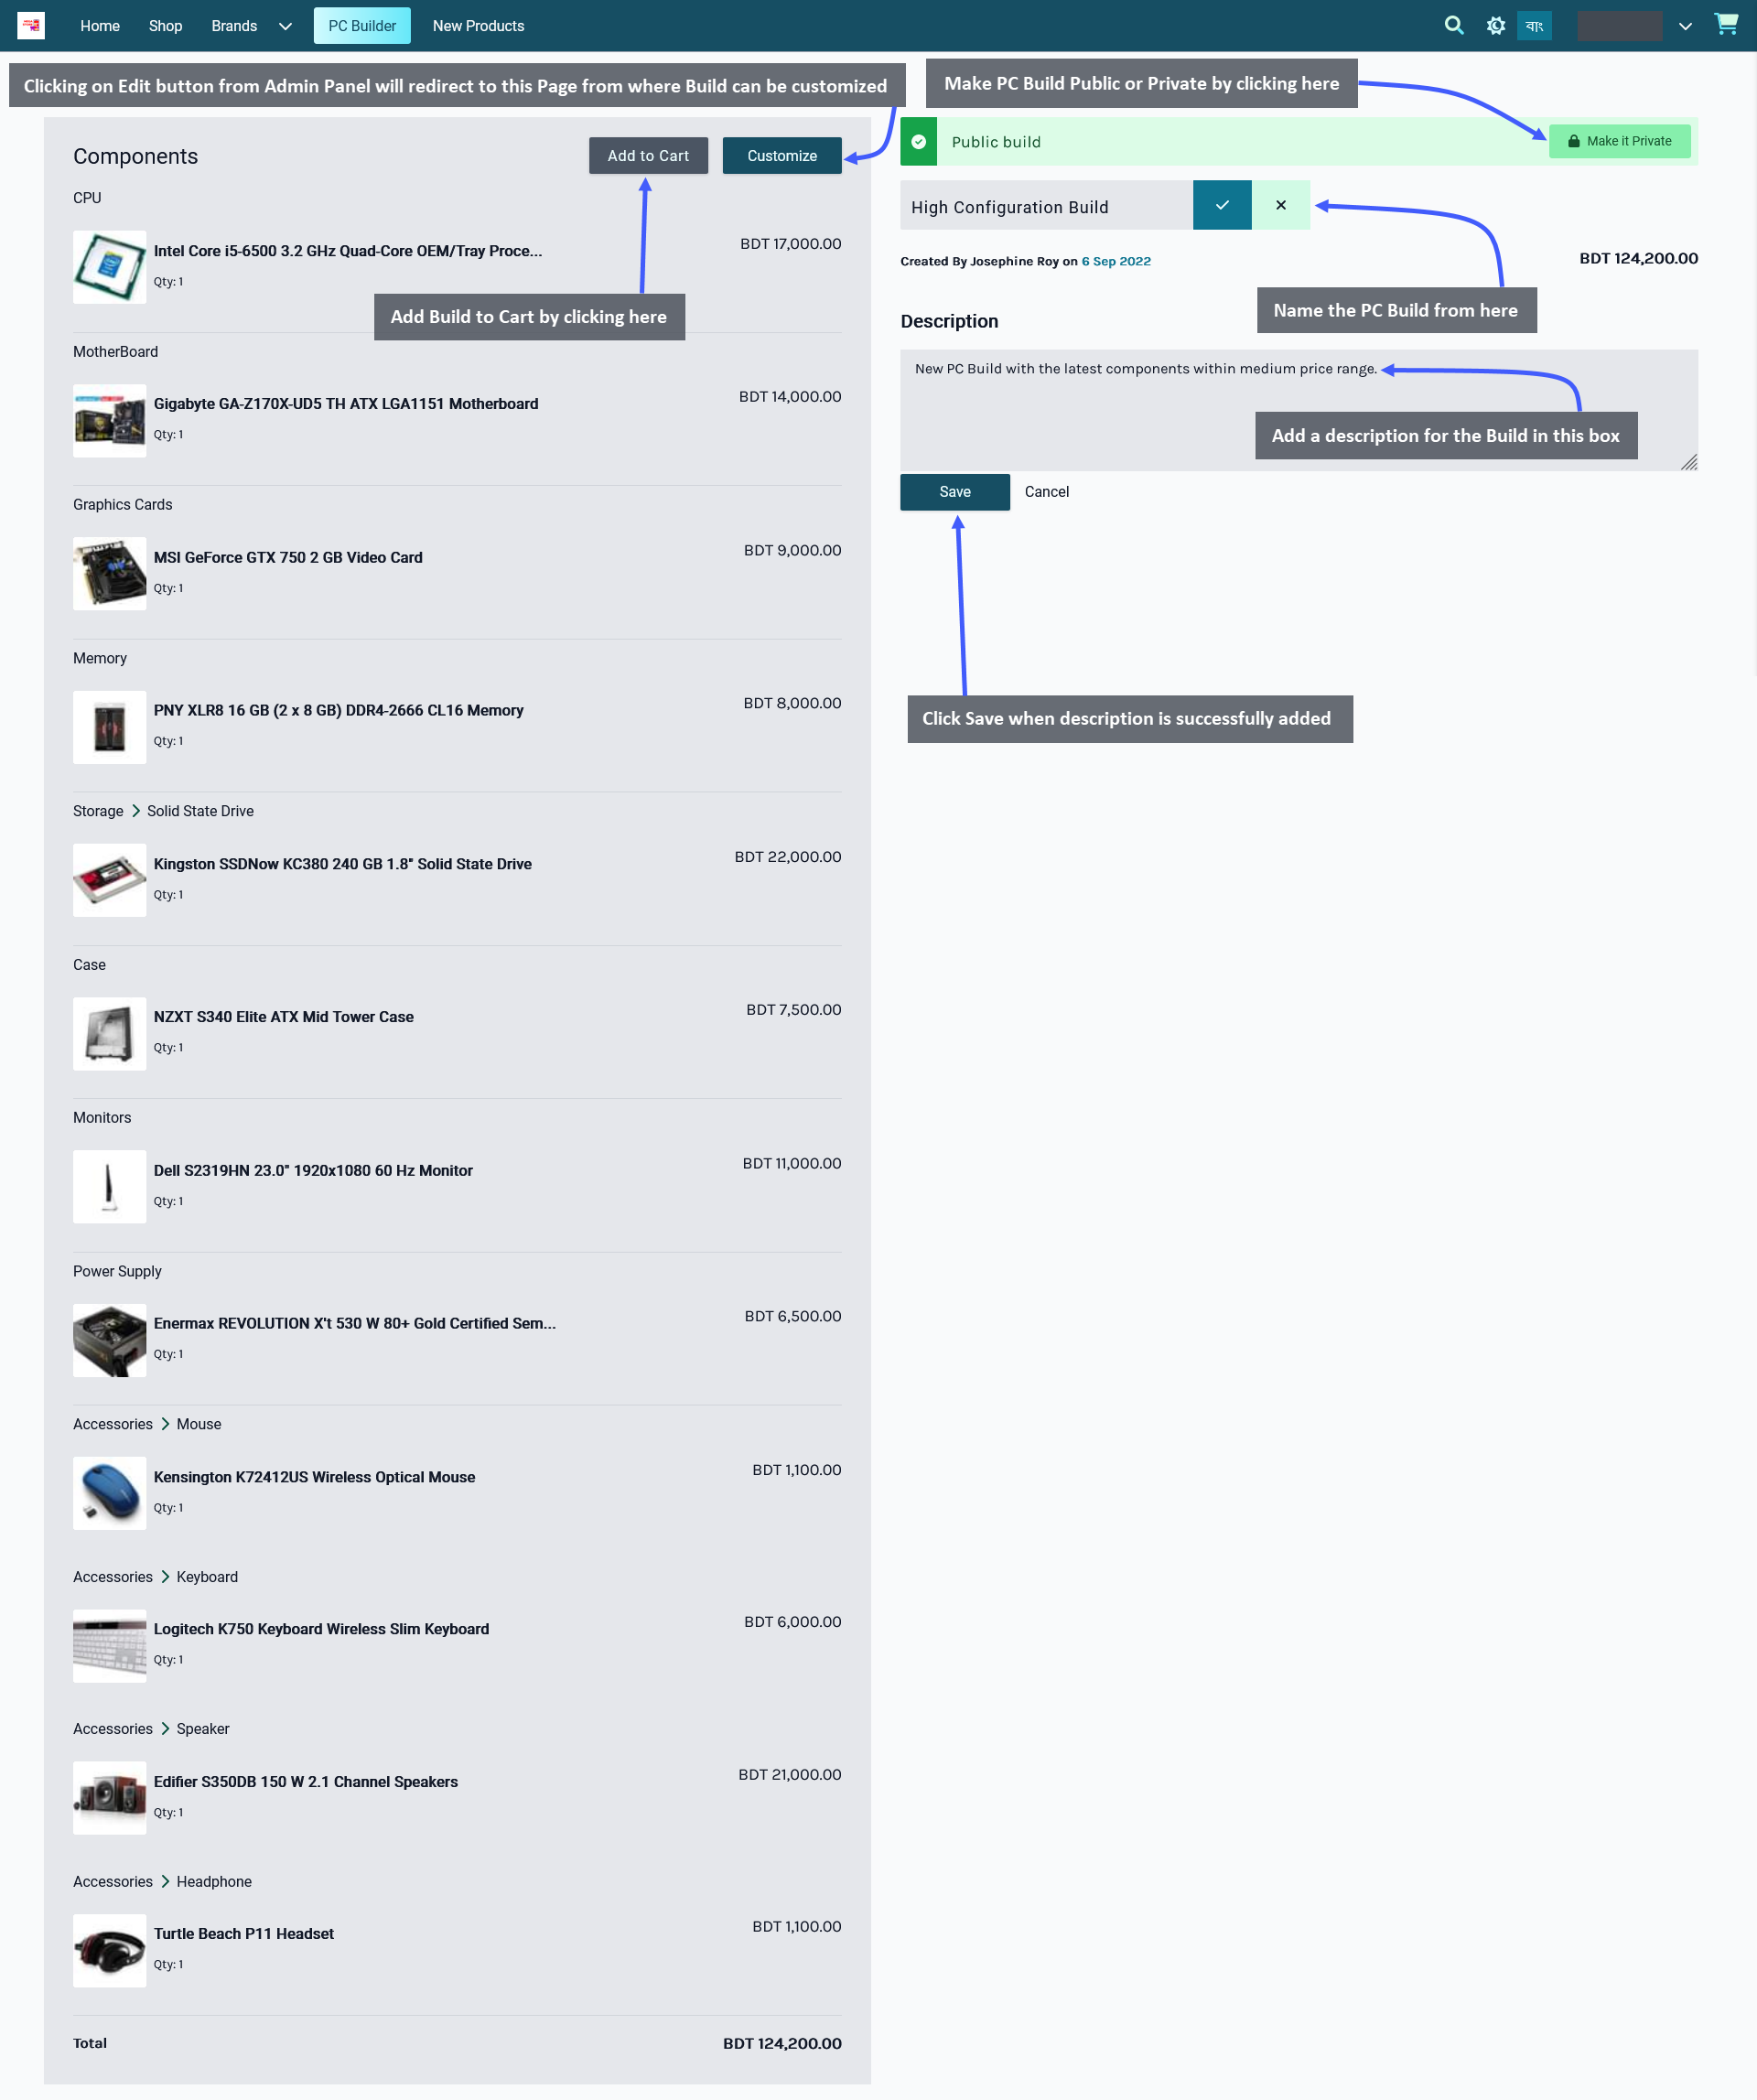
Create Featured Builds
PC Builds created by the User can me Marked as Featured to show up under Featured Builds on the Website. To do this, click on the Mark as Featured button from any of the Builds under the User Builds as shown below.
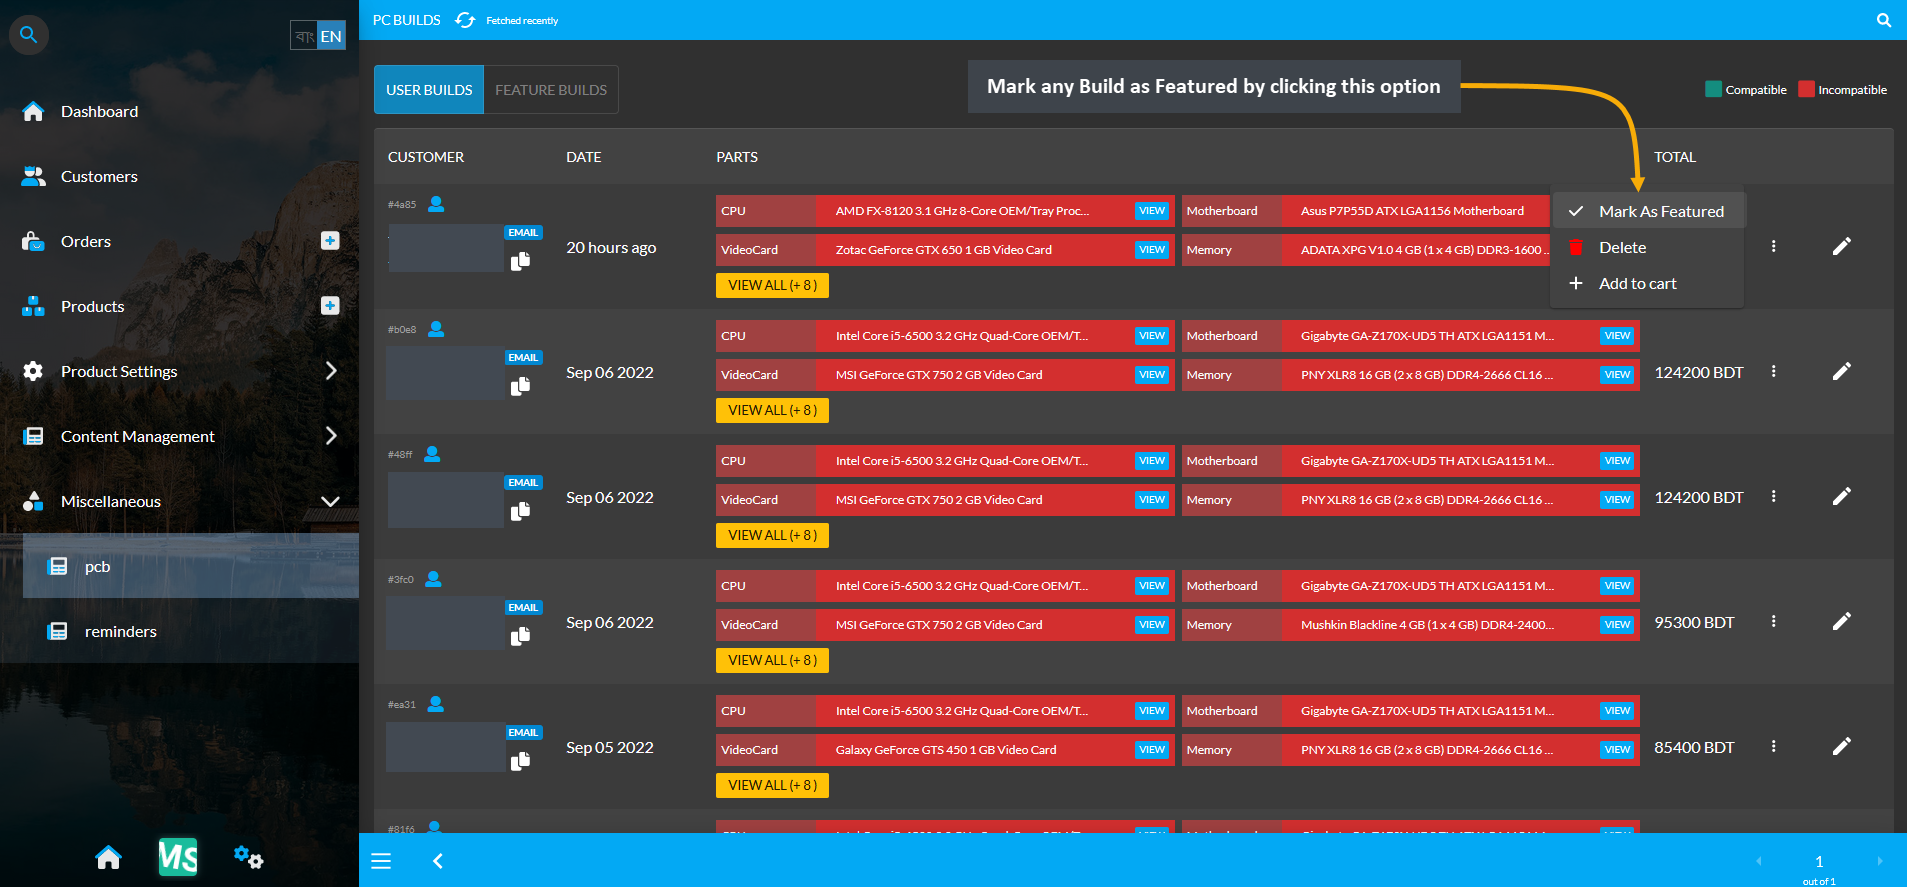
Image 1: Mark any Build as Featured by clicking on the Mark As Featured option from User Builds List.
The selected Builds marked as Featured will appear under the list of Featured Builds. The Shop Owner could set to display Three Featured Builds on the Website. If they want to rearrange their Featured Builds on Website, they can use the Re-Order button. To Re-Order Featured Builds, click on the preferred Build that will become movable (green) to drag and drop within the Featured Builds List.
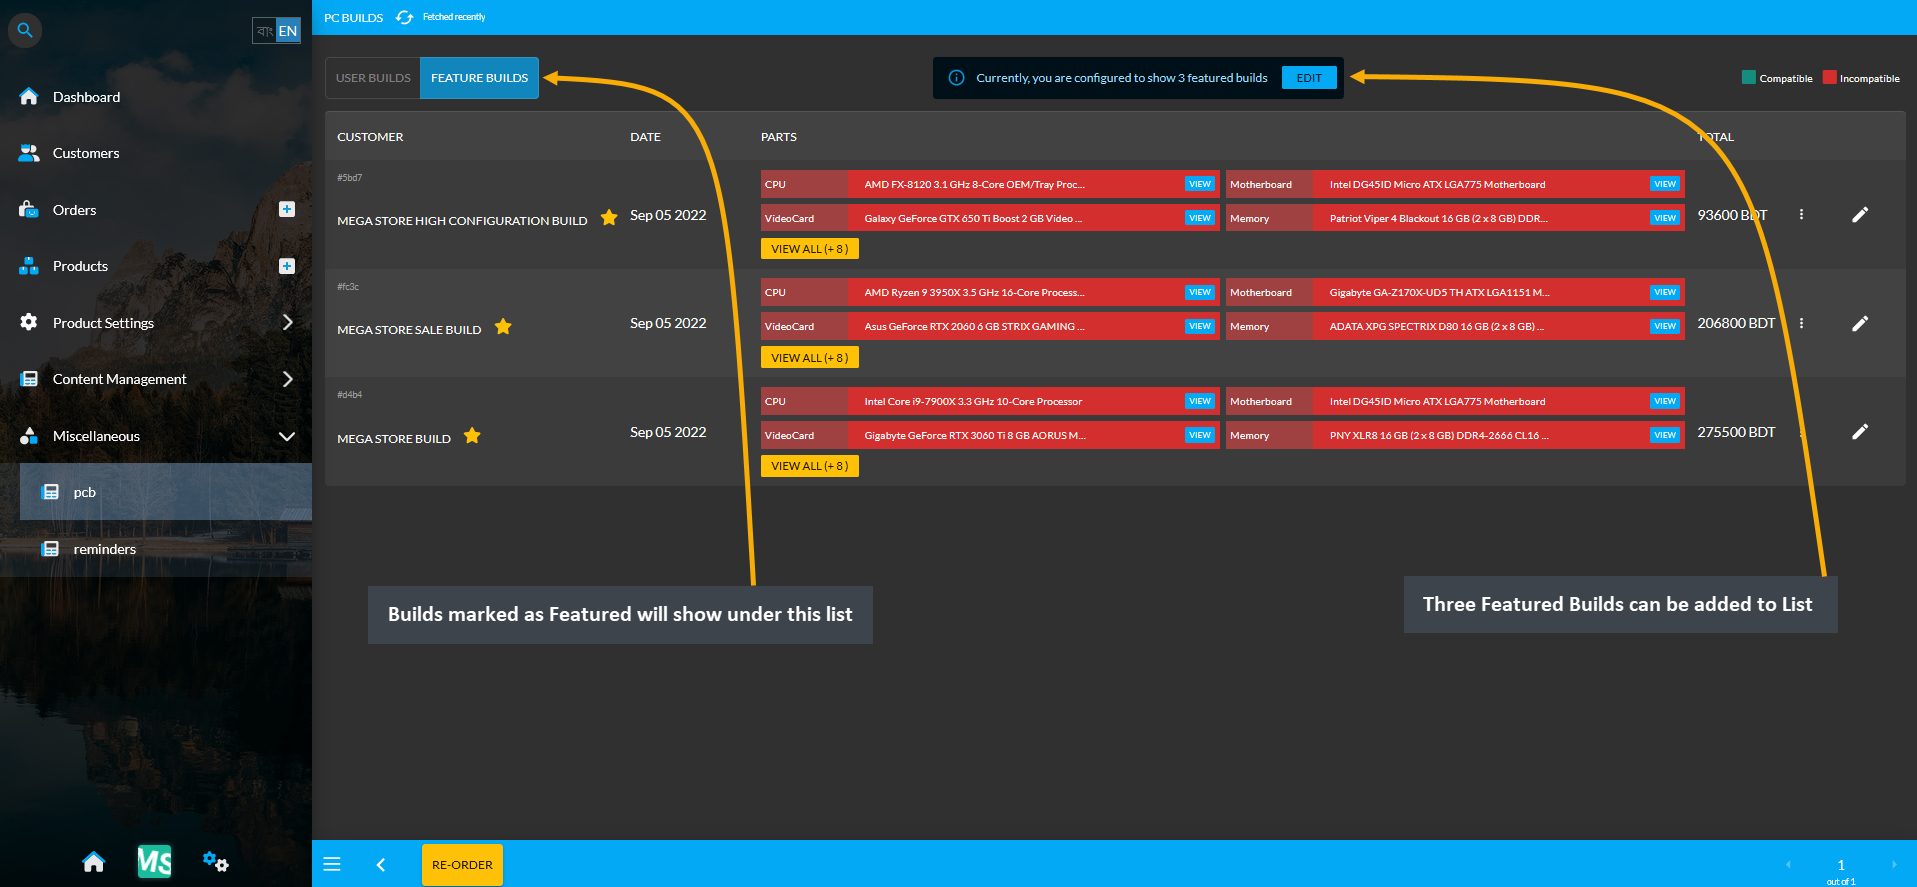
Image 2: The Shop Owner can set Three Featured Builds from their User Builds to display on the Website.
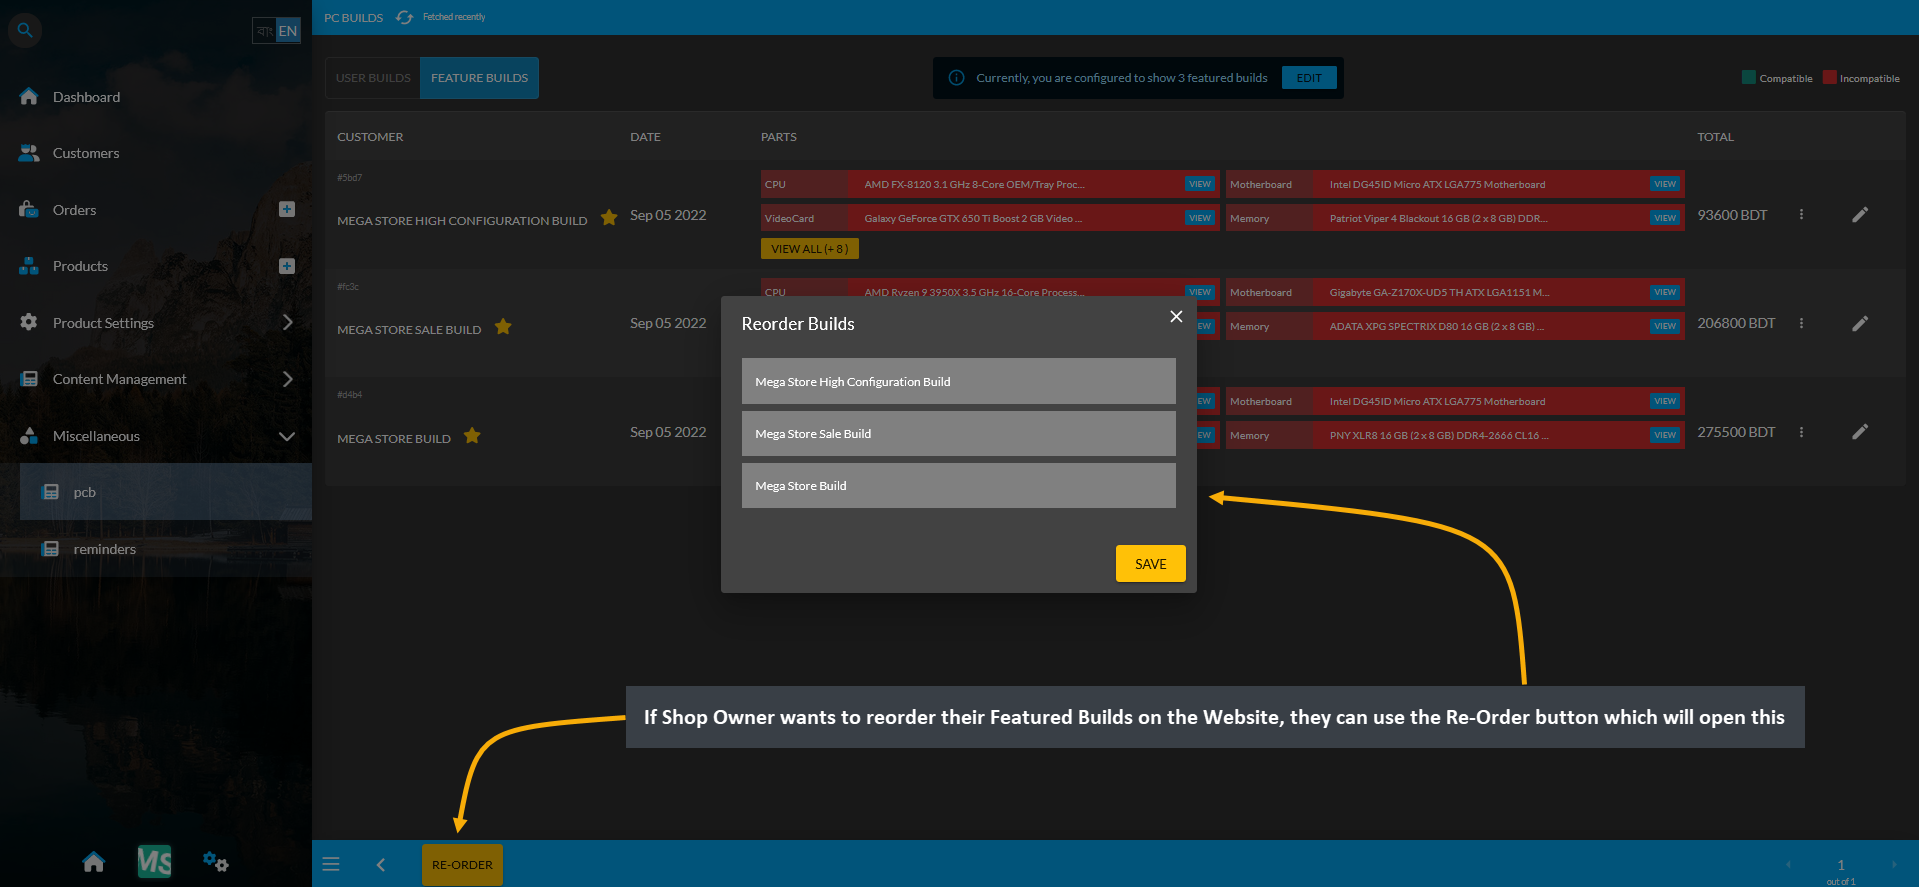
Image 3: Use the Re-Order button to rearrange Featured Builds in a specific sequence on the Website.
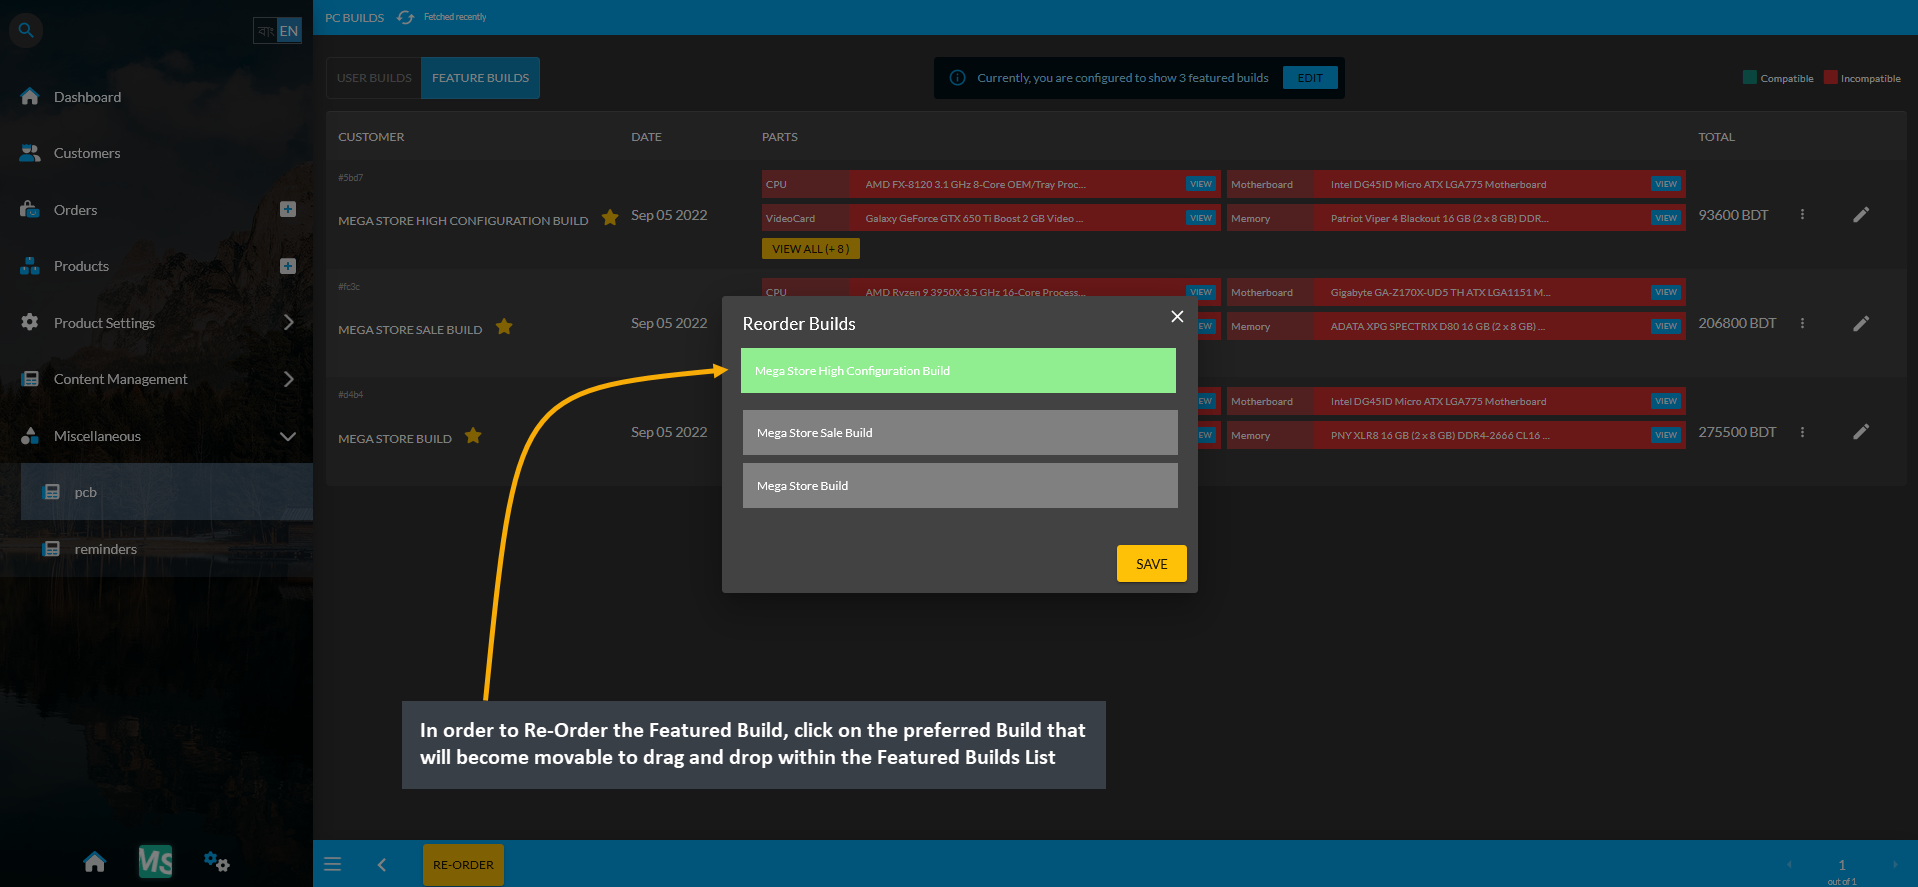
Image 4: Click the preferred Build that will become movable to drag and drop in any sequence on the List.
The Shop Owner could set to display Three Featured Builds on the Website where the Featured Builds tab will show these Featured PC Builds. Beside it is the tab which will display the User Builds as shown below.
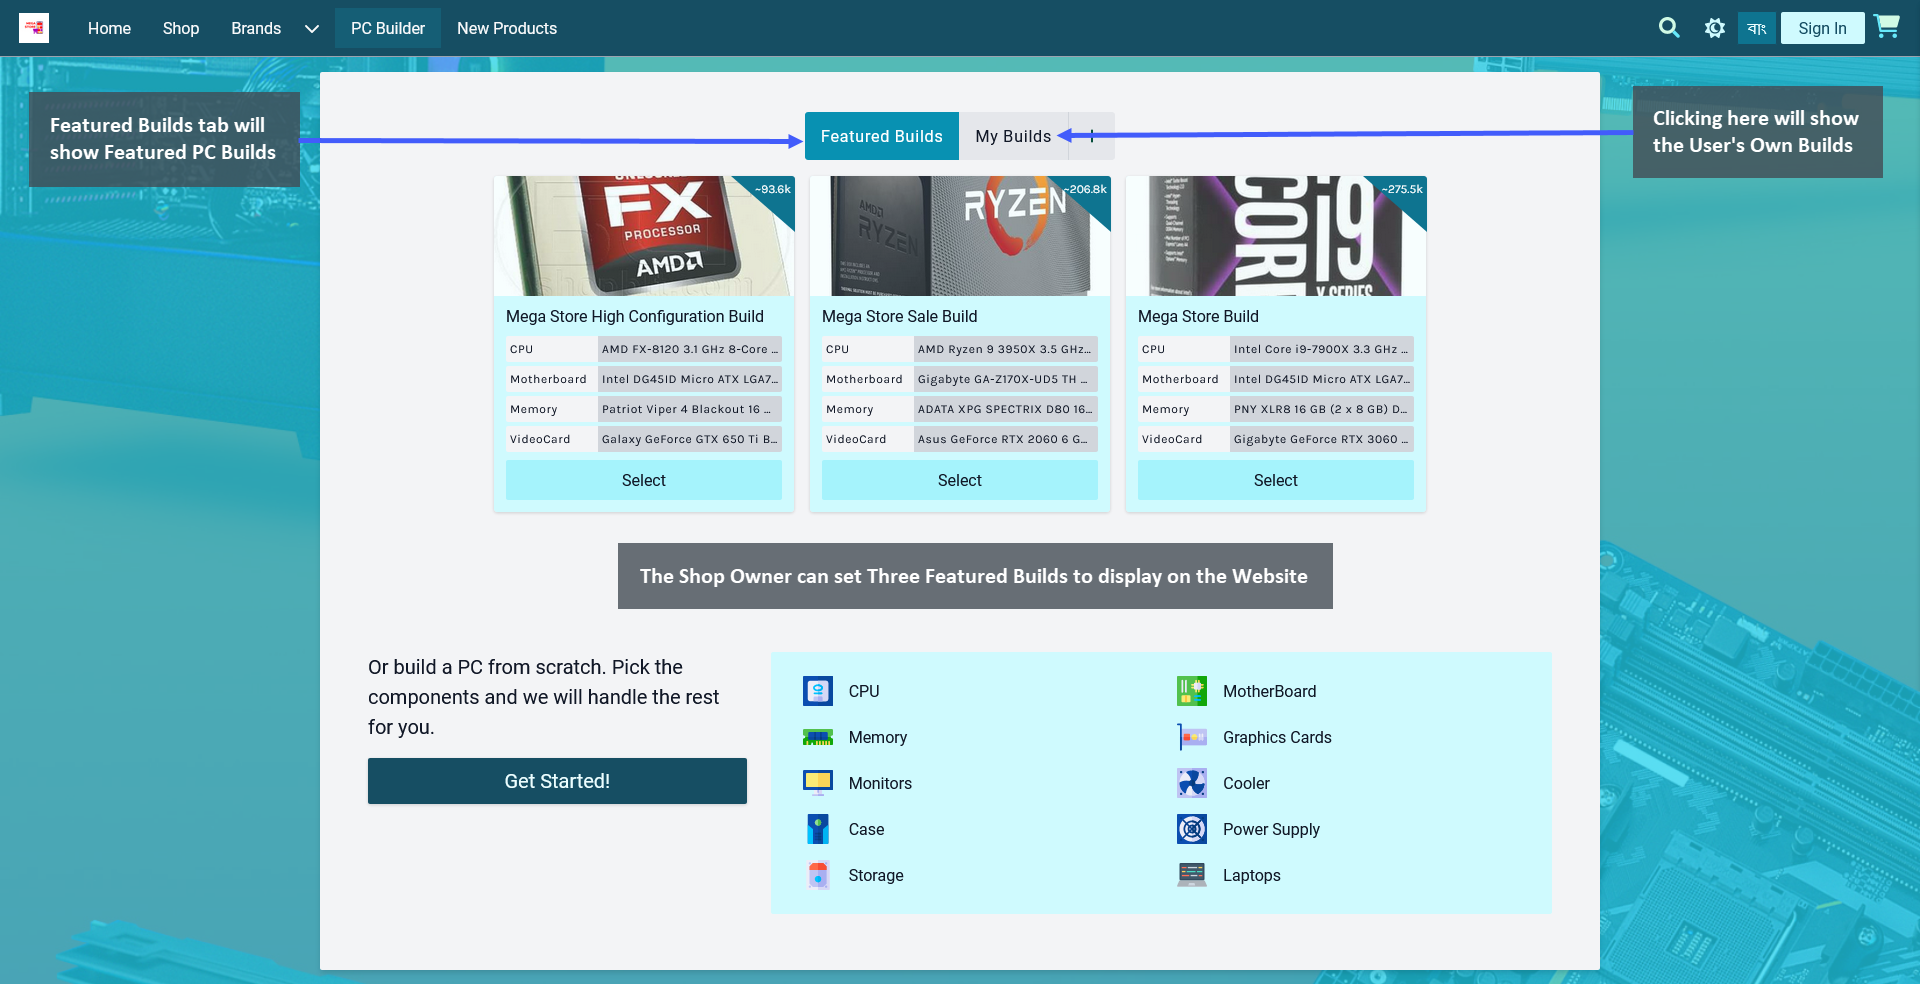
Image 5: The Shop Owner can set Three Featured Builds which will be displayed under the Featured Builds.
View PC Builds from Customer Profile
When a Customer creates a lot of PC Builds, they will be available to view under the Customer Dashboard. Click the View More button from Customer Contact information to view the View PC Builds button. Click this button to view the PC Builds created by this Customer that will redirect to a page with full list of this Customer’s Builds.
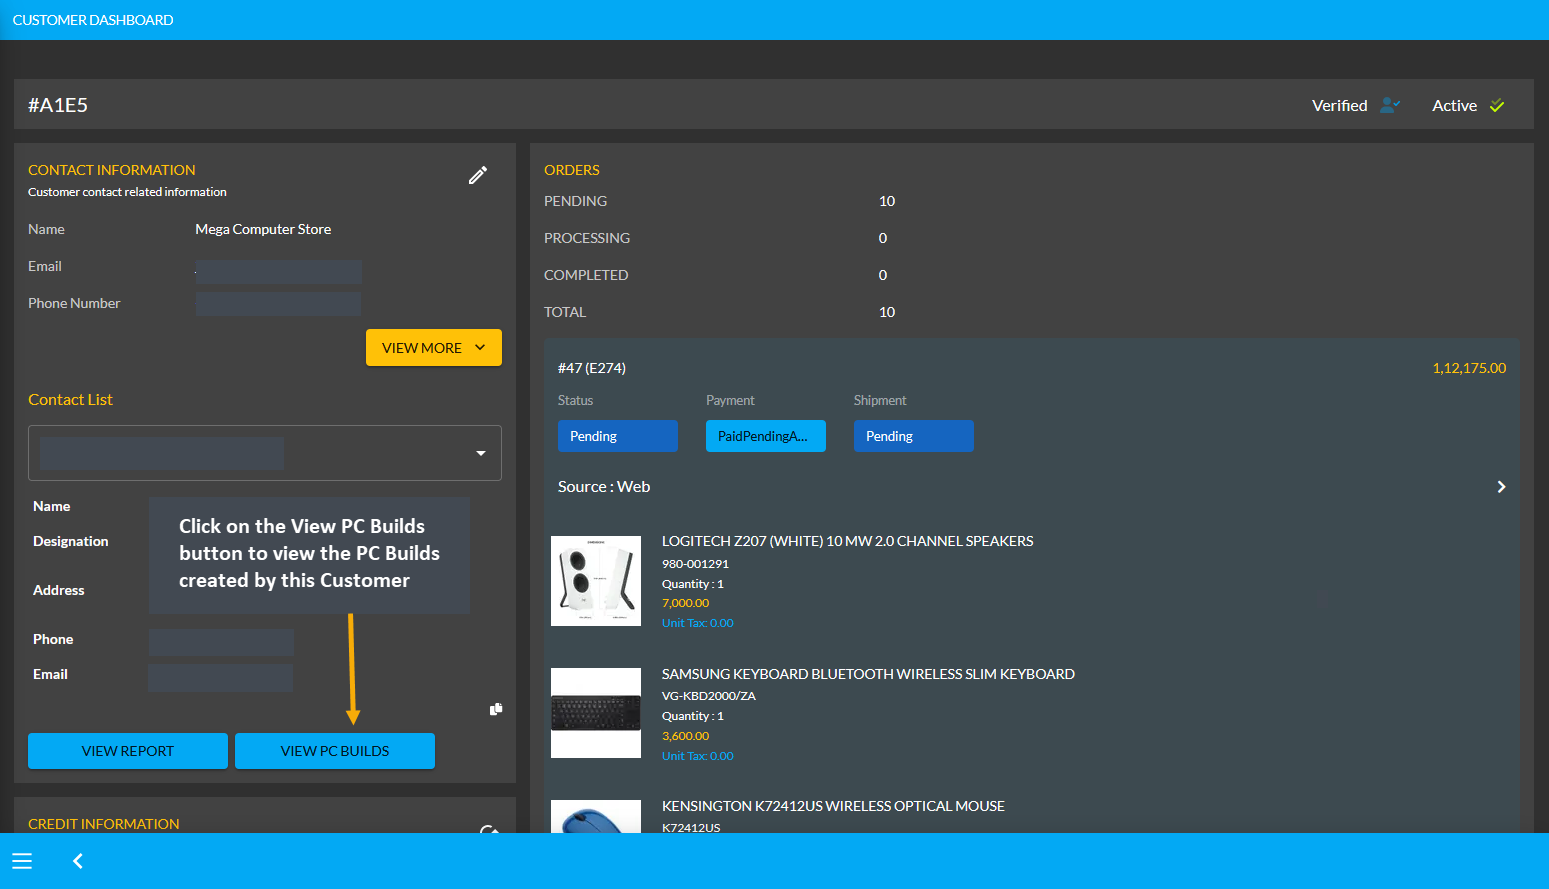
Image 1: Click on the View PC Builds button to view the PC Builds created by this Customer.
On the redirected page of the Customer’s PC Builds, the list of Builds will show the Customer’s information, PC Build creation date, PC Build total purchase price, and PC Build parts added as shown in the example.
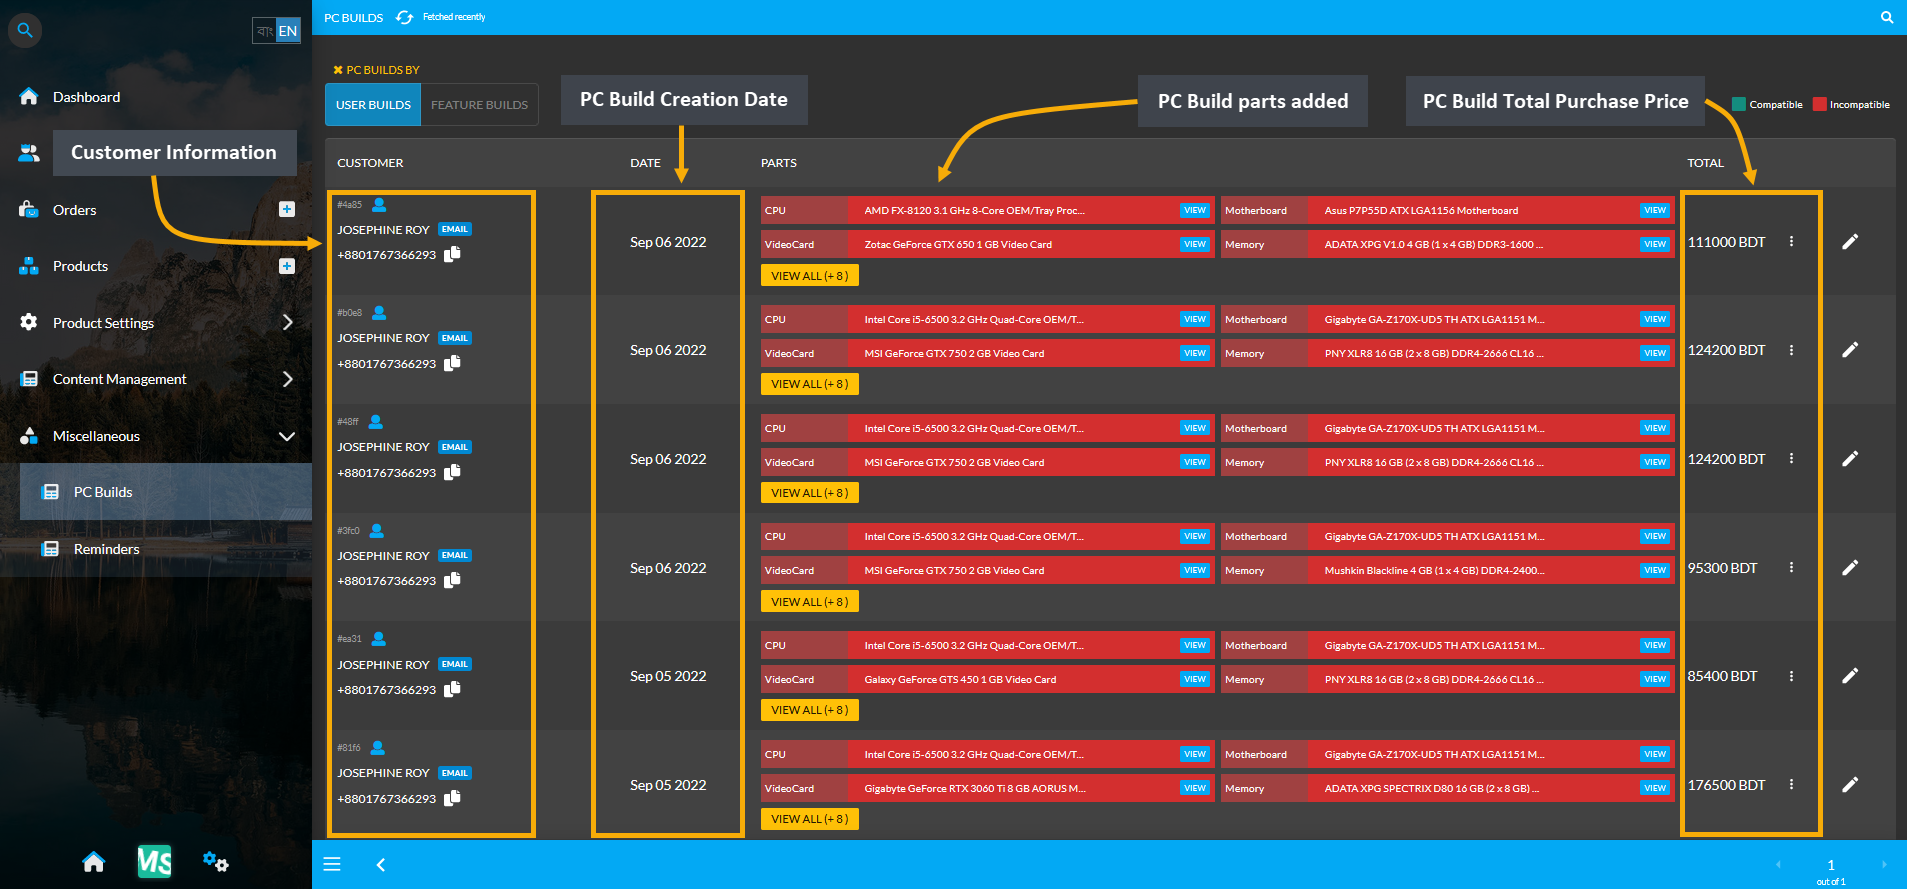
Image 2: Customer's information, PC Build creation date, total purchase price, and Build parts are shown.
To view all the added components of a specific User Build, click on View All that will show the details in a pop-up. There is a Customize for Print button, clicking on which will allow editing the quantities of the Build. There is a Print button beside this, using which the details of the Build can be printed for record.
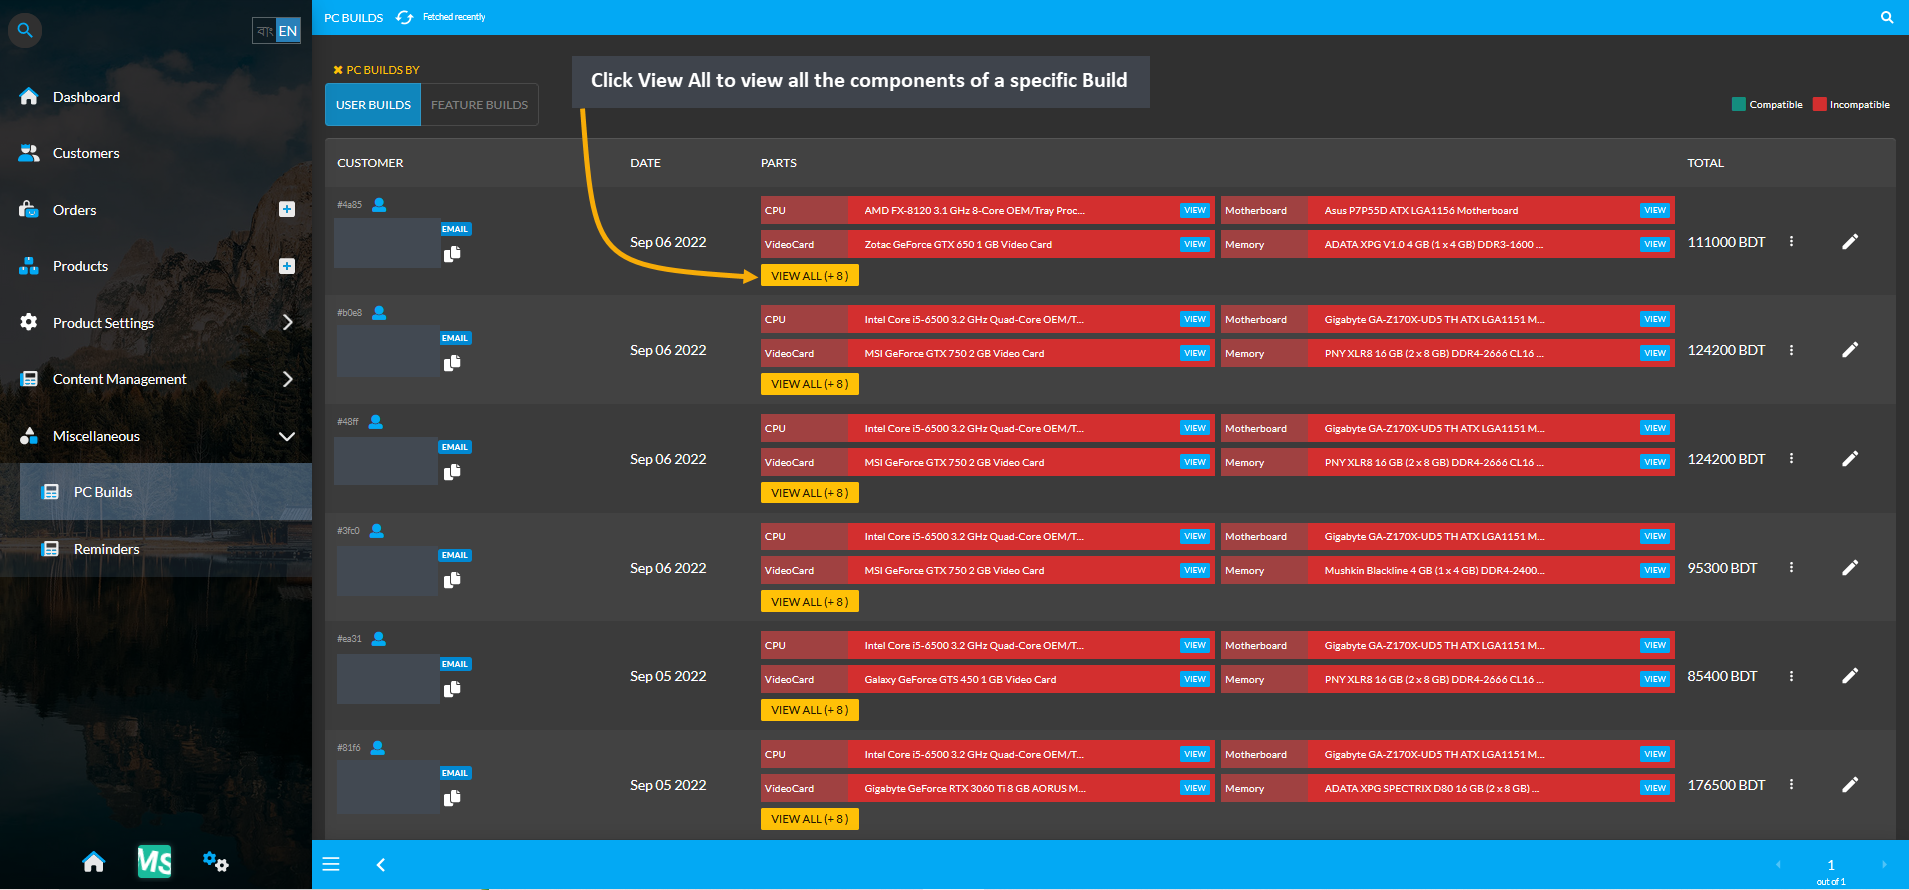
Image 3: Click View All to view all the components of a specific Build from the list of User's Builds.
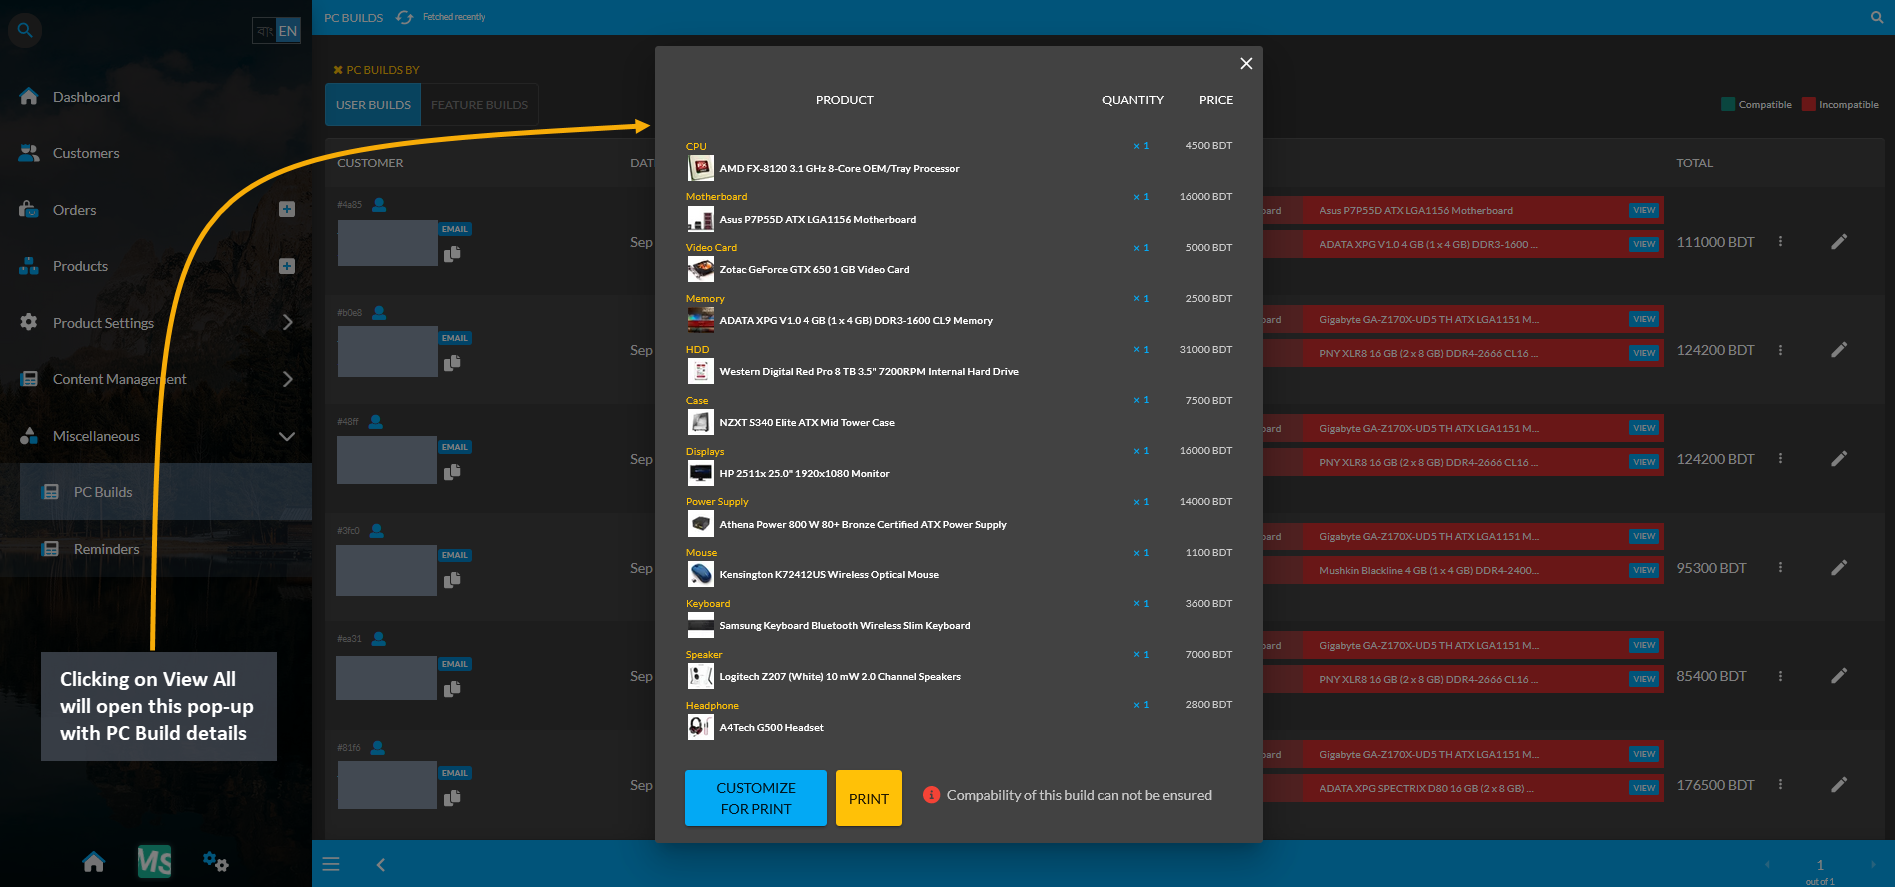
Image 4: Clicking on View All will open pop-up with PC Build details that can be customized or printed.
21.1 - PC Builds Categories
Specific Product Categories that should be selected during Product Creation for User PC Builds so that those Products are visible when creating PC Builds on the Website.
Categories to select for PC Build Visibility
Product Category: CPU
In order for Product(s) to be visible as components to select during PC Build creation, the Shop Owner needs to create Product(s) using specific Product Categories. For example, as shown in the screenshot below, in order for the Product AMD Ryzen 5 3400G 3.7 GHz Quad Core Processor to be visible or be selected during PC Build creation, the Product should be created under Categories CPU and Desktop CPU and not other CPU Categories.
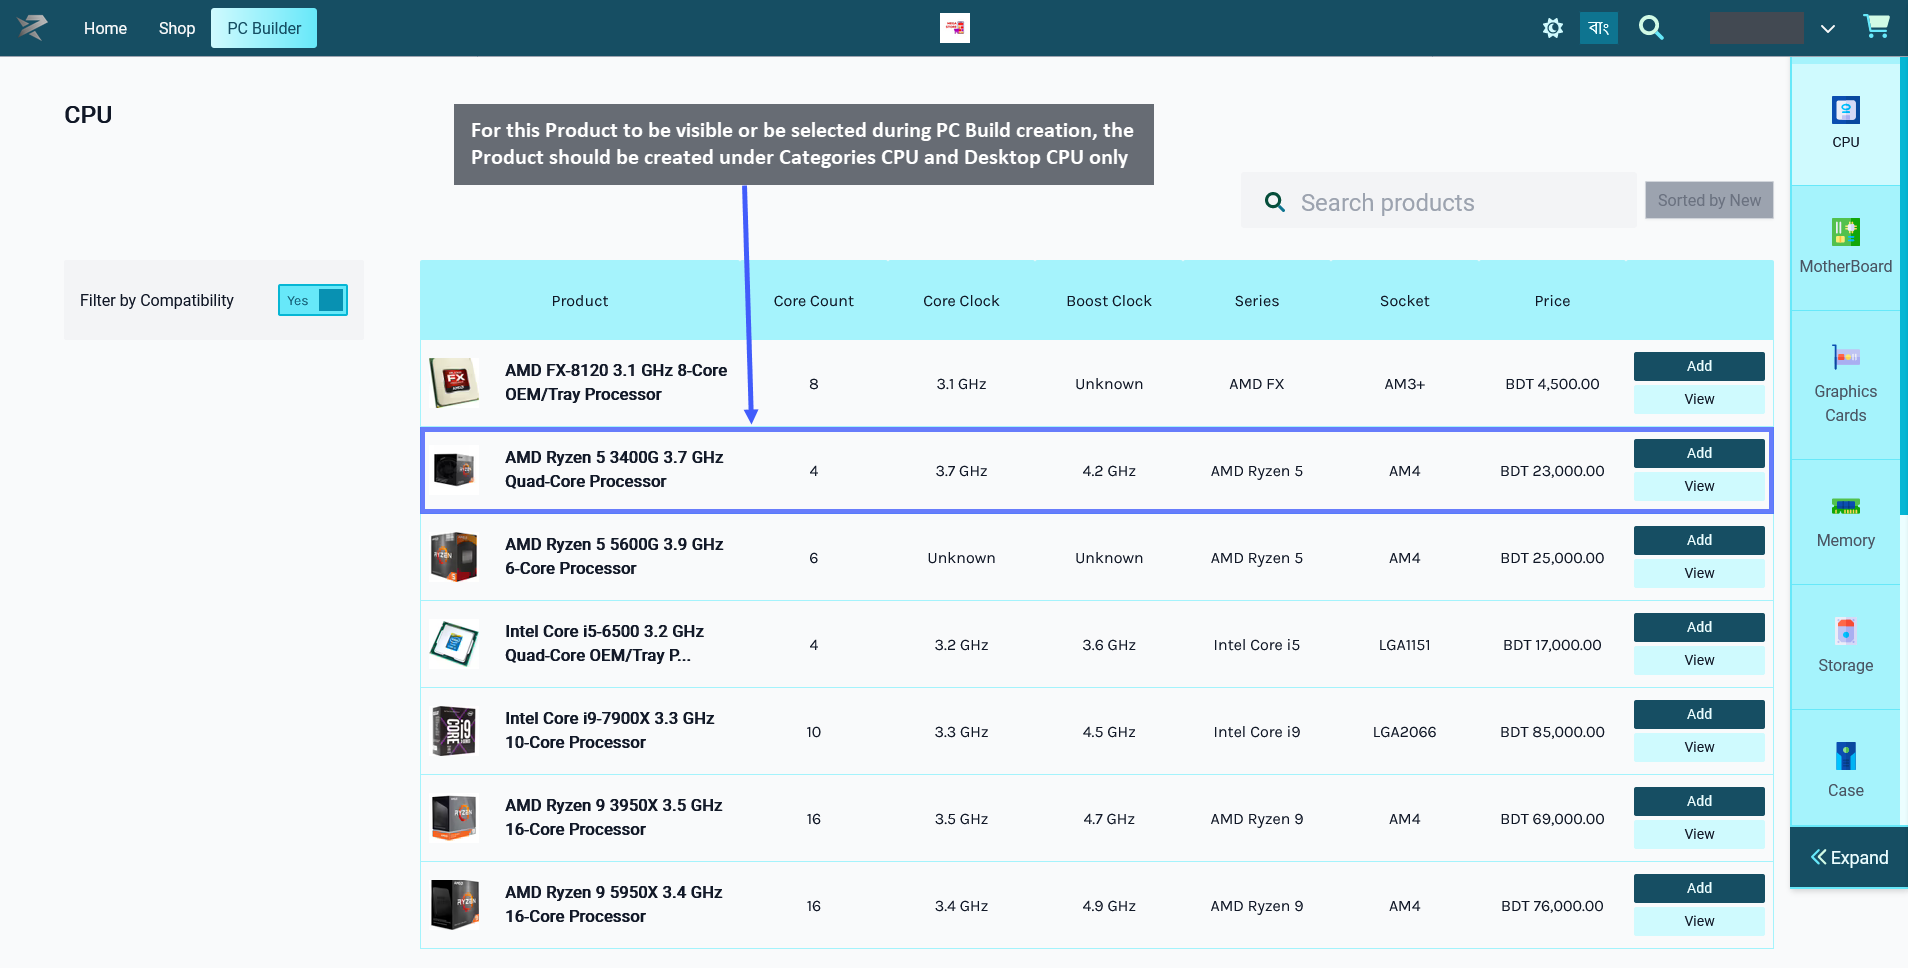
Image 1: For Product to be visible as a component for PC Build, select only CPU and Desktop CPU.
Therefore, even though a Product maybe have several Categories available for selection during Product creation, only certain Categories should be selected for the Product for it to be visible under PC Builds.
When creating a Product for CPU or Central Processing Unit, the Shop Owner should only select the Categories: CPU and Desktop CPU for the Product to be visible under PC Builds. When they will try to add this component CPU to PC Build later, this Product will then be visible and available for selection under PC Builds to create build.

Image 2: Select only these Categories during Product creation for the Product to be visible for PC Build.
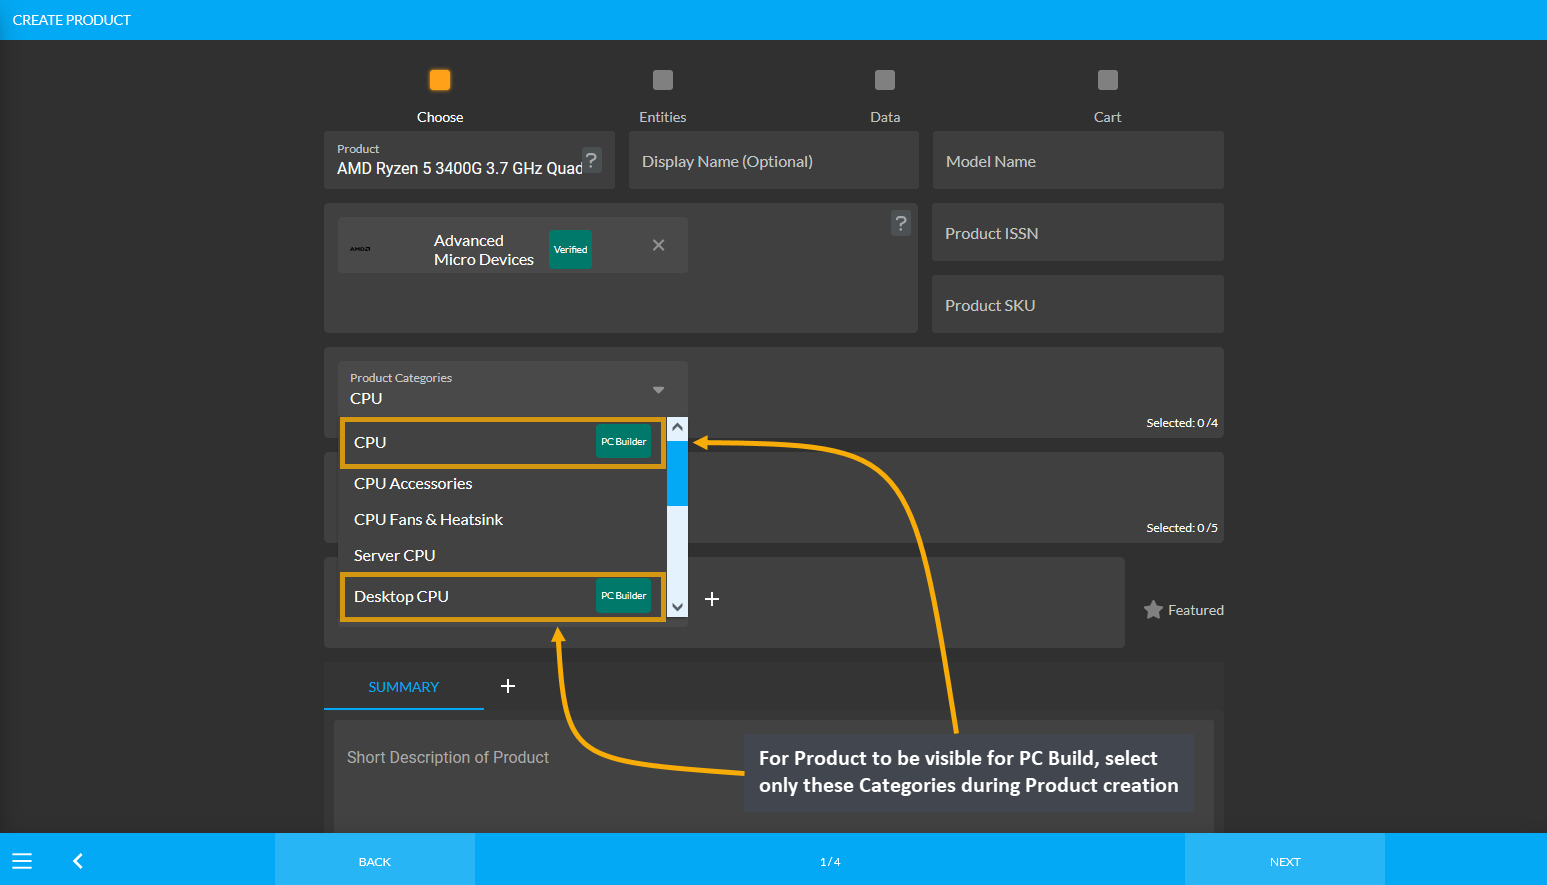
Image 3: For Product to be visible for PC Build, select only these Categories during Product creation.
Product Category: Motherboard
In order for Product(s) to be visible as components to select during PC Build creation, the Shop Owner needs to create Product(s) using specific Product Categories. For example, as shown in the screenshot below, in order for the Product Gigabyte GA-F2A78M-HD2 Micro ATX FM2+ Motherboard to be visible or be selected during PC Build creation, the Product should be created under the Categories Motherboards, Intel Motherboards, and AMD Motherboards and not other Motherboard Categories.
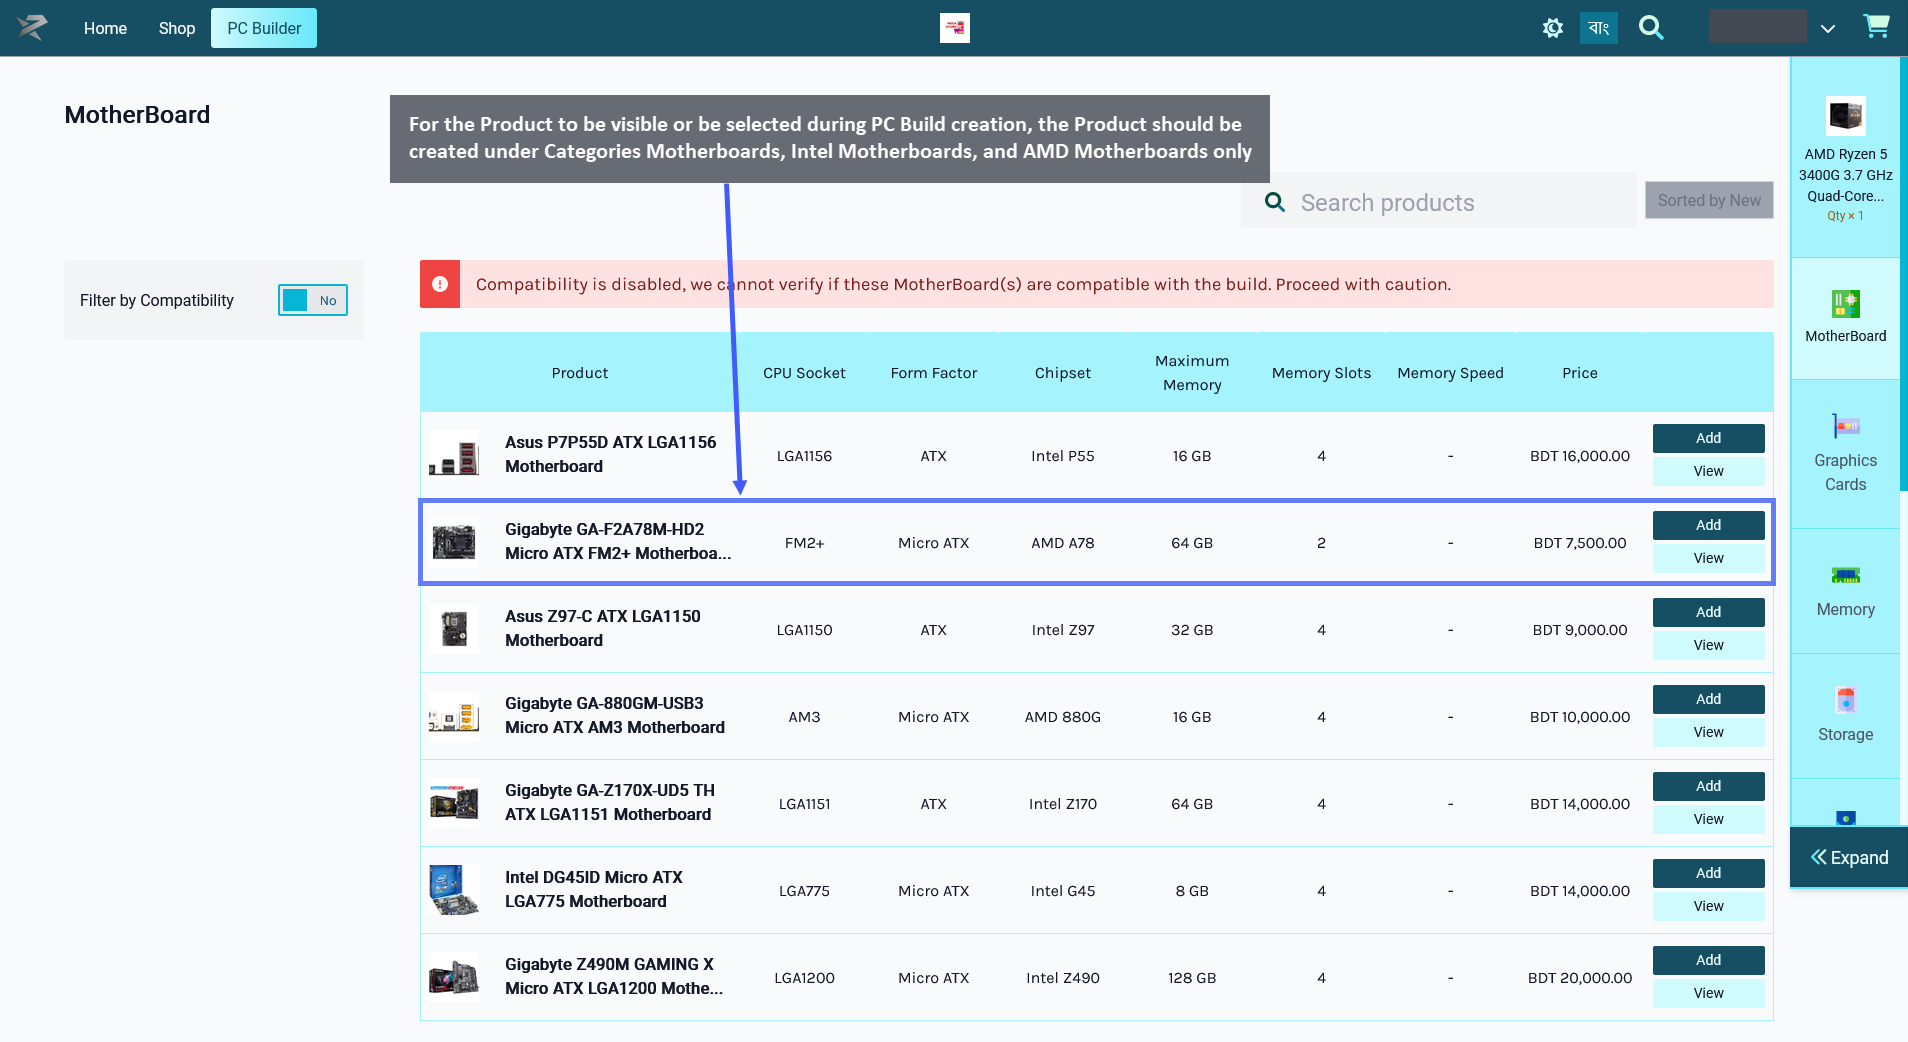
Image 1: For Product to be visible as a component for PC Build, select only CPU and Desktop CPU.
Therefore, even though a Product maybe have several Categories available for selection during Product creation, only certain Categories should be selected for the Product for it to be visible under PC Builds.
When creating a Product for Motherboard, the Shop Owner should only select these Categories: Motherboards, Intel Motherboards, and AMD Motherboards for the Product to be visible under PC Builds. When they will try to add the component Motherboard to PC Build later, this Product will then be visible and available for selection under PC Builds to create build.

Image 2: Select only these Categories during Product creation for the Product to be visible for PC Build.
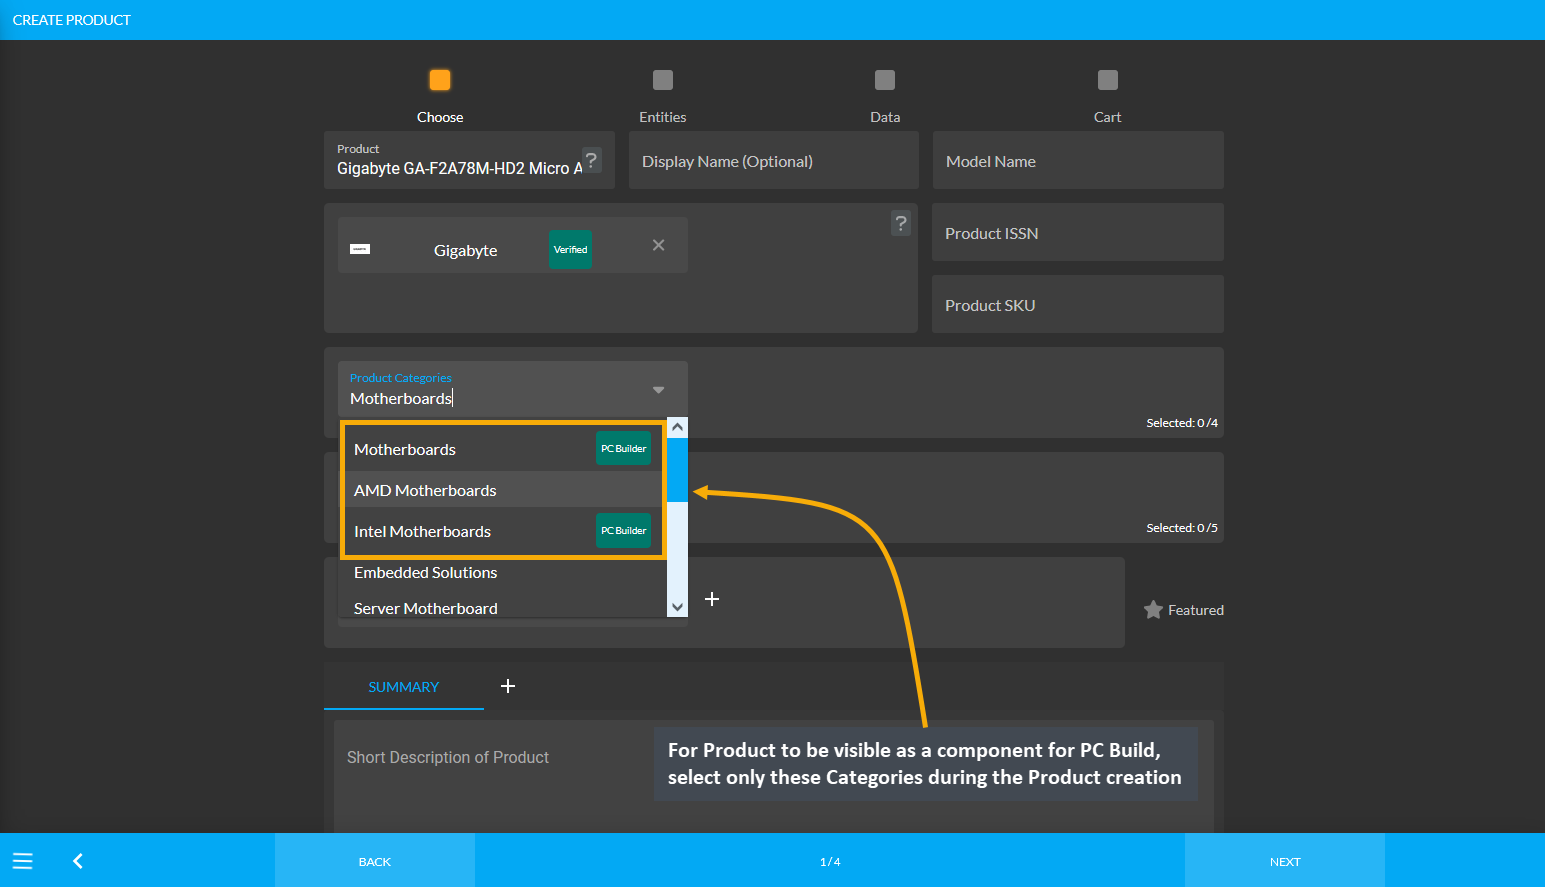
Image 3: For Product to be visible for PC Build, select only these Categories during Product creation.
Product Category: Video Card
In order for Product(s) to be visible as components to select during PC Build creation, the Shop Owner needs to create Product(s) using specific Product Categories. For example, as shown in the screenshot below, in order for the Product Asus GeForce RTX 2060 6GB TUF OC Video Card to be visible or be selected during PC Build creation, the Product should be created only under these two Categories: GPU & Video Devices and Desktop GPU.
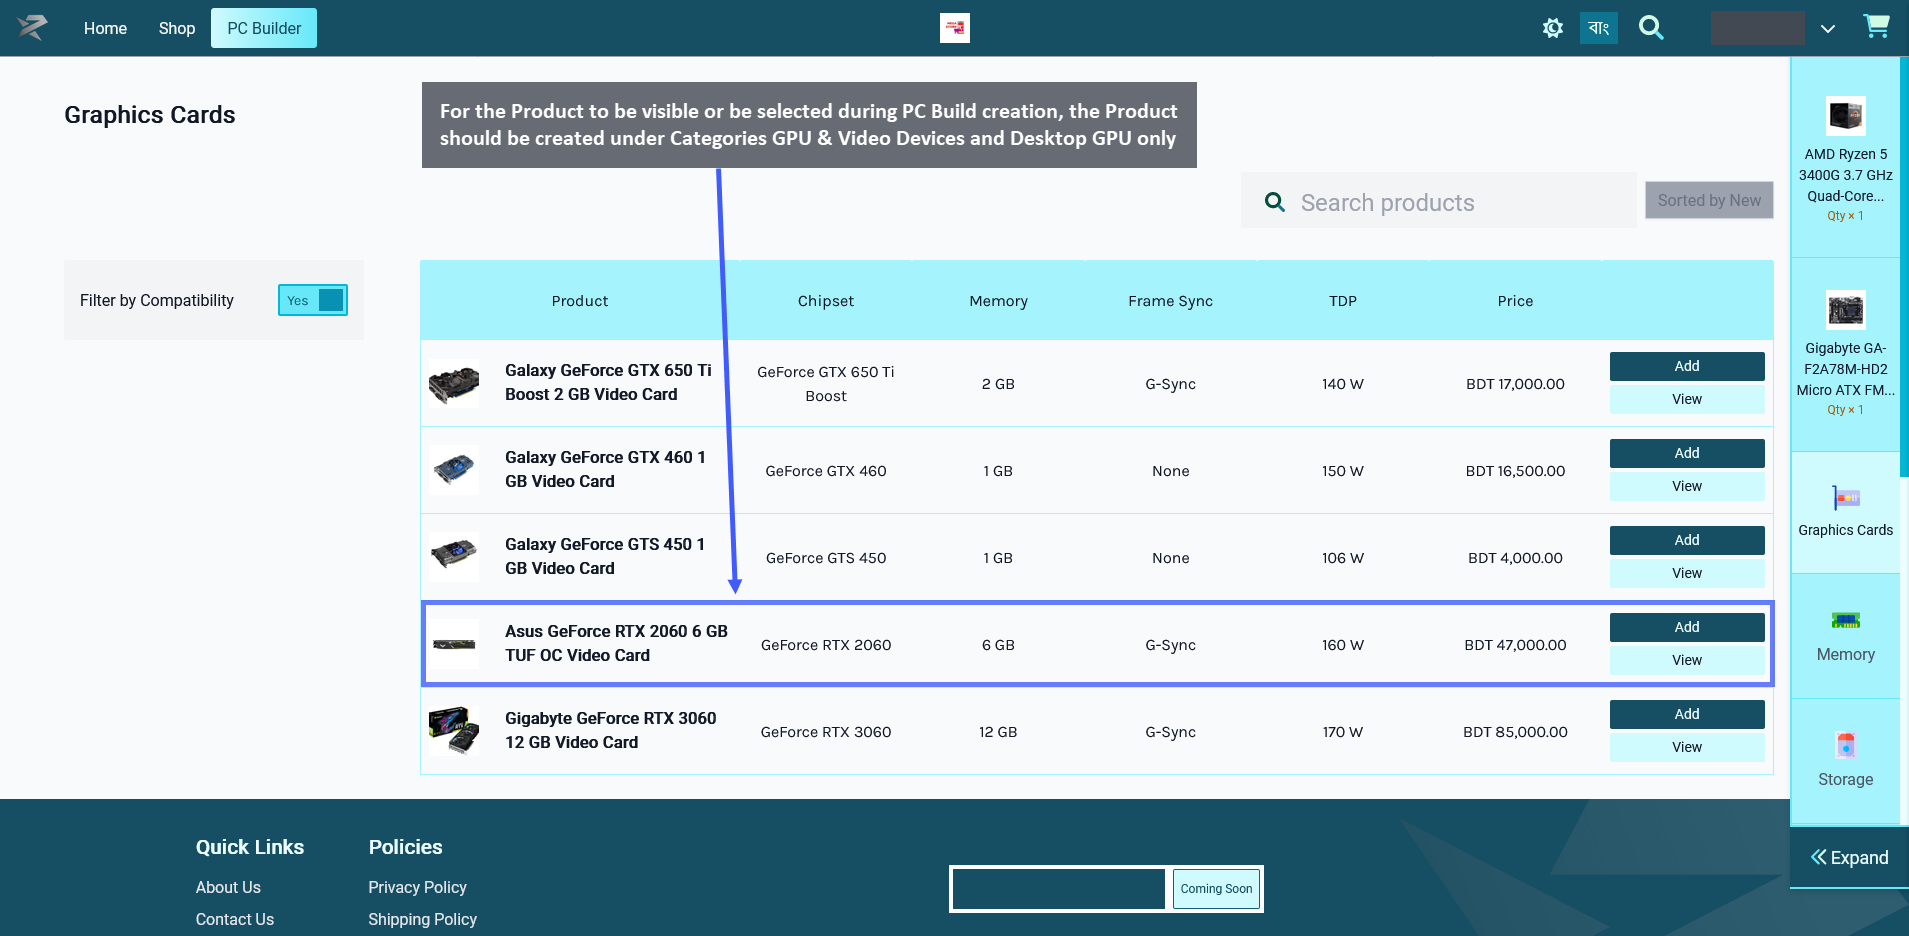
Image 1: For Product to be visible for PC Build, select only GPU & Video Devices and Desktop GPU.
Therefore, even though a Product maybe have several Categories available for selection during Product creation, only certain Categories should be selected for the Product for it to be visible under PC Builds.
When creating a Product for Video Card, Shop Owner should only select these Categories: GPU & Video Devices and Desktop GPU for the Product to be visible under PC Builds. When they will try to add this component Video Card to PC Build later, this Product will then be visible and available for selection under PC Builds to create build.

Image 2: Select only these Categories during Product creation for the Product to be visible for PC Build.
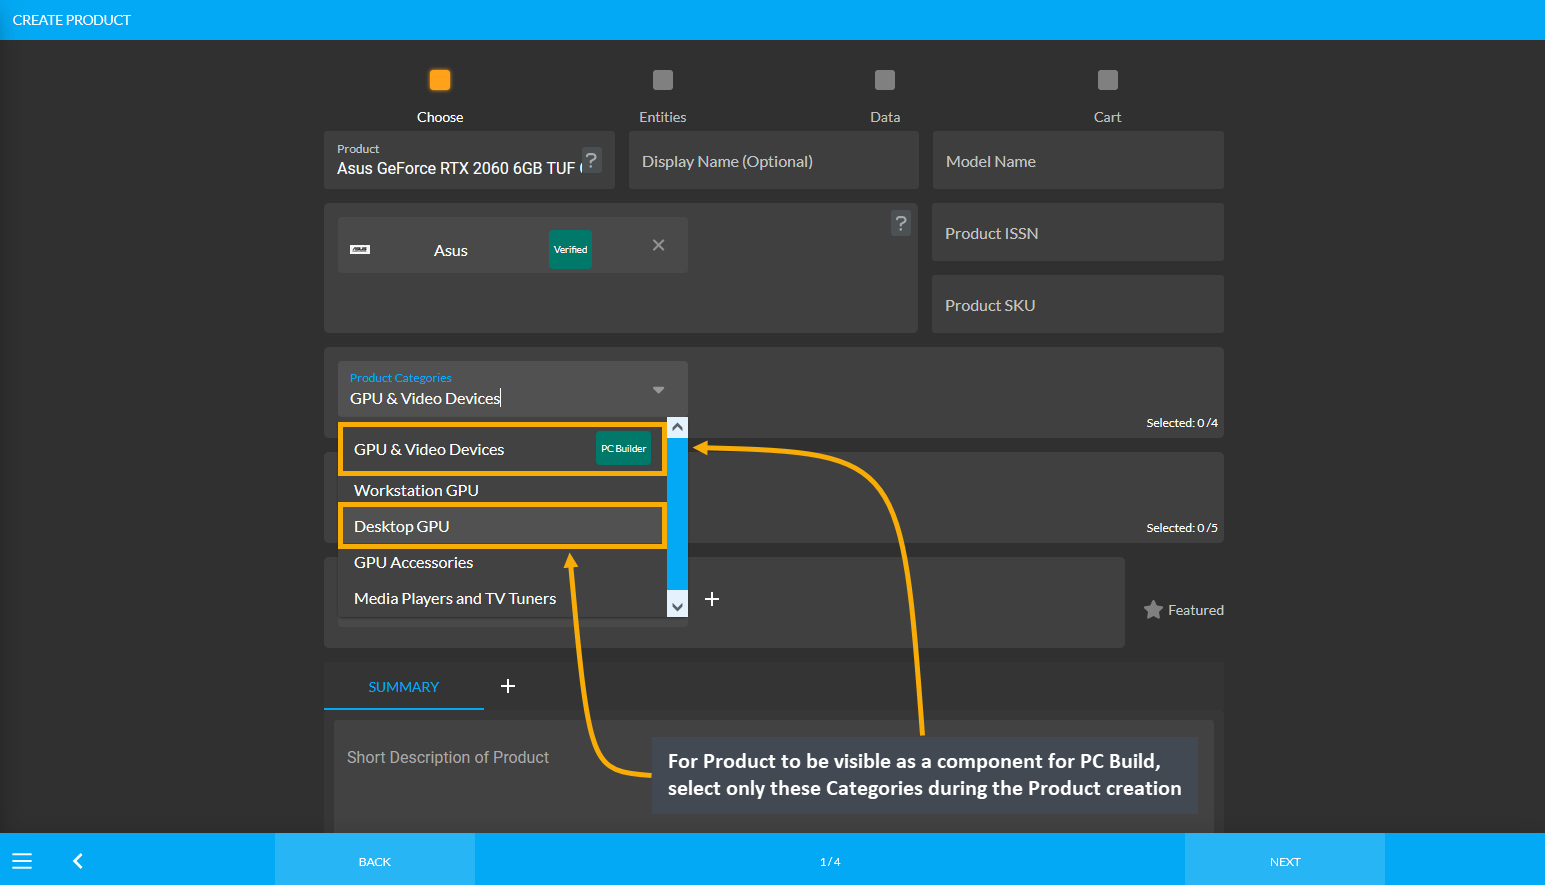
Image 3: For Product to be visible for PC Build, select only these Categories during Product creation.
Product Category: Memory
In order for Product(s) to be visible as components to select during PC Build creation, the Shop Owner needs to create Product(s) using specific Product Categories. For example, as shown in the screenshot below, in order for the Product PNY XLR8 8GB (2 x 4GB) DDR3-1600 CL9 Memory to be visible or be selected during PC Build creation, the Product should be created under Categories RAM and Desktop RAM and not other RAM Categories.
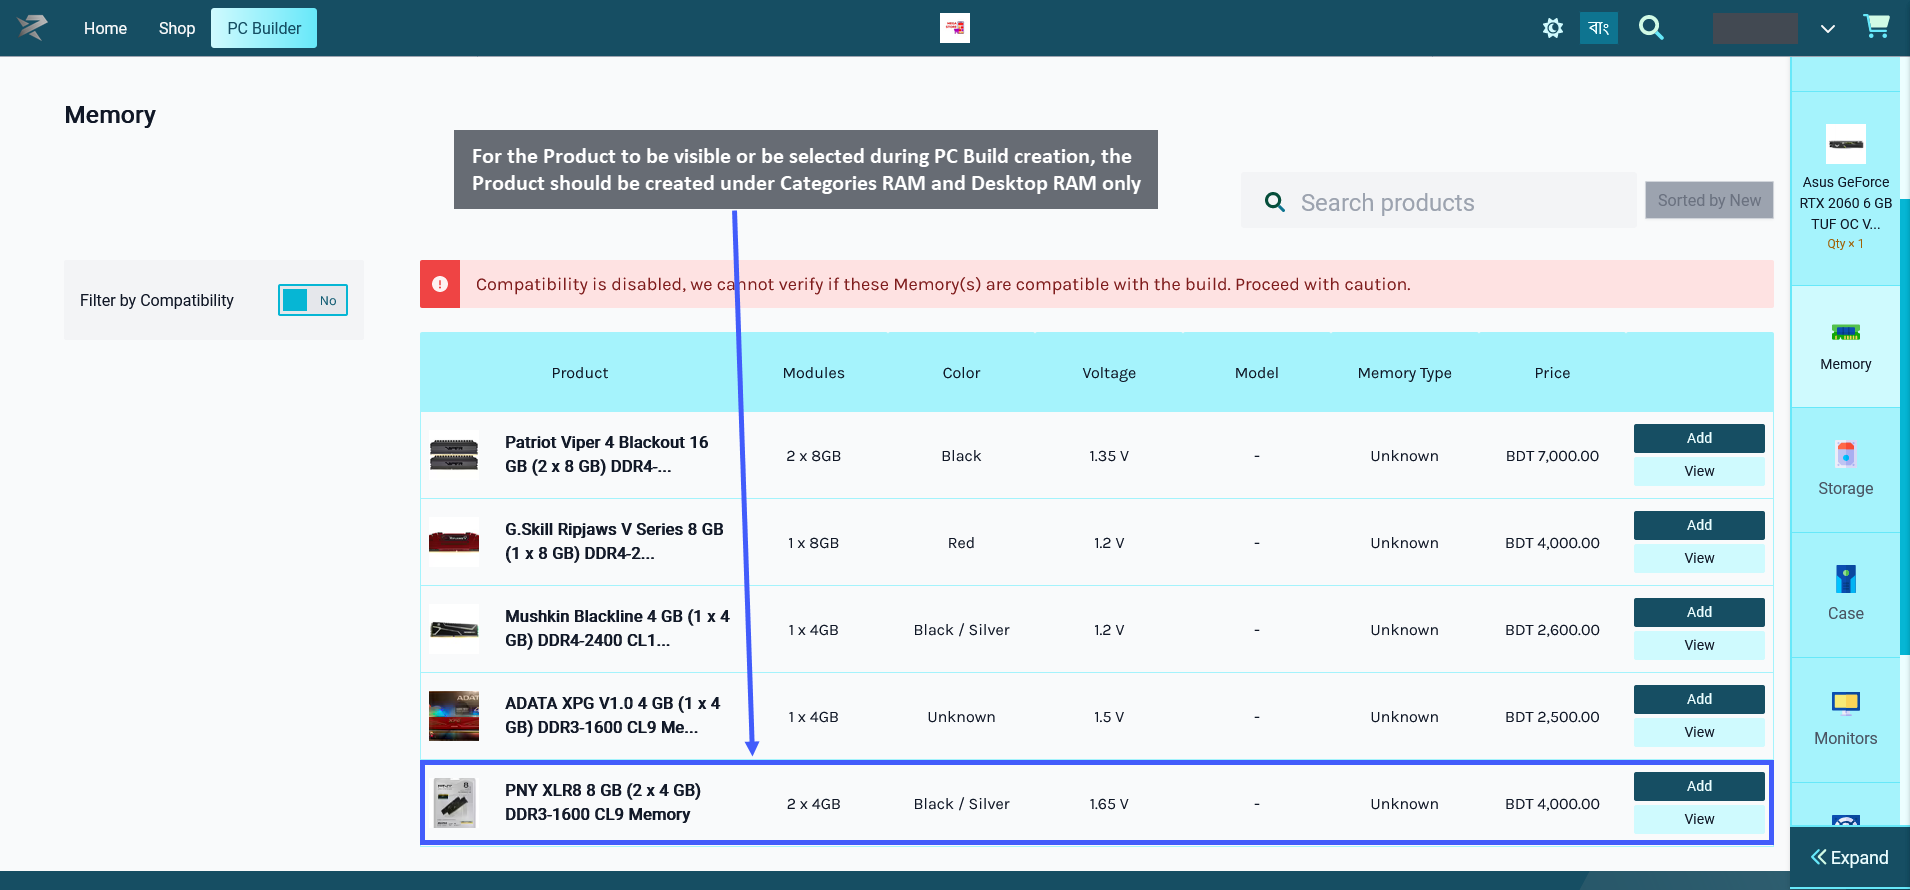
Image 1: For Product to be visible as a component for PC Build, select only RAM and Desktop RAM.
Therefore, even though a Product maybe have several Categories available for selection during Product creation, only certain Categories should be selected for the Product for it to be visible under PC Builds.
When creating a Product for Memory, the Shop Owner should only select the Categories: RAM and Desktop RAM for the Product to be visible under PC Builds. When they will try to add this component Memory to PC Build later, this Product will then be visible and available for selection under PC Builds to create build.

Image 2: Select only these Categories during Product creation for the Product to be visible for PC Build.
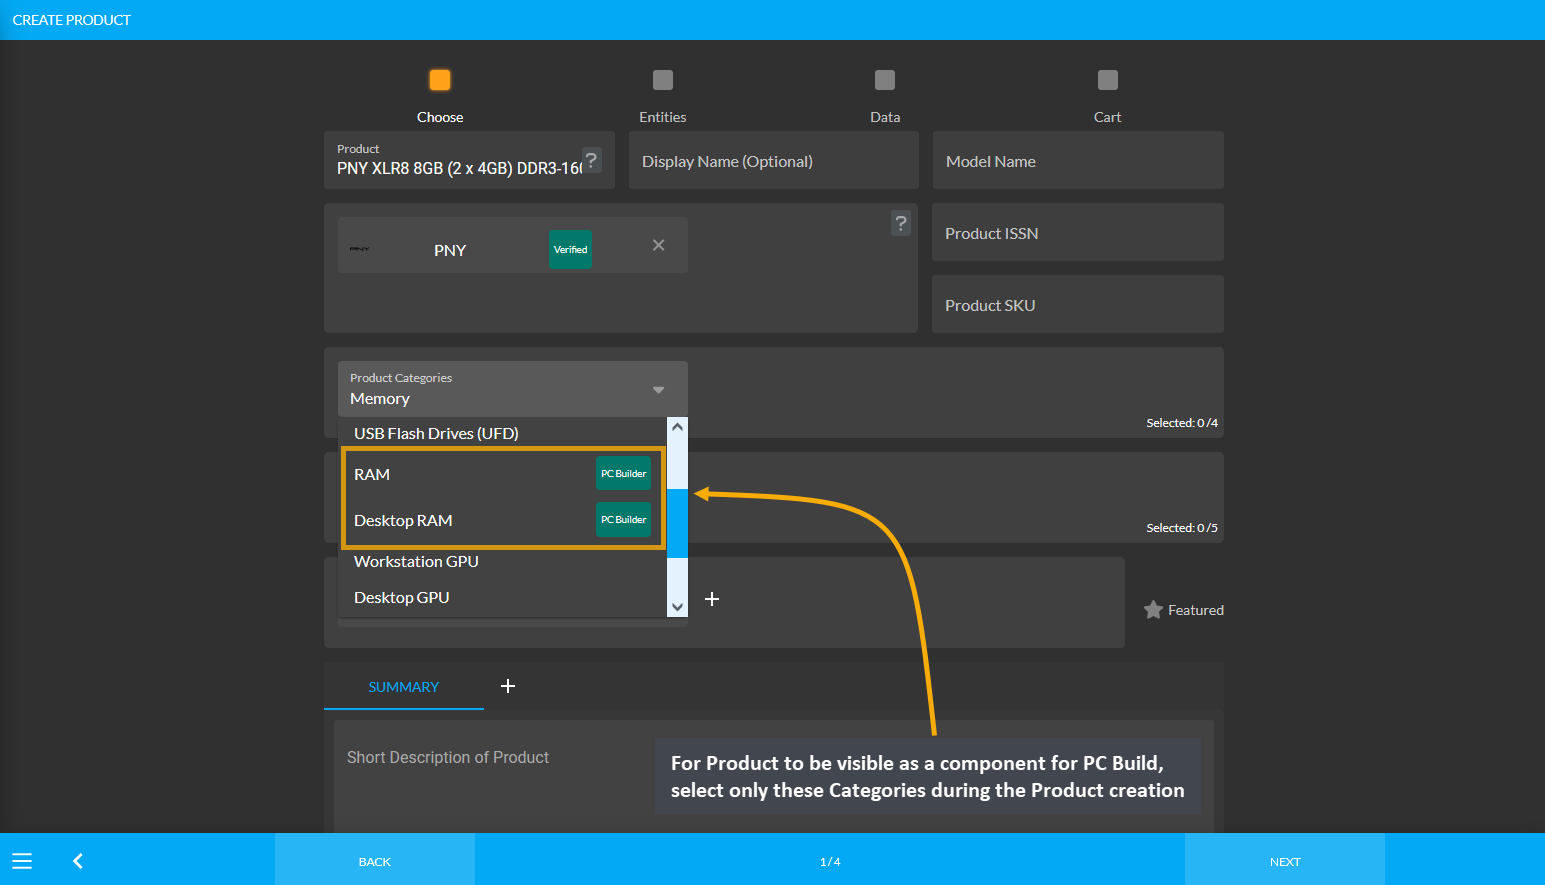
Image 3: For Product to be visible for PC Build, select only these Categories during Product creation.
Product Category: Storage
In order for Product(s) to be visible as components to select during PC Build creation, the Shop Owner needs to create Product(s) using specific Product Categories. Storage is available as Solid State Drive (SSD) and Hard Drives (HDD). During Product creation, specific Categories needs to be set for the Product so that they are visible during the PC Build component selection.
Storage: Hard Drives (HDD)
In case, Hard Drives (HDD) are selected from Storage, then in order for the Product Seagate Surveillance HDD 6TB 3.5’ 5400 RPM Internal Hard Drive to be visible or be selected during PC Build creation, this Product needs to be created under the Categories: Hard Drives (HDD), Desktop Internal HDD (3.5’), Desktop External HDD, and Portable External HDD and not other Hard Drives (HDD) Categories.
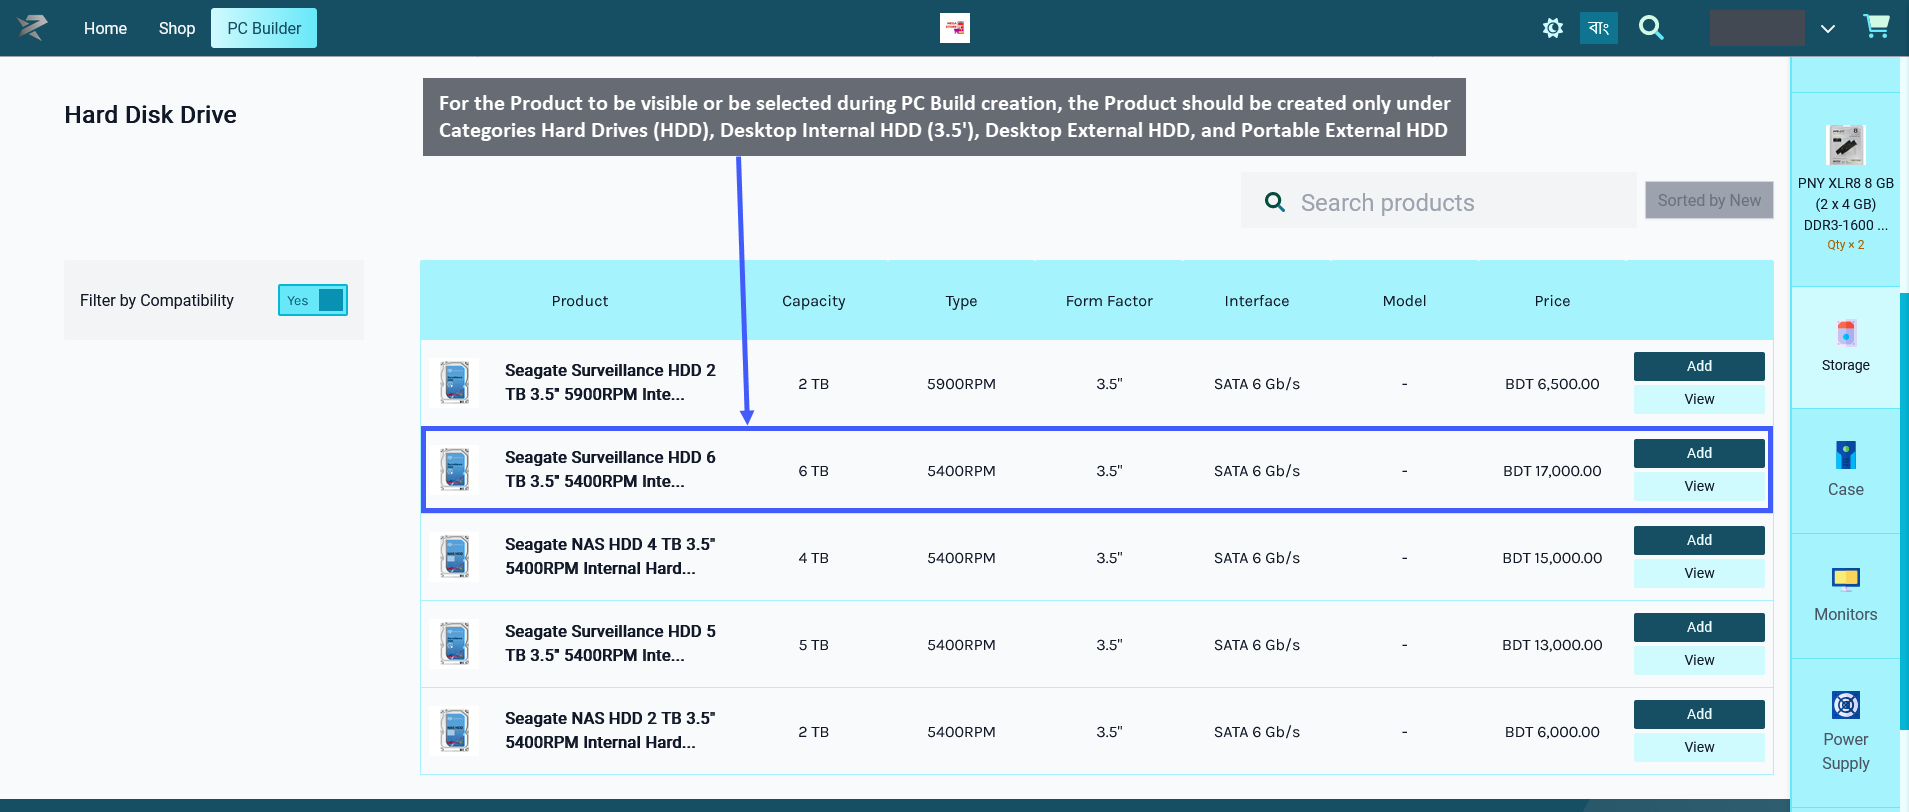
Image 1: For Product to be visible as component for PC Build, select specific Hard Drives (HDD) Categories.
Therefore, even though a Product maybe have several Categories available for selection during Product creation, only certain Categories should be selected for the Product for it to be visible under PC Builds.
When creating a Product for Storage with Hard Drives (HDD), the Shop Owner should only select the Categories: Hard Drives (HDD), Desktop Internal HDD (3.5’), Desktop External HDD, and Portable External HDD for the Product to be visible under PC Builds. When they will try to add the components of Hard Drives (HDD) to PC Build later, this Product will then be visible and available for selection under PC Builds to create build.

Image 2: Select only these Categories during Product creation for the Product to be visible for PC Build.
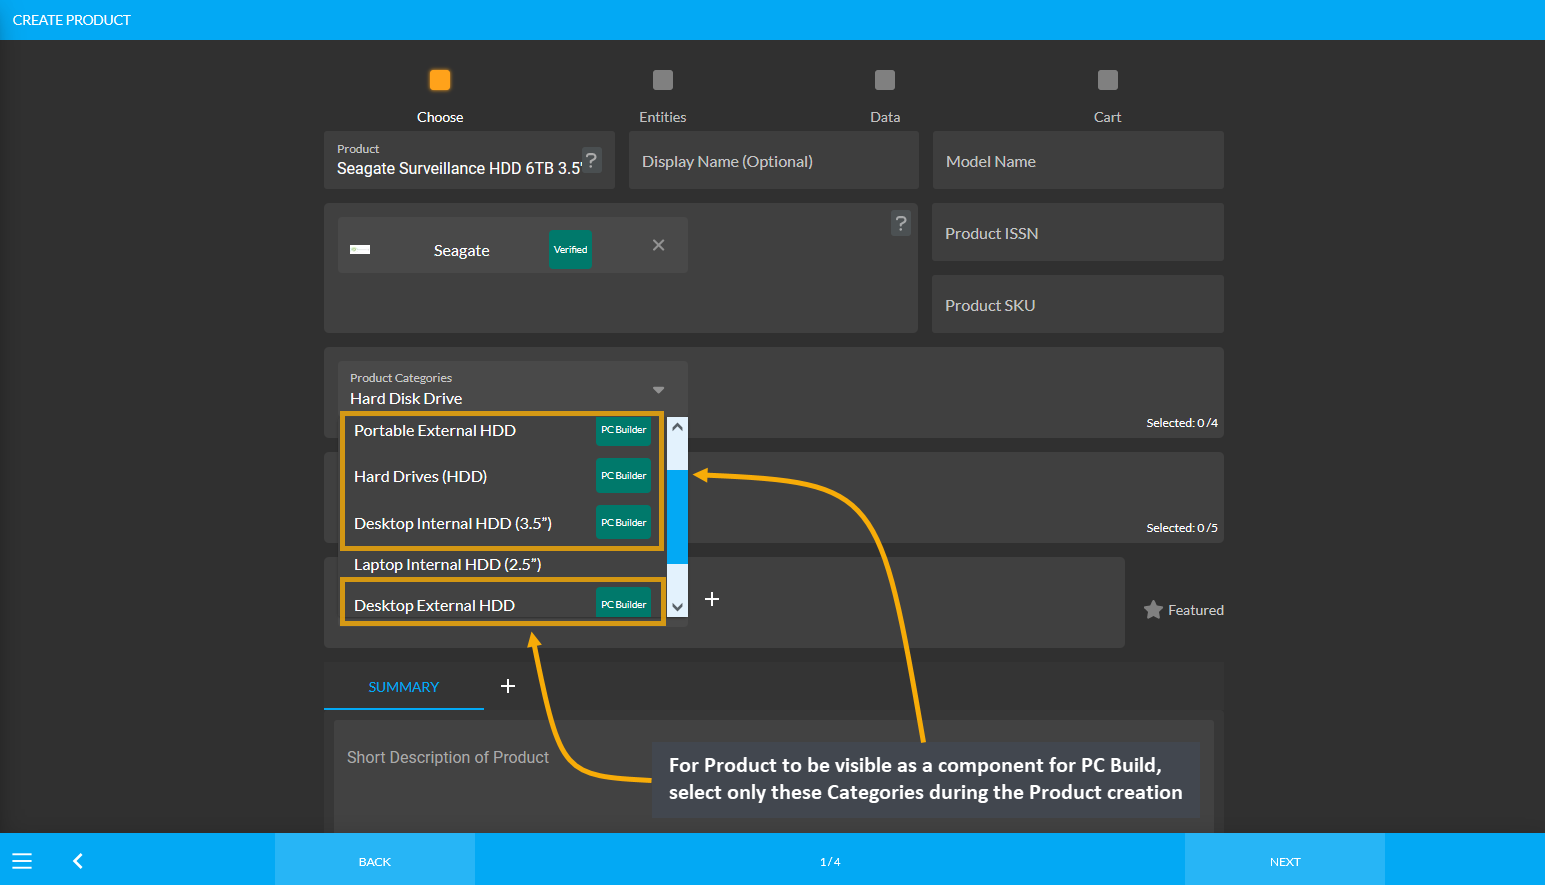
Image 3: For Product to be visible for PC Build, select only these Categories during Product creation.
Storage: Solid State Drive (SSD)
In case, Solid State Drive (SSD) are selected from Storage, then in order for the Product Western Digital Blue 250 GB M.2-2280 Solid State Drive to be visible or be selected during PC Build creation, this Product will need to be created under these Categories: Solid State Drive (SSD), SATA SSD. M.2 SATA SSD, M.2/U.2 NVMe SSD, and External SSD and not other Solid State Drive (SSD) Categories.
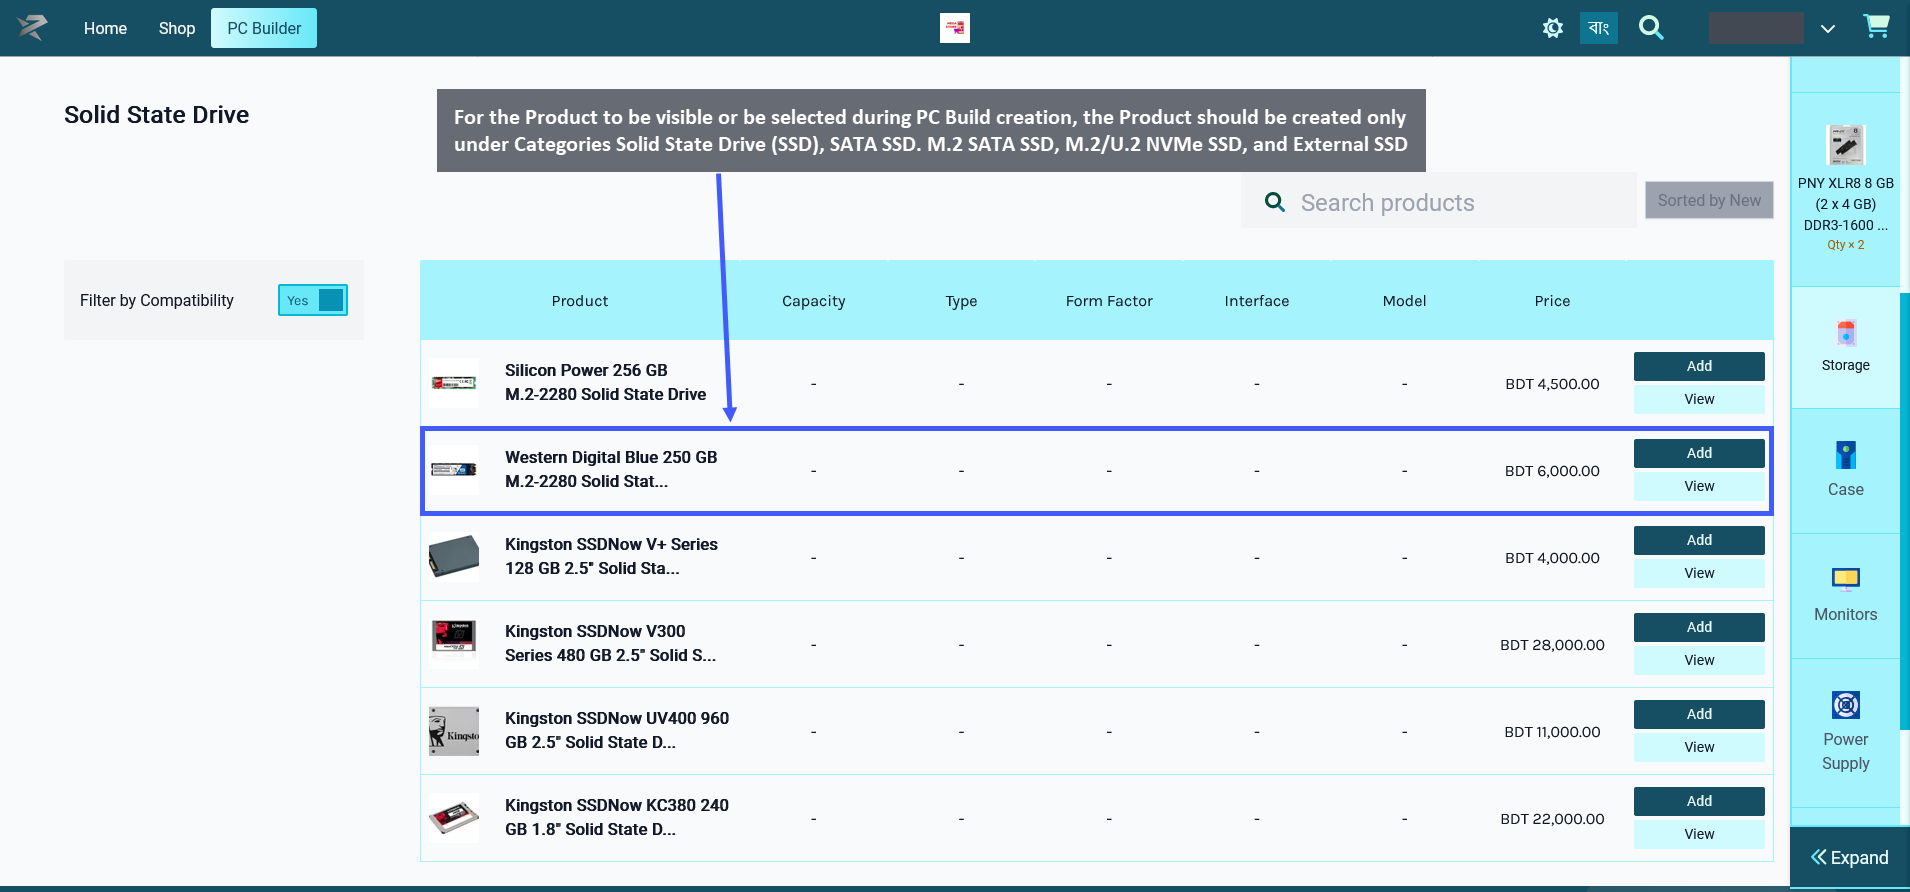
Image 4: For Product to be visible for PC Build, select the specific Solid State Drive (SSD) Categories.
Therefore, even though a Product maybe have several Categories available for selection during Product creation, only certain Categories should be selected for the Product for it to be visible under PC Builds.
When creating a Product for Storage with Solid State Drive (SSD), the Shop Owner should only select Categories: Solid State Drive (SSD), SATA SSD. M.2 SATA SSD, M.2/U.2 NVMe SSD, and External SSD for the Product to be visible under PC Builds. When they will try to add the components of Solid State Drive (SSD) to PC Build later, this Product will then be visible and available for selection under PC Builds to create build.

Image 5: Select only these Categories during Product creation for the Product to be visible for PC Build.
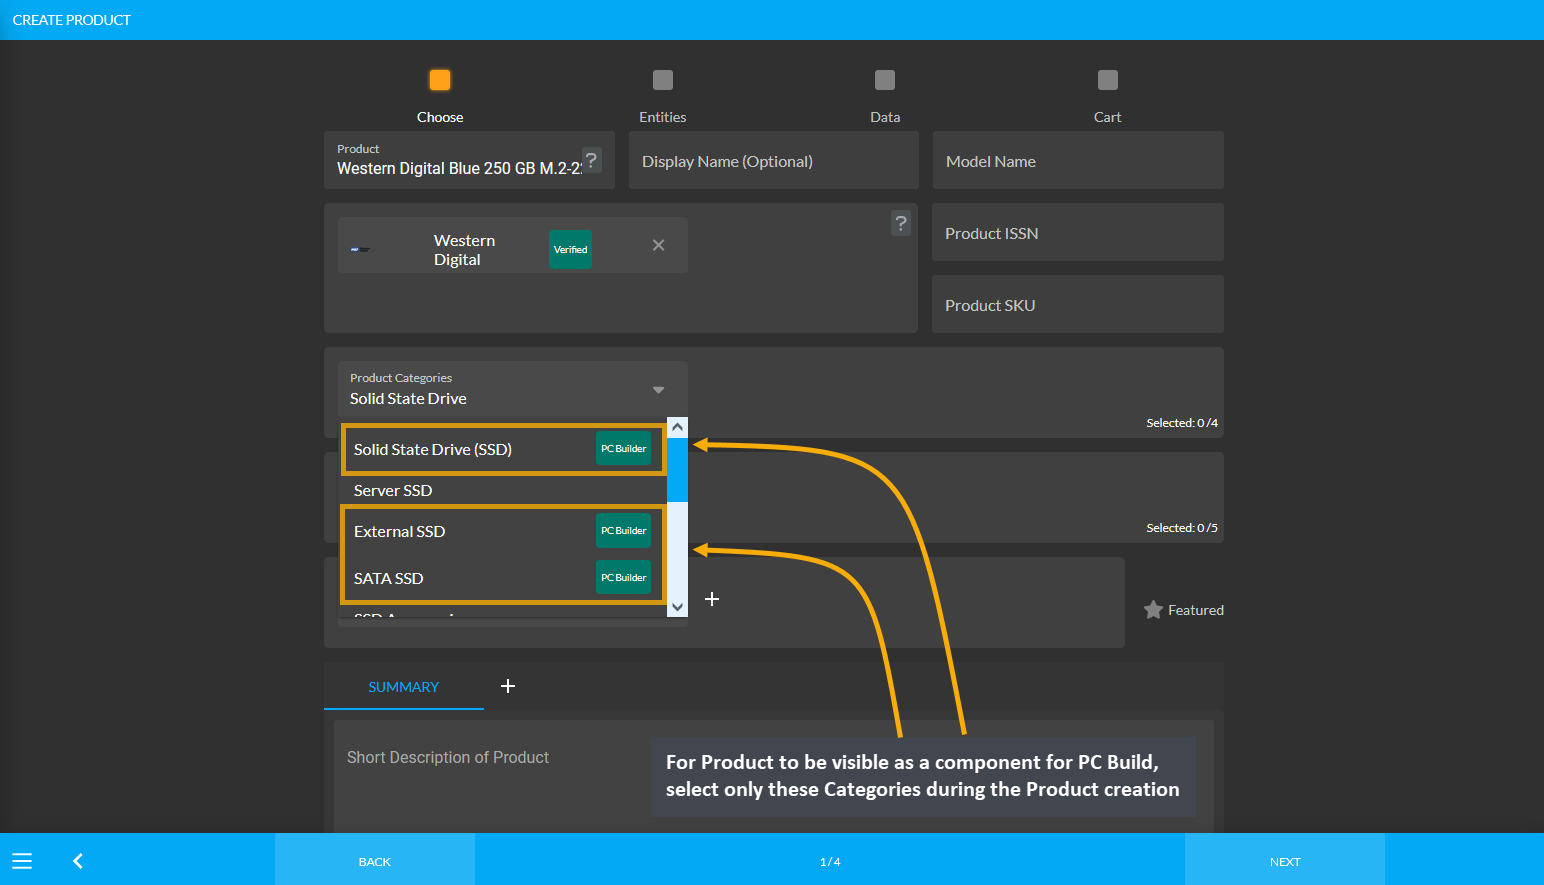
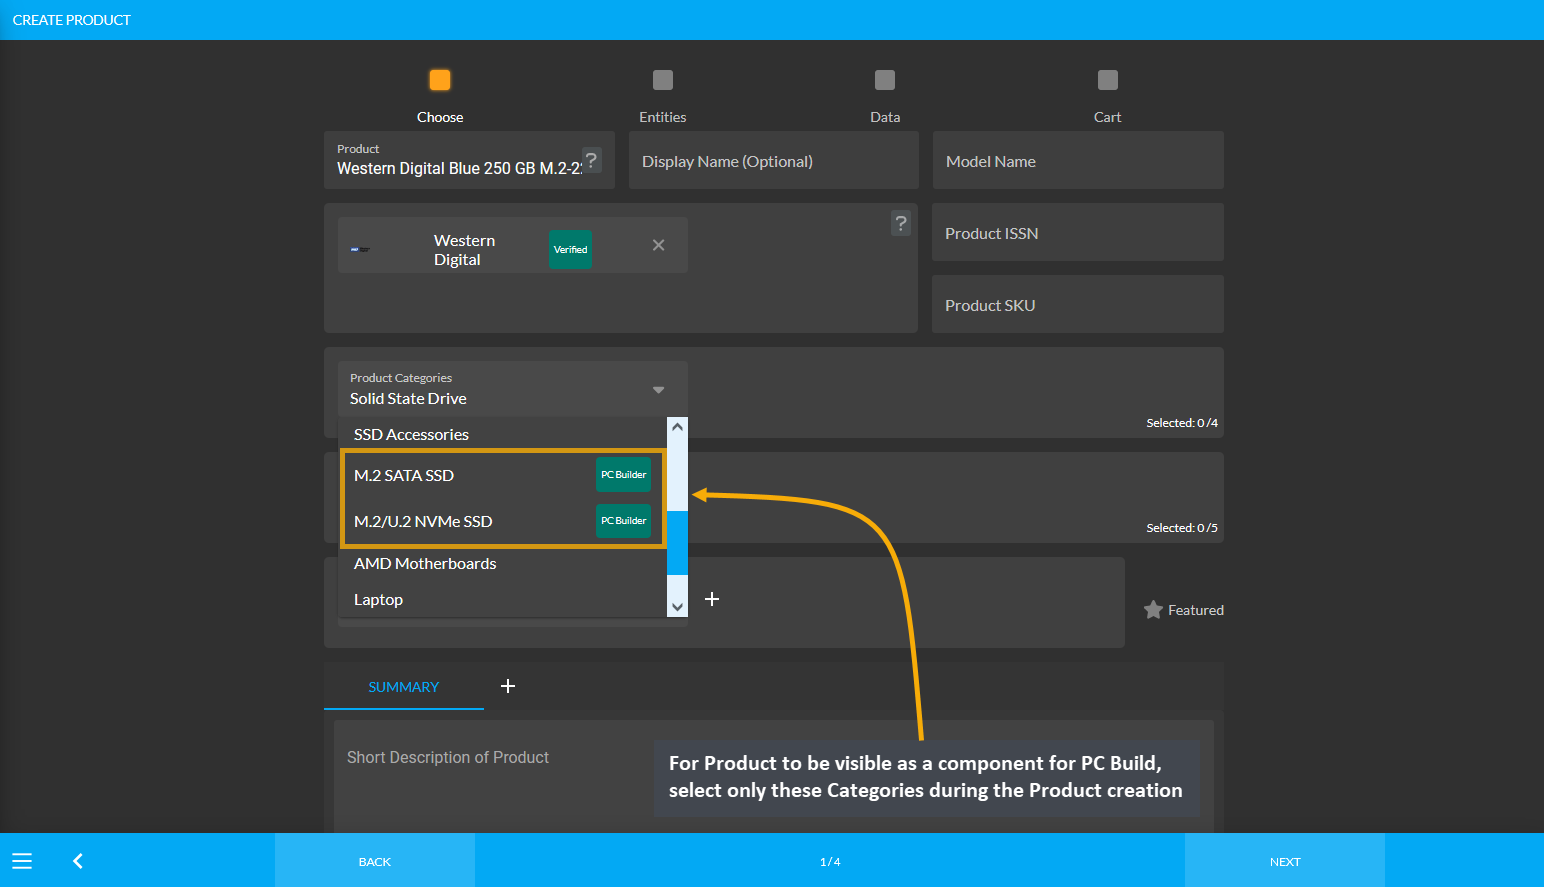
Image 6: For Product to be visible for PC Build, select only these Categories during Product creation.
Product Category: Case
In order for Product(s) to be visible as components to select during PC Build creation, the Shop Owner needs to create Product(s) using specific Product Categories. For example, as shown in the screenshot below, in order for the Product Thermaltake V9 Black Edition ATX Mid Tower Case to be visible or be selected during PC Build creation, the Product should be created only under the Categories Computer Cases and Desktop Cases.
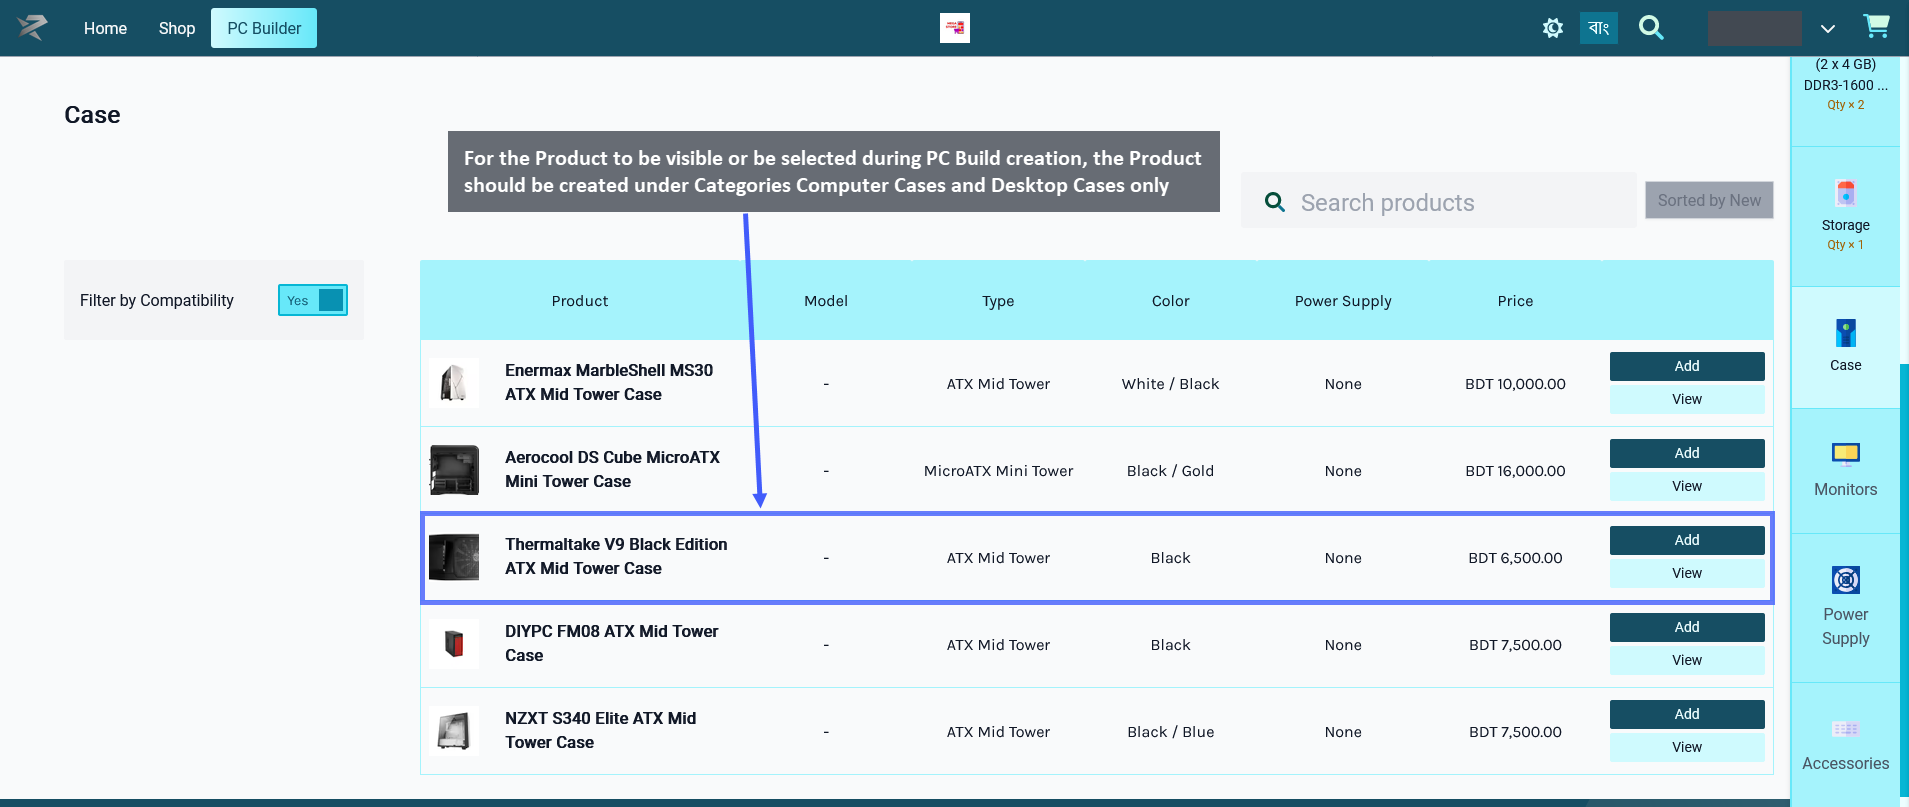
Image 1: For Product to be visible as PC Build component, select only Computer Cases and Desktop Cases.
Therefore, even though a Product maybe have several Categories available for selection during Product creation, only certain Categories should be selected for the Product for it to be visible under PC Builds.
When creating a Product for the Case, the Shop Owner should only select the Categories: Computer Cases and Desktop Cases for the Product to be visible under PC Builds. When they will try to add this component Case to PC Build later, this Product will then be visible and available for selection under PC Builds to create build.

Image 2: Select only these Categories during Product creation for the Product to be visible for PC Build.
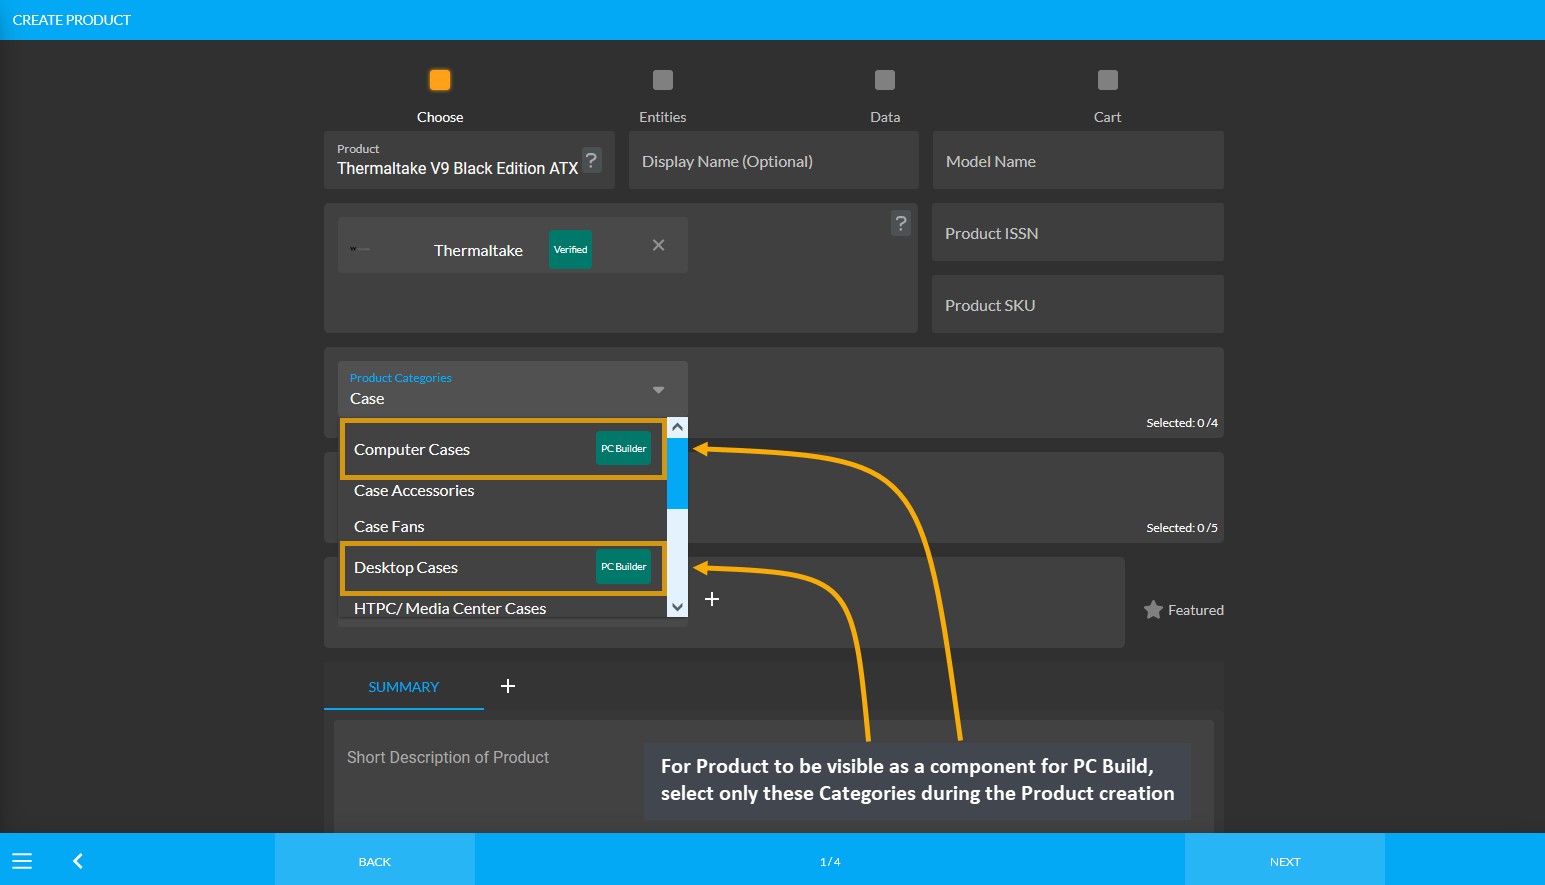
Image 3: For Product to be visible for PC Build, select only these Categories during Product creation.
Product Category: Monitor
In order for Product(s) to be visible as components to select during PC Build creation, the Shop Owner needs to create Product(s) using specific Product Categories. For example, as shown in the screenshot below, in order for the Product Asus VA229QSB 21.5" IPS Full HD Eye Care Monitor to be visible or be selected during PC Build creation, the Product should be created only under the Categories Gaming Monitors, Touchscreen Monitors, and LCD/ LED Monitors.
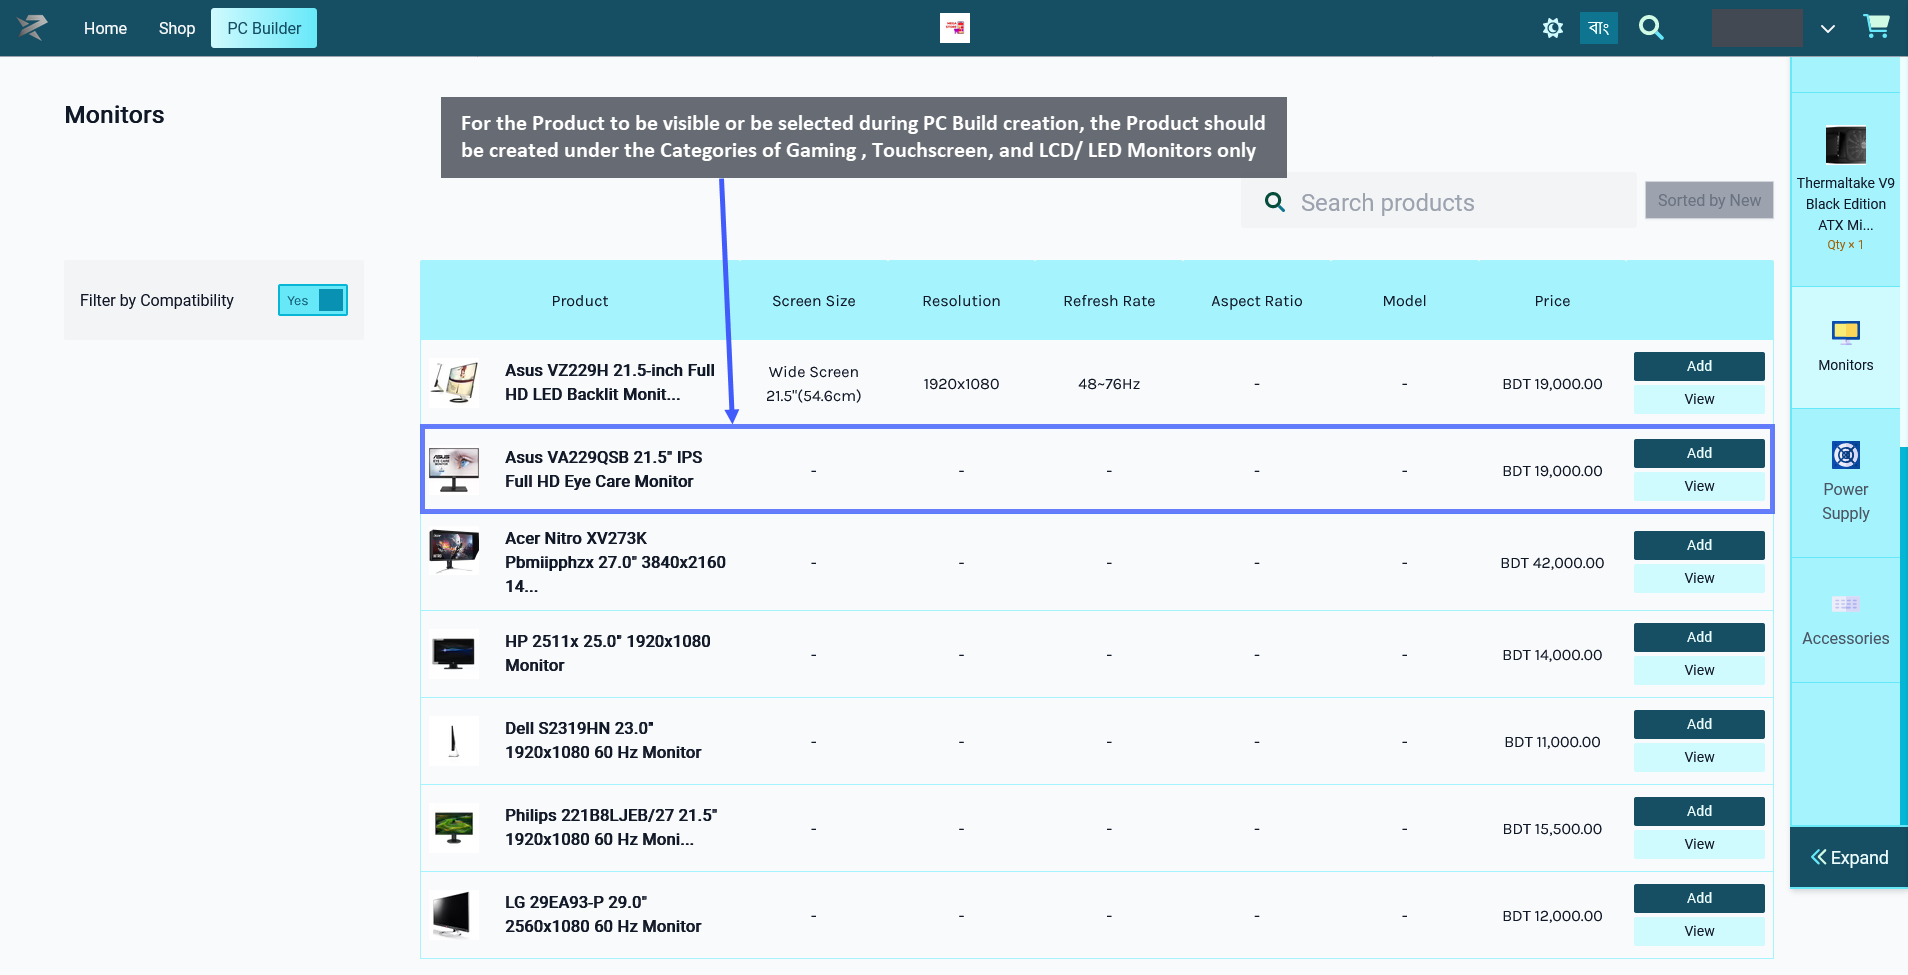
Image 1: For Product to be visible for PC Build, select only Gaming, Touchscreen, and LCD/ LED Monitors.
Therefore, even though a Product maybe have several Categories available for selection during Product creation, only certain Categories should be selected for the Product for it to be visible under PC Builds.
When creating a Product for Monitor, the Shop Owner should only select the Categories: Gaming Monitors, Touchscreen Monitors, and LCD/ LED Monitors for the Product to be visible under PC Builds. When they will try to add this component Monitor to PC Build later, this Product will then be visible and available for selection under PC Builds to create build.
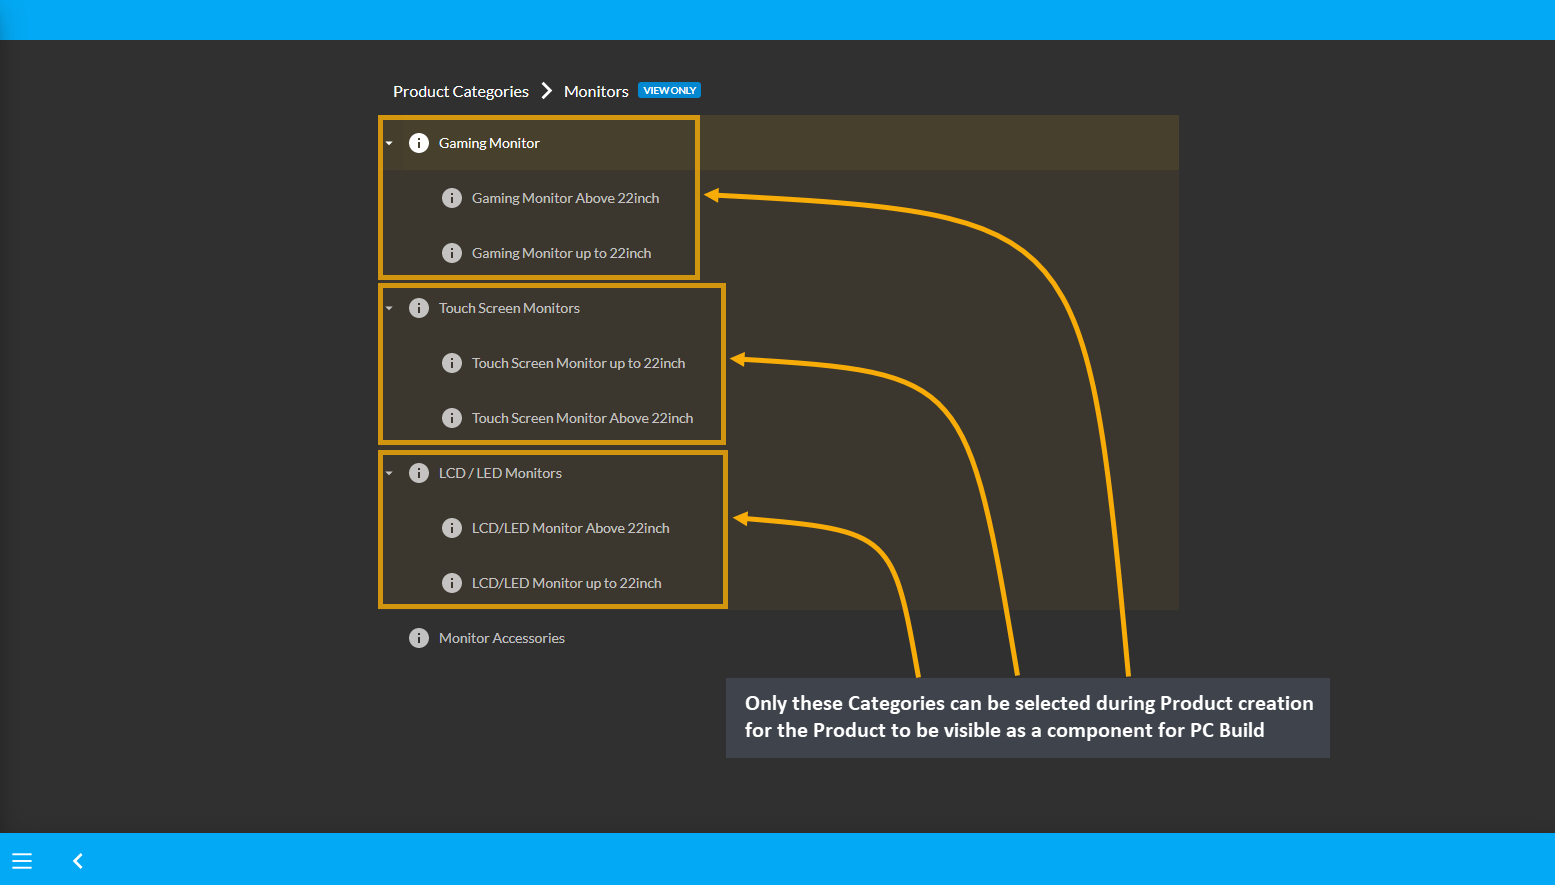
Image 2: Select only these Categories during Product creation for the Product to be visible for PC Build.
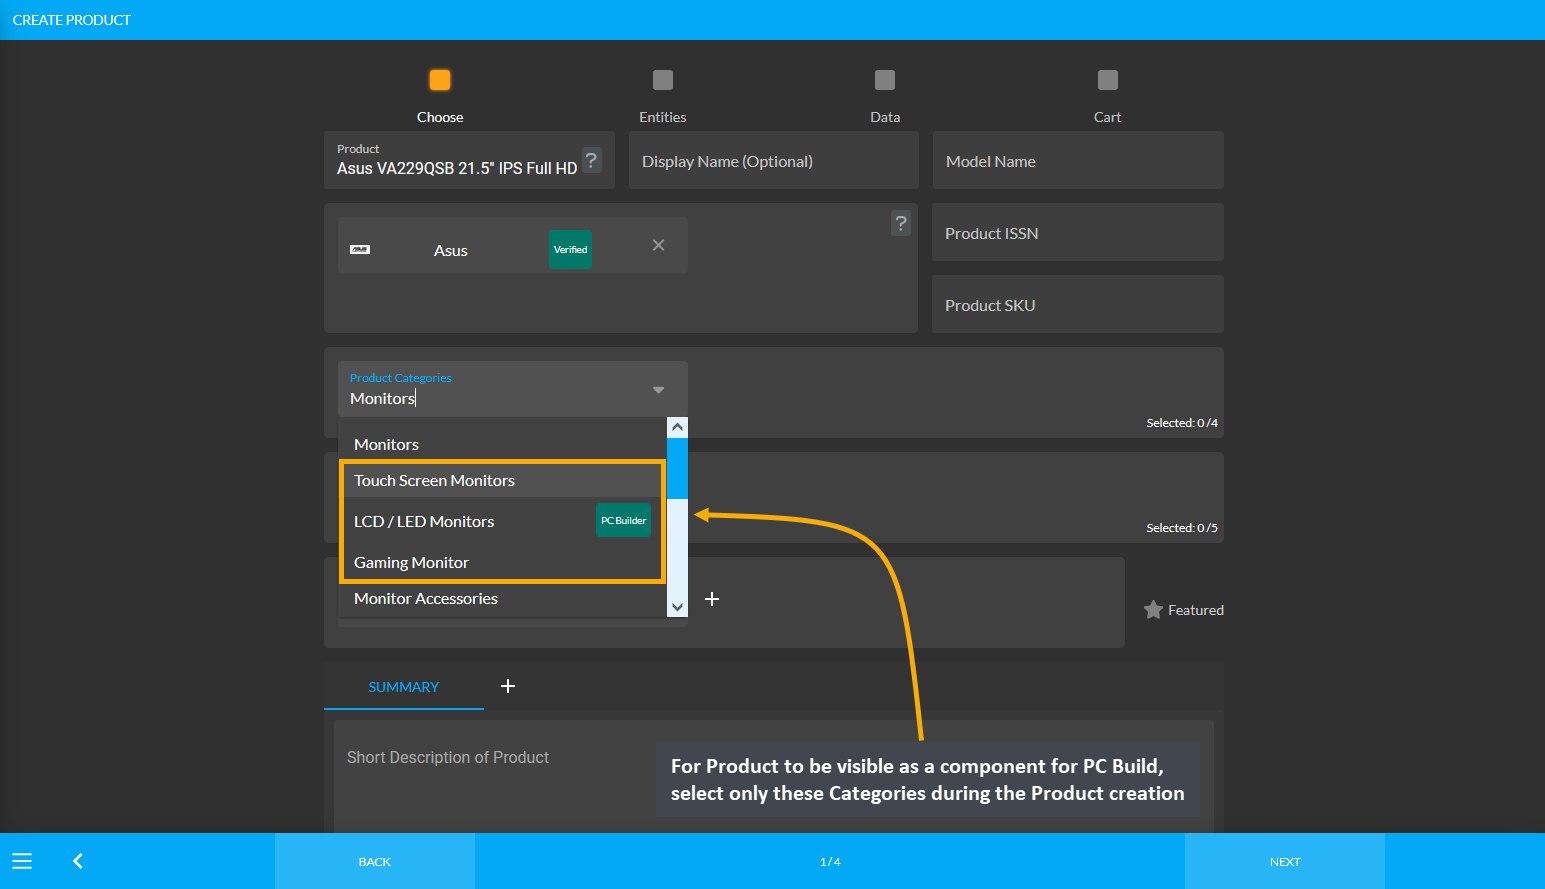
Image 3: For Product to be visible for PC Build, select only these Categories during Product creation.
Product Category: Power Supply
In order for Product(s) to be visible as components to select during PC Build creation, the Shop Owner needs to create Product(s) using specific Product Categories. For example, as shown in the screenshot below, in order for the Product Mars Gaming 650W ATX Power Supply to be visible or be selected during PC Build creation, the Product should be created only under the Categories PC Power Solutions and Desktop Power Supply (PSU).
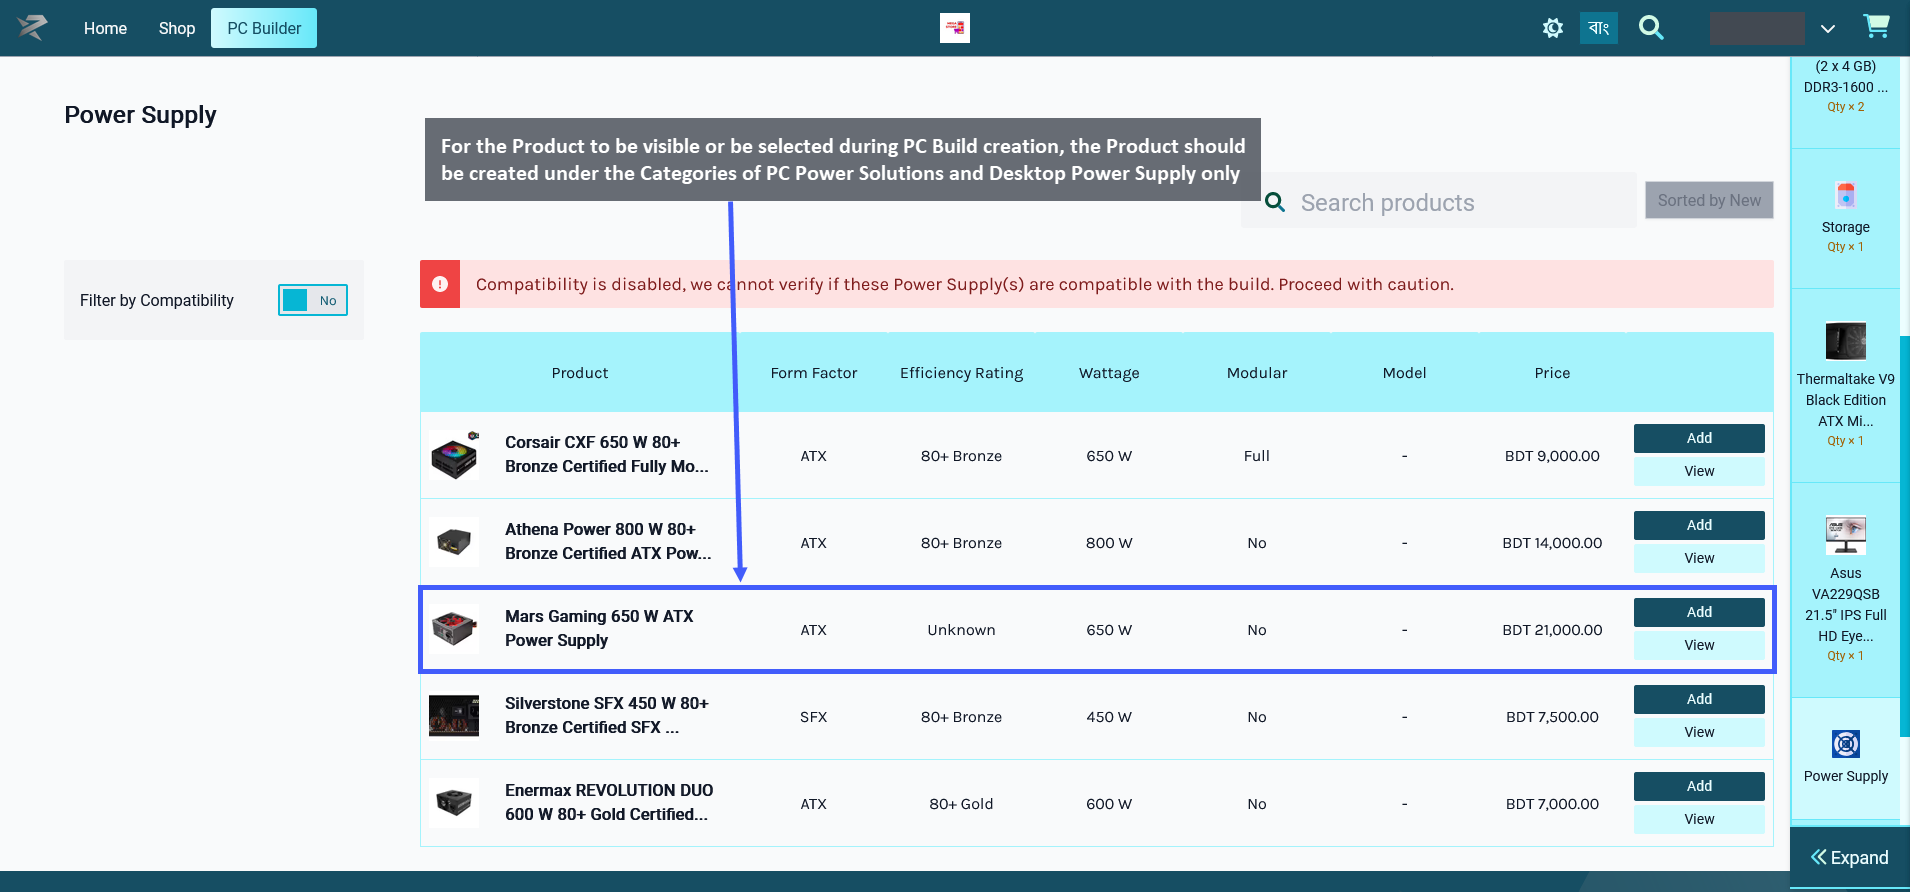
Image 1: For Product to be visible for PC Build, select only PC Power Solutions and Desktop Power Supply.
Therefore, even though a Product maybe have several Categories available for selection during Product creation, only certain Categories should be selected for the Product for it to be visible under PC Builds.
When creating a Product for Power Supply, the Shop Owner should only select the Categories: PC Power Solutions and Desktop Power Supply (PSU) for the Product to be visible under PC Builds. When they will try to add this component Power Supply to PC Build later, this Product will then be visible and available for selection under PC Builds to create build.

Image 2: Select only these Categories during Product creation for the Product to be visible for PC Build.
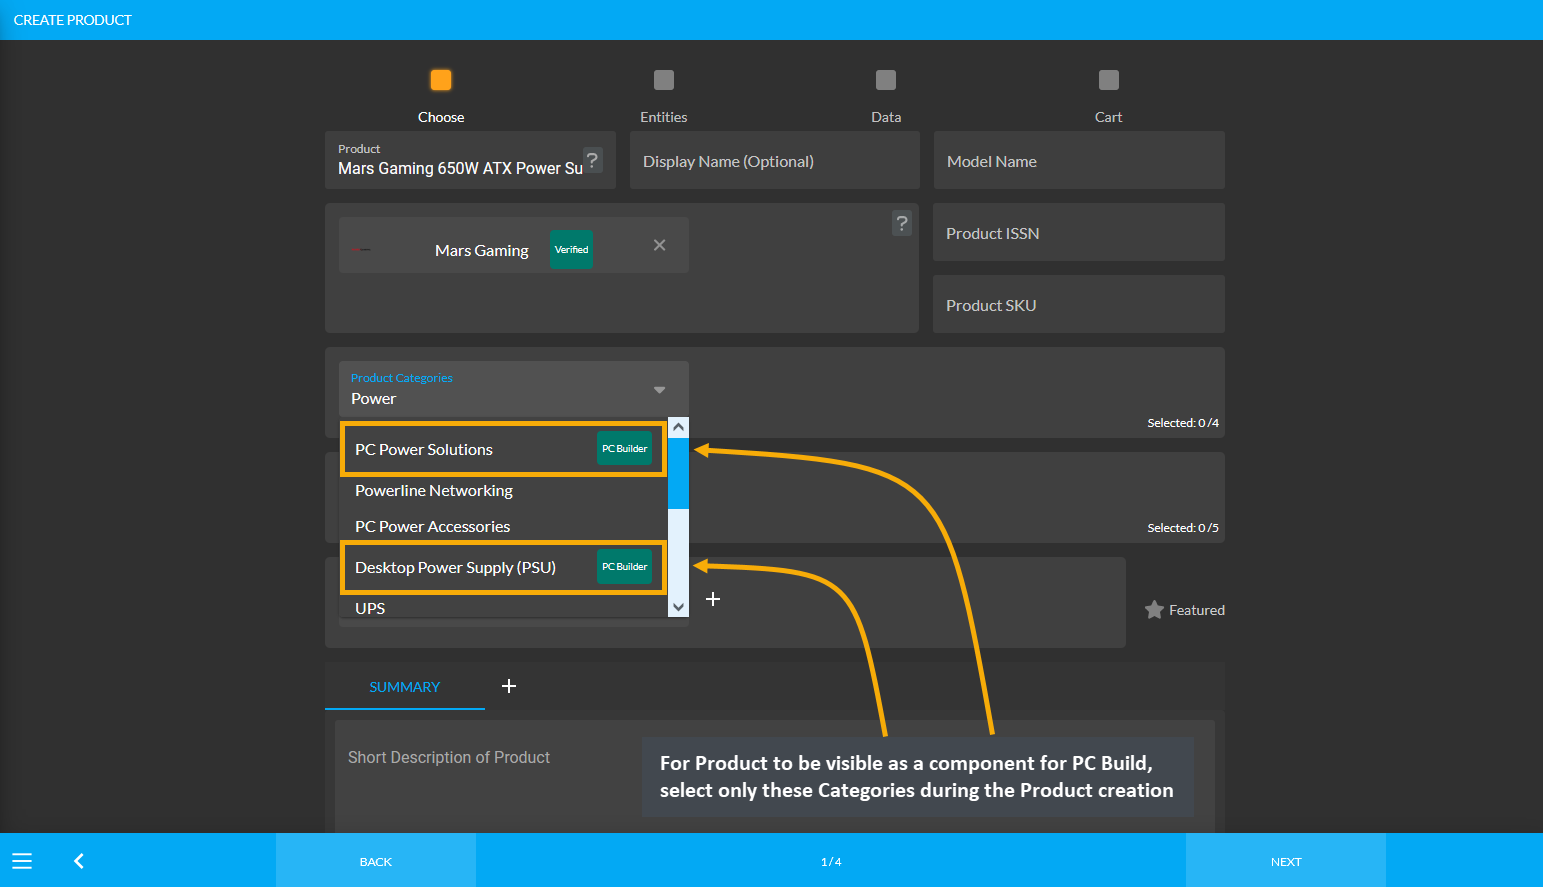
Image 3: For Product to be visible for PC Build, select only these Categories during Product creation.
Product Category: Accessories
In order for Product(s) to be visible as components to select during PC Build creation, the Shop Owner needs to create Product(s) using specific Product Categories. Accessories are available as Mouse, Keyboard, Speaker, and Headphone. During Product creation, specific Categories needs to be set for the Product so that they are visible during the PC Build component selection.
Accessories: Mouse
In case, Mouse is selected from Accessories, then in order for the Product Logitech M90 USB Mouse to be visible or be selected during PC Build creation, this Product needs to be created under the Categories: Mice and Gaming Mice and not other Input Output Devices Categories.
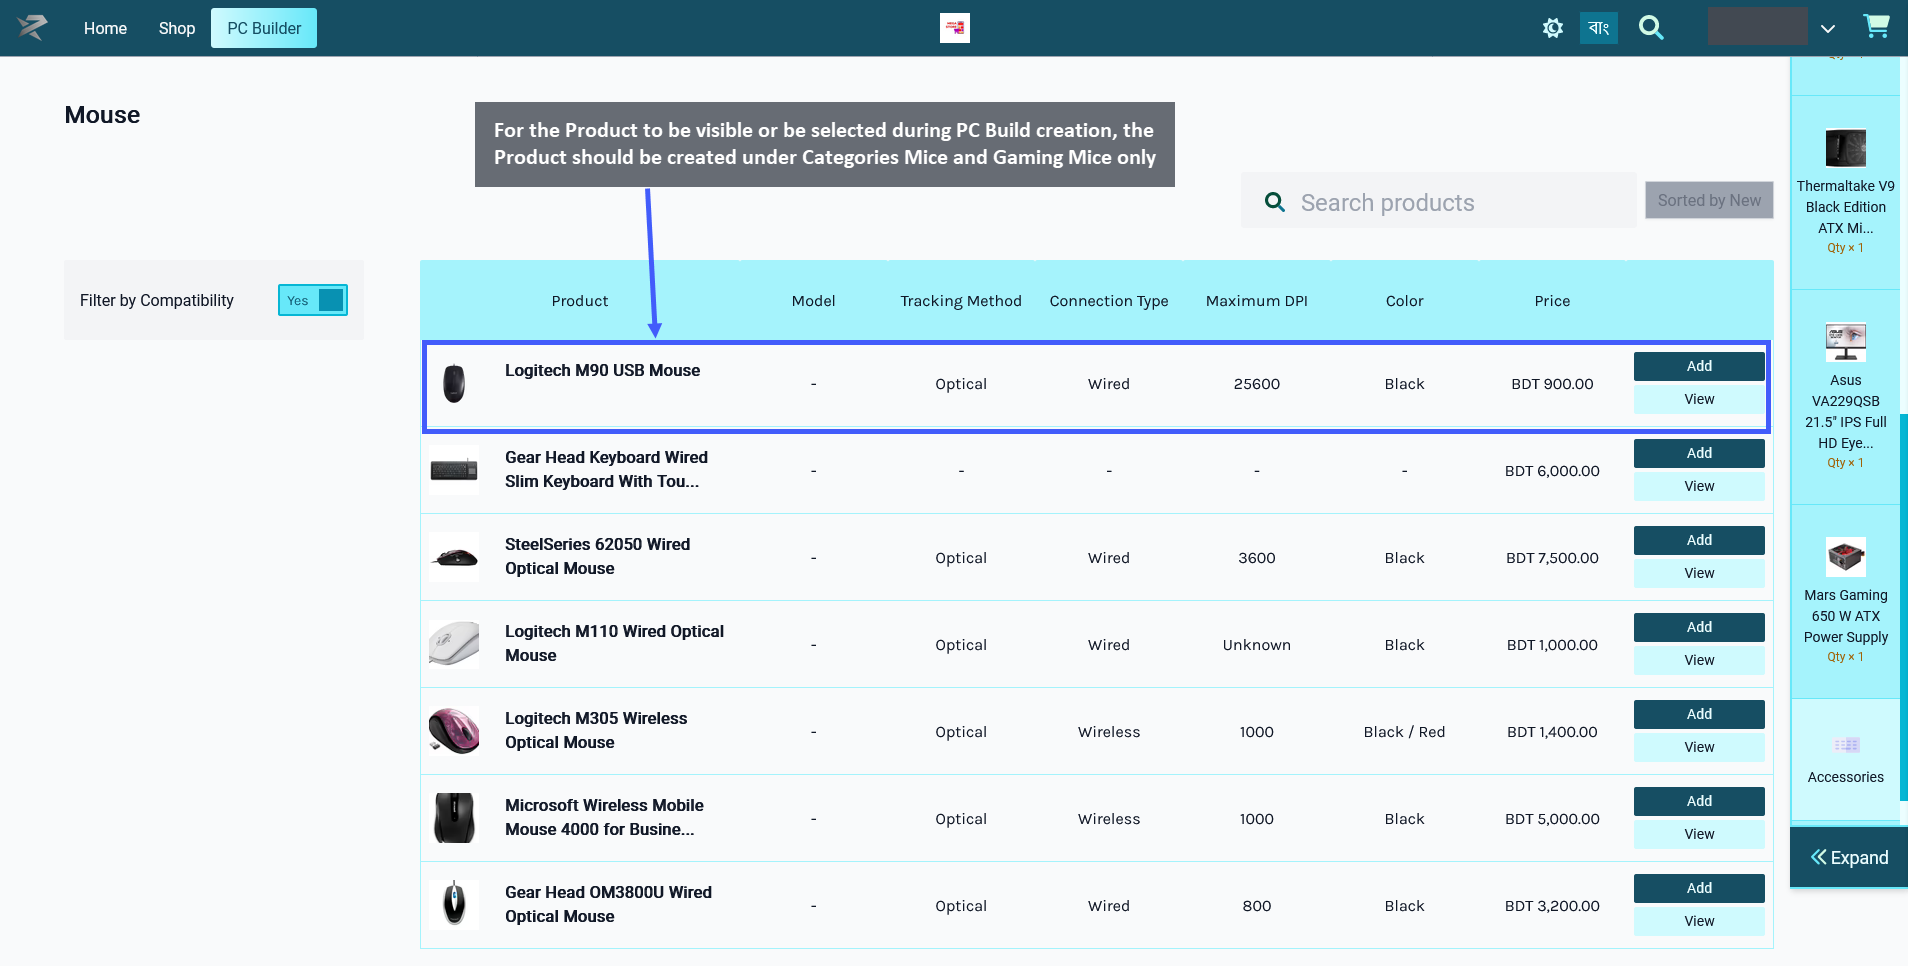
Image 1: For Product to be visible as component for PC Build, select Mice and Gaming Mice Categories.
Therefore, even though a Product maybe have several Categories available for selection during Product creation, only certain Categories should be selected for the Product for it to be visible under PC Builds.
When creating a Product for Accessories with Mouse, the Shop Owner should only select the Categories: Mice and Gaming Mice for the Product to be visible under PC Builds. When they will try to add these components of Mouse to PC Build later, this Product will then be visible and available for selection to create PC Build.

Image 2: Select only these Categories during Product creation for the Product to be visible for PC Build.
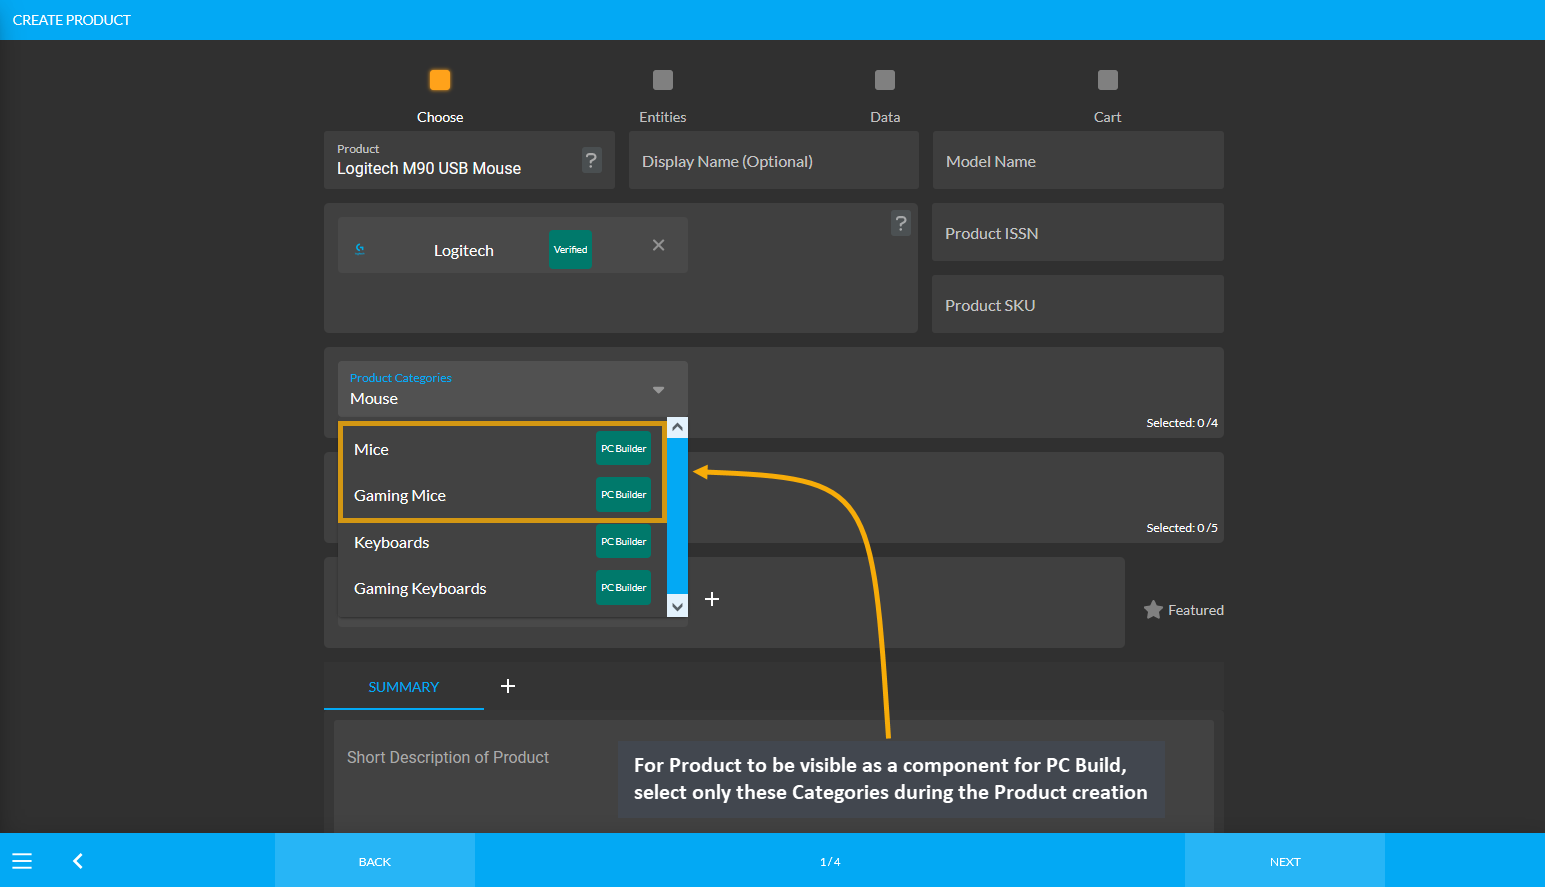
Image 3: For Product to be visible for PC Build, select only these Categories during Product creation.
Accessories: Keyboard
If Keyboard is selected from Accessories, then in order for the Product SolidTek Keyboard Wired Mini Keyboard to be visible or be selected during PC Build creation, this Product needs to be created under Categories: Keyboard and Gaming Keyboard and not other Input Output Devices Categories.
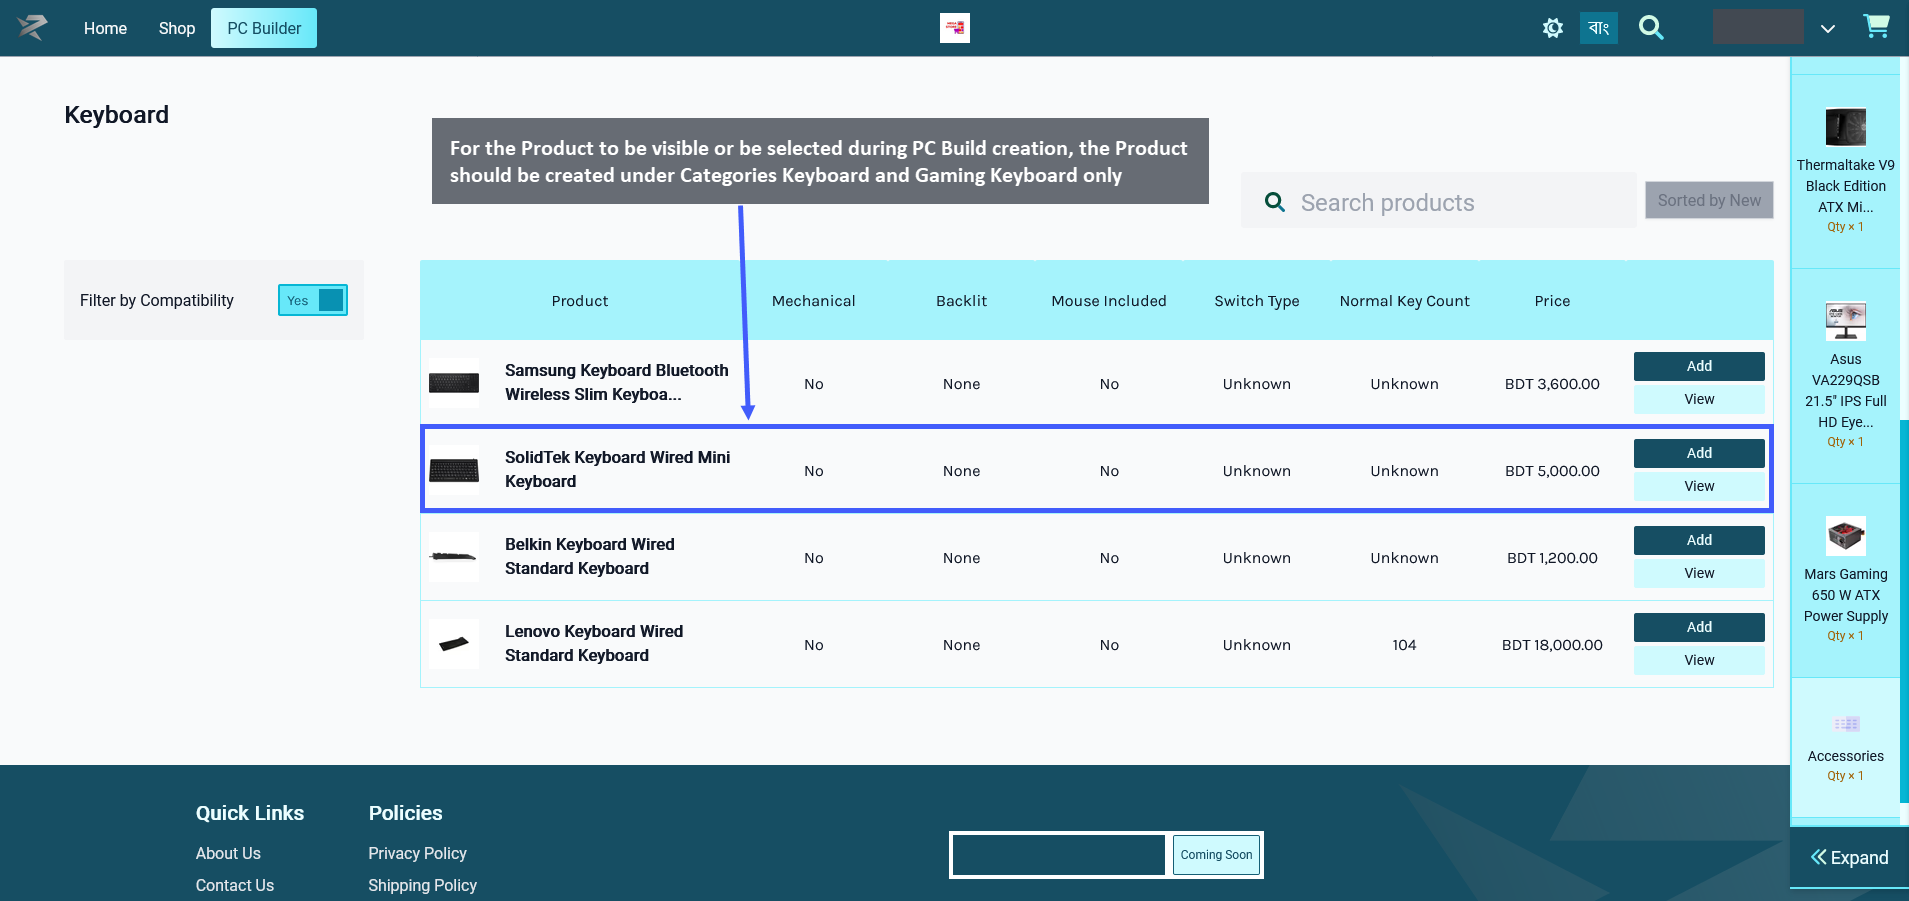
Image 1: For Product to be visible for PC Build, select only Keyboard and Gaming Keyboard Categories.
Therefore, even though a Product maybe have several Categories available for selection during Product creation, only certain Categories should be selected for the Product for it to be visible under PC Builds.
When creating Product for Accessories with Keyboard, Shop Owner should only select the Categories: Keyboard and Gaming Keyboard for the Product to be visible under PC Builds. When they will try to add these components of Keyboard to PC Build later, this Product will then be visible and available for selection to create PC Build.

Image 2: Select only these Categories during Product creation for the Product to be visible for PC Build.
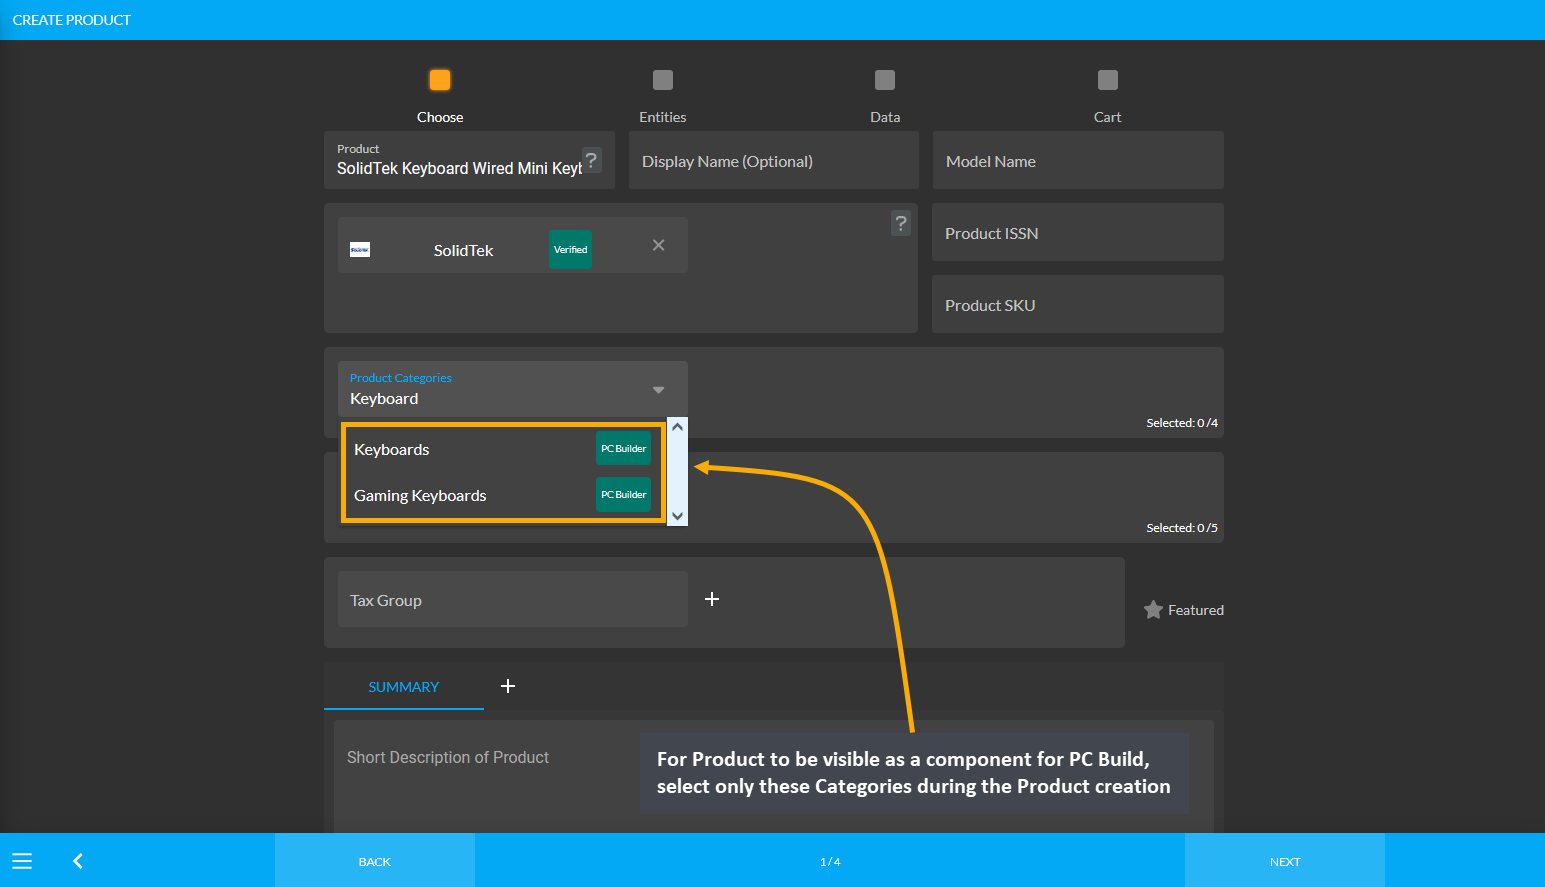
Image 3: For Product to be visible for PC Build, select only these Categories during Product creation.
Accessories: Speakers
In case, the Speakers are selected from Accessories, then in order for the Product Microlab SP-FC20WH 40W 2.1 Channel Speakers to be visible or be selected during PC Build creation, this Product needs to be created under Categories: Speakers and Gaming Speakers and not other Speaker, Headphones, and Mic Categories.
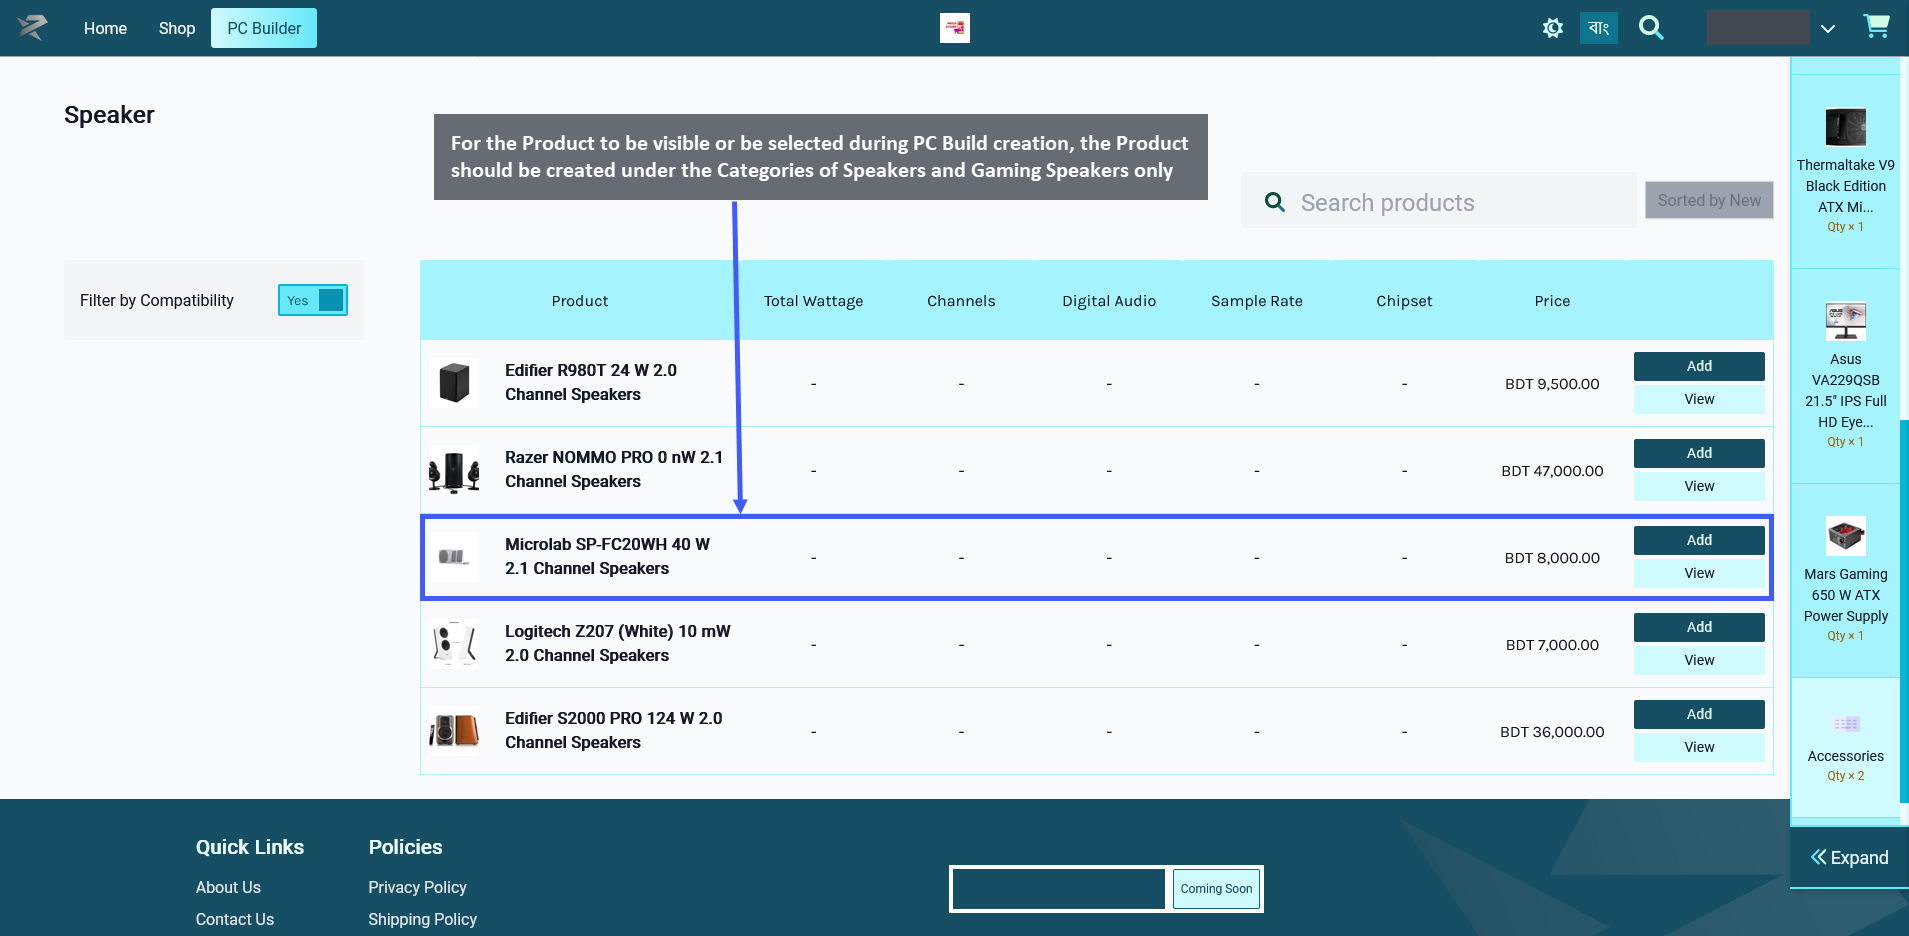
Image 1: For Product to be visible for PC Build, select only Speakers and Gaming Speakers Categories.
Therefore, even though a Product maybe have several Categories available for selection during Product creation, only certain Categories should be selected for the Product for it to be visible under PC Builds.
When creating Product for Accessories with Speakers, Shop Owner should only select the Categories: Speakers and Gaming Speakers for the Product to be visible under PC Builds. When they will try to add these components of Speakers to PC Build later, this Product will then be visible and available for selection to create PC Build.
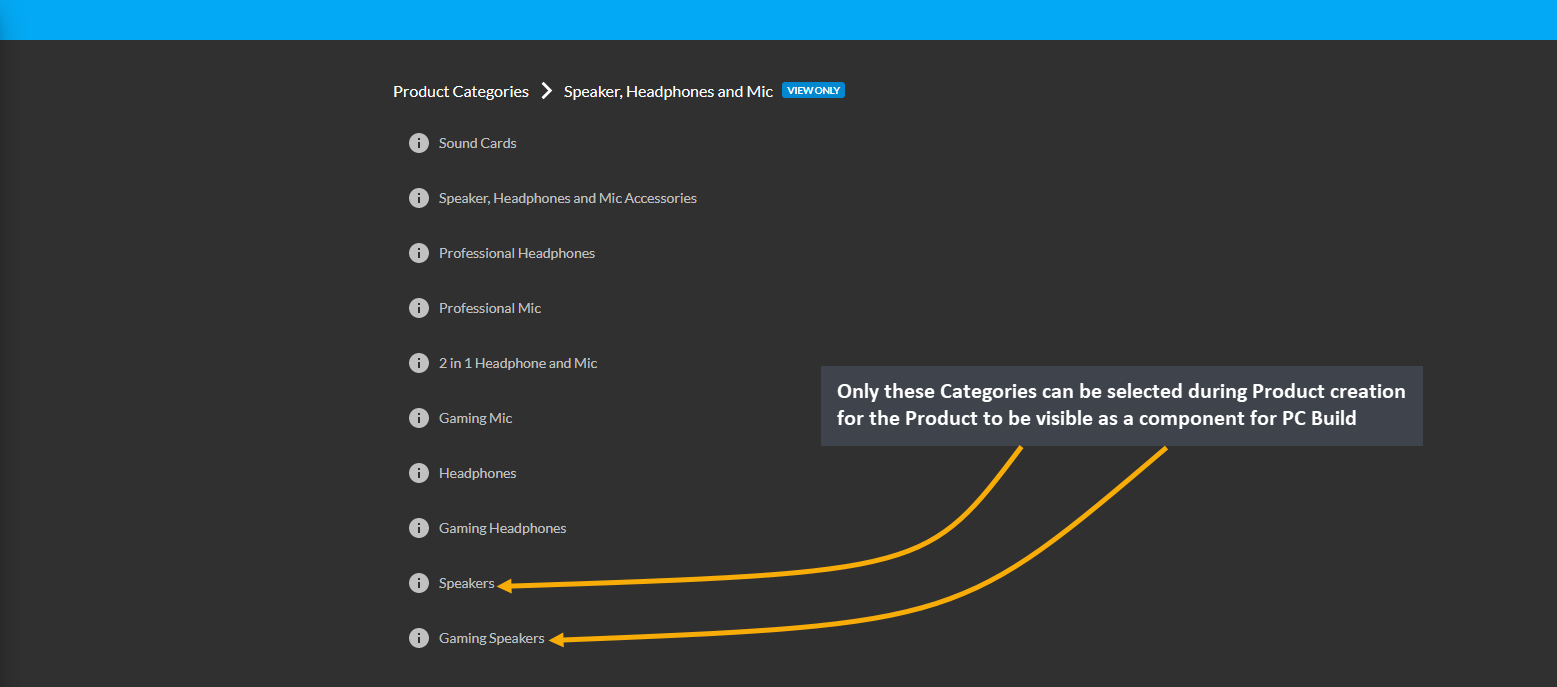
Image 2: Select only these Categories during Product creation for the Product to be visible for PC Build.
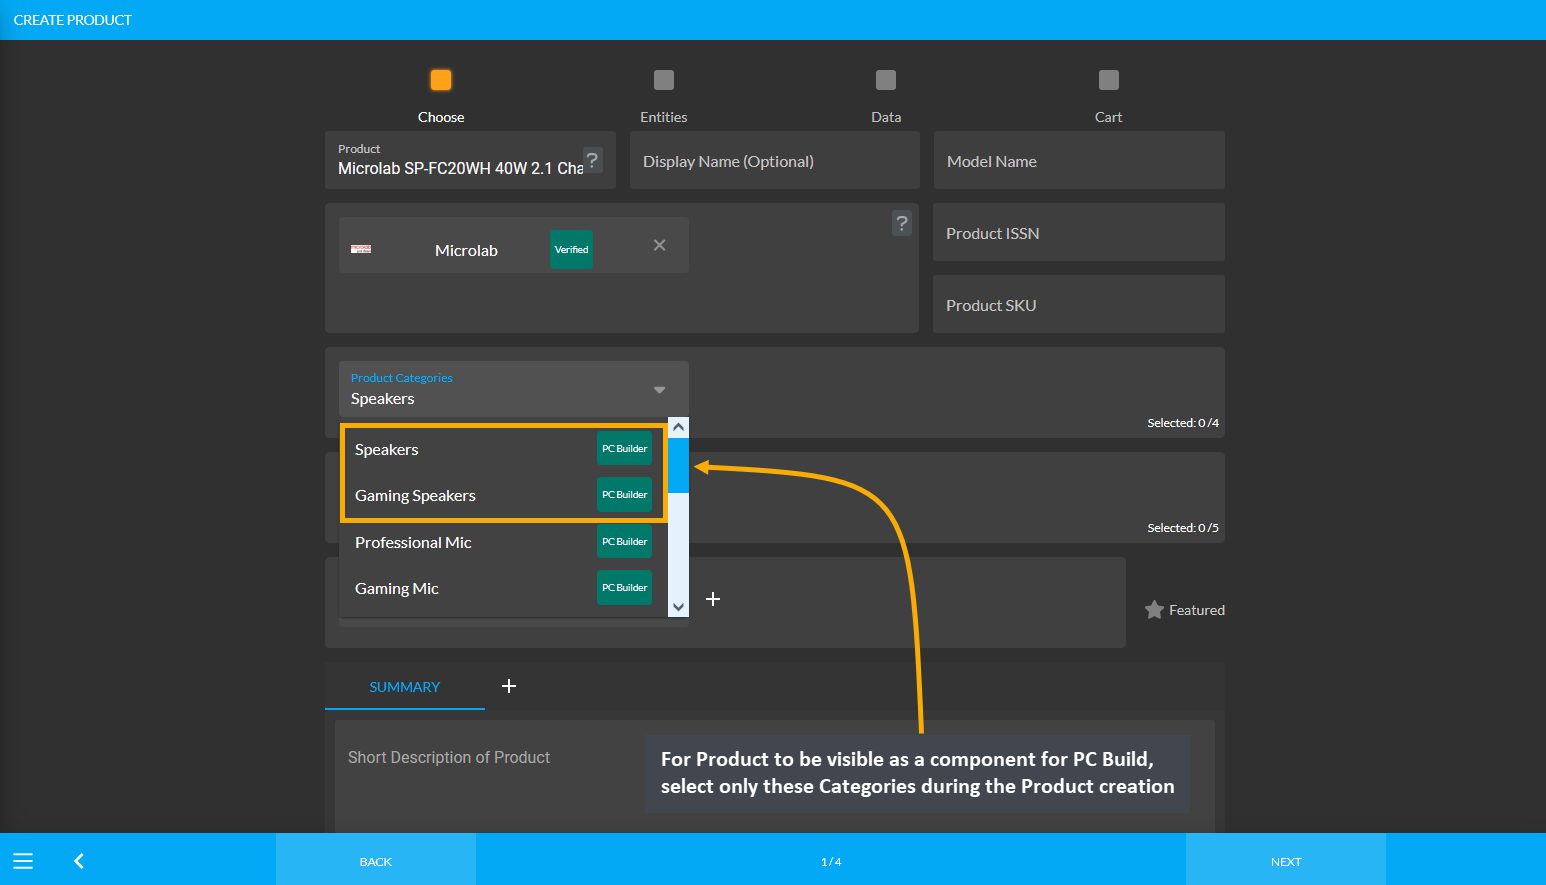
Image 3: For Product to be visible for PC Build, select only these Categories during Product creation.
Accessories: Headphones
In case, Headphones are selected from Accessories, then in order for the Product Audio - Technica ATH-A700 Headphones to be visible or be selected during PC Build creation, this Product needs to be created under the Categories: Headphones, Gaming Headphones, Professional Headphones, 2 in 1 Headphone and Mic, Professional Mic, and Gaming Mic and not other Speaker, Headphones, and Mic Categories.
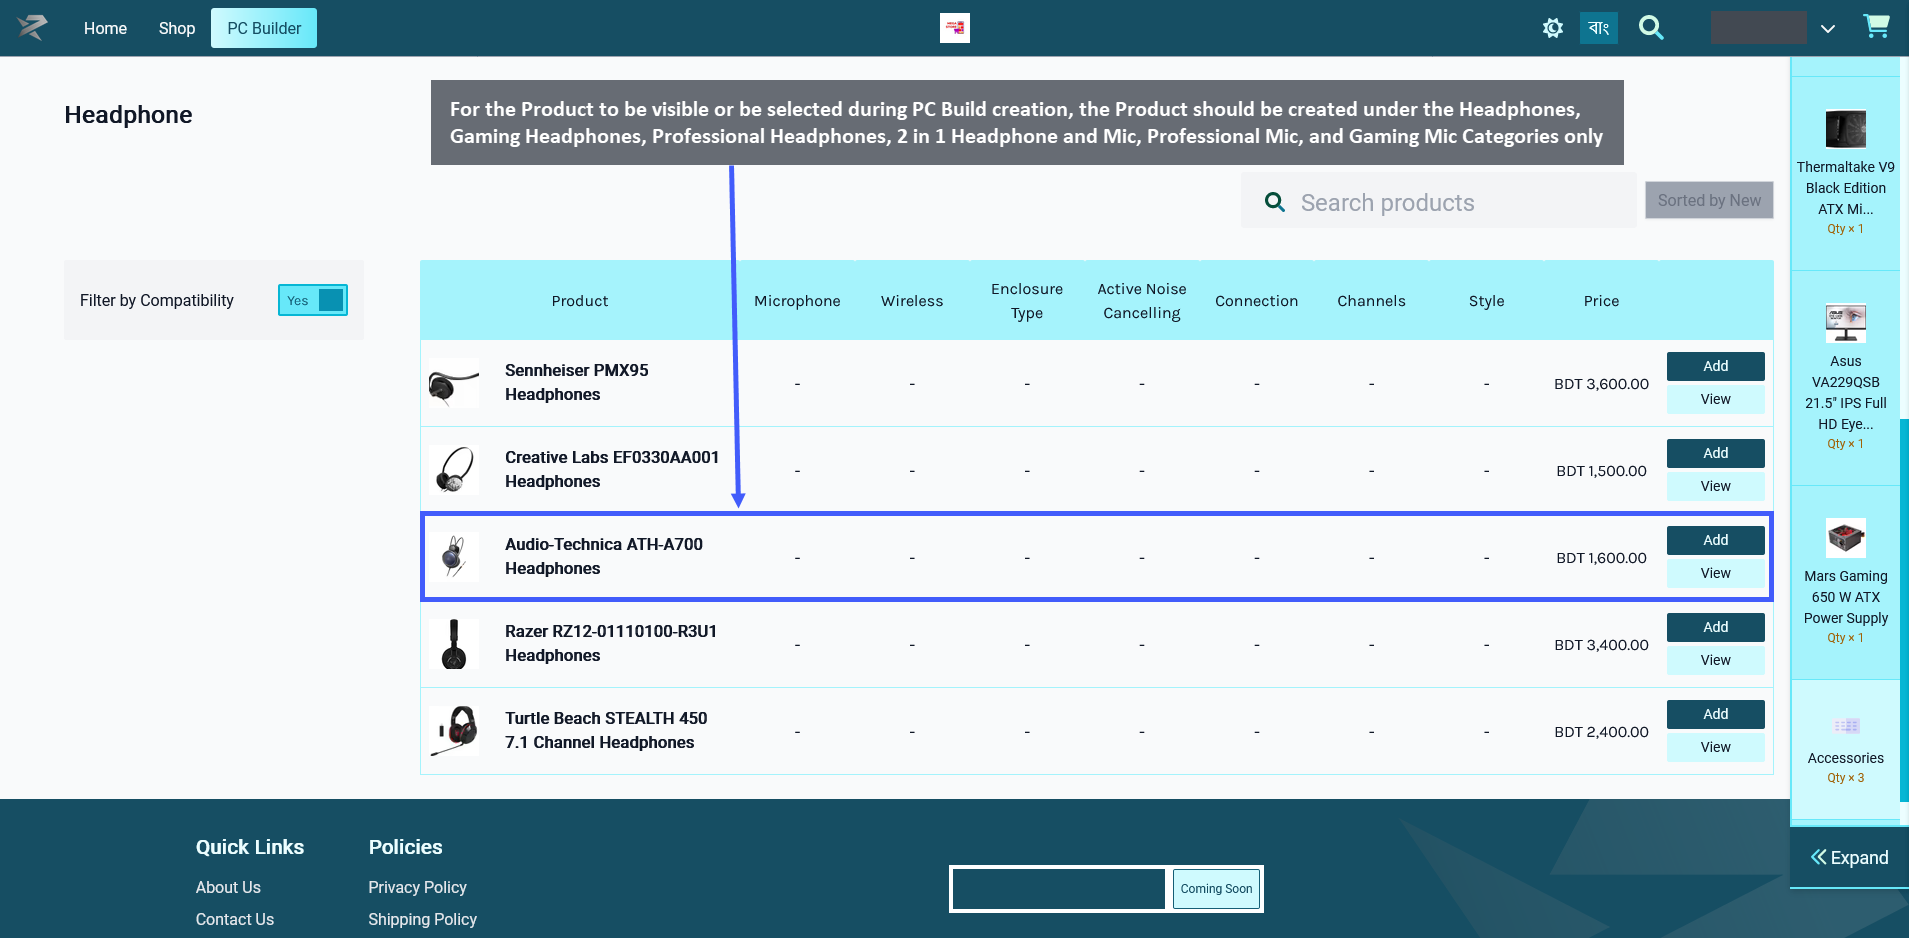
Image 1: For Product to be visible for PC Build, select only Headphones, Gaming Headphones, Professional Headphones, 2 in 1 Headphone and Mic, Professional Mic, and Gaming Mic Categories.
Therefore, even though a Product maybe have several Categories available for selection during Product creation, only certain Categories should be selected for the Product for it to be visible under PC Builds.
When creating a Product for Accessories with Headphones, the Shop Owner should only select these Categories: Headphones, Gaming Headphones, Professional Headphones, 2 in 1 Headphone and Mic, Professional Mic, and Gaming Mic for the Product to be visible under PC Builds. When they will try to add these components of Headphones to PC Build later, this Product will then be visible and available for selection to create PC Build.
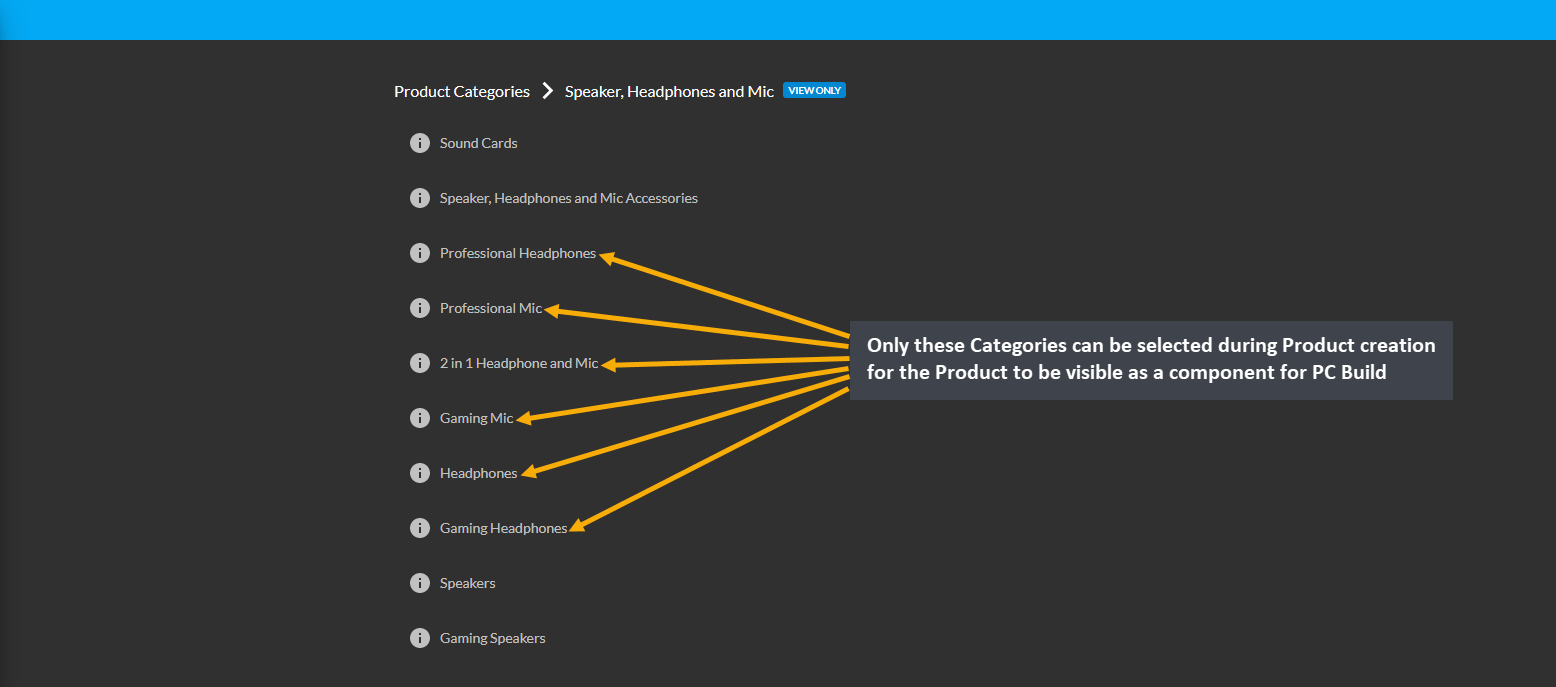
Image 2: Select only these Categories during Product creation for the Product to be visible for PC Build.
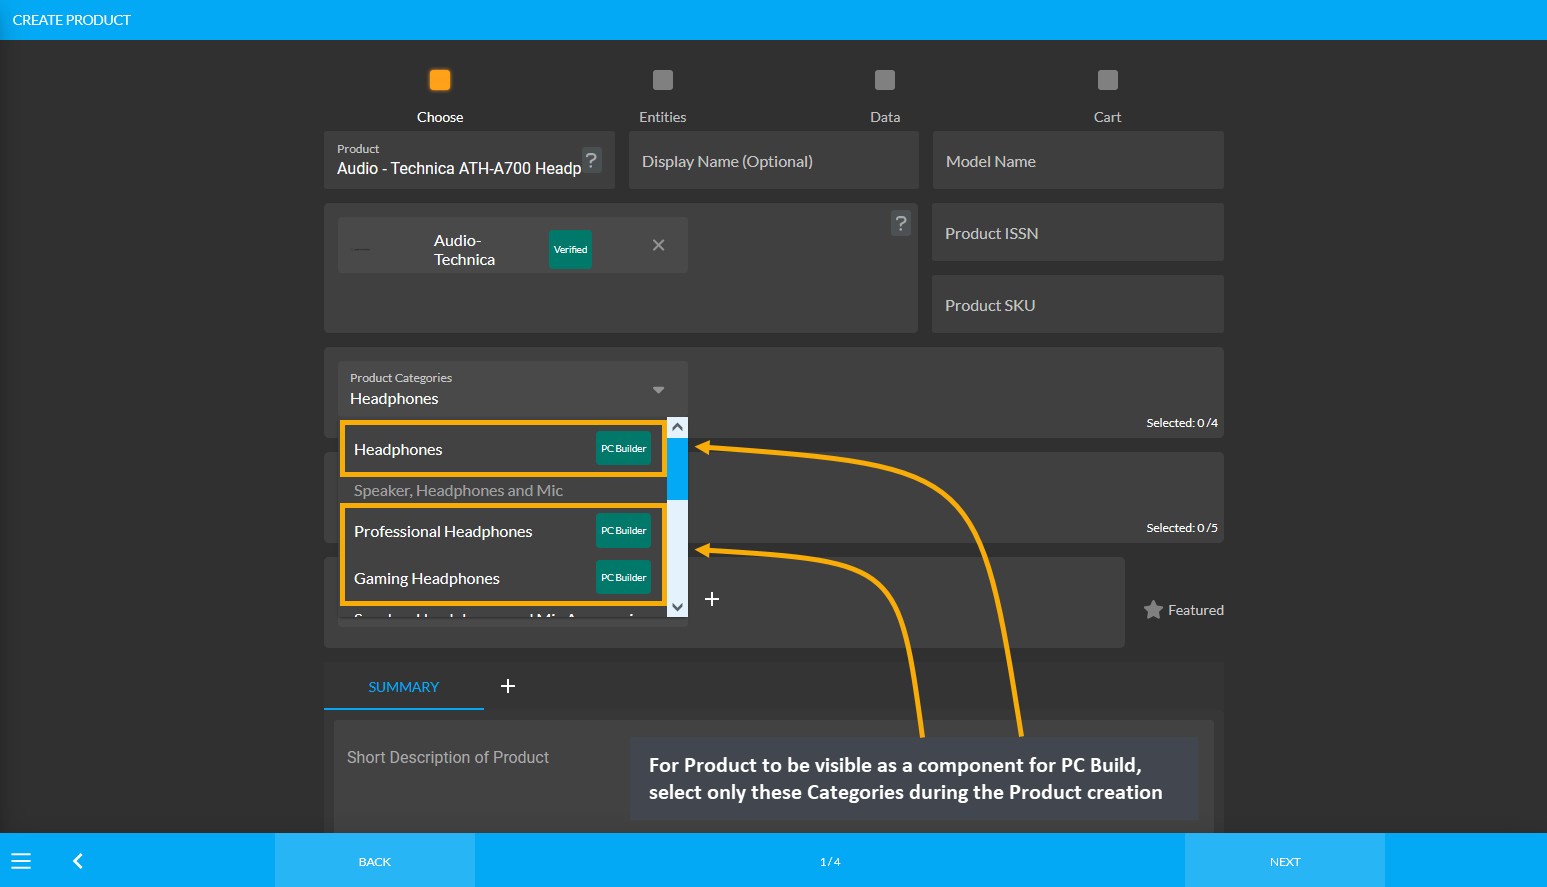
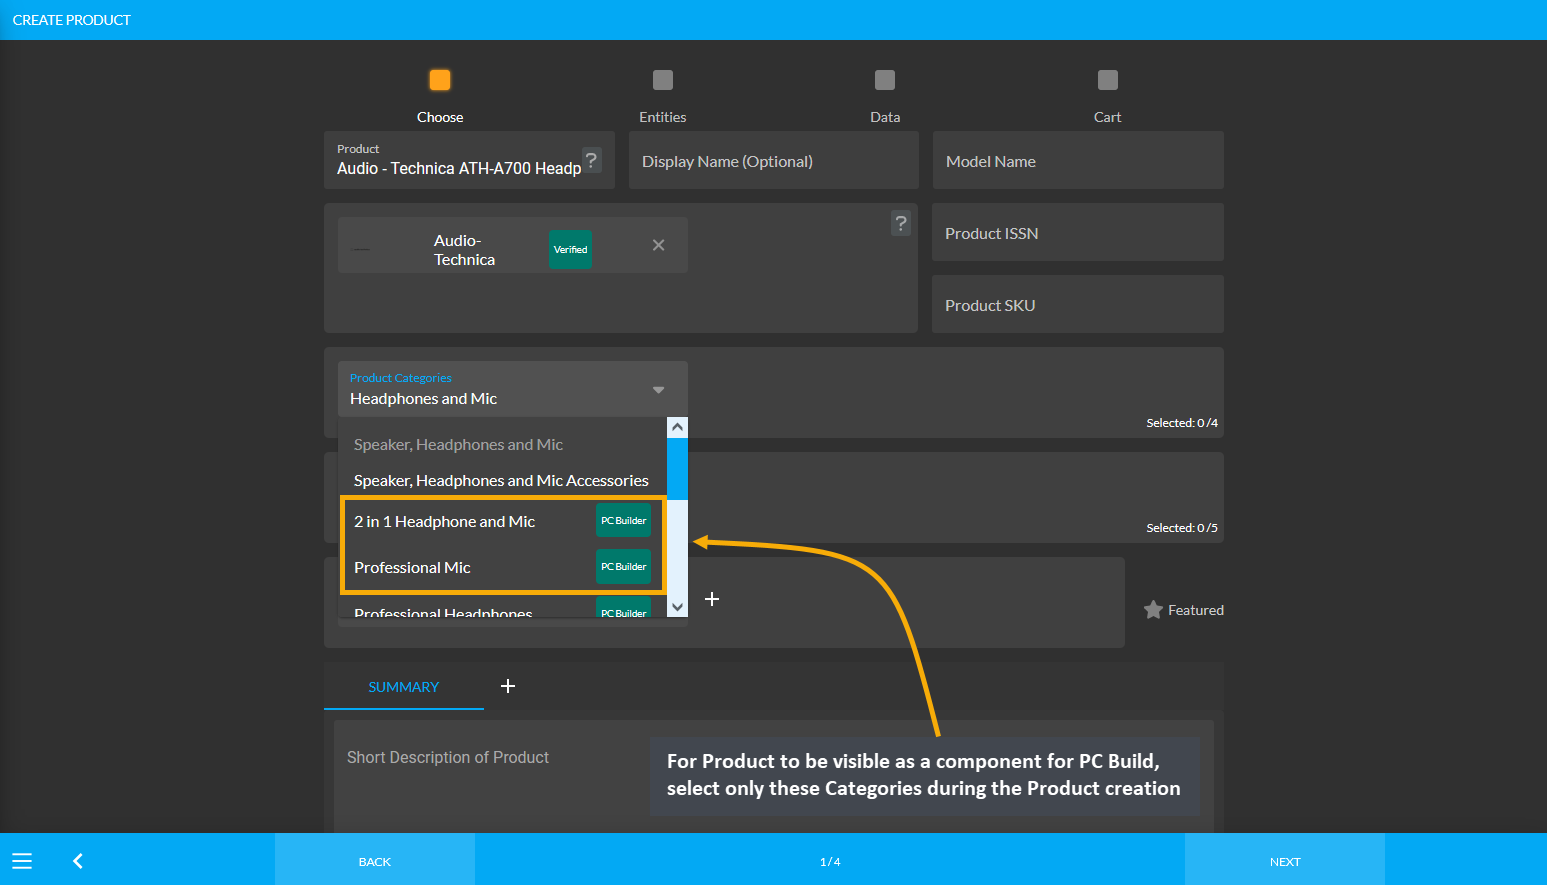
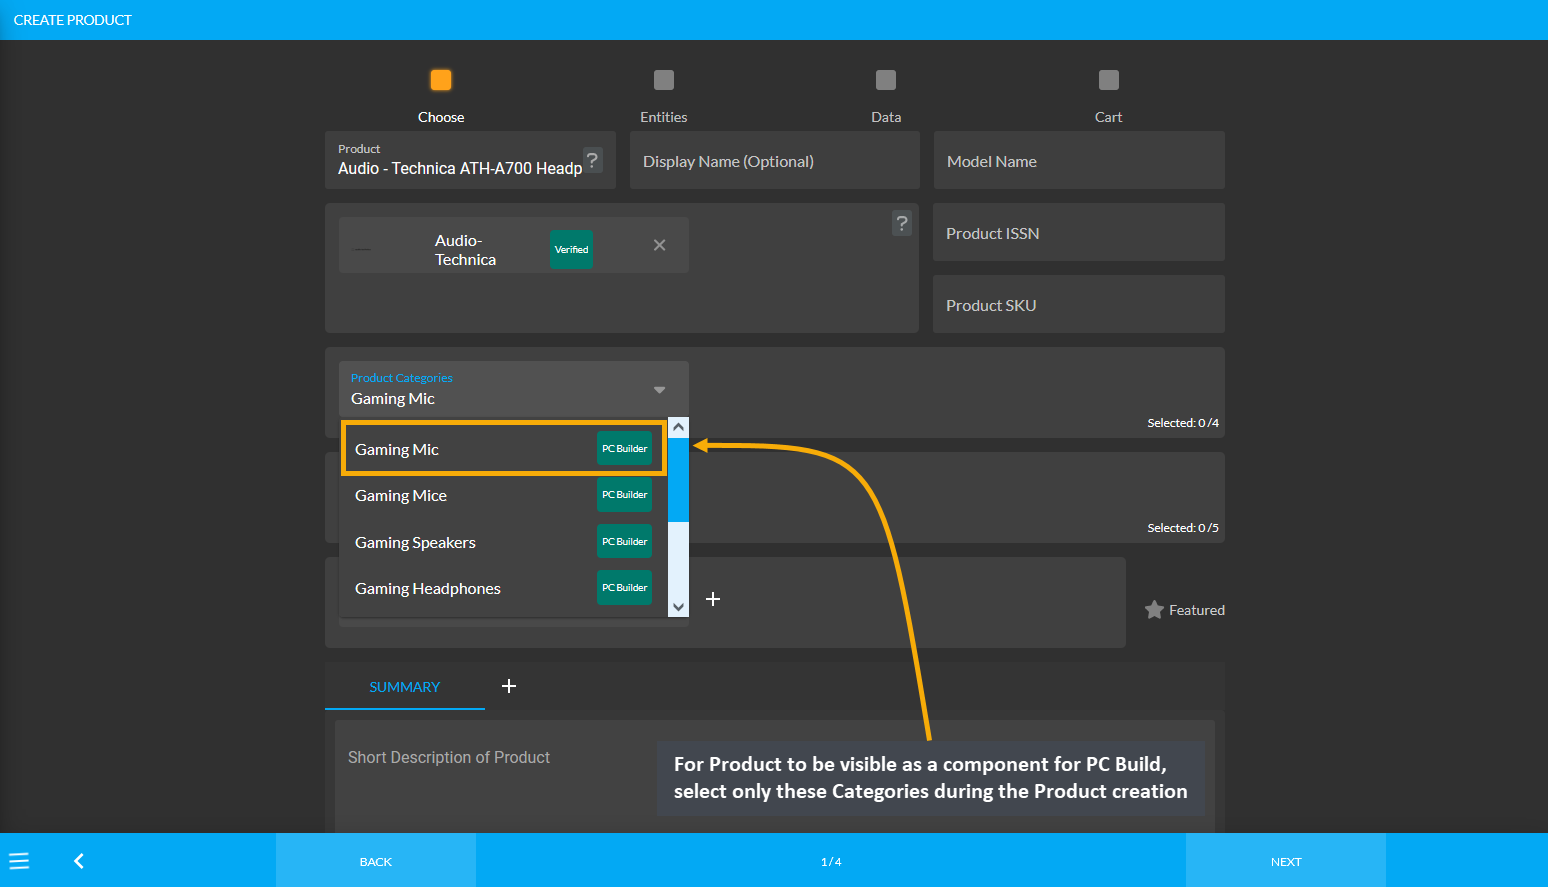
Image 3: For Product to be visible for PC Build, select only these Categories during Product creation.
22 - Tags
An explanation on how tags work in the system.
This section discusses the various ways tags can be implemented to group products and orders.
Tags are entities that can be used to build custom collections of other entities, currently the system support using them with Products, Global Products, and Orders. For instance, apart from pre-defined Product Categories in the system, tenant users/ shop owners can build their own custom product category hierarchy using tags when needed. To clarify with an example, both 4g and 5g phones have been released in 2021, so tags can be crated as 4g and 5g to define those products.
In the system, Product Categories are pre-defined, the Shop Owners cannot create them. For instance, the Office Solutions category has several sub-categories. So, if a Shop Owner wants to sell Printer-Scanner combo Product, they will have to create a New Category because such category does not exist under Office Solutions category. Tags allow creating New Categories like 3D printer-scanner, receipt printer-scanner, or barcode printer-scanner etc.

Image: Shop Owners can create and enable Tags to use as Product Categories in the Website Shop filter.
22.1 - Create and Manage Tags
Learn more about how to create, edit, view, and delete Tags.
This section discusses on how to create, edit, view, and delete Tags from Product Settings.
Options to create tags can be found under Product Settings. Choose Tags from there and click on the + icon to create new tags for the shop. On the Create Tag page, there are options to select Tag Type. Also, set Tag Name and Tag Description below which are two boxes to upload logo and banner for tags. There is a toggle button to activate and deactivate tags. Click Submit to save all the changes as shown in the example screenshot.

Image 1: Click the + button to create New Tags for the Shop filter from Tags tab under Product Settings.

Image 2: Select Tag Type, set Tag Name, Description and upload Logo and Banner to create Parent Tag.
The Tags created in the system will display on The Website. For instance, if Apple Tag is selected, it will bring the search results of all the Product(s) with Apple tags in The Website as shown in the screenshot below.

Image 3: If a Tag is selected, it will bring search results of all Products with that Tag in The Website.
View the list of existing tags by clicking on the Tags module from the left side panel. The page will display the list of Tags created. To delete any tag individually, click the Delete Button to immediately delete the tag. There is an Edit Button beside the Delete Button through which details for Tags can be edited and updated.

Image 4: View the list of already created Tags from Tags module under Product Settings.
Clicking on the Edit Button will redirect to this page where details for any Tags can be edited and updated.

Image 5: Clicking the Edit Button will redirect here where details for any Tags can be edited and updated.
22.2 - Add Tags to Products
An explanation on how to add Tags on Products.
This section shows how you can add Tags to Products in the system.
To add Tags to any Product, first click on the Products module and from there, click on the + icon which will open the page to add New Product(s). For existing Product(s), search Product Name on the search bar. If the Product is not available, the search bar will suggest adding a new product with Add New button.
Clicking on it will redirect to Create Product page where Tags can be added to that Product. Type any existing Tag Names in the search bar and click on it, which will automatically add that tag to the Product. Here, Shop Owners can add a maximum of 5 Tags to any Product.

22.3 - Create Child Tag
An explanation on how to add Child Tag under a Parent Tag.
This section shows how you can create a Child Tag within a Parent Tag.
Create Child Tag
Child Tag can be created within a Parent Tag from the Tags List. Click on the + icon to create a Child Tag for the selected Parent Tag. It will redirect to a new page where new Child Tag can be created by adding Tag Name, Tag Description, Images, and selecting Tag Type as illustrated in the example screenshot below.

Image 1: Click on the + icon to create a Child Tag from the selected Parent Tag.

Image 2: Select Tag Type, set Tag Name, Description and upload Logo and Banner to create Child Tag.
The Child Tag or Tags created under the Parent Tag will display in a list and they can be edited if needed.

Image 3: Child Tag or Tags created under the Parent Tag will display in a list and they can be edited.
23 - Operation Manual
This Operation Manual will guide CMS Users on how to perform specific functions.
The document lists down various questions and their answers detailing how to carry out particular tasks and how to create and setup various website modules.
Retail Xen Operation Manual
This Operation Manual is the documentation which provides guidance for CMS Users or Shop Owners to perform their functions correctly and reasonably efficiently while using the Content Management System. This document is a way of ensuring that the Shop Owner can efficiently carry out Orders with constant sales. This will guide them on what to do whenever they are faced with any questions and need answers to them.
Operation Manual Contents
Therefore, Operation Manual is a comprehensive documentation of how the Admin Panel of the CMS functions. This document offers a structure upon which all the Shop Owners approach their day-to-day tasks. This includes how they will create Orders, approach Customers, request payments for Product(s), create warranty plans, add tags and tax groups, utilize Global Product(s) and gallery, manage credit and supply from vendors, and so on.
23.1 - Frequently Asked Questions (FAQ)
This Operation Manual will guide Shop Owners to perform Admin Panel functions.
The document lists down various questions and their answers which specifically explains about how to carry out particular tasks and how to create and setup various Admin Panel modules.
How to create an Order manually for any Customer?
- The Shop Owner can create Manual Orders by clicking the ADD button at the bottom of the order list page.
- One or several manual Orders can be created for one or multiple Customers by adding different Carts.
- Fill in all the Customer information and add New Product(s) to Cart with desired items and quantities.
- Review the Cart, select Shipment and Payment options and click Confirm Order to place New Order.
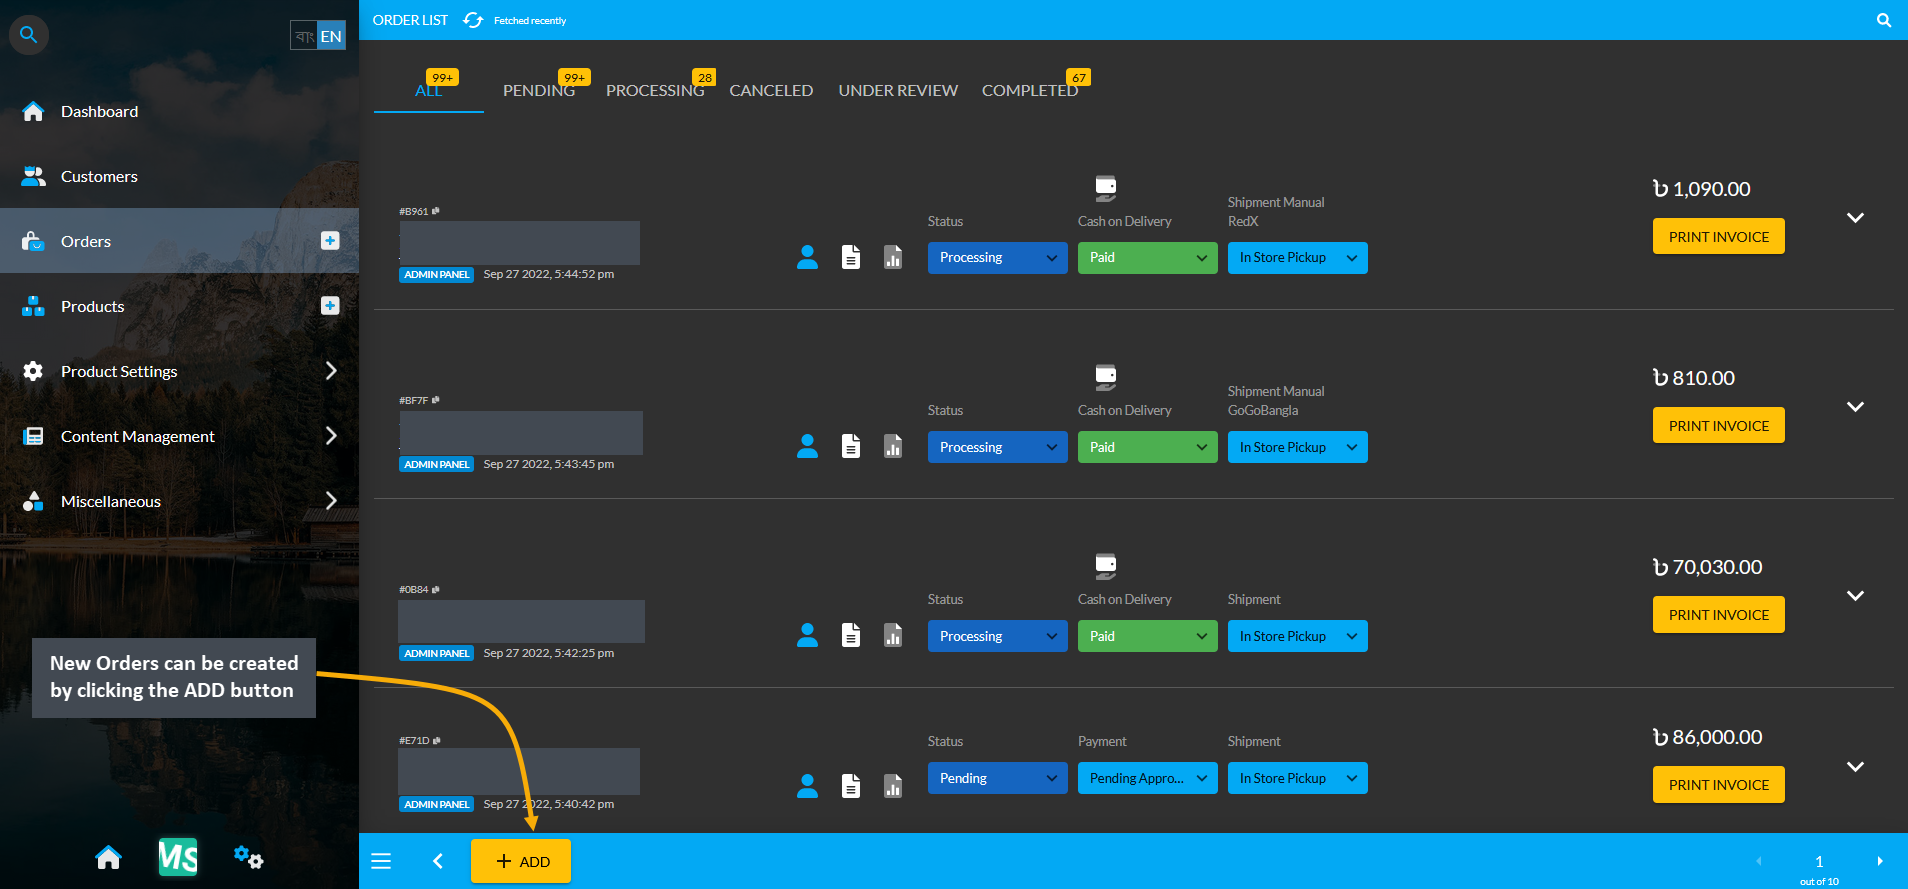
Image 1: Create Manual Orders by clicking the ADD button at the bottom of the order list page.
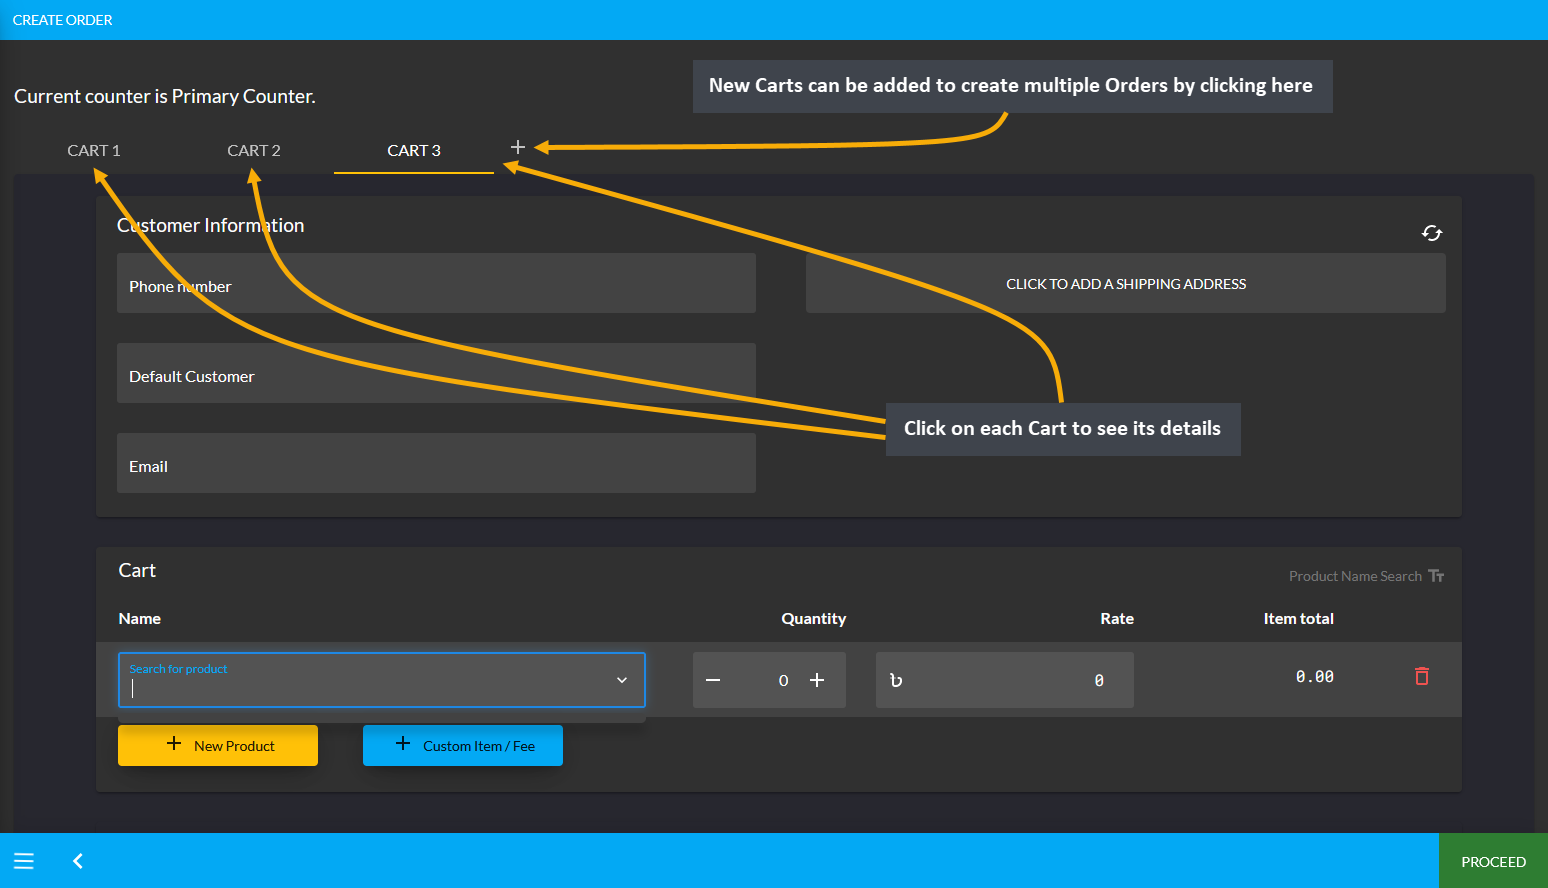
Image 2: Several manual Orders can be created for one or multiple Customers by adding different Carts.

Image 3: Fill in Customer information and add New Product(s) to Cart with desired items and quantities.
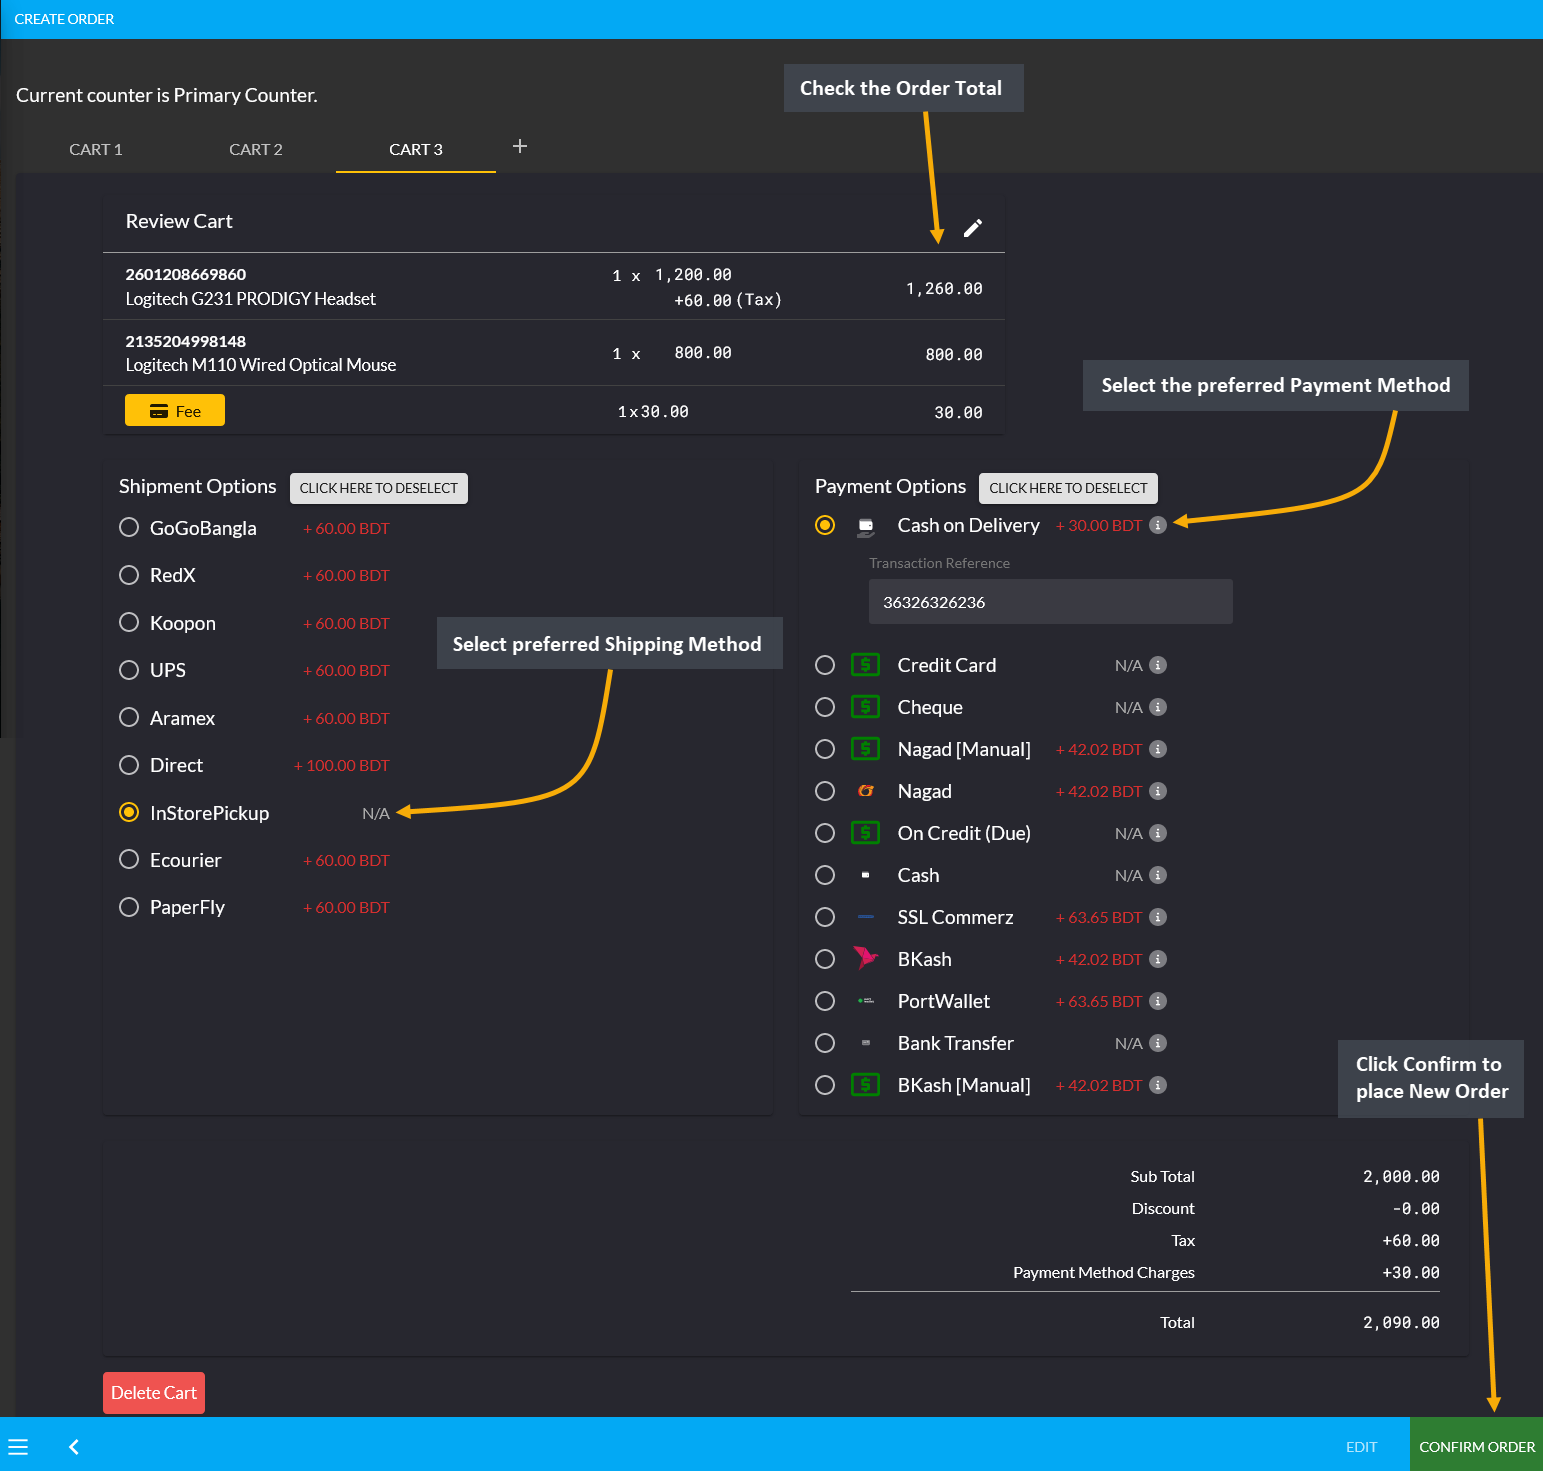
Image 4: Review the Cart, select Shipment and Payment options and click Confirm Order to place New Order.
How to add multiple Product(s) when creating a manual Order?
To add multiple Product(s), click on the New Product button that will add a separate new item to Cart each time.
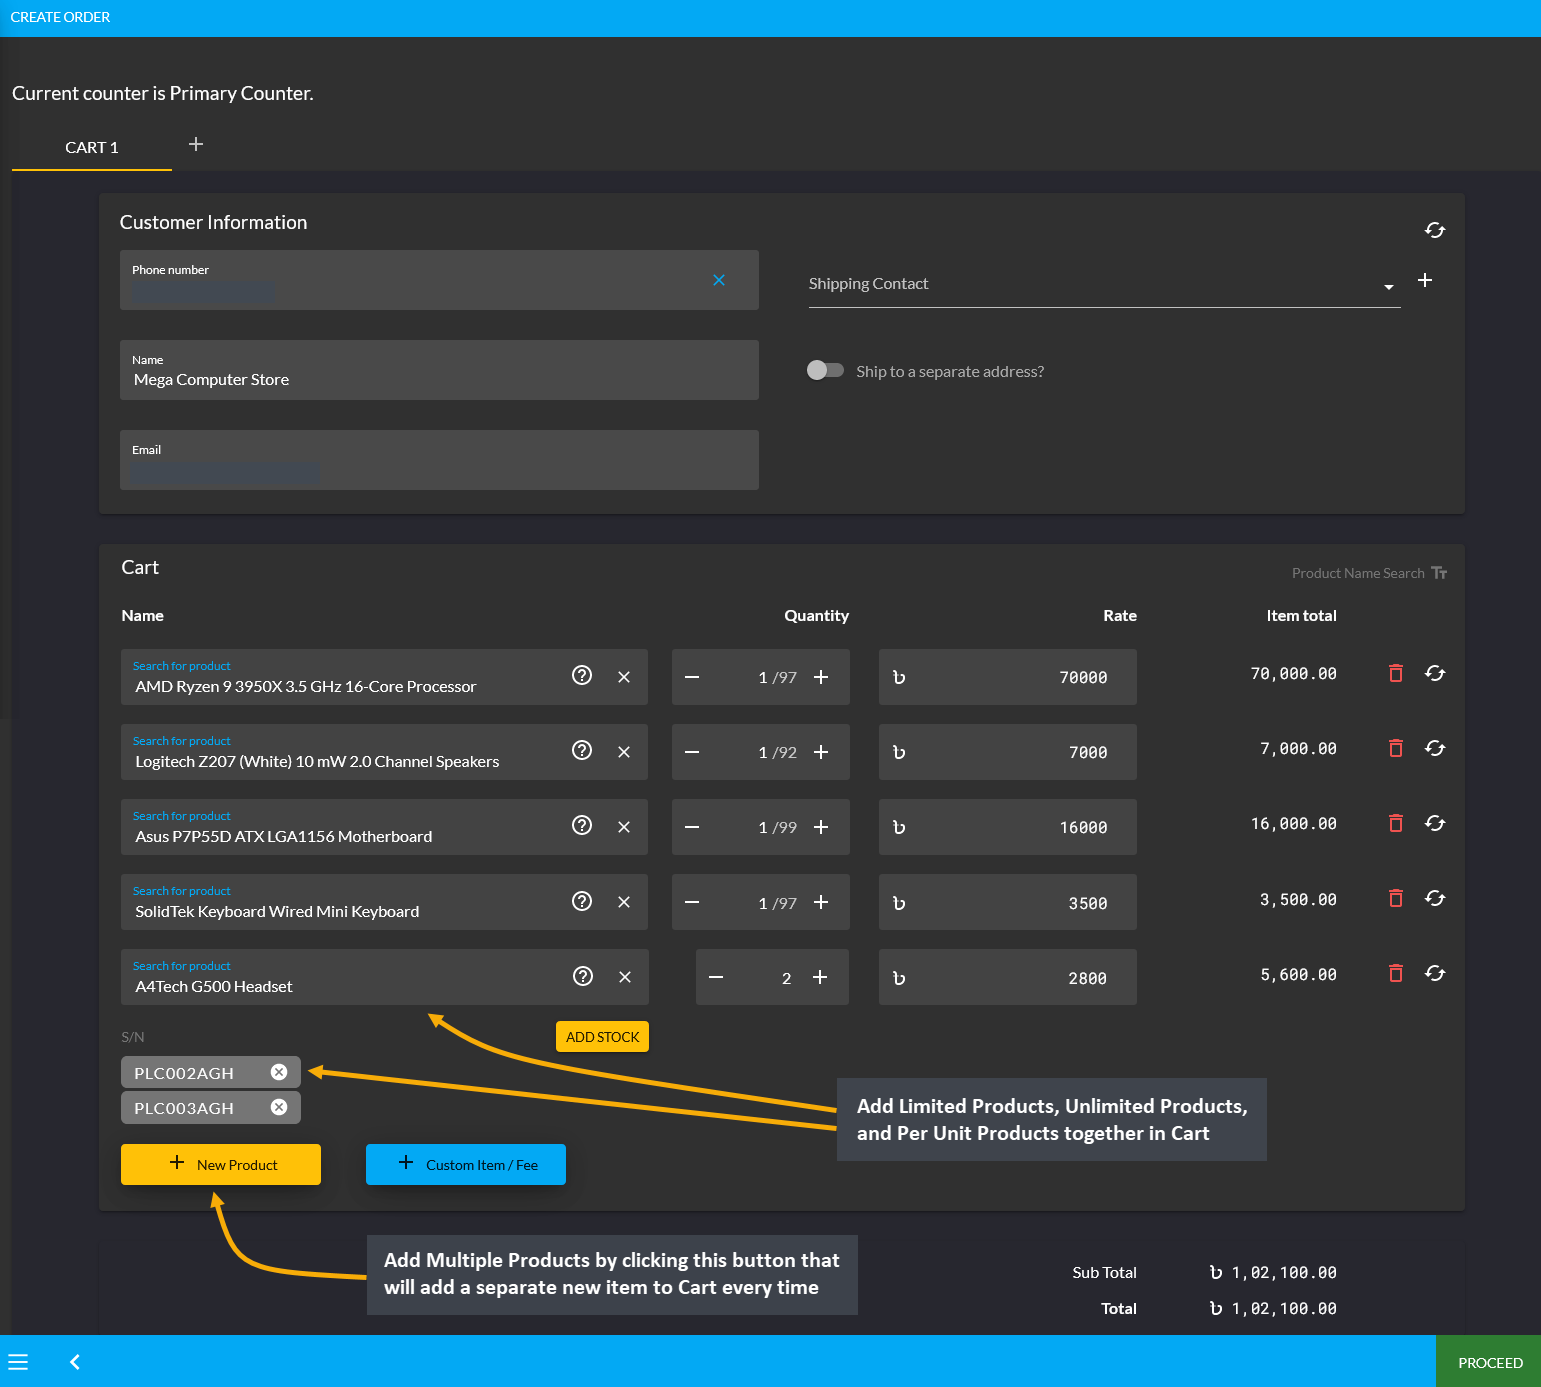
Image: Click the New Product button to add multiple Product(s) separately to Cart manually.
How to add Custom Product(s) to a manual Order?
- Click on the Custom Item/ Fee button to separately add Custom Product(s) to Cart which are not available on existing Product list.
- Clicking on this button will create a new box (underneath Search for Product box) for Custom Product(s).
- To add multiple Custom Product(s), click on the Custom Item/ Fee button with desired quantities and rates.
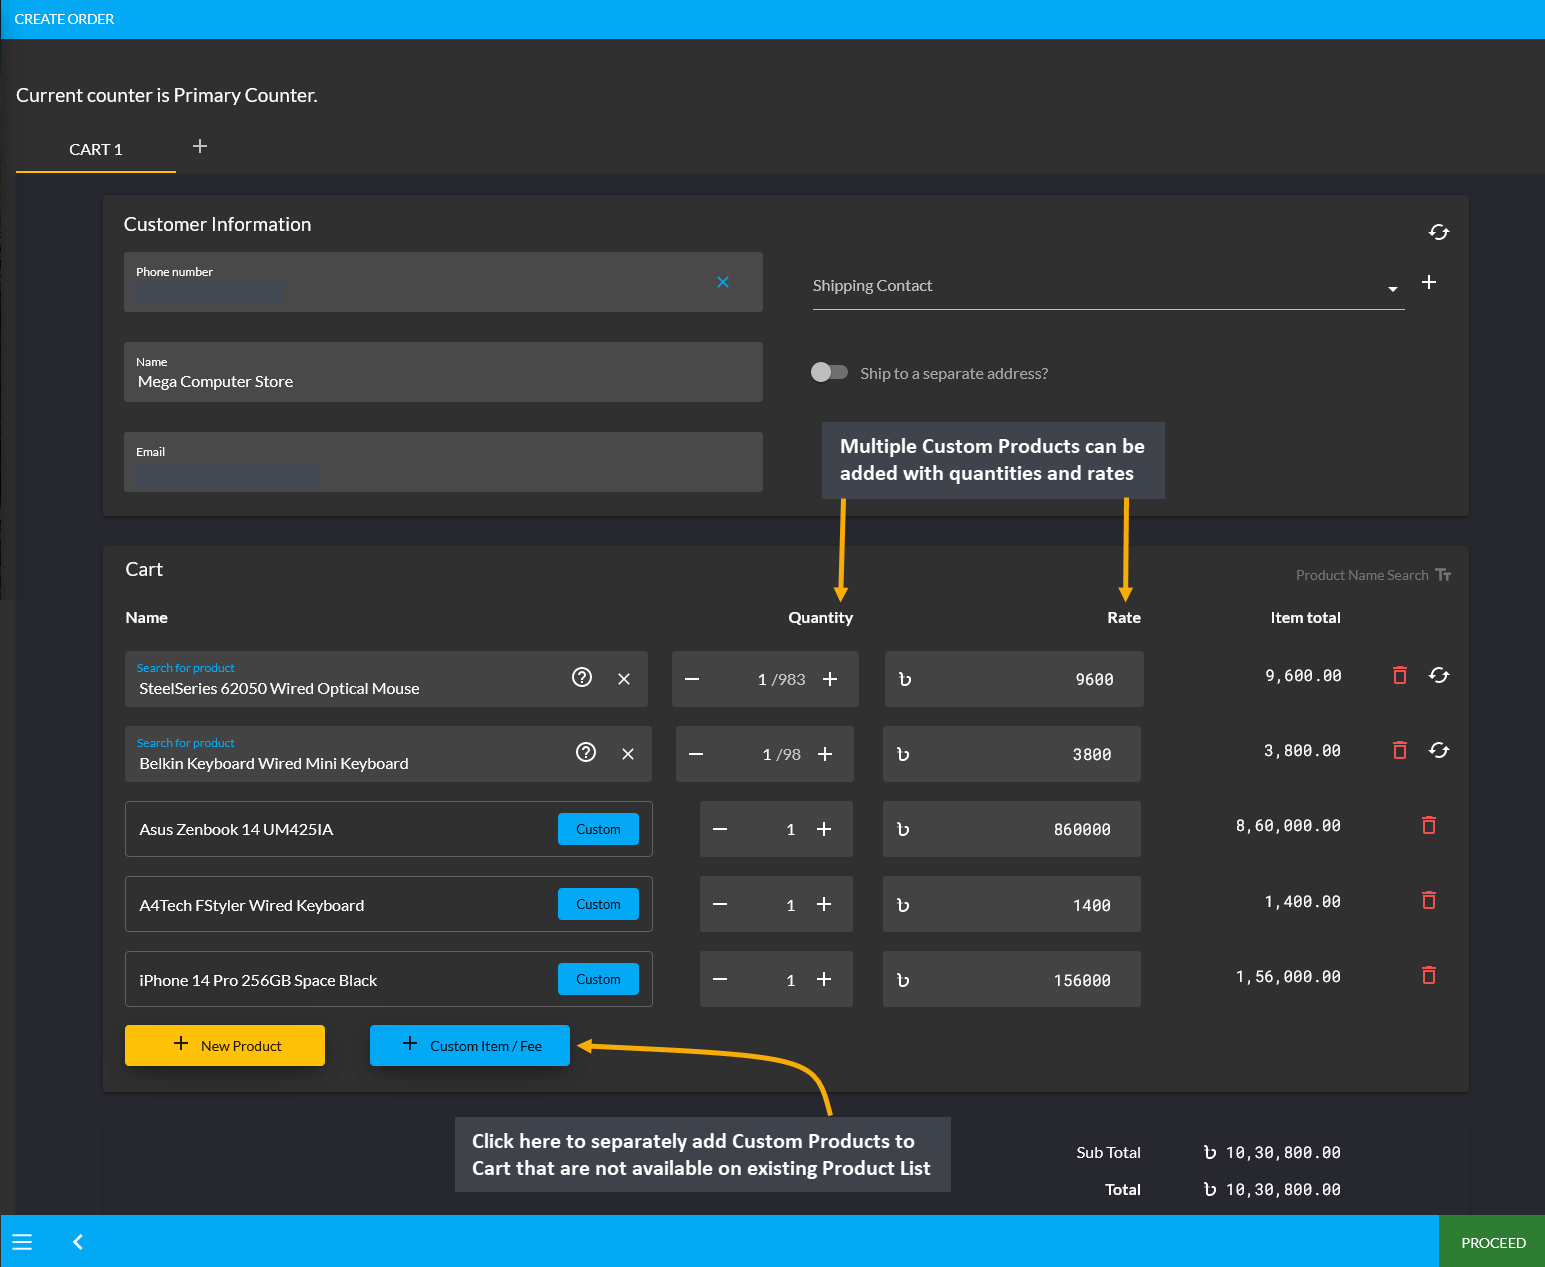
Image: Add Custom Product(s) to Cart by clicking on the Custom Product(s) to Cart.
How to create a New Product from pre-defined templates?
- New Product(s) can be created from pre-defined templates, i.e. the Global Product(s).
- From Products tab, click the ADD button that will redirect to a Product search Page.
- Type the generic Product name in search box to bring a list of pre-defined templates.
- Select the target Product that comes up within the search box results.
- Click it to redirect to a pre-defined Product Information page where details need to be filled.
- Hit the Submit button to complete creating a New Product.

Image 1: Create New Products from pre-defined templates by clicking on the ADD button.

Image 2: Type generic Product name in search box and select the target Product from search results.

Image 3: Fill details in pre-defined templates information page and hit Submit to create New Product.
What is the function of the Stock for Website field during Product creation?
- Stock for Website is an optional Stock Count where you can set the limit of how many quantities of the Product you want to sell to Customers through the Website.
- This option should only be used if the Shop Owner want to only make a certain amount of stock available for sale on the Website. The rest of the options to set stock or limit sale will be available via Admin portal.
- This feature will be required when the Shop Owner want Customers to purchase more Products, so as they visit the Website to purchase a high demand Product, Shop Owner can upsell other low demand Products to them by increasing the Stock for Website when more Customers are shopping.
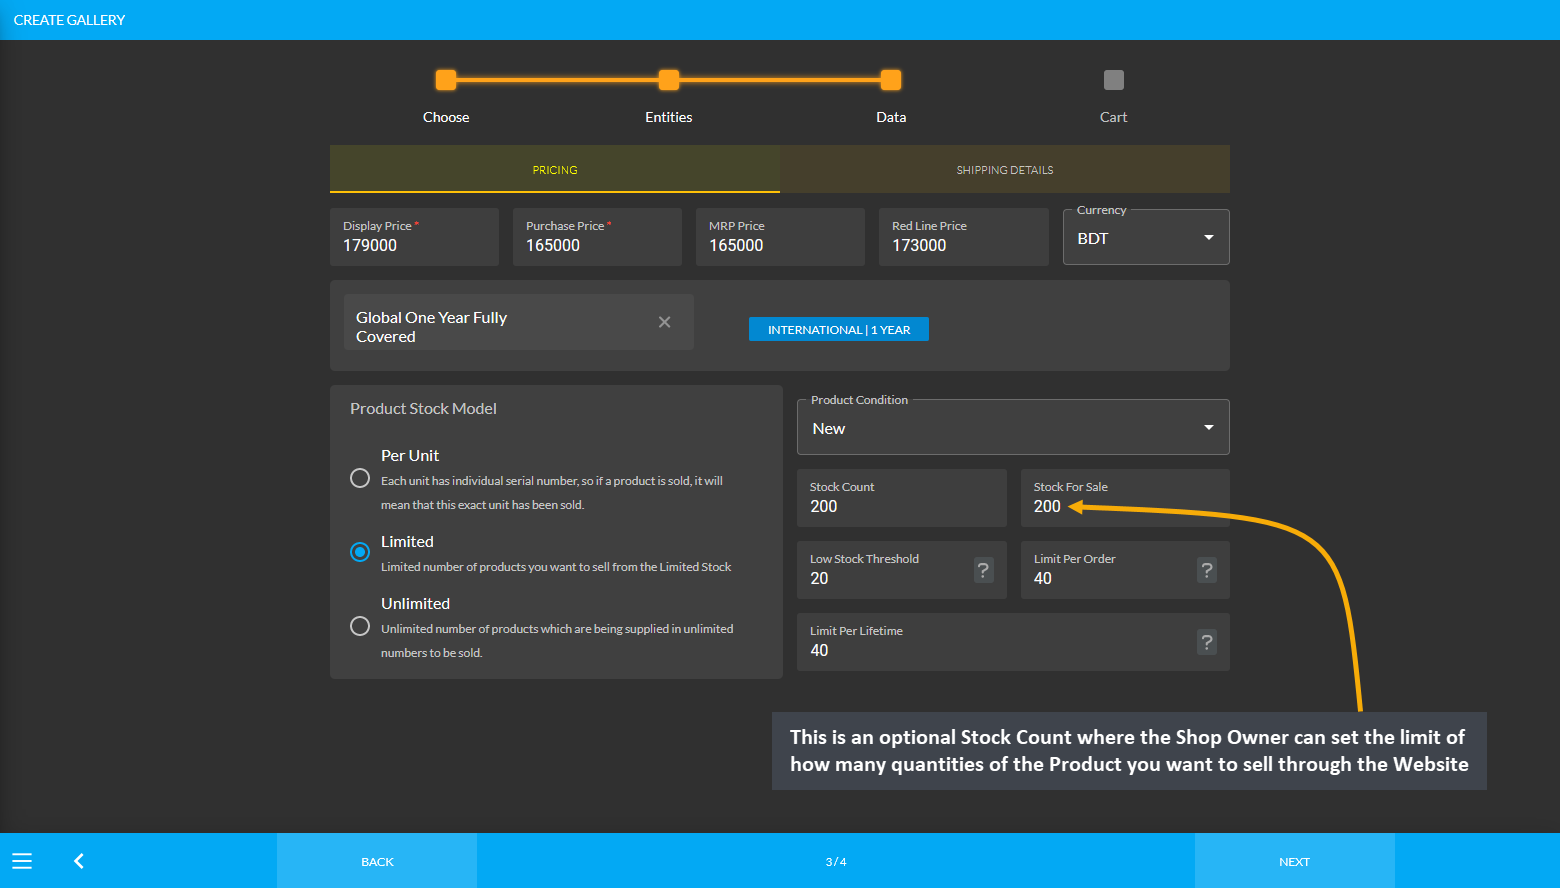
Image 1: Optional Stock Count to set the limit of Product quantities for sale to Customers on the Website.
What are the functions of Stock, Low Stock, and Limit Order setting options?
- Stock Count option will set the total available Stock for Sale from the Inventory.
- Stock for Website option will limit the amount of Inventory available for sale publicly on the Website. So, set the limit of how many quantities of the Product will be sold to Customers through the Website.
- Low Stock Threshold will filter Product Stock as Low or Out. If Stock for Website is set to 5 and Low Stock Threshold is set to 3, then stock status will show Low. If Stock for Website is set to 0, it will show Out.
- Limit Per Order will set the quantity of Products a single Customer buy at once in an Order.
- Limit Per Lifetime will set the number of times a Customer can buy the Product from shop within a lifetime.
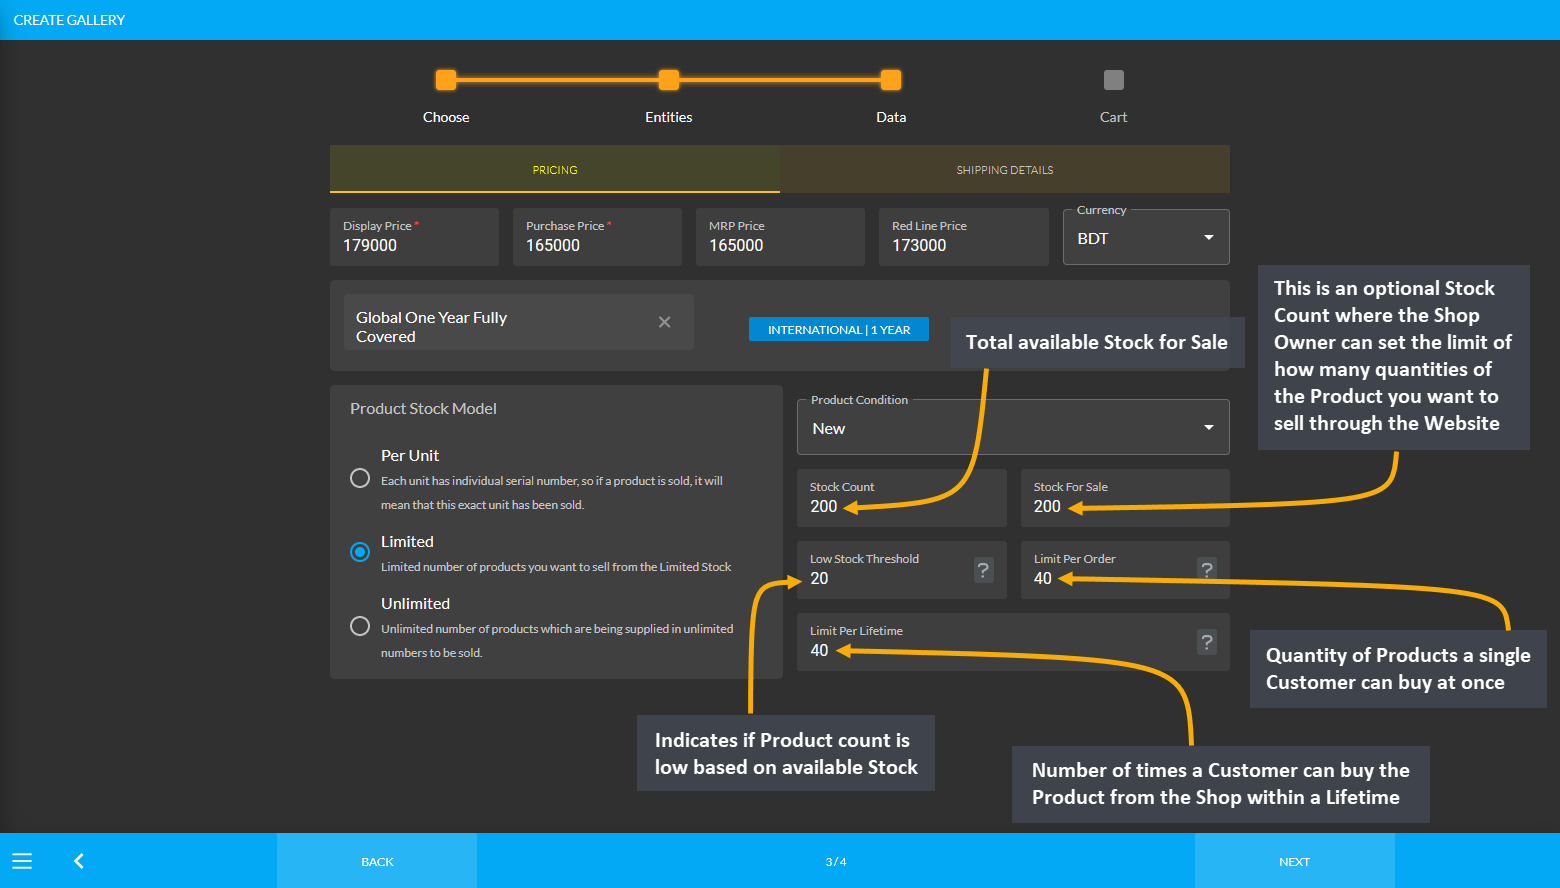
Image 1: Shop Owner can set Stock Count, Low Stock threshold, and Limit Order for sale on the Website.
How to create a New Product if it cannot be found under pre-defined templates?
- From Products tab, click the ADD button that will redirect to a Product search Page.
- Type Product name in the search box. If Product is not available, then click on ADD NEW button.
- Choose Product details and fill out all the main features of the Product.
- Add Product images through Gallery and publish Product and add supplier or external link.
- List prices, set warranty, stock information, and shipping details.
- Create Product Cart with cart notice, button label, after sales message, and notes.
- Hit the Submit button to complete creating a New Product.
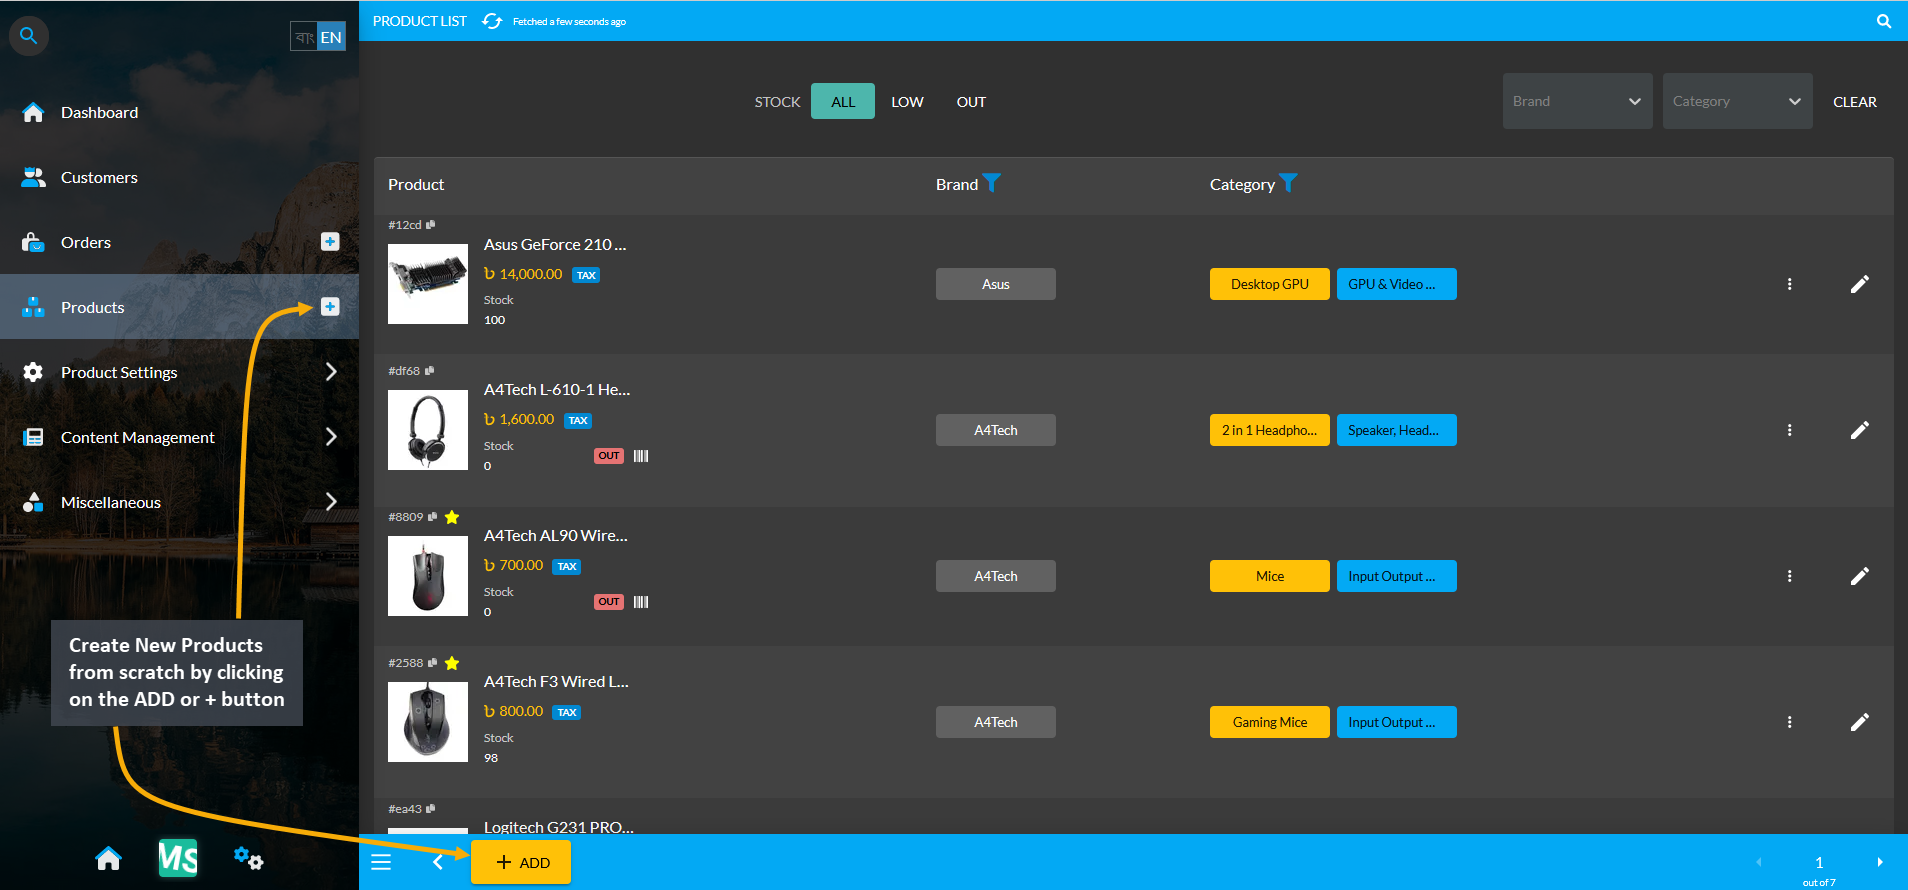
Image 1: Create New Products from scratch by clicking on the ADD button from Products tab.

Image 2: Type Product name in search box, if Product is not available, click ADD NEW to create Product.
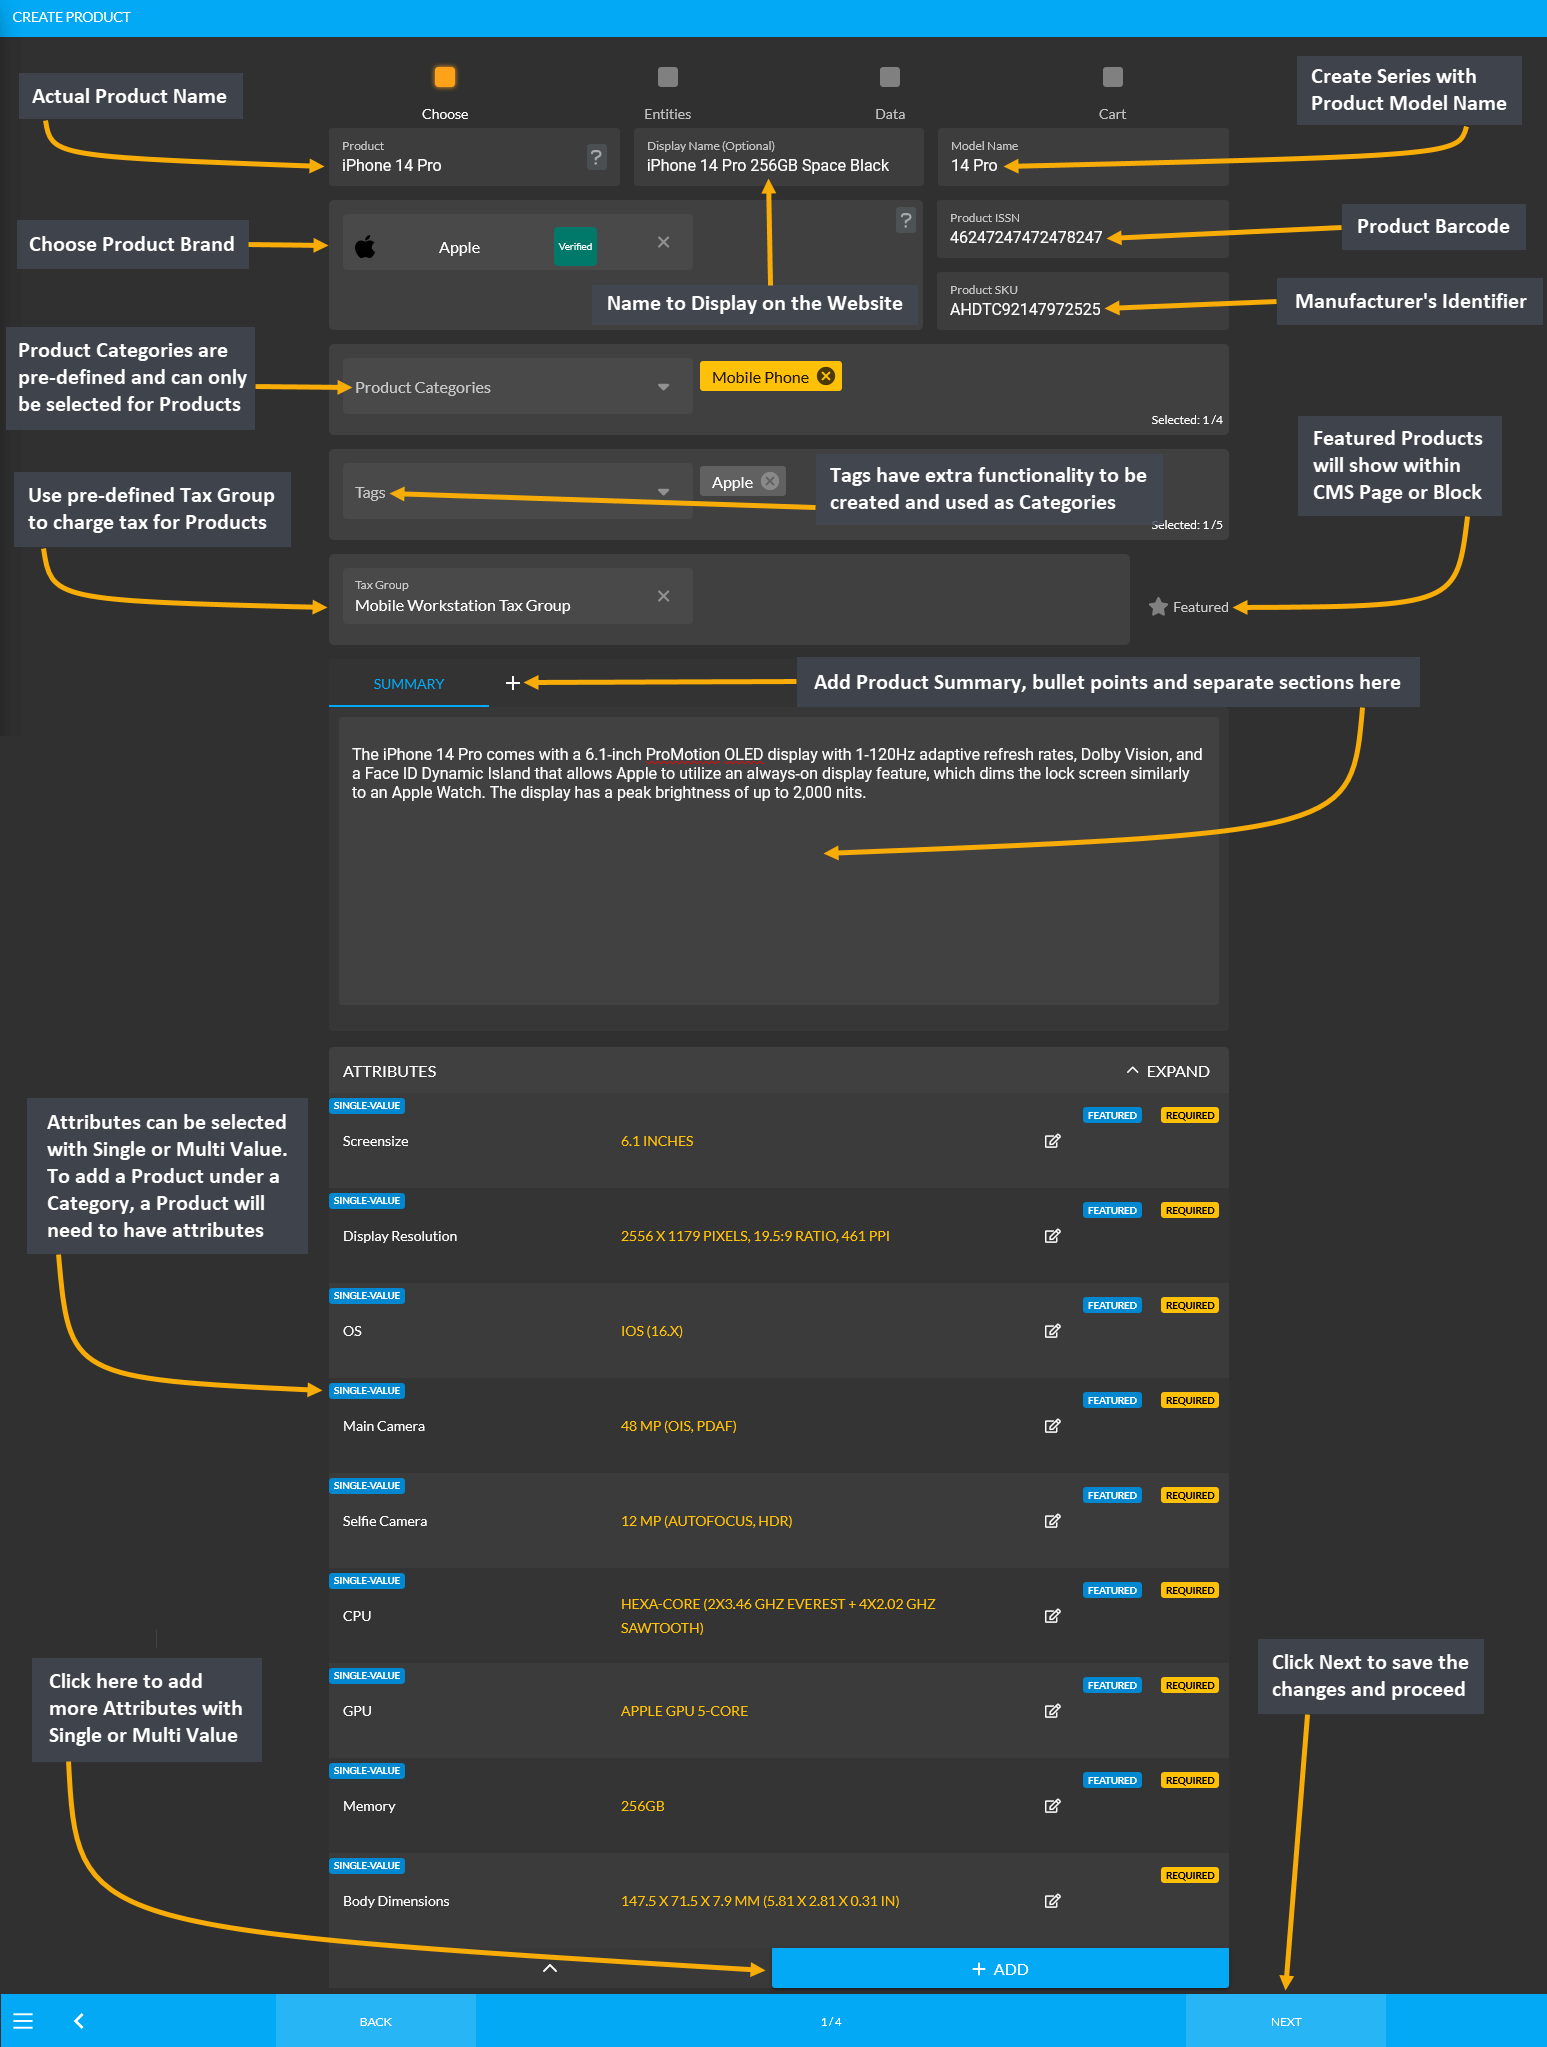
Image 3: Fill out all the Product details, main features, summary and attributes to create New Product.
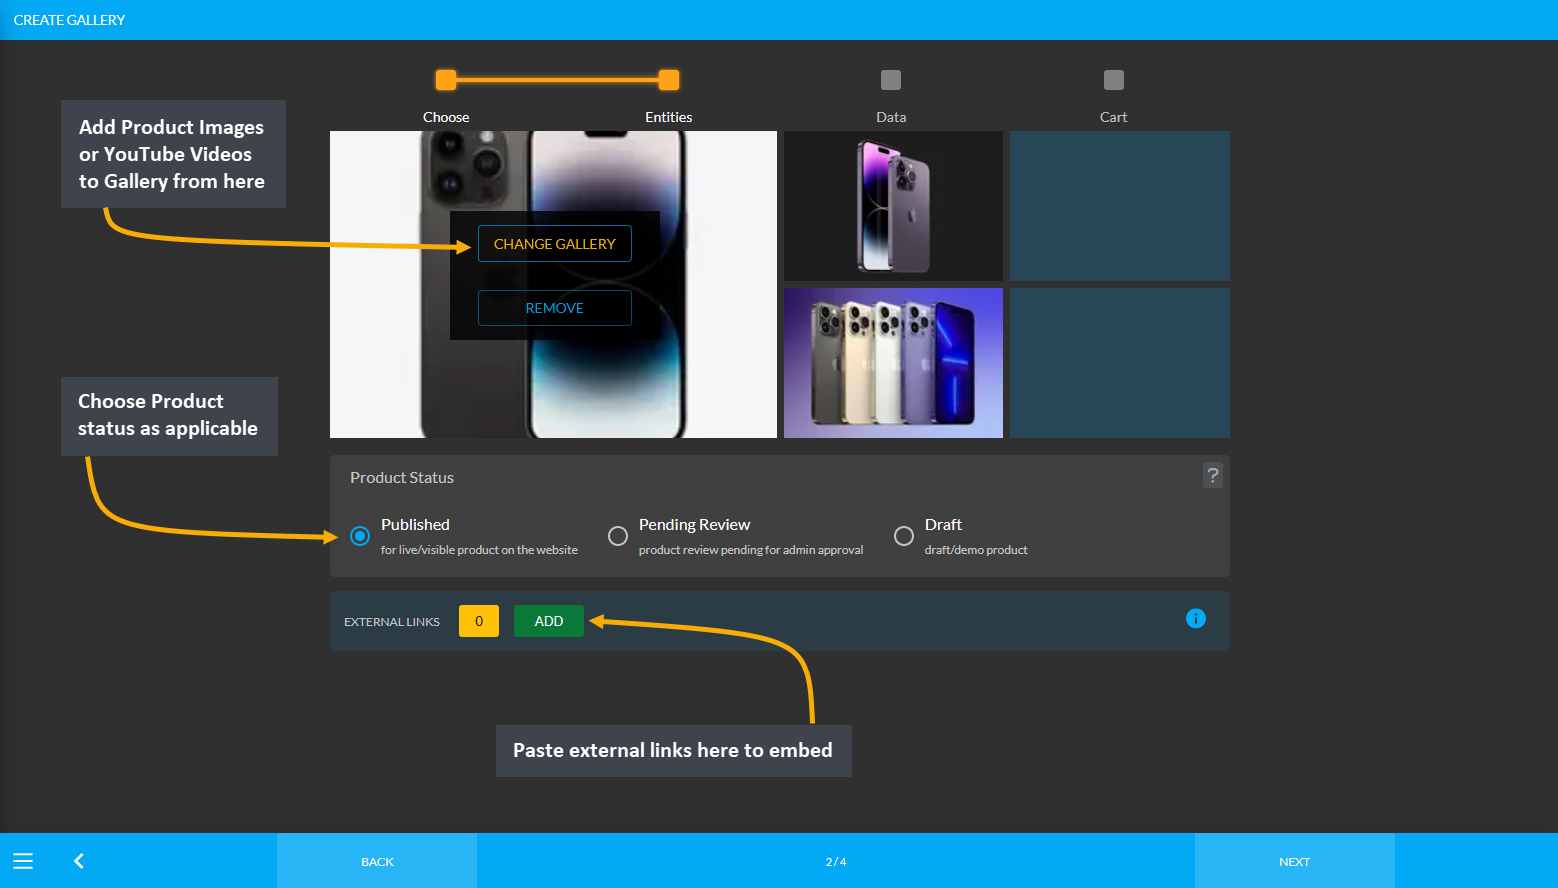
Image 4: Add Product images through Gallery and publish Product and add supplier or external link.
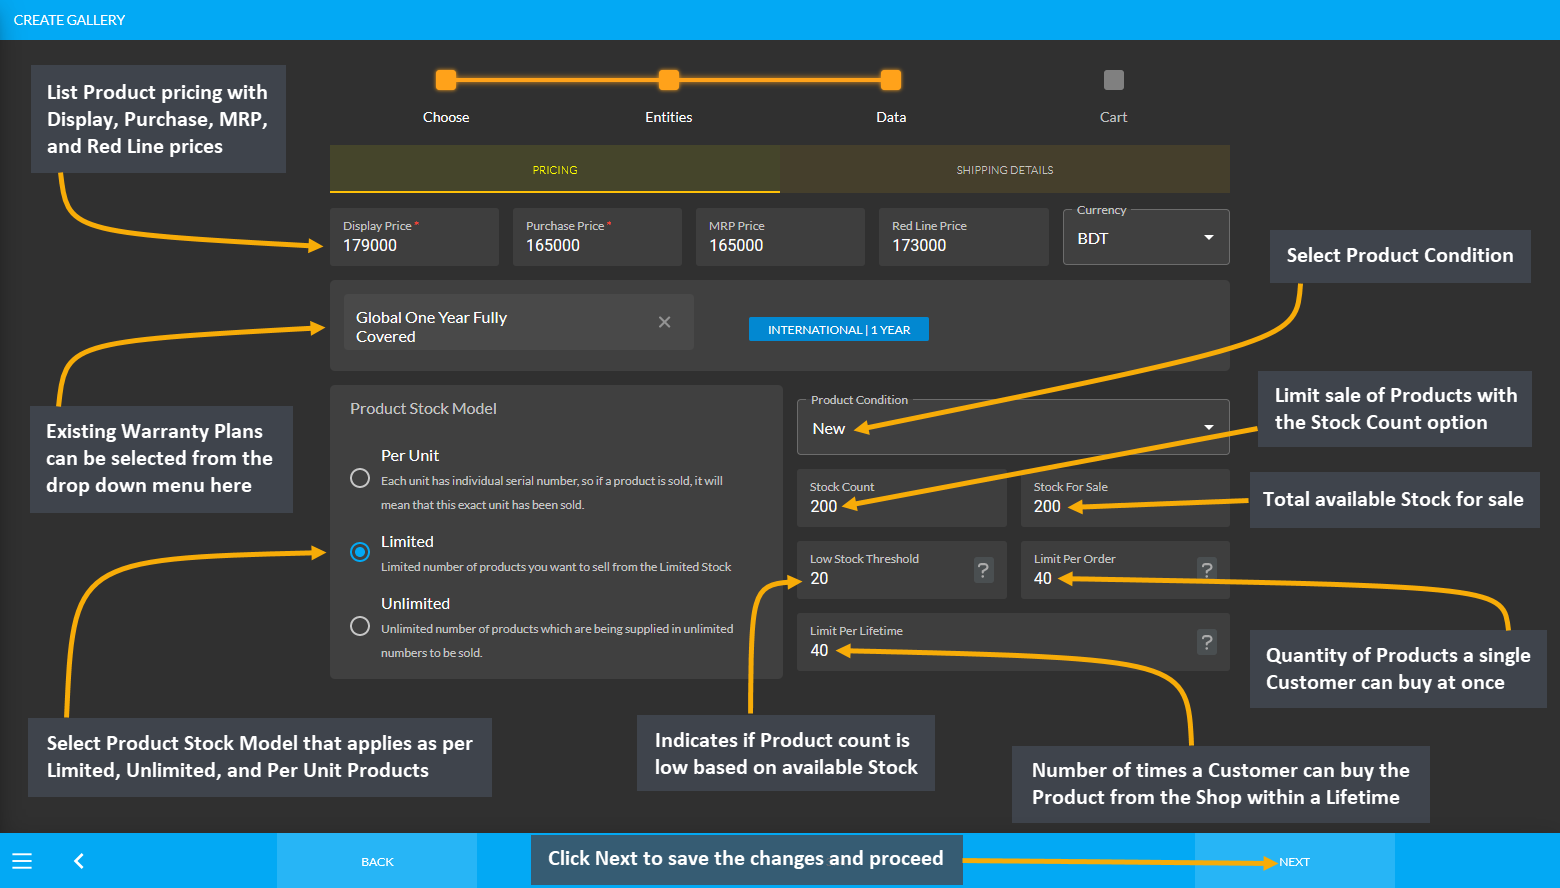
Image 5: List prices, set warranty, stock information, and shipping details.

Image 6: Create Product Cart Messages with Cart Notice, Button Label, After Sales Message, and Notes.
From where can Tax Group be added for Product(s)?
- Tax group is bound to Category. Tax Group automatically gets added based on the selected Category.
- Select Category during Product creation and similar Tax Group will automatically be added for Product.

Image: Select Category when creating Product and similar Tax Group will automatically be added.
How can Product Description be added during Product creation?
- When creating New Product manually, there is a separate section called Summary.
- Add the Product Description in paragraphs, sections, or bullet points within this box.
- New Sections for Product Description can be added by using the + button.
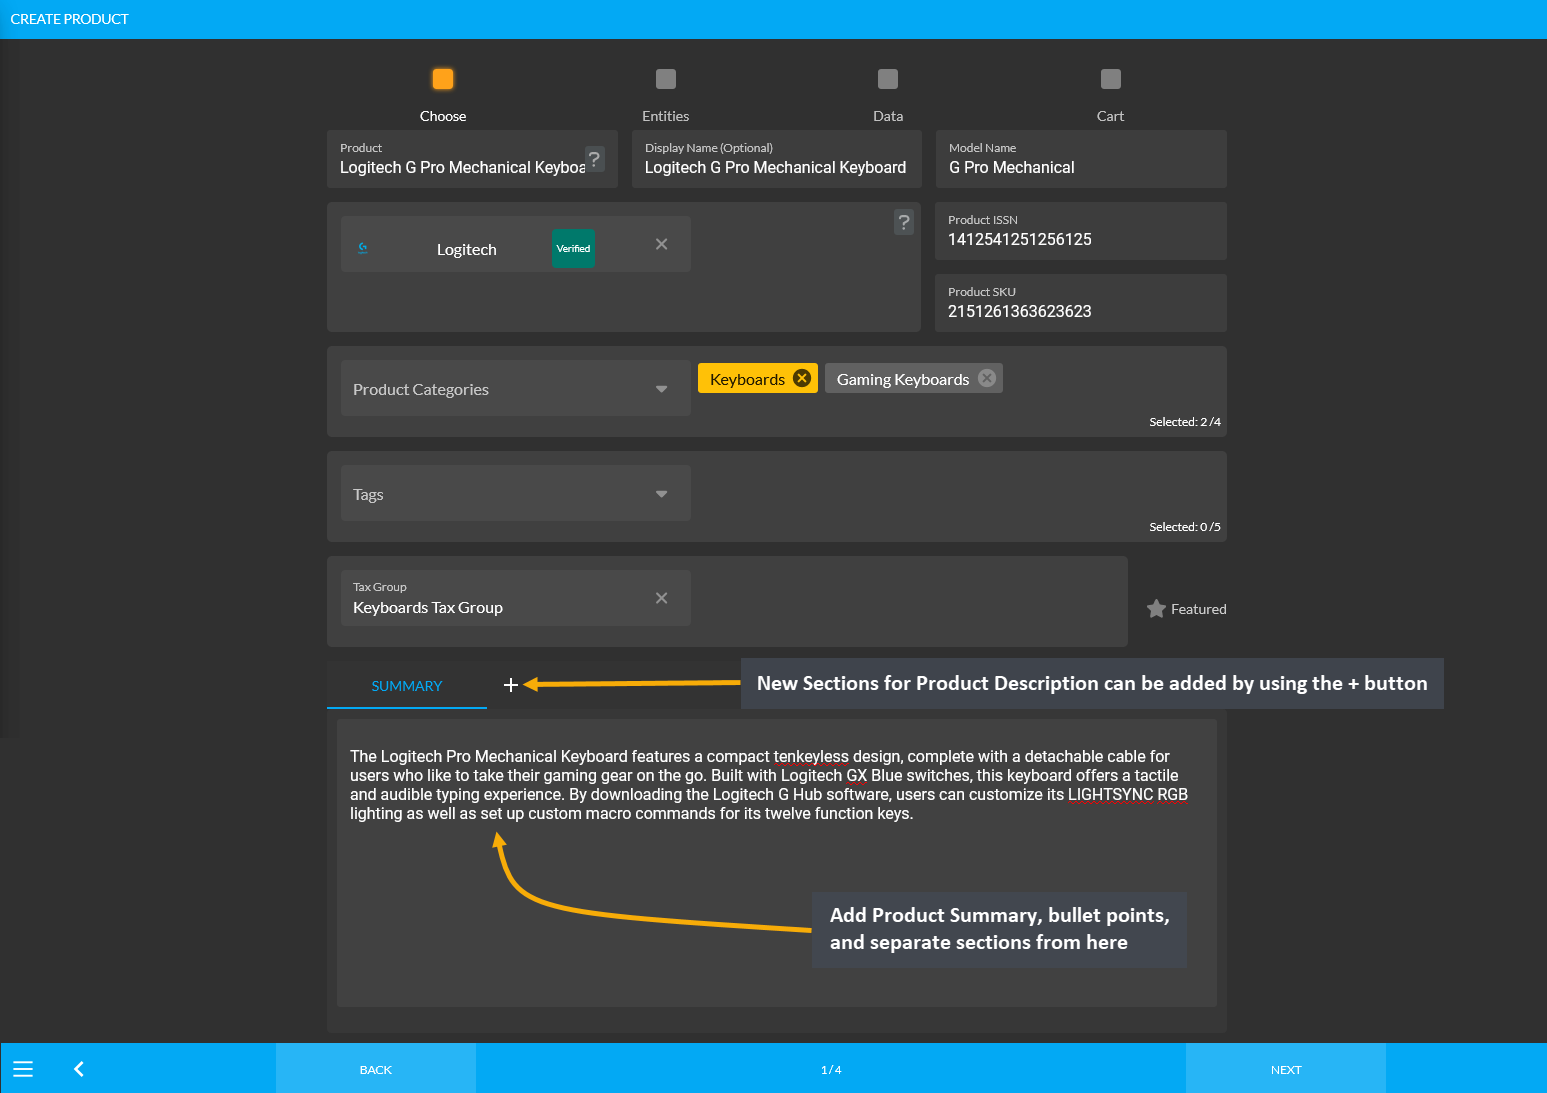
Image: Add Product Description in paragraphs, sections, or bullet points within the Summary box.
How can Product Attributes be added during Product creation?
- Product Attributes are properties that describe a Product. They can be selected with Single or Multi Value.
- For creating a Product under a Category, the Product will need to have attributes.
- When a Category is selected for a Product, some pre-defined attribute fields will become available.
- Fill in these attribute fields with Single or Multi Value to highlight Product characteristics.
- New attributes can be added using the ADD button if they are not available within pre-defined list.
- Within a new pop-up, select Value type, fill out Name and Value, and click Save to create New Attribute.
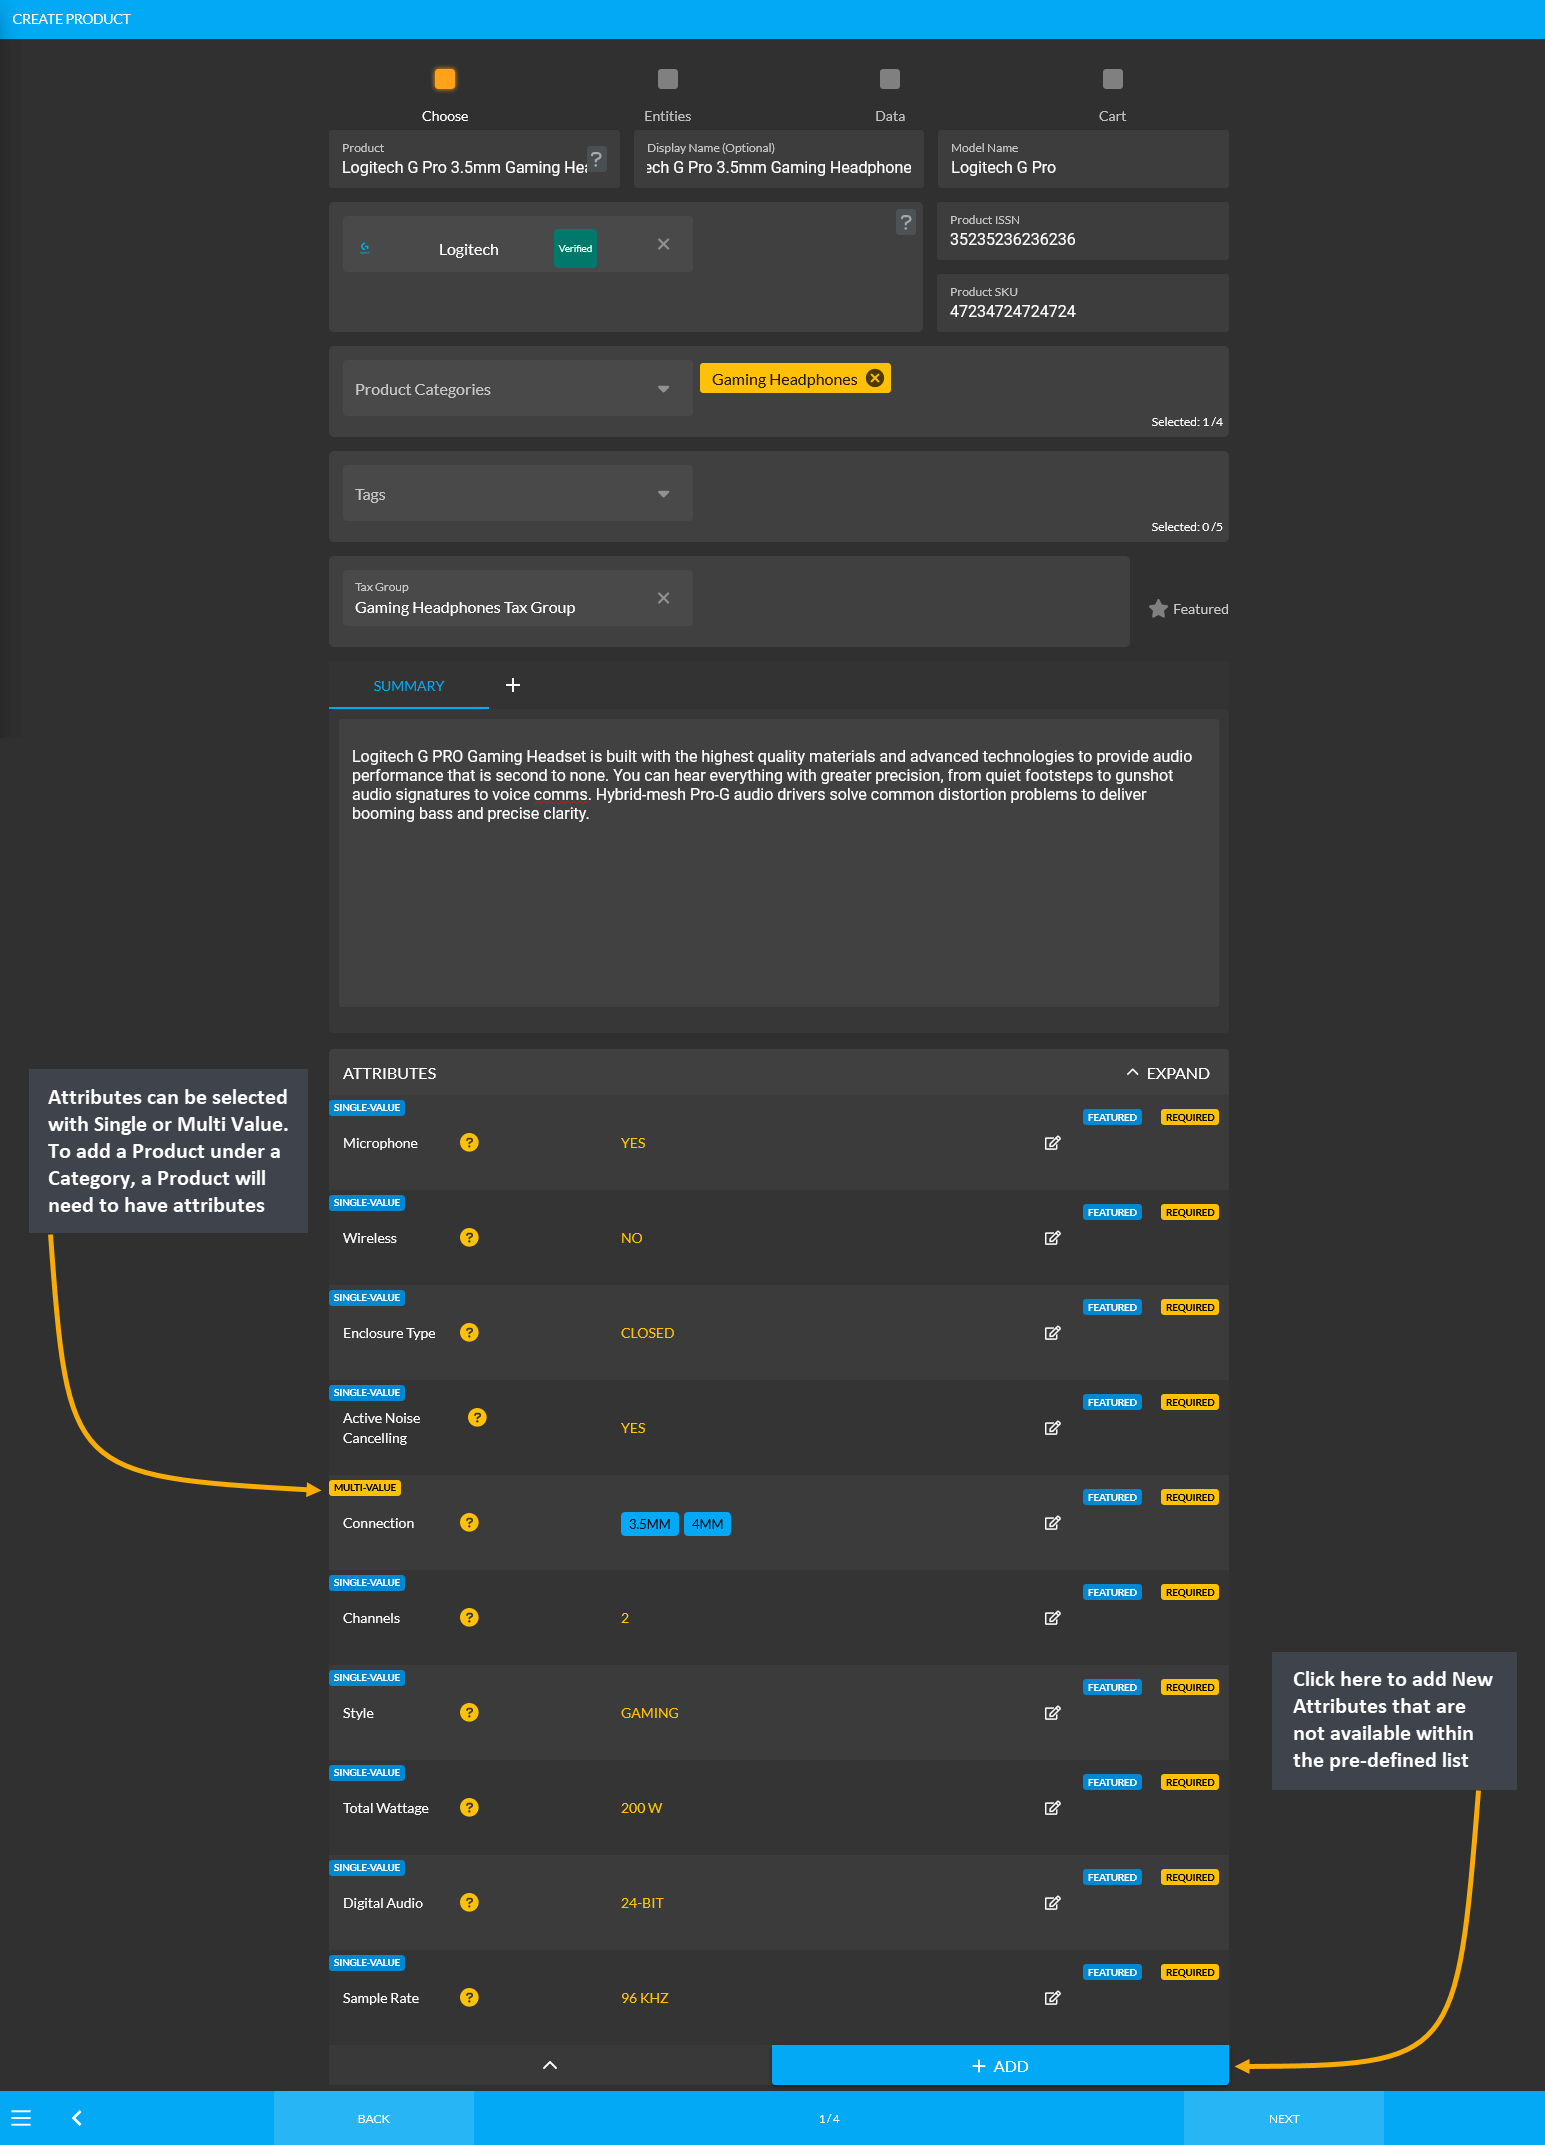
Image 1: Add Product Attributes with Single or Multi Value to highlight Product characteristics.

Image 2: Select Value type, fill out Name and Value, and click Save to create New Attribute.
How to filter Product(s) by Brand, Category, and Stock?
- Products can be filtered based on Brand, Category, and Stock from the Product List.
- On top middle section of the Page, the Stock can be filtered based on All, Low, and Out buttons.
- On the top right side of the Page, there are two separate Brand and Category filter dropdown menus.
- Type the Brand and Category names from these filter dropdown menus to filter specific Products.

Image: Filter specific Products using Stock Filter button and Brand and Category filter dropdown menus.
What is the function of Global Products?
- Global Products contain pre-defined templates that can be duplicated to create New Products.
- They contain pre-filled information like name, SKU, attributes, brand, category, and images.
- List and sell branded Product(s) instantly on the Shop using pre-defined Global Product templates.

Image: Global Products contain pre-filled information for instantly listing branded Products.
How to update a Product Stock instantly or use the Back Stock Feature?

Image: Update a Product Stock instantly by clicking on the Barcode icon that will open a shortcut menu.
How to create a New Brand if a Product Brand cannot be found under the pre-defined list?
- Create a New Brand by clicking on the + or ADD button from Brands tab under Product Settings.
- It will redirect to a separate search page from where New Brands can be created.
- Now type the Brand Name in the search box. If the Brand is not available, then click on ADD NEW button.
- It will redirect to a new page for creating a New Brand called the Create Brand page.
- Here, fill out the Name, Shorter Name, add Aliases, input website URL, and upload Brand logo.
- Use the toggle button to make the Brand Active or Inactive and lick Submit to create New Brand.

Image 1: Create a New Brand by clicking on the + or ADD button from Brands tab under Product Settings.

Image 2: Type the Brand Name in the search box, if the Brand is not available, click on ADD NEW button.

Image 3: Fill out Name, Shorter Name, add Aliases, input website URL, upload Brand logo, and click Save.
What are the functions of the Gallery tab?
- Product Images or YouTube videos can be added in advance through Galleries.
- The already created Gallery List will show up under My Galleries.
- New Galleries can be created beforehand for Product(s) and Branches.
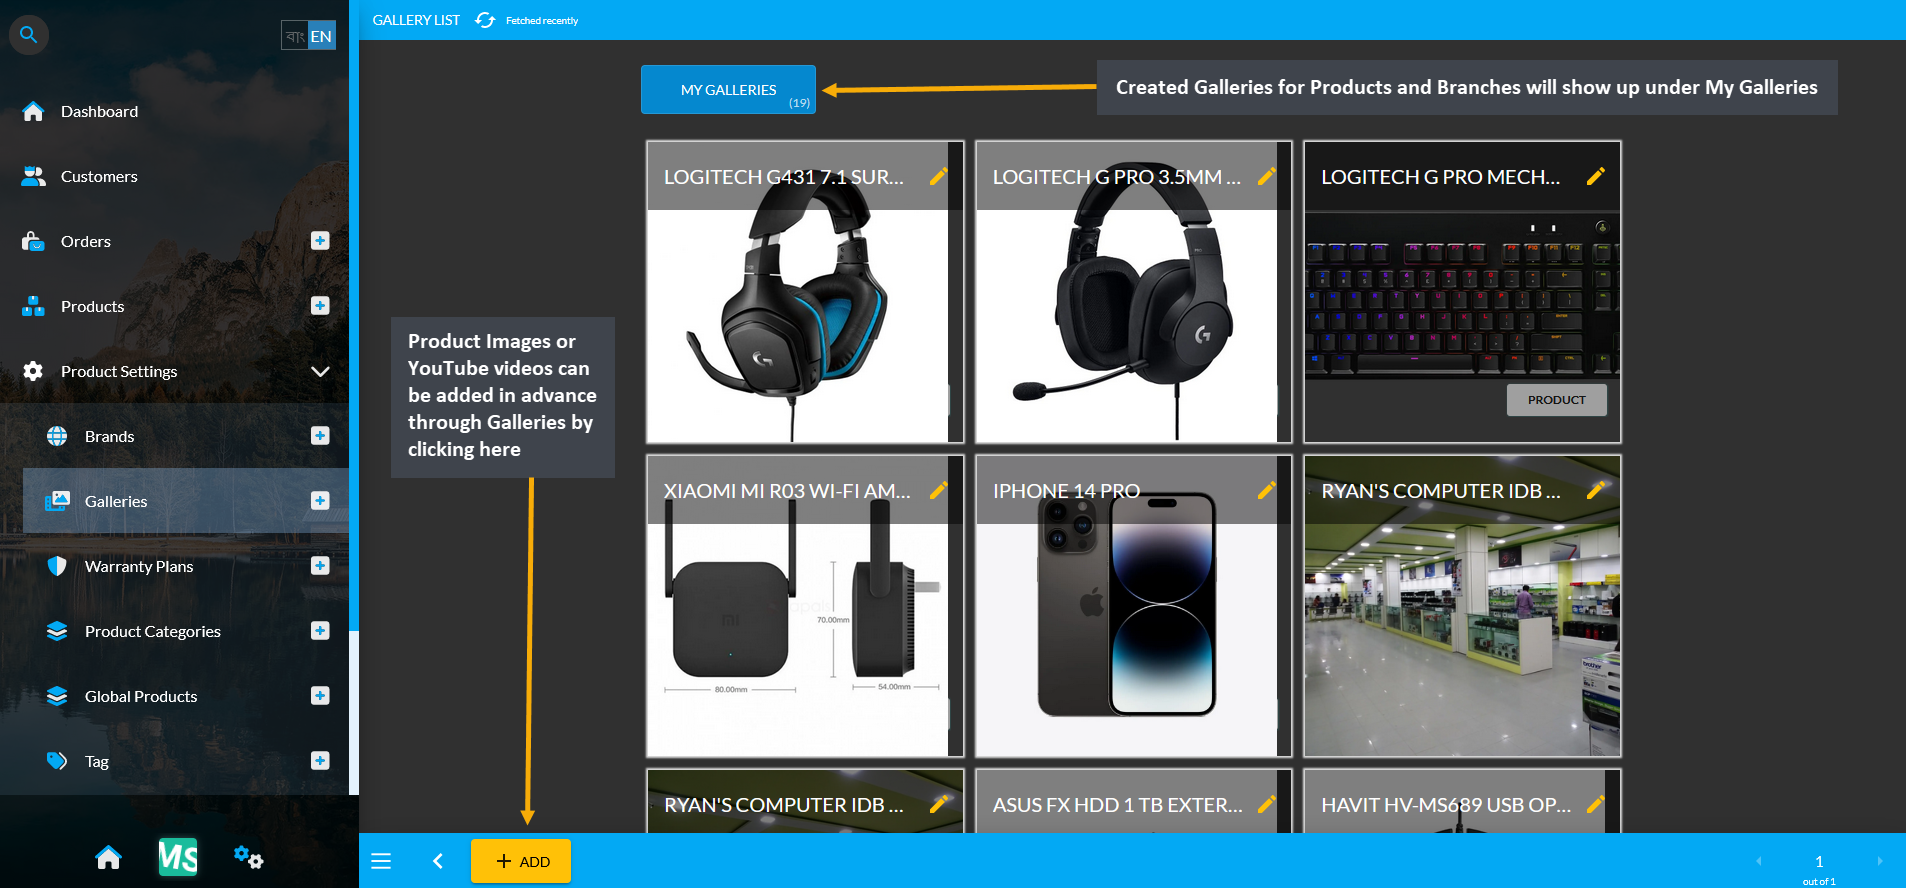
Image: Product Images or YouTube videos can be added in advance through Galleries.
How to create a Product Gallery from the Admin Panel?
- Click on the + or ADD button from the Galleries tab that will redirect to a new page.
- Fill out Gallery Name and Gallery Description and select Product from Gallery Type.
- Add Product images by clicking on the Upload from Device icon.
- Add YouTube videos by clicking on Embed YouTube Video icon and paste link to embed.
- Gallery items can be dragged and reordered as needed.
- Click Submit button to save all the changes.
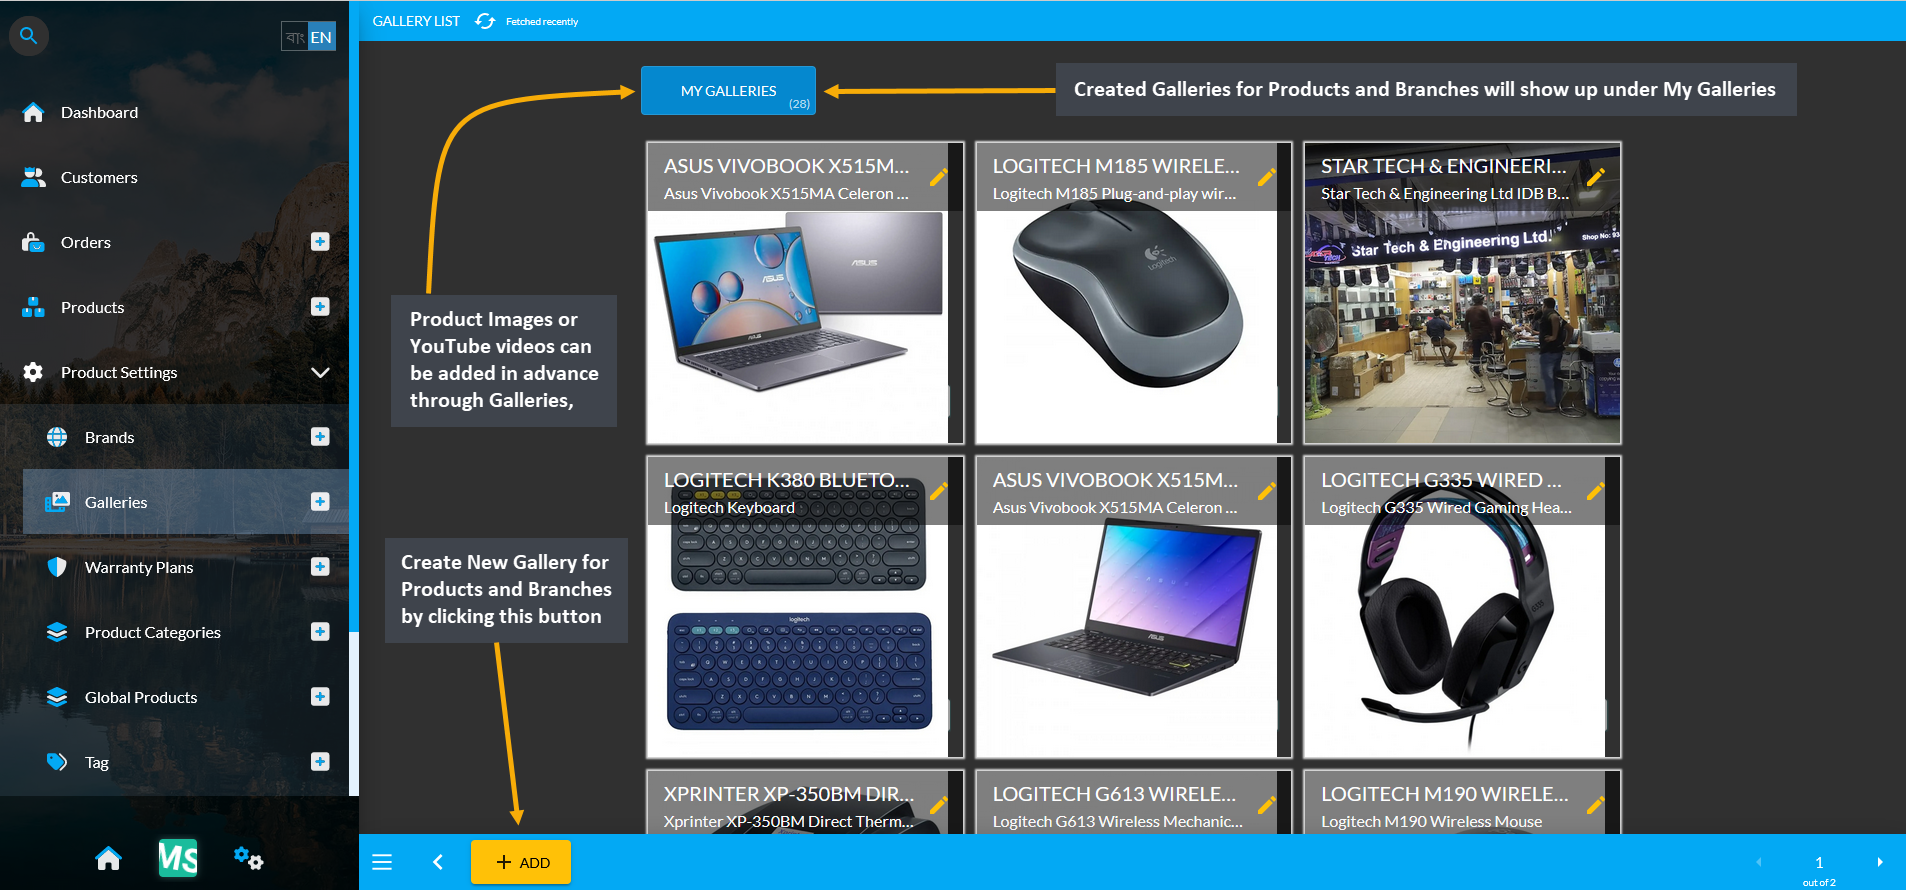
Image 1: Click on the + or ADD button from the Galleries tab that will redirect to a new page.

Image 2: Fill out Gallery Name, Description, select Gallery type, add Product images, and videos.
How to create Branch Gallery from the Admin Panel?
- Click on the + or ADD button from the Galleries tab that will redirect to a new page.
- Fill out Gallery Name and Gallery Description and select Branch from Gallery Type.
- Upload Branch images by clicking on the Upload from Device icon.
- Add YouTube videos by clicking on Embed YouTube Video icon and paste link to embed.
- Gallery items can be dragged and reordered as needed.
- Click the Submit button to save all the changes.

Image 1: Click on the + or ADD button from the Galleries tab that will redirect to a new page.

Image 2: Fill out Gallery Name, Description, select Gallery type, add Branch images, and videos.
How to create New Product Warranty Plans?
- From Warranty Plans tab, click the + or ADD button that will redirect to Create Warranty Plan page.
- Type the full name of Warranty for display and use the blue toggle button to keep the warranty active.
- Choose warranty plans that apply to the new warranty by clicking on the Select button for each.
- Clicking on the yellow Select button will open a pop-up from where desired warranty plan can be selected.
- Select the Warranty Plan and click Save to add the plan to the newly created Warranty.
- After selecting Warranty Plans, click Submit to save all the changes and create new Warranty Plan.
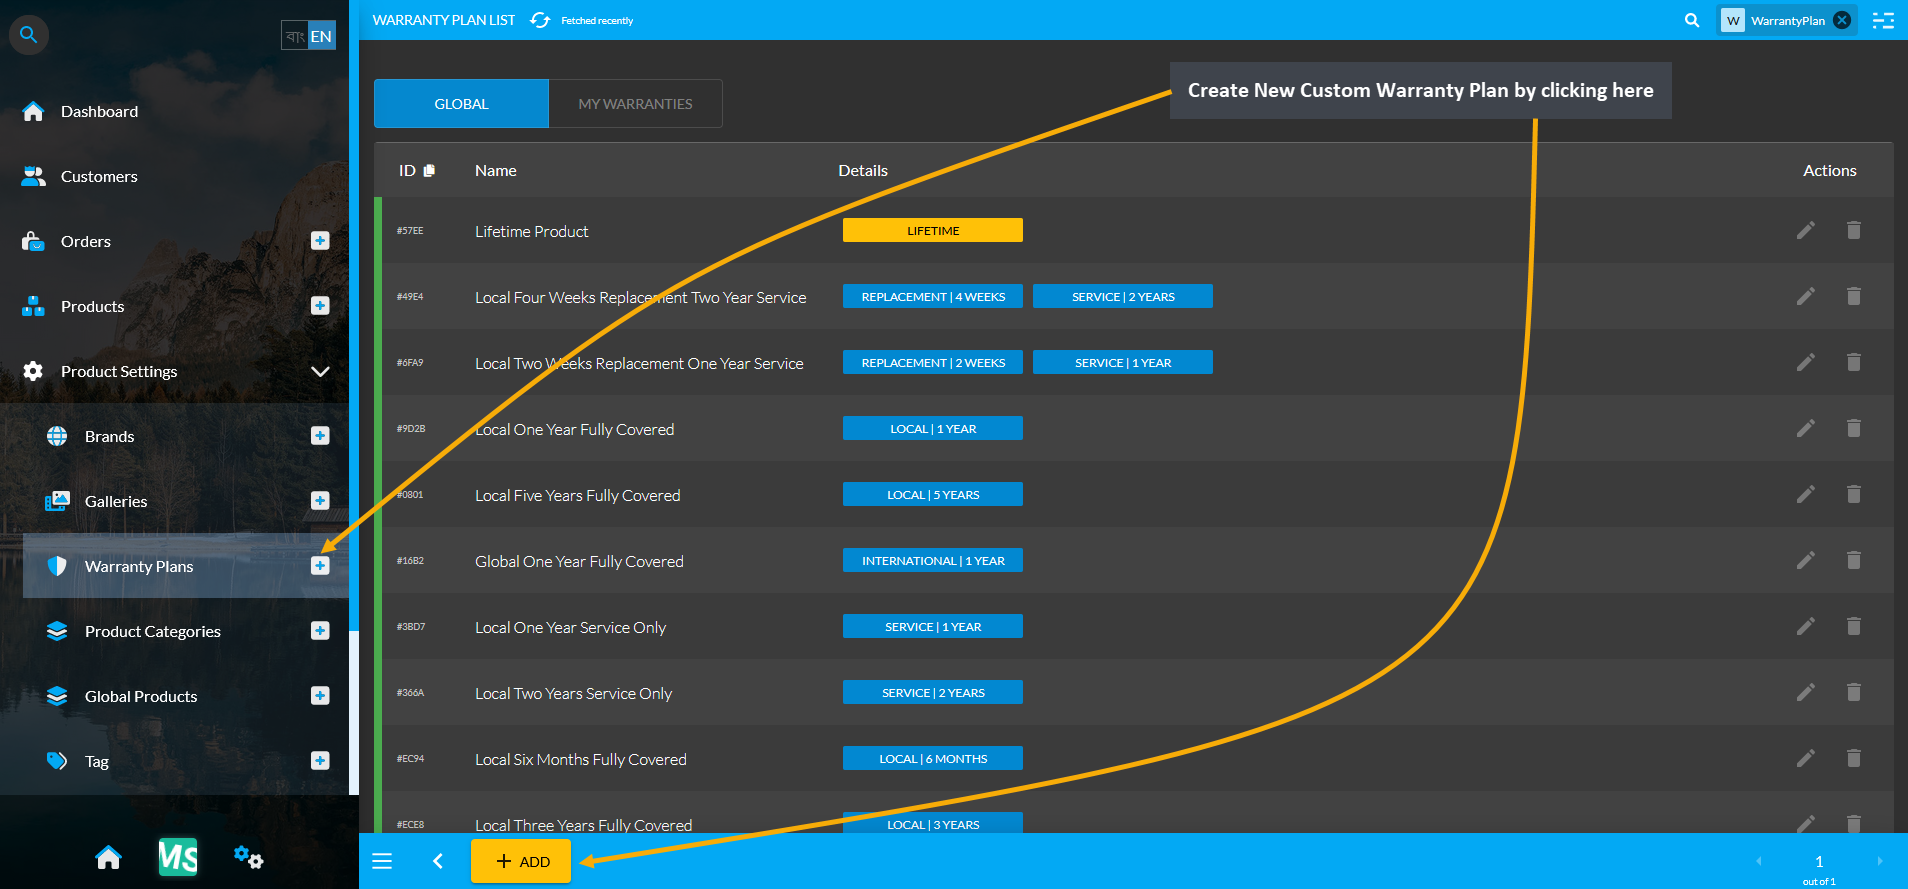
Image 1: From Warranty Plans tab, click the + or ADD button to redirect to Create Warranty Plan page.
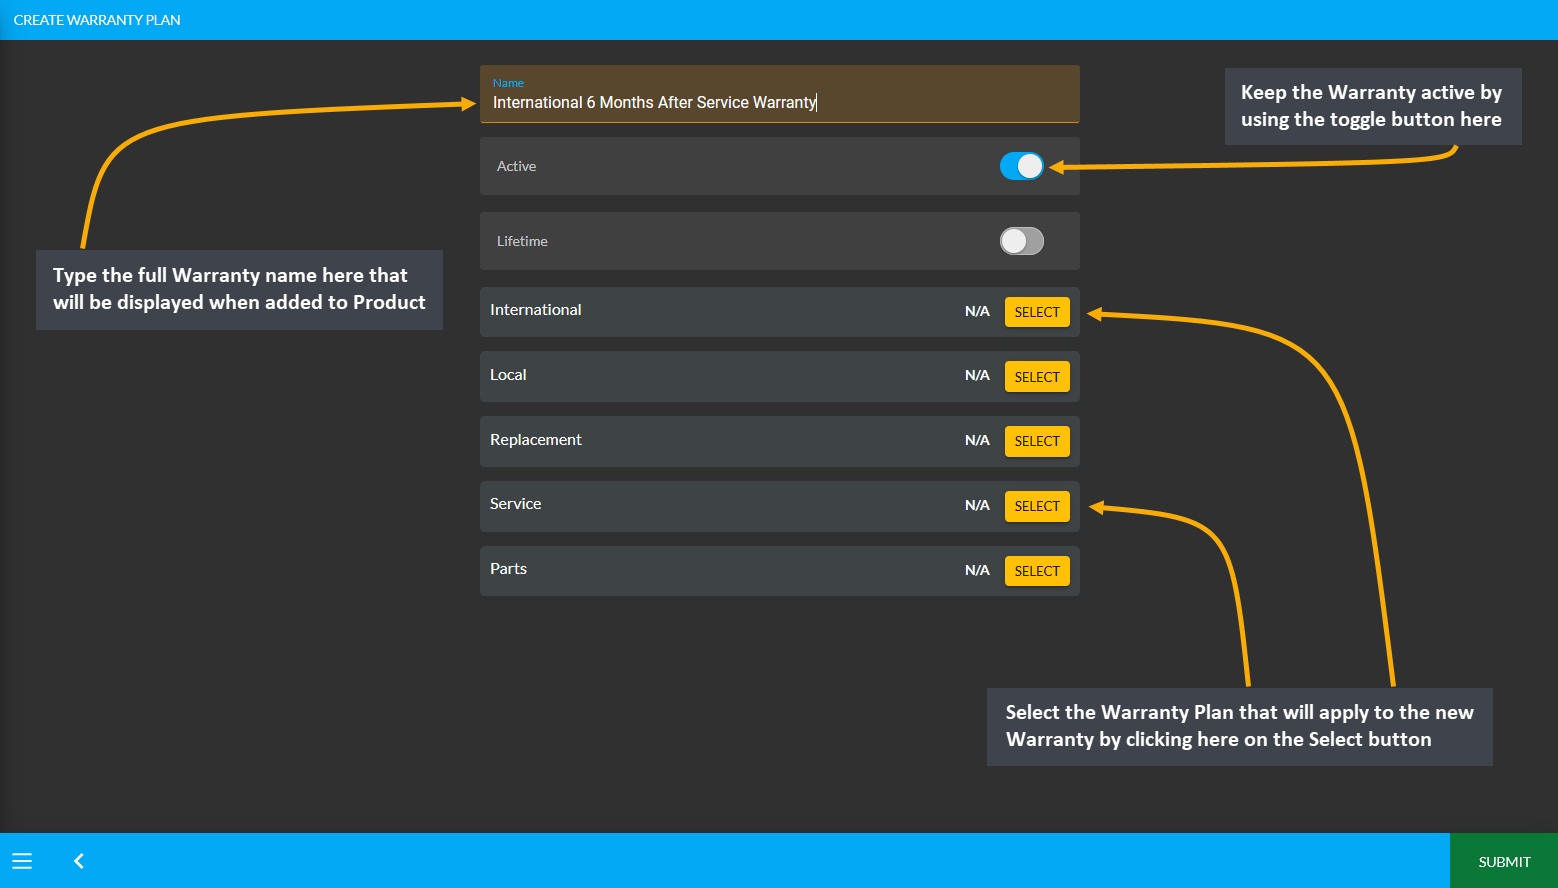
Image 2: Type full Warranty Name for display, use toggle button to keep warranty active, and select plans.
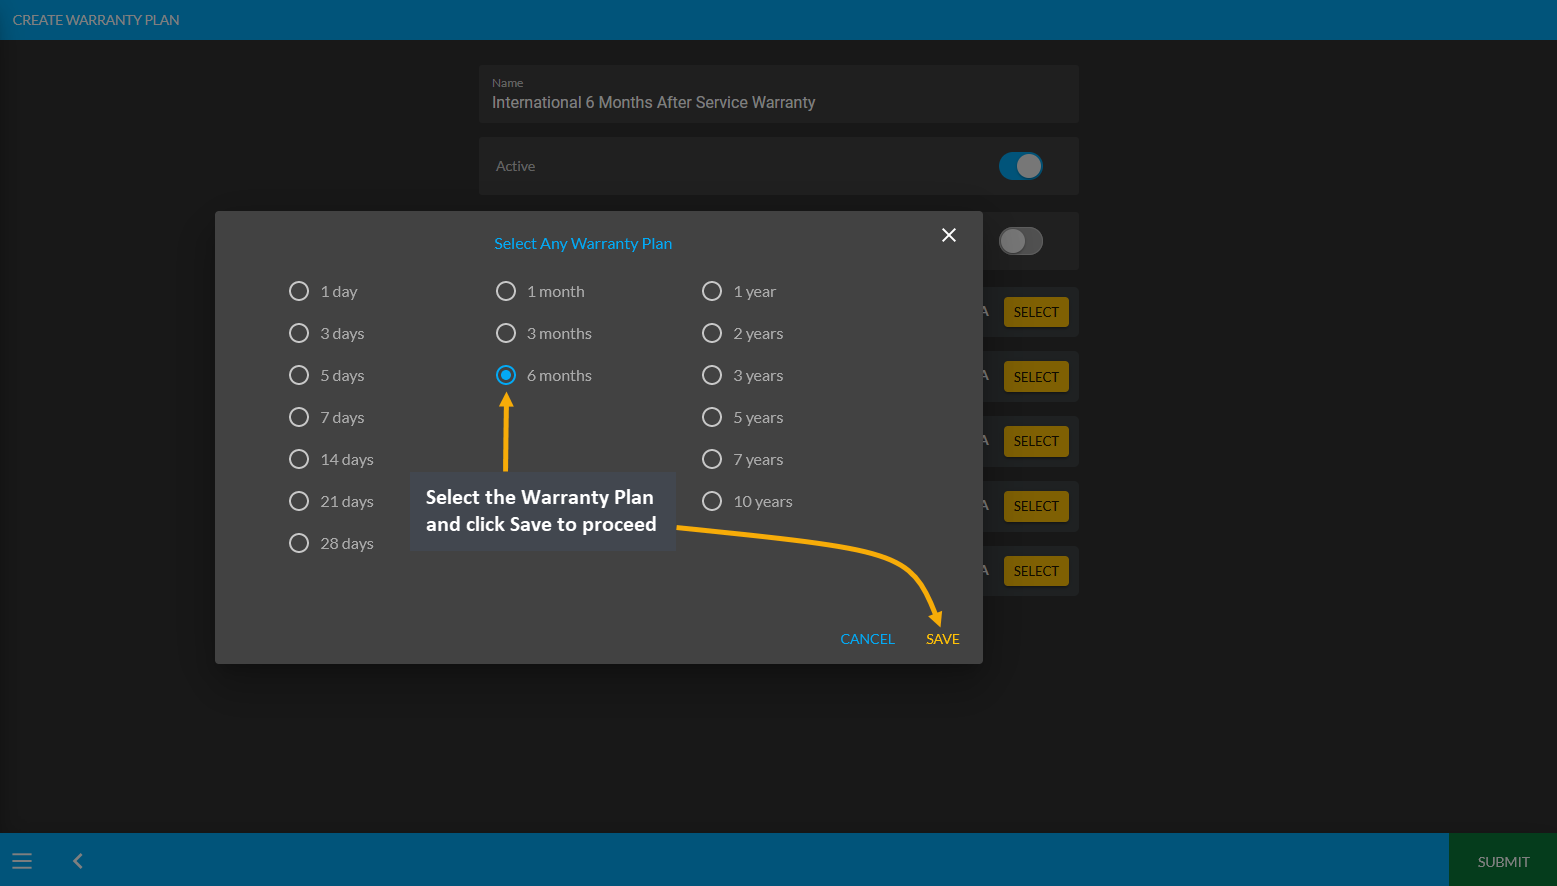
Image 3: Clicking the Select button will open a pop-up from where desired warranty plan can be selected.
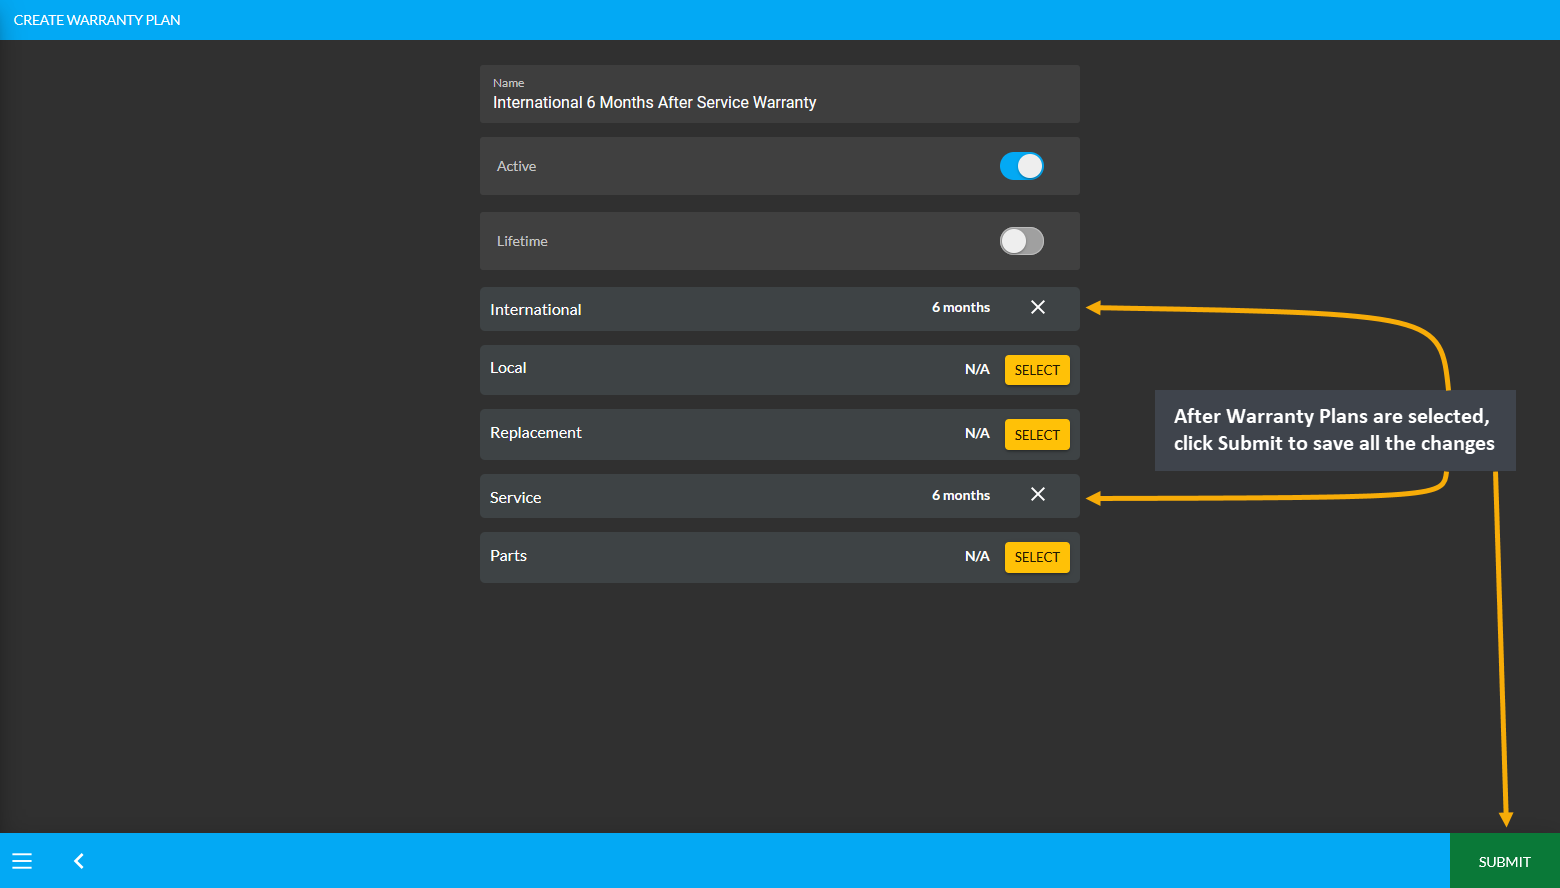
Image 4: After selecting Warranty Plans, click Submit to save all the changes and create new Warranty Plan.
From where can the list of Product Categories be checked?
The entire list of Product Categories can be checked by opening Product Categories from under Product Settings.
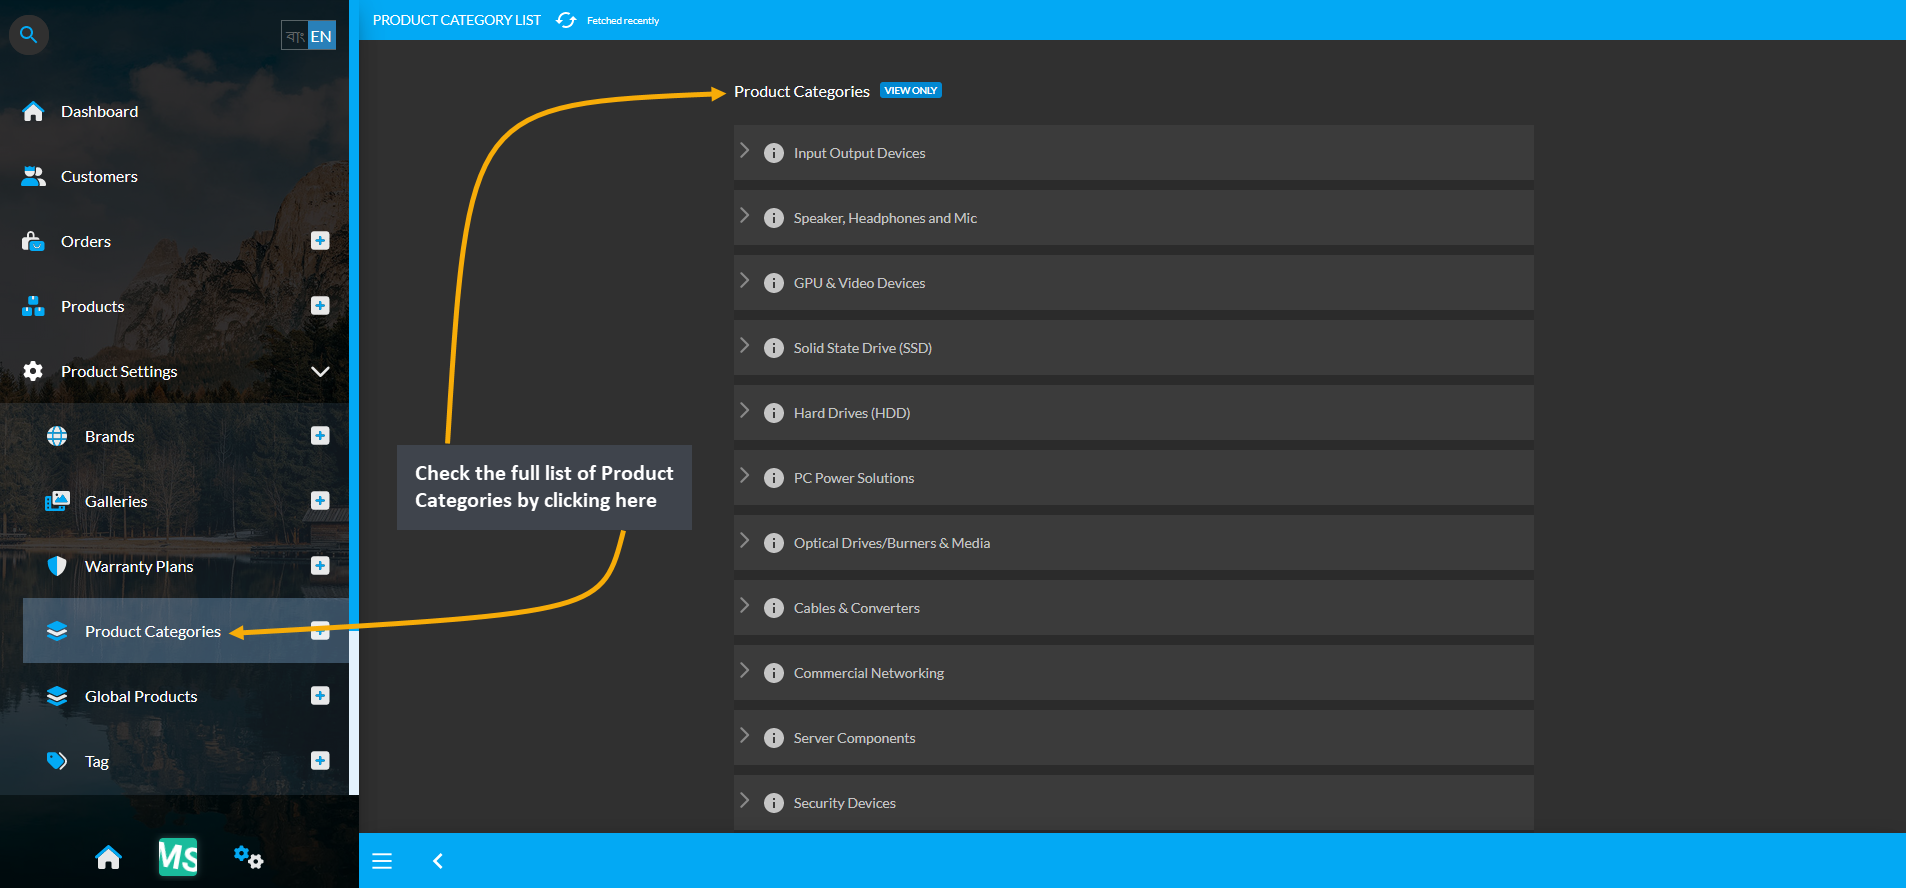
Image: Check the full list of Product Categories from the Product Categories tab under Product Settings.
How to add pre-defined Product Category when creating Product(s)?
- Product Categories are Pre-defined, so Shop Owners will not be able to create Categories.
- The Shop Owners will have to use the Product Categories that are provided in the system.
- During Product creation, Product Category can be selected from the dropdown menu provided.

Image 1: Product Categories are Pre-defined, so Shop Owners will not be able to create Categories.
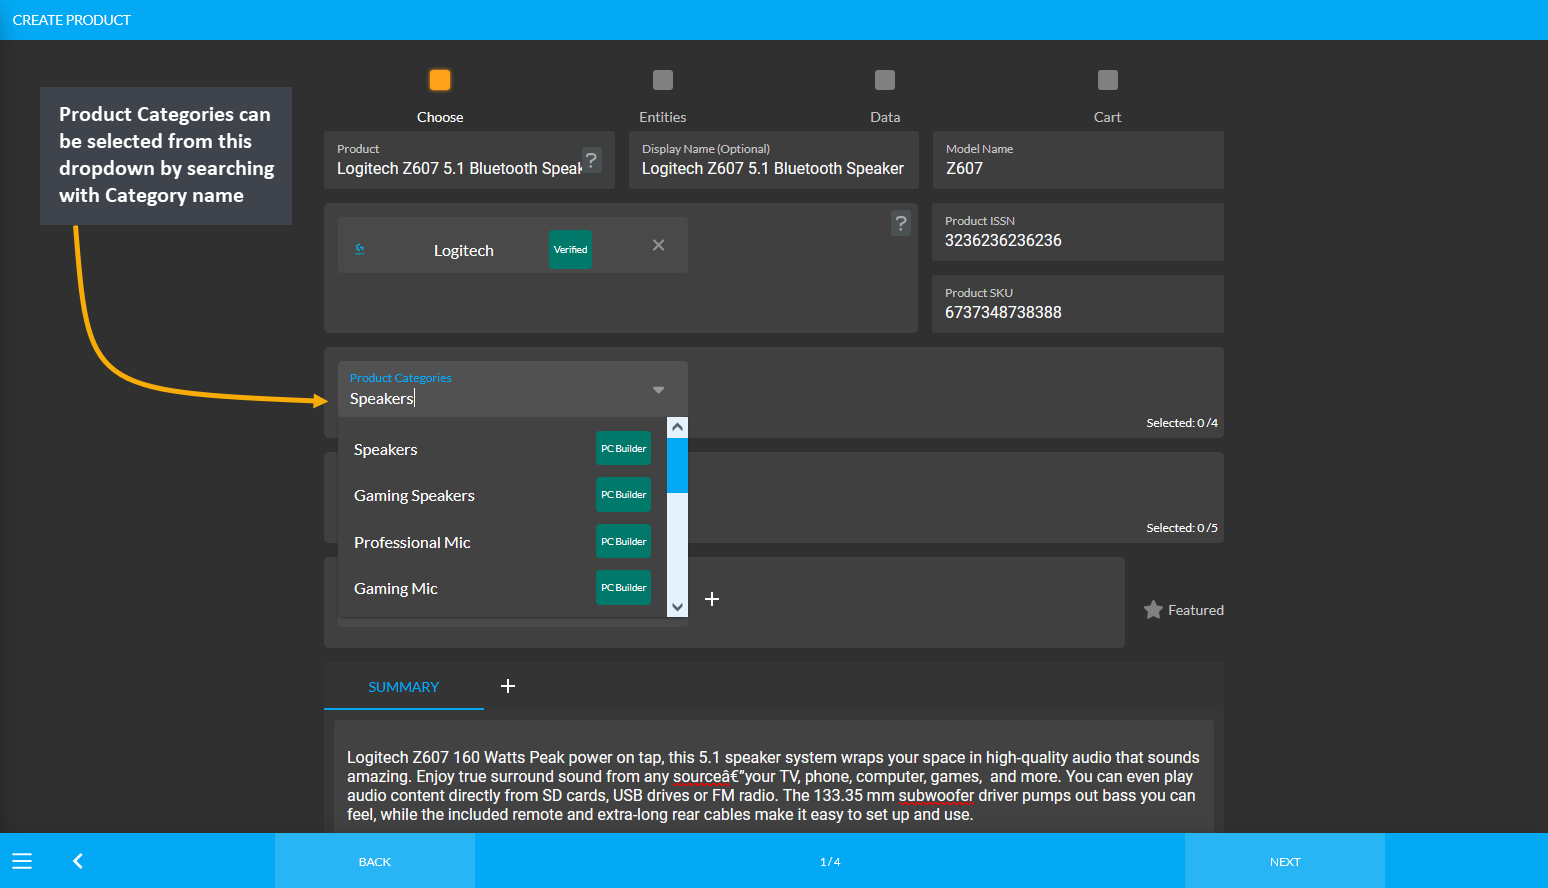
Image 2: During Product creation, Product Category can be selected from the dropdown menu provided.
- Choose Tags from under Product Settings and click the + icon to create new Tag.
- Select Tag Type, set Tag Name, Description and upload Logo and Banner for Tags.
- Activate or deactive the Tag using the toggle button and click Submit to save all changes.
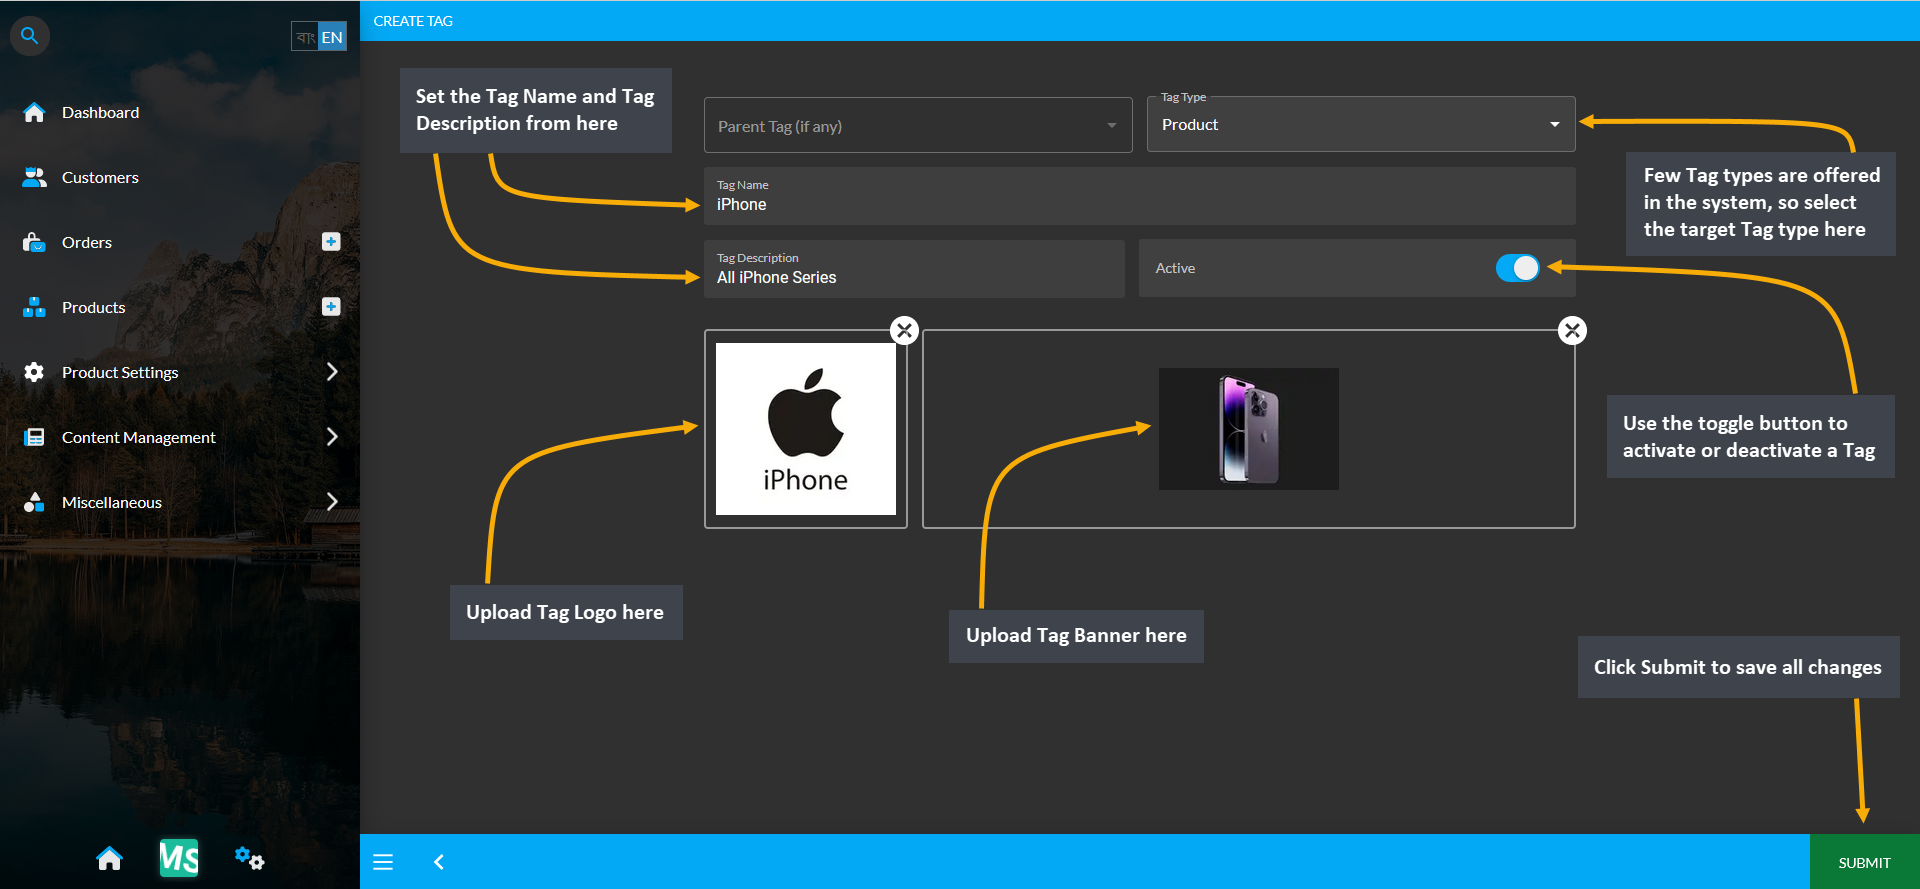
Image: Select Tag Type, set Tag Name, Description and upload Logo and Banner to create Parent Tag.
- Child Tag can be created within a Parent Tag from the Tags List.
- Click on the + icon to create a Child Tag from the selected Parent Tag.
- Select Tag Type, set Tag Name, Description and upload Logo and Banner for Tags.
- Activate or deactive the Tag using the toggle button and click Submit to save all changes.
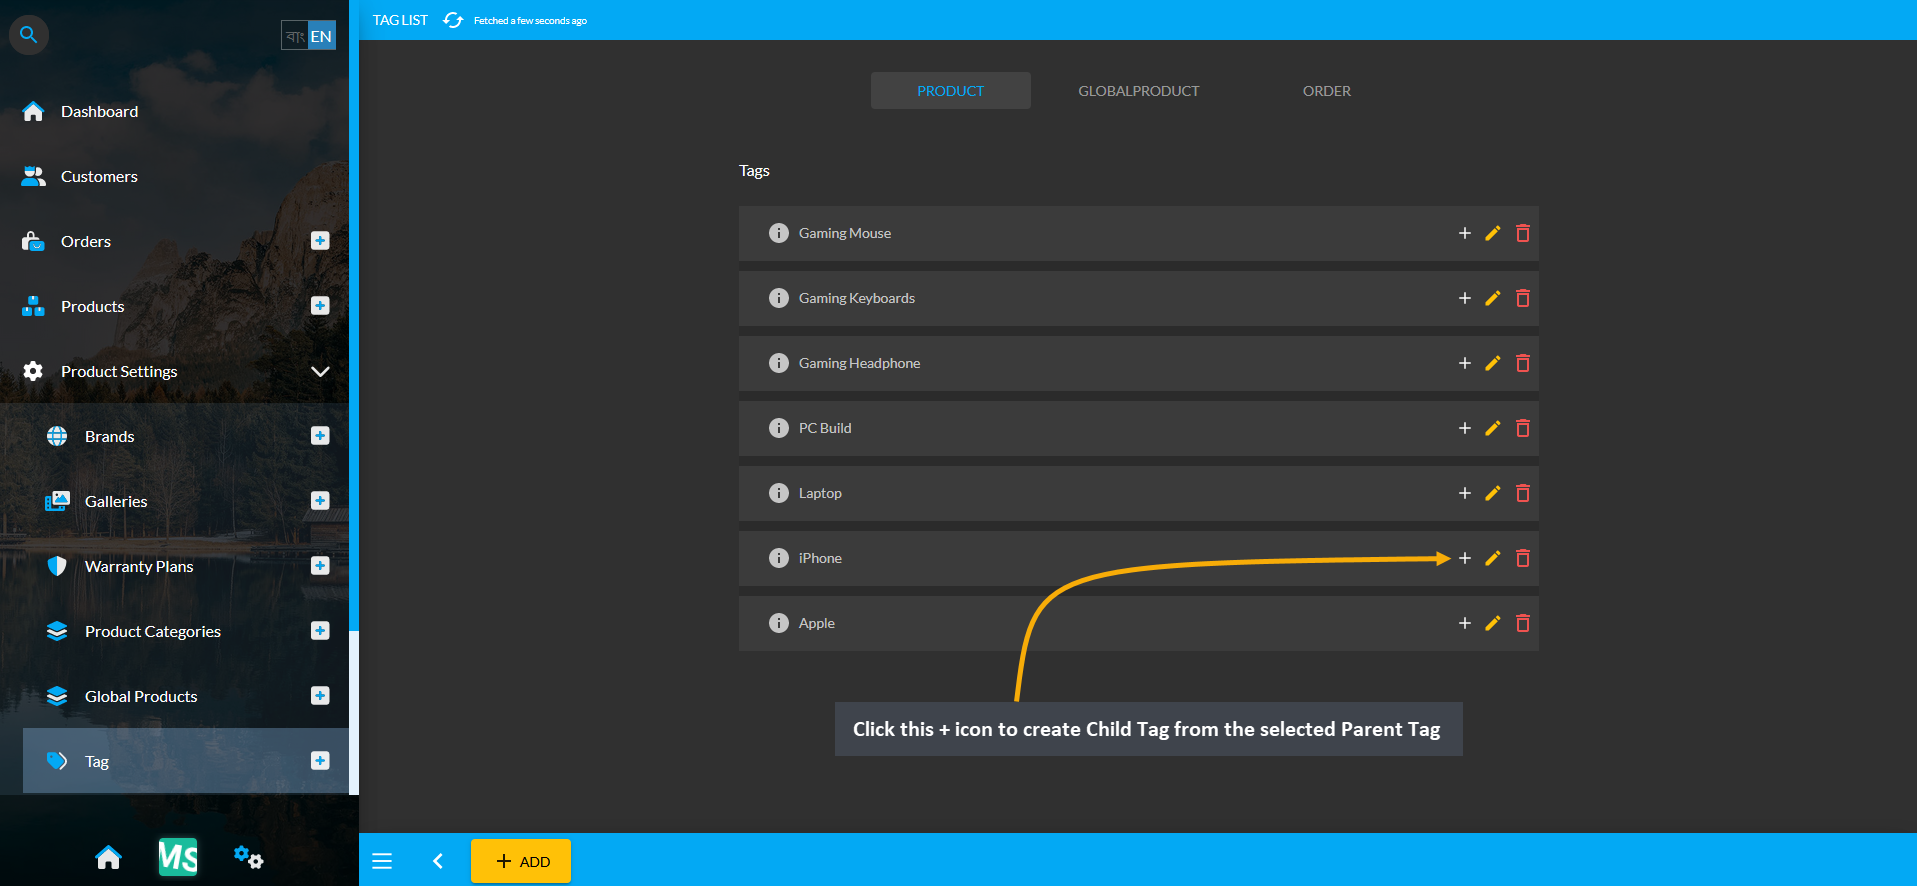
Image 1: Click on the + icon to create a Child Tag from the selected Parent Tag.

Image 2: Select Tag Type, set Tag Name, Description and upload Logo and Banner to create Child Tag.
View the list of already created Tags from Tags module under Product Settings.
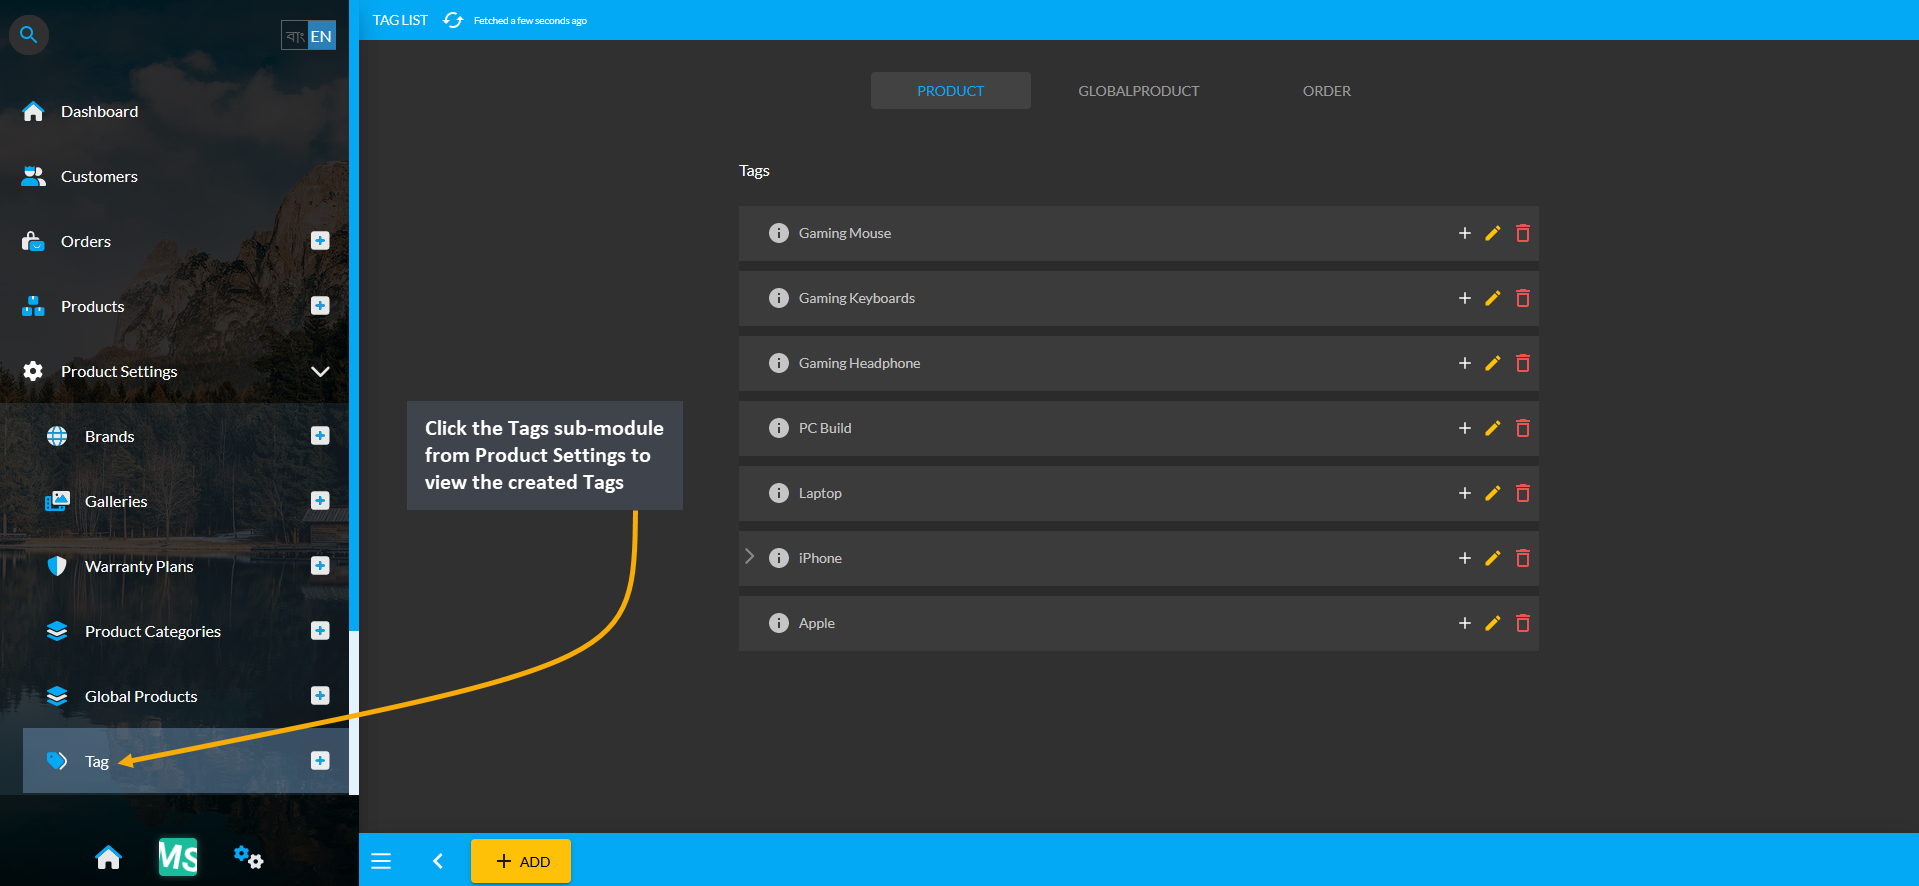
Image: View the list of already created Tags from Tags module under Product Settings.
How to Update Revenue after Order Payment Confirmation?

Image 1: Transaction status will show as Initiated until it is verified and completed for some payments.

Image 2: Transaction needs to be Set As Completed by selecting the option and hitting the Submit button.

Image 3: Click Agree to confirm if the Order status should be updated to Completed as well.

Image 4: Order status will now show as Completed, which means that the Order will add to the Revenues.

Image 5: Cost Basis will show that Revenues were made for all Orders that were Completed or Fulfilled.

Image 6: Revenue based on Completed Orders will be updated and show on the Dashboard Revenue section.
How to set Payment Gateway Maximum Limit according to Product Price?
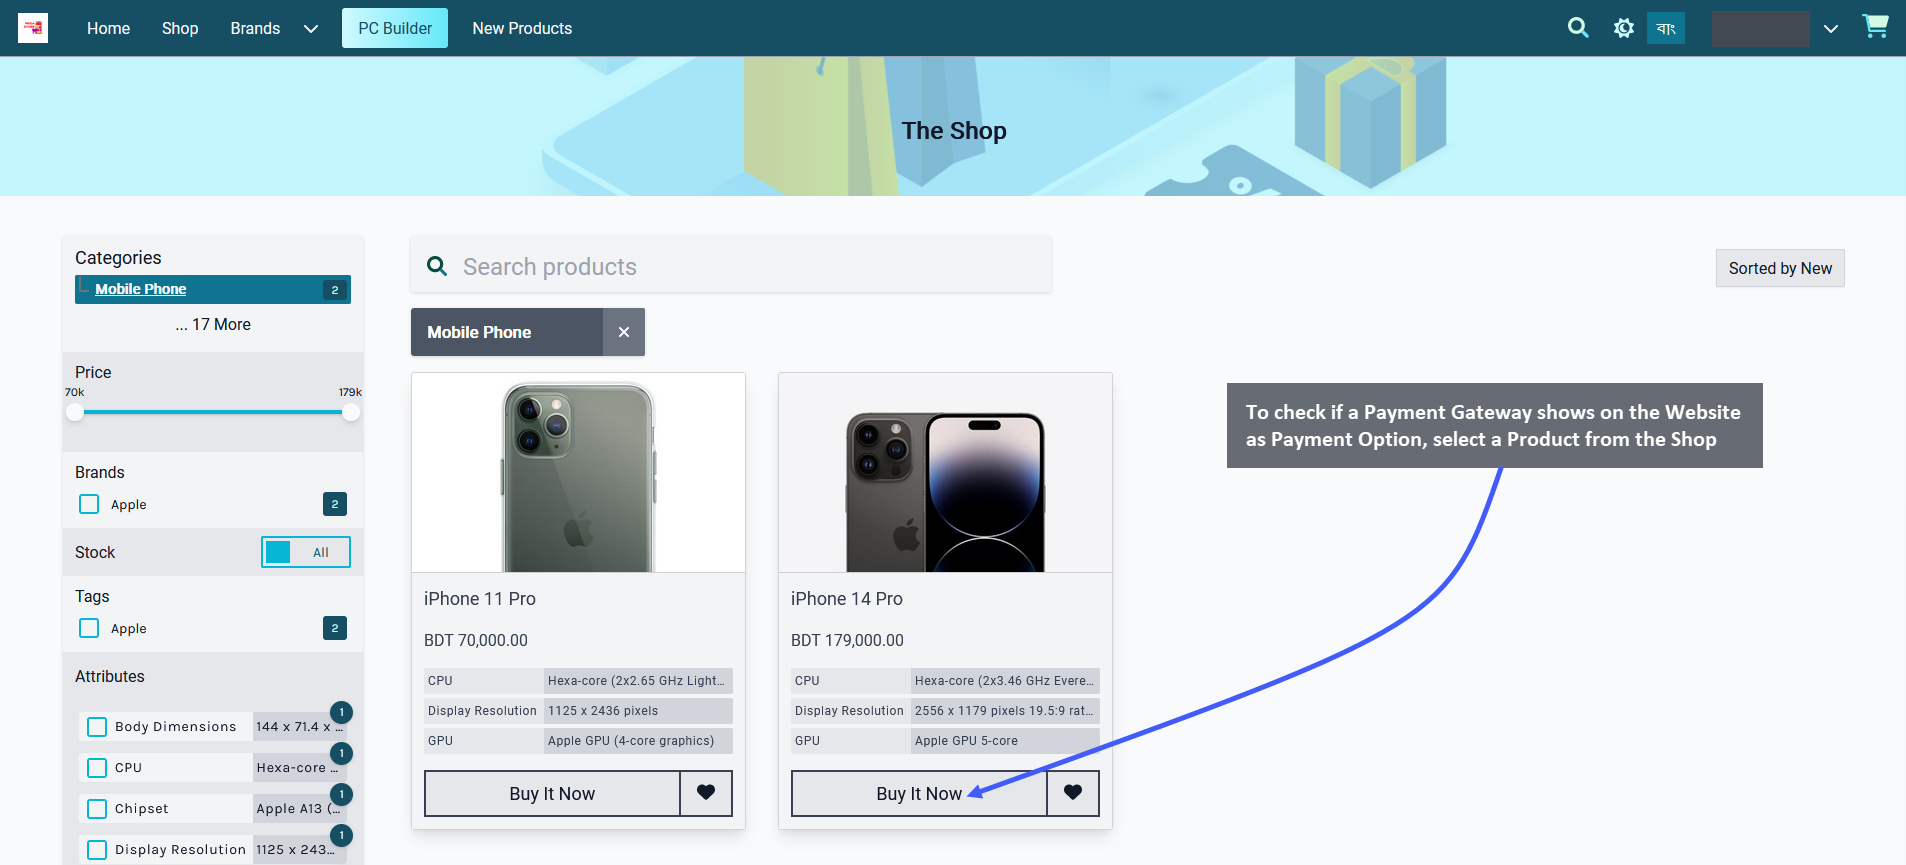
Image 1: To check if a Payment Gateway shows on Website as Payment Option, order a Product from the Shop.
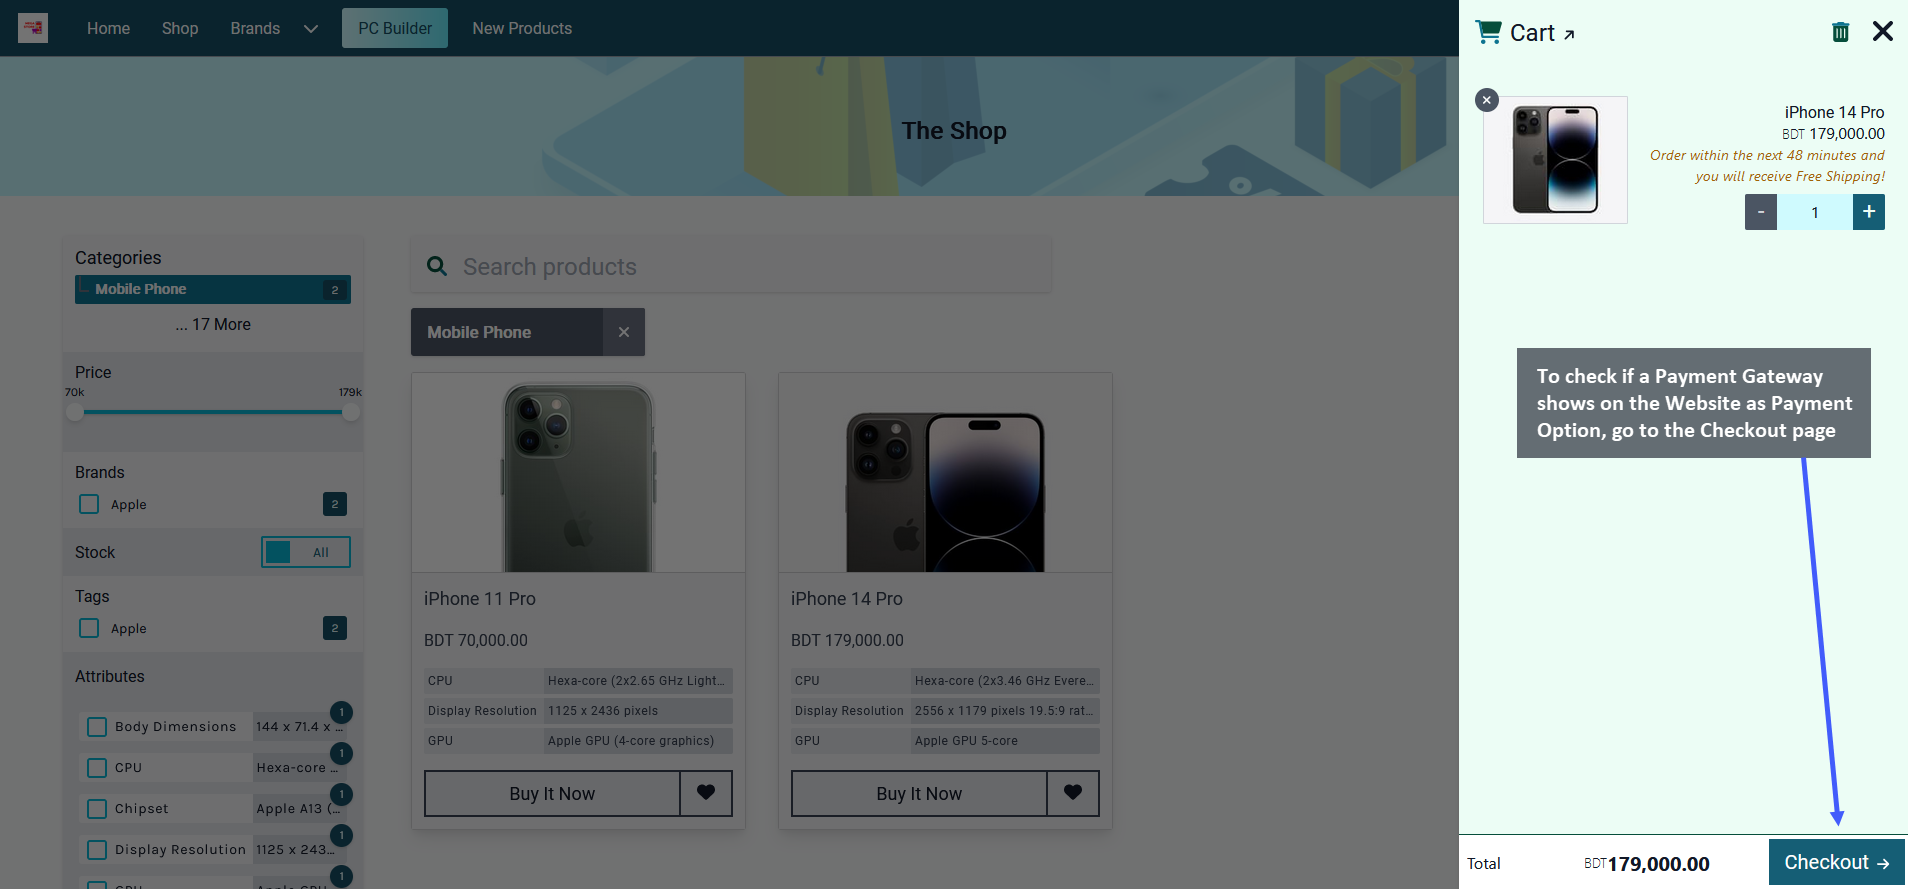
Image 2: To check if a Payment Gateway shows on Website as Payment Option, go to the Checkout page.
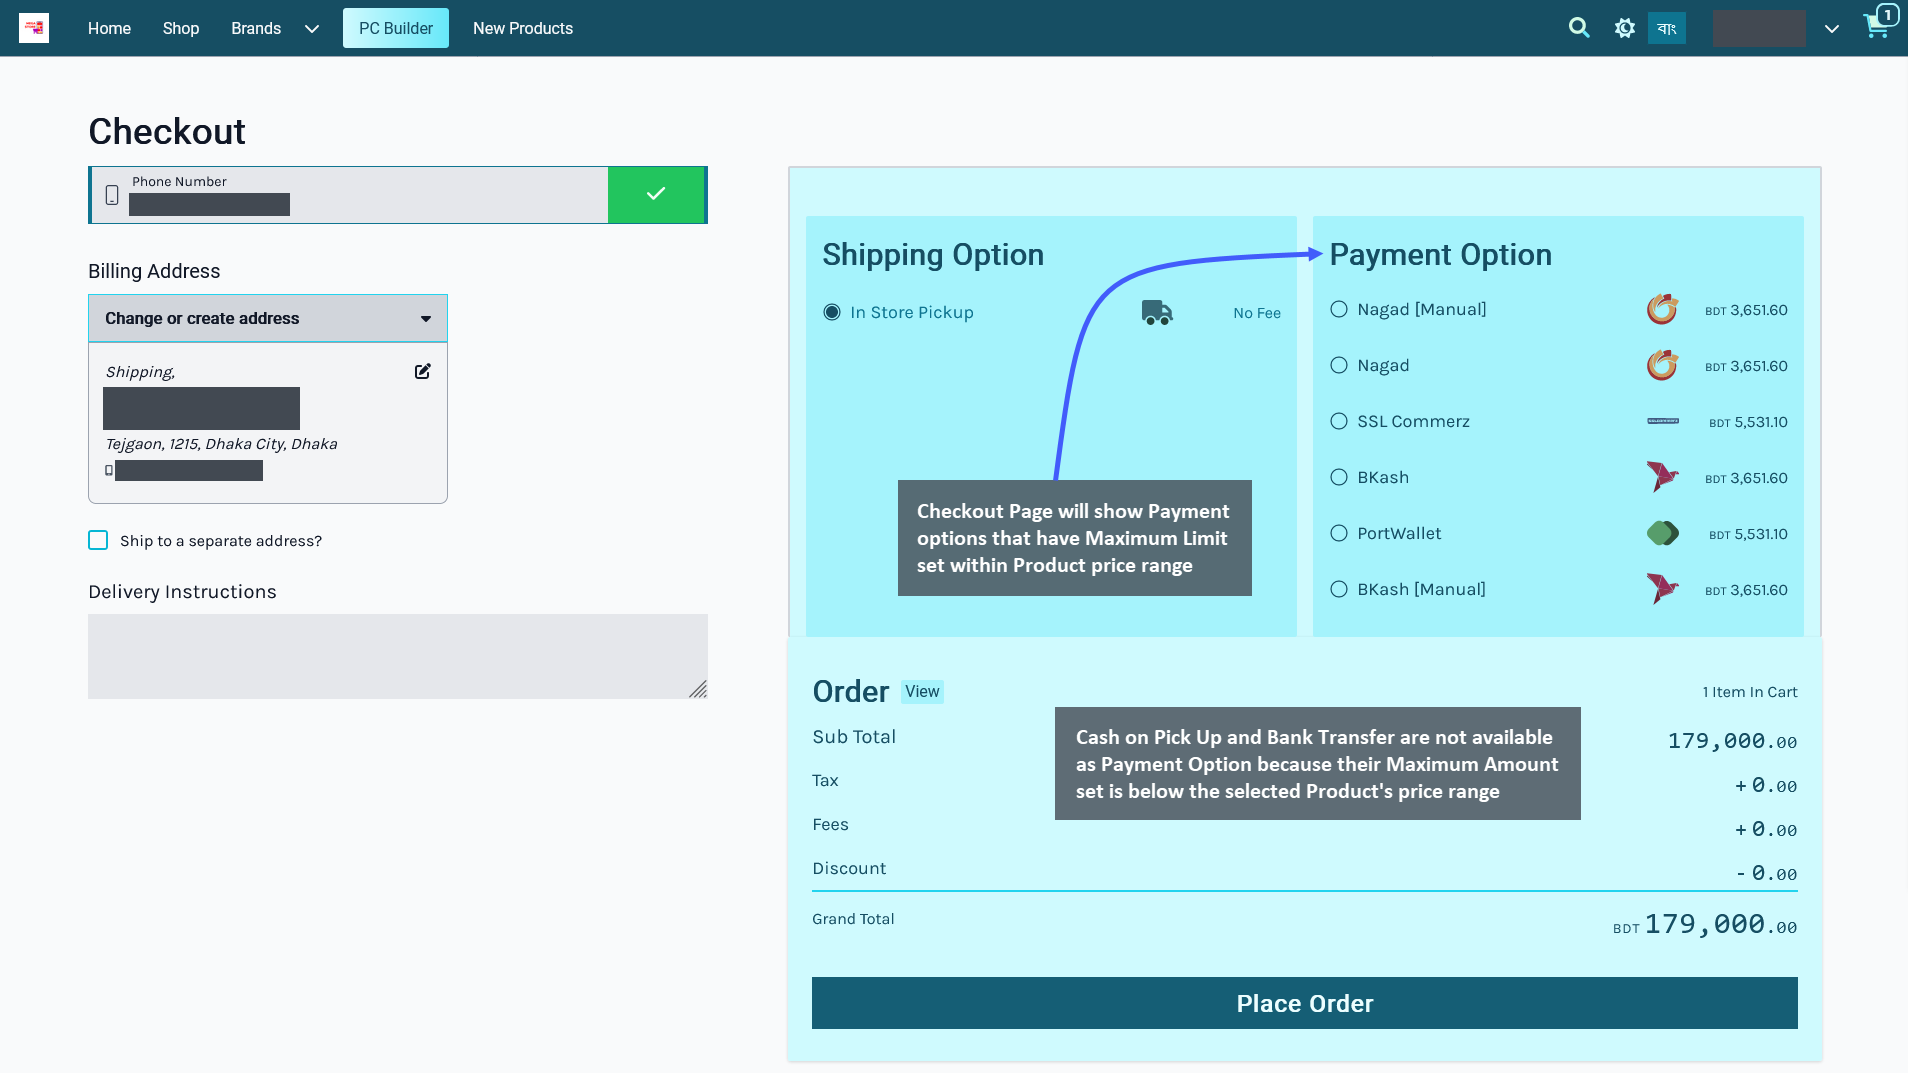
Image 3: Checkout Page will show Payment options that have Maximum Limit set within Product price range.
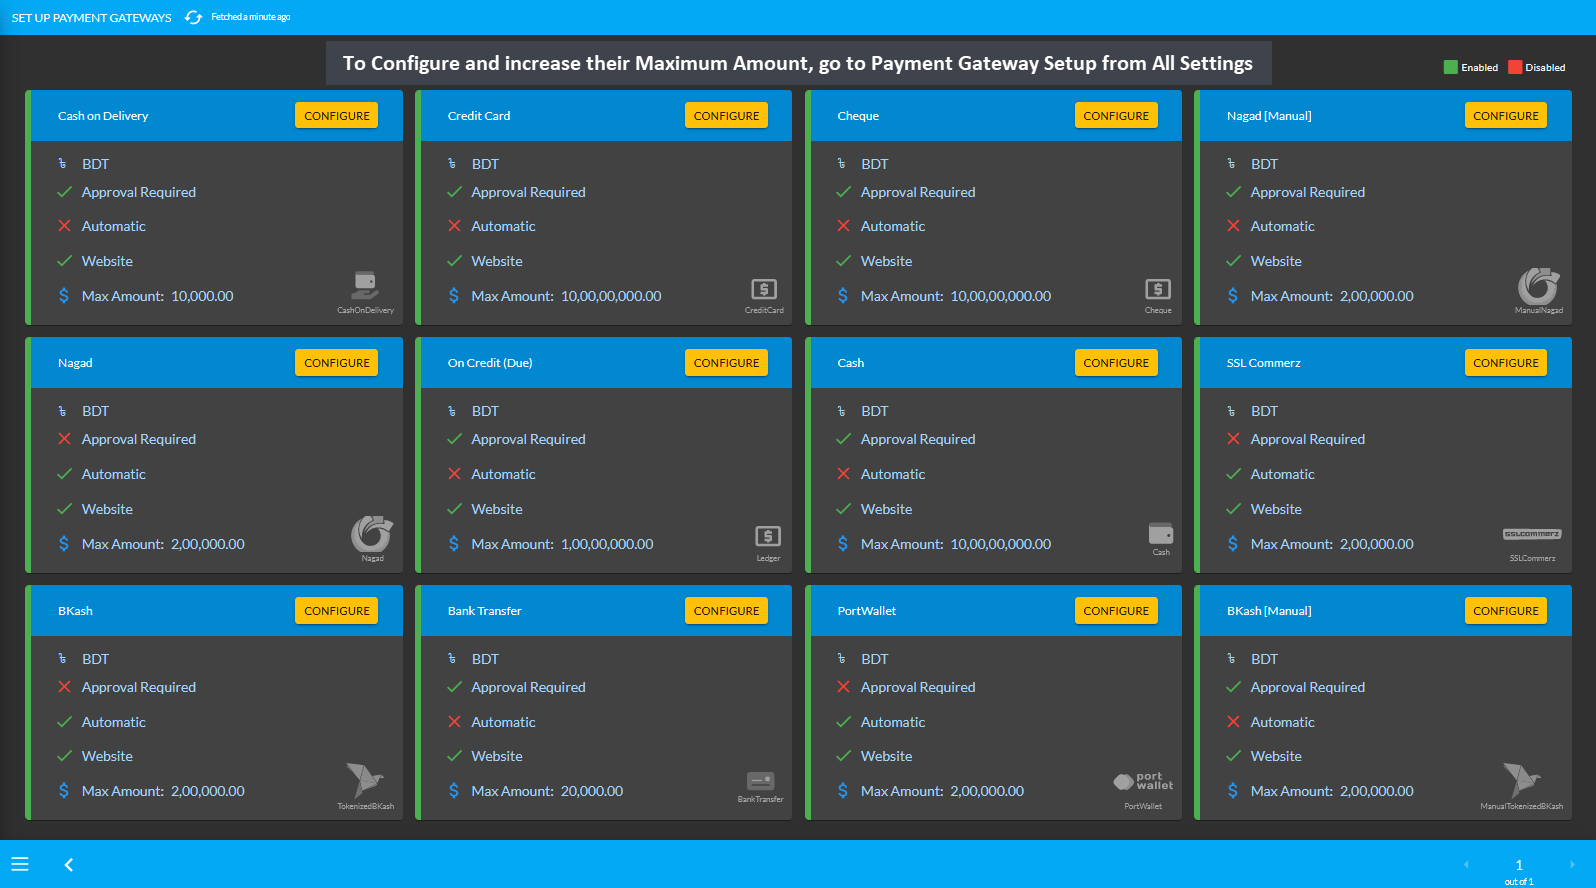
Image 4: To Configure and increase their Maximum Amount, go to Payment Gateway Setup from All Settings.

Image 5: Maximum Amount set for Cash on Delivery is lower than selected Product's price range.
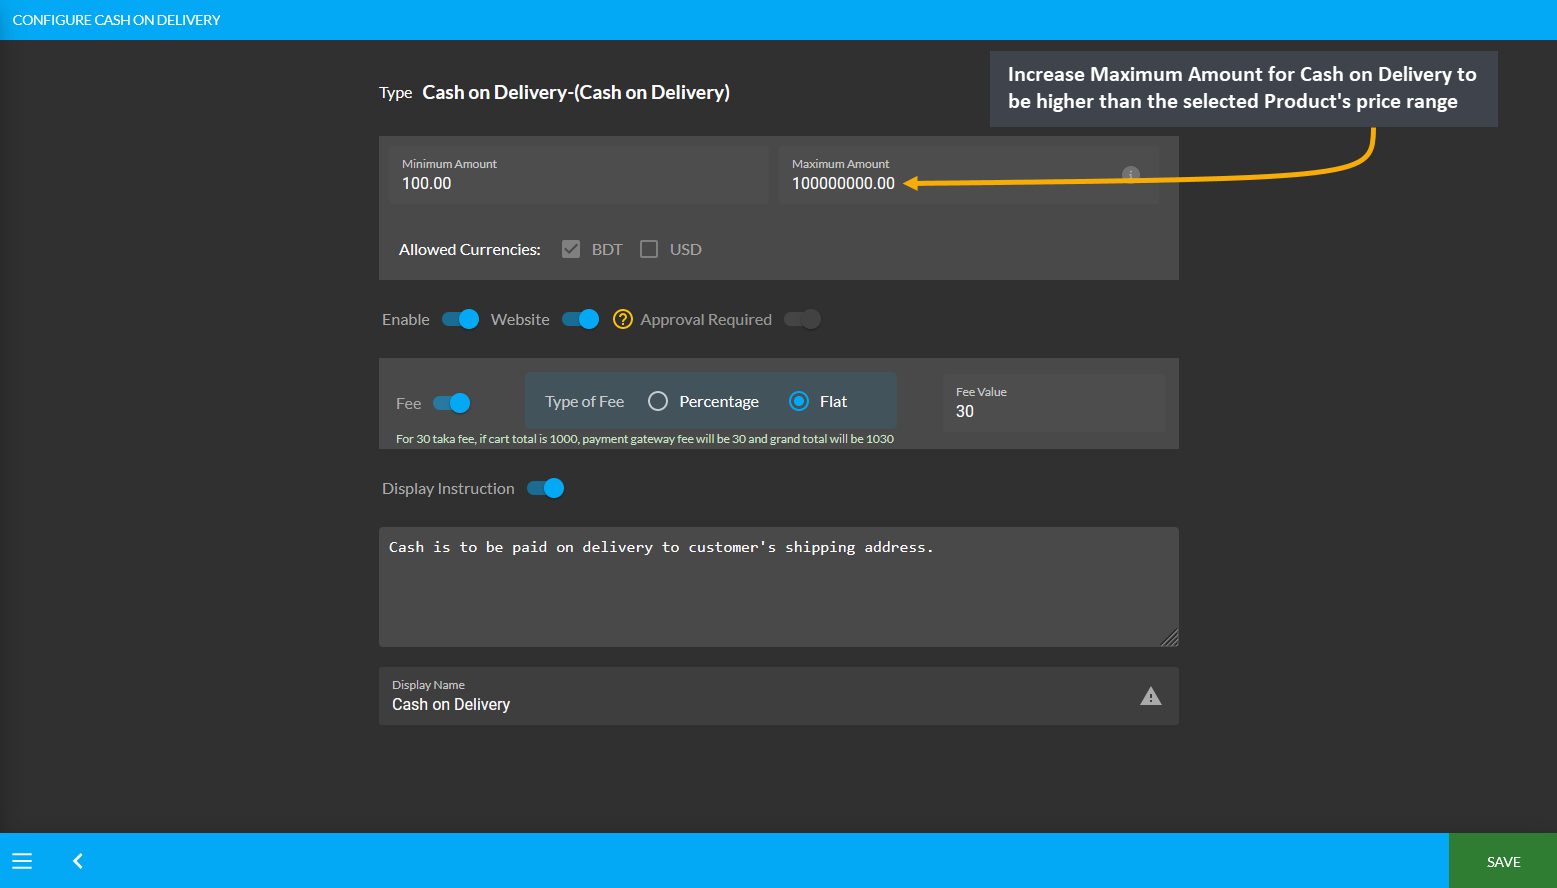
Image 6: Increase Maximum Amount for Cash on Delivery to be higher than selected Product’s price range.

Image 7: Maximum Amount set for Bank Transfer is lower than selected Product's price range.
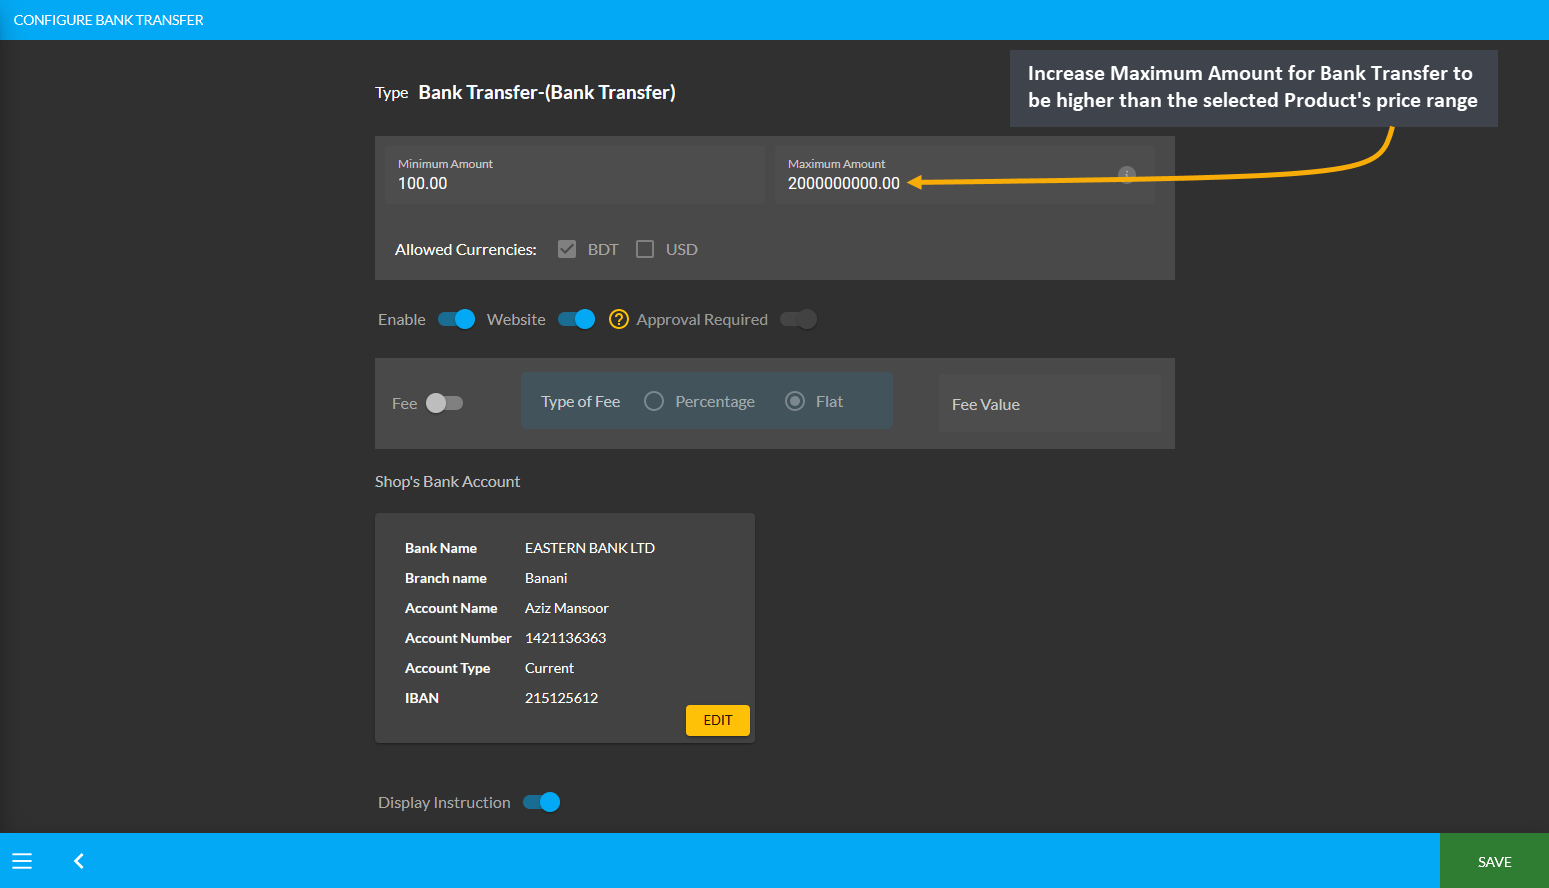
Image 8: Increase Maximum Amount for Bank Transfer to be higher than selected Product’s price range.
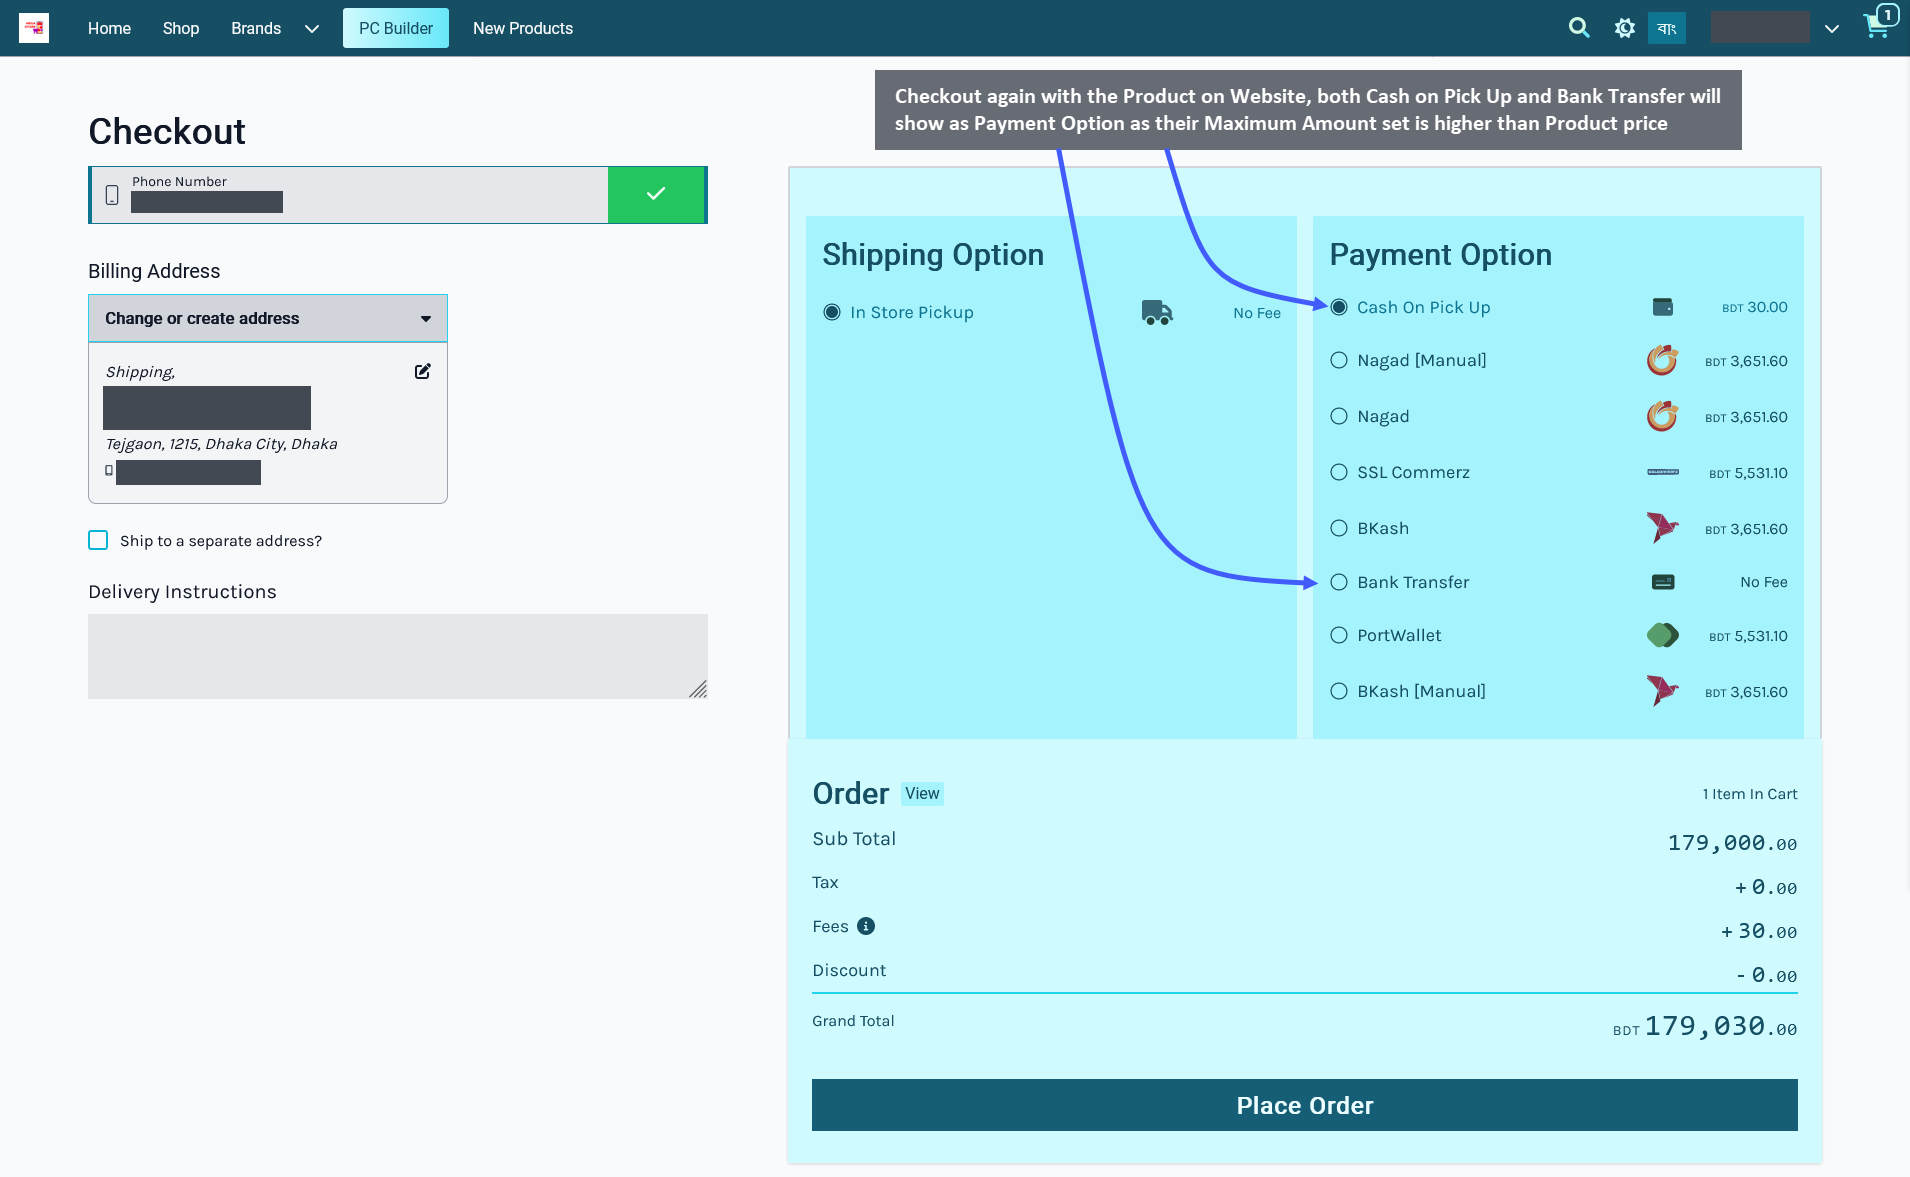
Image 9: Both Cash on Pick Up and Bank Transfer will now be available as Payment Options on the Website.
24 - Policy Templates
Policies associated with using our website and services.
Website Policy Templates
Shop Owners are requested to read all these Policy Templates for Privacy, Terms of Service, Return and Refund, Shipping, and EMI carefully before editing and posting them for Customers who will access the Shop Owner’s Website. These policies explain important information about Customers’ rights, obligations, limitations, and exclusions in using The Website. The Policy Templates can be used in both Default Pages for Privacy, Refund, Shipping, and EMI and Custom Pages like Terms of Service, Monthly Deals, or Flash Sales etc.
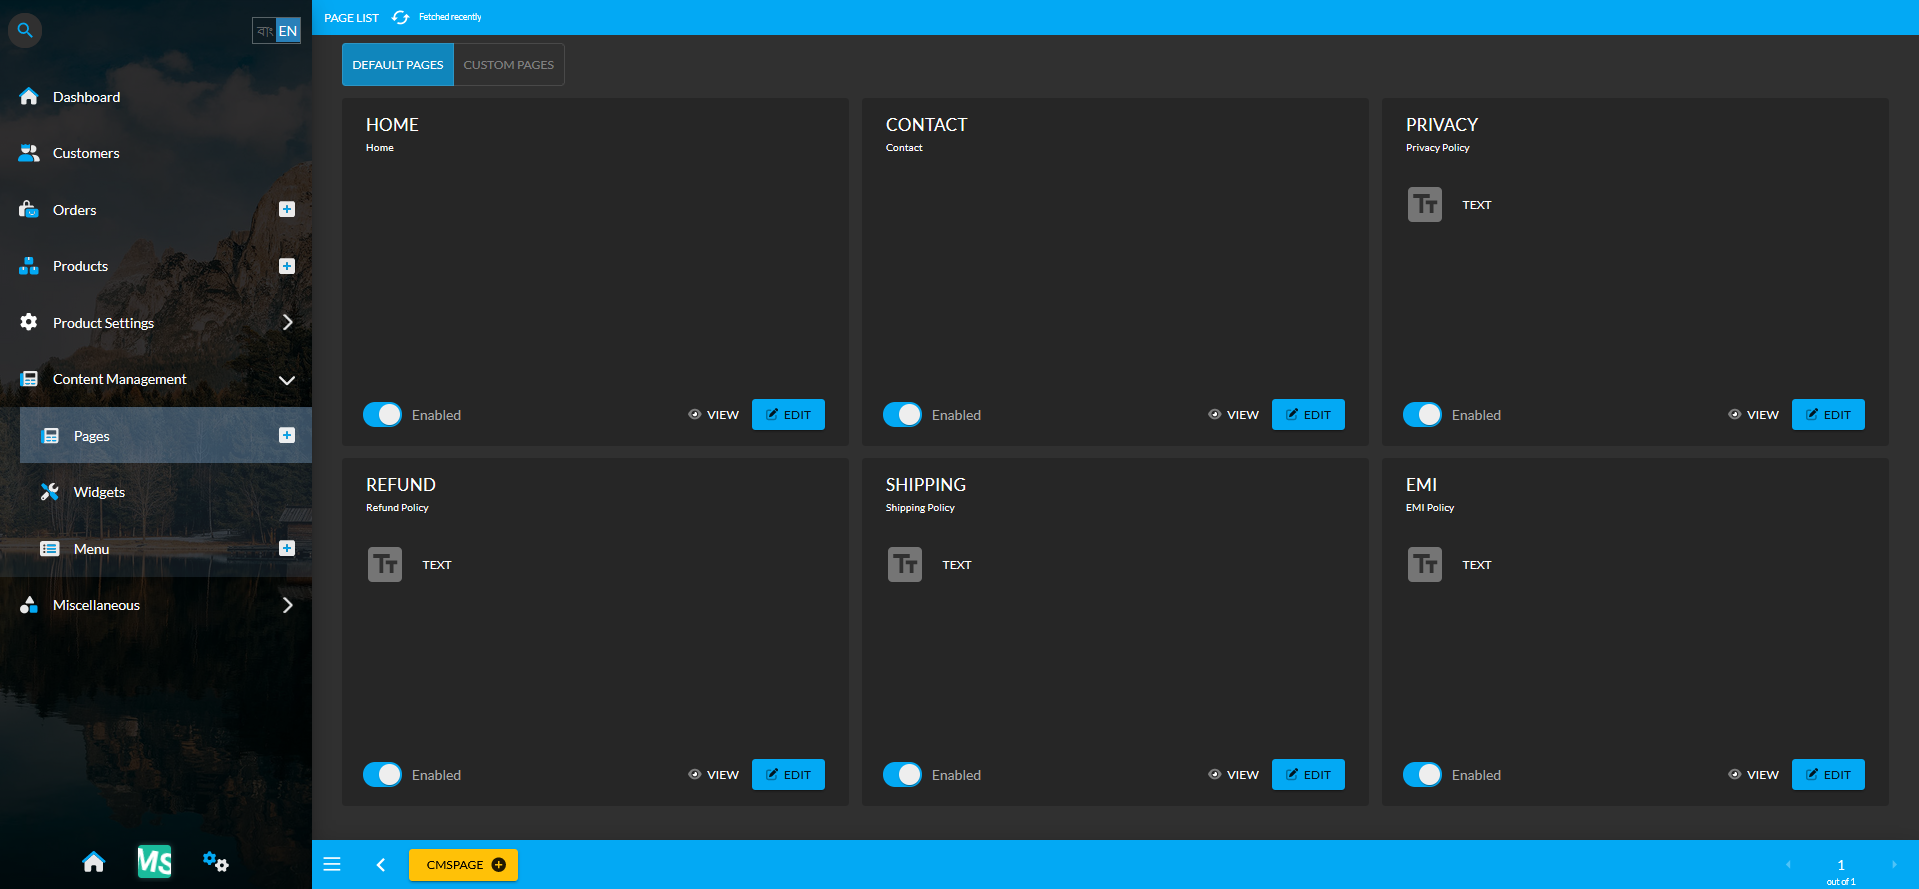
Image: Policy Templates can be edited and used in both Default Pages and Custom Pages for Customers.
24.1 - Privacy Policy
Privacy Policy for Customers in using The Website and its services.
Introduction
This page explains the Seller’s policies regarding the collection, use, and disclosure of the Customer’s Personal Information that the Sellers will receive from The Website. Please note that, from here on, Retail Xen is going to be referred to as The Website. This Privacy Policy has been compiled to better serve all the Customers who may be concerned with how their personal information will be used online.
Therefore, please read the Privacy Policy carefully to get a clear and comprehensive understanding of how the Seller collects, uses, protects, or handles the Customer’s personal information in accordance with The Website. By reading these policies, you will understand how the Seller takes steps to secure your personal information while you browse or shop at The Website.
The Seller only strives to collect information that is relevant to their business transaction with the Customer. All these information will be kept in records as long as they are relevant for business purposes or as required by law. Hence, by using The Website, the Customer will agree to the collection and use of their information in accordance with this Privacy Policy.
Without having to provide personal details, the Customer can browse The Website anonymously and unless they have an account on The Website or login with their username and password, the Seller cannot identify them.
Data that we Collect
The general information that the Seller collects from Customers include name, date of birth, email address, home address, work address, delivery address, phone number, payment, credit and billing information. When Customers register on The Website, the Seller stores their personal information that they provide in their user profile.
The Customer can view, edit, and delete their personal information and payment details at any time except for the username. The website administrators can also view and edit these information.
Furthermore, to carry out financial transactions during payments, the Seller collects information like bank account and payment details (for refund purposes). The Customer will have to use services of authorized third parties to collect order their related payments like BKash, Nagad, PortWallet, and SSLCommerz if they select those payment methods.
Cookies
Cookies are tiny text files which identifies the Customer when they visit certain pages on The Website. Cookies are stored by the Customer’s internet browser to recognize their IP address, or provide certain features on The Website like automatic login and product recommendations etc. Therefore, the acceptance of these cookies will make the Customer’s login and ordering process convenient.
During login at The Website, several cookies are set up to save the Customer’s login information and screen display choices. The login cookies will be retained for two weeks and the screen display option cookies for a year. If the Customer sets their browser to accept no cookies, the process will restrict their use of The Website. Please be assured that the cookies do not contain any personal details and are free from viruses.
The Seller records data of to keep track of new users and their demographics. Additionally, when Customers contact the Seller for getting information on Product(s) and services, the Seller retains their contact information for future communications.
For delivery of Product(s), the Seller will have to pass the Customer’s name and address to the third party courier services to assist with the delivery process. The Seller aims to keep Customers’ contact information up-to-date and expect them to inform of any changes so that their order can be delivered properly.
Completed information of orders will be stored in The Website and the Customer will be able to access this information by logging into their account. From the Orders tab, they can view the details of their past and present orders, orders that were cancelled, and orders ready to be dispatched.
The information associated with Customer’s orders will be kept secure. If they place an order on The Website, the Seller will collect various information to process orders and provide services according to their request.
Login Credentials
Customers need to be careful about the misuse of personal information like passwords as the Seller cannot assume the liability of the misuse of password in logging into The Website. They should make sure to keep those login information confidential and not share with unauthorized third parties.
For Market Research
The Seller may use customers’ personal information for the purpose of market research, which will mainly be used for statistical purposes and anonymously. Customers will have the freedom to opt out of this any time. They can be assured that their answers to opinion polls and surveys will not be forwarded to any third parties.
Besides, any Customer may choose to disclose their email address only if they are willing to take part in surveys and competitions. Upon participating and winning on the Seller’s contests, Customers may be asked to share their personal information again.
Customers may receive promotional emails from the Seller regarding their Product(s), services, sales promotions, or newsletters. If the Customer prefers not to receive these additional information, they can “Unsubscribe” from the email list at any time. Upon the Customer’s request, the Seller will stop sending any further information via email.
Google Analytics
The Website uses Google Analytics, a web analysis service of Google, Inc. at 1600 Amphitheatre Parkway in Mountain View, California 94043, USA. Google Analytics employs cookies to record the time, location, and frequency of the Customer’s visits to The Website, including their IP address which will be transmitted to and stored by Google on their servers in the United States.
Google may also transfer this information to third parties where required to do so by law or where such third parties process this data on Google’s behalf. Google clarifies that they will not associate your IP address with other data held by Google. The Customer can block cookies from being used by adjusting the settings on their browser, but it will prevent them from utilizing the full functionality of The Website.
Third Parties and External Links
The Seller may exchange information with third parties to ensure provide fraud protection and credit risk reduction depending on circumstances. Prior to obtaining the Customer’s permission, the Seller will not share or disclose personal information to third parties. In addition, The Website may contain links to third party websites which are out of our control.
In those cases, the Seller will not be responsible for the privacy practices or contents of those third party websites. Therefore, if the Customer access to third party websites using the links provided (in The Website), those websites may collect their information in accordance with their privacy policy, which will not be covered by this Privacy Policy.
Security and Rights
To prevent unauthorized access and accidental loss of data, The Website keeps Customers’ personal details and all the data on a secure server. Therefore, even when the Customers need to update their personal details, we may occasionally request proof of identity before disclosing specific information.
The Customers are requested to protect against any unauthorized access to their login credentials. They also have the rights to access to and request for any correction on their personal data that the Seller may hold or process during ordering. At any stage, the Customer may also request the Seller to stop using their personal information for marketing purposes.
If the Customer have questions about privacy policies, security of their personal information or need to access any specific personal information that the Seller holds about them, they can contact at:
ADDRESS:
PHONE: (During office hours, Monday - Friday, 10:00am - 6:00pm)
EMAIL:
Amendment of our Privacy Policy
This Privacy Policy will remain in full effect with respect to any changes in its provisions in the future. The Seller reserves the right to make changes to this Privacy Policy from time to time by undertaking new personal data practices or adopt new privacy policies by recognizing their responsibility for data protection and privacy.
The Customer’s continued use of The Website after the Seller posts modifications to privacy policies on this page will constitute their acknowledgment and their consent to abide by the modified Privacy Policy. Thus, the Seller encourages the Customers to review this privacy policy often to stay informed of changes that may affect them.
24.2 - Terms of Service
Terms of Service for Customers in using The Website and its services.
Terms of Service
Please read the Terms of Service carefully before accessing or using The Website and purchasing Products. They explain important information about your rights and obligations, as well as, limitations and exclusions in using The Website. As officially stated, you will have to agree to and accept all Terms and Conditions as the Customer, to continue using The Website and its services.
On placing any purchase order from The Website, you become a “Customer” and get involved with our “Services”. In addition, it will consecutively mean that, as the Customer, you are agreeing to be bound and be fully aware of the following terms and conditions.
You can review the most current version of the Terms of Service at any time on this page. The Seller reserves the right to update, change or replace any part of these Terms and Conditions. Thus, your continuous use of, or access to The Website, following the posting of any changes will constitute your acceptance of those changes.
Definition
1.1. “Customer” means the person who will order Product(s) through this Website.
1.2. “Seller” means the shop owner who will sell Product(s) to Customer through this Website.
1.3. “Product(s)” mean all the products listed as shopping items on The Website.
1.4. “The Website” means Retail Xen, where the Customer will buy and the Seller will sell Product(s).
To register on Retail Xen, you will need to create a login name and a password as the Customer. You will be responsible for keeping this information correct, confidential, and up to date. You must take full responsibility that the entered data truly identifies you.
The Seller will not be liable for any consequences that may result from inputting any incomplete and incorrect information related to the orders. In case of online payments, you will be required to enter the payment details. By placing an order, you will agree that your contact and payment information may be used to process your payment and to execute your order.
Placing Order
When placing an order through The Website, the Customer will agree to these terms and conditions on purchasing the Product(s). After the Customer places their order, the Seller will verify availability of the product, payment, billing and shipping details to proceed with the order.
The Customer will receive an order confirmation via their phone number and email when the order is received and is being processed by the Seller. When order is shipped, the Seller will send notification to the Customer via phone number and email.
Please note that, there are cases when a Customer’s order cannot be processed for several reasons and the Seller reserves the right to cancel any order for any reason at any given time. In such cases, the Customer may be asked to provide additional information for verification purpose before their order is confirmed.
The Seller reserves the right to obtain validation of the Customer’s payment details for avoiding any fraudulent activities with credit cards, debit cards, and bank transactions. These verifications may take forms of identity, banking information, and billing address confirmation checks.
The Customer’s absence of a confirmation replying following such inquiries will automatically result in the cancellation of their order within a designated time period. The Seller also reserves the right to directly cancel an order for suspecting a risk of fraudulent use of credit or debit card.
Products
The Product(s) are available exclusively online at the Seller’s shop on The Website. The Sellet will try to make every effort to be as accurate as possible in displaying the Product(s) in their original colors and accurate models.
However, due to your device’s visual settings, technical issues, and differences in display, variations may occur to the colors or sizes of the Product(s). Therefore, we cannot guarantee that the physical product will look exactly like the display images.
Product Pricing
The Seller is determined to provide the most accurate pricing information on The Website to the Customers. However, errors may still occur in cases, when the price of Product(s) may not correctly display on The Website. In those circumstances, the Seller reserves the right to cancel any order.
In cases, when Product(s) are mispriced, the Seller, at their own discretion, will contact the Customer for instructions or cancel the order and inform the Customer of such cancellation. The Seller has the right to cancel any such orders whether or not the order has been confirmed and paid. Necessary actions will be taken to rectify the situation or issue a refund to Customer’s original payment method.
All the product prices are subject to change without notification, and while every effort is made to ensure the accuracy of prices displayed on Retail Xen, they are not guaranteed to be accurate. Also, certain promotional pricing and offers are only valid during specific dates and other requirements have to be met in order to receive these promotional pricing.
The Seller reserves the right to cancel any orders containing pricing errors at any time, during or after the ordering process, with no further obligations to the Customer. Also, the pricing policies are subject to change from time to time and at our sole discretion and as provided by applicable law.
The Customer will solely be responsible for maining confidentiality of their account and password. They must accept the responsibility for all activities that occurs under their account and restrict any unauthorized access. They should also promptly update their account details, payment details, email address, and phone number, so that the Seller can complete transactions and contact the Customer whenever needed.
The Seller reserves the right to refuse any order placed by the Customer at their sole discretion, limit and cancel any quantities purchased. These restrictions may include orders placed by or under the same Customer account, the same credit card, and orders that use the same billing and shipping address.
If the Seller makes changes or cancels an order, they will contact the Customer via phone or e-mail address provided at the time the order was made. As the Customer, you agree to provide complete and accurate account information for all the purchases made at The Website.
Pricing and Payment
All prices are shown in Bangladeshi TAKA exclusive or inclusive of value added tax (VAT) and shipping costs. For orders, inclusive of VAT, it will be mentioned in electronic invoice or printed invoice that is provided to the Customer. At present, the Seller will only be keeping TAKA as the acceptable payment currency, but will add other currency options in the future.
Items in the Customer’s Shopping Cart will always reflect the most recent prices displayed on The Website. It is also possible that a product’s price may increase or decrease between the time the Customer places it in their cart and the time they purchase it.
To place an order on The Website, the Customer will have to provide valid payment details and billing information as requested by the Seller. For different payment methods like, BKash, Nagad, Bank Transfer, Credit Card, Cheque, Ledger, PortWallet, or SSLCommerz, you may be charged before or upon confirmation of the order or prior to shipment of the Product(s).
For Cash (during In Store Pickup) or Cash on Delivery (at Shipping Address), the Customer will be able to make payment while picking up the order or receiving the package from the courier.
The Seller will take all necessary precautions to keep the Customer’s order and payment details secure but they will be held liable for any losses caused as a result of unauthorized access to the Customer’s information.
Product Delivery
The Seller will ship the Product(s) to the delivery address last updated or added by the Customer. Based on the Customer’s preference and selection, the Seller will perform delivery with reputable carriers like RedX, FedEx, DHL, UPS, Paperfly, Aramex, GoGoBangla, Ecourier, Now, and Koopon etc.
Any loss or damage of the Product(s) must be reported immediately to the Seller. Please also note that, any dates quoted by the Seller for the delivery of your product are estimates only and shall not form part of the terms. Even though, the Seller will try to deliver your product promptly, delays may sometimes be inevitable due to unforeseen circumstances. Therefore, the Seller will not be liable for any delay in delivering the Product(s) within the estimated time.
Return and Refund Policy
The Seller always try their best to provide Customers with the proper Product(s). However, in the unlikely event, if the Customer receives any damaged or incorrect Product(s), then they may file a request for a return. To be eligible for replacement Product(s) or refund by the Seller, the Customer must return the Product(s) in a resalable and unused condition in their original packaging. To learn more, please review the Return and Refund Policy.
Force Majeure
Unforseeable circumstances like fire, flood, accident, riot, war, government intervention, embargoes, strikes, labour difficulties, or equipment failures are out of the Seller’s control. So, for any delays or failure in delivering the order, the Seller shall not be liable if they fall under these circumstances. Similarly, if there are shortage of quantities in stock, the Seller may allocate Product(s) at their sole discretion.
Governing Law
These terms and conditions stated shall be governed by and construed under the governing laws of Bangladesh. The Seller and the Customer shall irrevocably submits to the jurisdiction of the courts of Bangladesh for all purposes in connection with any proceeding which relates to this Agreement.
Any dispute arising under or in relation to this Agreement concerning the Customer’s order received by the Seller shall be resolved under the governing law. If either party shall commence an action or proceeding to enforce any provision of this Agreement, then the prevailing party shall be reimbursed by the other party for its expenses incurred with the prosecution of such action or proceeding.
Privacy Policy
Our Privacy Policy is designed to give Customers a better understanding of how the Seller protects their personal information. Read the detailed Privacy Policy here that will help you understand what information we collect, how we use it and what choices you have when you purchase Product(s) from The Website as the Customer.
Copyright
All contents on The Website including texts, graphics, logos, icons, audio, video, digital downloads, data compilations, and software, are properties of Retail Xen and are protected by Bangladesh and international copyright laws. Please note that, cannot download, record, duplicate, copy, redistribute, reproduce or republish any information from The Website.
Amendments of Terms of Service
The Customer can review the most current version of Terms and Conditions any time on this page. The Seller will reserve the right, at their sole discretion, to update, change, or replace any portion of these Terms and Conditions any time, so it is the Customer’s responsibility to check The Website at times for changes.
Your continued use of or access to The Website or its services following the posting of any changes to these Terms of Service constitutes acceptance of those changes.
24.3 - Return and Refund Policy
Return and Refund Policy for Customers in purchasing Product(s) from The Website.
Return and Refund Policy
Thank you for shopping with us at Retail Xen. Ifyou not completely satisfied with the purchase of any Product(s) as the Customer for any reason, we invite you to review the Return and Refund policy. For filing a claim on any Product(s) quality issue, you will have to directly contact the Seller, who will assist you. Therefore, please read through these Refund and Return policies before you make any Product(s) purchase.
The following terms will be applicable to all the Product(s) purchased from the Seller via the website. The return policies for Product(s) include manufacturing defects, wrong sizes, color, and damage, or broken items in transit etc. If the Customer’s claim falls within these categories, then they may file a form to request for a return of their Product(s) through the following procedures:
Return Request Procedure
If a Customer wants to return any Product(s) that are defective, they must return it to the Seller at their own expense. The Customer may only return the Product(s), if the Product(s) in question is defective. To formally complete the Return procedure, the Customer will have to complete and submit a Request for Return Form mentioning the Order ID and reasons for Return to the Seller.
Customer’s Claim Verification
Upon verifying the Customer’s claim, the Seller will notify the Customer through email that they may return the Product(s) to the Seller. After the Product(s) are returned in well packaged condition back to the Seller at the Customer’s expense, the Seller will inspect if the Product(s) are defective and provide a desired resolution.
The Seller reserves the right to refuse returns of any Product(s) that does not meet the above return conditions. The Customer will be responsible for return shipping expenses and handling charges that are not refundable. So, any amount refunded will not include the cost of shipping and the Seller will not take responsibility for the delivery time or loss of a returned package.
It is recommended, that the Customer uses tracking numbers to ensure that the Product(s) package is returned safely to the Seller. Without actual receipt of the Product(s) or proof of received return delivery, the Seller will not be able to issue replacement Product(s) or refund.
Replacement Product(s), Refund, or Store Credit
If the Customer request for replacement Product(s), the Seller will have to ship them to the Customer if they are available in stock. If replacement Product(s) are not available, then Seller will refund the original amount back to the Customer’s original Payment Method or issue Store Credit equivalent of Product price to Customer’s account.
Criteria for Defective Merchandise
Please note that all forms of digital products, software, video, or audio discs that have been opened are excluded from any return procedure unless they are actually Faulty and does not work. However, in this case, the Seller will determine if any Product(s) are faulty or not. Product(s) that are out of warranty and damaged or burned will be excluded from any return as well.
Criteria of Defective Merchandise includes having defects that arose from the initial manufacturing process. These include flaws like material imperfections and unusability that prevents the Customer from using the Product(s). Defects will not include: Color variations from the Website images to actual Products, Product(s) not fitting due incorrect size ordered by the Customer, or material damages done during opening the package (Customer’s use of sharp objects to cut into the parcel).
The Seller aims to make sure that the Customer remains satisfied with the Product(s) purchased, but they cannot accept return on instances like: If Customer changes their mind after placing an order, the quality of Product(s) not being acceptable in accordance with the Customer’s expectation, or Customer found the Product(s) cheaper with another Seller. Please note that, the Seller does not guarantee any price matches with other Vendors.
24.4 - Shipping Policy
Shipping Policy for Customers in receiving the Product(s) from the Seller.
Shipping Policy
By placing an order through The Website, the Customer will agree to the Shipping Policies below. These terms are provided to ensure that both the Customer and the Seller agrees on this arrangement to reciprocally protect and set expectations on the Shipping service for the Orders.
Shipping Costs
Shipping costs will be calculated during checkout based on the weight, dimension, and destination of Product(s) in the Order. The estimated charges for shipping will be calculated during purchase and before confirming the Order. This estimated cost will be the final price for the Shipping Fee to the Customer.
Delivery based on Stock Availability
Subject to Product’s stock availability, the Seller will try to maintain accurate stock counts of Product(s) on The Website. However, from time-to-time there stock discrepancy may be expected to suddenly occur, in case of which, the Seller will not be able to fulfill all the Product(s) of a Customer’s Order at time of purchase.
In this instance, the Seller will fulfill partial Order by shipping the available Product(s) to the Customer, and contact them about whether they would prefer to await restocking of the backordered Product(s) or prefer a refund for the items that were not shipped.
Shipping Procedures
The Seller will ship Products according to the Shipping Carrier of their choice from RedX, FedEx, Koopon, DHL, UPS, Now, PaperFly, Aramex, GoGoBangla, and ECourier when processing Order from The Website. They will process one shipping address per Order. If the Customer wants the Seller to ship to different addresses, then they will have to place separate Orders of Product(s) and make payments for them separately.
The Shipping date will depend on the Customer’s preferred delivery location and delivery type. Please note that, Customers located outside Dhaka city may have to collect delivery of their Product(s) from the nearest branches of the designated Shipping Carriers if the Products cannot be directly delivered at their address.
Tracking Notifications
Upon dispatch of their Product(s), Customers will receive a Tracking Number to their Order with a Link via email or SMS. Following the Tracking Number or link, they will be able to follow the progress of their shipment based on the latest updates made available by the Shipping Carrier.
Delivery Charges
Within Dhaka city, the regular delivery charges will be BDT 60 and outside Dhaka city, it will be BDT 120. Please note that, if there is any sudden change in delivery charges for a particular Product, it will be mentioned in the Product(s)’ details. The Seller will try to keep these information up-to-date.
Estimated Delivery Time
The estimated time of delivery will be mentioned on Product’(s) details page and may differ from one Product to another. Please note that, if Customer’s Shipping address is within Dhaka city, their Product(s) will be delivered within __ hours. If their Shipping address is outside Dhaka city, then their Product(s) delivery will take up to 2-5 business days.
The Business Day are considered from Saturday to Thursday except national or public holidays. Thus, any Order placed by the Customer after 6:00 pm will be considered as next business day Order, not as the same day Order. The Seller will take steps to ensure shipment delays will be kept to a minimum.
Change Of Delivery Address
In case of delivery address change requests from the Customer, the Seller will be able to change the address at any time before the Order is dispatched. Once Products are dispatched, no requests for delivery address change or update by the Customer will be accepted.
Delivery Time Exceeded
If delivery time of Product(s) exceeds the forecasted time, the Customer is requested to contact the Seller so that they can contact the shipping carrier for updates. Delivery time may exceed based on traffic, weather conditions, delivery vehicle breakdown, incorrect address, or natural disasters etc.
Parcels Damaged In Transit
If Customer finds that their parcel is damaged in-transit, they are requested to reject the parcel from the courier and get in touch with the Seller immediately. If the Product(s) are delivered to Customer’s address without them being present, they are requested to contact the Customer Service.
Please note that, the Seller will process replacement Product(s) as soon as the Shipping Carrier has completed their investigation into the claim. The Seller will provide Customer their desired resolution for parcels damaged in-transit.
24.5 - EMI Policy
EMI Policy for Customers in purchasing Product(s) from The Website.
EMI Payment Method
EMI (Equated Monthly Installment) is one of the popular Payment Methods for online shopping, which is applicable to Customers using any of the accepted Credit Cards on The Website. It allows them to pay for their Product(s) in easy and equal monthly installments with the issuing Bank’s assistance.
Requirements for EMI Facility
The equated monthly installments are used to pay off both interest and principal each month so that over a specified number of years, the loan is paid off in full. If Customer wants to avail EMI facility, they must have Credit Card of the concerned bank and the order value must be above BDT 10,000.
Choosing EMI for Purchase
Customers may often feel reluctant to purchase expensive Product(s) from The Website because it is hard on their wallets. With EMI facilities, the Customers will feel comfortable purchasing Product(s) of any value and choose the payment terms of their own choosing.
The Customer can avail 3 to 36 months EMI facility depending on their bank’s Credit Card. In case of EMI, the charge prescribed by the bank will be added. EMI plans are viewable after Checkout in the Pay Invoice section when an order needs to be paid and the total bill will be over BDT 10,000.
Banks Supporting EMI on The Website
If any of the banks listed below has a Credit Card, then the Customer can buy their desired Product(s) through that card (according to the limit) with easy EMI facility. EMI facilities with the aforementioned Banks are regulated as per their terms and conditions and these terms may vary from bank to bank.
The bank will give Customers the opportunity to pay the price of the Product(s) of their choice in 3 to maximum 36 months. For example, if a Customer wants to purchase an iPhone 12 from The Website with a cash value of BDT 88,000, they can pay the full amount of BDT 88,000 in installments.
EMI Conversion and Bank Statement Update
When transaction is made, the full amount gets deducted from the Customer’s account and stays in a freezing state, which gets adjusted after the EMI gets converted. The reflection of the EMI will seen in the Customer’s next billing cycle, when they will be charged the EMI amount and their credit limit will be reduced by the outstanding amount.
If a Customer does not receive an updated monthly bank statement reflecting their EMI transactions for the following month, they are requested to contact their issuing bank with the bank statement for further assistance. The bank will handle and resolve such issues from their end.
Convenience Fee Associated with EMI
It is important to note that the amount of money that the Customer will EMI using their Credit Card, may add some additional charges beyond the total value of the Product(s). So, if Customer wants to pay by EMI every month, they will have to pay some extra charges out of the total order amount.
As the concerned bank gives Customer the opportunity to pay it step by step, a convenience fee will be charged by banks and service providers to process the Customer’s payment and EMI.
How the EMI Procedure Works
During transaction, after inputting the Credit Card number, a box will appear where Customer needs to select the EMI tenure. After selecting the EMI tenure, the EMI will escalate to SSLCOMMERZ where Customer needs to perform SSLCOMMERZ after completing the EMI. The Customer need not contact the issuing bank to convert the transaction into EMI nor do they need to submit EMI documents.
Generally, the EMI conversion takes 7-10 working days. So, if a Customer’s purchase is not converted to EMI by 7 working days of their transaction date, they are requested to contact their issuing bank.
25 - Initial Shop Setup
Learn More about how to configure Settings for nag displays on Dashboard
This section describes in details on how to configure each of the settings for nag displays on dashboard.
List of Steps to Complete Shop Setup
In the Admin Panel dashboard, a series of nag displays will keep displaying, from where necessary settings for the Shop can be easily configured. So, detailed steps on how to configure each of these settings are explained below:
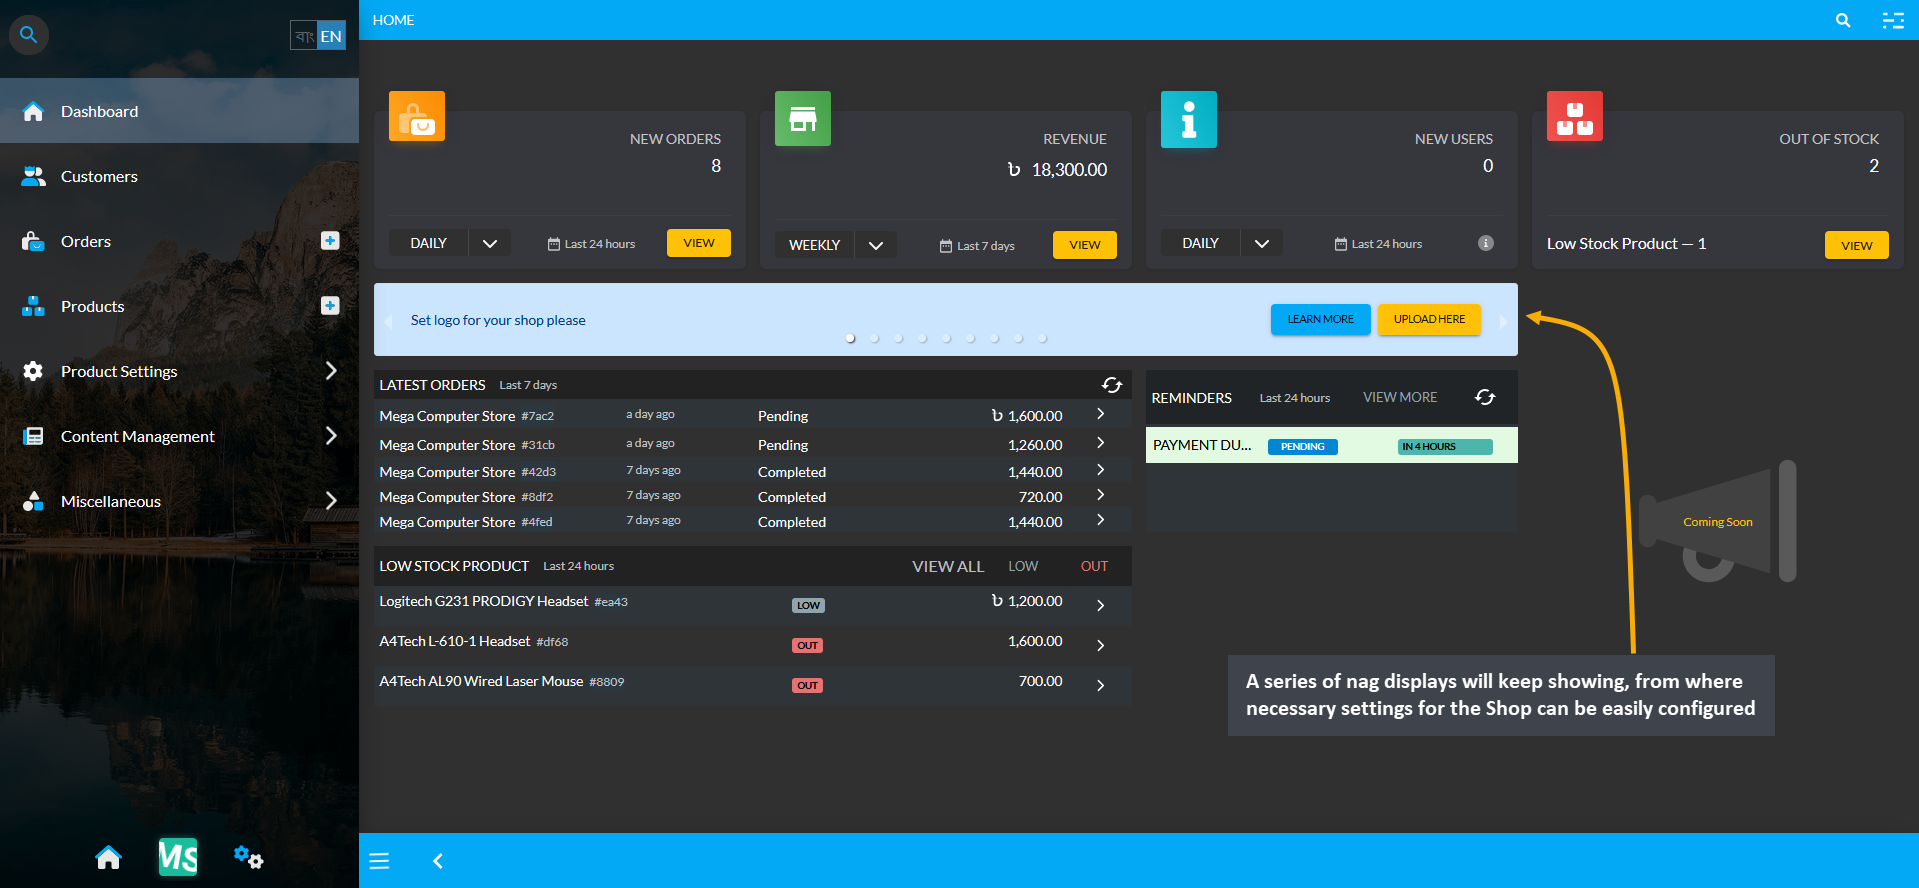
Set Logo for Shop
Setting up the basic information includes uploading a Shop Logo, Banner, and creating a Shop Name, Slogan, and Description. Click Next to proceed to subsequent steps for setting up business information for the Shop.

Set Shop Slogan
Setting up the basic information includes uploading a Shop Slogan. There are also subsequent steps for creating a Shop Name and Description, along with uploading a Shop Logo and Banner. Click Next to fill out more details.
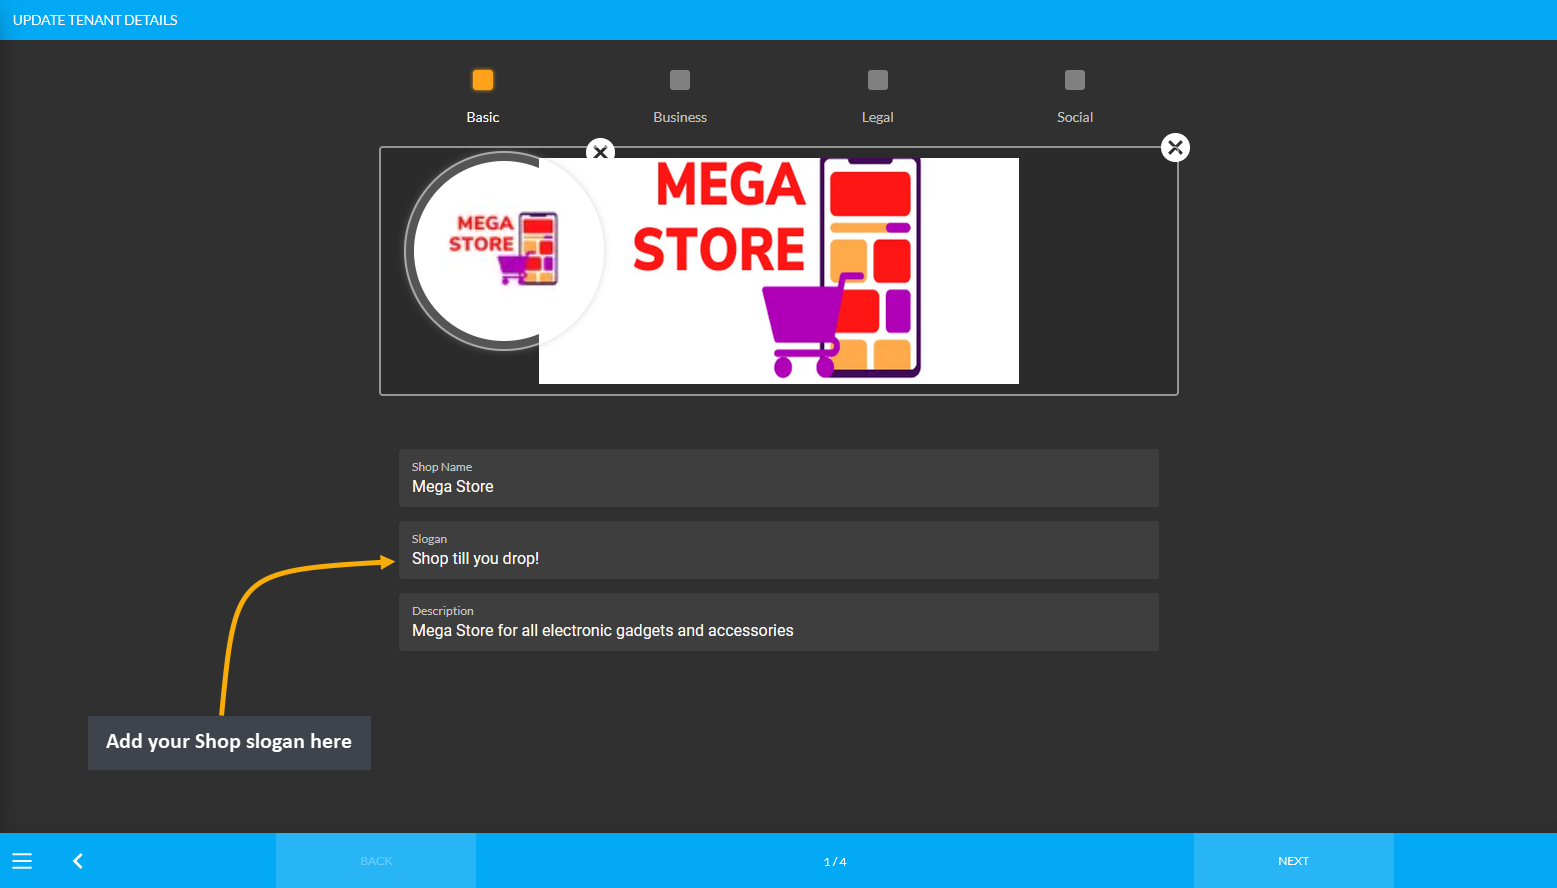
Set Support Phone Number
Another important step towards setting up the Tenant Account is filling out the social information of the Shop. To complete this step, add email address, support phone number, and other social media accounts as needed. Add a valid phone number to setup the Support Phone Number. Click Submit to save all the information successfully.

Upload Tax Identification Number (TIN)
Setup legal information by adding Tax Identification Number (TIN) and uploading a TIN Certificate according to the government law. The TIN Certificate needs to be uploaded in PDF format and after it is successfully uploaded, a Success button will be visible which will indicate that the TIN number has been added to the Shop.

Update Trade License
Setup legal information by adding Trade License number and uploading the document according to government law. The file needs to be uploaded in PDF format and upon successful upload of this document, a green Success button will be visible which will indicate that the Trade License has been added to the Shop.

Setup Shop Facebook Page
It is important for the Shop Owner to add Facebook Page ID for setting up the Messenger widget on The Website. So, copy the Facebook Page ID from Facebook and input it in the field as shown in screenshot below.
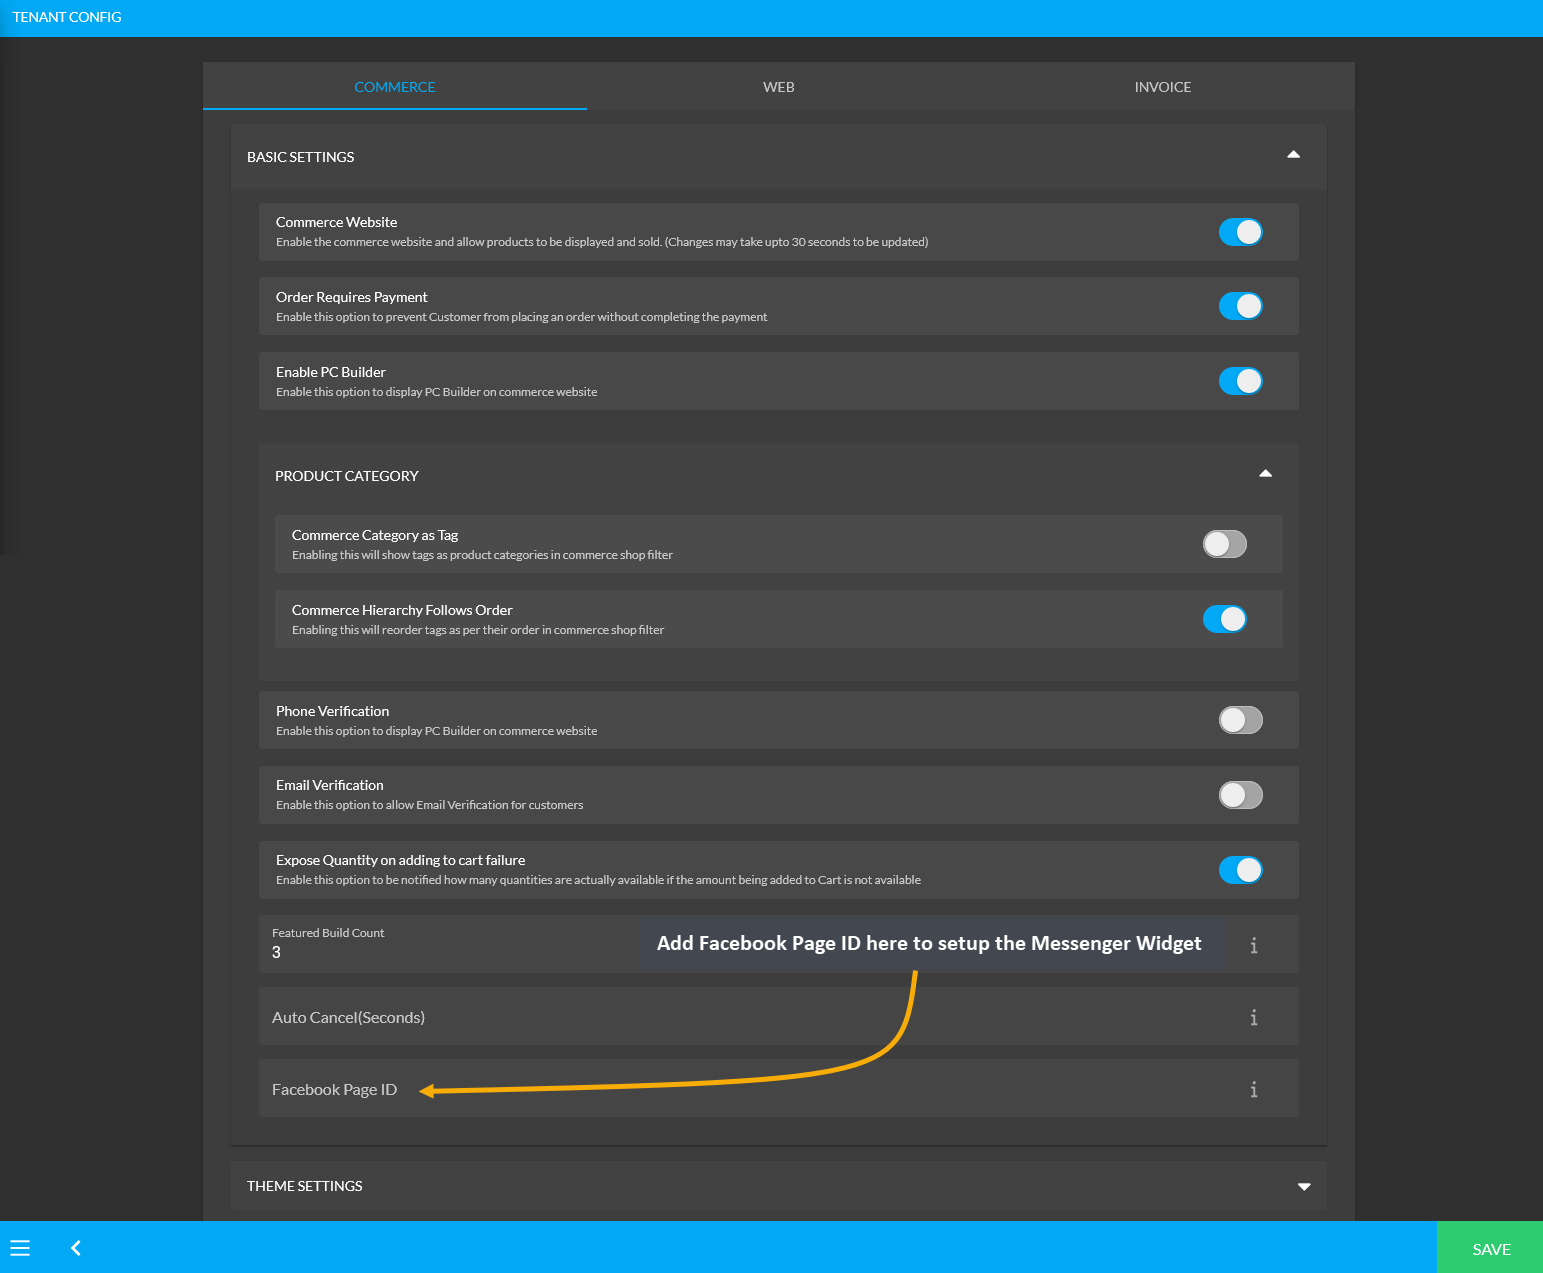
The second step for setting up the Shop Facebook Page is to copy the shop URL link from the Website and paste it on the Website section under Facebook Page Info on Facebook Page Manager as shown in the example. Now, both the shop and the Facebook Page ID will be linked to initiate the Messenger widget on the Website.
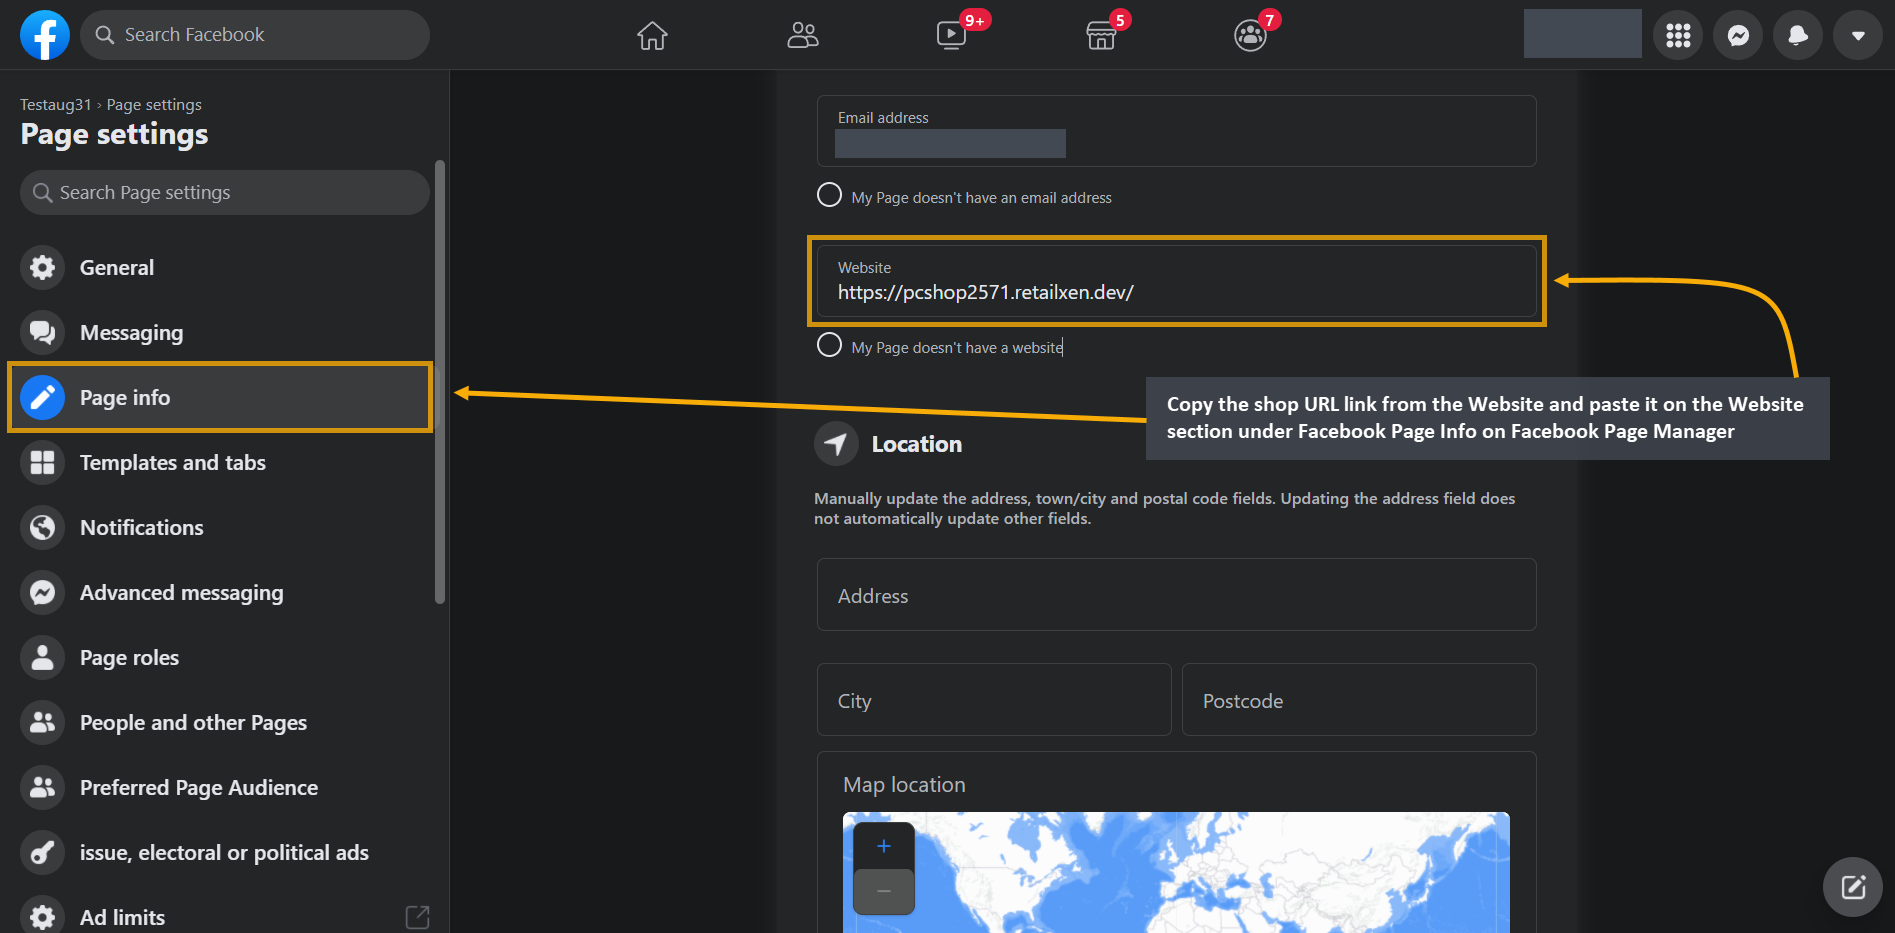
Set Cash on Delivery Payment Gateway
To setup the payment gateway for Cash on Delivery, first set a Minimum and Maximum amount for Customer’s payment. Use Enable button to activate the gateway. Then, use the toggle button to enable Fee and set the Fee Value. There is a box to enable and set Display Instruction for Customer’s convenience to pay the cash during order delivery at their address. Click Save to confirm all changes and enable the gateway.

Image 1: Setup the Cash on Delivery with minimum and maximum amounts, fees, and display instructions.
Configure Payment Gateways from Gateways under All Settings tab. The Payment Gateways that are embedded in the system are Cash, Cheque, Cash on Delivery, Bank Transfer, Credit Card, Ledger, PortWallet, SSLCommerz, Nagad, Nagad (Manual), Bkash, and Bkash (Manual). Shop Owners can activate or enable them whenever needed.
Click the Configure button beside each Payment Gateway to configure them. If any gateway is enabled, they will be marked as green, if any gateway is disabled, they will be marked as red. So, the Shop Owner can enable and disable any payment gateway to allow Customers to make payment via any of these gateways on The Website.
For the configuration of Payment Gateways, there are options to setup display name, minimum amount required, maximum amount allowed, fees, display instruction, QR Code, test API credentials, bank account (bank transfer), allowed currencies, and EMI (for credit cards) etc. One payment gateway configuration will vary from another.

Image 1: Click on the Configure button to setup various Payment Gateways from the list.
Bank Transfer
The payment gateway for Bank Transfer can be set with a Minimum and Maximum amount. Use Enable button to activate the gateway. There is a toggle button to enable Fee and set a Fee Value. Click Add Bank Account button to add bank details. Finally, set the Display Instruction and click Save to confirm all changes and enable the gateway.

Image 1: Setup Bank Transfer with a minimum and maximum amount, fees, and detailed bank information.
Within Bank Transfer, clicking on the Add Bank Account or Edit button will open a pop-up from where the Shop Owner can setup their bank details. The bank details include setting up bank name, bank account name, bank account number, bank branch, bank swift, bank routing number, IBAN and account type.

Image 2: Setup Bank details with Name, Account Name, Type, Number, Branch, Swift, Routing Number, and IBAN.
BKash (Manual)
The payment gateway for Bkash (Manual) can be set with a Minimum and Maximum amount. Use Enable button to activate the gateway. There is a toggle button to enable Fee and set a Fee Value. Enter BKash phone number and select Merchant Payment or Send Money. Upload QR Code using a screenshot downloaded from the phone and set Display Instruction below as shown. Click Save to confirm all changes and enable the gateway.

Image 1: Setup BKash (Manual) with amounts, fees, BKash phone number, payment mode, and QR code.
Downloading QR Code from BKash
In order to upload QR Code for activating BKash Manual Gateway, there are few steps to follow. First, User needs to login to their BKash Account using Account Number and Pin. Then, they need to click the avatar on top of the screen. This will redirect to the screen to download the QR Code to upload in BKash (Manual) payment gateway.

Image 1 and 2: Logging into BKash Account and selecting avatar to redirect to downloading QR Code.
The next page will recirect to the User’s unique QR Code. Click the Download QR Code button which will redirect to the downloadable BKash QR Code image. Now, get this file on computer with email, message, or Google Drive so that it can be downloaded. Then, upload the BKash QR Code while activating BKash payment gateway.

Image 3 and 4: Click Download QR Code Button and get the QR Code image on computer via email or message.
Ordering on Website with or without BKash QR Code
The Bkash (Manual) Payment Gateway can be created both with QR Code (which can be downloaded from phone) that can later be uploaded while activating BKash payment gateway or without QR Code image. Please note that, when paying with Bkash (Manual) for ordering on The Website, this is how the BKash payment gateway will show with the QR Code and without the QR Code.

Image 1: Bkash payment with QR Code when placing Order and completing payment on The Website.

Image 2: Bkash payment without QR Code when placing Order and completing payment on The Website.
Nagad (Manual)
The payment gateway for Nagad (Manual) can be set with a Minimum and Maximum amount. Use Enable button to activate the gateway. There is a toggle button to enable Fee and set a Fee Value. Enter Nagad phone number and select Merchant Payment or Send Money. Upload QR Code using a screenshot downloaded from the phone and set Display Instruction below as shown. Click Save to confirm all changes and enable the gateway.

Image 1: Setup Nagad (Manual) with amounts, fees, BKash phone number, payment mode, and QR code.
Ordering on Website with or without Nagad QR Code
The Nagad (Manual) Payment Gateway can be created both with QR Code (which can be downloaded from phone) that can later be uploaded while activating Nagad payment gateway or without QR Code image. Please note that, when paying with Nagad (Manual) for ordering on The Website, this is how the Nagad payment gateway will show with the QR Code and without the QR Code.

Image 2: Nagad payment with QR Code when placing Order and completing payment on The Website.

Image 3: Nagad payment without QR Code when placing Order and completing payment on The Website.
Cash On Delivery
To setup the payment gateway for Cash on Delivery, first set a Minimum and Maximum amount for Customer’s payment. Use Enable button to activate the gateway. Then, use the toggle button to enable Fee and set the Fee Value. There is a box to enable and set Display Instruction for Customer’s convenience to pay the cash during order delivery at their address. Click Save to confirm all changes and enable the gateway.

Image 1: Setup the Cash on Delivery with minimum and maximum amounts, fees, and display instructions.
On Credit (Due)
To setup the payment gateway for On Credit (Due), first set a Minimum and Maximum amount for Customer’s payment. Use Enable button to activate the gateway. Then, use the toggle button to enable Fee and set the Fee Value if any additional fee needs to be charged. Click Save to confirm all changes and enable the gateway.

Image 1: Setup the On Credit (Due) with minimum and maximum amounts and fees if applicable.
Credit Card, Cash, or Cheque
To setup the payment gateway for Credit Card, Cash, or Cheque, first set a Minimum and Maximum amount for Customer’s payment. Use Enable button to activate the gateway. Set the Display Instruction for these gateways. Click Save to confirm all changes and enable the gateway.

Image 1: Setup the Credit Card with minimum and maximum amounts and display instructions.

Image 2: Setup the Cash with minimum and maximum amounts and display instructions.

Image 3: Setup the Cheque with minimum and maximum amounts and display instructions.
BKash
To setup the payment gateway for BKash, first setup a Minimum and Maximum amount for Customer’s payment. Use Enable button to activate the gateway. Then, use the toggle button to enable Fee and set the Fee Value. In the section of Test API Keys, copy-paste the test API Keys from BKash to allow Customers to pay for their Products.
Providing these API keys will allow to verify them with BKash automatically. Finally, there is a box to set Display Instruction as shown in the example screenshot. Click the Save button after all the steps are completed.

Image 1: Setup the BKash with minimum and maximum amounts, fees, Test API keys, and display instructions.
Nagad
To setup the payment gateway for Nagad, first setup a Minimum and Maximum amount for Customer’s payment. Use Enable button to activate the gateway. Then, use the toggle button to enable Fee and set the Fee Value. In the section of Test API Keys, copy-paste the test API Keys from Nagad to allow Customers to pay for their Products.
Providing these API keys will allow to verify them with Nagad automatically. Finally, there is a box to set Display Instruction as shown in the example screenshot. Click the Save button after all the steps are completed.

Image 1: Setup the Nagad with minimum and maximum amounts, fees, Test API keys, and display instructions.
PortWallet
Configure the payment gateway for PortWallet by setting a Minimum and Maximum amount for the Customer’s payment. Use Enable button to activate the gateway. Then, use the toggle button to enable Fee and set Fee Value. Within the Test API Keys section, copy-paste test API Keys from PortWallet to allow Customers to pay for their Products. Also, select the monthly EMI that will be applicable.
Providing these API keys will allow to verify them with PortWallet automatically. Finally, there is a box to set the Display Instruction as shown in the example screenshot. Click the Save button after all steps are done.

Image 1: Setup PortWallet with minimum and maximum amounts, fees, Test API keys, and display instructions.
SSLCommerz
Configure the payment gateway for SSLCommerz by setting up a Minimum and Maximum amount for Customer’s payment. Use Enable button to activate the gateway. Then, use the toggle button to enable Fee and set Fee Value. Within the Test API Keys section, copy-paste test API Keys from SSLCommerz to allow Customers to pay for their Products. Also, select the monthly EMI that will be applicable.
Providing these API keys will allow to verify them with SSLCommerz automatically. Finally, there is a box to set the Display Instruction as shown in the example screenshot. Click the Save button after all steps are done.

Image 1: Setup SSLCommerz with minimum and maximum amounts, fees, Test API keys, and display instructions.
Configure Shipping Gateways from Gateways under All Settings tab. The Shipping Gateways that are embedded in the system include RedX, FedEx, UPS, PaperFly, Aramex, In Store Pickup, Direct, DHL, Now, Ecourier, GoGoBangla and Koopon. Shop Owners can activate or enable and disable them whenever needed.
Click the Configure button beside each Shipping Gateway to configure them. If a gateway is enabled, they will be marked as green, if any gateway is disabled, they will be marked as red. For configuration, there are options to setup gateway name, maximum value of shipping, display instruction, minimum weight, maximum weight, and fees. Click Save when all values are set. One shipping gateway will vary from another.

Image 1: Click on the Configure button to setup various Shipping Gateways from the list.
Setup all Shipping Carriers
Configure the shipping gateway for all Shipping Carriers like RedX, FedEx, UPS, PaperFly, Aramex, Direct, Ecourier, DHL, Now, Koopon, and GoGoBangla by setting a Maximum value of shipping fee. Use toggle button to enable Fee and set the Fee Value as Flat or Weight based. Then, set a Minimum Weight and Maximum Weight in Grams for Product(s). There is also a box to set Display Instruction. Click the Save button after all steps are done.

Setup Policy Pages on Website
Configure Refund Policy Page
Having a Refund Policy is a great asset to win over Customers as it gives them security and increases trust in the Seller’s brand or business. Besides, Return Policy is a key factor for Customers making a purchasing decision. So, adding them to The Website will increase performance of Shop Owner’s Product(s).
Configure the Refund Policy Page by first by setting up the Name, Title, Subtitle, and Slug. After that, select all the necessary widgets. For instance, setup Name, Title, Subtitle, and Slug for the Text Widget. Input Button Link that will redirect visitors to that link and Button Text which will the function of the button to be displayed. Widget options include a box to add contents where policies can be added in details with headings and bullet points.
Click on the All Devices button to make the policy visible on Mobile, Tablet, MDPi, and HiDPi. In the similar way, other widgets can be added using the + button which allows adding multiple widgets to the Refund Policy Page. This sample Refund Policy Page can be used by Shop Owners as a guide.
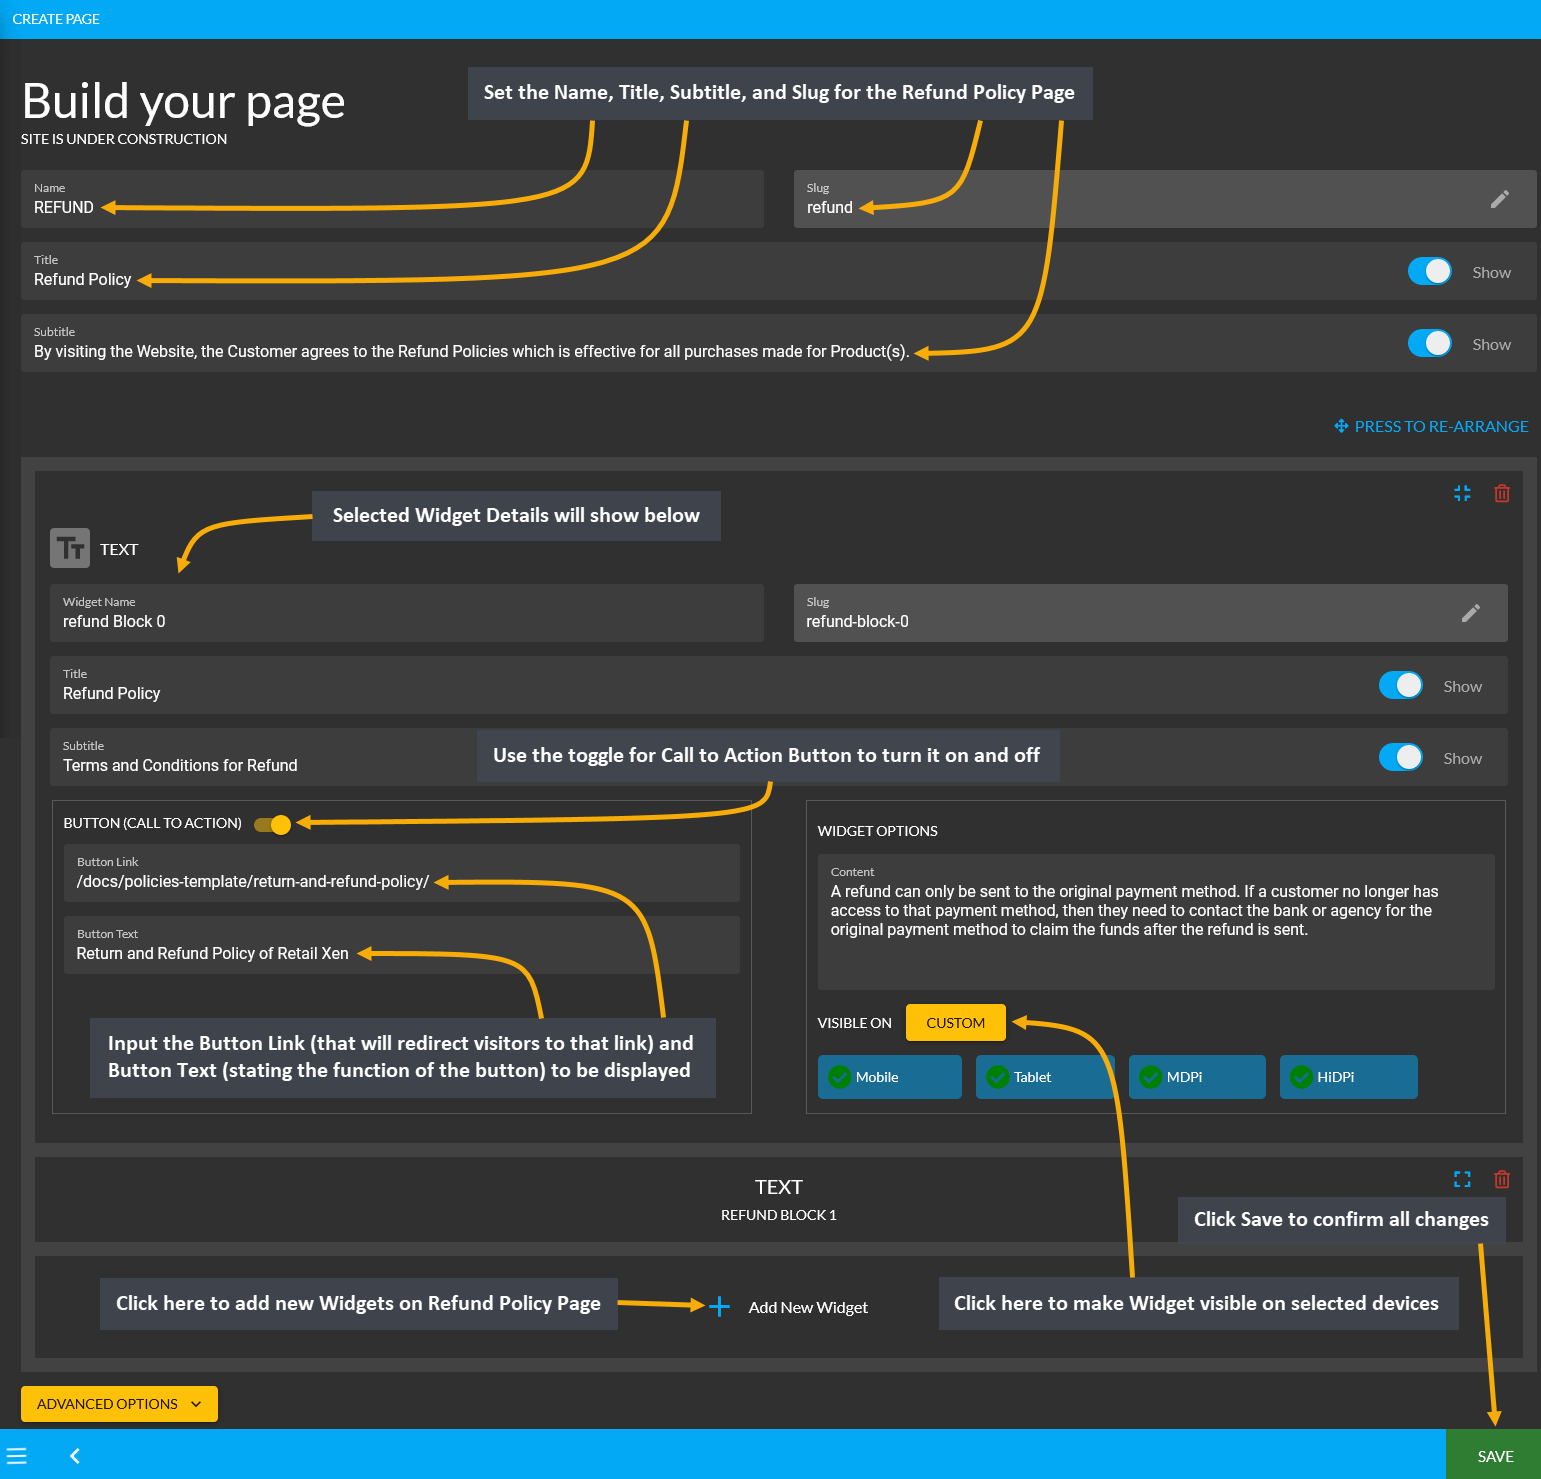
Configure Shipping Policy Page
A well-thought-out Shipping Policy will become an asset whenever the Customers will have questions about their Orders. Setup the Shipping Policy Page as a living document for business, one that can be updated and adjusted according to unforeseeable circumstances that may occur during the delivery of Product(s).
Configure the Shipping Policy Page by first by setting up the Name, Title, Subtitle, and Slug. After that, select all the necessary widgets. For instance, setup Name, Title, Subtitle, and Slug for the Text Widget. Input Button Link that will redirect visitors to that link and Button Text which will the function of the button to be displayed. Widget options include a box to add contents where policies can be added in details with headings and bullet points.
Click on All Devices button to make the policy visible on Mobile, Tablet, MDPi, and HiDPi. Similarly, other widgets can be added using the + button which allows adding multiple widgets to the Shipping Policy Page. This sample Shipping Policy Page can be used by Shop Owners as a guide.
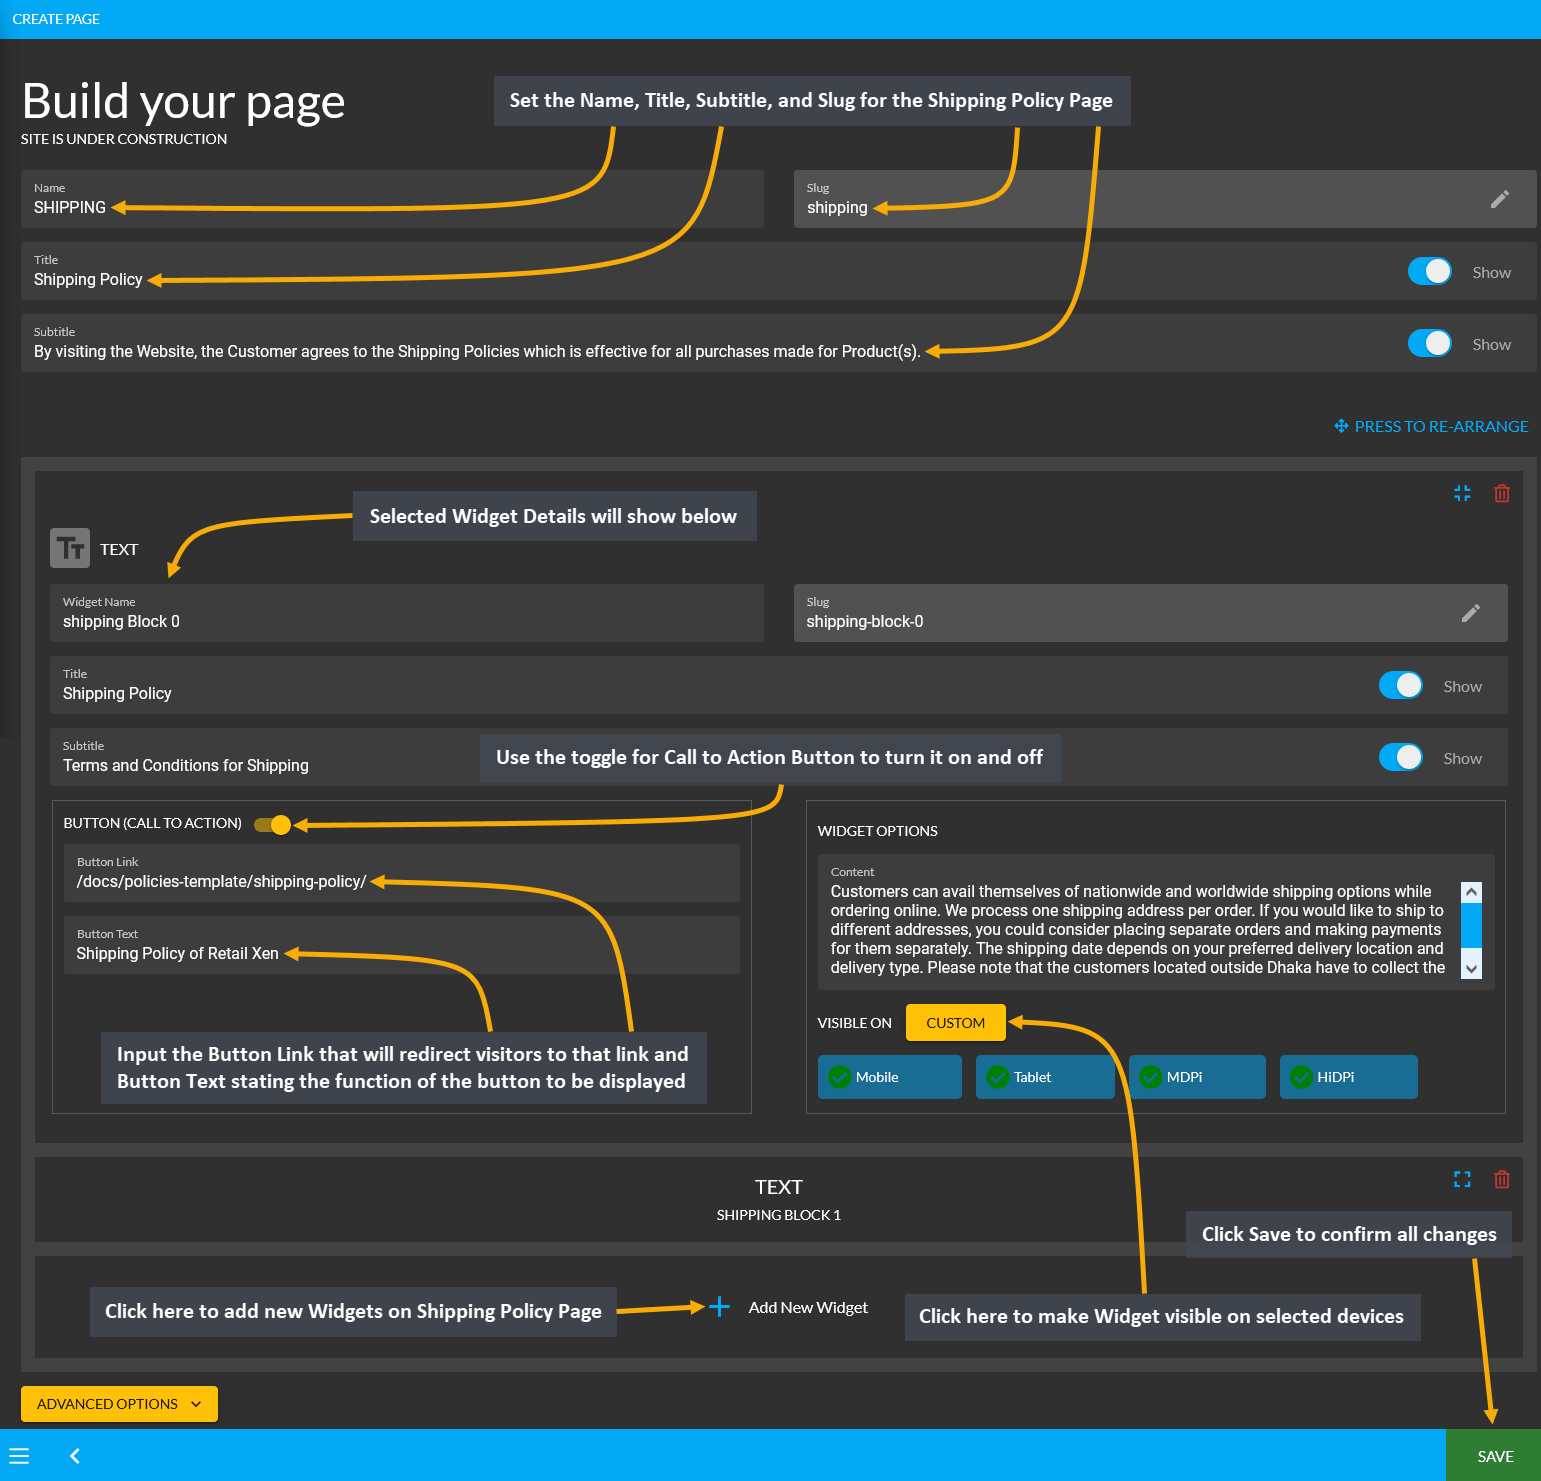
Configure EMI Policy Page
Configure the EMI Policy Page by first by setting up the Name, Title, Subtitle, and Slug. Then, select the necessary widgets. For instance, setup Name, Title, Subtitle, and Slug for the Text Widget. Input Button Link that will redirect visitors to that link and Button Text which will the function of the button to be displayed. Widget options include a box to add contents where policies can be added in details with headings and bullet points.
Click the All Devices button to make the policy visible on Mobile, Tablet, MDPi, and HiDPi. Similarly, other widgets can be added using the + button which allows adding multiple widgets to the EMI Policy Page. This sample EMI Policy Page can be used by Shop Owners as a guide.
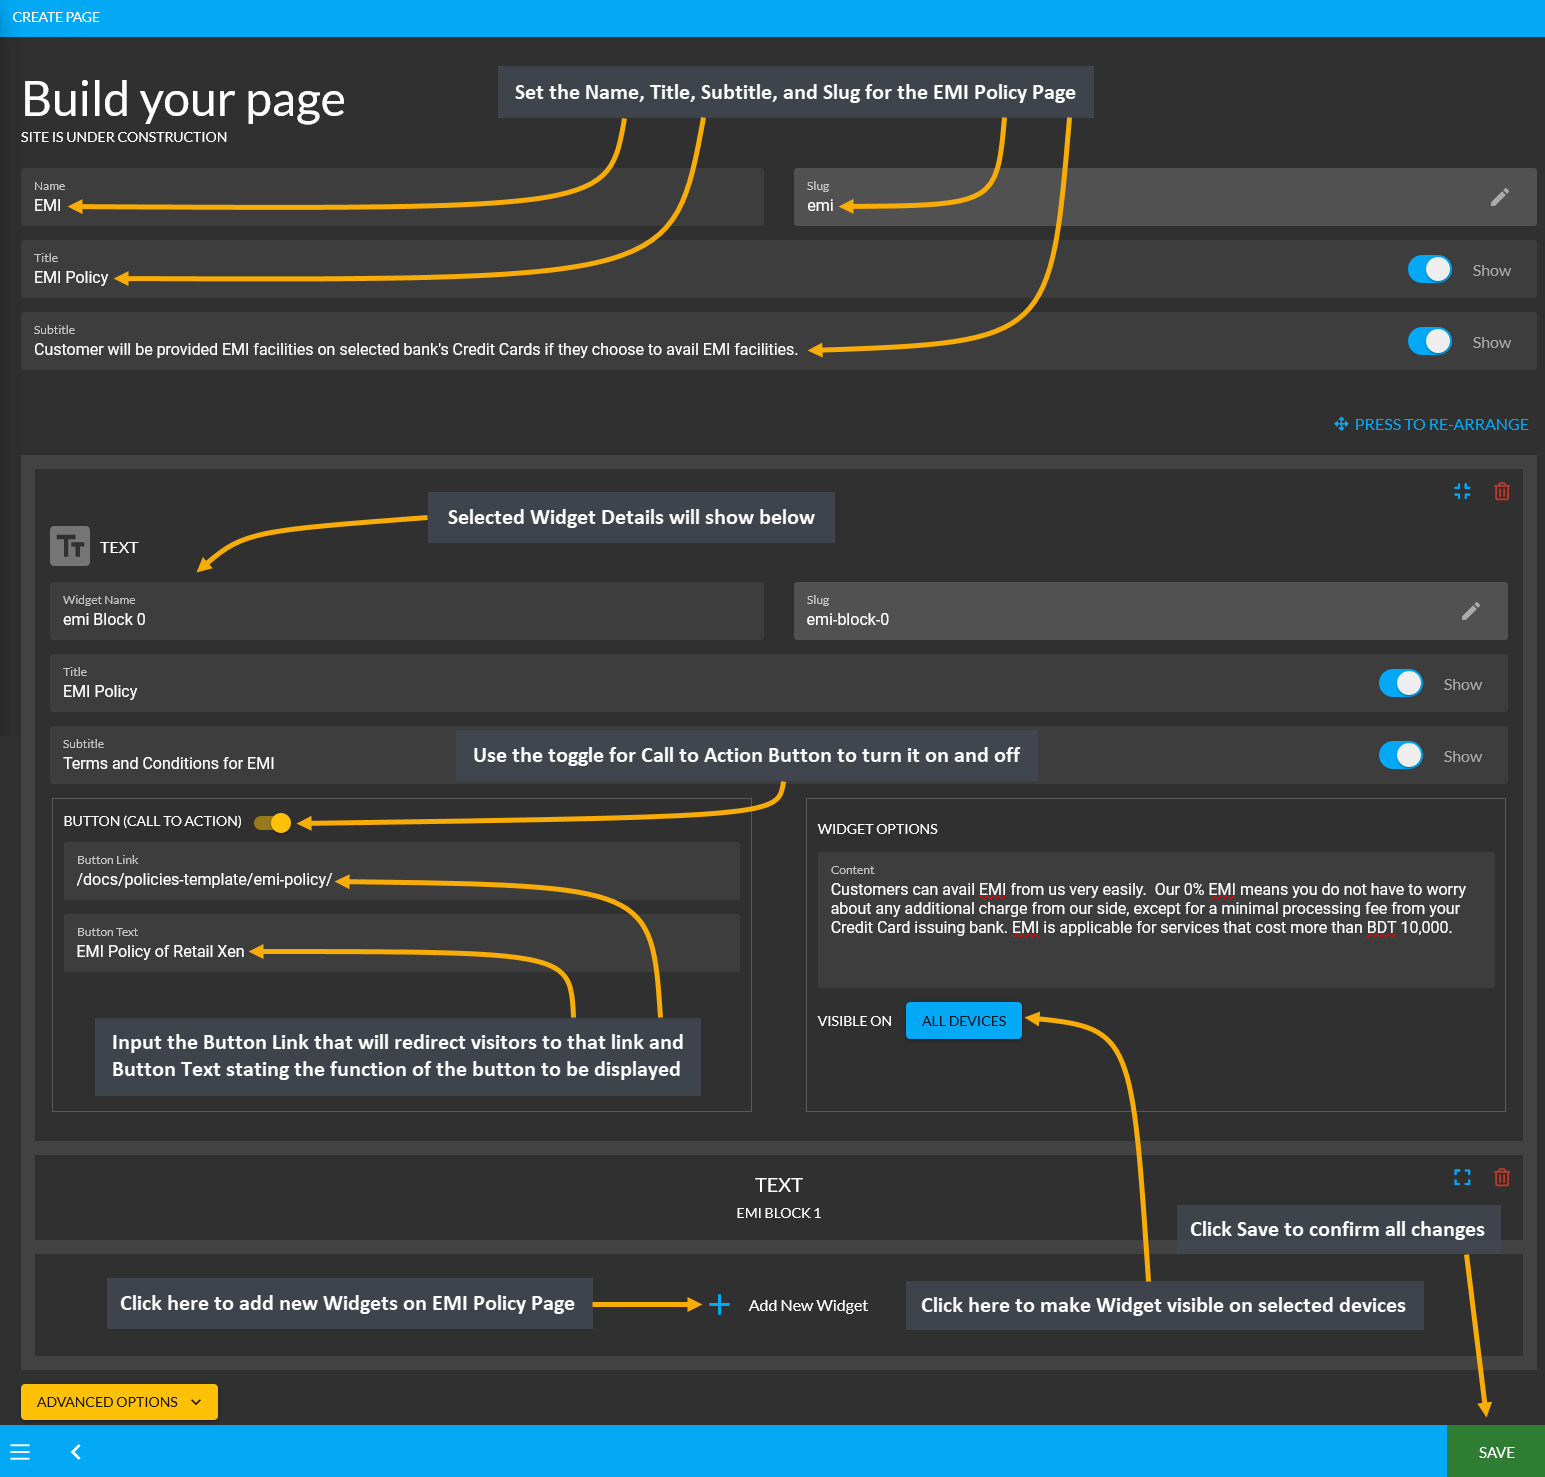
Configure Privacy Policy Page
The Privacy Policy is one of the most important legal agreement for any online business, regardless of where it is operated: on website, mobile app, desktop app and so on. Customers are very much aware of their online privacy and the mass collection of their data. Therefore, a clear, up-to-date and easily accessible privacy policy is a great tool for demonstrating your business’ principle of transparency and to build user trust.
Configure the Privacy Policy Page by first by setting up the Name, Title, Subtitle, and Slug. Then, select all necessary widgets. For instance, setup Name, Title, Subtitle, and Slug for the Text Widget. Input Button Link that will redirect visitors to that link and Button Text which will the function of the button to be displayed. Widget options include a box to add contents where policies can be added in details with headings and bullet points.
Click the All Devices button to make the policy visible on Mobile, Tablet, MDPi, and HiDPi. Similarly, other widgets can be added using the + button which allows adding multiple widgets to the Privacy Policy Page. This sample Privacy Policy Page can be used by Shop Owners as a guide.
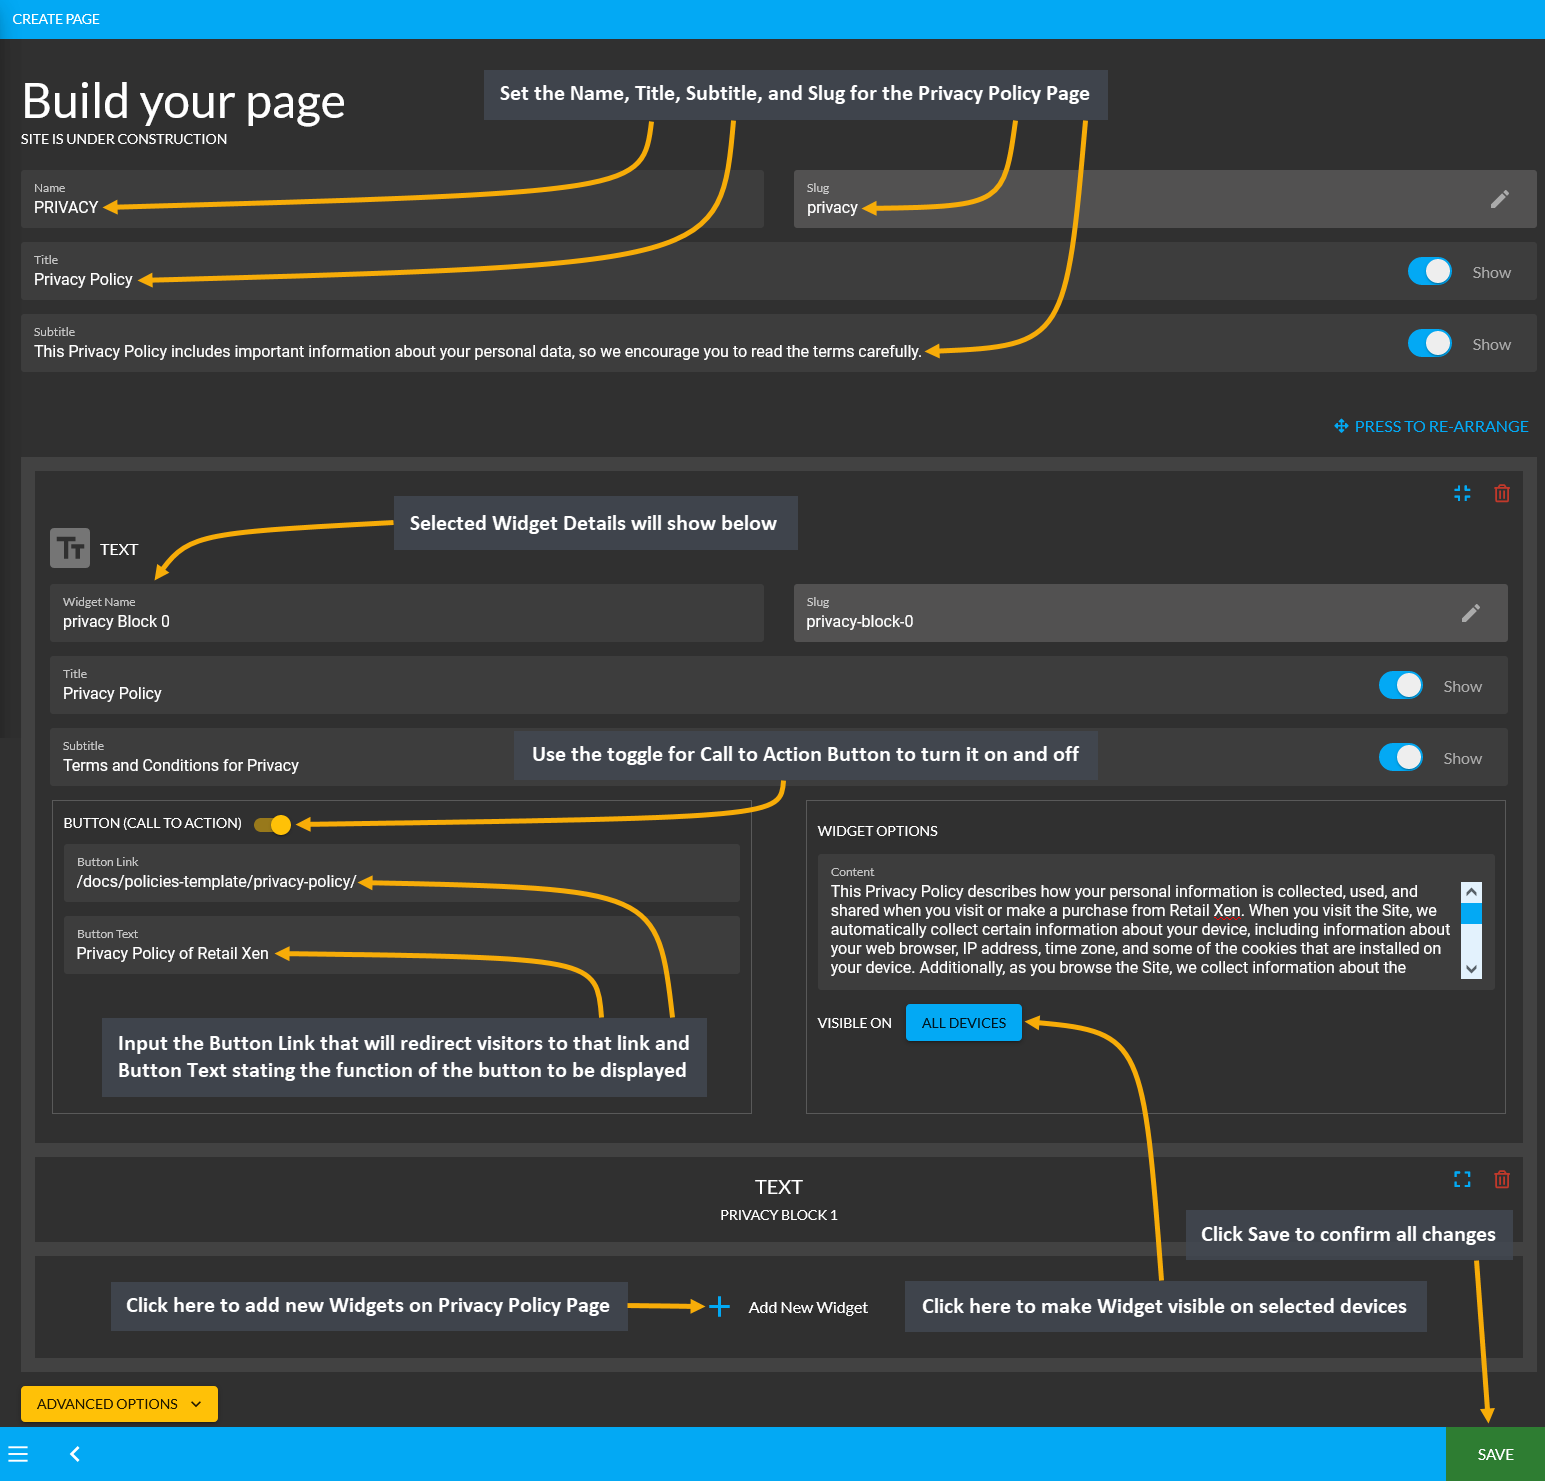
Update Branch Details and Schedule
Every Shop will have different Branches on various locations. For this reason, the Admin Panel include options to create Branches. Under Update Branch, the Shop Owners can set Schedule with business hours for Customers to visit and make a Product purchase. The first field to fill out for the Branch is the Branch Name.
Below is the Gallery where Shop Owners can add photos of their Branch outlets with Add New Gallery option. Add multiple images for Branch gallery. Then, there are two toggle buttons to set Branch as Office or Warehouse. Next, the Shop Owner can select if their Outlet is Point of Sales or Restaurant that best describes the Branch.
Then, fill out the email address, phone number, and detailed address of the Branch. Then, set the Branch operating Schedule for Customers to visit or make a purchase. Set business days and holidays with Start and End times. Use the toggle button to show when the Branch is open or closed. Add Primary Note or Secondary Note as needed.

Add Branch Address
Within Branch Settings to Update Branch, clicking the Edit icon beside the Add Address box will open a pop-up where Branch address details needs to be filled out. From here, fill out the Label, Address, Area, City, Country, and Zip Code. Click Submit to save all changes. It will redirect to the main page to update rest of the details.

26 - Ledger
Learn how to configure Settings for Ledger, Credit Customer, and Credit Supplier.
What is Ledger?
Ledger is like a complete transaction history of day-to-day busienss. The Shop Owners can decide to grant any Customer Credit Limit with which they can buy Product(s) from the Shop Owner that will reflect in their Ledger. Shop Owners can only manually provide Credit Limit to Customers from the Admin Panel, but customers cannot self checkout using the provided Credit Limit in The Website.
So, among three Customer types, only Credit Customer and Credit Supplier has Credit Limit and they can use On Credit (Due) to purchase Products. The Regular Customer does not have a Credit Limit and they cannot use On Credit (Due) to purchase Products. However, they can purchase Products from the Website using all the other types pf Payment Methods like Cash, Cash On Pickup, Cheque, Credit Card, SSL Commerz, PortWallet, Bank Transfer, Nagad, and BKash.
| Customer Types on the Admin Panel: |
|---|
| Regular Customers: Can purchase Products using different Payment Gateways except On Credit (Due). |
| Credit Customers: Are given a Credit Limit through which they can buy Products with On Credit (Due). |
| Credit Suppliers: Can both buy and sell Products with Credit Limit and all other Payment Gateways. |
Credit Customers
Customers who are granted an amount of Credit Limit will only turn into Credit Customers which differentiates them from regular Customers. The list of Credit Customers can be found under Customers module where the issued Credit Limit will be visible for each Credit Customer, i.e. here Farmgate PC Retailers has a Credit of 15,000 BDT. Check their Credit Information by clicking on View that will redirect to the Customer Dashboard.
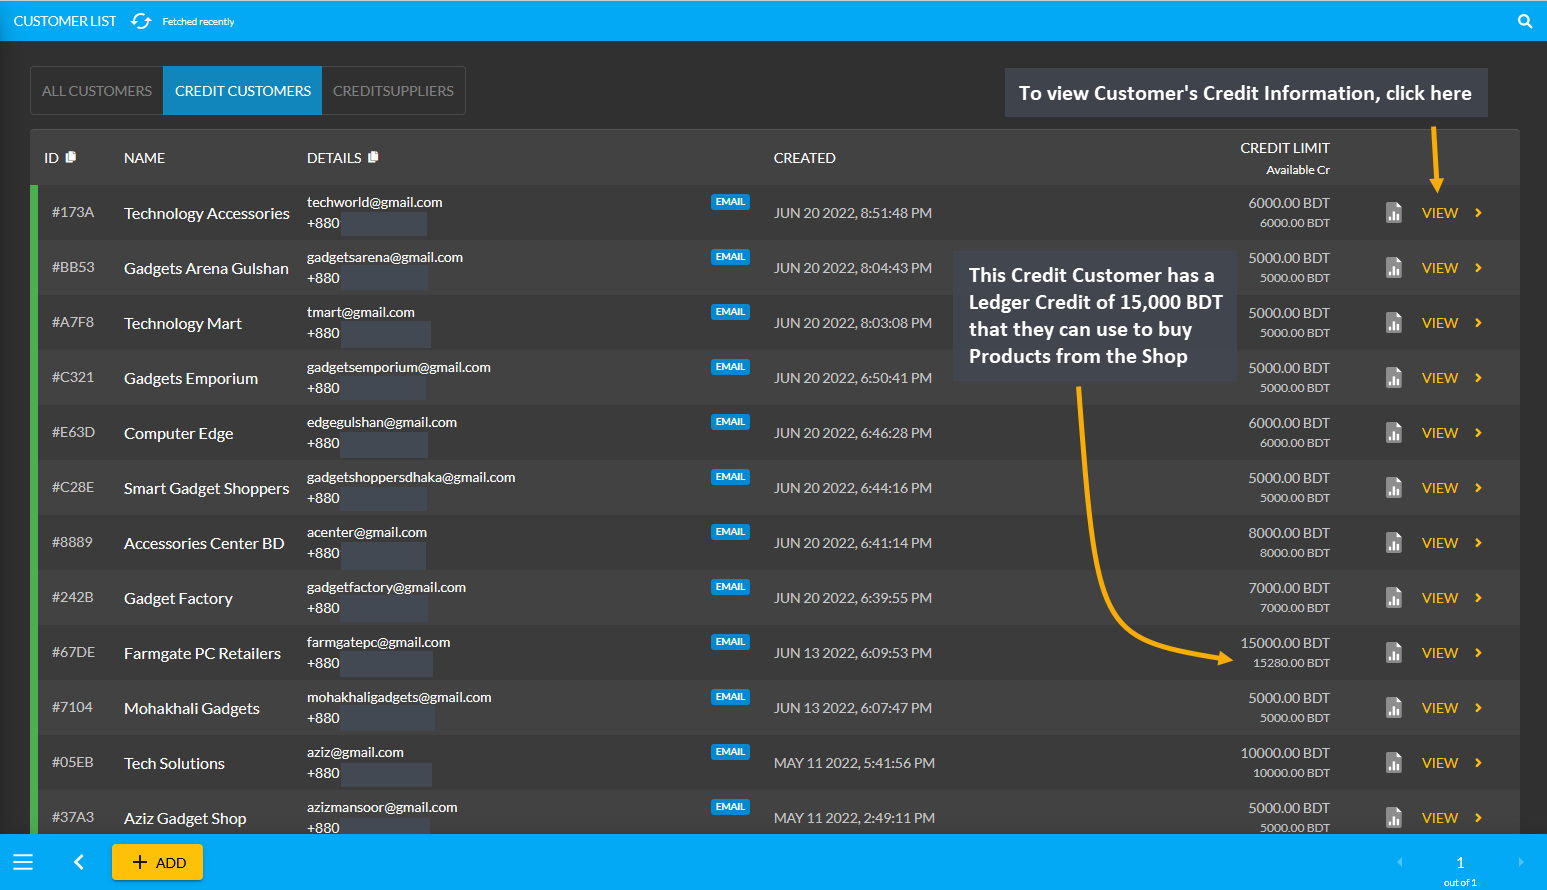
Creating a Credit Customer
Credit Customer can be created after a New Order is placed for a Customer. First, click on the Orders tab, which will open a New Cart to place New Order. Now, fill out the Customer information with name, phone, email, and shipping address. Then, add Product(s) to the Cart and click Proceed as shown in the example screenshot below:
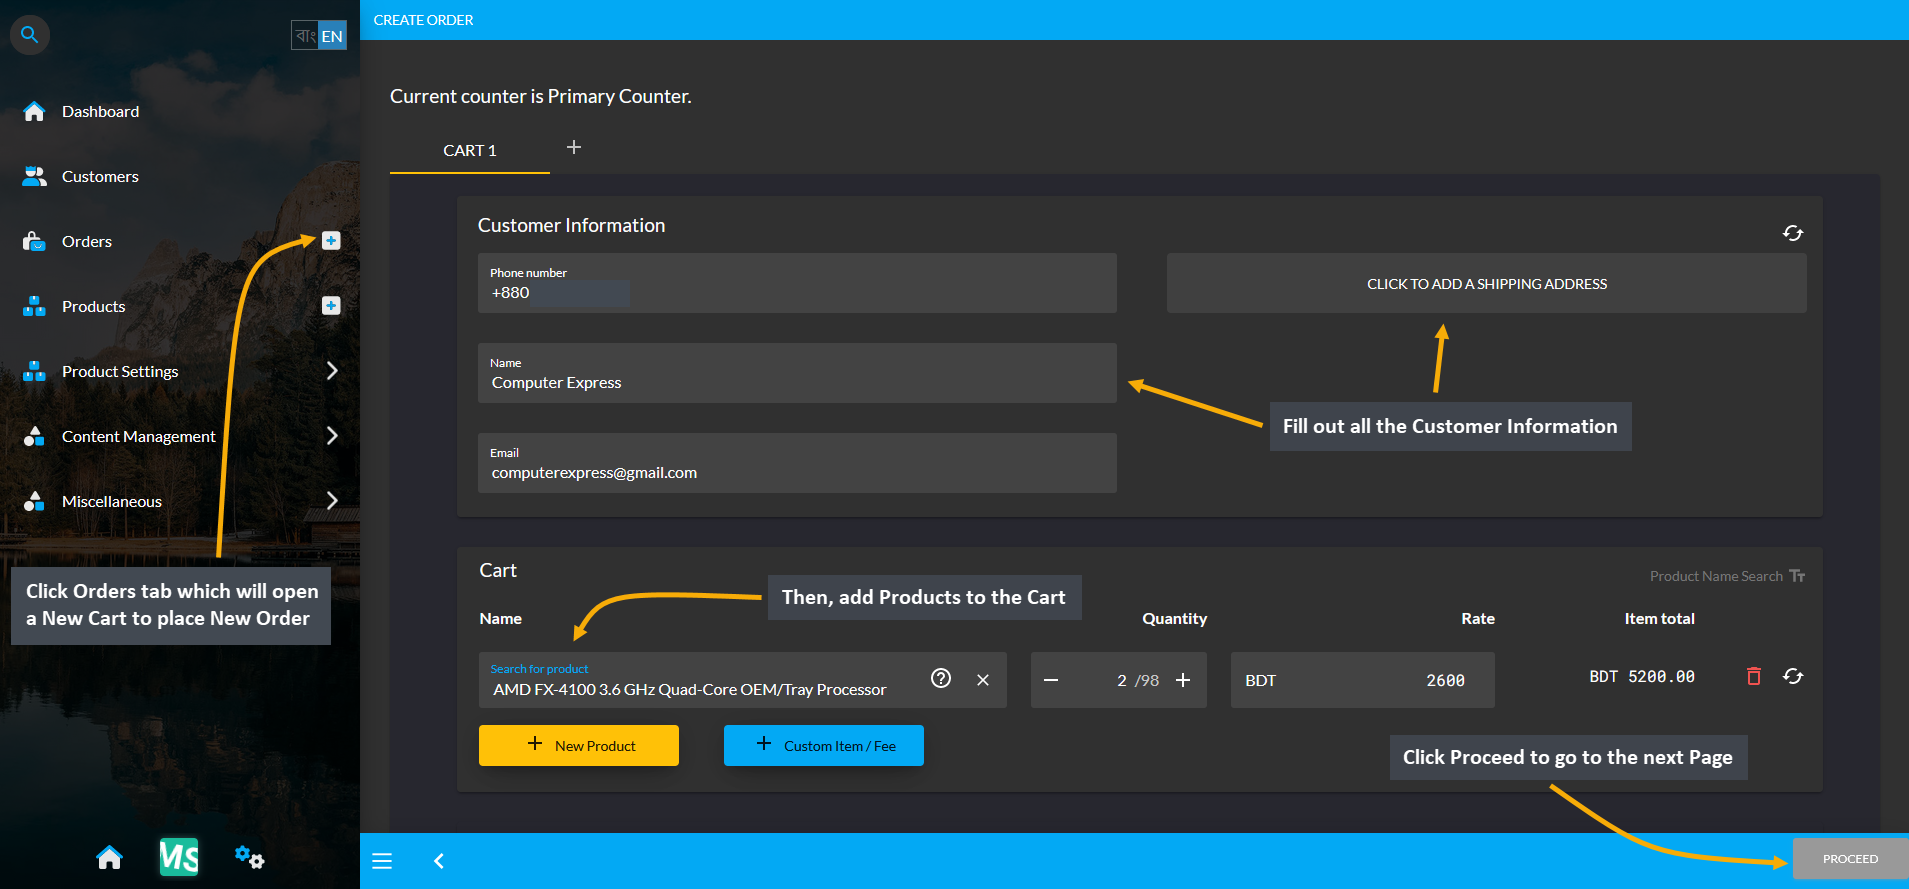
In the next Page, select from the Shipment Options and Payment Options and click Confirm Order. As a result, a New Order will be placed and a New Customer will be created that can be converted into a Credit Customer.
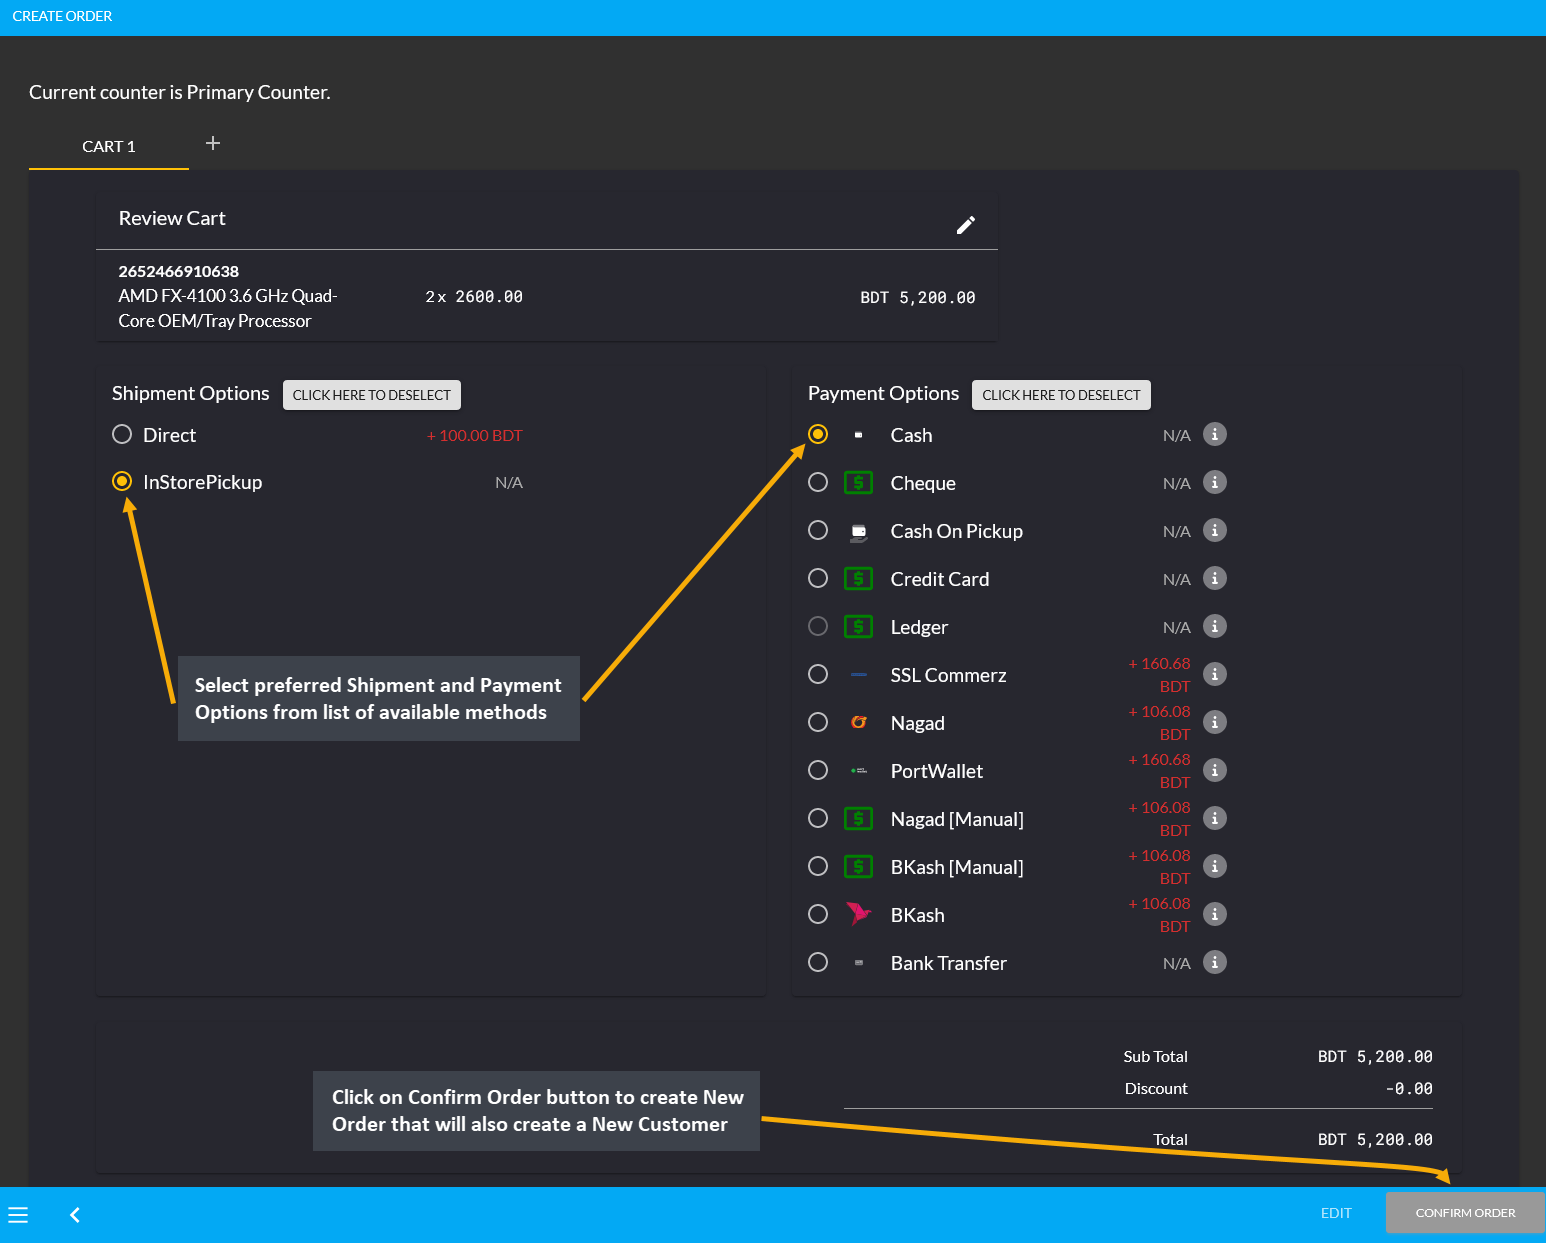
The New Customer will now be enlisted under the All Customers List. To create a Credit Customer, click the View button that will redirect to the Credit Information section on the Customer Dashboard.
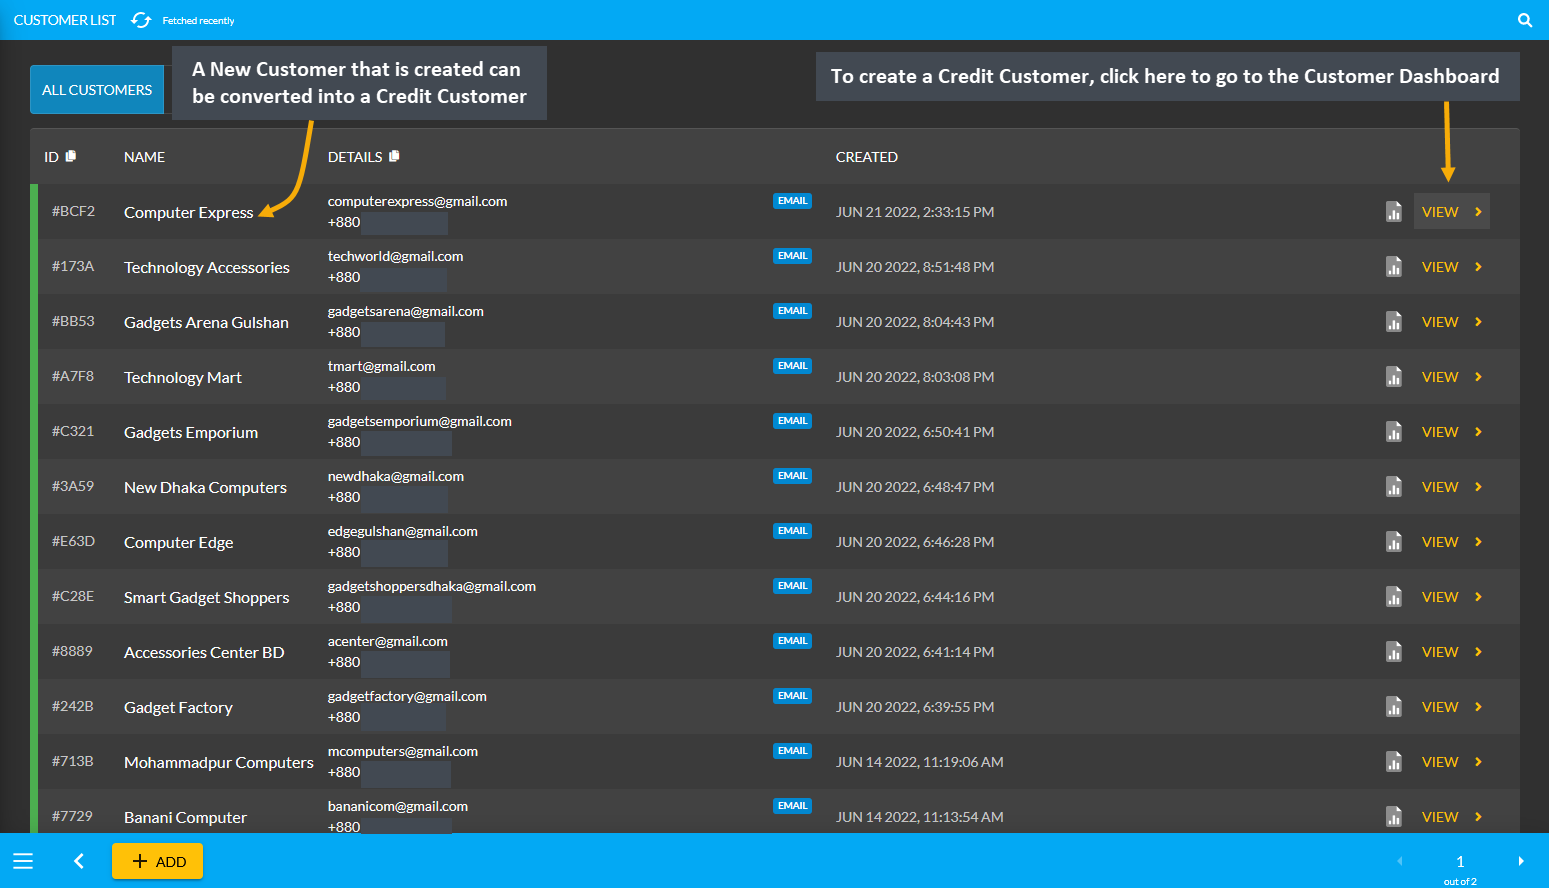
There is a Credit Information section in the Customer Dashboard that will display the Customer’s Credit balance. For instance, the Shop Owner trusts this Customer Computer Express (in the example), and wants to give them a Credit Limit of 15,000 BDT. To do this, the Shop Owner needs to click on the Edit icon as shown in the screenshot to open a new pop-up through which they can provide any amount of Credit Limit to this Customer.

Clicking the Credit Limit icon will open a pop-up with the Customer’s details. There is a box for Credit Limit, click on it and input 15,000 BDT to provide this Credit Limit to the Customer. Also, fill out the Company Name and turn on the toggle Allowed to Use Credit to convert this Customer into a Credit Customer. Now, this Credit Customer Computer Express will be able to make purchases with Credit Limit of worth 15,000 BDT without paying upfront. The final action is to click on the Submit button to save all the changes as shown in the screenshot below.

Being converted into a Credit Customer, this Customer now has a Credit Limit of 15,000 BDT. They will be able to spend this Credit Limit to make purchases without instantly paying. The Credit Limit spent will show within the Credit Used section. Customer can restore their Credit Limit of 15,000 BDT back to the Shop Owner by settling Ledger through different Payment Gateways which will clear out the Credit Used section back to 0.00 BDT.

However, this Credit Limit can only be used by Customer for In Store Pickup and can be used in transaction only from the Admin Portal. The Shop Owner and their staff can only use this Credit Limit for Credit Customer during making payments with On Credit (Due) Payment Gateway for Customer’s Product purchase for In Store Pickup.
View Invoices Paid with Credit and other Payment Methods
To view all the individual invoices that are paid with Credit and other Payment Methods, click on the View Invoices button. On the otherhand, click on Ledger Breakdown button to view details of Credit and Payment Transactions.
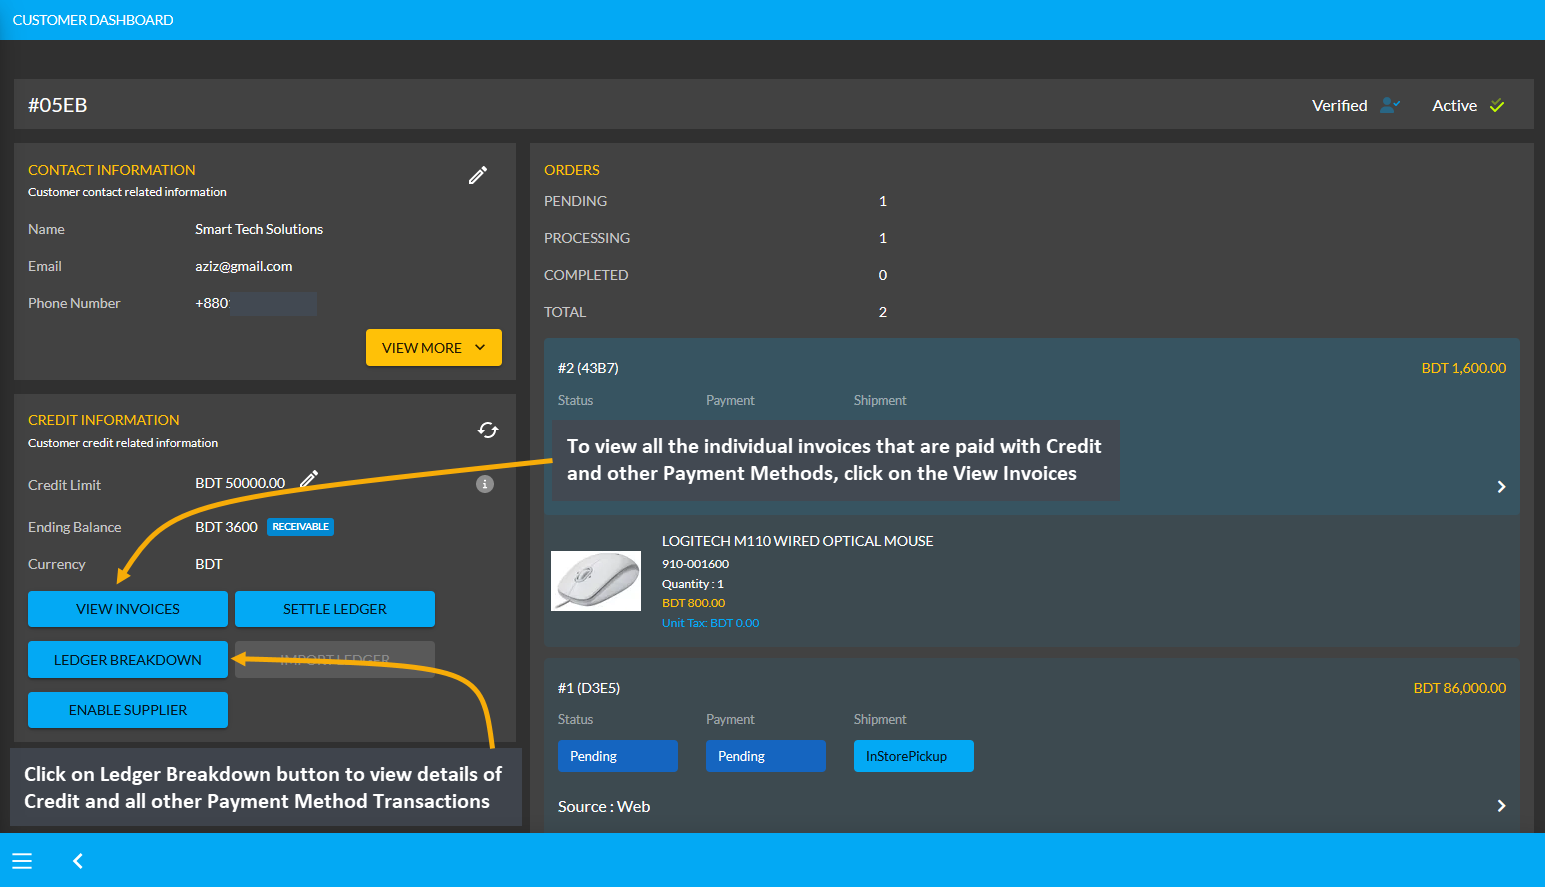
Clicking on View Invoices button will open a pop-up displaying list of invoices that are paid for Orders with both Credit and other Payment Methods. Therefore, when payments are completed with credit, cash or other payment methods, those orders will show up under the All Invoices section.
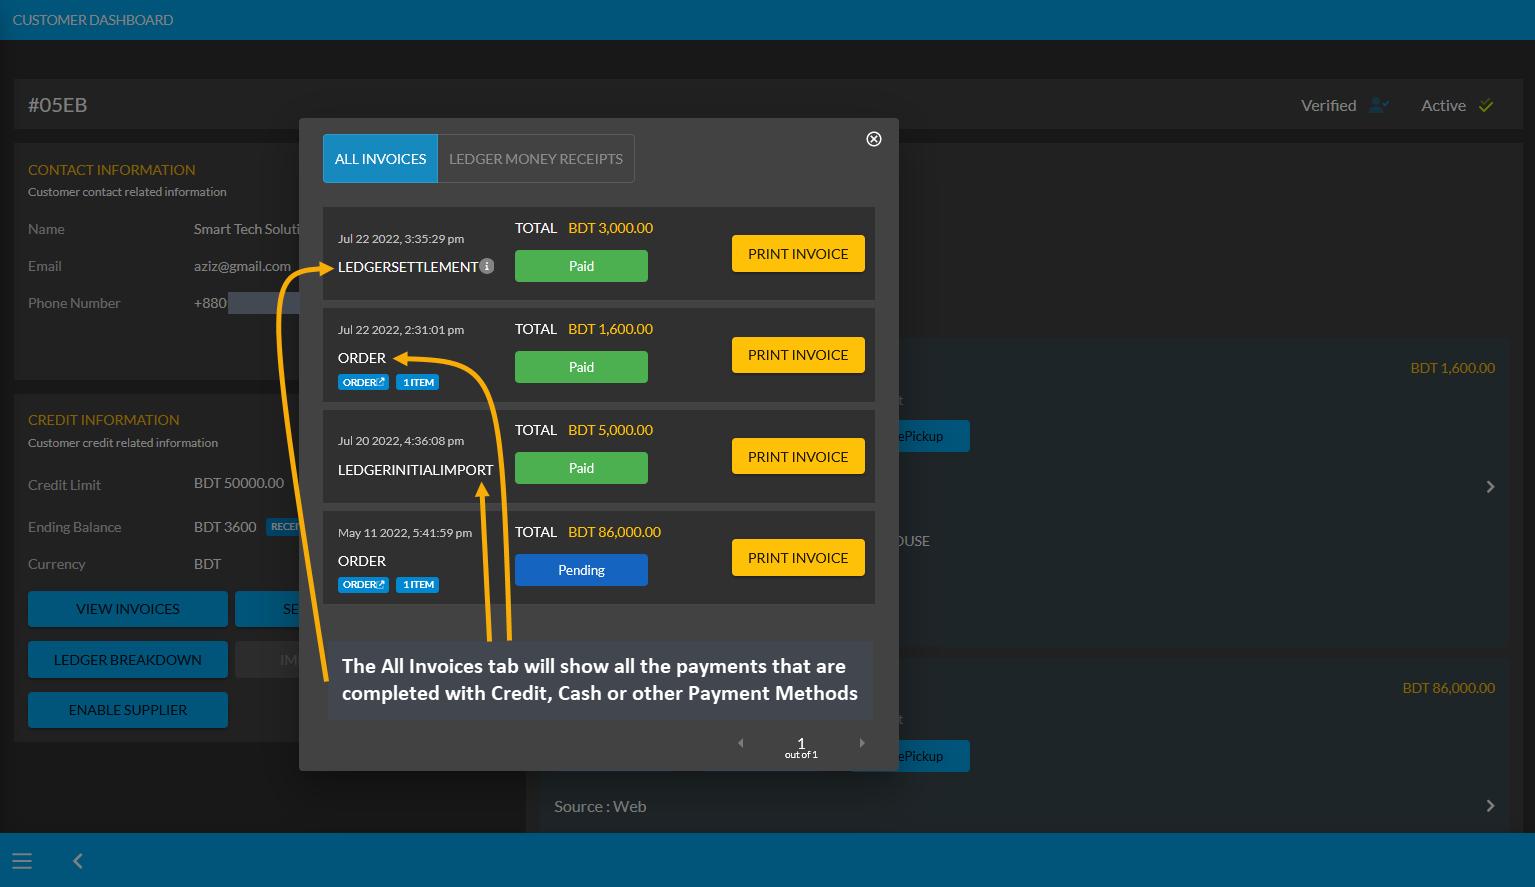
There is another tab of Ledger Money Receipts besides All Invoices which will only show transactions that were paid with Customer’s Credit Limit when ordering Products. Click the Print Invoice button to view or print invoice.
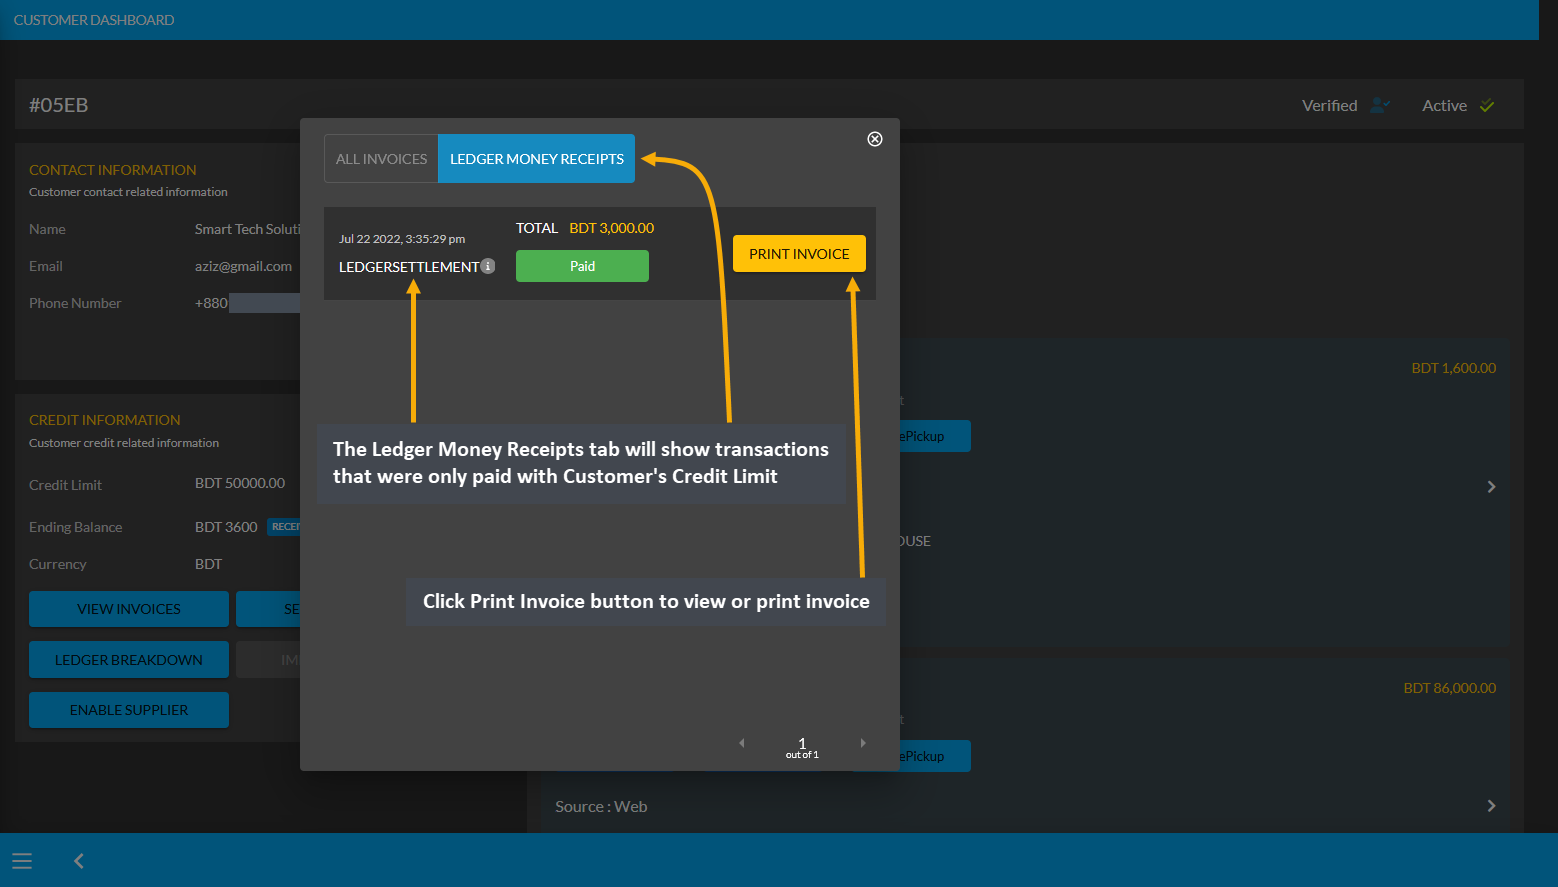
The Credit Limit cannot be used for Orders in The Website. The New Customer will also appear as Credit Customer under the Credit Customers list as illustrated in the example screenshot below.
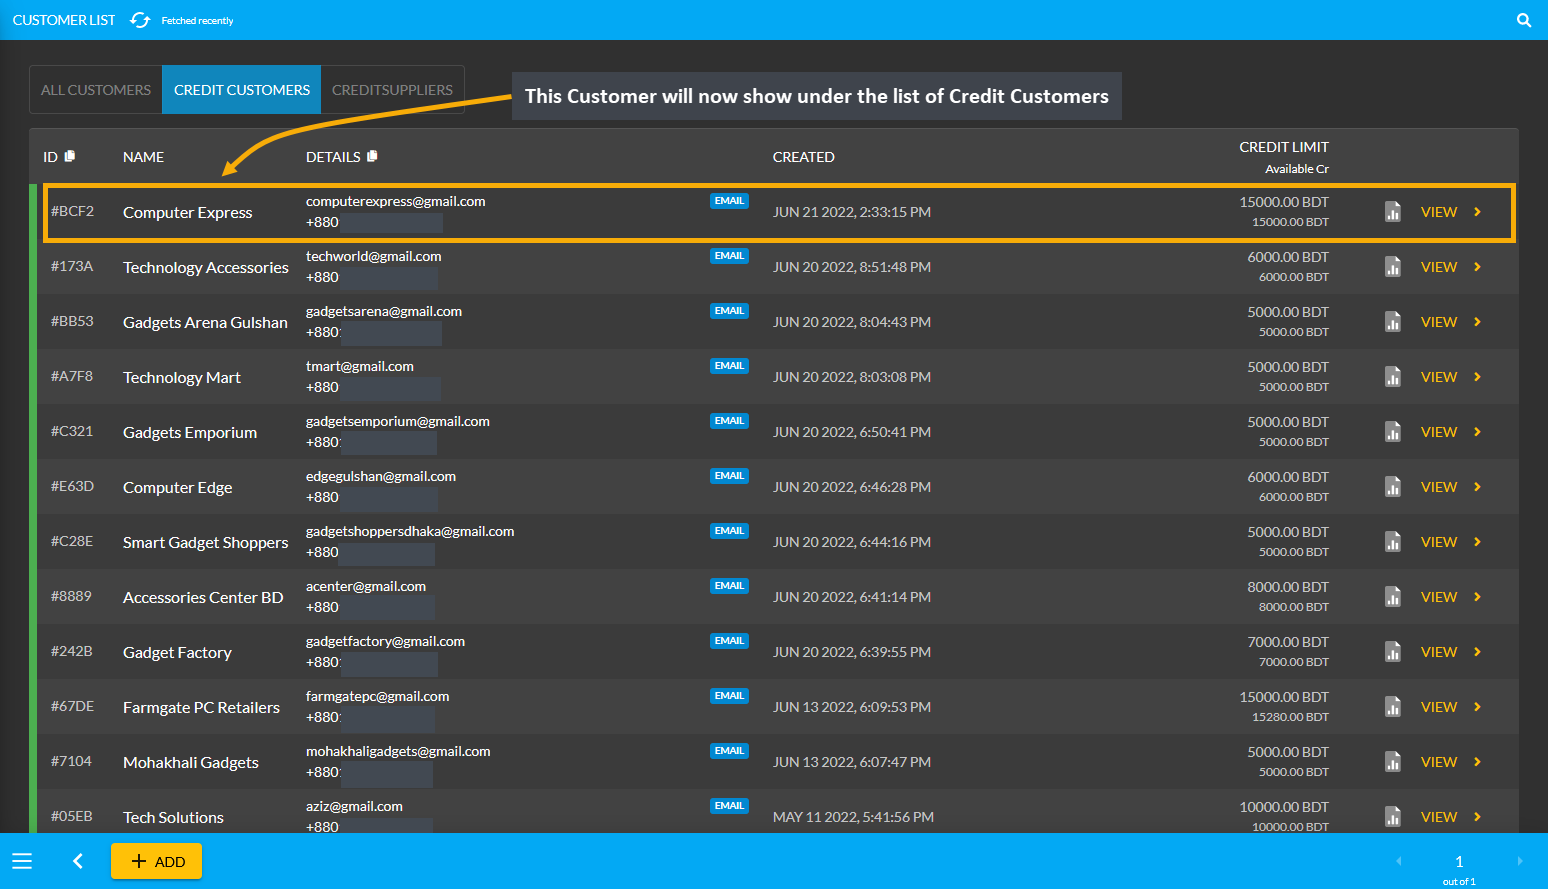
Credit Suppliers
Credit Suppliers are companies who can buy Product(s) from and also sell Product(s) to the Shop Owner. They will be granted Credit Limit and also permission to Sell Product(s) to the Shop Owner. With the Credit Limit, the Credit Suppliers can purchase Product(s) from the Shop Owner. Similarly, as the Supplier, they can sell Per Unit Product(s) to the Shop Owner. Both types of transactions will reflect on their Ledger Breakdown section.
Credit Suppliers could be selling Per Unit Product(s) like RAMs, Mice, Keyboards, and flash drives etc. Suppliers are renowned brands like Ryans Computer, UCC, or Star Tech. What differentiates the Credit Suppliers from the Credit Customers is that they have the permission to sell Product(s) which Credit Customers do not have.
The list of Credit Suppliers can be found under Customers module where Owed amount, Due amount, and issued Credit Limit will be visible for each Credit Supplier. Here, New Dhaka Computers has Credit Limit of 5,000 BDT and Due amount of 1,100 BDT which means they will get 1,100 BDT from the Shop Owner. Conversely, Mohammadpur Computers has Credit Limit of 5,000 BDT and Owed amount of 2,000 BDT which means they will pay 2,000 BDT to the Shop Owner. Check their Credit Information by clicking on View that will redirect to the Customer Dashboard.
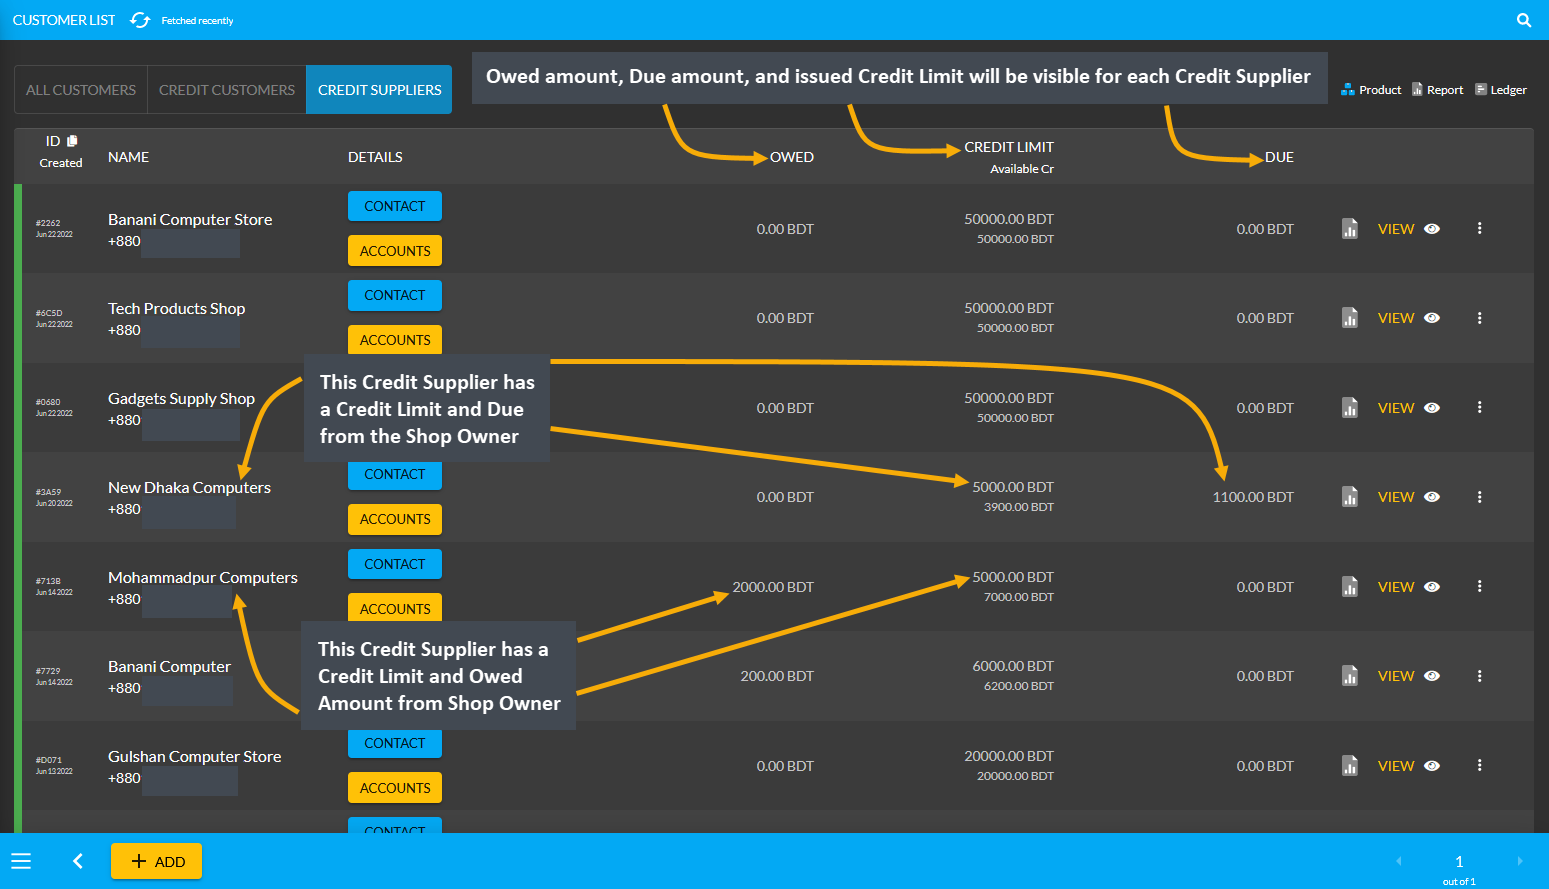
Creating a Credit Supplier
As discussed before, a Credit Customer will automatically be created after a New Order is placed for a Customer. Activate and provide Credit Limit to the New Customer from the Credit Information section that will convert them into a Credit Customer. Now, to convert this Credit Customer Technology Accessories into Credit Supplier, click the Enable Supplier button from Credit Information on Customer Dashboard as shown in the example below.

The New Supplier will appear as a Credit Supplier under the Credit Supplier List as shown in the example below.

When the Credit Supplier is created, they will have a Supplier Information section added to their Dashboard. From here, the Contact information and Bank Account information can be added for the Credit Supplier. Click the Edit icon on the Supplier Information section that will redirect to a new page to update contact and bank details.

On Edit Supplier page, the first field is to fill in the Name and Website Address of Credit Supplier. After that, there are Contact and Bank Account boxes with the + button, clicking on which will allow adding Contact Details and Bank Accounts of the Supplier. Several bank account information can be added if they have various bank accounts.

Clicking the + button over Contact Details will open a pop-up to edit Contact List. Fill the First Name, Last Name, and Current Designation, Phone and Email first. Then, select the type of Contact for Supplier like Home, Work, Shipping, Billing, Support, Other, or Supplier that best describes the Supplier contact type. On Address Section, write down the address in first line and second line. Set the Label, Area, Post Code, City, and Country for the Supplier Address. Then, click Add to save all changes for the contact information of the Credit Supplier.

Edit Credit Supplier Bank Details
Now, click the + button on Bank Account to open a pop-up for editing details of Bank Accounts. Fill out the Bank Account Name, Bank Account Number, Bank Name, Country, Bank Branch, Bank Swift, Bank Routing Number, and IBAN. Select if the Bank Account is Savings or Current and click Add to save all the changes as shown.

26.1 - Credit Customer Ledger Transactions
Learn More about the Credit Customer’s purpose of transactions through Ledger.
Purpose of Transactions with Ledger
Customers who are granted an amount of Credit Limit will only turn into Credit Customers which differentiates them from the regular Customers. After a Credit Customer is given Credit Limit, they can start buying Product(s) using the Credit Limit. For instance, the Credit Customer Computer Express has been provided with 15,000 BDT Credit Limit by Shop Owner. Their Credit Used amount will show 0 BDT unless they purchase Product with Ledger.
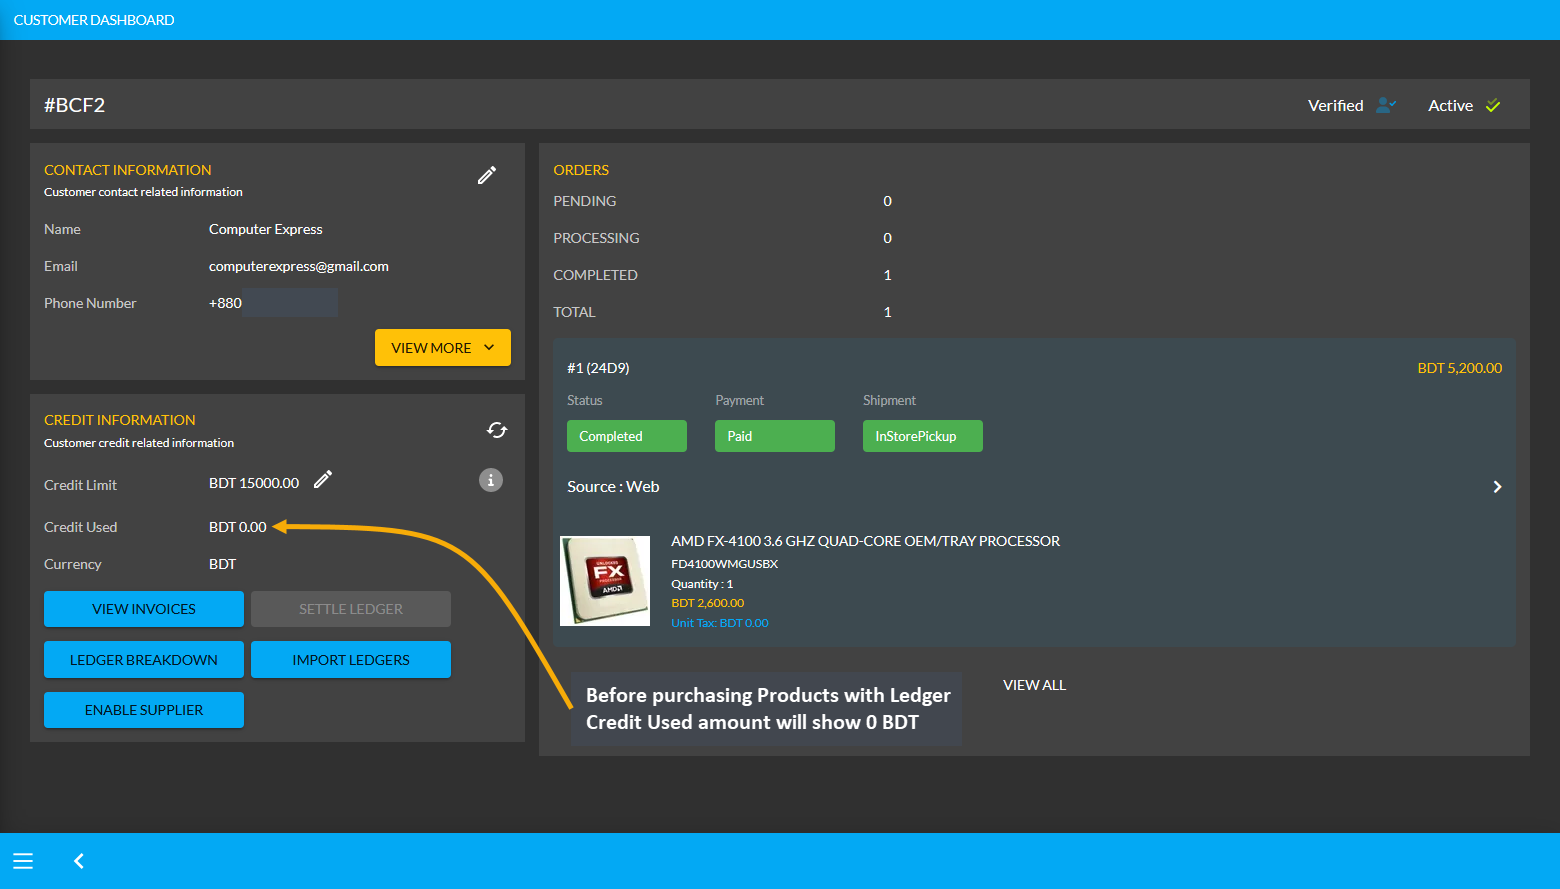
Using Credit to Order Products will add to Credit Used
If Product(s) are ordered for the Credit Customer through the Admin Panel with Credit payment, then it will add to the Credit Used amount within their Credit Information. So, the On Credit (Due) can be used to place Orders for Product(s). For this, first click the + button from Orders tab that will redirect to the Cart page. In the cart, fill the Customer’s details, add Product(s) to Cart with desired quantities and click Proceed to save all the changes.
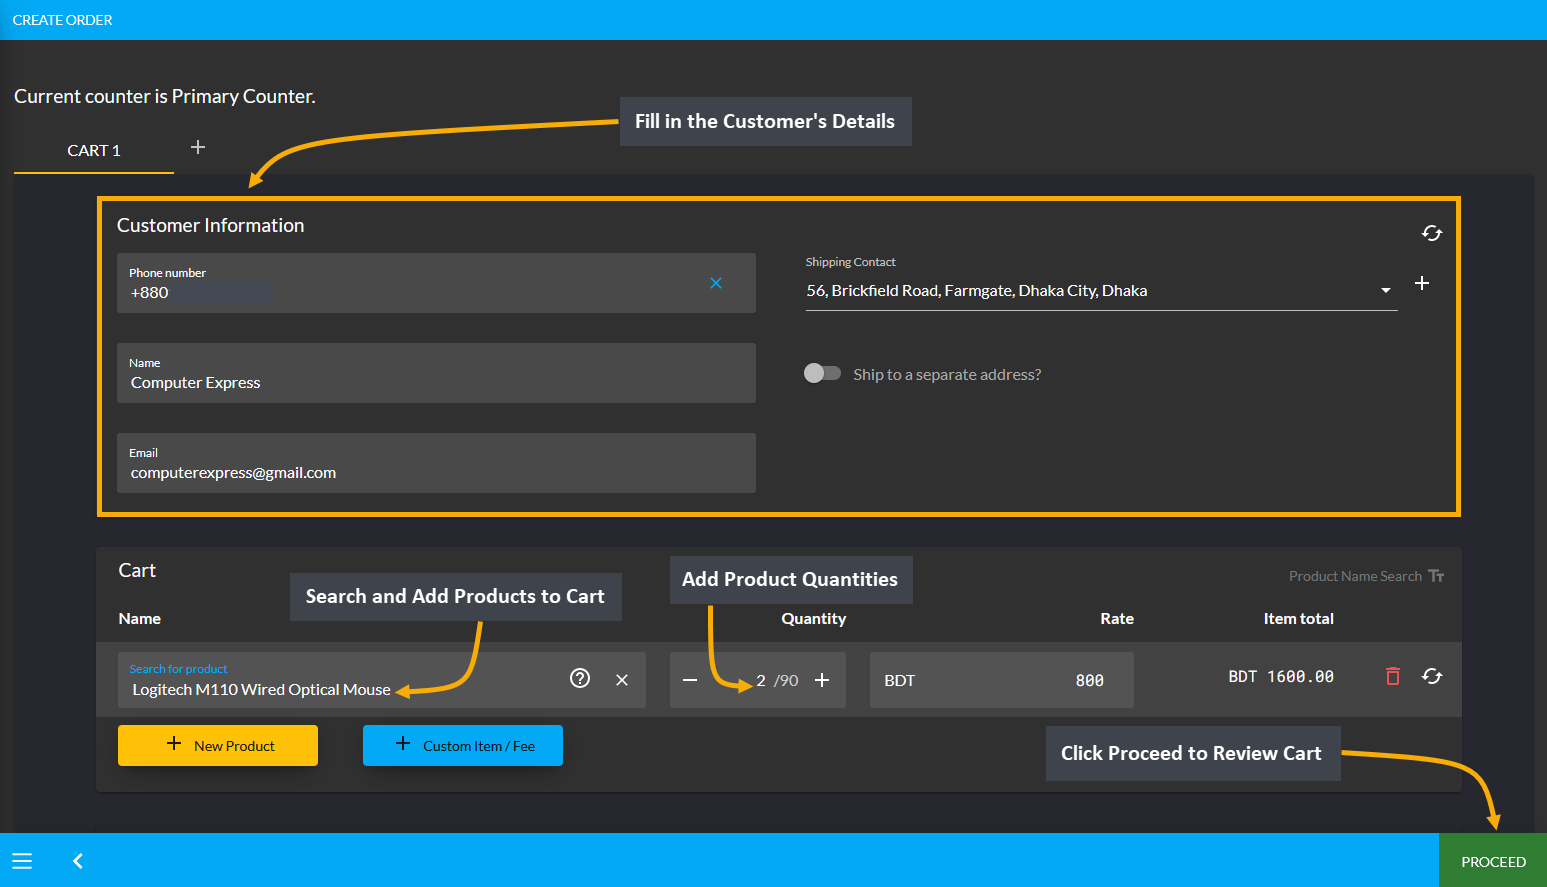
Image 1: Fill out Customer's details and add Products to Cart to order Products with Ledger.
During the checkout process, select preferred Shipping method and select On Credit (Due) as Payment method. Selecting it will display the available Credit Limit and Ending Balance for Credit Customer. Then click Confirm Order to redirect to the order confirmation page where there will be a Print Invoice button to get the invoice printed.
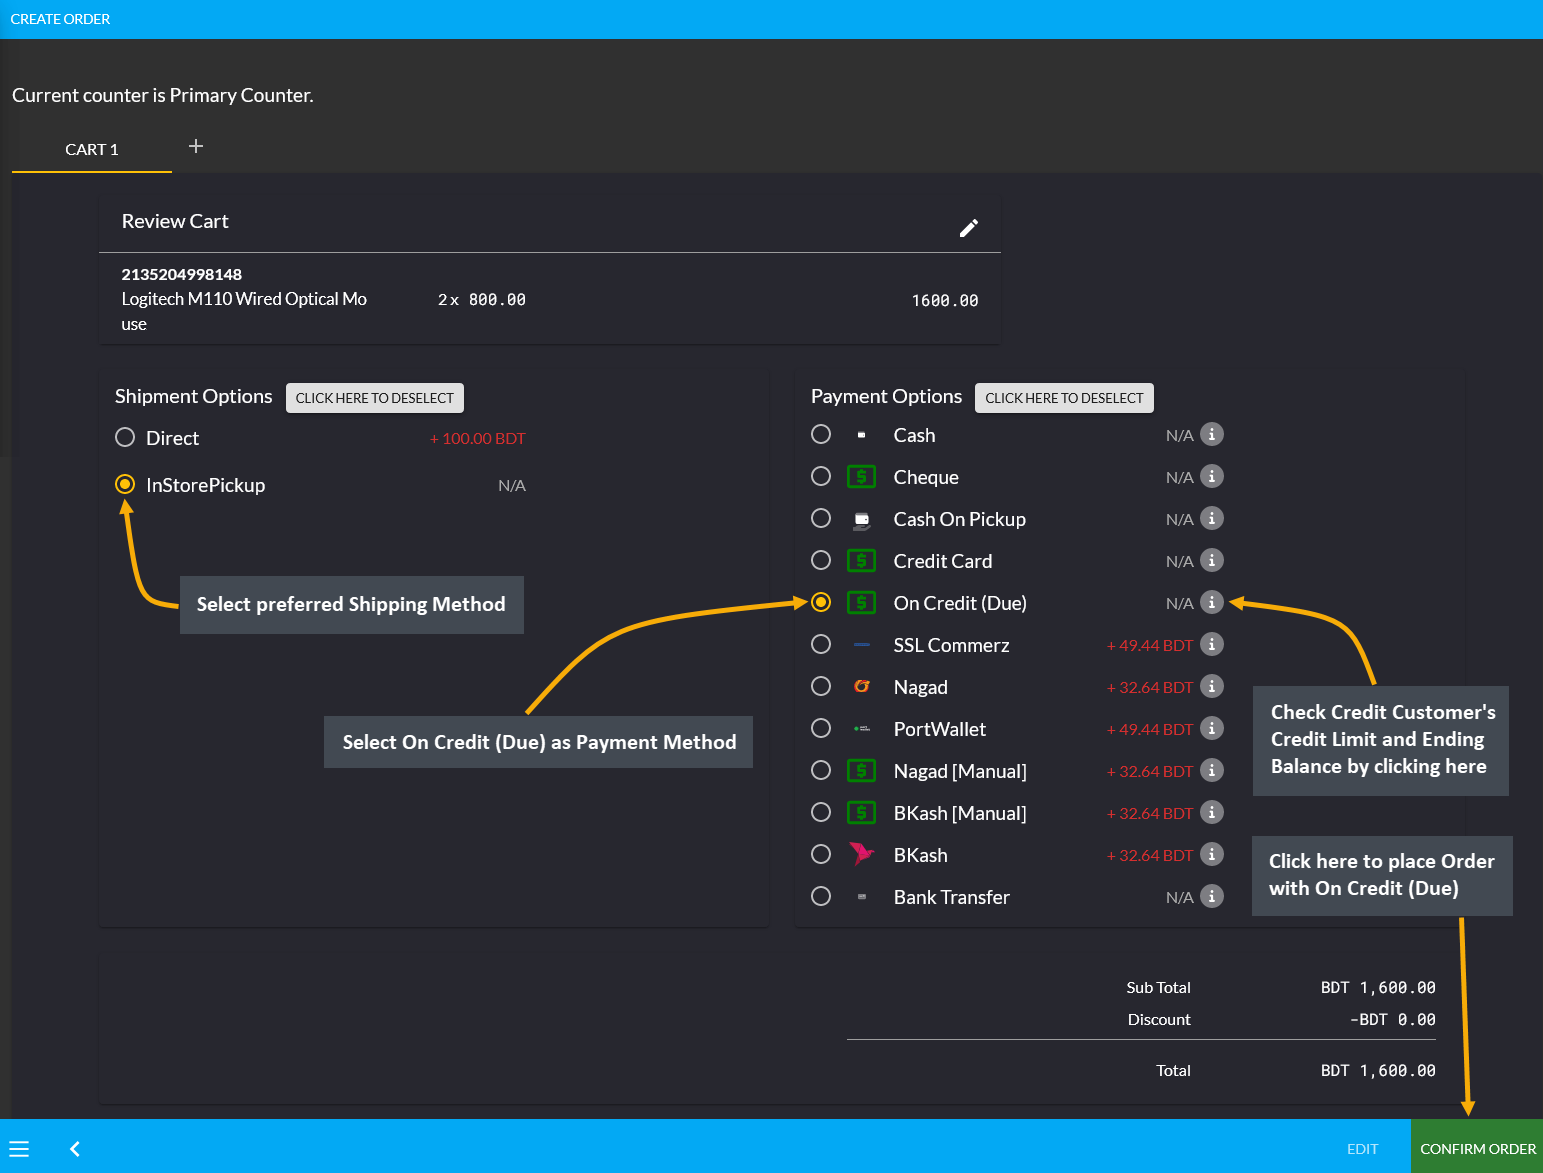
Image 2: Select preferred Shipping method and select Ledger as Payment method to order Products.
On the print invoice page, it will reflect that the payment has been completed with On Credit (Due) indicating the Credit Customer’s payment as Due. Here, the Customer paid 1,600 BDT from their Credit which will remain due until paid through cash or other payment methods to the Shop Owner through Settle Ledger option.
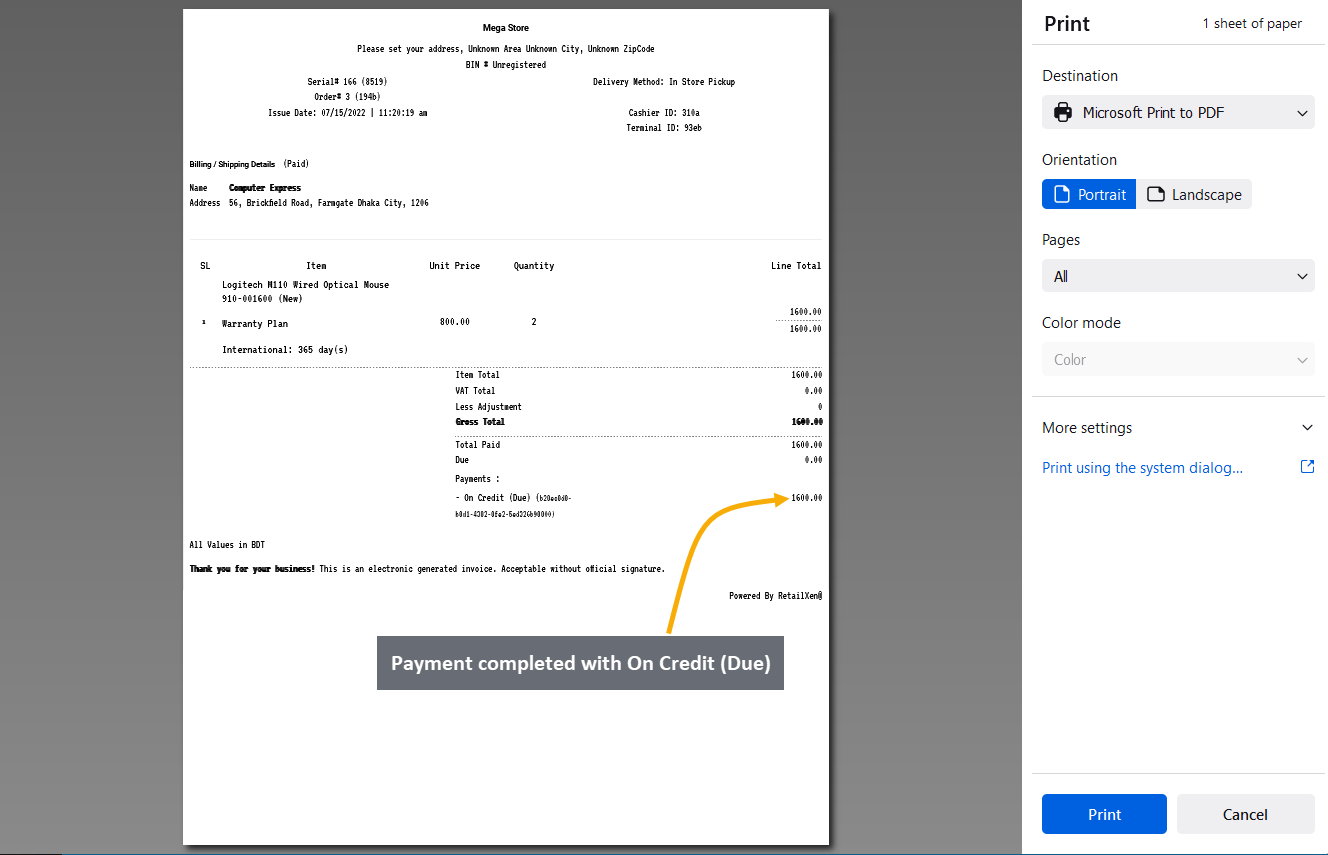
Image 3: Invoice breakdown will show payments completed with Ledger which will be Due.
Using the Ledger Breakdown feature from Credit Information section under Customer dashboard, the Shop Owner can check the Credit transaction after ordering Product(s) on their Ledger Breakdown Page.

Image 4: Import Ledger balance with previous dues will be updated on the Ledger Breakdown page.
Ending Balance Reflected on Credit Customer’s Dashboard
After ordering Products with Credit, the used balance from Credit Limit will reflect under Ending Balance. Here, Credit Customer Computer Express ordered Products with Credit payment, so their Ending Balance is 1,600 BDT.
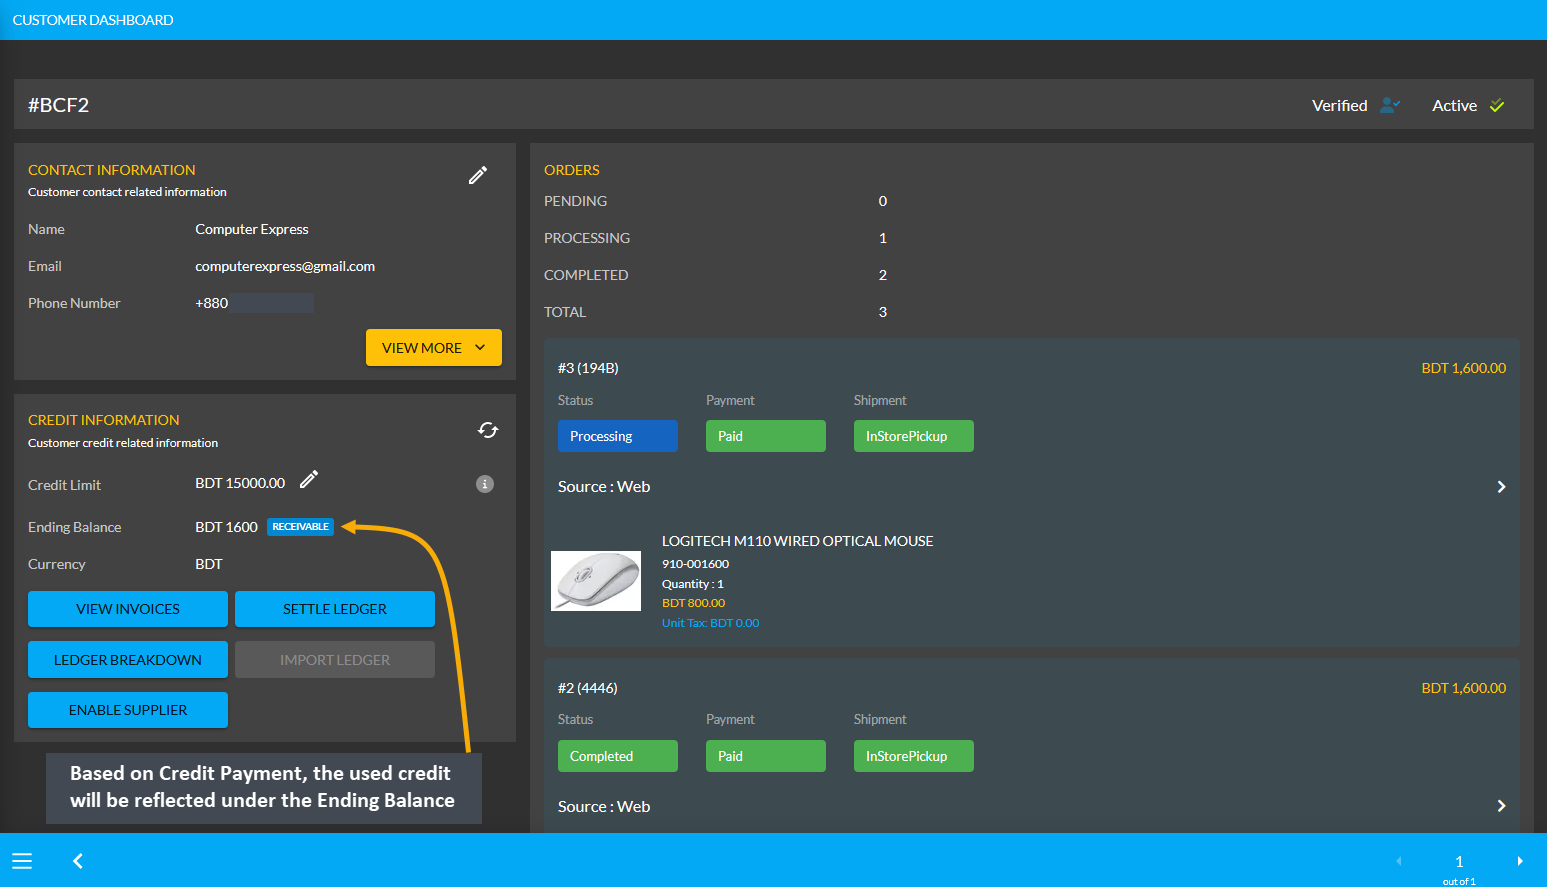
Credit Customer Import Ledger
Another purpose of Transaction is the Ledger Initial Import which is a feature that can only be used for once by the Admin on Credit Customer’s Dashboard. For instance, if Credit Customer has a receivable or payable amount from any previous transaction, they can be imported with Import Ledger button on Credit Information section.
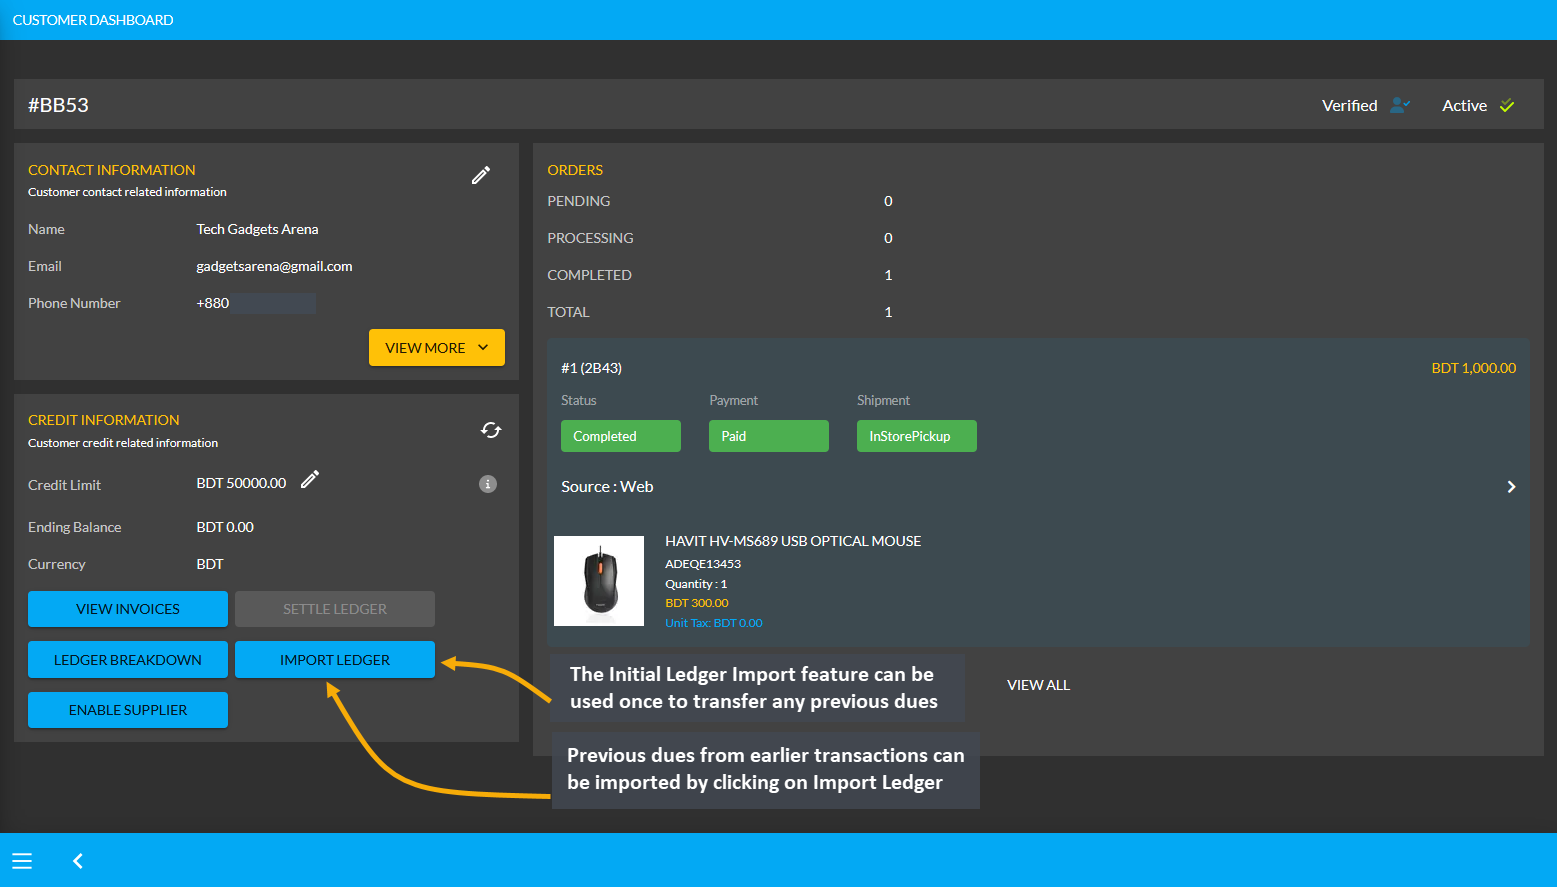
The Import Ledger feature has Receivable and Payable. Upon clicking the Import Ledger button, the Shop Owner will be asked to confirm if the previous transaction has a Receivable or Payable amount to the Credit Customer.
Payable Amount on Import Ledger
For instance, after clicking the Import Ledger button, if the Shop Owner selects Payable with an amount of 5,000 BDT for example, it will mean that that the Credit Customer will get 5,000 BDT from the Shop Owner. So, selecting Payable based on previous transactions will add to the Payable Amount on Import Ledger.
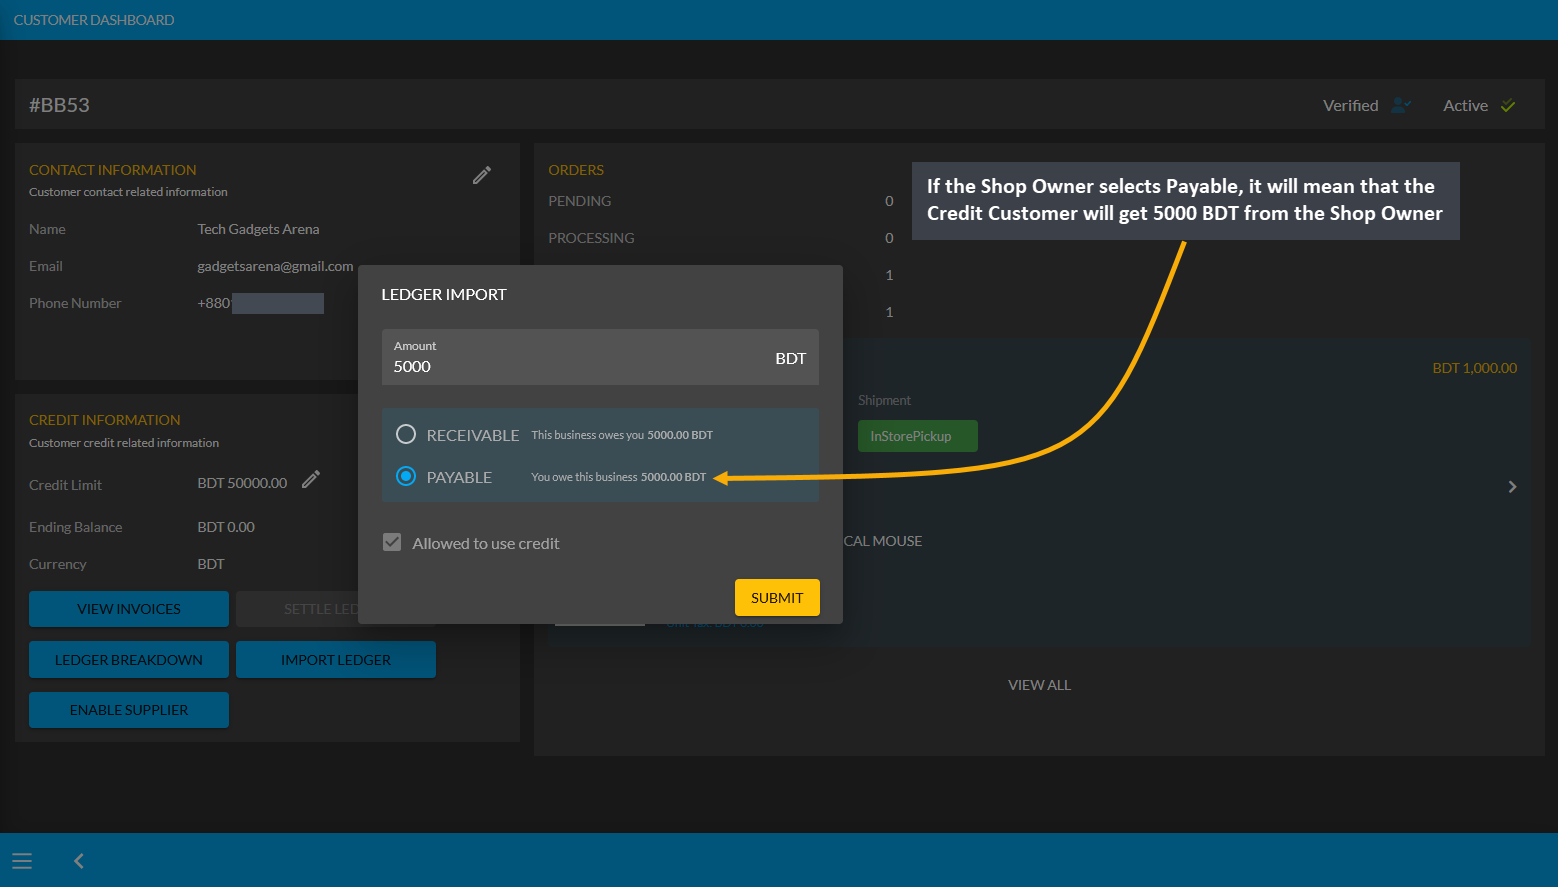
Image 1: If Shop Owner selects Payable, it will mean that Credit Customer will get 5000 BDT from them.
Import Ledger feature can only be used once, so before setting the Payable, the Shop Owner will have to confirm if all the information is correct. Therefore, after checking all the information, the Shop Owner has to click I Agree to add dues from previous transactions on Credit as shown in the example screenshot below.
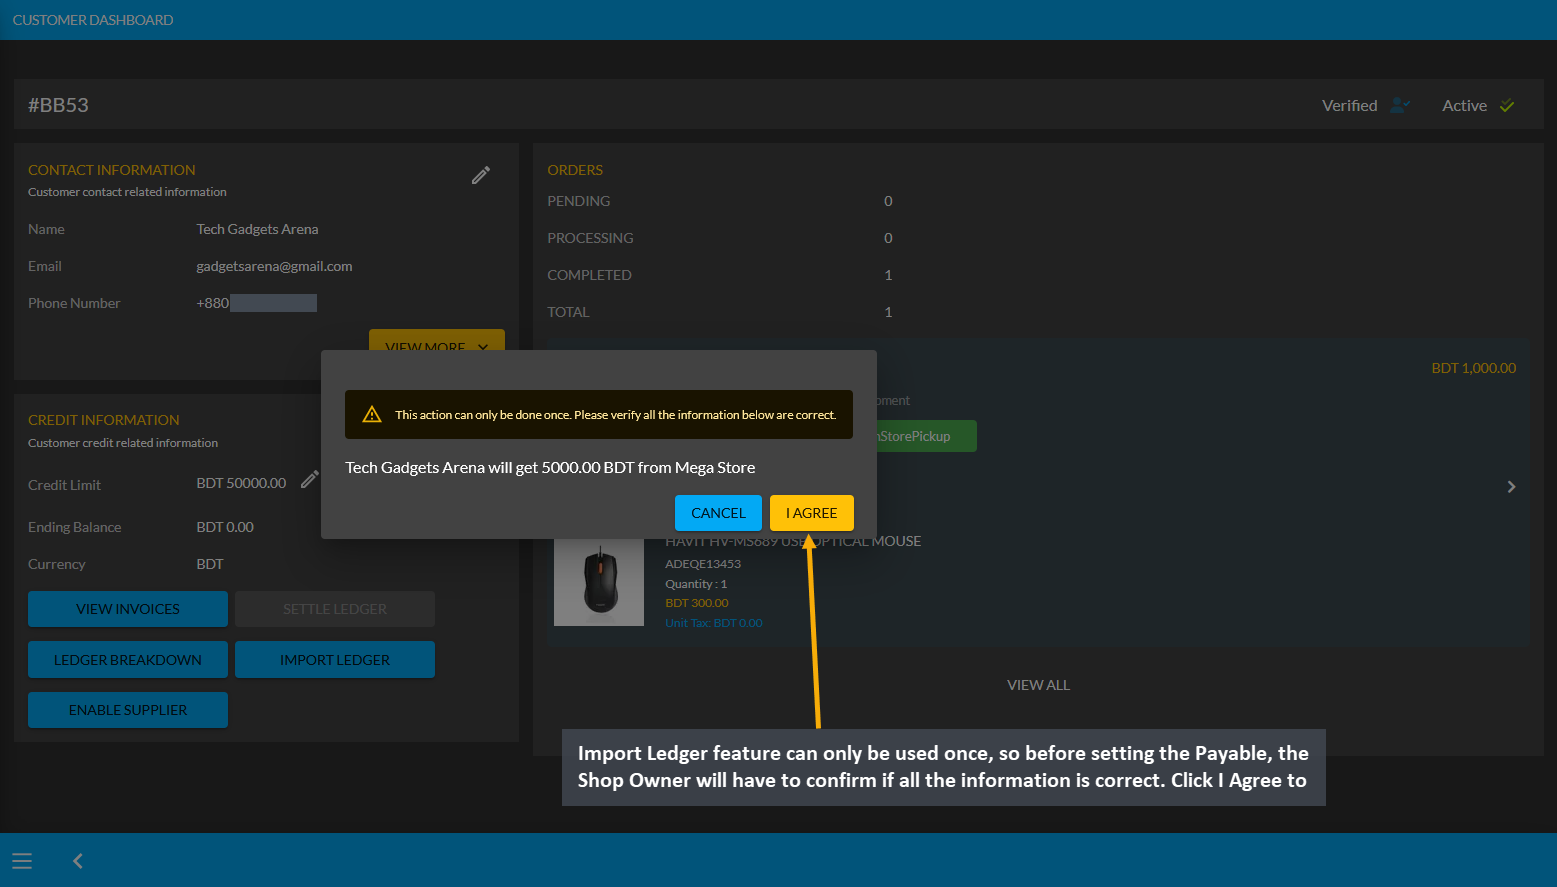
Image 2: Before setting Payable, the Shop Owner will be asked to confirm if all the information is correct.
As the Credit Customer will get 5000 BDT from the Shop Owner, selecting Payable for any previous transactions on the Import Ledger will add to the Payable amount that the Shop Owner owes to them.
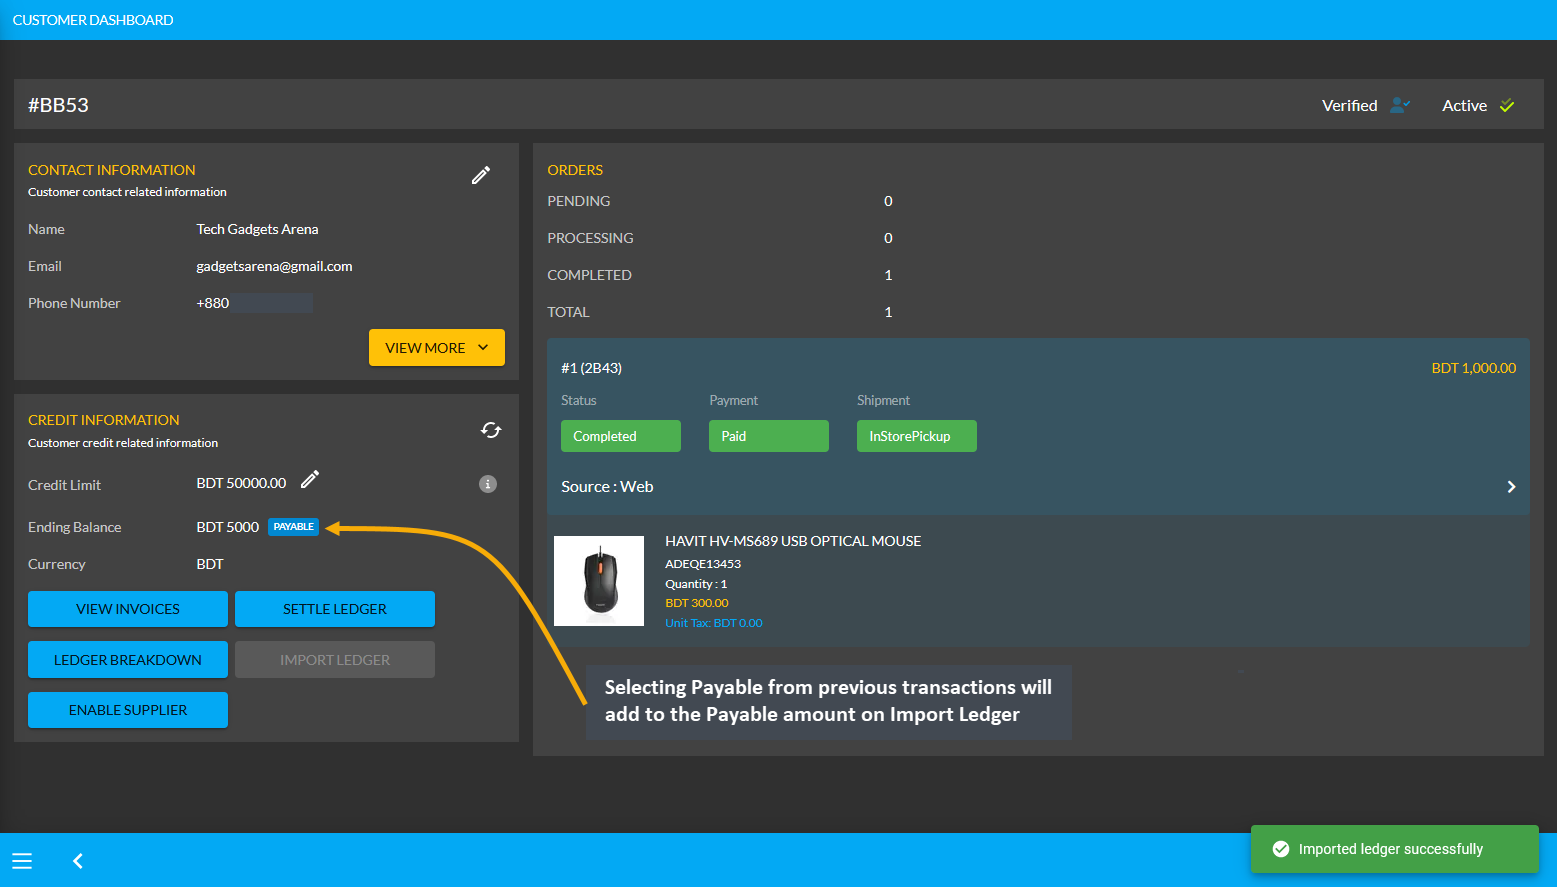
Image 3: Selecting Payable from previous transactions will add to the Payable Amount on Import Ledger.
Using the Ledger Breakdown feature, the Shop Owner can check previous transaction or payable amount that is transferred through the Import Ledger feature on their Ledger Breakdown Page.

Image 4: Import Ledger balance with previous payable amount will be updated on Ledger Breakdown page.
Credit Customer Ordering Products will deduct from Payable
Even if Credit Customer have dues from the Shop Owner worth of 5,000 BDT as the current example, they will be able to buy Product(s) from the Shop Owner via Credit which will deduct from the Payable amount. For example, Credit Customer Smart Gadget Shoppers have purchased two Product(s) worth of 1,600 BDT from Shop Owner.
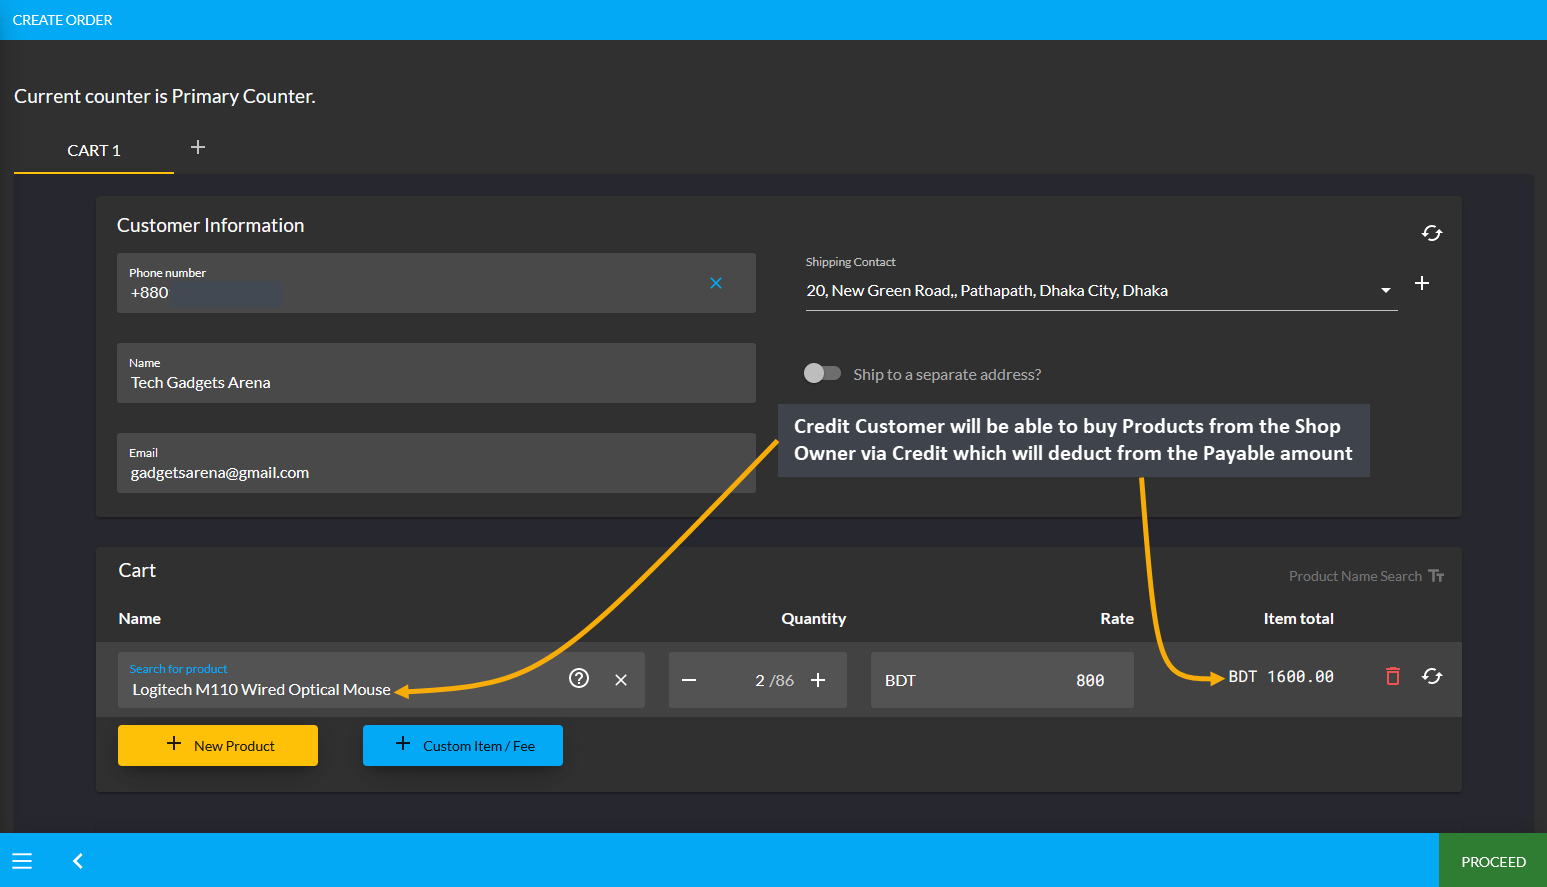
Image 1: Credit Customer buying Products from Shop Owner via Credit will deduct from Payable.
After the Credit Customer choose payment method as On Credit (Due) and confirms their Order, 1,600 BDT will be deducted from their already Payable or owed amount of 5,000 BDT from Shop Owner. With Product purchase of 1,600 BDT now, the amount will be deducted and 3,400 BDT Payable amount will be remaining from Shop Owner now. So, a Credit Customer can buy Products from the Shop Owner via Credit to settle Payable Amount.
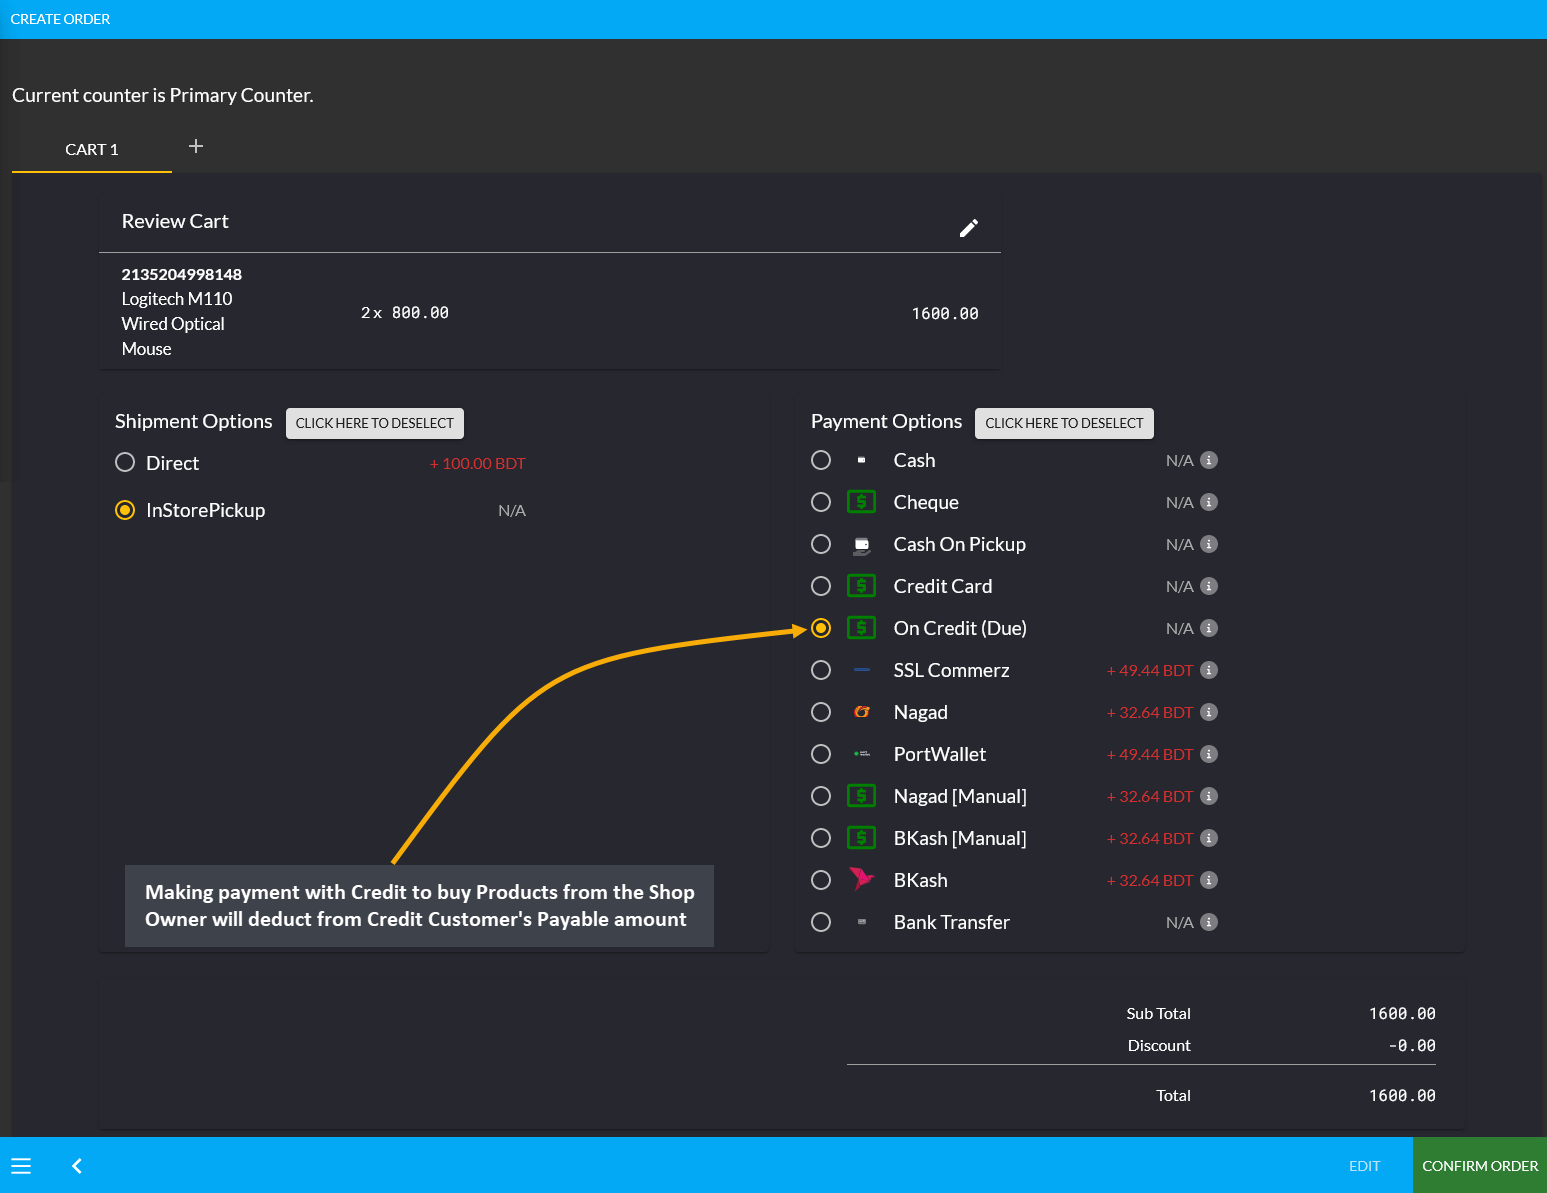
Image 2: Making Credit payment to buy Products from Shop Owner will deduct from Credit Customer's Payable.
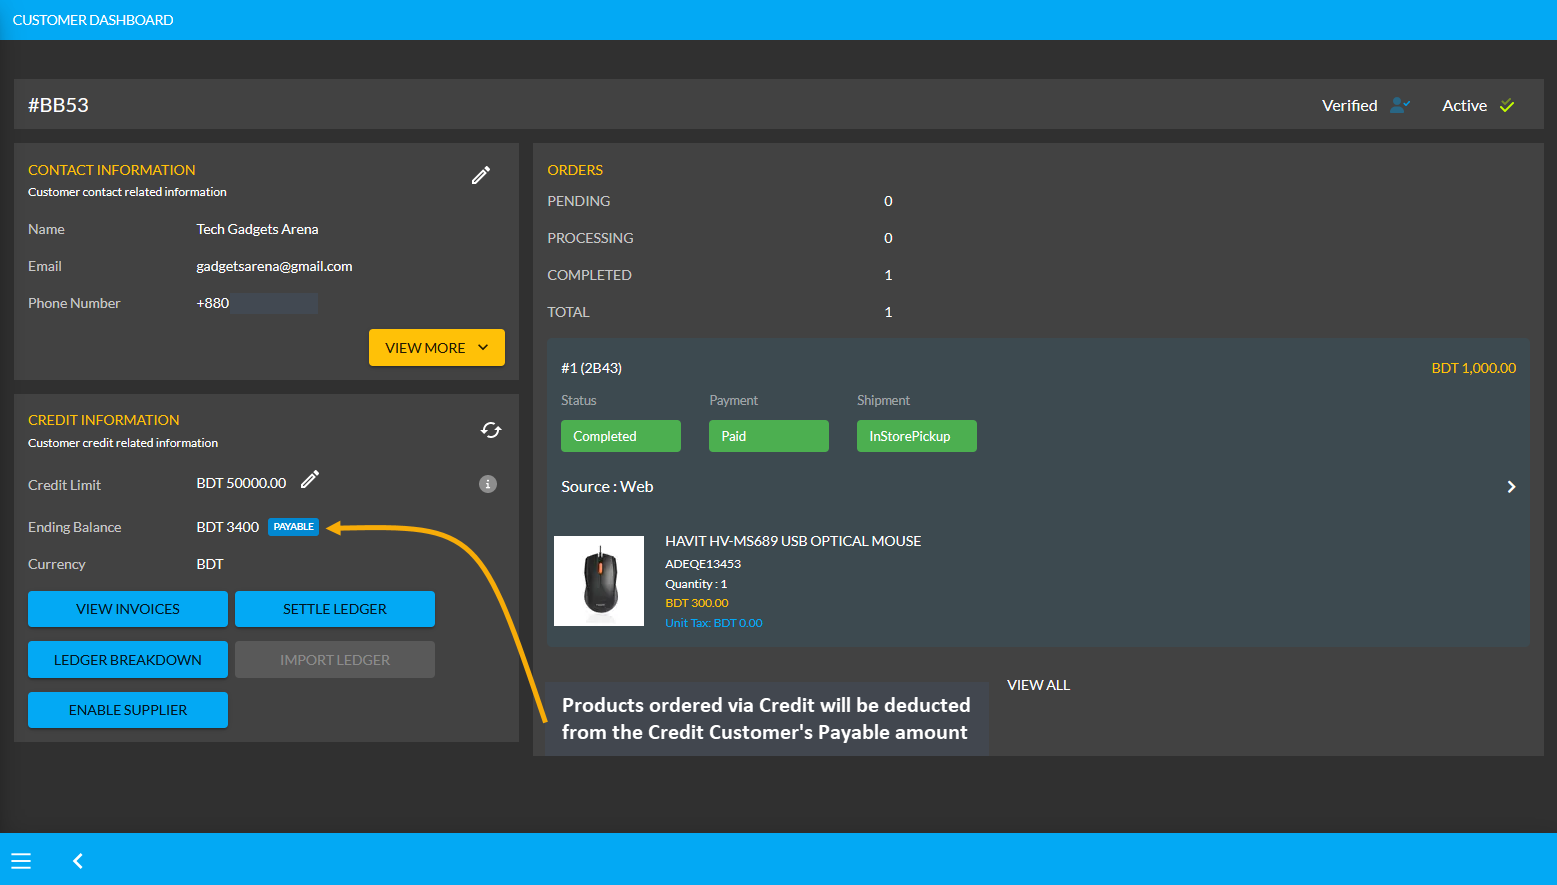
Image 3: Products ordered via Credit will be deducted from the Credit Customer's Payable amount.
Using the Ledger Breakdown feature, the Shop Owner can check the transaction of the Credit Customer on their Ledger Breakdown Page with Payable amount for ordering Products and Credit remaining from Credit Limit.

Image 4: Payable amount for ordering Products will be updated on the Ledger Breakdown page.
Use Payment Gateways to Settle Ledger for Payable
The Shop Owner can pay their remaining dues or Payable amount to the Credit Customer in full amount or in a certain amount through the Settle Ledger feature. For example, the Credit Customer Smart Gadget Shoppers will still get 3,400 BDT from Shop Owner. In this case, the Shop Owner can pay back 3,400 BDT to Credit Customer by using the six payment gateways (BKash, Nagad, Cash, Cheque, Bank Transfer, and Credit Card) available with the Settle Ledger button. Learn how to settle Ledger as shown in a few steps below with screenshots:
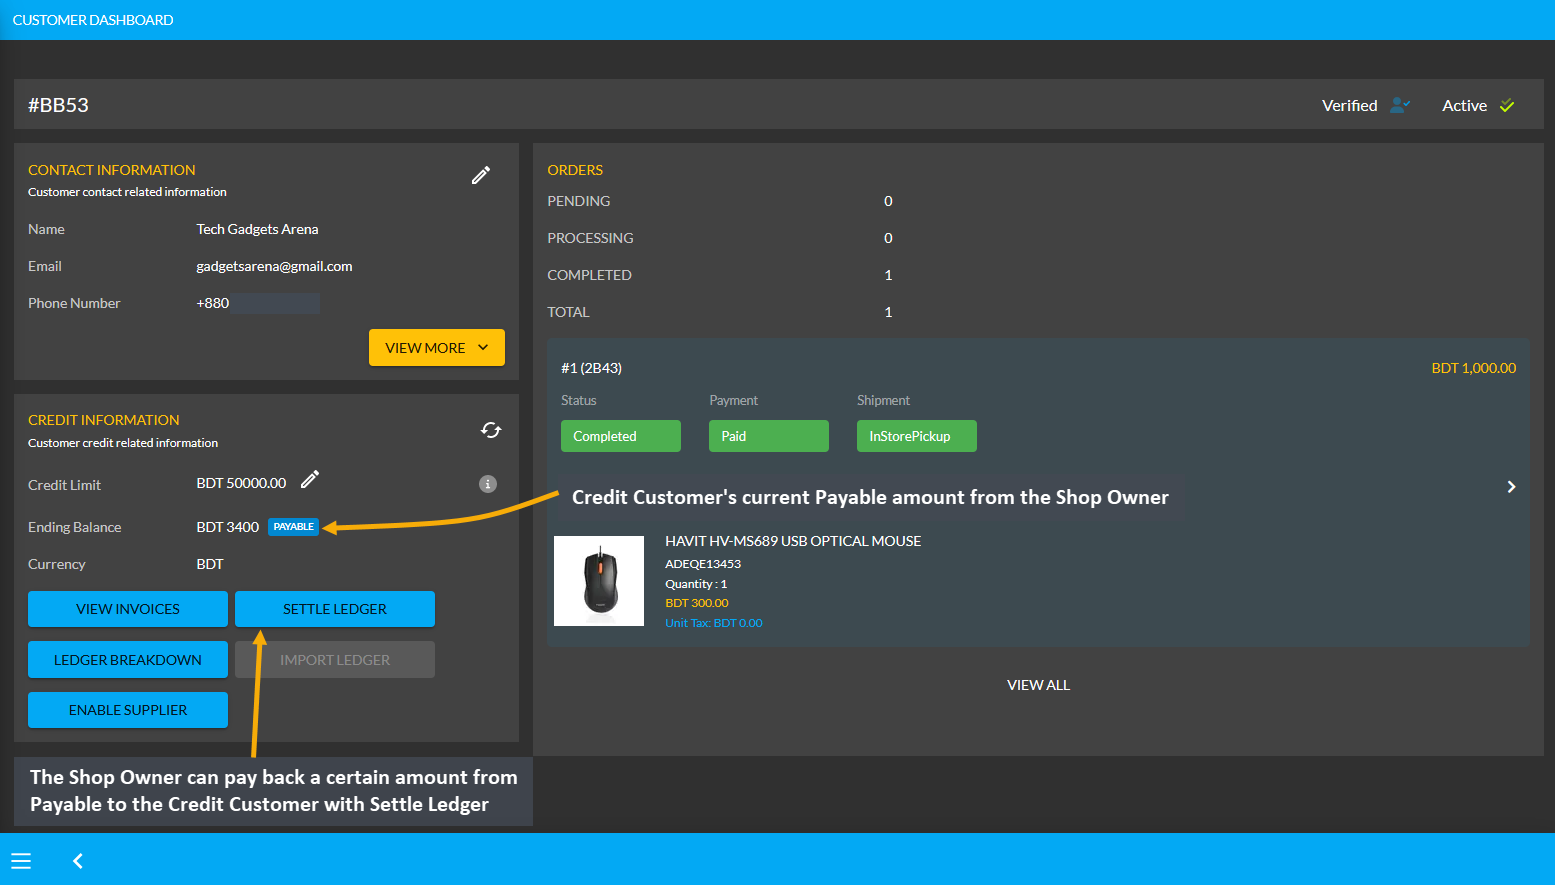
Image 1: The Shop Owner can pay back Payable Amount to Credit Customer with the Settle Ledger feature.
The Shop Owner can make payment for the 3,400 BDT Payable amount at once or by a few times through the six different payment gateways. Here, the Shop Owner will pay the Credit Customer 1,000 BDT with the Settle Ledger feature. So, first, they need to click the Settle Ledger button which will open a pop-up where the amount they want to pay needs to be set. For example, here, the Shop Owner wants to pay 1,000 BDT with the Settle Ledger option.
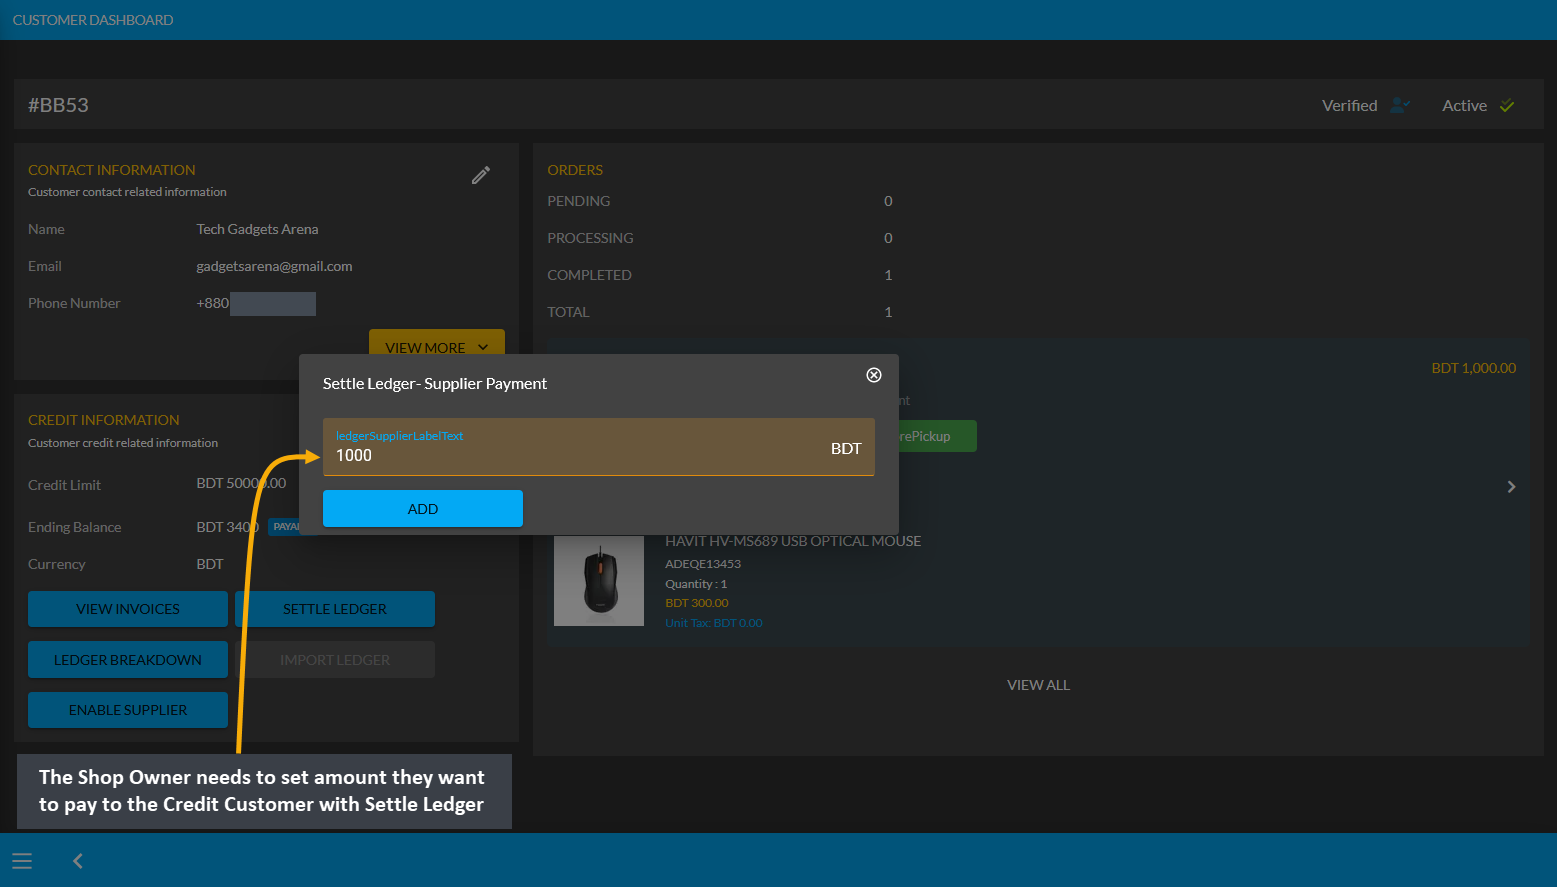
Image 2: The Shop Owner needs to set amount they want to pay to Credit Customer with Settle Ledger.
Then, Shop Owner needs to select one of the six Payment Gateways to make payment for the selected amount to Settle Ledger. For instance, Cheque payment was selected and Cheque Number, Due Date, Bank Name, and Amount was set. Thus, the Shop Owner needs to complete the payment information and hit Submit when done.
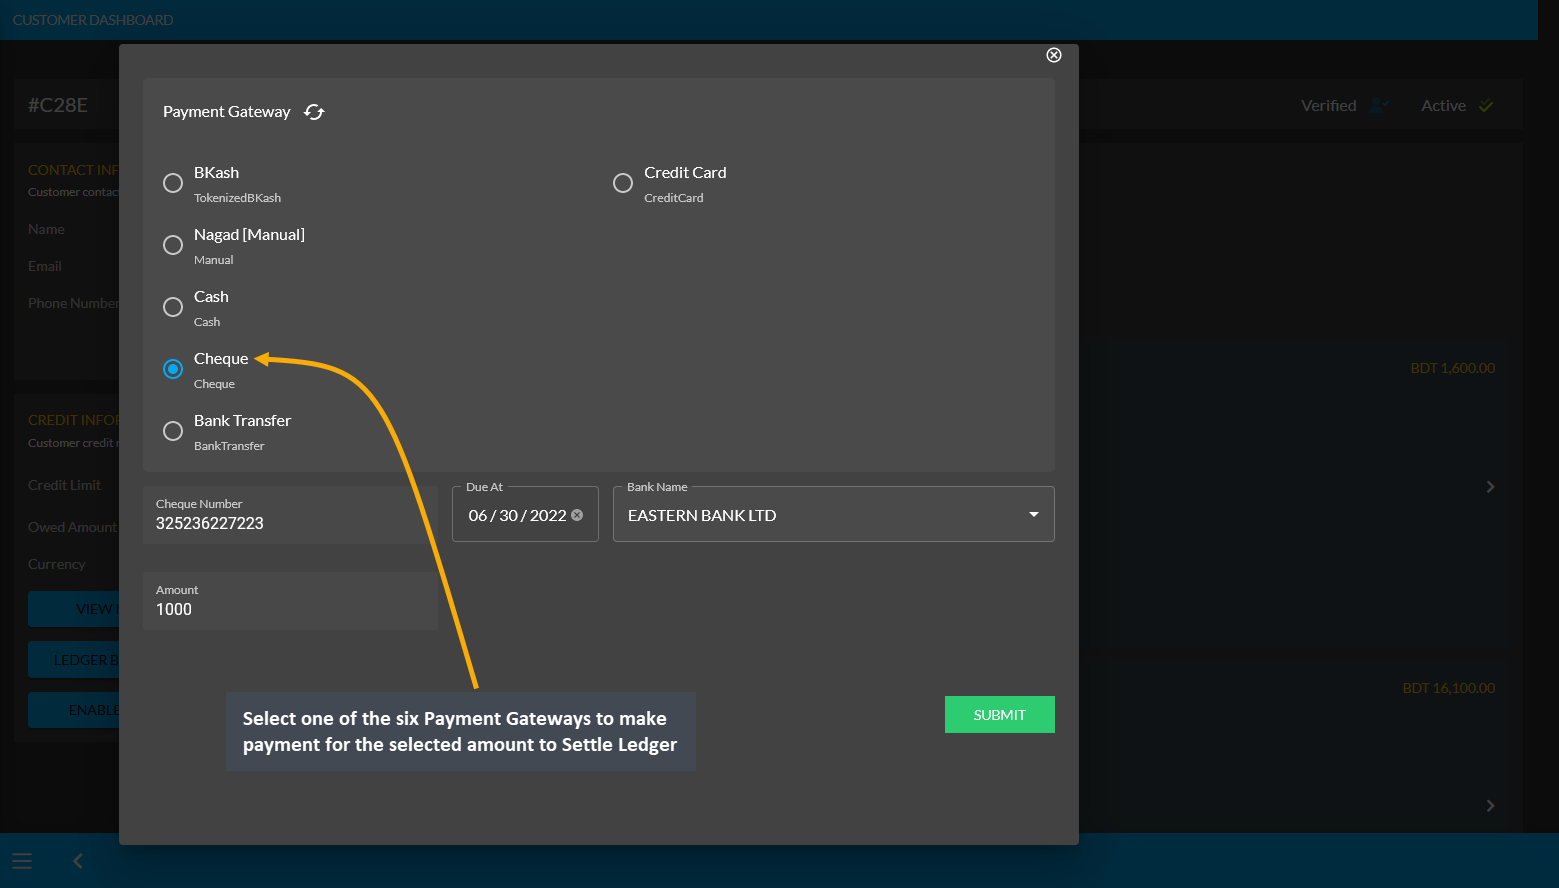
Image 3: Shop Owner needs to select a Payment Gateway to pay to Credit Customer with Settle Ledger.
After successful partial payment, a pop-up notification will confirm that the transaction amount 1,000 BDT was completed. Check the transaction reference and gateway used and click Submit to complete the process.
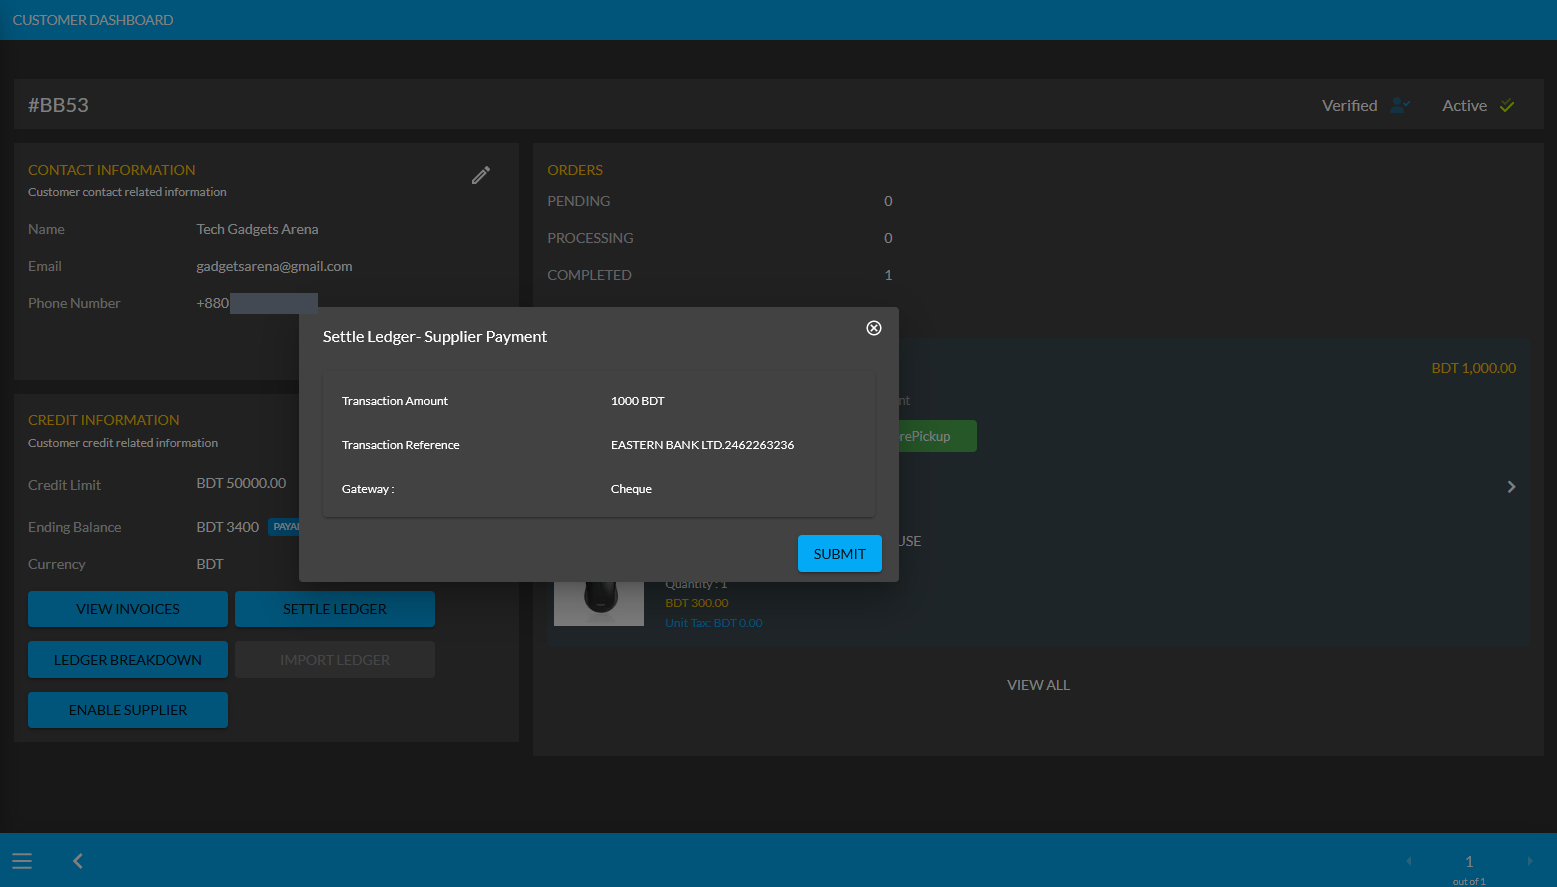
Image 4: After successful payment, a pop-up will show confirmation with the transaction details.
Completing the payment of 1,000 BDT to Credit Customer with the Settle Ledger feature will reflect the updated balance under the Credit Information section. For instance, here after settling Ledger with payment of 1,000 BDT, the Payable amount was automatically updated from 3,400 BDT to 2,400 BDT under Credit Information section.
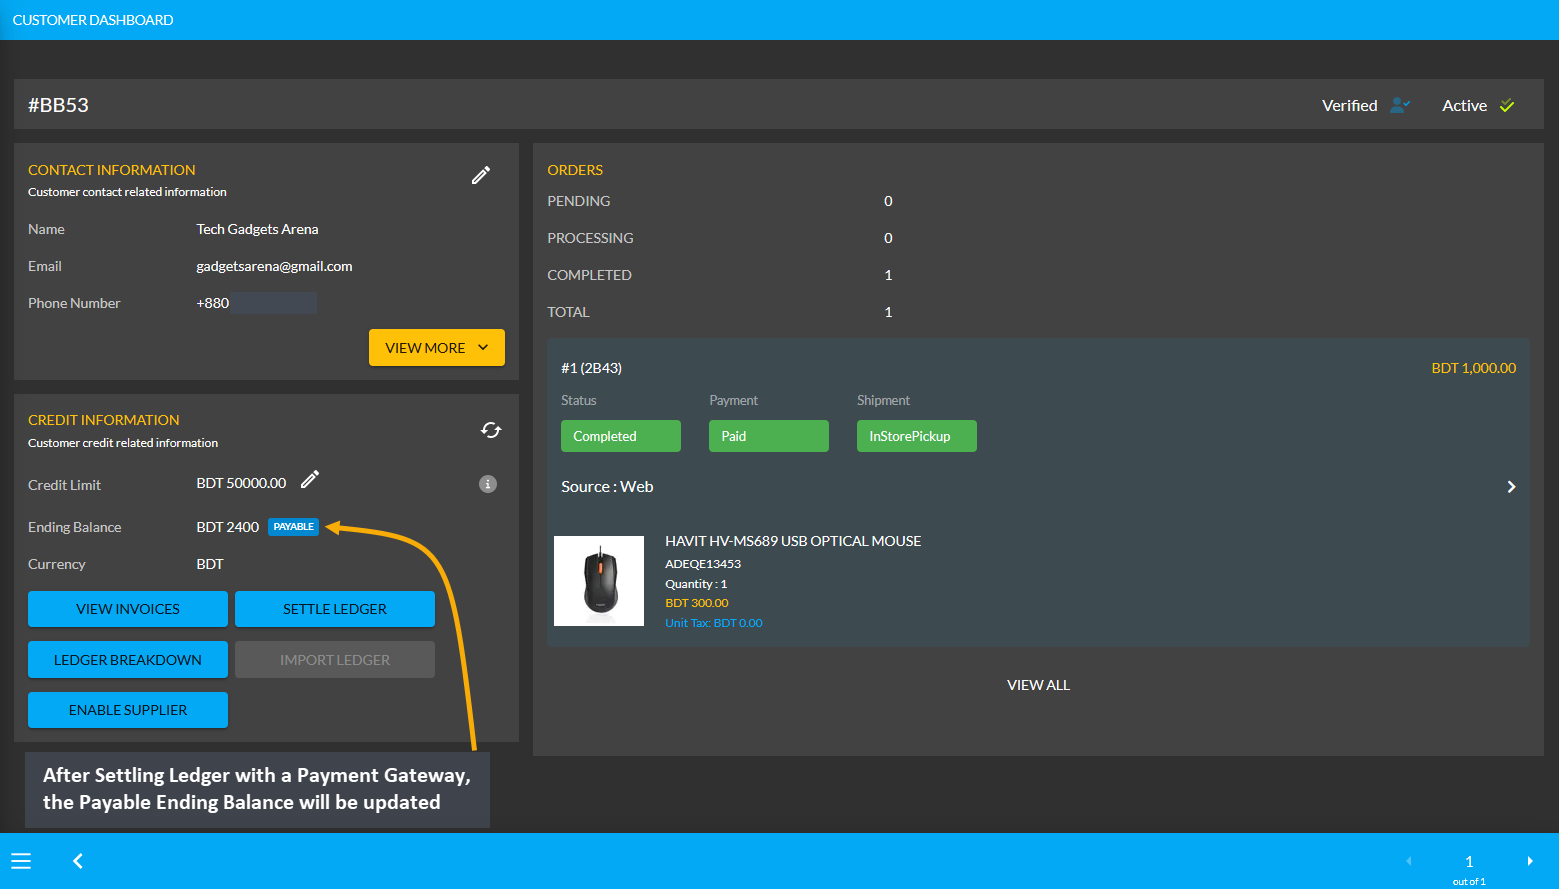
Image 5: Updated balance will be reflected under the Owed Amount after settling Ledger successfully.
Using the Ledger Breakdown feature, the Shop Owner can check transaction for Payable after Ledger settlement with Payment Gateways on the Credit Customer’s Ledger Breakdown Page.

Image 6: Settling Ledger with Payment Gateways will be updated on the Ledger Breakdown page.
Receivable Amount on Import Ledger
Similarly, after clicking the Import Ledger button, if the Shop Owner selects Receivable with an amount of 5,000 BDT for example, it will mean that the Credit Customer will pay 5,000 BDT to the Shop Owner. So, selecting the Receivable based on previous transactions will add to the Receivable amount on Import Ledger.
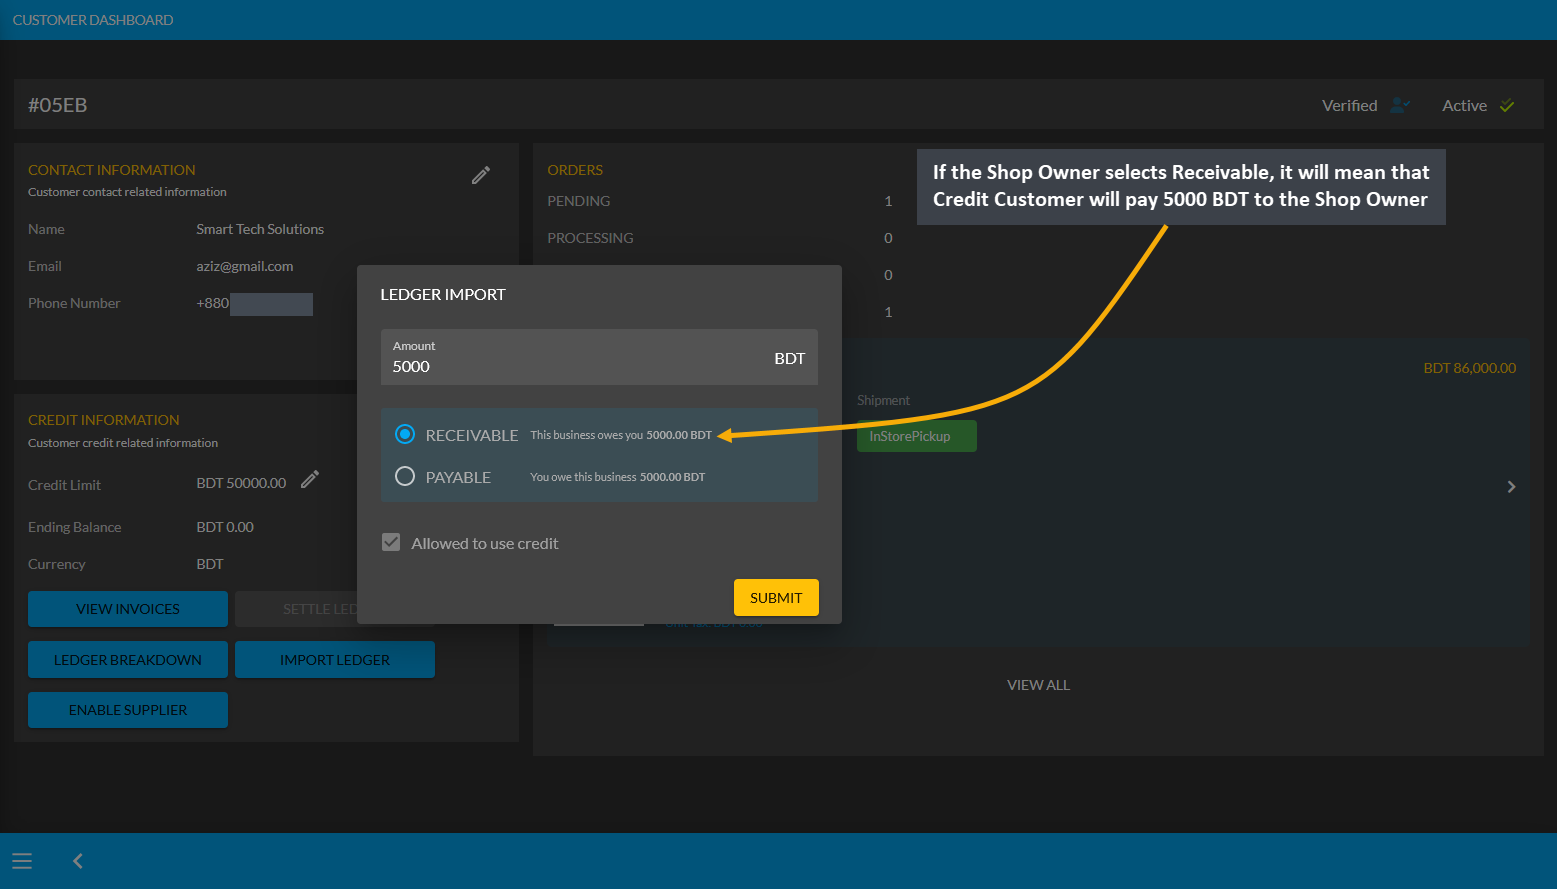
Image 1: If Shop Owner selects Receivable, it will mean that Credit Customer will pay 5000 BDT to them.
Import Ledger feature can only be used once, so before setting Receivable, Shop Owner will be asked to confirm if all the information is correct. Therefore, after checking all the information, the Shop Owner has to click I Agree to add receivable amount from previous transactions on Credit as shown in the example screenshot below.
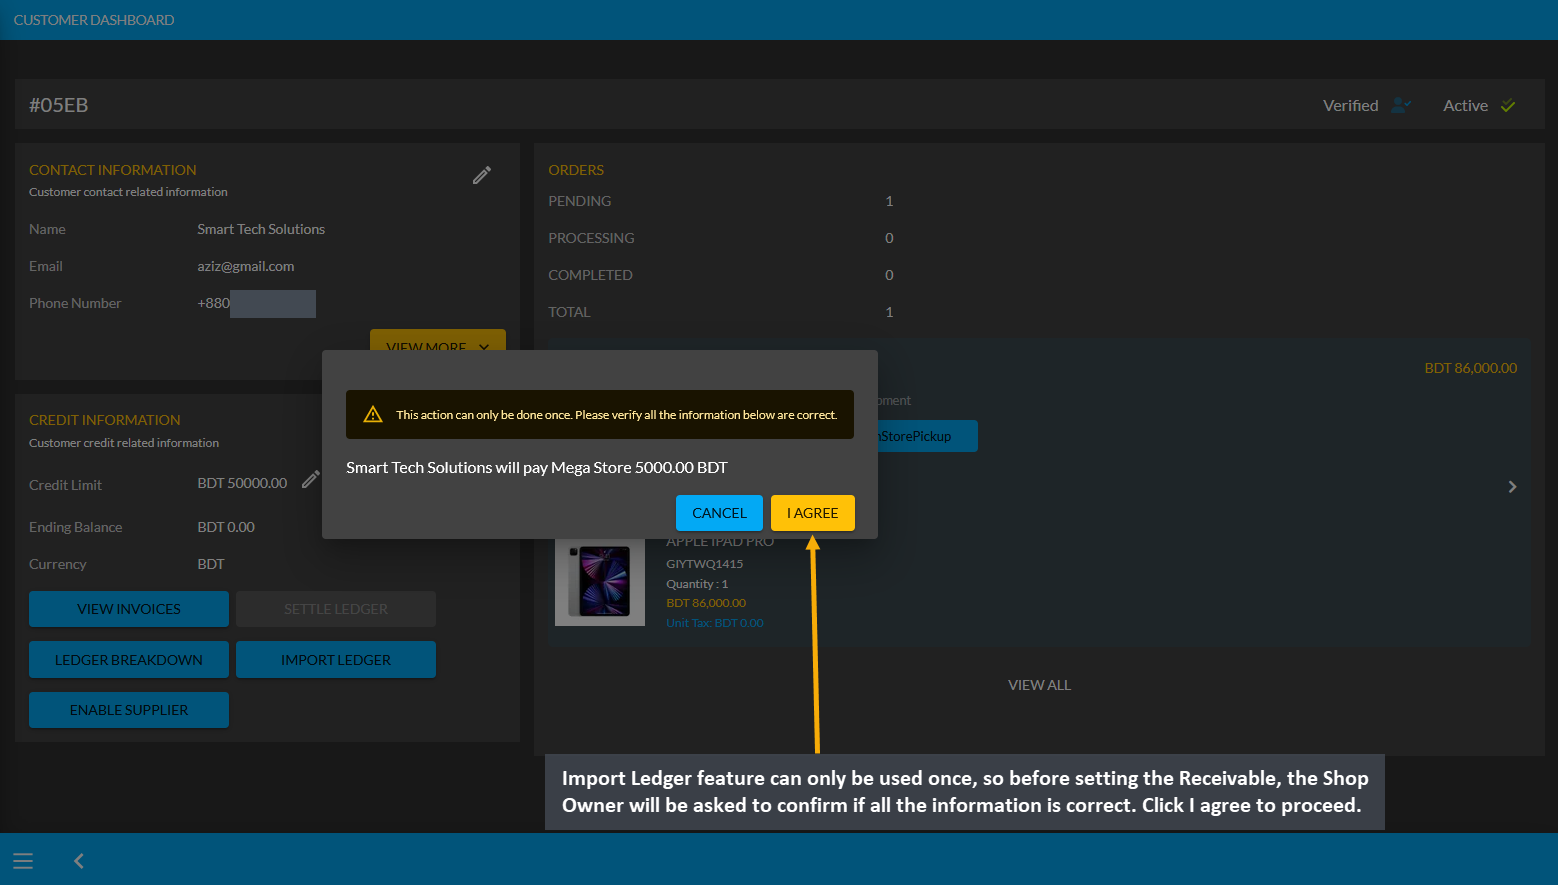
Image 2: Before setting Receivable, Shop Owner will be asked to confirm if all the information is correct.
As the Credit Customer will pay 5000 BDT to the Shop Owner, selecting Receivable for any previous transactions on the Import Ledger will add to the Receivable amount that the Shop Owner owes from them.
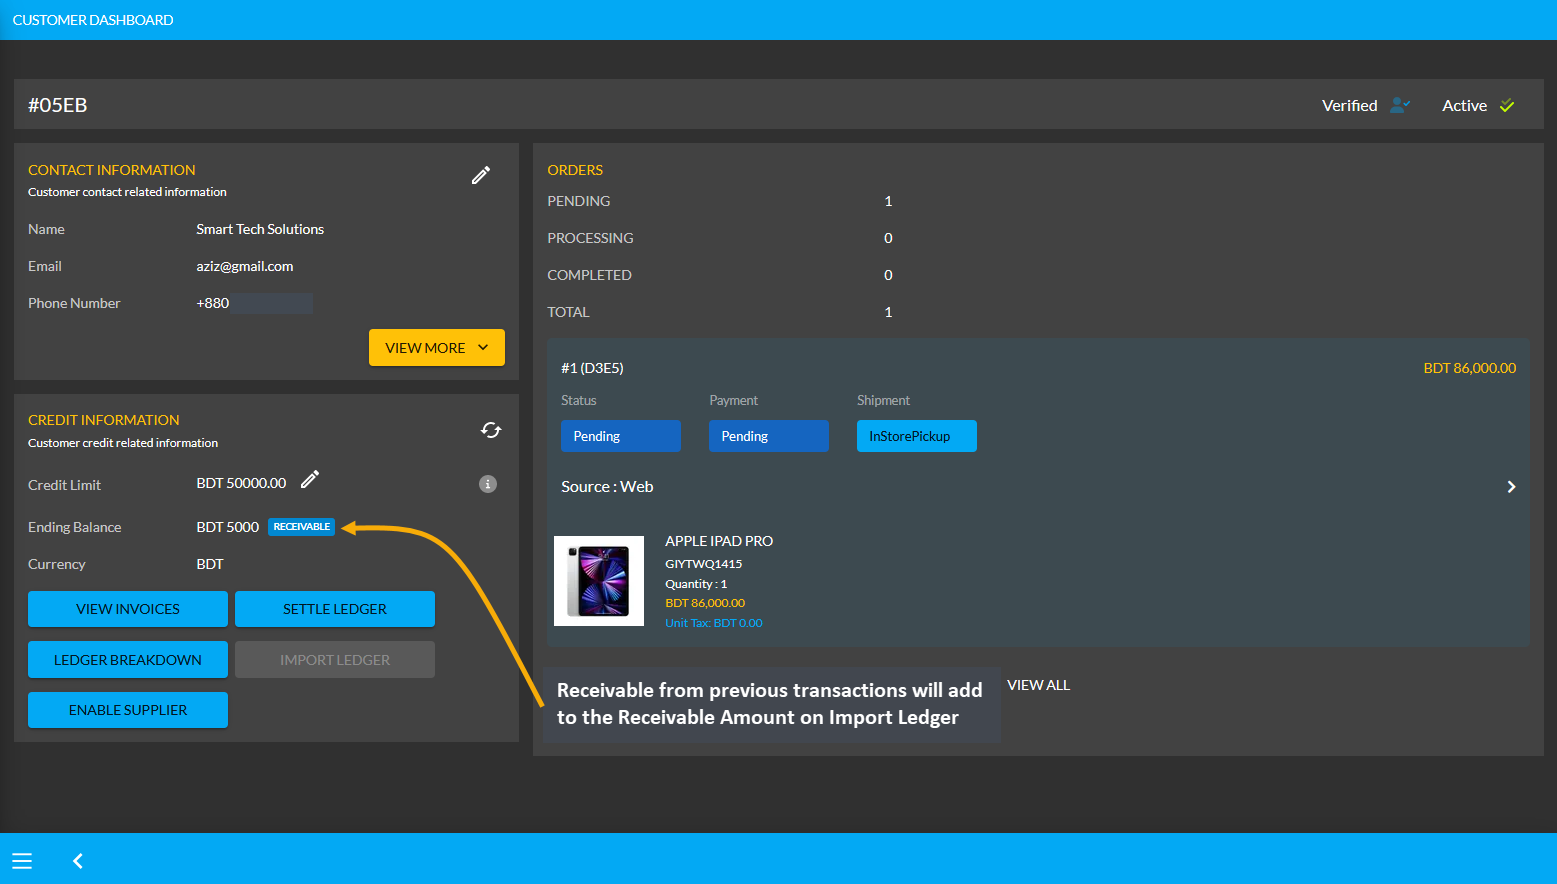
Image 3: Receivable from previous transactions will add to the Receivable Amount on Import Ledger.
Using the Ledger Breakdown feature, the Shop Owner can check previous transaction or receivable amount that is transferred through the Import Ledger feature on their Ledger Breakdown Page.

Image 4: Import Ledger balance with previous receivable amount will be updated on Ledger Breakdown page.
Credit Customer Ordering Products will add to Receivable
Though the Shop Owner already owes 5,000 BDT from the Credit Customer, the Credit Customer can still buy Product(s) from them using Credit which will add to the Receivable. For example, Credit Customer Smart Tech Solutions have purchased two Product(s) worth of 1,600 BDT from Shop Owner here.
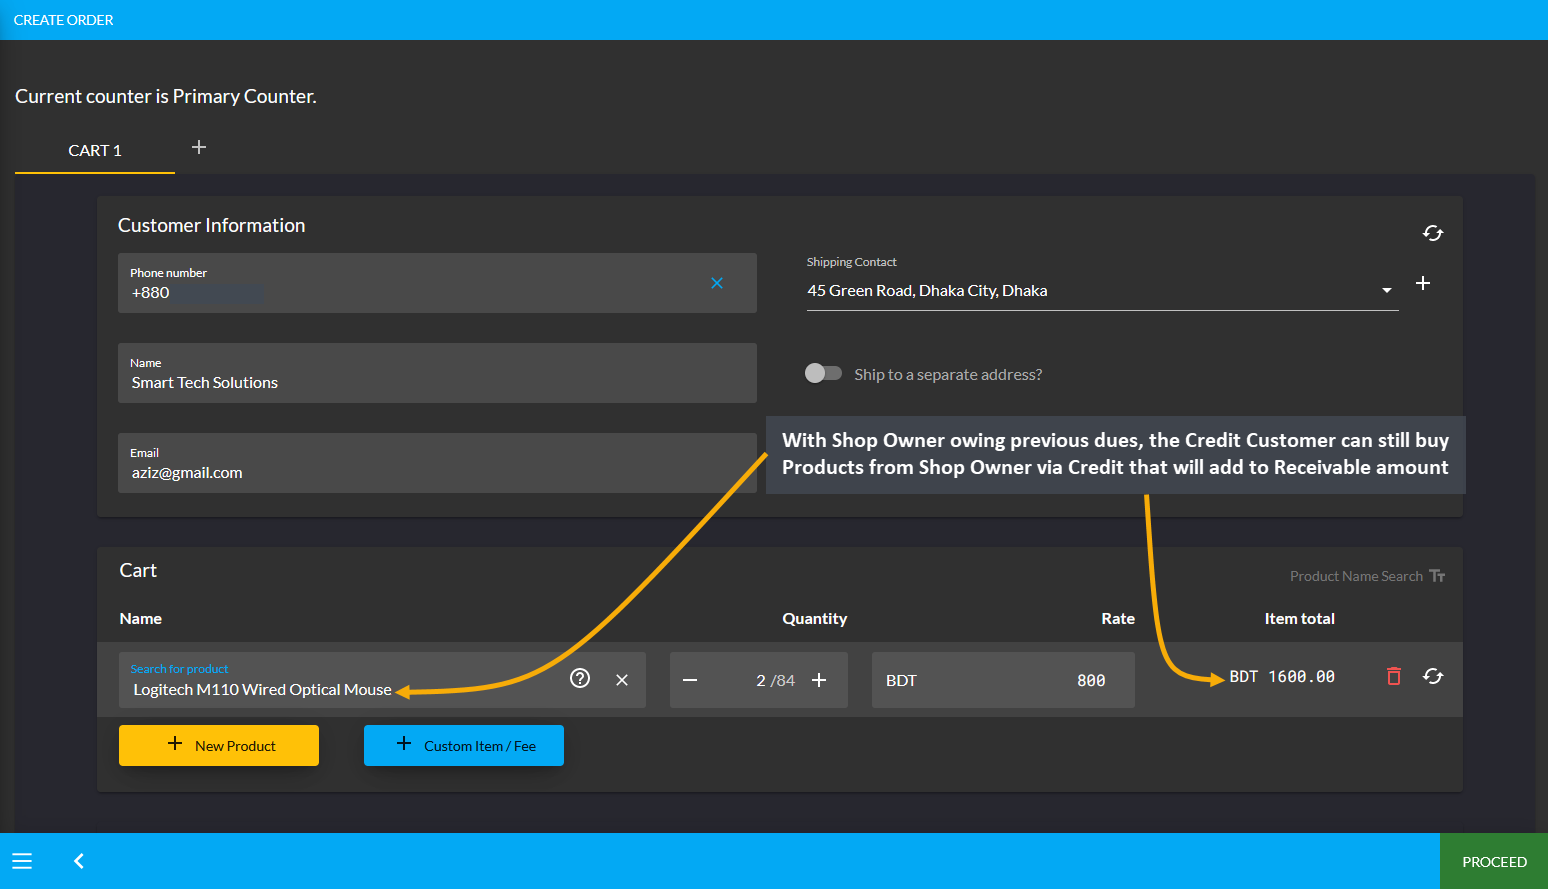
Image 1: Credit Customer buying Product(s) from Shop Owner via Credit will add to Receivable.
After the Credit Customer chooses payment method as On Credit (Due) and confirms their Order, 1,600 BDT will be added to their already Receivable or existing dues of 5,000 BDT to the Shop Owner. This Product purchase being 1,600 BDT, the amount will be added to and increase Receivable to 6,600 BDT now. If the Credit Customer wants to settle these dues, they can use ten different payment gateways to Settle Ledger.
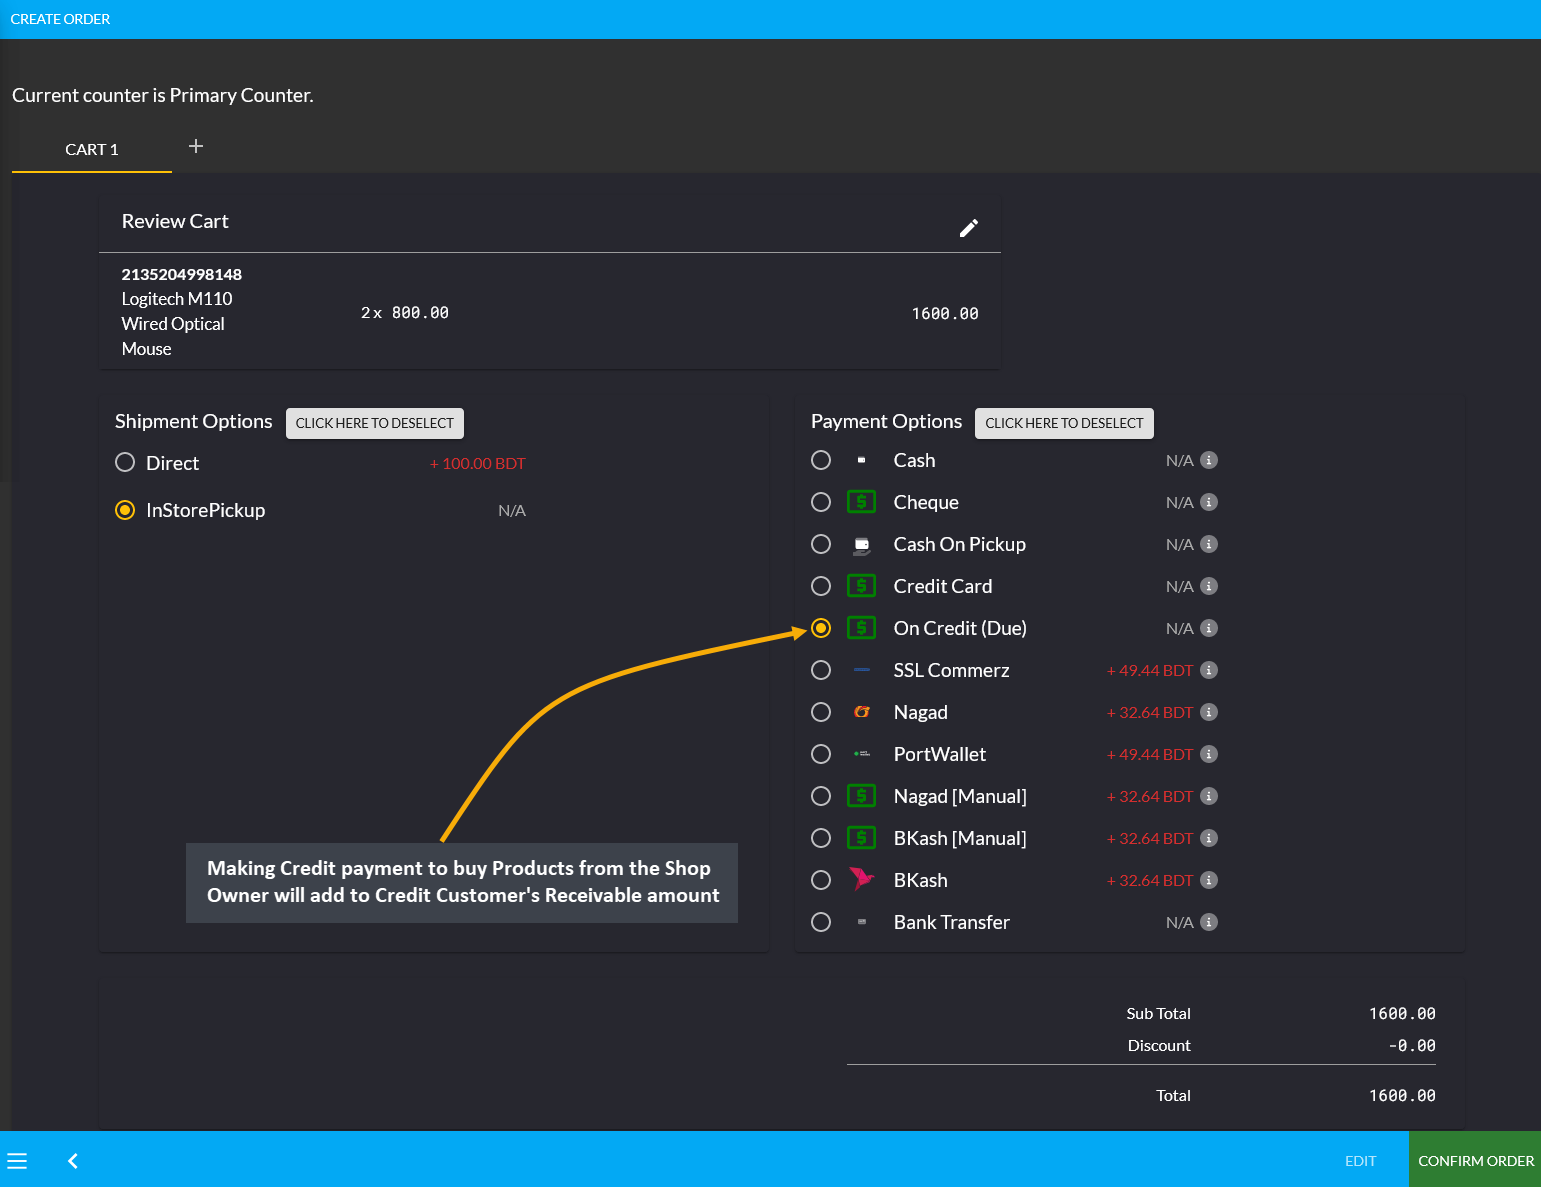
Image 2: Making Credit payment to buy Products from Shop Owner will add to Credit Customer's Receivable.
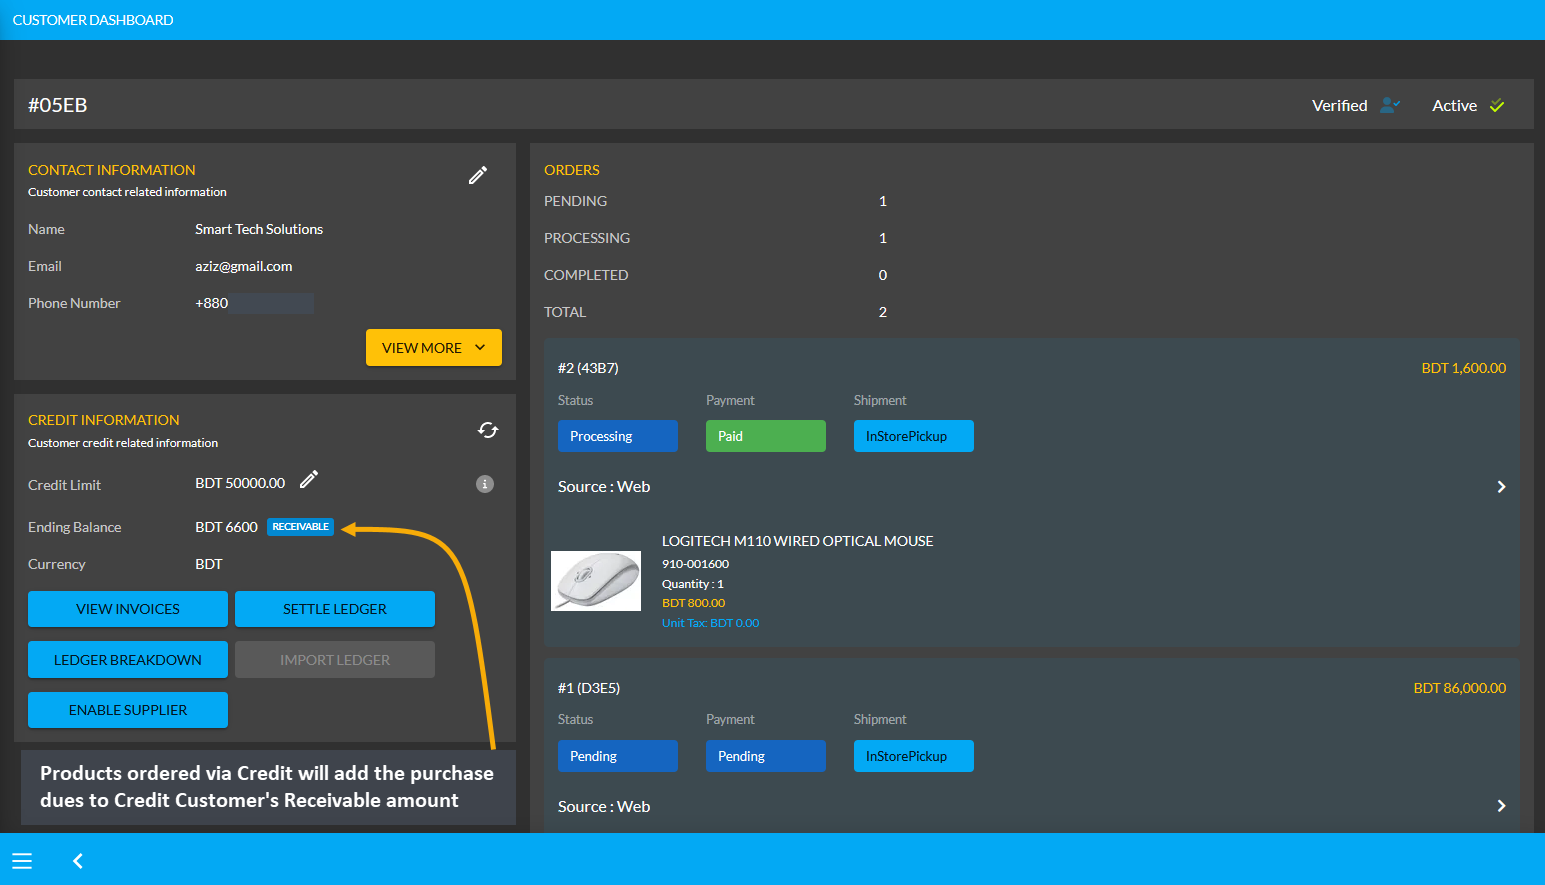
Image 3: Products ordered via Credit will add the purchase dues to Credit Customer's Receivable amount.
Using the Ledger Breakdown feature, the Shop Owner can check the transaction of the Credit Customer on their Ledger Breakdown Page with Receivable amount for ordering Products and Credit remaining from Credit Limit.

Image 4: Receivable amount for ordering Products will be updated on the Ledger Breakdown page.
Use Payment Gateways to Settle Ledger for Receivable
In total, the Credit Customer owes 6,600 BDT to the Shop Owner after their Product purchase. If they want to pay back the full amount or a certain amount to the Shop Owner from their Receivable, they can do it with the Settle Ledger option. For example, the Shop Owner will get 6,600 BDT from the Credit Customer Accessories Center BD, which they can pay back to the Shop Owner with the Settle Ledger feature.
In this case, the Credit Customer will try to pay back a certain amount i.e. 3,000 BDT from 6,600 BDT to the Shop Owner by using any of the ten payment gateways (Cheque, Cash On Delivery, Credit Card, SSLCommerz, Nagad, Nagad Manual, BKash Manual, BKash, PortWallet, Cash, and Bank Transfer) available with Settle Ledger button.
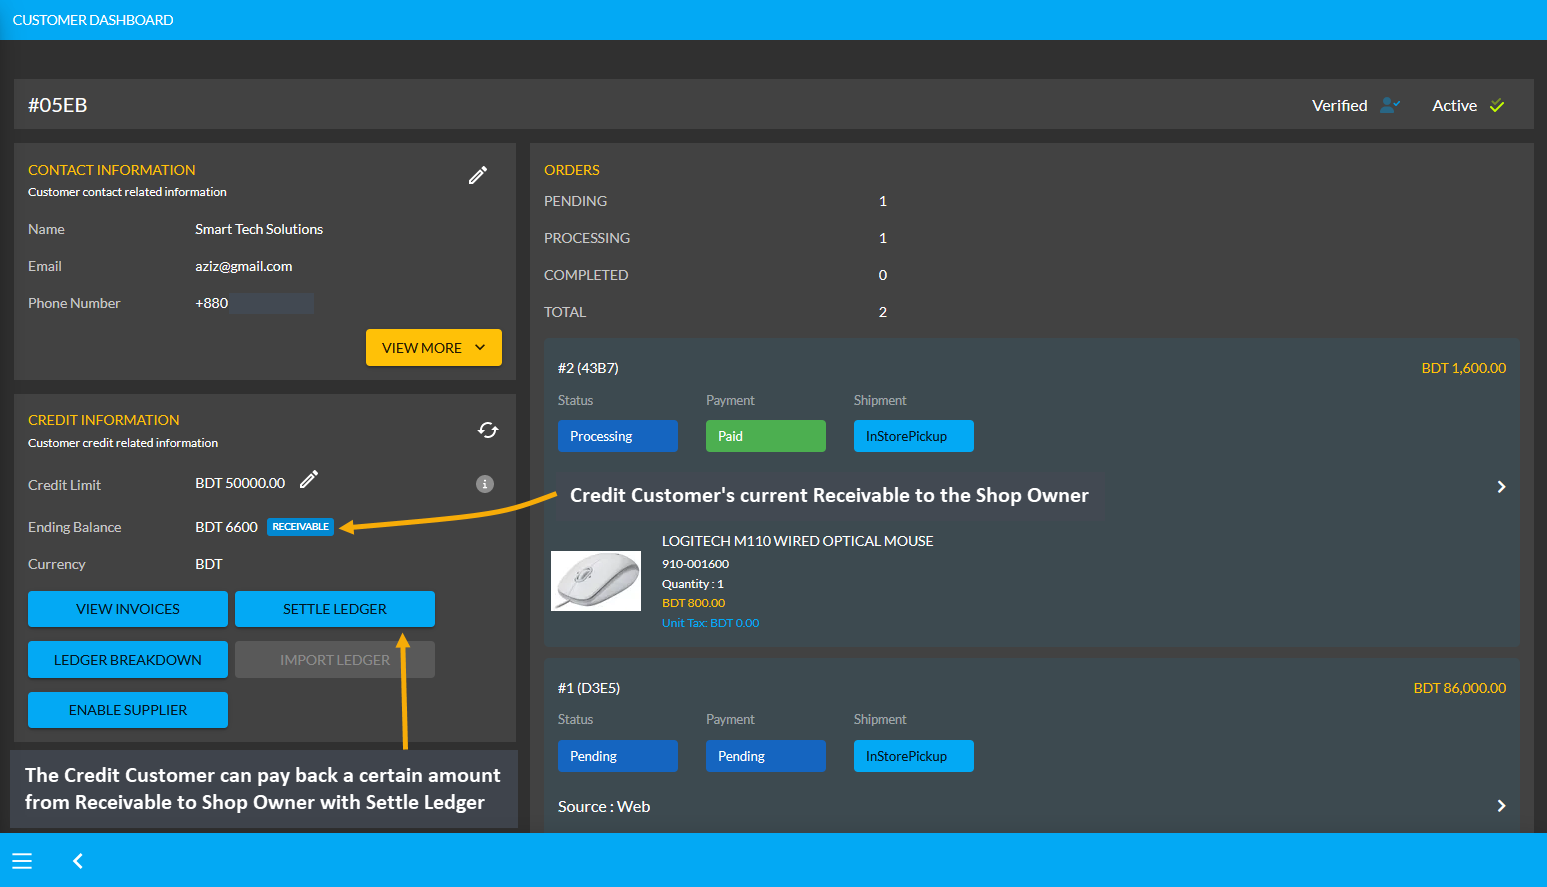
Image 1: Credit Customer can pay back an amount from Receivable to Shop Owner with Settle Ledger feature.
The Credit Customer can pay back from their Receivable amount of 6,600 BDT at once or by a few times through the ten different payment gateways. Here, the Credit Customer will pay back the Shop Owner 3,000 BDT with the Settle Ledger feature. First, they need to click the Settle Ledger button which will open a pop-up where the amount they want to pay needs to be set. Credit Customer wants to pay 3,000 BDT here with the Settle Ledger option.
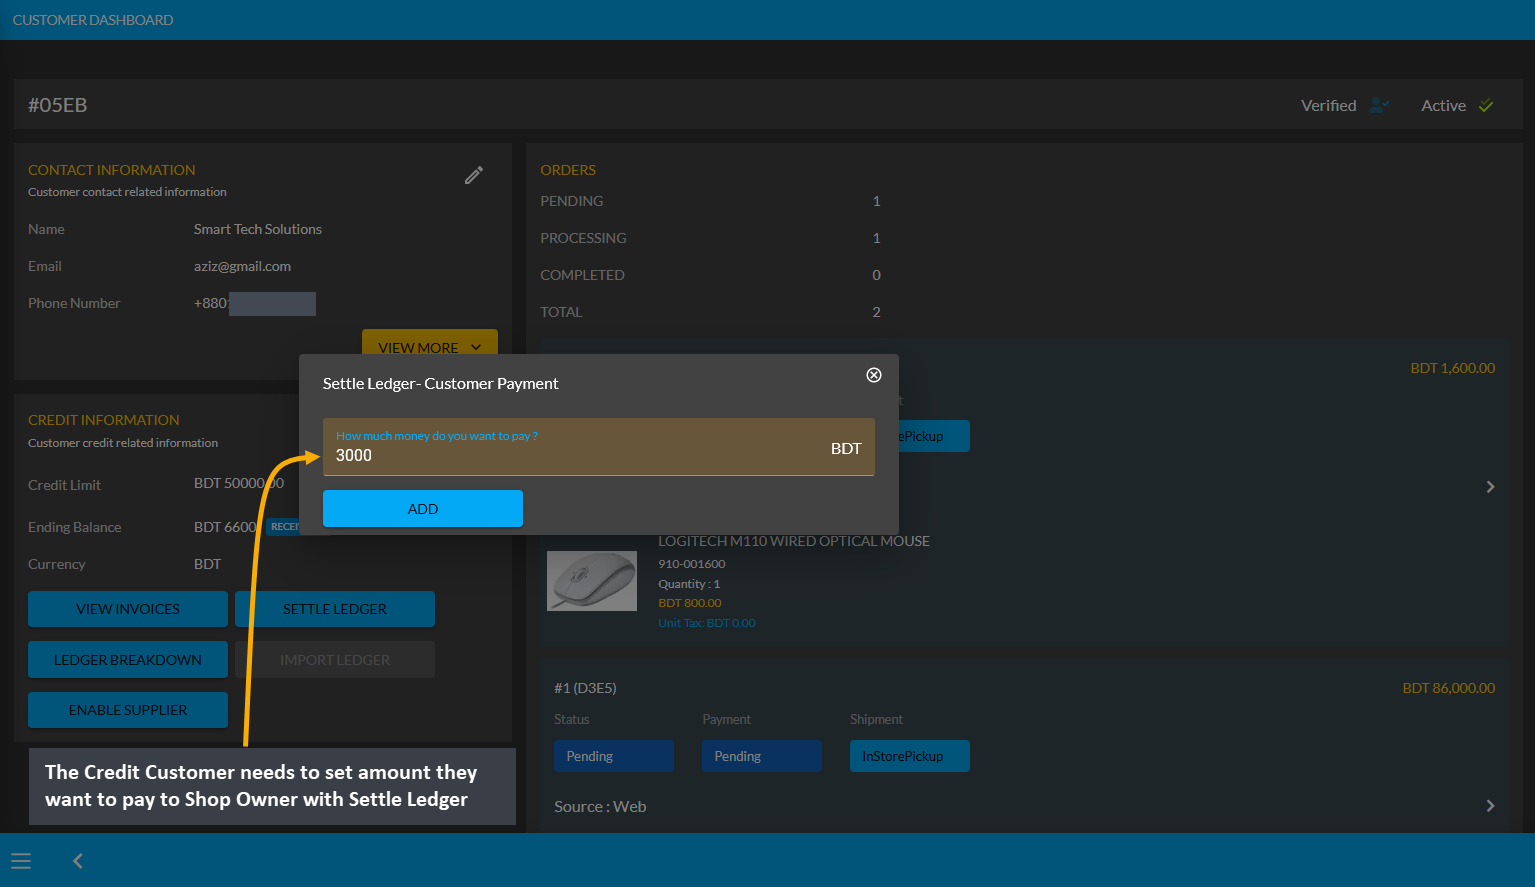
Image 2: The Credit Customer needs to set amount they want to pay to Shop Owner with Settle Ledger.
The Credit Customer needs to select one of the ten Payment Gateways to make payment for the selected amount to Settle Ledger now. Here, BKash Manual payment was selected and BKash (Manual) Transaction ID was set which incurred an additional transaction fee of 61.20 BDT. As demonstrated, the Credit Customer will have to complete their payment information and hit Submit when done.
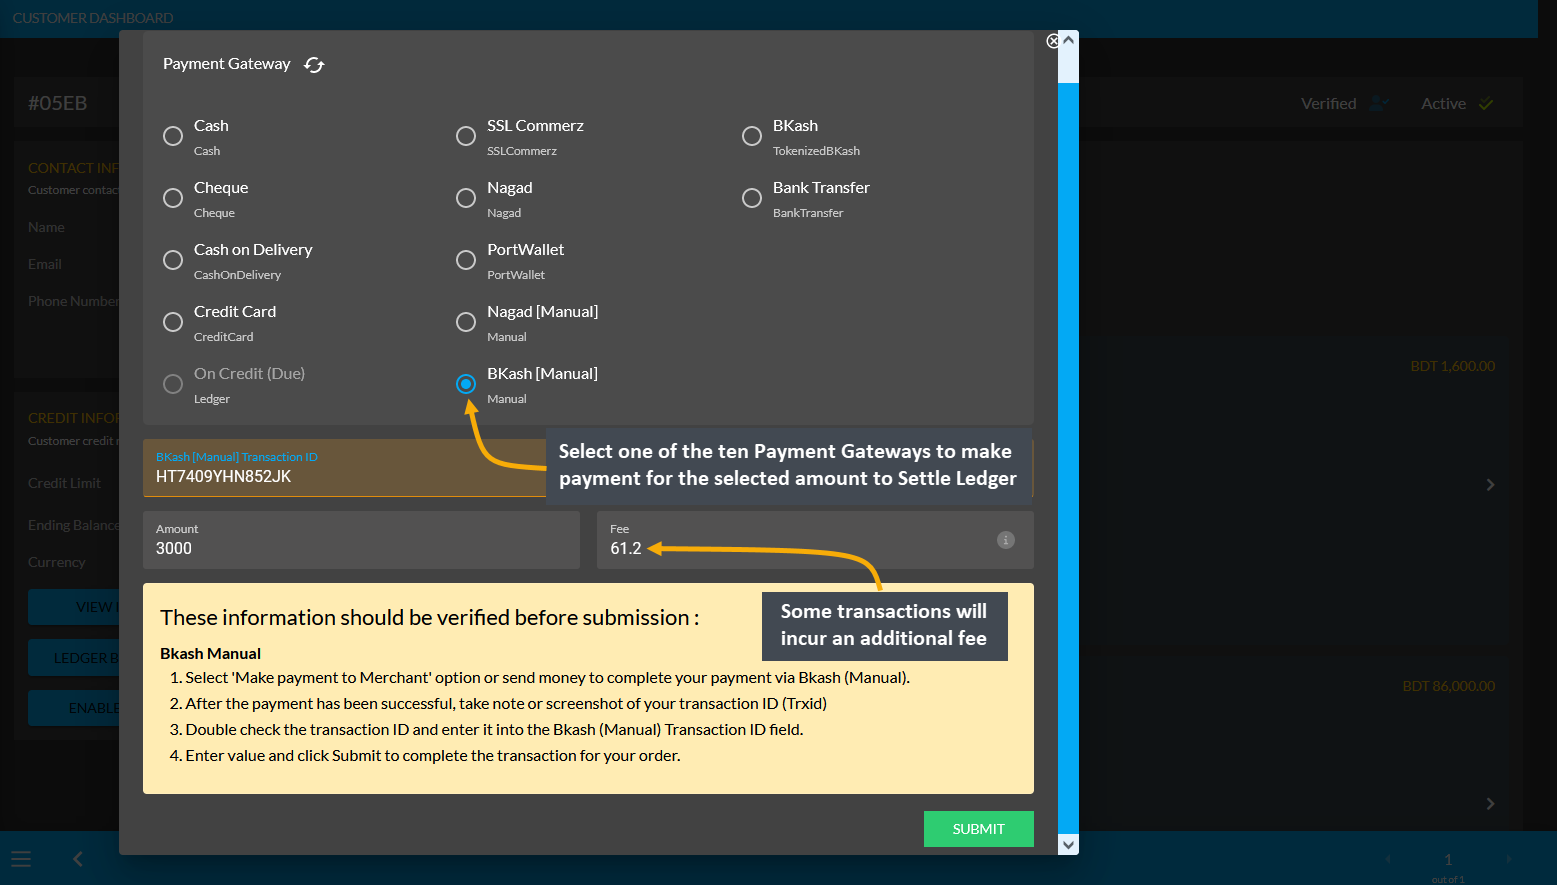
Image 3: Credit Customer needs to select a Payment Gateway to pay to Shop Owner with Settle Ledger.
After successful partial payment, a pop-up notification will confirm that the transaction amount 3,000 BDT was completed. Check the transaction reference and gateway used and click Submit to complete the process.
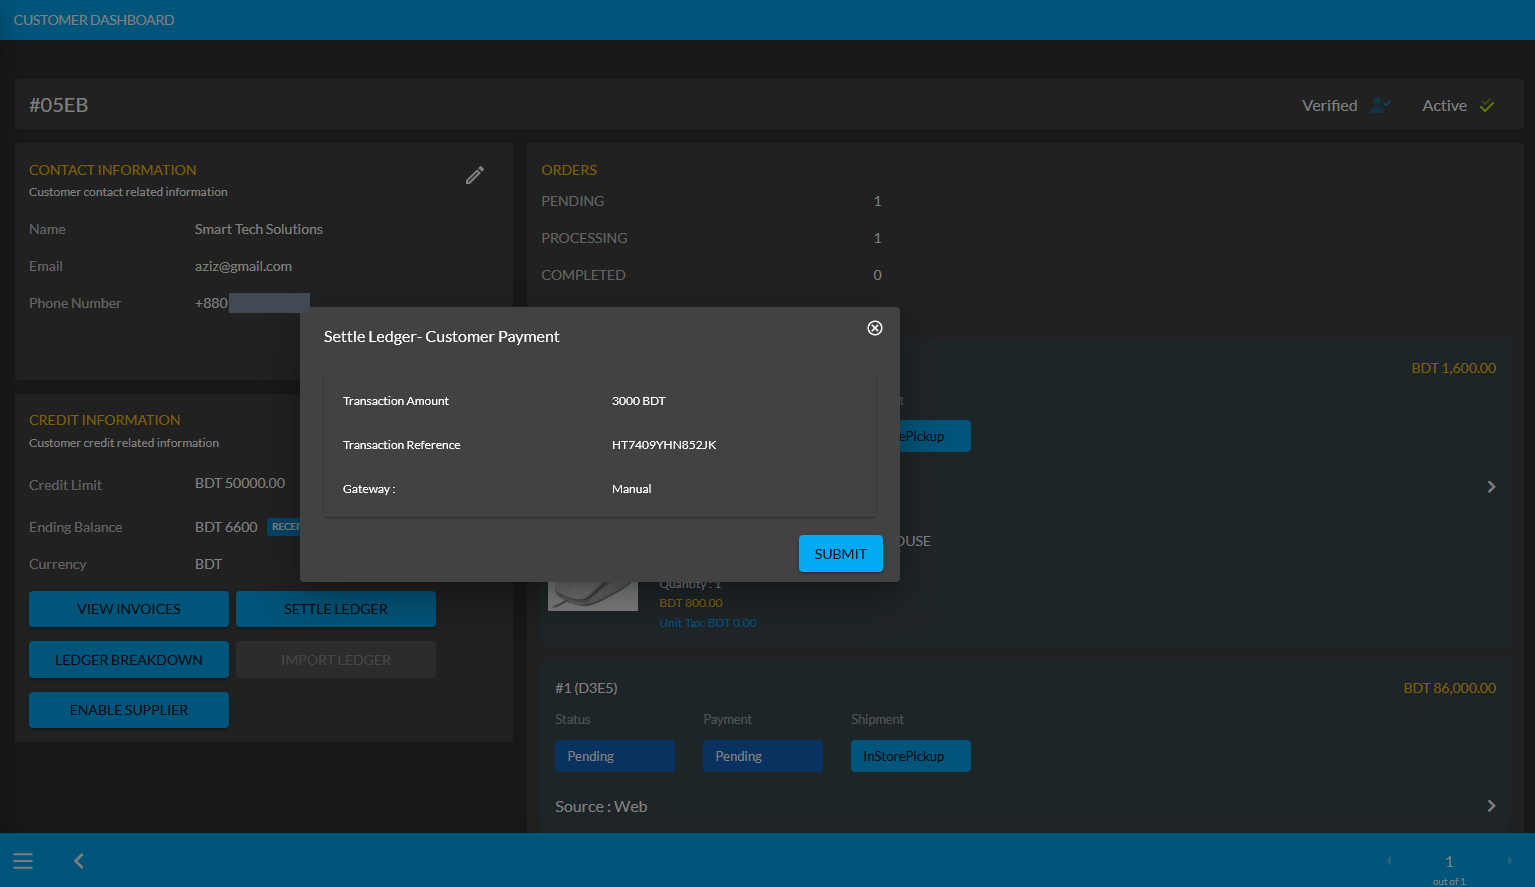
Image 4: After successful payment, a pop-up will show confirmation with the transaction details.
When the Credit Customer completes payment of 3,000 BDT to the Shop Owner with the Settle Ledger feature, it will reflect the updated balance under Receivable. For instance, after settling Ledger with payment of 3,000 BDT here, the Credit Customer’s Receivable was automatically updated from 6,600 BDT to 3,600 BDT.
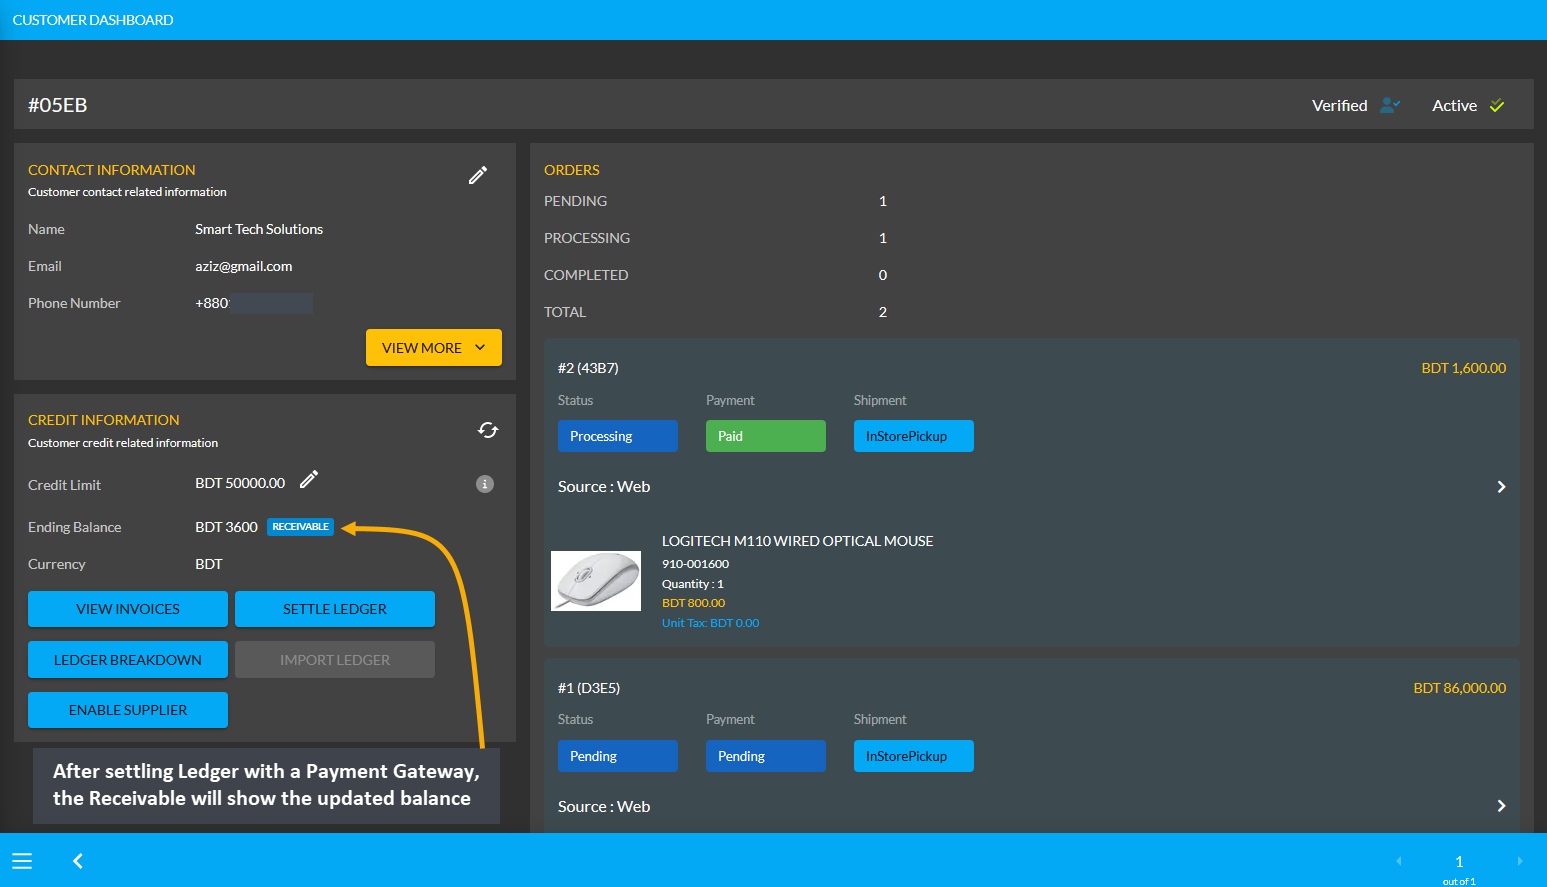
Image 5: After settling Ledger with a Payment Gateway, the Receivable will show updated balance.
Using Ledger Breakdown feature, the Shop Owner can check transactions after Ledger settlement with Payment Gateways by the Credit Customer on the Credit Customer’s Ledger Breakdown Page.

Image 6: Settling Ledger with Payment Gateways will be updated on the Ledger Breakdown page.
26.2 - Credit Supplier Ledger Transactions
Learn More about the Credit Supplier’s purpose of transactions through Ledger.
Purpose of Transactions with Ledger
Credit Suppliers are granted Credit Limit like Credit Customers to purchase Product(s) from the Shop Owner. They are also provided the permission to Sell Per Unit Product(s) to the Shop Owner. The Shop Owner can purchase Per Unit Product(s) from the Credit Supplier with Credit Purchase, Cash Purchase, and Paid Purchase.
Credit Suppliers can start buying Product(s) using the Credit Limit like Credit Customers. For example, the Credit Supplier Banani Computer Store is provided with 50,000 BDT Credit Limit by the Shop Owner. Their Credit Used amount will show 0 BDT unless they purchase Product(s) with Ledger.
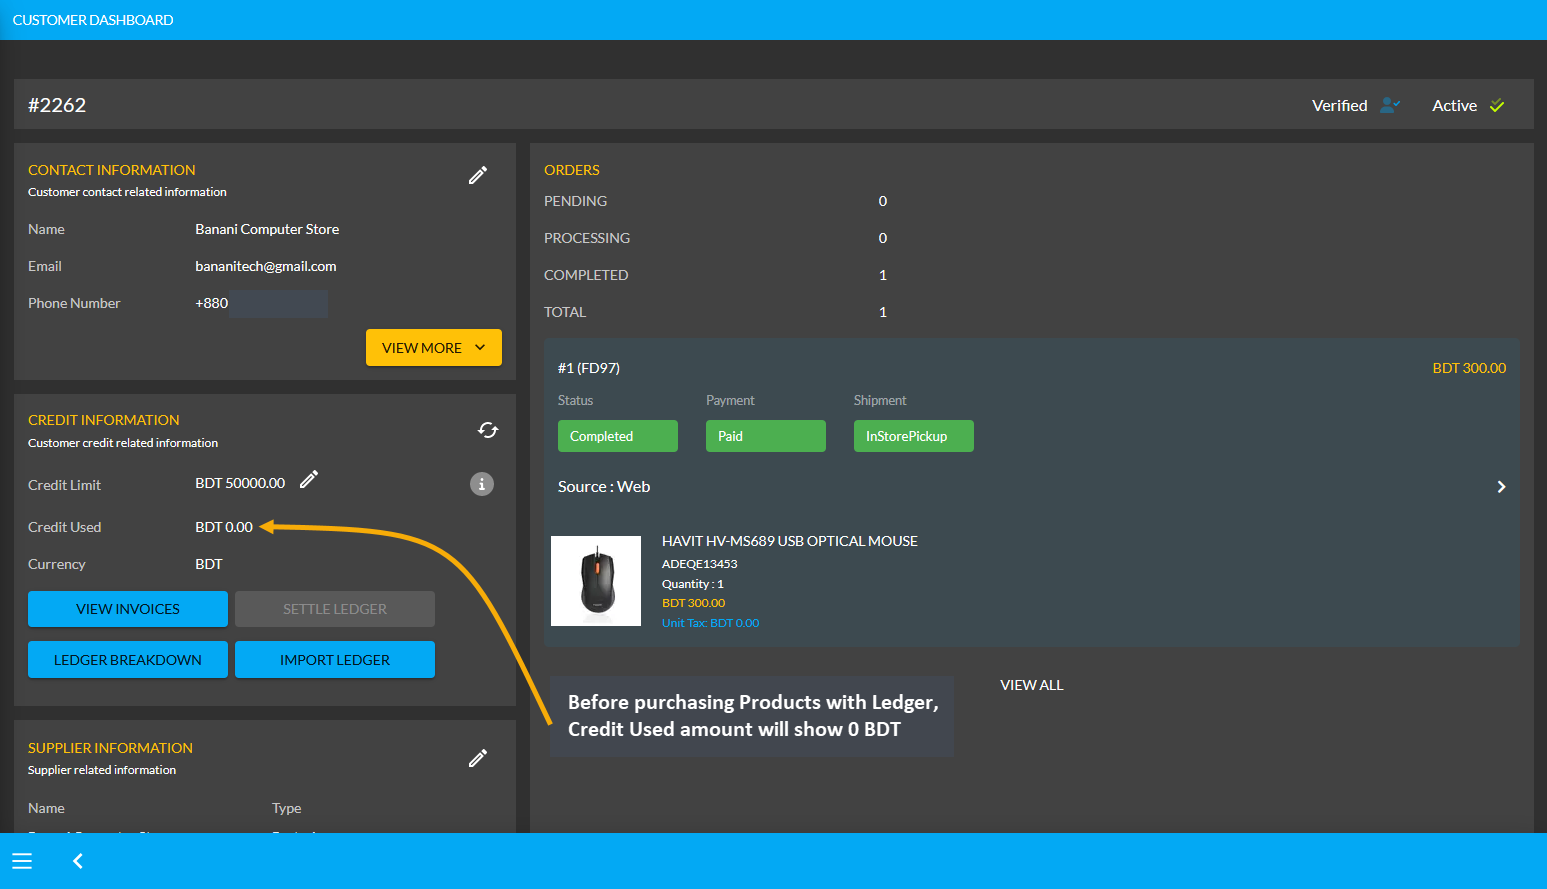
Using Credit to Order Products will add to Credit Used
If Product(s) are ordered for the Credit Supplier through the Admin Panel with Credit payment, then it will add to the Credit Used amount within their Credit Information. So, the On Credit (Due) can be used to place Orders for Product(s). For this, first click the + button from Orders tab that will redirect to the Cart page. In the cart, fill the Customer’s details, add Product(s) to Cart with desired quantities and click Proceed to save all the changes.
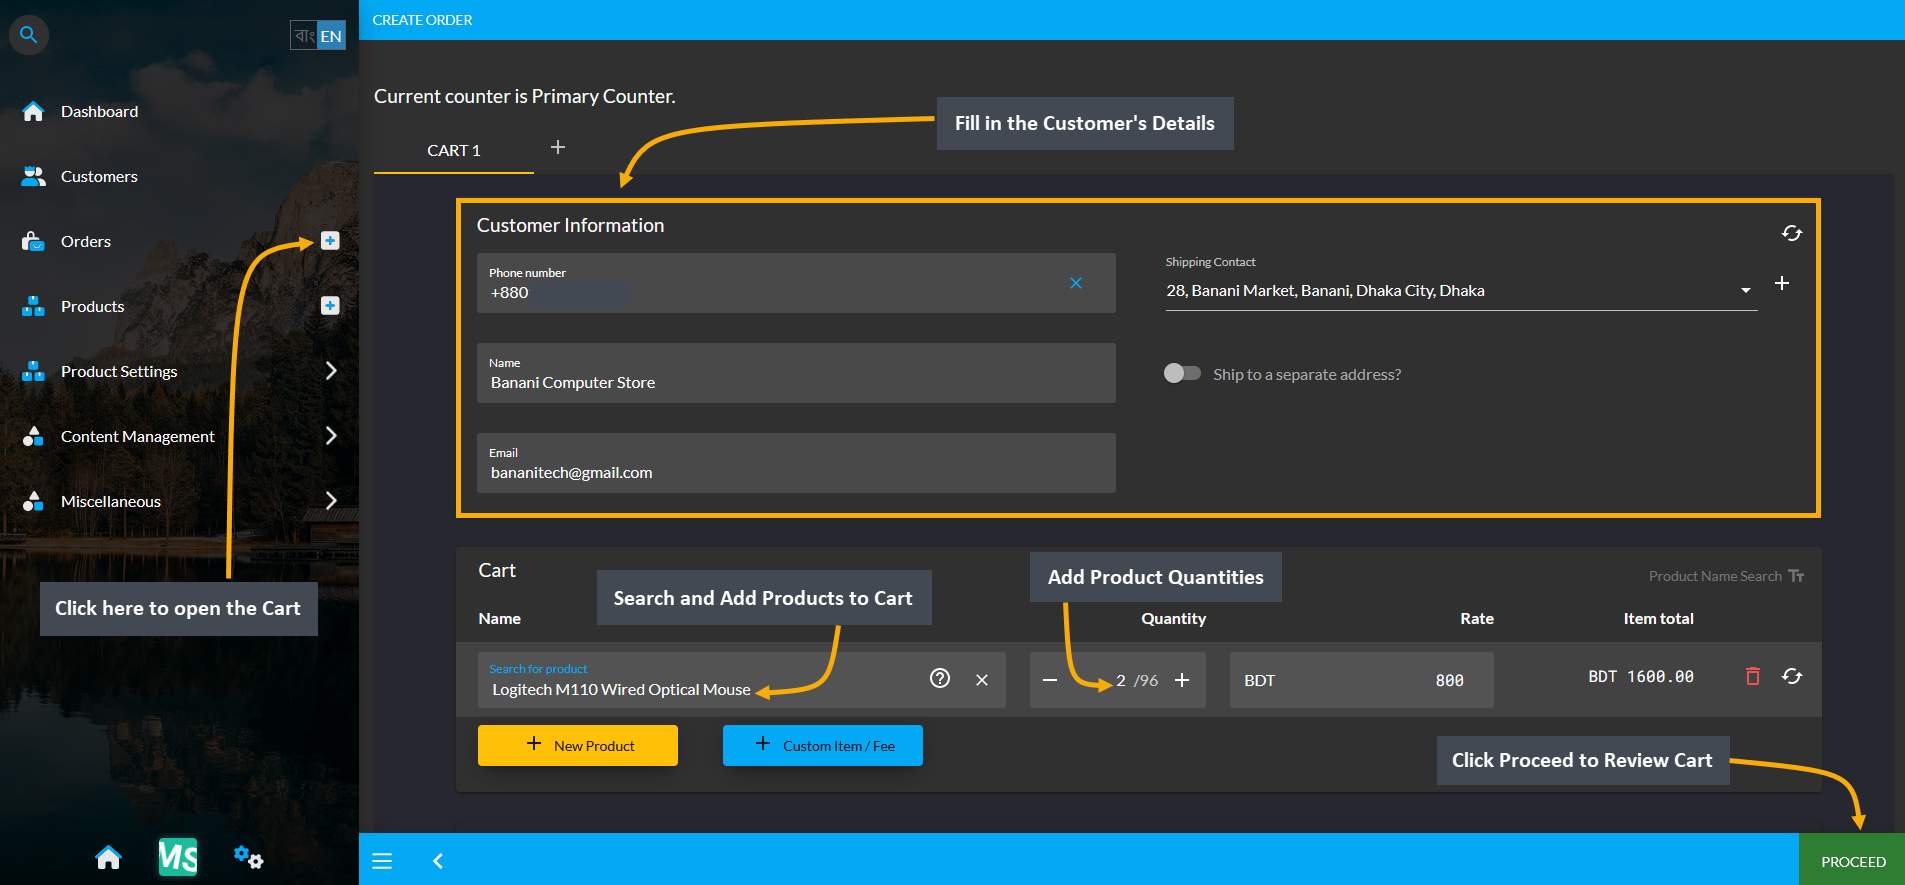
Image 1: Fill out Customer's details and add Products to Cart to order Products with Ledger.
During the checkout process, select preferred Shipping method and select On Credit (Due) as Payment method. Selecting it will display the available Credit Limit and Ending Balance for Credit Supplier. Then click Confirm Order to redirect to the order confirmation page where there will be a Print Invoice button to get the invoice printed.
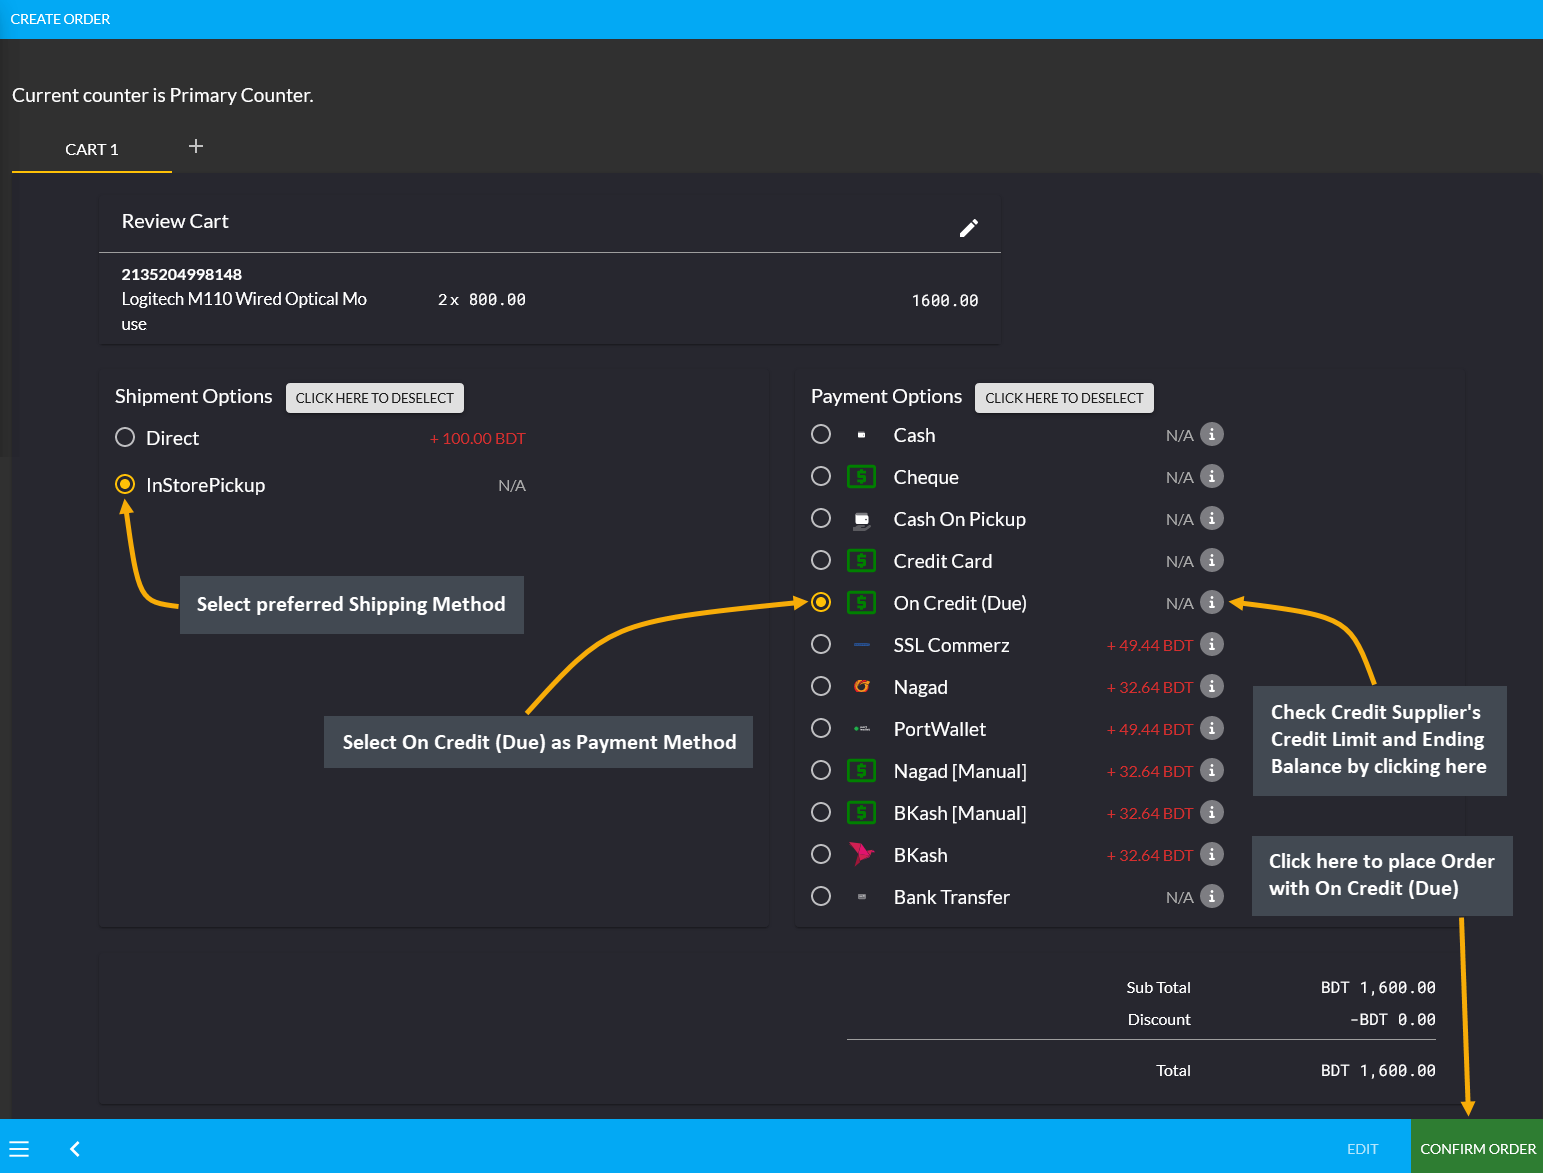
Image 2: Select preferred Shipping method and select Ledger as Payment method to order Products.
On the print invoice page, it will reflect that the payment has been completed with On Credit (Due) indicating the Credit Supplier’s payment as Due. Here, Customer paid 1,600 BDT from their Credit which will remain due until paid through cash or other payment methods to the Shop Owner through Settle Ledger option.
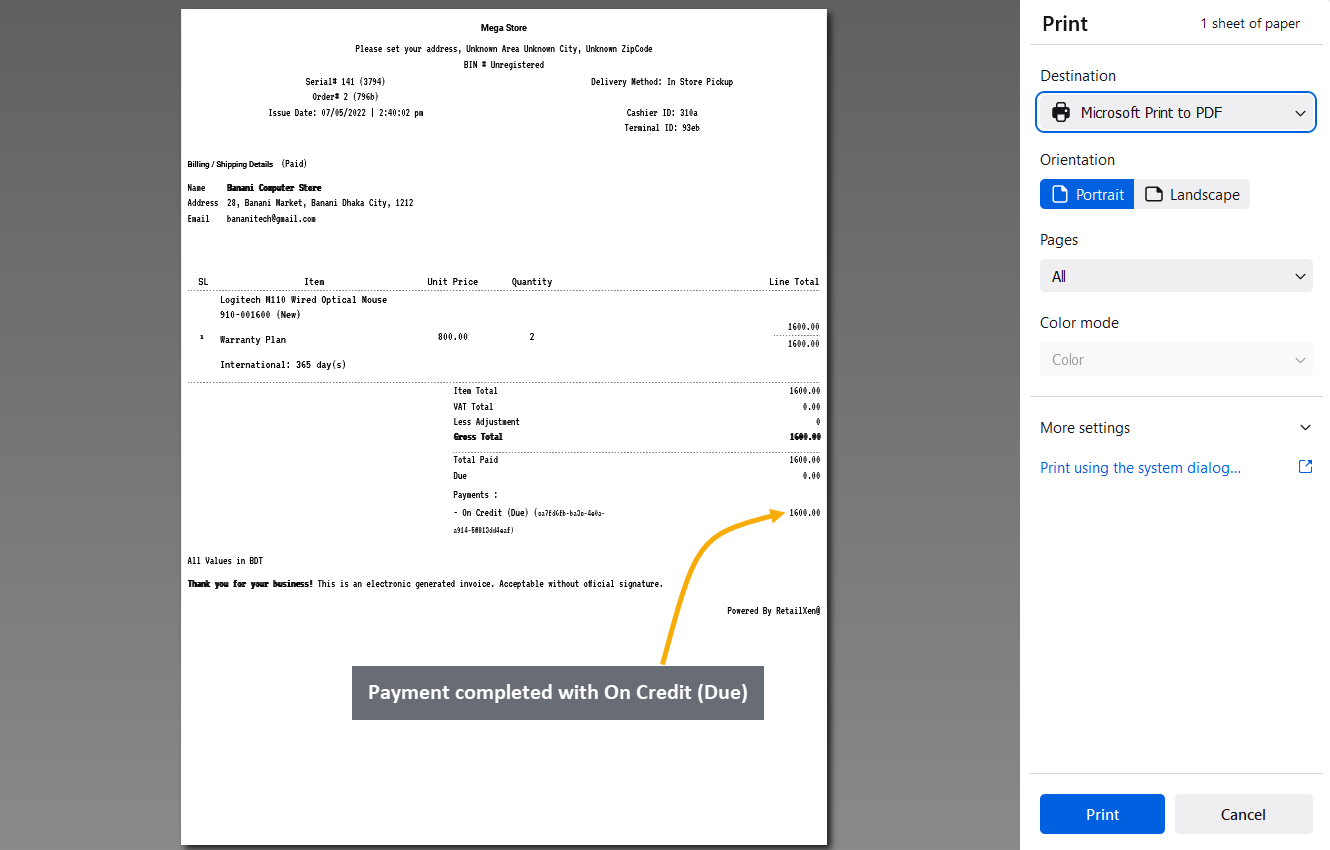
Image 3: Invoice breakdown will show payments completed with Ledger which will be Due.
Using the Ledger Breakdown feature from Credit Information section under Customer dashboard, the Shop Owner can check the Credit transaction after ordering Product(s) on their Ledger Breakdown Page.

Image 4: Import Ledger balance with previous dues will be updated on the Ledger Breakdown page.
Ending Balance Reflected on Credit Supplier’s Dashboard
After ordering Products with Credit, the used balance from Credit Limit will reflect under Ending Balance. Credit Supplier Banani Computer Store ordered Products with Credit payment, so their Ending Balance shows 1,600 BDT.
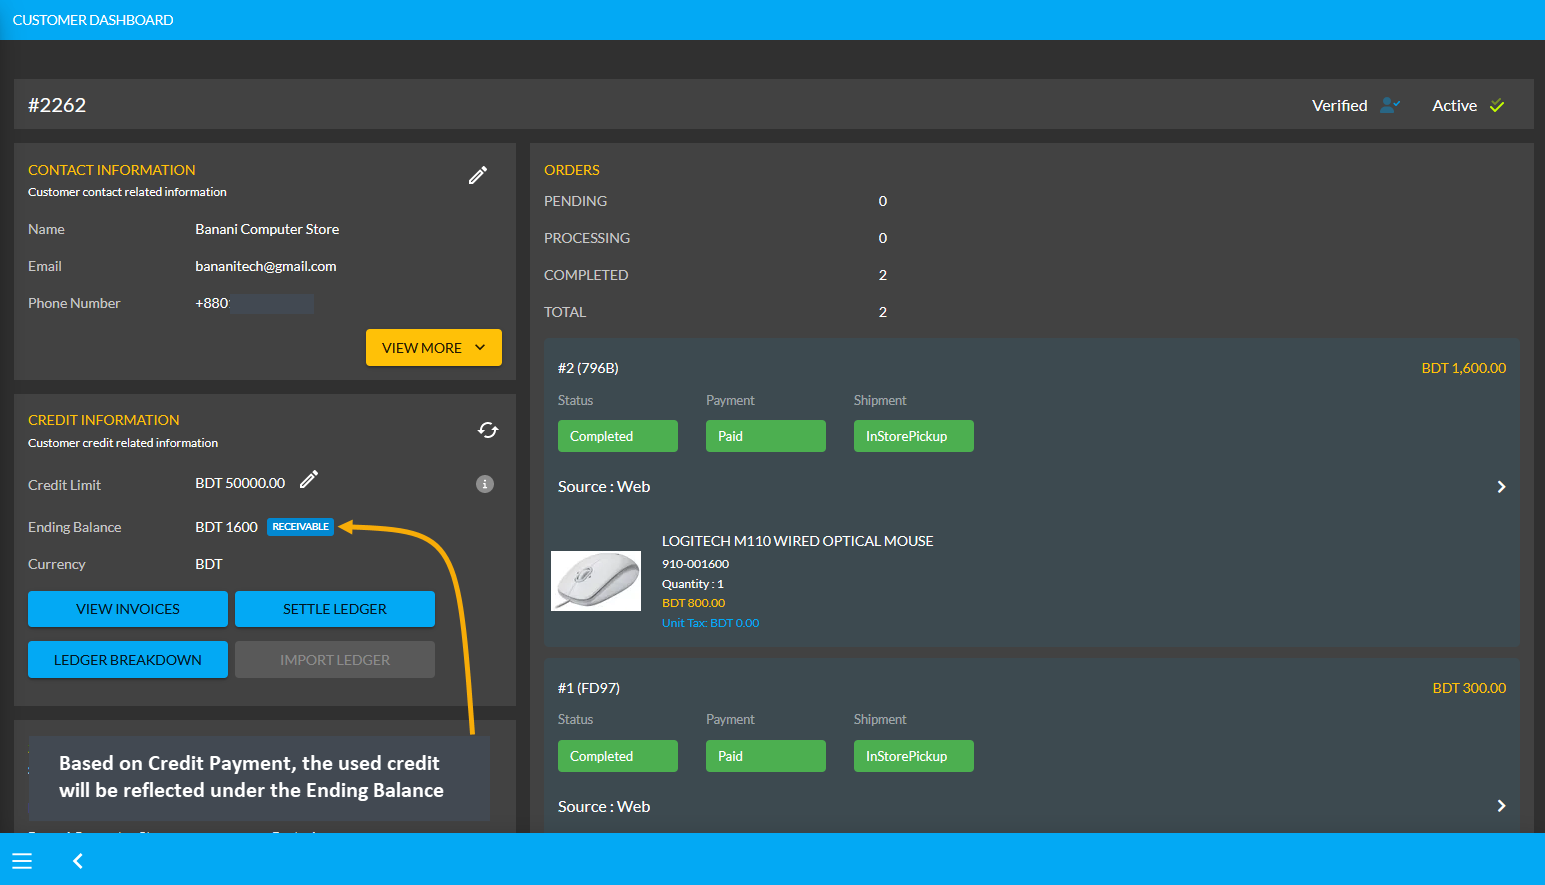
Credit Supplier Import Ledger
Another purpose of Transaction is the Ledger Initial Import which is a feature that can only be used for once by the Admin on Credit Supplier’s Dashboard. For instance, if the Credit Supplier has a receivable or payable amount from any previous transaction, they can be imported with Import Ledger button on Credit Information section.
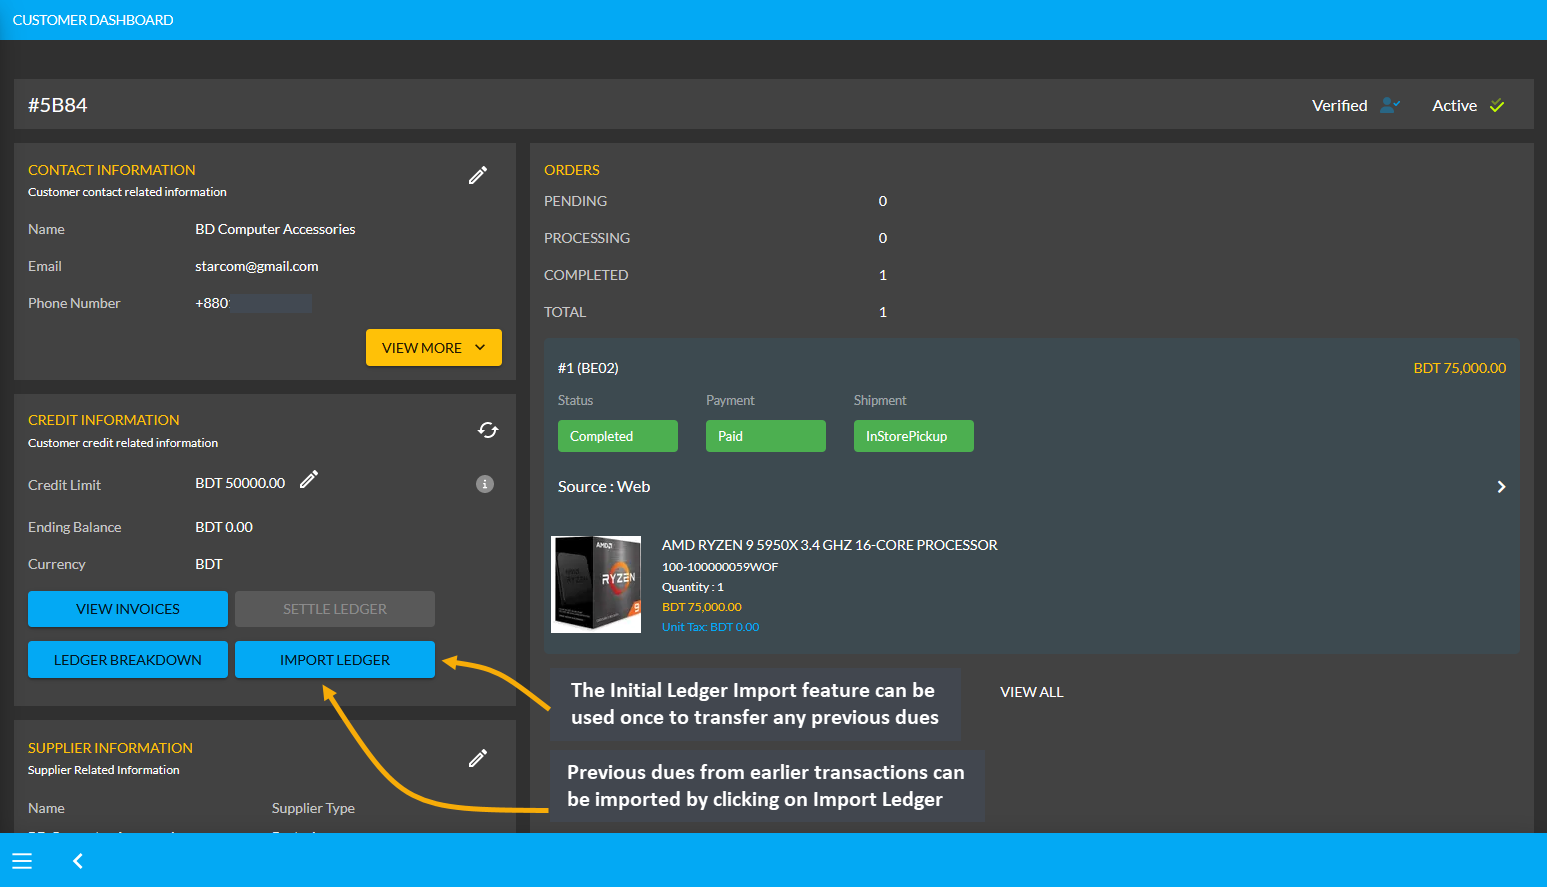
The Import Ledger feature has Receivable and Payable. Upon clicking the Import Ledger button, the Shop Owner will be asked to confirm if the previous transaction has a Receivable or Payable amount to the Credit Supplier.
Payable Amount on Import Ledger
For instance, after clicking the Import Ledger button, if the Shop Owner selects Payable with an amount of 5,000 BDT for example, it will mean that that the Credit Supplier will get 5,000 BDT from the Shop Owner. So, selecting Payable based on previous transactions will add to the Payable Amount on Import Ledger.
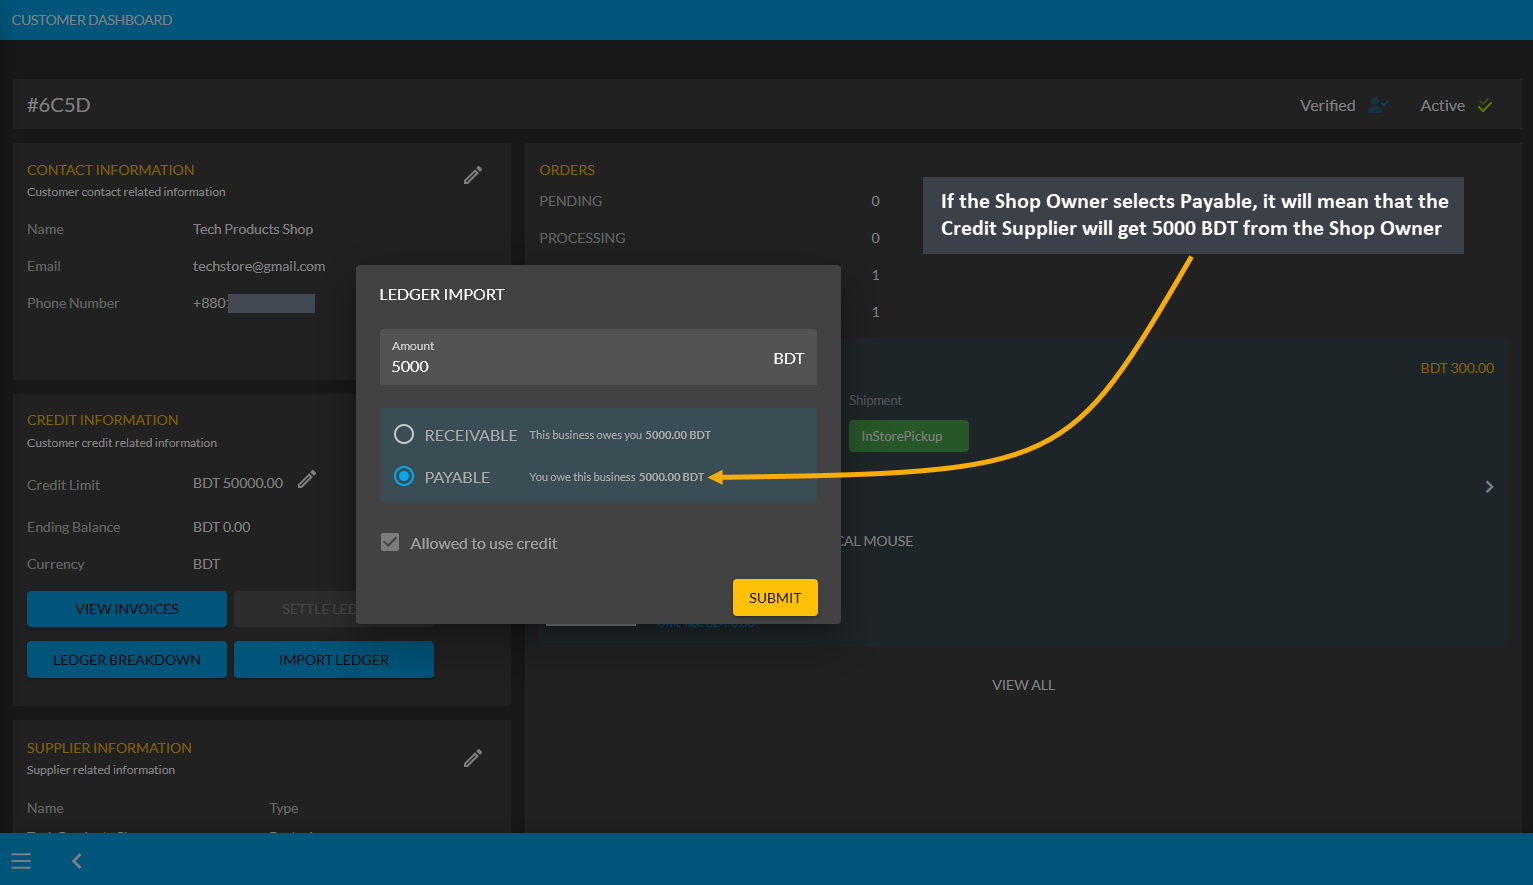
Image 1: If Shop Owner selects Payable, it will mean that Credit Supplier will get 5000 BDT from them.
Import Ledger feature can only be used once, so before setting the Payable, the Shop Owner will have to confirm if all the information is correct. Therefore, after checking all the information, the Shop Owner has to click I Agree to add dues from previous transactions on Credit as shown in the example screenshot below.
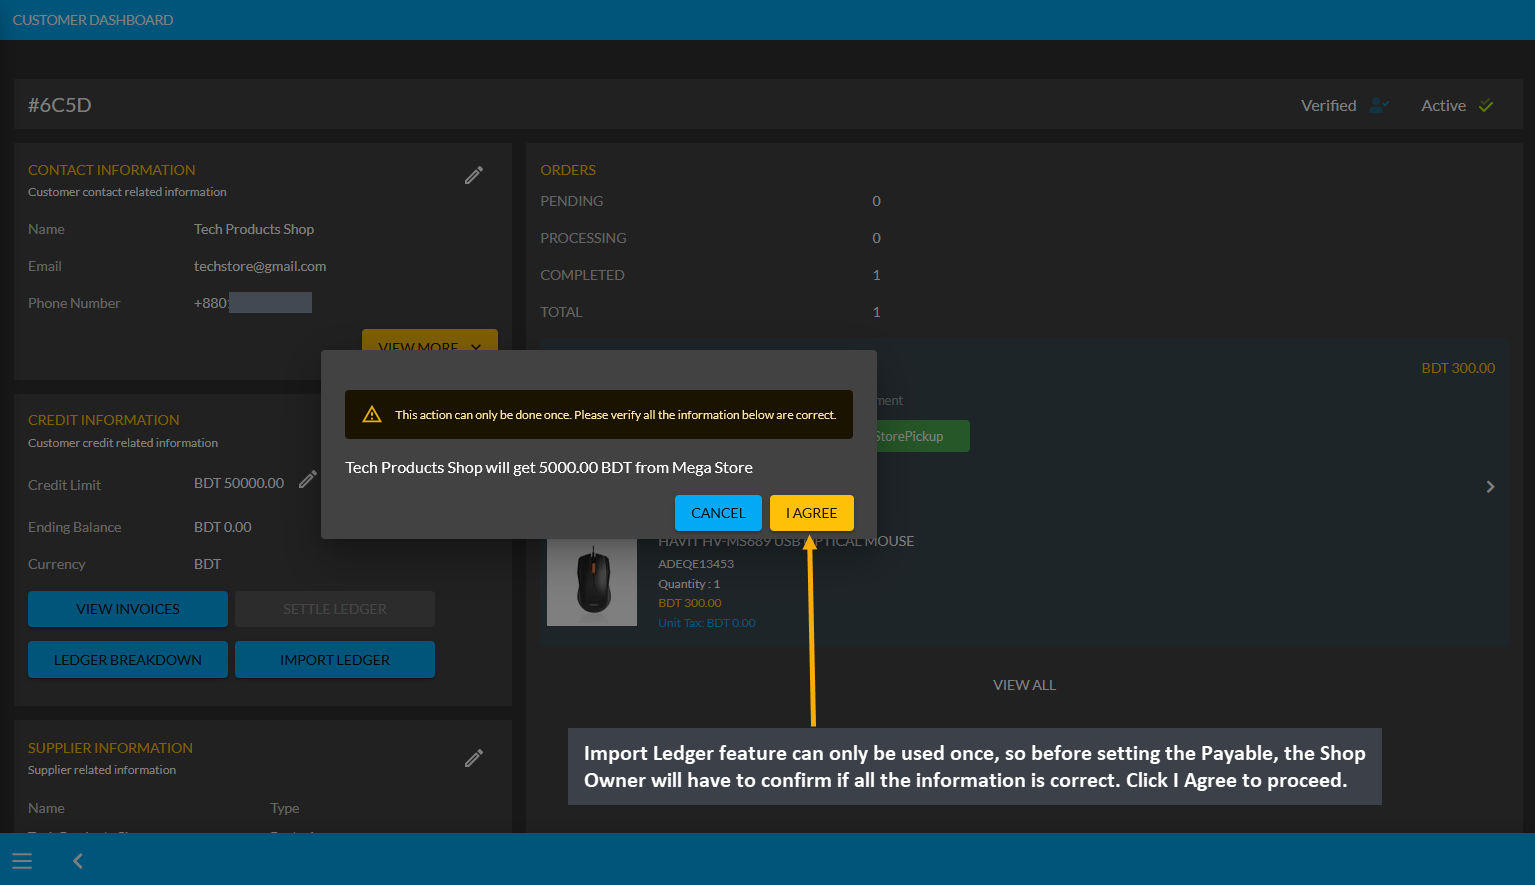
Image 2: Before setting Payable, the Shop Owner will be asked to confirm if all the information is correct.
As the Credit Supplier will get 5000 BDT from the Shop Owner, selecting Payable for any previous transactions on the Import Ledger will add to the Payable amount that the Shop Owner owes to them.
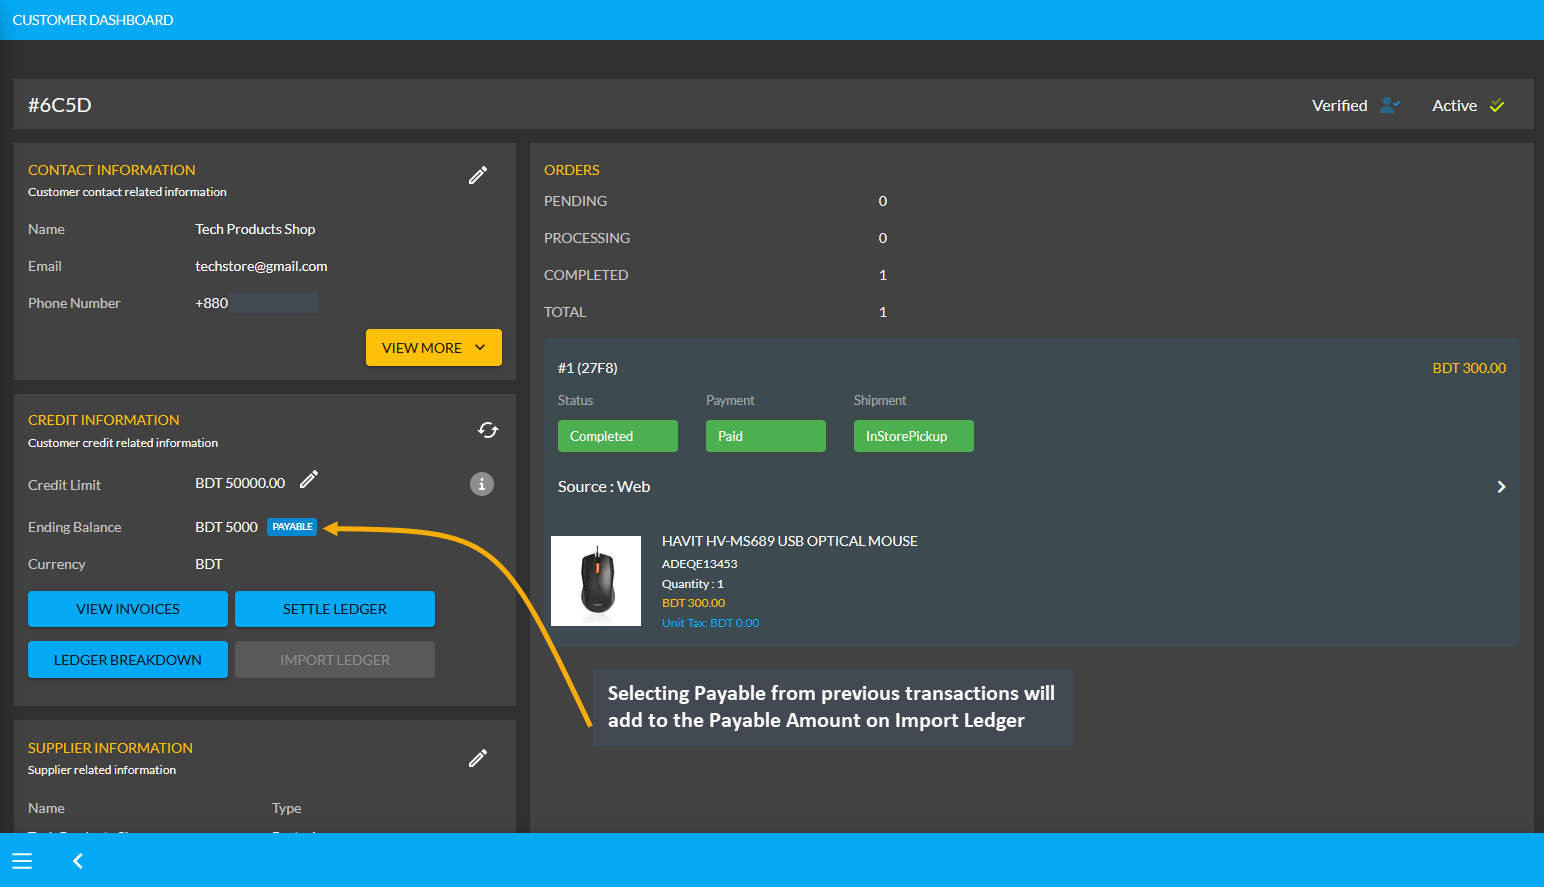
Image 3: Selecting Payable from previous transactions will add to the Payable Amount on Import Ledger.
Using the Ledger Breakdown feature, the Shop Owner can check previous transaction or payable amount that is transferred through the Import Ledger feature on their Ledger Breakdown Page.

Image 4: Import Ledger balance with previous payable amount will be updated on Ledger Breakdown page.
Credit Supplier Ordering Products will deduct from Payable
Even if Credit Supplier have dues from the Shop Owner worth of 5,000 BDT like the current example, they will be able to buy Product(s) from the Shop Owner via Credit which will deduct from the Payable amount. For example, Credit Supplier Tech Products Shop have purchased two Product(s) worth of 1,600 BDT from Shop Owner.
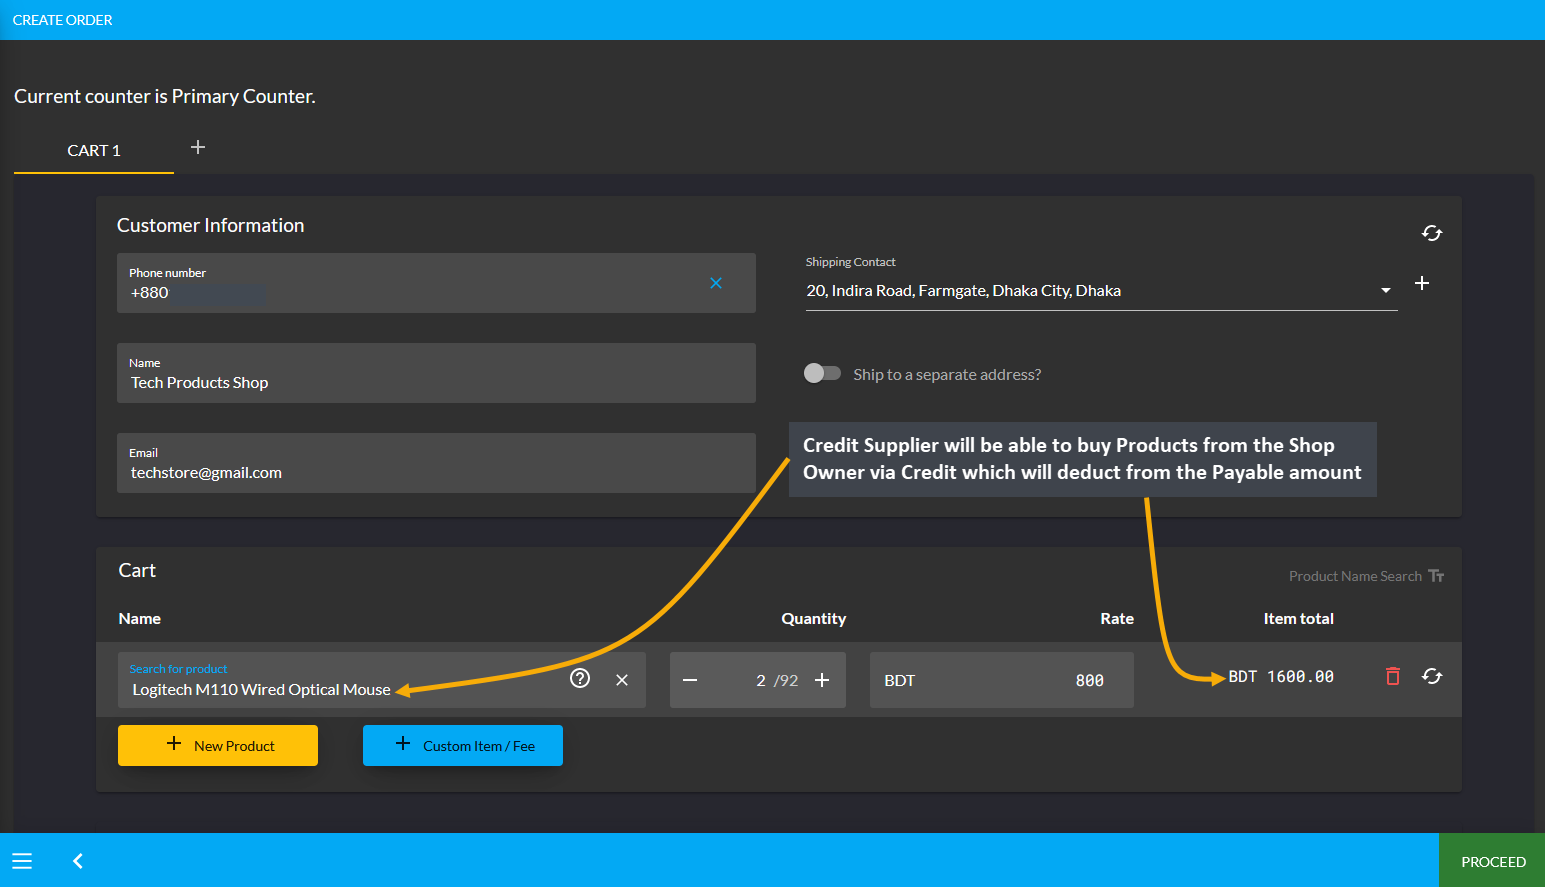
Image 1: Credit Supplier buying Products from Shop Owner via Credit will deduct from Payable.
After the Credit Supplier chooses payment method as On Credit (Due) and confirms their Order, 1,600 BDT will be deducted from their already Payable or owed amount of 5,000 BDT from Shop Owner. With Product purchase of 1,600 BDT now, the amount will be deducted and 3,400 BDT Payable amount will be remaining from Shop Owner now. So, a Credit Supplier can buy Products from the Shop Owner via Credit to settle Payable Amount.
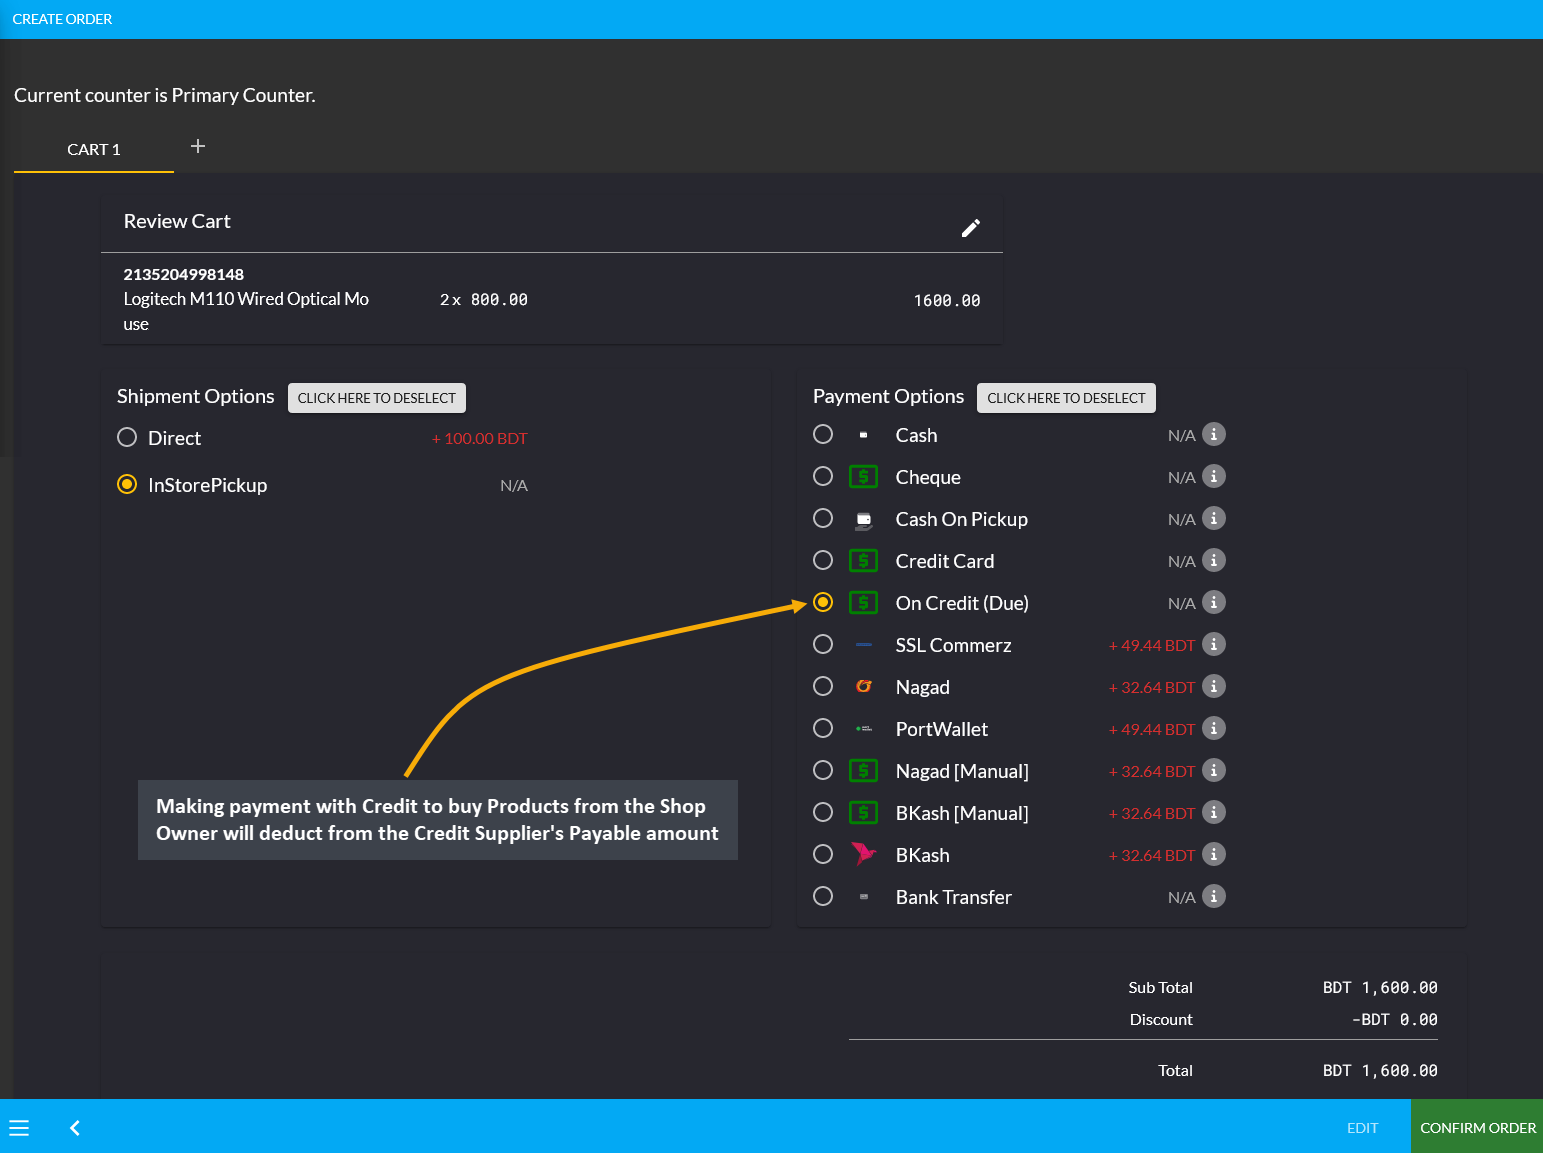
Image 2: Making Credit payment to buy Products from Shop Owner will deduct from Credit Supplier's Payable.
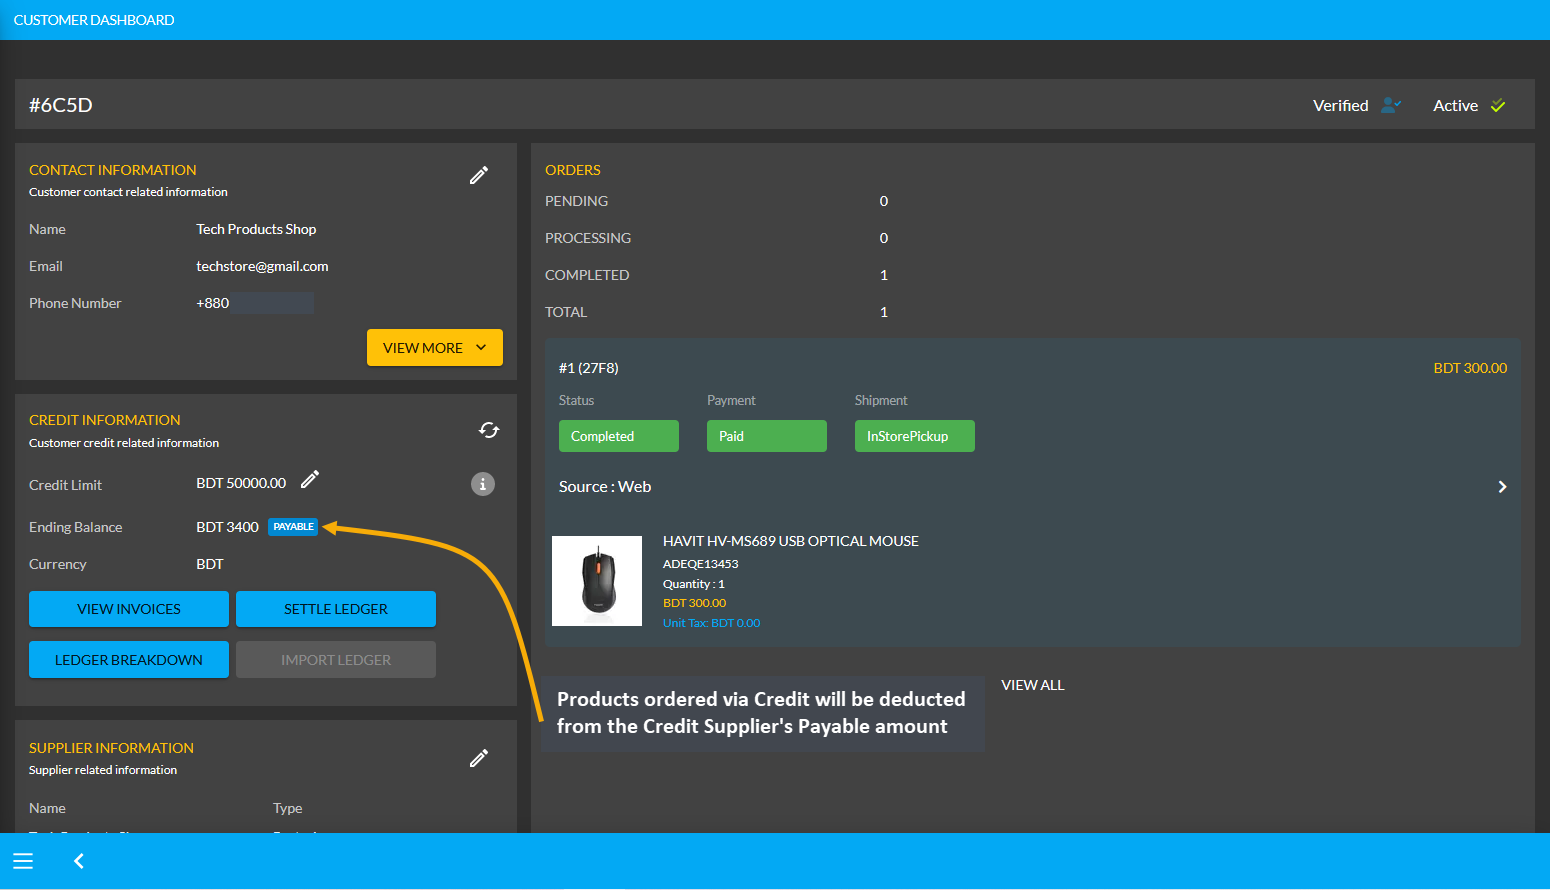
Image 3: Products ordered via Credit will be deducted from the Credit Supplier's Payable amount.
Using the Ledger Breakdown feature, the Shop Owner can check the transaction of the Credit Supplier on their Ledger Breakdown Page with Payable amount for ordering Products and Credit remaining from Credit Limit.

Image 4: Payable amount for ordering Products will be updated on the Ledger Breakdown page.
Use Payment Gateways to Settle Ledger for Payable
The Shop Owner can pay their remaining dues or Payable amount to the Credit Supplier in the full amount or in a certain amount through the Settle Ledger feature. For example, the Credit Supplier Tech Products Shop will still get 3,400 BDT from Shop Owner. In this case, the Shop Owner can pay back 3,400 BDT to Credit Supplier by using the six payment gateways (BKash, Nagad, Cash, Cheque, Bank Transfer, and Credit Card) available with the Settle Ledger button. Learn how to settle Ledger as shown in a few steps below with screenshots:
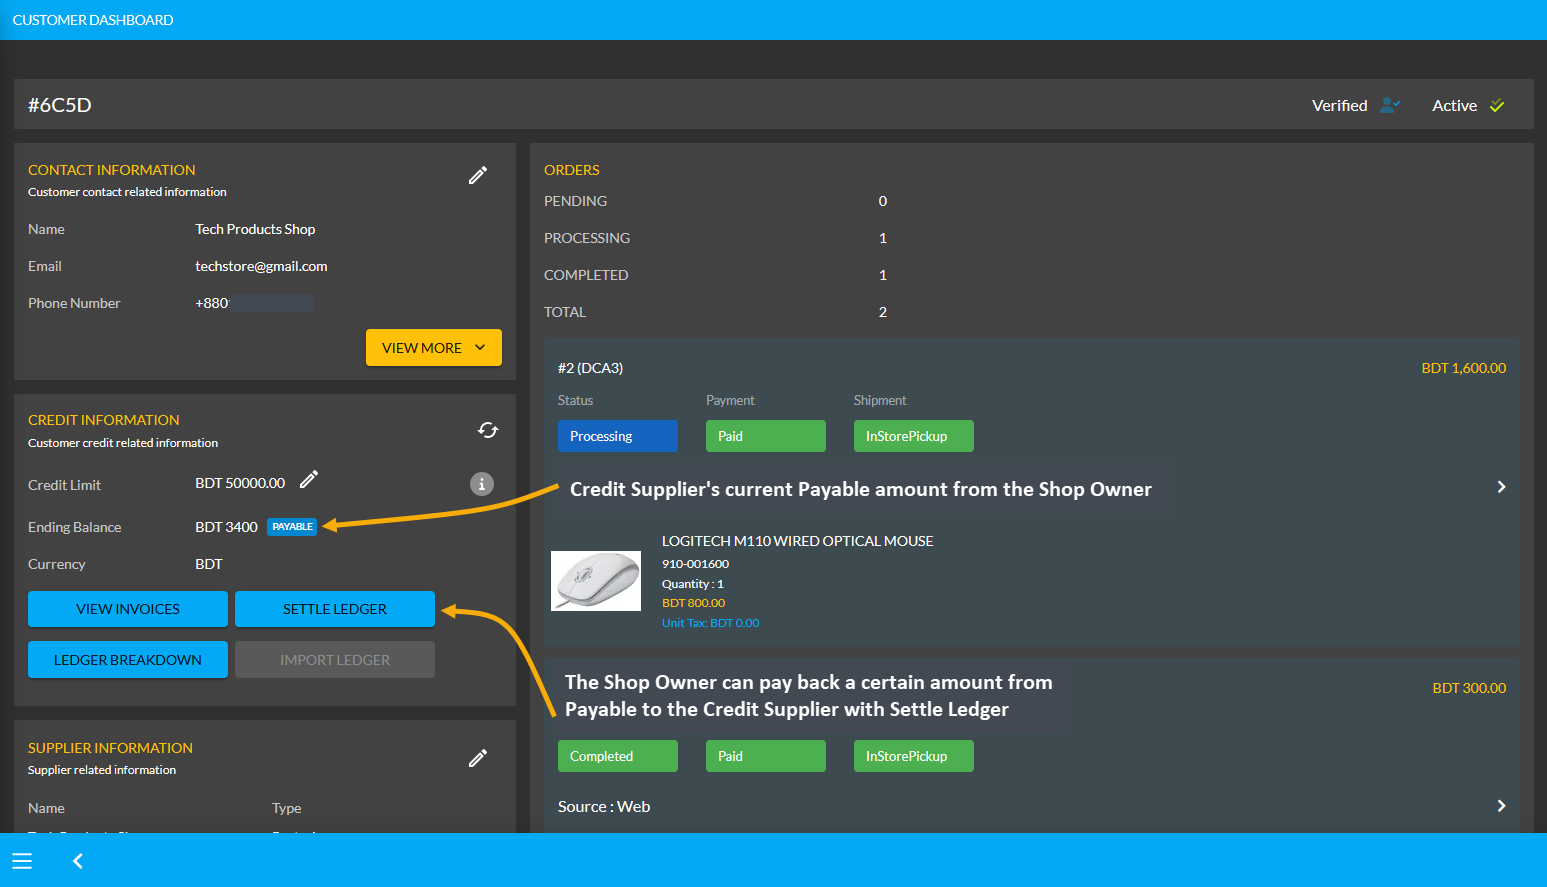
Image 1: The Shop Owner can pay back Payable Amount to Credit Supplier with the Settle Ledger feature.
The Shop Owner can make payment for the 3,400 BDT Payable amount at once or by a few times through the six different payment gateways. Here, the Shop Owner will pay the Credit Supplier 1,000 BDT with the Settle Ledger feature. So, first, they need to click the Settle Ledger button which will open a pop-up where the amount they want to pay needs to be set. For example, here, the Shop Owner wants to pay 1,000 BDT with the Settle Ledger option.
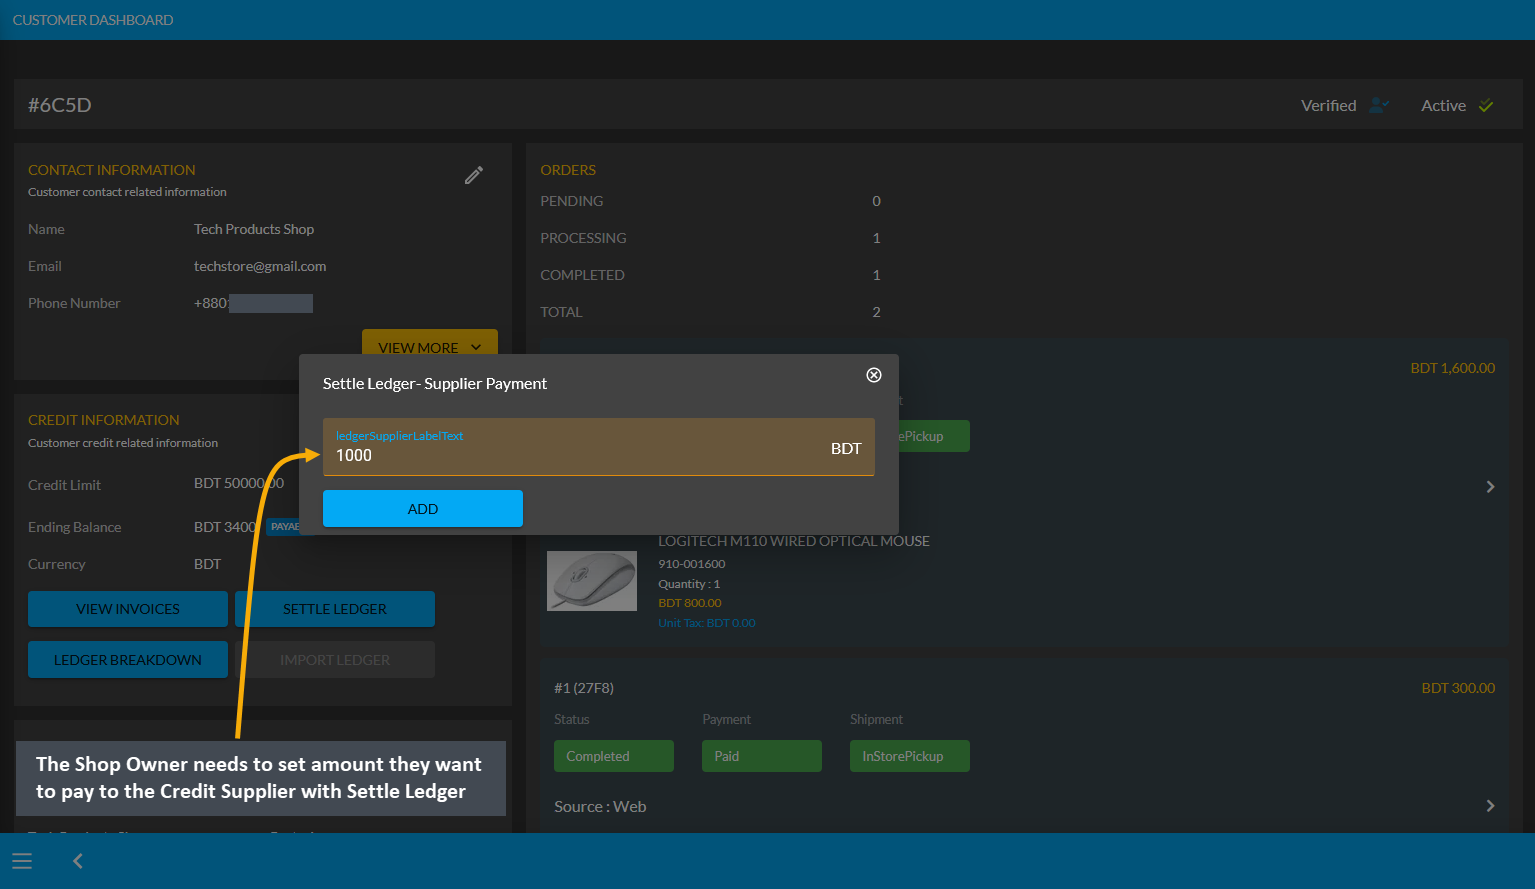
Image 2: The Shop Owner needs to set amount they want to pay to Credit Supplier with Settle Ledger.
Then, Shop Owner needs to select one of the six Payment Gateways to make payment for the selected amount to Settle Ledger. For instance, Cheque payment was selected and Cheque Number, Due Date, Bank Name, and Amount was set. Thus, the Shop Owner needs to complete the payment information and hit Submit when done.
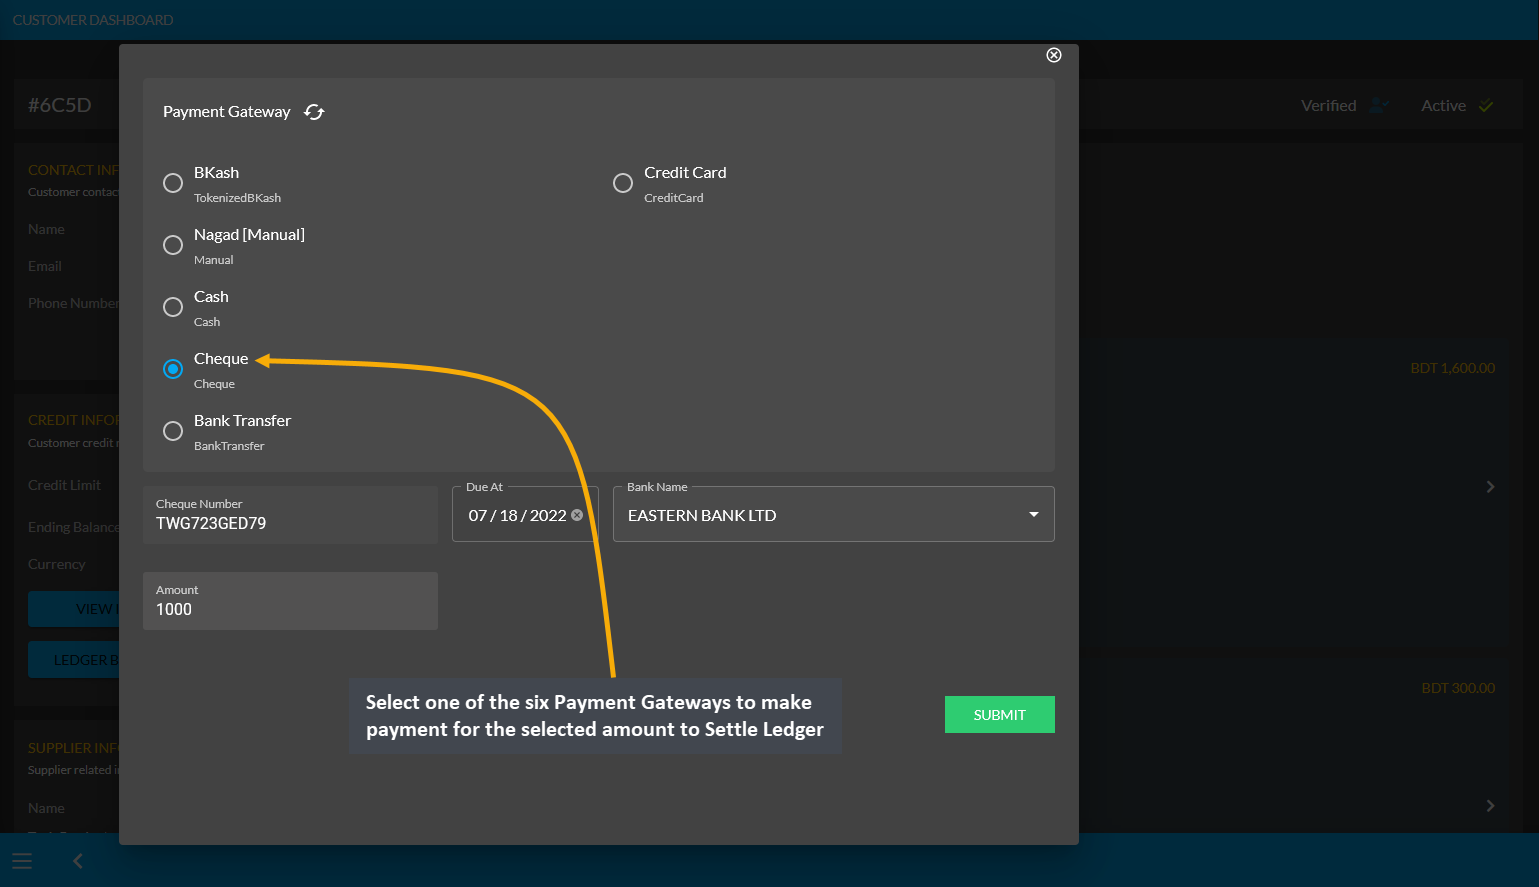
Image 3: Shop Owner needs to select a Payment Gateway to pay to Credit Customer with Settle Ledger.
After successful partial payment, a pop-up notification will confirm that the transaction amount 1,000 BDT was completed. Check the transaction reference and gateway used and click Submit to complete the process.
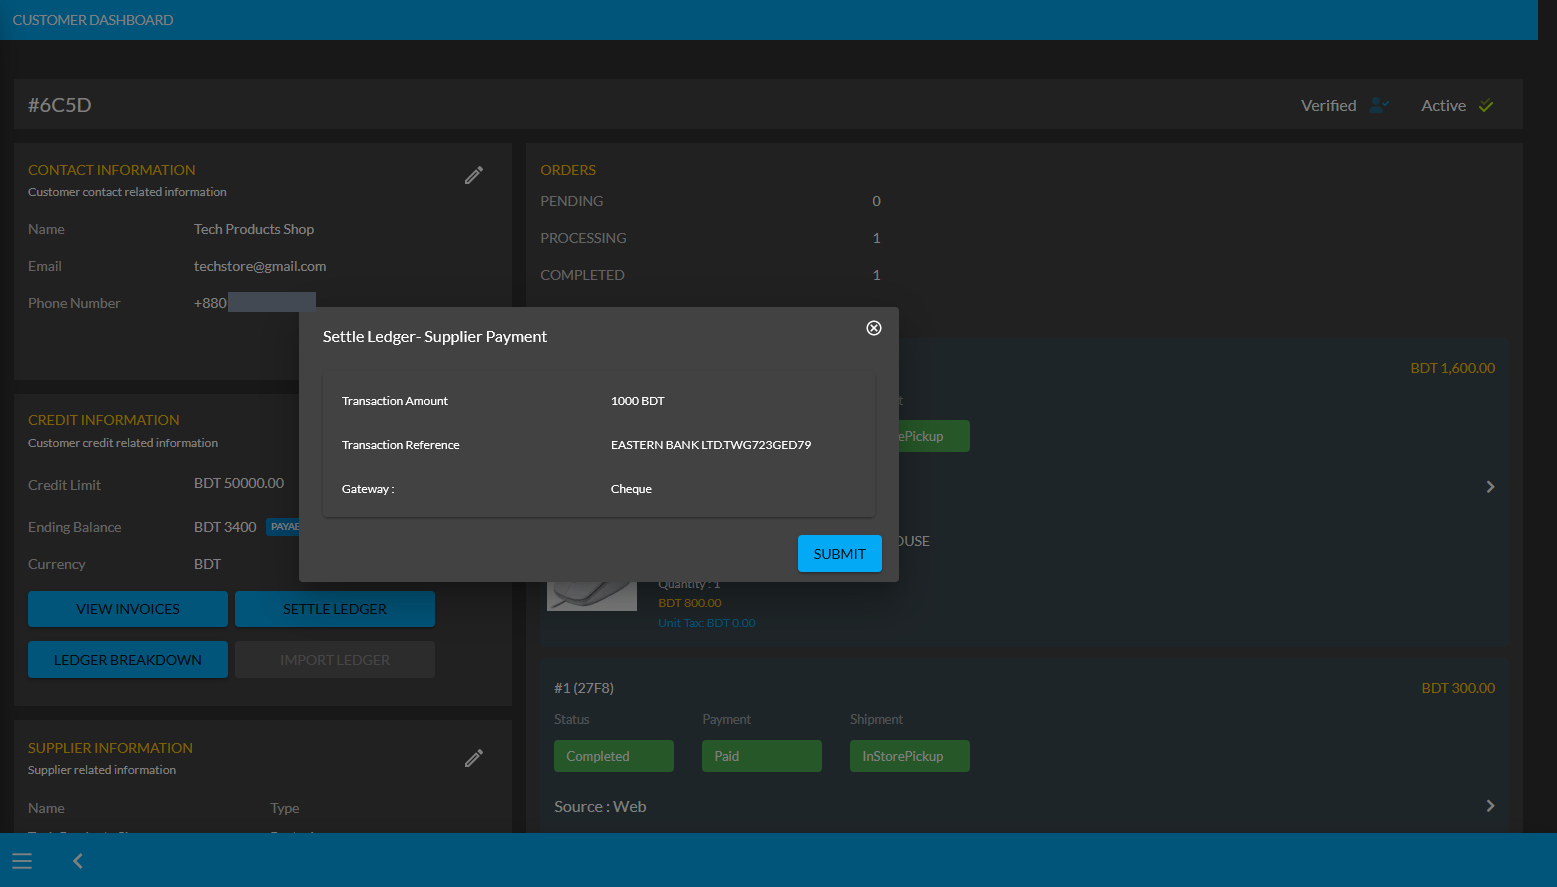
Image 4: After successful payment, a pop-up will show confirmation with the transaction details.
Completing the payment of 1,000 BDT to the Credit Supplier with the Settle Ledger feature will reflect the updated balance under the Credit Information section. For instance, here after settling Ledger with payment of 1,000 BDT, the Payable amount was automatically updated from 3,400 BDT to 2,400 BDT under Credit Information section.
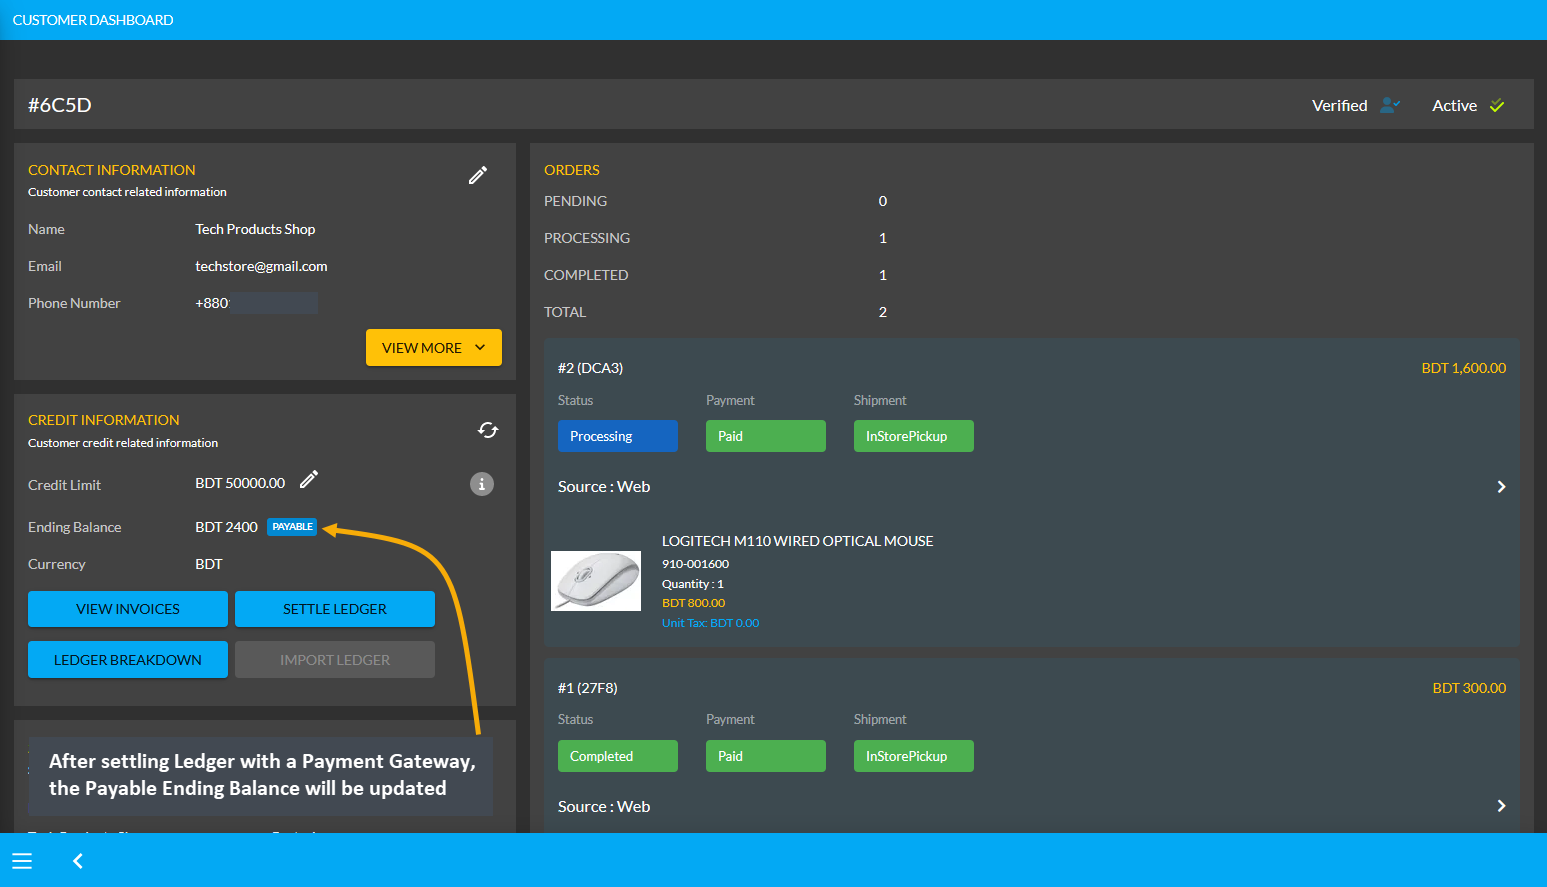
Image 5: Updated balance will be reflected under the Owed Amount after settling Ledger successfully.
Using the Ledger Breakdown feature, the Shop Owner can check transaction for Payable after Ledger settlement with Payment Gateways on the Credit Supplier’s Ledger Breakdown Page.

Image 6: Settling Ledger with Payment Gateways will be updated on the Ledger Breakdown page.
Receivable Amount on Import Ledger
Similarly, after clicking the Import Ledger button, if the Shop Owner selects Receivable with an amount of 5,000 BDT for example, it will mean that the Credit Supplier will pay 5,000 BDT to the Shop Owner. Thus, selecting the Receivable based on previous transactions will add to the Receivable amount on Import Ledger.
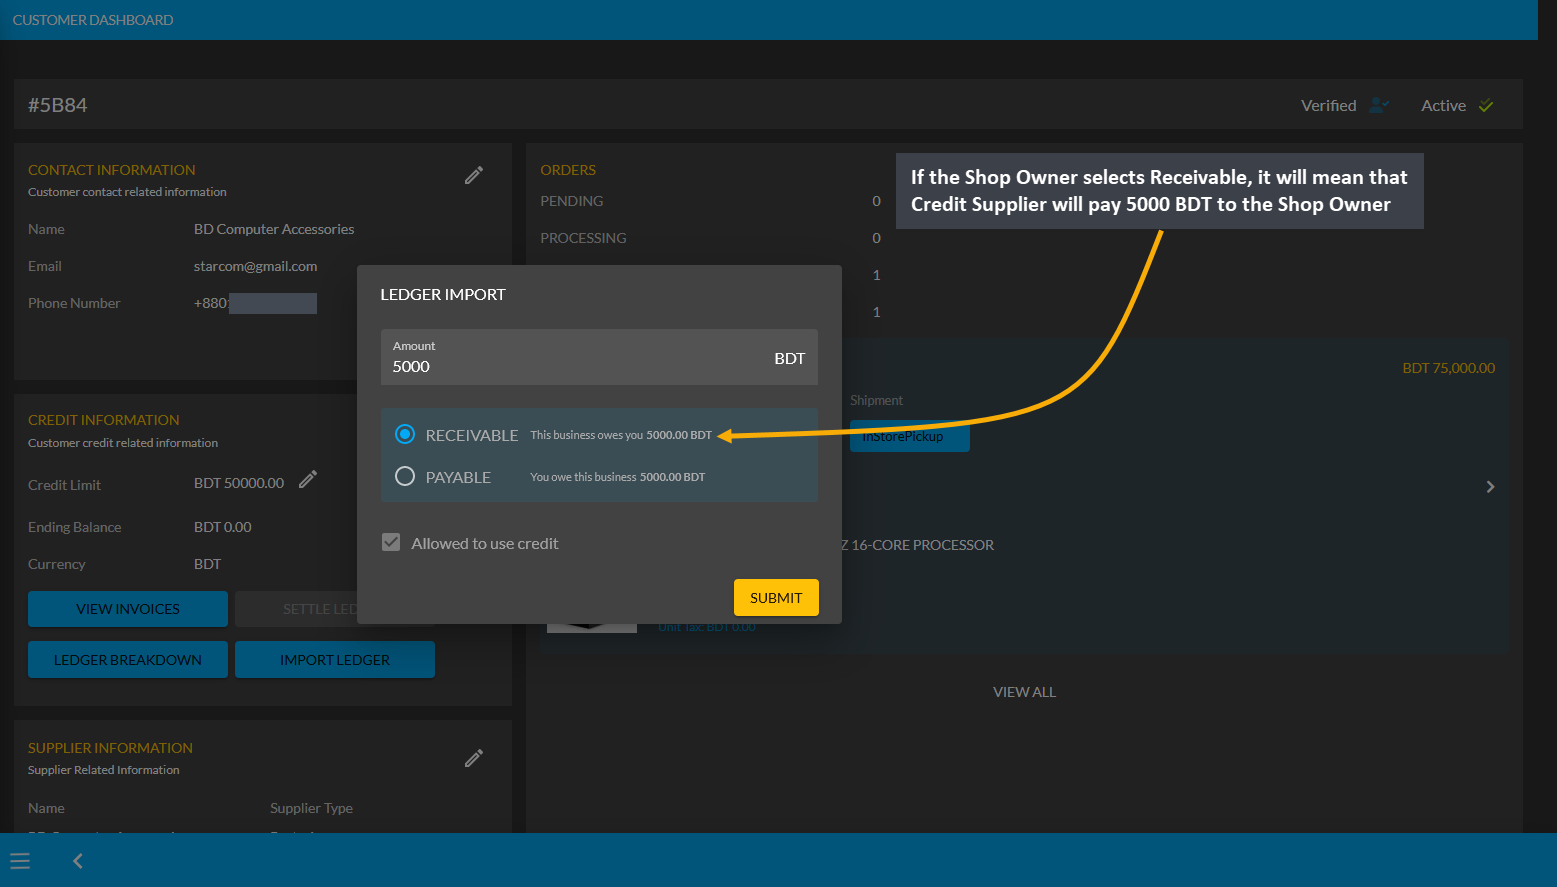
Image 1: If Shop Owner selects Receivable, it will mean that Credit Supplier will pay 5000 BDT to them.
Import Ledger feature can only be used once, so before setting Receivable, Shop Owner will be asked to confirm if all the information is correct. Therefore, after checking all the information, the Shop Owner has to click I Agree to add receivable amount from previous transactions on Credit as shown in the example screenshot below.
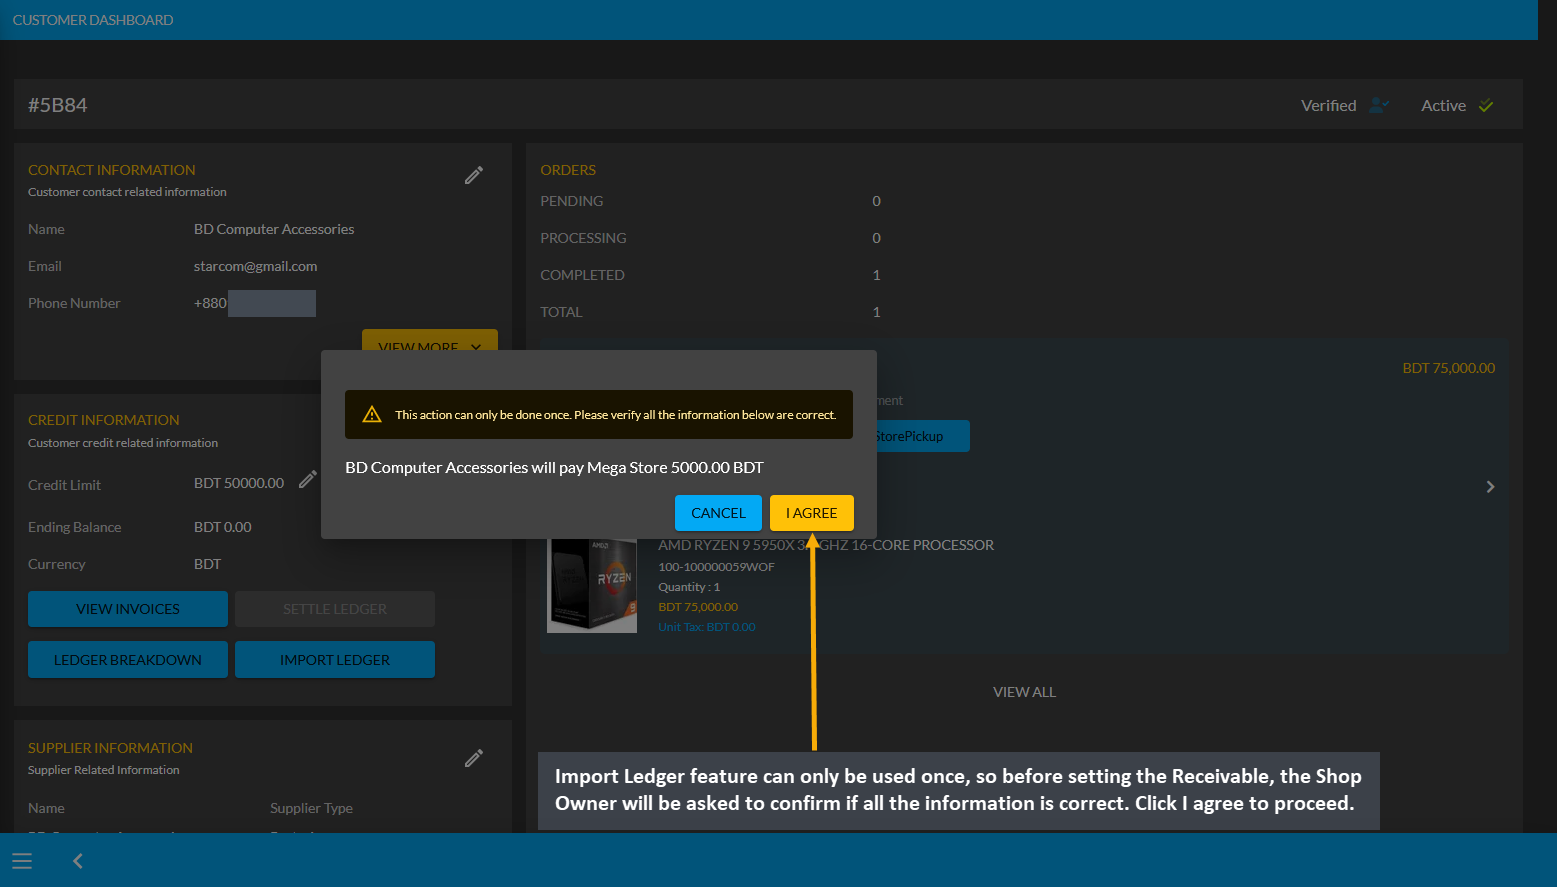
Image 2: Before setting Receivable, Shop Owner will be asked to confirm if all the information is correct.
As the Credit Supplier will pay 5000 BDT to the Shop Owner, selecting Receivable for any previous transactions on the Import Ledger will add to the Receivable amount that the Shop Owner owes from them.
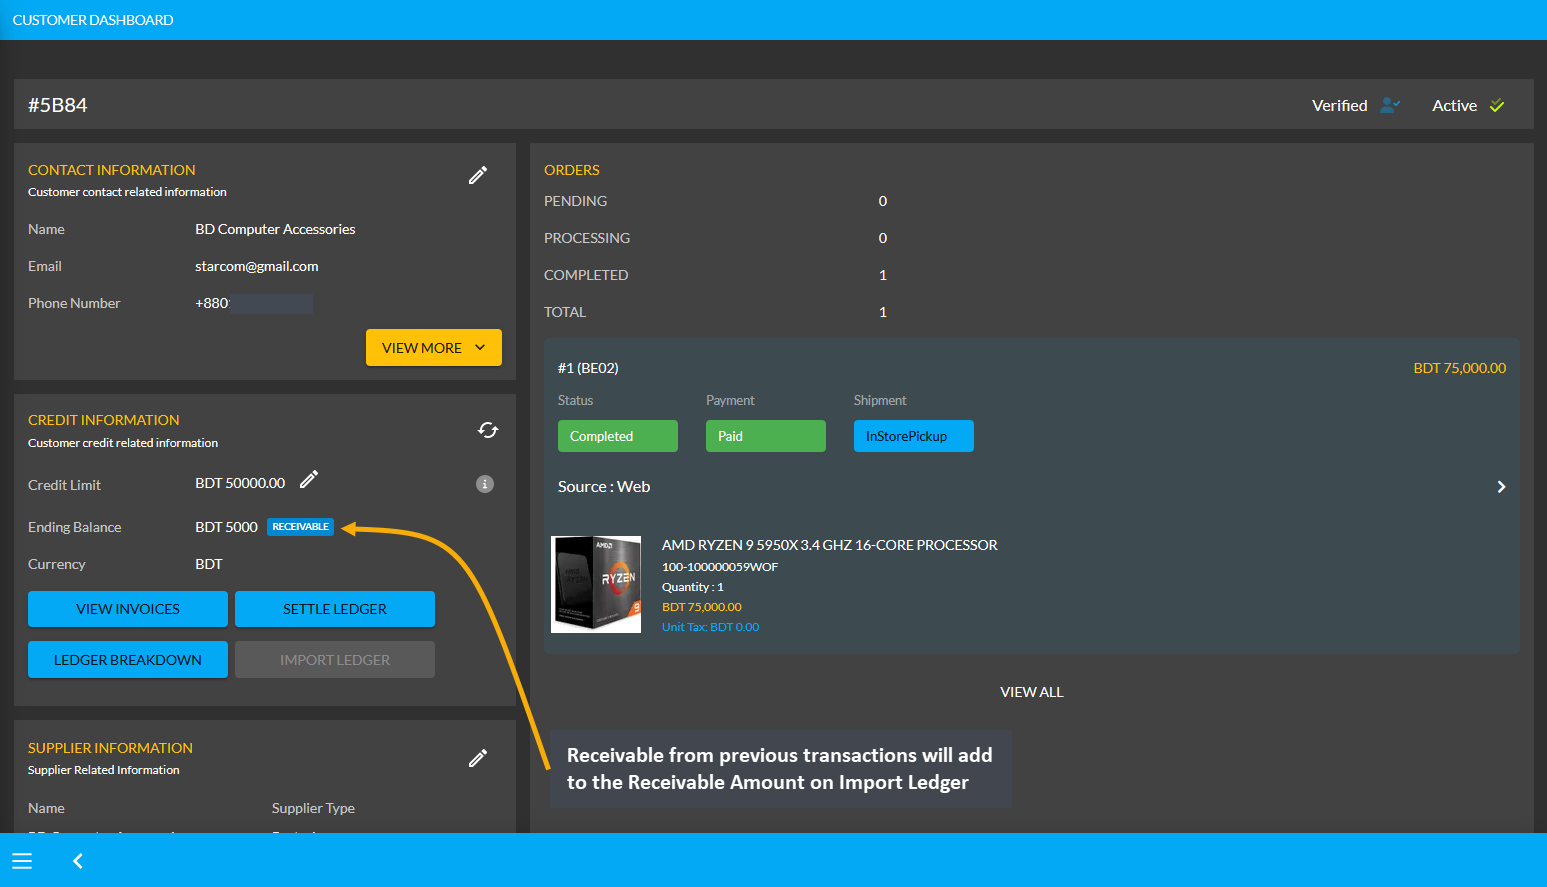
Image 3: Receivable from previous transactions will add to the Receivable Amount on Import Ledger.
Using the Ledger Breakdown feature, the Shop Owner can check previous transaction or receivable amount that is transferred through the Import Ledger feature on their Ledger Breakdown Page.

Image 4: Import Ledger balance with previous receivable amount will be updated on Ledger Breakdown page.
Credit Supplier Ordering Products will add to Receivable
Though the Shop Owner already owes 5,000 BDT from the Credit Supplier, the Credit Supplier can still purchase Product(s) from them using the Credit which will add to the Receivable. For example, Credit Supplier Technology Accessories have purchased two Product(s) worth of 1,600 BDT from Shop Owner here.
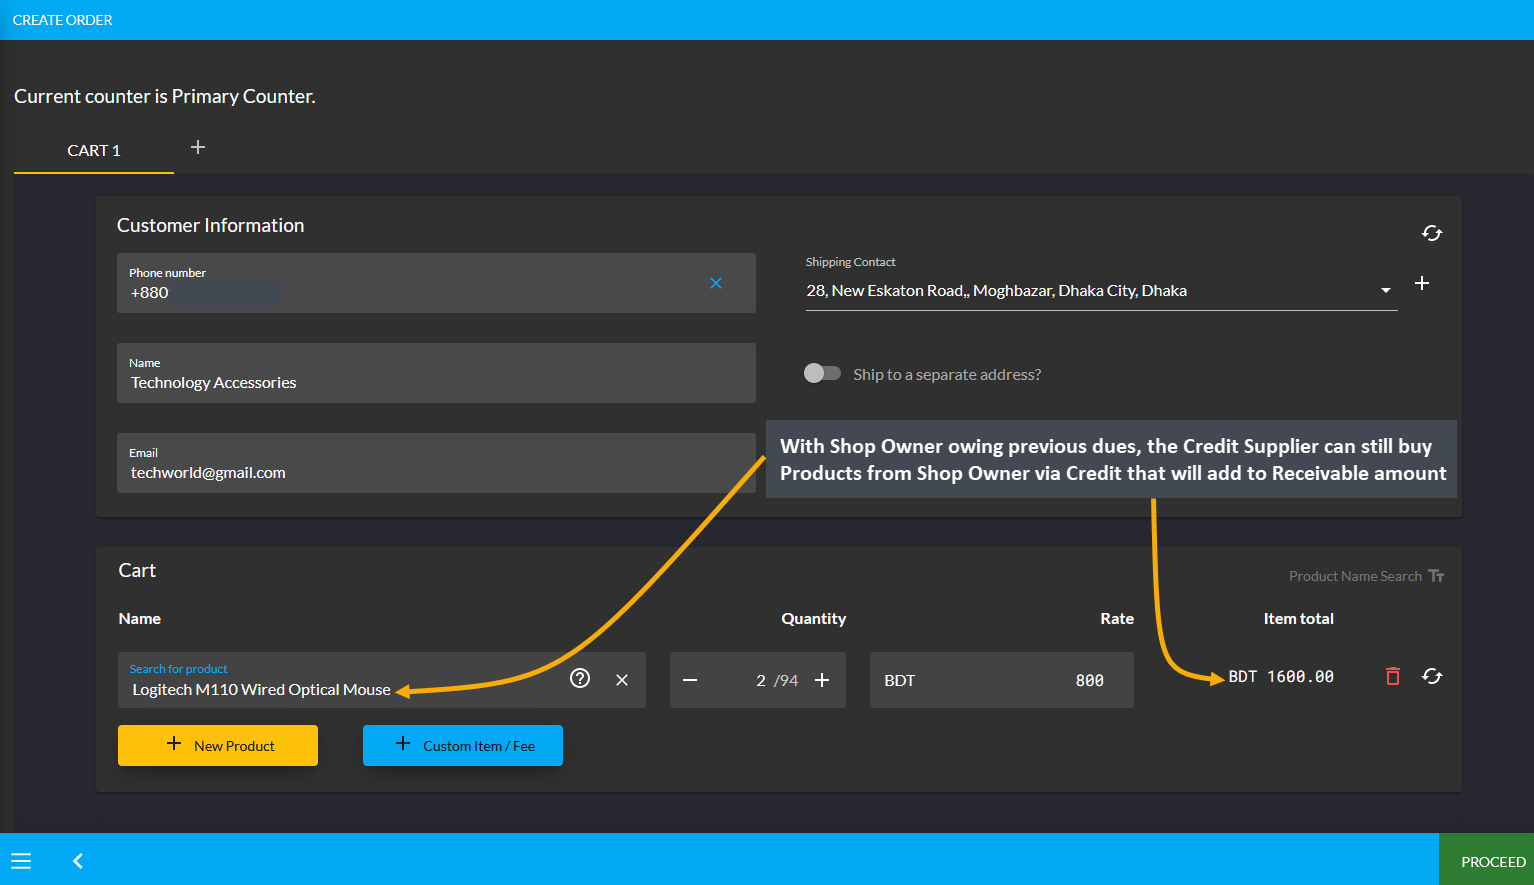
Image 1: Credit Supplier buying Product(s) from Shop Owner via Credit will add to Receivable.
After the Credit Supplier chooses payment method as On Credit (Due) and confirms their Order, 1,600 BDT will be added to their already Receivable or existing dues of 5,000 BDT to the Shop Owner. This Product purchase being 1,600 BDT, the amount will be added to and increase Receivable to 6,600 BDT now. If the Credit Supplier wants to settle these dues, they can use ten different payment gateways to Settle Ledger.
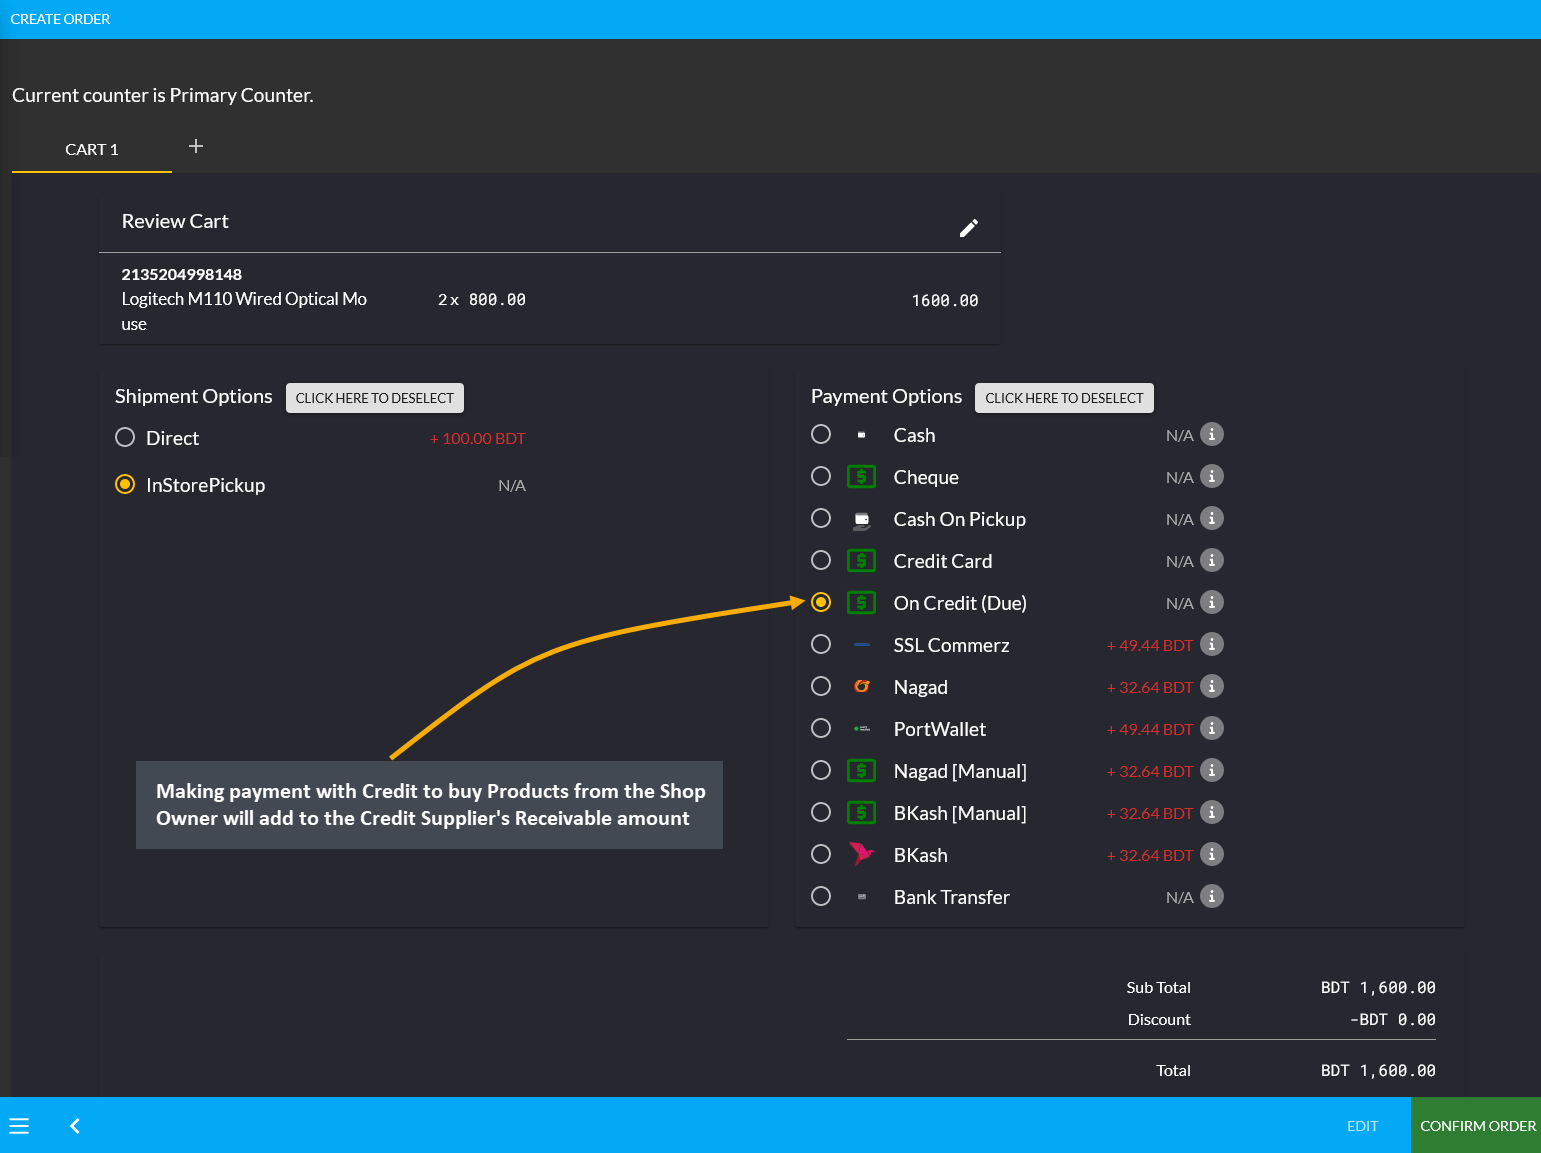
Image 2: Making Credit payment to buy Products from Shop Owner will add to Credit Supplier's Receivable.
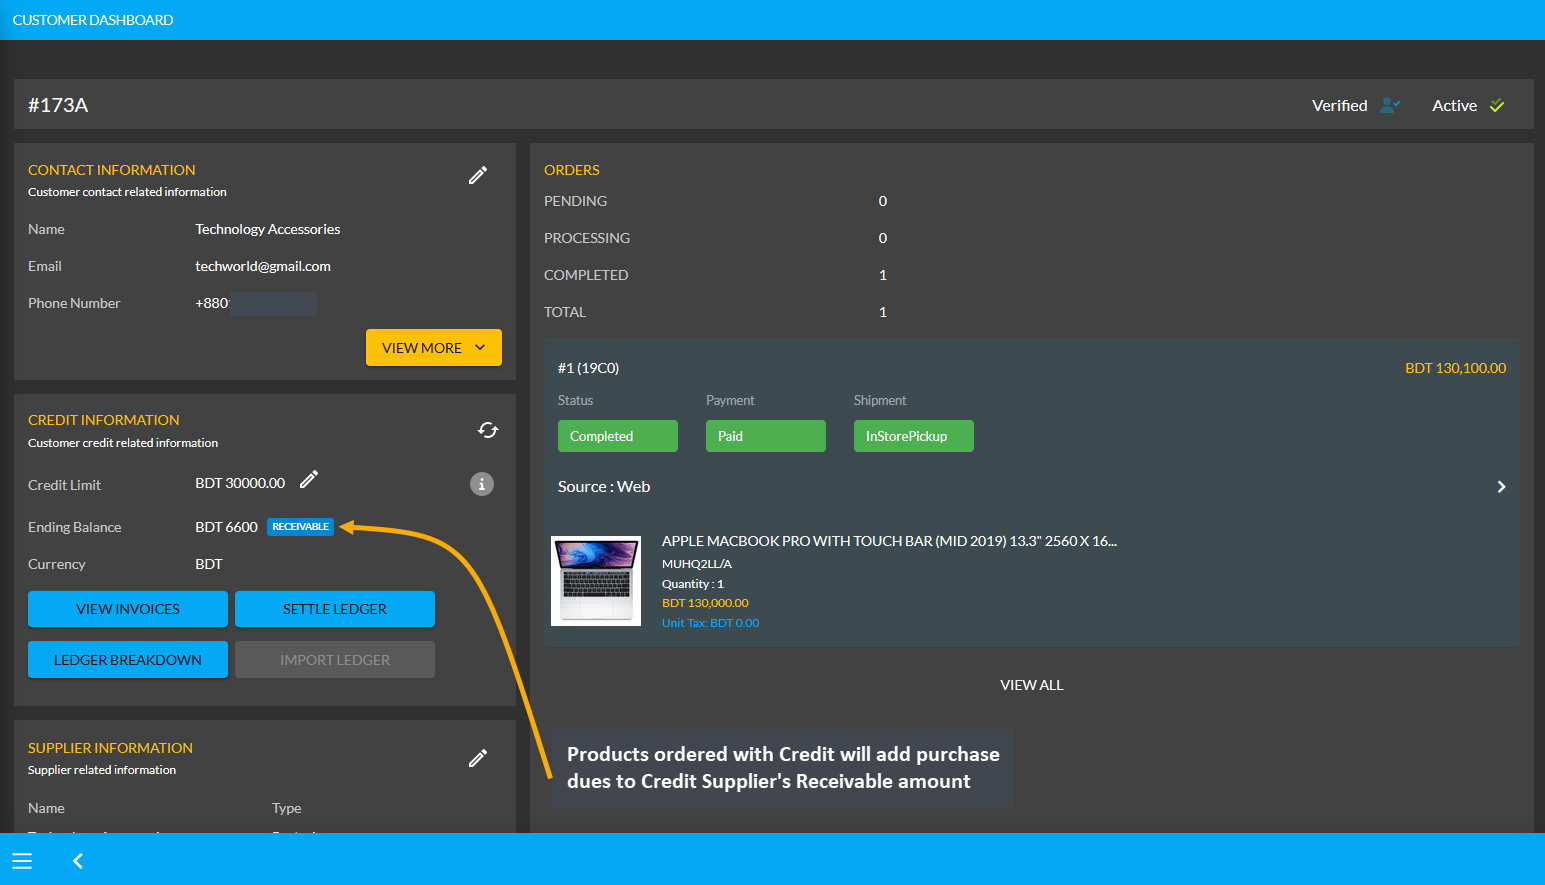
Image 3: Products ordered via Credit will add the purchase dues to Credit Supplier's Receivable amount.
Using the Ledger Breakdown feature, the Shop Owner can check the transaction of the Credit Supplier on their Ledger Breakdown Page with Receivable amount for ordering Products and Credit remaining from Credit Limit.

Image 4: Receivable amount for ordering Products will be updated on the Ledger Breakdown page.
Use Payment Gateways to Settle Ledger for Receivable
In total, the Credit Supplier owes 6,600 BDT to the Shop Owner after their Products purchase. If they want to pay back the full amount or a certain amount to the Shop Owner from their Receivable, they can do it with the Settle Ledger option. For example, the Shop Owner will get 6,600 BDT from the Credit Supplier Technology Accessories, which they can pay back to the Shop Owner with the Settle Ledger feature.
In this case, the Credit Supplier will try to pay back a certain amount i.e. 3,000 BDT from 6,600 BDT to the Shop Owner by using any of the ten payment gateways (Cheque, Cash On Delivery, Credit Card, SSLCommerz, Nagad, Nagad Manual, BKash Manual, BKash, PortWallet, Cash, and Bank Transfer) available with Settle Ledger button.
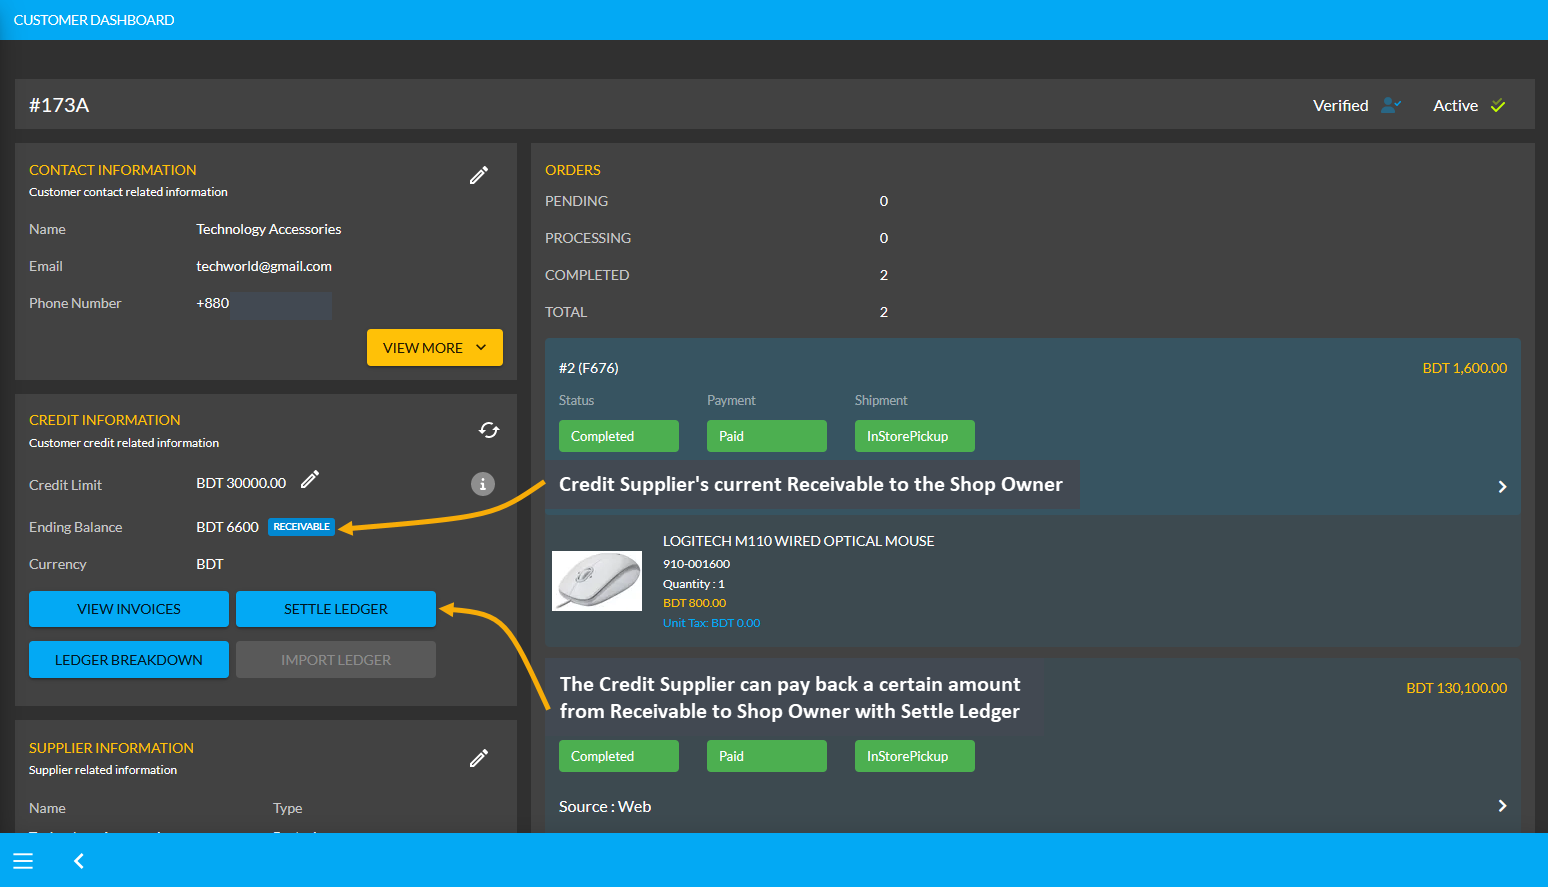
Image 1: Credit Supplier can pay back an amount from Receivable to Shop Owner with Settle Ledger feature.
The Credit Supplier can pay back from their Receivable amount of 6,600 BDT at once or by a few times through the ten different payment gateways. Here, the Credit Supplier will pay back the Shop Owner 3,000 BDT with the Settle Ledger feature. First, they need to click the Settle Ledger button which will open a pop-up where the amount they want to pay needs to be set. Credit Supplier wants to pay 3,000 BDT here with the Settle Ledger option.
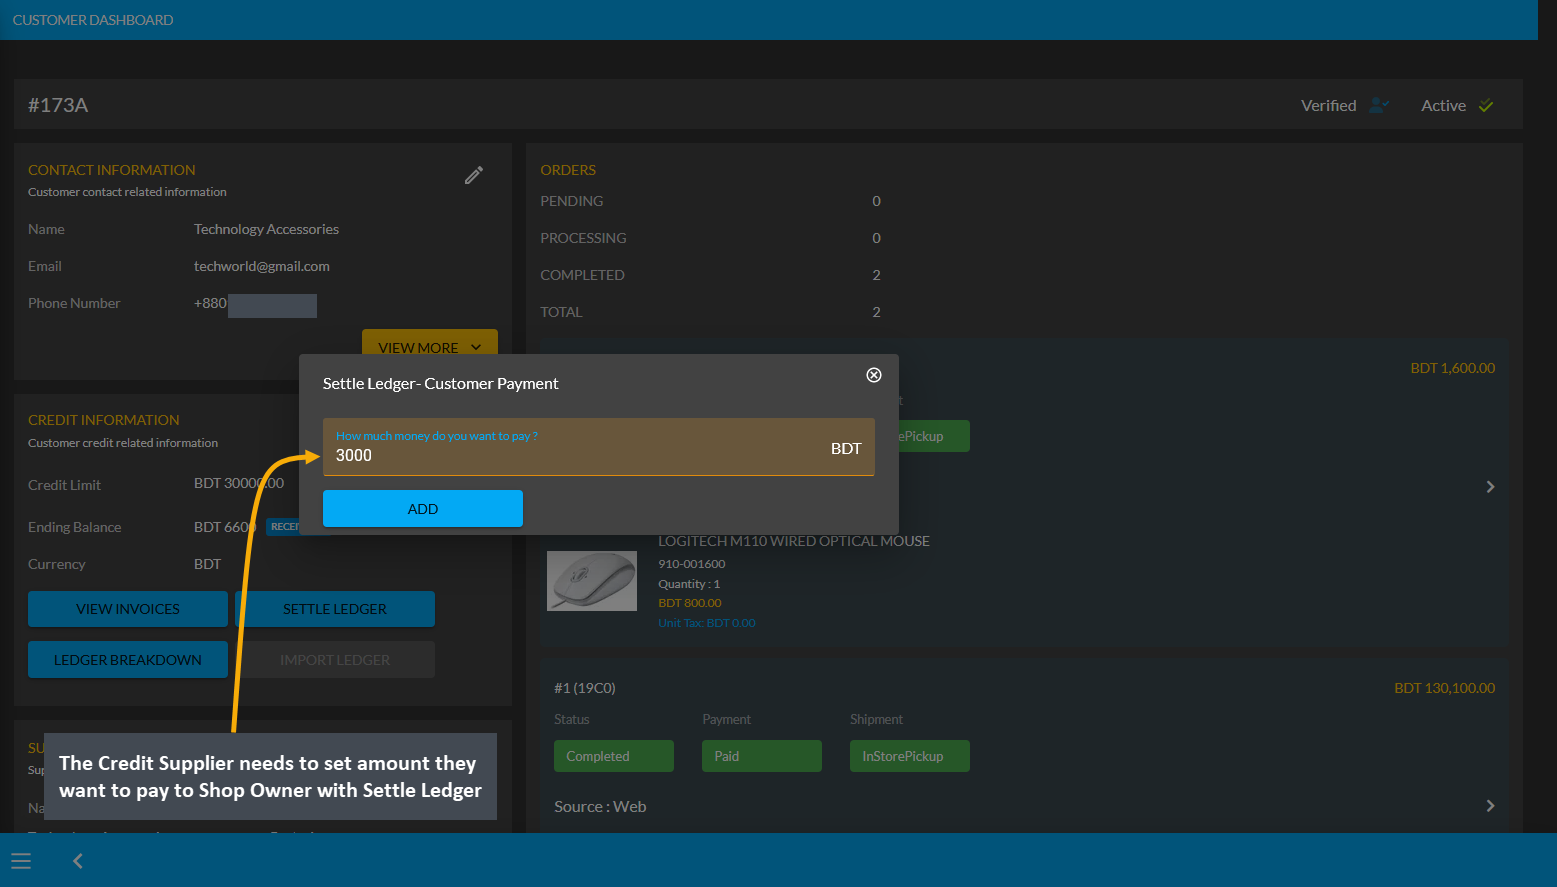
Image 2: The Credit Supplier needs to set amount they want to pay to Shop Owner with Settle Ledger.
The Credit Supplier needs to select one of the ten Payment Gateways to make payment for the selected amount to Settle Ledger now. Here, BKash Manual payment was selected and BKash (Manual) Transaction ID was set which incurred an additional transaction fee of 61.20 BDT. As demonstrated, the Credit Supplier will have to complete their payment information and hit Submit when done.
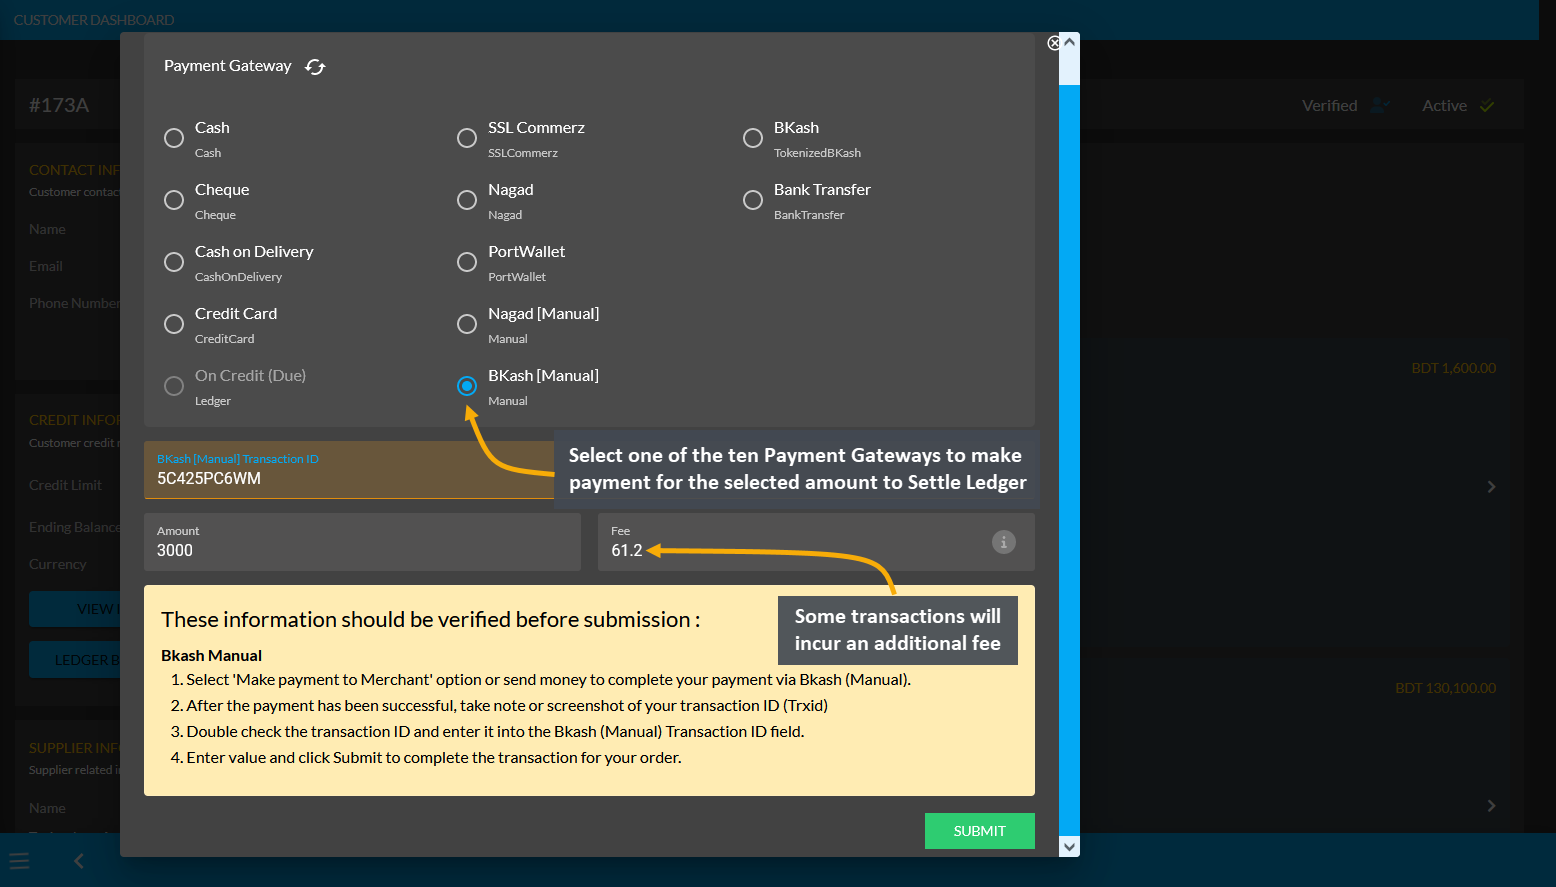
Image 3: Credit Supplier needs to select a Payment Gateway to pay to Shop Owner with Settle Ledger.
After successful partial payment, a pop-up notification will confirm that the transaction amount 3,000 BDT was completed. Check the transaction reference and gateway used and click Submit to complete the process.
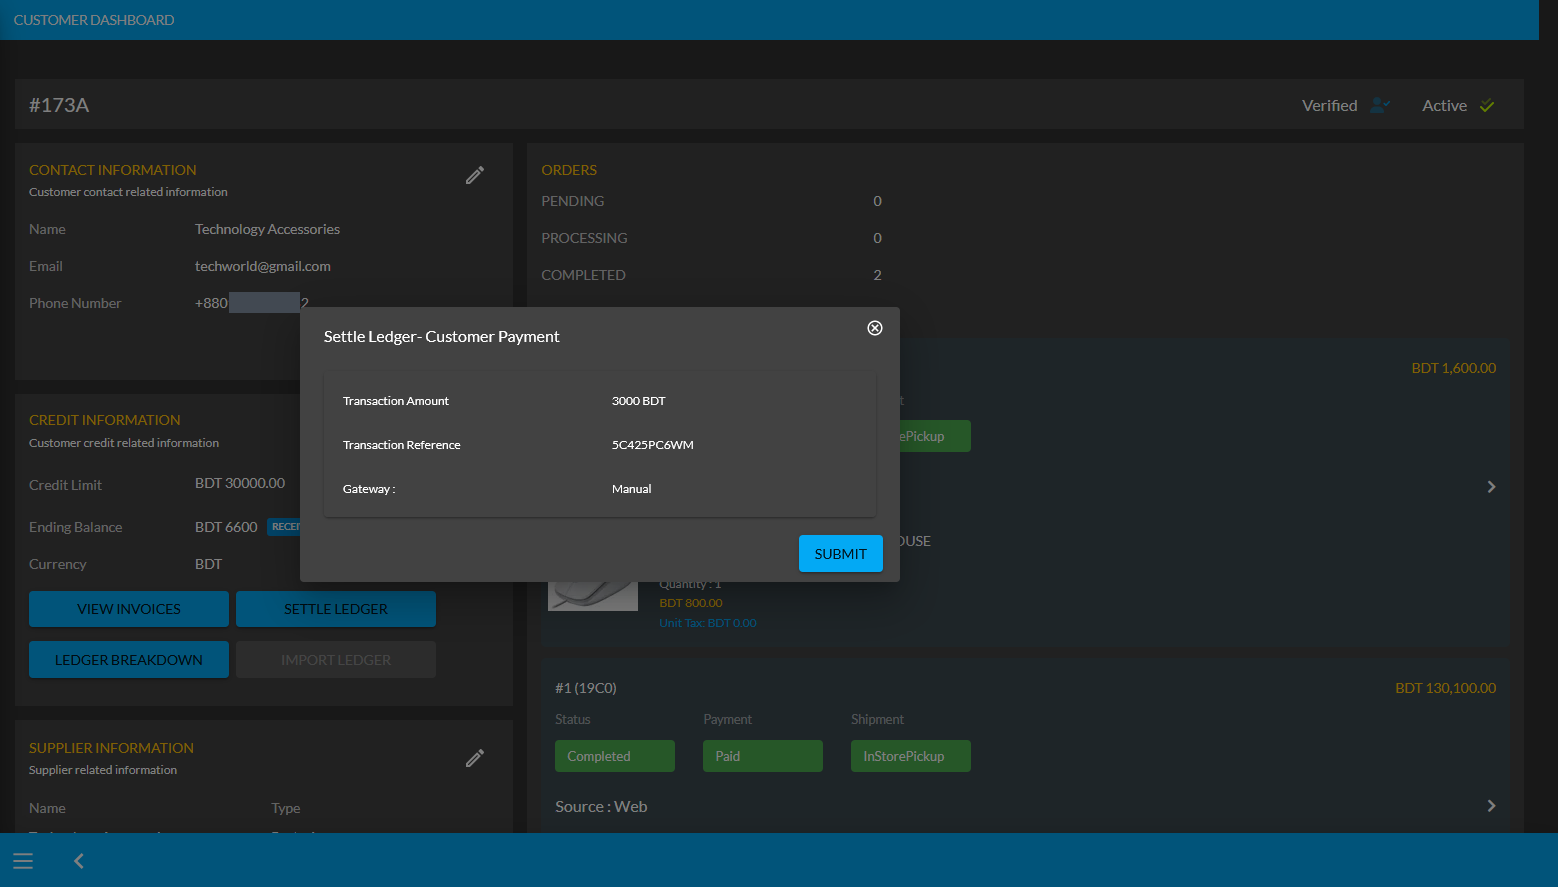
Image 4: After successful payment, a pop-up will show confirmation with the transaction details.
When the Credit Supplier completes payment of 3,000 BDT to the Shop Owner with the Settle Ledger feature, it will reflect the updated balance under Receivable. For instance, after settling Ledger with payment of 3,000 BDT here, the Credit Supplier’s Receivable was automatically updated from 6,600 BDT to 3,600 BDT.
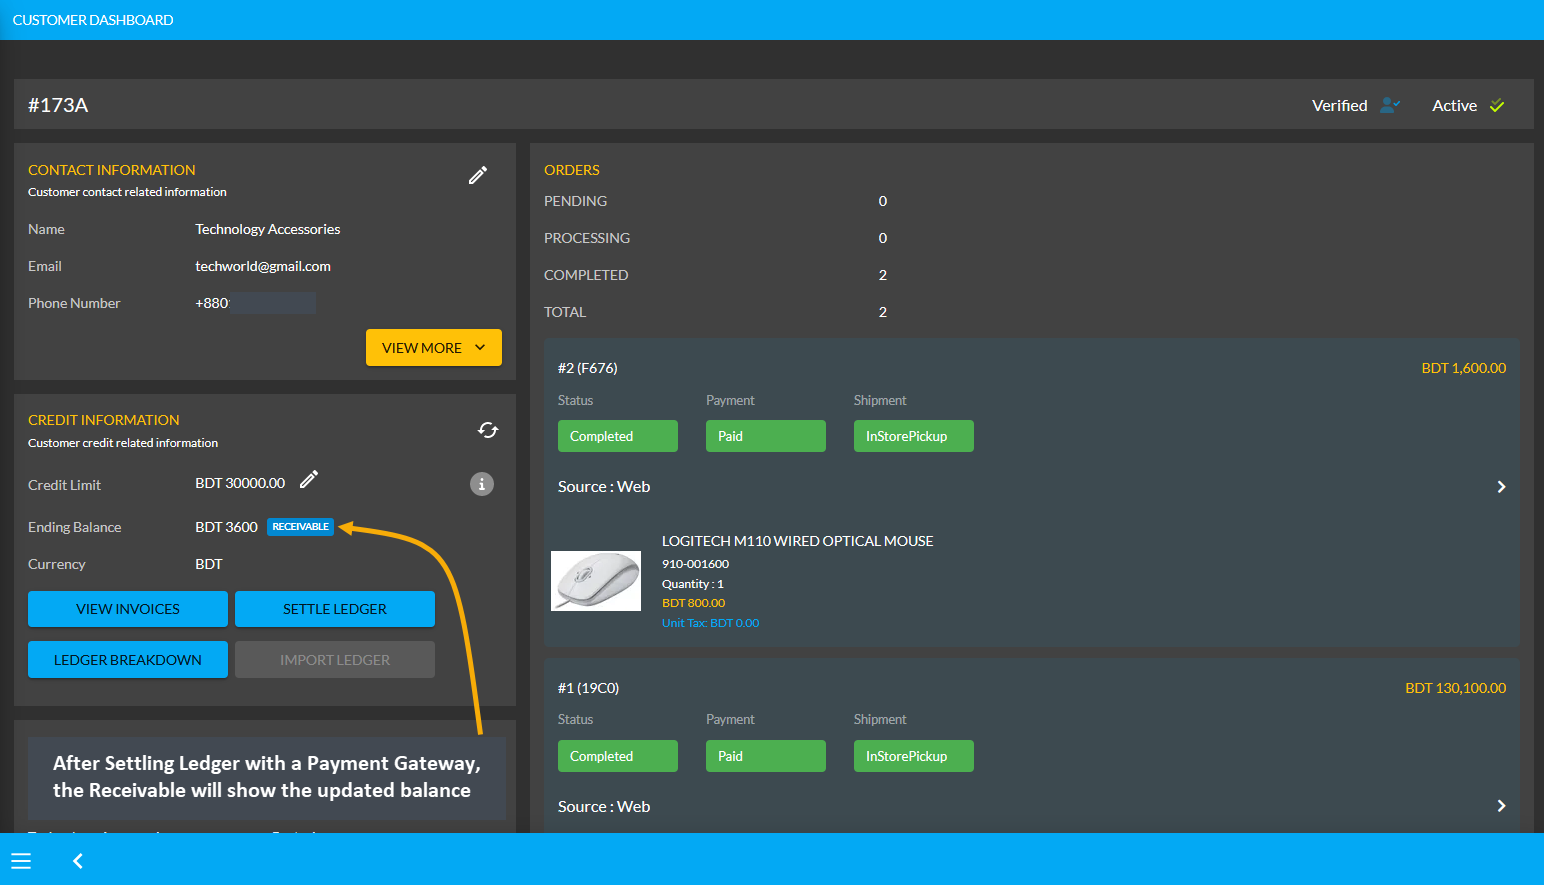
Image 5: After settling Ledger with a Payment Gateway, the Receivable will show updated balance.
Using Ledger Breakdown feature, the Shop Owner can check transactions after Ledger settlement with Payment Gateways by the Credit Supplier on the Credit Supplier’s Ledger Breakdown Page.

Image 6: Settling Ledger with Payment Gateways will be updated on the Ledger Breakdown page.
Per Unit Product Purchase Transactions
The Shop Owner can purchase Per Unit Products from the Credit Supplier Without Payment, with Full Payment, or with Partial Payment which will be reflected under the Credit Information section on Supplier’s Payable. The types of Per Unit Product purchases will also be updated with details on the Credit Supplier’s Ledger Breakdown page.
Per Unit Product purchase Without Payment
The Shop Owner can purchase Per Unit Products from the Credit Supplier without payment by using the Purchase option. From the Products tab, go to the Product List View and select the Purchase option from the target Per Unit Product. Clicking this option will redirect to the Add Product Stock page from where Shop Owner can purchase the Per Unit Product without payment which can be paid later on a due date.

Image 1: Select target Per Unit Product and click the Purchase button to buy from Credit Supplier.
On the Add Product Stock page, select Without Payment Method from Acquisition Options, set the Purchase Price Per Unit, select Credit Supplier, and select Warranty if it is not automatically selected. Then click the Auto Generate Serial Numbers button to generate Quantity and Serial of Per Unit Product that Shop Owner will buy from Supplier.

Image 2: Set Purchase Price, select Supplier and Warranty, and click Auto Generate Serial Numbers button.
After clicking the Auto Generate Serial Numbers button, a pop-up will appear where Product Serial Number and Quantity needs to be set with Prefix, Suffix, Start Counter, and End Counter. Click the Generate button to create the Per Unit Products for purchase from the Credit Supplier. Here, 5 Per Unit Products quantities were created.

Image 3: Set Product Serial Number and Quantity with Prefix, Suffix, Start Counter, and End Counter.
After Product Serial Numbers and Quantities are generated for the target Per Unit Product, turn on the Payment Due toggle button and select the Due Date. Click Submit to complete the purchase process Without Payment.

Image 4: Turn on the Payment Due toggle button and set the Due Date for Without Payment Method.
Then, a pop-up will show uploading assigned Per Unit Product quantities and confirm when units are successfully created. Click Okay to complete the Per Unit Product purchase process from Credit Supplier. If Shop Owner wants to purchase more quantities of the same Per Unit Product from the same Credit Supplier, then they need to click the Purchase Product from Same Supplier button as shown in the example screenshot.

Image 5: Pop-up showing successful creation or batch upload of Per Unit Product. Click Okay to proceed.
Clicking on Okay will redirect to the Unit Stock Management page where the successfully created Batch of Per Unit Products will be displayed on the top of the list as marked in the example screenshot.

Image 6: Successfully created Batch of Per Unit Products will display on the Unit Stock Management Page.
Per Unit Product purchase Without Payment Ledger View
On the Customer Dashboard of the Credit Supplier, the purchase of 5 Per Unit Products worth 5,000 BDT without payment will add to the Payable Ending Balance. This Payable amount will indicate that the Credit Supplier will get 5,000 BDT from the Shop Owner which the Shop Owner can pay with the Settle Ledger option.
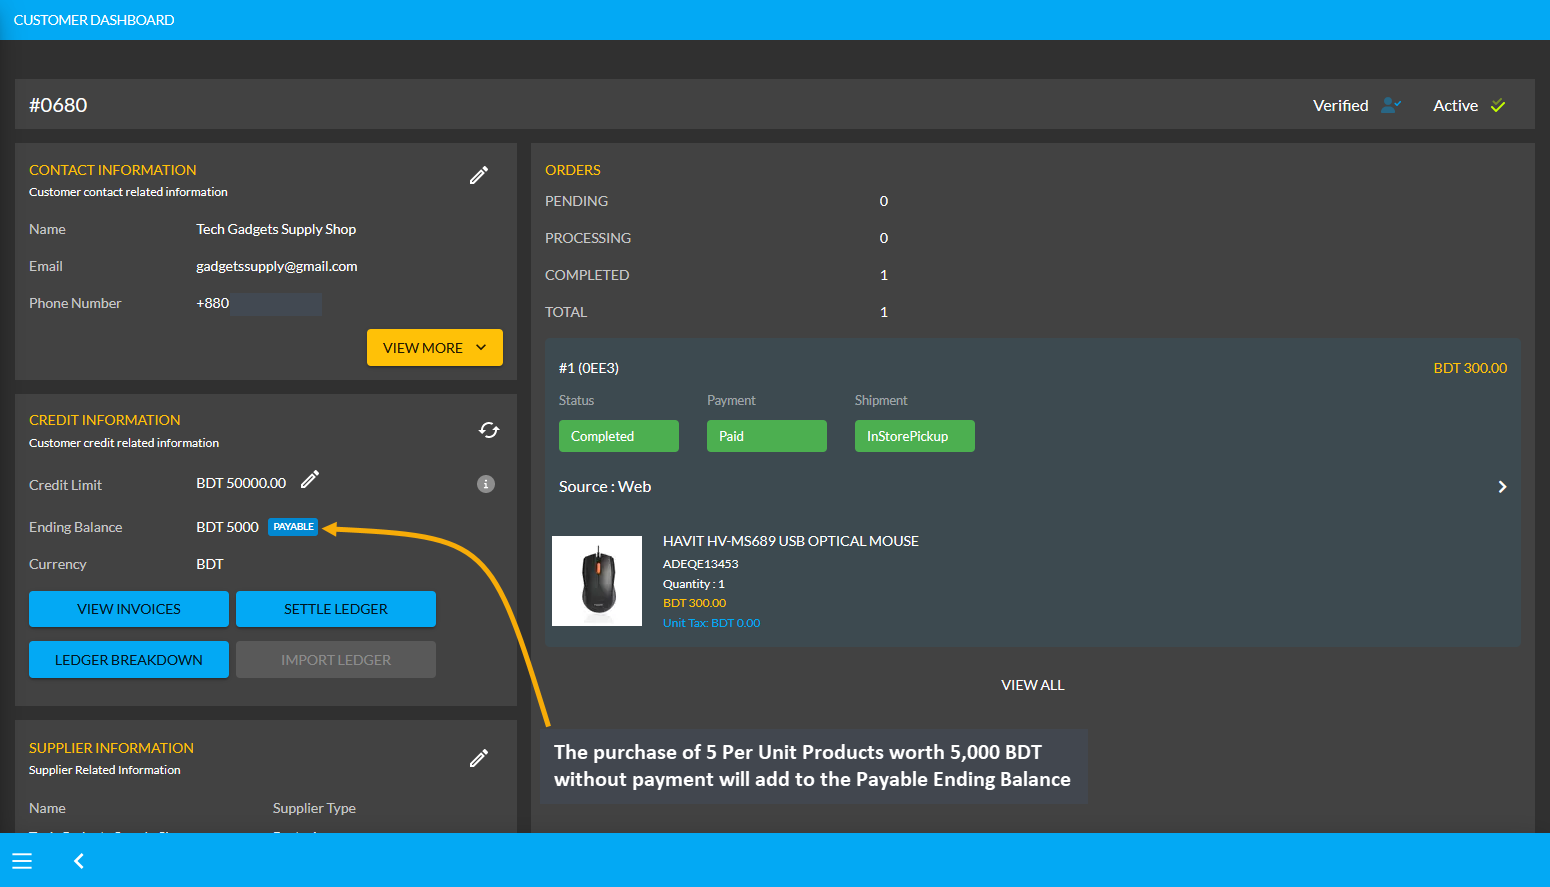
Image 7: The purchase of 5 Per Unit Products without payment will add to the Payable Ending Balance.
Using the Ledger Breakdown feature, the Shop Owner can check the Per Unit Product purchase Without Payment transaction from the Credit Supplier on their Ledger Breakdown Page as shown in the example below.

Image 8: Ledger Breakdown Page will show details of Per Unit Product purchase Without Payment transaction.
Per Unit Product purchase with Partial Payment
The Shop Owner can purchase Per Unit Products from Credit Supplier with partial payment by using the Purchase option. From the Products tab, go to the Product List View and select the Purchase option from the target Per Unit Product. Clicking this option will redirect to the Add Product Stock page from where Shop Owner can purchase the Per Unit Product with partial payment which can be paid later on a due date.

Image 1: Select target Per Unit Product and click the Purchase button to buy from Credit Supplier.
On the Add Product Stock page, select Partial Payment Method from Acquisition Options, set the Purchase Price Per Unit, select Credit Supplier, and select Warranty if it is not automatically selected. Then click the Auto Generate Serial Numbers button to generate Quantity and Serial of Per Unit Product that Shop Owner will buy from Supplier.

Image 2: Set Purchase Price, select Supplier and Warranty, and click Auto Generate Serial Numbers button.
After clicking the Auto Generate Serial Numbers button, a pop-up will appear where Product Serial Number and Quantity needs to be set with Prefix, Suffix, Start Counter, and End Counter. Click the Generate button to create the Per Unit Products for purchase from the Credit Supplier. Here, 5 Per Unit Products quantities were created.

Image 3: Set Product Serial Number and Quantity with Prefix, Suffix, Start Counter, and End Counter.
After Product Serial Numbers and Quantities are generated for the target Per Unit Product, set partial payment amount on the Paid Amount box based on the amount that will be paid partially. Then, turn on the Payment Due toggle button and select the Due Date. Click Submit to complete the purchase process with Partial Payment.

Image 4: Set Partial Payment, turn on Payment Due toggle and set Due Date for Partial Payment Method.
Then, a pop-up will show uploading assigned Per Unit Product quantities and confirm when units are successfully created. Click Okay to complete the Per Unit Product purchase process from Credit Supplier. If Shop Owner wants to purchase more quantities of the same Per Unit Product from the same Credit Supplier, then they need to click the Purchase Product from Same Supplier button as shown in the example screenshot.

Image 5: Pop-up showing successful creation or batch upload of Per Unit Product. Click Okay to proceed.
Clicking on Okay will redirect to the Unit Stock Management page where the successfully created Batch of Per Unit Products will be displayed on the top of the list as marked in the example screenshot.

Image 6: Successfully created Batch of Per Unit Products will display on the Unit Stock Management Page.
Per Unit Product purchase with Partial Payment Ledger View
The Credit Supplier Tech Gadgets Supply Shop had a previous Payable of 5,000 BDT. Now, with the purchase of 5 Per Unit Products with a partial payment of 1,000 BDT, the remaining 4,000 BDT will add to the Payable Ending Balance making it a total of 9,000 BDT. This Payable amount will indicate that the Credit Supplier will get 9,000 BDT from the Shop Owner in total which the Shop Owner can pay with the Settle Ledger option.
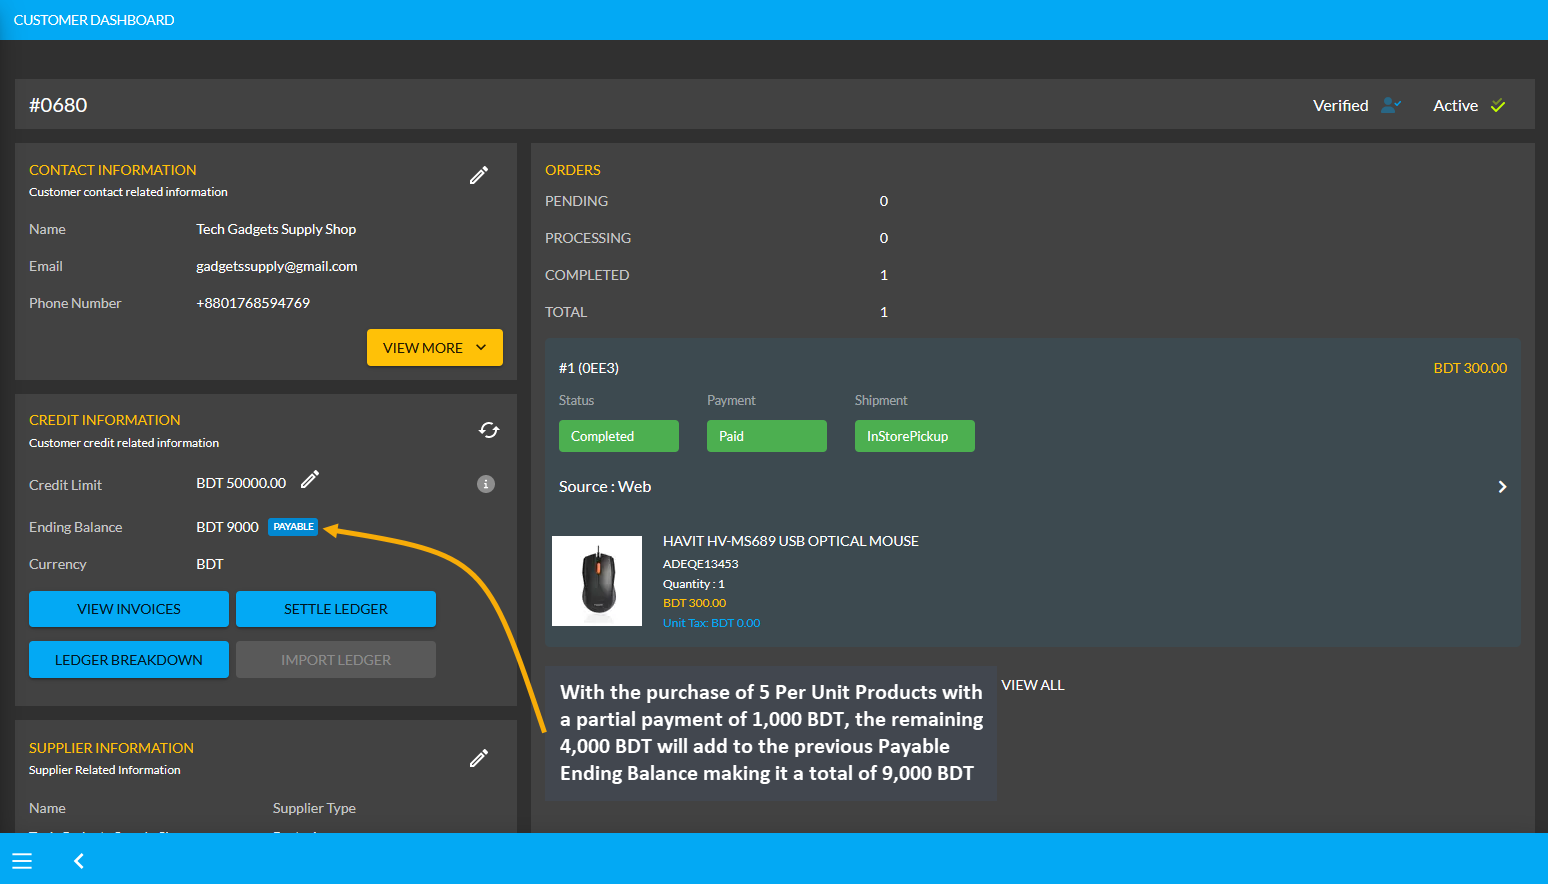
Image 7: The purchase of 5 Per Unit Products without payment will add to the Payable Ending Balance.
Using the Ledger Breakdown feature, the Shop Owner can check the Per Unit Product purchase of their Partial Payment transaction from the Credit Supplier on their Ledger Breakdown Page as shown in the example below.

Image 8: Ledger Breakdown Page will show details of Per Unit Product purchase With Partial Payment.
Per Unit Product purchase with Full Payment
The Shop Owner can purchase Per Unit Products from the Credit Supplier with full payment by using the Purchase option. From the Products tab, go to the Product List View and select the Purchase option from the target Per Unit Product. Clicking this option will redirect to the Add Product Stock page from where Shop Owner can purchase the Per Unit Products with full payment from the Credit Supplier.

Image 1: Select target Per Unit Product and click the Purchase button to buy from Credit Supplier.
On the Add Product Stock page, select the Full Payment Method from Acquisition Options, set the Purchase Price Per Unit, select Credit Supplier, and select Warranty if it is not automatically selected. Then click the Auto Generate Serial Numbers button to generate Quantity and Serial of Per Unit Product that Shop Owner will buy from Supplier.

Image 2: Set Purchase Price, select Supplier and Warranty, and click Auto Generate Serial Numbers button.
After clicking the Auto Generate Serial Numbers button, a pop-up will appear where Product Serial Number and Quantity needs to be set with Prefix, Suffix, Start Counter, and End Counter. Click the Generate button to create the Per Unit Products for purchase from the Credit Supplier. Here, 5 Per Unit Products quantities were created.

Image 3: Set Product Serial Number and Quantity with Prefix, Suffix, Start Counter, and End Counter.
After Product Serial Numbers and Quantities are generated for the target Per Unit Product, full payment amount will automatically be set on the Paid Amount box. Click Submit to complete purchase process with Full Payment.

Image 4: After Full Payment amount is set, click Submit to complete purchase with Full Payment Method.
Then, a pop-up will show uploading assigned Per Unit Product quantities and confirm when units are successfully created. Click Okay to complete the Per Unit Product purchase process from Credit Supplier. If Shop Owner wants to purchase more quantities of the same Per Unit Product from the same Credit Supplier, then they need to click the Purchase Product from Same Supplier button as shown in the example screenshot.

Image 5: Pop-up showing successful creation or batch upload of Per Unit Product. Click Okay to proceed.
Clicking on Okay will redirect to the Unit Stock Management page where the successfully created Batch of Per Unit Products will be displayed on the top of the list as marked in the example screenshot.

Image 6: Successfully created Batch of Per Unit Products will display on the Unit Stock Management Page.
Per Unit Product purchase with Full Payment Ledger View
As the Credit Supplier Tech Gadgets Supply Shop already have a previous Payable of 9,000 BDT and the purchase of 5 Per Unit Products with a full payment of 5,000 BDT was made, no remaining dues will be added to their Payable Ending Balance. However, as the Credit Supplier will get 9,000 BDT from Shop Owner in total based on previous dues, the Shop Owner can pay them back using the Settle Ledger option.
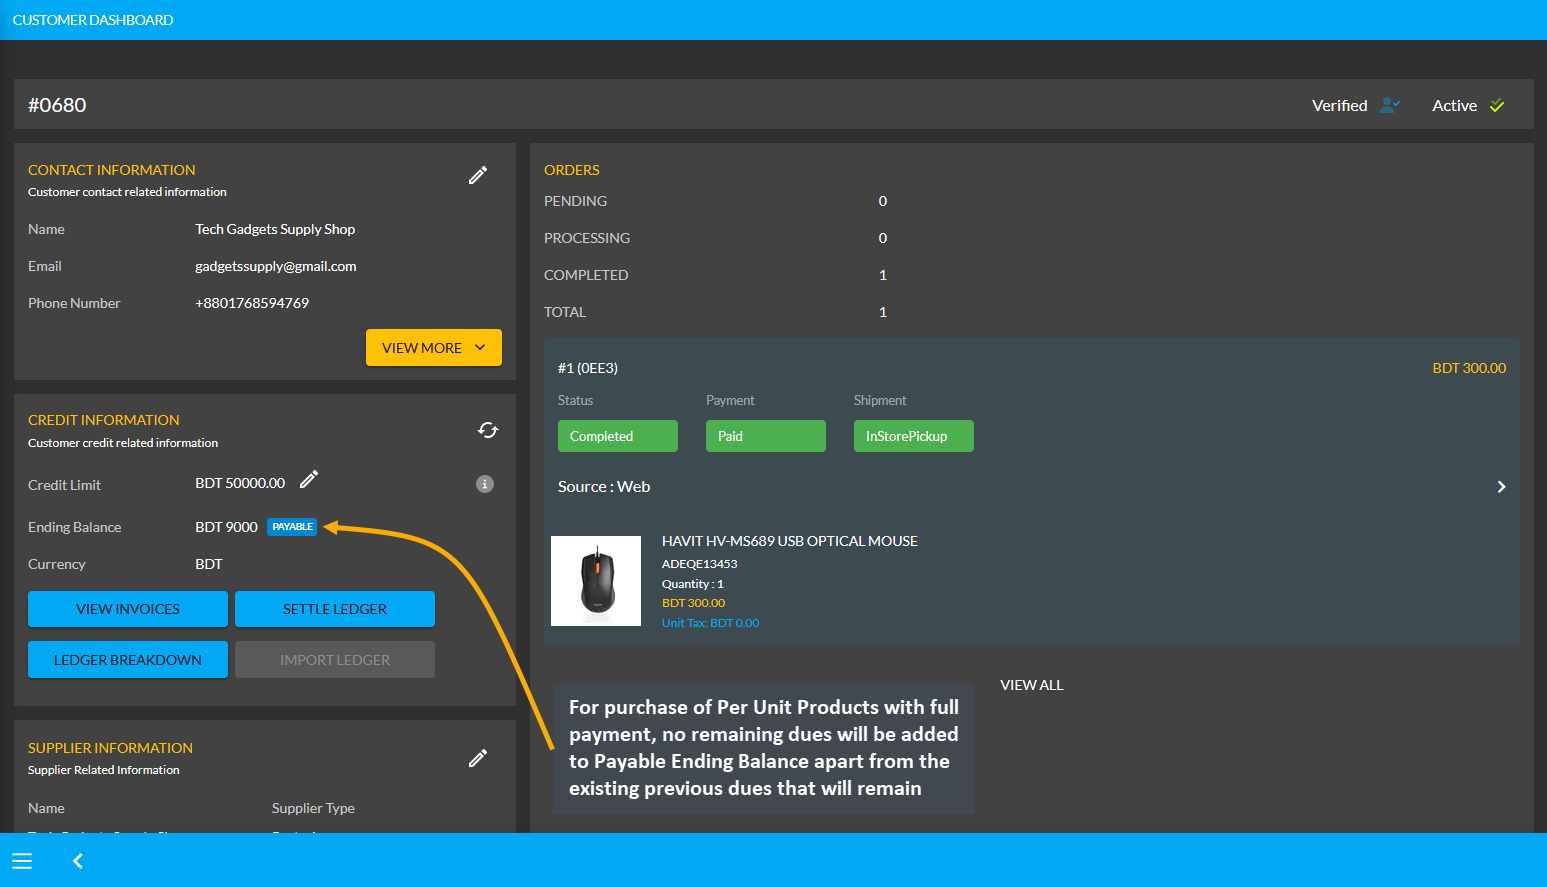
Image 7: For purchase of Per Unit Products with full payment, no dues will add to Payable Ending Balance.
Using the Ledger Breakdown feature, the Shop Owner can check the Per Unit Product purchase of their Partial Payment transaction from the Credit Supplier on their Ledger Breakdown Page as shown in the example below.

Image 8: Ledger Breakdown Page will show details of Per Unit Product purchase With Full Payment.
27 - Automatic Payment Gateway Configuration
Learn how to configure and setup Automatic Payment Gateways from Admin Panel.
What is Automatic Payment Gateway?
Most people in Bangladesh prefer internet banking over traditional banking these days with the introduction of digital Payment Gateways. For this reason, Automatic Payment Gateways are an asset to businesses because they ensure smooth and safe transactions, and reduce losses associated with late payments. So, both the Customers and Shop Owners need to work together when using payment gateways to make a transaction.

Image 1: Automatic Payment Gateways are an asset because they ensure smooth and safe online transactions.
Payment Gateways with API Settings
API stands for Application Programming Interface, which is a set of programmatic instructions that allow a program to interface with another program. Here, an API authorizes and integrates two applications to communicate with one another to provide a seamless digital purchase experience for Customers when making payment for Orders.
Automatic Payment Gateways with API Settings are payment processing portals which facilitate payment fulfillment processes for online stores. They operate to integrate a payment solution with an application, like connecting a business’ checkout function to the payment system. By authorizing the payment between Shop Owner and Customer through a payment gateway, it processes the transaction.
How does Payment Gateways with API Settings Work?
Automatic Payment Gateways with API settings takes request from the Shop Owner’s end which include Customer details and passes it to the payment gateway for transaction processing. It is usually a third-party service that process, verify, and accept or decline credit card, debit card and internet banking transactions that allow Shop Owners to accept payment from Customers on Website, avoiding the risk of Shopping Cart abandonment.
The advantage of using a payment gateway with API settings is that it can simplify the payment process (request, authorization, receipt and confirmation). The way a payment API typically works is that an application transmits a request to the API, which relays it to the payment processing network, which in turn processes the request and responds to the API that relays the response to the application.
Automatic Payment Gateways supported on Website
The Website supports Automatic Payment Gateways like BKash, Nagad, PortWallet, and SSLCommerz that has some distinct characteristics and features, which makes them stand out. They will ensure that the Customer’s payment experience is secure, smooth, fast, and increase their trust to purchase more Products from the Shop in future. As SSLCommerz, BKash, Nagad, and PortWallet are compliant with Bangladesh Payment and Settlement System Regulations, they have been included as The Website’s Automatic Payment Gateways.

Image 2: SSLCommerz, BKash, Nagad, and PortWallet are compliant with Bangladesh Payment System Regulation.
27.1 - BKash
Learn how to configure API Settings for BKash Payment Gateway from Admin.
BKash Payment Gateway
BKash is the country’s biggest financial service with storage of money and can be accessed through Customer’s mobile phone. After registration, their mobile number will be their BKash Account number. Users can access a range of services, including transferring and receiving money, making online payments, or depositing money in recipients’ mobile phone accounts. For money-related transactions, BKash has its two-stage verification protocol.
Setup API Keys for BKash
By providing API keys on The Website’s payment gateway, you will allow the customers to pay for your Products online and verify them with BKash automatically. There are few steps to setup API keys for BKash. To get the API or demo credentials, the first step is to contact BKash and open an account with them.
Once your account is validated, BKash will provide you the test API Keys. Within Settings, set the Minimum and Maximum amount, use Enable button to activate the gateway, enable Fee using the toggle button and set Fee Value. Copy-paste the test API keys including AppKey, AppSecret, Username, and Password from BKash to allow Customers to pay for their Products. Set Display instruction inside this box, Click Save to confirm all the changes.

Image 1: Activate the Gateway and setup API Keys for BKash to allow Customers to pay for their Products.
27.2 - Nagad
Learn how to configure API Settings for Nagad Payment Gateway from Admin.
Nagad Payment Gateway
Nagad is one of the most popular payment methods in Bangladesh with lows costs. Users of this application can avail of the digital financial services being offered by the Bangladesh Post Office, including money transfers and online payments all from within a single portal. This mobile financial service provider has two-stage verification protocol for money-related transactions.
Setup API Keys for Nagad
By providing API keys on The Website’s payment gateway, you will allow the customers to pay for your Products online and verify them with Nagad automatically. There are few steps to setup API keys for Nagad. To get the API or demo credentials, the first step is to contact Nagad and open an account with them.
Once your account is validated, Nagad will provide you the test API Keys. Within Settings, set the Minimum and Maximum amount, use Enable button to activate the gateway, enable Fee using the toggle button and set Fee Value. Copy-paste the test API keys here including AppKey, Private Key RSA, and Public Key RSA from Nagad to allow Customers to pay for their Products. Set Display instruction inside this box, Click Save to confirm all the changes.

Image 1: Activate the Gateway and setup API Keys for Nagad to allow Customers to pay for their Products.
27.3 - PortWallet
Learn how to configure PortWallet Payment Gateway in The Website
PortWallet Payment Gateway
PortWallet is one of the smoothest and fastest payment gateways in Bangladesh. Having an inbuilt API system, this platform offers the most secured system that is compliant with PCI and DSS system. Online merchants can incorporate PortWallet as their payment gateway to expand their online businesses. This secured and reliable payment processing solution will let customers make online purchases with ease and security.
Setup API Keys for PortWallet
By providing API keys on The Website’s payment gateway, you will allow the customers to pay for your Products online and verify them with PortWallet automatically. There are few steps to setup API keys for PortWallet. To get the API or demo credentials, the first step is to contact PortWallet and open an account with them.
Once your account is validated, PortWallet will provide you the test API Keys. Within Settings, set the Minimum and Maximum amount, use Enable button to activate the gateway, enable Fee using the toggle button and set Fee Value. Copy-paste the test API keys including AppKey and AppSecret from PortWallet to allow Customers to pay for their Products and select EMI. Set Display instruction inside this box, Click Save to confirm all the changes.

Image 1: Activate Gateway and setup API Keys for PortWallet to allow Customers to pay for their Products.
27.4 - SSLCommerz
Learn how to configure SSLCommerz Payment Gateway in The Website
SSLCommerz Payment Gateway
SSLCommerz was founded in 2010 and is the oldest and largest digital payment gateway of Bangladesh providing payment solutions to various range of businesses. They are a secured and authorized online payment gateway platform with API settings. The platform is fully compliant with PCI and DSS and does not collect any information without Customer’s authorization.
Setup API Keys for SSLCommerz
By providing API keys on The Website’s payment gateway, you will allow customers to pay for your Products online and verify them with SSLCommerz automatically. There are few steps to setup API keys for SSLCommerz. To get the API or demo credentials, the first step is to contact SSLCommerz and open an account with them.
Once your account is validated, SSLCommerz will provide you the test API Keys. Within Settings, set the Minimum and Maximum amount, use Enable button to activate the gateway, enable Fee using the toggle button and set Fee Value. Copy-paste the test API keys including AppKey and AppSecret from SSLCommerz to allow Customers to pay for their Products and select EMI. Set Display instruction inside this box, Click Save to confirm all the changes.
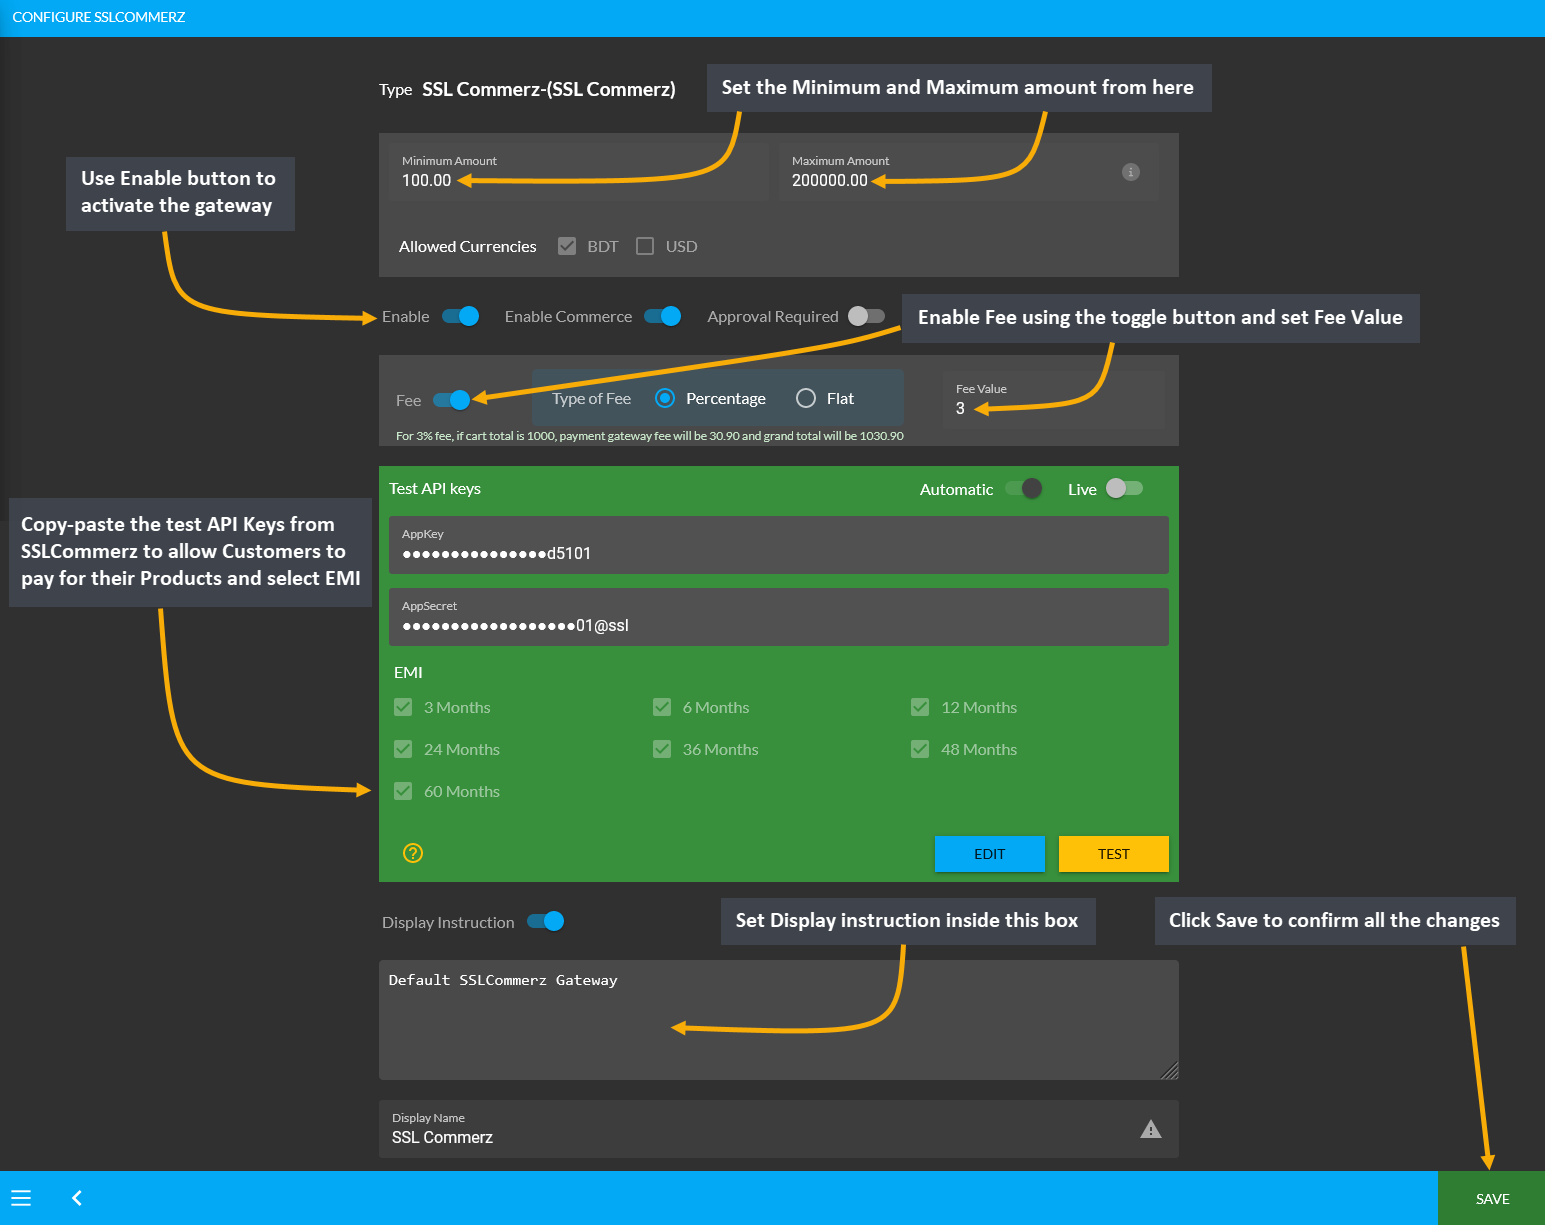
Image 1: Activate Gateway and setup API Keys for SSLCommerz to allow Customers to pay for their Products.
28 - Order Payment with Multiple Transactions
Resolve Pending Order by completing Order payment with Multiple Transactions.
Complete Order Payment with Multiple Transactions
In order to add multiple transactions for completing payments on a single Order, create an Order by filling basic Customer Information and Shipping Address. In the Cart, search for and add Products from the drop down menu. Check Product rate, Order total, subtotal, and click Proceed to select payment and shipping options.
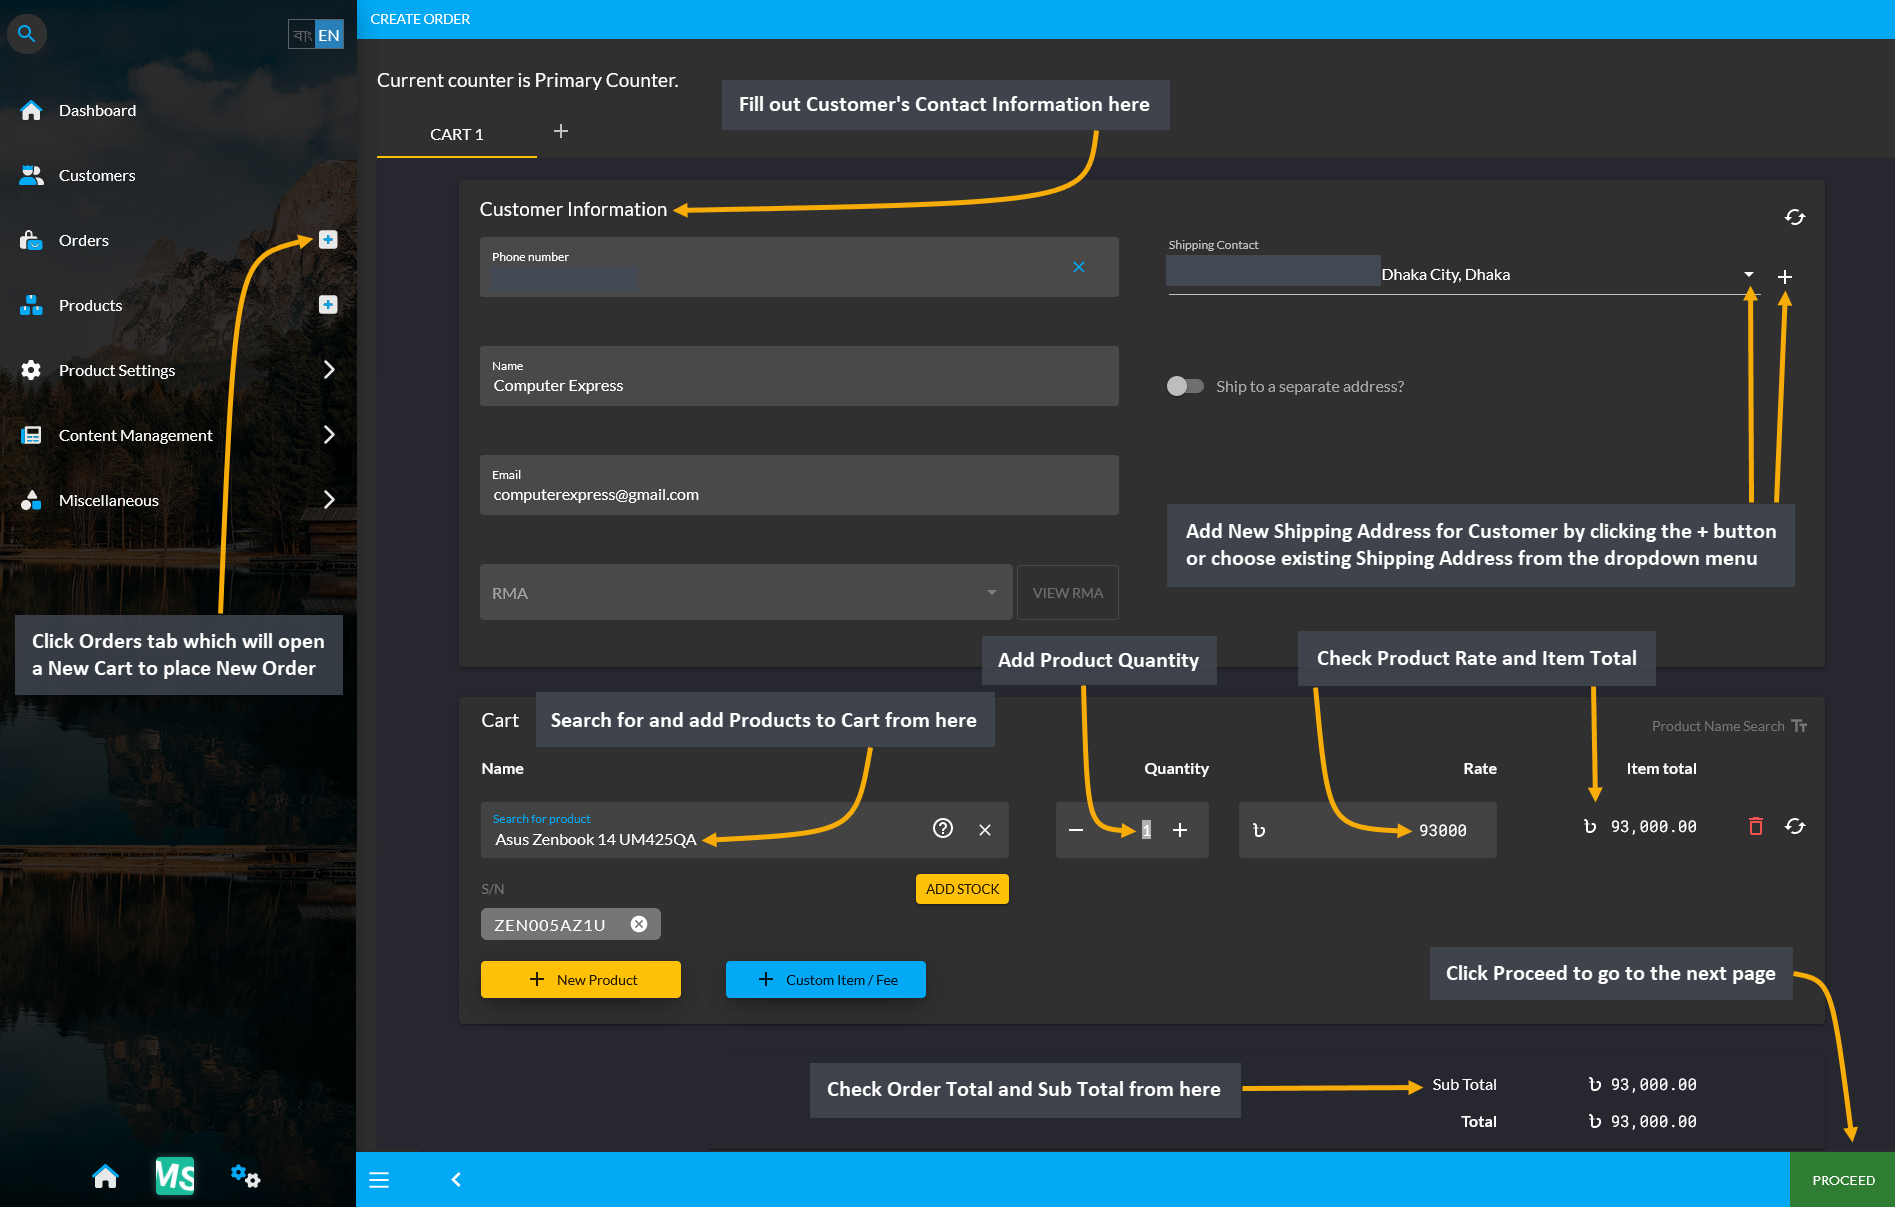
Image 1: Create Order Cart by adding Product and checking Product rate, Order total, subtotal to pay later.
Confirm Order without selecting Payment
Now, if a Customer wants to complete their order payment through Multiple Transactions i.e. half of the payment through BKash and half through Cash, then they will have to confirm Order without selecting any payment option. It can be seen in the example that, In Store Pickup was selected as Shipment without selecting any Payment option. Add a Note to keep record that Order was placed without Payment and transaction will be completed later. Thus, proceed without selecting any payment option and click on Confirm Order to proceed to the next step.
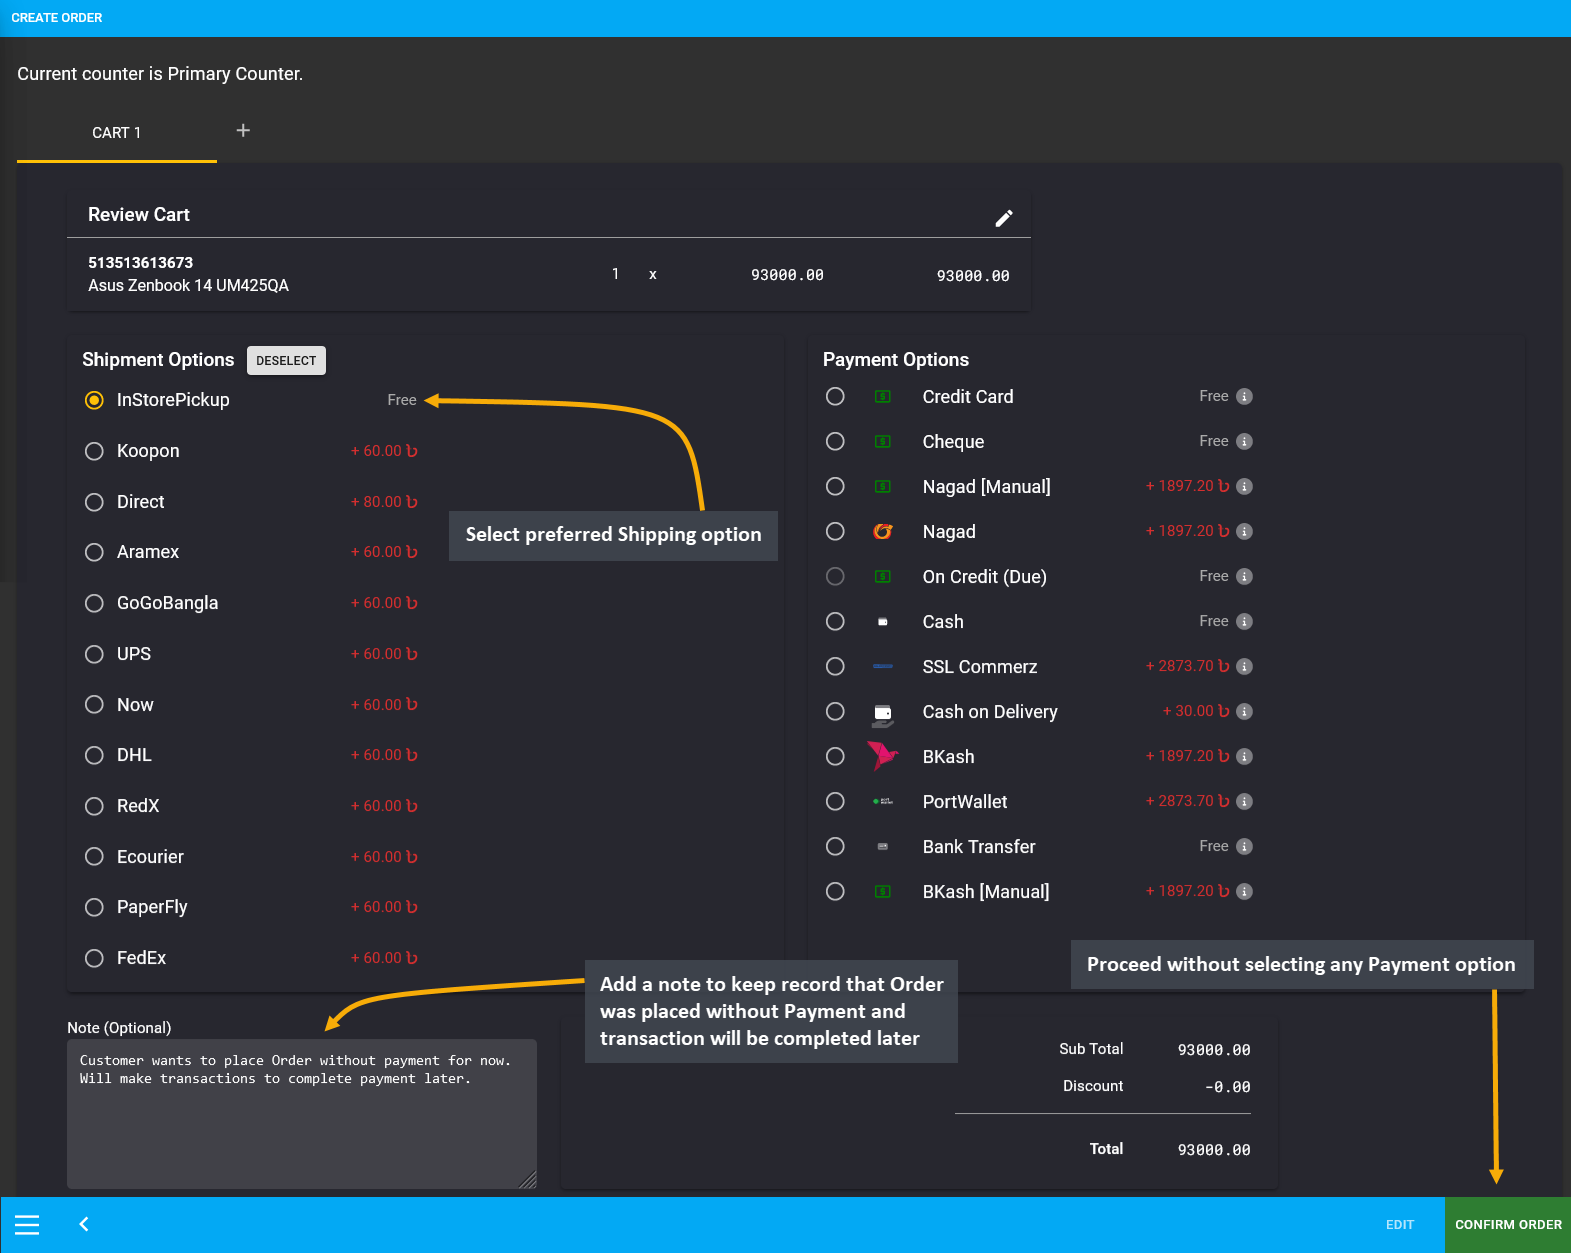
Image 2: Confirm Order without selecting any Payment and add a Note that Order was placed without Payment.
As Customer wants to place Order without payment, so select the option Ignore Issue to proceed without paying upfront for the Order. Click Submit button to proceed and confirm the Order without payment and pay later.
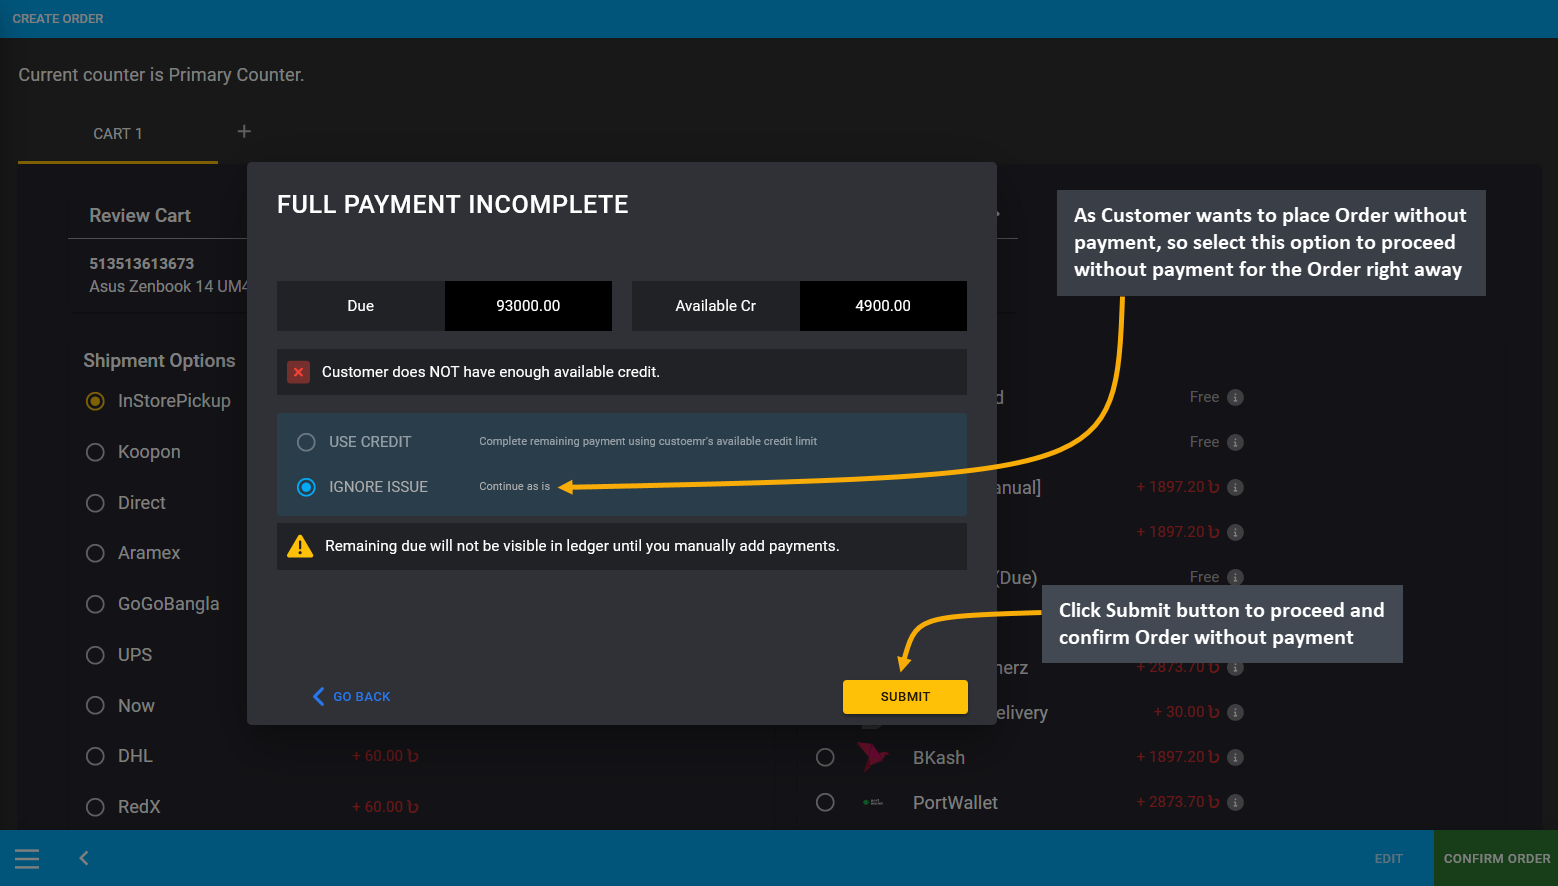
Image 3: Select the option Ignore Issue on payment confirmation modal to proceed without paying for Order.
Add Transactions for Pending Order Balance
To add payment details to this Order, go the the Orders Tab, where the newly created order will appear at the top of the list. Now, click on the ⌄ to extend viewing the options for adding Payment details for the Pending Order.
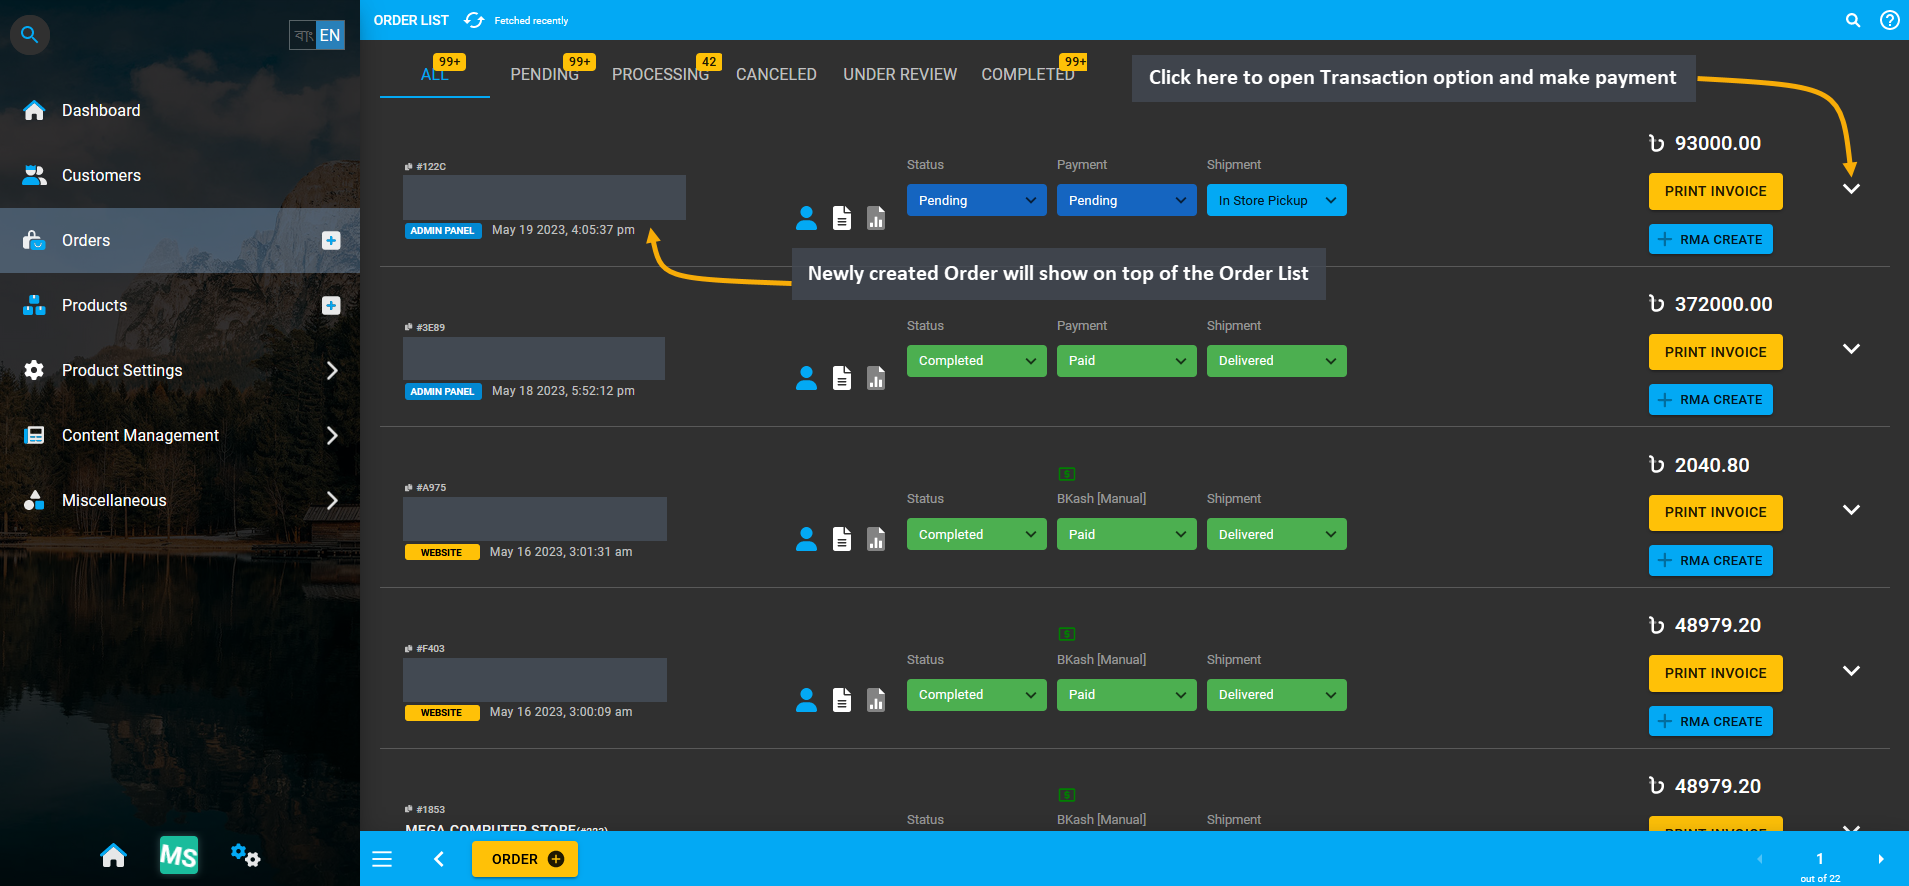
Image 4: Click on ⌄ from Order to extend viewing options for adding Payment details for the Pending Order.
Currently, Order has incomplete payment that needs to be completed. For Order Payment, click the Transaction + button which will redirect to the Payment Gateway that will allow making payment with Multiple Transactions.
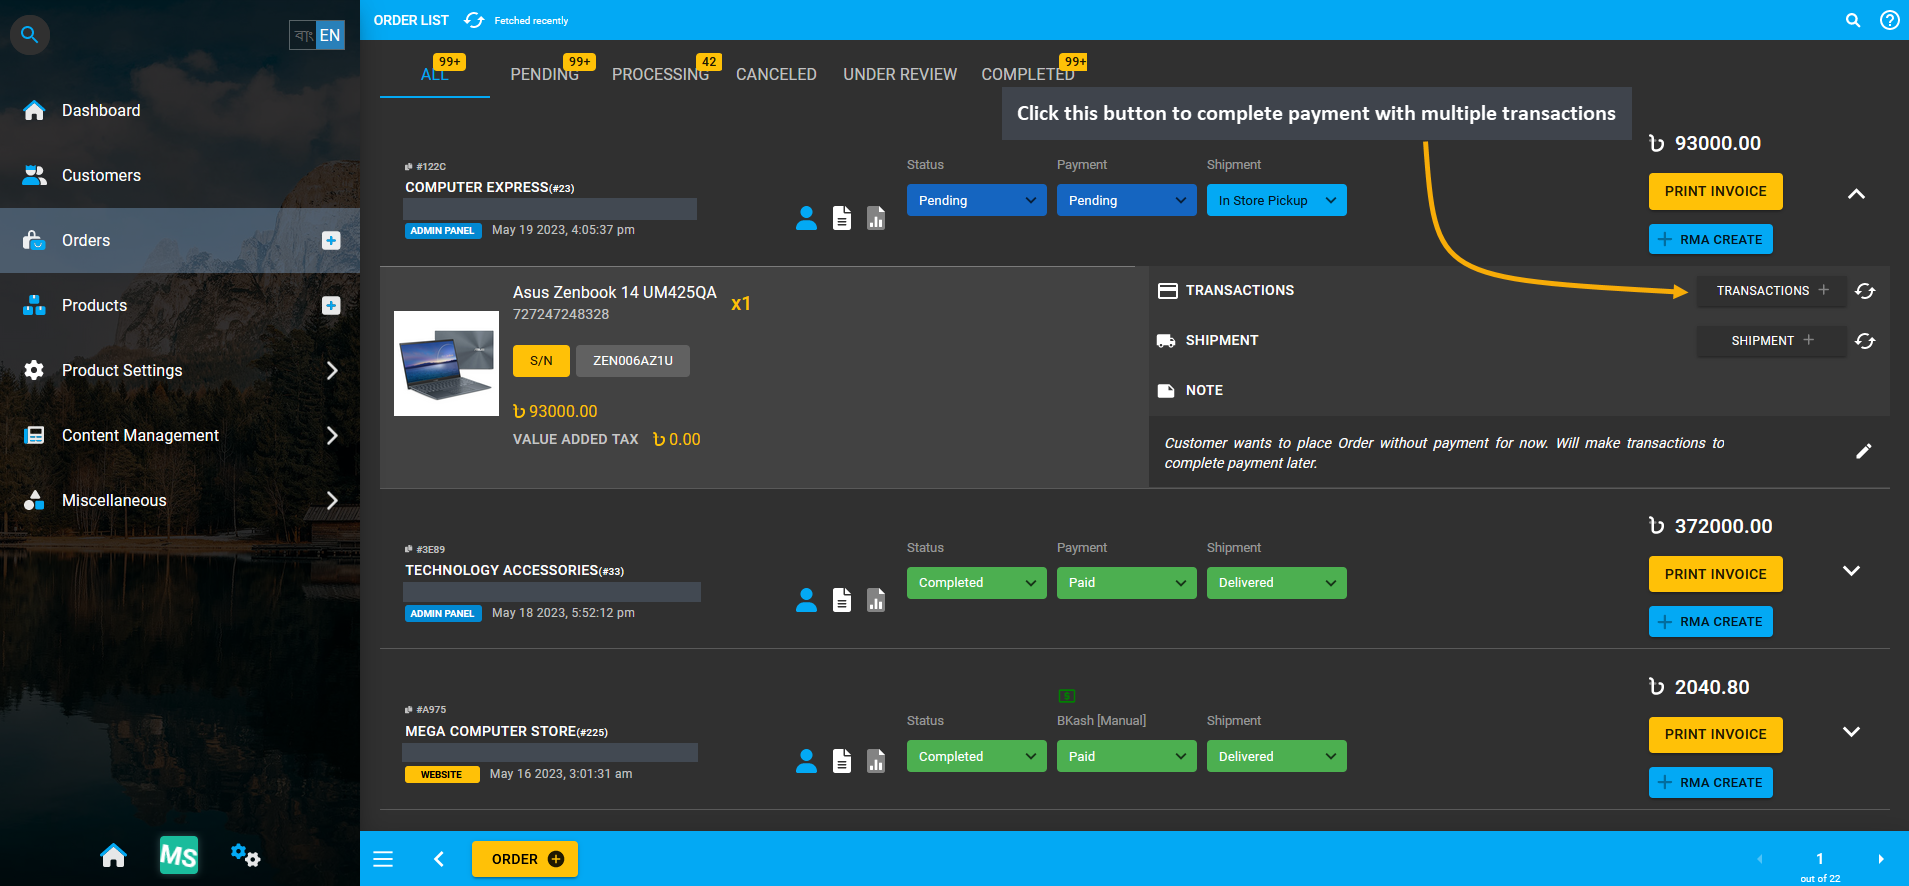
Image 5: For Order Payment, click the Transaction + button that will redirect to available Payment Gateway.
Resolve Pending Order Balance with Cash Transaction
Customer can resolve Pending Order balance with Multiple Transactions i.e. Cash and Bank Transfer. So, when the page redirects to Payment Gateway, first select Cash. As the Order total is 93,000 BDT for example, the Customer can make payment of 70,000 BDT by Cash and pay the rest with another Payment Gateway. On Amount box, type target amount that Customer wants to pay by Cash, i.e. 70,000 BDT and click Submit to complete payment.
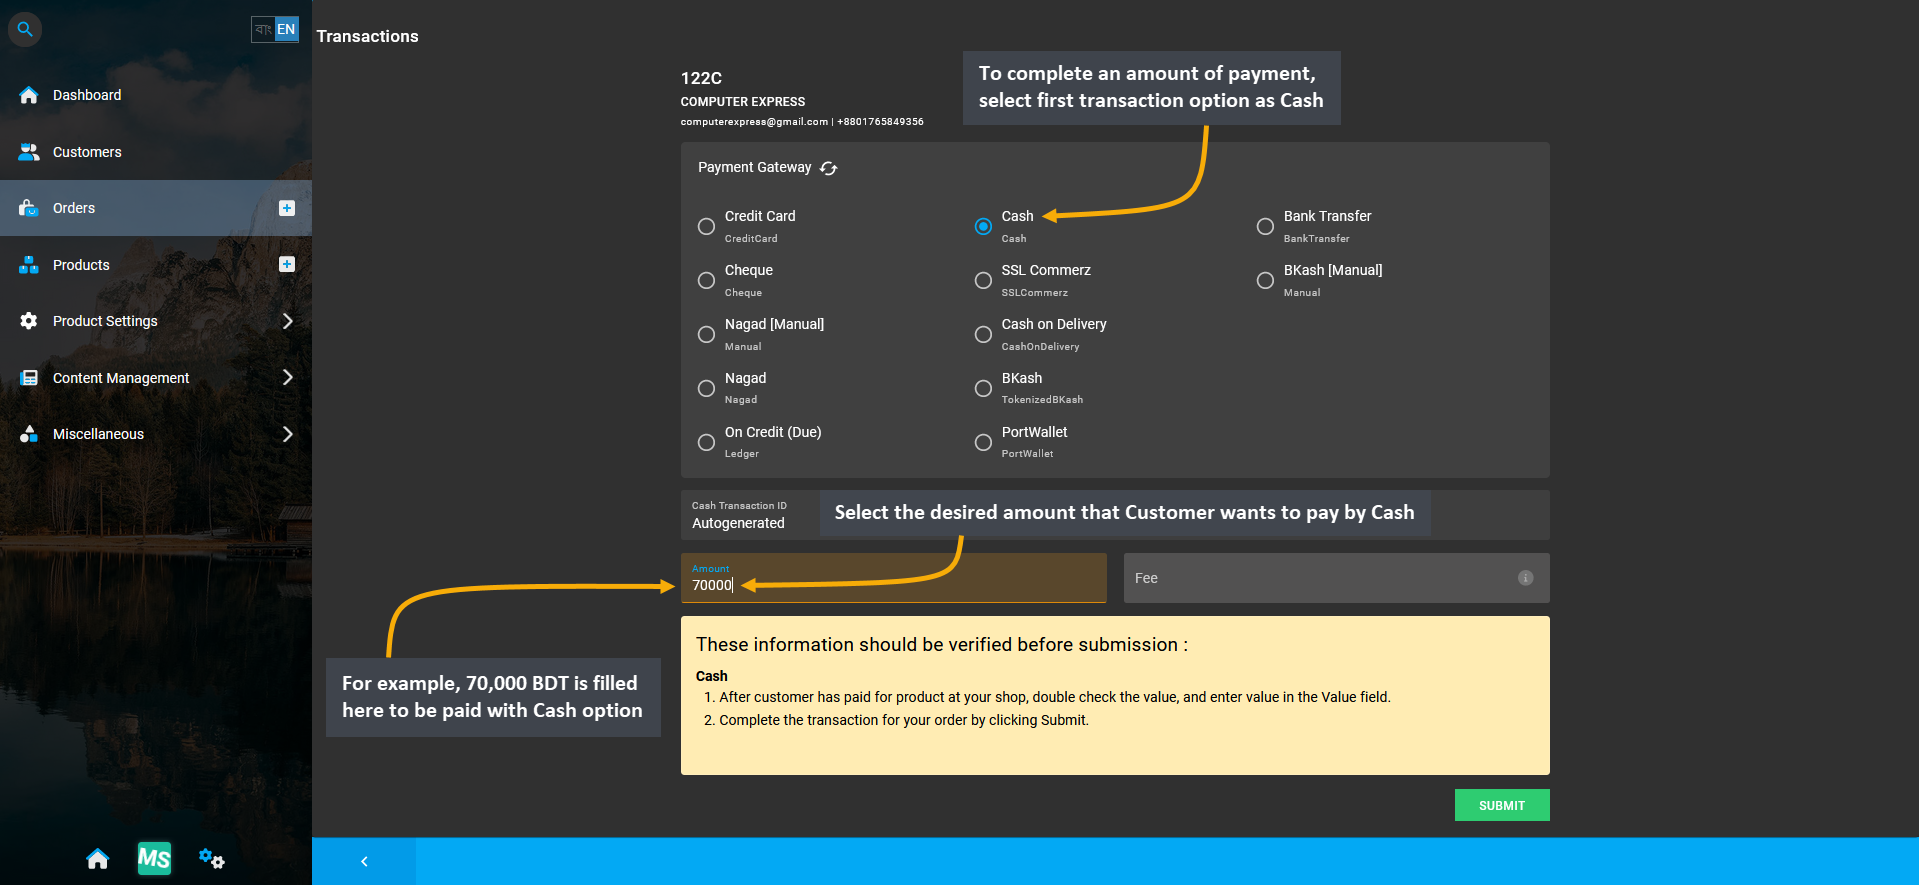
Image 6: Resolve Pending Order balance with Multiple Transactions i.e. a certain portion with Cash payment.
Before completing the transaction with Cash payment, a pop-up will show asking for confirmation to proceed. So, click Proceed to the confirm partial payment of 70,000 BDT for Order with Cash payment.
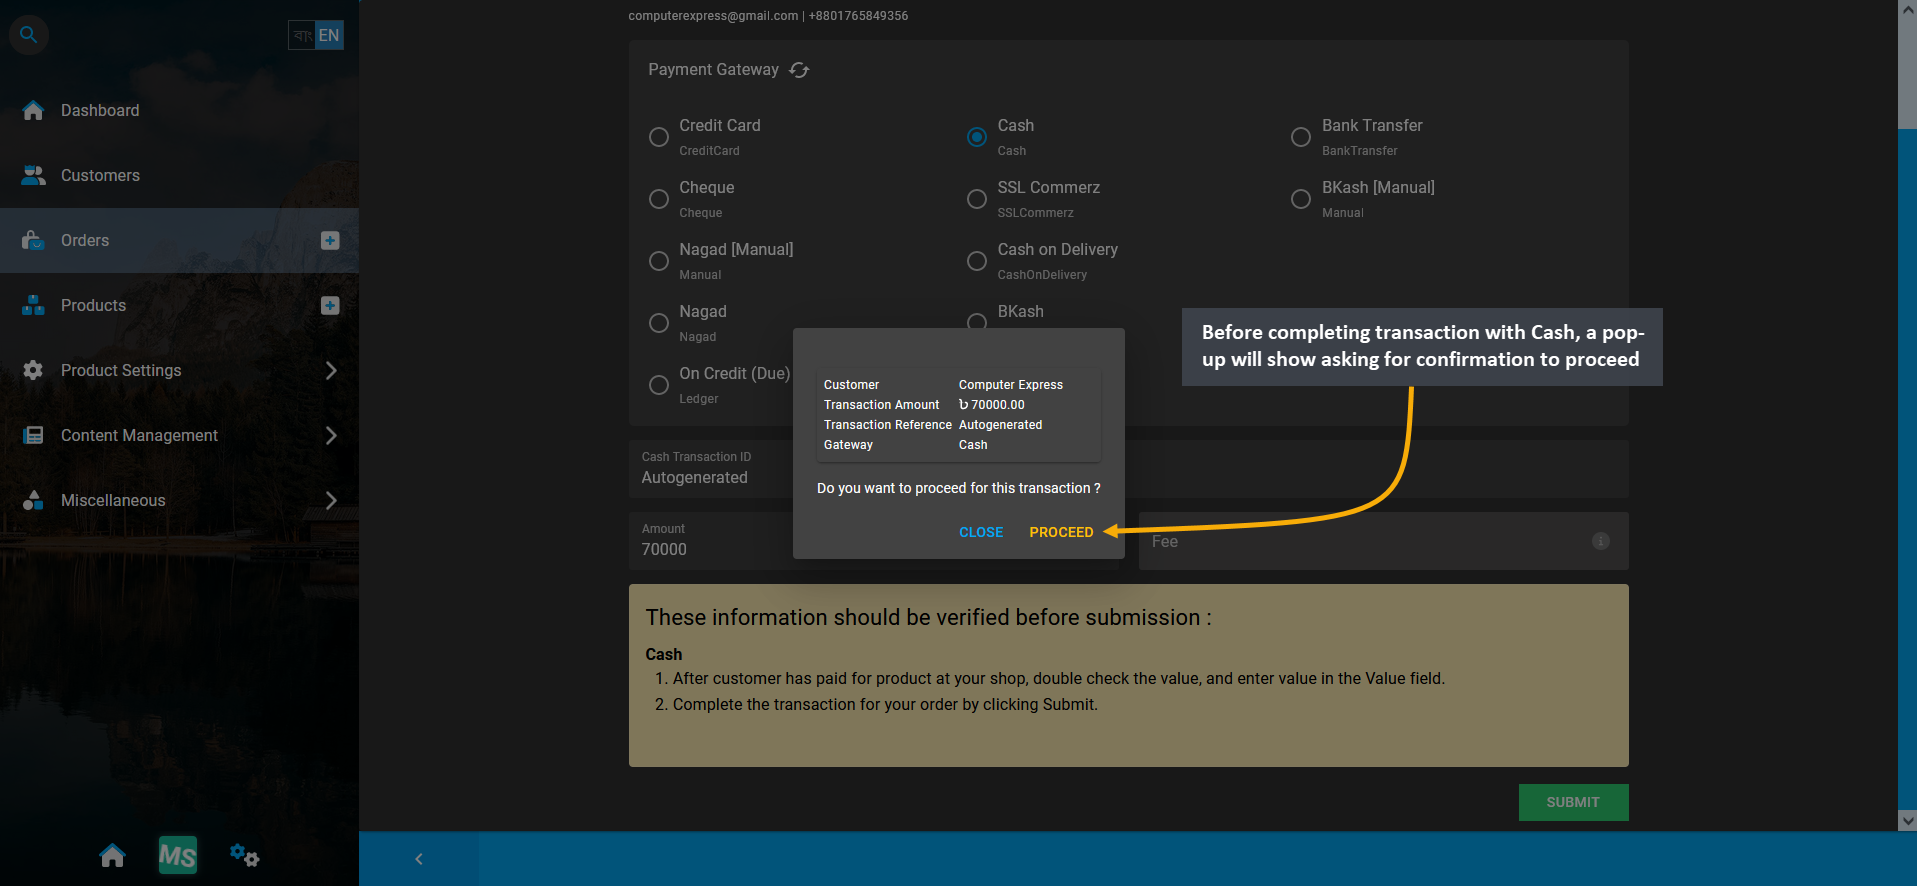
Image 7: Before completing transaction with Cash payment, a pop-up will ask for confirmation to proceed.
After completing partial transaction with Cash payment, a pop-up will notify that Full Payment for the Order is still incomplete and give two options to make payment with Credit or ignore the issue to complete full payment later.
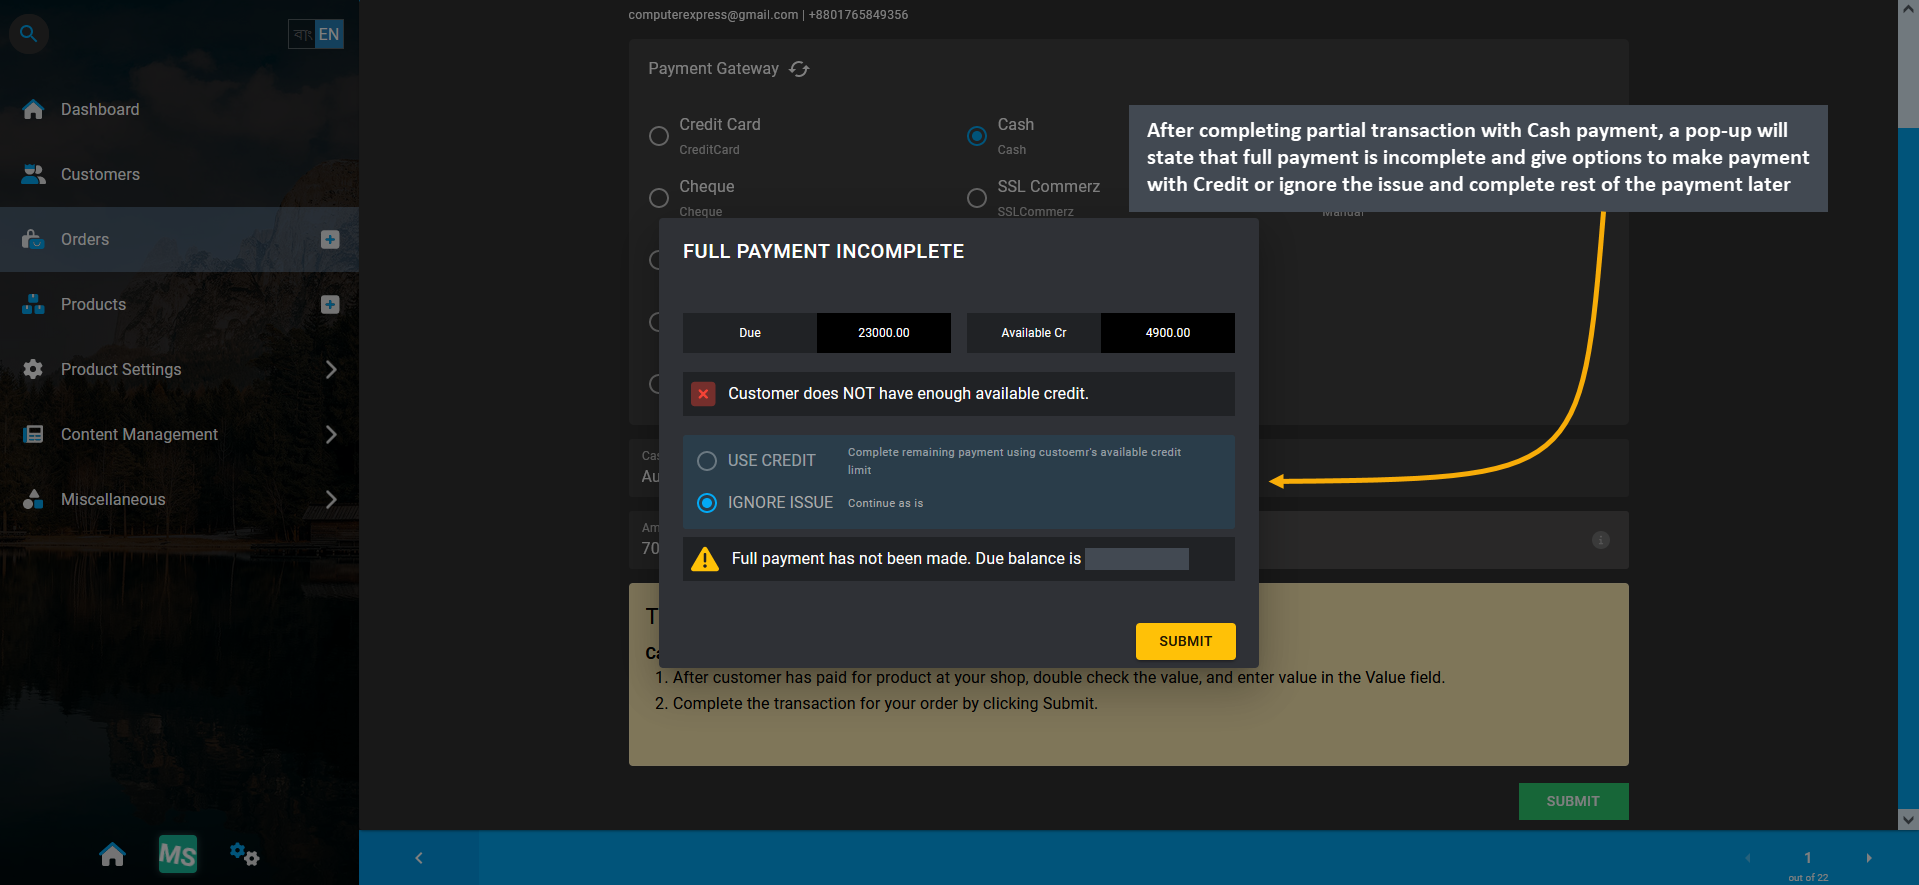
Image 8: A pop-up will ask to make payment with Credit or ignore the issue to complete full payment later.
After partial payment is completed with Cash, it will show within the Transaction history of the Order. 70,000 BDT that was paid with Cash here that will show payment status as Completed with no Fee Amount for Cash payment.
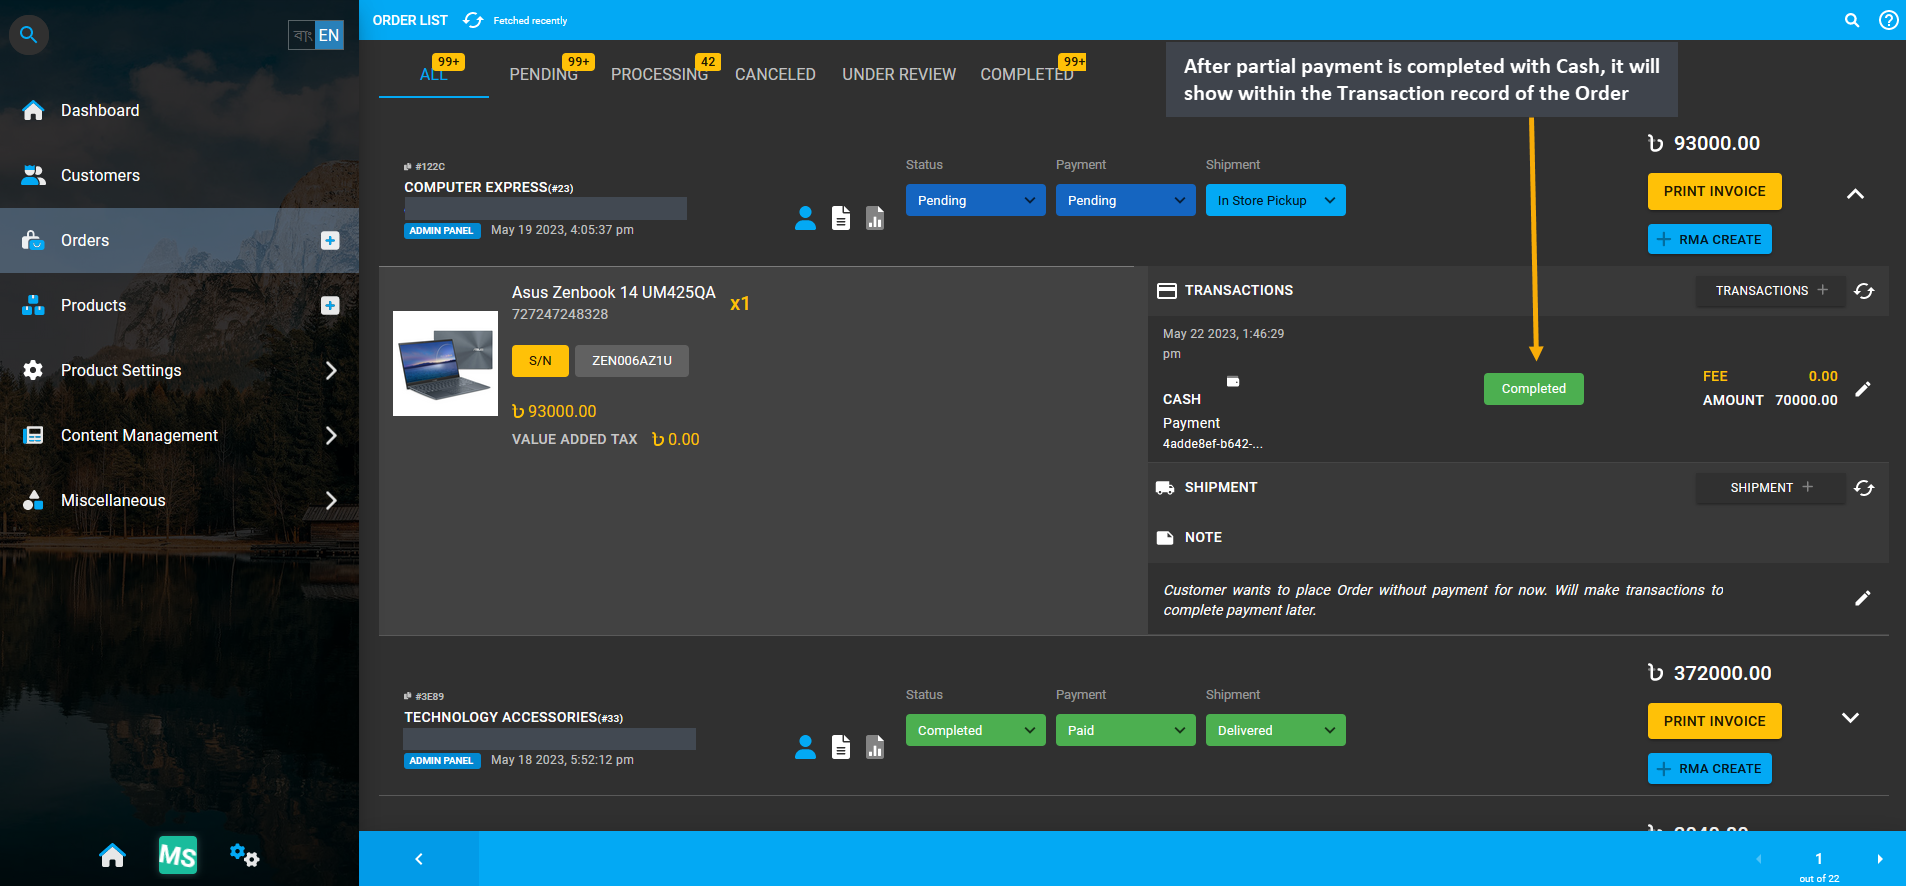
Image 9: After partial payment is completed with Cash, it will as Completed within the Transaction history.
Resolve Pending Order Balance with Bank Transfer
In this Order, a remaining amount of 23,000 BDT is pending from Order total 93,000 BDT. To resolve the Pending Order balance and complete remaining payment with another payment gateway, click the Transaction + button. As Bank Transfer was selected as second payment option, Bank Transfer Transaction ID needs to be filled in first.
On Amount box, the remaining Order balance of 23,000 BDT will automatically be filled. As Bank Transfer payment method was selected, there was no transaction fee. Click Submit to complete payment of remaining 23,000 BDT.
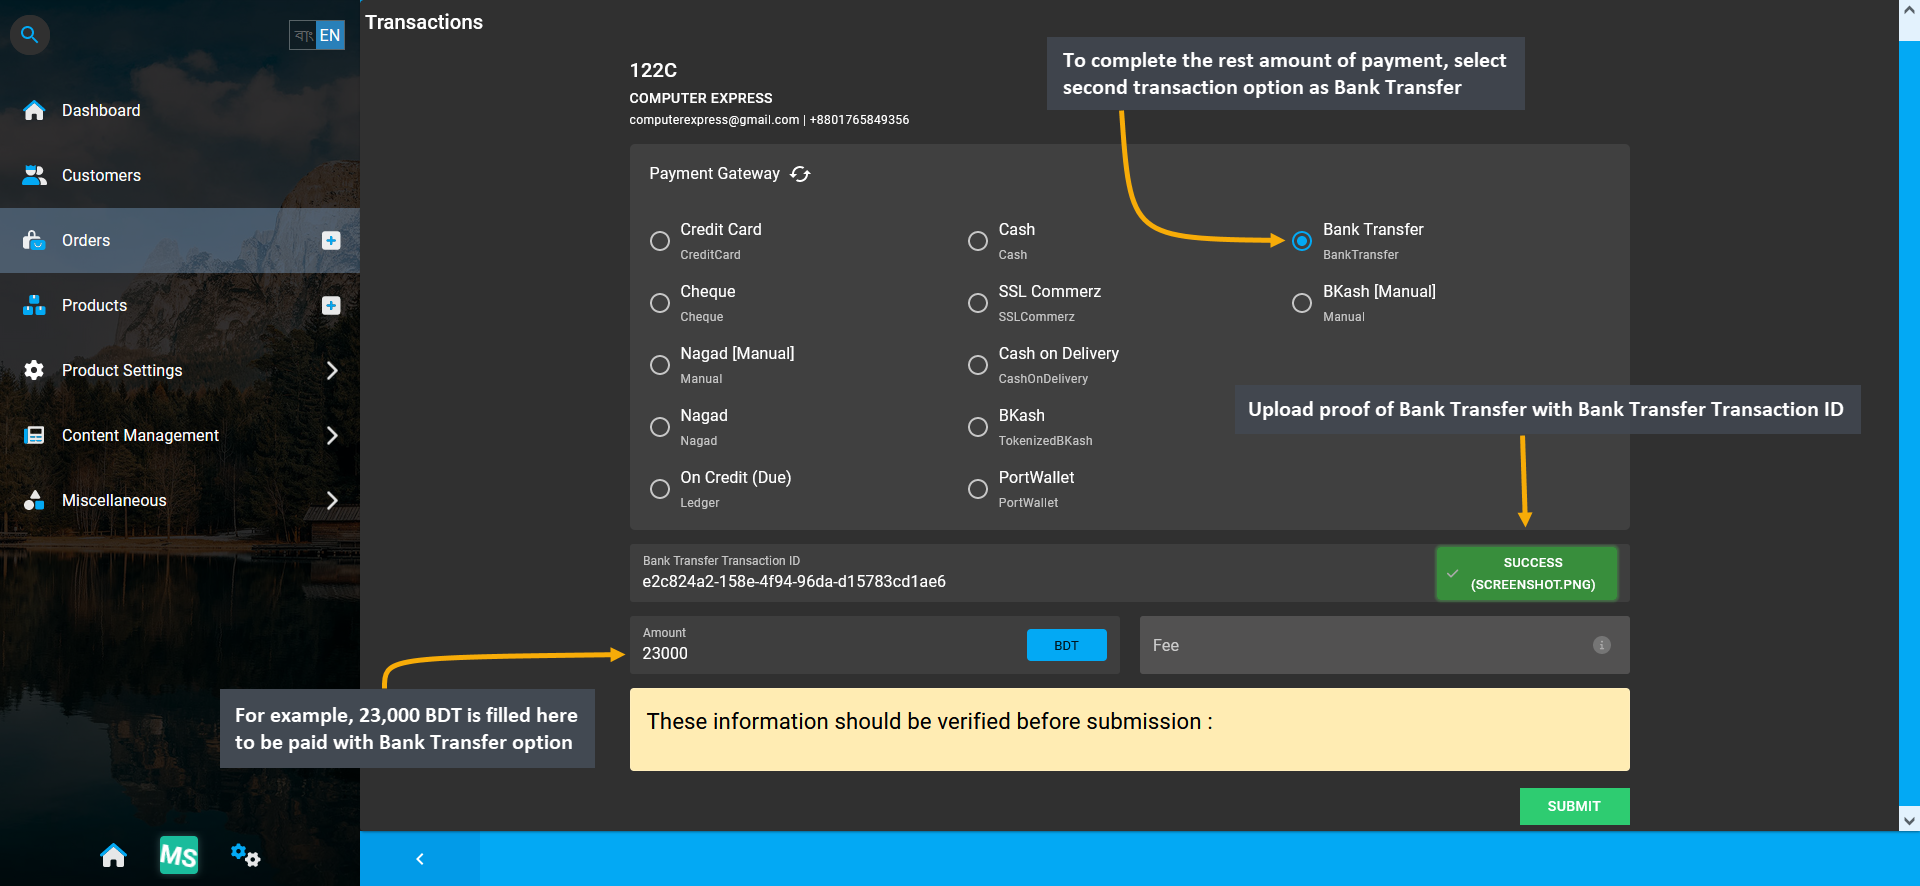
Image 10: Resolve Pending Order balance with Multiple Transaction i.e. remaining portion with Bank payment.
Before completing the remaining payment of 23,000 BDT with Bank Transfer, a pop-up will ask for confirmation to proceed with the transaction. Click the Proceed button to confirm payment with Bank Transfer.
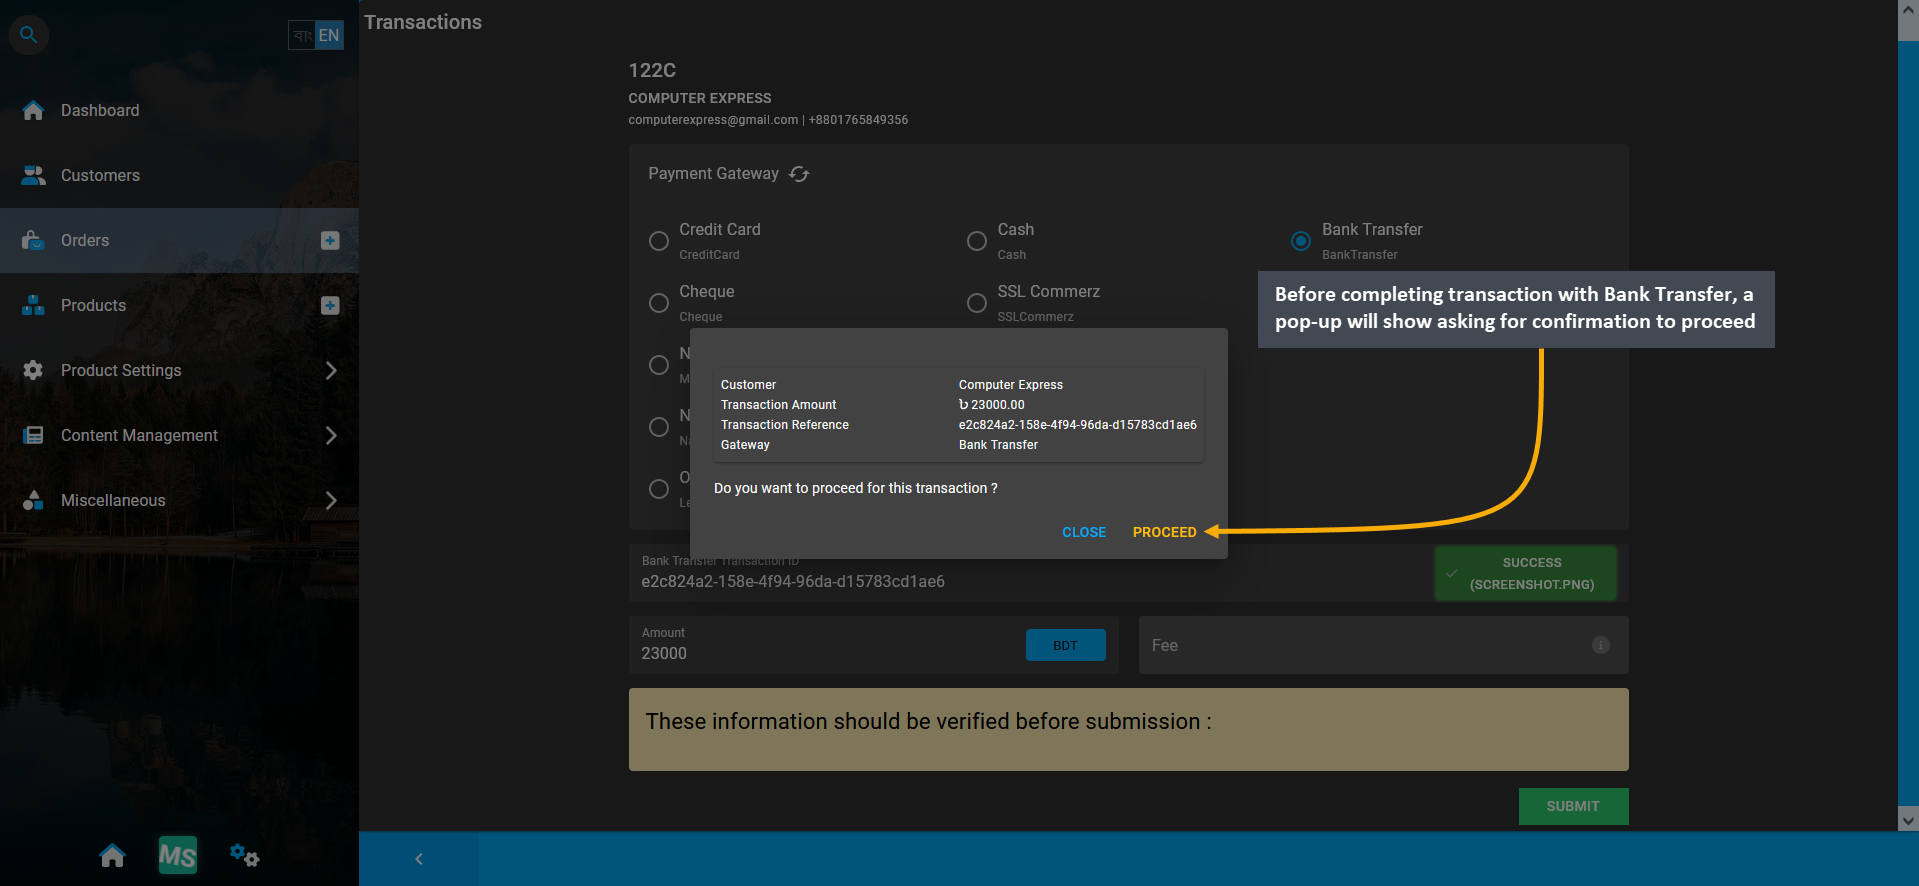
Image 11: Before completing transaction with Bank Transfer, a pop-up will ask for confirmation to proceed.
Check Multiple Transactions on Order Invoice
After completing full Order payment, Transaction history will show the payment amounts and Payment Gateways used. To check and view the full Order payment details breakdown, click the Print Invoice button.
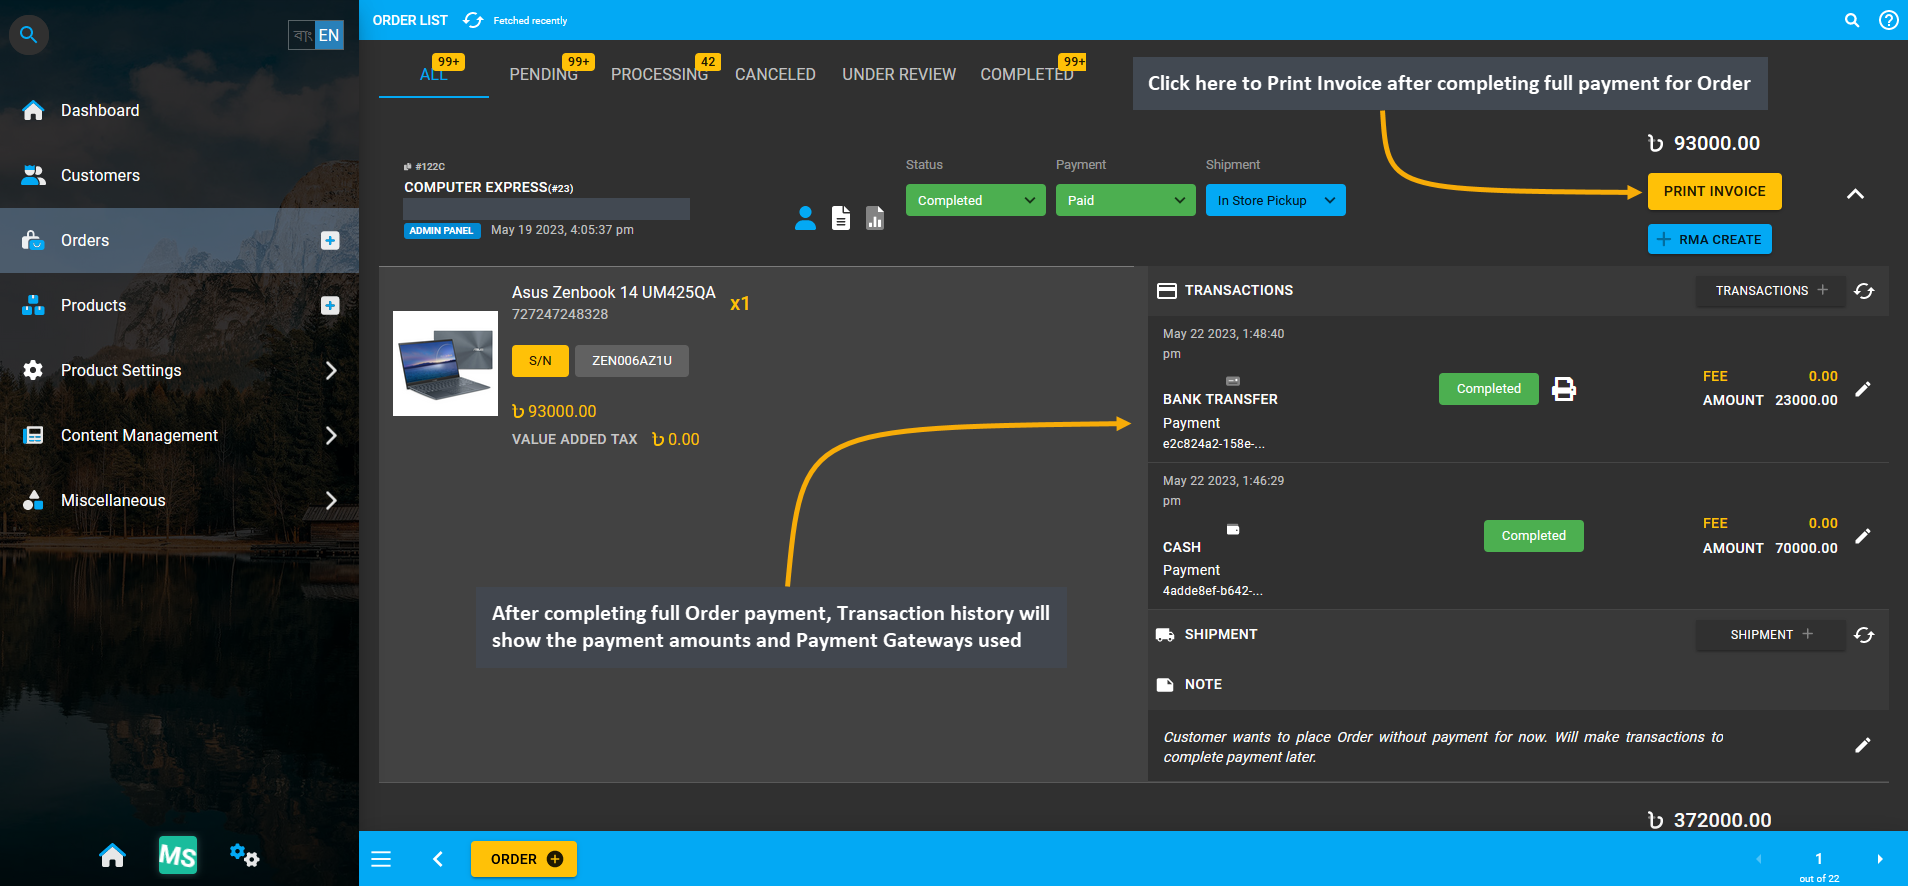
Image 12: Full Order payment will show in Transaction history, click Print Invoice button to check details.
The invoice will reflect Multiple Transactions that were used to complete Order payment. The breakdown of all the transactions will show below Total Paid. This is how Order Payment with Multiple Transactions can be completed.
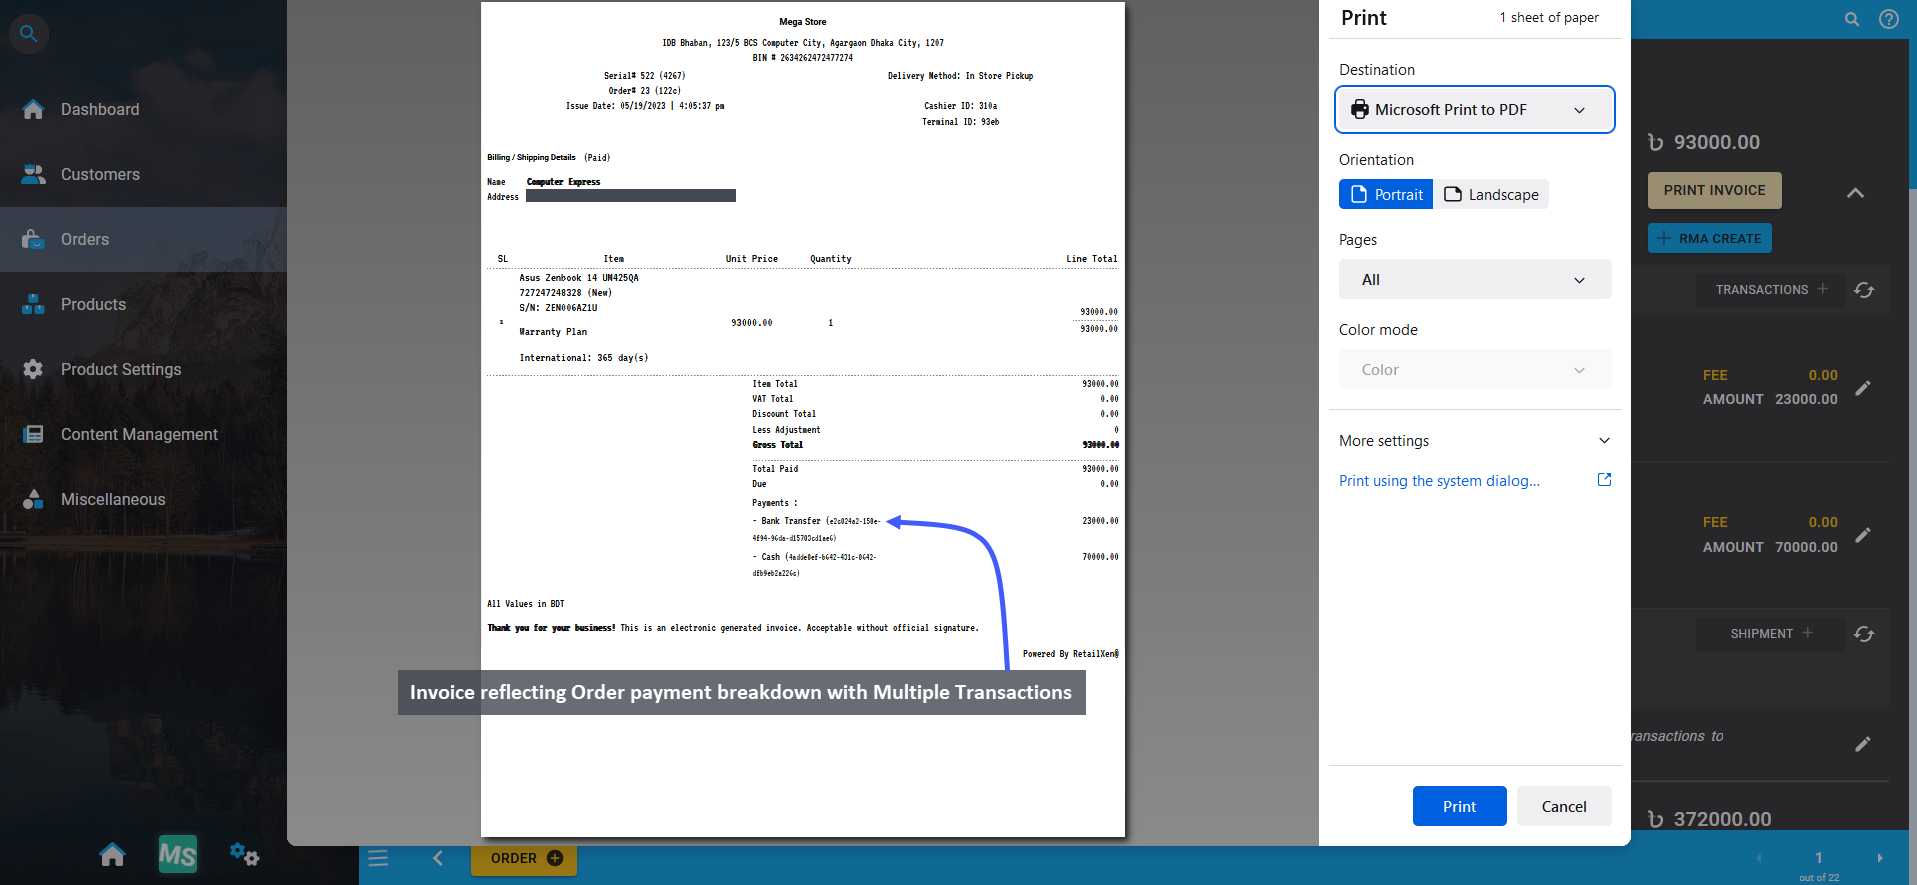
Image 13: Invoice will reflect breakdown of Multiple Transactions that were used to complete Order payment.
29 - Image Resolution Requirements
Learn More about the requirements of Image Resolution for Widget Banner Layout.
Carousel Full
| Banner Layout Type | Resolution | Ratio | |
|---|
| Carousel Full | 1920x1080 | 16:9 | |
Carousel Half
| Banner Layout Type | Resolution | Ratio | |
|---|
| Carousel Half | 1920x700 | 27:10 | |
Grid 1x2 Horizontal
| Banner Layout Type | Resolution | Ratio | |
|---|
| Grid 1x2 Horizontal | | | |
| 1x | 1920x480 | 4:1 | |
| 2x | 960x480 | 2:1 | |
Grid 1x2 Vertical
| Banner Layout Type | Resolution | Ratio | |
|---|
| Grid 1x2 Vertical | | | |
| 1x | 960x960 | 1:1 | |
| 2x | 960x480 | 2:1 | |
Grid 1x3 Horizontal
| Banner Layout Type | Resolution | Ratio | |
|---|
| Grid 1x3 Horizontal | | | |
| 1x | 1920x480 | 4:1 | |
| 3x | 640x480 | 4:3 | |
Grid 1x3 Vertical
| Banner Layout Type | Resolution | Ratio | |
|---|
| Grid 1x3 Vertical | | | |
| 1x | 960x1080 | 8:9 | |
| 3x | 960x360 | 8:3 | |
Grid 2x2 Vertical
| Banner Layout Type | Resolution | Ratio | |
|---|
| Grid 2x2 Vertical | 960x480 | 2:1 | |
Grid 3x3 Vertical
| Banner Layout Type | Resolution | Ratio | |
|---|
| Grid 3x3 Vertical | 640x480 | 4:3 | |
Flex Horizontal (Wrap)
| Banner Layout Type | Resolution | Ratio | |
|---|
| Flex Horizontal (Wrap) ( X ) | 640x480 | 4:3 | |
Flex Horizontal (No Wrap)
| Banner Layout Type | Resolution | Ratio | |
|---|
Flex Horizontal (No Wrap; Max 8) | | | |
4 <= n <= 8 | 1920nx480 | x:3 | |
The Admin Panel have a limitation of 5MB for all image file sizes, because large file sizes will not upload properly, slow down the server and make pages slow to load. Therefore, we recommend keeping image sizes below 5MB so that it allow the Customers to browse your Shop Website smoothly and fast.
In addition, we recommend keeping image formats generally as JPG. However, where high quality images will be required, we recomment keeping image formats as PNG.
30 - Customer's Manual
Customer’s go-to guide on how to place Orders, add profile information, add Billing/ Shipping address, make payments, and create PC Builds.
The document lists down the steps for Customers to place Orders, make Order payments via different payment gateways, add user information, view Orders, add Billing/ Shipping addresses, and create PC Builds etc.
Setup Customer’s Account
The main page of the Shop from the Customer’s view will look like the example screenshot below. From here, the Customer needs to click the Sign In button to login to their User Account that will redirect to a pop-up for login. Even if the Customer is not logged in, they can still select Product(s) and place Orders, during which they will be prompted to Sign In when selecting address, shipping, and payment options.
The Customer has to enter their Phone Number and click the Sign In button on the login pop-up. Click on Send OTP to my Phone if you do not have a password set. Once the OTP is received on your phone, type it in the box that will automatically log you in to the User Account. Now, you can place Orders as the Customer on the Shop.
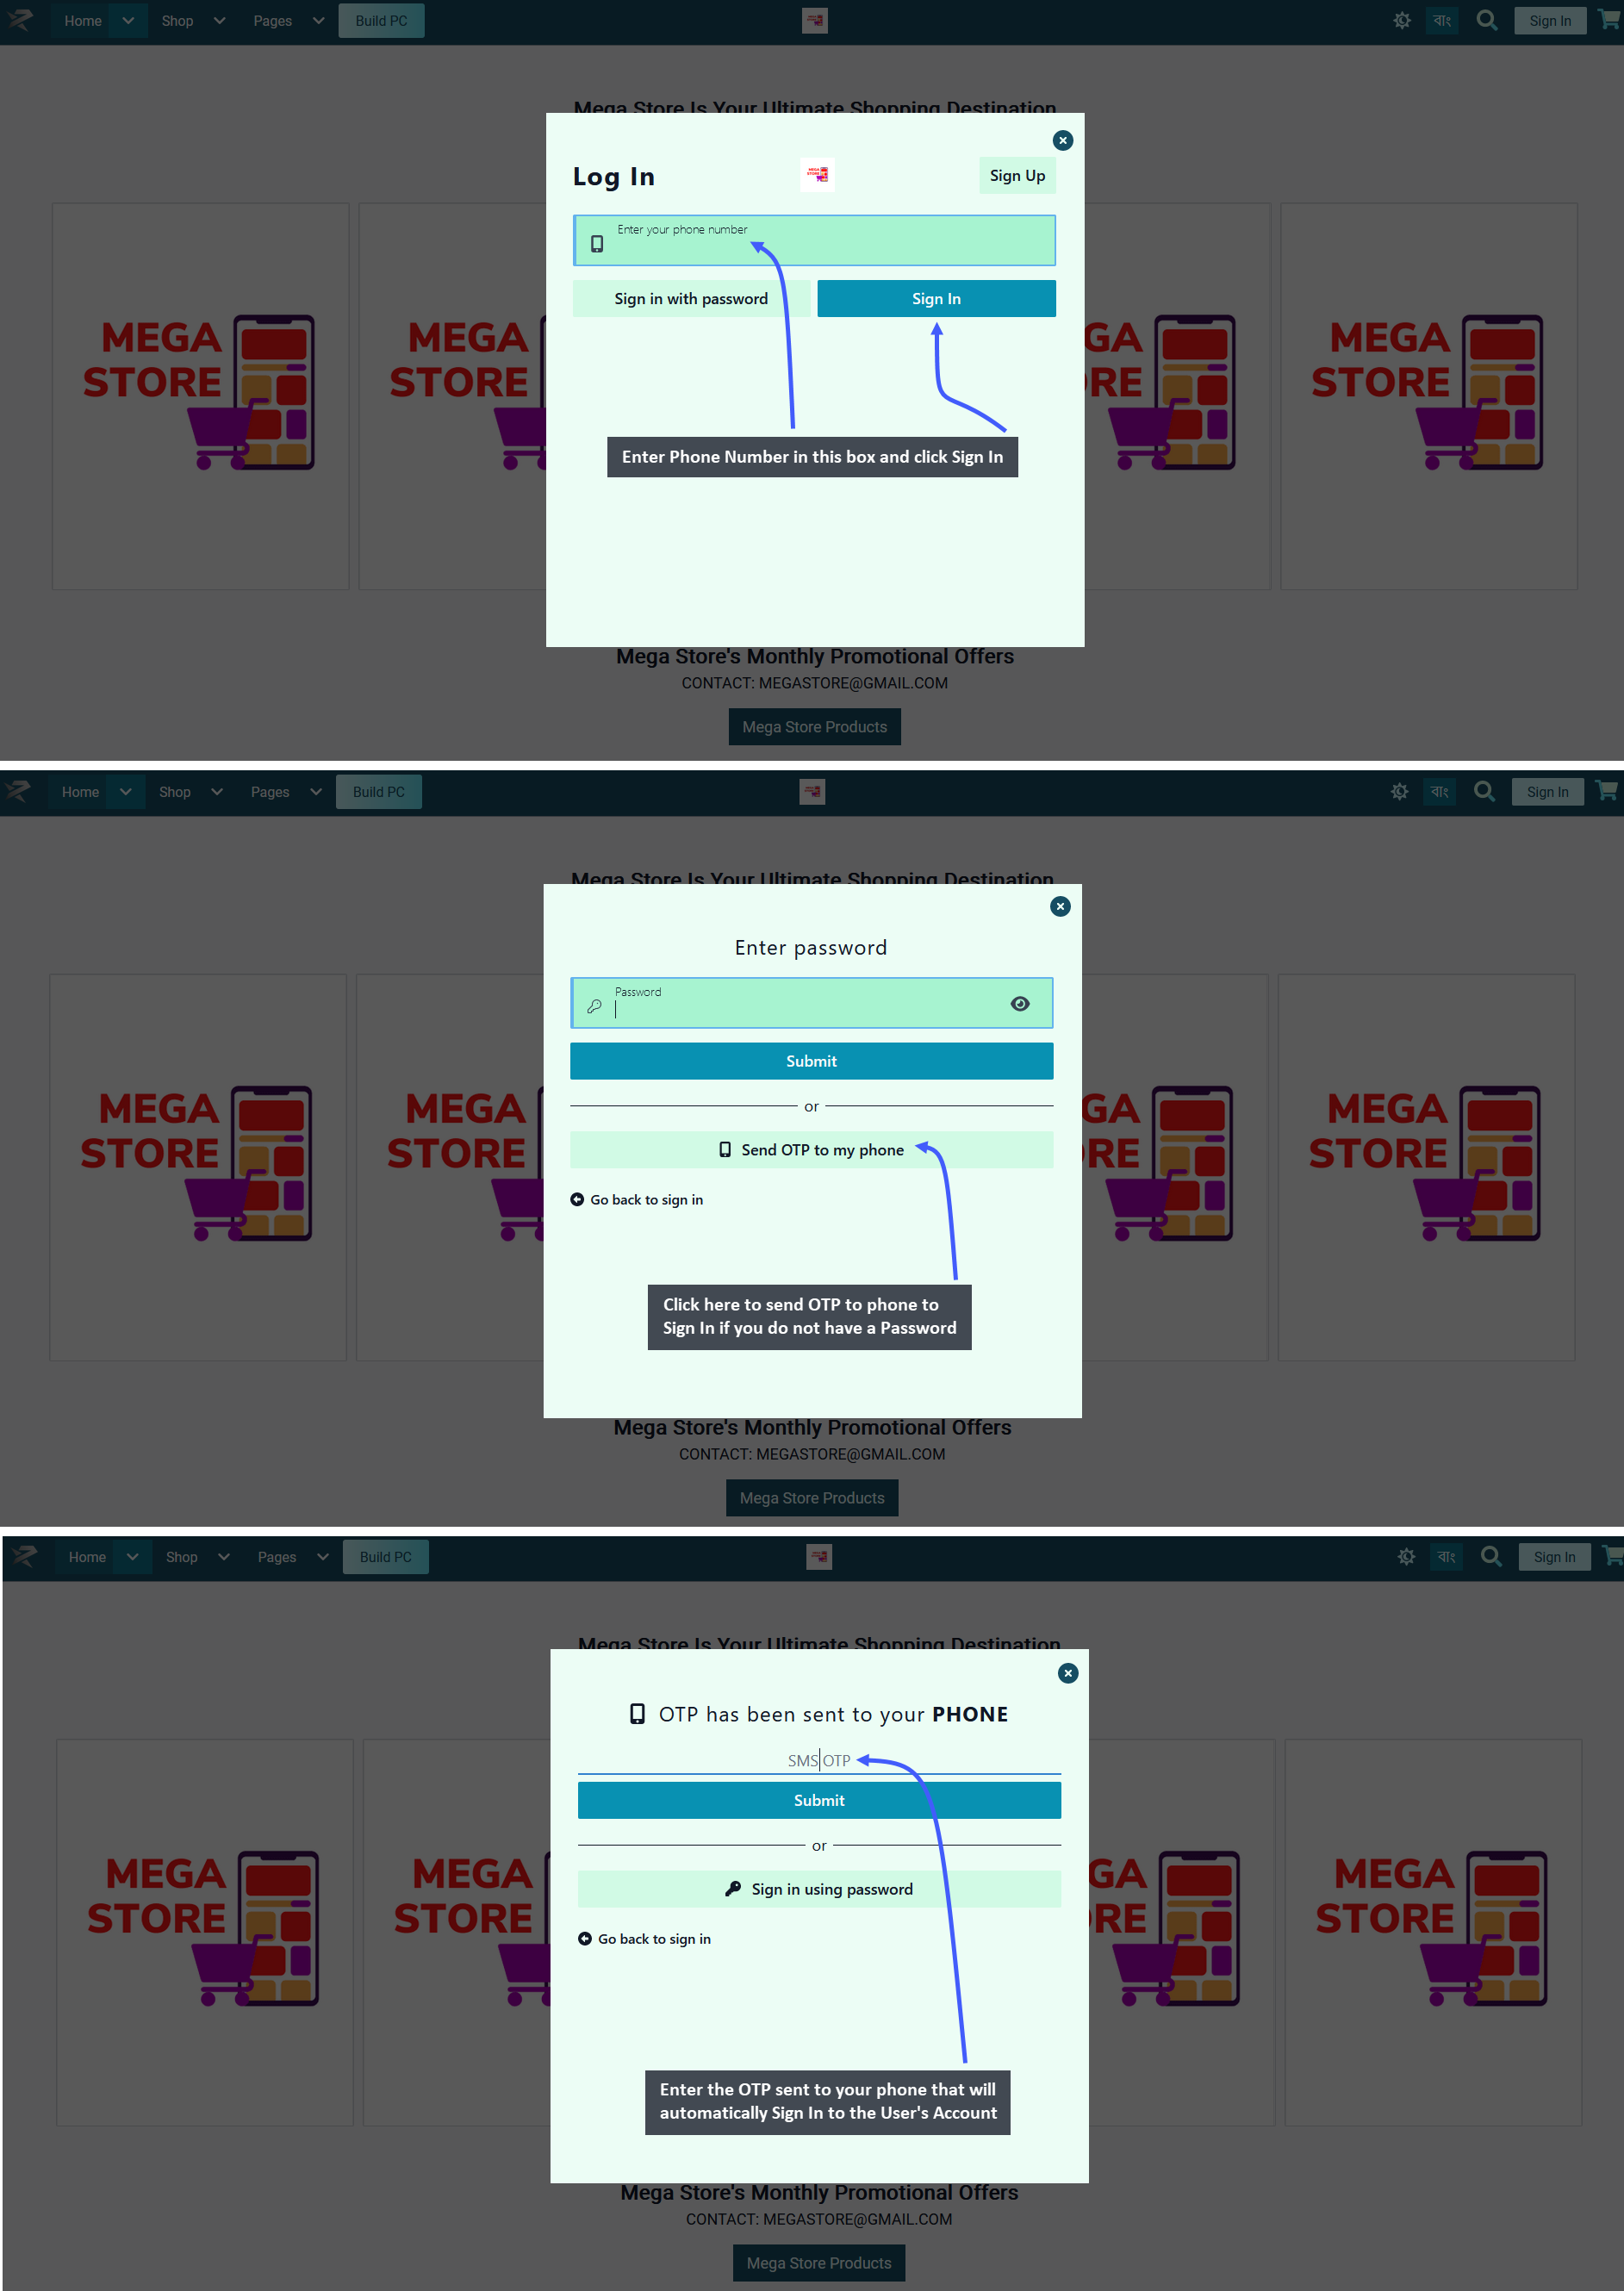
The User Dashboard can be accessed from thr top right corner of The Website. Click on the dropdown V icon to open the list of User Dashboard shortcuts. The first option in the Dashboard dropdown includes Details which will allow editing User details. The second option includes Addresses from where New Addresses can be created and existing addresses can be edited.
The third option includes Orders from where all current and previous Orders can be be viewed. There is also a an option for Wishlist which will be added soon. Finally, there is a Sign Out button at the very bottom using which the User can sign out from The Website. The rest of the features will be discussed below.

There are some shortcuts on the header of The Website. On the left side, there is the Home tab first, clicking on which will recirect to the Main Page. Then, there is the Shop tab, clicking on which will lead to the Products the Shop Owner is selling. The PC Builder tab will provide the benefit of building a PC or get quotation for different components of a PC. There are other Custom tabs beside it to view other Pages.
On the very right, there is a Cart icon, clicking on which will expand and display added Products to Cart. Beside it, is the dropdown shortcut to User dashboard. In the middle, there is a sun icon using which the User can change The Website theme to Light or Dark. Next to it, is the icon to switch Language from Bengali to English. Beside it, is a shortcut search bar, clicking on which will lead to the large Product Search box on any Page.
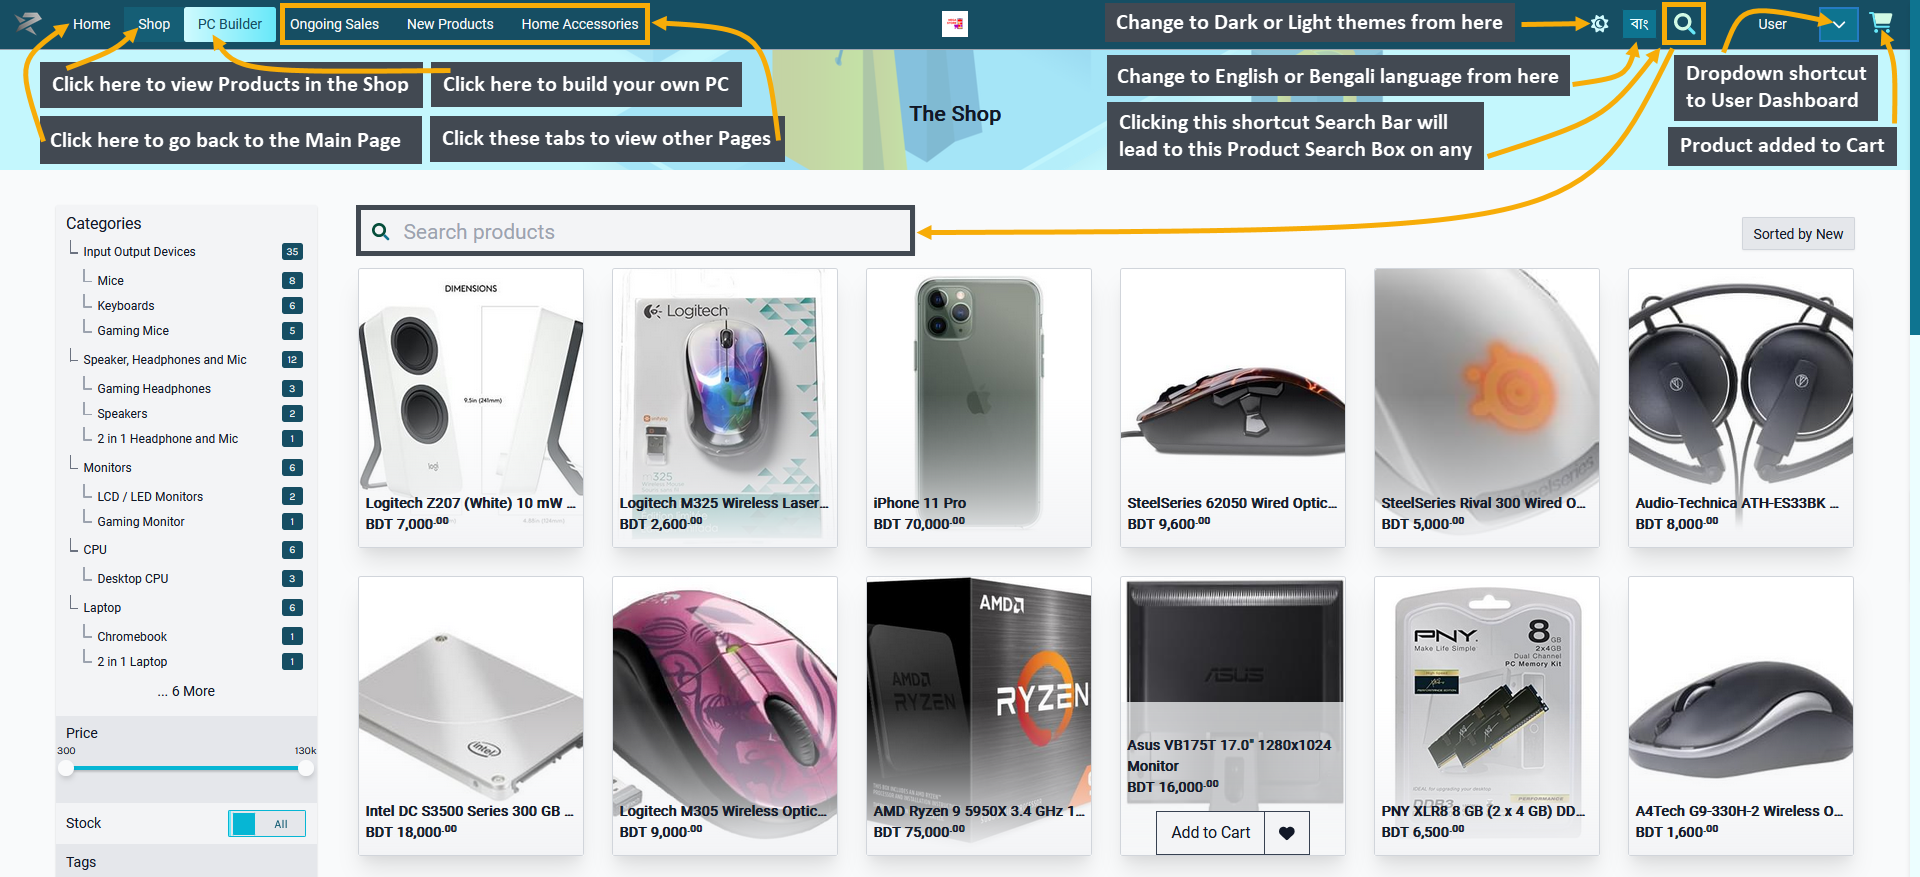
Customer Dashboard Details
Clicking on the User tab will redirect to a Page with four User modules of Profile, Orders, Addresses, and Ledger.

The first option to the dropdown shortcut to User dashboard is Details. Clicking on it will redirect to a Page from where the Customer can edit User information like Phone Number, Email, Name and change Password. On the left hand side, there are Addresses, Orders and Ledger options clicking on which will allow Customer to edit their addresses, view all their Orders, and Ledger transactions.

Customer Addresses
The second option from the dropdown shortcut for User dashboard is Addresses. The Customer can view and edit their different labeled addresses like Home, Office, or Work. Using the + Add New Address button, they can add a new address, clicking on which will open the form to fill-out a new address as shown below.

Image 1: Customer can view and edit their already existing labelled addresses from the Addresses Menu.
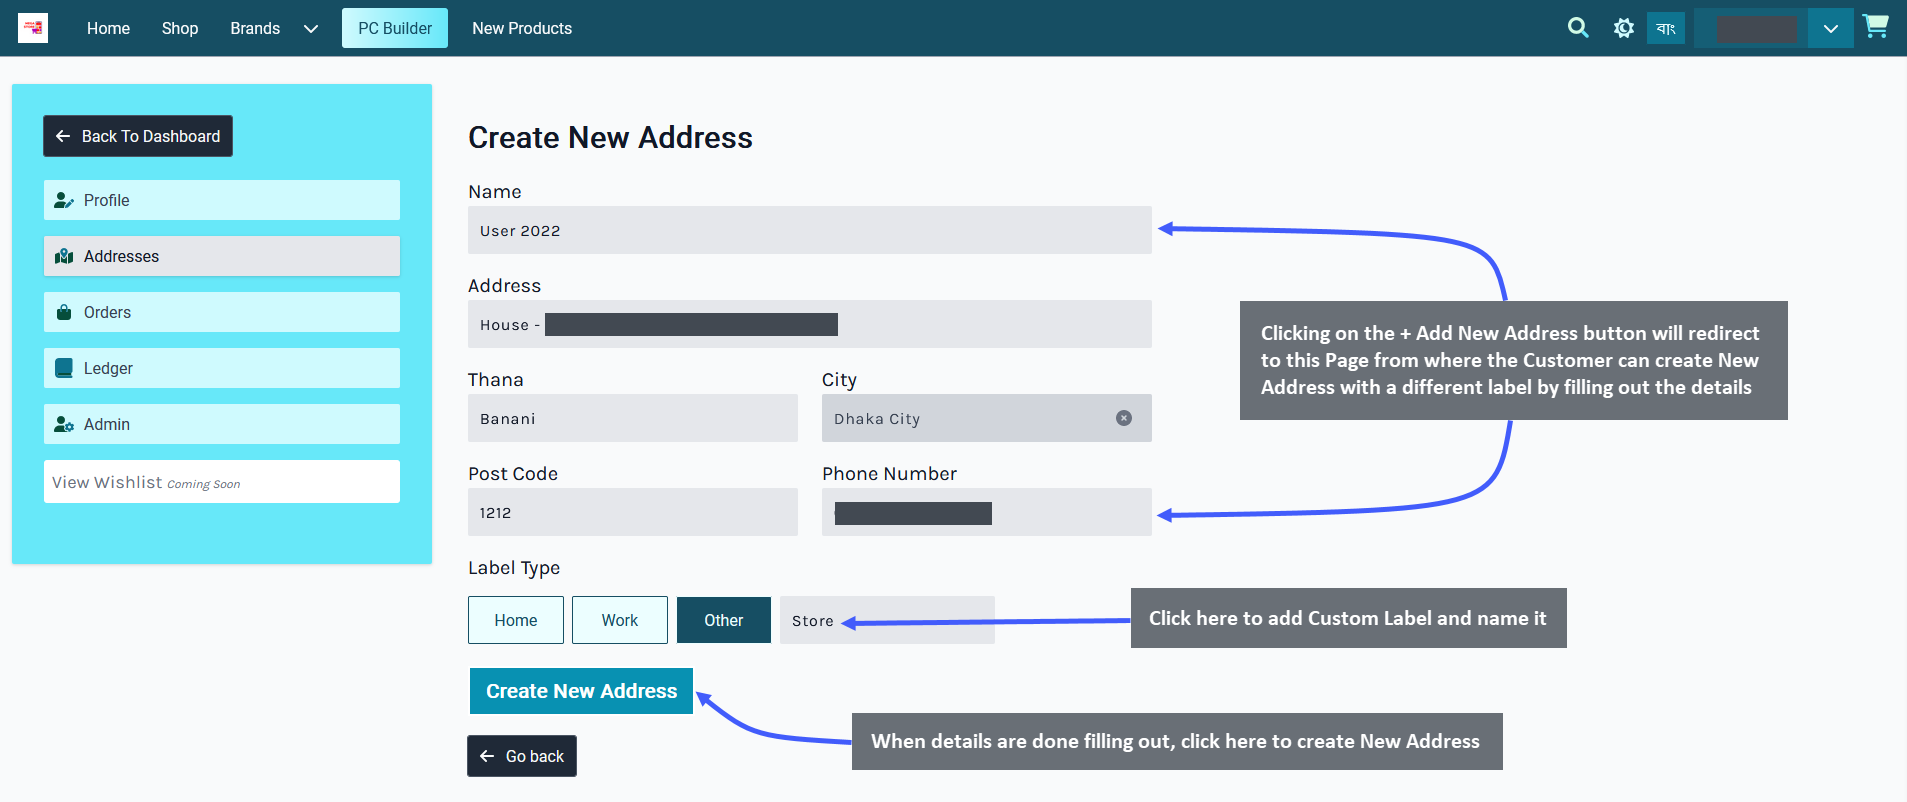
Image 2: Customer can create New Address by clicking on the + Add New Address button.

Image 3: The newly created Address will show first and be set as default which can be changed.
Customer Orders
The third option to the dropdown shortcut to User dashboard is Orders. From here, the Customer can check their previous and current Orders with details of Order Date, Order Total, and Order Status. Click the toggle button for Pending Orders Only to view only the Pending Orders. There is also a Refresh button to refresh the Order List.
By clicking on Order Again button, the Customer can place same Order with same Products and quantities. If any Order remains Payment pending, then Customer can pay it using the Pay Now button.
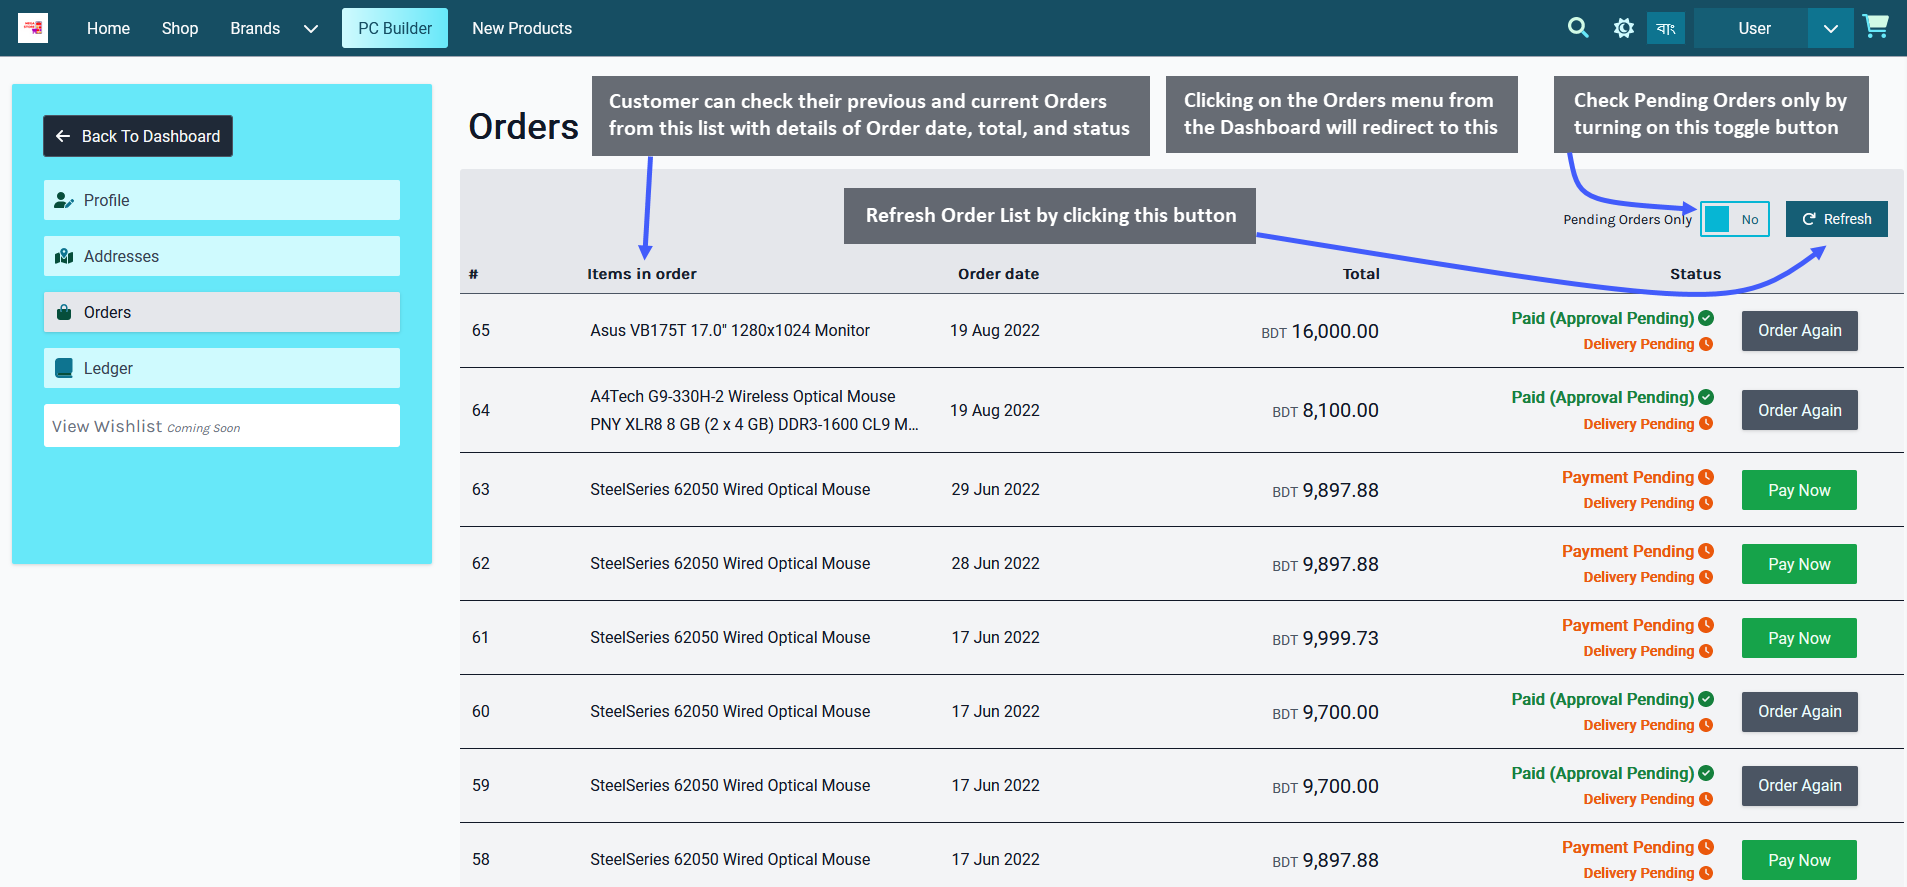
Image 1: Customer can view and edit their already existing Orders from the Orders Menu.
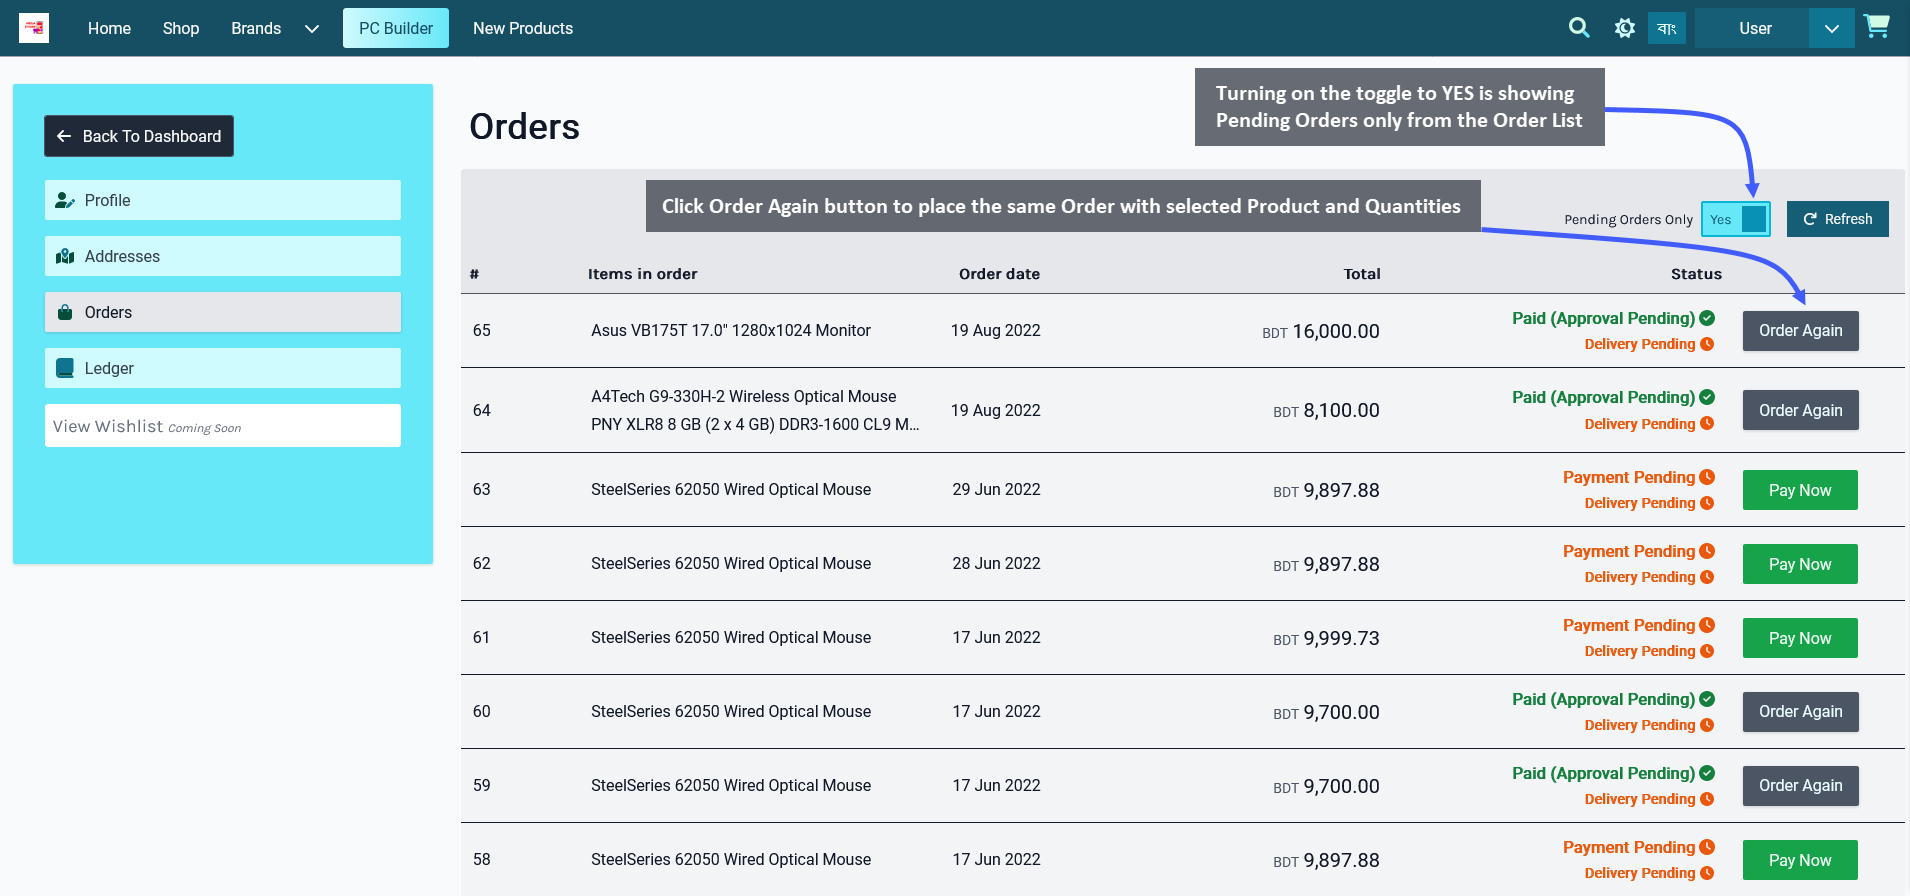
Image 2: Customer can view only Pending Orders from the list by turning on the toggle button.
Customer Ledger
The fourth option to the dropdown shortcut to User dashboard is Ledger where Customer can check their weekly and monthly transaction details of purchases from the Shop Owner. All Product purchases by the Customer from Shop Owner using different payment methods will show up within this Ledger section. However, the Shop Owner will have to give Customer the permission of Allowed to View Ledger first, only then they will be able to see Ledger.
Within the Ledger section, Customer can select 7 days, 30 days, 90 days, 180 days, and also Custom timeframe to check their purchase transaction details. Click View button to see Order details of each Ledger transaction.
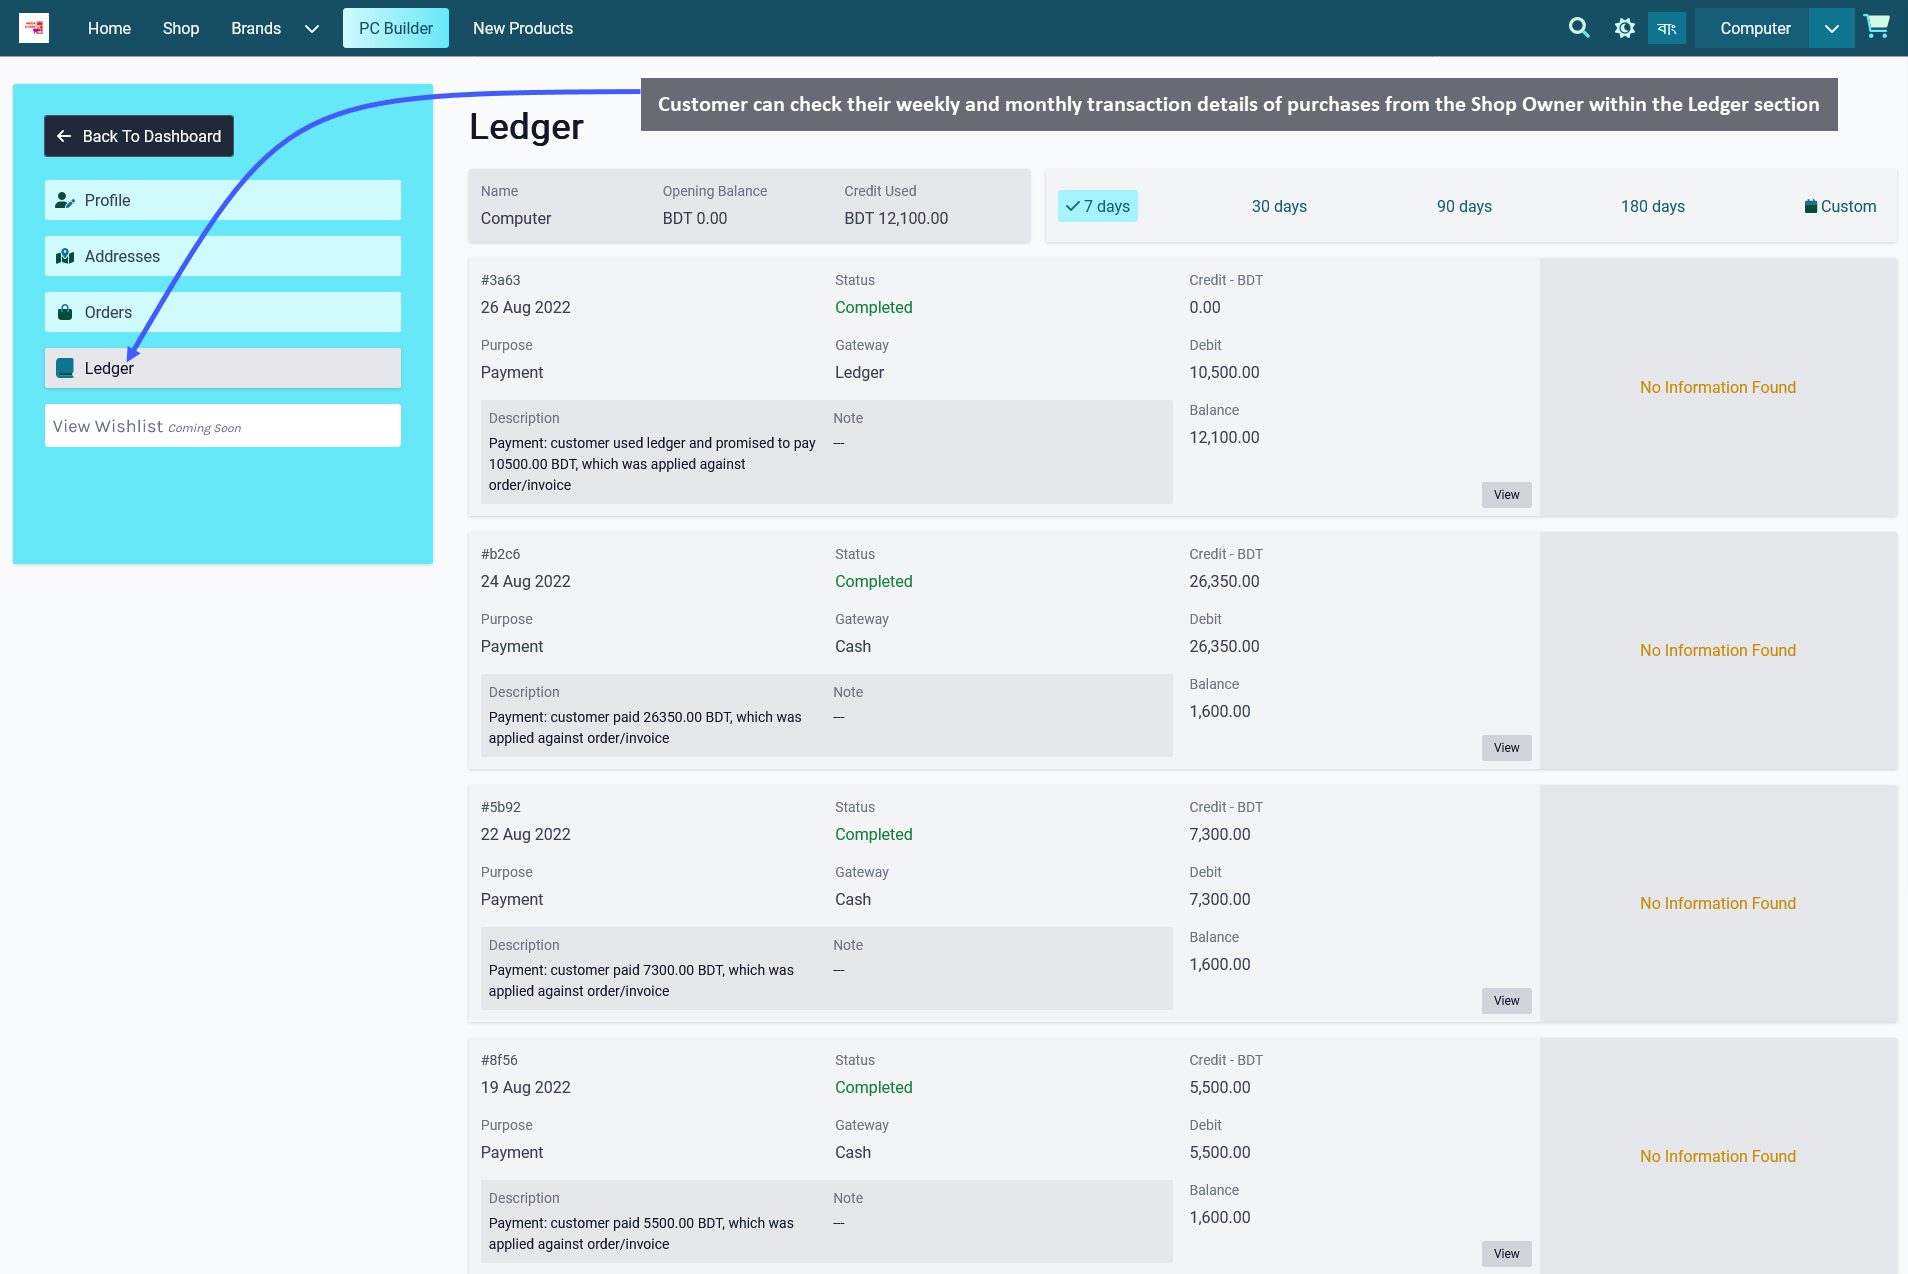
Image 1: Customer can view their weekly and monthly transaction details of purchases on Ledger Section.
Different Payment Methods
After adding Products to Cart and checking out, the Customer can choose to make the Order’s payment using different Payment Methods
Place Order with Cash Payment
Customer can order Products by clicking on The Shop tab where Products will be available based on Categories and Brands. Click on the Add to Cart button to add any Product to Cart. After adding Products to Cart, the mini pop-up Product Cart will be visible on the right side of the screen, clicking on which will expand full Product Cart.
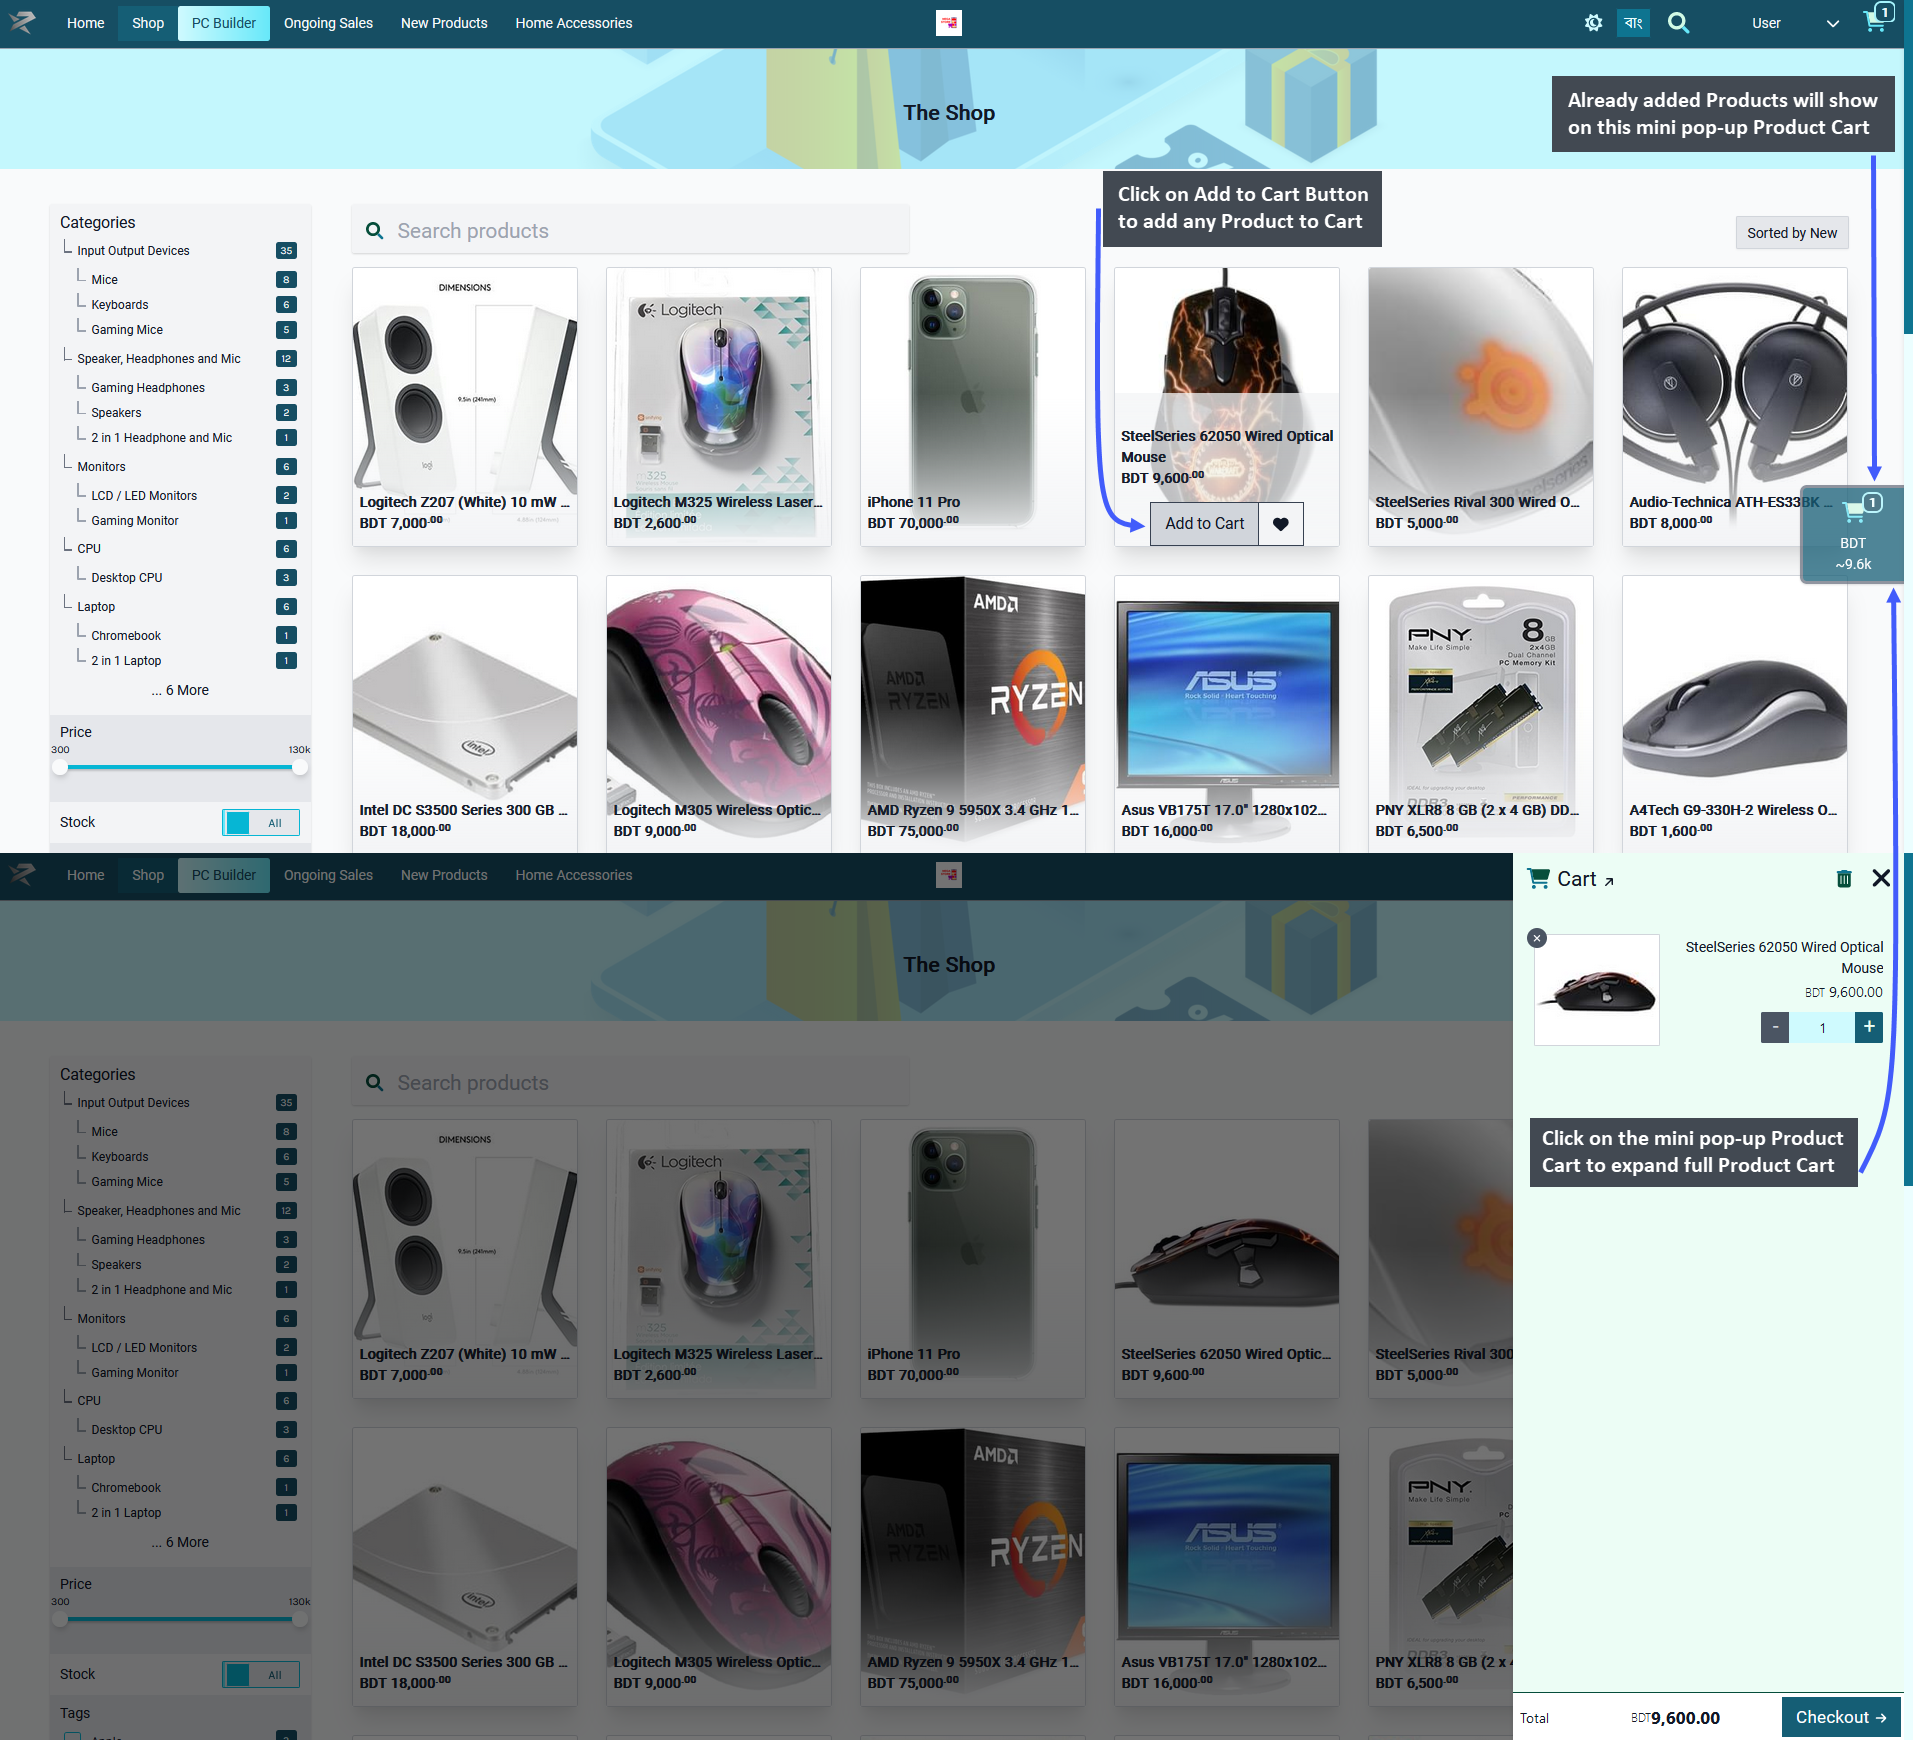
Add Billing and Shipping Address
Clicking the Checkout button will redirect to the Checkout Page, where Customer can add New Address to their profile from Change or Create Address dropdown menu. They can add separate Billing and Shipping addresses.
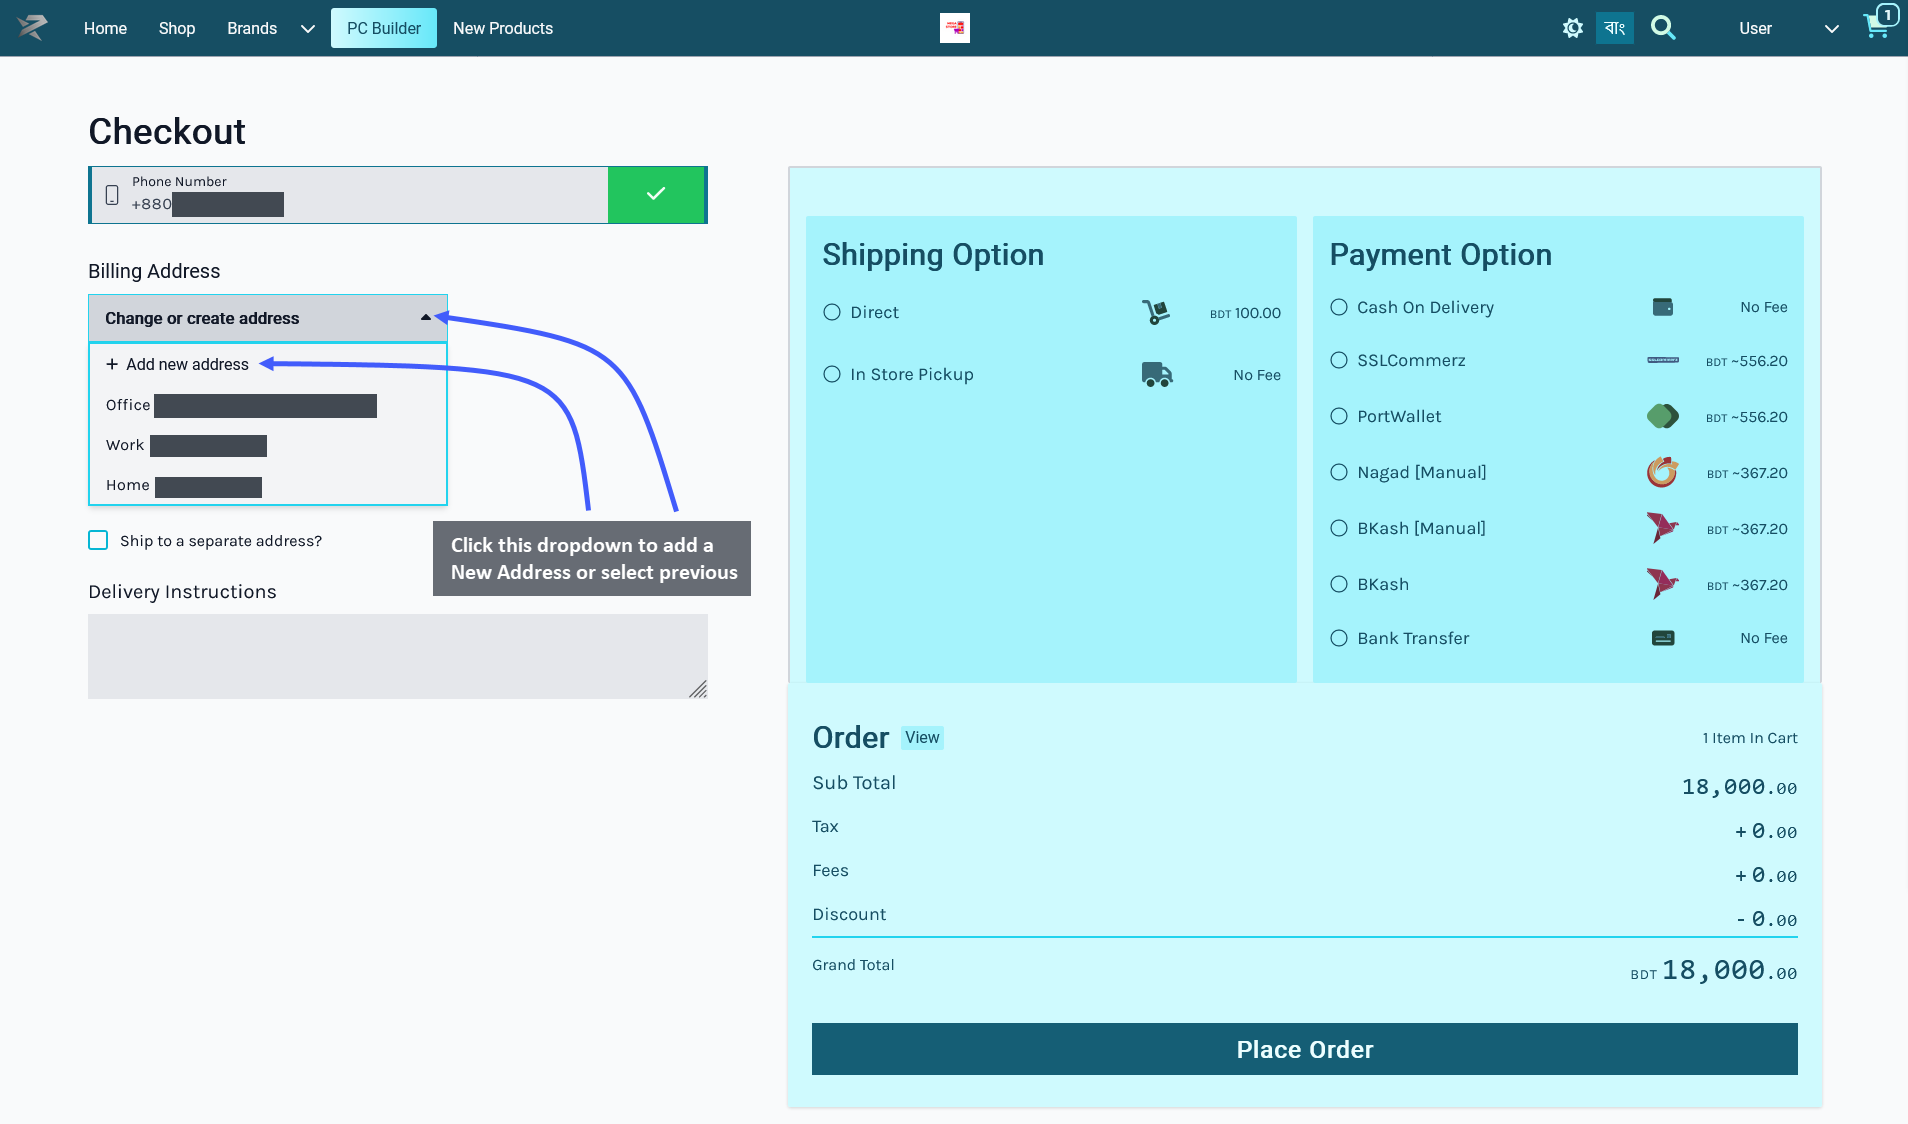
Clicking here will open a Billing Address field to fill out with name, address line, thana, city, postcode, and phone number. Select the Label Type for address as Home, Work, or Other (with custom labels like warehouse, mailbox, or shop etc). To add a different Shipping Address, check the box Ship to separate address that will open a separate field to fill out address details.
Then, select the preferred Shipping option based on home delivery on in-store pickup by the Customer. Delivery instructions can be added if needed. Select Cash on Delivery as payment option and click on Place Order button to complete Order. Any Product tax, fees, or discounts will be visible in the Order Grant Total.
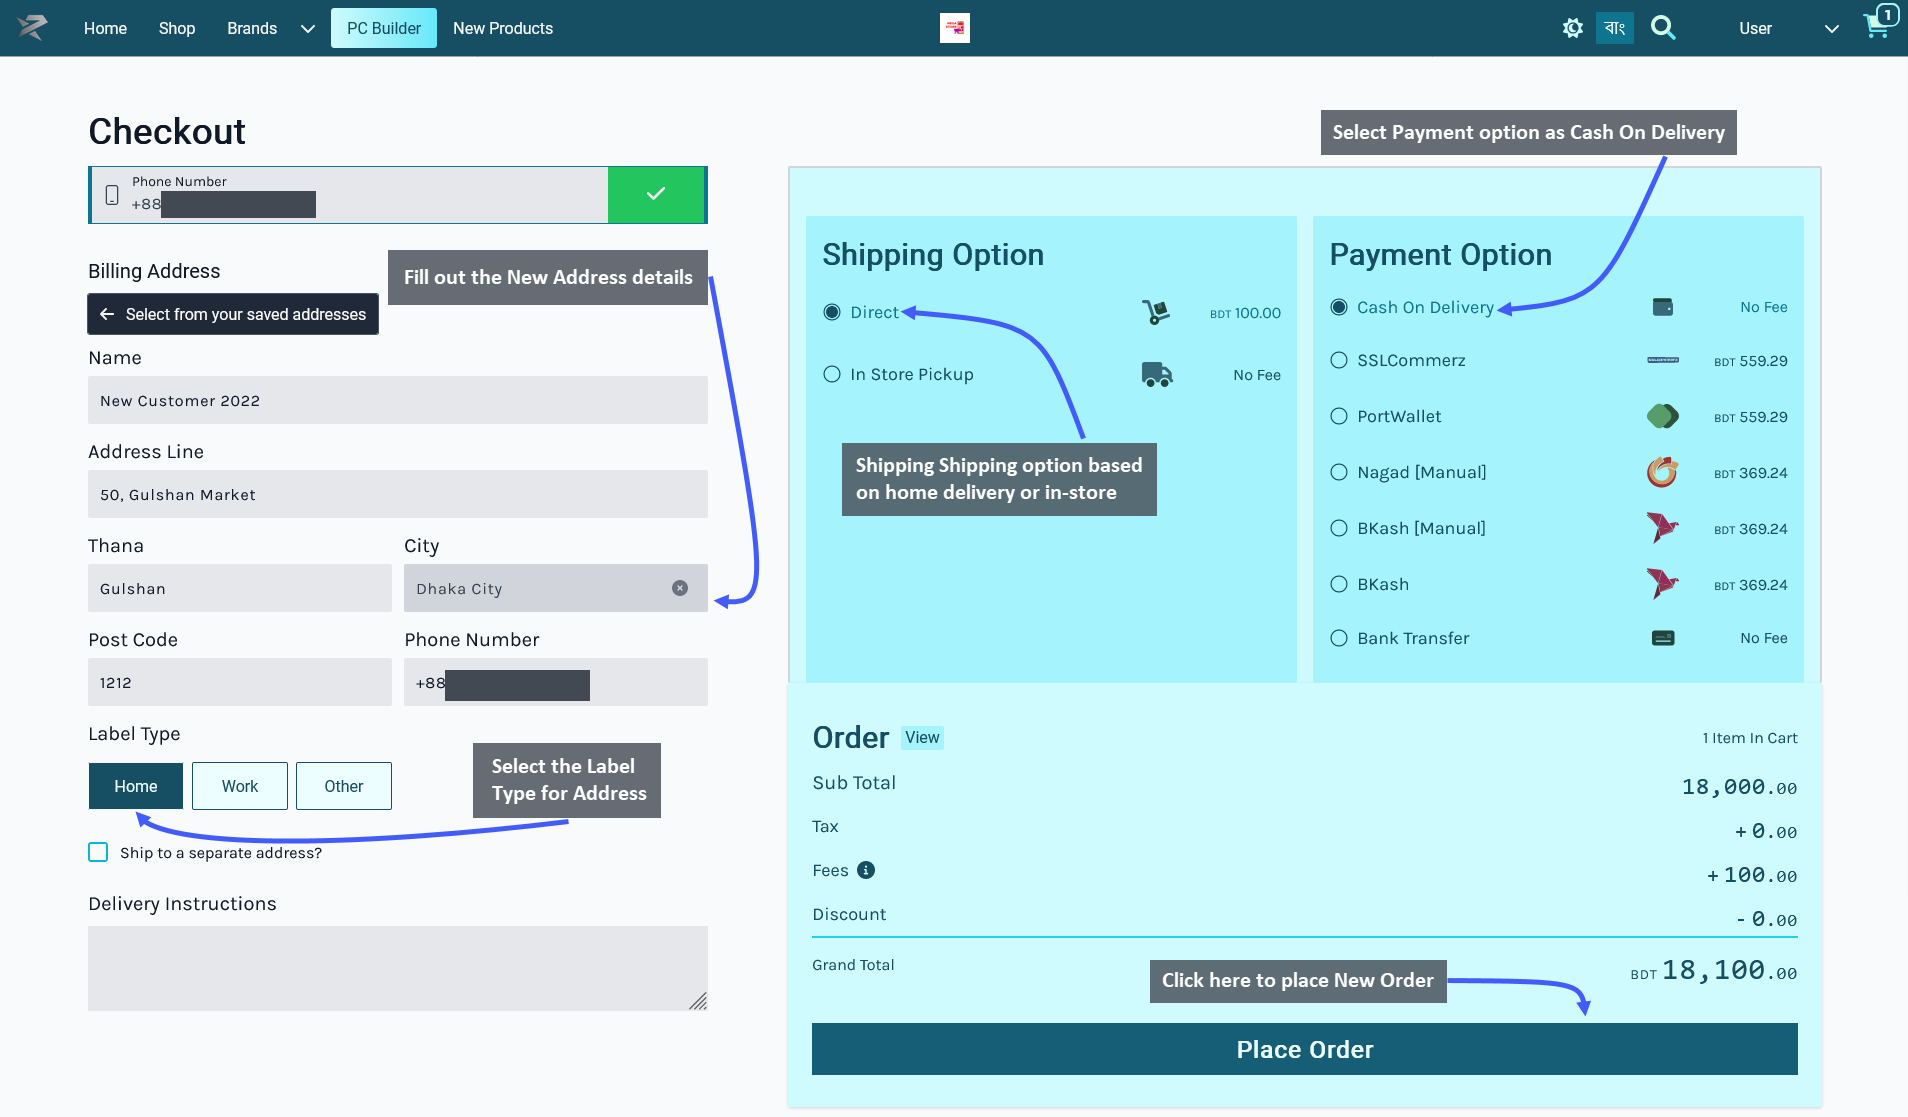
Order Confirmation and Print Invoice
After Order confirmation, the invoice will show the Order details with Customer’s Billing and Shipping addresses. Click the Print Invoice button to have the invoice printed out for future references. To view previous and current Orders, click the View all Orders button, click the Shop button to go to Shop, and click Home to go to main page.
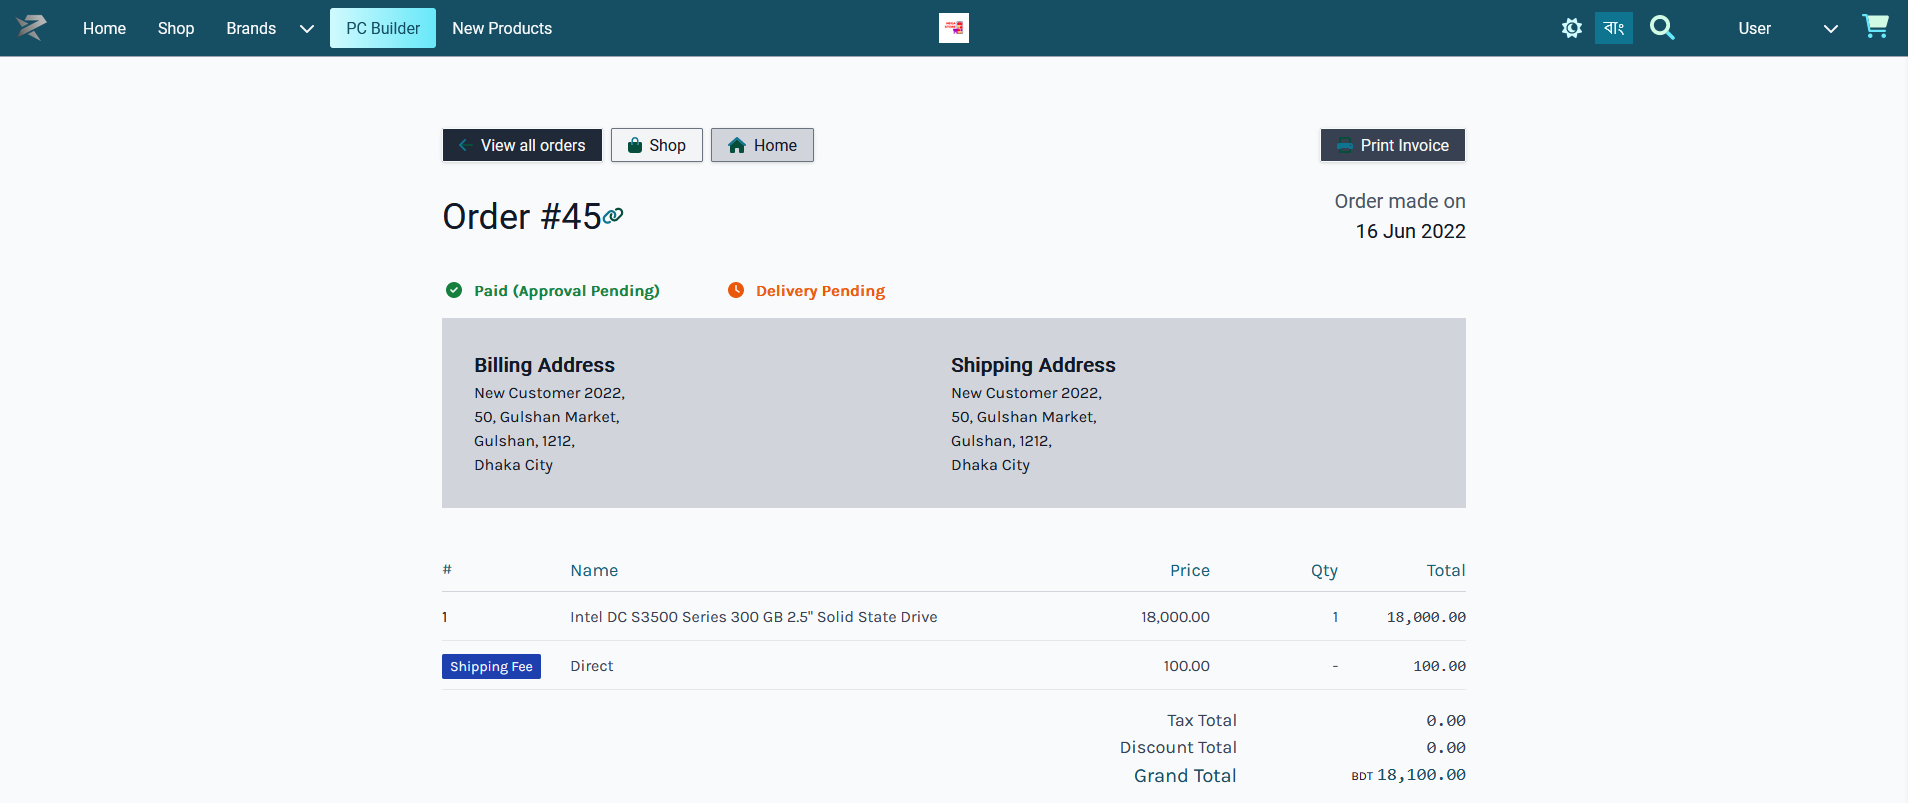
Place Order with SSLCommerz Payment
Customer can order Products by clicking on The Shop tab where Products will be available based on Categories and Brands. Click on the Add to Cart button to add any Product to Cart. After adding Products to Cart, the mini pop-up Product Cart will be visible on the right side of the screen, clicking on which will expand full Product Cart.

Go to the Checkout Page by clicking the Checkout button. From here, select the preferred Shipping option based on home delivery on in-store pickup by the Customer. The already saved Billing Address will automatically be used as the Customer’s Shipping Address. To add a different Shipping Address, check the box Ship to separate address that will provide a separate field to fill out address details.
Delivery instructions can be added if needed. Select SSLCommerz as payment option and click the Place Order button to complete Order. Any Product tax, fees, or discounts will be visible in the Order Grant Total.
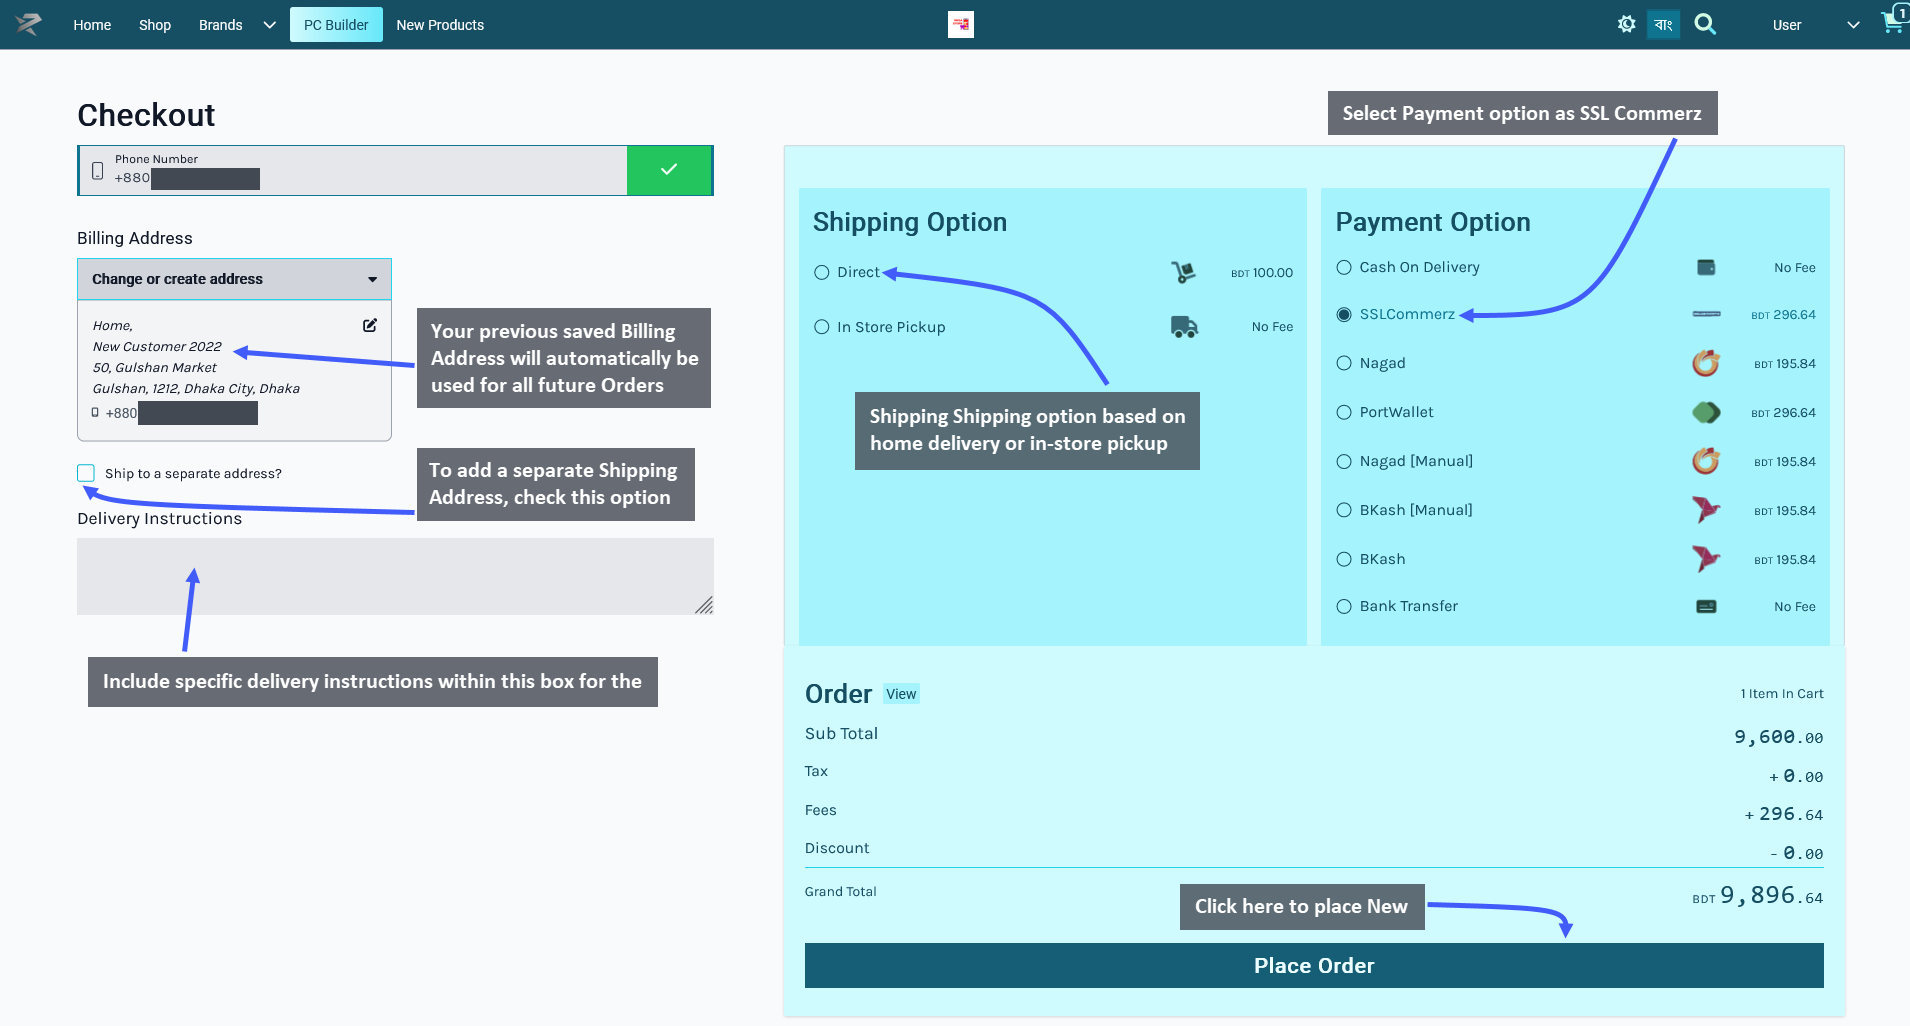
Making Payment with SSLCommerz
After clicking on the Place Order button, the Customer will be redirected to the SSLCommerz payment portal. Now, click the Pay now BDT ____ to proceed with the payment via SSLCommerz.
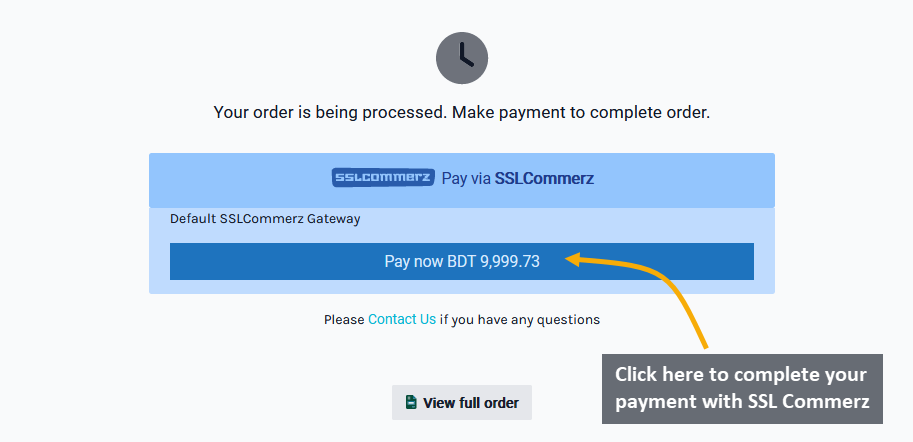
The next page will initiate SSLCommerz payment via Cards, where the Customer will have to fill out their Card Number, expiration date, CVV, and Name and click on Pay ____ BDT. In the following OTP Page, fill out the OTP sent to your phone and click Success. This will confirm the Order and redirect to the Order Confirmation Page.
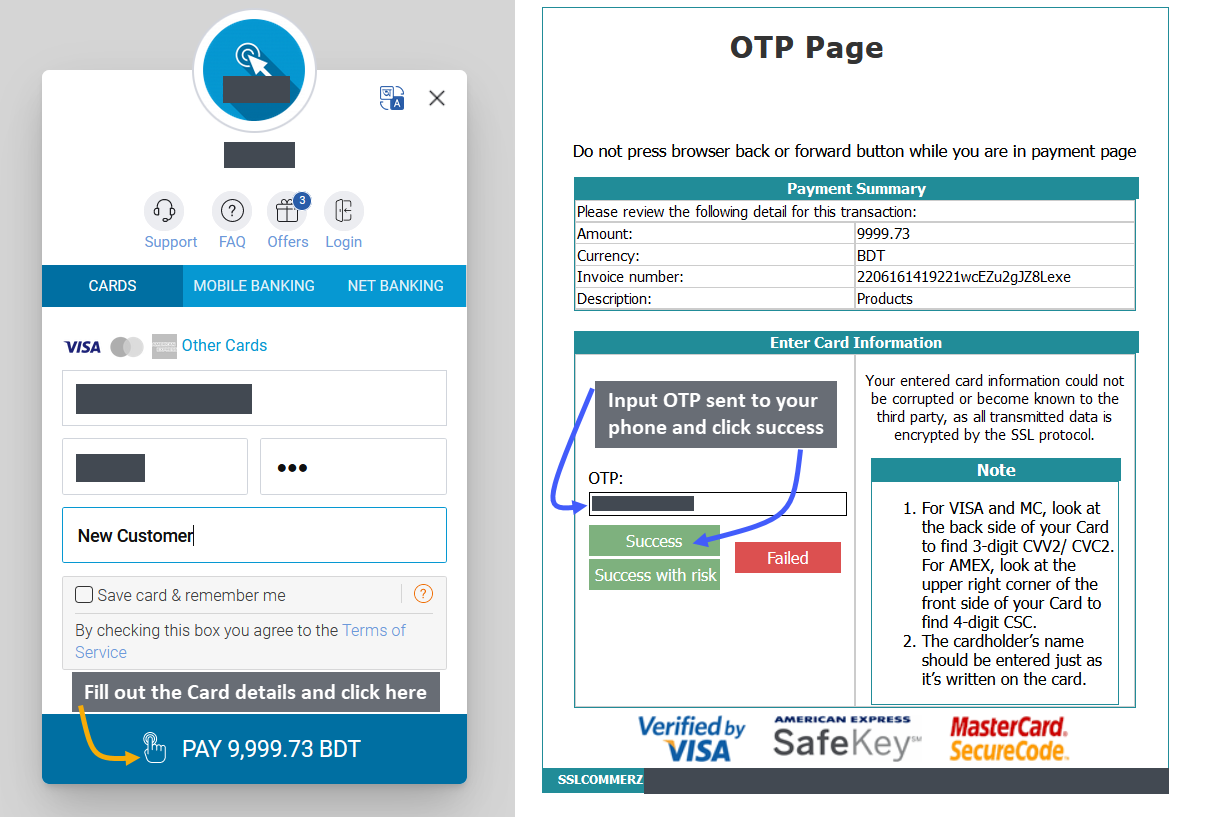
Order Confirmation and Print Invoice
After Order confirmation, the invoice will show the Order details with Customer’s Billing and Shipping addresses. Click the Print Invoice button to have the invoice printed out for future references. To view previous and current Orders, click the View all Orders button, click the Shop button to go to Shop, and click Home to go to main page.
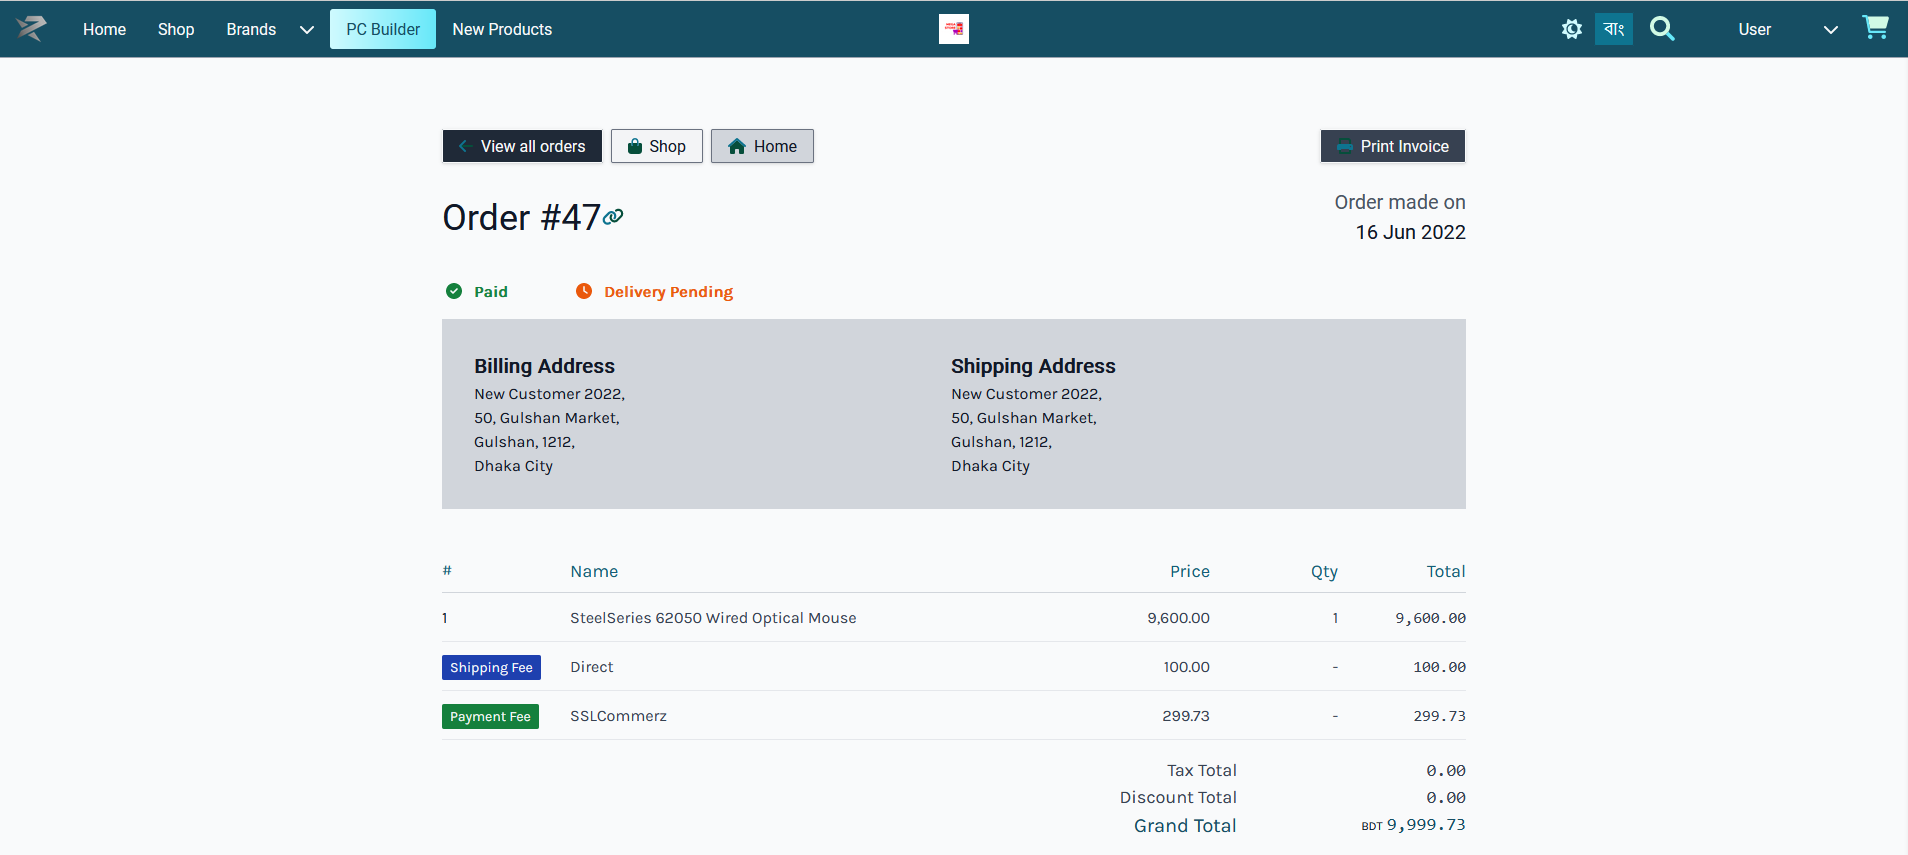
Place Order with Nagad Payment
Customer can order Products by clicking on The Shop tab where Products will be available based on Categories and Brands. Click on the Add to Cart button to add any Product to Cart. After adding Products to Cart, the mini pop-up Product Cart will be visible on the right side of the screen, clicking on which will expand full Product Cart.

Go to the Checkout Page by clicking the Checkout button. From here, select the preferred Shipping option based on home delivery on in-store pickup by the Customer. The already saved Billing Address will automatically be used as the Customer’s Shipping Address. To add a different Shipping Address, check the box Ship to separate address that will provide a separate field to fill out address details.
Delivery instructions can be added if needed. Select Nagad as payment option and click the Place Order button to complete Order. Any Product tax, fees, or discounts will be visible in the Order Grant Total.
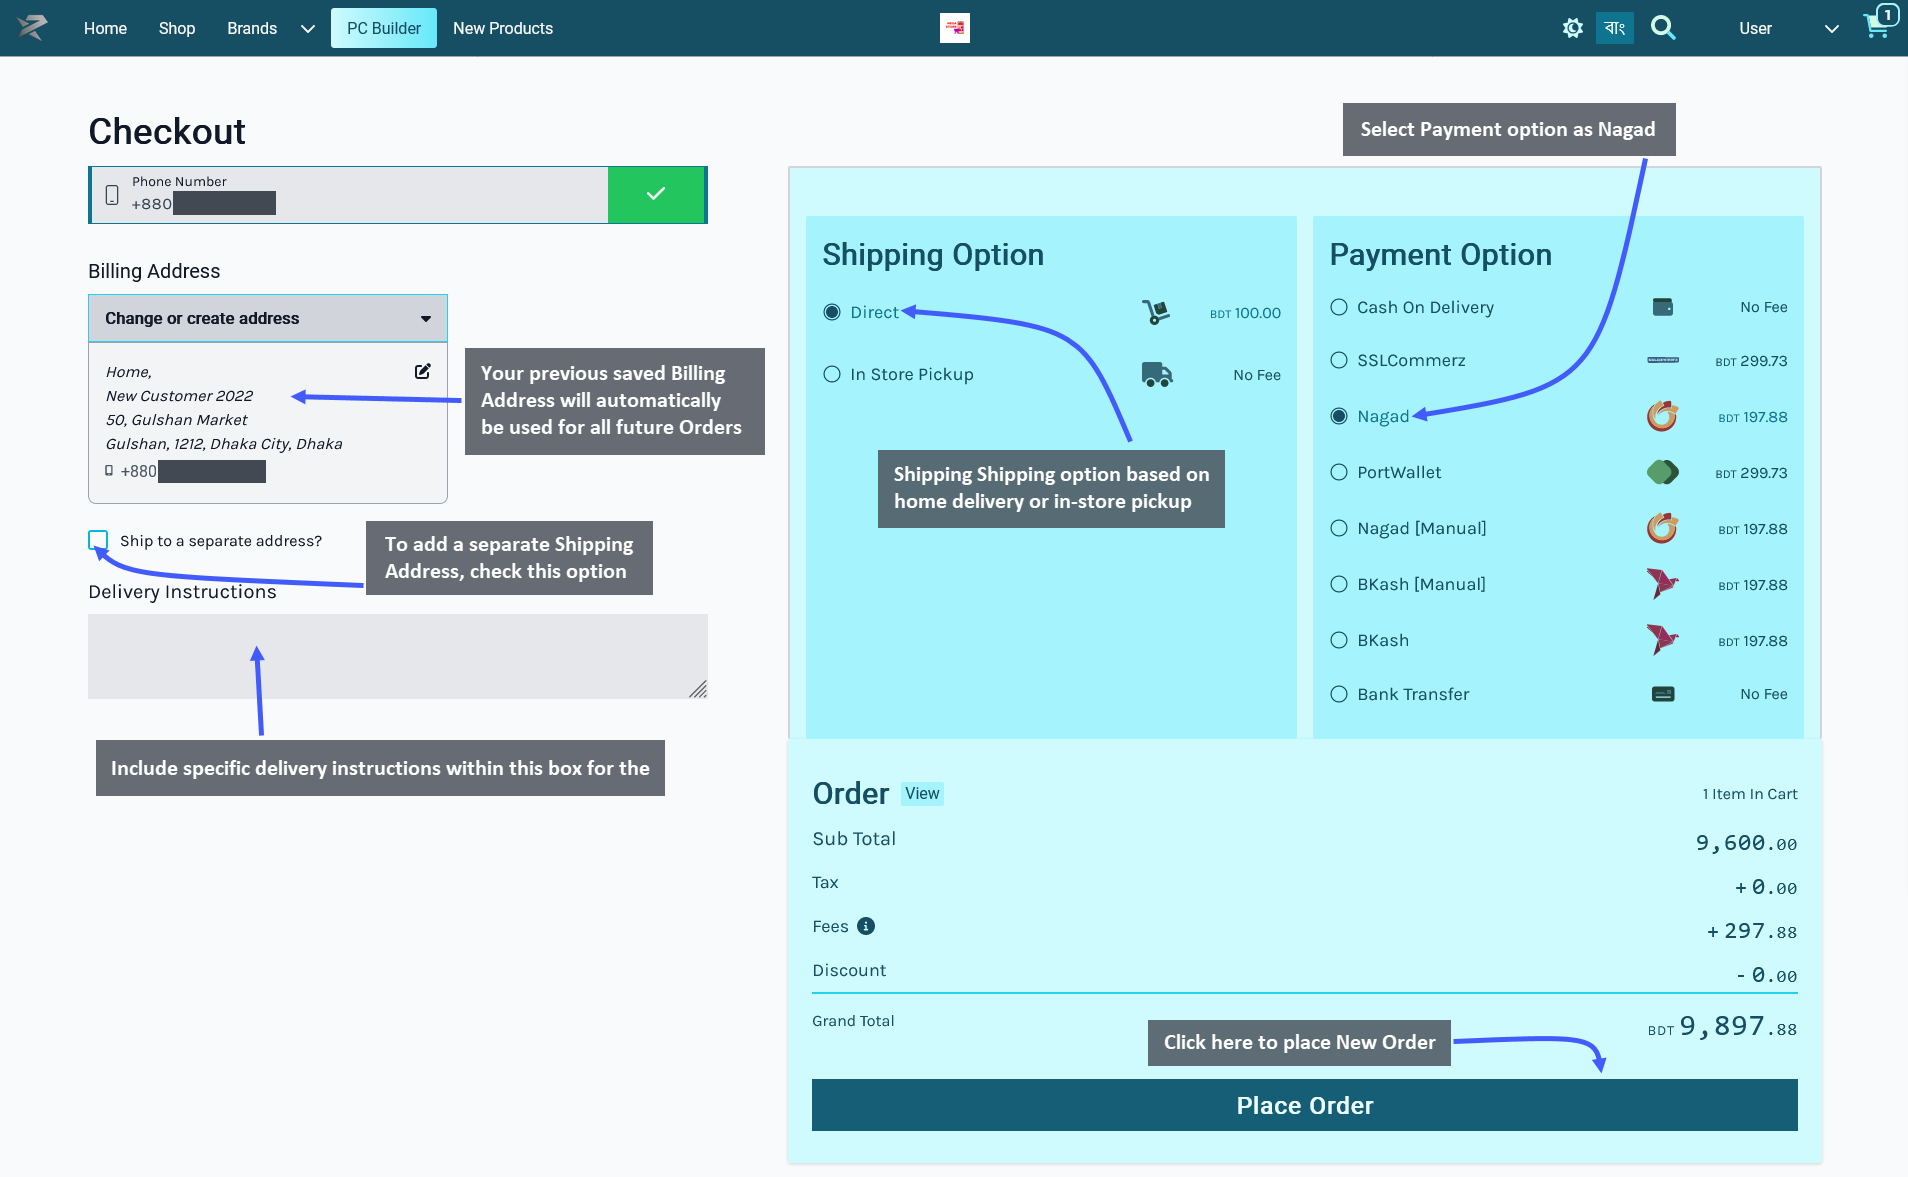
Making Payment with Nagad
After clicking on the Place Order button, the Customer will be redirected to the Nagad payment portal. Now, click the Pay now BDT ____ to proceed with the payment via Nagad.
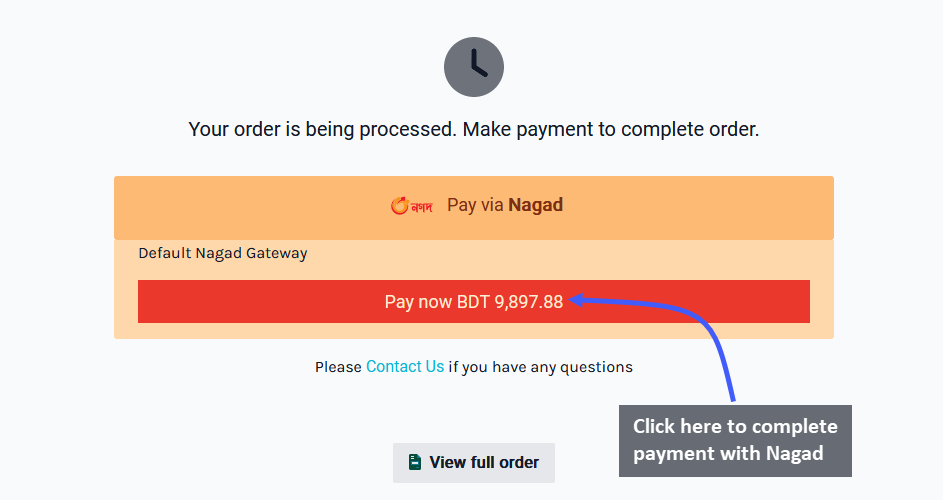
The next page will initiate Nagad payment via the Customer’s Nagad Phone Number. Enter the Nagad Account Number in the given box and click on Proceed to redirect to the payment processing page.
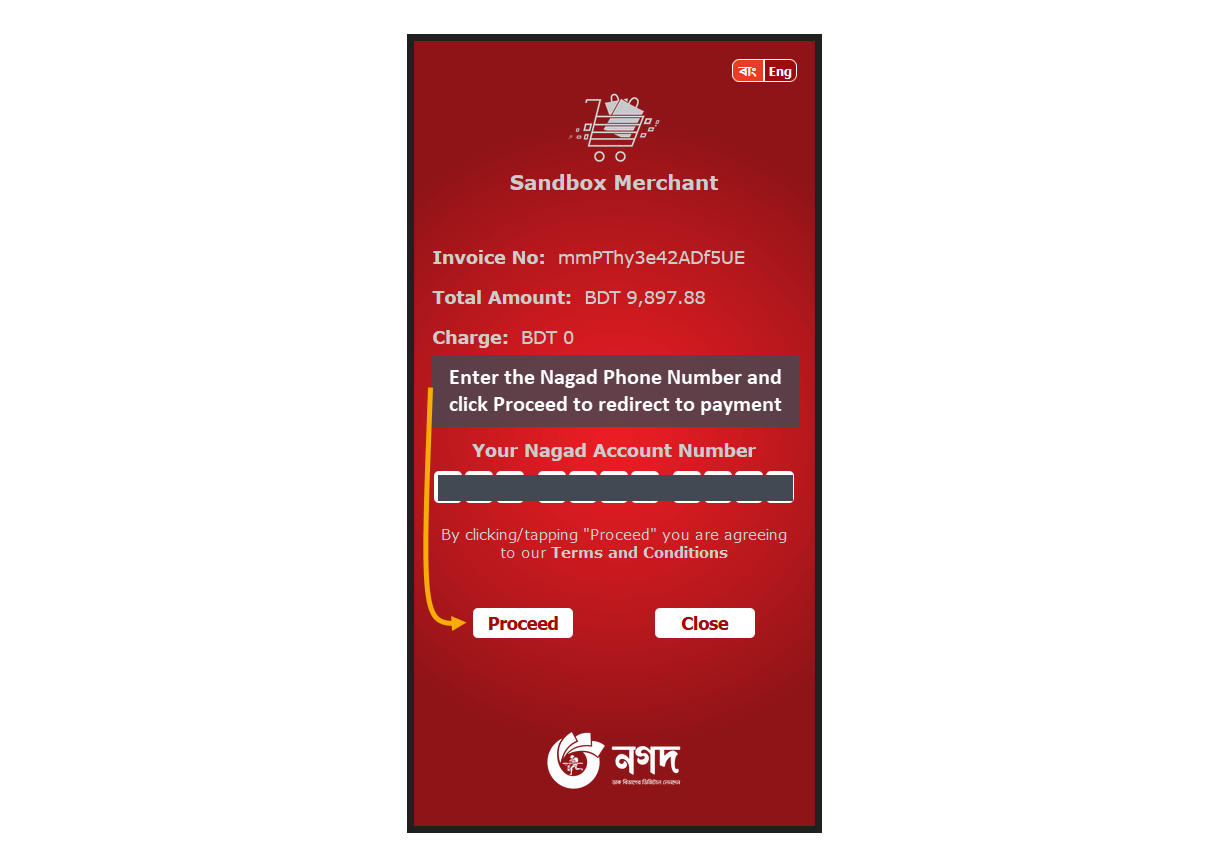
Order Confirmation and Print Invoice
After Order confirmation, the invoice will show the Order details with Customer’s Billing and Shipping addresses. Click the Print Invoice button to have the invoice printed out for future references. To view previous and current Orders, click the View all Orders button, click the Shop button to go to Shop, and click Home to go to main page.
Place Order with PortWallet Payment
Customer can order Products by clicking on The Shop tab where Products will be available based on Categories and Brands. Click on the Add to Cart button to add any Product to Cart. After adding Products to Cart, the mini pop-up Product Cart will be visible on the right side of the screen, clicking on which will expand full Product Cart.

Go to the Checkout Page by clicking the Checkout button. From here, select the preferred Shipping option based on home delivery on in-store pickup by the Customer. The already saved Billing Address will automatically be used as the Customer’s Shipping Address. To add a different Shipping Address, check the box Ship to separate address that will provide a separate field to fill out address details.
Delivery instructions can be added if needed. Select PortWallet as payment option and click Place Order button to complete Order. Any Product tax, fees, or discounts will be visible in the Order Grant Total.
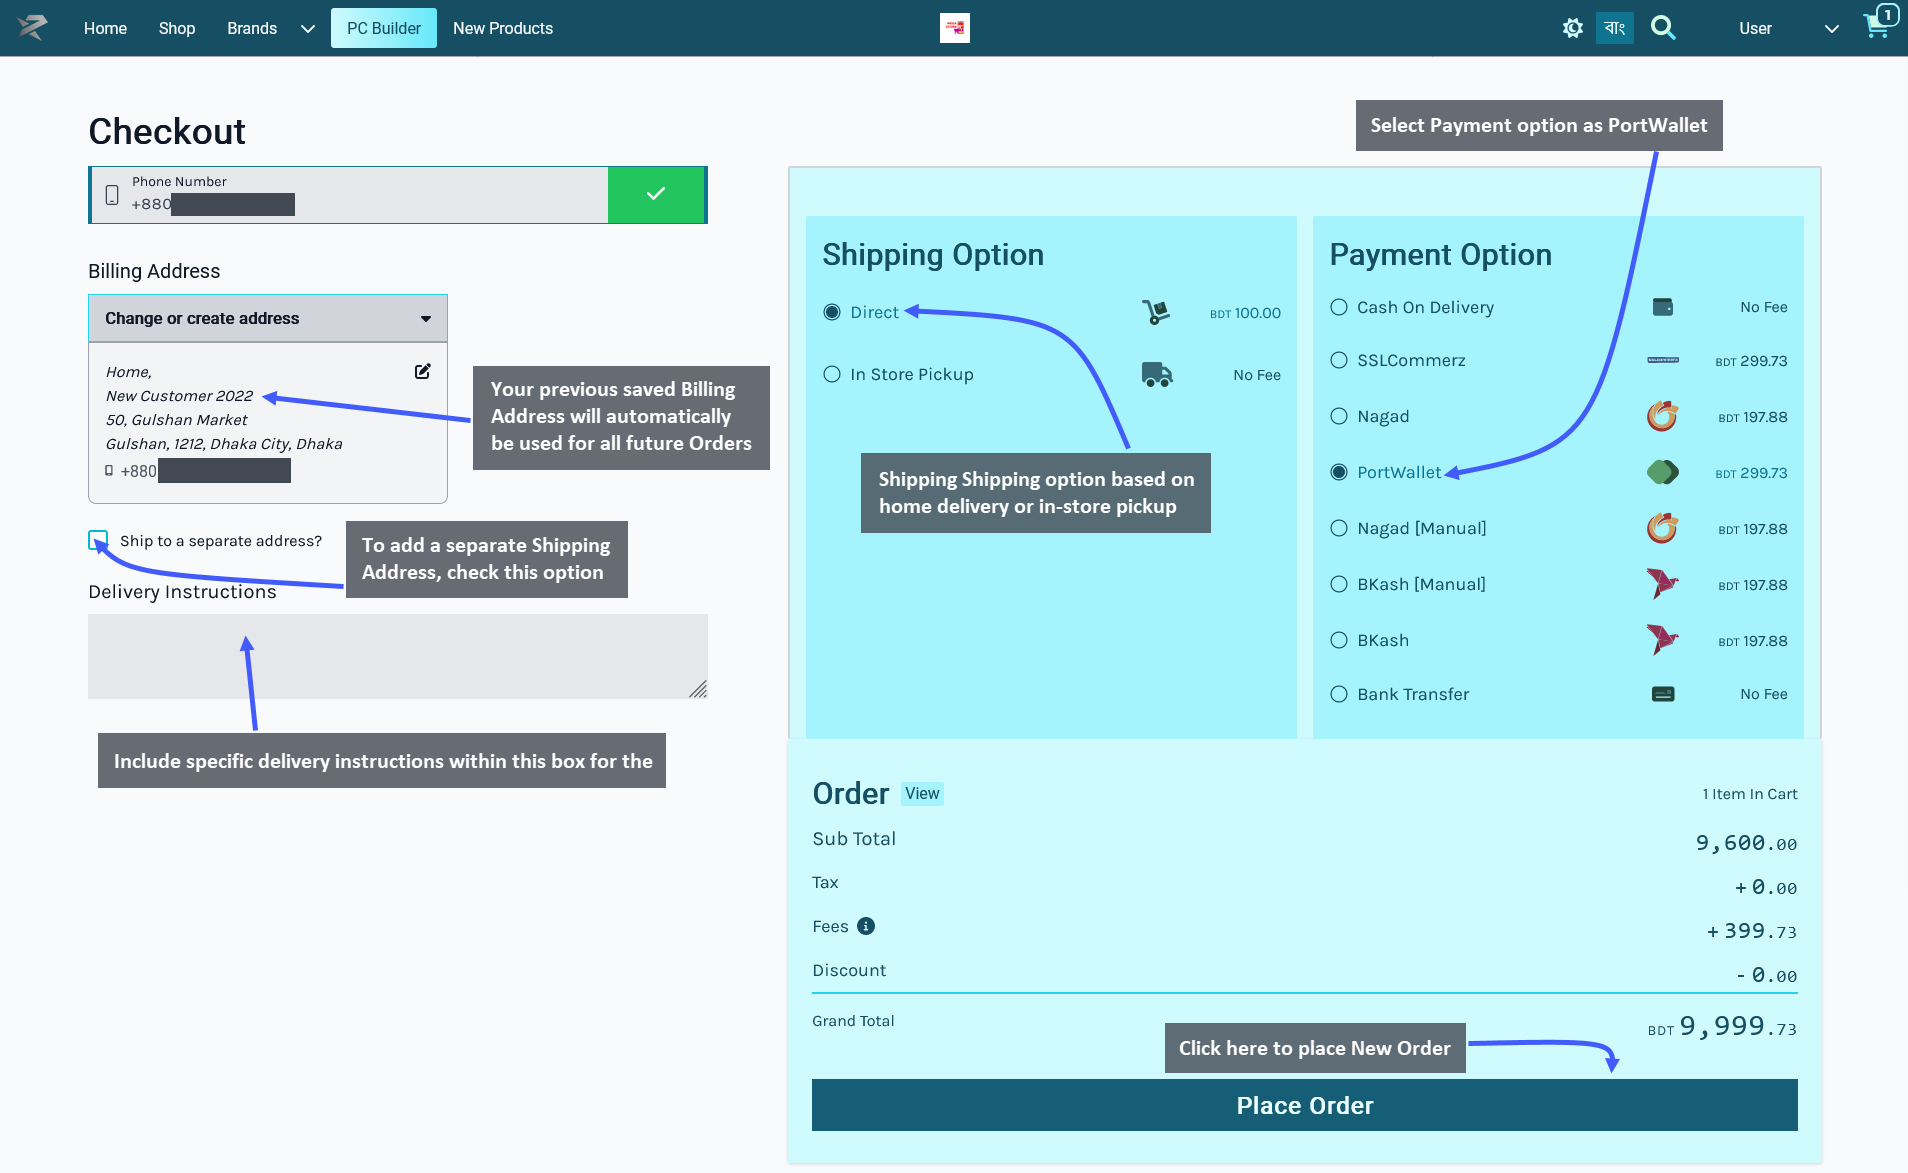
Making Payment with PortWallet
After clicking on the Place Order button, the Customer will be redirected to the PortWallet payment portal. Now, click the Pay now BDT ____ to proceed with the payment via PortWallet.
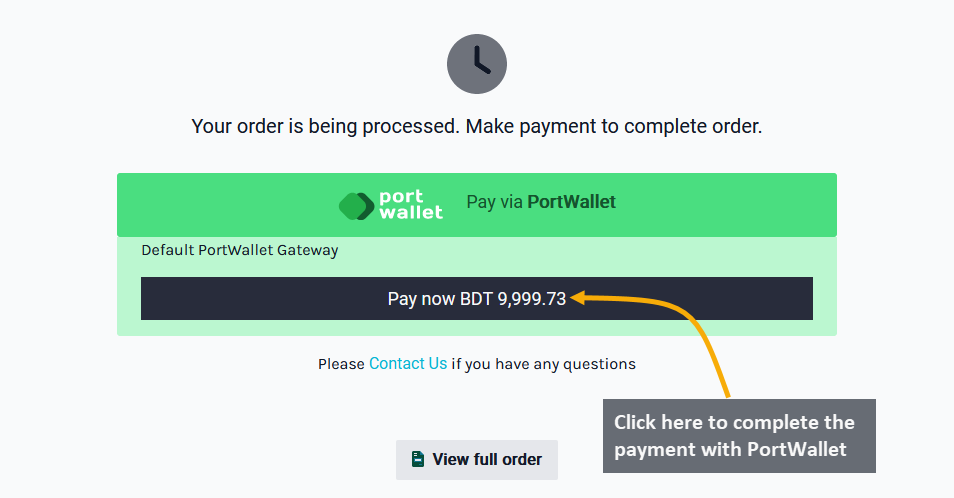
The next page will initiate PortWallet payment with Cards, where Customer will have to first select either Visa or Mastercard and click Pay Now. In the next page, they will need to fill out their Card Number, expiration date, CVV, and Name and click on Pay Now. Then, authenticate the payment process by inputting the One-Time Password (OTP) and click Submit. This will confirm the Order and redirect to the Order Confirmation Page.
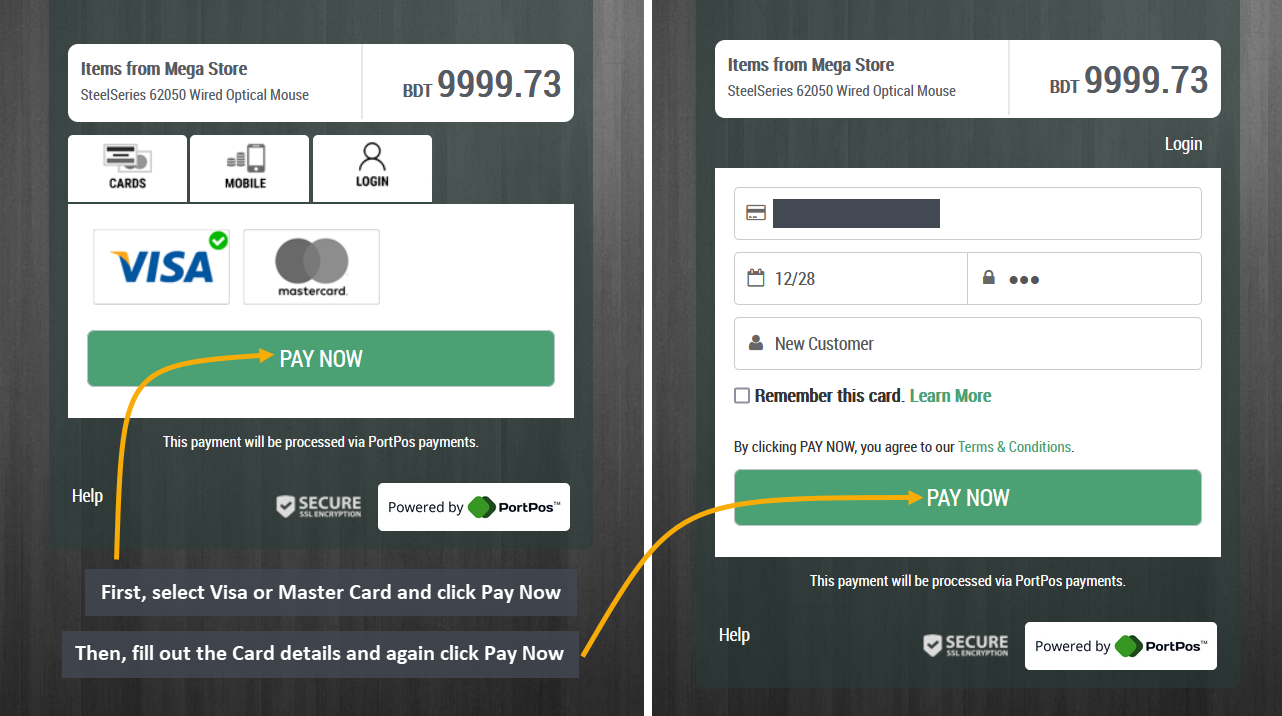
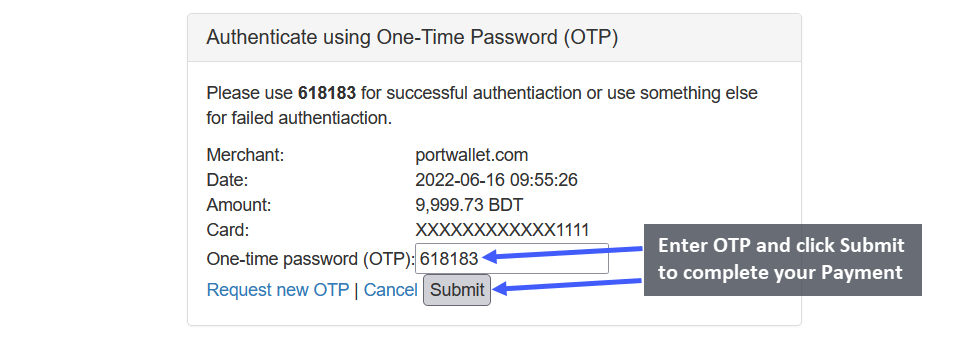
Order Confirmation and Print Invoice
After Order confirmation, the invoice will show the Order details with Customer’s Billing and Shipping addresses. Click the Print Invoice button to have the invoice printed out for future references. To view previous and current Orders, click the View all Orders button, click the Shop button to go to Shop, and click Home to go to main page.
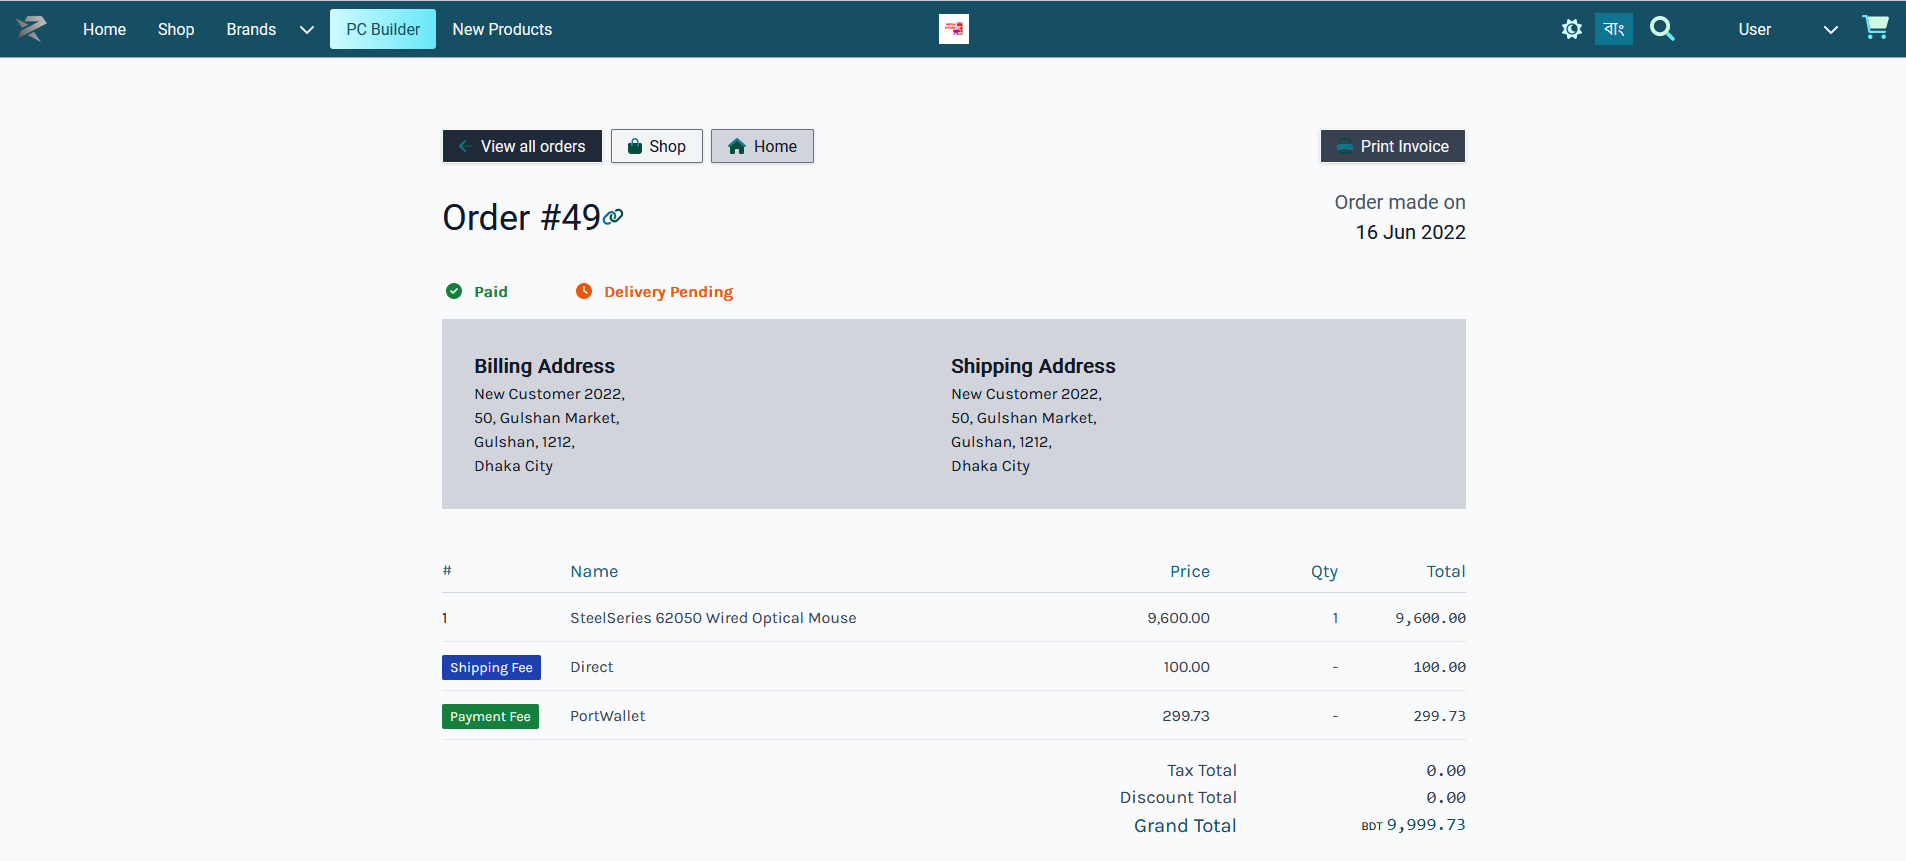
Place Order with Nagad (Manual) Payment
Customer can order Products by clicking on The Shop tab where Products will be available based on Categories and Brands. Click on the Add to Cart button to add any Product to Cart. After adding Products to Cart, the mini pop-up Product Cart will be visible on the right side of the screen, clicking on which will expand full Product Cart.

Go to the Checkout Page by clicking the Checkout button. From here, select the preferred Shipping option based on home delivery on in-store pickup by the Customer. The already saved Billing Address will automatically be used as the Customer’s Shipping Address. To add a different Shipping Address, check the box Ship to separate address that will provide a separate field to fill out address details.
Delivery instructions can be added if needed. Select Nagad (Manual) as payment option and click the Place Order button to complete Order. Any Product tax, fees, or discounts will be visible in the Order Grant Total.
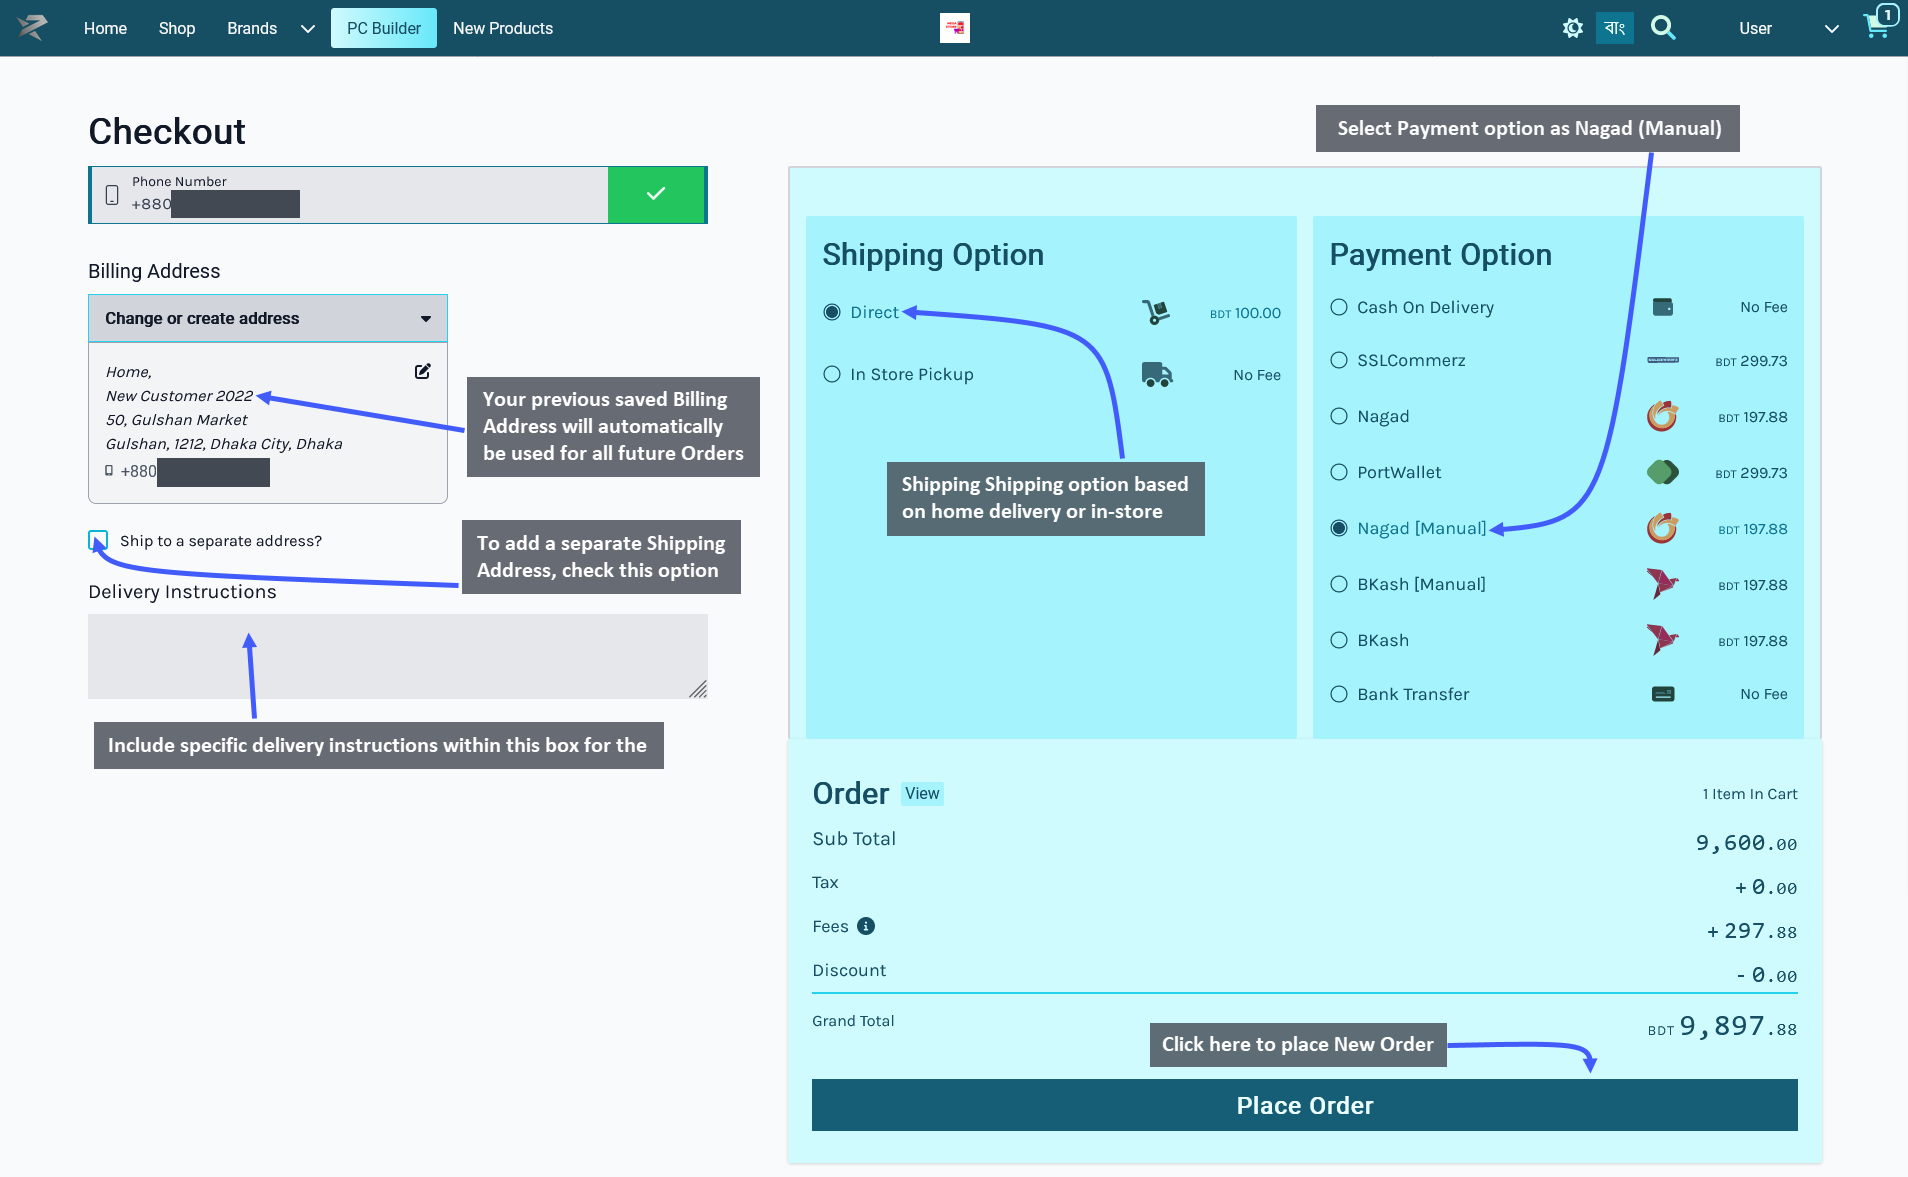
Making Payment with Nagad (Manual)
After clicking on the Place Order button, the Customer will be redirected to the Nagad (Manual) payment portal. The next page will initiate Nagad (Manual) payment, where after making the payment following the instructions, the Customer will have to enter the Transaction ID and click on Pay now BDT ____. This will confirm the Order and redirect to the Order Confirmation Page.
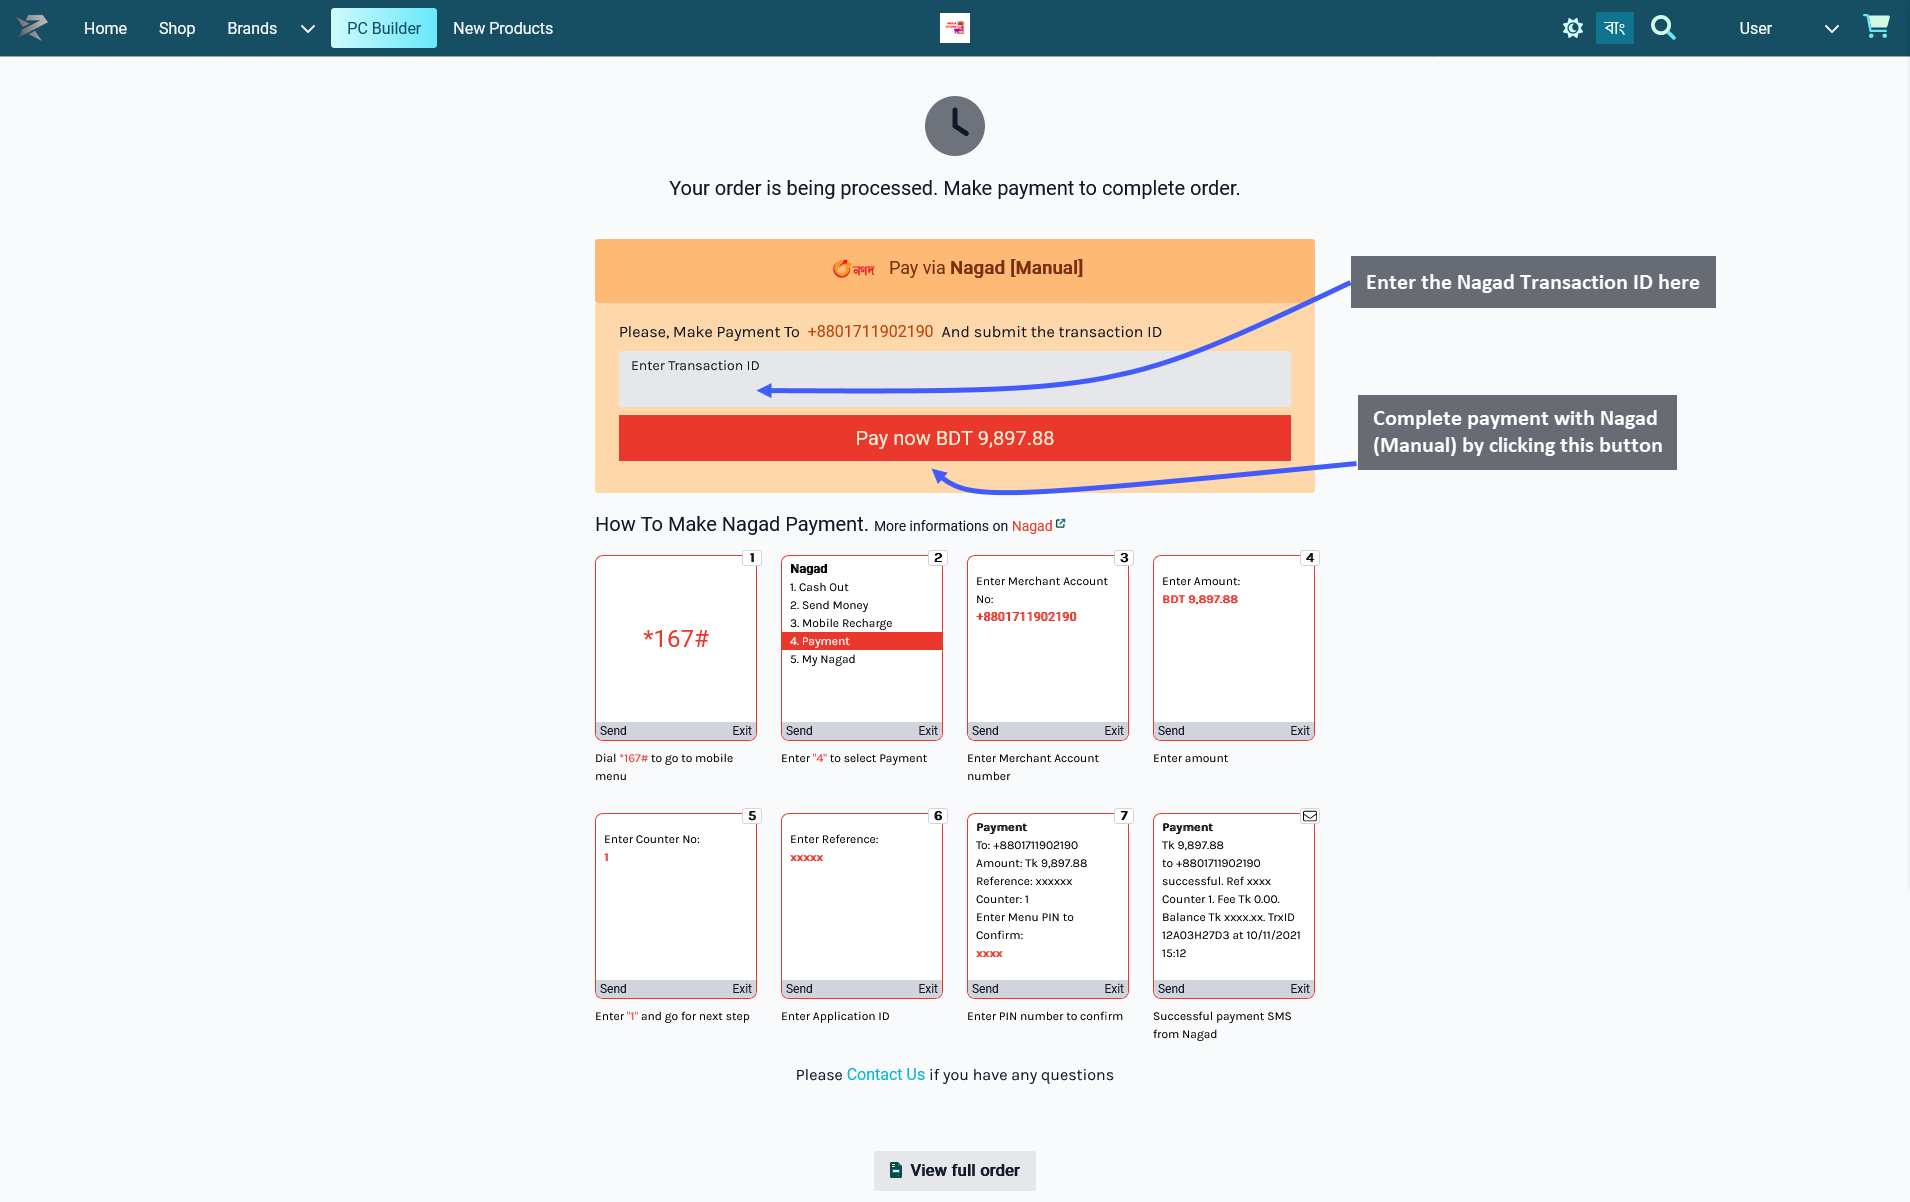
Order Confirmation and Print Invoice
After Order confirmation, the invoice will show the Order details with Customer’s Billing and Shipping addresses. Click the Print Invoice button to have the invoice printed out for future references. To view previous and current Orders, click the View all Orders button, click the Shop button to go to Shop, and click Home to go to main page.
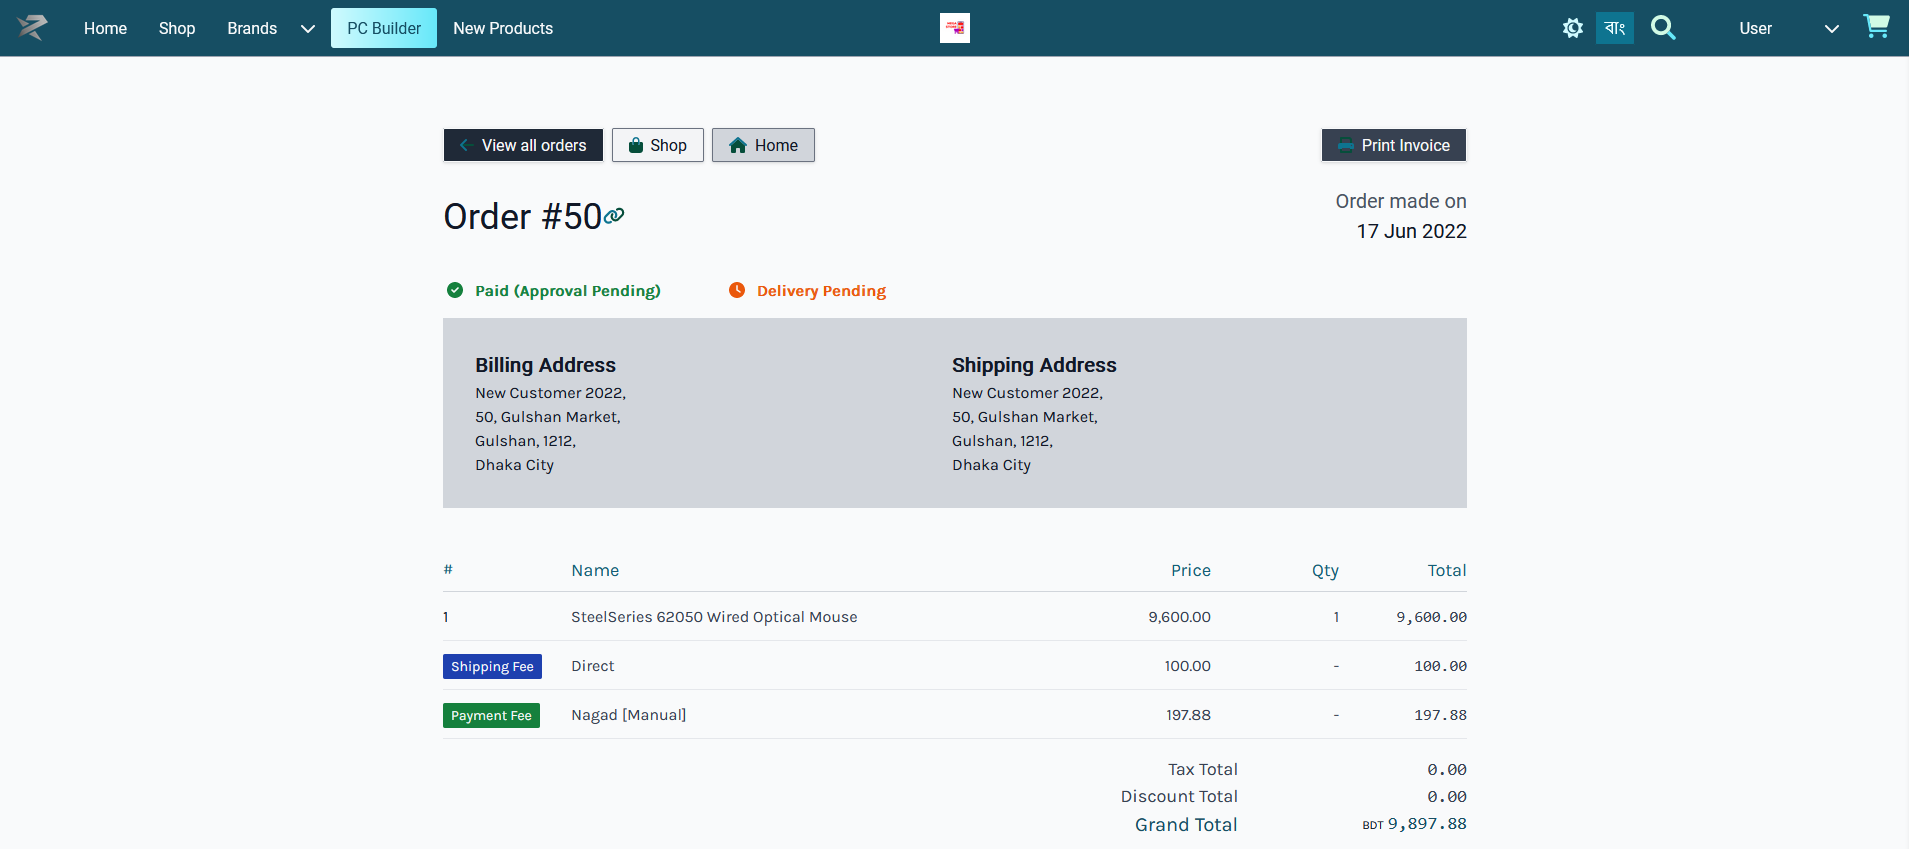
Place Order with BKash (Manual) Payment
Customer can order Products by clicking on The Shop tab where Products will be available based on Categories and Brands. Click on the Add to Cart button to add any Product to Cart. After adding Products to Cart, the mini pop-up Product Cart will be visible on the right side of the screen, clicking on which will expand full Product Cart.

Go to the Checkout Page by clicking the Checkout button. From here, select the preferred Shipping option based on home delivery on in-store pickup by the Customer. The already saved Billing Address will automatically be used as the Customer’s Shipping Address. To add a different Shipping Address, check the box Ship to separate address that will provide a separate field to fill out address details.
Delivery instructions can be added if needed. Select BKash (Manual) as payment option and click the Place Order button to complete Order. Any Product tax, fees, or discounts will be visible in the Order Grant Total.
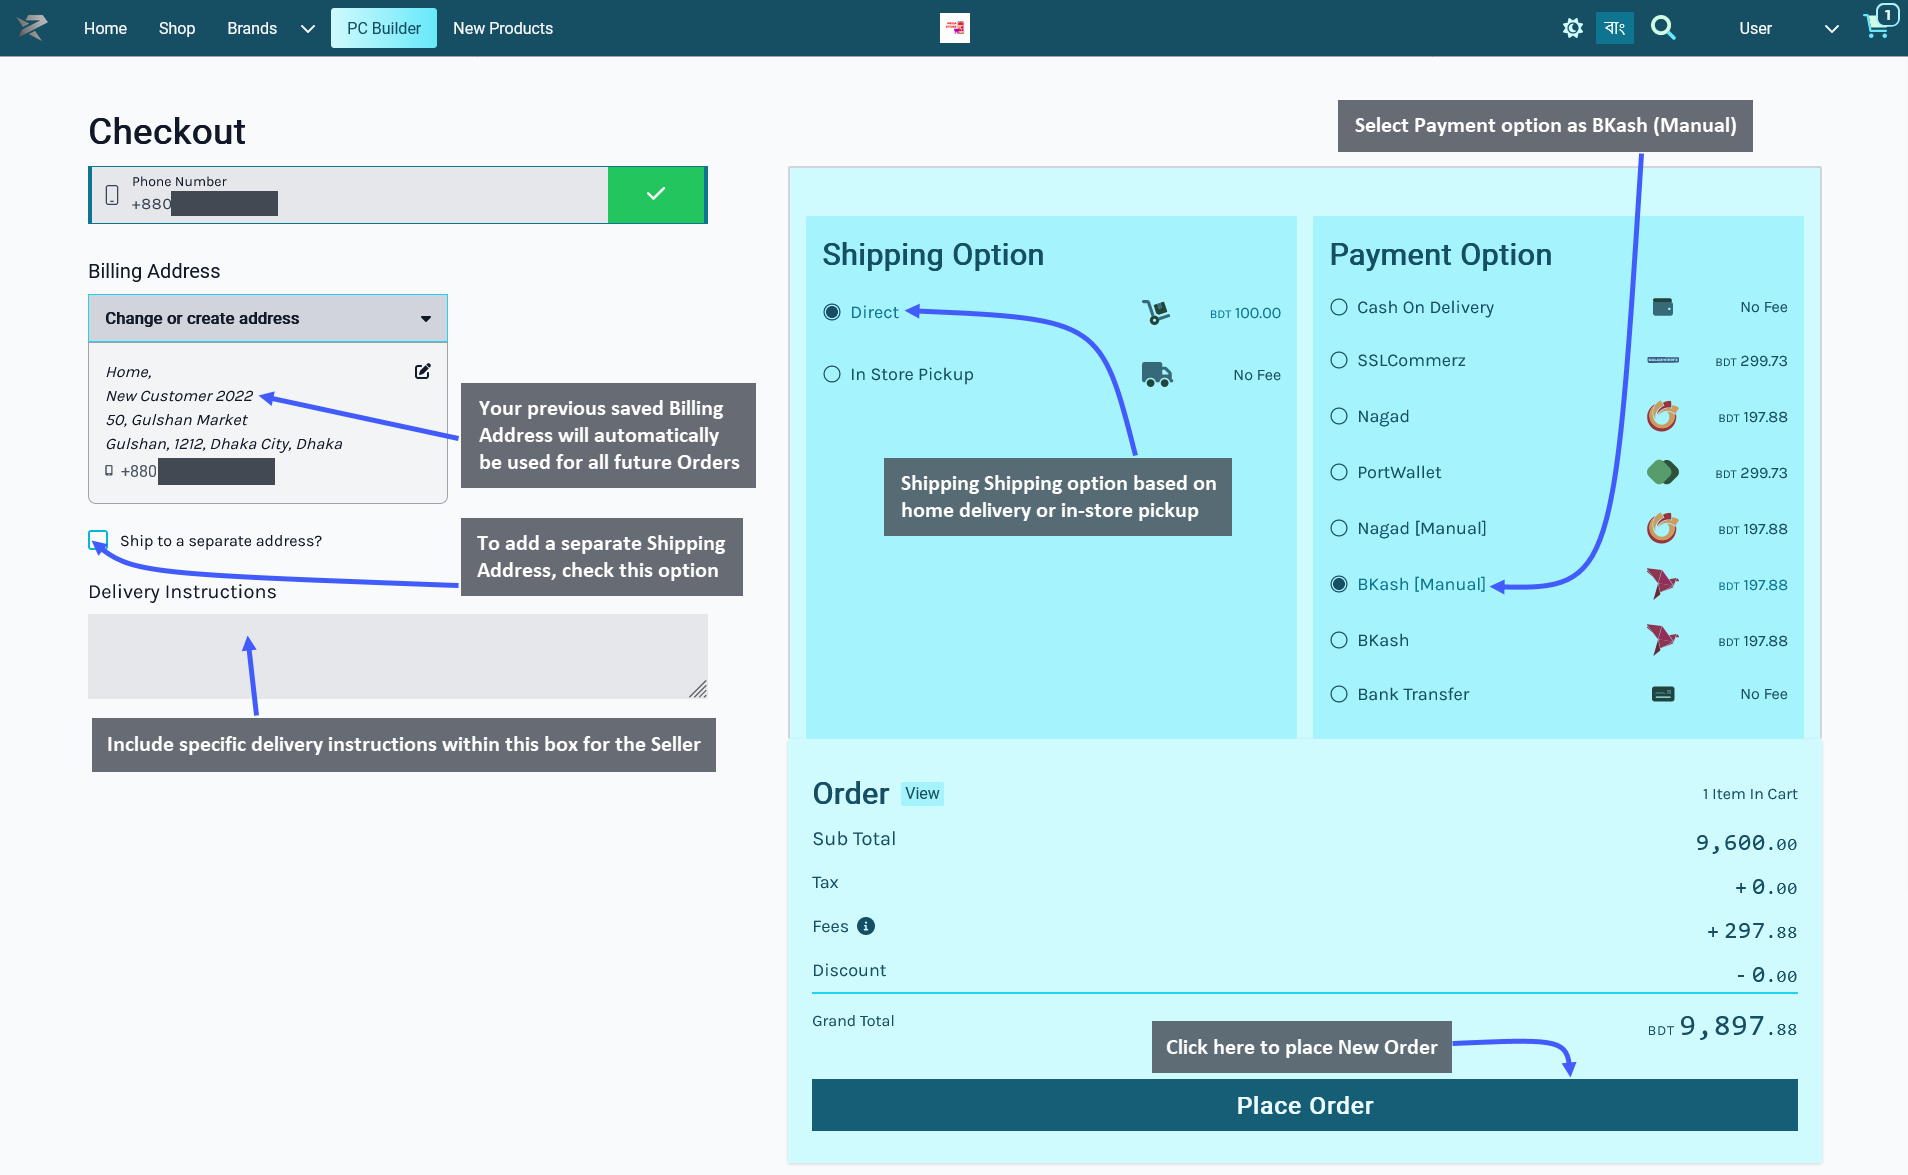
Making Payment with BKash (Manual)
After clicking on the Place Order button, the Customer will be redirected to the BKash (Manual) payment portal. The next page will initiate BKash (Manual) payment, where after making the payment following the instructions, the Customer will have to enter the Transaction ID and click on Pay now BDT ____. This will confirm the Order and redirect to the Order Confirmation Page.
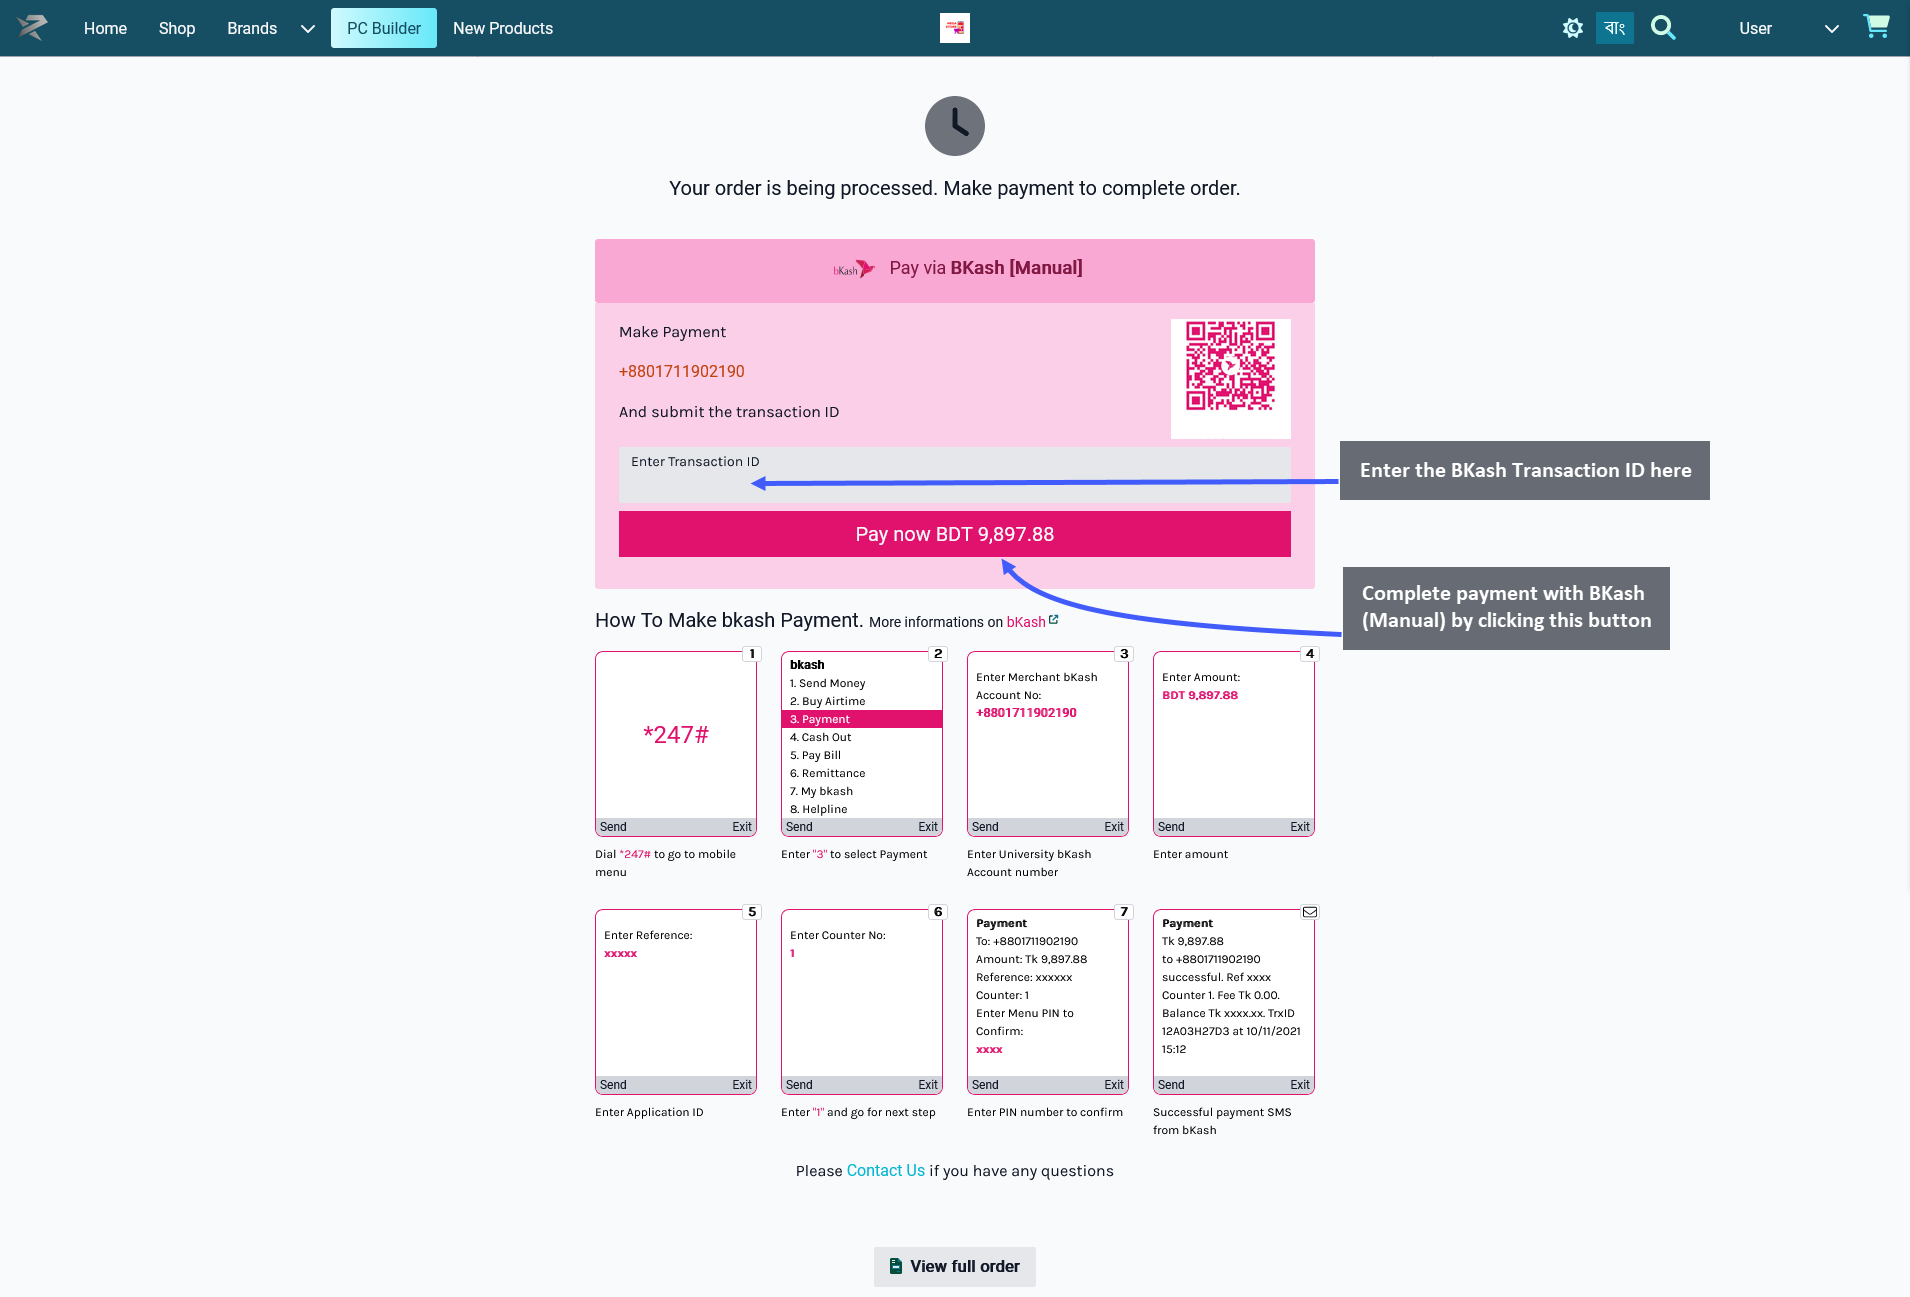
Order Confirmation and Print Invoice
After Order confirmation, the invoice will show the Order details with Customer’s Billing and Shipping addresses. Click the Print Invoice button to have the invoice printed out for future references. To view previous and current Orders, click the View all Orders button, click the Shop button to go to Shop, and click Home to go to main page.
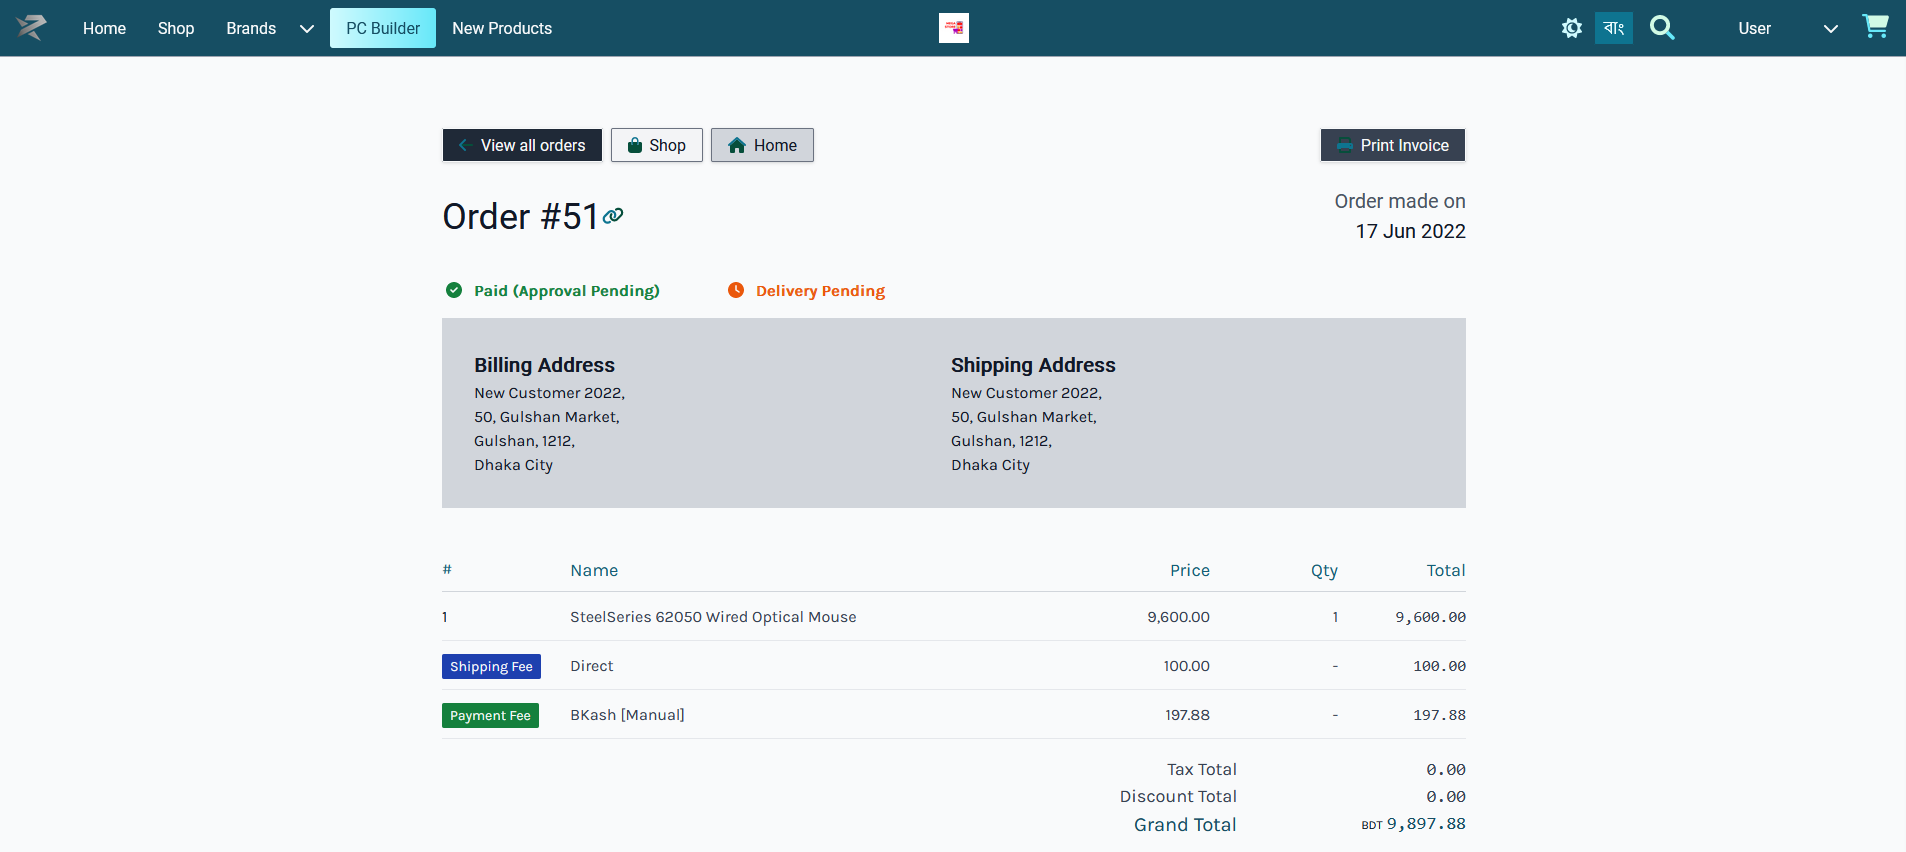
Place Order with BKash Payment
Customer can order Products by clicking on The Shop tab where Products will be available based on Categories and Brands. Click on the Add to Cart button to add any Product to Cart. After adding Products to Cart, the mini pop-up Product Cart will be visible on the right side of the screen, clicking on which will expand full Product Cart.

Go to the Checkout Page by clicking the Checkout button. From here, select the preferred Shipping option based on home delivery on in-store pickup by the Customer. The already saved Billing Address will automatically be used as the Customer’s Shipping Address. To add a different Shipping Address, check the box Ship to separate address that will provide a separate field to fill out address details.
Delivery instructions can be added if needed. Select BKash as payment option and click the Place Order button to complete Order. Any Product tax, fees, or discounts will be visible in the Order Grant Total.
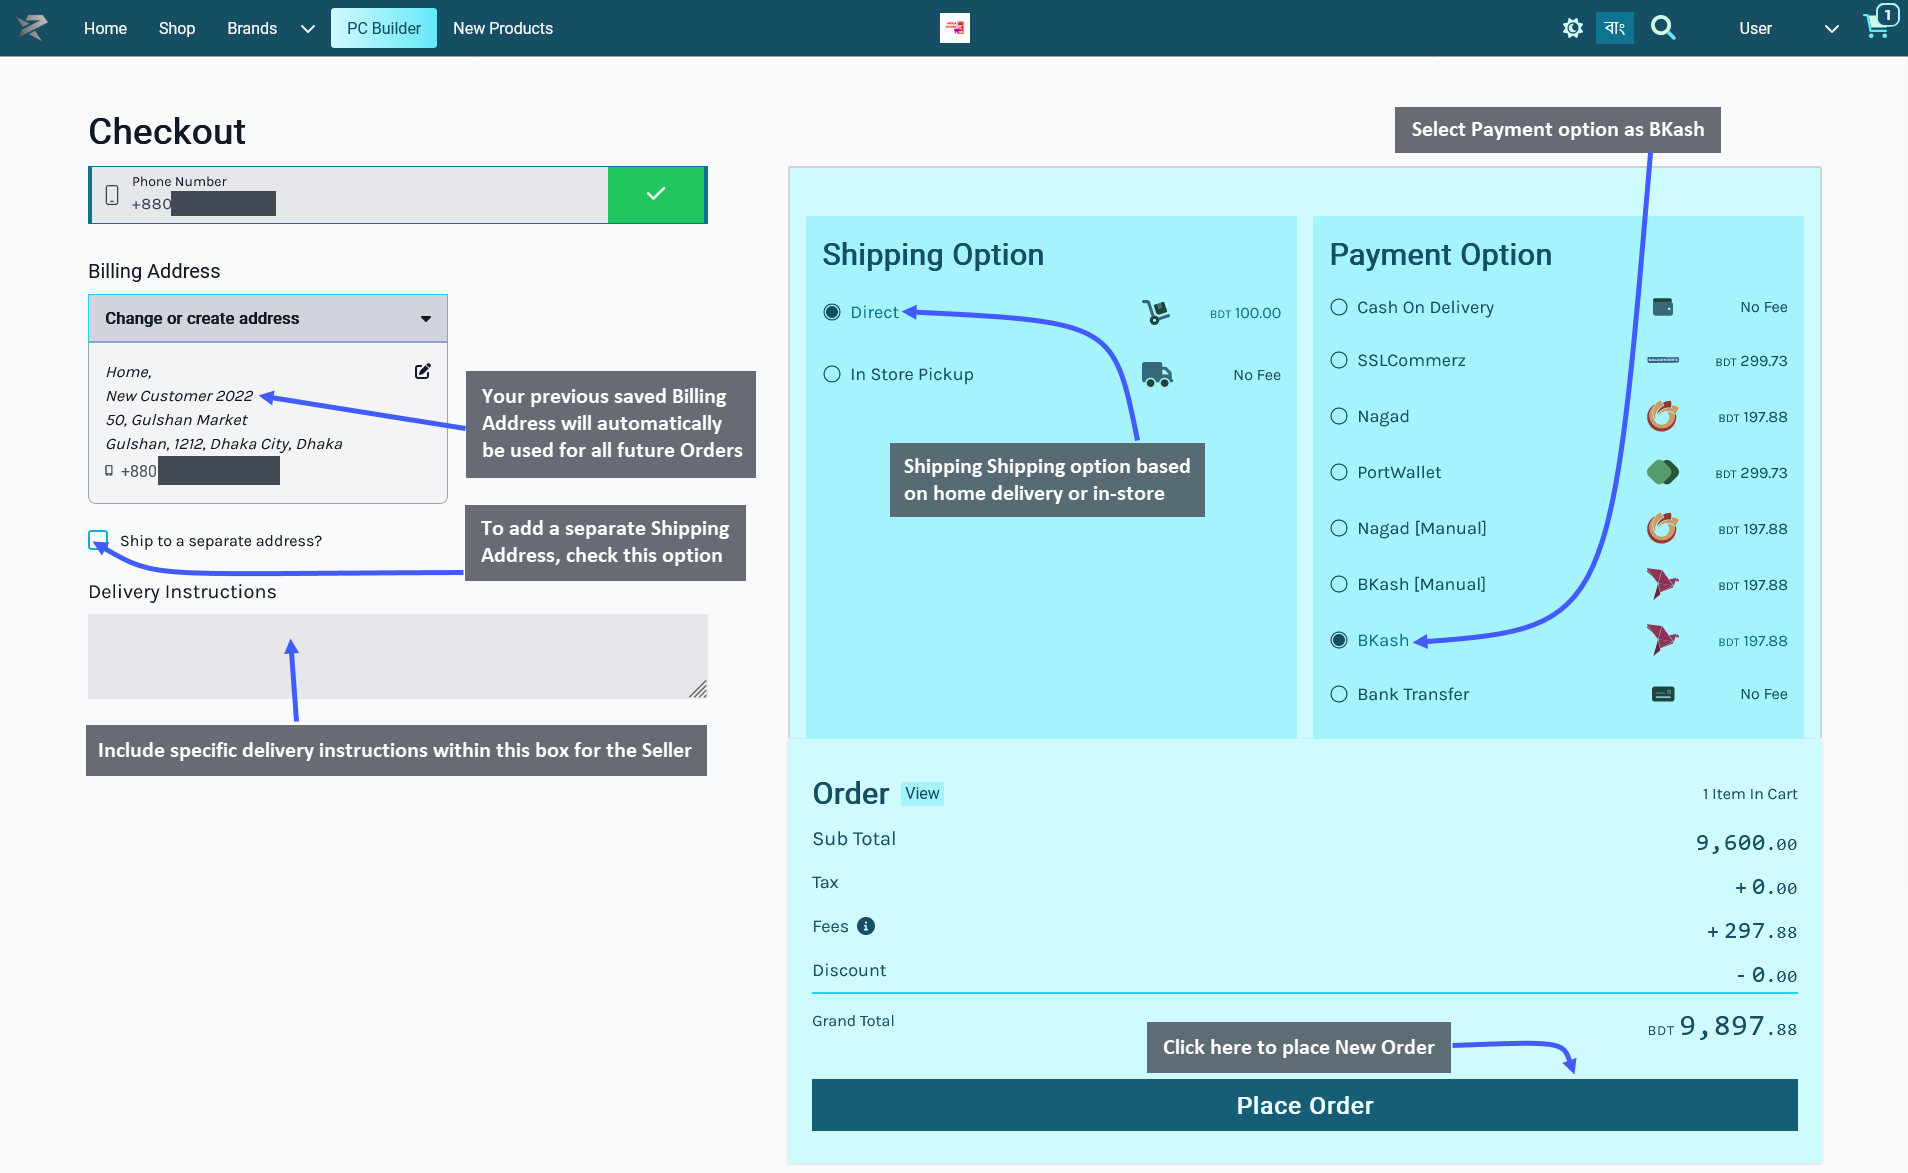
Making Payment with BKash
After clicking on the Place Order button, the Customer will be redirected to the BKash payment portal. Now, click the Pay now BDT ____ to proceed with the payment via BKash.
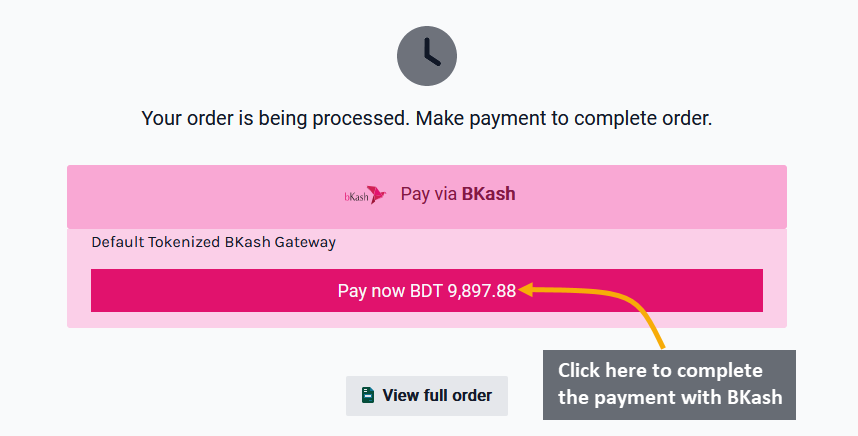
The next page will initiate BKash payment, where Customer will have to first enter their BKash Account Number and click Confirm. In the next step, they will have to enter a verification code sent to their BKash phone number and click Confirm. Then, they will have to enter the PIN of their BKash Account Number and again click Confirm. This will confirm the Order and redirect to the Shop Order Confirmation Page back on The Website.
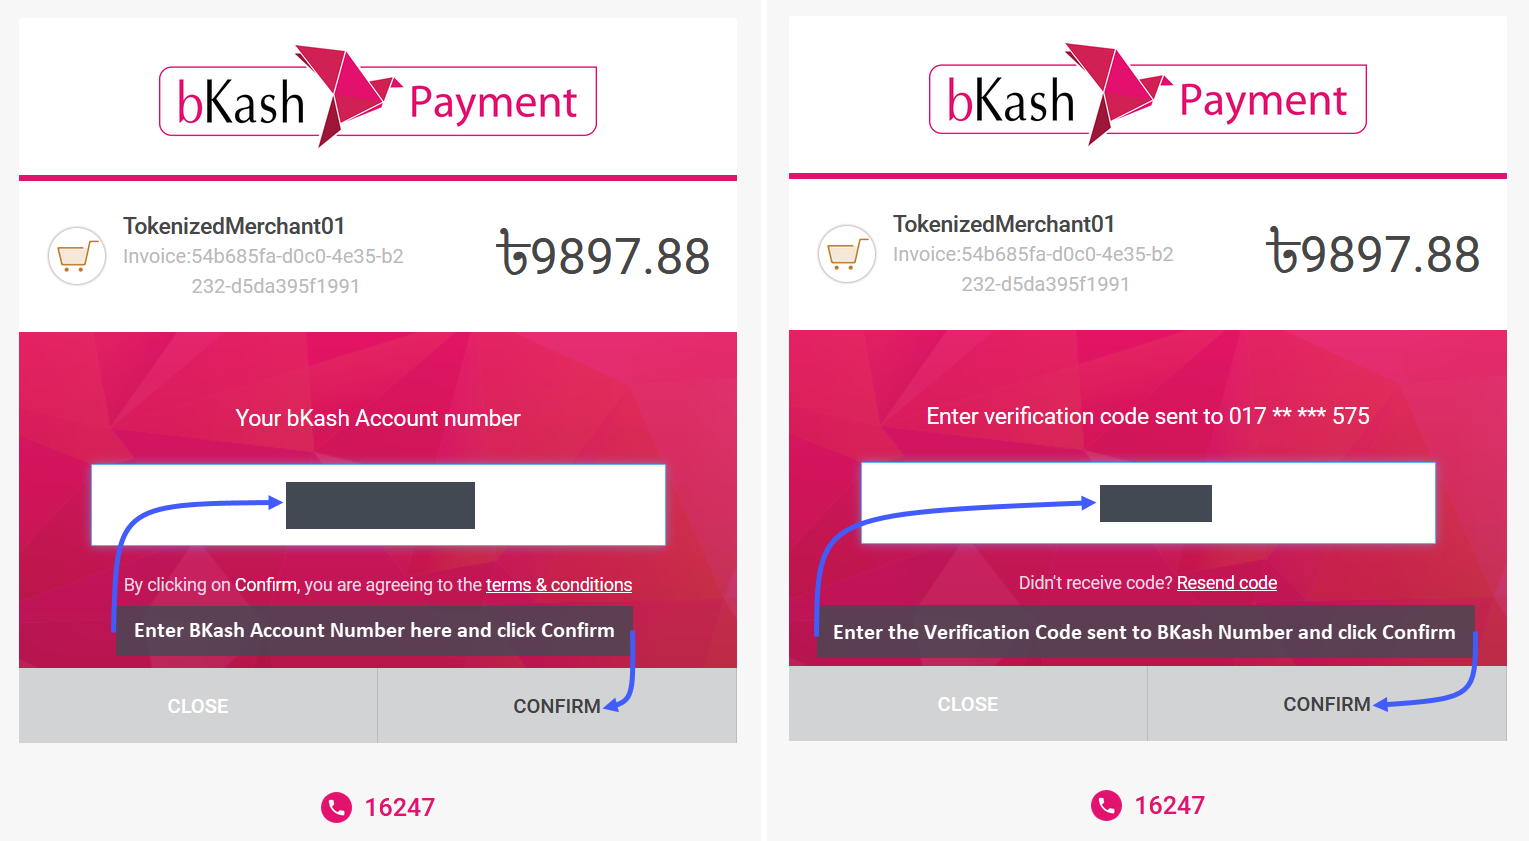
Image 1: First enter the BKash Account Number and the verification code, then click Confirm.
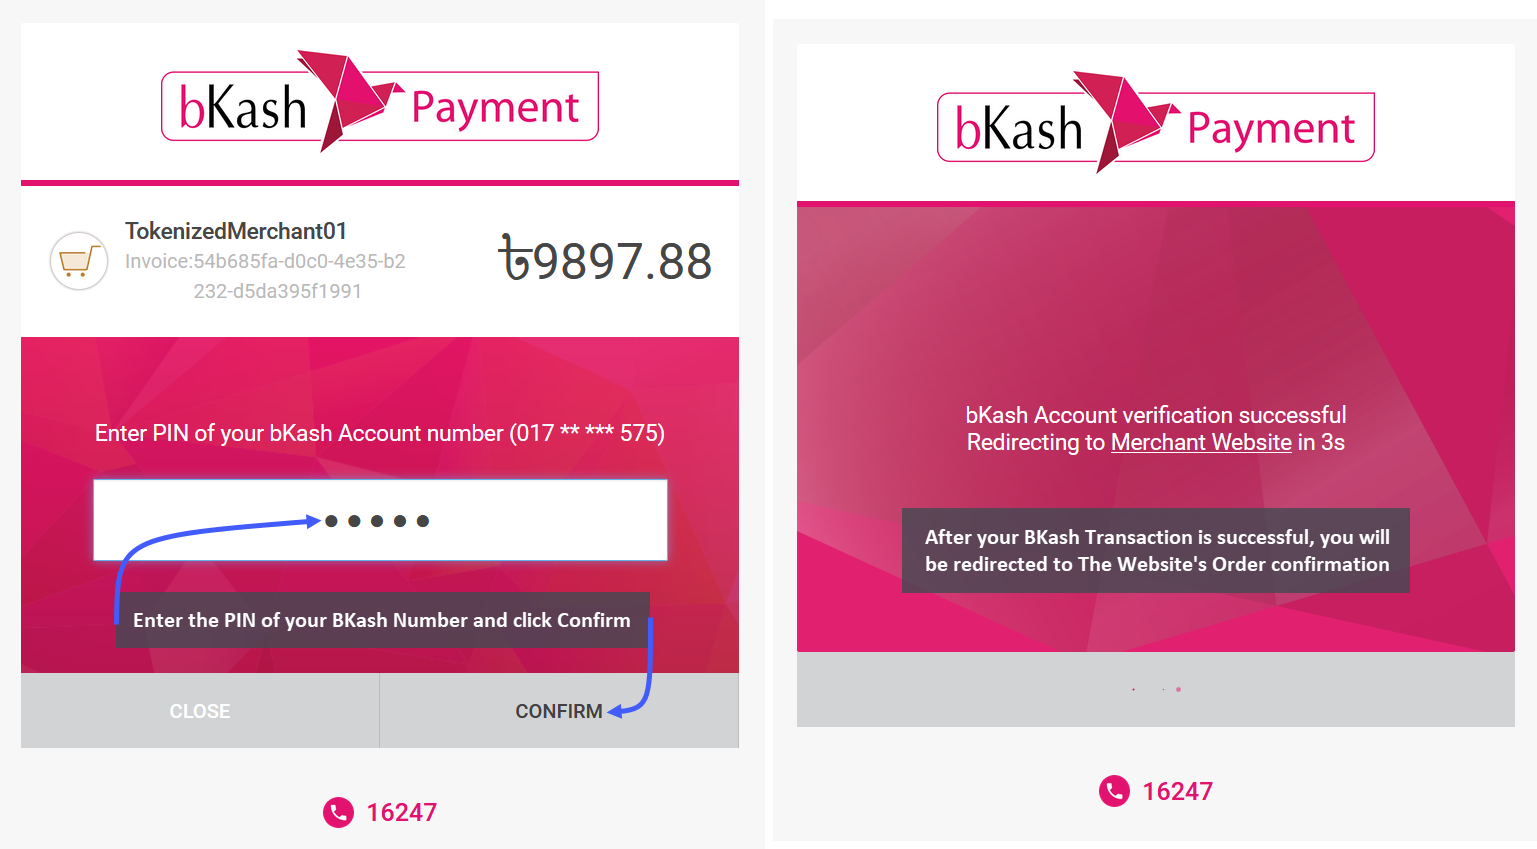
Image 2: Then, enter the BKash PIN Number and click Confirm that will redirect back to the Shop.
Order Confirmation and Print Invoice
After Order confirmation, the invoice will show the Order details with Customer’s Billing and Shipping addresses. Click the Print Invoice button to have the invoice printed out for future references. To view previous and current Orders, click the View all Orders button, click the Shop button to go to Shop, and click Home to go to main page.
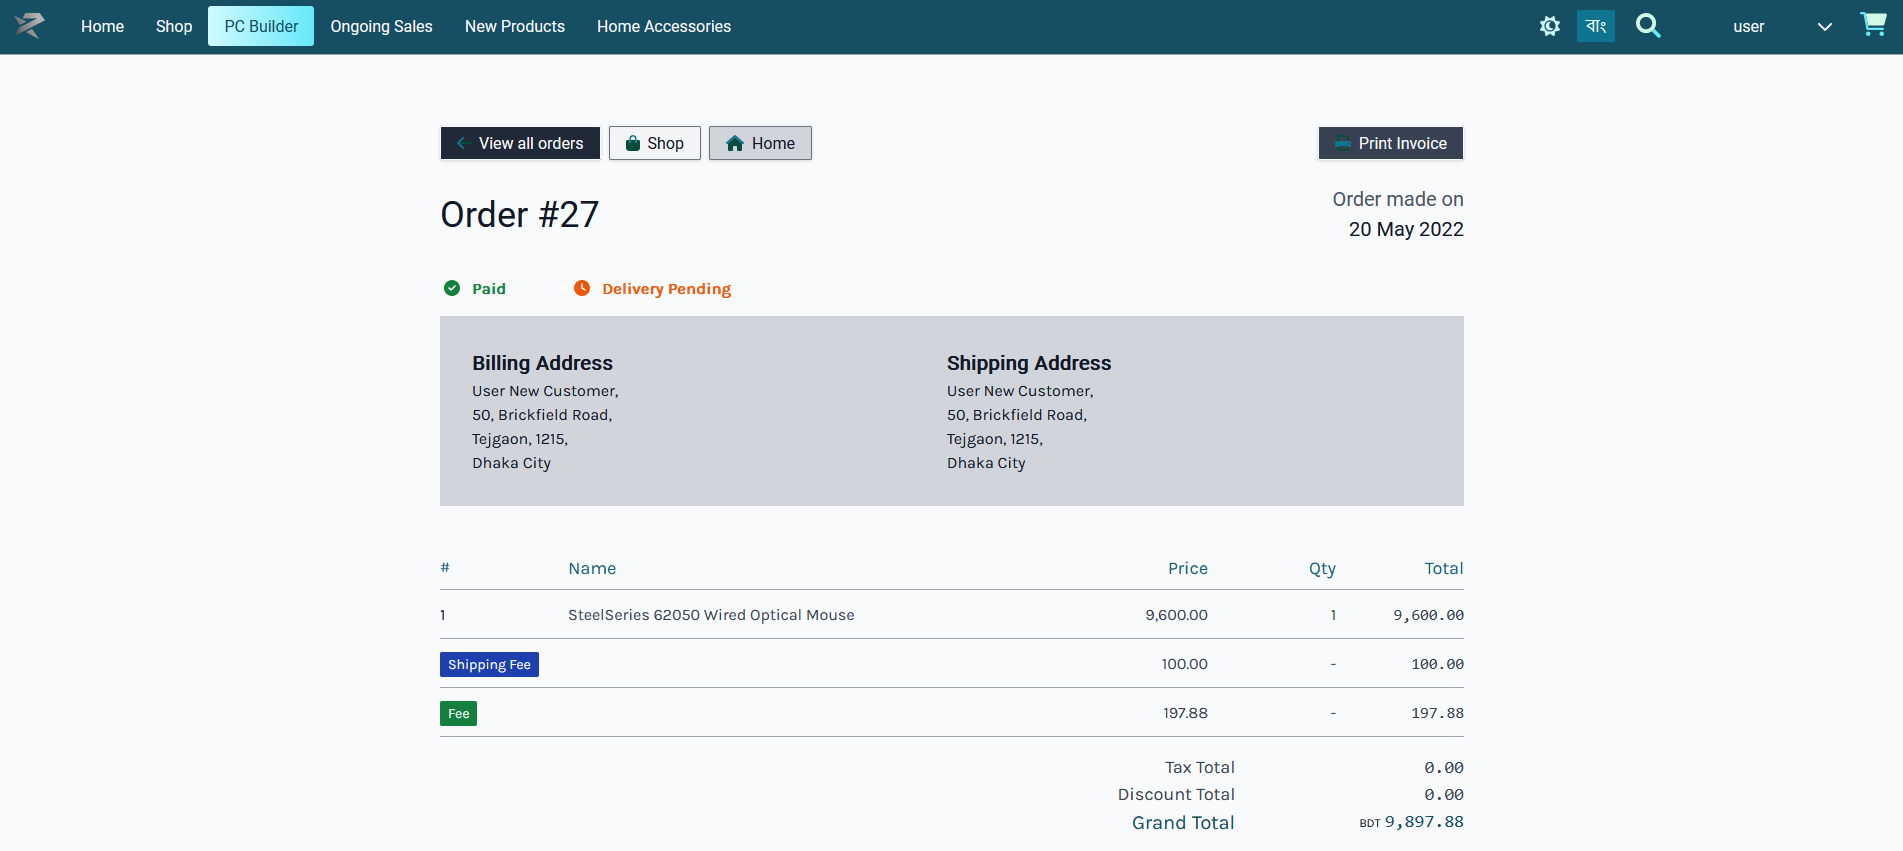
Place Order with Bank Transfer Payment
Customer can order Products by clicking on The Shop tab where Products will be available based on Categories and Brands. Click on the Add to Cart button to add any Product to Cart. After adding Products to Cart, the mini pop-up Product Cart will be visible on the right side of the screen, clicking on which will expand full Product Cart.

Go to the Checkout Page by clicking the Checkout button. From here, select the preferred Shipping option based on home delivery on in-store pickup by the Customer. The already saved Billing Address will automatically be used as the Customer’s Shipping Address. To add a different Shipping Address, check the box Ship to separate address that will provide a separate field to fill out address details.
Delivery instructions can be added if needed. Select Bank Transfer as payment option and click the Place Order button to complete Order. Any Product tax, fees, or discounts will be visible in the Order Grant Total.
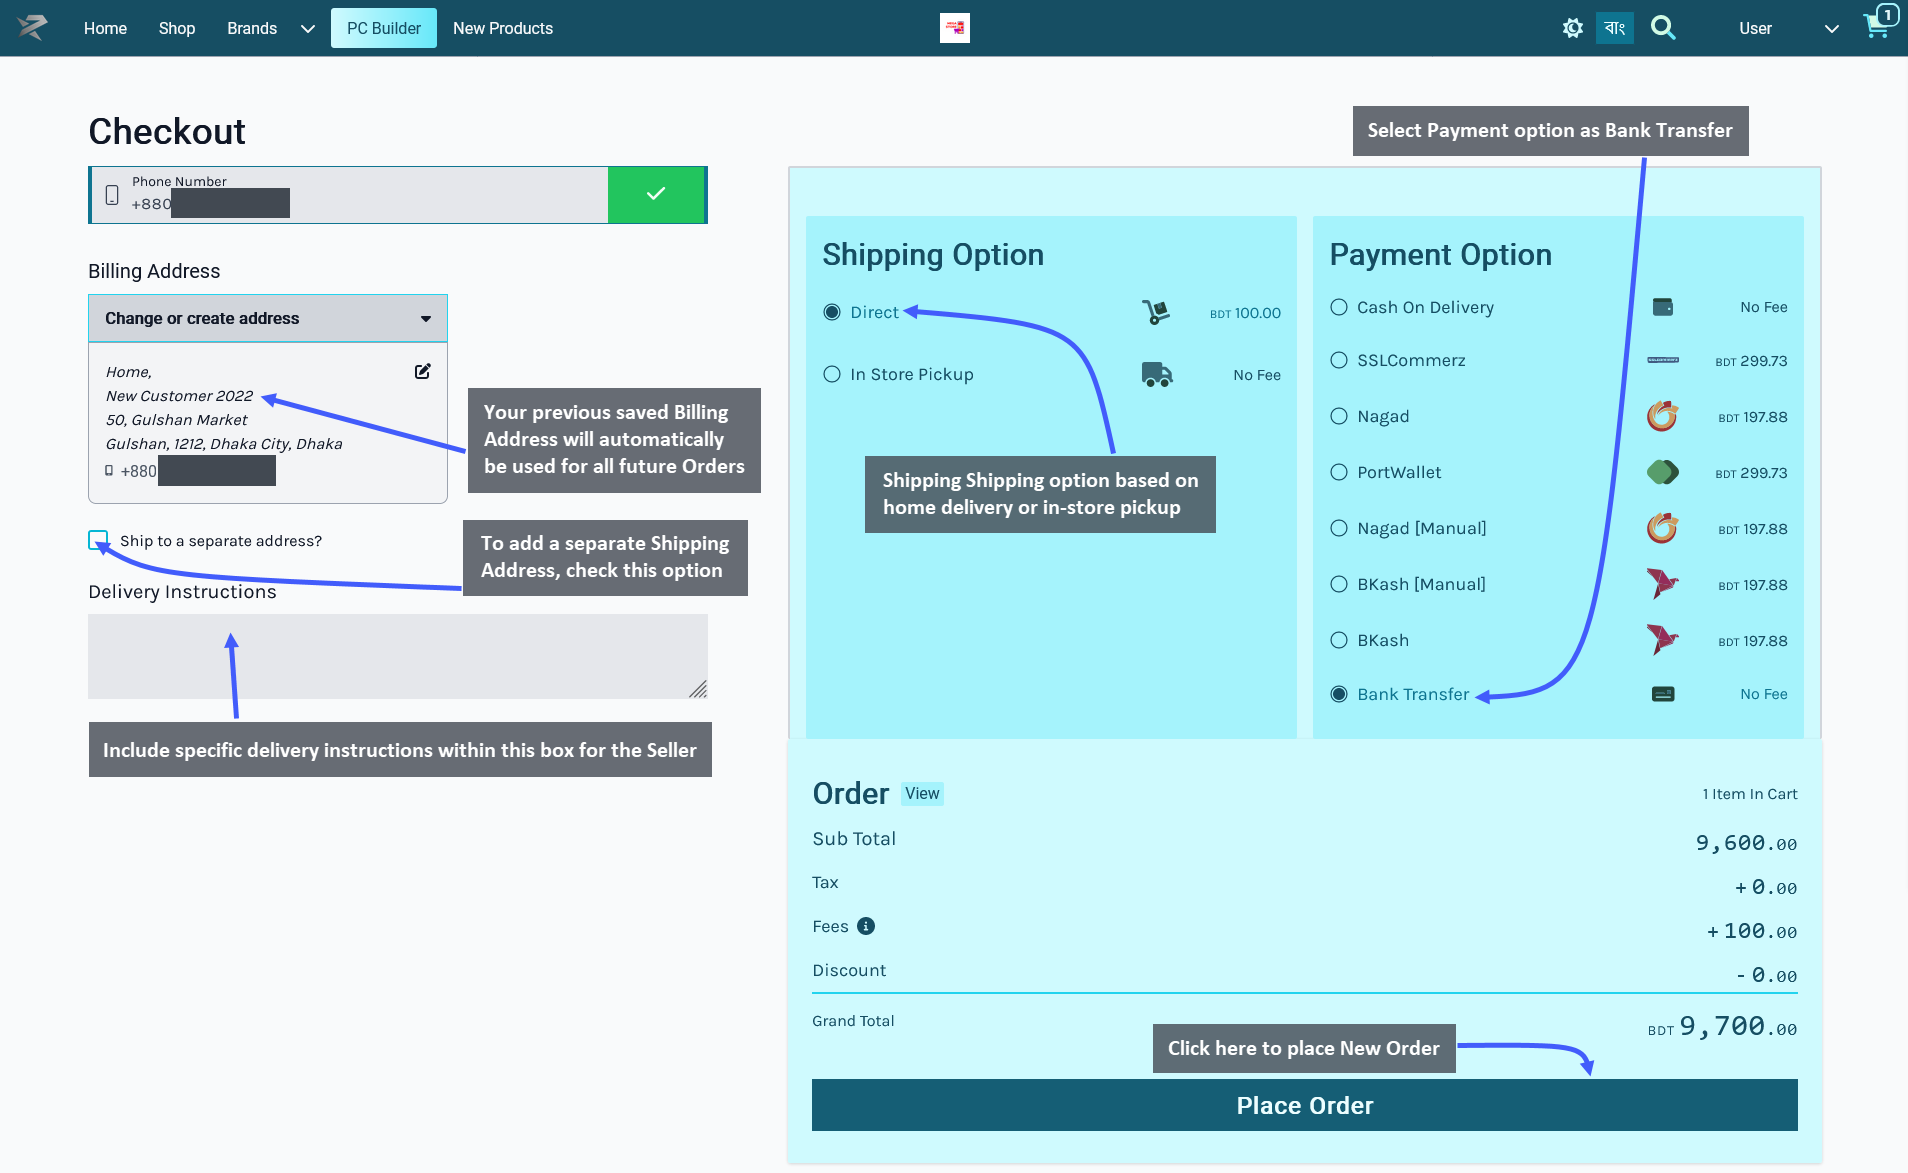
Making Payment with Bank Transfer
After clicking on the Place Order button, the Customer will be redirected to the Bank Transfer payment portal. Here, after completing the payment through bank transfer or check deposit, the Customer will have to upload the screenshot of their bank confirmation slip. After that, click the Pay now BDT ____ to proceed with the payment via Bank Transfer. Click on the View Full Order button to check the order details if necessary.
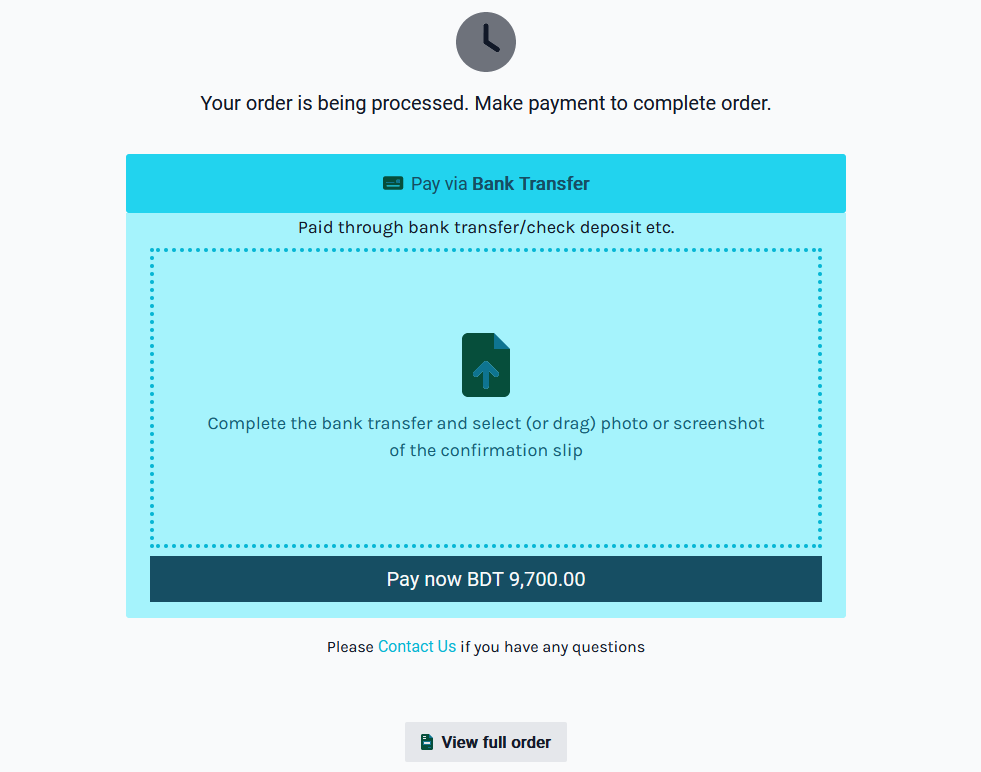
When the bank transfer or check deposit slip is uploaded in the next page, a checkmark will be visible in the box if the file of screenshot is successfully uploaded. Now, click on the Pay now BDT ____ button and this will confirm the Order and redirect to the Order Confirmation Page.
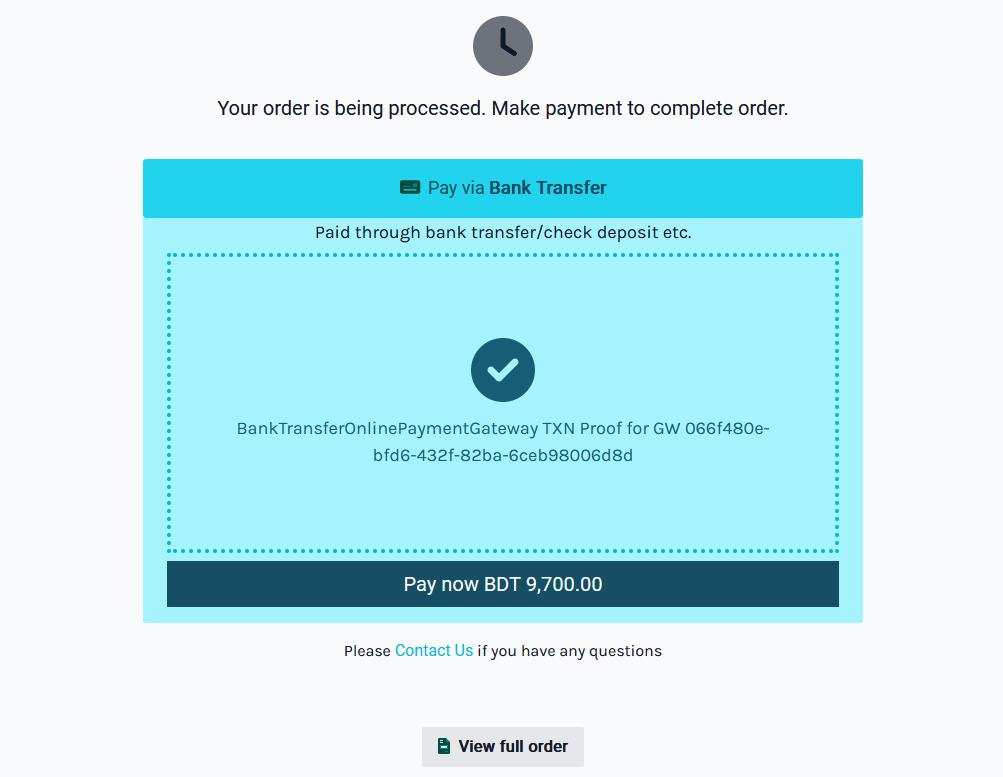
Order Confirmation and Print Invoice
After Order confirmation, the invoice will show the Order details with Customer’s Billing and Shipping addresses. Click the Print Invoice button to have the invoice printed out for future references. To view previous and current Orders, click the View all Orders button, click the Shop button to go to Shop, and click Home to go to main page.
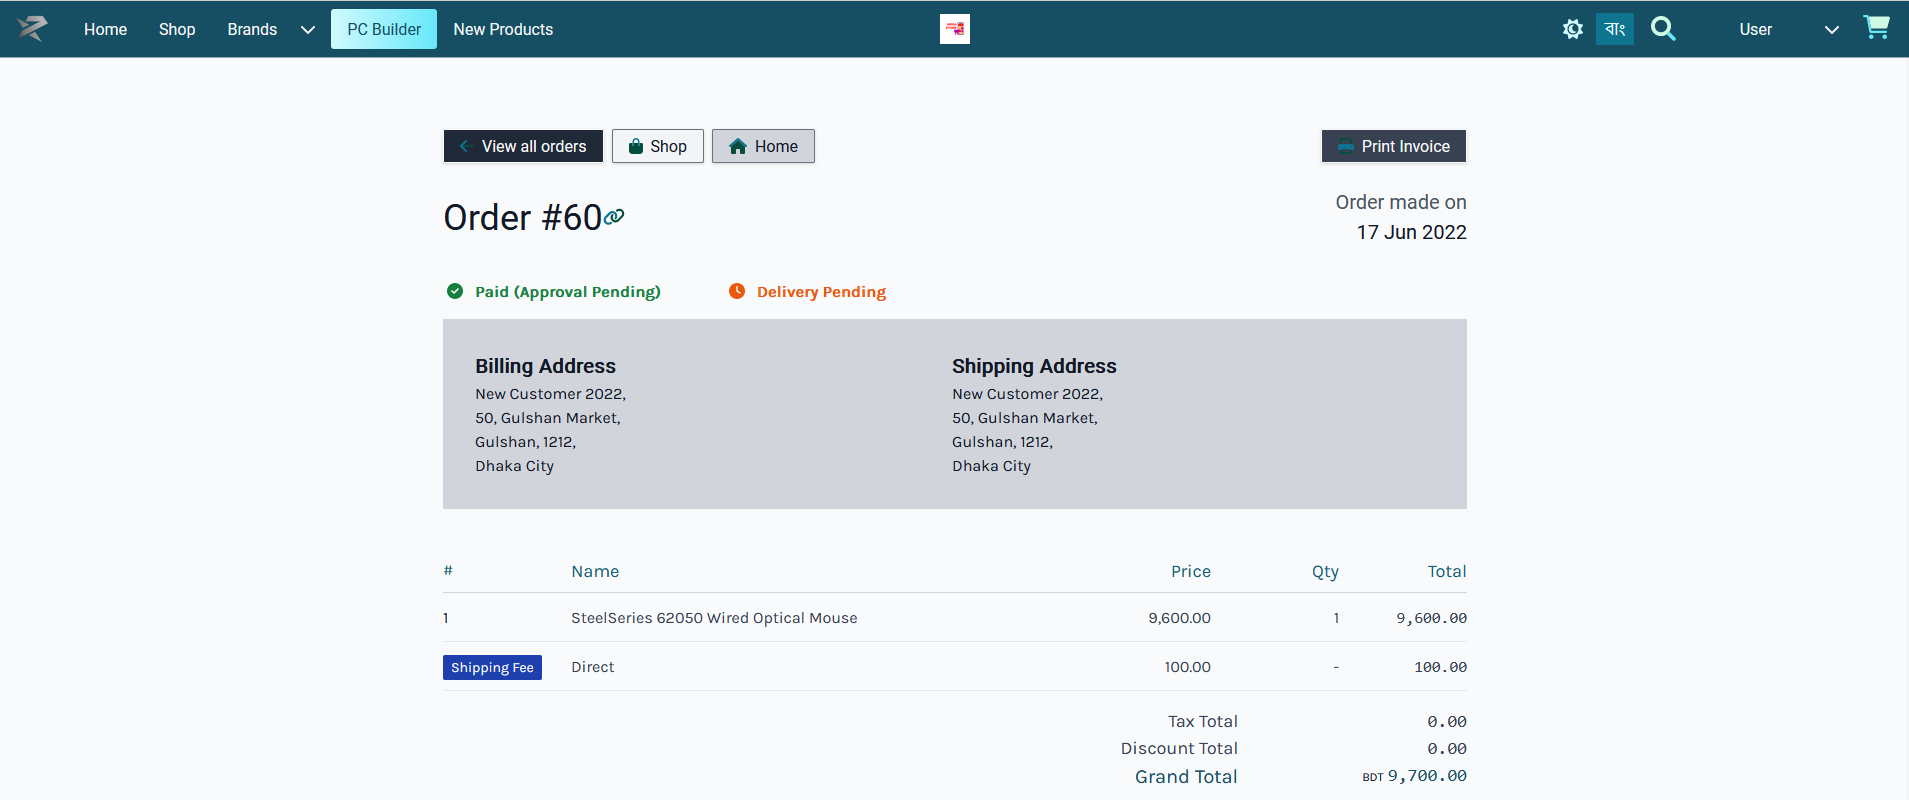
Steps to Create PC Builds
The Customer can create their own PC Builds by logging into their account on The Website. They can also create their private PC Builds by logging into their account and save it for placing Order later. The components need to be selected one by one with CPU, Motherboard, Graphics Card, Memory, Storage, Case, Monitor, Power Supply, and Accessories on the PC Build Page. Selecting these components will create new PC Build.

Add CPU to PC Build
The first component to choose for PC Build is the CPU or central processing unit or the main processor. Click on the Add button to add the Product to build. Below the Add Button is a View button clicking on which will open a pop-up to display Product price, general specifications, performance specifications, physical specifications, and power specifications along with detailed Product images.
There is a Search Box on the top right corner to help find specific Product(s). The Product features will show on top of the list. There is a Filter Compatibility button which can be toggled to Yes/ No to search by compatibility of PC components or not. Click on Expand to see a detailed view of added components and their prices.

Add Motherboard to PC Build
After successfully adding CPU to PC Build, select Motherboard which is the main printed circuit board that allows communication between many of the crucial electronic components of a system. Click on the Add button to add the item to build. Below the Add Button is a View button clicking on which will open a pop-up to display Product price, general specifications, performance specifications, physical specifications, and power specifications along with detailed Product images.
There is a Search Box on the top right corner to help find specific Product(s). The Product features will show on top of the list. There is a Filter Compatibility button which can be toggled to Yes/ No to search by compatibility of PC components or not. For instance, in the example below, turning on the compatibility button did not bring any Product(s) for the Motherboard. However, when compatibility was turned off, all Motherboard Product(s) were displayed. Click on Expand to see a detailed view of added components and their prices.

Add Graphics Card to PC Build
When Motherboard is added to PC Build, select Graphics Card which is the expansion card that generates a feed of output images to a display device. Click on the Add button to add the Product to build. Below the Add Button is a View button clicking on which will open a pop-up to display Product price, general specifications, performance specifications, physical specifications, and power specifications along with detailed Product images.
There is a Search Box on the top right corner to help find specific Product(s). The Product features will show on top of the list. There is a Filter Compatibility button which can be toggled to Yes/ No to search by compatibility of PC components or not. Click on Expand to see a detailed view of added components and their prices.

Add Memory to PC Build
The next step is to select Memory which is the system that stores information for immediate use. Click the Add button to add the item to build. Below the Add Button is a View button clicking on which will open a pop-up to display the Product price, general specifications, performance specifications, physical specifications, and power specifications along with detailed Product images.
There is a Search Box on the top right corner to help find specific Product(s). The Product features will show on top of the list. There is a Filter Compatibility button which can be toggled to Yes/ No to search by compatibility of PC components or not. For instance, in the example, turning on compatibility did not bring any Product(s) for the Memory. However, when compatibility was turned off, all the Memory Product(s) were displayed. Click on Expand to see a detailed view of added components and their prices.

Add Storage to PC Build
After Memory is added successfully, select the Storage which are available in two options - Solid State Drive and Hard Disk Drive. Hard Disk Drives or HDDs is a traditional storage device that uses mechanical spinning platters and a moving read/write head to access data. Solid States Drive or SSDs are newer, faster drives that store data on instantly accessible memory chips. Each storages are provided from different brands to select.
Select any of the storage options, like SSD and click the Add button to add the Product to build. Below the Add Button is a View button clicking on which will open a pop-up to show the Product price, general specifications, performance specifications, physical specifications, and power specifications along with detailed Product images.
There is a Search Box on the top right corner to help find specific Product(s). The Product features will show on top of the list. There is a Filter Compatibility button which can be toggled to Yes/ No to search by compatibility of PC components or not. Click on Expand to see a detailed view of added components and their prices.


Add Case to PC Buils
When Storage is added, Case needs to be selected. A computer case serves mainly as a way to physically mount and contain all the actual components inside a computer. Click on the Add button to add the Product to build. Below the Add Button is a View button clicking on which will open a pop-up to display Product price, general specifications, performance specifications, physical specifications, power specifications, and Product images.
There is a Search Box on the top right corner to help find specific Product(s). The Product features will show on top of the list. There is a Filter Compatibility button which can be toggled to Yes/ No to search by compatibility of PC components or not. Click on Expand to see a detailed view of added components and their prices.

Add Monitor to PC Build
The next component to add after Case is Monitor. A monitor is an output device that displays information in the pictorial or text form. A monitor usually comprises a visual display, some circuitry, a casing, and a power supply. Click on the Add button to add the Product to build. Below the Add Button is a View button clicking on which will open a pop-up to show Product price, general specifications, performance specifications, physical specifications, and power specifications along with detailed Product images.
There is a Search Box on the top right corner to help find specific Product(s). The Product features will show on top of the list. There is a Filter Compatibility button which can be toggled to Yes/ No to search by compatibility of PC components or not. Click on Expand to see a detailed view of added components and their prices.

Add Power Supply to PC Build
After adding Monitor to the build, select Power Supply. A power supply is a unit converts mains AC to low-voltage regulated DC power for the internal components of a computer. Click the Add button to add the Product to build. Below the Add Button is a View button clicking on which will open a pop-up to display the Product price, general specifications, performance specifications, physical specifications, and power specifications with Product images.
There is a Search Box on the top right corner to help find specific Product(s). The Product features will show on top of the list. There is a Filter Compatibility button which can be toggled to Yes/ No to search by compatibility of PC components or not. For instance, in the example, turning on compatibility did not bring any Product(s) for the Power Supply. However, when compatibility was turned off, all the Power Supply Product(s) were displayed. Click on Expand to see a detailed view of added components and their prices.

Add Accessories to PC Build
The last component to add to PC Build are accessories. The accessories Page includes four Product(s) to select - Mouse, Keyboard, Speaker, and Headphone. Click on each one of these to add them one by one to Cart.

Add Mouse to PC Build
From these accessories, select the Mouse first which is a hand-held pointing device that detects two-dimensional motion relative to a surface. This motion is typically translated into the motion of a pointer on a display. Click on the Add button to add the Product to build. Below the Add Button is a View button clicking on which will open a pop-up to display Product price, general specifications, performance specifications, physical specifications, and power specifications along with detailed Product images.
There is a Search Box on the top right corner to help find specific Product(s). The Product features will show on top of the list. There is a Filter Compatibility button which can be toggled to Yes/ No to search by compatibility of PC components or not. Click on Expand to see a detailed view of added components and their prices.

Add Keyboard to PC Build
After adding Mouse, click on Accessories button to go back to the accessories main page. Now, select the second component Keyboard. A Keyboard is a peripheral input device modeled after the typewriter keyboard which uses an arrangement of buttons or keys to act as mechanical levers or electronic switches. Click the Add button to add the Product to build. Below the Add Button is a View button clicking on which will open a pop-up to show Product price, general specifications, performance specifications, physical specifications, and power specifications along with detailed Product images.
There is a Search Box on the top right corner to help find specific Product(s). The Product features will show on top of the list. There is a Filter Compatibility button which can be toggled to Yes/ No to search by compatibility of PC components or not. Click on Expand to see a detailed view of added components and their prices.

Add Speaker to PC Build
After adding Keyboard, click on Accessories button to go back to the accessories main page. Now, select the third component Speaker, which can be used to play sound or music. Click the Add button to add the Product to build. Below the Add Button is a View button clicking on which will open a pop-up to display the Product price, general specifications, performance specifications, physical specifications, and power specifications with Product images.
There is a Search Box on the top right corner to help find specific Product(s). The Product features will show on top of the list. There is a Filter Compatibility button which can be toggled to Yes/ No to search by compatibility of PC components or not. Click on Expand to see a detailed view of added components and their prices.

Add Headphone to PC Build
After adding Speaker, click on Accessories button to go back to the accessories main page. Now, select the fourth component headphones, which are output device that can be plugged into a computer to listen to audio. Click on the Add button to add Product to build. Below the Add Button is a View button clicking on which will open a pop-up to show Product price, general specifications, performance specifications, physical specifications, and power specifications along with detailed Product images.
There is a Search Box on the top right corner to help find specific Product(s). The Product features will show on top of the list. There is a Filter Compatibility button which can be toggled to Yes/ No to search by compatibility of PC components or not. Click on Expand to see a detailed view of added components and their prices.

Place Order for Created Build
When all the components will be successfully added to the PC Build, click on the Expand button from the bottom left to open the pop-up showing Cart details. From here, click on the Add to Cart button to complete the New PC Build and place a New Order. Click on View Build button to make any changes or name to save the PC Build.

Image 1: Click on the Expand button from the bottom left to open the pop-up showing Cart details.

Image 2: When all the components are added to the PC Build, click on Add to Cart to proceed with Order.
Review Cart Checkout Details
Clicking on Add to Cart will redirect to a new Page showing full details of PC Build Cart. Beside each component, there are + and - buttons to increase and decrease quantities for the Build. After checking all the details, click on Proceed to Checkout button to proceed with filling in the Billing, Shipping, and Payment details for New Order.

Complete Billing, Shipping, and Payment Details for Order
In the checkout page, fill in the Billing details to complete processing of the Order. Select preferred Shipping and Payment options, and click on Place Order button to confirm and place New Order for the User’s PC Build.

PC Build Order Confirmation
When the Order is sucessfully placed, it will redirect to the Order Confirmation Page showing the Order details. There are three options to view all the Order of the User, and go directly to Shop or Home. Using Print Invoice button, the User can print out the Order invoice for record containing the Billing, Shipping, and Order details.

Save Build under My Builds
When all the components will be successfully added to the PC Build, click on the Expand button from the bottom left to open the pop-up showing Cart details. From here, click on the Add to Cart button to complete the New PC Build and place a New Order. Click on View Build button to make any changes or name to save the PC Build.
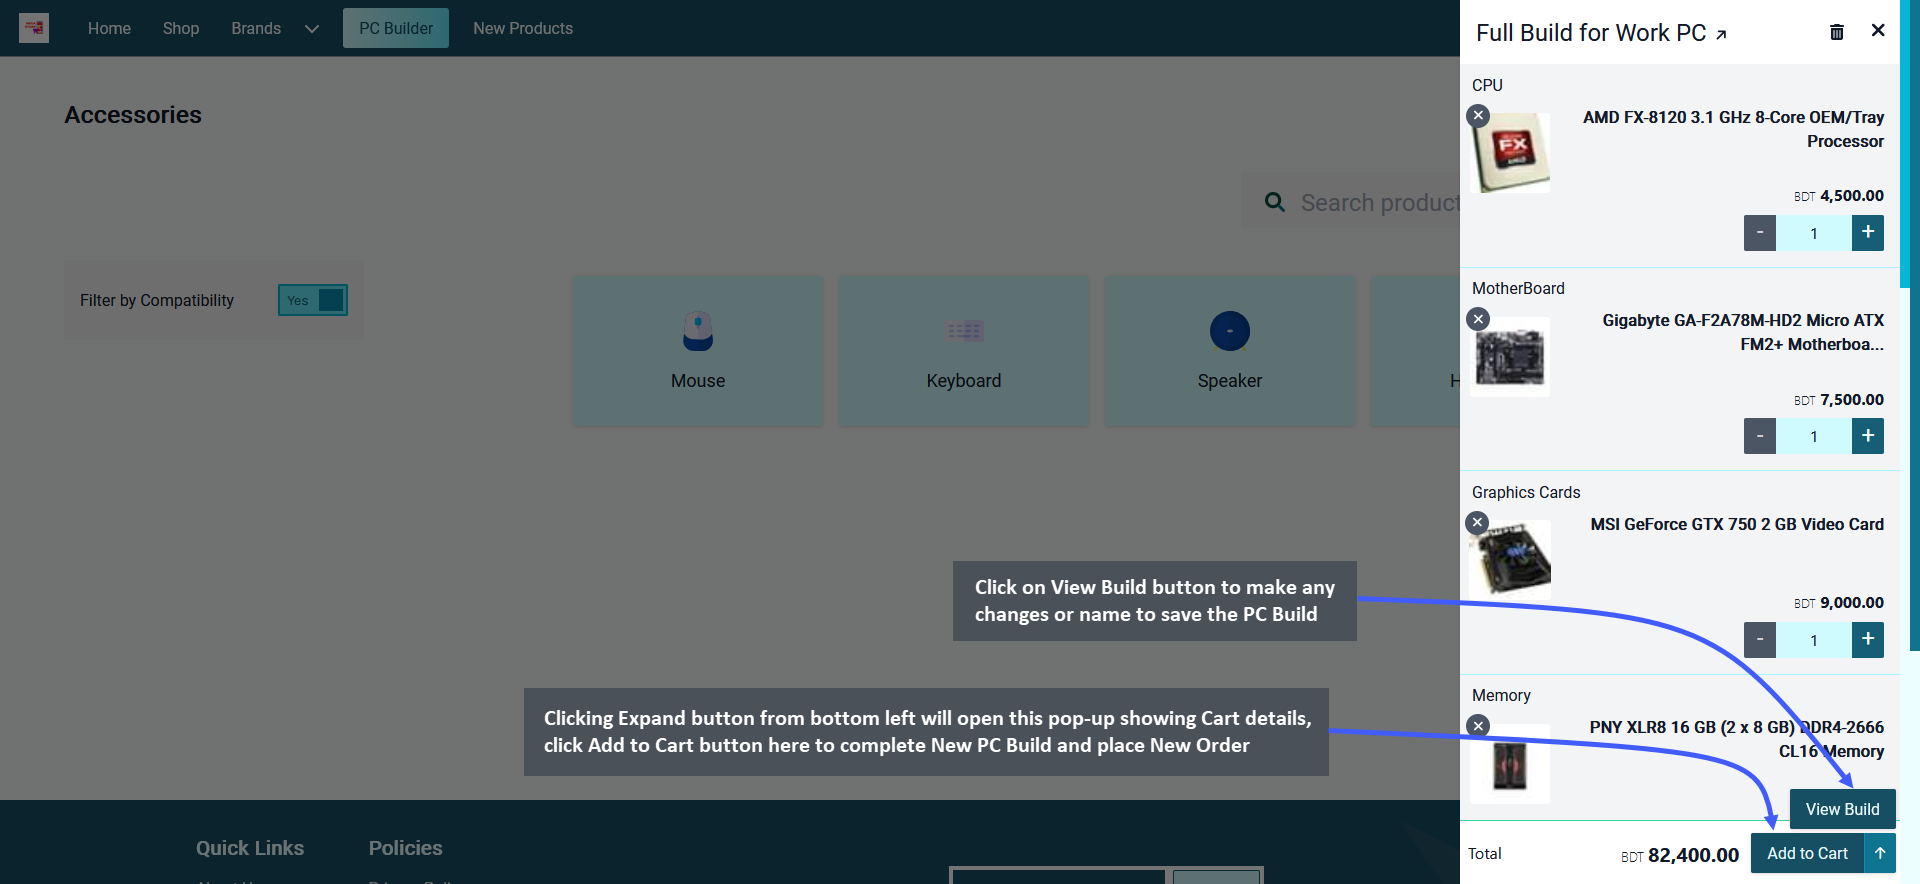
Image 1: Click Add to Cart button to complete PC Build or Click View Build button to make any changes.
Make Builds Public or Private
The Customer can customize their Build by clicking on View Build button. They can make the PC Builds Public or Private with the use of Make It Public and Make It Private buttons. Switching from one to another will make Build from Public to Private and vice versa. Below it, there is a box to Name the PC Build and a box to add description for the Build. Click the Save button to save all these settings successfully. Use Add to Cart button to add the PC Build to Cart again after completing customization and Order this Build.
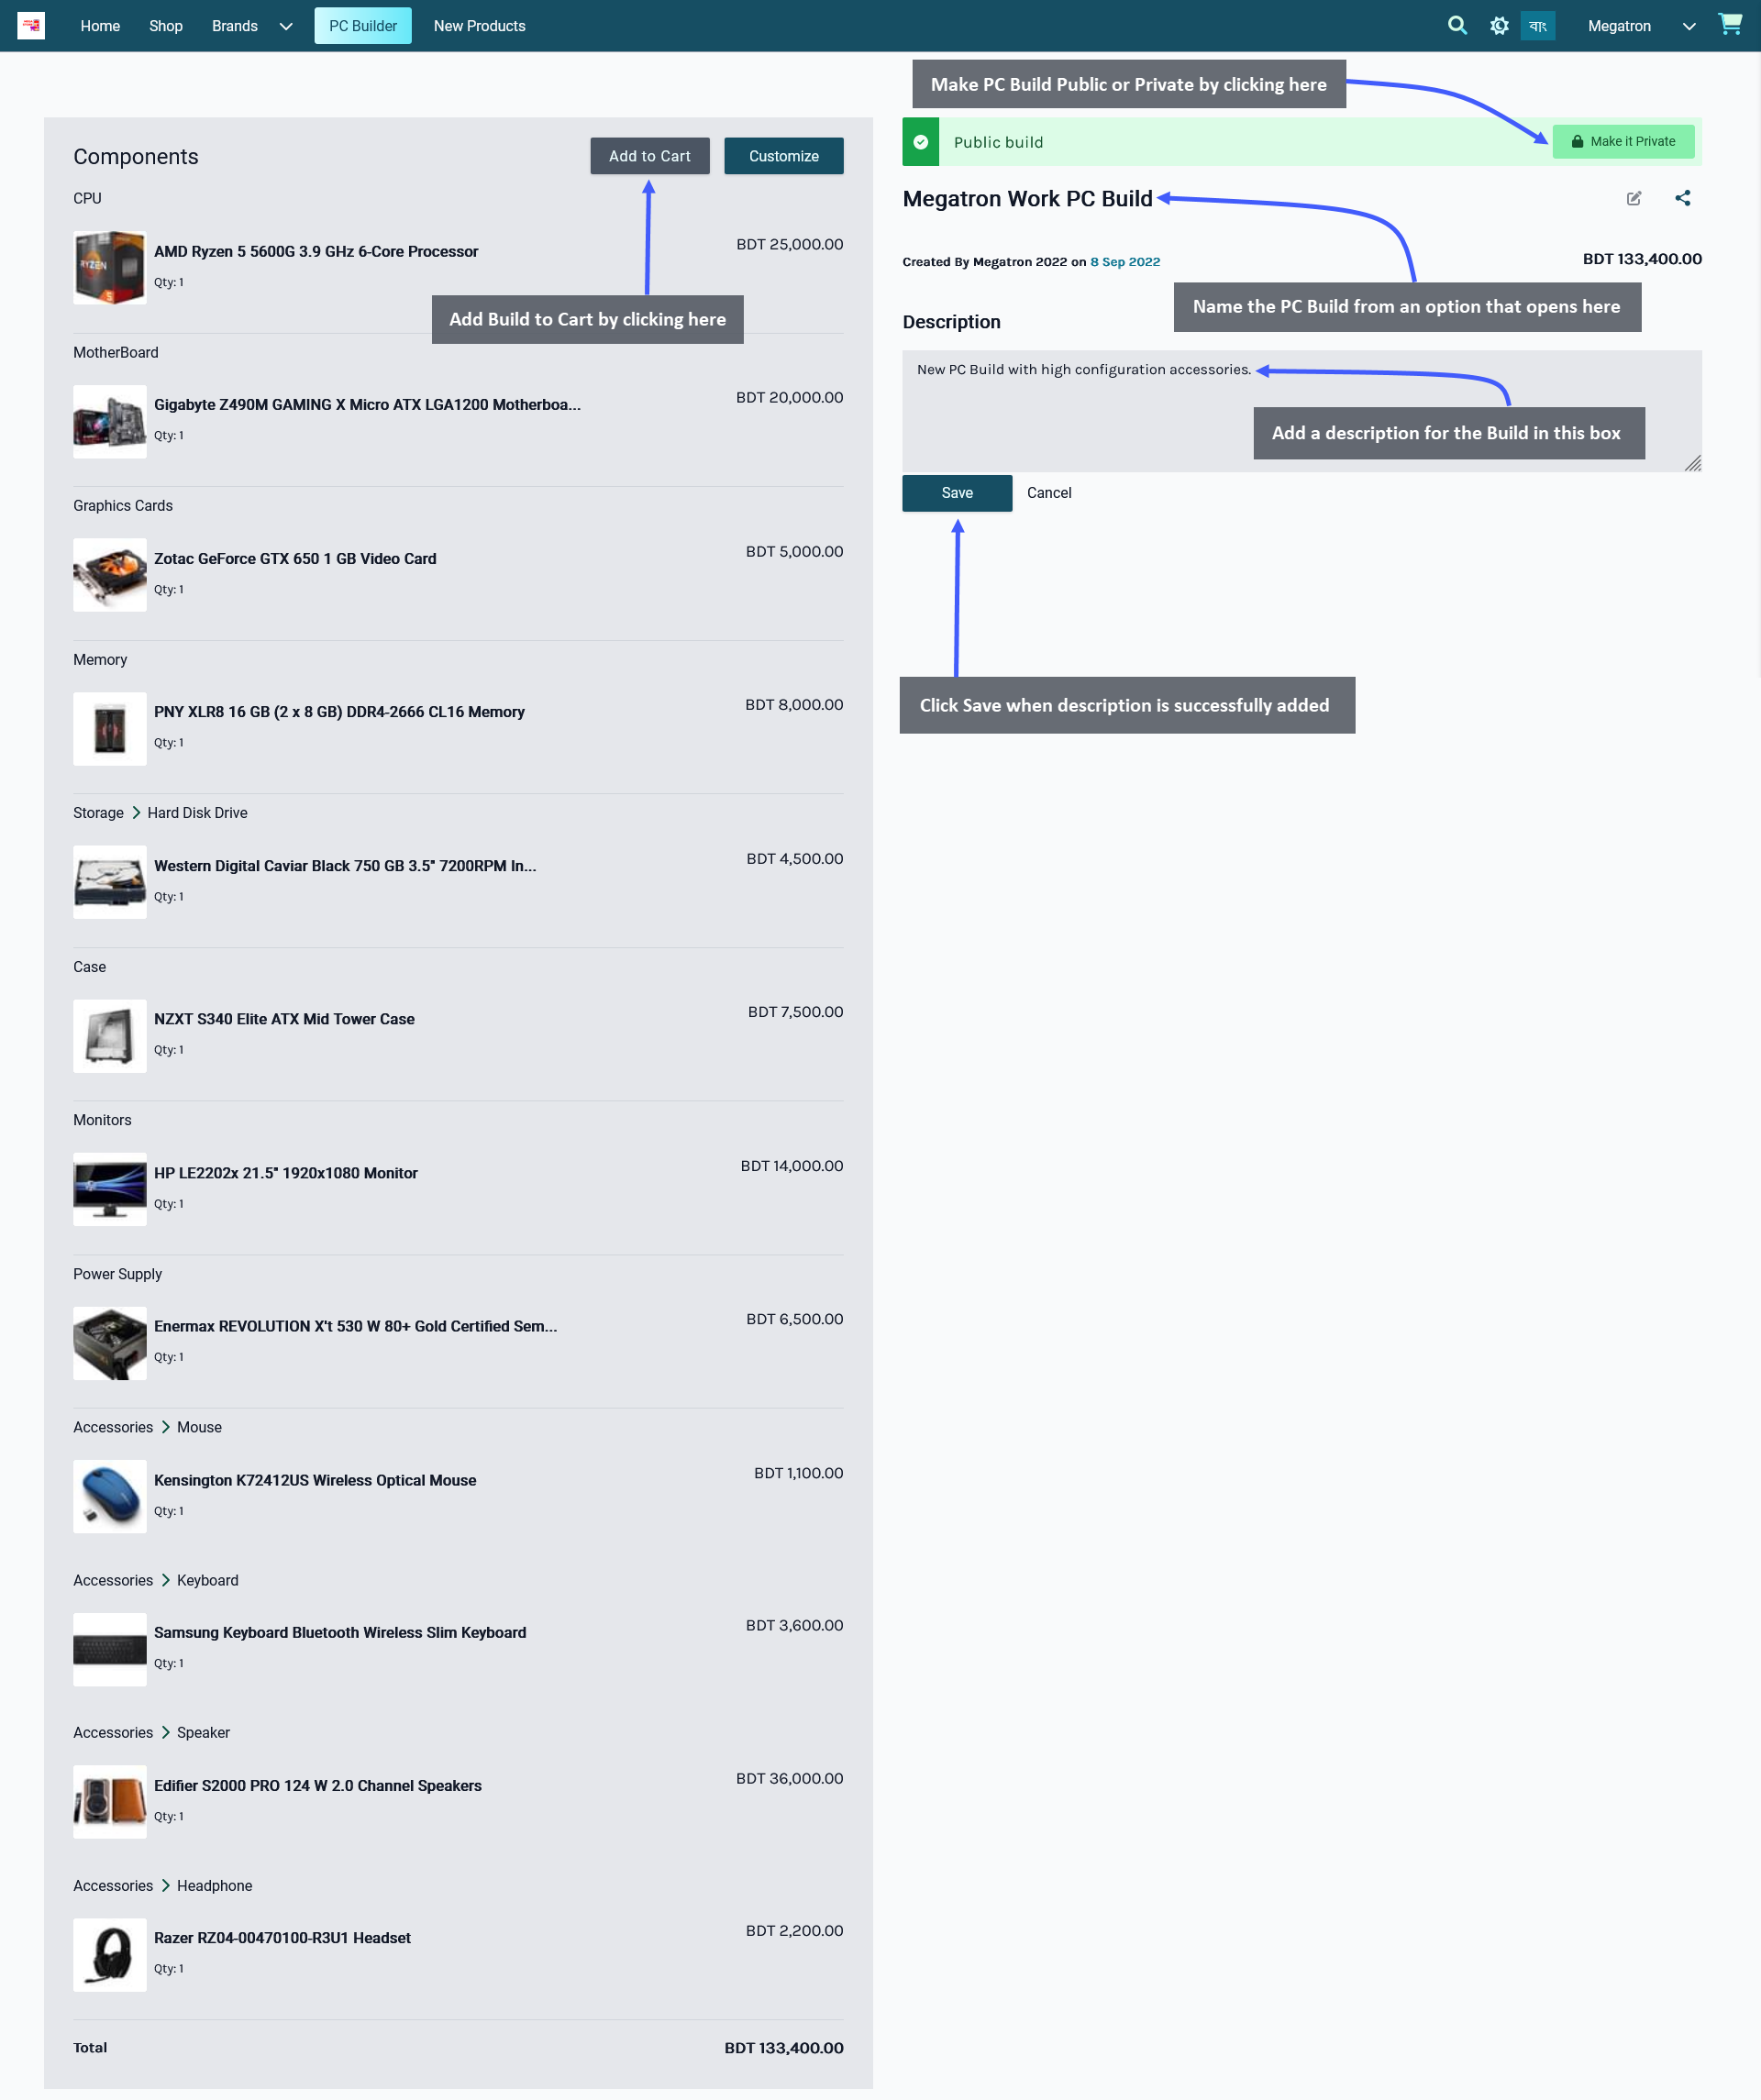
Image 2: Customize Cart on this Page, make Build Public or Private, add Name or Description for Build.
My Builds
The Saved Build with a Name and a Description will show up under My Builds section on PC Builder. Usually, the last three recent PC Builds by the Customer will be on display under My Builds. If a Customer had created more than three Builds, then they can be viewed by clicking on the View More button. Clicking on the View More button will show all the Builds that Customer have created in several pages that can be viewed.
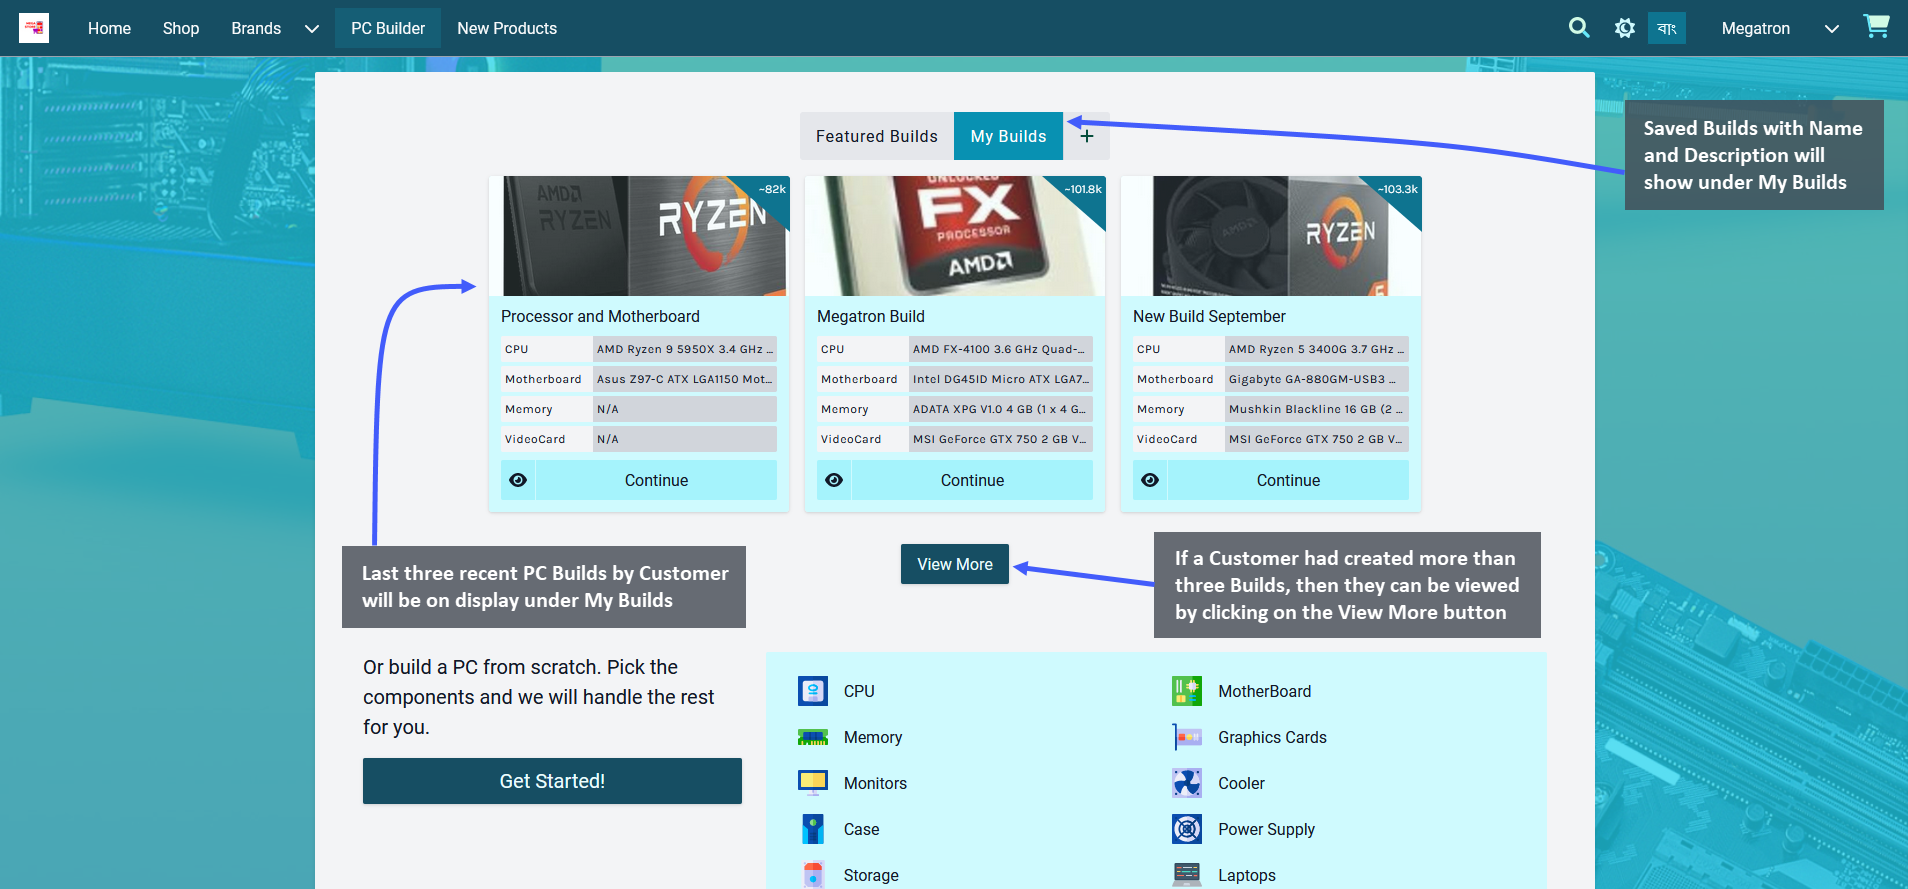
Image 3: Only last three Builds will show under My Builds, click View More to view all Builds by Customer.
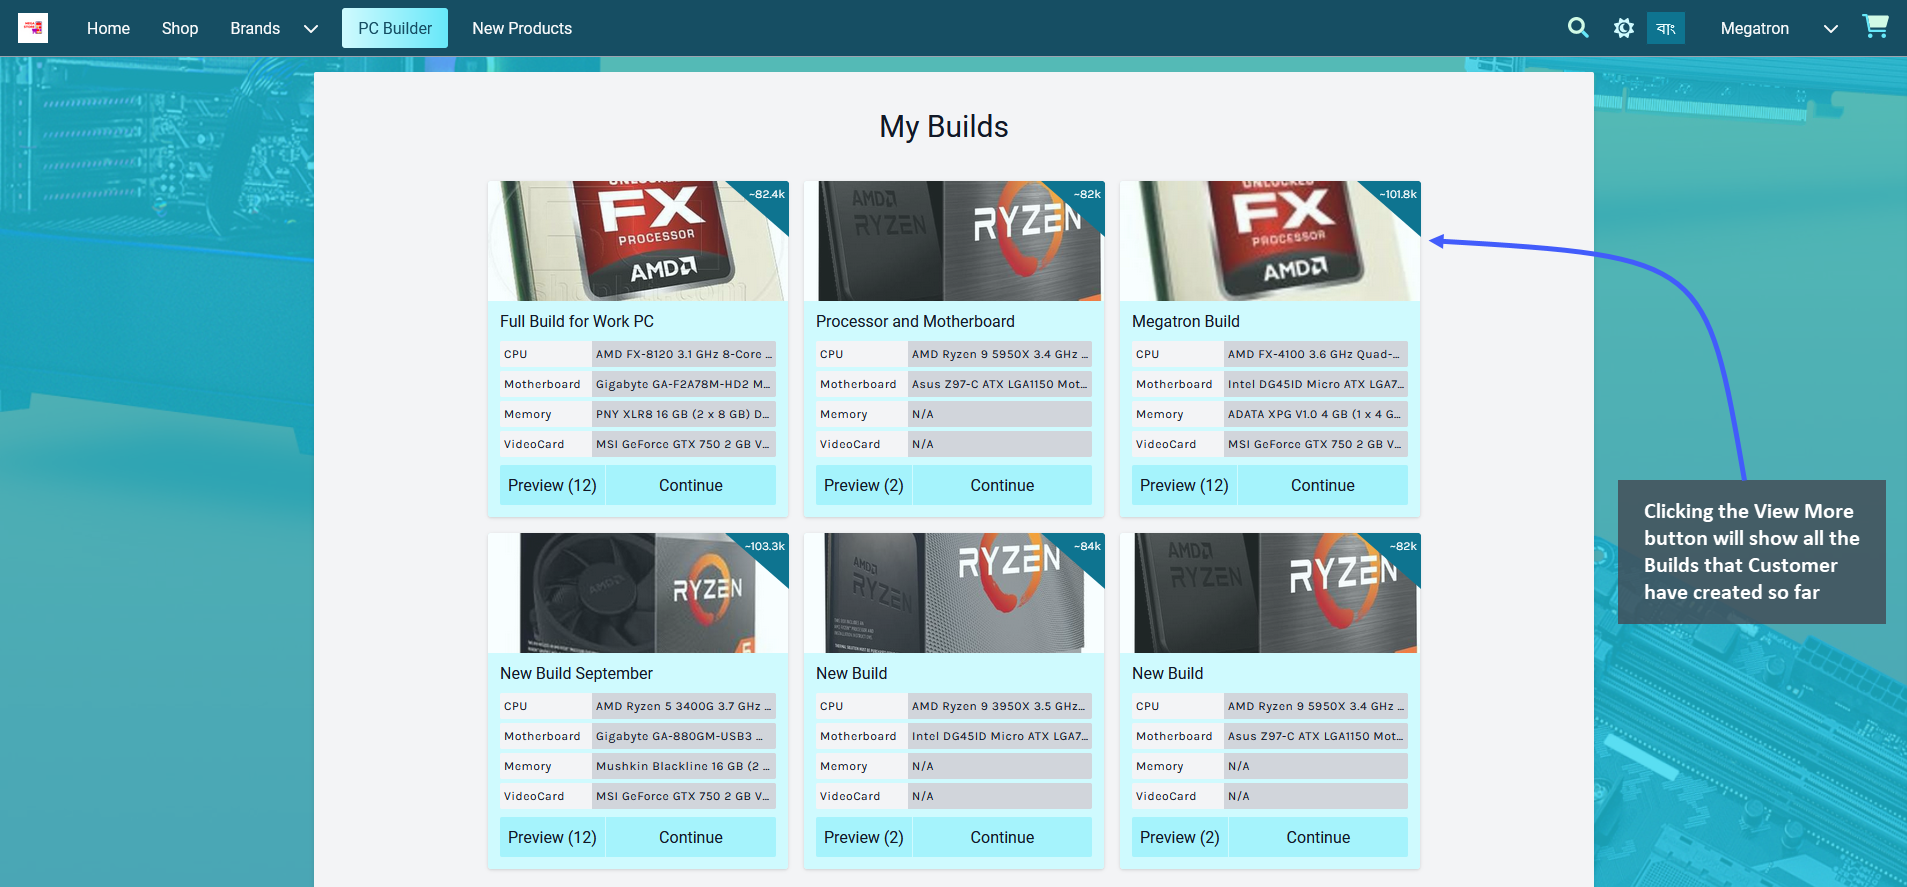
Image 4: Clicking View More button will show all the Builds that Customer have created with PC Build.
31 - Cable Plug and Socket Types
Learn about the different electrical outlet cable plug and socket types used around the world.
Commonly used Plug Types
Several types of electrical outlet plugs and sockets are used in our country. In order to under the socket types better, a list of respective plug and outlet types with voltages and frequencies has been provided below:
Type A: 2 Flat Pins (Ungrounded)
- This plug with two flat parallel prongs is considered standard mainly in the USA, Canada, Mexico, and Japan.
- The plug has two flat 1.5 mm thick blades, measuring 15.9 – 18.3 mm in length and spaced 12.7 mm apart.
- This plug is rated at 15 amps and has almost always 100 – 127 V.
- These plugs are not insulated (i.e. the pin shanks are not sleeved, i.e. they do not have a black covering towards the plug body)
- Sockets compatible with this plug usually have two contact wiper that the prongs slide into.
- These sockets either have bumps that fit into the holes or two spring-action blades that grip the sides of the plug pin.
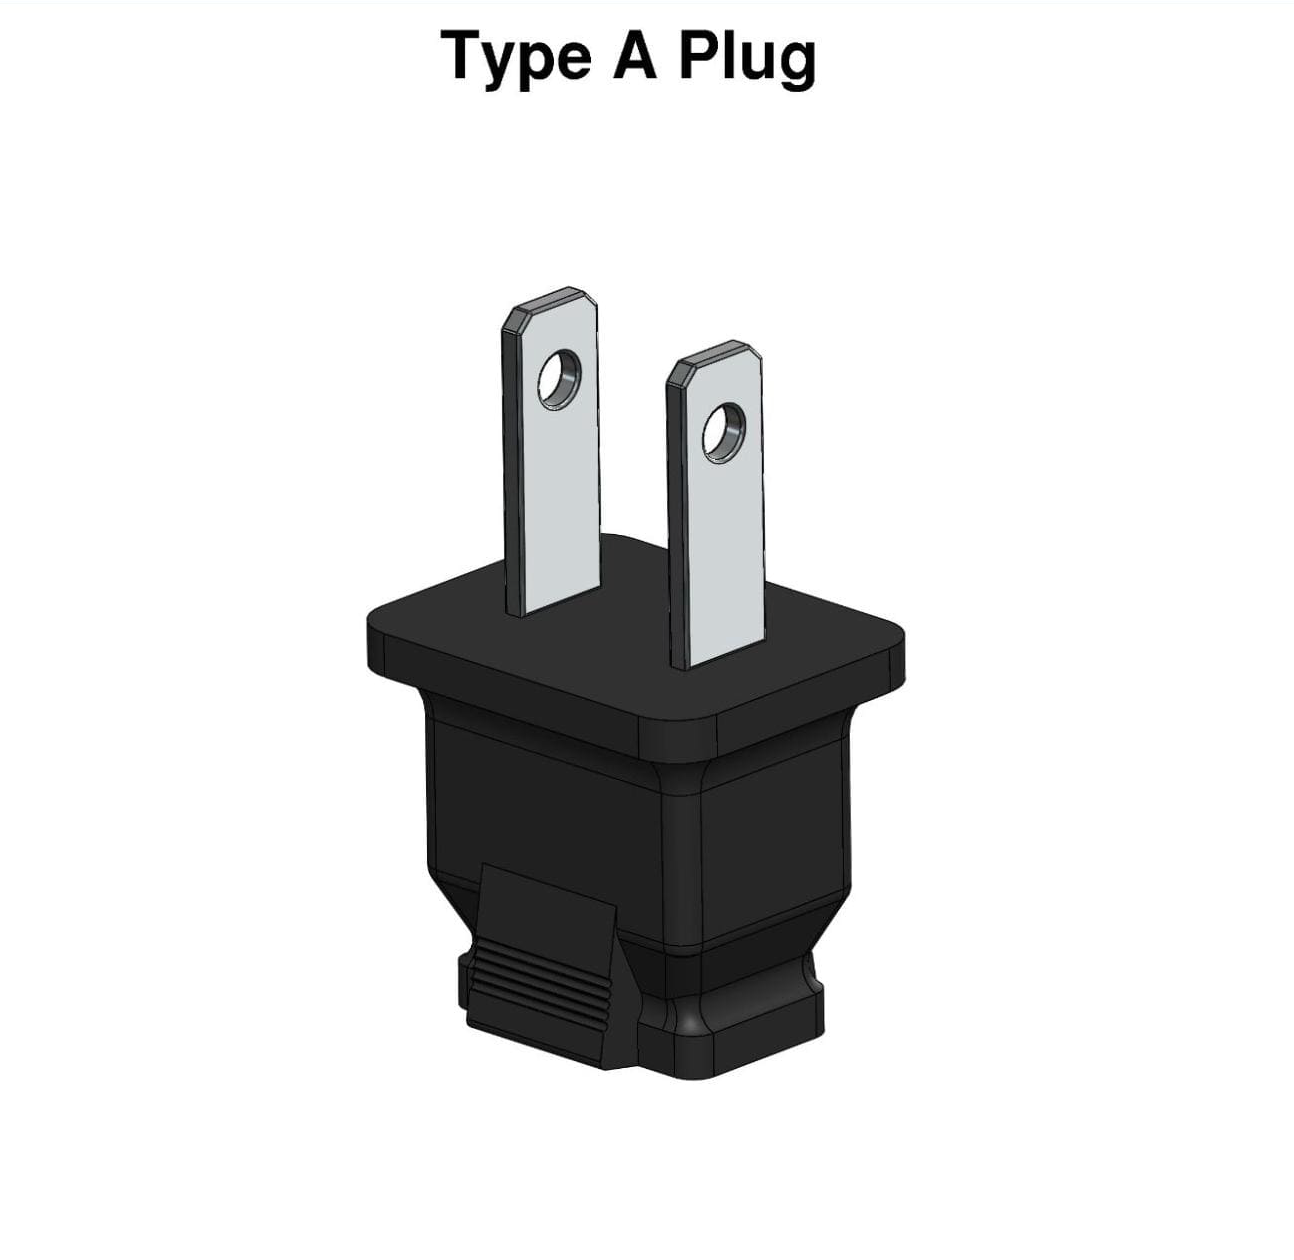
Image 1: This plug with two flat parallel prongs is mainly used in the USA, Canada, Mexico, and Japan.

Image 2: Type A sockets either have bumps or two spring-action blades that grips the the plug pin.
Type B: 2 Flat Pins and 1 Round Pin (Grounded)
- This plug with two flat 1.5 mm thick blades and a 4.8 mm diameter round or U-shaped earth pin is mainly used in the USA, Canada, and Mexico.
- The plug is rated at 15 amps and has almost always 100 – 127 V.
- These plugs are not insulated (i.e. the pin shanks are not sleeved, i.e. they do not have a black covering towards the plug body)
- These plugs outlets are not recessed into the wall, i.e. if a the plug is pulled halfway out, its prongs are still connected to the socket which has risk of electrocution when pulling the plug out and putting fingers around it.
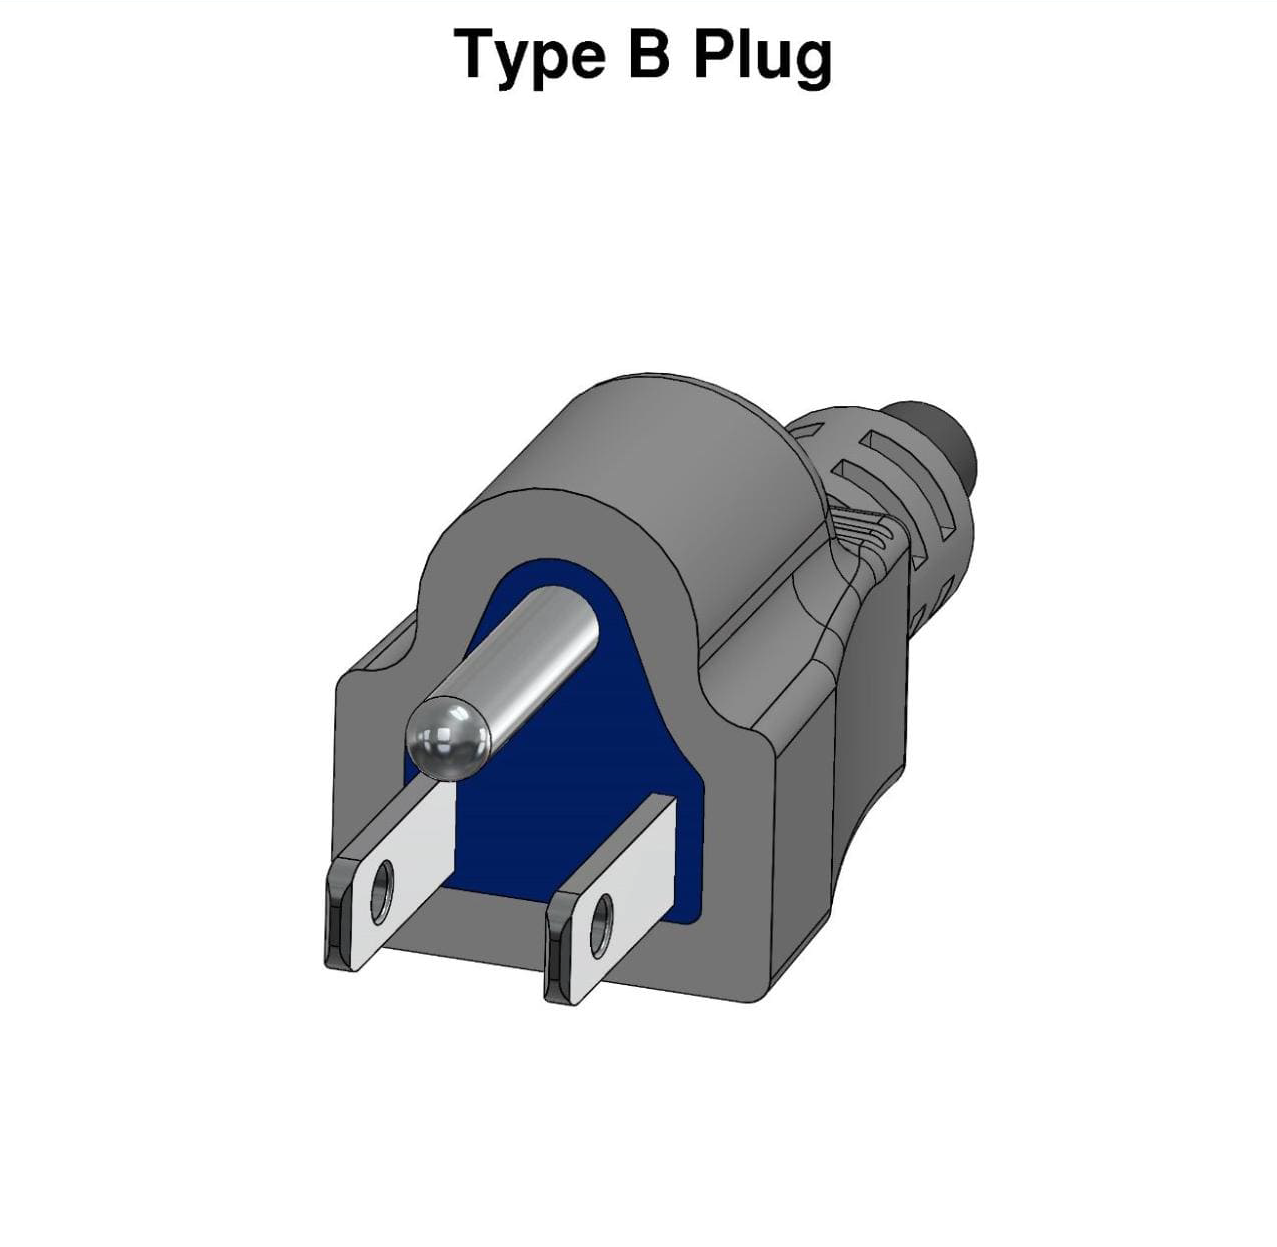
Image 3: This plug with two flat thick blades and a U-shaped earth pin is used in USA, Canada, and Mexico.
Image 4: Type B sockets are not recessed into the wall and has electrocution risk when pulling the plug.
Type C: 2 Round Pins (Ungrounded) 2.5 amp version
- This plug with two round prongs is the most common plug internationally widely used in Europe, South America, and Asia.
- The plug has two 4 mm round pins, measuring 19 mm in length on centres spaced 18.6 mm apart at the base and 17.5 mm apart at the tip.
- The two pins have 10 mm long insulated sleeves that fits into any socket that accepts 4.0 – 4.8 mm round contacts on 17.5 – 19 mm centres.
- The plug is generally limited for use in class II applications that require 2.5 amps or less.
Image 5: This plug with two round prongs is internationally widely used in Europe, South America, and Asia.
Image 6: Type C sockets have two holes with two spring-action blades that grips the plug pin.
Type C: 2 Round Pins (Ungrounded) 16 amp version
- There is also a second, less frequently used version of the type C plug (CEE 7/17), which is rated at either 10 or 16 amps.
- Its pins have the same length (19 mm) as the 2.5 amp version, but they are not insulated and have a slightly larger diameter (4.8 mm).
- Appliances that do not require earthing, but which are high energy-consuming, are almost always fitted with this kind of plug (e.g. hair dryers, bathroom heaters, vacuum cleaners, etc.).
Image 7: This ungrounded contour plug with two round prongs is the 10 or 16 ampere version of type-c plug.
Type D: 3 Round Pins (Grounded)
- This plug with three round prongs that form a triangle is almost exclusively used in India and Nepal.
- The plug is rated at 6 amps and has almost always 220 – 240 V.
- The central earth pin is 20.6 mm long and has a diameter of 7.1 mm.
- The 5.1 mm line and neutral pins are 14.9 mm long, on centres spaced 19.1 mm apart.
- These plugs are not insulated (i.e. the pin shanks are not sleeved, i.e. they do not have a black covering towards the plug body)
- These plugs outlets are not recessed into the wall, i.e. if a the plug is pulled halfway out, its prongs are still connected to the socket which has risk of electrocution when pulling the plug out and putting fingers around it.
Image 8: This plug with three round prongs that form a triangle is exclusively used in India and Nepal.
Image 9: Type D sockets have one large and two small holes with spring-action blades that grip the plug pin.
Type E: 2 Round Pins (Grounded)
- This plug with two 4.8 mm round pins is used in France, Belgium, Poland, Slovakia and Czech Republic.
- It has a 14 mm long grounding hole to accept the earth pin of the type E socket.
- This plug is rated at 16 amps and has almost always 220 – 240 V.
- It has top and bottom indentations with earthing clips and a pair of plastic notches on the left and right side.
- The socket is recessed by 15 mm, so partially inserted plugs do not present a shock hazard.
Image 10: This plug with two round pins is used in France, Belgium, Poland, Slovakia and Czech Republic.
Image 11: Type E socket is recessed by 15 mm, so partially inserted plugs do not present a shock hazard.
Type F: 2 Round Pins (Grounded)
- This plug with two 4.8 mm round pins is used almost everywhere in Europe and Russia, except for UK and Ireland.
- It top and bottom indentations with conductive clips in them in order to earth the appliance.
- This plug is rated at 16 amps and has almost always 220 – 240 V.
- It has a pair of plastic notches on the left and right side to provide extra stability when using large and heavy plugs (e.g. with built-in transformers).
- The socket is recessed by 15 mm, so partially inserted plugs do not present a shock hazard.
Image 12: This plug with two round pins and conductive clips is used mostly in Europe and Russia.
Image 13: Type F socket is recessed by 15 mm, so partially inserted plugs do not present a shock hazard.
Type G: 3 Rectangular Prongs (Grounded)
- This plug with three rectangular prongs are mainly used in the United Kingdom, Ireland, Malta, Malaysia, Singapore and the Arabian Peninsula.
- The central earth pin is 4 by 8 mm and 22.7 mm long. Line and neutral pins are 4 by 6.35 mm and 17.7 mm long, on centres spaced 22.2 mm apart.
- This plug is rated at 13 amps and has almost always 220 – 250 V.
- The 9-mm long insulated sleeves prevent accidental contact with a bare connector while the plug is partially inserted.
- Type G wall sockets almost always include built-in switches for extra safety and prevent shock hazard.
Image 14: This plug with three rectangular prongs are used in UK, Ireland, Malta, Malaysia, and Singapore.
Image 15: Type G sockets almost always include built-in switches for extra safety and prevent shock hazard.
Appliance Connectors
Some appliance connectors are also commonly used in our country to medium and low voltage appliances:
C7 Connectors: 2 Side-by-Side Prongs (Ungrounded)
- C7 is a two-pronged non-polarized connector that has two prongs side-by-side.
- They are typically used to power low voltage appliances such as TVs, portable CD players, laptop chargers, laptop power supplies, video, and audio equipment etc.
- They are rated up to 250V and 2.5 Amps Internationally or 125V and 10 Amps in North America.
Image 16: This two-pronged non-polarized connector is typically used to power low voltage appliances.
C13 Connectors: 3 Pin Power Cables (Grounded)
- C13 is a 3-pin power cable used mainly for computers, monitors, communications, and other appliances.
- It is also commonly called a “kettle cord” and is the male connection that fits in C14 female.
- They are typically used on standard mains cables and are rated to a maximum of 240V and 10 Amps.
Image 17: This 3-pin power connector is used mainly for computers, monitors, and other appliances.


 s
s


