All Settings
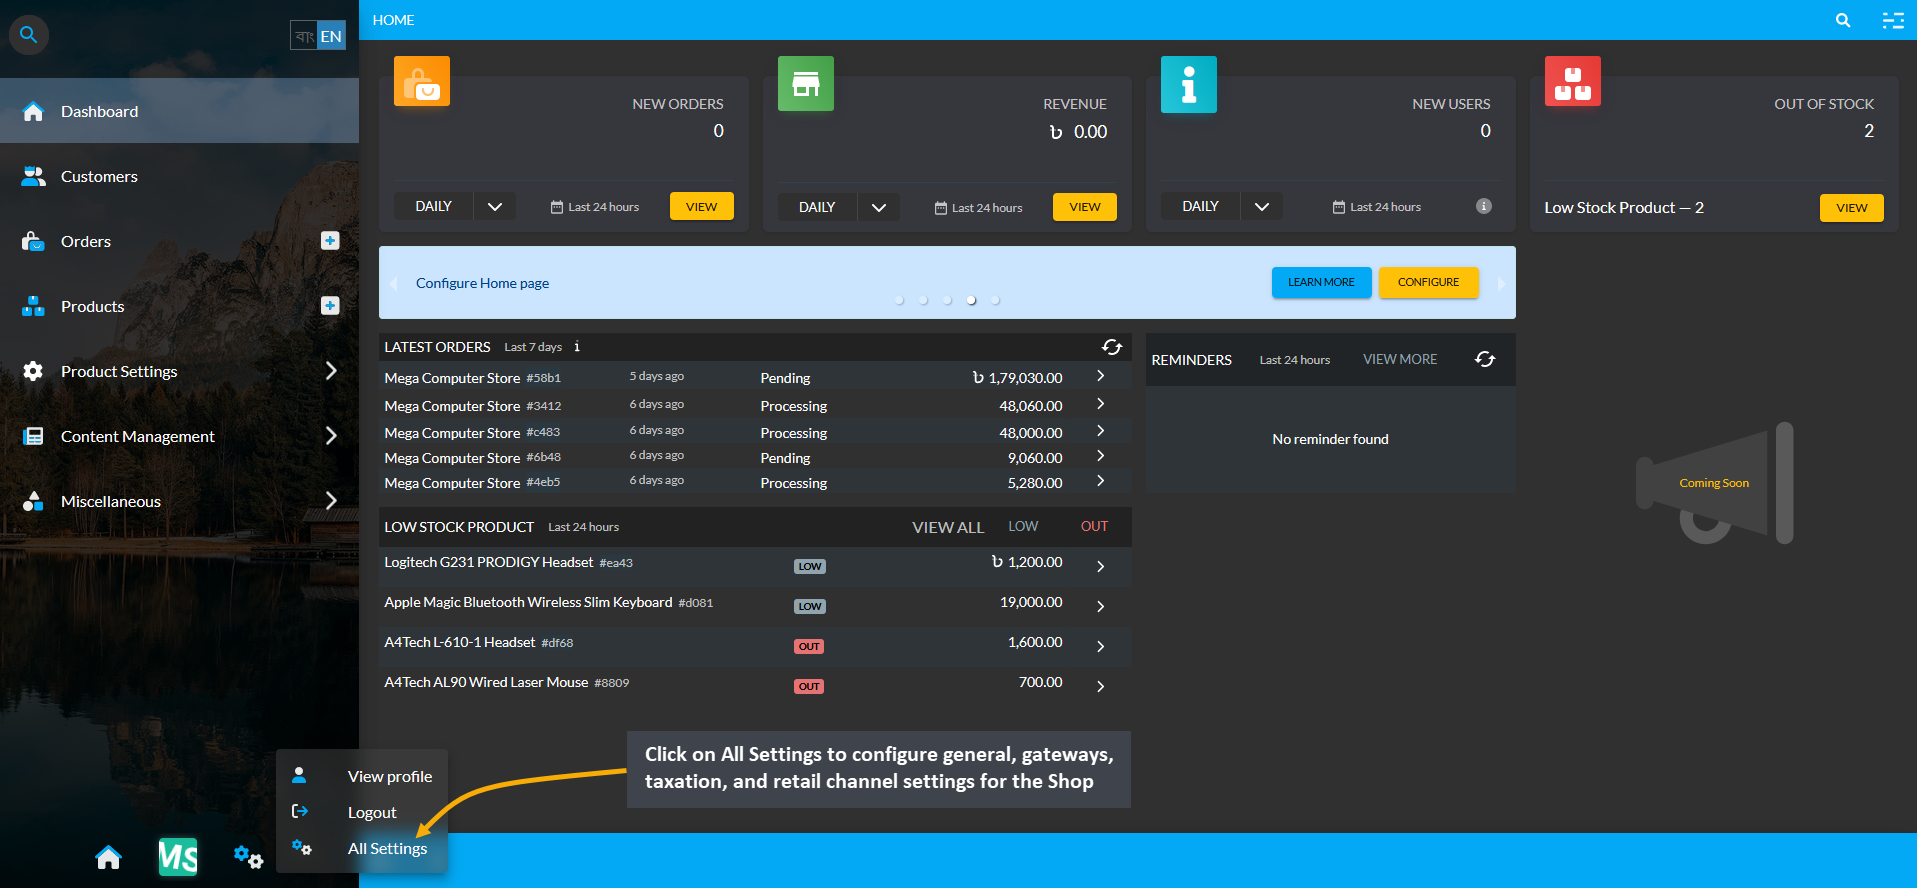
All Settings will allow configuring business information, Payment gateways, Shipping gateways, tax related settings, and product retail channel settings.
Click on All Settings to configure general, gateways, taxation, and retail channel settings for the Shop.
The main configuration for business information, web page themes, Payment gateways, Shipping gateways, Tax management related settings, and product retail channel settings can be done through All Settings.
Clicking on All Setting will open the Page where General settings for business details, branches, and counters can be set. Then, Payment Gateway and Shipping Gateway can be configured. Already created Tax Groups based on Product Categories can be viewed under Taxation. Finally, control whether Products will be allowed to be visible on the Shop or not with Retail Channels setting. Shop Owner needs to configure these settings first for their Shop.
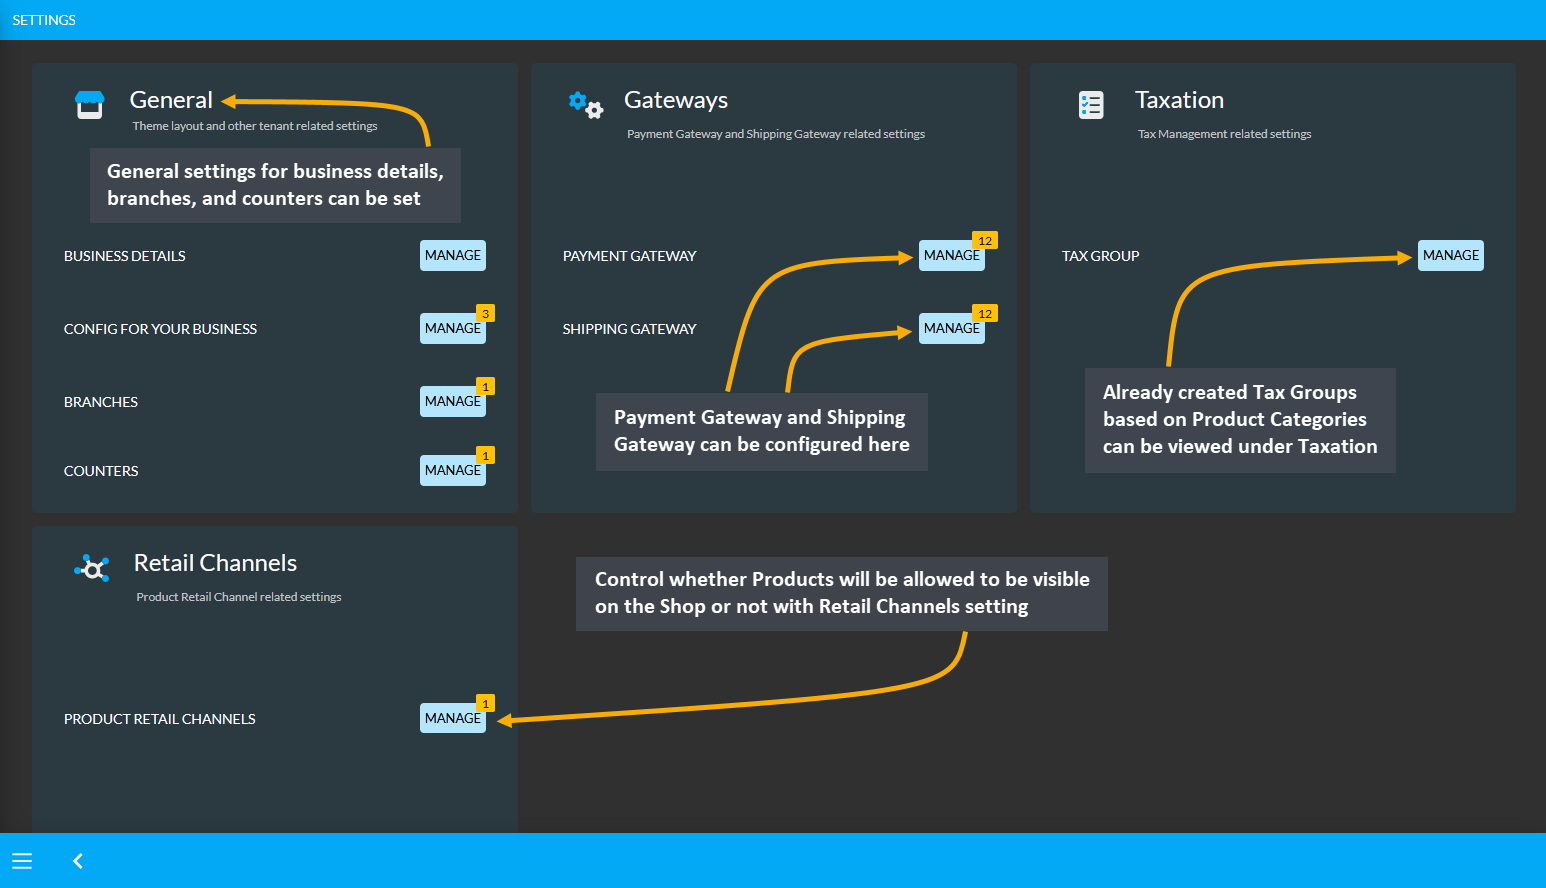
1 - General Tenant Settings
The main configuration for business information, web page themes, payment gateways, shipping gateways, tax management related settings, and product retail channel settings can be done through this module.
General Tenant Settings
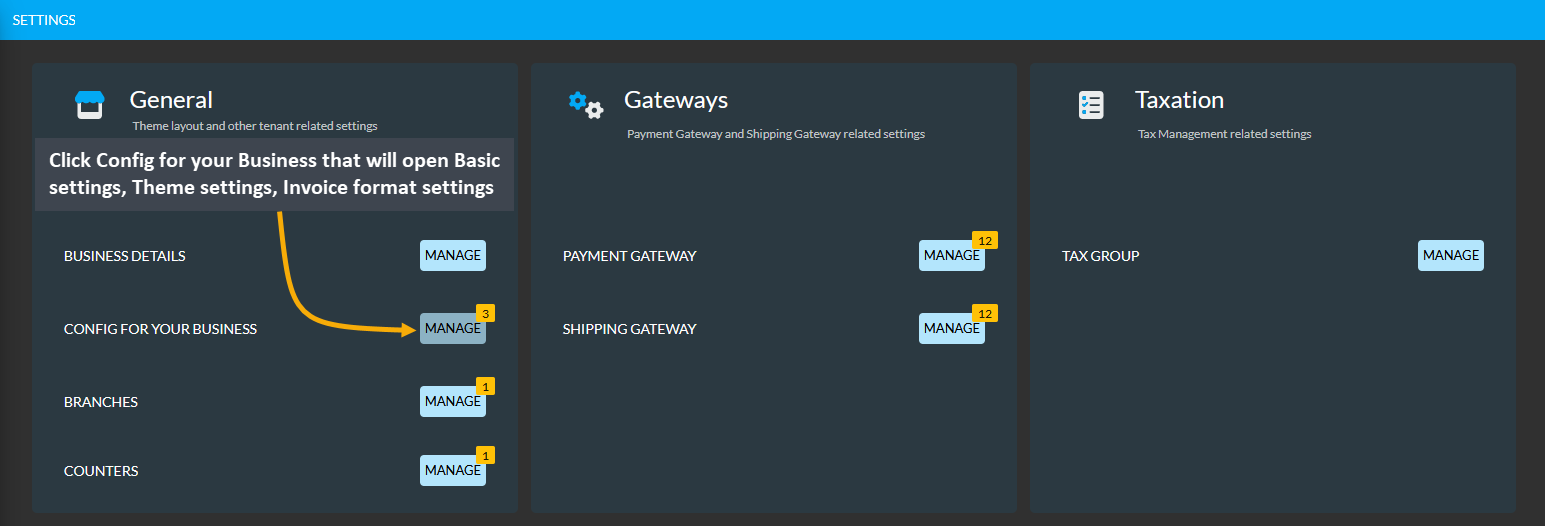
Under General Settings, the first option to configure is the Business Details, which have been previously described Setup Tenant Details. Then, there are Config for your Business, Branches, and Counters that needs to be set. Click on Config for your Business from Settings that will open Basic settings, Theme settings, Invoice format settings.
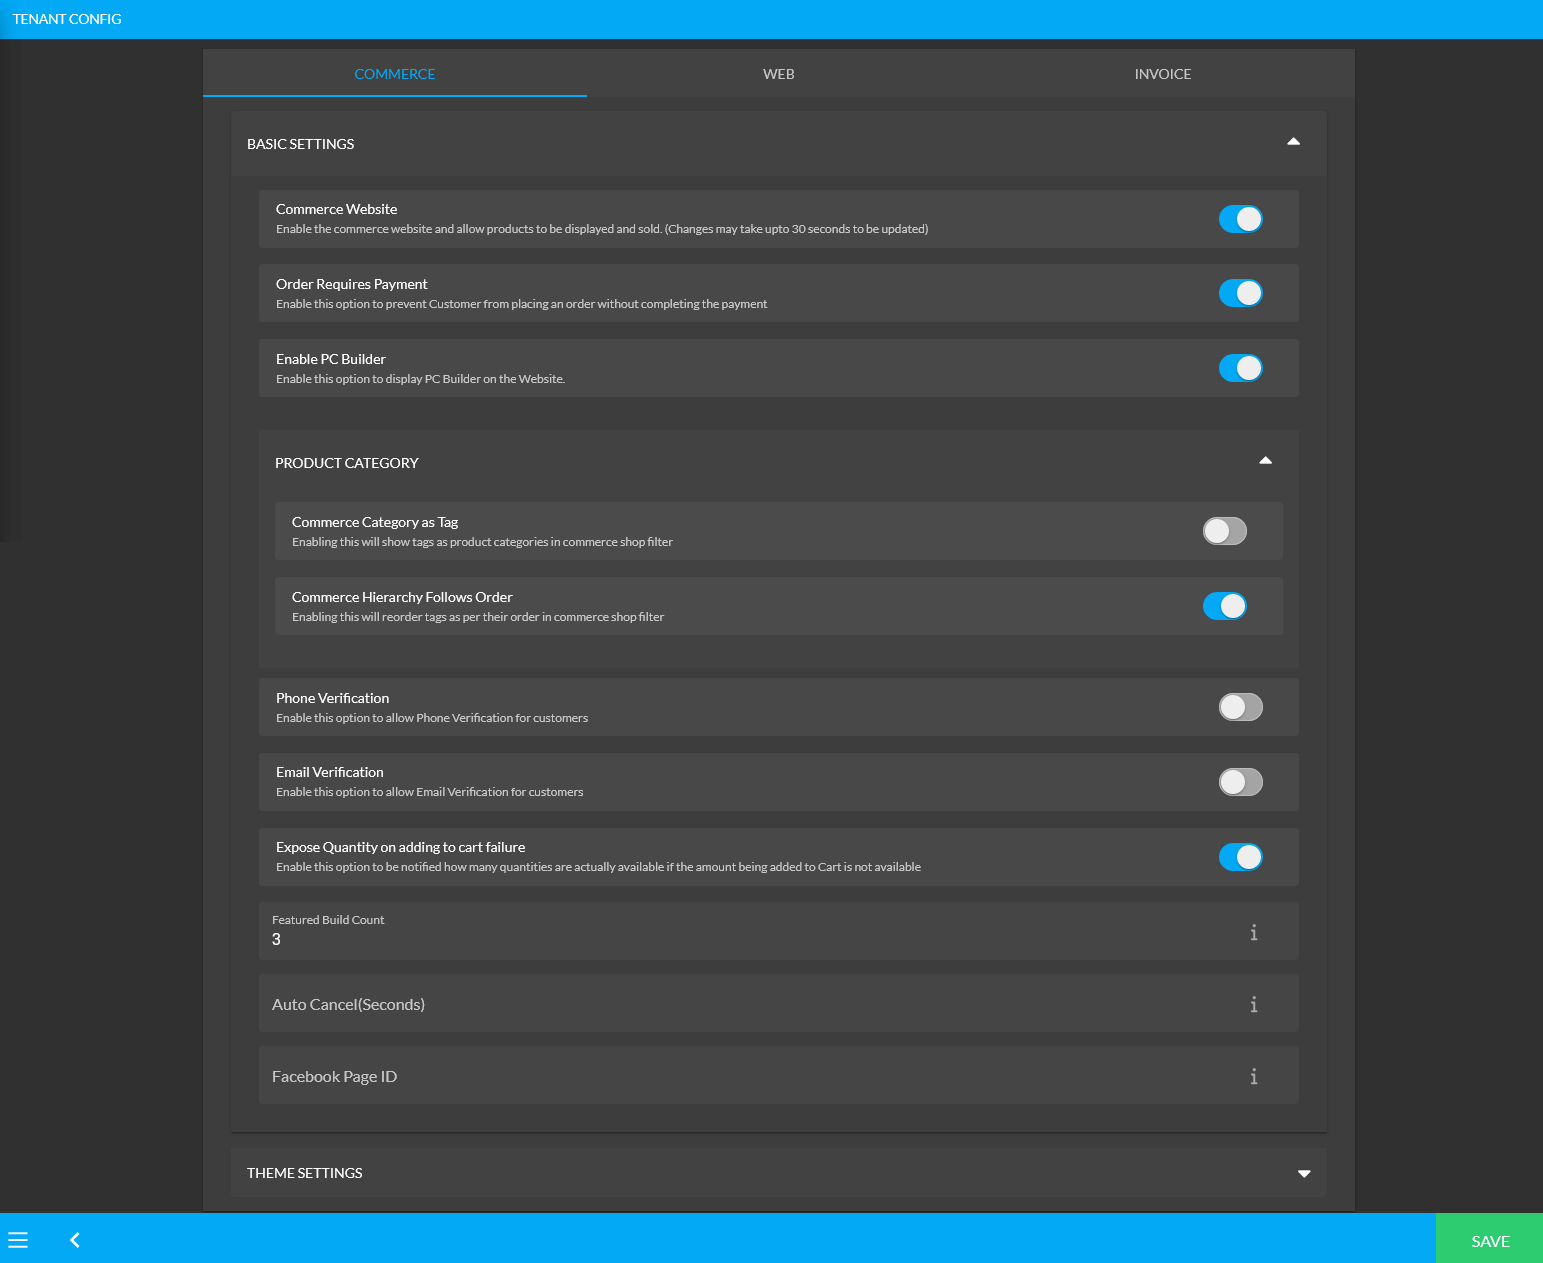
Basic Settings
Basic Settings include options of Commerce Website toggle which enables the Website and allows Products to be displayed and sold. The Order Requires Payment toggle will prevent a Customer from placing an Order without completing the Payment. The Enable PC Builder toggle will allow displaying PC Builder tab on the Website.
Under Product Category, there are options to use Tags as Product Categories on Website, reorder Tags according to their order on Website shop filter, allow phone and email verification, expose quantities on Cart if the amount added is not available, show build count, auto cancel timing, and link the Facebook Page ID to setup Messenger widget on the Website. These are the basic settings that Shop Owner needs to configure.
Theme Settings
Click the down arrow to minimize Basic Settings and see the wide view for Theme Settings. Check the detailed configuration options for theme colors and fonts with preview. There is a dropdown to select preferred layout from Full Width (Default), Large, Standard, and Small. Click Save button to confirm all the changes.
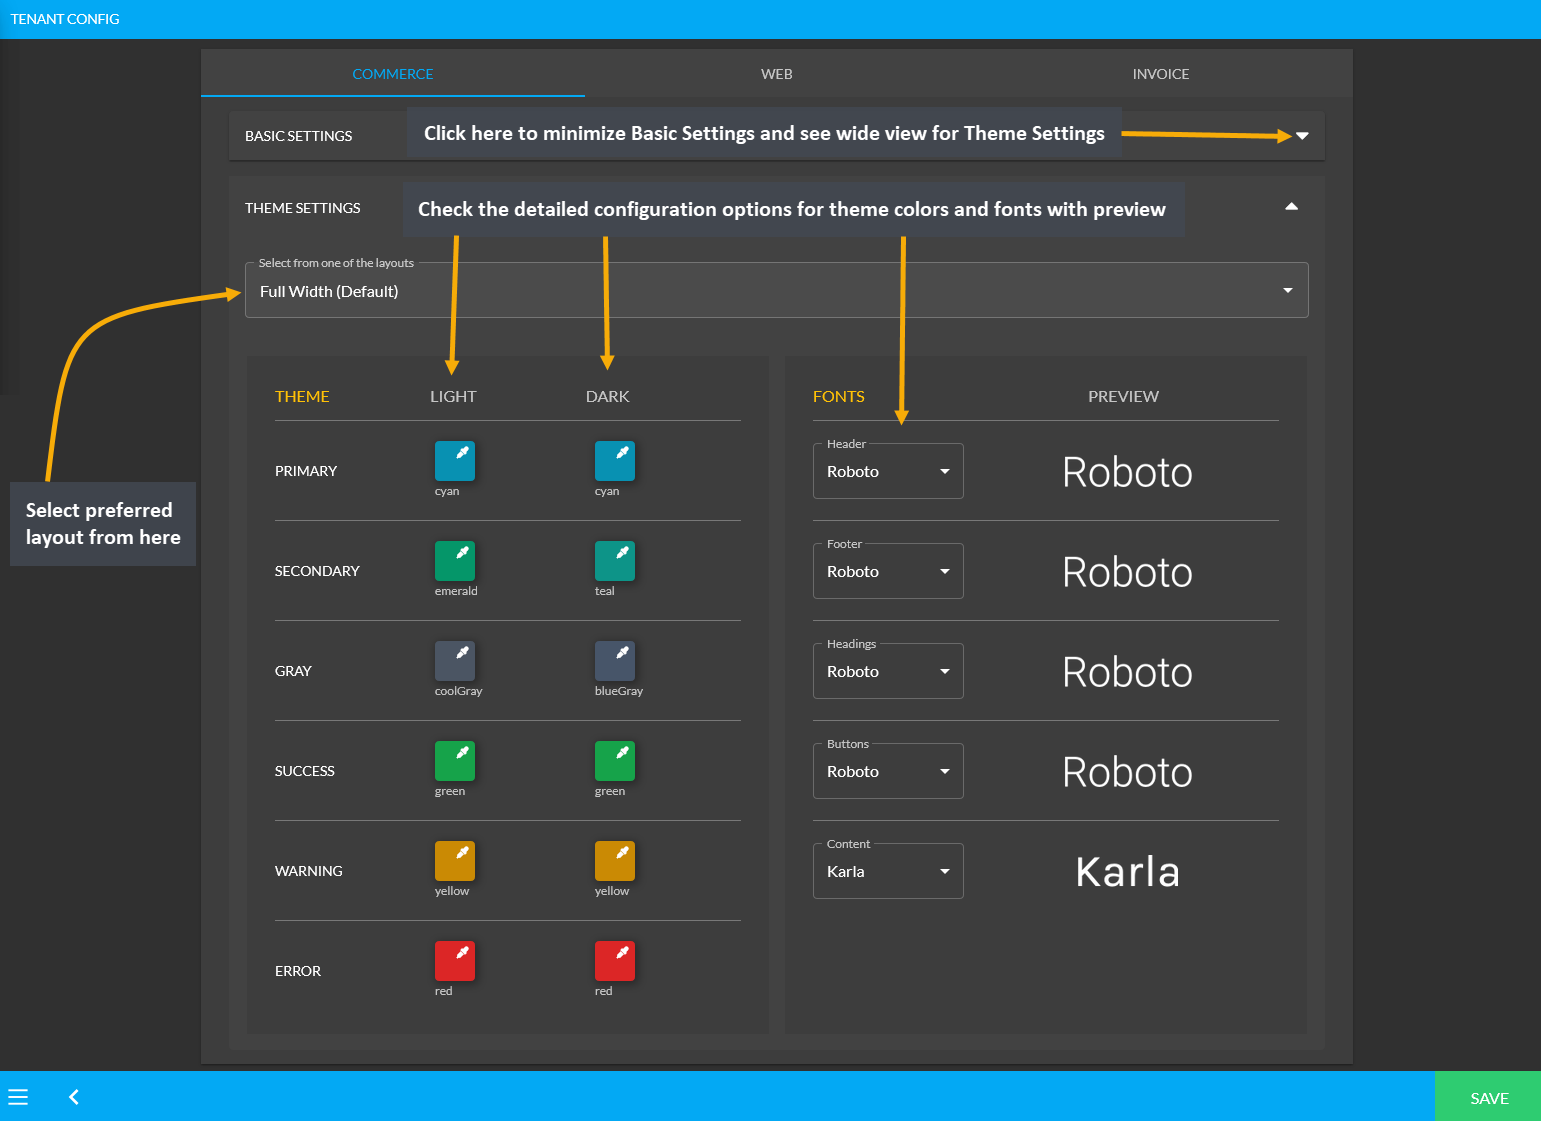
Image 1: Check detailed configuration options for theme colors and fonts with preview from Theme settings.
Instantly change the Website themes to Dark, Light, or Auto, click on the Web tab beside Commerce tab which will allow switching Themes immediately for the Website. Click on any of the options to set the desired Web outlook.
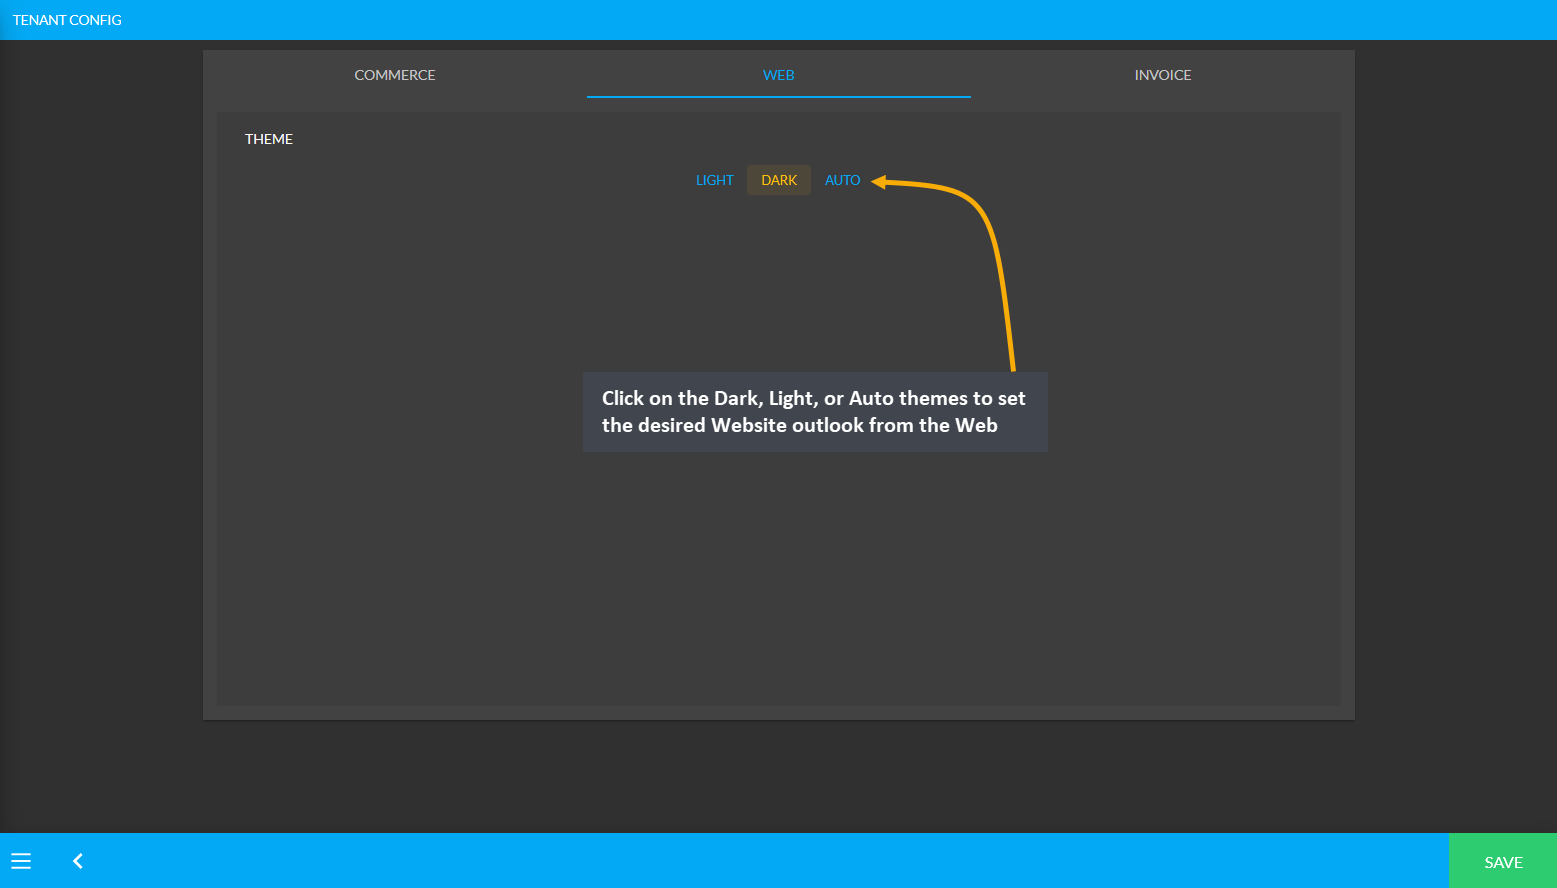
Image 2: Click on the Dark, Light, or Auto themes to set the desired Website outlook from the Web tab.
Invoice Layout Settings
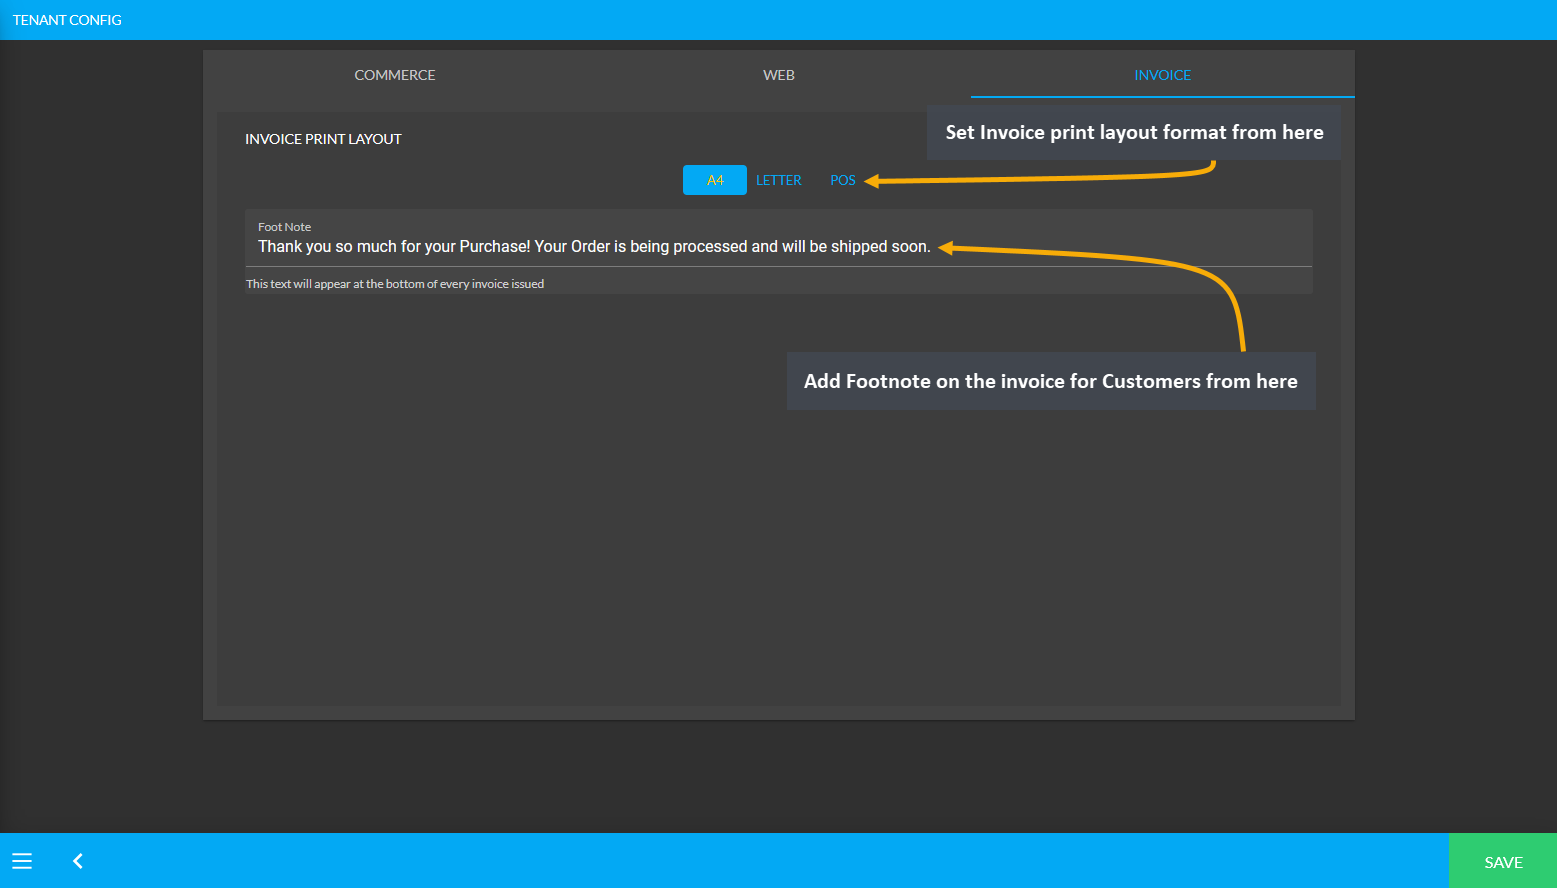
Invoices can be printed anytime for both new and old Orders. Shop Owners can retrieve the old invoices anytime whenever they need to print out from the Order List. Retail Xen supports three invoice printing formats. Invoice printing formats can be configured from the Invoice tab beside the Web tab.
There are three types of Invoice print layout. One of them is the cost machine printing format, also known as the Point of Sales (POS) format, and the other two formats are the regular A4 invoice printing format and the Letter invoice printing format. There is an option to include a Footnote on the invoice for Customers as illustrated.
Branch Settings
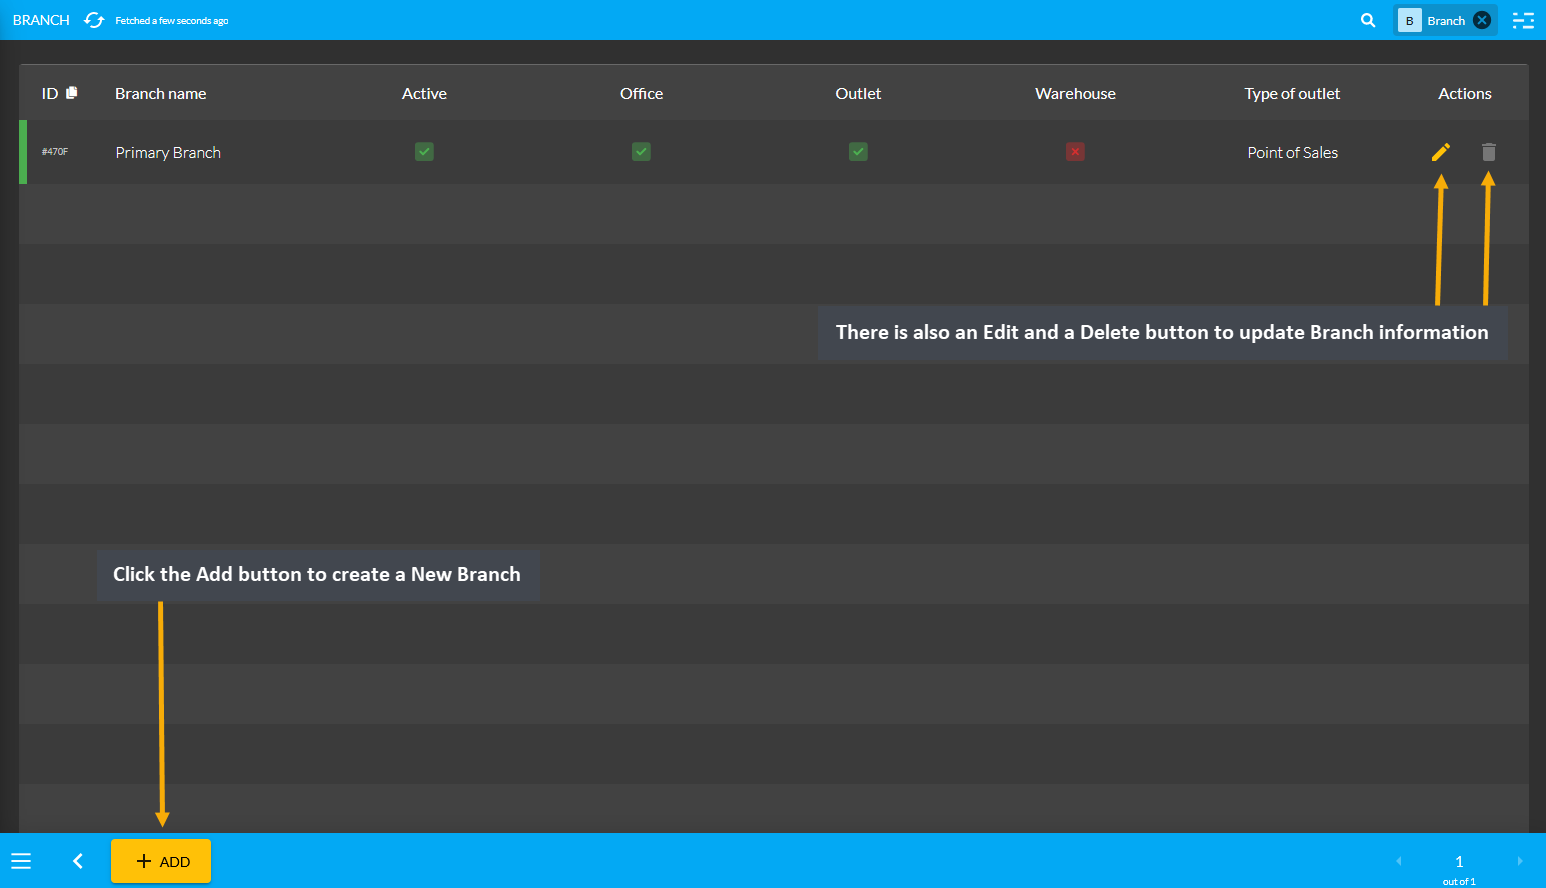
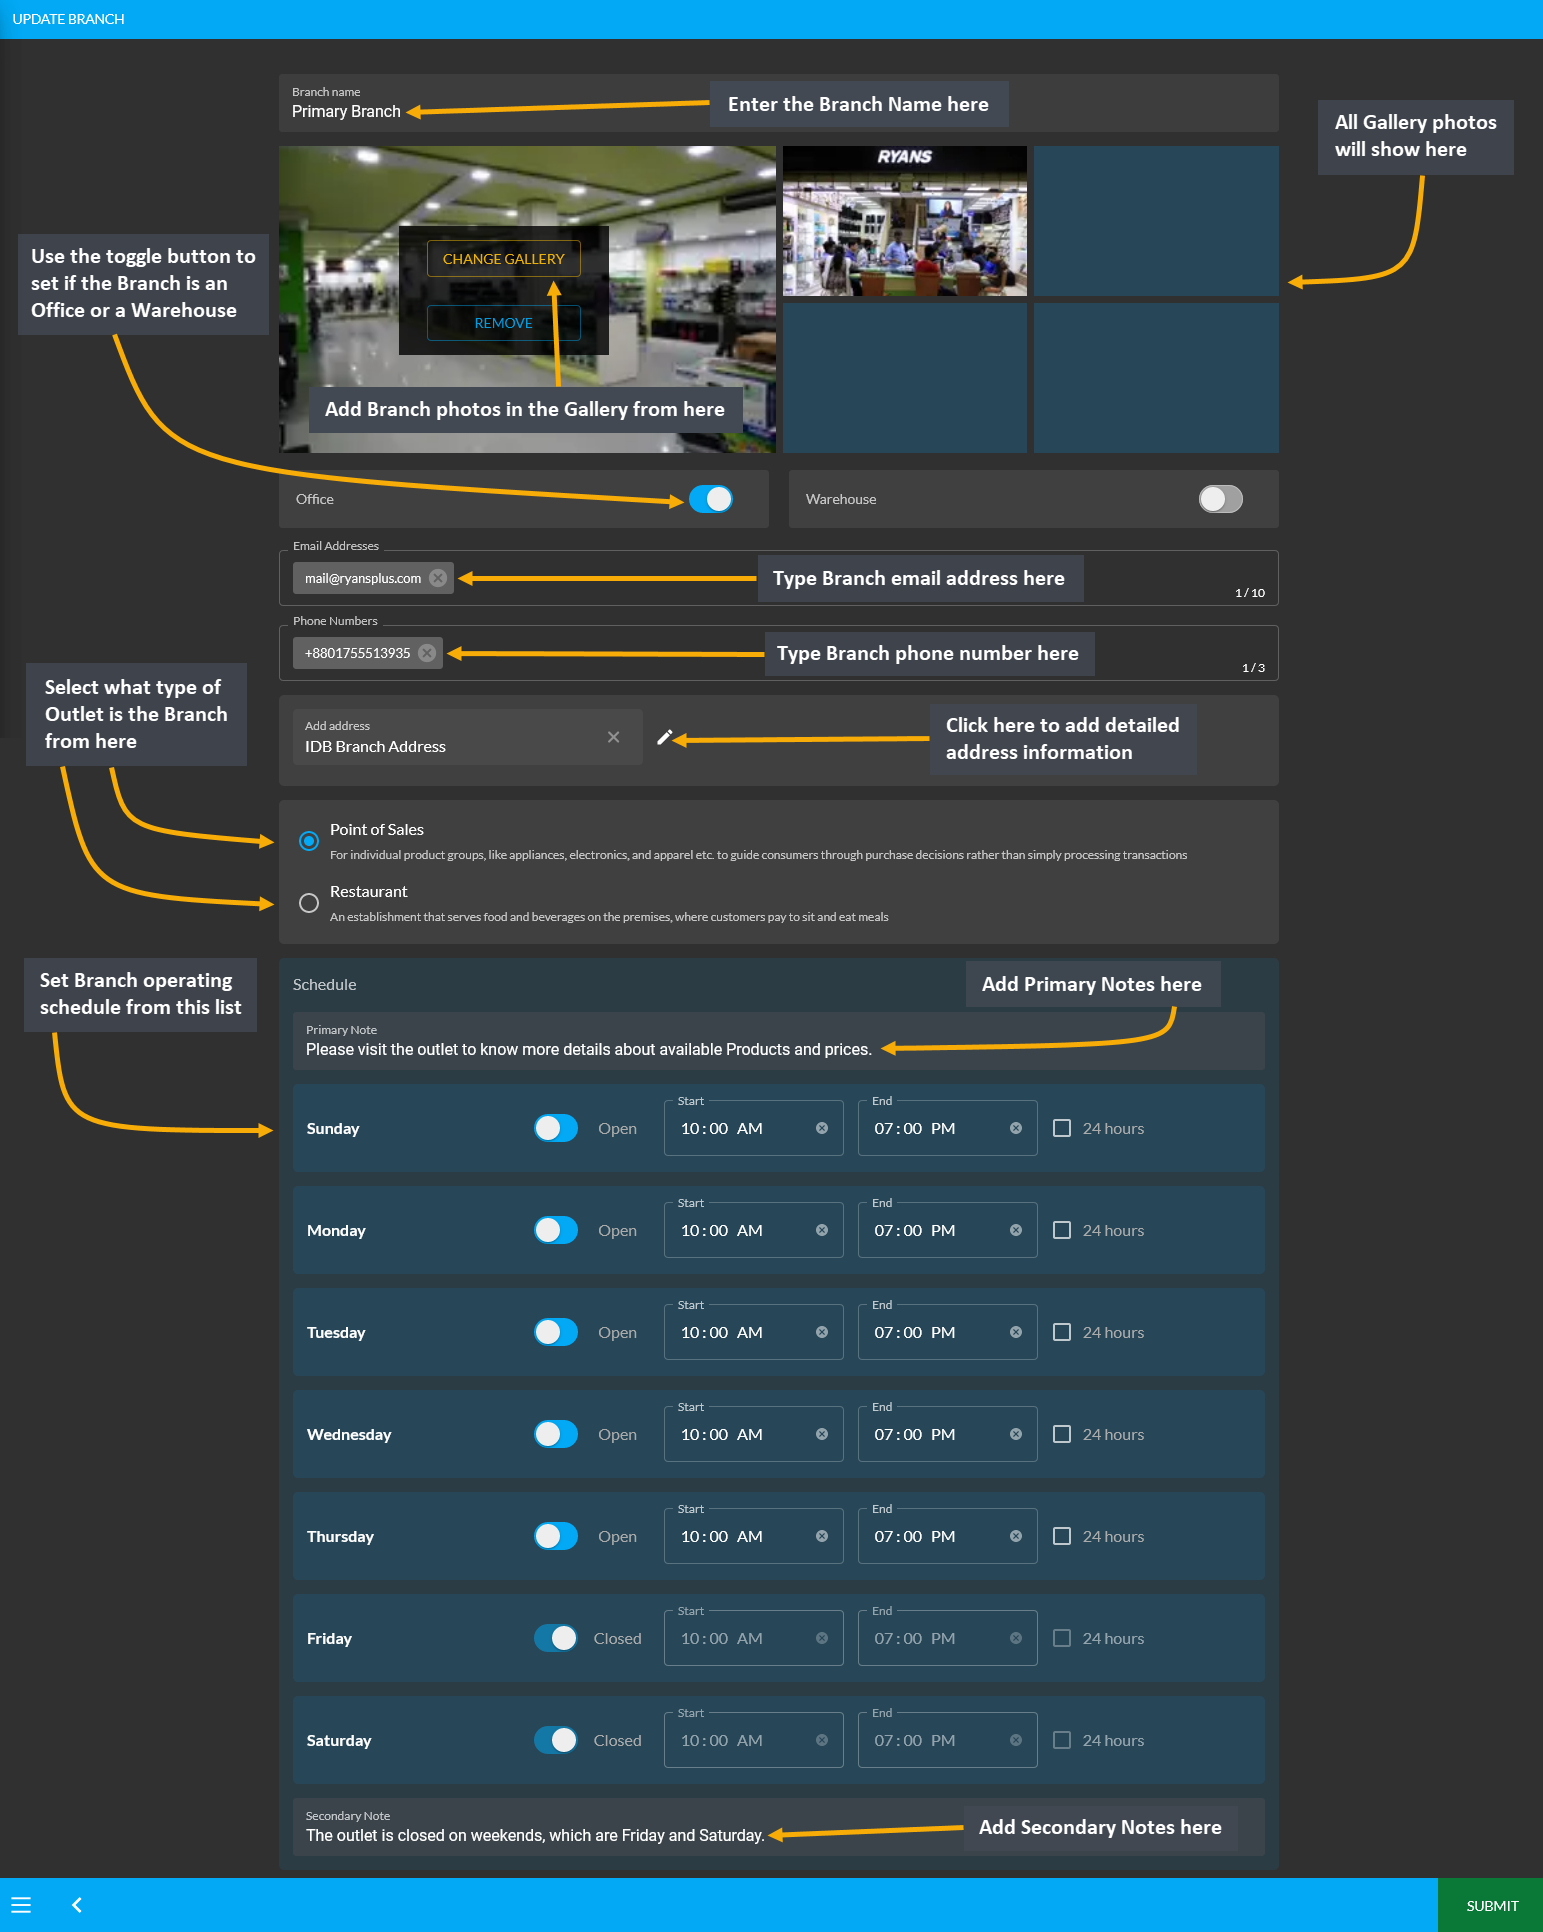
Under General Settings, the third option to configure is Branches. There are options to add Branch Name, make any Branch active or inactive, display Branch as Office or Warehouse, or add Type of Outlet as Point of Sales or Restaurant. To add a New Branch, click the Add button at the bottom left of the page. This will redirect to a new page for updating Branch information. There is also an Edit and a Delete button to update Branch information.
Every Shop will have different Branches on various locations. For this reason, the Admin Panel include options to create Branches. Under Update Branch, the Shop Owners can set Schedule with business hours for Customers to visit and make a Product purchase. The first field to fill out for the Branch is the Branch Name.
Below is the Gallery where Shop Owners can add photos of their Branch outlets with Add New Gallery option. Add multiple images for Branch gallery. Then, there are two toggle buttons to set Branch as Office or Warehouse. Next, the Shop Owner can select if their Outlet is Point of Sales or Restaurant that best describes the Branch.
Then, fill out the email address, phone number, and detailed address of the Branch. Then, set the Branch operating Schedule for Customers to visit or make a purchase. Set business days and holidays with Start and End times. Use the toggle button to show when the Branch is open or closed. Add Primary Note or Secondary Note as needed.
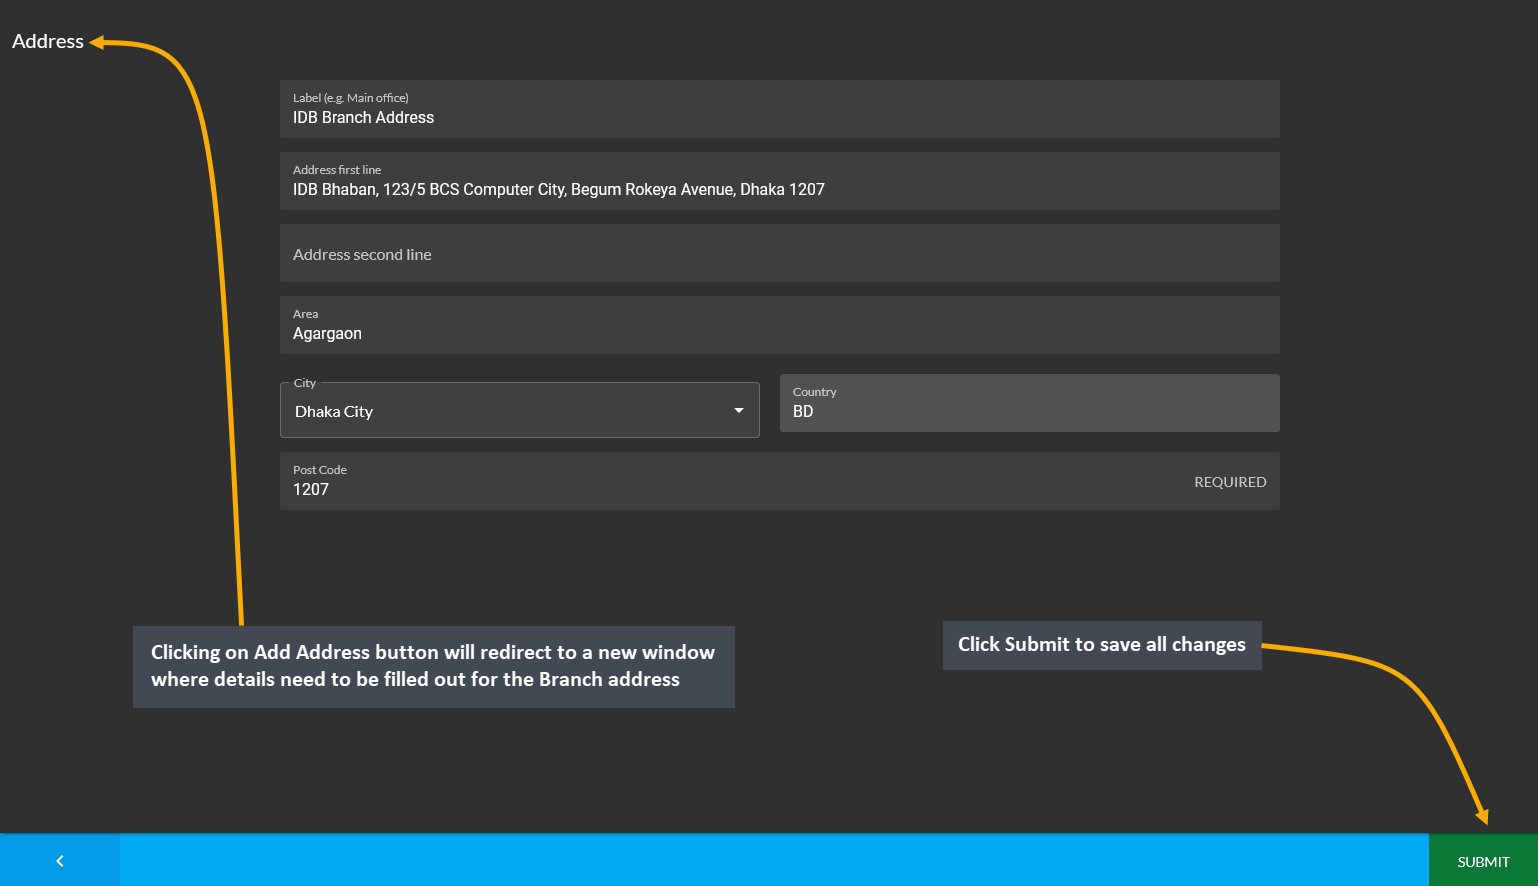
Add Branch Address
Within Branch Settings to Update Branch, clicking the Edit icon beside the Add Address box will open a pop-up where Branch address details needs to be filled out. From here, fill out the Label, Address, Area, City, Country, and Zip Code. Click Submit to save all changes. It will redirect to the main page to update rest of the details.
Counter Settings
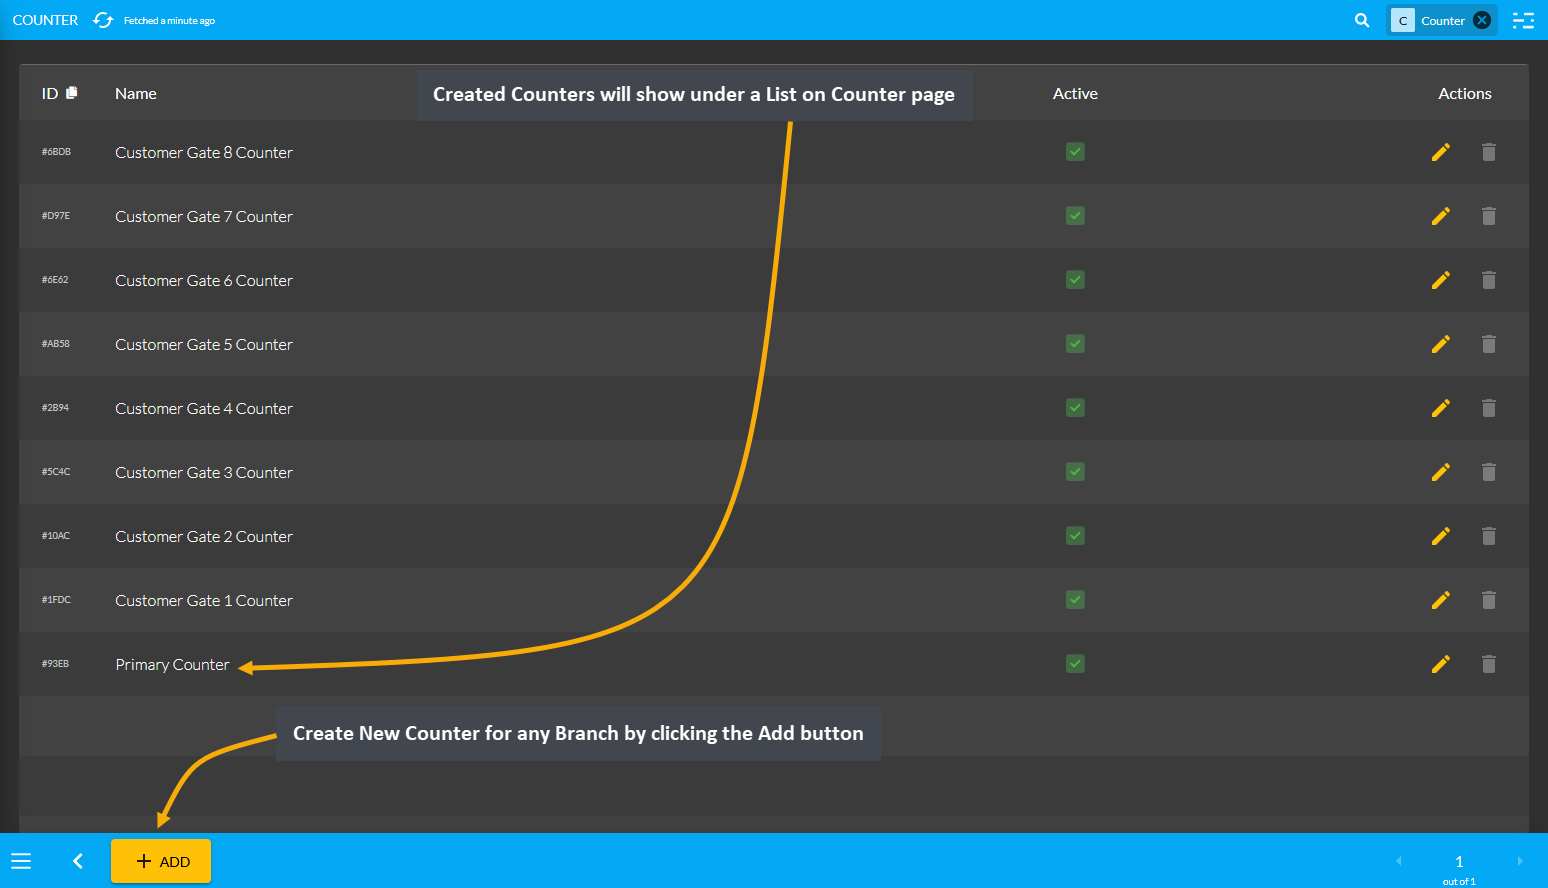
Under General Settings, the fourth option to configure is Counters. Create and set Counters under a specific Shop Branch for taking Orders from Customers. When there are too many Counters in a single Shop Branch, creating Counter will help Admins create and handle Orders. Created Counters will show under a List on Counter page.
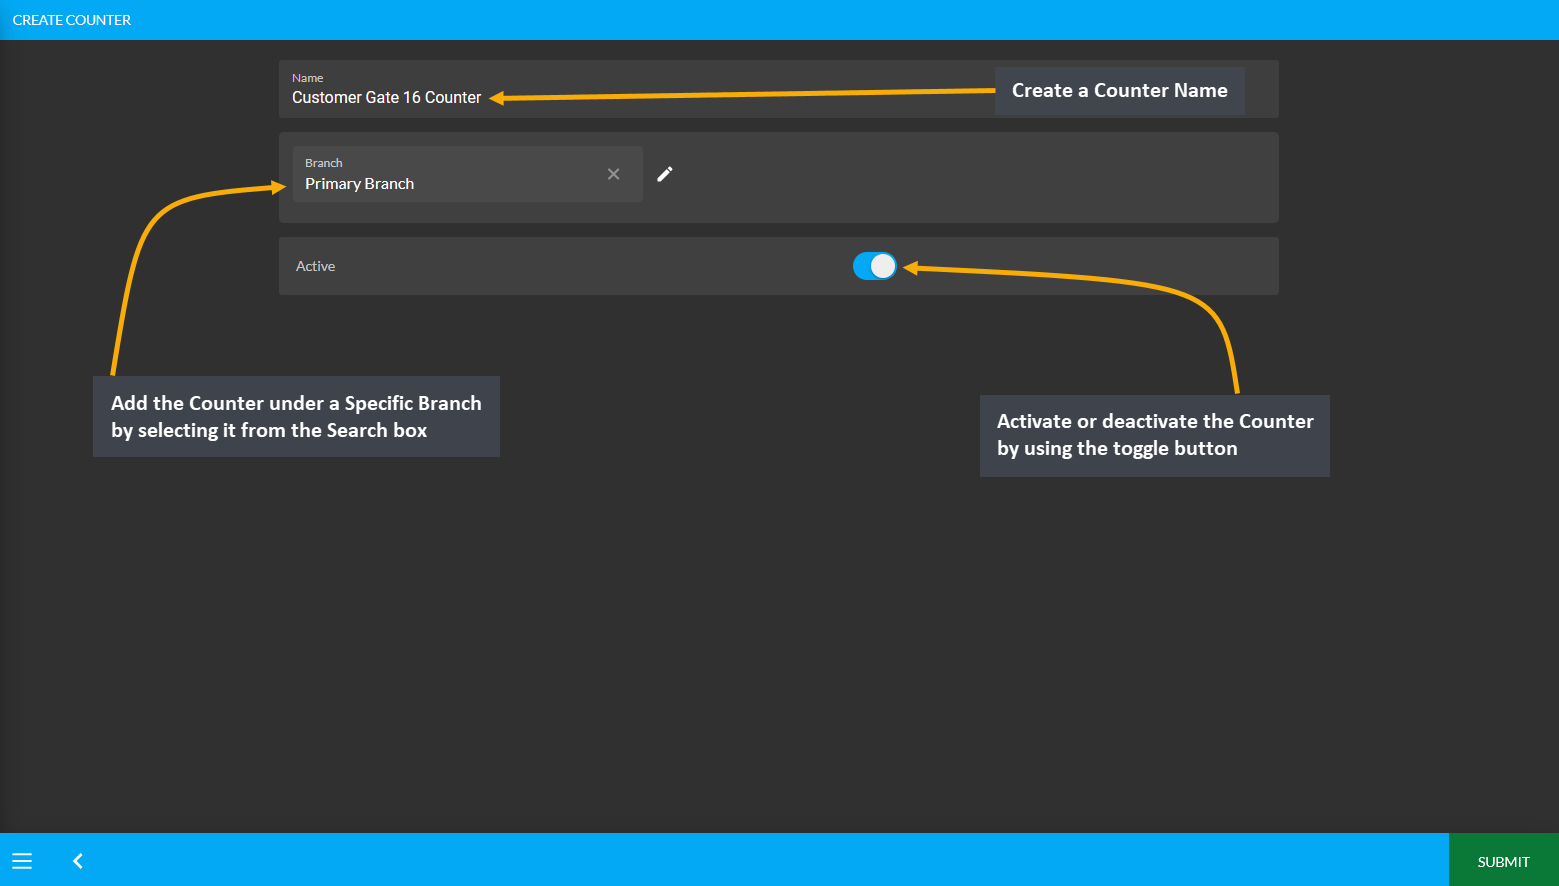
Create New Counter for any Branch by clicking the Add button. It will redirect to a new page from where Counter Name needs to be created and added under a Specific Branch by selecting it from the Search box, and activate or deactivate the Counter as needed. Click the Submit button to create a New Counter that will show under the list.
2 - Payment Gateway Settings
Learn more about the configuration of Payment Gateways and how to activate them for Order transactions.
Payment Gateway Settings
Configure Payment Gateways from Gateways under All Settings tab. The Payment Gateways that are embedded in the system are Cash, Cheque, Cash on Delivery, Bank Transfer, Credit Card, Ledger, PortWallet, SSLCommerz, Nagad, Nagad (Manual), Bkash, and Bkash (Manual). Shop Owners can activate or enable them whenever needed.
Click the Configure button beside each Payment Gateway to configure them. If any gateway is enabled, they will be marked as green, if any gateway is disabled, they will be marked as red. So, the Shop Owner can enable and disable any payment gateway to allow Customers to make payment via any of these gateways on The Website.
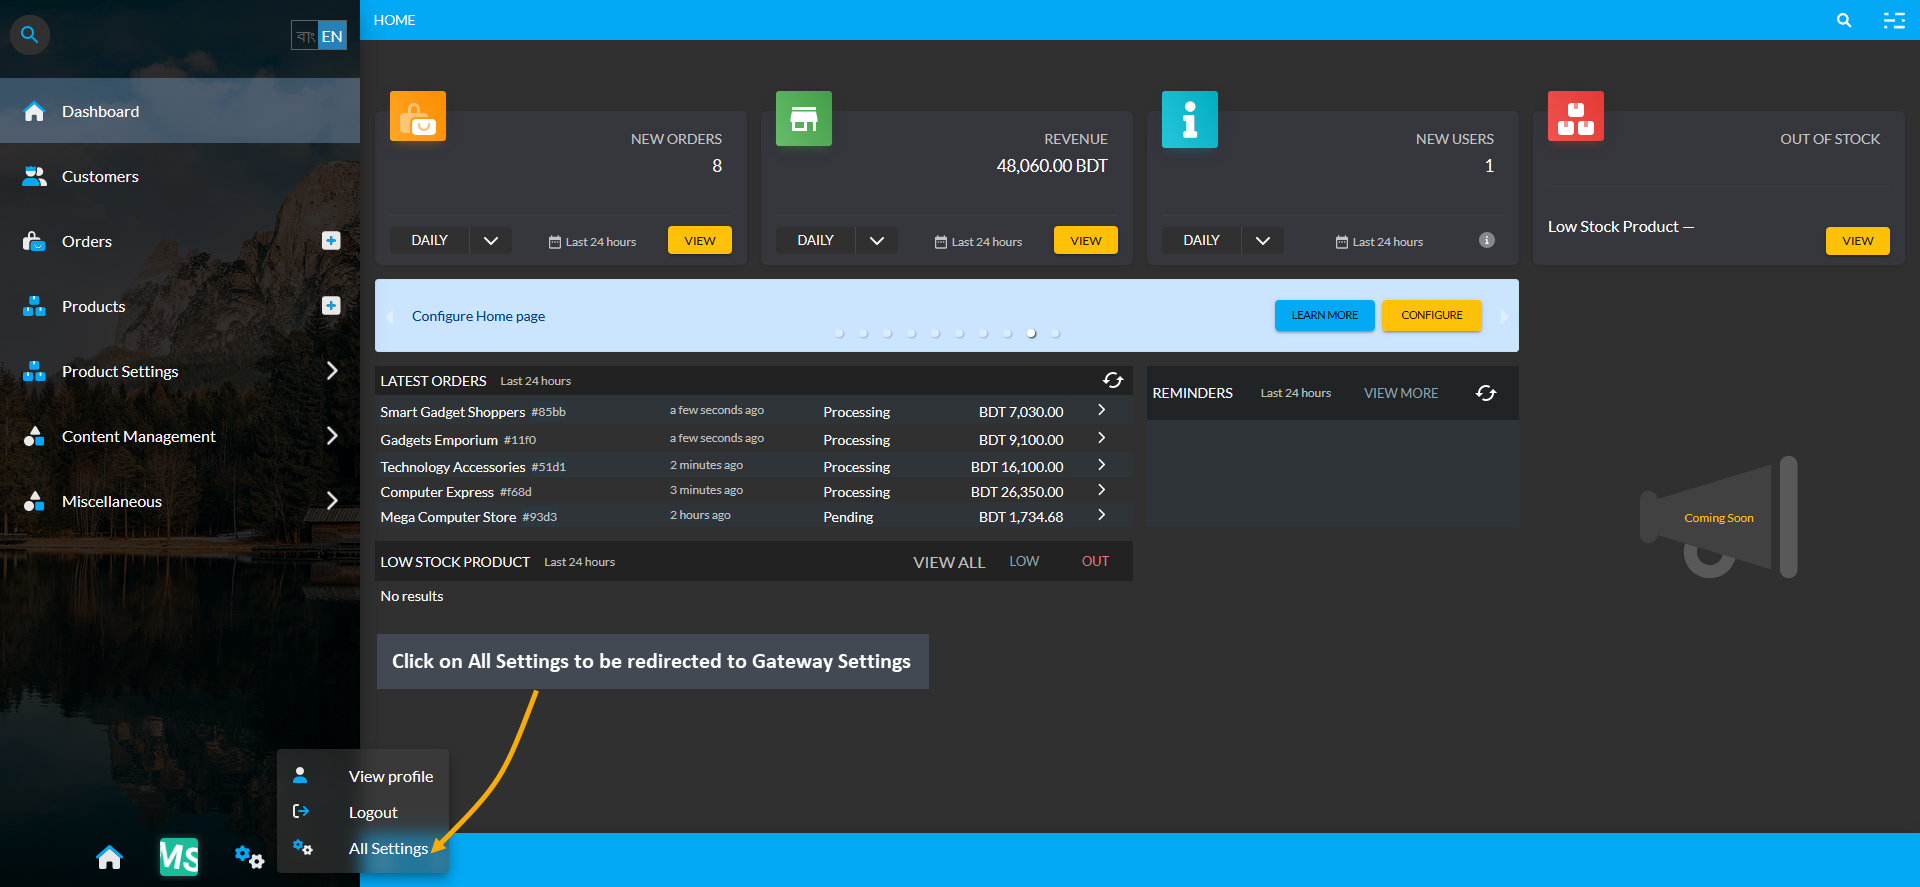
Image 1: Click on All Settings to be redirected to Gateway Settings from the Dashboard.
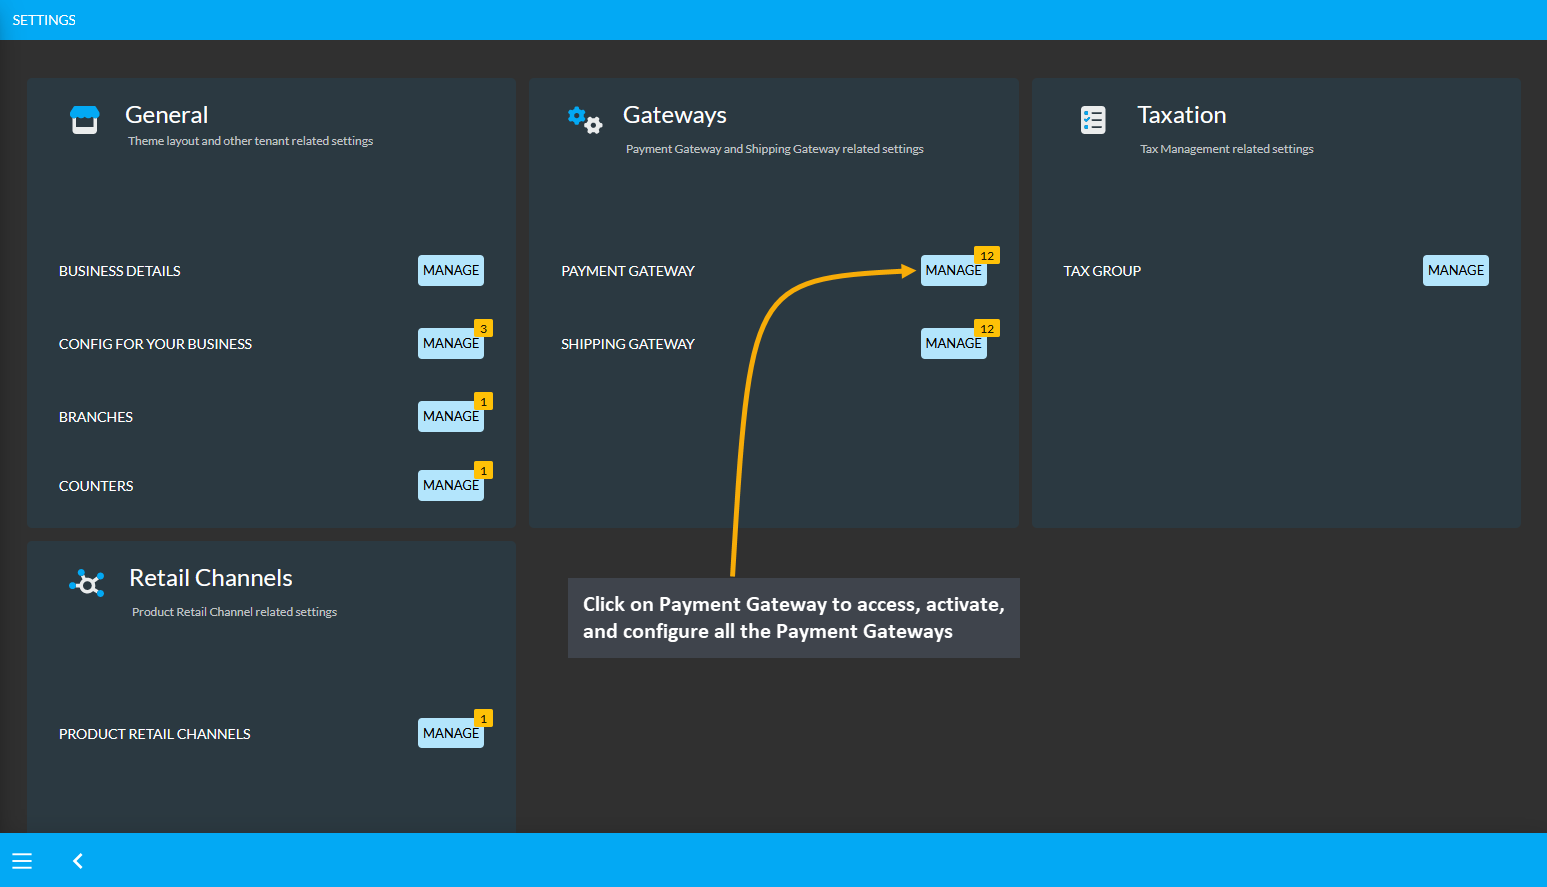
Image 2: Click on Payment Gateway to access, activate, and configure all the Payment Gateways.
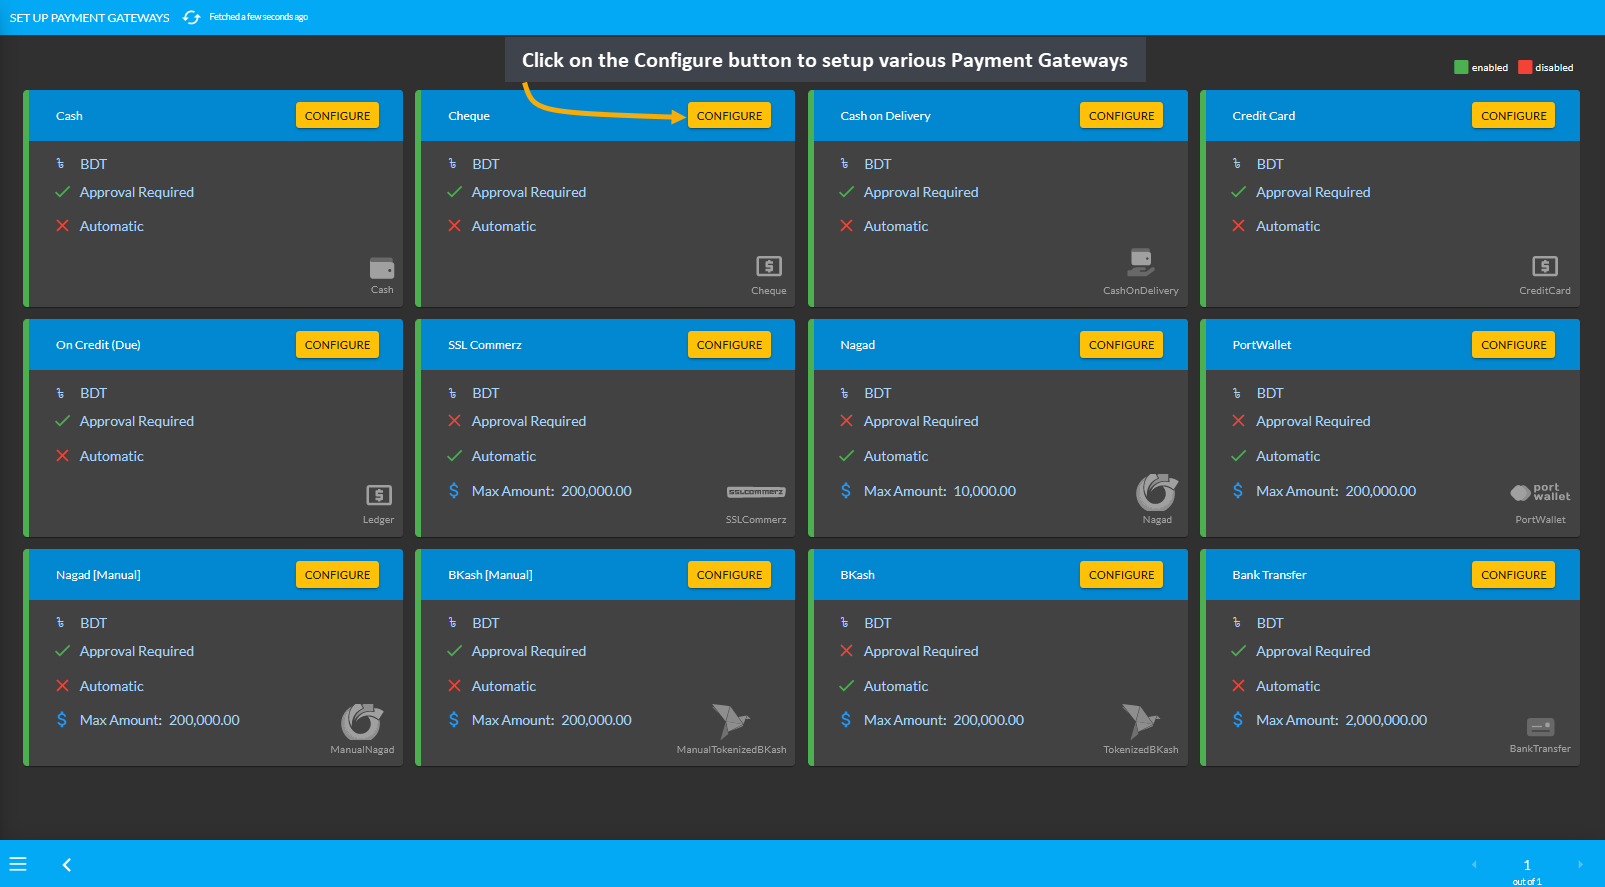
Image 3: Click on the Configure button to setup various Payment Gateways from the list.
For the configuration of Payment Gateways, there are options to setup display name, minimum amount required, maximum amount allowed, fees, display instruction, QR Code, test API credentials, bank account (bank transfer), allowed currencies, and EMI (for credit cards) etc. One payment gateway configuration will vary from another.
New Feature: Ecommerce Enabled
Enable Commerce is a new feature that was introduced on the Admin Panel. Enabling or disabling this option is going to display or not display the selected Payment Gateway on The Website for Customers.

Image 1: Enable or disable Commerce feature to display Payment Gateway on The Website for Customers.
If the Enable Commerce is disabled, then the selected Payment Gateways will show as disabled like SSLCommerz, PortWallet, Bank Transfer, BKash, BKash (Manual), Nagad, and Nagad (Manual) as shown in the example.
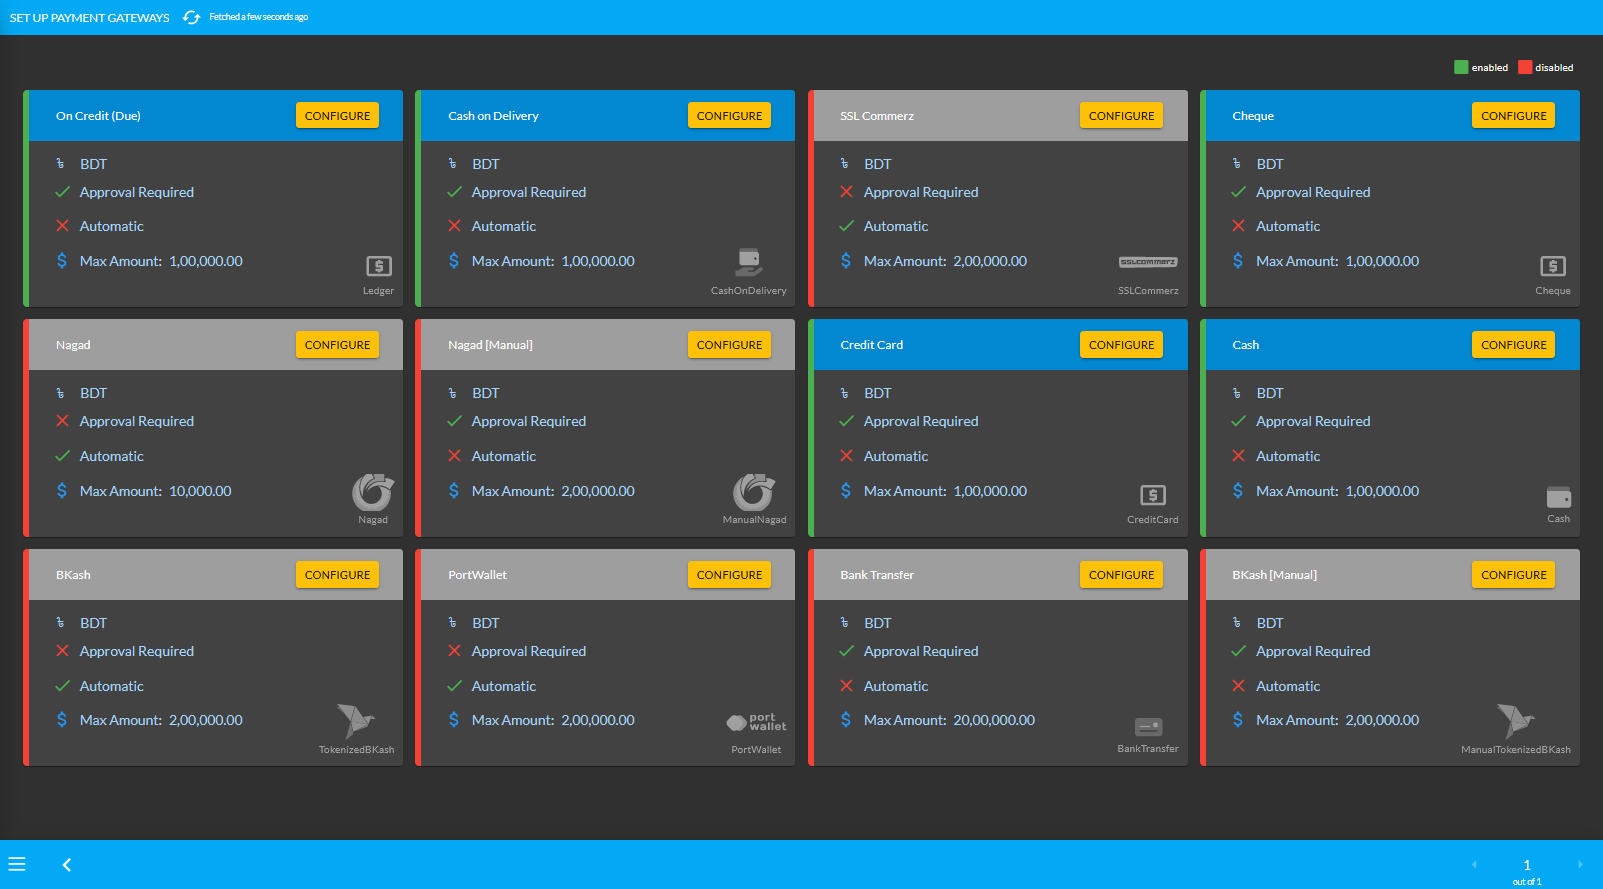
Image 2: Commerce feature disabled for few Payment Gateways that will not display on The Website.
With the Enable Commerce option turned on from the Admin Panel for selected Payment Gateways, the Website will display those Payment Gateways when Customer checks out from their Cart to place a New Order as shown.
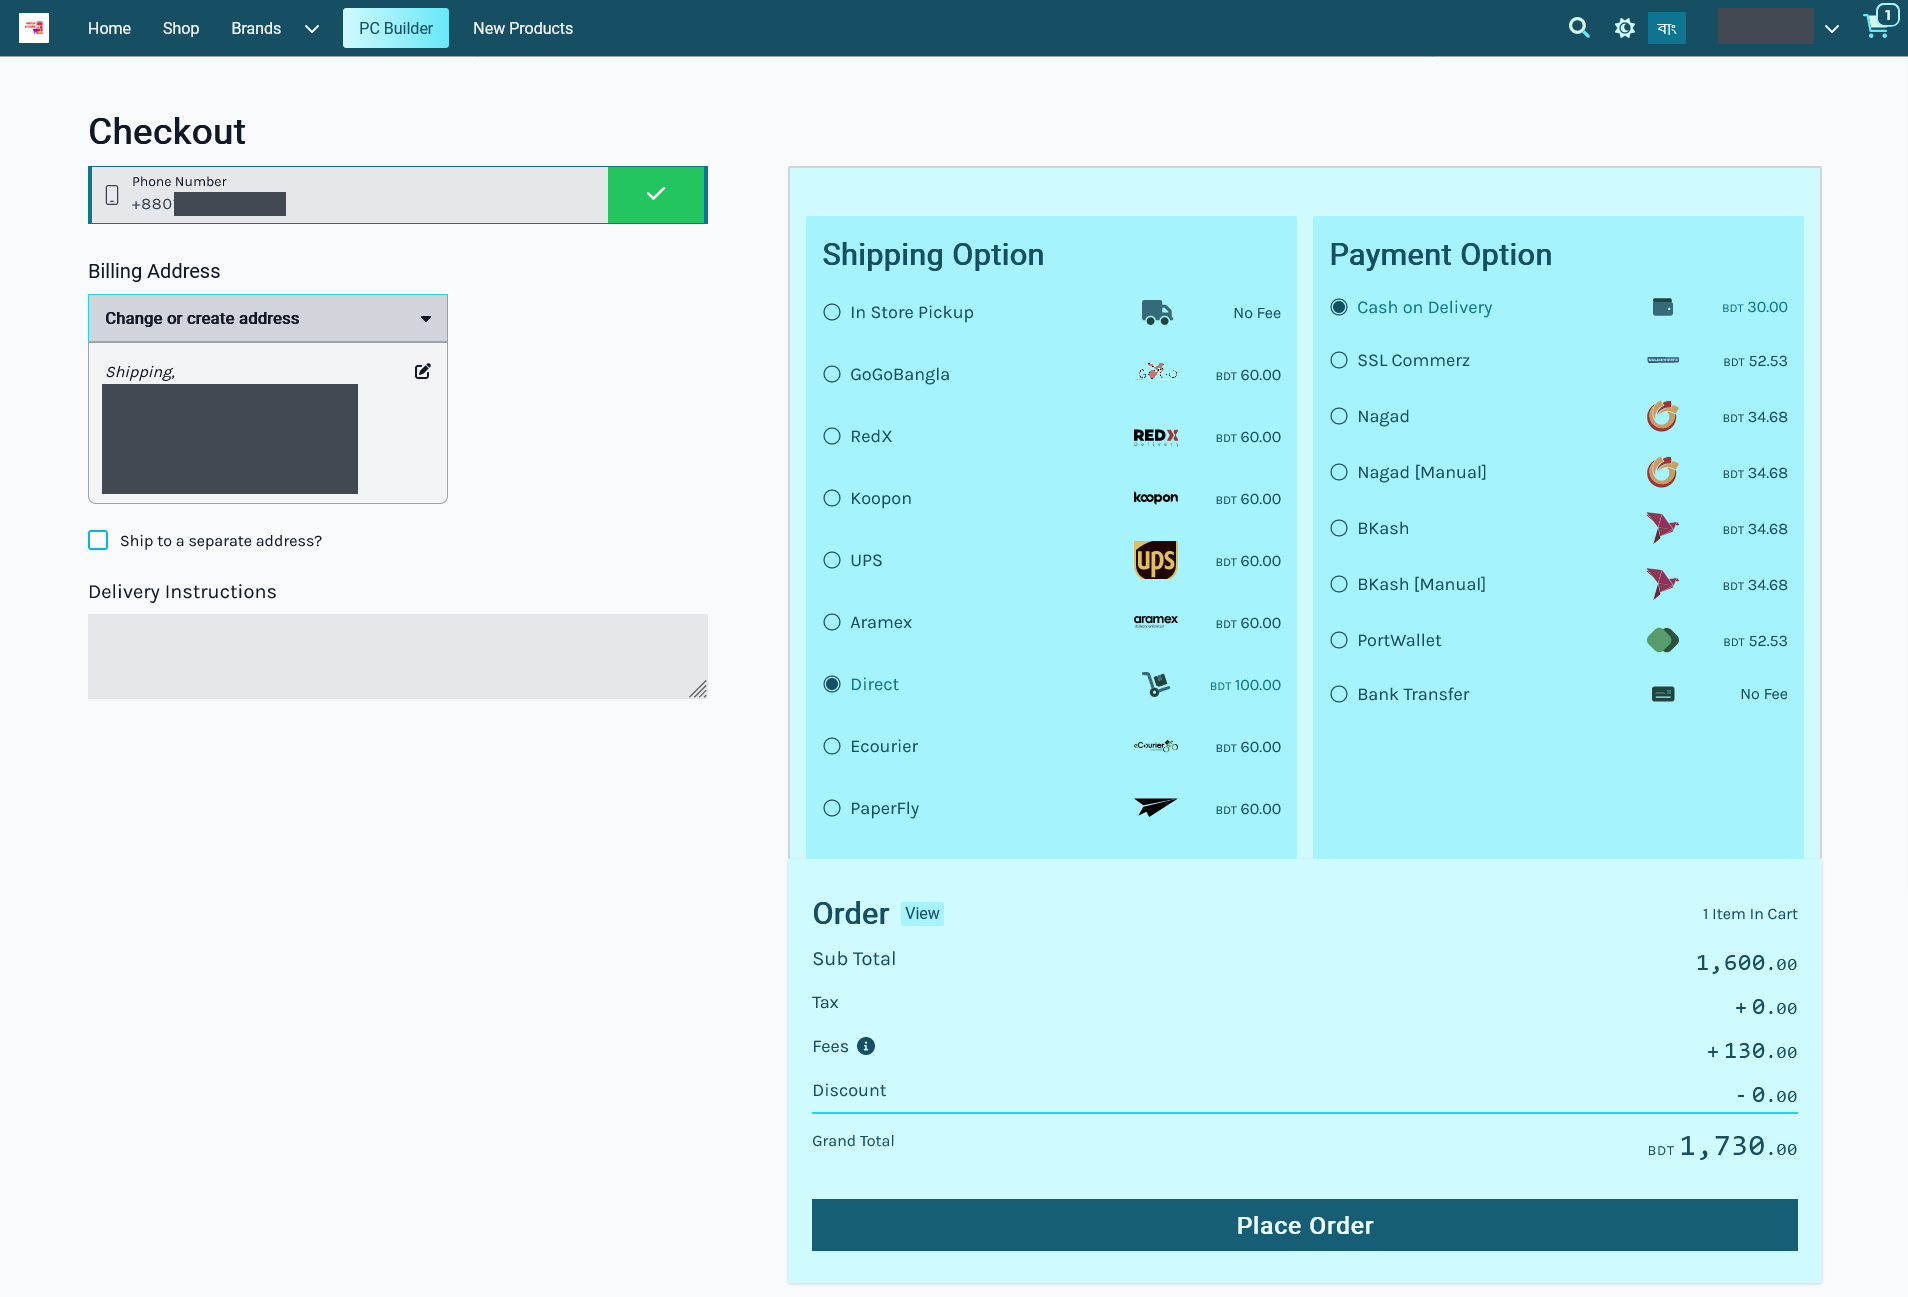
Image 3: The Website will display all the available Payment Gateways with Enabled Commerce turned on.
Conversely, with Enable Commerce option turned off from the Admin Panel for selected Payment Gateways, the Website will not display those Payment Gateways when Customer checks out from their Cart to place New Order.
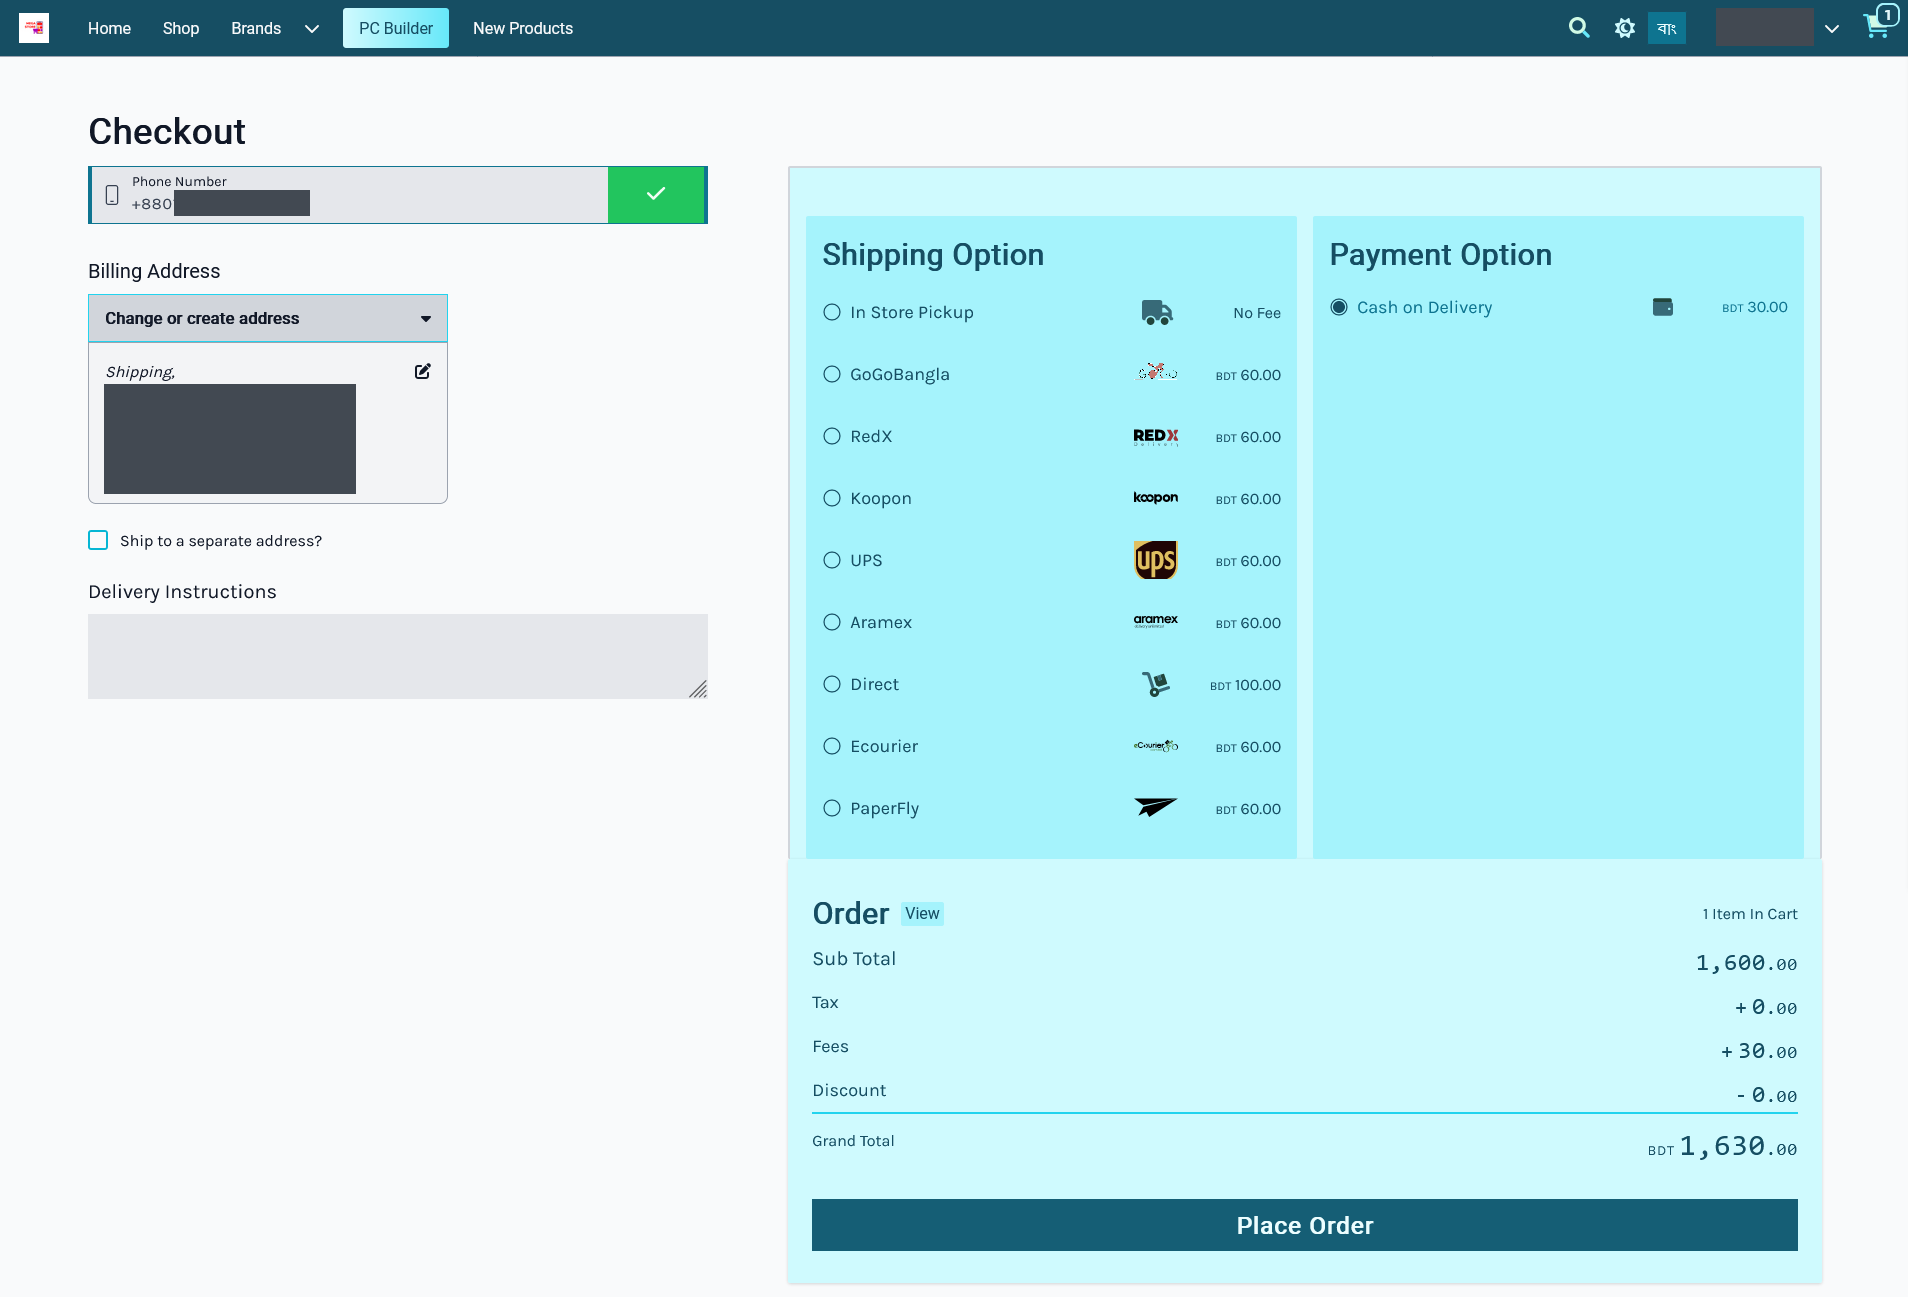
Image 4: The Website will not display selected Payment Gateways when Enabled Commerce is turned off.
Bank Transfer
The payment gateway for Bank Transfer can be set with a Minimum and Maximum amount. Use Enable button to activate the gateway. There is a toggle button to enable Fee and set a Fee Value. Click Add Bank Account button to add bank details. Finally, set the Display Instruction and click Save to confirm all changes and enable the gateway.
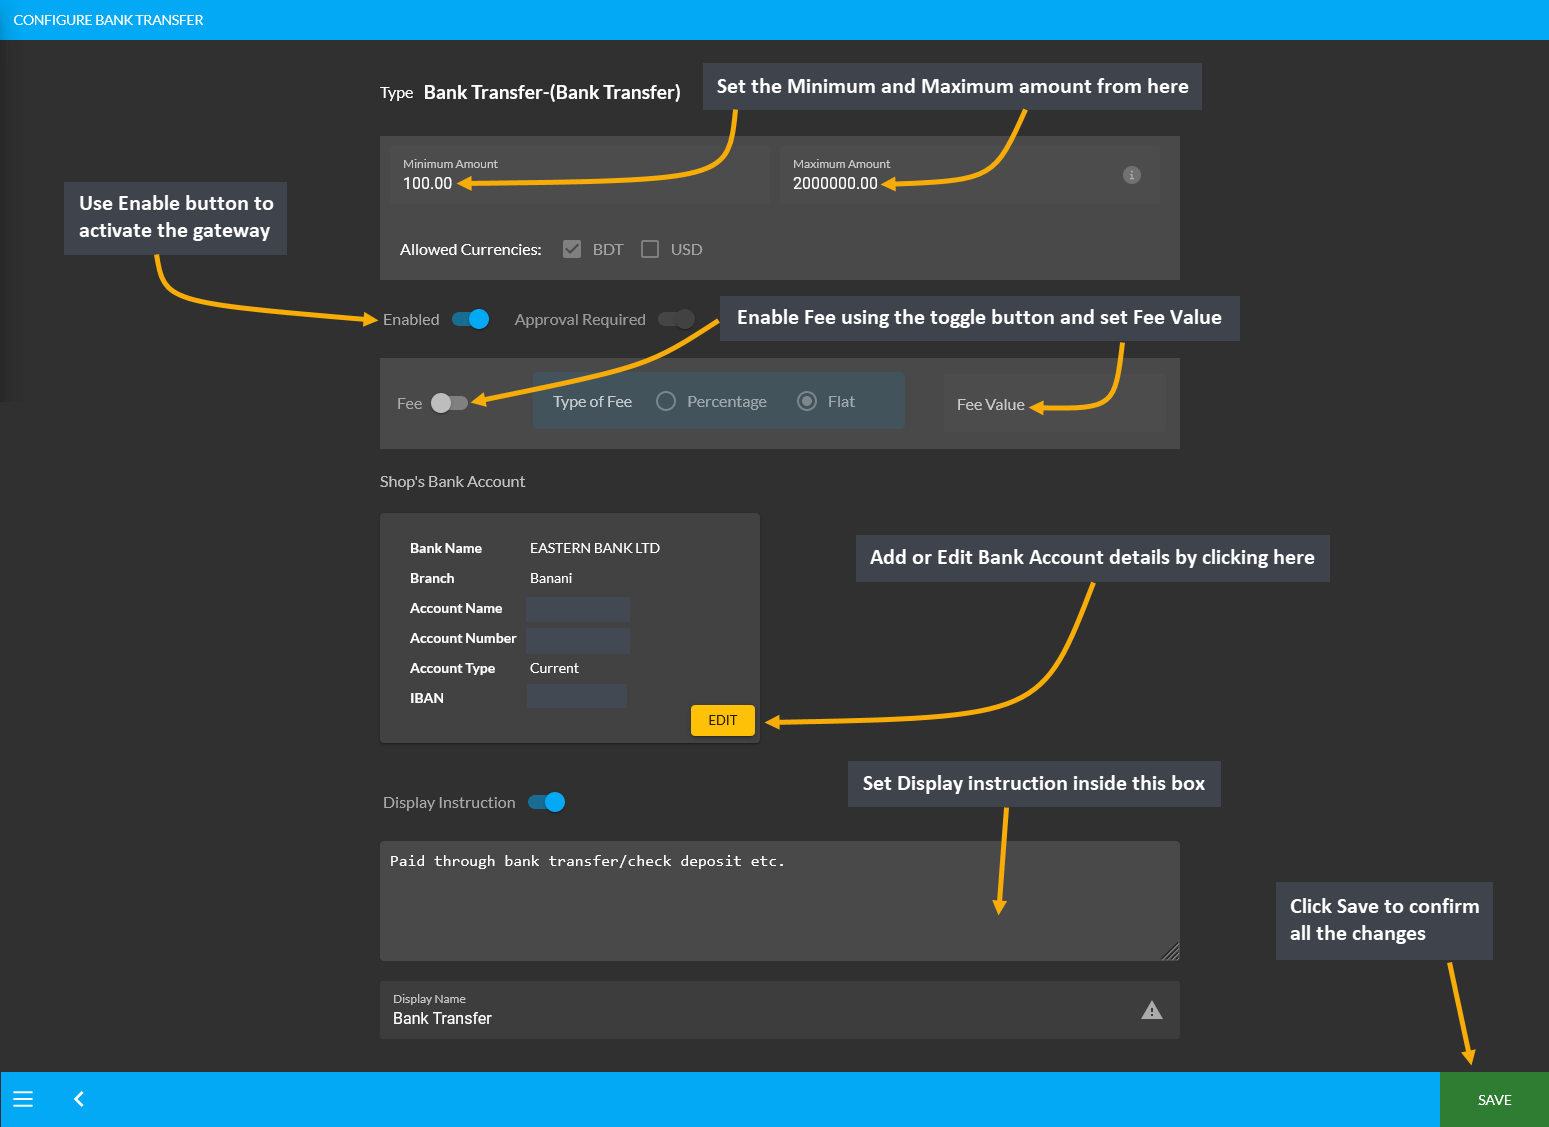
Image 1: Setup Bank Transfer with a minimum and maximum amount, fees, and detailed bank information.
Within Bank Transfer, clicking on the Add Bank Account or Edit button will open a pop-up from where the Shop Owner can setup their bank details. The bank details include setting up bank name, bank account name, bank account number, bank branch, bank swift, bank routing number, IBAN and account type.
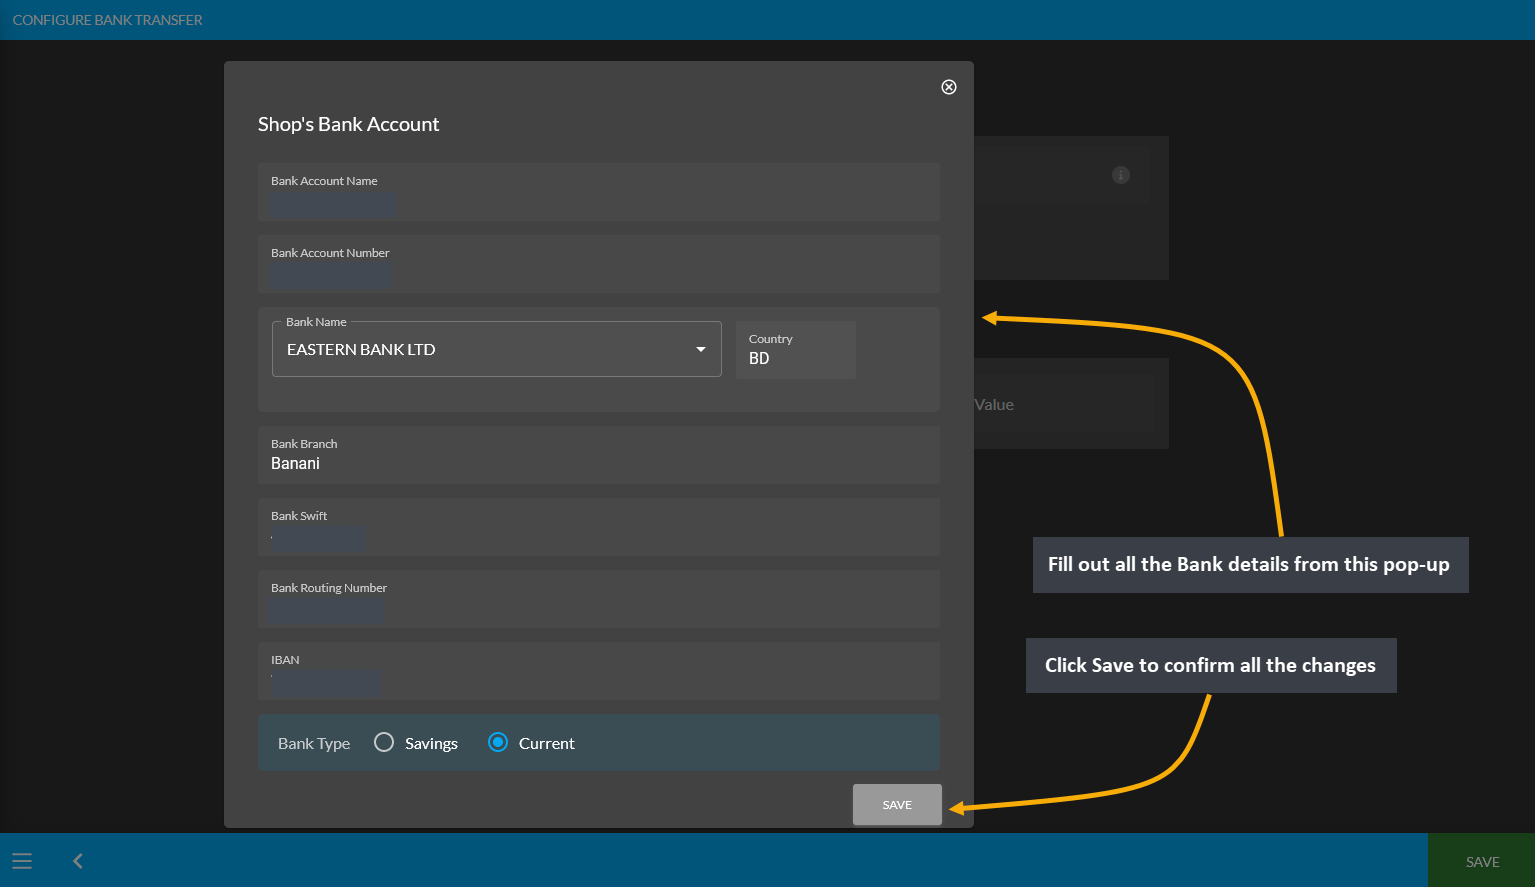
Image 2: Setup Bank details with Name, Account Name, Type, Number, Branch, Swift, Routing Number, and IBAN.
BKash (Manual)
The payment gateway for Bkash (Manual) can be set with a Minimum and Maximum amount. Use Enable button to activate the gateway. There is a toggle button to enable Fee and set a Fee Value. Enter BKash phone number and select Merchant Payment or Send Money. Upload QR Code using a screenshot downloaded from the phone and set Display Instruction below as shown. Click Save to confirm all changes and enable the gateway.
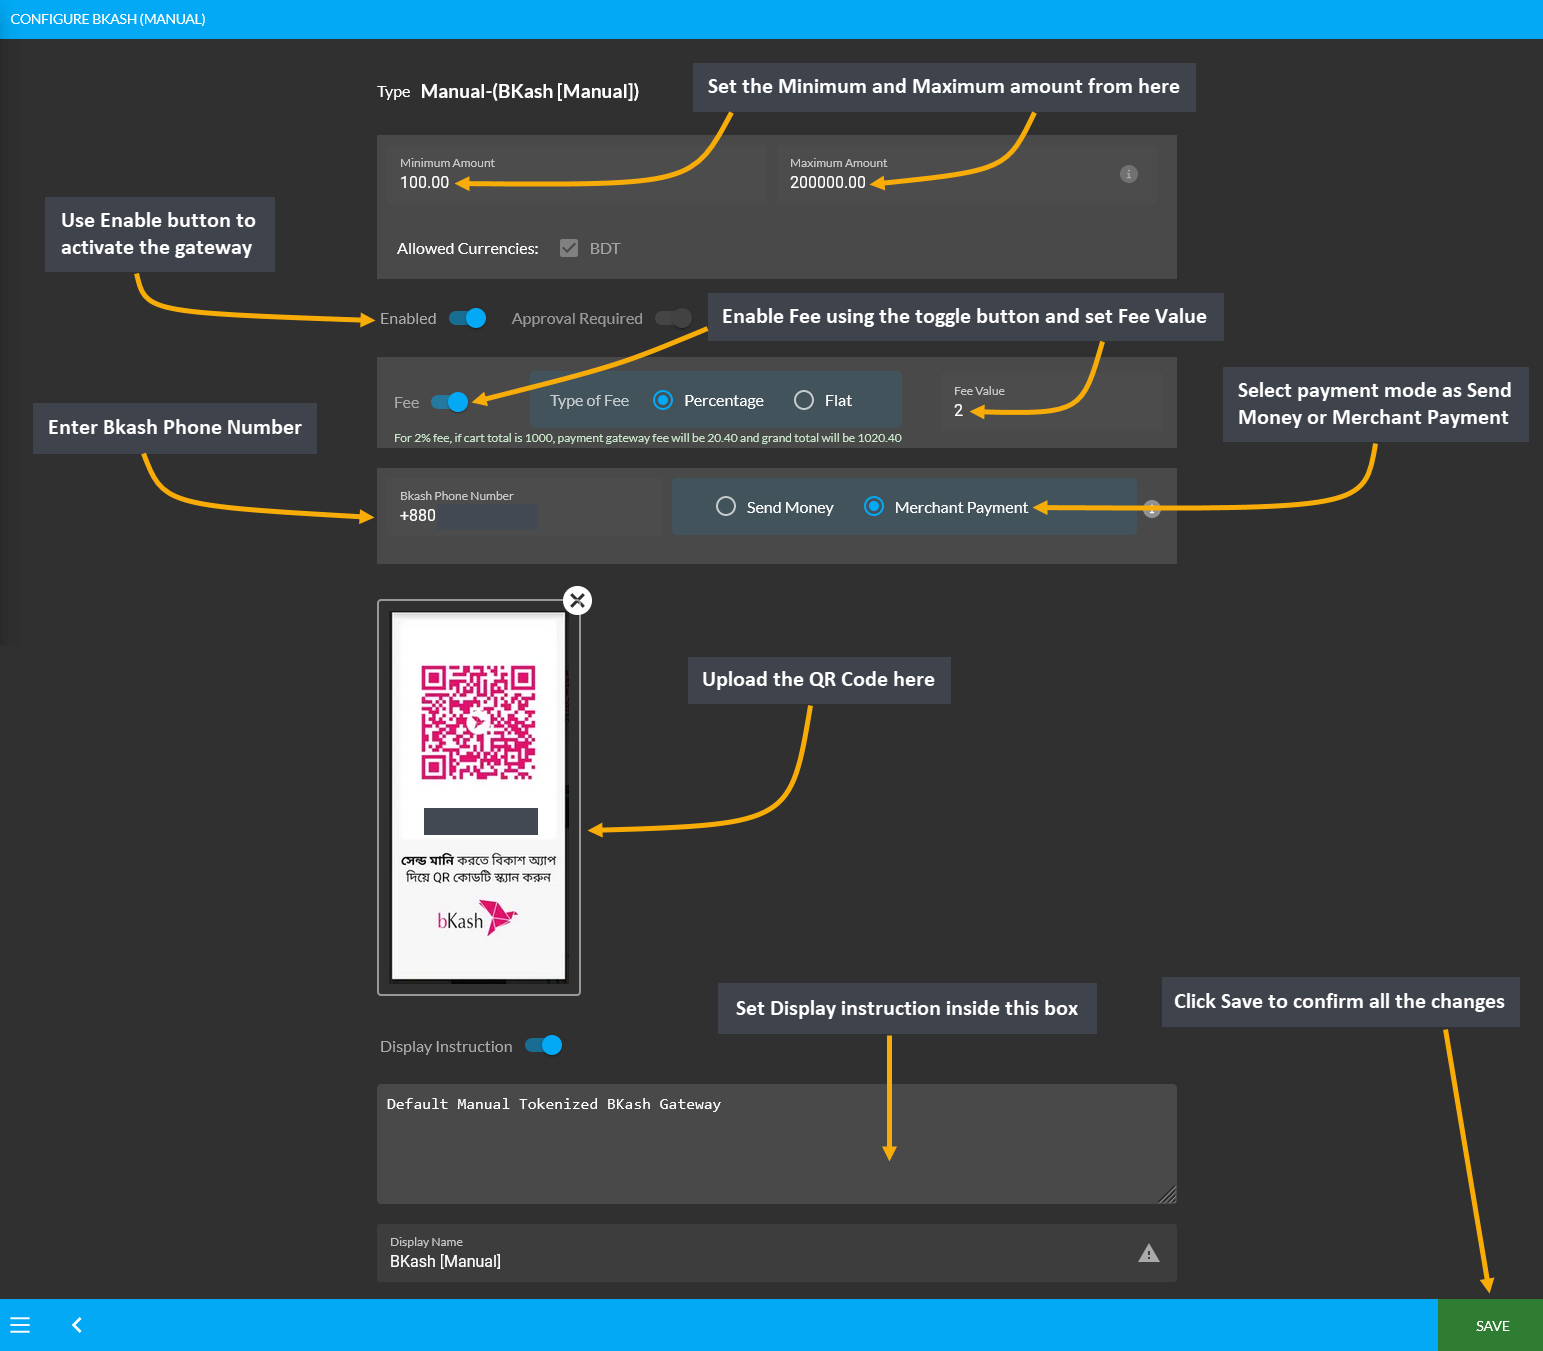
Image 1: Setup BKash (Manual) with amounts, fees, BKash phone number, payment mode, and QR code.
Downloading QR Code from BKash
In order to upload QR Code for activating BKash Manual Gateway, there are few steps to follow. First, User needs to login to their BKash Account using Account Number and Pin. Then, they need to click the avatar on top of the screen. This will redirect to the screen to download the QR Code to upload in BKash (Manual) payment gateway.
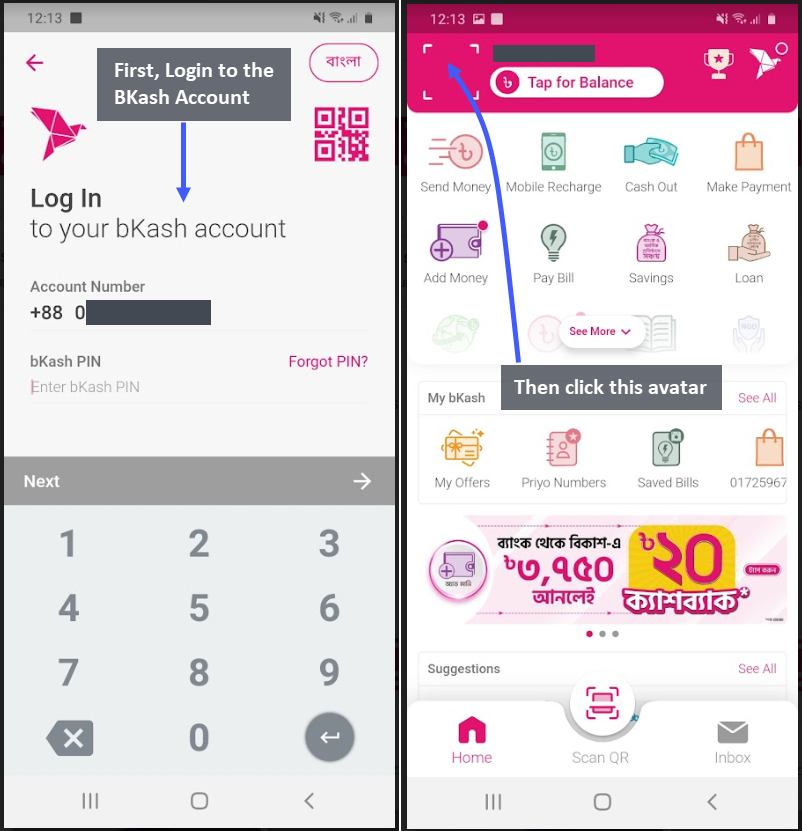
Image 1 and 2: Logging into BKash Account and selecting avatar to redirect to downloading QR Code.
The next page will recirect to the User’s unique QR Code. Click the Download QR Code button which will redirect to the downloadable BKash QR Code image. Now, get this file on computer with email, message, or Google Drive so that it can be downloaded. Then, upload the BKash QR Code while activating BKash payment gateway.
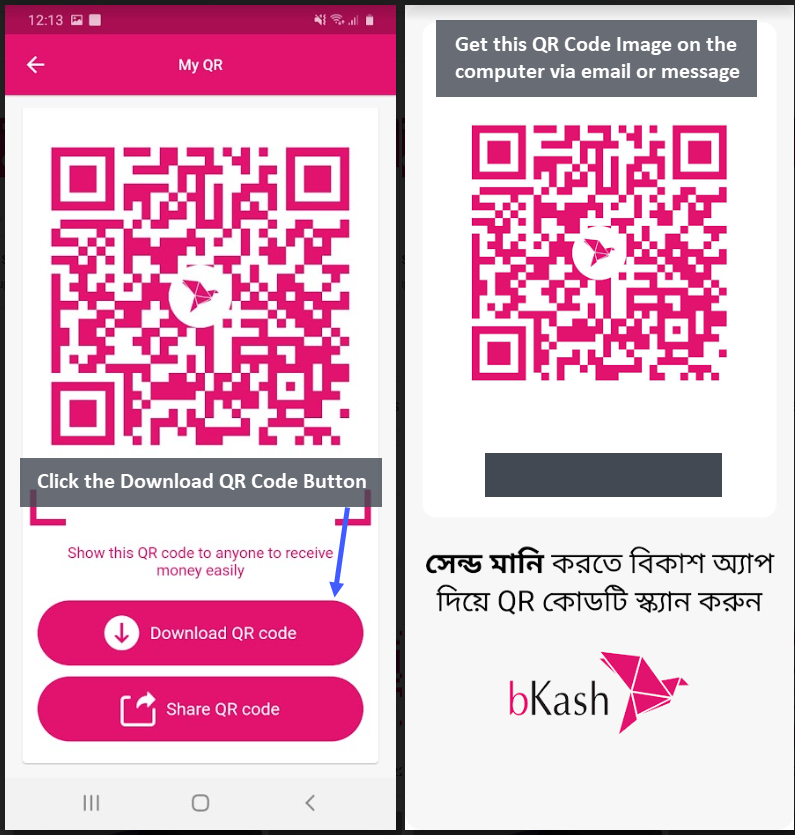
Image 3 and 4: Click Download QR Code Button and get the QR Code image on computer via email or message.
Ordering on Website with or without BKash QR Code
The Bkash (Manual) Payment Gateway can be created both with QR Code (which can be downloaded from phone) that can later be uploaded while activating BKash payment gateway or without QR Code image. Please note that, when paying with Bkash (Manual) for ordering on The Website, this is how the BKash payment gateway will show with the QR Code and without the QR Code.
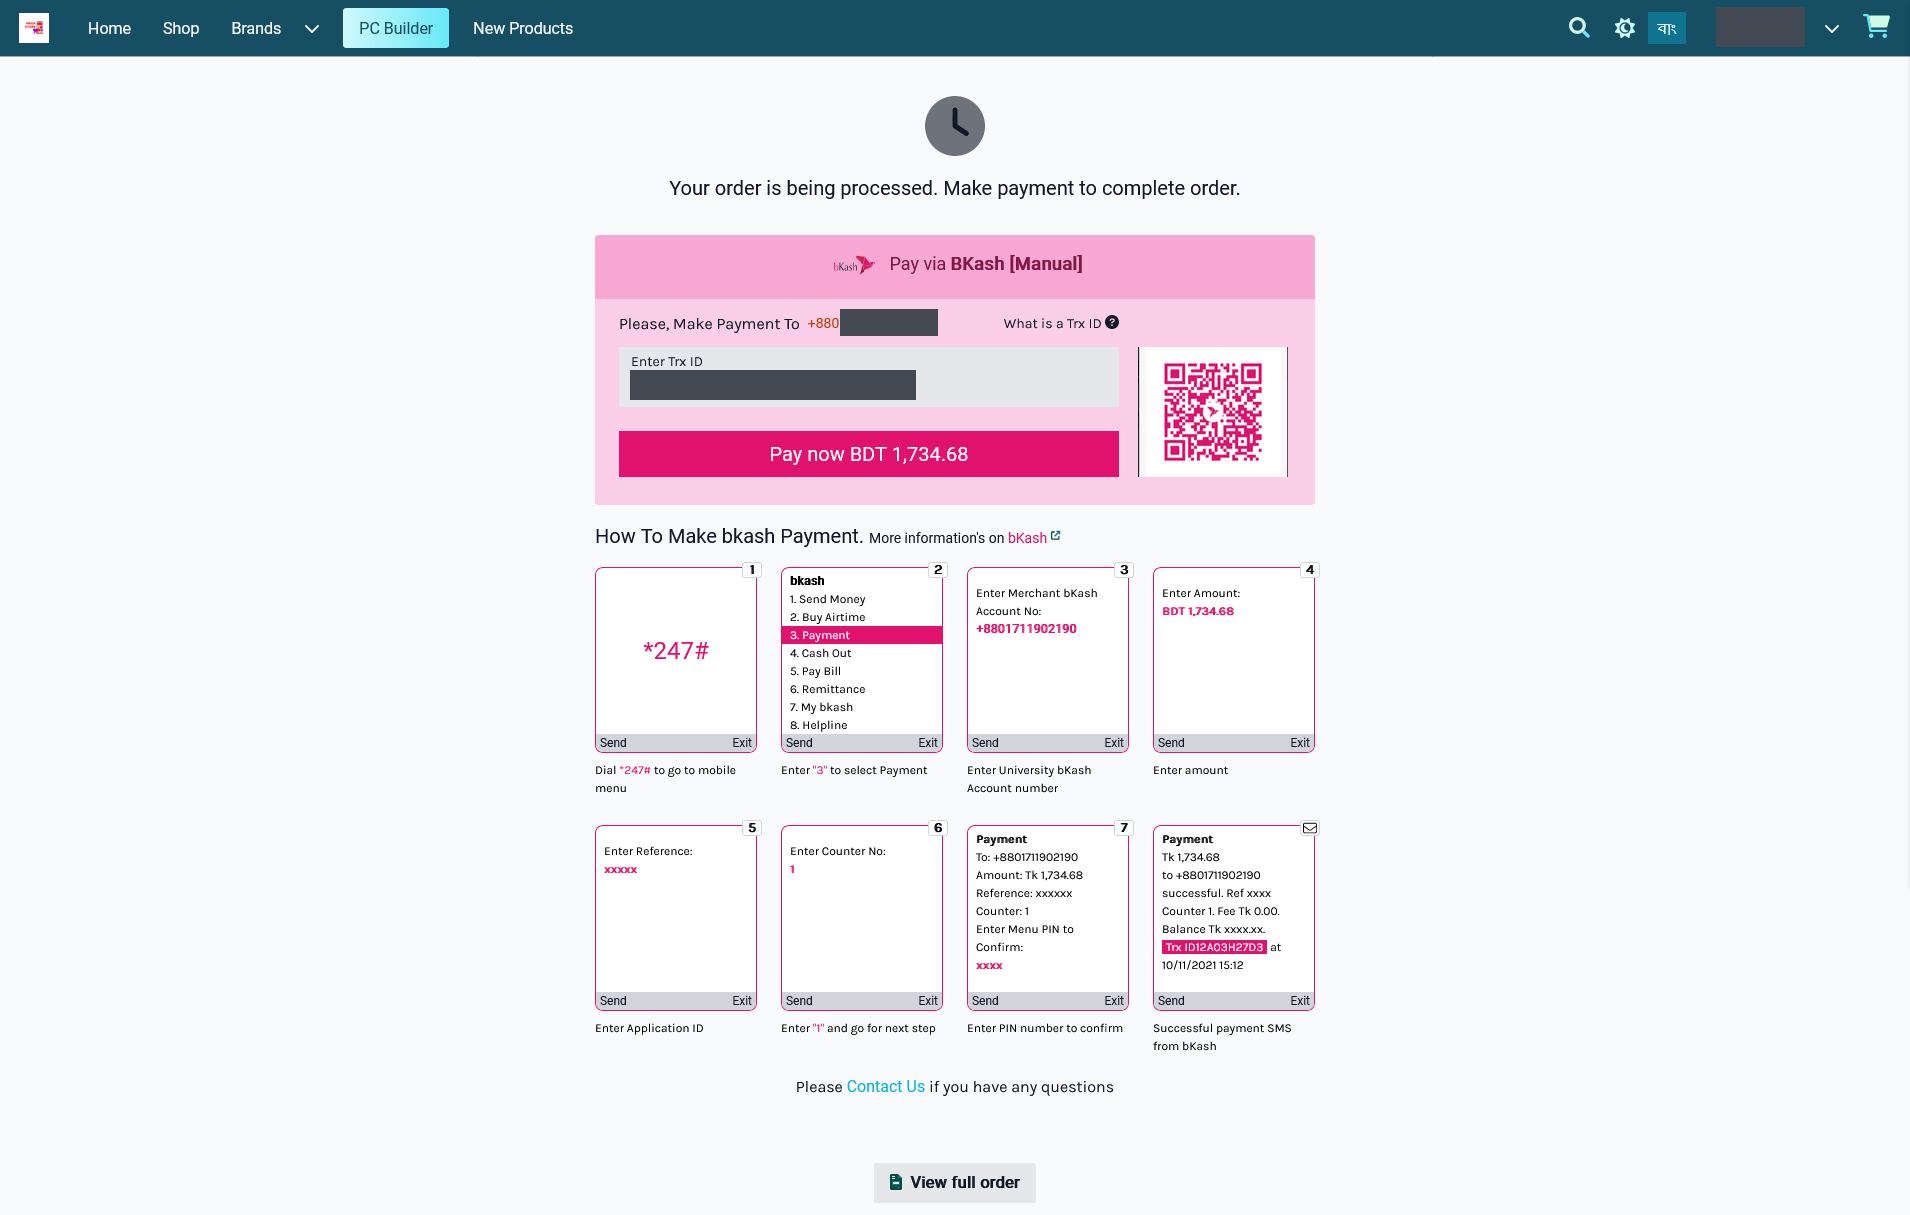
Image 1: Bkash payment with QR Code when placing Order and completing payment on The Website.
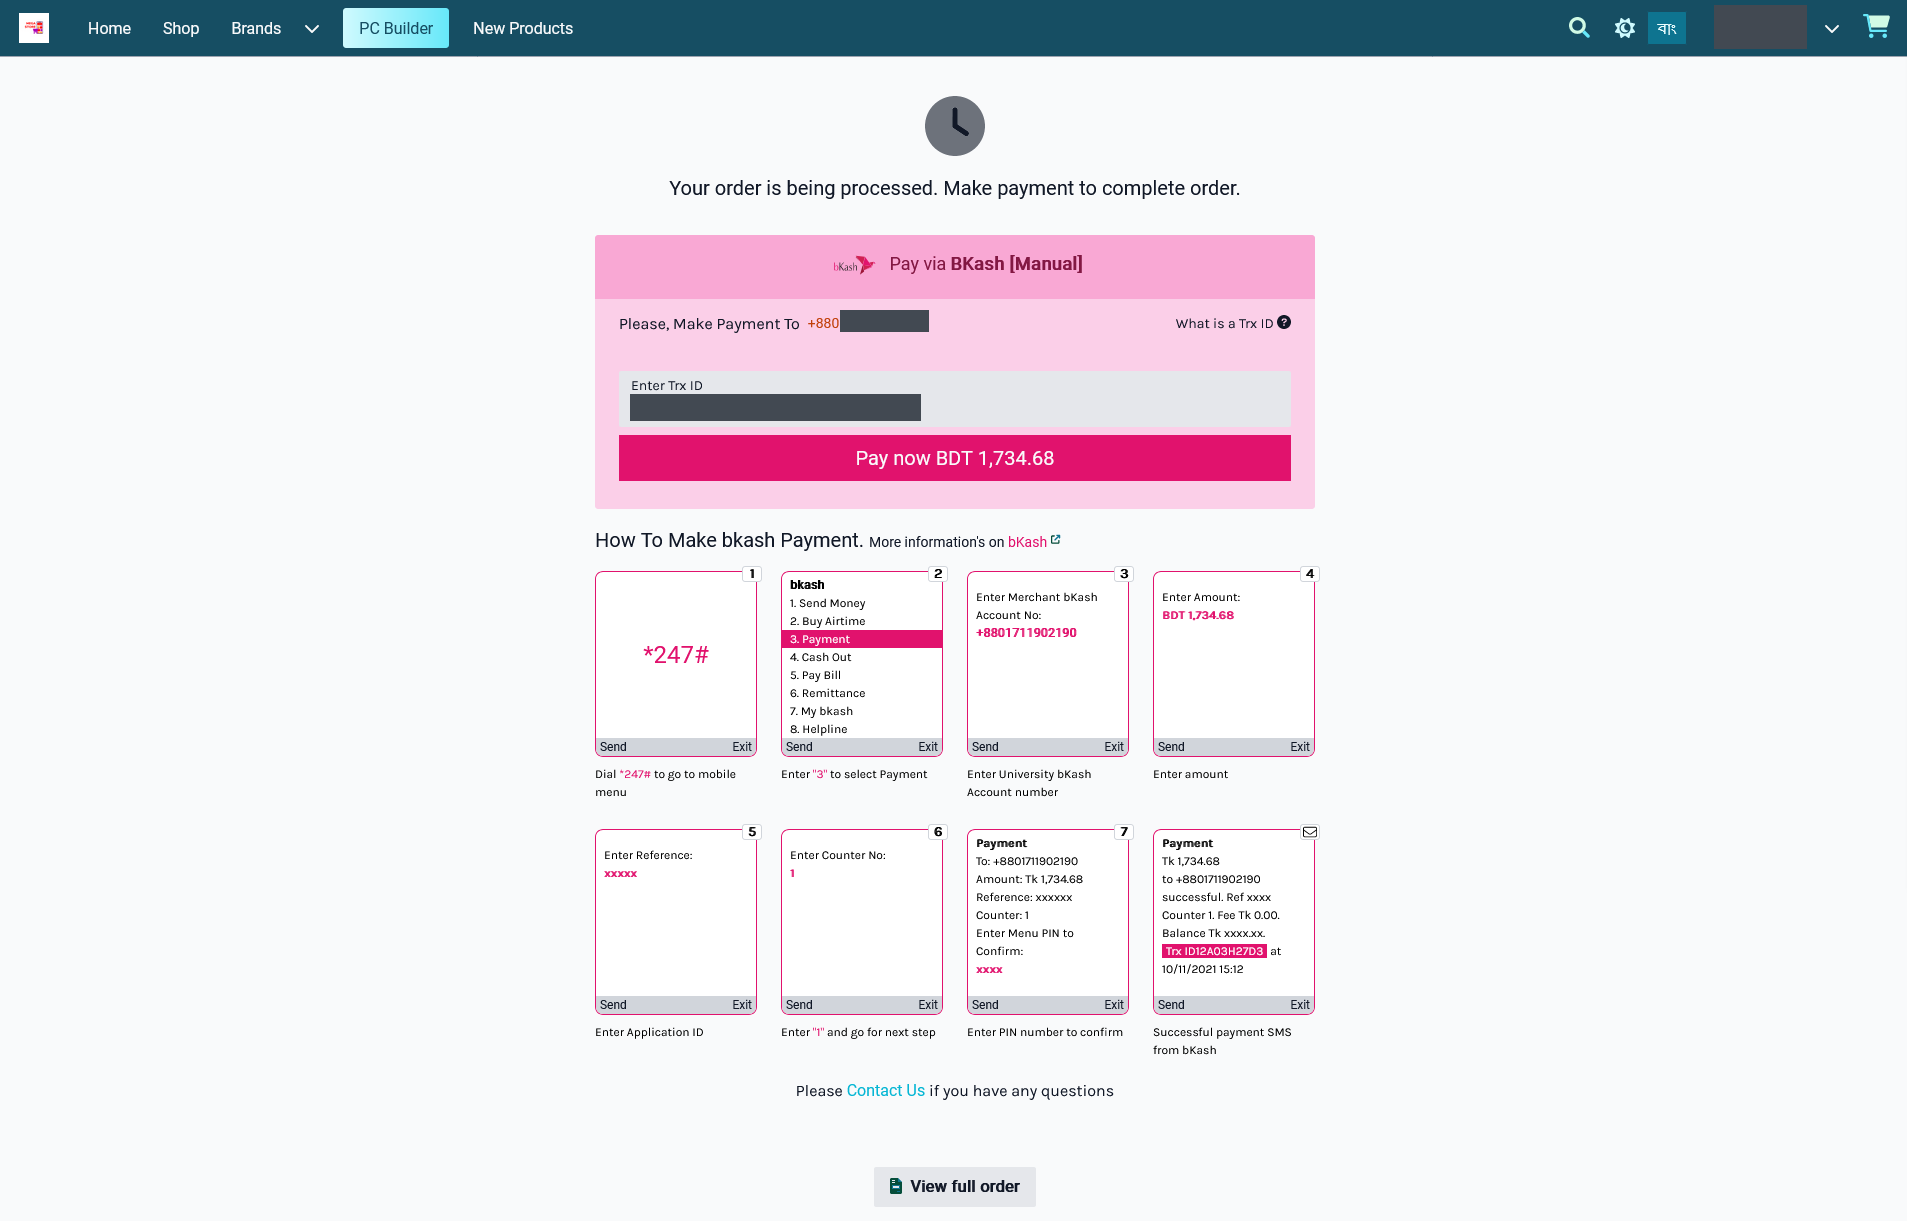
Image 2: Bkash payment without QR Code when placing Order and completing payment on The Website.
Nagad (Manual)
The payment gateway for Nagad (Manual) can be set with a Minimum and Maximum amount. Use Enable button to activate the gateway. There is a toggle button to enable Fee and set a Fee Value. Enter Nagad phone number and select Merchant Payment or Send Money. Upload QR Code using a screenshot downloaded from the phone and set Display Instruction below as shown. Click Save to confirm all changes and enable the gateway.
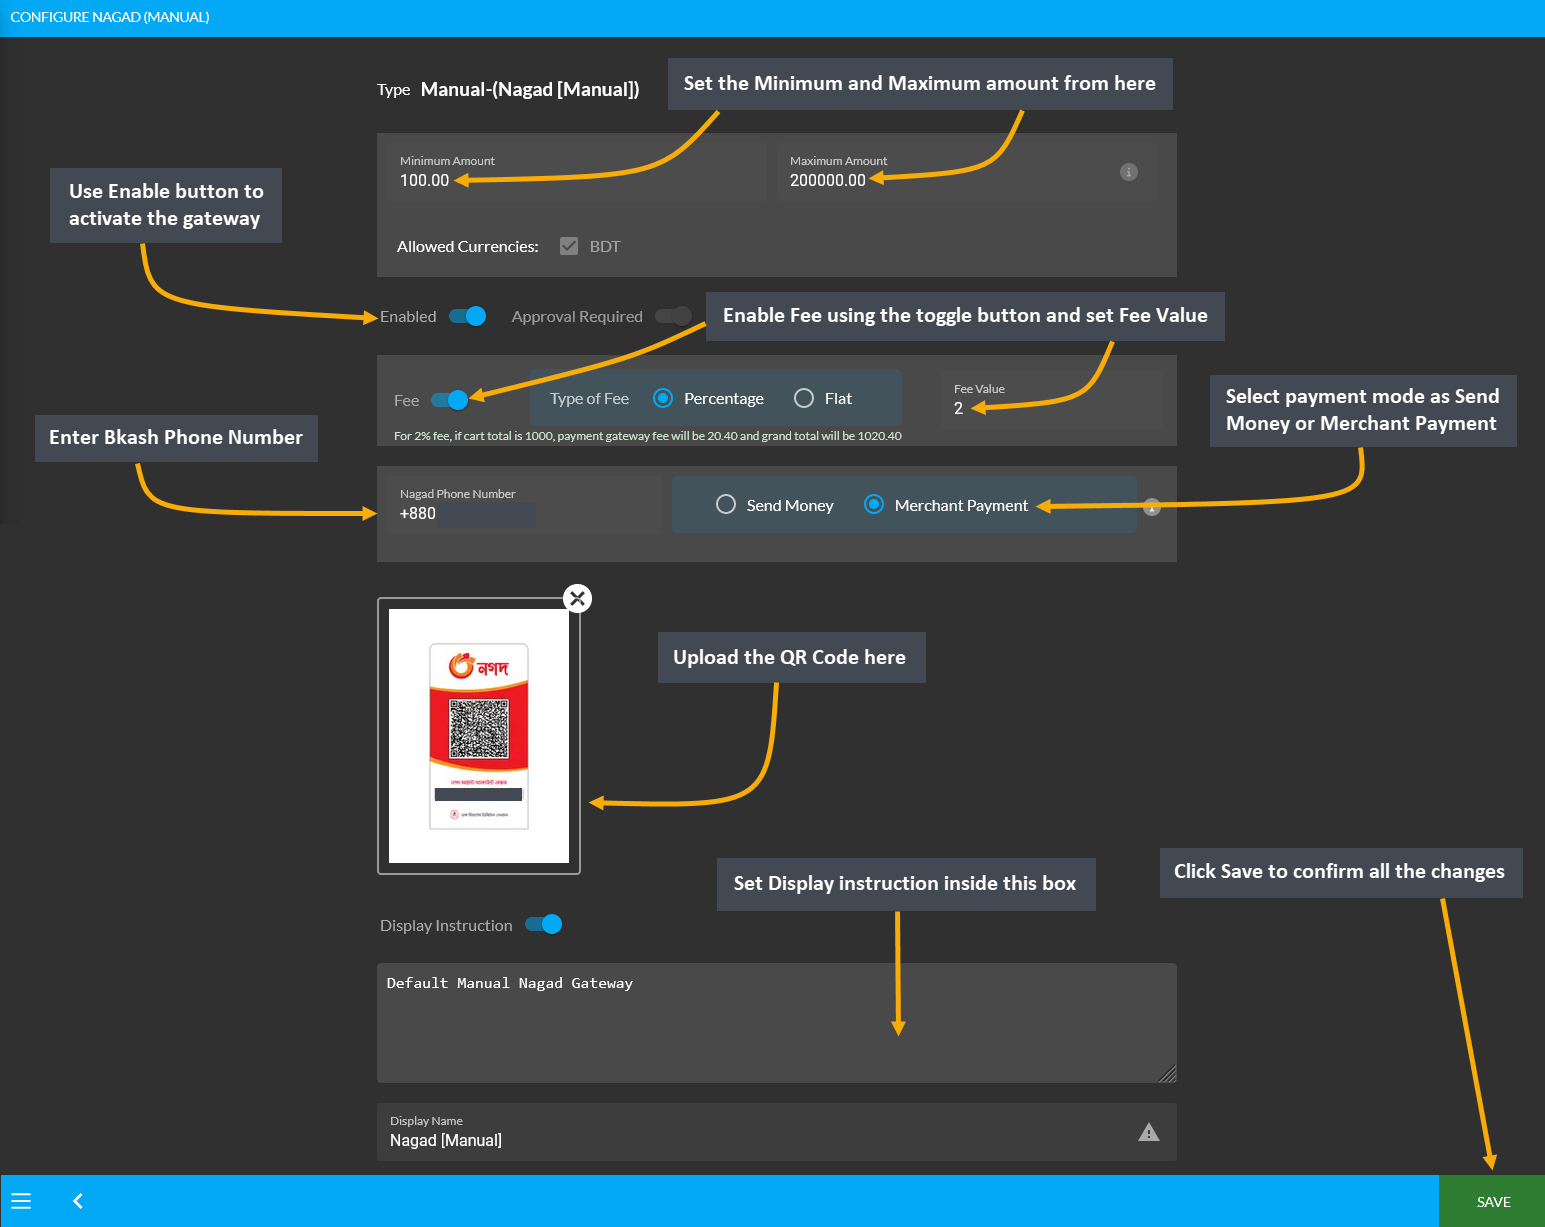
Image 1: Setup Nagad (Manual) with amounts, fees, BKash phone number, payment mode, and QR code.
Ordering on Website with or without Nagad QR Code
The Nagad (Manual) Payment Gateway can be created both with QR Code (which can be downloaded from phone) that can later be uploaded while activating Nagad payment gateway or without QR Code image. Please note that, when paying with Nagad (Manual) for ordering on The Website, this is how the Nagad payment gateway will show with the QR Code and without the QR Code.
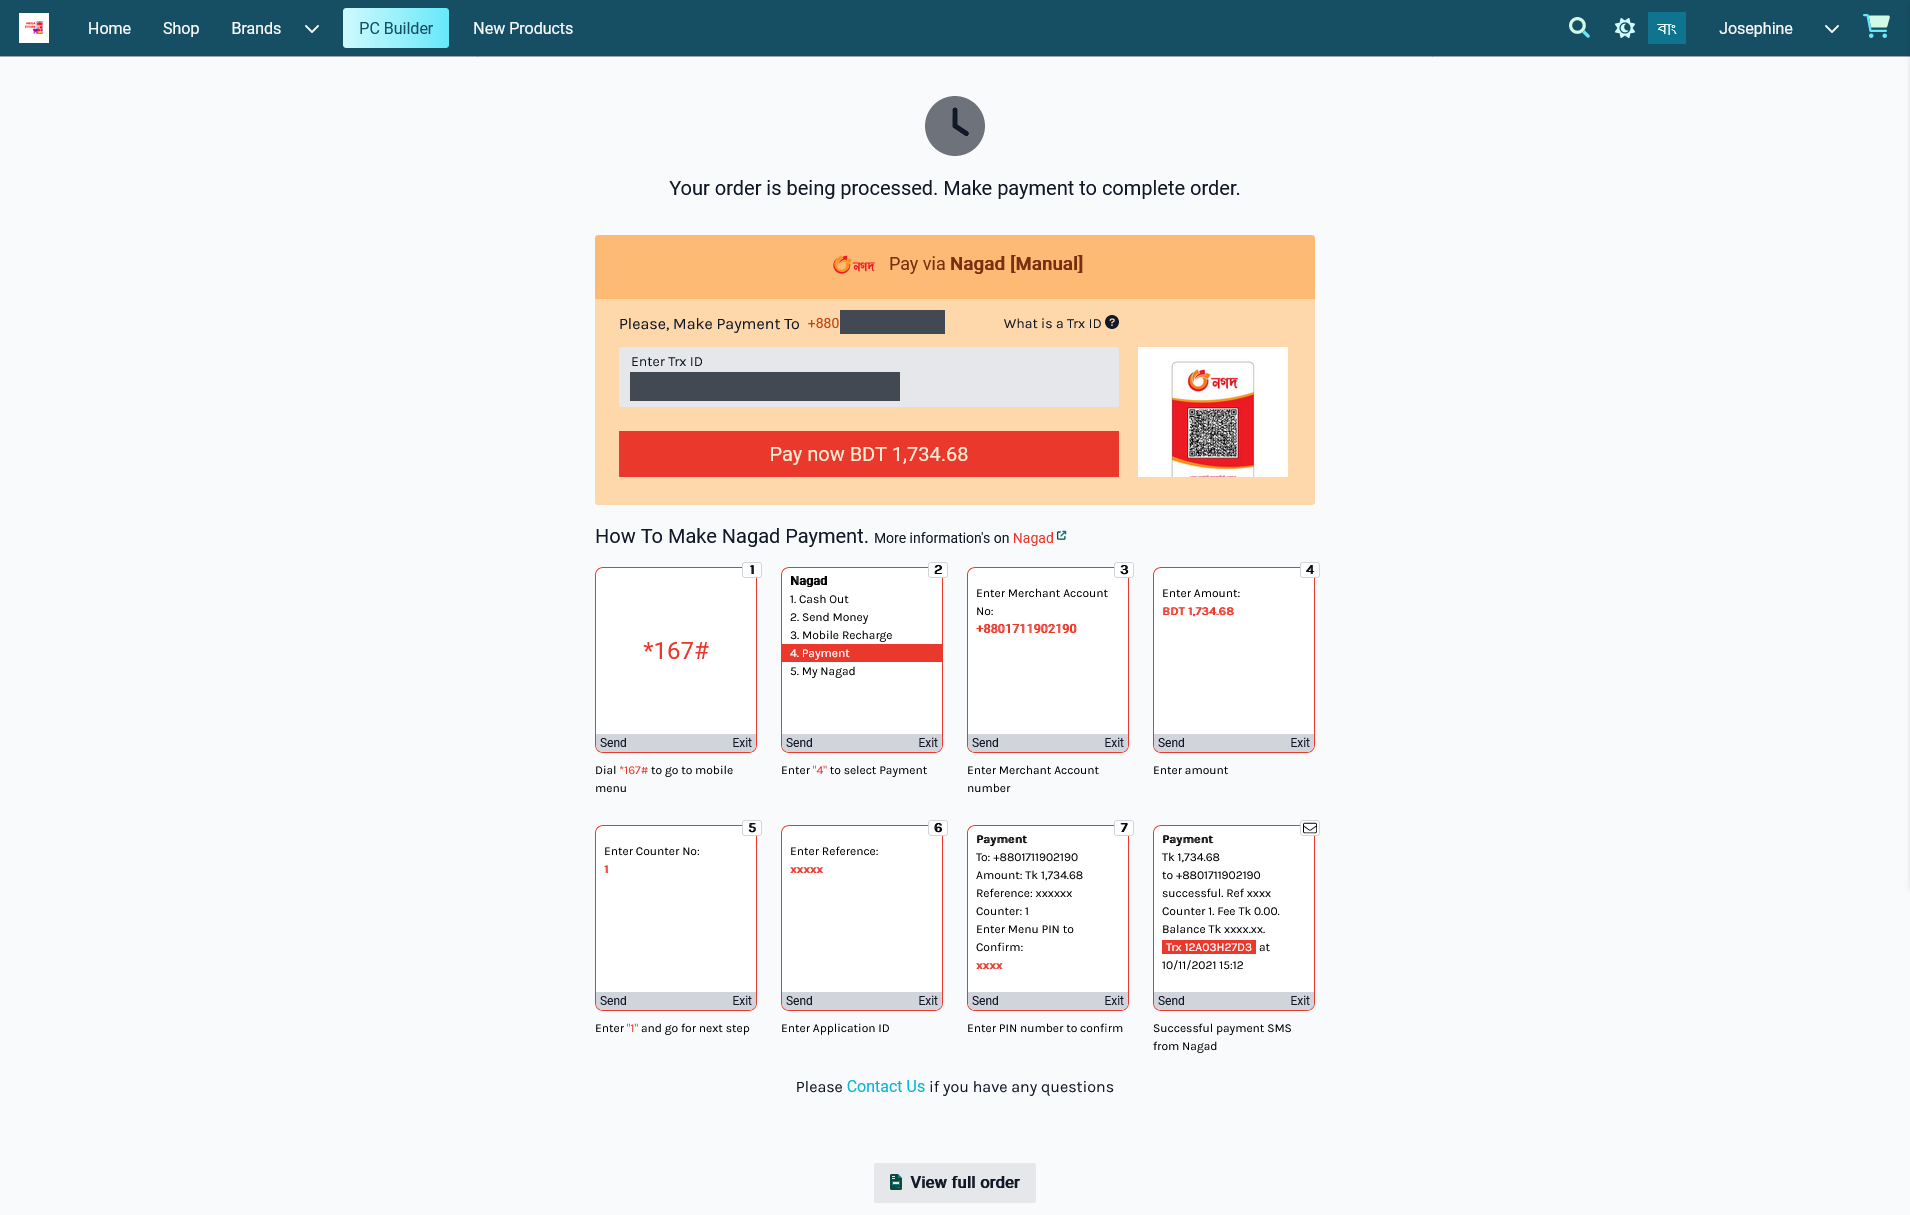
Image 2: Nagad payment with QR Code when placing Order and completing payment on The Website.
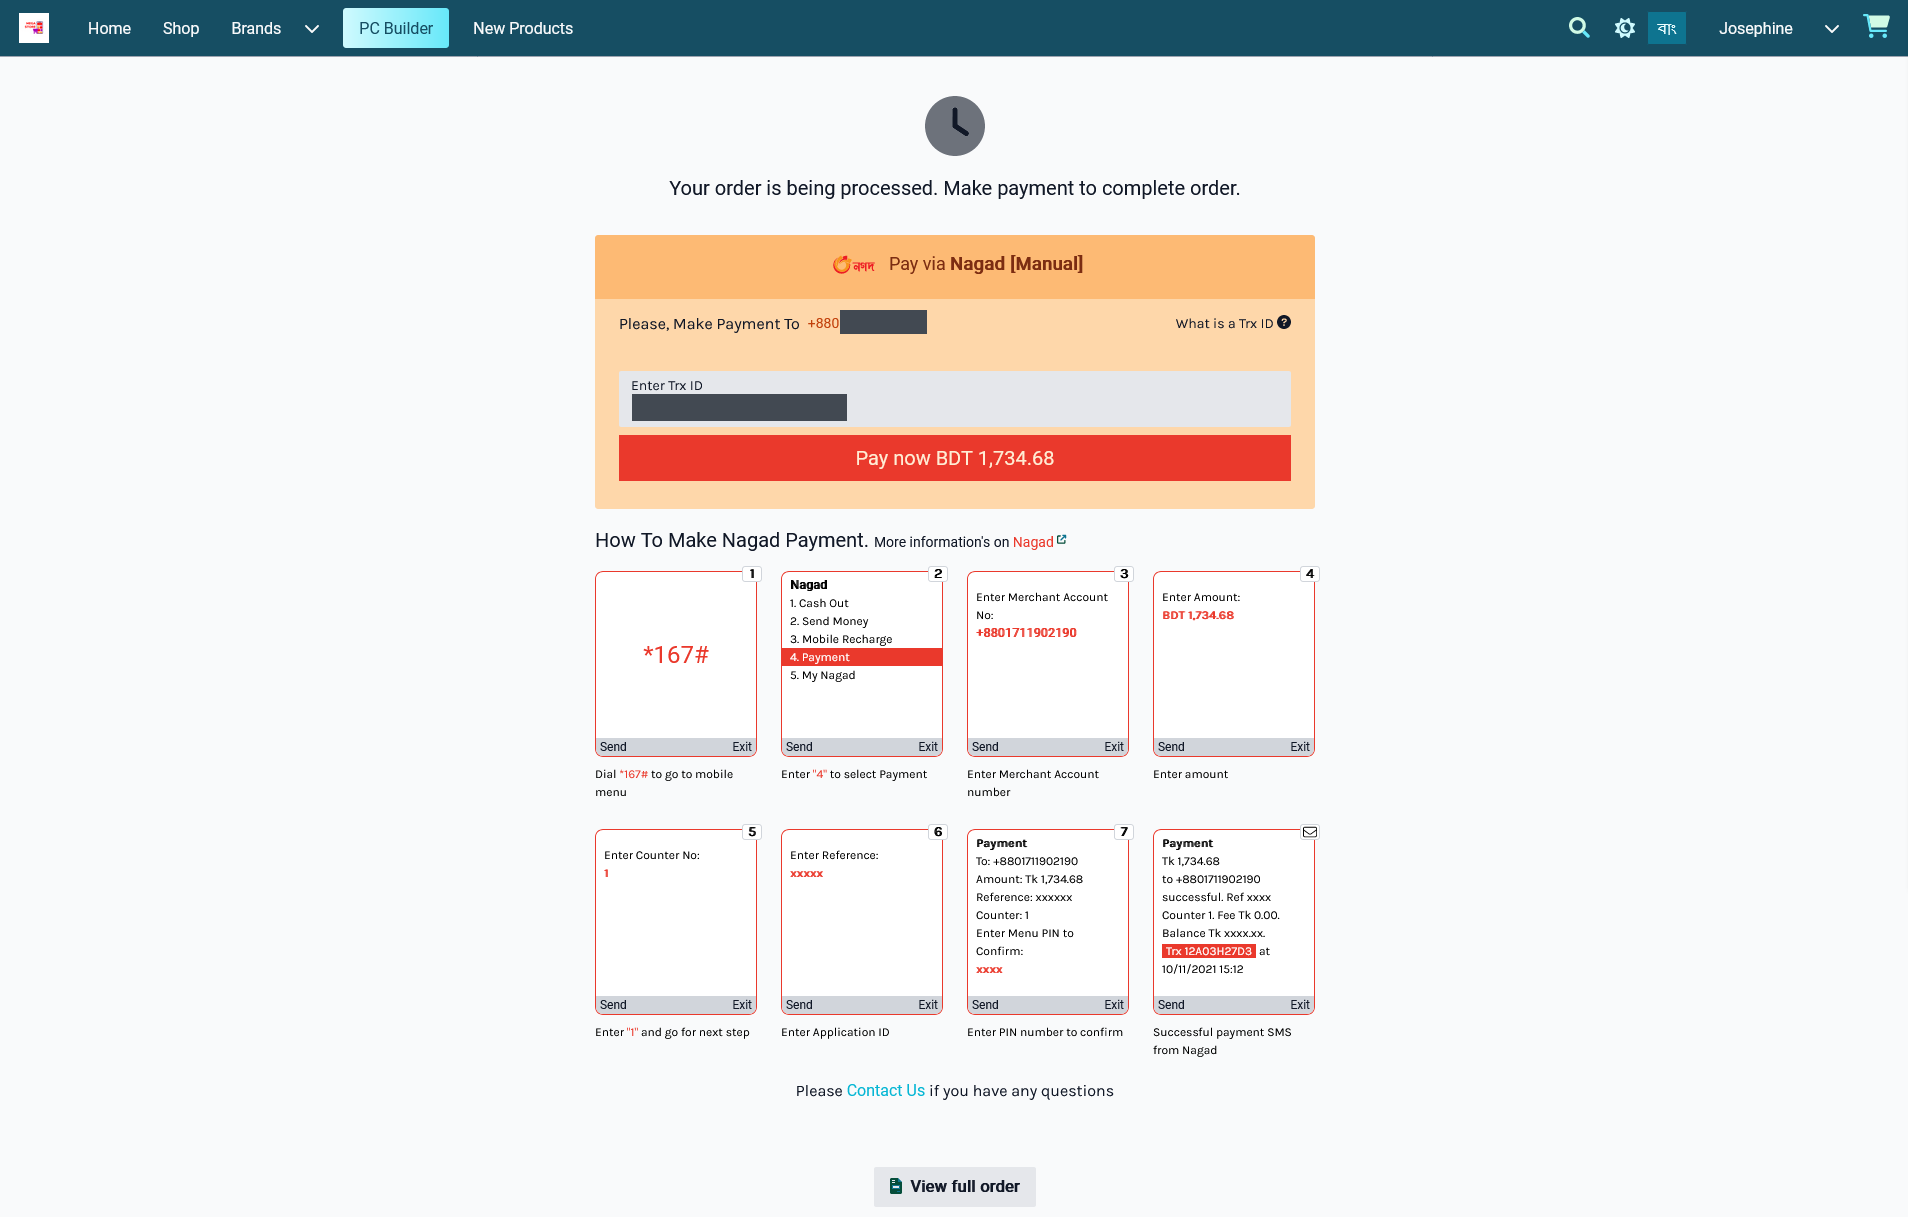
Image 3: Nagad payment without QR Code when placing Order and completing payment on The Website.
Cash On Delivery
To setup the payment gateway for Cash on Delivery, first set a Minimum and Maximum amount for Customer’s payment. Use Enable button to activate the gateway. Then, use the toggle button to enable Fee and set the Fee Value. There is a box to enable and set Display Instruction for Customer’s convenience to pay the cash during order delivery at their address. Click Save to confirm all changes and enable the gateway.
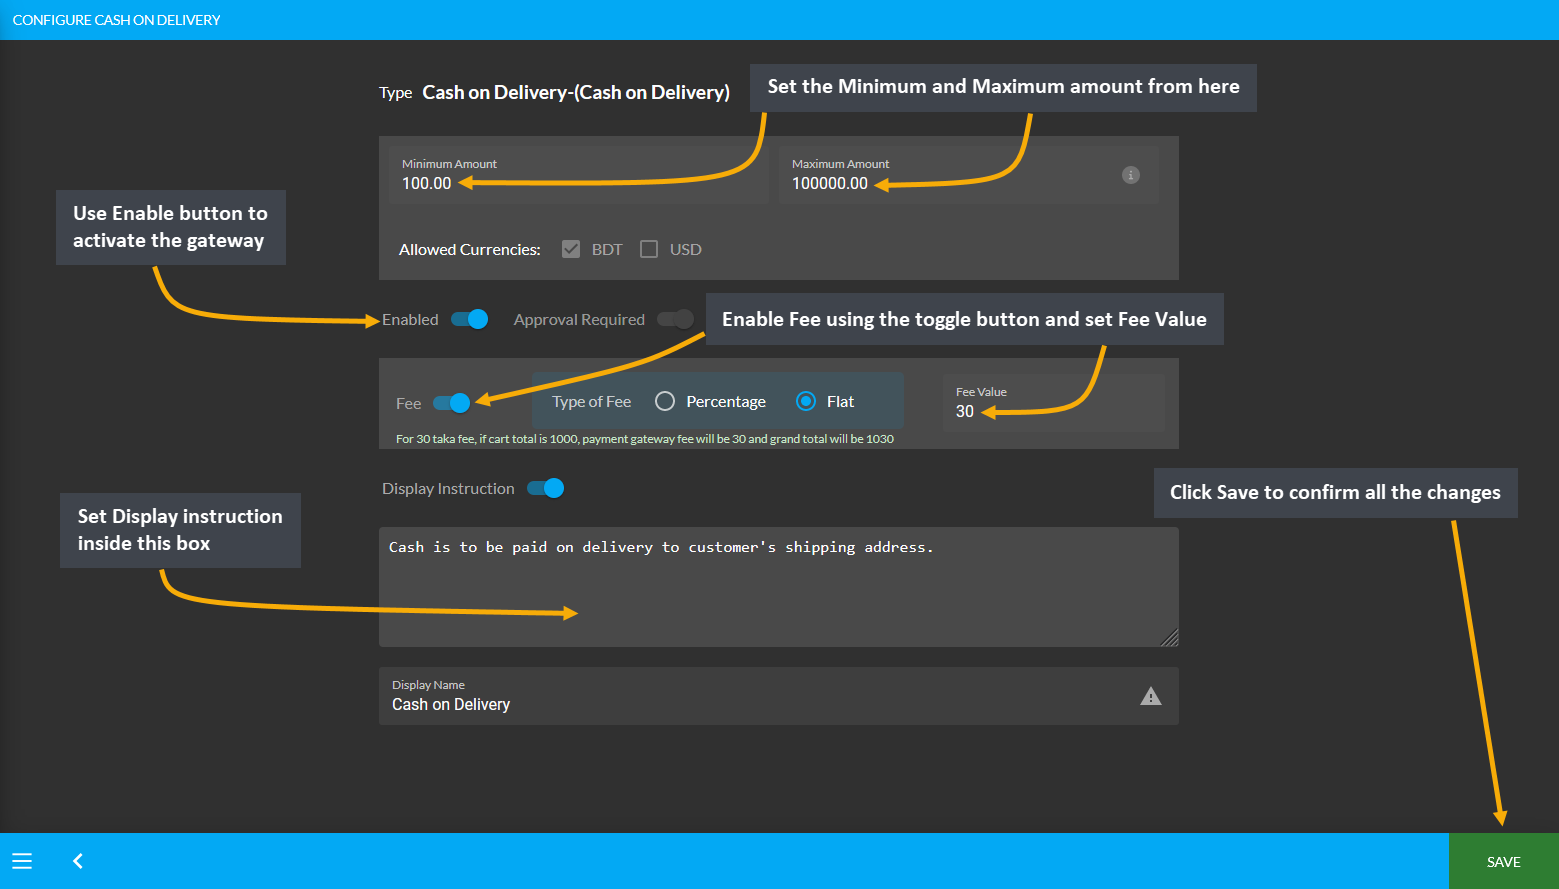
Image 1: Setup the Cash on Delivery with minimum and maximum amounts, fees, and display instructions.
On Credit (Due)
To setup the payment gateway for On Credit (Due), first set a Minimum and Maximum amount for Customer’s payment. Use Enable button to activate the gateway. Then, use the toggle button to enable Fee and set the Fee Value if any additional fee needs to be charged. Click Save to confirm all changes and enable the gateway.
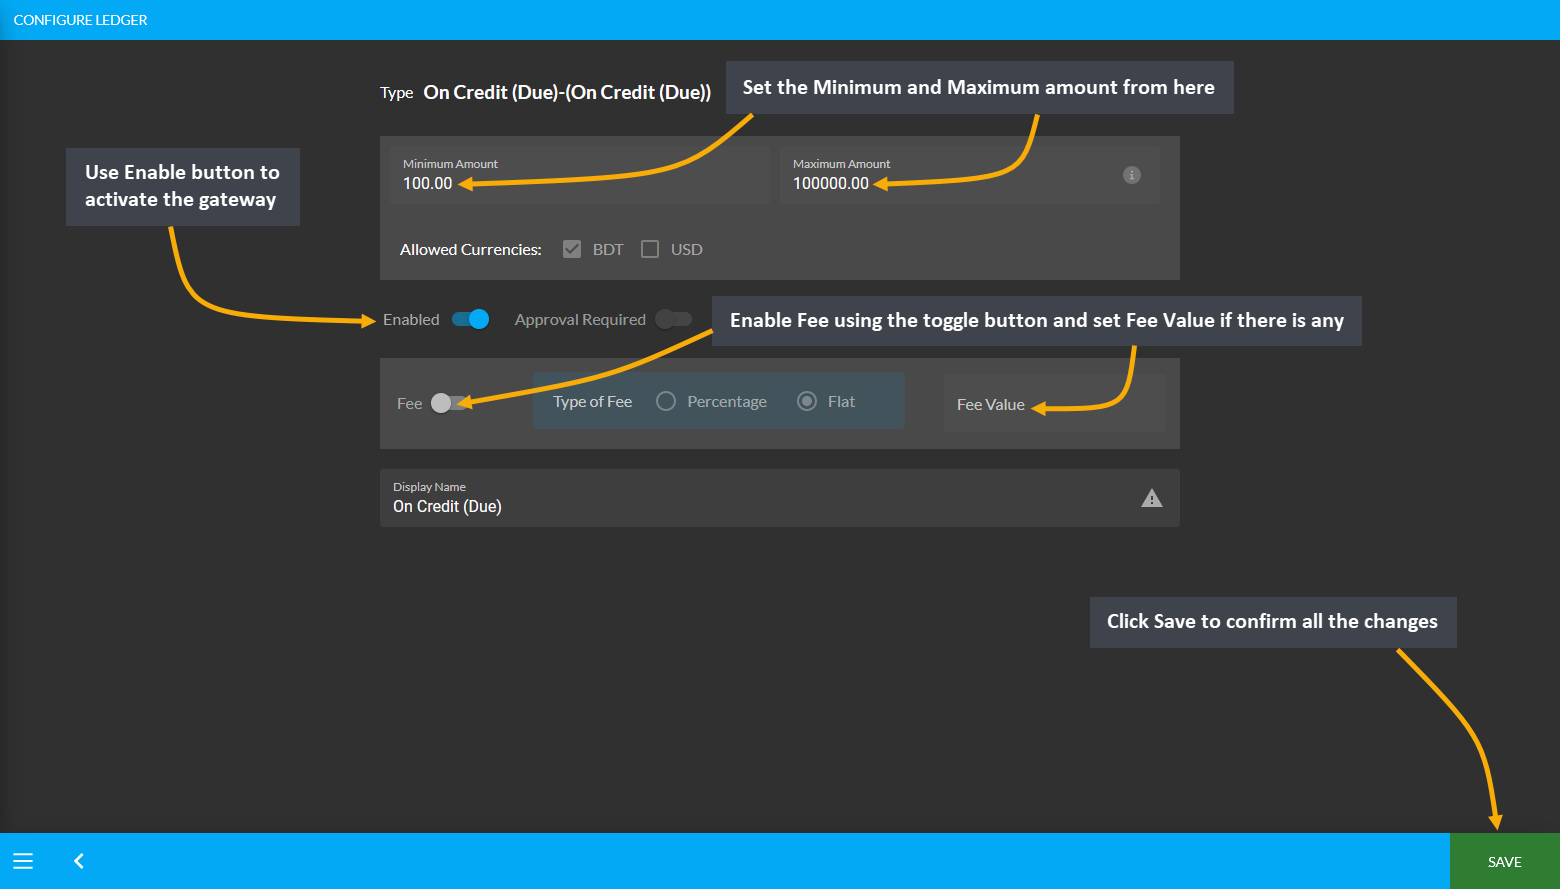
Image 1: Setup the On Credit (Due) with minimum and maximum amounts and fees if applicable.
Credit Card, Cash, or Cheque
To setup the payment gateway for Credit Card, Cash, or Cheque, first set a Minimum and Maximum amount for Customer’s payment. Use Enable button to activate the gateway. Set the Display Instruction for these gateways. Click Save to confirm all changes and enable the gateway.
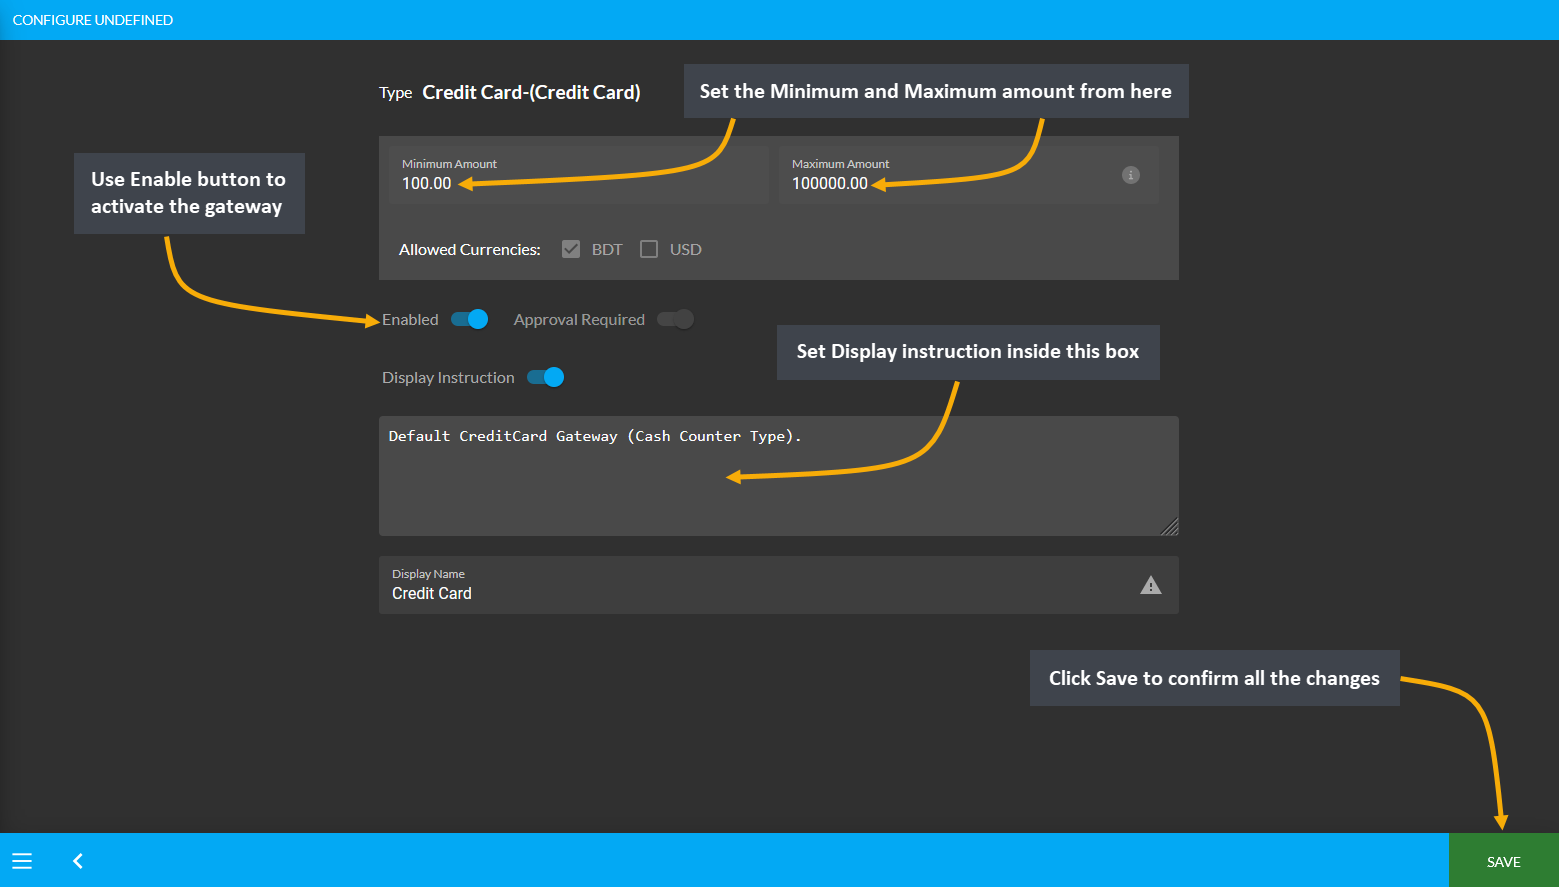
Image 1: Setup the Credit Card with minimum and maximum amounts and display instructions.

Image 2: Setup the Cash with minimum and maximum amounts and display instructions.
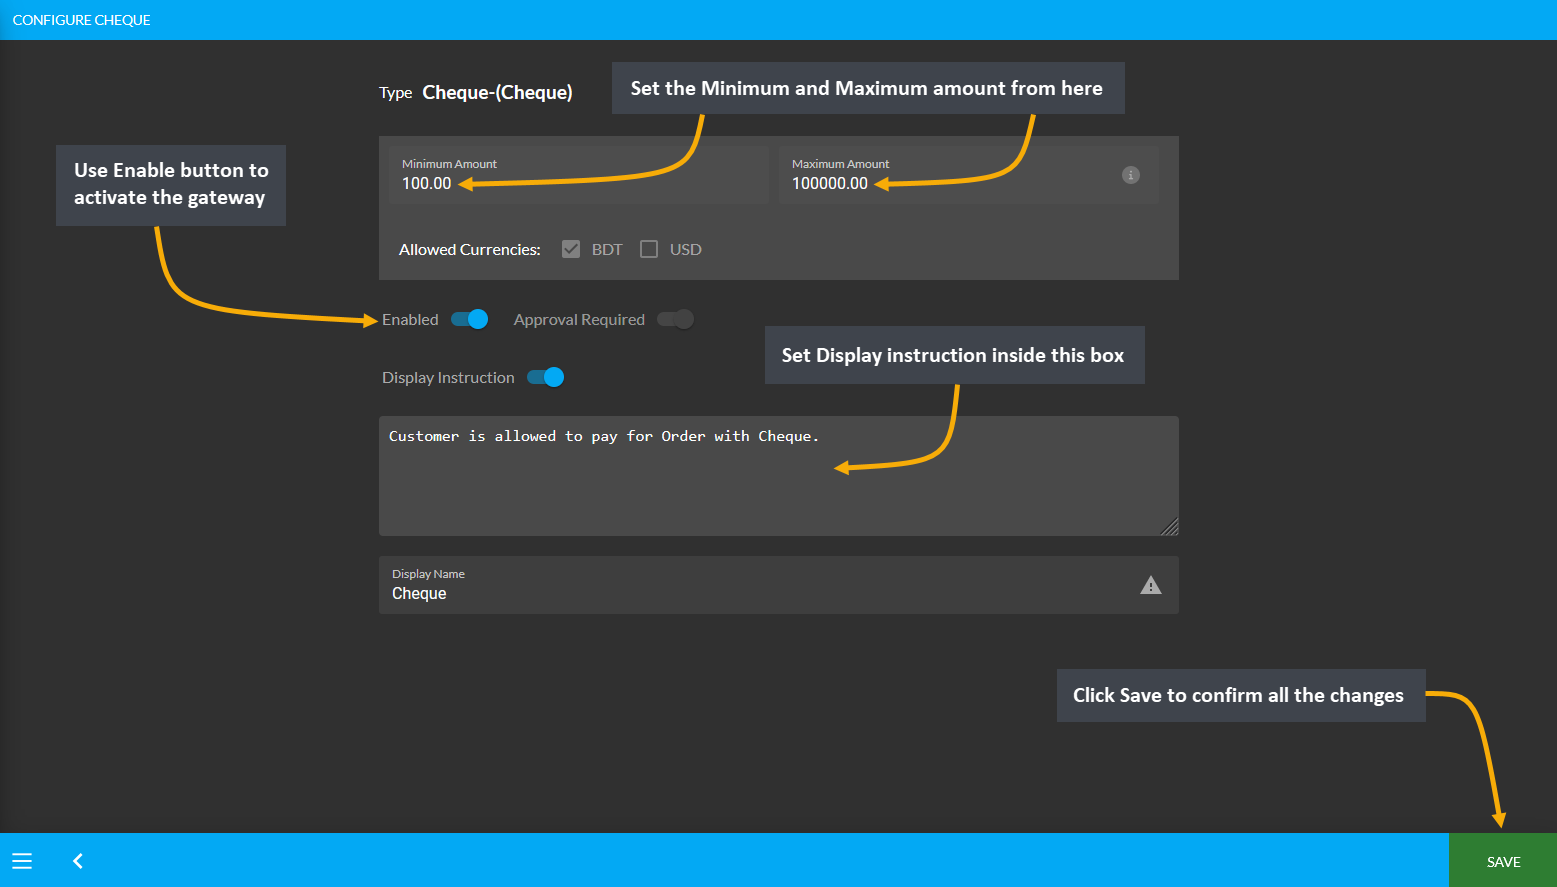
Image 3: Setup the Cheque with minimum and maximum amounts and display instructions.
BKash
To setup the payment gateway for BKash, first setup a Minimum and Maximum amount for Customer’s payment. Use Enable button to activate the gateway. Then, use the toggle button to enable Fee and set the Fee Value. In the section of Test API Keys, copy-paste the test API Keys from BKash to allow Customers to pay for their Products.
Providing these API keys will allow to verify them with BKash automatically. Finally, there is a box to set Display Instruction as shown in the example screenshot. Click the Save button after all the steps are completed.
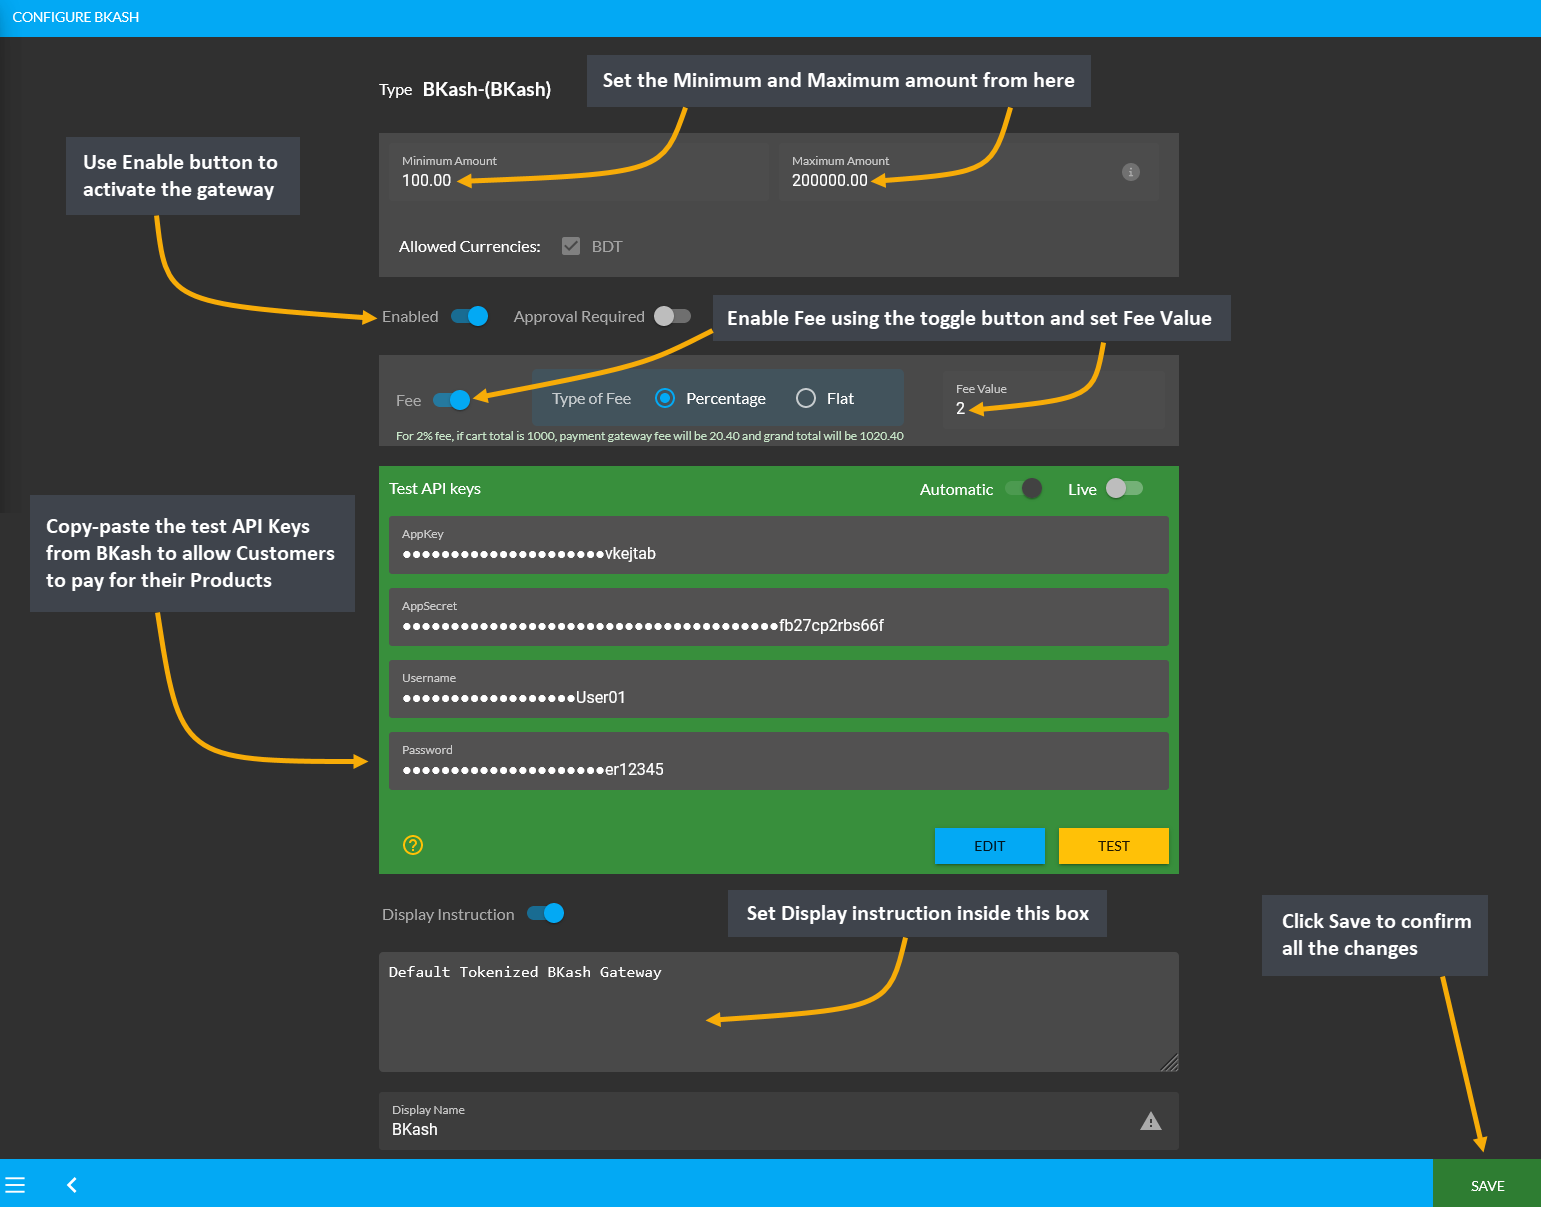
Image 1: Setup the BKash with minimum and maximum amounts, fees, Test API keys, and display instructions.
Nagad
To setup the payment gateway for Nagad, first setup a Minimum and Maximum amount for Customer’s payment. Use Enable button to activate the gateway. Then, use the toggle button to enable Fee and set the Fee Value. In the section of Test API Keys, copy-paste the test API Keys from Nagad to allow Customers to pay for their Products.
Providing these API keys will allow to verify them with Nagad automatically. Finally, there is a box to set Display Instruction as shown in the example screenshot. Click the Save button after all the steps are completed.
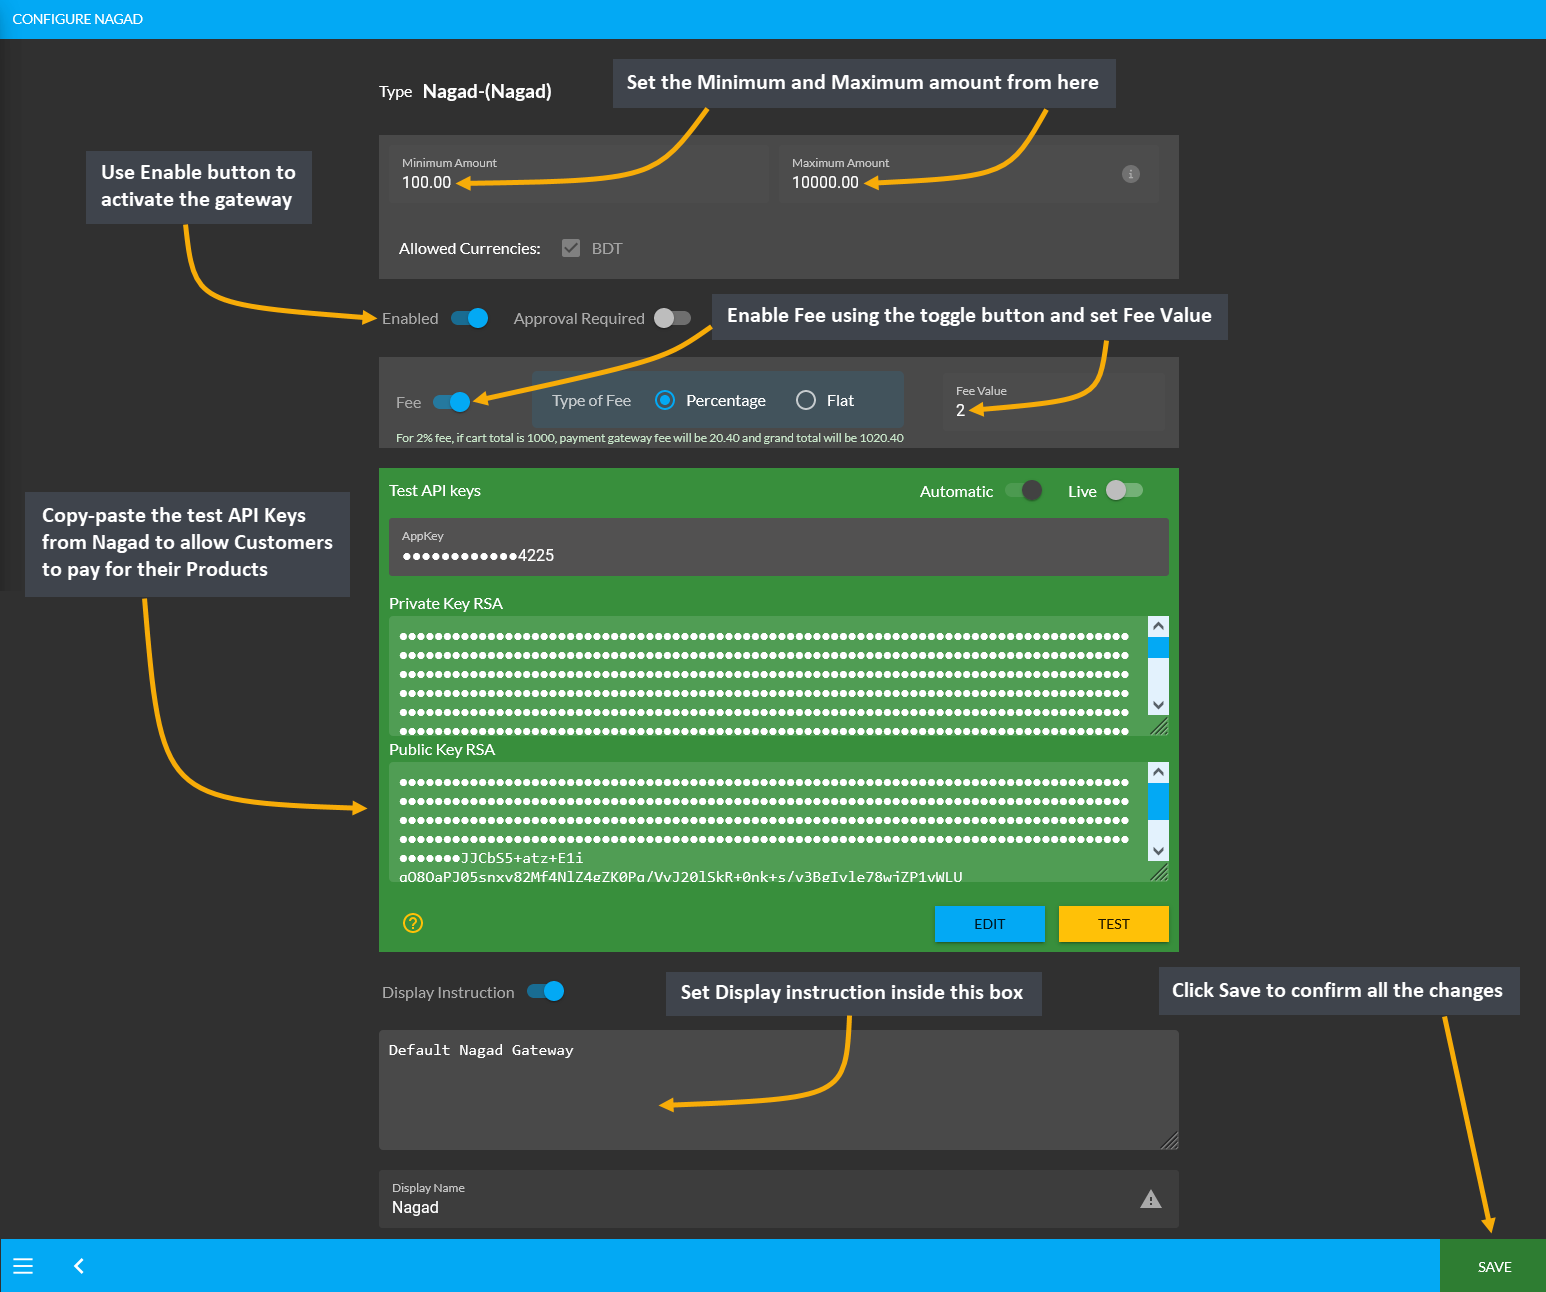
Image 1: Setup the Nagad with minimum and maximum amounts, fees, Test API keys, and display instructions.
PortWallet
Configure the payment gateway for PortWallet by setting a Minimum and Maximum amount for the Customer’s payment. Use Enable button to activate the gateway. Then, use the toggle button to enable Fee and set Fee Value. Within the Test API Keys section, copy-paste test API Keys from PortWallet to allow Customers to pay for their Products. Also, select the monthly EMI that will be applicable.
Providing these API keys will allow to verify them with PortWallet automatically. Finally, there is a box to set the Display Instruction as shown in the example screenshot. Click the Save button after all steps are done.
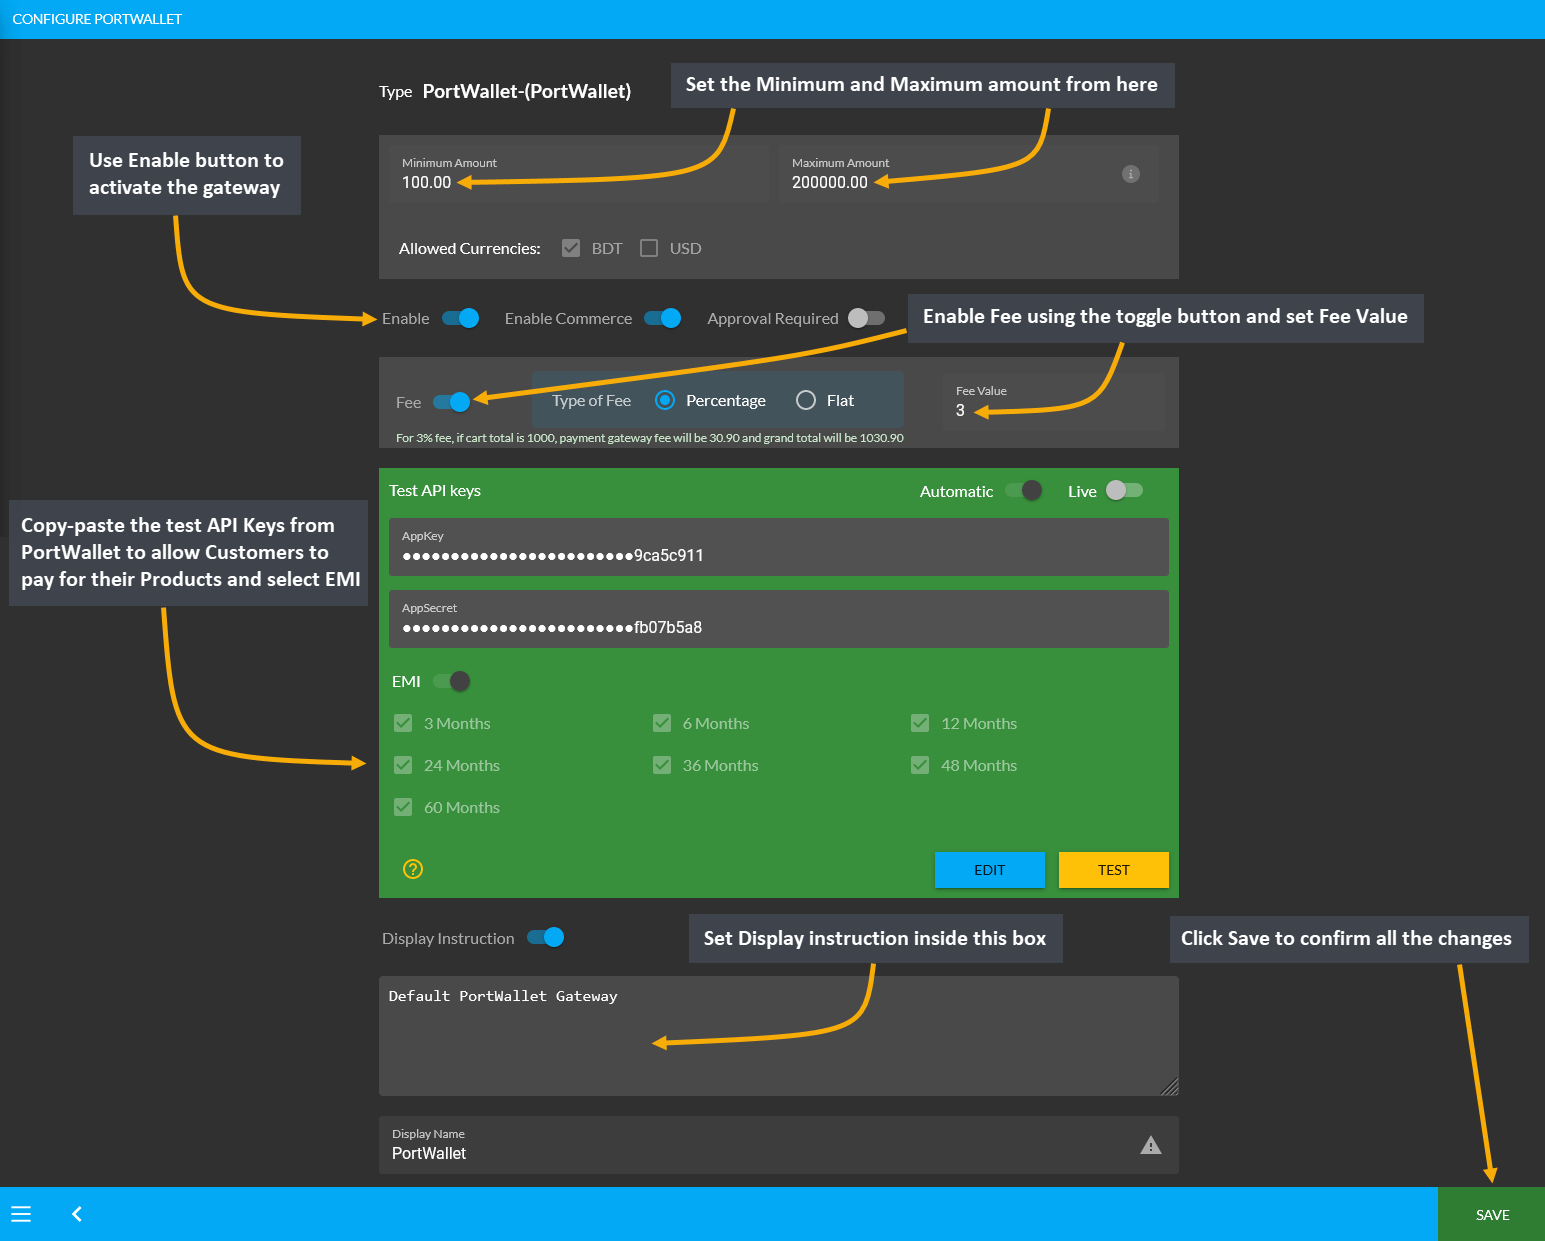
Image 1: Setup PortWallet with minimum and maximum amounts, fees, Test API keys, and display instructions.
SSLCommerz
Configure the payment gateway for SSLCommerz by setting up a Minimum and Maximum amount for Customer’s payment. Use Enable button to activate the gateway. Then, use the toggle button to enable Fee and set Fee Value. Within the Test API Keys section, copy-paste test API Keys from SSLCommerz to allow Customers to pay for their Products. Also, select the monthly EMI that will be applicable.
Providing these API keys will allow to verify them with SSLCommerz automatically. Finally, there is a box to set the Display Instruction as shown in the example screenshot. Click the Save button after all steps are done.
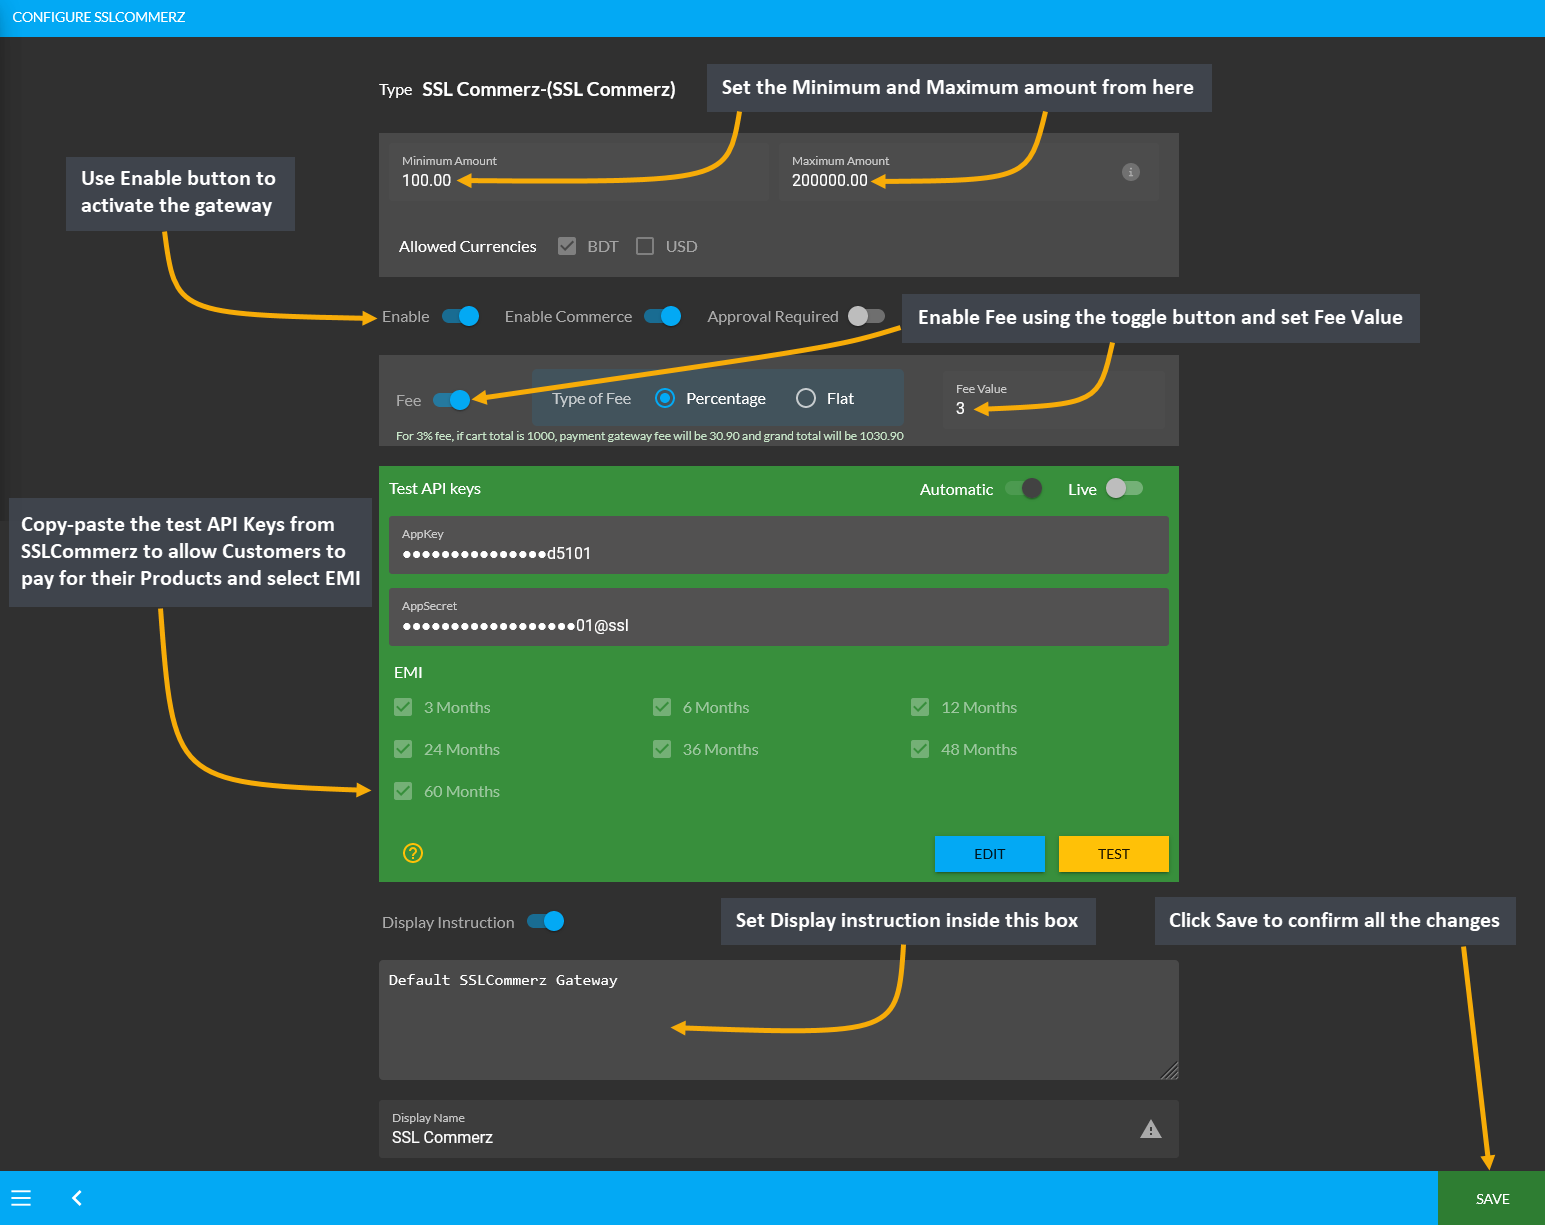
Image 1: Setup SSLCommerz with minimum and maximum amounts, fees, Test API keys, and display instructions.
3 - Shipping Gateway Settings
Learn more about the configuration of Shipping Gateways and how to activate them for Order deliveries.
Shipping Gateway Settings
Configure Shipping Gateways from Gateways under All Settings tab. The Shipping Gateways that are embedded in the system include RedX, FedEx, UPS, PaperFly, Aramex, In Store Pickup, Direct, DHL, Now, Ecourier, GoGoBangla, and Koopon. Shop Owners can activate or enable them whenever needed.
Click the Configure button beside each Shipping Gateway to configure them. If any gateway is enabled, they will be marked as green, if any gateway is disabled, they will be marked as red. So, the Shop Owner can enable and disable any shipping gateway to use for shipping Orders via any of these gateways on The Website.
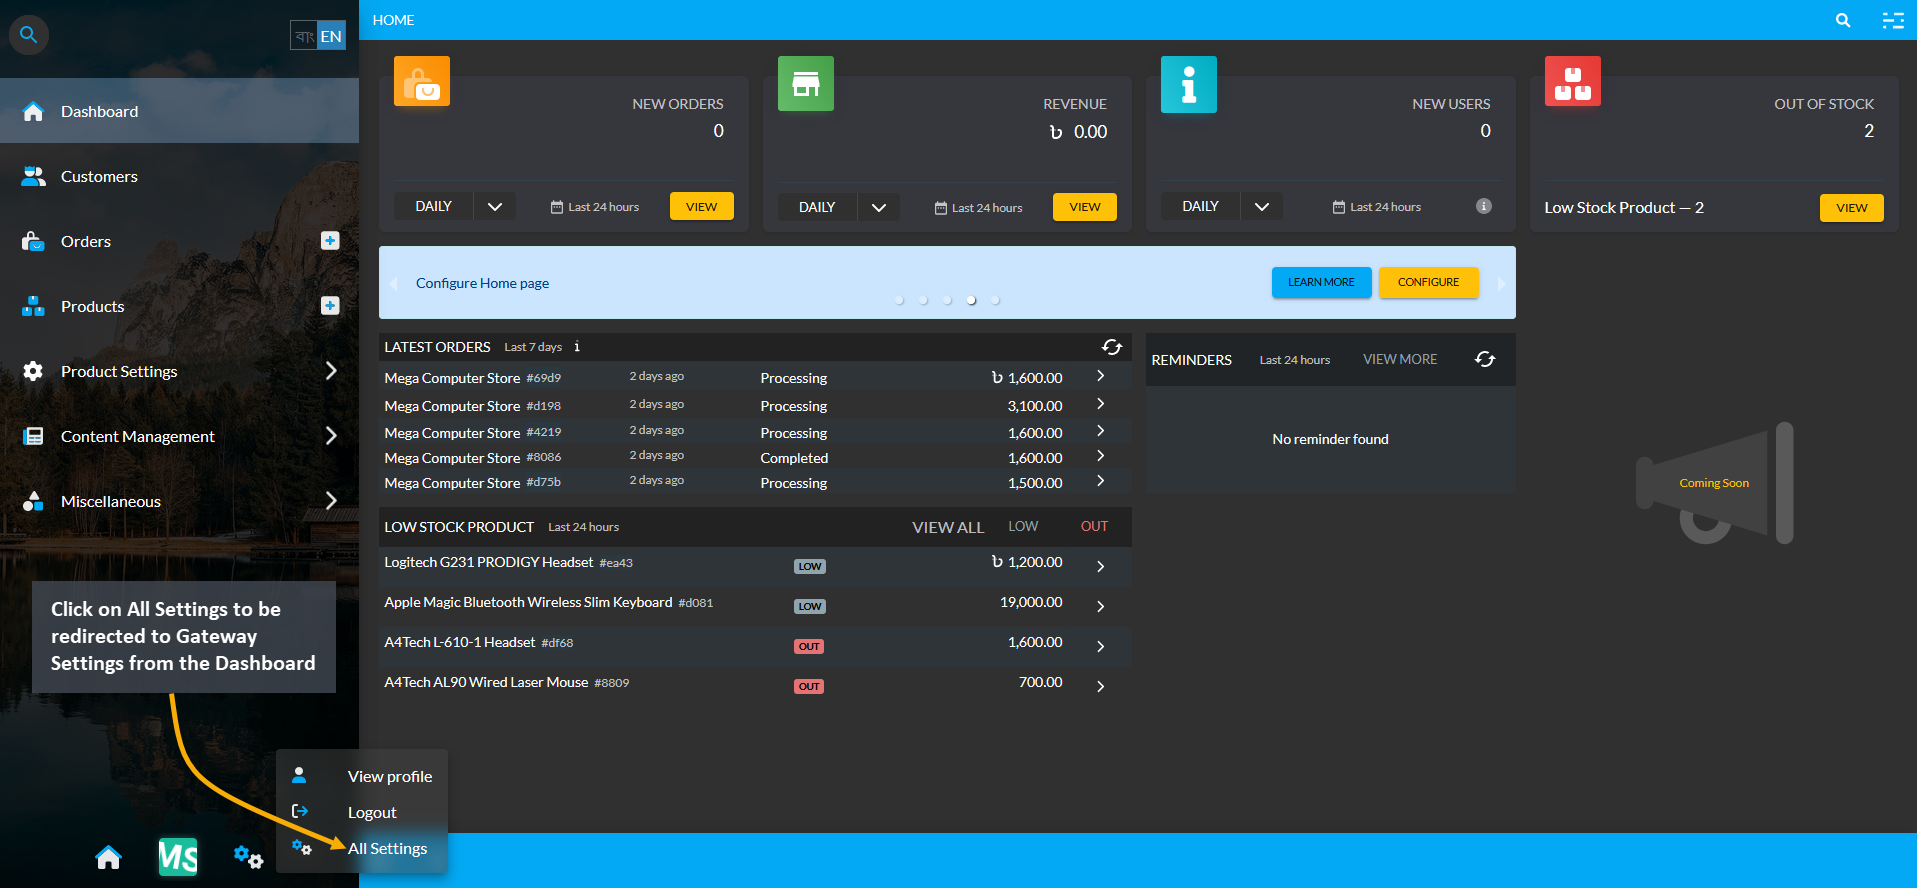
Image 1: Click on All Settings to be redirected to Gateway Settings from the Dashboard.
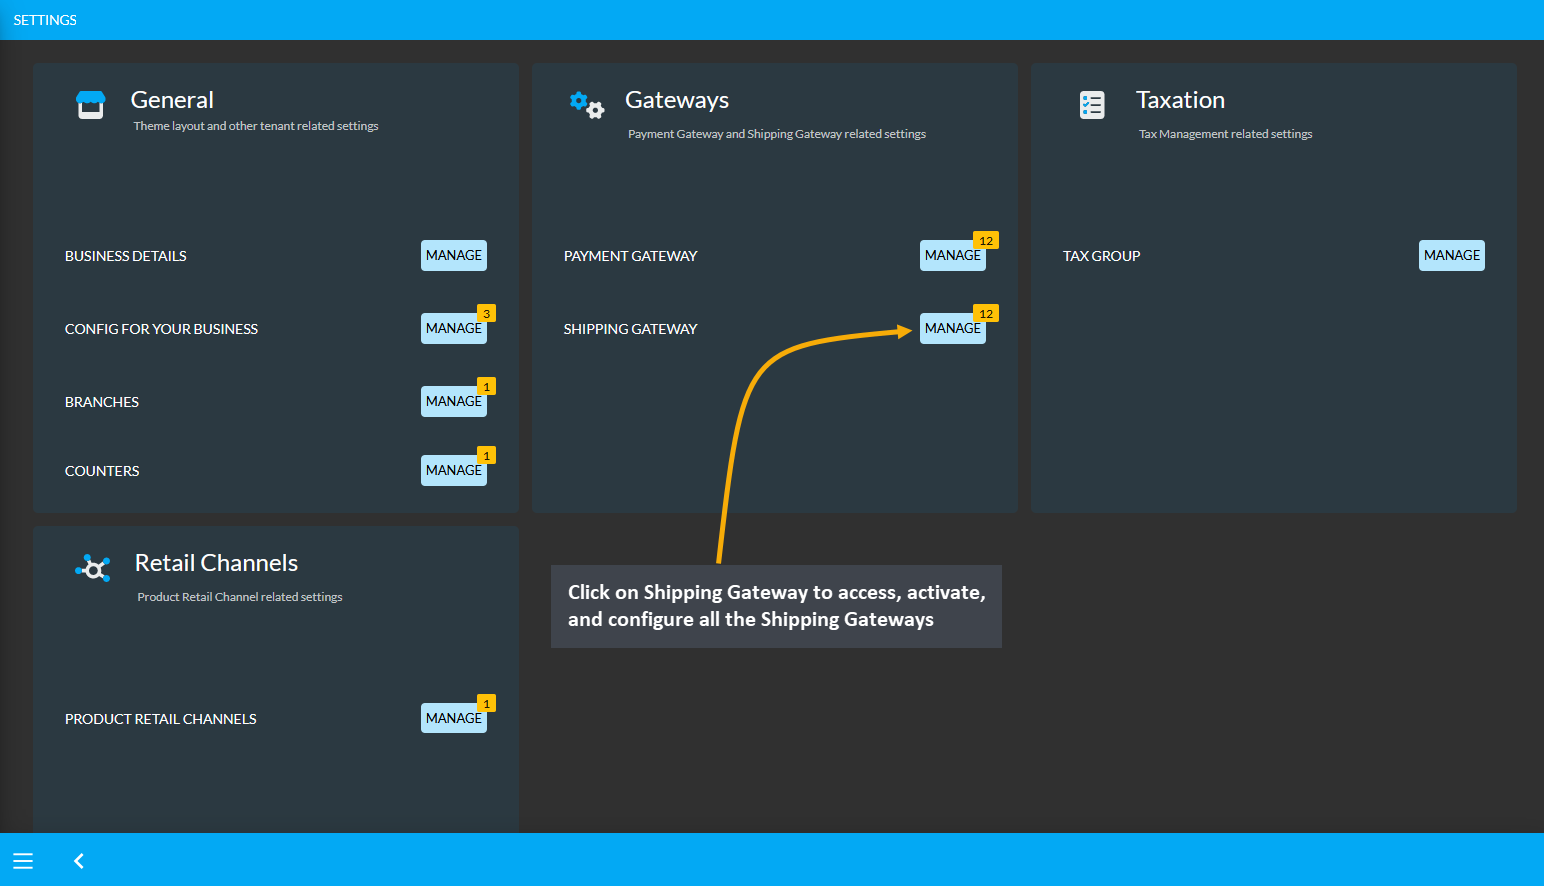
Image 2: Click on Shipping Gateway to access, activate, and configure all the Shipping Gateways.
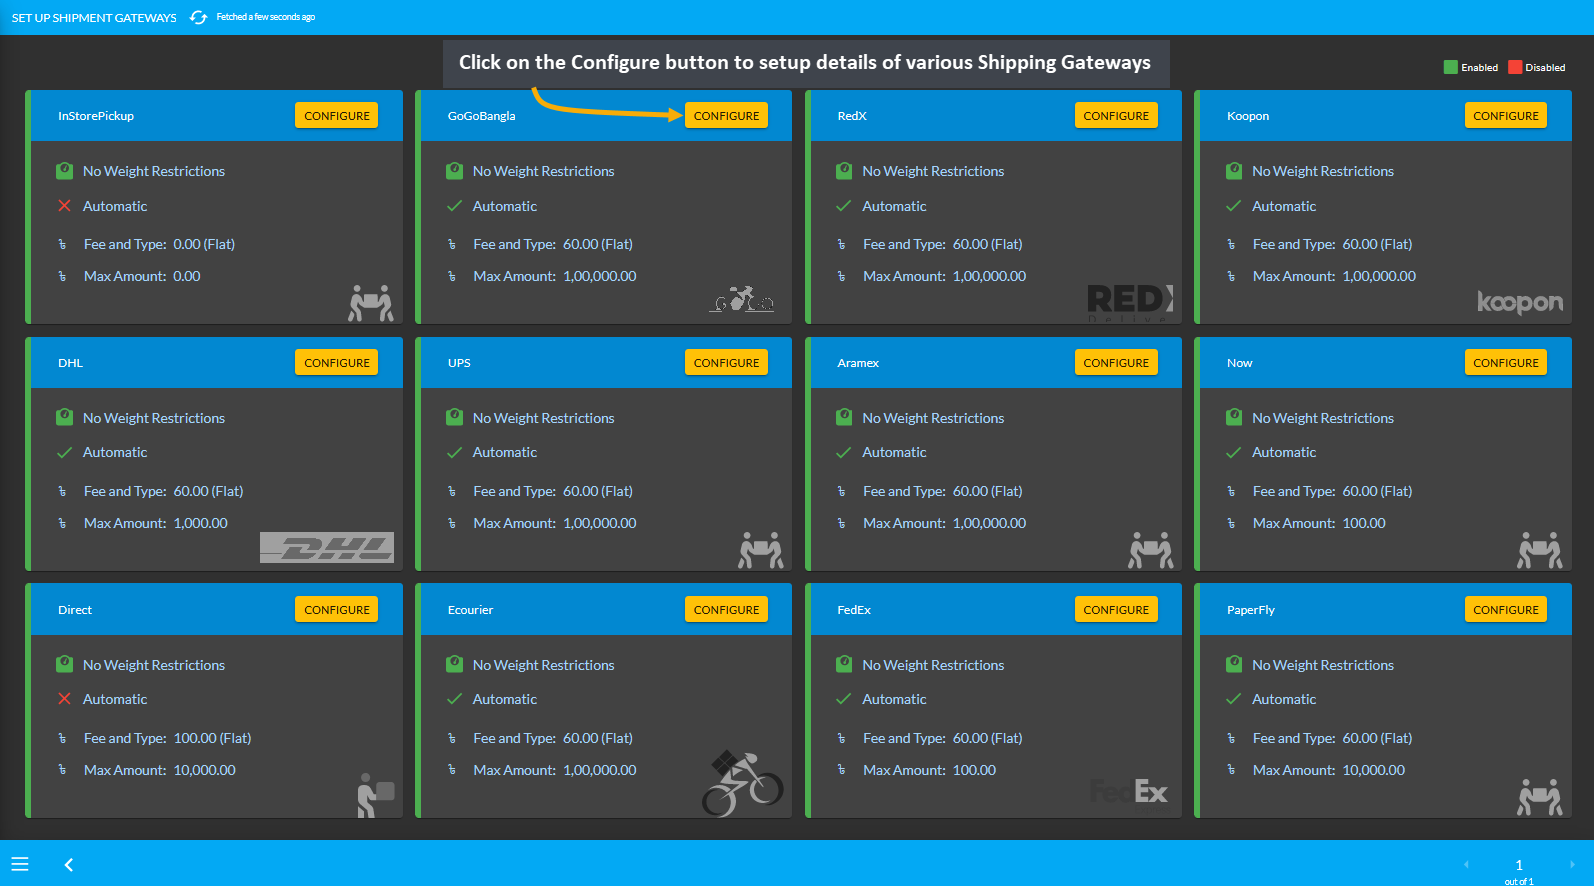
Image 3: Click on the Configure button to setup and activate various Shipment Gateways from the list.
For the configuration of Shipping Gateways, there are options to set gateway name, maximum value of shipping, fees, minimum weight, maximum weight, and display instruction etc. There are separate toggle buttons to enable or disable gateways for Admin Panel and Website. One shipping gateway configuration will vary from another.
New Feature: Website Enabled
Enable Website is a new feature that was introduced on the Admin Panel. Enabling or disabling this option will display or not display the selected Shipping Gateway on The Website for Customers.

Image 1: Enable or disable Website feature to display Shipping Gateway on The Website for Customers.
If the Enable Website option is disabled, then the selected Shipping Gateways will show as disabled like RedX, Koopon, Now, Aramex, GoGoBangla, PaperFly, and Ecourier as shown in the example.
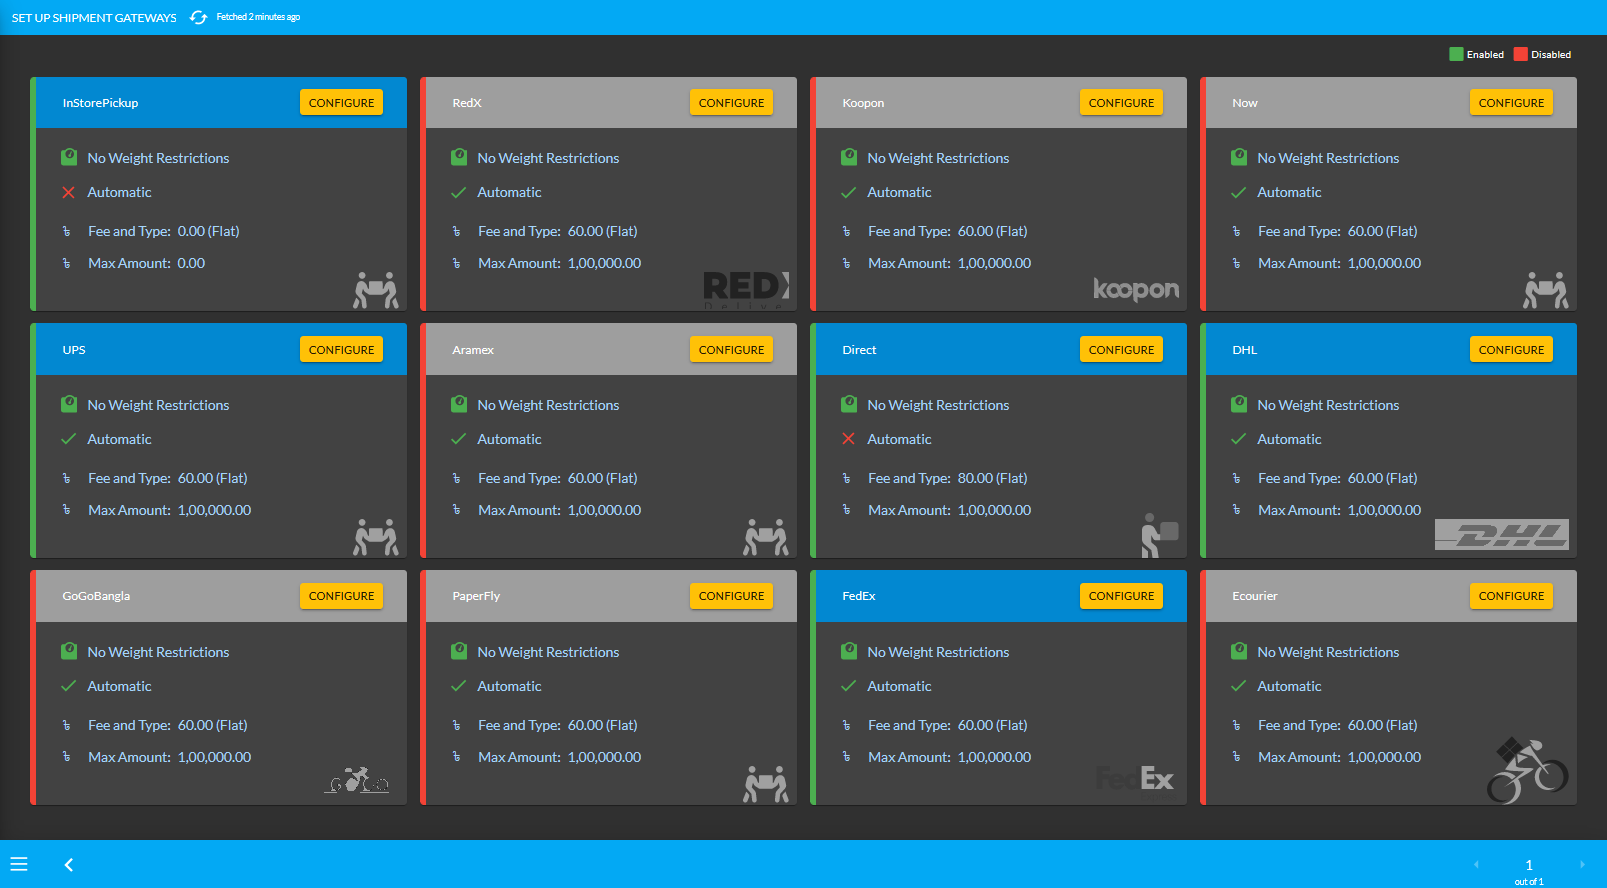
Image 2: Website feature disabled for few Shipping Gateways that will not display on The Website.
With the Enable Website option turned on from the Admin Panel for selected Shipping Gateways, the Website will display those Shipping Gateways when Customer checks out from their Cart to place a New Order as shown.
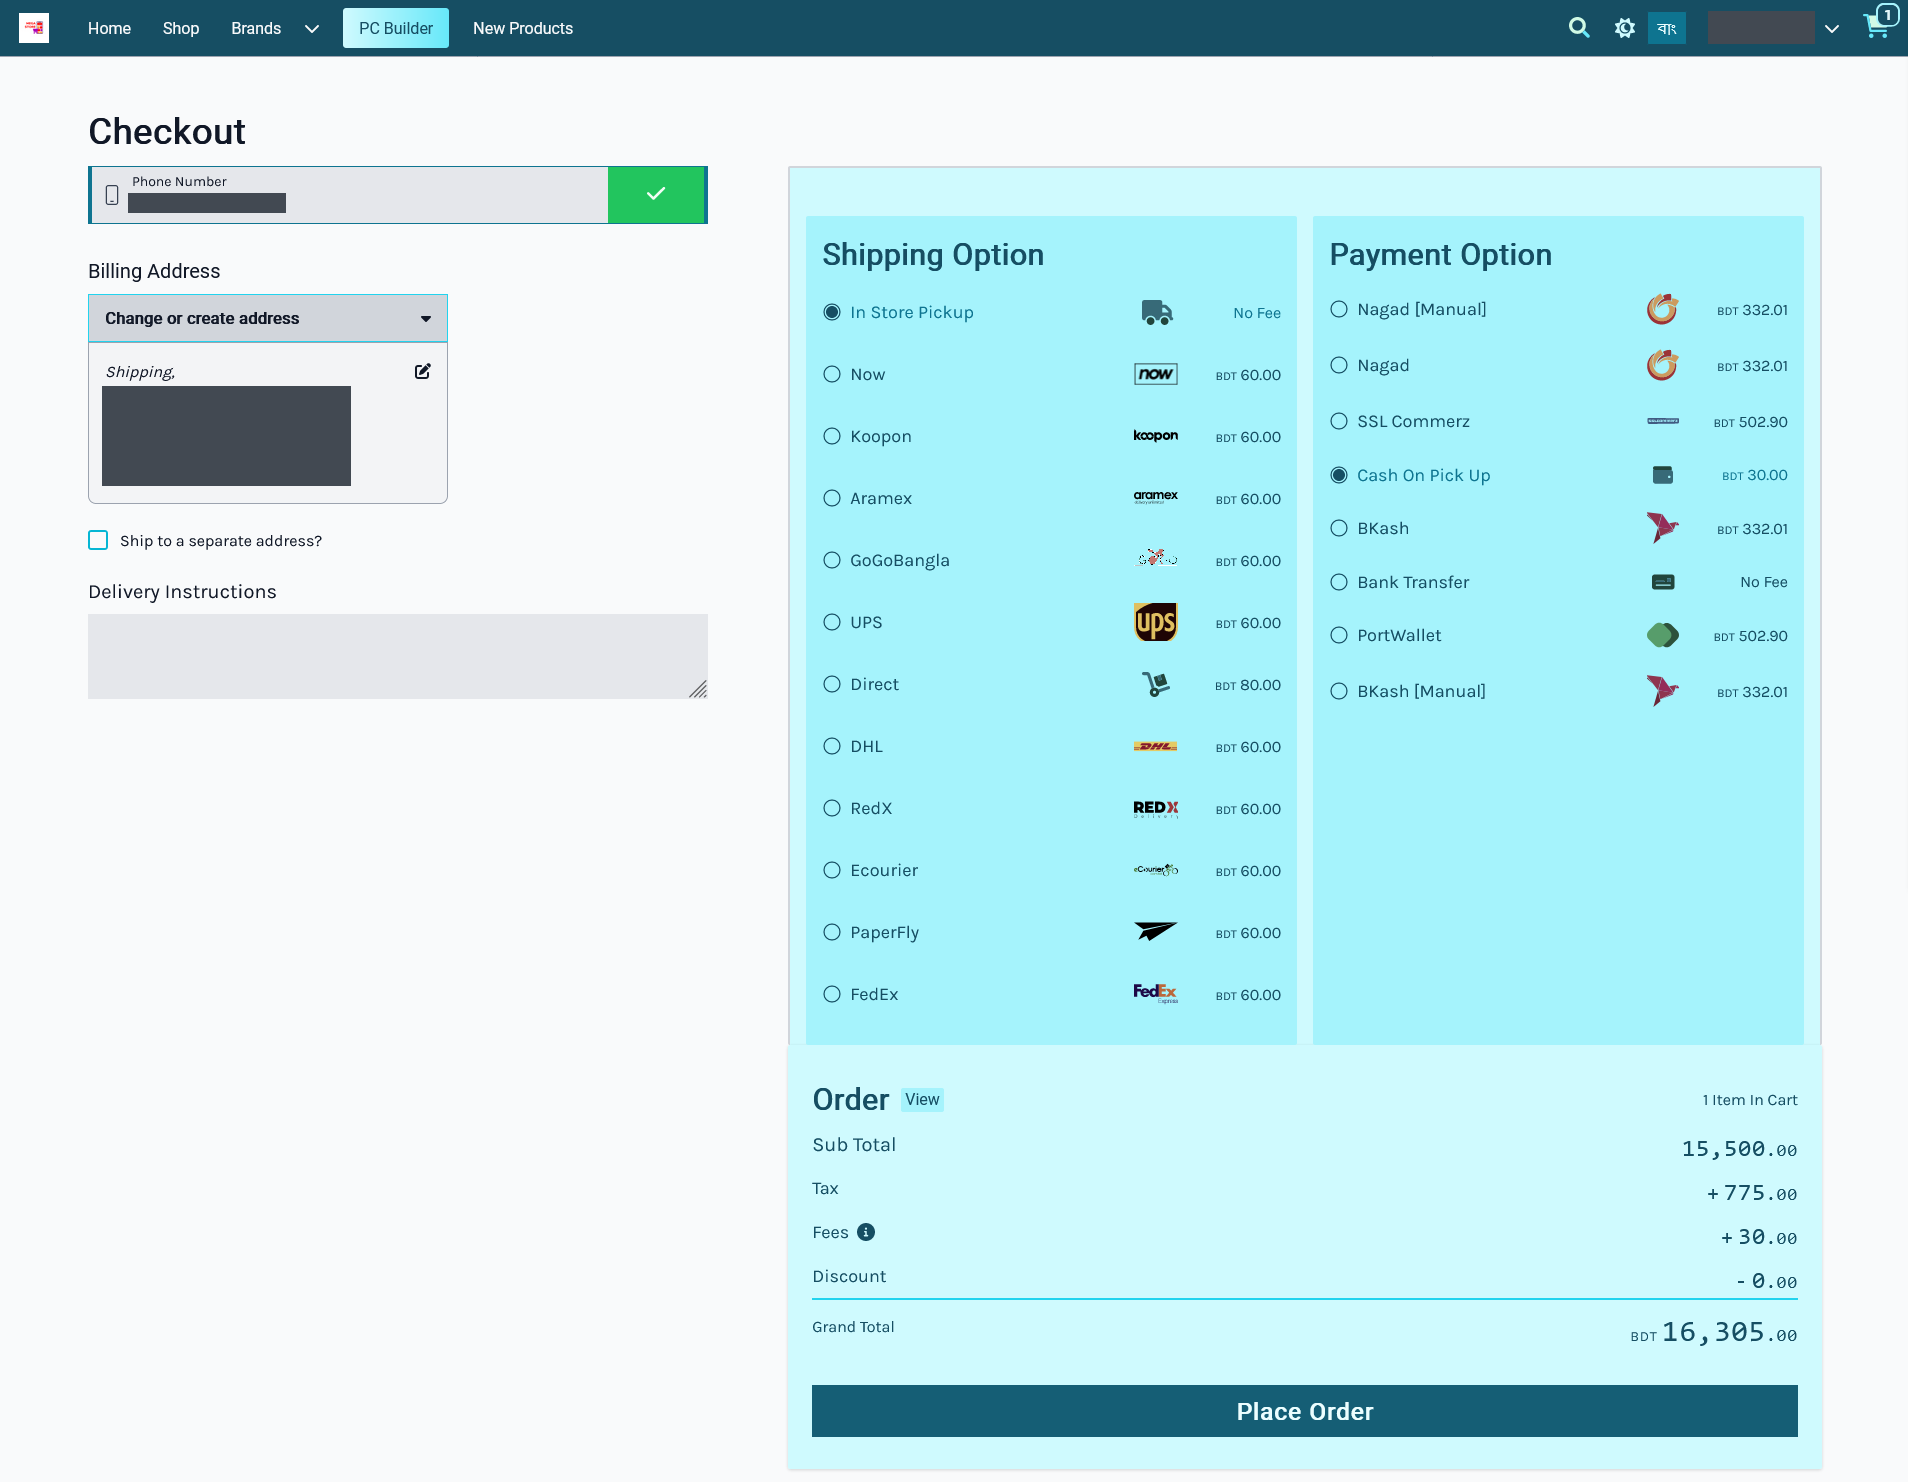
Image 3: Website feature disabled for few Shipping Gateways that will not display on The Website.
Conversely, with the Enable Website option turned off from the Admin Panel for selected Shipping Gateways, the Website will not display those Shipping Gateways when Customer checks out from their Cart to place New Order.
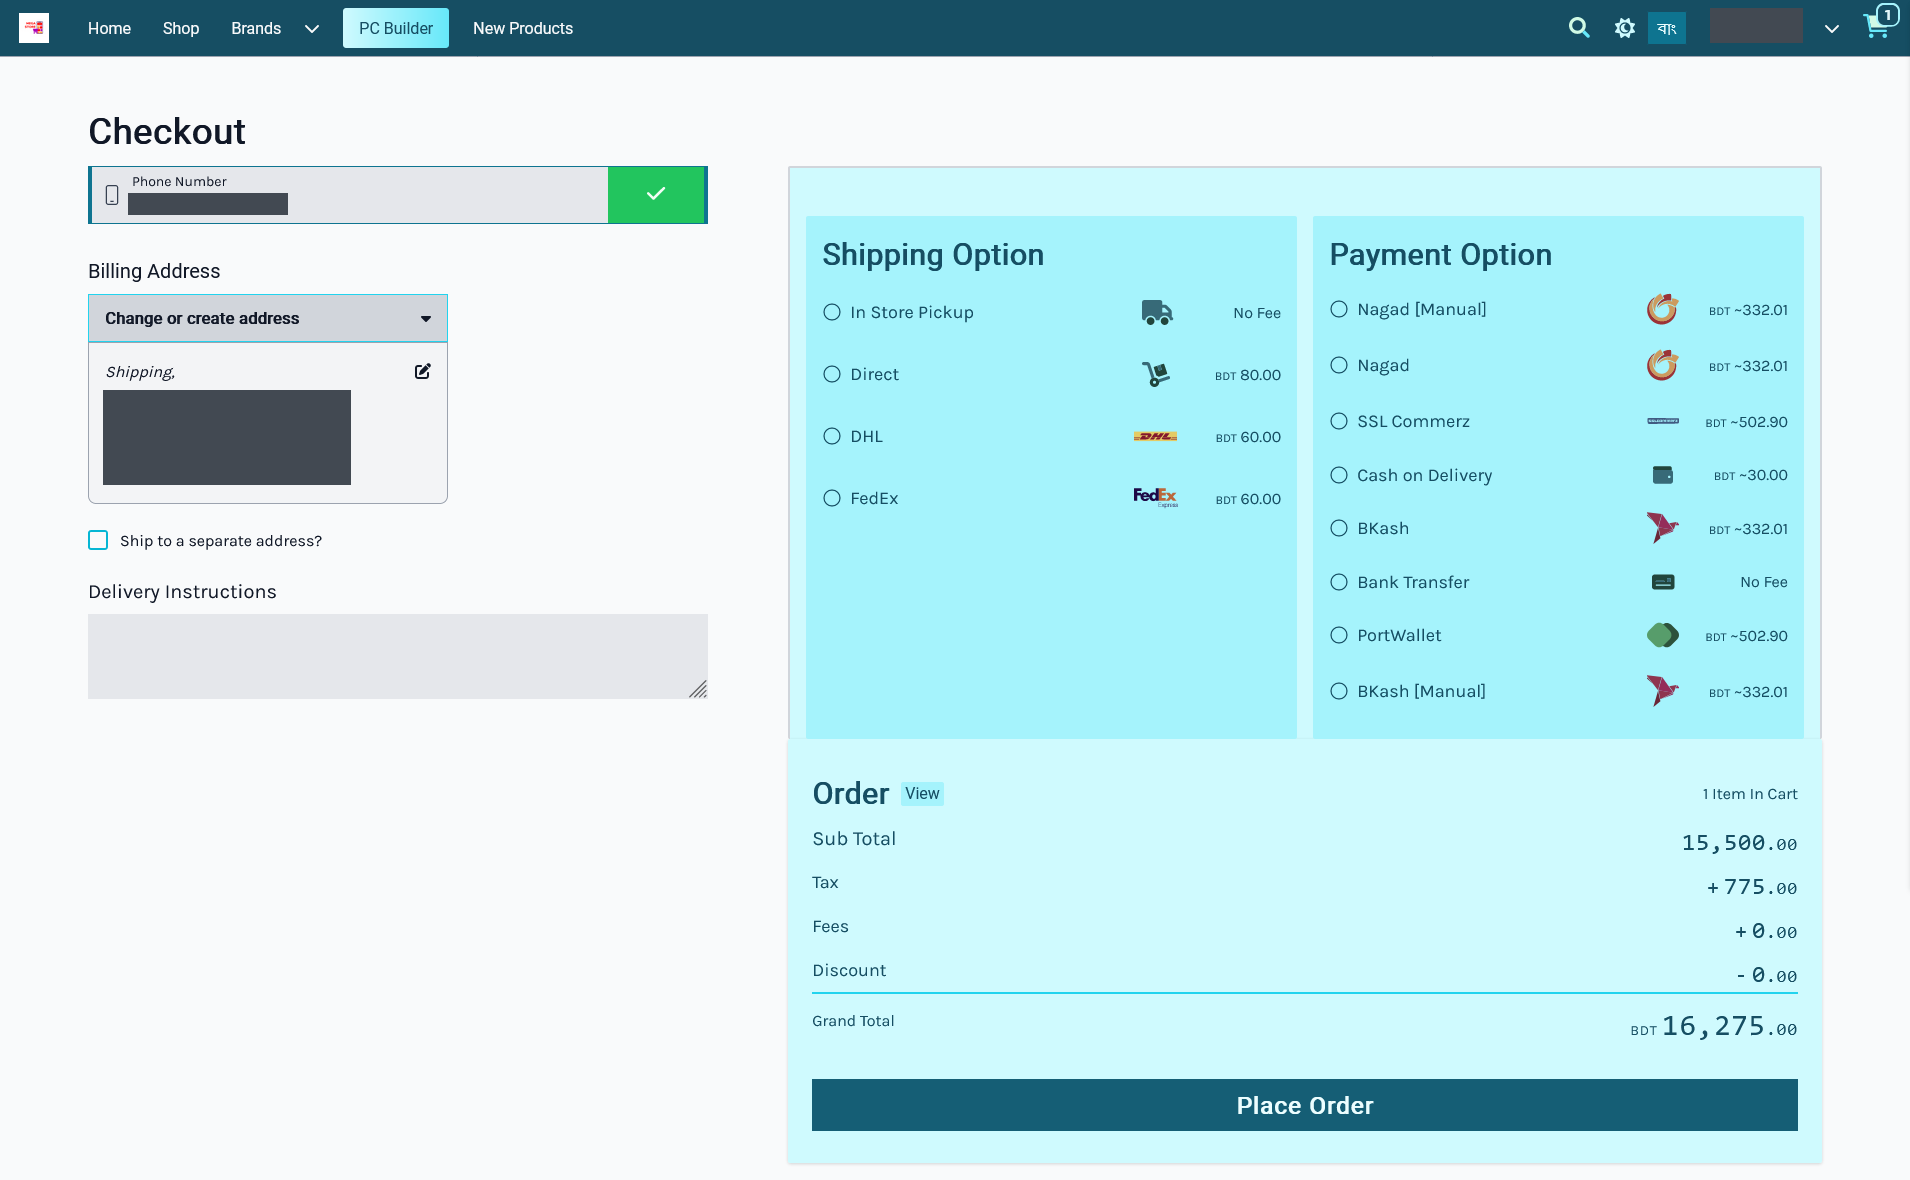
Image 4: The Website will not display selected Payment Gateways when Enabled Commerce is turned off.
Manual Shipping Gateways
Shipping Carriers like RedX, FedEx, UPS, PaperFly, Aramex, Ecourier, DHL, Now, Koopon, and GoGoBangla are all Manual Shipping Gateways that needs to be manually managed or handled. Every single time the Shop Owner makes a shipment with any manual Shipping Gateway, they need to add the shipment manually. If there is any update for these manual Gateways, then it has to be done manually too, because there is no automation. Our team is working on gateway automation with a selected few carriers. So, stay tuned for more information.
Configure Manual Shipping Gateways by setting a Maximum Value of shipping. Use the Enable and Website features to activate the Shipping gateway on Admin Panel and on Website. Then, use the toggle button to enable Fee and set the Fee Value as Flat or Weight based. After that, set Minimum Weight and Maximum Weight in Grams. Finally, use toggle button to enable Display Instruction and there will be a box to set the Display Instruction. Click Save to confirm all changes and use these Manual Shipping Gateways.
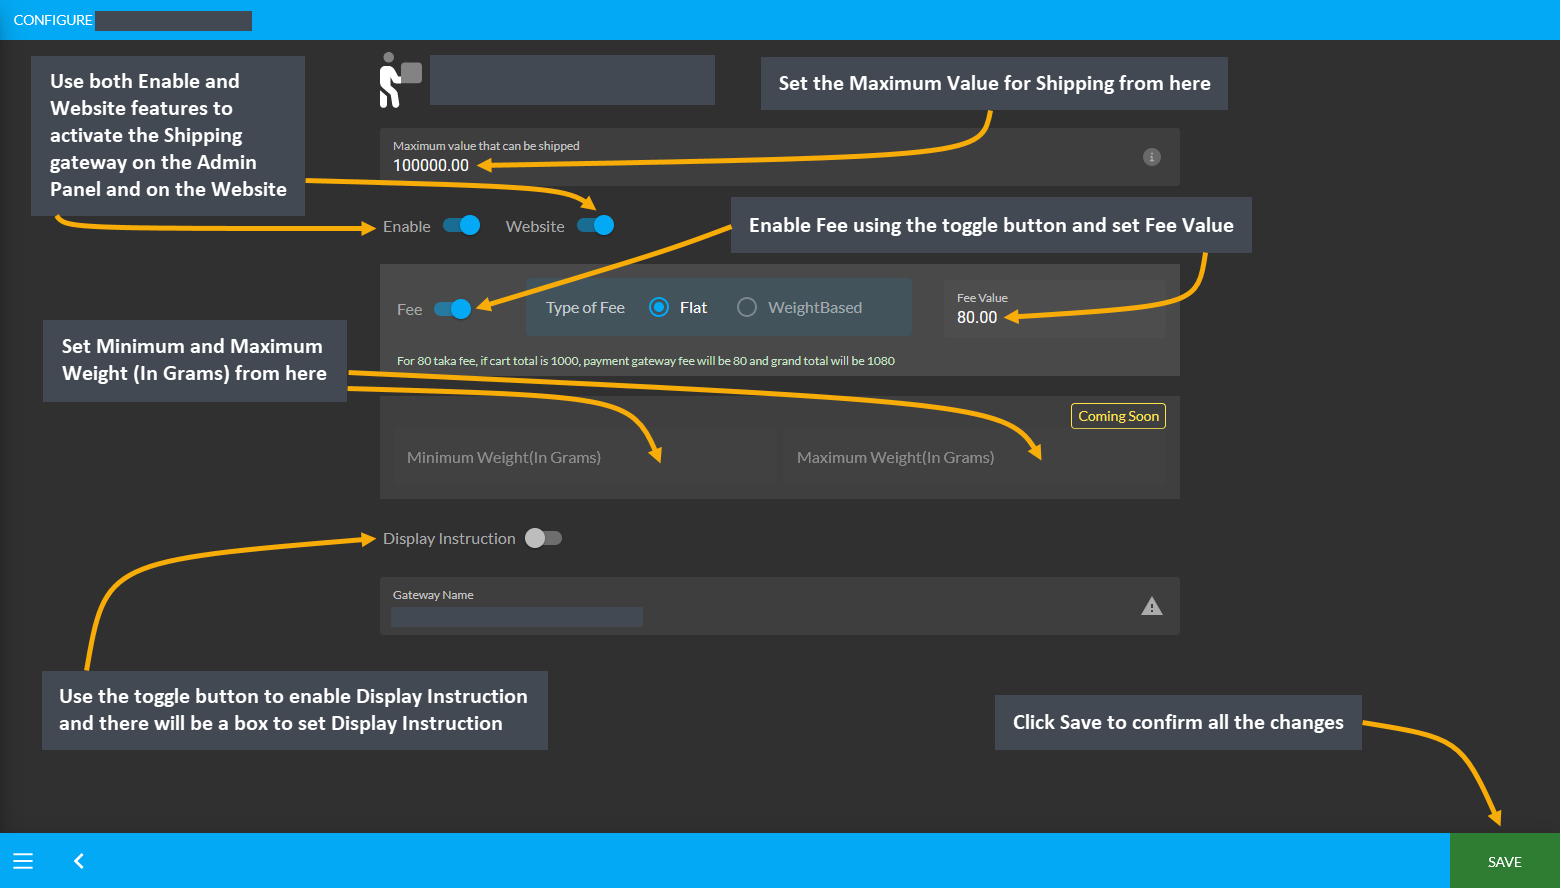
In Store Pickup
Configure the shipping gateway for In Store Pickup by setting a Maximum Value of shipping. Then, use the Enable and Website features to activate the Shipping gateway on the Admin Panel and on the Website. After that, use the toggle button to enable Fee and set the Fee Value as Flat or Weight based. The next step is to set Minimum Weight and Maximum Weight in Grams for Products. Finally, use the toggle button to enable Display Instruction and there will be a box to set Display Instruction. Click Save to confirm all changes and use the Shipping gateway.
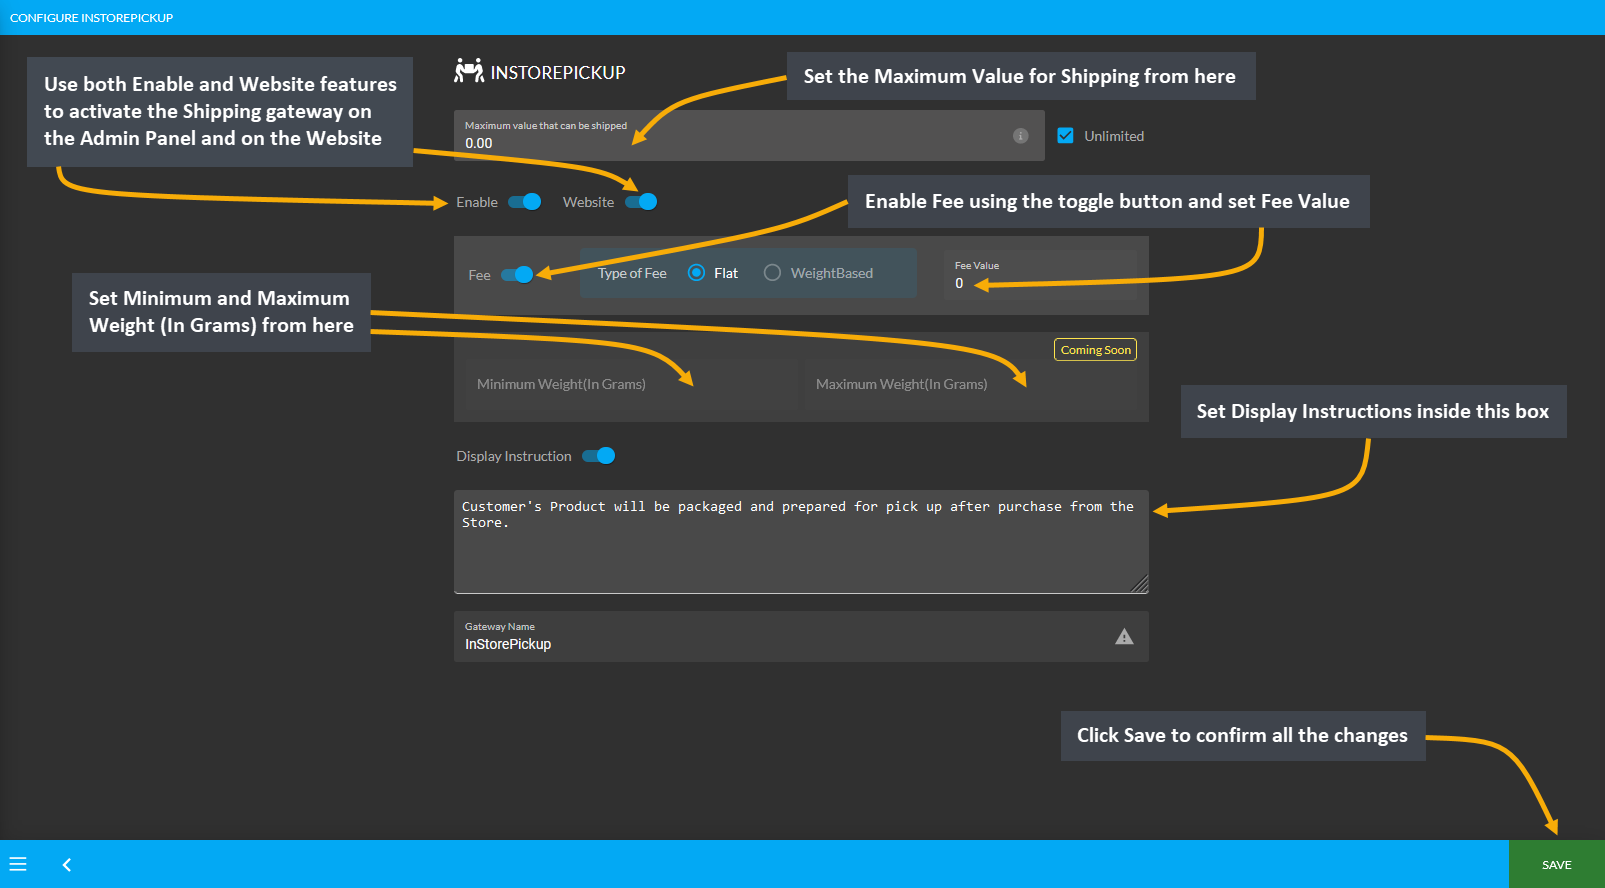
Direct
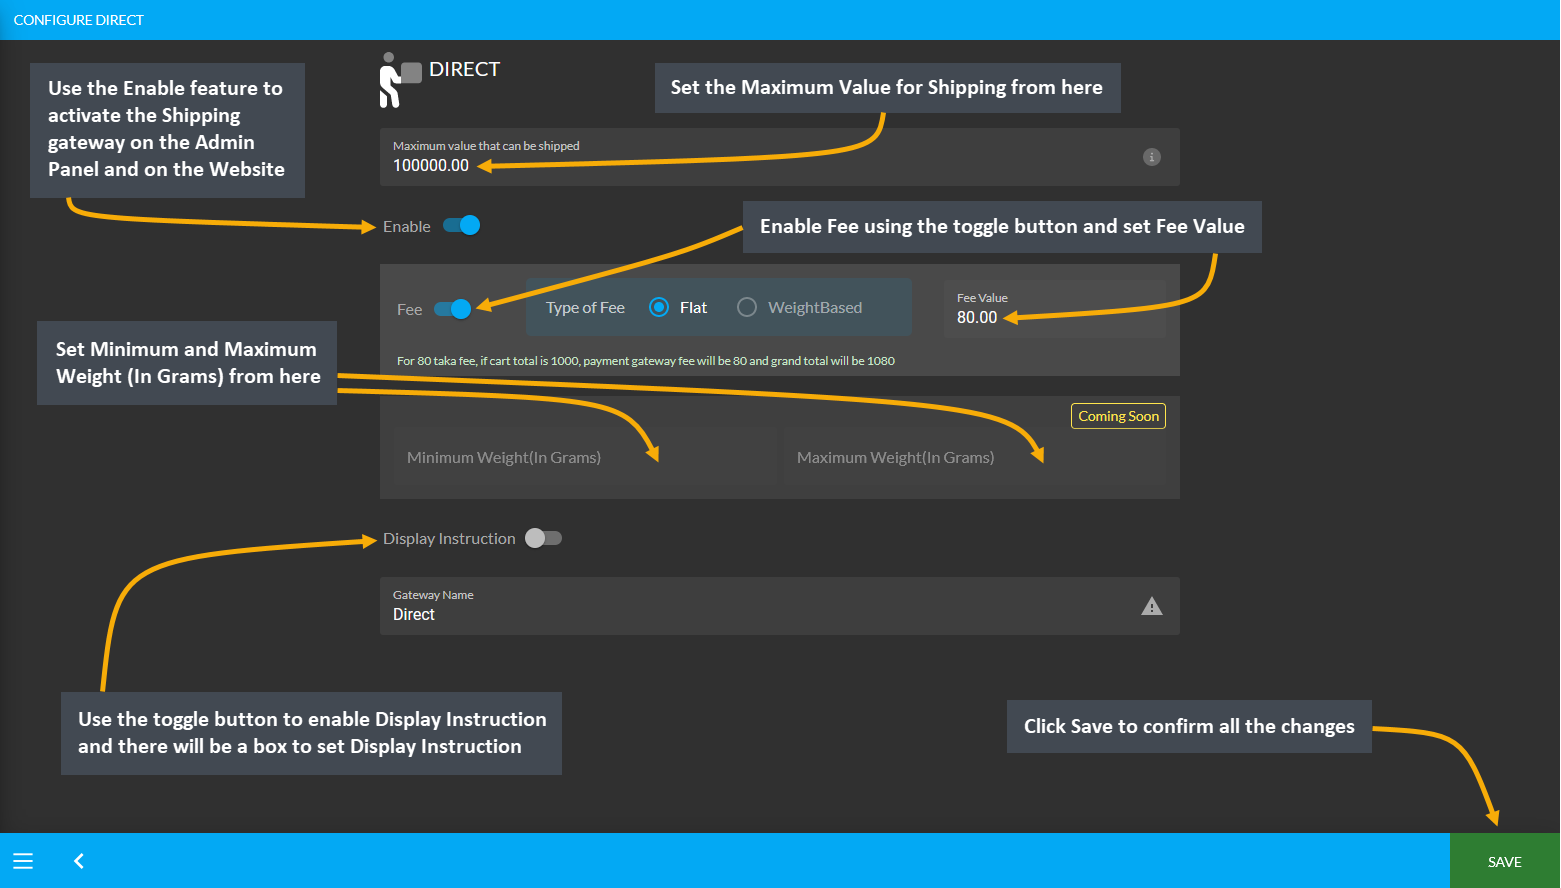
Configure the shipping gateway for Direct by setting a Maximum Value of shipping. Then, use the Enable feature to activate the Shipping gateway on the Admin Panel and on the Website. After that, use the toggle button to enable Fee and set the Fee Value as Flat or Weight based. The next step is to set Minimum Weight and Maximum Weight in Grams for Products. Finally, use the toggle button to enable Display Instruction and there will be a box to set Display Instruction. Click Save to confirm all changes and use the Shipping gateway.
4 - Taxation Settings
Learn more about the configuration of Taxation based on pre-fined Tax Groups.
Taxation Settings
Configure Tax Group from Taxation under All Settings tab. Click the Manage button beside Tax Group to view the pre-defined Global Tax Groups. Within the Tax Management related settings, this list of Predefined Global Tax Groups in already created based on specific Product Categories with name, description, HS Code, and Tax Rules.
As the Admin, the Shop Owner can also create their own Tax Groups for any Product Category will show under My Tax Groups. They will also include the name, description, HS Code, and Tax Rules based on a Category.
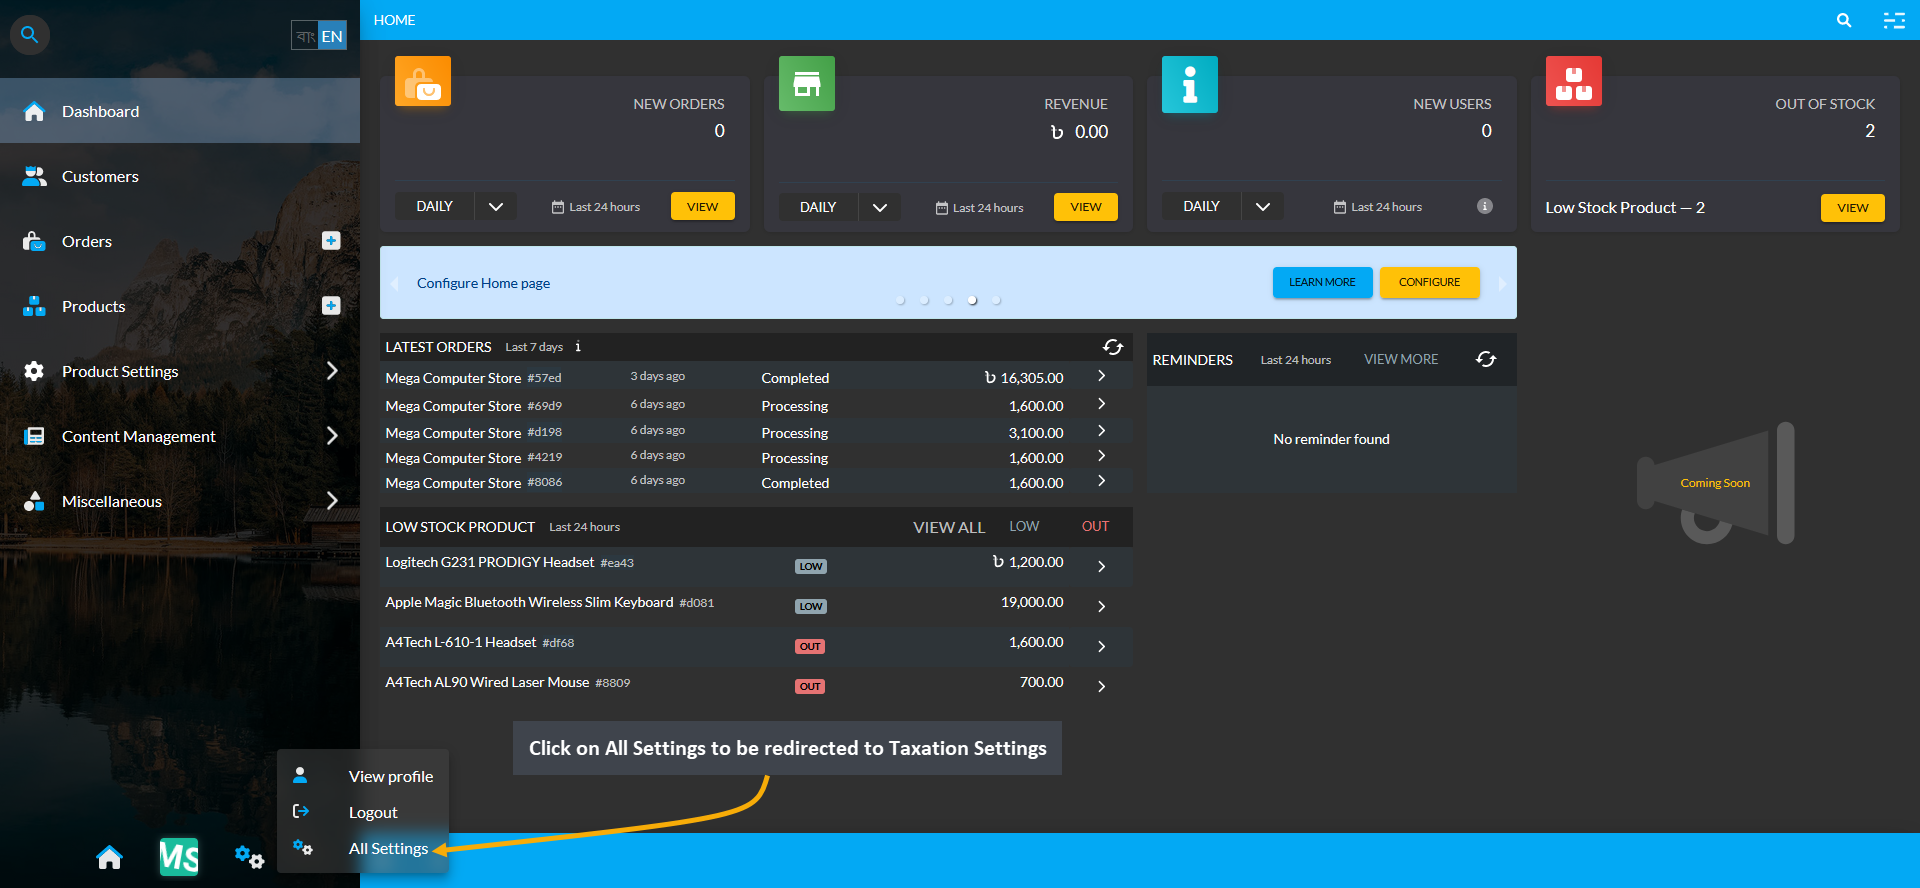
Image 1: Click on All Settings to be redirected to Taxation Settings from the Dashboard.
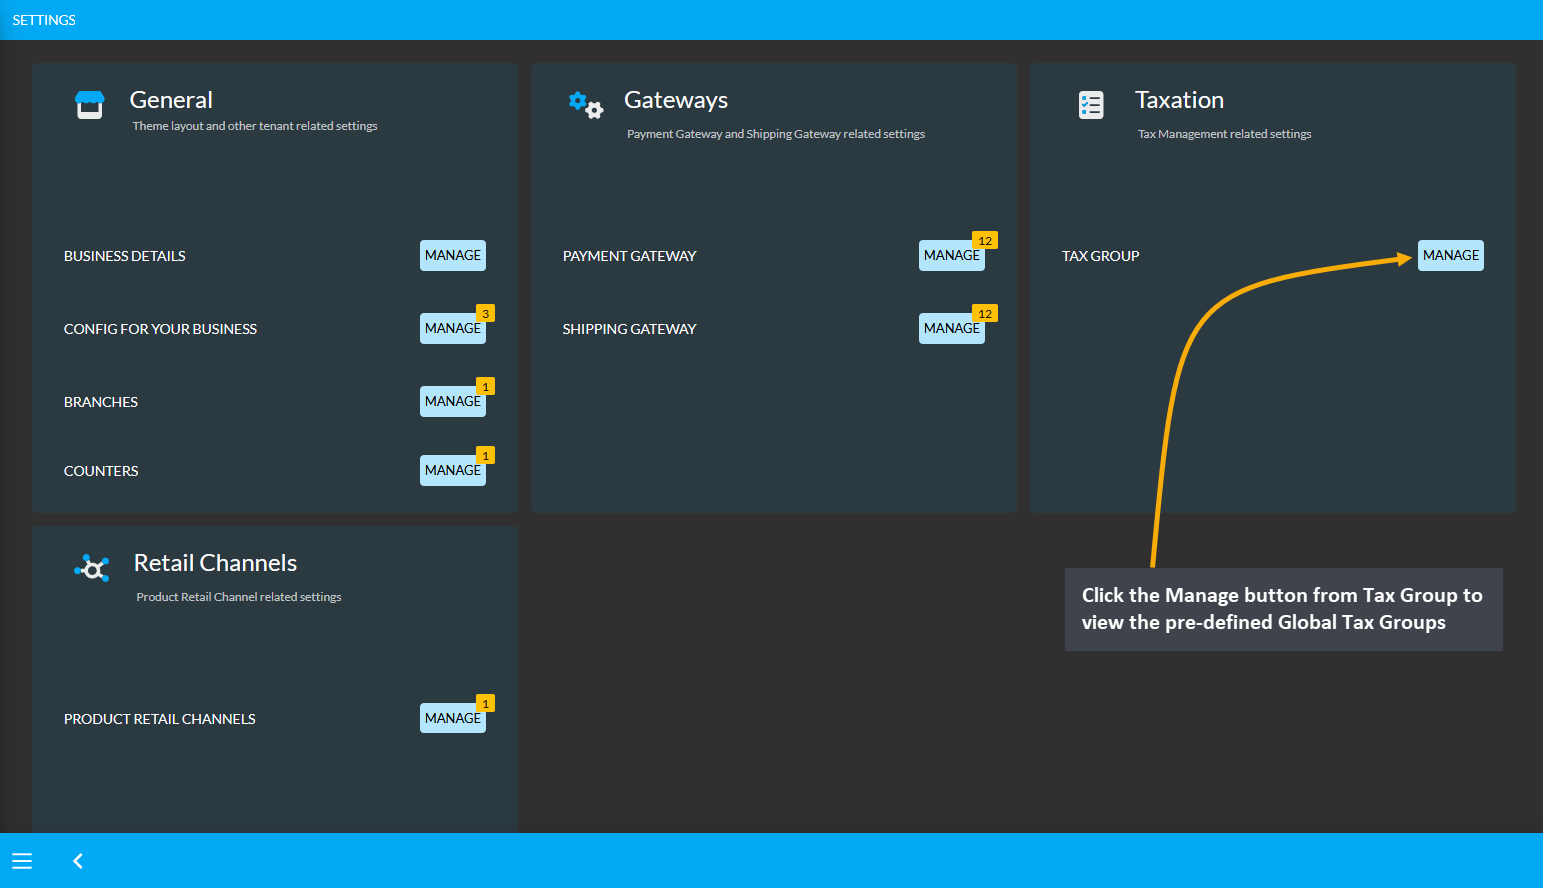
Image 2: Click the Manage button from Tax Group to view the pre-defined Global Tax Groups.
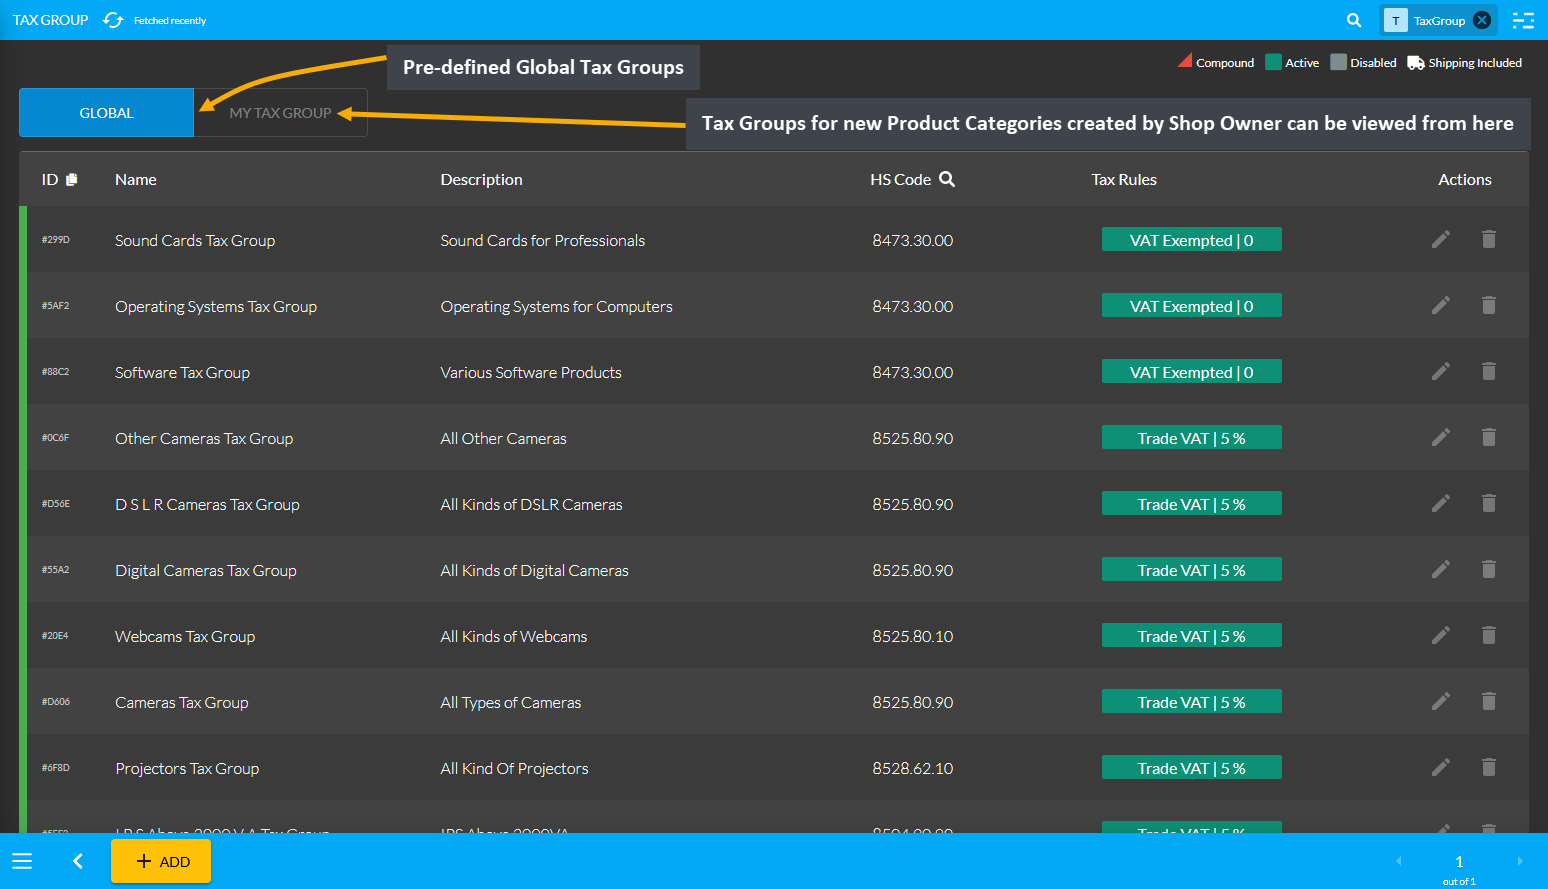
Image 3: View Pre-defined Global Tax Groups and self-created Tax Groups for new Product Categories.
Create New Tax Group
To create a new Tax Group, click on the Add button which will redirect to a new page for creating New Tax Group with tax rule. Create Tax Group Name, add a short description, use the toggle button to activate or deactivate it, input the HS Code for the target Product Category, and create New Tax Rule for the Tax Group.
The HS (Harmonized System) Codes are a standardized numerical method of classifying traded products, used by customs authorities around the world to identify products when assessing duties and taxes. Similarly, Tax Rules include the taxes or VAT which is required to be paid to the government by businesses.
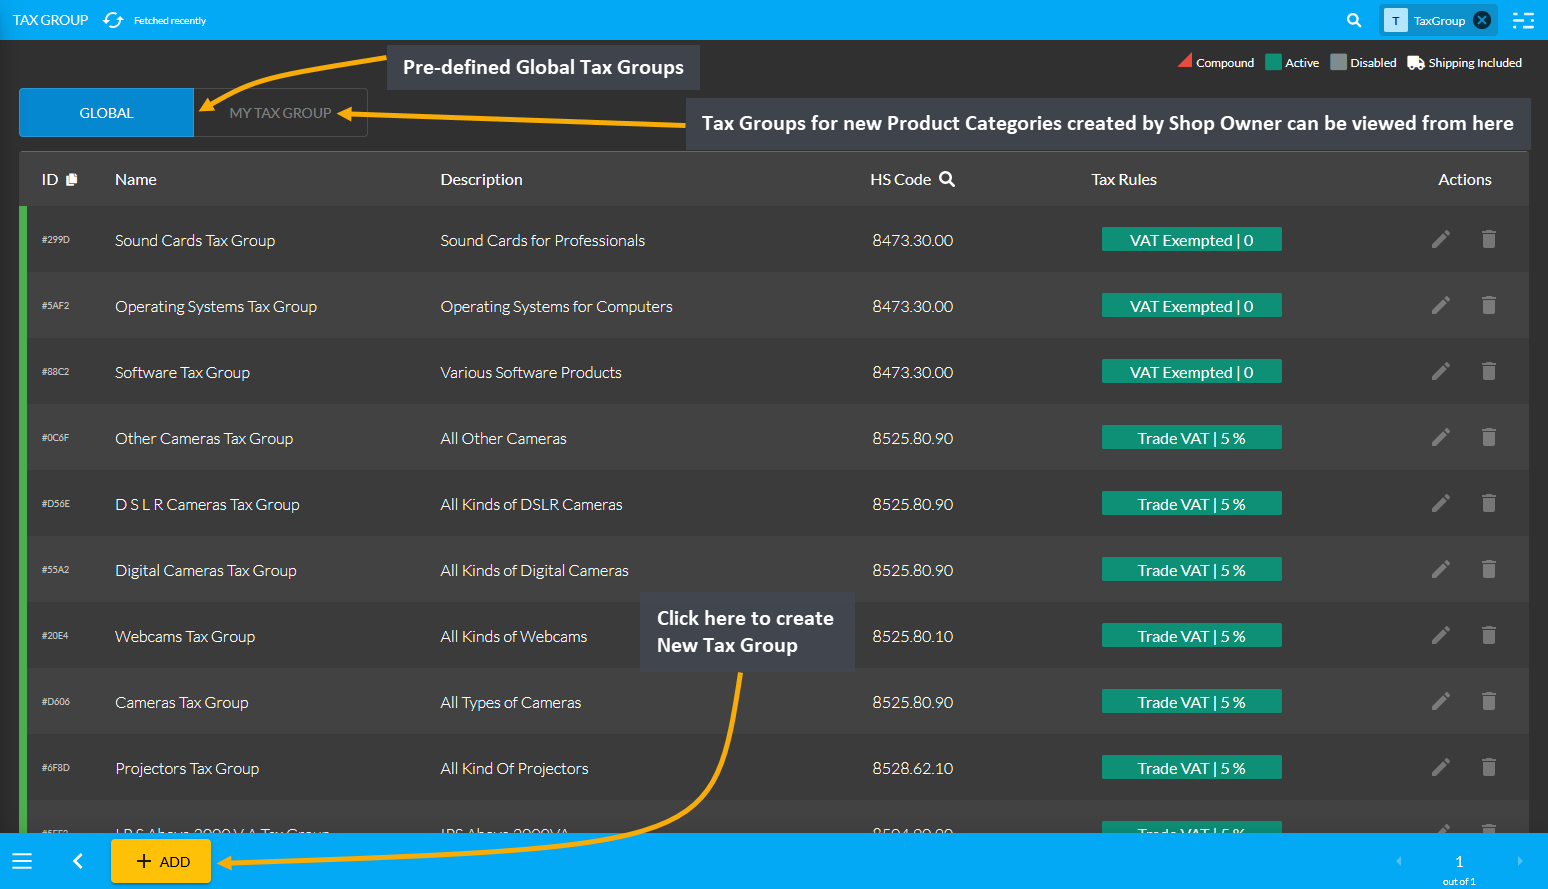
Image 1: Click the Add button which will redirect to a new page for creating New Tax Group with tax rule.
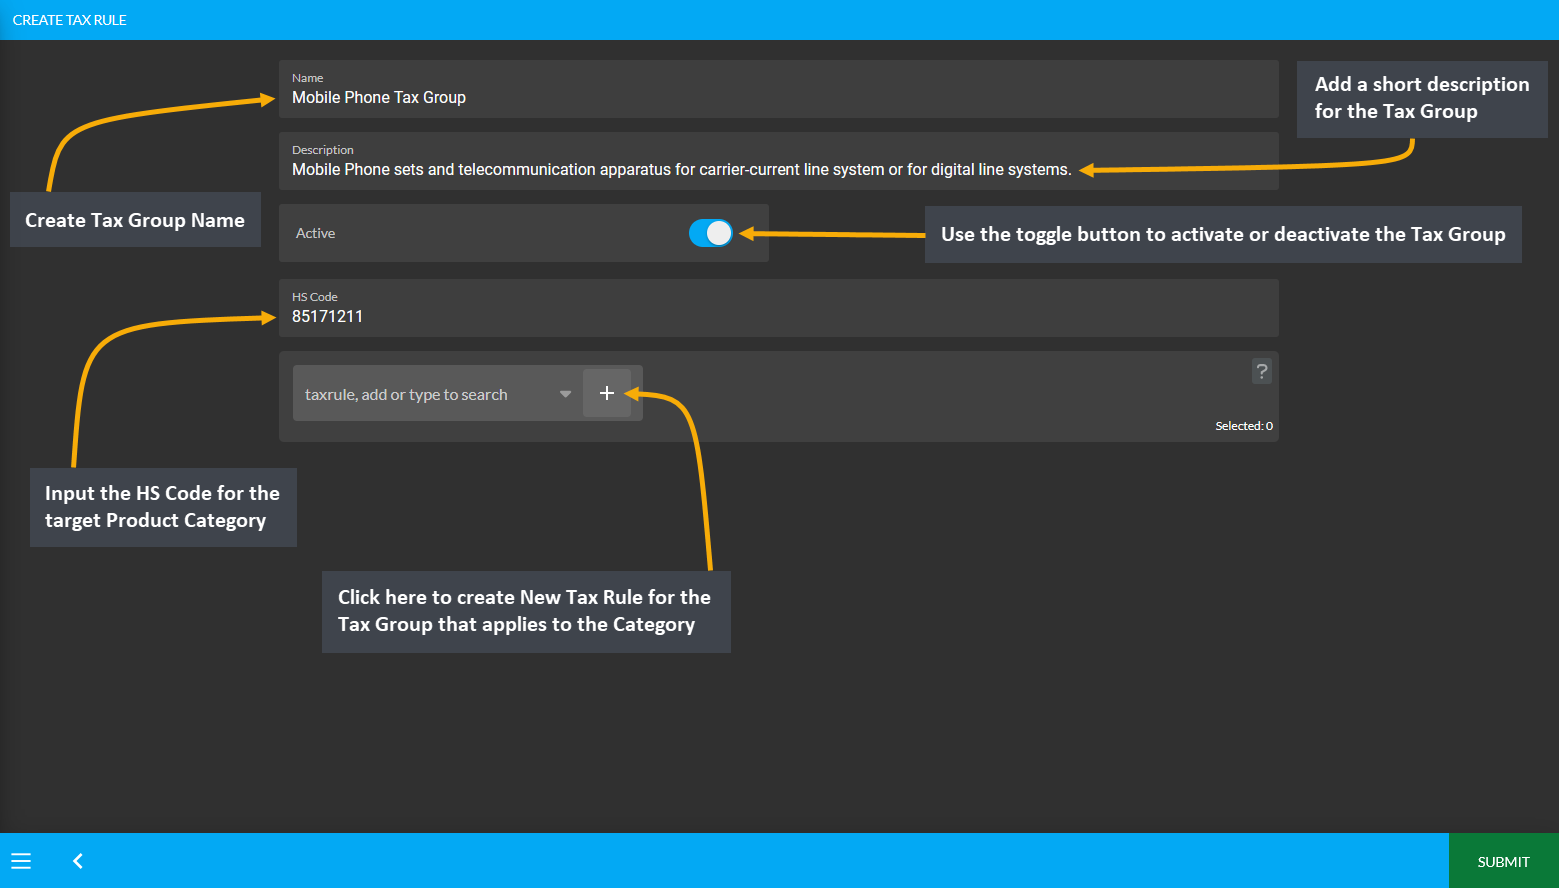
Image 2: Create New Tax Group with Name, Description, HS Code, and Tax Rule that applies to the Category.
Create New Tax Rule
Click the + button beside the Tax Rule search box on Tax Group create Page which will redirect to a new page where New Tax Rule can be created for the target Tax Group. Create Tax Rule Name, add a short description, select a Tax Variant which applies to the Tax Rule, enable Fee and select the type of Fee, use toggle button to activate or deactivate it, add Compound or Priority attributes, and click Submit to create New Tax Rule.
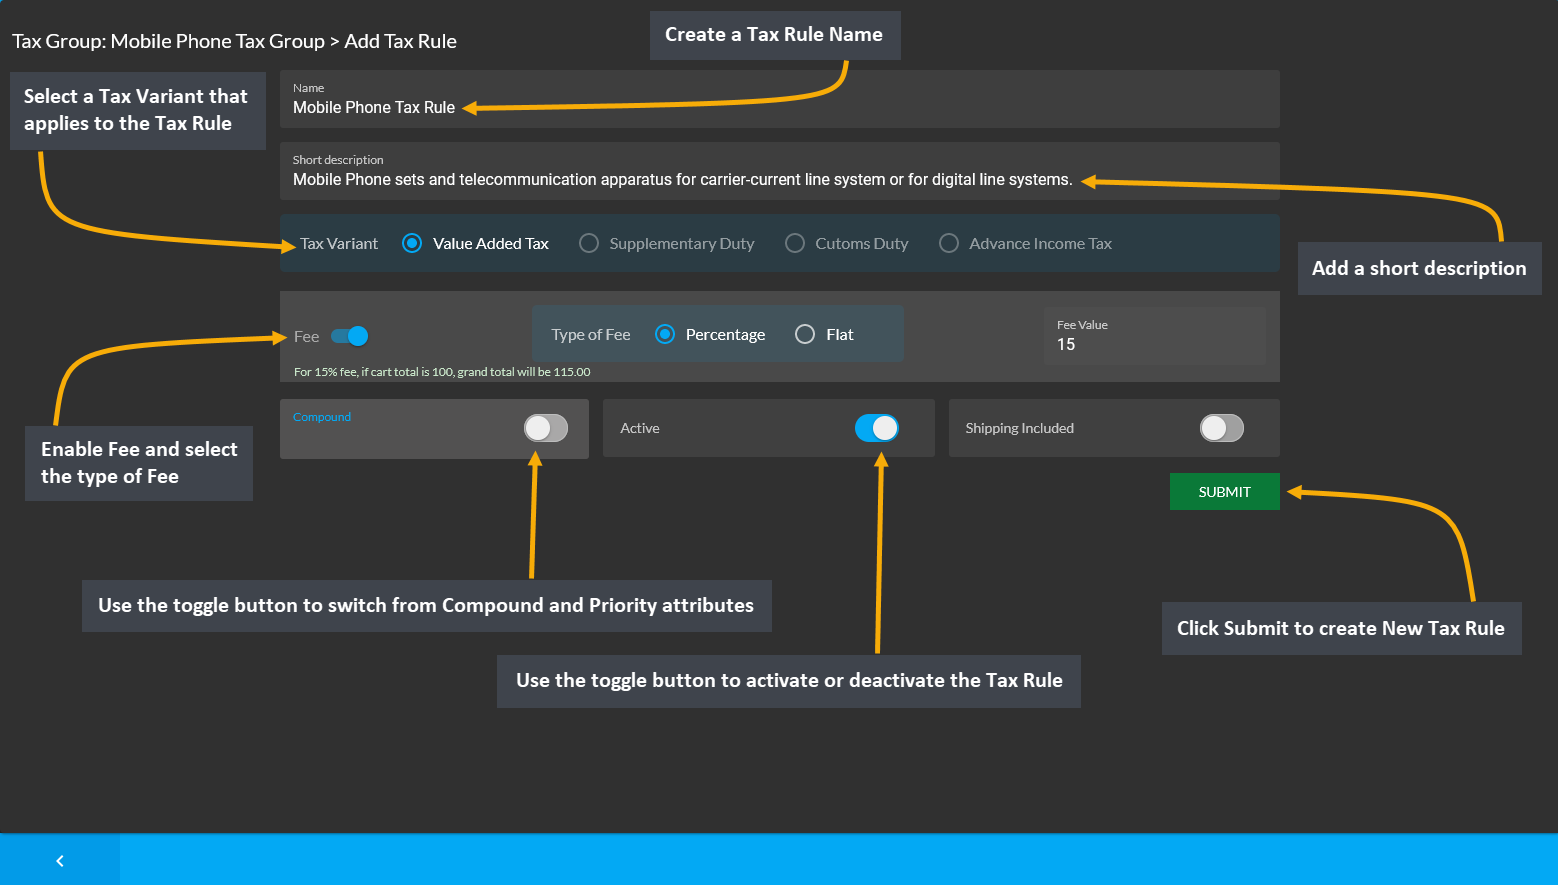
Image 1: Create a Tax Rule with Name, Description, Tax Variant, Fee, Compound, and Priority attributes.
Compound and Priority Attributes
Below the Fee section, there is a toggle button to switch from Compound and Priority attributes. Compound rules will calculate the sale with the first Tax Rule when using the second Tax Rule. Priority is giving which Tax Rule is to be prioritized. Both Compound and Priority are actually considered as the attributes of the Tax Group.
So, if the Shop Owner is working on a 100 Taka sale and the first Tax Rule applied is a static 10 Taka rule, then the output will be 110 Taka. Similarly, if a second Tax Rule applied for 100 Taka sale has 2% tax rule included, then by default it will be 102 Taka. However, if the second rule in the tax group is a Compound rule, then it will calculate the rule with 110 Taka instead of 100 Taka. If the Compound rule is turned off, then it will be 2% of 100 Taka.
Therefore, in this Tax Group, the first Tax Rule applied is static 10 Taka rule and second Tax Rule applied is 2% (Compound), so the Shop Owner will get 110 + 110 x 0.02 (2% of 110 Taka). If the Compound rule is turned off, then it will be 2% of 100 Taka instead of 110 Taka when calculating the sale.
Tax Group and Tax Rule Successfully Created
After Tax Rule is created, it will automatically be added to the Tax Group. Now, click Submit button to complete creating the Tax Group. All the New Tax Groups that were successfully created by the Shop Owner will be visible under My Tax Group List. In this way, the Shop Owner can create their own Tax Groups for any Product Category apart from the already existing pre-defined Global Tax Groups.
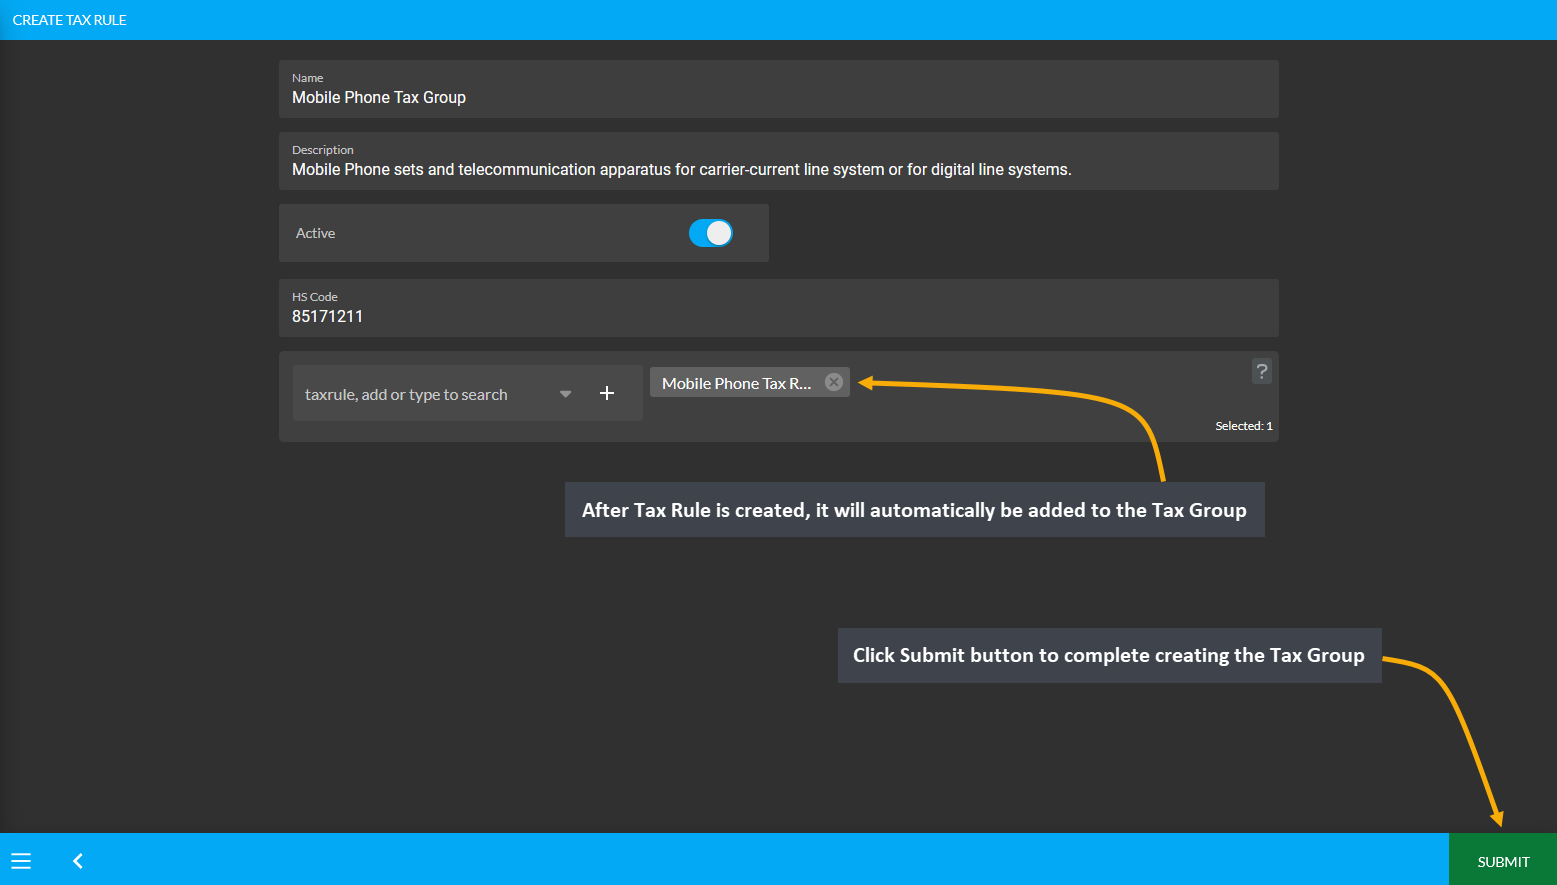
Image 2: After Tax Rule is created, it will automatically be added to Tax Group, click Submit to proceed.
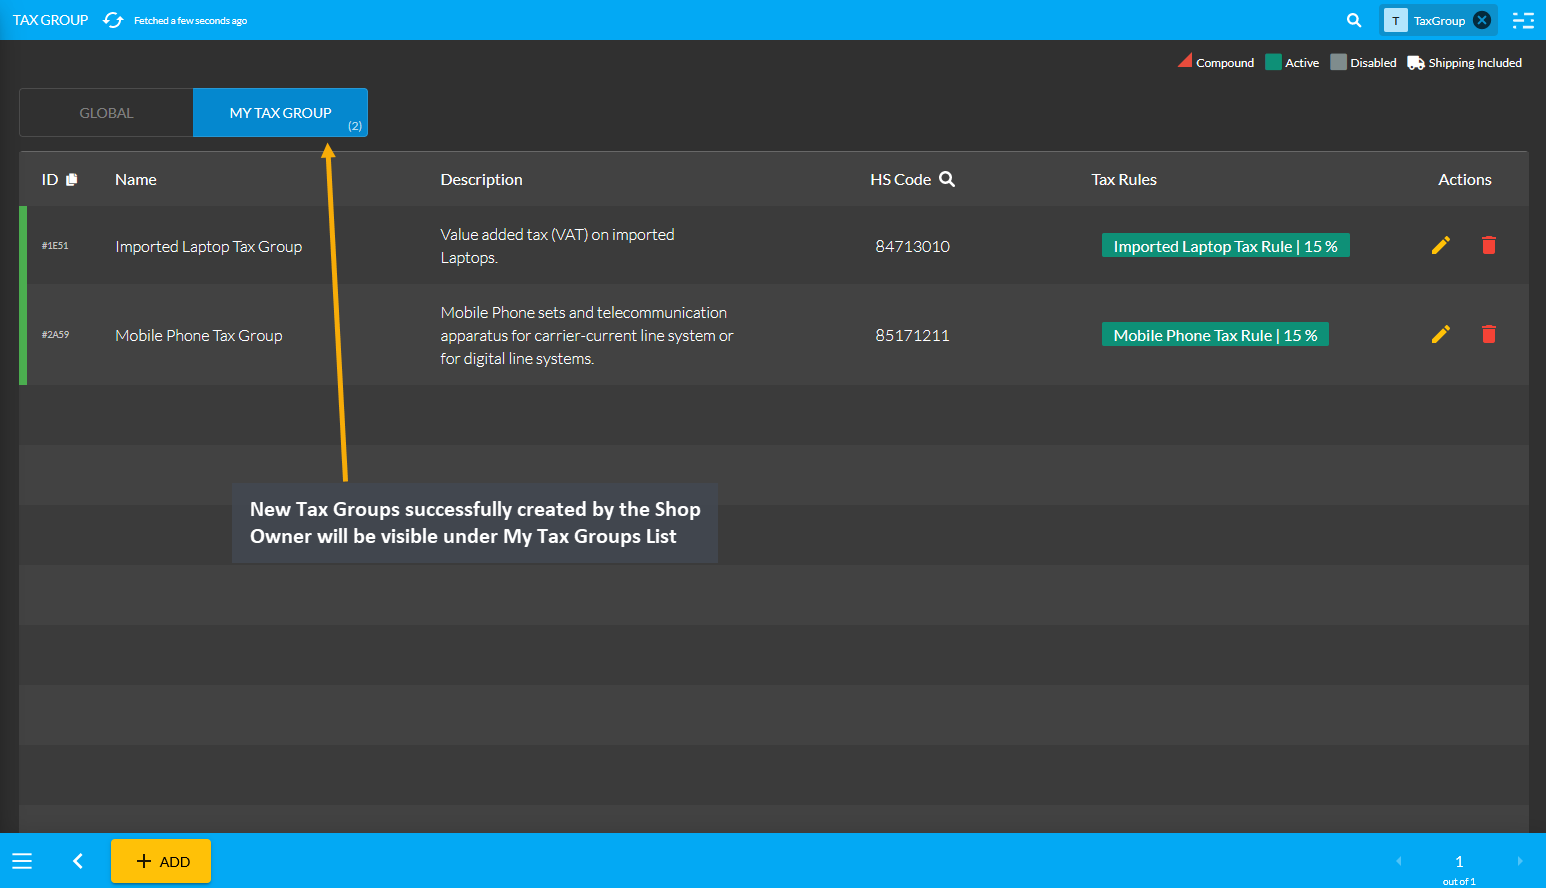
Image 3: New Tax Groups successfully created by the Shop Owner will be visible under My Tax Group List.
5 - Configure Product Retail Channel
Learn more about the configuration of Product Retail Channel from Settings.
Configure Product Retail Channels from Retail Channels under All Settings tab. Click on All Settings to be redirected to Retail Channel Settings from the Dashboard. Click on Manage button under Retail Channels to access, create, activate, and configure all the Retail Channels or Websites that are maintain by the Tenant Admin.
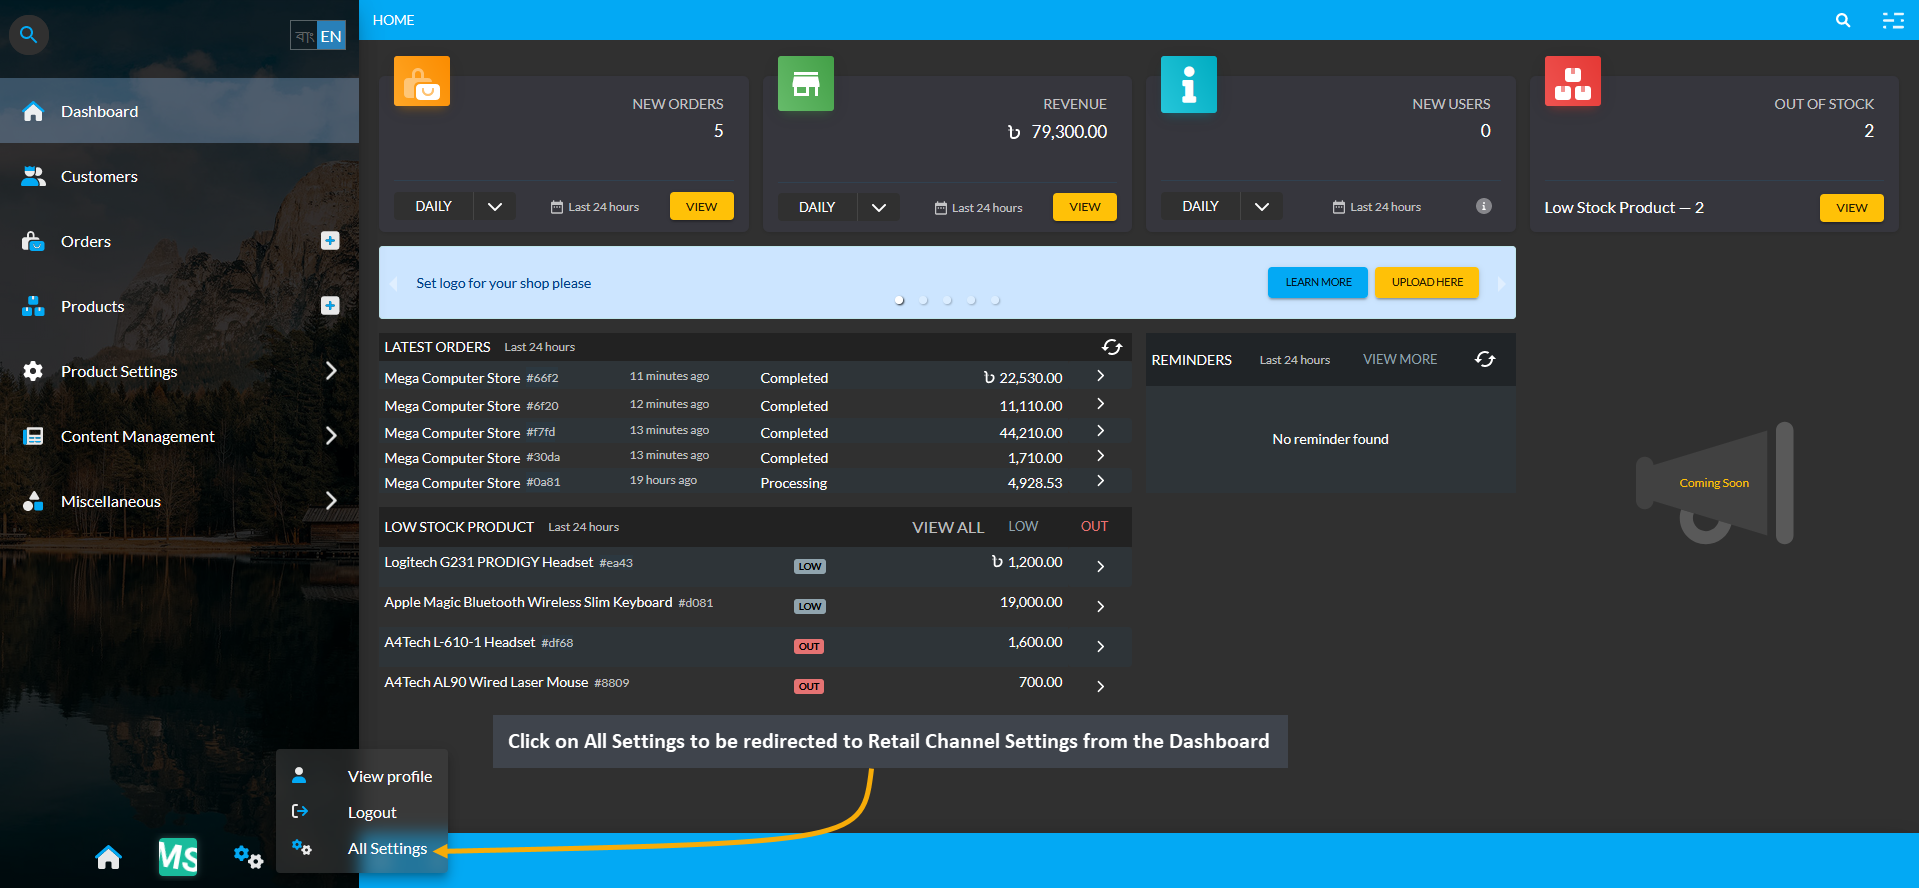
Image 1: Click on All Settings to be redirected to Retail Channel Settings from the Dashboard.
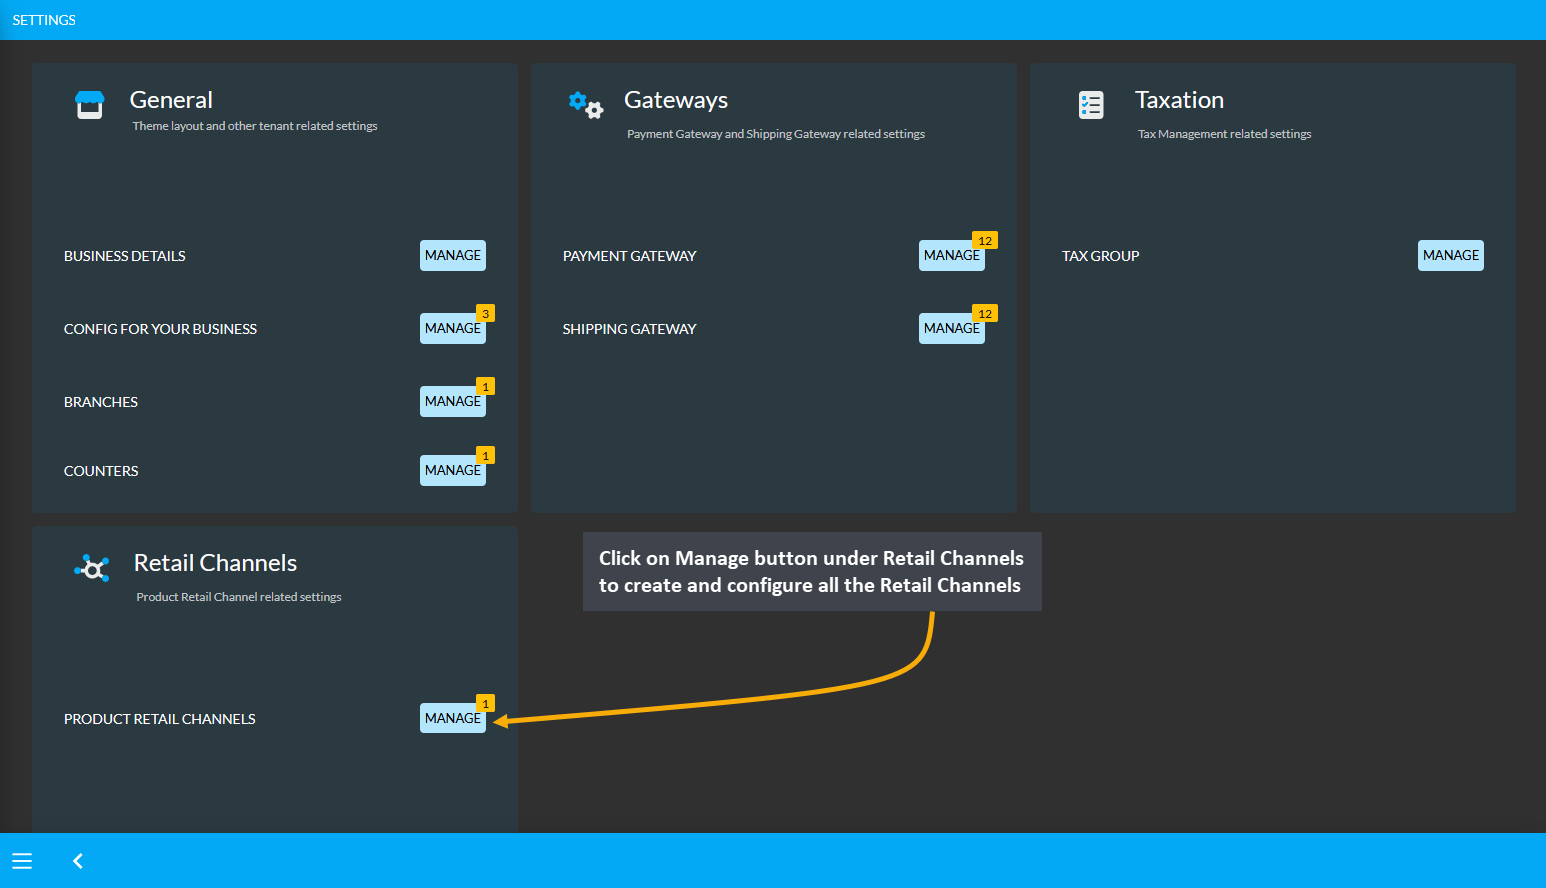
Image 2: Click on Manage button under Retail Channels to create and configure Retail Channels.
Create Product Retail Channel
On Retail Channels Page, list of available channels will show and new Retail Channel can be added by clicking the Add button. The Shop Owner can create or update Product Retail Channels by setting up name and avenues.
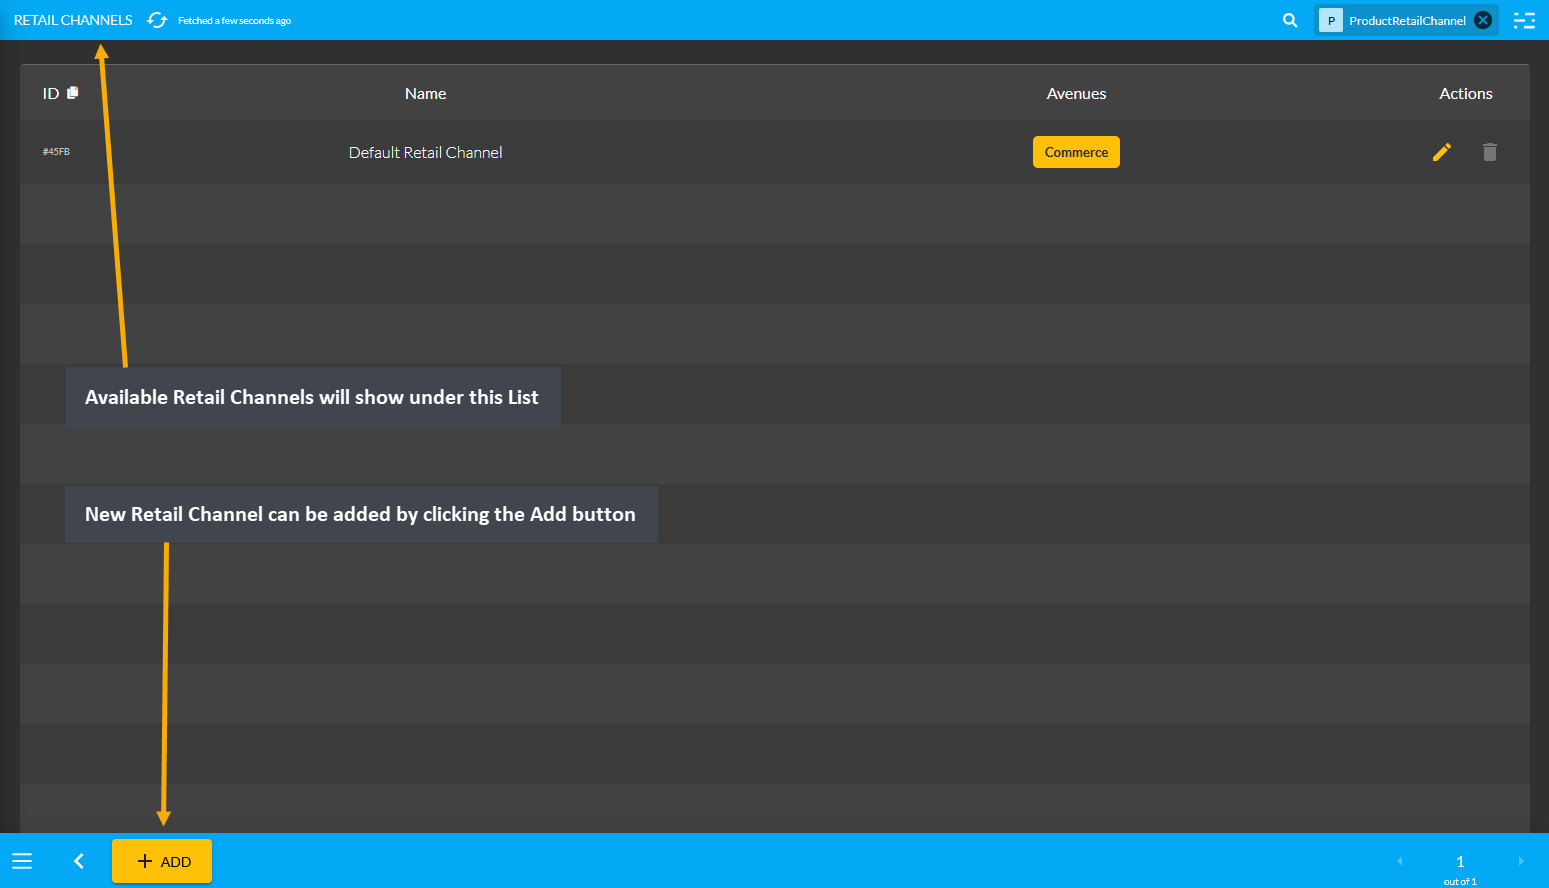
Image 3: Click on All Settings to be redirected to Retail Channel Settings from the Dashboard.
Edit Product Retail Channel
When editing a Retail Channel, there is an option for Commerce with a checkbox under Avenues. This option controls whether the Shop Owner want their Products to be shown or hide on the Website.
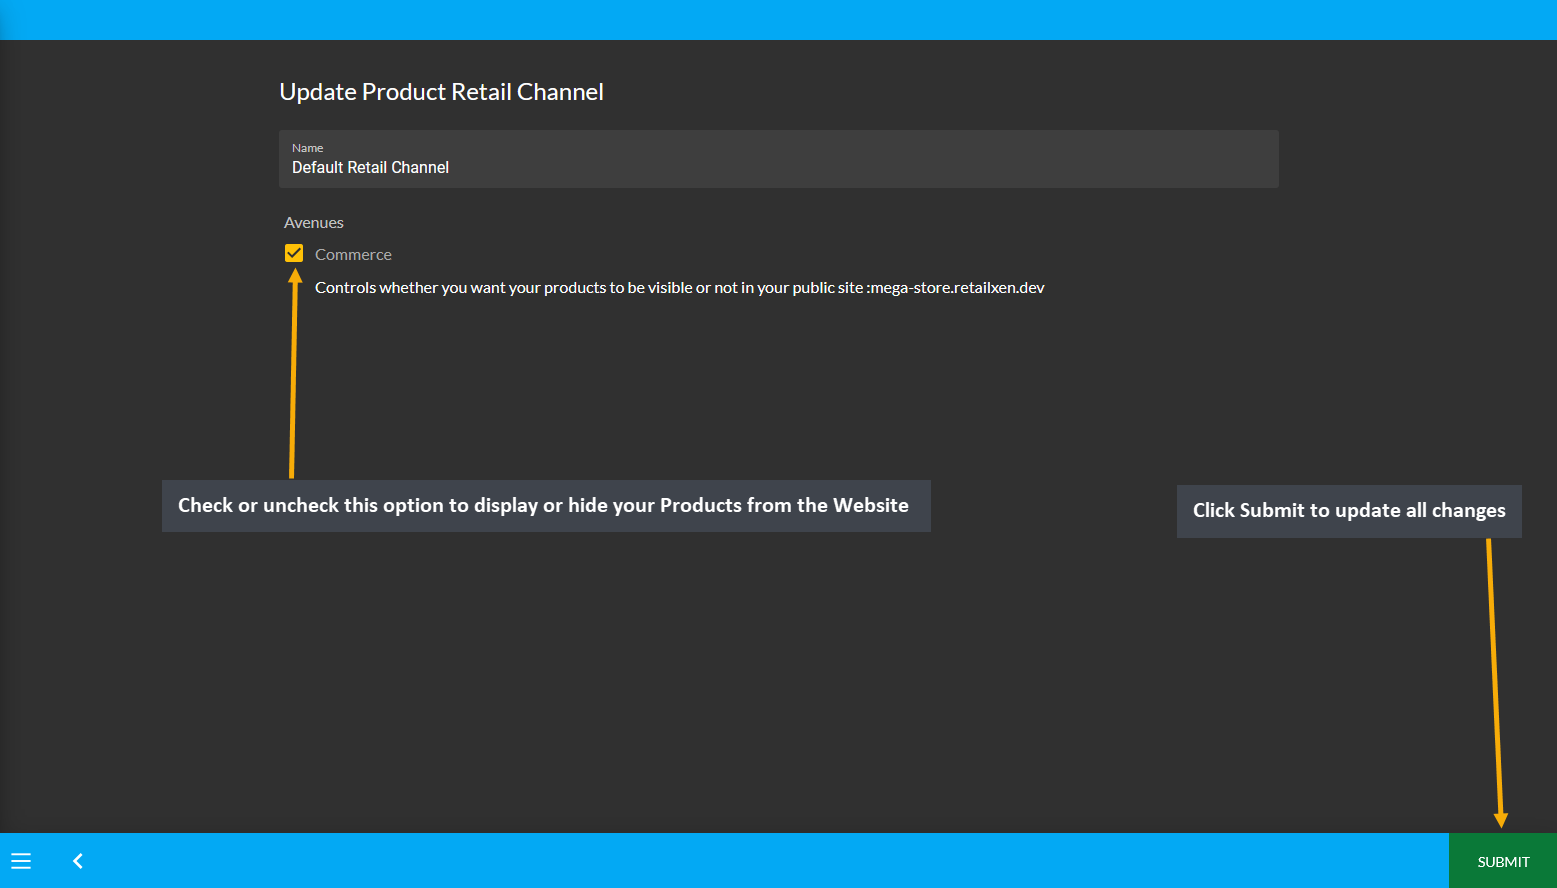
Image 4: Shop Owners can check or uncheck Commerce option to display or hide their Products on the Website.
Select Retail Channel
Retail Channels are where Products can be sold like Facebook, Google, or Website. Products can be assigned on other Retail Channels than the Default Retail Channel, which is the Website. After selecting other Avenues like Facebook or Google, Products will show in selected avenue of the Retail Channel, but not on the Website. Enabling or disabling any avenue will show or hide the Products within that avenue.
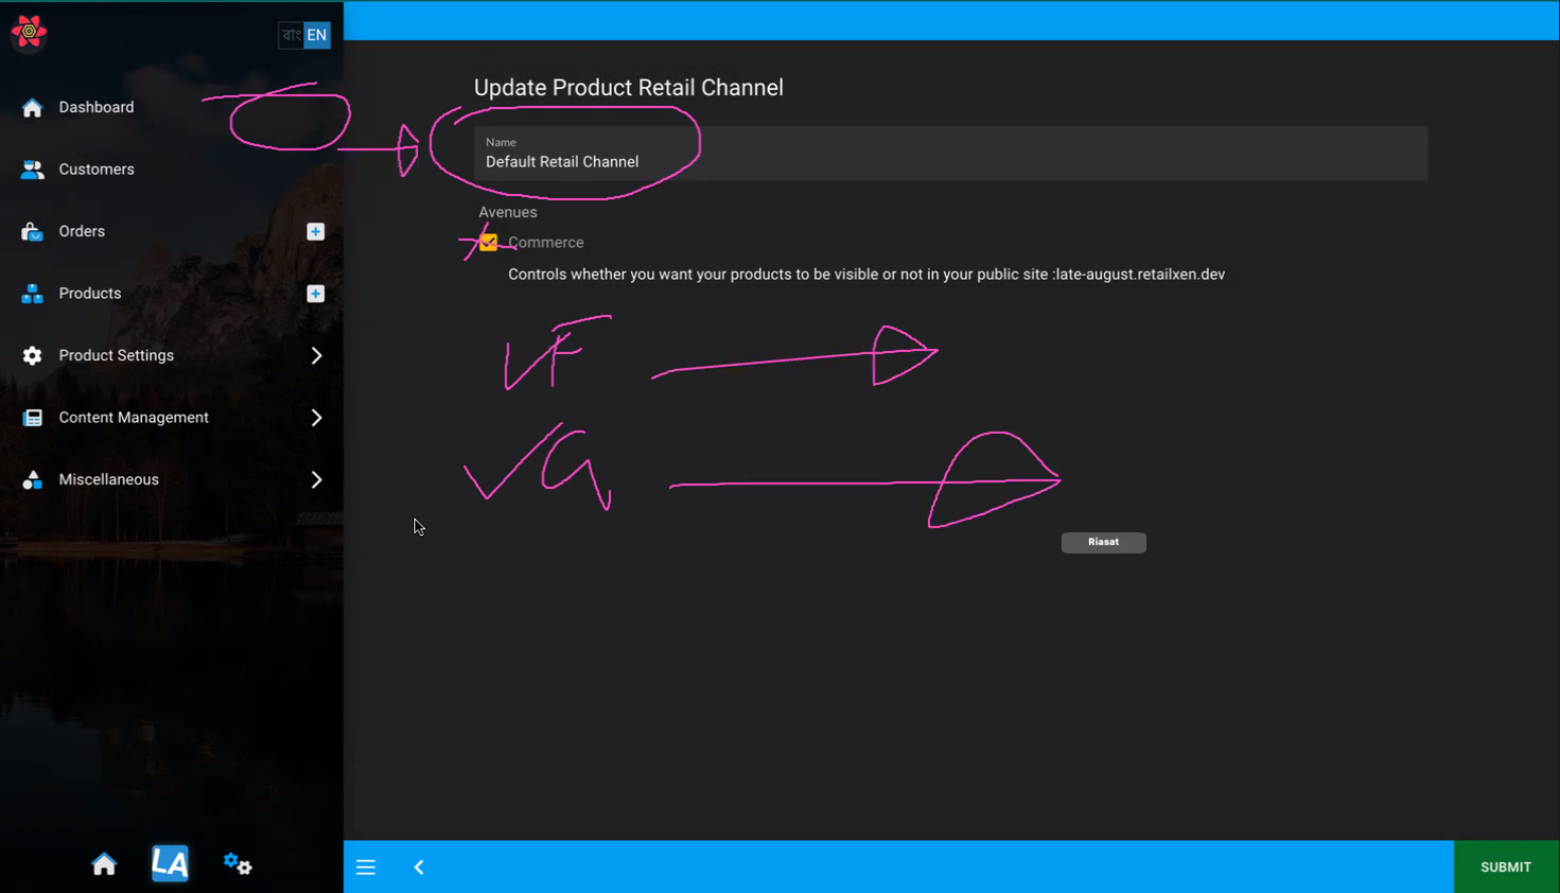
Image 5: Products can be assigned on other Retail Channel and their Avenues than on Default Retail Channel.


