Payment Gateway Settings
Payment Gateway Settings
Configure Payment Gateways from Gateways under All Settings tab. The Payment Gateways that are embedded in the system are Cash, Cheque, Cash on Delivery, Bank Transfer, Credit Card, Ledger, PortWallet, SSLCommerz, Nagad, Nagad (Manual), Bkash, and Bkash (Manual). Shop Owners can activate or enable them whenever needed.
Click the Configure button beside each Payment Gateway to configure them. If any gateway is enabled, they will be marked as green, if any gateway is disabled, they will be marked as red. So, the Shop Owner can enable and disable any payment gateway to allow Customers to make payment via any of these gateways on The Website.
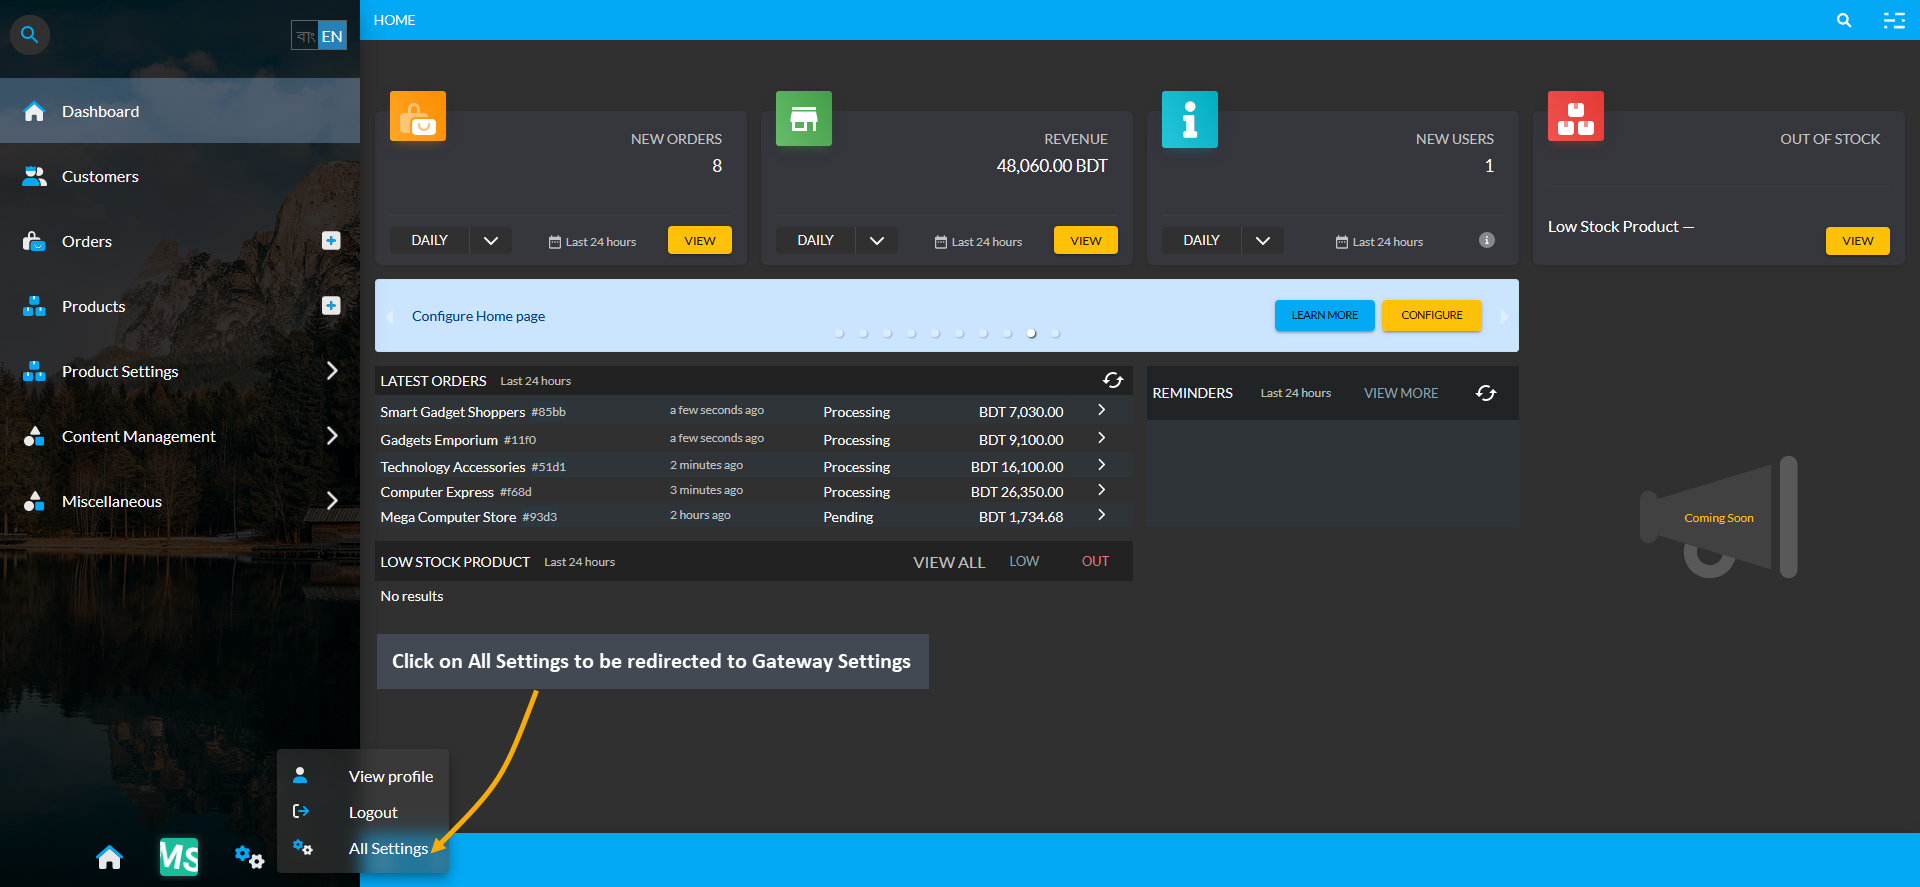
Image 1: Click on All Settings to be redirected to Gateway Settings from the Dashboard.
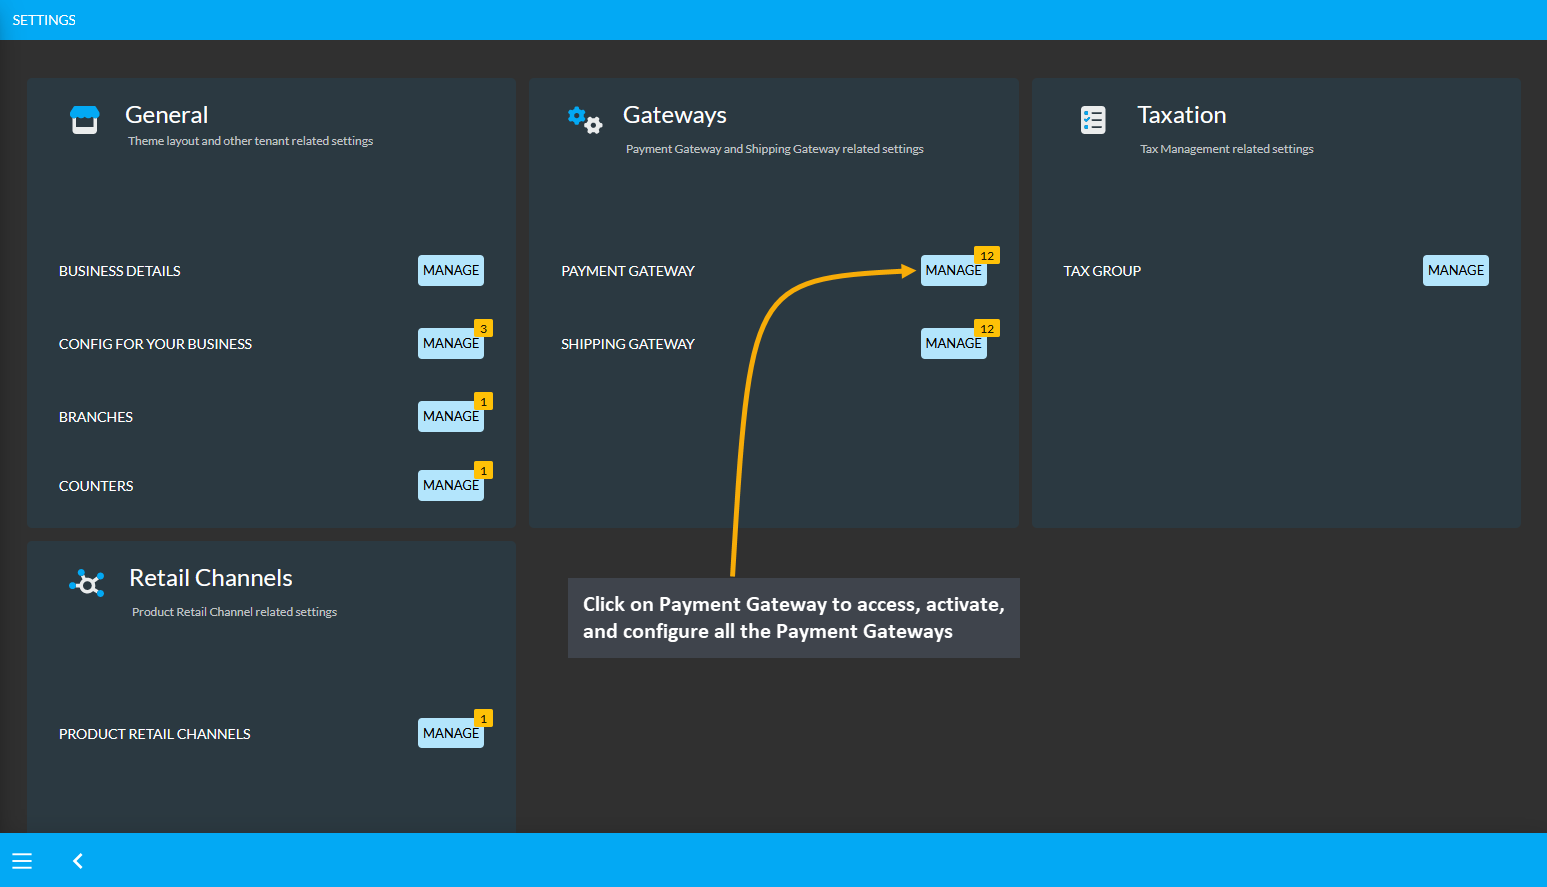
Image 2: Click on Payment Gateway to access, activate, and configure all the Payment Gateways.
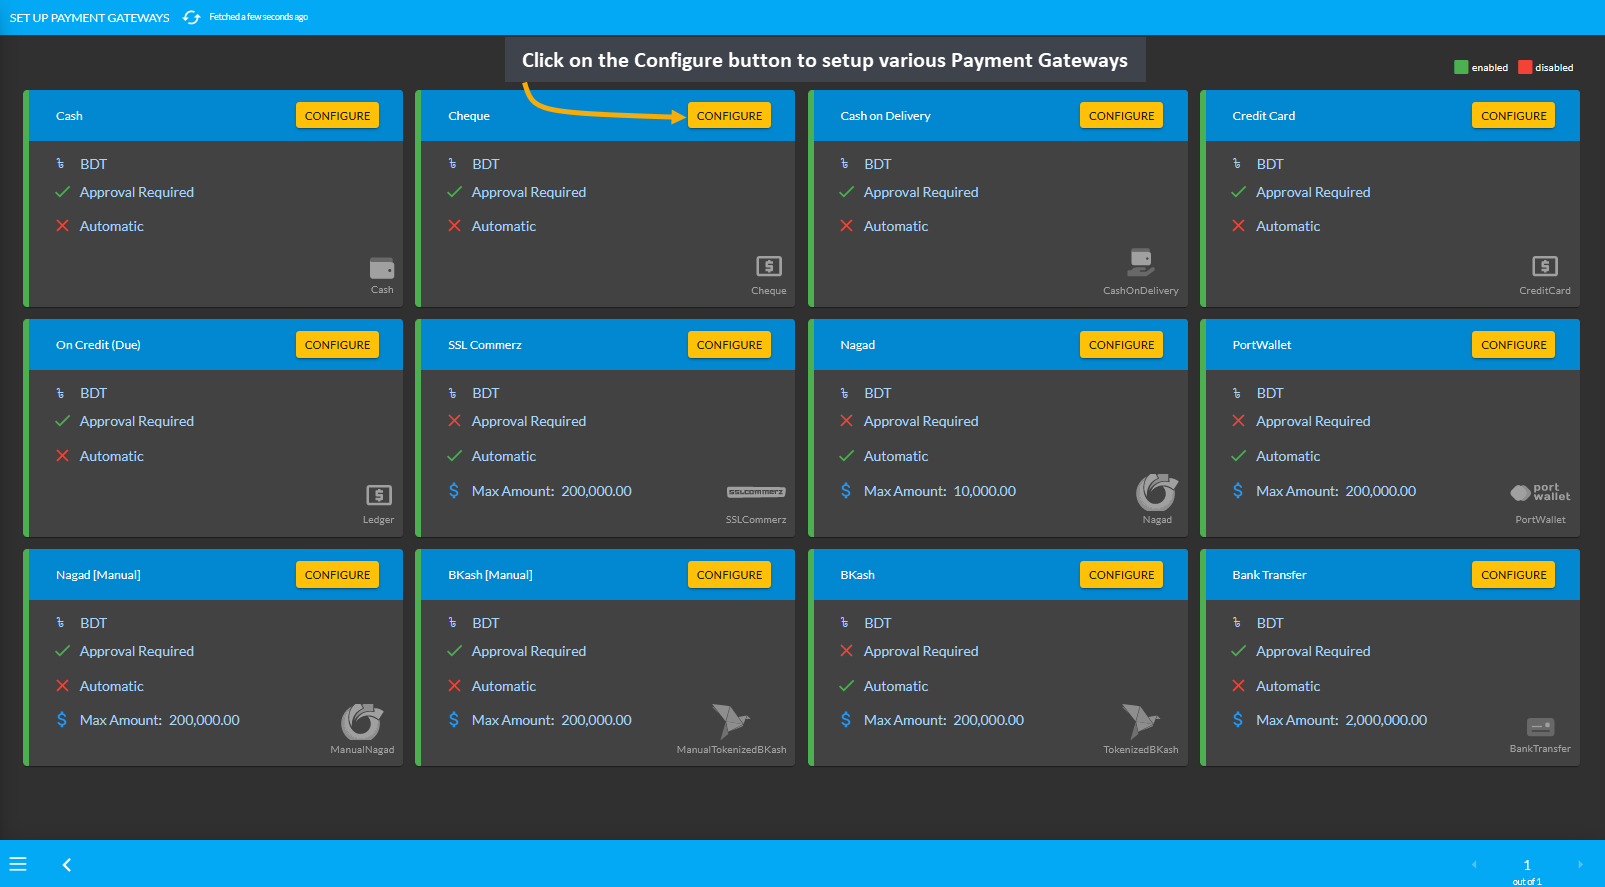
Image 3: Click on the Configure button to setup various Payment Gateways from the list.
For the configuration of Payment Gateways, there are options to setup display name, minimum amount required, maximum amount allowed, fees, display instruction, QR Code, test API credentials, bank account (bank transfer), allowed currencies, and EMI (for credit cards) etc. One payment gateway configuration will vary from another.
New Feature: Ecommerce Enabled
Enable Commerce is a new feature that was introduced on the Admin Panel. Enabling or disabling this option is going to display or not display the selected Payment Gateway on The Website for Customers.

Image 1: Enable or disable Commerce feature to display Payment Gateway on The Website for Customers.
If the Enable Commerce is disabled, then the selected Payment Gateways will show as disabled like SSLCommerz, PortWallet, Bank Transfer, BKash, BKash (Manual), Nagad, and Nagad (Manual) as shown in the example.
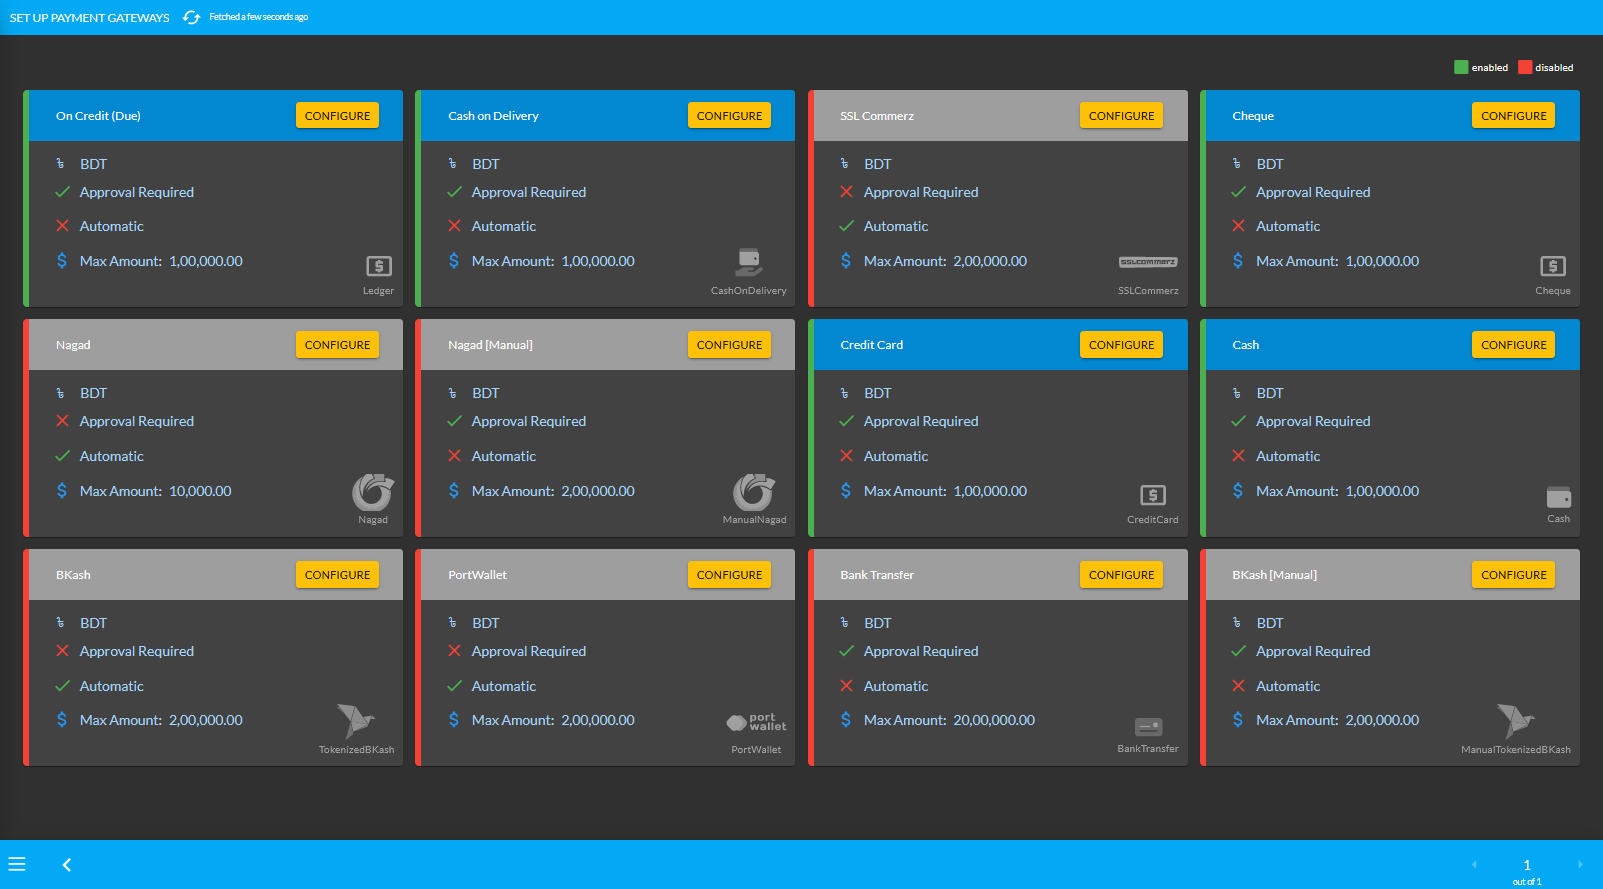
Image 2: Commerce feature disabled for few Payment Gateways that will not display on The Website.
With the Enable Commerce option turned on from the Admin Panel for selected Payment Gateways, the Website will display those Payment Gateways when Customer checks out from their Cart to place a New Order as shown.
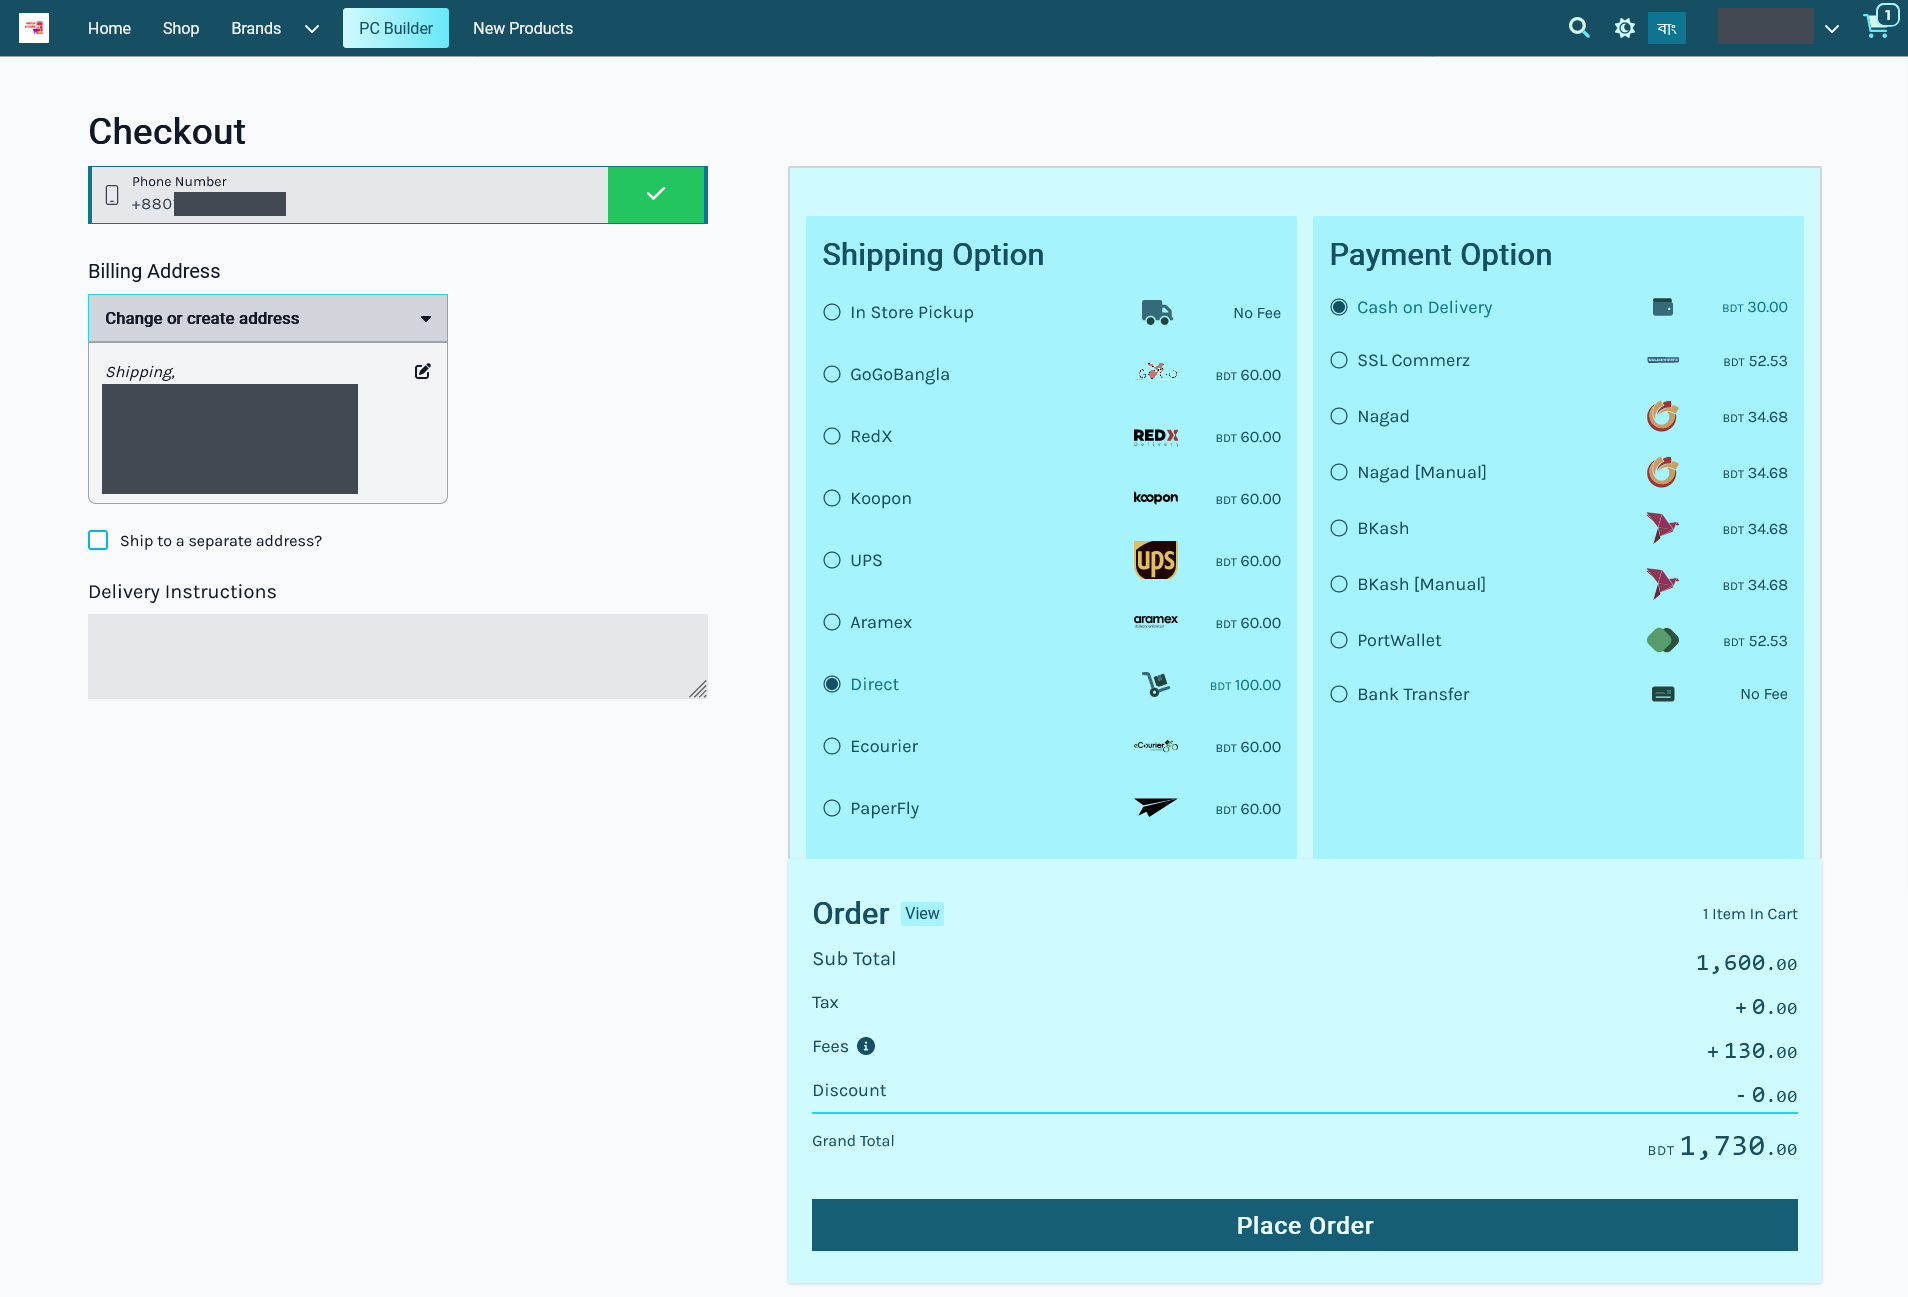
Image 3: The Website will display all the available Payment Gateways with Enabled Commerce turned on.
Conversely, with Enable Commerce option turned off from the Admin Panel for selected Payment Gateways, the Website will not display those Payment Gateways when Customer checks out from their Cart to place New Order.
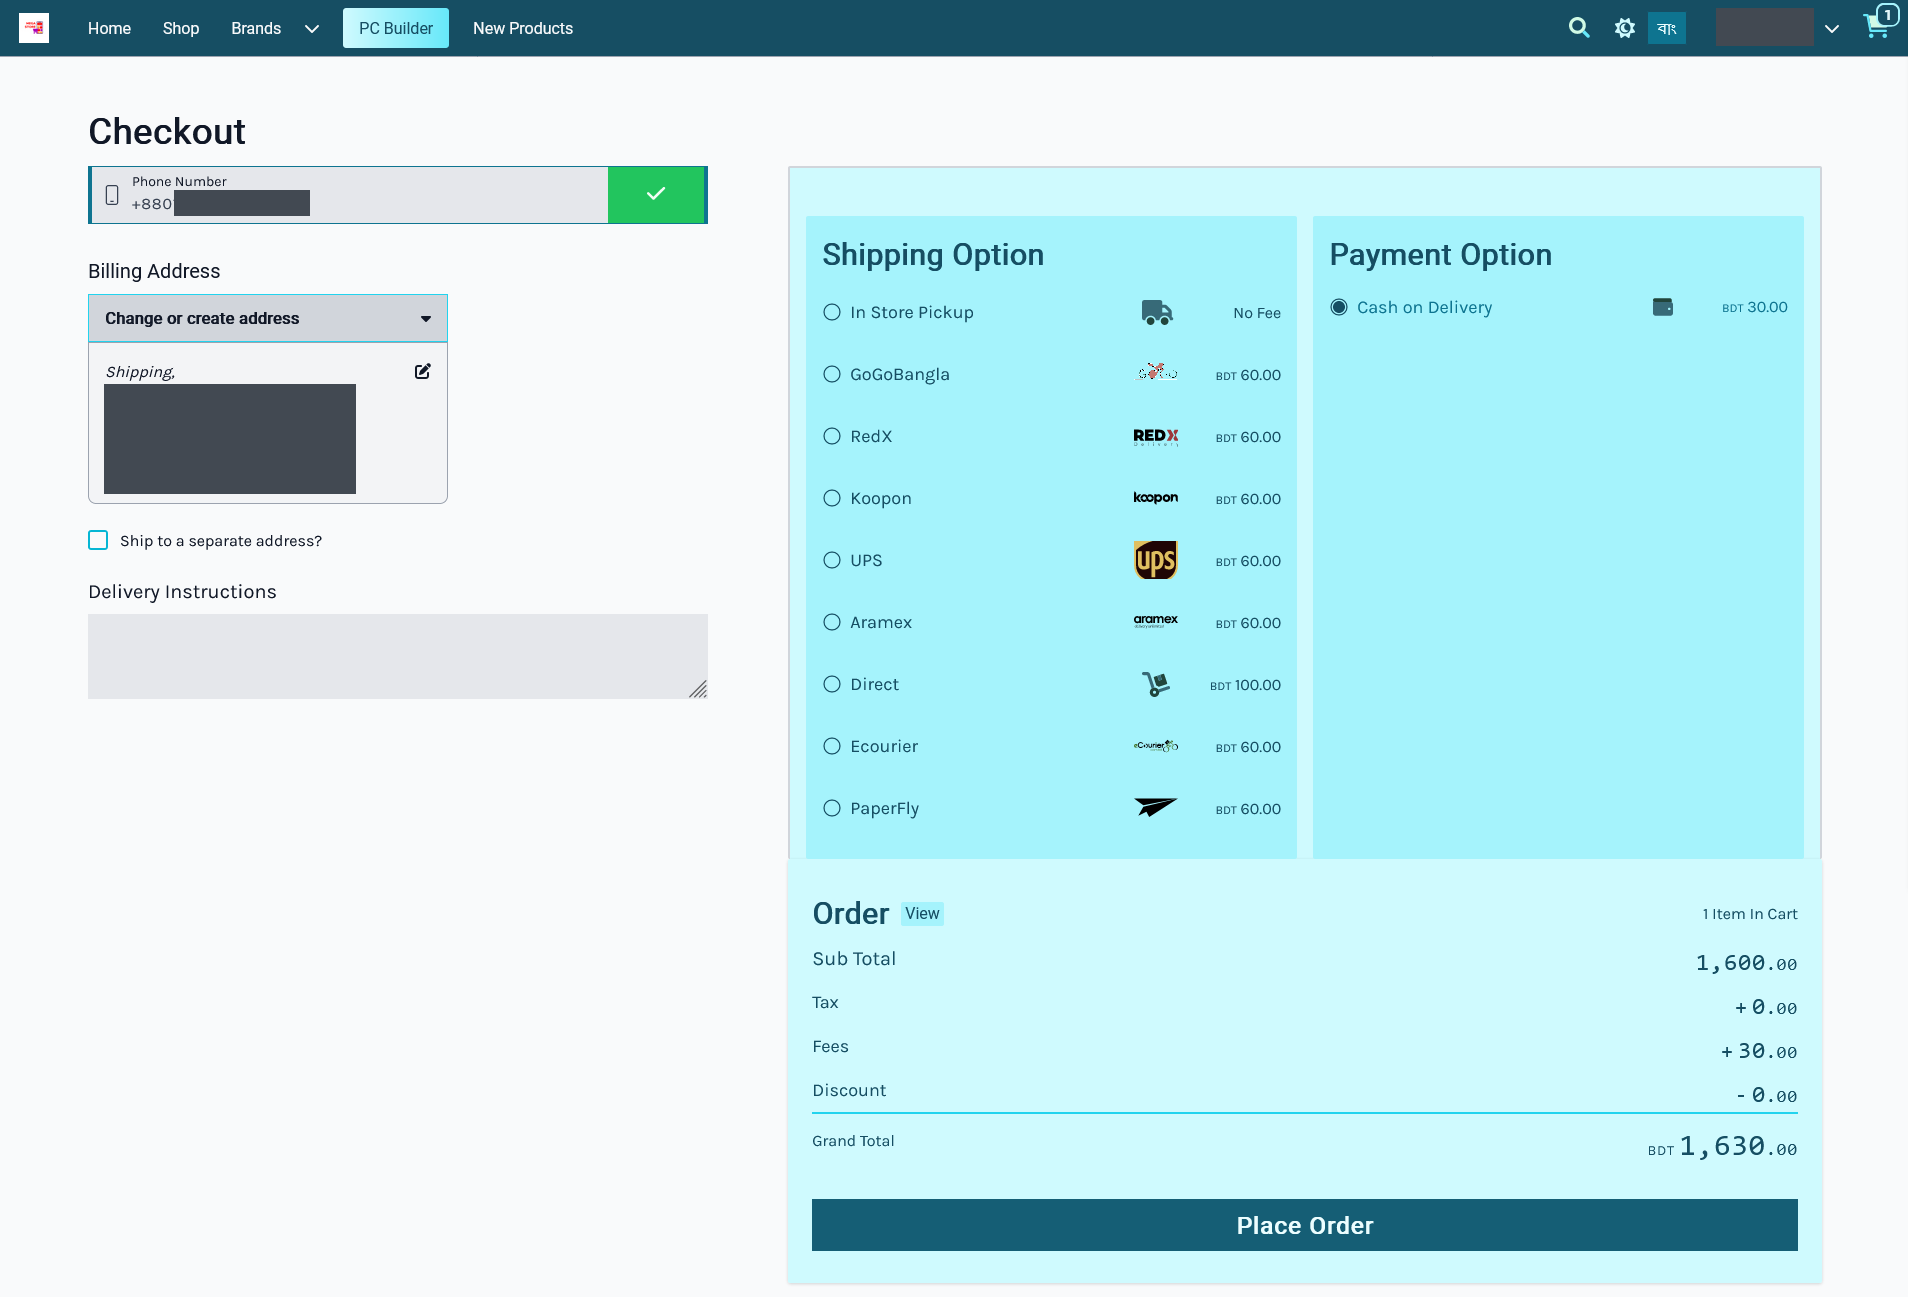
Image 4: The Website will not display selected Payment Gateways when Enabled Commerce is turned off.
Bank Transfer
The payment gateway for Bank Transfer can be set with a Minimum and Maximum amount. Use Enable button to activate the gateway. There is a toggle button to enable Fee and set a Fee Value. Click Add Bank Account button to add bank details. Finally, set the Display Instruction and click Save to confirm all changes and enable the gateway.
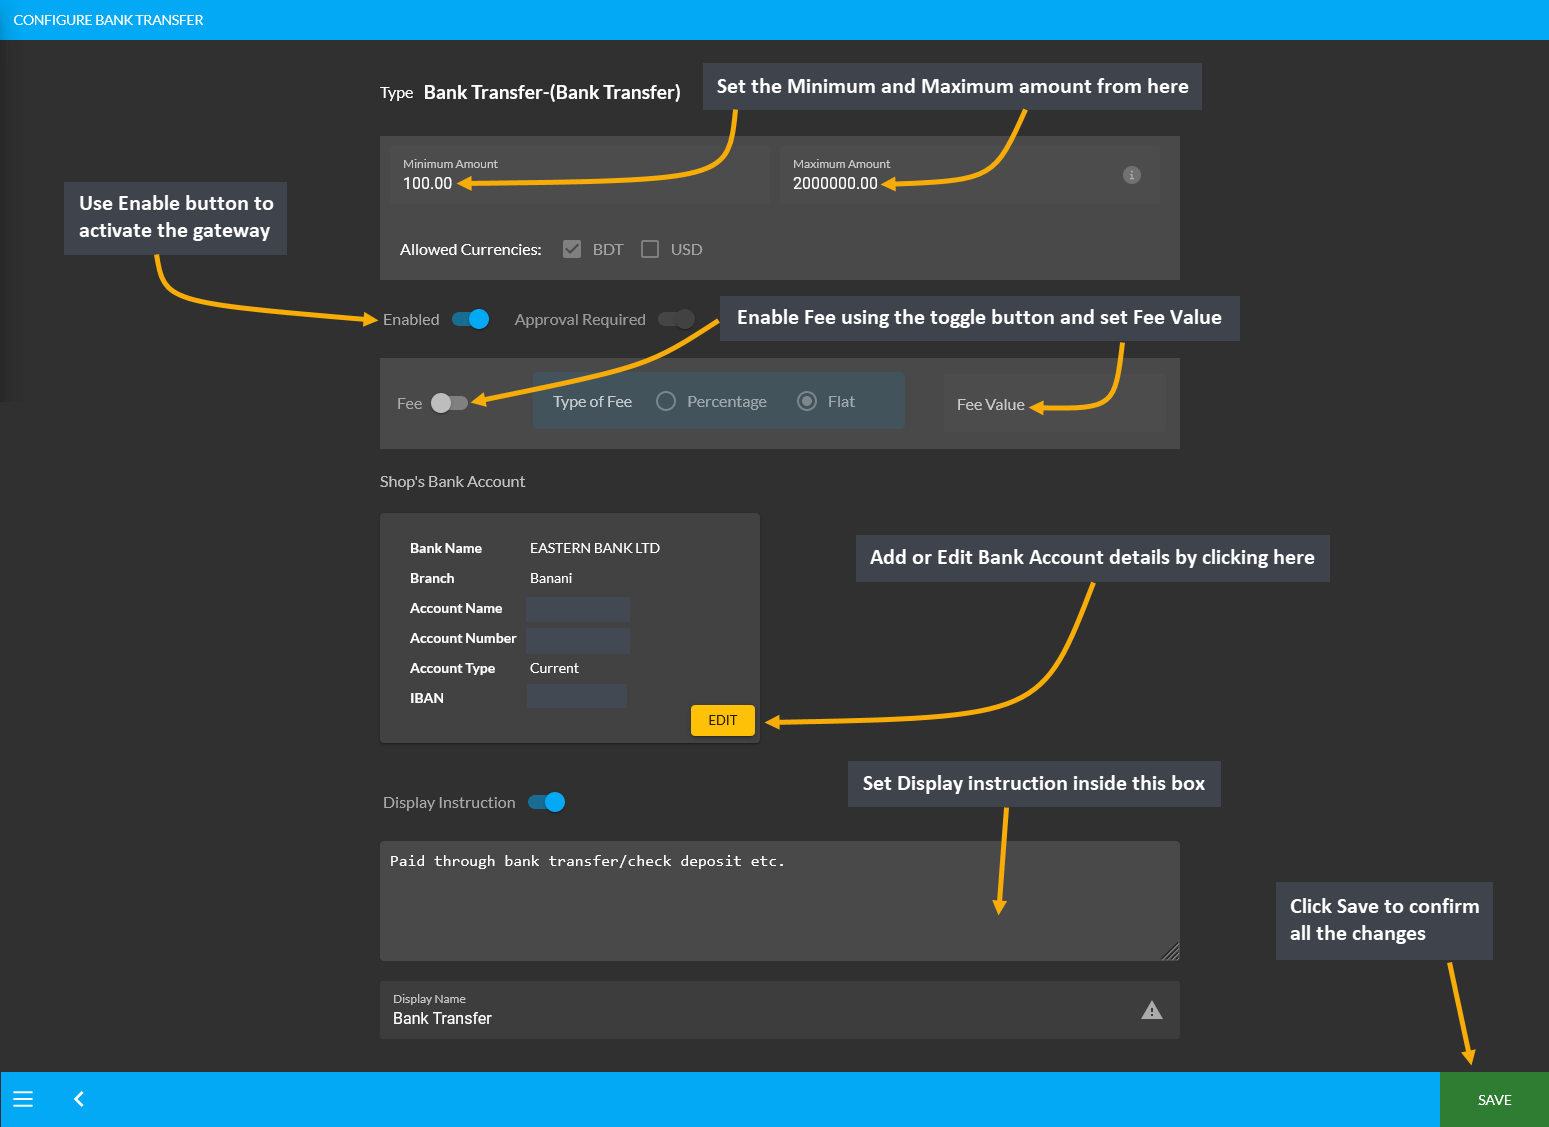
Image 1: Setup Bank Transfer with a minimum and maximum amount, fees, and detailed bank information.
Within Bank Transfer, clicking on the Add Bank Account or Edit button will open a pop-up from where the Shop Owner can setup their bank details. The bank details include setting up bank name, bank account name, bank account number, bank branch, bank swift, bank routing number, IBAN and account type.
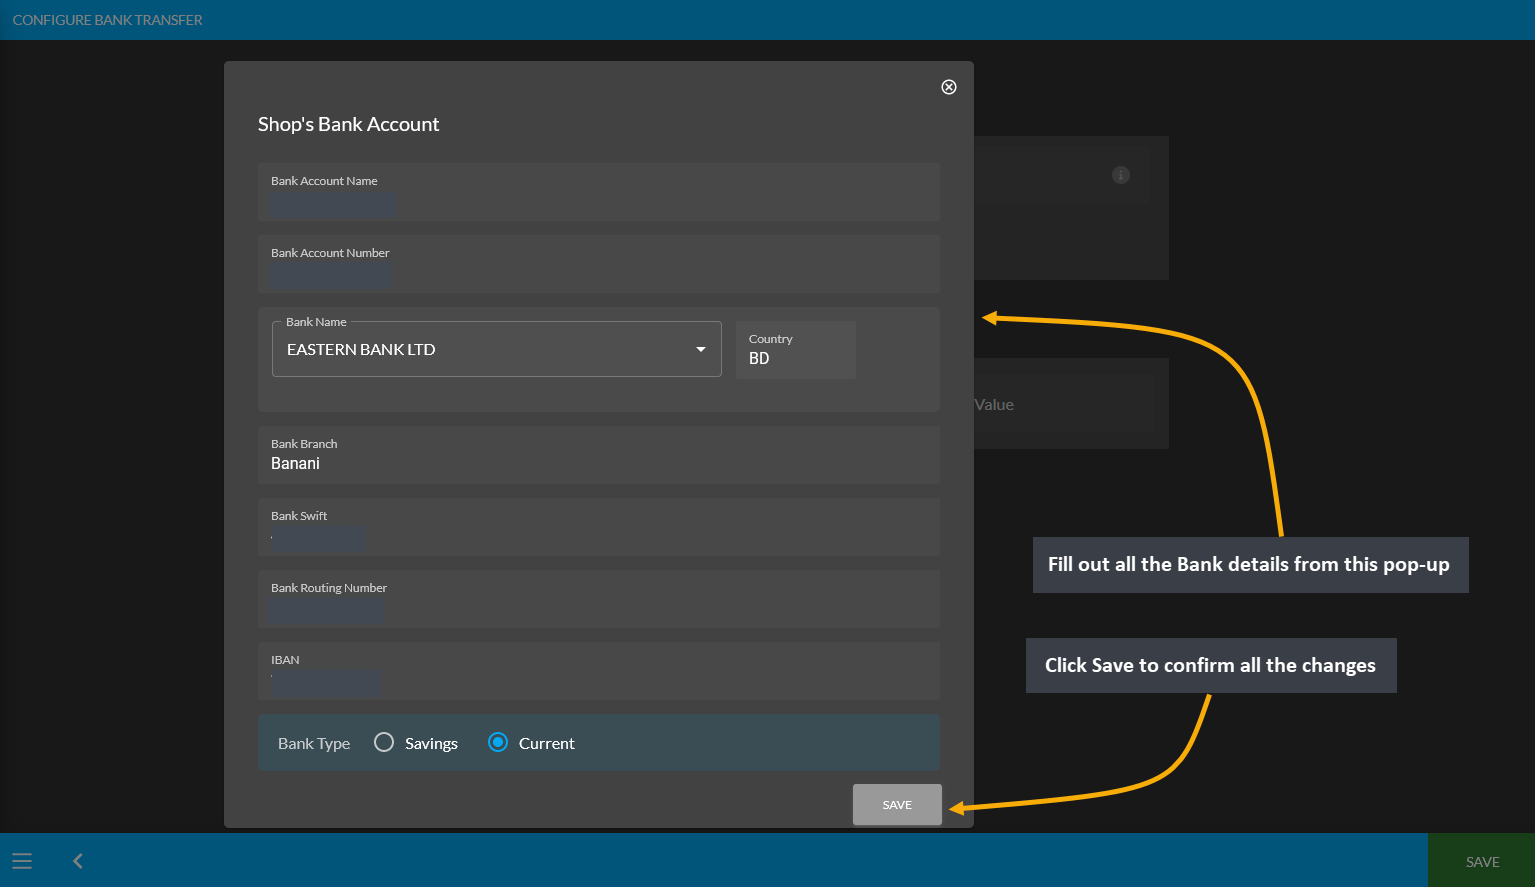
Image 2: Setup Bank details with Name, Account Name, Type, Number, Branch, Swift, Routing Number, and IBAN.
BKash (Manual)
The payment gateway for Bkash (Manual) can be set with a Minimum and Maximum amount. Use Enable button to activate the gateway. There is a toggle button to enable Fee and set a Fee Value. Enter BKash phone number and select Merchant Payment or Send Money. Upload QR Code using a screenshot downloaded from the phone and set Display Instruction below as shown. Click Save to confirm all changes and enable the gateway.
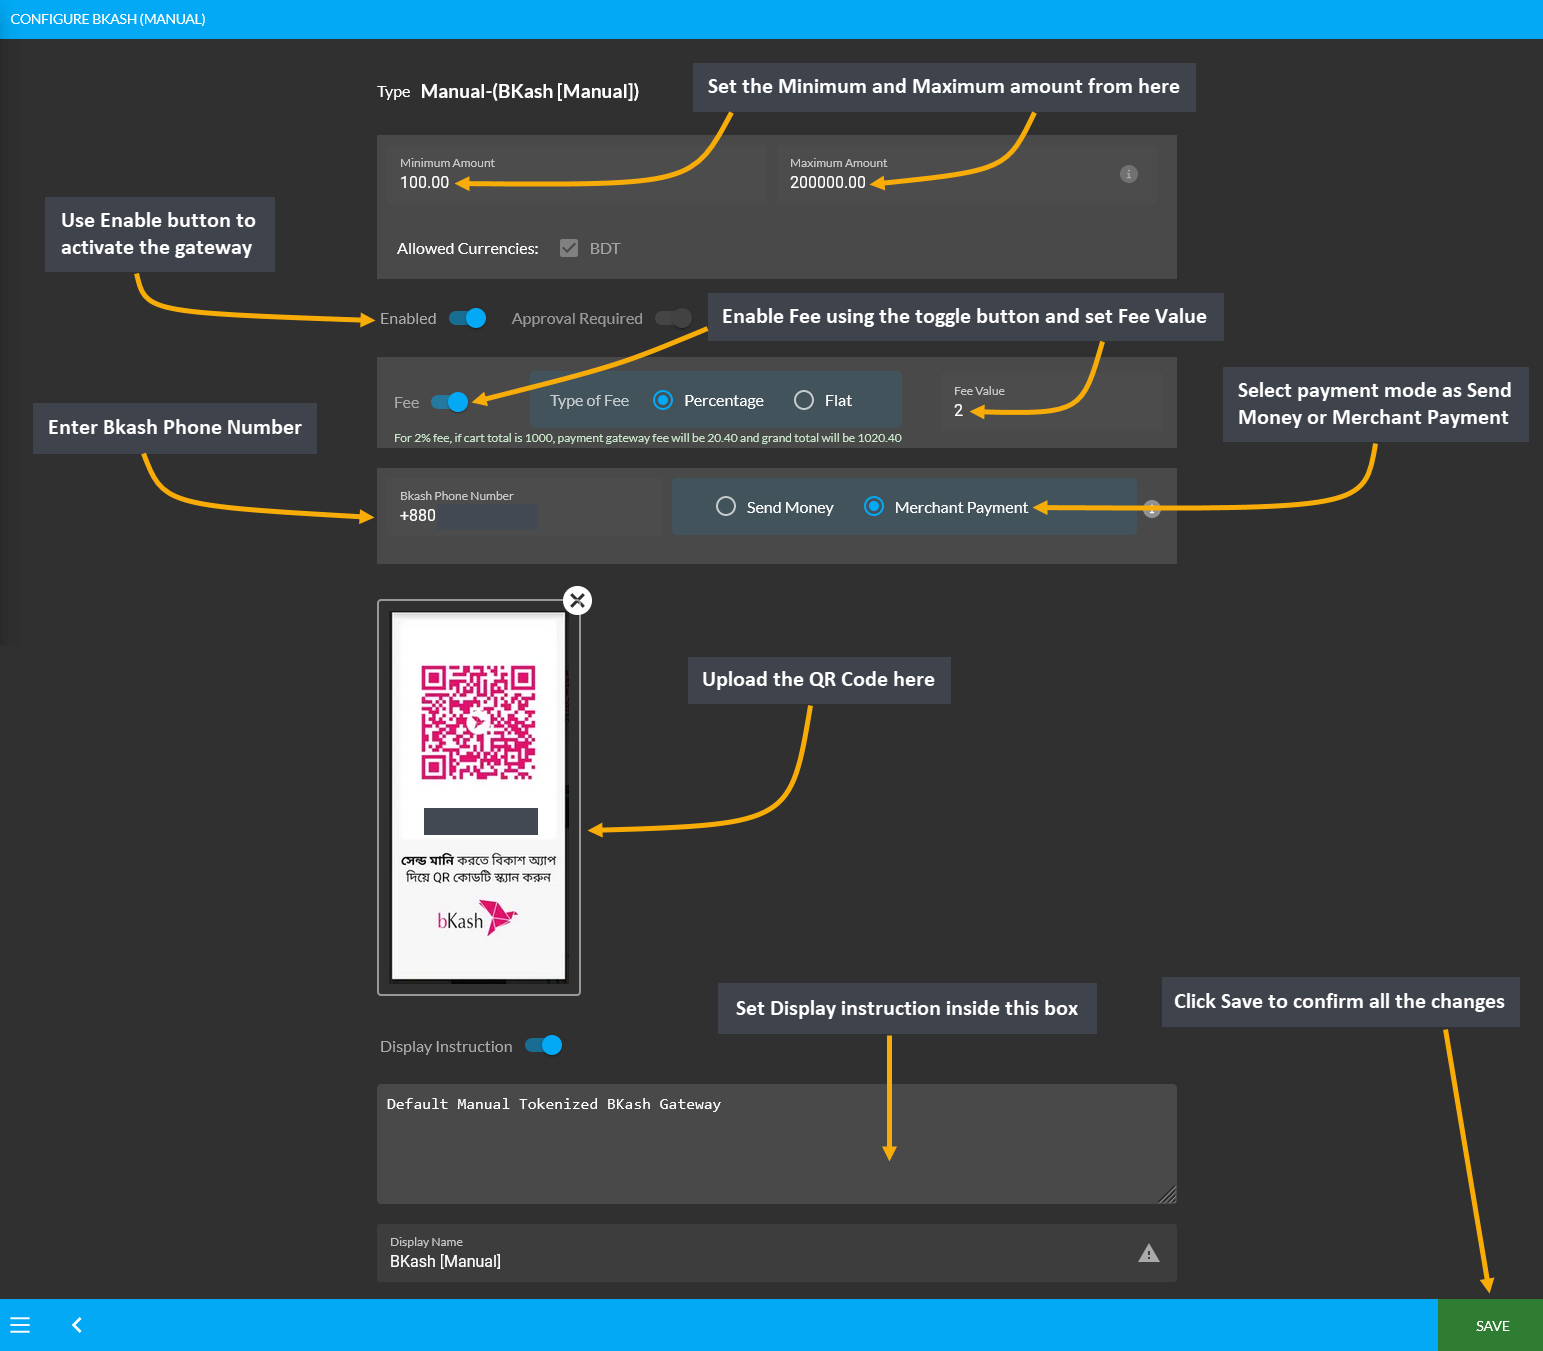
Image 1: Setup BKash (Manual) with amounts, fees, BKash phone number, payment mode, and QR code.
Downloading QR Code from BKash
In order to upload QR Code for activating BKash Manual Gateway, there are few steps to follow. First, User needs to login to their BKash Account using Account Number and Pin. Then, they need to click the avatar on top of the screen. This will redirect to the screen to download the QR Code to upload in BKash (Manual) payment gateway.
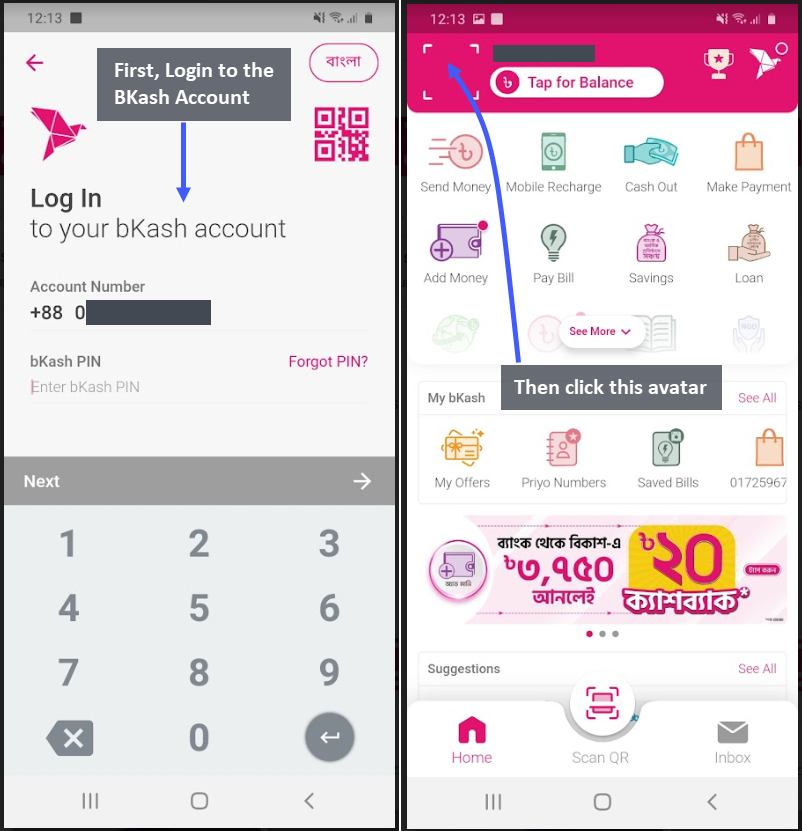
Image 1 and 2: Logging into BKash Account and selecting avatar to redirect to downloading QR Code.
The next page will recirect to the User’s unique QR Code. Click the Download QR Code button which will redirect to the downloadable BKash QR Code image. Now, get this file on computer with email, message, or Google Drive so that it can be downloaded. Then, upload the BKash QR Code while activating BKash payment gateway.
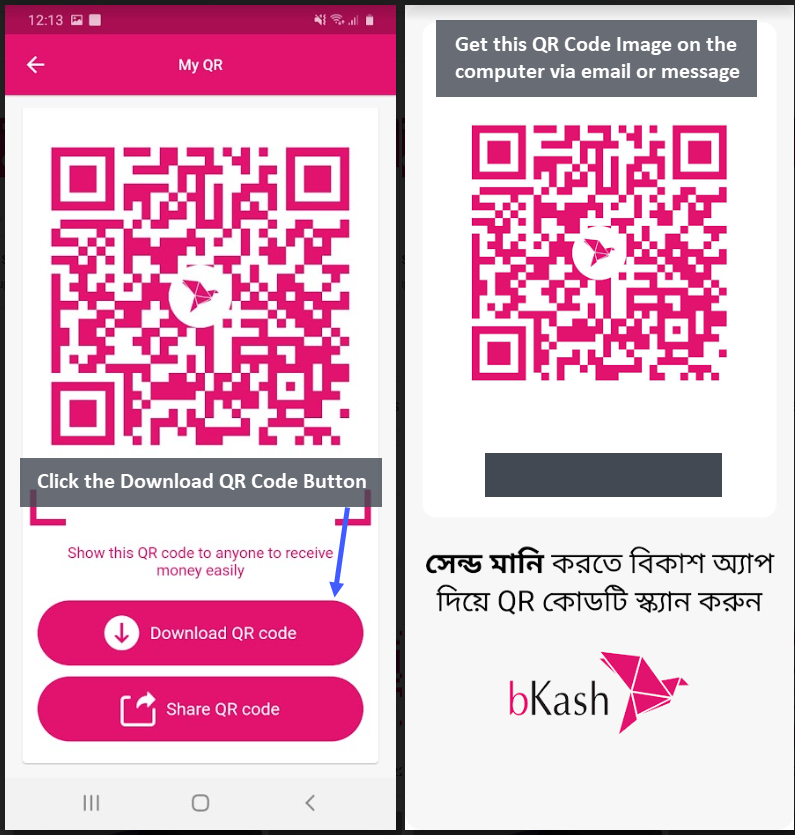
Image 3 and 4: Click Download QR Code Button and get the QR Code image on computer via email or message.
Ordering on Website with or without BKash QR Code
The Bkash (Manual) Payment Gateway can be created both with QR Code (which can be downloaded from phone) that can later be uploaded while activating BKash payment gateway or without QR Code image. Please note that, when paying with Bkash (Manual) for ordering on The Website, this is how the BKash payment gateway will show with the QR Code and without the QR Code.
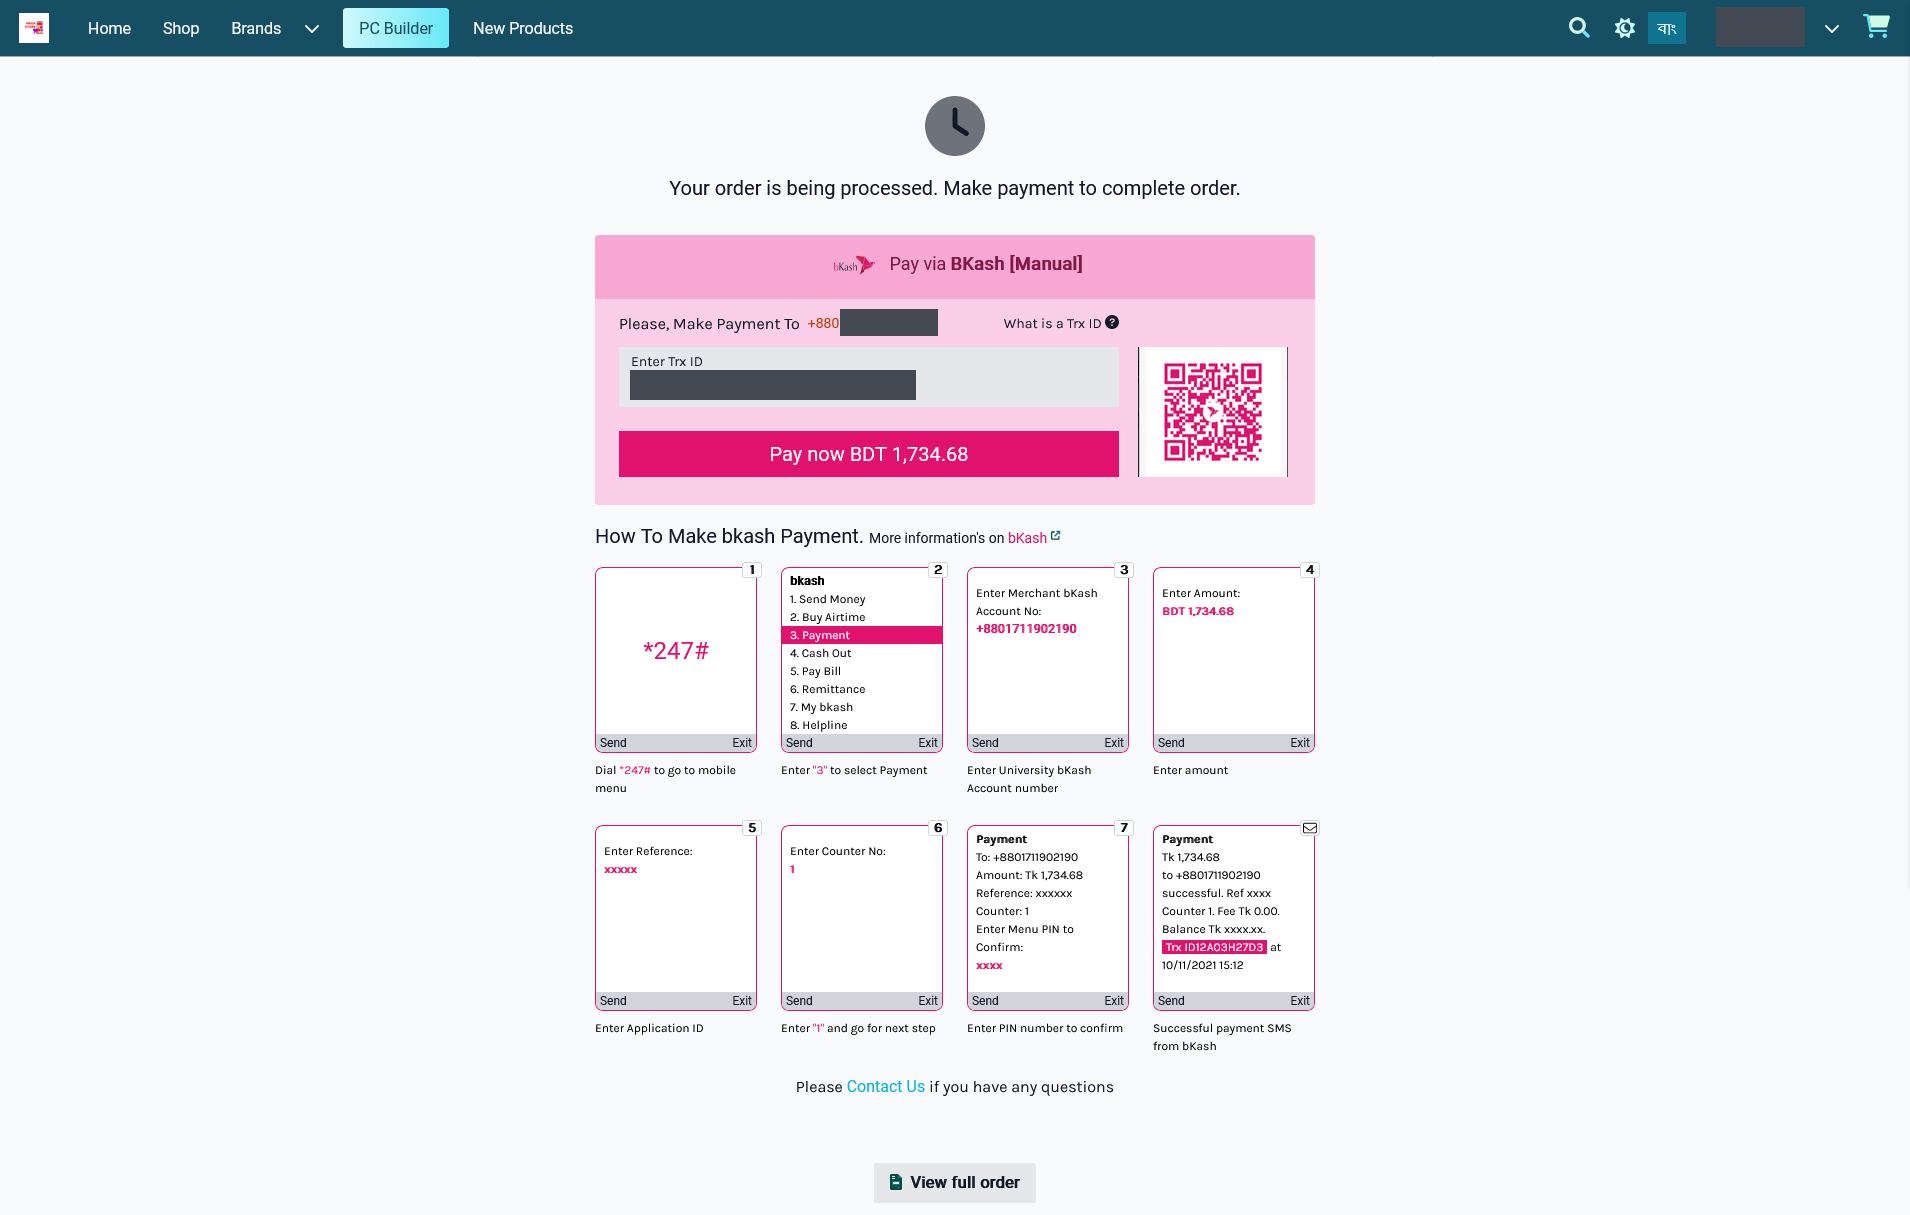
Image 1: Bkash payment with QR Code when placing Order and completing payment on The Website.
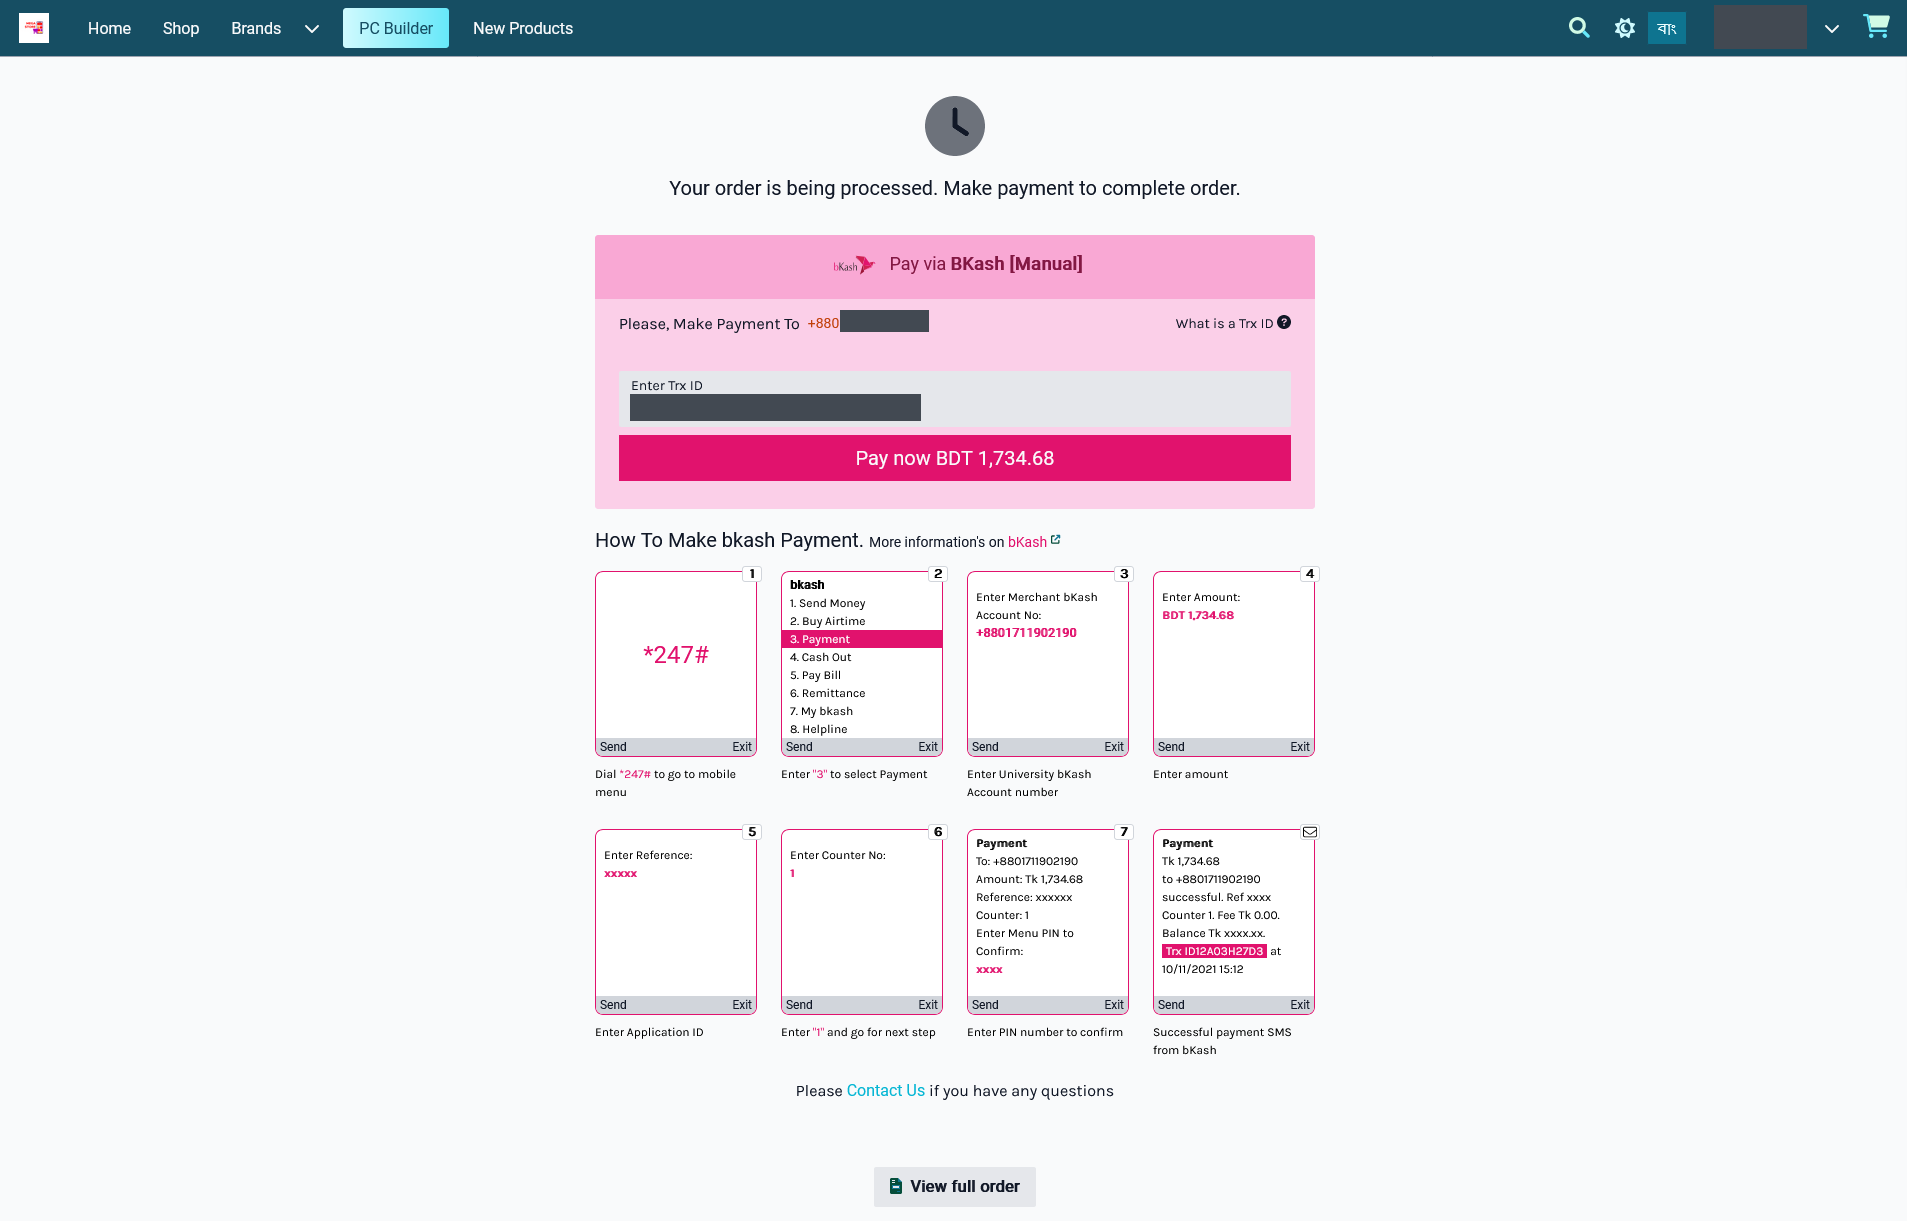
Image 2: Bkash payment without QR Code when placing Order and completing payment on The Website.
Nagad (Manual)
The payment gateway for Nagad (Manual) can be set with a Minimum and Maximum amount. Use Enable button to activate the gateway. There is a toggle button to enable Fee and set a Fee Value. Enter Nagad phone number and select Merchant Payment or Send Money. Upload QR Code using a screenshot downloaded from the phone and set Display Instruction below as shown. Click Save to confirm all changes and enable the gateway.
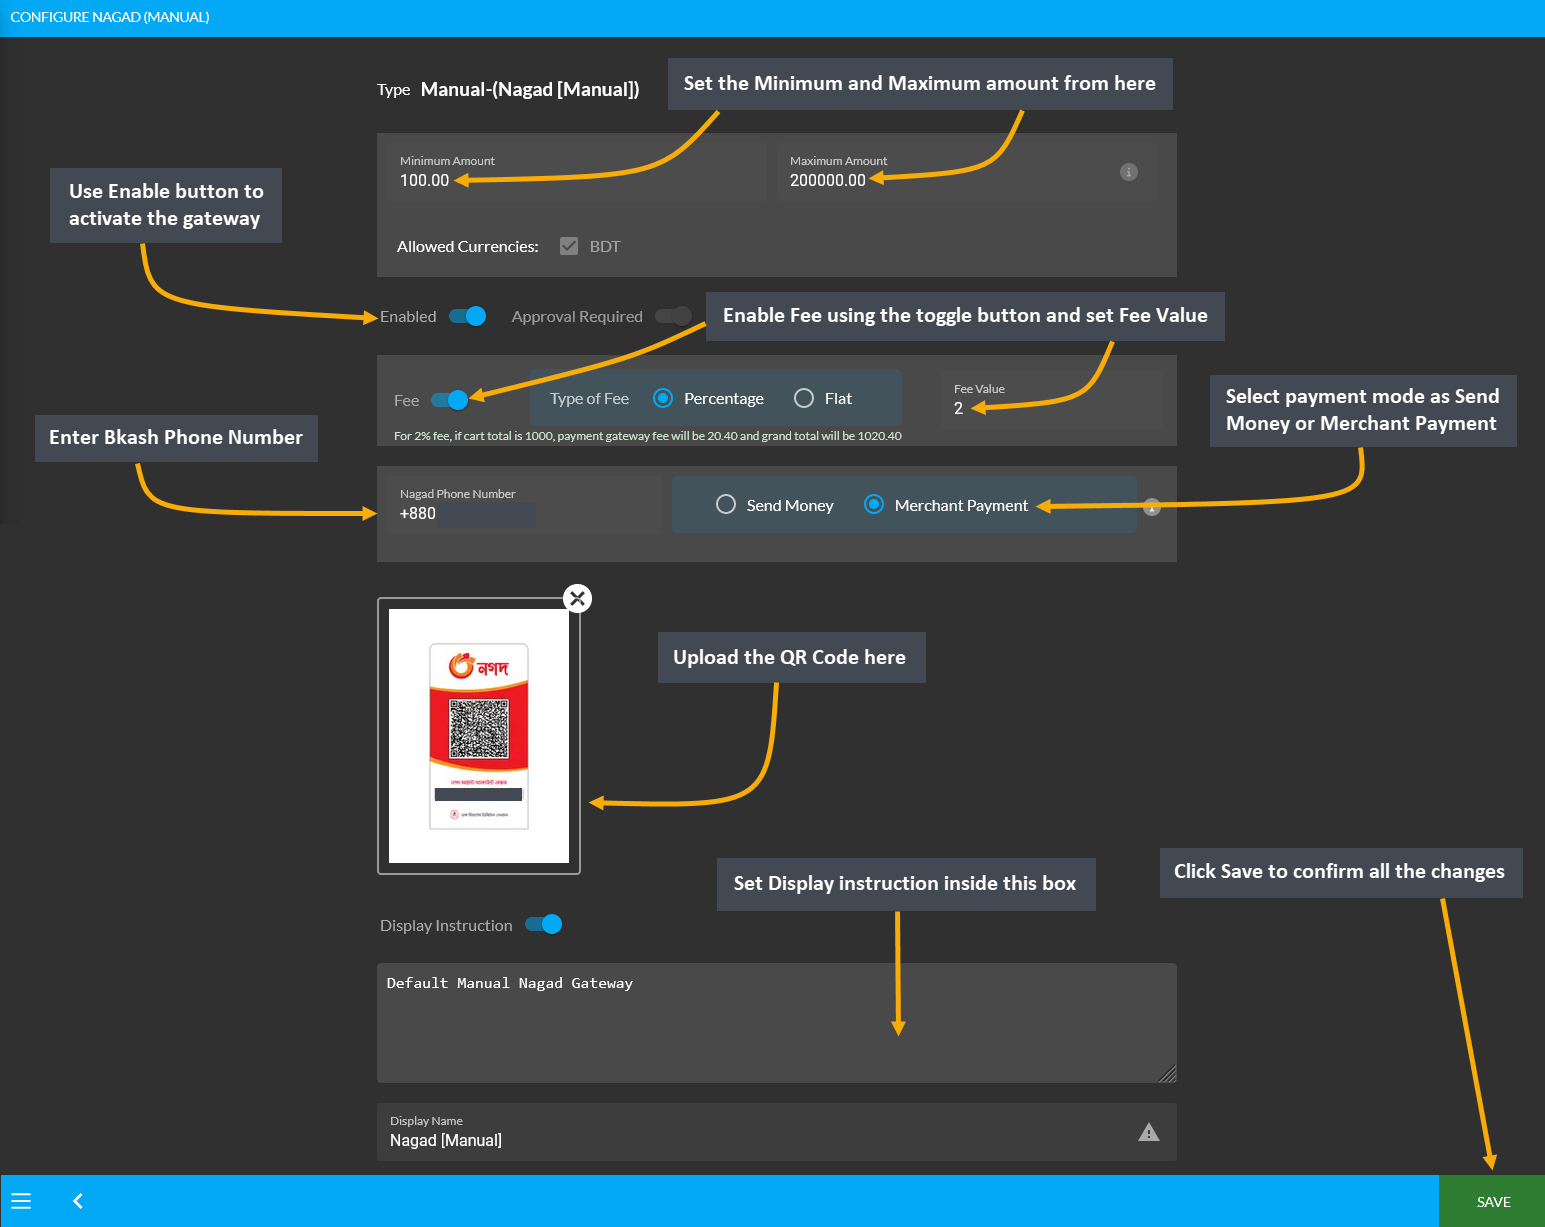
Image 1: Setup Nagad (Manual) with amounts, fees, BKash phone number, payment mode, and QR code.
Ordering on Website with or without Nagad QR Code
The Nagad (Manual) Payment Gateway can be created both with QR Code (which can be downloaded from phone) that can later be uploaded while activating Nagad payment gateway or without QR Code image. Please note that, when paying with Nagad (Manual) for ordering on The Website, this is how the Nagad payment gateway will show with the QR Code and without the QR Code.
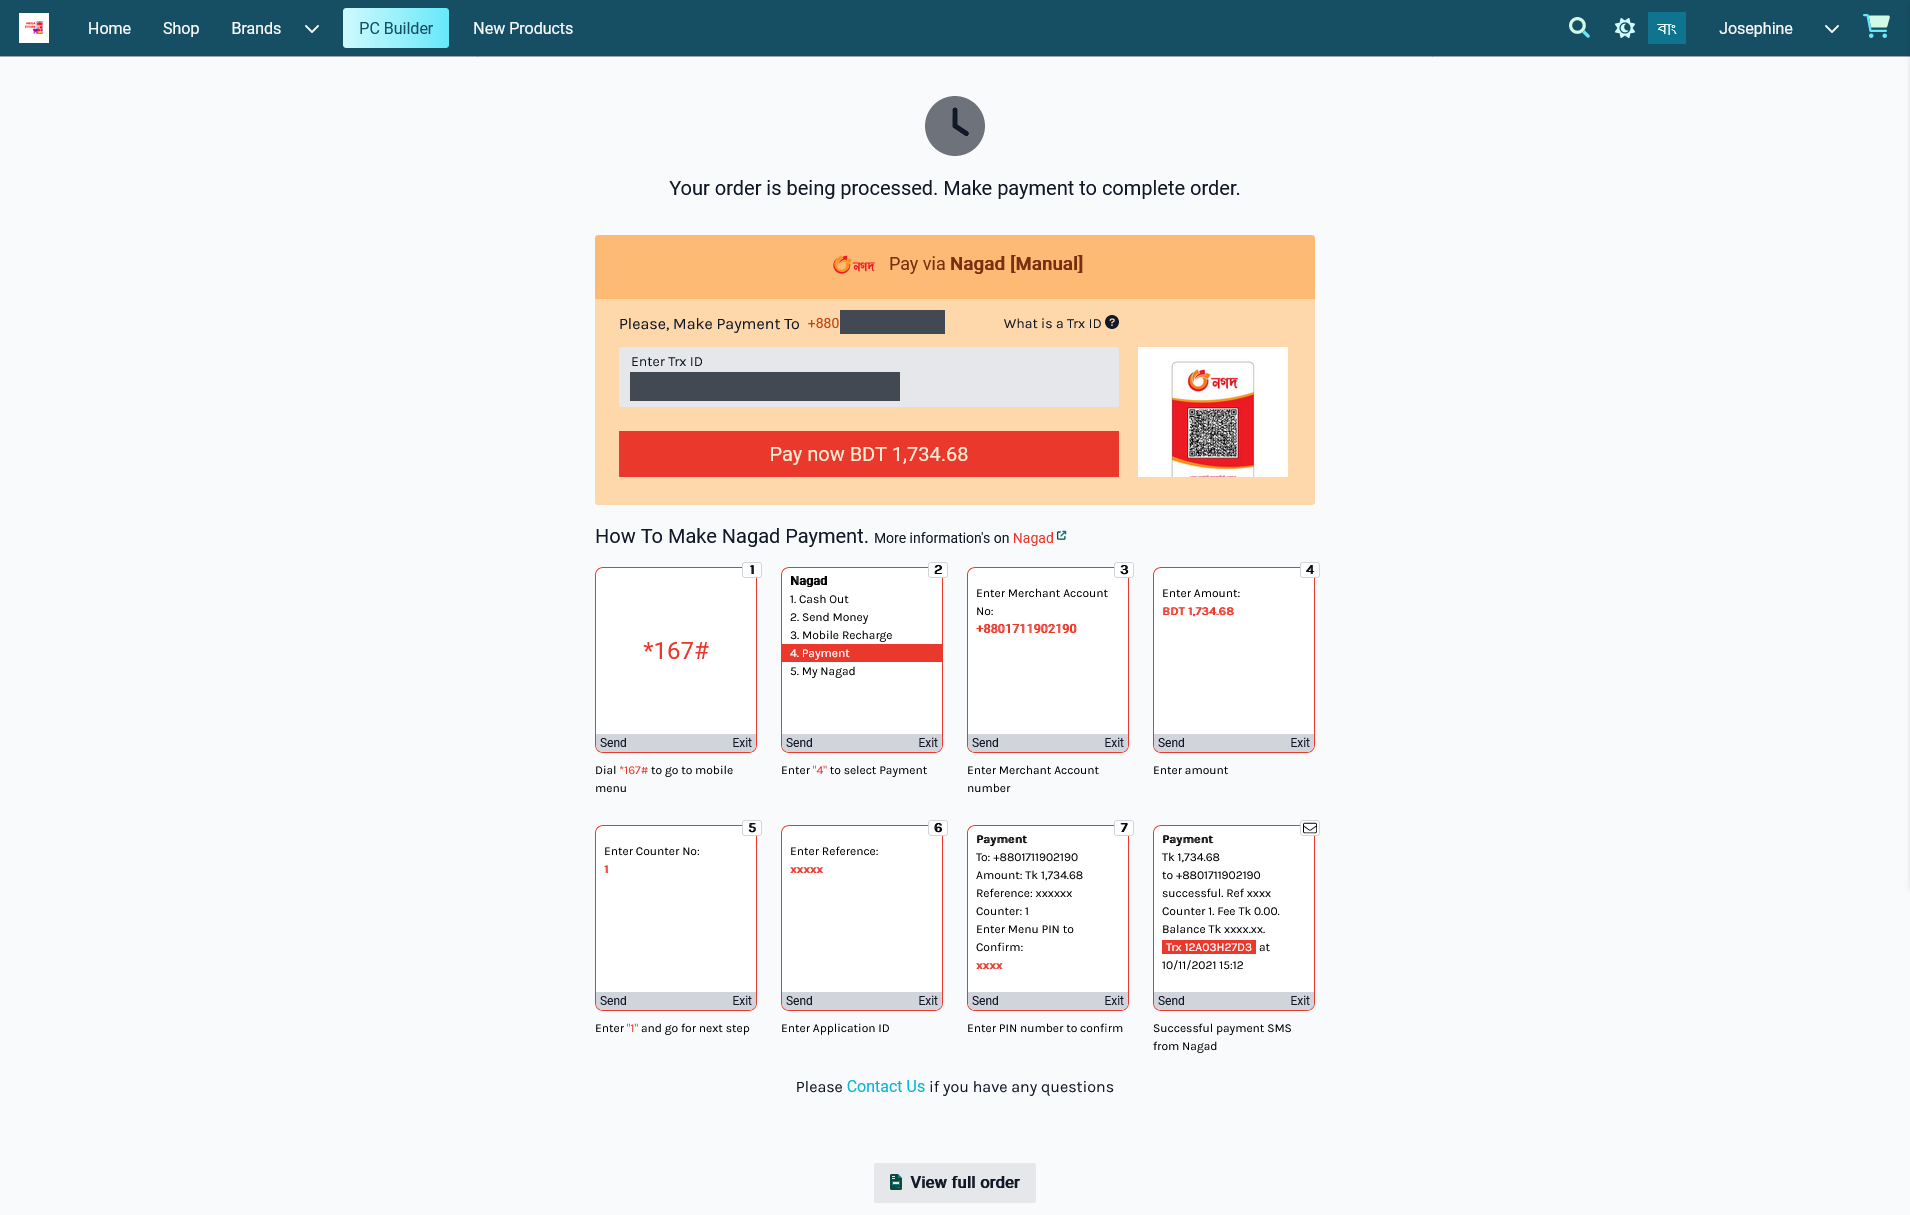
Image 2: Nagad payment with QR Code when placing Order and completing payment on The Website.
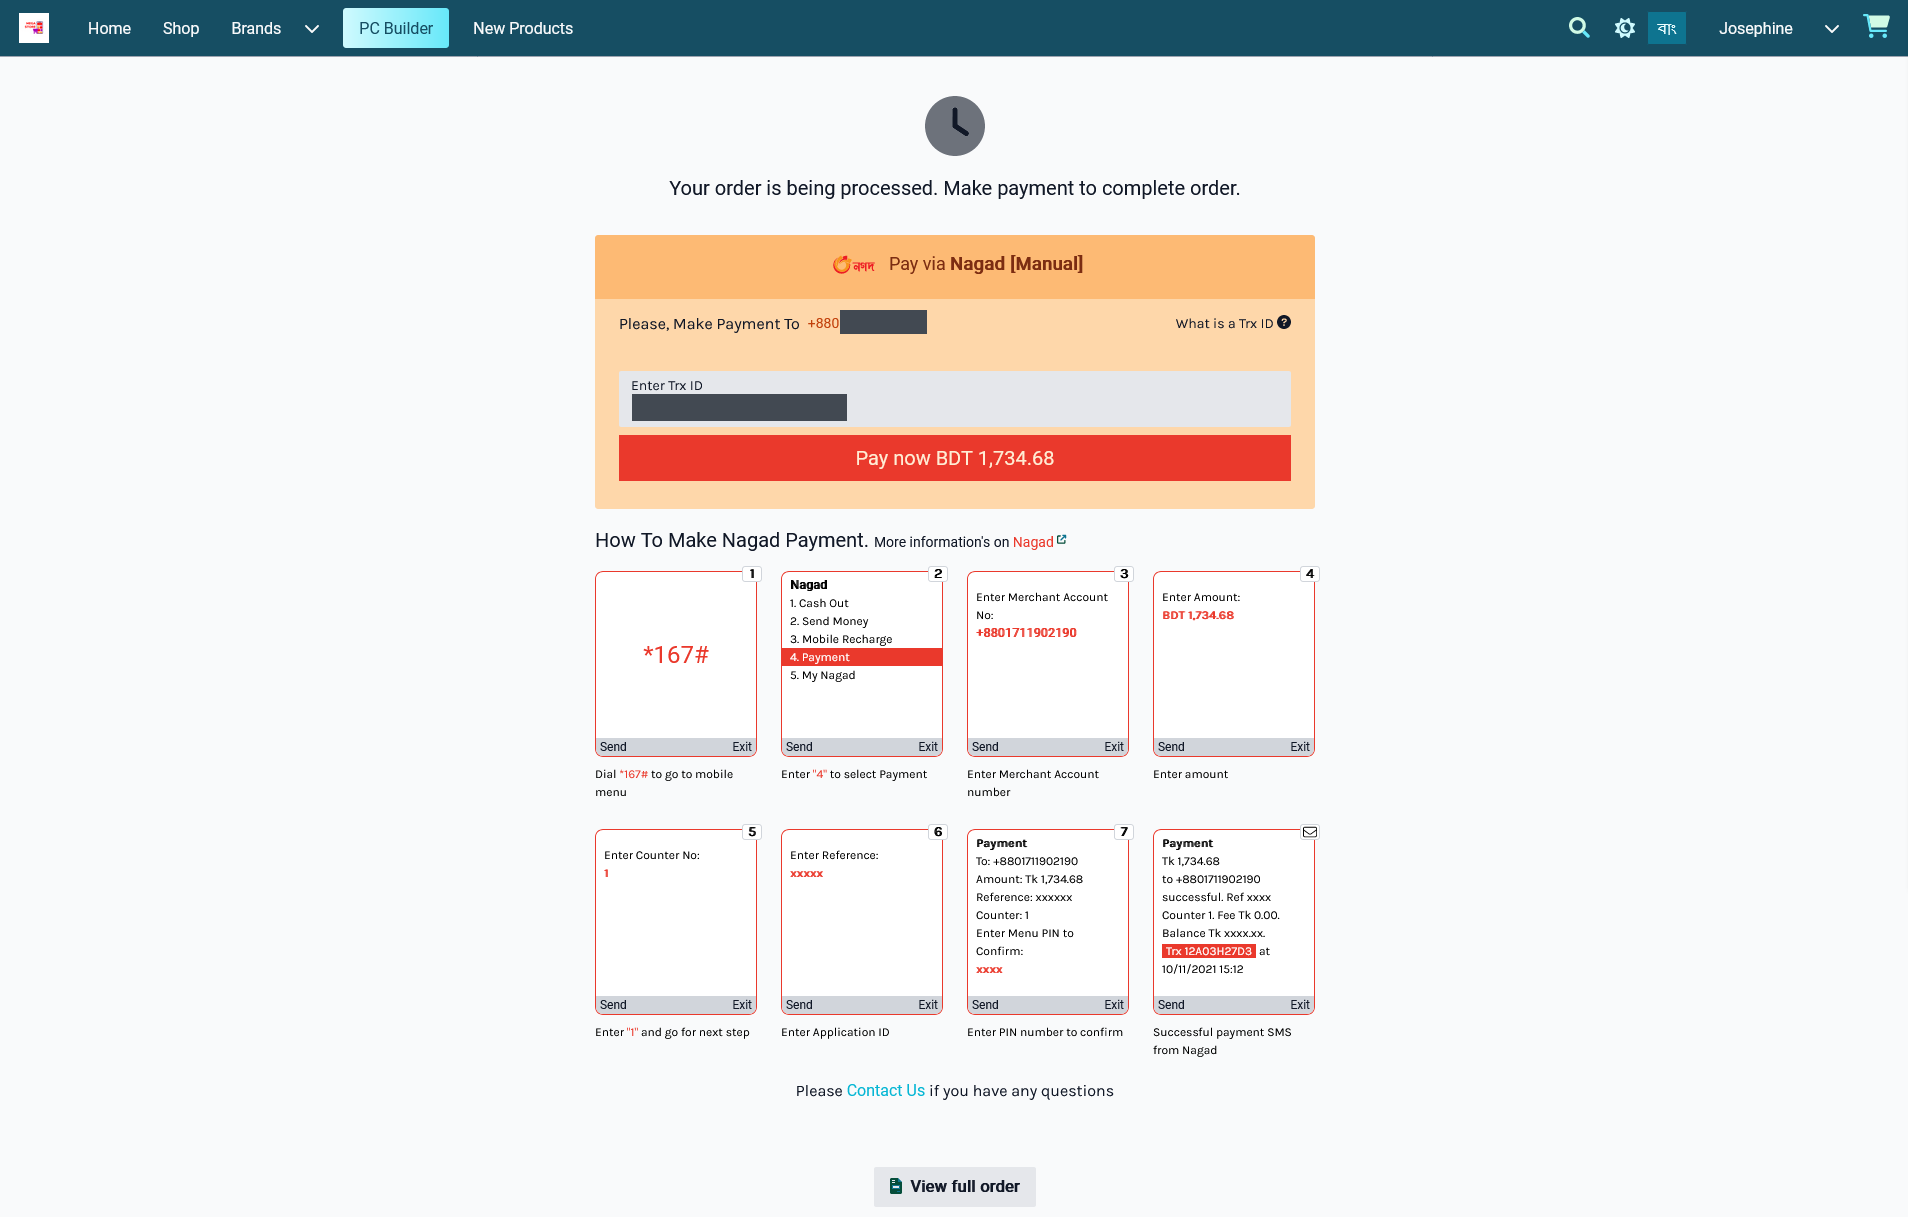
Image 3: Nagad payment without QR Code when placing Order and completing payment on The Website.
Cash On Delivery
To setup the payment gateway for Cash on Delivery, first set a Minimum and Maximum amount for Customer’s payment. Use Enable button to activate the gateway. Then, use the toggle button to enable Fee and set the Fee Value. There is a box to enable and set Display Instruction for Customer’s convenience to pay the cash during order delivery at their address. Click Save to confirm all changes and enable the gateway.
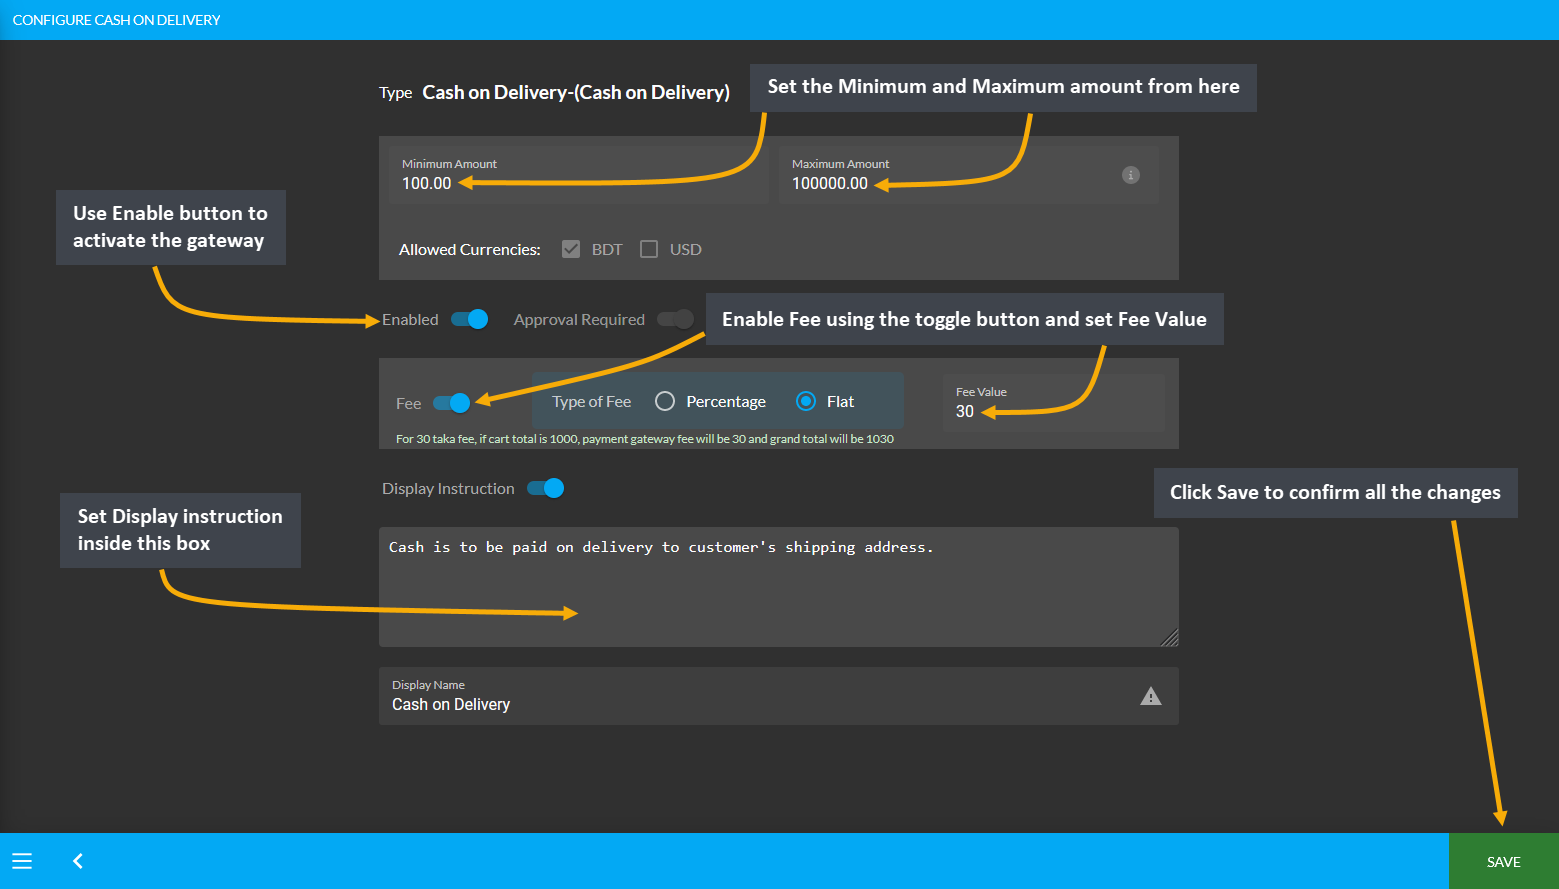
Image 1: Setup the Cash on Delivery with minimum and maximum amounts, fees, and display instructions.
On Credit (Due)
To setup the payment gateway for On Credit (Due), first set a Minimum and Maximum amount for Customer’s payment. Use Enable button to activate the gateway. Then, use the toggle button to enable Fee and set the Fee Value if any additional fee needs to be charged. Click Save to confirm all changes and enable the gateway.
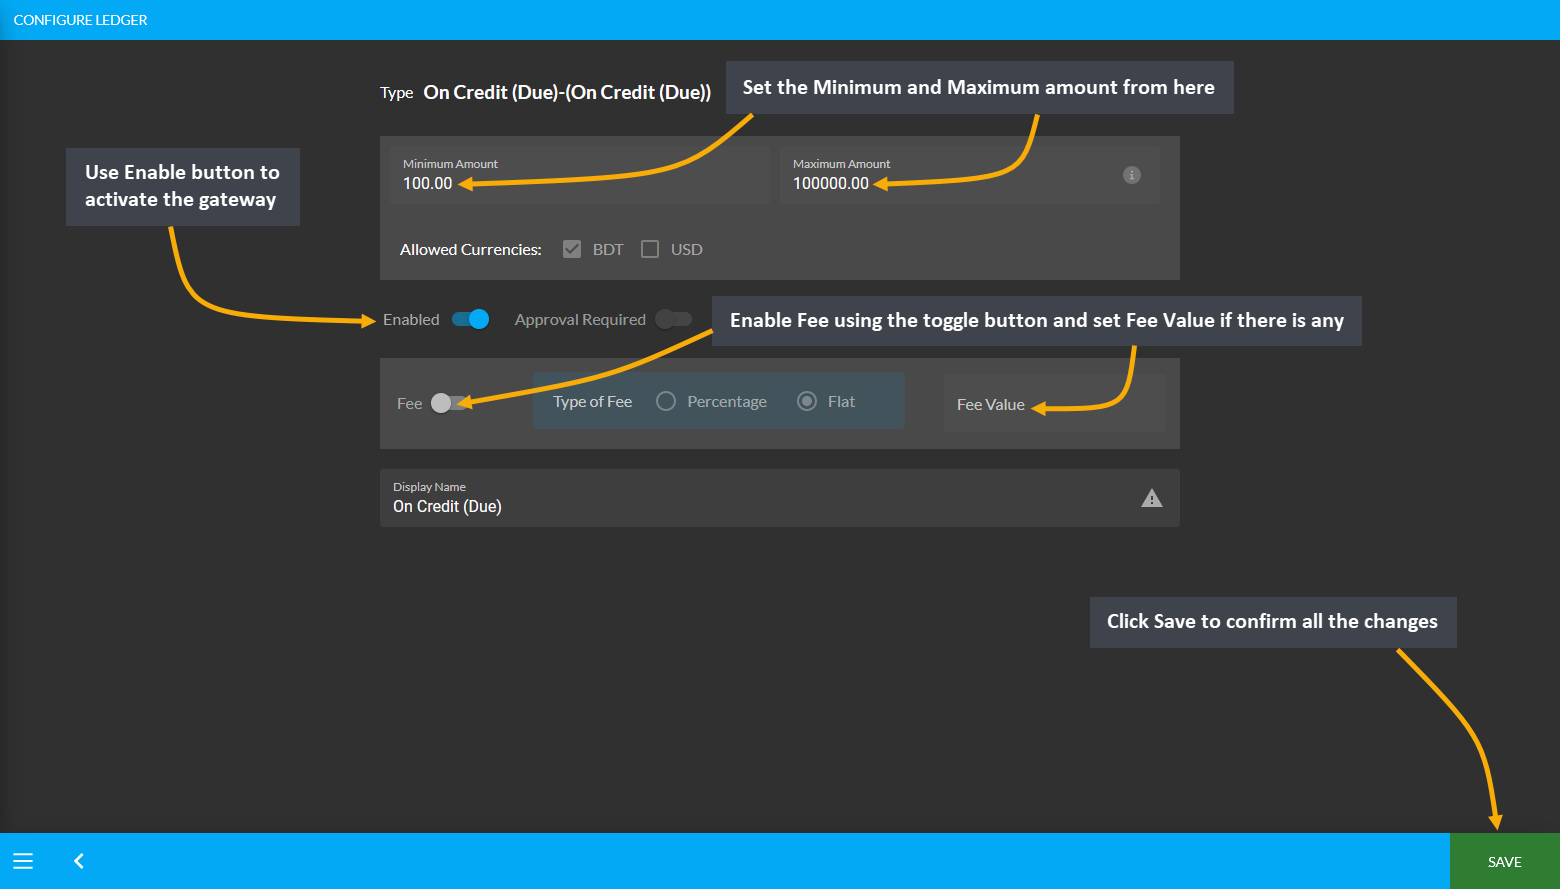
Image 1: Setup the On Credit (Due) with minimum and maximum amounts and fees if applicable.
Credit Card, Cash, or Cheque
To setup the payment gateway for Credit Card, Cash, or Cheque, first set a Minimum and Maximum amount for Customer’s payment. Use Enable button to activate the gateway. Set the Display Instruction for these gateways. Click Save to confirm all changes and enable the gateway.
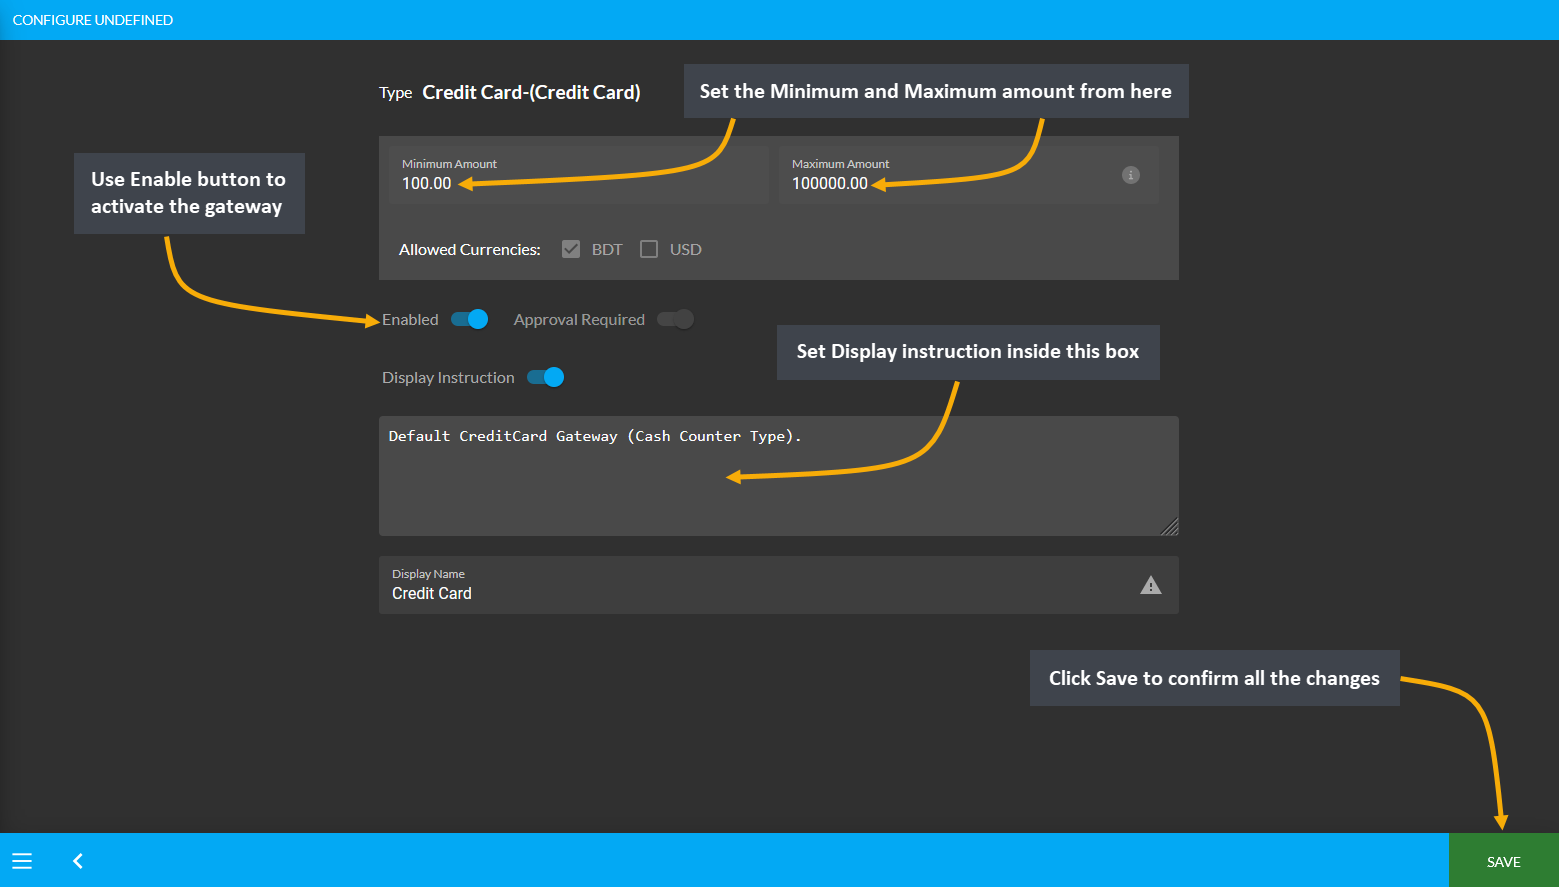
Image 1: Setup the Credit Card with minimum and maximum amounts and display instructions.

Image 2: Setup the Cash with minimum and maximum amounts and display instructions.
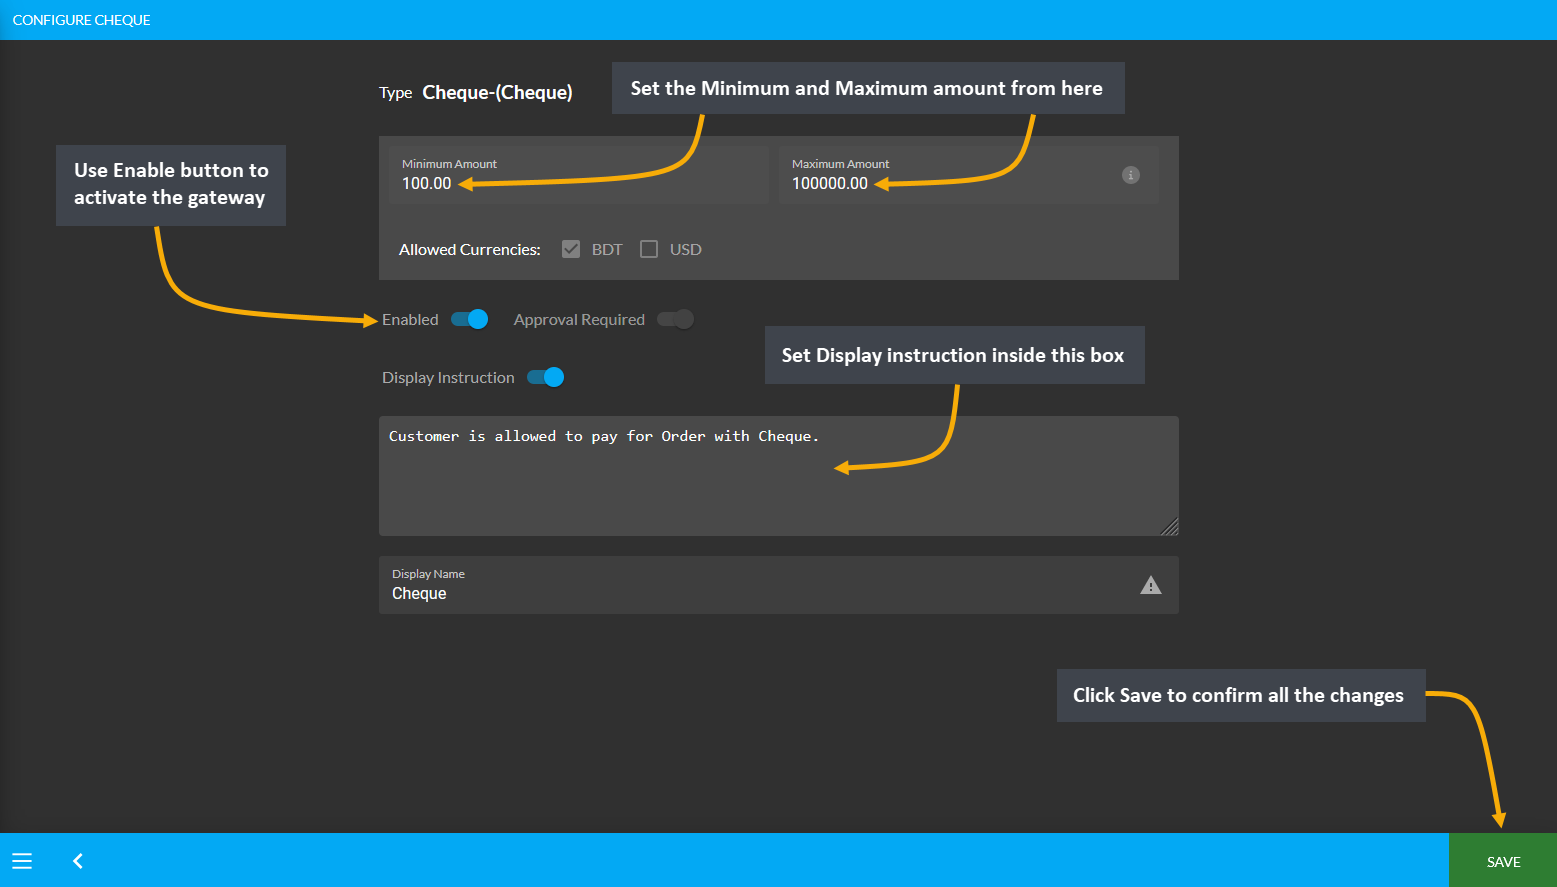
Image 3: Setup the Cheque with minimum and maximum amounts and display instructions.
BKash
To setup the payment gateway for BKash, first setup a Minimum and Maximum amount for Customer’s payment. Use Enable button to activate the gateway. Then, use the toggle button to enable Fee and set the Fee Value. In the section of Test API Keys, copy-paste the test API Keys from BKash to allow Customers to pay for their Products.
Providing these API keys will allow to verify them with BKash automatically. Finally, there is a box to set Display Instruction as shown in the example screenshot. Click the Save button after all the steps are completed.
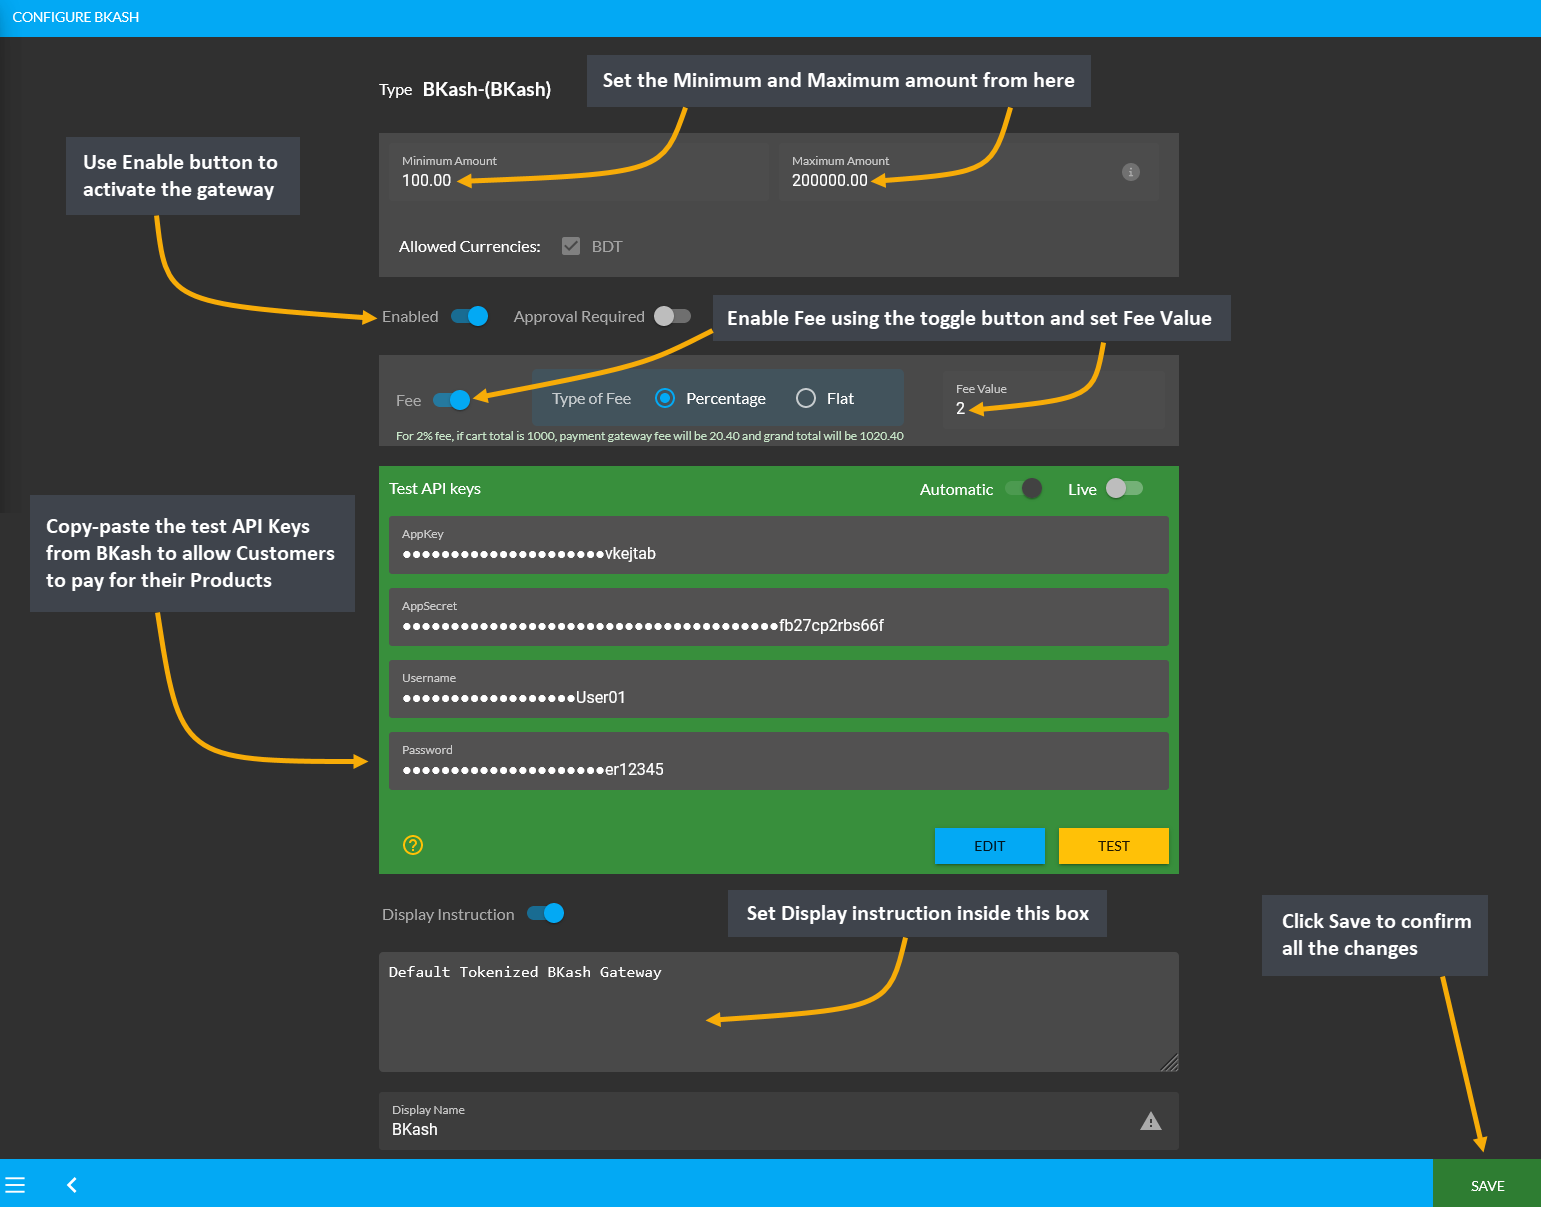
Image 1: Setup the BKash with minimum and maximum amounts, fees, Test API keys, and display instructions.
Nagad
To setup the payment gateway for Nagad, first setup a Minimum and Maximum amount for Customer’s payment. Use Enable button to activate the gateway. Then, use the toggle button to enable Fee and set the Fee Value. In the section of Test API Keys, copy-paste the test API Keys from Nagad to allow Customers to pay for their Products.
Providing these API keys will allow to verify them with Nagad automatically. Finally, there is a box to set Display Instruction as shown in the example screenshot. Click the Save button after all the steps are completed.
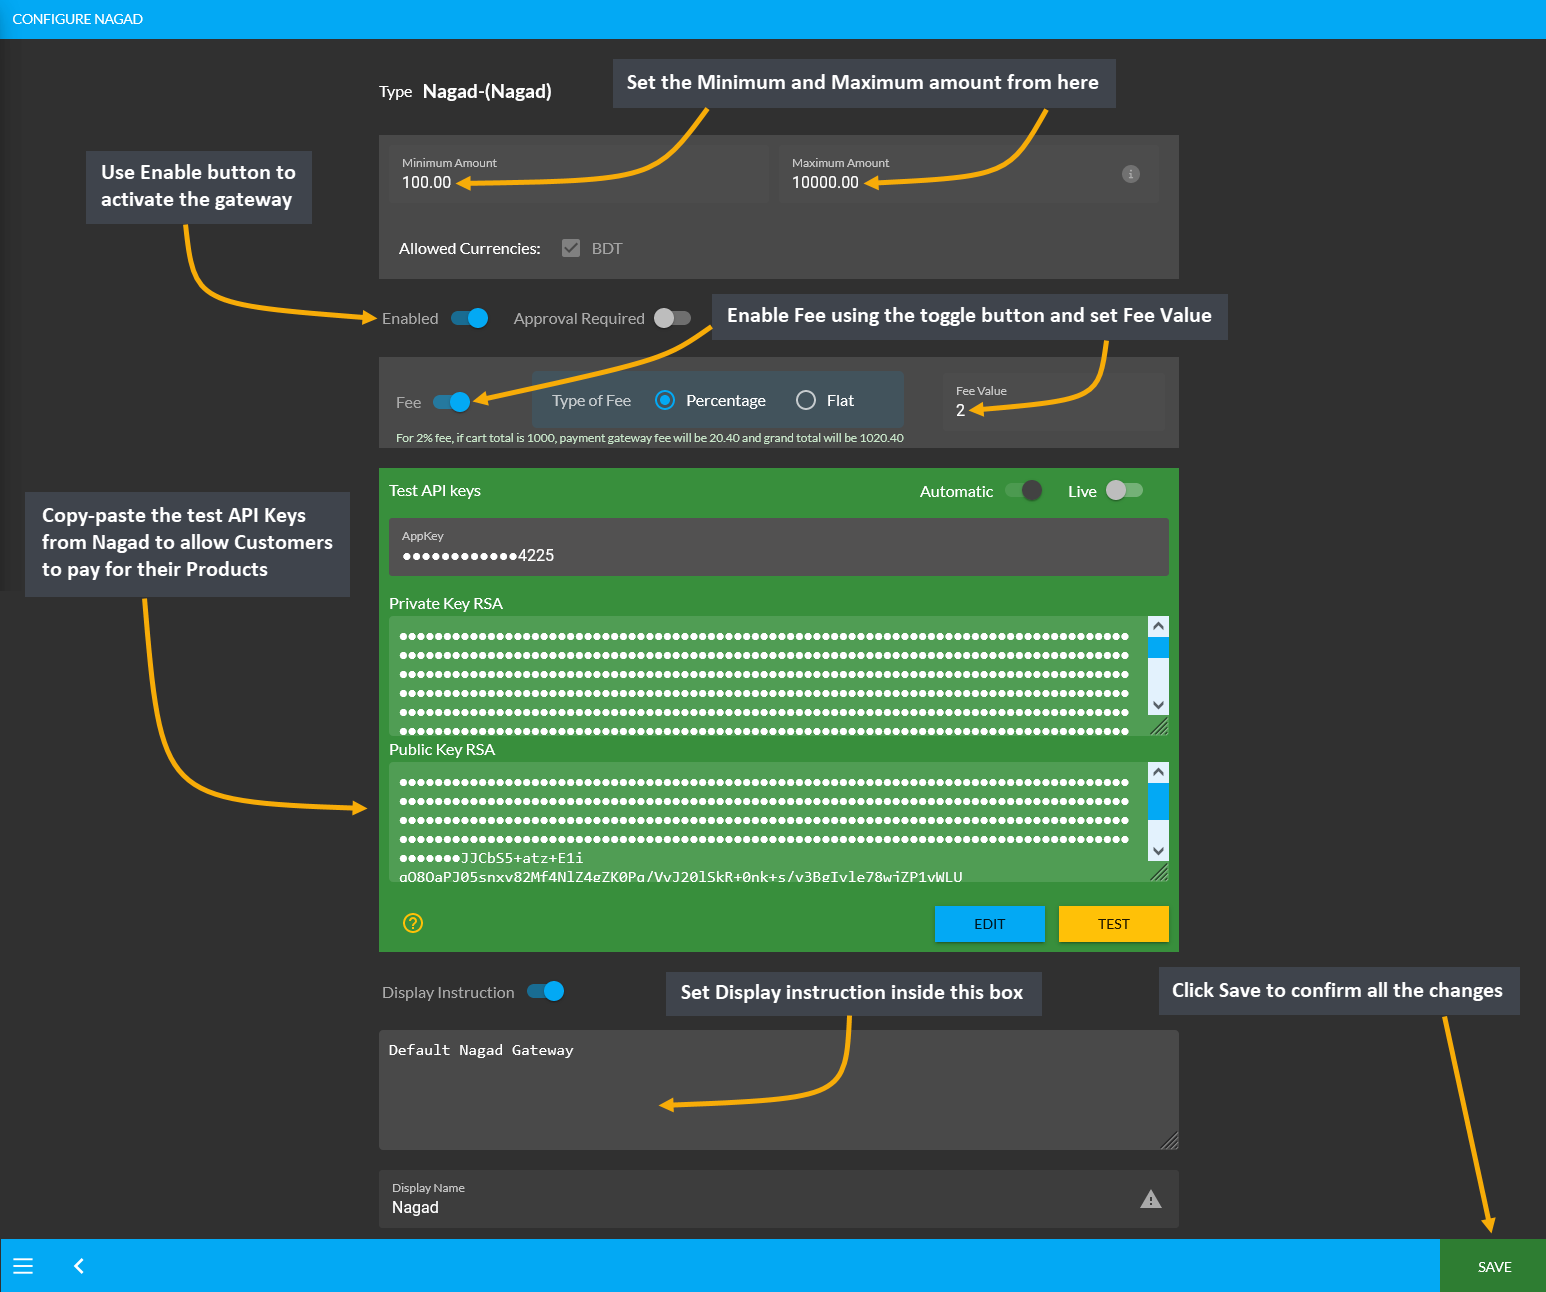
Image 1: Setup the Nagad with minimum and maximum amounts, fees, Test API keys, and display instructions.
PortWallet
Configure the payment gateway for PortWallet by setting a Minimum and Maximum amount for the Customer’s payment. Use Enable button to activate the gateway. Then, use the toggle button to enable Fee and set Fee Value. Within the Test API Keys section, copy-paste test API Keys from PortWallet to allow Customers to pay for their Products. Also, select the monthly EMI that will be applicable.
Providing these API keys will allow to verify them with PortWallet automatically. Finally, there is a box to set the Display Instruction as shown in the example screenshot. Click the Save button after all steps are done.
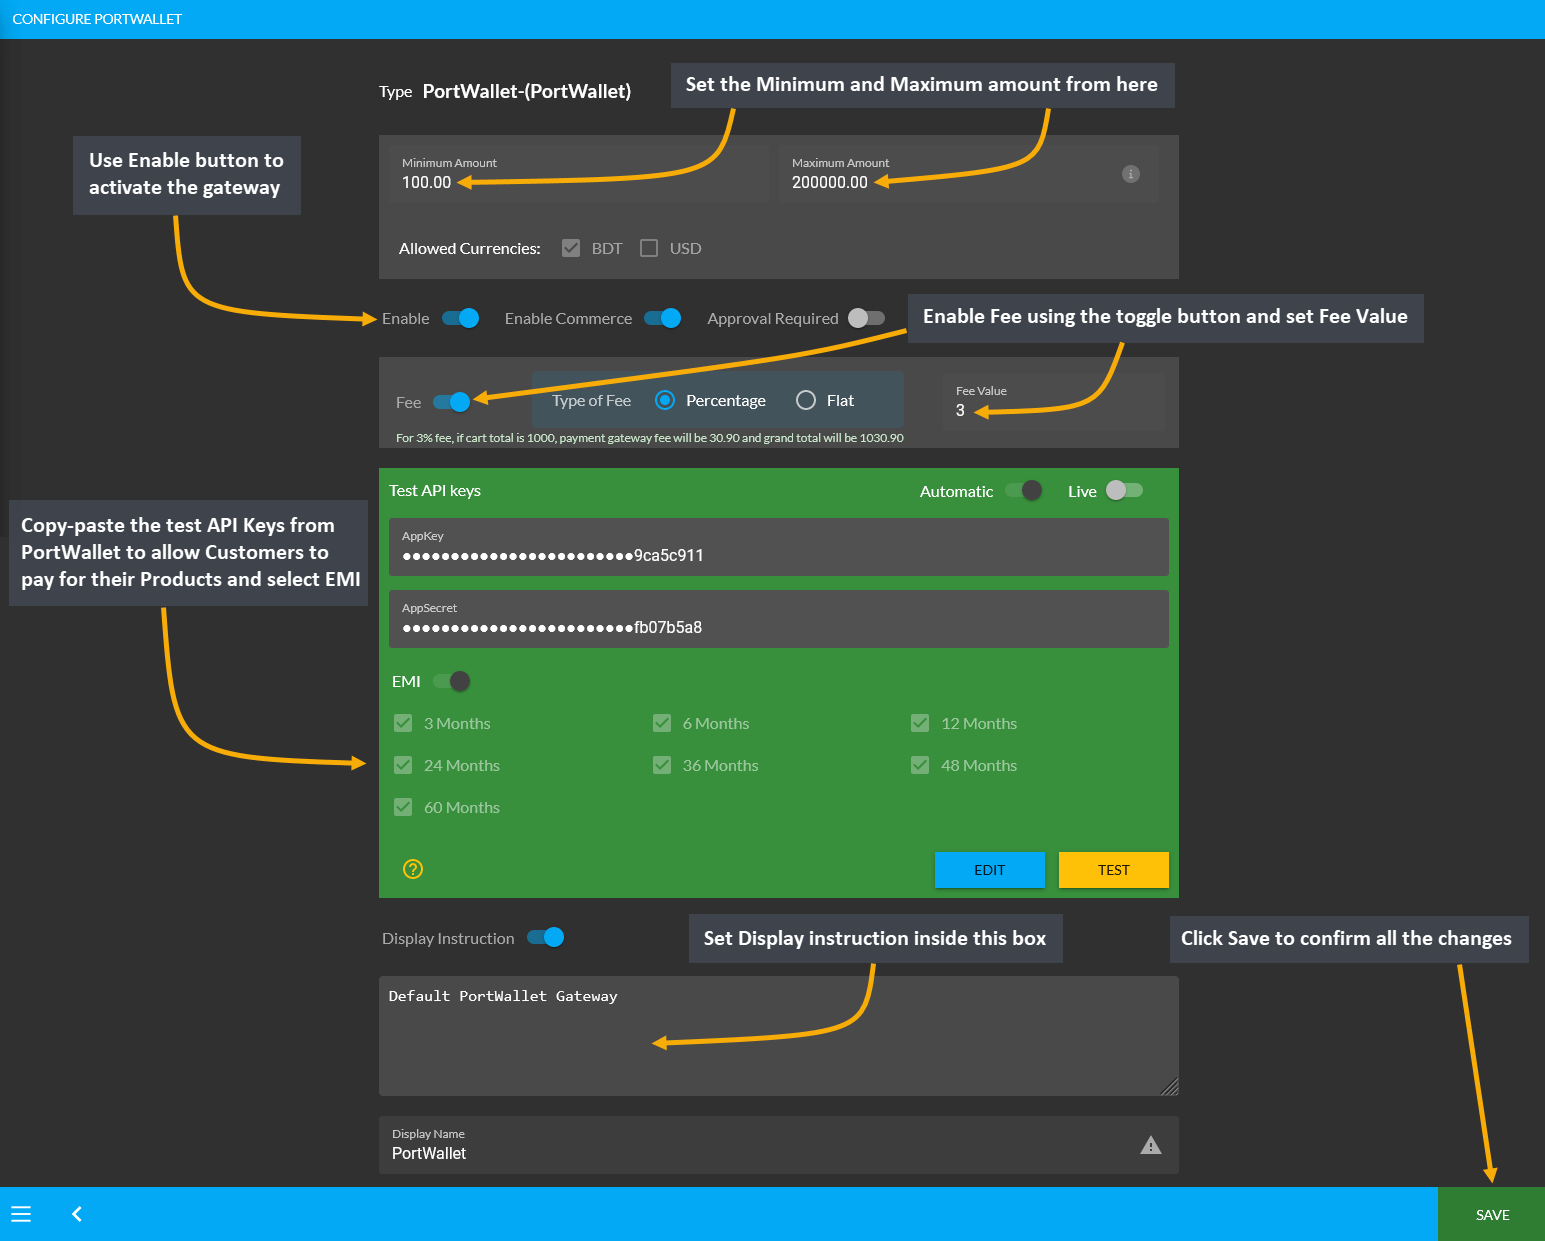
Image 1: Setup PortWallet with minimum and maximum amounts, fees, Test API keys, and display instructions.
SSLCommerz
Configure the payment gateway for SSLCommerz by setting up a Minimum and Maximum amount for Customer’s payment. Use Enable button to activate the gateway. Then, use the toggle button to enable Fee and set Fee Value. Within the Test API Keys section, copy-paste test API Keys from SSLCommerz to allow Customers to pay for their Products. Also, select the monthly EMI that will be applicable.
Providing these API keys will allow to verify them with SSLCommerz automatically. Finally, there is a box to set the Display Instruction as shown in the example screenshot. Click the Save button after all steps are done.
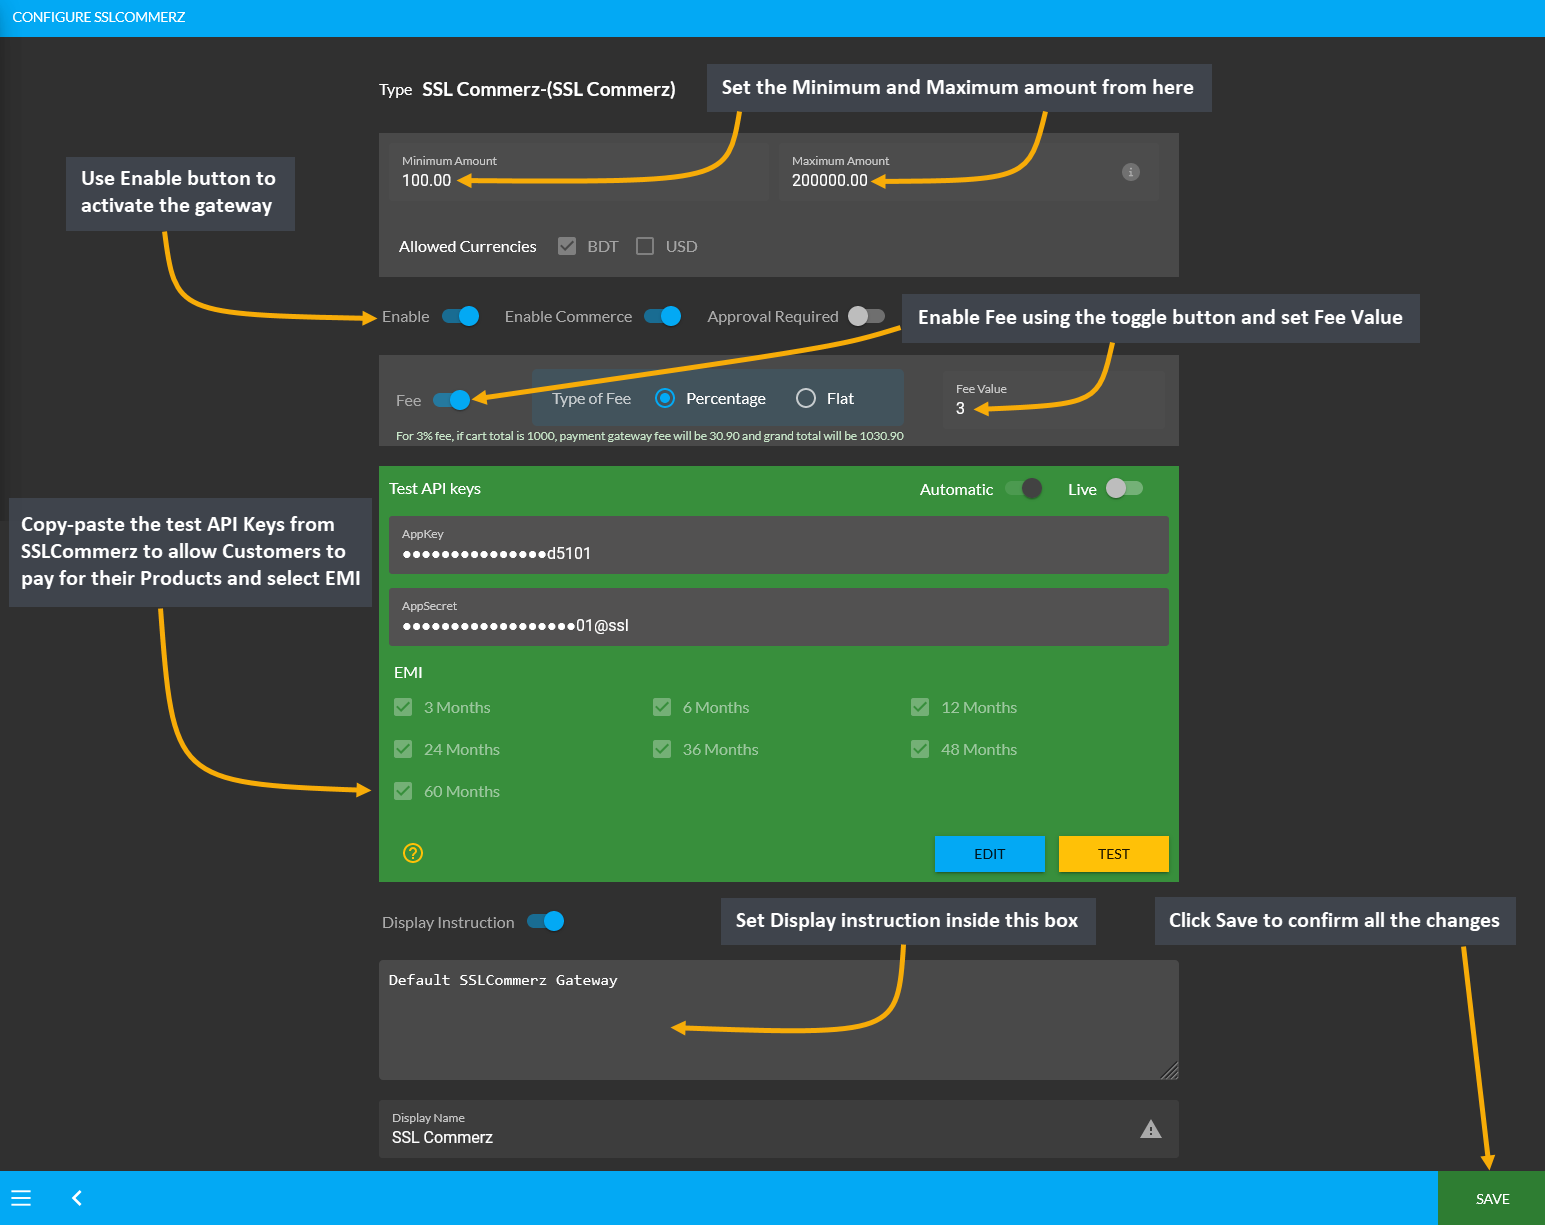
Image 1: Setup SSLCommerz with minimum and maximum amounts, fees, Test API keys, and display instructions.