Custom Pages
Create Custom Pages
Shop Owners can make their own Custom Pages to sell or advertise Products to Customers. Several Custom Pages can be created for different purposes such as welcoming Visitors to the Shop, highlighting promotional offers, or showcasing new Products. Custom Pages can be created as additional Pages on The Website to show promotional offers, limited edition Product pages, or advertisements of new Shop branches etc. A Custom Page include Titles, Subtitles, Texts, Call to Action buttons, images, banners, Products, and hyperlinks within the added Widgets.
Within the Page List, Custom Pages can be accessed from the tab beside Default Pages. The newly created Custom Pages will be under this tab and there is a toggle button to enable or disable the pages. Use View or Edit button to see the Pages updated on the Website or modify them. Add several Widgets on Custom Pages to decorate them.
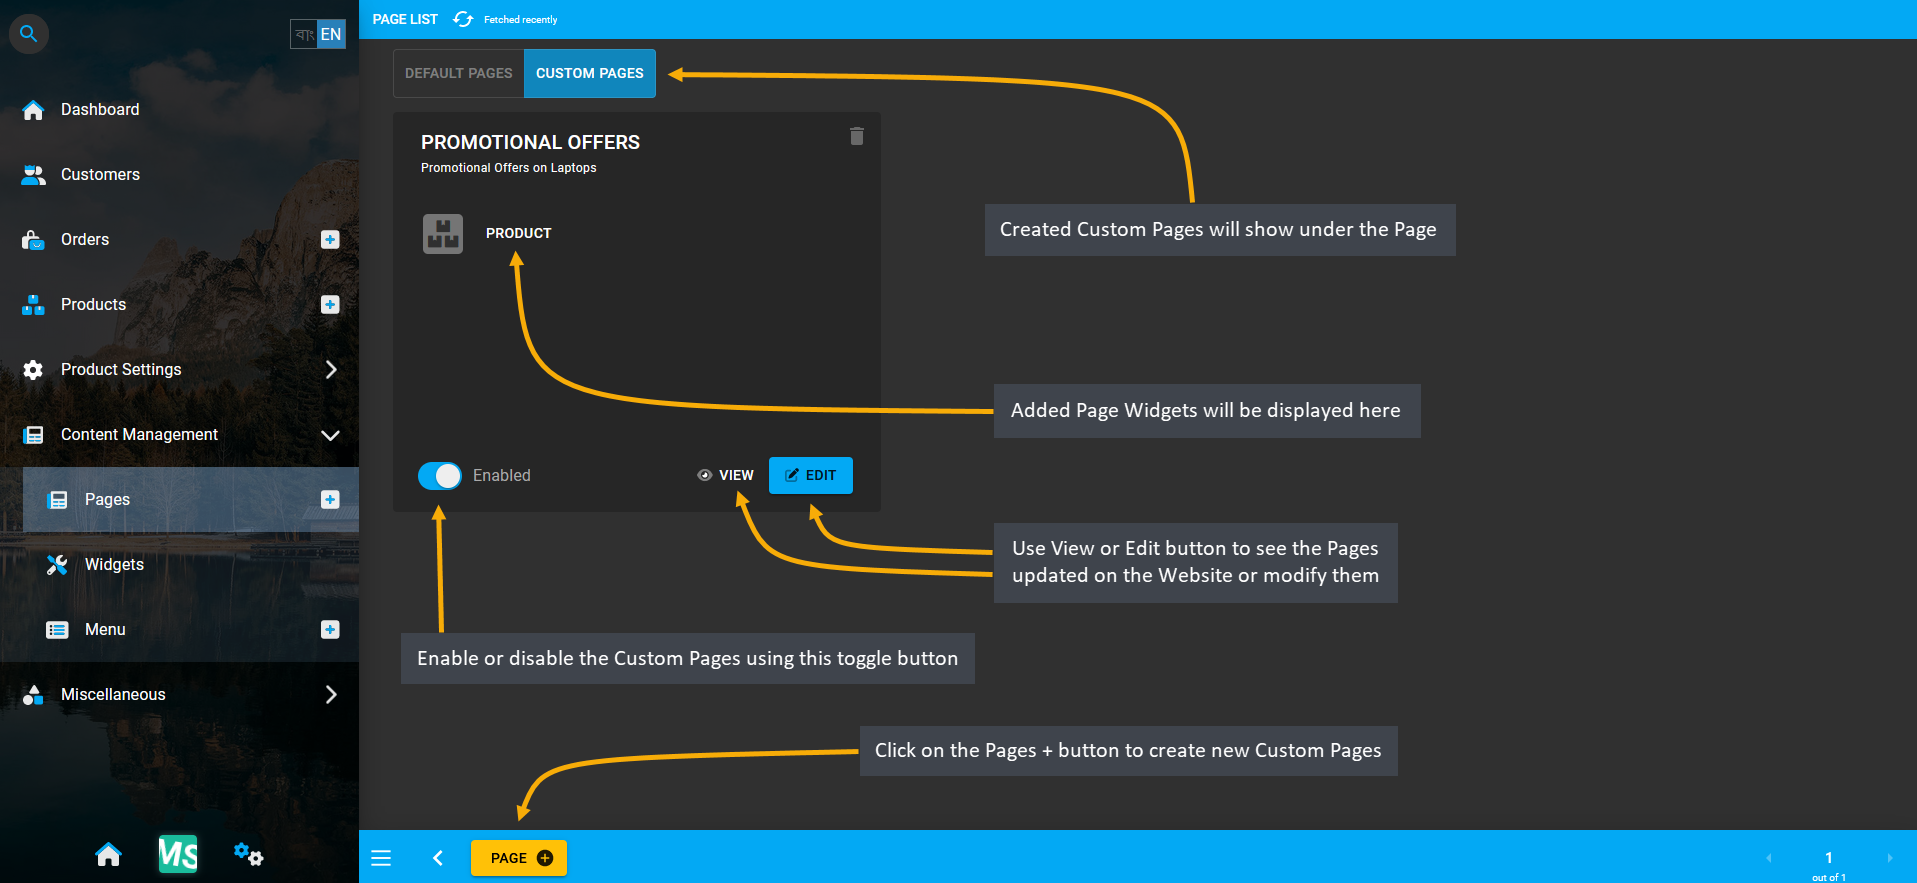
Image 1: Shop Owners can make their own Custom Pages on Website to sell or advertise Products to Customers.
Steps to Create Custom Pages
To create new Custom Pages, click on the New Page or Page button from the Page List. This will redirect to Create Page, where the Custom Page can be built with the following configurations. First, set a Page Name and Slug that will clearly show the function of the Custom Page. Then, create a Title and Subtitle that will give the Customers an idea about what to look for in the Custom Page. To display or hide the Title and Subtitle, there is a toggle button which can be enabled or disabled to display or hide the Title or Subtitle on the Custom Page.
To highlight the promotional offers on laptops, for instance, add a Product Widget and create Widget name, title, and subtitle. Enable and use the Call to Action button within the Widget to redirect Customers to Shop’s Laptop page. Select a Category within the Product Widget and select the max quantities of Products to display within it.
Several Widgets can be added to customize the Page like this. Existing Widgets will show from the top to bottom and below it, there will be an Add New Widget button using which New Widgets can be added to the Custom Page. At the bottom of the page, there is an Advanced Options to set Refresh Frequency for automatic page refreshing.
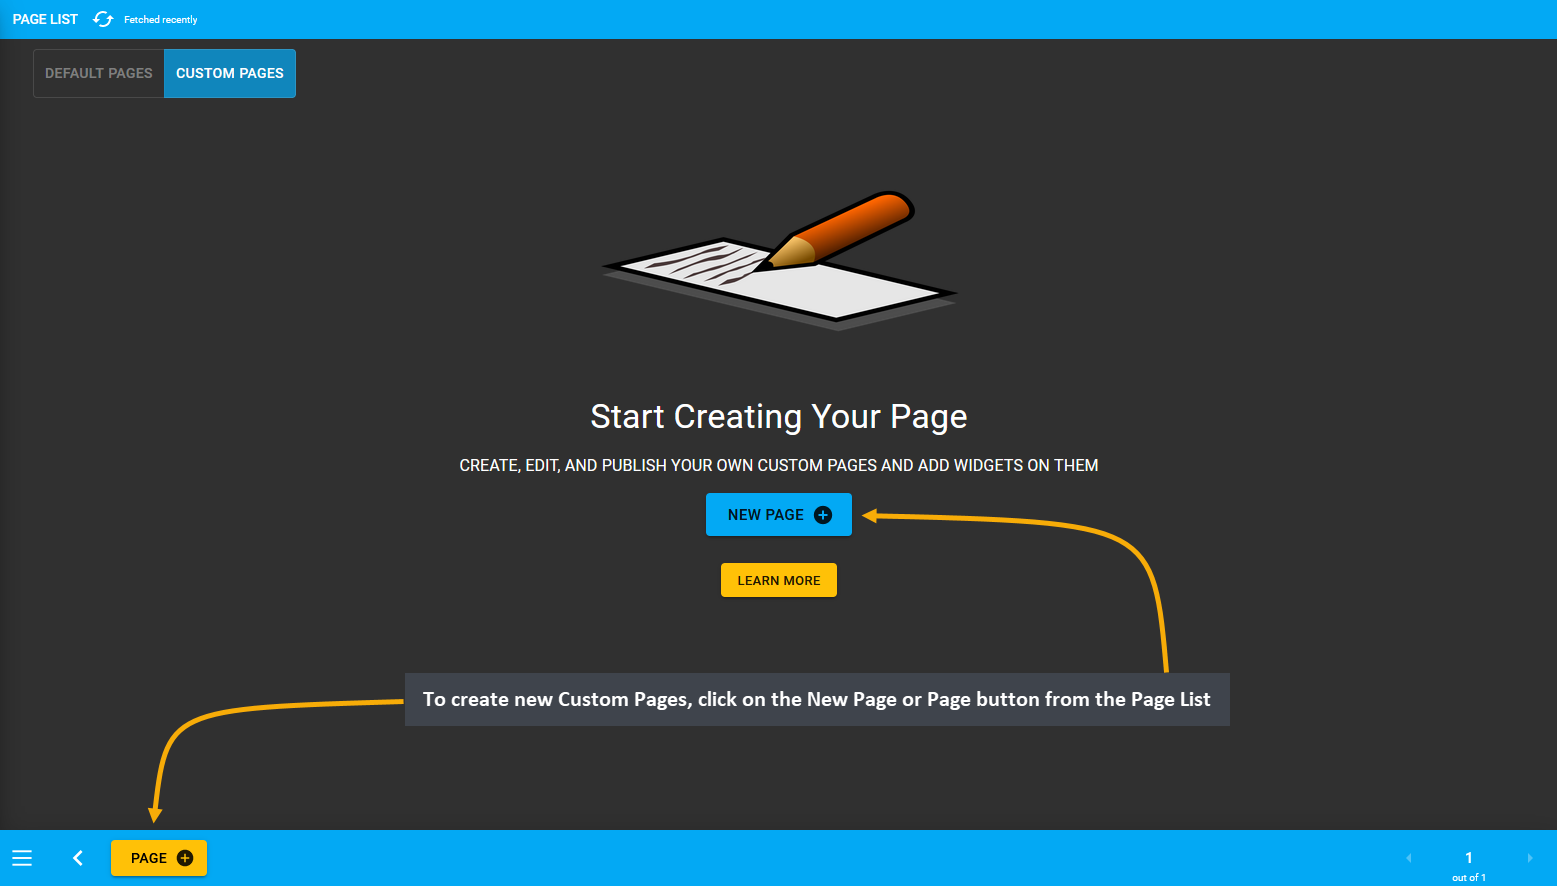
Image 2: Create New Custom Pages by clicking the New Page or Page button that will redirect to Create Page.
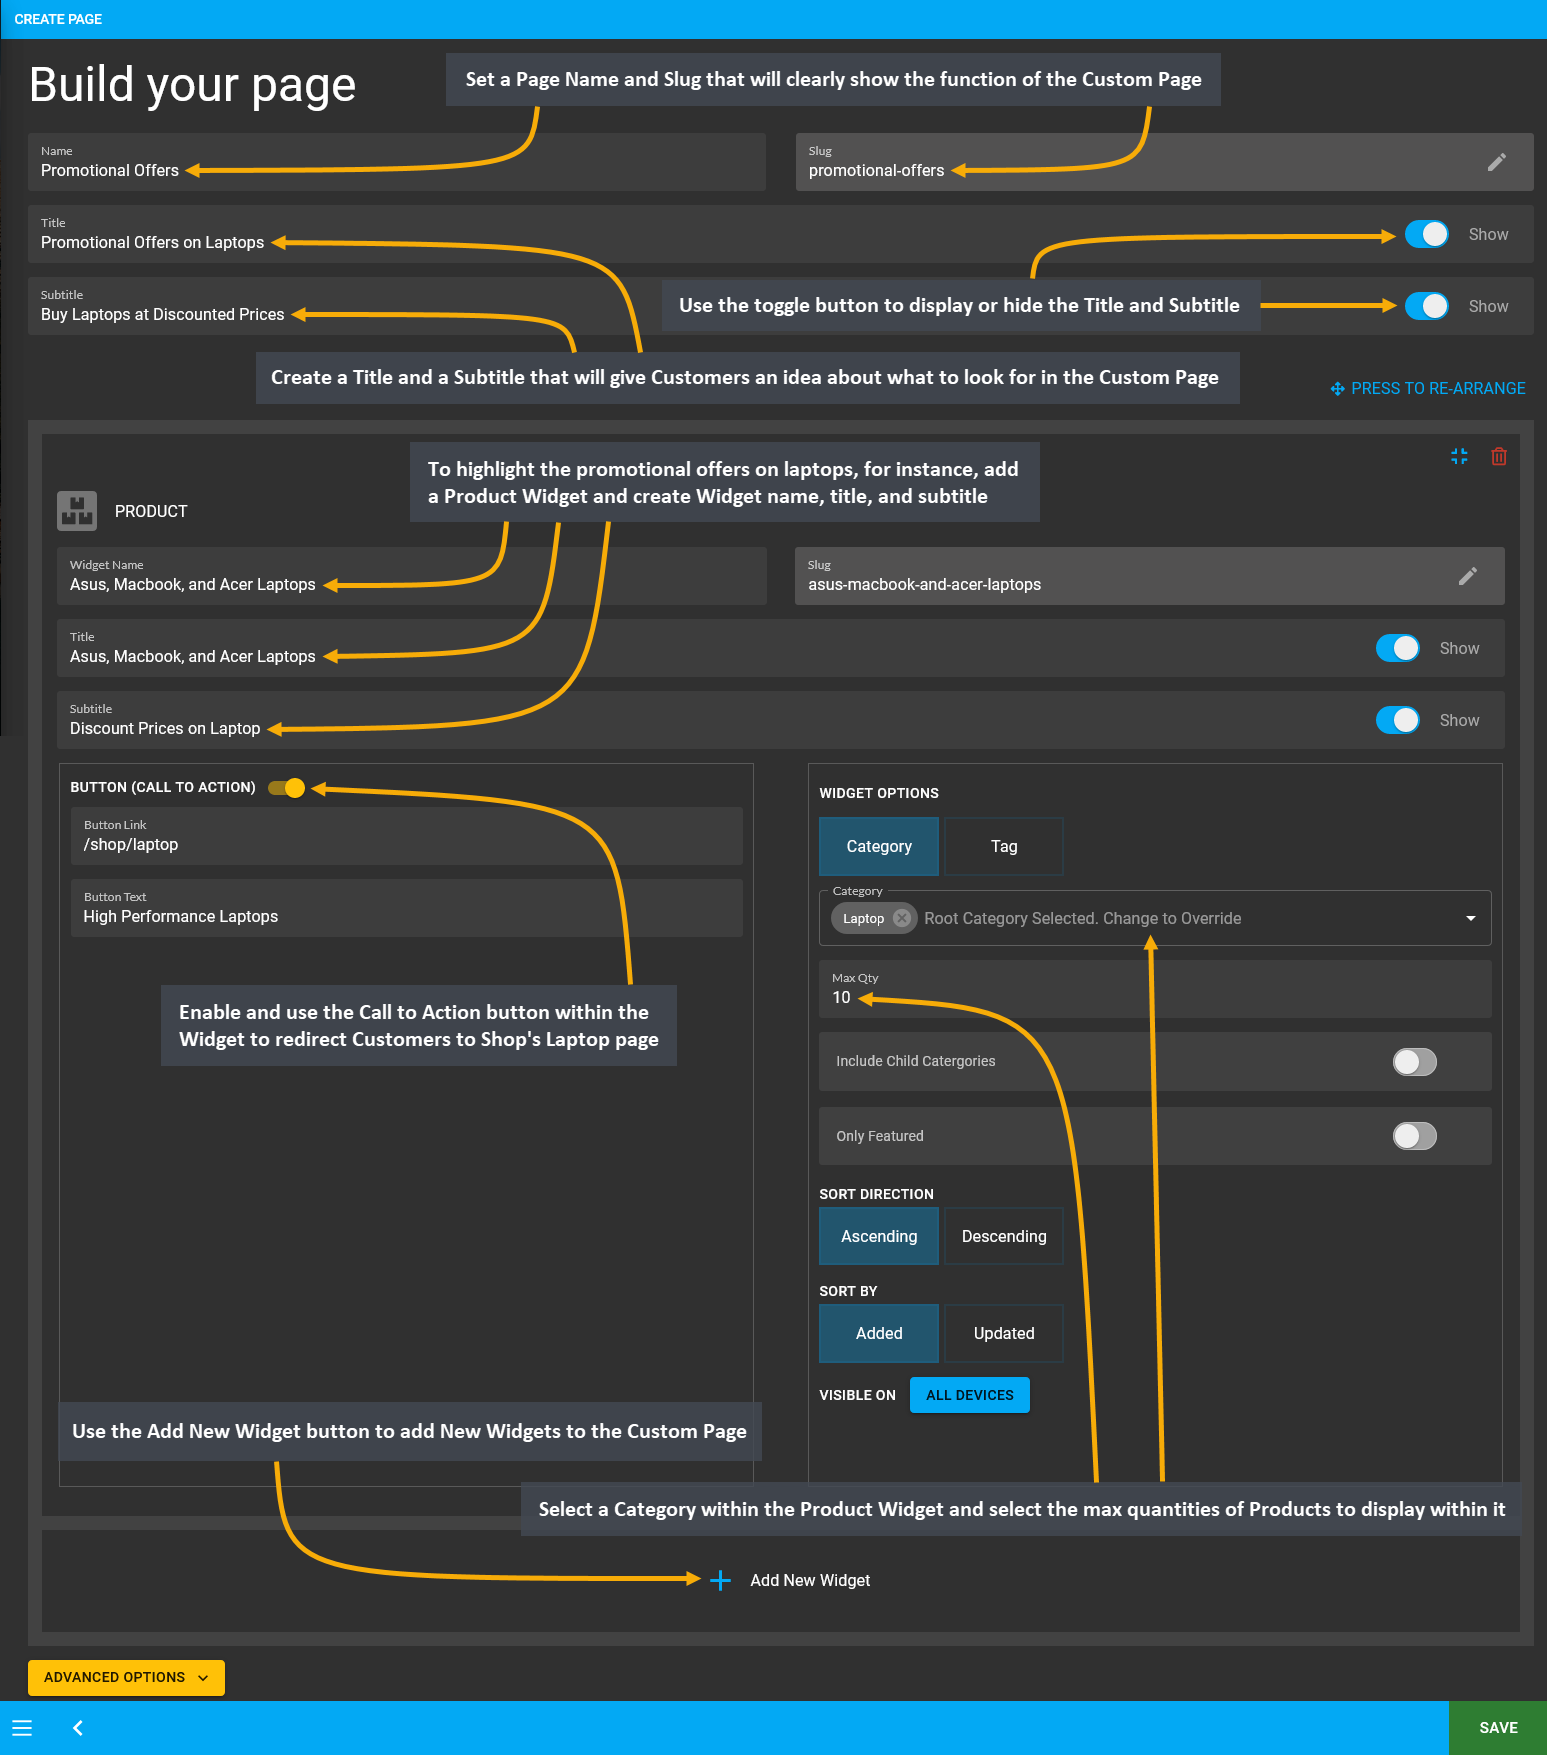
Image 3: Setup Custom Page with Title, Subtitle, and Widgets that will highlight what the Page is about.
When all the customization is done for the Custom Page, click Save to proceed with the changes. After saving the changes, a pop-up message will show with a View button to check the new Custom Page created, click on it. This will redirect to the Custom Page that was created with necessary Widgets. To make the Custom Page accessible on the Website, add the Custom Page under the Menu within the Website Header using the Menu module.
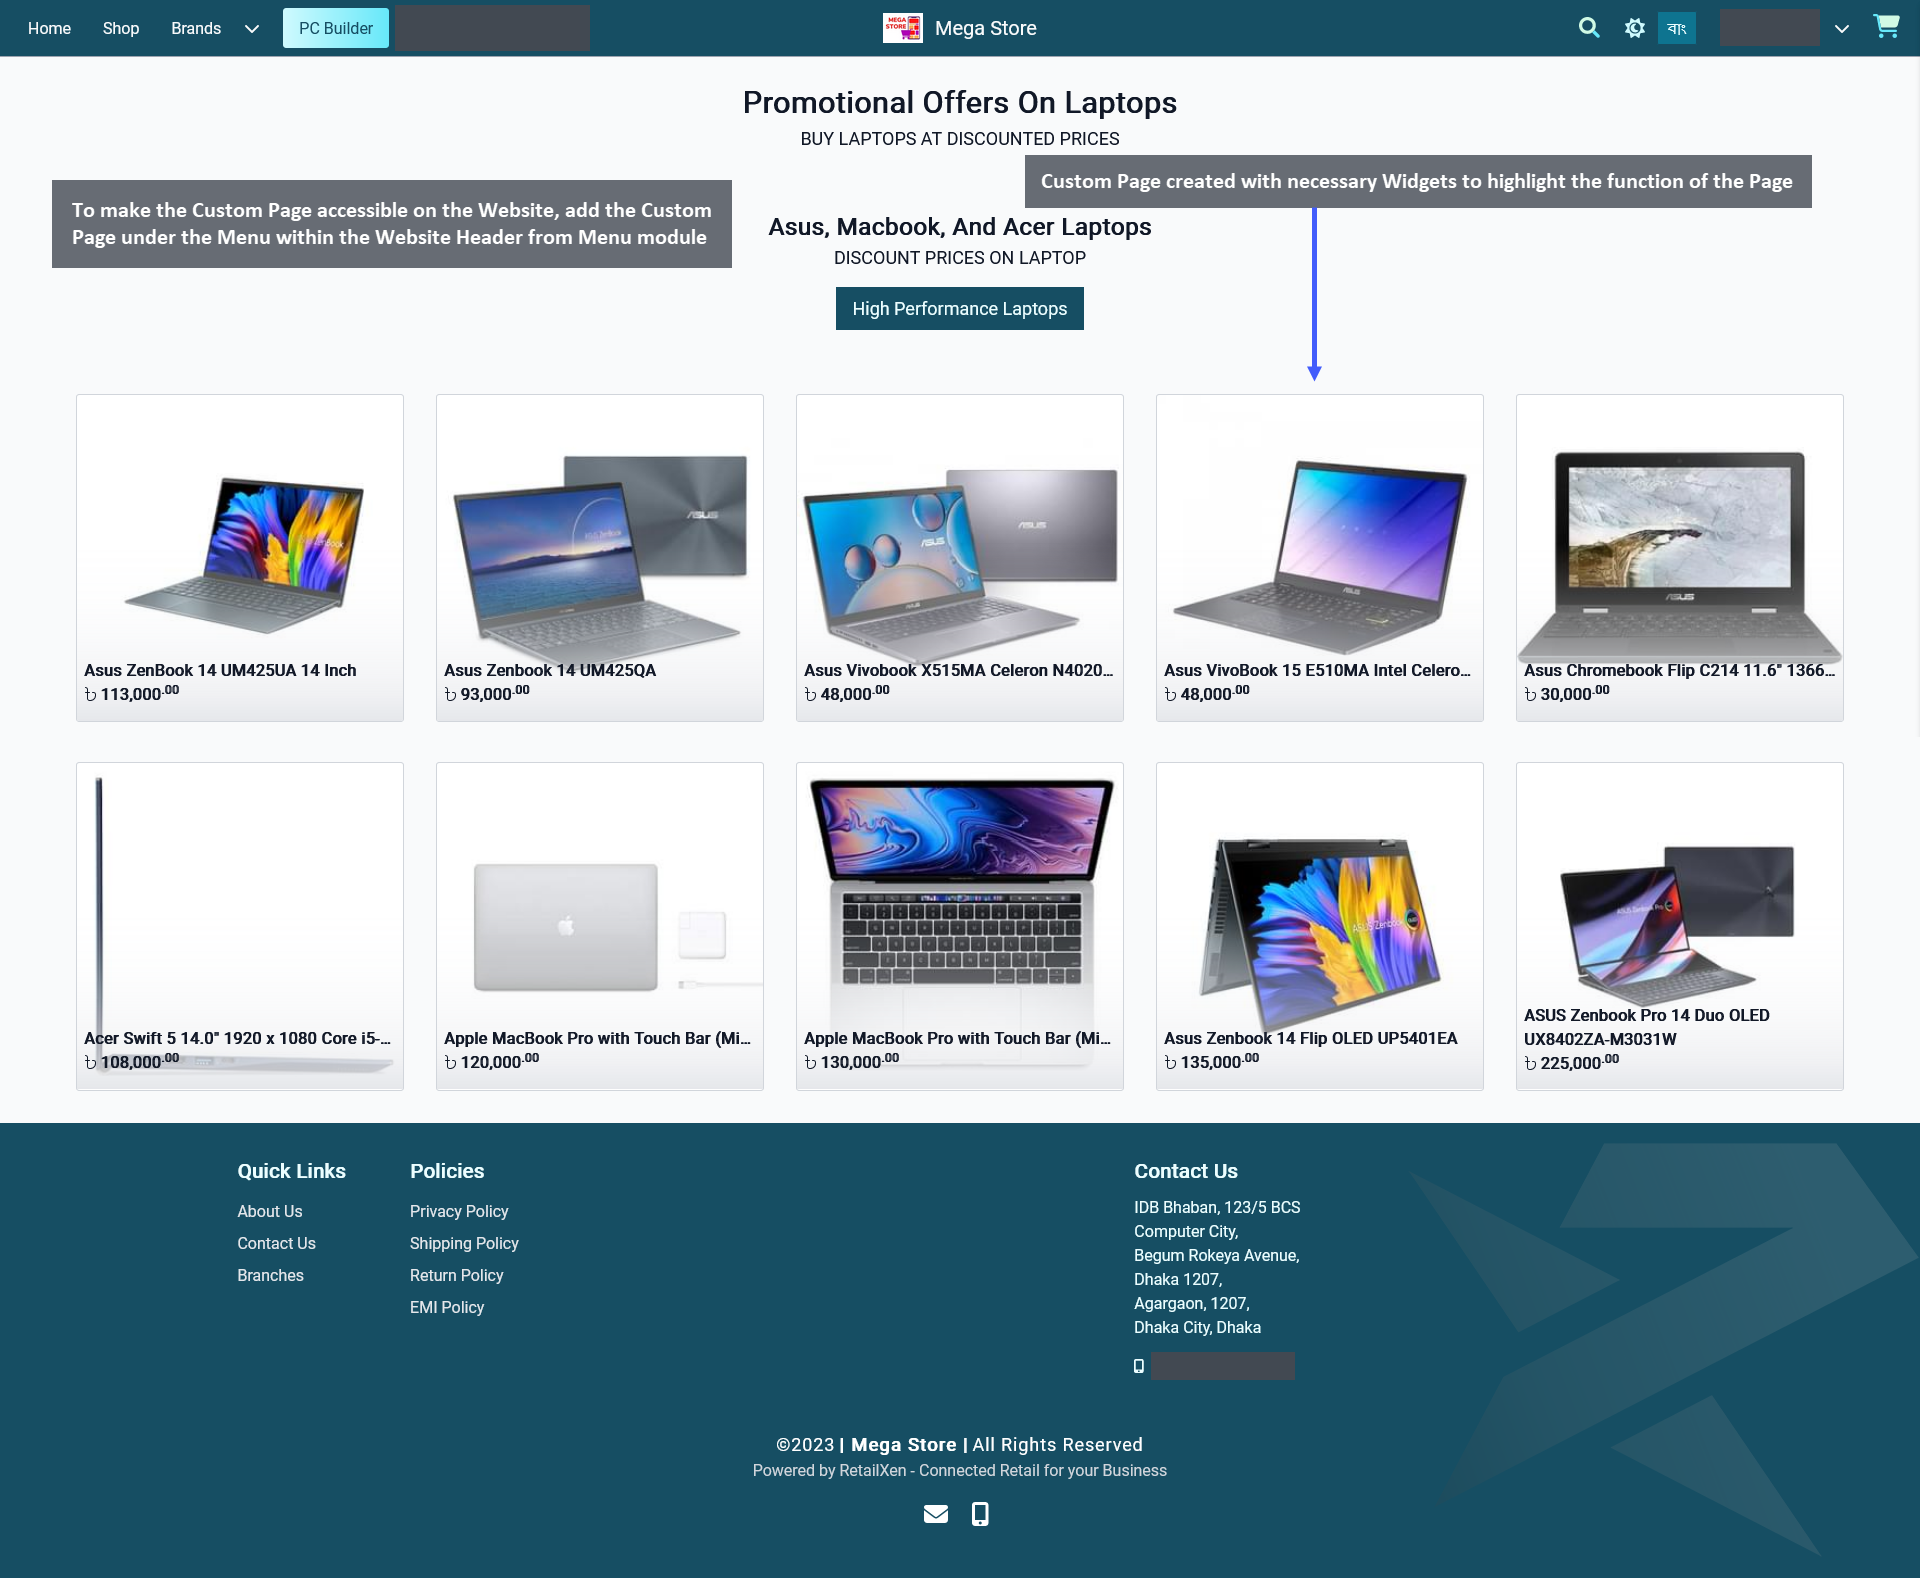
Image 4: To make Custom Page accessible on the Website, add the Page under the Menu within Website Header.
Create Custom Page Menu on Website Header
Create a Custom Page Menu on the Website Header for the page to be accessible on the Website. To perform this action, go to the Menu module from Content Management. Here, click the Edit icon on Default Header (Commerce). Using this option, Shop Owners can create Menu within Default Header and display the Custom Page created.
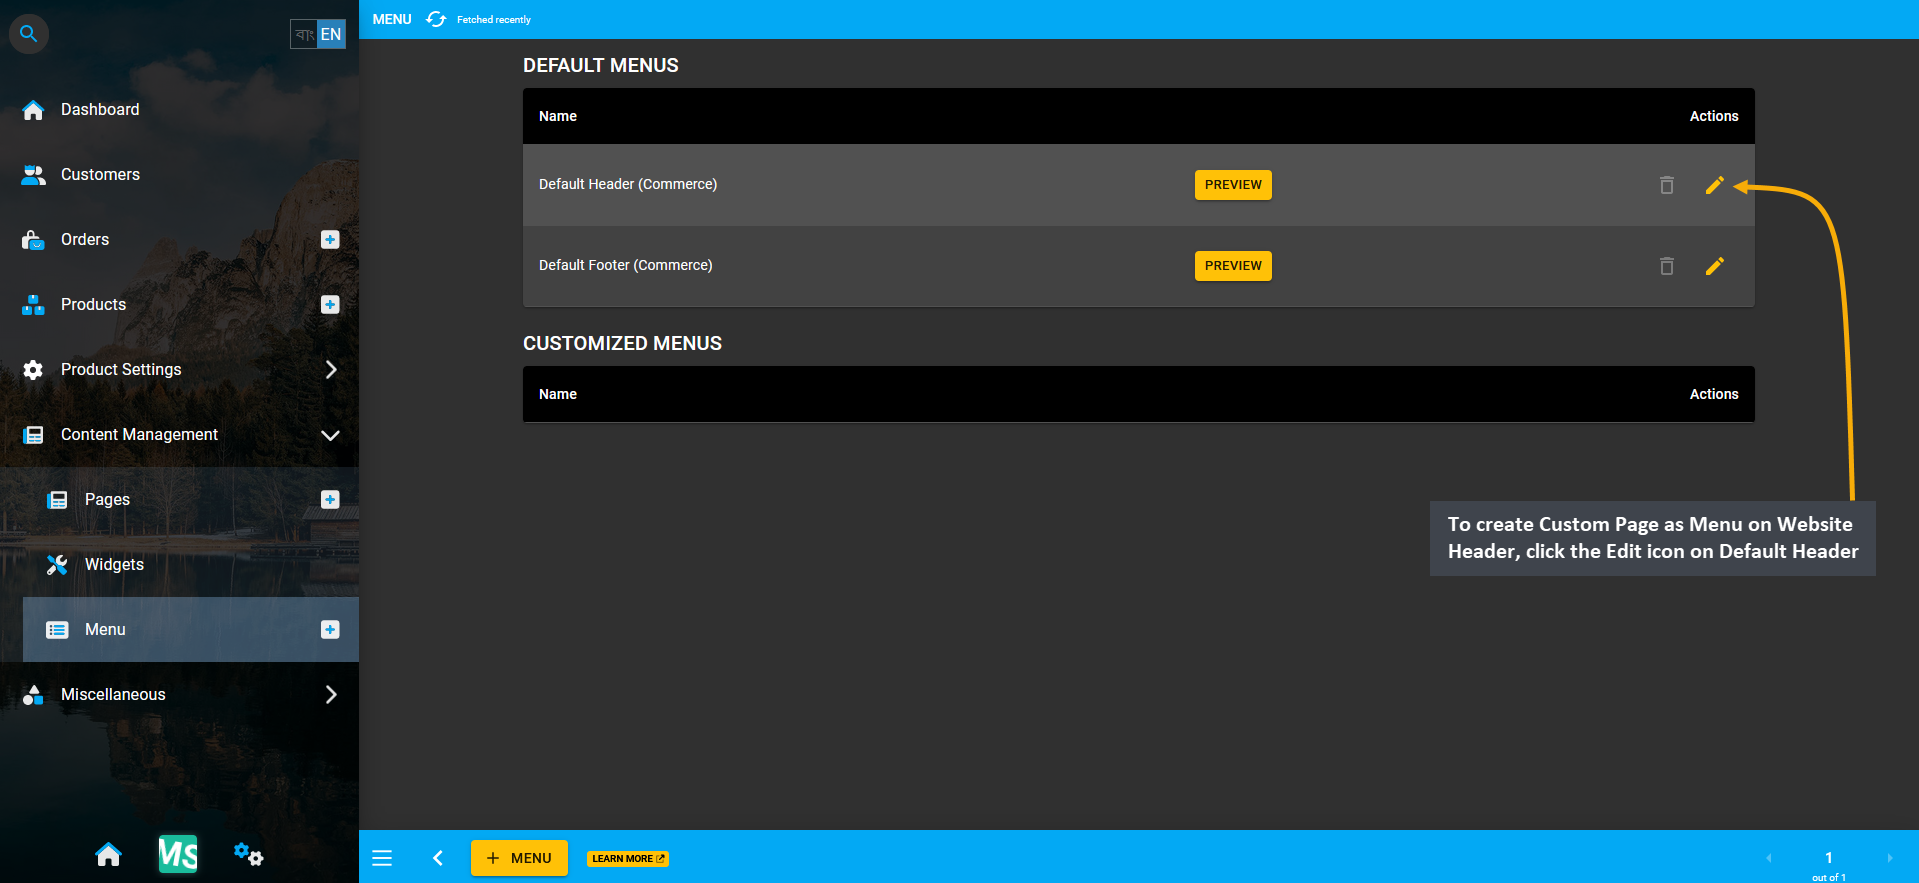
Image 5: To create Custom Page as Menu on Website Header, click the Edit icon on Default Header (Commerce).
Click ADD Button to Create New Menu
From the Default Header (Commerce) menu, click the ADD button from Link (Custom) to create new menu for the Custom Page. Clicking ADD button will allow Shop Owner to create a Menu for Custom Page on Website Header.
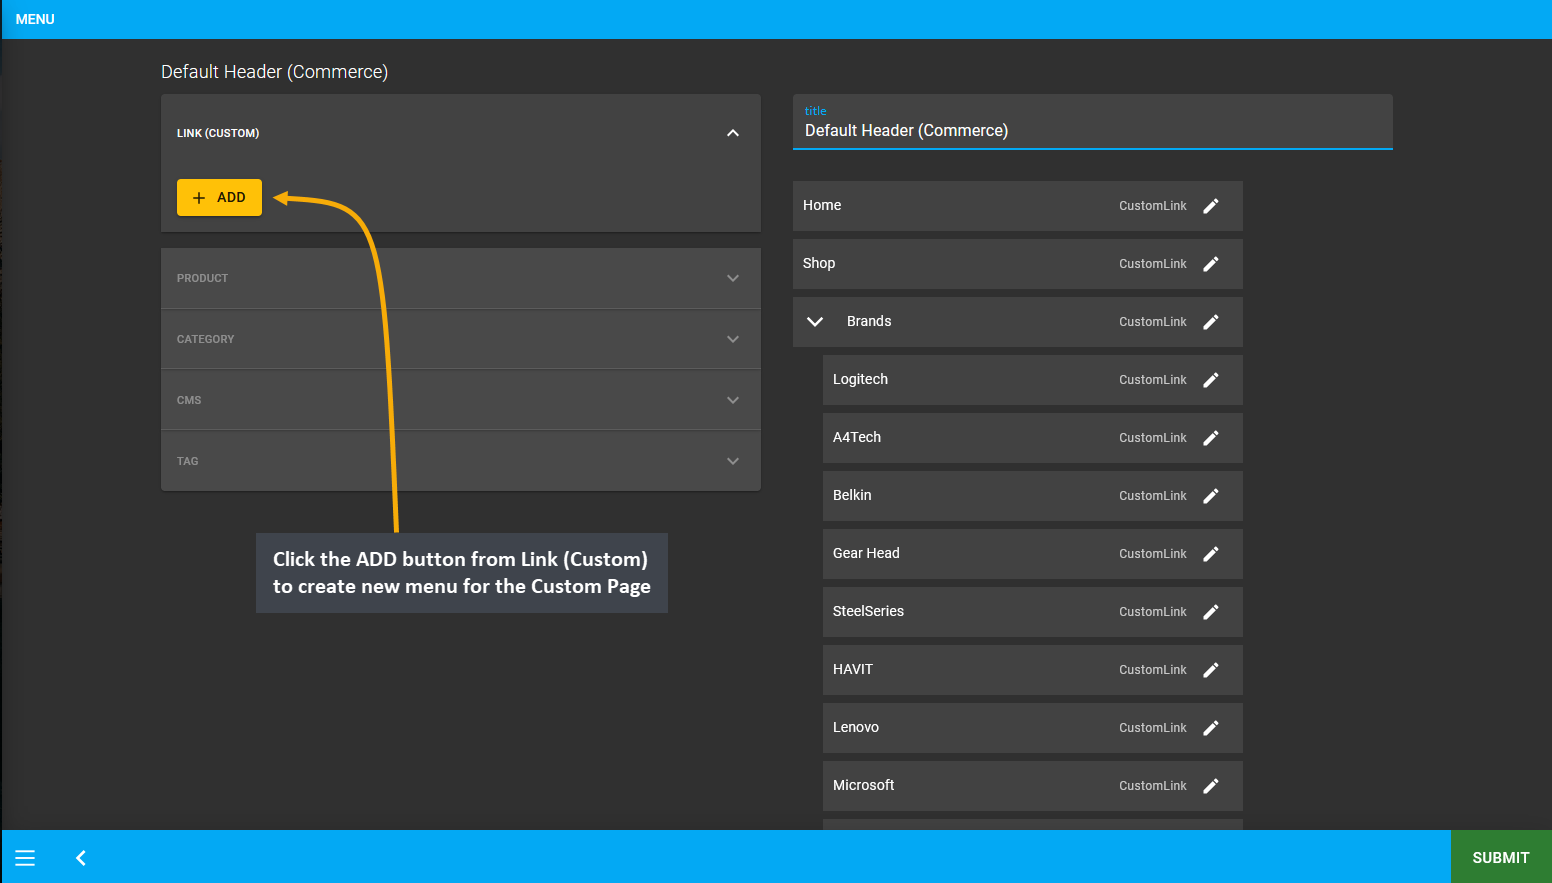
Image 6: Click the ADD button from Link (Custom) to create new menu for the Custom Page for Website Header.
When the New Menu is created, it will appear under the List of menus within the Default Header (Commerce). Now, to change Menu Name to the Custom Page Name and add the Custom Page Link on the menu, click the Edit icon.
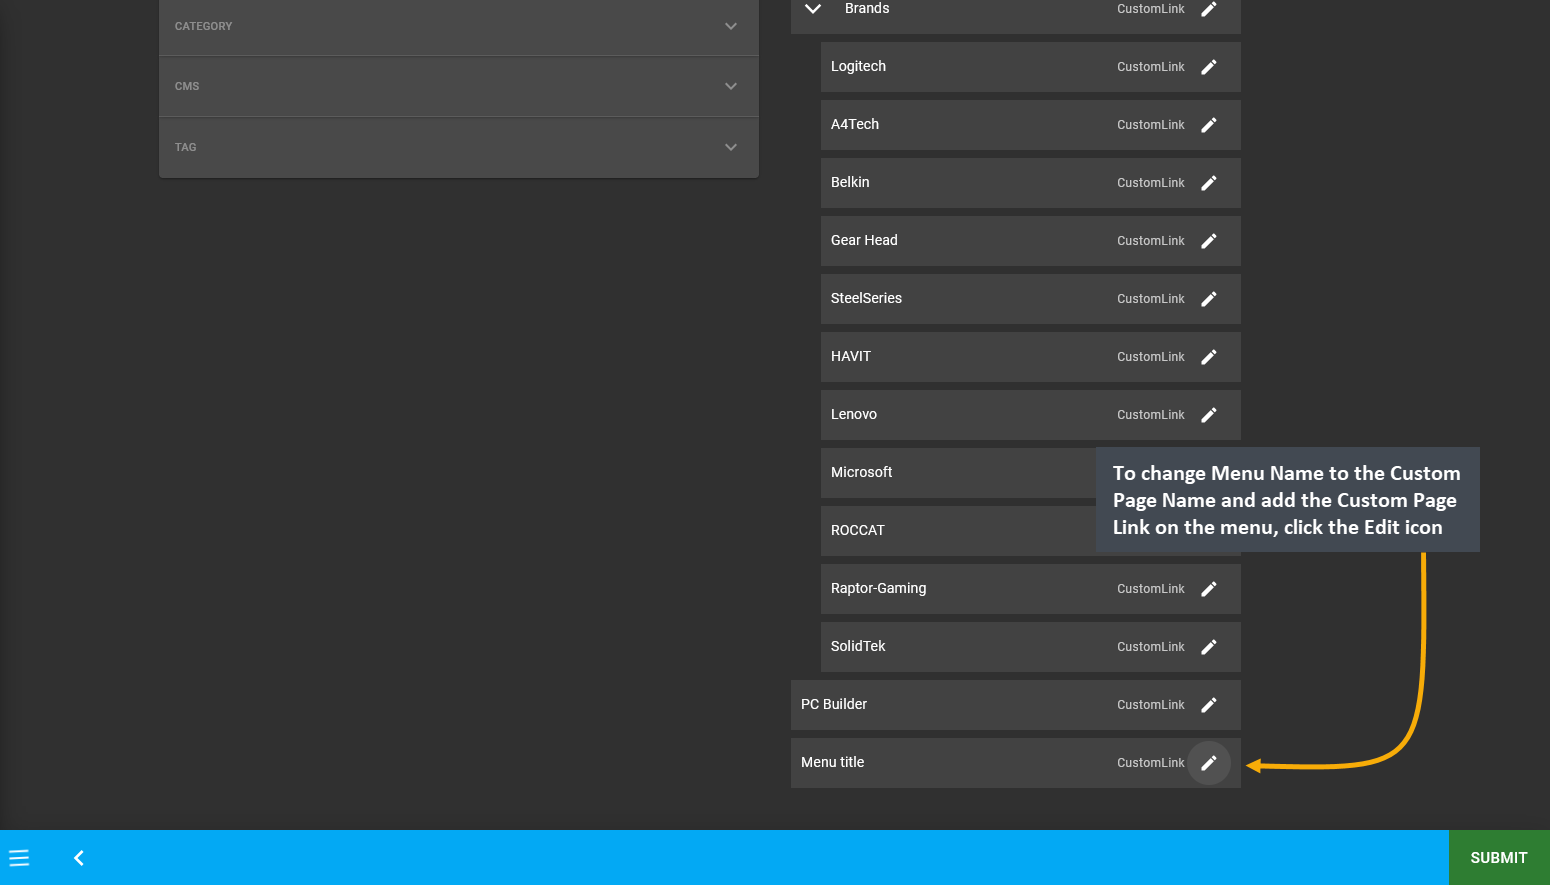
Image 7: To change Menu Name to Custom Page Name and add Custom Page Link on the menu, click the Edit icon.
Edit Details to Create Custom Page Menu
After creating the New Menu, click its Edit button and a pop-up will appear to edit the details of the menu. When the New Menu is created, name its Title as Promotional Offers similar to the Custom Page name. To activate the Custom Page Menu, copy the Relative Link from Website and click Update button to create Custom Page’s Menu.
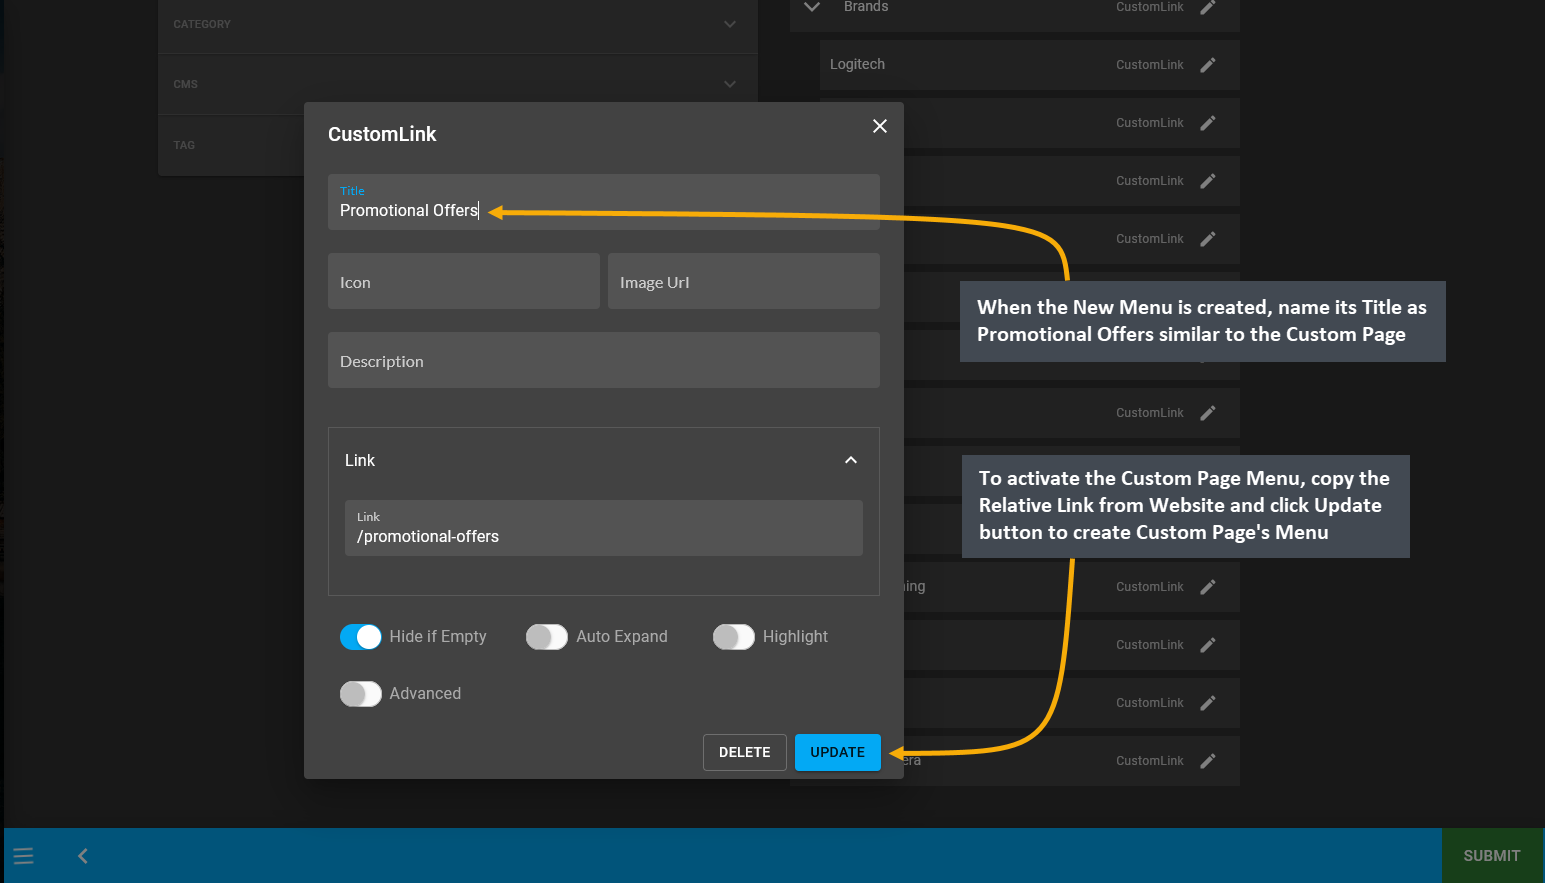
Image 8: Edit the Custom Page Menu by clicking the Edit button and name the Title and the Link on pop-up.
The newly created Custom Page Menu will now show at the bottom of the Default Header (Commerce) menu list.
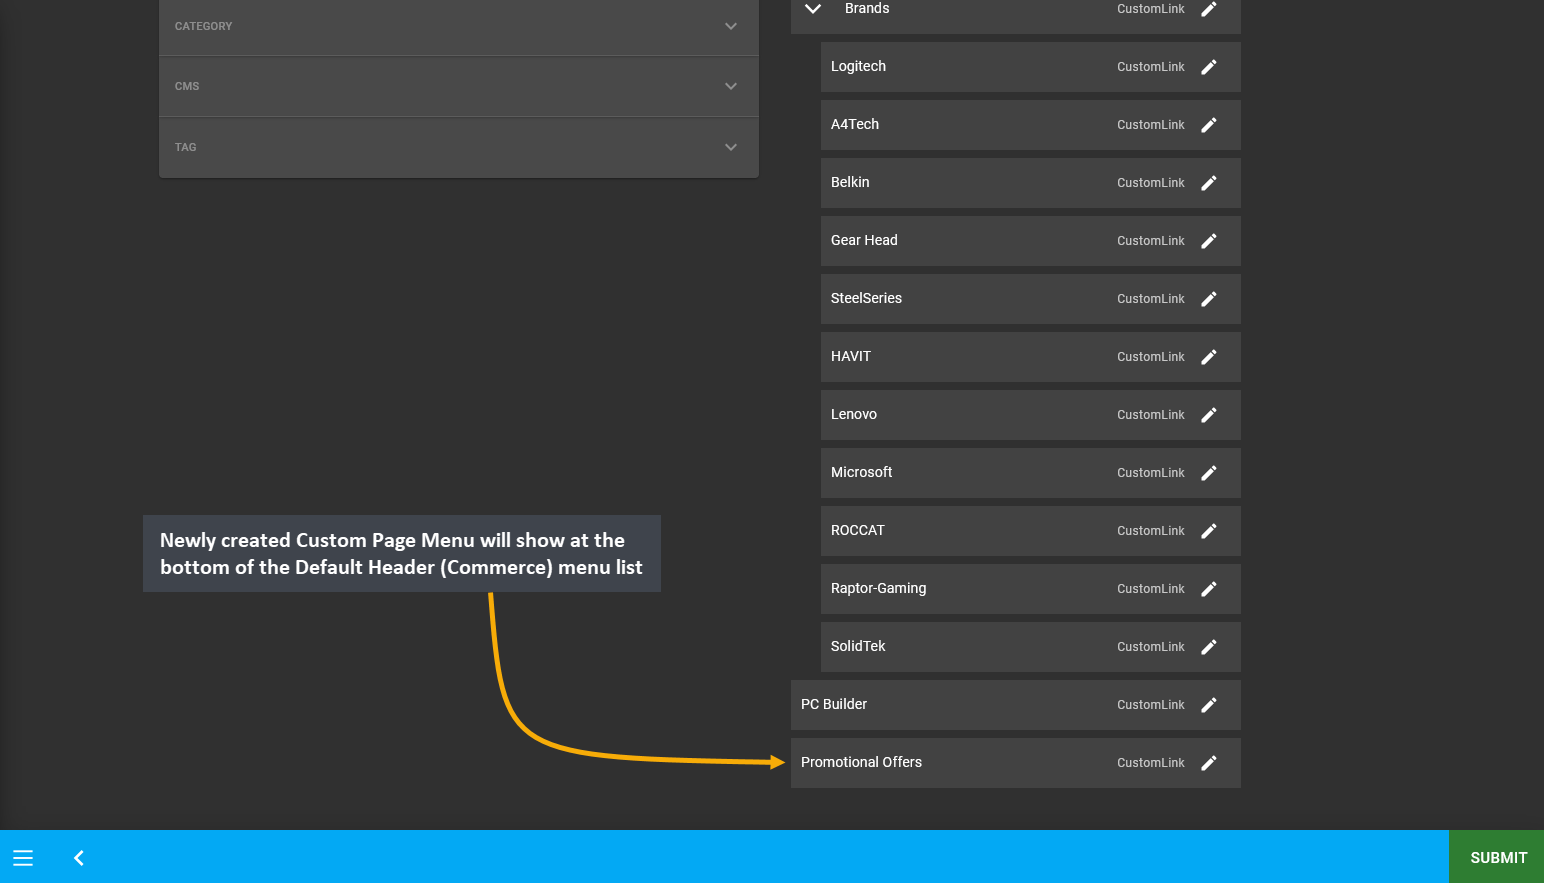
Image 9: Newly created Custom Page Menu will show at the bottom of the Default Header (Commerce) menu list.
Copy the Relative Link for Custom Page Menu
Retrieving the Relative Link from the Custom Page on Website can be done in a few simple steps. First, try to Edit the Custom Page from Page List and click Save which will show a pop-up with a VIEW button to check the updated Custom Page. So, clicking the VIEW button will open the Custom Page on Website and they will have a URL address which can be accessed from the Browser’s URL search bar. Copy Relative Link /promotional-offers from the whole URL https://mega-store.retailxen.dev/promotional-offers and paste it within Link field on Custom Page Menu.
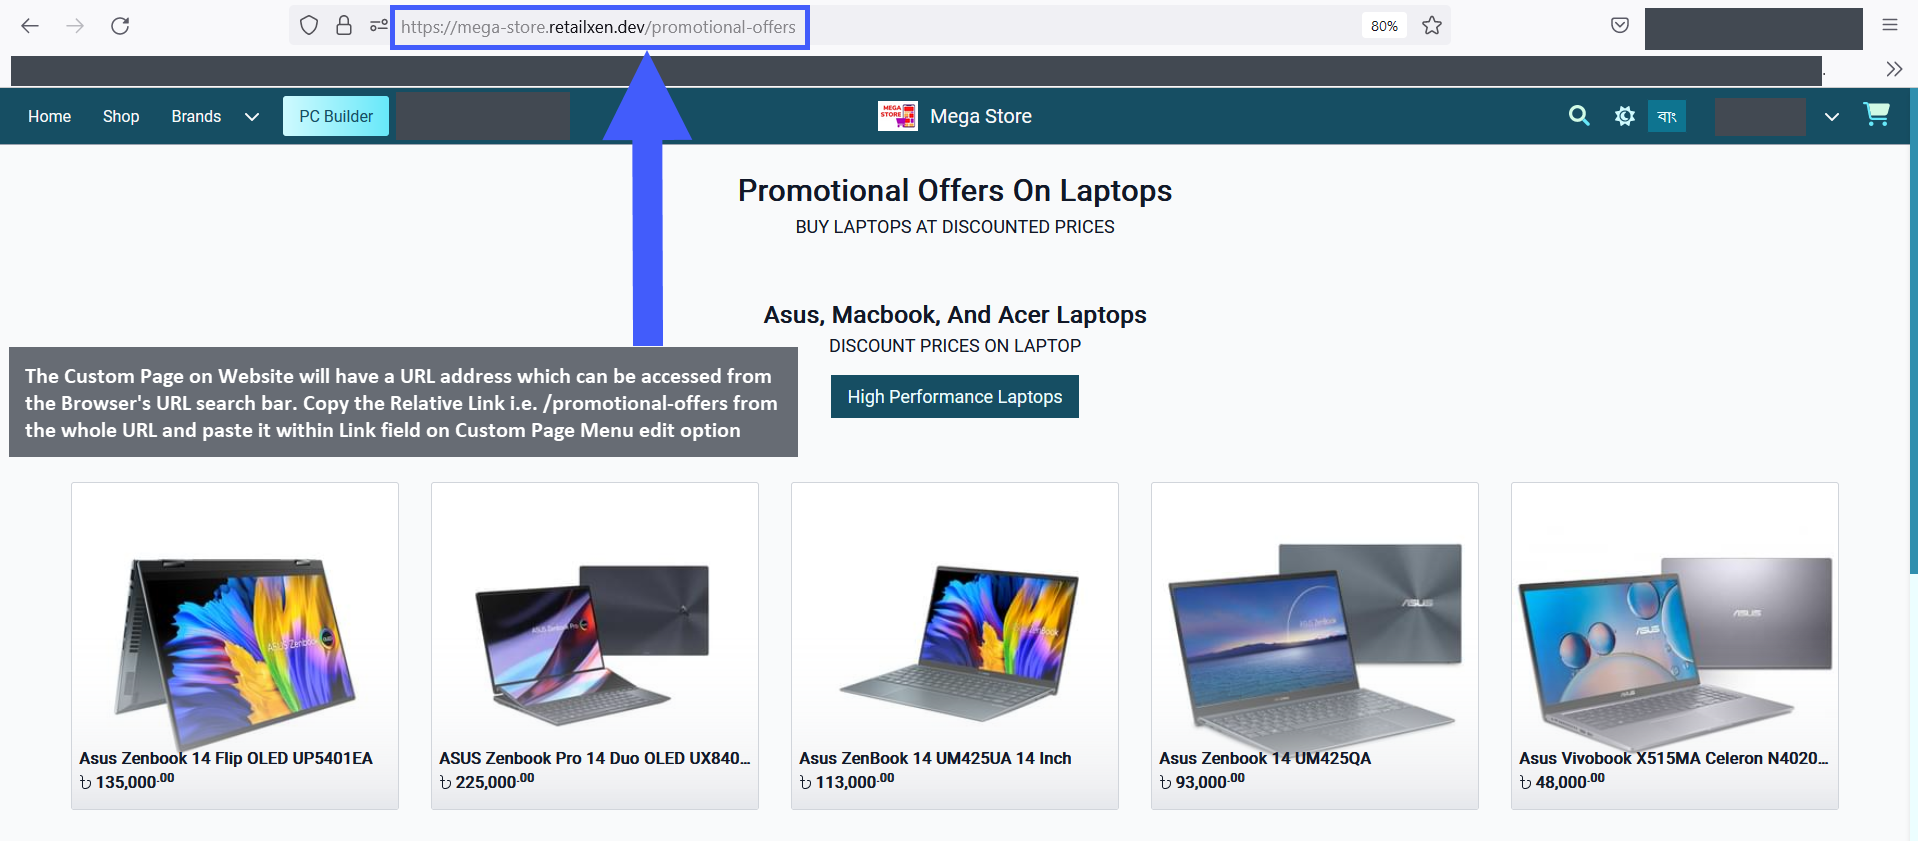
Image 10: Copy Relative Link from Browser's URL search bar and paste it within Link field on Menu Edit.
Therefore, simply copying and pasting the Relative Link within the Link field on Custom Page Menu’s editing pop-up window will activate the Custom Page Menu on the Website Header, click Update to complete the process.
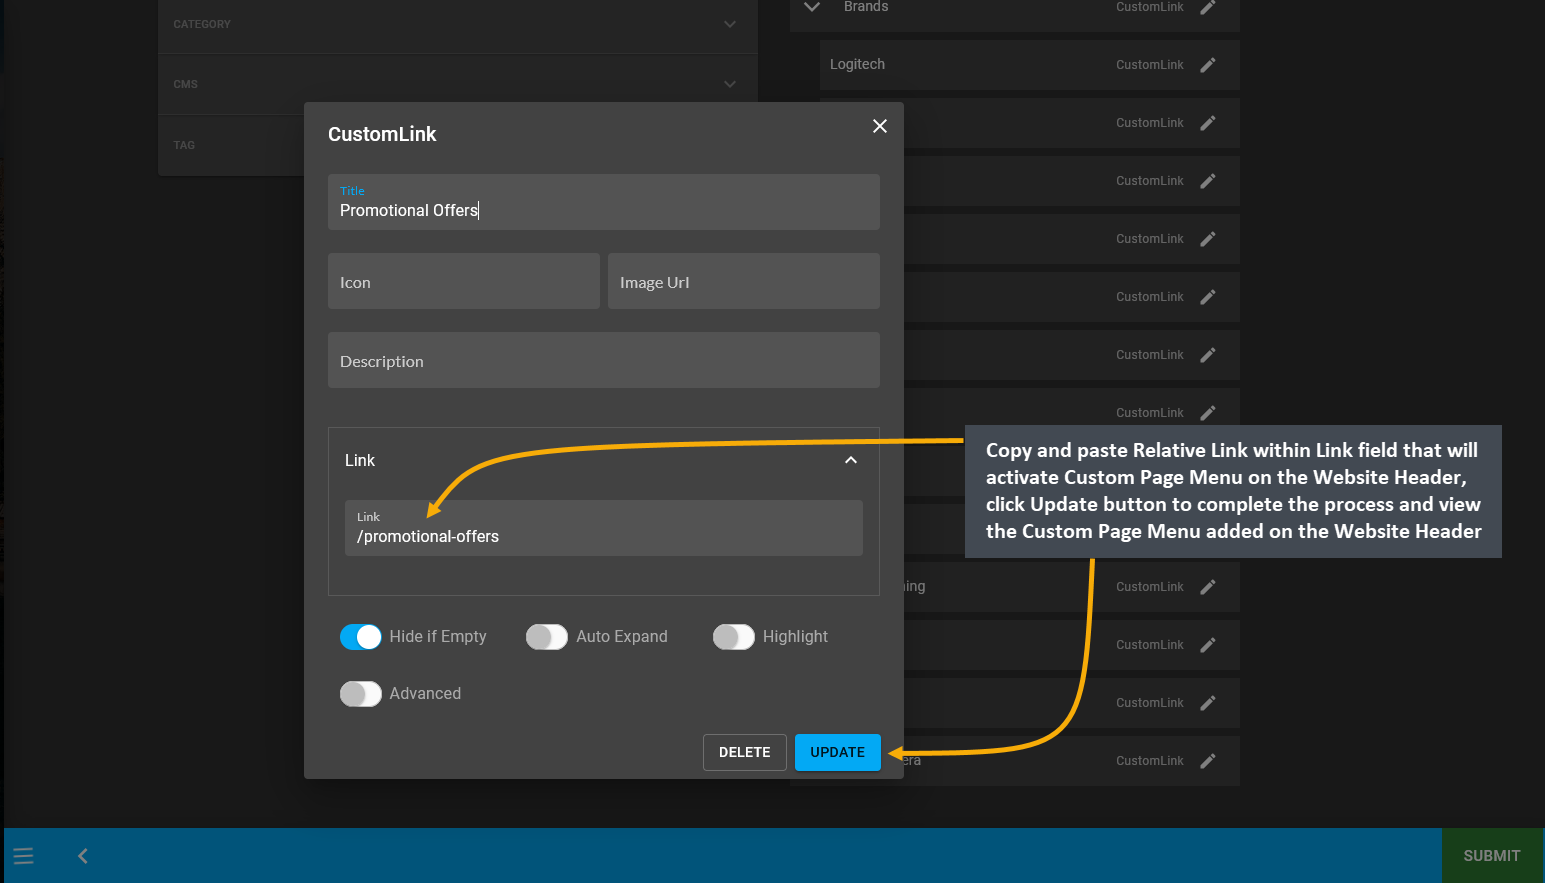
Image 11: Copy-paste Relative Link within Link field that will activate Custom Page Menu on Website Header.
After creating the Custom Page Menu and assigning the Relative Link within the menu, the created Custom Page will be visible and accessible on the Website Header. So, Shop Owner can add more Custom Pages on Website like this.
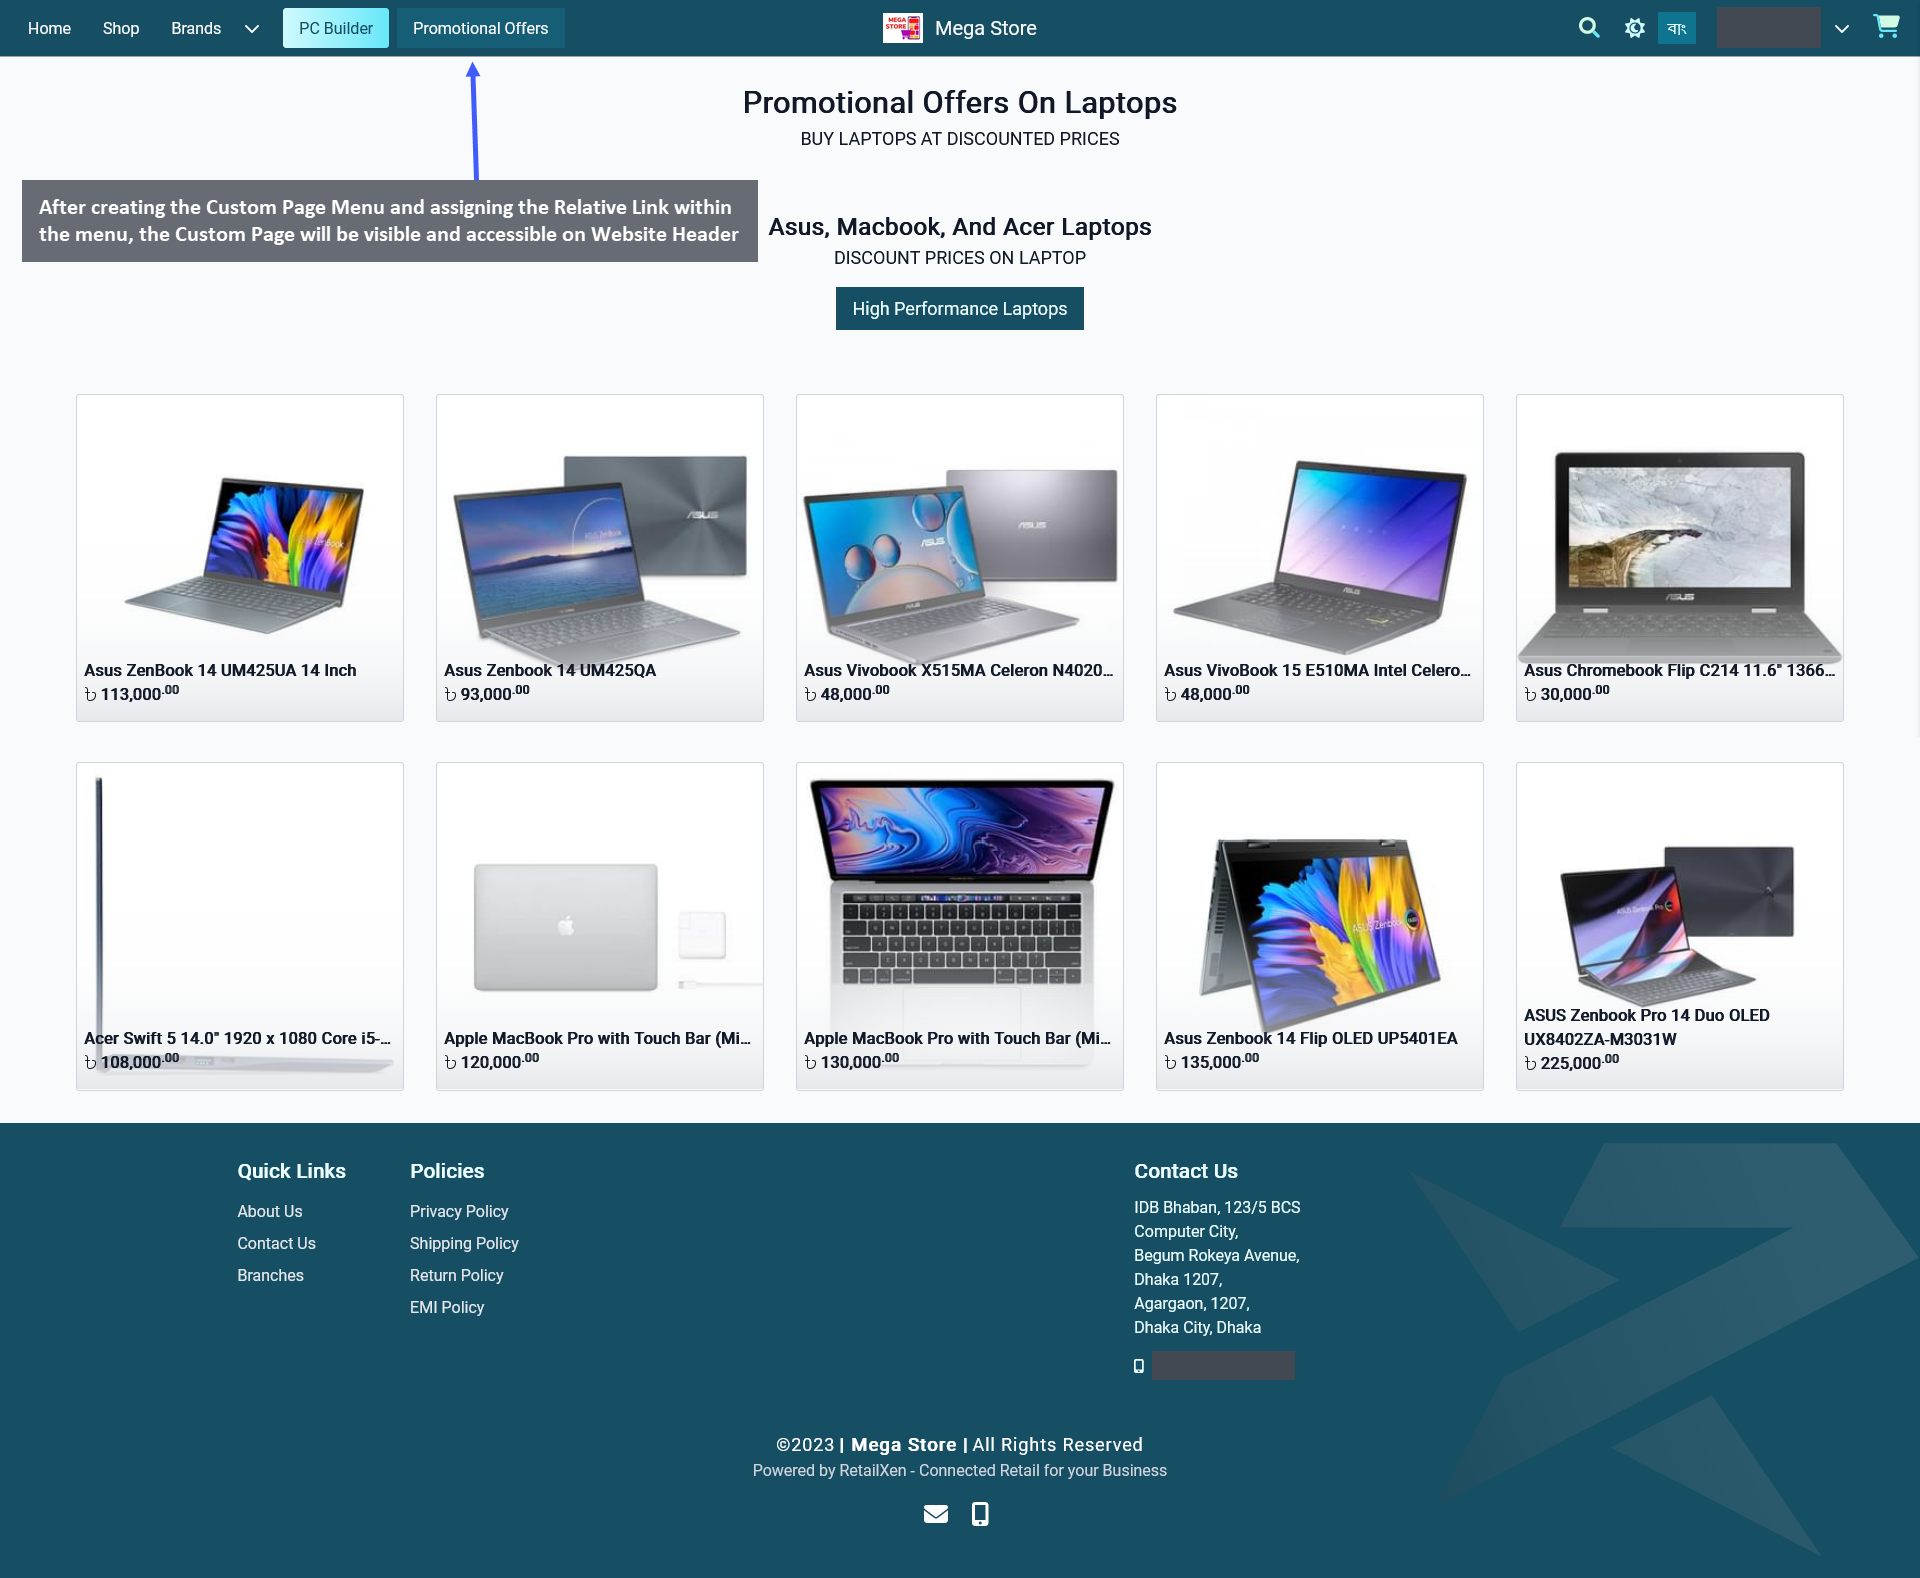
Image 12: Custom Page will be visible on the Website after assigning Relative Link within Custom Page Menu.
Add New Widgets to Page
To add New Widgets to a Page, click on the Add New Widget Button which will redirect to a new pop-up containing the Default Elements. Default Elements include five Widget Blocks types - Banner Widget, Product Widget, Category Widget, Text Widget, and Image Widget which can be individually selected by clicking on each one of these blocks.
Therefore, click on each of Widget Block types to add them as New Widgets for the Page. There is another tab that contains the Library Elements which are existing Widgets already created beforehand by the Shop Owner. Library Elements can be added instantly as Widgets to a Page. They were already created before from the Widgets menu.
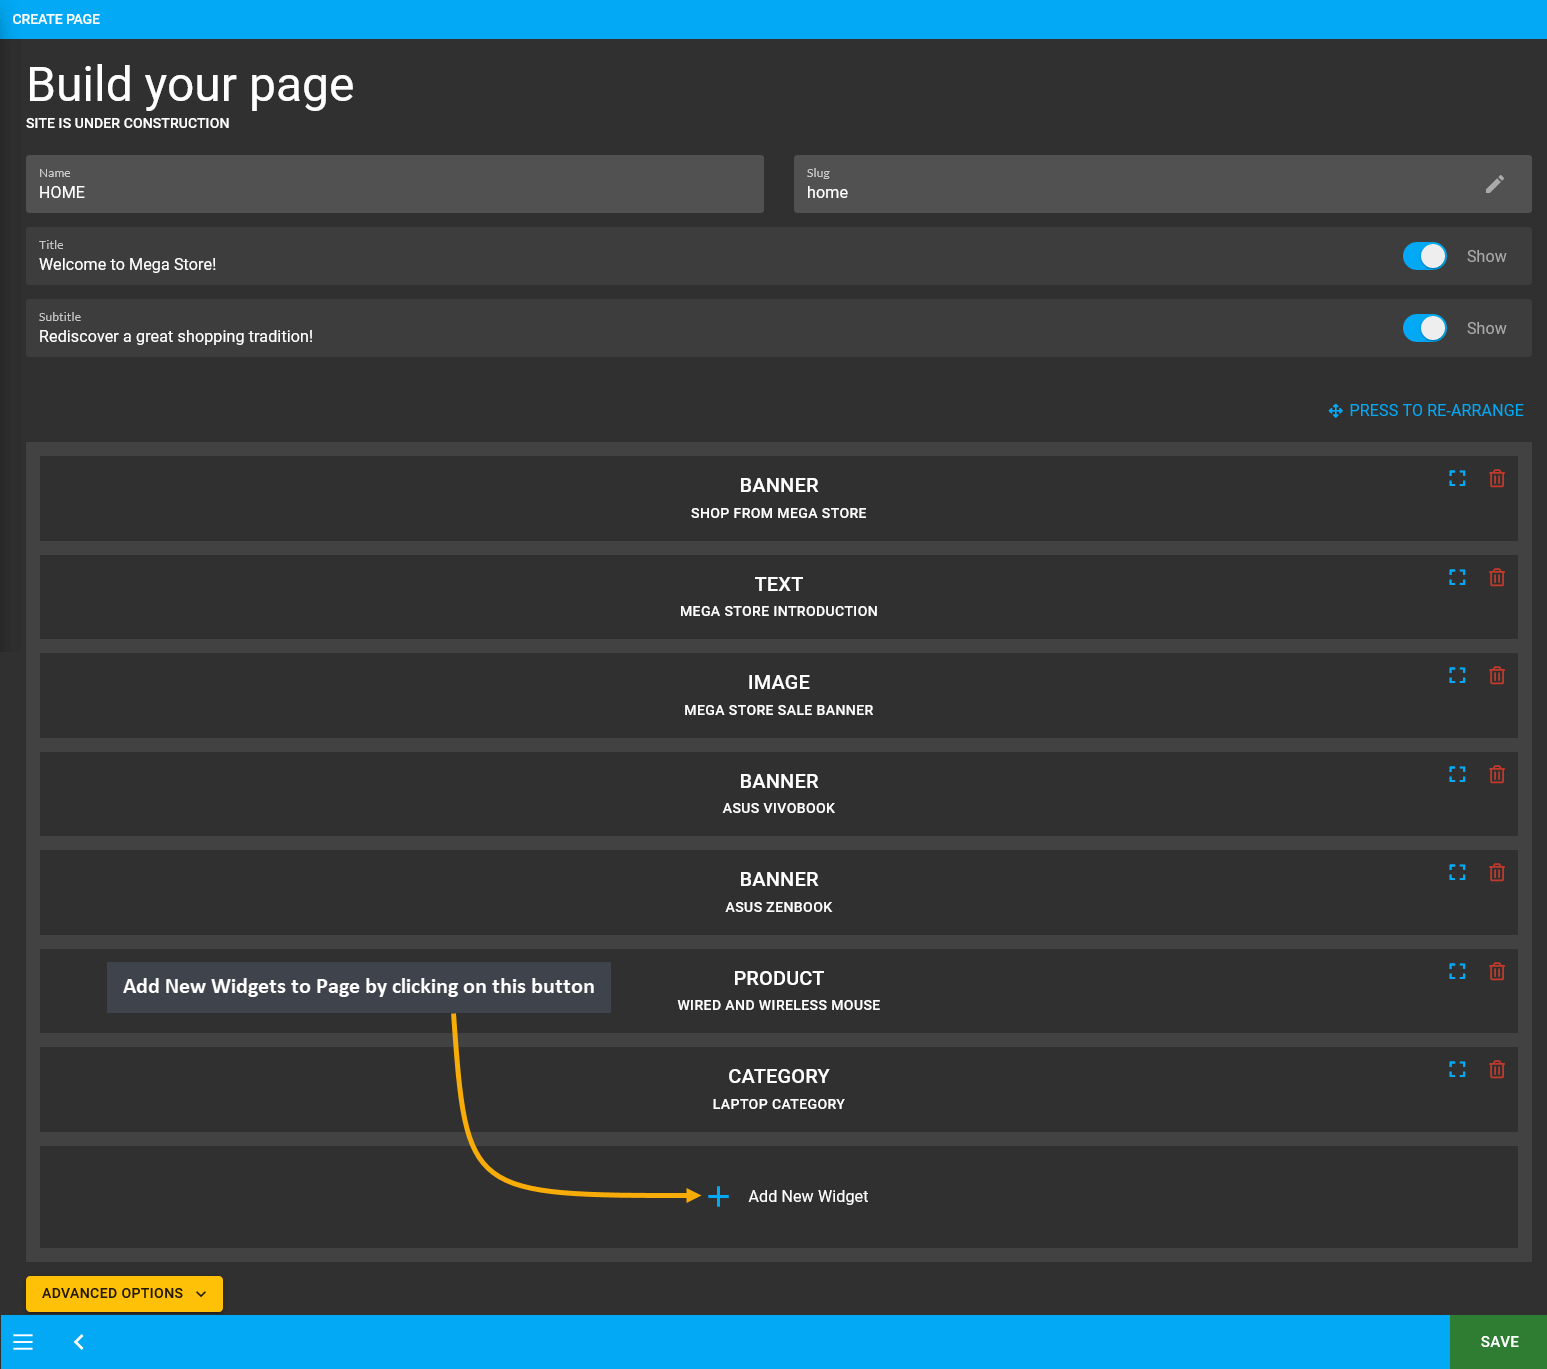
Image 13: Add New Widgets to Page by clicking on the Add New Widget button from the bottom on the page.
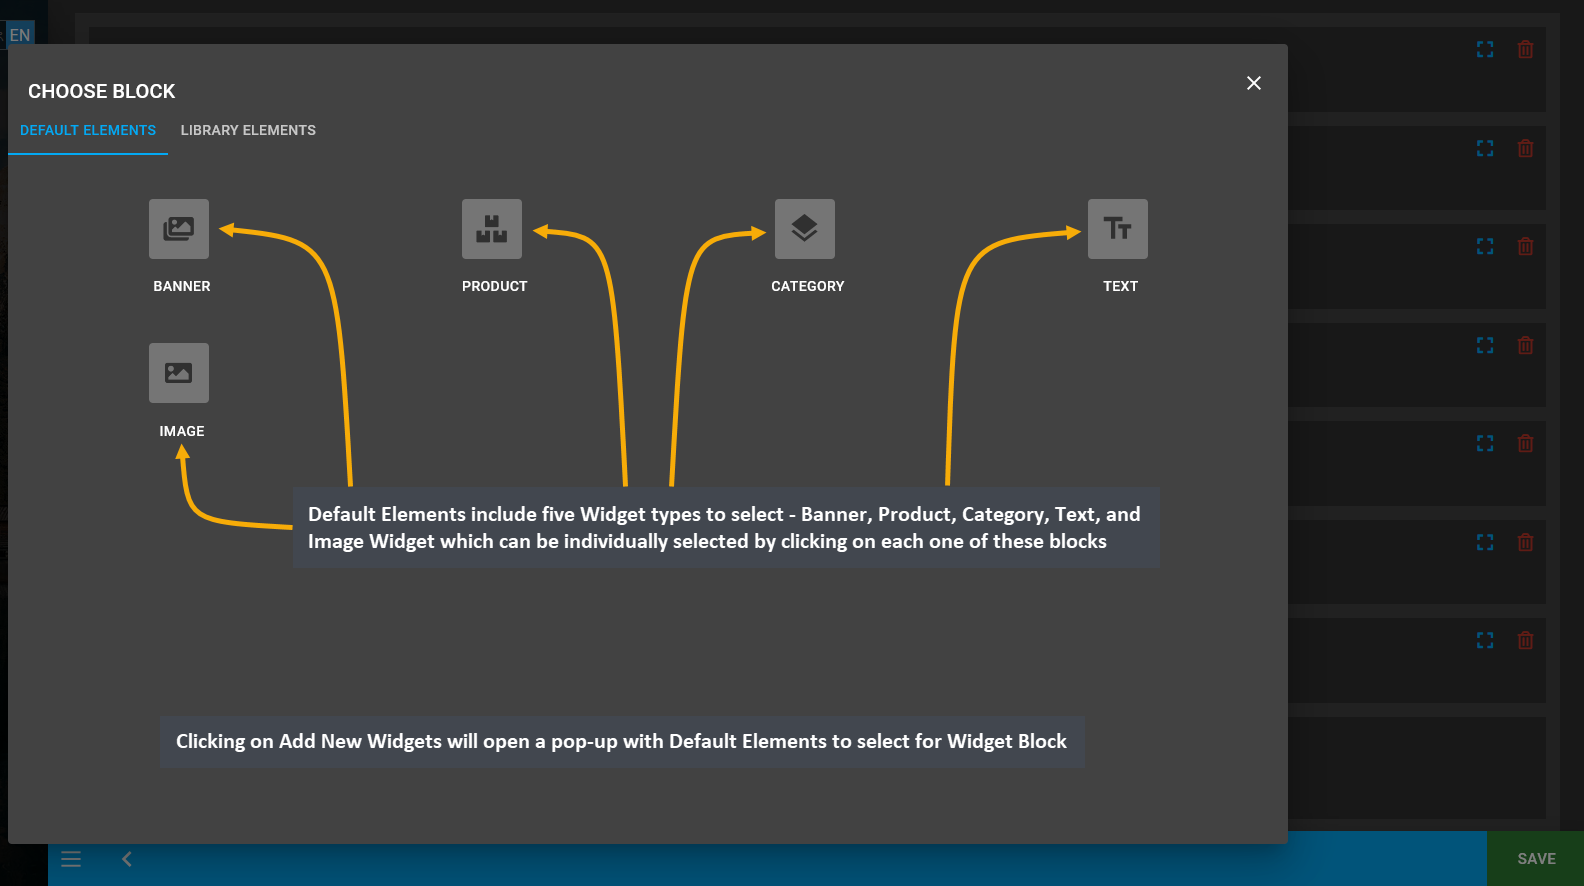
Image 14: Clicking on Add New Widgets will open a pop-up with Default Elements to select for Widget Block.
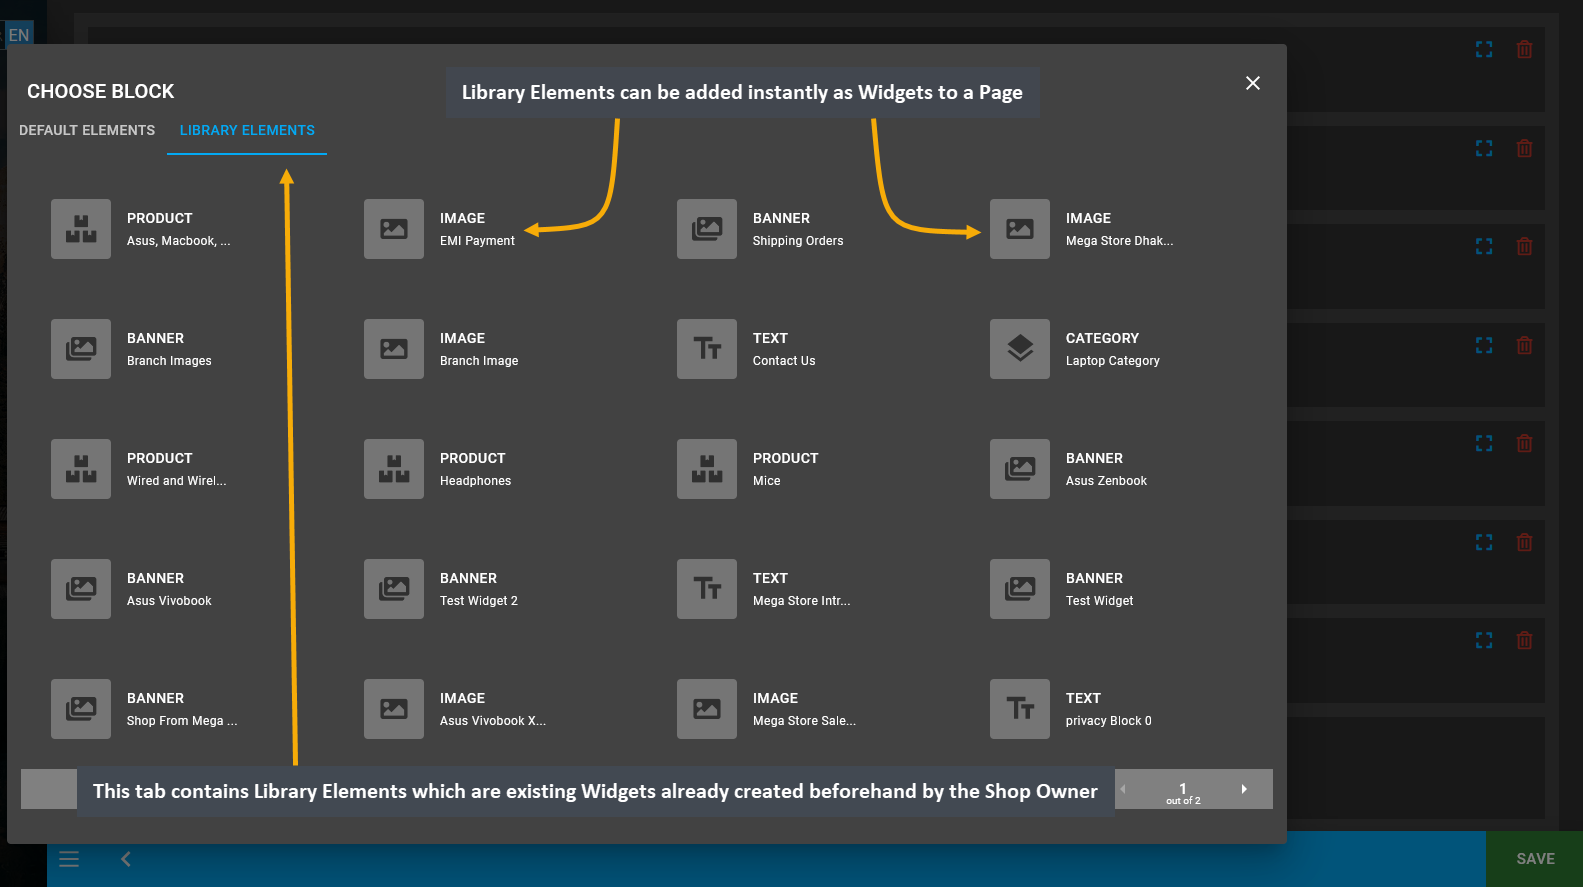
Image 15: Library Elements are existing Widgets already created beforehand by Shop Owner to add on Page.
Steps to Rearrange Widgets
Widgets already created under a Page can be rearranged using the Press to Re-Arrange button. To rearrange the Widgets, the Press to Re-Arrange button needs to be clicked twice to complete the full Widget rearranging process. Clicking the button once will allow the Widgets to become movable for rearranging. The Save button will become disabled when the Press to Re-Arrange button is clicked. During this time, rearrange all the Widgets as needed.
After completing the Widget rearrangement, click the Press to Re-Arrange button again for the rearranged Widgets to set in. Use the Edit or Delete button to make any changes or delete any Widget. When rearranging of Widgets is done, click the Save button and the Widgets rearrangement will be saved. Instantly, a pop-up with View button will show to view changes made on the Page. Clicking it will redirect to the Updated Page where Widgets were added.
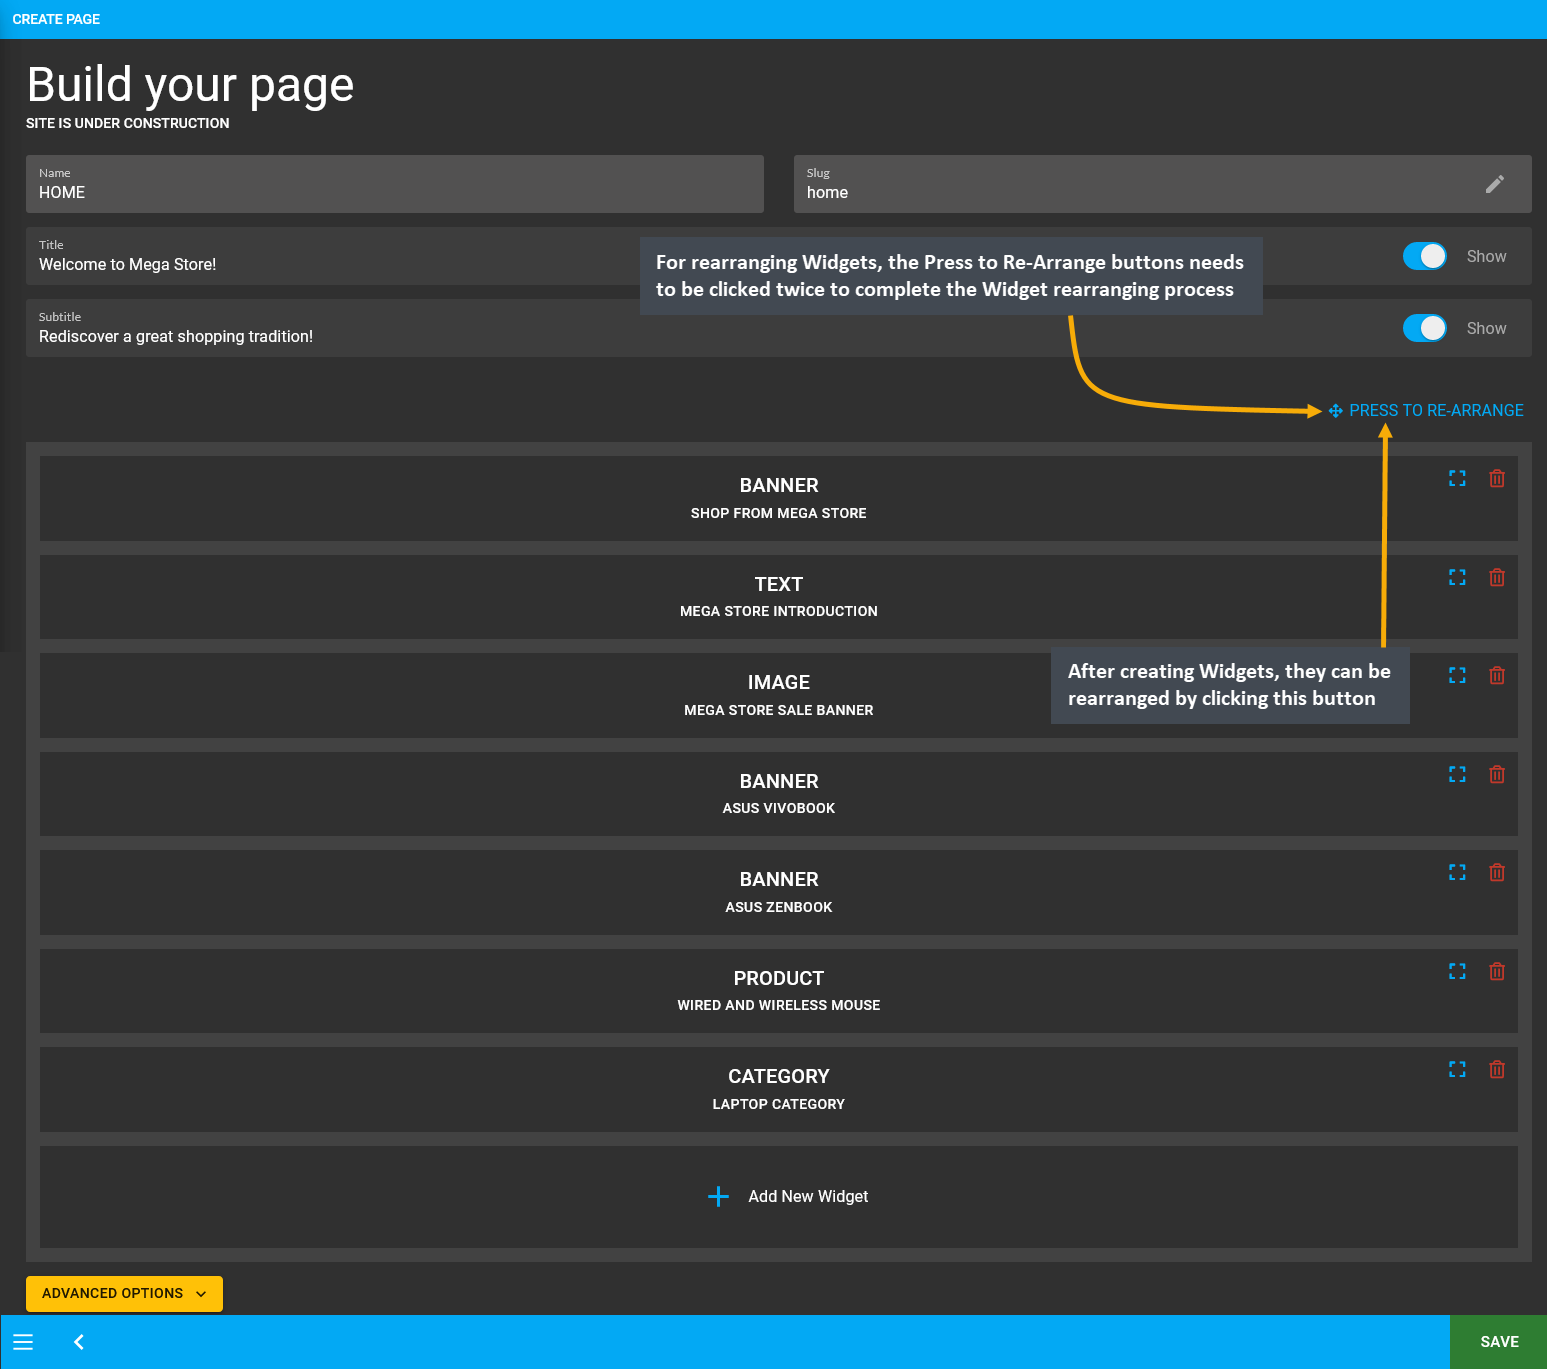
Image 16: Click the Press to Re-Arrange button twice to complete Widget rearranging process within a Page.
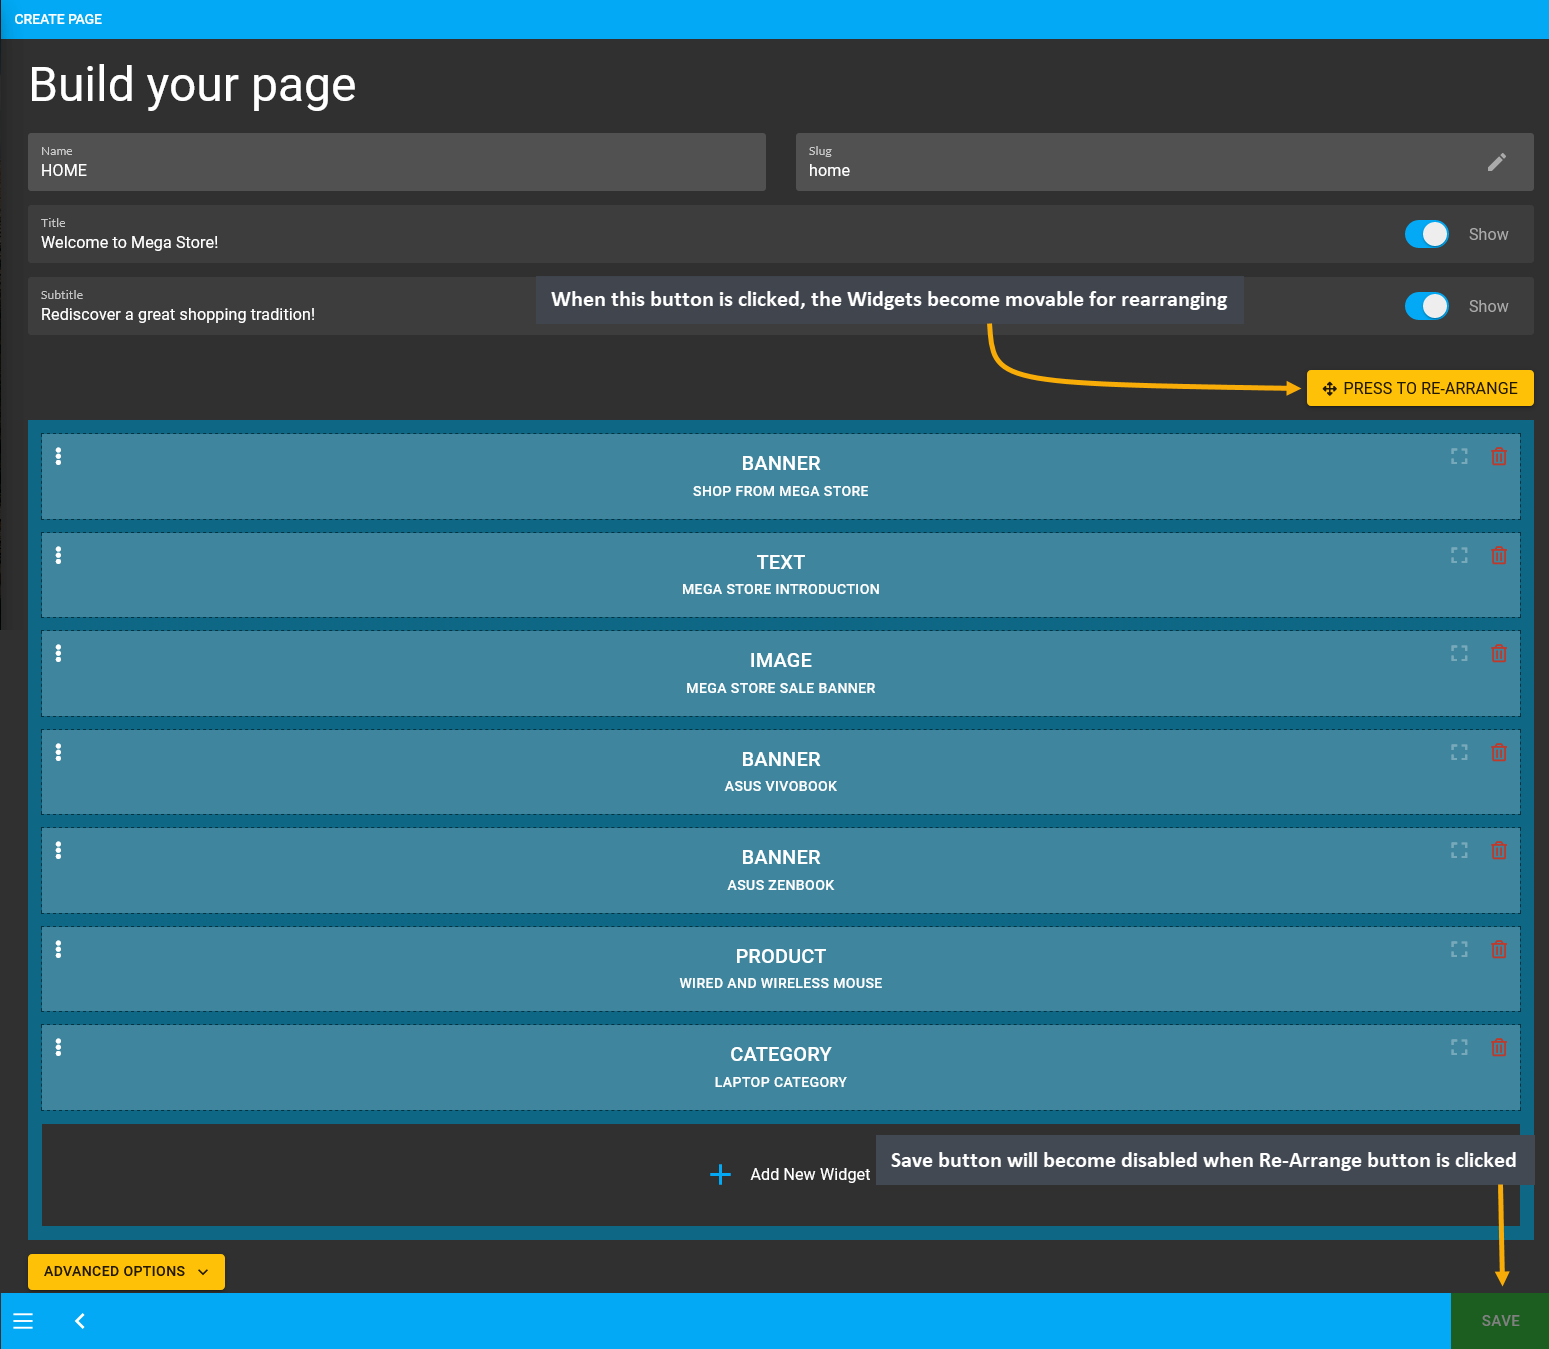
Image 17: When the Press to Re-Arrange button is clicked, all the Widgets become movable for rearranging.
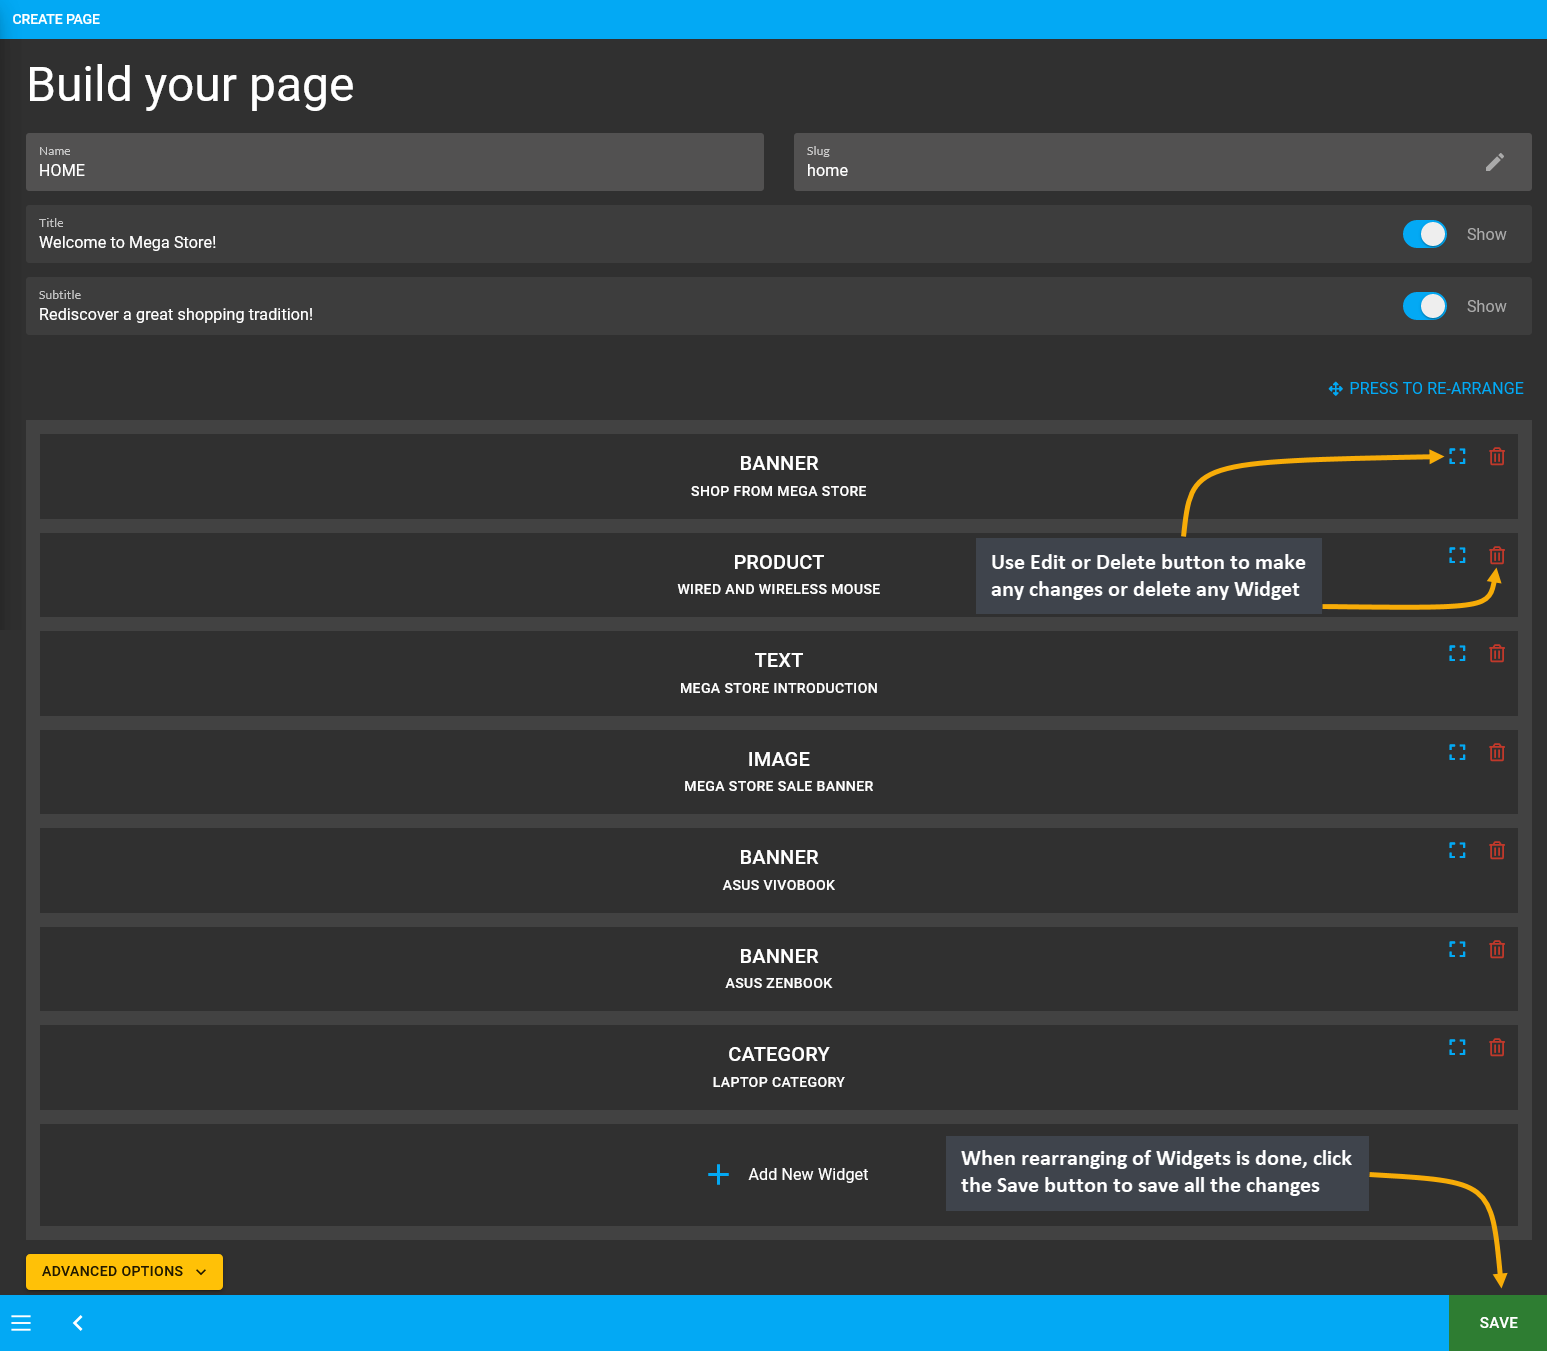
Image 18: Use Edit or Delete button to make changes or delete a Widget, click Save button to save changes.
Delete Widget after Removing from Page
If a Widget is attached to a Page, it can only be deleted after it is removed from under the Page it is assigned. For instance, the Image Widget here is assigned to the Home Page, so clicking Delete button will not allow deleting it.
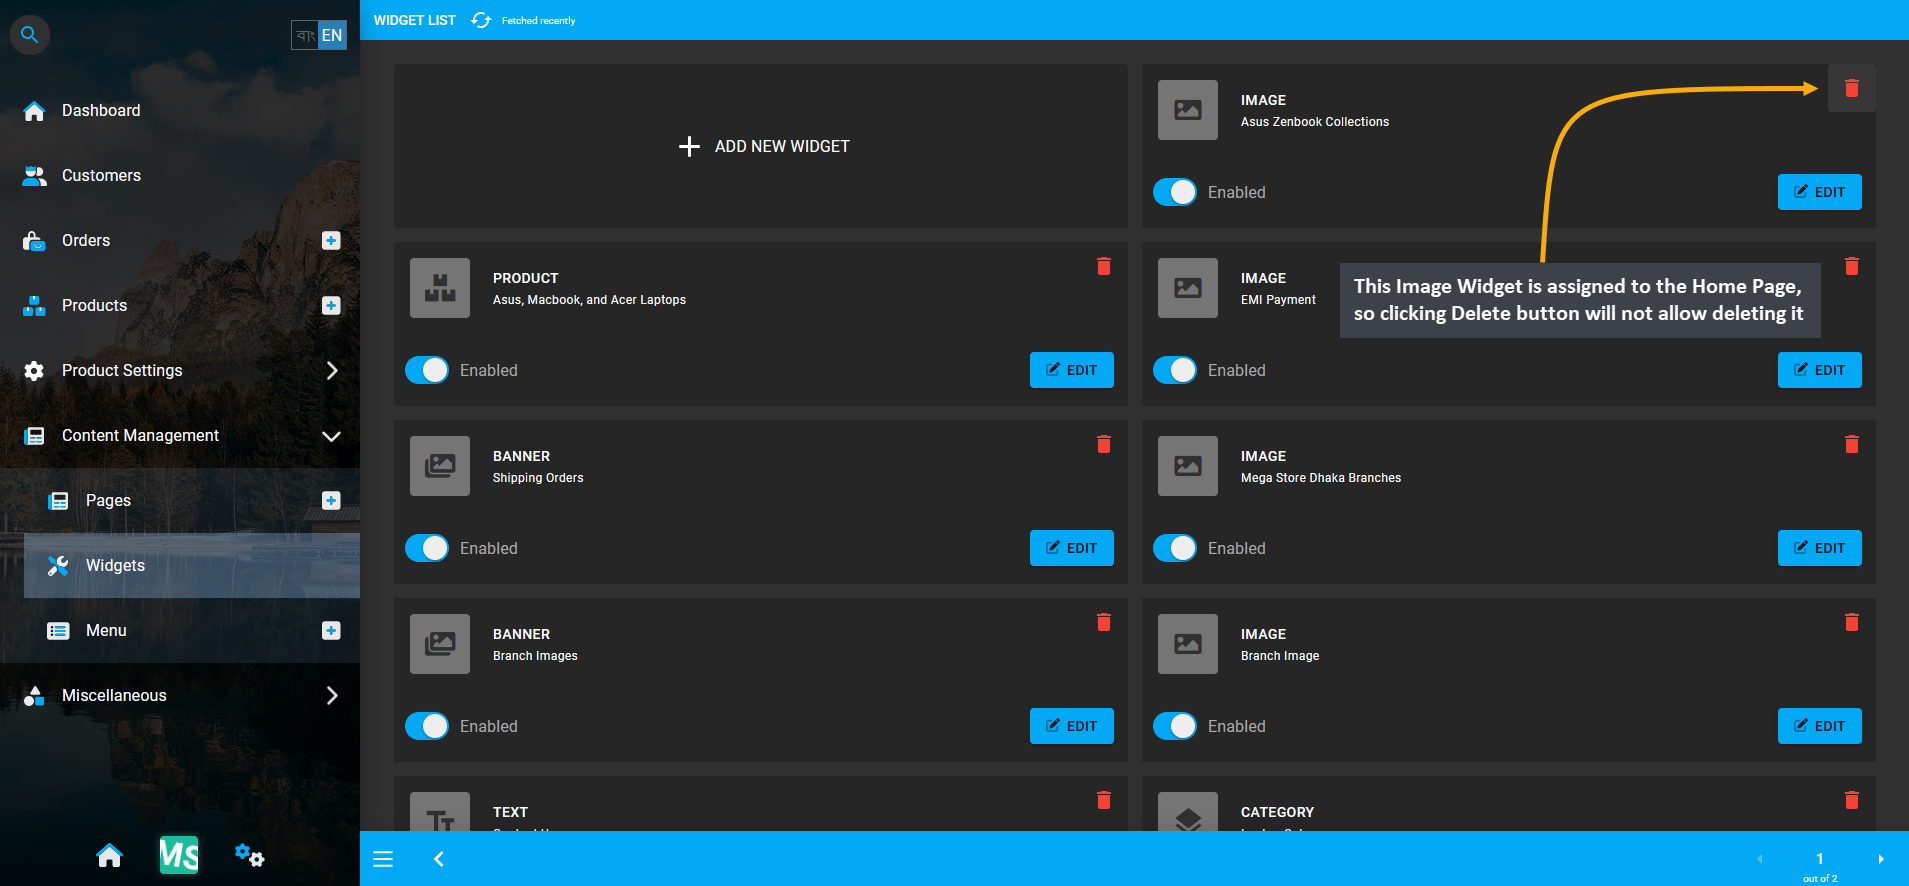
Image 19: Image Widget is assigned to the Home Page, so clicking Delete button will not allow deleting it.
So, after clicking the Delete button, a confirmation pop-up will ask if the Shop Owner wants to delete the Widget.
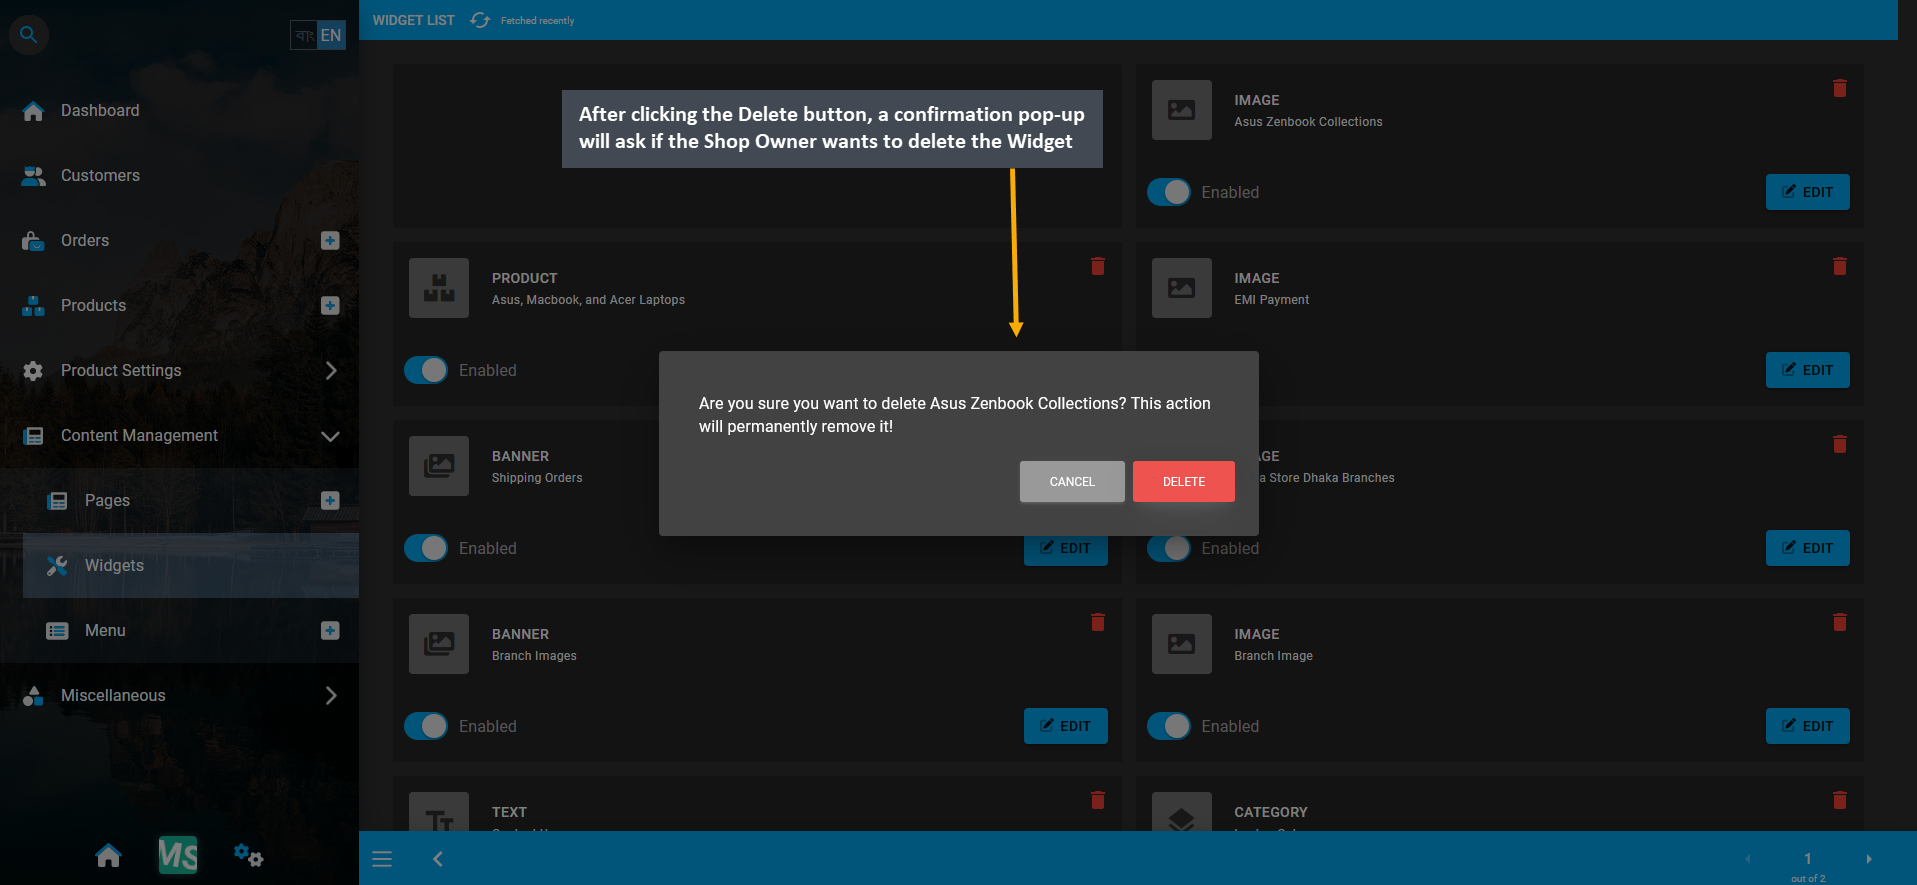
Image 20: After clicking Delete button, confirmation pop-up will ask if Shop Owner wants to delete Widget.
However, even after confirming to delete the Widget, an error message will show stating that the Widget or CMS Block cannot be deleted because it is already assigned under a Page. The Widget have to be removed from Page.
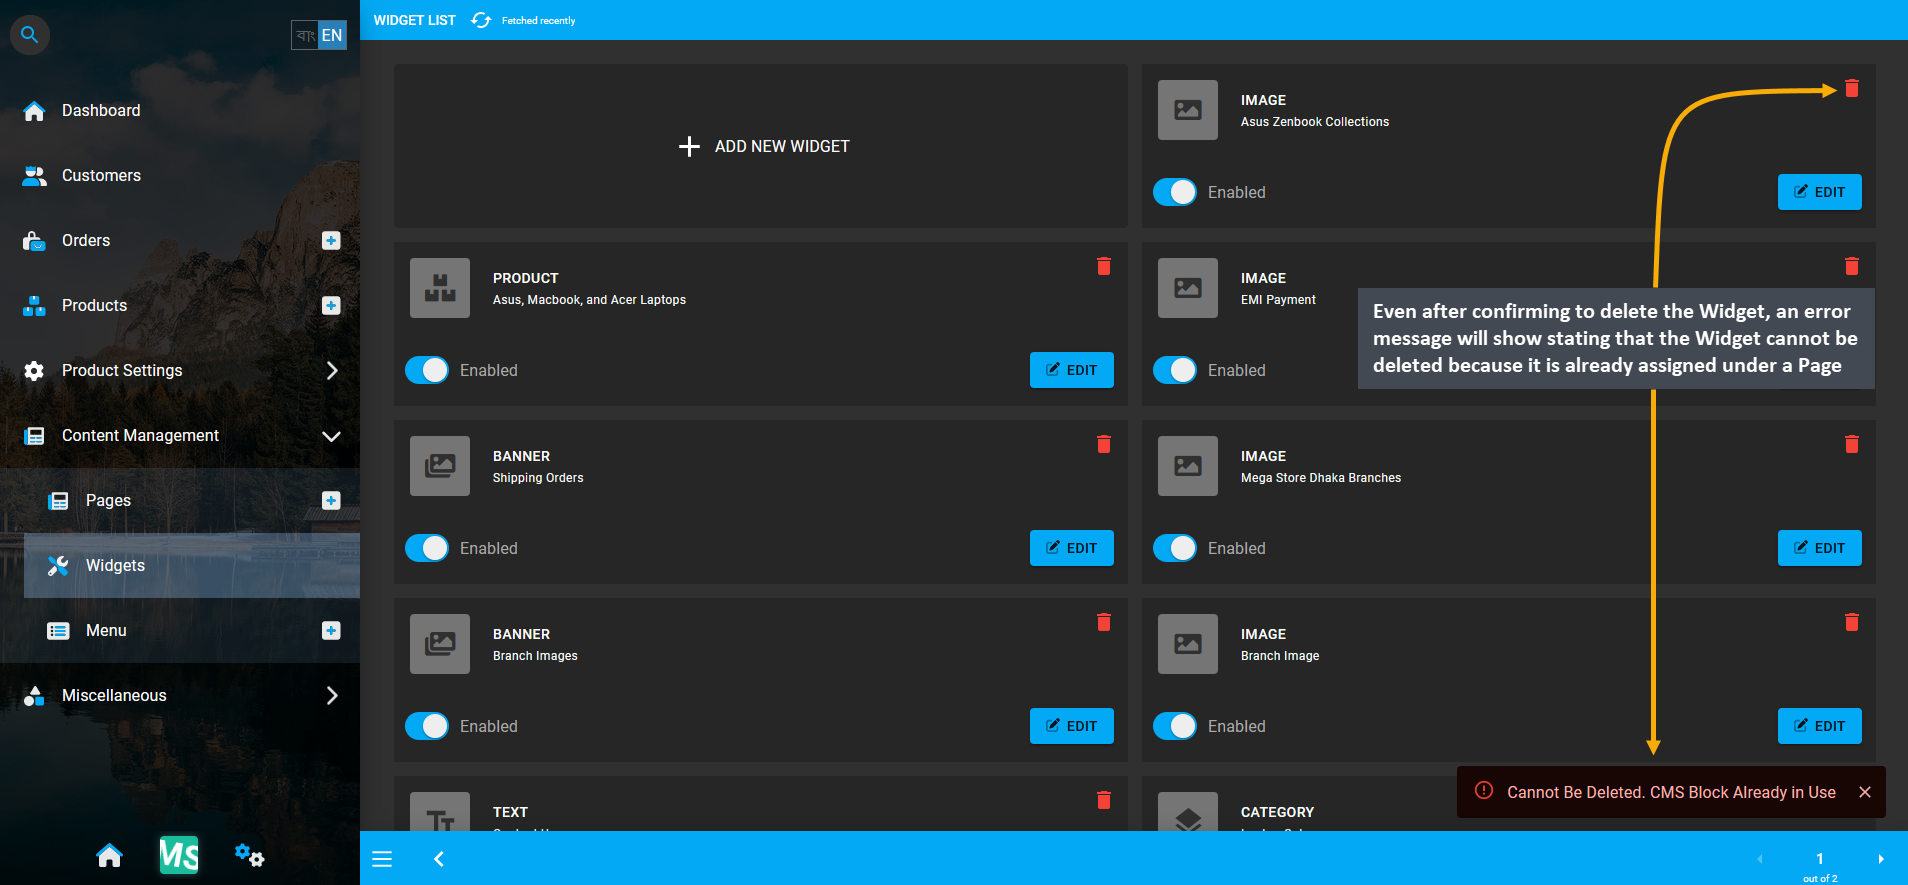
Image 21: Error message will state that Widget cannot be deleted as it is already assigned under a Page.
Therefore, a Widget attached to a Page can only be permanently deleted after it is removed from under the Page is it assigned. Only then, the Shop Owner can completely delete the target Widget from the list of Widgets. Thus, to remove the Widget from under the Page it is assigned, click Edit to edit the Page and remove Widget from it.
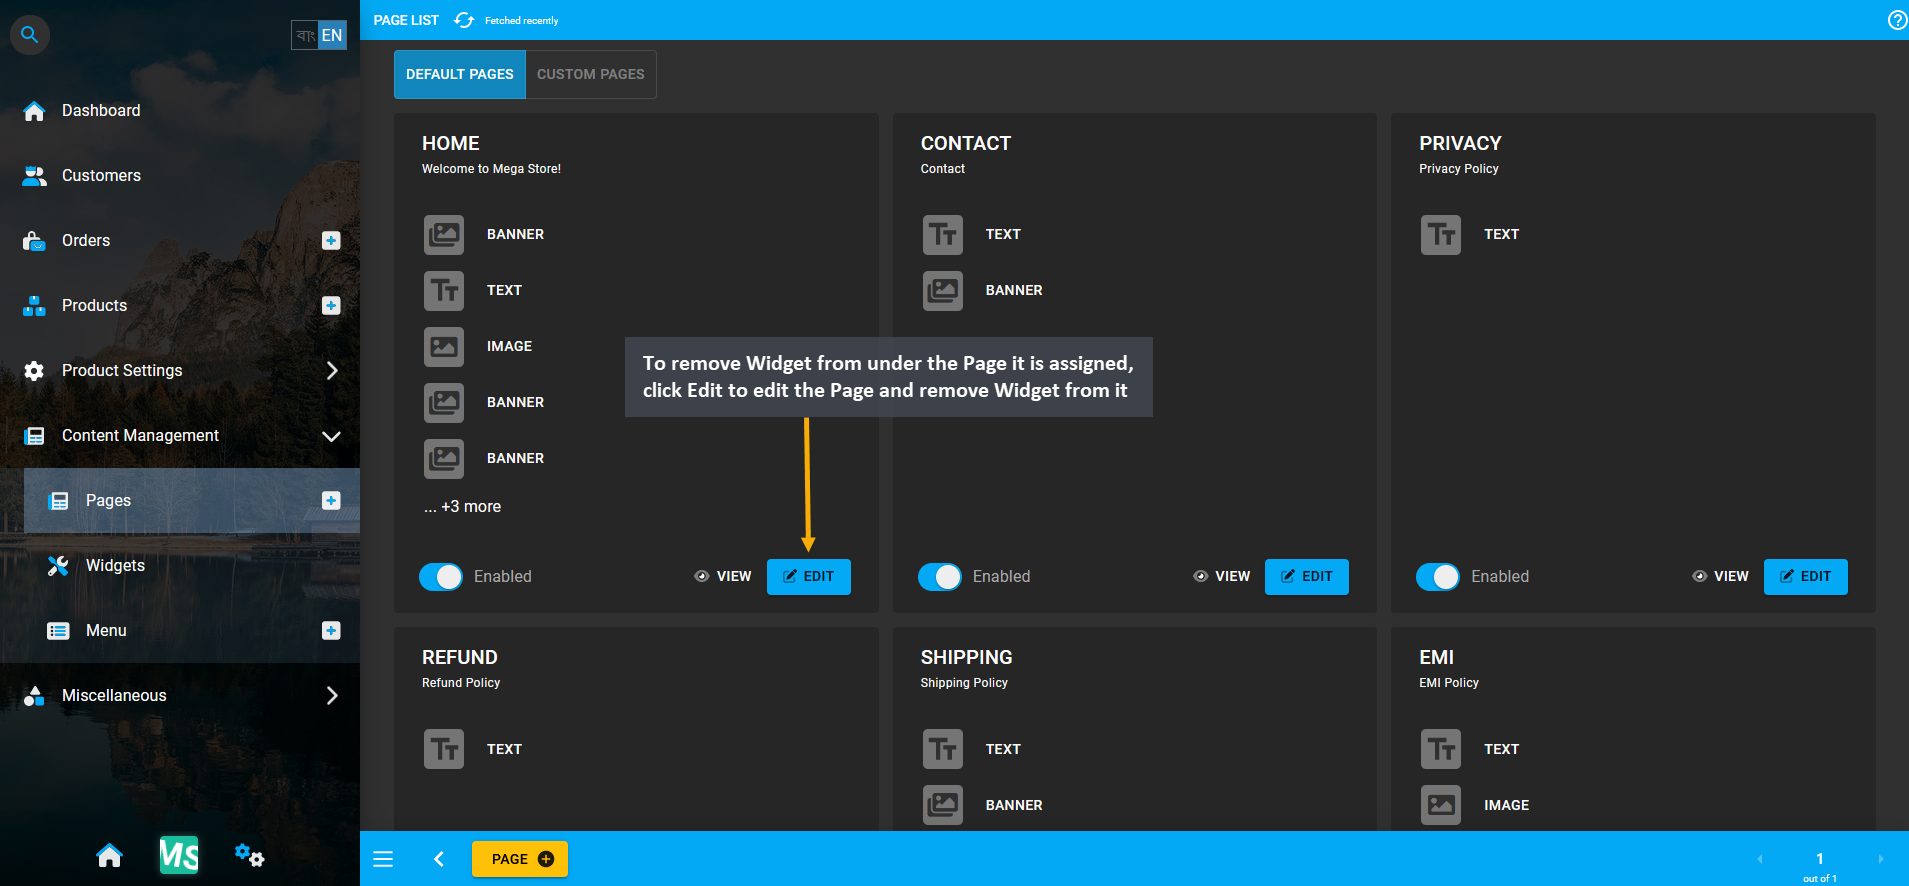
Image 22: To remove the Widget from under the Page it is assigned, Edit the Page and remove Widget from it.
Inside the Page, click the Delete button for the target Widget that needs to be deleted. It will remove the assigned Widget from the Page and allow it to be deleted permanently from under the List of Widgets.
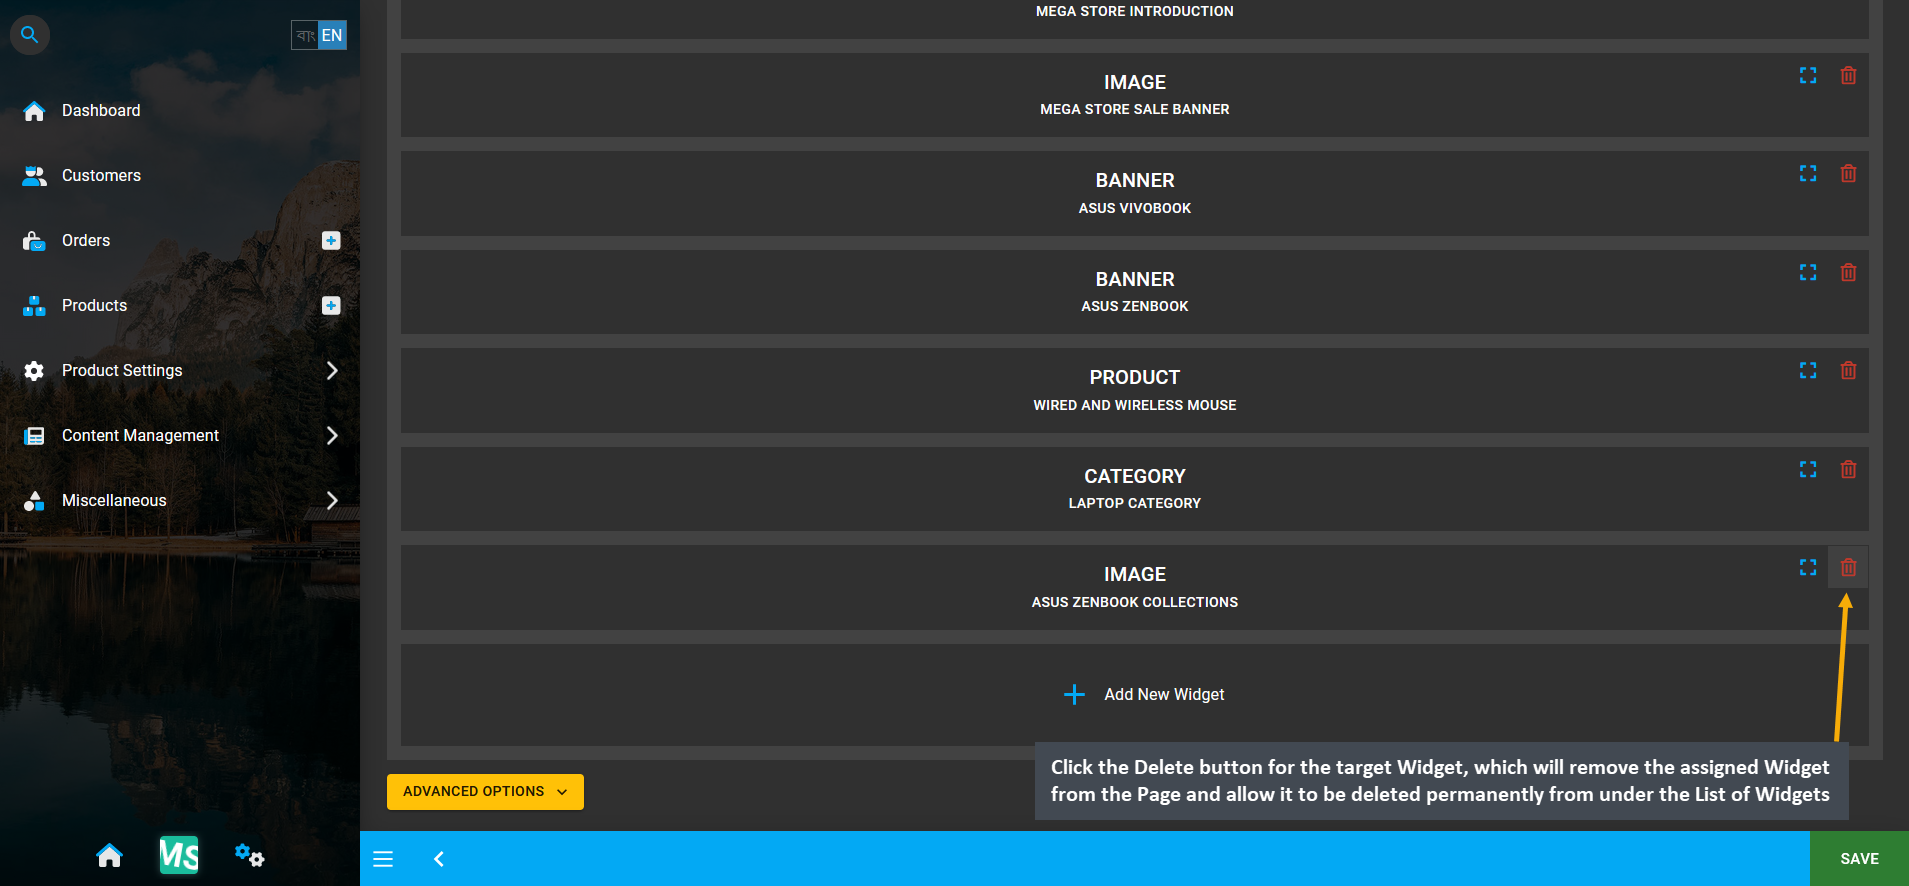
Image 23: Click Delete to remove assigned Widget from Page that will allow it to be deleted permanently.
After Widget is removed from Page, click Save button to update the Page. Widget is no longer assigned to Page.
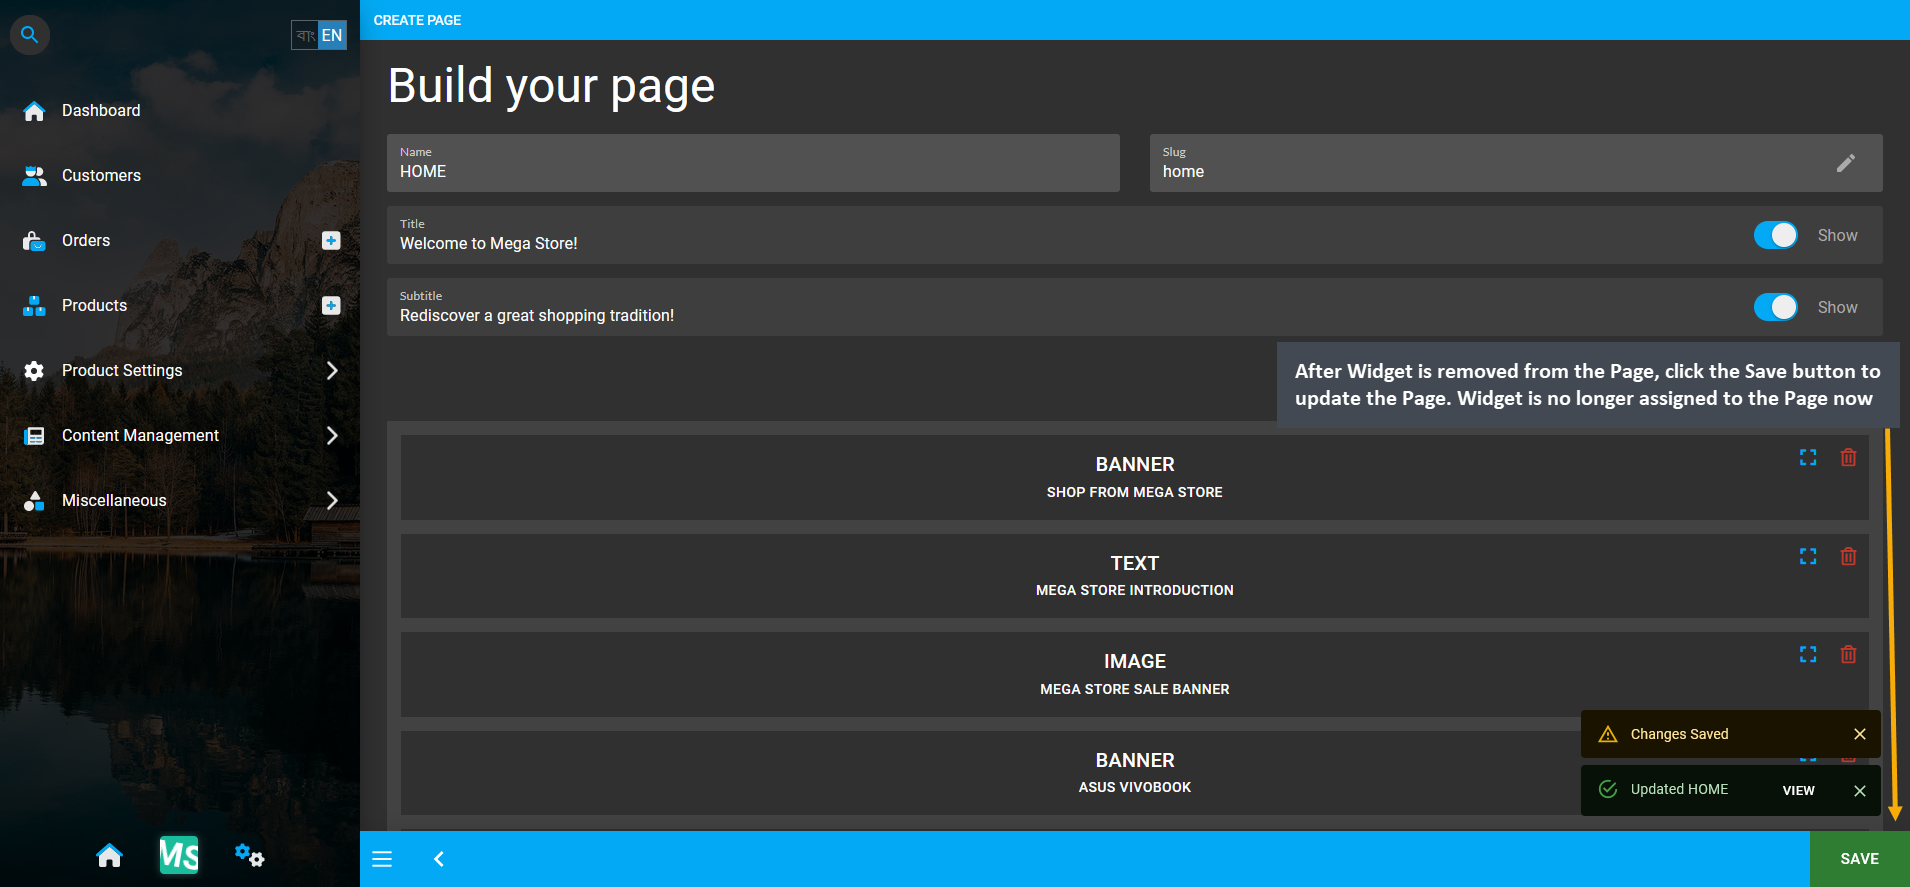
Image 24: After Widget is removed, click Save to update the Page. Widget is no longer assigned to Page.
Now, go back to the Widget List Page, and click the Delete button on the target Widget. This will allow the the Shop Owner to completely delete the target Widget from the list of Widgets as it is not assigned to a Page anymore.
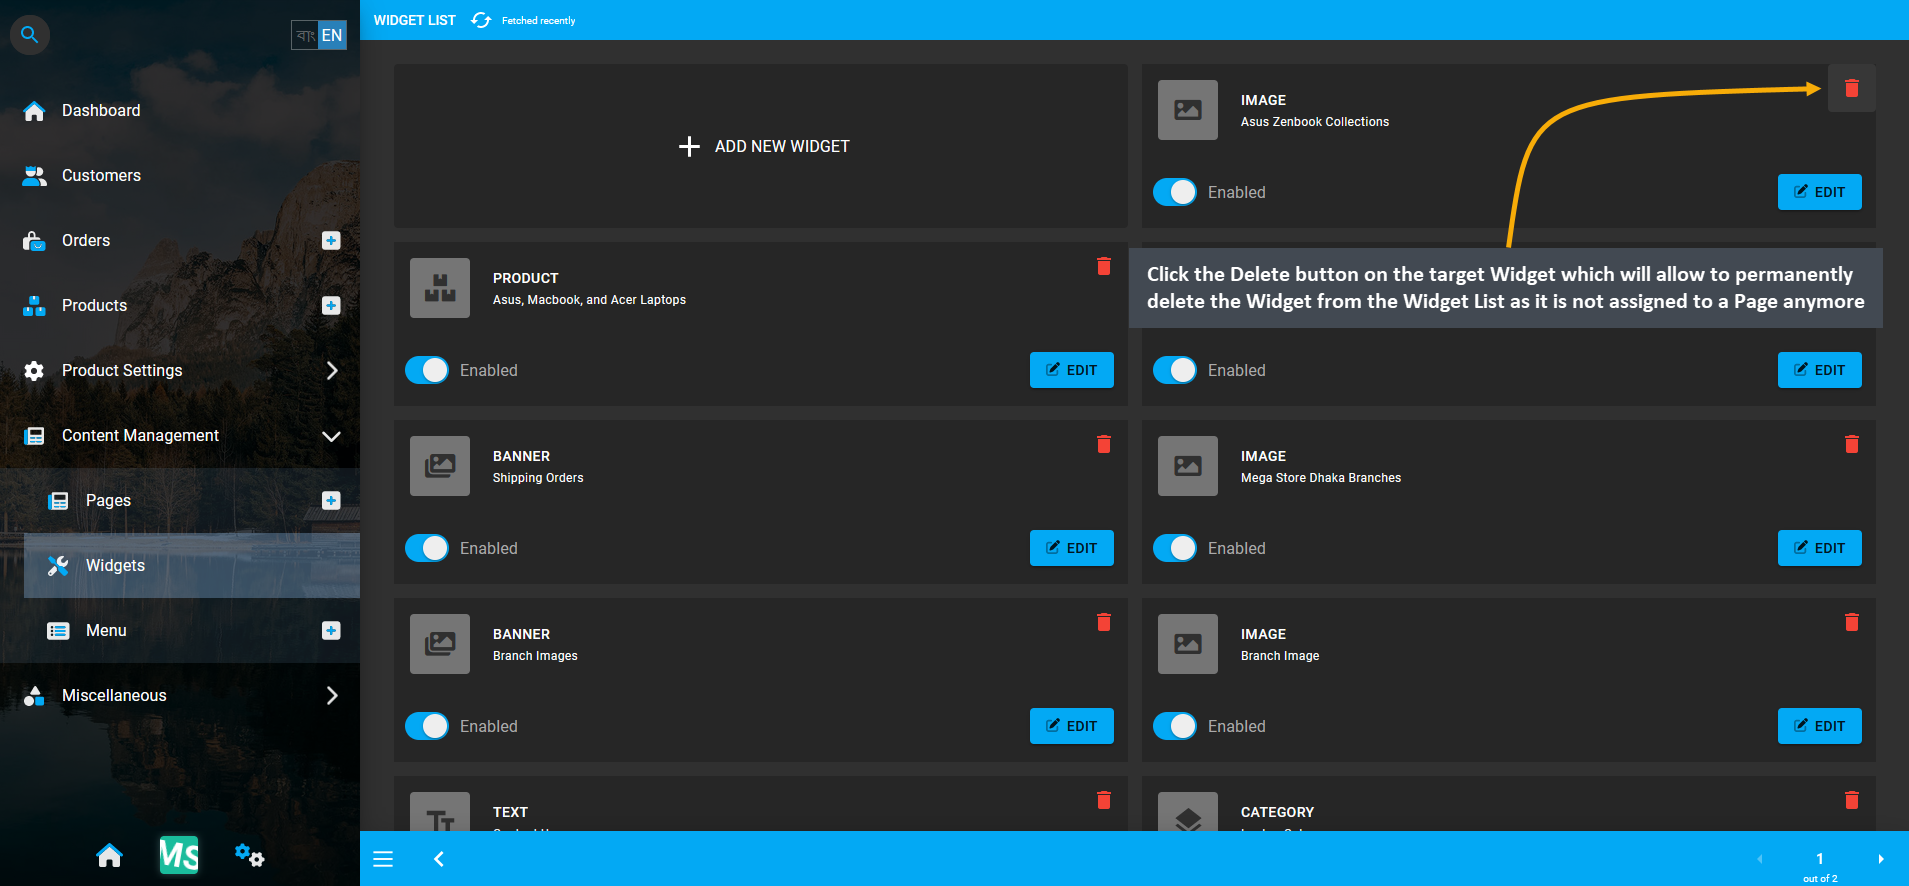
Image 25: Click Delete for target Widget that will allow to completely delete the Widget from Widget List.
So, after clicking the Delete button, a confirmation pop-up will ask if the Shop Owner wants to delete the Widget.
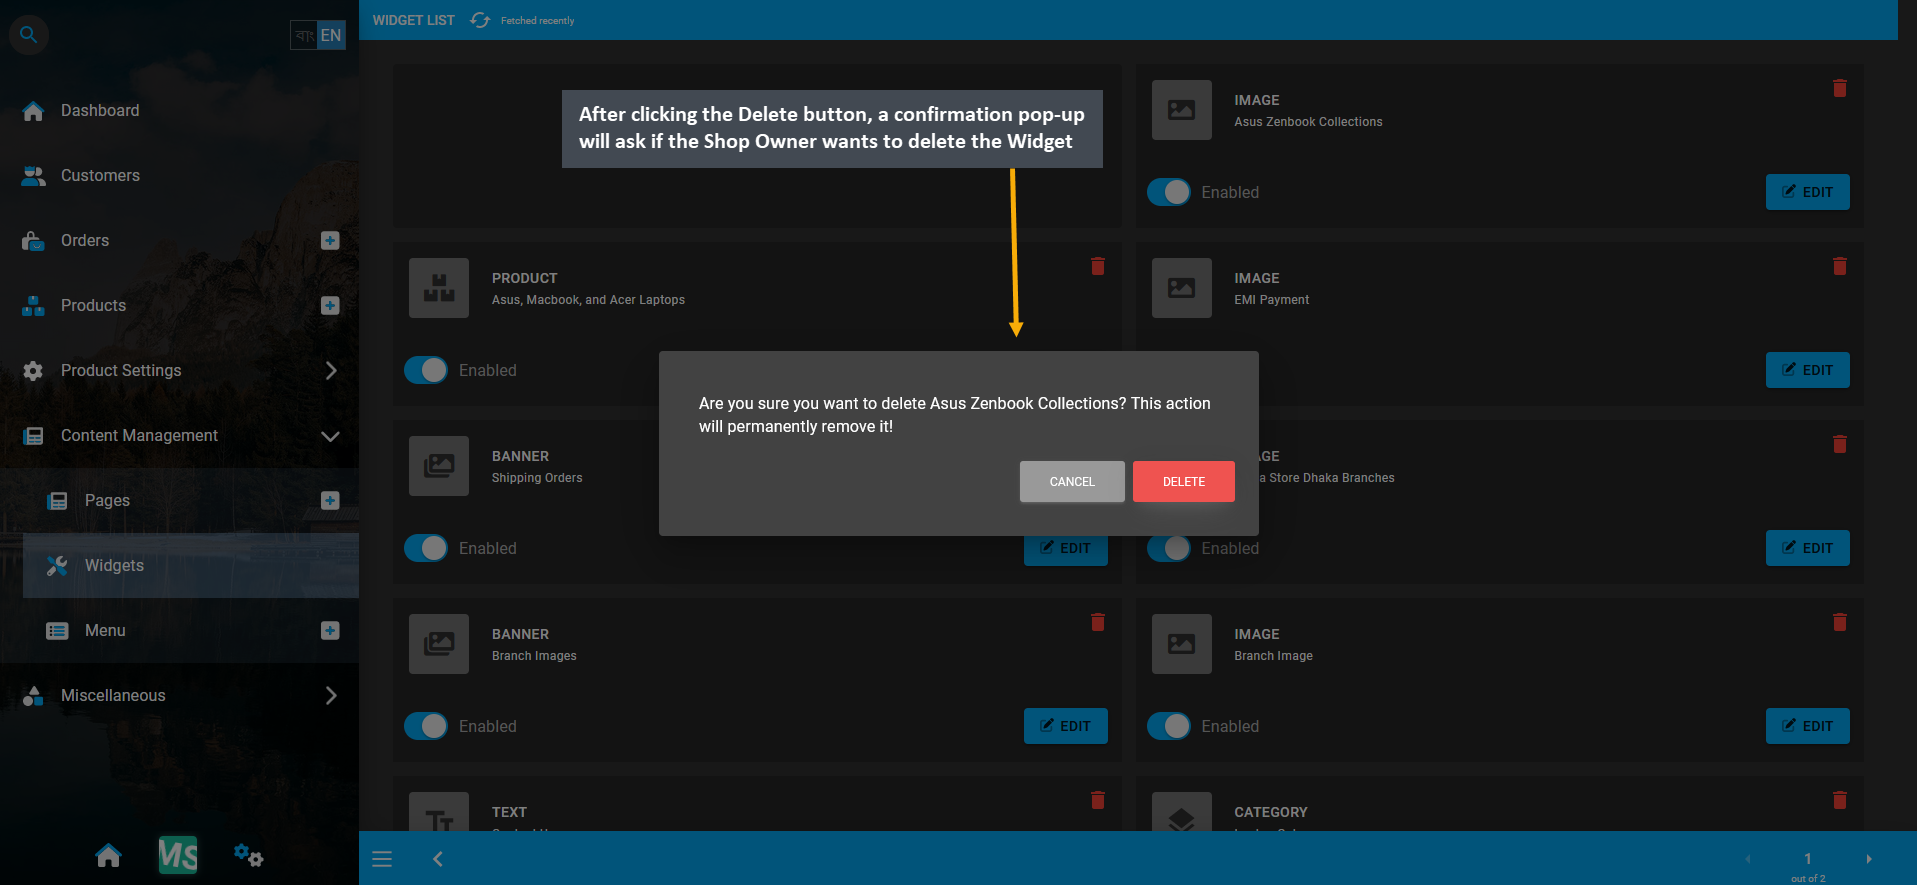
Image 26: After clicking Delete button, confirmation pop-up will ask if Shop Owner wants to delete Widget.
Confirmation pop-up will show that Widget has been deleted from Widget List which means that it can no longer be retrieved. In this way, Shop Owner can permanently delete a Widget after having it unassigned from a Page.
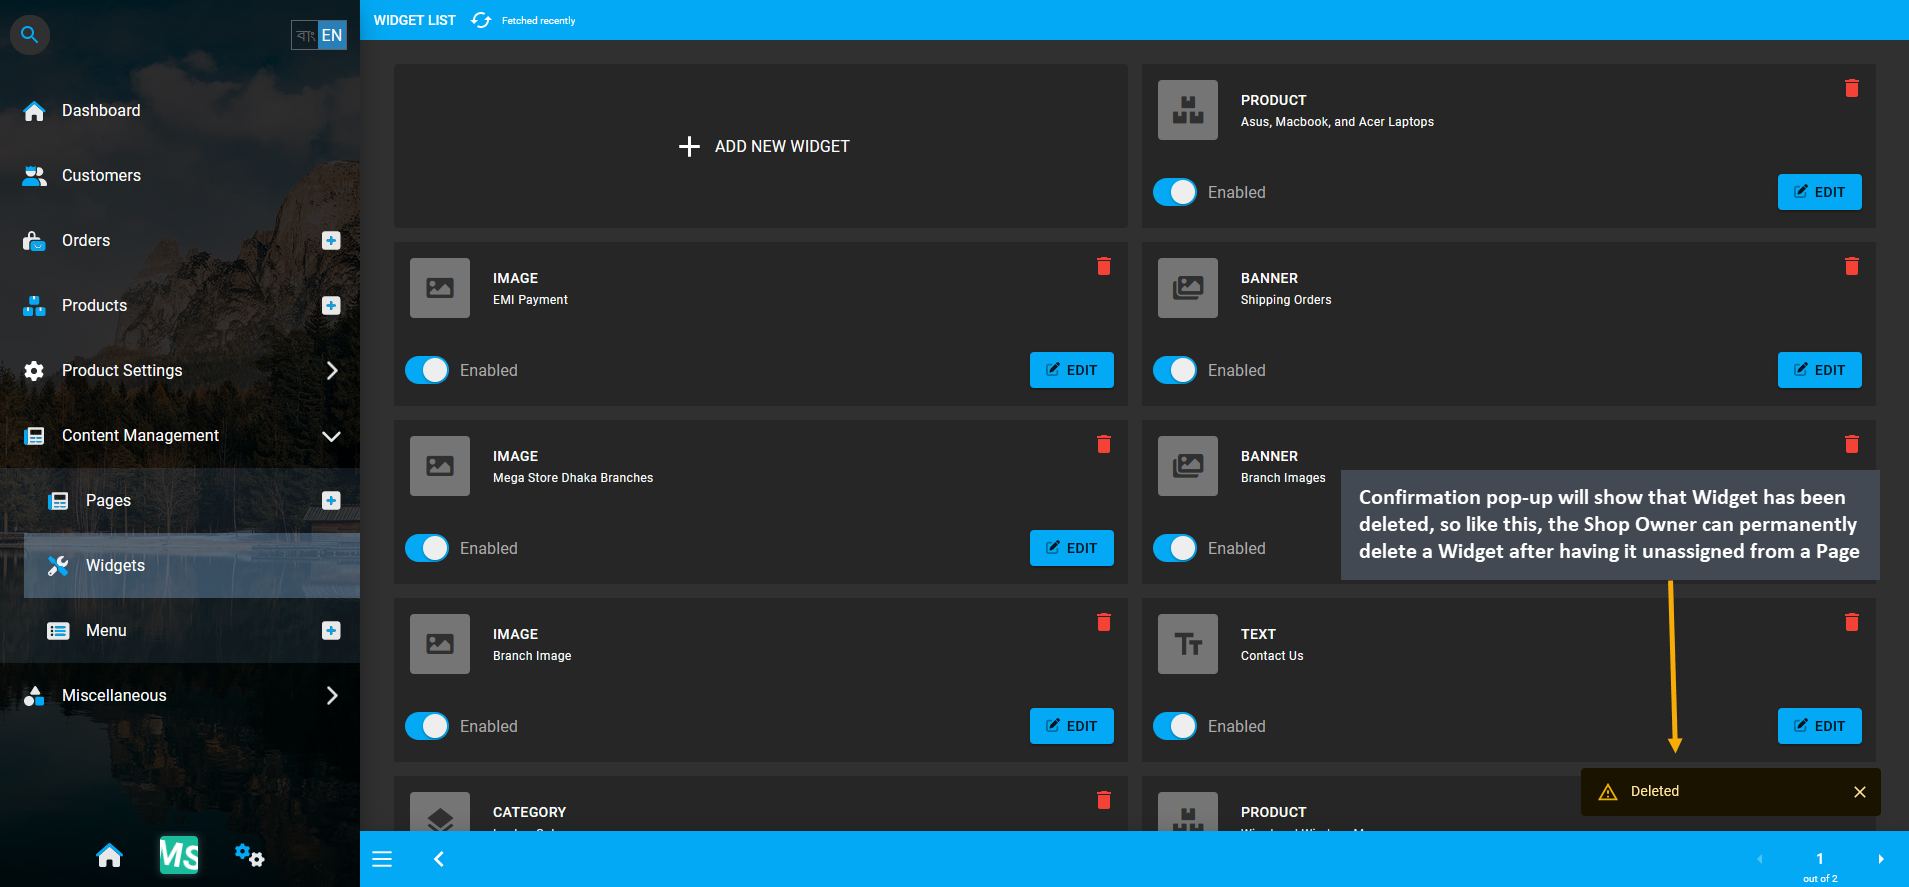
Image 27: Like this, the Shop Owner can permanently delete a Widget after having it unassigned from a Page.