Create New Customer
Create New Customer
To create New Customer, a new Order needs to be placed which will automatically create a New Customer. In order to create a New Order, go to the Orders tab, and click on the + or Order button that will open the Order Cart.
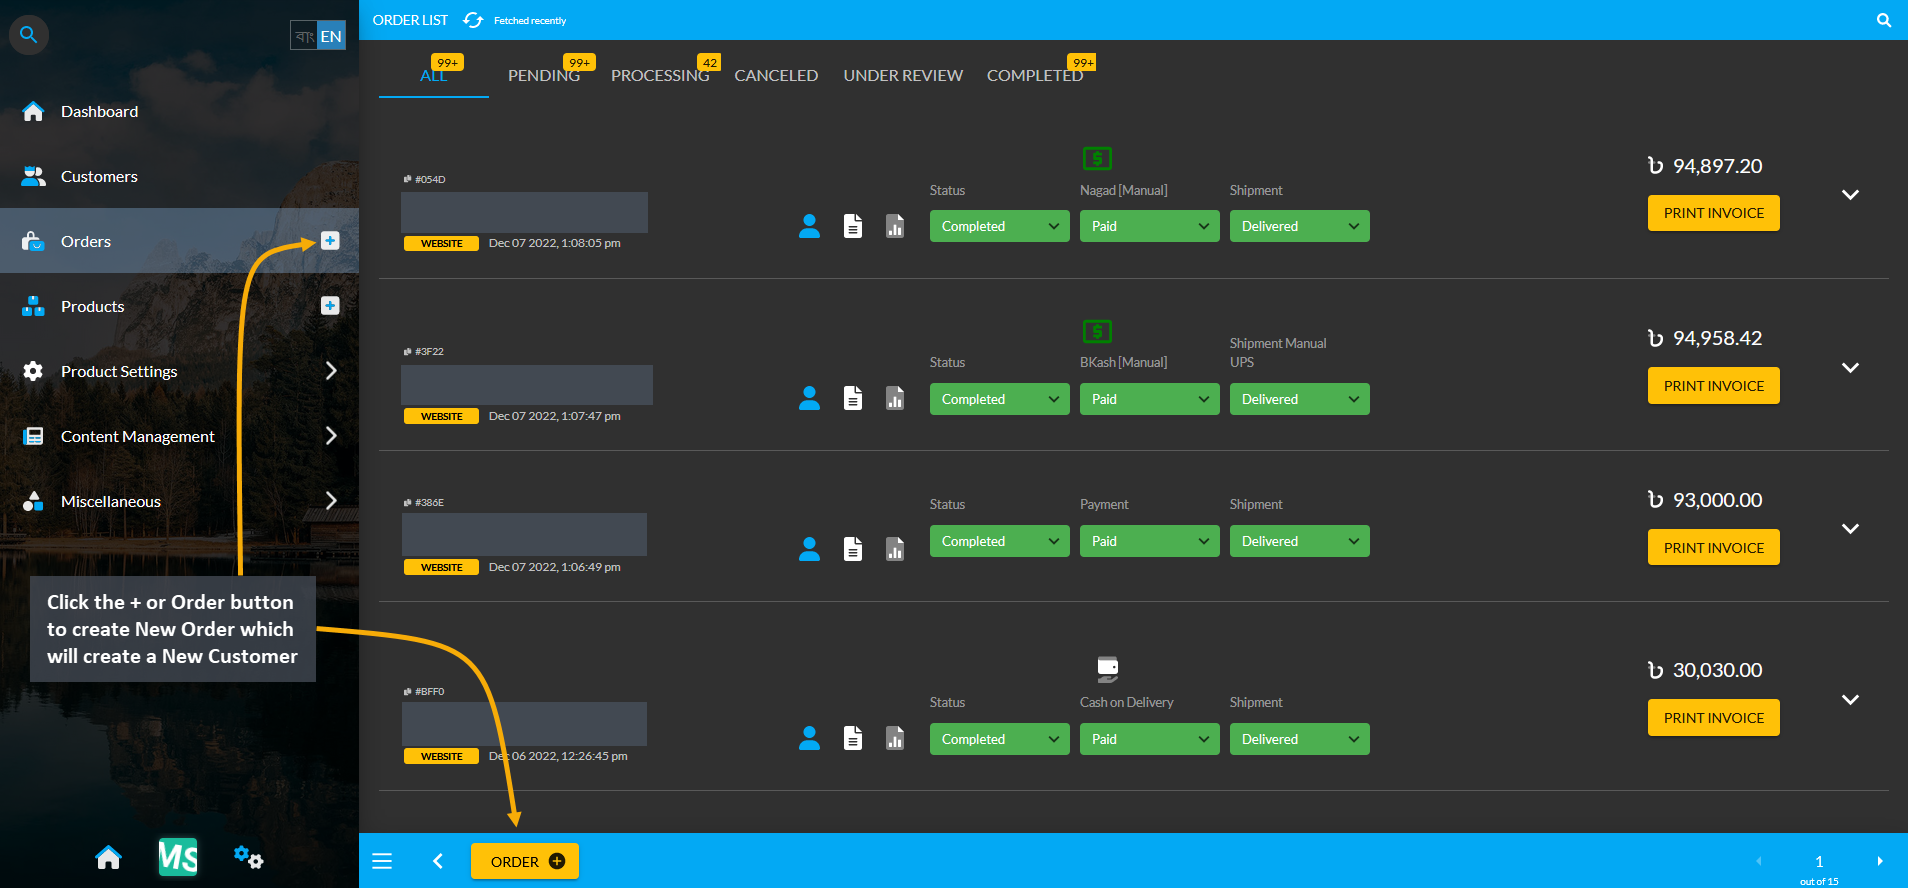
Image 1: Click the + or Order button to place a New Order which will automatically create a New Customer.
Create New Order
Clicking the Order create button will open a New Cart to place New Order. The Create Order page will open a Cart, where Customer’s contact information with name, phone, email, and shipping address needs to be filled out first. Then, search for Products under Cart and add Quantity of Products that needs to be ordered. Check the Product rate, item total, subtotal, and total. Click the Proceed button to save all changes and move to the next step.
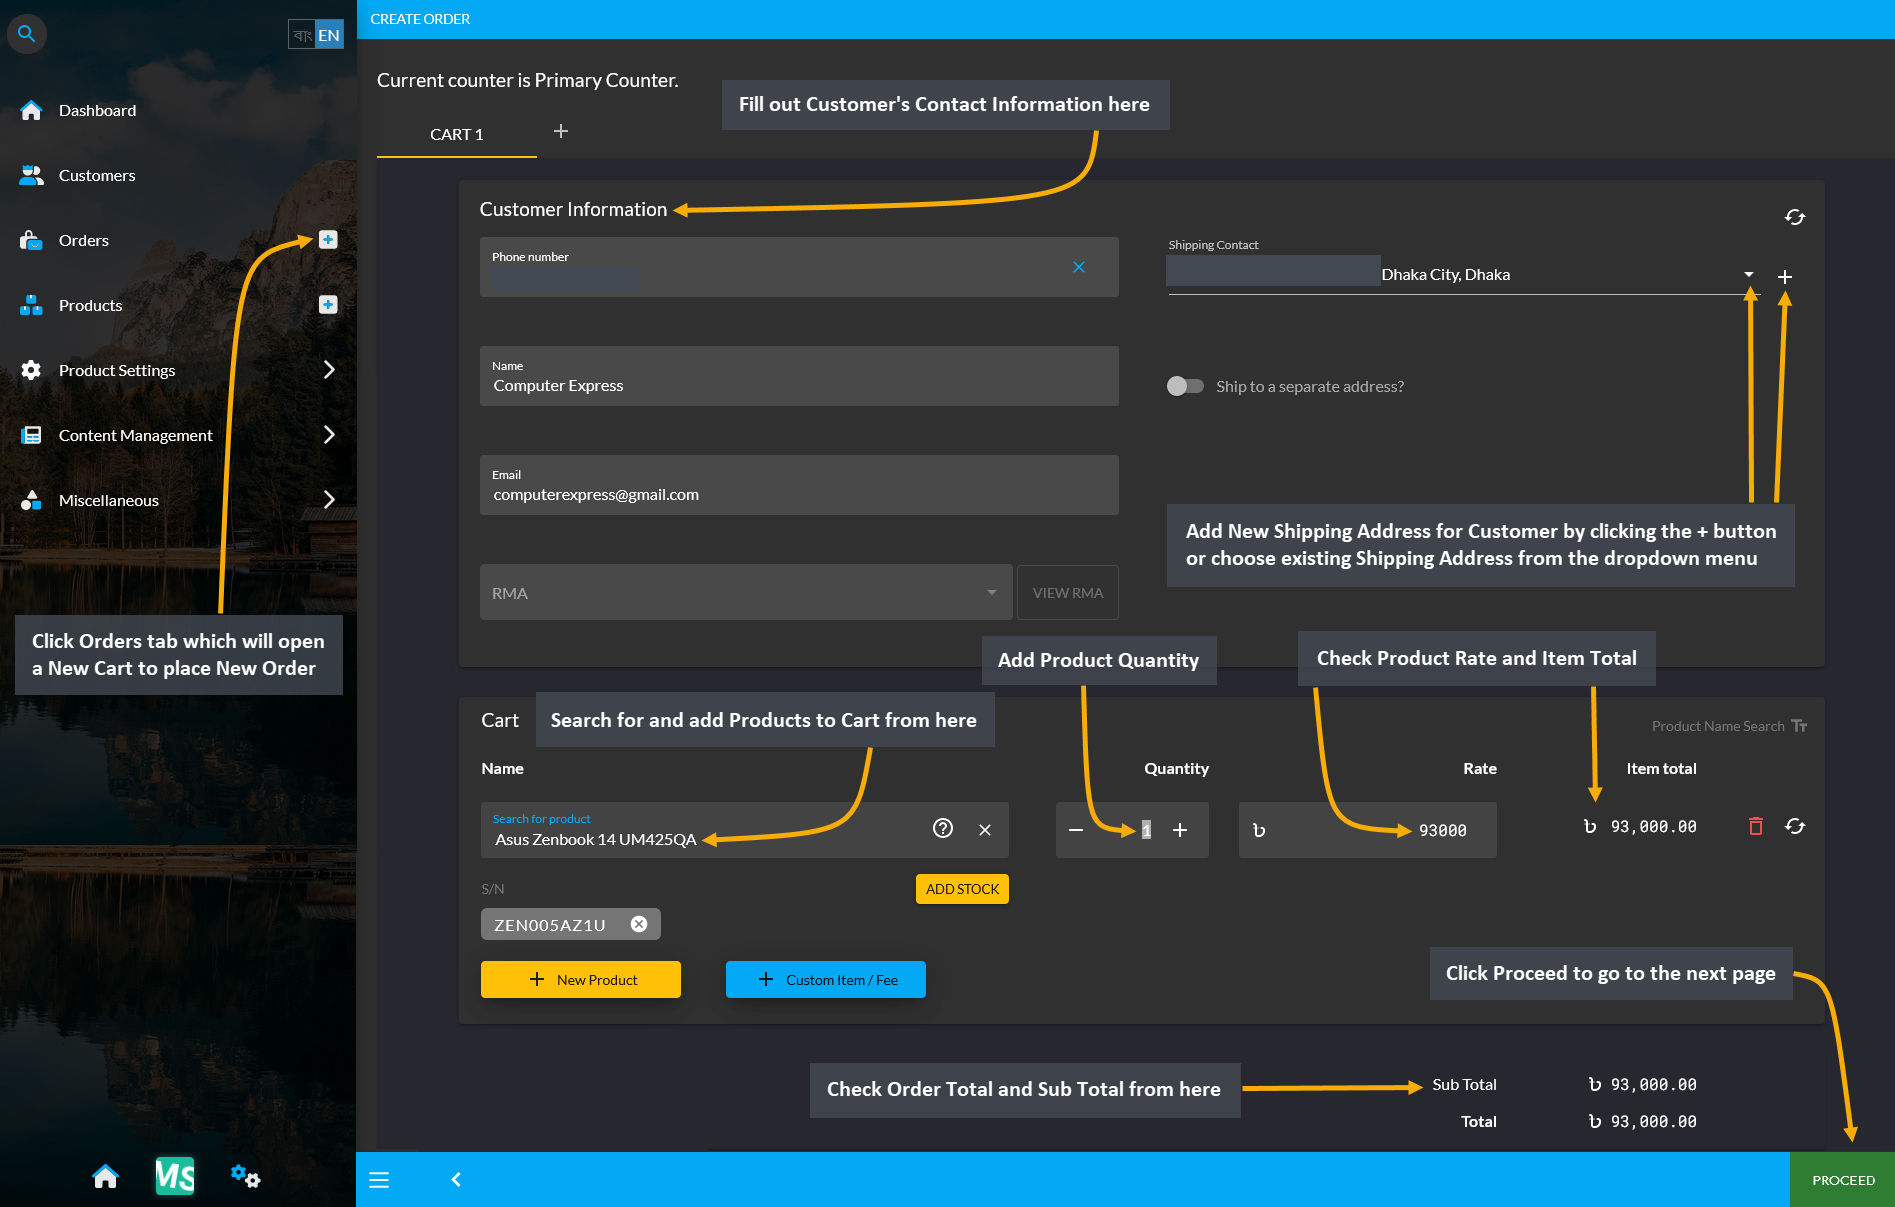
Image 2: Complete the Order Cart with Customer information and add Products to Cart with target Quantities.
Add Shipping Address
While updating the Cart, Shipping Address needs to be manually added for the first time for the Customer. Add a New Shipping Address by clicking the + button or choose existing Shipping Address for already created Customers from the dropdown menu. Fill out address, area, city, and post code fields. Click Submit to save all the changes. The Shipping details updated for Customer will automatically be added to their profile.
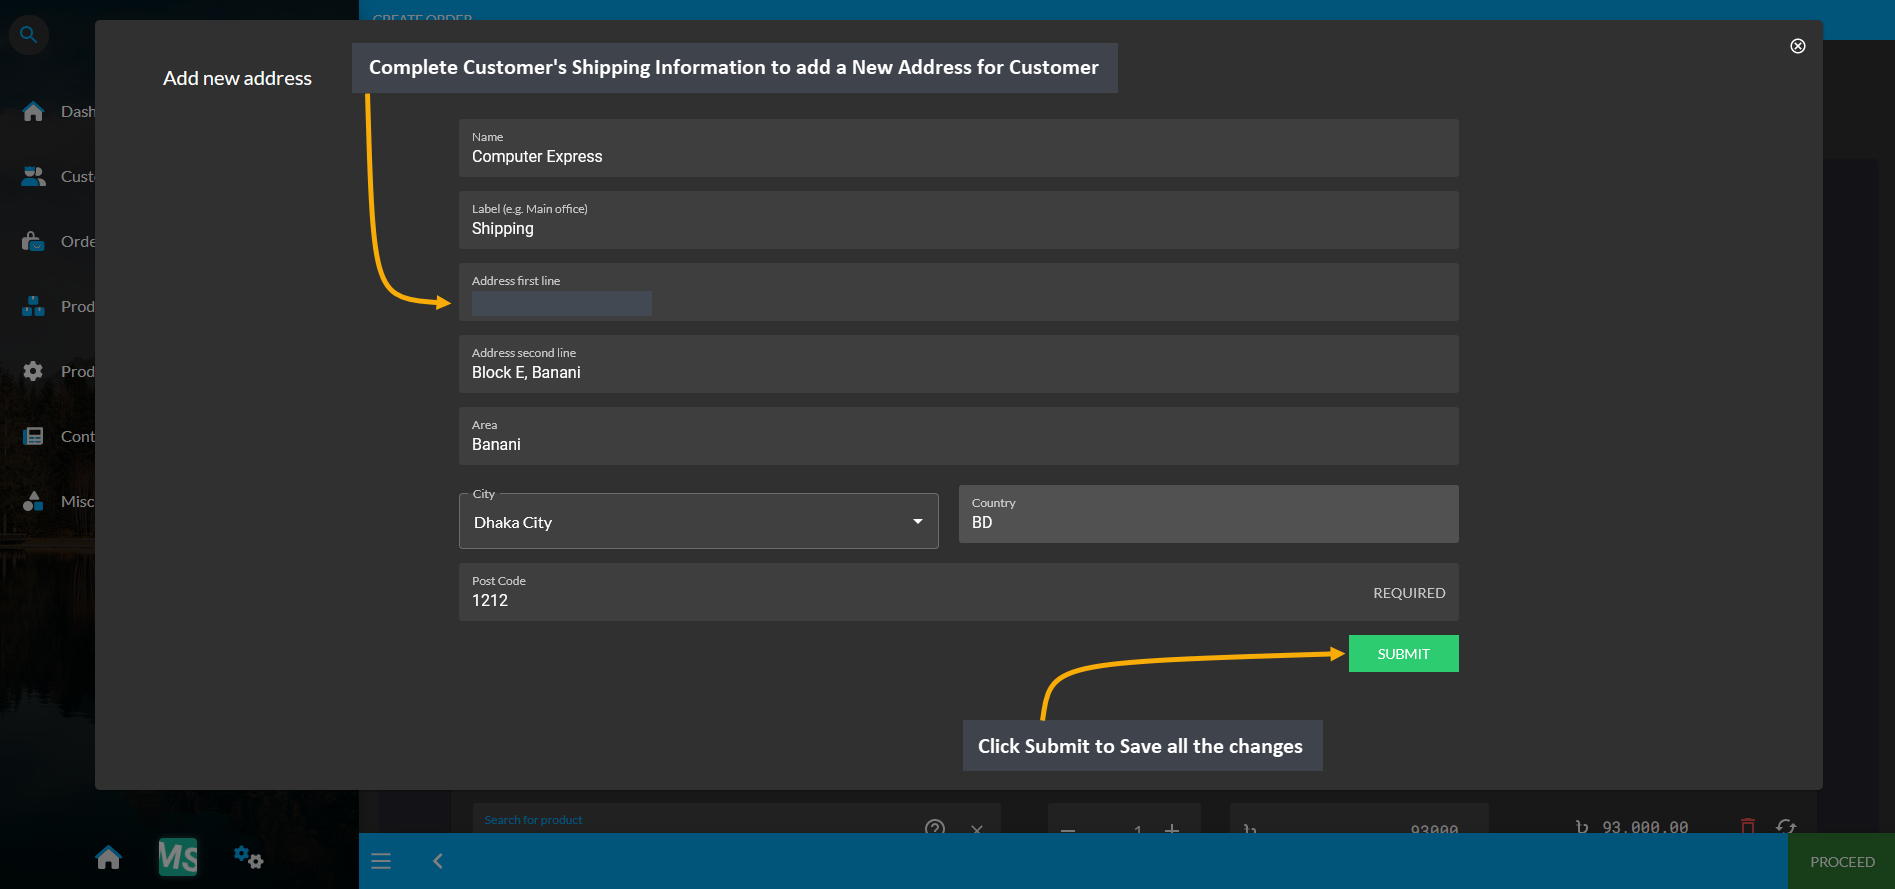
Image 3: Add New Shipping Address by clicking the + button and fill out address, area, city, and post code.
Select Shipment and Payment Options
In the next page, select a preferred Shipment and a Payment option, check Order total, and click the Confirm Order button to complete the New Order. As a result, a New Order will be placed and a New Customer will be created.
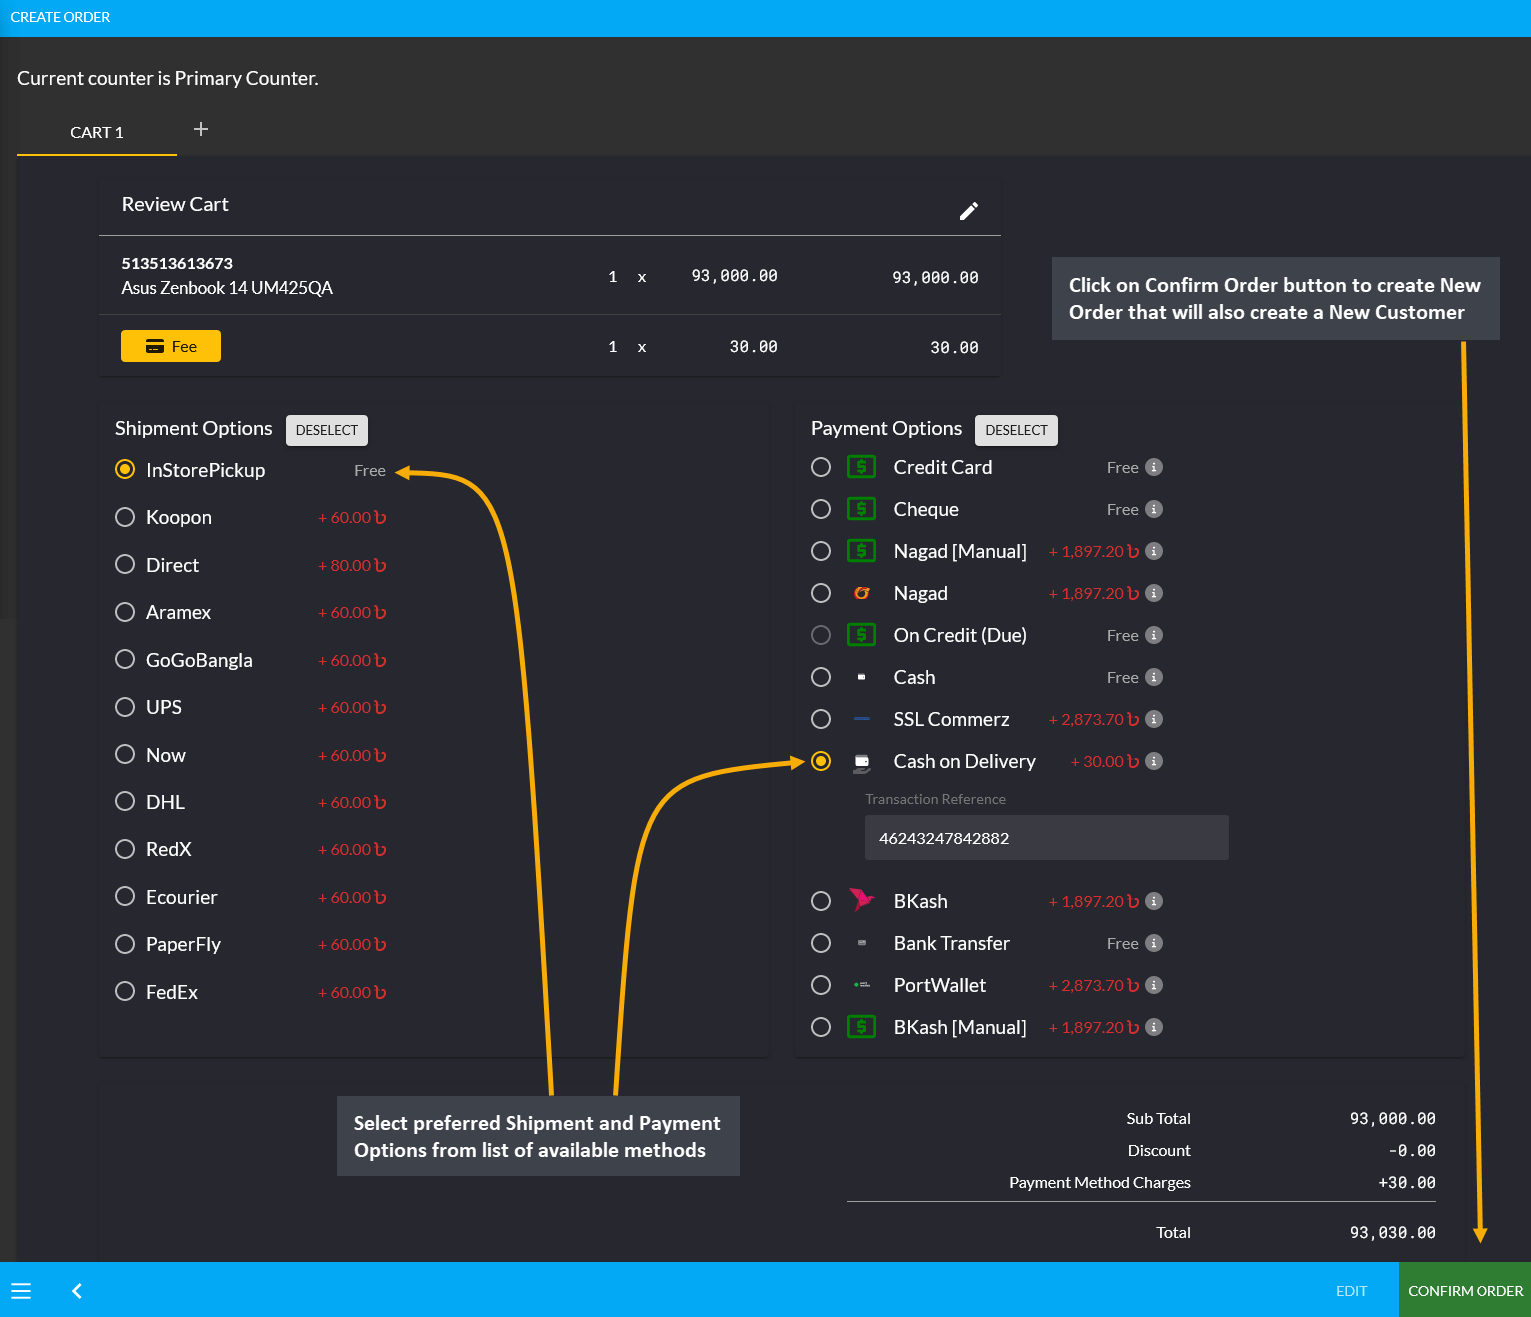
Image 4: Select preferred Shipment and Payment option, check Order total, and click Confirm Order button.
New Customer Created
Creating a New Order will automatically create a New Customer. The New Customer will now be enlisted under the All Customers List. To create a Credit Customer, click the View button that will redirect to the Customer Dashboard.
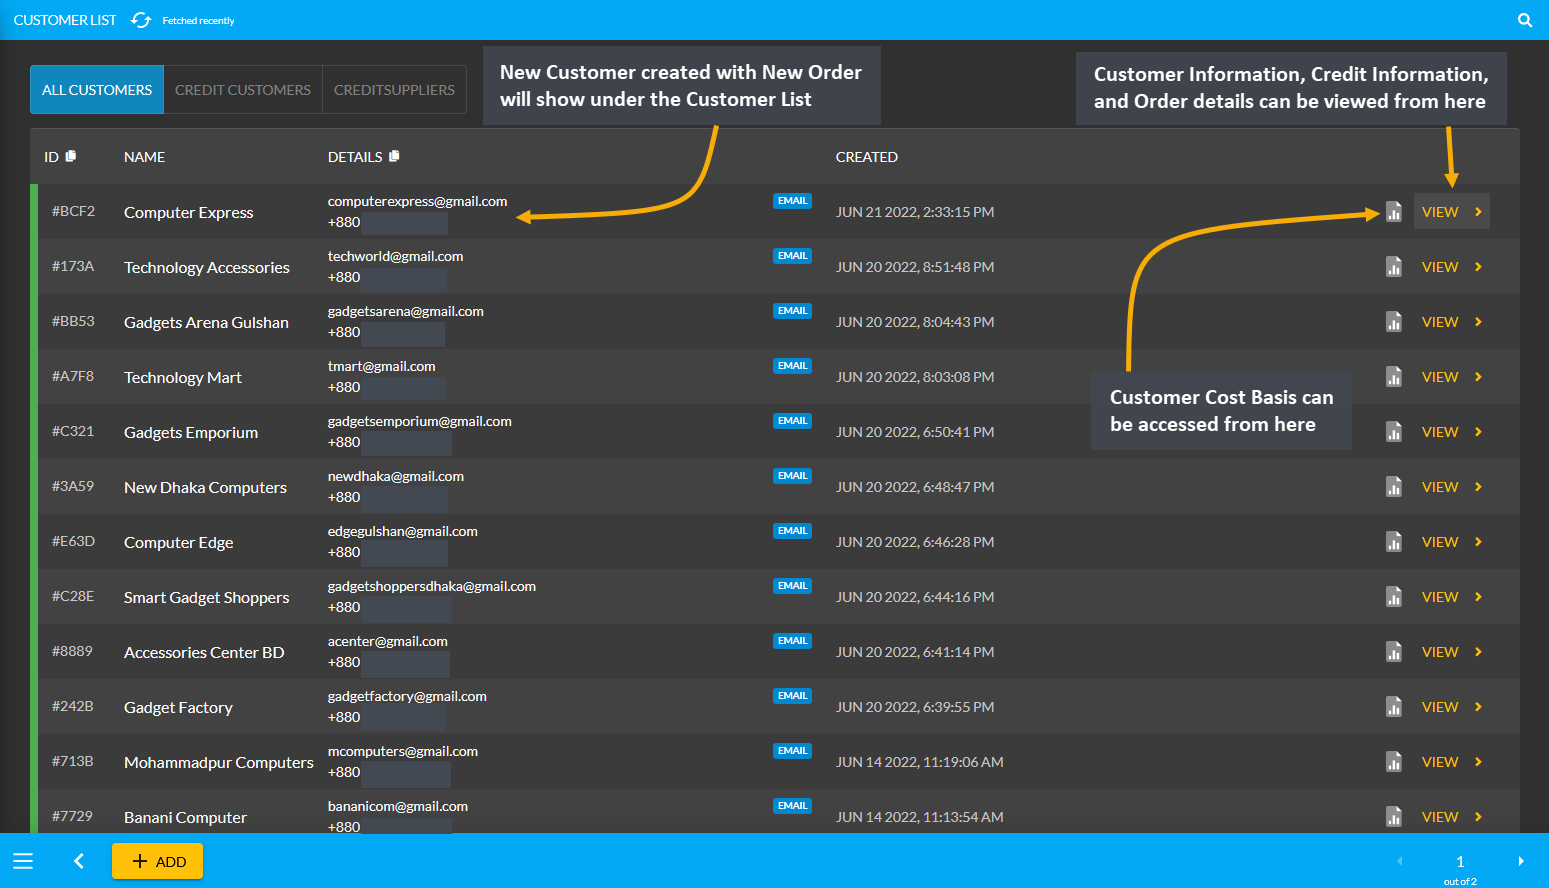
Image 5: Creating New Order will automatically create a New Customer that will be under All Customers List.
Create a Credit Customer
Customers who are granted an amount of Credit Limit will convert into Credit Customers which differentiates them from regular Customers. The list of Credit Customers can be found under Customers tab where the issued Credit Limit will be visible for each Credit Customer. Check their Credit Information by clicking on View that will redirect to the Customer Dashboard. A New Customer that is created can be converted into a Credit Customer. To create a Credit Customer, click View to go to the Customer Dashboard.
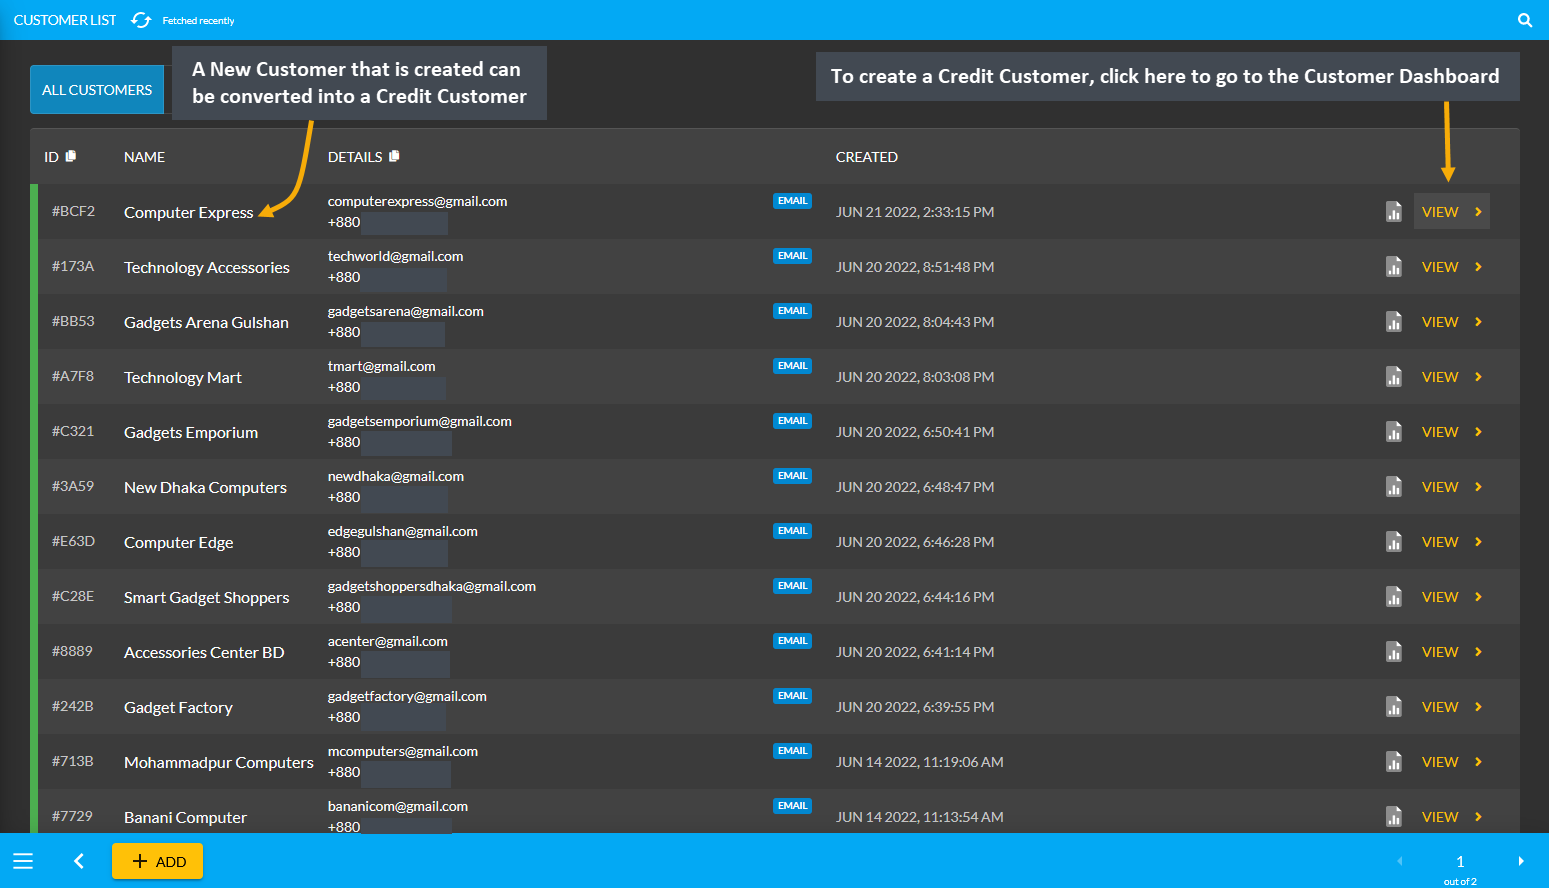
Image 6: Customers granted Credit Limit will convert into Credit Customers to use Credit to buy Products.
Credit Information Section
There is a Credit Information section in the Customer Dashboard that will display the Customer’s Credit balance. For instance, the Shop Owner trusts this Customer Computer Express (in the example), and wants to give them a Credit Limit of 15,000 BDT. To do this, the Shop Owner needs to click on the Edit icon as shown in the screenshot to open a new pop-up through which they can provide any amount of Credit Limit to this Customer.
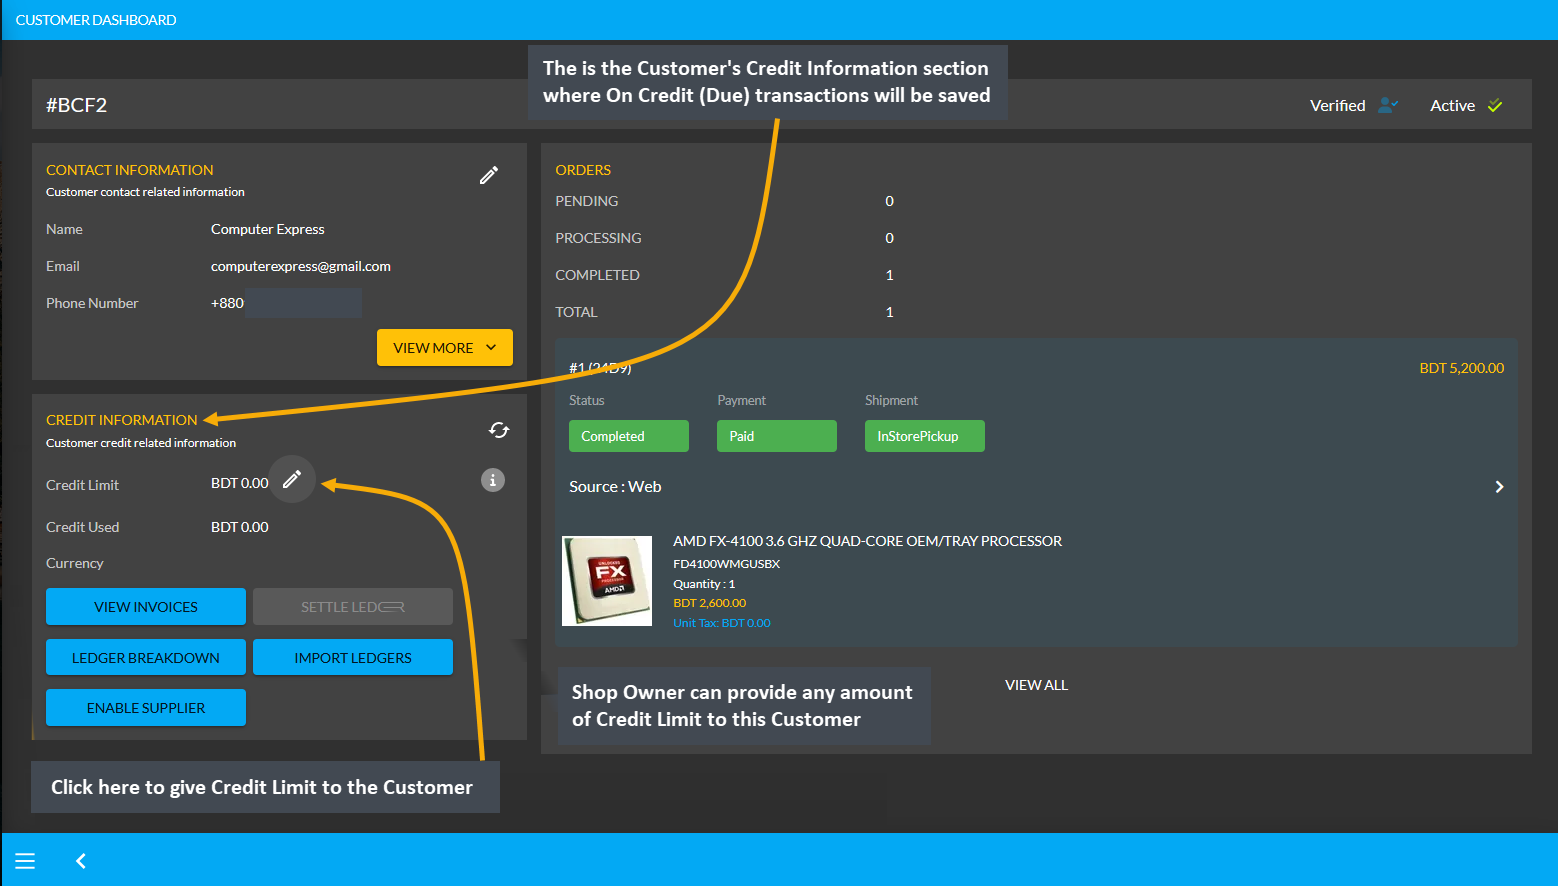
Image 7: The Credit Information section will display the Customer’s Credit balance in Customer Dashboard.
Clicking the Credit Limit icon will open a pop-up with the Customer’s details. There is a box for Credit Limit, click on it and input 15,000 BDT to provide this Credit Limit to the Customer. Also, fill out the Company Name and turn on the toggle Allowed to Use Credit to convert this Customer into a Credit Customer. Now, this Credit Customer Computer Express will be able to make purchases with Credit Limit of worth 15,000 BDT without paying upfront. The final action is to click on the Submit button to save all the changes as shown in the screenshot below.
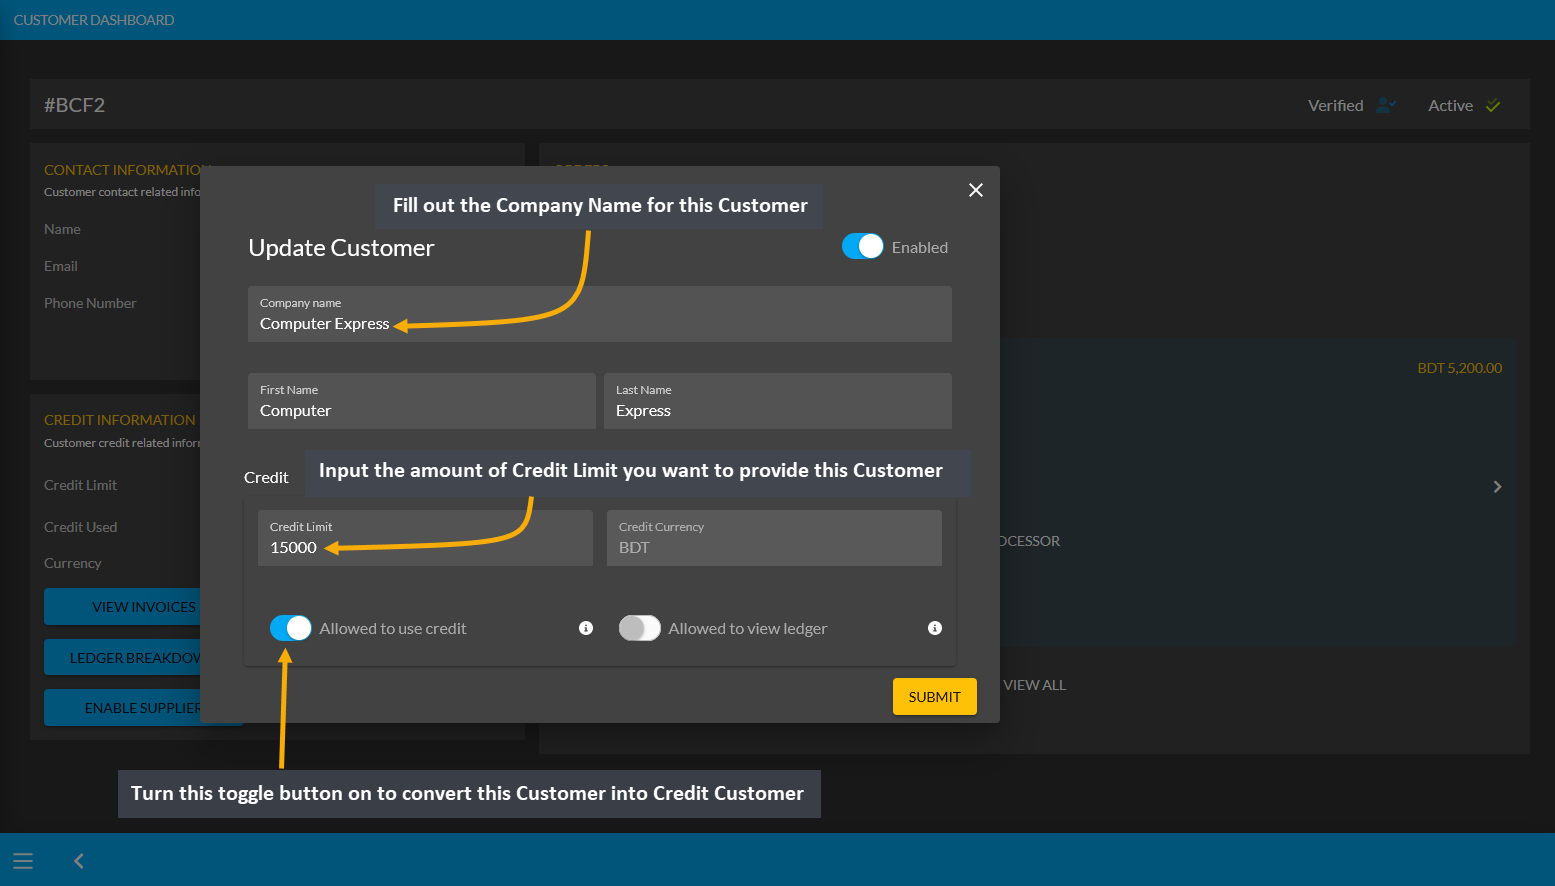
Image 8: Turn on the toggle Allowed to Use Credit to convert a Customer into a Credit Customer with Credit.
Being converted into a Credit Customer, this Customer now has a Credit Limit of 15,000 BDT. They will be able to spend this Credit Limit to make purchases without instantly paying. The Credit Limit spent will show within the Credit Used section. Customer can restore their Credit Limit of 15,000 BDT back to the Shop Owner by settling Ledger through different Payment Gateways which will clear out the Credit Used section back to 0.00 BDT.
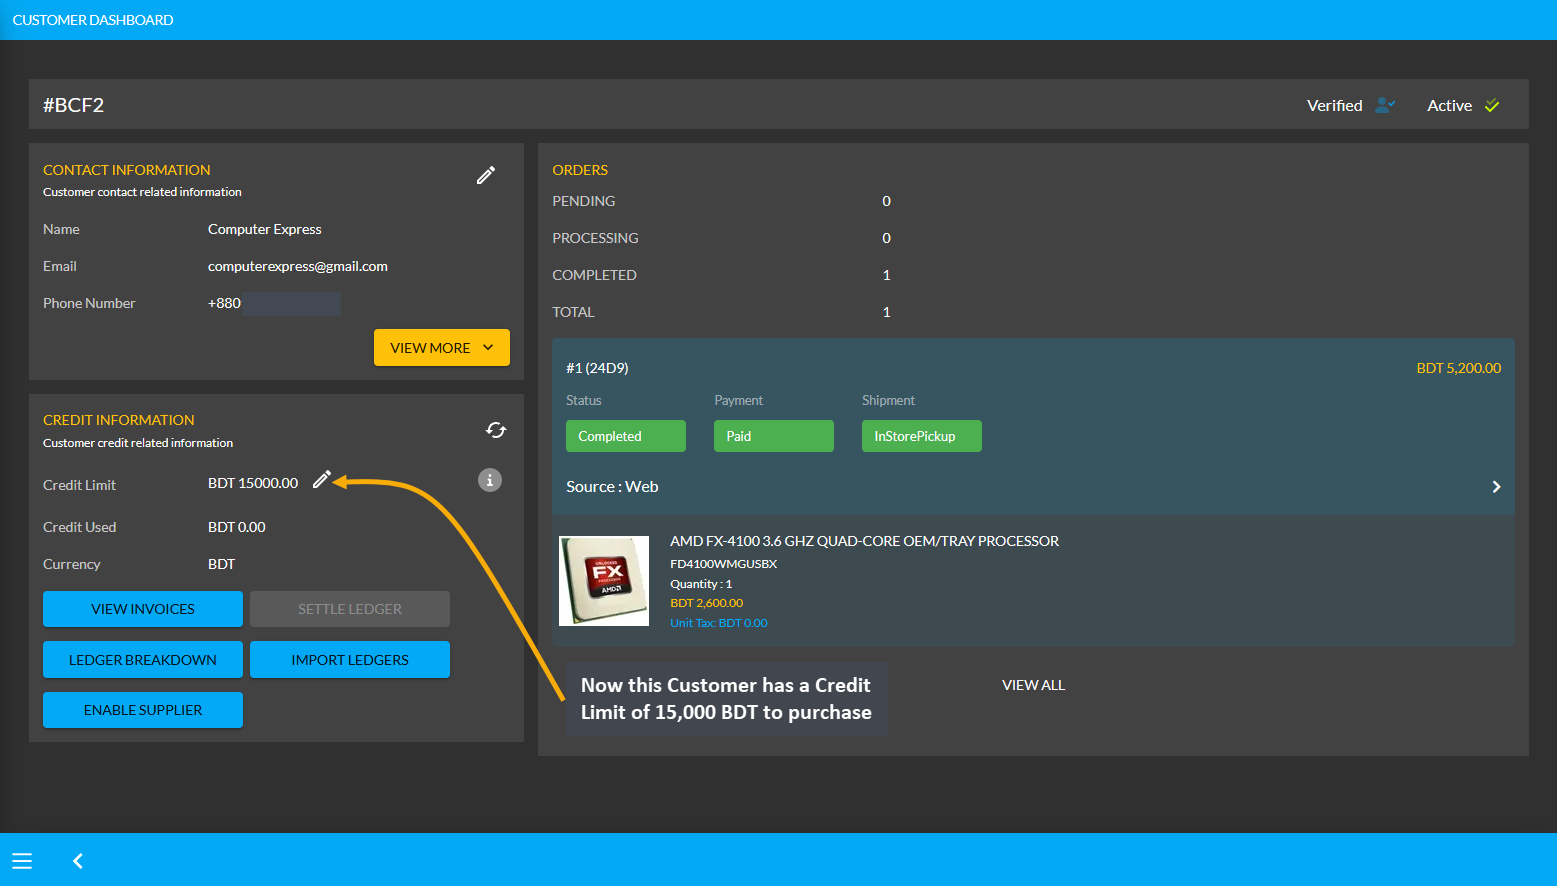
Image 9: Credit Customers will be able to spend Credit Limit to make purchases without instantly paying.
However, this Credit Limit can only be used by Customer for In Store Pickup and can be used in transaction only from the Admin Portal. The Shop Owner and their staff can only use this Credit Limit for Credit Customer during making payments with On Credit (Due) Payment Gateway for Customer’s Product purchase for In Store Pickup. Instead of showing under the All Customers List, this Customer will now show under the Credit Customers list.
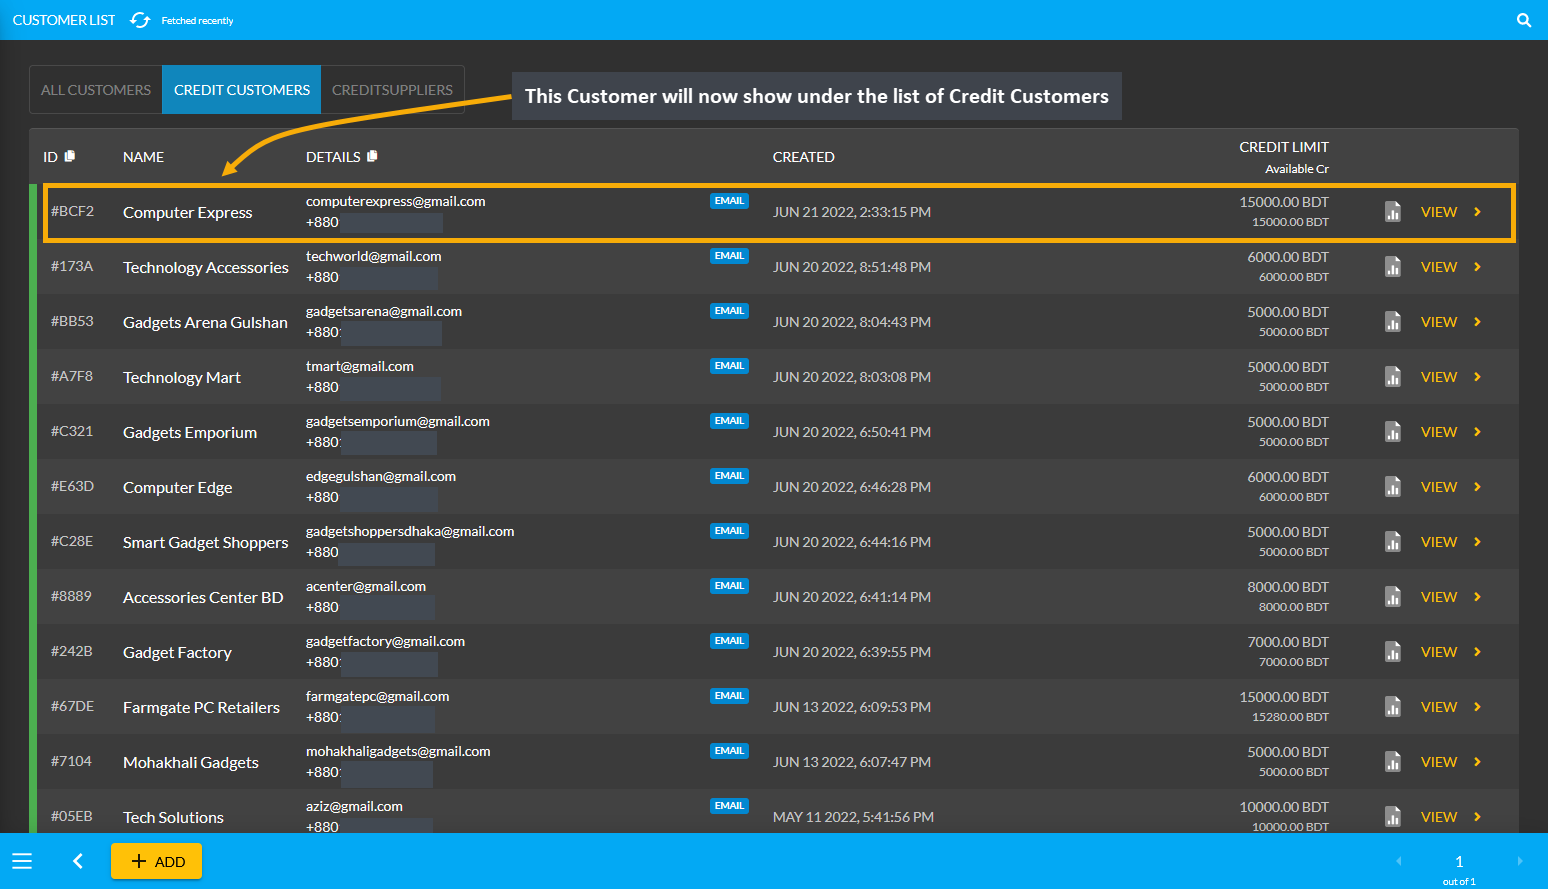
Image 10: Credit Limit can only be used for In Store Pickup and in transaction only from the Admin Portal.
Create a Credit Supplier
Credit Suppliers are companies who can buy Products from and also sell Products to the Shop Owner. They will be granted Credit Limit and also permission to Sell Products to the Shop Owner. With Credit Limit, Credit Suppliers can purchase Product(s) from the Shop Owner. Similarly, as the Supplier, they can sell Per Unit Products to the Shop Owner. Both types of transactions will reflect on their Ledger Breakdown section. Credit Suppliers could be selling Per Unit Products like RAMs, Mice, Keyboards, and flash drives etc.
Suppliers are renowned brands like Ryans Computer, UCC, or Star Tech. What differentiates the Credit Suppliers from the Credit Customers is that they have the permission to sell Products which Credit Customers do not have. Credit Suppliers can be found under Customers module where Owed amount, Due amount, and issued Credit Limit will be visible for each Credit Supplier. Create a Credit Supplier or check their Credit Information by clicking the View button to go to the Customer Dashboard.
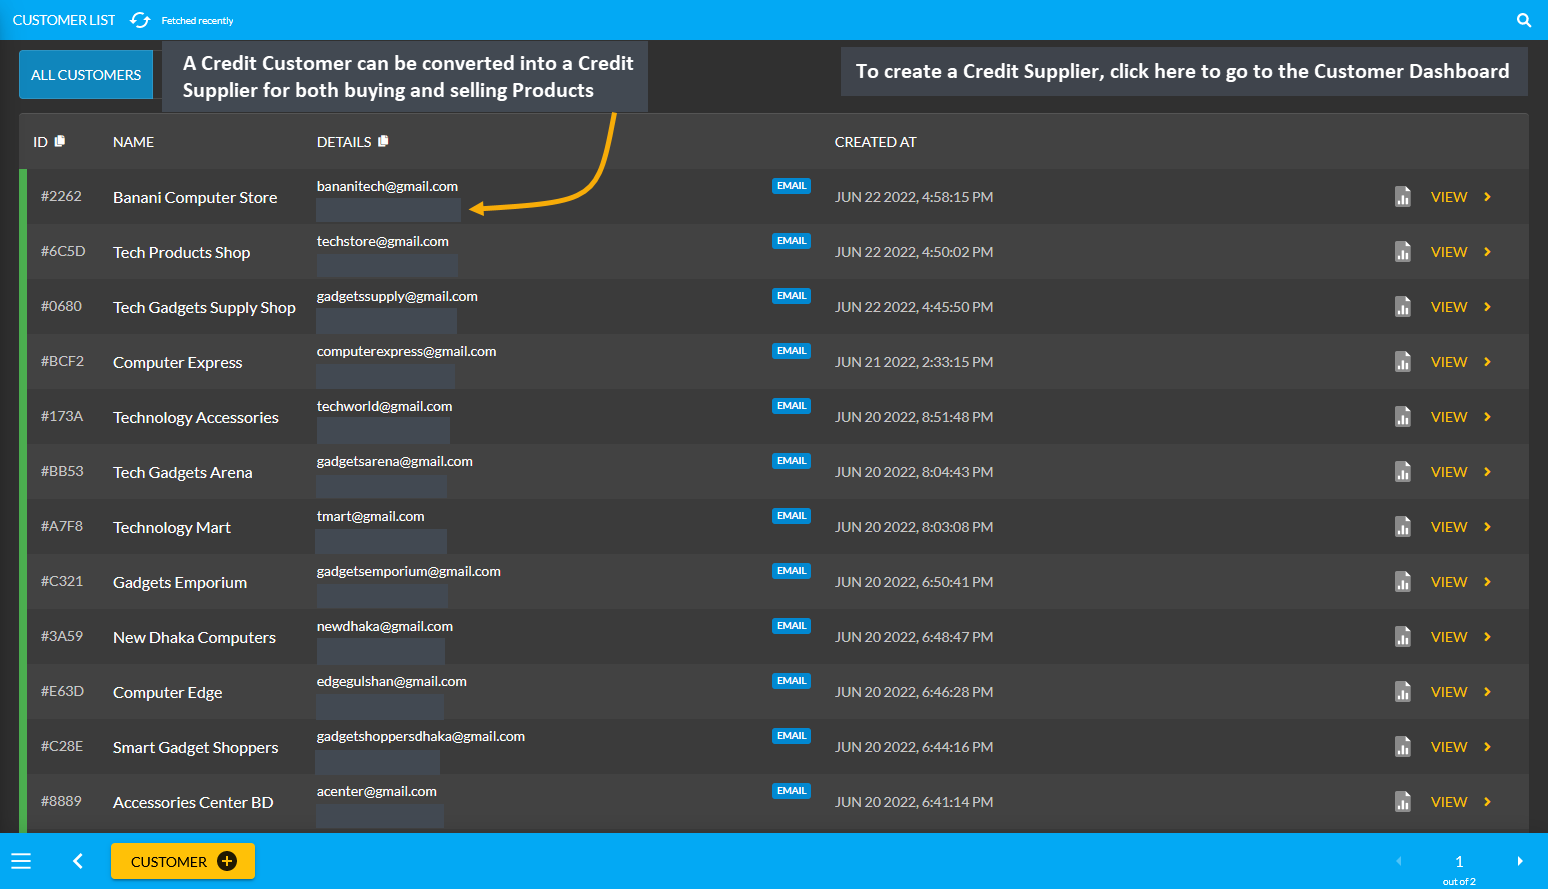
Image 11: Credit Suppliers are companies who can buy Products from and also sell Products to Shop Owner.
Credit Information Section
As discussed before, a Credit Customer will automatically be created after a New Order is placed for a Customer. Activate and provide Credit Limit to the New Customer from the Credit Information section that will convert them into a Credit Customer. Now, to convert this Credit Customer Technology Accessories into Credit Supplier, click the Enable Supplier button from Credit Information on Customer Dashboard as shown in the example below.
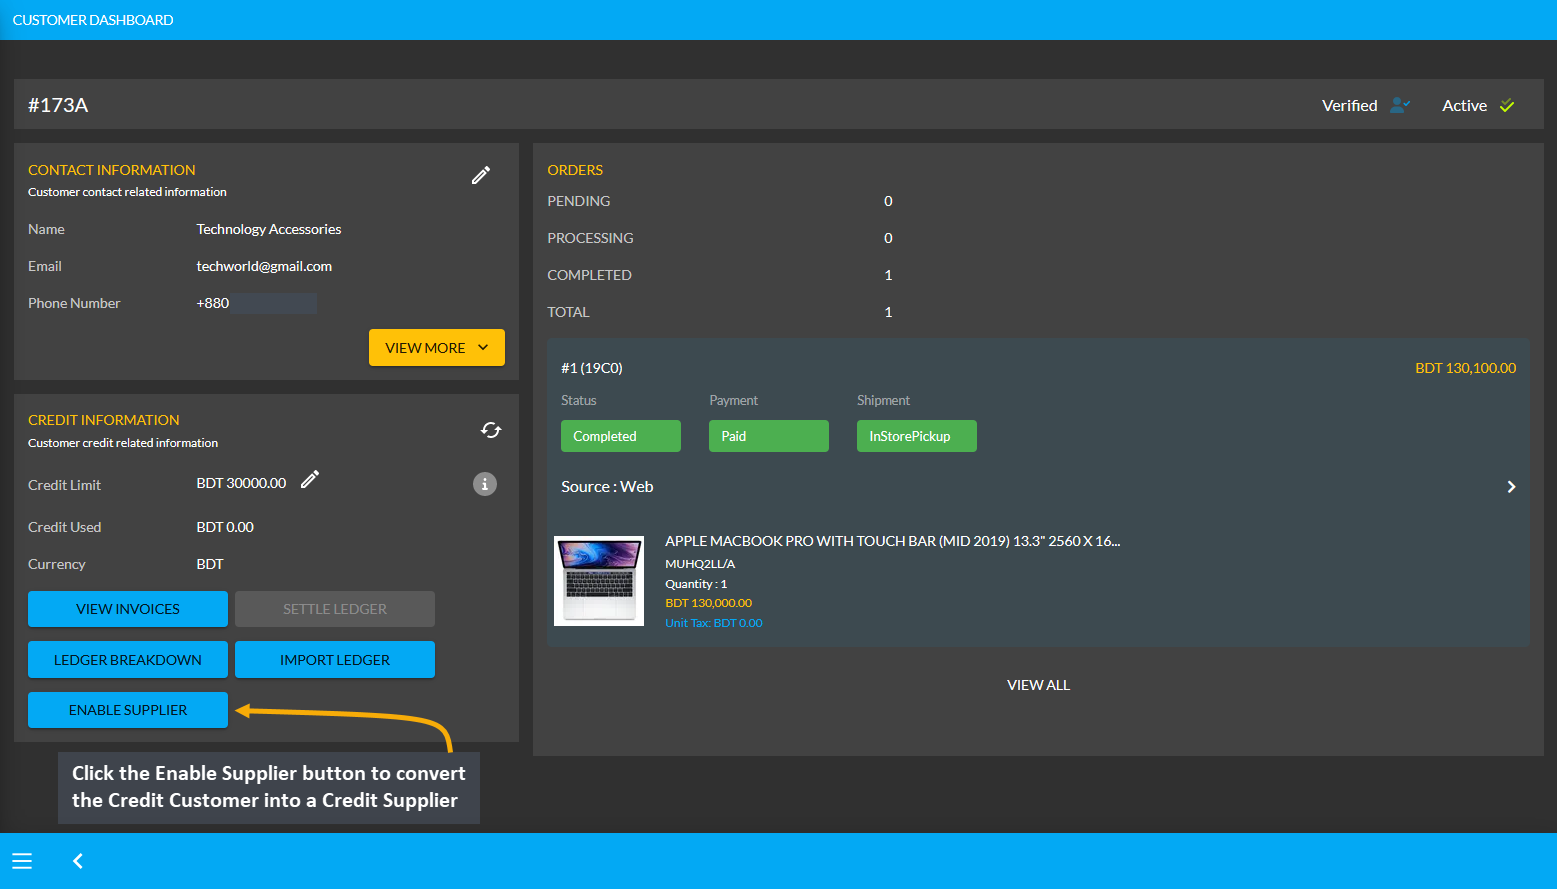
Image 12: Click Enable Supplier button to convert Credit Customer into a Credit Supplier from Dashboard.
The New Supplier will appear as a Credit Supplier under the Credit Supplier List as shown in the example below.
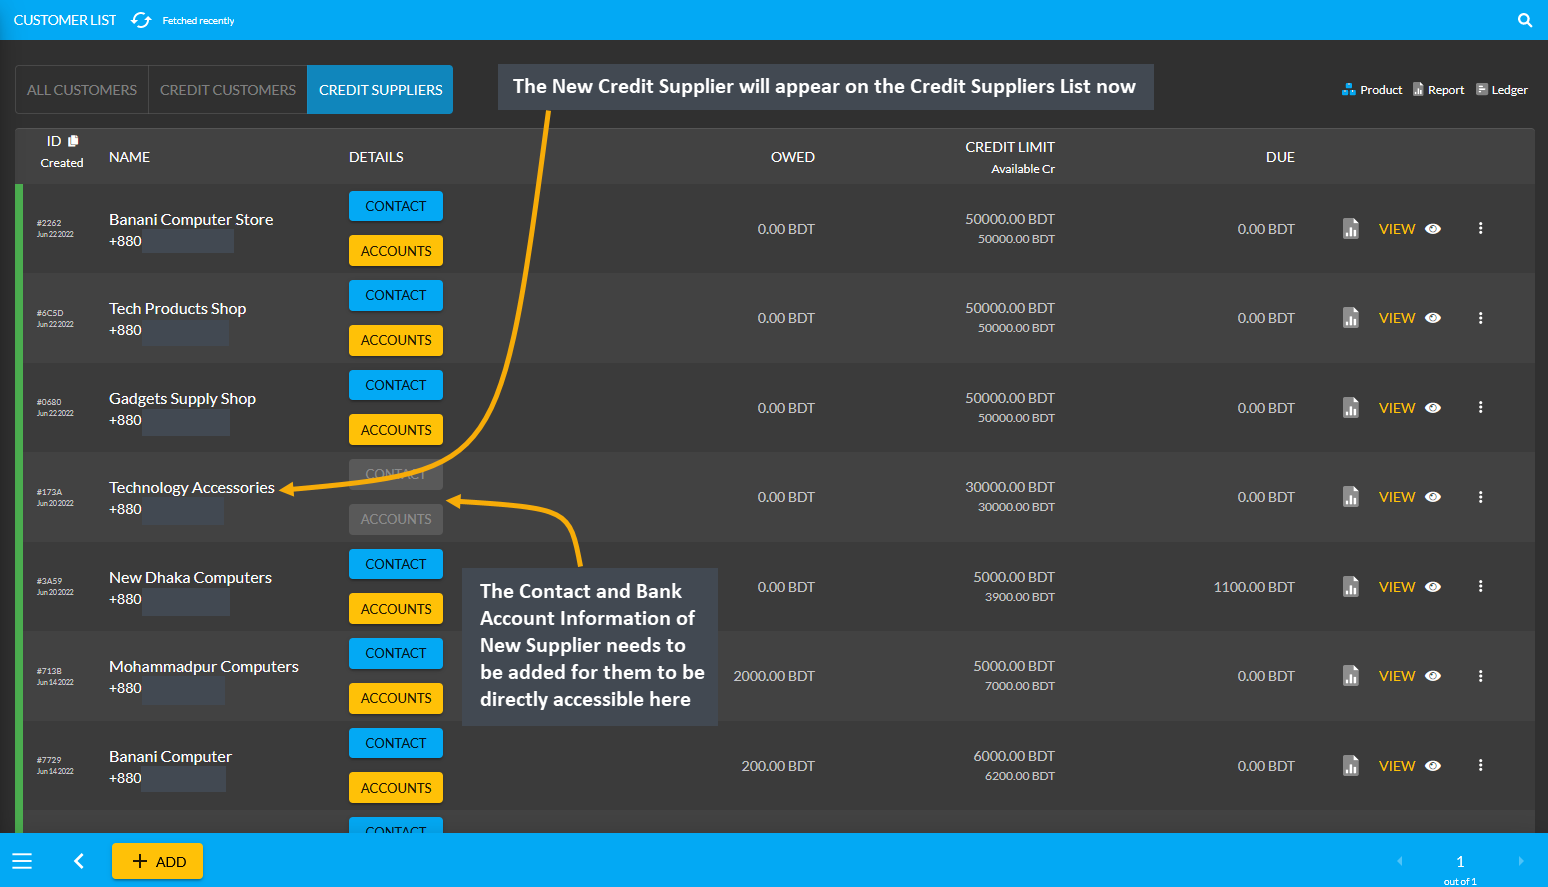
Image 13: The New Supplier will appear under the Credit Supplier List with Contact and Bank Information.
Edit Contact and Bank Account Information for Credit Supplier
When the Credit Supplier is created, they will have a Supplier Information section added to their Dashboard. From here, the Contact information and Bank Account information can be added for the Credit Supplier. Click the Edit icon on the Supplier Information section that will redirect to a new page to update contact and bank details.
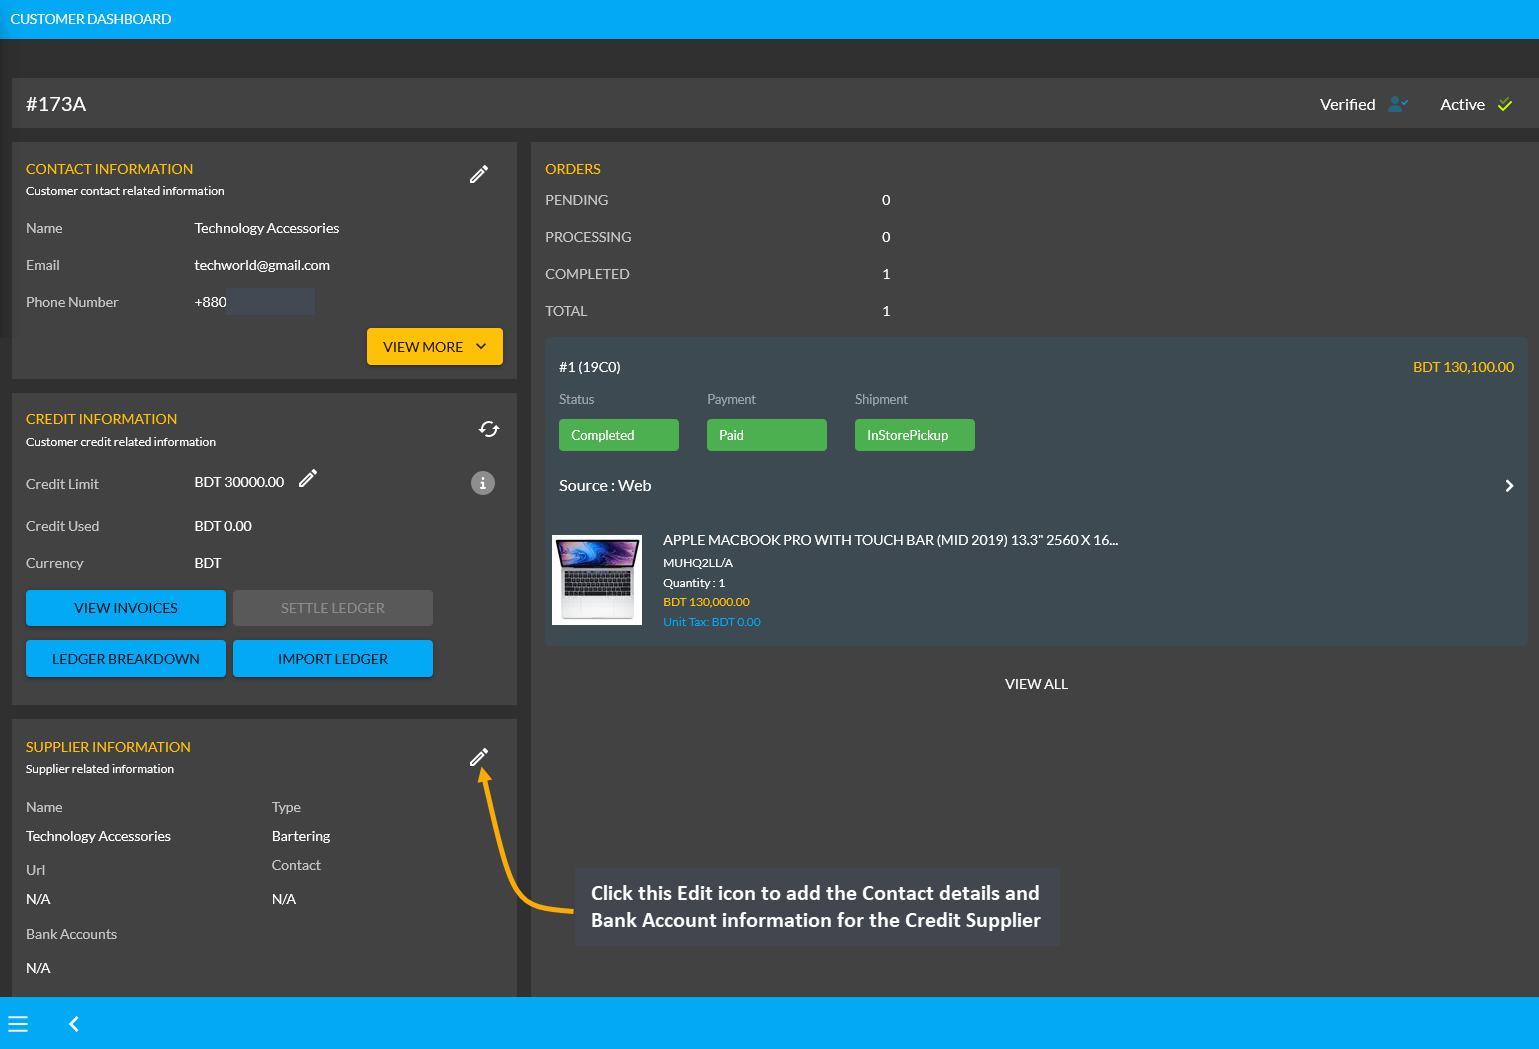
Image 14: A Credit Supplier will have a Supplier Information section on their Dashboard that can be edited.
On Edit Supplier page, the first field is to fill in the Name and Website Address of Credit Supplier. After that, there are Contact and Bank Account boxes with the + button, clicking on which will allow adding Contact Details and Bank Accounts of the Supplier. Several bank account information can be added if they have various bank accounts.
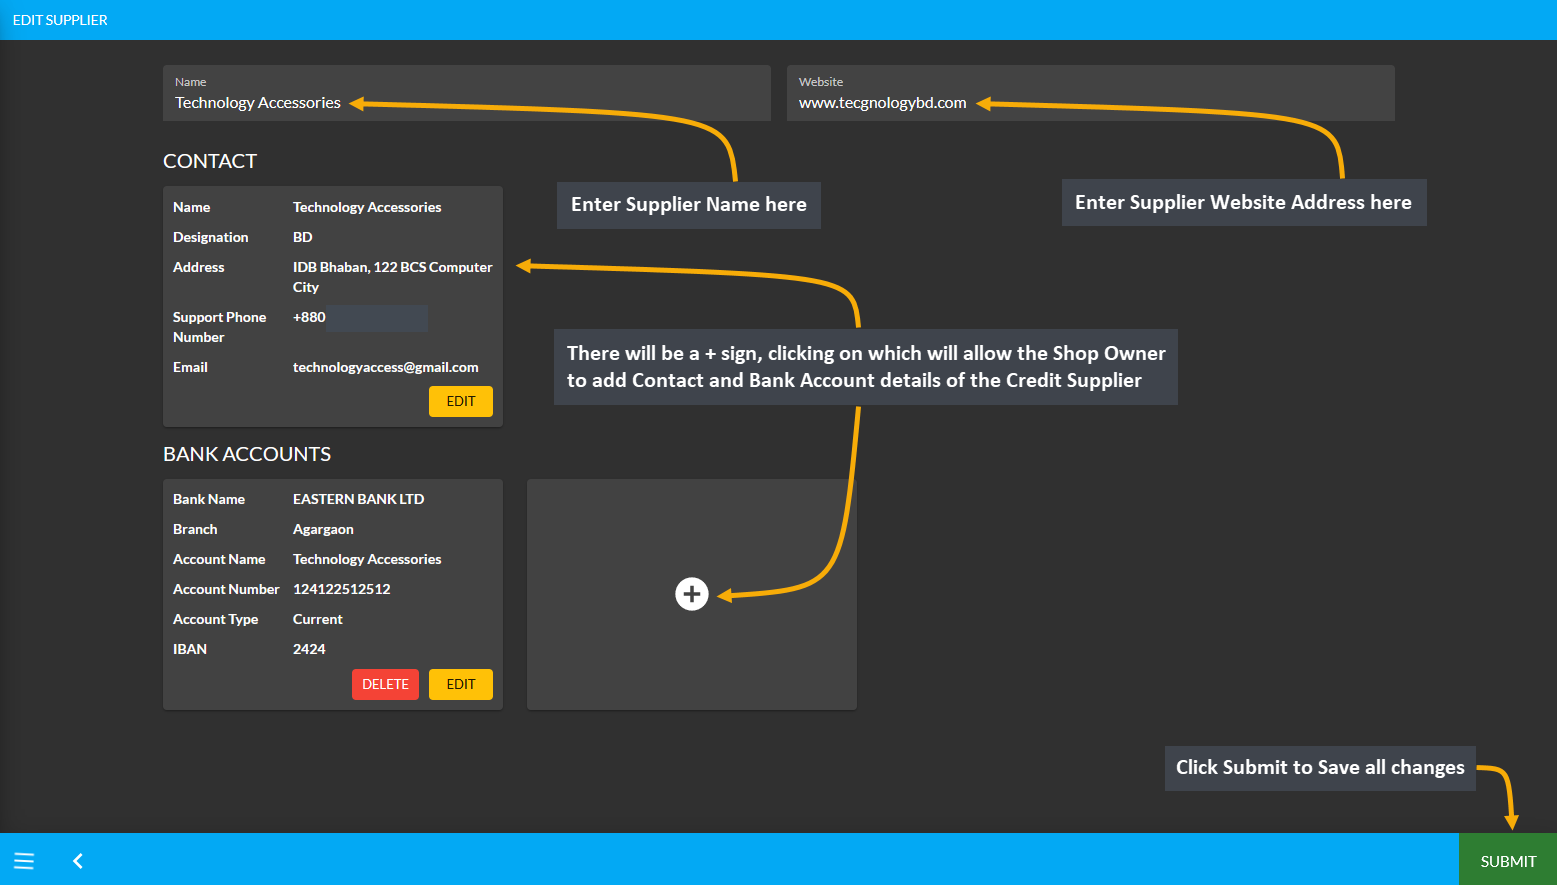
Image 15: On Edit Supplier page, fill out Name, Website, Contact Details, and Bank Accounts of Supplier.
Edit Credit Supplier Contact Details
Clicking the + button over Contact Details will open a pop-up to edit Contact List. Fill the First Name, Last Name, and Current Designation, Phone and Email first. Then, select the type of Contact for Supplier like Home, Work, Shipping, Billing, Support, Other, or Supplier that best describes the Supplier contact type. On Address Section, write down the address in first line and second line. Set the Label, Area, Post Code, City, and Country for the Supplier Address. Then, click Add to save all changes for the contact information of the Credit Supplier.
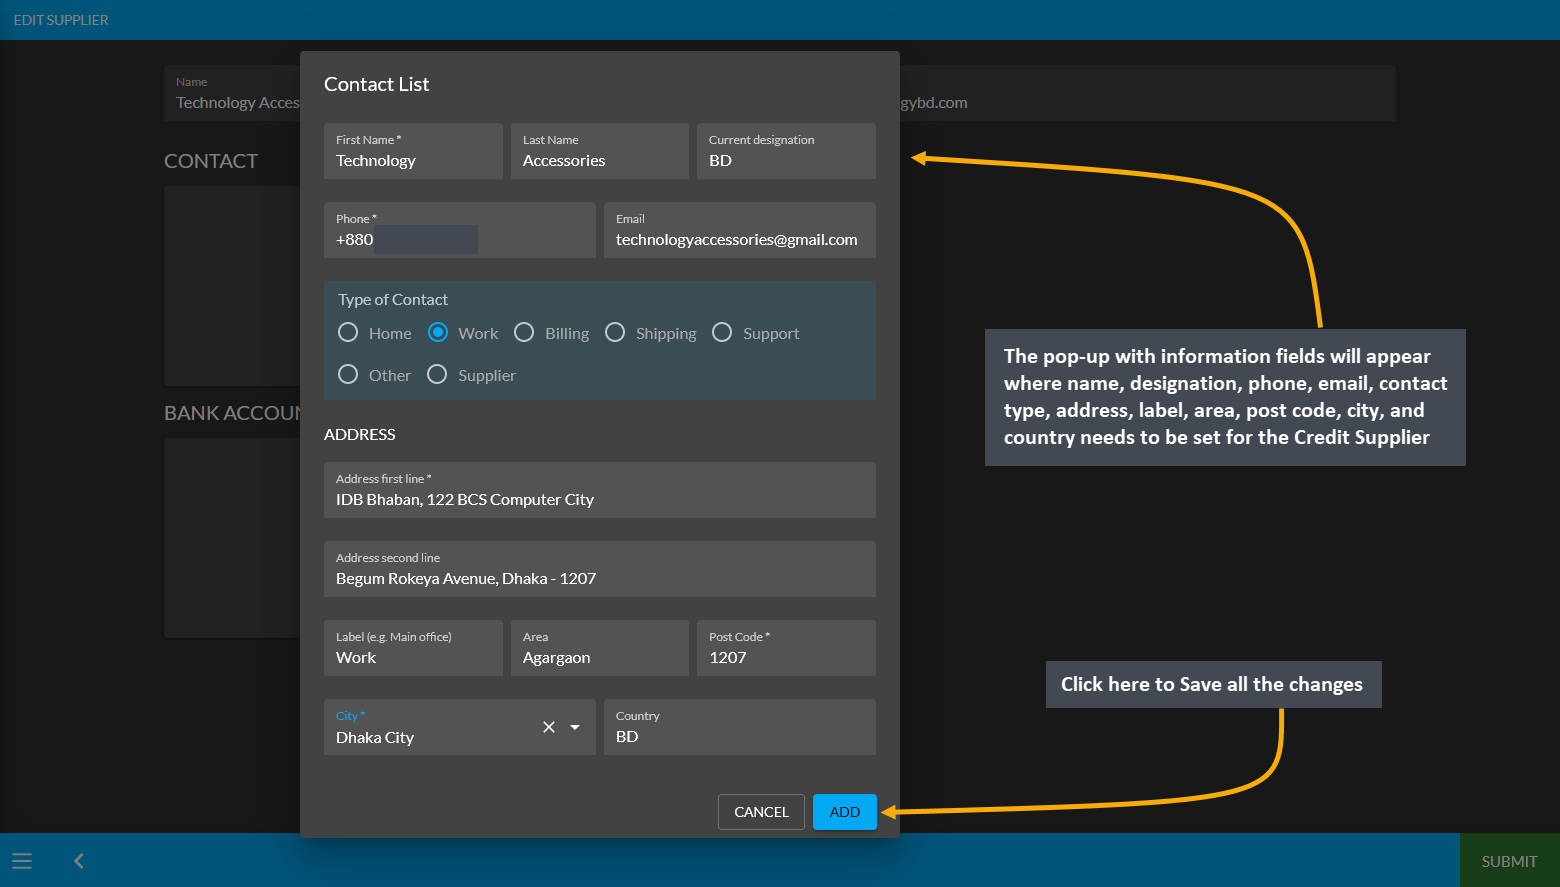
Image 16: Fill out First Name, Last Name, Current Designation, Phone, Email, and Address of the Supplier.
Edit Credit Supplier Bank Details
Now, click the + button on Bank Account to open a pop-up for editing details of Bank Accounts. Fill out the Bank Account Name, Bank Account Number, Bank Name, Country, Bank Branch, Bank Swift, Bank Routing Number, and IBAN. Select if the Bank Account is Savings or Current and click Add to save all the changes as shown.
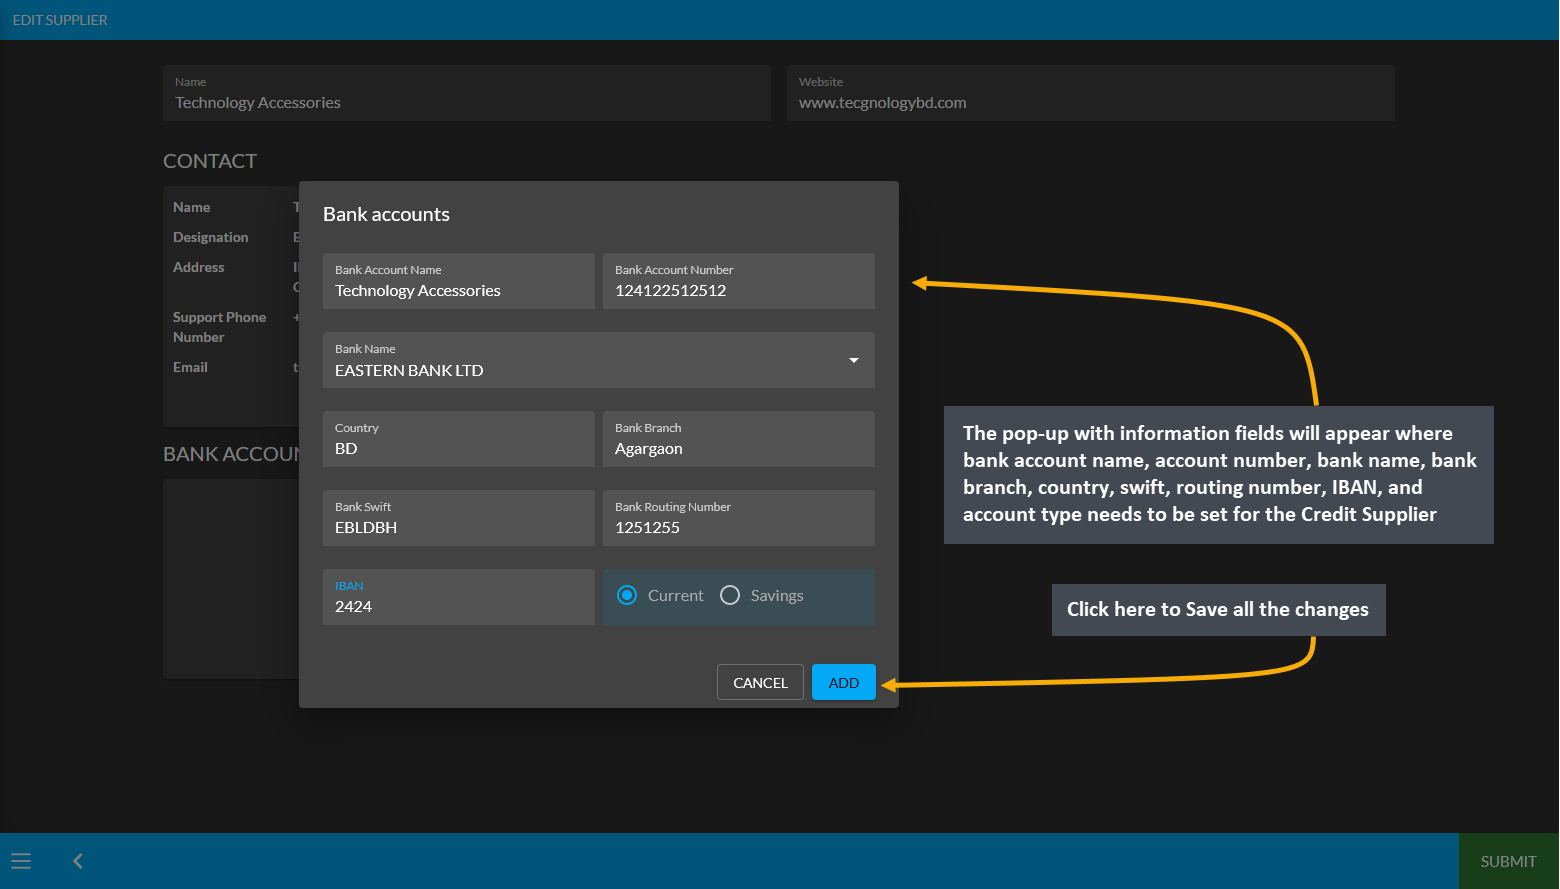
Image 17: Fill out Bank Account Name, Number, Bank Name, Country, Branch, Swift, Routing Number, and IBAN.