Customer's Manual
The document lists down the steps for Customers to place Orders, make Order payments via different payment gateways, add user information, view Orders, add Billing/ Shipping addresses, and create PC Builds etc.
Setup Customer’s Account
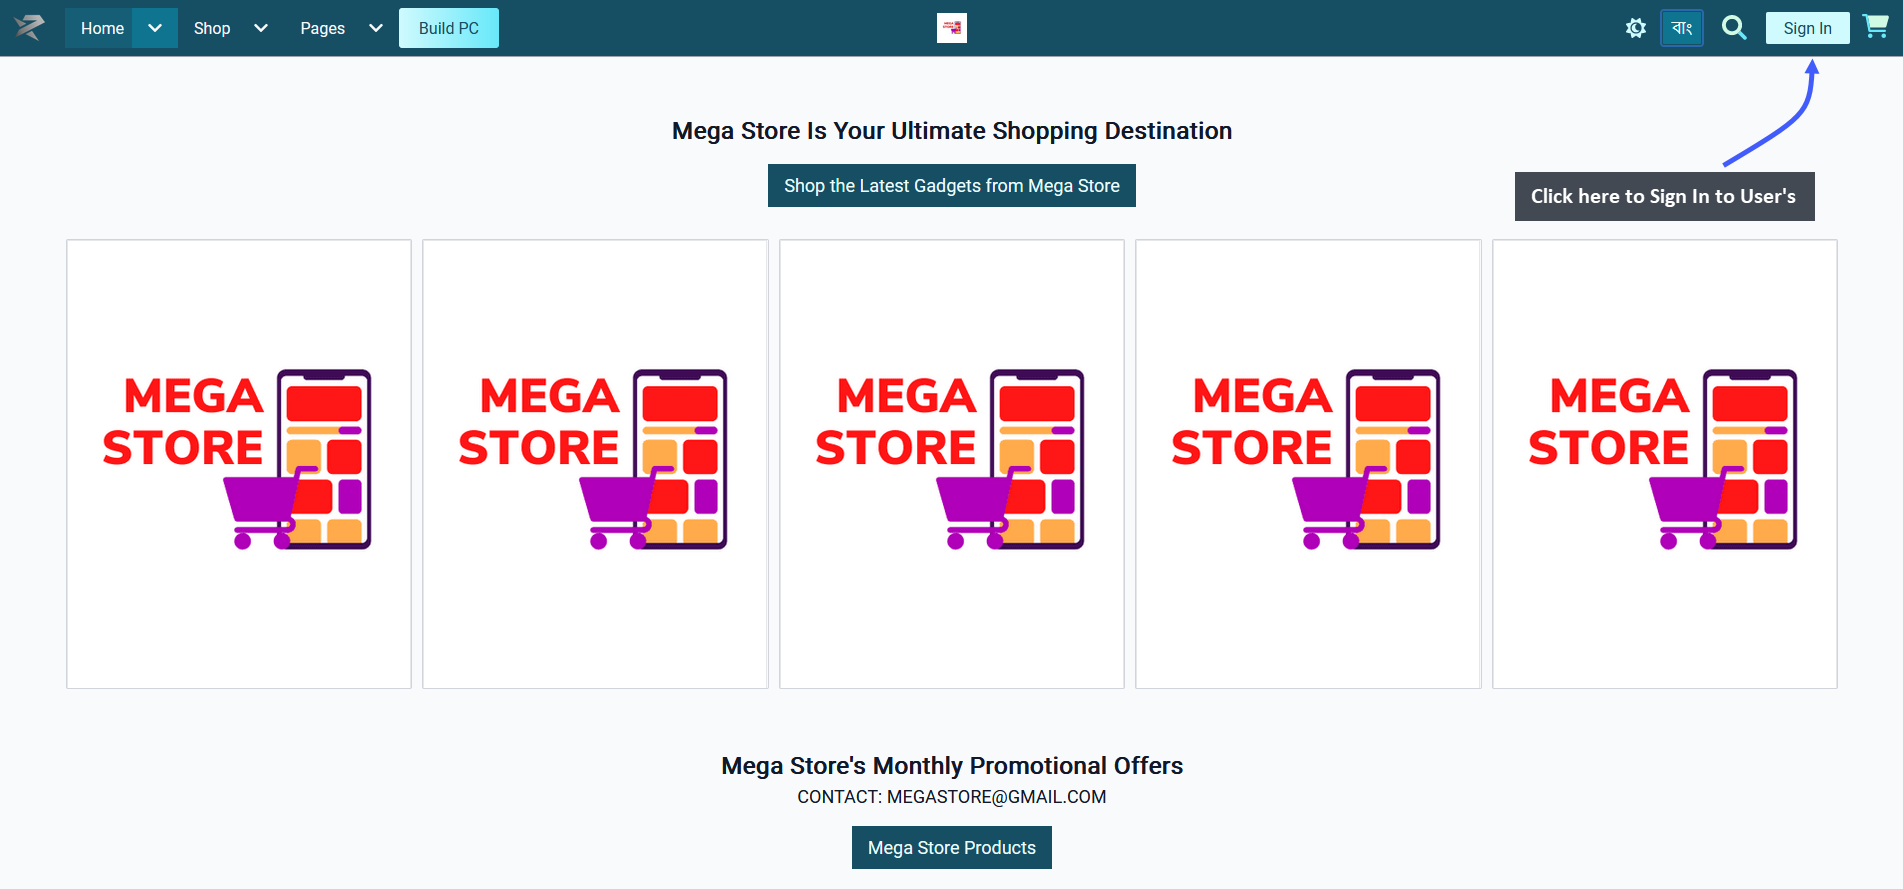
The main page of the Shop from the Customer’s view will look like the example screenshot below. From here, the Customer needs to click the Sign In button to login to their User Account that will redirect to a pop-up for login. Even if the Customer is not logged in, they can still select Product(s) and place Orders, during which they will be prompted to Sign In when selecting address, shipping, and payment options.
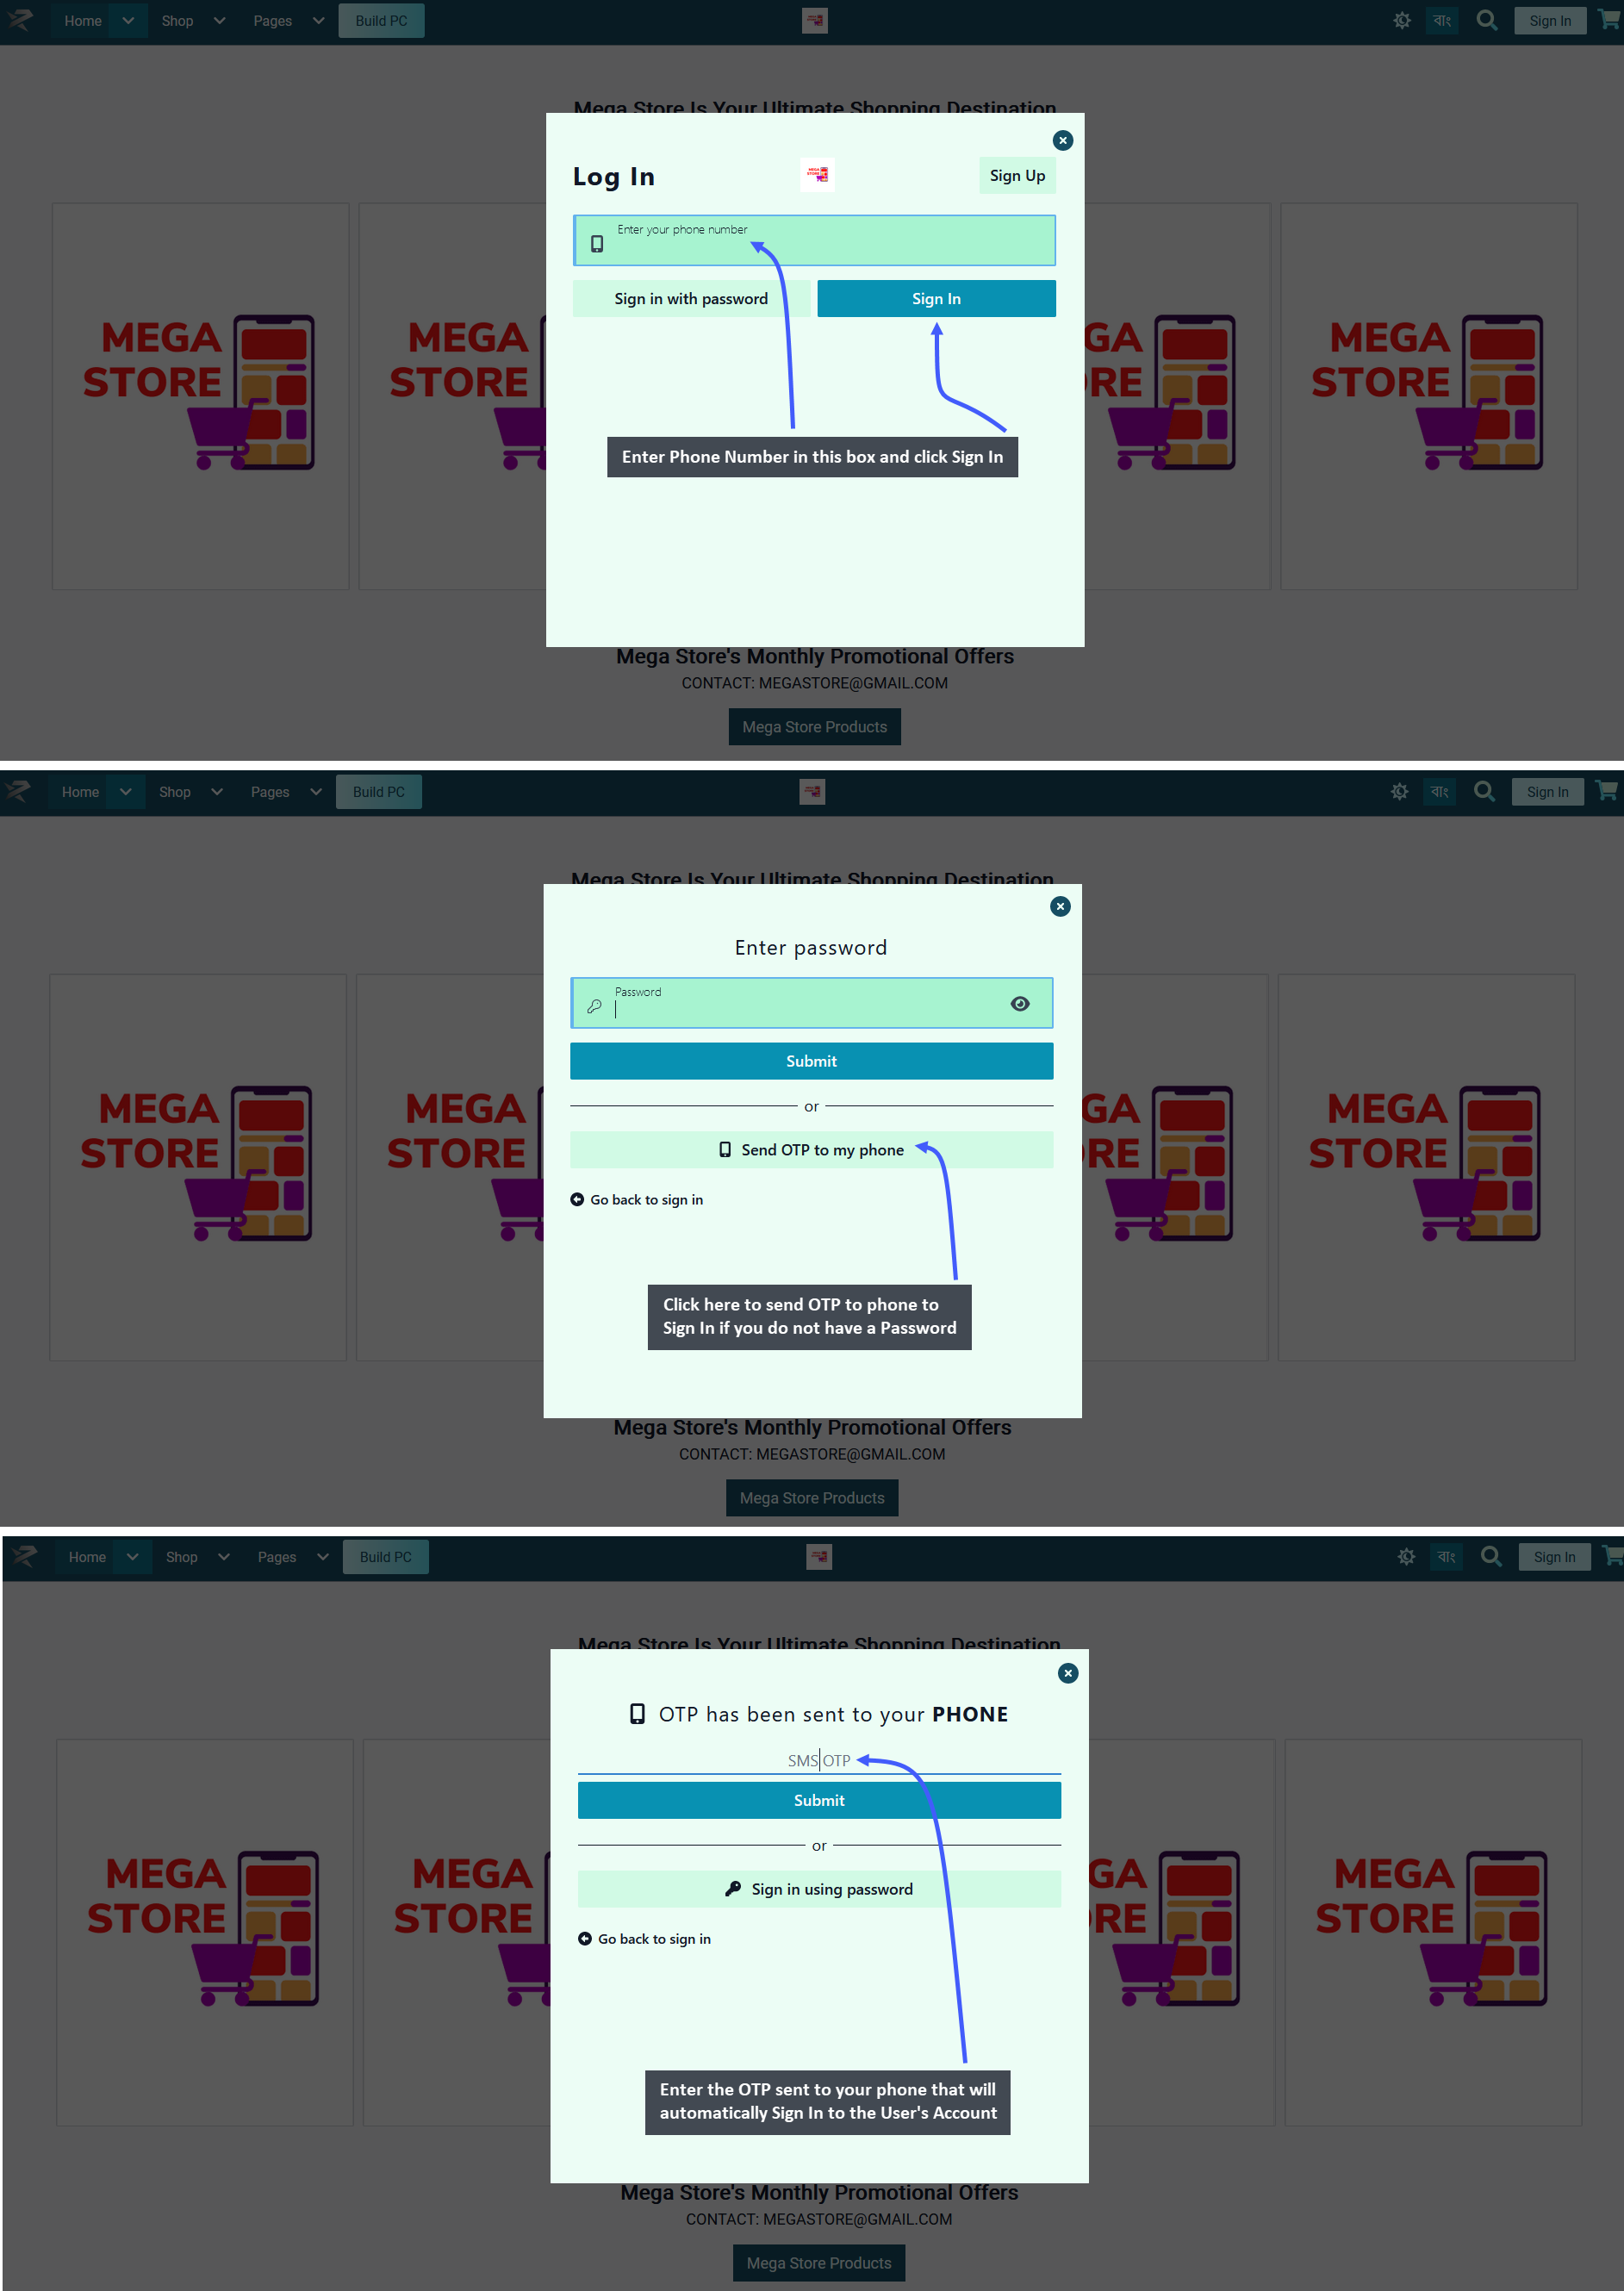
The Customer has to enter their Phone Number and click the Sign In button on the login pop-up. Click on Send OTP to my Phone if you do not have a password set. Once the OTP is received on your phone, type it in the box that will automatically log you in to the User Account. Now, you can place Orders as the Customer on the Shop.
Configure Dashboard Settings
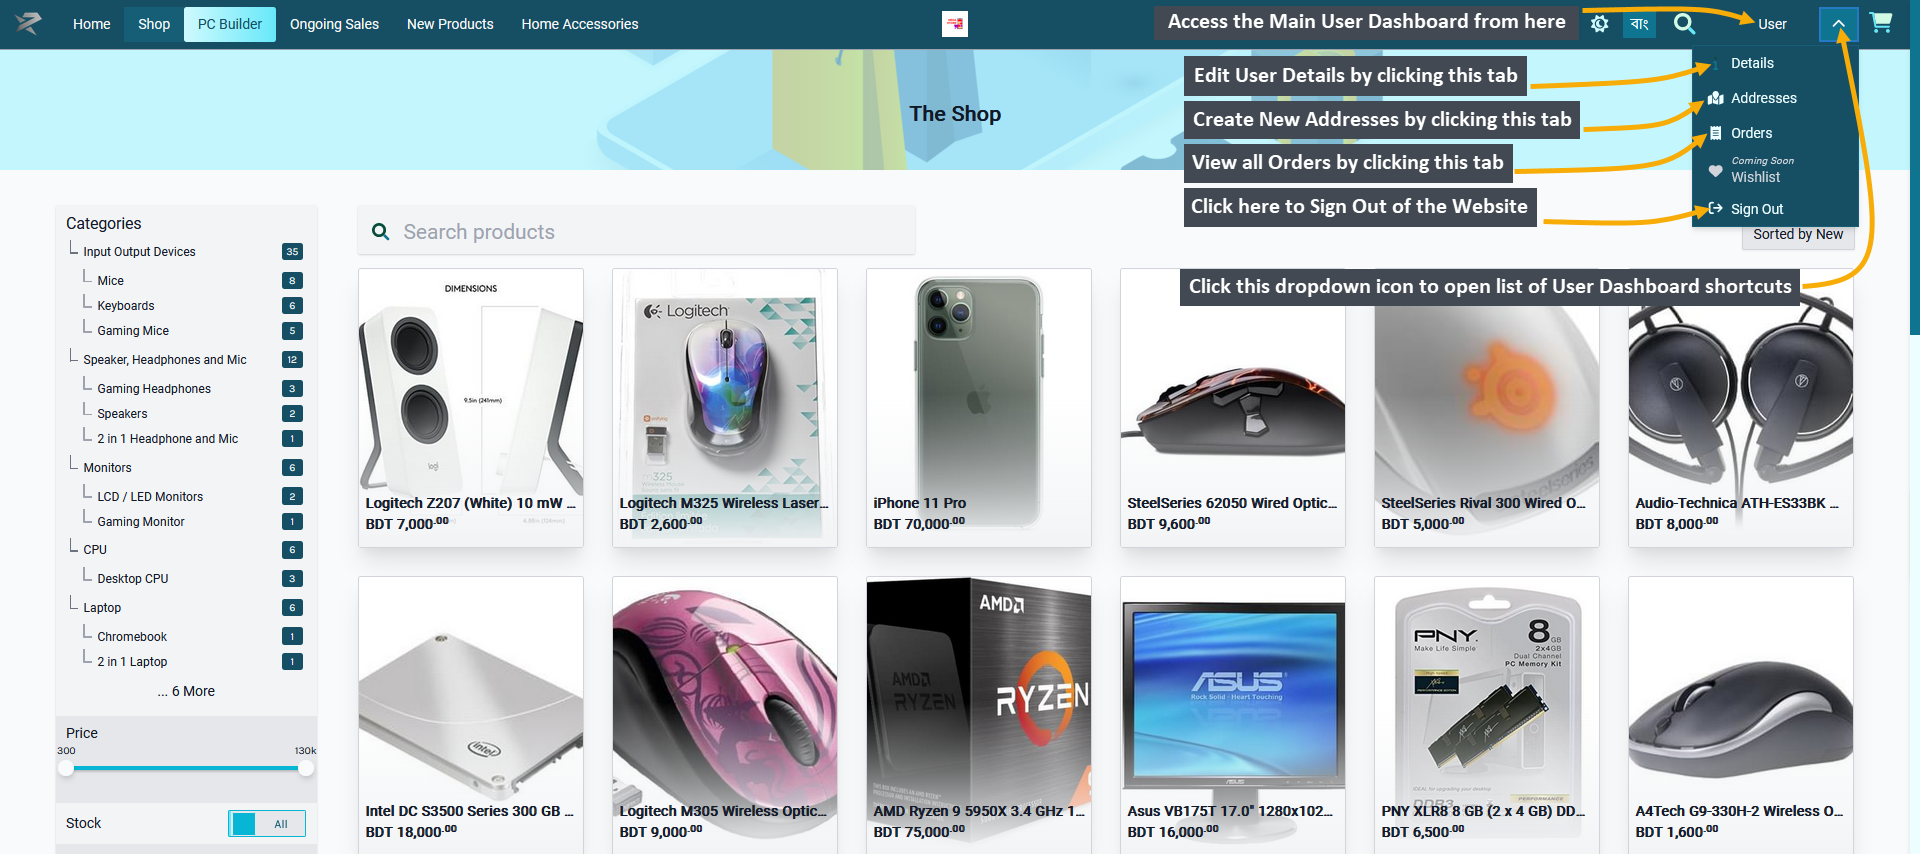
The User Dashboard can be accessed from thr top right corner of The Website. Click on the dropdown V icon to open the list of User Dashboard shortcuts. The first option in the Dashboard dropdown includes Details which will allow editing User details. The second option includes Addresses from where New Addresses can be created and existing addresses can be edited.
The third option includes Orders from where all current and previous Orders can be be viewed. There is also a an option for Wishlist which will be added soon. Finally, there is a Sign Out button at the very bottom using which the User can sign out from The Website. The rest of the features will be discussed below.
Website Header Shortcuts
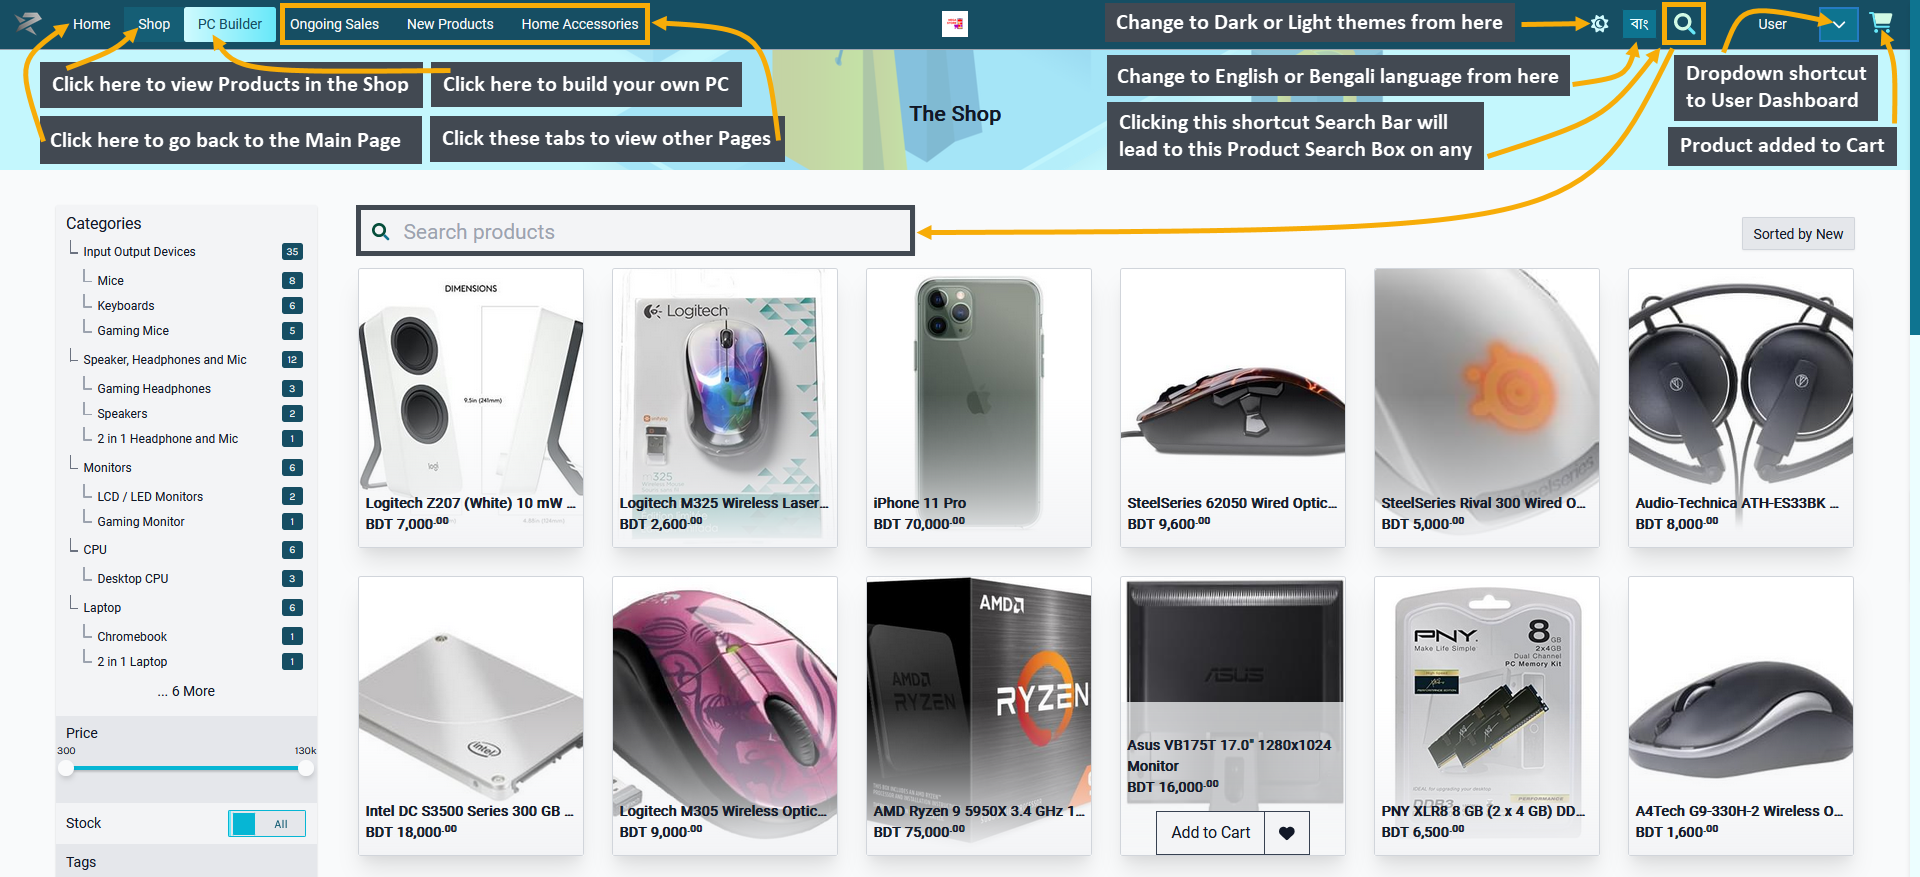
There are some shortcuts on the header of The Website. On the left side, there is the Home tab first, clicking on which will recirect to the Main Page. Then, there is the Shop tab, clicking on which will lead to the Products the Shop Owner is selling. The PC Builder tab will provide the benefit of building a PC or get quotation for different components of a PC. There are other Custom tabs beside it to view other Pages.
On the very right, there is a Cart icon, clicking on which will expand and display added Products to Cart. Beside it, is the dropdown shortcut to User dashboard. In the middle, there is a sun icon using which the User can change The Website theme to Light or Dark. Next to it, is the icon to switch Language from Bengali to English. Beside it, is a shortcut search bar, clicking on which will lead to the large Product Search box on any Page.
Customer Dashboard Details
Clicking on the User tab will redirect to a Page with four User modules of Profile, Orders, Addresses, and Ledger.

The first option to the dropdown shortcut to User dashboard is Details. Clicking on it will redirect to a Page from where the Customer can edit User information like Phone Number, Email, Name and change Password. On the left hand side, there are Addresses, Orders and Ledger options clicking on which will allow Customer to edit their addresses, view all their Orders, and Ledger transactions.

Customer Addresses
The second option from the dropdown shortcut for User dashboard is Addresses. The Customer can view and edit their different labeled addresses like Home, Office, or Work. Using the + Add New Address button, they can add a new address, clicking on which will open the form to fill-out a new address as shown below.

Image 1: Customer can view and edit their already existing labelled addresses from the Addresses Menu.
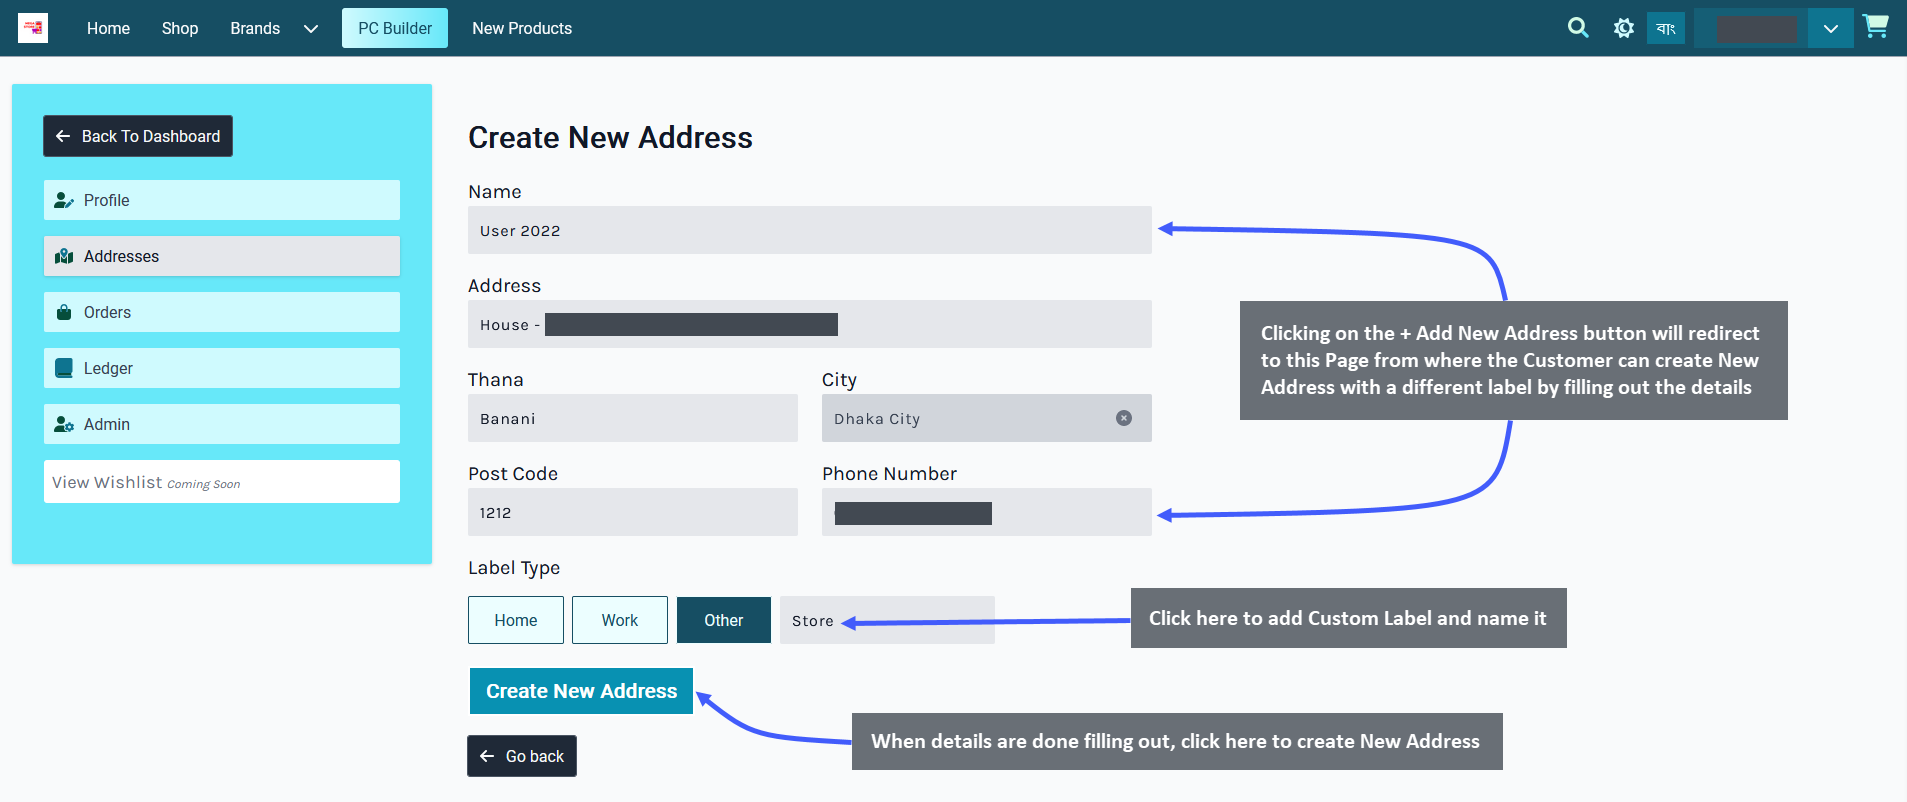
Image 2: Customer can create New Address by clicking on the + Add New Address button.

Image 3: The newly created Address will show first and be set as default which can be changed.
Customer Orders
The third option to the dropdown shortcut to User dashboard is Orders. From here, the Customer can check their previous and current Orders with details of Order Date, Order Total, and Order Status. Click the toggle button for Pending Orders Only to view only the Pending Orders. There is also a Refresh button to refresh the Order List.
By clicking on Order Again button, the Customer can place same Order with same Products and quantities. If any Order remains Payment pending, then Customer can pay it using the Pay Now button.
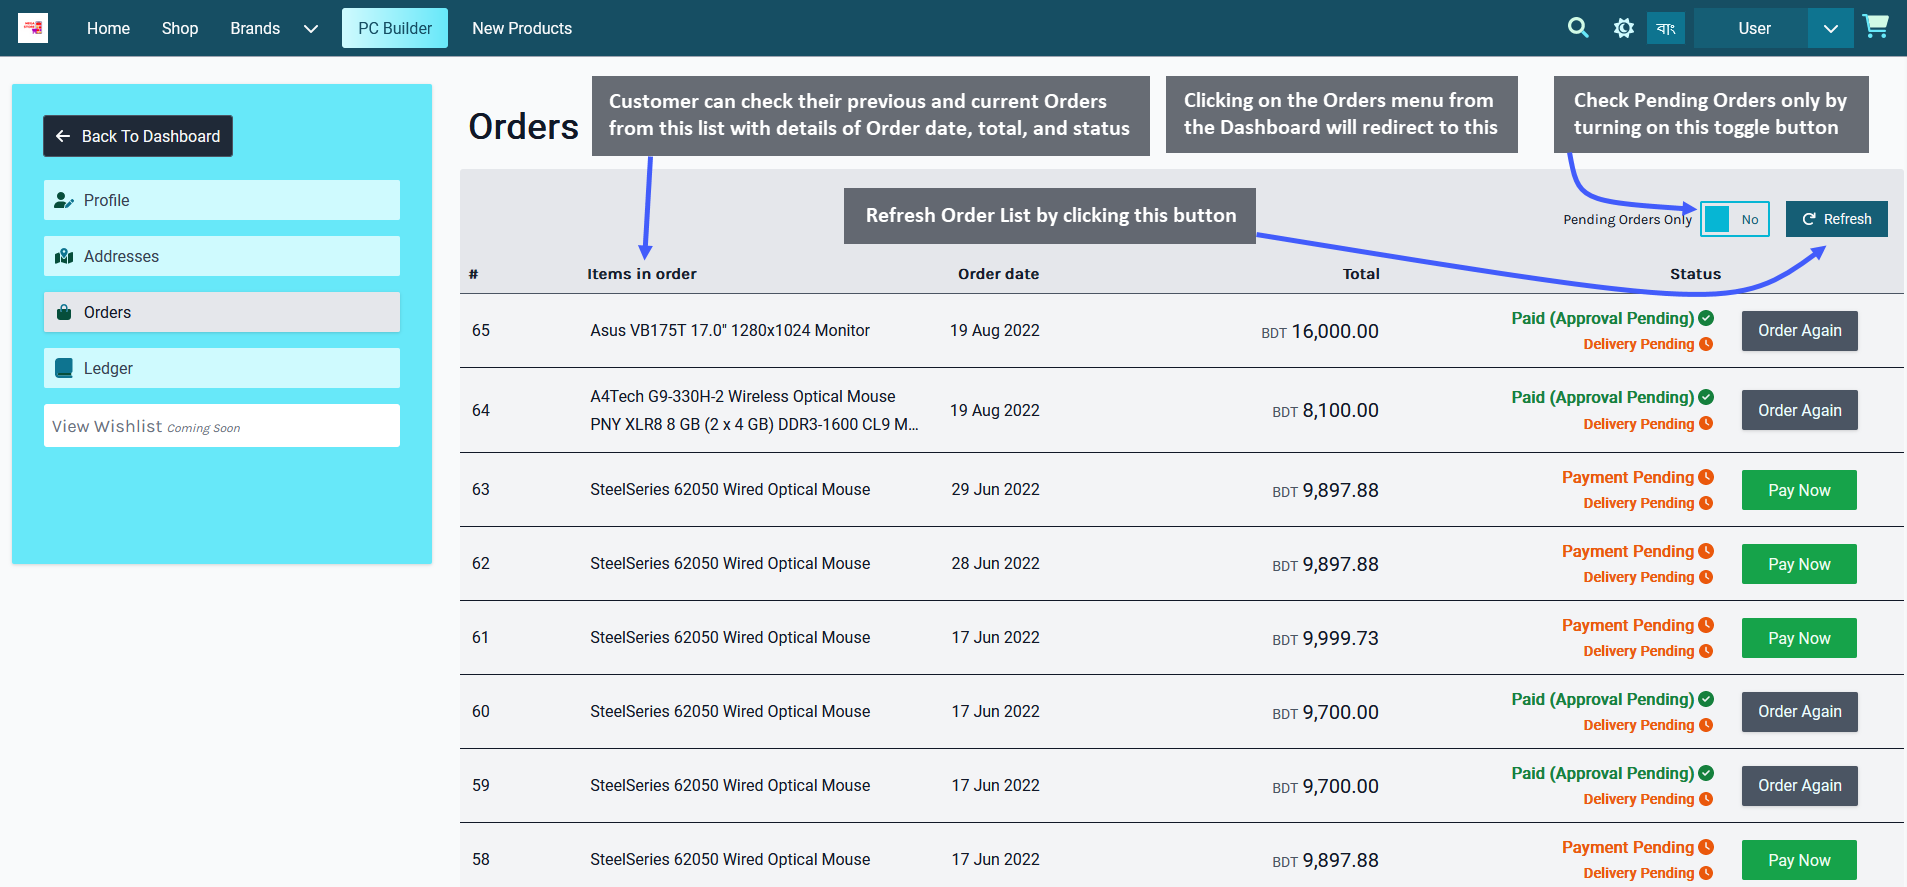
Image 1: Customer can view and edit their already existing Orders from the Orders Menu.
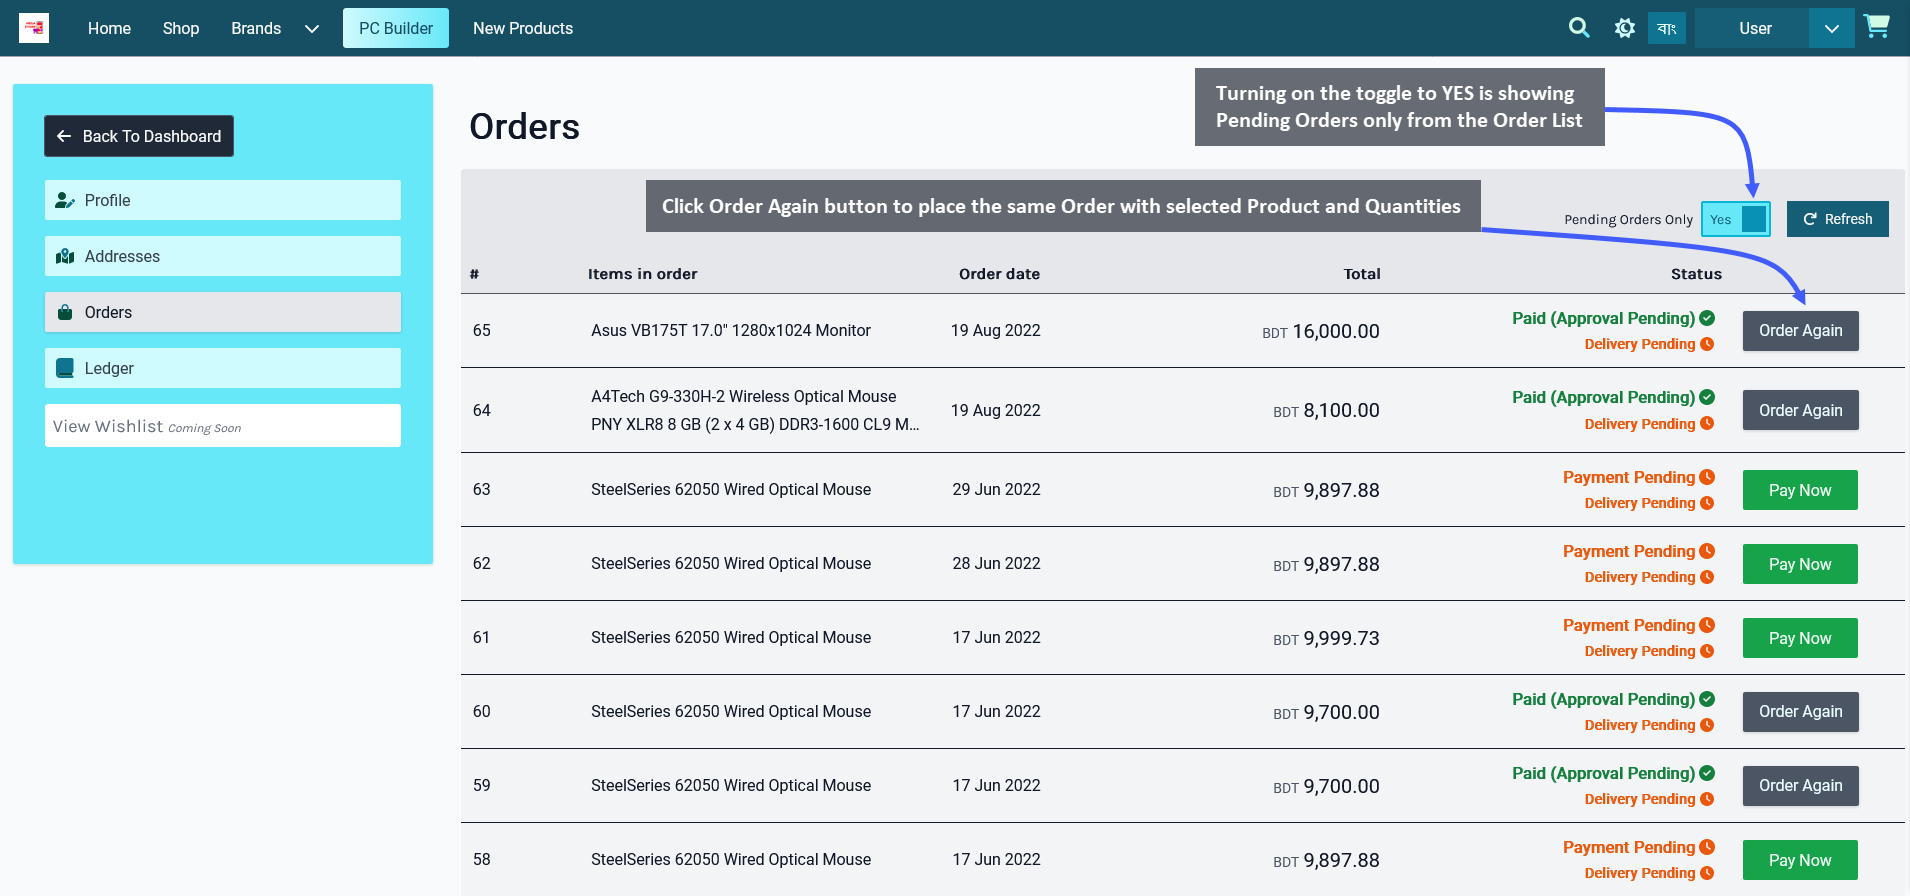
Image 2: Customer can view only Pending Orders from the list by turning on the toggle button.
Customer Ledger
The fourth option to the dropdown shortcut to User dashboard is Ledger where Customer can check their weekly and monthly transaction details of purchases from the Shop Owner. All Product purchases by the Customer from Shop Owner using different payment methods will show up within this Ledger section. However, the Shop Owner will have to give Customer the permission of Allowed to View Ledger first, only then they will be able to see Ledger.
Within the Ledger section, Customer can select 7 days, 30 days, 90 days, 180 days, and also Custom timeframe to check their purchase transaction details. Click View button to see Order details of each Ledger transaction.
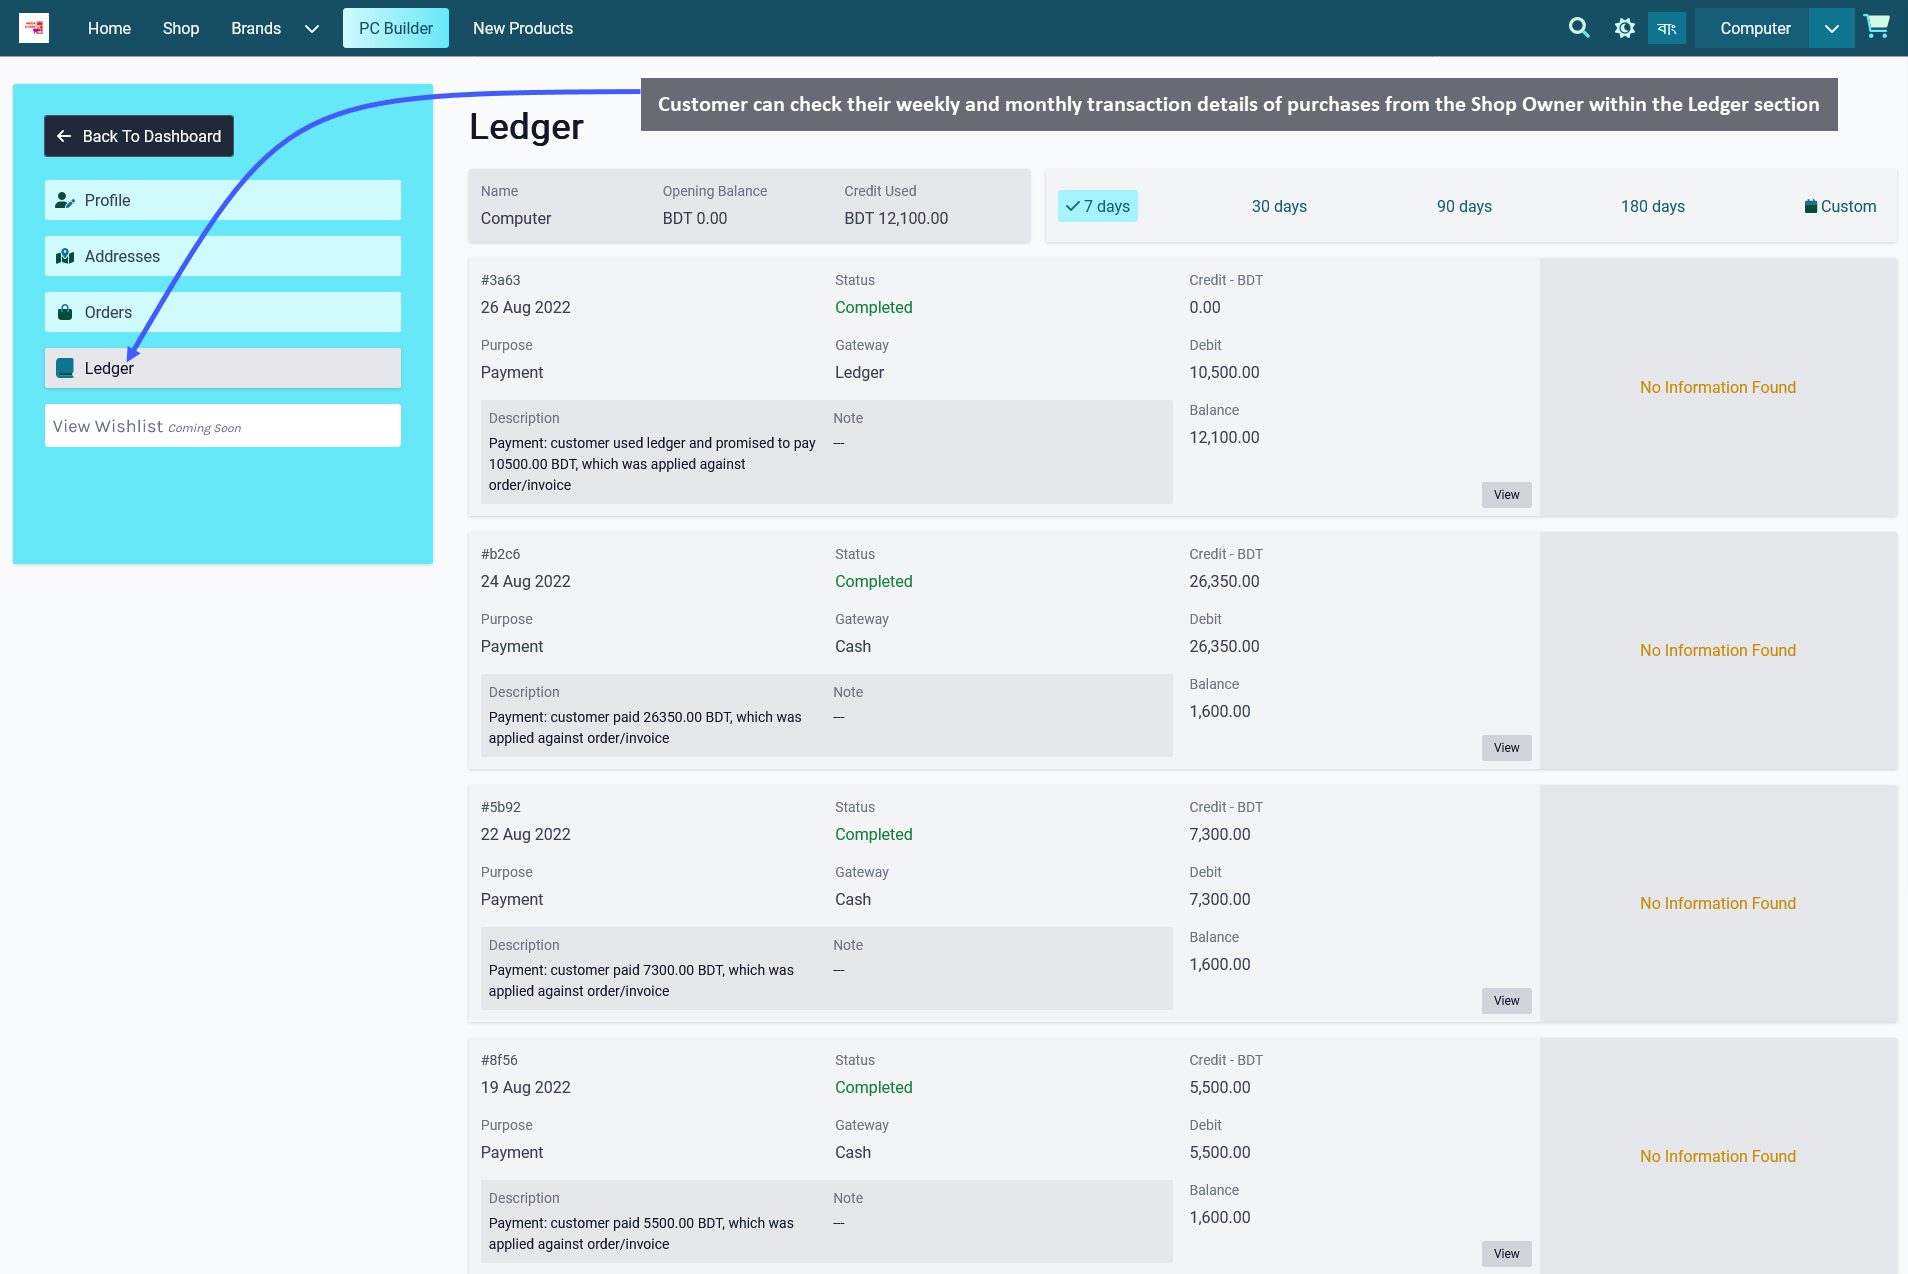
Image 1: Customer can view their weekly and monthly transaction details of purchases on Ledger Section.
Different Payment Methods
After adding Products to Cart and checking out, the Customer can choose to make the Order’s payment using different Payment Methods
Place Order with Cash Payment
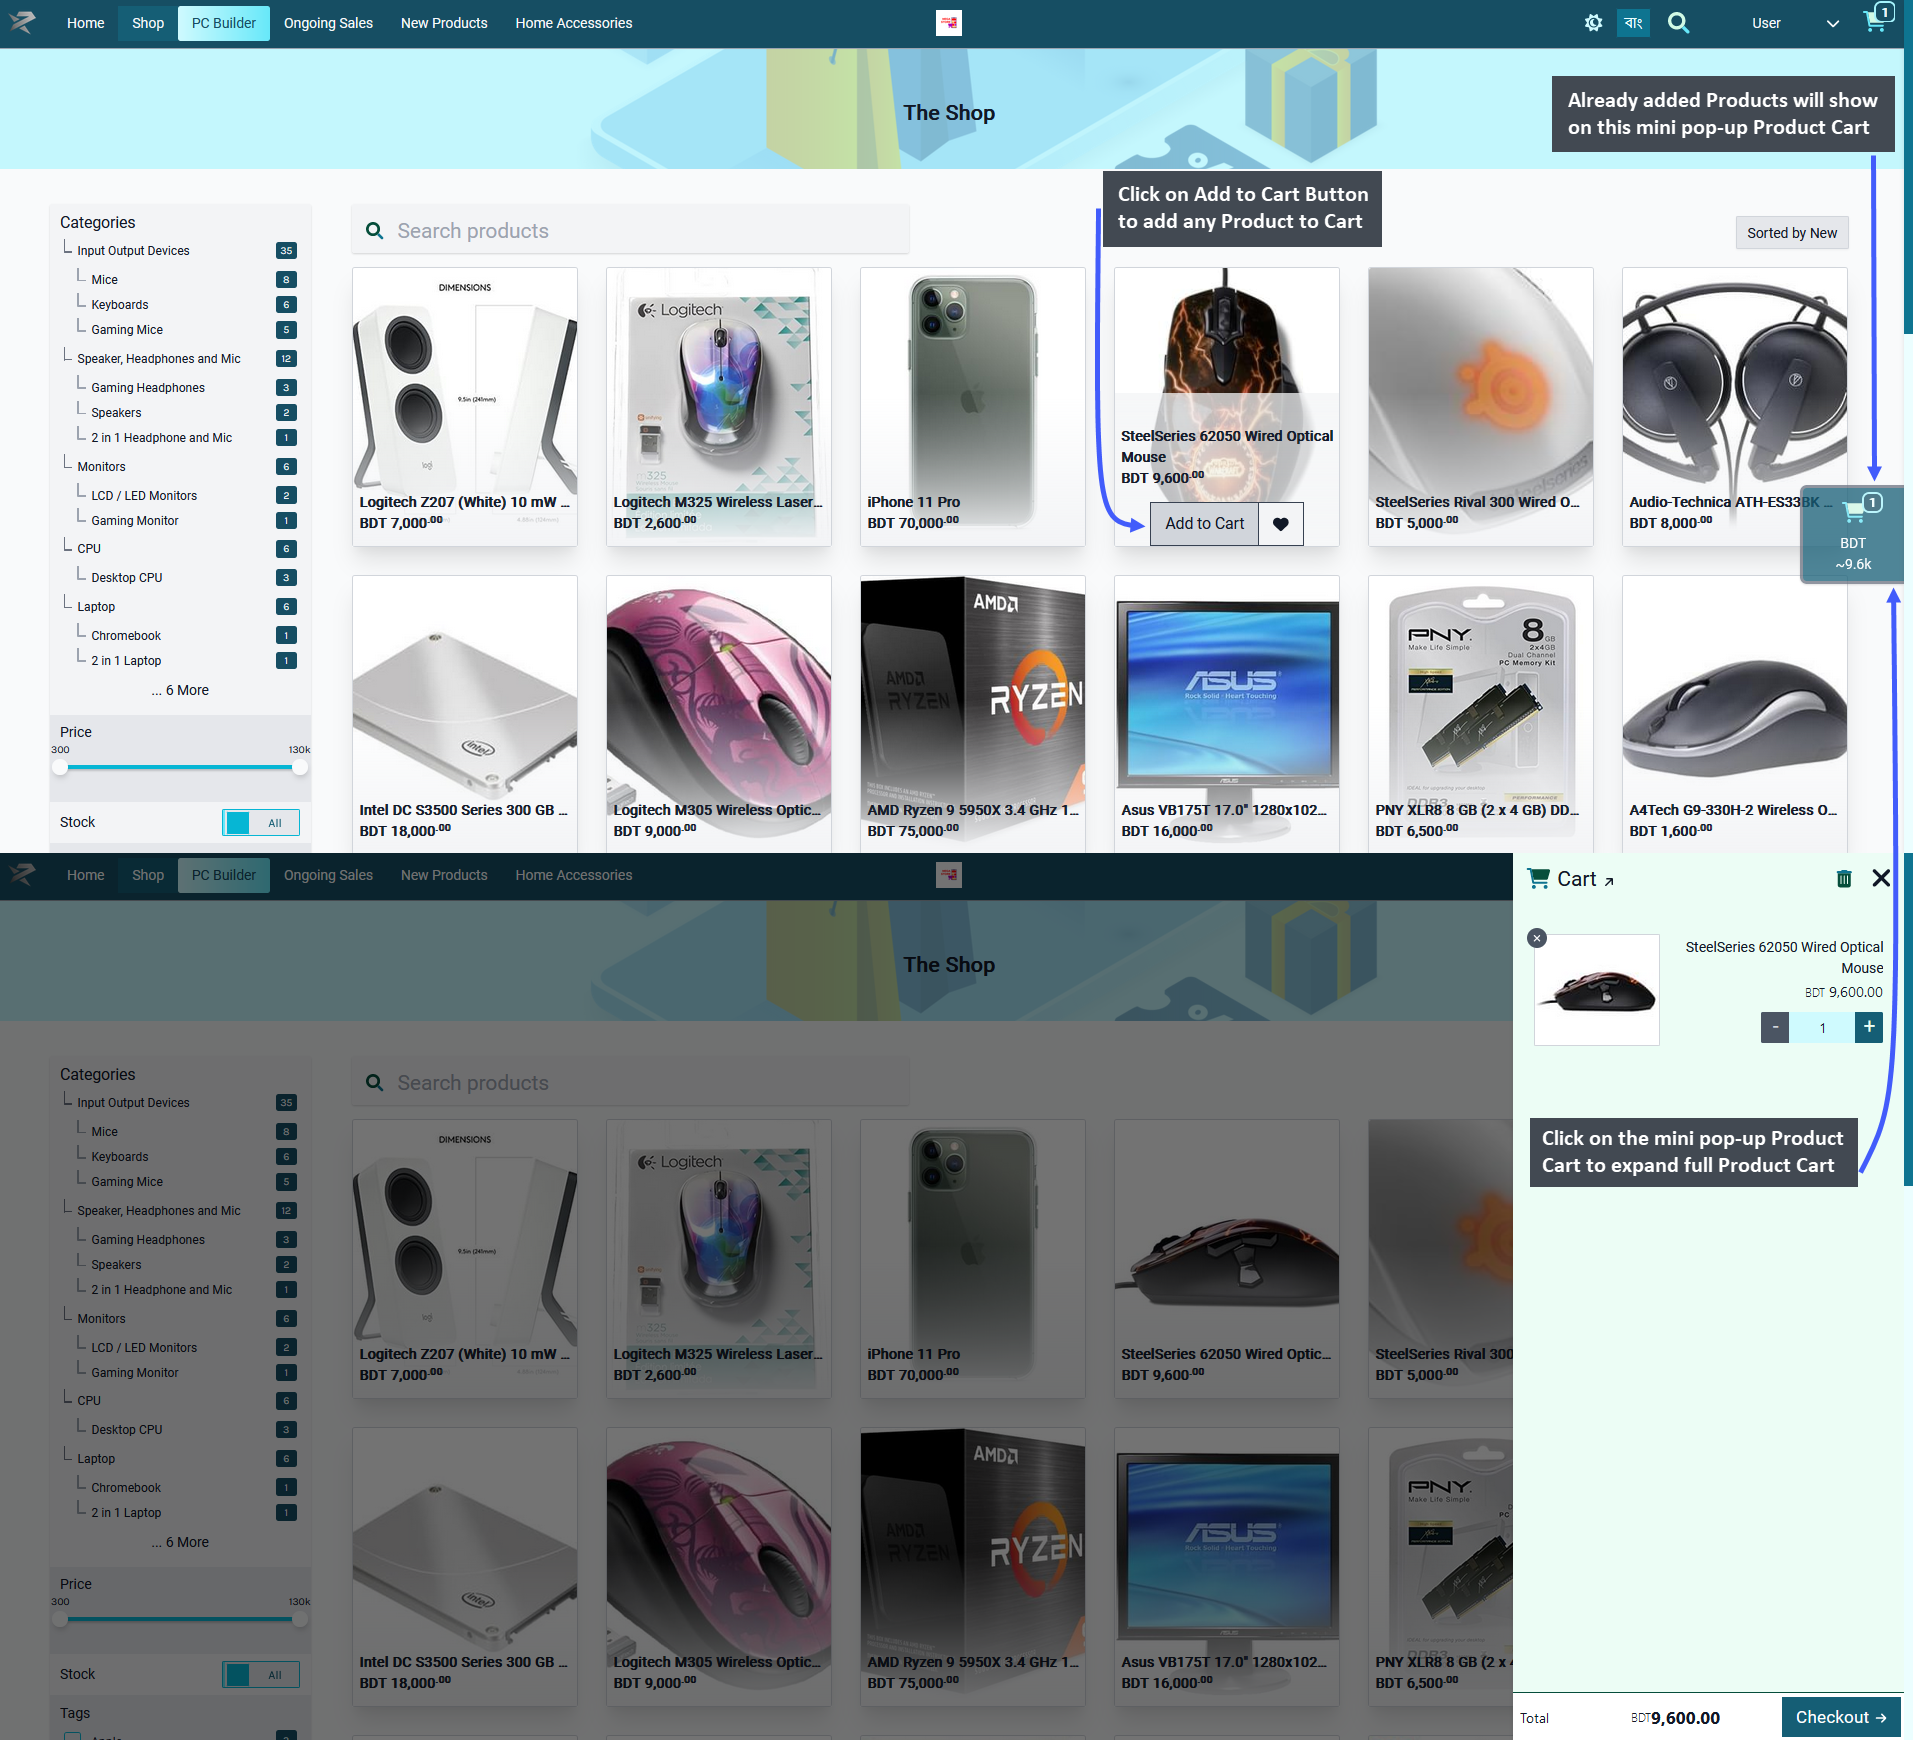
Customer can order Products by clicking on The Shop tab where Products will be available based on Categories and Brands. Click on the Add to Cart button to add any Product to Cart. After adding Products to Cart, the mini pop-up Product Cart will be visible on the right side of the screen, clicking on which will expand full Product Cart.
Add Billing and Shipping Address
Clicking the Checkout button will redirect to the Checkout Page, where Customer can add New Address to their profile from Change or Create Address dropdown menu. They can add separate Billing and Shipping addresses.
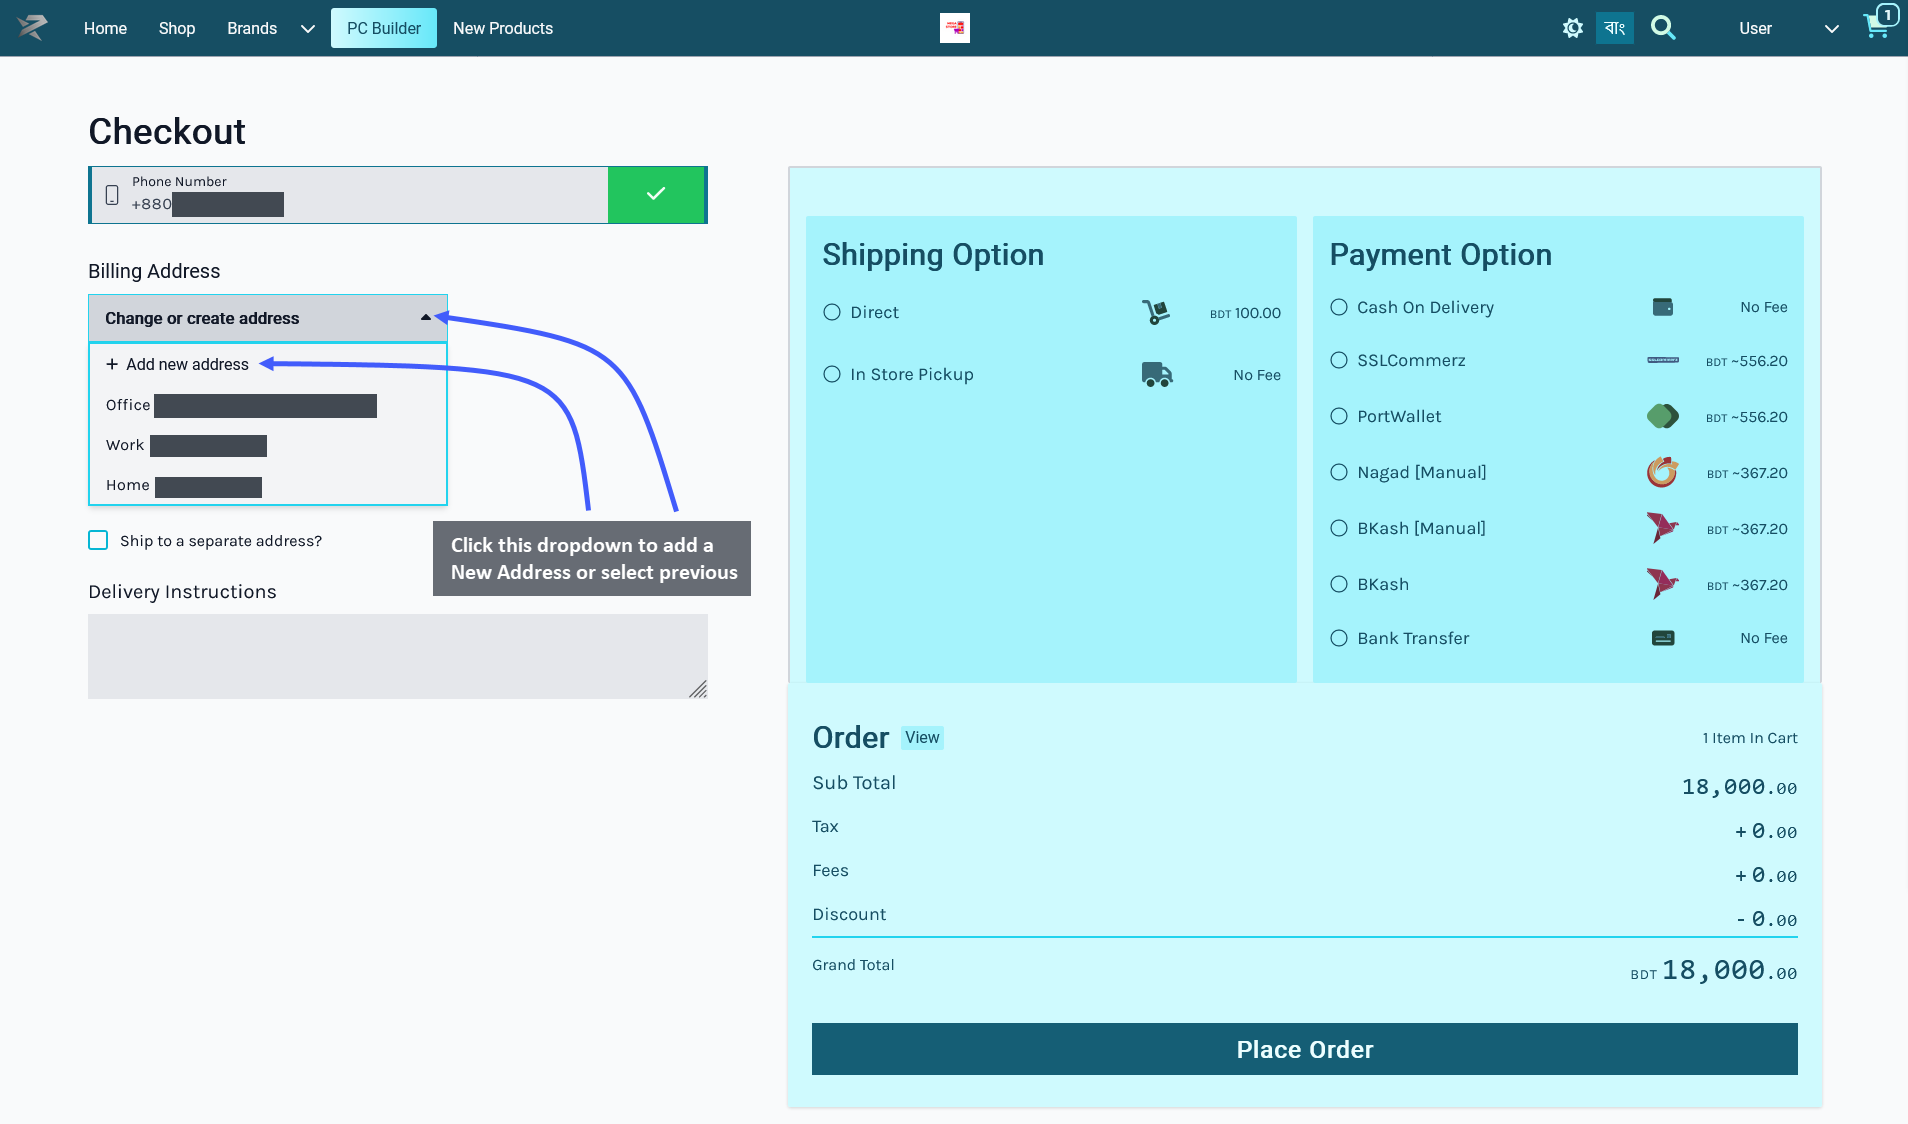
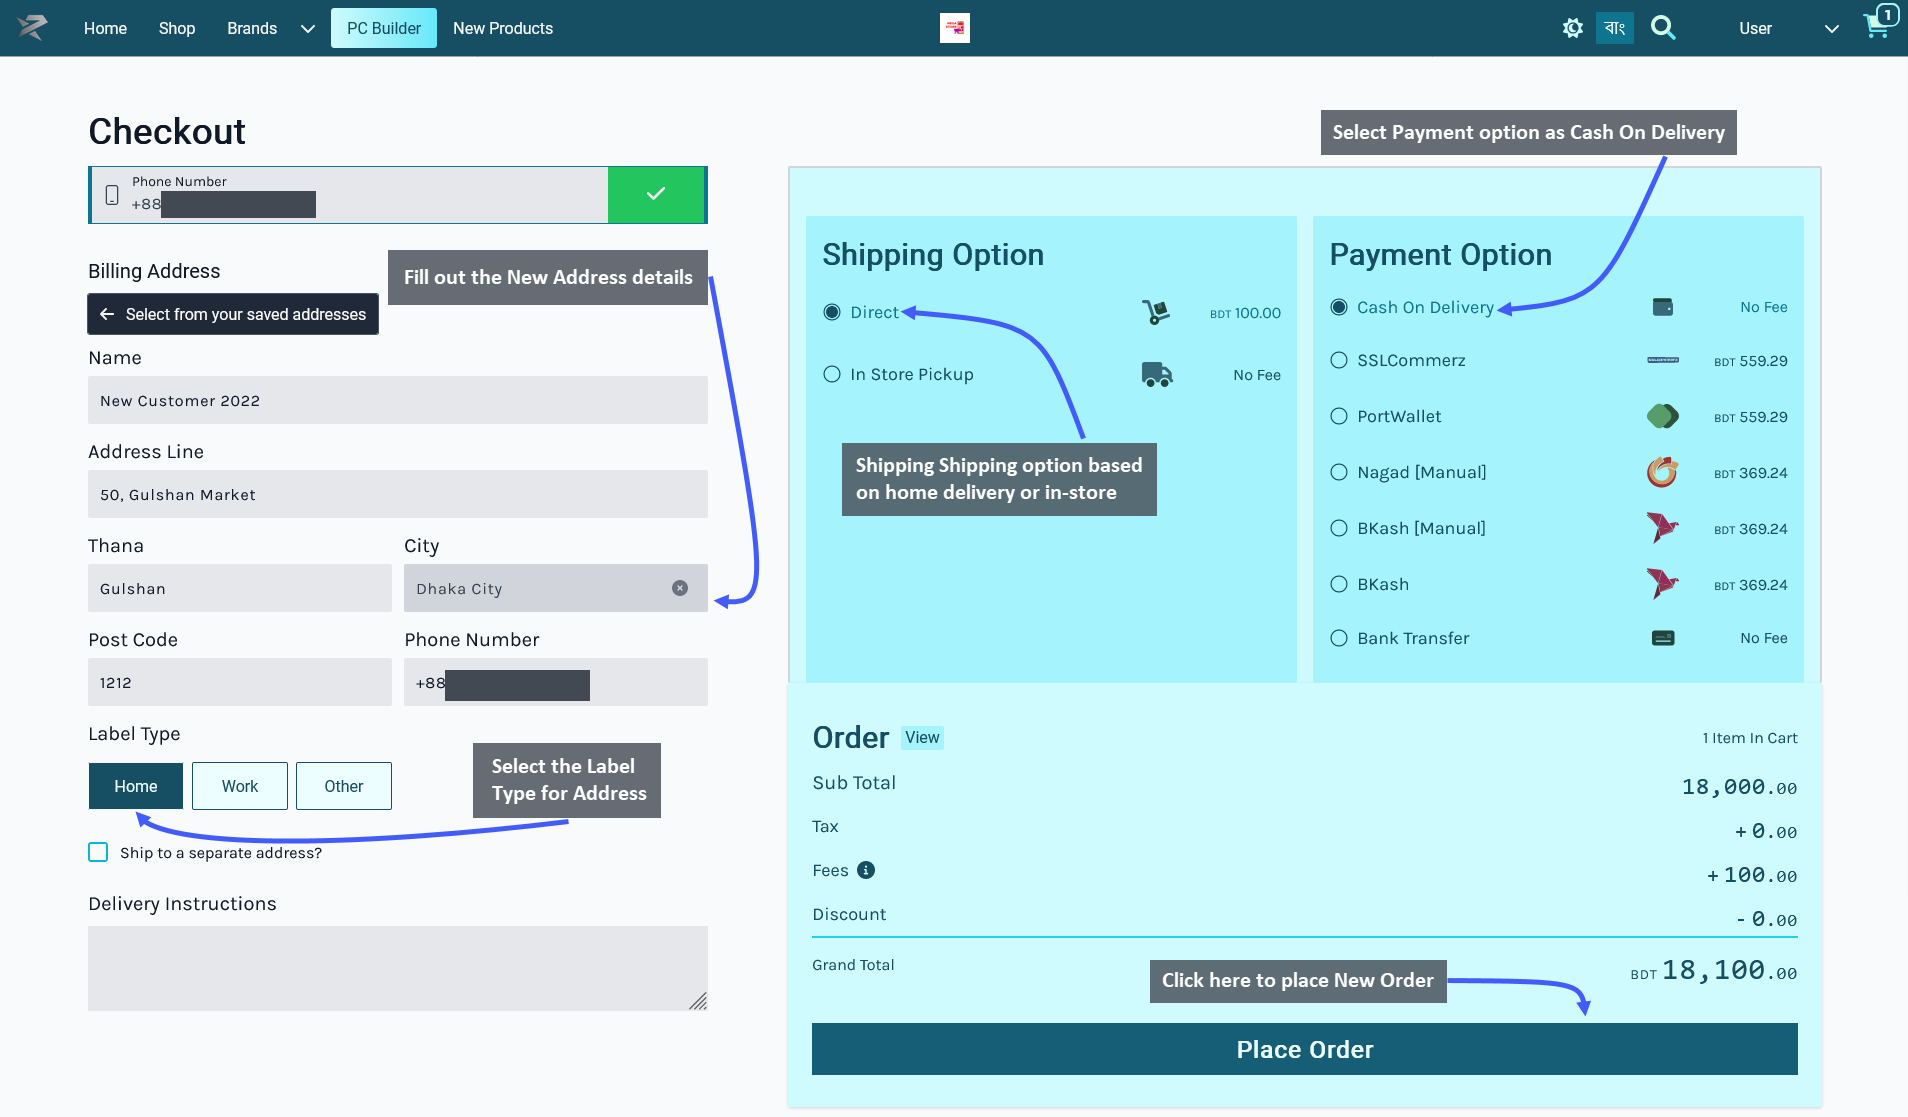
Clicking here will open a Billing Address field to fill out with name, address line, thana, city, postcode, and phone number. Select the Label Type for address as Home, Work, or Other (with custom labels like warehouse, mailbox, or shop etc). To add a different Shipping Address, check the box Ship to separate address that will open a separate field to fill out address details.
Then, select the preferred Shipping option based on home delivery on in-store pickup by the Customer. Delivery instructions can be added if needed. Select Cash on Delivery as payment option and click on Place Order button to complete Order. Any Product tax, fees, or discounts will be visible in the Order Grant Total.
Order Confirmation and Print Invoice
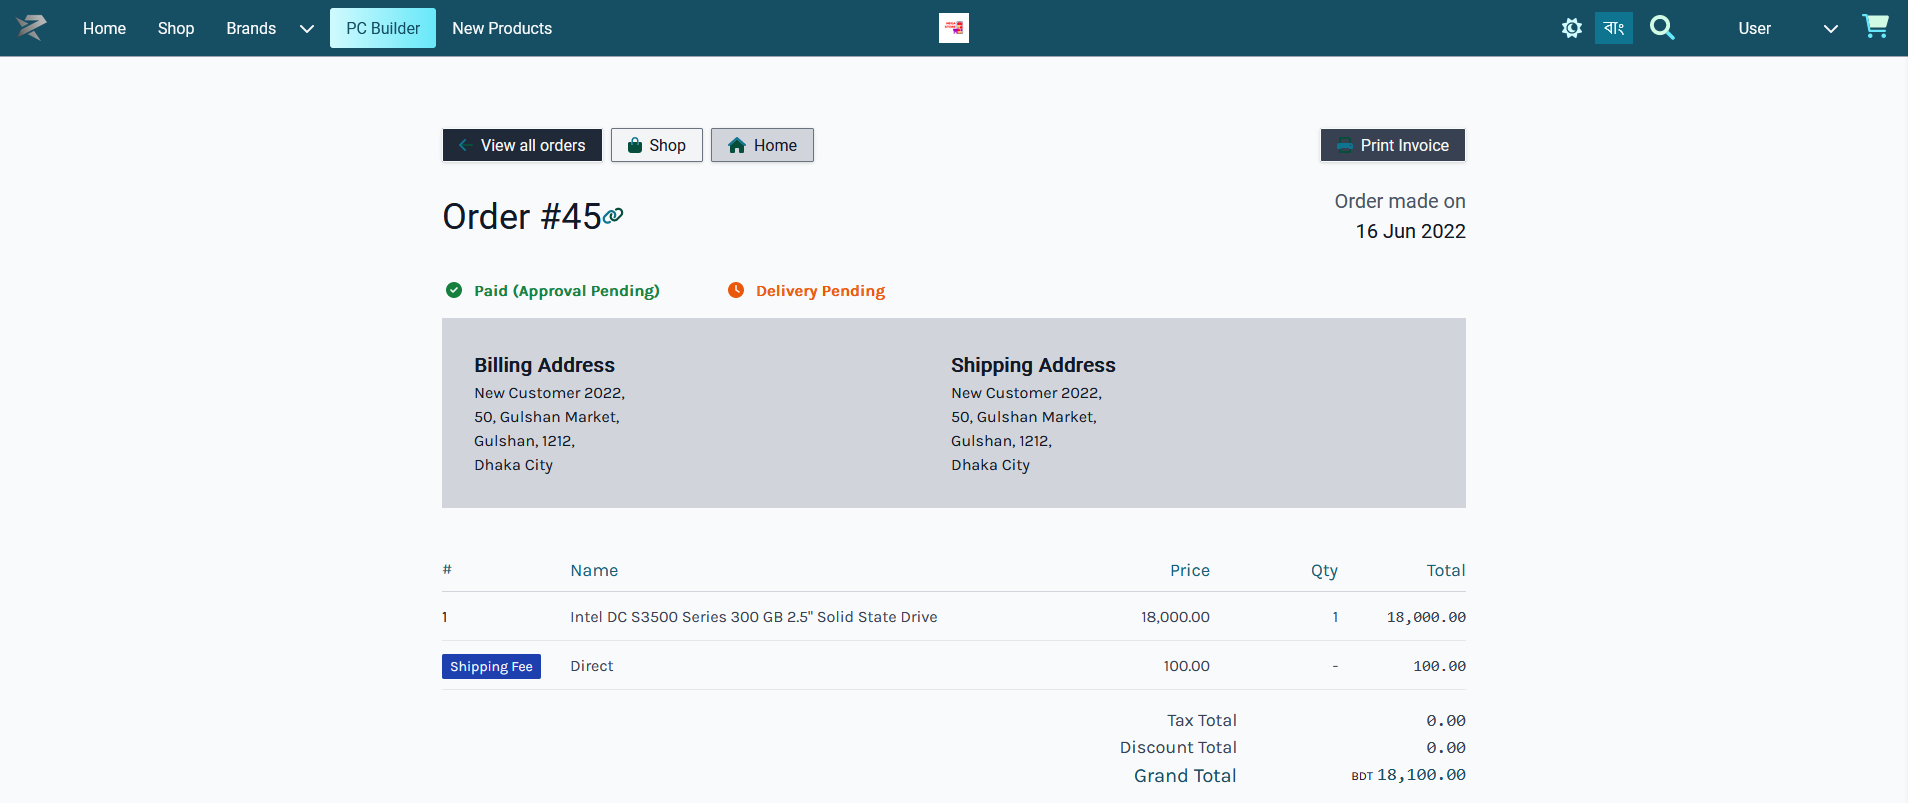
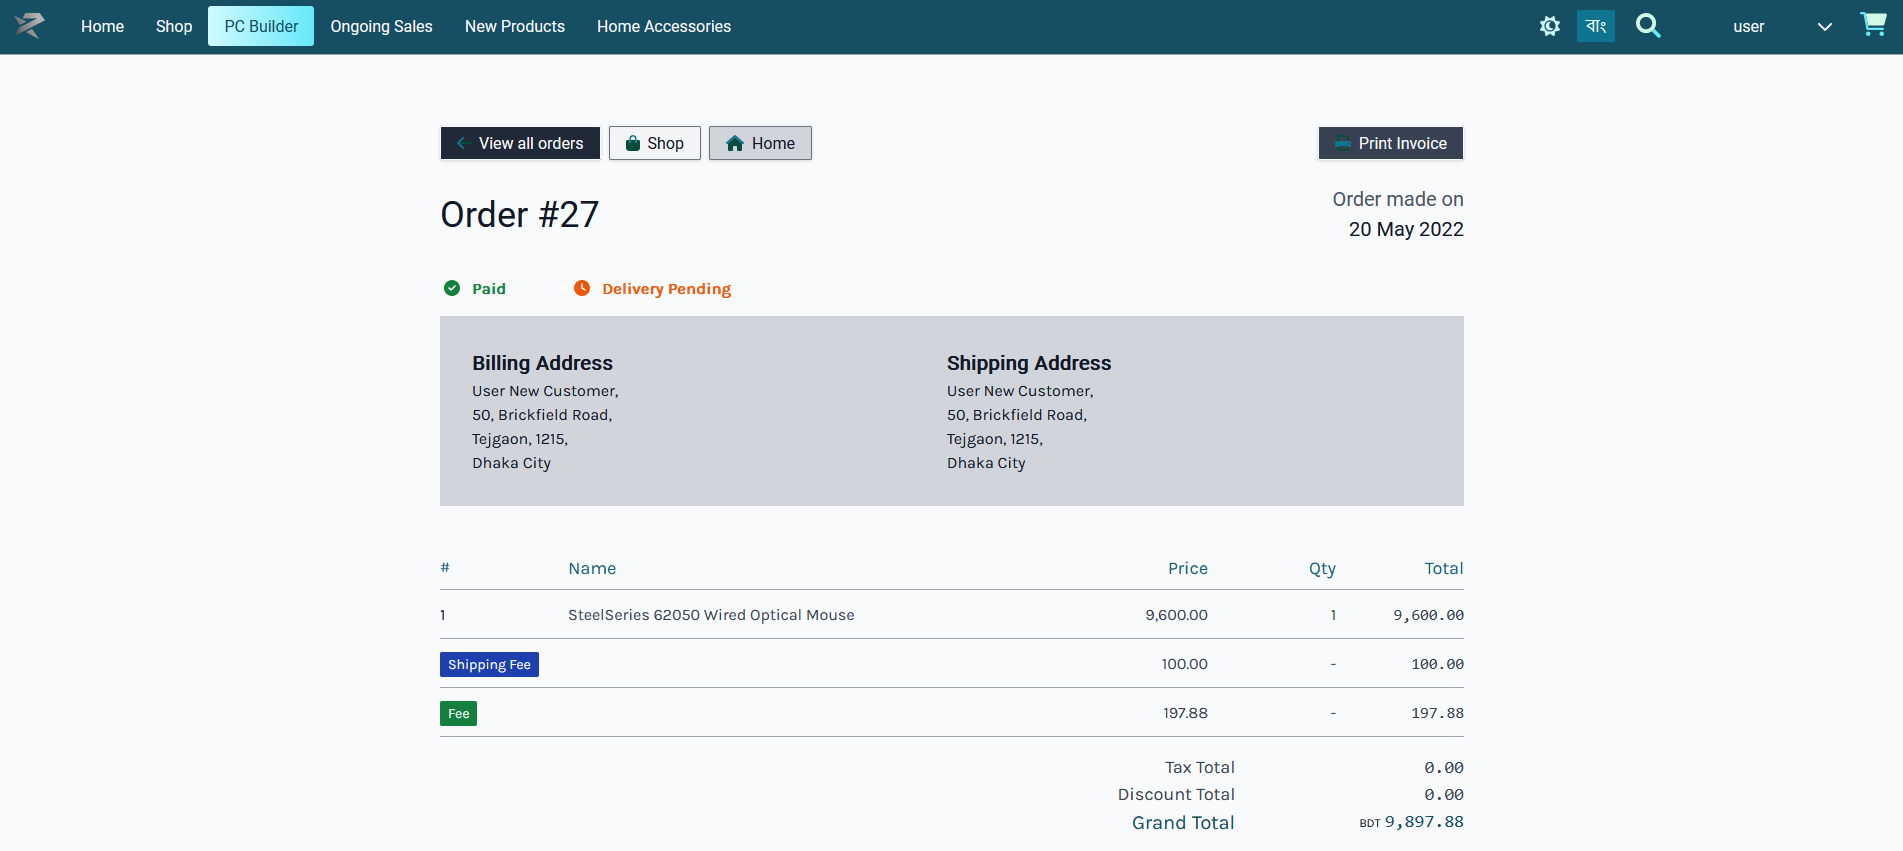
After Order confirmation, the invoice will show the Order details with Customer’s Billing and Shipping addresses. Click the Print Invoice button to have the invoice printed out for future references. To view previous and current Orders, click the View all Orders button, click the Shop button to go to Shop, and click Home to go to main page.
Place Order with SSLCommerz Payment
Customer can order Products by clicking on The Shop tab where Products will be available based on Categories and Brands. Click on the Add to Cart button to add any Product to Cart. After adding Products to Cart, the mini pop-up Product Cart will be visible on the right side of the screen, clicking on which will expand full Product Cart.

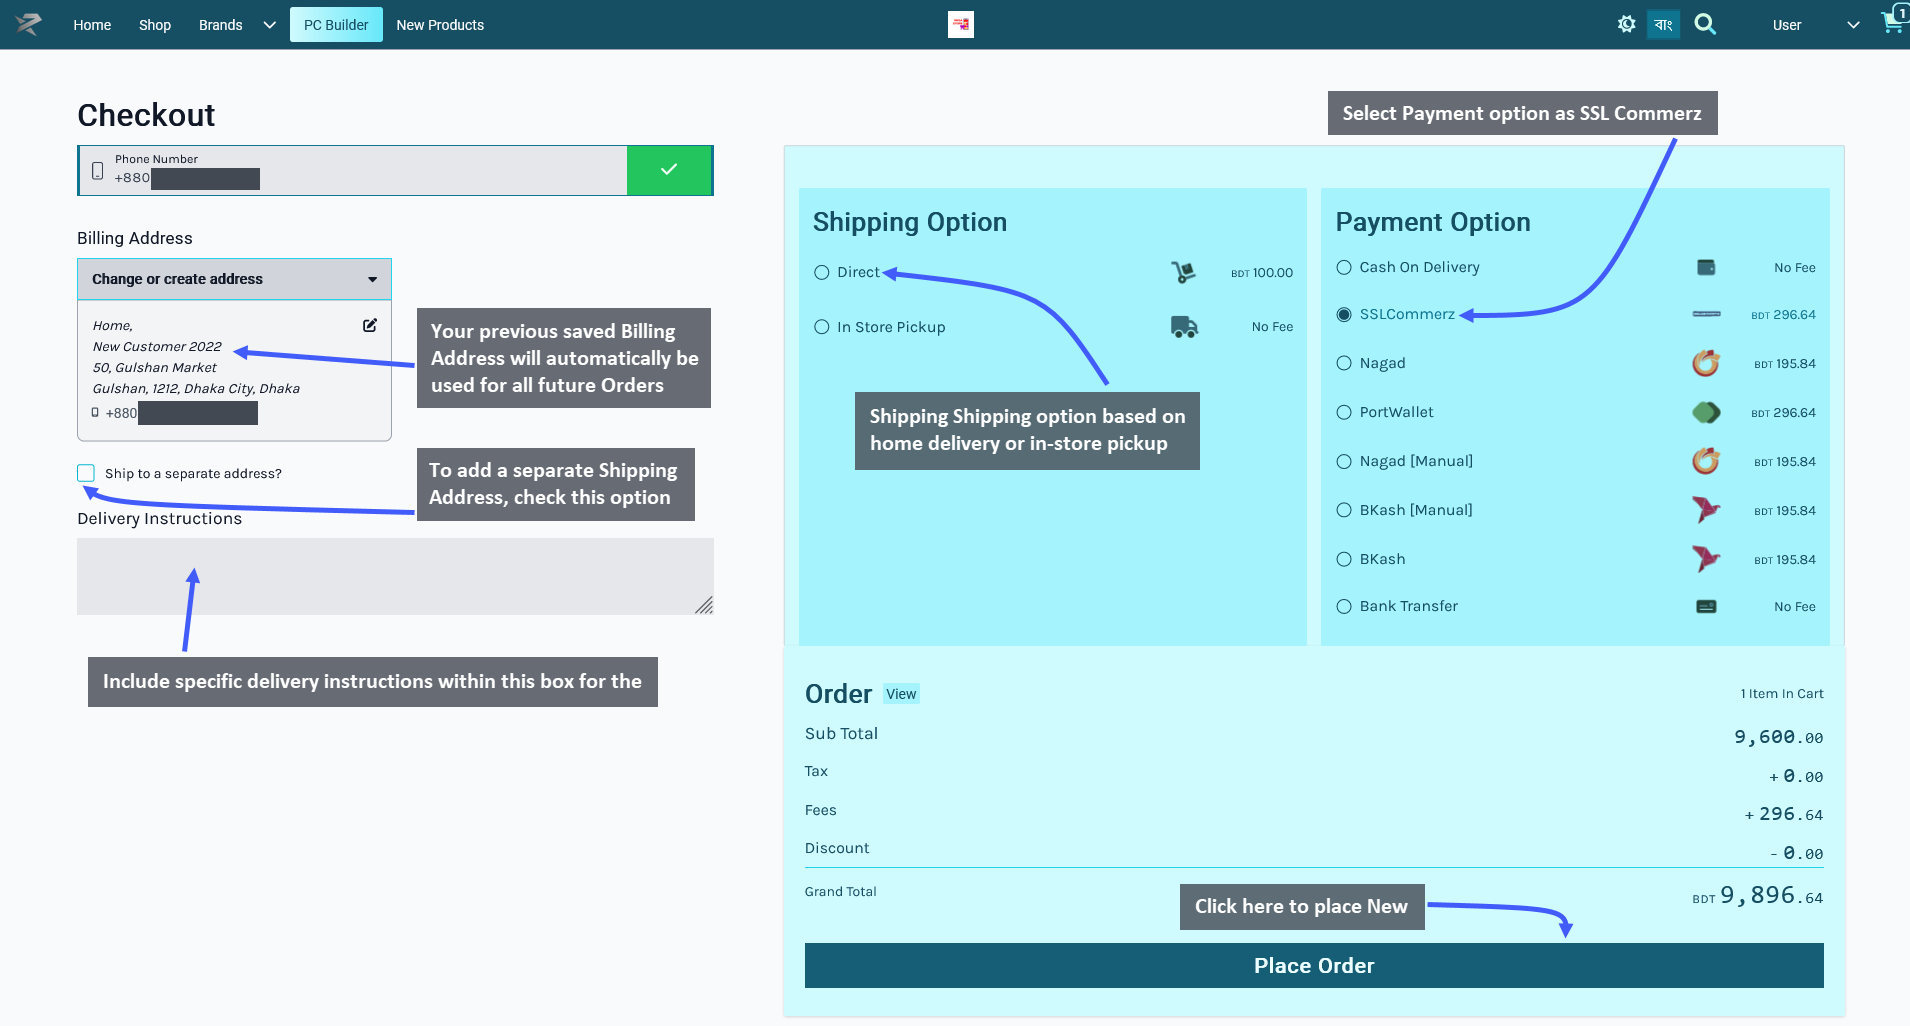
Go to the Checkout Page by clicking the Checkout button. From here, select the preferred Shipping option based on home delivery on in-store pickup by the Customer. The already saved Billing Address will automatically be used as the Customer’s Shipping Address. To add a different Shipping Address, check the box Ship to separate address that will provide a separate field to fill out address details.
Delivery instructions can be added if needed. Select SSLCommerz as payment option and click the Place Order button to complete Order. Any Product tax, fees, or discounts will be visible in the Order Grant Total.
Making Payment with SSLCommerz
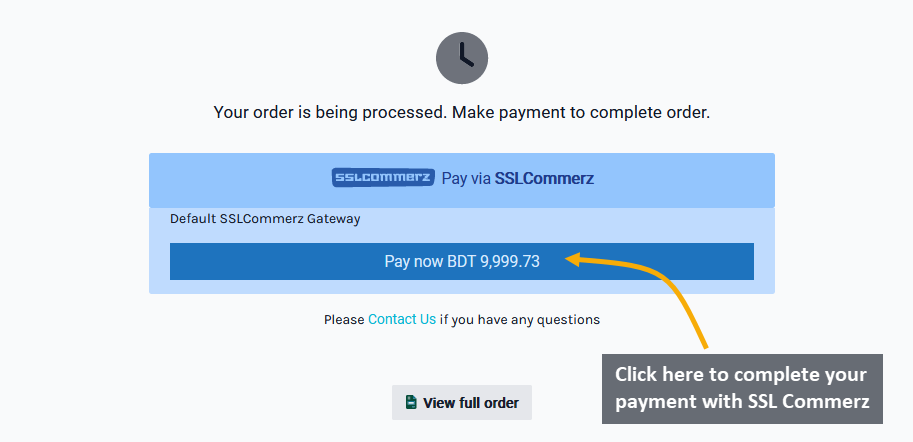
After clicking on the Place Order button, the Customer will be redirected to the SSLCommerz payment portal. Now, click the Pay now BDT ____ to proceed with the payment via SSLCommerz.
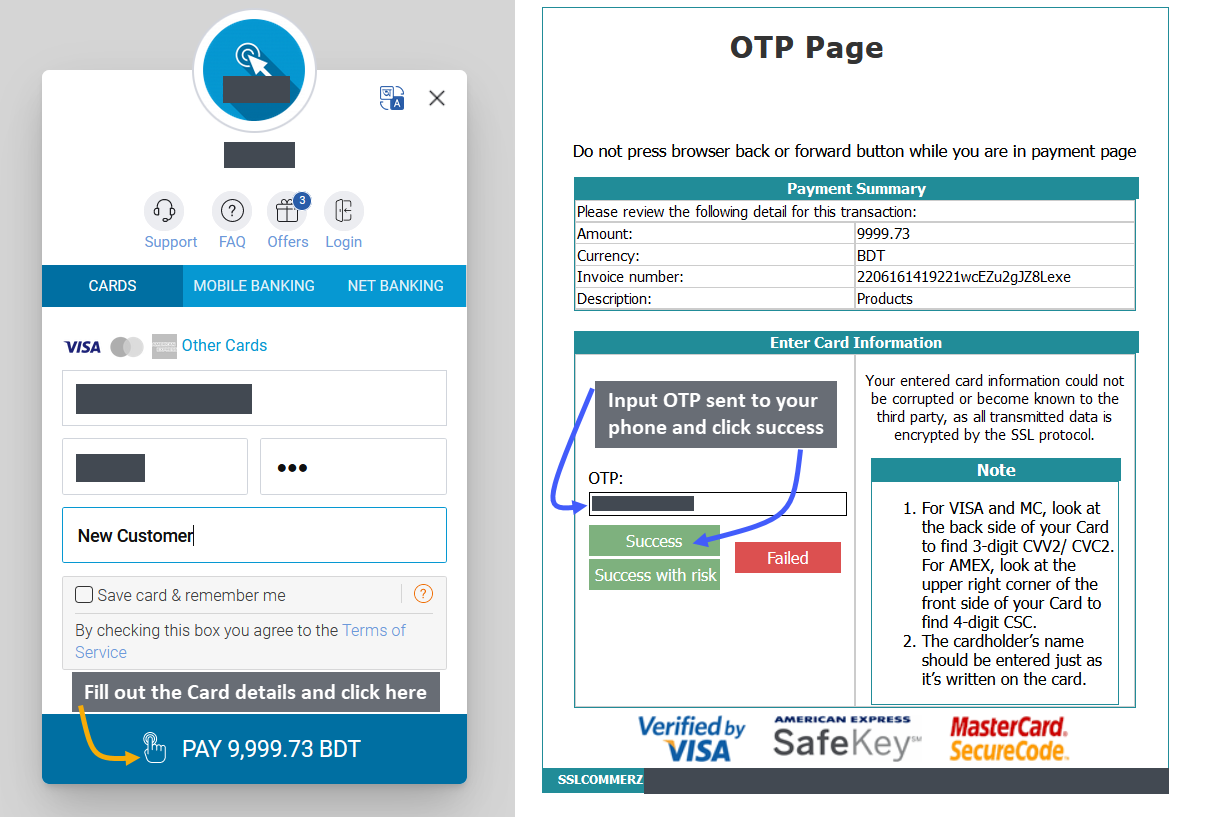
The next page will initiate SSLCommerz payment via Cards, where the Customer will have to fill out their Card Number, expiration date, CVV, and Name and click on Pay ____ BDT. In the following OTP Page, fill out the OTP sent to your phone and click Success. This will confirm the Order and redirect to the Order Confirmation Page.
Order Confirmation and Print Invoice
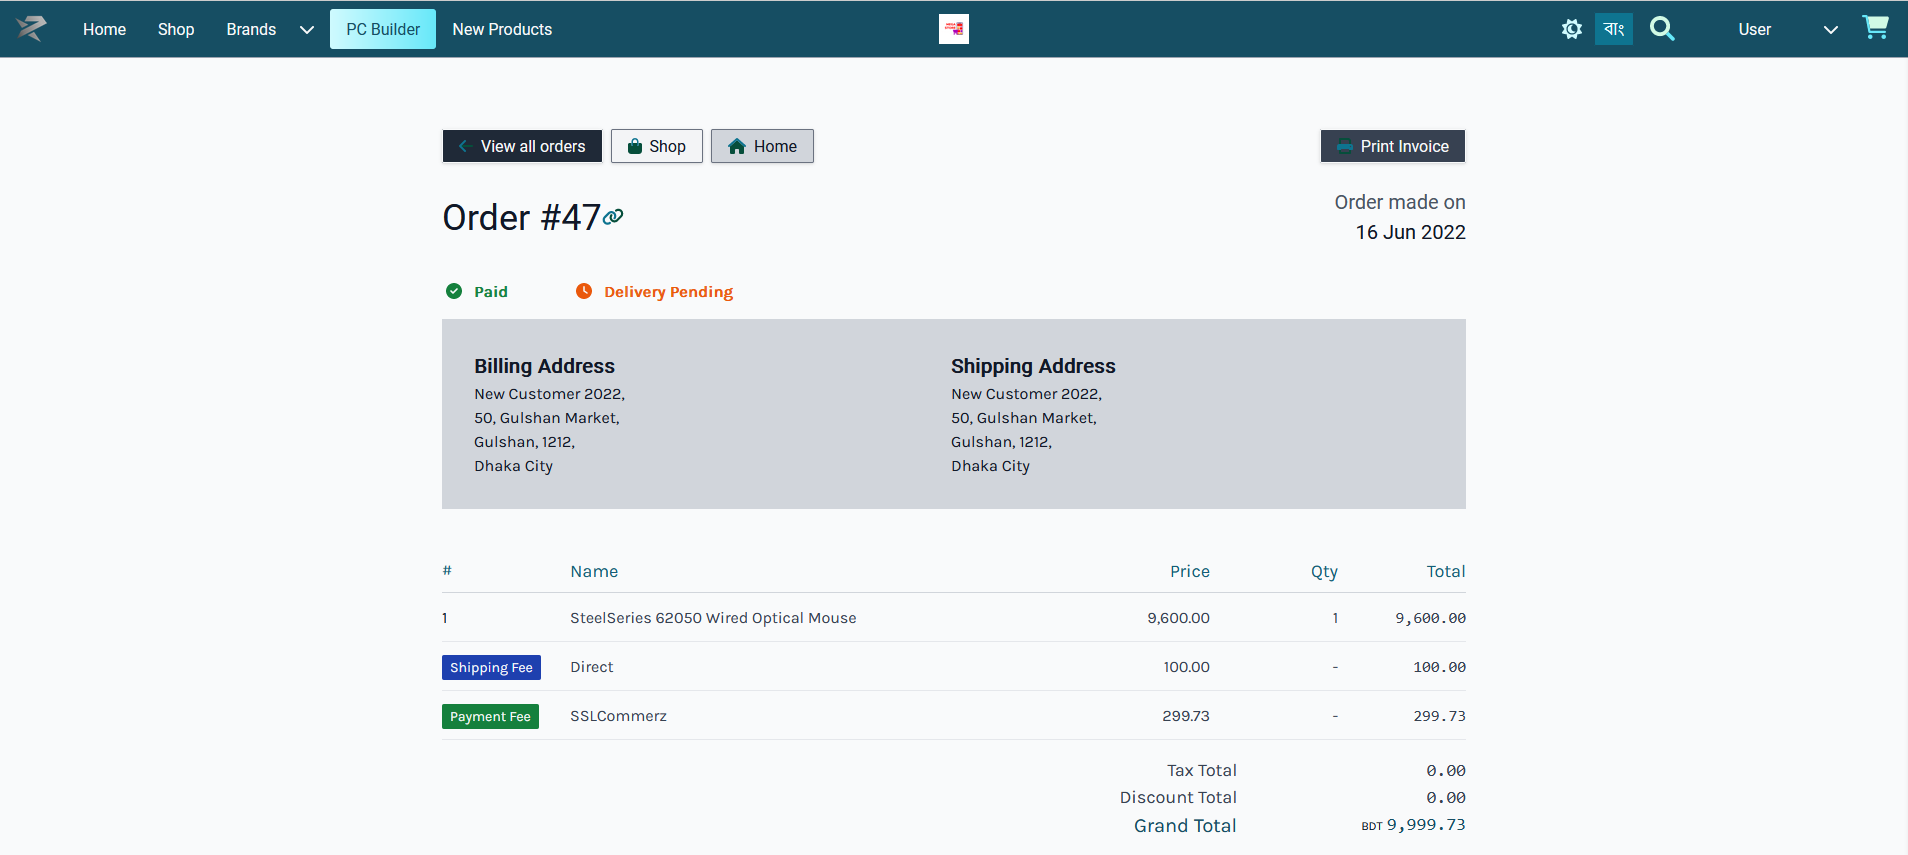
After Order confirmation, the invoice will show the Order details with Customer’s Billing and Shipping addresses. Click the Print Invoice button to have the invoice printed out for future references. To view previous and current Orders, click the View all Orders button, click the Shop button to go to Shop, and click Home to go to main page.
Place Order with Nagad Payment
Customer can order Products by clicking on The Shop tab where Products will be available based on Categories and Brands. Click on the Add to Cart button to add any Product to Cart. After adding Products to Cart, the mini pop-up Product Cart will be visible on the right side of the screen, clicking on which will expand full Product Cart.

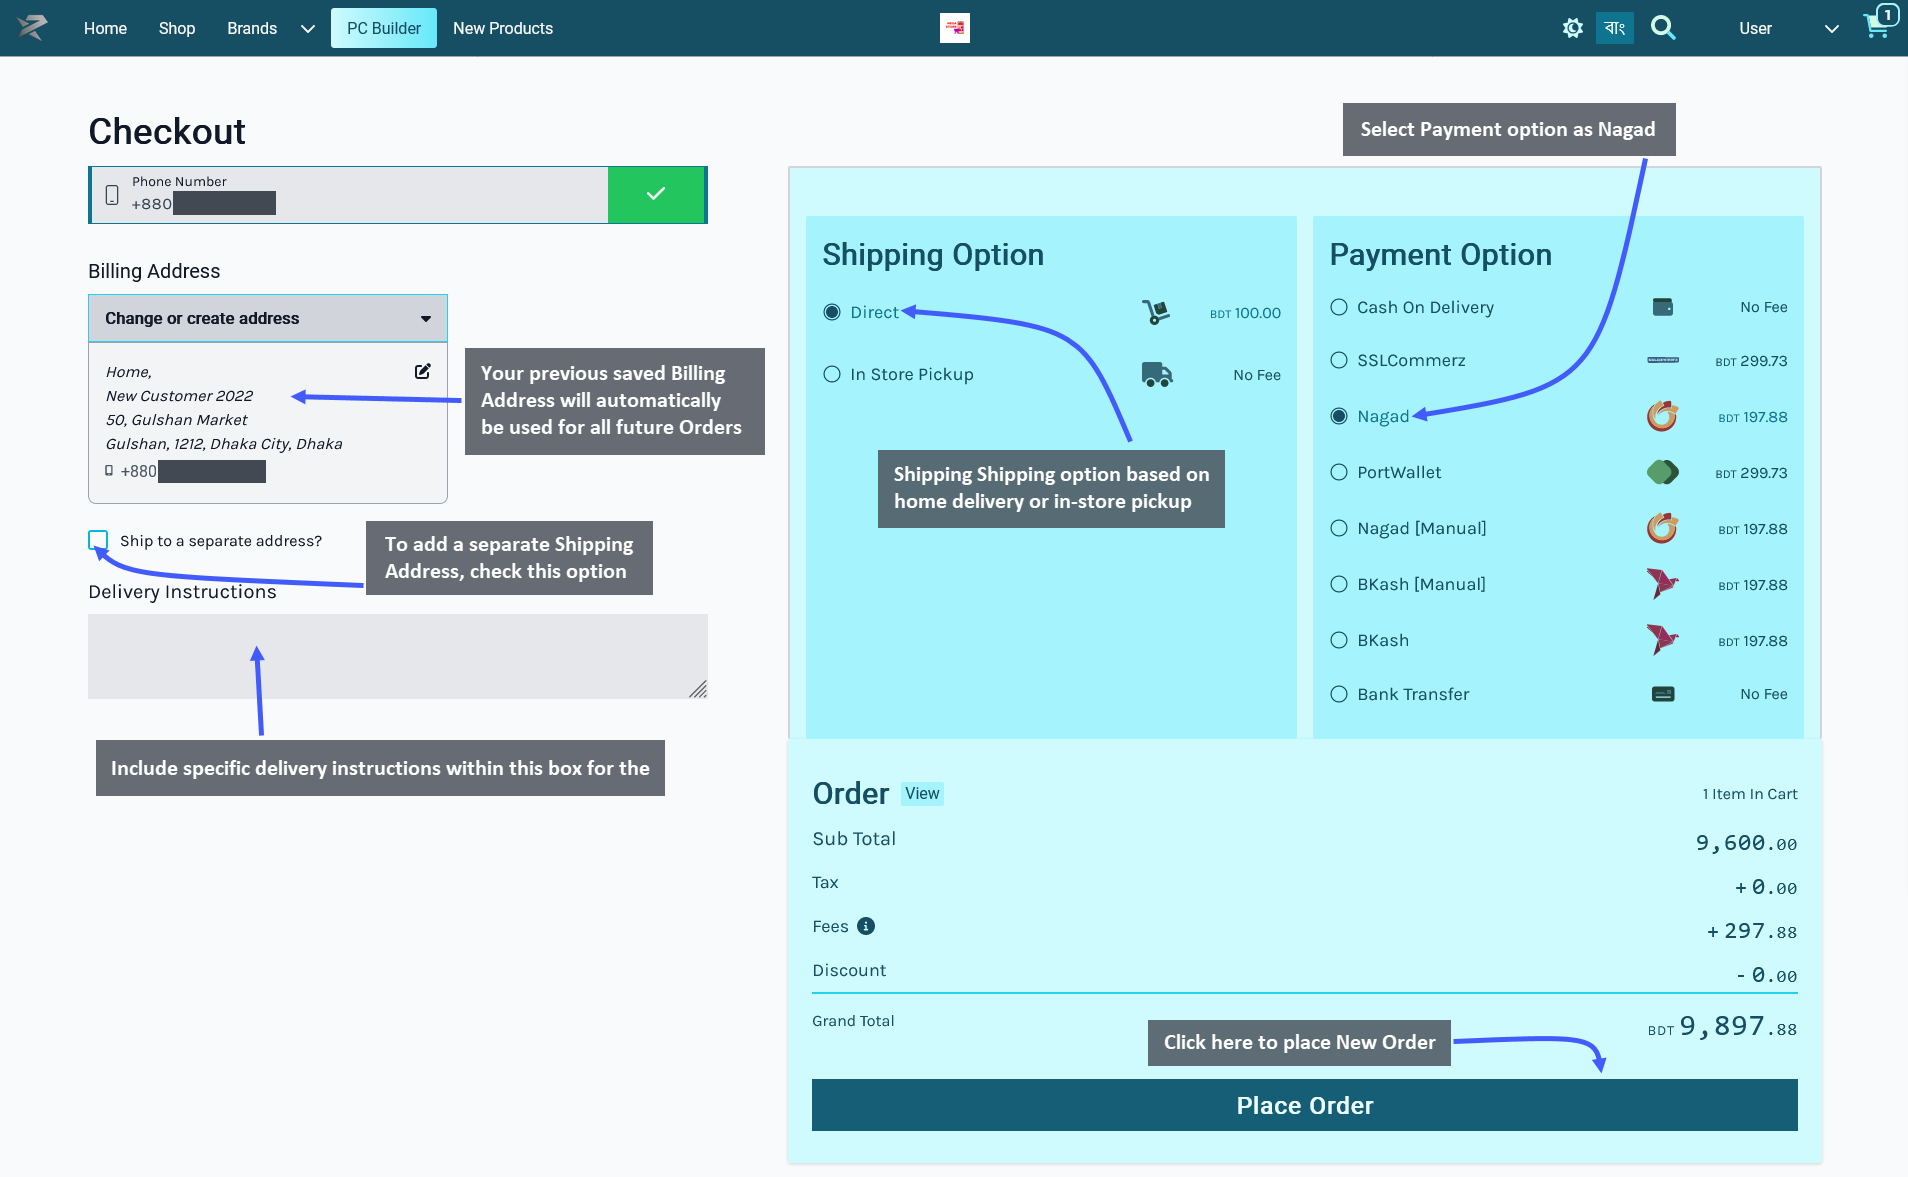
Go to the Checkout Page by clicking the Checkout button. From here, select the preferred Shipping option based on home delivery on in-store pickup by the Customer. The already saved Billing Address will automatically be used as the Customer’s Shipping Address. To add a different Shipping Address, check the box Ship to separate address that will provide a separate field to fill out address details.
Delivery instructions can be added if needed. Select Nagad as payment option and click the Place Order button to complete Order. Any Product tax, fees, or discounts will be visible in the Order Grant Total.
Making Payment with Nagad
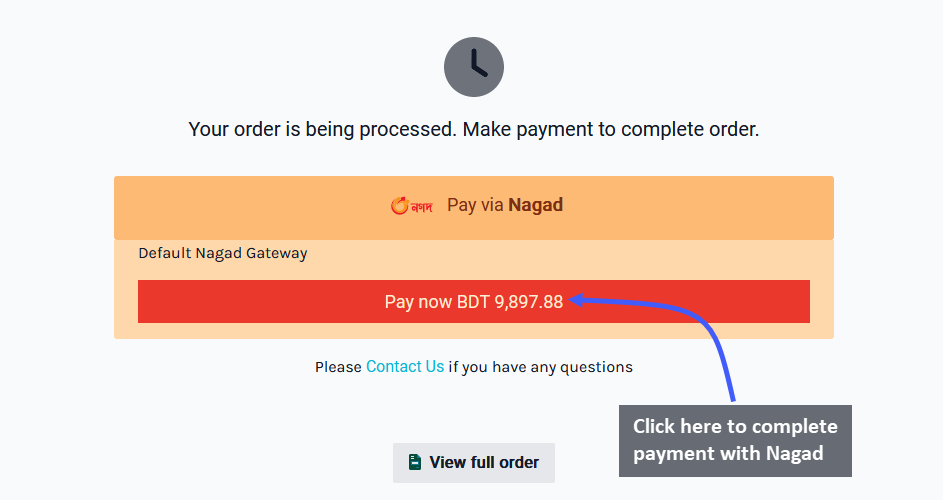
After clicking on the Place Order button, the Customer will be redirected to the Nagad payment portal. Now, click the Pay now BDT ____ to proceed with the payment via Nagad.
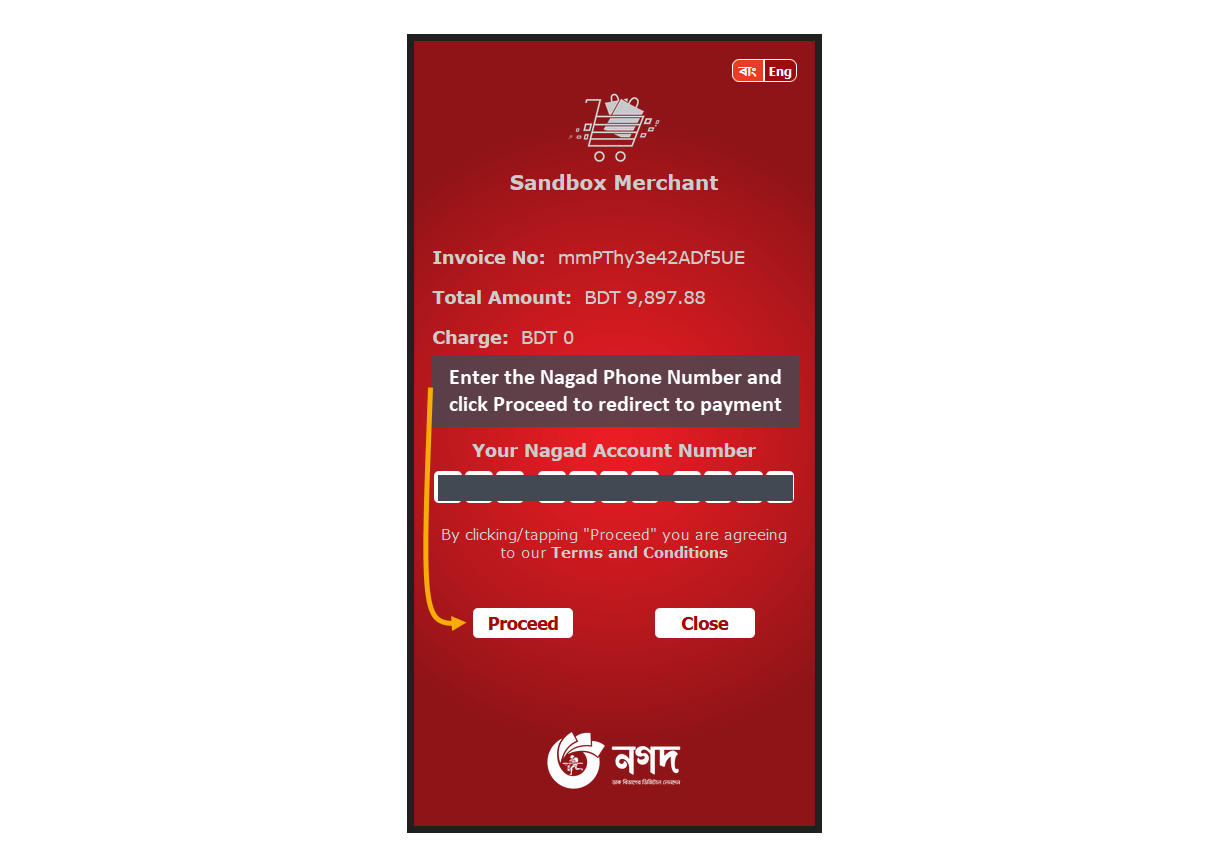
The next page will initiate Nagad payment via the Customer’s Nagad Phone Number. Enter the Nagad Account Number in the given box and click on Proceed to redirect to the payment processing page.
Order Confirmation and Print Invoice
After Order confirmation, the invoice will show the Order details with Customer’s Billing and Shipping addresses. Click the Print Invoice button to have the invoice printed out for future references. To view previous and current Orders, click the View all Orders button, click the Shop button to go to Shop, and click Home to go to main page.
Place Order with PortWallet Payment
Customer can order Products by clicking on The Shop tab where Products will be available based on Categories and Brands. Click on the Add to Cart button to add any Product to Cart. After adding Products to Cart, the mini pop-up Product Cart will be visible on the right side of the screen, clicking on which will expand full Product Cart.

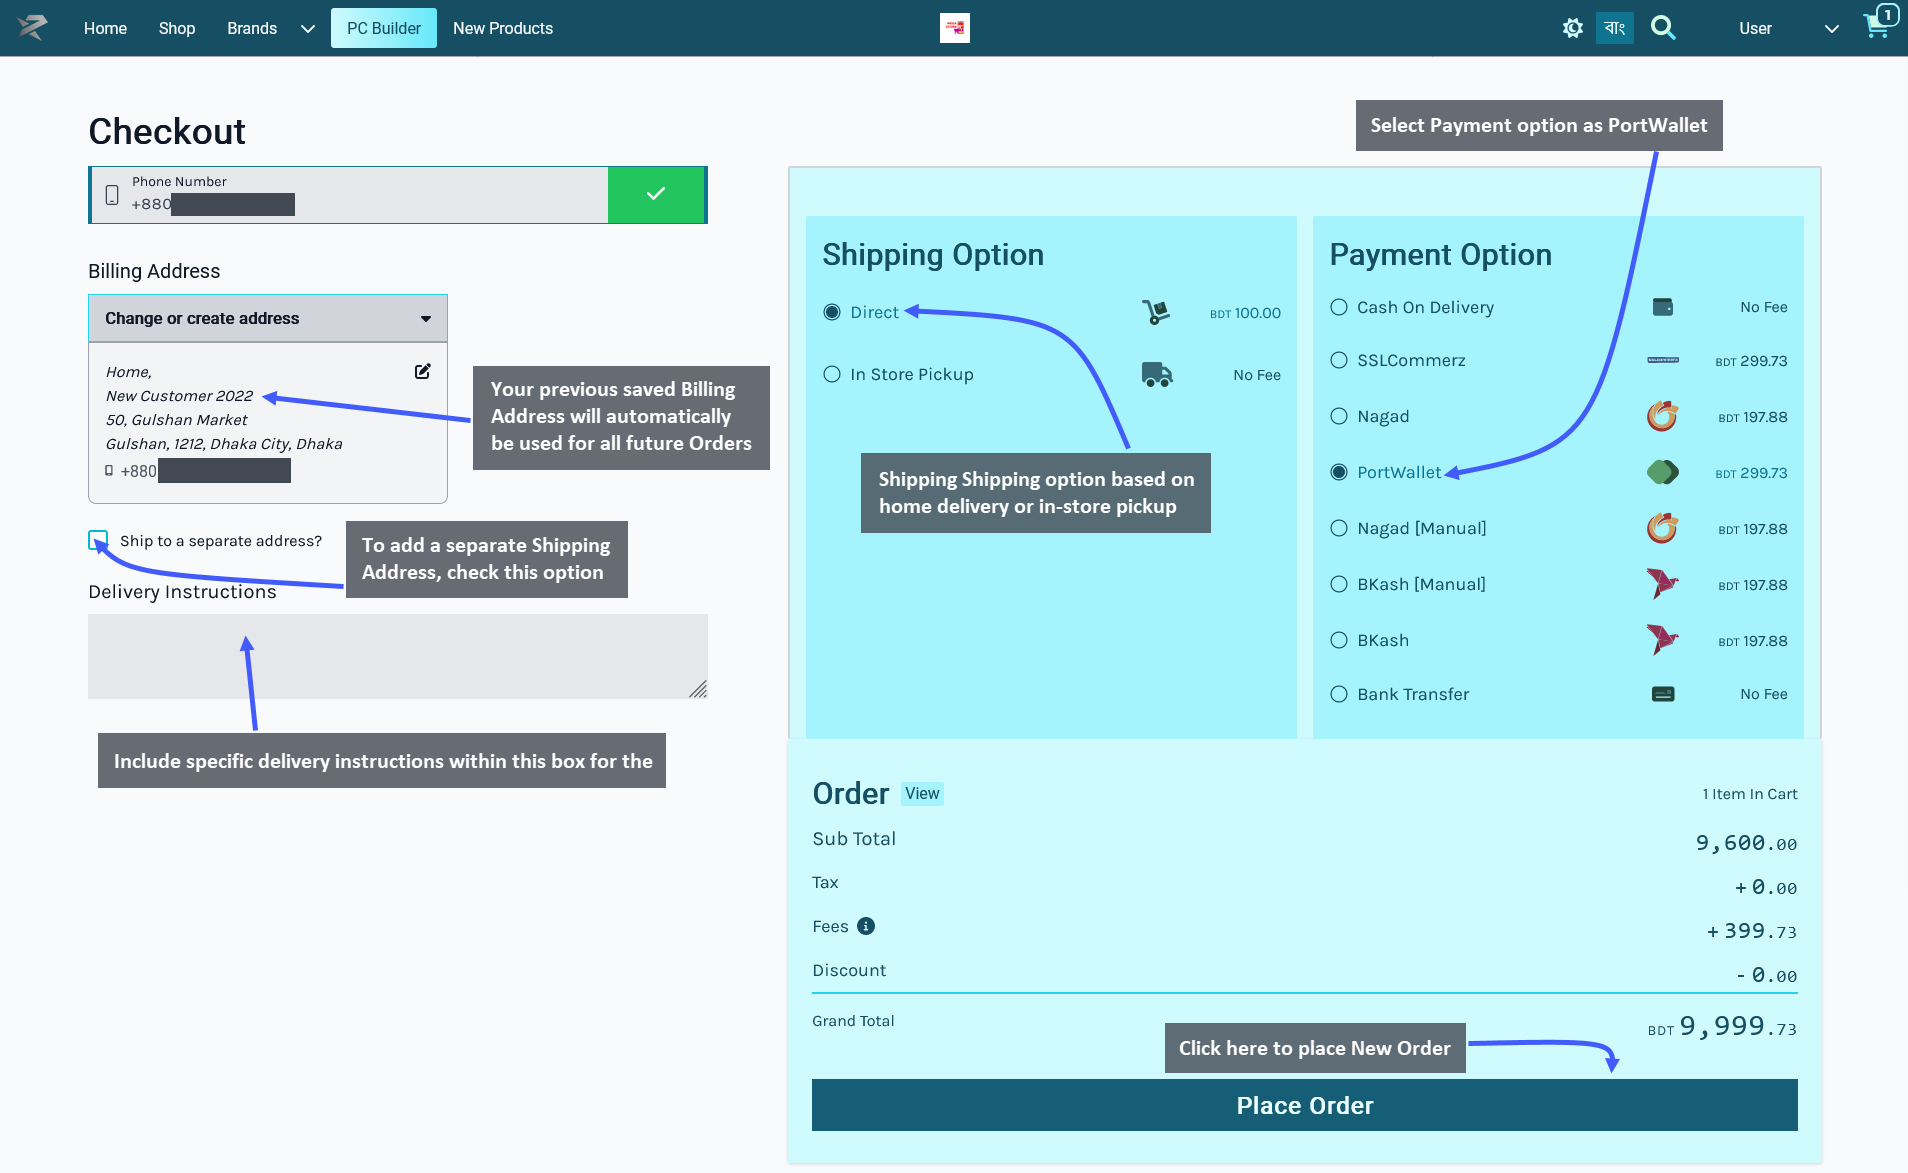
Go to the Checkout Page by clicking the Checkout button. From here, select the preferred Shipping option based on home delivery on in-store pickup by the Customer. The already saved Billing Address will automatically be used as the Customer’s Shipping Address. To add a different Shipping Address, check the box Ship to separate address that will provide a separate field to fill out address details.
Delivery instructions can be added if needed. Select PortWallet as payment option and click Place Order button to complete Order. Any Product tax, fees, or discounts will be visible in the Order Grant Total.
Making Payment with PortWallet
After clicking on the Place Order button, the Customer will be redirected to the PortWallet payment portal. Now, click the Pay now BDT ____ to proceed with the payment via PortWallet.
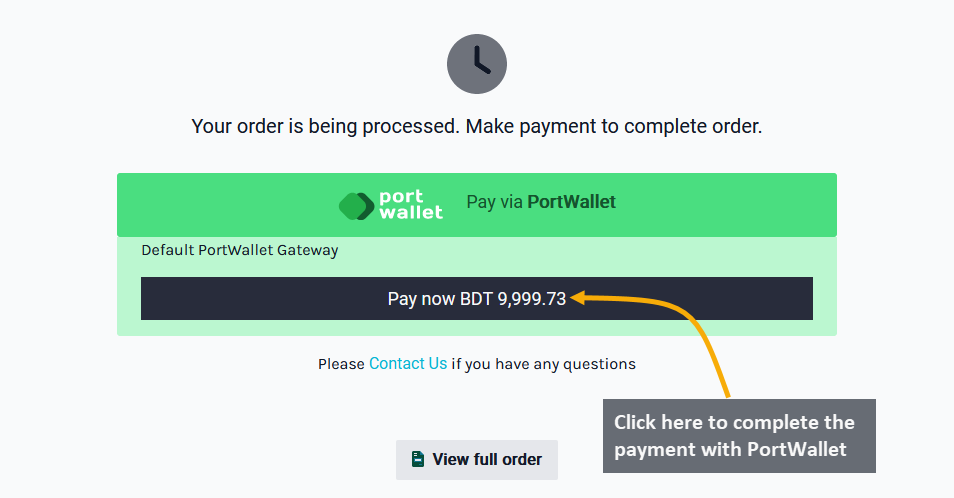
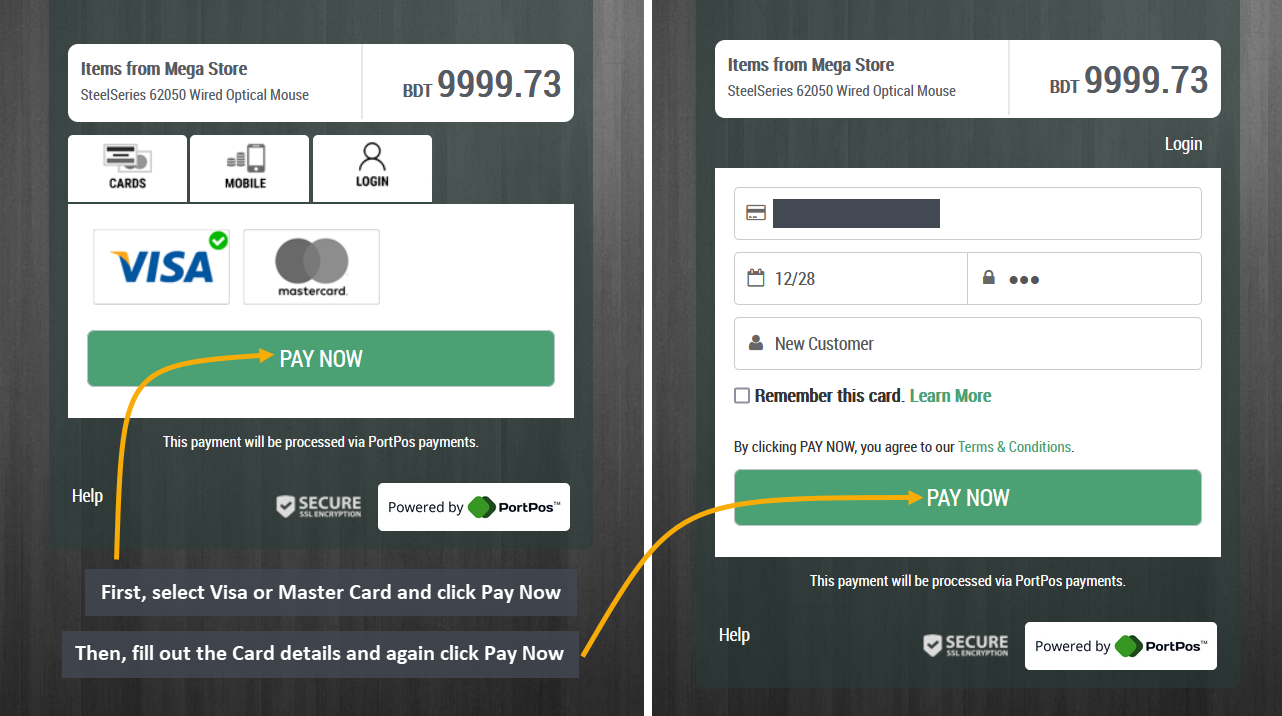
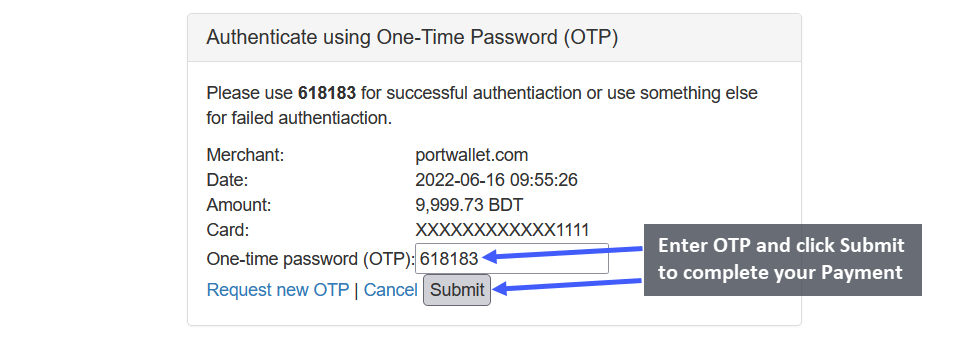
The next page will initiate PortWallet payment with Cards, where Customer will have to first select either Visa or Mastercard and click Pay Now. In the next page, they will need to fill out their Card Number, expiration date, CVV, and Name and click on Pay Now. Then, authenticate the payment process by inputting the One-Time Password (OTP) and click Submit. This will confirm the Order and redirect to the Order Confirmation Page.
Order Confirmation and Print Invoice
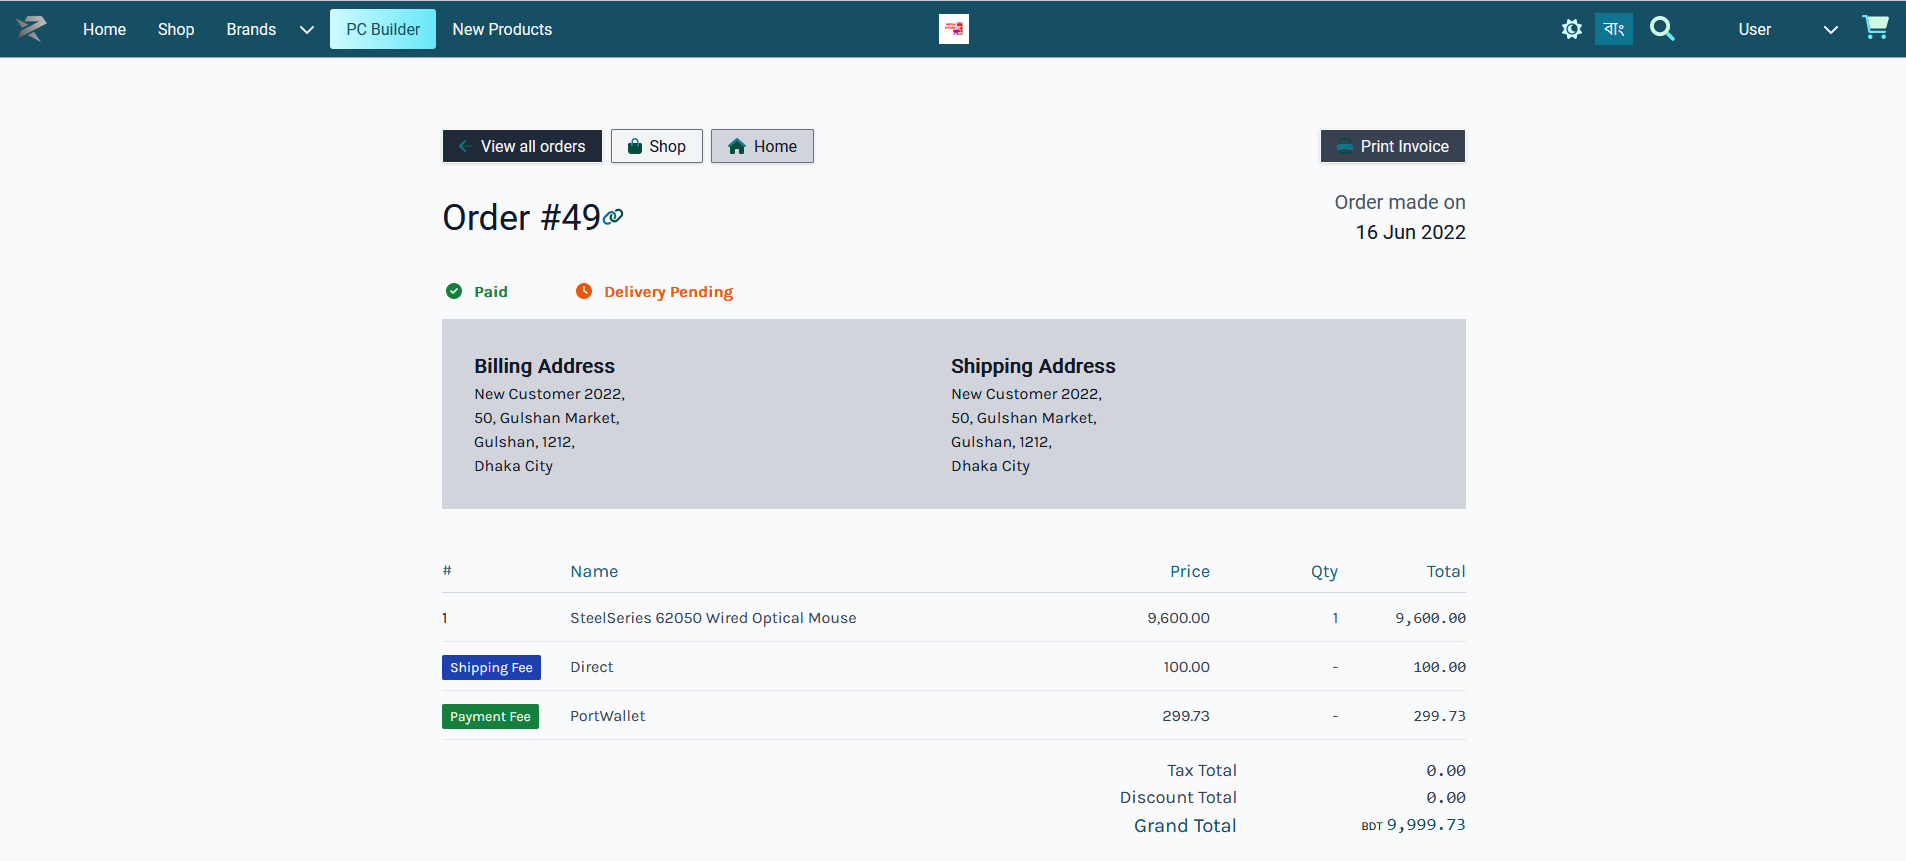
After Order confirmation, the invoice will show the Order details with Customer’s Billing and Shipping addresses. Click the Print Invoice button to have the invoice printed out for future references. To view previous and current Orders, click the View all Orders button, click the Shop button to go to Shop, and click Home to go to main page.
Place Order with Nagad (Manual) Payment
Customer can order Products by clicking on The Shop tab where Products will be available based on Categories and Brands. Click on the Add to Cart button to add any Product to Cart. After adding Products to Cart, the mini pop-up Product Cart will be visible on the right side of the screen, clicking on which will expand full Product Cart.

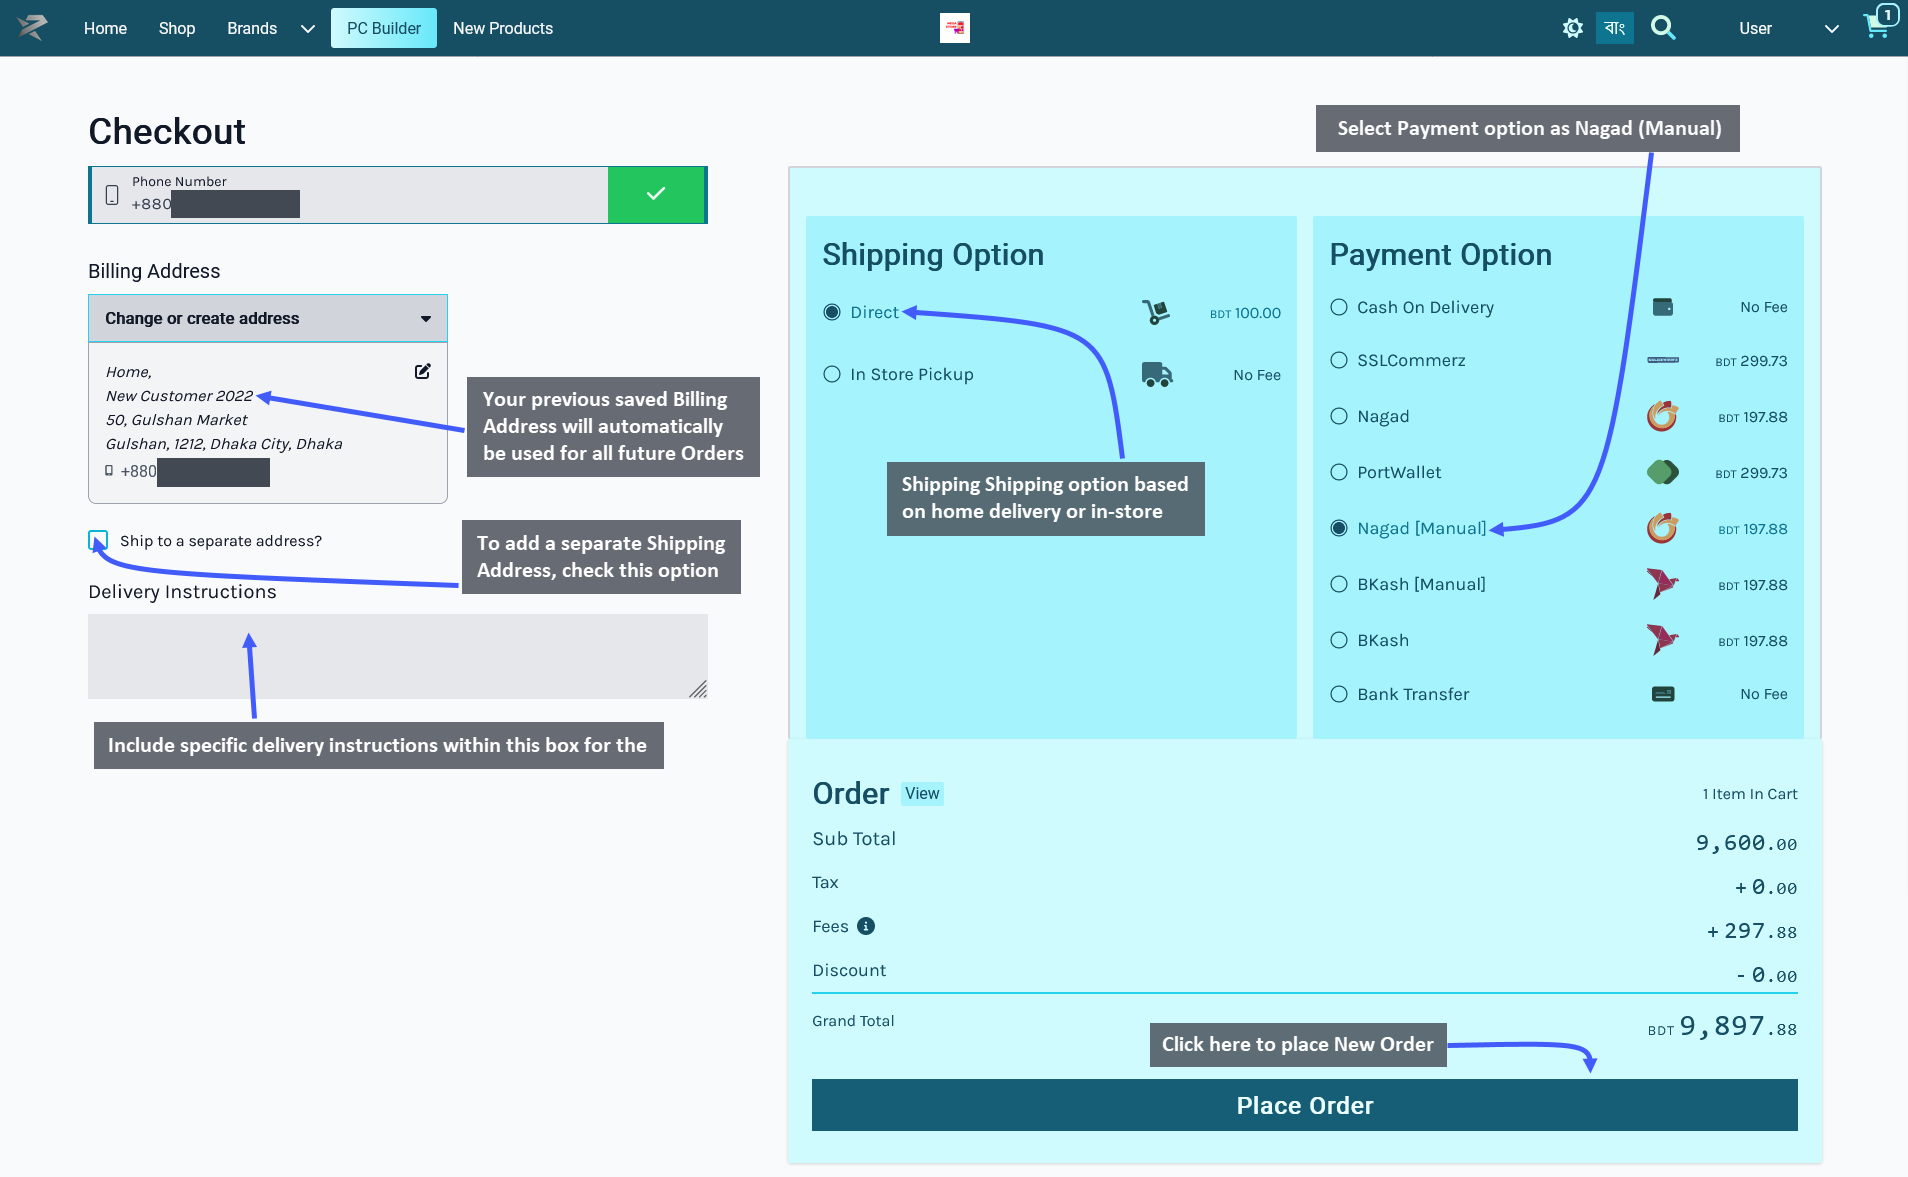
Go to the Checkout Page by clicking the Checkout button. From here, select the preferred Shipping option based on home delivery on in-store pickup by the Customer. The already saved Billing Address will automatically be used as the Customer’s Shipping Address. To add a different Shipping Address, check the box Ship to separate address that will provide a separate field to fill out address details.
Delivery instructions can be added if needed. Select Nagad (Manual) as payment option and click the Place Order button to complete Order. Any Product tax, fees, or discounts will be visible in the Order Grant Total.
Making Payment with Nagad (Manual)
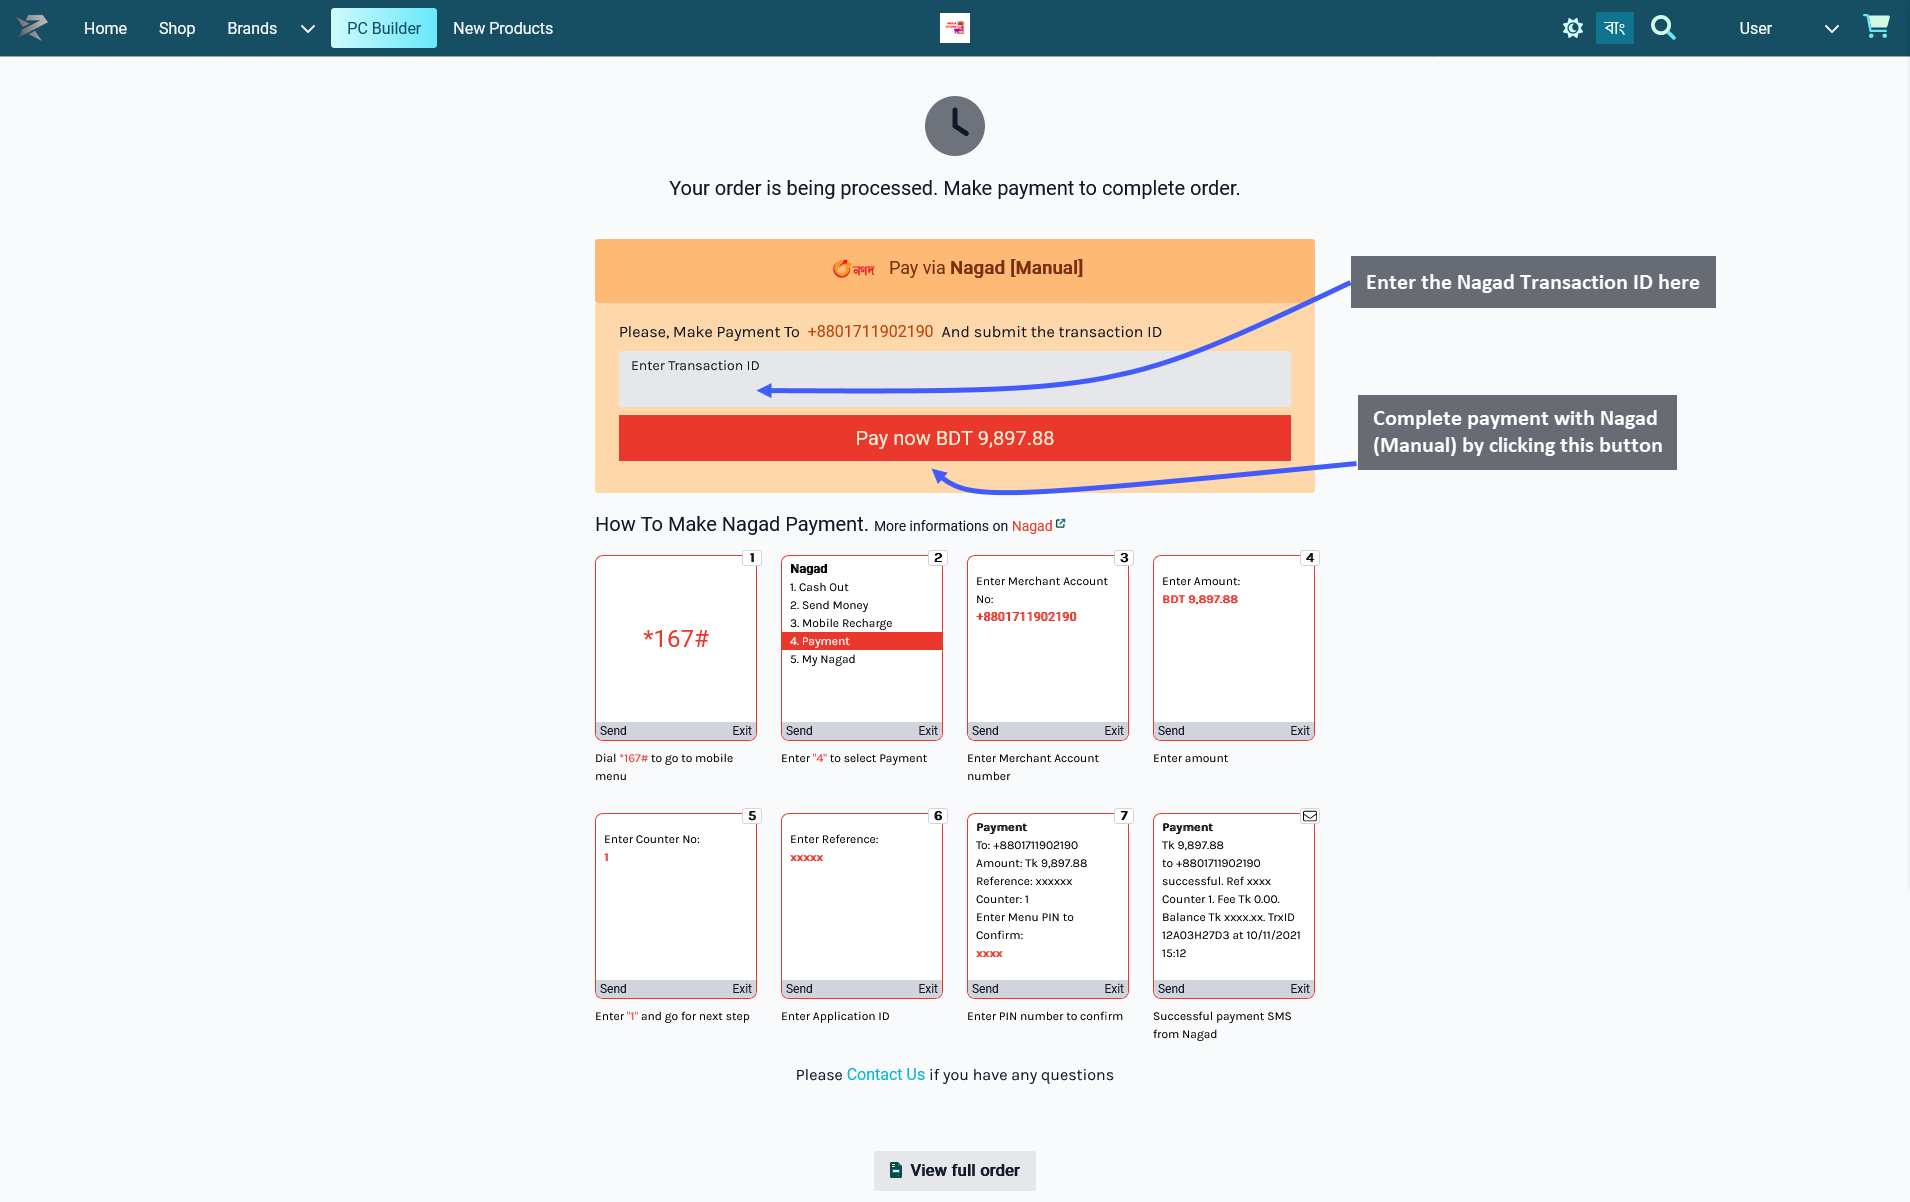
After clicking on the Place Order button, the Customer will be redirected to the Nagad (Manual) payment portal. The next page will initiate Nagad (Manual) payment, where after making the payment following the instructions, the Customer will have to enter the Transaction ID and click on Pay now BDT ____. This will confirm the Order and redirect to the Order Confirmation Page.
Order Confirmation and Print Invoice
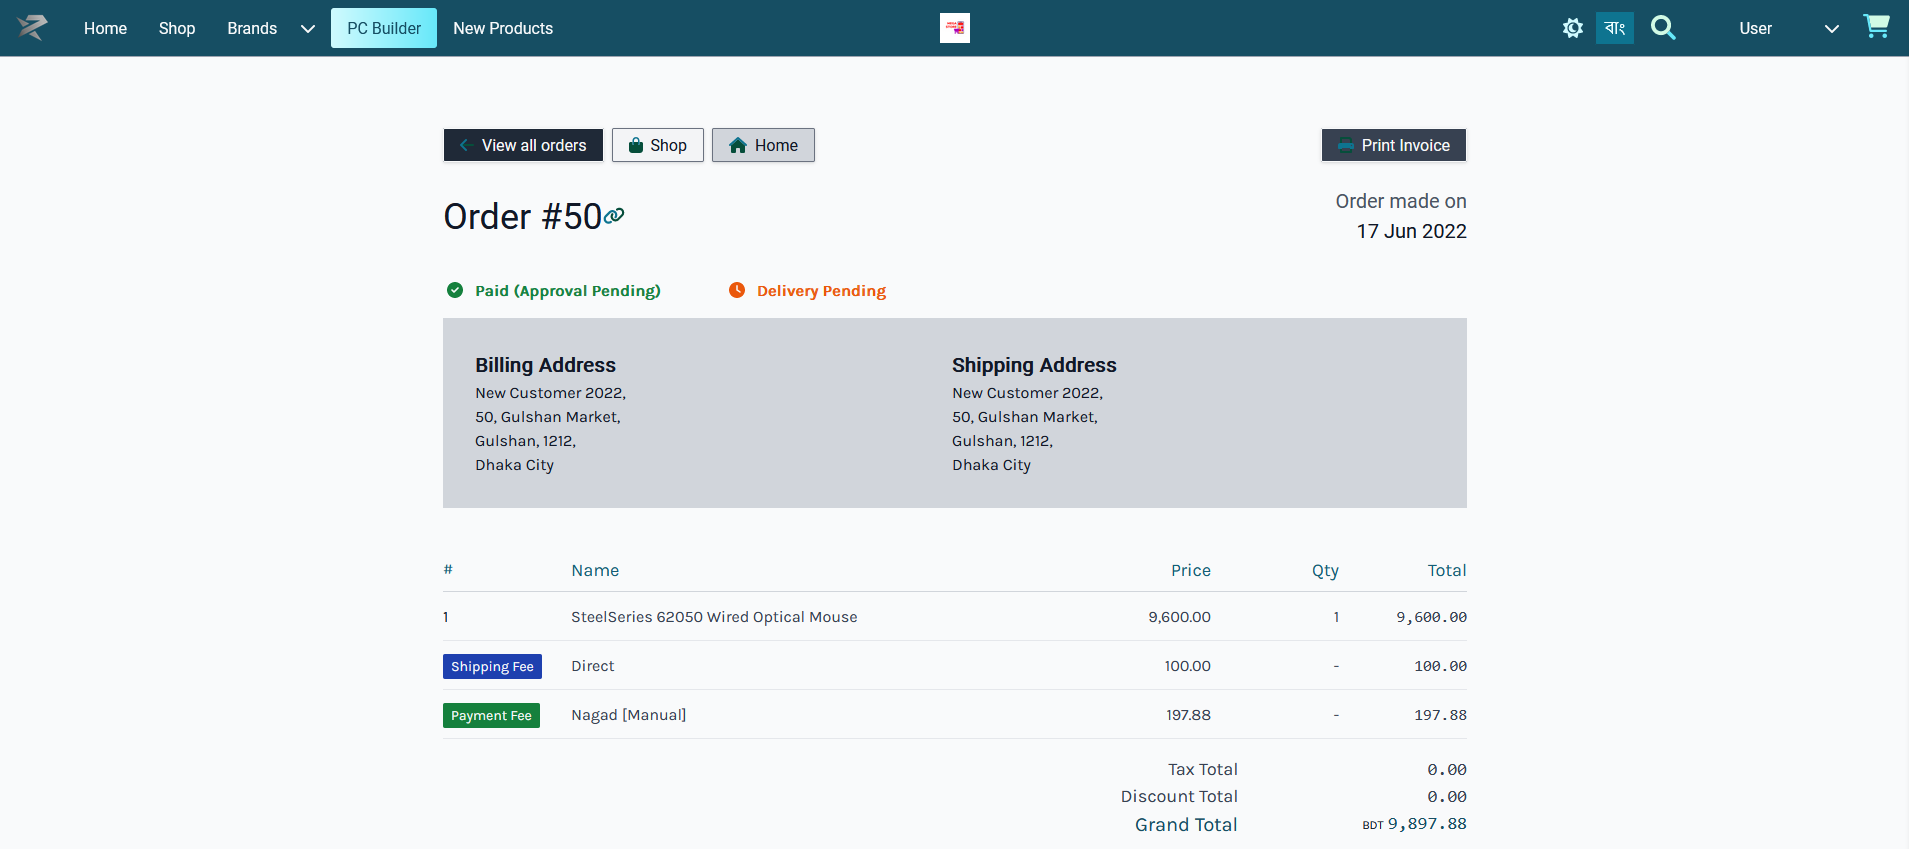
After Order confirmation, the invoice will show the Order details with Customer’s Billing and Shipping addresses. Click the Print Invoice button to have the invoice printed out for future references. To view previous and current Orders, click the View all Orders button, click the Shop button to go to Shop, and click Home to go to main page.
Place Order with BKash (Manual) Payment
Customer can order Products by clicking on The Shop tab where Products will be available based on Categories and Brands. Click on the Add to Cart button to add any Product to Cart. After adding Products to Cart, the mini pop-up Product Cart will be visible on the right side of the screen, clicking on which will expand full Product Cart.

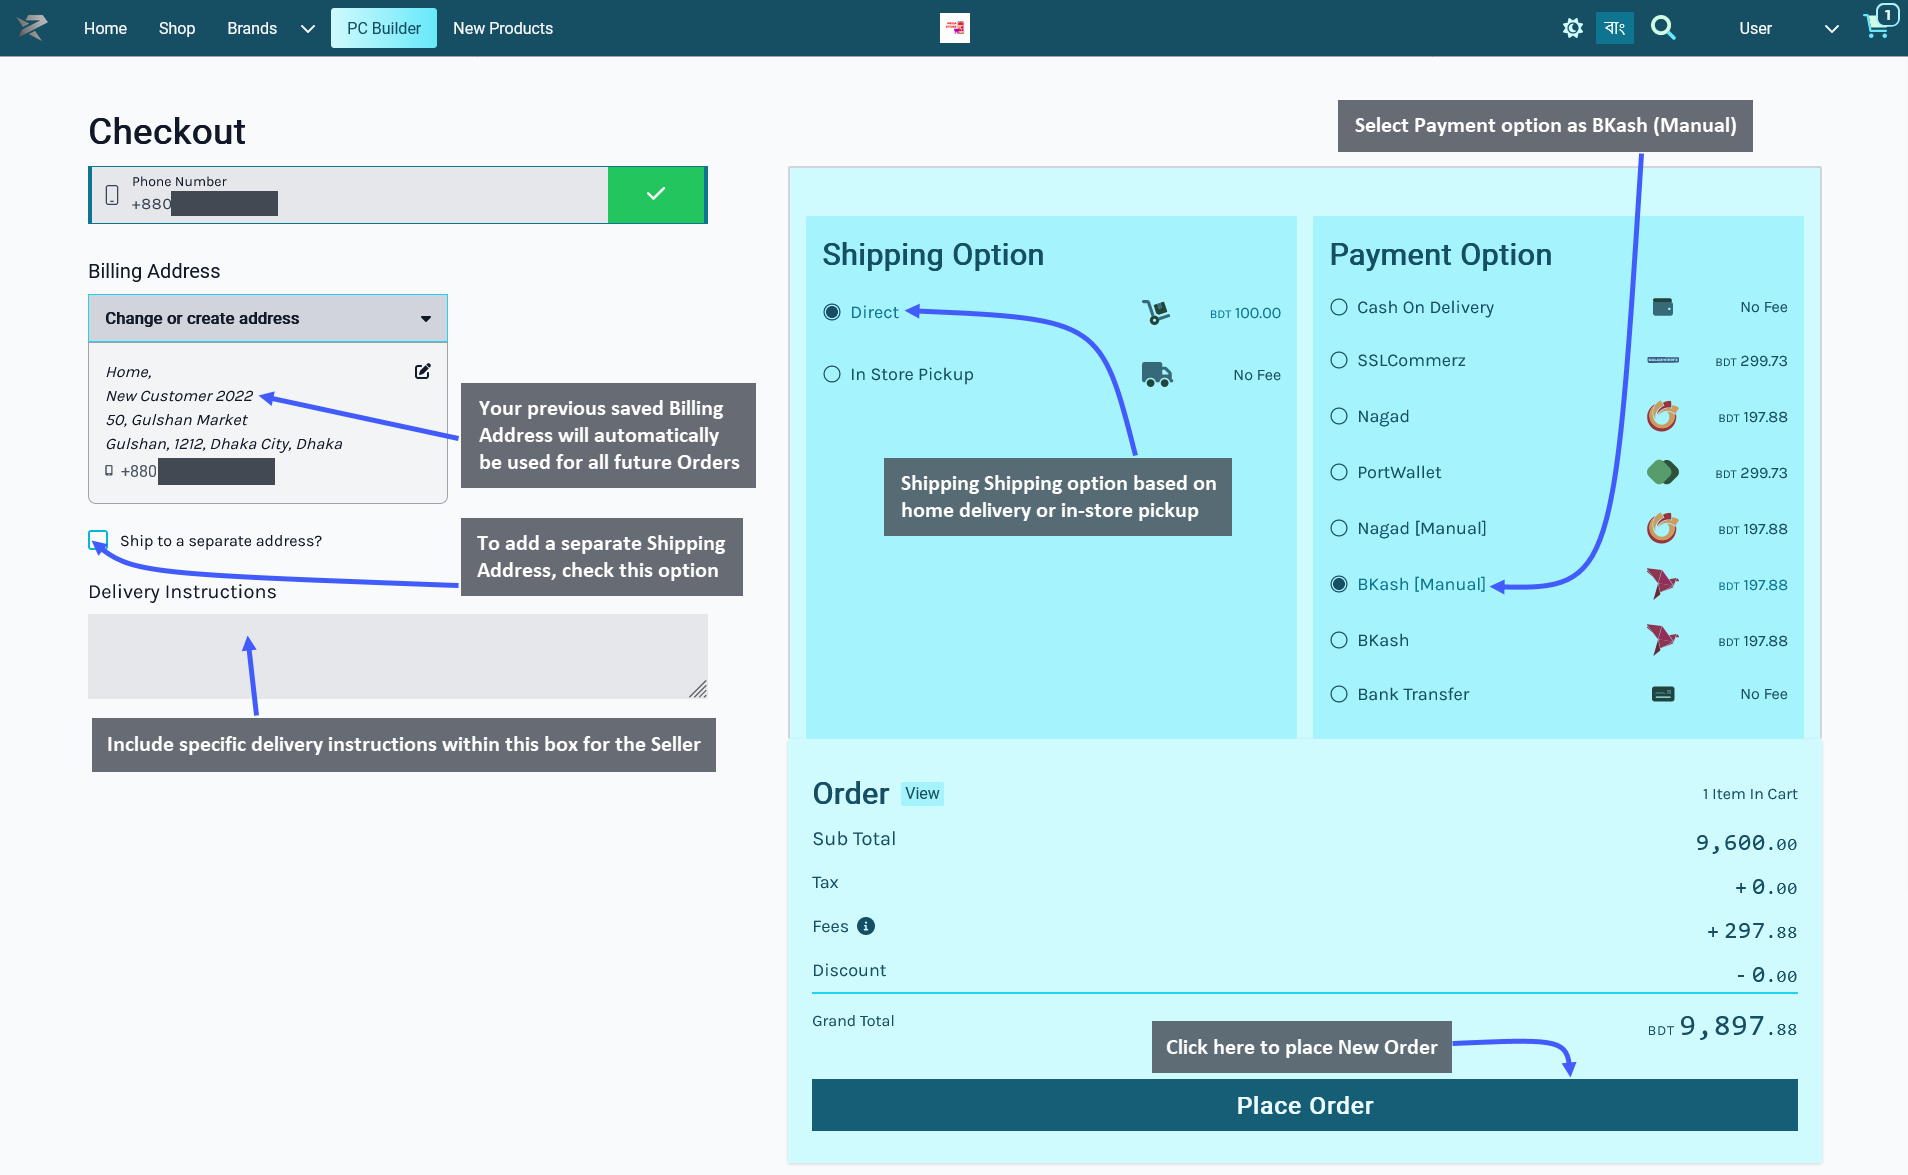
Go to the Checkout Page by clicking the Checkout button. From here, select the preferred Shipping option based on home delivery on in-store pickup by the Customer. The already saved Billing Address will automatically be used as the Customer’s Shipping Address. To add a different Shipping Address, check the box Ship to separate address that will provide a separate field to fill out address details.
Delivery instructions can be added if needed. Select BKash (Manual) as payment option and click the Place Order button to complete Order. Any Product tax, fees, or discounts will be visible in the Order Grant Total.
Making Payment with BKash (Manual)
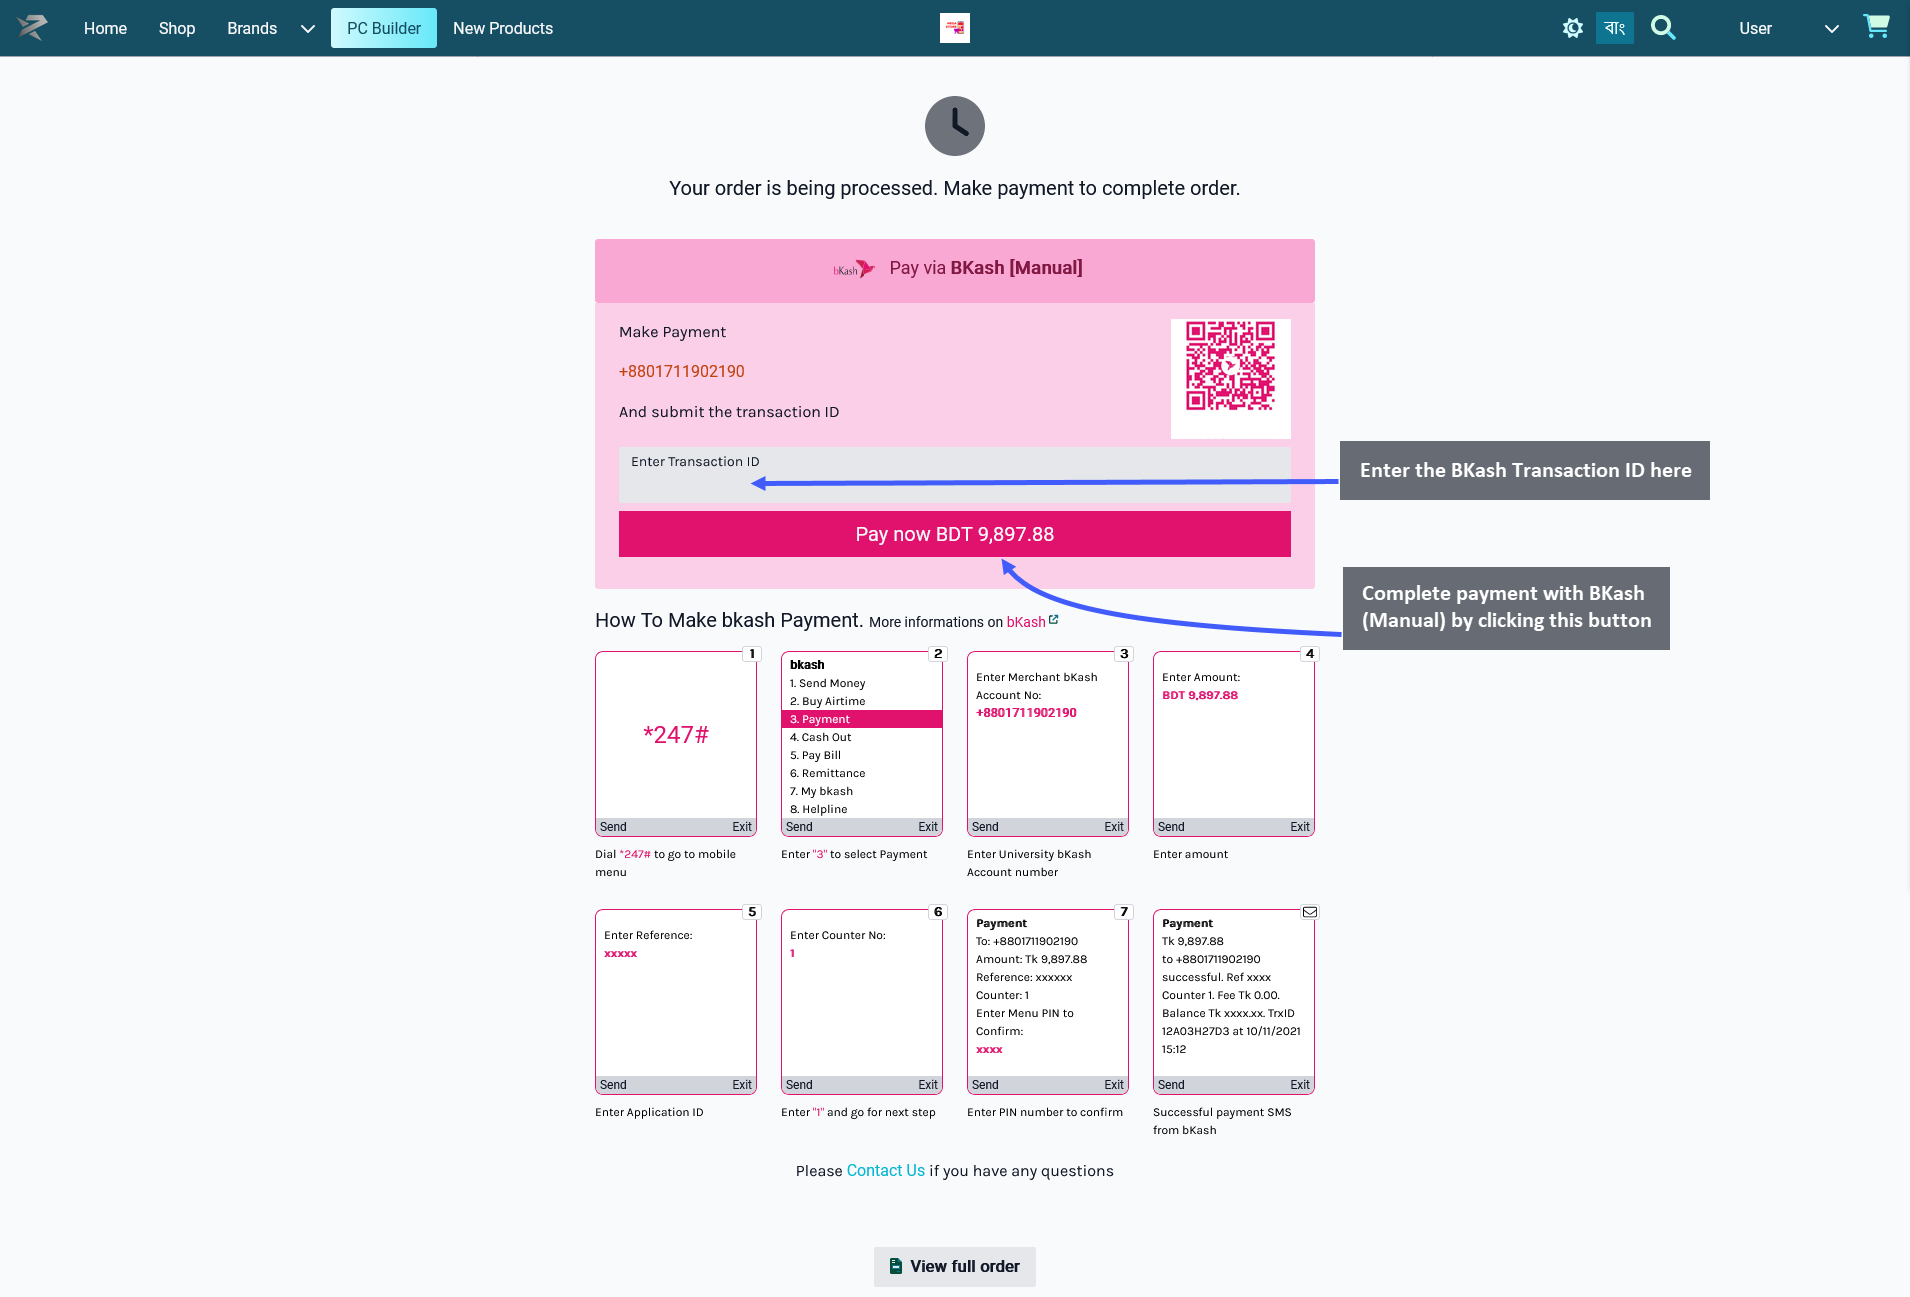
After clicking on the Place Order button, the Customer will be redirected to the BKash (Manual) payment portal. The next page will initiate BKash (Manual) payment, where after making the payment following the instructions, the Customer will have to enter the Transaction ID and click on Pay now BDT ____. This will confirm the Order and redirect to the Order Confirmation Page.
Order Confirmation and Print Invoice
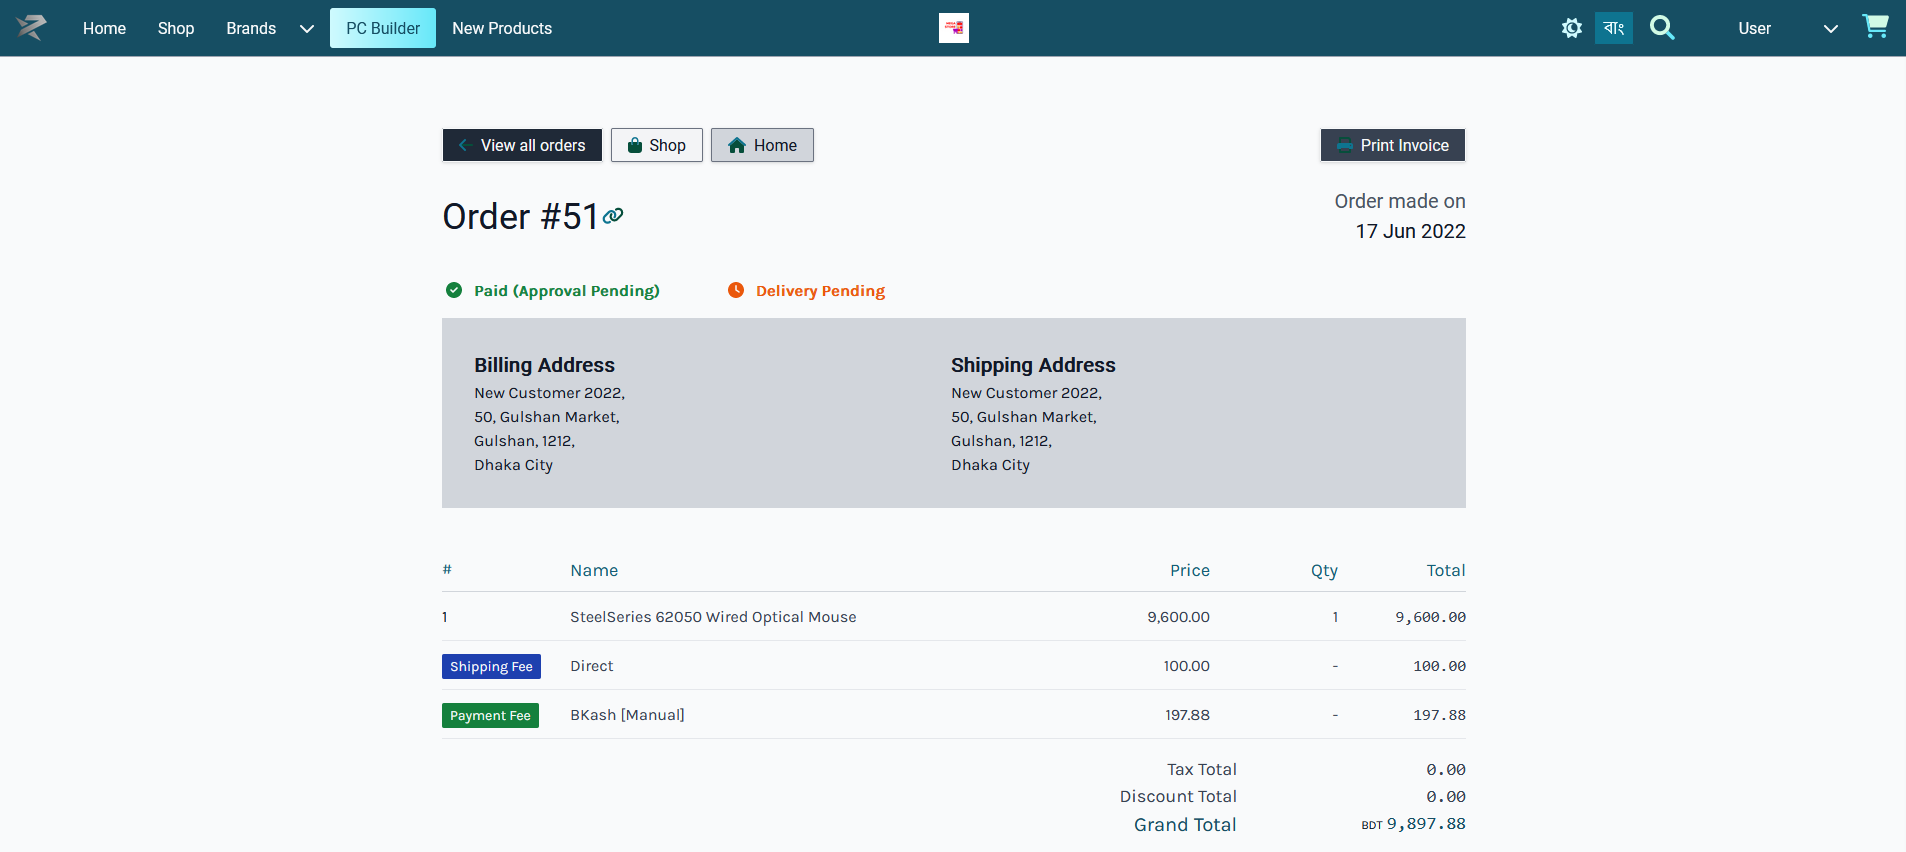
After Order confirmation, the invoice will show the Order details with Customer’s Billing and Shipping addresses. Click the Print Invoice button to have the invoice printed out for future references. To view previous and current Orders, click the View all Orders button, click the Shop button to go to Shop, and click Home to go to main page.
Place Order with BKash Payment
Customer can order Products by clicking on The Shop tab where Products will be available based on Categories and Brands. Click on the Add to Cart button to add any Product to Cart. After adding Products to Cart, the mini pop-up Product Cart will be visible on the right side of the screen, clicking on which will expand full Product Cart.

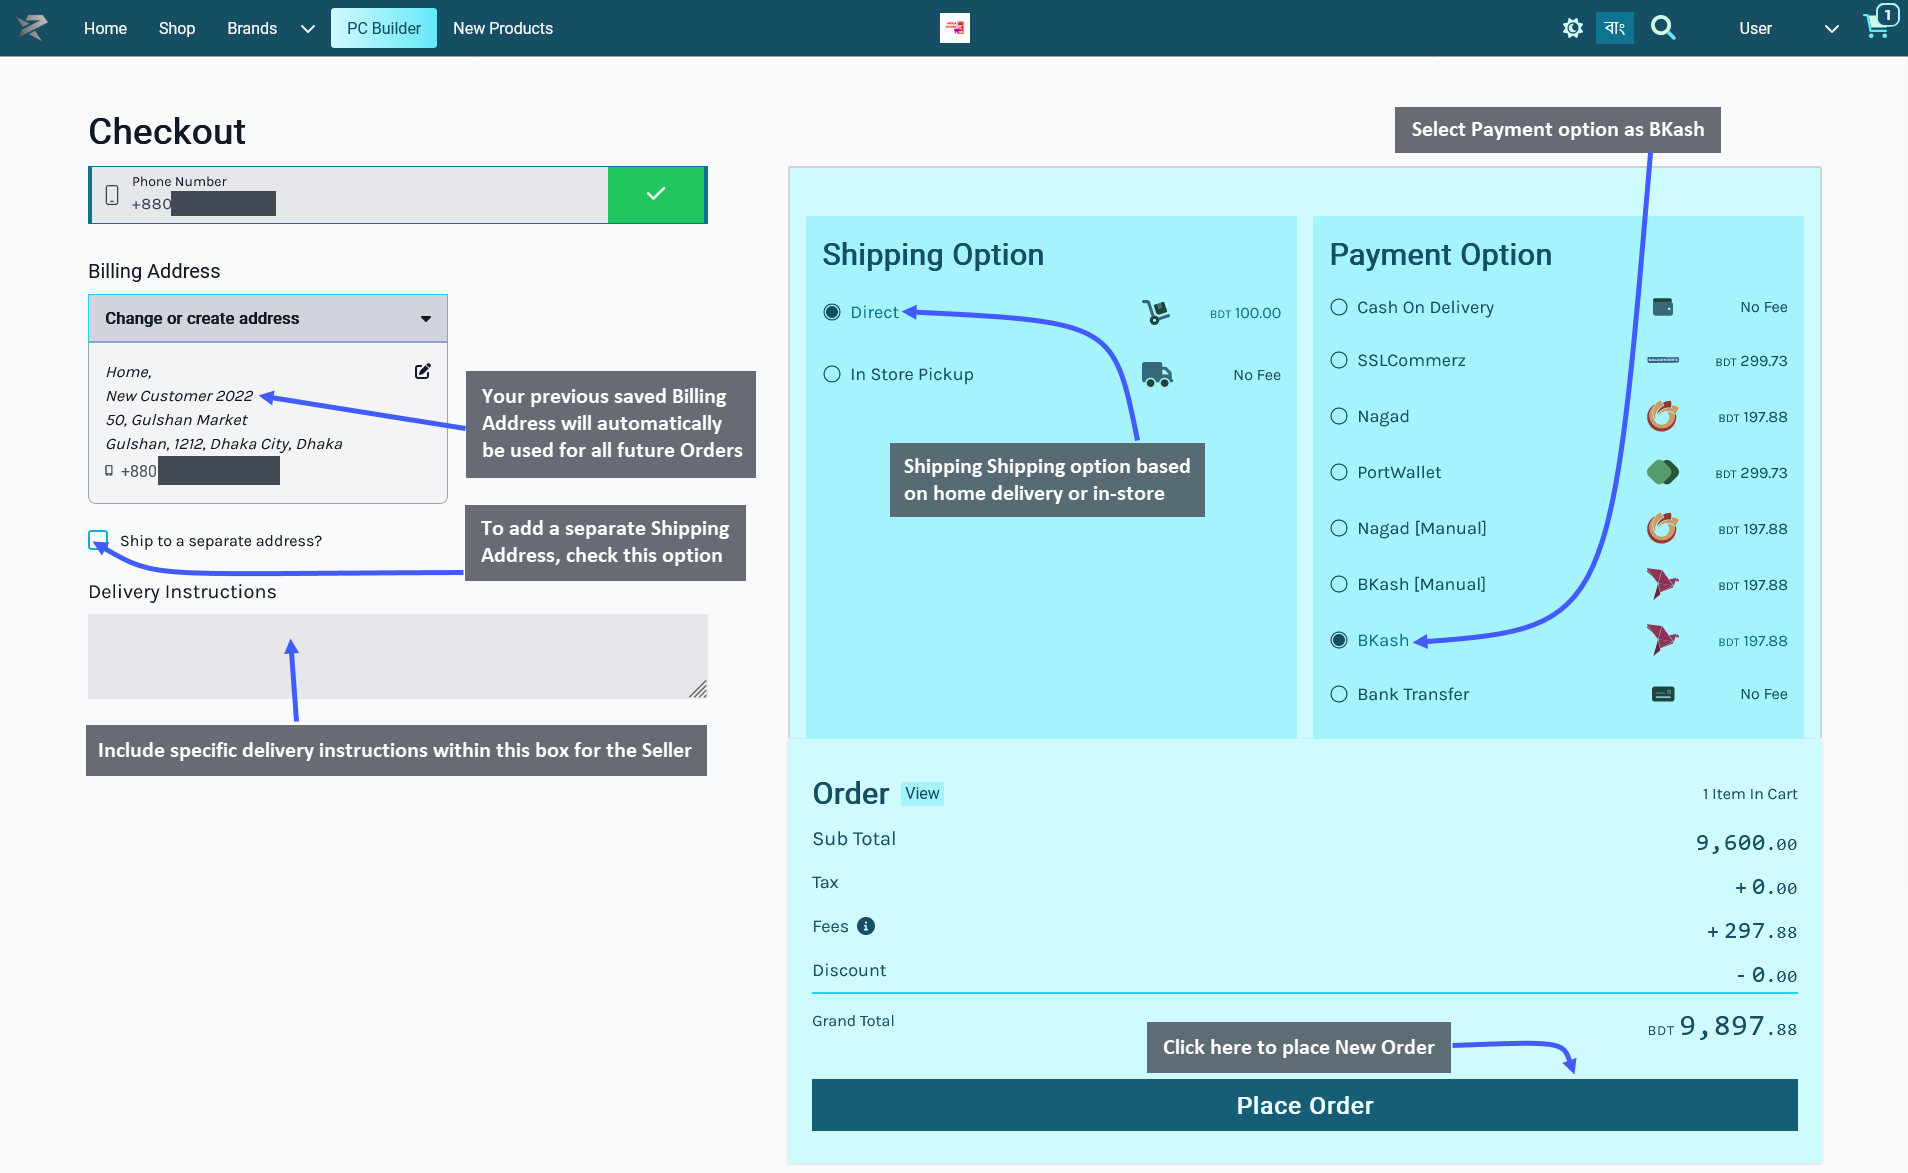
Go to the Checkout Page by clicking the Checkout button. From here, select the preferred Shipping option based on home delivery on in-store pickup by the Customer. The already saved Billing Address will automatically be used as the Customer’s Shipping Address. To add a different Shipping Address, check the box Ship to separate address that will provide a separate field to fill out address details.
Delivery instructions can be added if needed. Select BKash as payment option and click the Place Order button to complete Order. Any Product tax, fees, or discounts will be visible in the Order Grant Total.
Making Payment with BKash
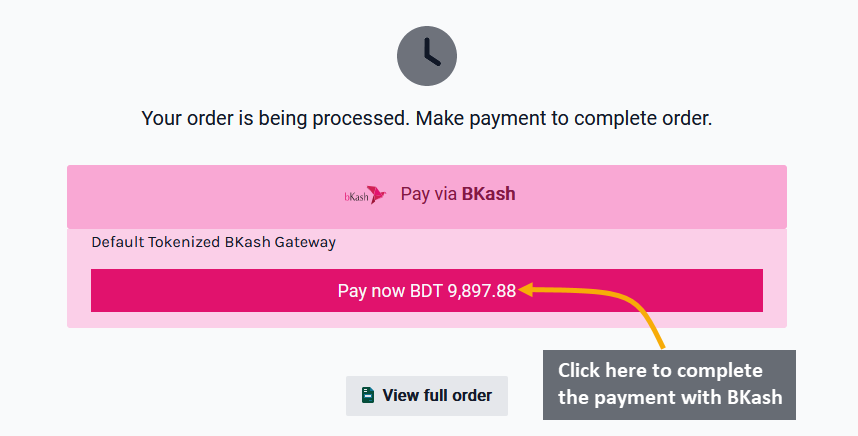
After clicking on the Place Order button, the Customer will be redirected to the BKash payment portal. Now, click the Pay now BDT ____ to proceed with the payment via BKash.
The next page will initiate BKash payment, where Customer will have to first enter their BKash Account Number and click Confirm. In the next step, they will have to enter a verification code sent to their BKash phone number and click Confirm. Then, they will have to enter the PIN of their BKash Account Number and again click Confirm. This will confirm the Order and redirect to the Shop Order Confirmation Page back on The Website.
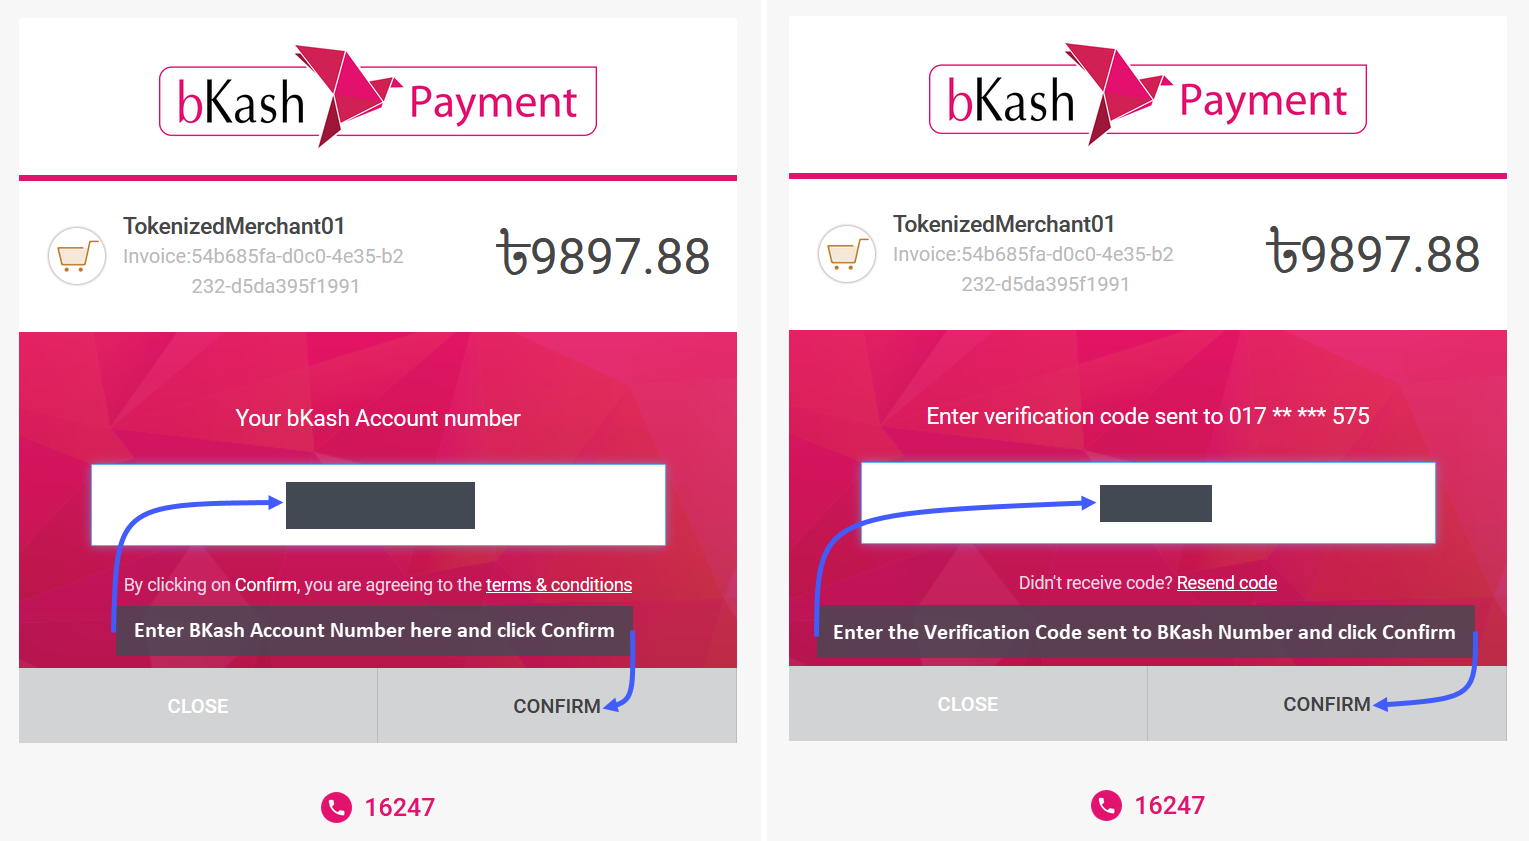
Image 1: First enter the BKash Account Number and the verification code, then click Confirm.
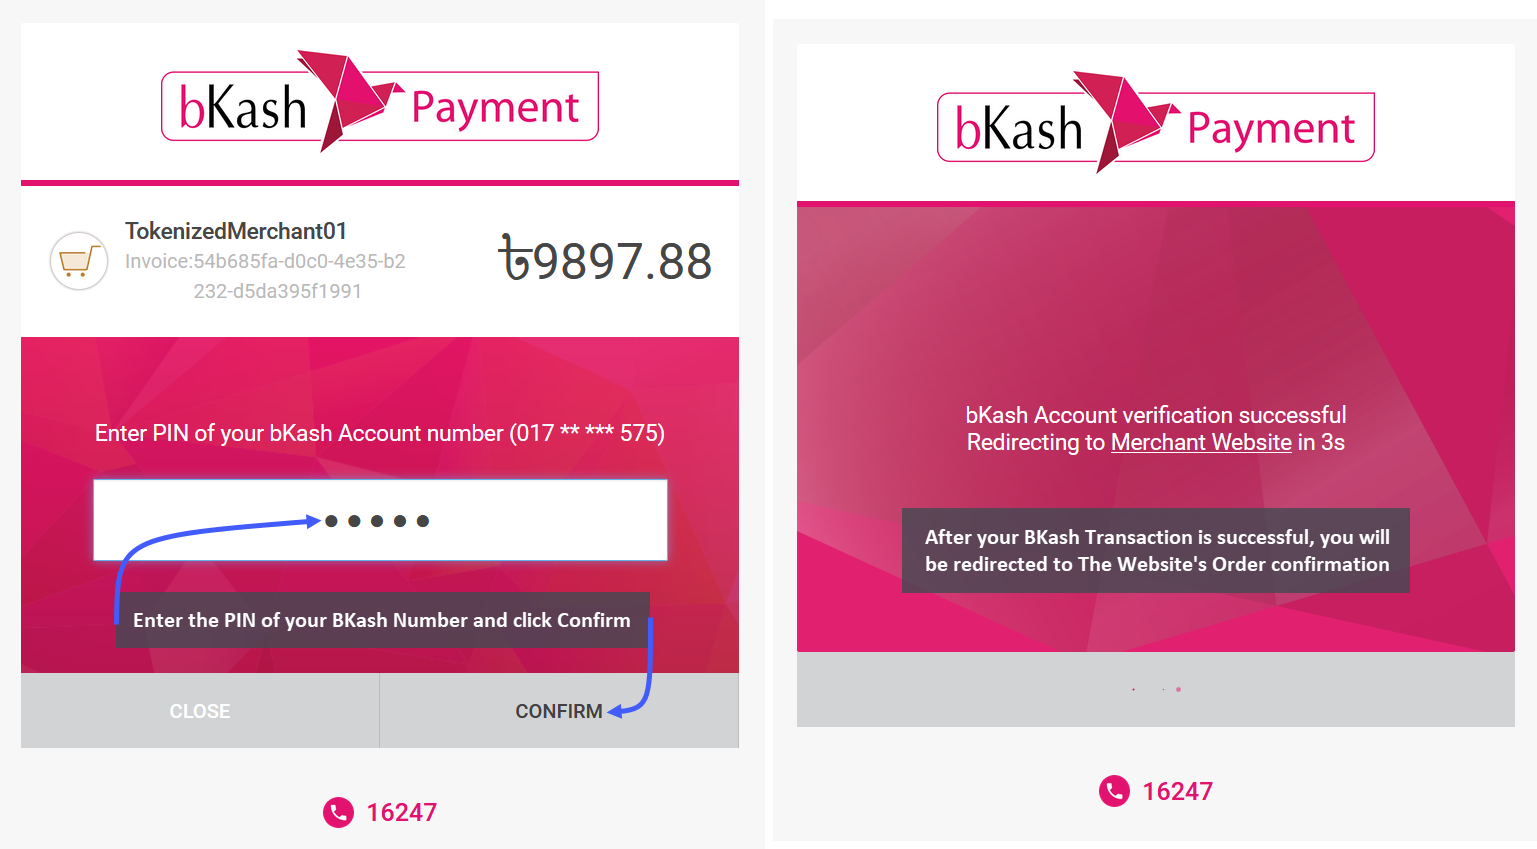
Image 2: Then, enter the BKash PIN Number and click Confirm that will redirect back to the Shop.
Order Confirmation and Print Invoice
After Order confirmation, the invoice will show the Order details with Customer’s Billing and Shipping addresses. Click the Print Invoice button to have the invoice printed out for future references. To view previous and current Orders, click the View all Orders button, click the Shop button to go to Shop, and click Home to go to main page.
Place Order with Bank Transfer Payment
Customer can order Products by clicking on The Shop tab where Products will be available based on Categories and Brands. Click on the Add to Cart button to add any Product to Cart. After adding Products to Cart, the mini pop-up Product Cart will be visible on the right side of the screen, clicking on which will expand full Product Cart.

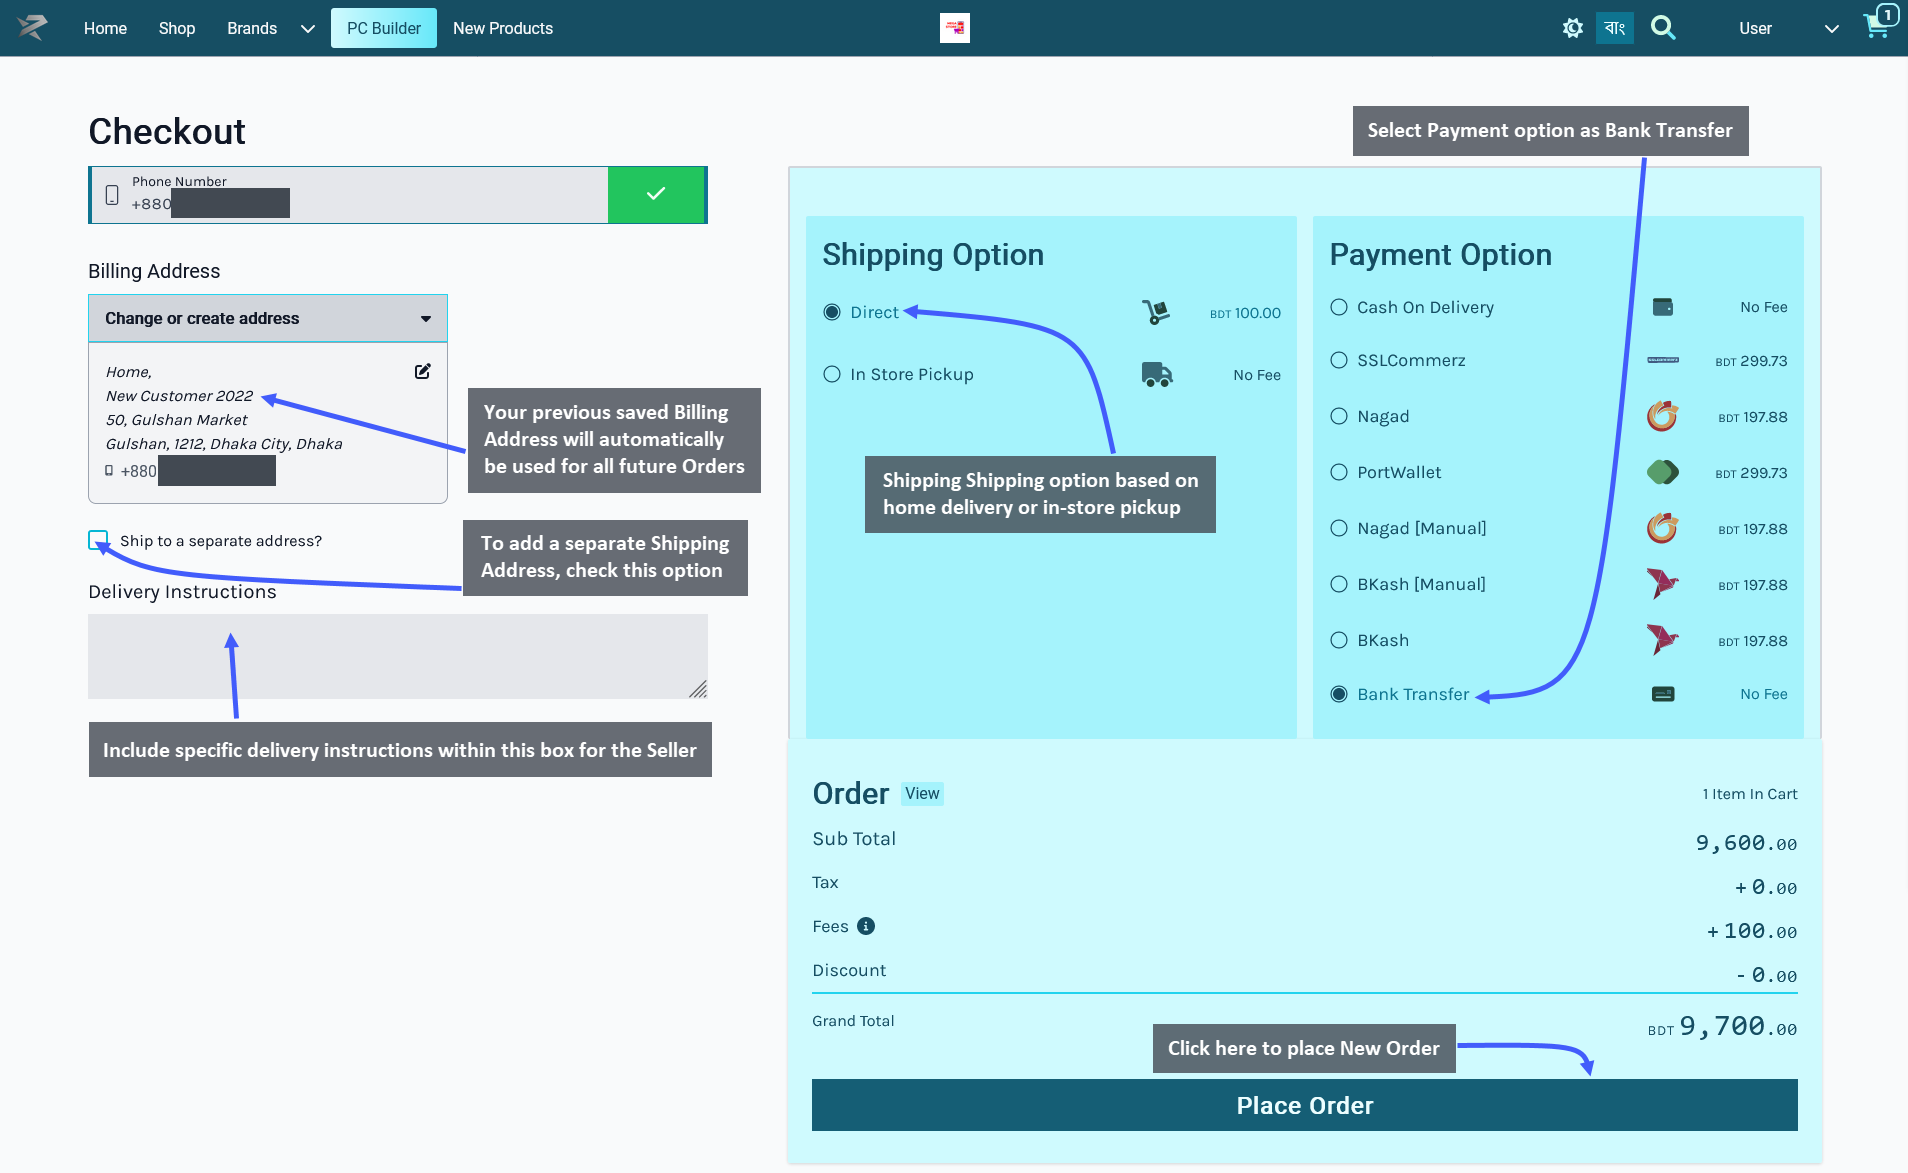
Go to the Checkout Page by clicking the Checkout button. From here, select the preferred Shipping option based on home delivery on in-store pickup by the Customer. The already saved Billing Address will automatically be used as the Customer’s Shipping Address. To add a different Shipping Address, check the box Ship to separate address that will provide a separate field to fill out address details.
Delivery instructions can be added if needed. Select Bank Transfer as payment option and click the Place Order button to complete Order. Any Product tax, fees, or discounts will be visible in the Order Grant Total.
Making Payment with Bank Transfer
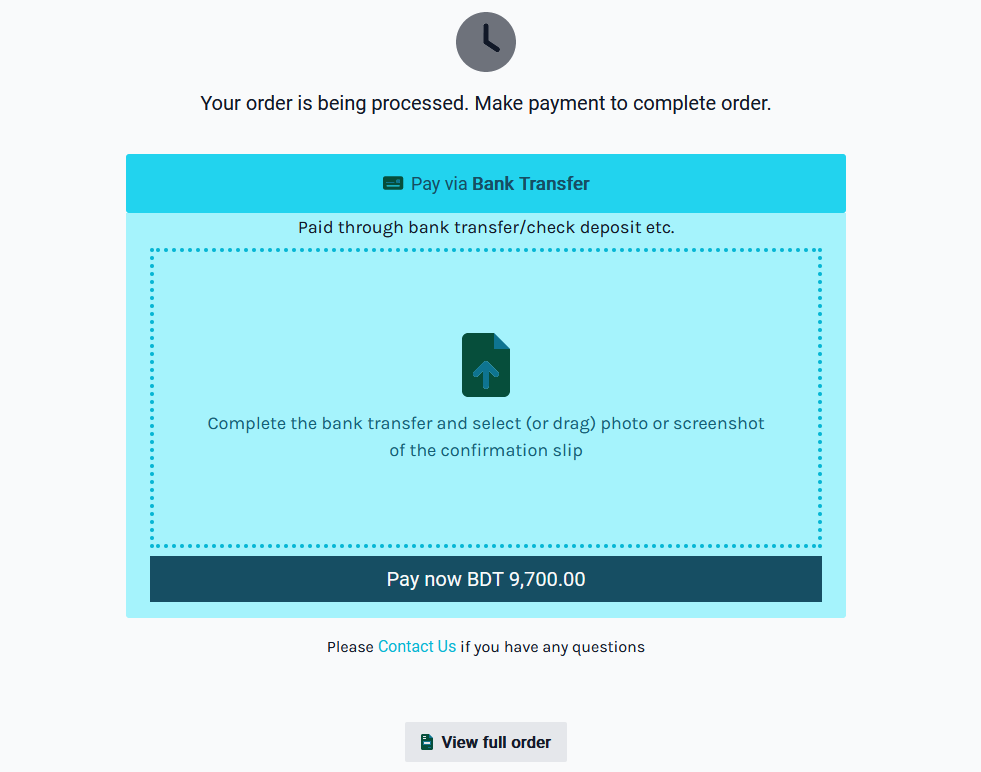
After clicking on the Place Order button, the Customer will be redirected to the Bank Transfer payment portal. Here, after completing the payment through bank transfer or check deposit, the Customer will have to upload the screenshot of their bank confirmation slip. After that, click the Pay now BDT ____ to proceed with the payment via Bank Transfer. Click on the View Full Order button to check the order details if necessary.
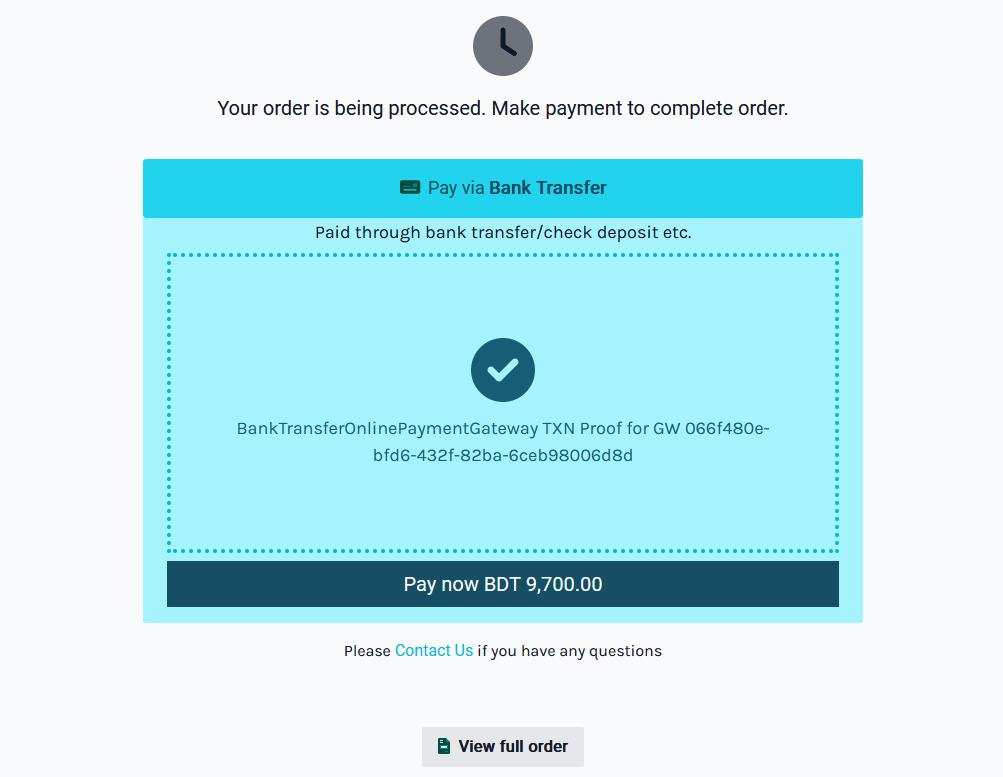
When the bank transfer or check deposit slip is uploaded in the next page, a checkmark will be visible in the box if the file of screenshot is successfully uploaded. Now, click on the Pay now BDT ____ button and this will confirm the Order and redirect to the Order Confirmation Page.
Order Confirmation and Print Invoice
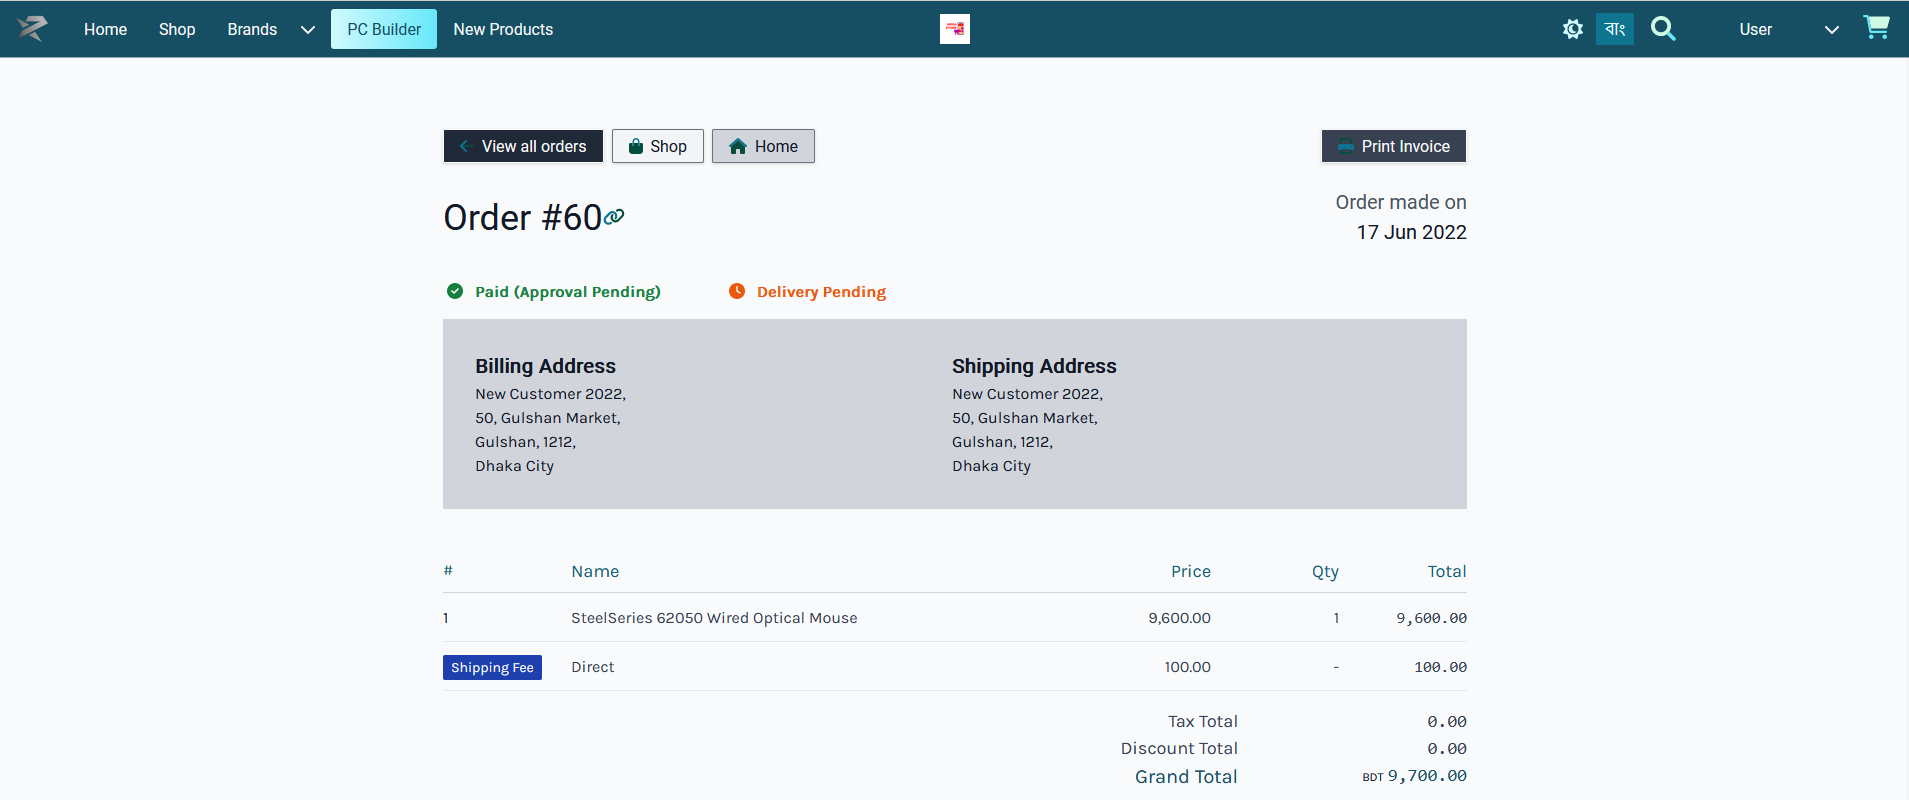
After Order confirmation, the invoice will show the Order details with Customer’s Billing and Shipping addresses. Click the Print Invoice button to have the invoice printed out for future references. To view previous and current Orders, click the View all Orders button, click the Shop button to go to Shop, and click Home to go to main page.
Steps to Create PC Builds
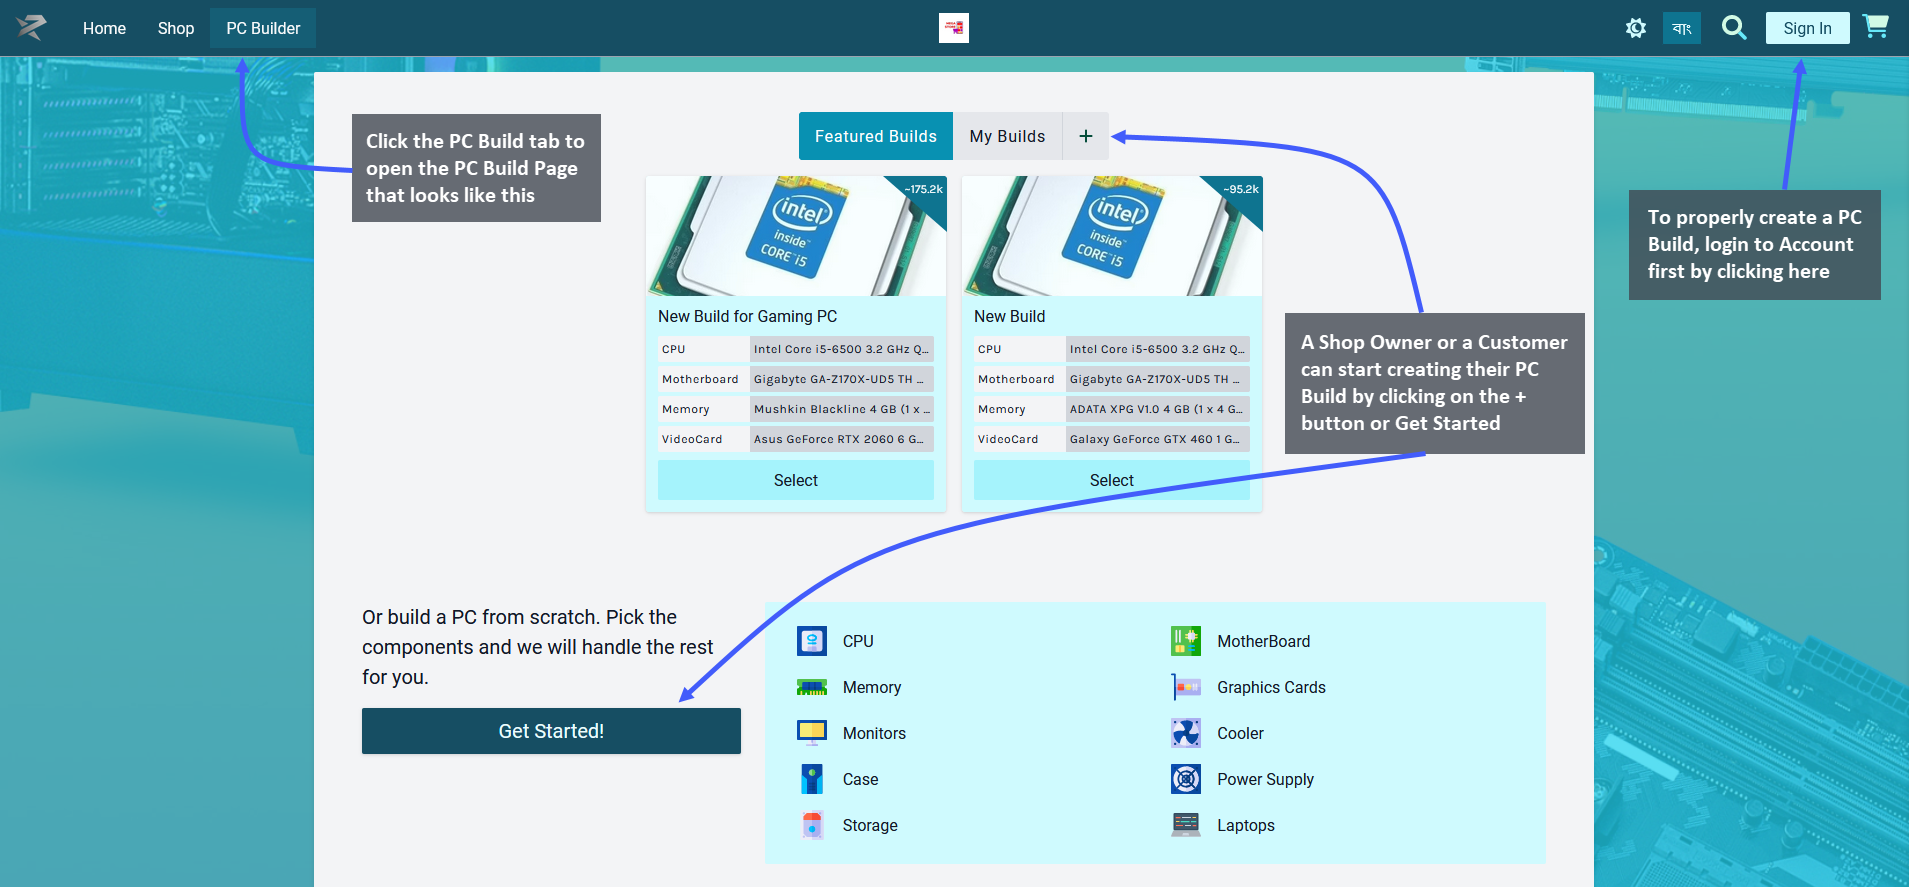
The Customer can create their own PC Builds by logging into their account on The Website. They can also create their private PC Builds by logging into their account and save it for placing Order later. The components need to be selected one by one with CPU, Motherboard, Graphics Card, Memory, Storage, Case, Monitor, Power Supply, and Accessories on the PC Build Page. Selecting these components will create new PC Build.
Add CPU to PC Build
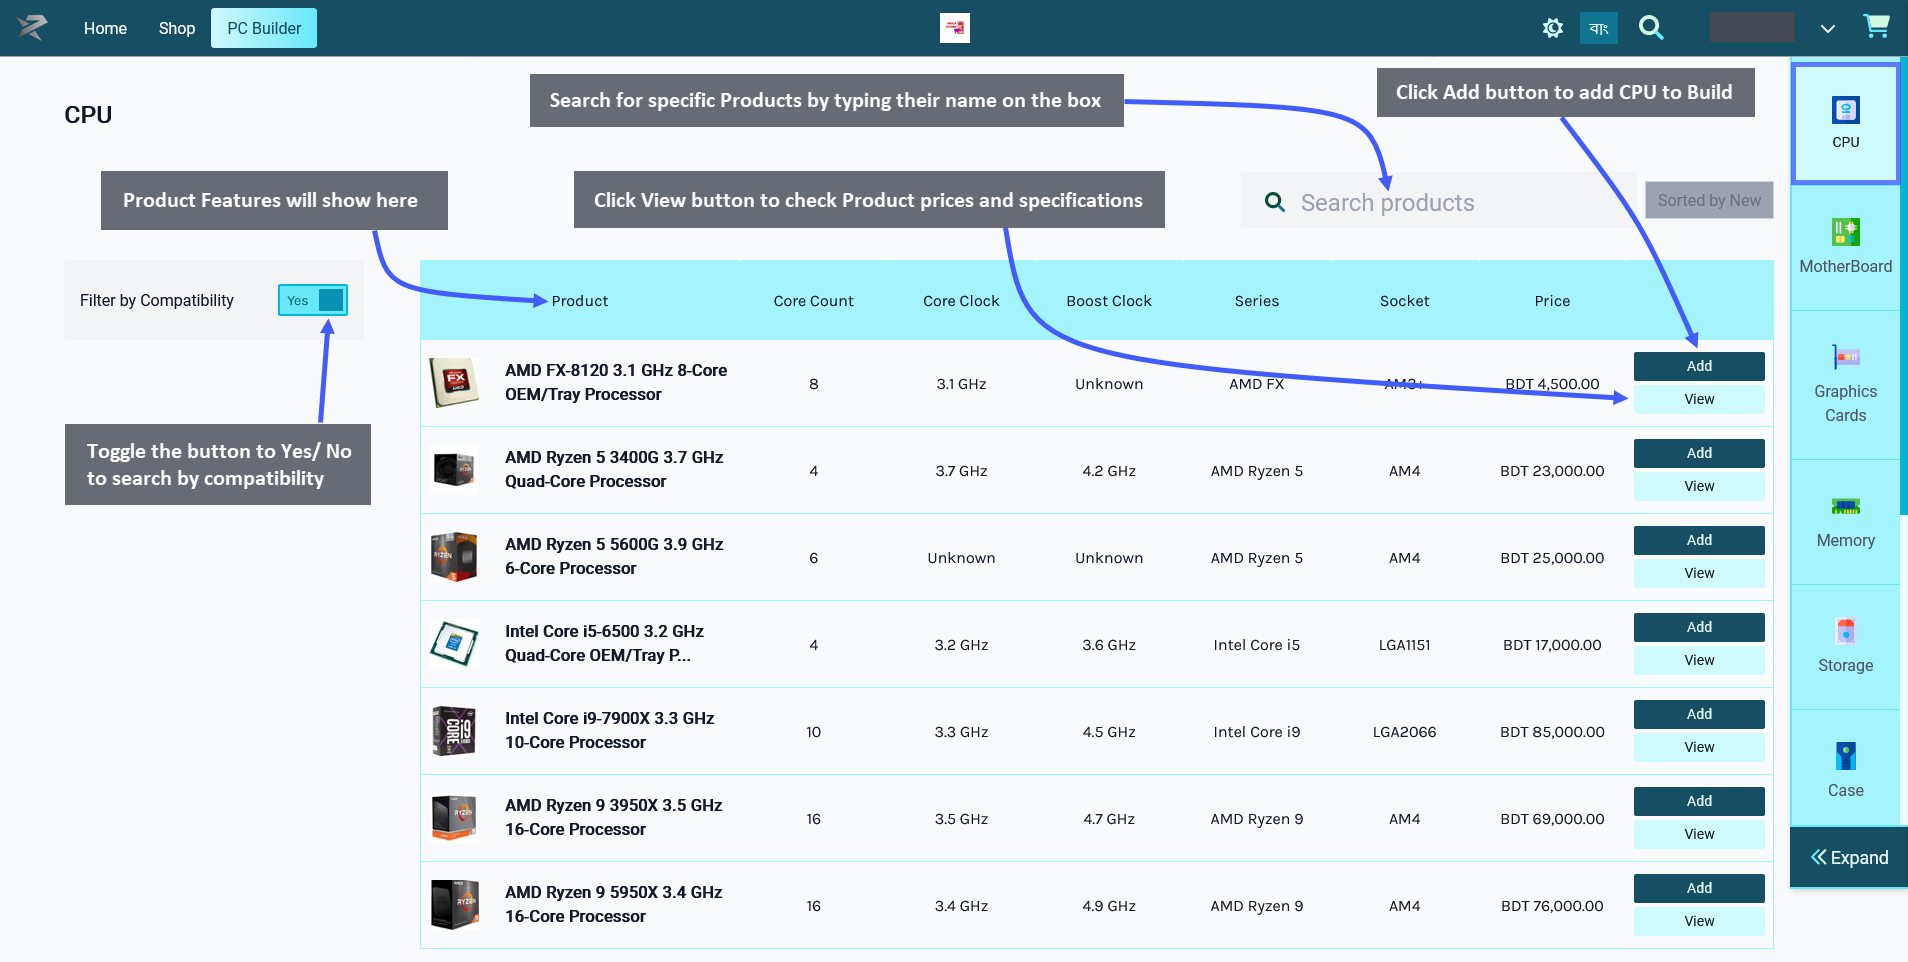
The first component to choose for PC Build is the CPU or central processing unit or the main processor. Click on the Add button to add the Product to build. Below the Add Button is a View button clicking on which will open a pop-up to display Product price, general specifications, performance specifications, physical specifications, and power specifications along with detailed Product images.
There is a Search Box on the top right corner to help find specific Product(s). The Product features will show on top of the list. There is a Filter Compatibility button which can be toggled to Yes/ No to search by compatibility of PC components or not. Click on Expand to see a detailed view of added components and their prices.
Add Motherboard to PC Build
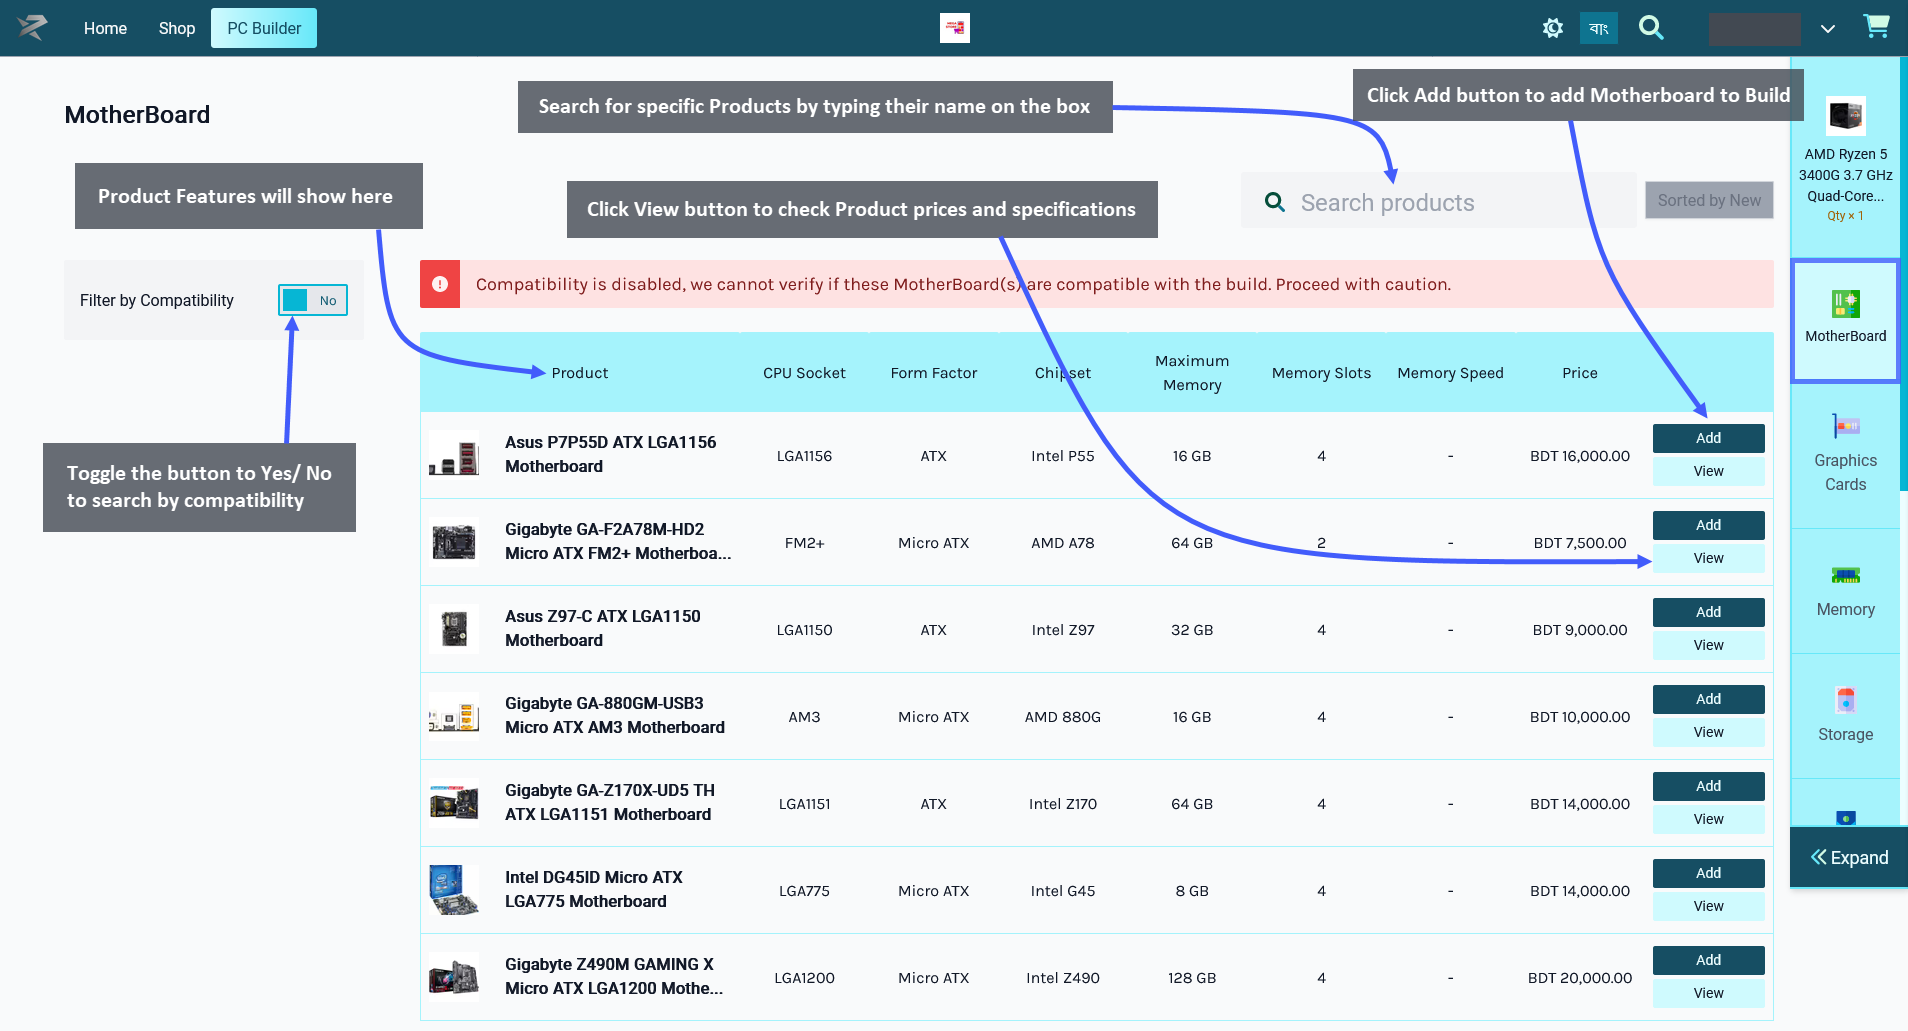
After successfully adding CPU to PC Build, select Motherboard which is the main printed circuit board that allows communication between many of the crucial electronic components of a system. Click on the Add button to add the item to build. Below the Add Button is a View button clicking on which will open a pop-up to display Product price, general specifications, performance specifications, physical specifications, and power specifications along with detailed Product images.
There is a Search Box on the top right corner to help find specific Product(s). The Product features will show on top of the list. There is a Filter Compatibility button which can be toggled to Yes/ No to search by compatibility of PC components or not. For instance, in the example below, turning on the compatibility button did not bring any Product(s) for the Motherboard. However, when compatibility was turned off, all Motherboard Product(s) were displayed. Click on Expand to see a detailed view of added components and their prices.
Add Graphics Card to PC Build
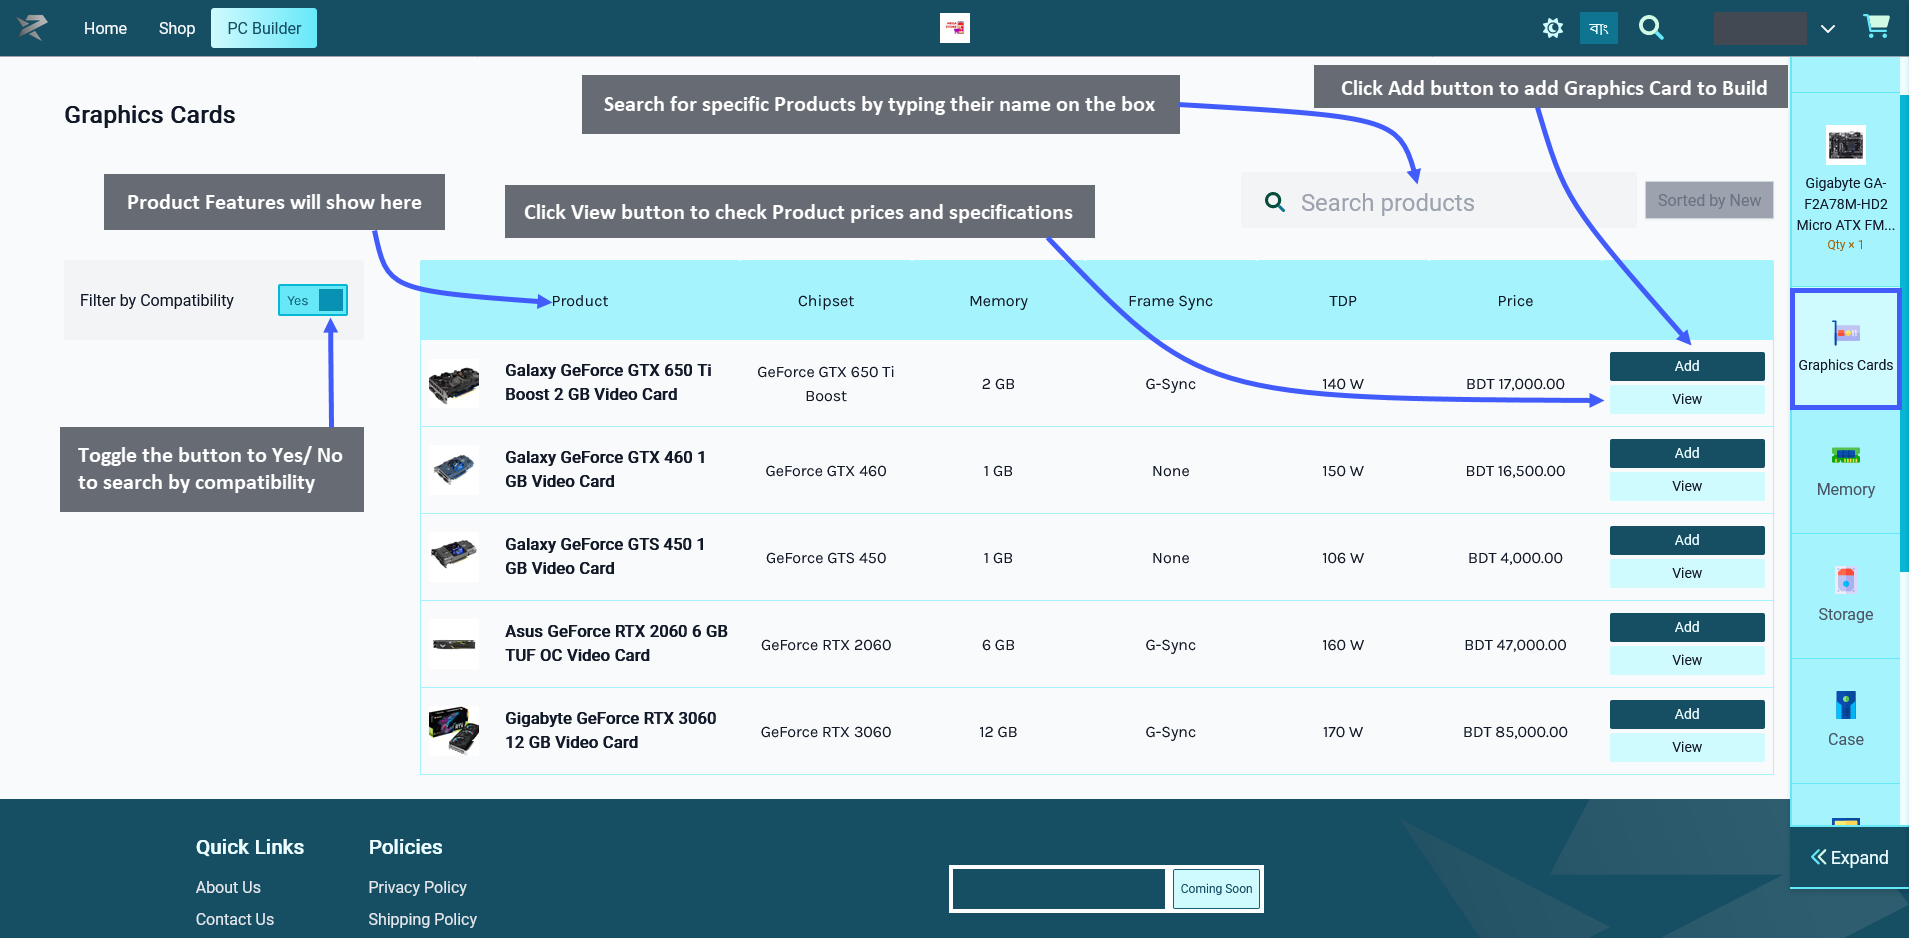
When Motherboard is added to PC Build, select Graphics Card which is the expansion card that generates a feed of output images to a display device. Click on the Add button to add the Product to build. Below the Add Button is a View button clicking on which will open a pop-up to display Product price, general specifications, performance specifications, physical specifications, and power specifications along with detailed Product images.
There is a Search Box on the top right corner to help find specific Product(s). The Product features will show on top of the list. There is a Filter Compatibility button which can be toggled to Yes/ No to search by compatibility of PC components or not. Click on Expand to see a detailed view of added components and their prices.
Add Memory to PC Build
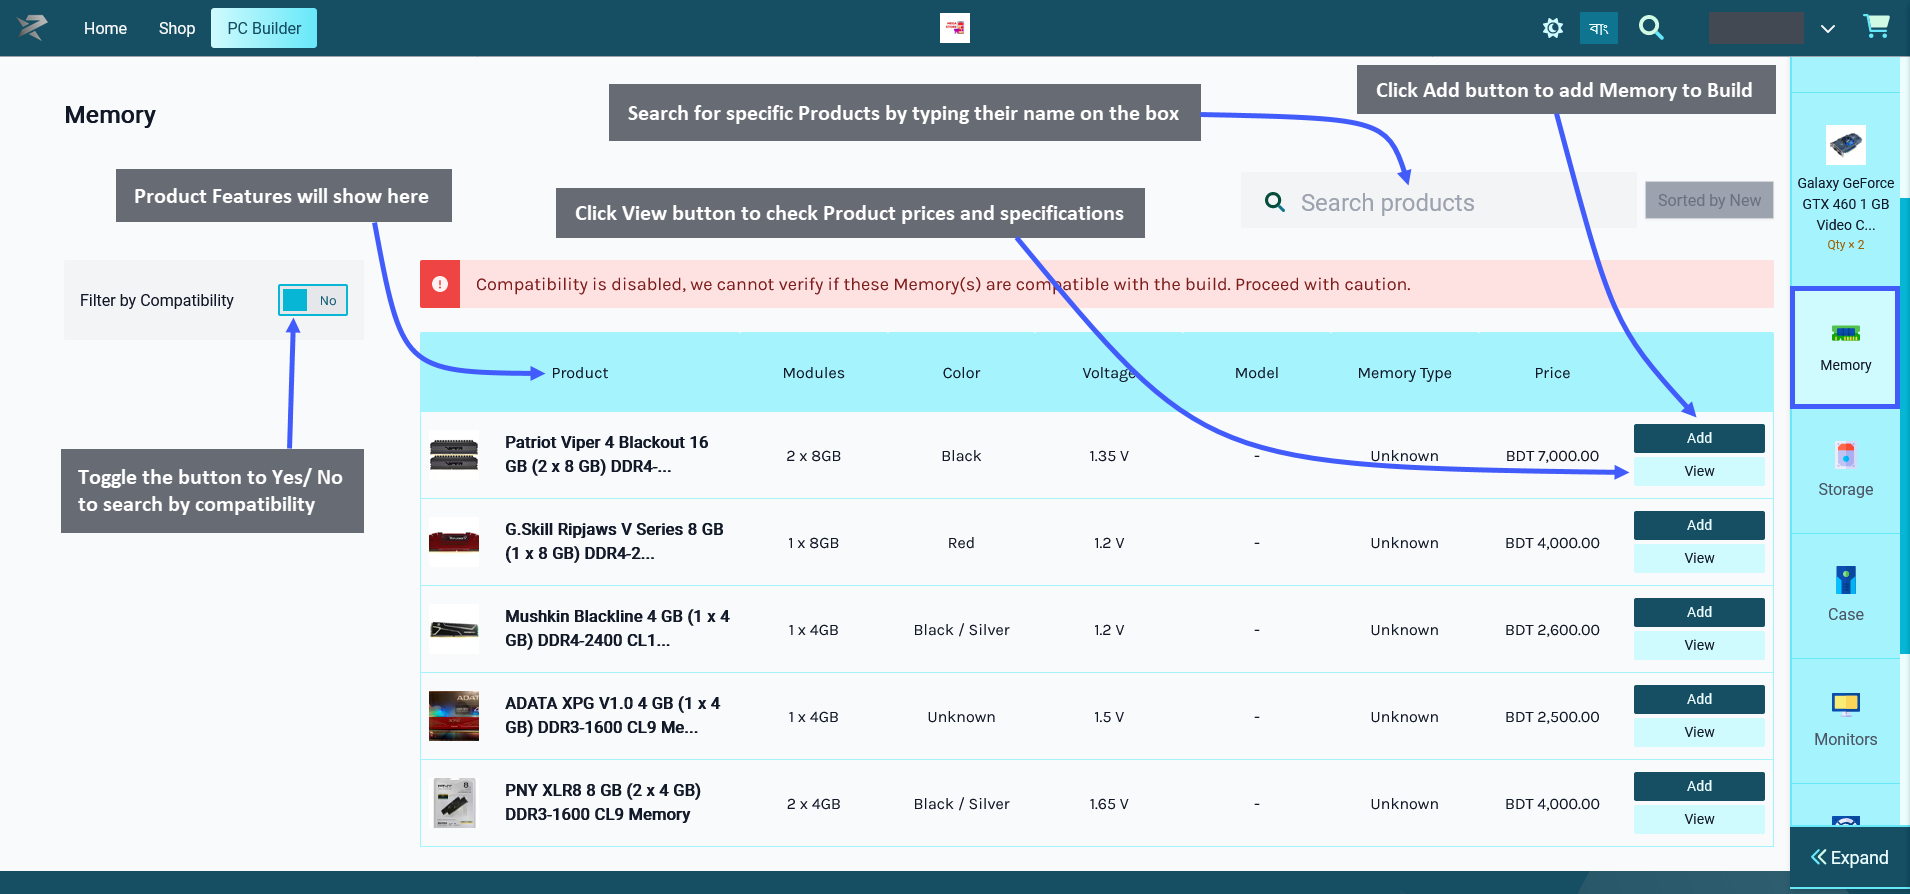
The next step is to select Memory which is the system that stores information for immediate use. Click the Add button to add the item to build. Below the Add Button is a View button clicking on which will open a pop-up to display the Product price, general specifications, performance specifications, physical specifications, and power specifications along with detailed Product images.
There is a Search Box on the top right corner to help find specific Product(s). The Product features will show on top of the list. There is a Filter Compatibility button which can be toggled to Yes/ No to search by compatibility of PC components or not. For instance, in the example, turning on compatibility did not bring any Product(s) for the Memory. However, when compatibility was turned off, all the Memory Product(s) were displayed. Click on Expand to see a detailed view of added components and their prices.
Add Storage to PC Build
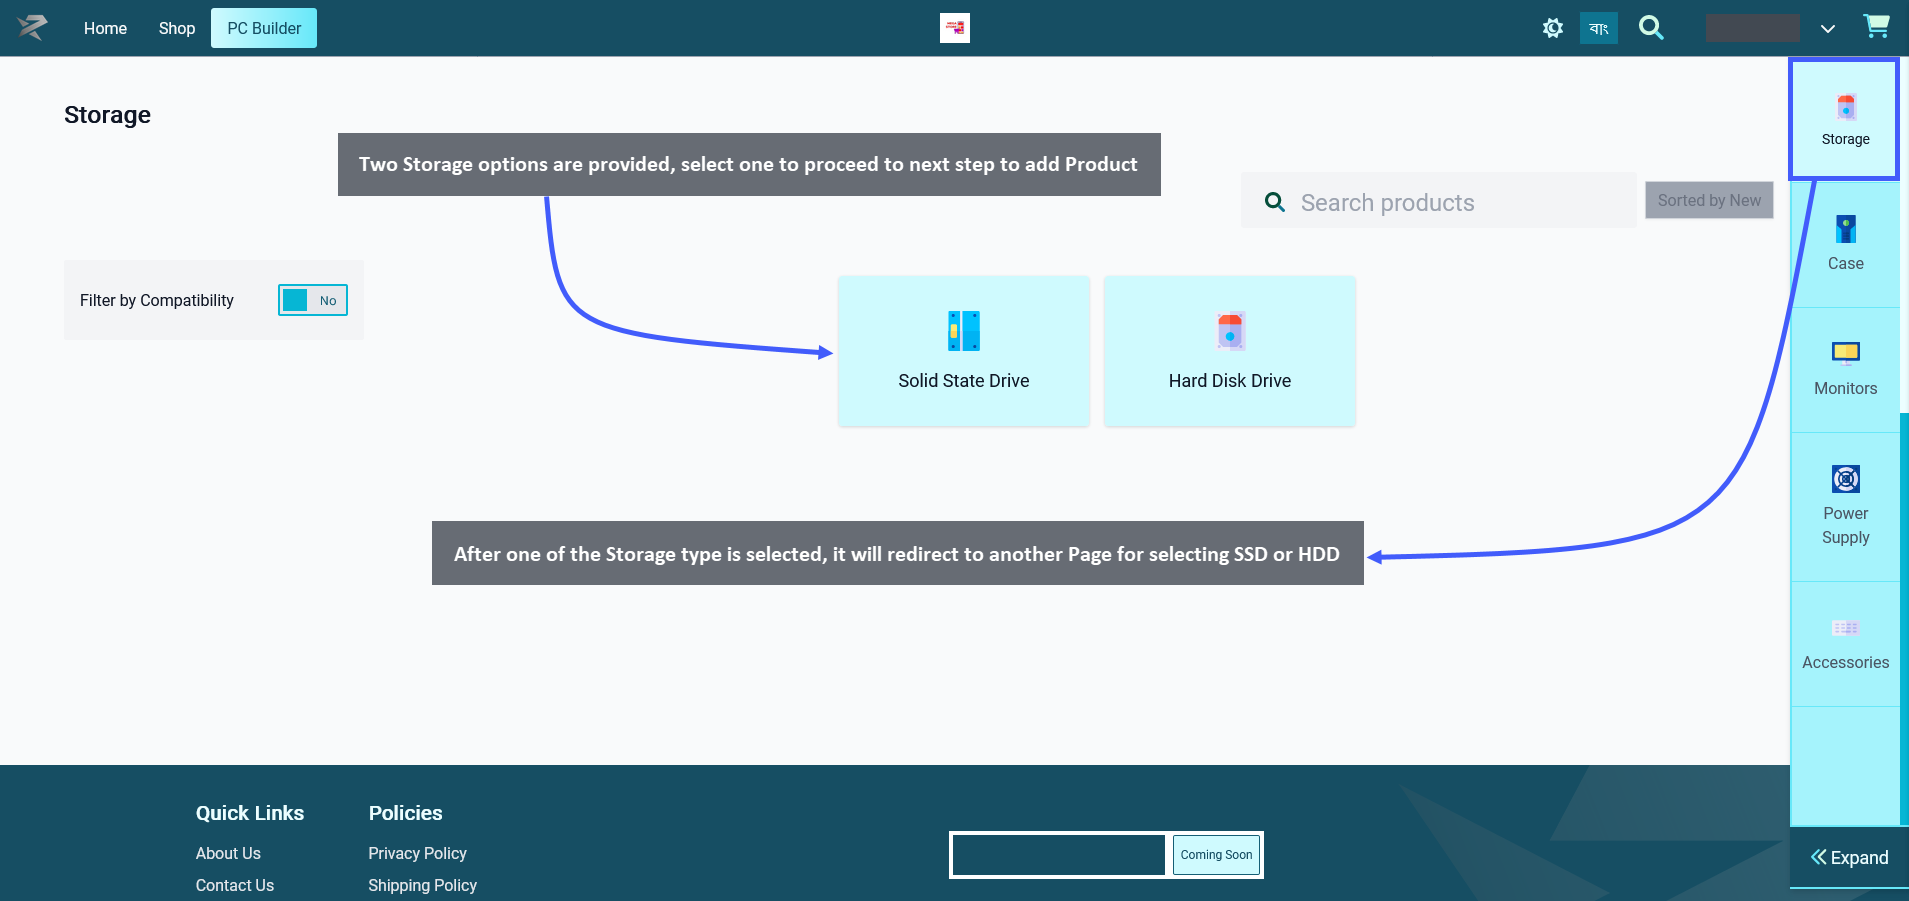
After Memory is added successfully, select the Storage which are available in two options - Solid State Drive and Hard Disk Drive. Hard Disk Drives or HDDs is a traditional storage device that uses mechanical spinning platters and a moving read/write head to access data. Solid States Drive or SSDs are newer, faster drives that store data on instantly accessible memory chips. Each storages are provided from different brands to select.
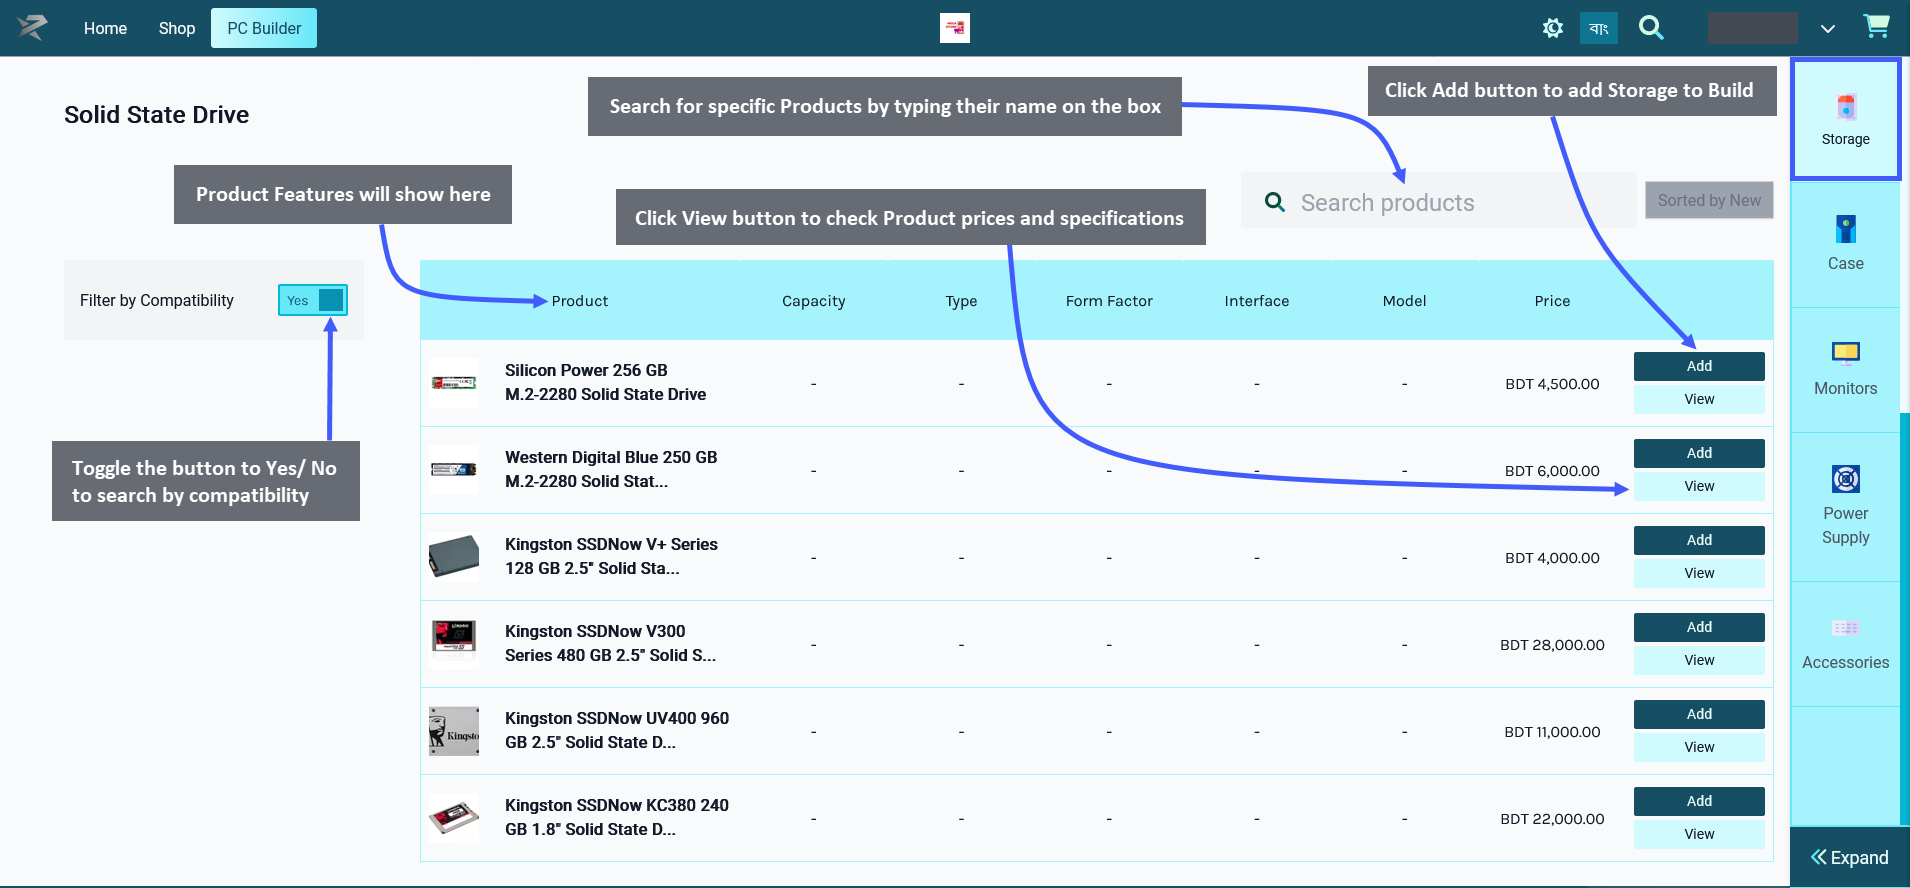
Select any of the storage options, like SSD and click the Add button to add the Product to build. Below the Add Button is a View button clicking on which will open a pop-up to show the Product price, general specifications, performance specifications, physical specifications, and power specifications along with detailed Product images.
There is a Search Box on the top right corner to help find specific Product(s). The Product features will show on top of the list. There is a Filter Compatibility button which can be toggled to Yes/ No to search by compatibility of PC components or not. Click on Expand to see a detailed view of added components and their prices.
Add Case to PC Buils
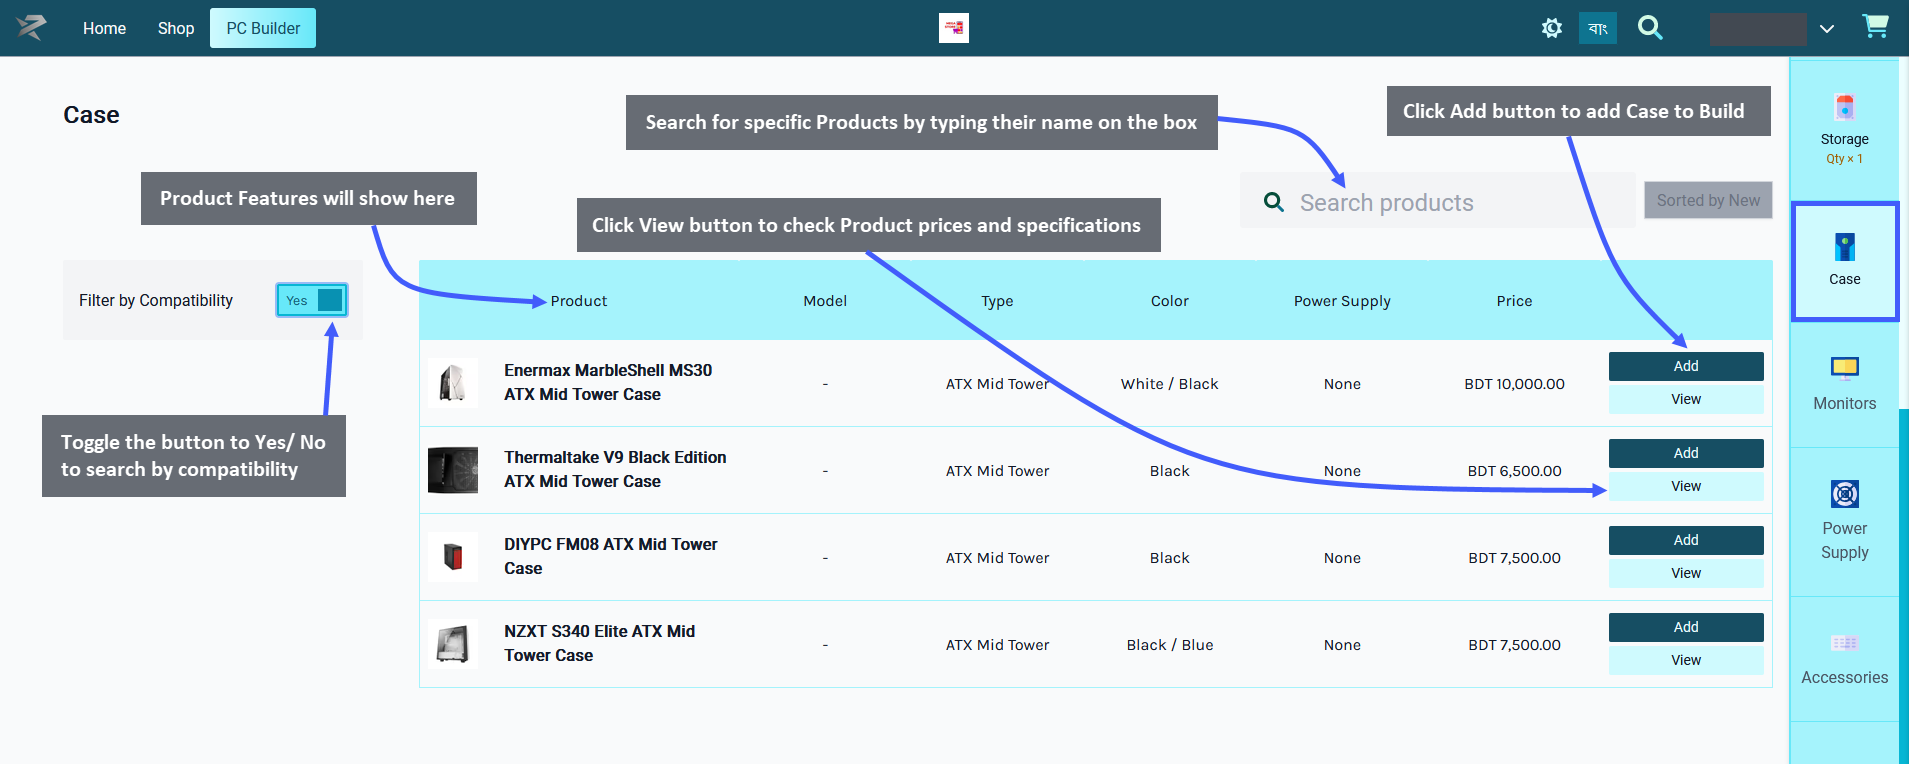
When Storage is added, Case needs to be selected. A computer case serves mainly as a way to physically mount and contain all the actual components inside a computer. Click on the Add button to add the Product to build. Below the Add Button is a View button clicking on which will open a pop-up to display Product price, general specifications, performance specifications, physical specifications, power specifications, and Product images.
There is a Search Box on the top right corner to help find specific Product(s). The Product features will show on top of the list. There is a Filter Compatibility button which can be toggled to Yes/ No to search by compatibility of PC components or not. Click on Expand to see a detailed view of added components and their prices.
Add Monitor to PC Build
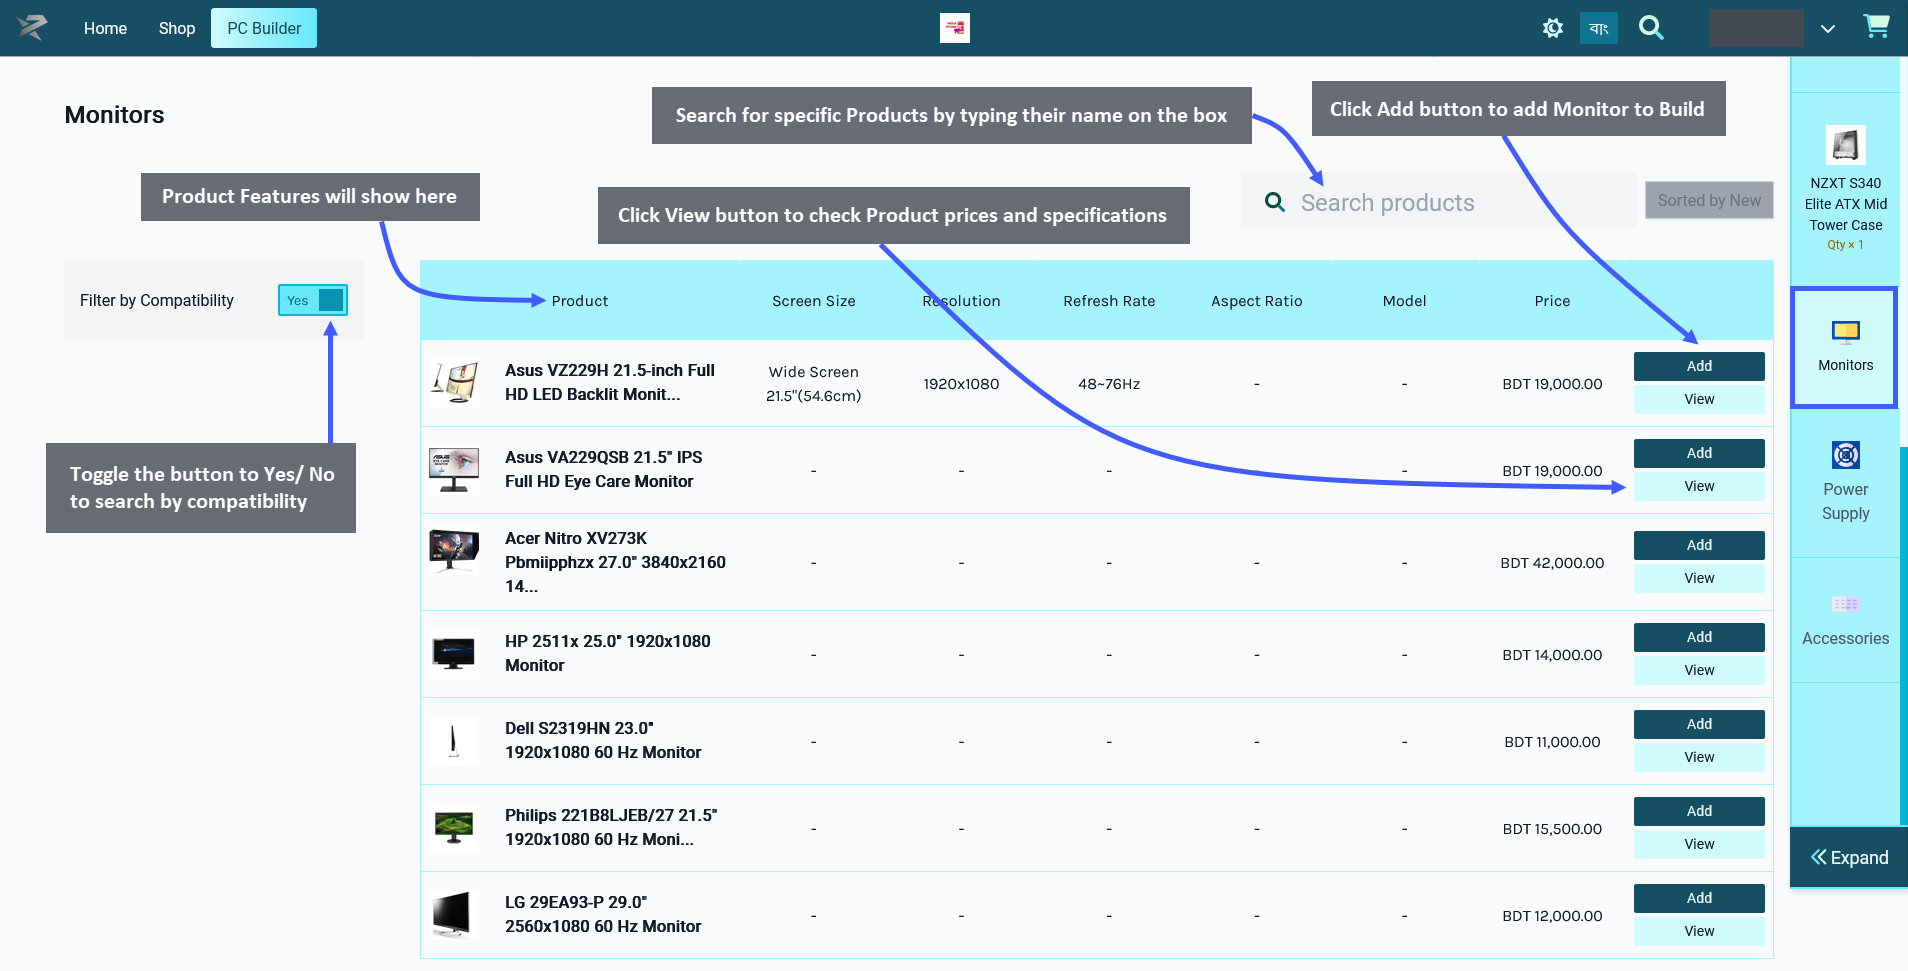
The next component to add after Case is Monitor. A monitor is an output device that displays information in the pictorial or text form. A monitor usually comprises a visual display, some circuitry, a casing, and a power supply. Click on the Add button to add the Product to build. Below the Add Button is a View button clicking on which will open a pop-up to show Product price, general specifications, performance specifications, physical specifications, and power specifications along with detailed Product images.
There is a Search Box on the top right corner to help find specific Product(s). The Product features will show on top of the list. There is a Filter Compatibility button which can be toggled to Yes/ No to search by compatibility of PC components or not. Click on Expand to see a detailed view of added components and their prices.
Add Power Supply to PC Build
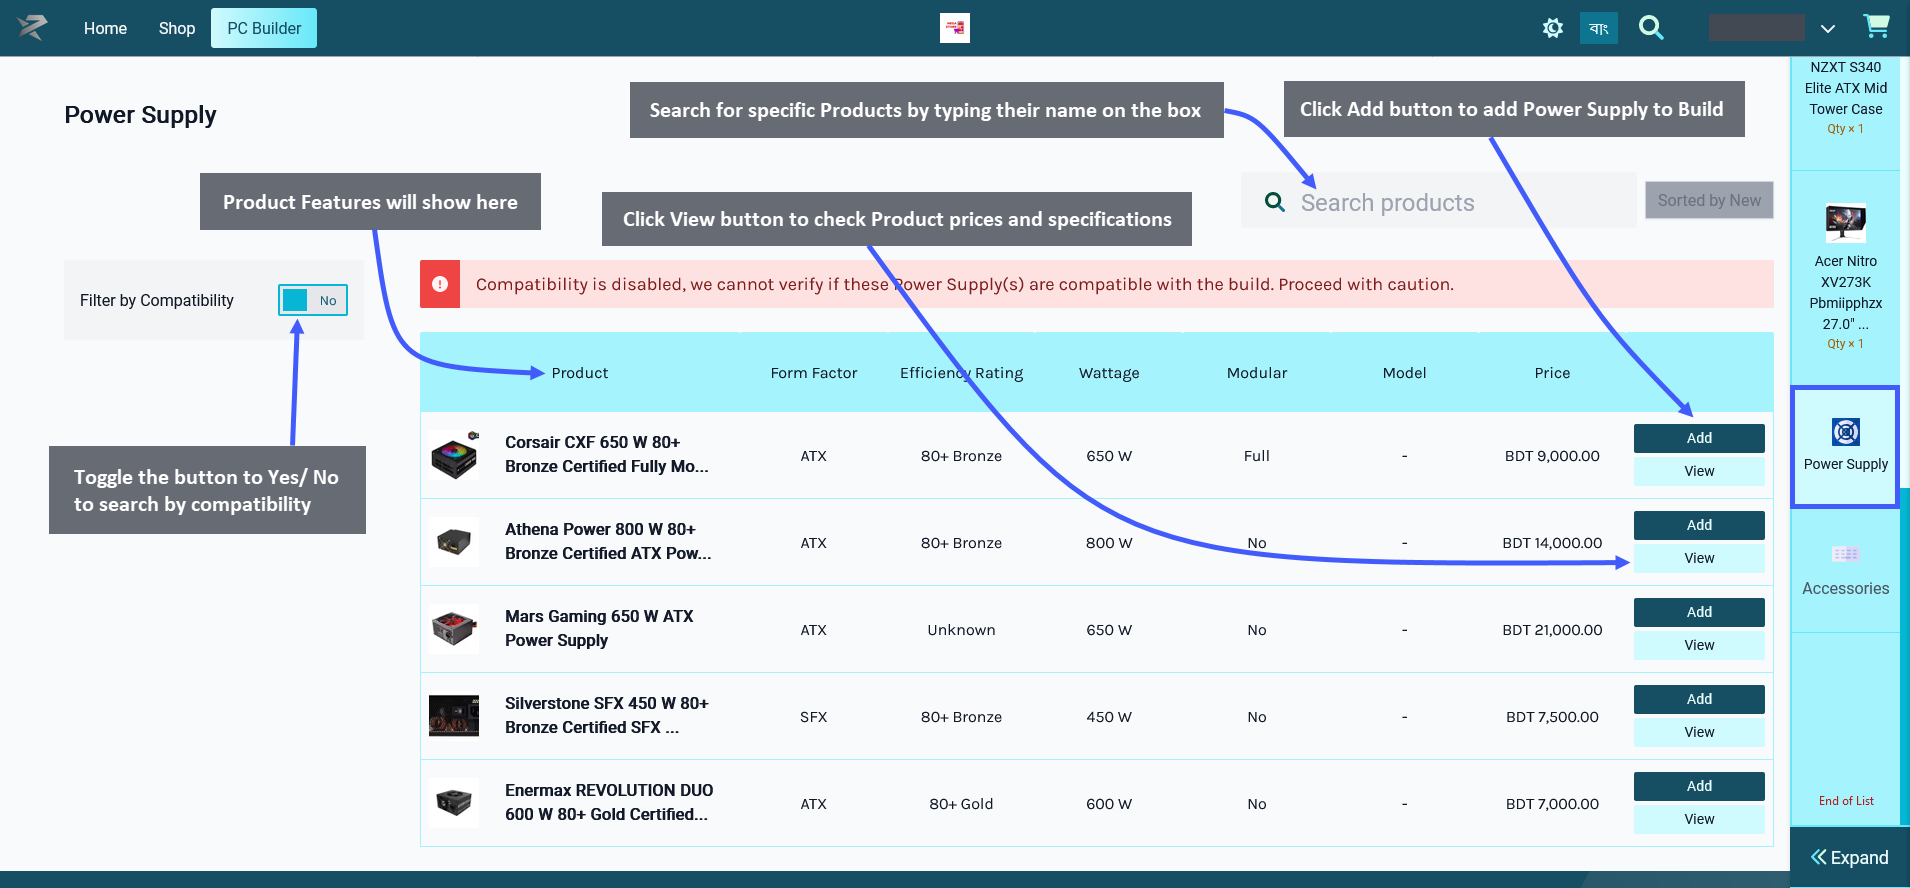
After adding Monitor to the build, select Power Supply. A power supply is a unit converts mains AC to low-voltage regulated DC power for the internal components of a computer. Click the Add button to add the Product to build. Below the Add Button is a View button clicking on which will open a pop-up to display the Product price, general specifications, performance specifications, physical specifications, and power specifications with Product images.
There is a Search Box on the top right corner to help find specific Product(s). The Product features will show on top of the list. There is a Filter Compatibility button which can be toggled to Yes/ No to search by compatibility of PC components or not. For instance, in the example, turning on compatibility did not bring any Product(s) for the Power Supply. However, when compatibility was turned off, all the Power Supply Product(s) were displayed. Click on Expand to see a detailed view of added components and their prices.
Add Accessories to PC Build
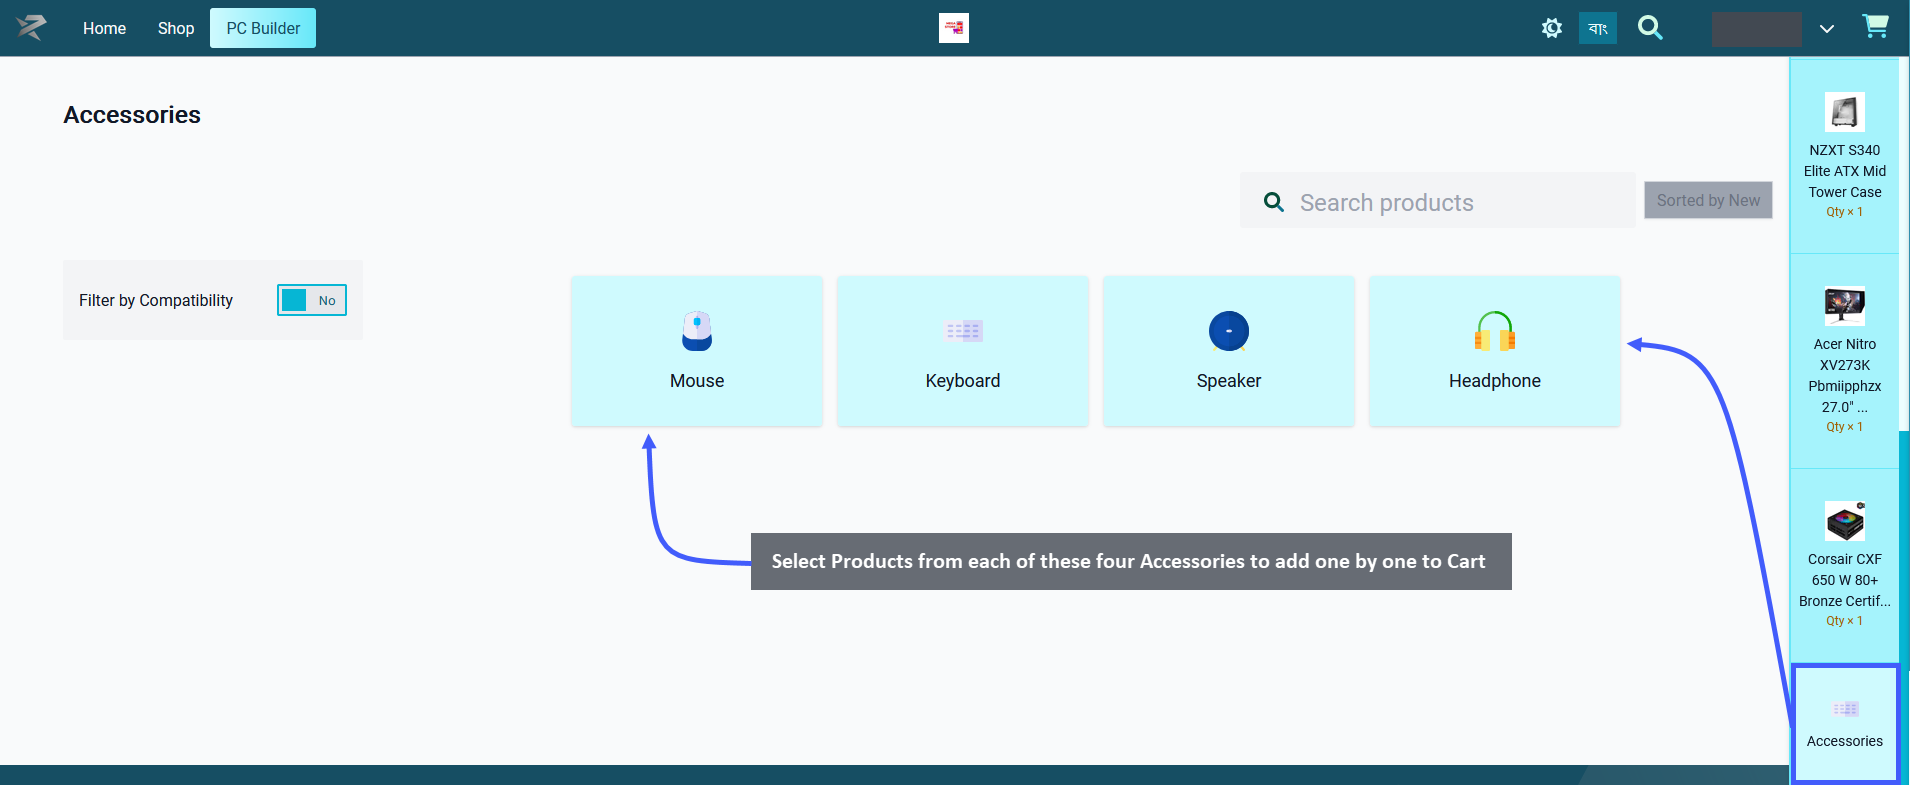
The last component to add to PC Build are accessories. The accessories Page includes four Product(s) to select - Mouse, Keyboard, Speaker, and Headphone. Click on each one of these to add them one by one to Cart.
Add Mouse to PC Build
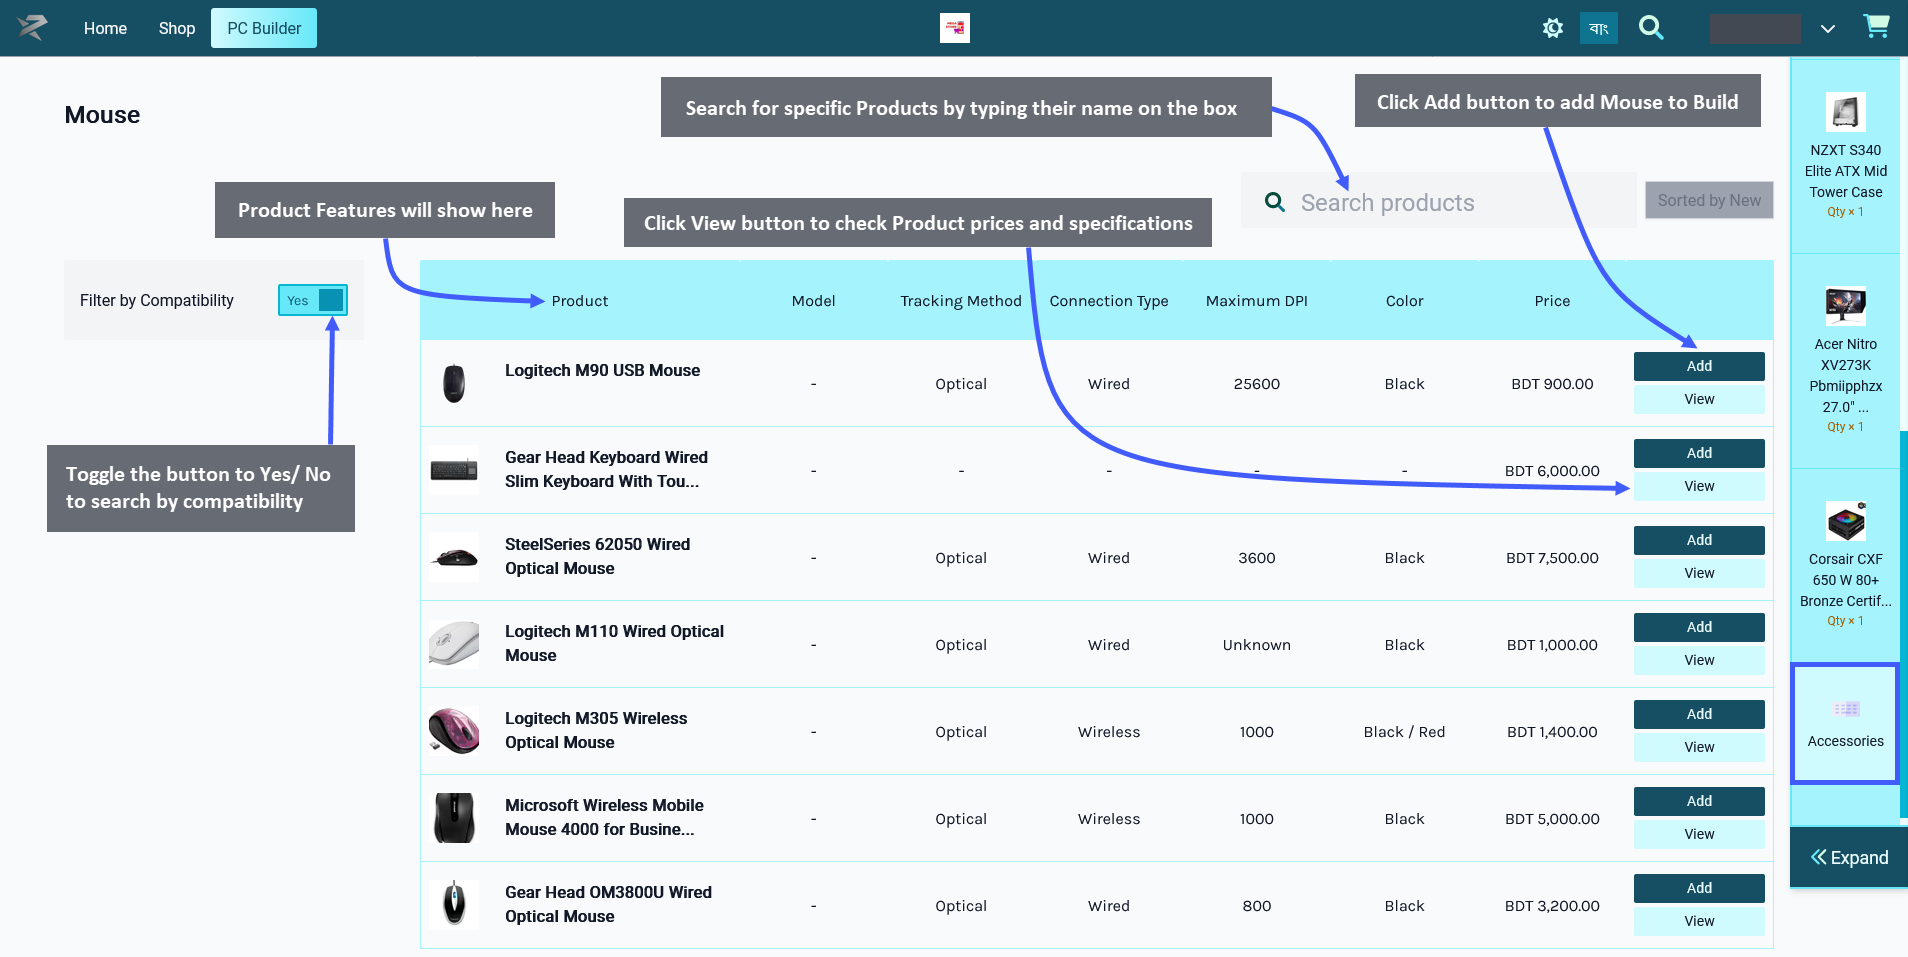
From these accessories, select the Mouse first which is a hand-held pointing device that detects two-dimensional motion relative to a surface. This motion is typically translated into the motion of a pointer on a display. Click on the Add button to add the Product to build. Below the Add Button is a View button clicking on which will open a pop-up to display Product price, general specifications, performance specifications, physical specifications, and power specifications along with detailed Product images.
There is a Search Box on the top right corner to help find specific Product(s). The Product features will show on top of the list. There is a Filter Compatibility button which can be toggled to Yes/ No to search by compatibility of PC components or not. Click on Expand to see a detailed view of added components and their prices.
Add Keyboard to PC Build
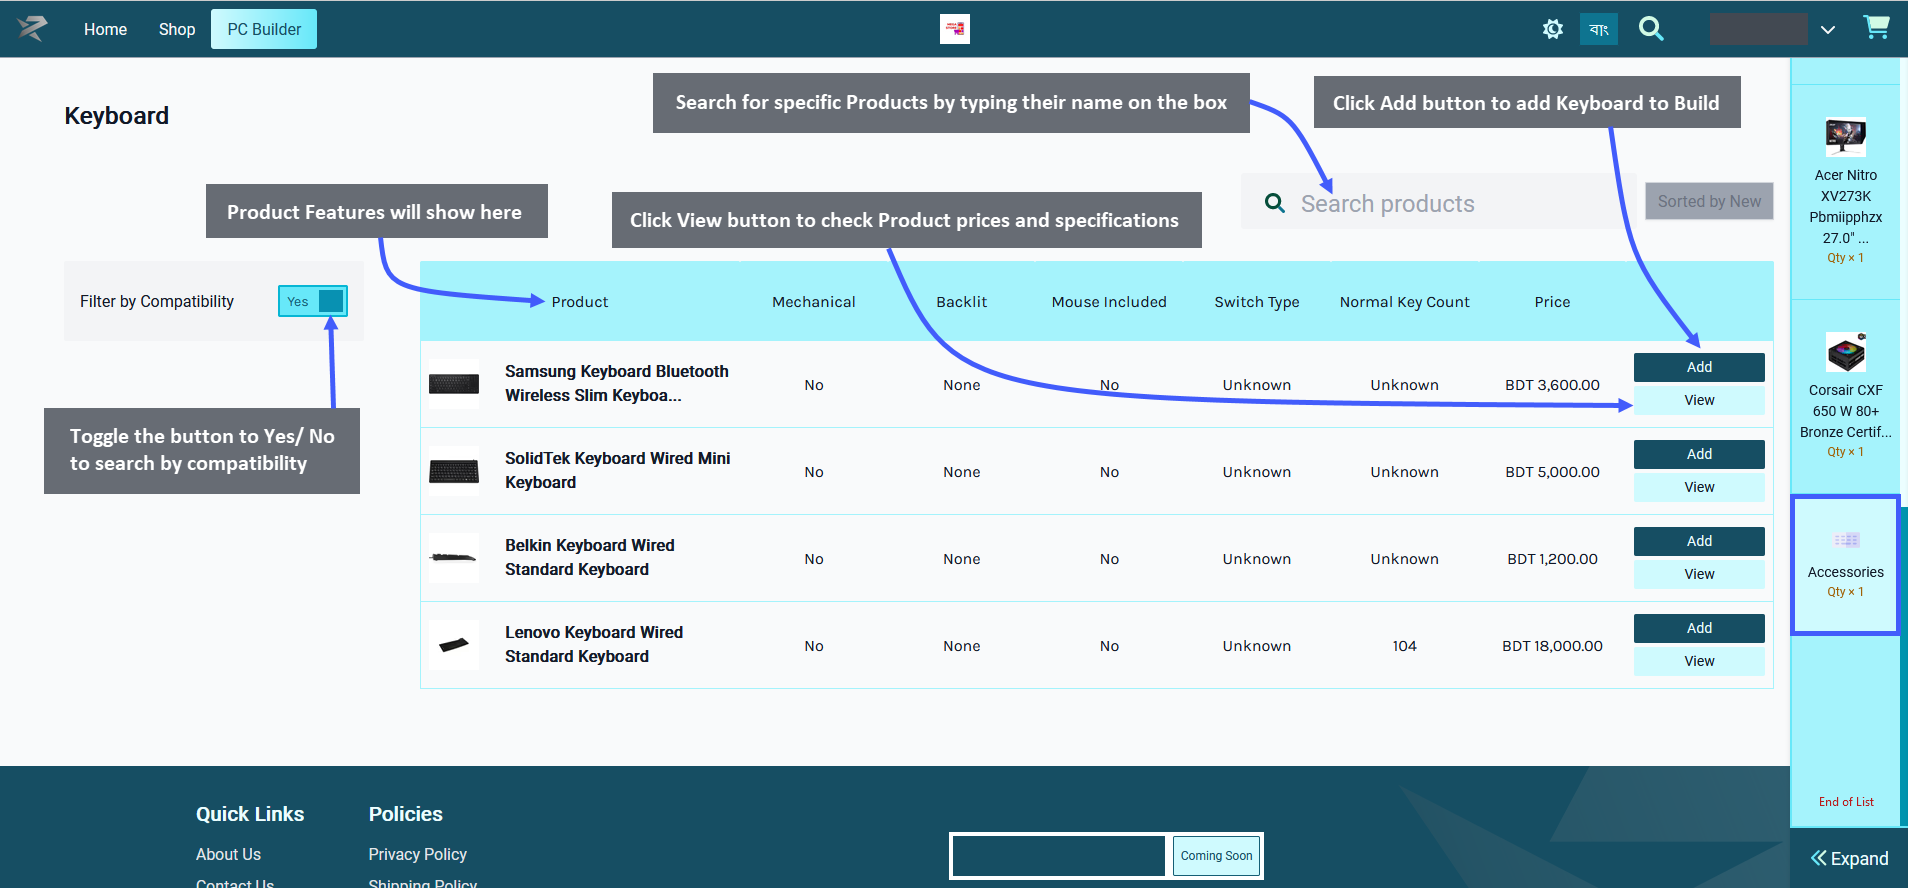
After adding Mouse, click on Accessories button to go back to the accessories main page. Now, select the second component Keyboard. A Keyboard is a peripheral input device modeled after the typewriter keyboard which uses an arrangement of buttons or keys to act as mechanical levers or electronic switches. Click the Add button to add the Product to build. Below the Add Button is a View button clicking on which will open a pop-up to show Product price, general specifications, performance specifications, physical specifications, and power specifications along with detailed Product images.
There is a Search Box on the top right corner to help find specific Product(s). The Product features will show on top of the list. There is a Filter Compatibility button which can be toggled to Yes/ No to search by compatibility of PC components or not. Click on Expand to see a detailed view of added components and their prices.
Add Speaker to PC Build
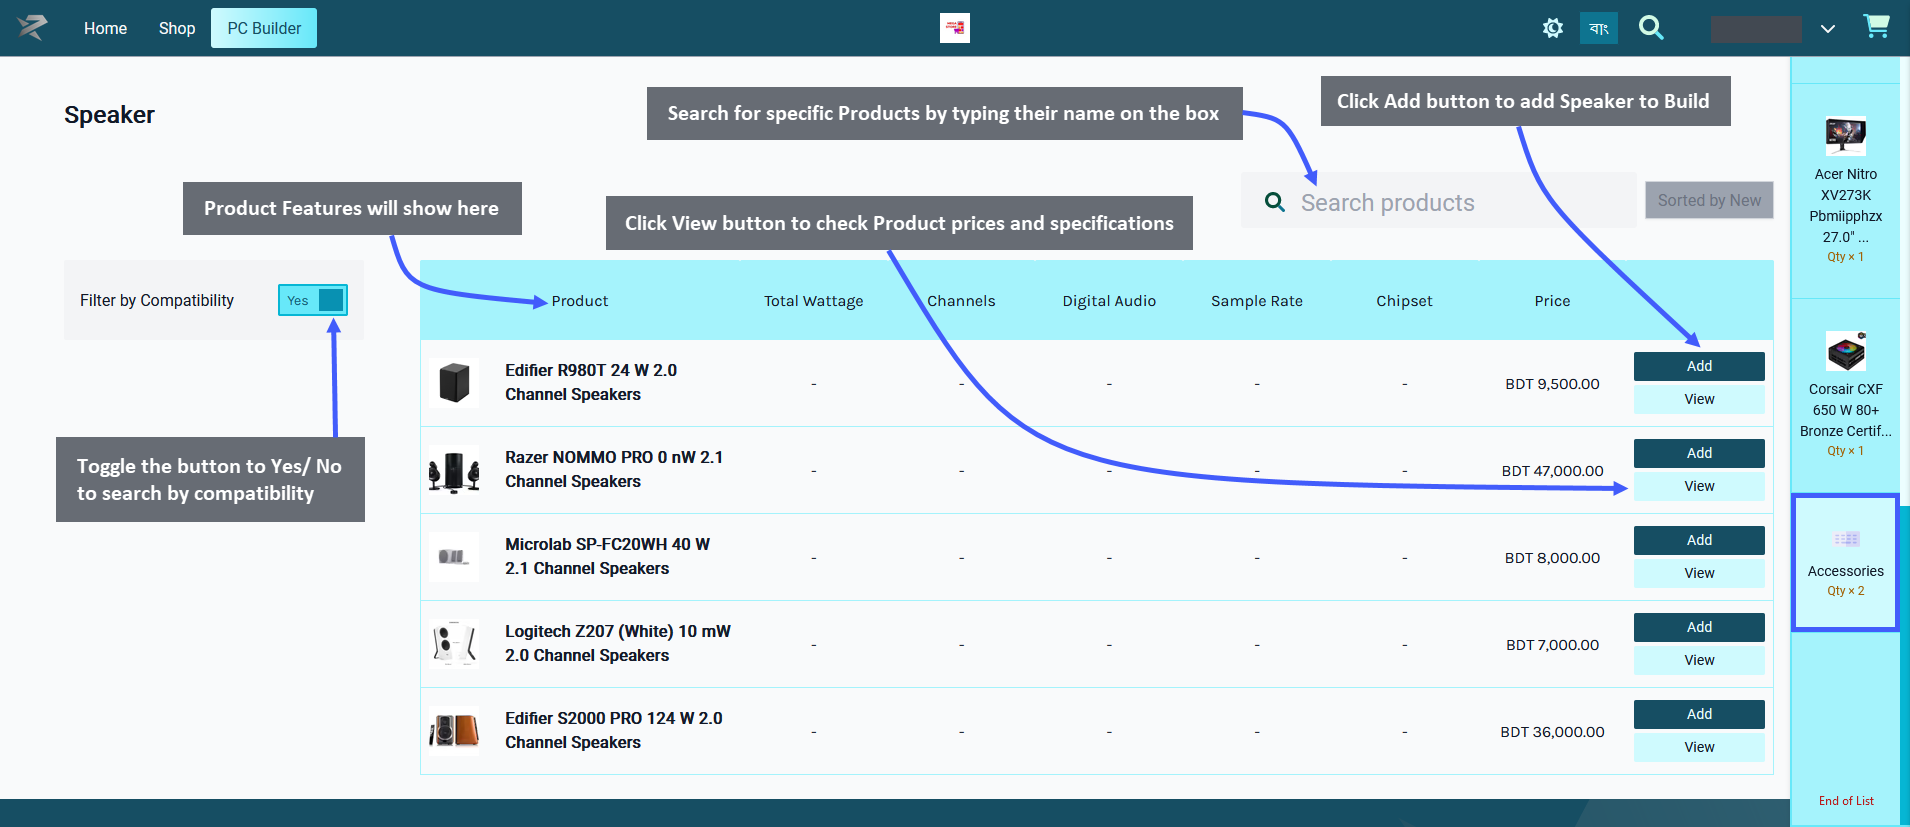
After adding Keyboard, click on Accessories button to go back to the accessories main page. Now, select the third component Speaker, which can be used to play sound or music. Click the Add button to add the Product to build. Below the Add Button is a View button clicking on which will open a pop-up to display the Product price, general specifications, performance specifications, physical specifications, and power specifications with Product images.
There is a Search Box on the top right corner to help find specific Product(s). The Product features will show on top of the list. There is a Filter Compatibility button which can be toggled to Yes/ No to search by compatibility of PC components or not. Click on Expand to see a detailed view of added components and their prices.
Add Headphone to PC Build
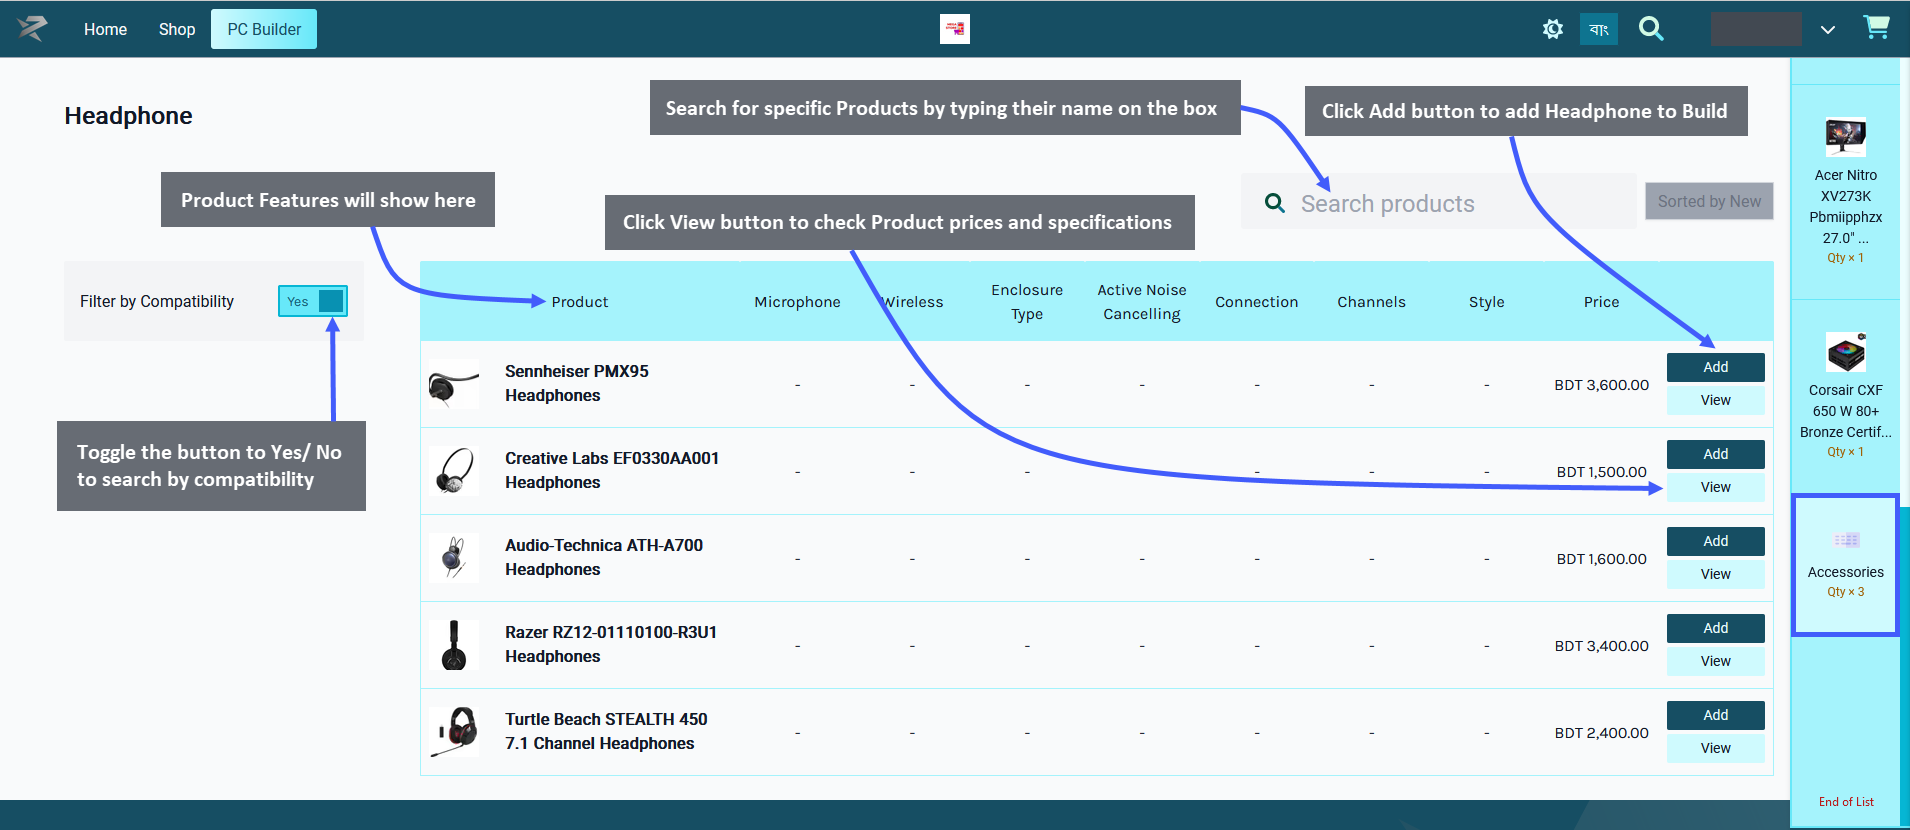
After adding Speaker, click on Accessories button to go back to the accessories main page. Now, select the fourth component headphones, which are output device that can be plugged into a computer to listen to audio. Click on the Add button to add Product to build. Below the Add Button is a View button clicking on which will open a pop-up to show Product price, general specifications, performance specifications, physical specifications, and power specifications along with detailed Product images.
There is a Search Box on the top right corner to help find specific Product(s). The Product features will show on top of the list. There is a Filter Compatibility button which can be toggled to Yes/ No to search by compatibility of PC components or not. Click on Expand to see a detailed view of added components and their prices.
Place Order for Created Build
When all the components will be successfully added to the PC Build, click on the Expand button from the bottom left to open the pop-up showing Cart details. From here, click on the Add to Cart button to complete the New PC Build and place a New Order. Click on View Build button to make any changes or name to save the PC Build.
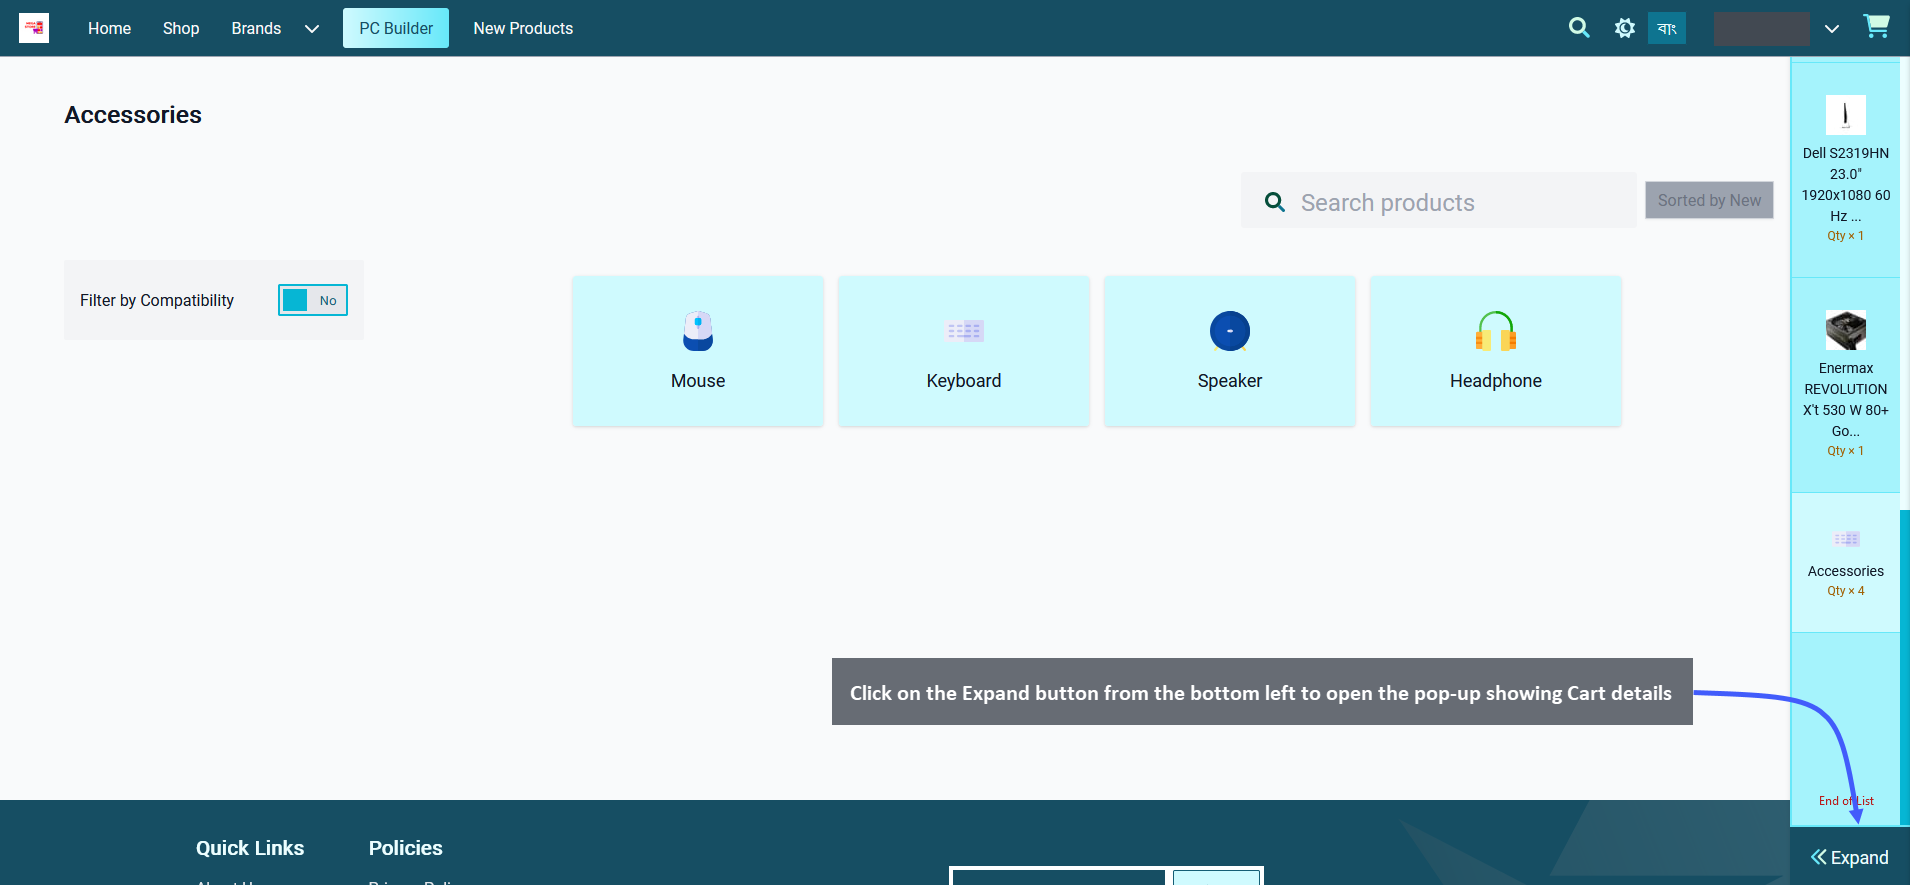
Image 1: Click on the Expand button from the bottom left to open the pop-up showing Cart details.
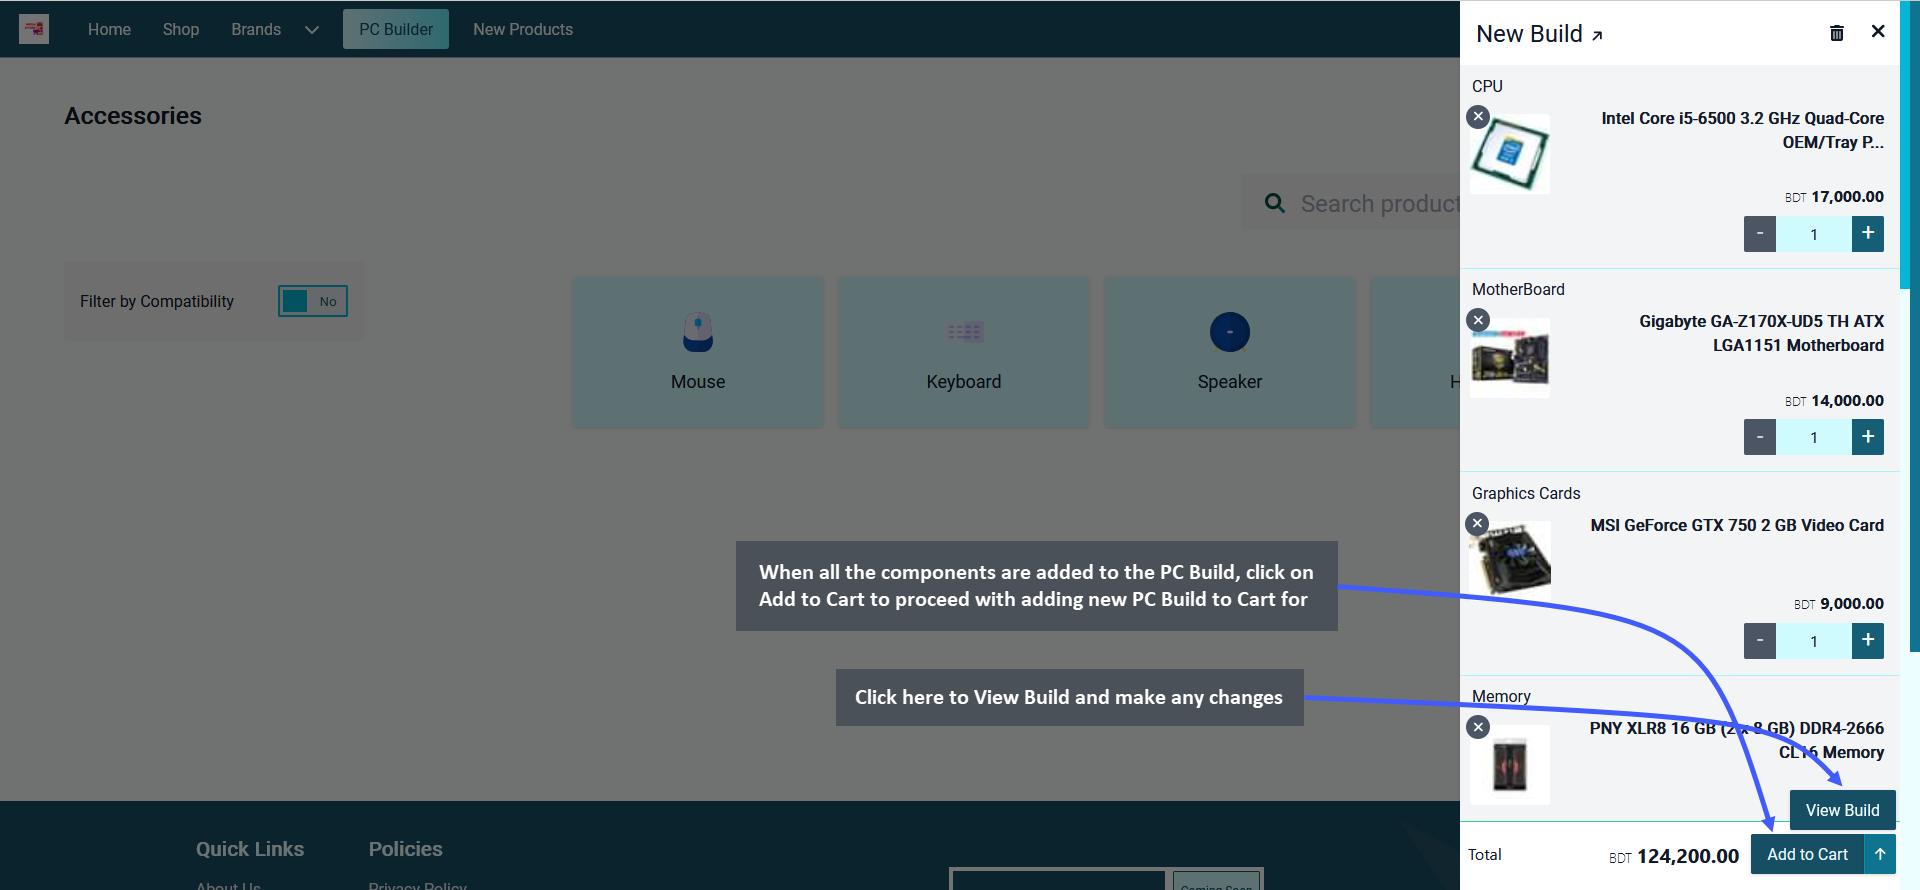
Image 2: When all the components are added to the PC Build, click on Add to Cart to proceed with Order.
Review Cart Checkout Details
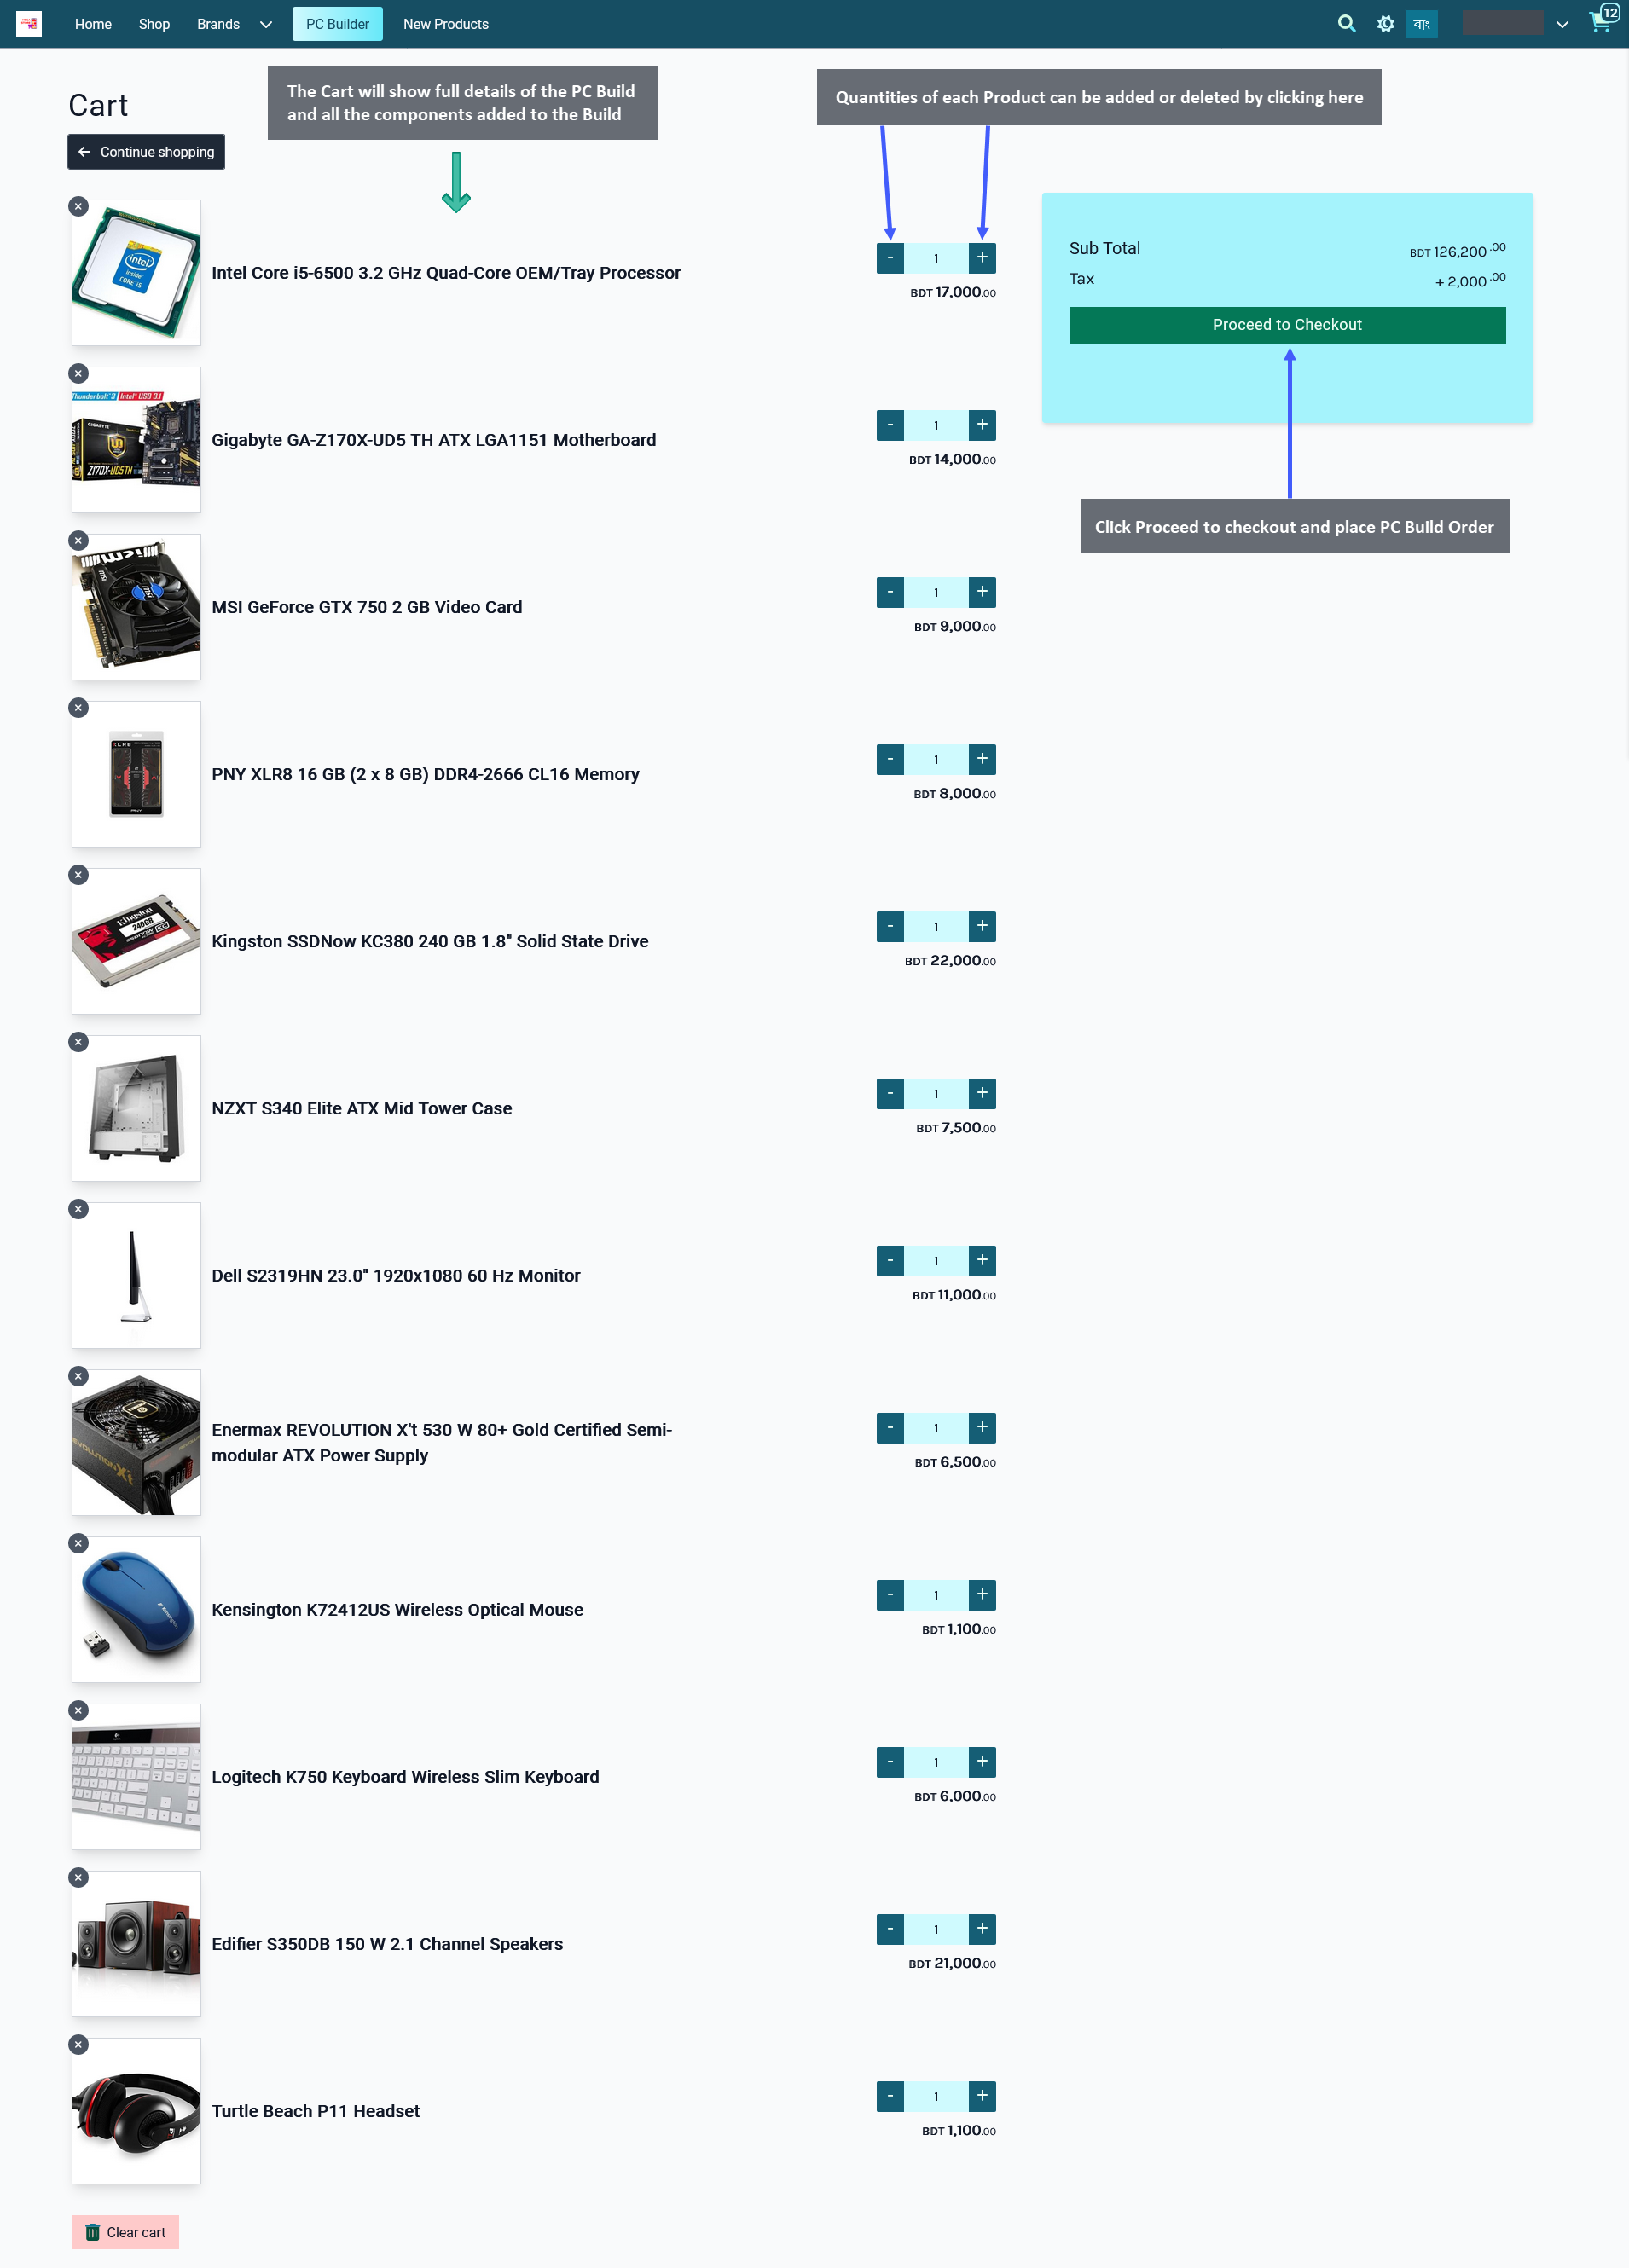
Clicking on Add to Cart will redirect to a new Page showing full details of PC Build Cart. Beside each component, there are + and - buttons to increase and decrease quantities for the Build. After checking all the details, click on Proceed to Checkout button to proceed with filling in the Billing, Shipping, and Payment details for New Order.
Complete Billing, Shipping, and Payment Details for Order
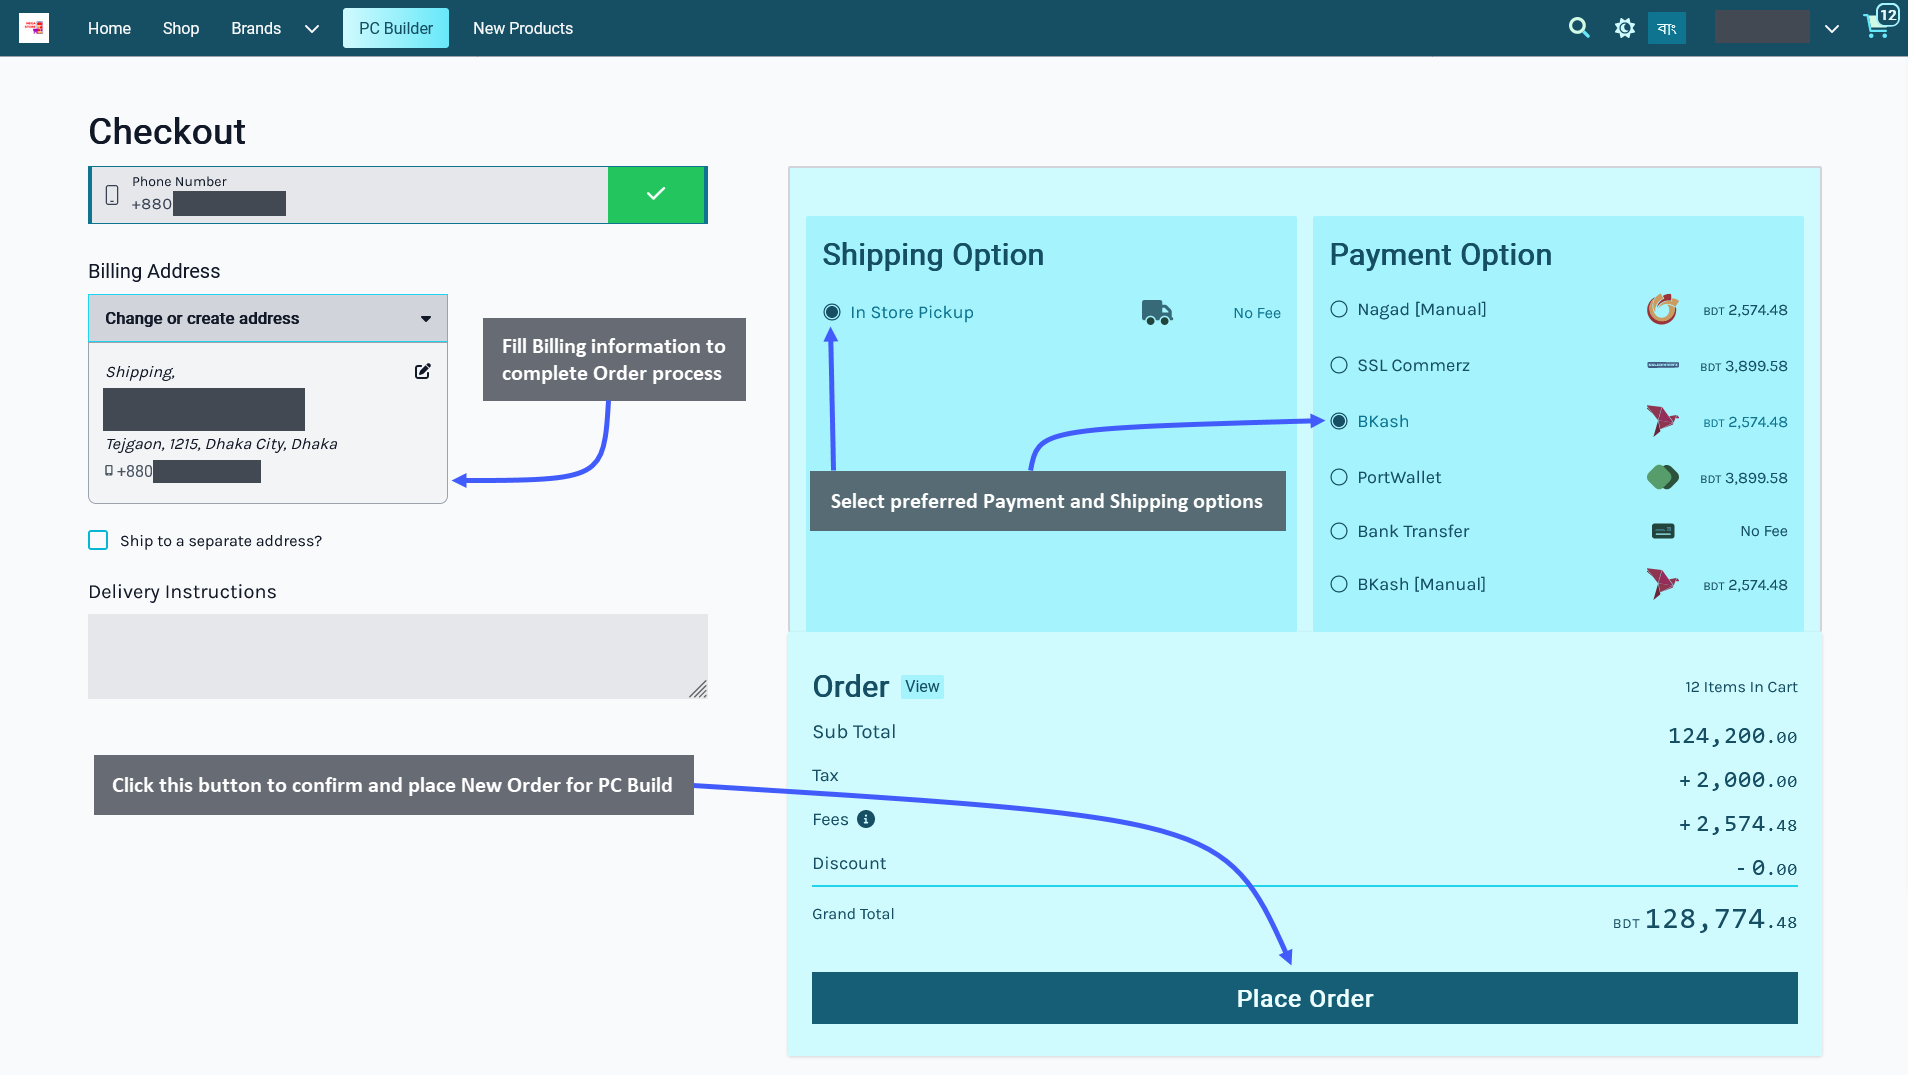
In the checkout page, fill in the Billing details to complete processing of the Order. Select preferred Shipping and Payment options, and click on Place Order button to confirm and place New Order for the User’s PC Build.
PC Build Order Confirmation
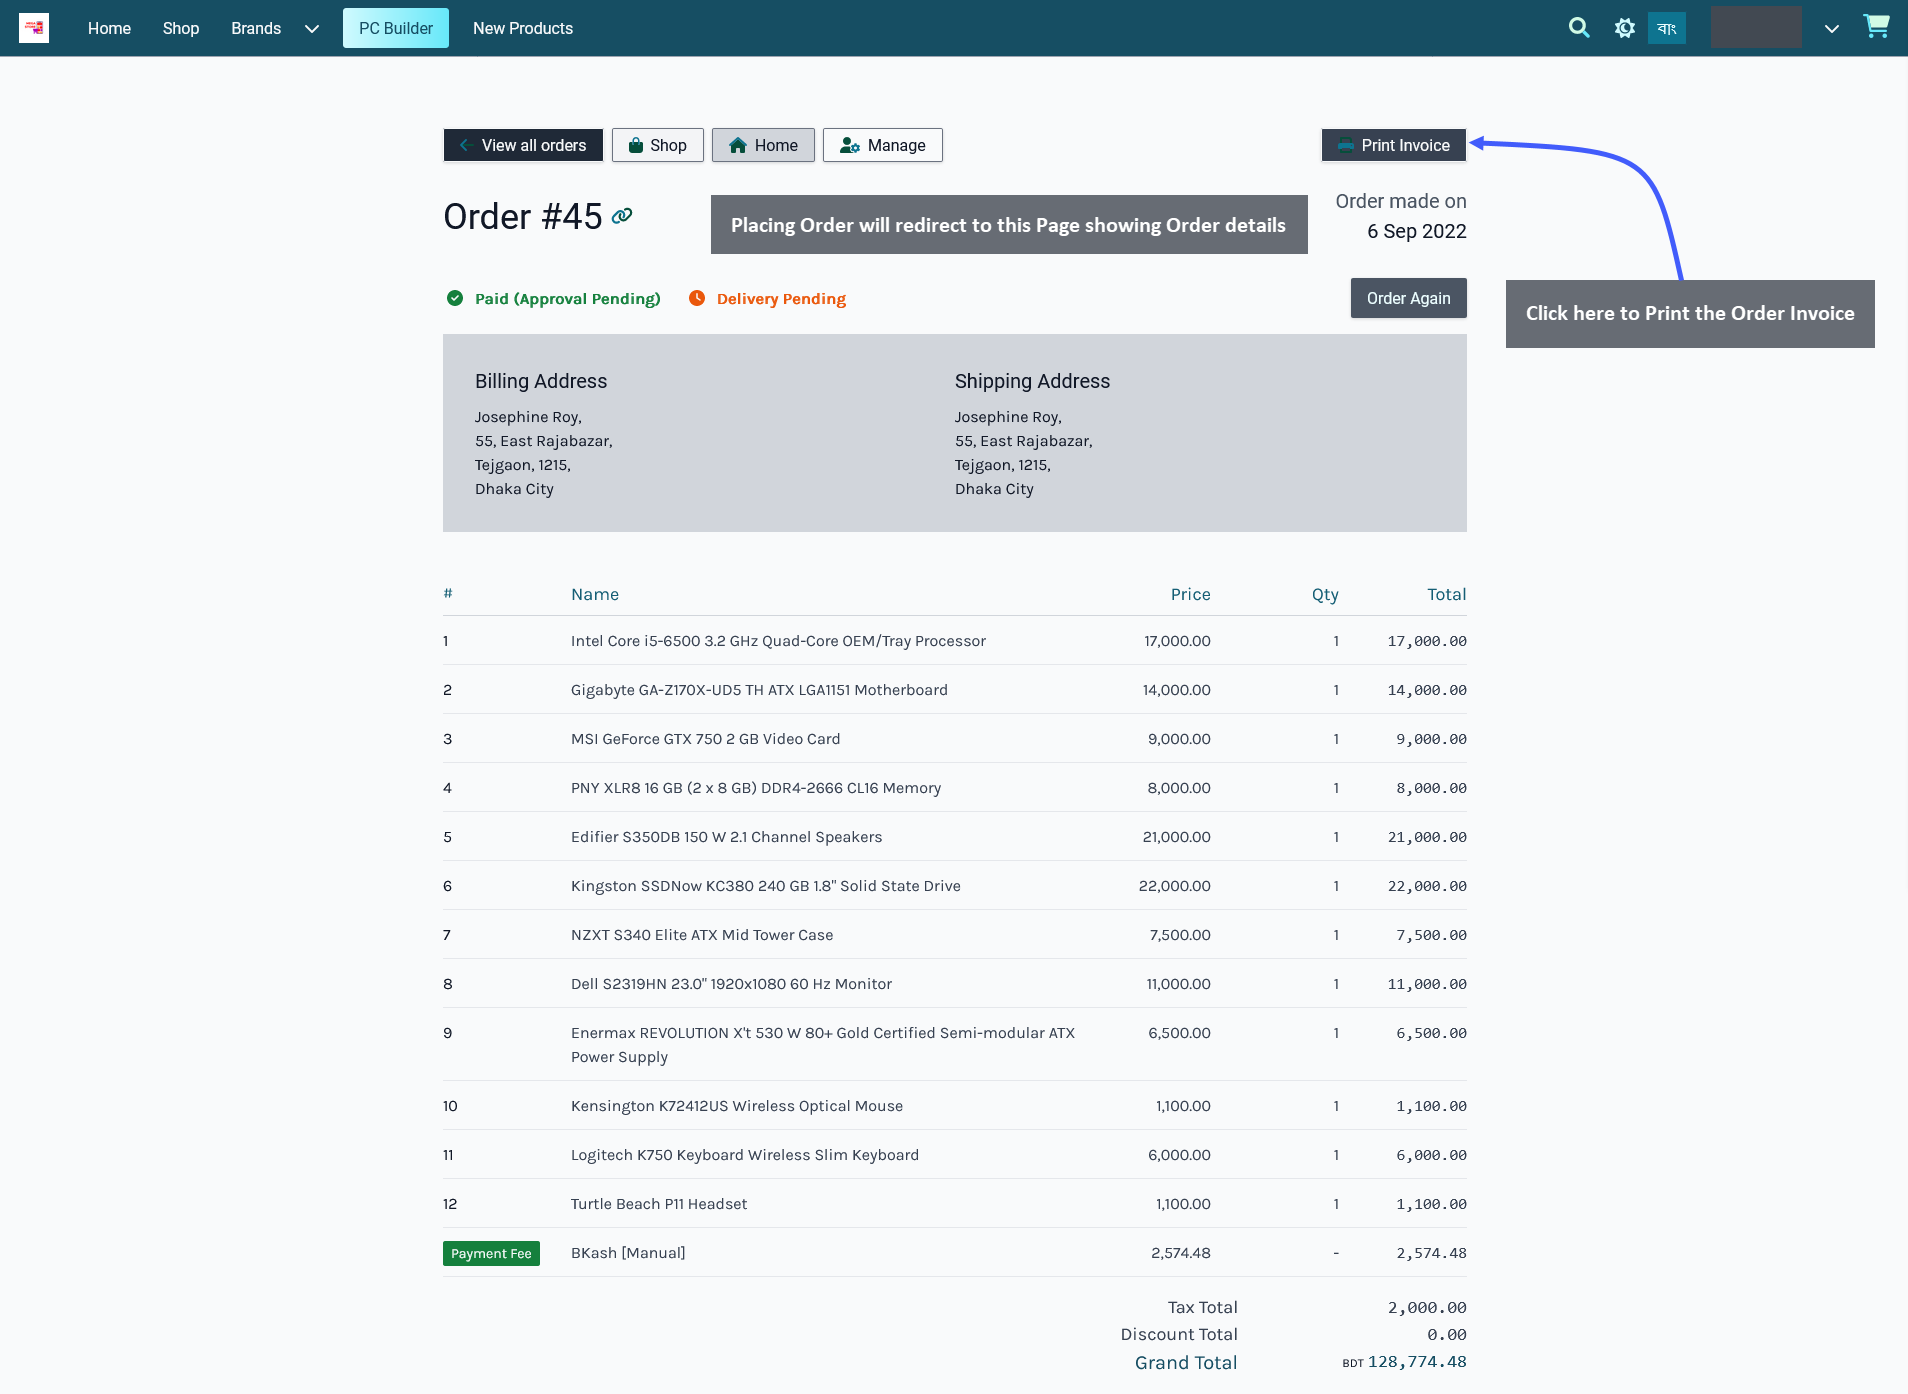
When the Order is sucessfully placed, it will redirect to the Order Confirmation Page showing the Order details. There are three options to view all the Order of the User, and go directly to Shop or Home. Using Print Invoice button, the User can print out the Order invoice for record containing the Billing, Shipping, and Order details.
Save Build under My Builds
When all the components will be successfully added to the PC Build, click on the Expand button from the bottom left to open the pop-up showing Cart details. From here, click on the Add to Cart button to complete the New PC Build and place a New Order. Click on View Build button to make any changes or name to save the PC Build.
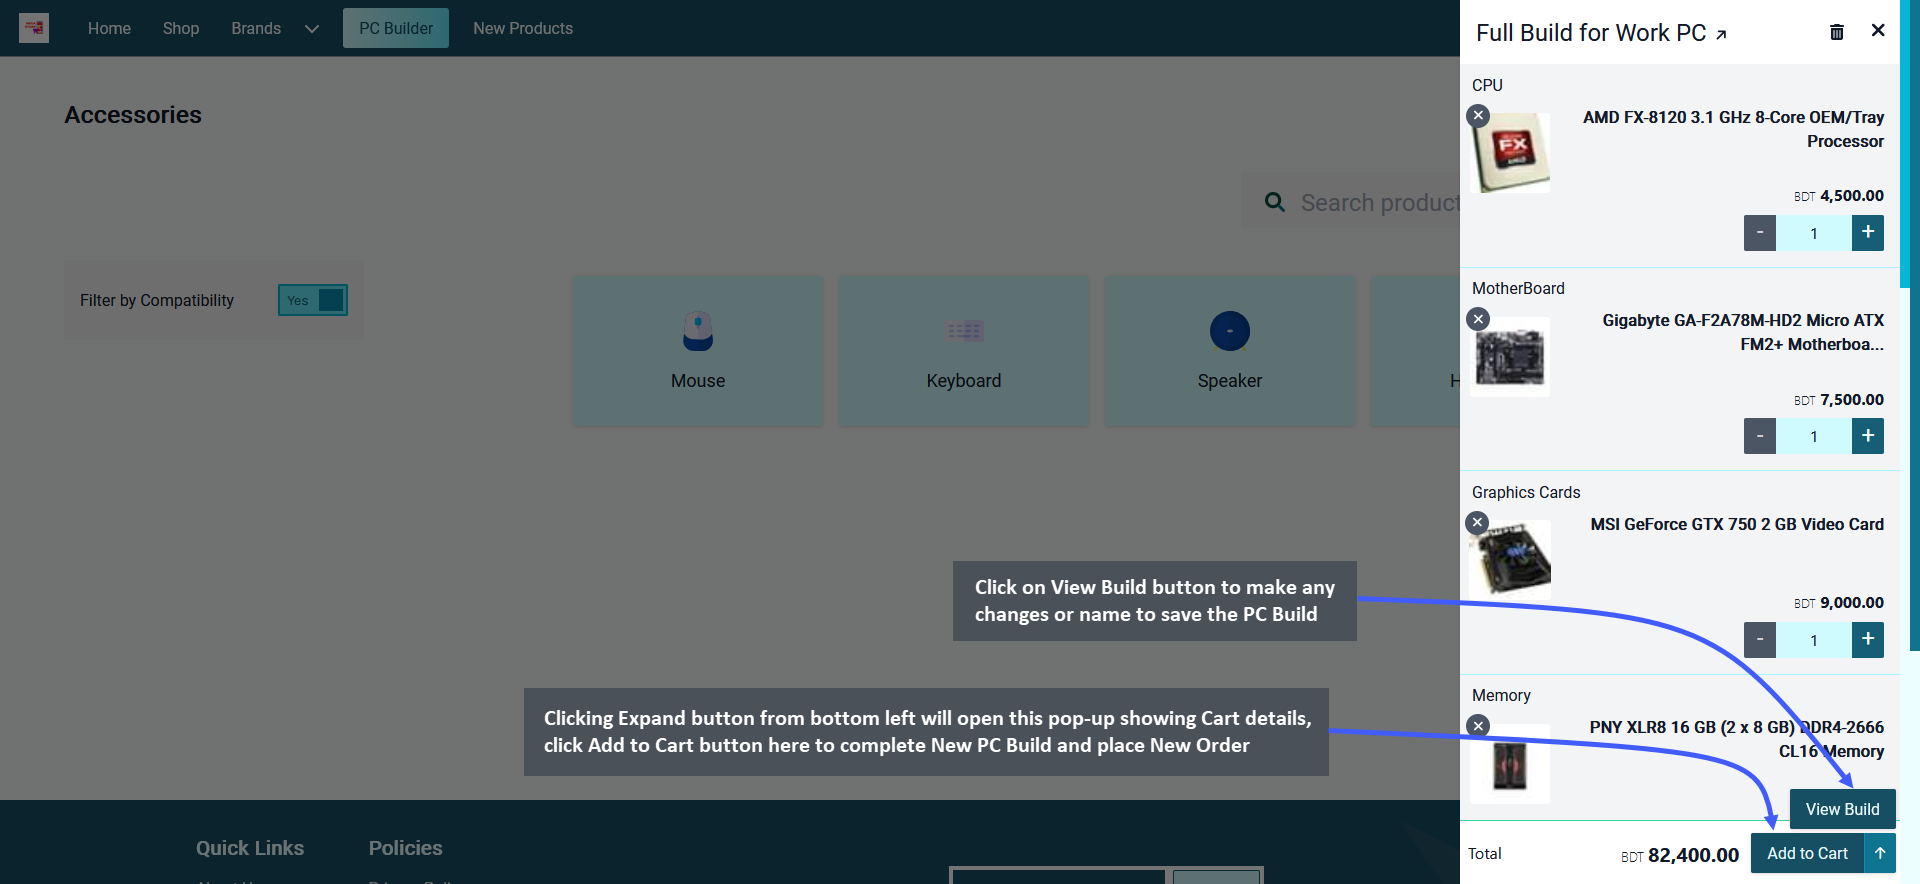
Image 1: Click Add to Cart button to complete PC Build or Click View Build button to make any changes.
Make Builds Public or Private
The Customer can customize their Build by clicking on View Build button. They can make the PC Builds Public or Private with the use of Make It Public and Make It Private buttons. Switching from one to another will make Build from Public to Private and vice versa. Below it, there is a box to Name the PC Build and a box to add description for the Build. Click the Save button to save all these settings successfully. Use Add to Cart button to add the PC Build to Cart again after completing customization and Order this Build.
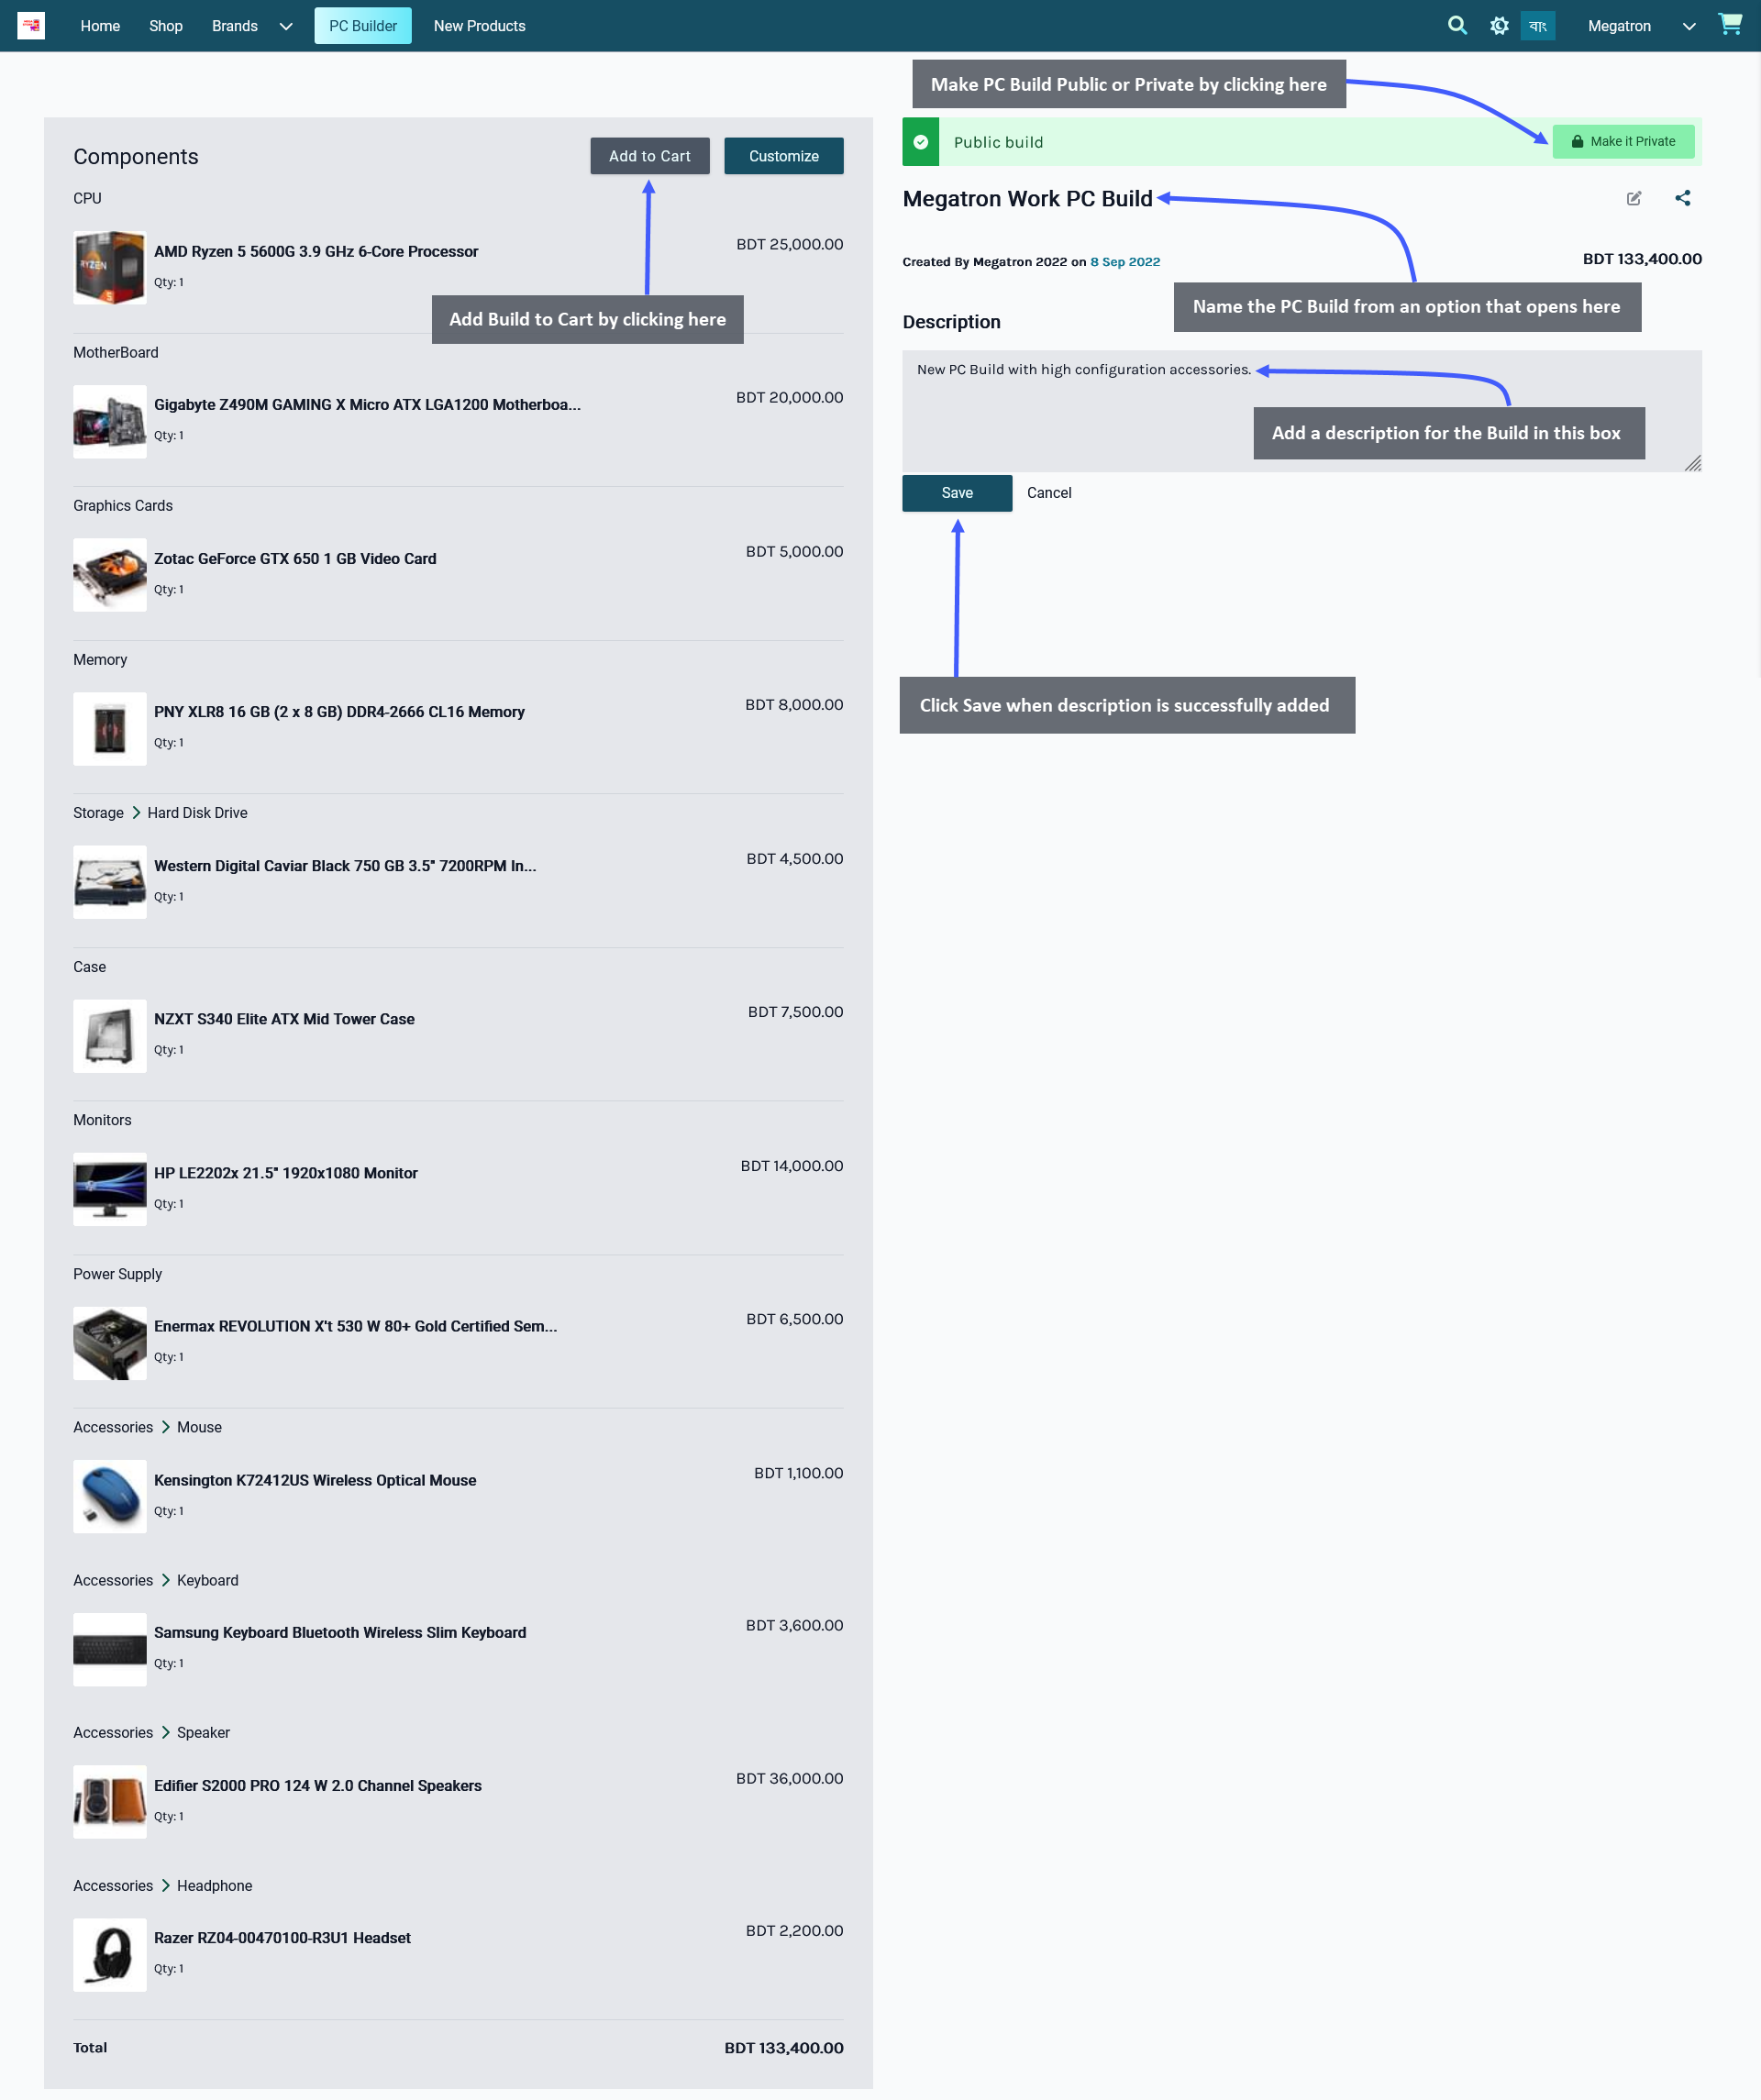
Image 2: Customize Cart on this Page, make Build Public or Private, add Name or Description for Build.
My Builds
The Saved Build with a Name and a Description will show up under My Builds section on PC Builder. Usually, the last three recent PC Builds by the Customer will be on display under My Builds. If a Customer had created more than three Builds, then they can be viewed by clicking on the View More button. Clicking on the View More button will show all the Builds that Customer have created in several pages that can be viewed.
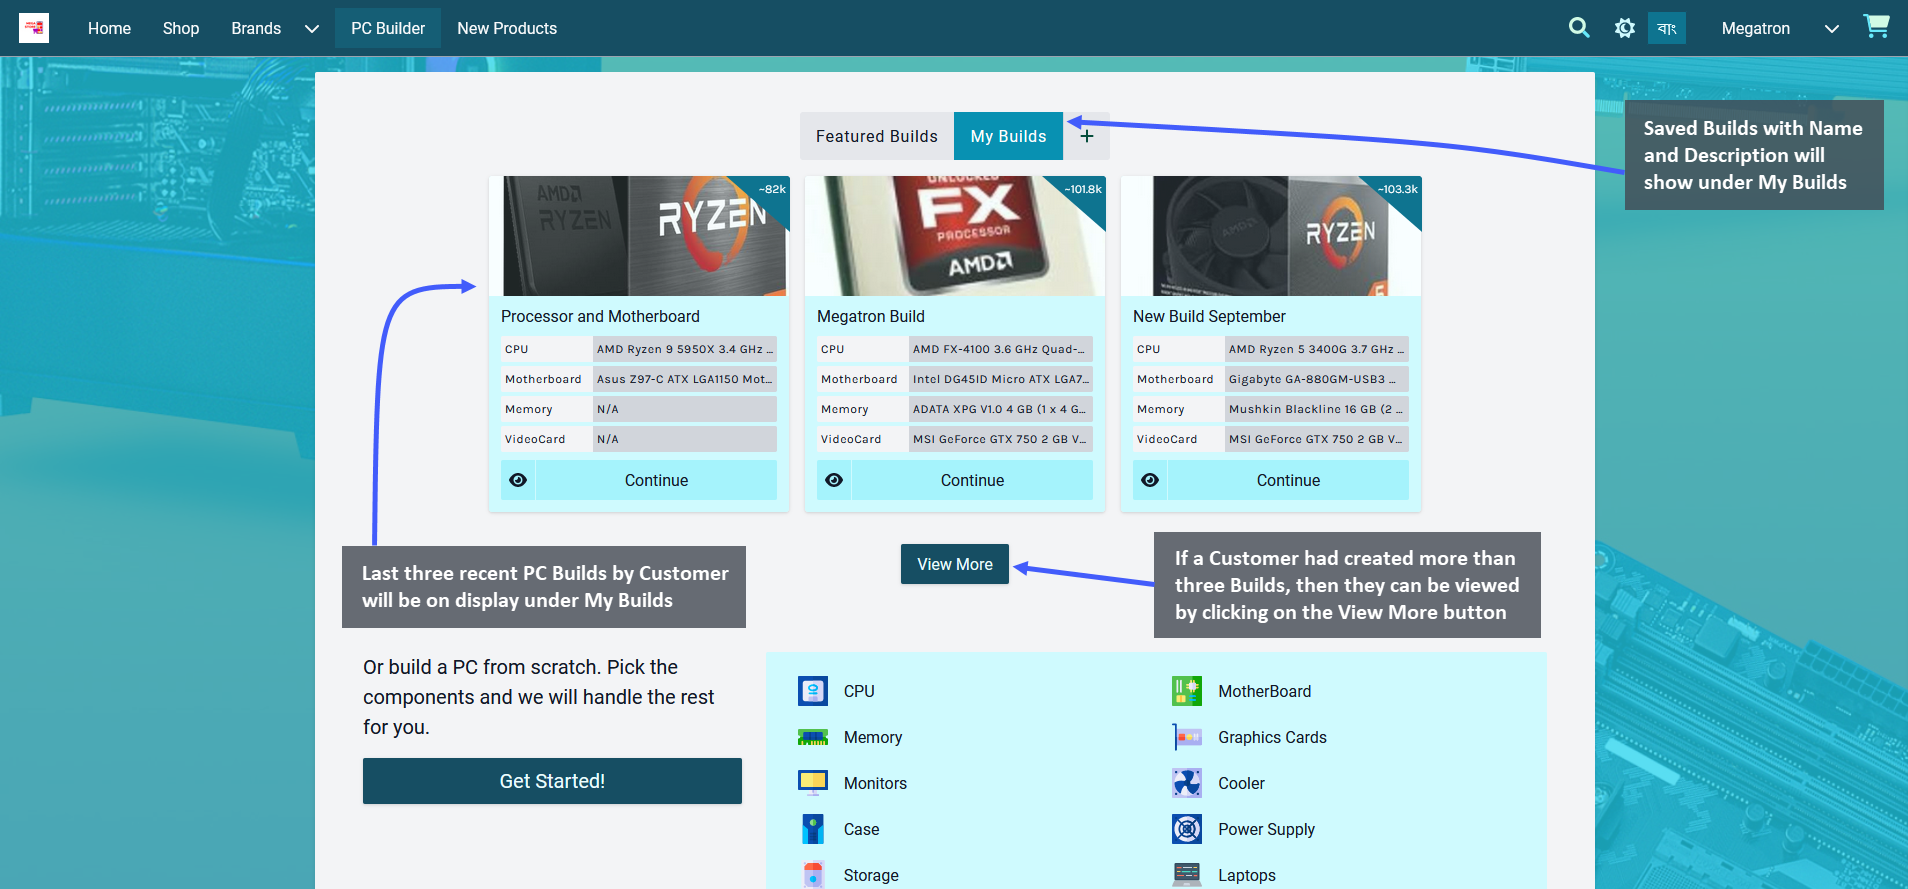
Image 3: Only last three Builds will show under My Builds, click View More to view all Builds by Customer.
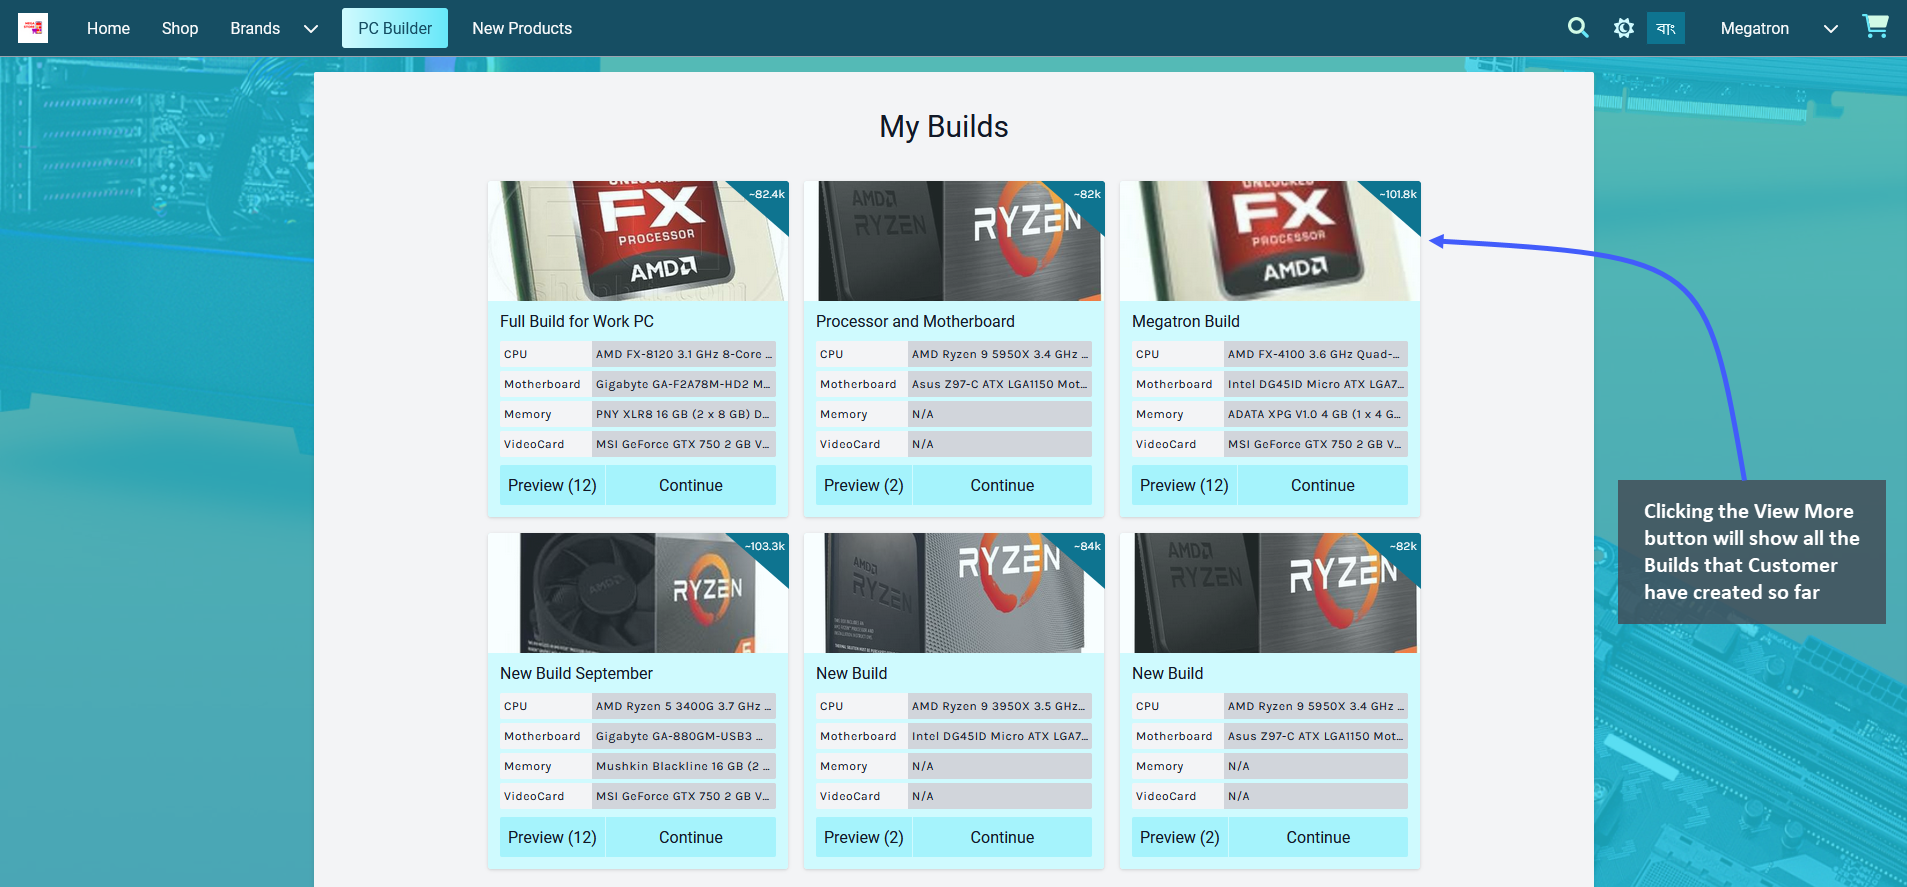
Image 4: Clicking View More button will show all the Builds that Customer have created with PC Build.