CMS Flowchart
This Flowchart shows an overview of creating and managing Tenant from Admin.
This page shows the overview of the Tenant Account on the Dashboard and Home Page sections.
The Content Management System consists of six main modules - Dashboard, Customers, Orders, Products, Product Settings, and Content Management. Using these modules, various sections and tabs of the Website can be created and edited. Select any module and their sub-sections from the left hand menu as needed.
The Shop Owner can create and modify Orders, Products, Customers, Pages, and Widgets on the Website. A Shop Owner can employ multiple Admins to manage the Shop for Customers, enlist Products, and manage Orders etc.
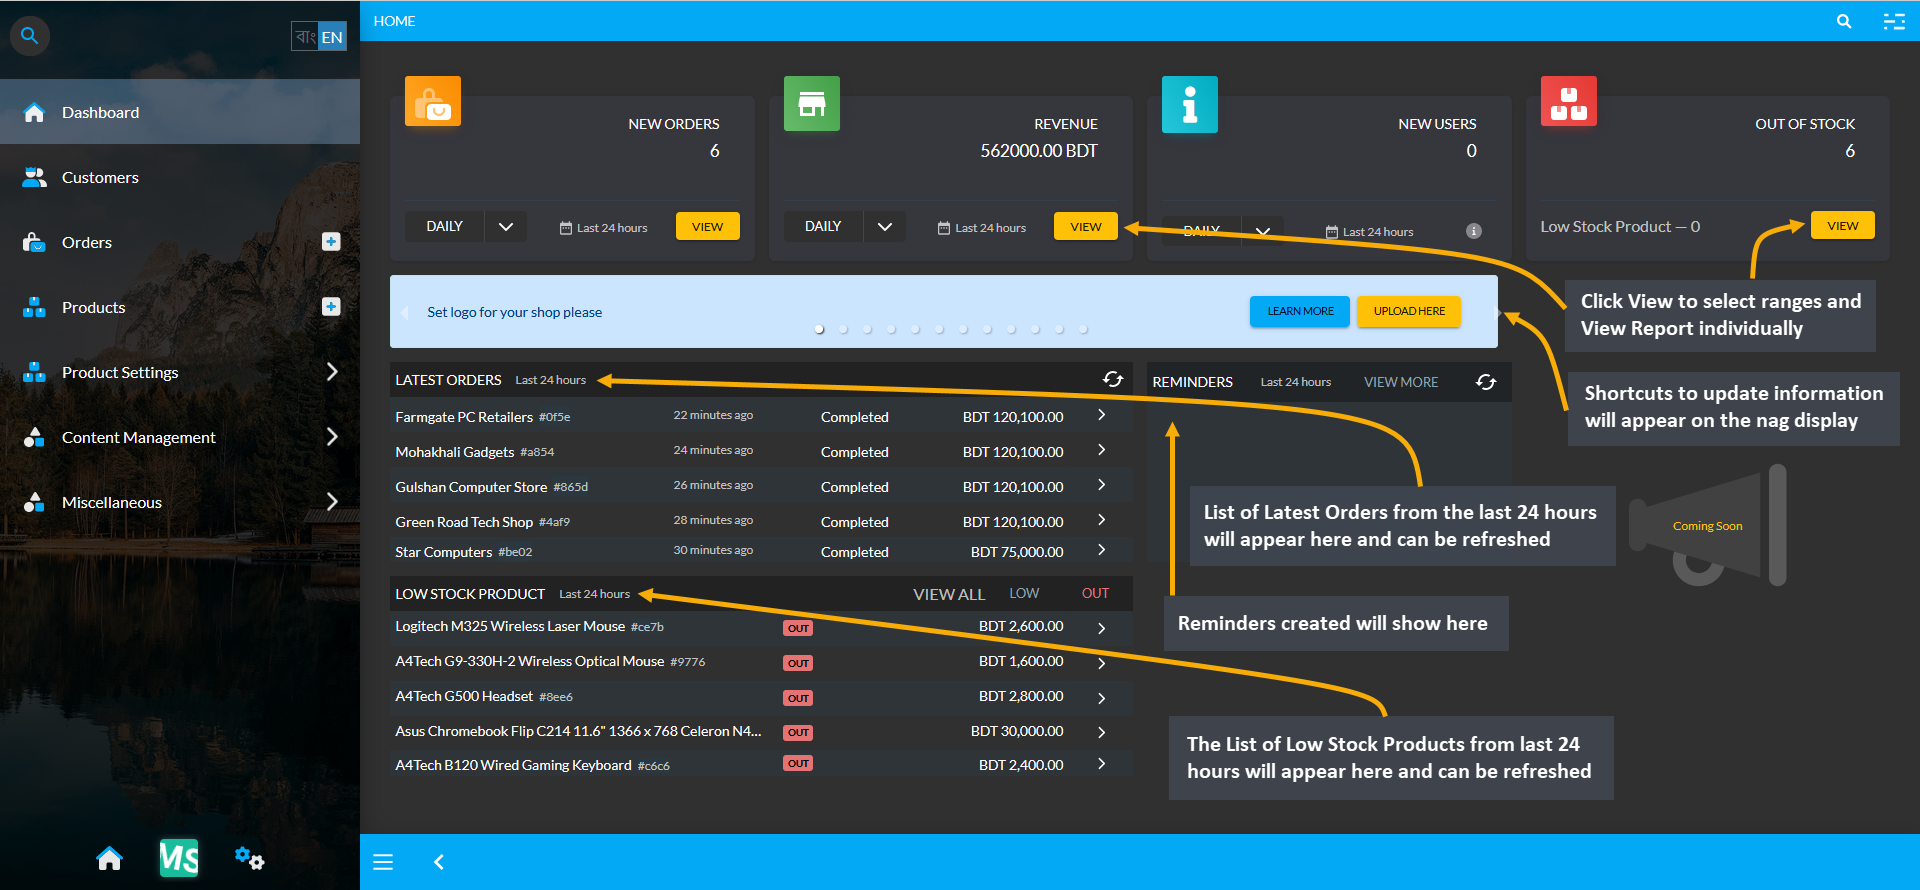
In the New Admin Panel Dashboard, four sections for New Orders, Revenue, New Users, and Out of Stock are shown on top. The functions of each section is described below in details with screenshots. Below them is a nag display where shortcut options to update information will keep showing if they have not been updated yet.
The nag display will prompt the Shop Owner to setup shop logo, slogan, support phone number, Facebook page, payment gateways, shipping gateways, refund policy page, shipping page, EMI page, TIN, BIN, and Trade License etc. For more details, please read about How to Complete Shop Setup.

Depending on the selected timeframe, the results will show. Hourly means the current hour when all New Orders are created, Revenues, or New Customers are made. Daily means all the Orders placed today, all Revenues made today, and all the New Users created today. Weekly means the Last 7 Days, which will generally be from Sunday to Saturday, i.e. if today is Friday, 7 Days will be from last Sunday to upcoming Saturday.
Similarly, if today is Sunday, then 7 days time frame will start from today 0:00AM till next Saturday 23:59PM. Thus, current Week will mean current Sunday to current Saturday, but if today is Saturday, then 7 Days will be from last Sunday to today (Saturday). Monthly means the first day of the month to the last day of the current month which is 30 days. Likewise, Yearly means from the first month of the year to the last month of the year.
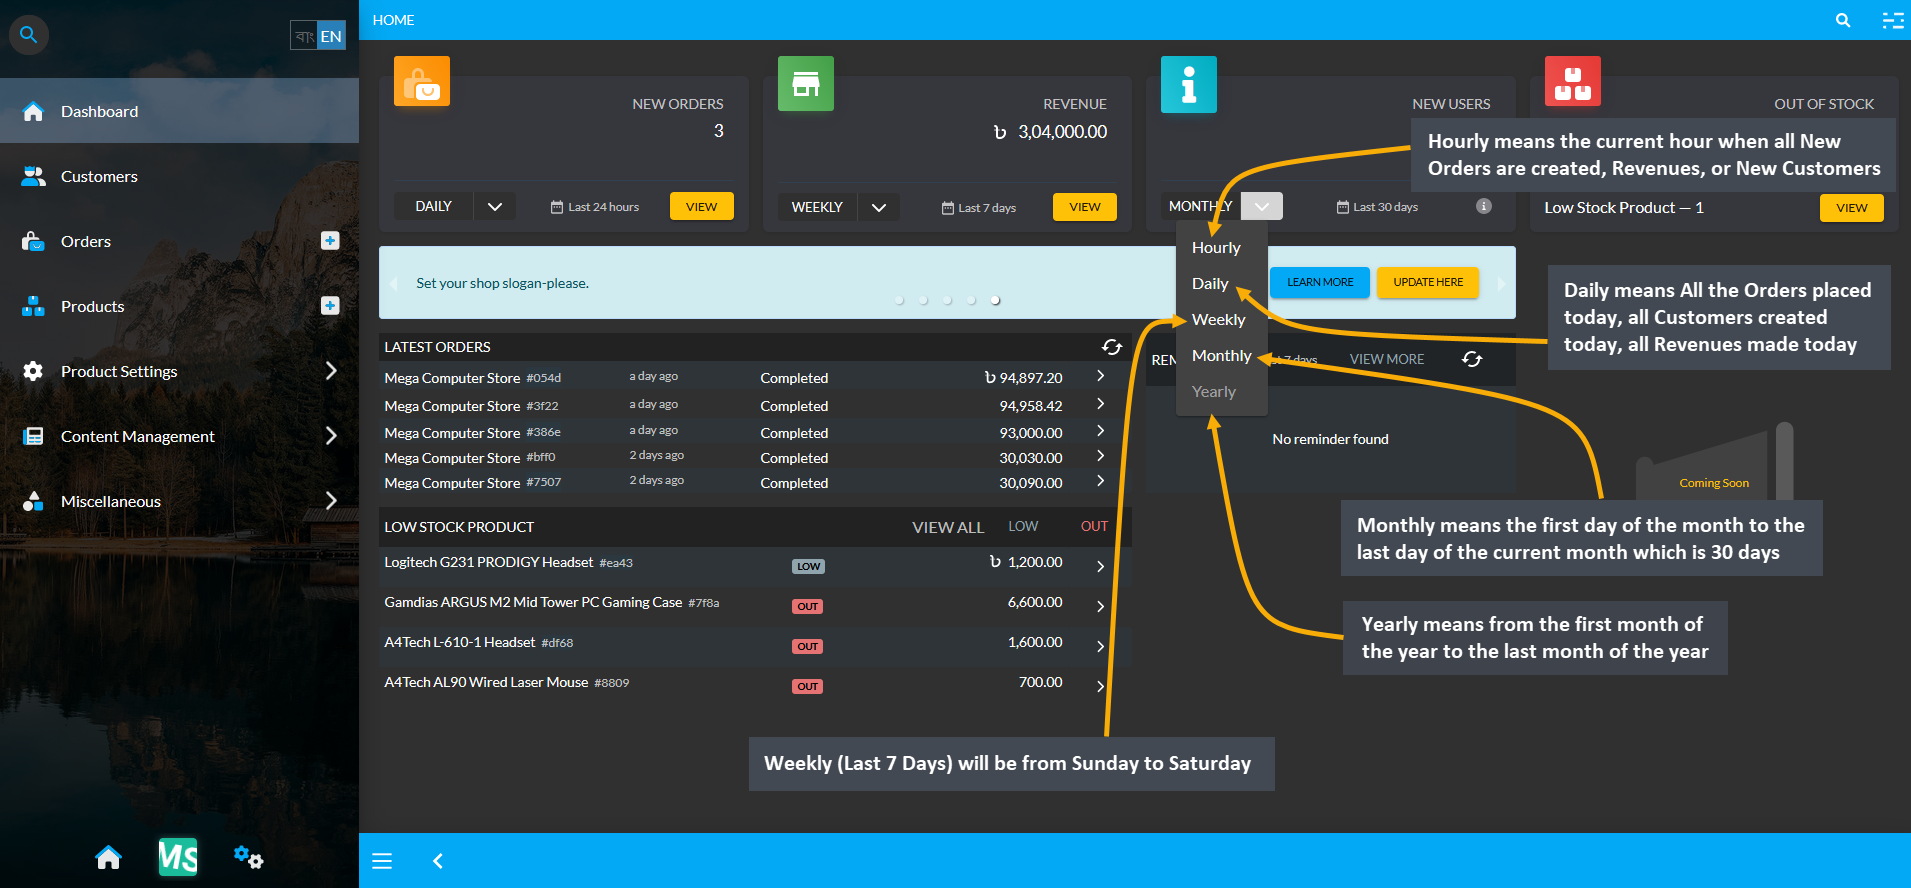
Select ranges of Hourly, Daily, Weekly, Monthly, and Yearly and then click View to check all the Orders placed within that selected range. Based on the selected range, it will redirect to the Order List Page.
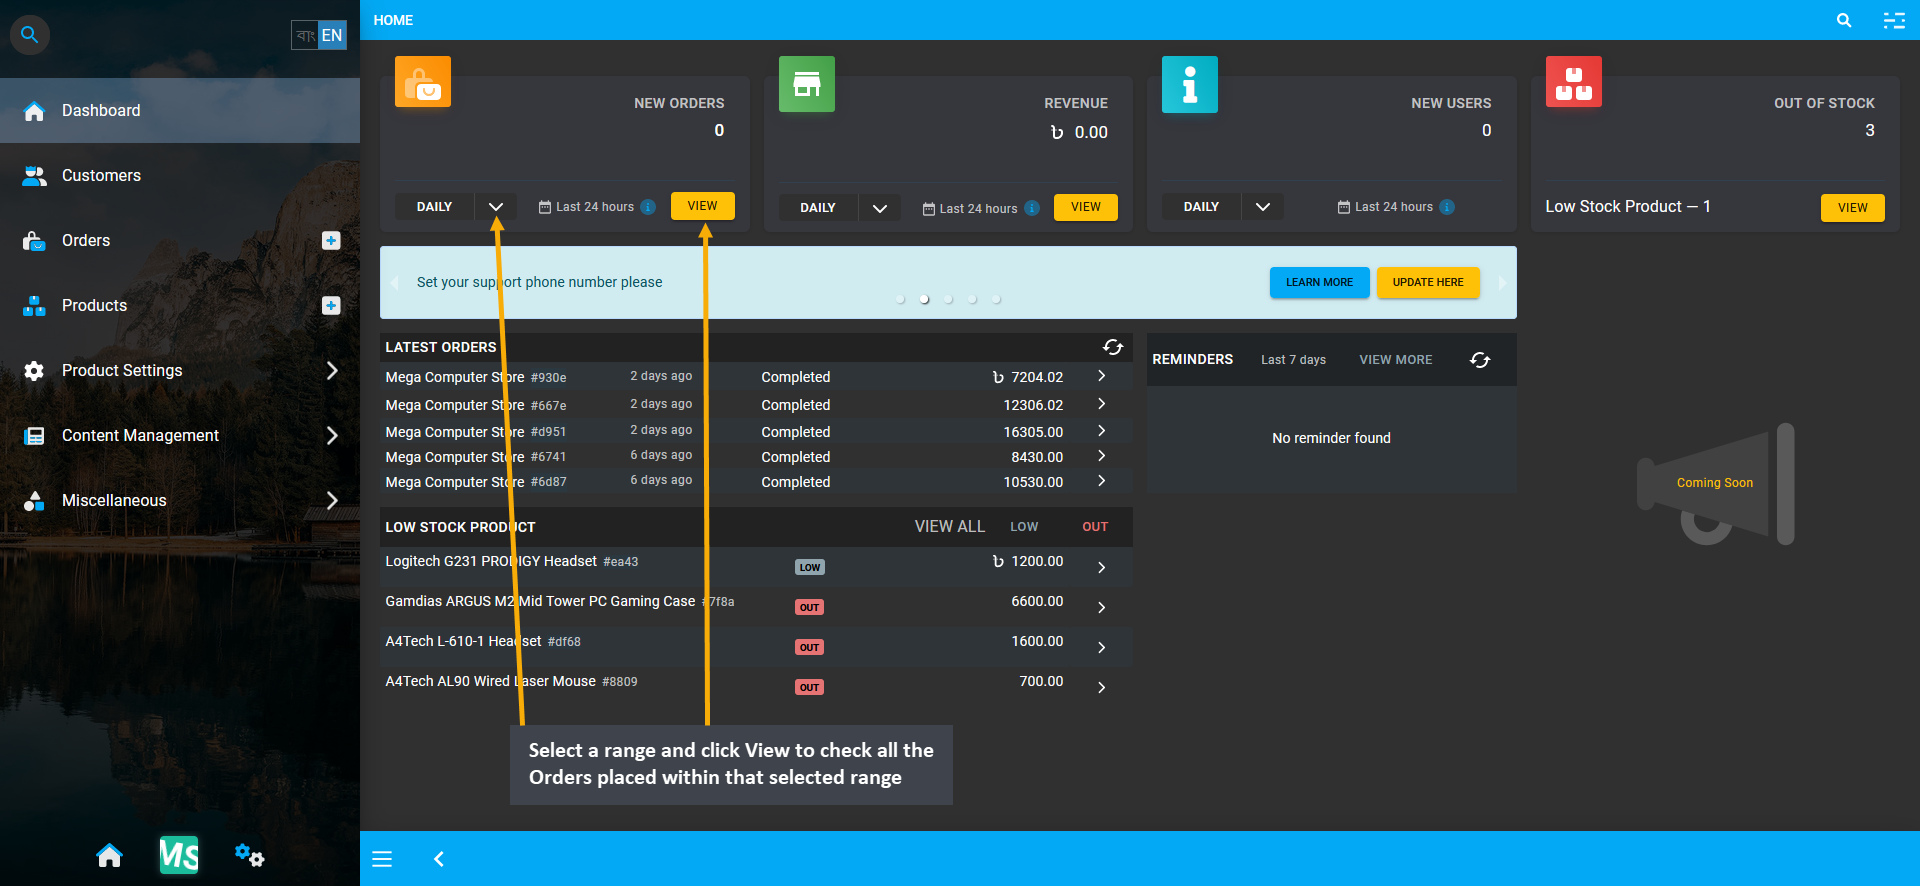
Image 1: Select a range and click View to check all the Orders placed within that selected range.
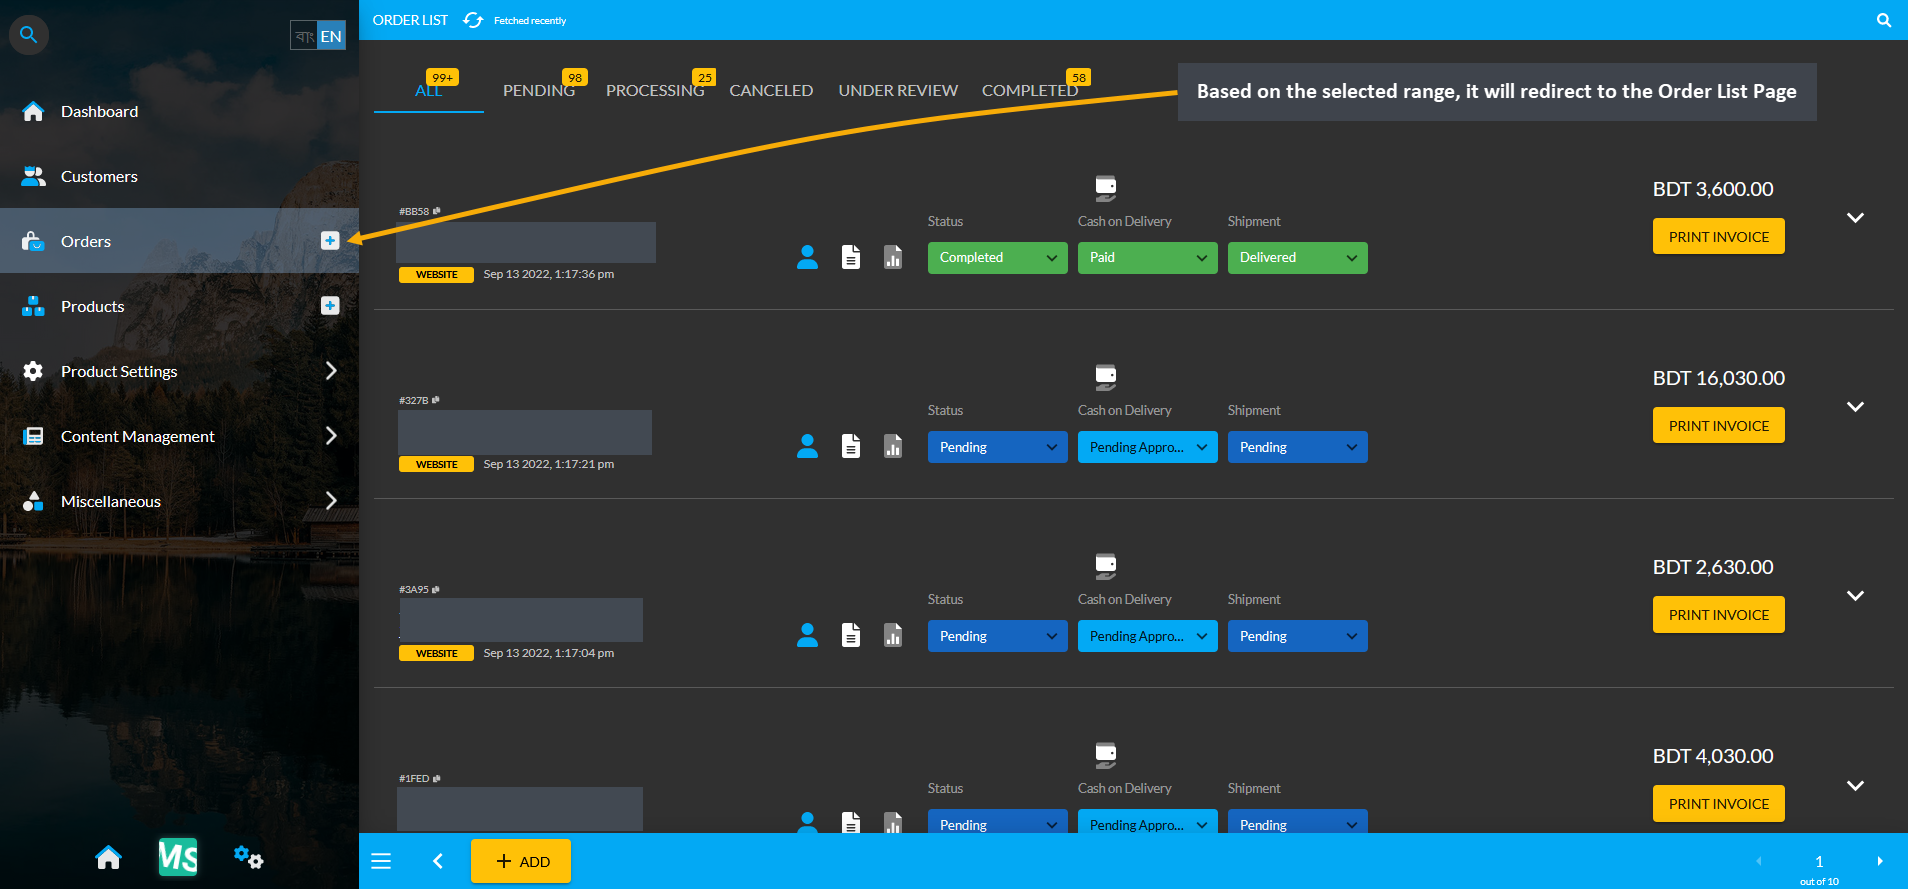
Image 2: Based on the selected range, it will redirect to the Order List Page with the range of Orders.
New Orders can also be created by clicking on the + button on the main Orders tab as shown in the example.
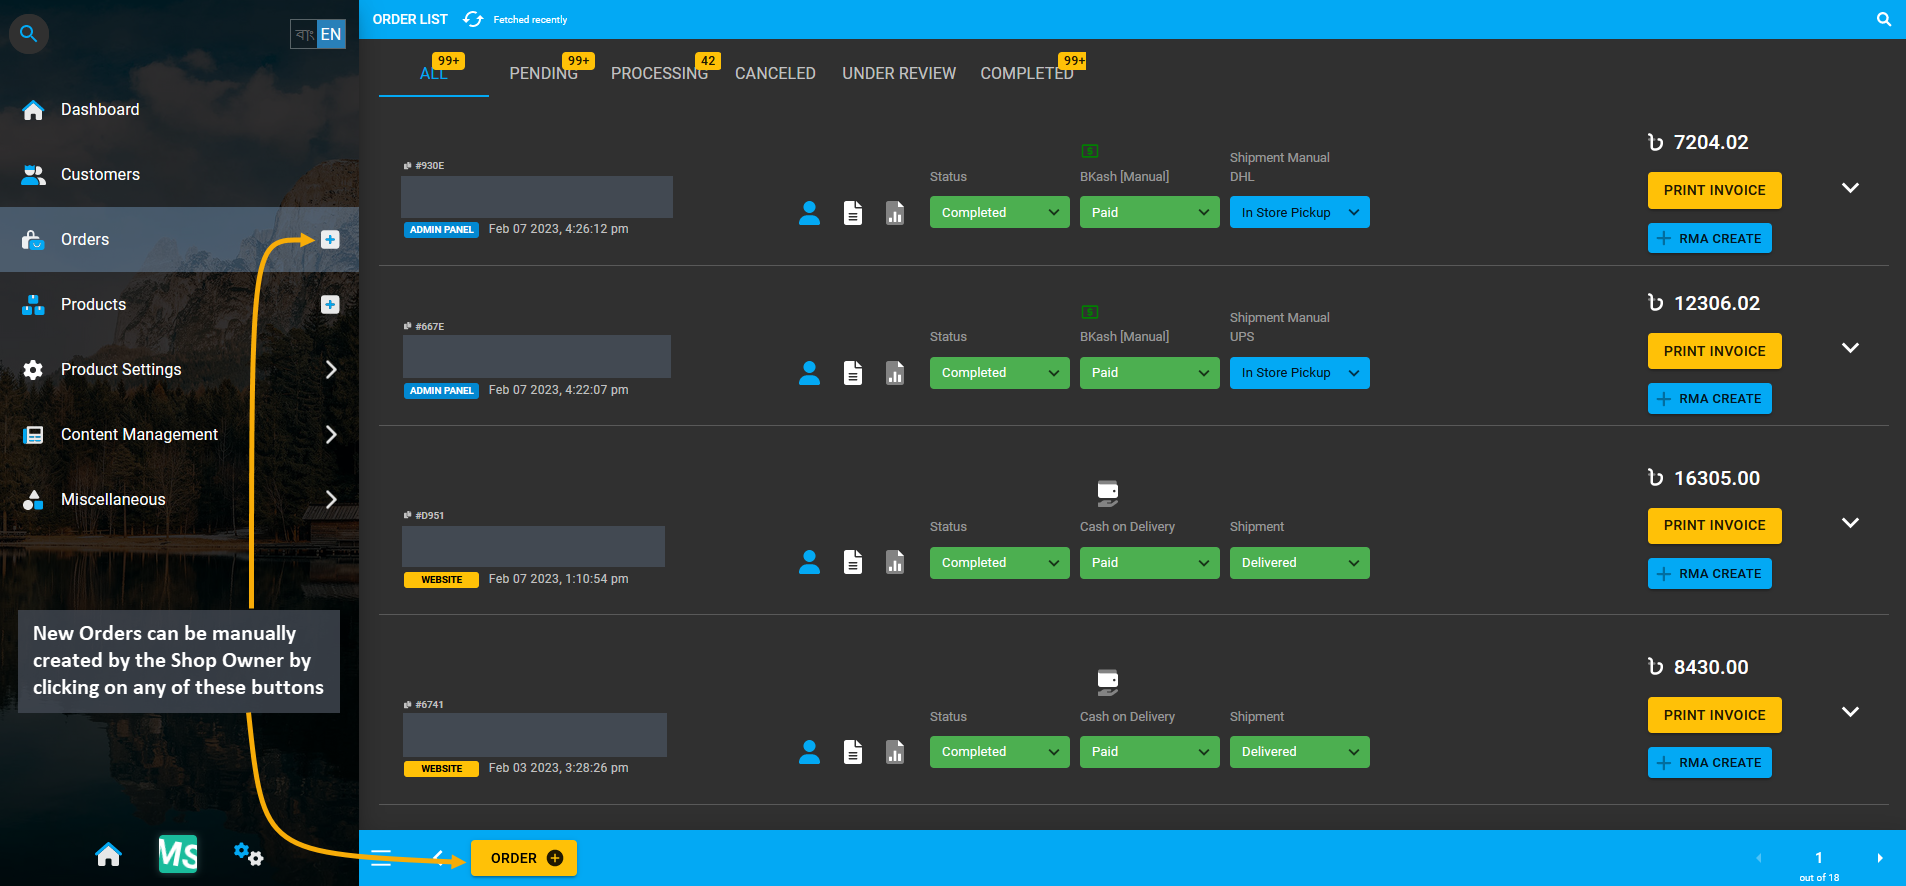
Image 1: New Orders can be manually created by Shop Owner from Order List page by clicking Order + button.
The first step towards creating New Order manually is to select the Branch and Counter for the Shop. Click Proceed when done. Several Manual Orders can be created for a Customer or multiple Customers by creating different Carts and adding Products to them which can be checked out individually from the Admin Panel.
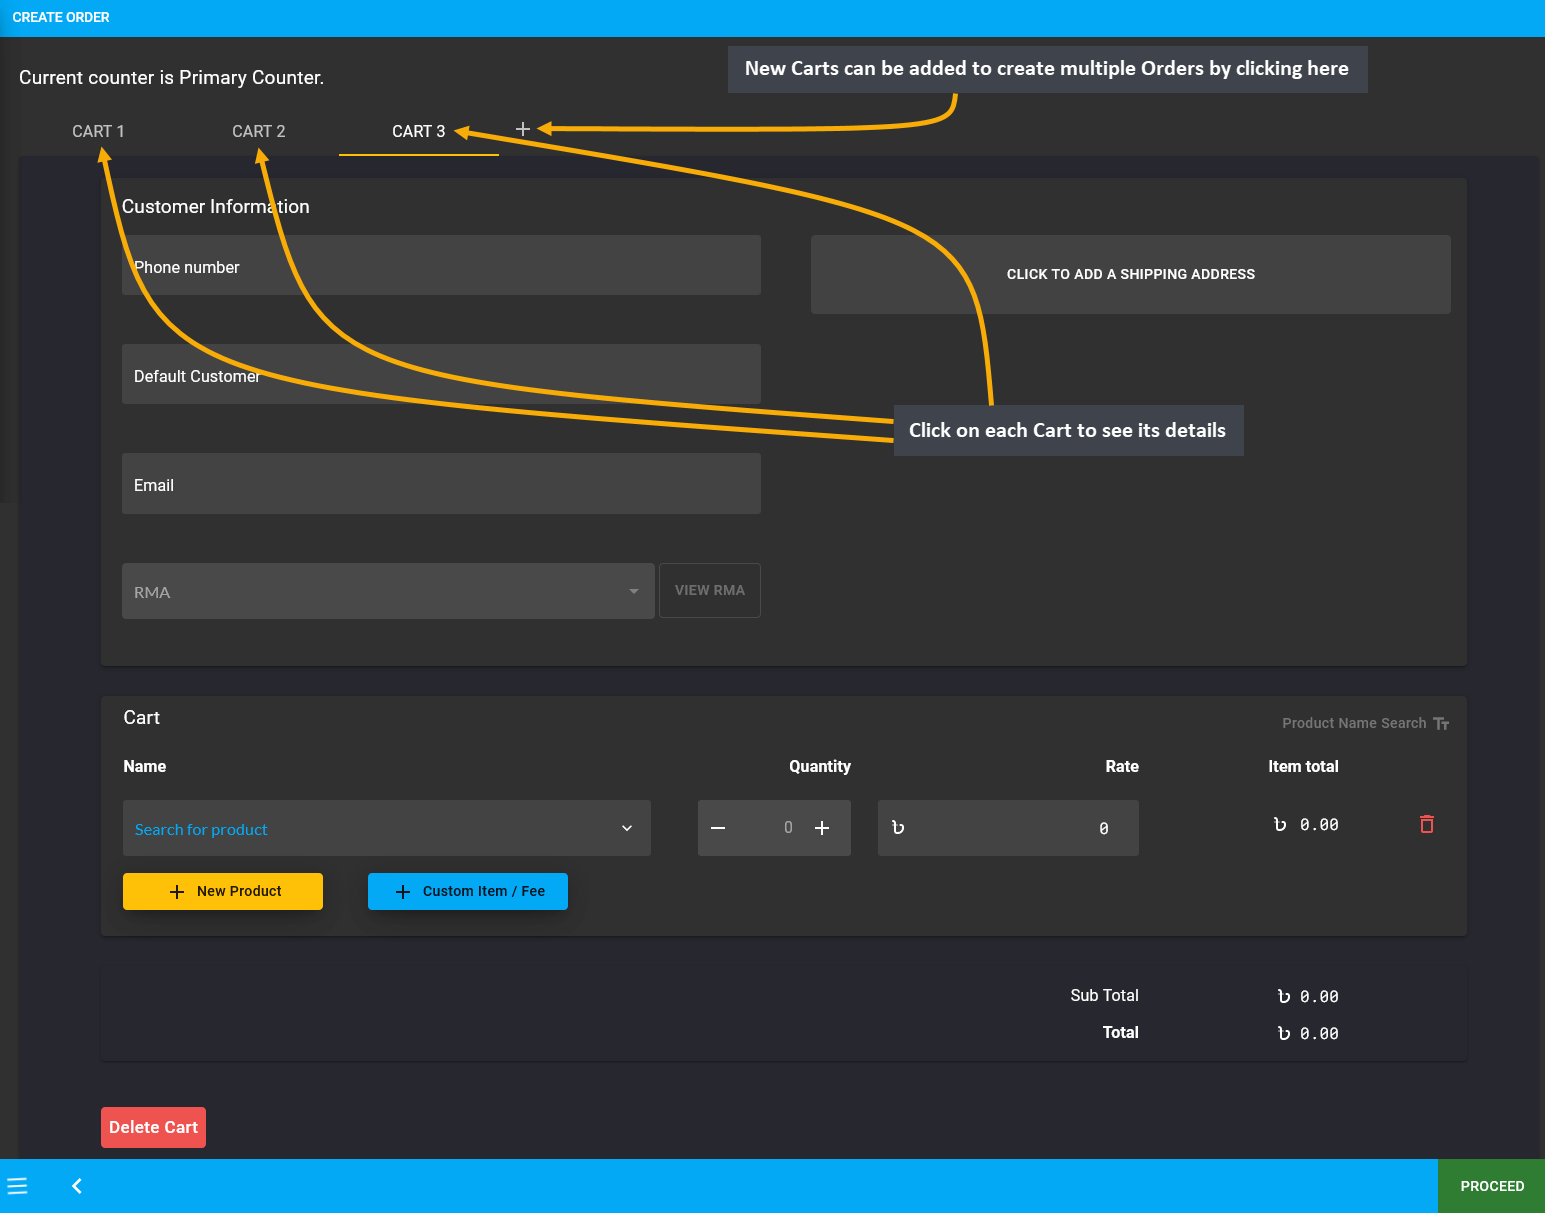
Image 2: Several New Orders can be created for multiple Customers by adding Products to different Carts.
Then, fill in the basic Customer information like phone number, name, and email from the Customer Information tab. Then Click to add a Shipping Address which will redirect to a new pop-up to add a new address with the Label (Billing or Shipping), Address, Area, City, Country, and Zip Code. After clicking the Submit button, Shipping Address will be added to the Customer information. Add new address by clicking the + button beside Shipping Contact.
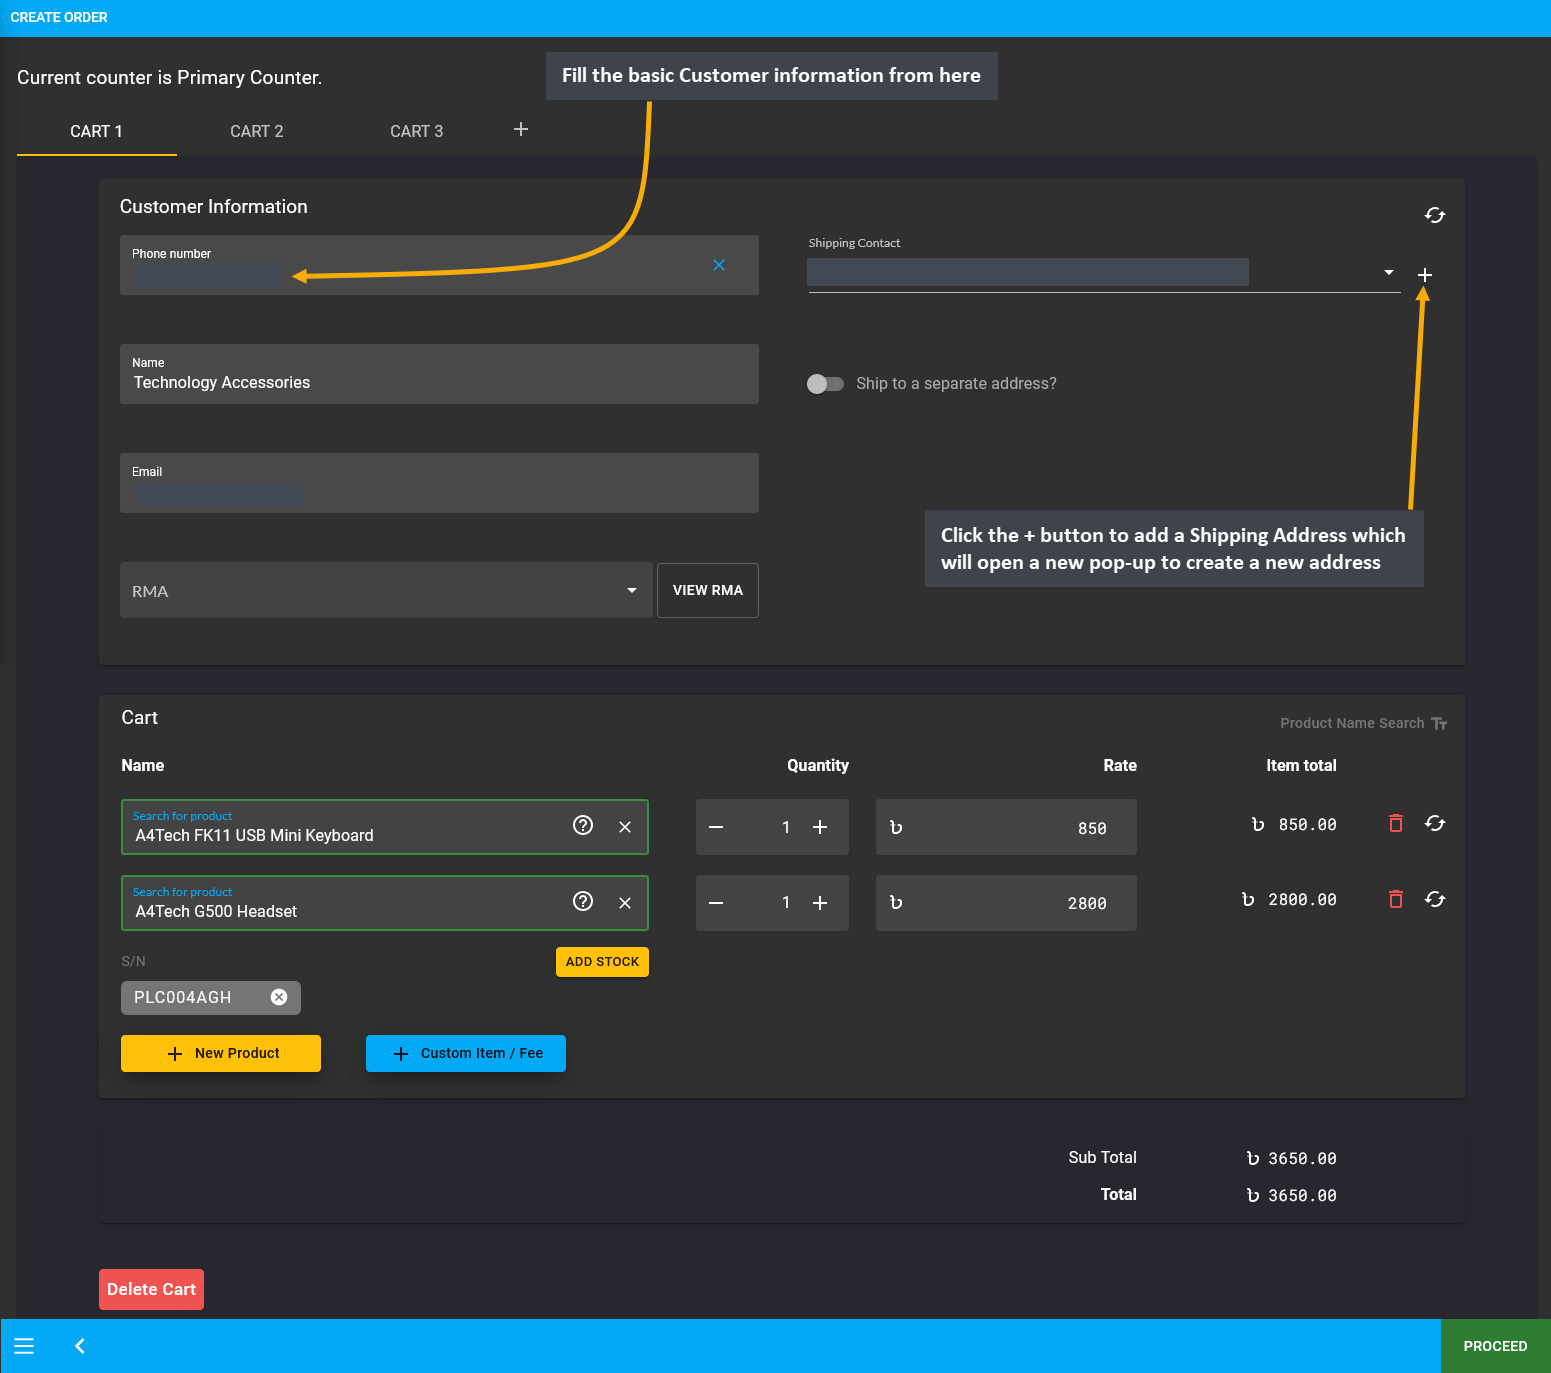
Image 3: Fill out Customer information like phone number, name, and email from Customer Information tab.
After confirming the Billing and Shipping address, new Products can be added to the Order Cart. For this, click on the New Product button and a box will appear from which new Product can be added to Cart. Within it, search for existing Products from the Product List and add desired quantities that will automatically calculate the item total. To add multiple Products, click New Product that will add a separate new item to cart each time.
There is a separate option to add Custom Products to Cart. For this, click on the Custom Item/ Fee button that will let you add Custom Products to Cart which are not available on existing product list. Clicking on this button will create a new box (underneath the New Product box) for Custom Products.
To add multiple Custom Products, click on the Custom Item/ Fee button with desired quantities and rate/ fees. Use the Delete Cart button to delete any Cart that were manually added. Click on the Bin Icon to delete Products from the Cart. When done, click Proceed to continue to the next step.
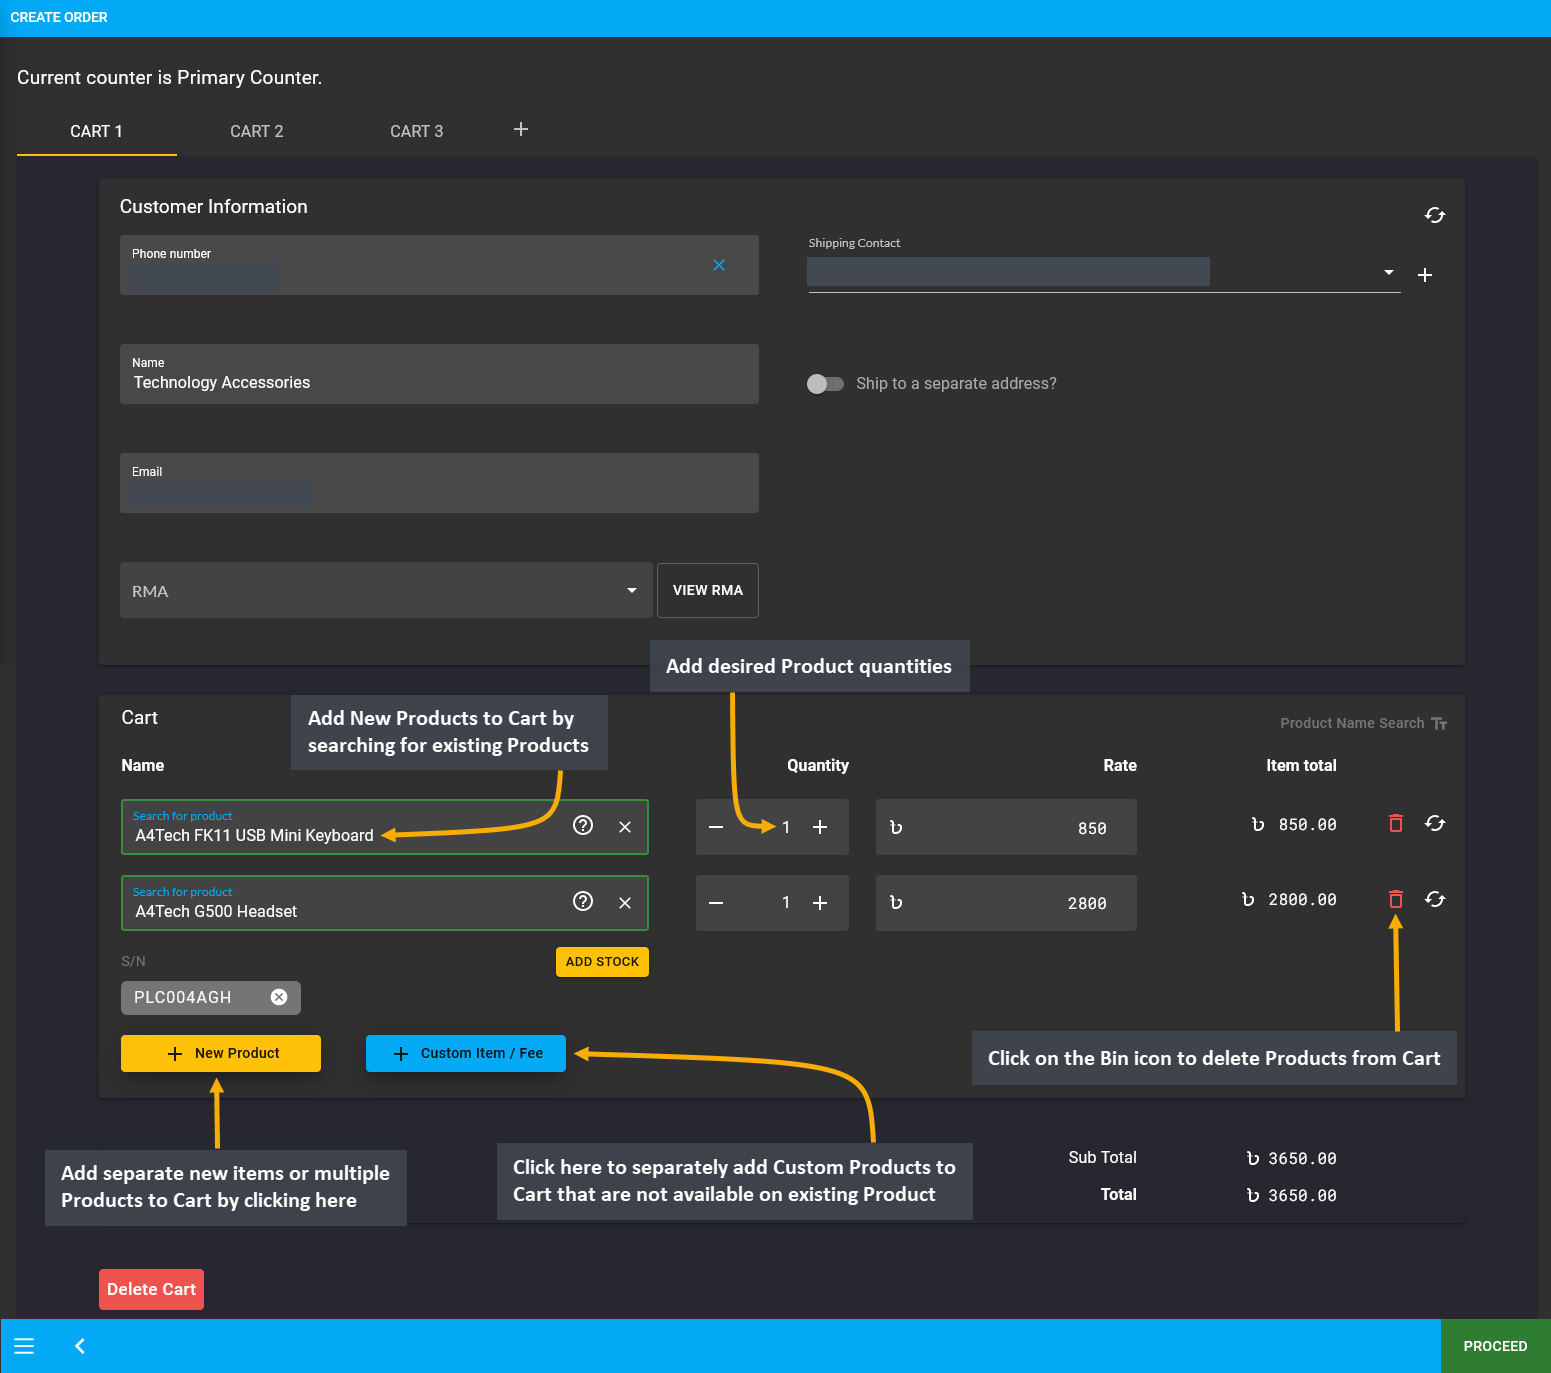
Image 4: Add Multiple Products or add Custom Products to Cart with desired quantities and rates or fees.
In the next page, review the Cart, and select Shipment and Payment options. To make any changes, click the Edit button. If all the information is correct, click Confirm Order that will redirect to a new page with the message that the Order has been confirmed. From here, you can choose to Print Invoice or Close Tab.
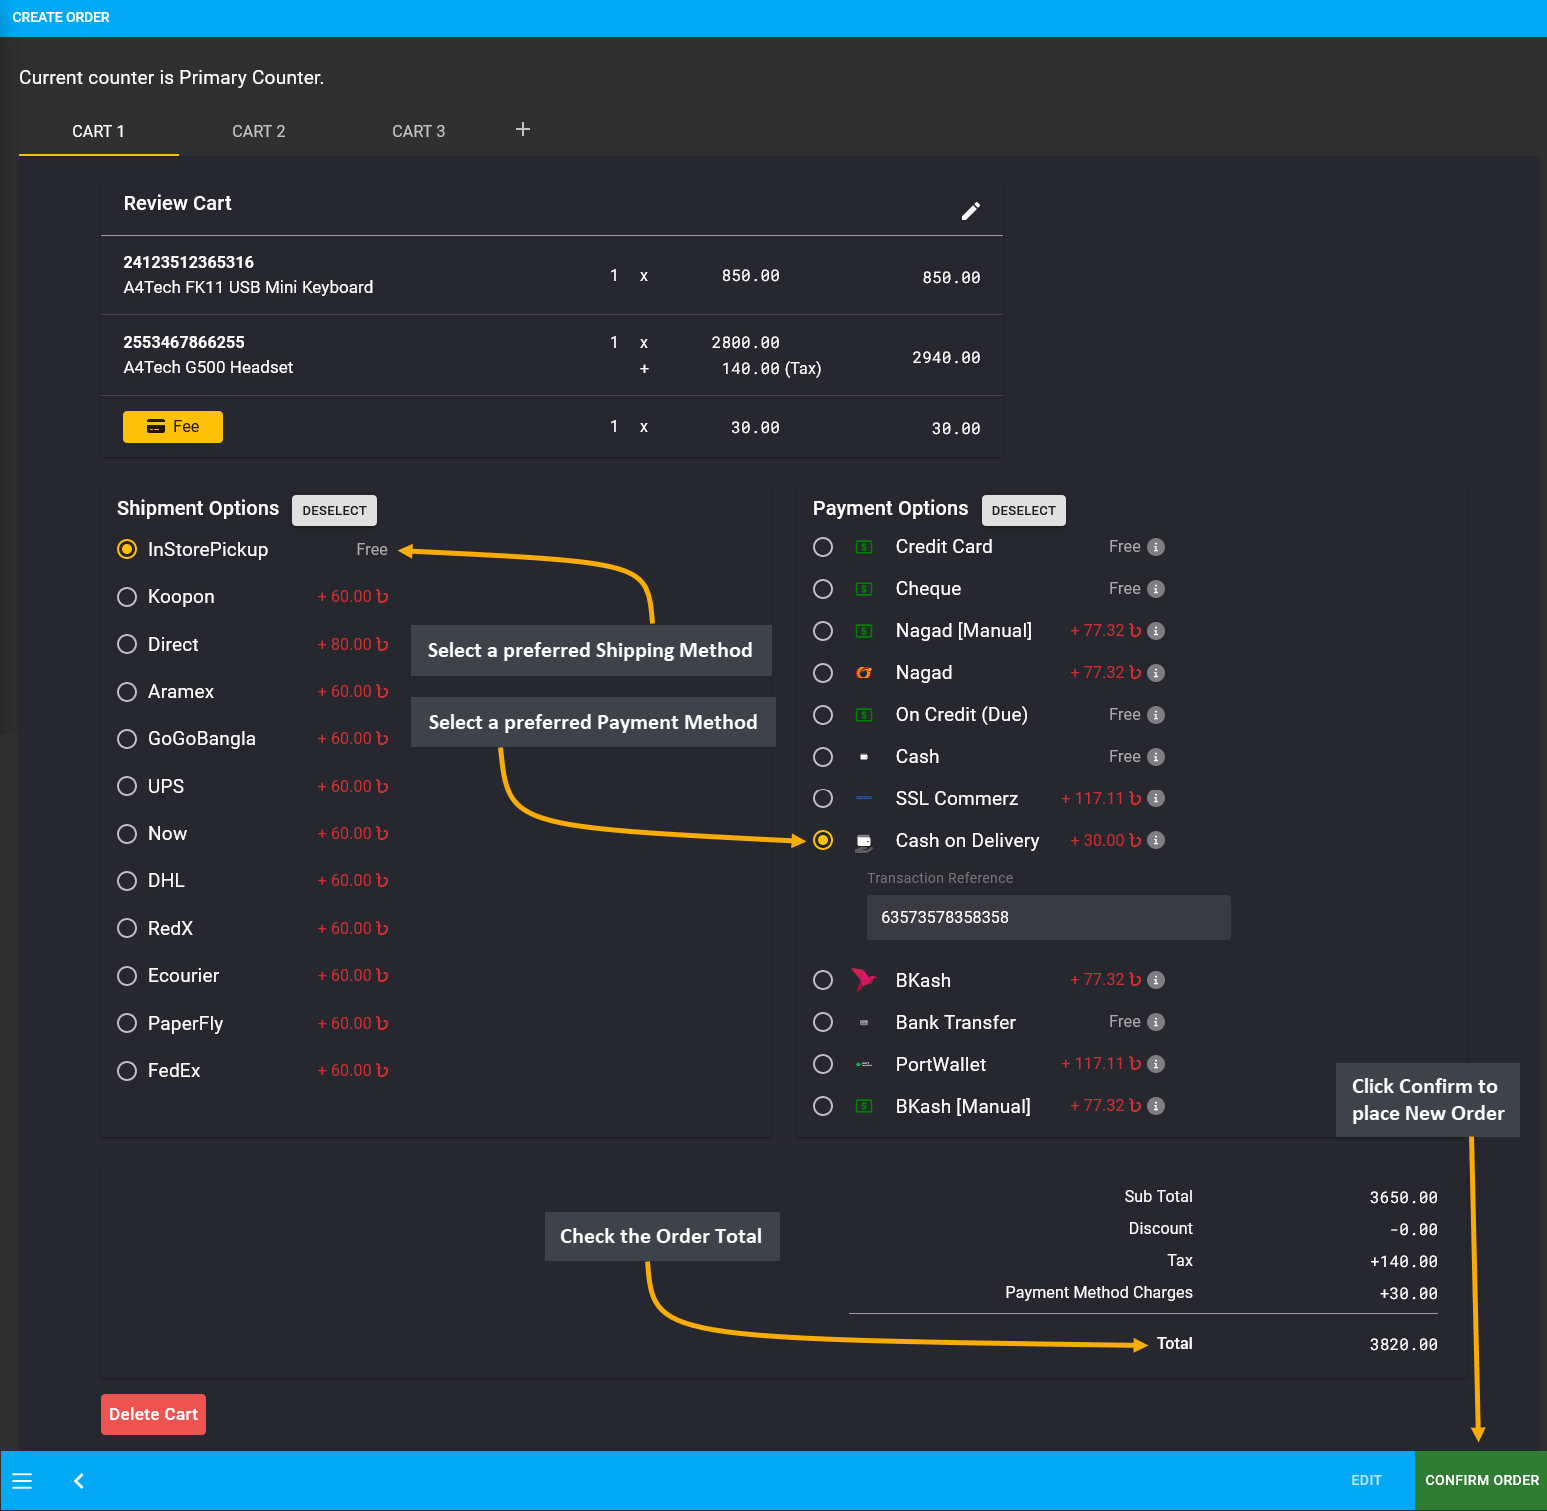
Image 5: Review the Cart, select Shipment and Payment options, and click Confirm Order to place the Order.
From the Order List, invoices for Orders can be printed using the Print Invoice button on the right. Clicking it will open the detailed Order Invoice to print. Set Printer, Pages, Layout, and Colors from the print settings as needed. Then, click on the Print button at the bottom right corner to print the Order Invoice for Customers.
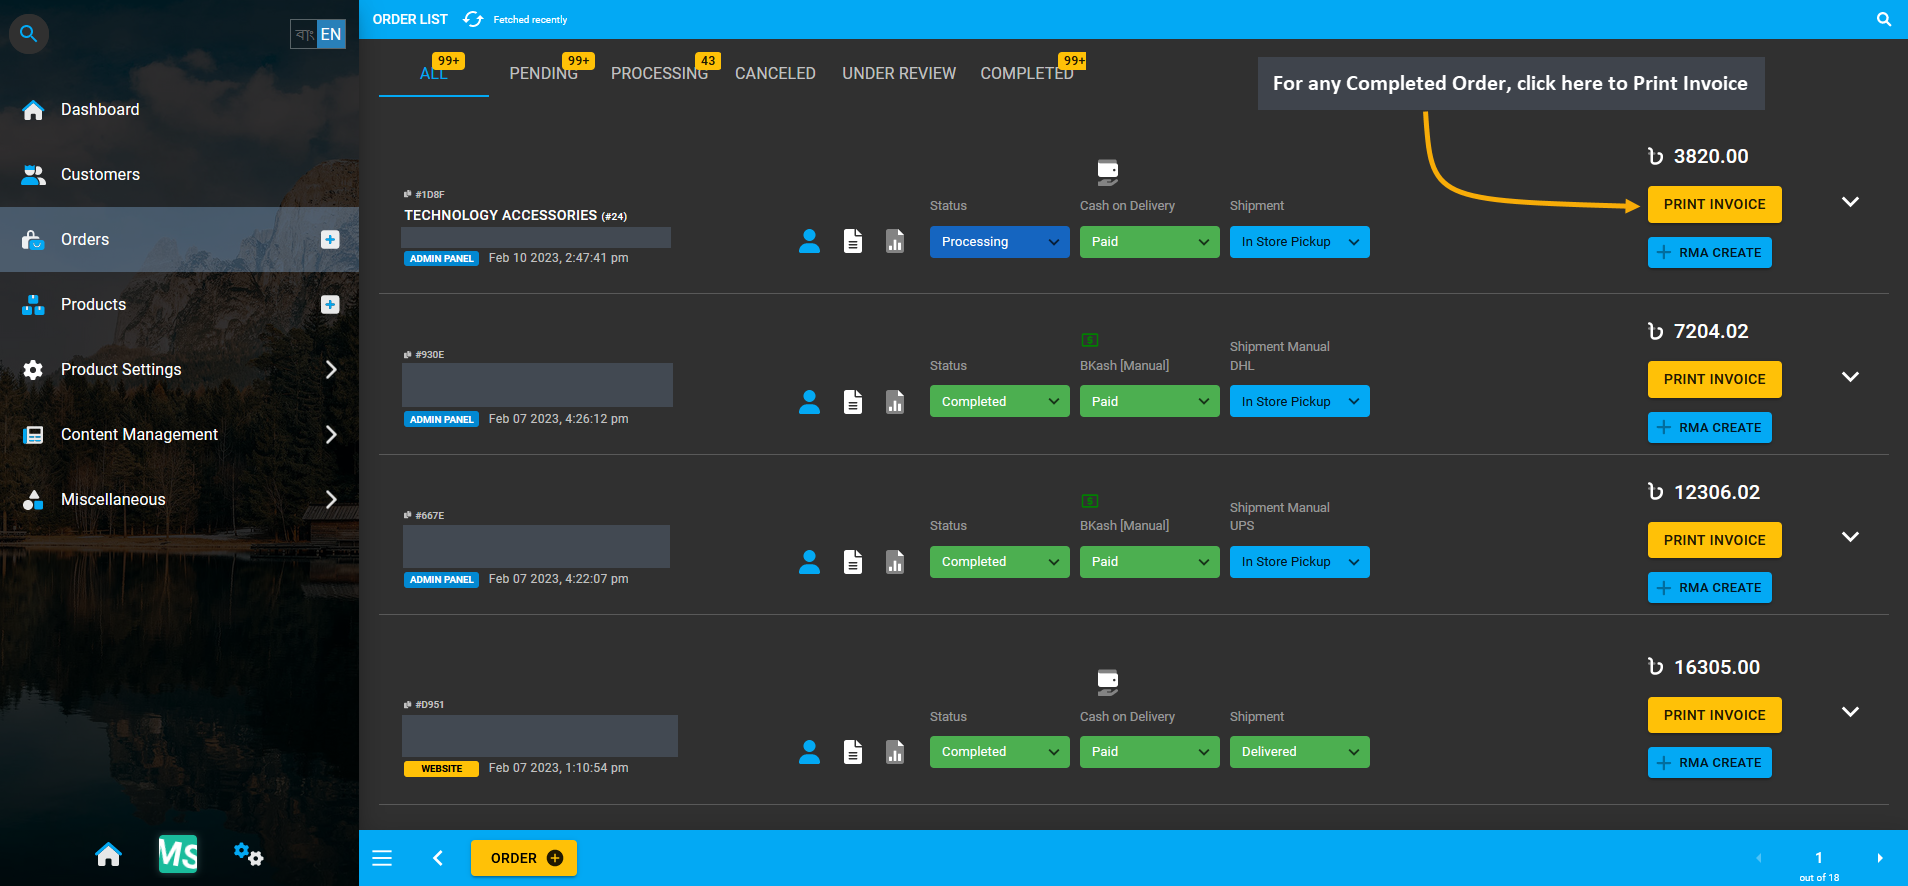
Image 6: For any Completed Order, click the Print Invoice button to print the Order Invoice for reference.
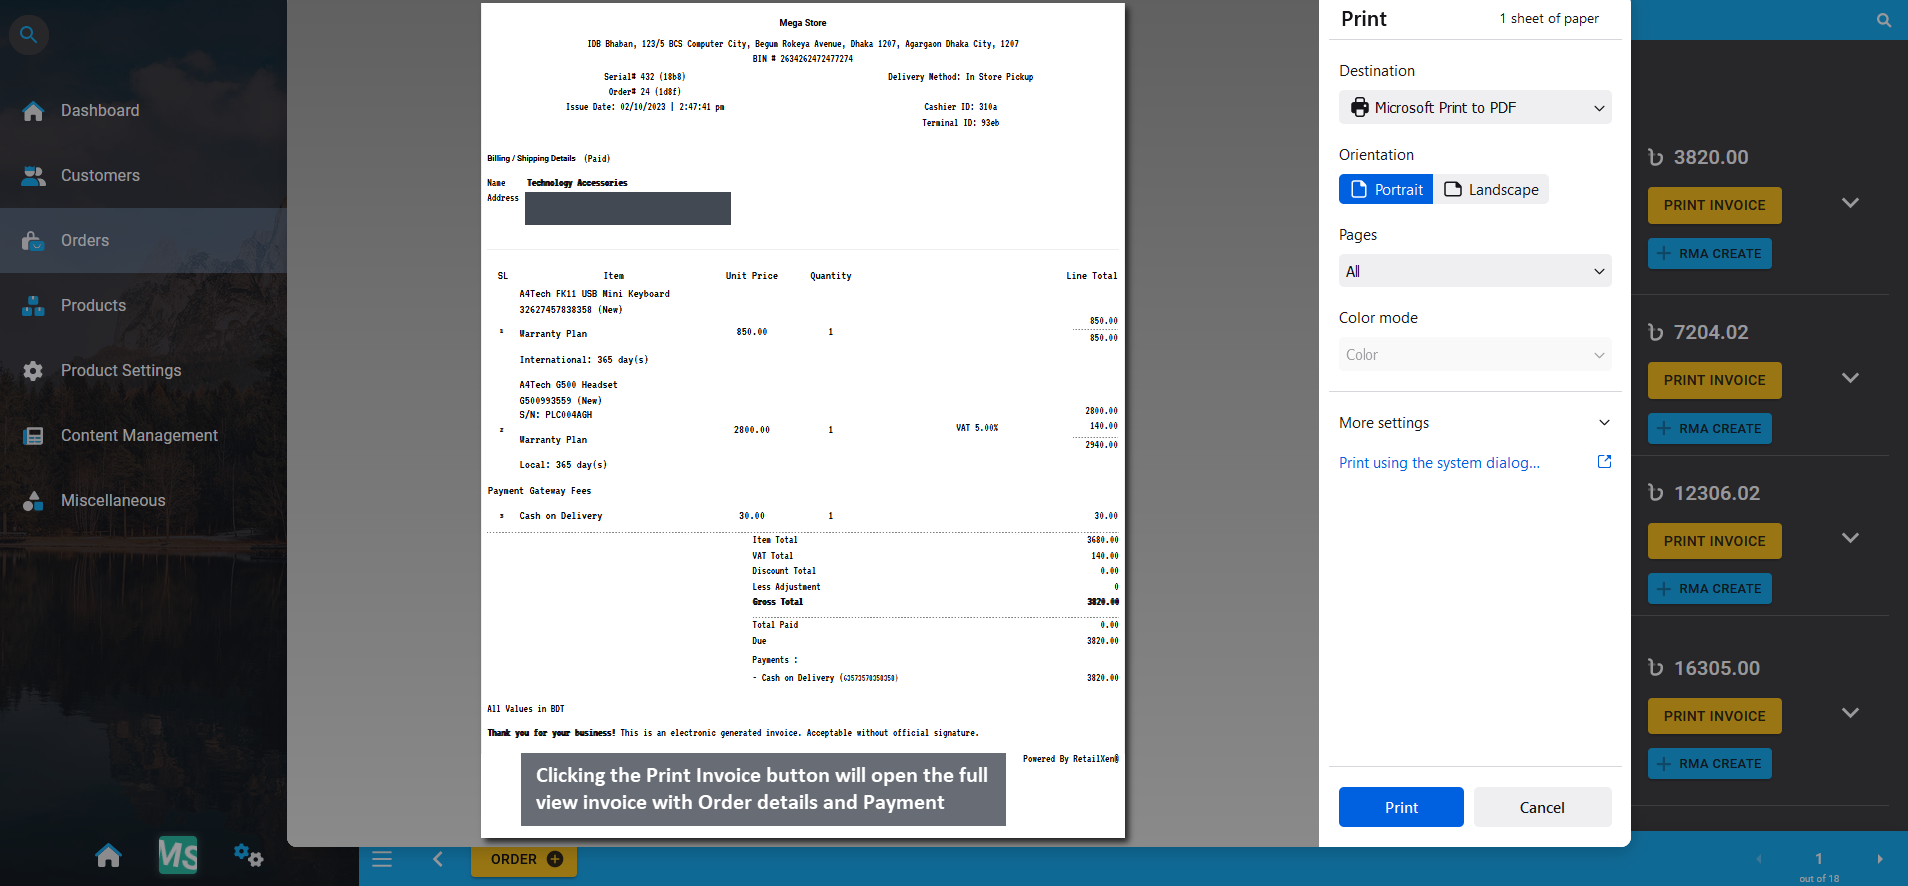
Image 7: Print Orders using Print Invoice button clicking on which will open the Order Invoice to print.
After a New Order or multiple New Orders are created, the total count of New Orders placed within the default Daily time range will show under New Orders on the Dashboard.
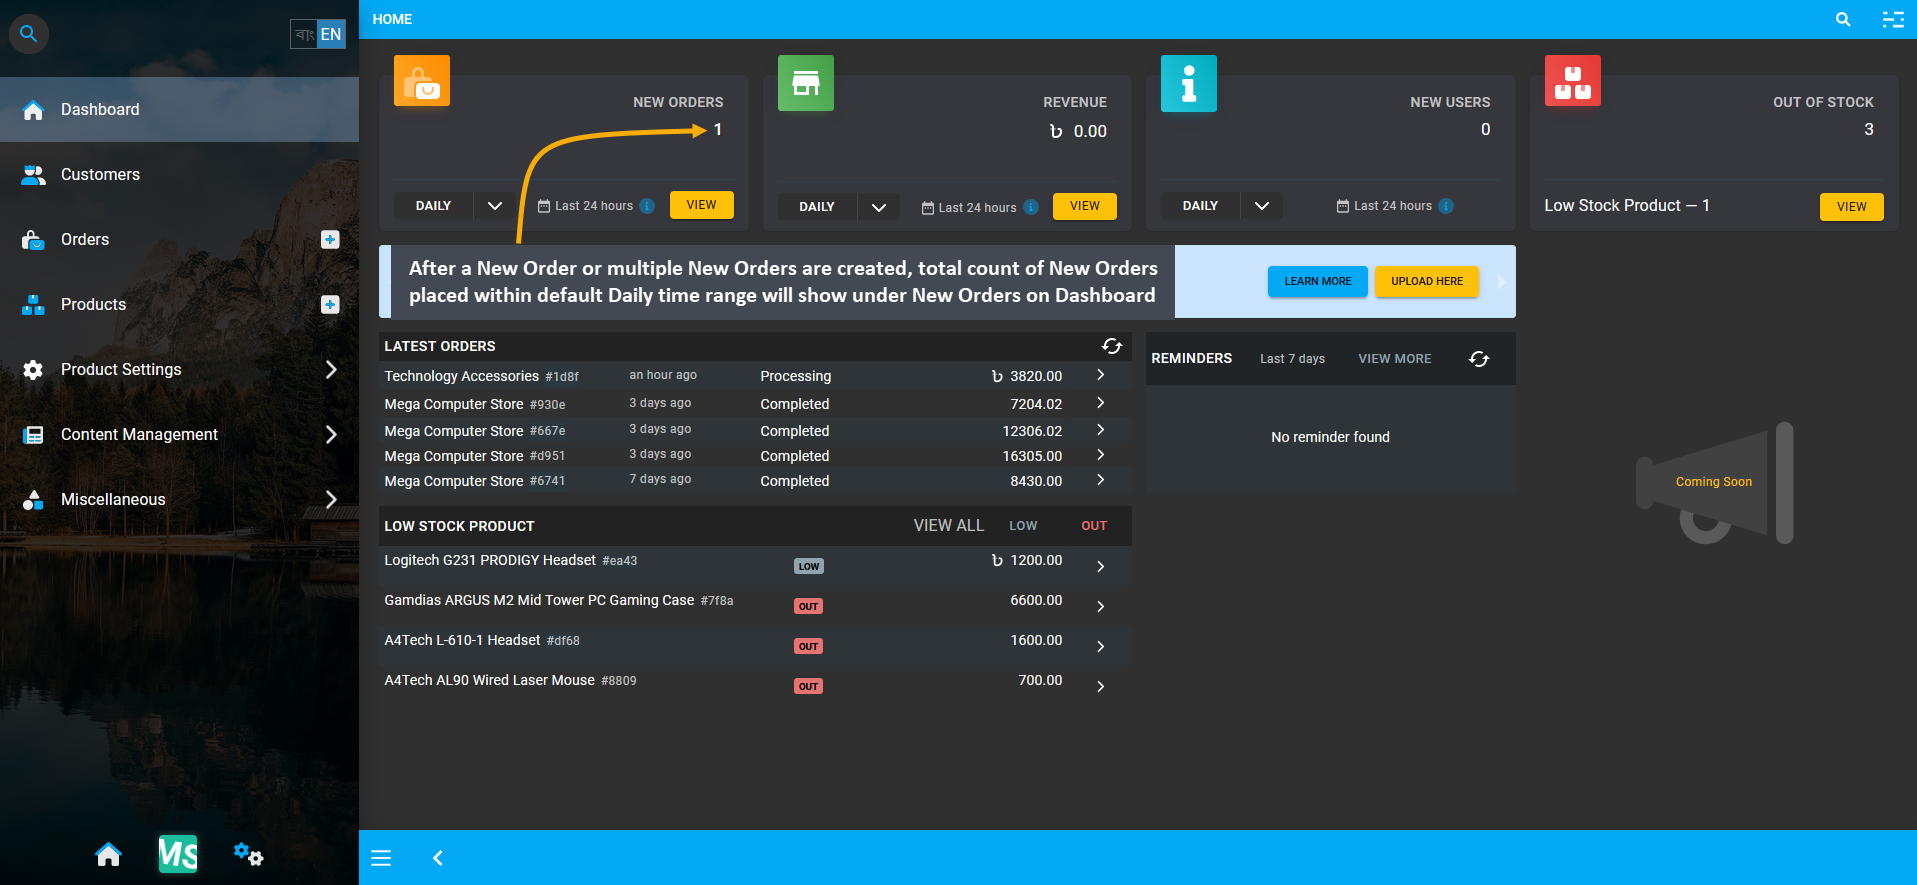
Image 9: Total New Orders placed within default Daily time range will show under New Orders on Dashboard.
In the Revenue section, the Shop Owner can check its Cost Basis based on Hourly, Daily, Weekly, Monthly, and Yearly ranges. Select a range and click on View to be redirected to the Cost Basis Page with detailed entries of profit, cost, tax, vat, discount, and revenue are shown with fulfilled and pending Orders.
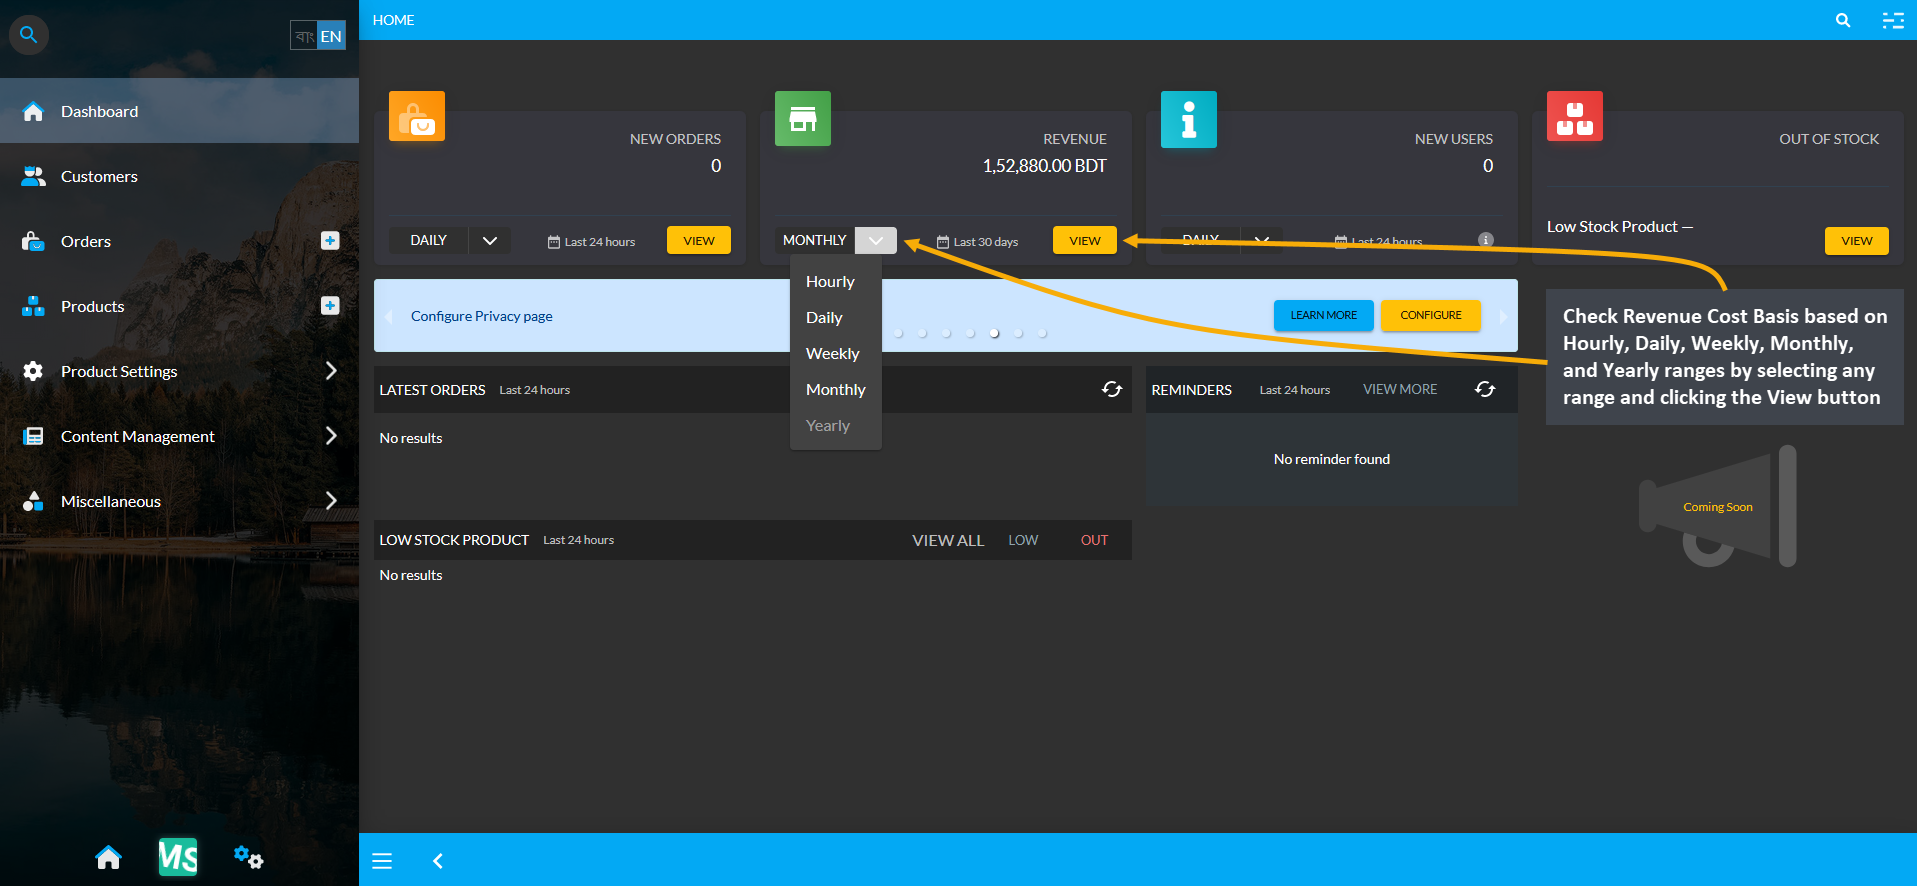
Image 1: Check Revenue Cost Basis by selecting from the given ranges and clicking View for details.
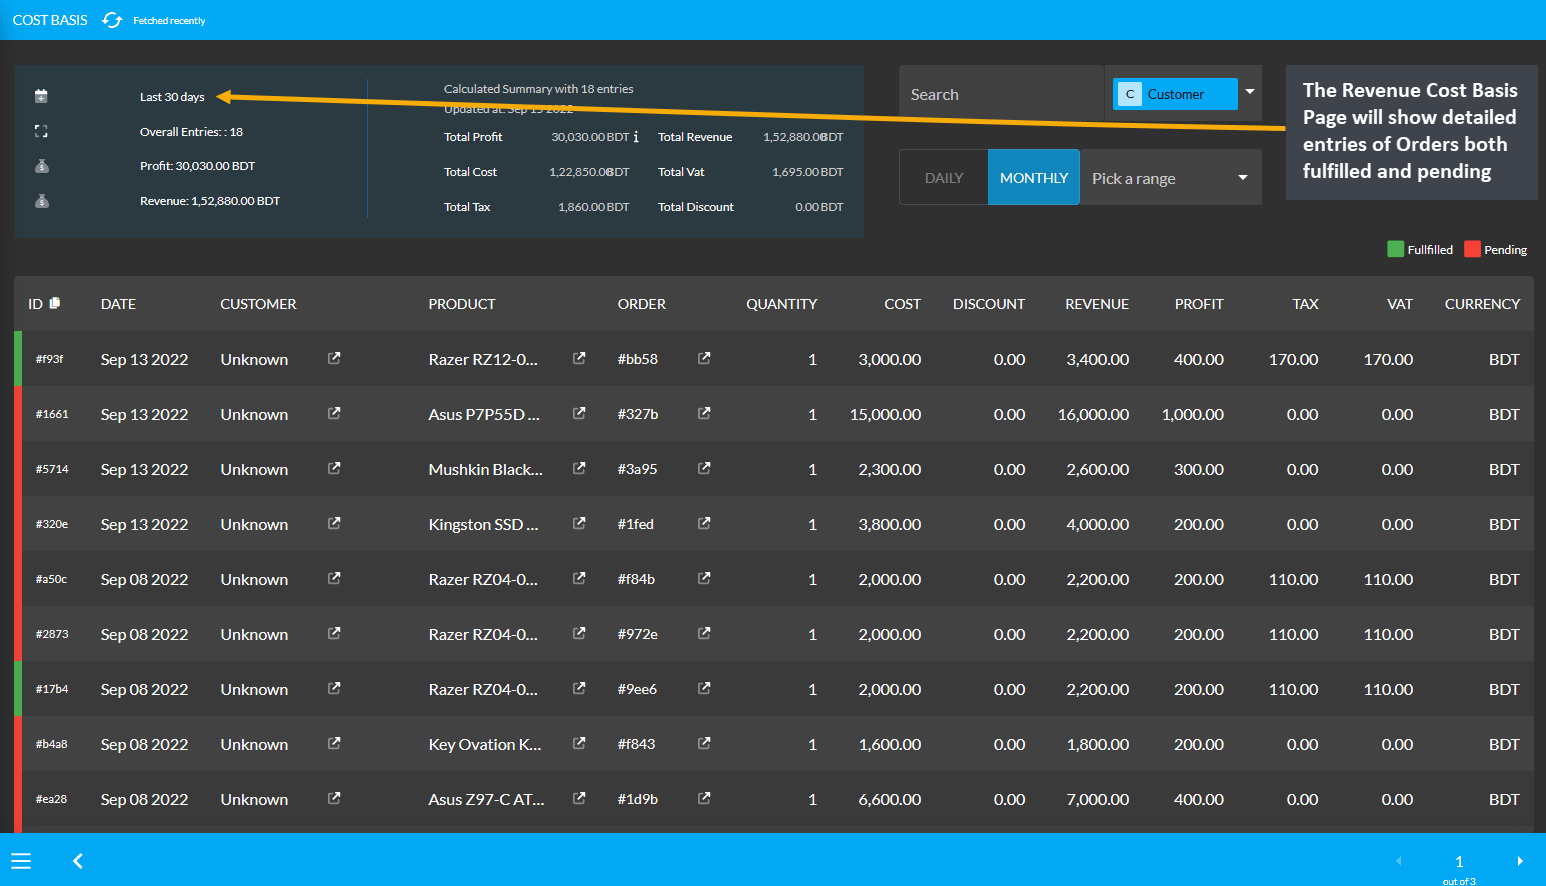
Image 2: The Revenue Cost Basis Page will show detailed entries of Orders both fulfilled and pending.
On the Revenue dashboard, even after creating Orders with few sales on the same day, selecting the Daily range may still show Revenue as 0.00 because those Order payments were not confirmed. Under the Latest Orders, they will still show as Pending, which means they are still not completed due to incomplete payment. In this case, click the View button to see which Order entities have not yet been fulfilled.
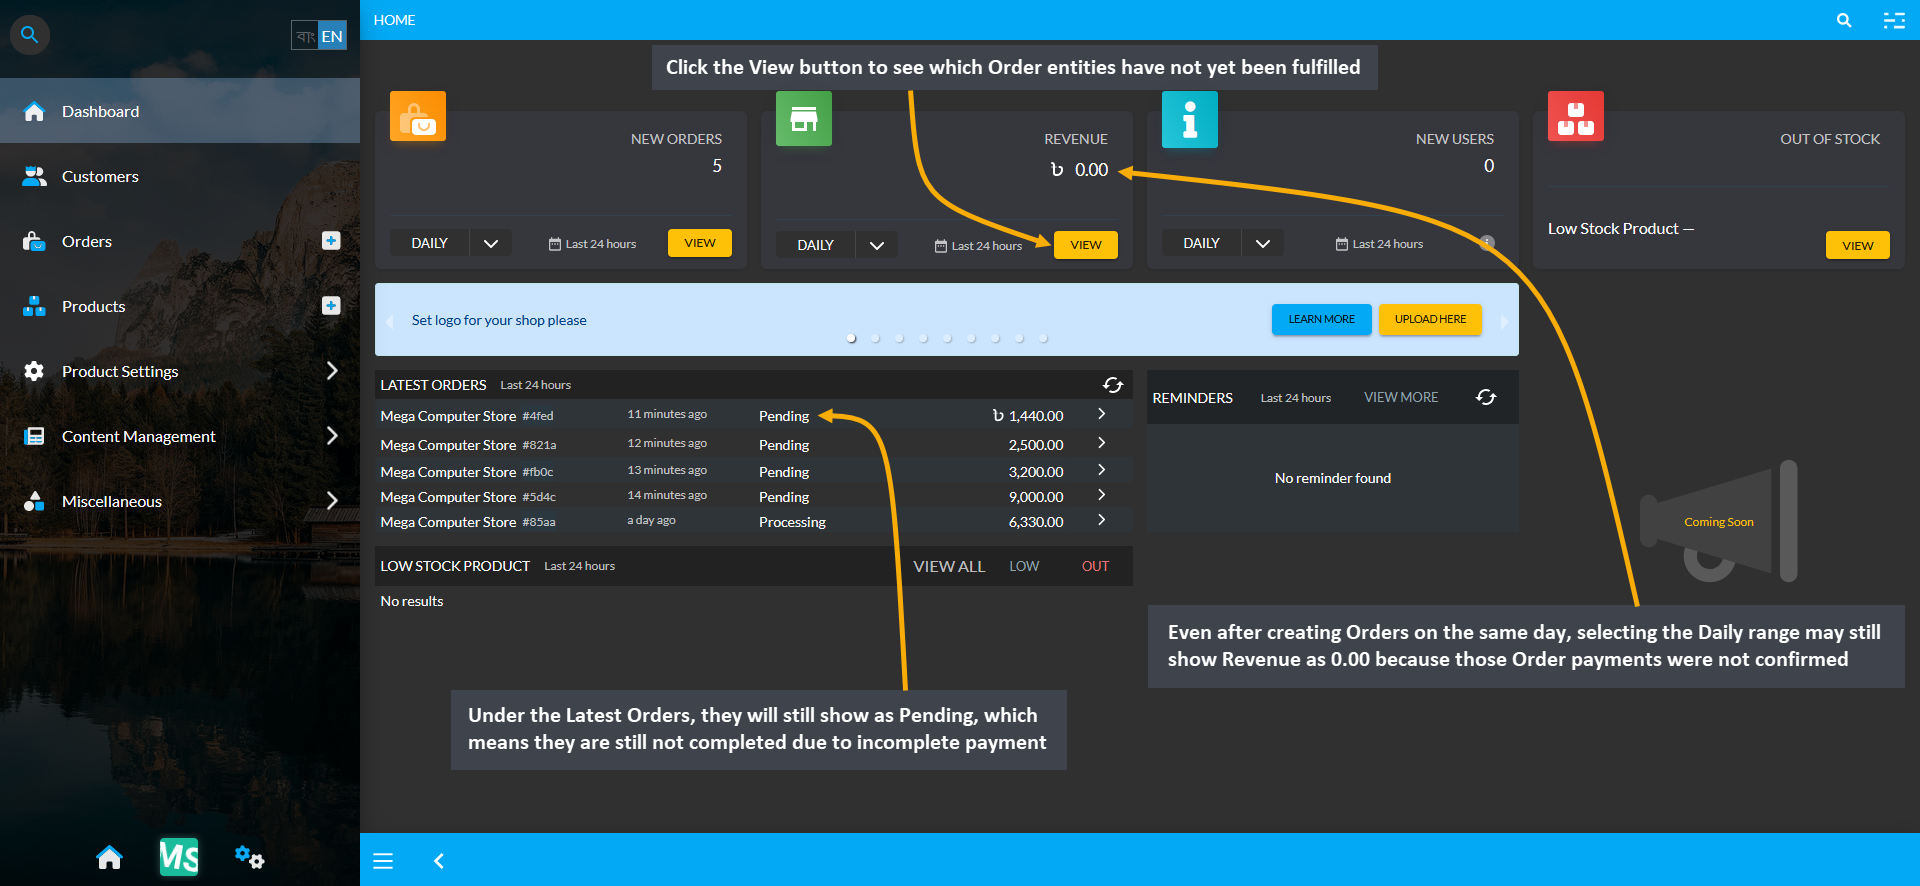
Image 3: Revenue will not be updated until Pending Orders are completed with Payment confirmation.
Clicking on View will redirect to the Revenue Cost Basis page, where it will be seen that no Revenues were made as all the Orders are still Pending with Payment confirmation. It means that those Orders have only been placed, but they have not been Paid or their Payment have not yet been confirmed. So, until Payment is confirmed for these Orders, Revenue based on them will not be updated on the Dashboard Revenue section.
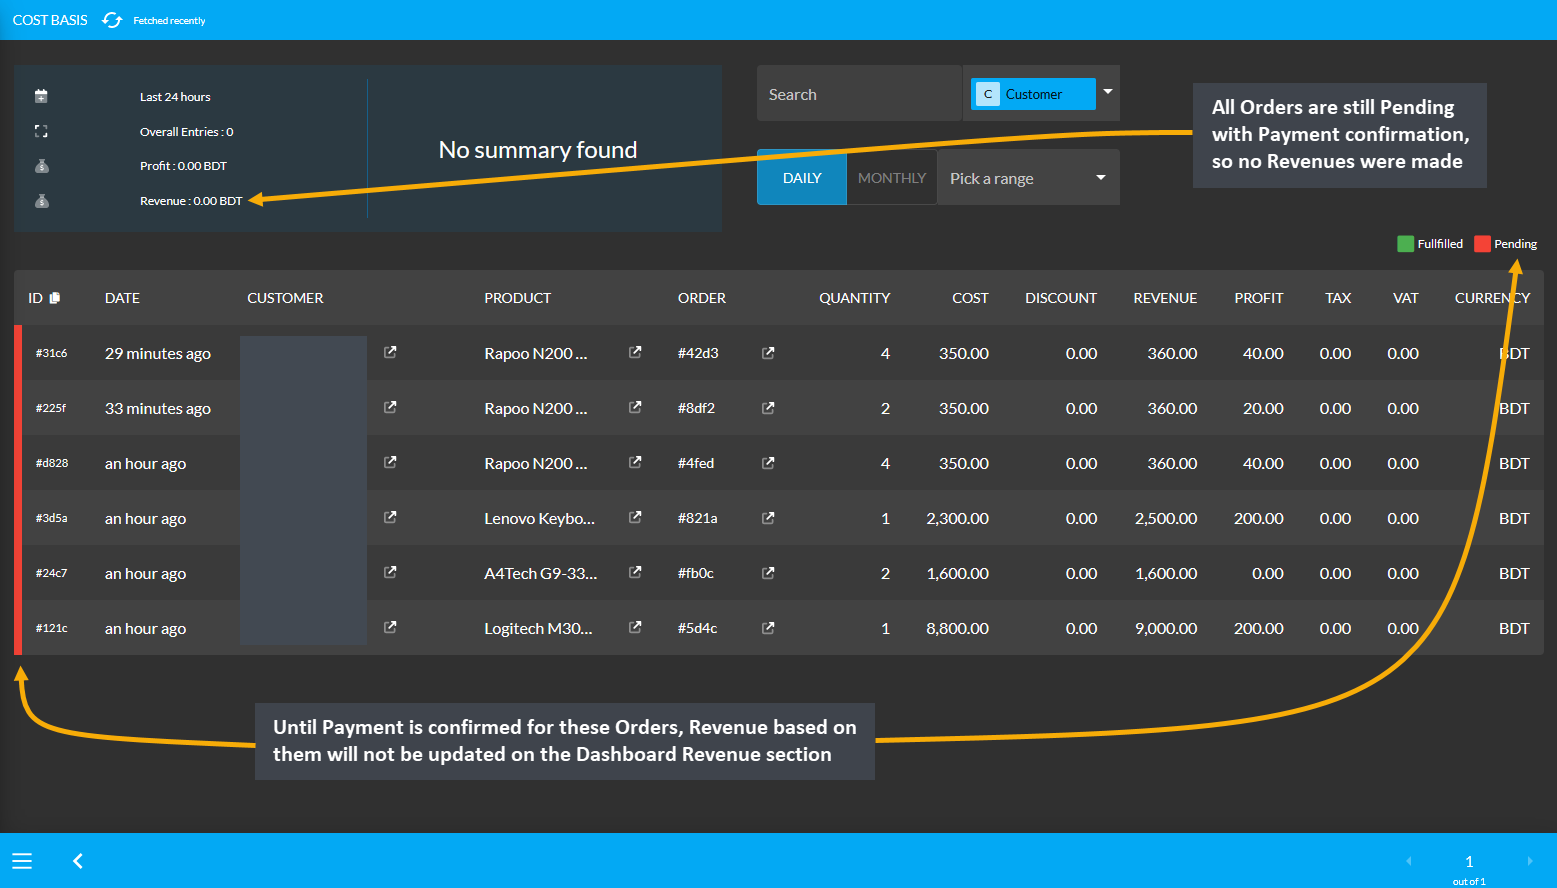
Image 4: Until Payment is confirmed for Pending Orders, no revenues will be made for those Orders.
To convert these Pending Orders, Shop Owner has to go to Order List, where these Orders can be seen as Pending.
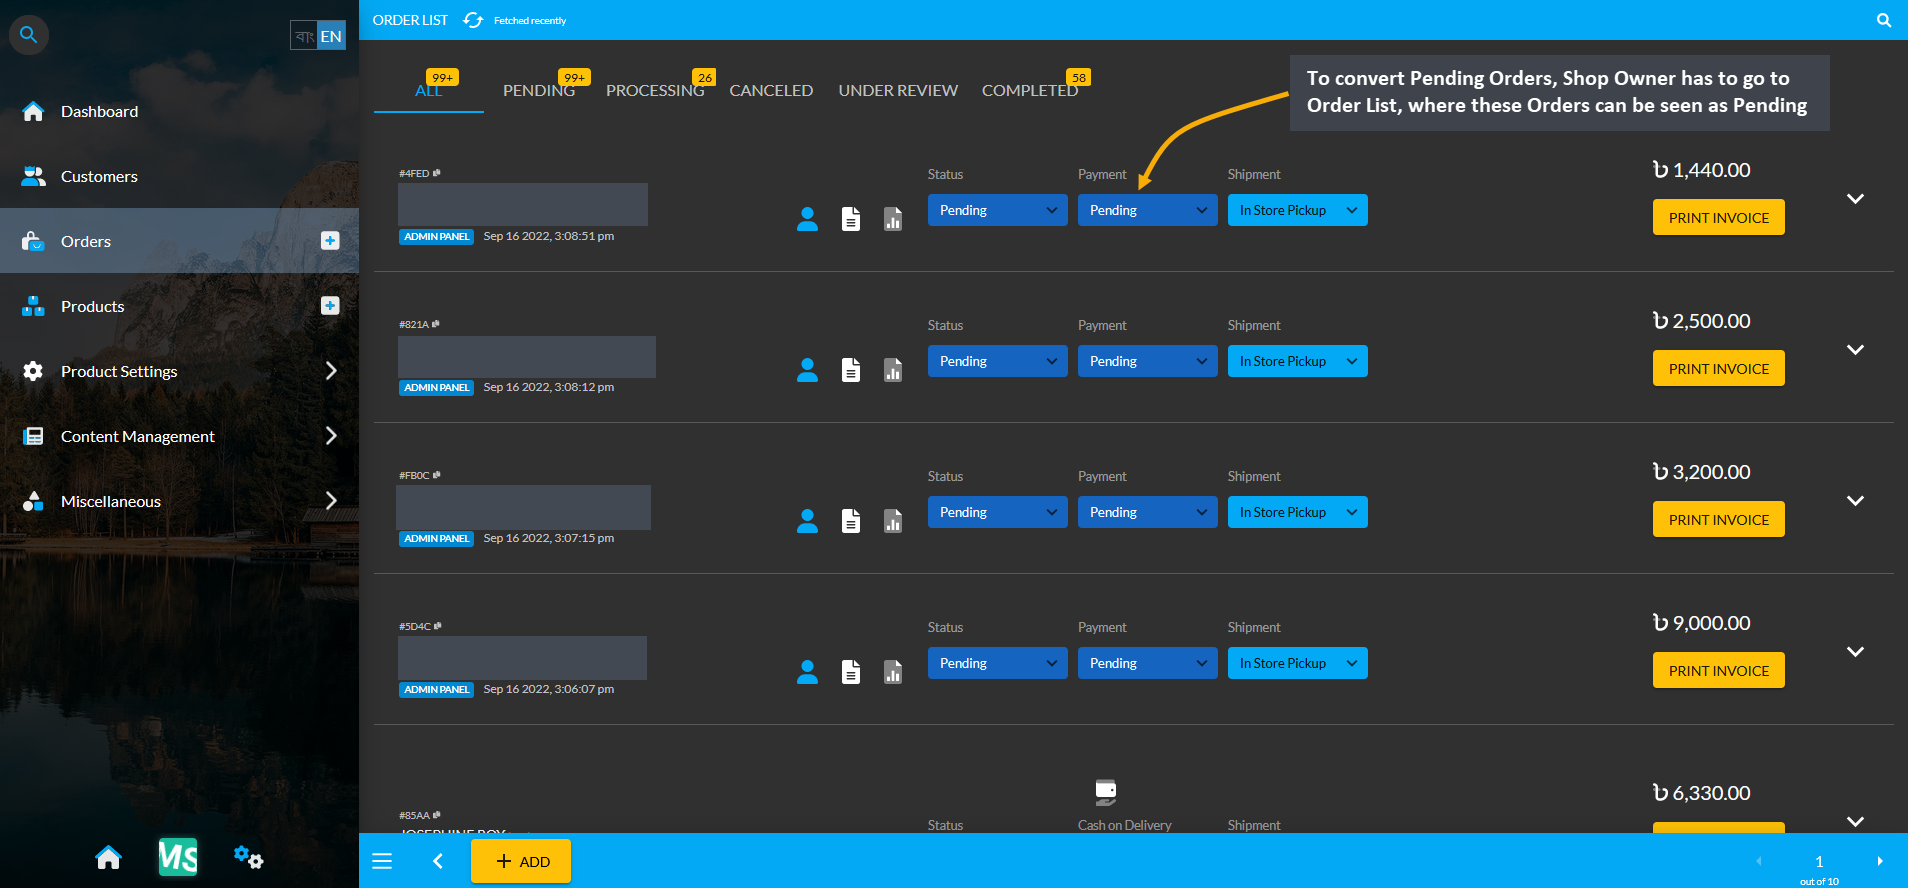
Image 5: To convert Pending Orders, Shop Owner has to go to Order List to complete their payment.
Here, click on the down arrow V on each Order to open Order details, and click the Add Transaction button to complete Payment for the Pending Orders to change their status to Completed as shown in the example.
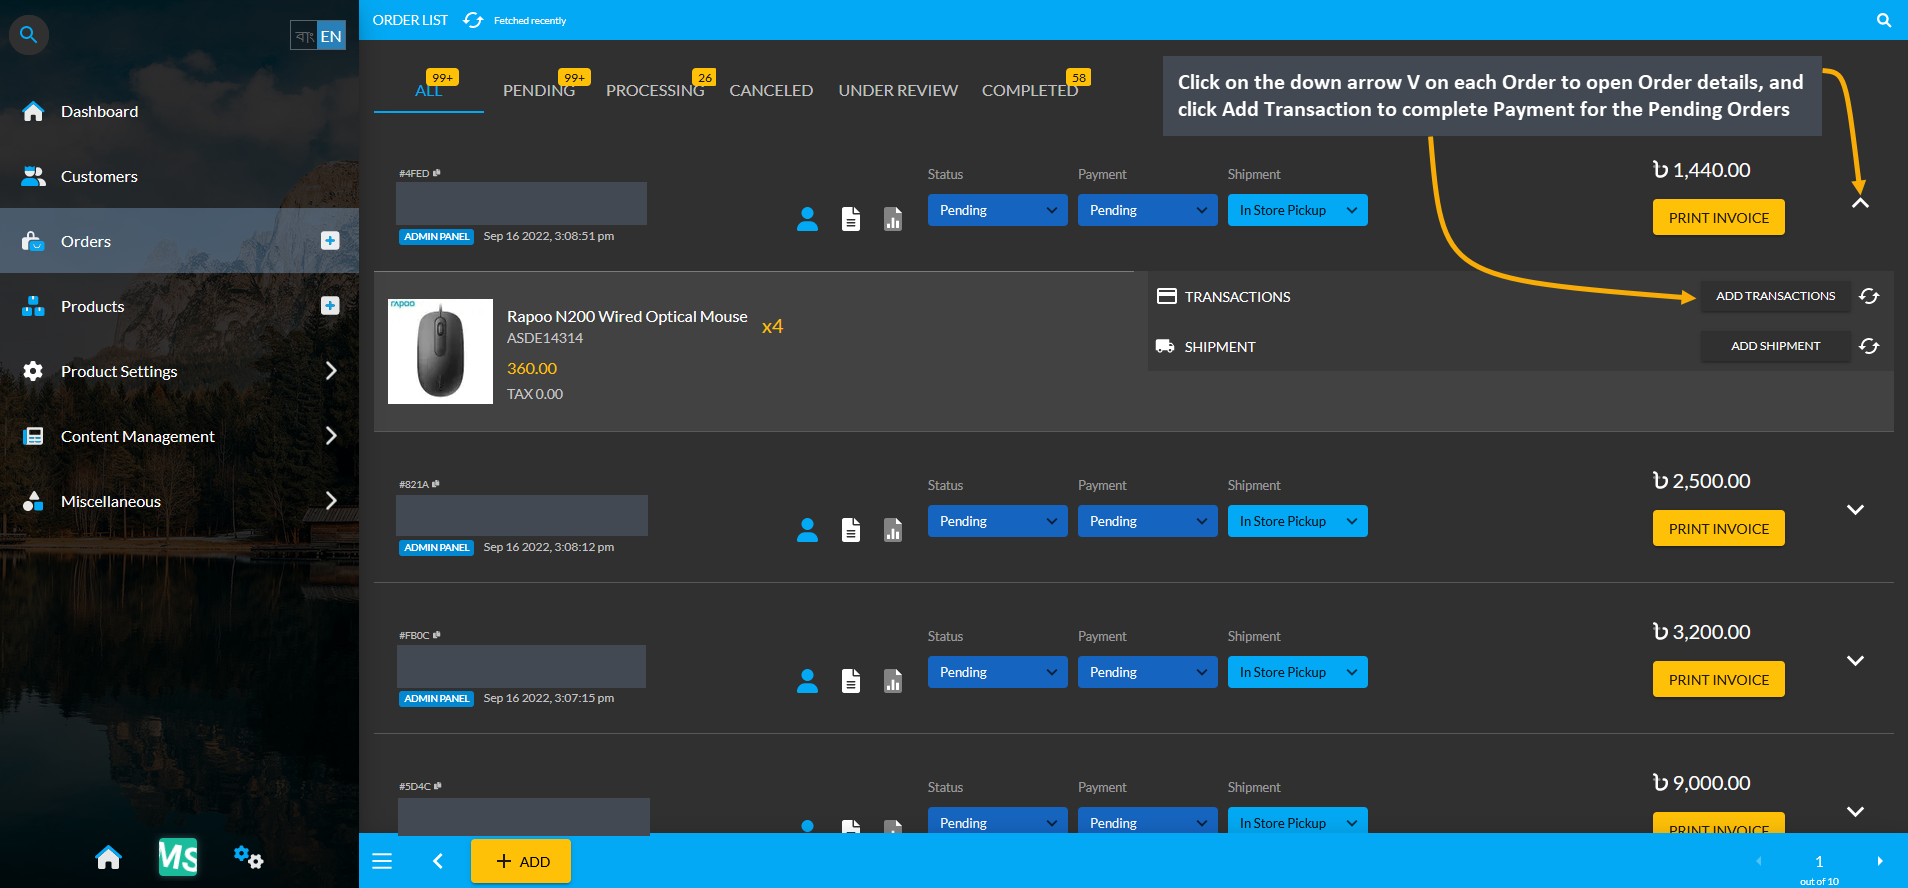
Image 6: Click down arrow V on each Order and click Add Transaction to complete Payment for Pending Orders.
Then, select a preferred Payment Gateway, enter full Order amount, and click Submit to complete Payment.
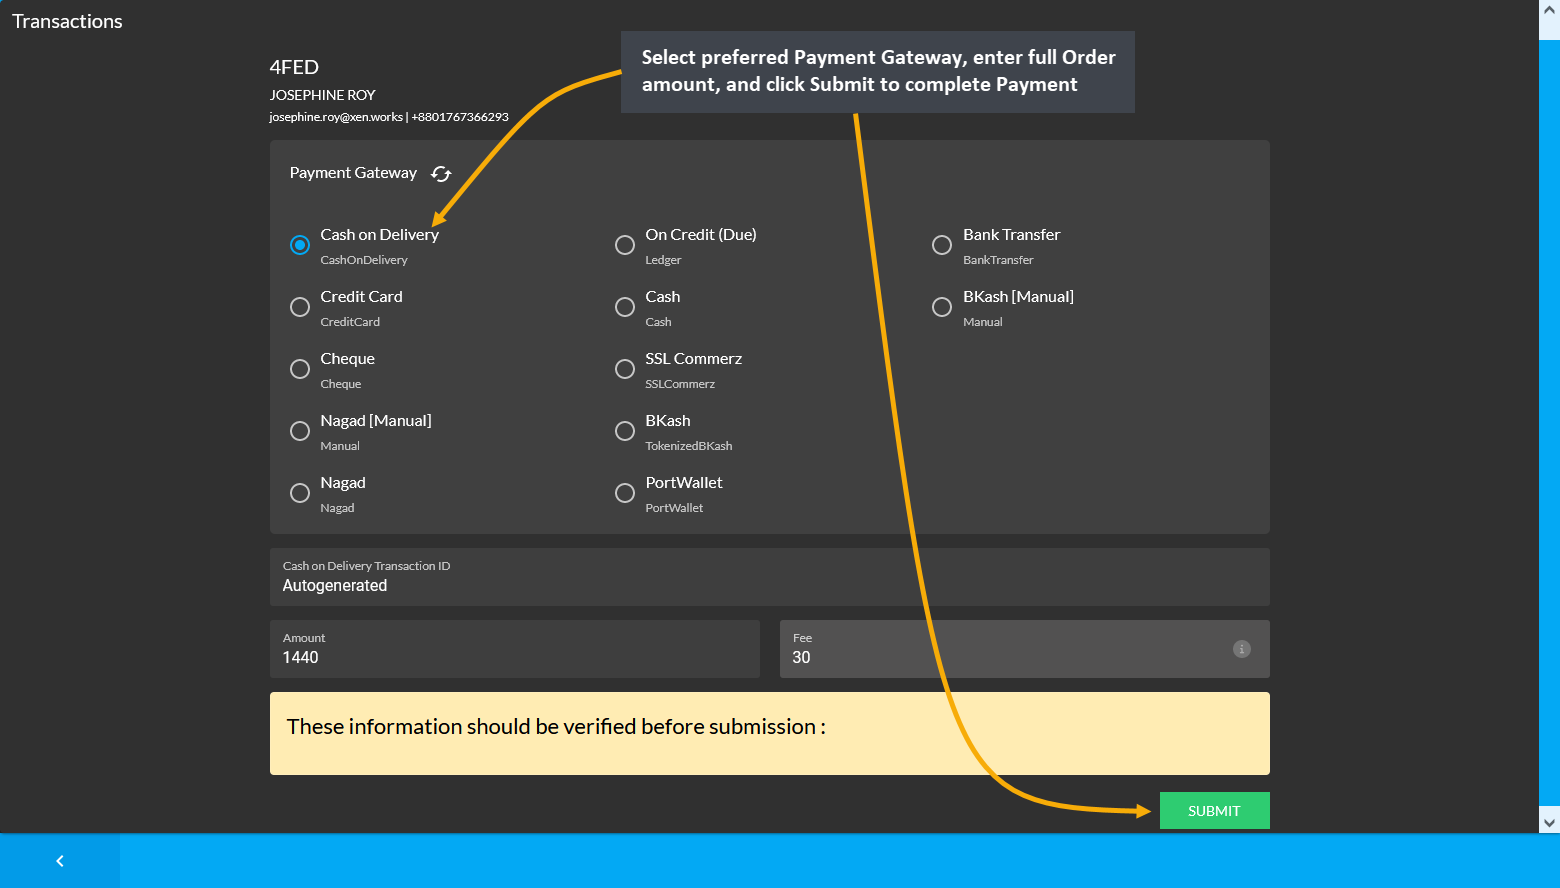
Image 7: Select preferred Payment Gateway, enter full Order amount, and click Submit to complete Payment.
After Payment transaction is completed, Pending Orders on Order List will show their Payment status as Paid.
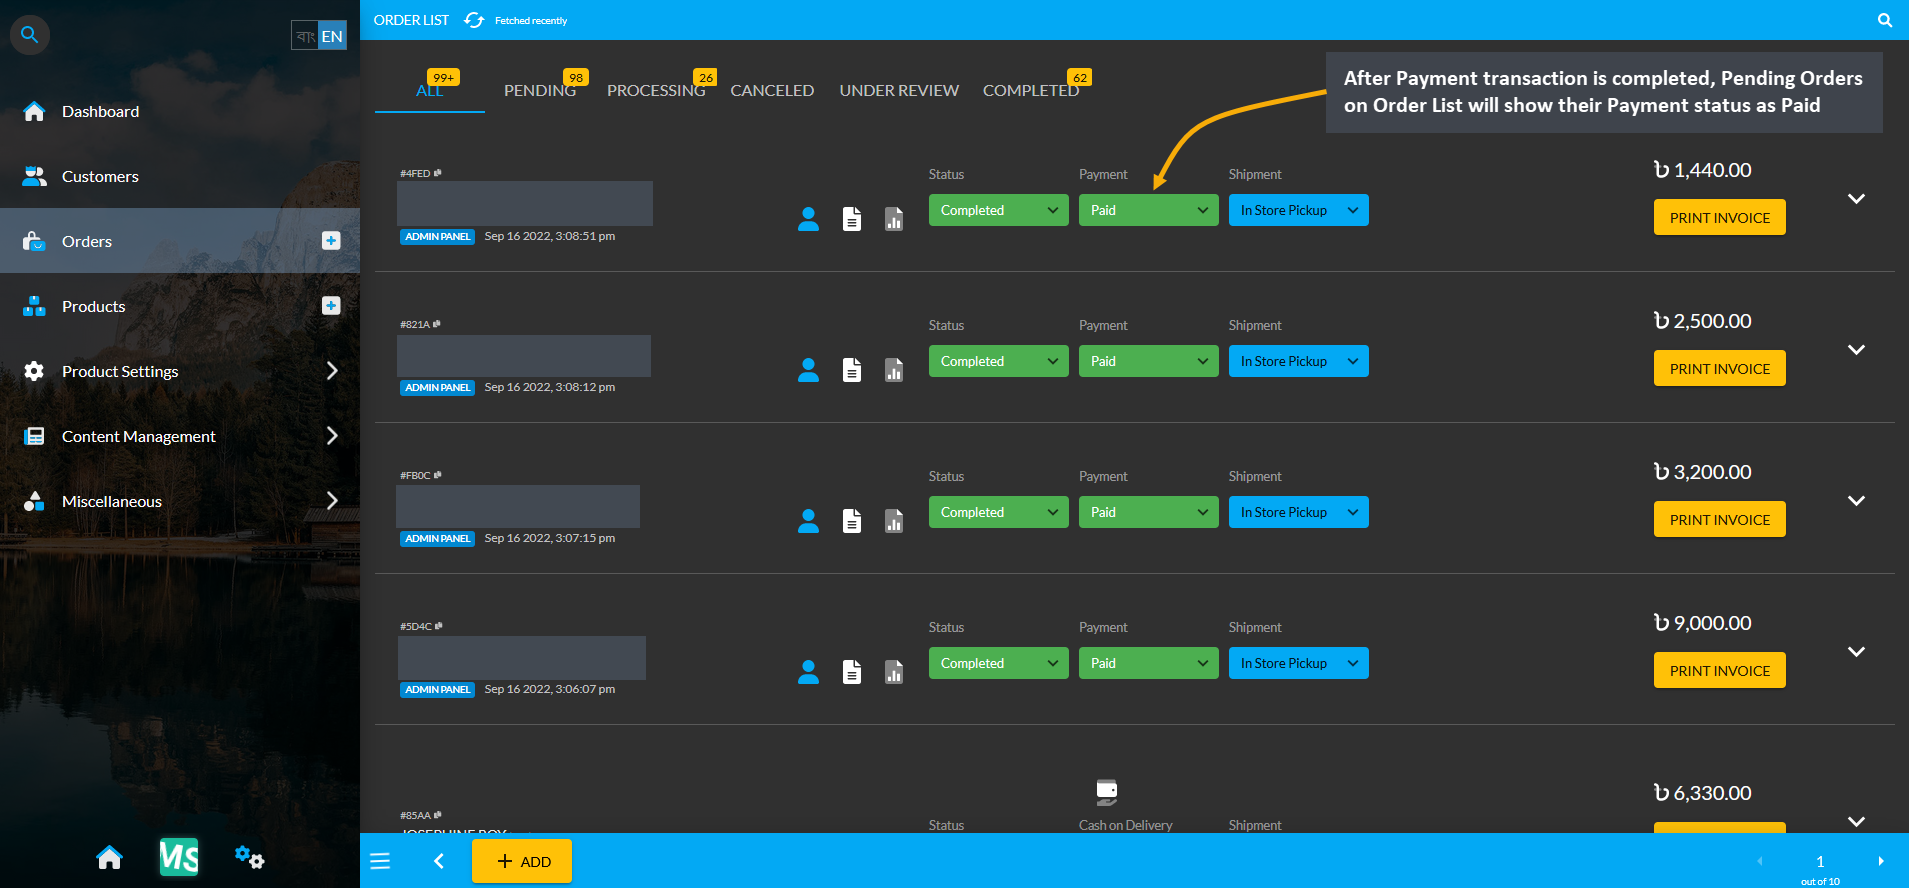
Image 8: After Payment transaction is completed, Pending Orders will display Payment status as Paid.
Even though Payment Status shows Paid, here the transaction is technically Initiated for some payment methods like Cash on Delivery. Hence, the current status of the transaction will show as Initiated. However, to change the transaction status, it needs to be edited, which can be done by clicking the Verify button, or else the transaction will not be completed and be added to Revenues. Follow these few steps as shown in the example below.
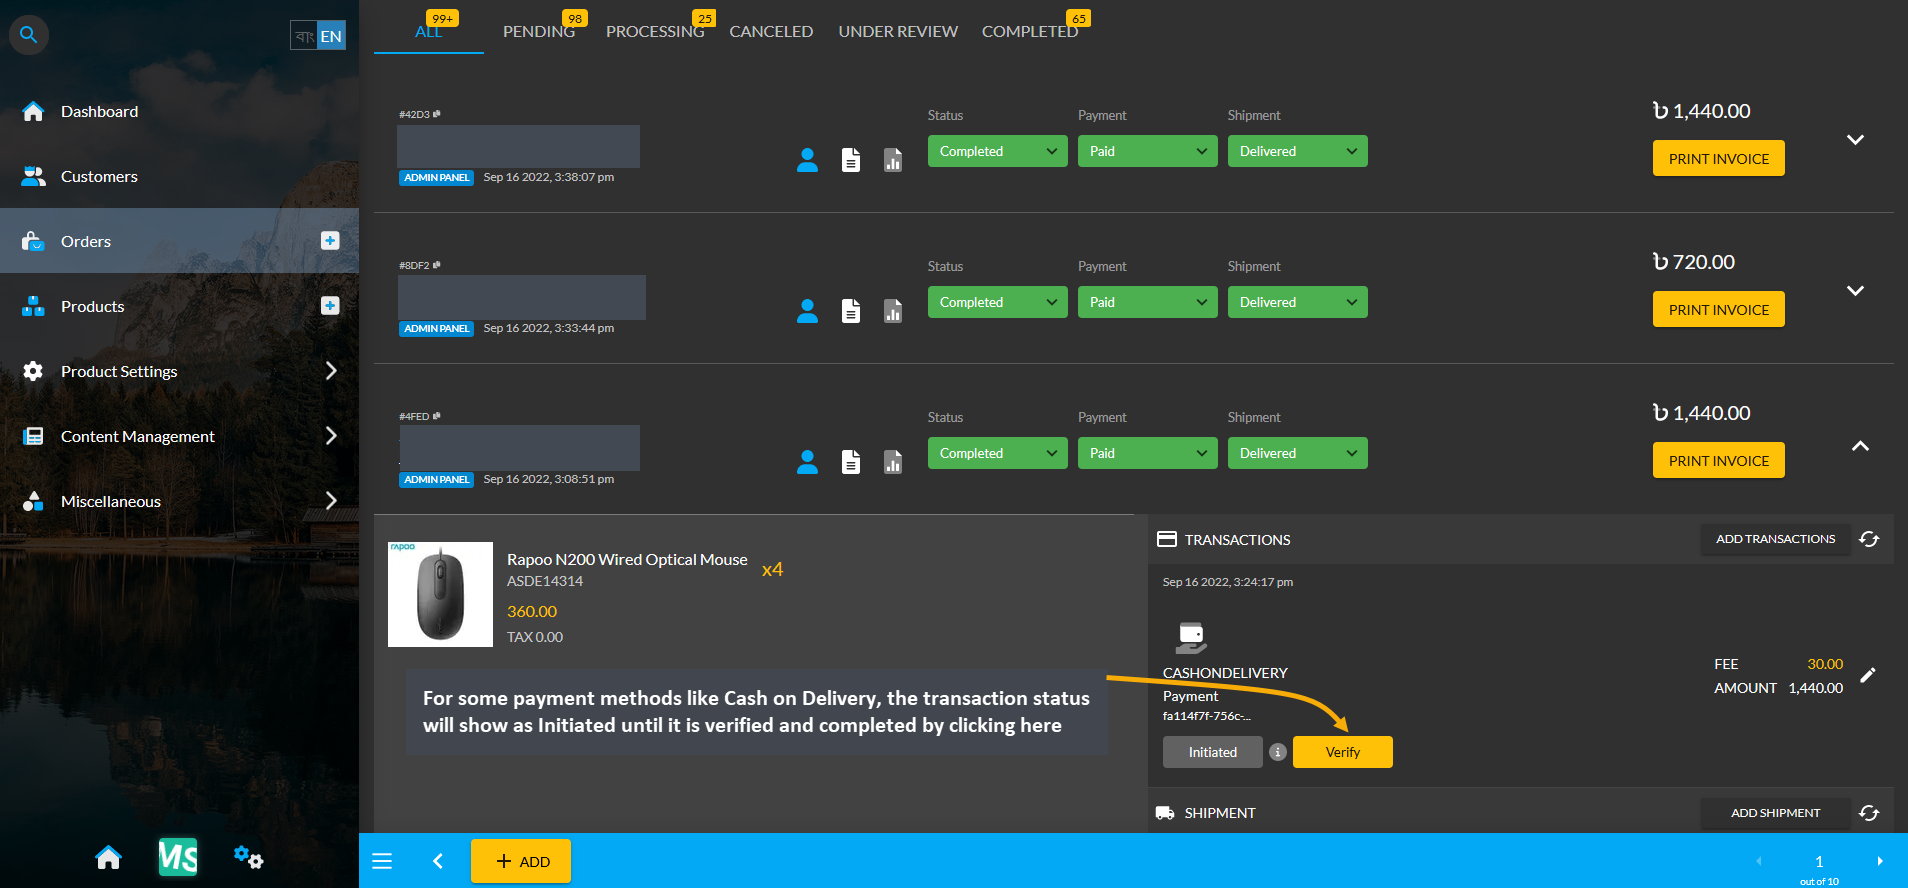
Image 9: Transaction status will show as Initiated until it is verified and completed for some payments.
After clicking on the Verify button, a pop-up will show where the transaction needs to be Set As Completed by selecting the option and hitting the Submit button as shown below.
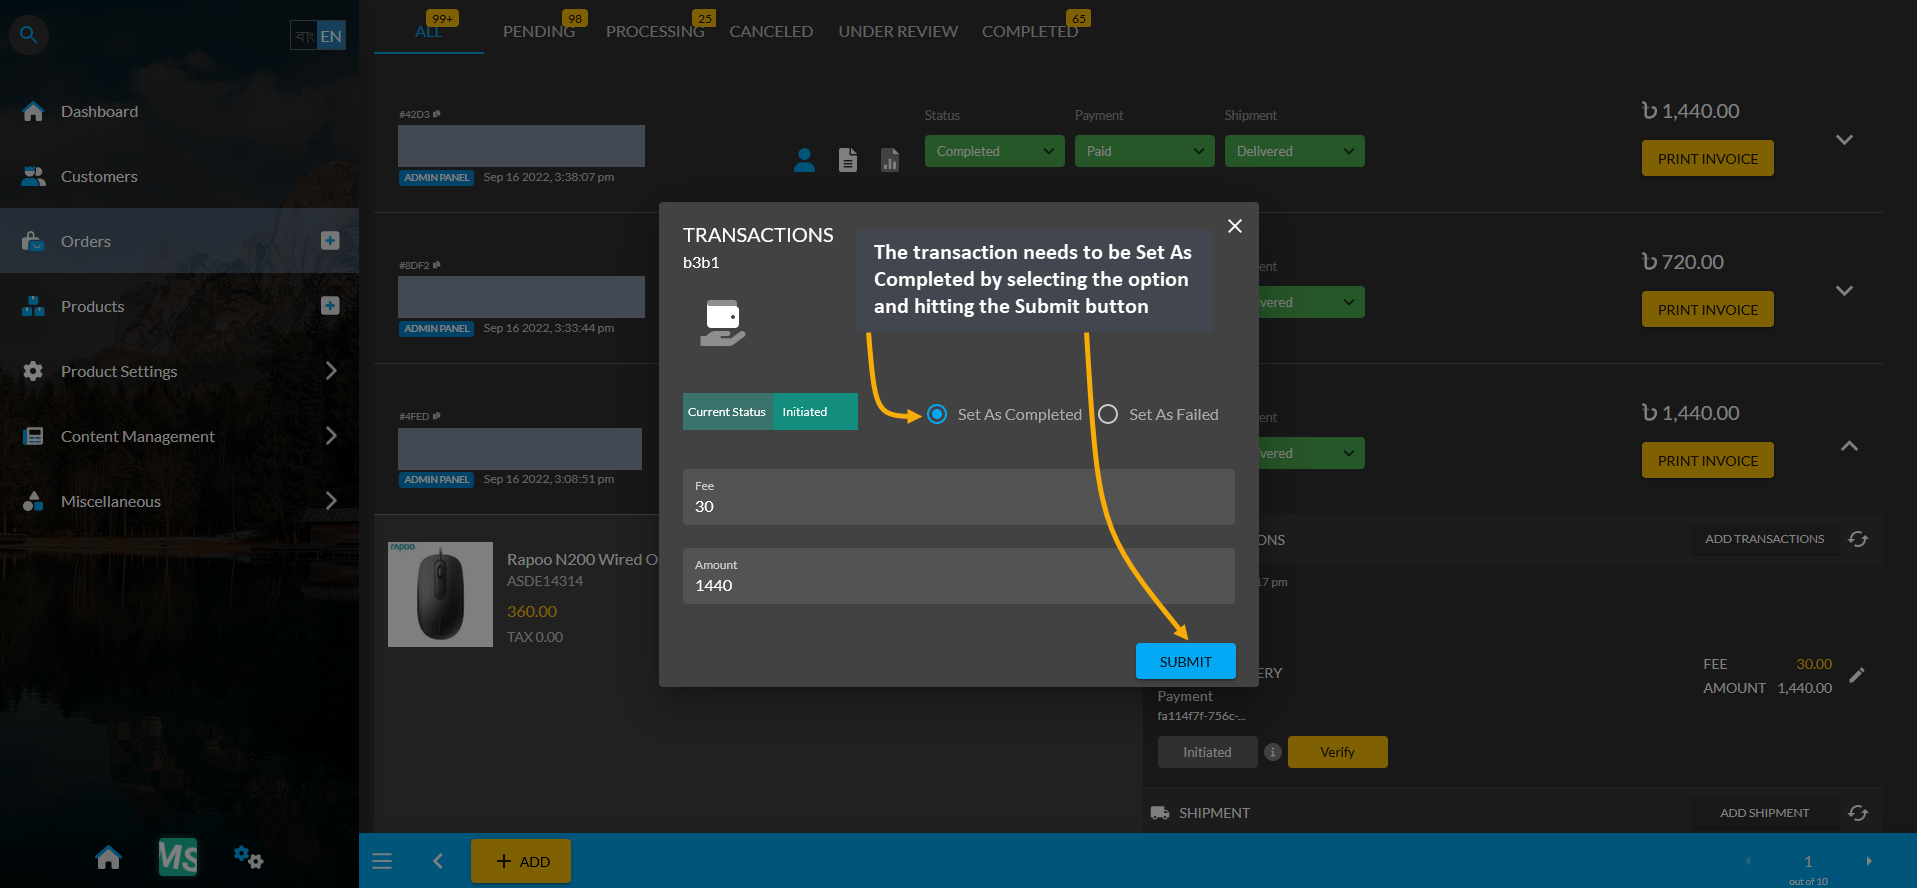
Image 10: Transaction needs to be Set As Completed by selecting the option and hitting the Submit button.
A message will show up asking to confirm that the transaction status is updated, so if the Order status should be updated to Completed as well. Click Agree to proceed and update Order status to Completed.
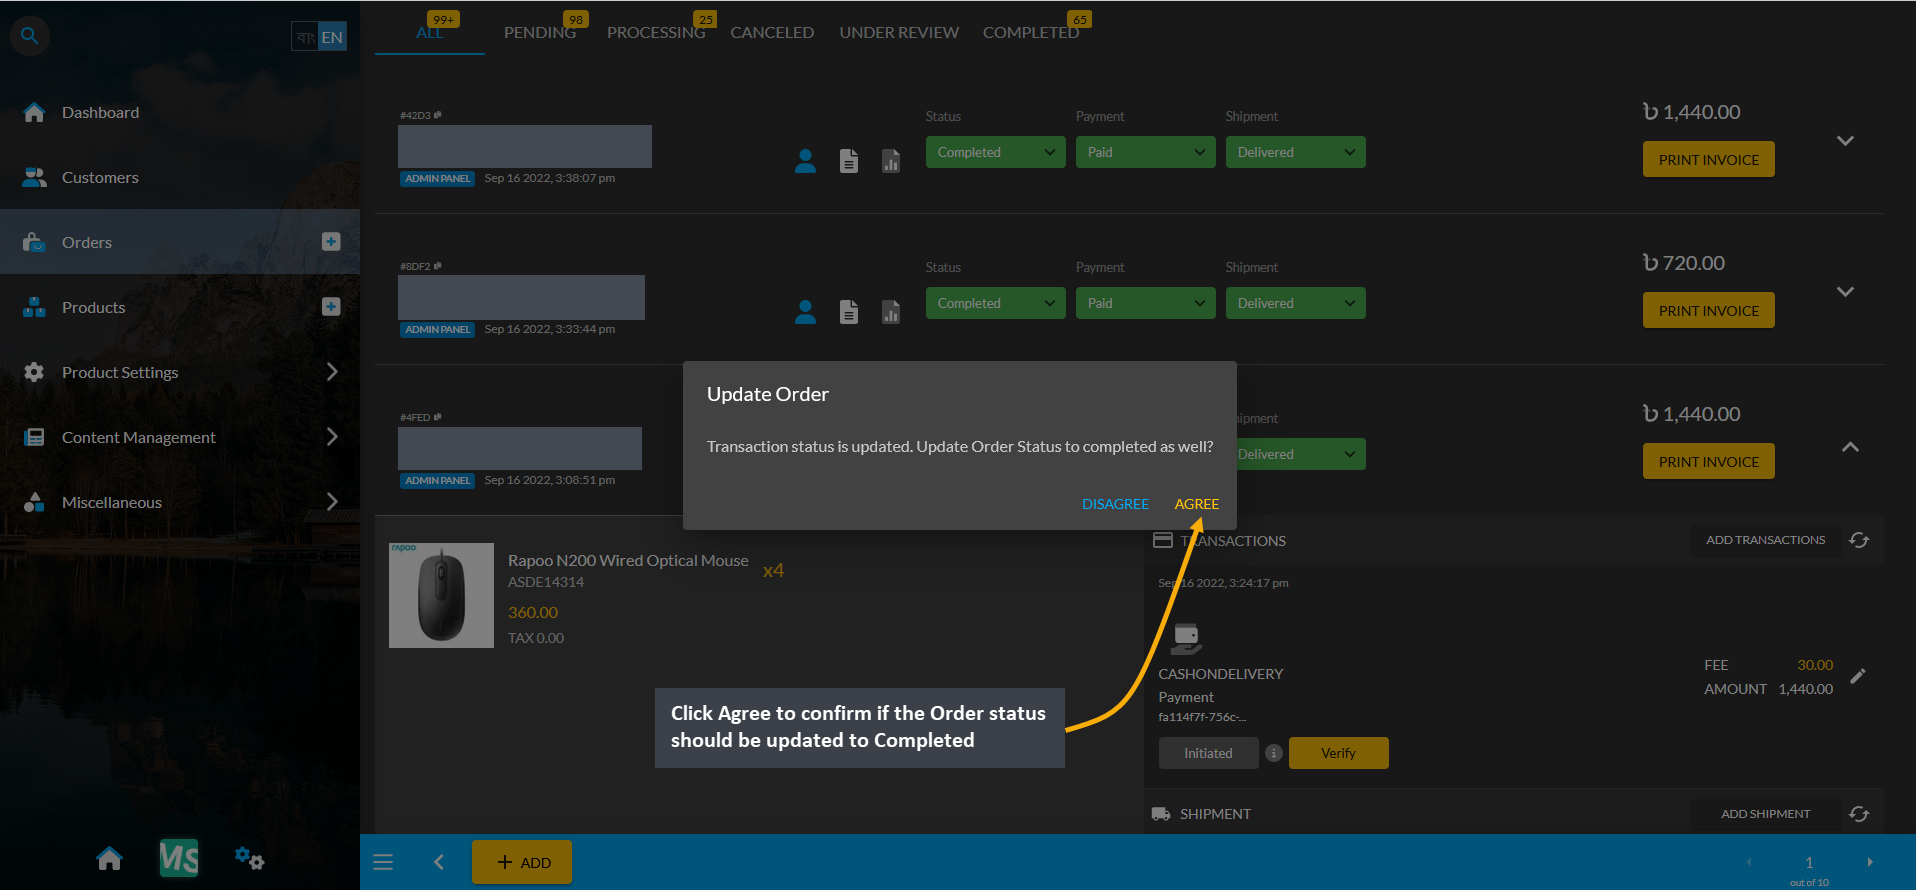
Image 11: Click Agree to confirm if the Order status should be updated to Completed as well.
Upon successfully confirming to change the Order status, the Order status will now show as Completed, which means that the Order transaction is completed and added to Revenues.
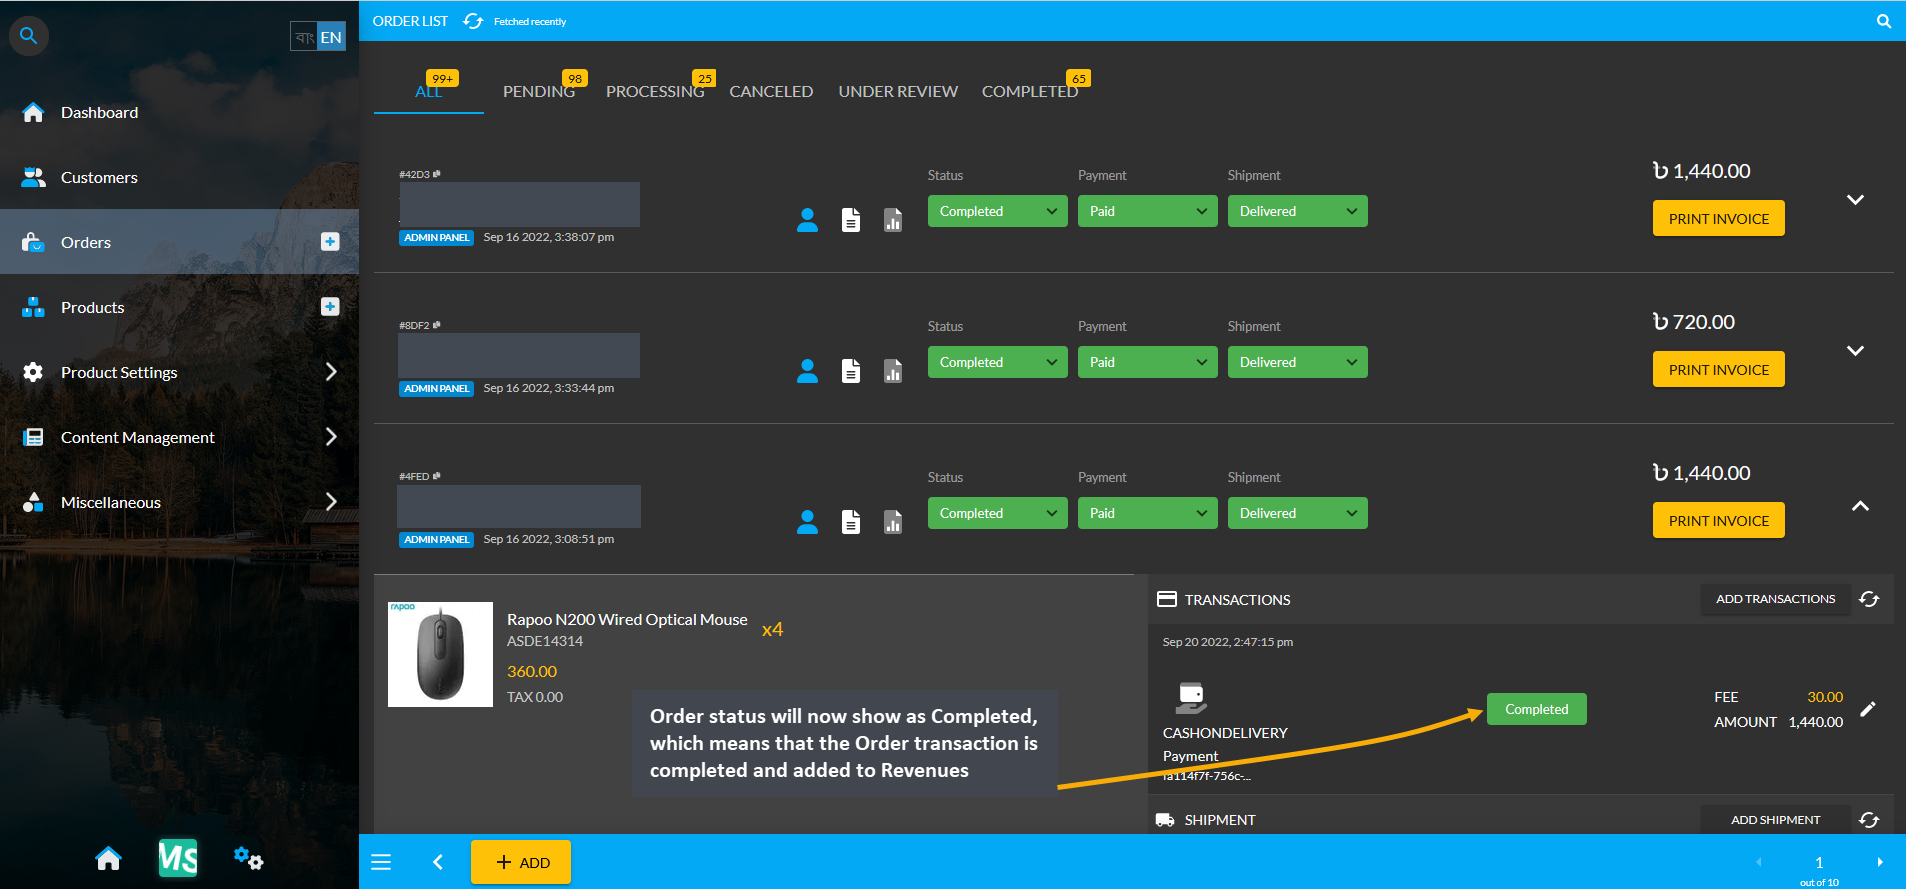
Image 12: Order status will now show as Completed, which means that the Order will add to the Revenues.
Now, on the Revenue Cost Basis page, it will be seen that Revenues were made for all these Orders which were successfully Completed or Fulfilled and their transaction have been confirmed.
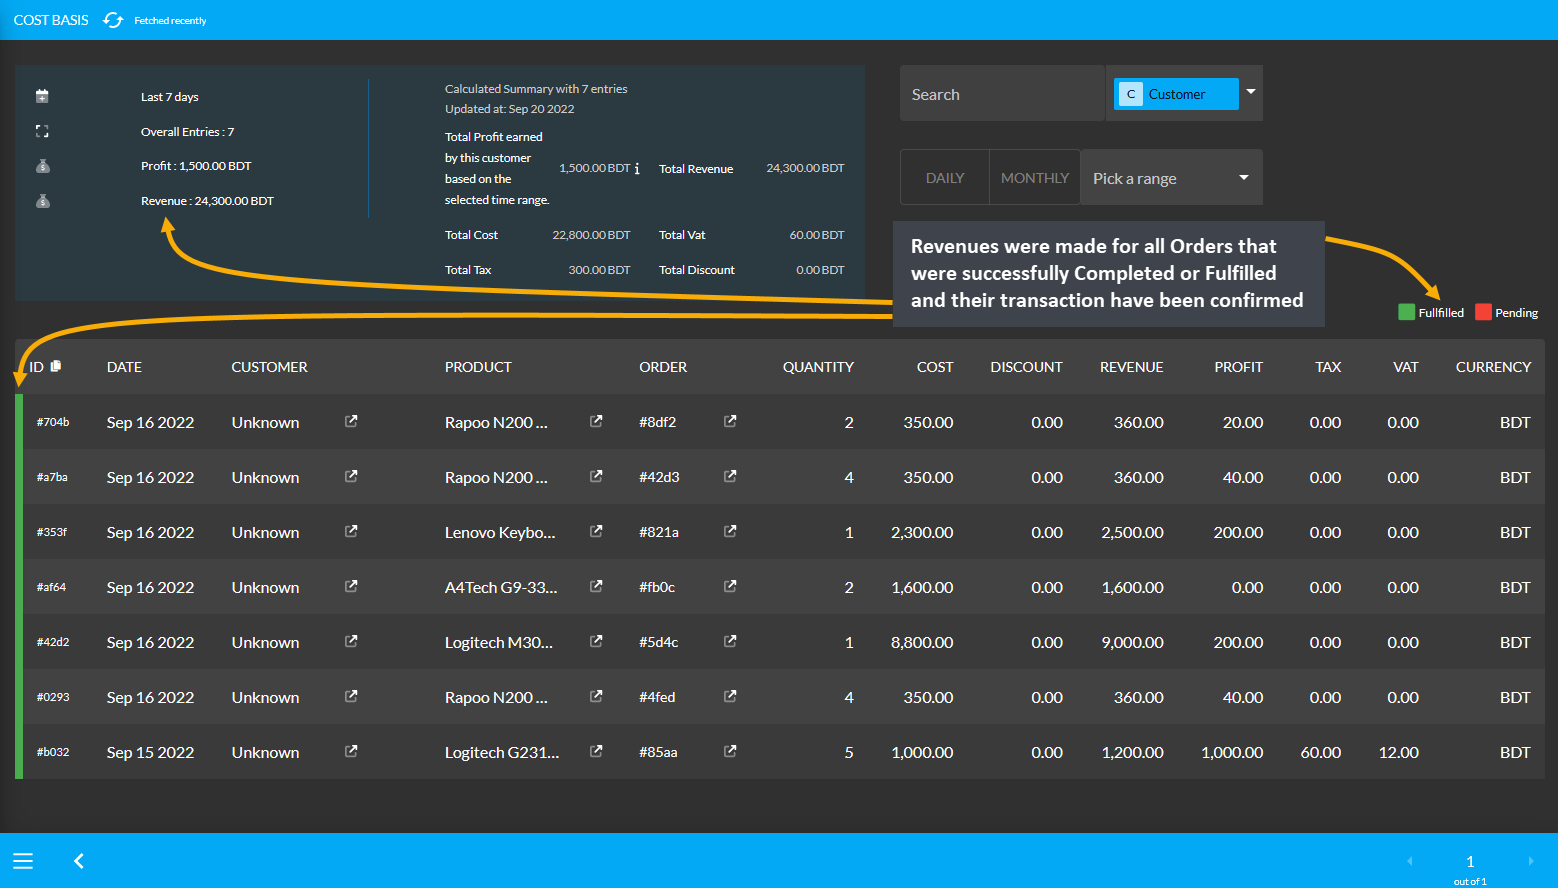
Image 13: Cost Basis will show that Revenues were made for all Orders that were Completed or Fulfilled.
As Payment transactions were confirmed for all these Orders, Revenue based on them will be updated and show on the Dashboard Revenue section as shown in the example below.
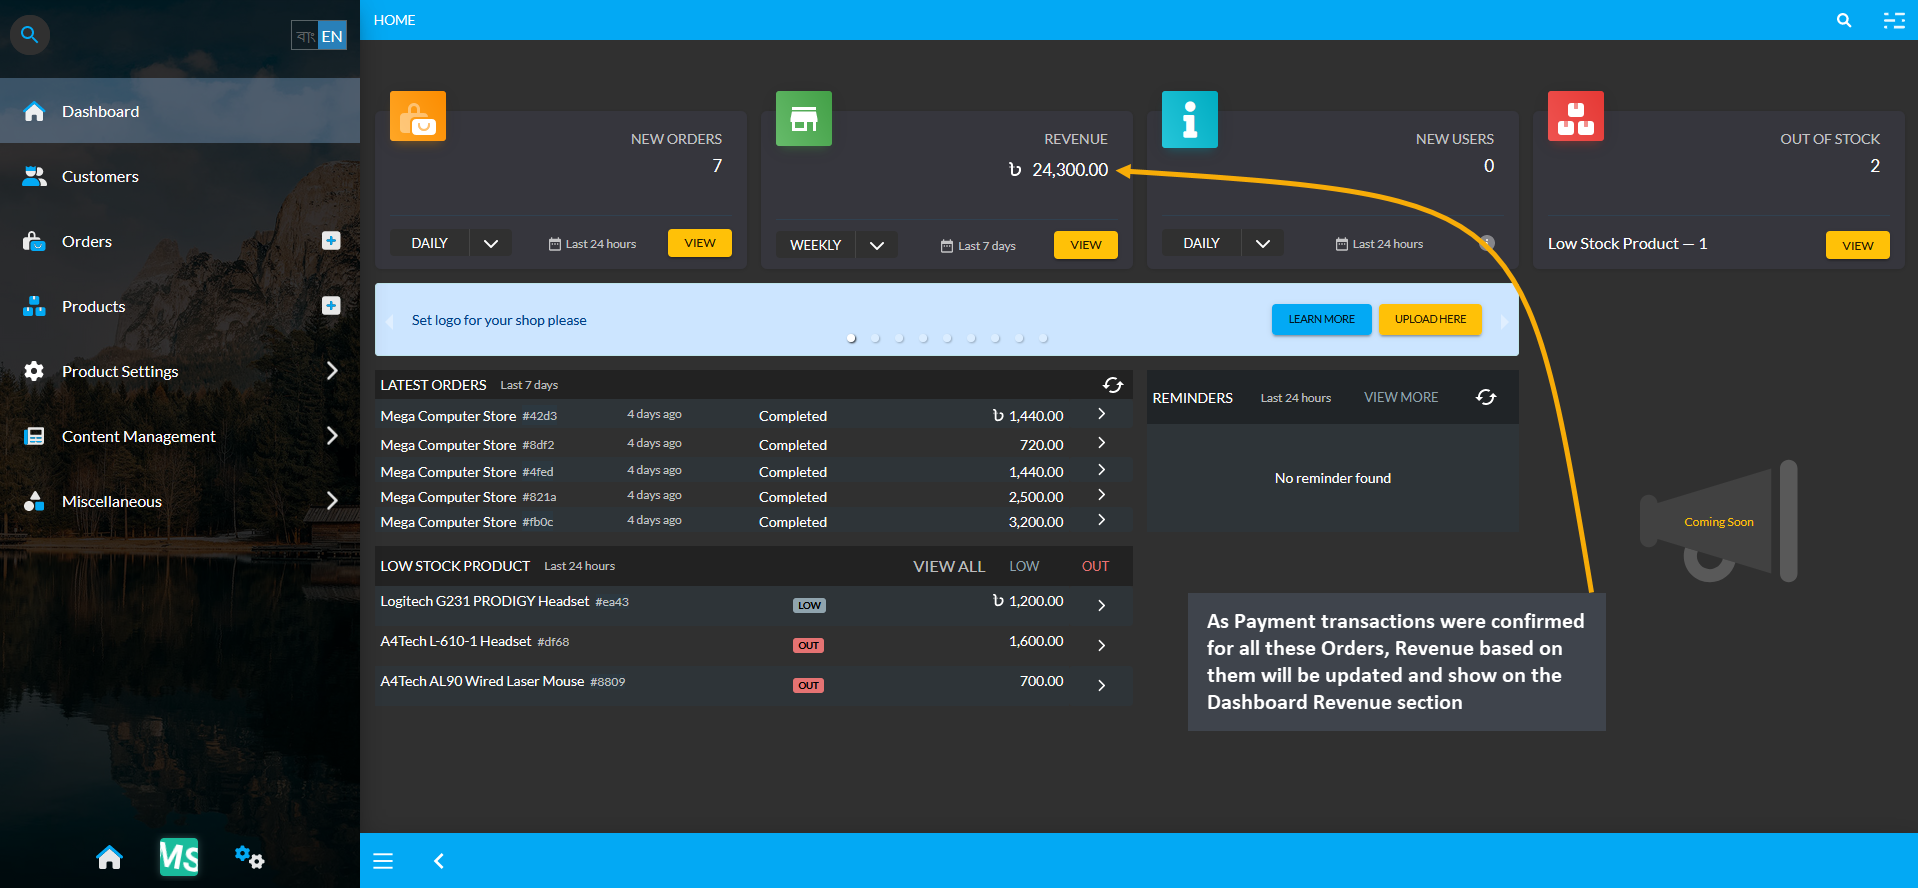
Image 14: Revenue based on Completed Orders will be updated and show on the Dashboard Revenue section.
New Users will display the count of New Users or Customers from the Website based on the selected timeframe. The Shop Owner can select ranges of Hourly, Daily, Weekly, Monthly, and Yearly to view number of New Users.
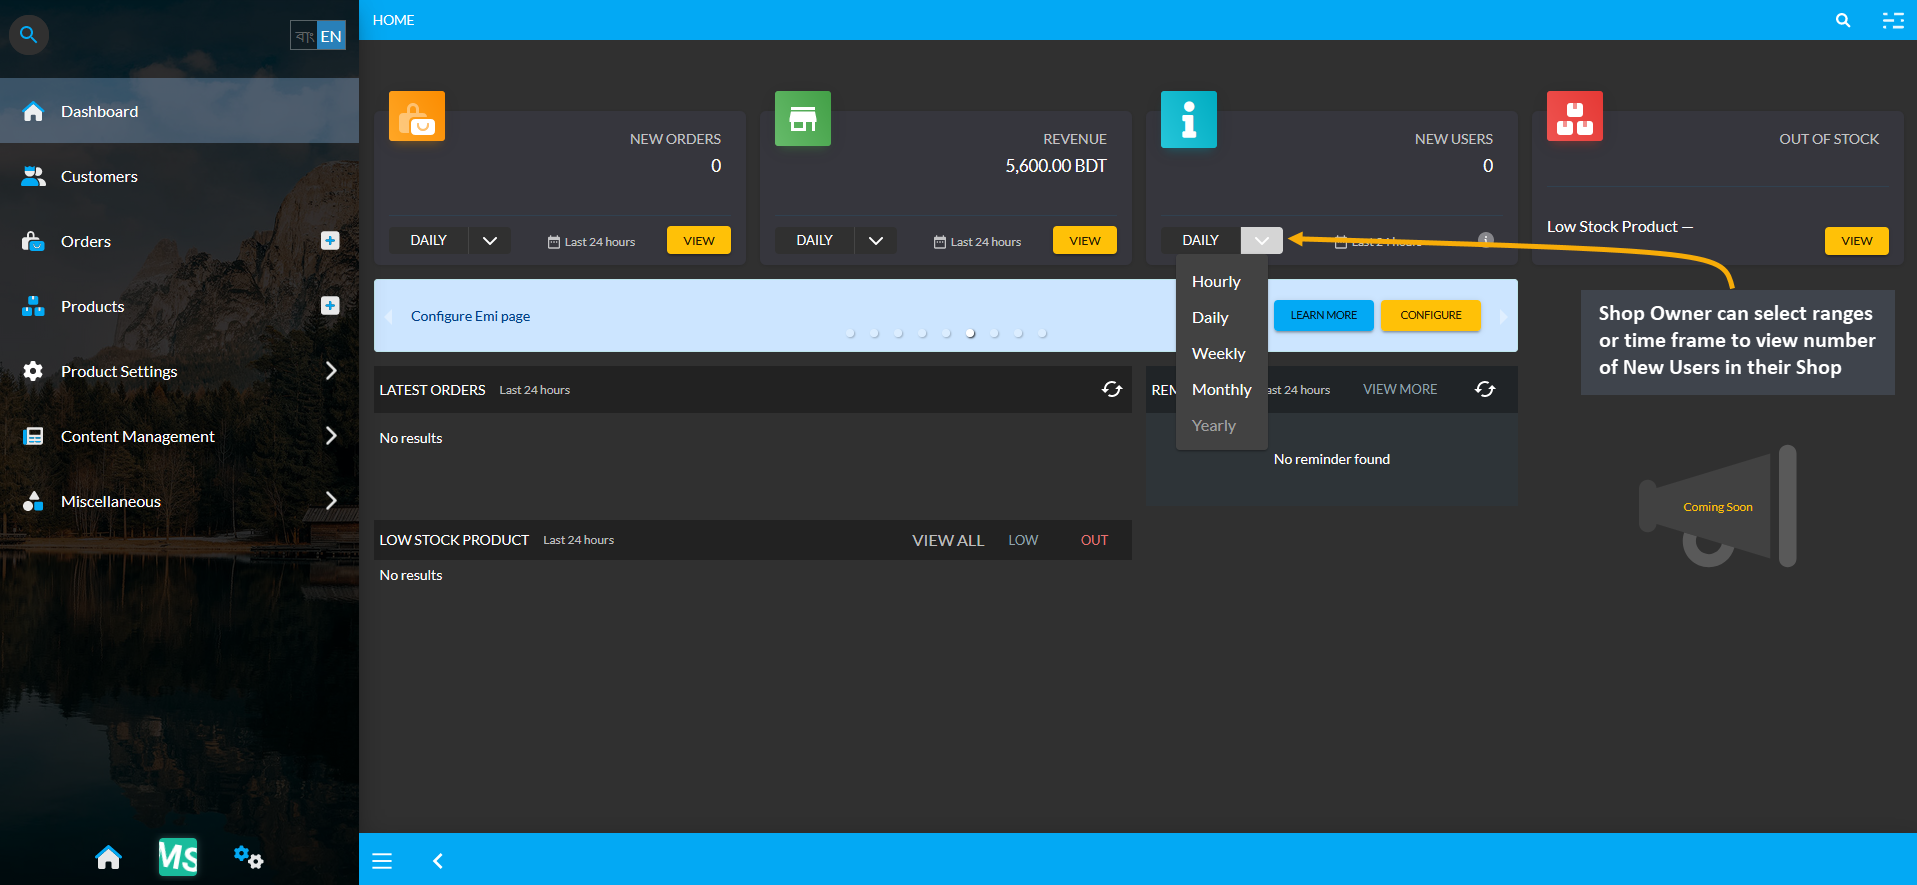
Image 1: Shop Owner can select any timeframe or ranges to view the number of New Users in their Shop.
Out of Stock will display the count of both Out of Stock and Low Stock Products. Click on View to be redirected to the count of both Out of Stock and Low Stock Products on a separate page. The list of Low Stock Products will be displayed at the bottom end of the screen under Latest Orders with Low and Out buttons to check. Low Stock Products will also show the latest Out of Stock Products under this section.
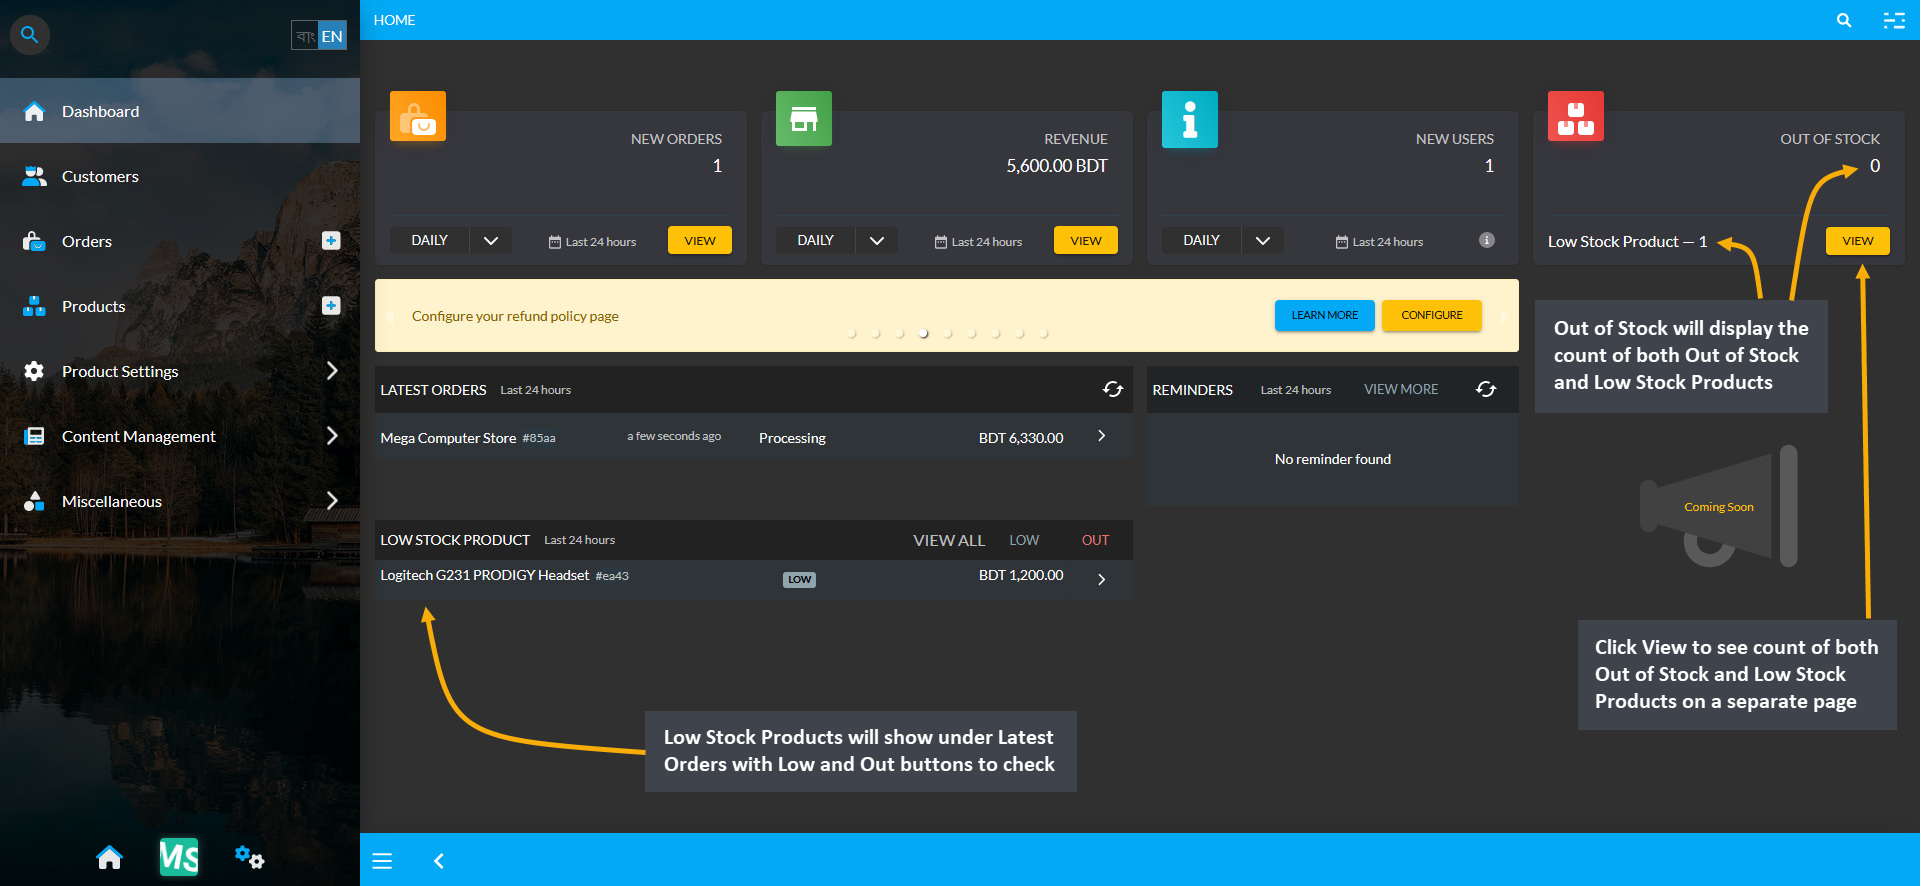
Image 1: Out of Stock will display the count of both overall Out of Stock and Low Stock Products.
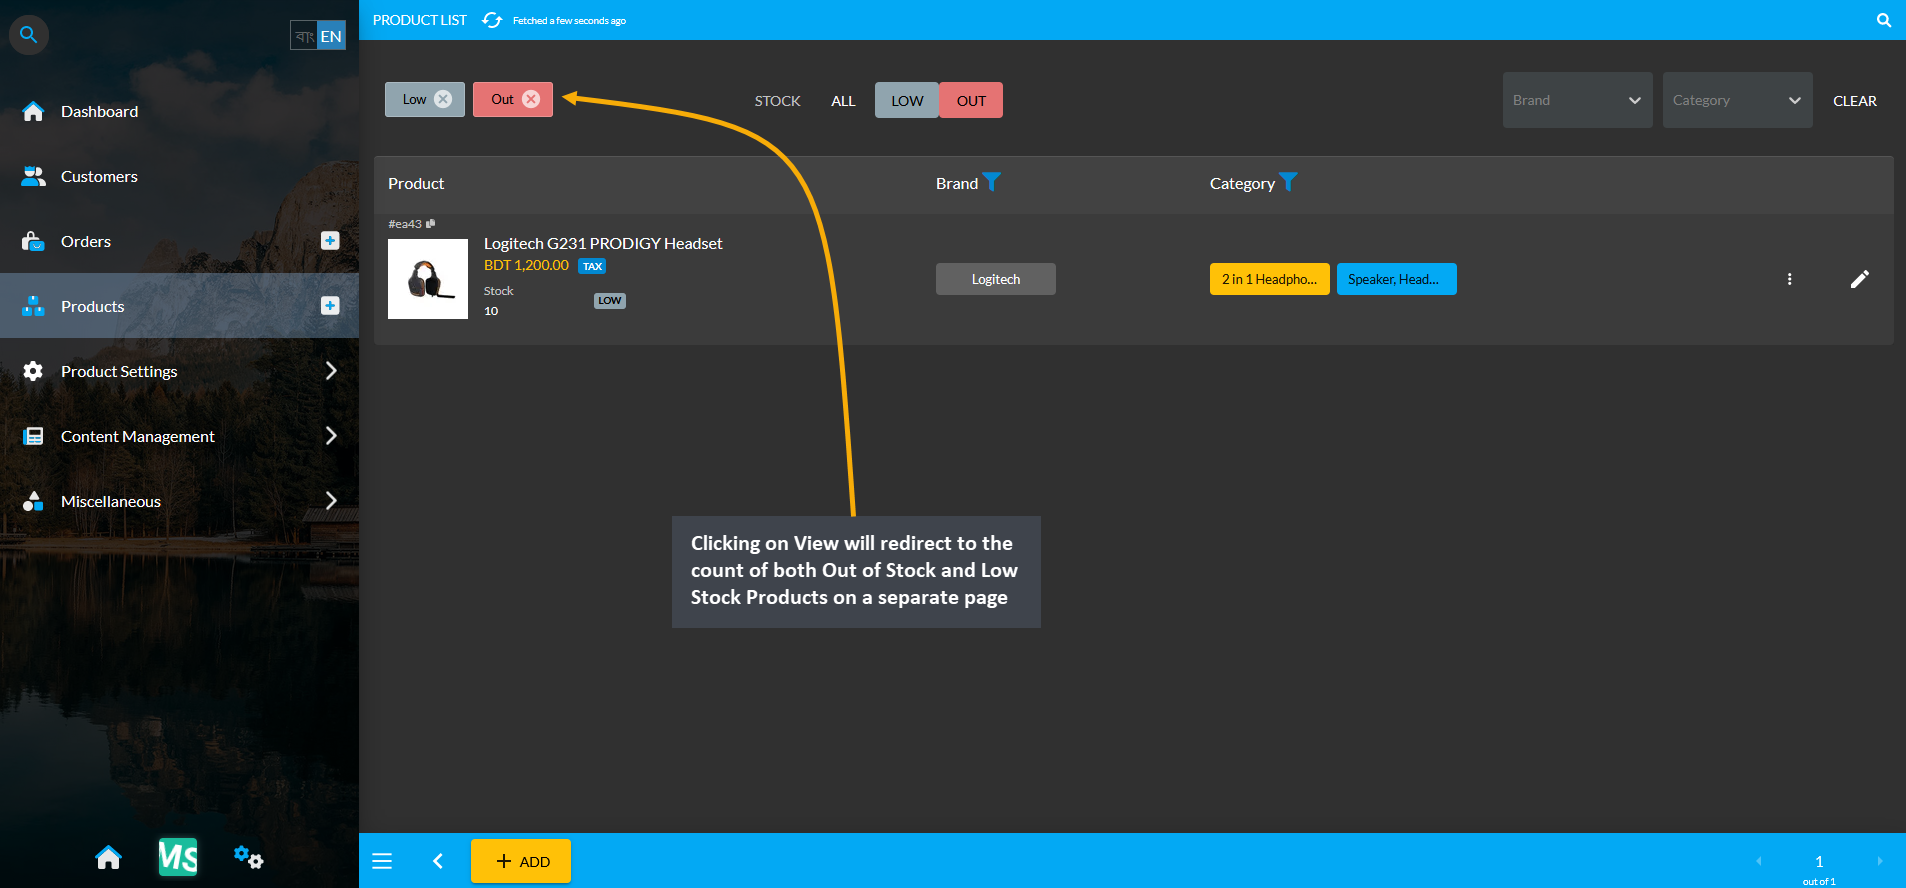
Image 2: Clicking on View will show count of both Out of Stock and Low Stock Products on a separate page.
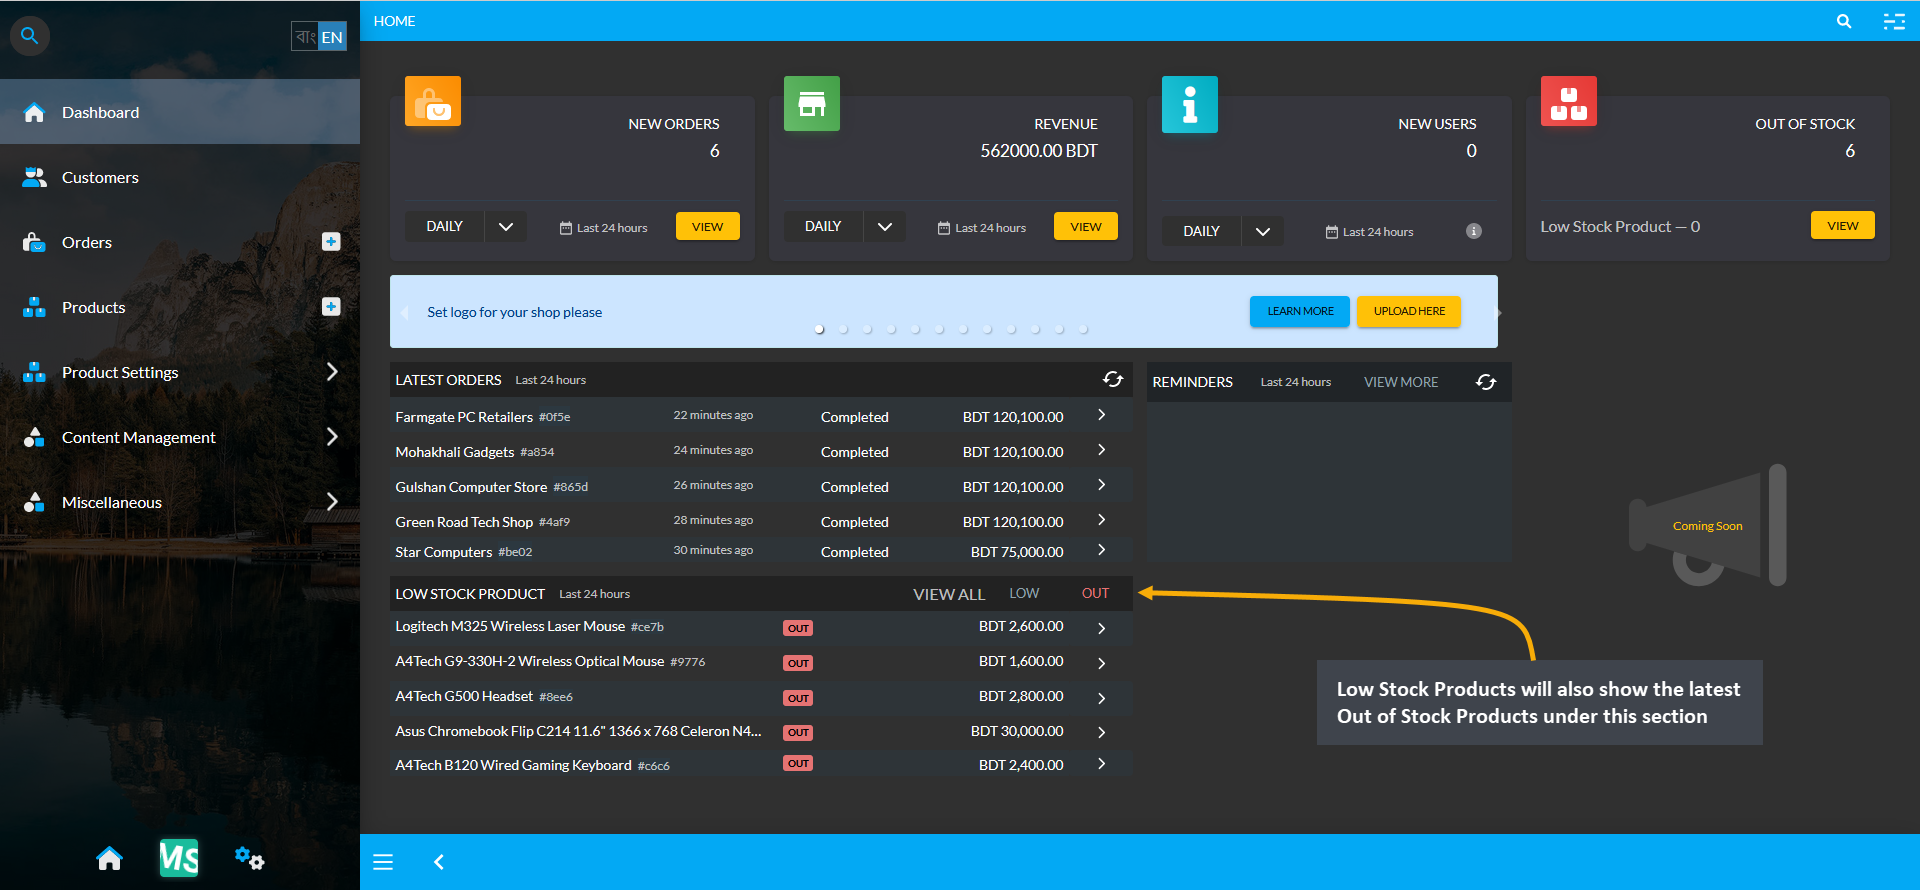
Image 3: Low Stock Products will also show the latest Out of Stock Products under this section.
There is a section for Latest Orders showing Customers and Order amount from the last 7 days in the Website under the nag display dashboard. There is a refresh ⟳ button that can be used to check the latest Orders placed.
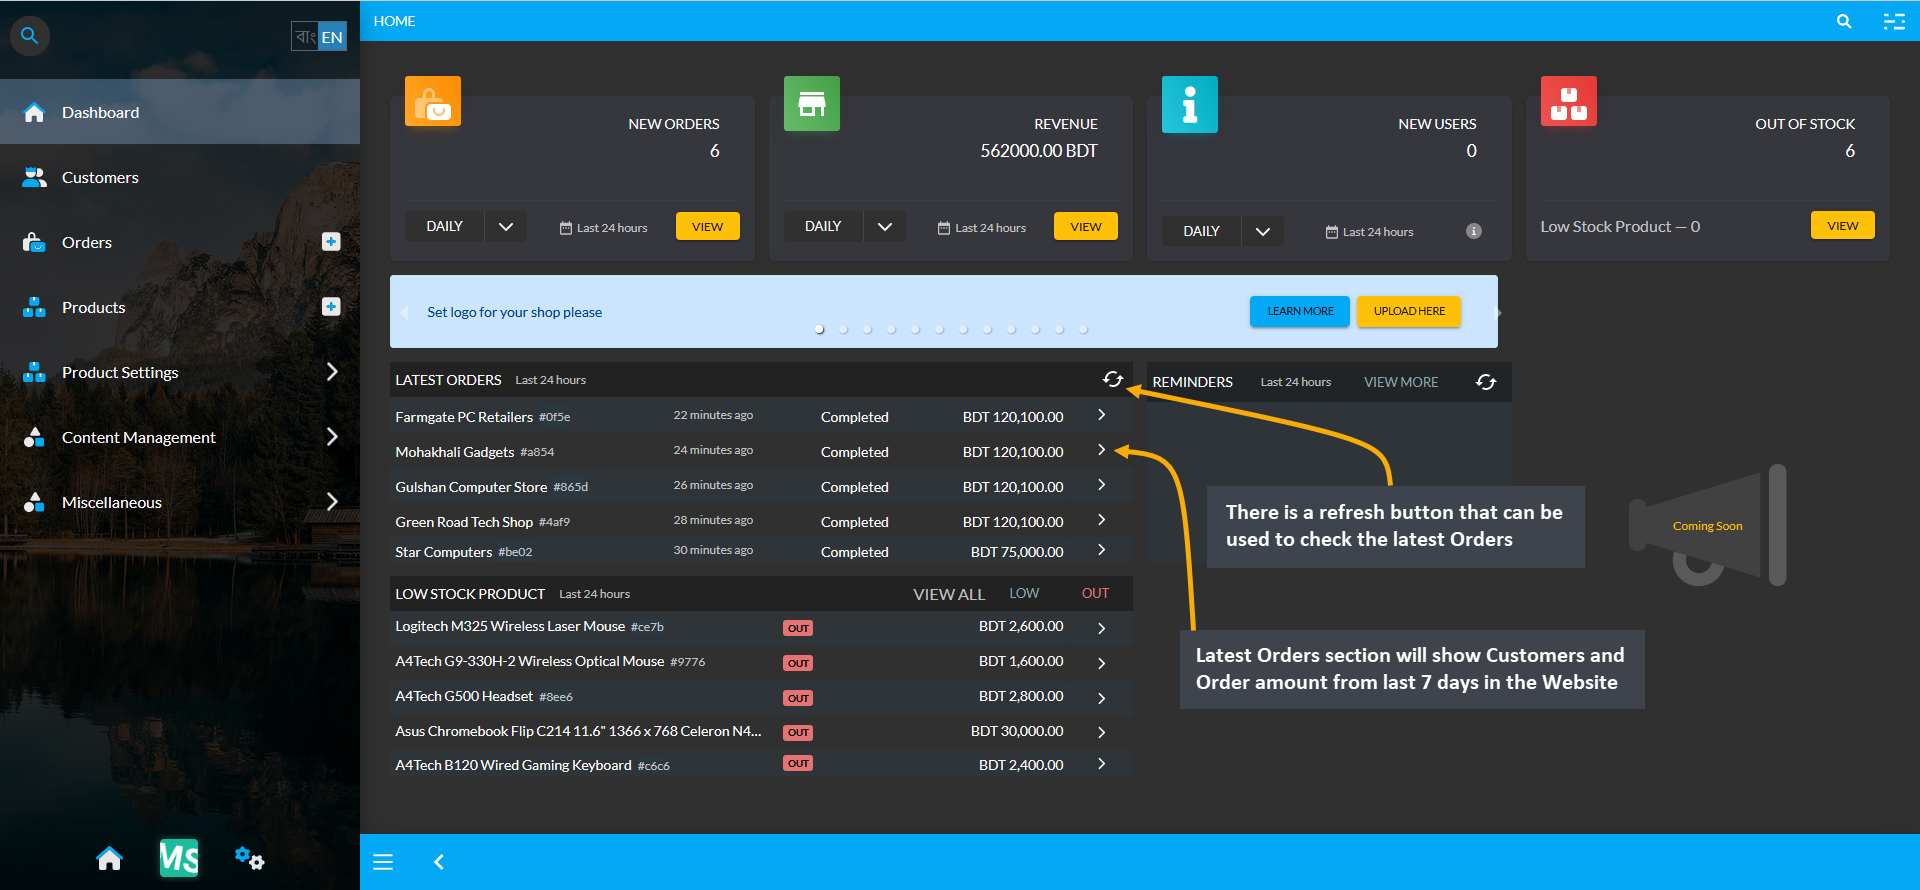
Image 1: Latest Orders section will show Customers and Order amount from last 7 days with ⟳ button.
The Shop Owners can set Reminders that they need to follow up which will show beside Latest Orders section. A maximum of 5 Reminders will display on the dashboard refreshing with results of last 24 hours. Click on the View More button to be redirected to the Reminders page, where Reminders can be updated or deleted.
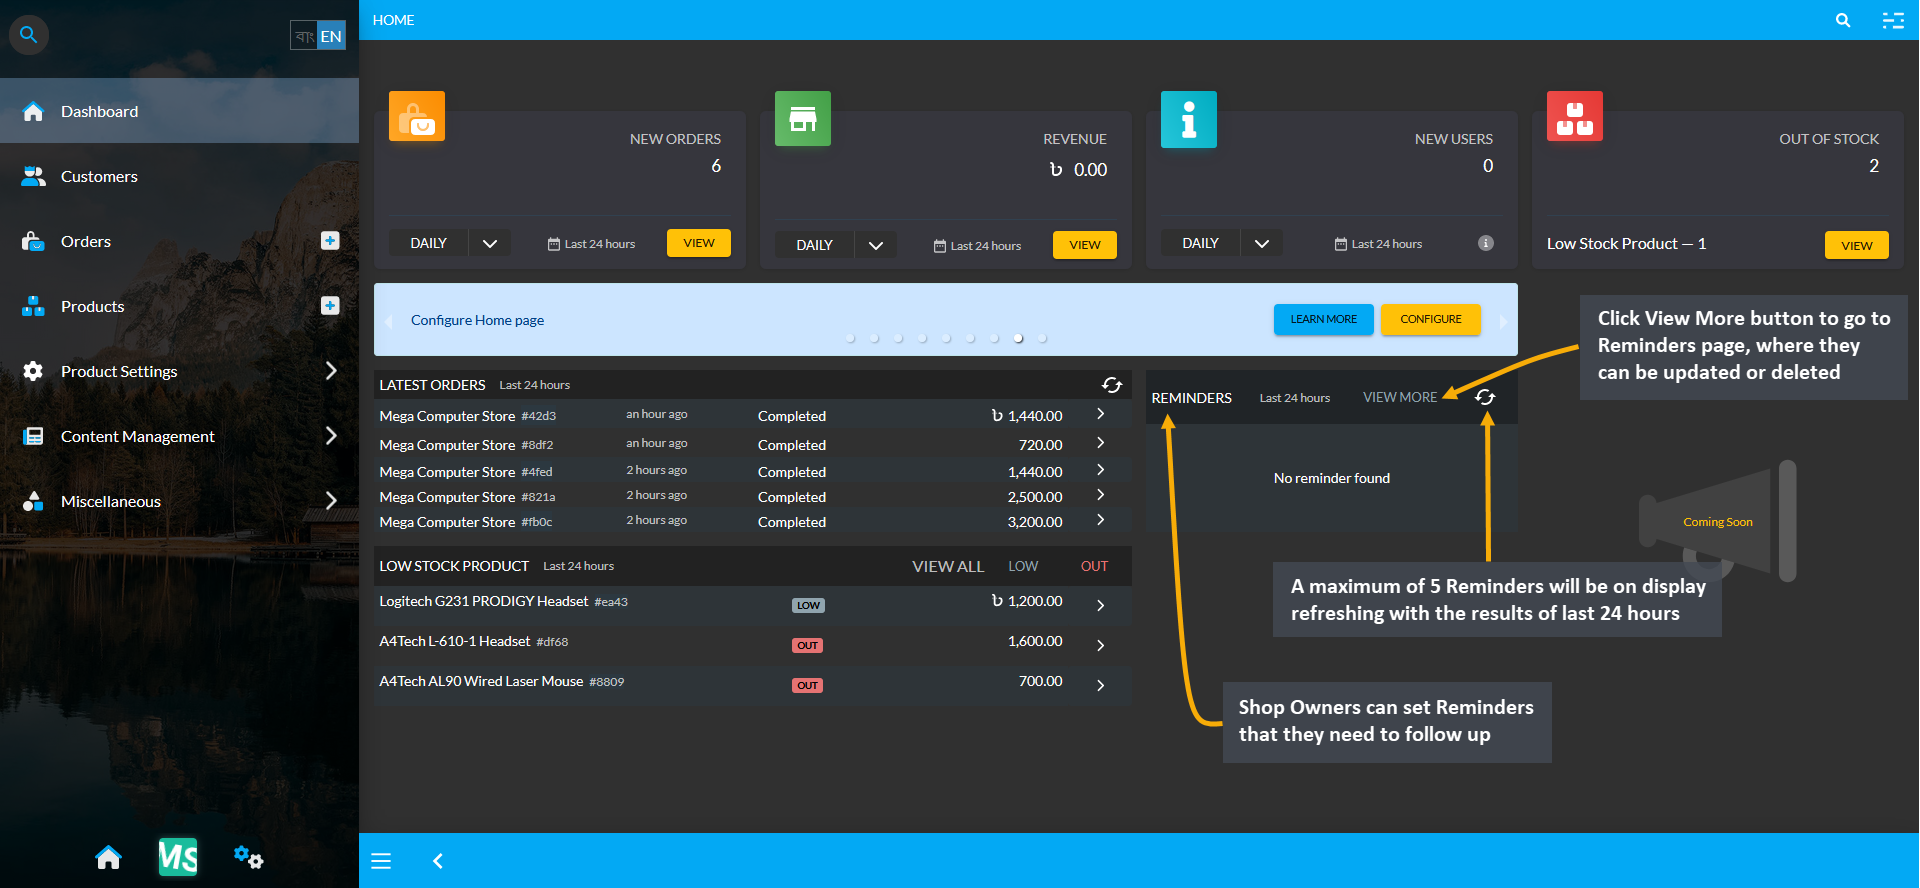
Image 1: Reminders section will show Reminders from last 24 hours with ⟳ button to follow up with.
On the Reminders Page, newly created or existing Reminders can be seen under the List with Pending Reminders that are Over Due needs to be completed, such as Payment Dues or Cheque Settlements. New Reminders can be added by clicking on the Add button. Find Reminders based on Types like Cheque and Custom or Status such as Pending, In Progress, Completed or timeframe like Daily, Weekly, and Monthly options.
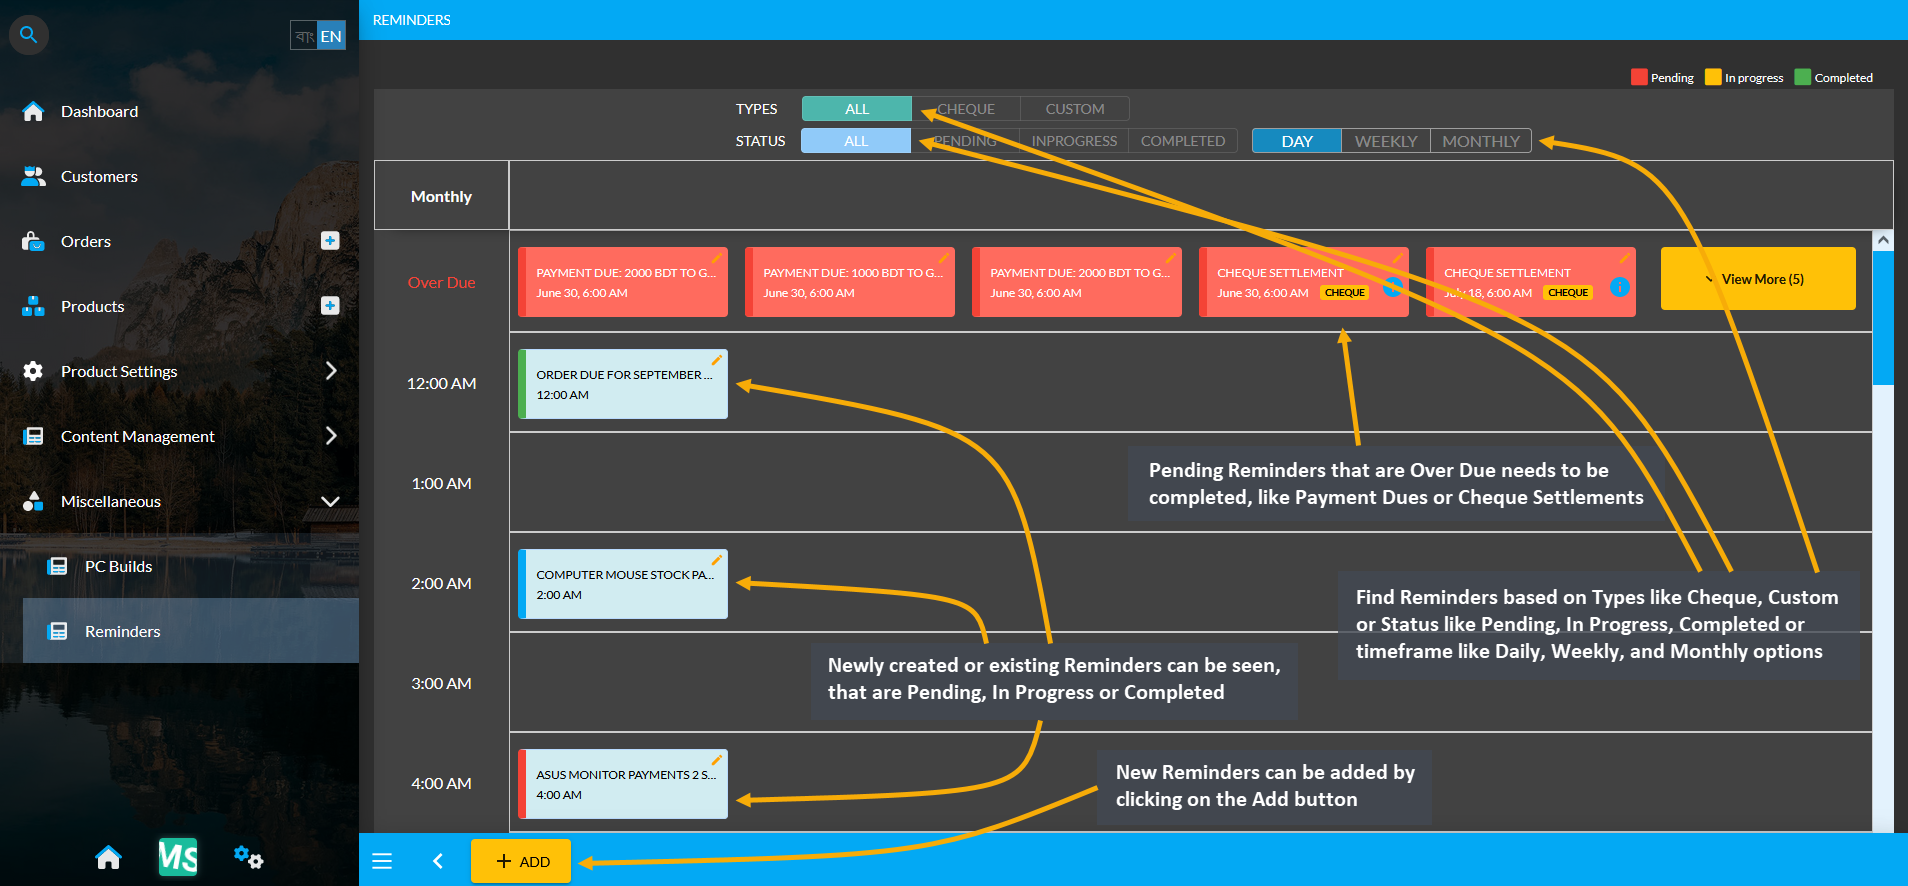
Image 2: New, Existing, and Pending Reminders can be seen based on Types, Status, and Time Frames.
New Custom Reminders can be added by clicking the Add button, which will open this pop-up. Set the reminder Title and Due Date and Time, set status to Pending, In Progress, or Completed and click Add to create New Reminder.
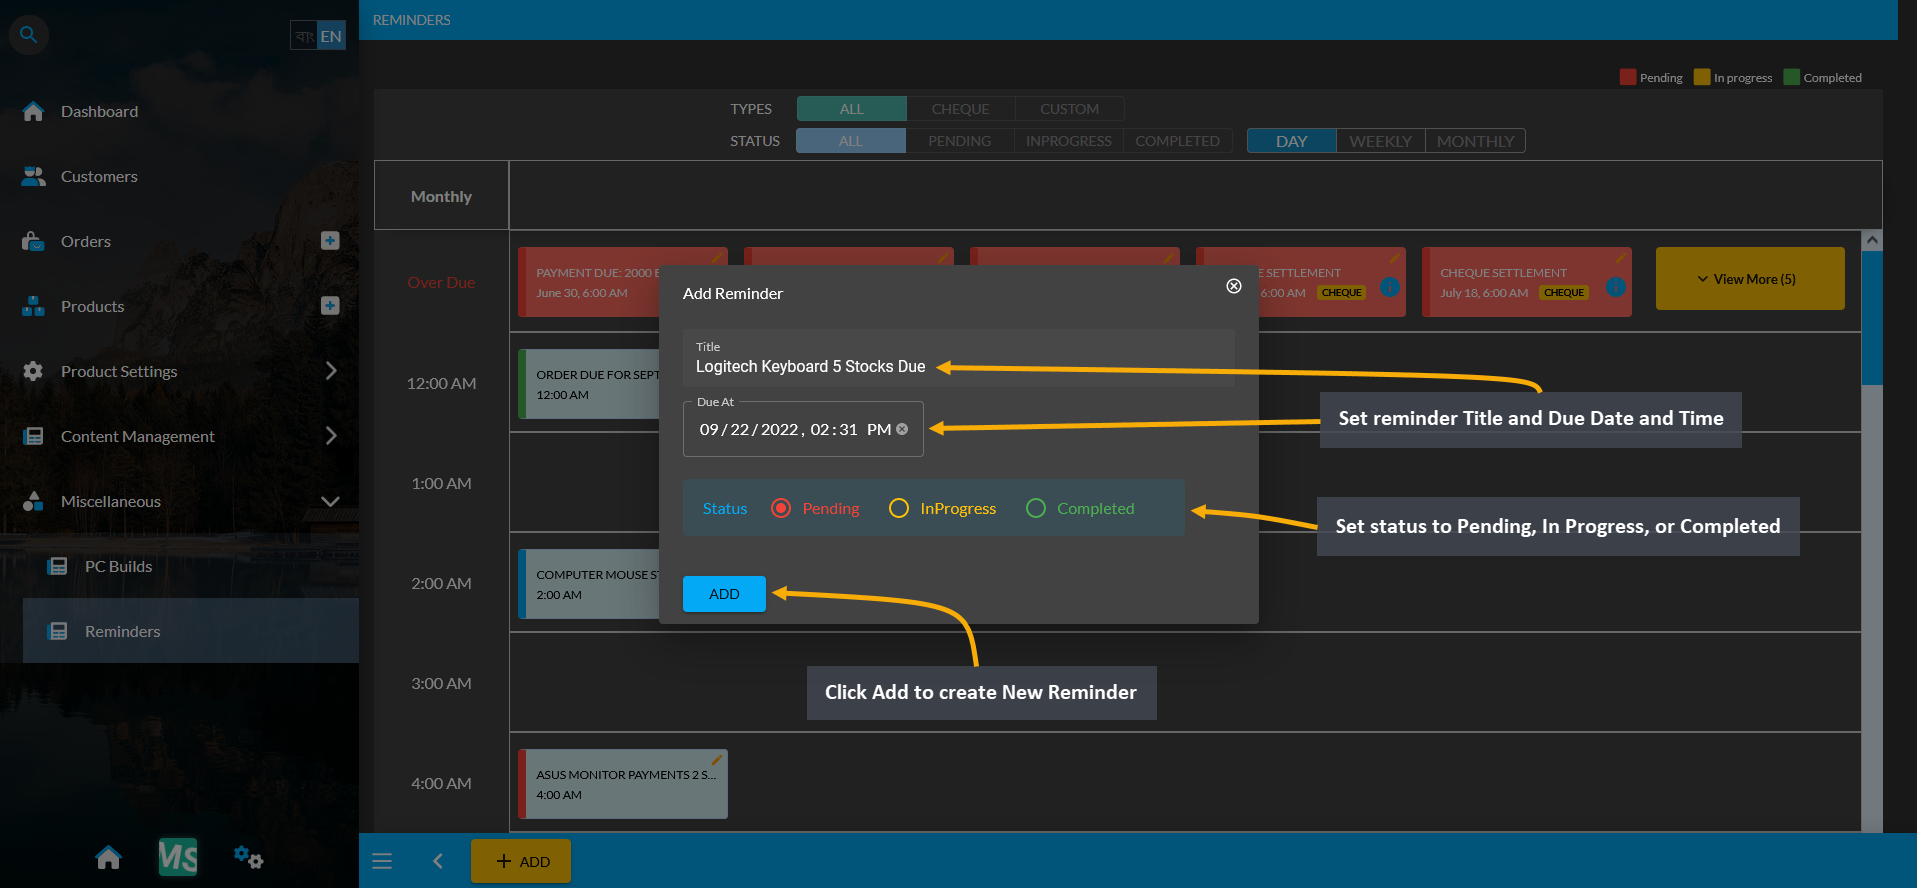
Image 1: Set Reminder Title, Due Date, Time, and Status to create New Custom Reminder from Reminders Page.
Newly created Reminders can be seen within the Daily, Weekly, and Monthly timeframe. Based on the selected timeframe, Reminders can be seen within the list which can be edited by clicking on the Edit icon.
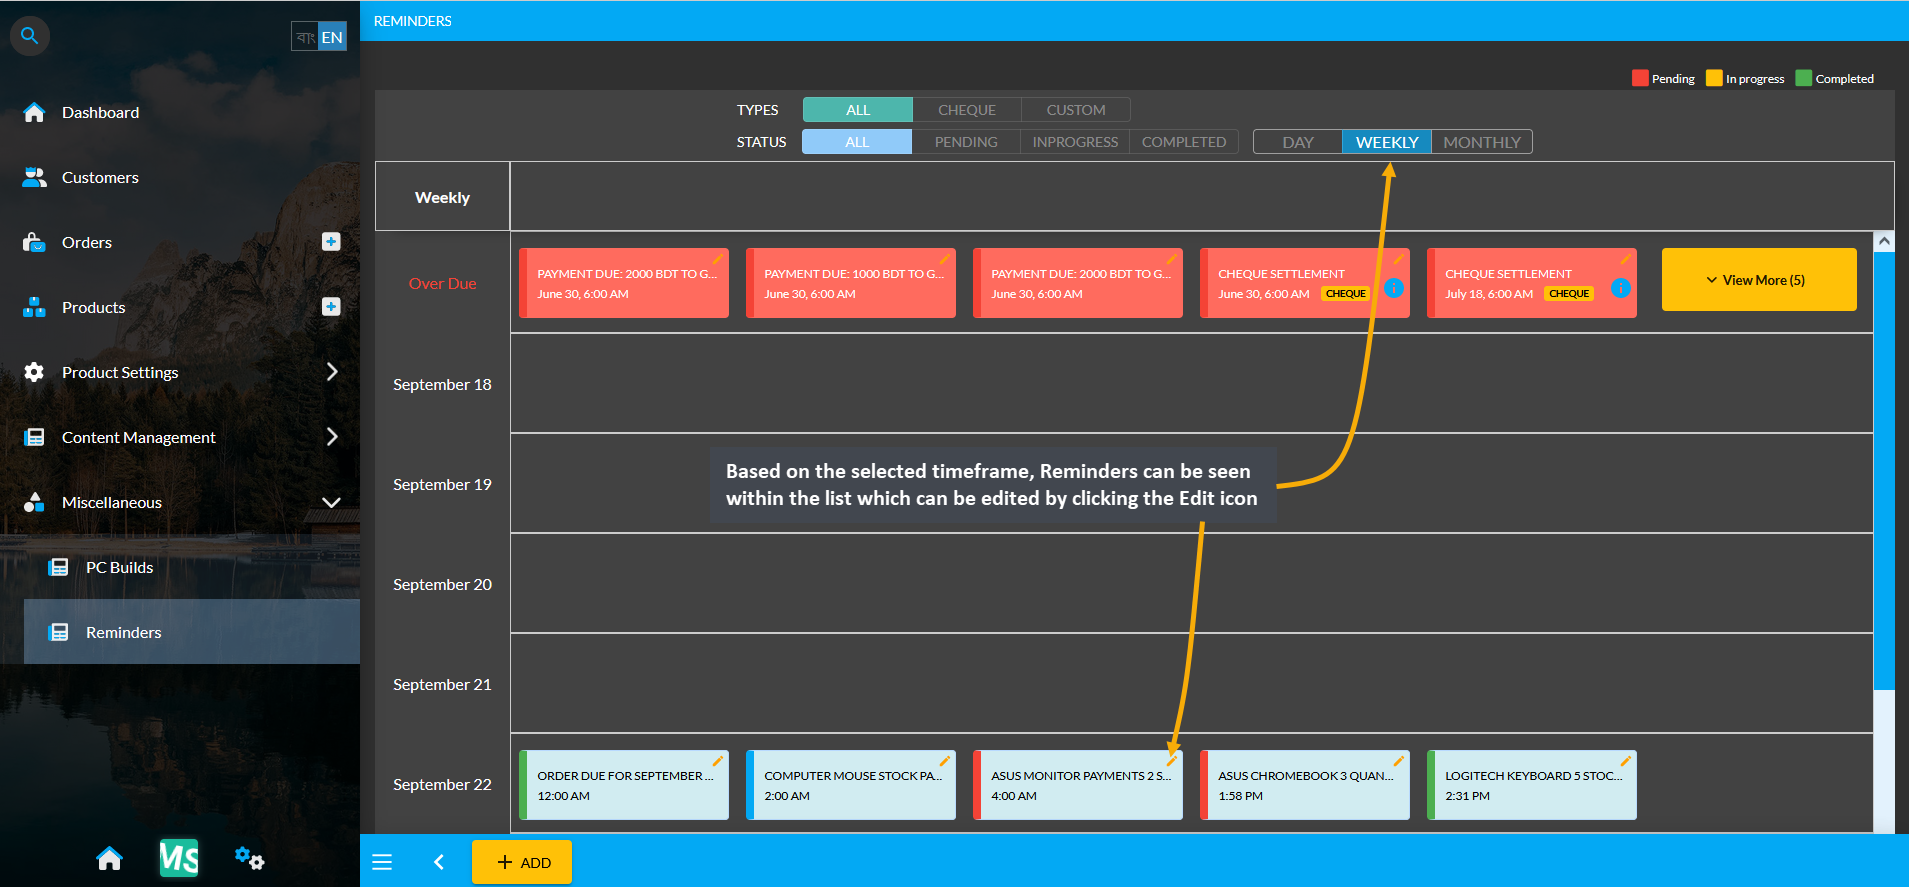
Image 2: Based on the selected timeframe, Reminders can be seen within the list which can be edited.
Within the dashboard Reminders section, five latest Reminders will be seen that were created within the last 24 hours. Click refresh ⟳ button to refresh this section and click View More to go to Reminders page for full view.
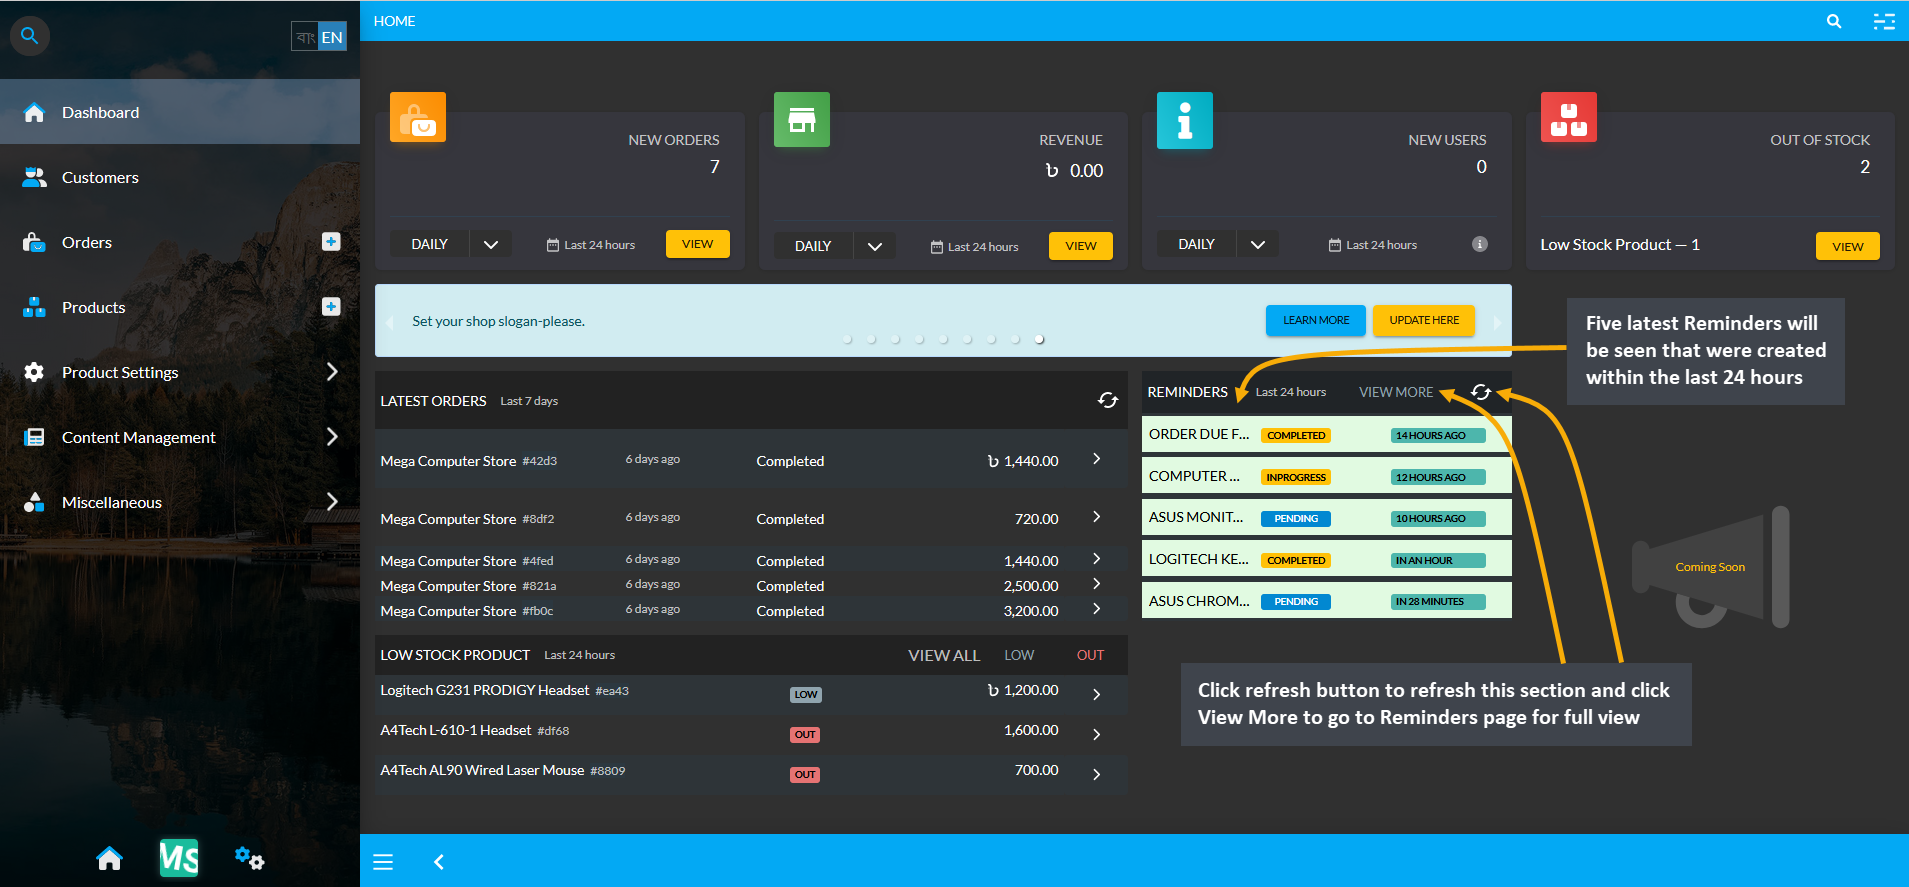
Image 3: Five latest Reminders will be visible from last 24 hours, click View More to view full details.
New Cheque Reminders will be created when placing a New Order and choosing Payment Method with Cheque. This will automatically create and set a Cheque Reminder within the Reminders page. In this case, place New Order from Orders tab with Customer information, preferred Product, and Quantity and click Proceed to continue.
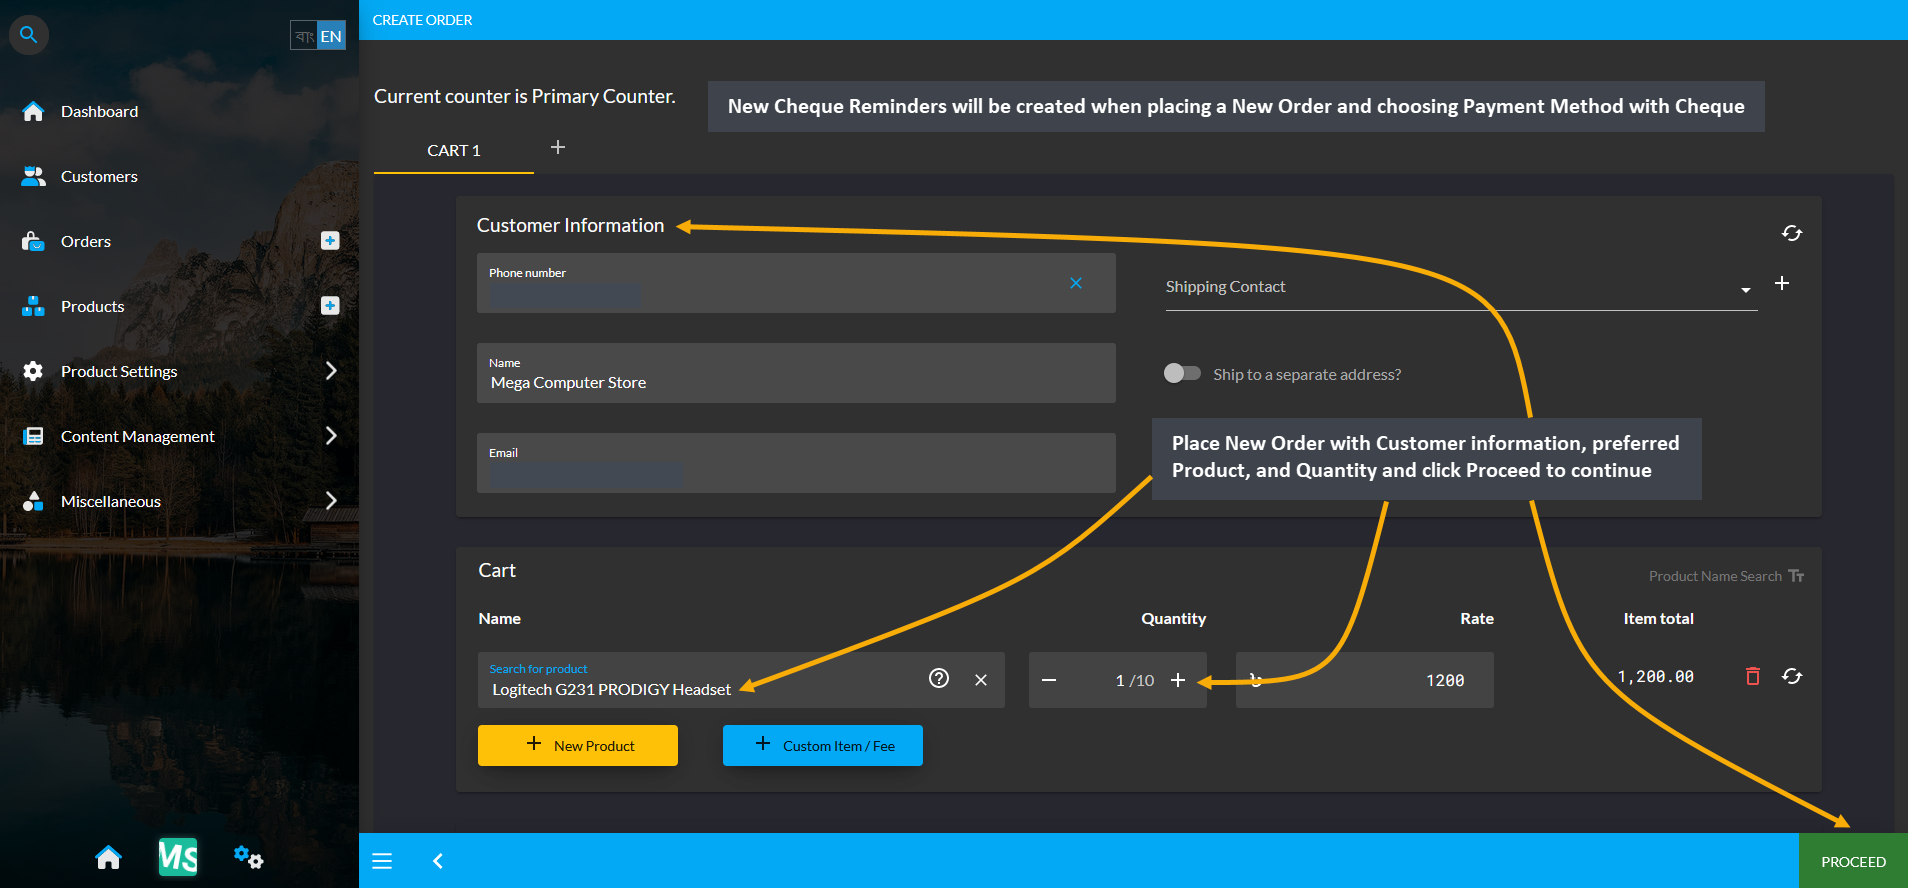
Image 1: Cheque Reminders will be created when placing New Order and choosing Payment Method with Cheque.
After selecting preferred Shipping Option, select Payment Method with Cheque which will automatically create and set a Cheque Reminder within the Reminders page. Set Cheque Number, Due Date, Bank Name, and click Confirm Order to place New Order. Due Date will be set as Reminder to remind Shop Owner of the due.
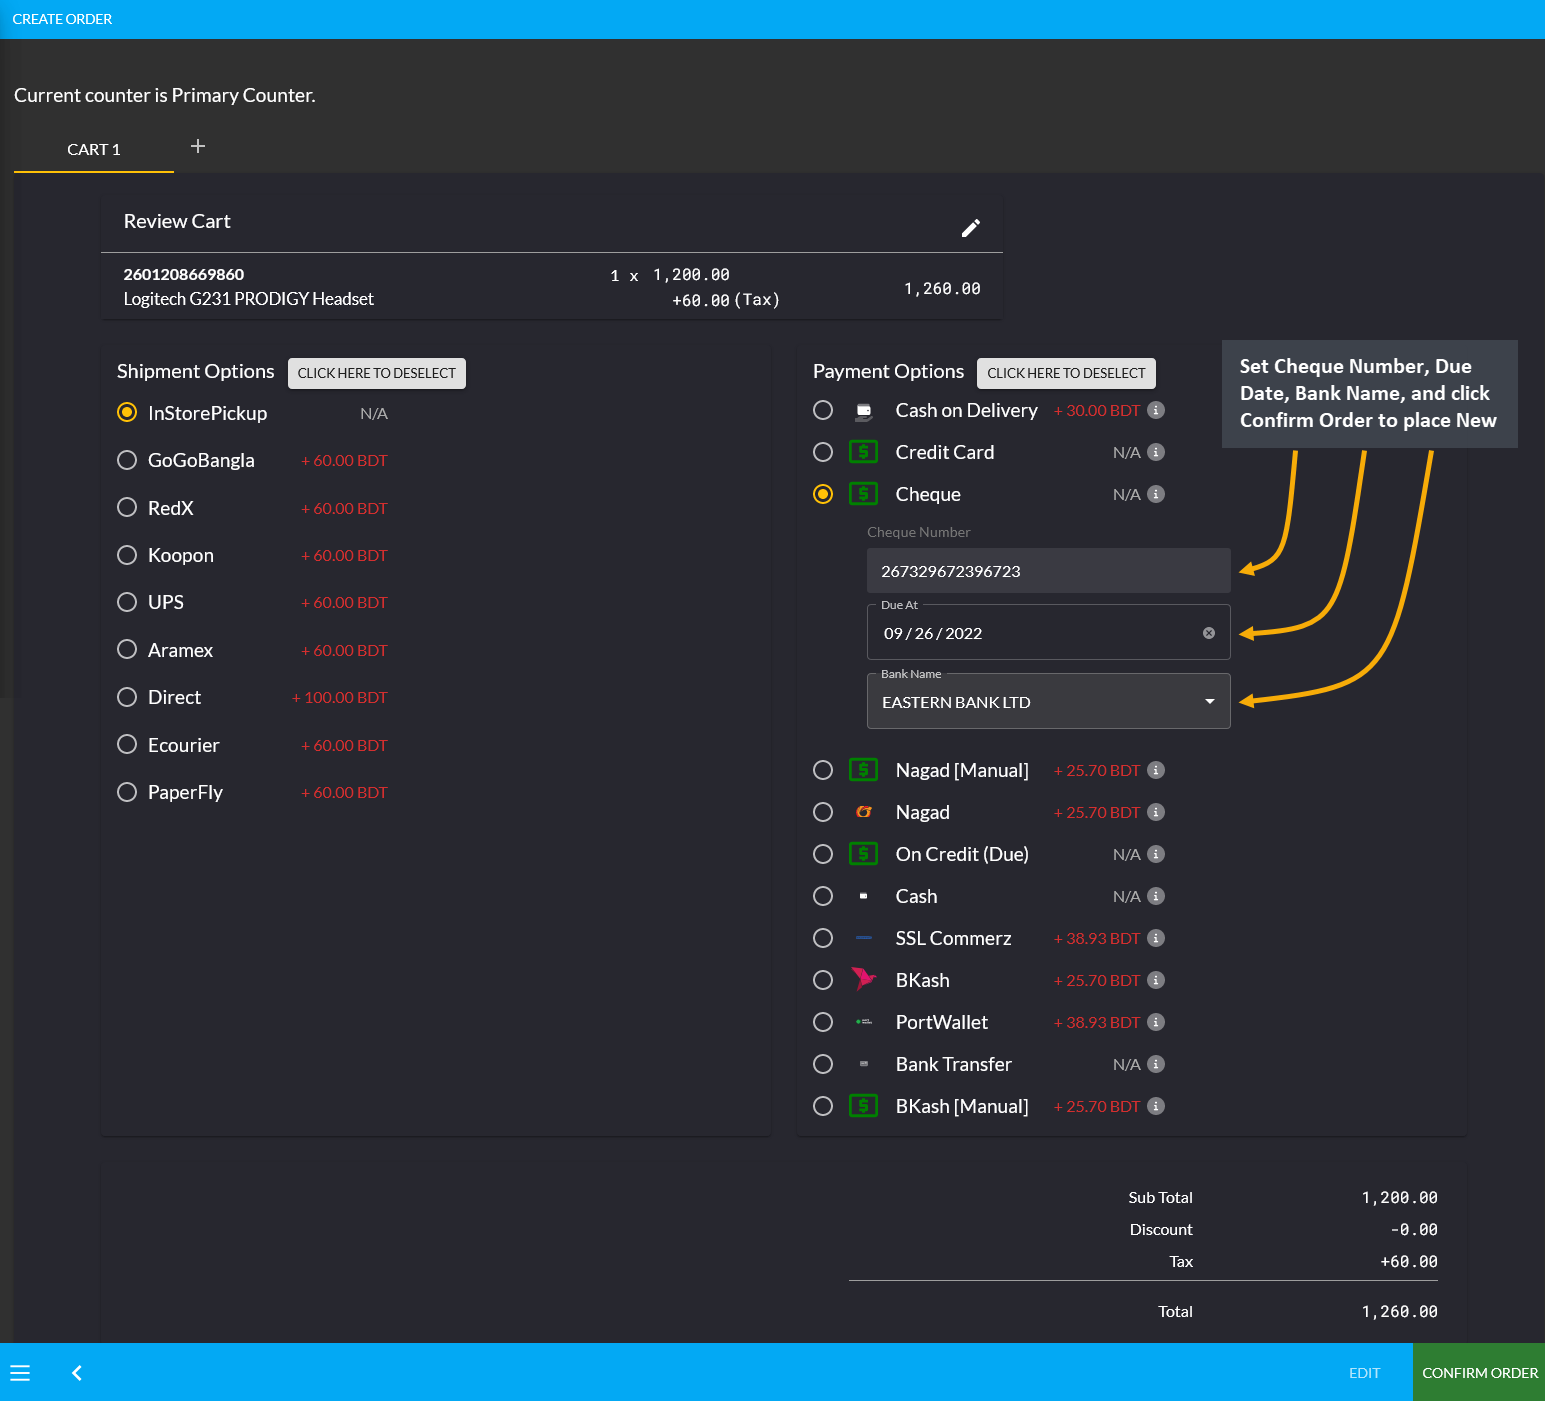
Image 2: Select Payment Method with Cheque which will automatically create and set a Cheque Reminder.
In the Reminders Page, select Cheque from types and select a preferred i.e. Monthly timeframe to find the Cheque Reminders that were created when placing New Order and making payment with Cheque. Update any Reminder information by clicking on the Edit icon. Click on the tooltip icon (i) to see Cheque Number, amount, and status.
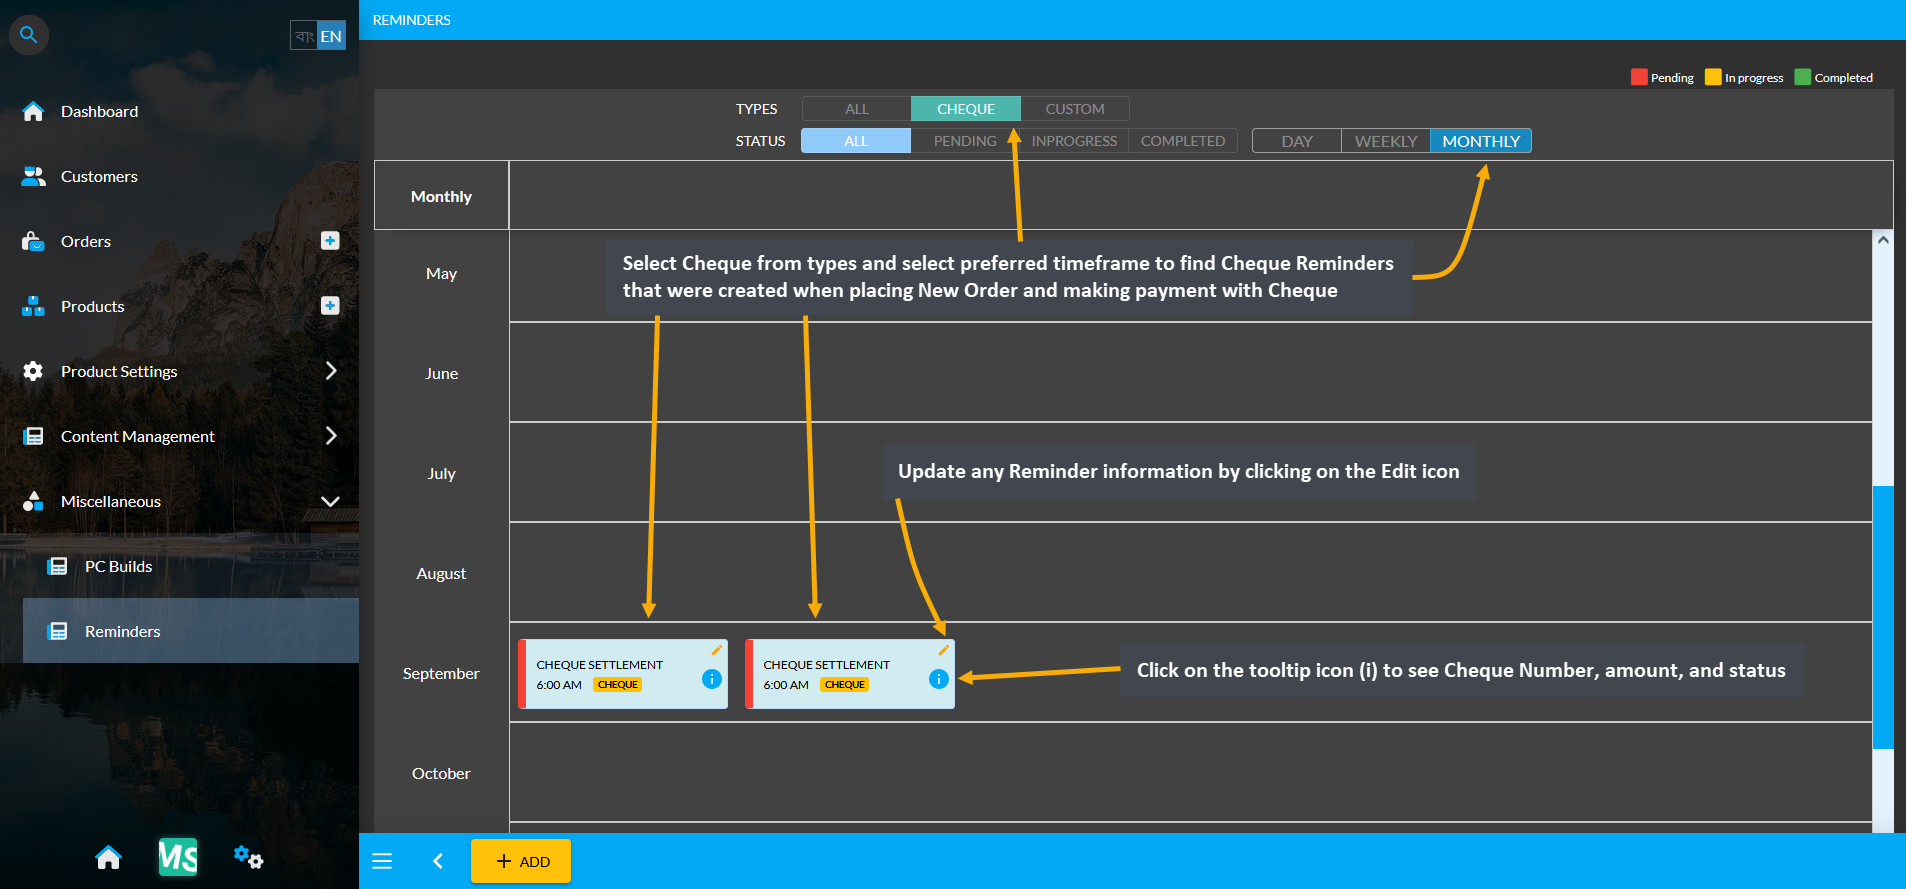
Image 3: Find Cheque Reminders by selecting type and timeframe and click the Edit icon to add an update.
The function of the Search option at the top left corner of the screen is to mainly to redirect to any module in the Main Menu quickly when you need to access it. Search with exact keywords on the search bar to find any module.
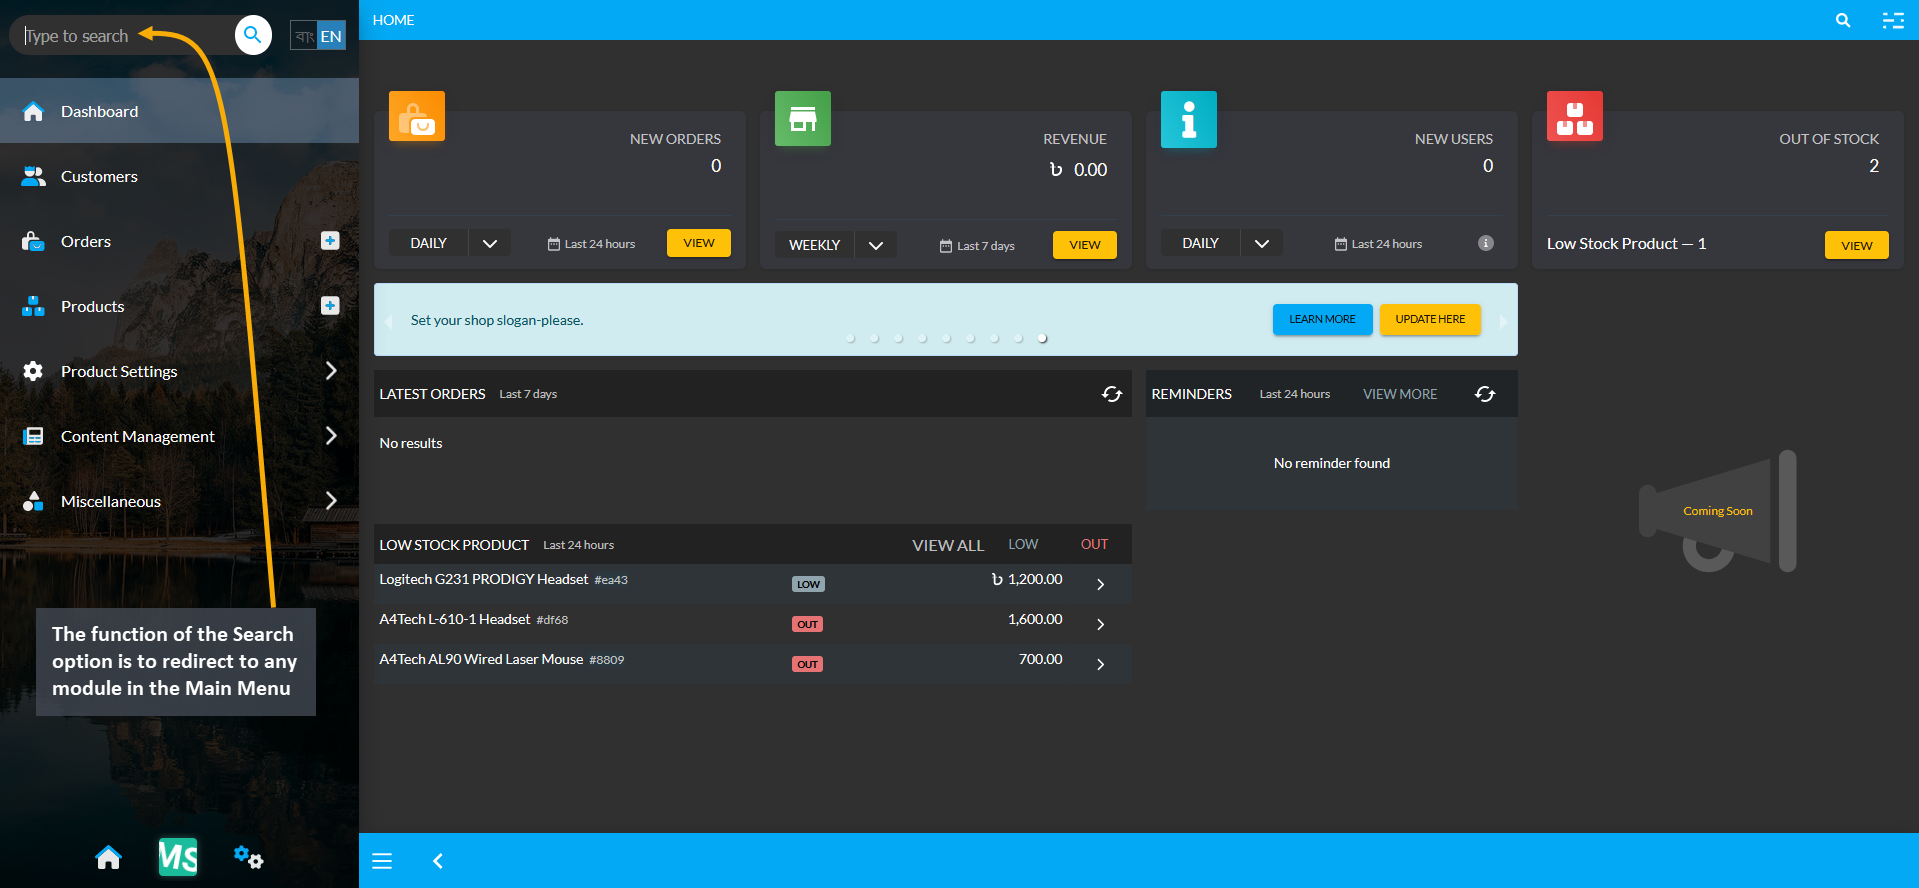
Image 1: The function of the Search option is to redirect to any module in the Main Menu.
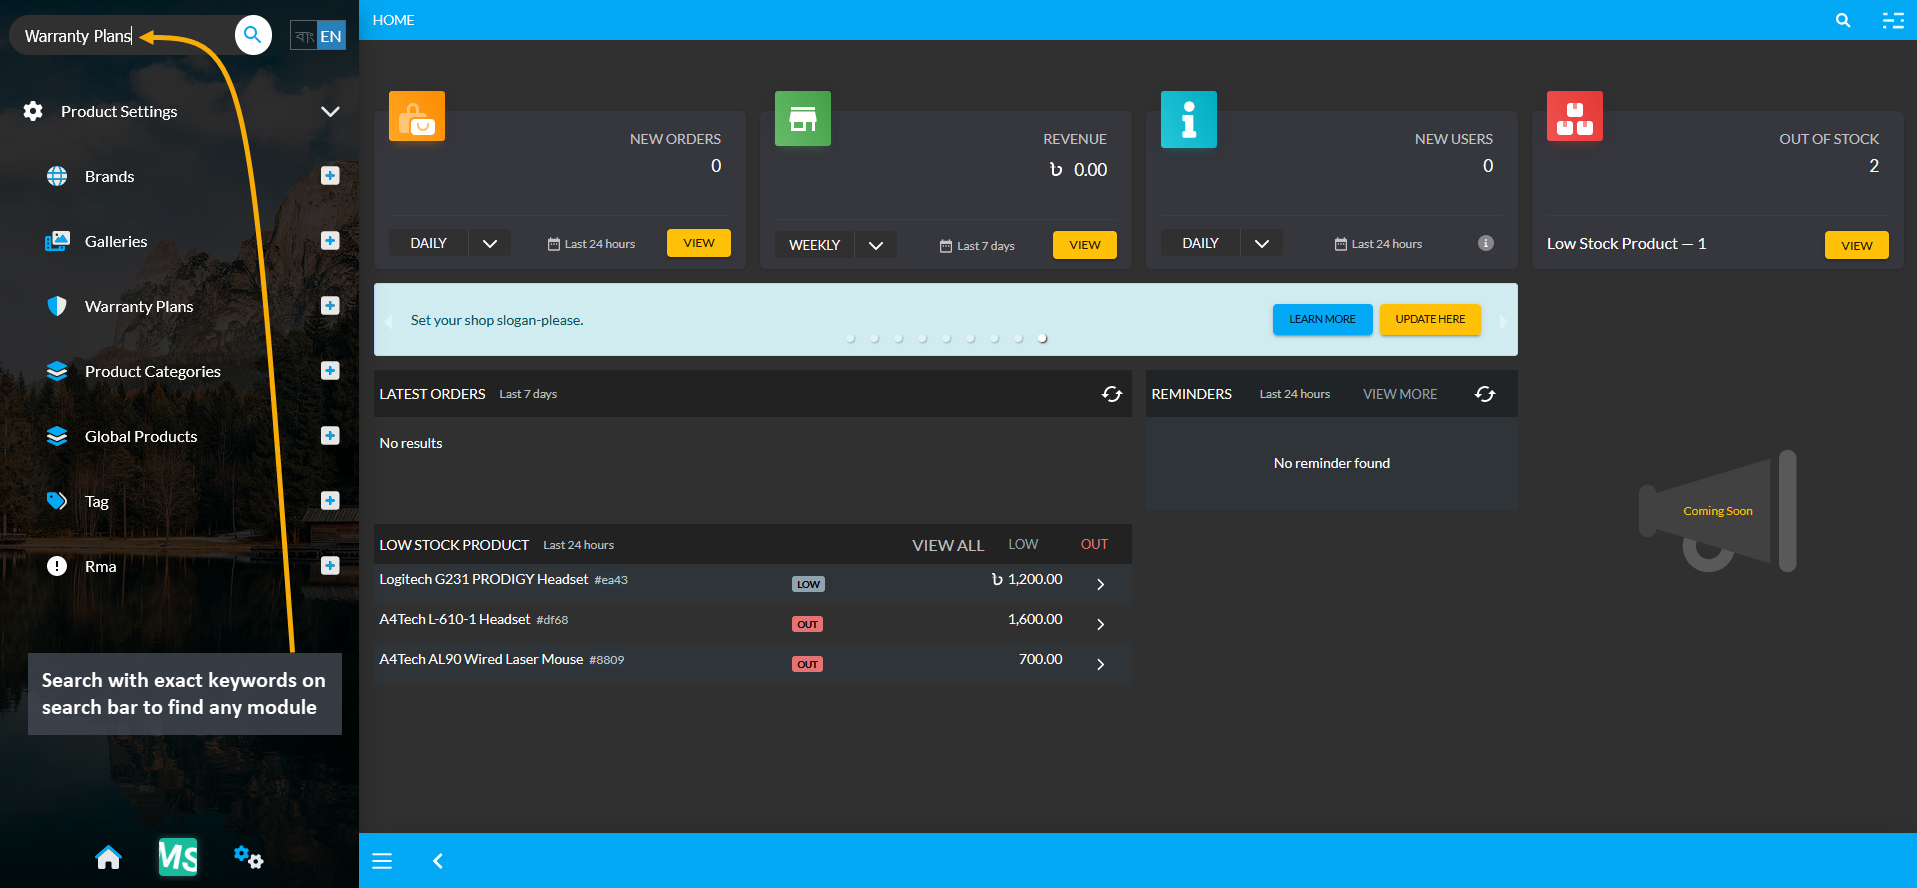
Image 2: Search with exact keywords on the search bar to find any module within the Main Menu.
This Flowchart shows an overview of creating and managing Tenant from Admin.