Initial Shop Setup
This section describes in details on how to configure each of the settings for nag displays on dashboard.
List of Steps to Complete Shop Setup
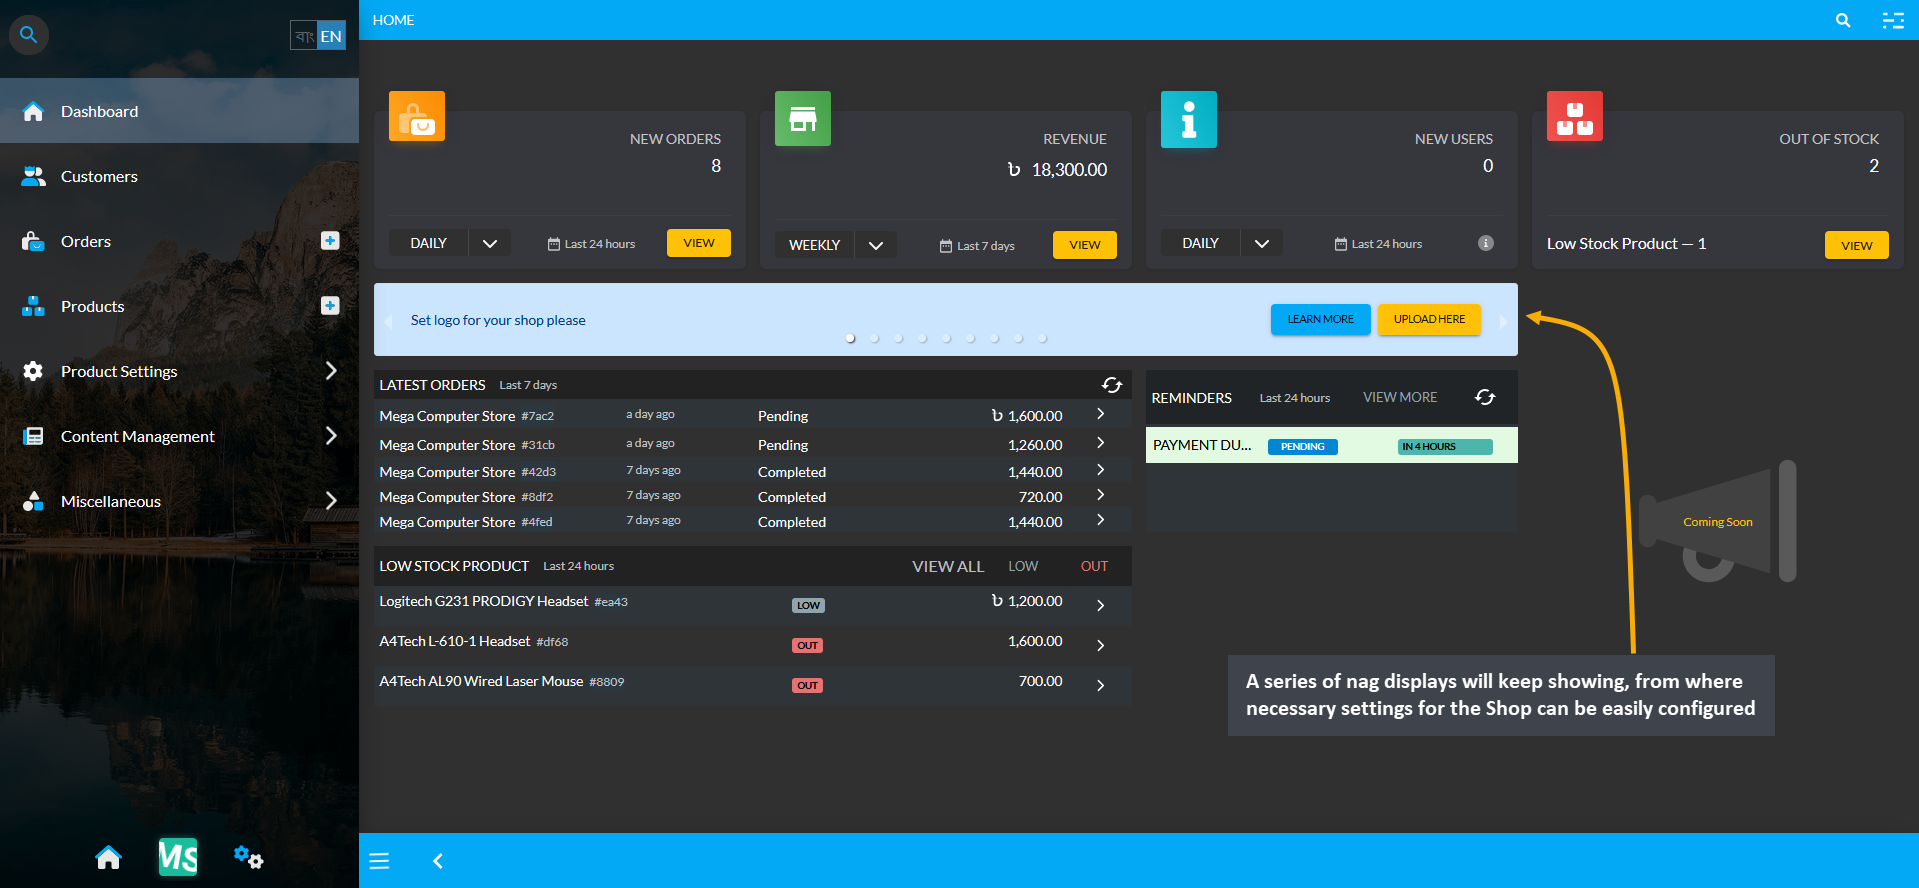
In the Admin Panel dashboard, a series of nag displays will keep displaying, from where necessary settings for the Shop can be easily configured. So, detailed steps on how to configure each of these settings are explained below:
Set Logo for Shop
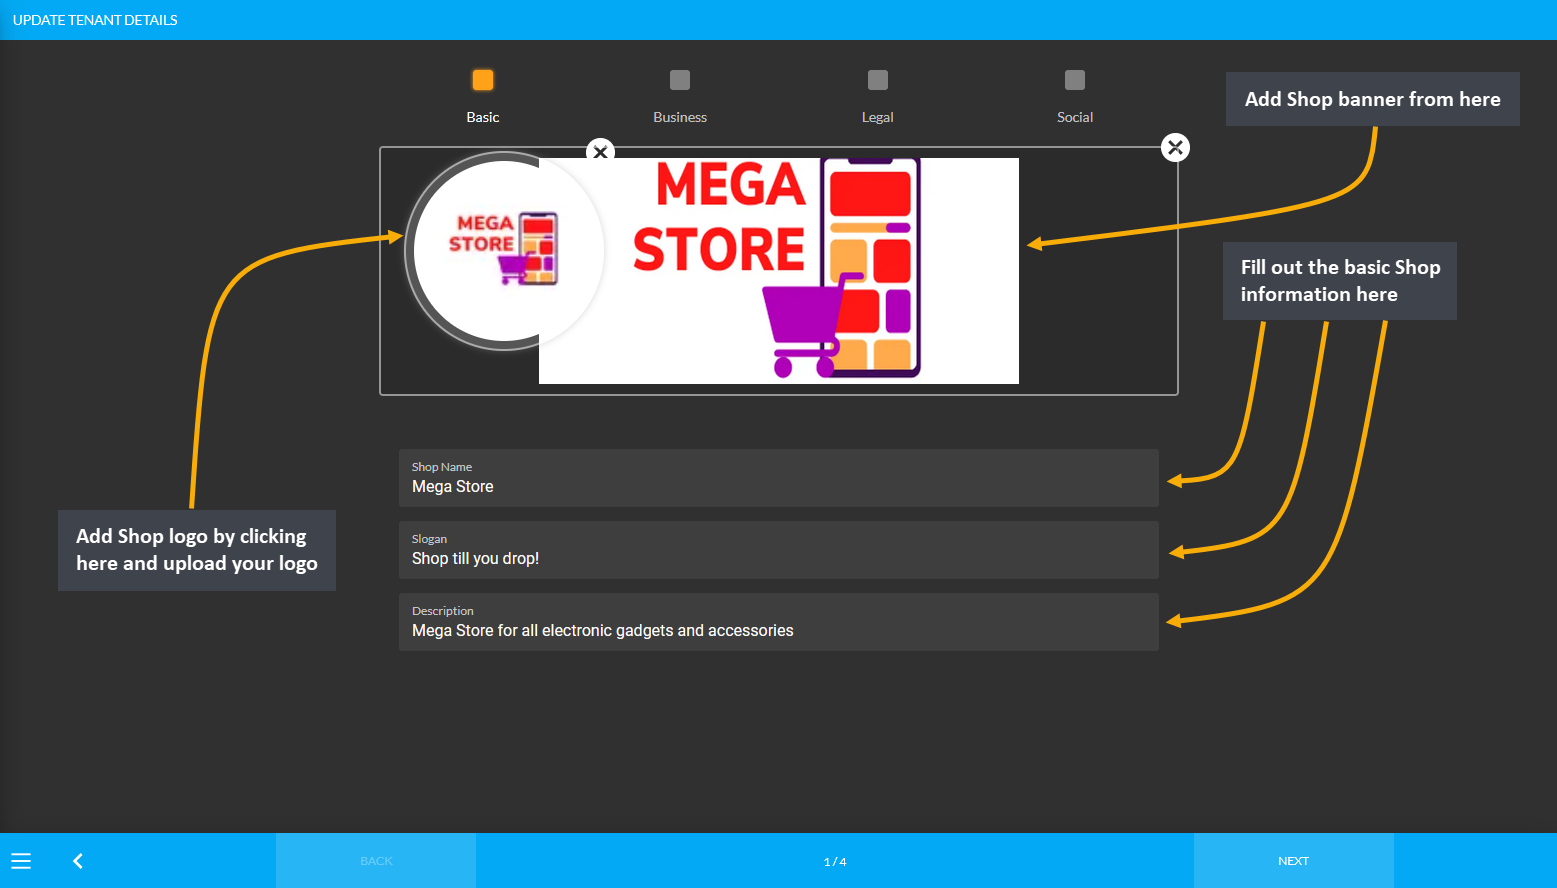
Setting up the basic information includes uploading a Shop Logo, Banner, and creating a Shop Name, Slogan, and Description. Click Next to proceed to subsequent steps for setting up business information for the Shop.
Set Shop Slogan
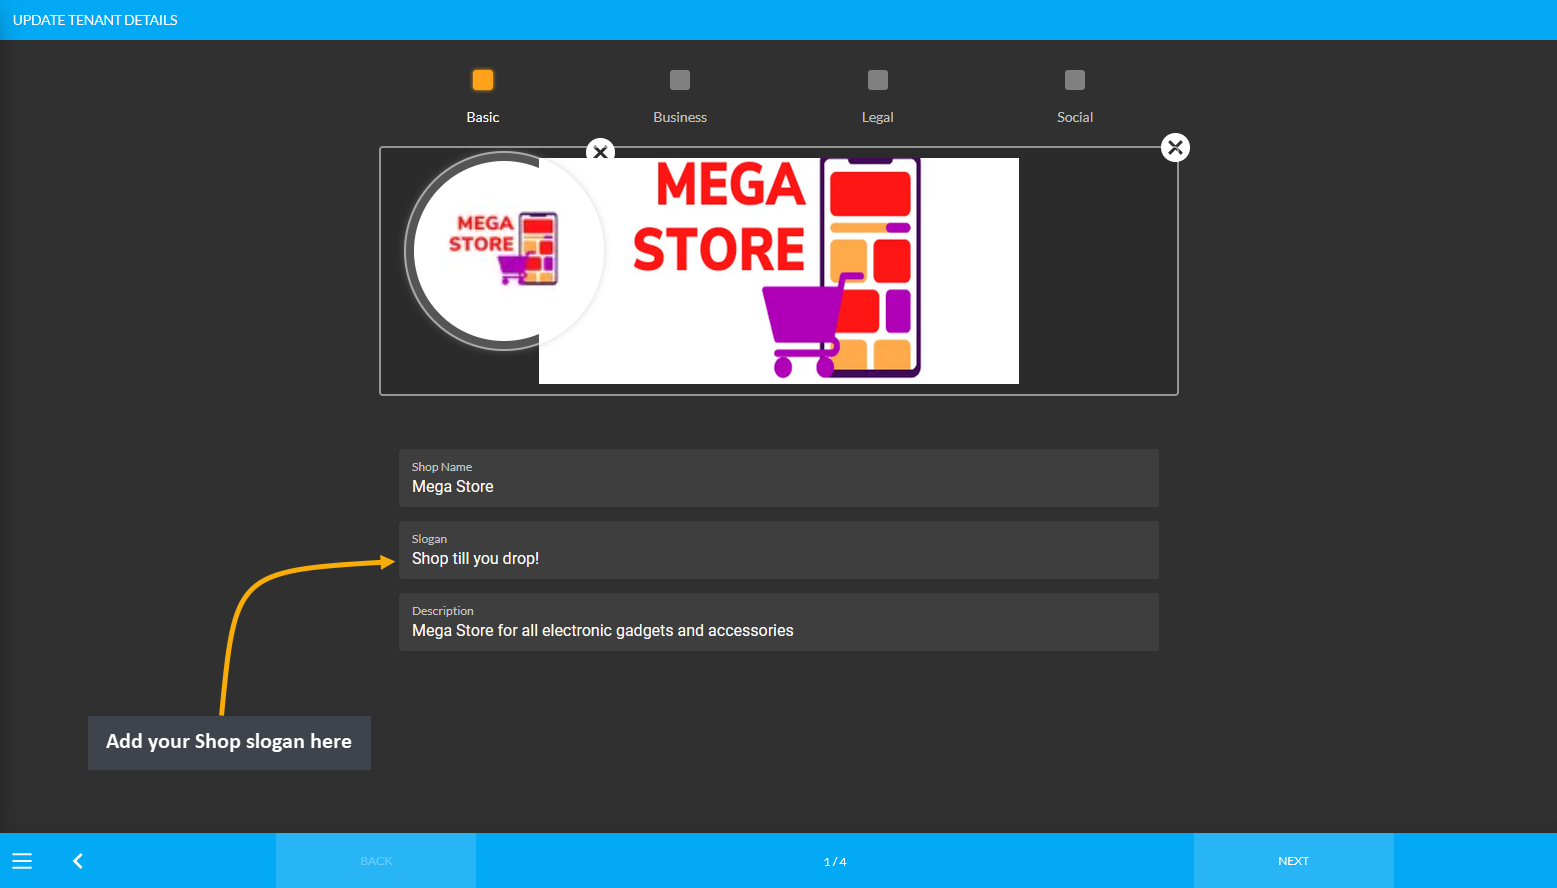
Setting up the basic information includes uploading a Shop Slogan. There are also subsequent steps for creating a Shop Name and Description, along with uploading a Shop Logo and Banner. Click Next to fill out more details.
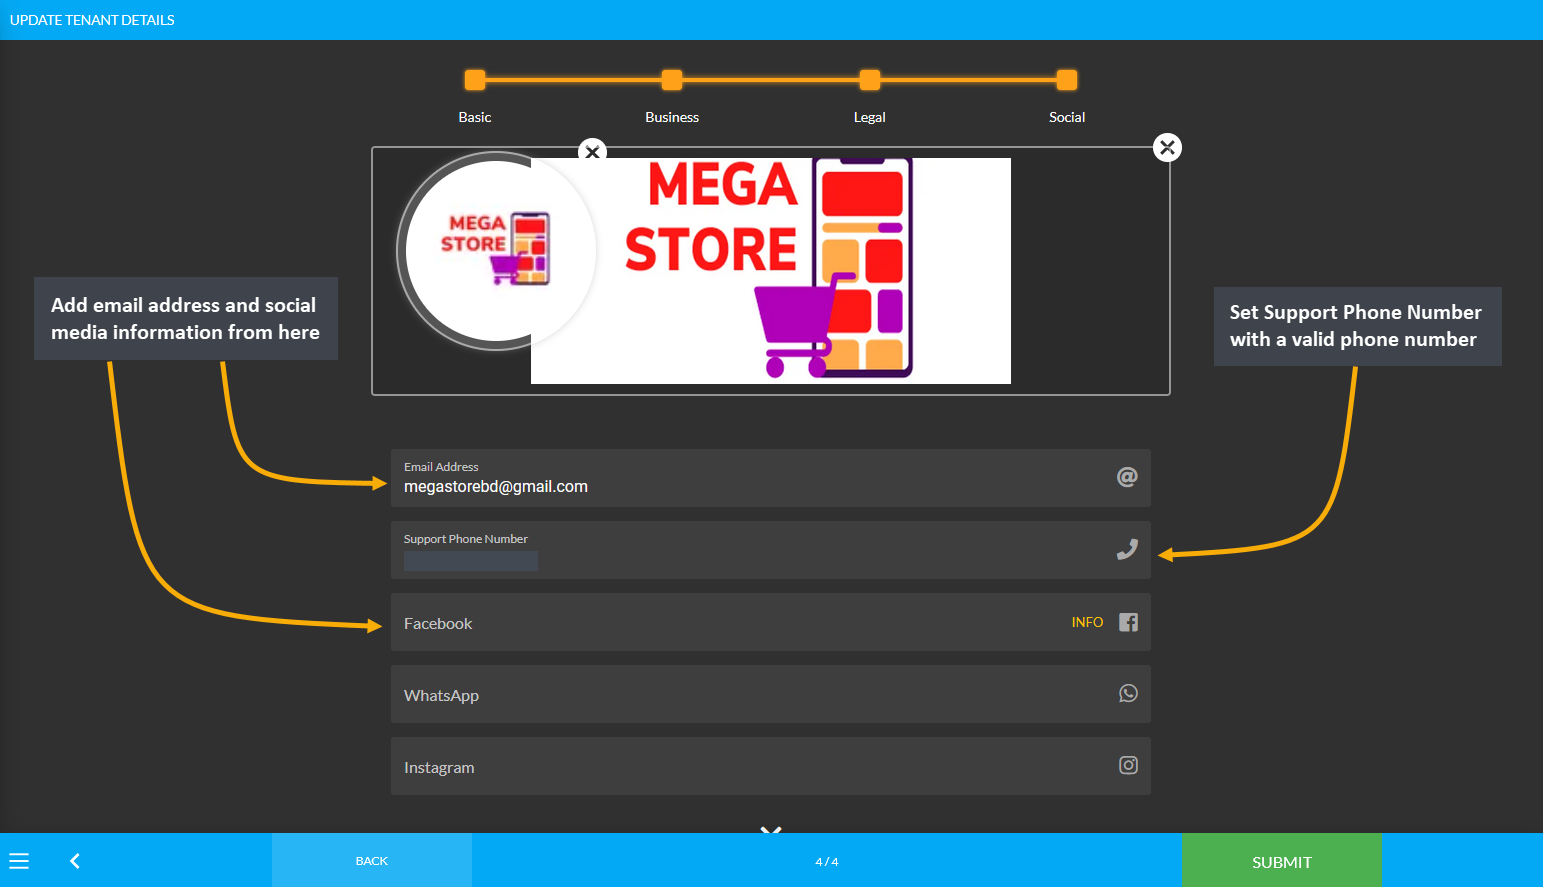
Set Support Phone Number
Another important step towards setting up the Tenant Account is filling out the social information of the Shop. To complete this step, add email address, support phone number, and other social media accounts as needed. Add a valid phone number to setup the Support Phone Number. Click Submit to save all the information successfully.
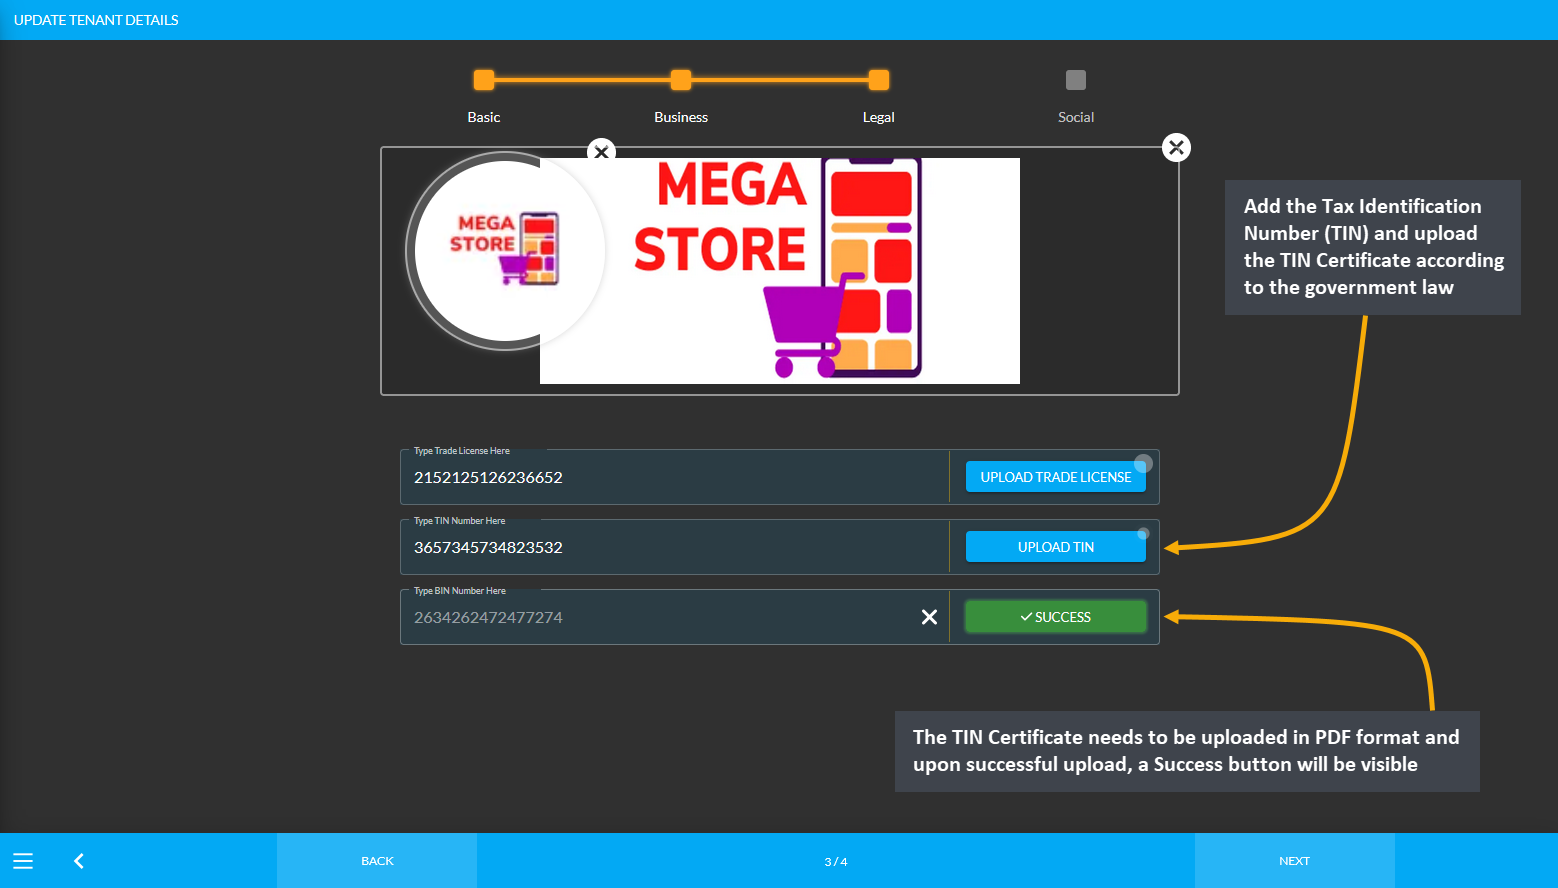
Upload Tax Identification Number (TIN)
Setup legal information by adding Tax Identification Number (TIN) and uploading a TIN Certificate according to the government law. The TIN Certificate needs to be uploaded in PDF format and after it is successfully uploaded, a Success button will be visible which will indicate that the TIN number has been added to the Shop.
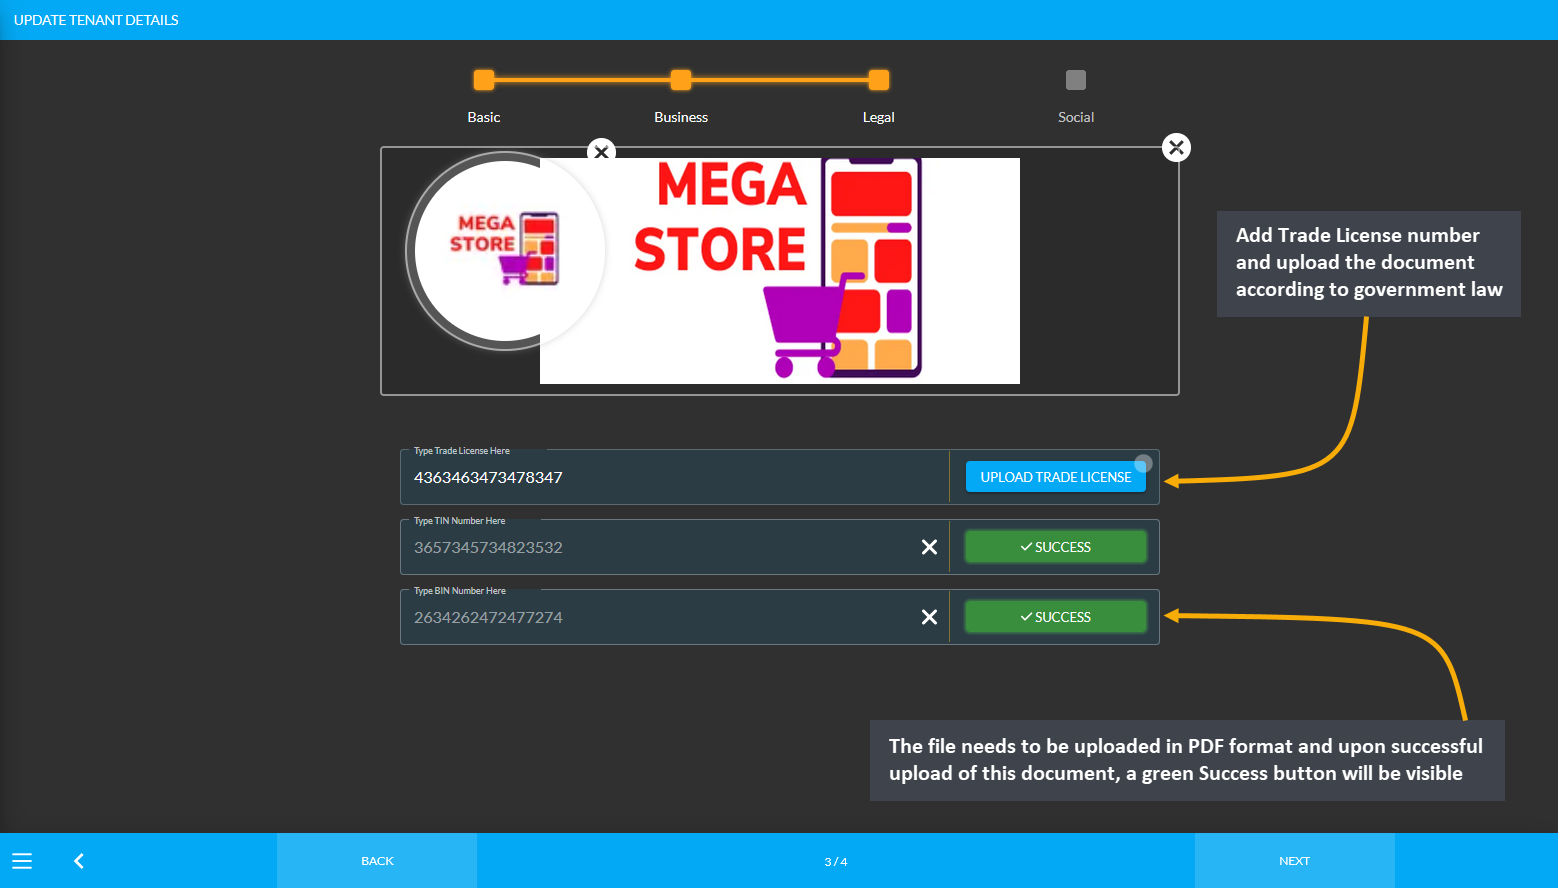
Update Trade License
Setup legal information by adding Trade License number and uploading the document according to government law. The file needs to be uploaded in PDF format and upon successful upload of this document, a green Success button will be visible which will indicate that the Trade License has been added to the Shop.
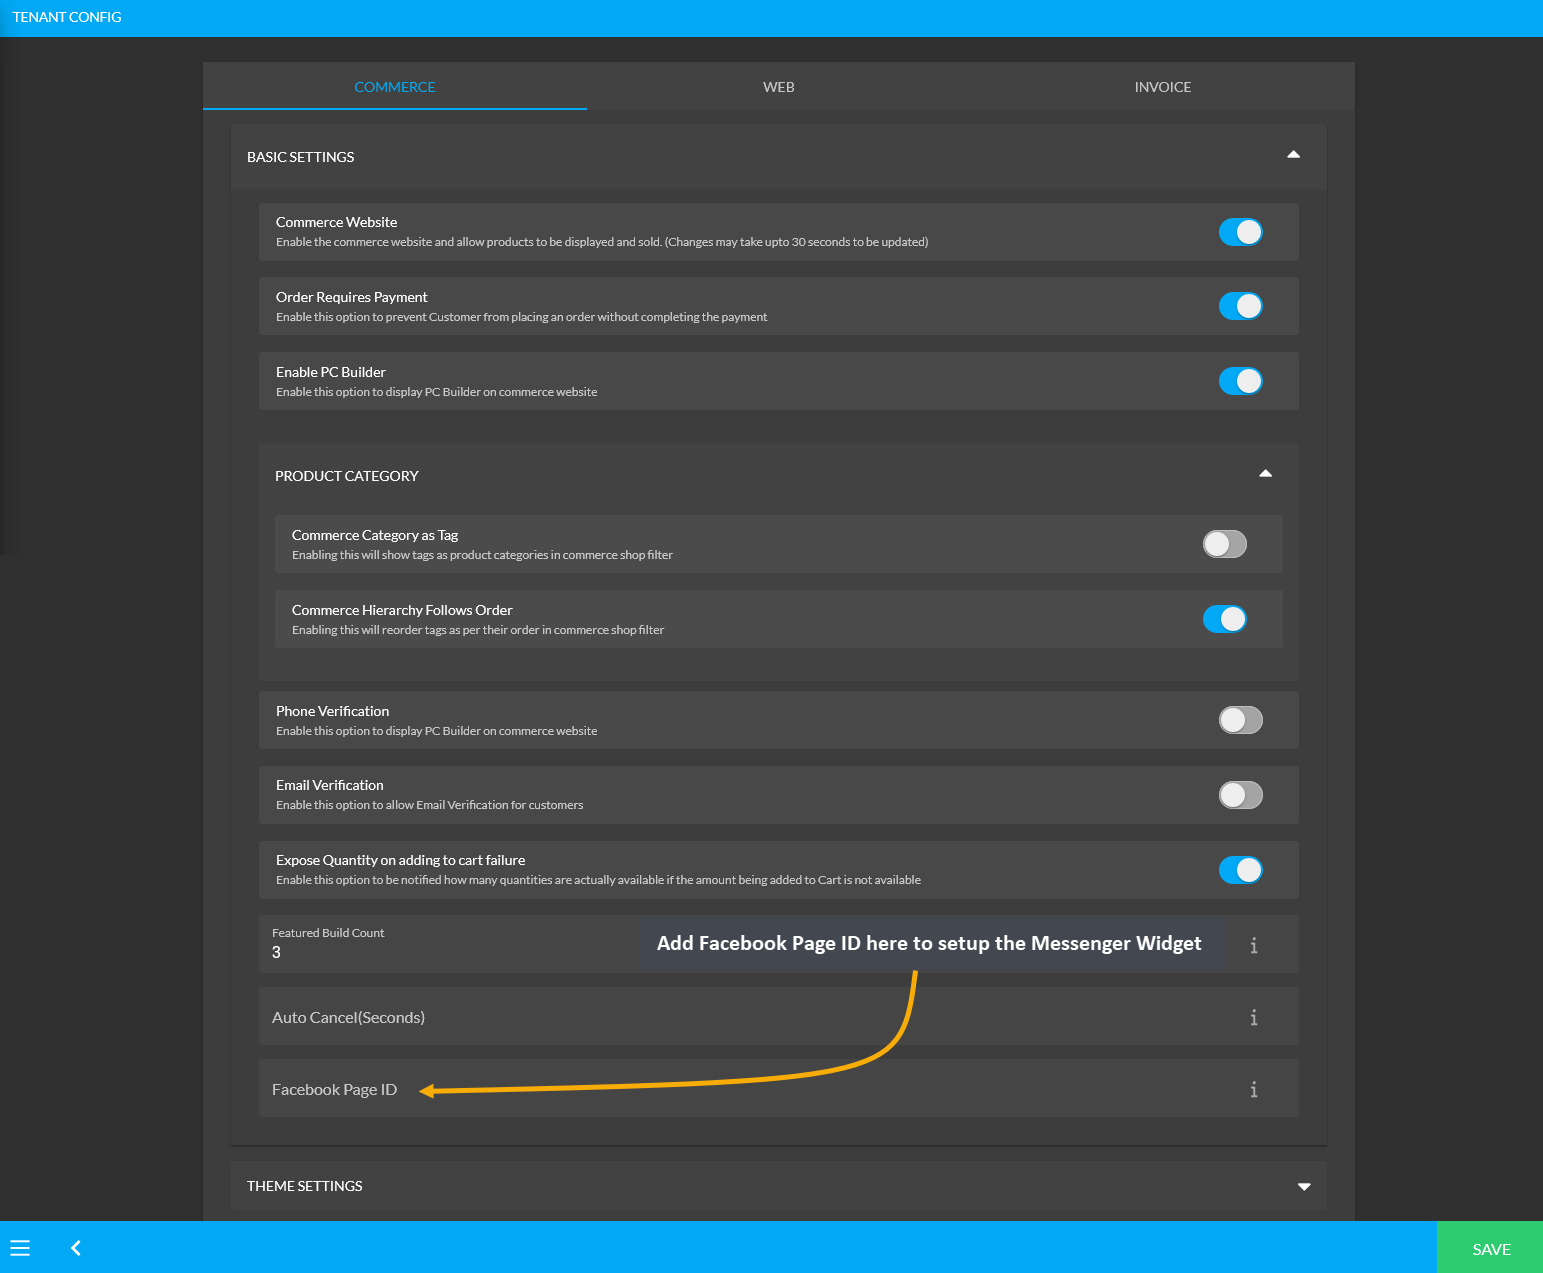
Setup Shop Facebook Page
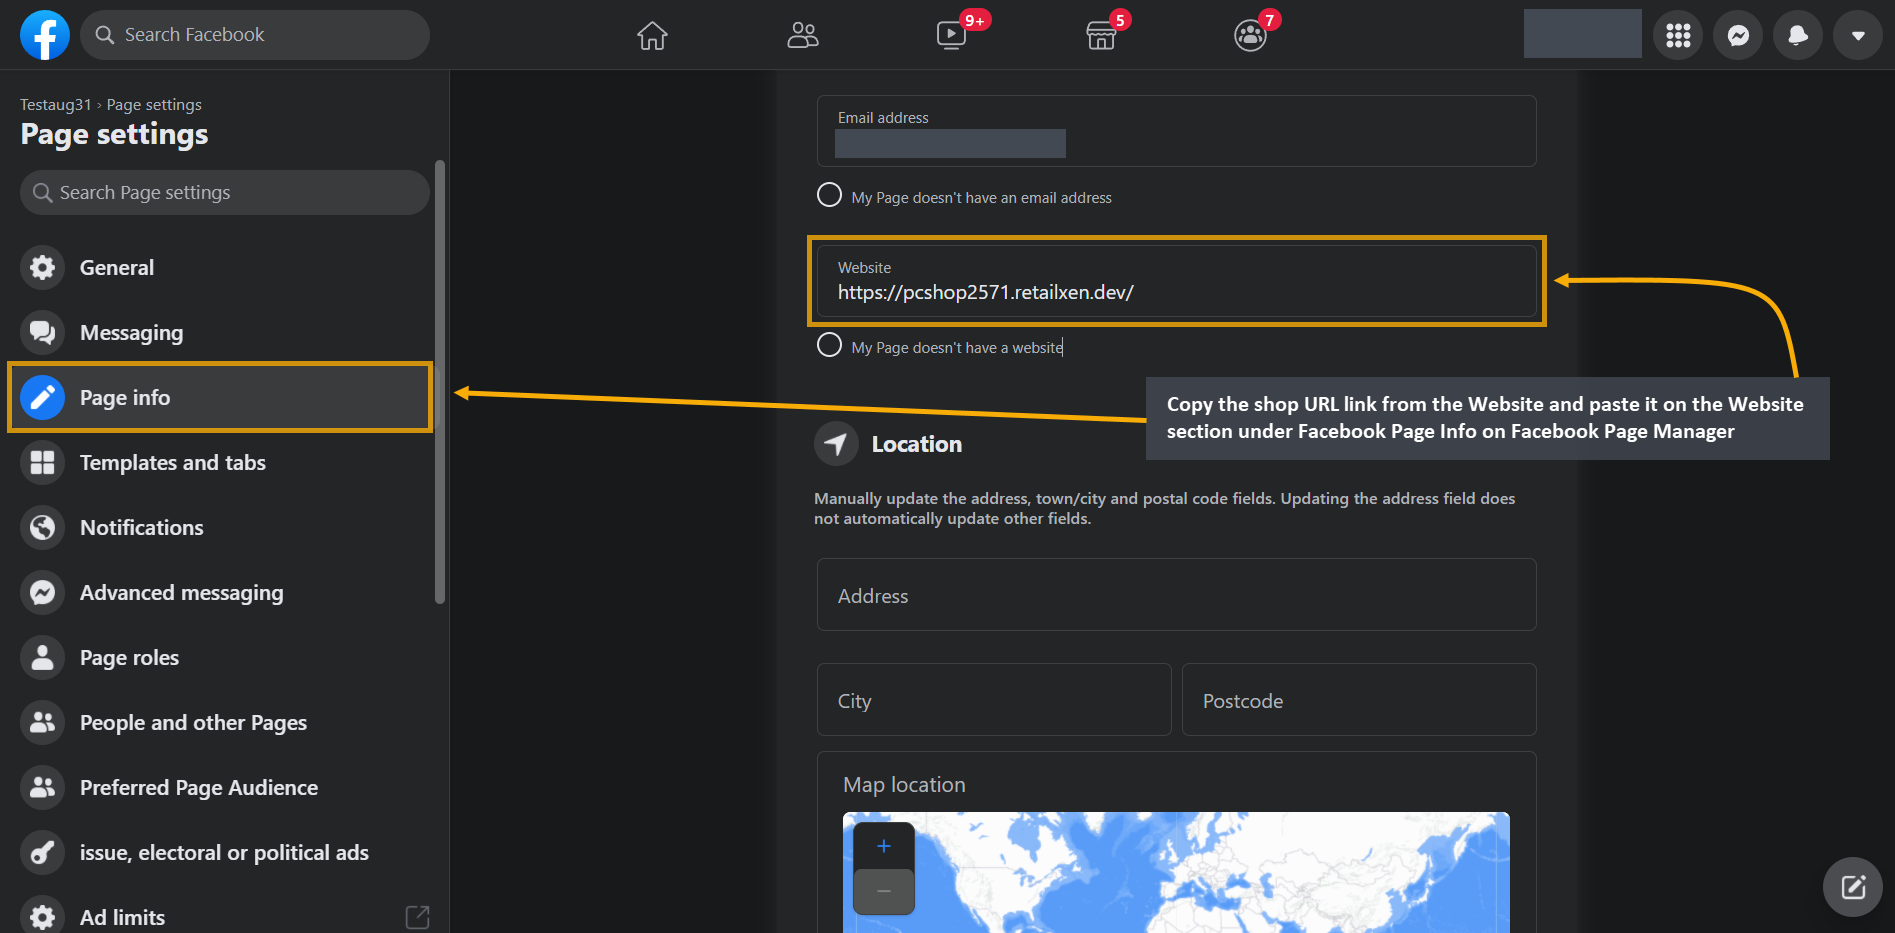
It is important for the Shop Owner to add Facebook Page ID for setting up the Messenger widget on The Website. So, copy the Facebook Page ID from Facebook and input it in the field as shown in screenshot below.
The second step for setting up the Shop Facebook Page is to copy the shop URL link from the Website and paste it on the Website section under Facebook Page Info on Facebook Page Manager as shown in the example. Now, both the shop and the Facebook Page ID will be linked to initiate the Messenger widget on the Website.
Set Cash on Delivery Payment Gateway
To setup the payment gateway for Cash on Delivery, first set a Minimum and Maximum amount for Customer’s payment. Use Enable button to activate the gateway. Then, use the toggle button to enable Fee and set the Fee Value. There is a box to enable and set Display Instruction for Customer’s convenience to pay the cash during order delivery at their address. Click Save to confirm all changes and enable the gateway.
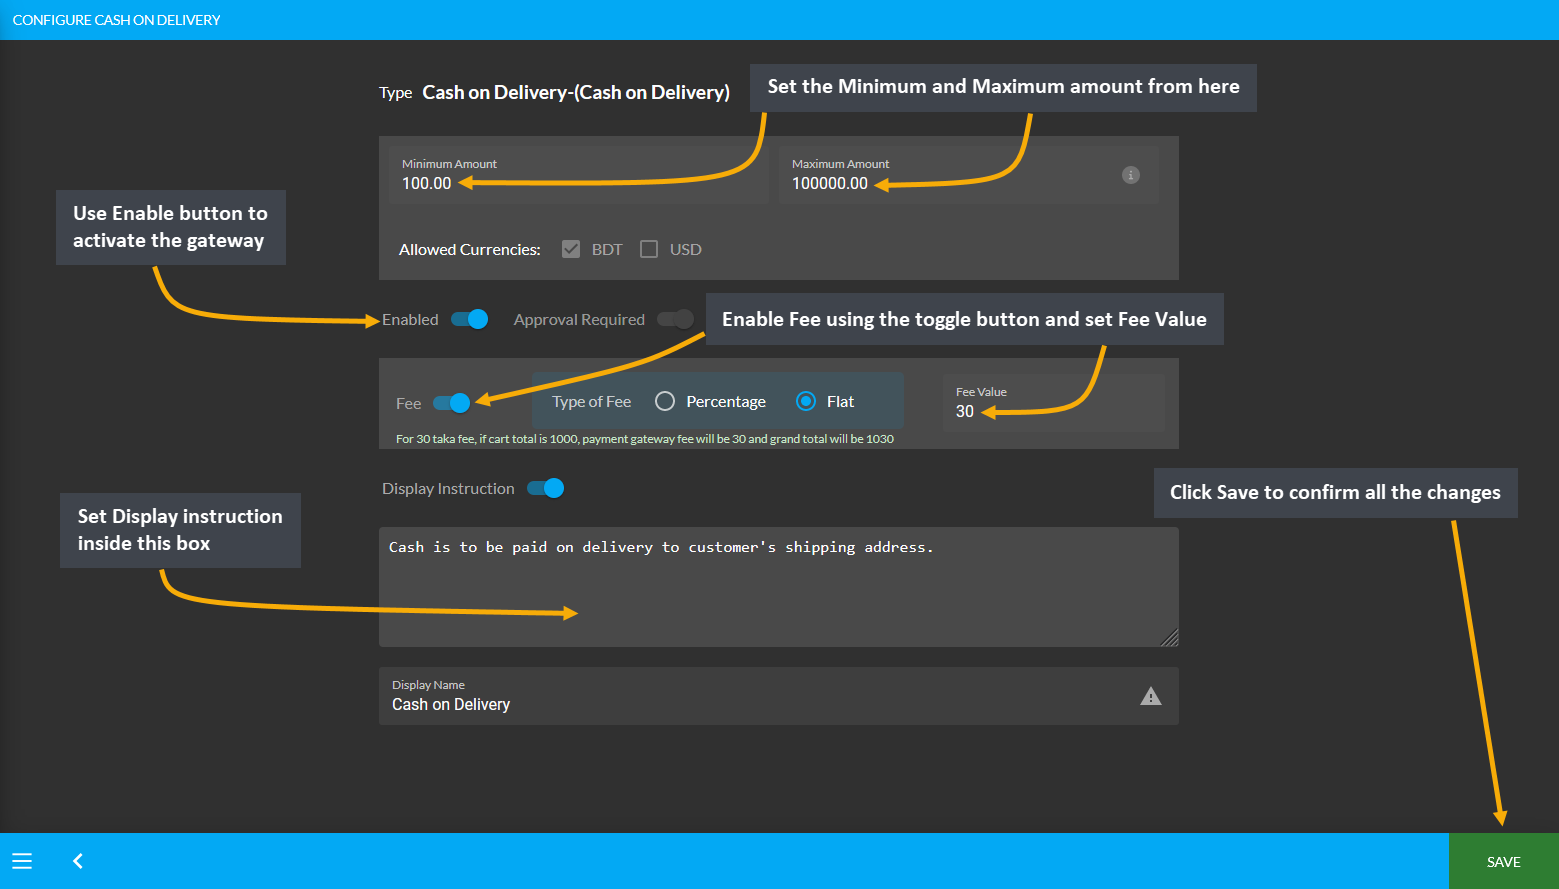
Image 1: Setup the Cash on Delivery with minimum and maximum amounts, fees, and display instructions.
Configure Payment Gateways
Configure Payment Gateways from Gateways under All Settings tab. The Payment Gateways that are embedded in the system are Cash, Cheque, Cash on Delivery, Bank Transfer, Credit Card, Ledger, PortWallet, SSLCommerz, Nagad, Nagad (Manual), Bkash, and Bkash (Manual). Shop Owners can activate or enable them whenever needed.
Click the Configure button beside each Payment Gateway to configure them. If any gateway is enabled, they will be marked as green, if any gateway is disabled, they will be marked as red. So, the Shop Owner can enable and disable any payment gateway to allow Customers to make payment via any of these gateways on The Website.
For the configuration of Payment Gateways, there are options to setup display name, minimum amount required, maximum amount allowed, fees, display instruction, QR Code, test API credentials, bank account (bank transfer), allowed currencies, and EMI (for credit cards) etc. One payment gateway configuration will vary from another.
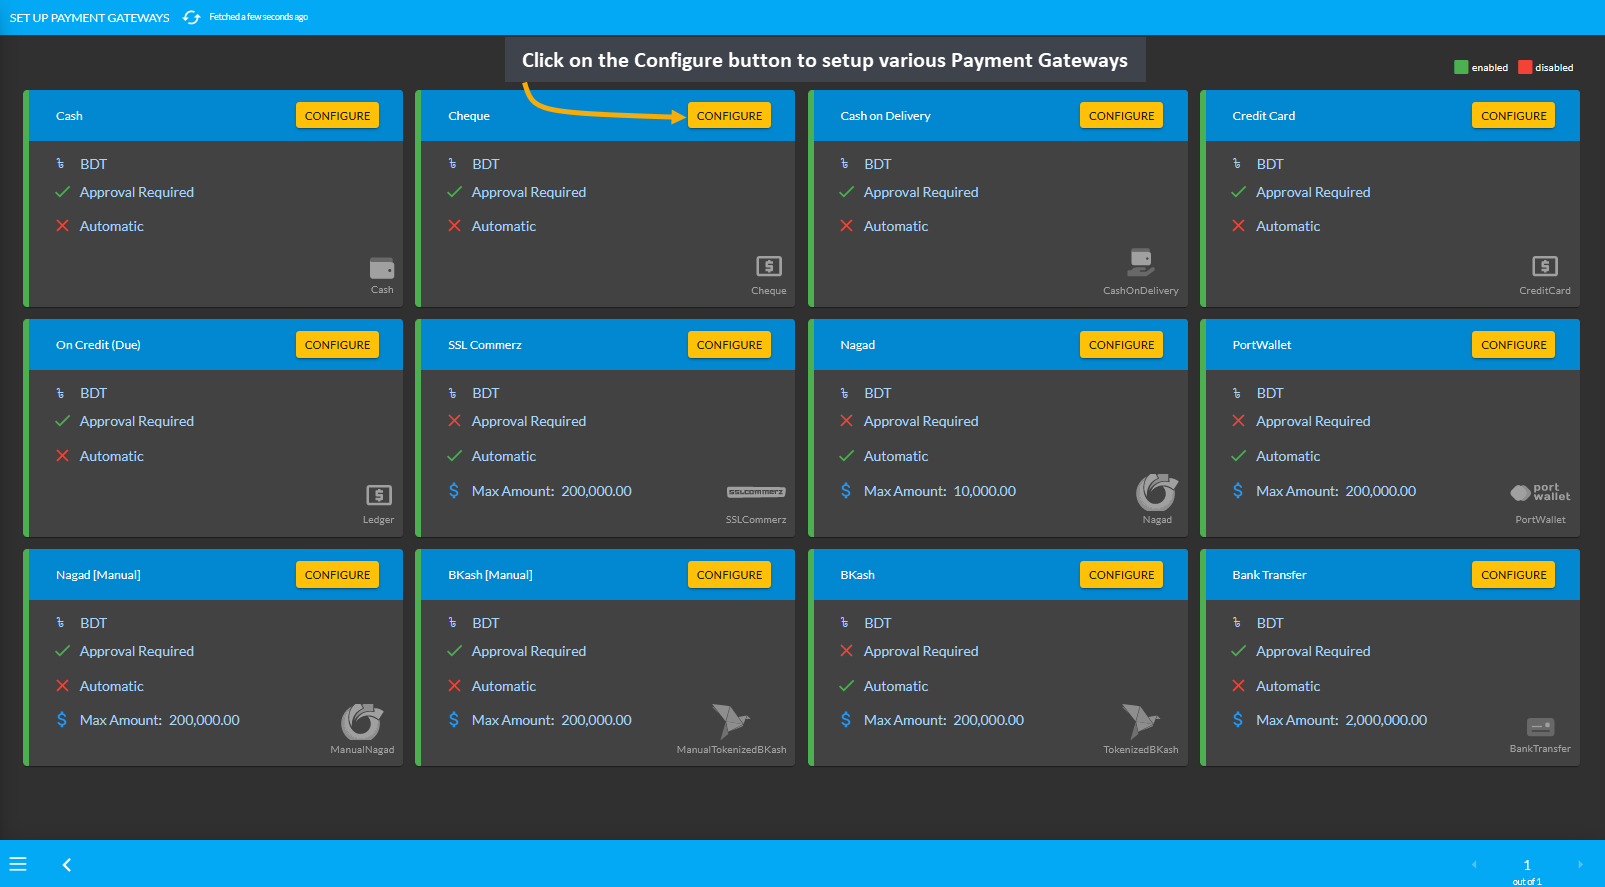
Image 1: Click on the Configure button to setup various Payment Gateways from the list.
Bank Transfer
The payment gateway for Bank Transfer can be set with a Minimum and Maximum amount. Use Enable button to activate the gateway. There is a toggle button to enable Fee and set a Fee Value. Click Add Bank Account button to add bank details. Finally, set the Display Instruction and click Save to confirm all changes and enable the gateway.
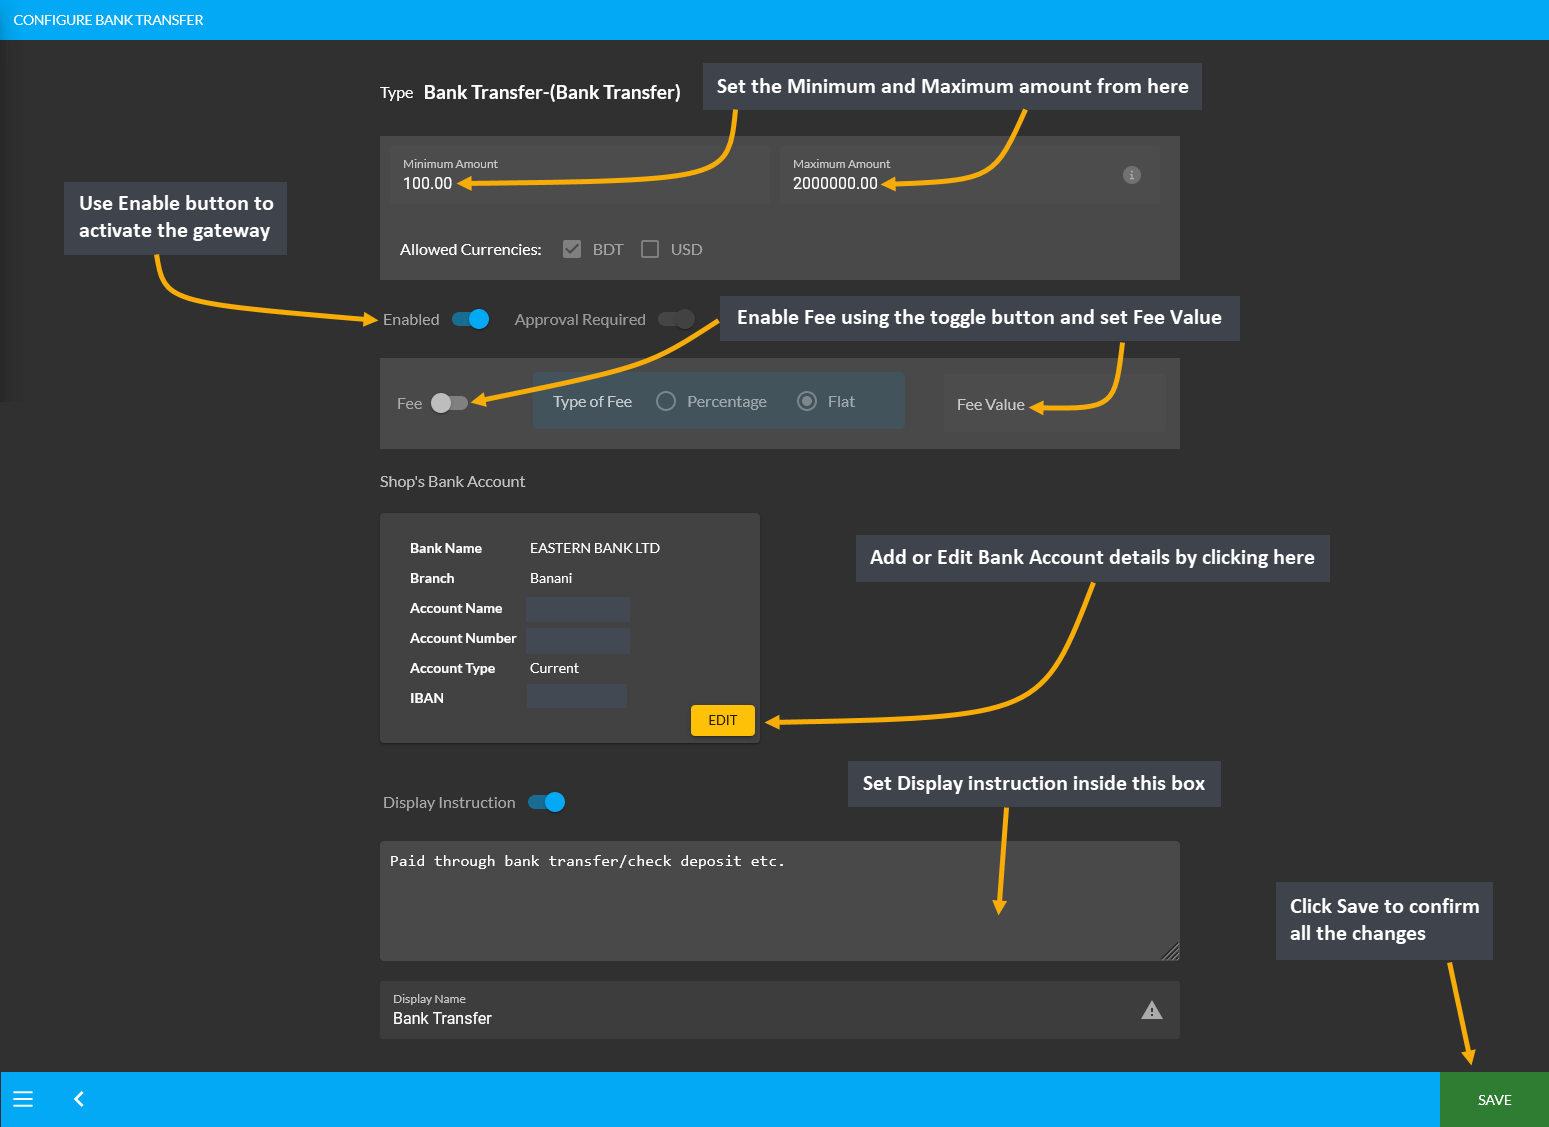
Image 1: Setup Bank Transfer with a minimum and maximum amount, fees, and detailed bank information.
Within Bank Transfer, clicking on the Add Bank Account or Edit button will open a pop-up from where the Shop Owner can setup their bank details. The bank details include setting up bank name, bank account name, bank account number, bank branch, bank swift, bank routing number, IBAN and account type.
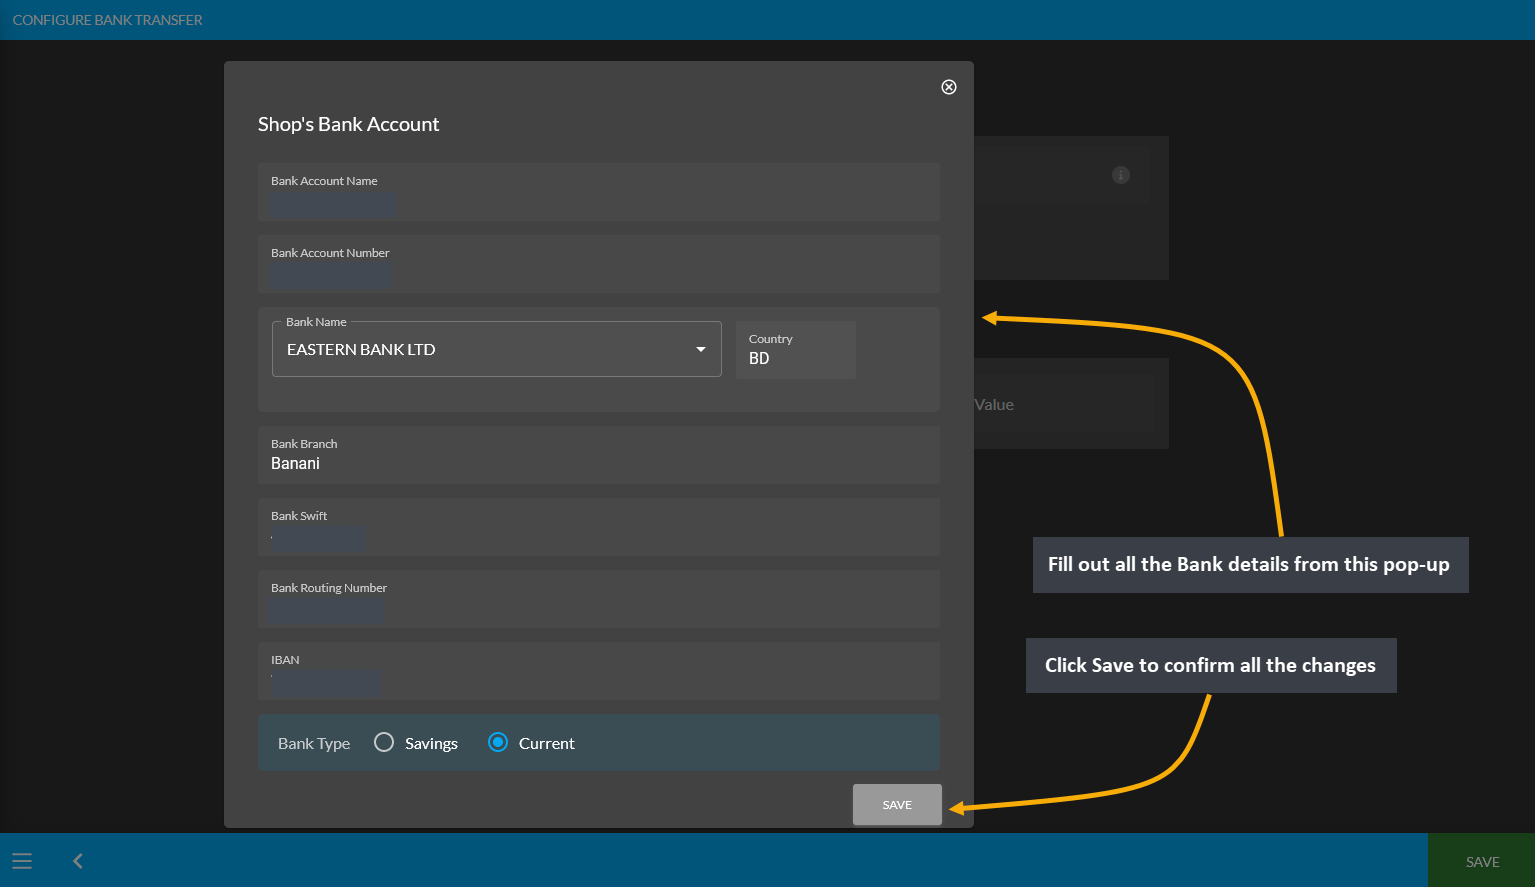
Image 2: Setup Bank details with Name, Account Name, Type, Number, Branch, Swift, Routing Number, and IBAN.
BKash (Manual)
The payment gateway for Bkash (Manual) can be set with a Minimum and Maximum amount. Use Enable button to activate the gateway. There is a toggle button to enable Fee and set a Fee Value. Enter BKash phone number and select Merchant Payment or Send Money. Upload QR Code using a screenshot downloaded from the phone and set Display Instruction below as shown. Click Save to confirm all changes and enable the gateway.
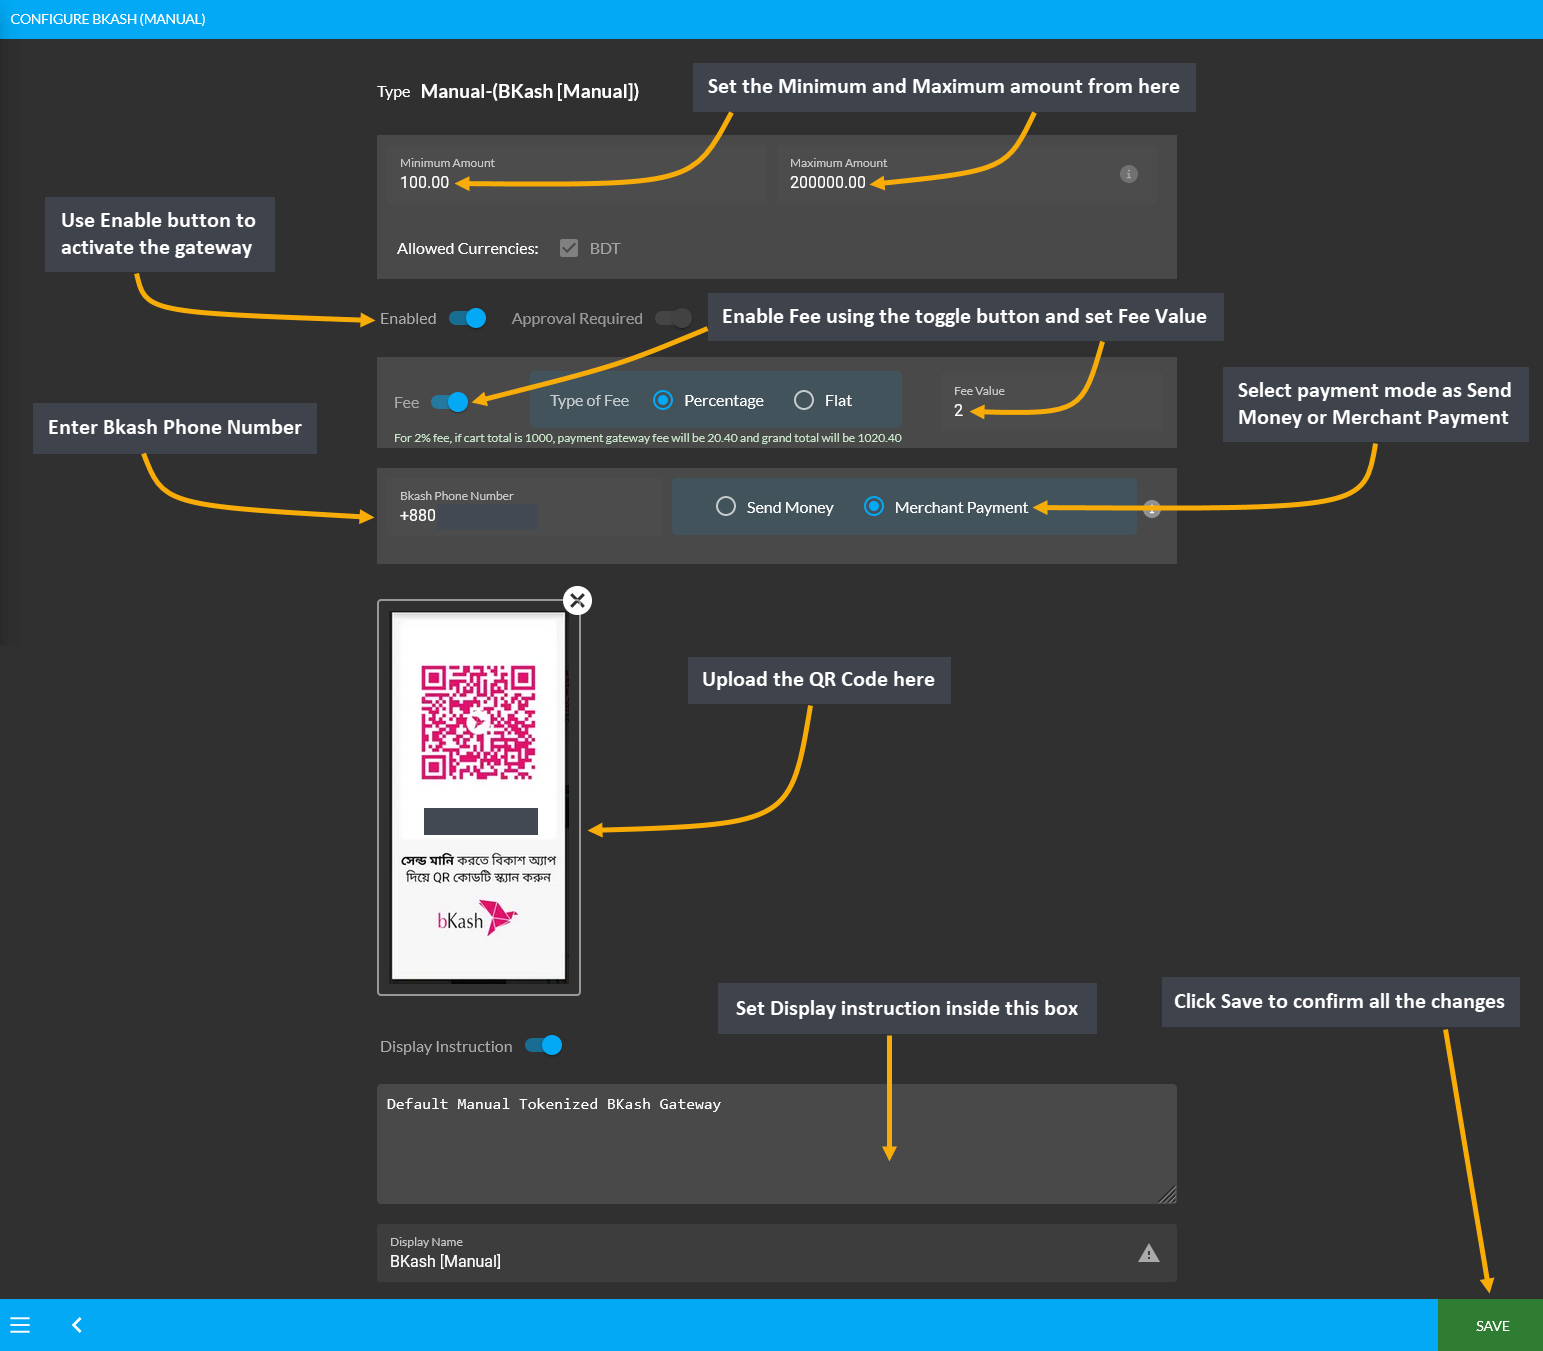
Image 1: Setup BKash (Manual) with amounts, fees, BKash phone number, payment mode, and QR code.
Downloading QR Code from BKash
In order to upload QR Code for activating BKash Manual Gateway, there are few steps to follow. First, User needs to login to their BKash Account using Account Number and Pin. Then, they need to click the avatar on top of the screen. This will redirect to the screen to download the QR Code to upload in BKash (Manual) payment gateway.
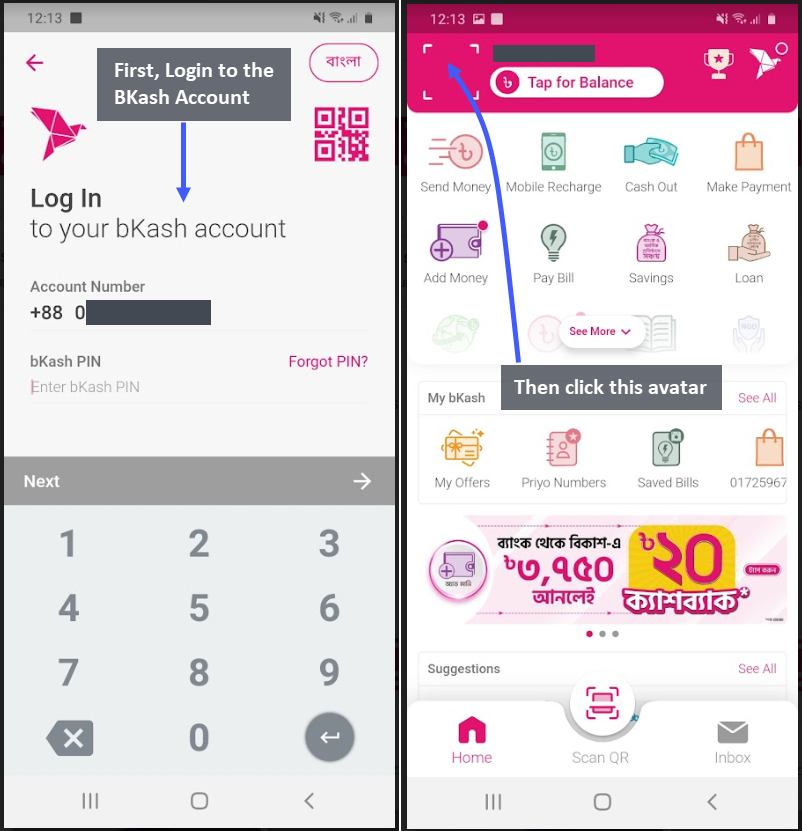
Image 1 and 2: Logging into BKash Account and selecting avatar to redirect to downloading QR Code.
The next page will recirect to the User’s unique QR Code. Click the Download QR Code button which will redirect to the downloadable BKash QR Code image. Now, get this file on computer with email, message, or Google Drive so that it can be downloaded. Then, upload the BKash QR Code while activating BKash payment gateway.
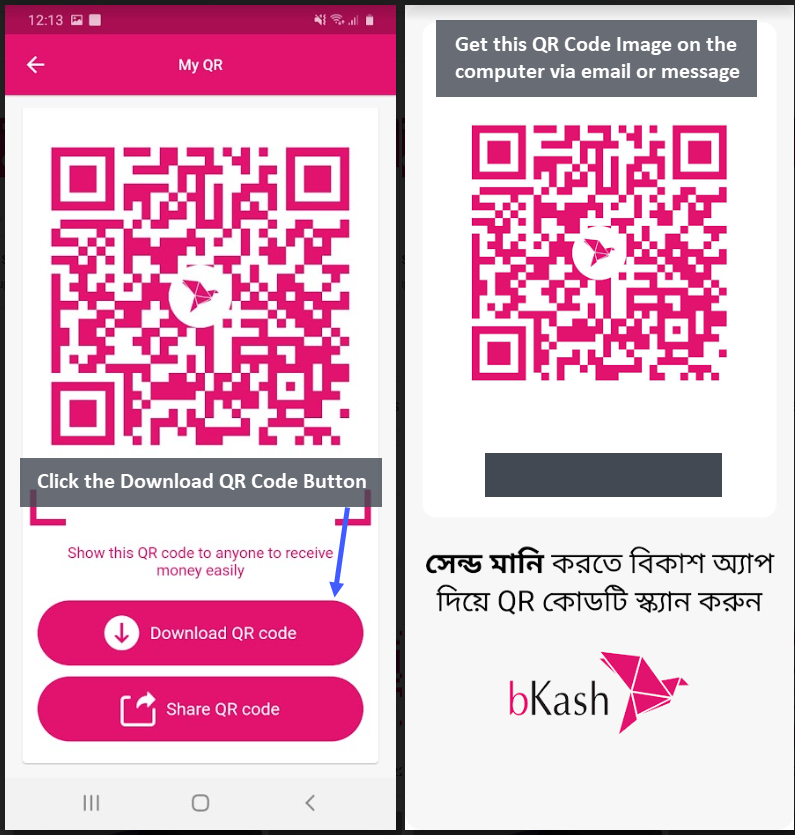
Image 3 and 4: Click Download QR Code Button and get the QR Code image on computer via email or message.
Ordering on Website with or without BKash QR Code
The Bkash (Manual) Payment Gateway can be created both with QR Code (which can be downloaded from phone) that can later be uploaded while activating BKash payment gateway or without QR Code image. Please note that, when paying with Bkash (Manual) for ordering on The Website, this is how the BKash payment gateway will show with the QR Code and without the QR Code.
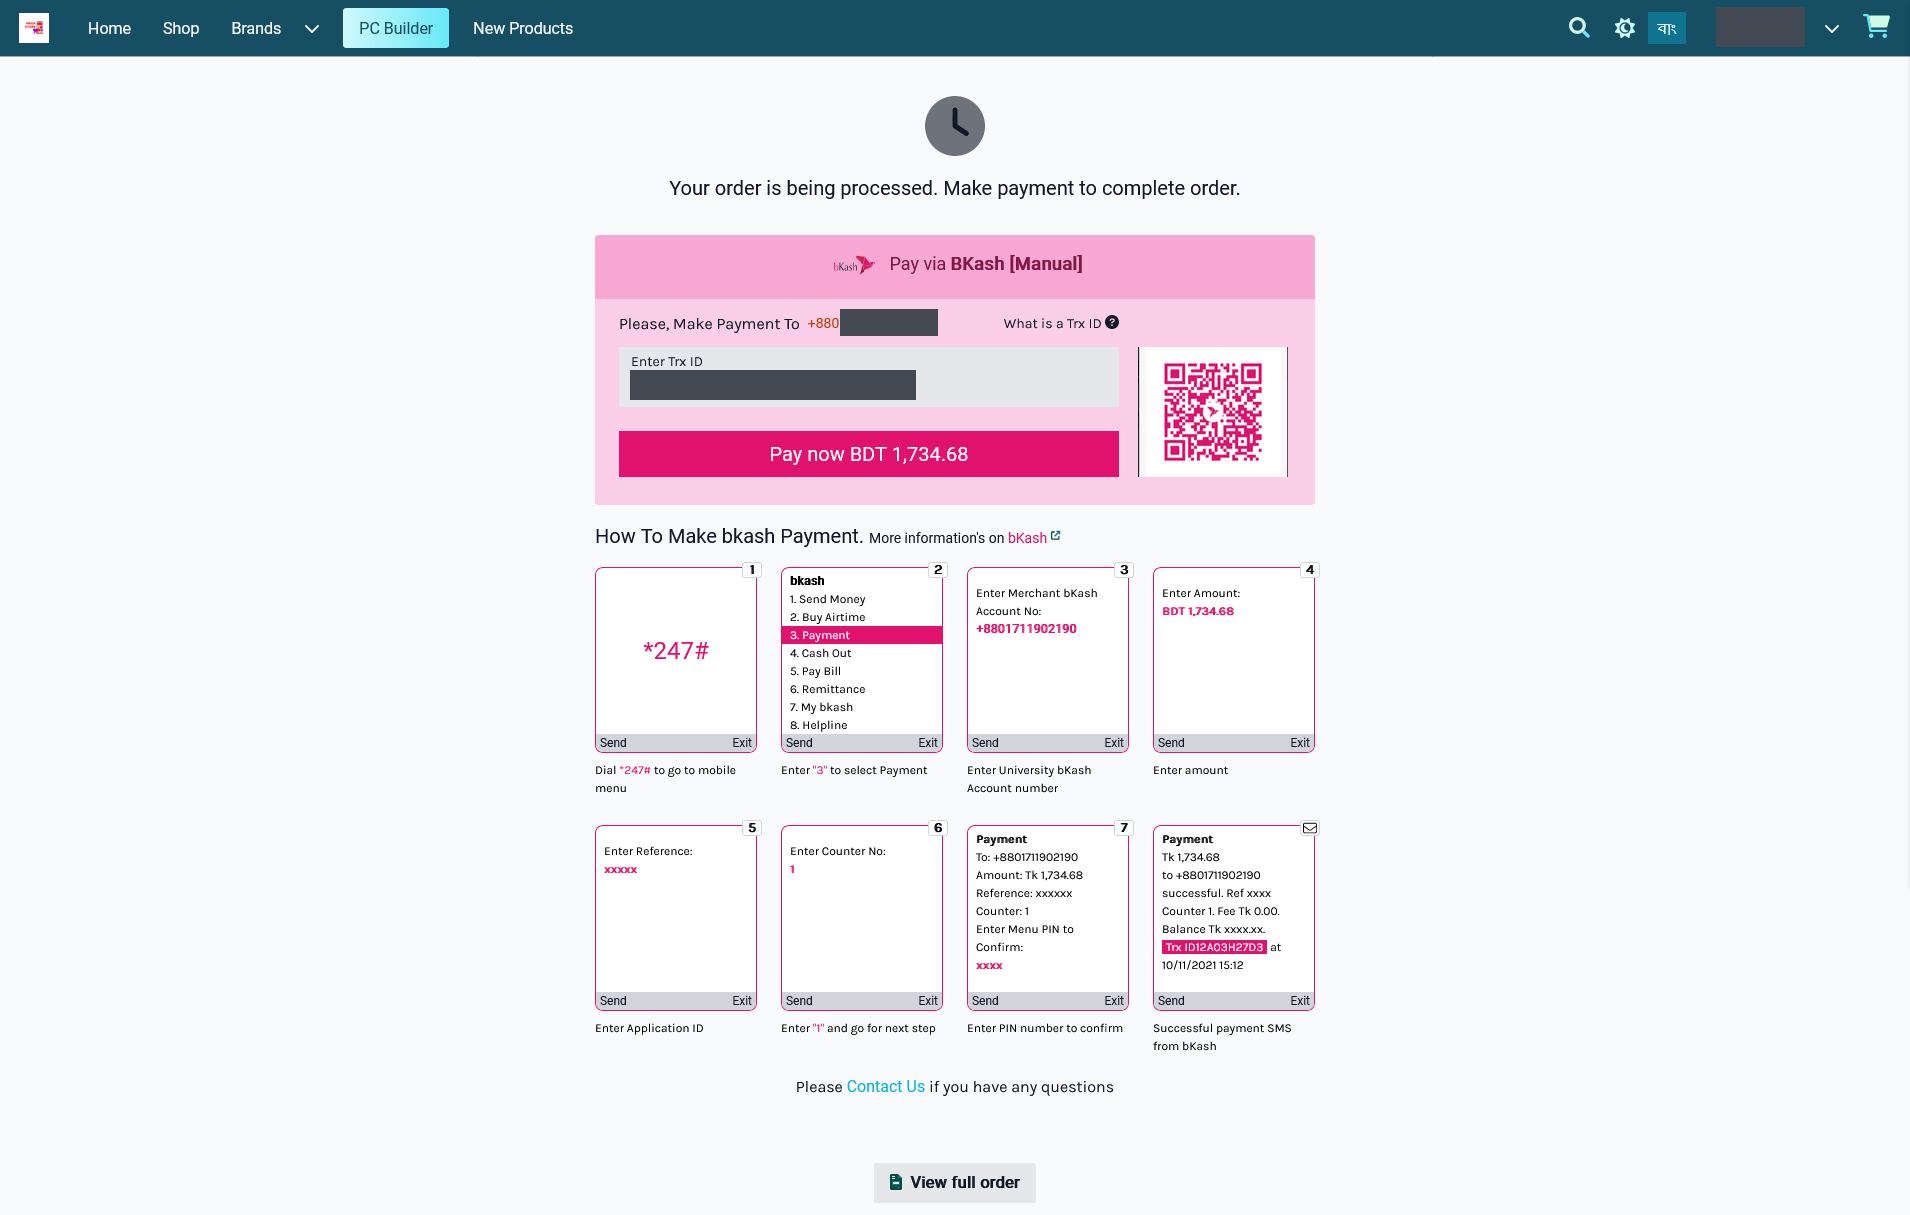
Image 1: Bkash payment with QR Code when placing Order and completing payment on The Website.
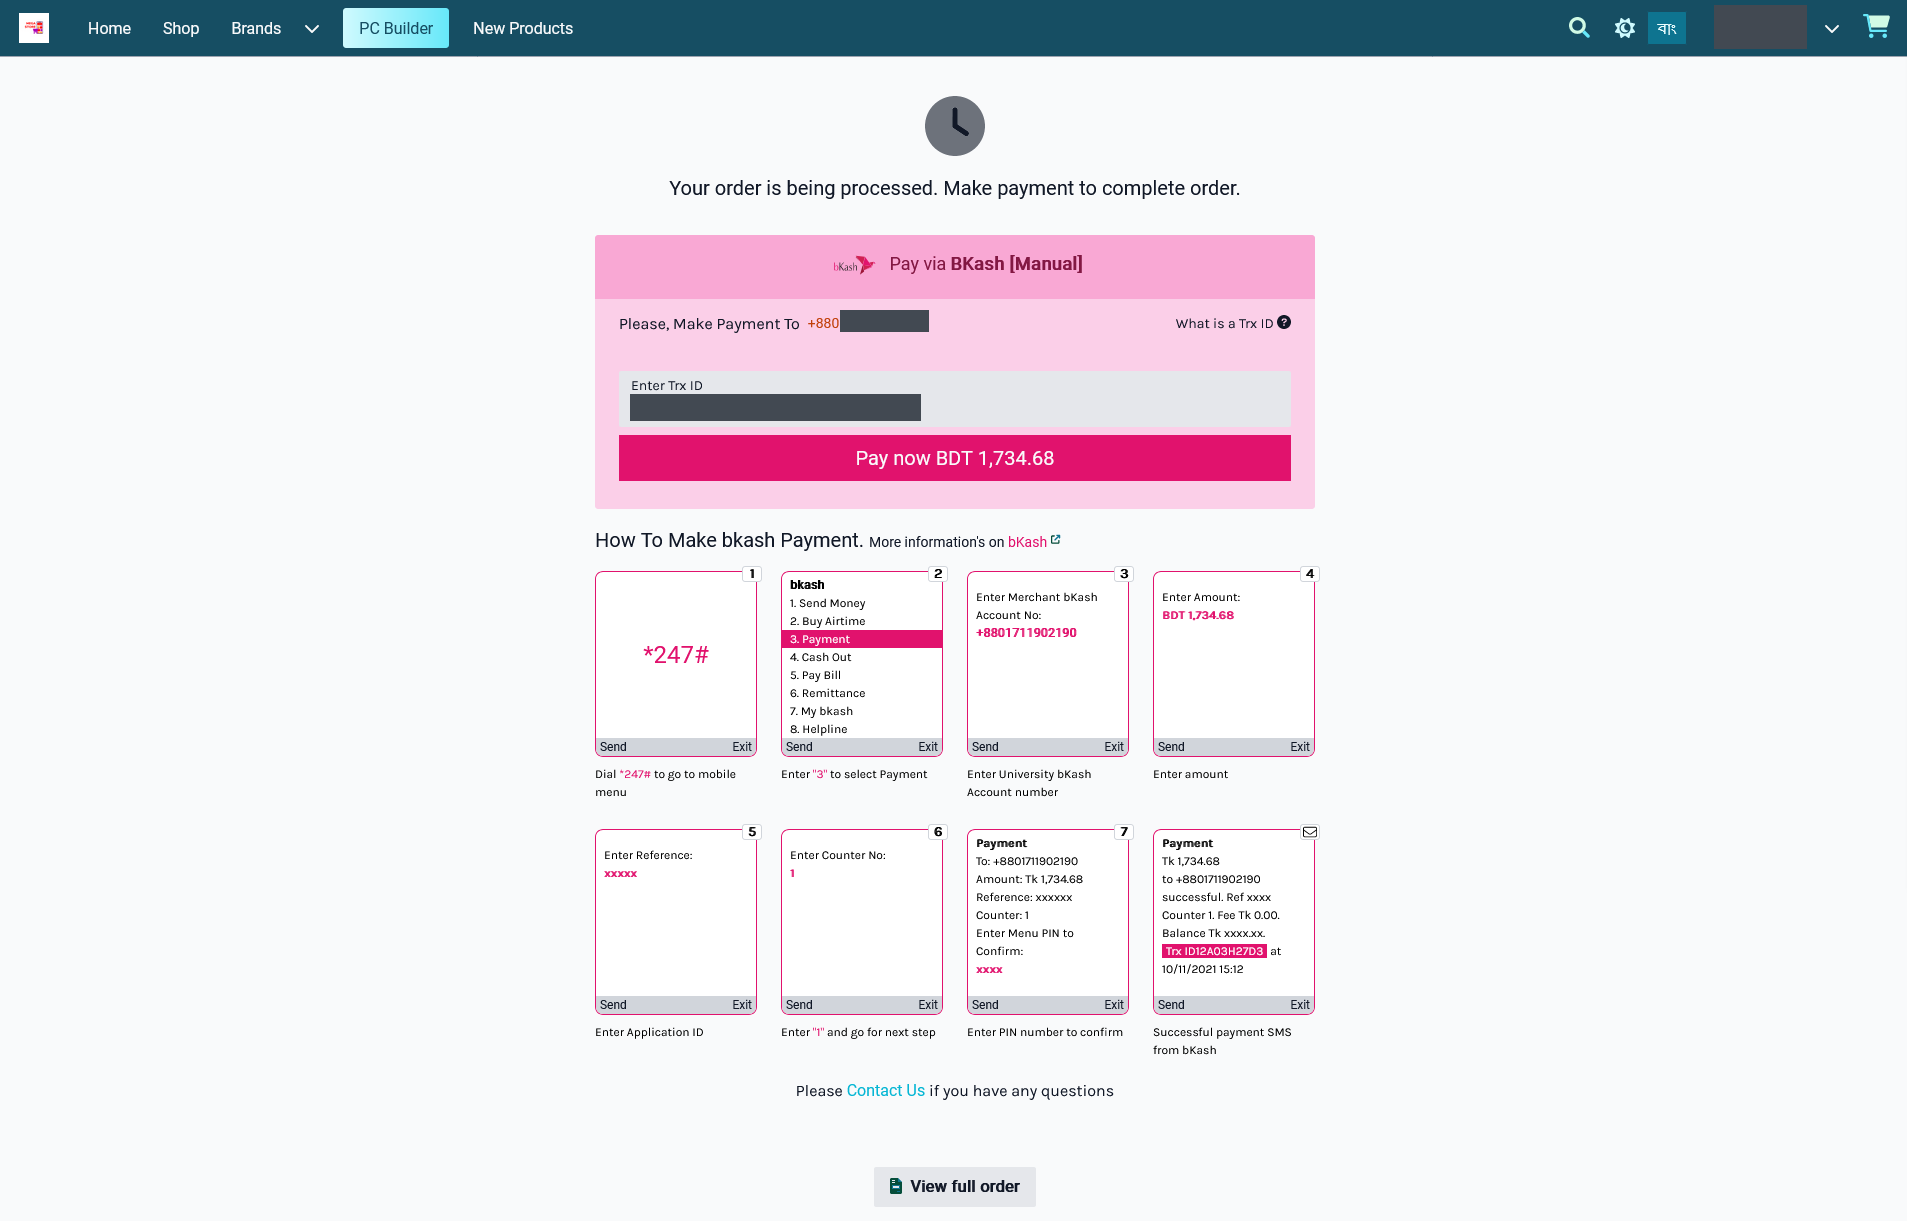
Image 2: Bkash payment without QR Code when placing Order and completing payment on The Website.
Nagad (Manual)
The payment gateway for Nagad (Manual) can be set with a Minimum and Maximum amount. Use Enable button to activate the gateway. There is a toggle button to enable Fee and set a Fee Value. Enter Nagad phone number and select Merchant Payment or Send Money. Upload QR Code using a screenshot downloaded from the phone and set Display Instruction below as shown. Click Save to confirm all changes and enable the gateway.
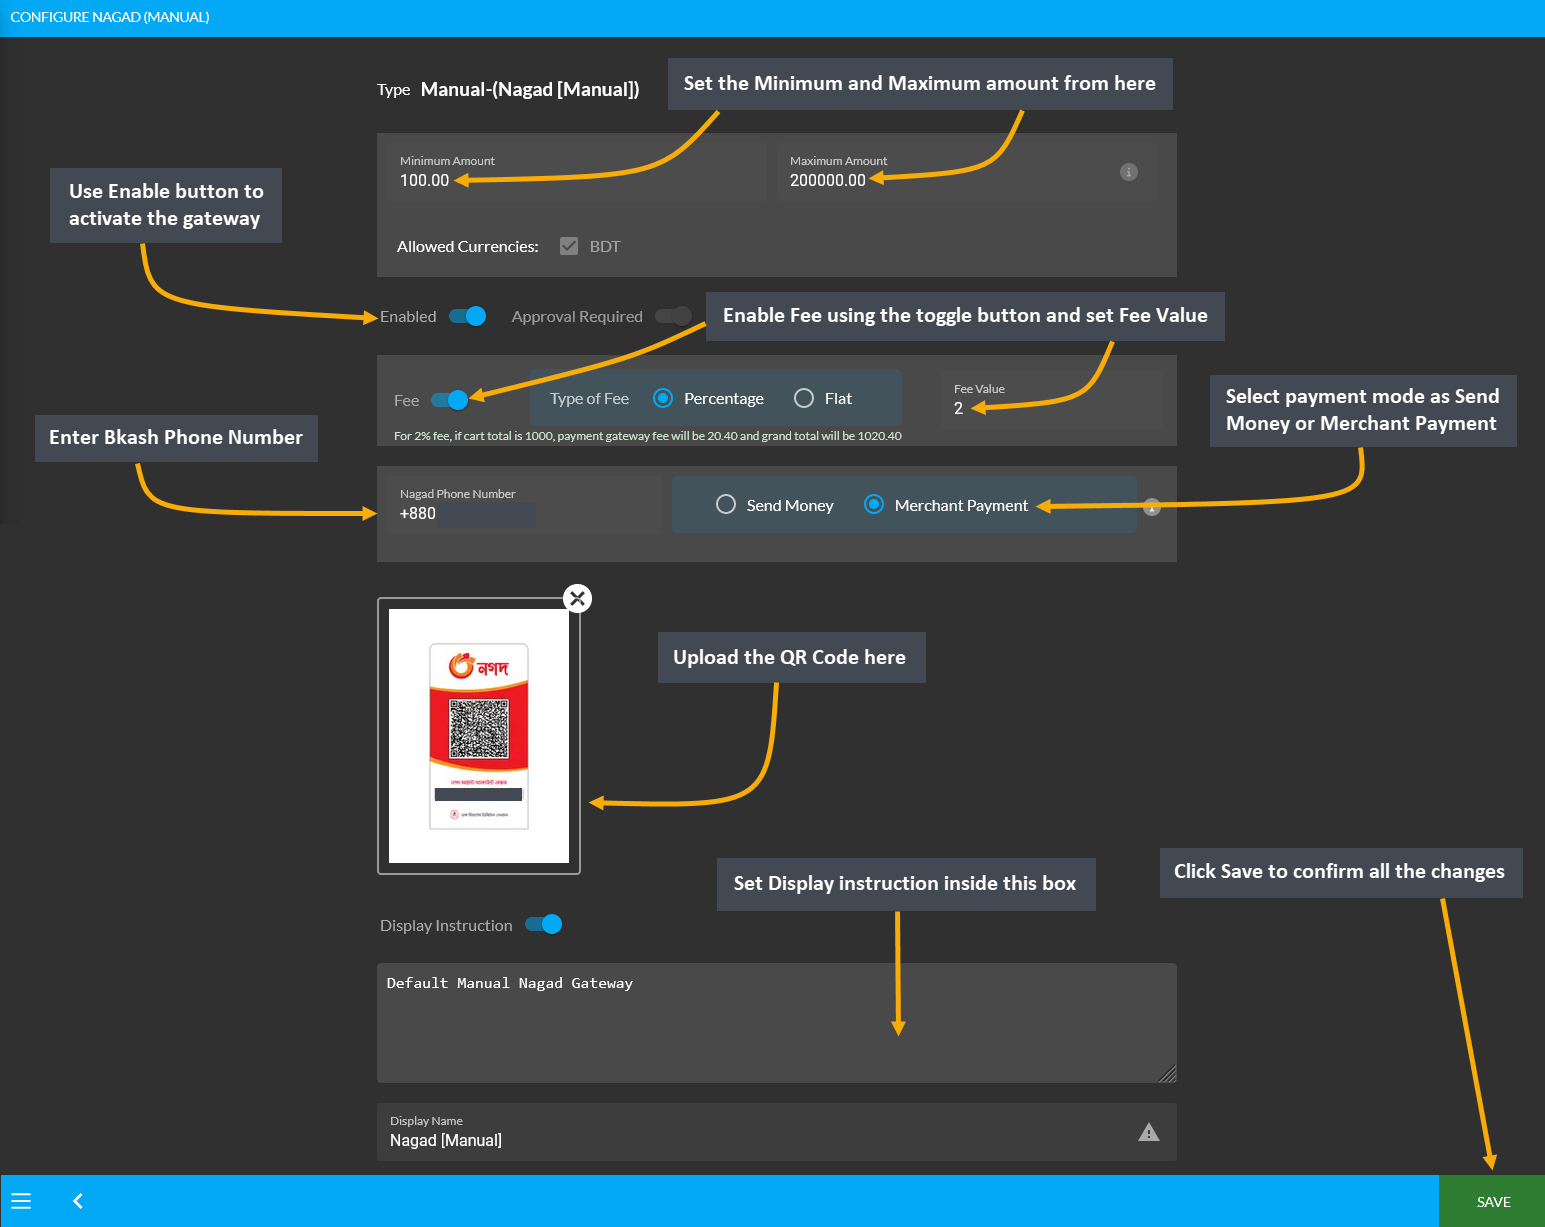
Image 1: Setup Nagad (Manual) with amounts, fees, BKash phone number, payment mode, and QR code.
Ordering on Website with or without Nagad QR Code
The Nagad (Manual) Payment Gateway can be created both with QR Code (which can be downloaded from phone) that can later be uploaded while activating Nagad payment gateway or without QR Code image. Please note that, when paying with Nagad (Manual) for ordering on The Website, this is how the Nagad payment gateway will show with the QR Code and without the QR Code.
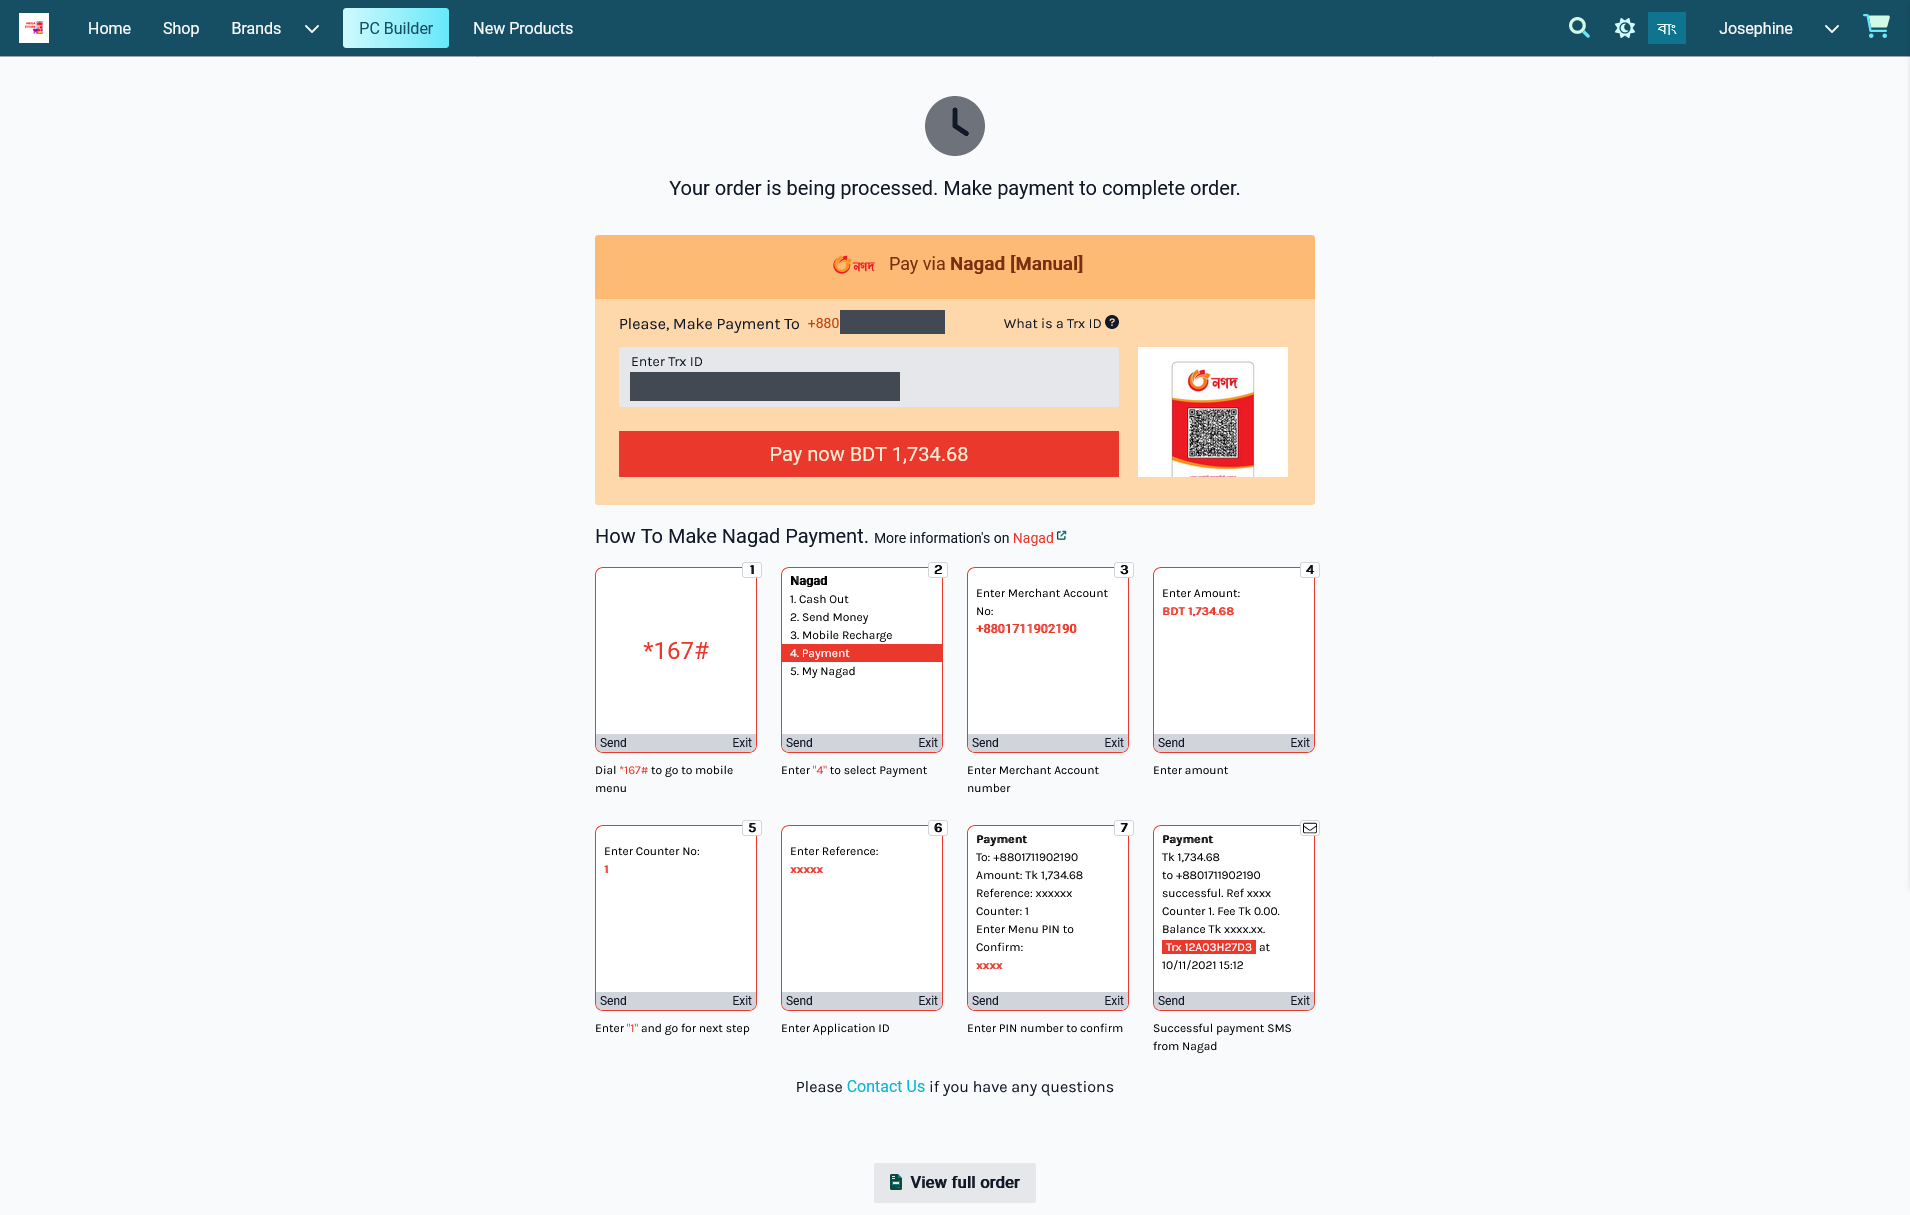
Image 2: Nagad payment with QR Code when placing Order and completing payment on The Website.
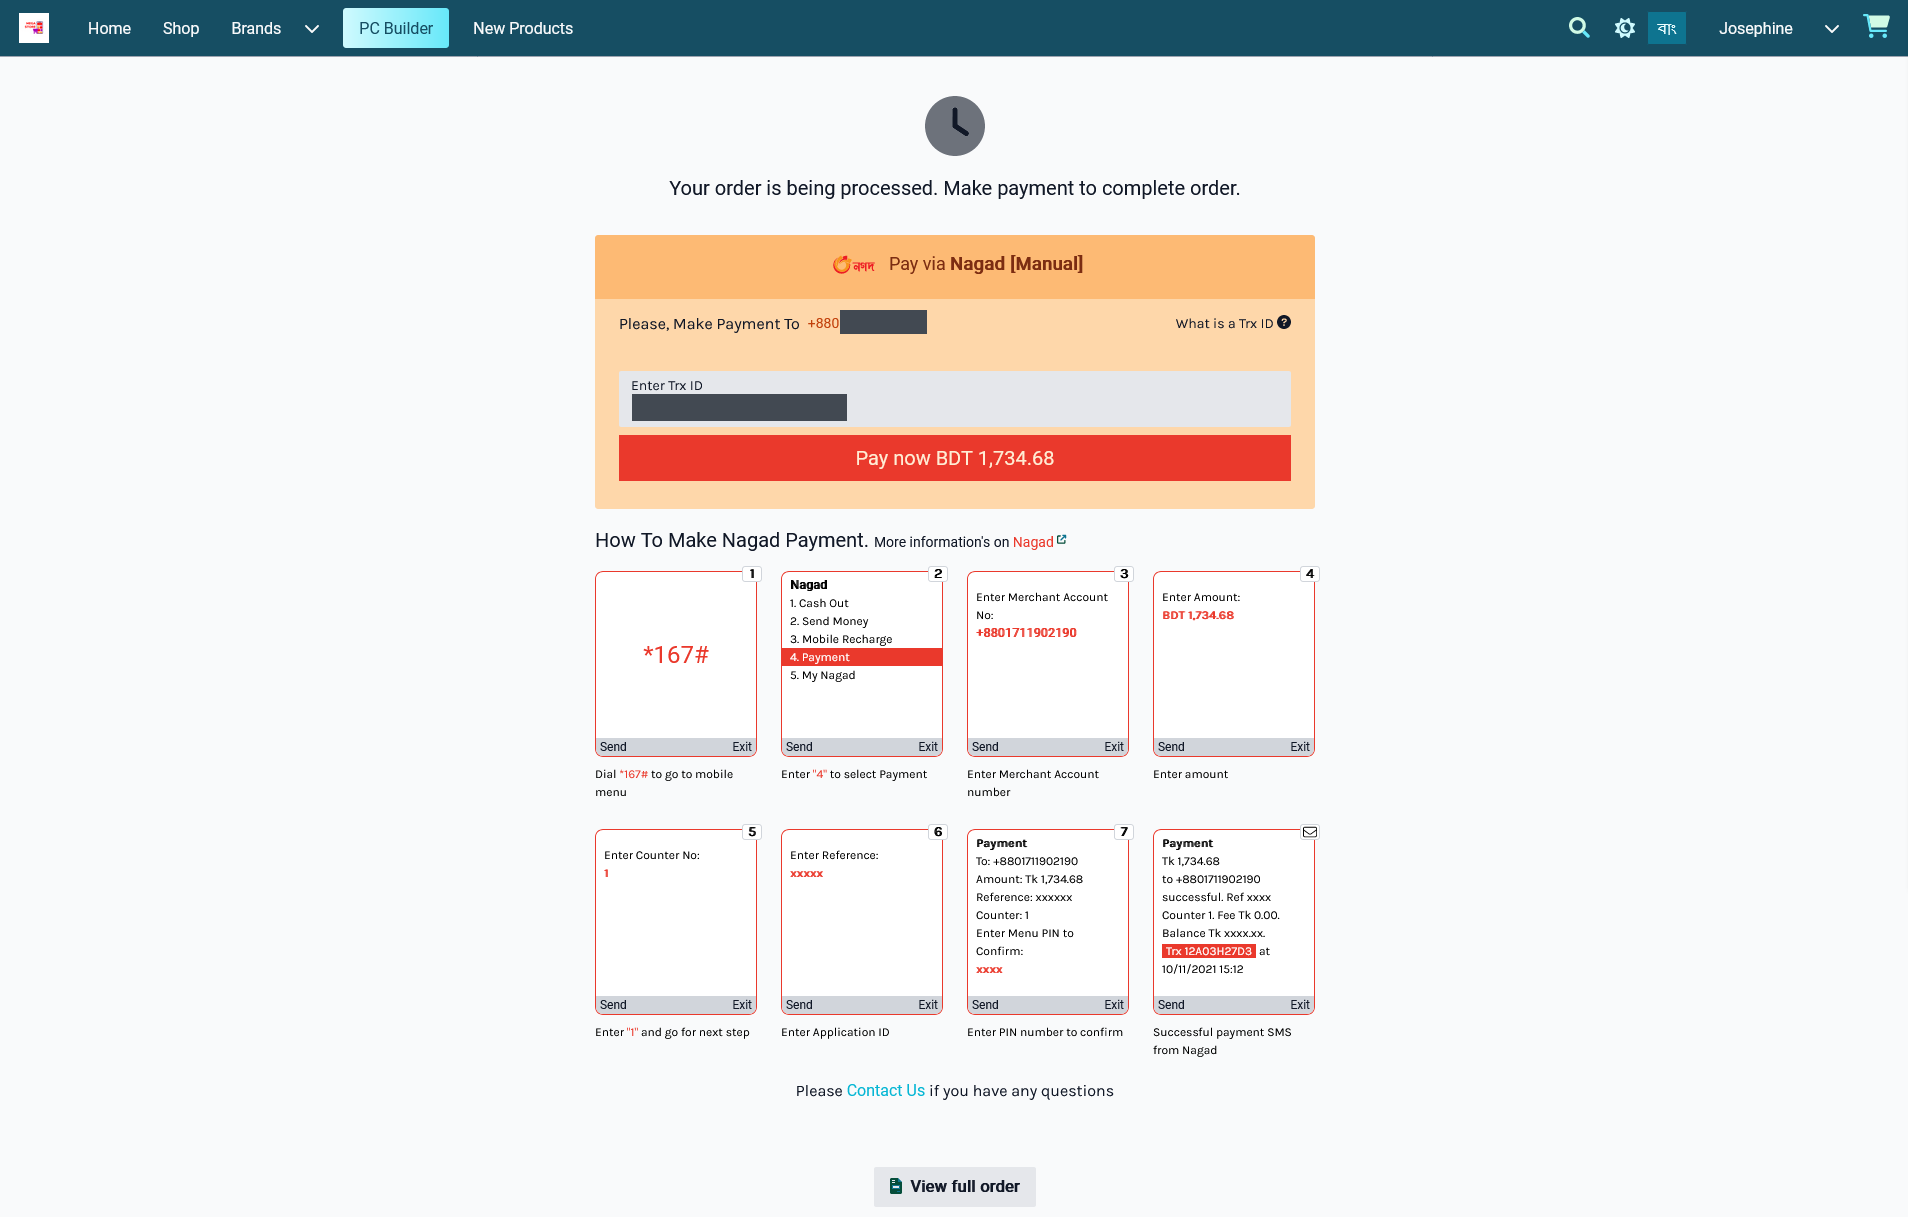
Image 3: Nagad payment without QR Code when placing Order and completing payment on The Website.
Cash On Delivery
To setup the payment gateway for Cash on Delivery, first set a Minimum and Maximum amount for Customer’s payment. Use Enable button to activate the gateway. Then, use the toggle button to enable Fee and set the Fee Value. There is a box to enable and set Display Instruction for Customer’s convenience to pay the cash during order delivery at their address. Click Save to confirm all changes and enable the gateway.

Image 1: Setup the Cash on Delivery with minimum and maximum amounts, fees, and display instructions.
On Credit (Due)
To setup the payment gateway for On Credit (Due), first set a Minimum and Maximum amount for Customer’s payment. Use Enable button to activate the gateway. Then, use the toggle button to enable Fee and set the Fee Value if any additional fee needs to be charged. Click Save to confirm all changes and enable the gateway.
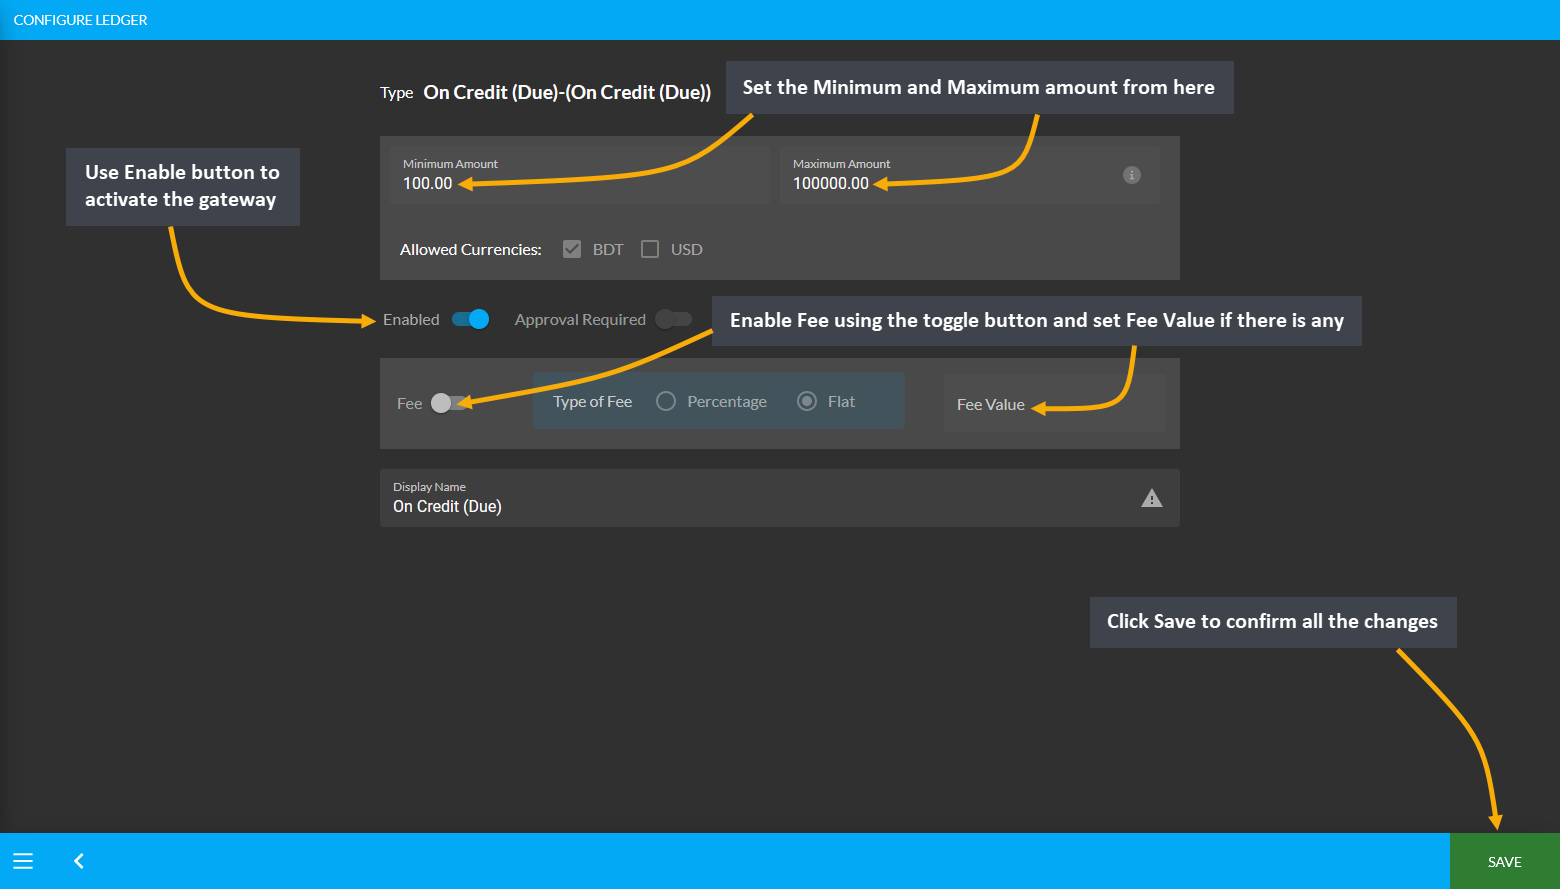
Image 1: Setup the On Credit (Due) with minimum and maximum amounts and fees if applicable.
Credit Card, Cash, or Cheque
To setup the payment gateway for Credit Card, Cash, or Cheque, first set a Minimum and Maximum amount for Customer’s payment. Use Enable button to activate the gateway. Set the Display Instruction for these gateways. Click Save to confirm all changes and enable the gateway.
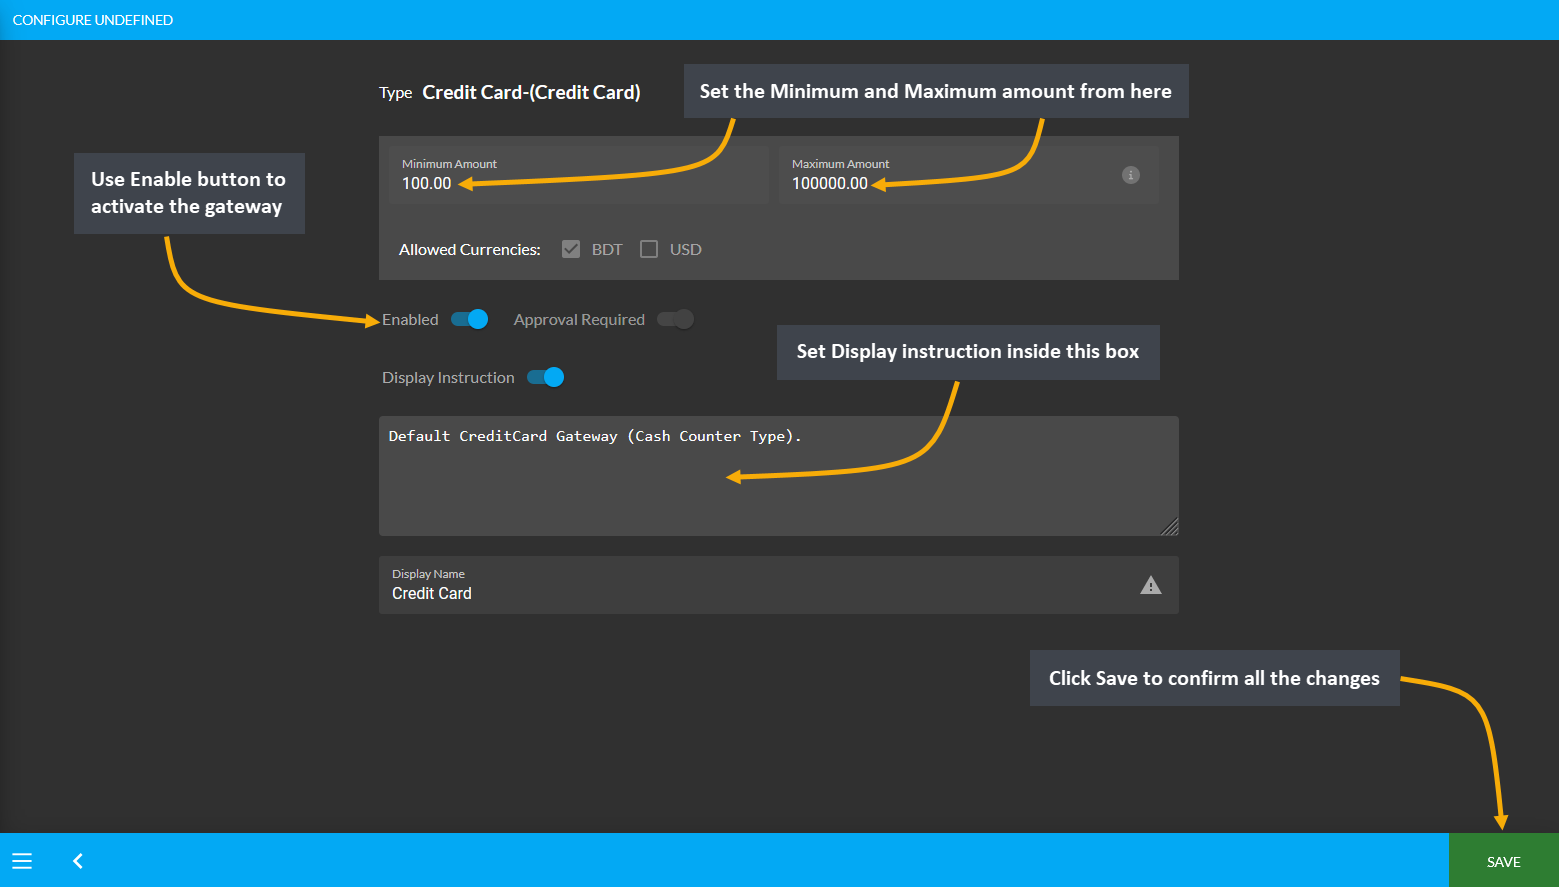
Image 1: Setup the Credit Card with minimum and maximum amounts and display instructions.

Image 2: Setup the Cash with minimum and maximum amounts and display instructions.
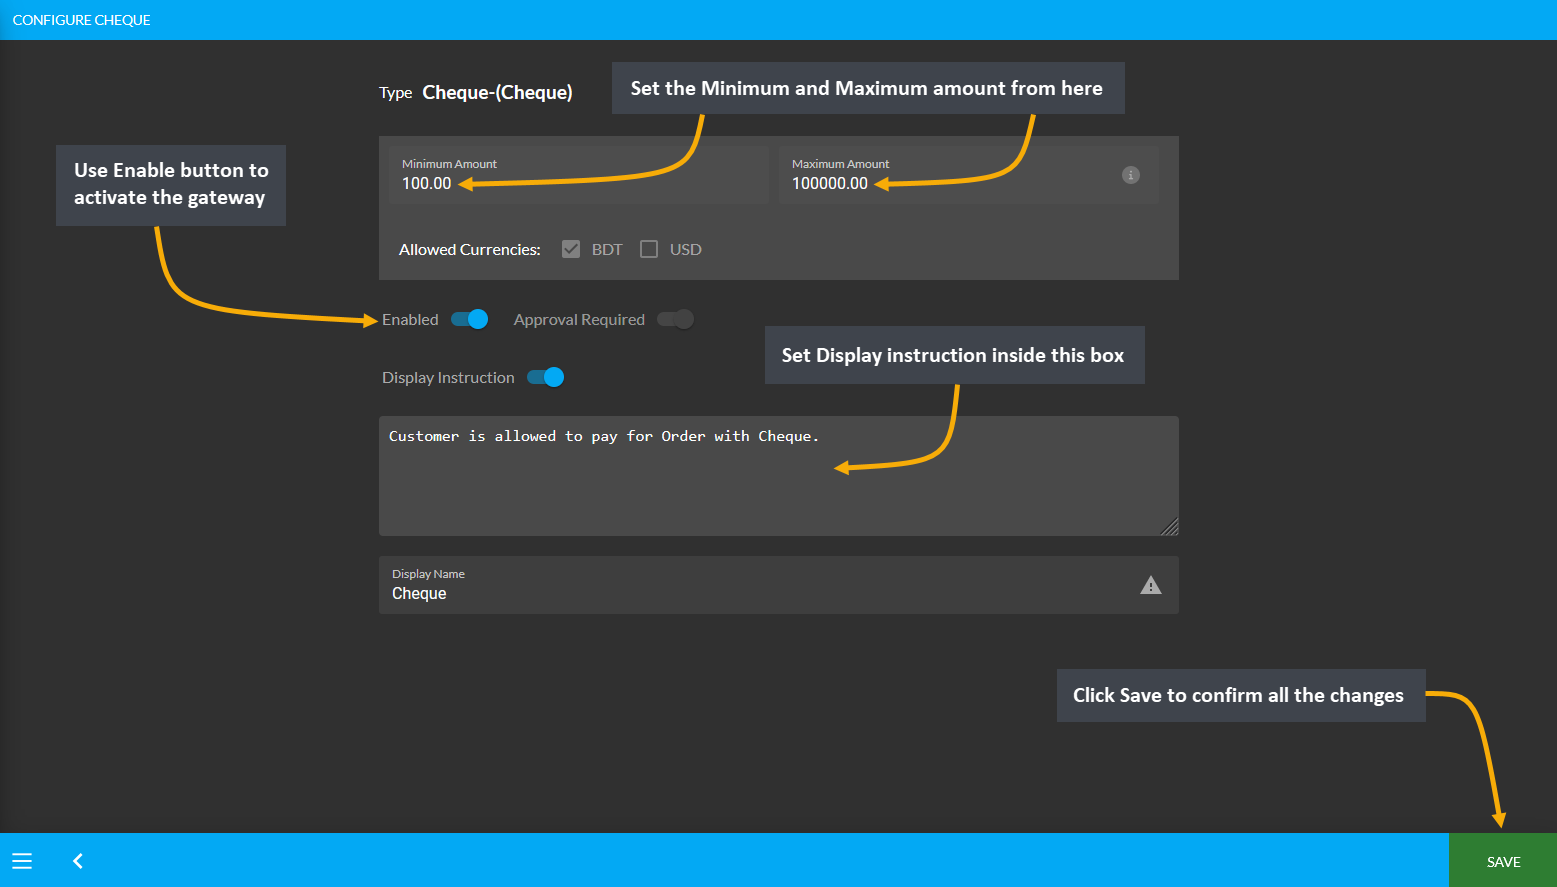
Image 3: Setup the Cheque with minimum and maximum amounts and display instructions.
BKash
To setup the payment gateway for BKash, first setup a Minimum and Maximum amount for Customer’s payment. Use Enable button to activate the gateway. Then, use the toggle button to enable Fee and set the Fee Value. In the section of Test API Keys, copy-paste the test API Keys from BKash to allow Customers to pay for their Products.
Providing these API keys will allow to verify them with BKash automatically. Finally, there is a box to set Display Instruction as shown in the example screenshot. Click the Save button after all the steps are completed.
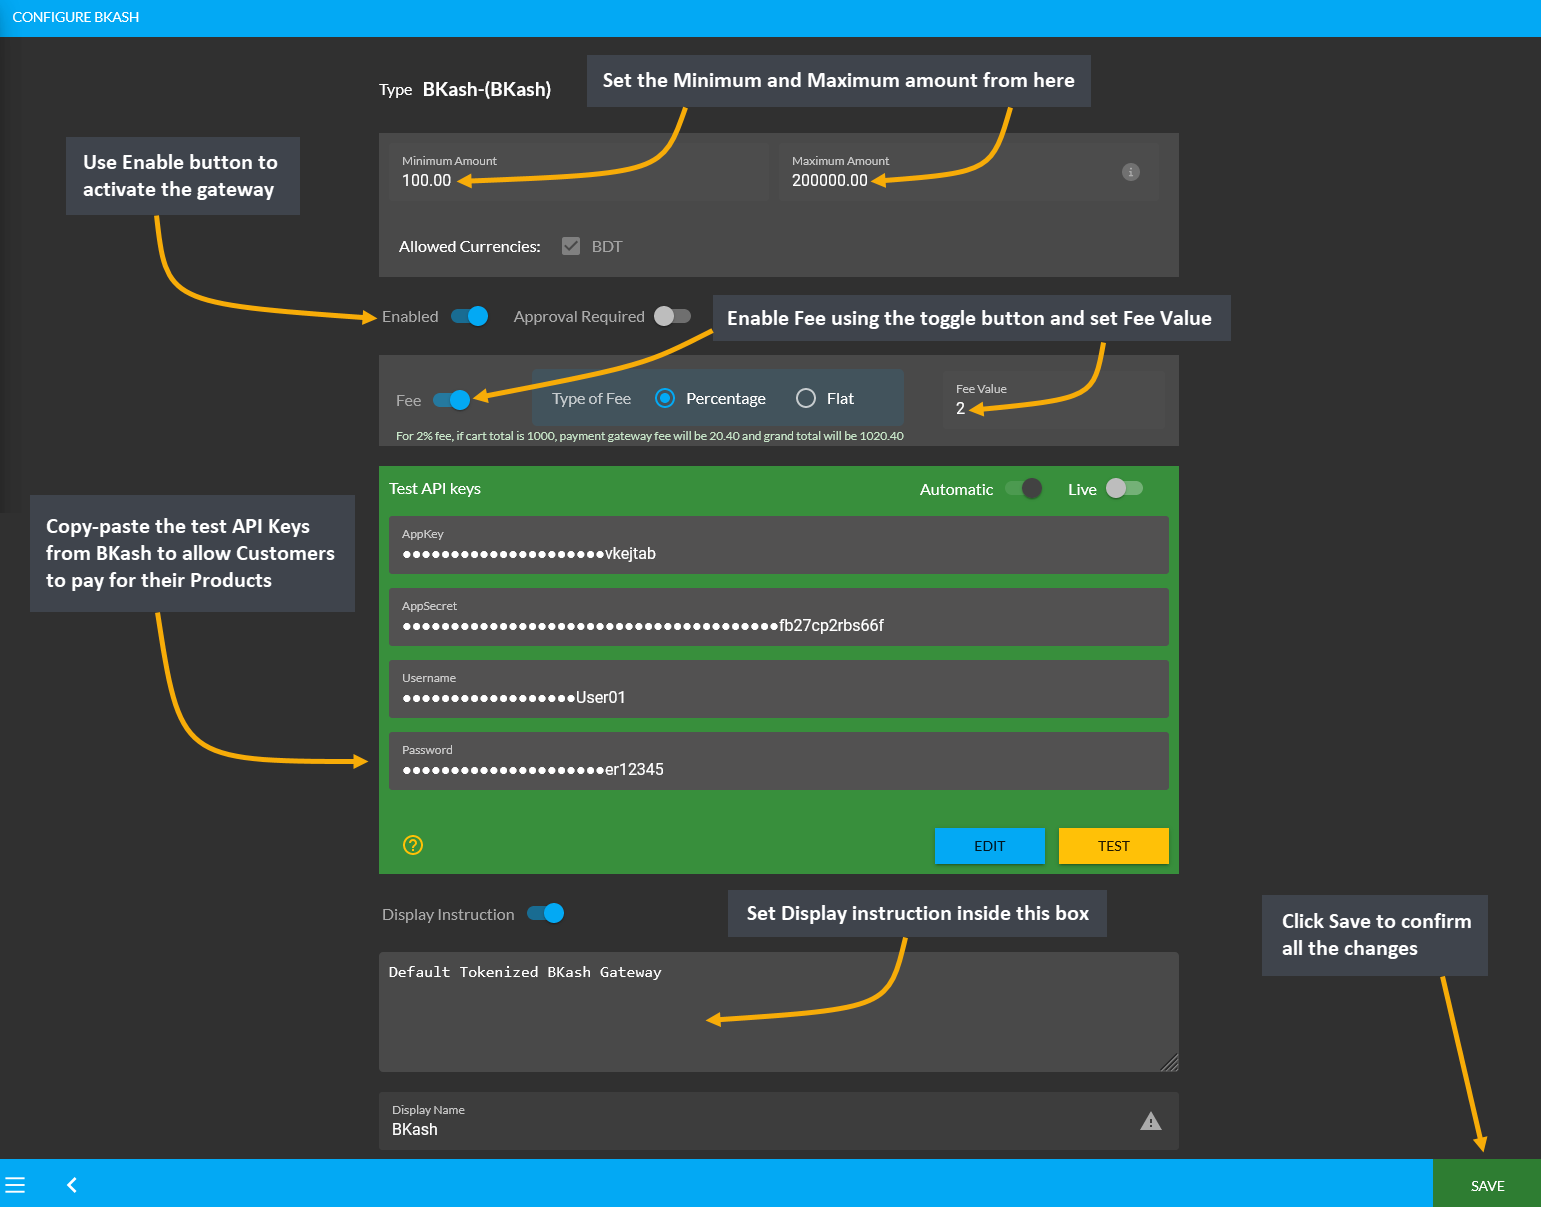
Image 1: Setup the BKash with minimum and maximum amounts, fees, Test API keys, and display instructions.
Nagad
To setup the payment gateway for Nagad, first setup a Minimum and Maximum amount for Customer’s payment. Use Enable button to activate the gateway. Then, use the toggle button to enable Fee and set the Fee Value. In the section of Test API Keys, copy-paste the test API Keys from Nagad to allow Customers to pay for their Products.
Providing these API keys will allow to verify them with Nagad automatically. Finally, there is a box to set Display Instruction as shown in the example screenshot. Click the Save button after all the steps are completed.
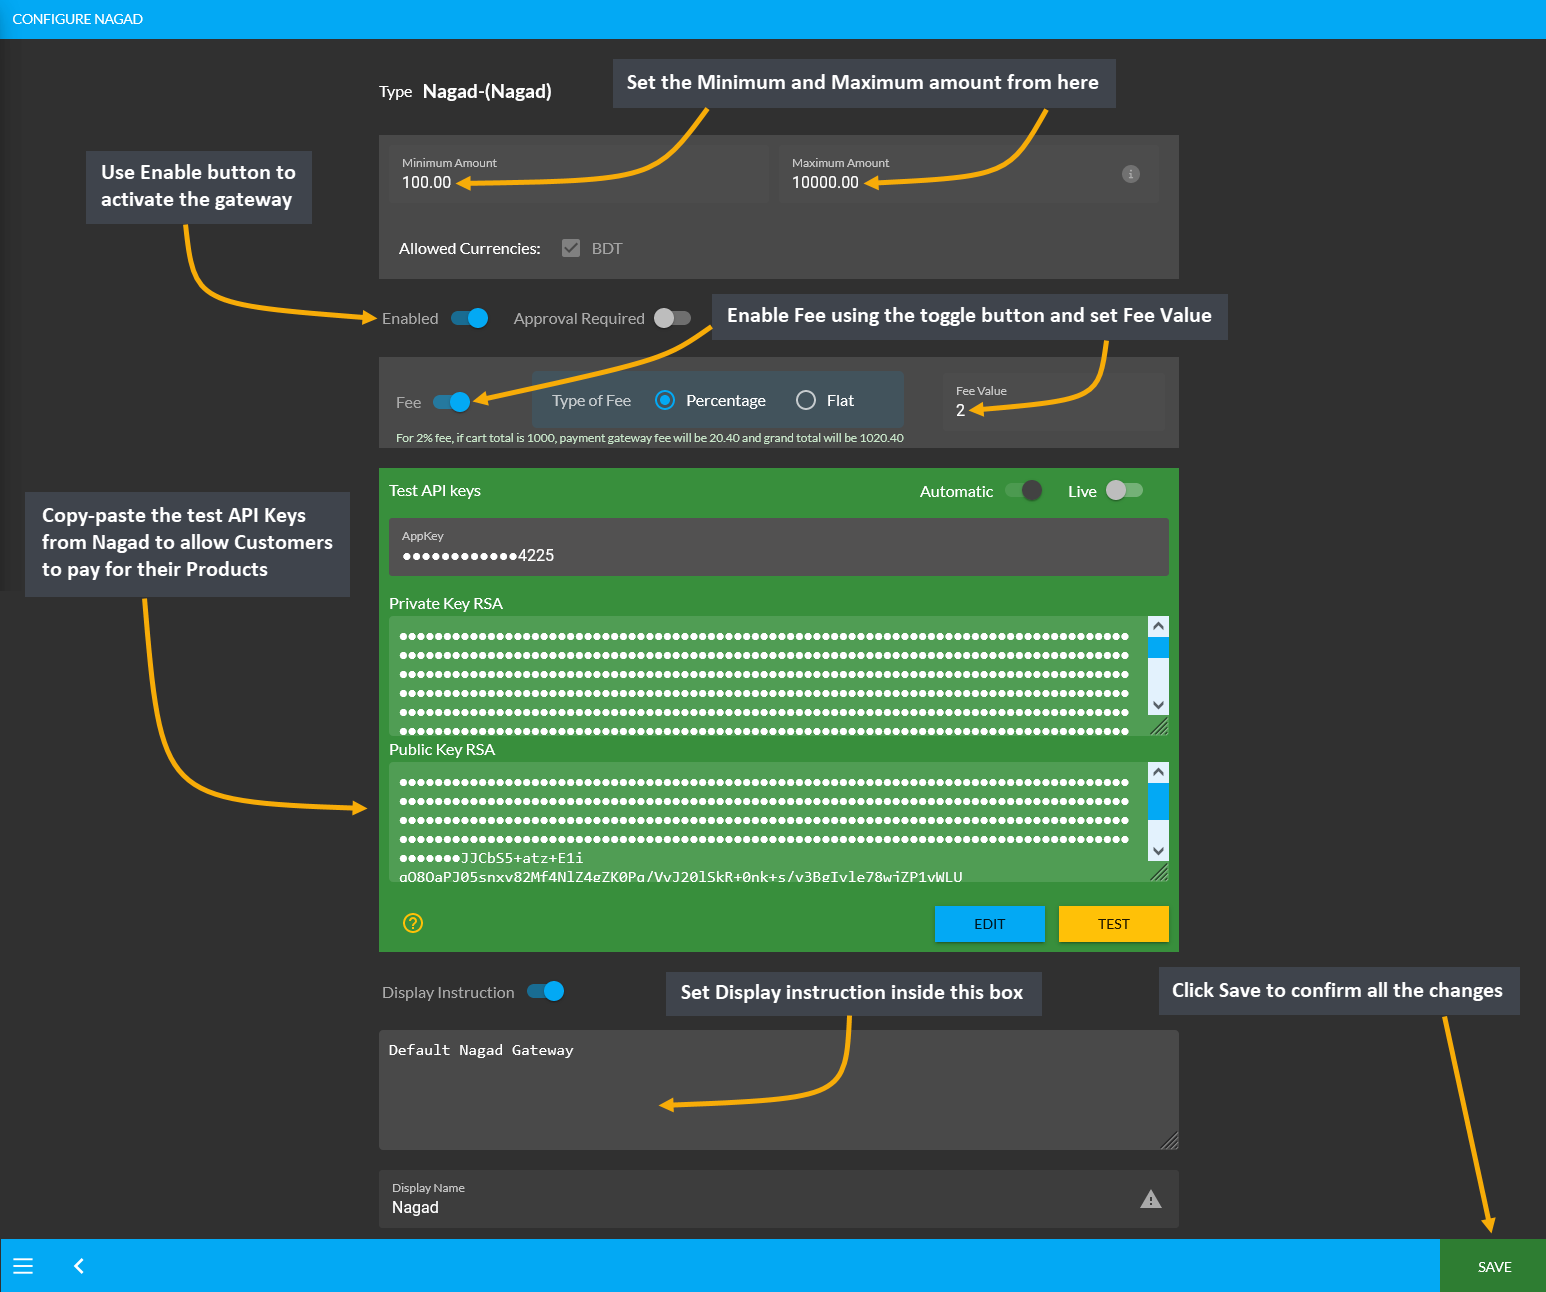
Image 1: Setup the Nagad with minimum and maximum amounts, fees, Test API keys, and display instructions.
PortWallet
Configure the payment gateway for PortWallet by setting a Minimum and Maximum amount for the Customer’s payment. Use Enable button to activate the gateway. Then, use the toggle button to enable Fee and set Fee Value. Within the Test API Keys section, copy-paste test API Keys from PortWallet to allow Customers to pay for their Products. Also, select the monthly EMI that will be applicable.
Providing these API keys will allow to verify them with PortWallet automatically. Finally, there is a box to set the Display Instruction as shown in the example screenshot. Click the Save button after all steps are done.
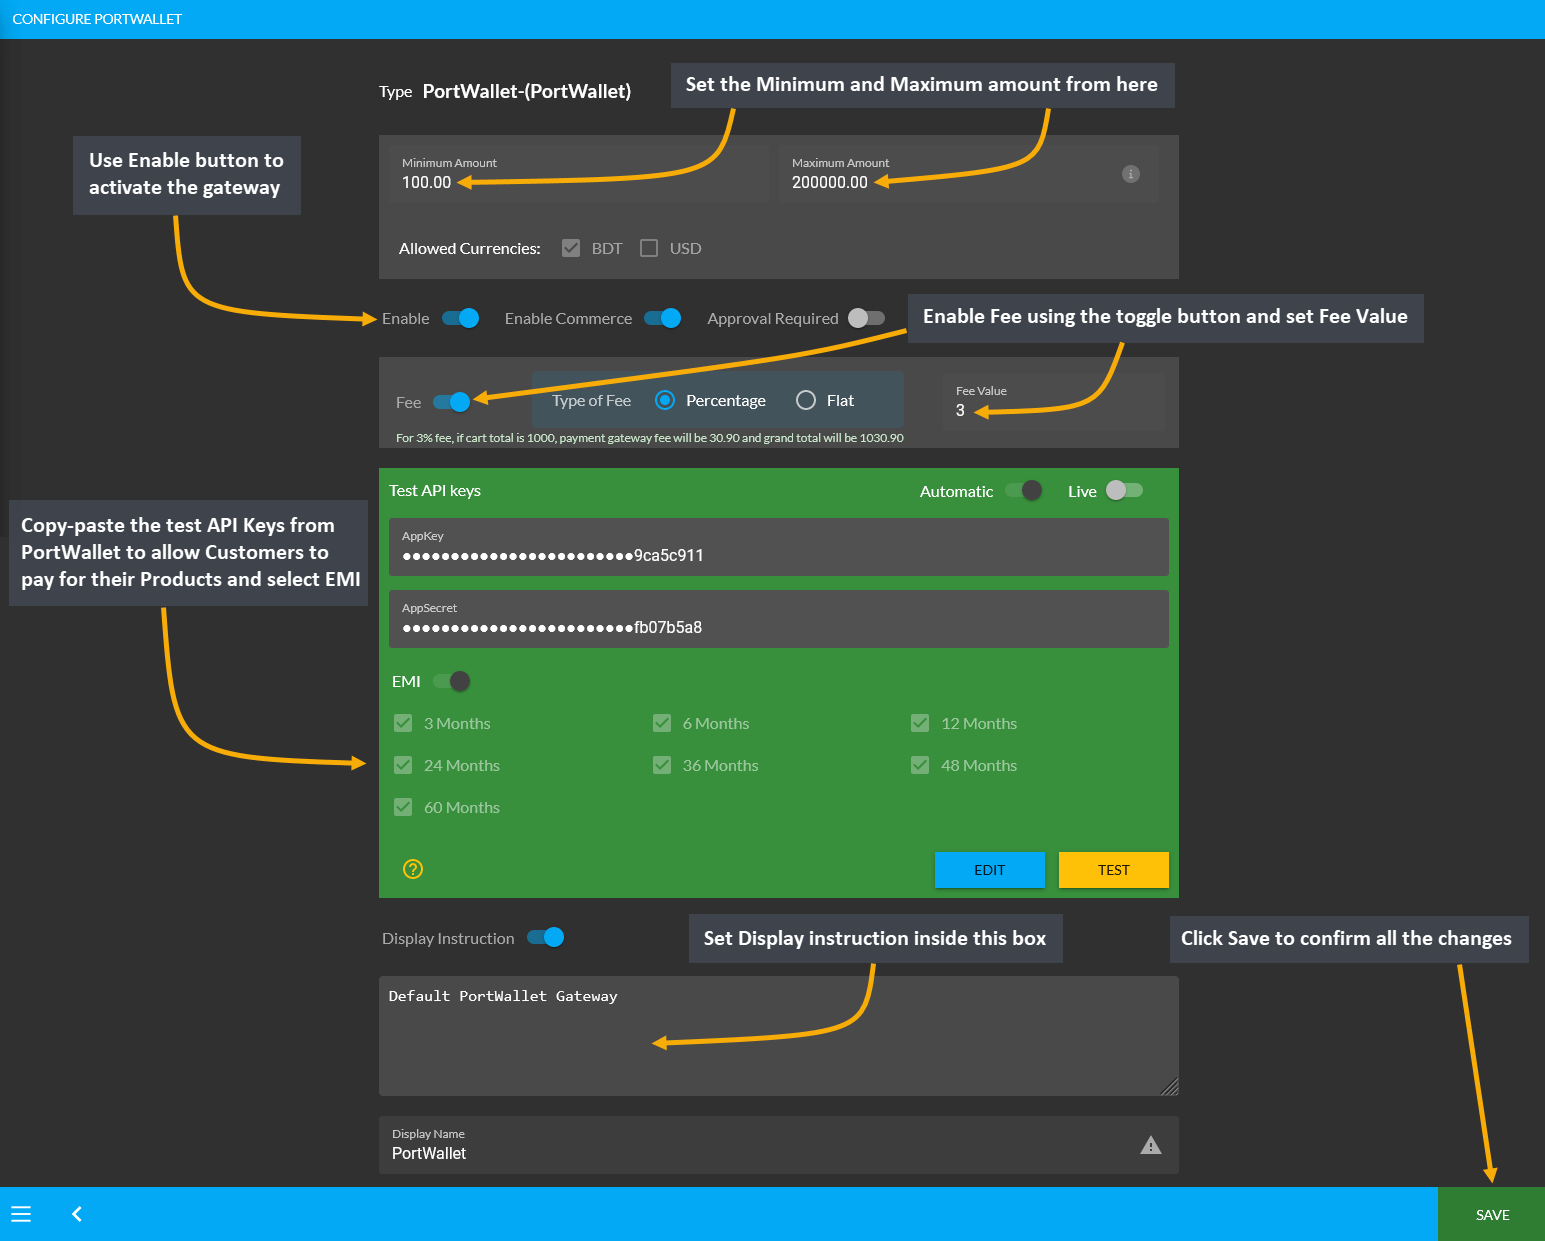
Image 1: Setup PortWallet with minimum and maximum amounts, fees, Test API keys, and display instructions.
SSLCommerz
Configure the payment gateway for SSLCommerz by setting up a Minimum and Maximum amount for Customer’s payment. Use Enable button to activate the gateway. Then, use the toggle button to enable Fee and set Fee Value. Within the Test API Keys section, copy-paste test API Keys from SSLCommerz to allow Customers to pay for their Products. Also, select the monthly EMI that will be applicable.
Providing these API keys will allow to verify them with SSLCommerz automatically. Finally, there is a box to set the Display Instruction as shown in the example screenshot. Click the Save button after all steps are done.
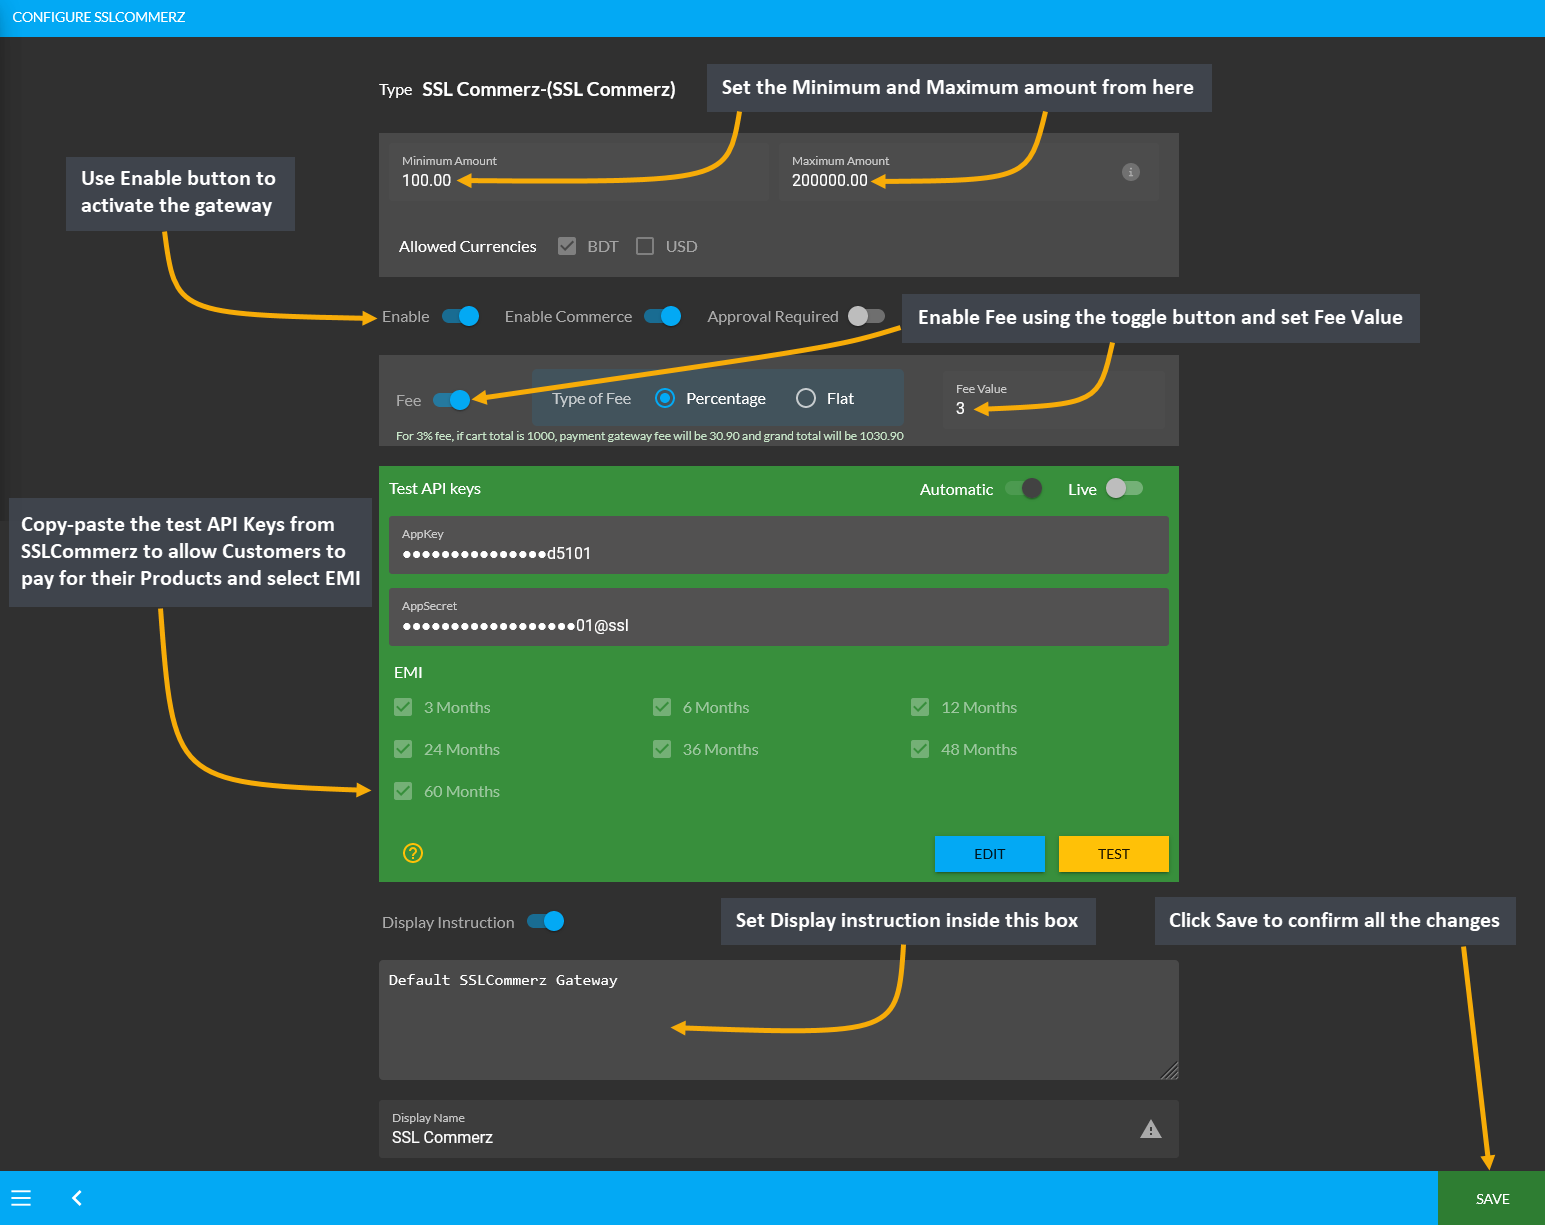
Image 1: Setup SSLCommerz with minimum and maximum amounts, fees, Test API keys, and display instructions.
Configure Shipping Gateways
Configure Shipping Gateways from Gateways under All Settings tab. The Shipping Gateways that are embedded in the system include RedX, FedEx, UPS, PaperFly, Aramex, In Store Pickup, Direct, DHL, Now, Ecourier, GoGoBangla and Koopon. Shop Owners can activate or enable and disable them whenever needed.
Click the Configure button beside each Shipping Gateway to configure them. If a gateway is enabled, they will be marked as green, if any gateway is disabled, they will be marked as red. For configuration, there are options to setup gateway name, maximum value of shipping, display instruction, minimum weight, maximum weight, and fees. Click Save when all values are set. One shipping gateway will vary from another.
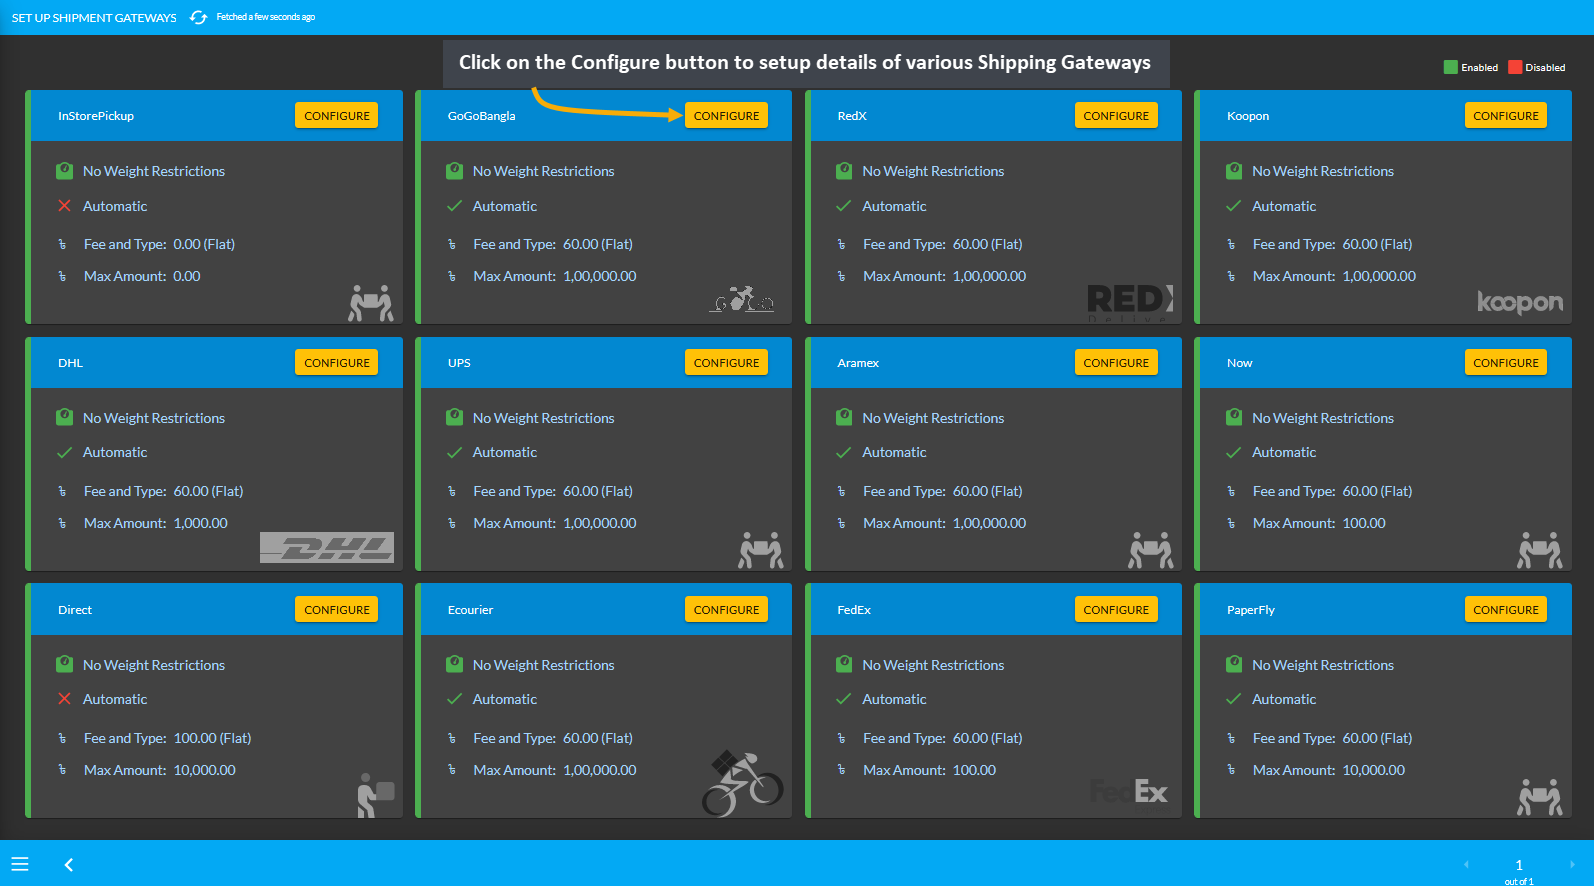
Image 1: Click on the Configure button to setup various Shipping Gateways from the list.
Setup all Shipping Carriers
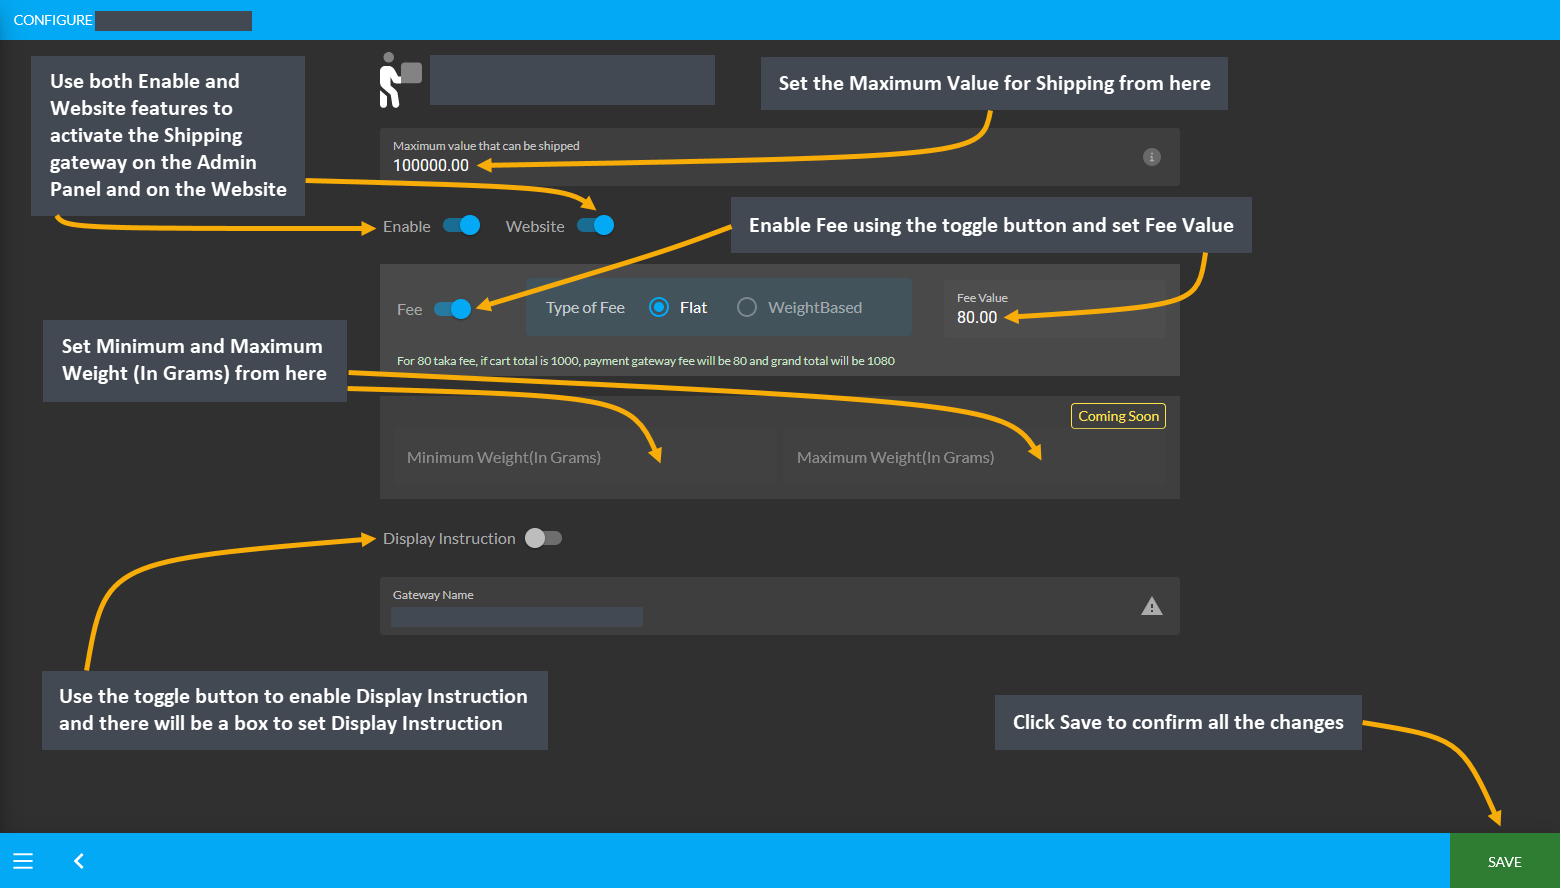
Configure the shipping gateway for all Shipping Carriers like RedX, FedEx, UPS, PaperFly, Aramex, Direct, Ecourier, DHL, Now, Koopon, and GoGoBangla by setting a Maximum value of shipping fee. Use toggle button to enable Fee and set the Fee Value as Flat or Weight based. Then, set a Minimum Weight and Maximum Weight in Grams for Product(s). There is also a box to set Display Instruction. Click the Save button after all steps are done.
Setup Policy Pages on Website
Configure Refund Policy Page
Having a Refund Policy is a great asset to win over Customers as it gives them security and increases trust in the Seller’s brand or business. Besides, Return Policy is a key factor for Customers making a purchasing decision. So, adding them to The Website will increase performance of Shop Owner’s Product(s).
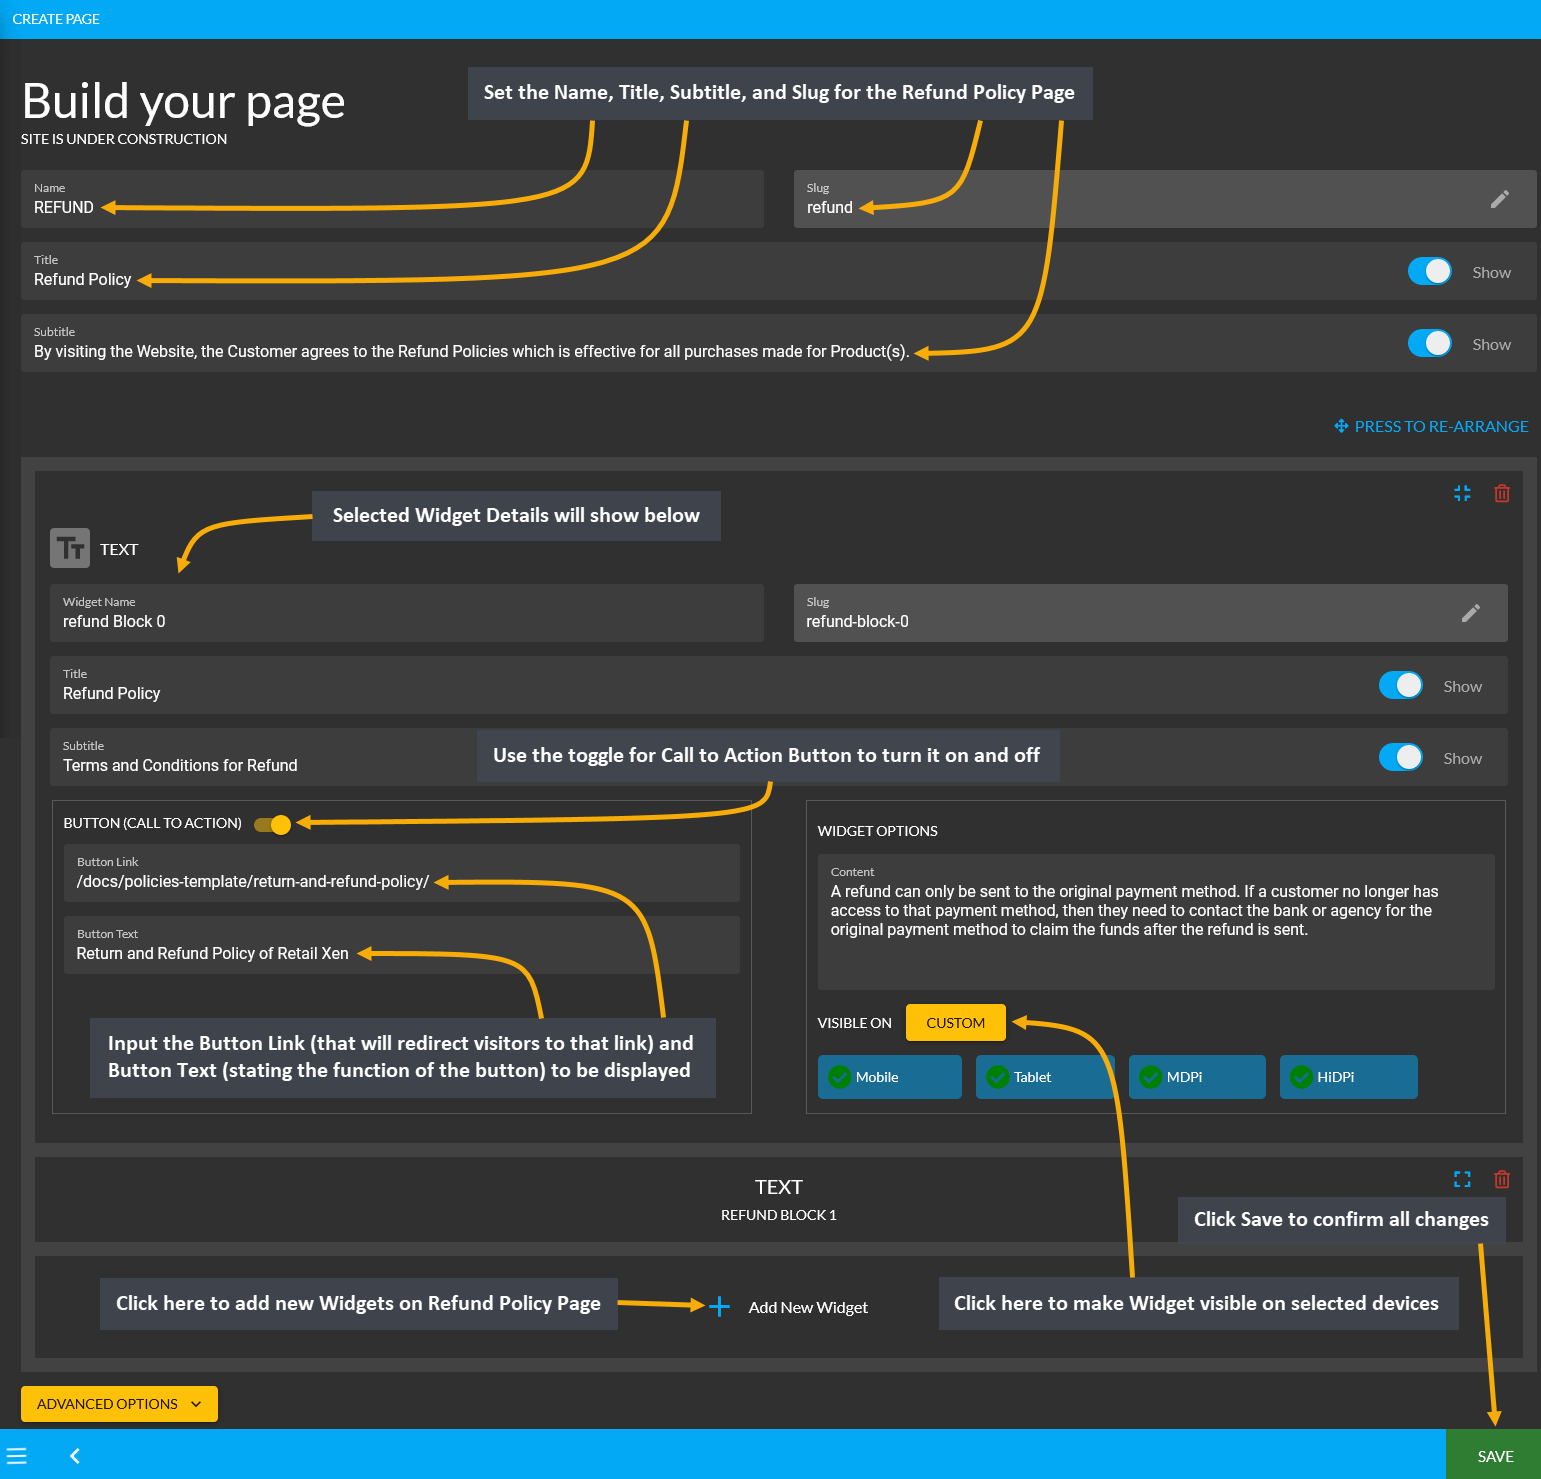
Configure the Refund Policy Page by first by setting up the Name, Title, Subtitle, and Slug. After that, select all the necessary widgets. For instance, setup Name, Title, Subtitle, and Slug for the Text Widget. Input Button Link that will redirect visitors to that link and Button Text which will the function of the button to be displayed. Widget options include a box to add contents where policies can be added in details with headings and bullet points.
Click on the All Devices button to make the policy visible on Mobile, Tablet, MDPi, and HiDPi. In the similar way, other widgets can be added using the + button which allows adding multiple widgets to the Refund Policy Page. This sample Refund Policy Page can be used by Shop Owners as a guide.
Configure Shipping Policy Page
A well-thought-out Shipping Policy will become an asset whenever the Customers will have questions about their Orders. Setup the Shipping Policy Page as a living document for business, one that can be updated and adjusted according to unforeseeable circumstances that may occur during the delivery of Product(s).
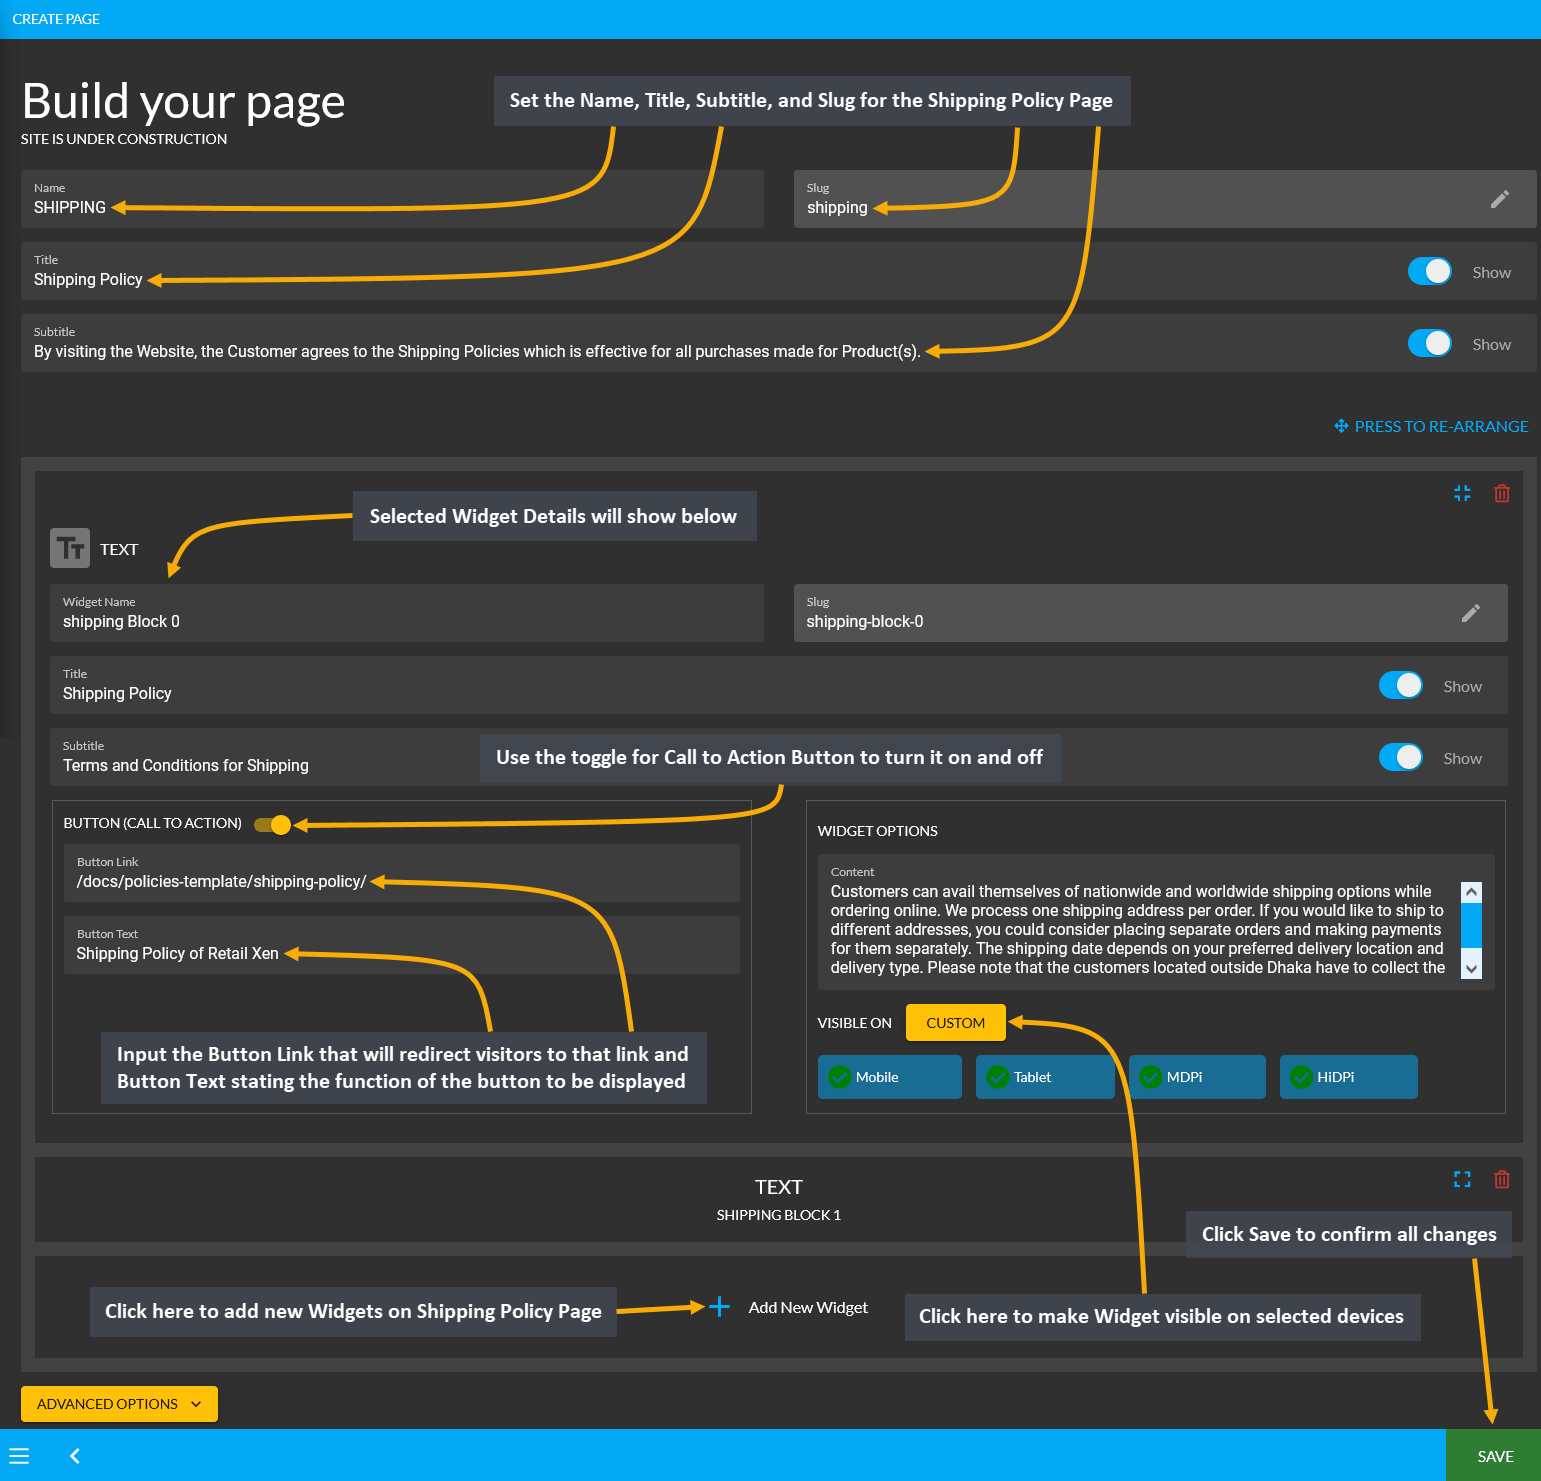
Configure the Shipping Policy Page by first by setting up the Name, Title, Subtitle, and Slug. After that, select all the necessary widgets. For instance, setup Name, Title, Subtitle, and Slug for the Text Widget. Input Button Link that will redirect visitors to that link and Button Text which will the function of the button to be displayed. Widget options include a box to add contents where policies can be added in details with headings and bullet points.
Click on All Devices button to make the policy visible on Mobile, Tablet, MDPi, and HiDPi. Similarly, other widgets can be added using the + button which allows adding multiple widgets to the Shipping Policy Page. This sample Shipping Policy Page can be used by Shop Owners as a guide.
Configure EMI Policy Page
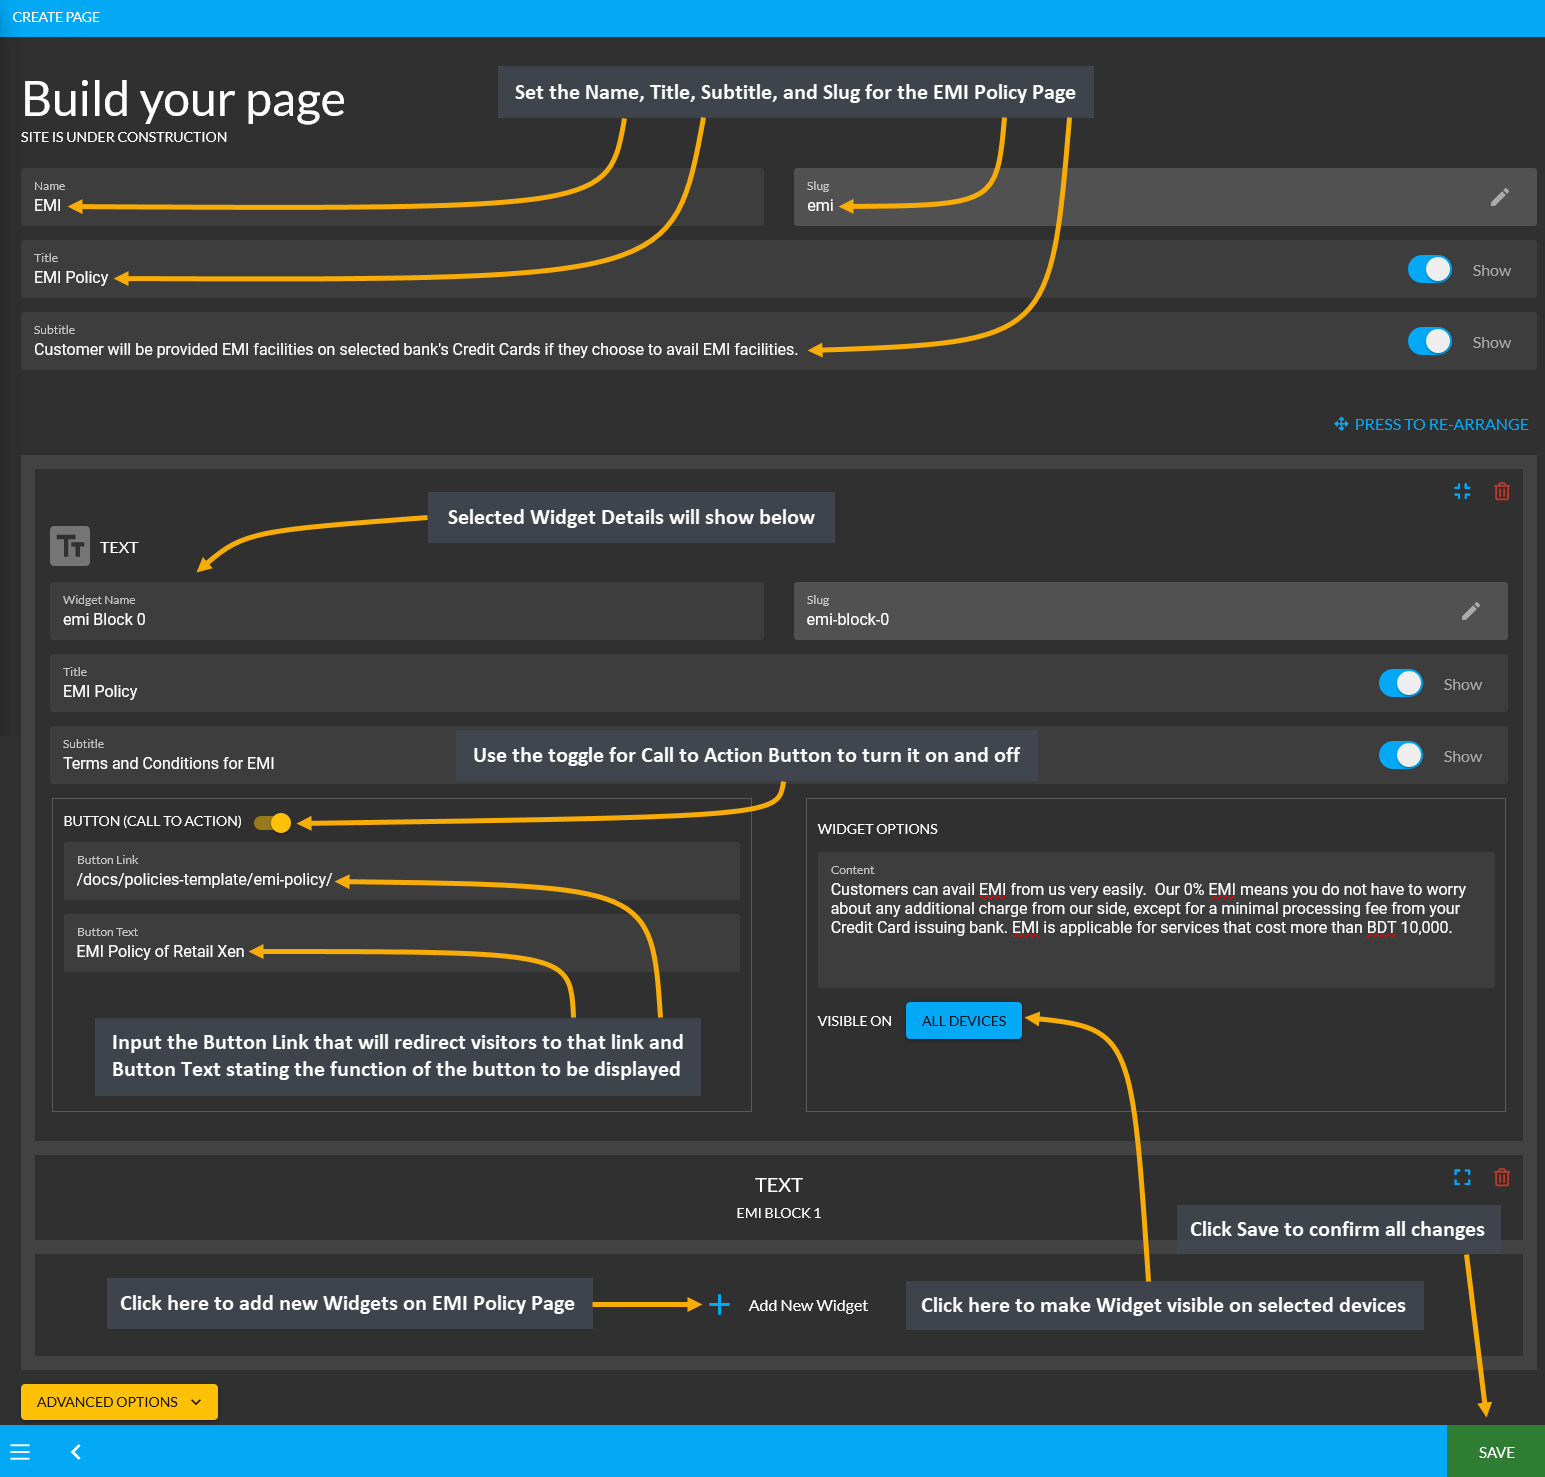
Configure the EMI Policy Page by first by setting up the Name, Title, Subtitle, and Slug. Then, select the necessary widgets. For instance, setup Name, Title, Subtitle, and Slug for the Text Widget. Input Button Link that will redirect visitors to that link and Button Text which will the function of the button to be displayed. Widget options include a box to add contents where policies can be added in details with headings and bullet points.
Click the All Devices button to make the policy visible on Mobile, Tablet, MDPi, and HiDPi. Similarly, other widgets can be added using the + button which allows adding multiple widgets to the EMI Policy Page. This sample EMI Policy Page can be used by Shop Owners as a guide.
Configure Privacy Policy Page
The Privacy Policy is one of the most important legal agreement for any online business, regardless of where it is operated: on website, mobile app, desktop app and so on. Customers are very much aware of their online privacy and the mass collection of their data. Therefore, a clear, up-to-date and easily accessible privacy policy is a great tool for demonstrating your business’ principle of transparency and to build user trust.
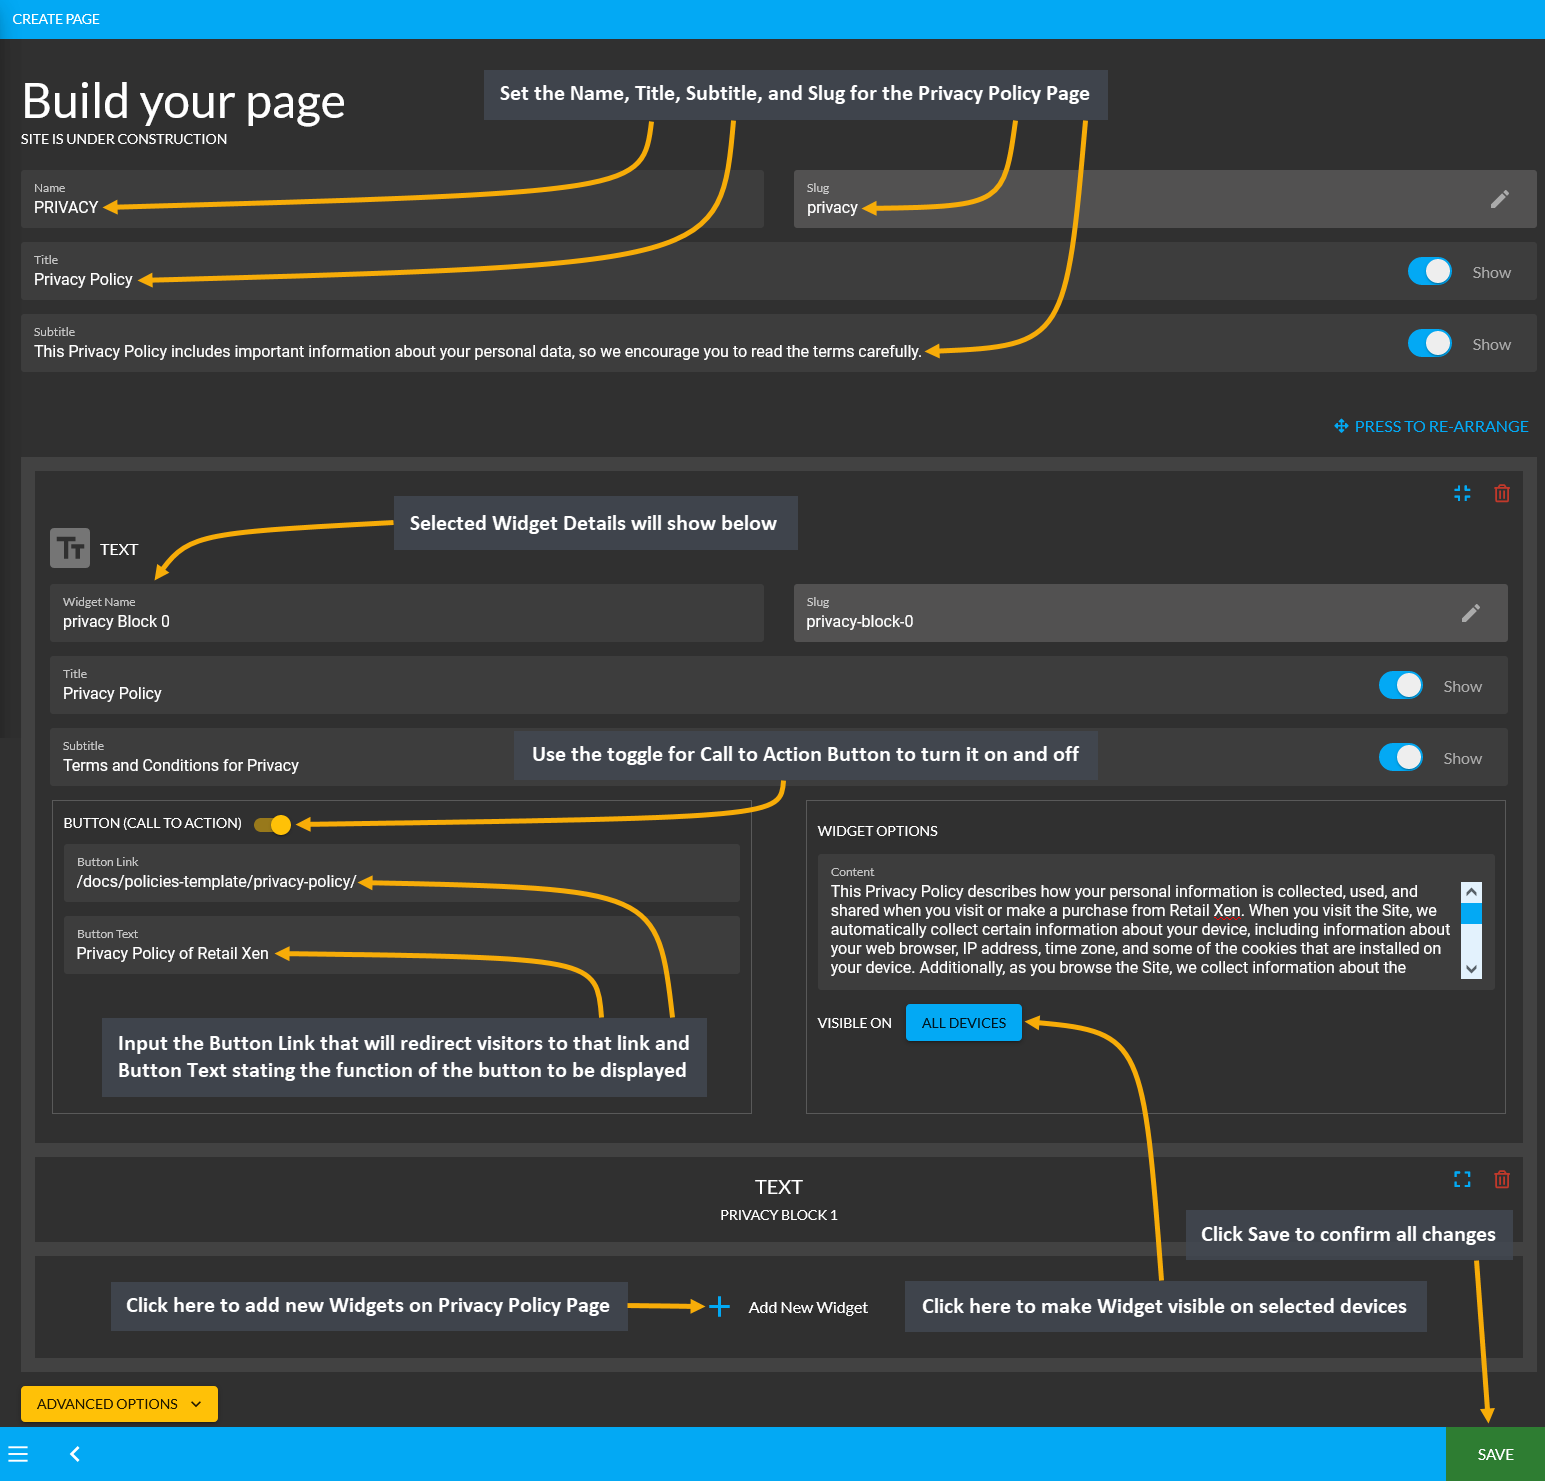
Configure the Privacy Policy Page by first by setting up the Name, Title, Subtitle, and Slug. Then, select all necessary widgets. For instance, setup Name, Title, Subtitle, and Slug for the Text Widget. Input Button Link that will redirect visitors to that link and Button Text which will the function of the button to be displayed. Widget options include a box to add contents where policies can be added in details with headings and bullet points.
Click the All Devices button to make the policy visible on Mobile, Tablet, MDPi, and HiDPi. Similarly, other widgets can be added using the + button which allows adding multiple widgets to the Privacy Policy Page. This sample Privacy Policy Page can be used by Shop Owners as a guide.
Update Branch Details and Schedule
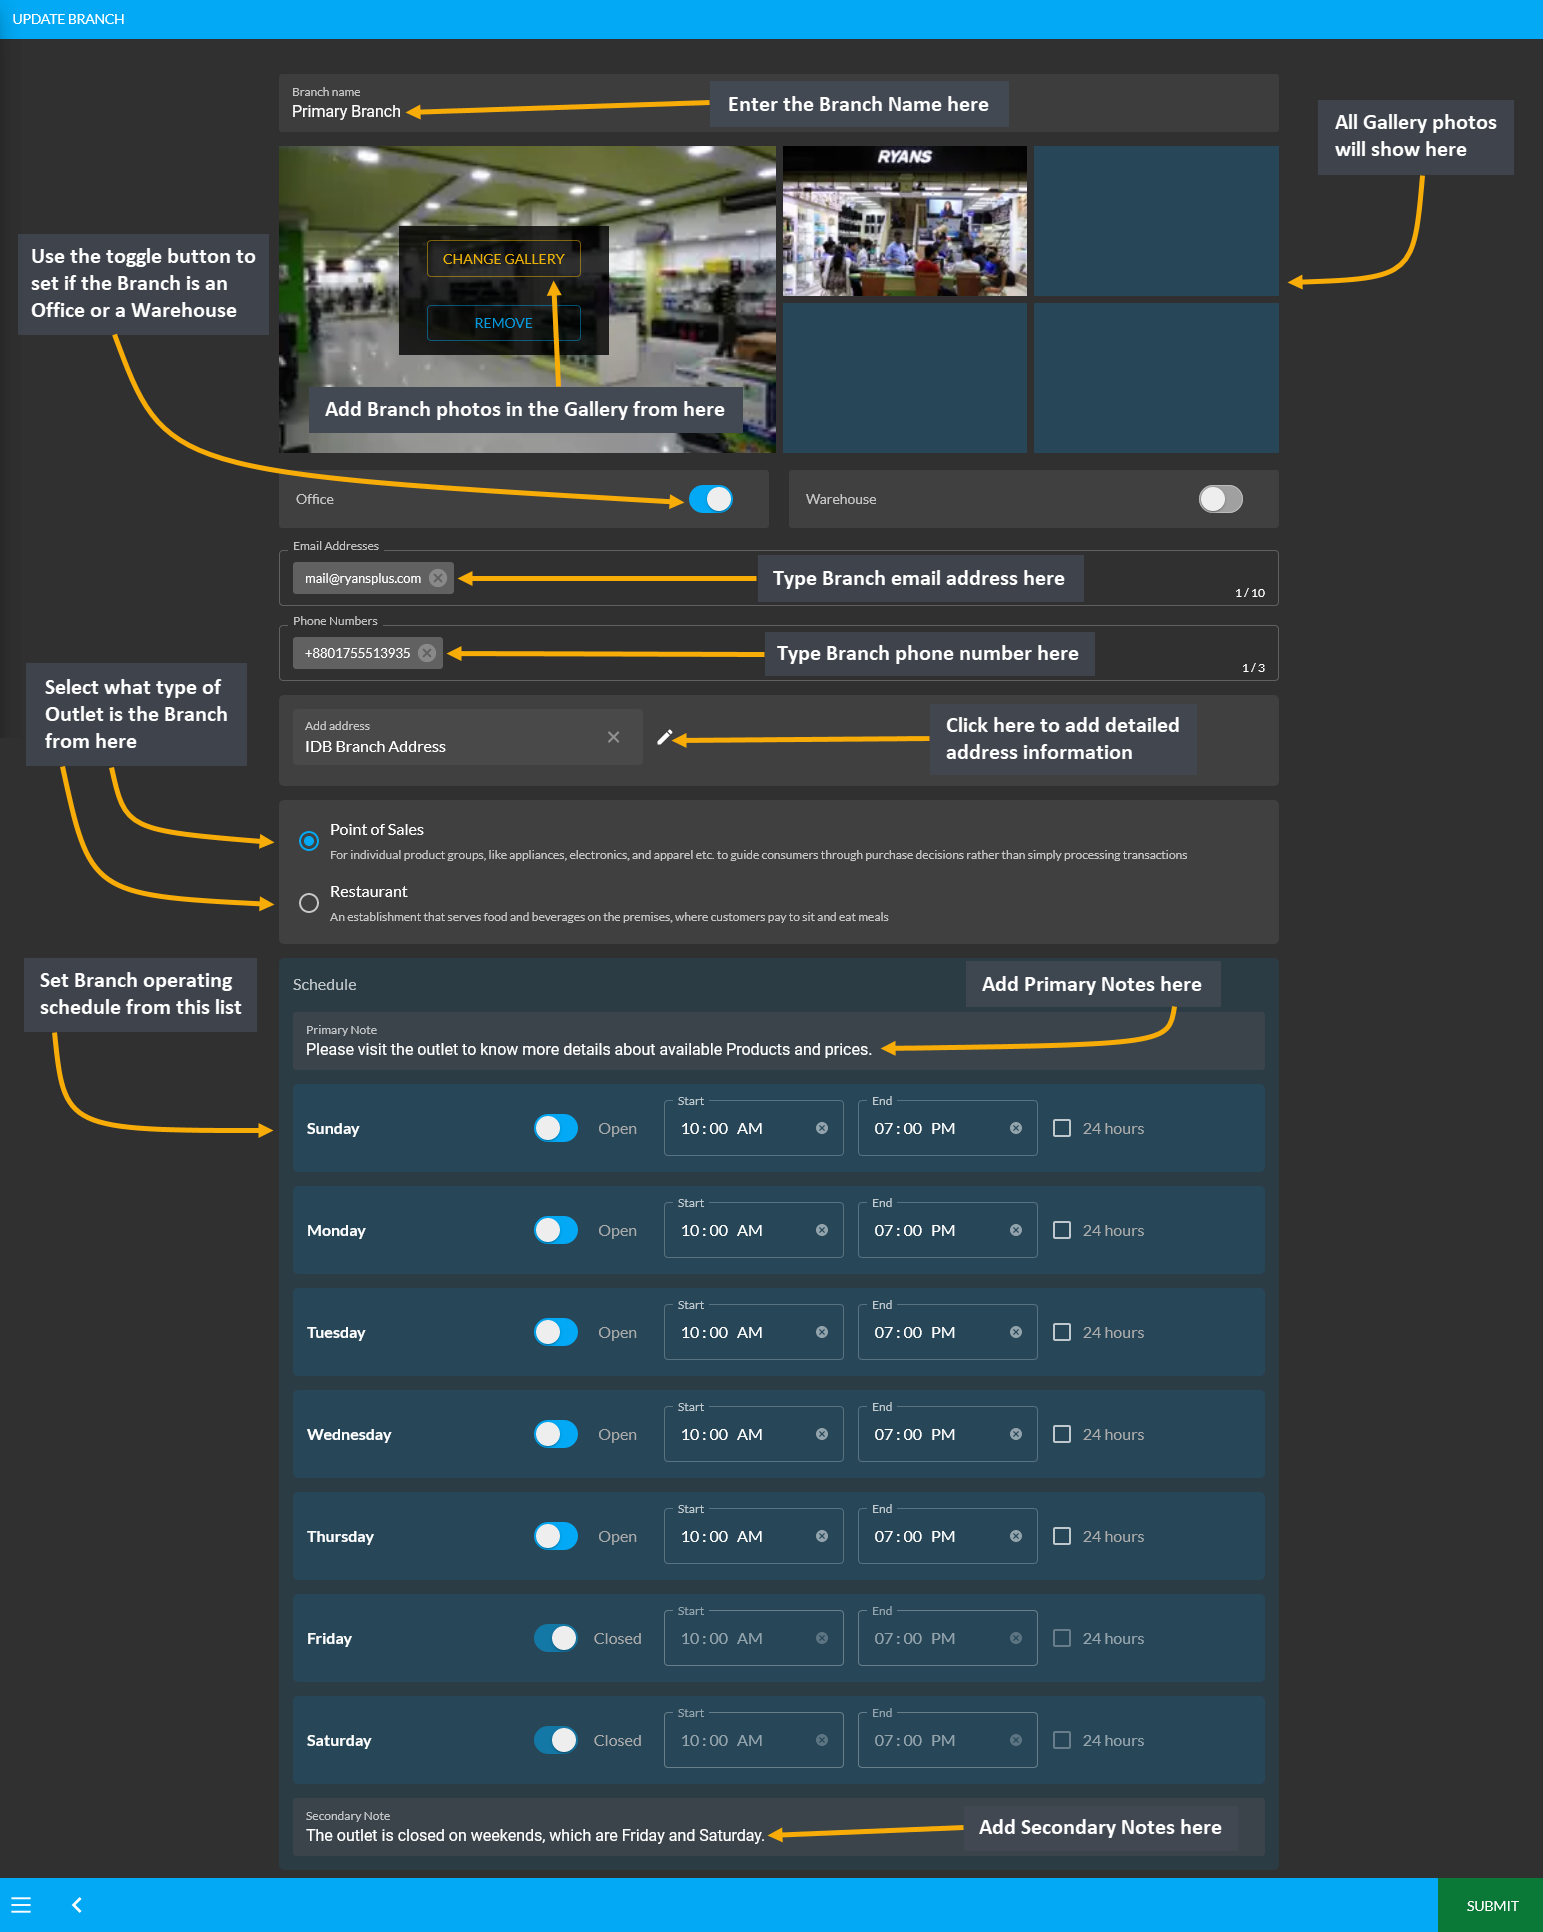
Every Shop will have different Branches on various locations. For this reason, the Admin Panel include options to create Branches. Under Update Branch, the Shop Owners can set Schedule with business hours for Customers to visit and make a Product purchase. The first field to fill out for the Branch is the Branch Name.
Below is the Gallery where Shop Owners can add photos of their Branch outlets with Add New Gallery option. Add multiple images for Branch gallery. Then, there are two toggle buttons to set Branch as Office or Warehouse. Next, the Shop Owner can select if their Outlet is Point of Sales or Restaurant that best describes the Branch.
Then, fill out the email address, phone number, and detailed address of the Branch. Then, set the Branch operating Schedule for Customers to visit or make a purchase. Set business days and holidays with Start and End times. Use the toggle button to show when the Branch is open or closed. Add Primary Note or Secondary Note as needed.
Add Branch Address
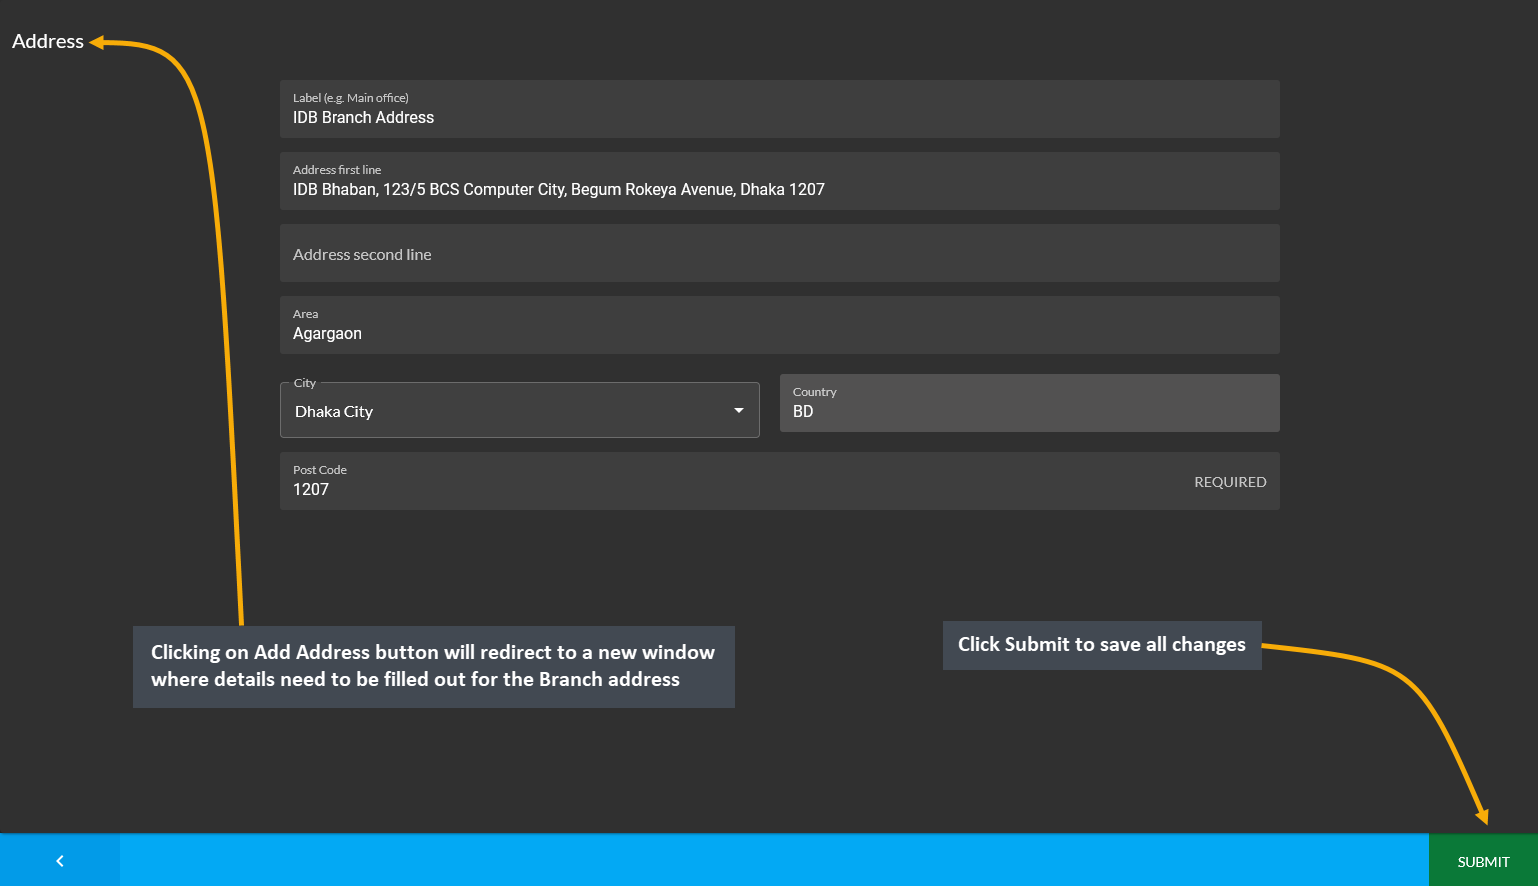
Within Branch Settings to Update Branch, clicking the Edit icon beside the Add Address box will open a pop-up where Branch address details needs to be filled out. From here, fill out the Label, Address, Area, City, Country, and Zip Code. Click Submit to save all changes. It will redirect to the main page to update rest of the details.
