Credit Customer Ledger Transactions
Learn More about the Credit Customer’s purpose of transactions through Ledger.
Ledger is like a complete transaction history of day-to-day busienss. The Shop Owners can decide to grant any Customer Credit Limit with which they can buy Product(s) from the Shop Owner that will reflect in their Ledger. Shop Owners can only manually provide Credit Limit to Customers from the Admin Panel, but customers cannot self checkout using the provided Credit Limit in The Website.
So, among three Customer types, only Credit Customer and Credit Supplier has Credit Limit and they can use On Credit (Due) to purchase Products. The Regular Customer does not have a Credit Limit and they cannot use On Credit (Due) to purchase Products. However, they can purchase Products from the Website using all the other types pf Payment Methods like Cash, Cash On Pickup, Cheque, Credit Card, SSL Commerz, PortWallet, Bank Transfer, Nagad, and BKash.
| Customer Types on the Admin Panel: |
|---|
| Regular Customers: Can purchase Products using different Payment Gateways except On Credit (Due). |
| Credit Customers: Are given a Credit Limit through which they can buy Products with On Credit (Due). |
| Credit Suppliers: Can both buy and sell Products with Credit Limit and all other Payment Gateways. |
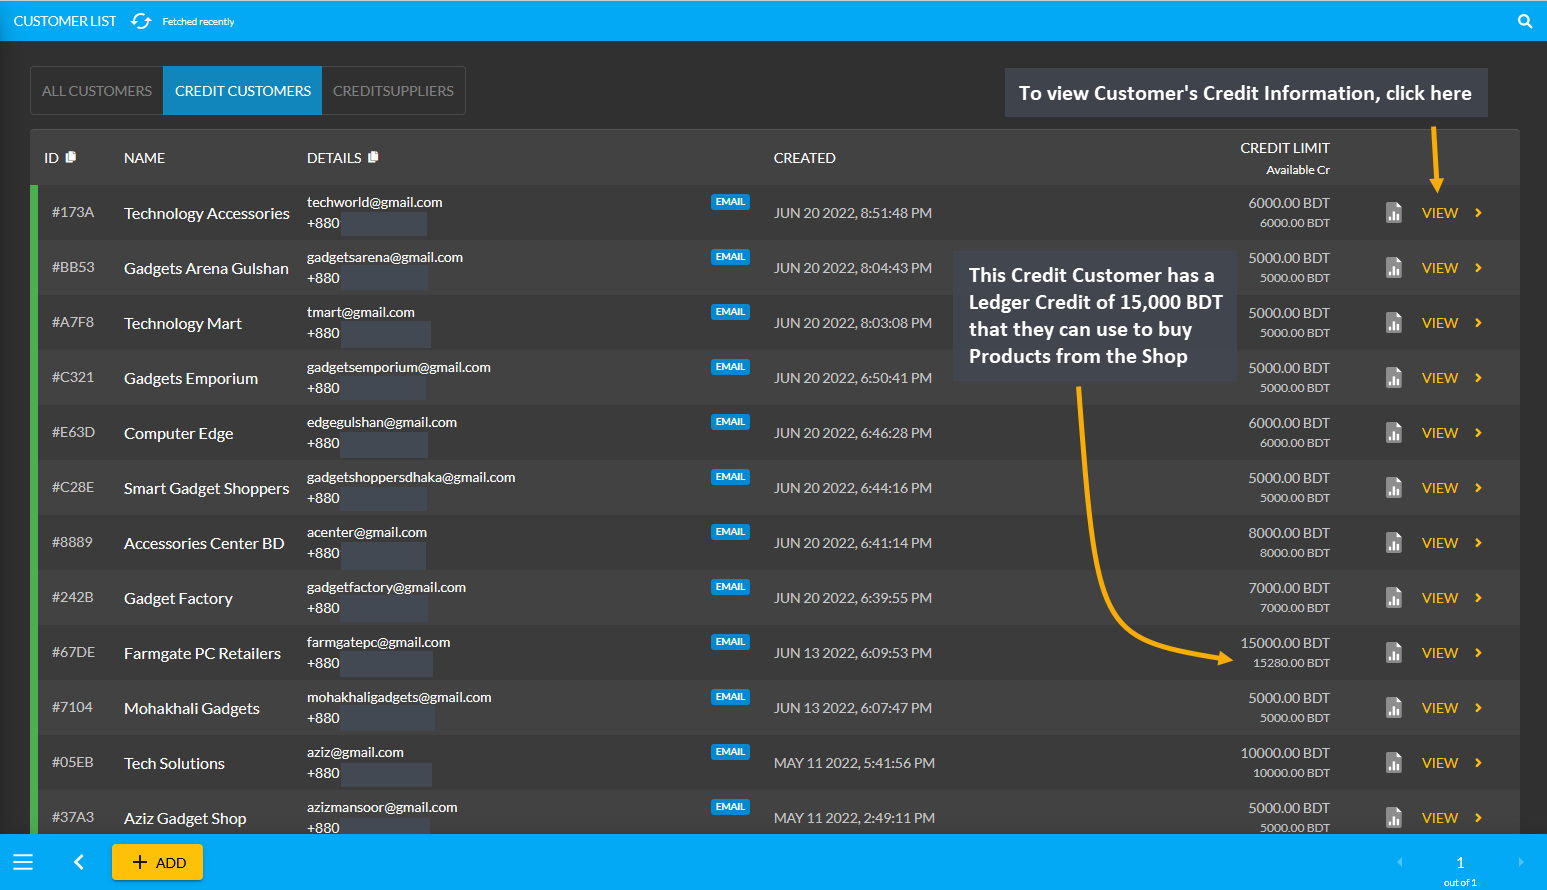
Customers who are granted an amount of Credit Limit will only turn into Credit Customers which differentiates them from regular Customers. The list of Credit Customers can be found under Customers module where the issued Credit Limit will be visible for each Credit Customer, i.e. here Farmgate PC Retailers has a Credit of 15,000 BDT. Check their Credit Information by clicking on View that will redirect to the Customer Dashboard.
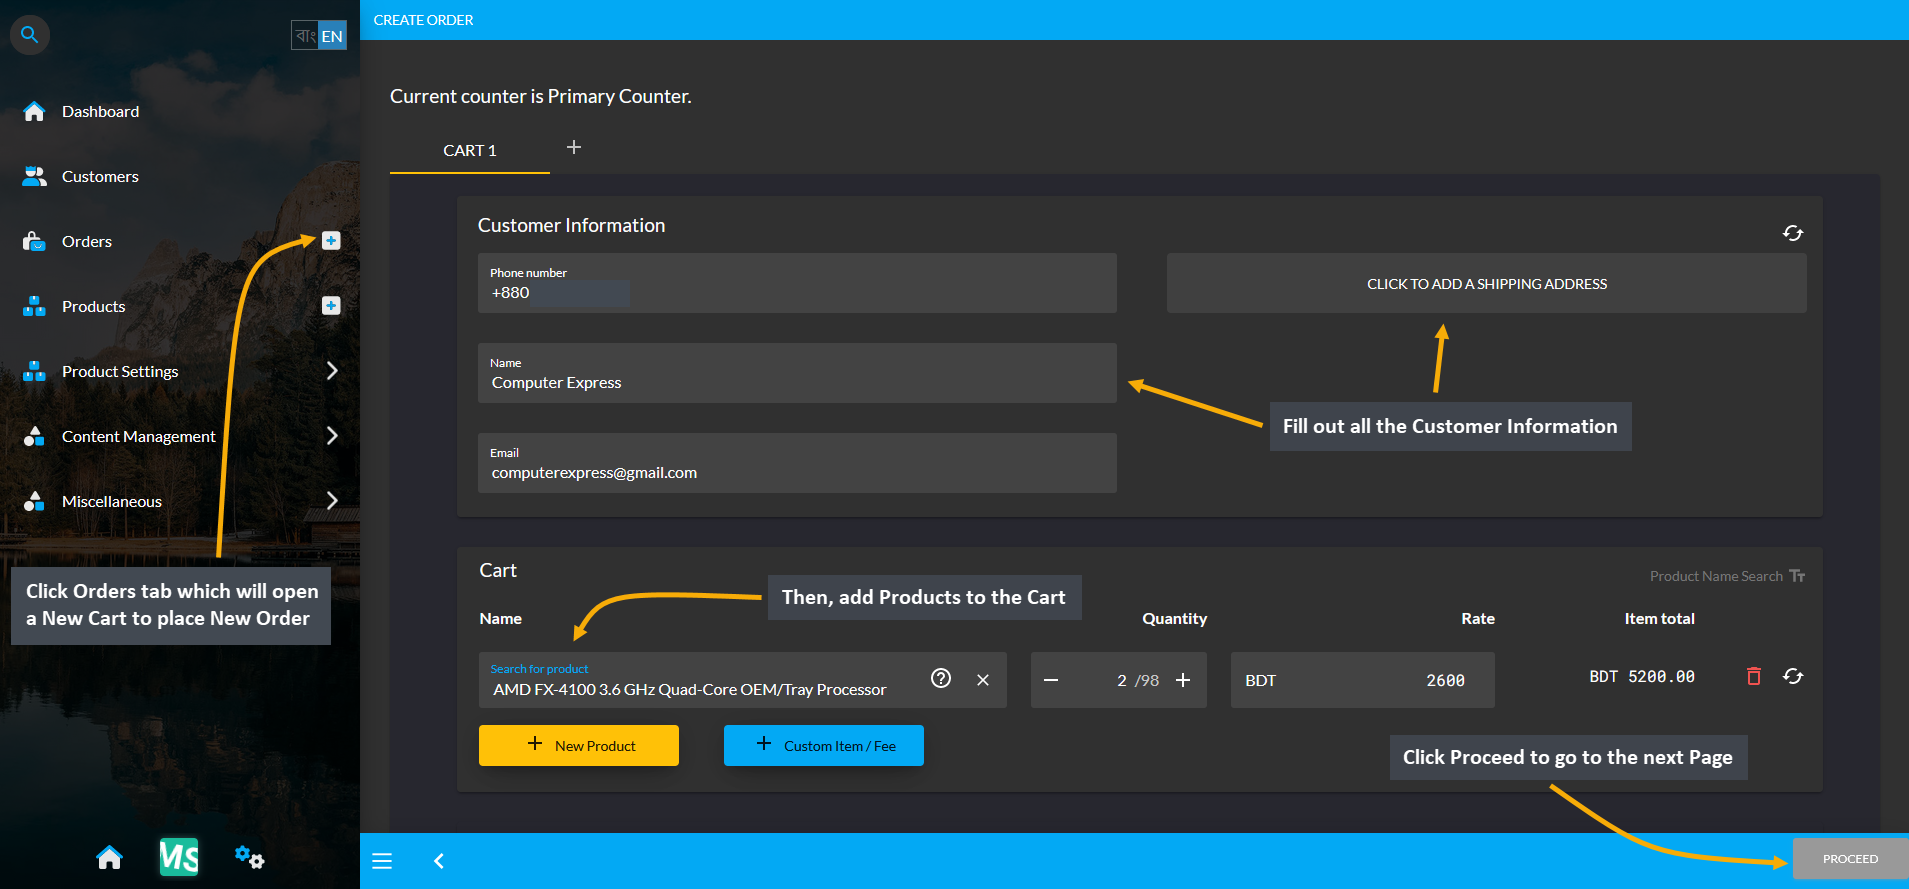
Credit Customer can be created after a New Order is placed for a Customer. First, click on the Orders tab, which will open a New Cart to place New Order. Now, fill out the Customer information with name, phone, email, and shipping address. Then, add Product(s) to the Cart and click Proceed as shown in the example screenshot below:
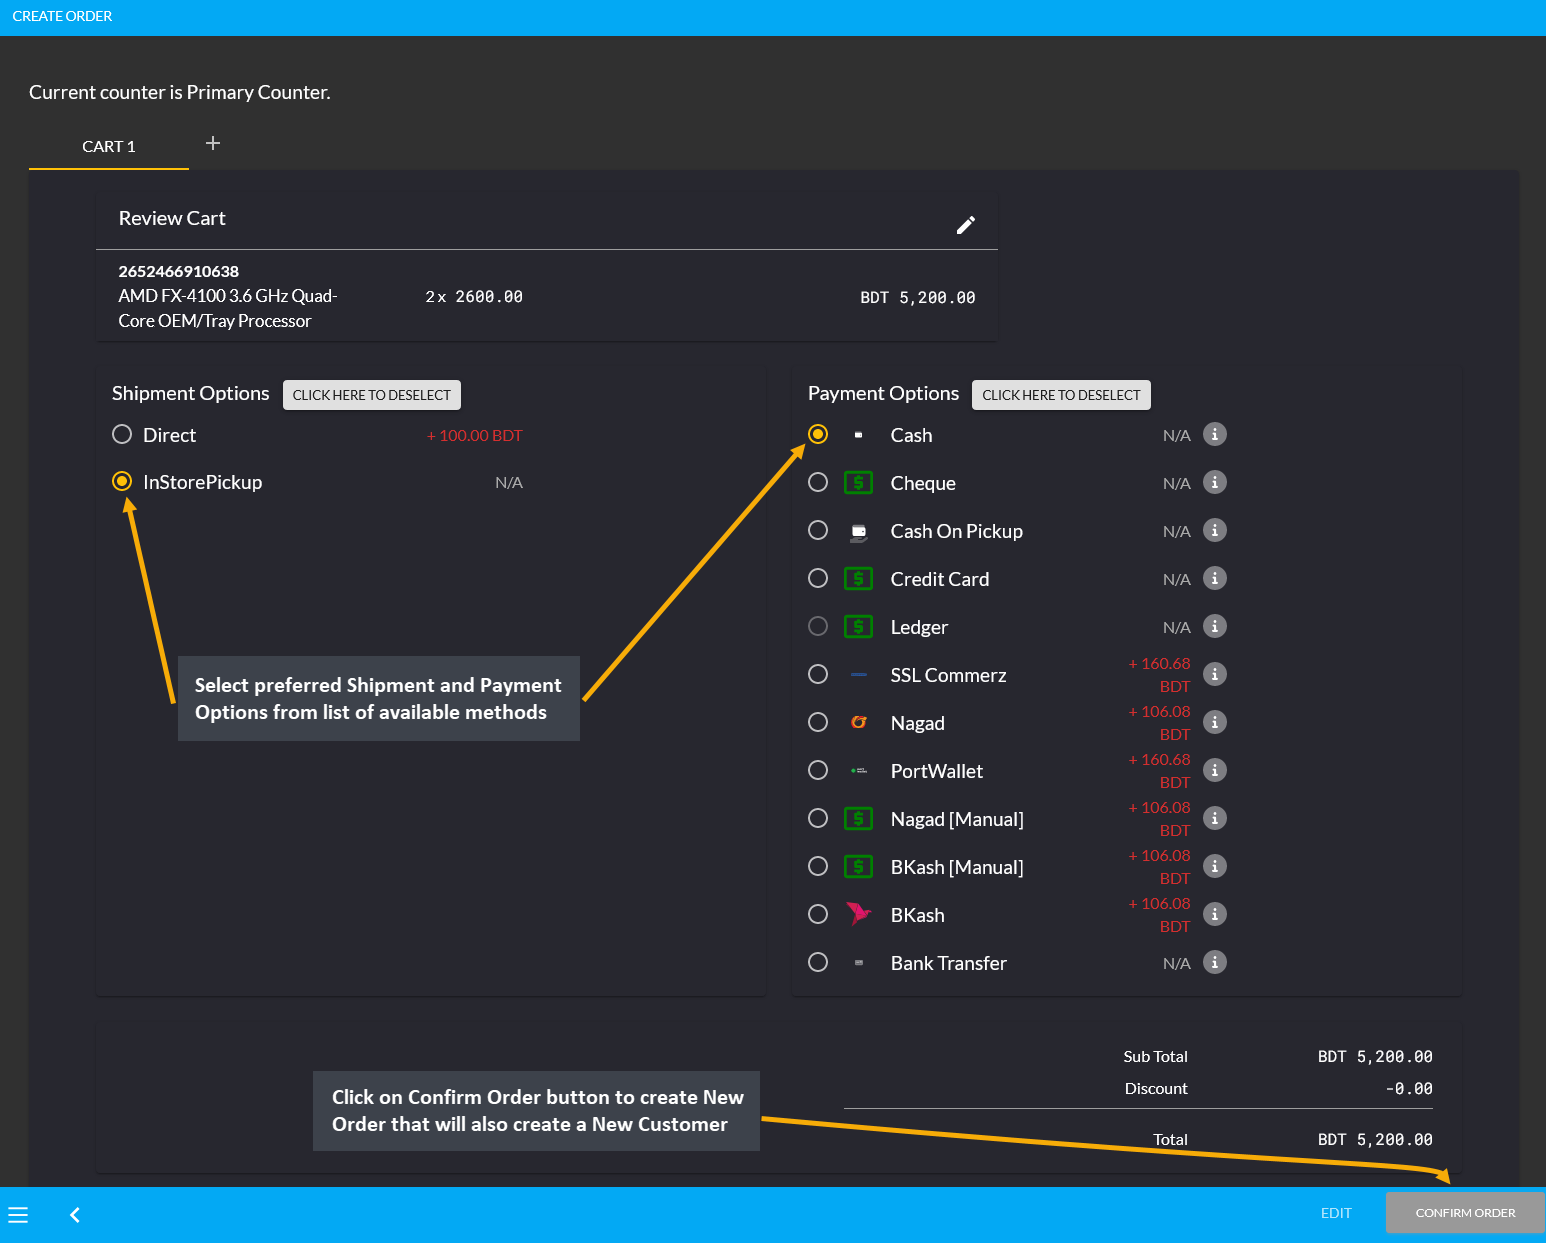
In the next Page, select from the Shipment Options and Payment Options and click Confirm Order. As a result, a New Order will be placed and a New Customer will be created that can be converted into a Credit Customer.
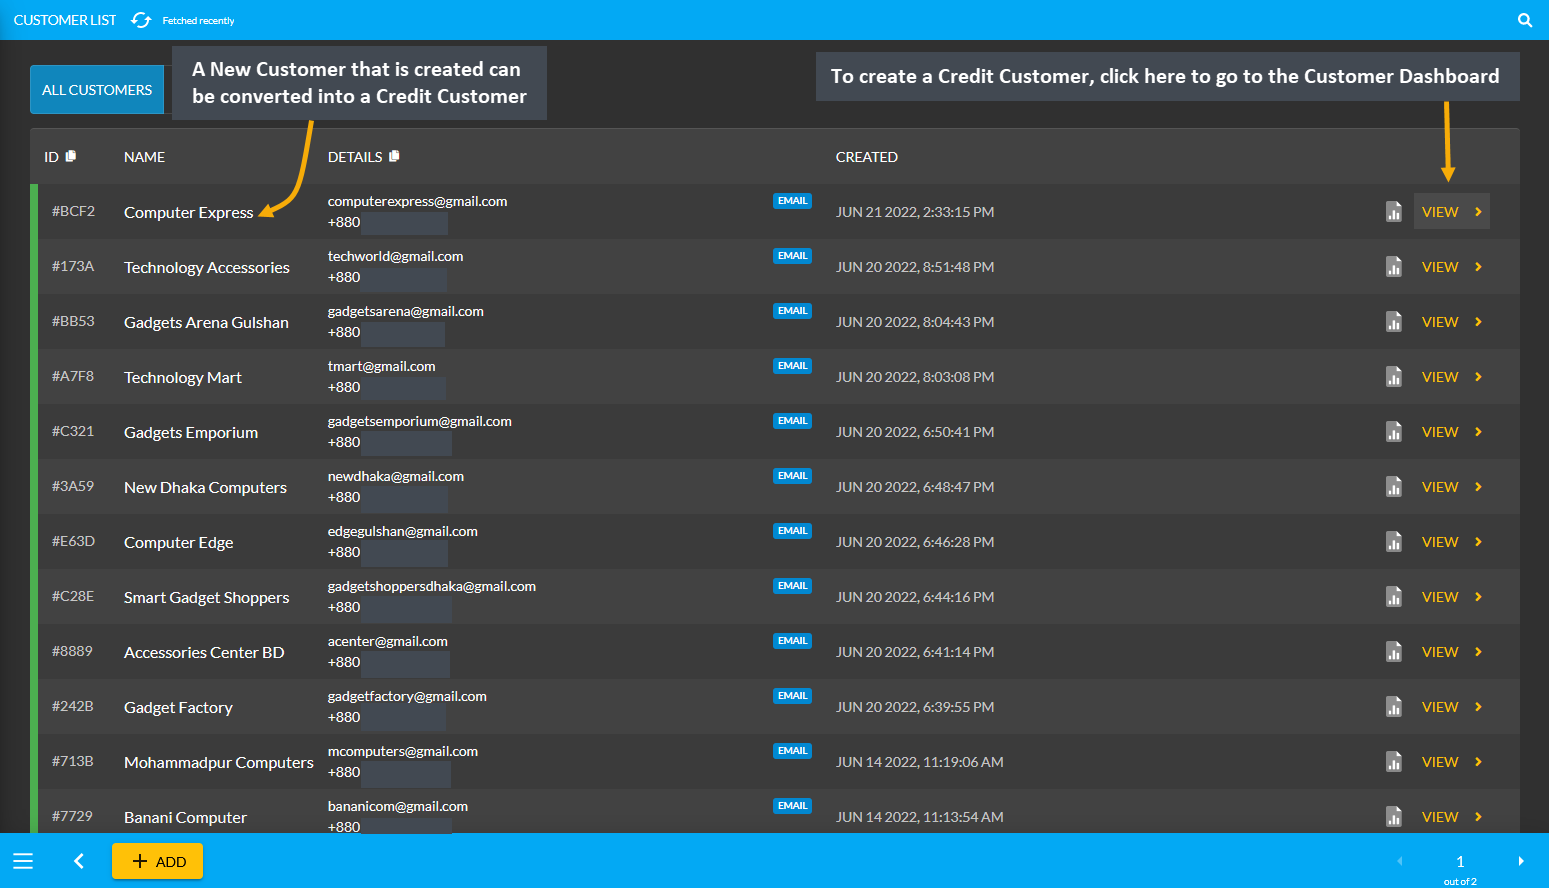
The New Customer will now be enlisted under the All Customers List. To create a Credit Customer, click the View button that will redirect to the Credit Information section on the Customer Dashboard.
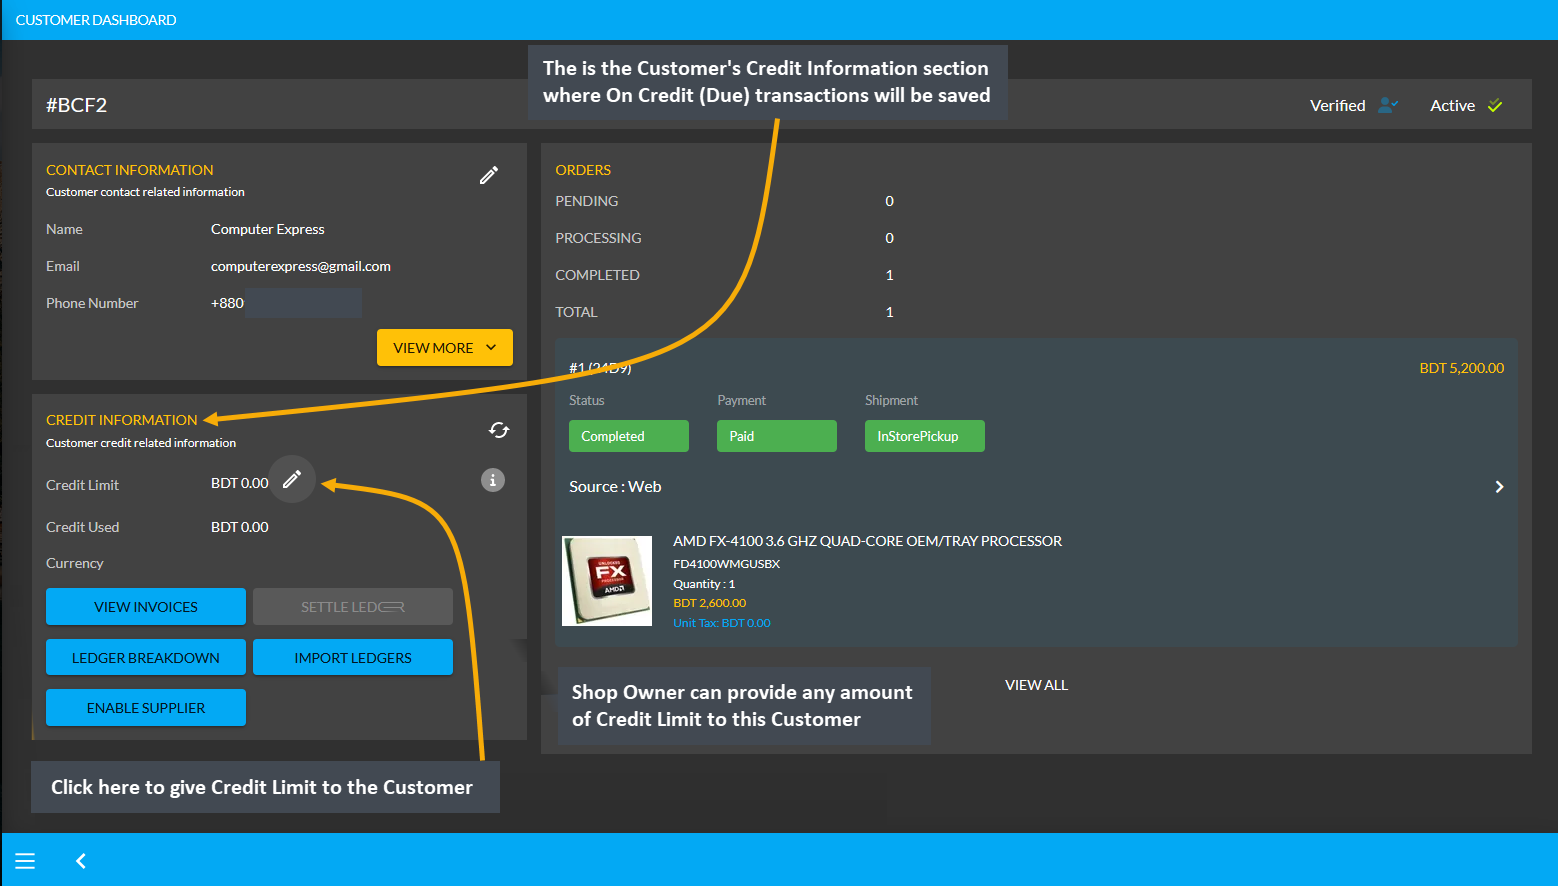
There is a Credit Information section in the Customer Dashboard that will display the Customer’s Credit balance. For instance, the Shop Owner trusts this Customer Computer Express (in the example), and wants to give them a Credit Limit of 15,000 BDT. To do this, the Shop Owner needs to click on the Edit icon as shown in the screenshot to open a new pop-up through which they can provide any amount of Credit Limit to this Customer.
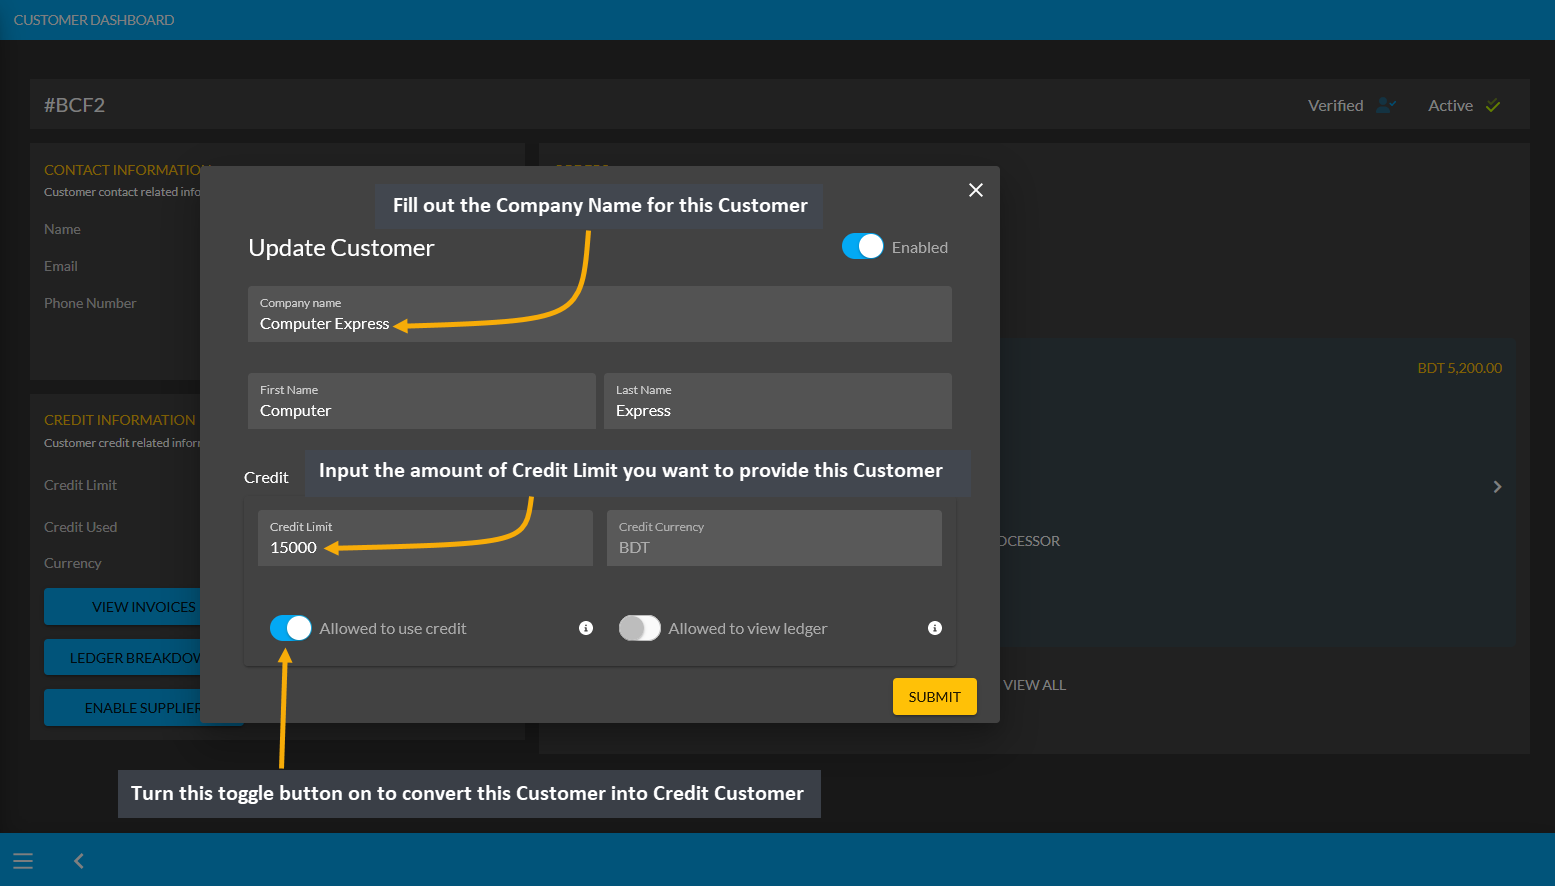
Clicking the Credit Limit icon will open a pop-up with the Customer’s details. There is a box for Credit Limit, click on it and input 15,000 BDT to provide this Credit Limit to the Customer. Also, fill out the Company Name and turn on the toggle Allowed to Use Credit to convert this Customer into a Credit Customer. Now, this Credit Customer Computer Express will be able to make purchases with Credit Limit of worth 15,000 BDT without paying upfront. The final action is to click on the Submit button to save all the changes as shown in the screenshot below.
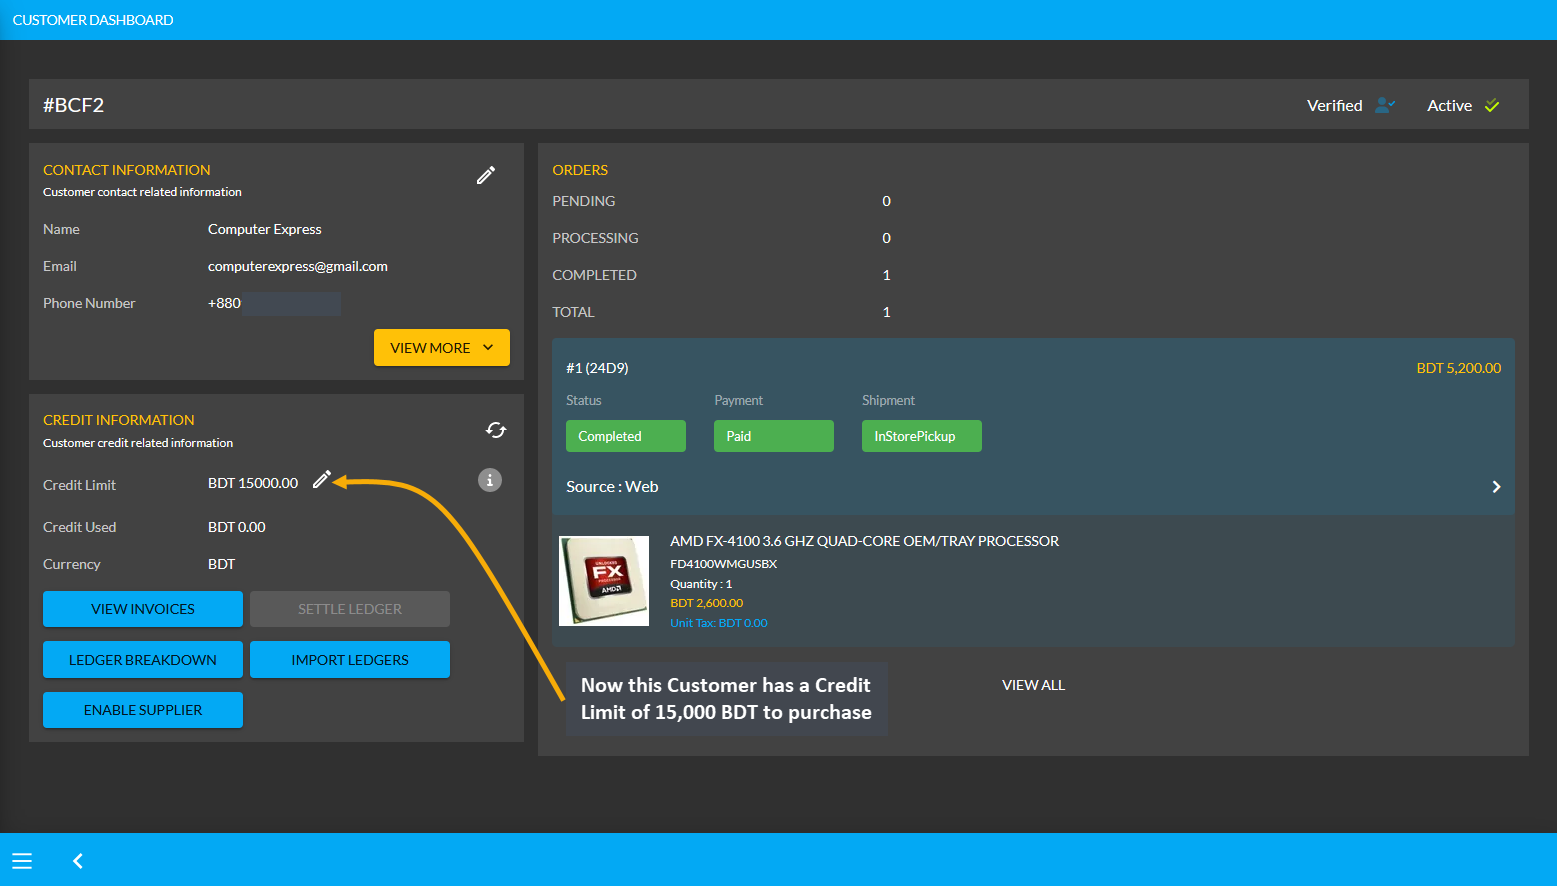
Being converted into a Credit Customer, this Customer now has a Credit Limit of 15,000 BDT. They will be able to spend this Credit Limit to make purchases without instantly paying. The Credit Limit spent will show within the Credit Used section. Customer can restore their Credit Limit of 15,000 BDT back to the Shop Owner by settling Ledger through different Payment Gateways which will clear out the Credit Used section back to 0.00 BDT.
However, this Credit Limit can only be used by Customer for In Store Pickup and can be used in transaction only from the Admin Portal. The Shop Owner and their staff can only use this Credit Limit for Credit Customer during making payments with On Credit (Due) Payment Gateway for Customer’s Product purchase for In Store Pickup.
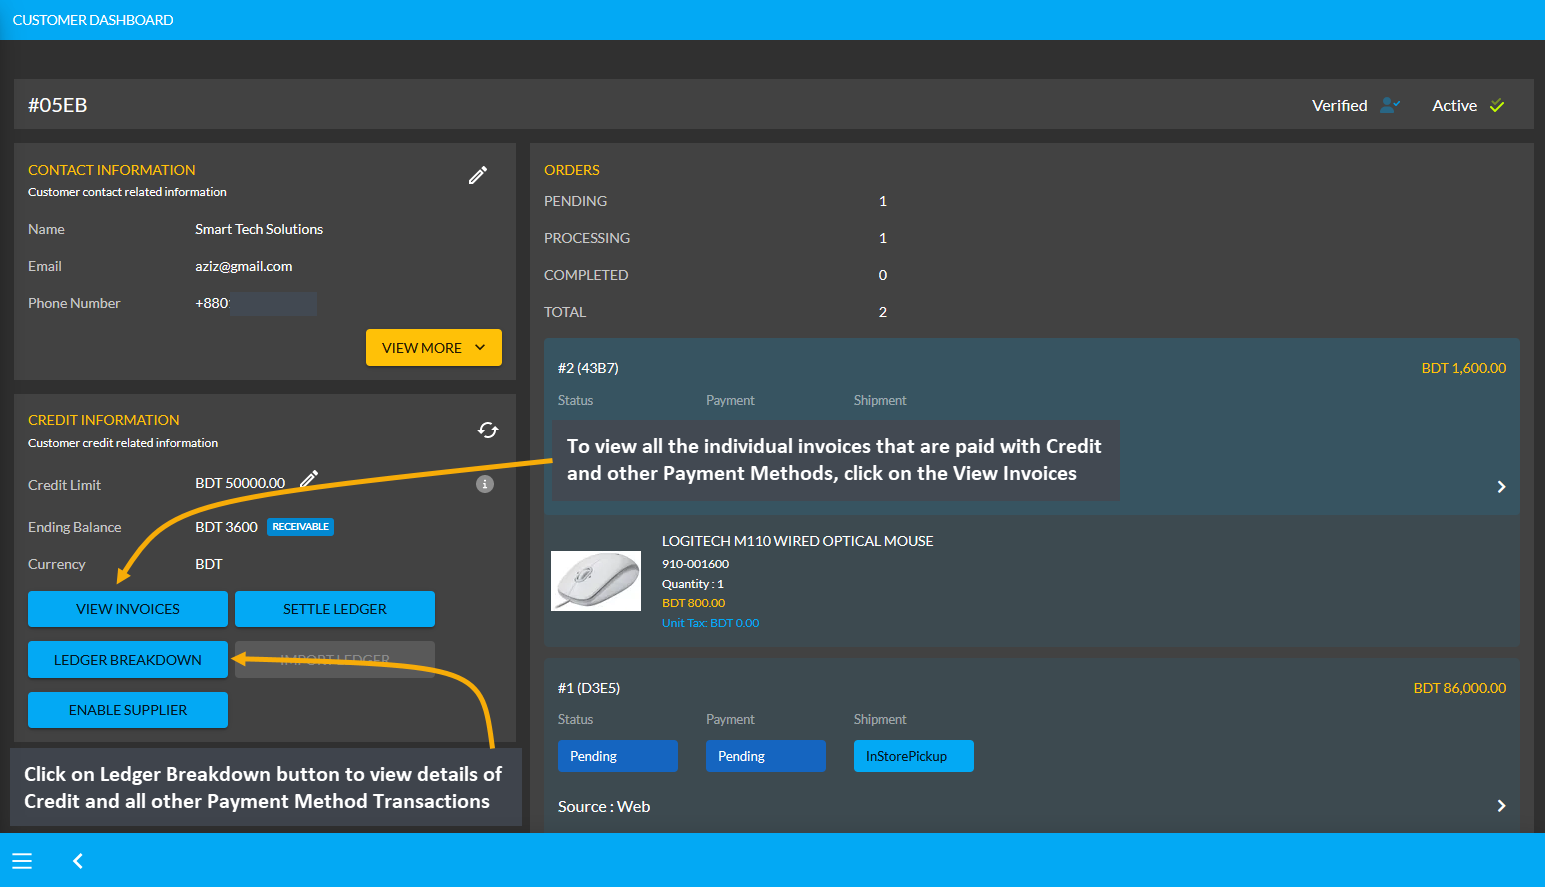
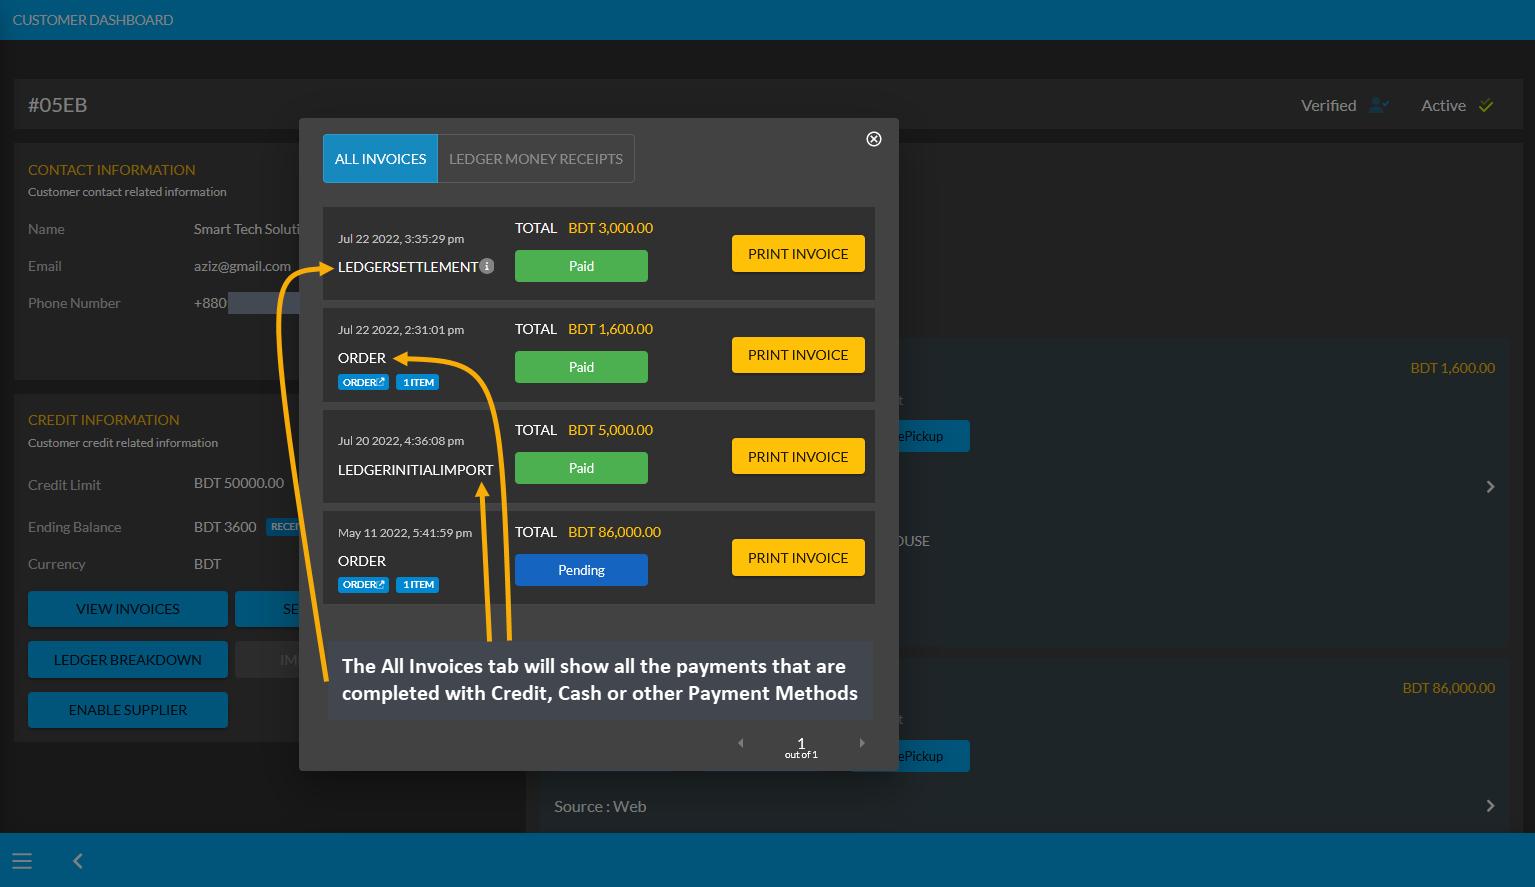
To view all the individual invoices that are paid with Credit and other Payment Methods, click on the View Invoices button. On the otherhand, click on Ledger Breakdown button to view details of Credit and Payment Transactions.
Clicking on View Invoices button will open a pop-up displaying list of invoices that are paid for Orders with both Credit and other Payment Methods. Therefore, when payments are completed with credit, cash or other payment methods, those orders will show up under the All Invoices section.
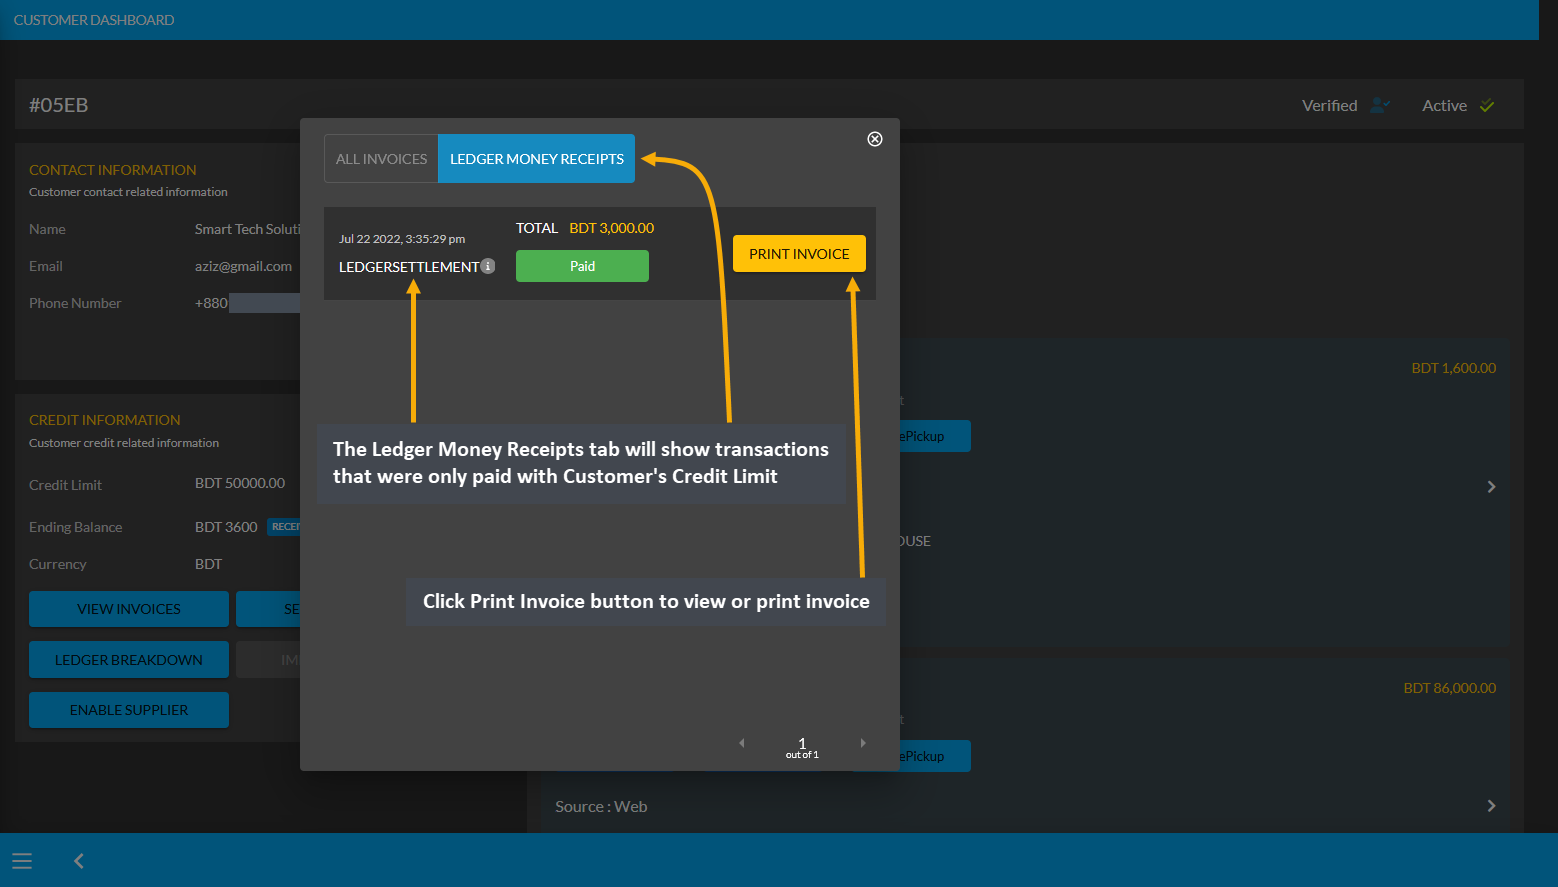
There is another tab of Ledger Money Receipts besides All Invoices which will only show transactions that were paid with Customer’s Credit Limit when ordering Products. Click the Print Invoice button to view or print invoice.
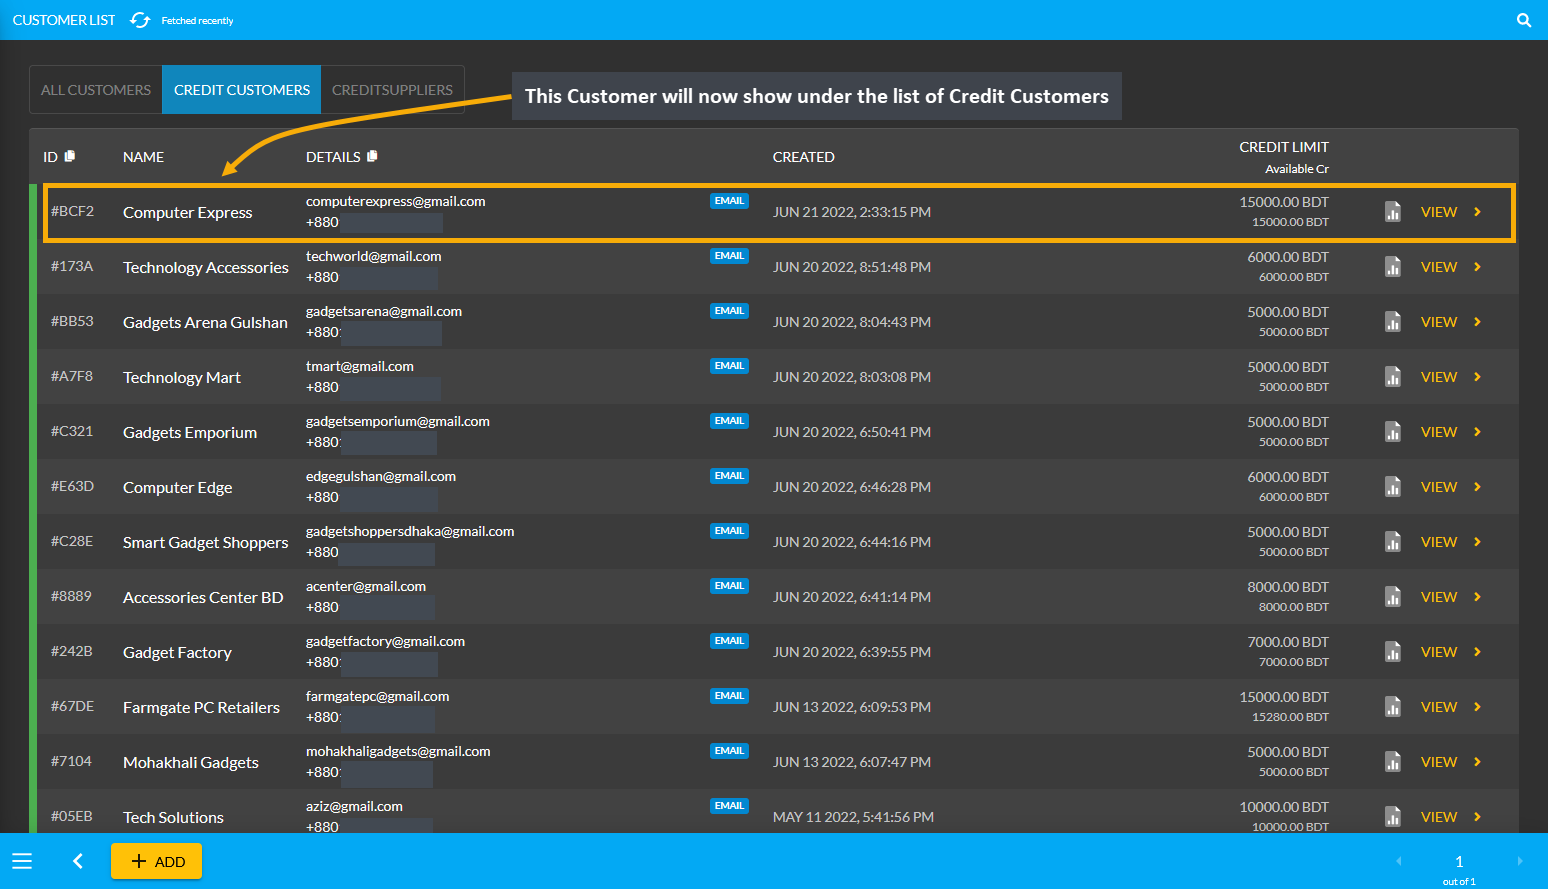
The Credit Limit cannot be used for Orders in The Website. The New Customer will also appear as Credit Customer under the Credit Customers list as illustrated in the example screenshot below.
Credit Suppliers are companies who can buy Product(s) from and also sell Product(s) to the Shop Owner. They will be granted Credit Limit and also permission to Sell Product(s) to the Shop Owner. With the Credit Limit, the Credit Suppliers can purchase Product(s) from the Shop Owner. Similarly, as the Supplier, they can sell Per Unit Product(s) to the Shop Owner. Both types of transactions will reflect on their Ledger Breakdown section.
Credit Suppliers could be selling Per Unit Product(s) like RAMs, Mice, Keyboards, and flash drives etc. Suppliers are renowned brands like Ryans Computer, UCC, or Star Tech. What differentiates the Credit Suppliers from the Credit Customers is that they have the permission to sell Product(s) which Credit Customers do not have.
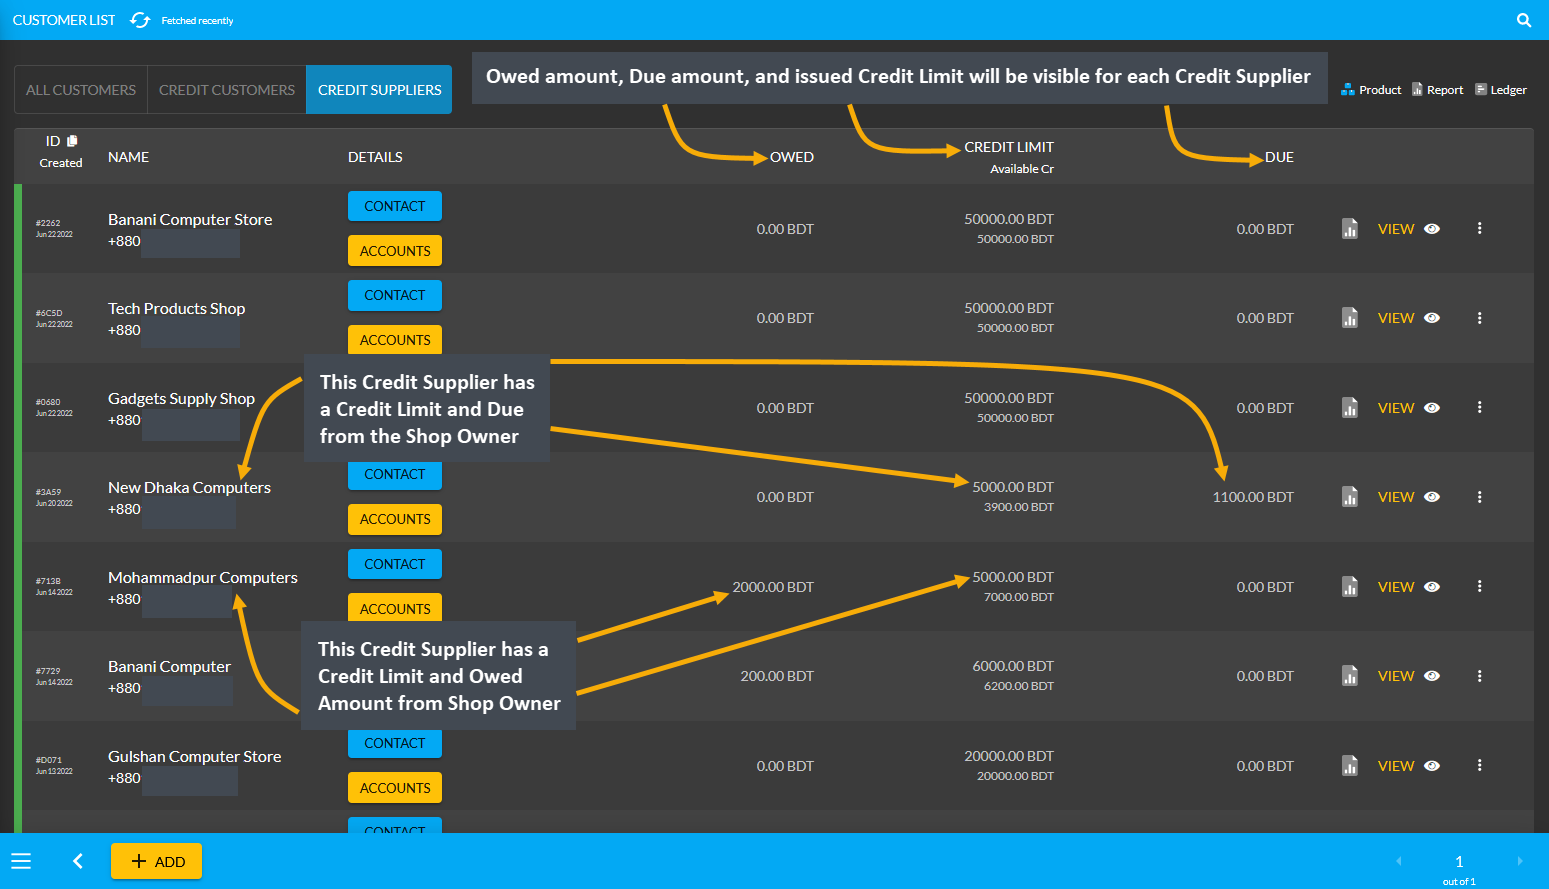
The list of Credit Suppliers can be found under Customers module where Owed amount, Due amount, and issued Credit Limit will be visible for each Credit Supplier. Here, New Dhaka Computers has Credit Limit of 5,000 BDT and Due amount of 1,100 BDT which means they will get 1,100 BDT from the Shop Owner. Conversely, Mohammadpur Computers has Credit Limit of 5,000 BDT and Owed amount of 2,000 BDT which means they will pay 2,000 BDT to the Shop Owner. Check their Credit Information by clicking on View that will redirect to the Customer Dashboard.
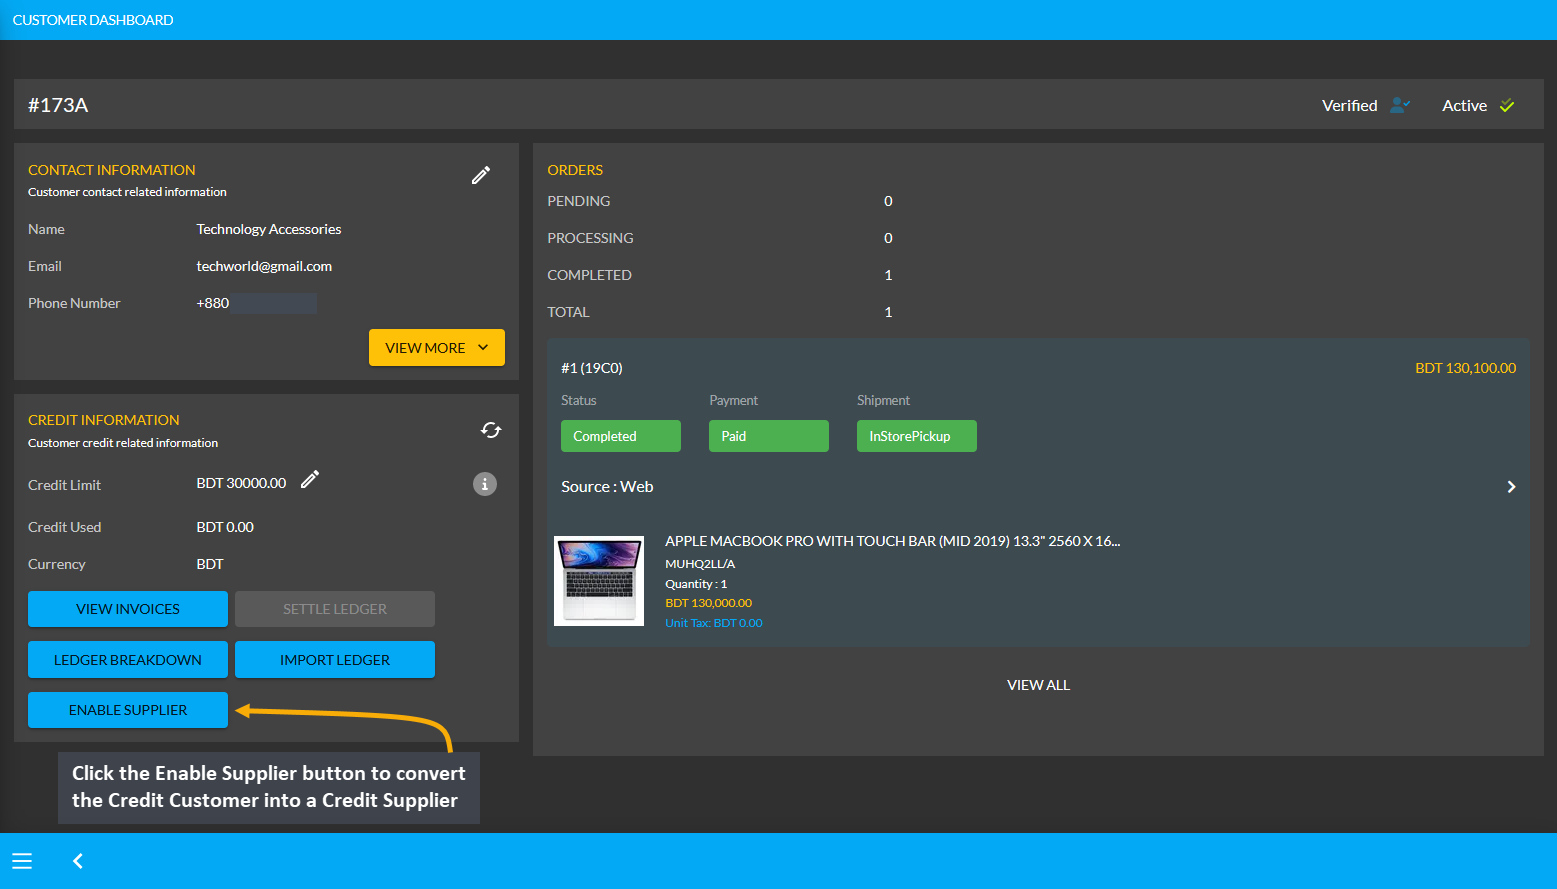
As discussed before, a Credit Customer will automatically be created after a New Order is placed for a Customer. Activate and provide Credit Limit to the New Customer from the Credit Information section that will convert them into a Credit Customer. Now, to convert this Credit Customer Technology Accessories into Credit Supplier, click the Enable Supplier button from Credit Information on Customer Dashboard as shown in the example below.
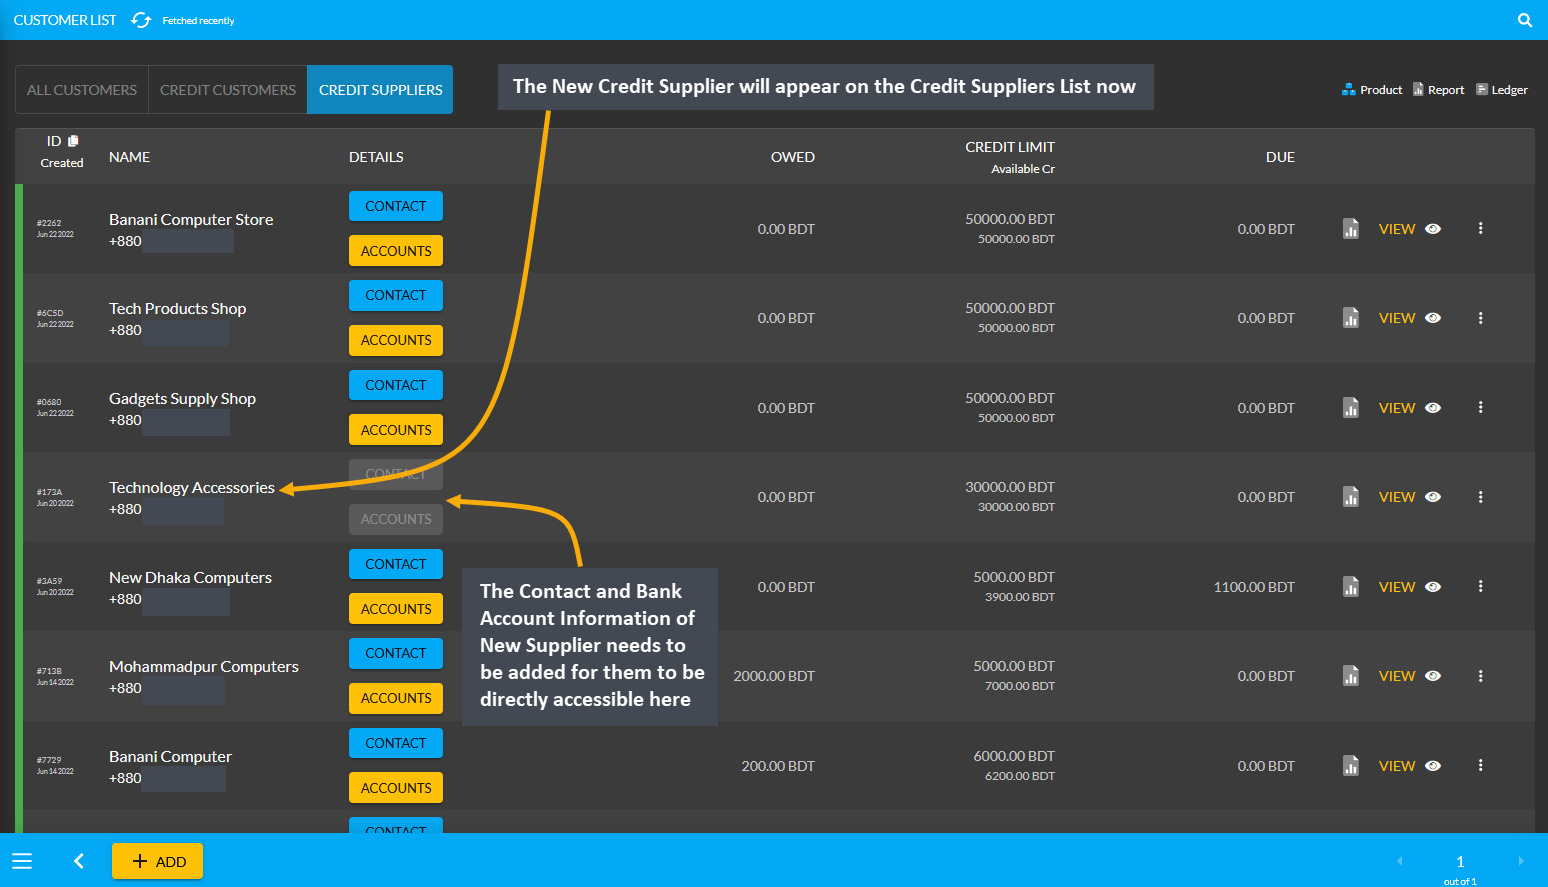
The New Supplier will appear as a Credit Supplier under the Credit Supplier List as shown in the example below.
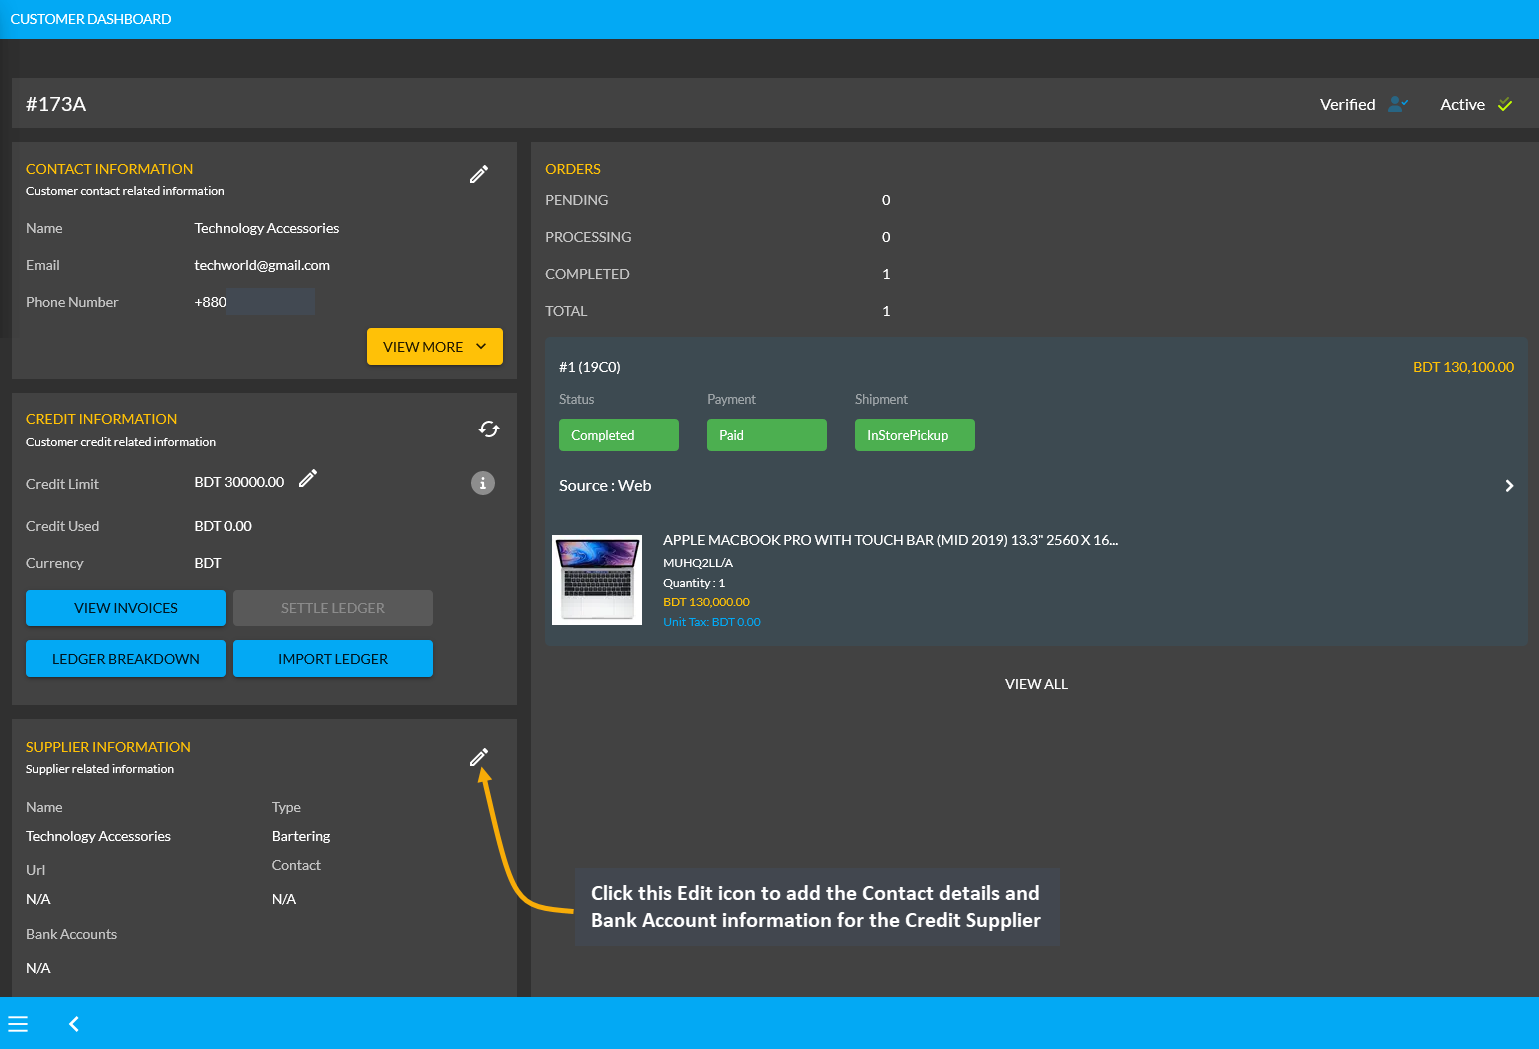
When the Credit Supplier is created, they will have a Supplier Information section added to their Dashboard. From here, the Contact information and Bank Account information can be added for the Credit Supplier. Click the Edit icon on the Supplier Information section that will redirect to a new page to update contact and bank details.
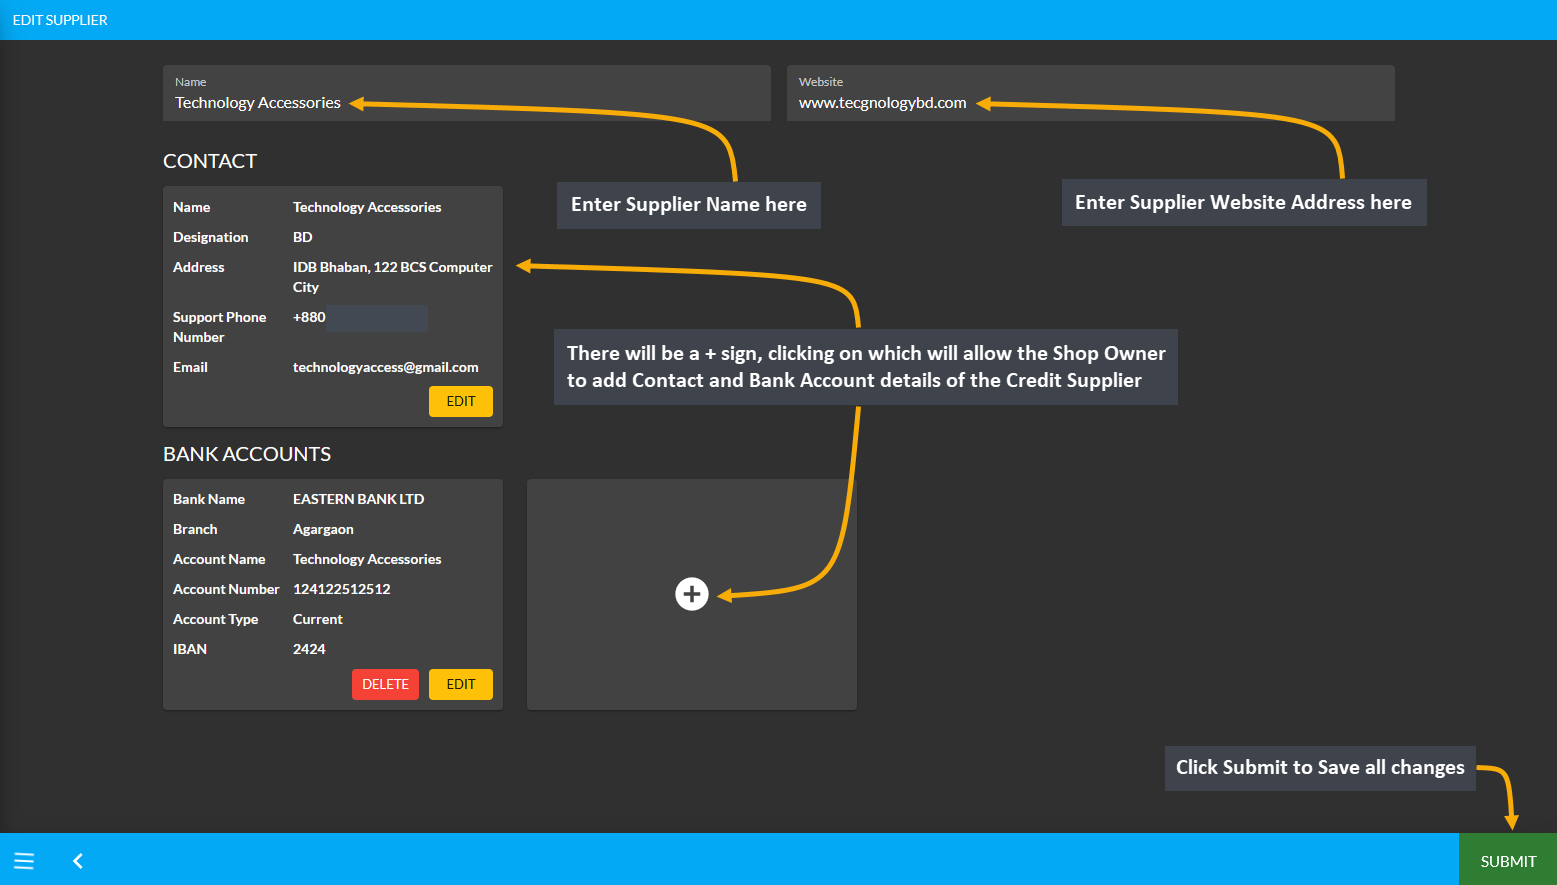
On Edit Supplier page, the first field is to fill in the Name and Website Address of Credit Supplier. After that, there are Contact and Bank Account boxes with the + button, clicking on which will allow adding Contact Details and Bank Accounts of the Supplier. Several bank account information can be added if they have various bank accounts.
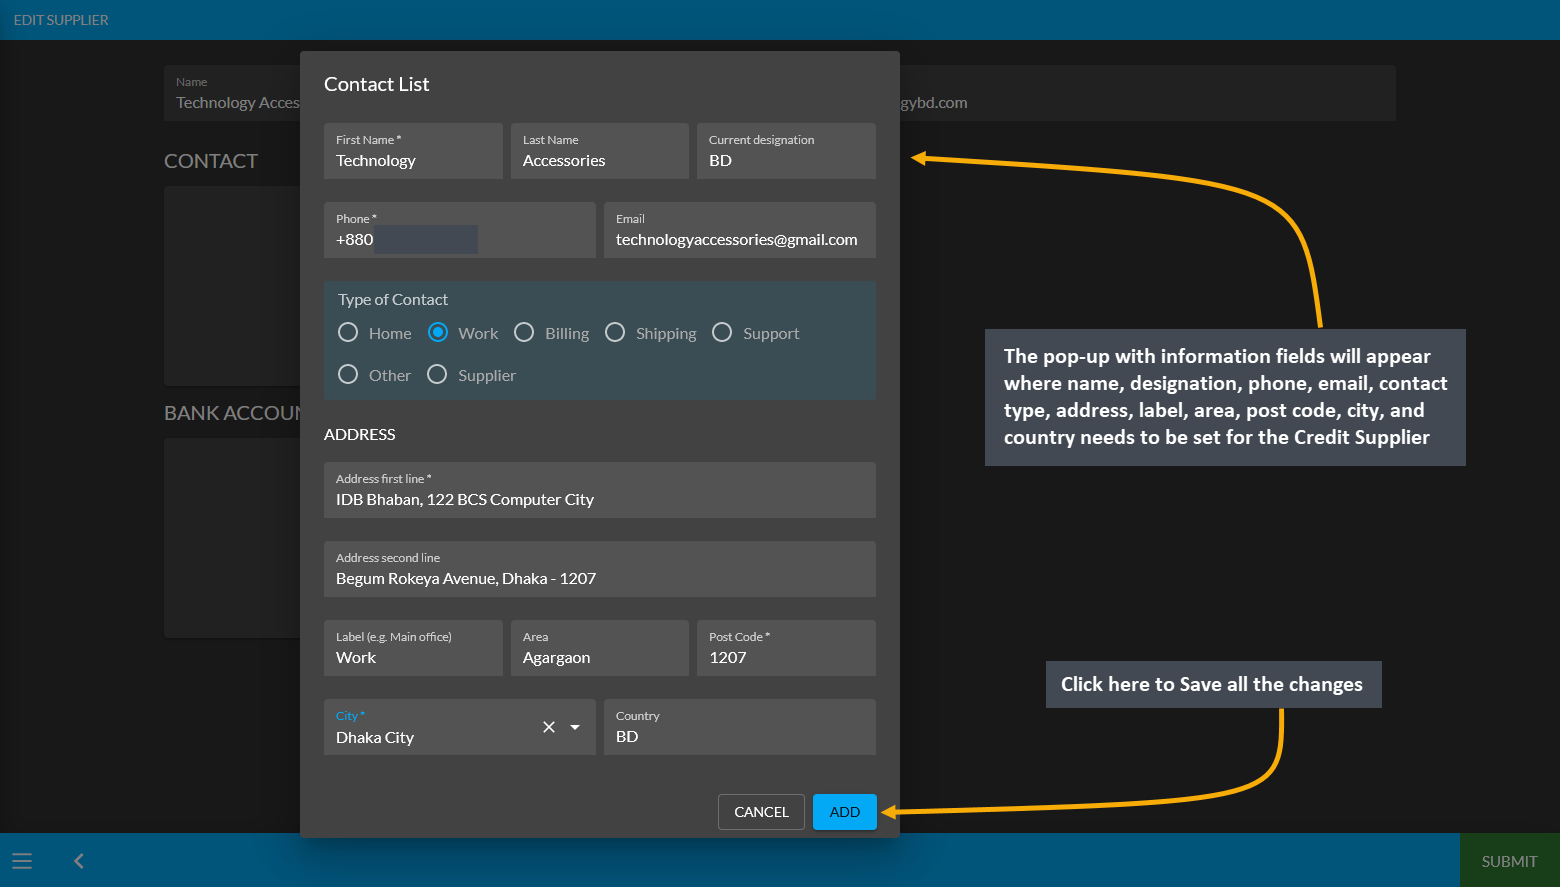
Clicking the + button over Contact Details will open a pop-up to edit Contact List. Fill the First Name, Last Name, and Current Designation, Phone and Email first. Then, select the type of Contact for Supplier like Home, Work, Shipping, Billing, Support, Other, or Supplier that best describes the Supplier contact type. On Address Section, write down the address in first line and second line. Set the Label, Area, Post Code, City, and Country for the Supplier Address. Then, click Add to save all changes for the contact information of the Credit Supplier.
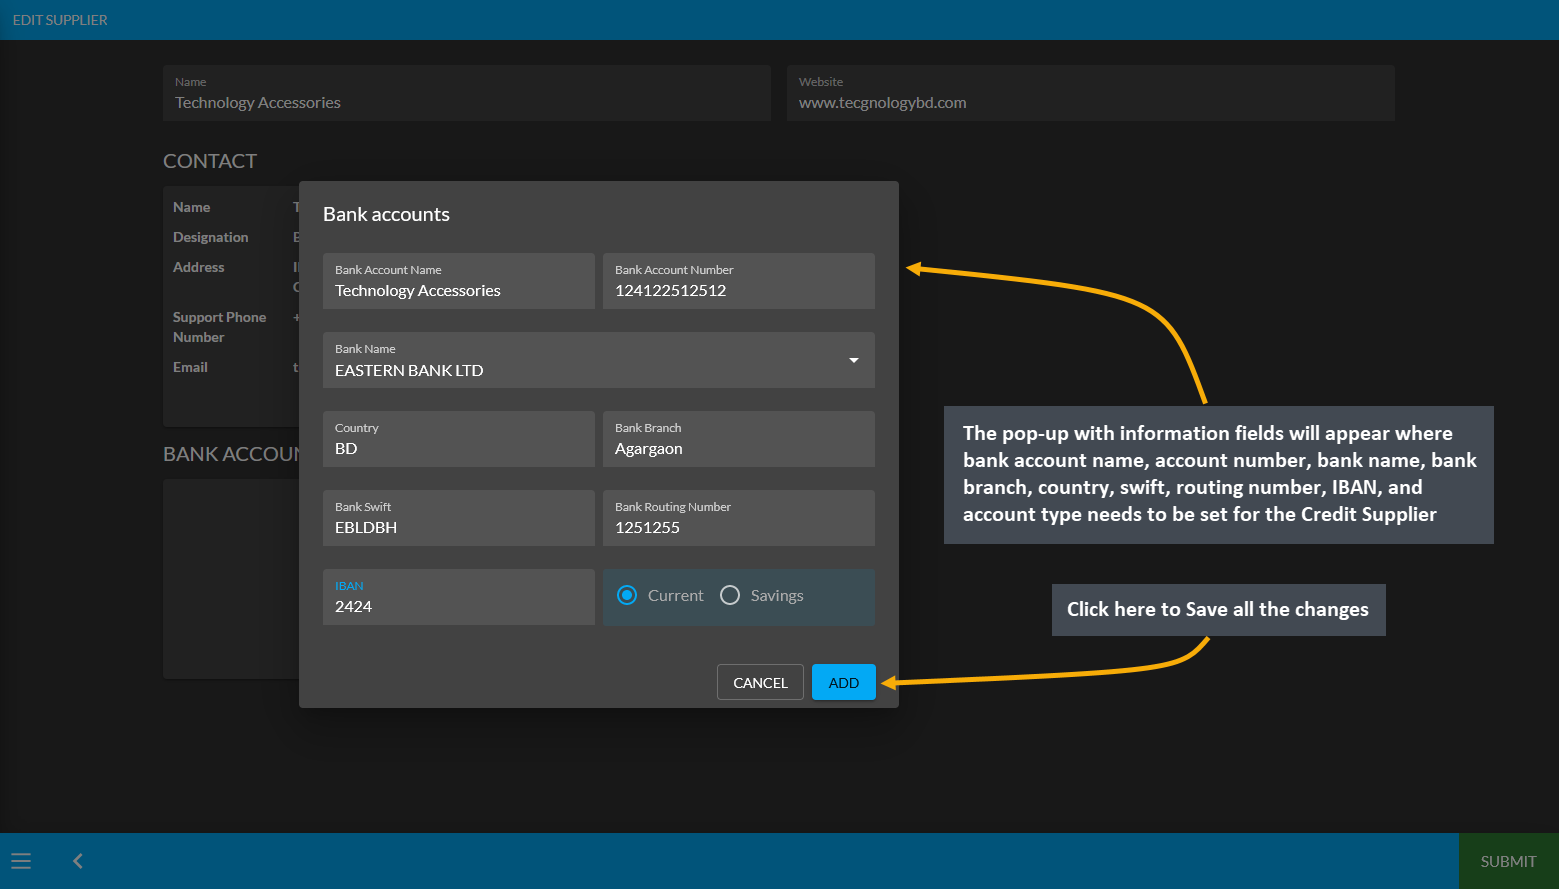
Now, click the + button on Bank Account to open a pop-up for editing details of Bank Accounts. Fill out the Bank Account Name, Bank Account Number, Bank Name, Country, Bank Branch, Bank Swift, Bank Routing Number, and IBAN. Select if the Bank Account is Savings or Current and click Add to save all the changes as shown.
Learn More about the Credit Customer’s purpose of transactions through Ledger.
Learn More about the Credit Supplier’s purpose of transactions through Ledger.