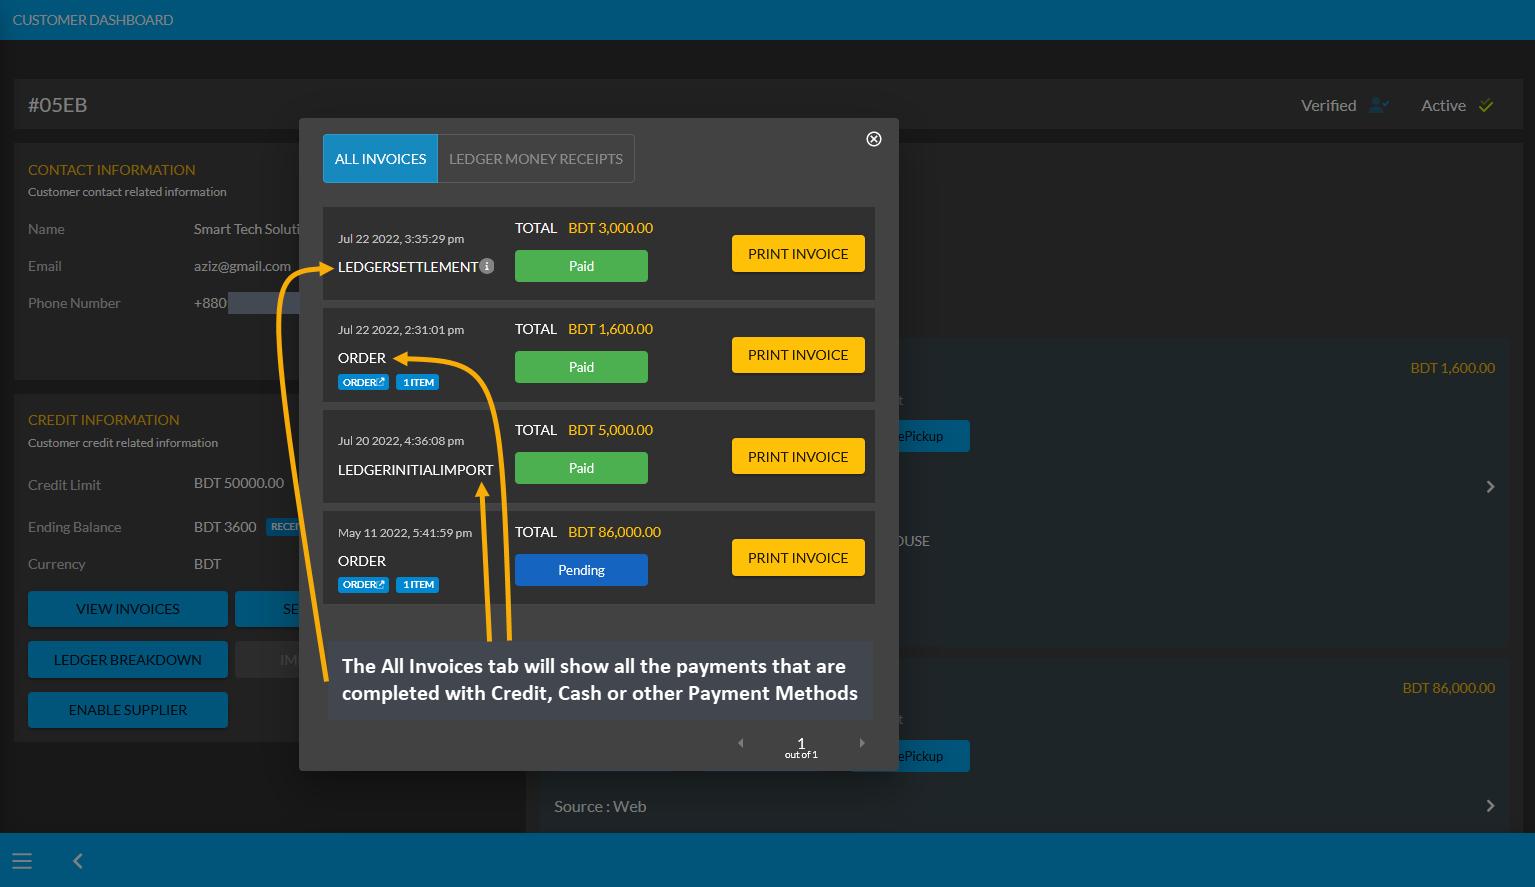
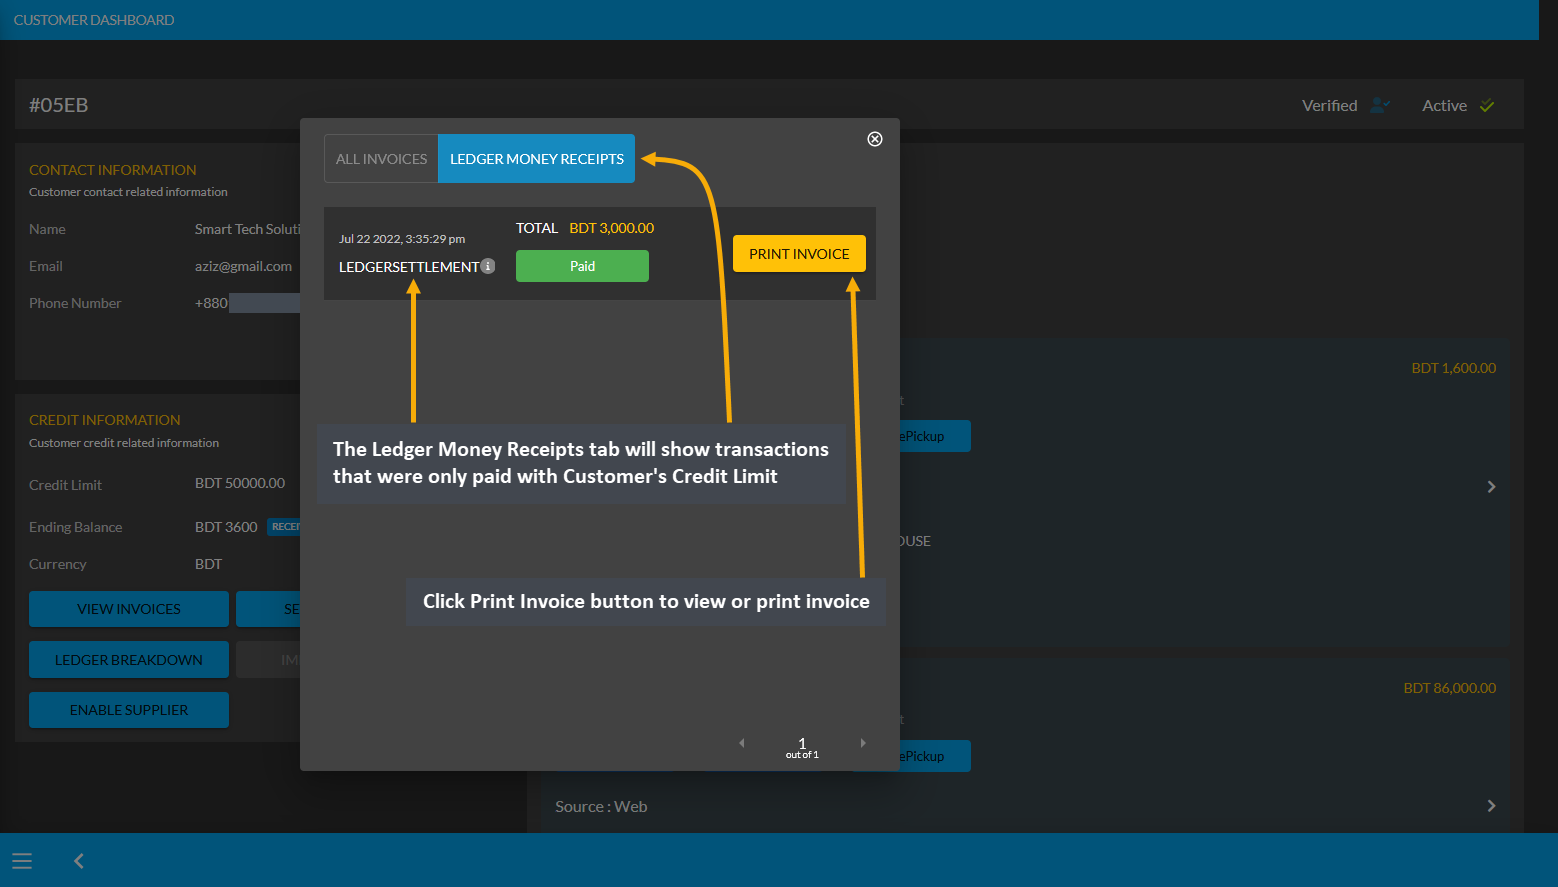
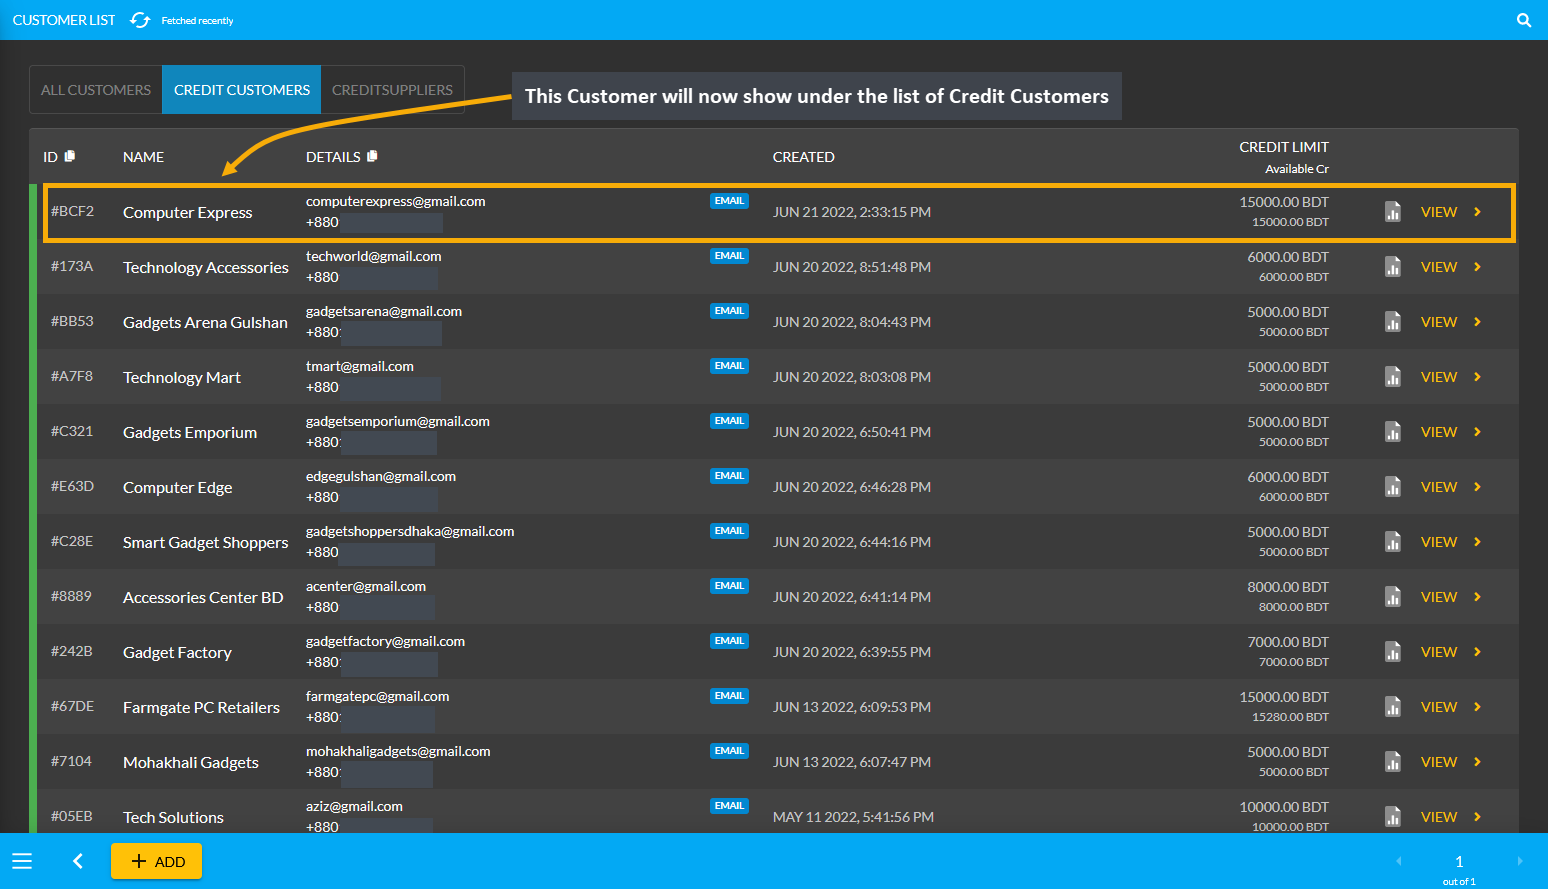
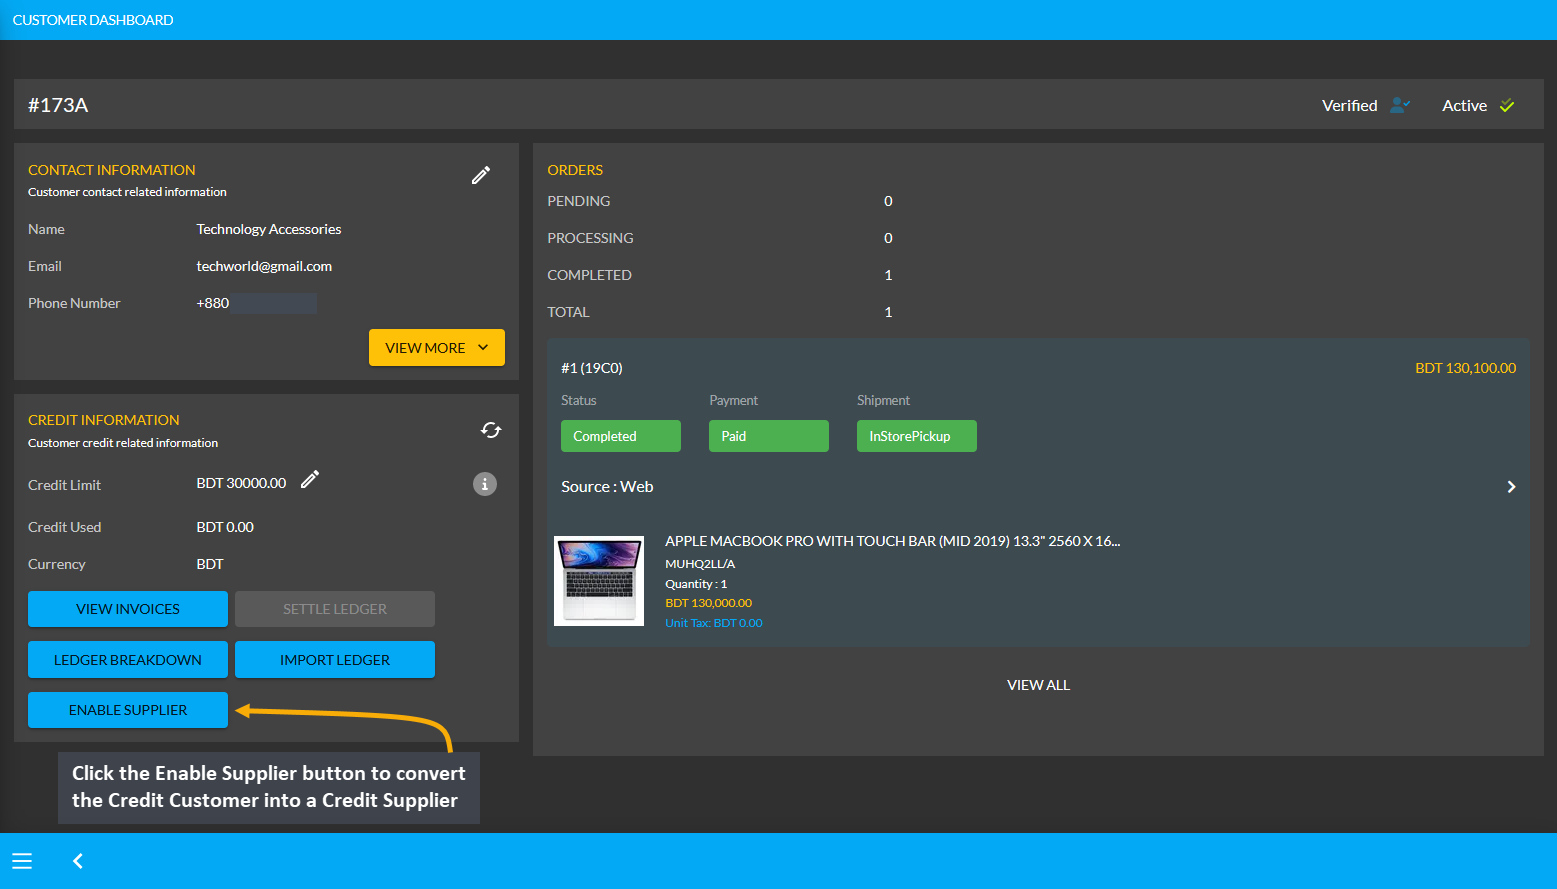
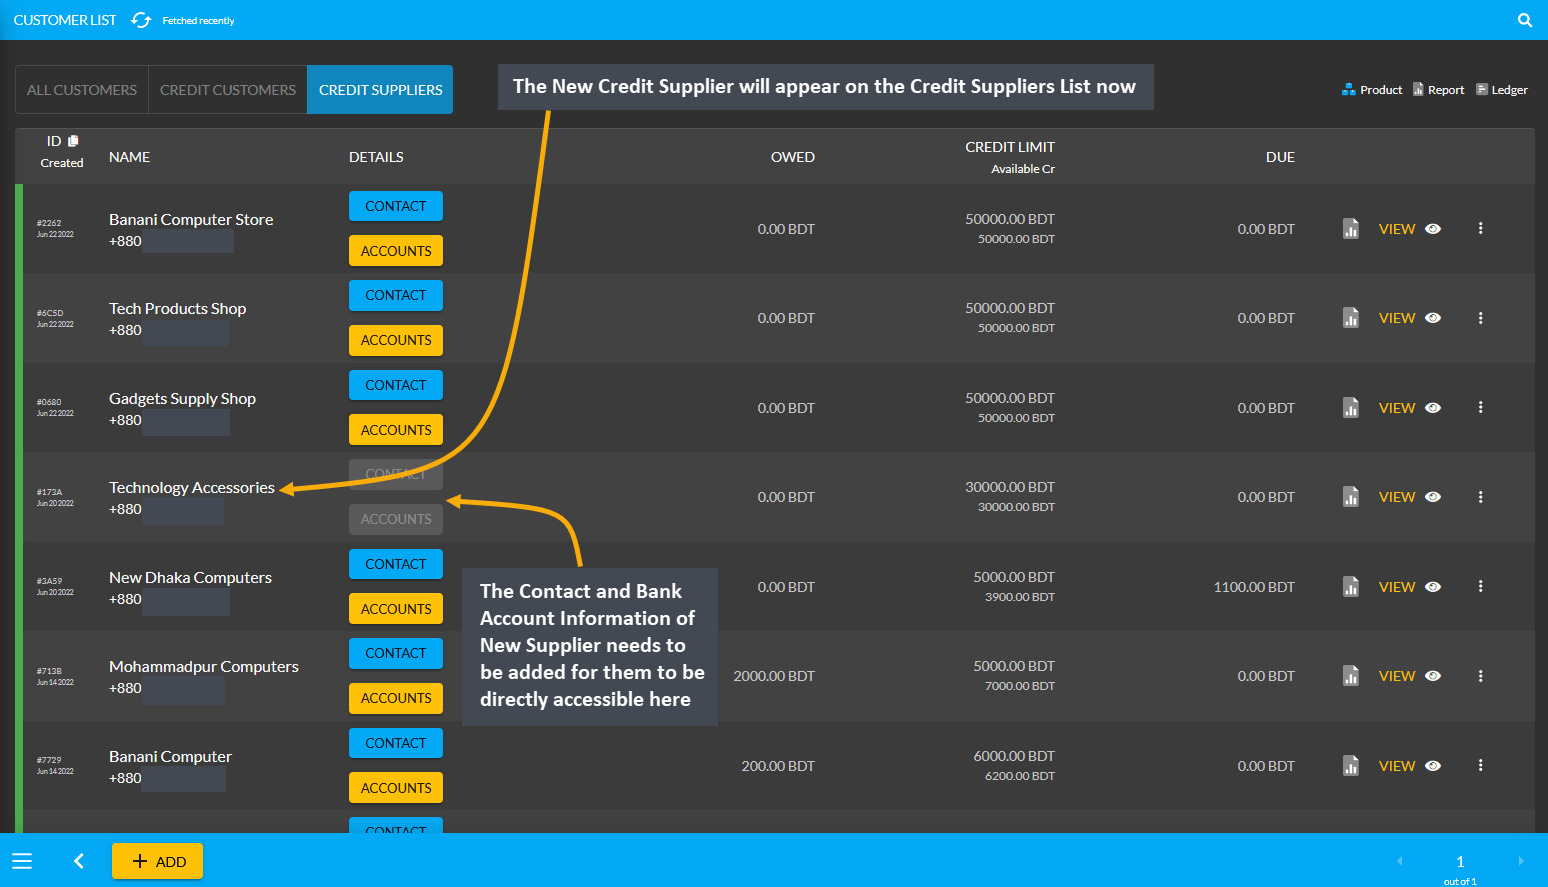
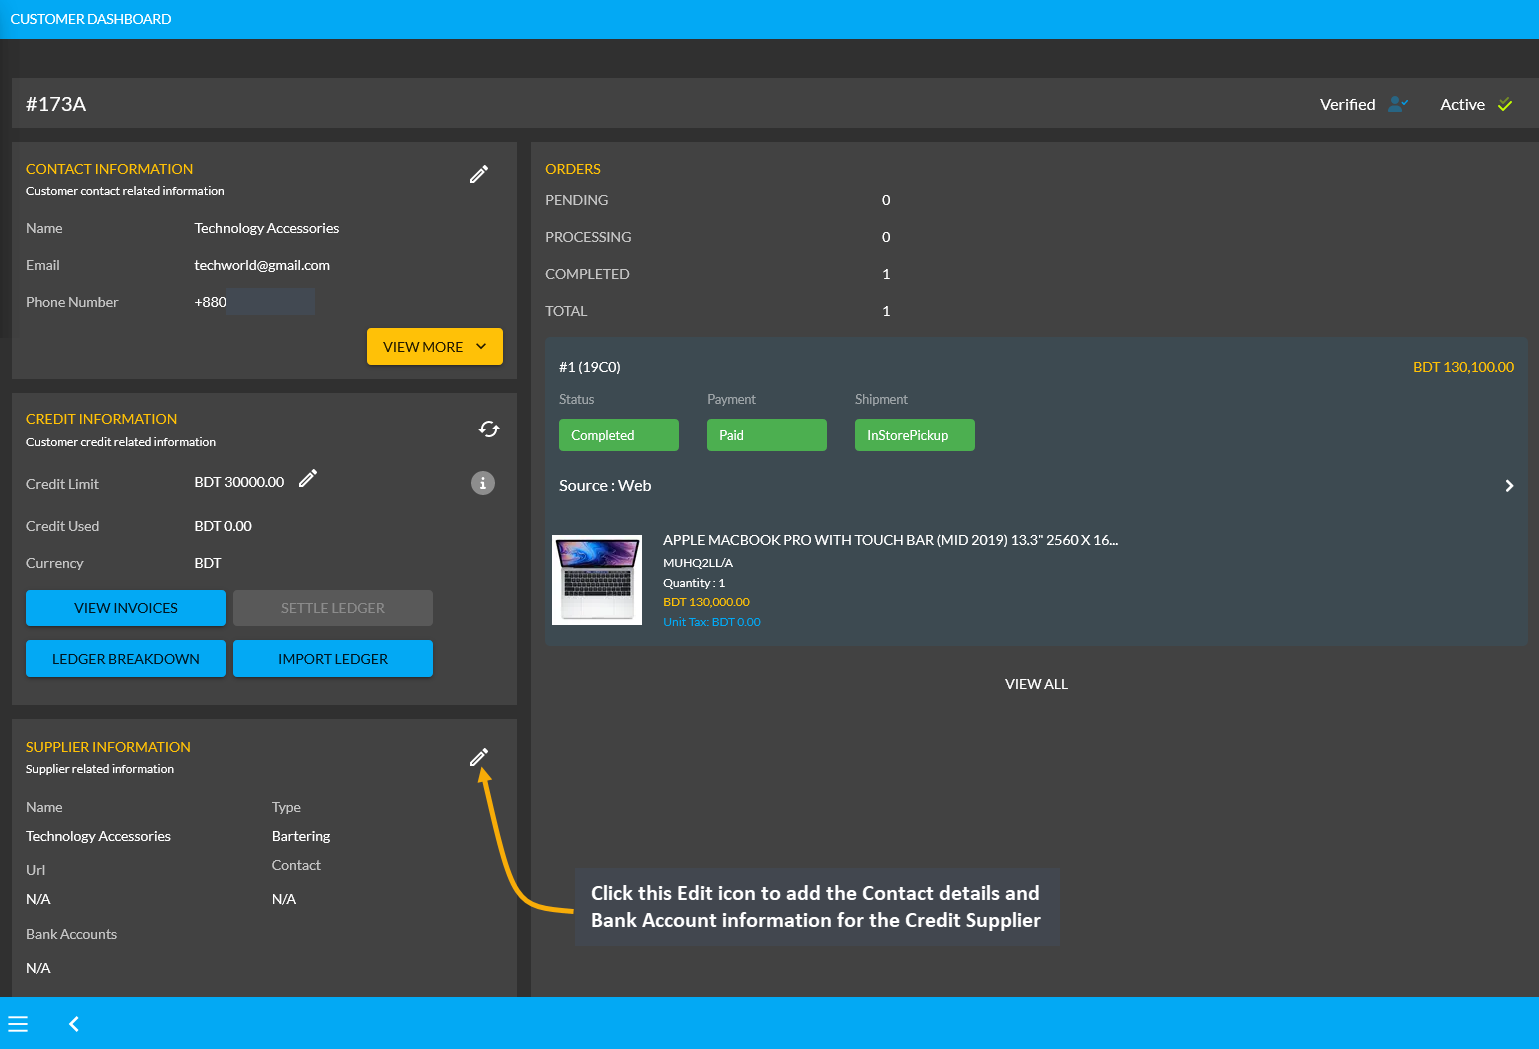
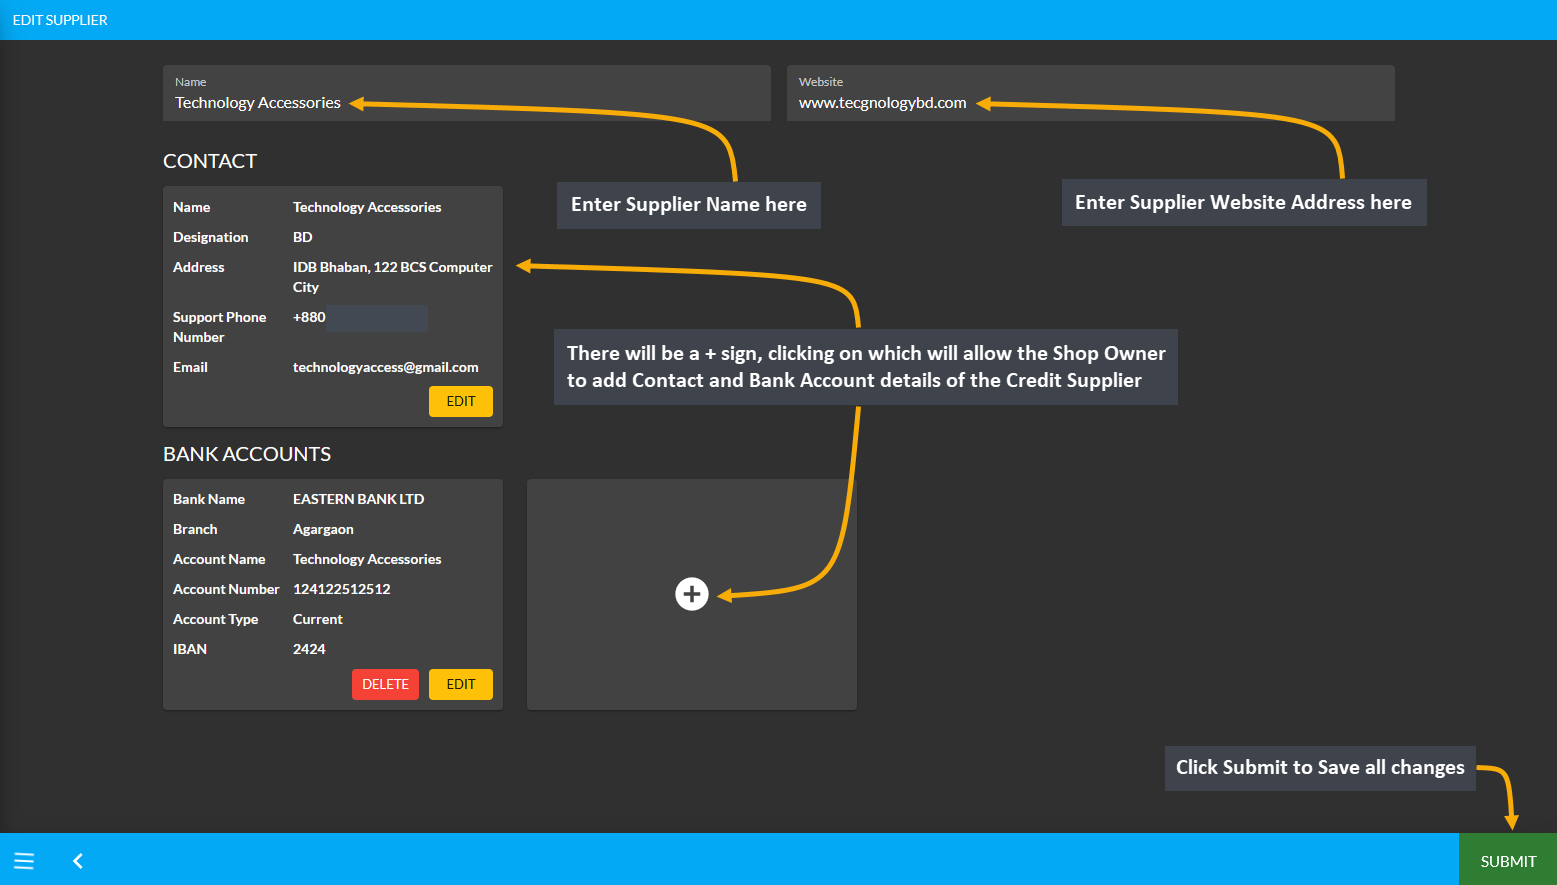
1 - Credit Customer Ledger Transactions
Learn More about the Credit Customer’s purpose of transactions through Ledger.
Purpose of Transactions with Ledger
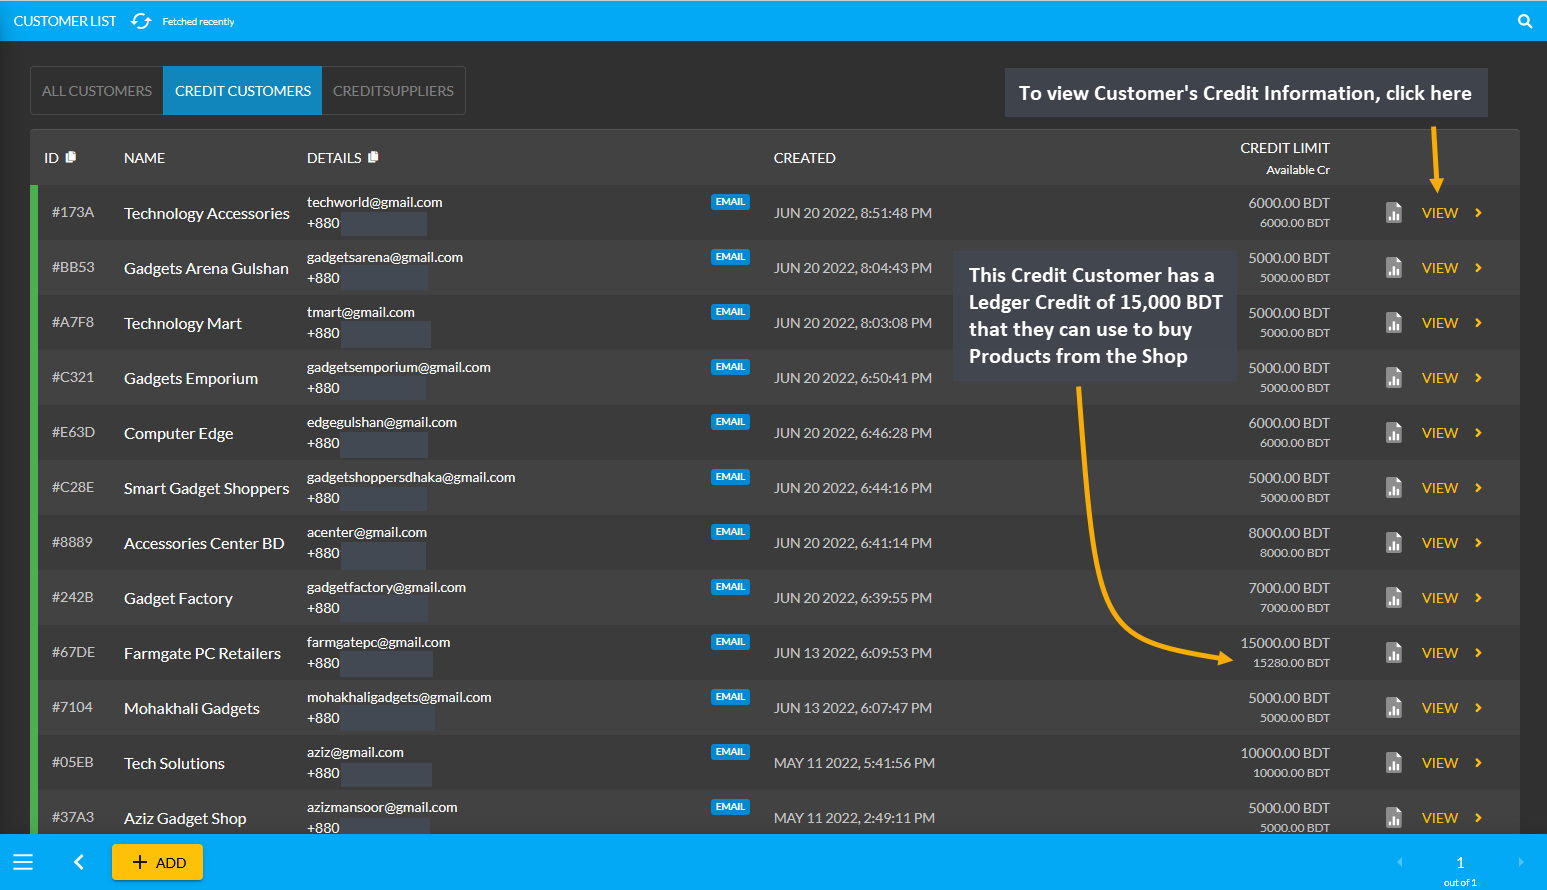
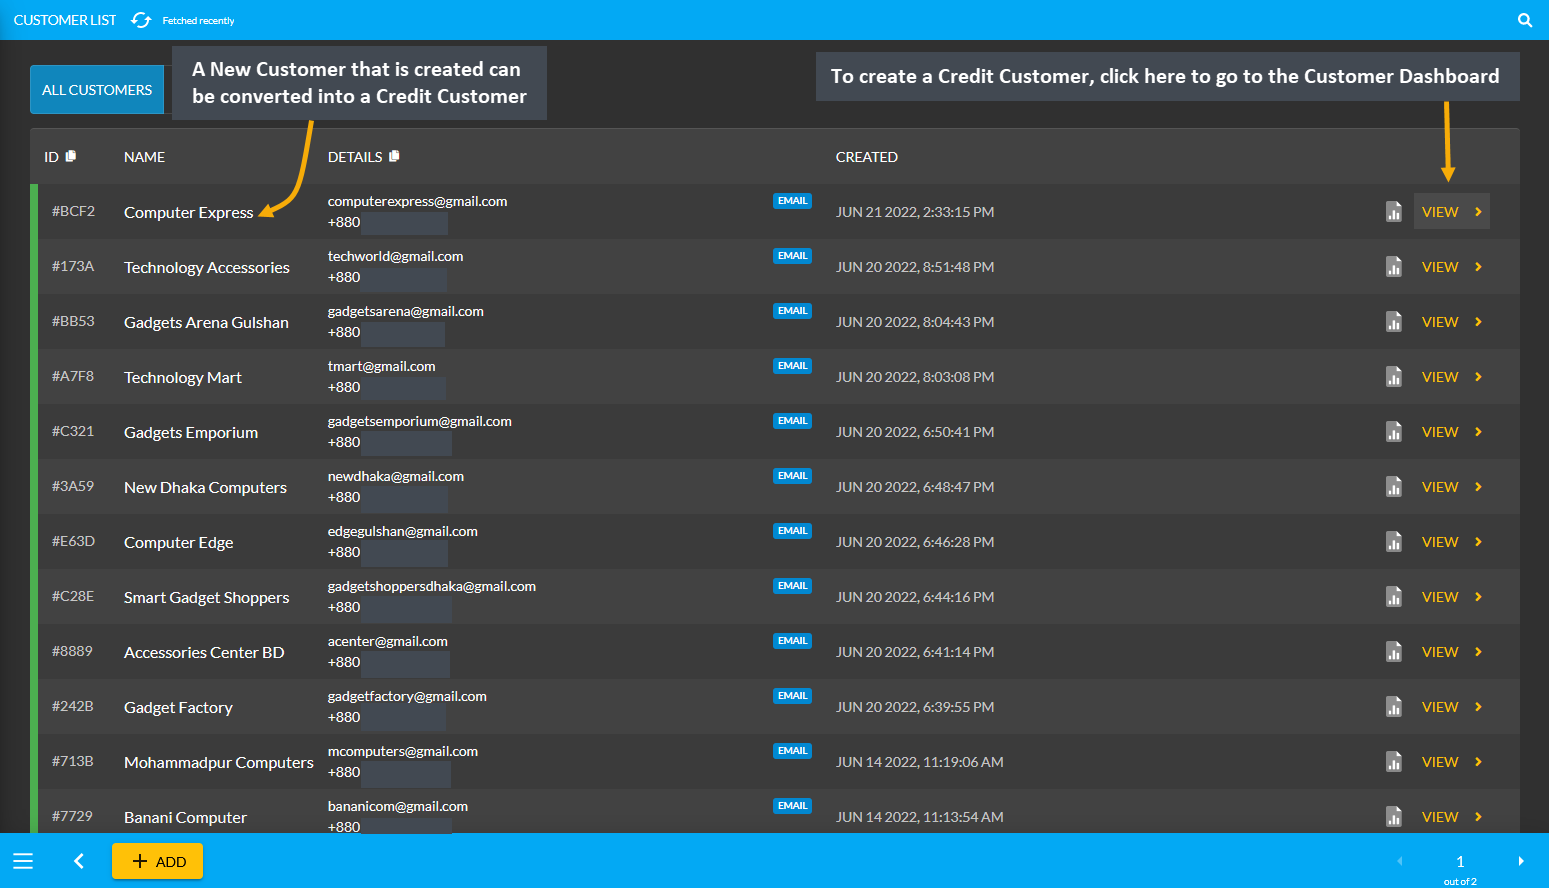
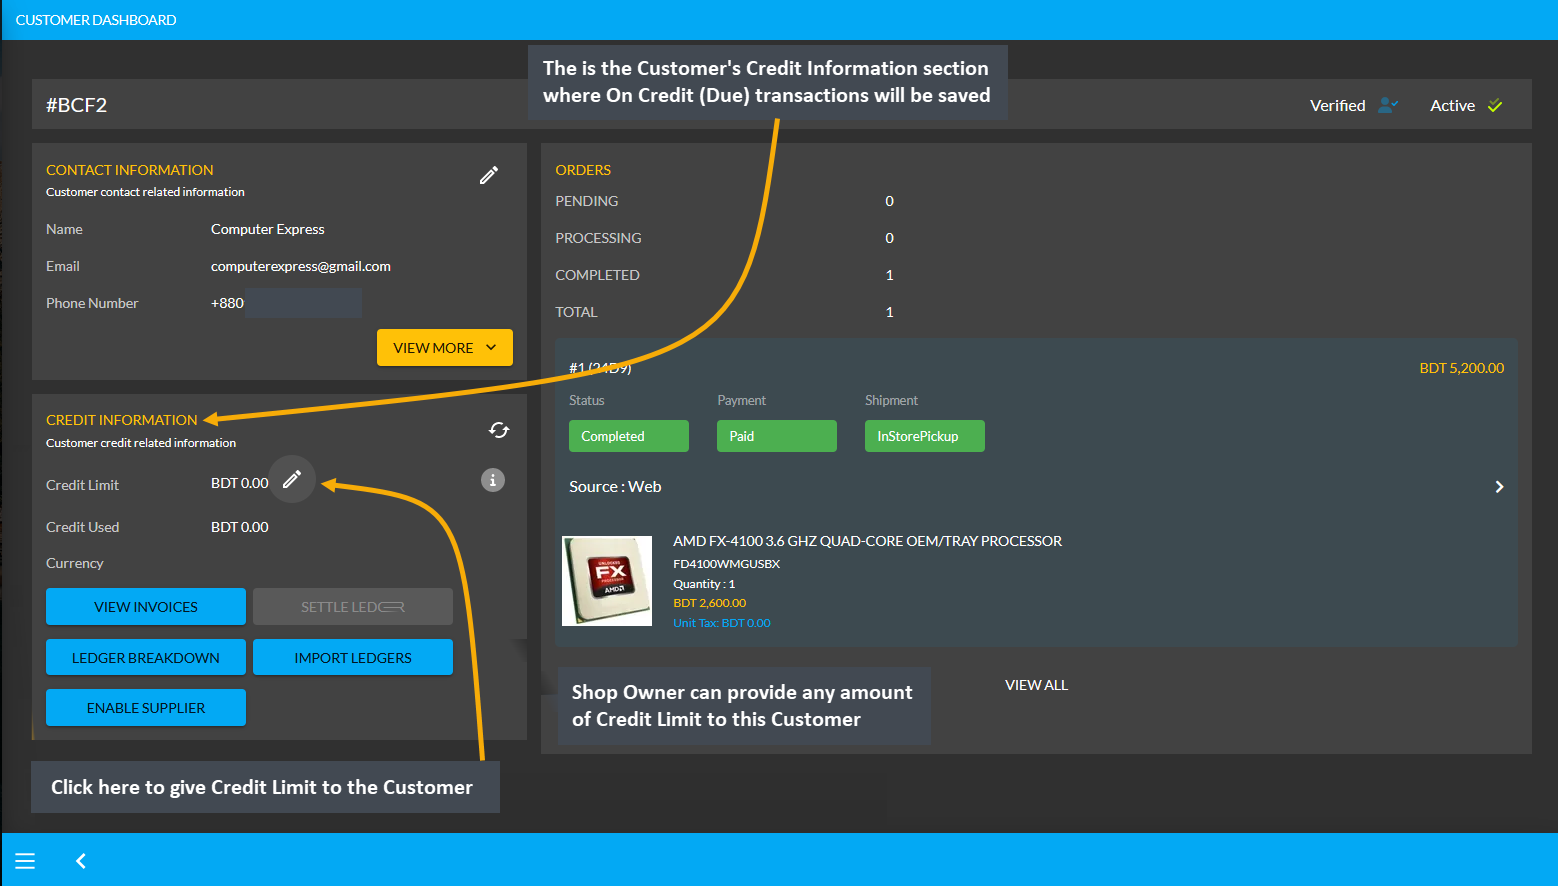
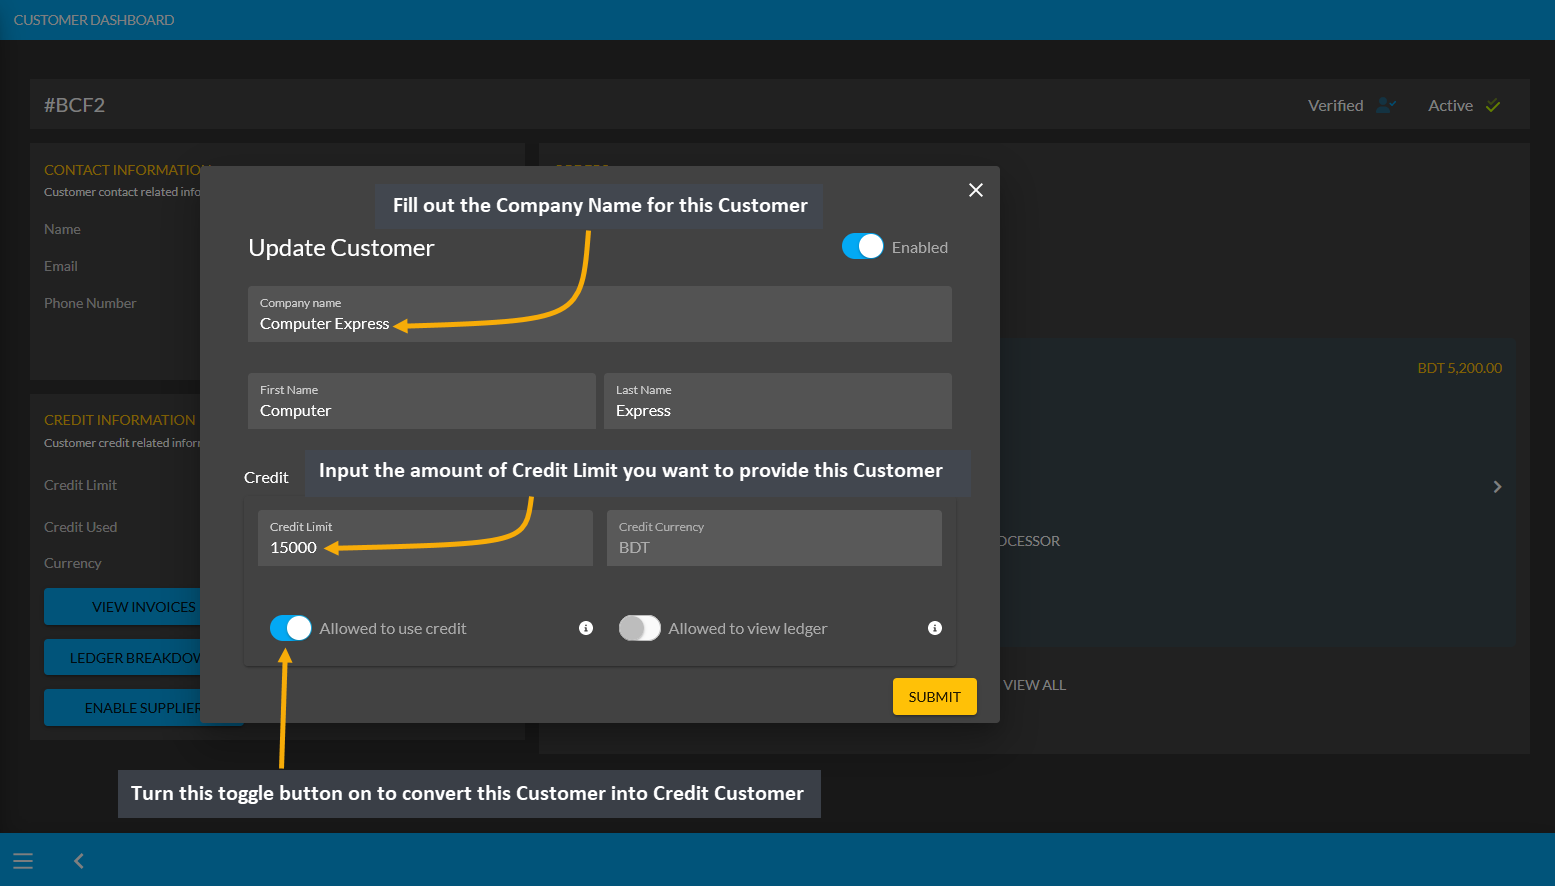
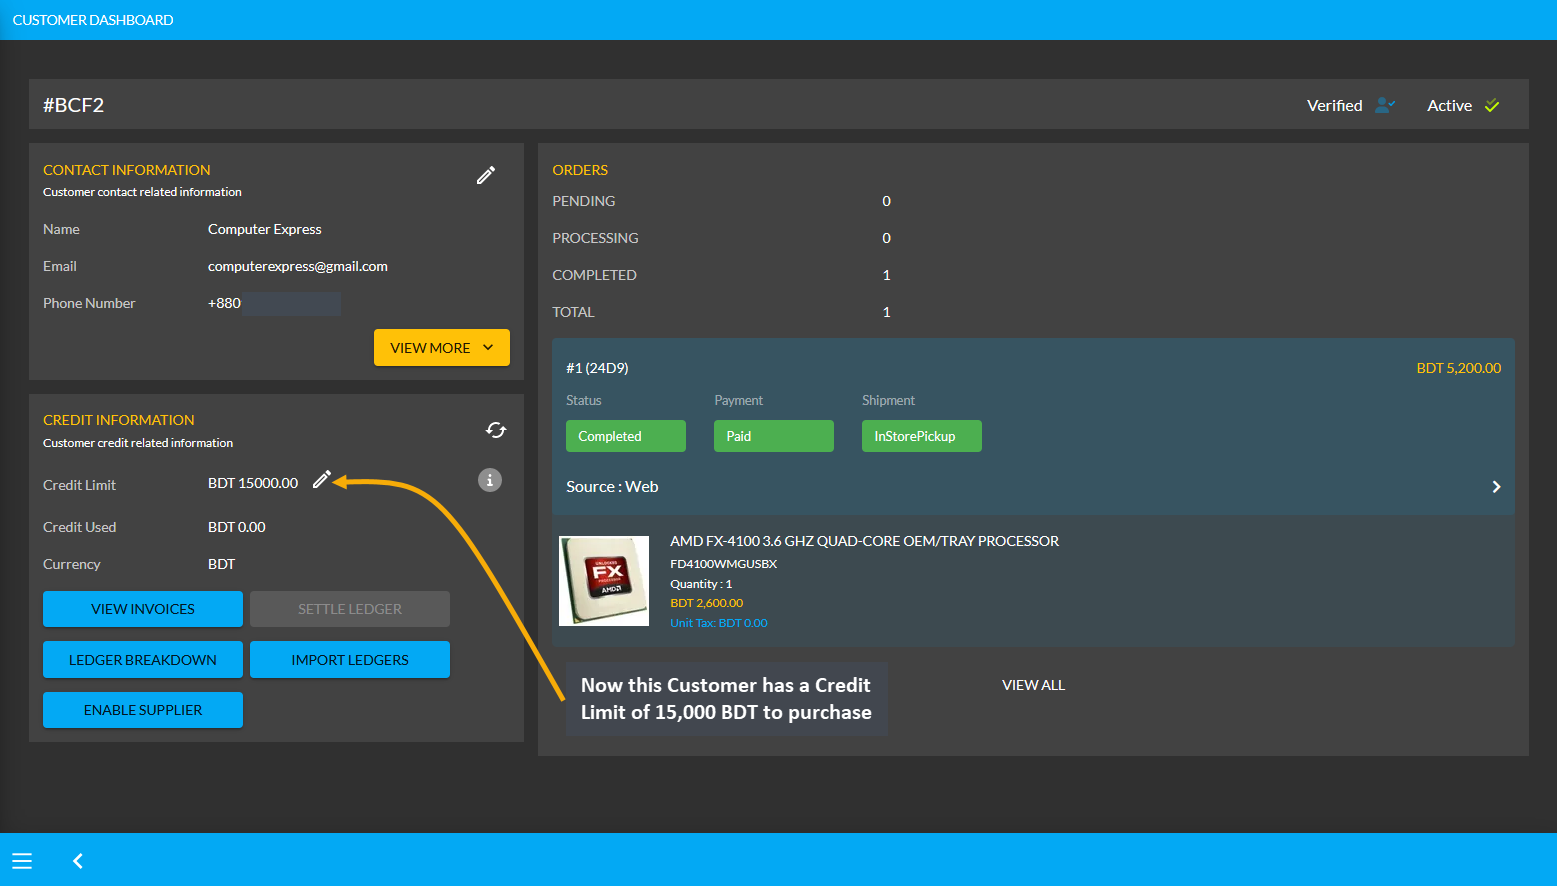
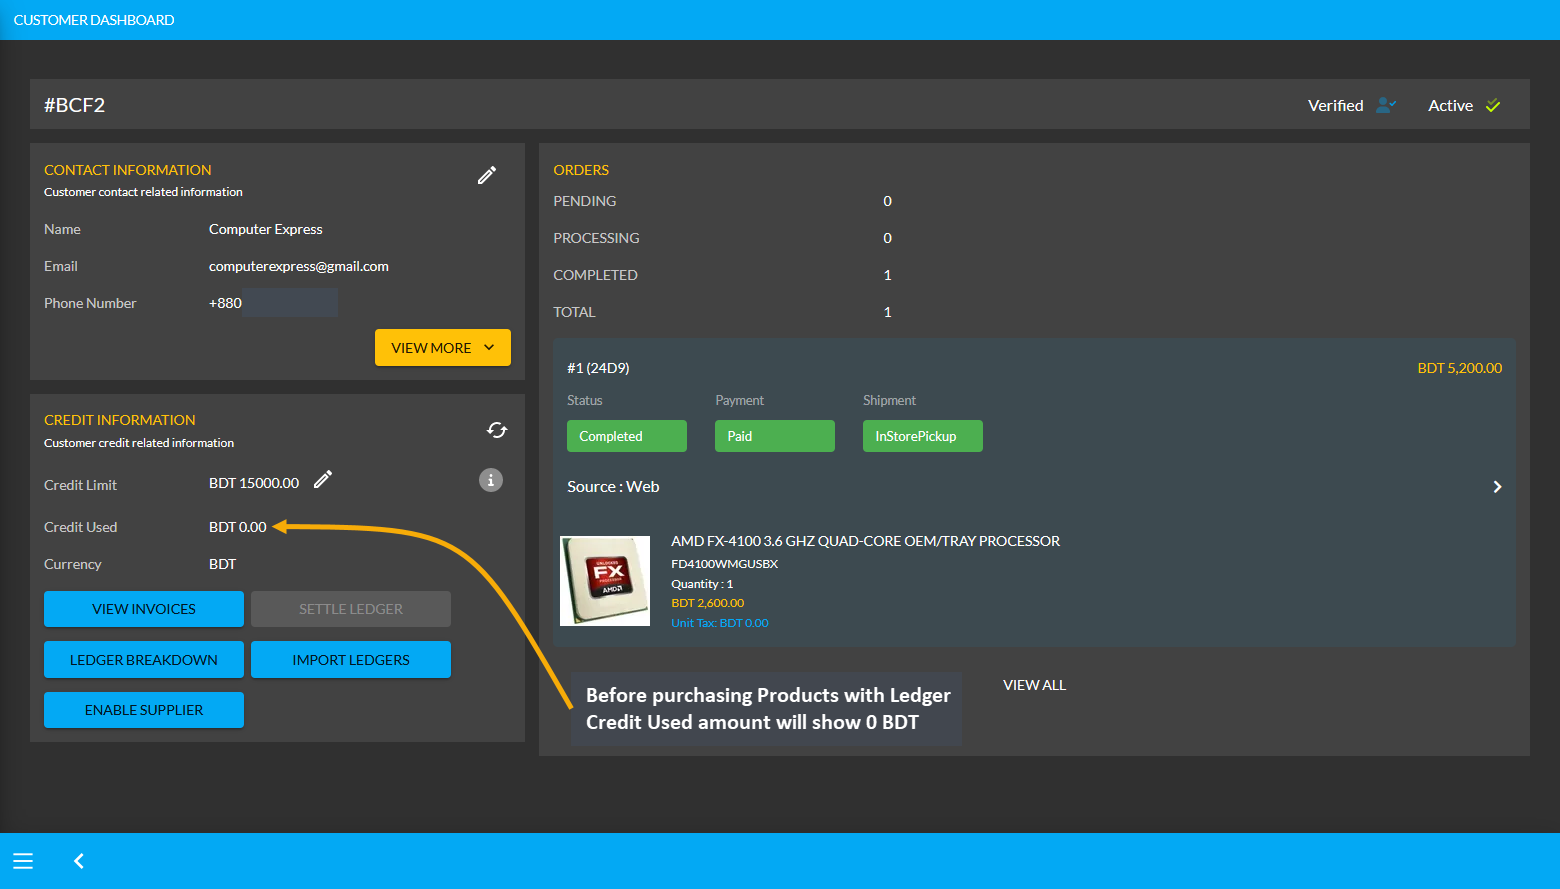
Customers who are granted an amount of Credit Limit will only turn into Credit Customers which differentiates them from the regular Customers. After a Credit Customer is given Credit Limit, they can start buying Product(s) using the Credit Limit. For instance, the Credit Customer Computer Express has been provided with 15,000 BDT Credit Limit by Shop Owner. Their Credit Used amount will show 0 BDT unless they purchase Product with Ledger.
Using Credit to Order Products will add to Credit Used
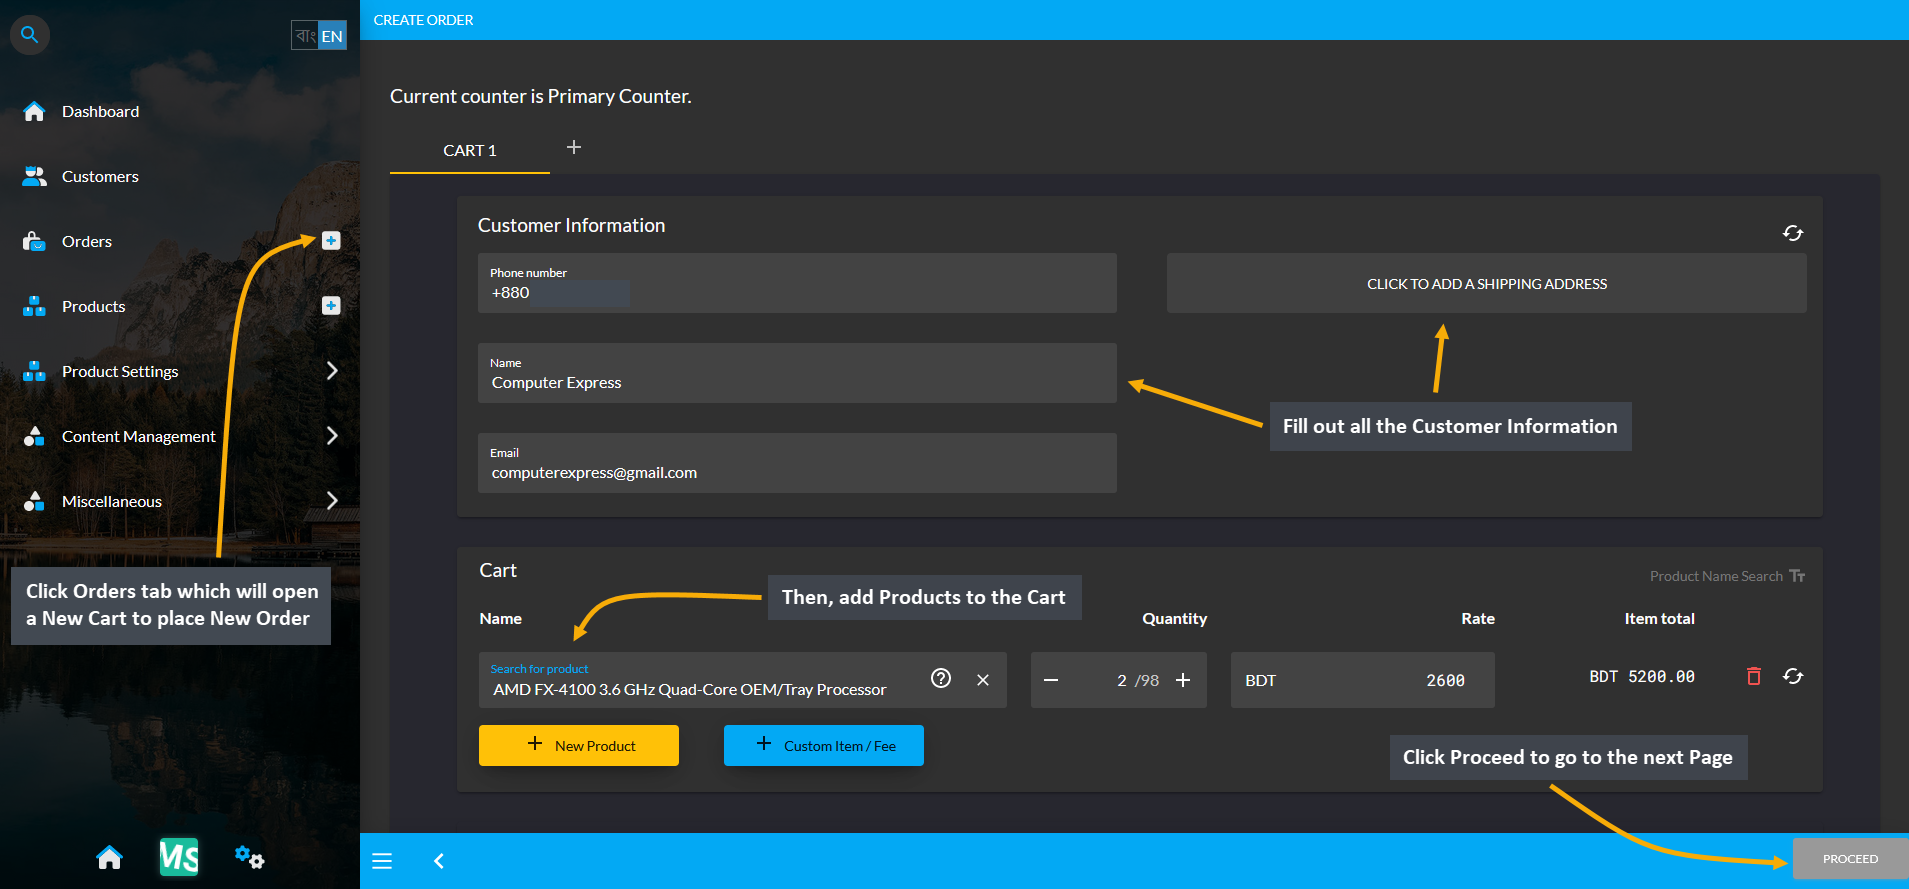
If Product(s) are ordered for the Credit Customer through the Admin Panel with Credit payment, then it will add to the Credit Used amount within their Credit Information. So, the On Credit (Due) can be used to place Orders for Product(s). For this, first click the + button from Orders tab that will redirect to the Cart page. In the cart, fill the Customer’s details, add Product(s) to Cart with desired quantities and click Proceed to save all the changes.
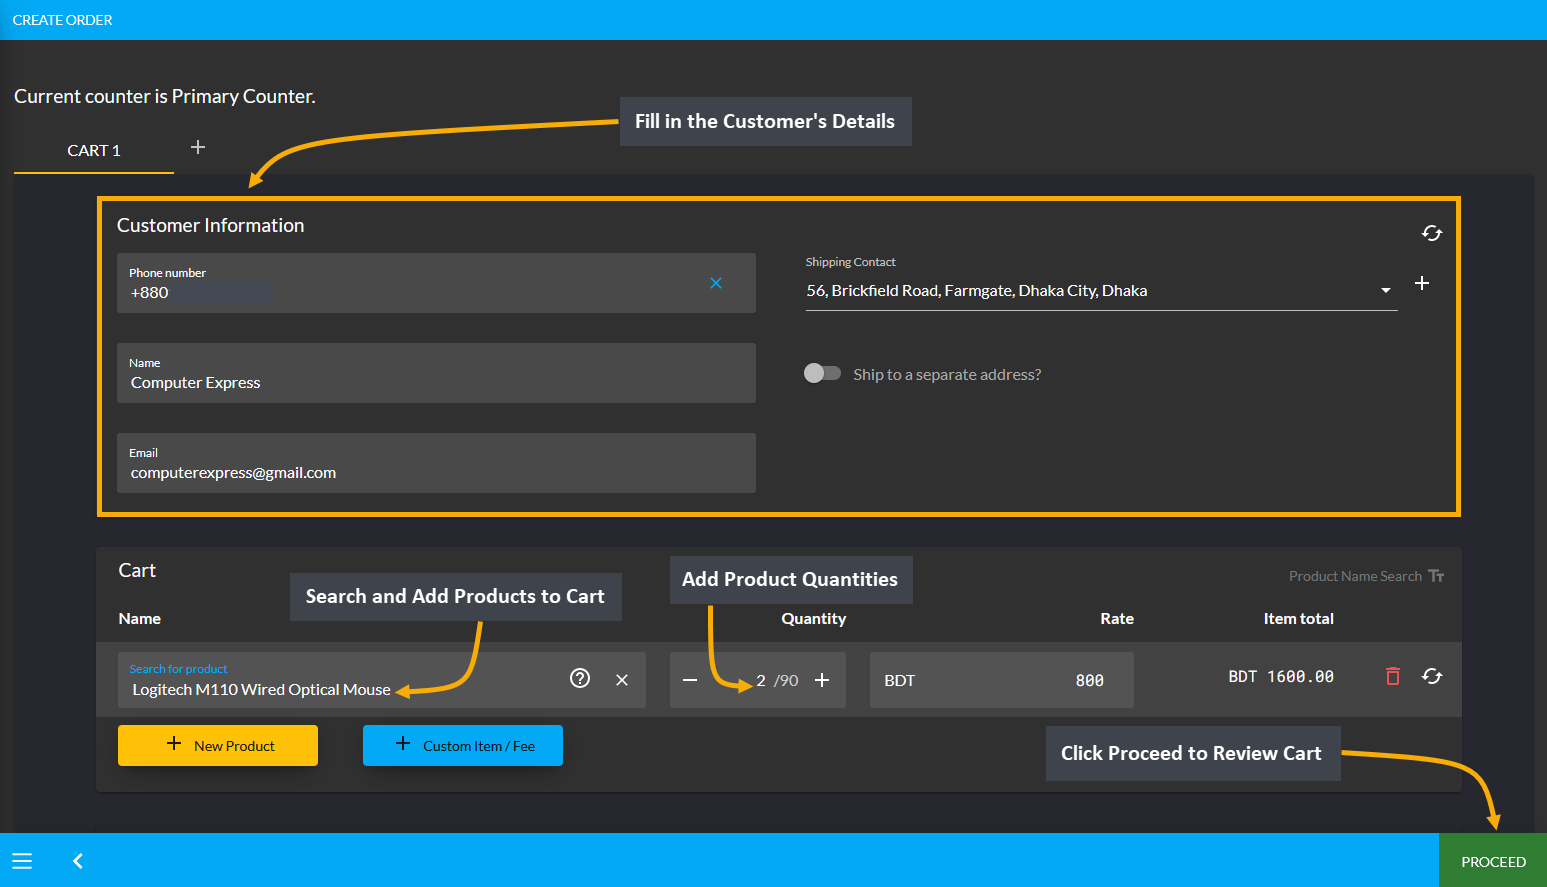
Image 1: Fill out Customer's details and add Products to Cart to order Products with Ledger.
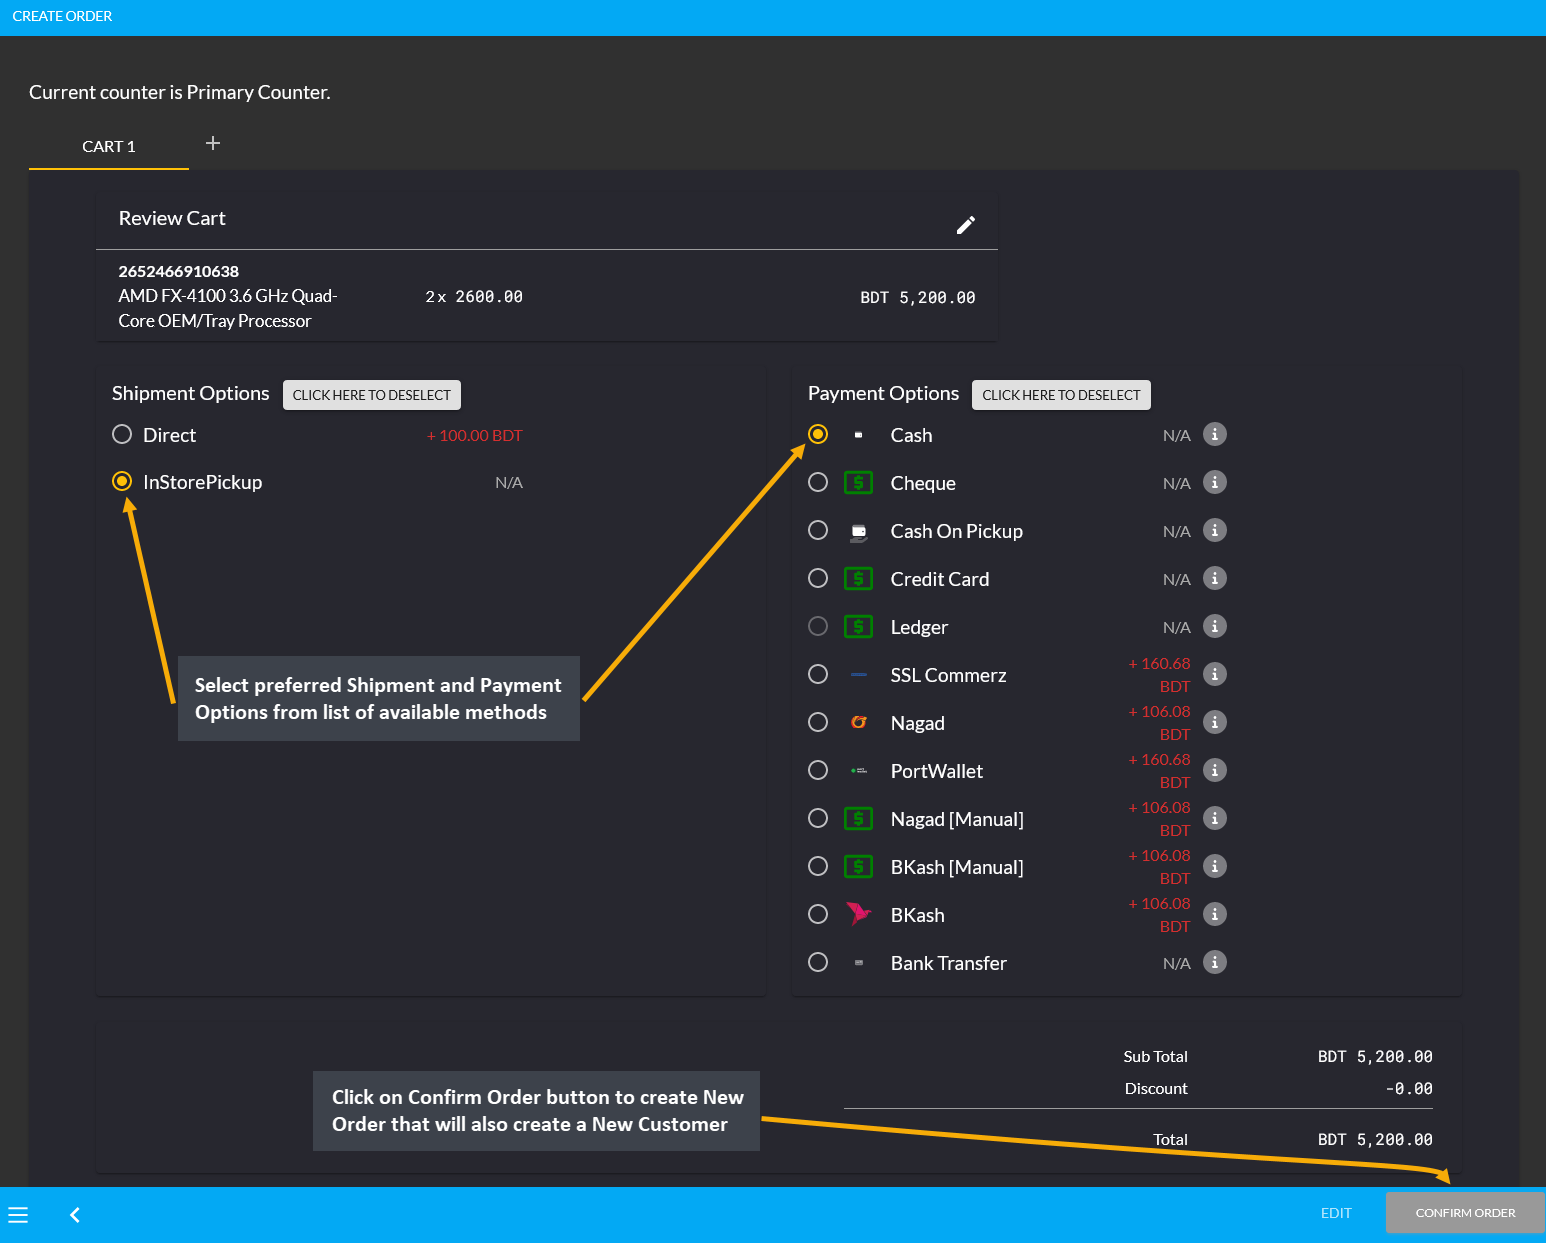
During the checkout process, select preferred Shipping method and select On Credit (Due) as Payment method. Selecting it will display the available Credit Limit and Ending Balance for Credit Customer. Then click Confirm Order to redirect to the order confirmation page where there will be a Print Invoice button to get the invoice printed.
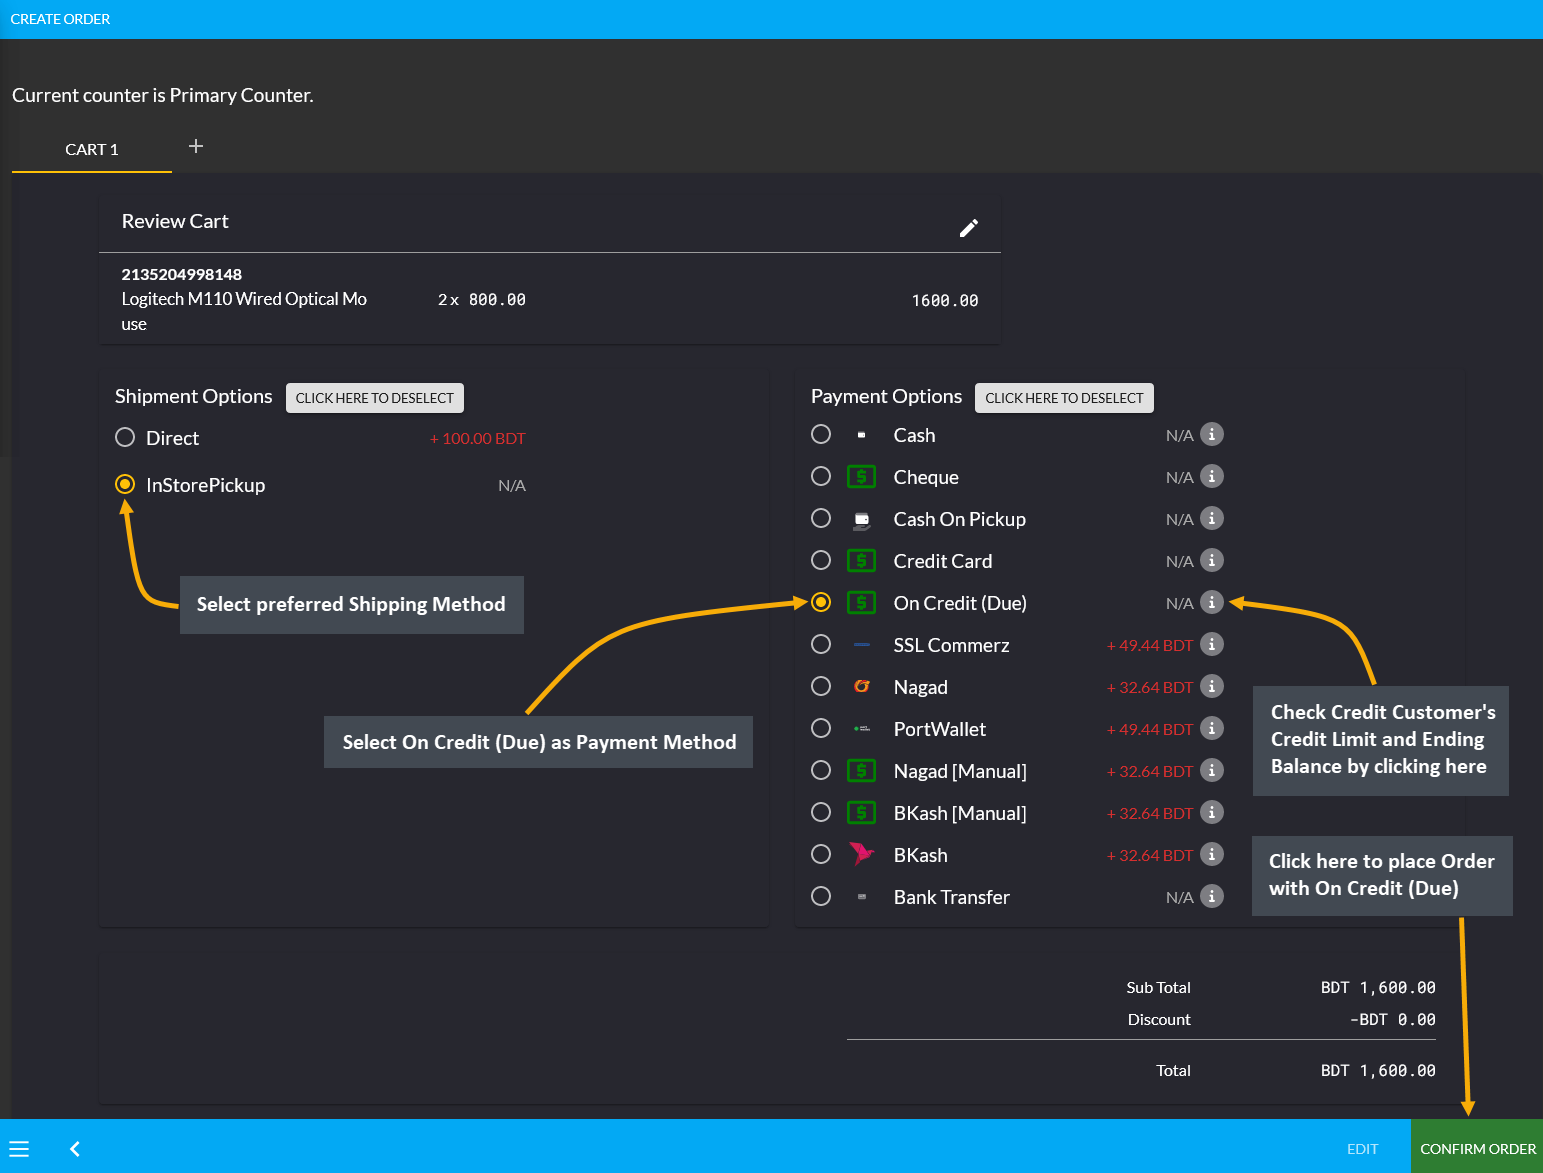
Image 2: Select preferred Shipping method and select Ledger as Payment method to order Products.
On the print invoice page, it will reflect that the payment has been completed with On Credit (Due) indicating the Credit Customer’s payment as Due. Here, the Customer paid 1,600 BDT from their Credit which will remain due until paid through cash or other payment methods to the Shop Owner through Settle Ledger option.
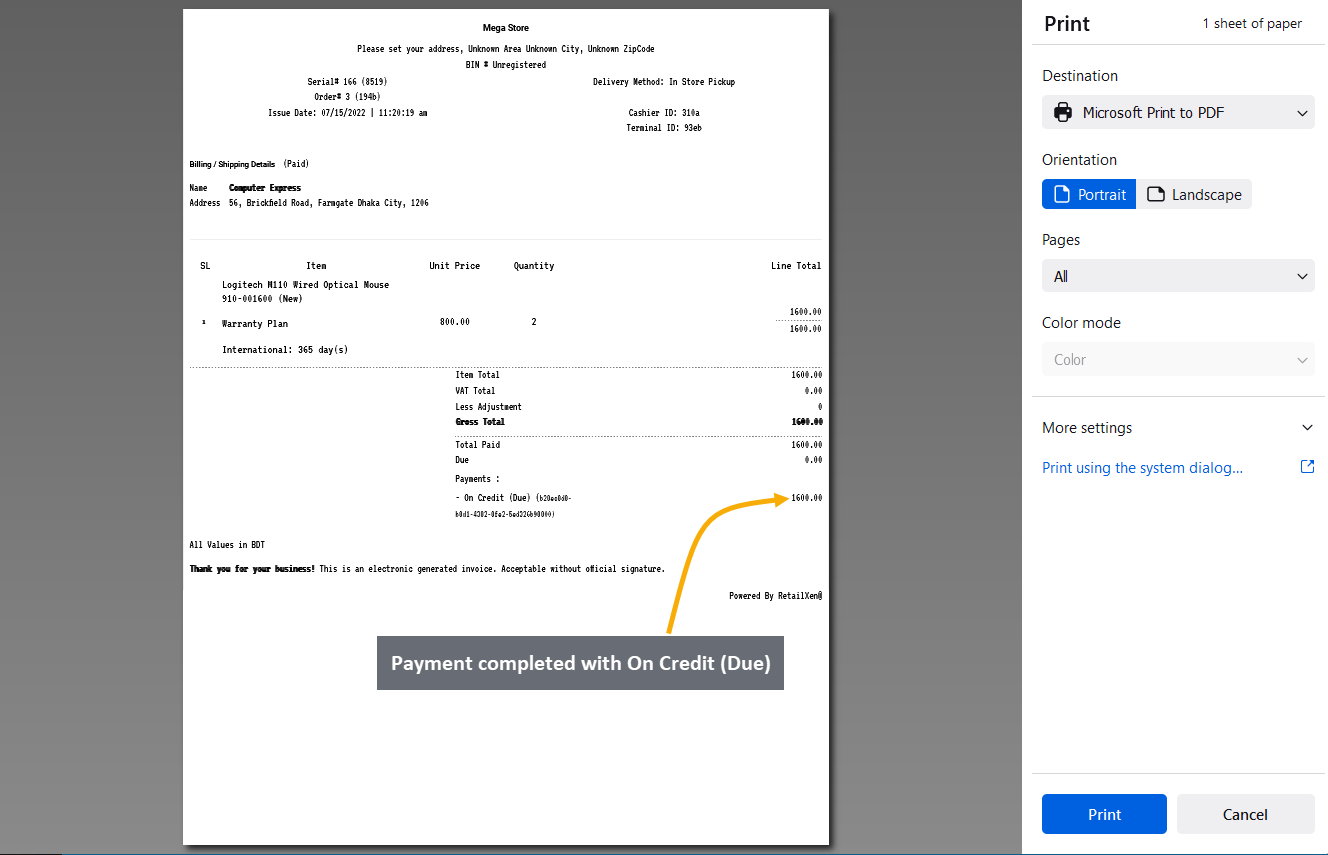
Image 3: Invoice breakdown will show payments completed with Ledger which will be Due.
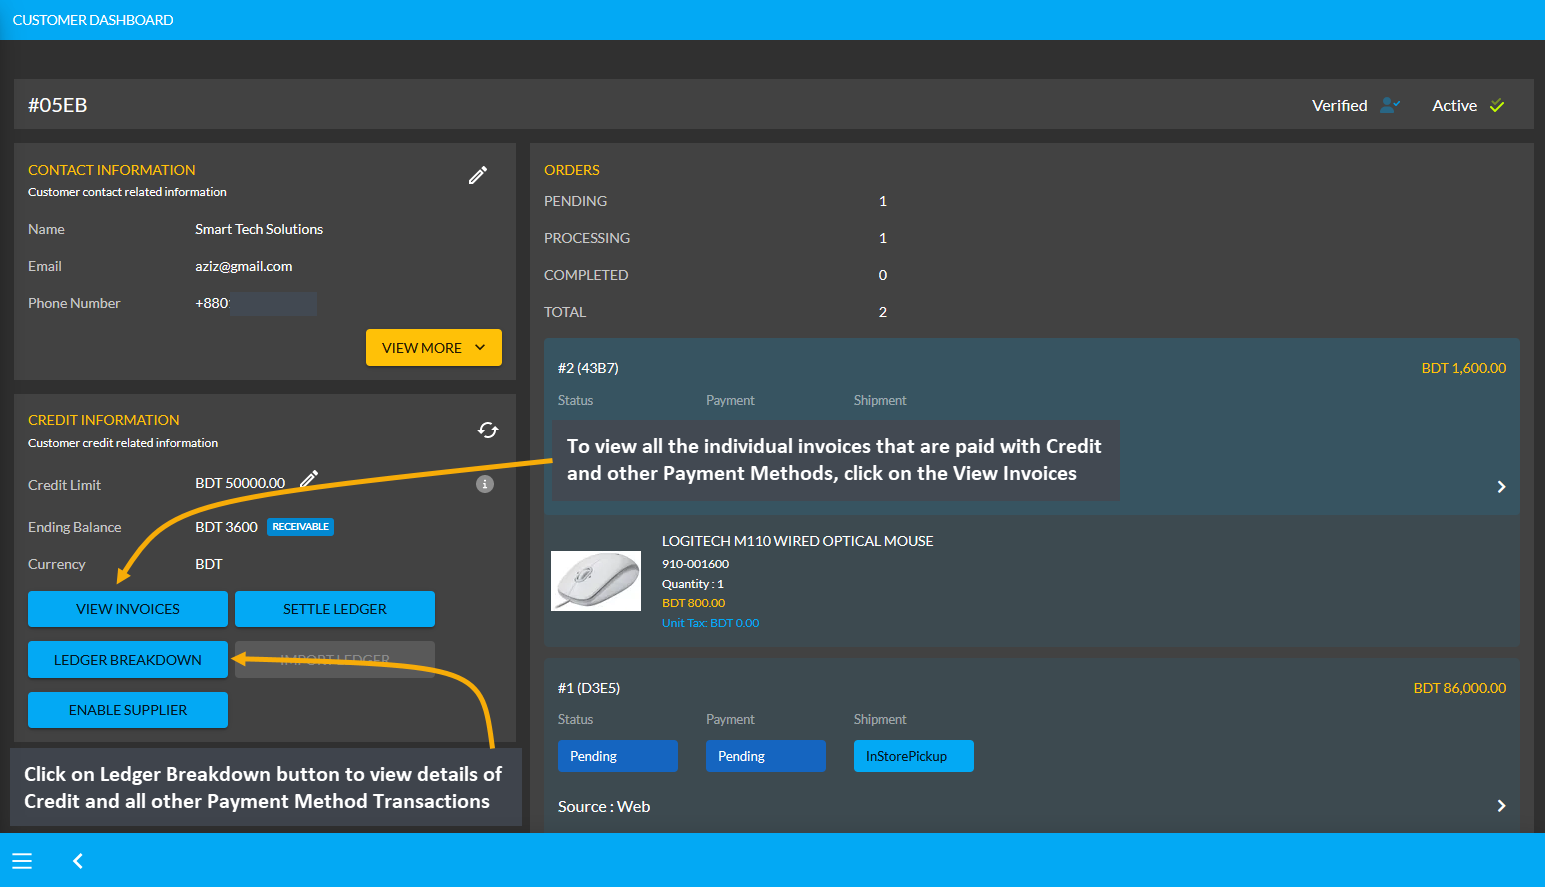
Using the Ledger Breakdown feature from Credit Information section under Customer dashboard, the Shop Owner can check the Credit transaction after ordering Product(s) on their Ledger Breakdown Page.

Image 4: Import Ledger balance with previous dues will be updated on the Ledger Breakdown page.
Ending Balance Reflected on Credit Customer’s Dashboard
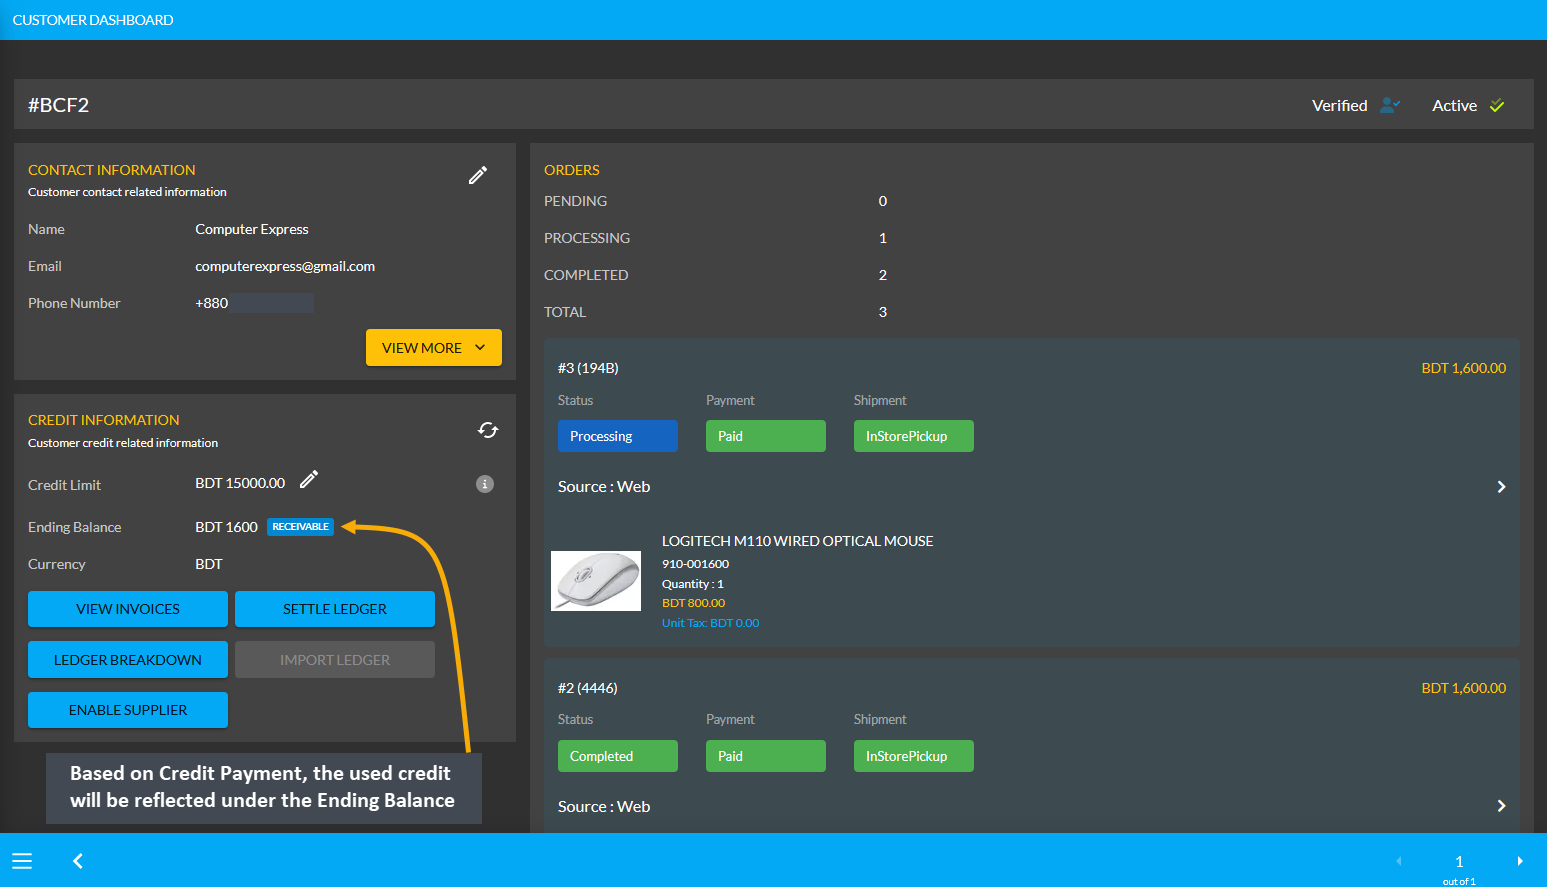
After ordering Products with Credit, the used balance from Credit Limit will reflect under Ending Balance. Here, Credit Customer Computer Express ordered Products with Credit payment, so their Ending Balance is 1,600 BDT.
Credit Customer Import Ledger
Another purpose of Transaction is the Ledger Initial Import which is a feature that can only be used for once by the Admin on Credit Customer’s Dashboard. For instance, if Credit Customer has a receivable or payable amount from any previous transaction, they can be imported with Import Ledger button on Credit Information section.
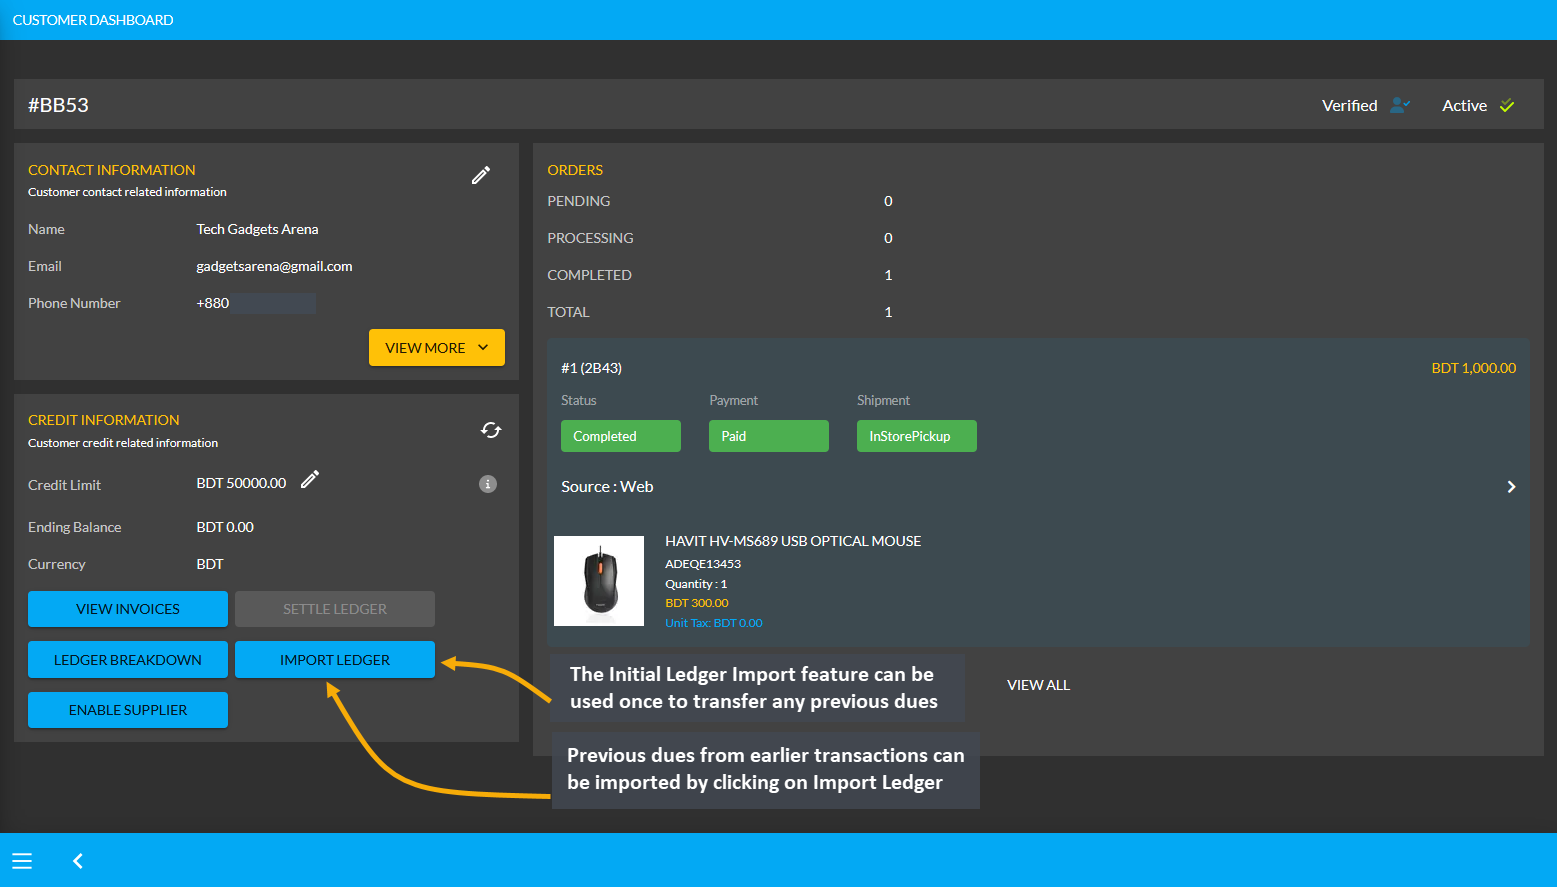
The Import Ledger feature has Receivable and Payable. Upon clicking the Import Ledger button, the Shop Owner will be asked to confirm if the previous transaction has a Receivable or Payable amount to the Credit Customer.
Payable Amount on Import Ledger
For instance, after clicking the Import Ledger button, if the Shop Owner selects Payable with an amount of 5,000 BDT for example, it will mean that that the Credit Customer will get 5,000 BDT from the Shop Owner. So, selecting Payable based on previous transactions will add to the Payable Amount on Import Ledger.
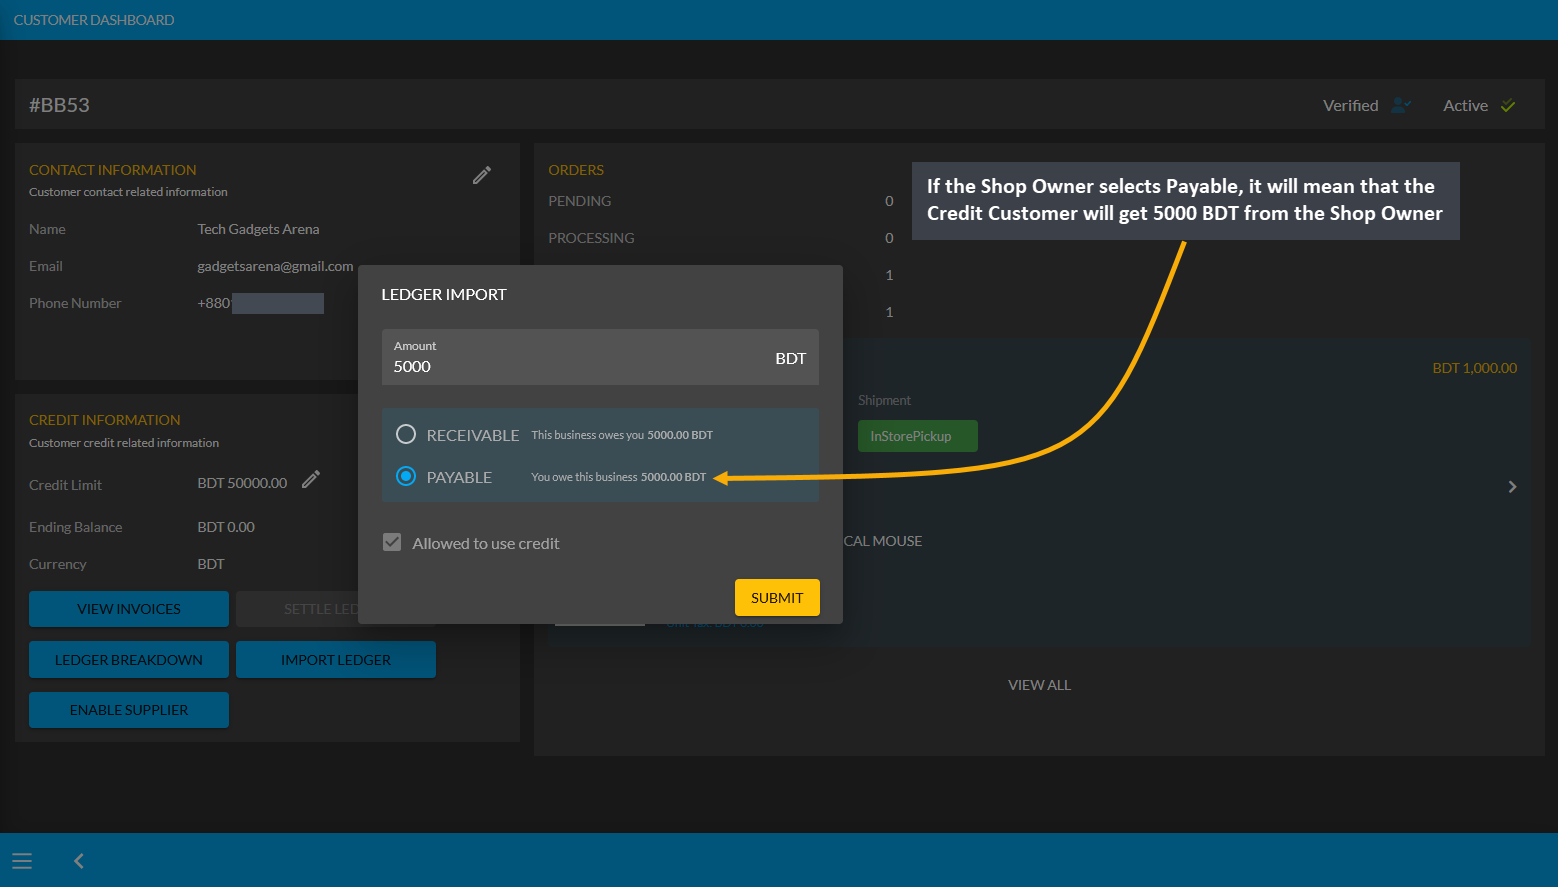
Image 1: If Shop Owner selects Payable, it will mean that Credit Customer will get 5000 BDT from them.
Import Ledger feature can only be used once, so before setting the Payable, the Shop Owner will have to confirm if all the information is correct. Therefore, after checking all the information, the Shop Owner has to click I Agree to add dues from previous transactions on Credit as shown in the example screenshot below.
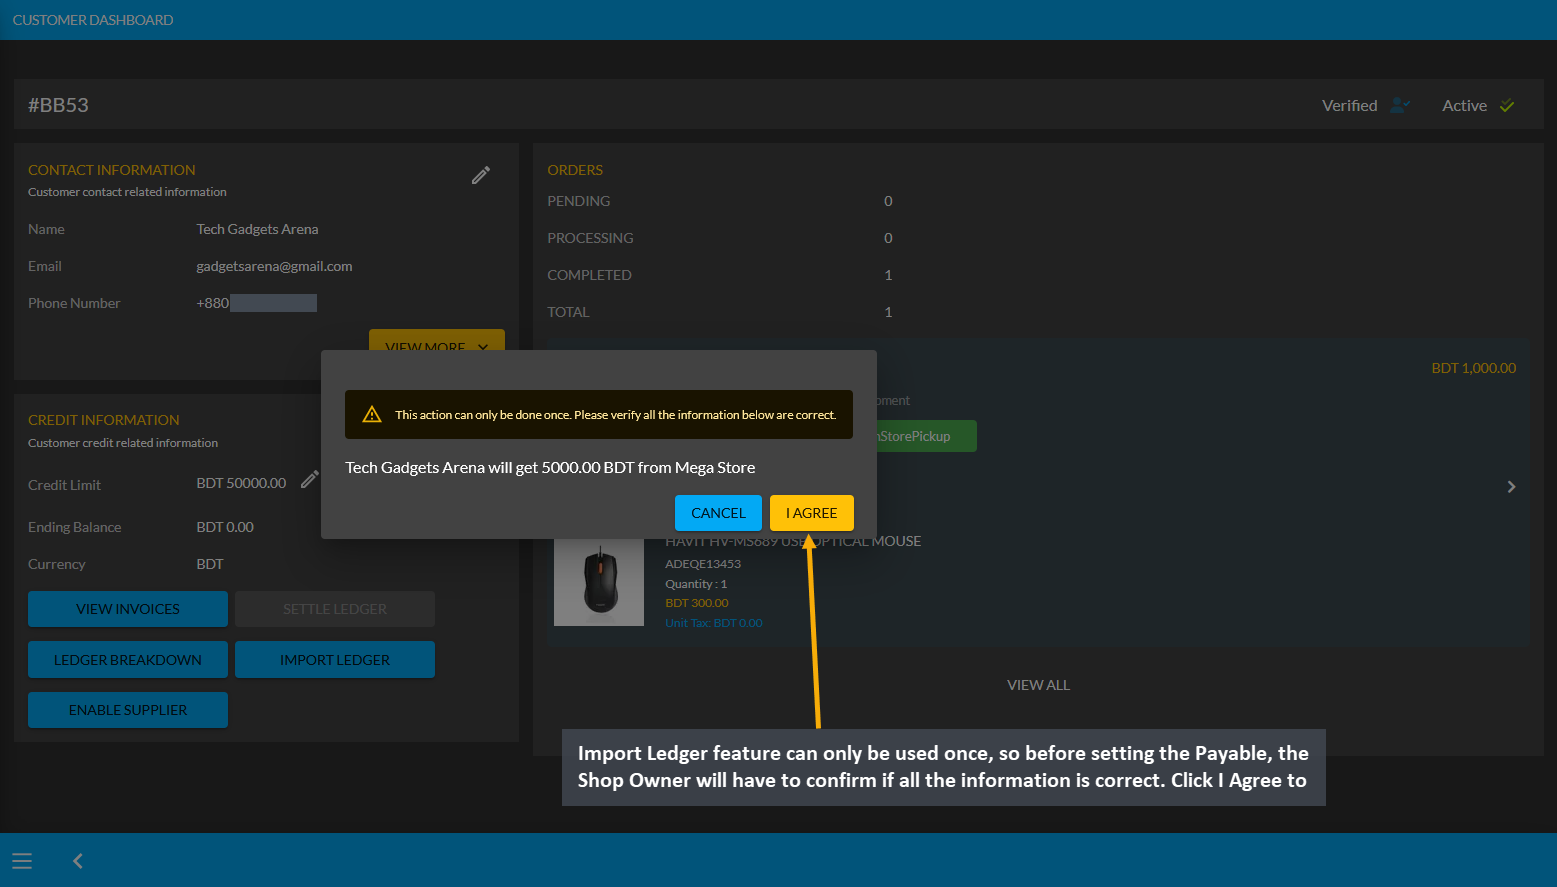
Image 2: Before setting Payable, the Shop Owner will be asked to confirm if all the information is correct.
As the Credit Customer will get 5000 BDT from the Shop Owner, selecting Payable for any previous transactions on the Import Ledger will add to the Payable amount that the Shop Owner owes to them.
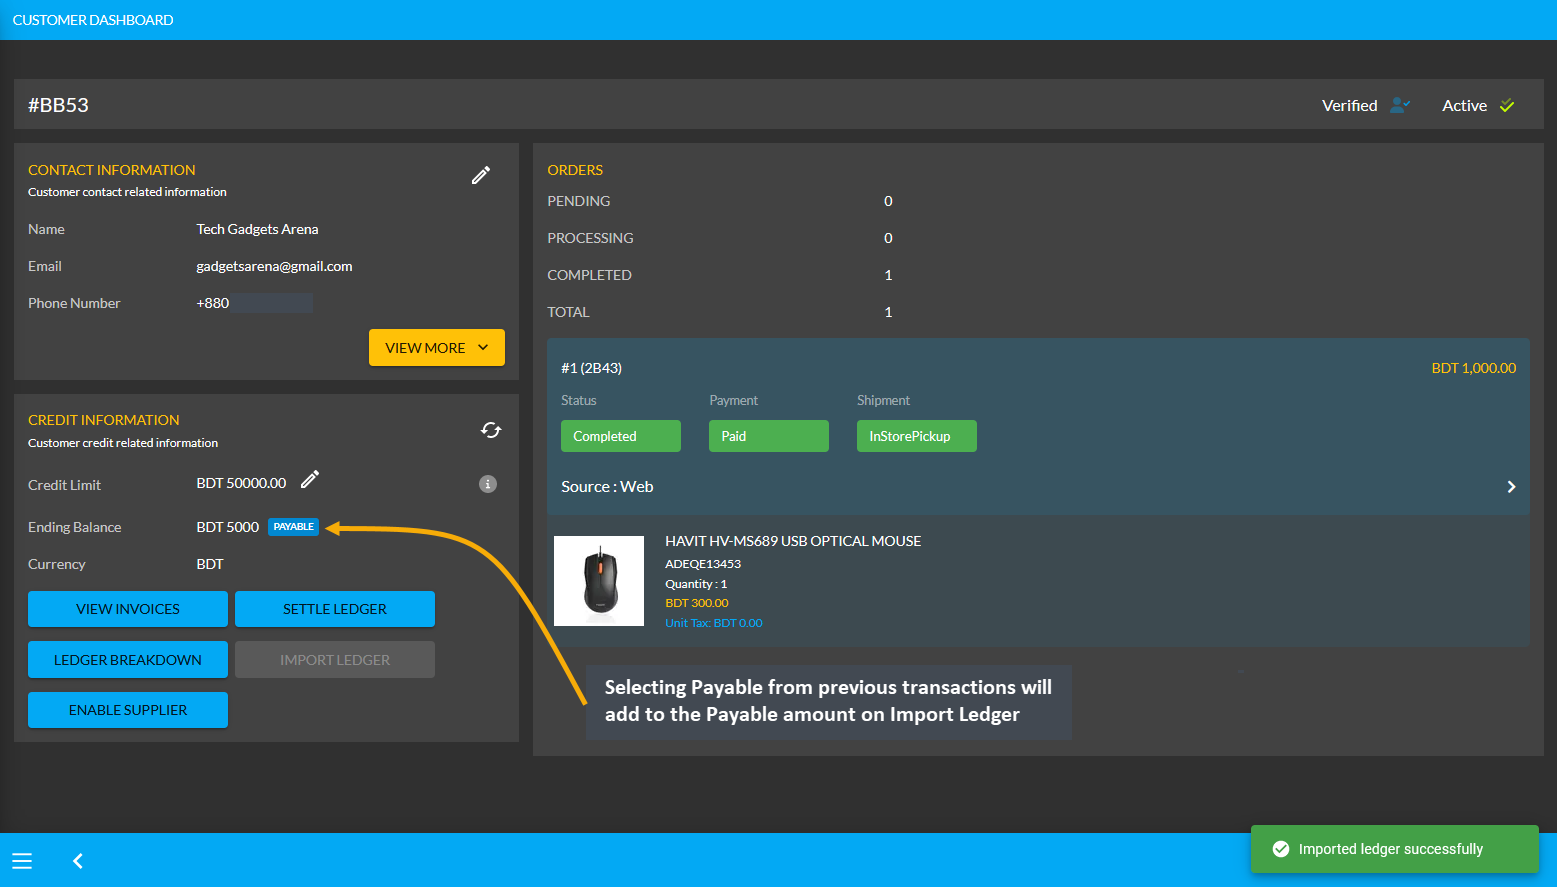
Image 3: Selecting Payable from previous transactions will add to the Payable Amount on Import Ledger.
Using the Ledger Breakdown feature, the Shop Owner can check previous transaction or payable amount that is transferred through the Import Ledger feature on their Ledger Breakdown Page.

Image 4: Import Ledger balance with previous payable amount will be updated on Ledger Breakdown page.
Credit Customer Ordering Products will deduct from Payable
Even if Credit Customer have dues from the Shop Owner worth of 5,000 BDT as the current example, they will be able to buy Product(s) from the Shop Owner via Credit which will deduct from the Payable amount. For example, Credit Customer Smart Gadget Shoppers have purchased two Product(s) worth of 1,600 BDT from Shop Owner.
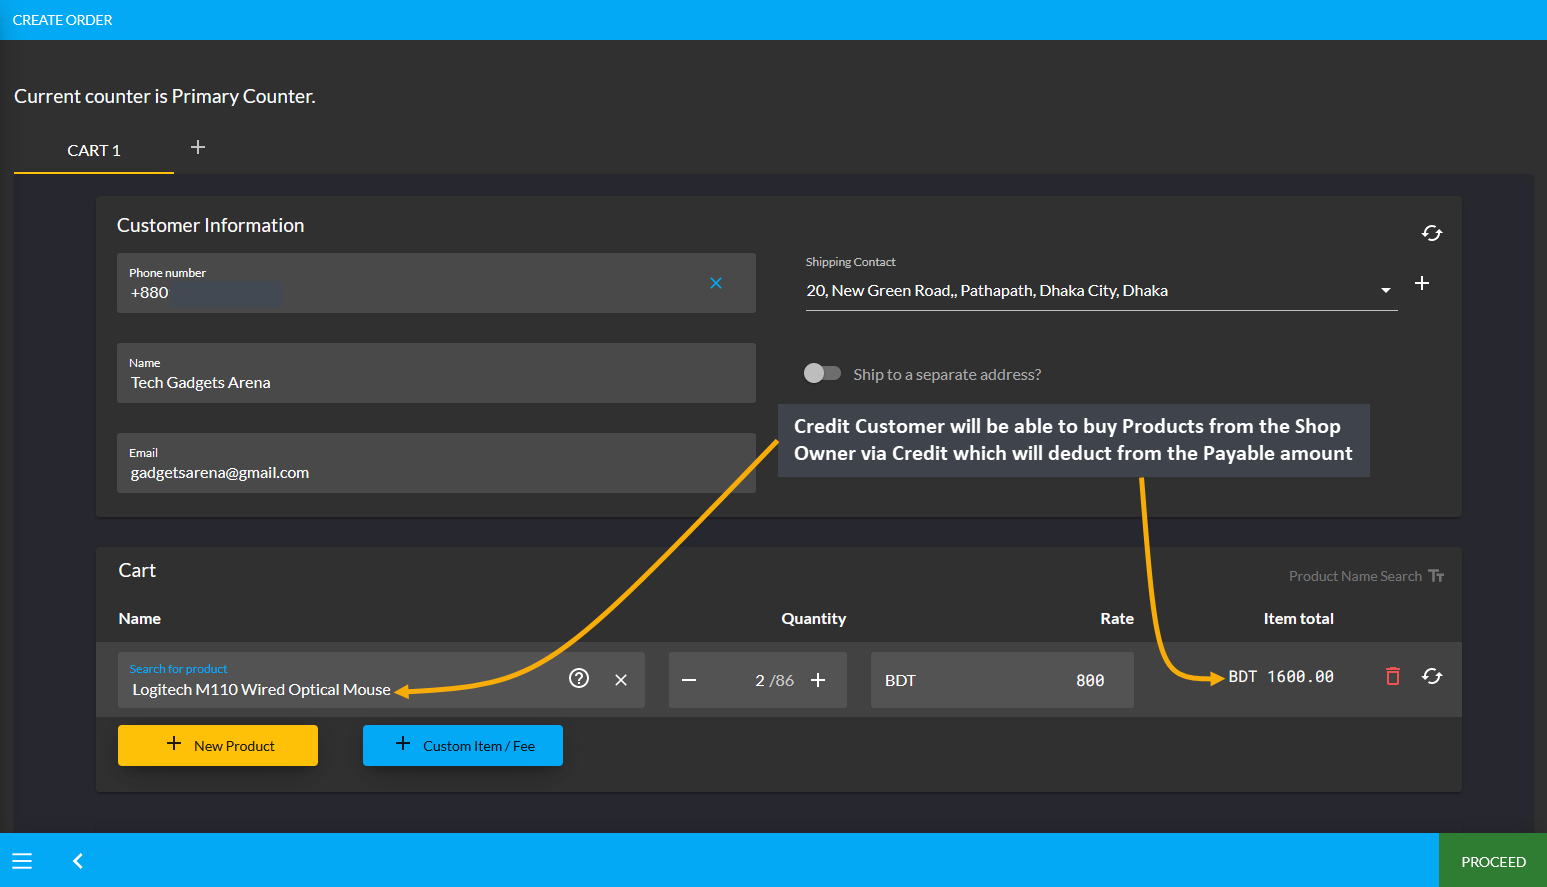
Image 1: Credit Customer buying Products from Shop Owner via Credit will deduct from Payable.
After the Credit Customer choose payment method as On Credit (Due) and confirms their Order, 1,600 BDT will be deducted from their already Payable or owed amount of 5,000 BDT from Shop Owner. With Product purchase of 1,600 BDT now, the amount will be deducted and 3,400 BDT Payable amount will be remaining from Shop Owner now. So, a Credit Customer can buy Products from the Shop Owner via Credit to settle Payable Amount.
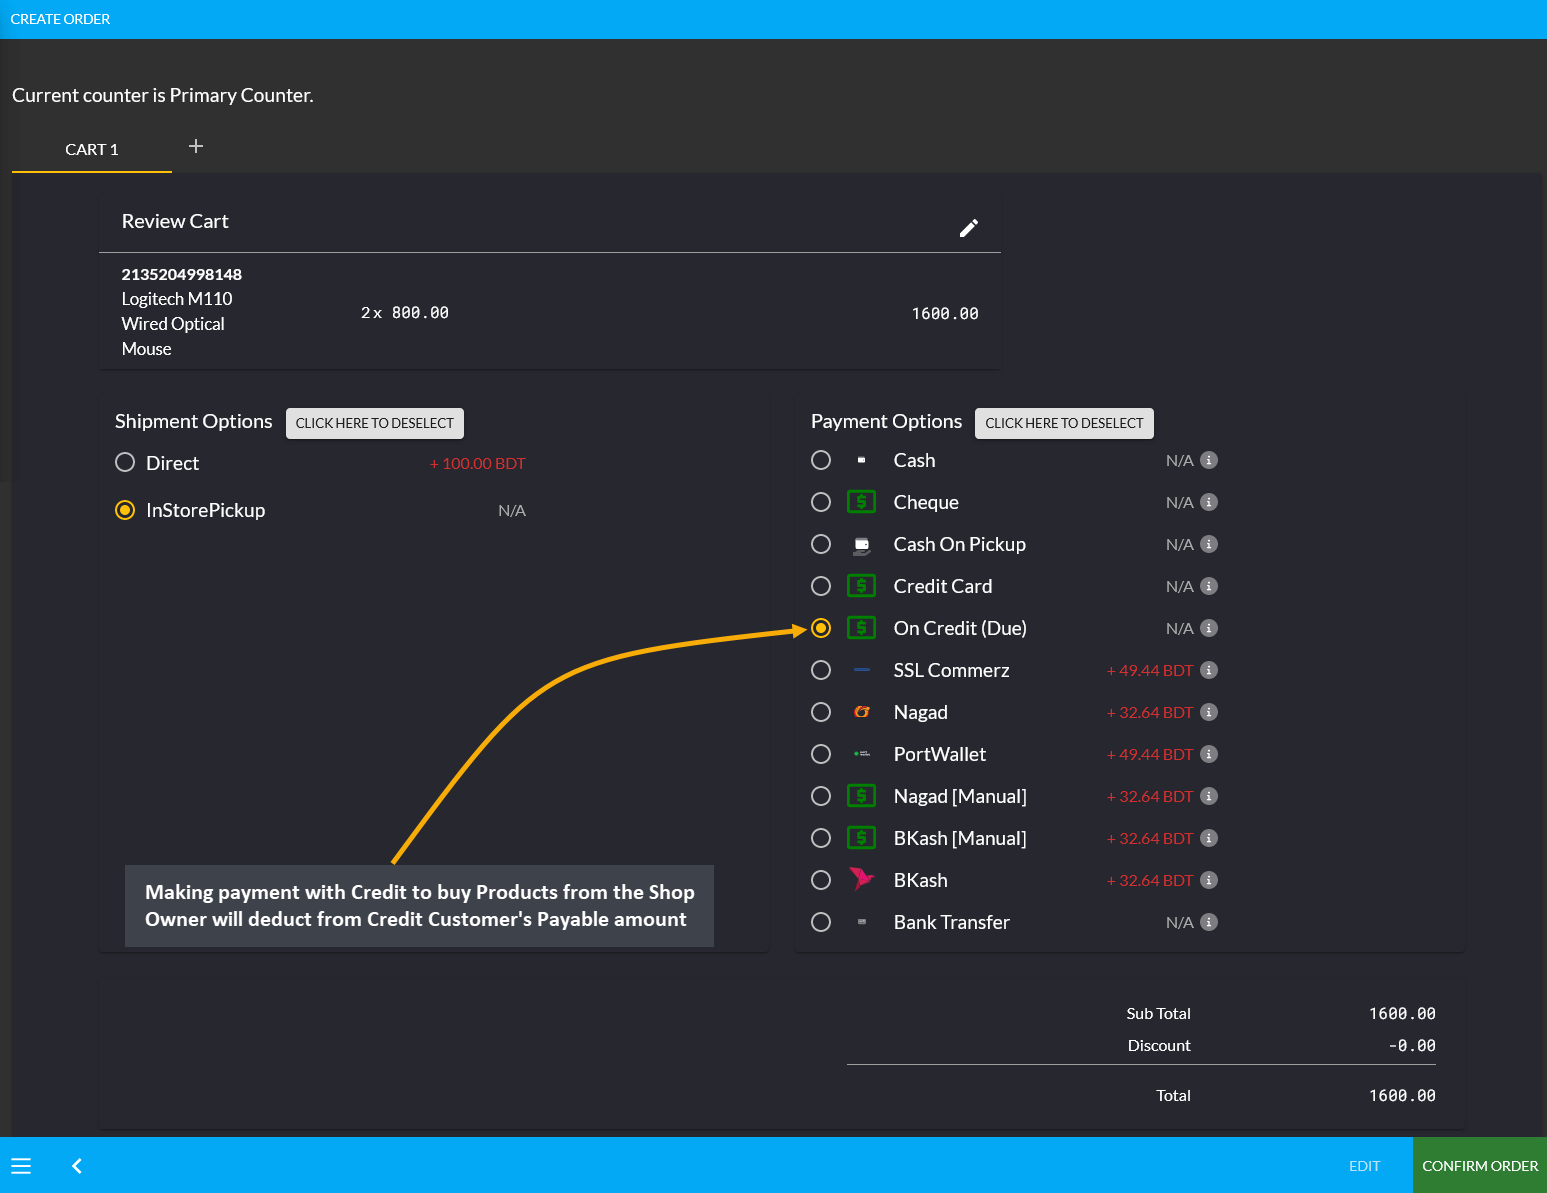
Image 2: Making Credit payment to buy Products from Shop Owner will deduct from Credit Customer's Payable.
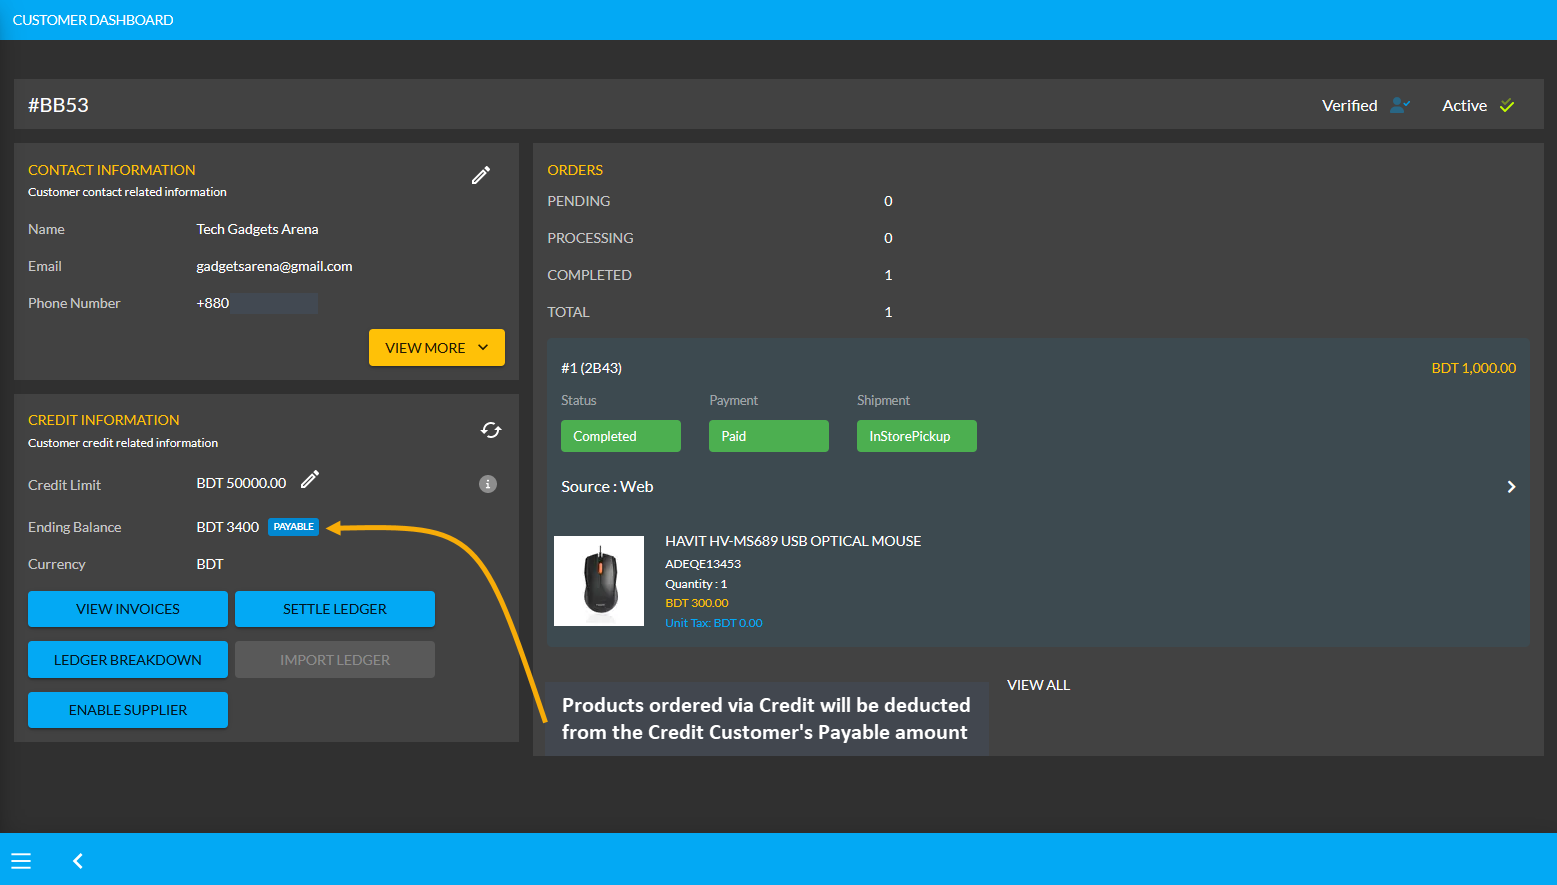
Image 3: Products ordered via Credit will be deducted from the Credit Customer's Payable amount.
Using the Ledger Breakdown feature, the Shop Owner can check the transaction of the Credit Customer on their Ledger Breakdown Page with Payable amount for ordering Products and Credit remaining from Credit Limit.

Image 4: Payable amount for ordering Products will be updated on the Ledger Breakdown page.
Use Payment Gateways to Settle Ledger for Payable
The Shop Owner can pay their remaining dues or Payable amount to the Credit Customer in full amount or in a certain amount through the Settle Ledger feature. For example, the Credit Customer Smart Gadget Shoppers will still get 3,400 BDT from Shop Owner. In this case, the Shop Owner can pay back 3,400 BDT to Credit Customer by using the six payment gateways (BKash, Nagad, Cash, Cheque, Bank Transfer, and Credit Card) available with the Settle Ledger button. Learn how to settle Ledger as shown in a few steps below with screenshots:
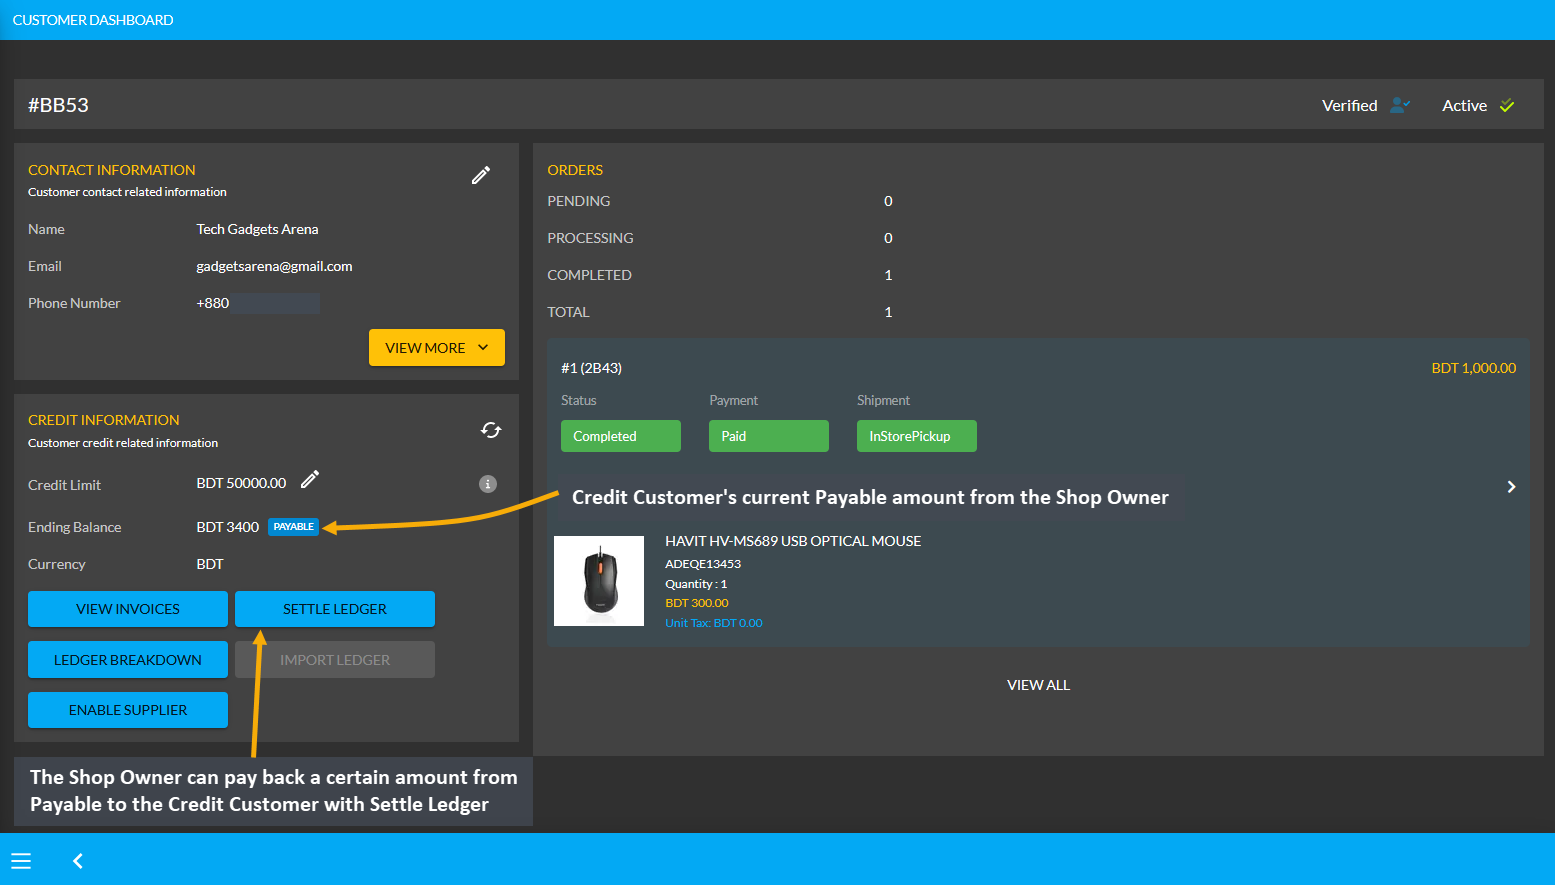
Image 1: The Shop Owner can pay back Payable Amount to Credit Customer with the Settle Ledger feature.
The Shop Owner can make payment for the 3,400 BDT Payable amount at once or by a few times through the six different payment gateways. Here, the Shop Owner will pay the Credit Customer 1,000 BDT with the Settle Ledger feature. So, first, they need to click the Settle Ledger button which will open a pop-up where the amount they want to pay needs to be set. For example, here, the Shop Owner wants to pay 1,000 BDT with the Settle Ledger option.
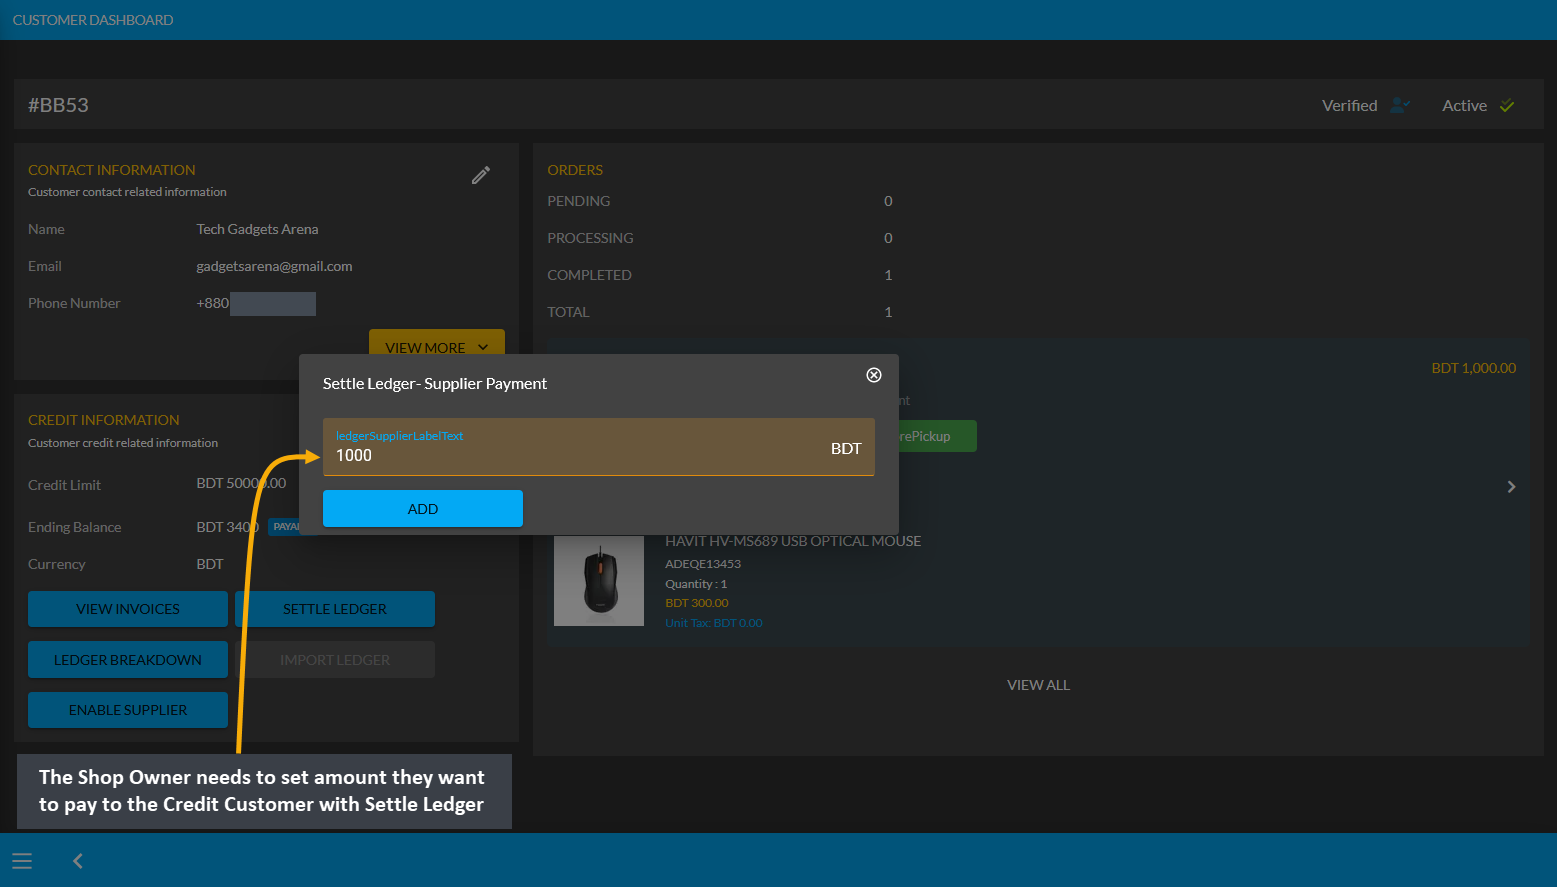
Image 2: The Shop Owner needs to set amount they want to pay to Credit Customer with Settle Ledger.
Then, Shop Owner needs to select one of the six Payment Gateways to make payment for the selected amount to Settle Ledger. For instance, Cheque payment was selected and Cheque Number, Due Date, Bank Name, and Amount was set. Thus, the Shop Owner needs to complete the payment information and hit Submit when done.
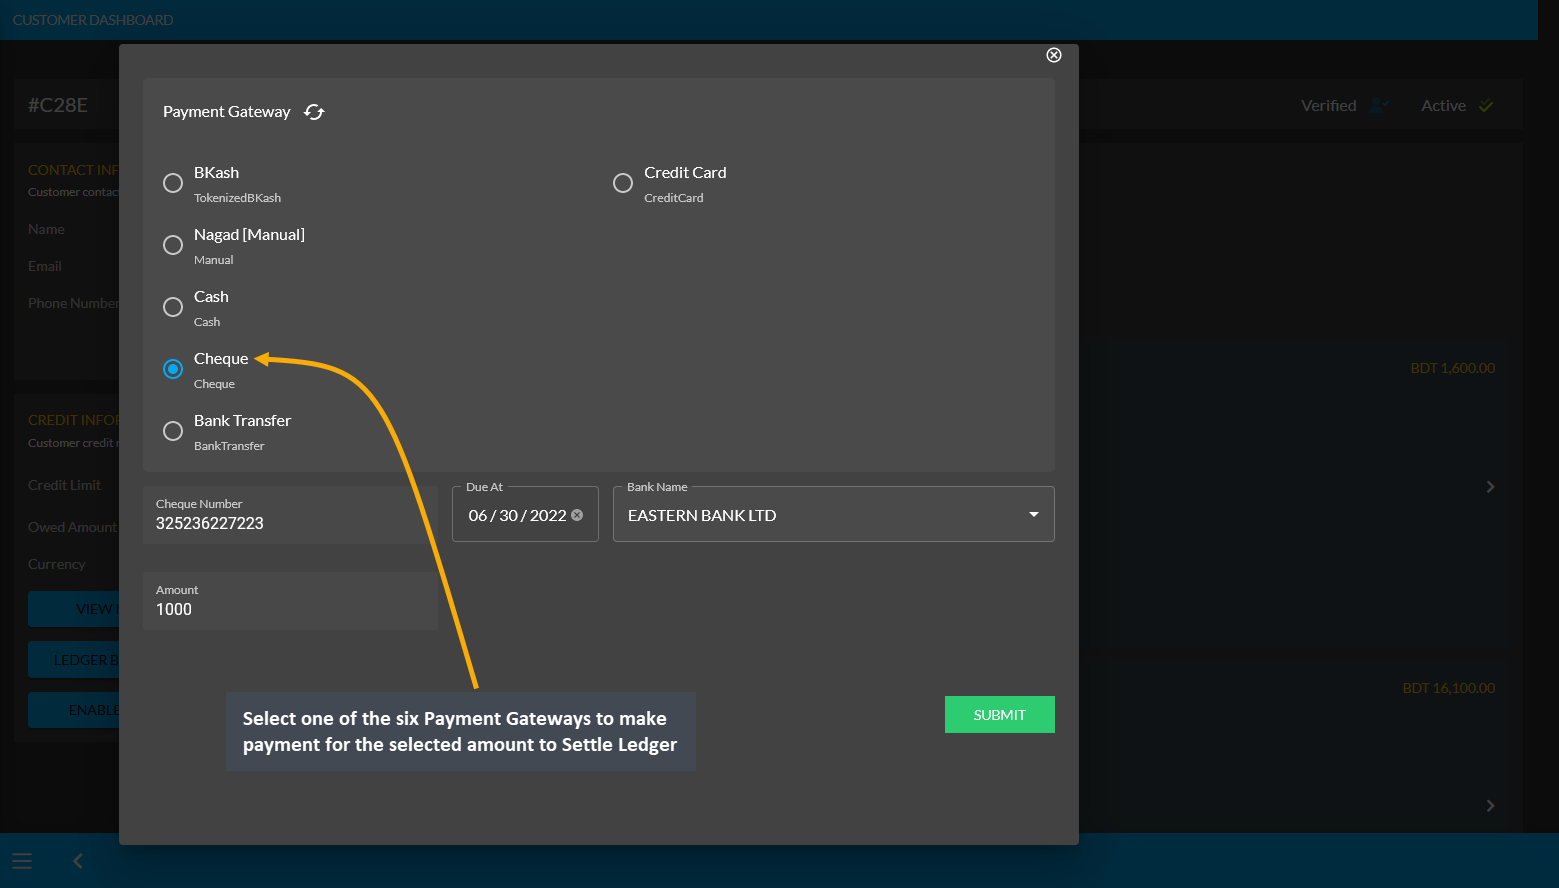
Image 3: Shop Owner needs to select a Payment Gateway to pay to Credit Customer with Settle Ledger.
After successful partial payment, a pop-up notification will confirm that the transaction amount 1,000 BDT was completed. Check the transaction reference and gateway used and click Submit to complete the process.
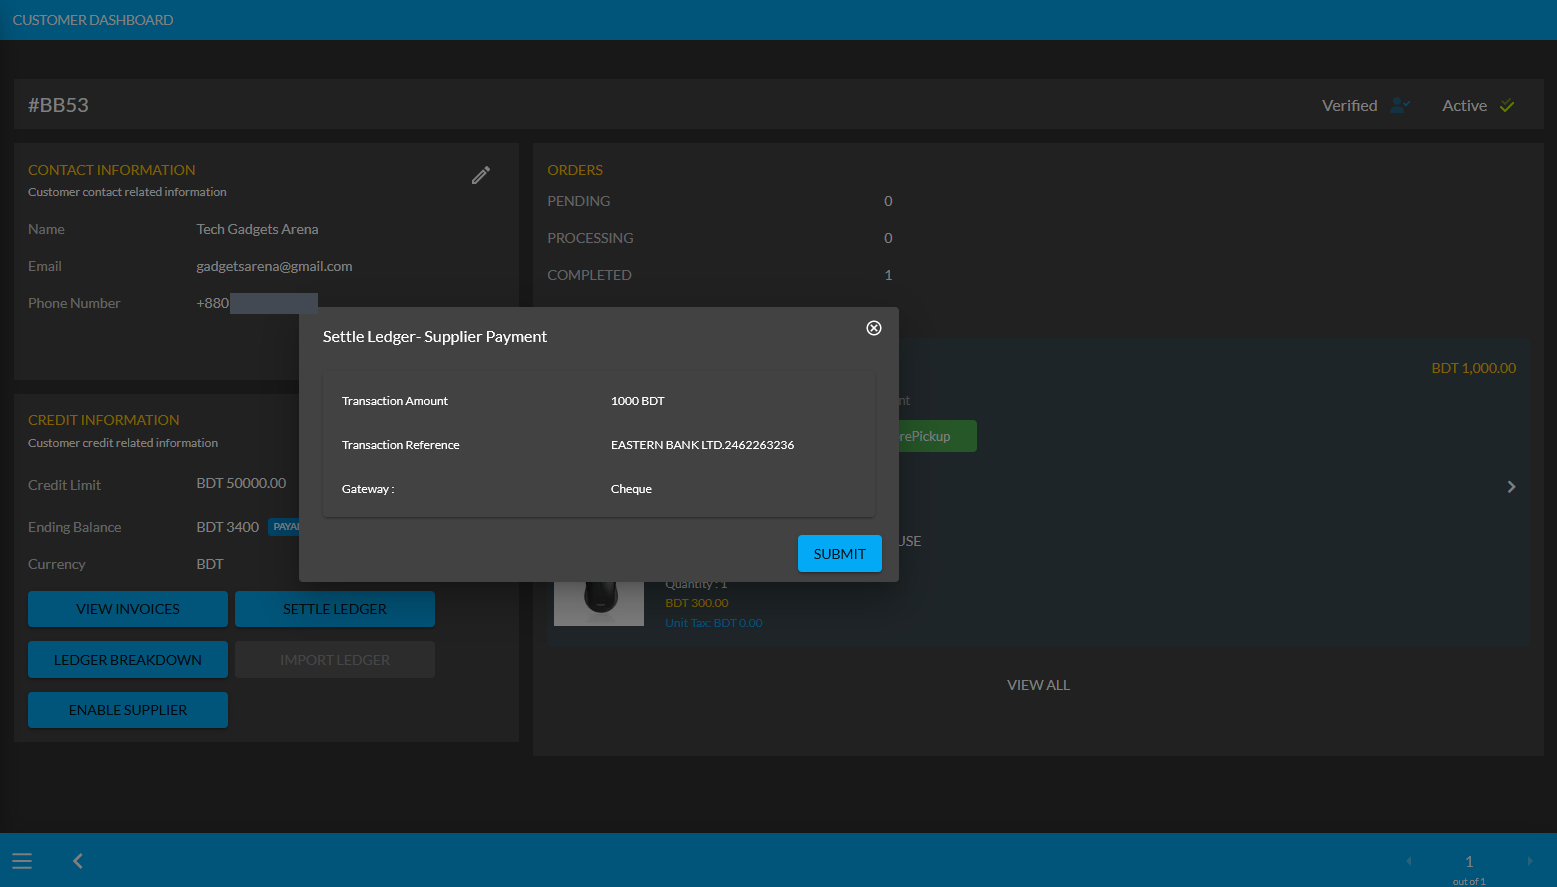
Image 4: After successful payment, a pop-up will show confirmation with the transaction details.
Completing the payment of 1,000 BDT to Credit Customer with the Settle Ledger feature will reflect the updated balance under the Credit Information section. For instance, here after settling Ledger with payment of 1,000 BDT, the Payable amount was automatically updated from 3,400 BDT to 2,400 BDT under Credit Information section.
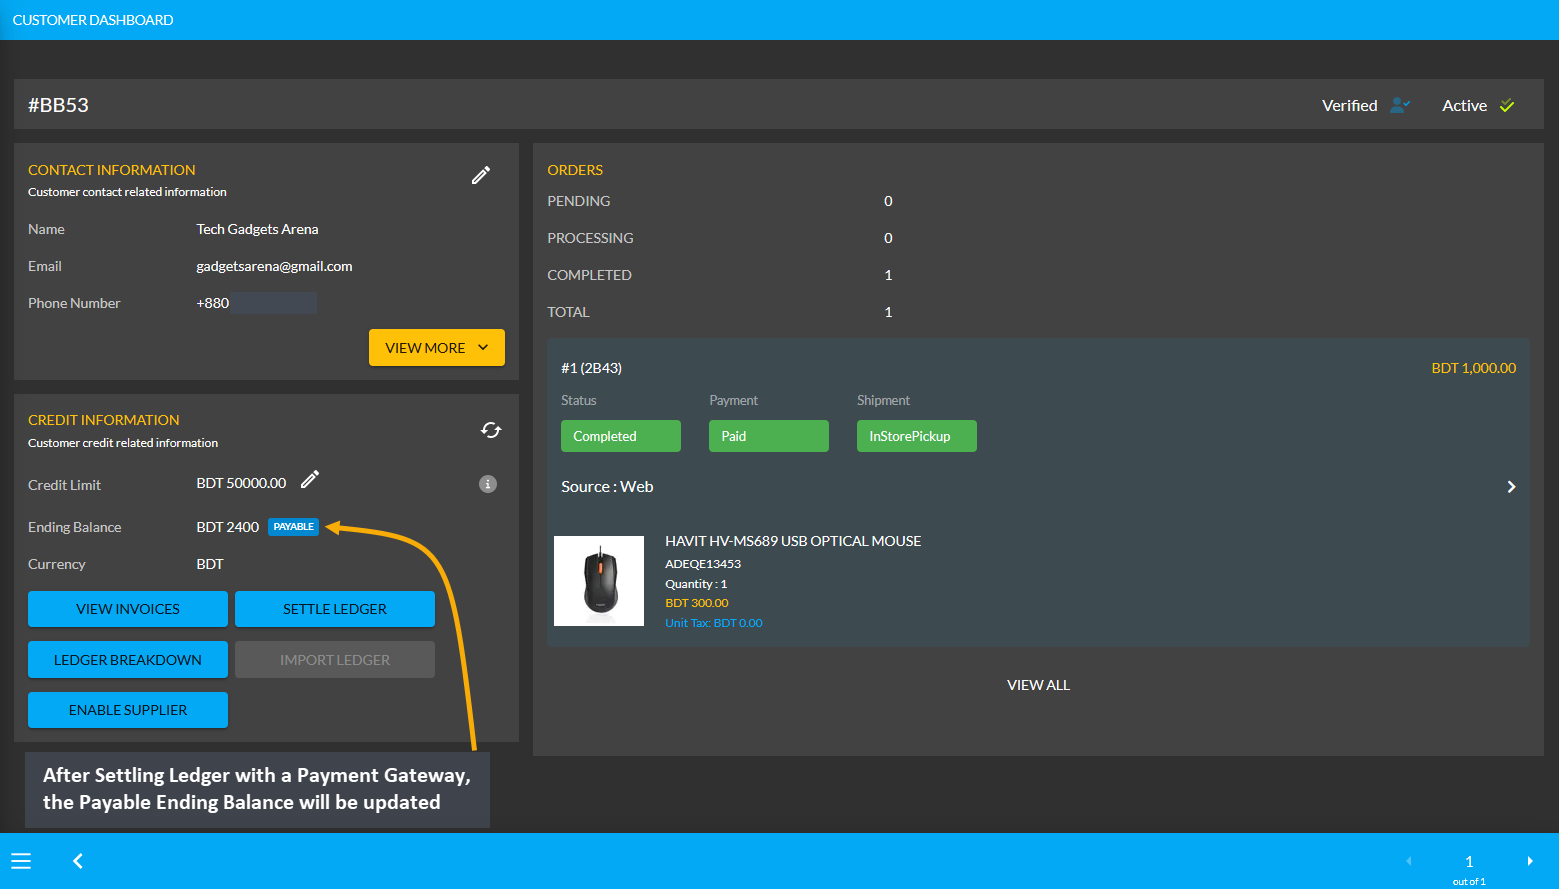
Image 5: Updated balance will be reflected under the Owed Amount after settling Ledger successfully.
Using the Ledger Breakdown feature, the Shop Owner can check transaction for Payable after Ledger settlement with Payment Gateways on the Credit Customer’s Ledger Breakdown Page.

Image 6: Settling Ledger with Payment Gateways will be updated on the Ledger Breakdown page.
Receivable Amount on Import Ledger
Similarly, after clicking the Import Ledger button, if the Shop Owner selects Receivable with an amount of 5,000 BDT for example, it will mean that the Credit Customer will pay 5,000 BDT to the Shop Owner. So, selecting the Receivable based on previous transactions will add to the Receivable amount on Import Ledger.
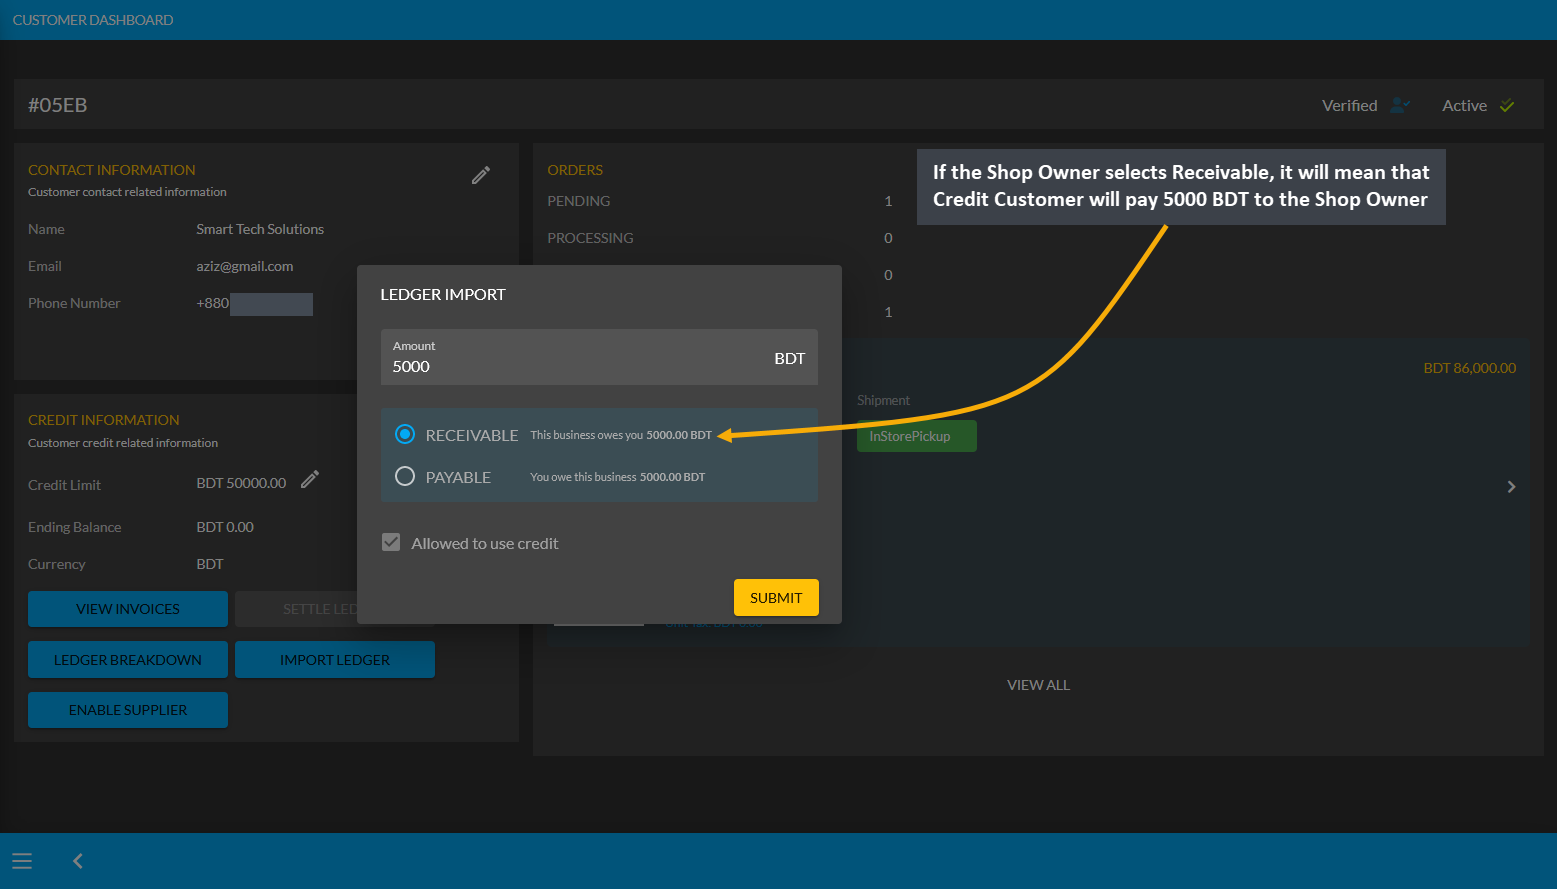
Image 1: If Shop Owner selects Receivable, it will mean that Credit Customer will pay 5000 BDT to them.
Import Ledger feature can only be used once, so before setting Receivable, Shop Owner will be asked to confirm if all the information is correct. Therefore, after checking all the information, the Shop Owner has to click I Agree to add receivable amount from previous transactions on Credit as shown in the example screenshot below.
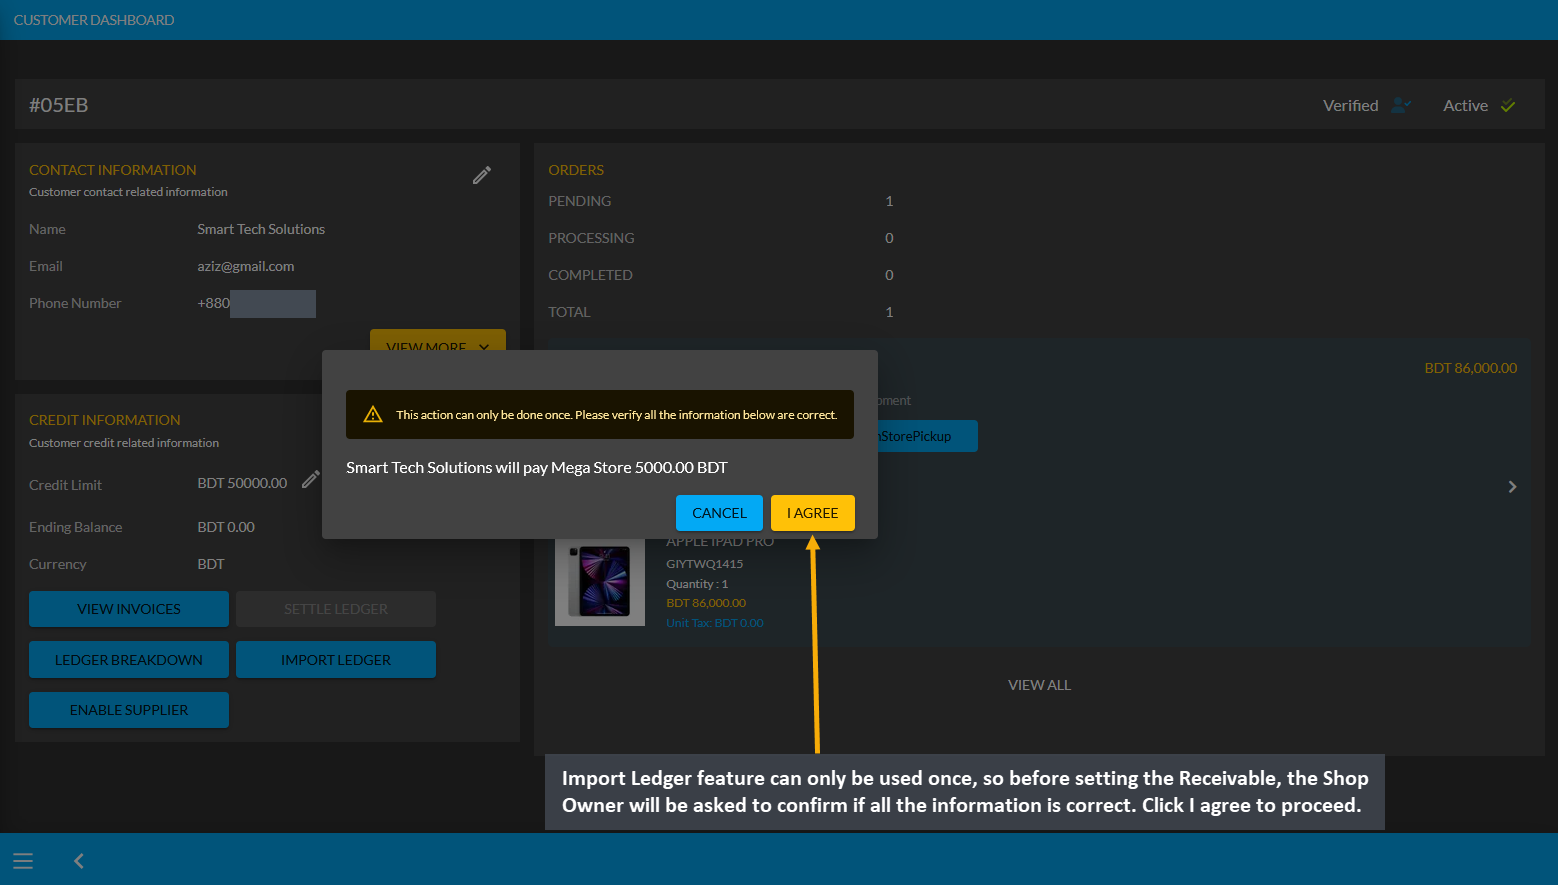
Image 2: Before setting Receivable, Shop Owner will be asked to confirm if all the information is correct.
As the Credit Customer will pay 5000 BDT to the Shop Owner, selecting Receivable for any previous transactions on the Import Ledger will add to the Receivable amount that the Shop Owner owes from them.
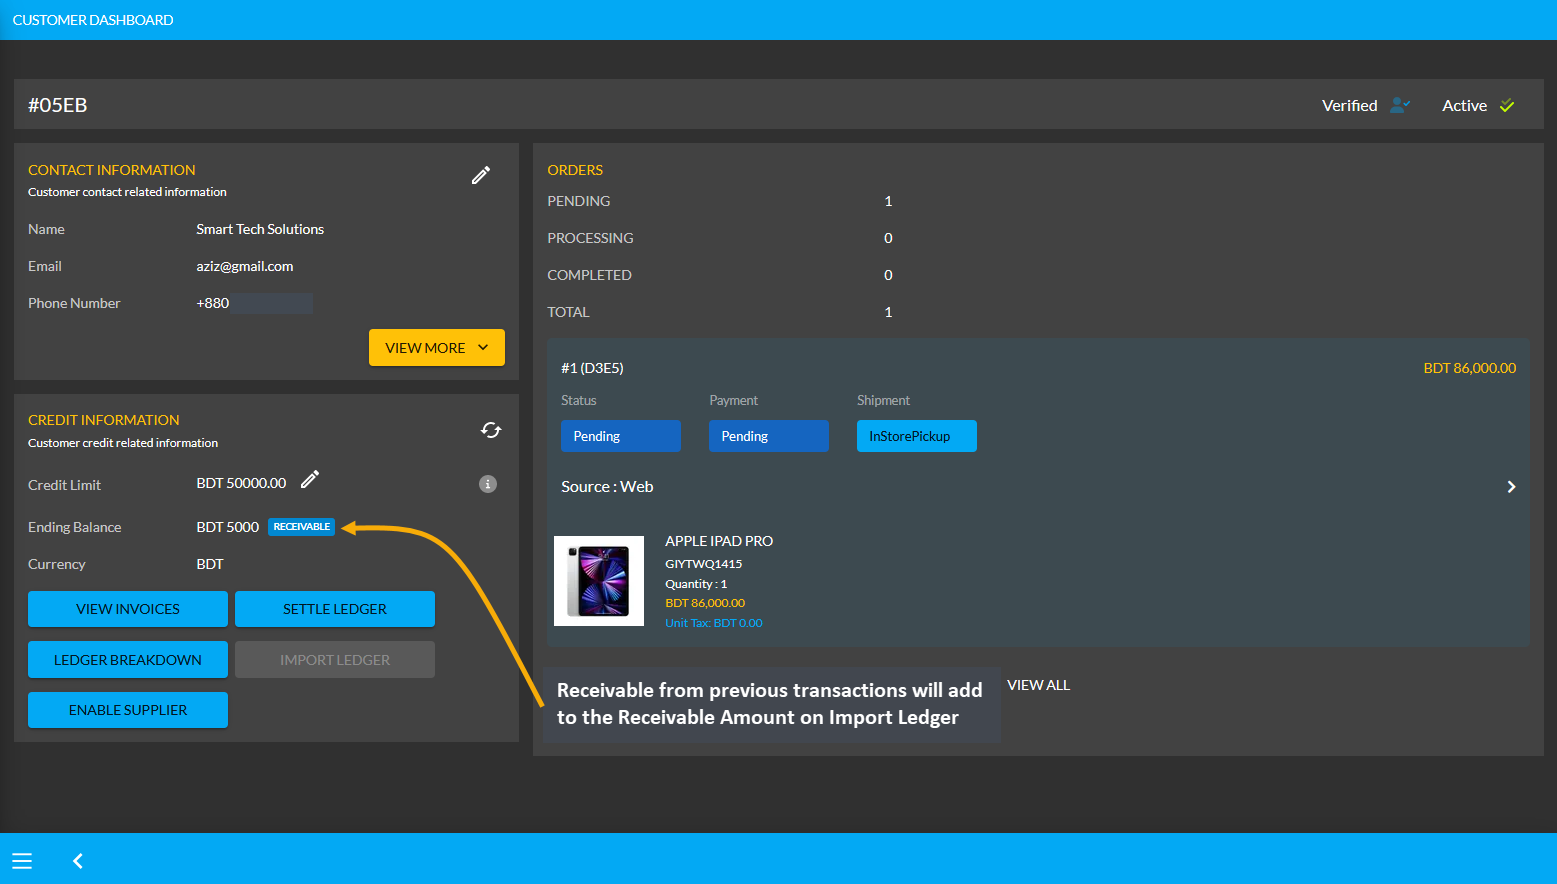
Image 3: Receivable from previous transactions will add to the Receivable Amount on Import Ledger.
Using the Ledger Breakdown feature, the Shop Owner can check previous transaction or receivable amount that is transferred through the Import Ledger feature on their Ledger Breakdown Page.

Image 4: Import Ledger balance with previous receivable amount will be updated on Ledger Breakdown page.
Credit Customer Ordering Products will add to Receivable
Though the Shop Owner already owes 5,000 BDT from the Credit Customer, the Credit Customer can still buy Product(s) from them using Credit which will add to the Receivable. For example, Credit Customer Smart Tech Solutions have purchased two Product(s) worth of 1,600 BDT from Shop Owner here.
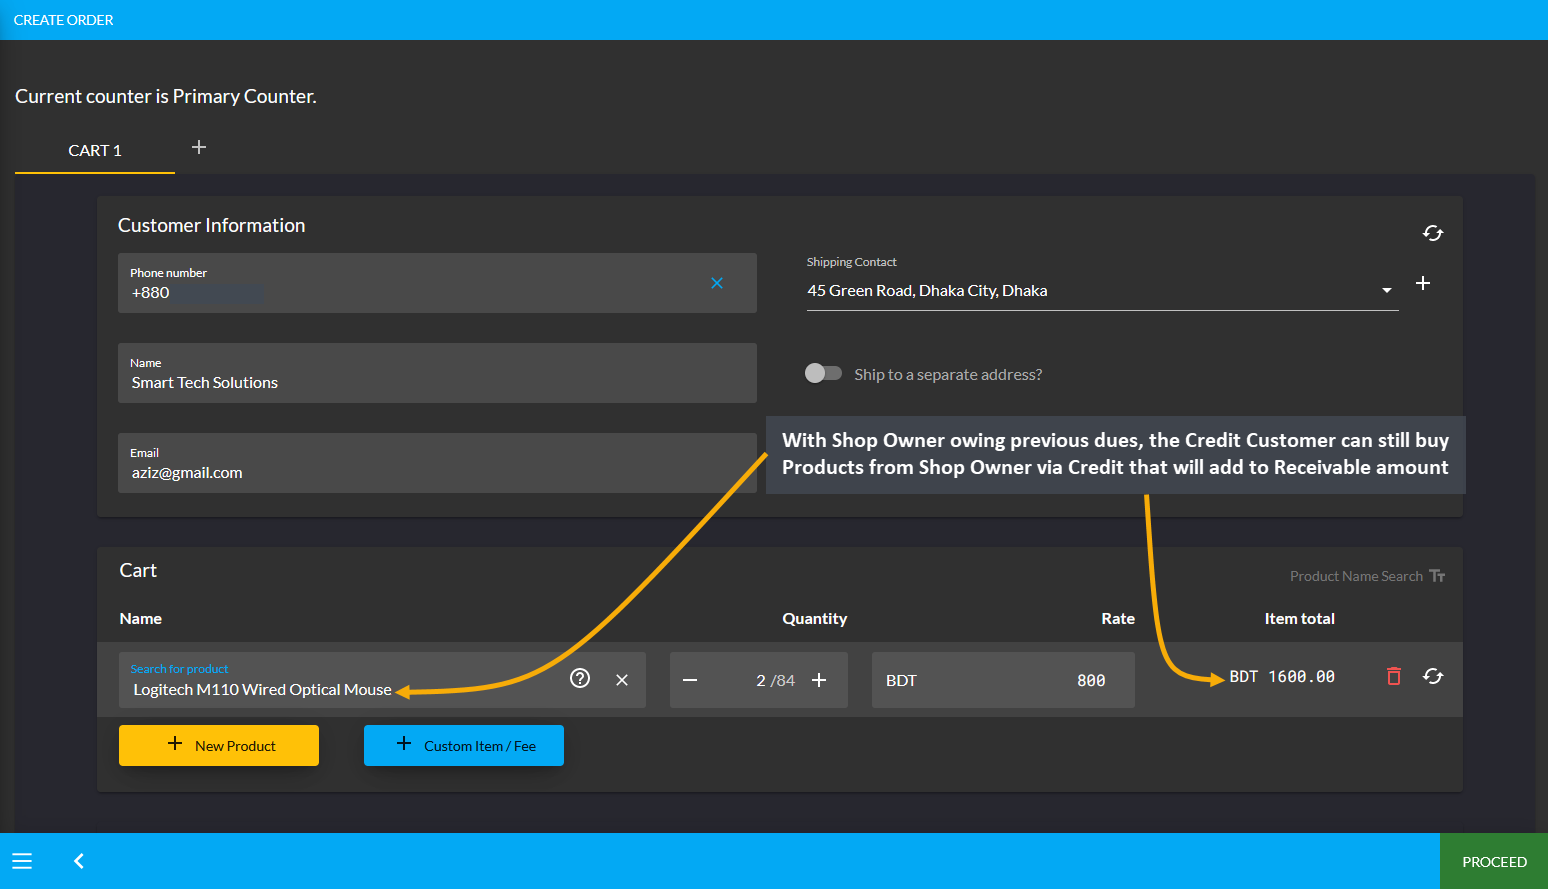
Image 1: Credit Customer buying Product(s) from Shop Owner via Credit will add to Receivable.
After the Credit Customer chooses payment method as On Credit (Due) and confirms their Order, 1,600 BDT will be added to their already Receivable or existing dues of 5,000 BDT to the Shop Owner. This Product purchase being 1,600 BDT, the amount will be added to and increase Receivable to 6,600 BDT now. If the Credit Customer wants to settle these dues, they can use ten different payment gateways to Settle Ledger.
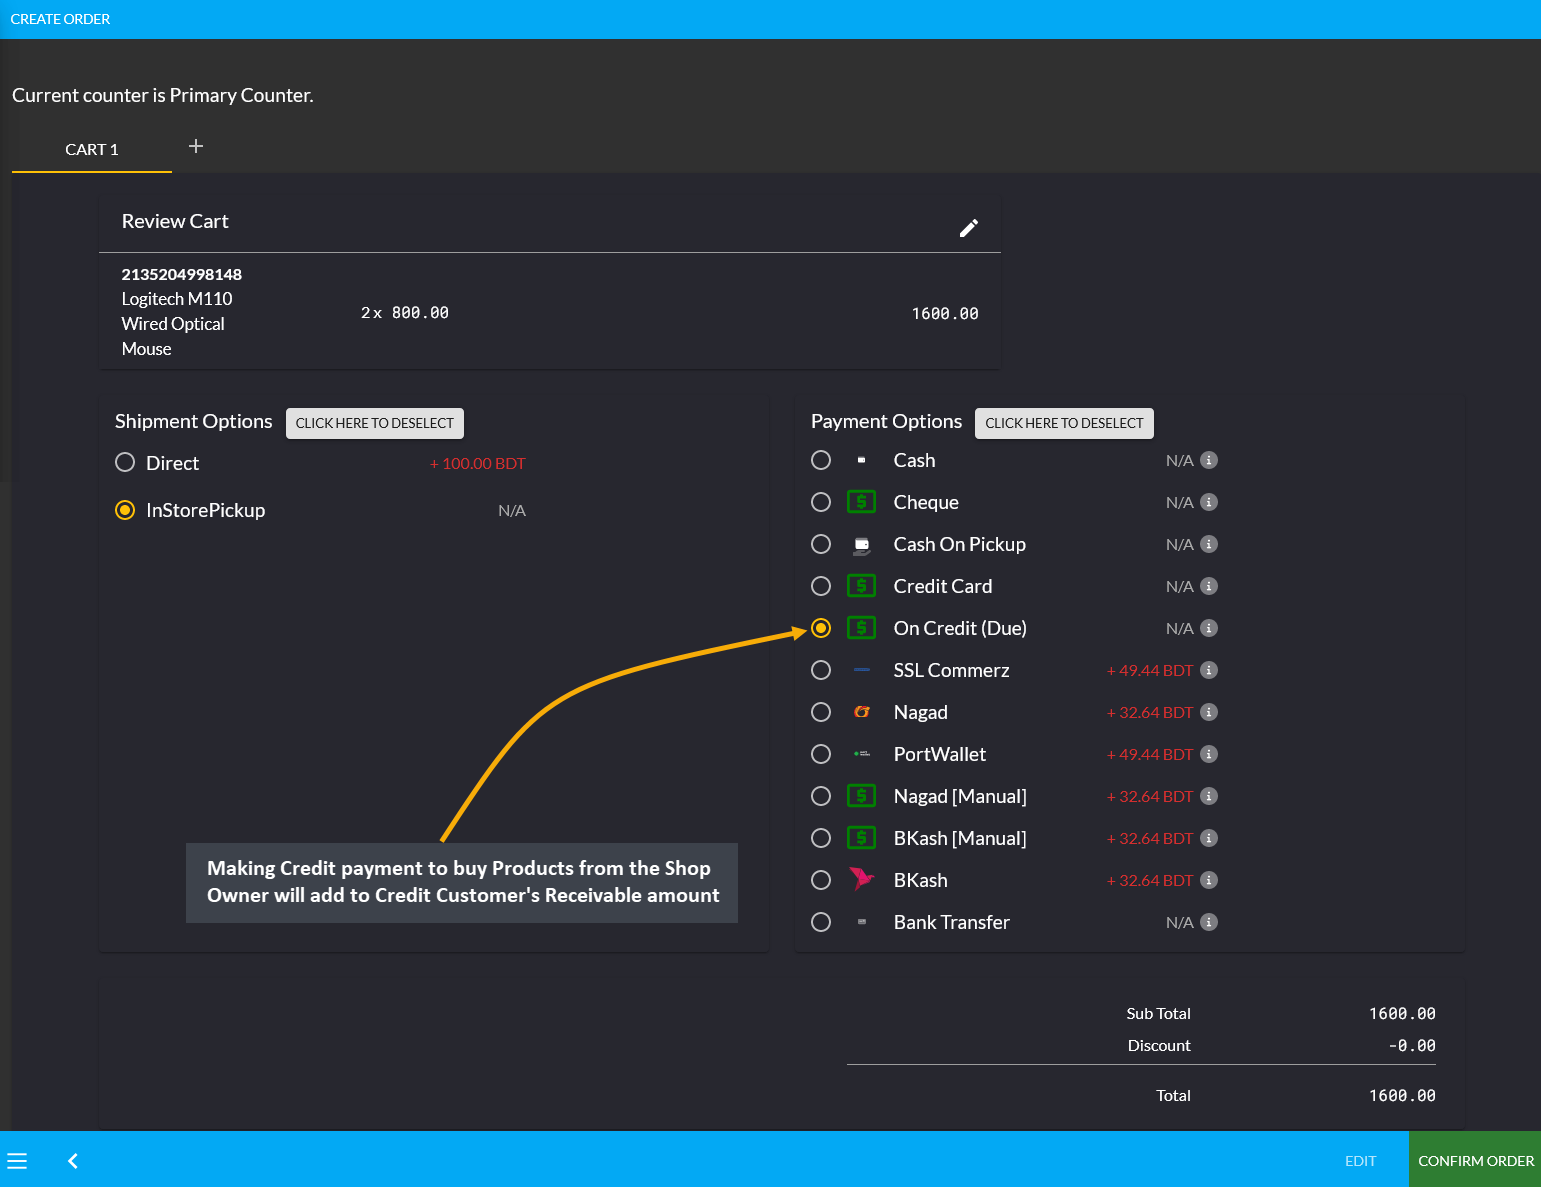
Image 2: Making Credit payment to buy Products from Shop Owner will add to Credit Customer's Receivable.
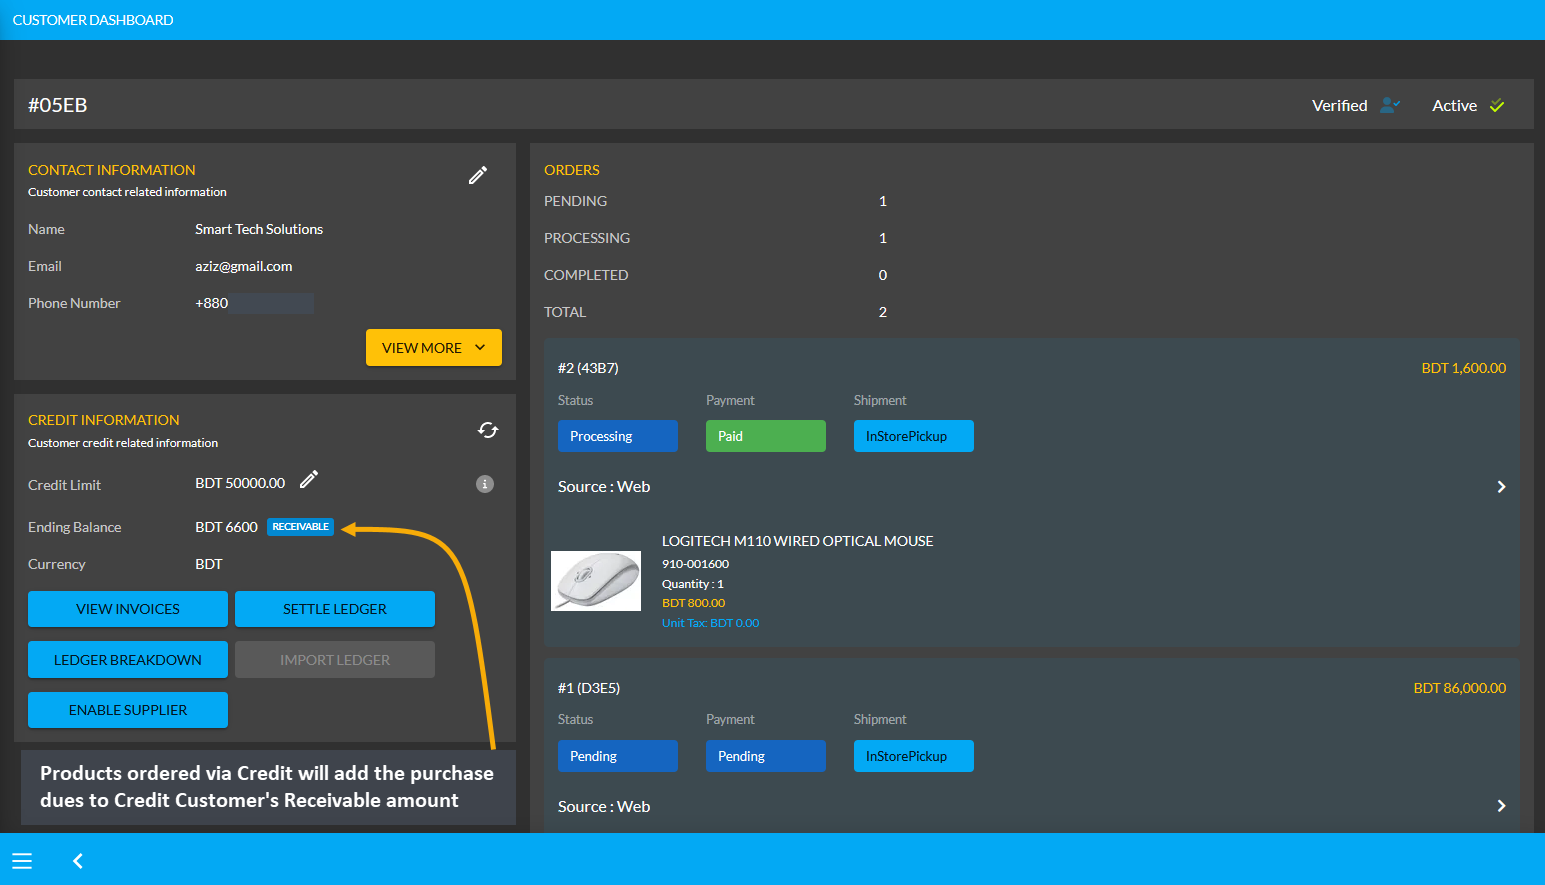
Image 3: Products ordered via Credit will add the purchase dues to Credit Customer's Receivable amount.
Using the Ledger Breakdown feature, the Shop Owner can check the transaction of the Credit Customer on their Ledger Breakdown Page with Receivable amount for ordering Products and Credit remaining from Credit Limit.

Image 4: Receivable amount for ordering Products will be updated on the Ledger Breakdown page.
Use Payment Gateways to Settle Ledger for Receivable
In total, the Credit Customer owes 6,600 BDT to the Shop Owner after their Product purchase. If they want to pay back the full amount or a certain amount to the Shop Owner from their Receivable, they can do it with the Settle Ledger option. For example, the Shop Owner will get 6,600 BDT from the Credit Customer Accessories Center BD, which they can pay back to the Shop Owner with the Settle Ledger feature.
In this case, the Credit Customer will try to pay back a certain amount i.e. 3,000 BDT from 6,600 BDT to the Shop Owner by using any of the ten payment gateways (Cheque, Cash On Delivery, Credit Card, SSLCommerz, Nagad, Nagad Manual, BKash Manual, BKash, PortWallet, Cash, and Bank Transfer) available with Settle Ledger button.
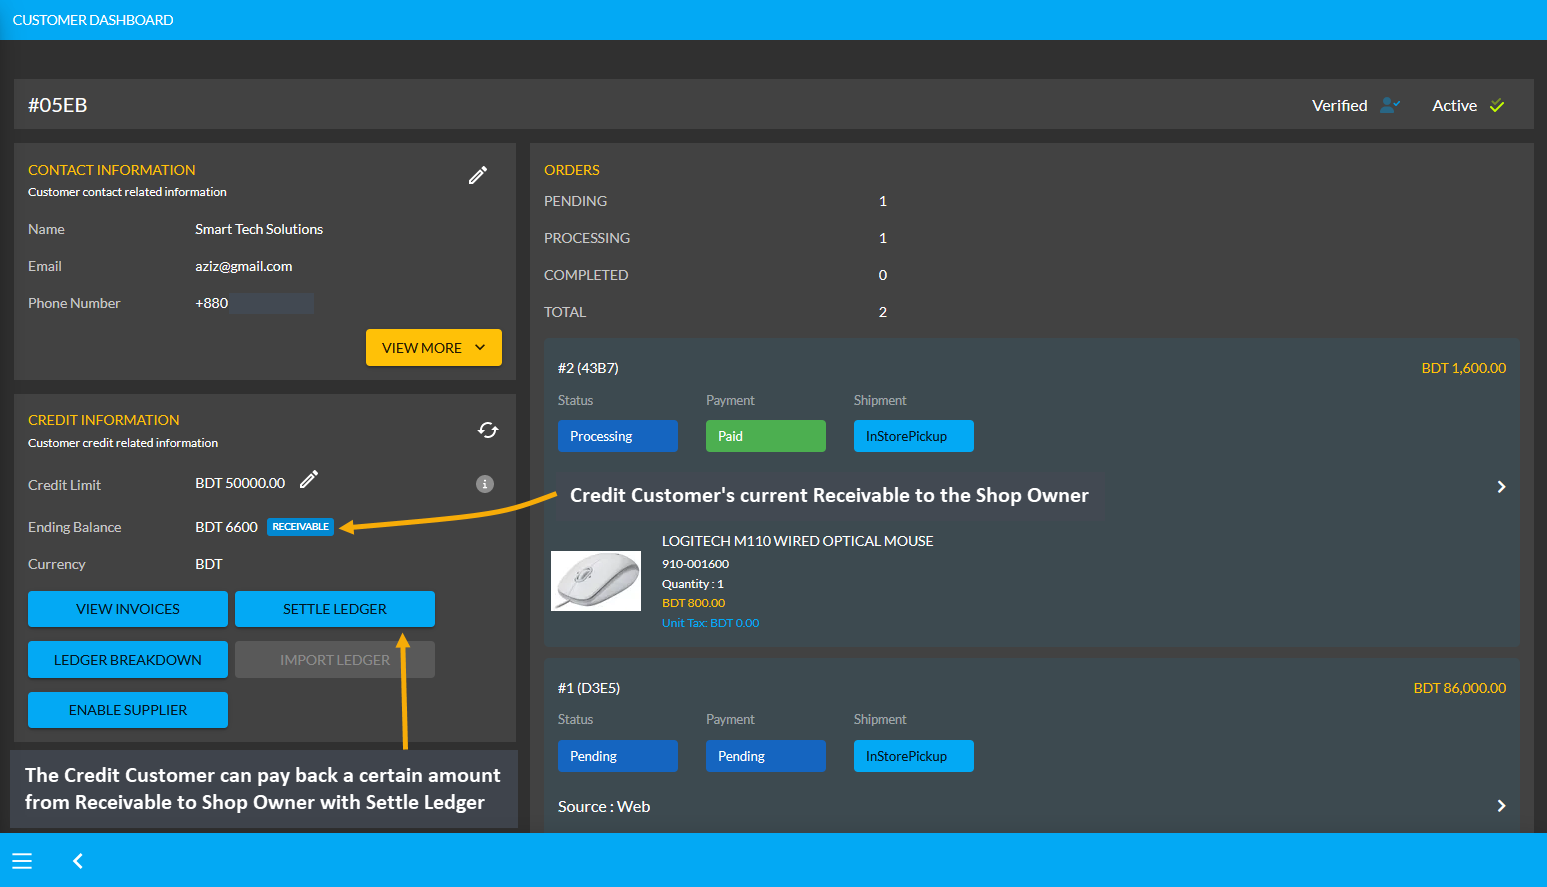
Image 1: Credit Customer can pay back an amount from Receivable to Shop Owner with Settle Ledger feature.
The Credit Customer can pay back from their Receivable amount of 6,600 BDT at once or by a few times through the ten different payment gateways. Here, the Credit Customer will pay back the Shop Owner 3,000 BDT with the Settle Ledger feature. First, they need to click the Settle Ledger button which will open a pop-up where the amount they want to pay needs to be set. Credit Customer wants to pay 3,000 BDT here with the Settle Ledger option.
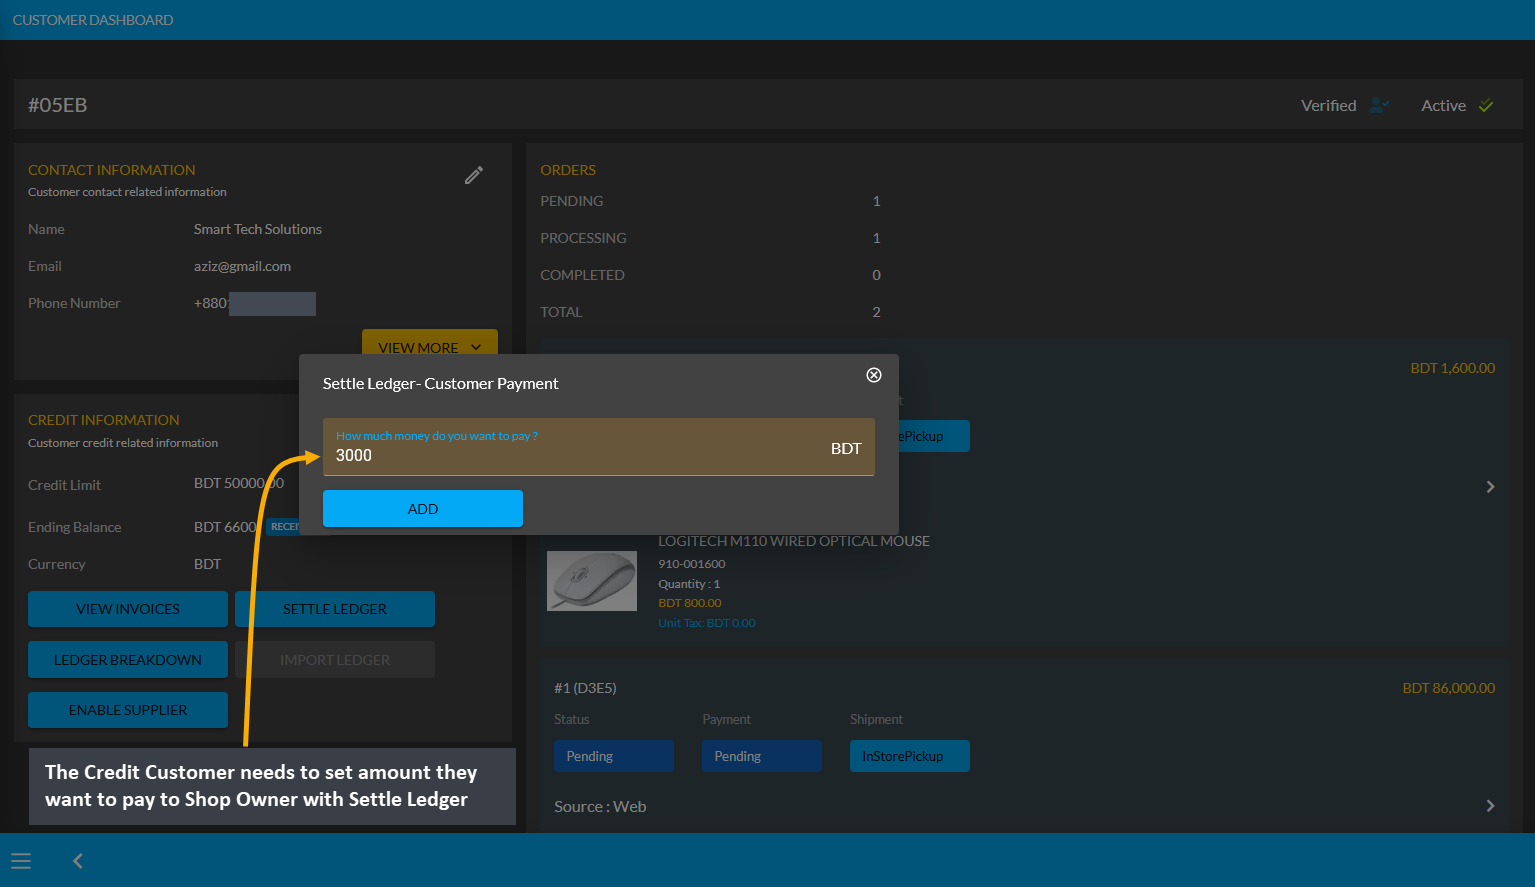
Image 2: The Credit Customer needs to set amount they want to pay to Shop Owner with Settle Ledger.
The Credit Customer needs to select one of the ten Payment Gateways to make payment for the selected amount to Settle Ledger now. Here, BKash Manual payment was selected and BKash (Manual) Transaction ID was set which incurred an additional transaction fee of 61.20 BDT. As demonstrated, the Credit Customer will have to complete their payment information and hit Submit when done.
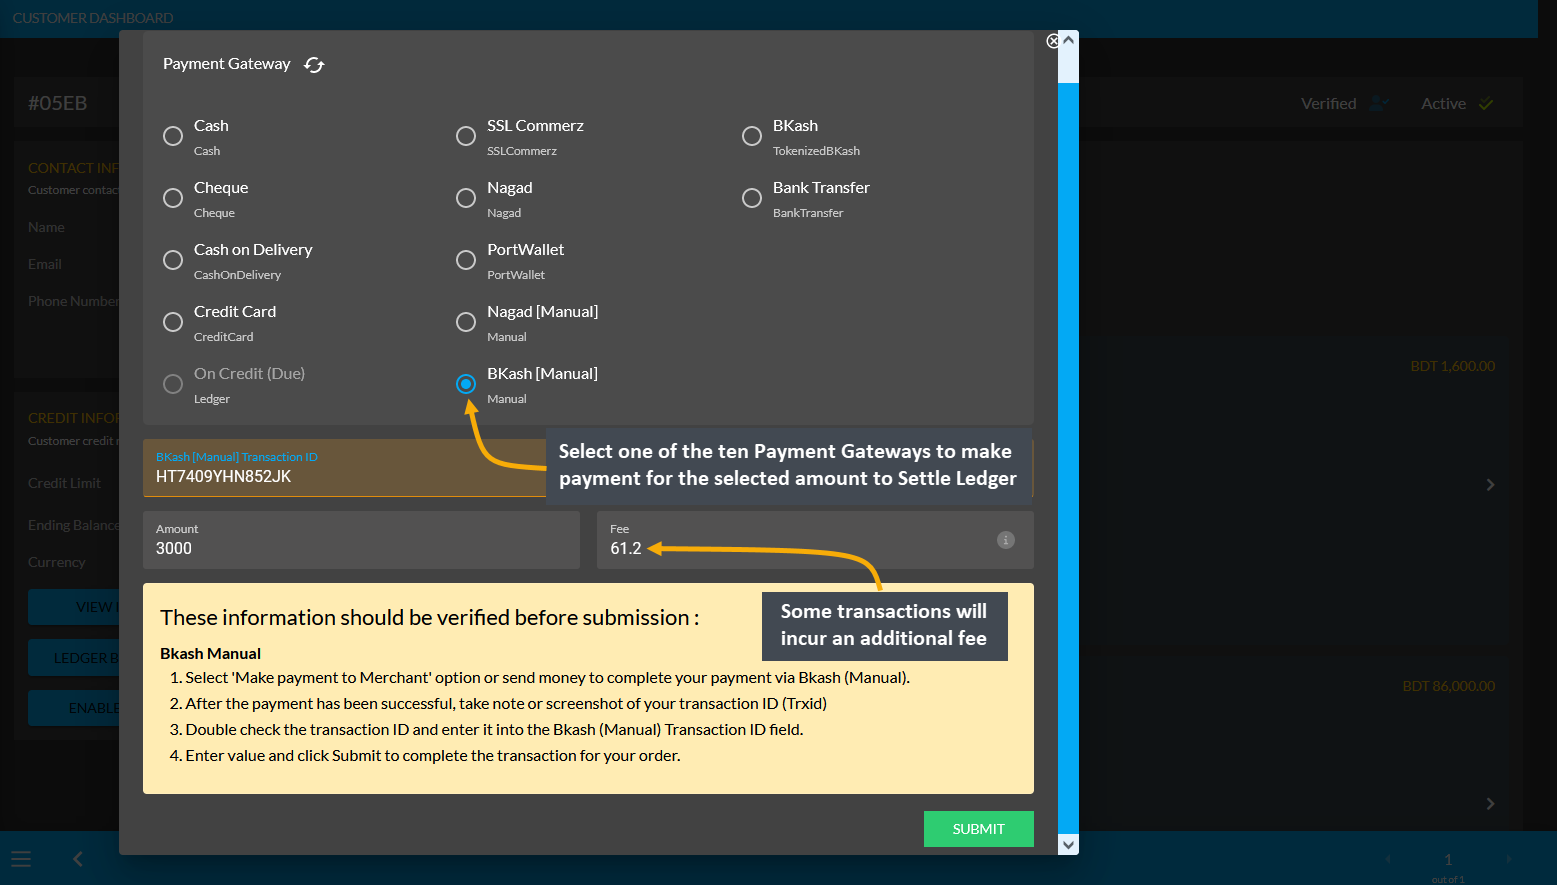
Image 3: Credit Customer needs to select a Payment Gateway to pay to Shop Owner with Settle Ledger.
After successful partial payment, a pop-up notification will confirm that the transaction amount 3,000 BDT was completed. Check the transaction reference and gateway used and click Submit to complete the process.
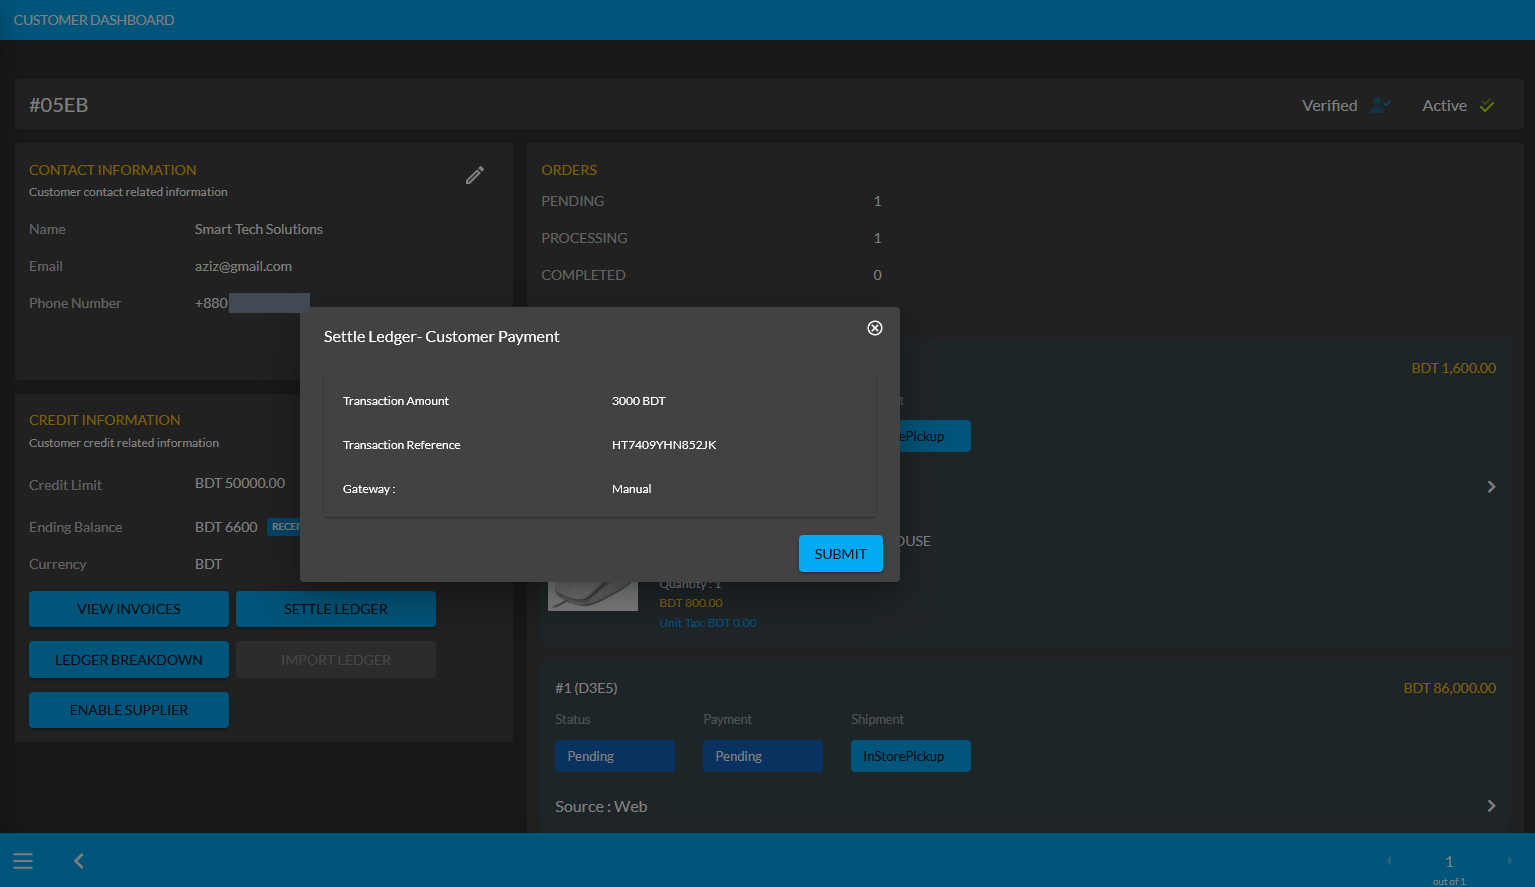
Image 4: After successful payment, a pop-up will show confirmation with the transaction details.
When the Credit Customer completes payment of 3,000 BDT to the Shop Owner with the Settle Ledger feature, it will reflect the updated balance under Receivable. For instance, after settling Ledger with payment of 3,000 BDT here, the Credit Customer’s Receivable was automatically updated from 6,600 BDT to 3,600 BDT.
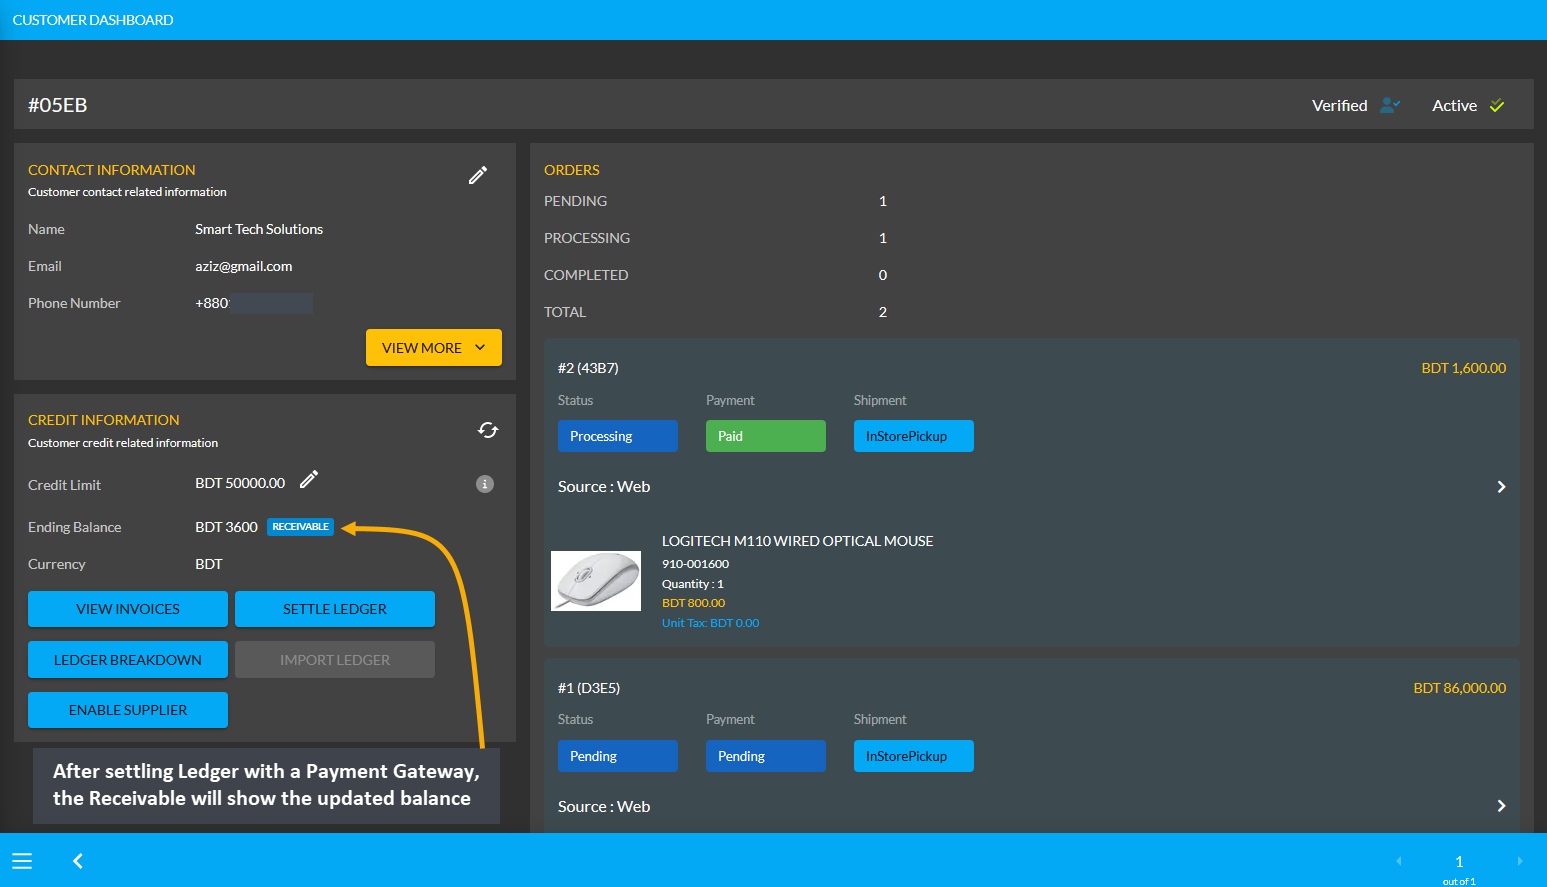
Image 5: After settling Ledger with a Payment Gateway, the Receivable will show updated balance.
Using Ledger Breakdown feature, the Shop Owner can check transactions after Ledger settlement with Payment Gateways by the Credit Customer on the Credit Customer’s Ledger Breakdown Page.

Image 6: Settling Ledger with Payment Gateways will be updated on the Ledger Breakdown page.
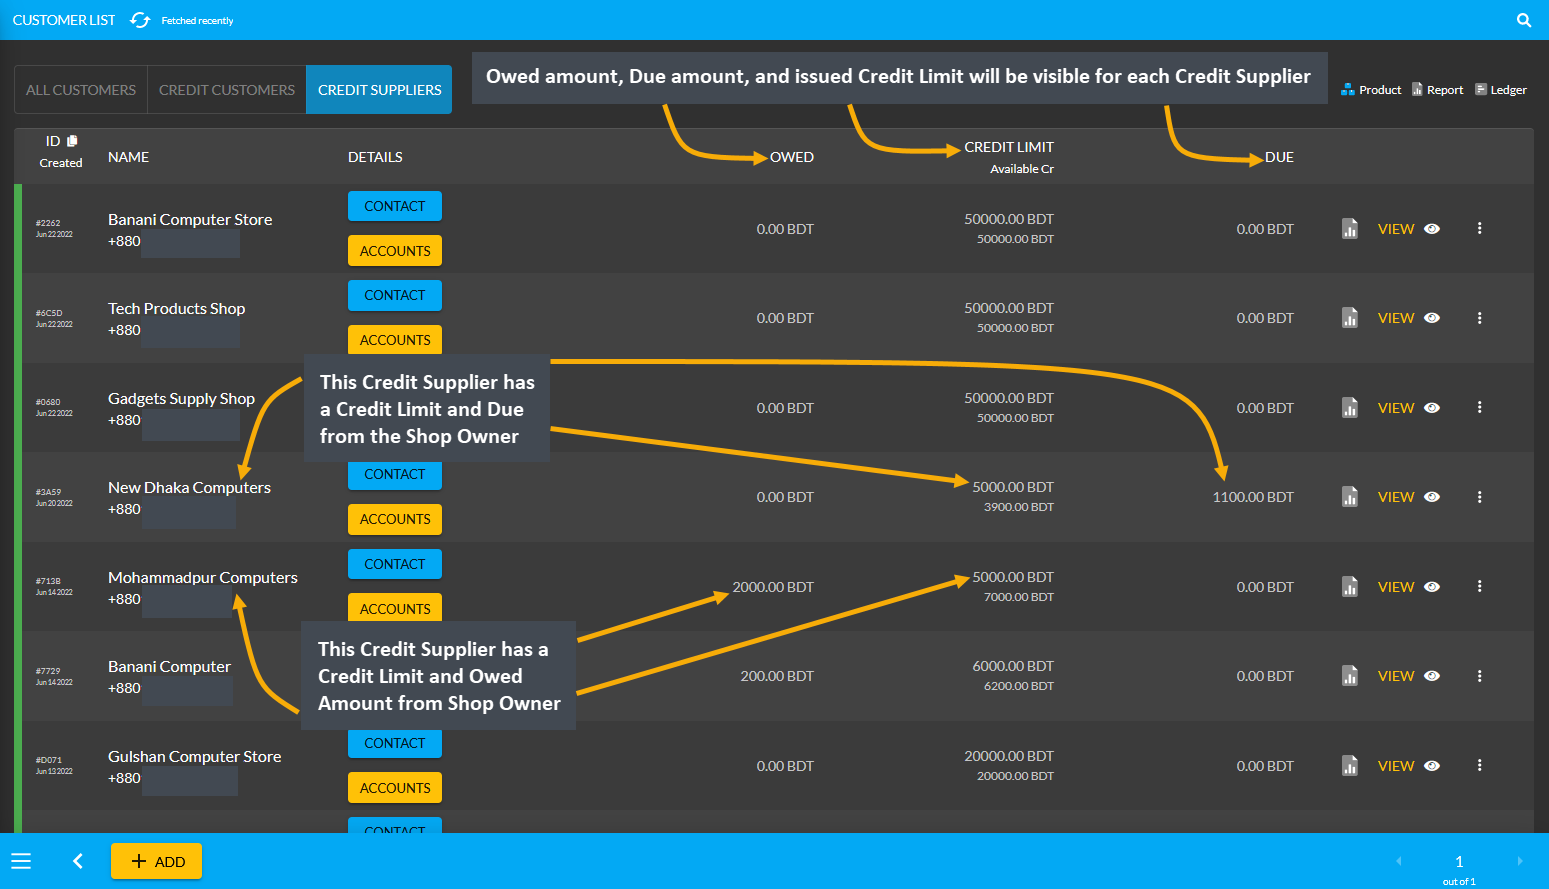
2 - Credit Supplier Ledger Transactions
Learn More about the Credit Supplier’s purpose of transactions through Ledger.
Purpose of Transactions with Ledger
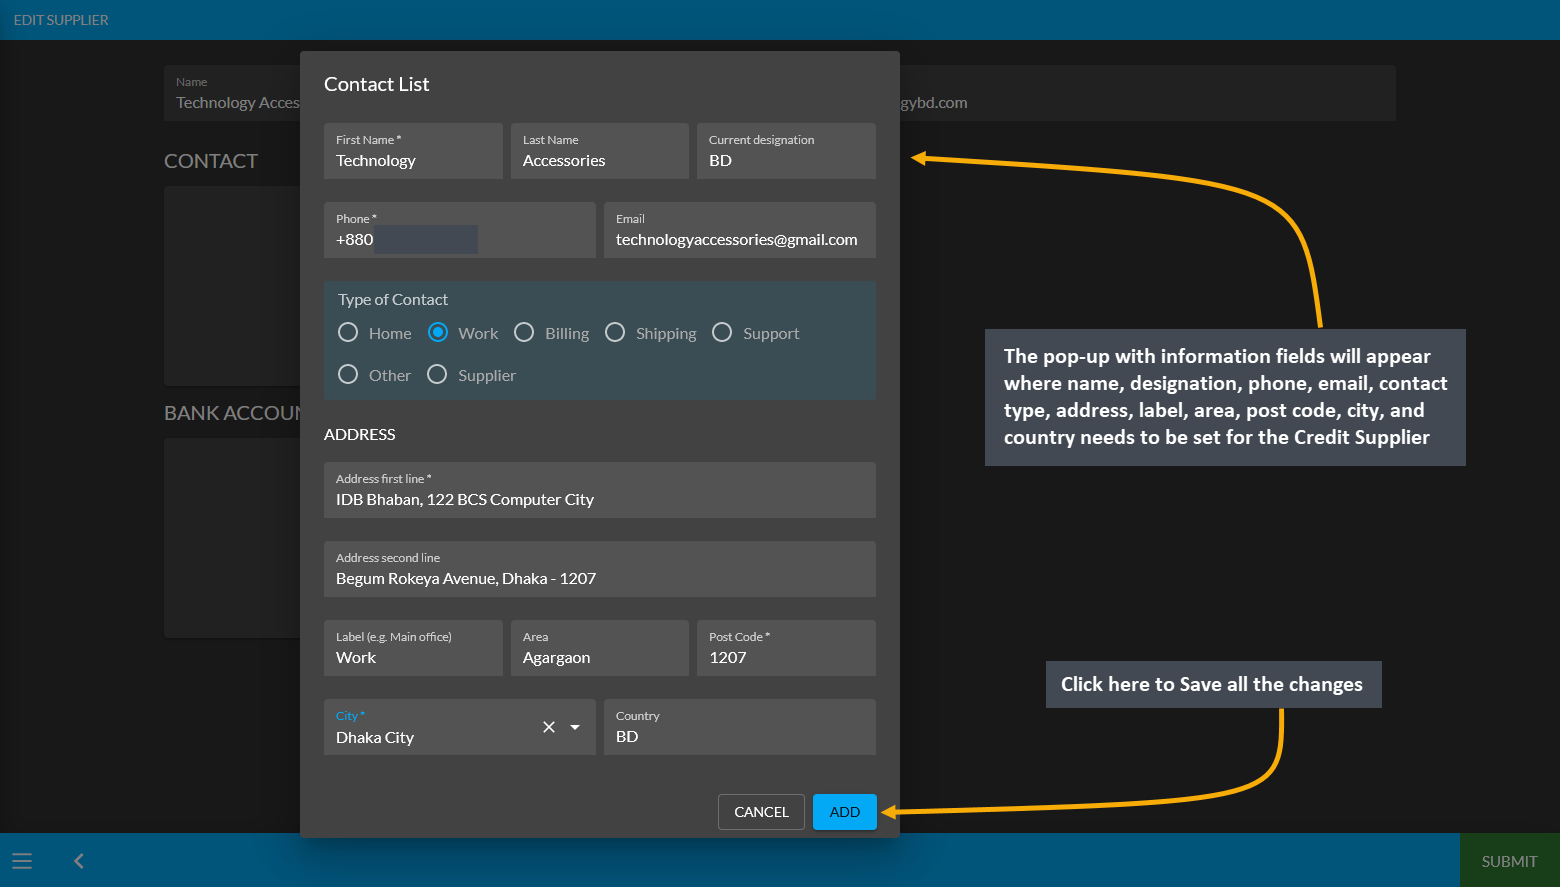
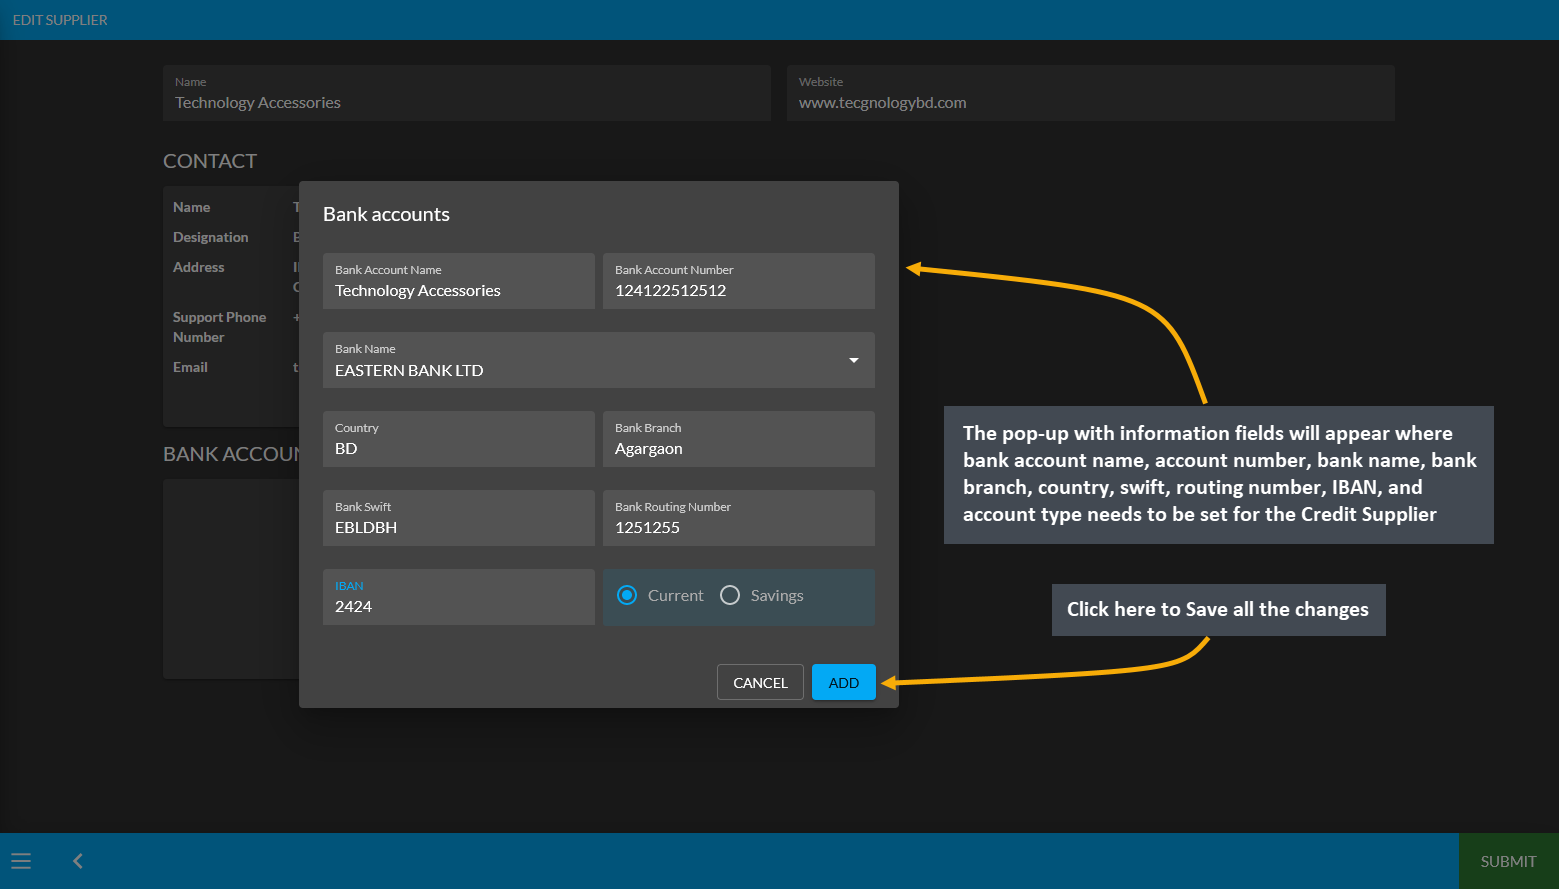
Credit Suppliers are granted Credit Limit like Credit Customers to purchase Product(s) from the Shop Owner. They are also provided the permission to Sell Per Unit Product(s) to the Shop Owner. The Shop Owner can purchase Per Unit Product(s) from the Credit Supplier with Credit Purchase, Cash Purchase, and Paid Purchase.
Credit Suppliers can start buying Product(s) using the Credit Limit like Credit Customers. For example, the Credit Supplier Banani Computer Store is provided with 50,000 BDT Credit Limit by the Shop Owner. Their Credit Used amount will show 0 BDT unless they purchase Product(s) with Ledger.
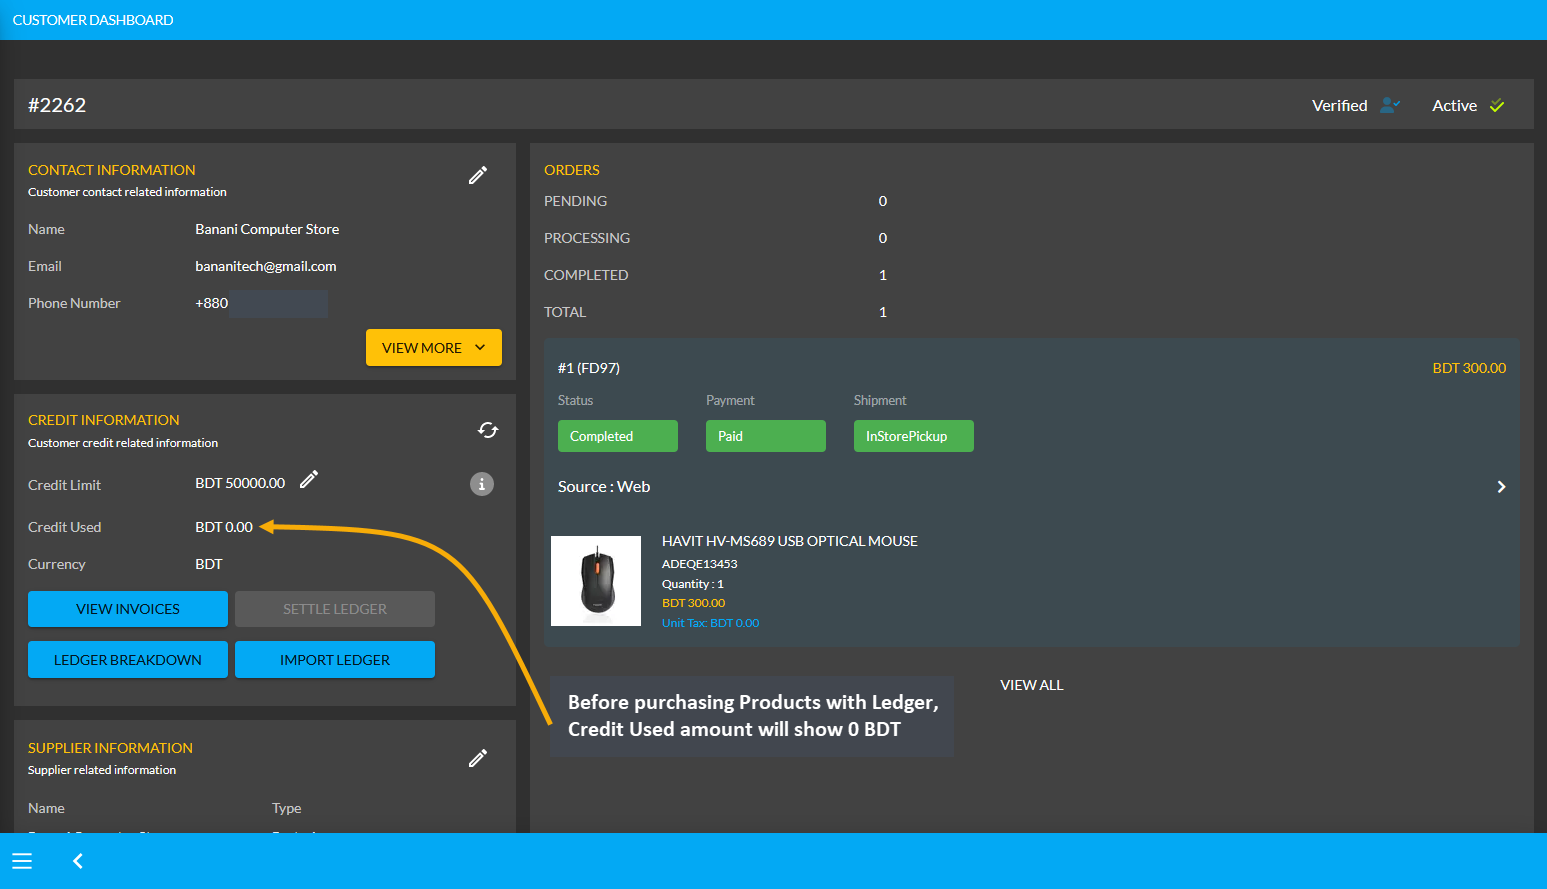
Using Credit to Order Products will add to Credit Used
If Product(s) are ordered for the Credit Supplier through the Admin Panel with Credit payment, then it will add to the Credit Used amount within their Credit Information. So, the On Credit (Due) can be used to place Orders for Product(s). For this, first click the + button from Orders tab that will redirect to the Cart page. In the cart, fill the Customer’s details, add Product(s) to Cart with desired quantities and click Proceed to save all the changes.
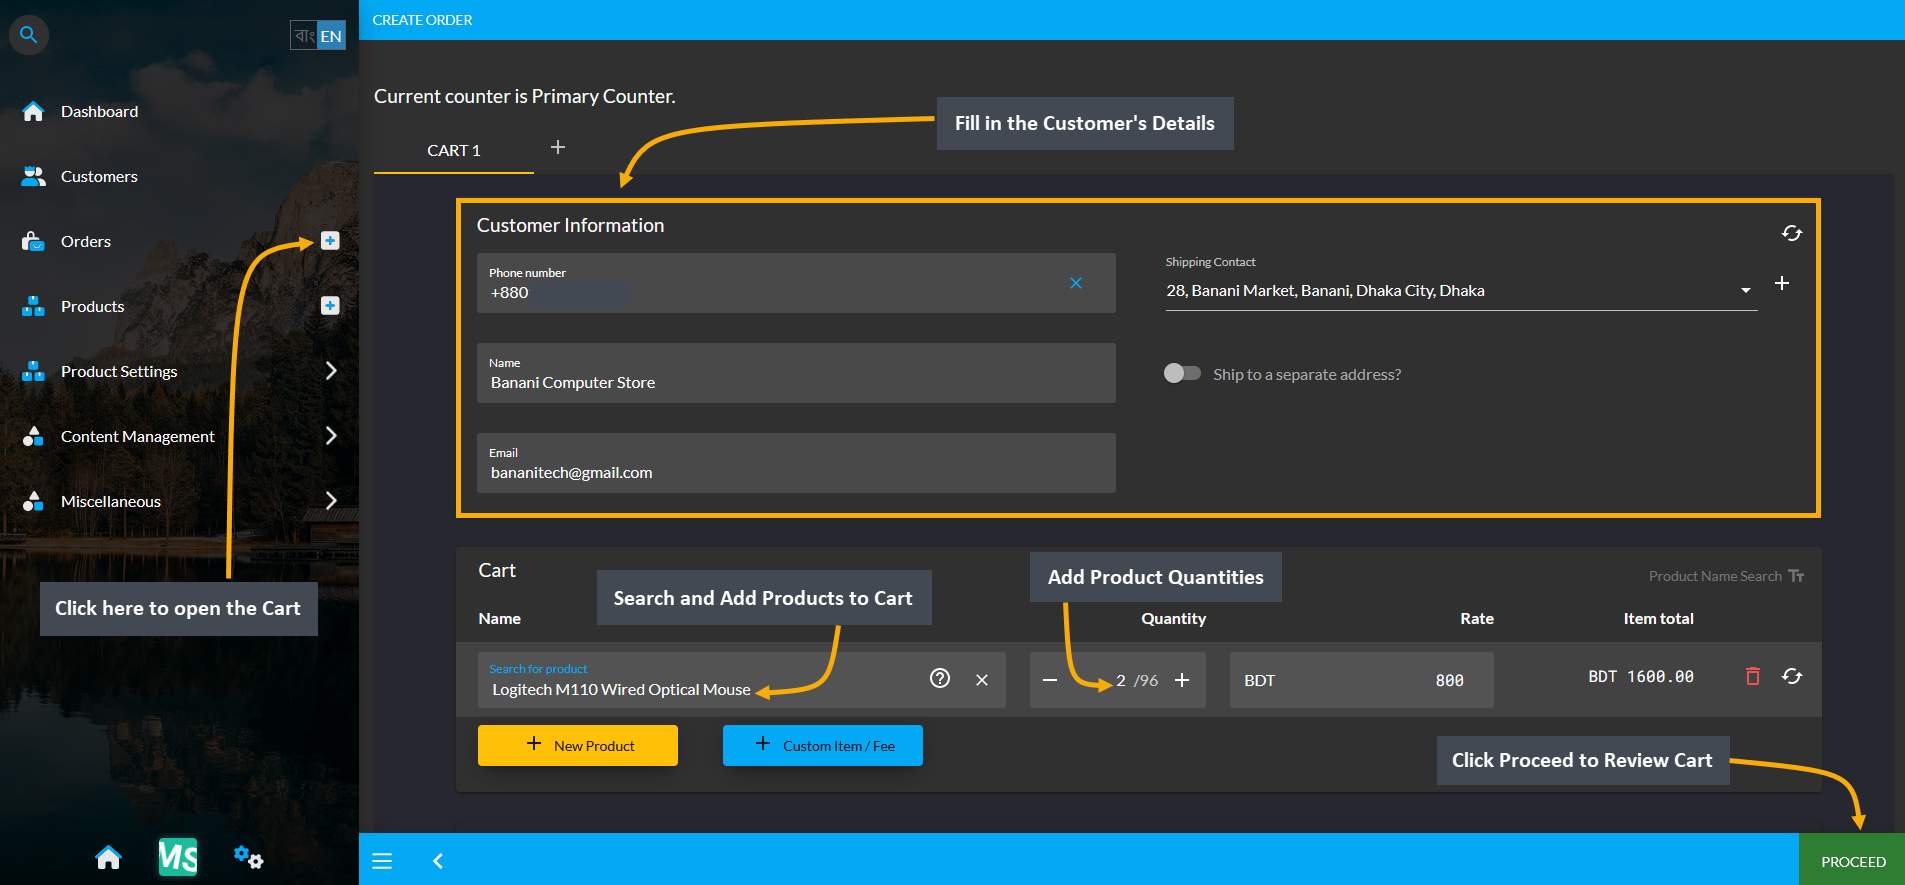
Image 1: Fill out Customer's details and add Products to Cart to order Products with Ledger.
During the checkout process, select preferred Shipping method and select On Credit (Due) as Payment method. Selecting it will display the available Credit Limit and Ending Balance for Credit Supplier. Then click Confirm Order to redirect to the order confirmation page where there will be a Print Invoice button to get the invoice printed.
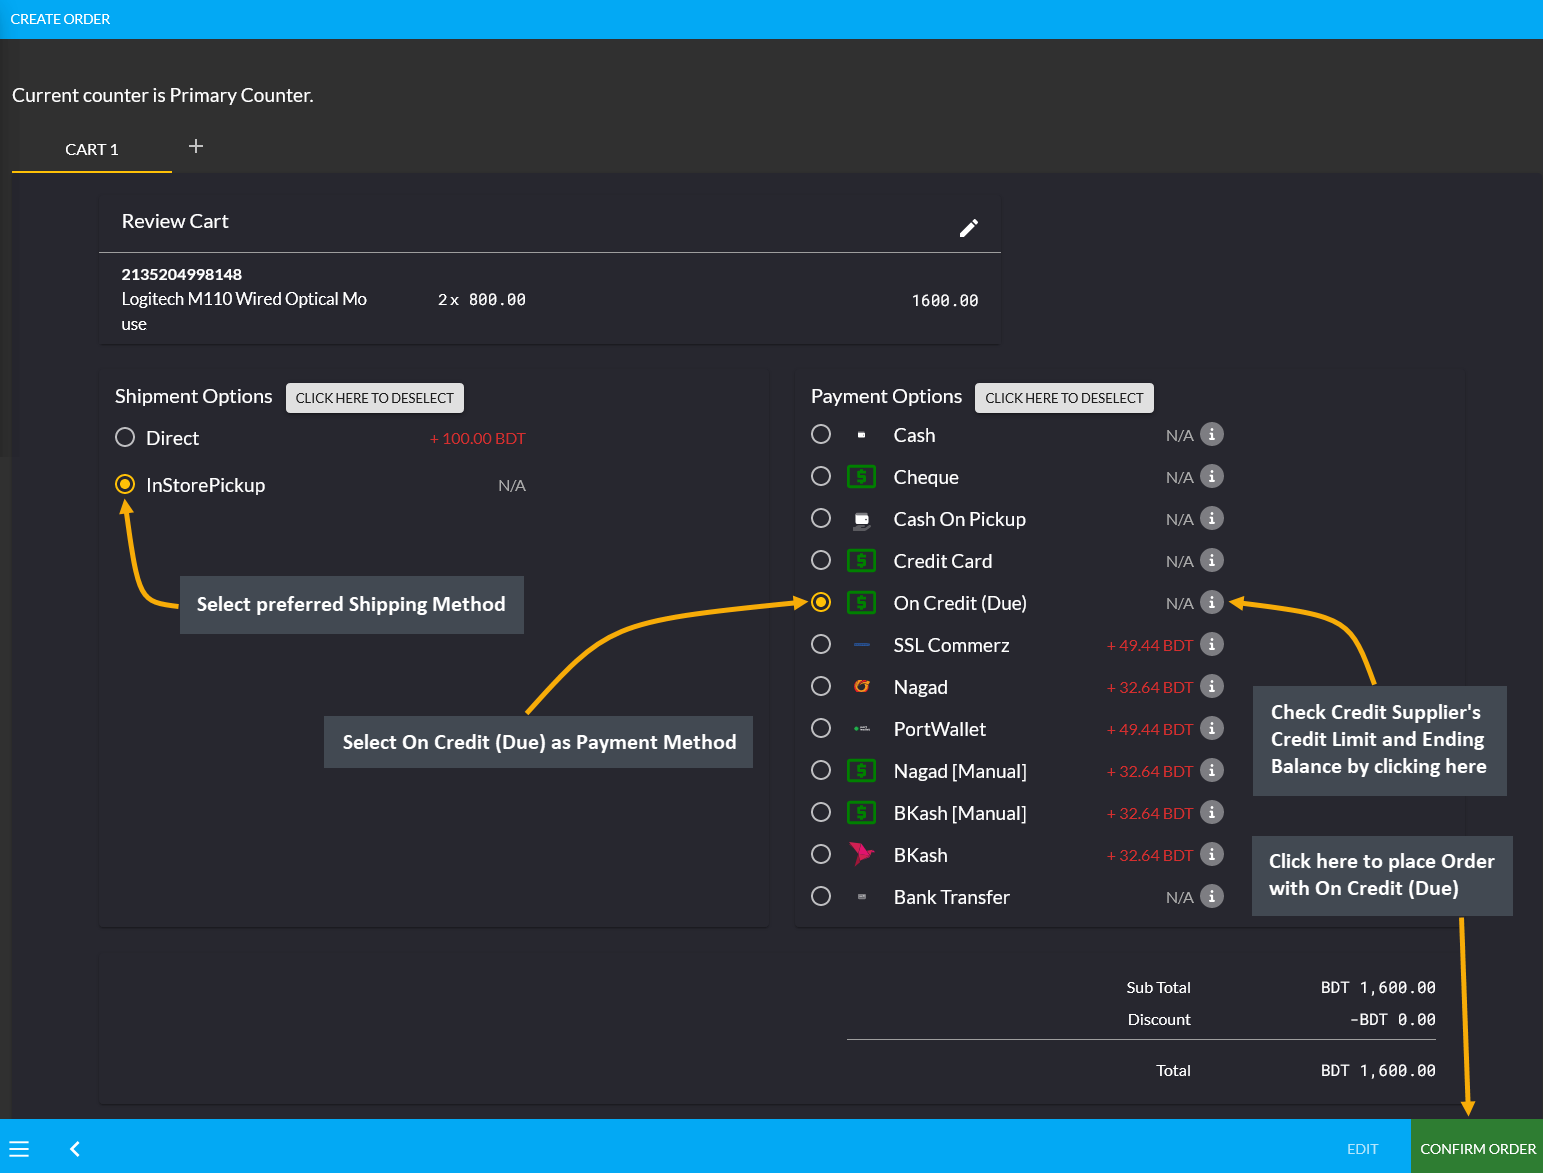
Image 2: Select preferred Shipping method and select Ledger as Payment method to order Products.
On the print invoice page, it will reflect that the payment has been completed with On Credit (Due) indicating the Credit Supplier’s payment as Due. Here, Customer paid 1,600 BDT from their Credit which will remain due until paid through cash or other payment methods to the Shop Owner through Settle Ledger option.
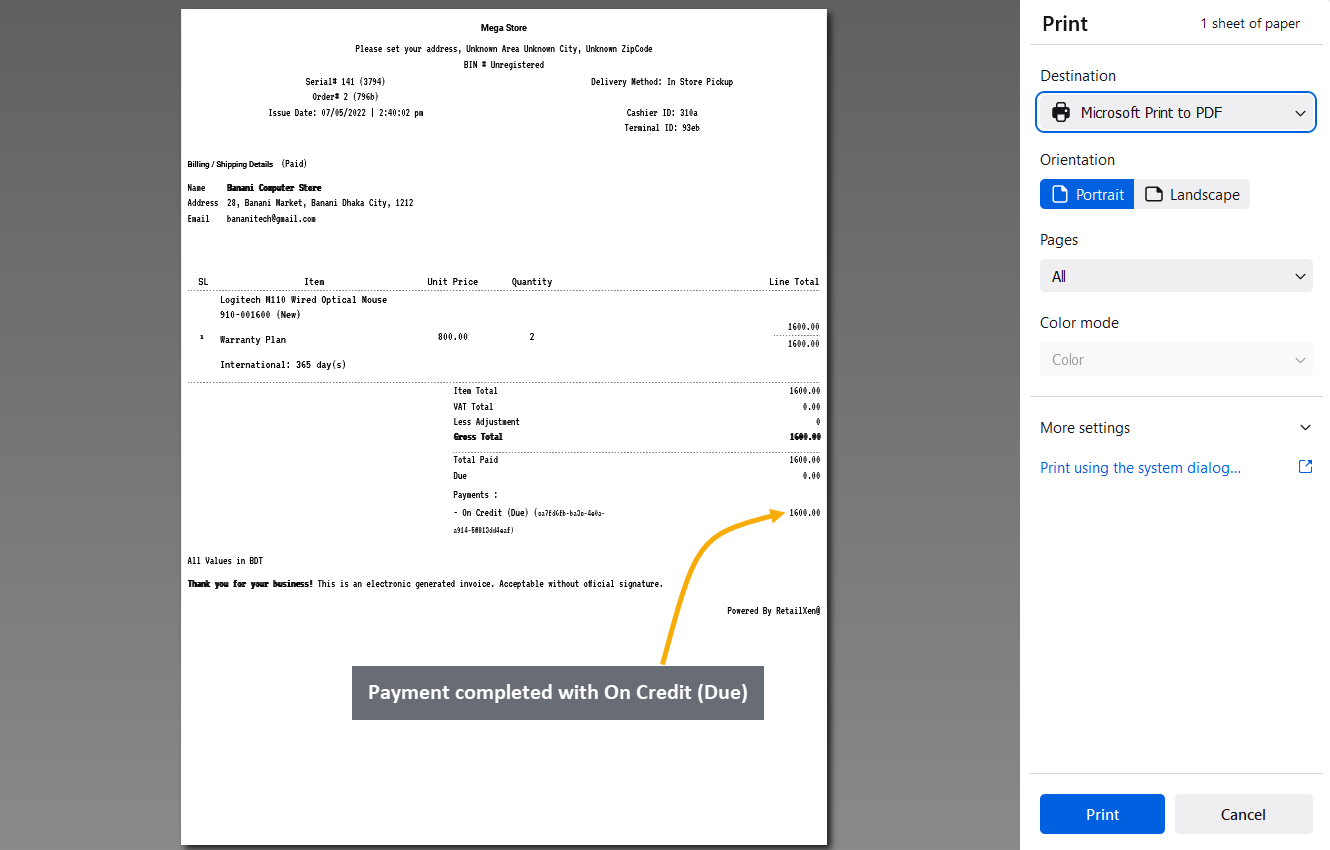
Image 3: Invoice breakdown will show payments completed with Ledger which will be Due.
Using the Ledger Breakdown feature from Credit Information section under Customer dashboard, the Shop Owner can check the Credit transaction after ordering Product(s) on their Ledger Breakdown Page.

Image 4: Import Ledger balance with previous dues will be updated on the Ledger Breakdown page.
Ending Balance Reflected on Credit Supplier’s Dashboard
After ordering Products with Credit, the used balance from Credit Limit will reflect under Ending Balance. Credit Supplier Banani Computer Store ordered Products with Credit payment, so their Ending Balance shows 1,600 BDT.
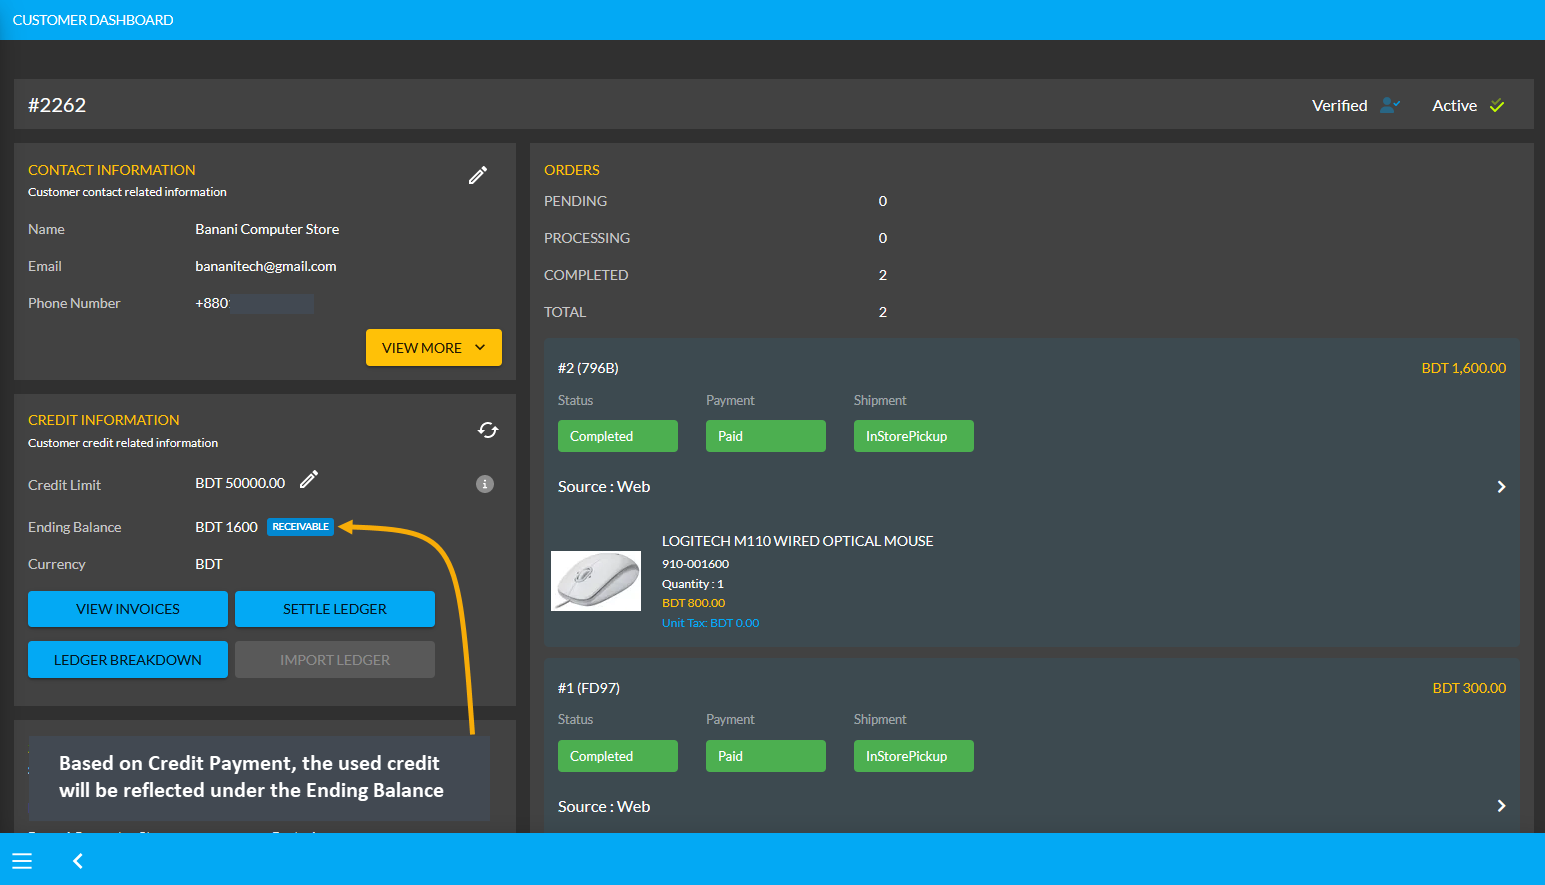
Credit Supplier Import Ledger
Another purpose of Transaction is the Ledger Initial Import which is a feature that can only be used for once by the Admin on Credit Supplier’s Dashboard. For instance, if the Credit Supplier has a receivable or payable amount from any previous transaction, they can be imported with Import Ledger button on Credit Information section.
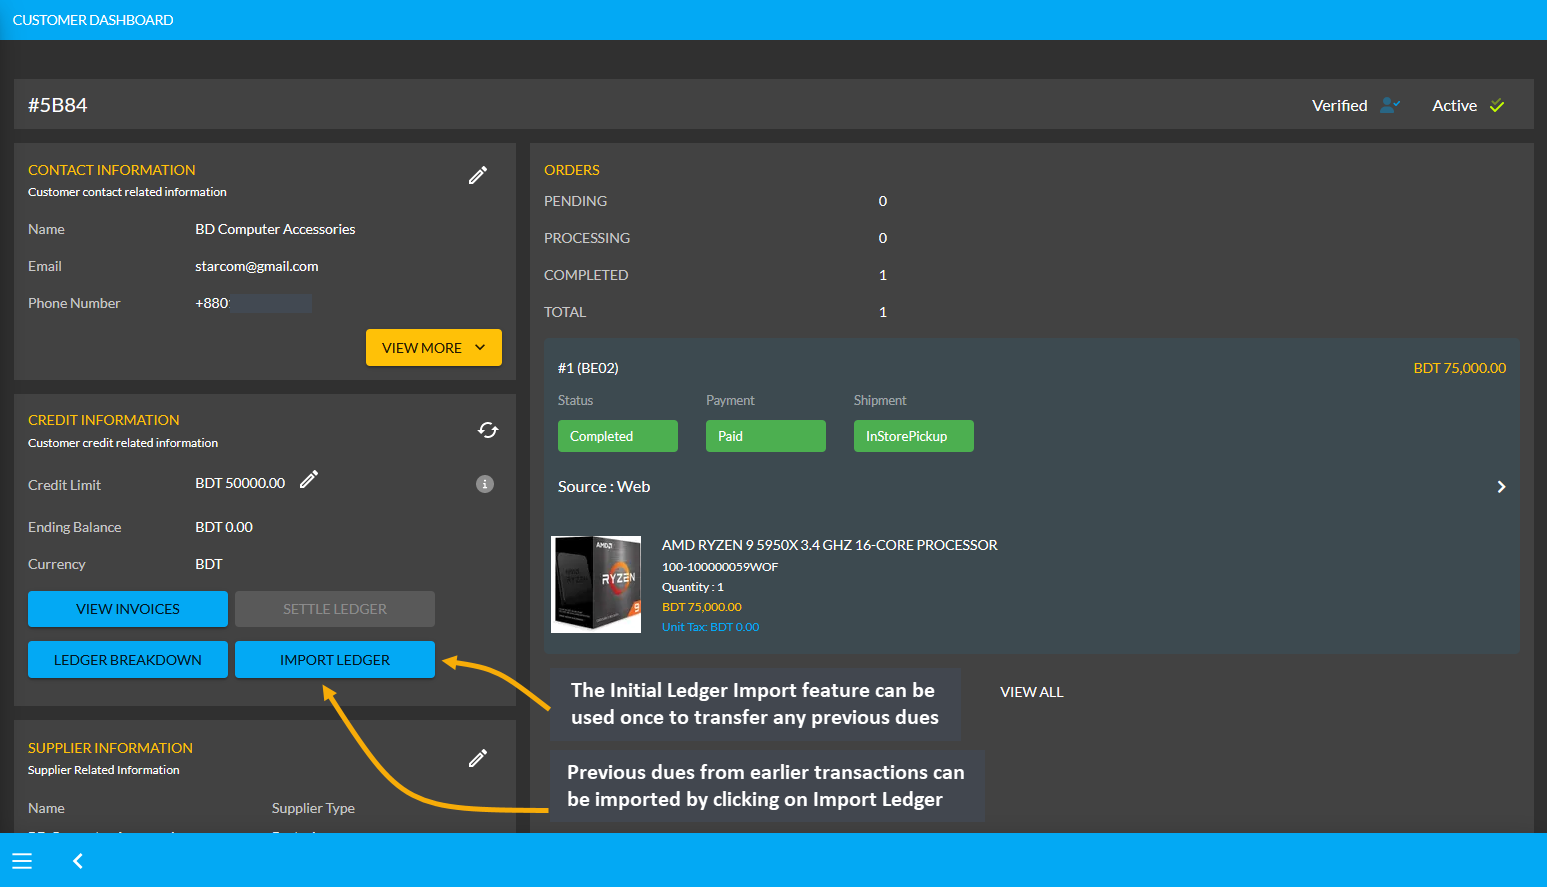
The Import Ledger feature has Receivable and Payable. Upon clicking the Import Ledger button, the Shop Owner will be asked to confirm if the previous transaction has a Receivable or Payable amount to the Credit Supplier.
Payable Amount on Import Ledger
For instance, after clicking the Import Ledger button, if the Shop Owner selects Payable with an amount of 5,000 BDT for example, it will mean that that the Credit Supplier will get 5,000 BDT from the Shop Owner. So, selecting Payable based on previous transactions will add to the Payable Amount on Import Ledger.
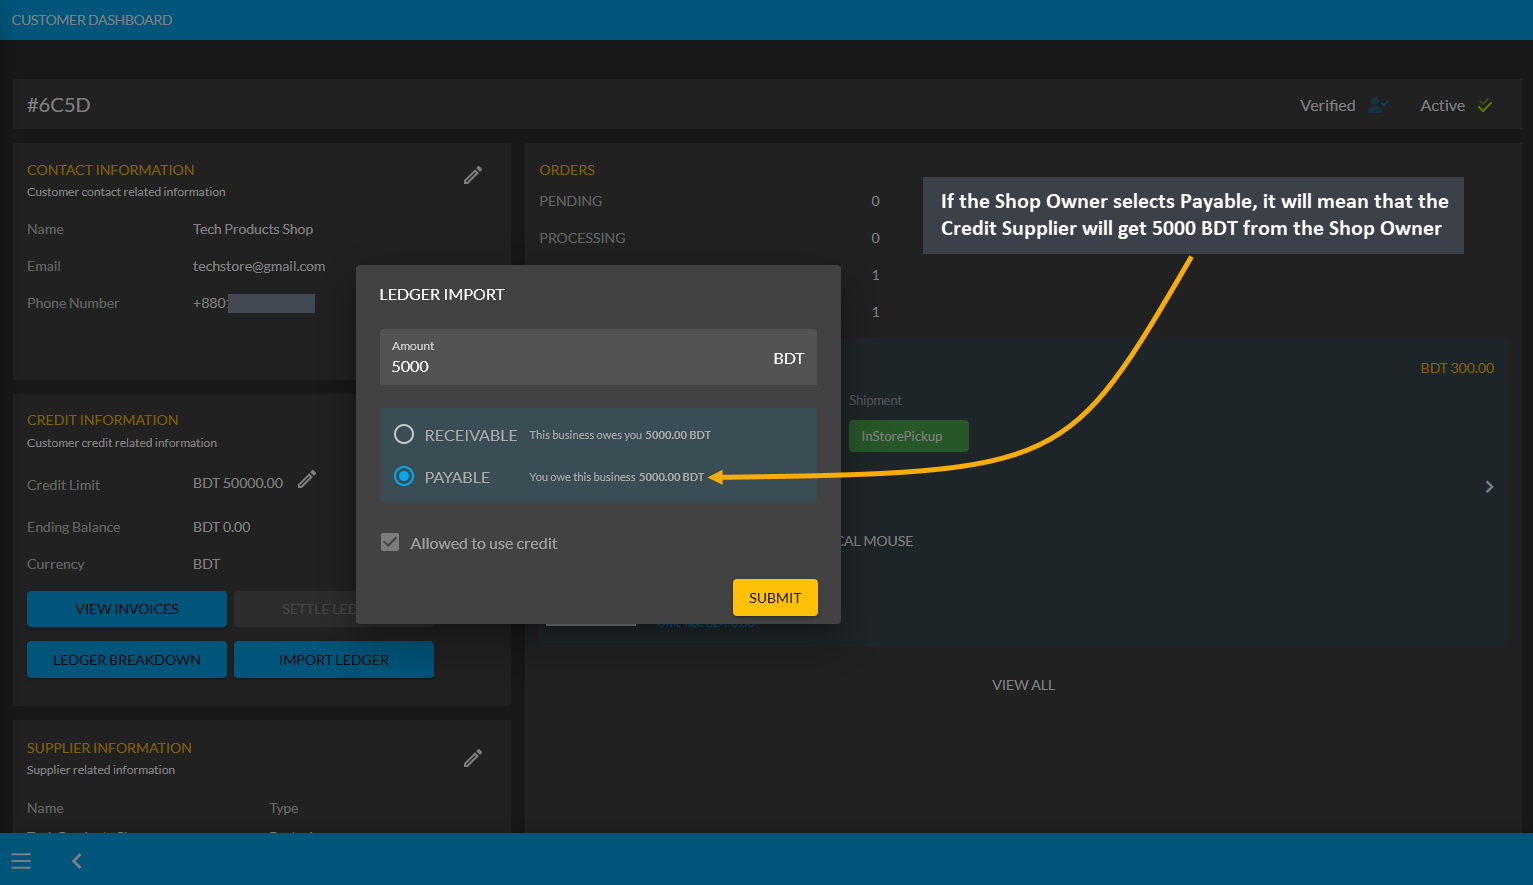
Image 1: If Shop Owner selects Payable, it will mean that Credit Supplier will get 5000 BDT from them.
Import Ledger feature can only be used once, so before setting the Payable, the Shop Owner will have to confirm if all the information is correct. Therefore, after checking all the information, the Shop Owner has to click I Agree to add dues from previous transactions on Credit as shown in the example screenshot below.
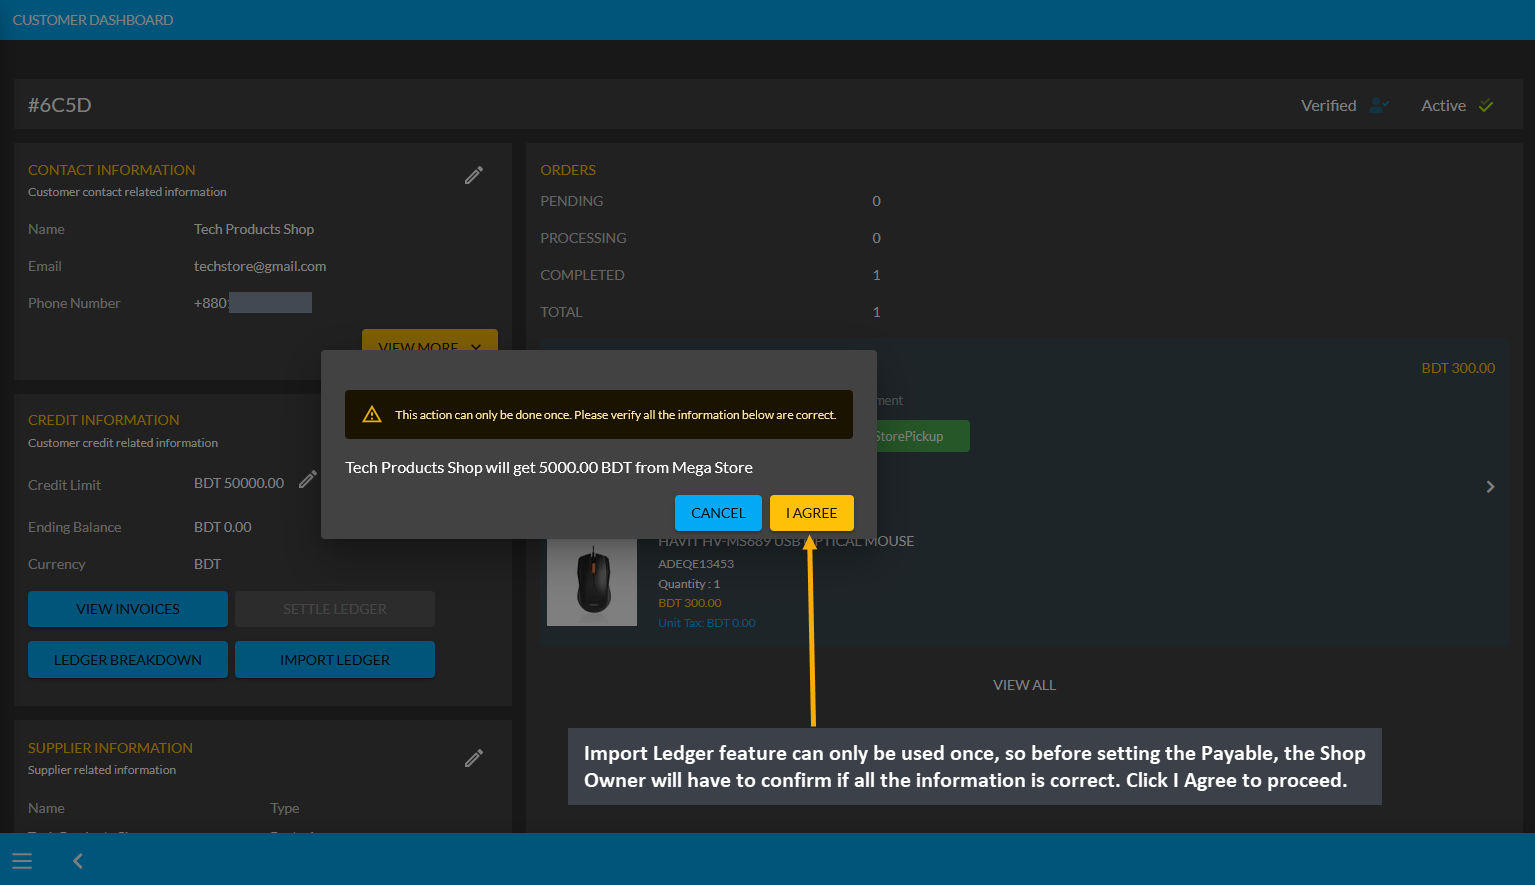
Image 2: Before setting Payable, the Shop Owner will be asked to confirm if all the information is correct.
As the Credit Supplier will get 5000 BDT from the Shop Owner, selecting Payable for any previous transactions on the Import Ledger will add to the Payable amount that the Shop Owner owes to them.
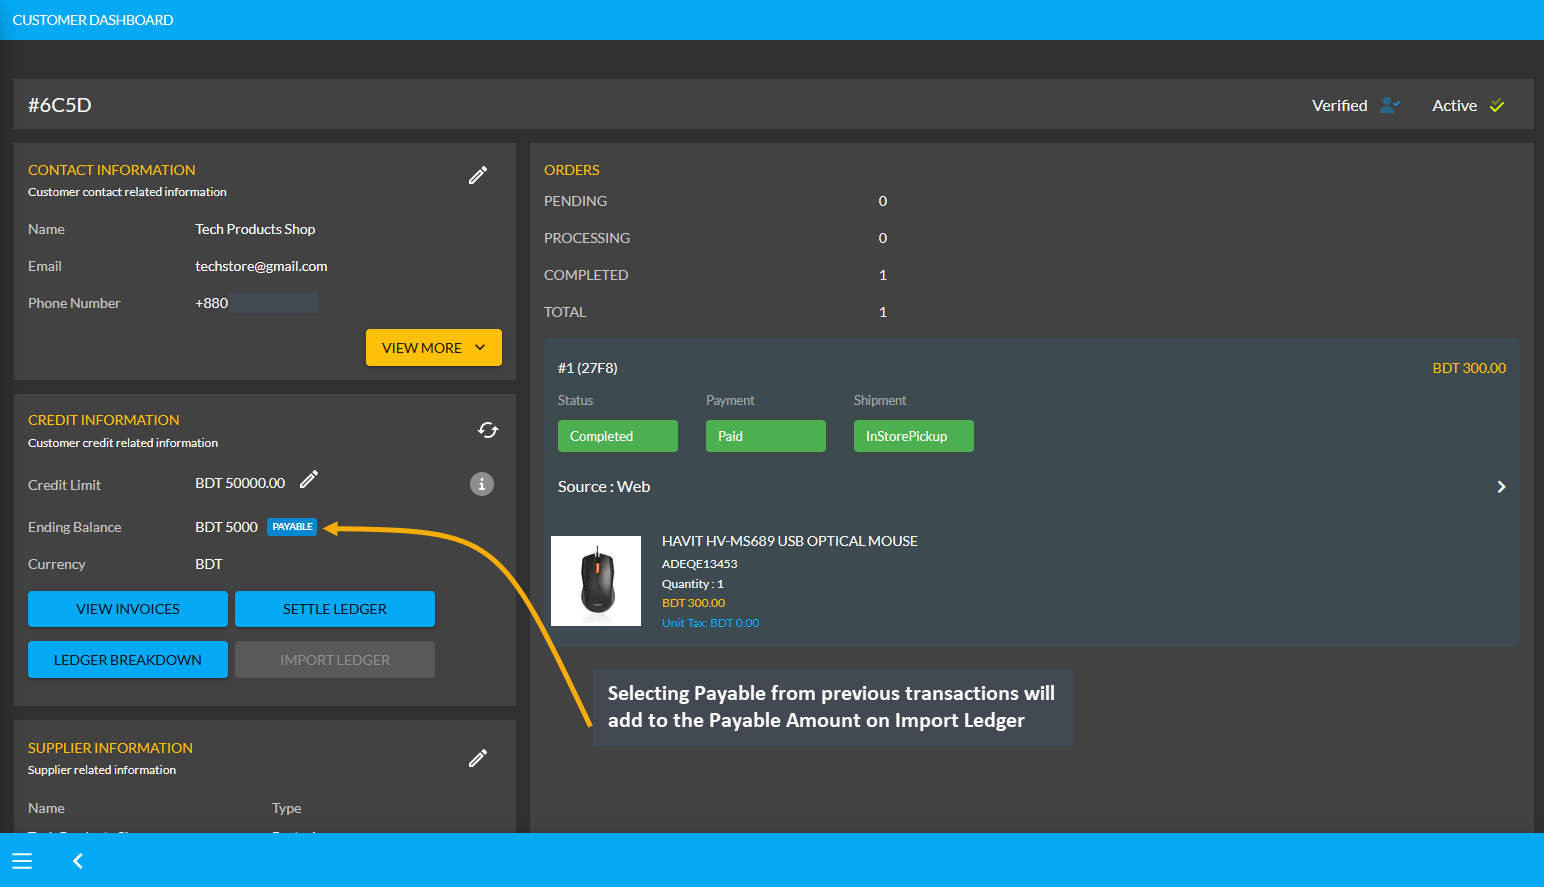
Image 3: Selecting Payable from previous transactions will add to the Payable Amount on Import Ledger.
Using the Ledger Breakdown feature, the Shop Owner can check previous transaction or payable amount that is transferred through the Import Ledger feature on their Ledger Breakdown Page.

Image 4: Import Ledger balance with previous payable amount will be updated on Ledger Breakdown page.
Credit Supplier Ordering Products will deduct from Payable
Even if Credit Supplier have dues from the Shop Owner worth of 5,000 BDT like the current example, they will be able to buy Product(s) from the Shop Owner via Credit which will deduct from the Payable amount. For example, Credit Supplier Tech Products Shop have purchased two Product(s) worth of 1,600 BDT from Shop Owner.
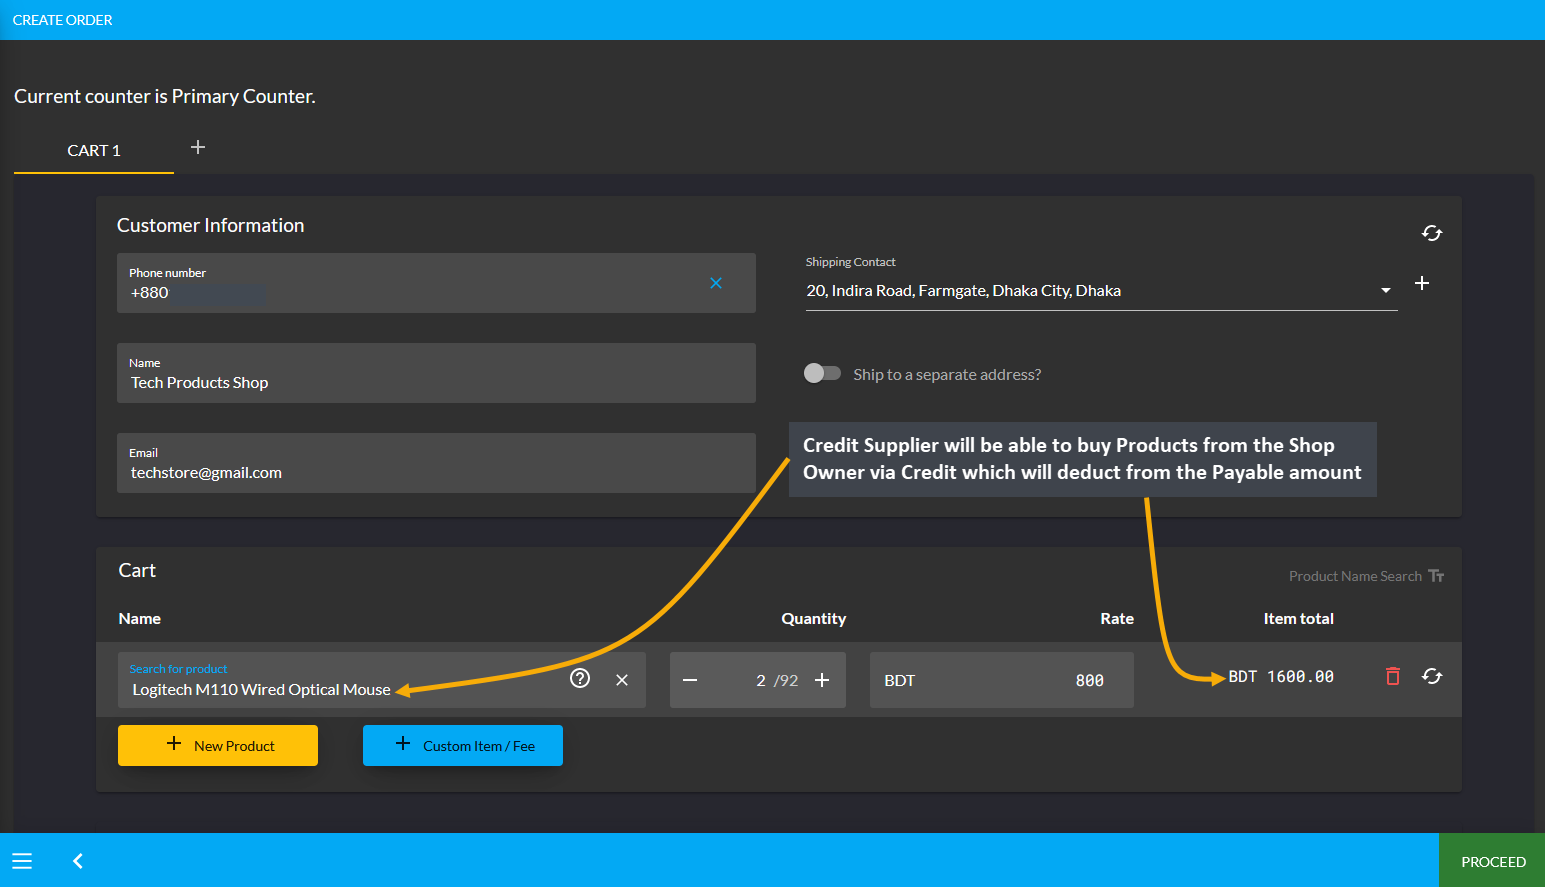
Image 1: Credit Supplier buying Products from Shop Owner via Credit will deduct from Payable.
After the Credit Supplier chooses payment method as On Credit (Due) and confirms their Order, 1,600 BDT will be deducted from their already Payable or owed amount of 5,000 BDT from Shop Owner. With Product purchase of 1,600 BDT now, the amount will be deducted and 3,400 BDT Payable amount will be remaining from Shop Owner now. So, a Credit Supplier can buy Products from the Shop Owner via Credit to settle Payable Amount.
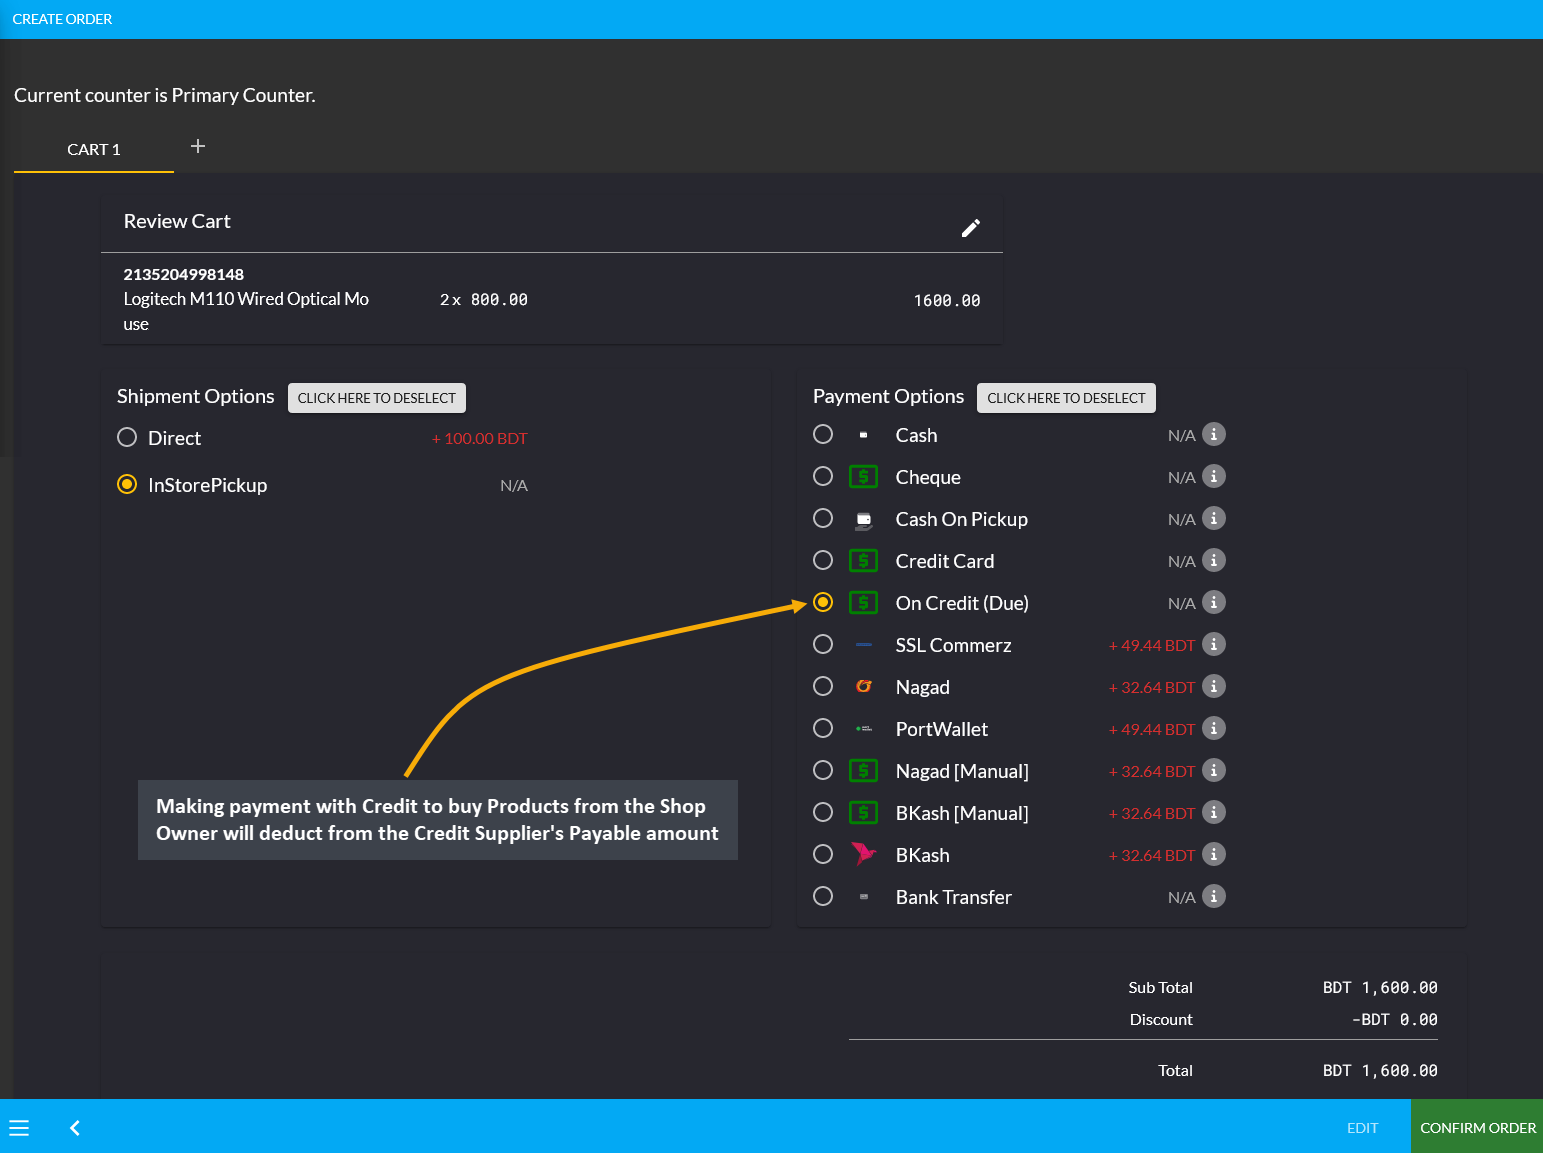
Image 2: Making Credit payment to buy Products from Shop Owner will deduct from Credit Supplier's Payable.
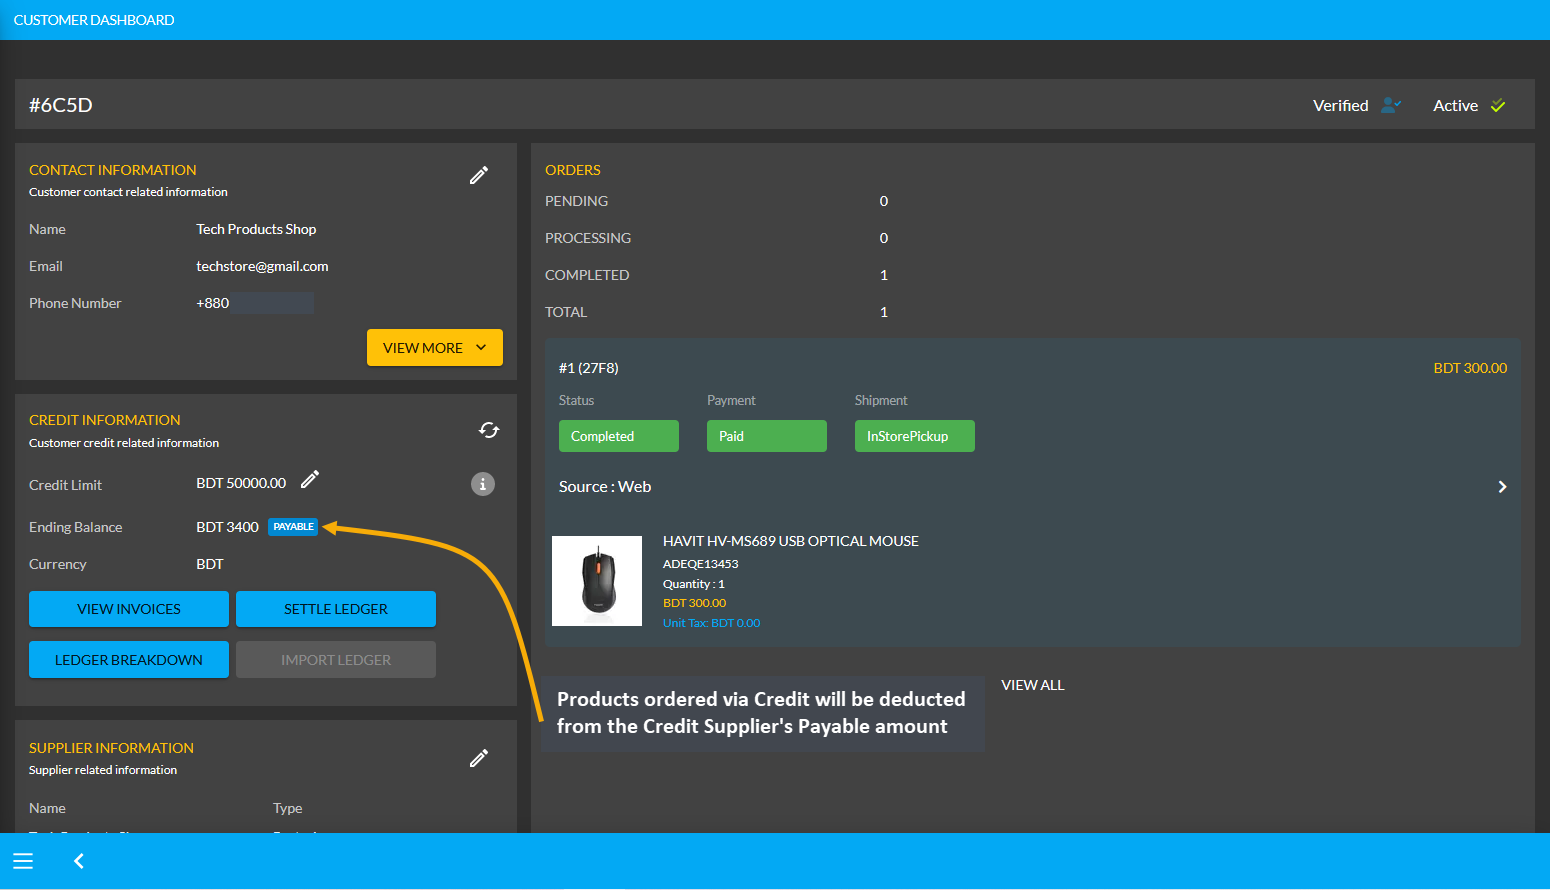
Image 3: Products ordered via Credit will be deducted from the Credit Supplier's Payable amount.
Using the Ledger Breakdown feature, the Shop Owner can check the transaction of the Credit Supplier on their Ledger Breakdown Page with Payable amount for ordering Products and Credit remaining from Credit Limit.

Image 4: Payable amount for ordering Products will be updated on the Ledger Breakdown page.
Use Payment Gateways to Settle Ledger for Payable
The Shop Owner can pay their remaining dues or Payable amount to the Credit Supplier in the full amount or in a certain amount through the Settle Ledger feature. For example, the Credit Supplier Tech Products Shop will still get 3,400 BDT from Shop Owner. In this case, the Shop Owner can pay back 3,400 BDT to Credit Supplier by using the six payment gateways (BKash, Nagad, Cash, Cheque, Bank Transfer, and Credit Card) available with the Settle Ledger button. Learn how to settle Ledger as shown in a few steps below with screenshots:
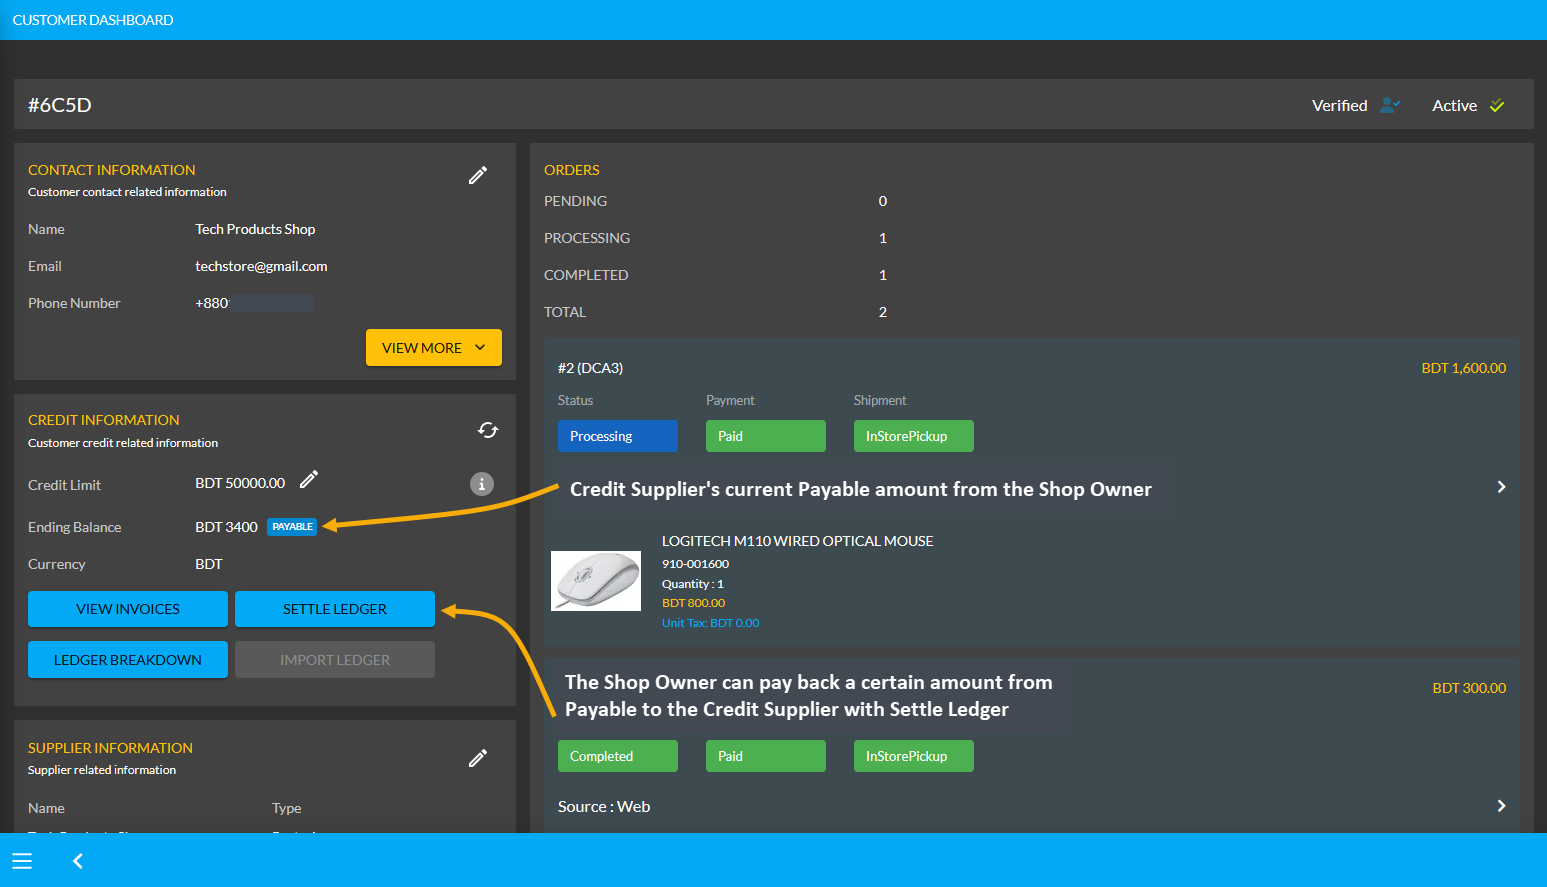
Image 1: The Shop Owner can pay back Payable Amount to Credit Supplier with the Settle Ledger feature.
The Shop Owner can make payment for the 3,400 BDT Payable amount at once or by a few times through the six different payment gateways. Here, the Shop Owner will pay the Credit Supplier 1,000 BDT with the Settle Ledger feature. So, first, they need to click the Settle Ledger button which will open a pop-up where the amount they want to pay needs to be set. For example, here, the Shop Owner wants to pay 1,000 BDT with the Settle Ledger option.
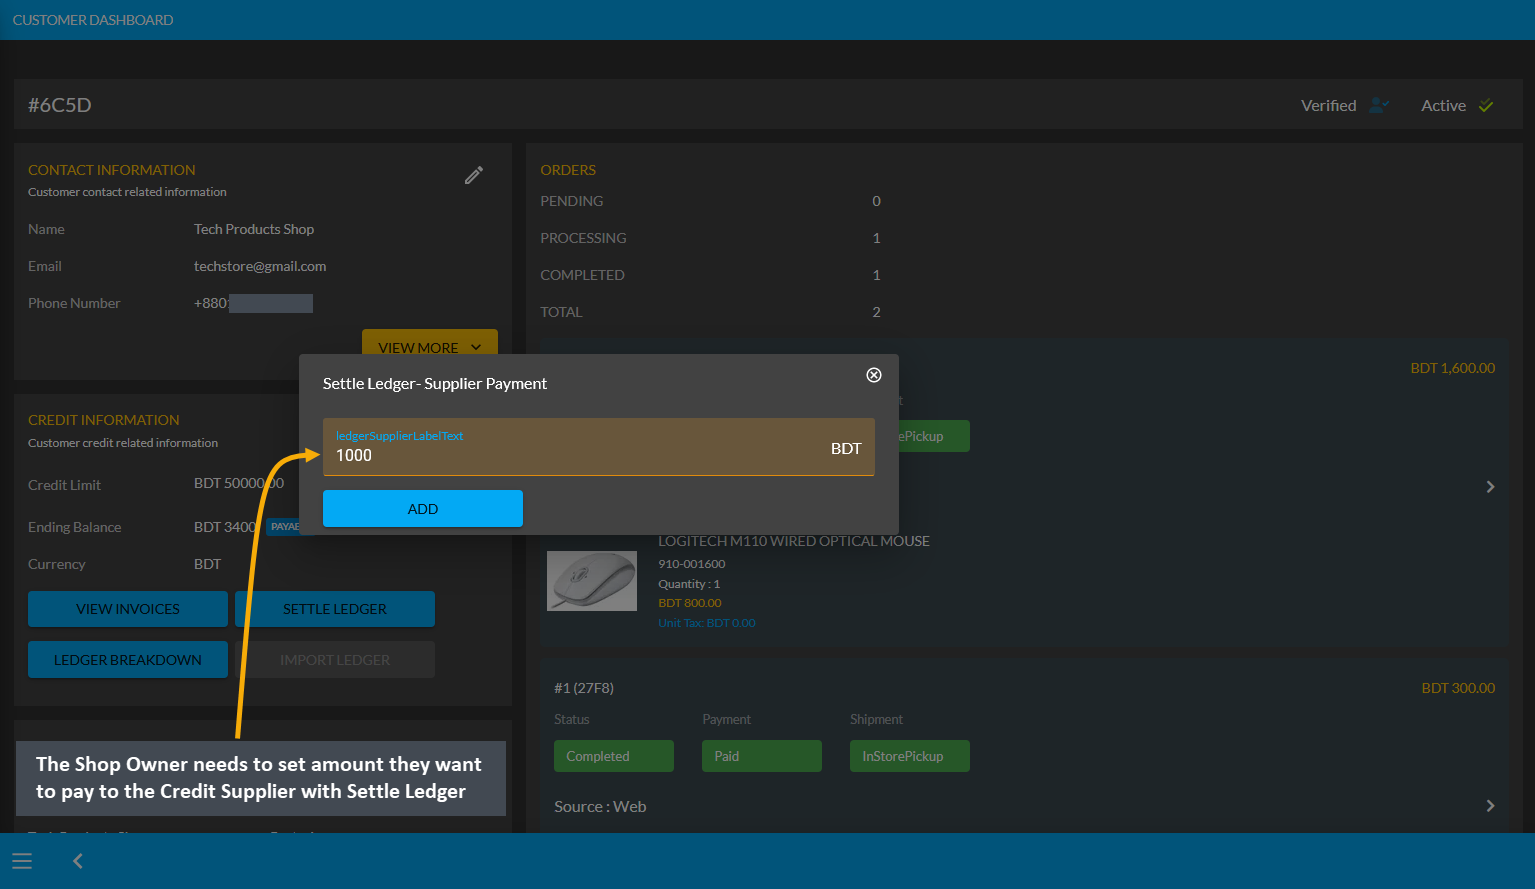
Image 2: The Shop Owner needs to set amount they want to pay to Credit Supplier with Settle Ledger.
Then, Shop Owner needs to select one of the six Payment Gateways to make payment for the selected amount to Settle Ledger. For instance, Cheque payment was selected and Cheque Number, Due Date, Bank Name, and Amount was set. Thus, the Shop Owner needs to complete the payment information and hit Submit when done.
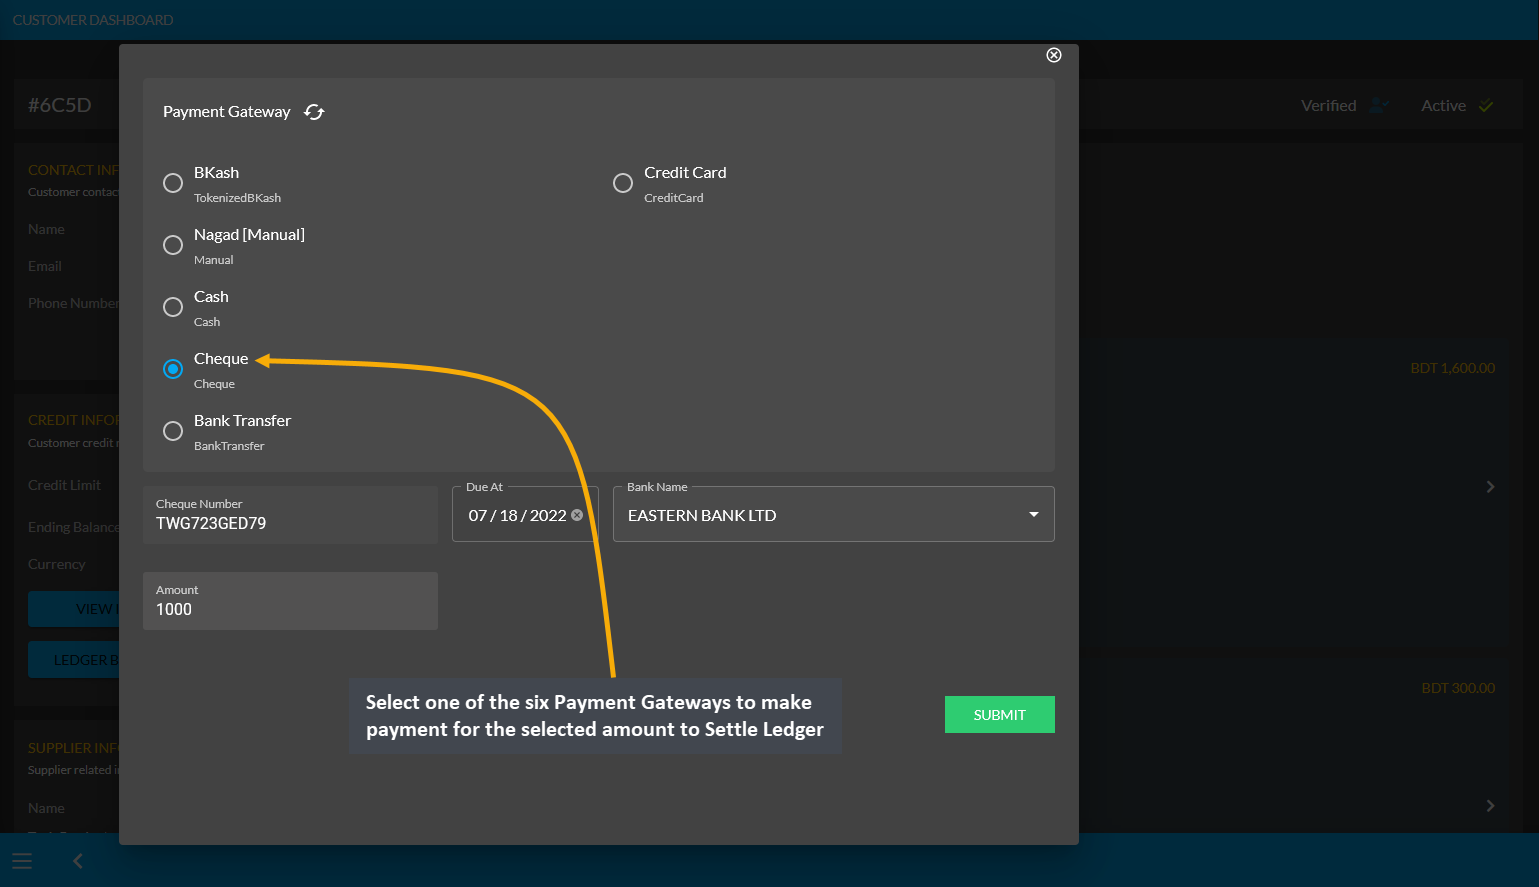
Image 3: Shop Owner needs to select a Payment Gateway to pay to Credit Customer with Settle Ledger.
After successful partial payment, a pop-up notification will confirm that the transaction amount 1,000 BDT was completed. Check the transaction reference and gateway used and click Submit to complete the process.
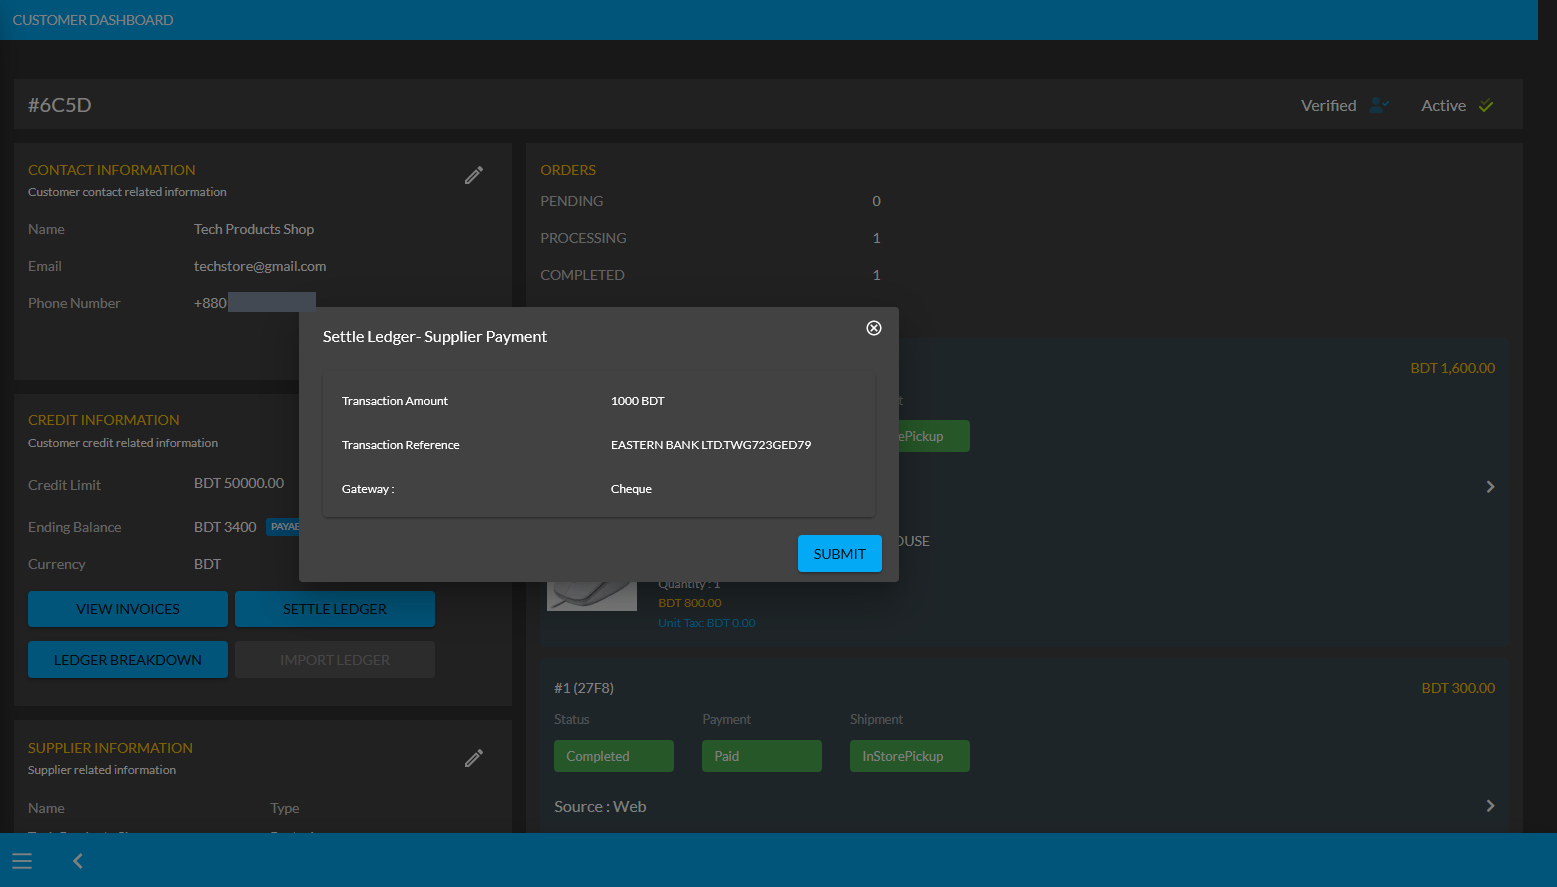
Image 4: After successful payment, a pop-up will show confirmation with the transaction details.
Completing the payment of 1,000 BDT to the Credit Supplier with the Settle Ledger feature will reflect the updated balance under the Credit Information section. For instance, here after settling Ledger with payment of 1,000 BDT, the Payable amount was automatically updated from 3,400 BDT to 2,400 BDT under Credit Information section.
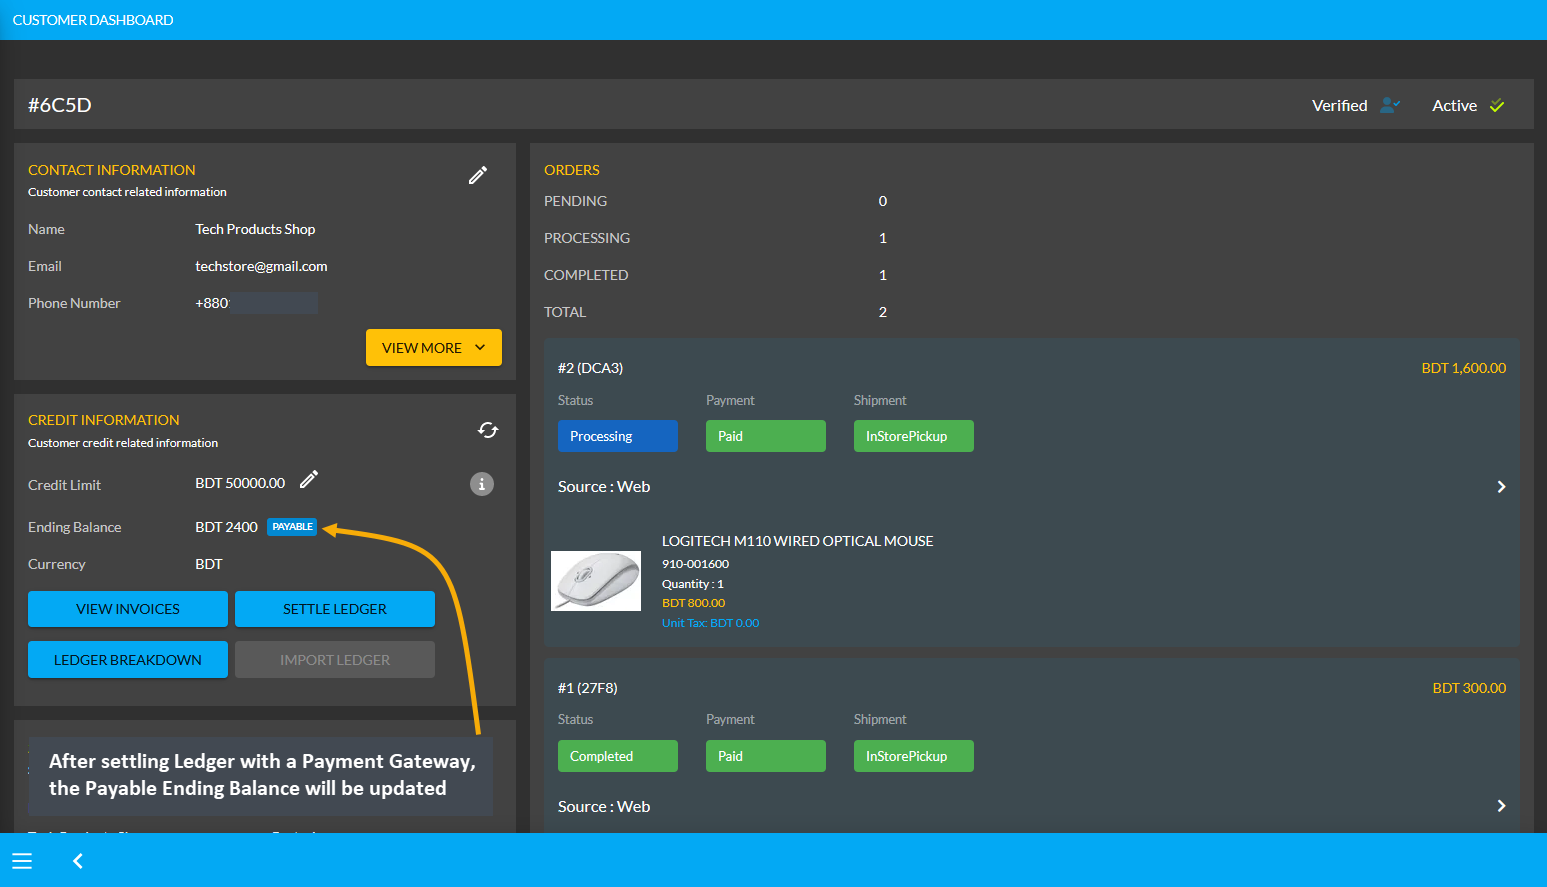
Image 5: Updated balance will be reflected under the Owed Amount after settling Ledger successfully.
Using the Ledger Breakdown feature, the Shop Owner can check transaction for Payable after Ledger settlement with Payment Gateways on the Credit Supplier’s Ledger Breakdown Page.

Image 6: Settling Ledger with Payment Gateways will be updated on the Ledger Breakdown page.
Receivable Amount on Import Ledger
Similarly, after clicking the Import Ledger button, if the Shop Owner selects Receivable with an amount of 5,000 BDT for example, it will mean that the Credit Supplier will pay 5,000 BDT to the Shop Owner. Thus, selecting the Receivable based on previous transactions will add to the Receivable amount on Import Ledger.
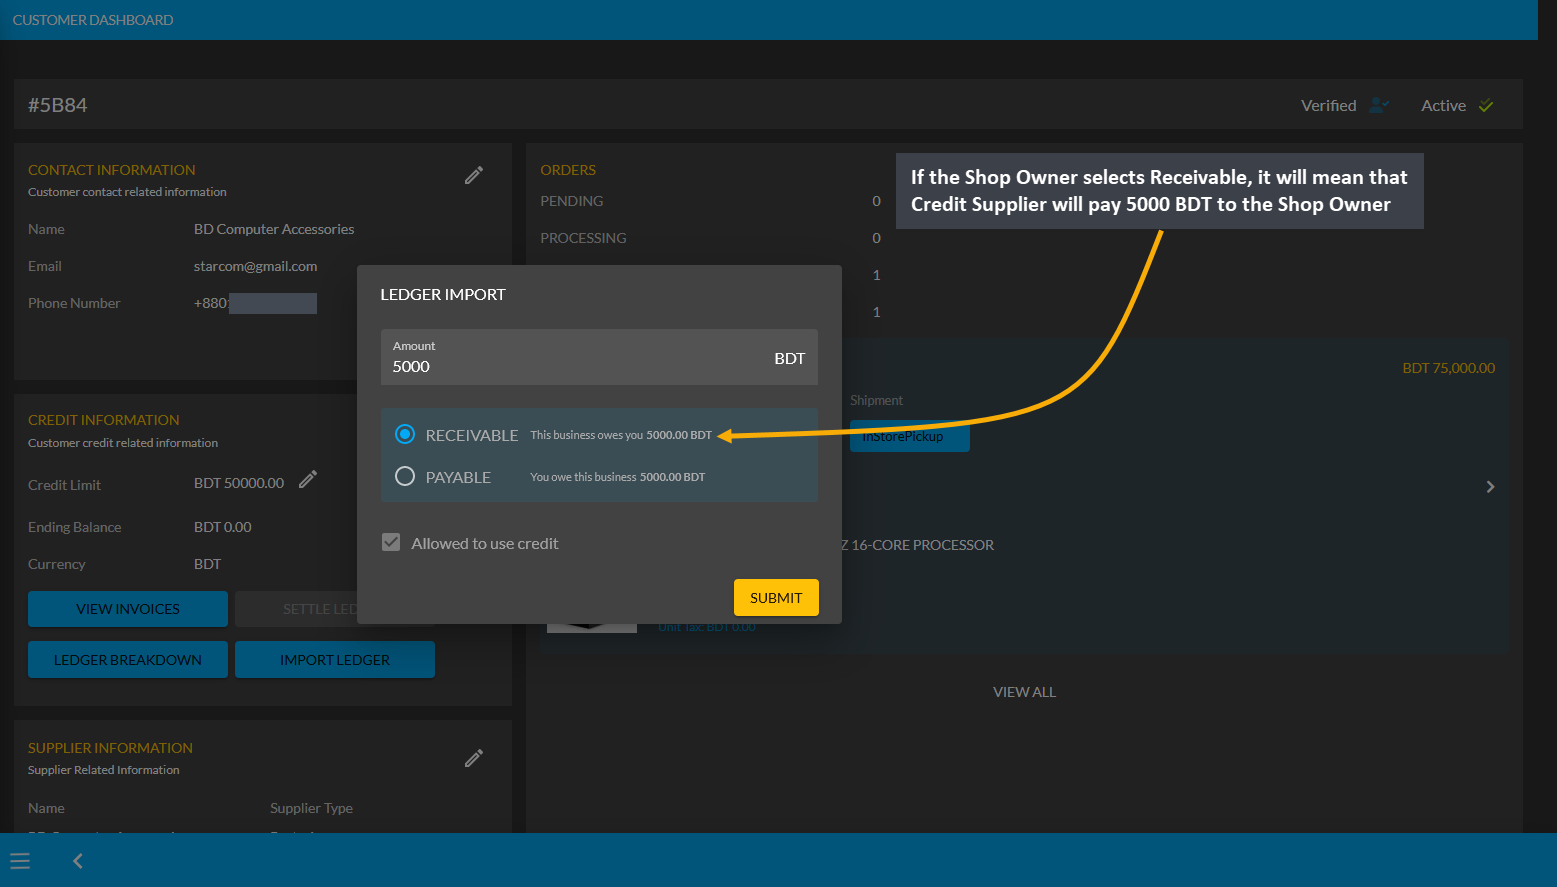
Image 1: If Shop Owner selects Receivable, it will mean that Credit Supplier will pay 5000 BDT to them.
Import Ledger feature can only be used once, so before setting Receivable, Shop Owner will be asked to confirm if all the information is correct. Therefore, after checking all the information, the Shop Owner has to click I Agree to add receivable amount from previous transactions on Credit as shown in the example screenshot below.
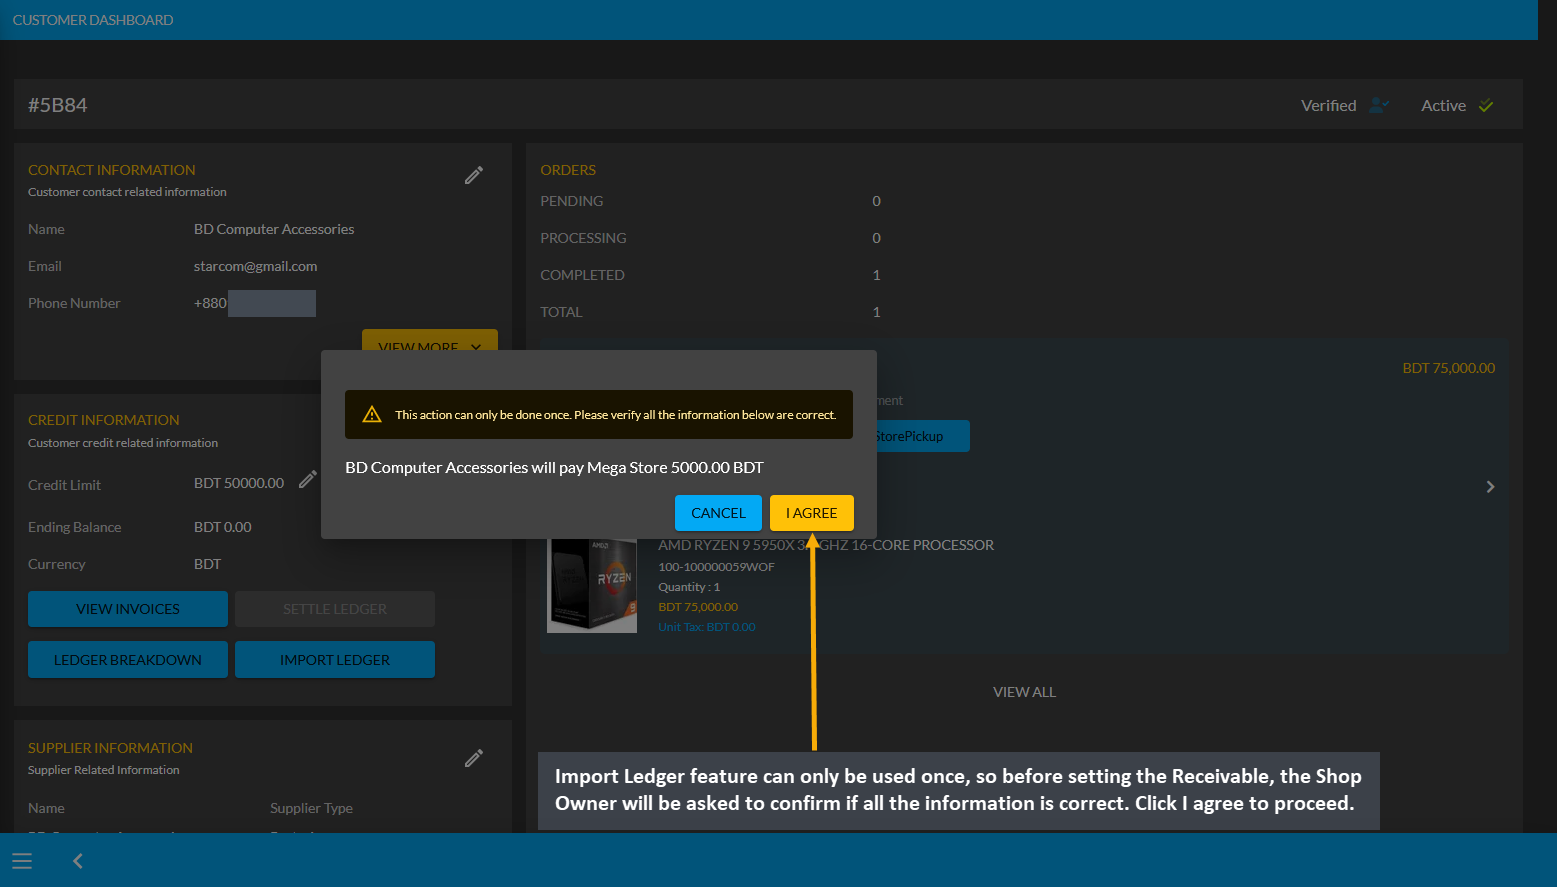
Image 2: Before setting Receivable, Shop Owner will be asked to confirm if all the information is correct.
As the Credit Supplier will pay 5000 BDT to the Shop Owner, selecting Receivable for any previous transactions on the Import Ledger will add to the Receivable amount that the Shop Owner owes from them.
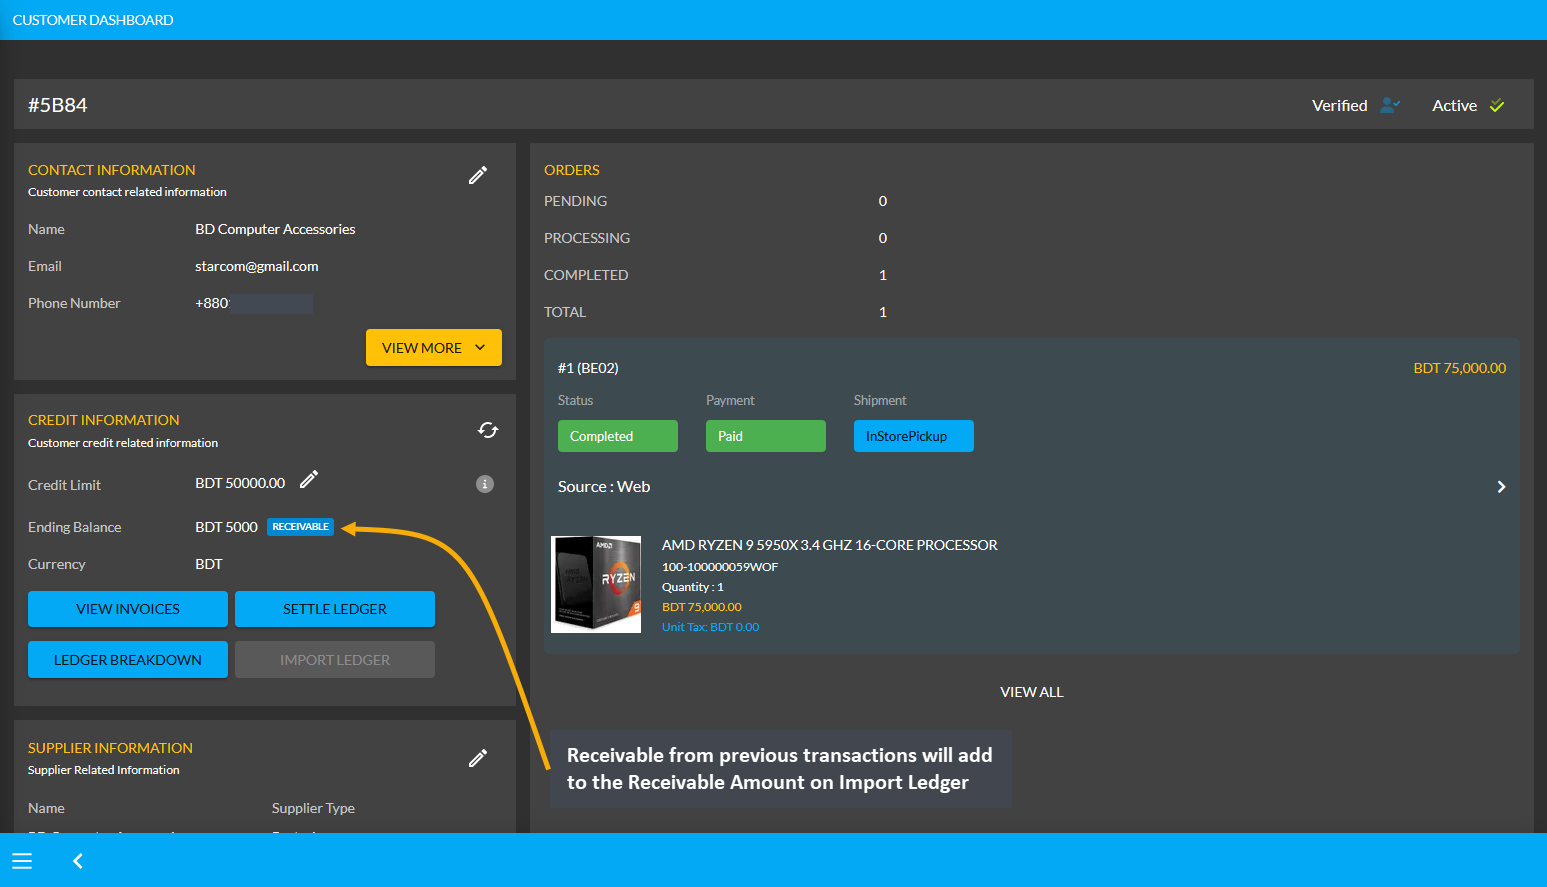
Image 3: Receivable from previous transactions will add to the Receivable Amount on Import Ledger.
Using the Ledger Breakdown feature, the Shop Owner can check previous transaction or receivable amount that is transferred through the Import Ledger feature on their Ledger Breakdown Page.

Image 4: Import Ledger balance with previous receivable amount will be updated on Ledger Breakdown page.
Credit Supplier Ordering Products will add to Receivable
Though the Shop Owner already owes 5,000 BDT from the Credit Supplier, the Credit Supplier can still purchase Product(s) from them using the Credit which will add to the Receivable. For example, Credit Supplier Technology Accessories have purchased two Product(s) worth of 1,600 BDT from Shop Owner here.
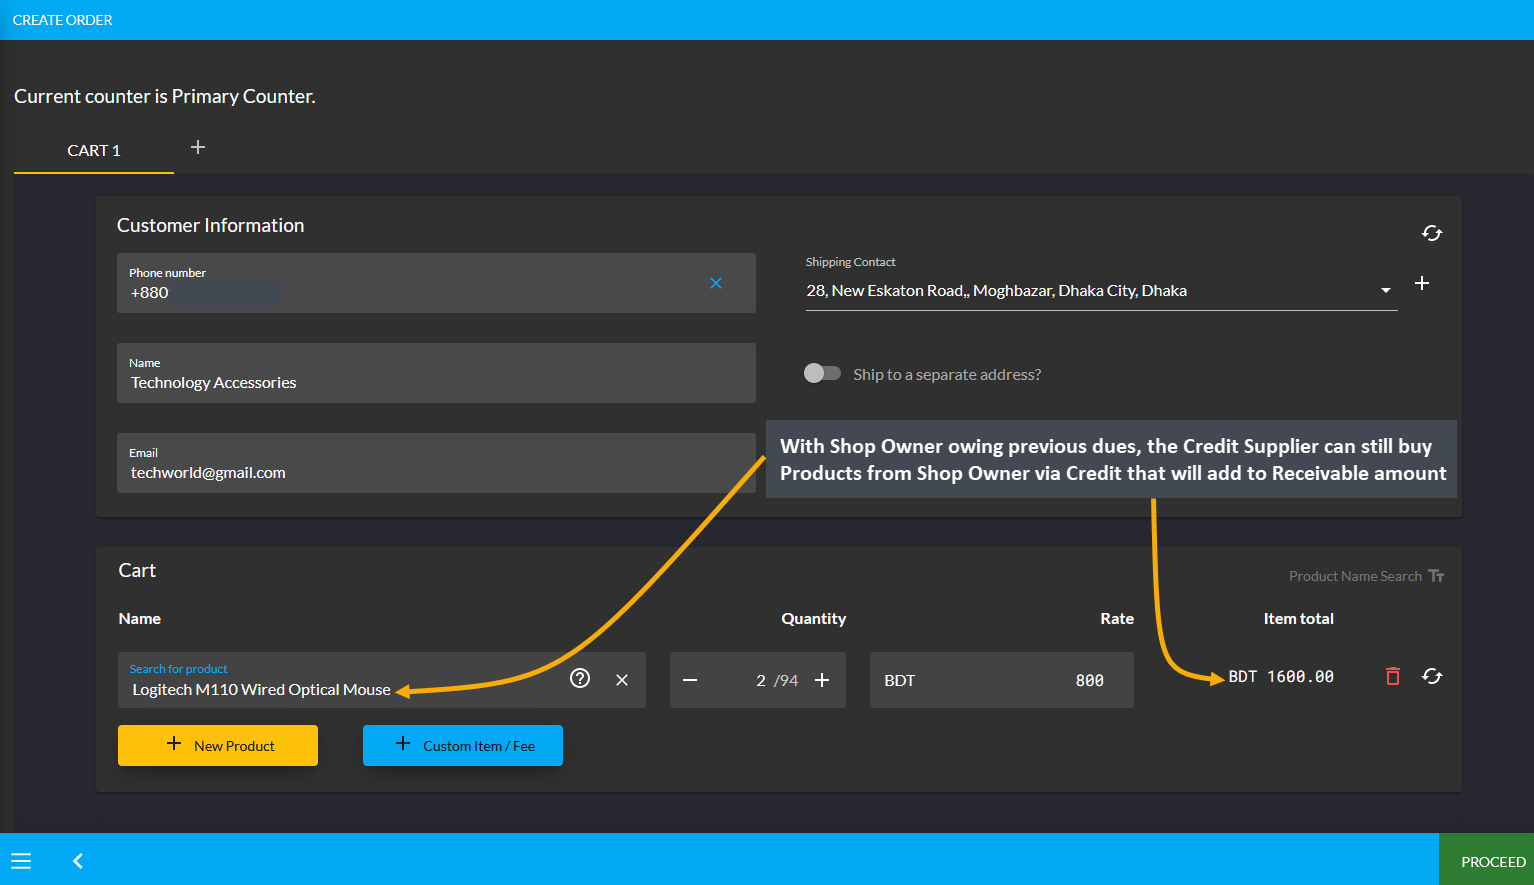
Image 1: Credit Supplier buying Product(s) from Shop Owner via Credit will add to Receivable.
After the Credit Supplier chooses payment method as On Credit (Due) and confirms their Order, 1,600 BDT will be added to their already Receivable or existing dues of 5,000 BDT to the Shop Owner. This Product purchase being 1,600 BDT, the amount will be added to and increase Receivable to 6,600 BDT now. If the Credit Supplier wants to settle these dues, they can use ten different payment gateways to Settle Ledger.
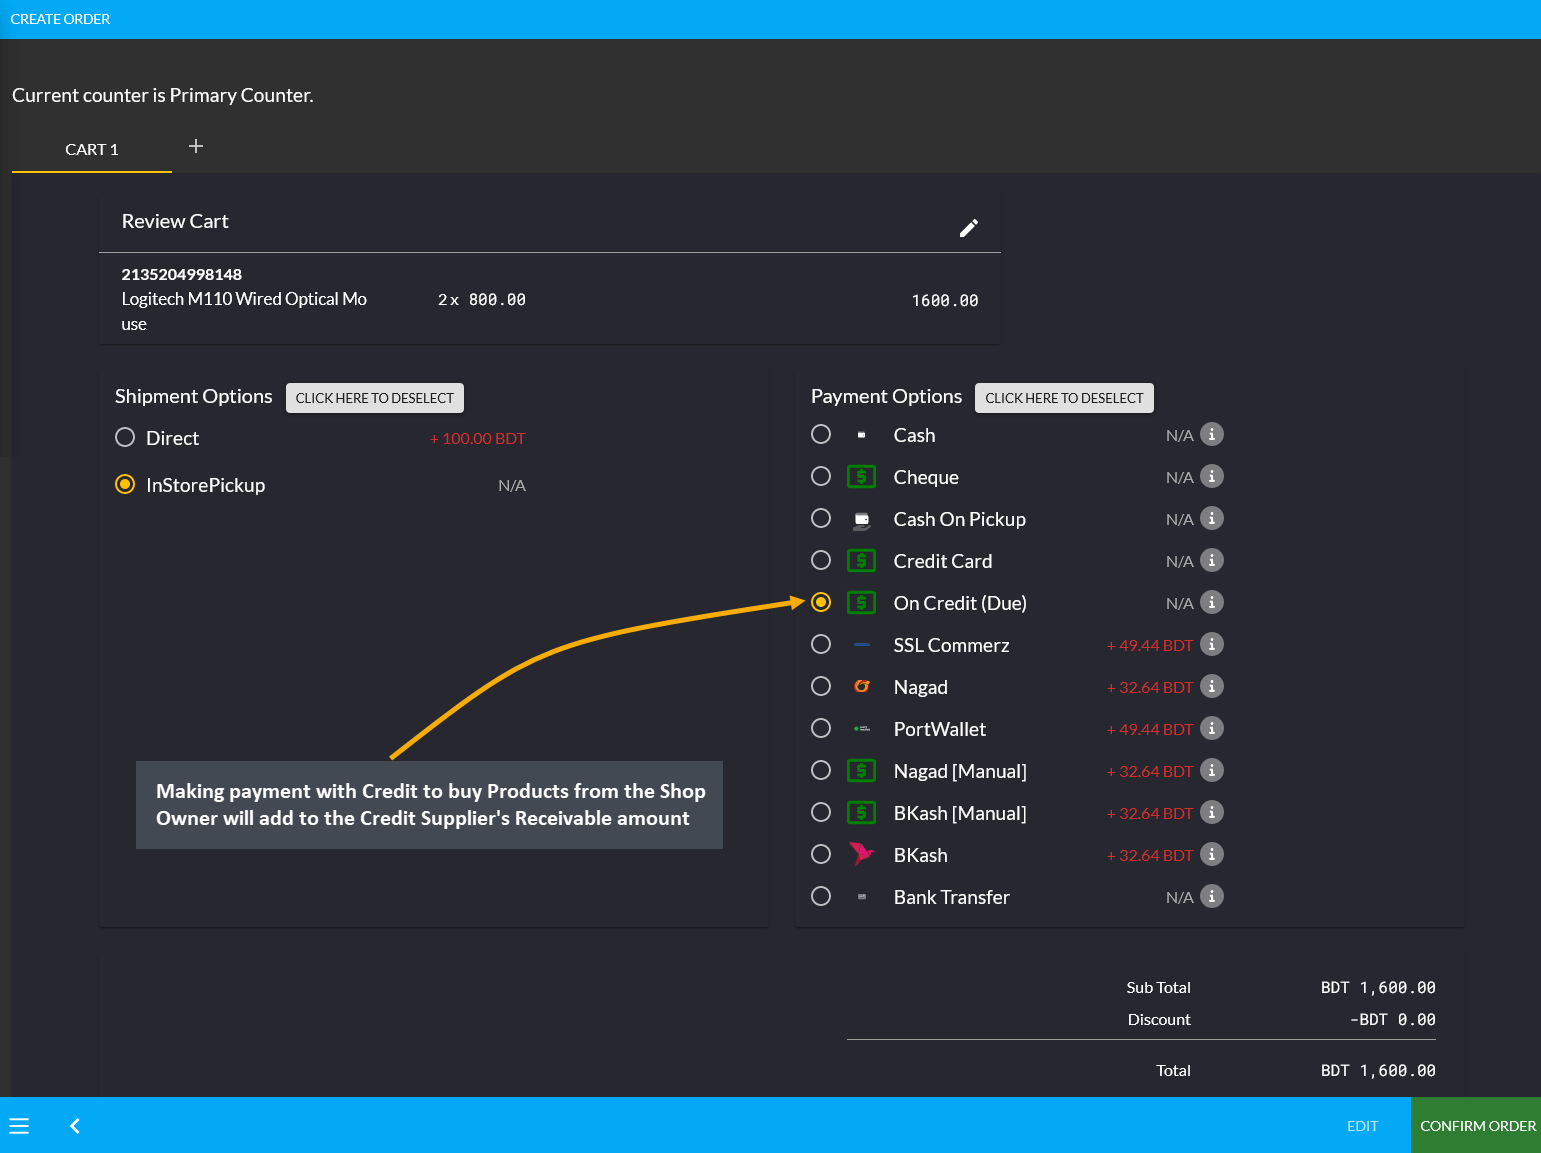
Image 2: Making Credit payment to buy Products from Shop Owner will add to Credit Supplier's Receivable.
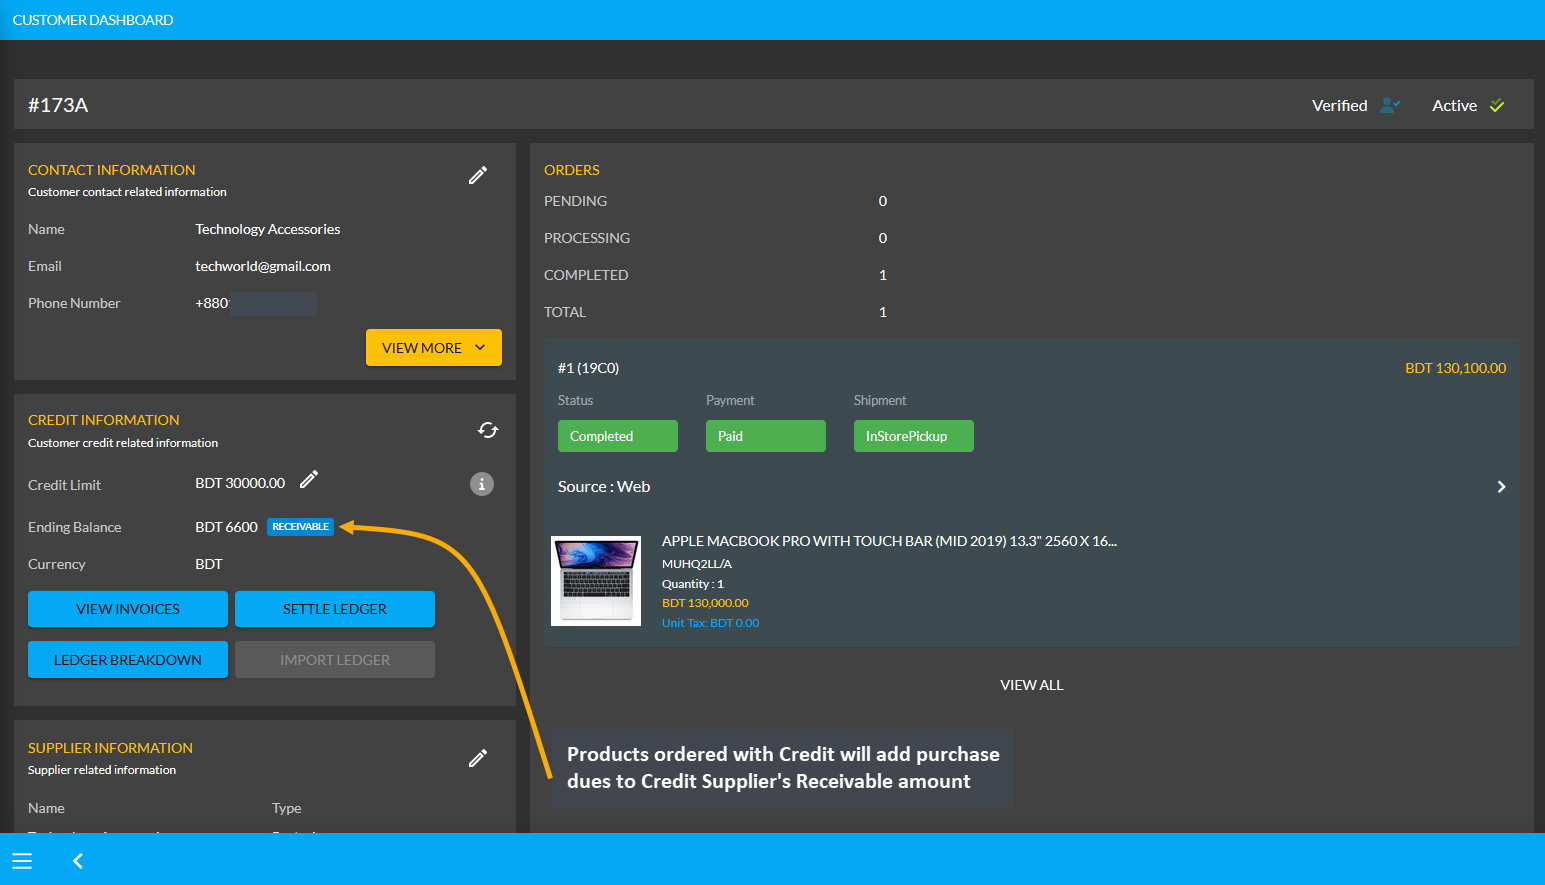
Image 3: Products ordered via Credit will add the purchase dues to Credit Supplier's Receivable amount.
Using the Ledger Breakdown feature, the Shop Owner can check the transaction of the Credit Supplier on their Ledger Breakdown Page with Receivable amount for ordering Products and Credit remaining from Credit Limit.

Image 4: Receivable amount for ordering Products will be updated on the Ledger Breakdown page.
Use Payment Gateways to Settle Ledger for Receivable
In total, the Credit Supplier owes 6,600 BDT to the Shop Owner after their Products purchase. If they want to pay back the full amount or a certain amount to the Shop Owner from their Receivable, they can do it with the Settle Ledger option. For example, the Shop Owner will get 6,600 BDT from the Credit Supplier Technology Accessories, which they can pay back to the Shop Owner with the Settle Ledger feature.
In this case, the Credit Supplier will try to pay back a certain amount i.e. 3,000 BDT from 6,600 BDT to the Shop Owner by using any of the ten payment gateways (Cheque, Cash On Delivery, Credit Card, SSLCommerz, Nagad, Nagad Manual, BKash Manual, BKash, PortWallet, Cash, and Bank Transfer) available with Settle Ledger button.
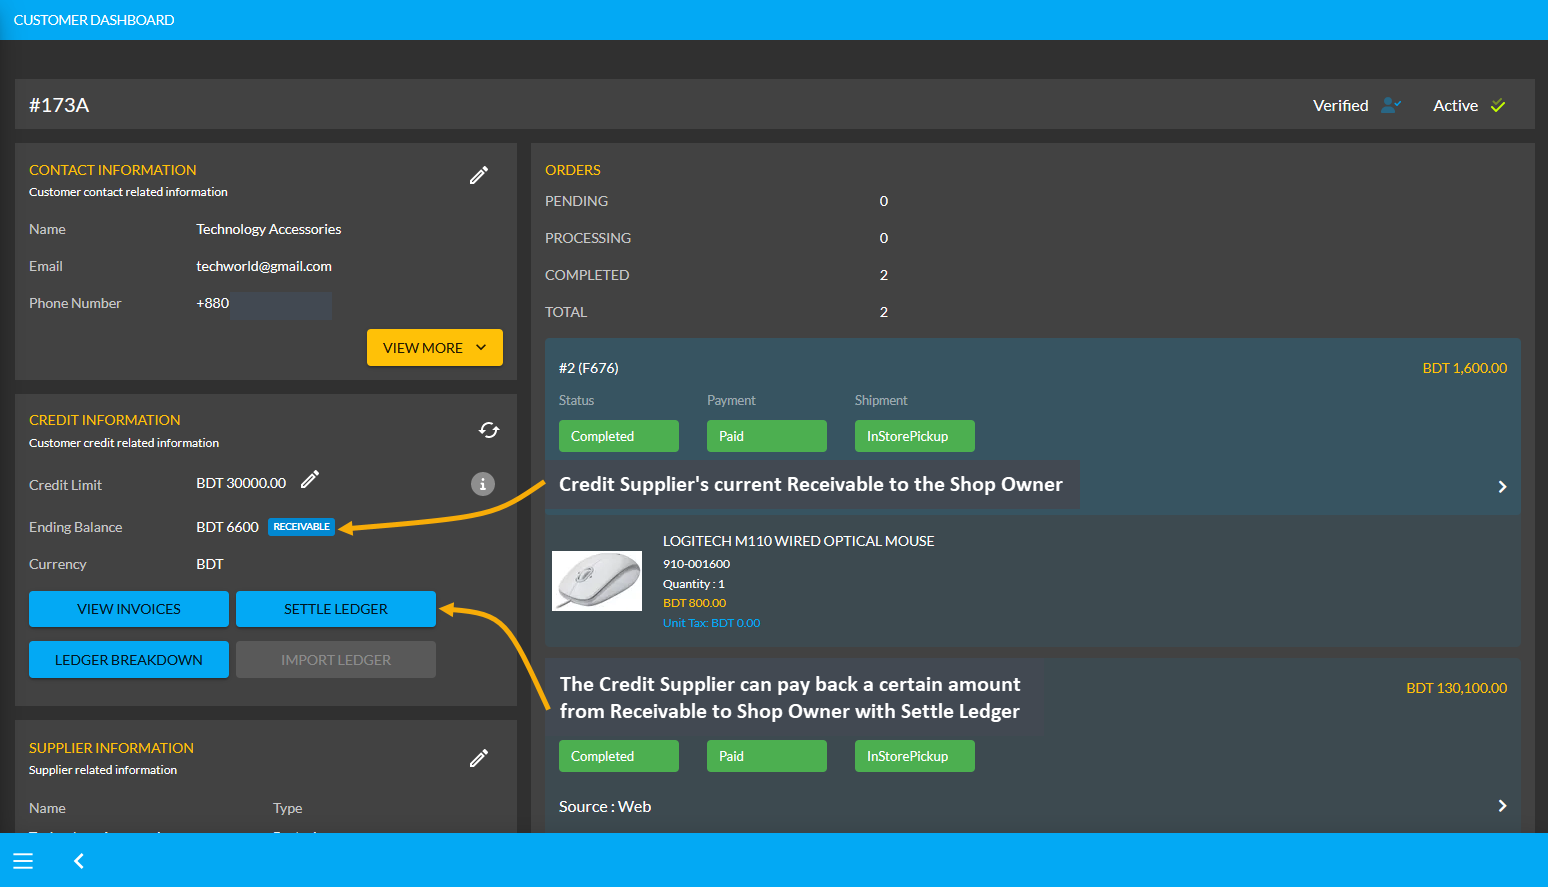
Image 1: Credit Supplier can pay back an amount from Receivable to Shop Owner with Settle Ledger feature.
The Credit Supplier can pay back from their Receivable amount of 6,600 BDT at once or by a few times through the ten different payment gateways. Here, the Credit Supplier will pay back the Shop Owner 3,000 BDT with the Settle Ledger feature. First, they need to click the Settle Ledger button which will open a pop-up where the amount they want to pay needs to be set. Credit Supplier wants to pay 3,000 BDT here with the Settle Ledger option.
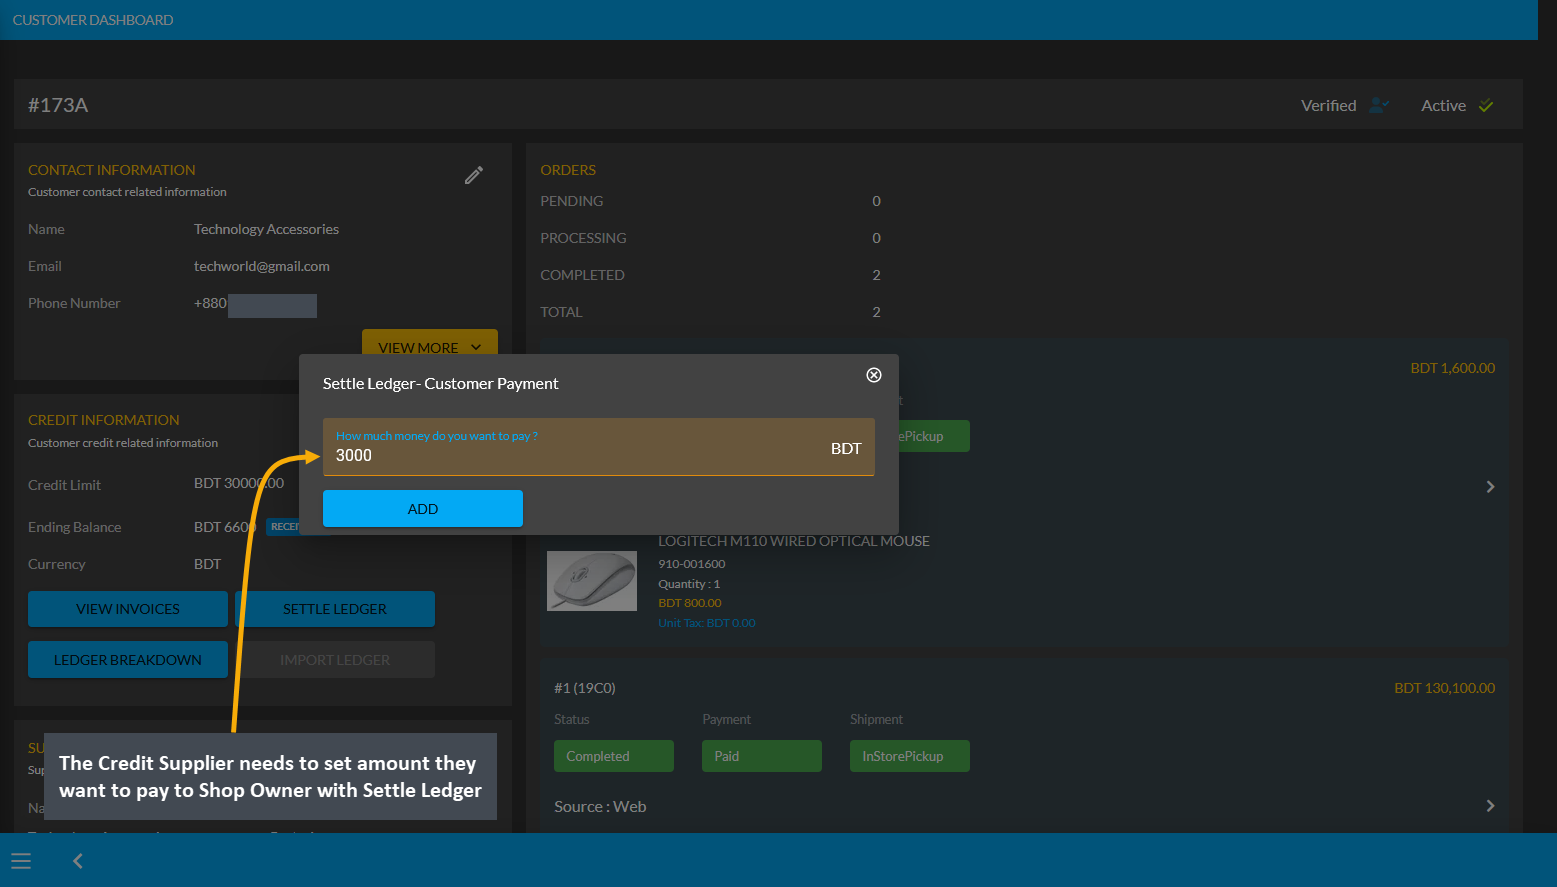
Image 2: The Credit Supplier needs to set amount they want to pay to Shop Owner with Settle Ledger.
The Credit Supplier needs to select one of the ten Payment Gateways to make payment for the selected amount to Settle Ledger now. Here, BKash Manual payment was selected and BKash (Manual) Transaction ID was set which incurred an additional transaction fee of 61.20 BDT. As demonstrated, the Credit Supplier will have to complete their payment information and hit Submit when done.
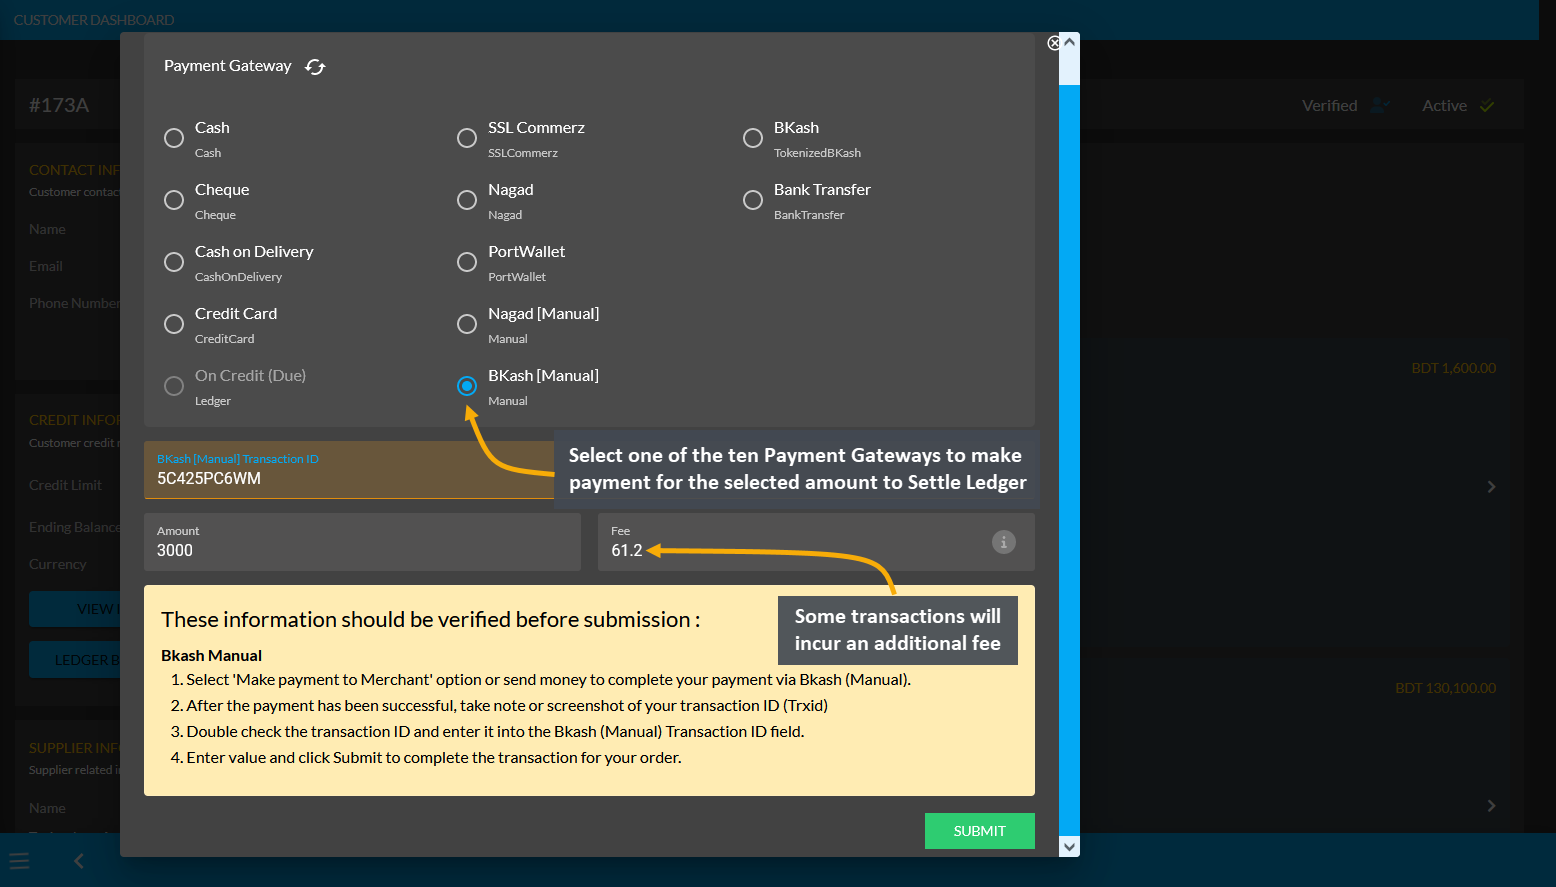
Image 3: Credit Supplier needs to select a Payment Gateway to pay to Shop Owner with Settle Ledger.
After successful partial payment, a pop-up notification will confirm that the transaction amount 3,000 BDT was completed. Check the transaction reference and gateway used and click Submit to complete the process.
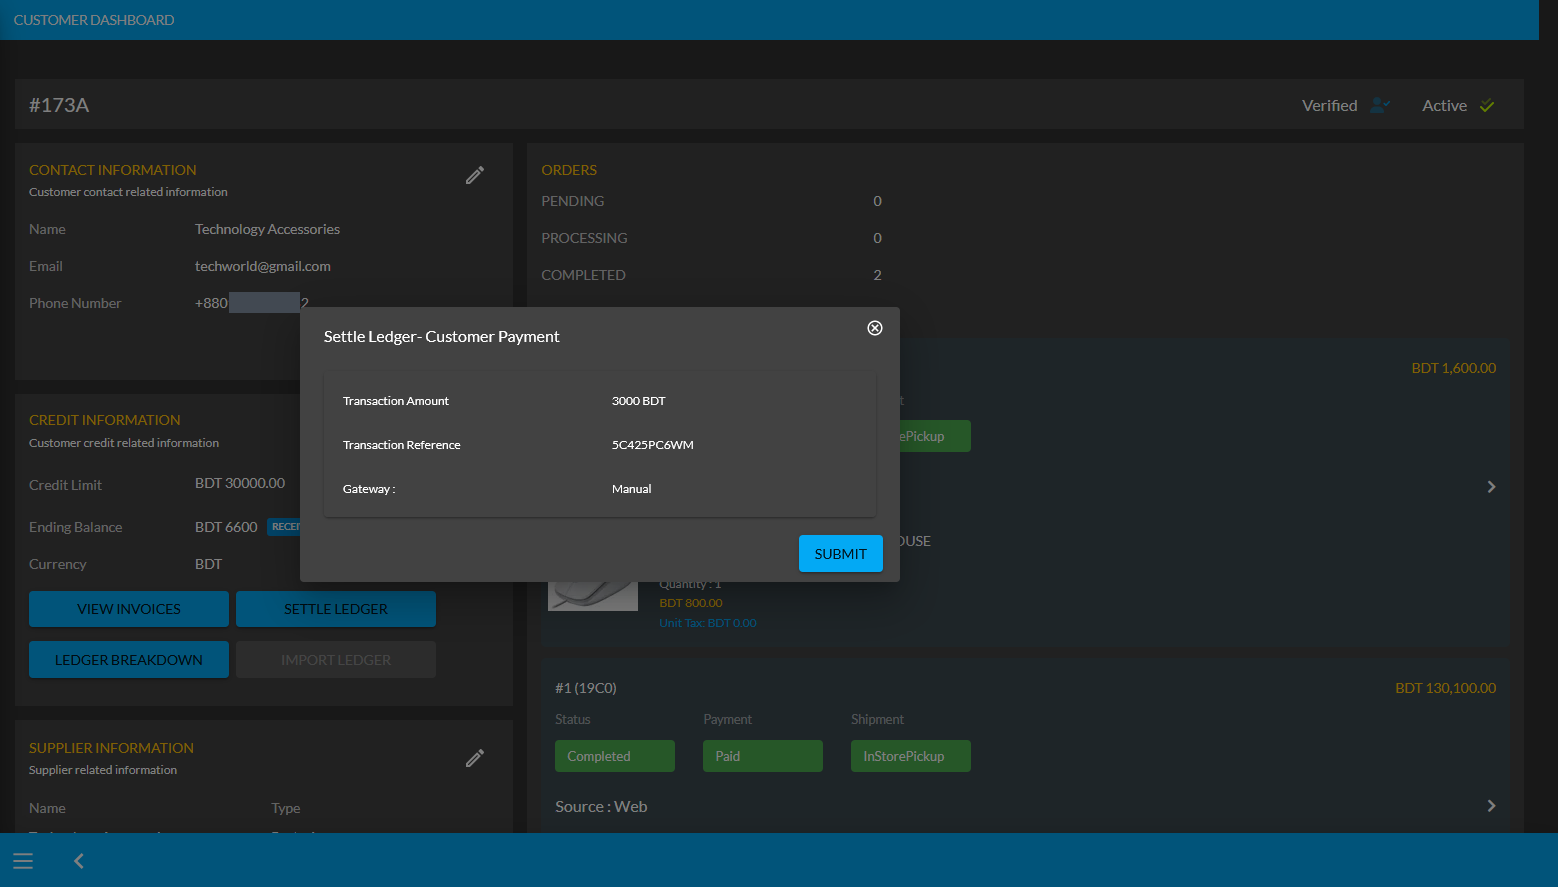
Image 4: After successful payment, a pop-up will show confirmation with the transaction details.
When the Credit Supplier completes payment of 3,000 BDT to the Shop Owner with the Settle Ledger feature, it will reflect the updated balance under Receivable. For instance, after settling Ledger with payment of 3,000 BDT here, the Credit Supplier’s Receivable was automatically updated from 6,600 BDT to 3,600 BDT.
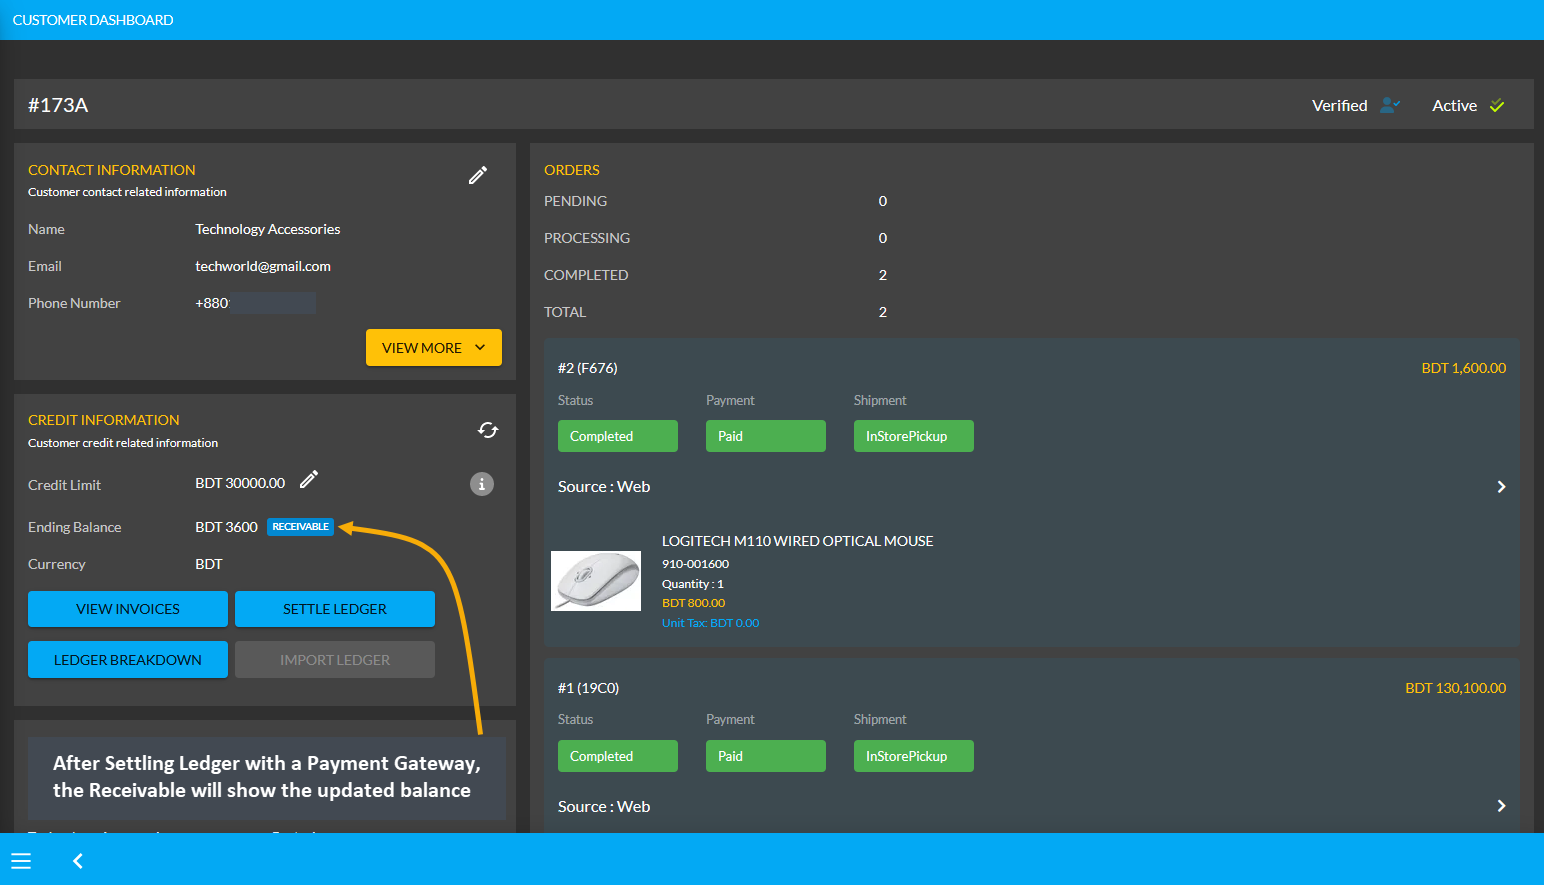
Image 5: After settling Ledger with a Payment Gateway, the Receivable will show updated balance.
Using Ledger Breakdown feature, the Shop Owner can check transactions after Ledger settlement with Payment Gateways by the Credit Supplier on the Credit Supplier’s Ledger Breakdown Page.

Image 6: Settling Ledger with Payment Gateways will be updated on the Ledger Breakdown page.
Per Unit Product Purchase Transactions
The Shop Owner can purchase Per Unit Products from the Credit Supplier Without Payment, with Full Payment, or with Partial Payment which will be reflected under the Credit Information section on Supplier’s Payable. The types of Per Unit Product purchases will also be updated with details on the Credit Supplier’s Ledger Breakdown page.
Per Unit Product purchase Without Payment
The Shop Owner can purchase Per Unit Products from the Credit Supplier without payment by using the Purchase option. From the Products tab, go to the Product List View and select the Purchase option from the target Per Unit Product. Clicking this option will redirect to the Add Product Stock page from where Shop Owner can purchase the Per Unit Product without payment which can be paid later on a due date.
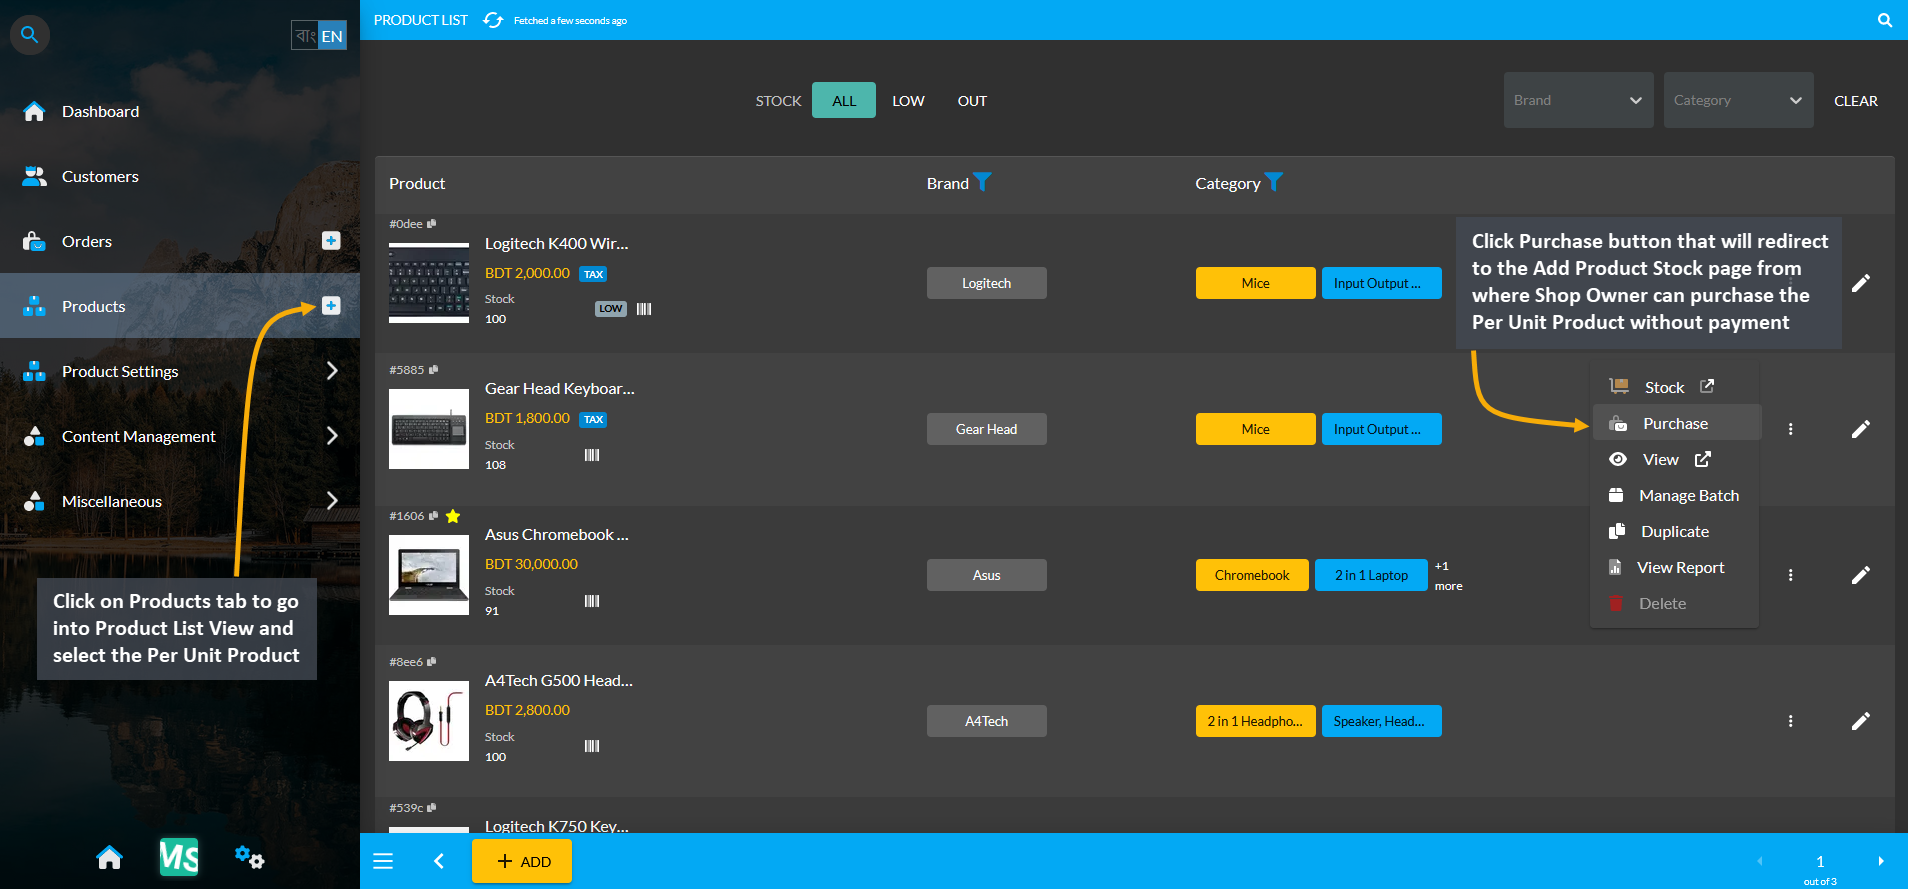
Image 1: Select target Per Unit Product and click the Purchase button to buy from Credit Supplier.
On the Add Product Stock page, select Without Payment Method from Acquisition Options, set the Purchase Price Per Unit, select Credit Supplier, and select Warranty if it is not automatically selected. Then click the Auto Generate Serial Numbers button to generate Quantity and Serial of Per Unit Product that Shop Owner will buy from Supplier.
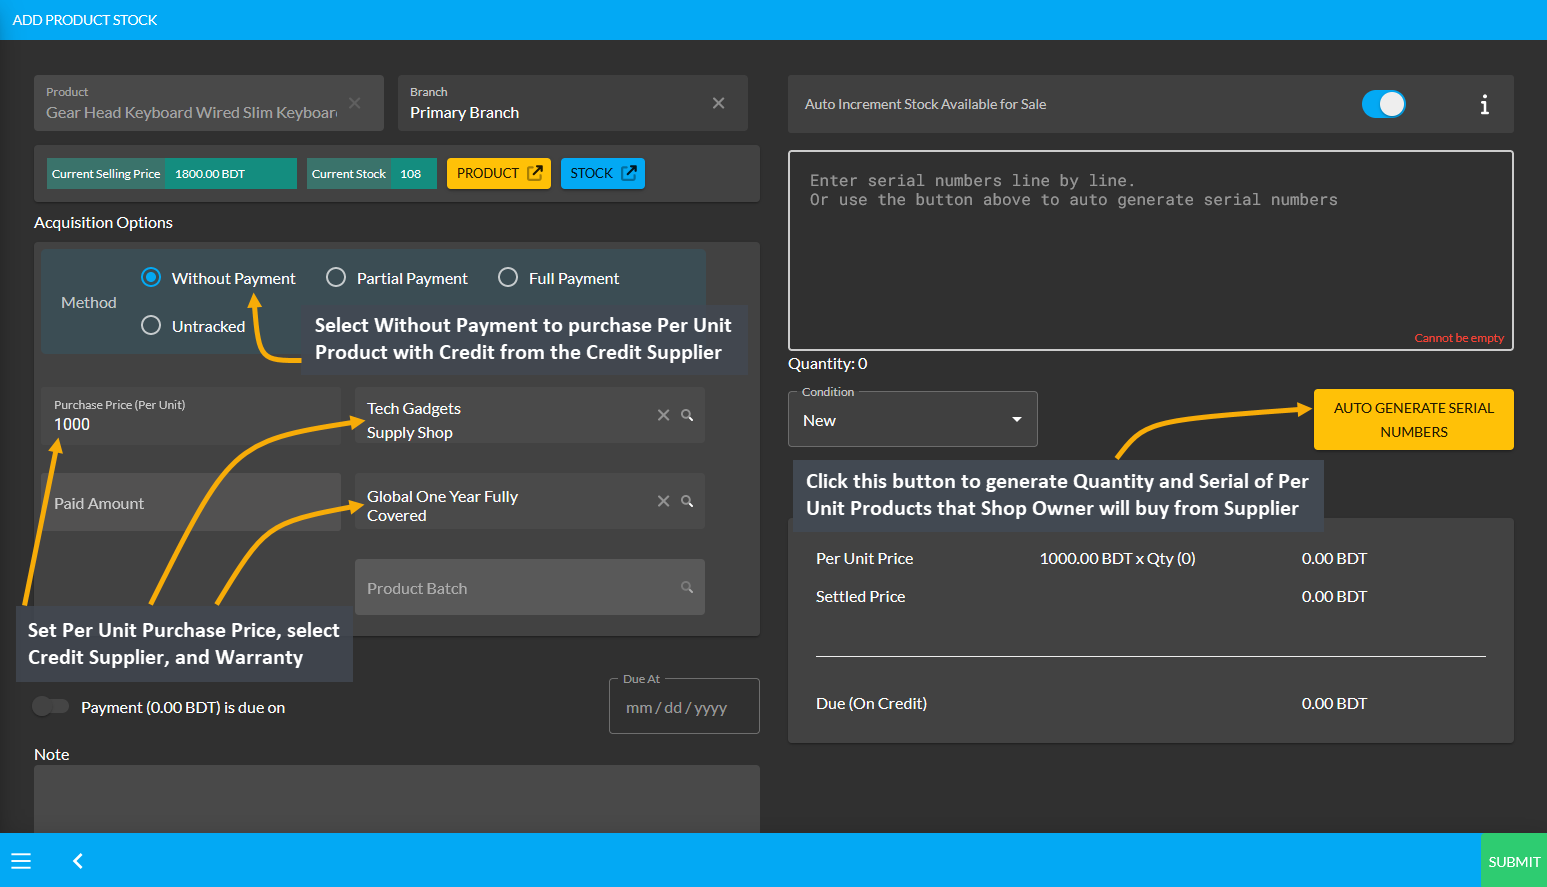
Image 2: Set Purchase Price, select Supplier and Warranty, and click Auto Generate Serial Numbers button.
After clicking the Auto Generate Serial Numbers button, a pop-up will appear where Product Serial Number and Quantity needs to be set with Prefix, Suffix, Start Counter, and End Counter. Click the Generate button to create the Per Unit Products for purchase from the Credit Supplier. Here, 5 Per Unit Products quantities were created.
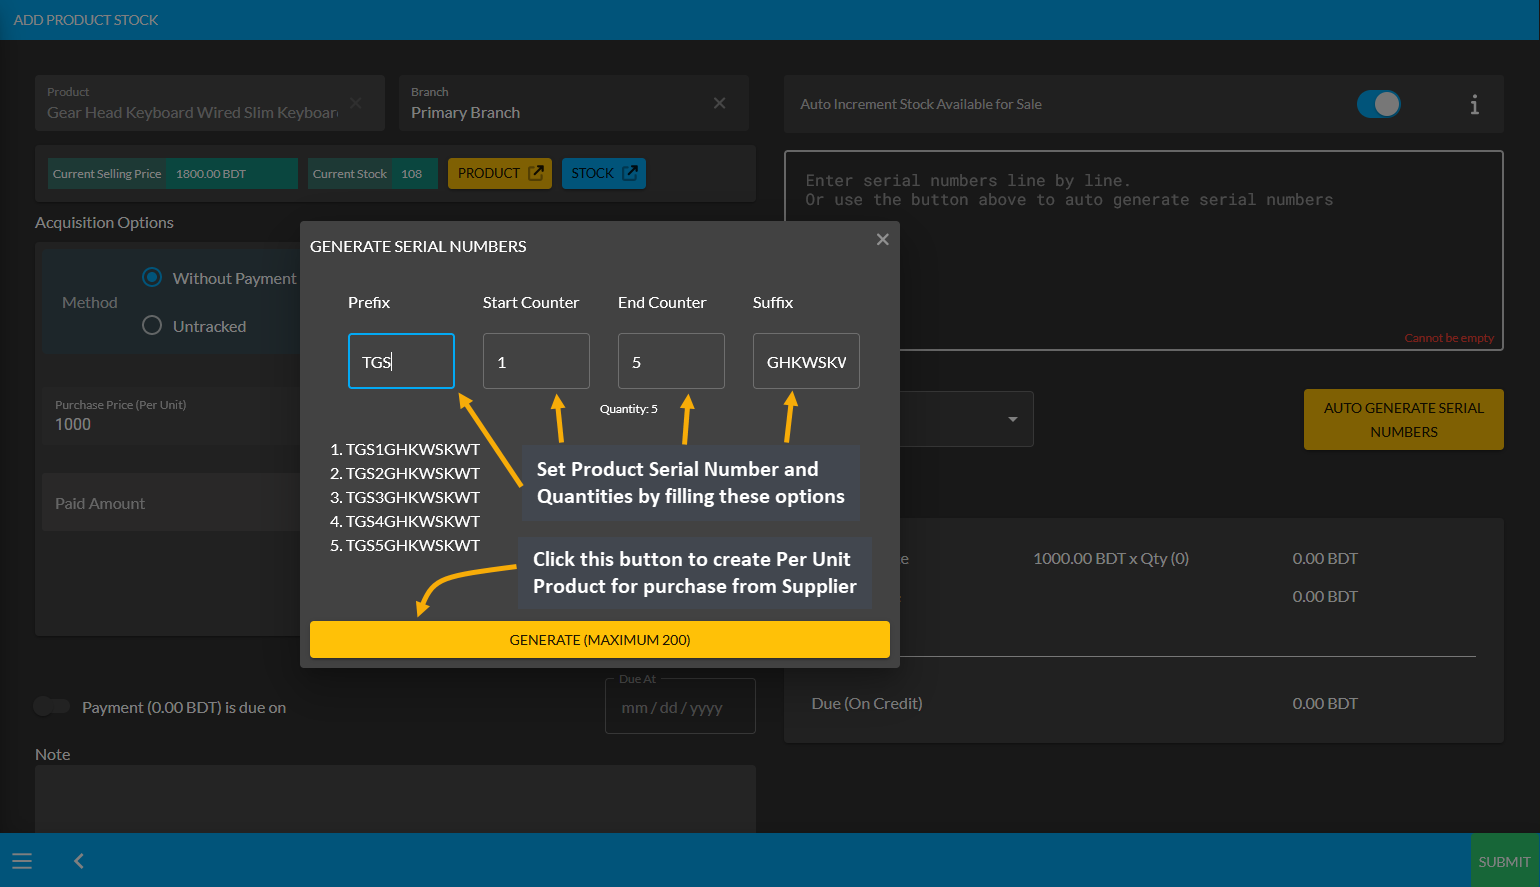
Image 3: Set Product Serial Number and Quantity with Prefix, Suffix, Start Counter, and End Counter.
After Product Serial Numbers and Quantities are generated for the target Per Unit Product, turn on the Payment Due toggle button and select the Due Date. Click Submit to complete the purchase process Without Payment.
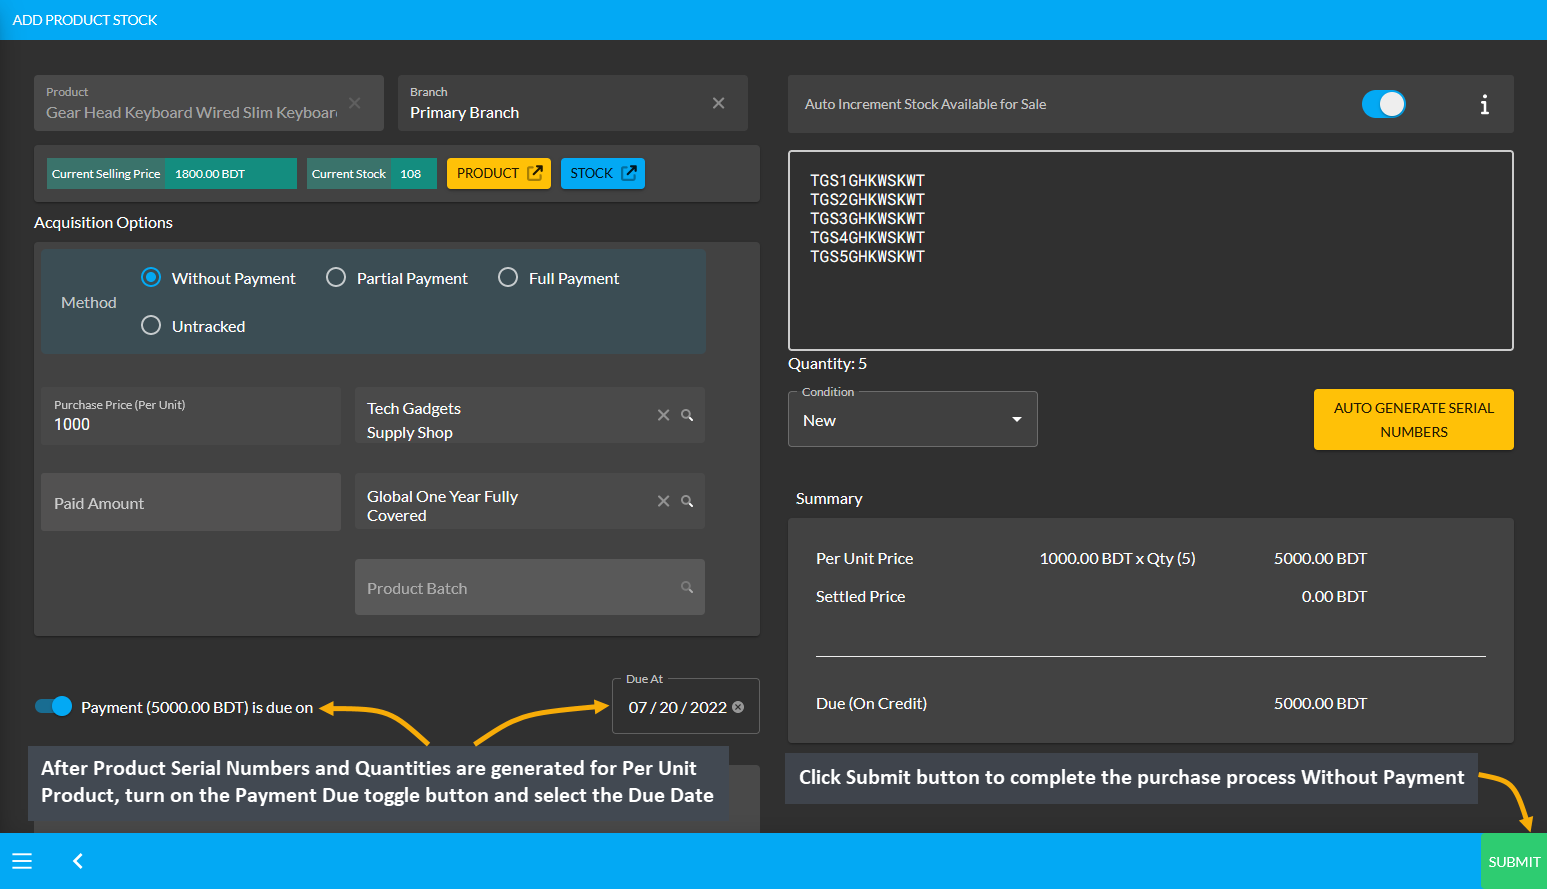
Image 4: Turn on the Payment Due toggle button and set the Due Date for Without Payment Method.
Then, a pop-up will show uploading assigned Per Unit Product quantities and confirm when units are successfully created. Click Okay to complete the Per Unit Product purchase process from Credit Supplier. If Shop Owner wants to purchase more quantities of the same Per Unit Product from the same Credit Supplier, then they need to click the Purchase Product from Same Supplier button as shown in the example screenshot.
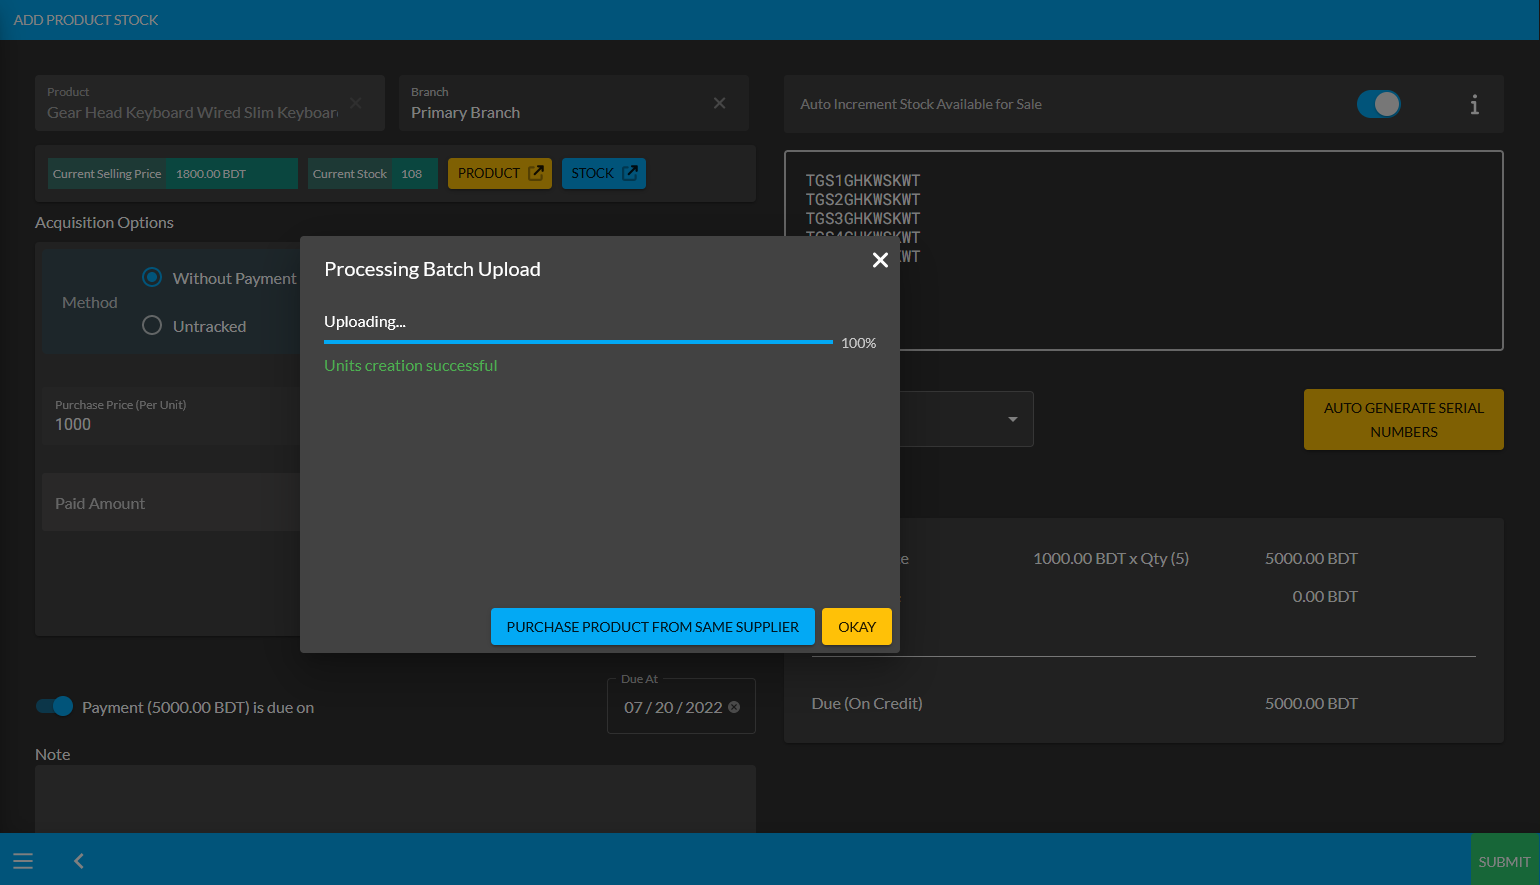
Image 5: Pop-up showing successful creation or batch upload of Per Unit Product. Click Okay to proceed.
Clicking on Okay will redirect to the Unit Stock Management page where the successfully created Batch of Per Unit Products will be displayed on the top of the list as marked in the example screenshot.
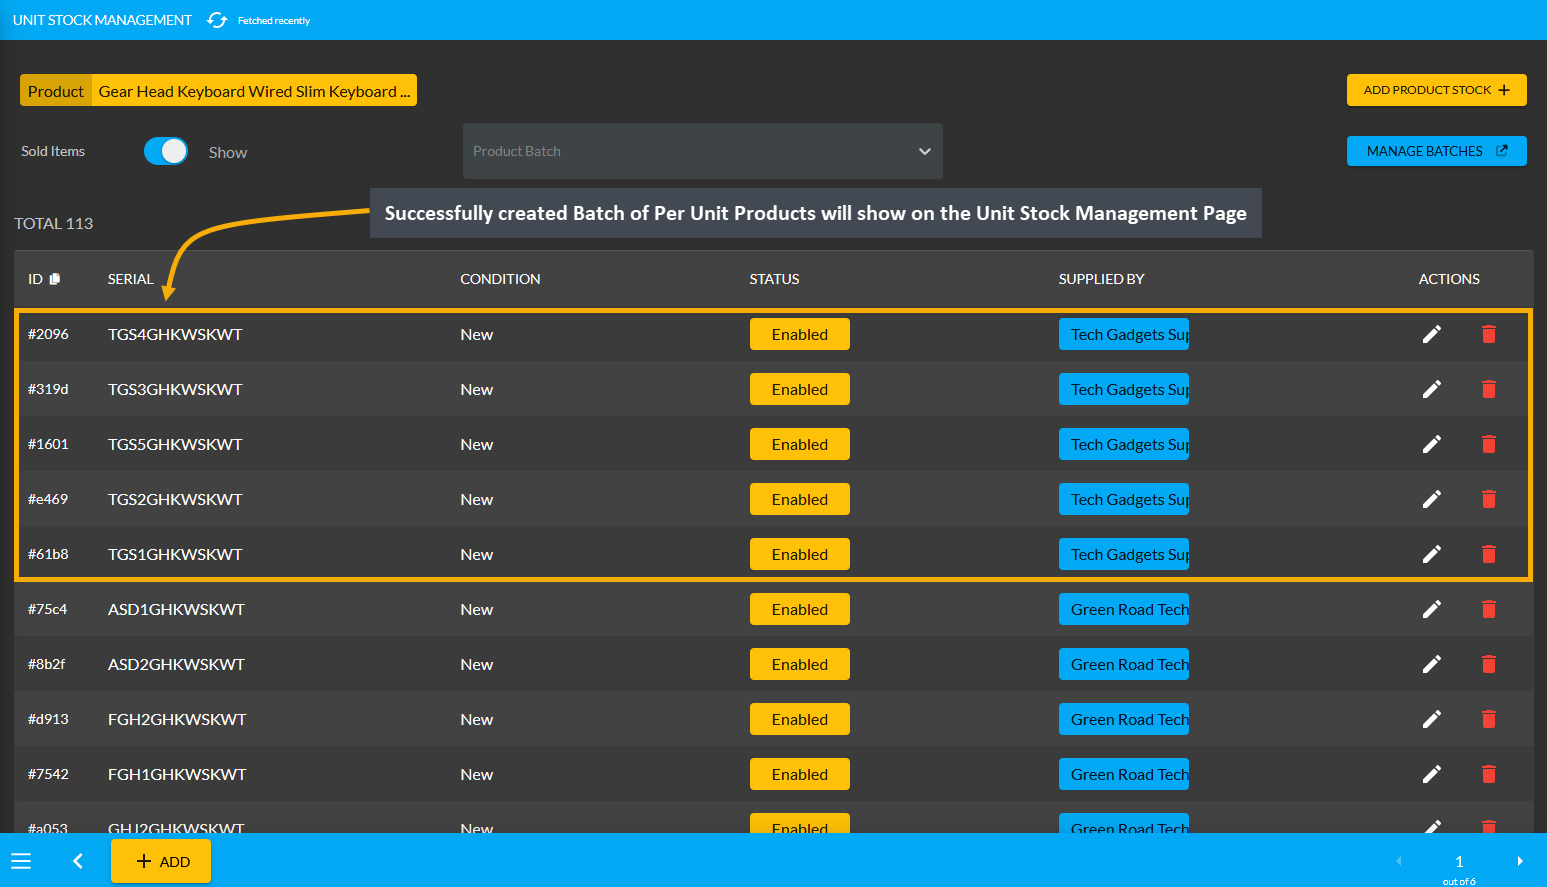
Image 6: Successfully created Batch of Per Unit Products will display on the Unit Stock Management Page.
Per Unit Product purchase Without Payment Ledger View
On the Customer Dashboard of the Credit Supplier, the purchase of 5 Per Unit Products worth 5,000 BDT without payment will add to the Payable Ending Balance. This Payable amount will indicate that the Credit Supplier will get 5,000 BDT from the Shop Owner which the Shop Owner can pay with the Settle Ledger option.
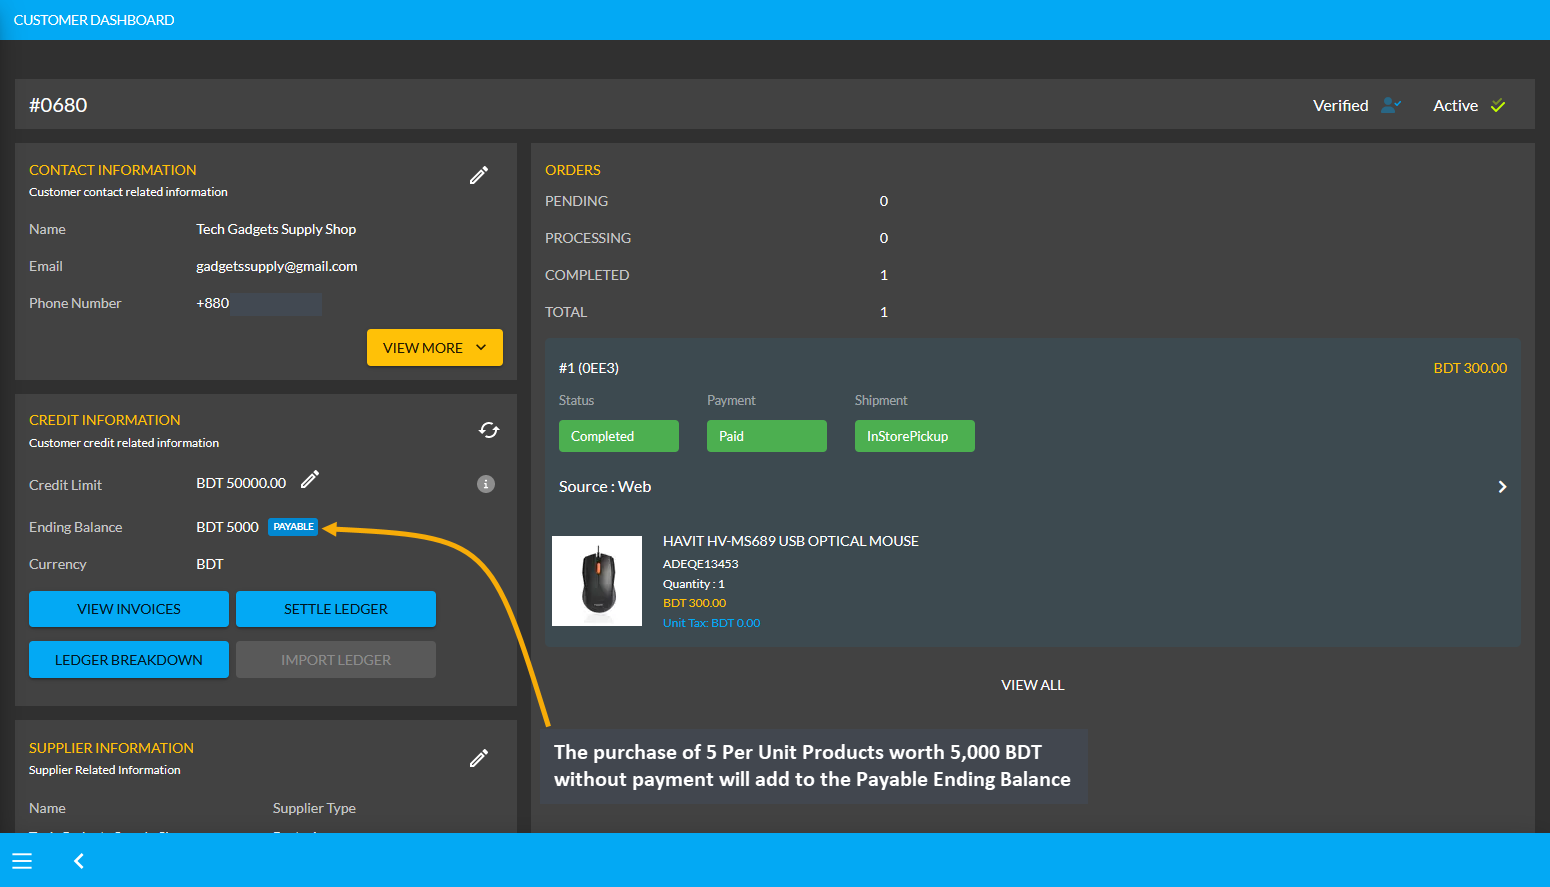
Image 7: The purchase of 5 Per Unit Products without payment will add to the Payable Ending Balance.
Using the Ledger Breakdown feature, the Shop Owner can check the Per Unit Product purchase Without Payment transaction from the Credit Supplier on their Ledger Breakdown Page as shown in the example below.

Image 8: Ledger Breakdown Page will show details of Per Unit Product purchase Without Payment transaction.
Per Unit Product purchase with Partial Payment
The Shop Owner can purchase Per Unit Products from Credit Supplier with partial payment by using the Purchase option. From the Products tab, go to the Product List View and select the Purchase option from the target Per Unit Product. Clicking this option will redirect to the Add Product Stock page from where Shop Owner can purchase the Per Unit Product with partial payment which can be paid later on a due date.
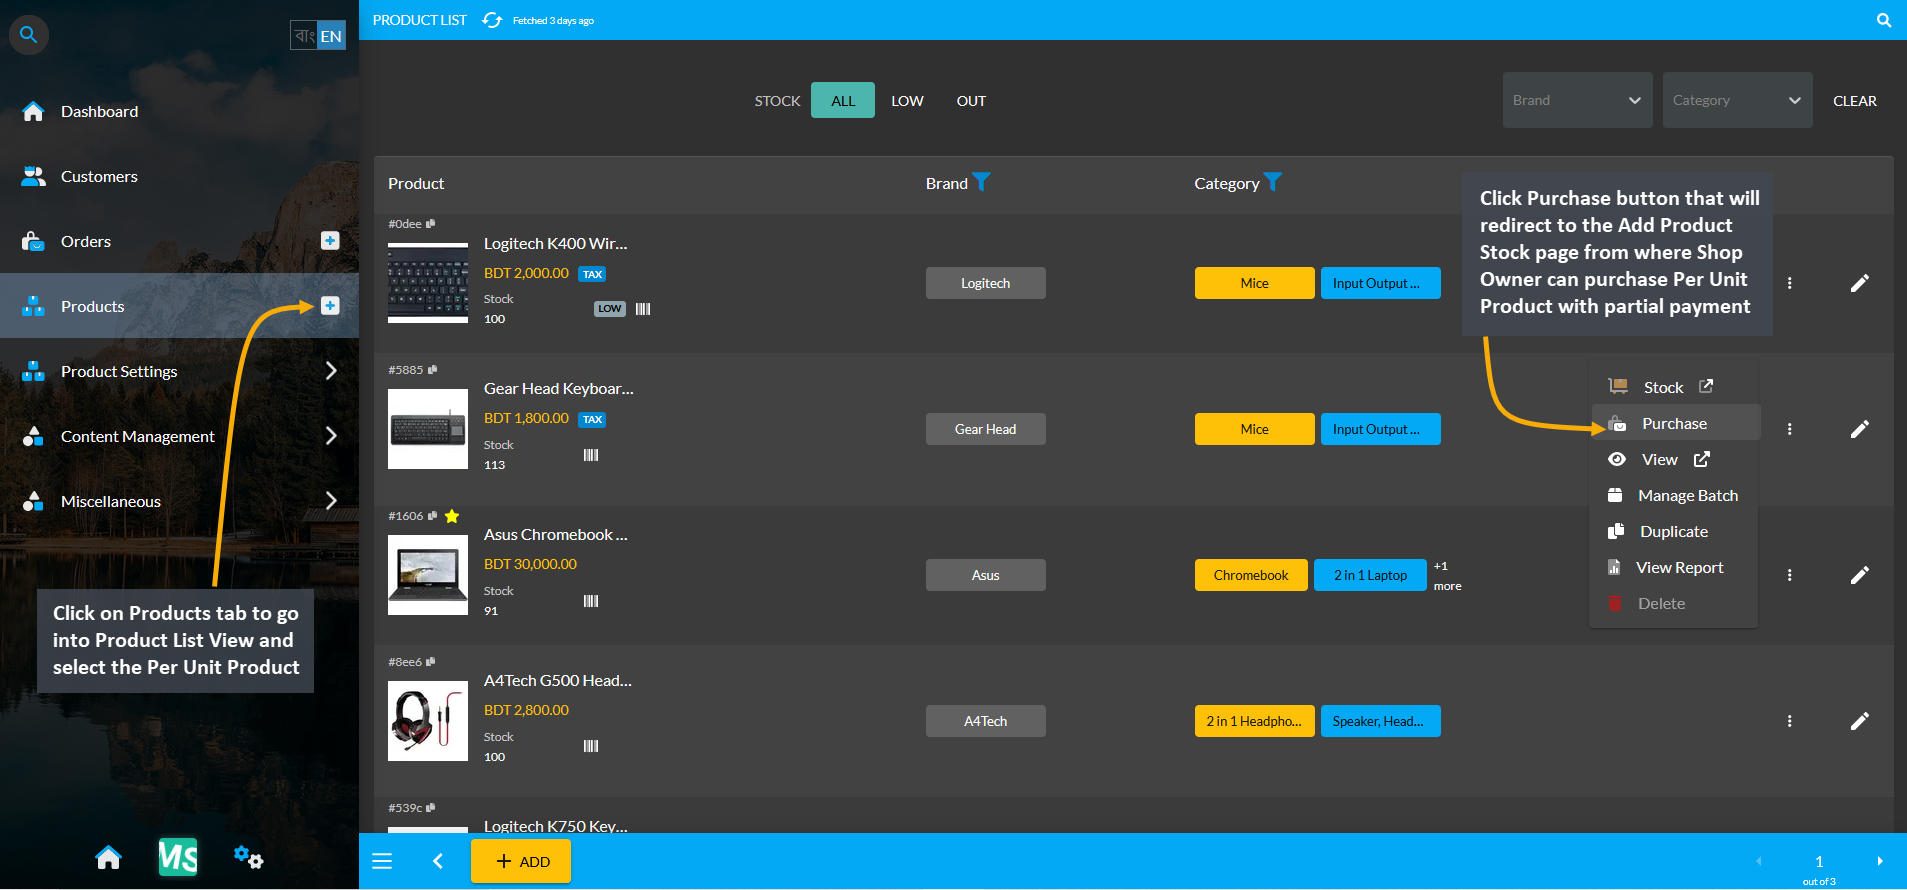
Image 1: Select target Per Unit Product and click the Purchase button to buy from Credit Supplier.
On the Add Product Stock page, select Partial Payment Method from Acquisition Options, set the Purchase Price Per Unit, select Credit Supplier, and select Warranty if it is not automatically selected. Then click the Auto Generate Serial Numbers button to generate Quantity and Serial of Per Unit Product that Shop Owner will buy from Supplier.
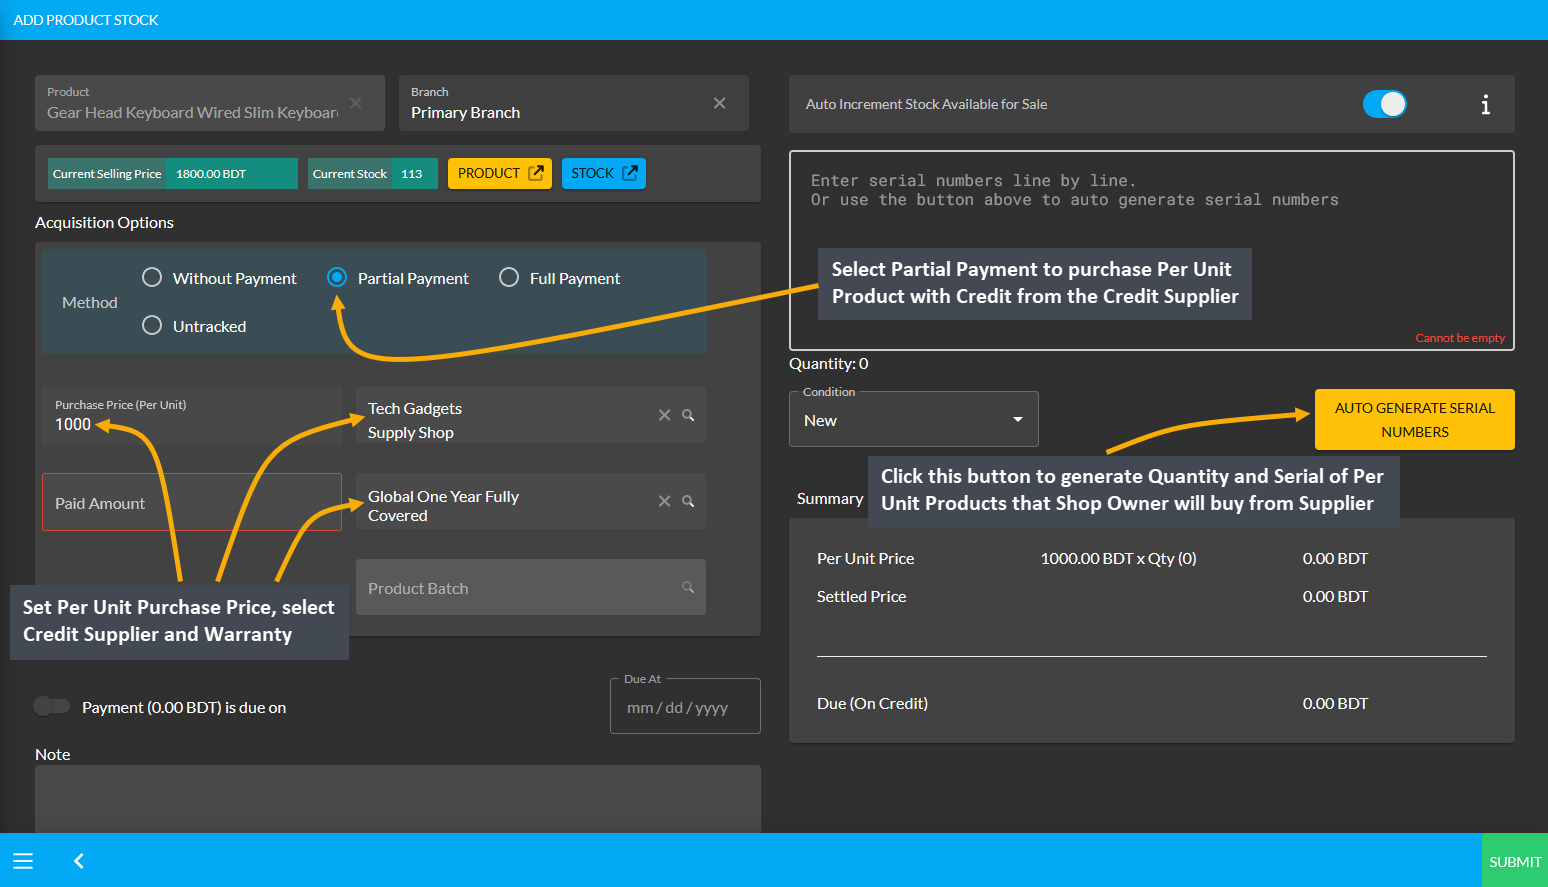
Image 2: Set Purchase Price, select Supplier and Warranty, and click Auto Generate Serial Numbers button.
After clicking the Auto Generate Serial Numbers button, a pop-up will appear where Product Serial Number and Quantity needs to be set with Prefix, Suffix, Start Counter, and End Counter. Click the Generate button to create the Per Unit Products for purchase from the Credit Supplier. Here, 5 Per Unit Products quantities were created.
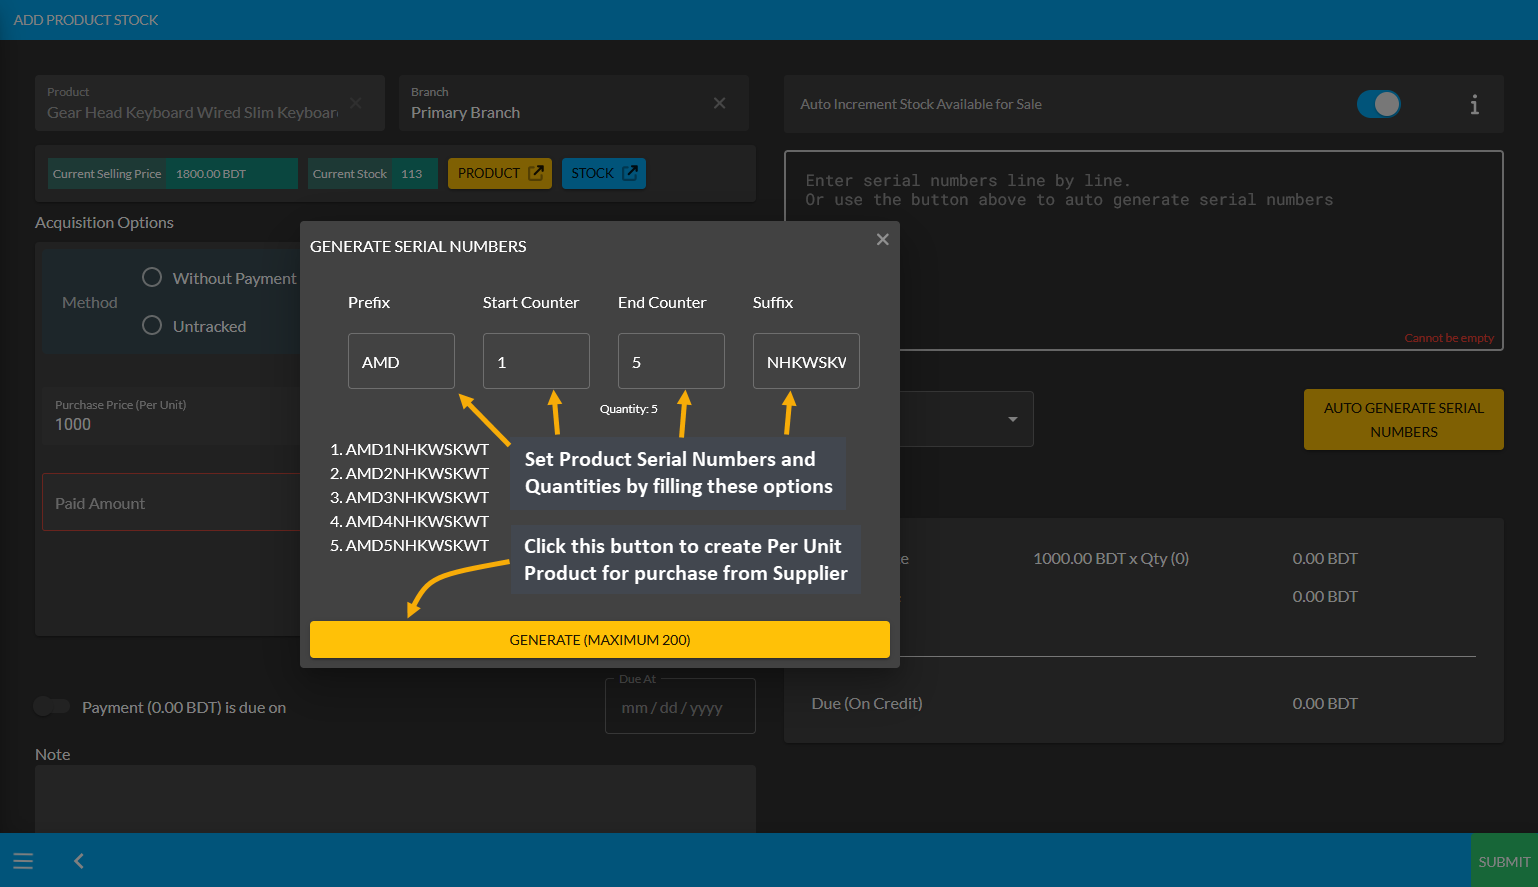
Image 3: Set Product Serial Number and Quantity with Prefix, Suffix, Start Counter, and End Counter.
After Product Serial Numbers and Quantities are generated for the target Per Unit Product, set partial payment amount on the Paid Amount box based on the amount that will be paid partially. Then, turn on the Payment Due toggle button and select the Due Date. Click Submit to complete the purchase process with Partial Payment.
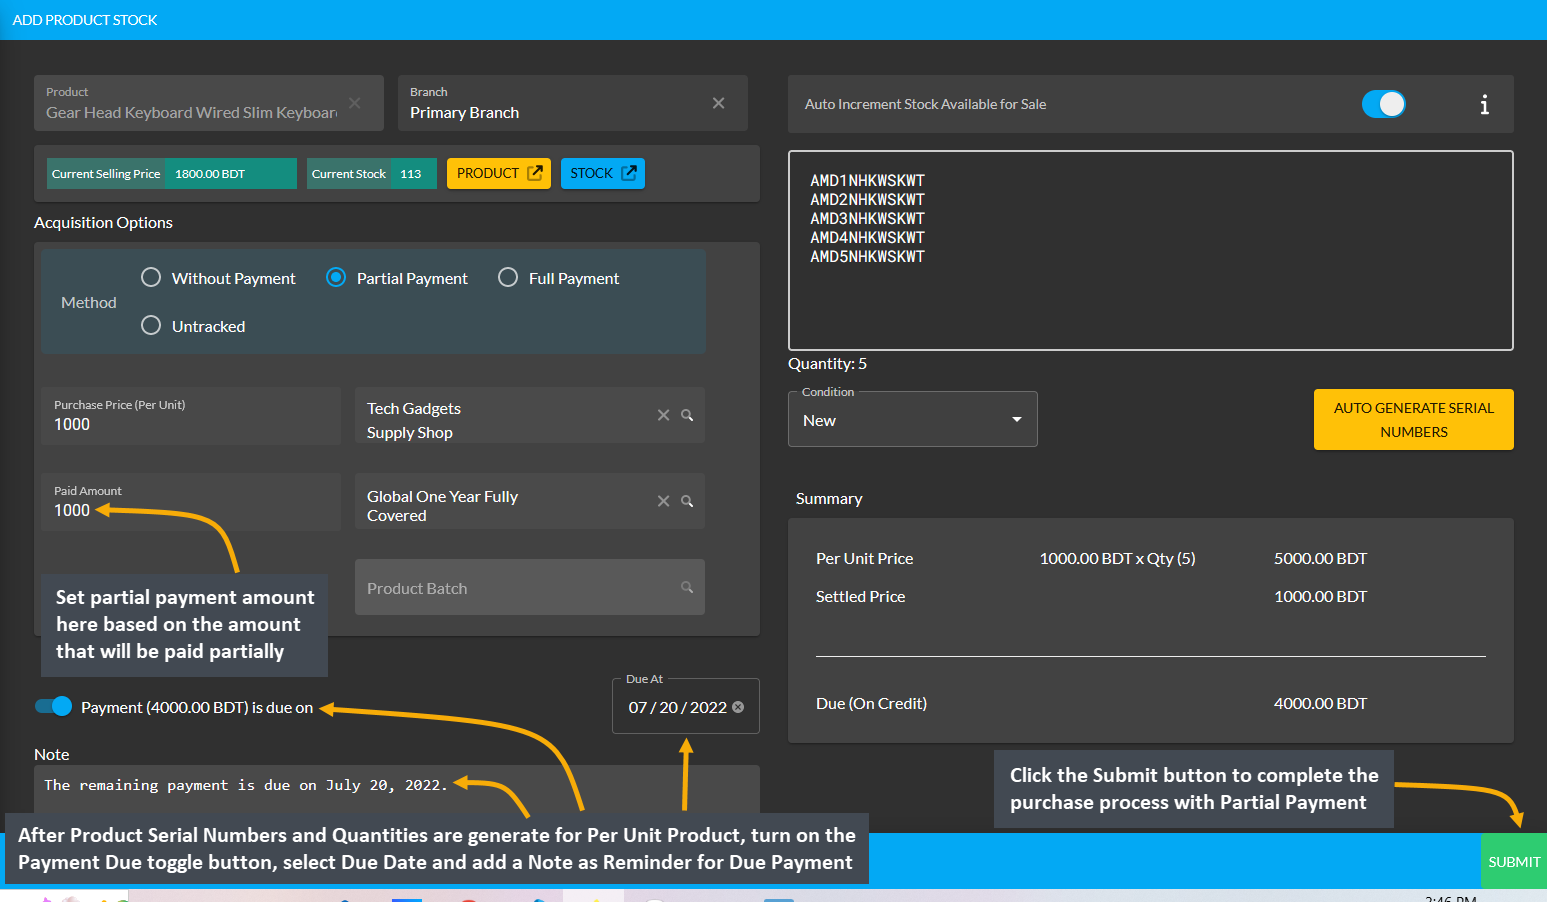
Image 4: Set Partial Payment, turn on Payment Due toggle and set Due Date for Partial Payment Method.
Then, a pop-up will show uploading assigned Per Unit Product quantities and confirm when units are successfully created. Click Okay to complete the Per Unit Product purchase process from Credit Supplier. If Shop Owner wants to purchase more quantities of the same Per Unit Product from the same Credit Supplier, then they need to click the Purchase Product from Same Supplier button as shown in the example screenshot.
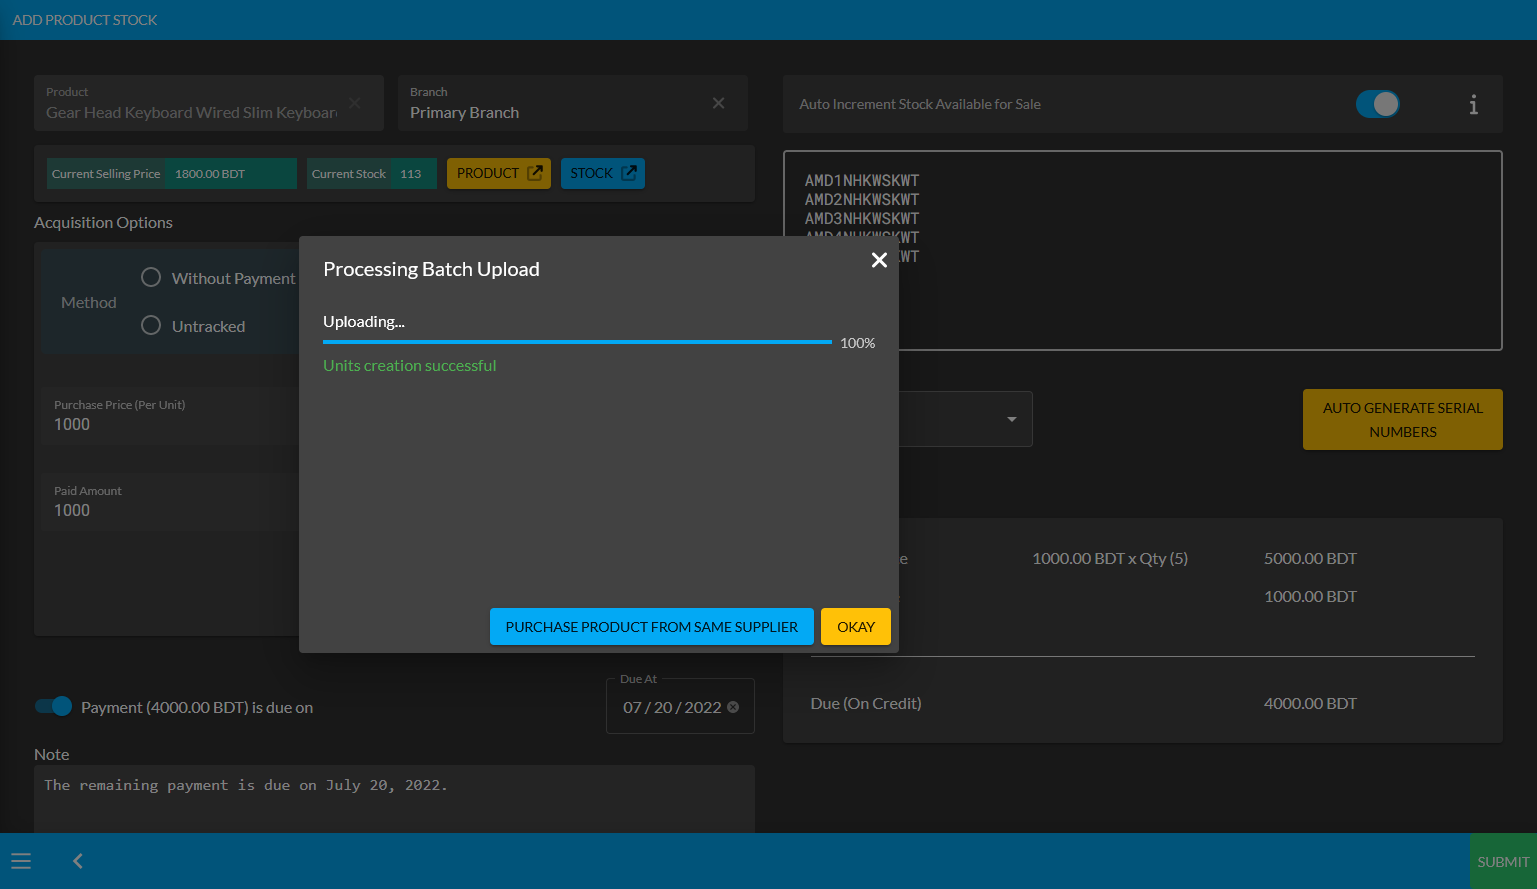
Image 5: Pop-up showing successful creation or batch upload of Per Unit Product. Click Okay to proceed.
Clicking on Okay will redirect to the Unit Stock Management page where the successfully created Batch of Per Unit Products will be displayed on the top of the list as marked in the example screenshot.
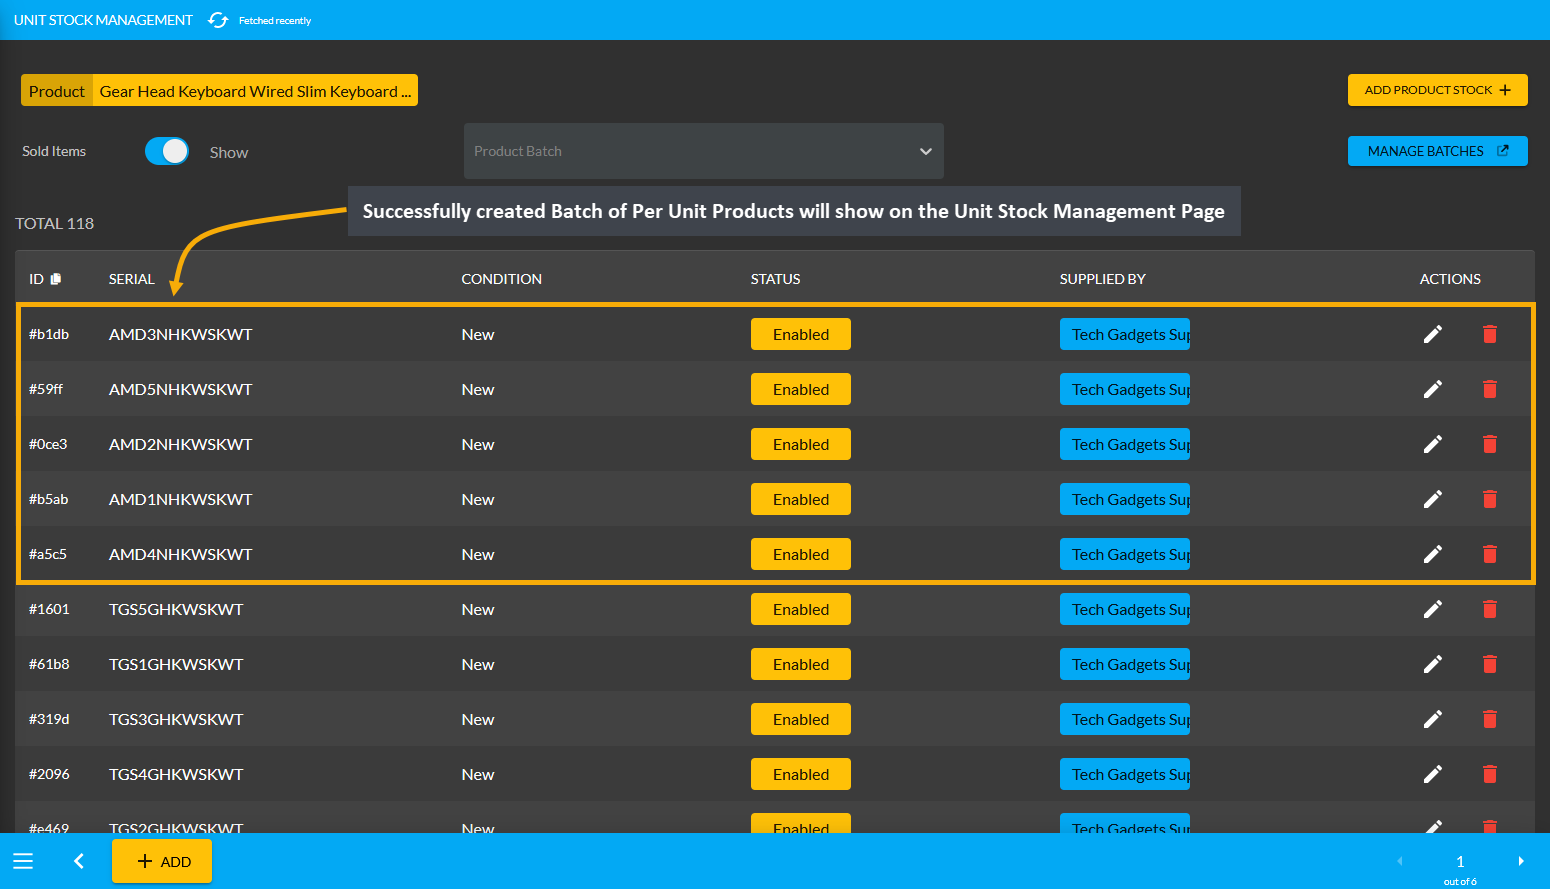
Image 6: Successfully created Batch of Per Unit Products will display on the Unit Stock Management Page.
Per Unit Product purchase with Partial Payment Ledger View
The Credit Supplier Tech Gadgets Supply Shop had a previous Payable of 5,000 BDT. Now, with the purchase of 5 Per Unit Products with a partial payment of 1,000 BDT, the remaining 4,000 BDT will add to the Payable Ending Balance making it a total of 9,000 BDT. This Payable amount will indicate that the Credit Supplier will get 9,000 BDT from the Shop Owner in total which the Shop Owner can pay with the Settle Ledger option.
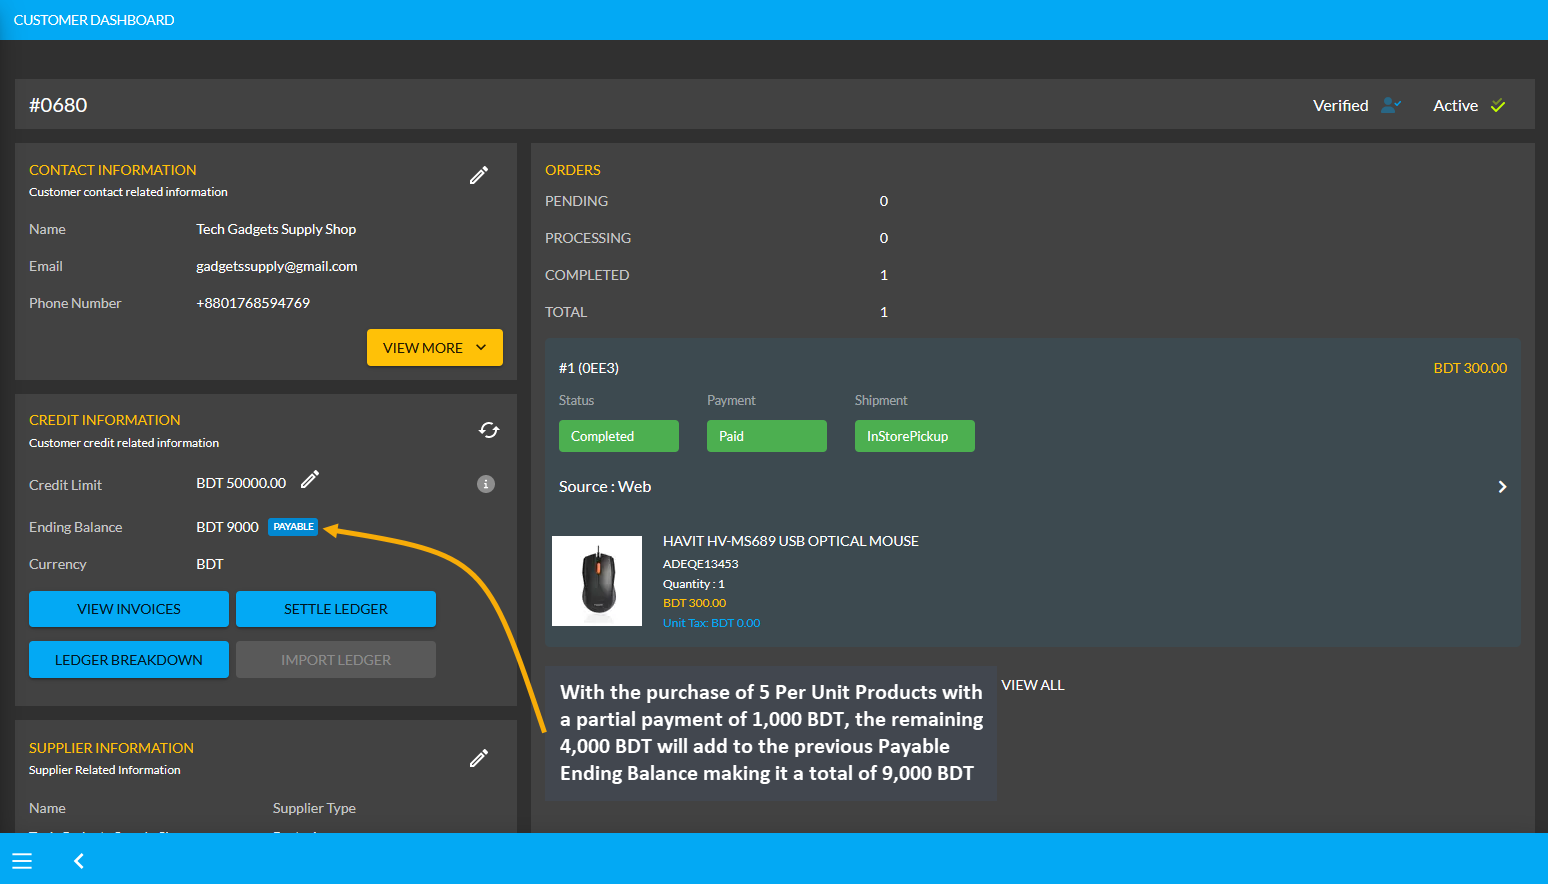
Image 7: The purchase of 5 Per Unit Products without payment will add to the Payable Ending Balance.
Using the Ledger Breakdown feature, the Shop Owner can check the Per Unit Product purchase of their Partial Payment transaction from the Credit Supplier on their Ledger Breakdown Page as shown in the example below.

Image 8: Ledger Breakdown Page will show details of Per Unit Product purchase With Partial Payment.
Per Unit Product purchase with Full Payment
The Shop Owner can purchase Per Unit Products from the Credit Supplier with full payment by using the Purchase option. From the Products tab, go to the Product List View and select the Purchase option from the target Per Unit Product. Clicking this option will redirect to the Add Product Stock page from where Shop Owner can purchase the Per Unit Products with full payment from the Credit Supplier.
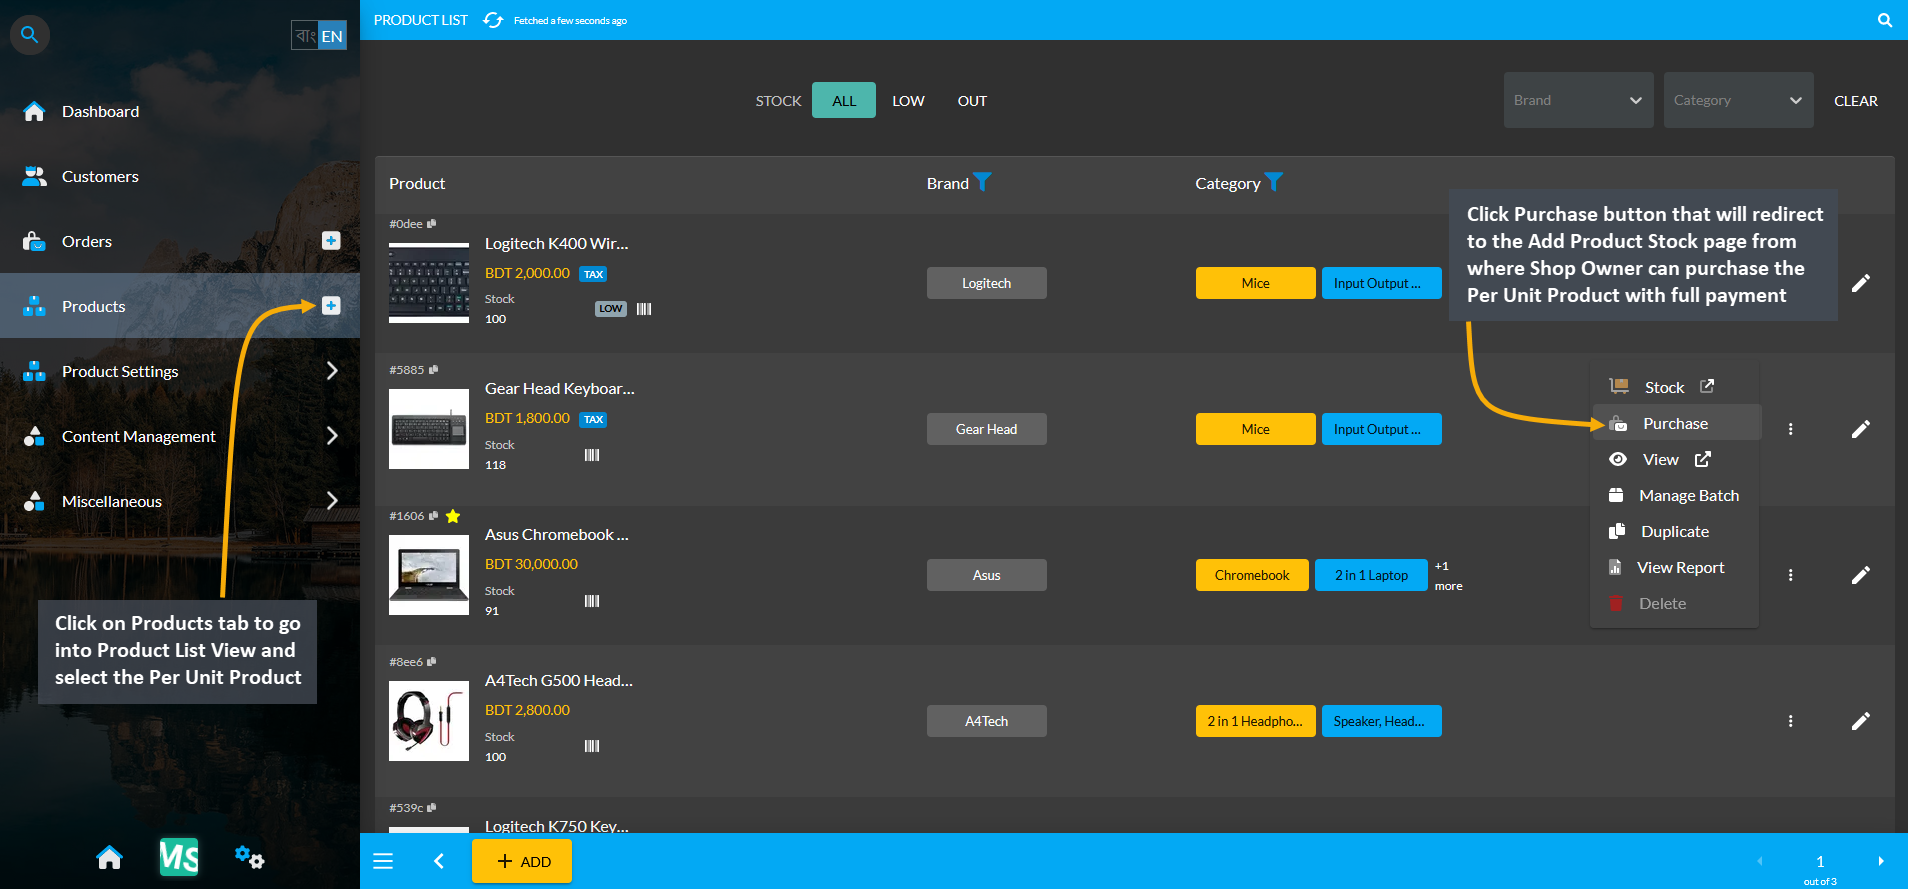
Image 1: Select target Per Unit Product and click the Purchase button to buy from Credit Supplier.
On the Add Product Stock page, select the Full Payment Method from Acquisition Options, set the Purchase Price Per Unit, select Credit Supplier, and select Warranty if it is not automatically selected. Then click the Auto Generate Serial Numbers button to generate Quantity and Serial of Per Unit Product that Shop Owner will buy from Supplier.
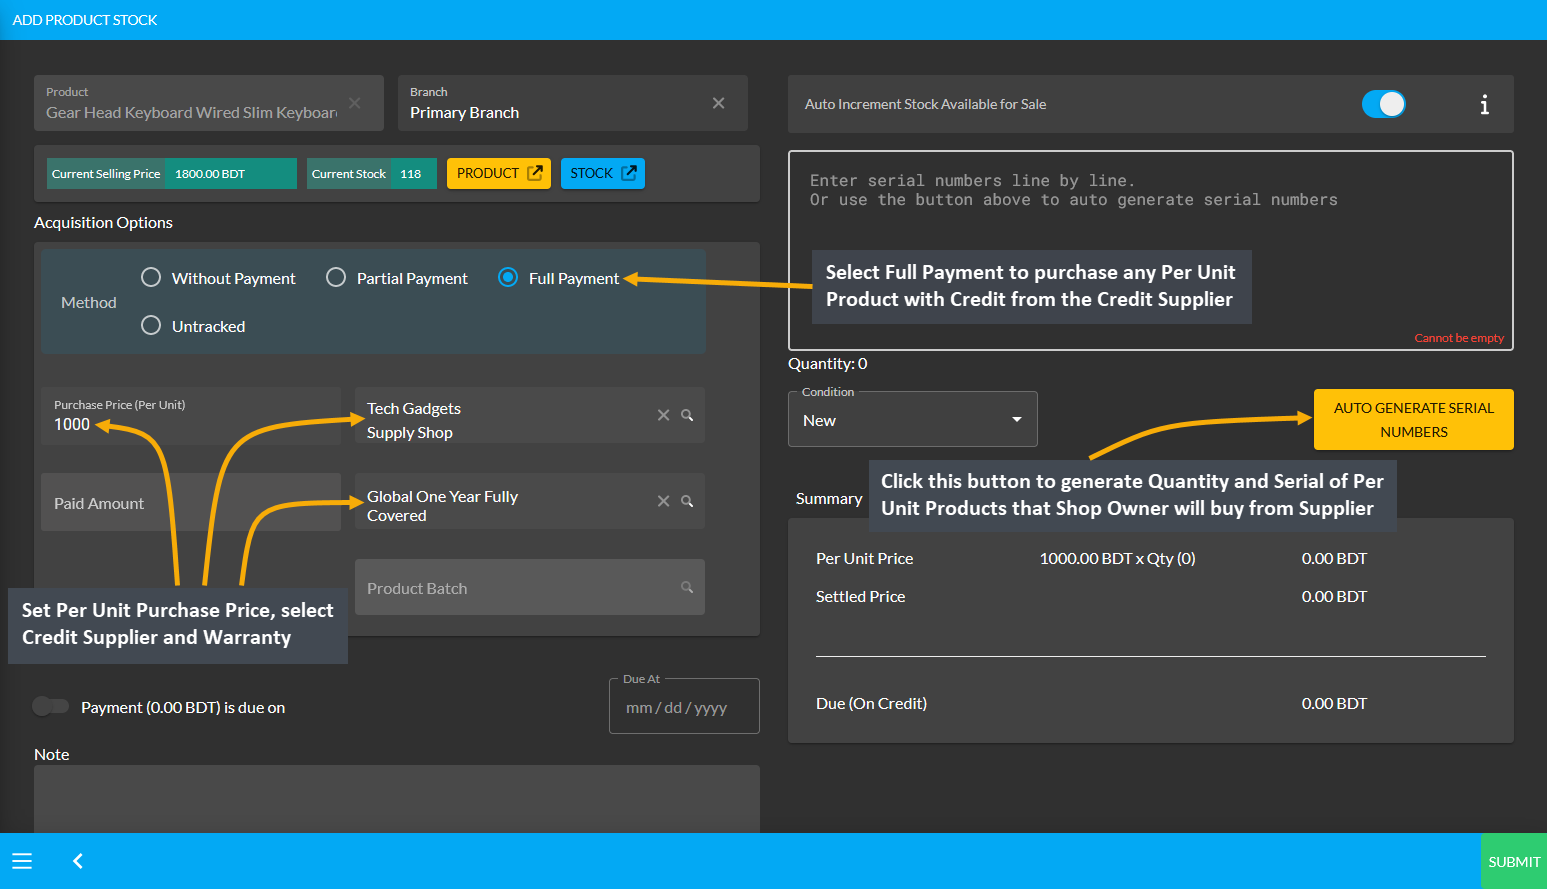
Image 2: Set Purchase Price, select Supplier and Warranty, and click Auto Generate Serial Numbers button.
After clicking the Auto Generate Serial Numbers button, a pop-up will appear where Product Serial Number and Quantity needs to be set with Prefix, Suffix, Start Counter, and End Counter. Click the Generate button to create the Per Unit Products for purchase from the Credit Supplier. Here, 5 Per Unit Products quantities were created.
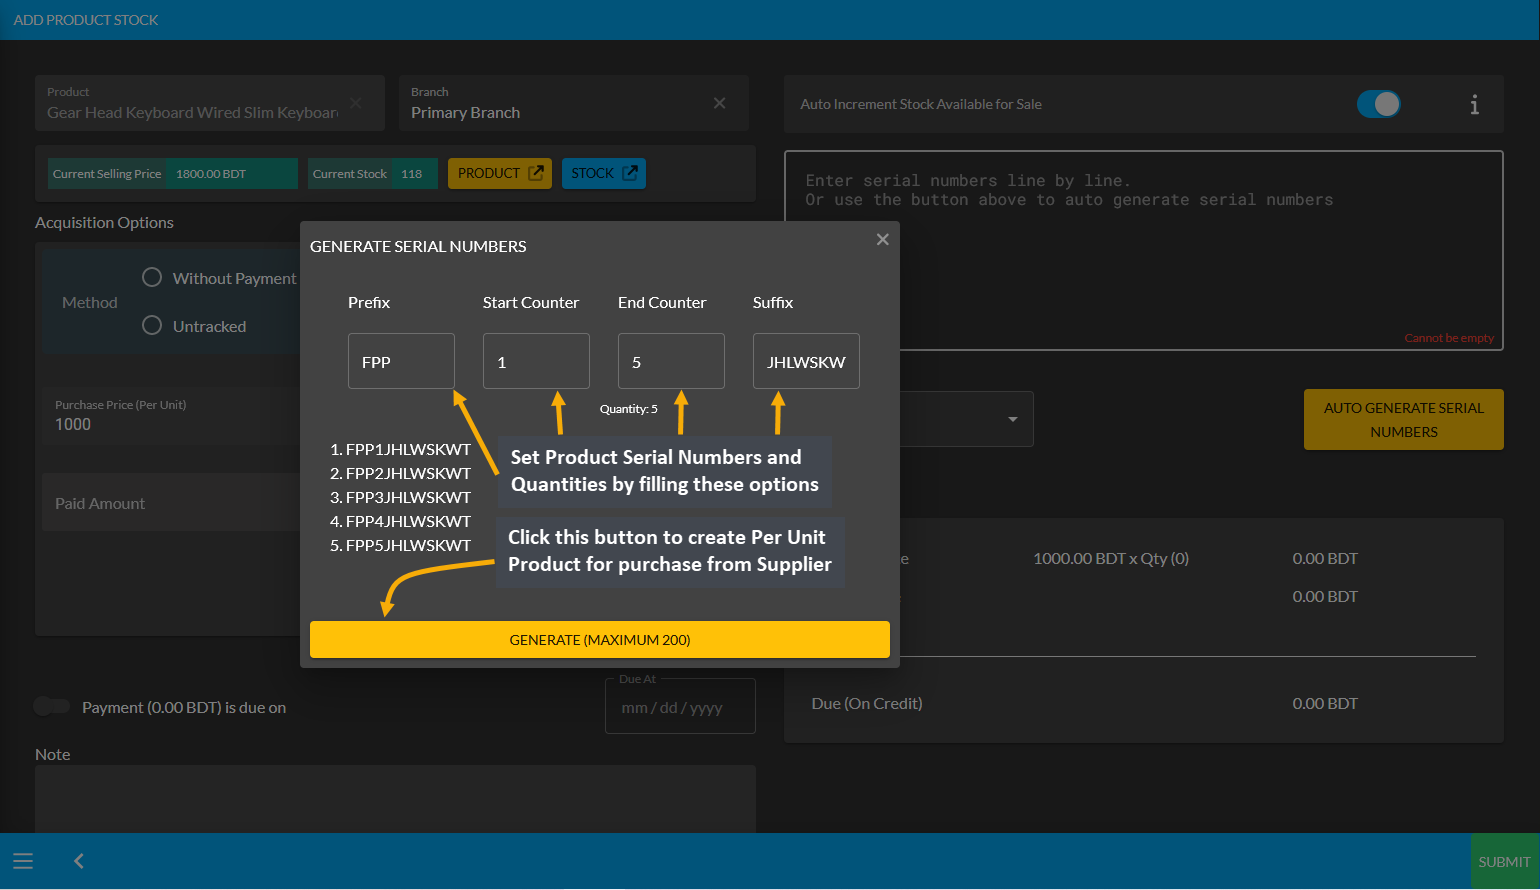
Image 3: Set Product Serial Number and Quantity with Prefix, Suffix, Start Counter, and End Counter.
After Product Serial Numbers and Quantities are generated for the target Per Unit Product, full payment amount will automatically be set on the Paid Amount box. Click Submit to complete purchase process with Full Payment.
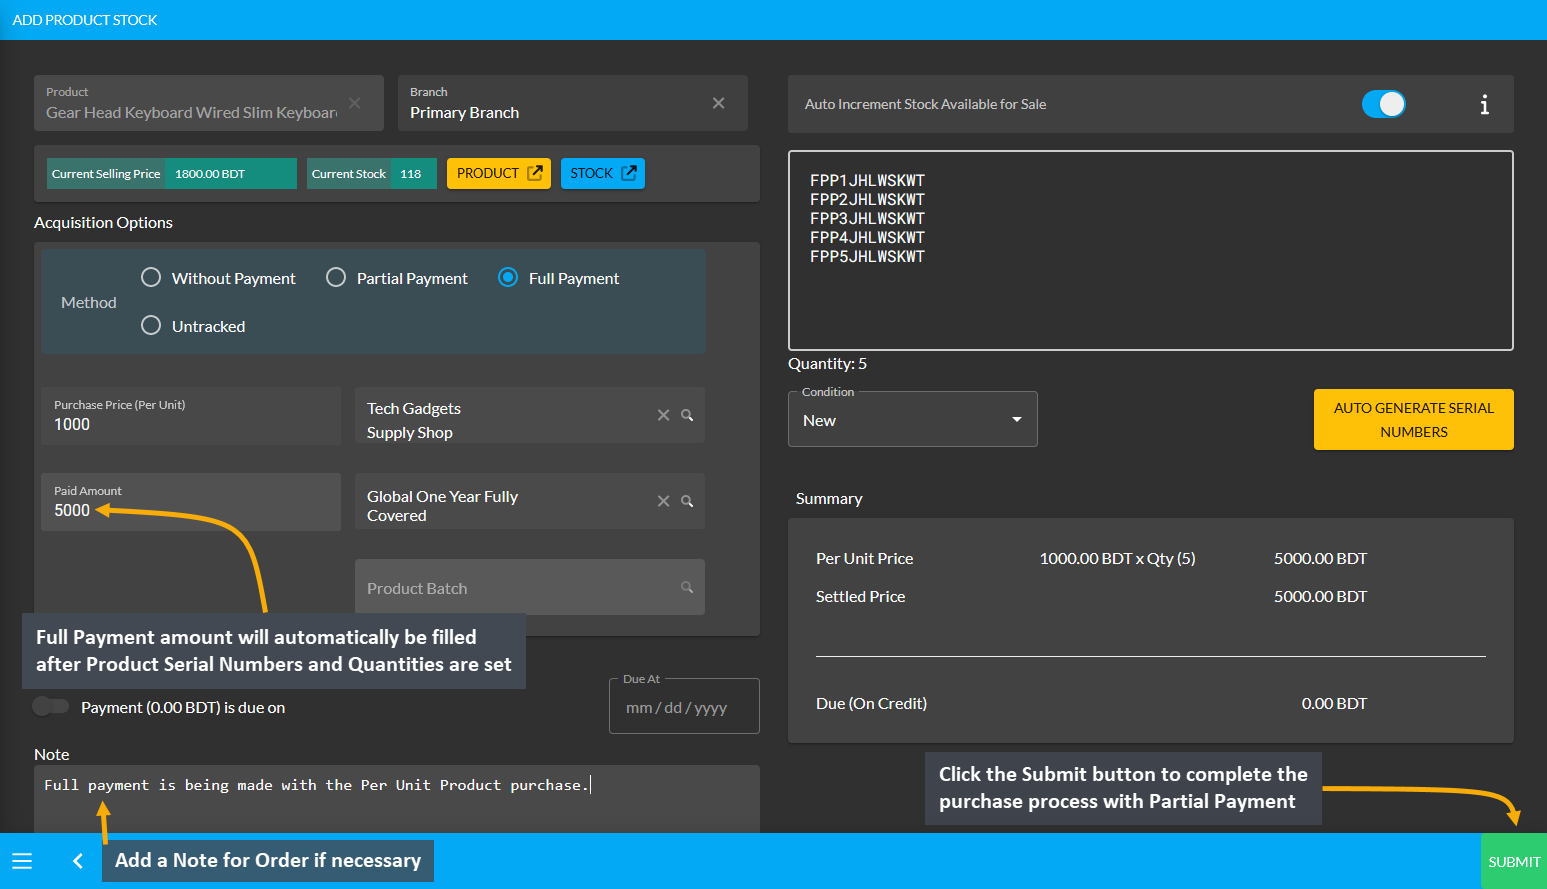
Image 4: After Full Payment amount is set, click Submit to complete purchase with Full Payment Method.
Then, a pop-up will show uploading assigned Per Unit Product quantities and confirm when units are successfully created. Click Okay to complete the Per Unit Product purchase process from Credit Supplier. If Shop Owner wants to purchase more quantities of the same Per Unit Product from the same Credit Supplier, then they need to click the Purchase Product from Same Supplier button as shown in the example screenshot.
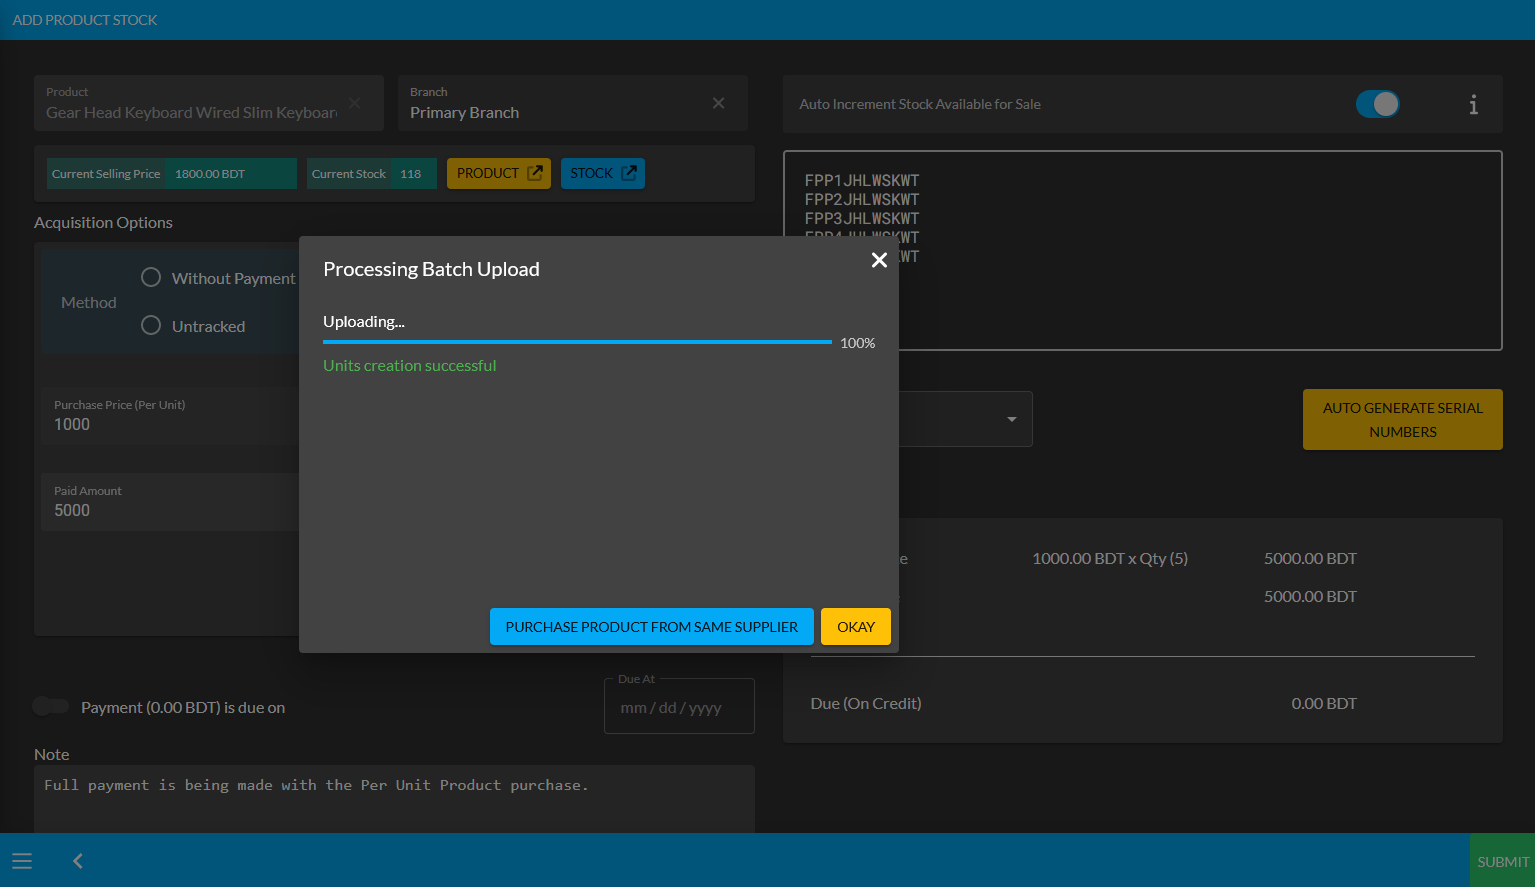
Image 5: Pop-up showing successful creation or batch upload of Per Unit Product. Click Okay to proceed.
Clicking on Okay will redirect to the Unit Stock Management page where the successfully created Batch of Per Unit Products will be displayed on the top of the list as marked in the example screenshot.
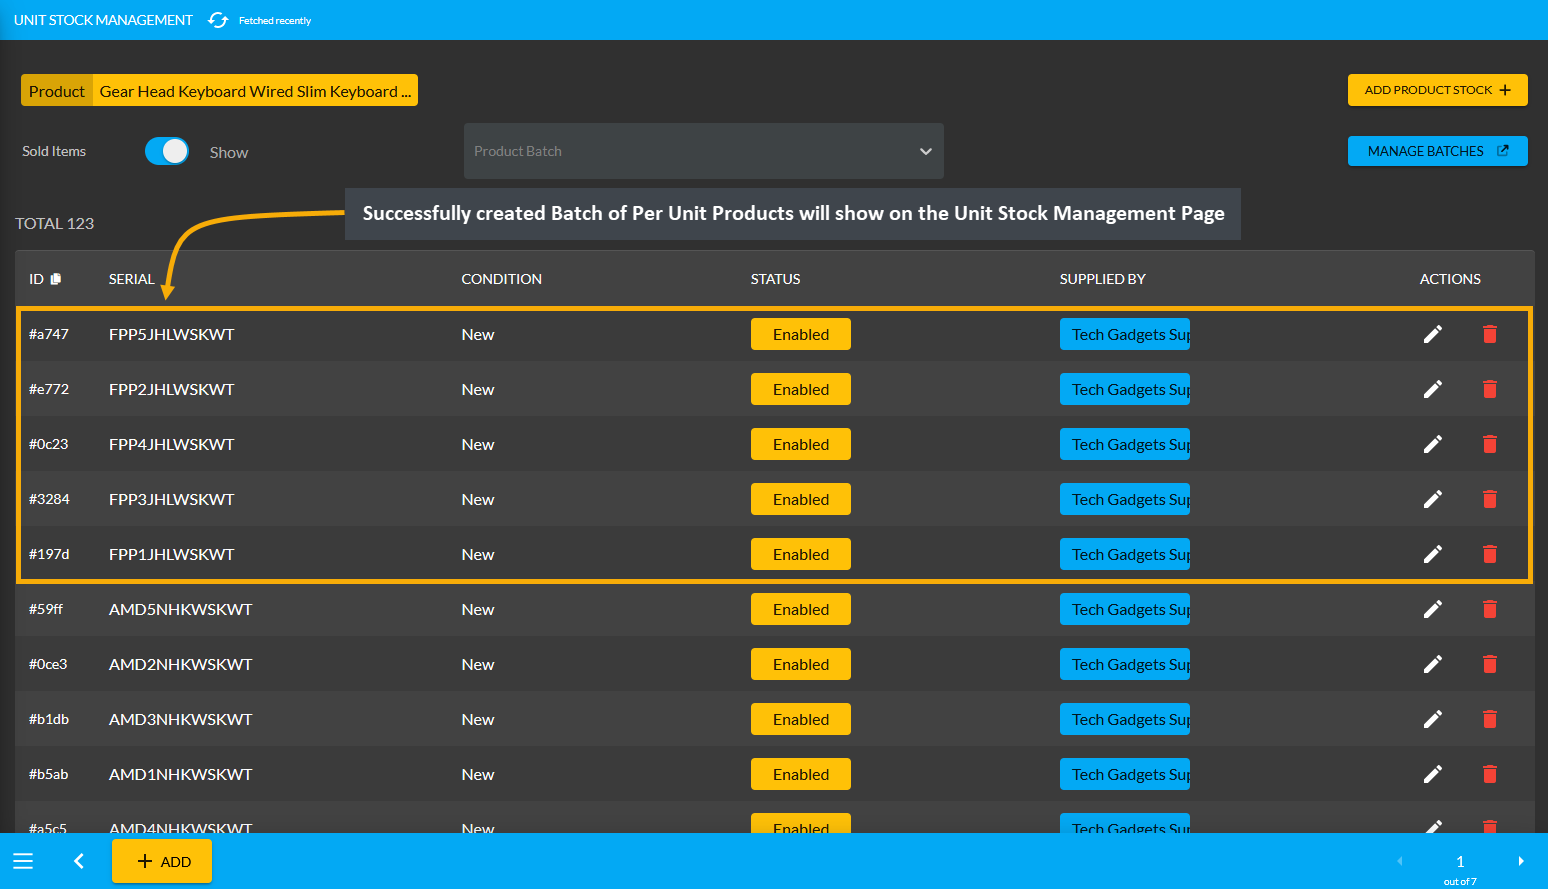
Image 6: Successfully created Batch of Per Unit Products will display on the Unit Stock Management Page.
Per Unit Product purchase with Full Payment Ledger View
As the Credit Supplier Tech Gadgets Supply Shop already have a previous Payable of 9,000 BDT and the purchase of 5 Per Unit Products with a full payment of 5,000 BDT was made, no remaining dues will be added to their Payable Ending Balance. However, as the Credit Supplier will get 9,000 BDT from Shop Owner in total based on previous dues, the Shop Owner can pay them back using the Settle Ledger option.
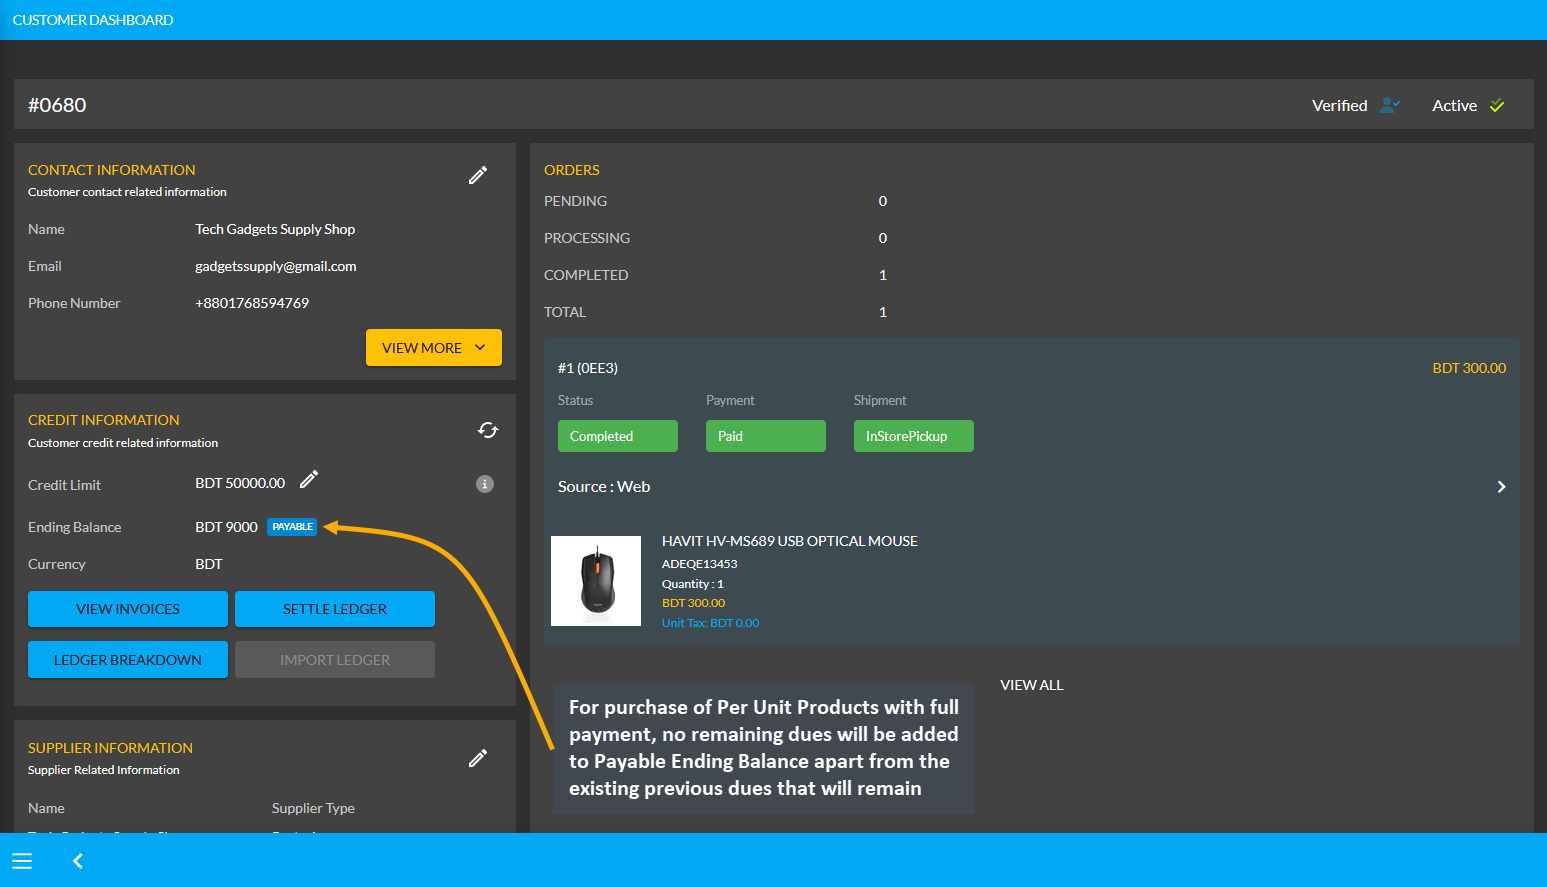
Image 7: For purchase of Per Unit Products with full payment, no dues will add to Payable Ending Balance.
Using the Ledger Breakdown feature, the Shop Owner can check the Per Unit Product purchase of their Partial Payment transaction from the Credit Supplier on their Ledger Breakdown Page as shown in the example below.

Image 8: Ledger Breakdown Page will show details of Per Unit Product purchase With Full Payment.
