Manage PC Builds
Manage User and Featured PC Builds from the Miscellaneous tab.
Click on the Miscellaneous module to create, view, and modify PC Builds by adding components like CPU, memory, monitor, case, storage, motherboard, graphics card, cooler, power supply, mouse, keyboard, headphone, and speaker etc.
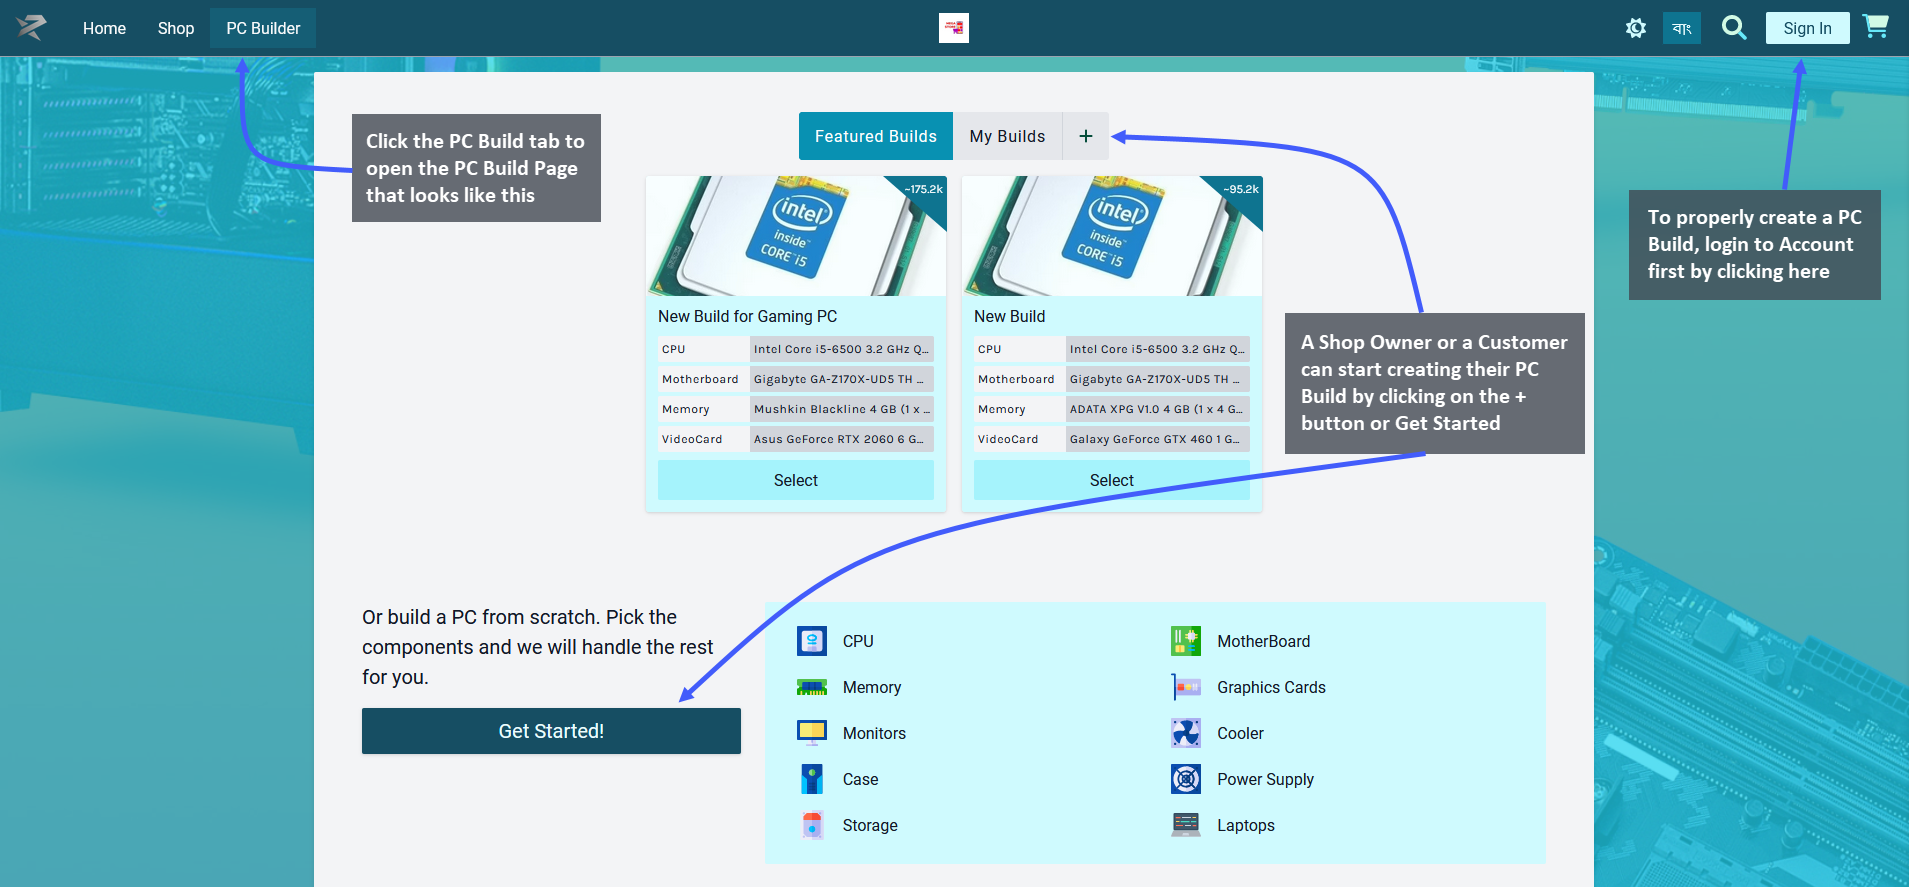
Create PC Builds on The Website
The Shop Owner can create their own PC Builds by logging into their account on The Website. A Customer can also create their private PC Builds by logging into their account and save it for placing Order.
Add Components to PC Build
On the PC Builds Page, components need to be selected one by one with CPU, Motherboard, Graphics Card, Memory, Storage, Case, Monitor, Power Supply, and Accessories. Selecting these components will create new PC Build.
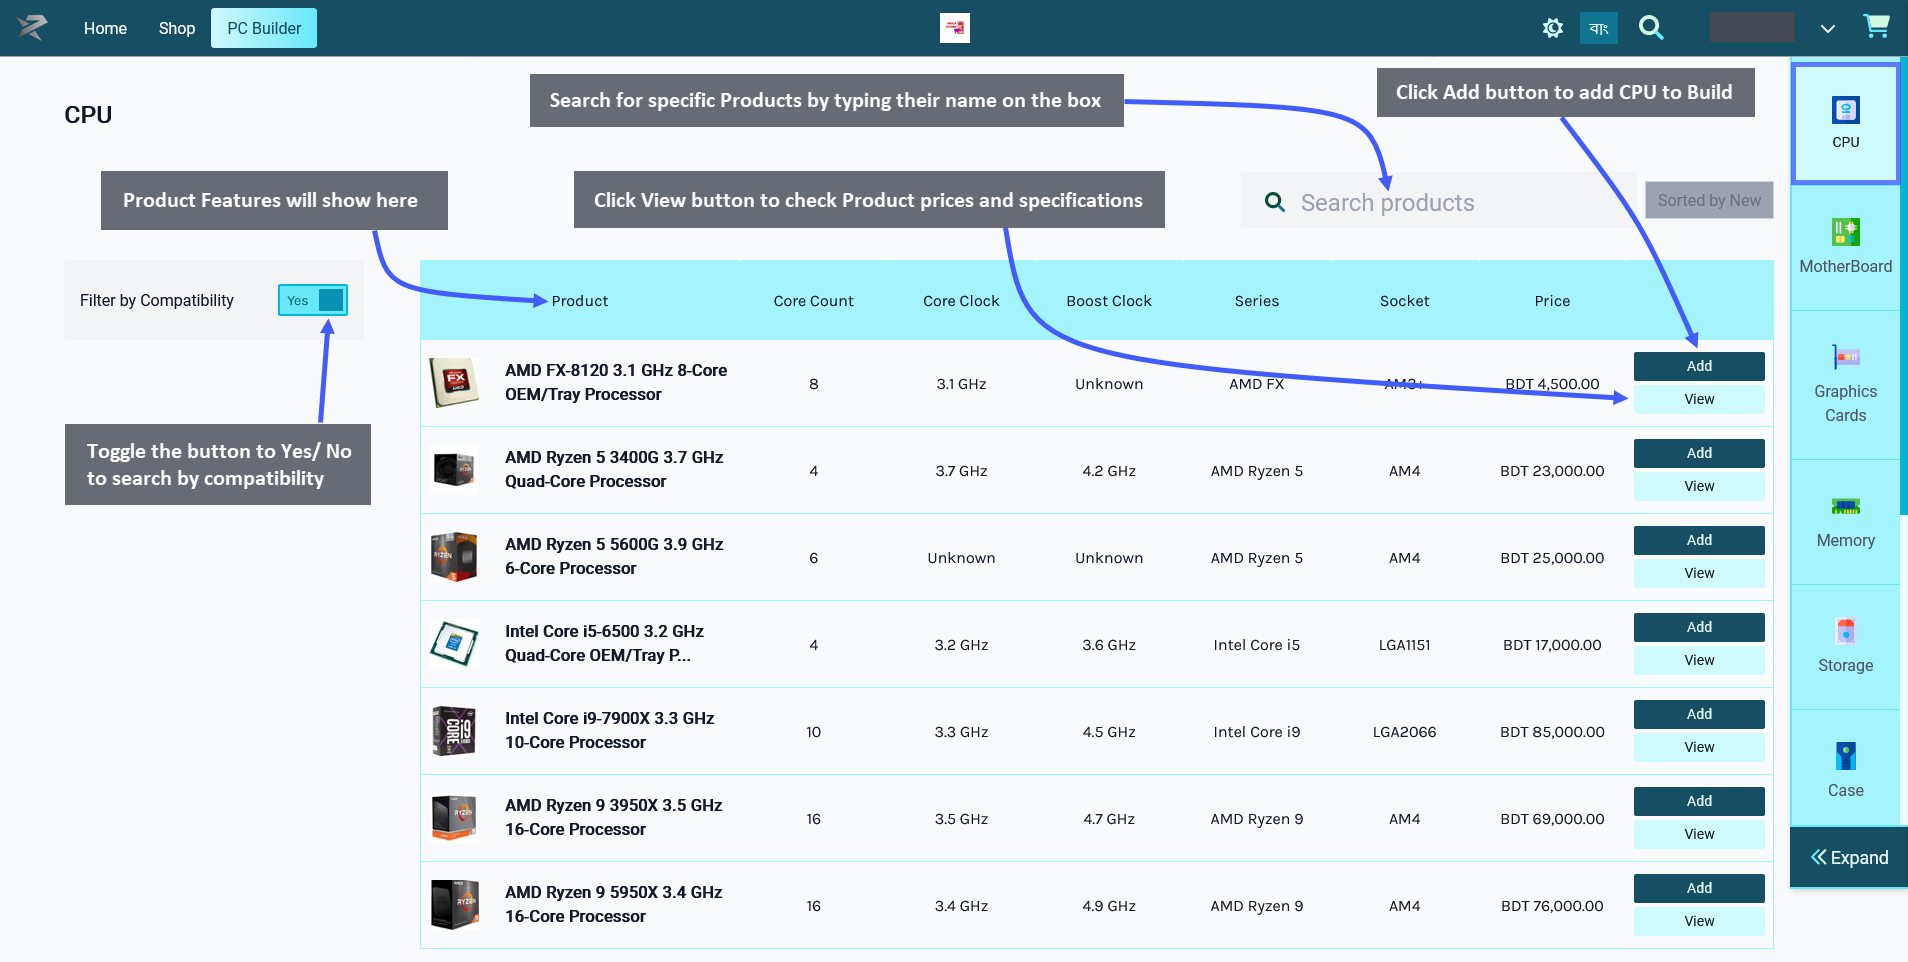
Add CPU to PC Build
The first component to choose for PC Build is the CPU or central processing unit or the main processor. Click on the Add button to add the Product to build. Below the Add Button is a View button clicking on which will open a pop-up to display Product price, general specifications, performance specifications, physical specifications, and power specifications along with detailed Product images.
There is a Search Box on the top right corner to help find specific Product(s). The Product features will show on top of the list. There is a Filter Compatibility button which can be toggled to Yes/ No to search by compatibility of PC components or not. Click on Expand to see a detailed view of added components and their prices.
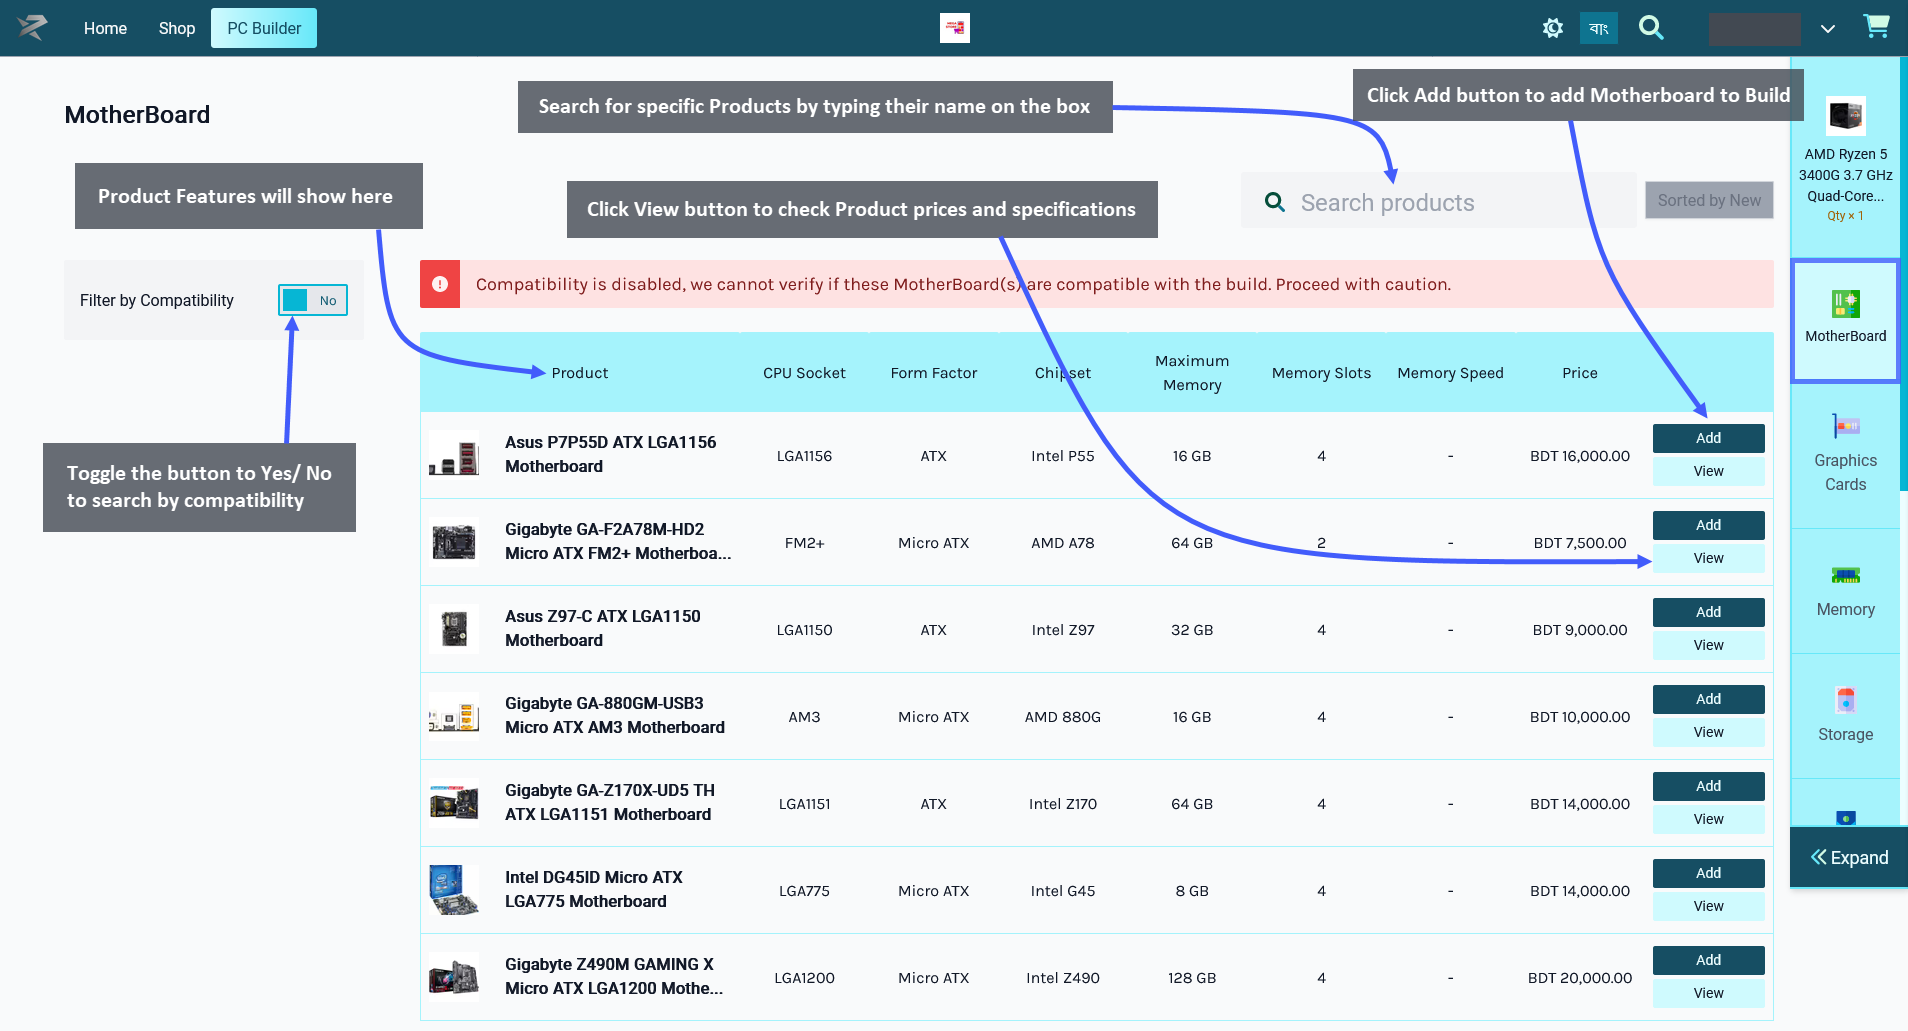
Add Motherboard to PC Build
After successfully adding CPU to PC Build, select Motherboard which is the main printed circuit board that allows communication between many of the crucial electronic components of a system. Click on the Add button to add the item to build. Below the Add Button is a View button clicking on which will open a pop-up to display Product price, general specifications, performance specifications, physical specifications, and power specifications along with detailed Product images.
There is a Search Box on the top right corner to help find specific Product(s). The Product features will show on top of the list. There is a Filter Compatibility button which can be toggled to Yes/ No to search by compatibility of PC components or not. For instance, in the example below, turning on the compatibility button did not bring any Product(s) for the Motherboard. However, when compatibility was turned off, all Motherboard Product(s) were displayed. Click on Expand to see a detailed view of added components and their prices.
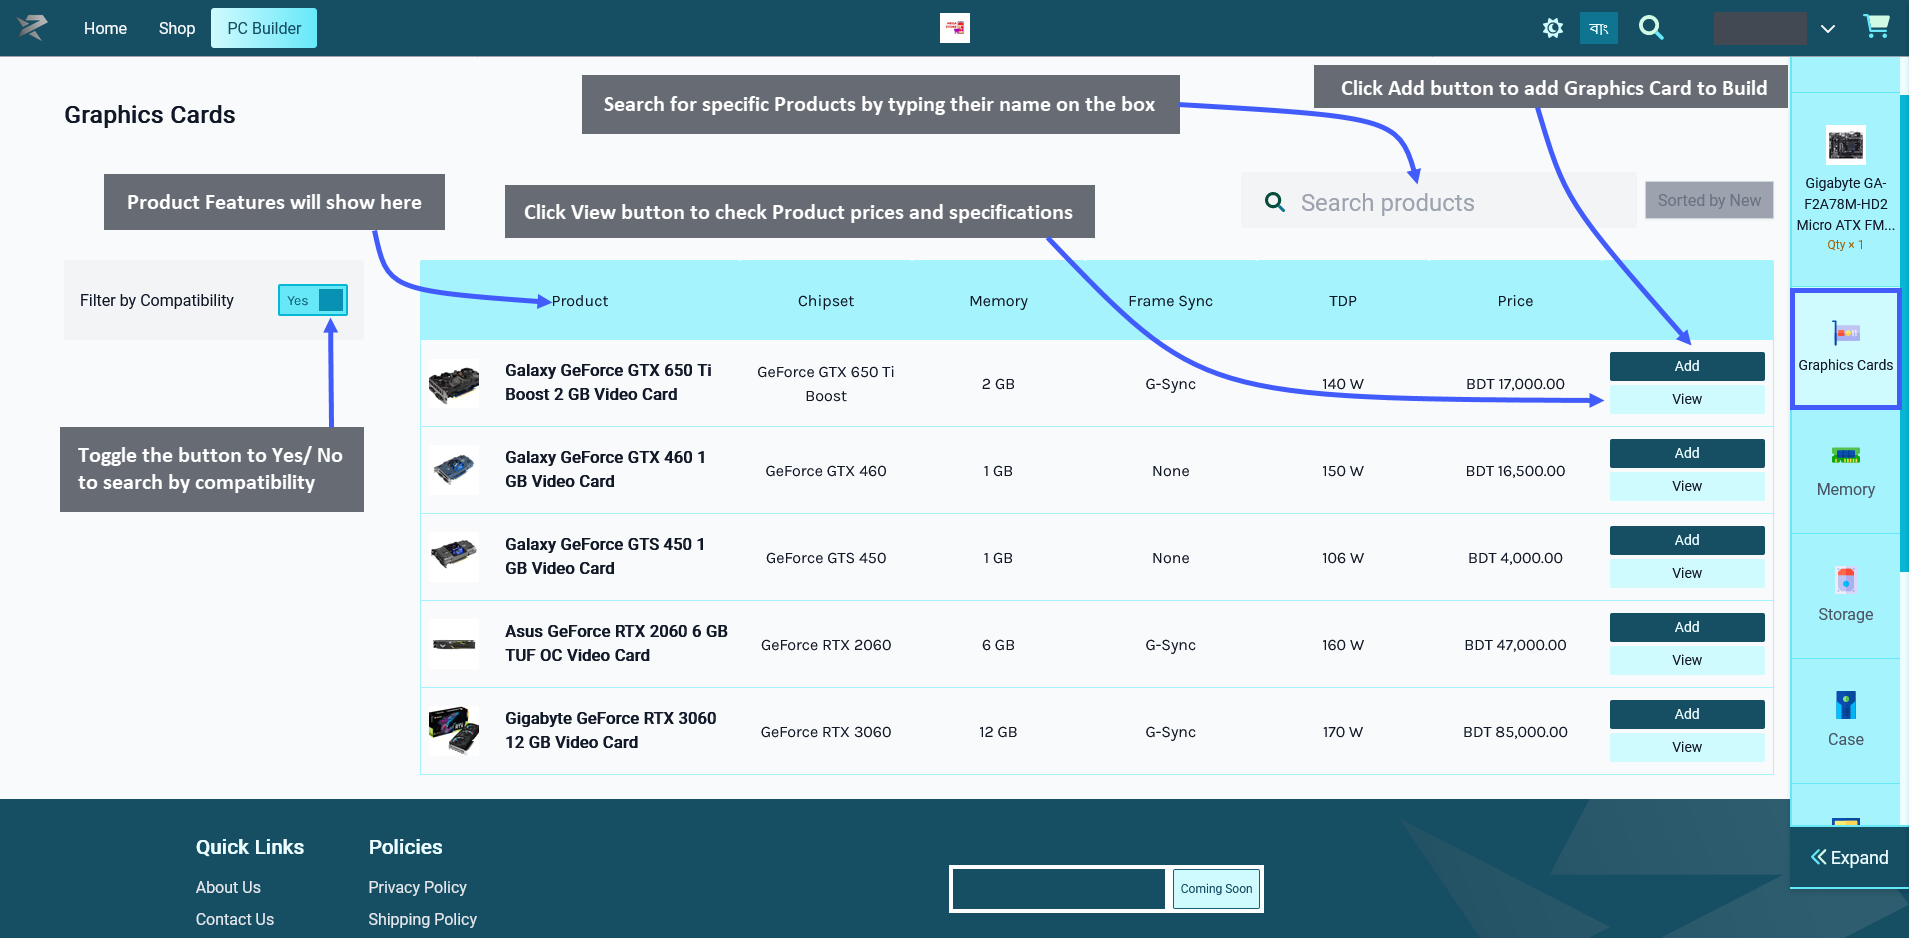
Add Graphics Card to PC Build
When Motherboard is added to PC Build, select Graphics Card which is the expansion card that generates a feed of output images to a display device. Click on the Add button to add the Product to build. Below the Add Button is a View button clicking on which will open a pop-up to display Product price, general specifications, performance specifications, physical specifications, and power specifications along with detailed Product images.
There is a Search Box on the top right corner to help find specific Product(s). The Product features will show on top of the list. There is a Filter Compatibility button which can be toggled to Yes/ No to search by compatibility of PC components or not. Click on Expand to see a detailed view of added components and their prices.
Add Memory to PC Build
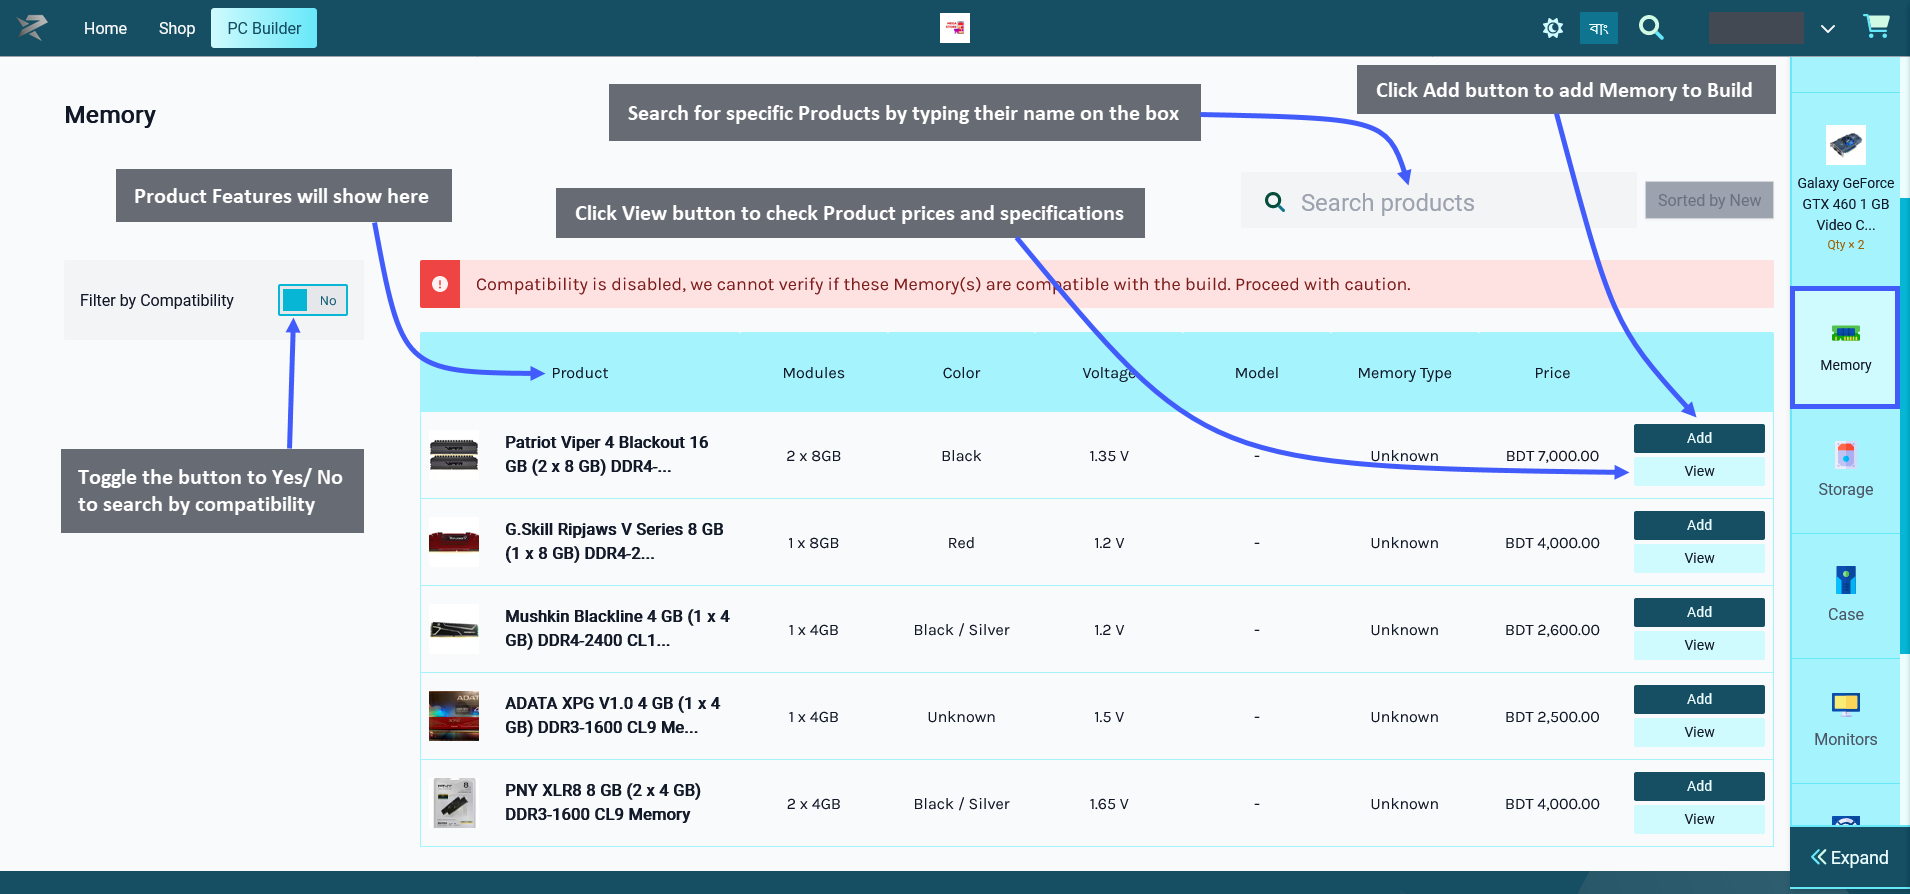
The next step is to select Memory which is the system that stores information for immediate use. Click the Add button to add the item to build. Below the Add Button is a View button clicking on which will open a pop-up to display the Product price, general specifications, performance specifications, physical specifications, and power specifications along with detailed Product images.
There is a Search Box on the top right corner to help find specific Product(s). The Product features will show on top of the list. There is a Filter Compatibility button which can be toggled to Yes/ No to search by compatibility of PC components or not. For instance, in the example, turning on compatibility did not bring any Product(s) for the Memory. However, when compatibility was turned off, all the Memory Product(s) were displayed. Click on Expand to see a detailed view of added components and their prices.
Add Storage to PC Build
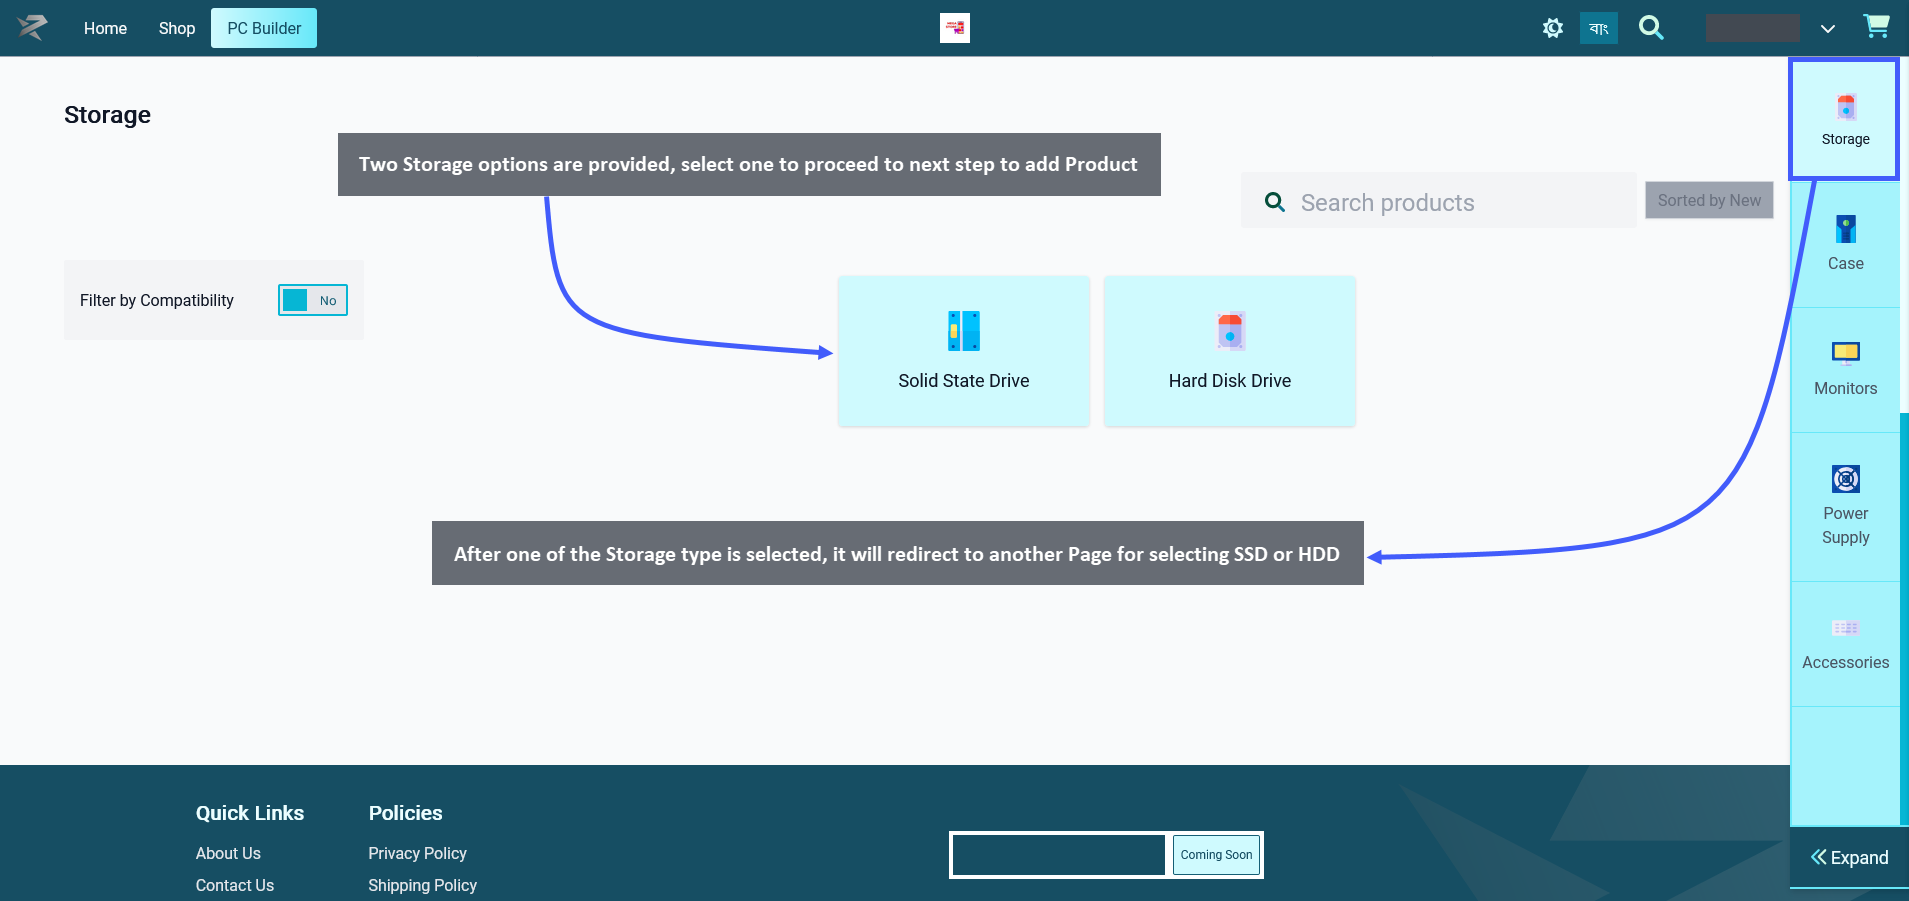
After Memory is added successfully, select the Storage which are available in two options - Solid State Drive and Hard Disk Drive. Hard Disk Drives or HDDs is a traditional storage device that uses mechanical spinning platters and a moving read/write head to access data. Solid States Drive or SSDs are newer, faster drives that store data on instantly accessible memory chips. Each storages are provided from different brands to select.
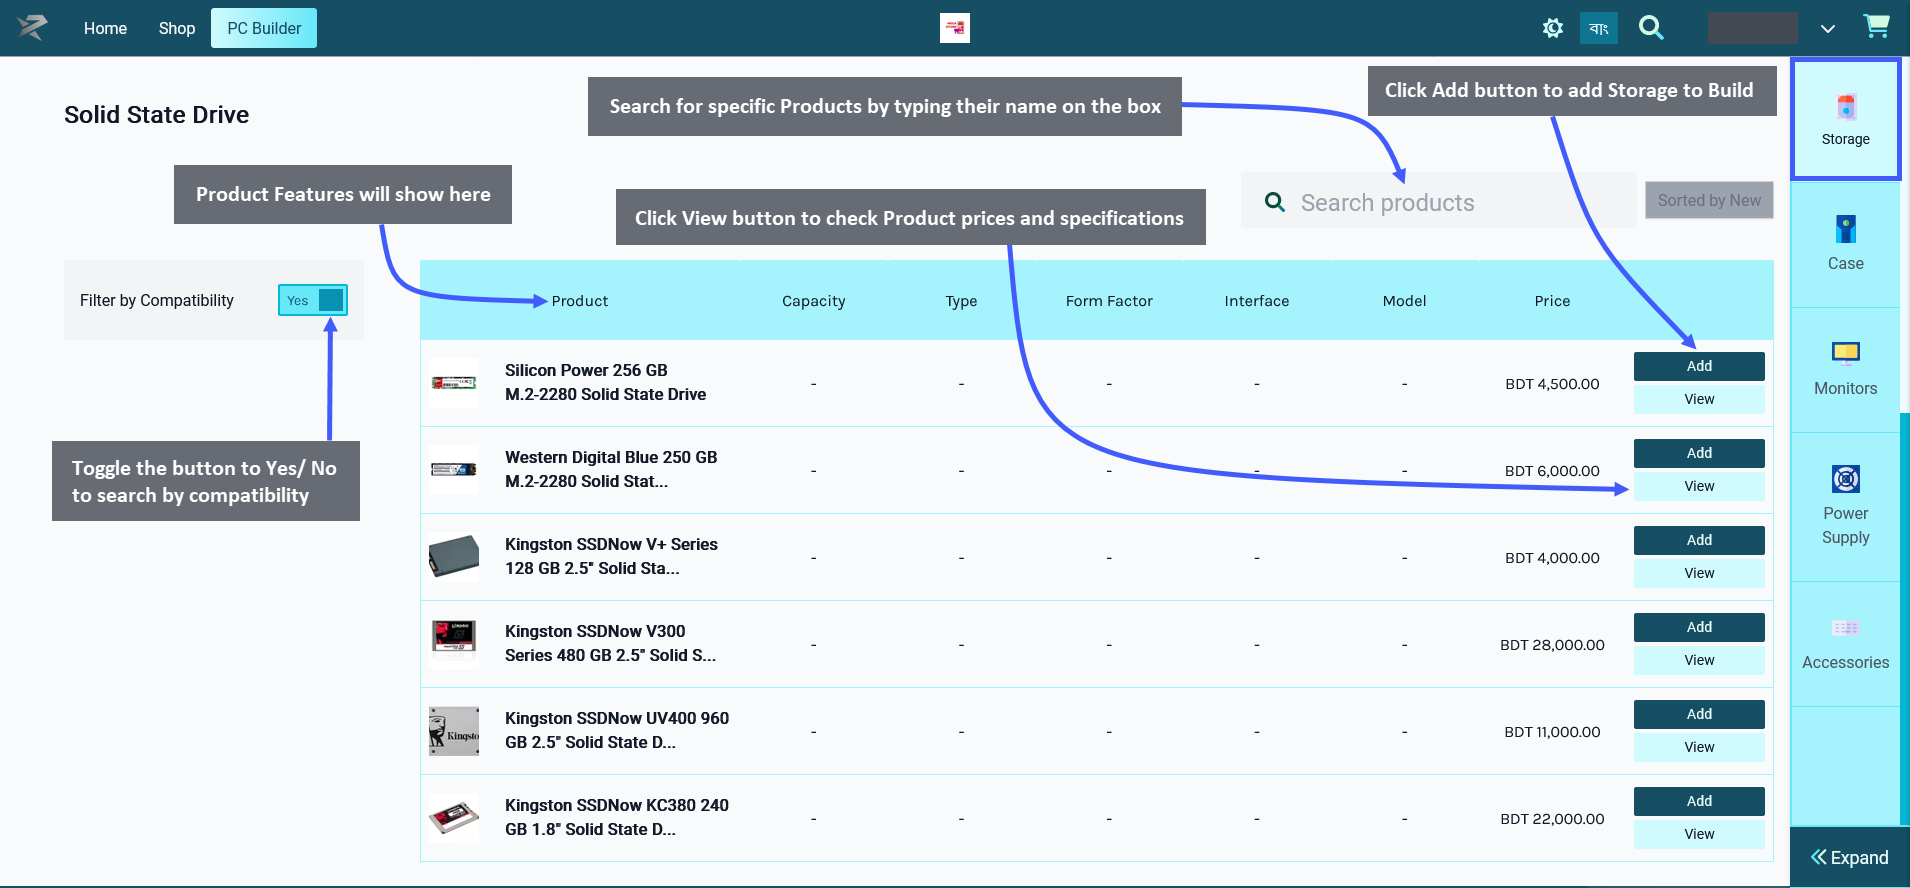
Select any of the storage options, like SSD and click the Add button to add the Product to build. Below the Add Button is a View button clicking on which will open a pop-up to show the Product price, general specifications, performance specifications, physical specifications, and power specifications along with detailed Product images.
There is a Search Box on the top right corner to help find specific Product(s). The Product features will show on top of the list. There is a Filter Compatibility button which can be toggled to Yes/ No to search by compatibility of PC components or not. Click on Expand to see a detailed view of added components and their prices.
Add Case to PC Buils
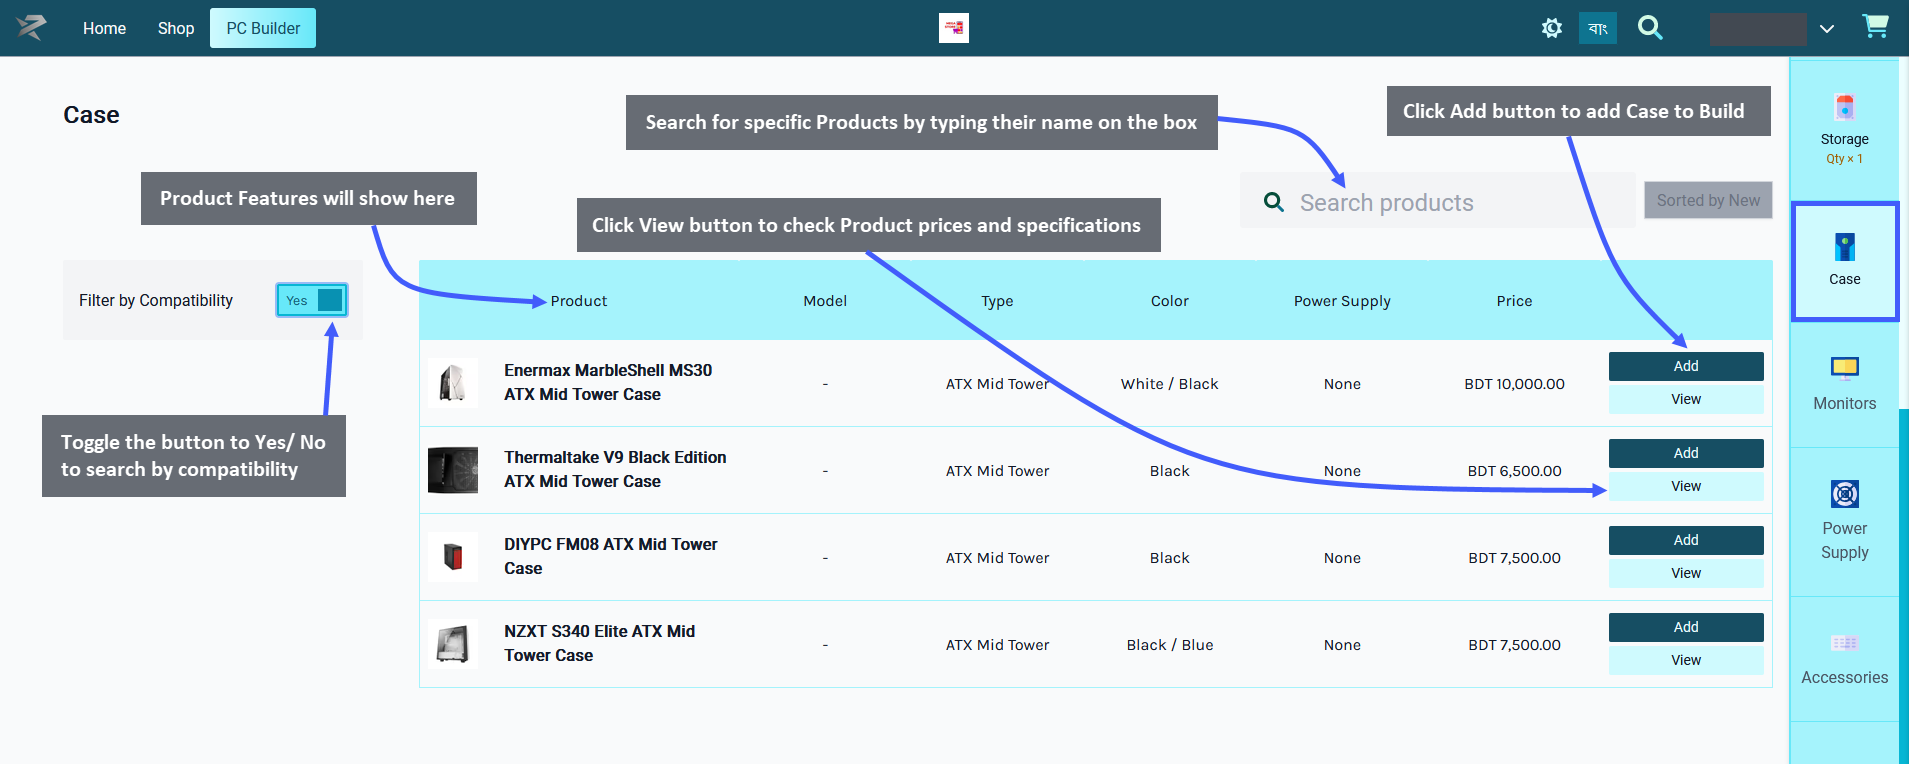
When Storage is added, Case needs to be selected. A computer case serves mainly as a way to physically mount and contain all the actual components inside a computer. Click on the Add button to add the Product to build. Below the Add Button is a View button clicking on which will open a pop-up to display Product price, general specifications, performance specifications, physical specifications, power specifications, and Product images.
There is a Search Box on the top right corner to help find specific Product(s). The Product features will show on top of the list. There is a Filter Compatibility button which can be toggled to Yes/ No to search by compatibility of PC components or not. Click on Expand to see a detailed view of added components and their prices.
Add Monitor to PC Build
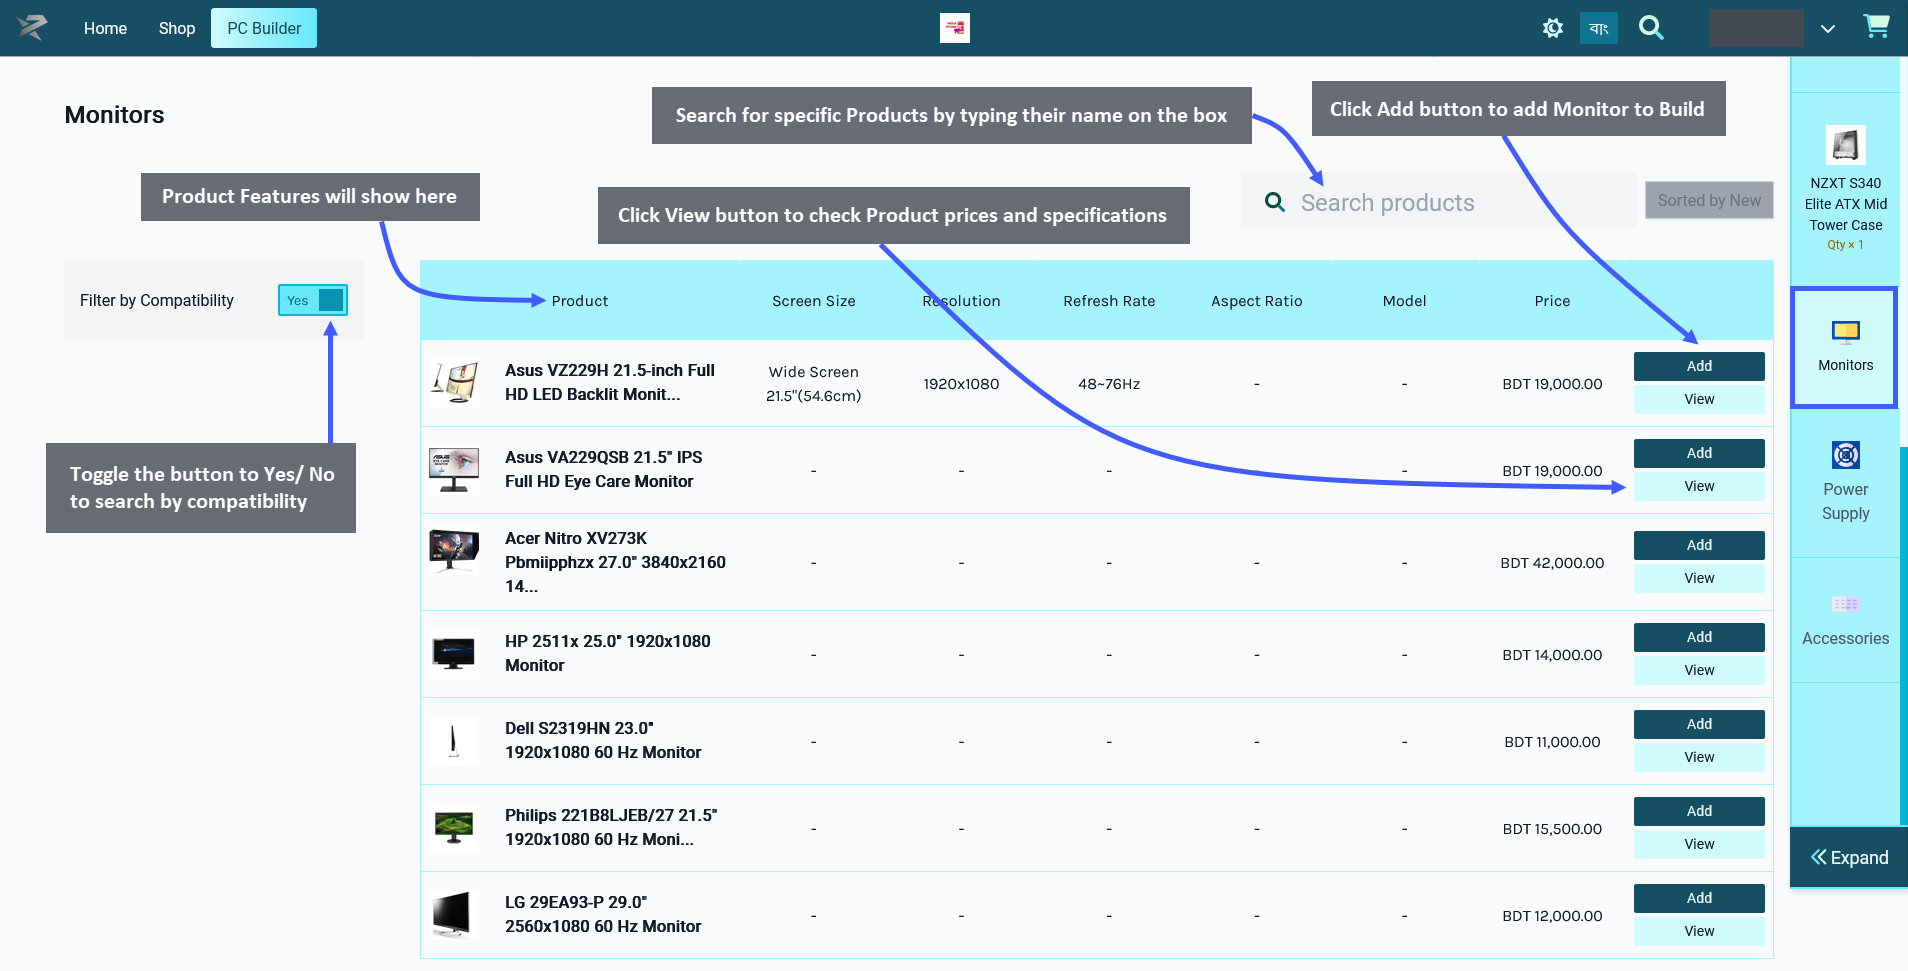
The next component to add after Case is Monitor. A monitor is an output device that displays information in the pictorial or text form. A monitor usually comprises a visual display, some circuitry, a casing, and a power supply. Click on the Add button to add the Product to build. Below the Add Button is a View button clicking on which will open a pop-up to show Product price, general specifications, performance specifications, physical specifications, and power specifications along with detailed Product images.
There is a Search Box on the top right corner to help find specific Product(s). The Product features will show on top of the list. There is a Filter Compatibility button which can be toggled to Yes/ No to search by compatibility of PC components or not. Click on Expand to see a detailed view of added components and their prices.
Add Power Supply to PC Build
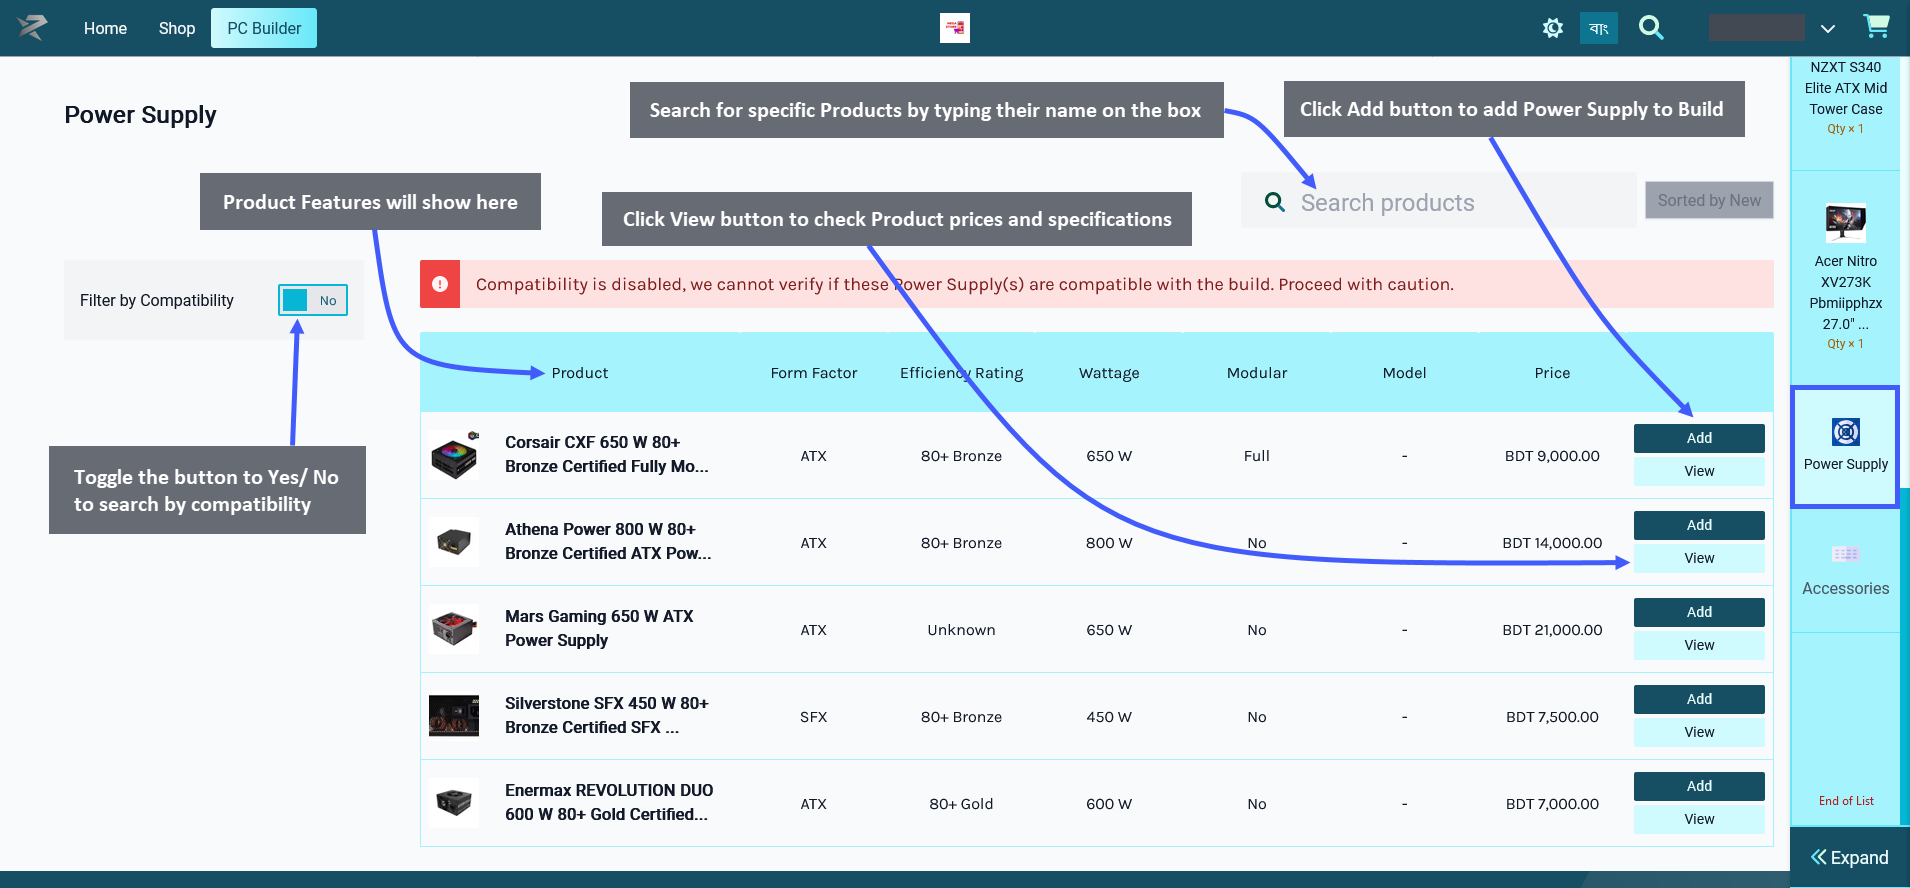
After adding Monitor to the build, select Power Supply. A power supply is a unit converts mains AC to low-voltage regulated DC power for the internal components of a computer. Click the Add button to add the Product to build. Below the Add Button is a View button clicking on which will open a pop-up to display the Product price, general specifications, performance specifications, physical specifications, and power specifications with Product images.
There is a Search Box on the top right corner to help find specific Product(s). The Product features will show on top of the list. There is a Filter Compatibility button which can be toggled to Yes/ No to search by compatibility of PC components or not. For instance, in the example, turning on compatibility did not bring any Product(s) for the Power Supply. However, when compatibility was turned off, all the Power Supply Product(s) were displayed. Click on Expand to see a detailed view of added components and their prices.
Add Accessories to PC Build
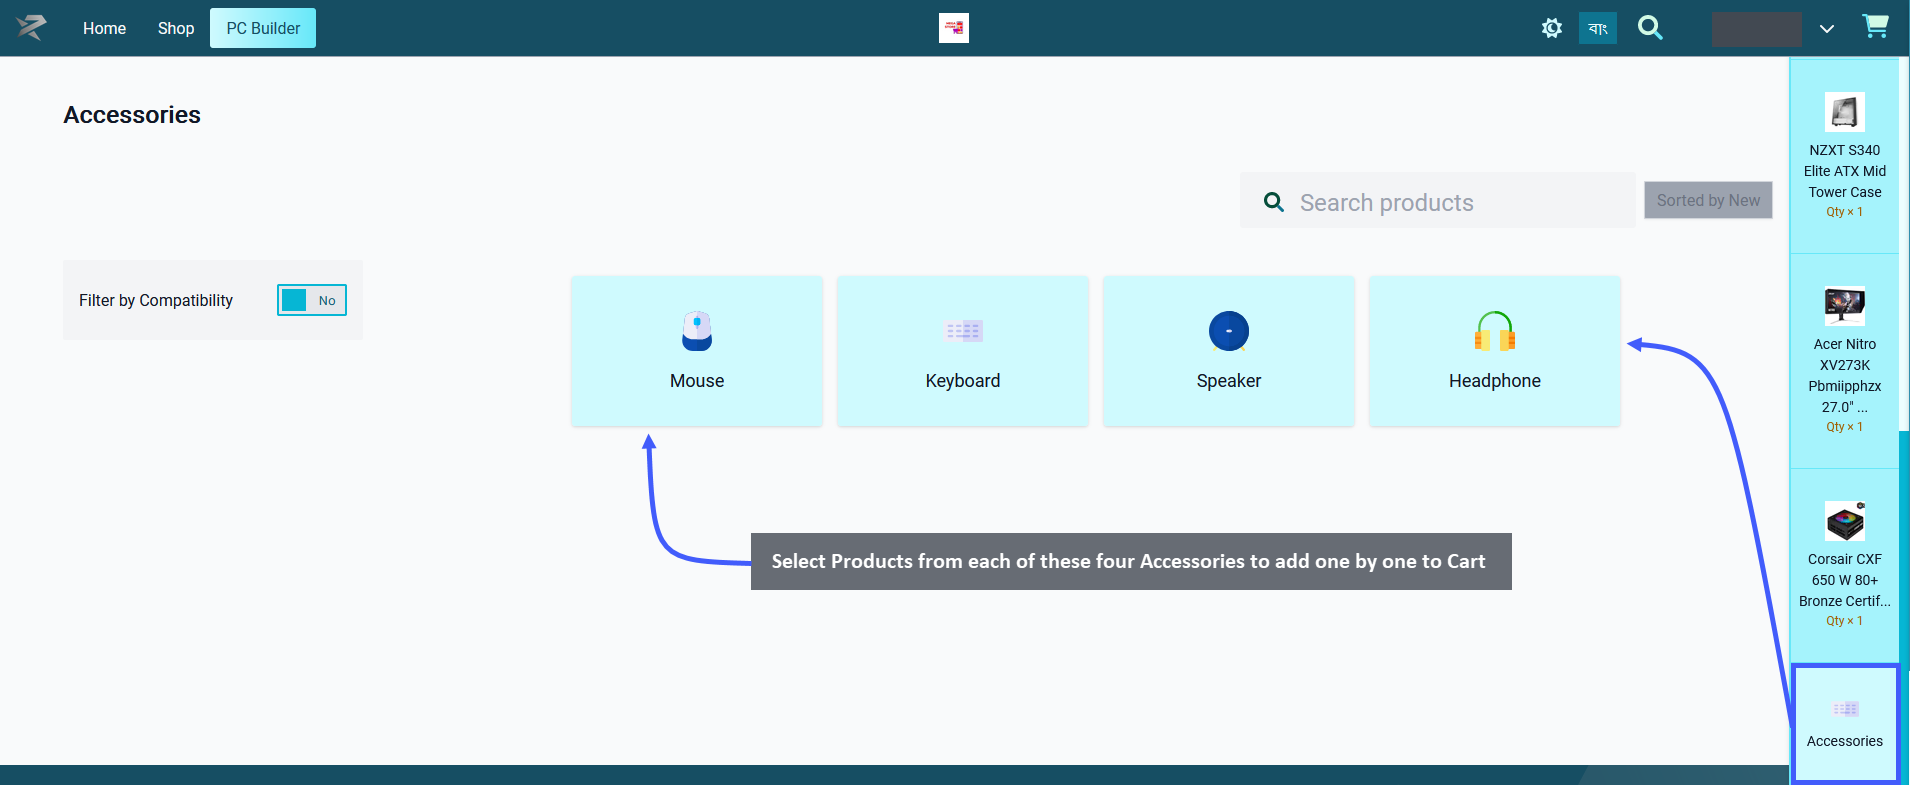
The last component to add to PC Build are accessories. The accessories Page includes four Product(s) to select - Mouse, Keyboard, Speaker, and Headphone. Click on each one of these to add them one by one to Cart.
Add Mouse to PC Build
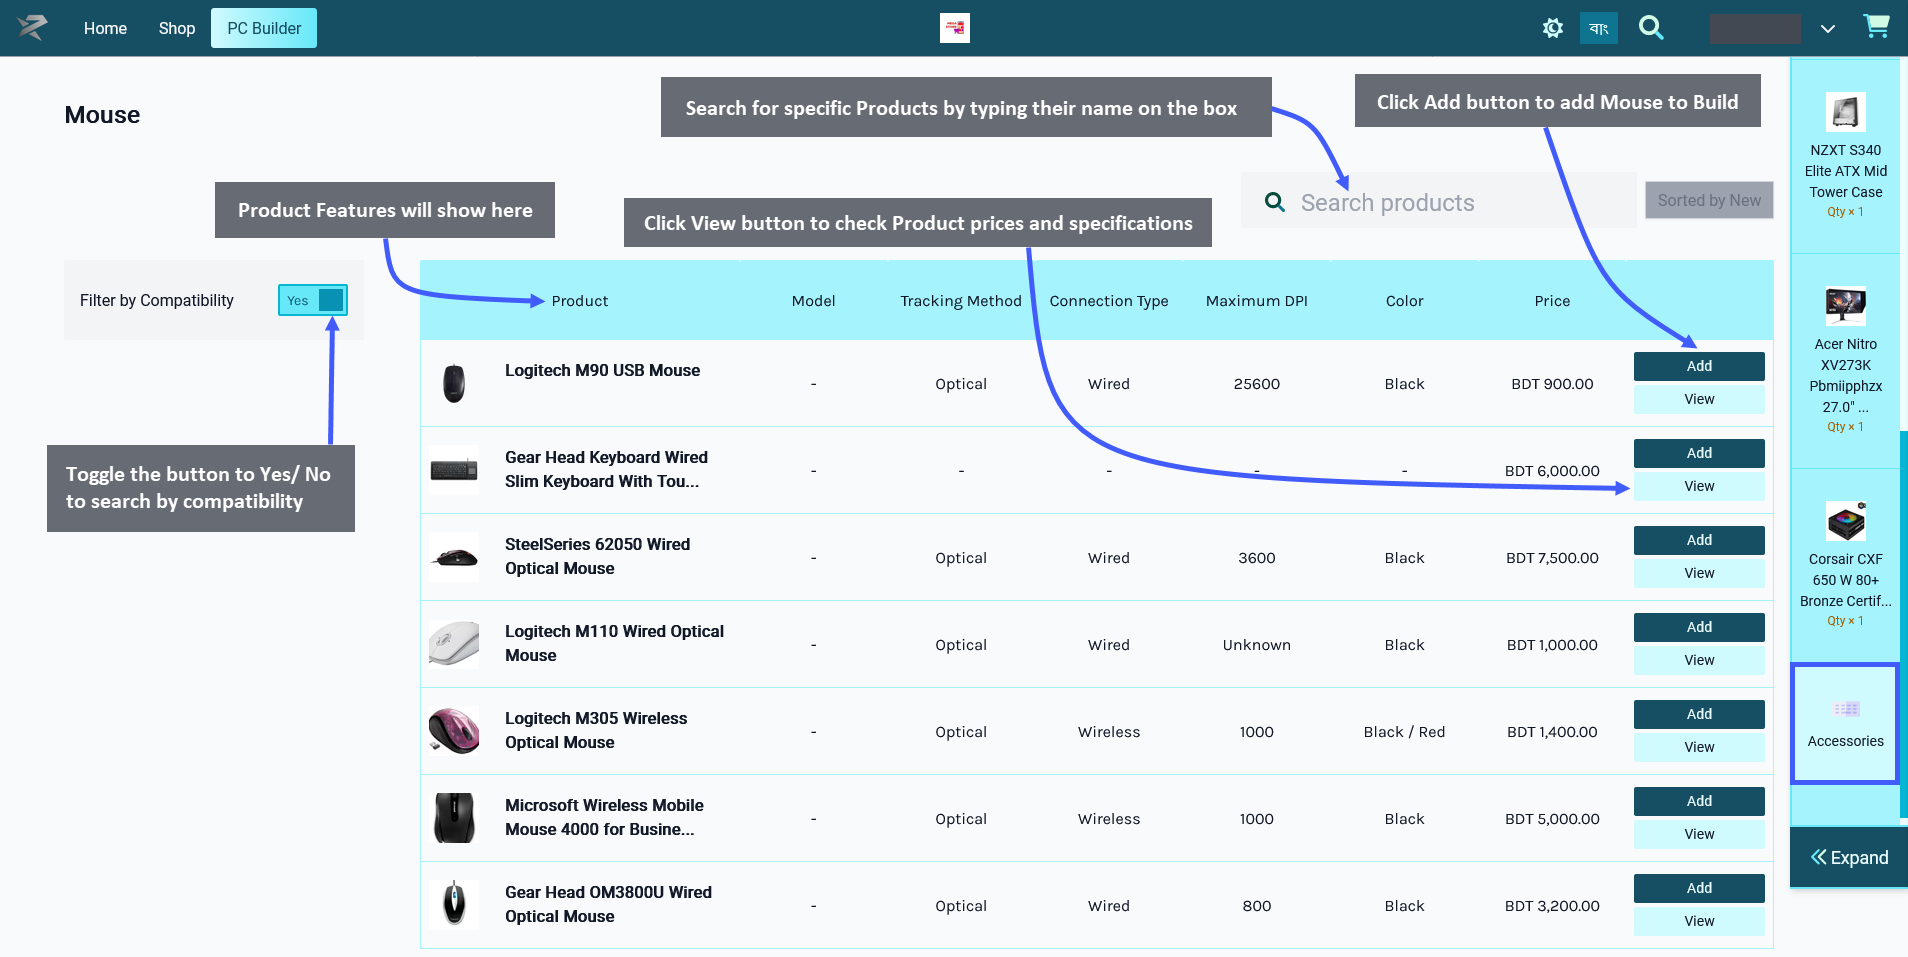
From these accessories, select the Mouse first which is a hand-held pointing device that detects two-dimensional motion relative to a surface. This motion is typically translated into the motion of a pointer on a display. Click on the Add button to add the Product to build. Below the Add Button is a View button clicking on which will open a pop-up to display Product price, general specifications, performance specifications, physical specifications, and power specifications along with detailed Product images.
There is a Search Box on the top right corner to help find specific Product(s). The Product features will show on top of the list. There is a Filter Compatibility button which can be toggled to Yes/ No to search by compatibility of PC components or not. Click on Expand to see a detailed view of added components and their prices.
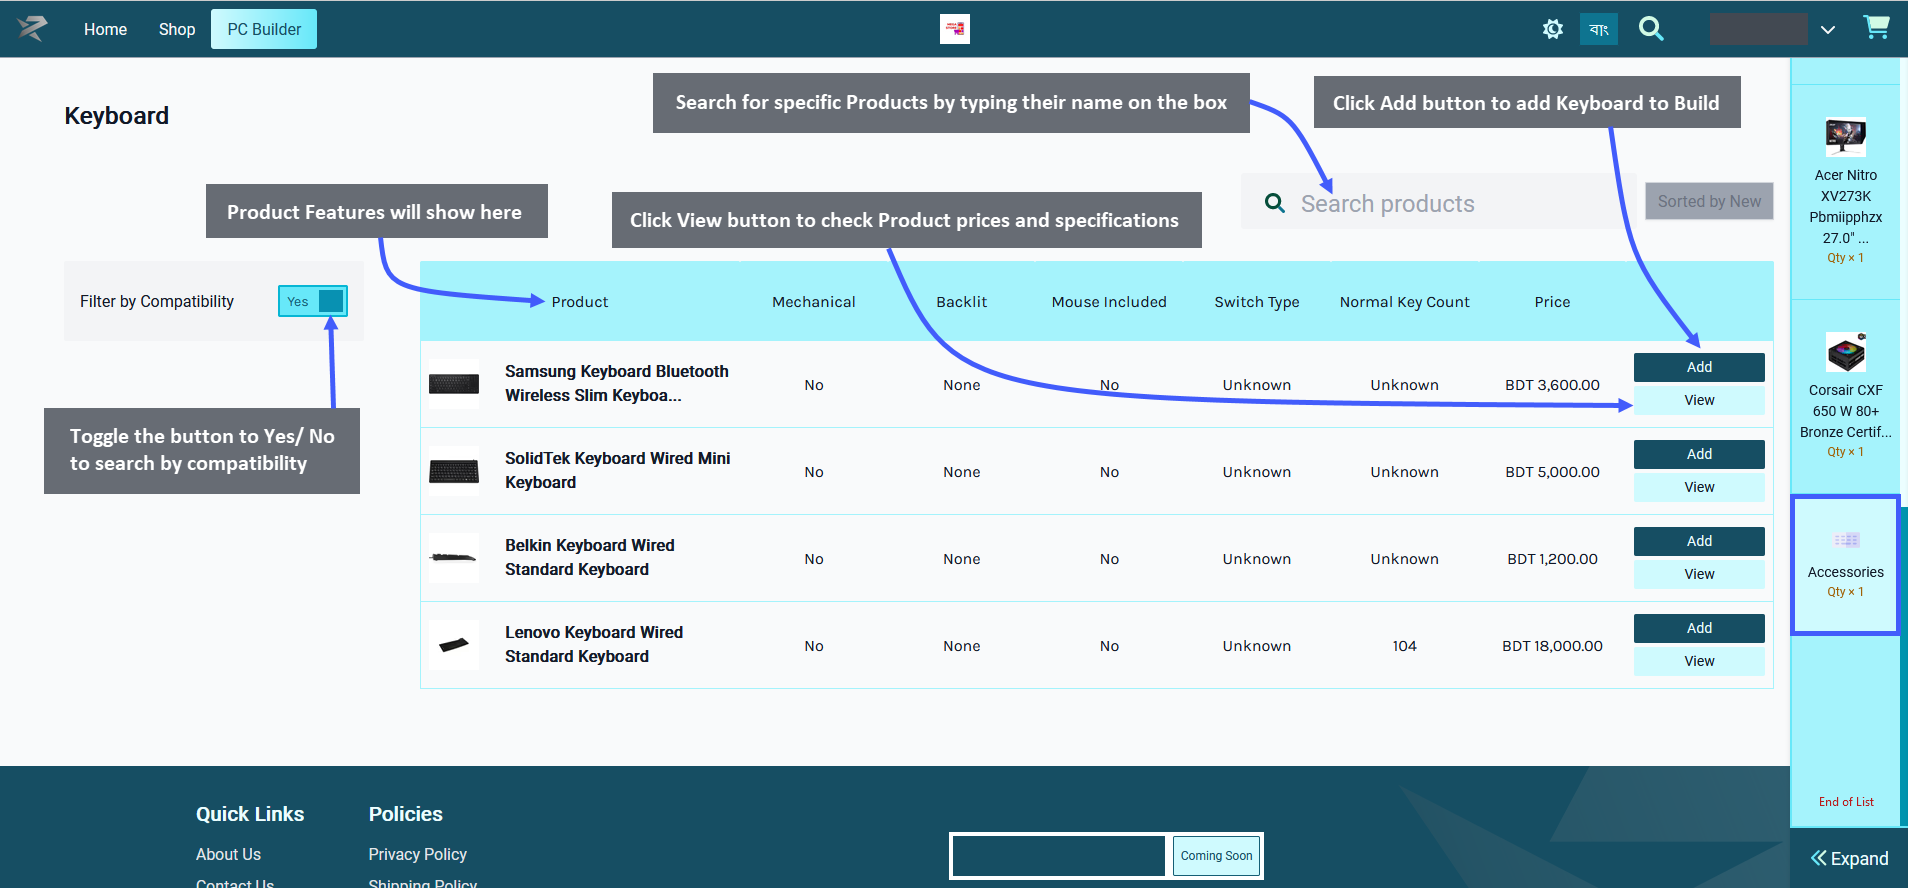
Add Keyboard to PC Build
After adding Mouse, click on Accessories button to go back to the accessories main page. Now, select the second component Keyboard. A Keyboard is a peripheral input device modeled after the typewriter keyboard which uses an arrangement of buttons or keys to act as mechanical levers or electronic switches. Click the Add button to add the Product to build. Below the Add Button is a View button clicking on which will open a pop-up to show Product price, general specifications, performance specifications, physical specifications, and power specifications along with detailed Product images.
There is a Search Box on the top right corner to help find specific Product(s). The Product features will show on top of the list. There is a Filter Compatibility button which can be toggled to Yes/ No to search by compatibility of PC components or not. Click on Expand to see a detailed view of added components and their prices.
Add Speaker to PC Build
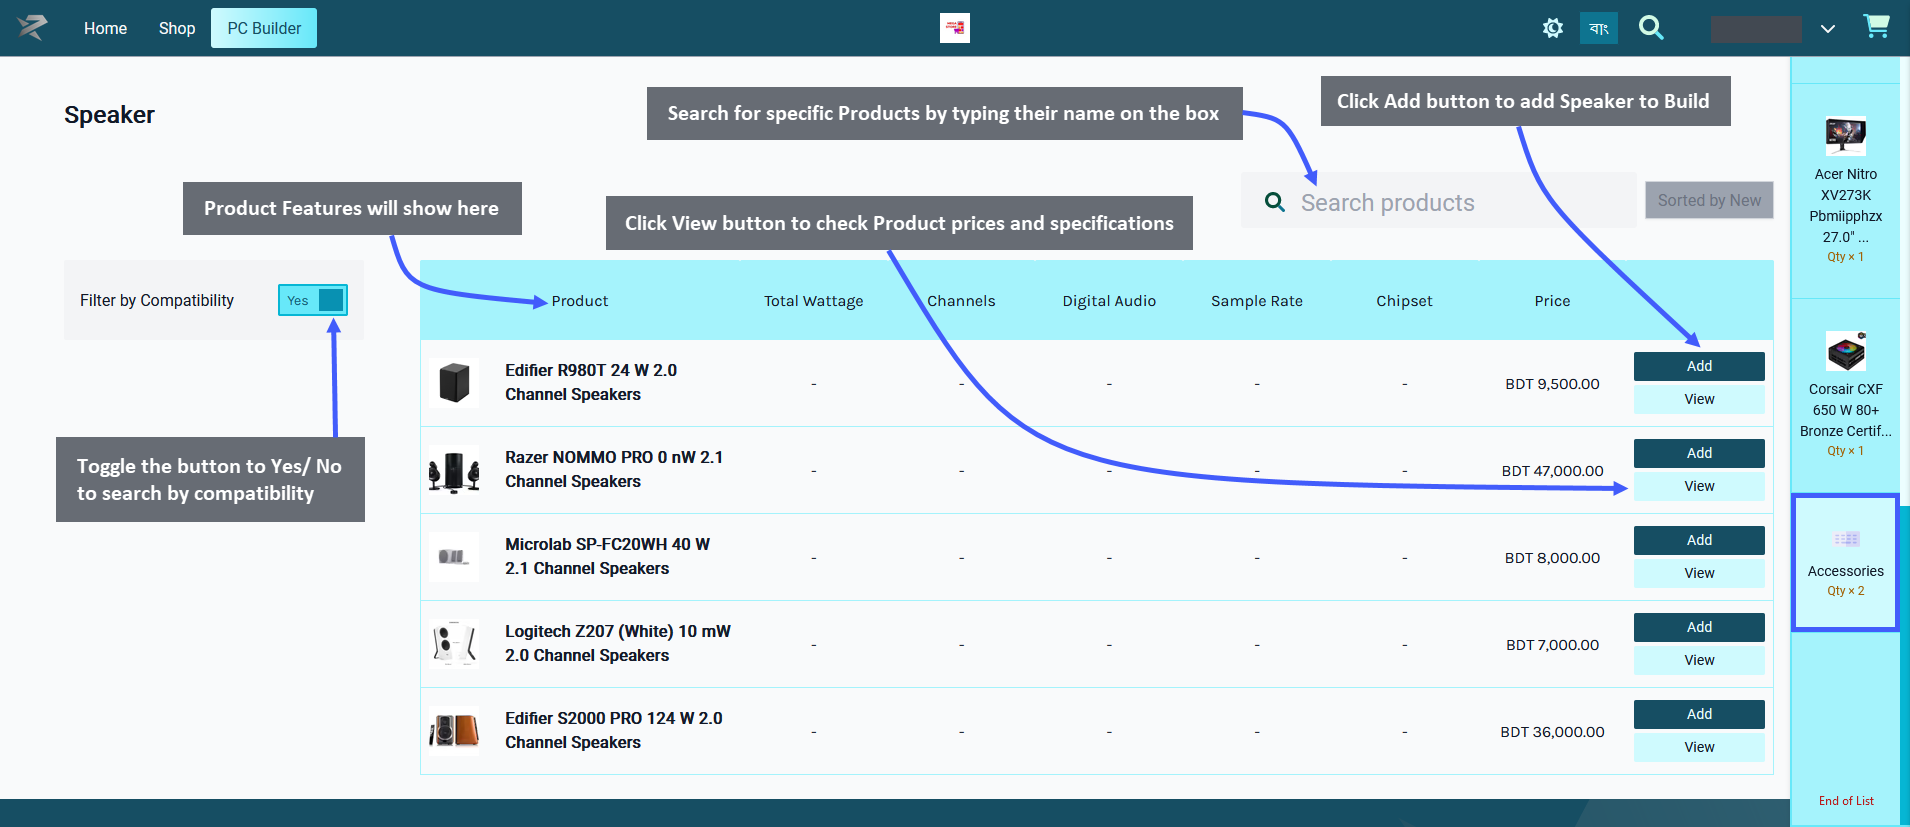
After adding Keyboard, click on Accessories button to go back to the accessories main page. Now, select the third component Speaker, which can be used to play sound or music. Click the Add button to add the Product to build. Below the Add Button is a View button clicking on which will open a pop-up to display the Product price, general specifications, performance specifications, physical specifications, and power specifications with Product images.
There is a Search Box on the top right corner to help find specific Product(s). The Product features will show on top of the list. There is a Filter Compatibility button which can be toggled to Yes/ No to search by compatibility of PC components or not. Click on Expand to see a detailed view of added components and their prices.
Add Headphone to PC Build
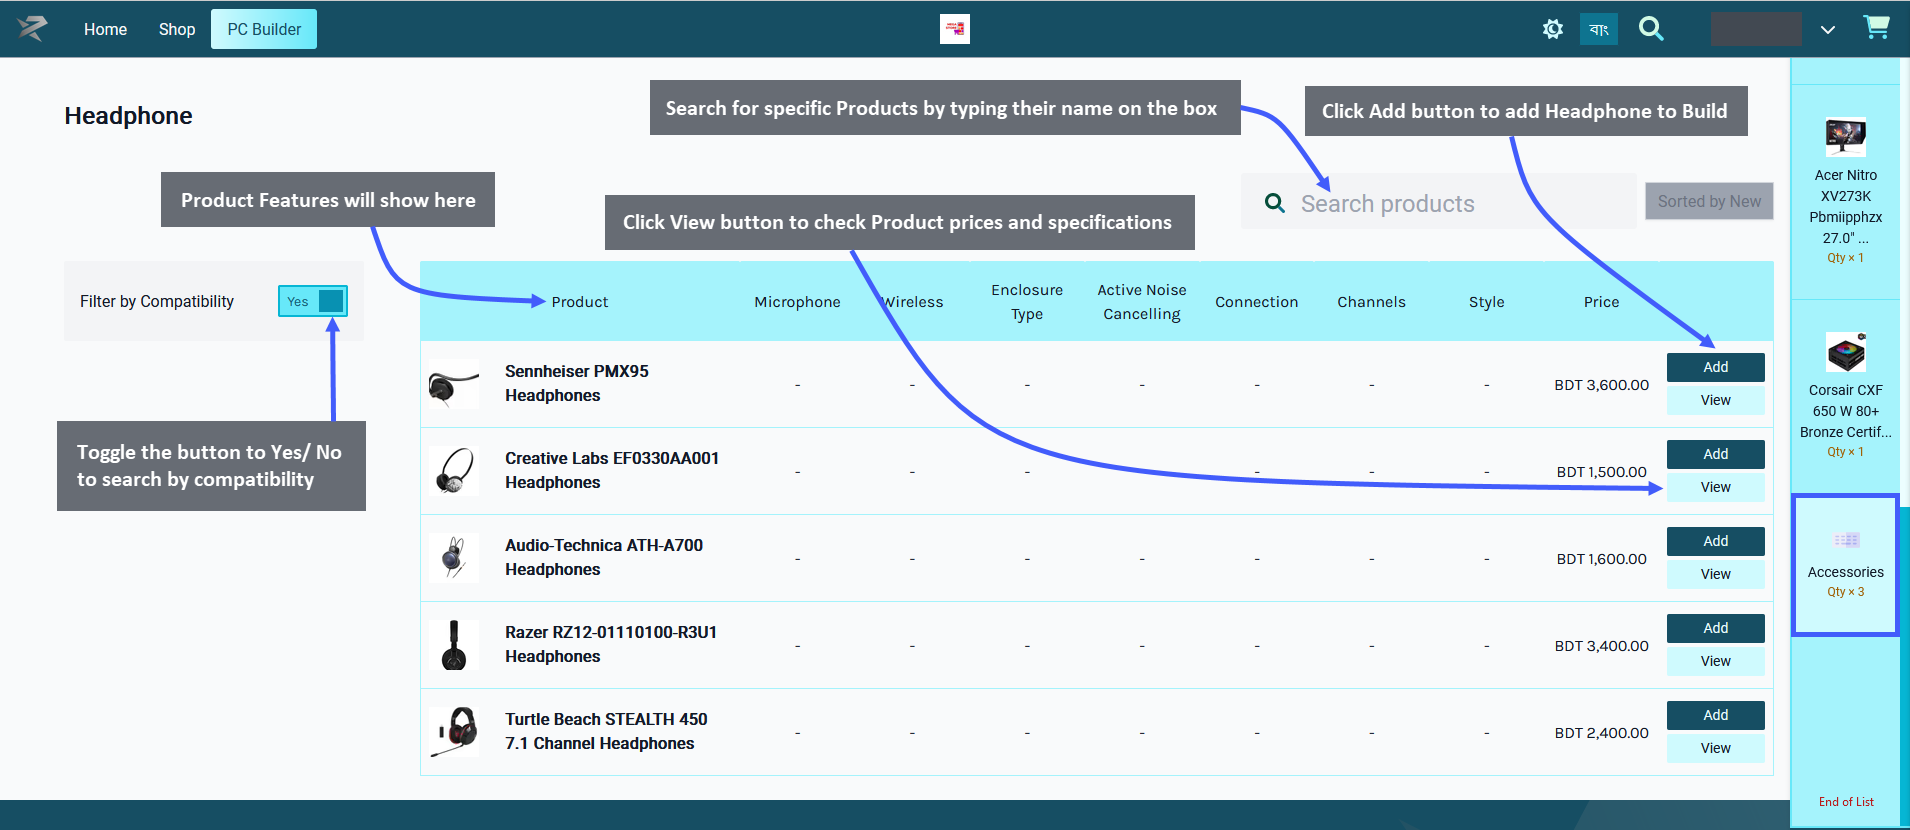
After adding Speaker, click on Accessories button to go back to the accessories main page. Now, select the fourth component headphones, which are output device that can be plugged into a computer to listen to audio. Click on the Add button to add Product to build. Below the Add Button is a View button clicking on which will open a pop-up to show Product price, general specifications, performance specifications, physical specifications, and power specifications along with detailed Product images.
There is a Search Box on the top right corner to help find specific Product(s). The Product features will show on top of the list. There is a Filter Compatibility button which can be toggled to Yes/ No to search by compatibility of PC components or not. Click on Expand to see a detailed view of added components and their prices.
Place Order for Newly Created PC Build
When all the components will be successfully added to the PC Build, click on the Expand button from the bottom left to open the pop-up showing Cart details. From here, click on the Add to Cart button to complete the New PC Build and place a New Order. This PC Build will automatically be saved under Users Build on the Admin Panel.
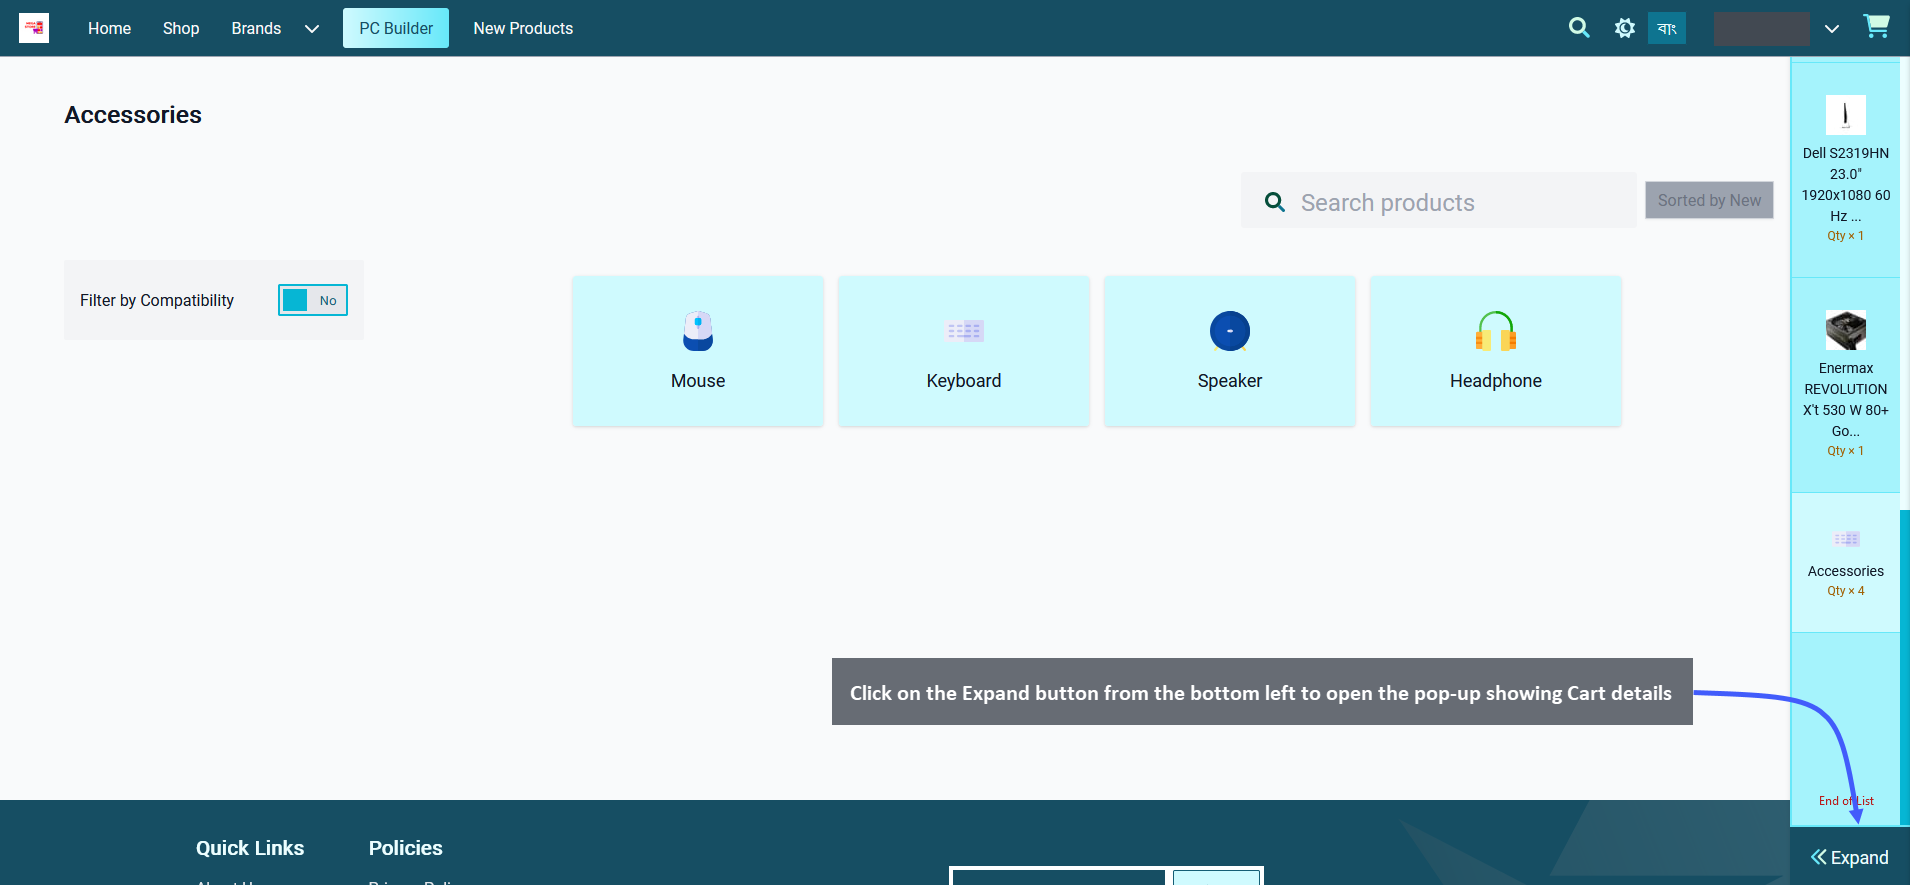
Image 1: Click on the Expand button from the bottom left to open the pop-up showing Cart details.
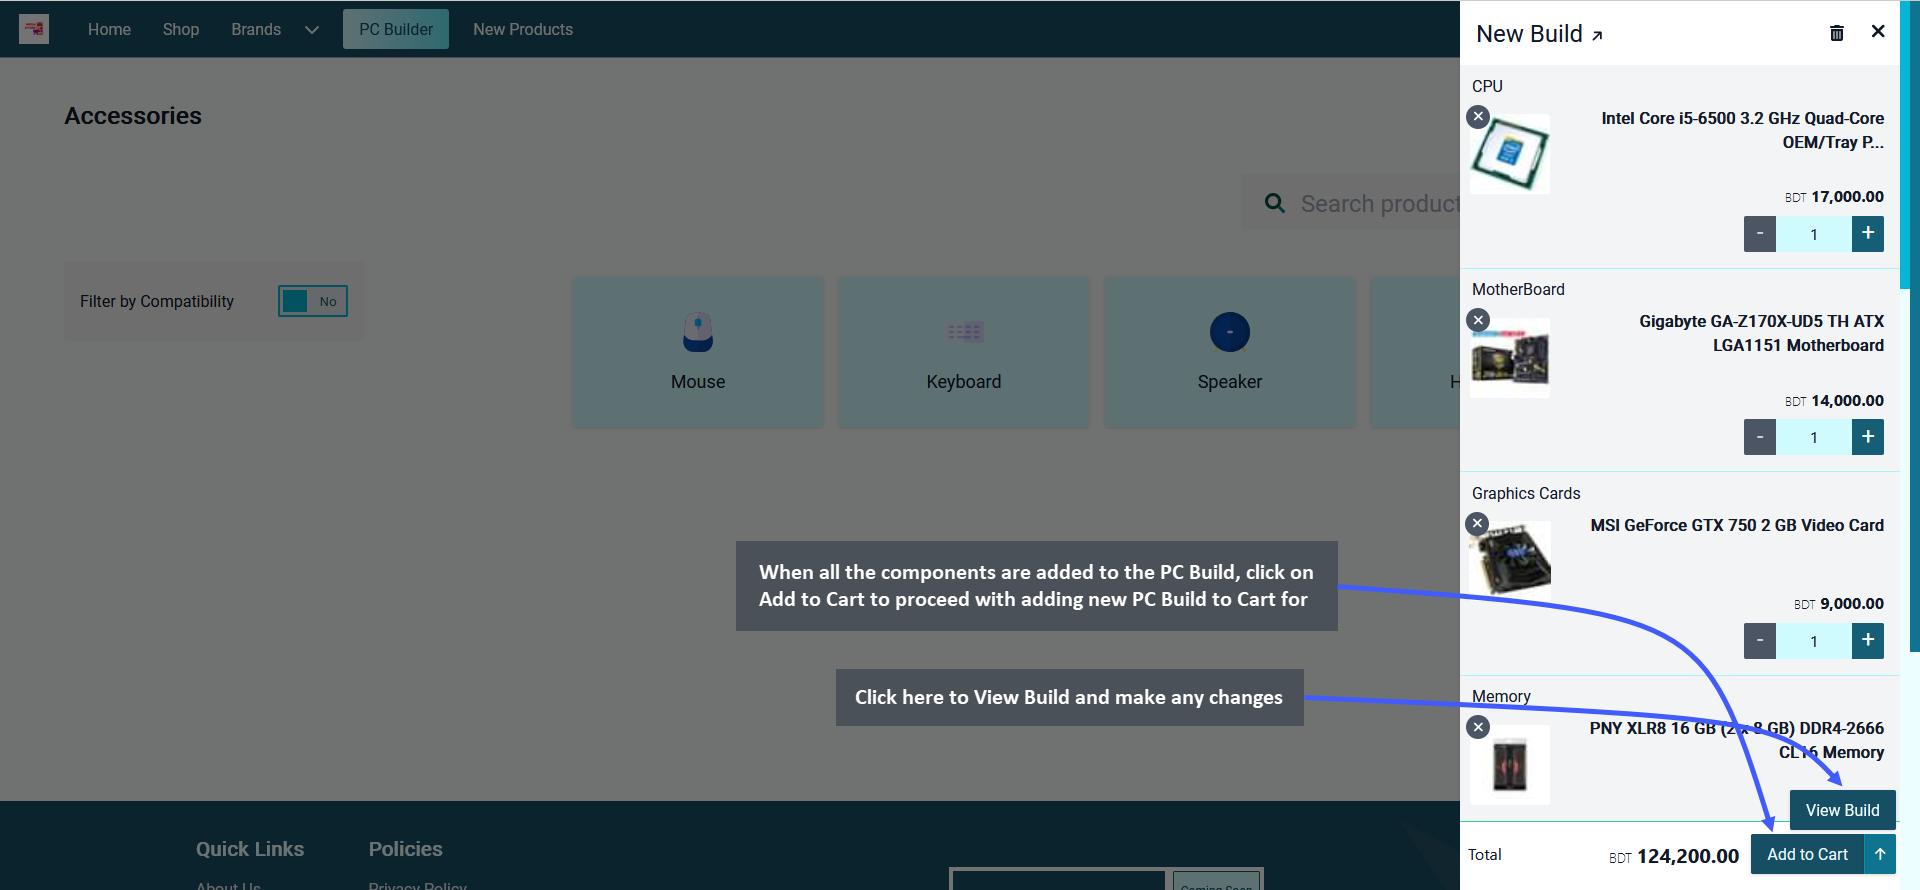
Image 2: When all the components are added to the PC Build, click on Add to Cart to proceed with Order.
Check Cart Details to Proceed to Checkout
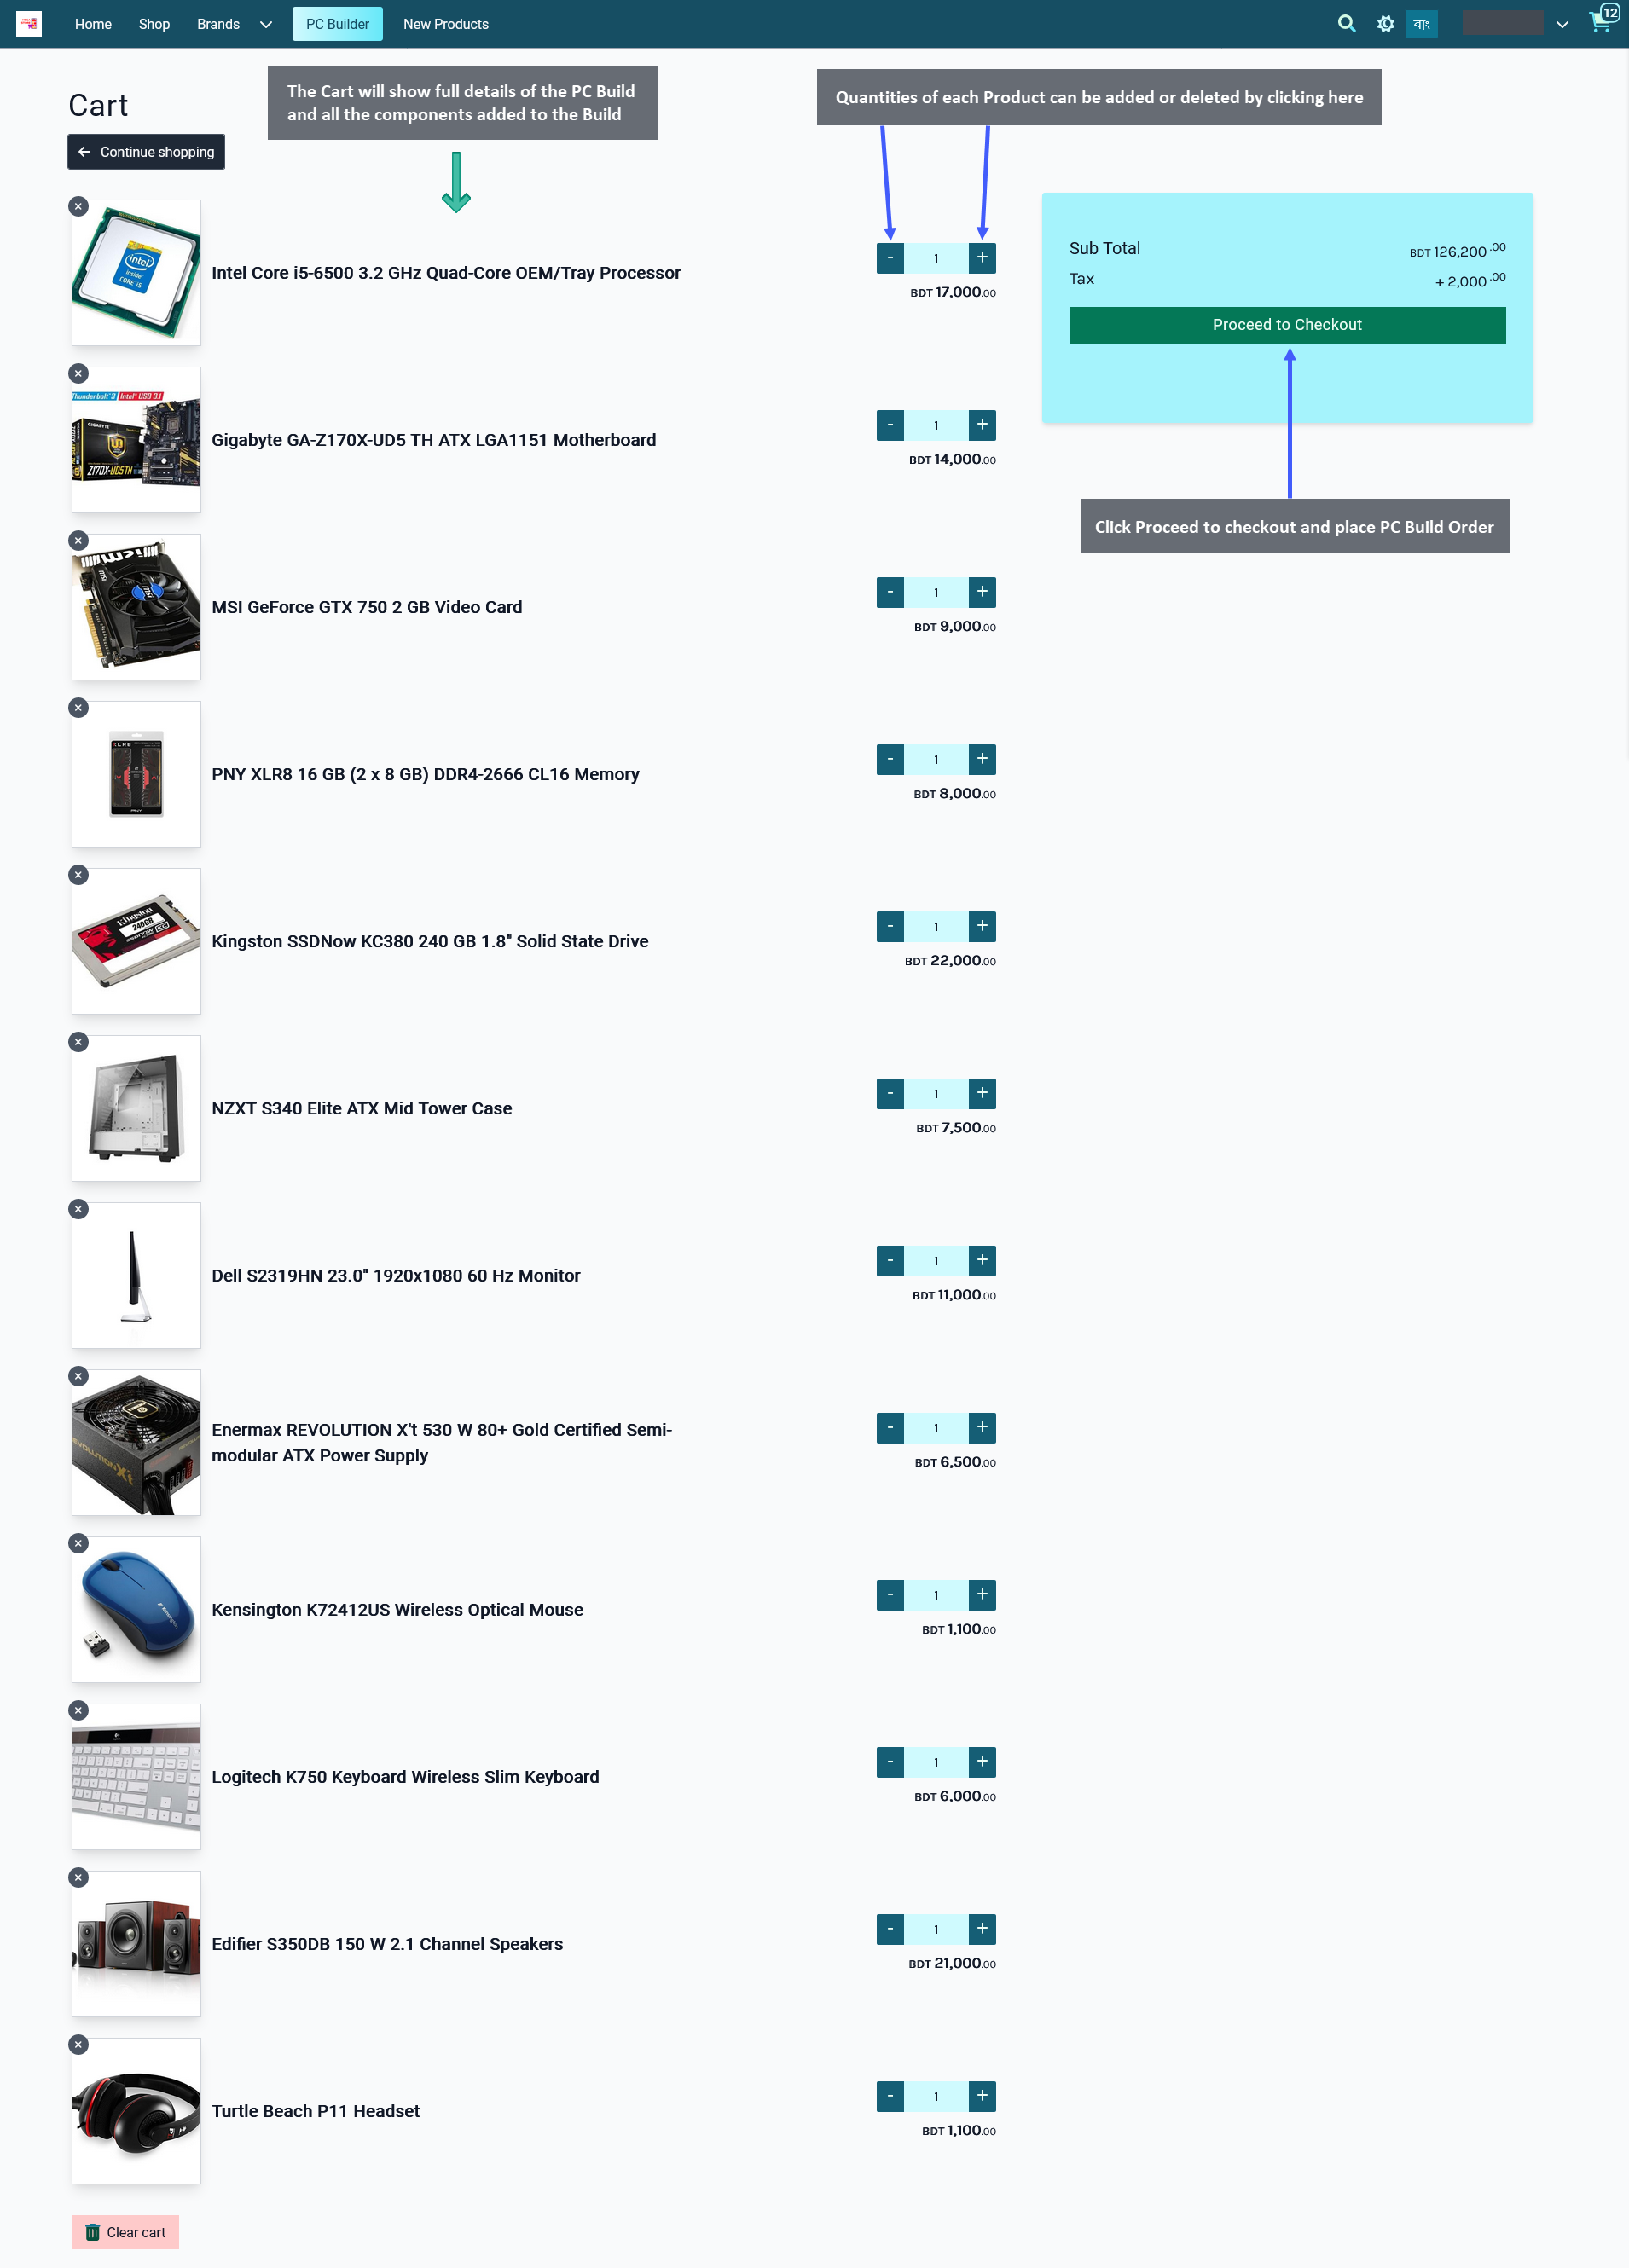
Clicking on Add to Cart will redirect to a new Page showing full details of PC Build Cart. Beside each component, there are + and - buttons to increase and decrease quantities for the Build. After checking all the details, click on Proceed to Checkout button to proceed with filling in the Billing, Shipping, and Payment details for New Order.
Complete Billing, Shipping, and Payment Details to Place Order
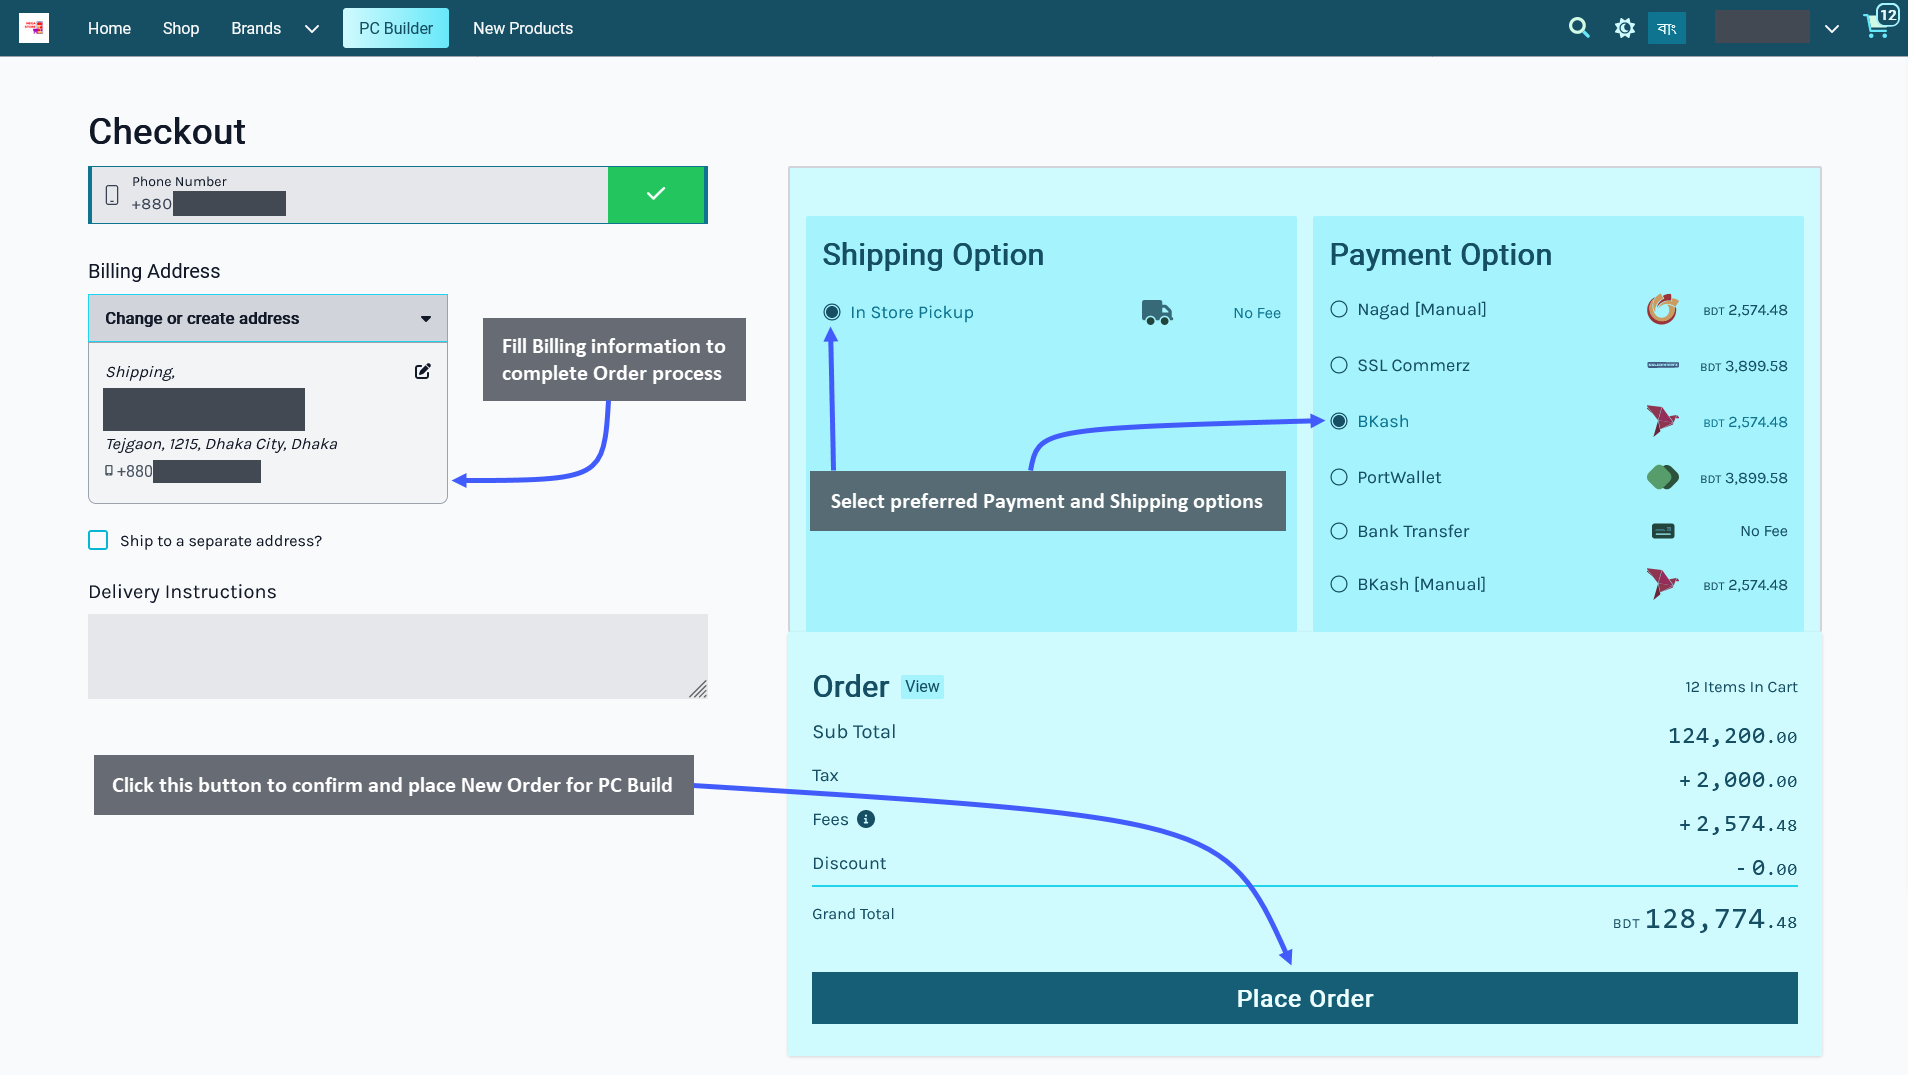
In the checkout page, fill in the Billing details to complete processing of the Order. Select preferred Shipping and Payment options, and click on Place Order button to confirm and place New Order for the User’s PC Build.
PC Build Order Confirmation Page
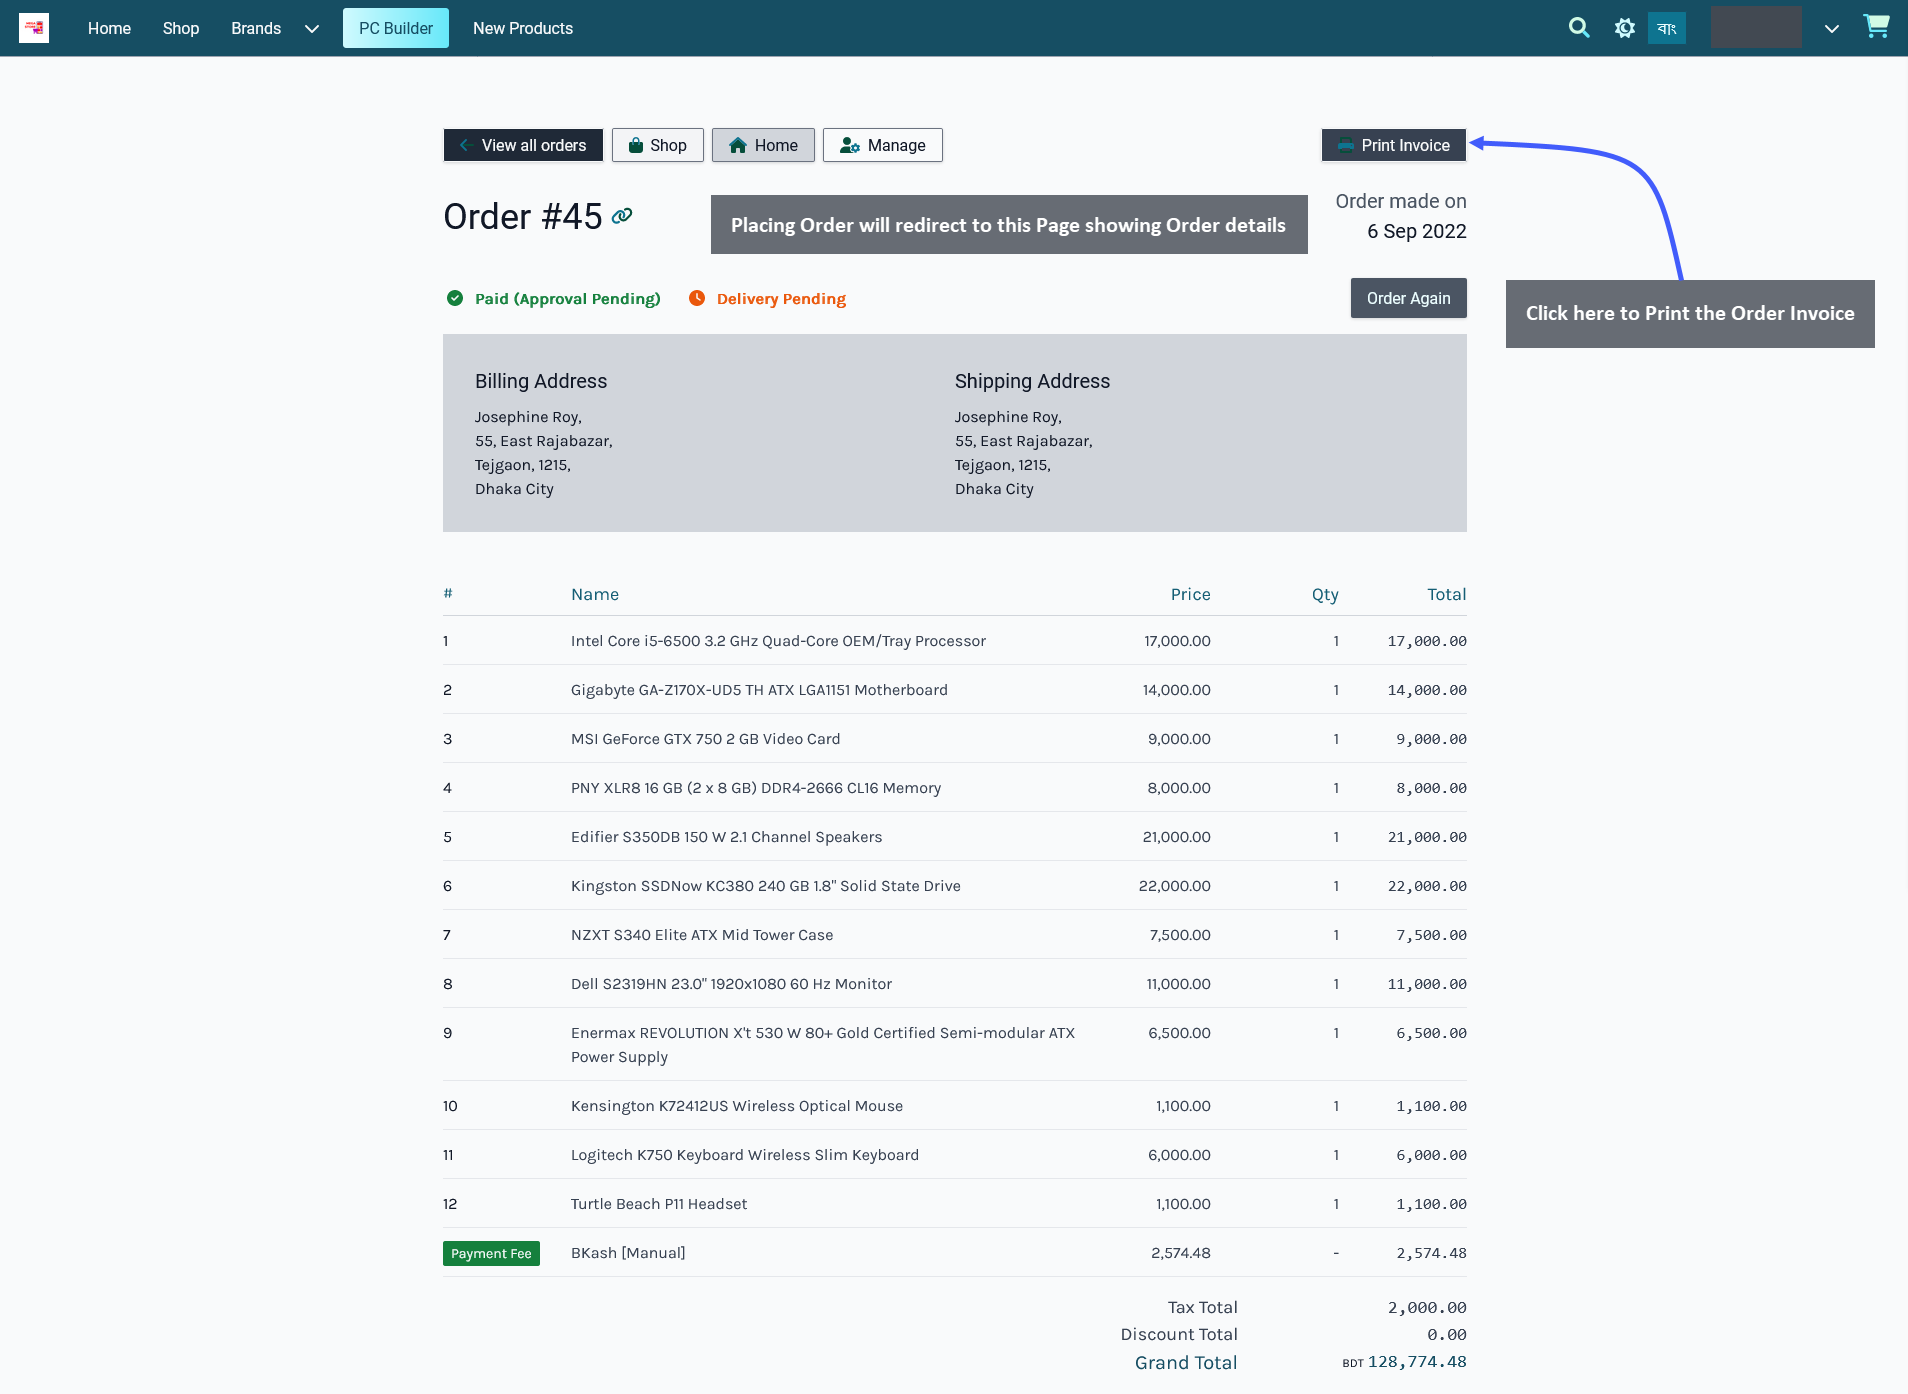
When the Order is sucessfully placed, it will redirect to the Order Confirmation Page showing the Order details. There are three options to view all the Order of the User, and go directly to Shop or Home. Using Print Invoice button, the User can print out the Order invoice for record containing the Billing, Shipping, and Order details.
User PC Builds on Admin Panel
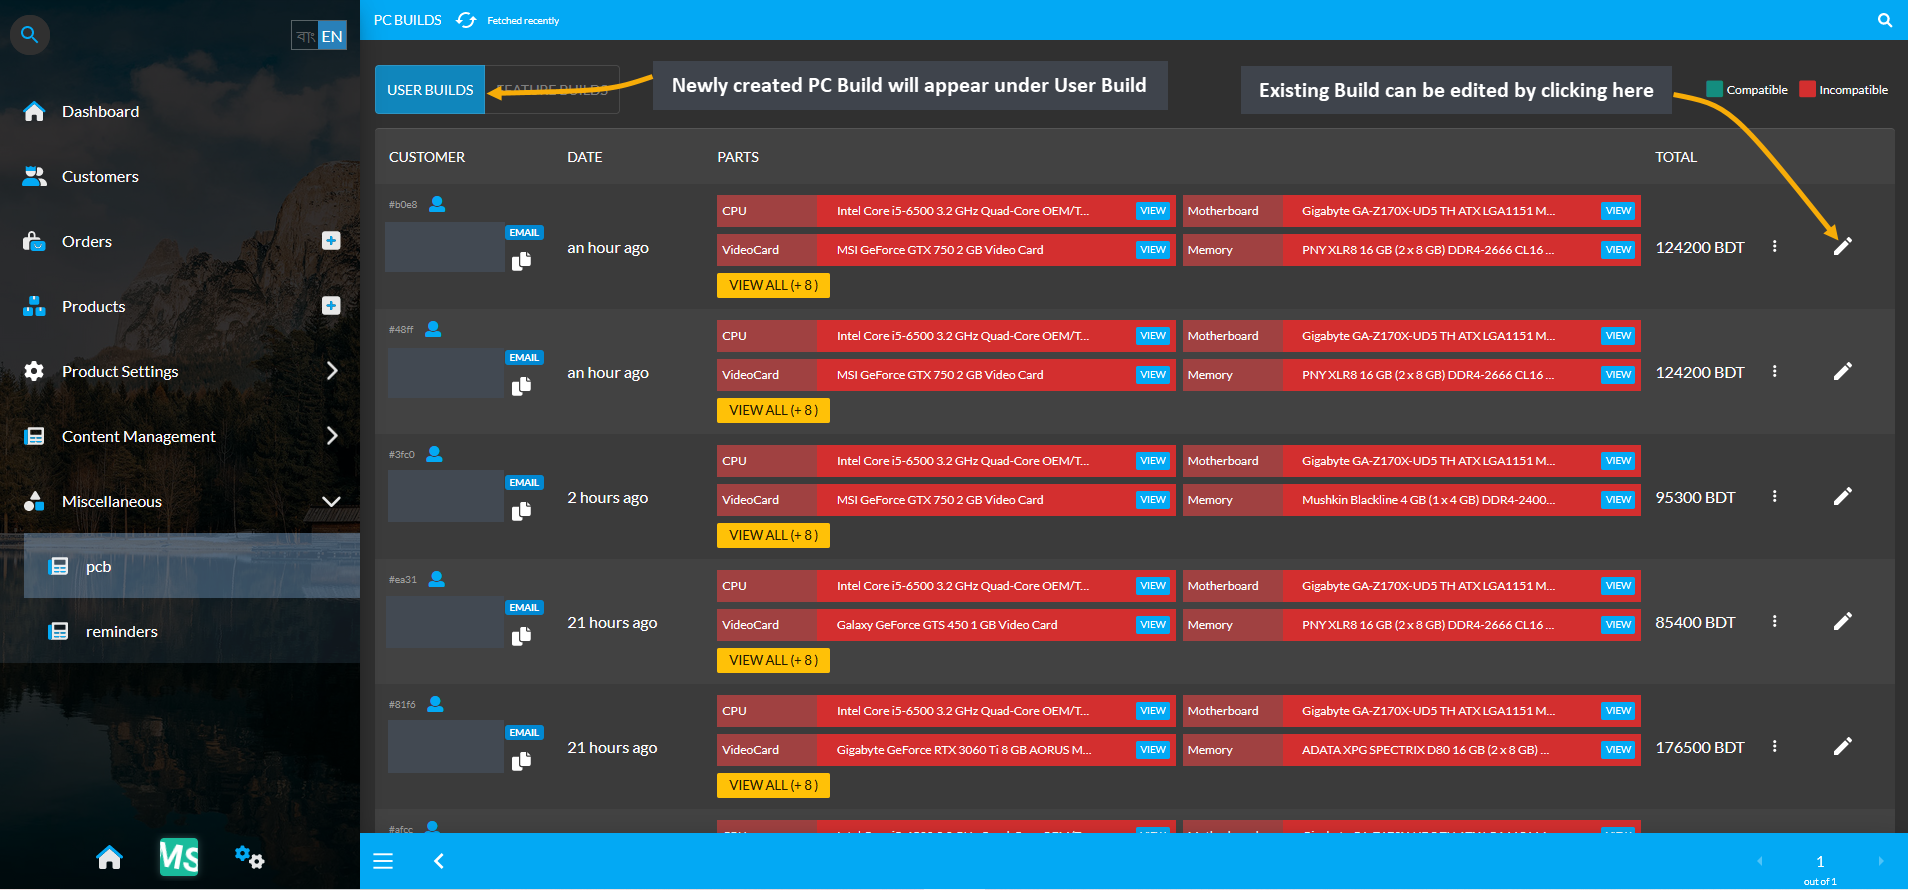
The newly created PC Build will automatically be listed under User Builds Section with Customer’s information, creation date, and PC Build parts added. The existing builds can be edited by clicking on the Pencil Icon which will redirect to The Website. From there, that particular build can be customized and changed to order again.
Customize Existing Build on The Website
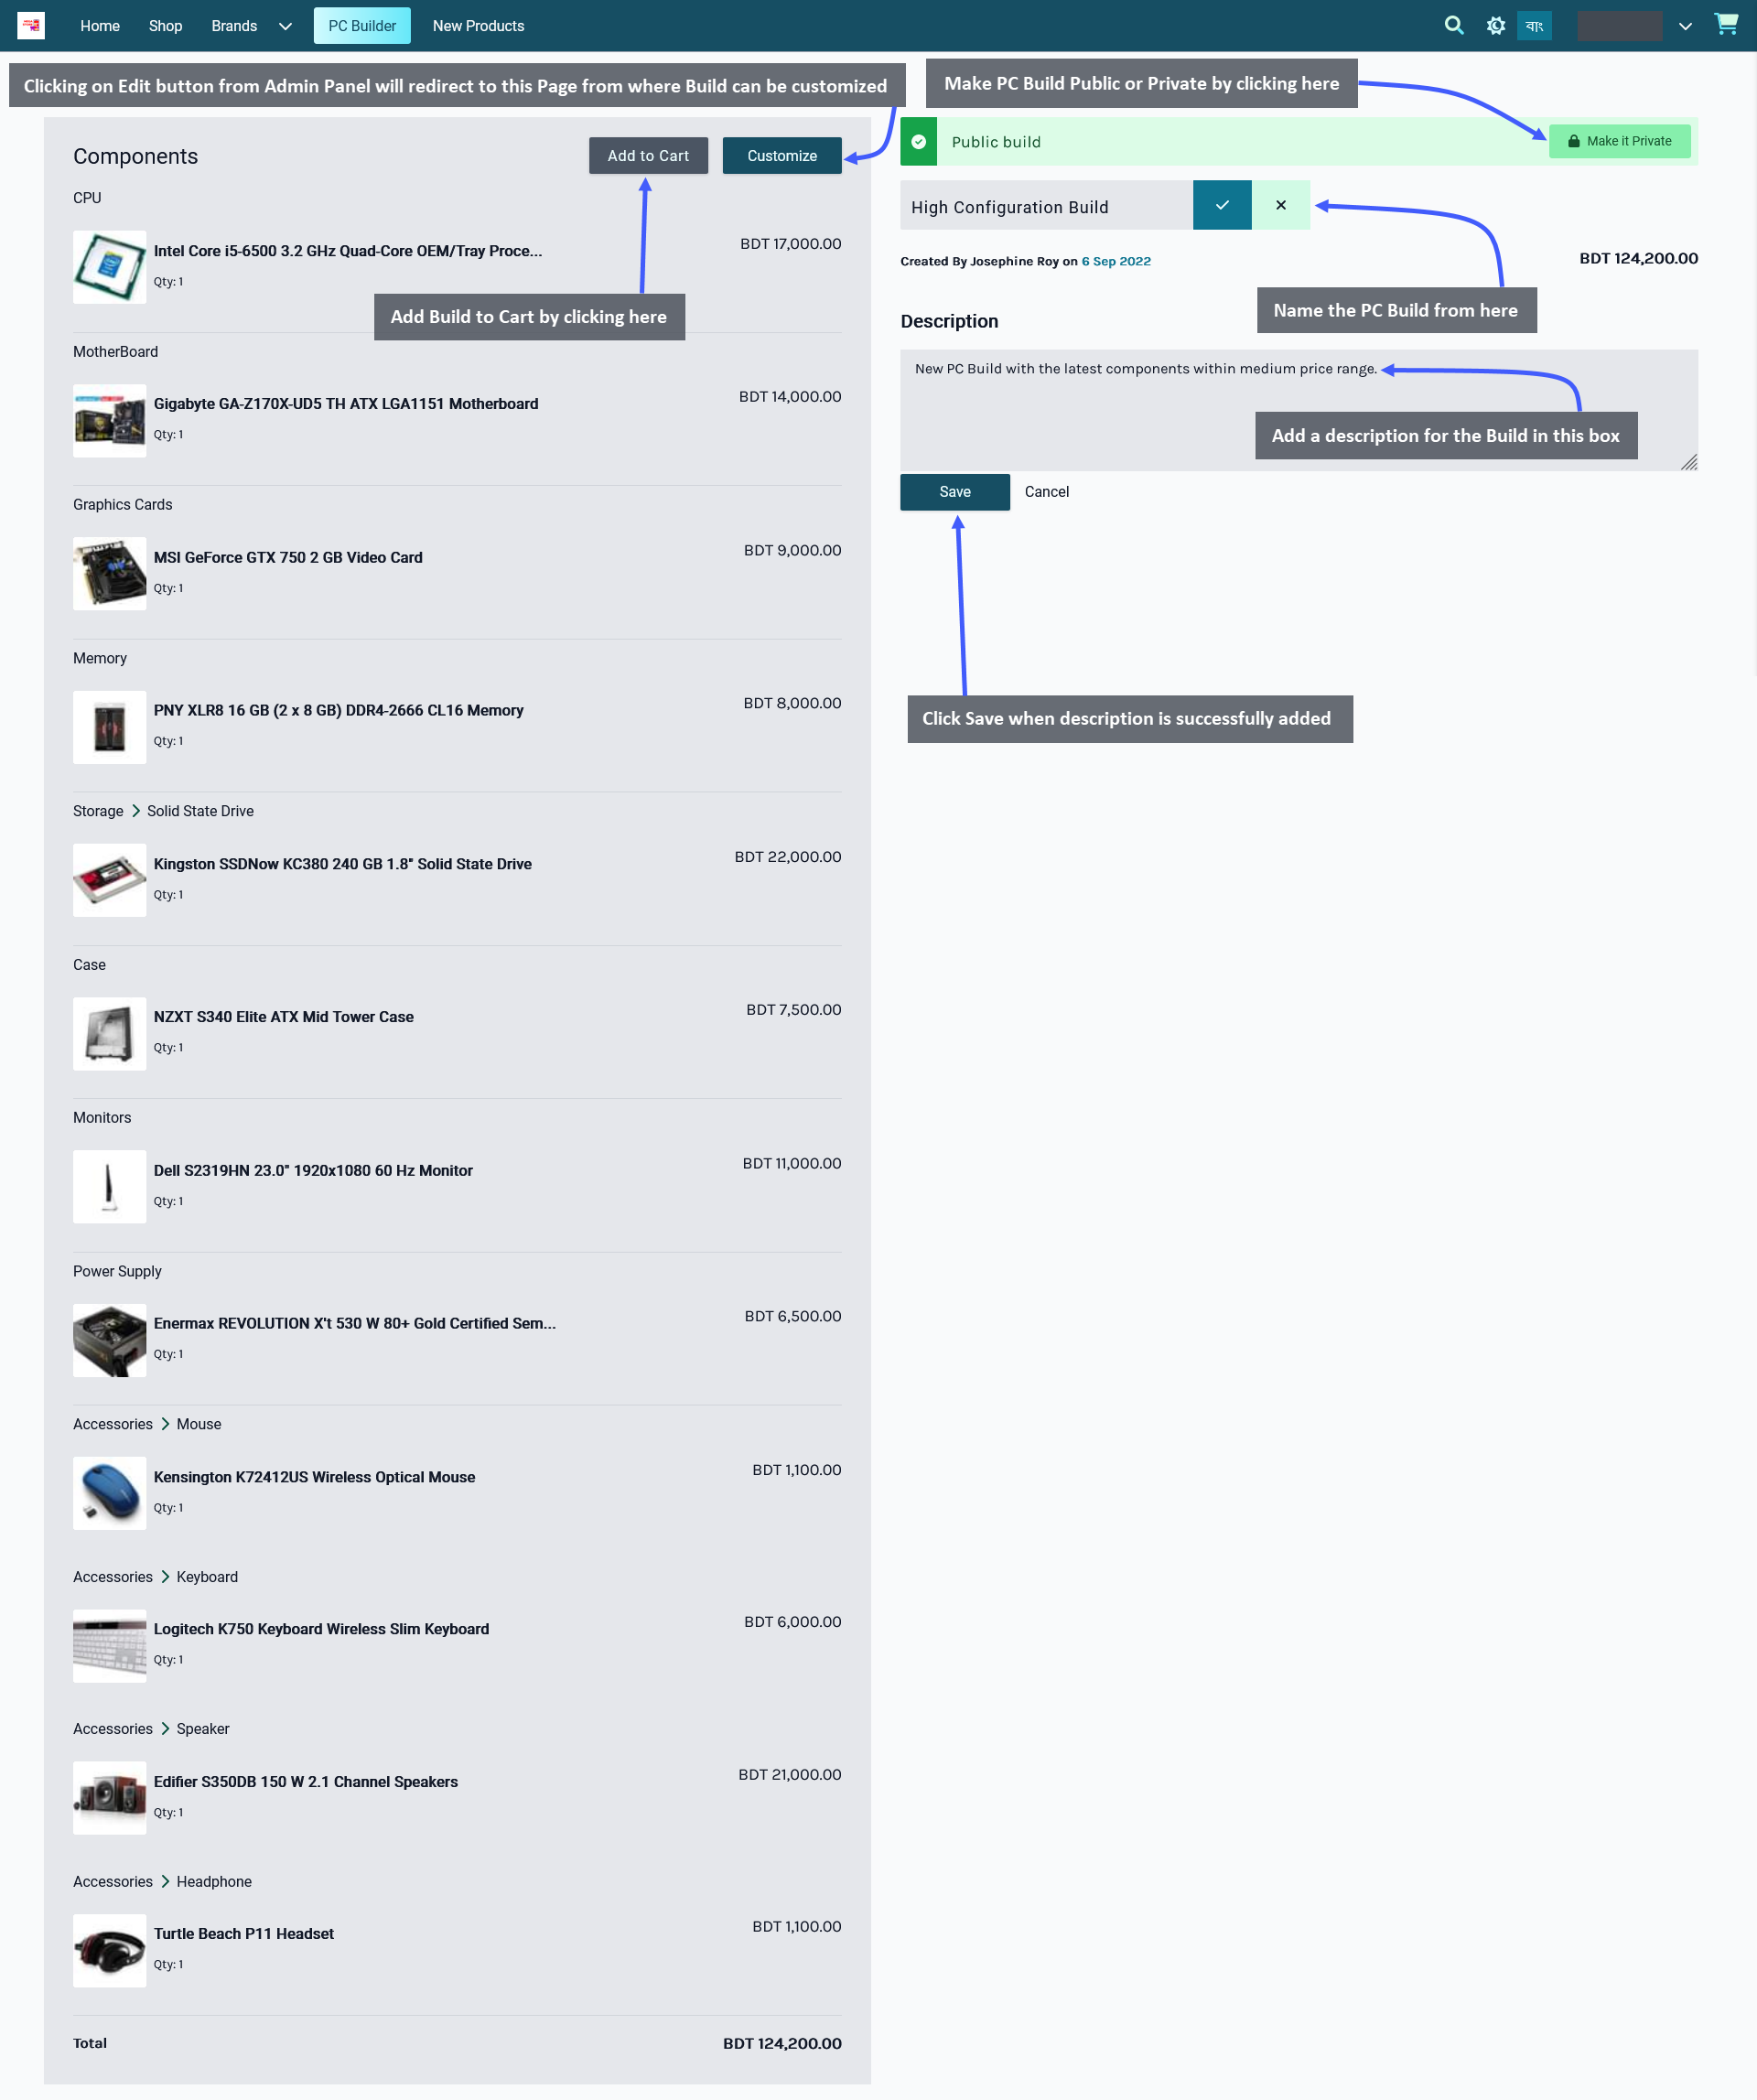
Clicking on Edit button from Admin Panel will redirect to The Website’s saved PC Build Page. From there, the Build can be Customized and again added to Cart for a New Order. All the Builds can be made Public or Private with the use of Make It Public and Make It Private buttons. Switching from one to another will make the Build from Public to Private and vice versa. Below this, there is a box to Name the PC Build and a box to add description for the Build. Click the Save button to save all these settings successfully. Use Add to Cart button to Order this Build.
Create Featured Builds
PC Builds created by the User can me Marked as Featured to show up under Featured Builds on the Website. To do this, click on the Mark as Featured button from any of the Builds under the User Builds as shown below.
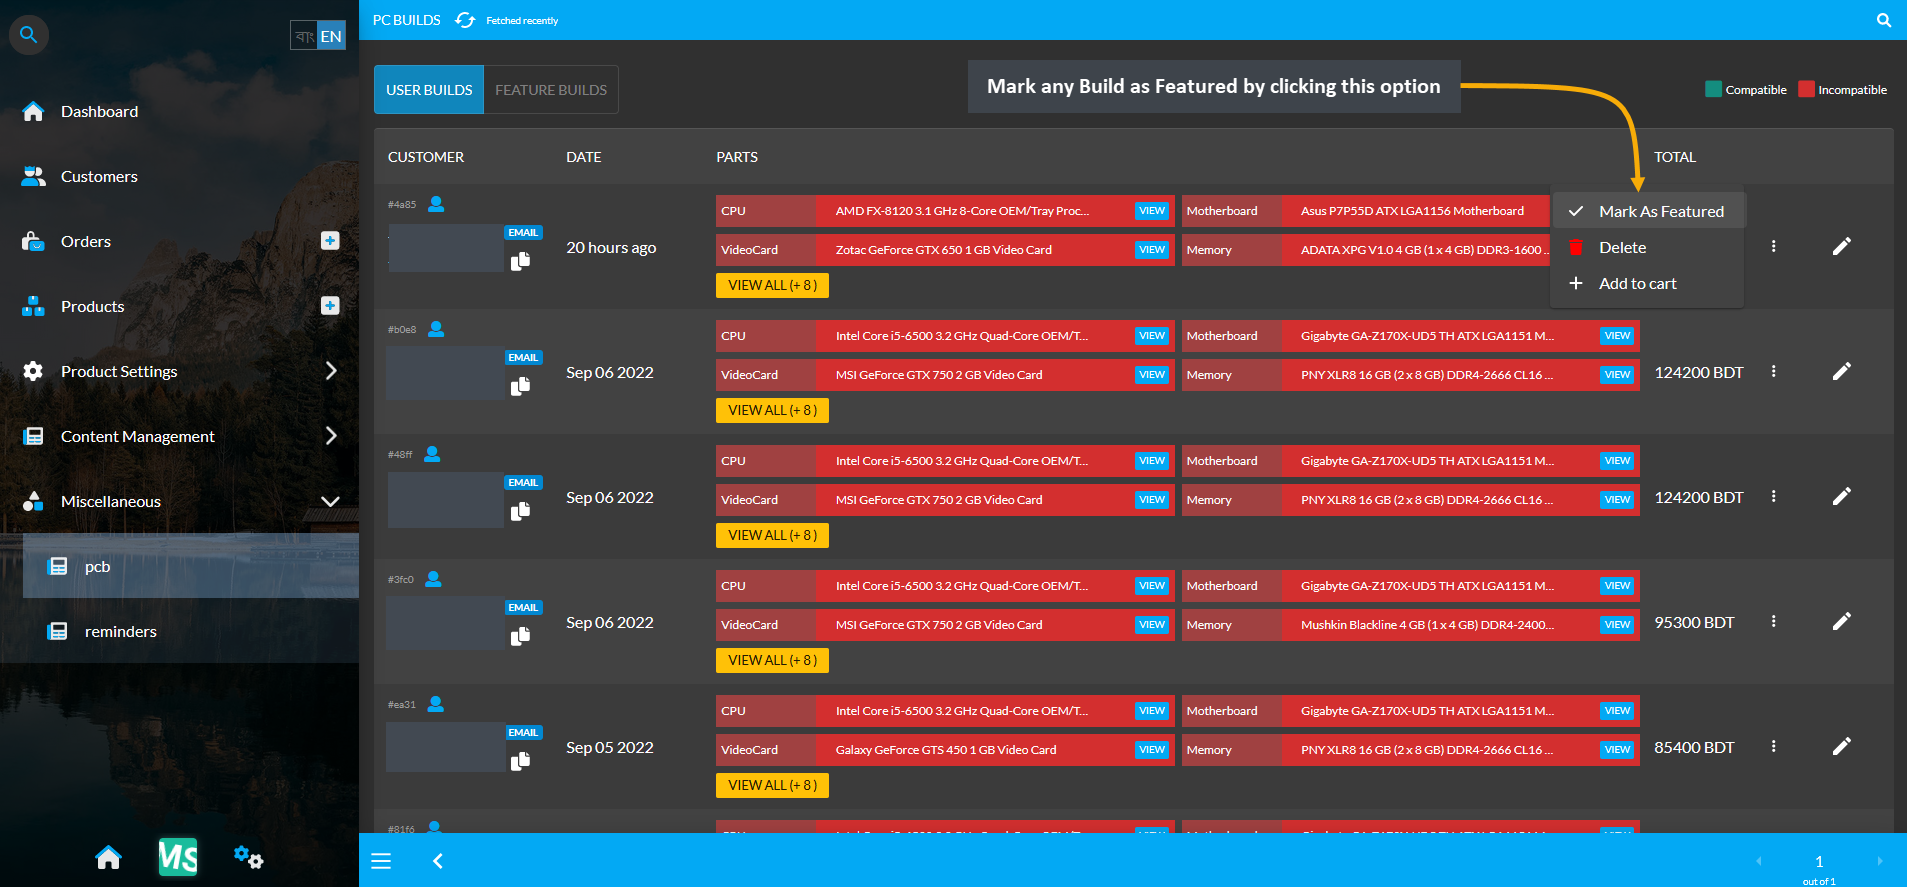
Image 1: Mark any Build as Featured by clicking on the Mark As Featured option from User Builds List.
The selected Builds marked as Featured will appear under the list of Featured Builds. The Shop Owner could set to display Three Featured Builds on the Website. If they want to rearrange their Featured Builds on Website, they can use the Re-Order button. To Re-Order Featured Builds, click on the preferred Build that will become movable (green) to drag and drop within the Featured Builds List.
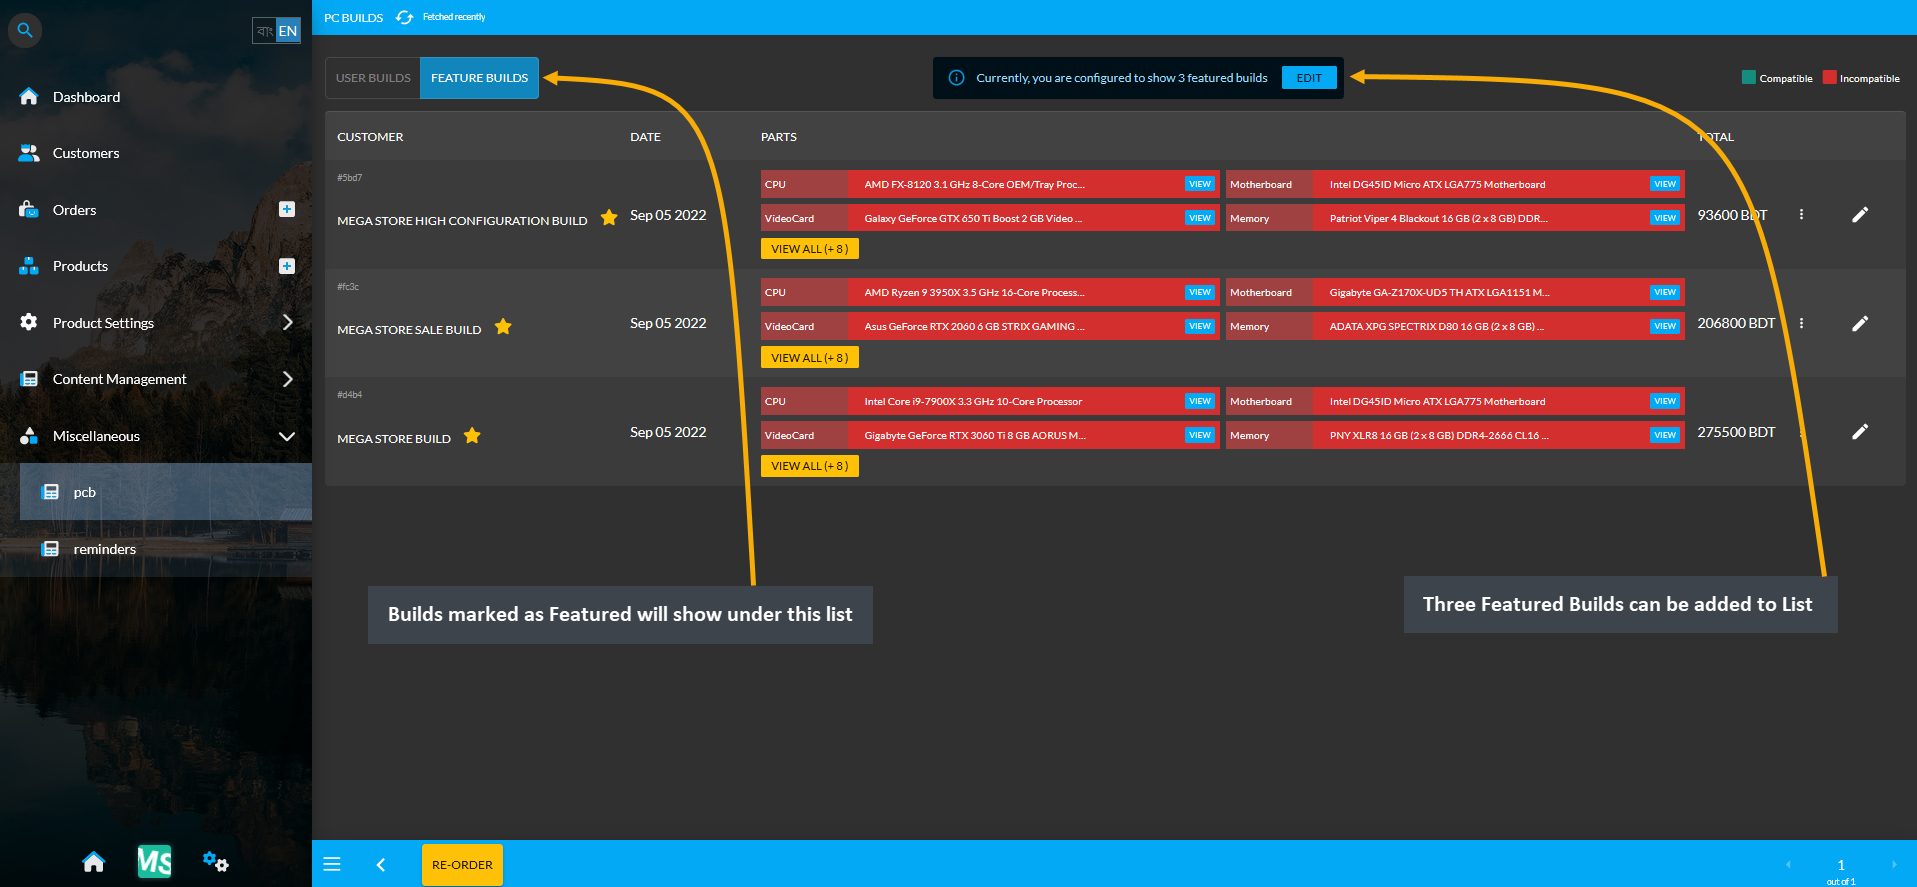
Image 2: The Shop Owner can set Three Featured Builds from their User Builds to display on the Website.
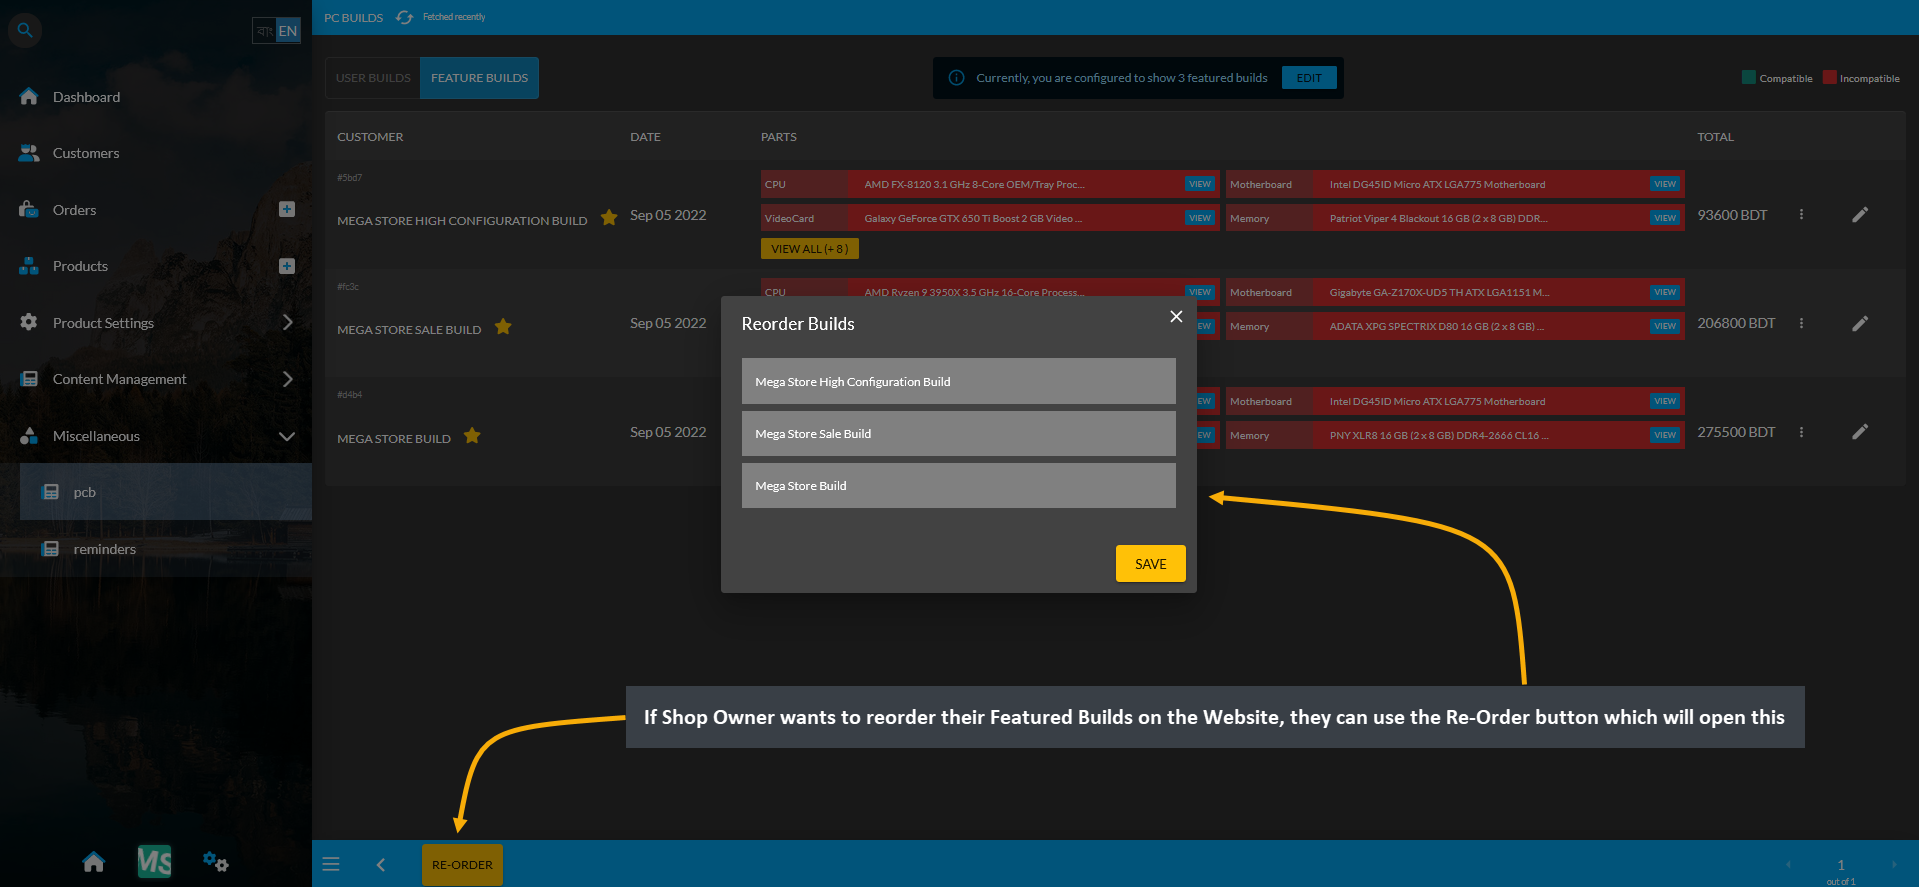
Image 3: Use the Re-Order button to rearrange Featured Builds in a specific sequence on the Website.
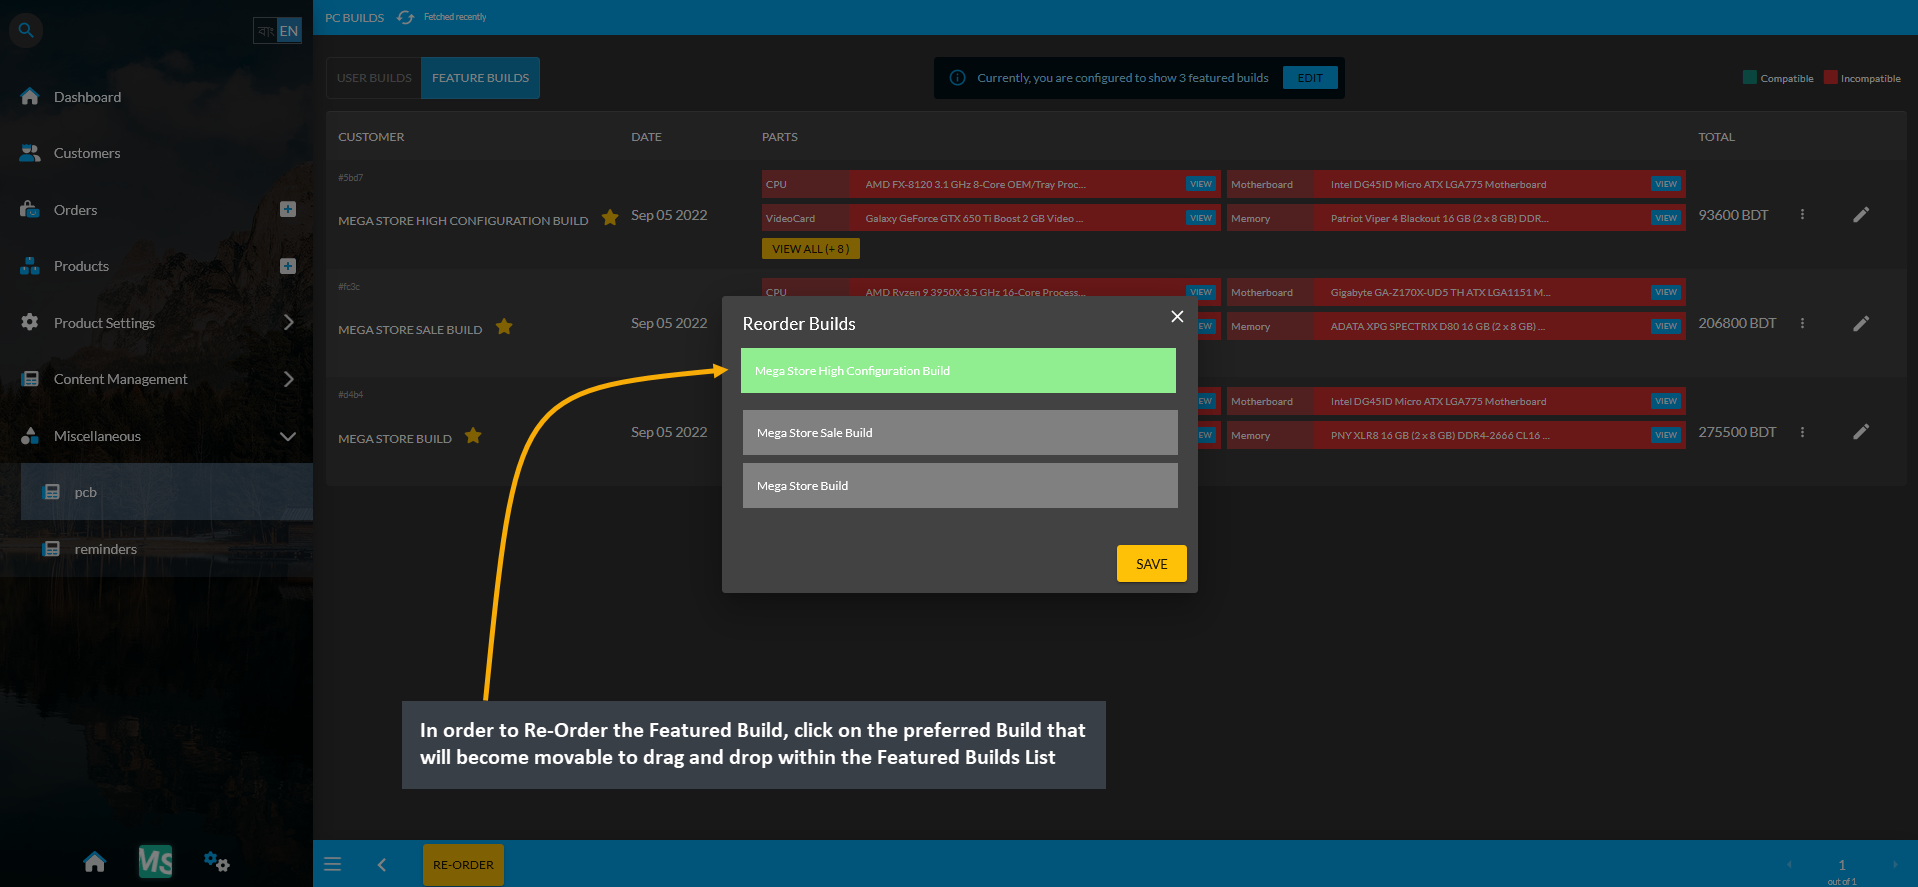
Image 4: Click the preferred Build that will become movable to drag and drop in any sequence on the List.
The Shop Owner could set to display Three Featured Builds on the Website where the Featured Builds tab will show these Featured PC Builds. Beside it is the tab which will display the User Builds as shown below.
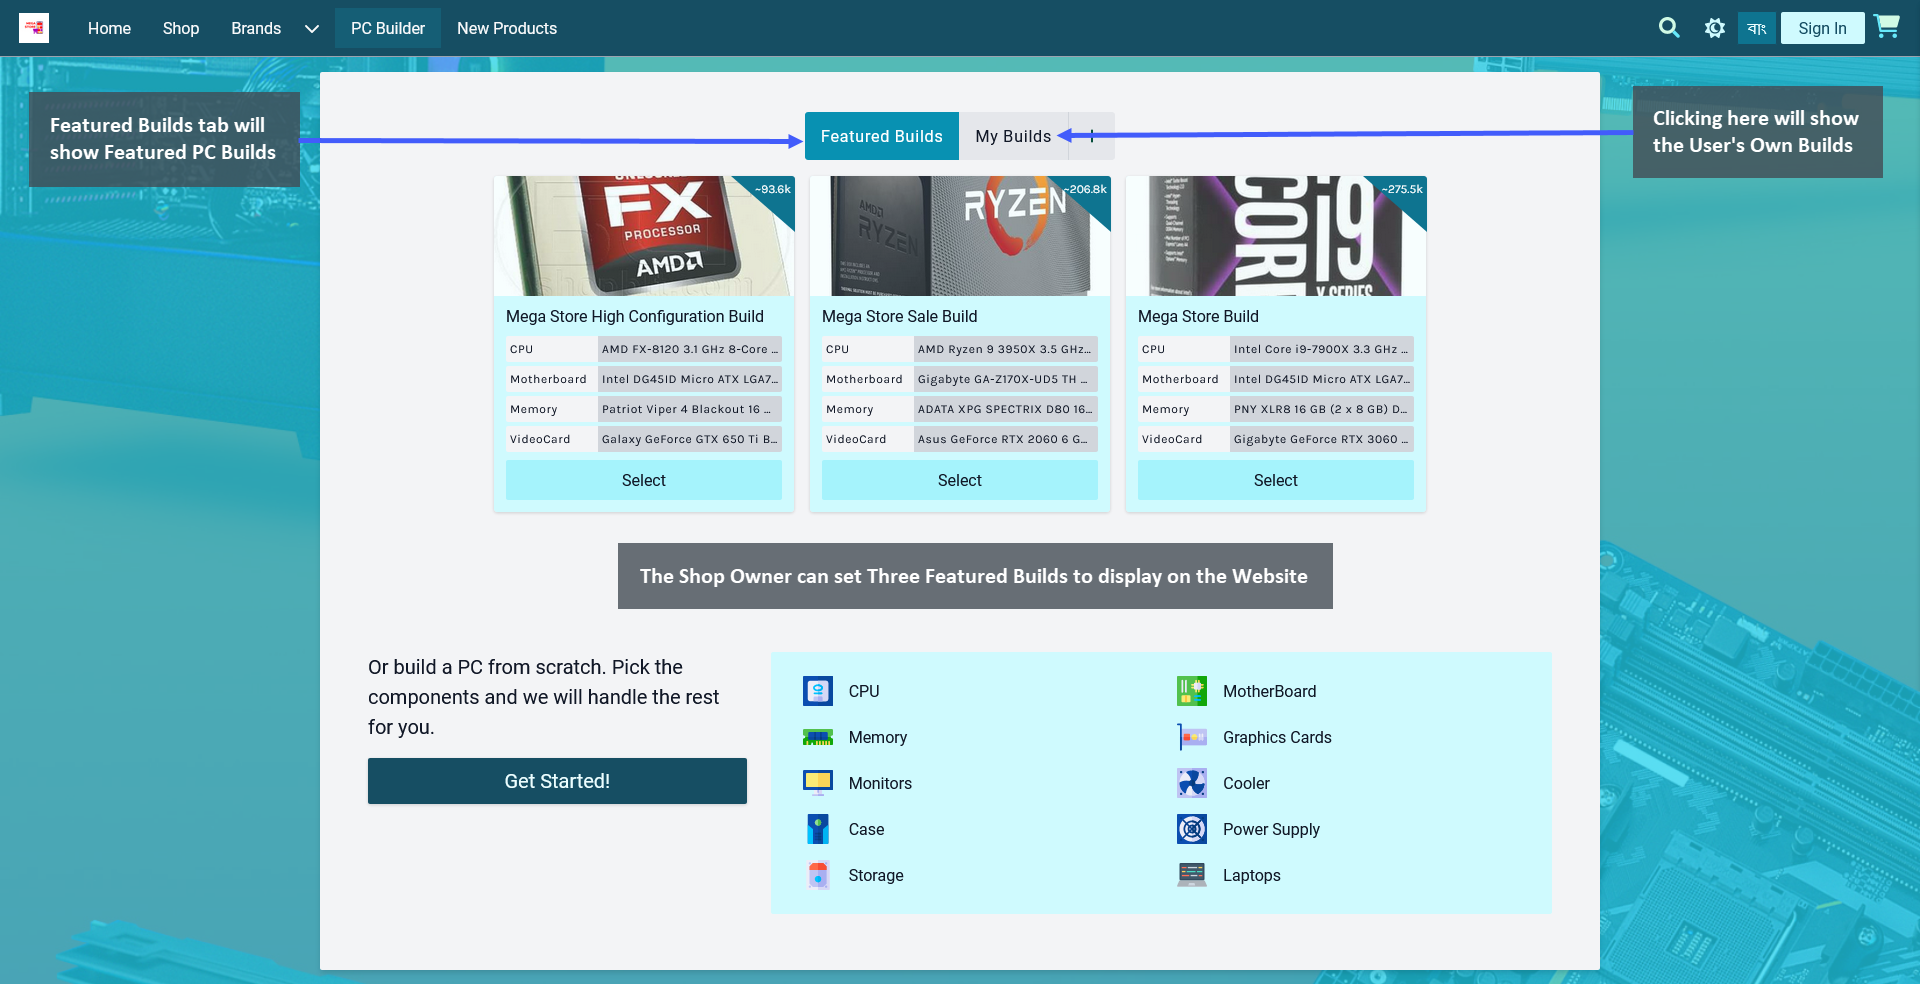
Image 5: The Shop Owner can set Three Featured Builds which will be displayed under the Featured Builds.
View PC Builds from Customer Profile
When a Customer creates a lot of PC Builds, they will be available to view under the Customer Dashboard. Click the View More button from Customer Contact information to view the View PC Builds button. Click this button to view the PC Builds created by this Customer that will redirect to a page with full list of this Customer’s Builds.
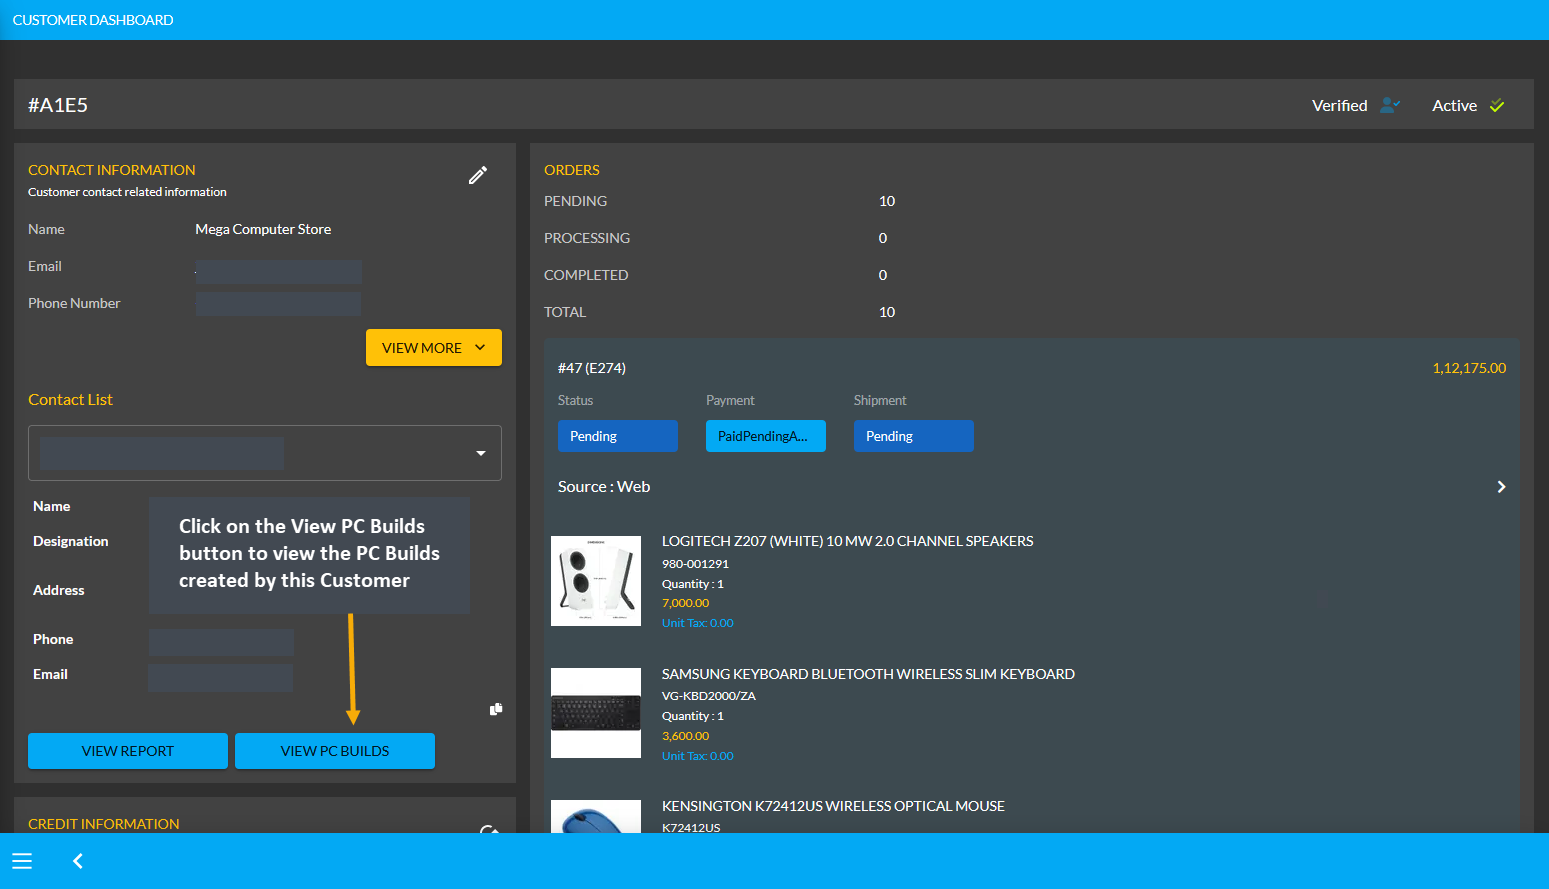
Image 1: Click on the View PC Builds button to view the PC Builds created by this Customer.
On the redirected page of the Customer’s PC Builds, the list of Builds will show the Customer’s information, PC Build creation date, PC Build total purchase price, and PC Build parts added as shown in the example.
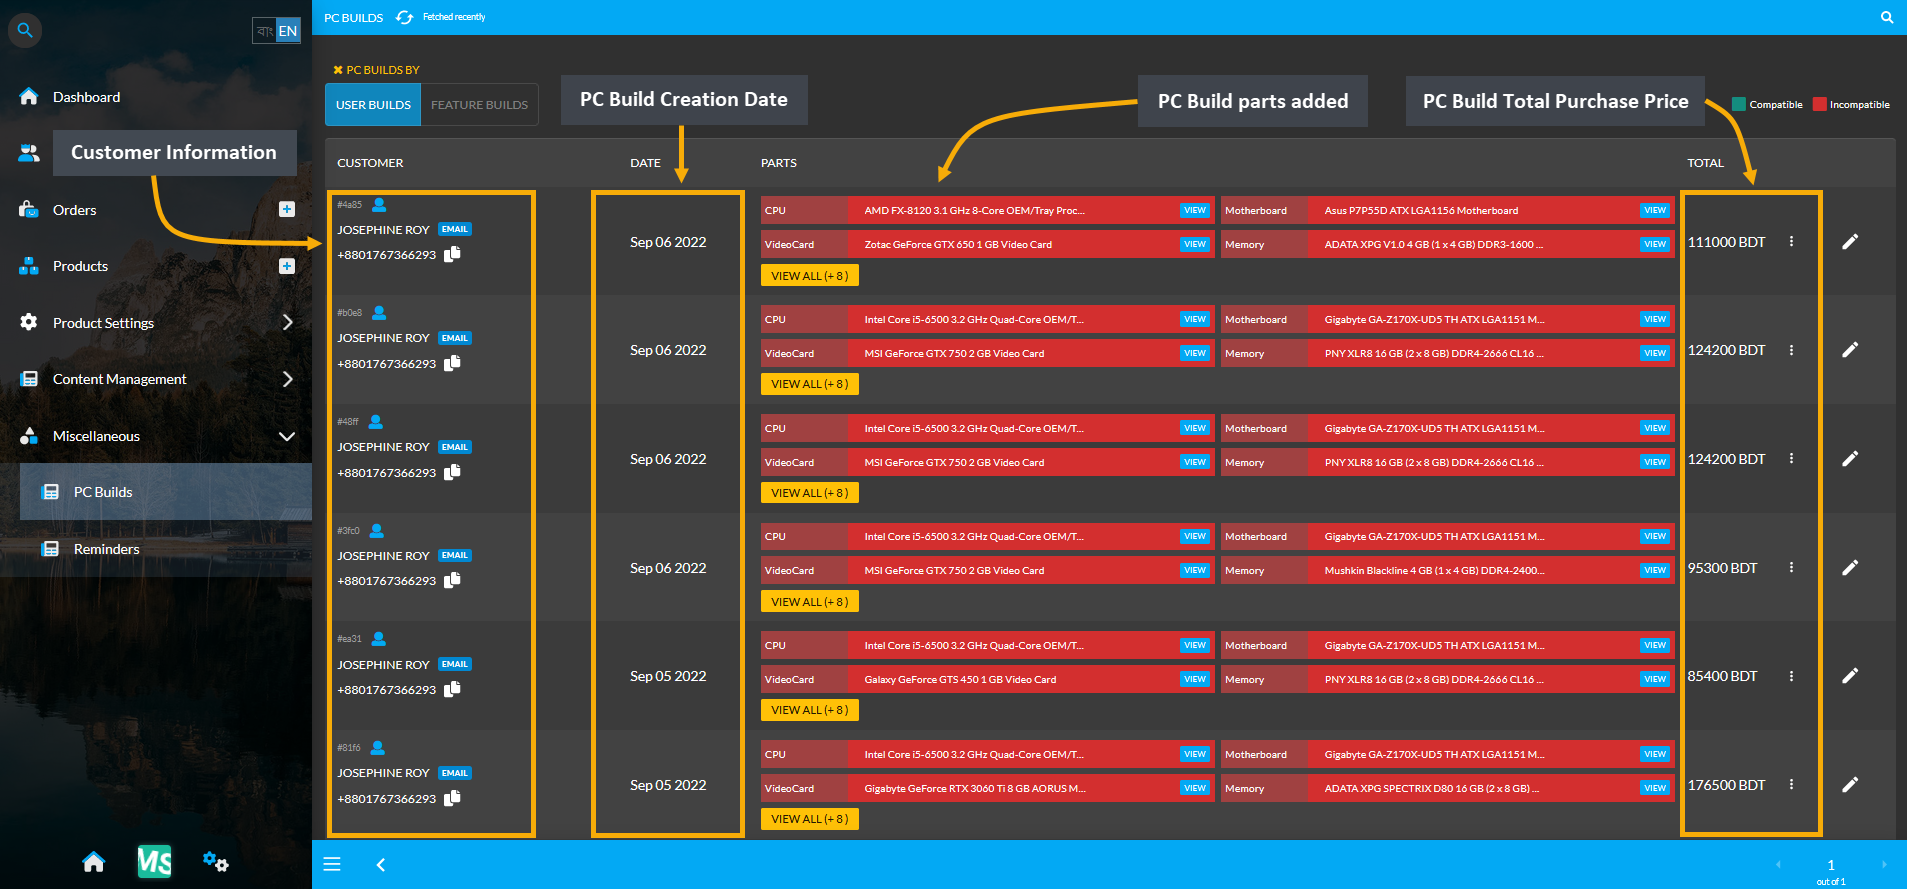
Image 2: Customer's information, PC Build creation date, total purchase price, and Build parts are shown.
To view all the added components of a specific User Build, click on View All that will show the details in a pop-up. There is a Customize for Print button, clicking on which will allow editing the quantities of the Build. There is a Print button beside this, using which the details of the Build can be printed for record.
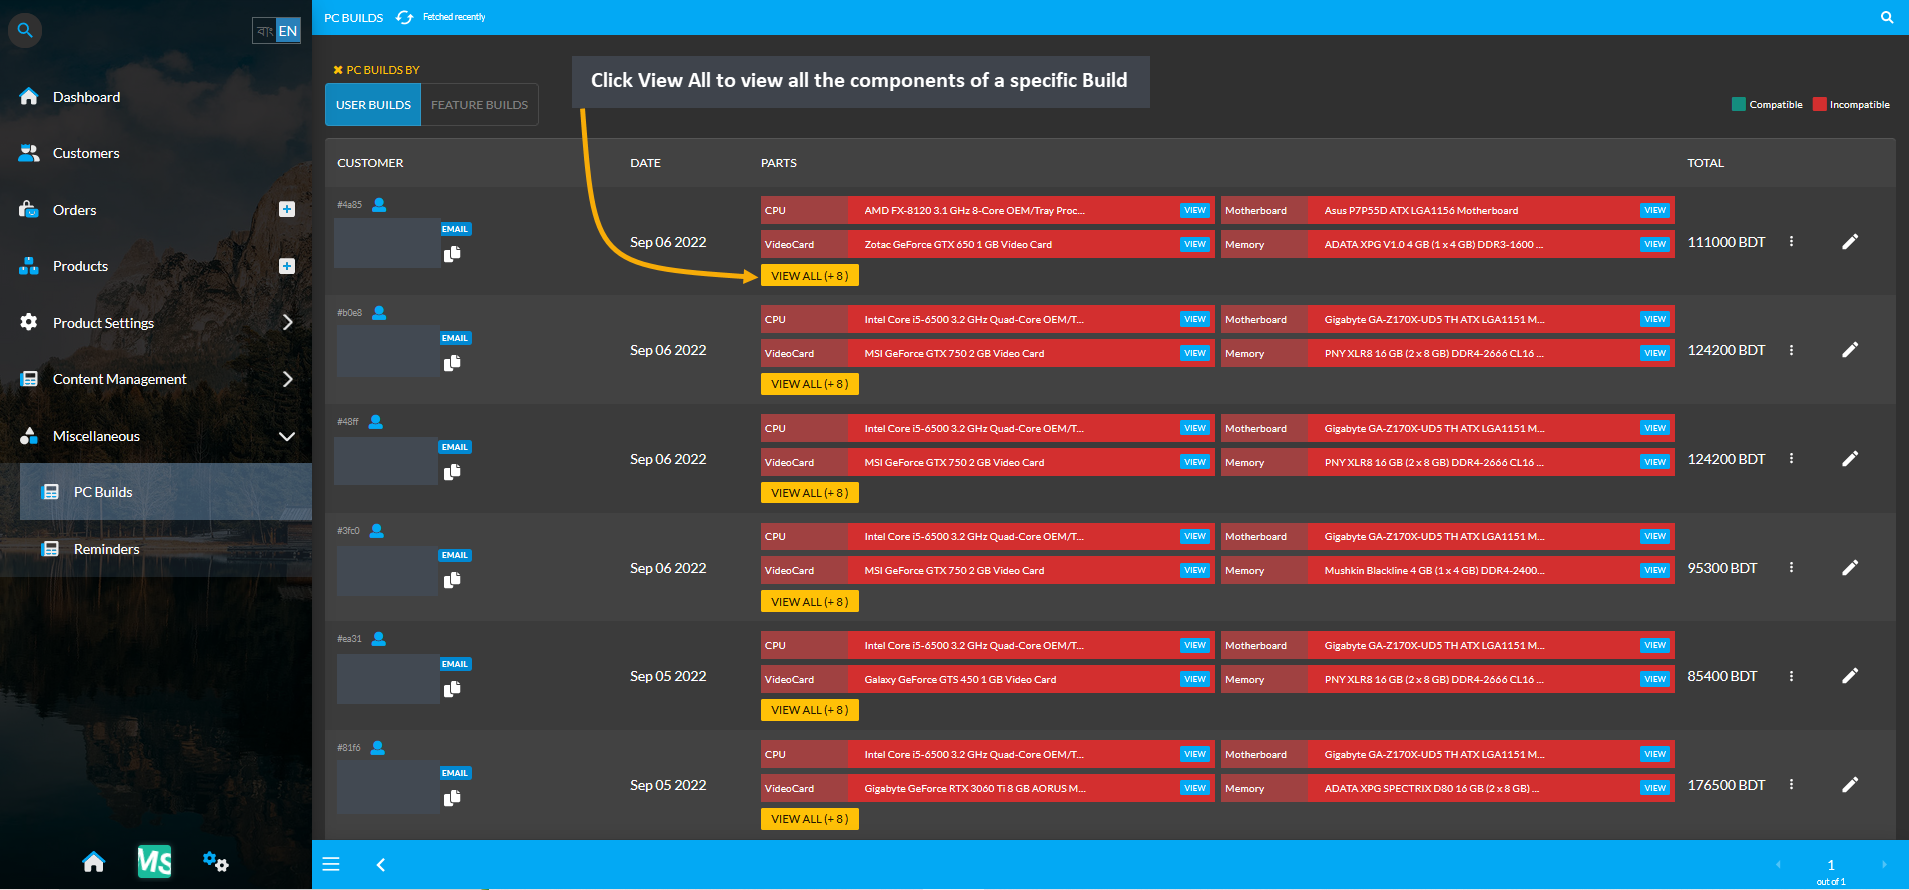
Image 3: Click View All to view all the components of a specific Build from the list of User's Builds.
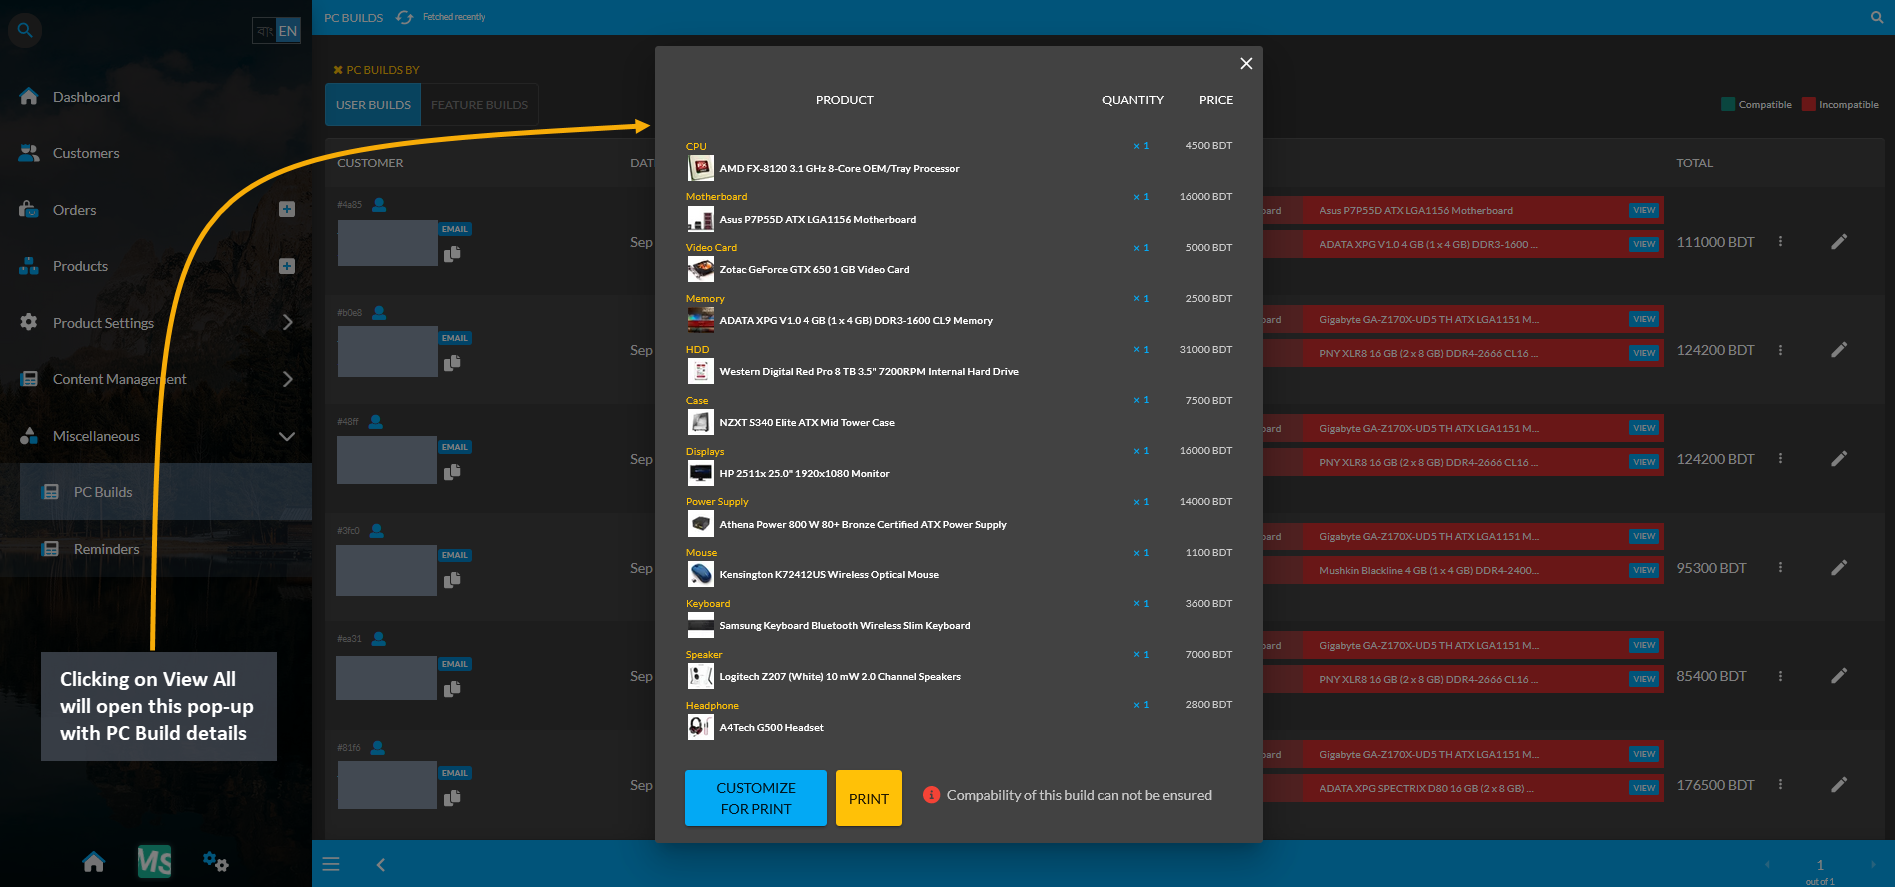
Image 4: Clicking on View All will open pop-up with PC Build details that can be customized or printed.
1 - PC Builds Categories
Specific Product Categories that should be selected during Product Creation for User PC Builds so that those Products are visible when creating PC Builds on the Website.
Categories to select for PC Build Visibility
Product Category: CPU
In order for Product(s) to be visible as components to select during PC Build creation, the Shop Owner needs to create Product(s) using specific Product Categories. For example, as shown in the screenshot below, in order for the Product AMD Ryzen 5 3400G 3.7 GHz Quad Core Processor to be visible or be selected during PC Build creation, the Product should be created under Categories CPU and Desktop CPU and not other CPU Categories.
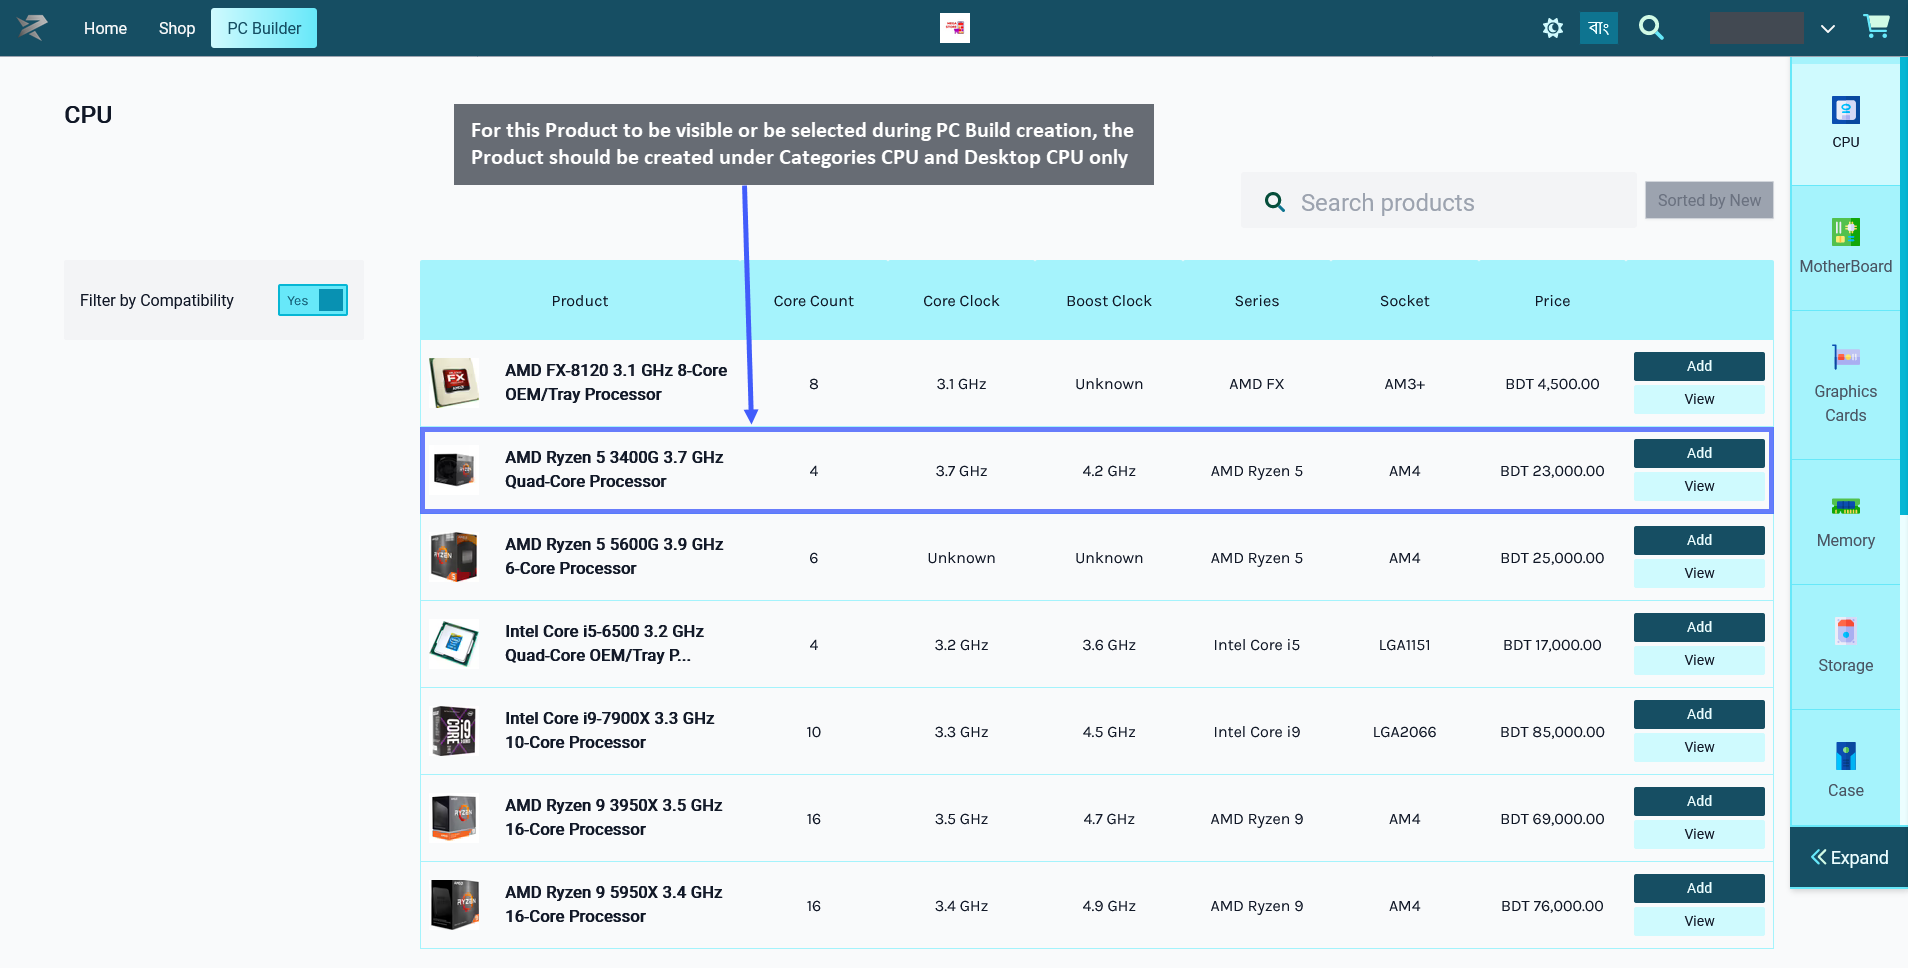
Image 1: For Product to be visible as a component for PC Build, select only CPU and Desktop CPU.
Therefore, even though a Product maybe have several Categories available for selection during Product creation, only certain Categories should be selected for the Product for it to be visible under PC Builds.
When creating a Product for CPU or Central Processing Unit, the Shop Owner should only select the Categories: CPU and Desktop CPU for the Product to be visible under PC Builds. When they will try to add this component CPU to PC Build later, this Product will then be visible and available for selection under PC Builds to create build.

Image 2: Select only these Categories during Product creation for the Product to be visible for PC Build.
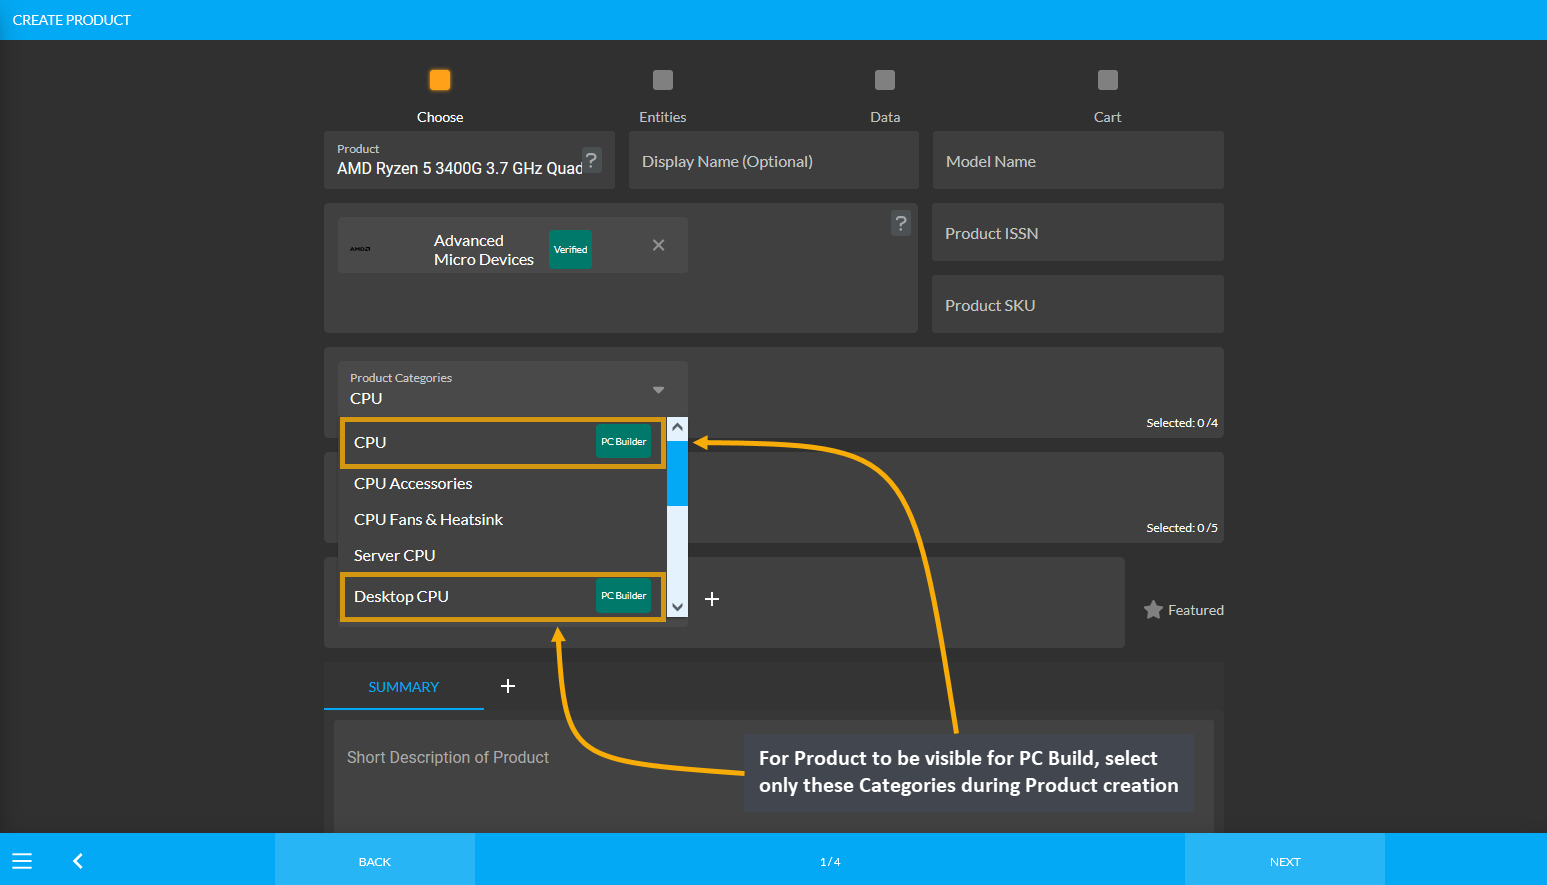
Image 3: For Product to be visible for PC Build, select only these Categories during Product creation.
Product Category: Motherboard
In order for Product(s) to be visible as components to select during PC Build creation, the Shop Owner needs to create Product(s) using specific Product Categories. For example, as shown in the screenshot below, in order for the Product Gigabyte GA-F2A78M-HD2 Micro ATX FM2+ Motherboard to be visible or be selected during PC Build creation, the Product should be created under the Categories Motherboards, Intel Motherboards, and AMD Motherboards and not other Motherboard Categories.
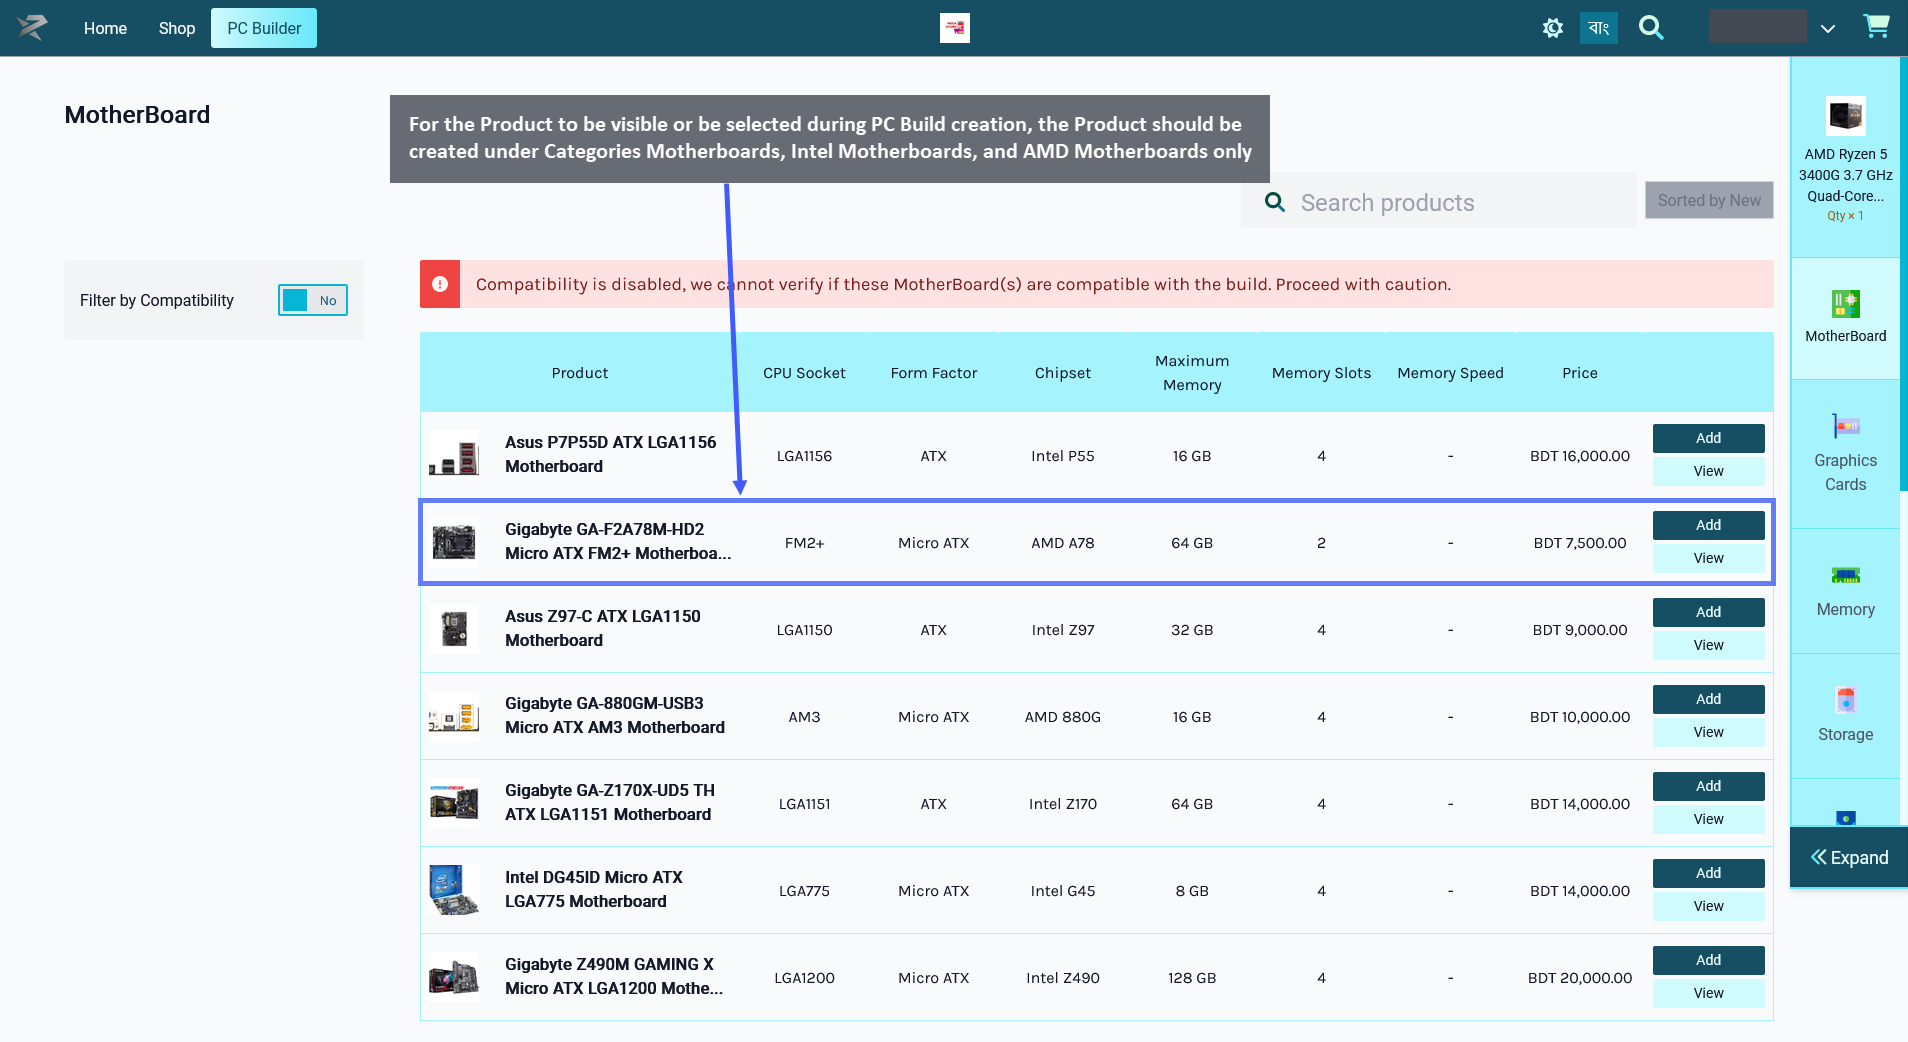
Image 1: For Product to be visible as a component for PC Build, select only CPU and Desktop CPU.
Therefore, even though a Product maybe have several Categories available for selection during Product creation, only certain Categories should be selected for the Product for it to be visible under PC Builds.
When creating a Product for Motherboard, the Shop Owner should only select these Categories: Motherboards, Intel Motherboards, and AMD Motherboards for the Product to be visible under PC Builds. When they will try to add the component Motherboard to PC Build later, this Product will then be visible and available for selection under PC Builds to create build.

Image 2: Select only these Categories during Product creation for the Product to be visible for PC Build.
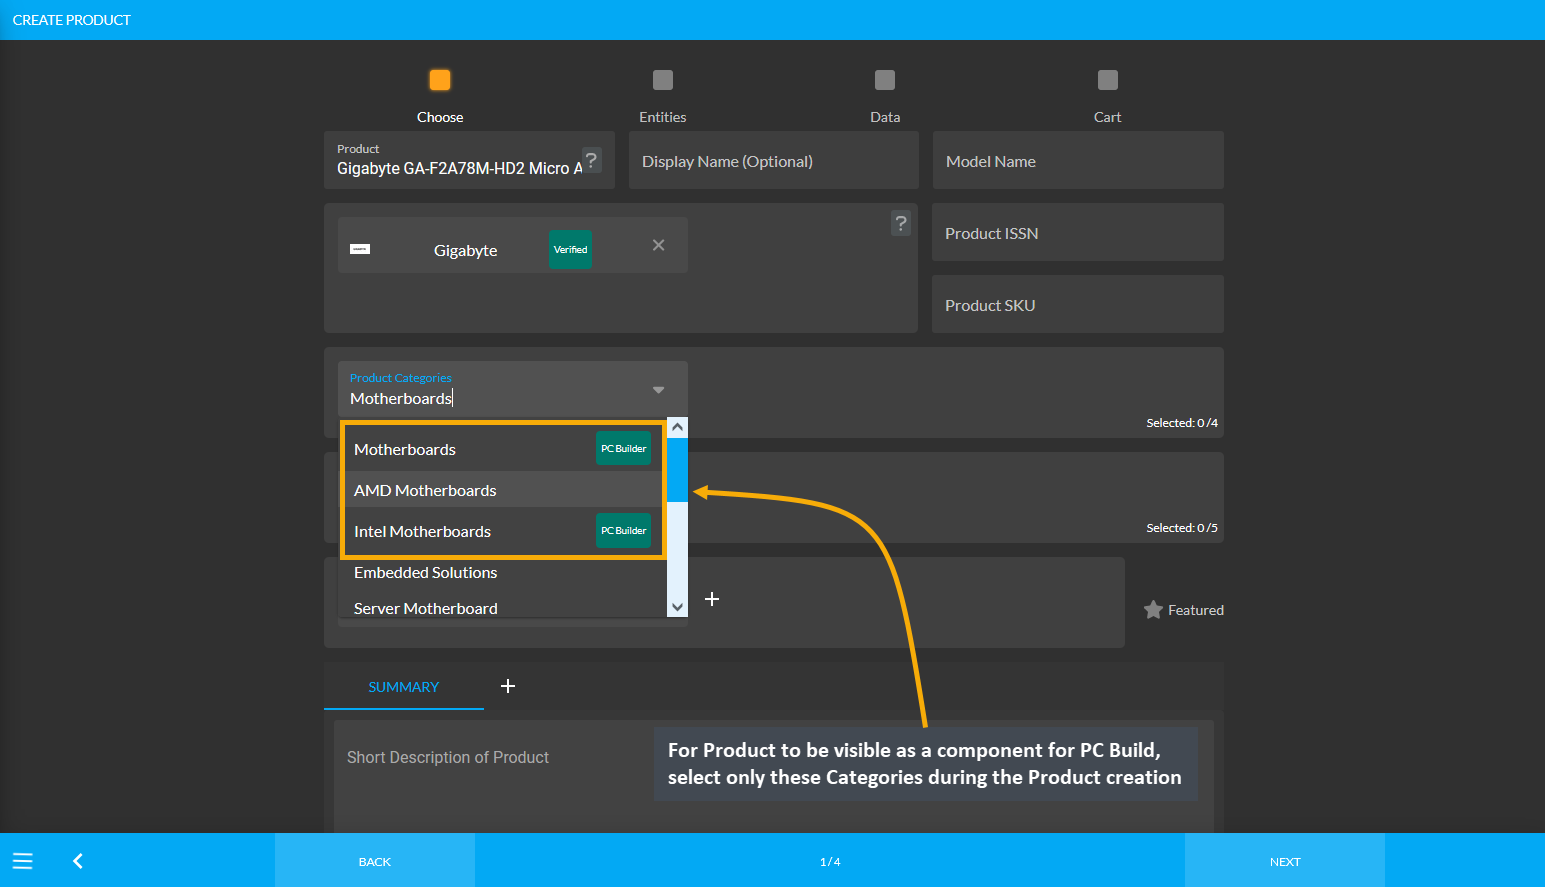
Image 3: For Product to be visible for PC Build, select only these Categories during Product creation.
Product Category: Video Card
In order for Product(s) to be visible as components to select during PC Build creation, the Shop Owner needs to create Product(s) using specific Product Categories. For example, as shown in the screenshot below, in order for the Product Asus GeForce RTX 2060 6GB TUF OC Video Card to be visible or be selected during PC Build creation, the Product should be created only under these two Categories: GPU & Video Devices and Desktop GPU.
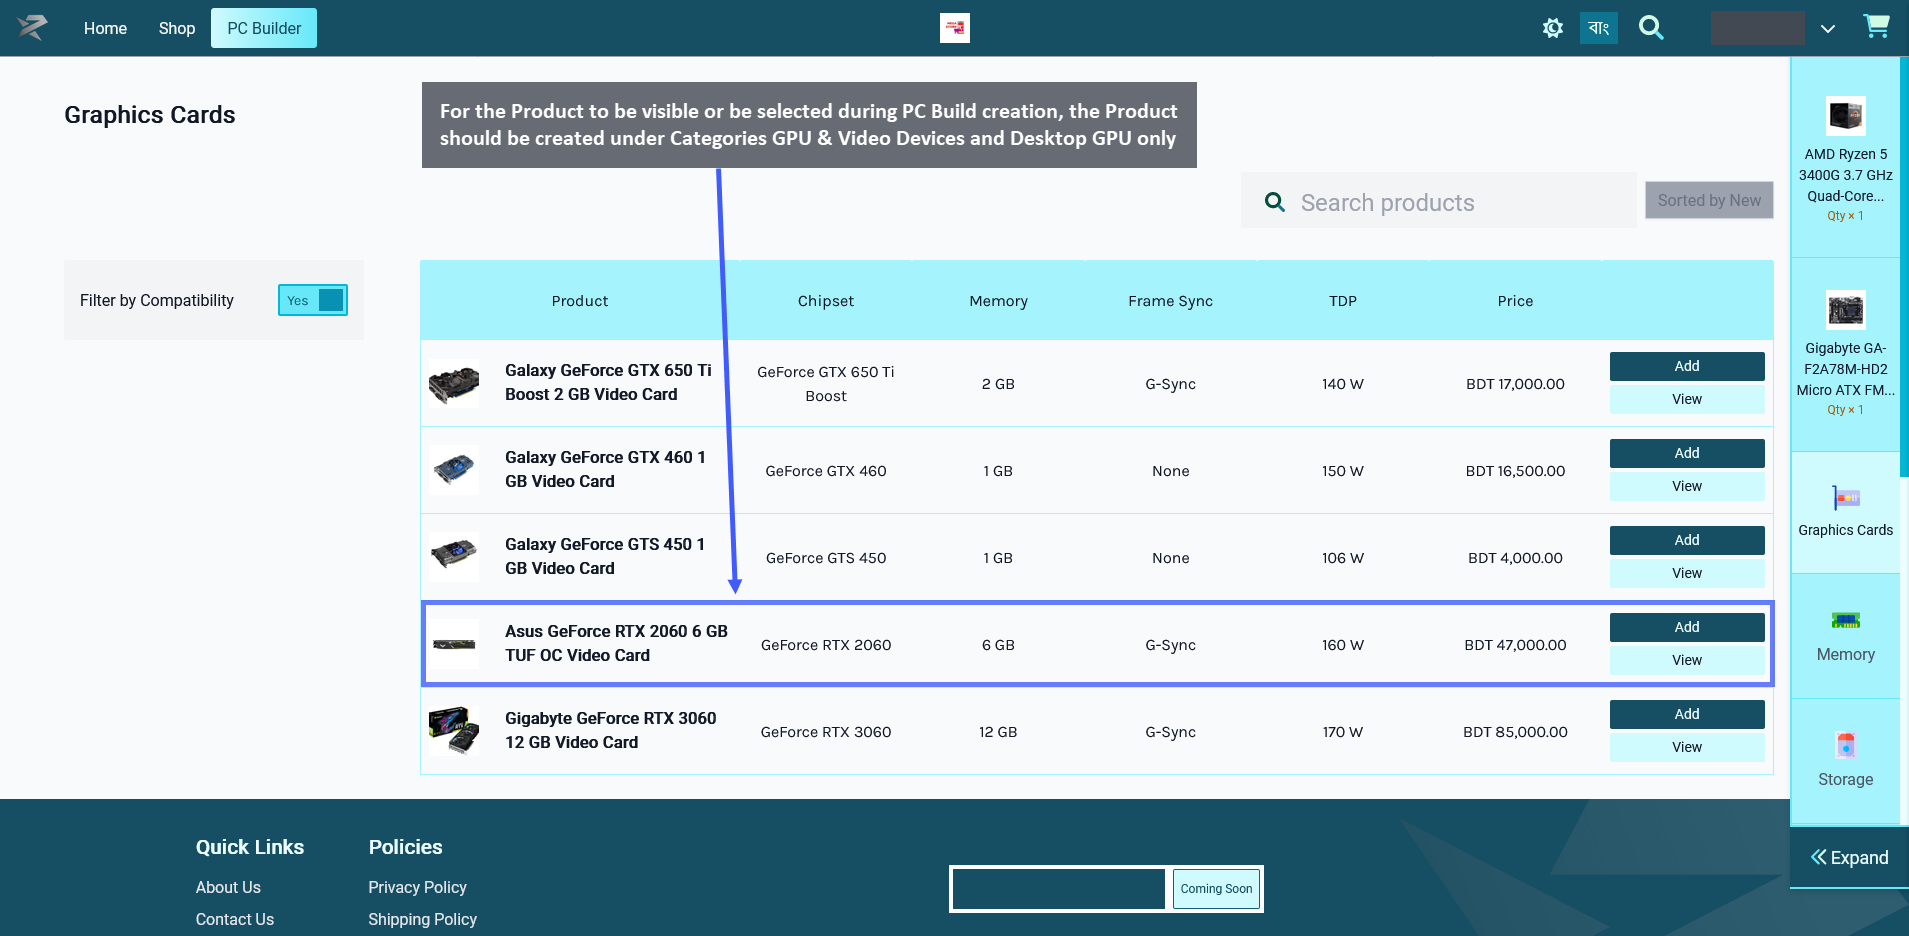
Image 1: For Product to be visible for PC Build, select only GPU & Video Devices and Desktop GPU.
Therefore, even though a Product maybe have several Categories available for selection during Product creation, only certain Categories should be selected for the Product for it to be visible under PC Builds.
When creating a Product for Video Card, Shop Owner should only select these Categories: GPU & Video Devices and Desktop GPU for the Product to be visible under PC Builds. When they will try to add this component Video Card to PC Build later, this Product will then be visible and available for selection under PC Builds to create build.

Image 2: Select only these Categories during Product creation for the Product to be visible for PC Build.
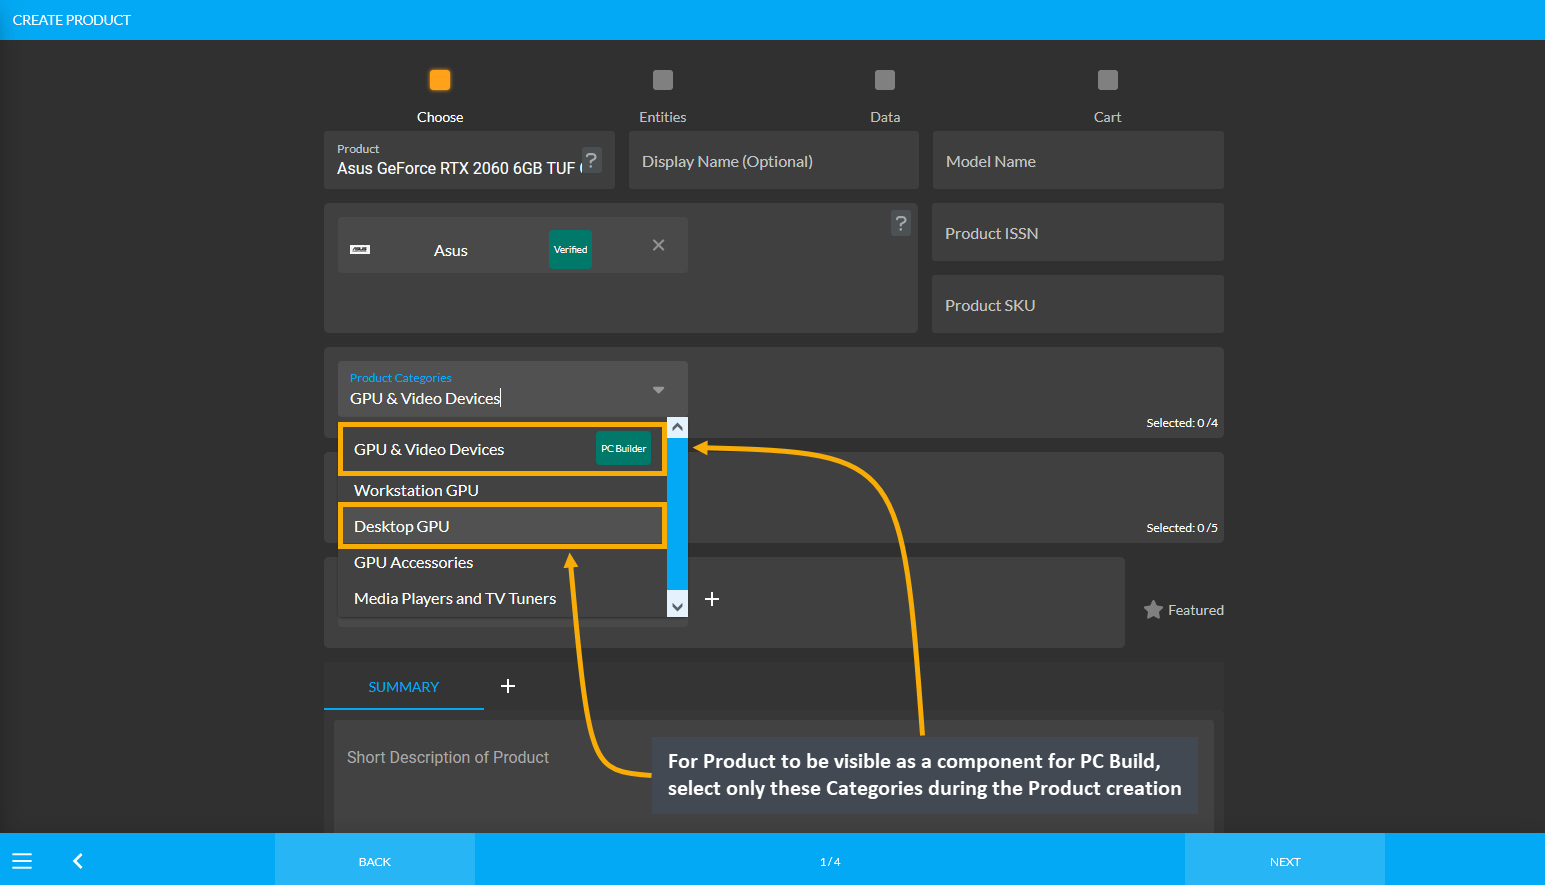
Image 3: For Product to be visible for PC Build, select only these Categories during Product creation.
Product Category: Memory
In order for Product(s) to be visible as components to select during PC Build creation, the Shop Owner needs to create Product(s) using specific Product Categories. For example, as shown in the screenshot below, in order for the Product PNY XLR8 8GB (2 x 4GB) DDR3-1600 CL9 Memory to be visible or be selected during PC Build creation, the Product should be created under Categories RAM and Desktop RAM and not other RAM Categories.
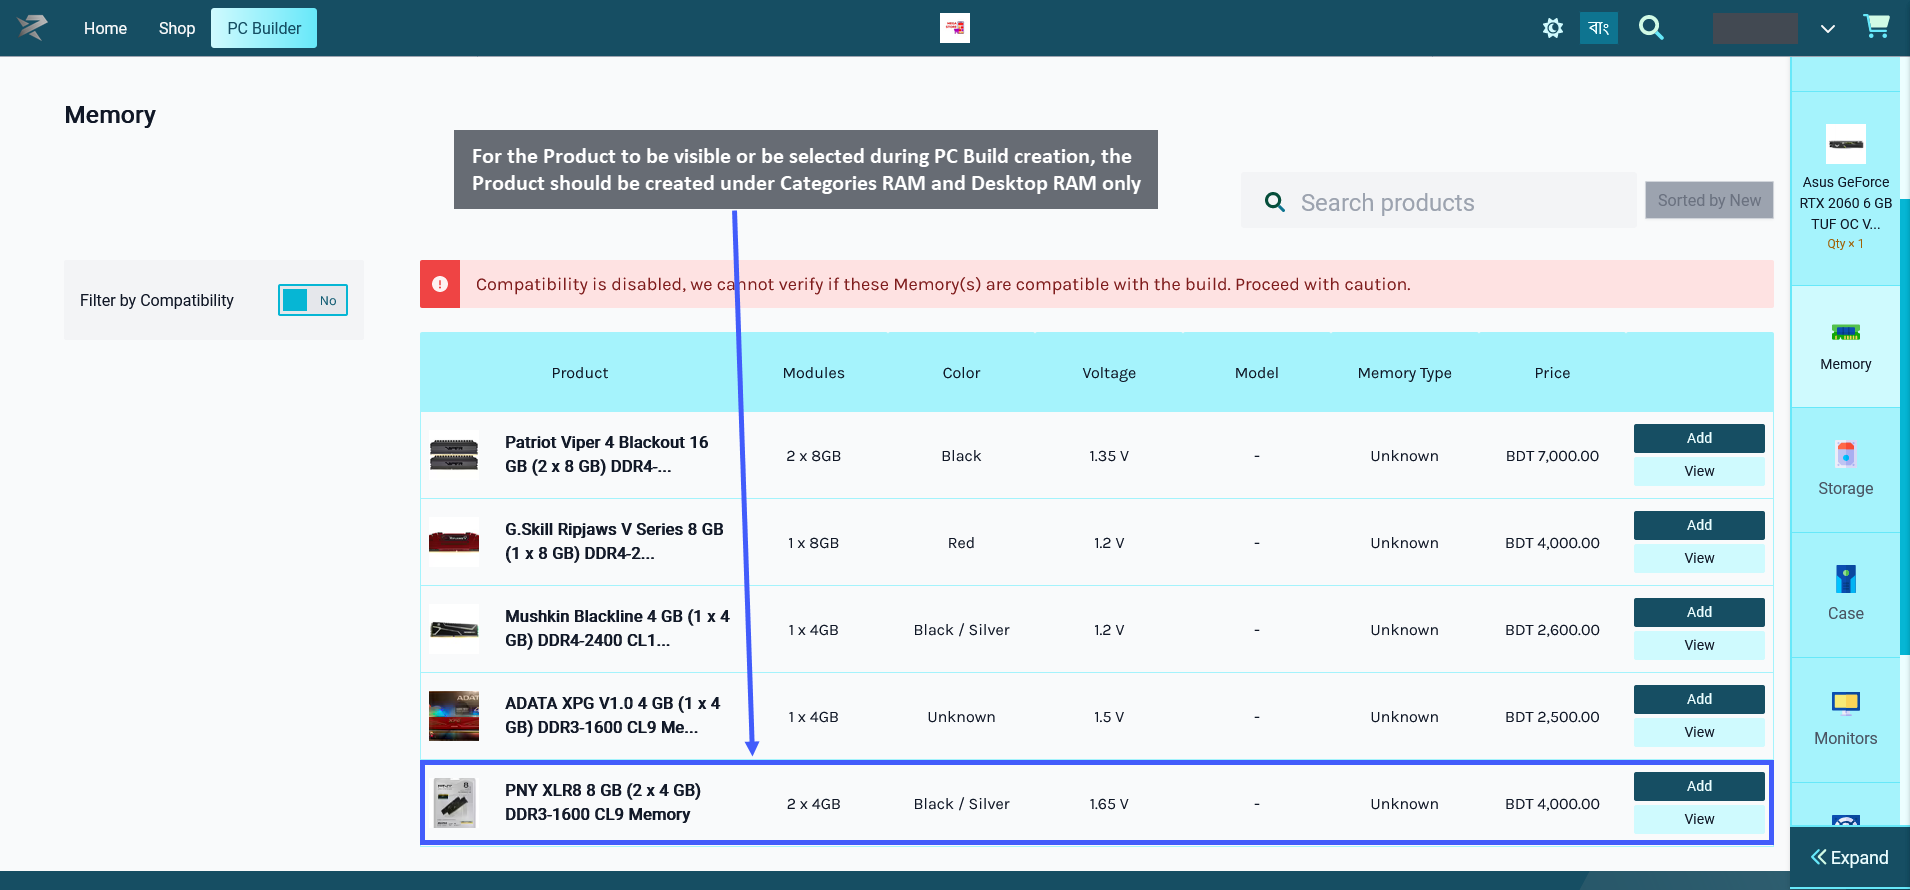
Image 1: For Product to be visible as a component for PC Build, select only RAM and Desktop RAM.
Therefore, even though a Product maybe have several Categories available for selection during Product creation, only certain Categories should be selected for the Product for it to be visible under PC Builds.
When creating a Product for Memory, the Shop Owner should only select the Categories: RAM and Desktop RAM for the Product to be visible under PC Builds. When they will try to add this component Memory to PC Build later, this Product will then be visible and available for selection under PC Builds to create build.

Image 2: Select only these Categories during Product creation for the Product to be visible for PC Build.
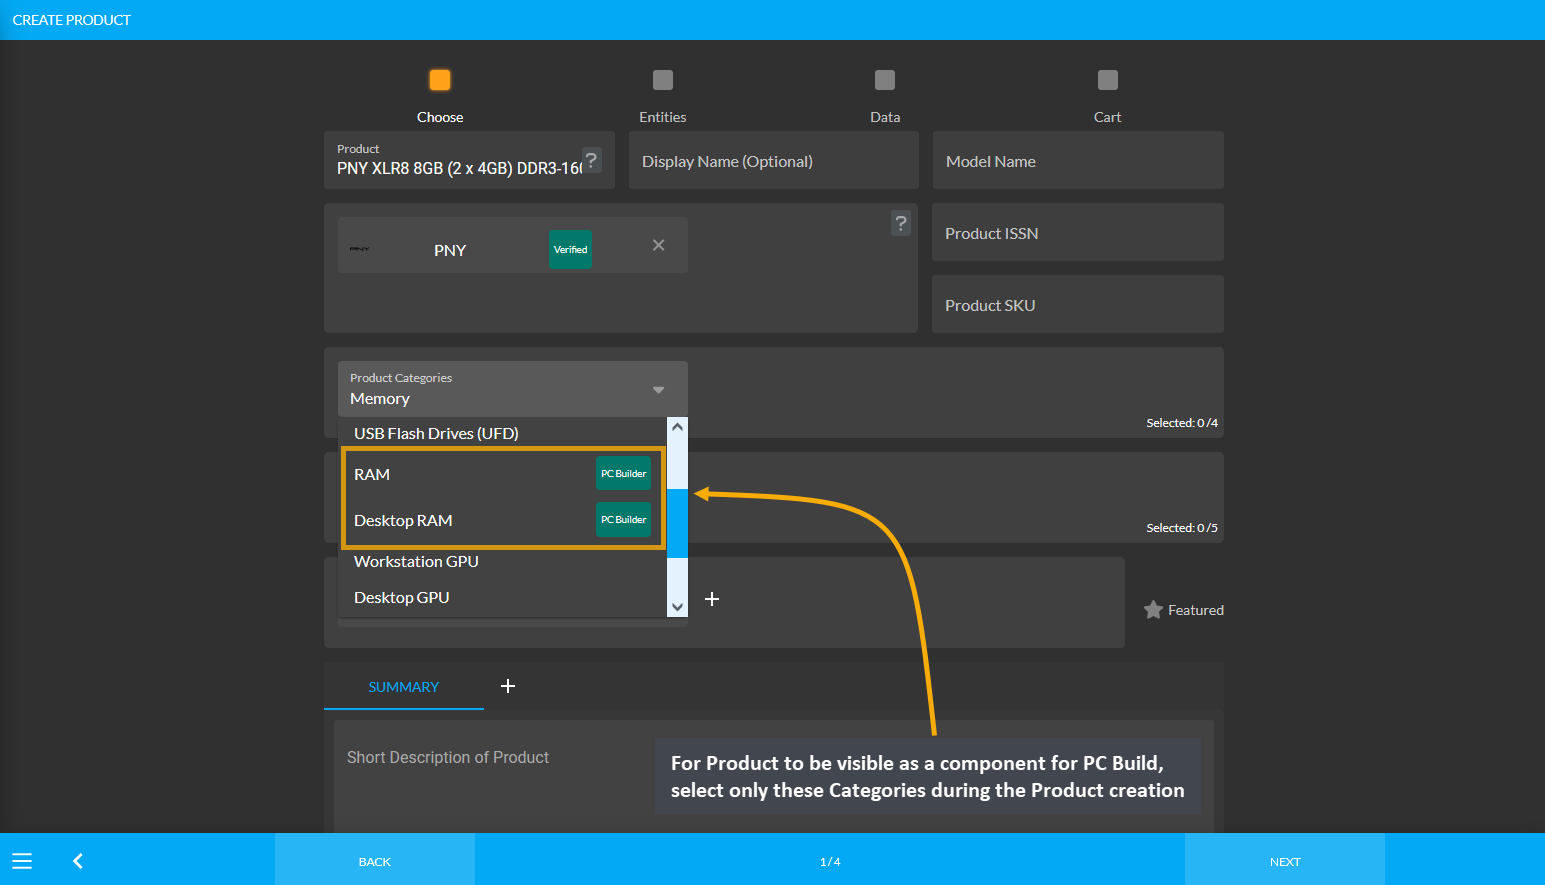
Image 3: For Product to be visible for PC Build, select only these Categories during Product creation.
Product Category: Storage
In order for Product(s) to be visible as components to select during PC Build creation, the Shop Owner needs to create Product(s) using specific Product Categories. Storage is available as Solid State Drive (SSD) and Hard Drives (HDD). During Product creation, specific Categories needs to be set for the Product so that they are visible during the PC Build component selection.
Storage: Hard Drives (HDD)
In case, Hard Drives (HDD) are selected from Storage, then in order for the Product Seagate Surveillance HDD 6TB 3.5’ 5400 RPM Internal Hard Drive to be visible or be selected during PC Build creation, this Product needs to be created under the Categories: Hard Drives (HDD), Desktop Internal HDD (3.5’), Desktop External HDD, and Portable External HDD and not other Hard Drives (HDD) Categories.
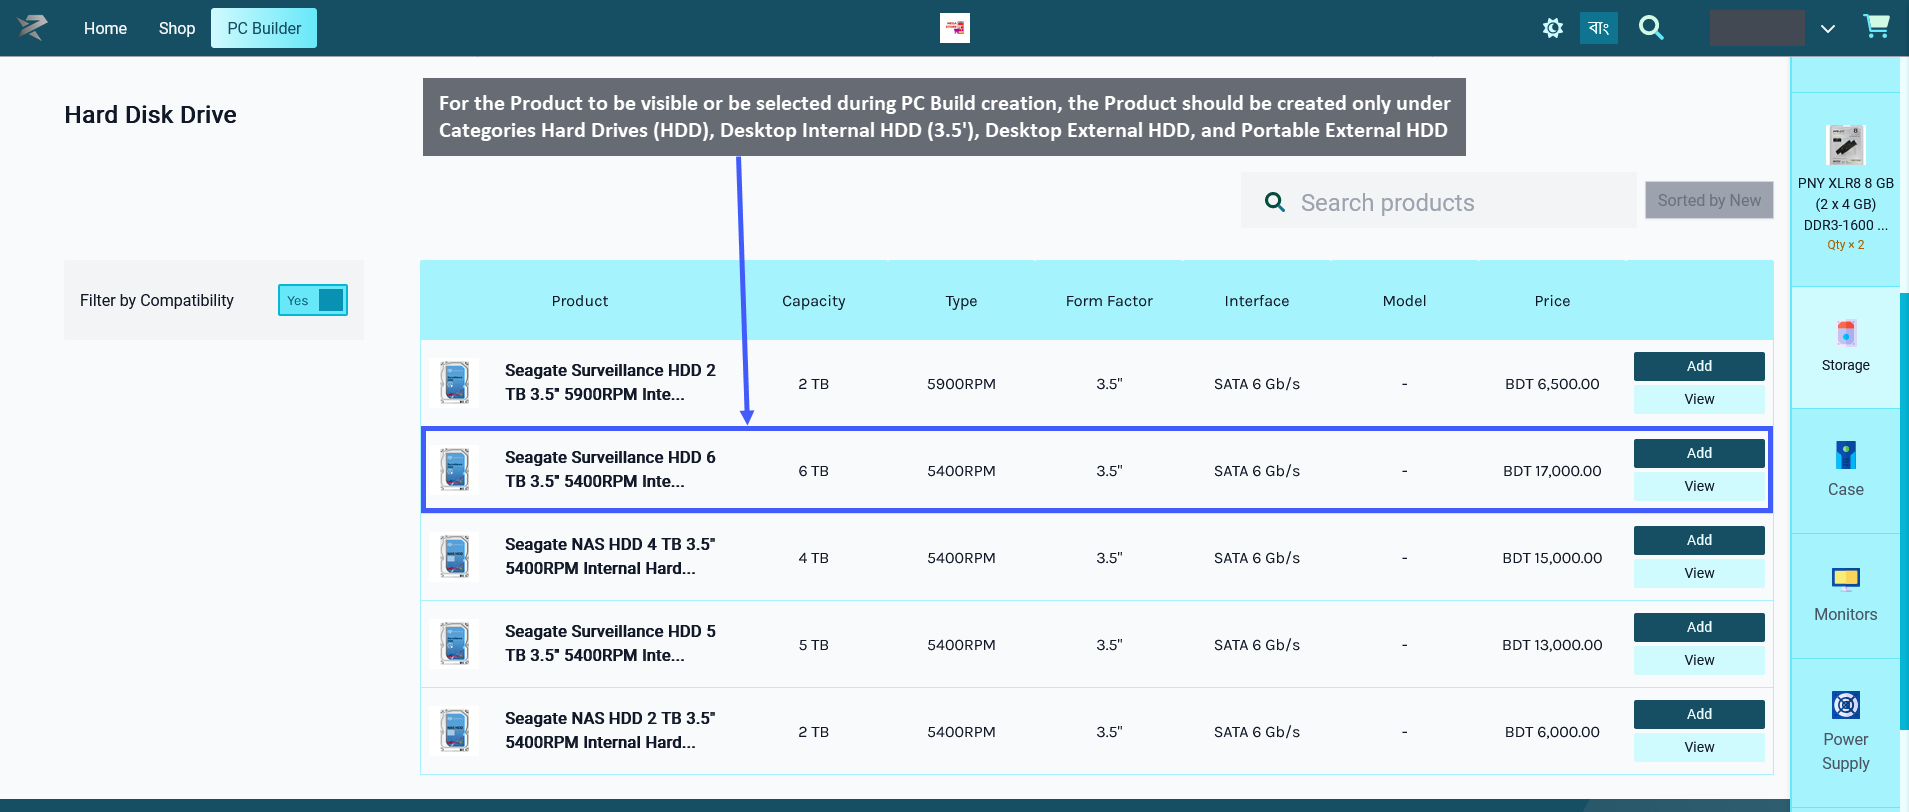
Image 1: For Product to be visible as component for PC Build, select specific Hard Drives (HDD) Categories.
Therefore, even though a Product maybe have several Categories available for selection during Product creation, only certain Categories should be selected for the Product for it to be visible under PC Builds.
When creating a Product for Storage with Hard Drives (HDD), the Shop Owner should only select the Categories: Hard Drives (HDD), Desktop Internal HDD (3.5’), Desktop External HDD, and Portable External HDD for the Product to be visible under PC Builds. When they will try to add the components of Hard Drives (HDD) to PC Build later, this Product will then be visible and available for selection under PC Builds to create build.

Image 2: Select only these Categories during Product creation for the Product to be visible for PC Build.
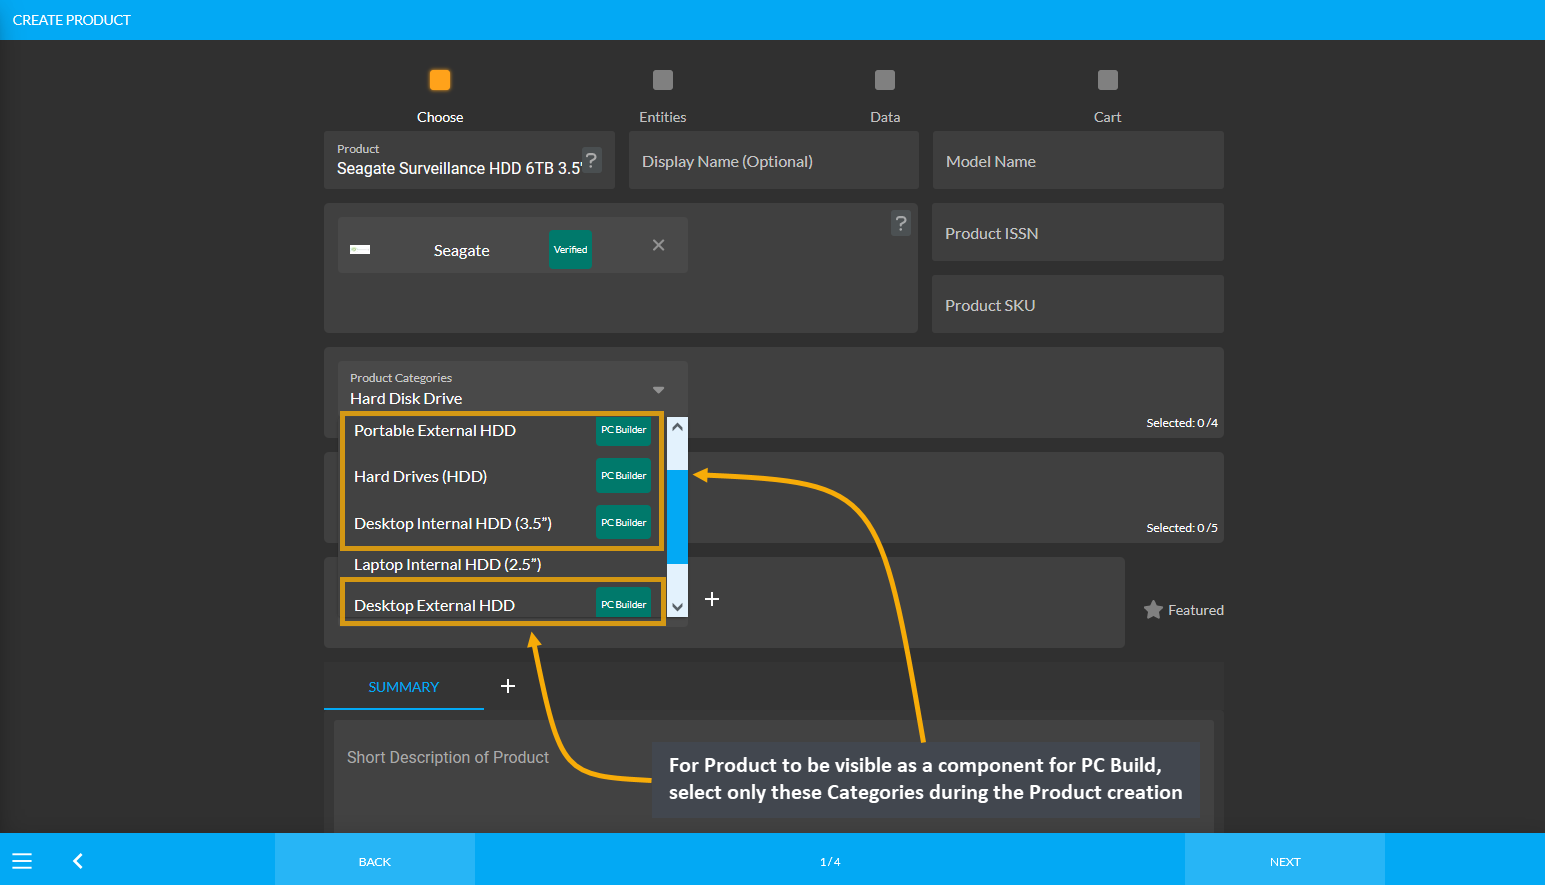
Image 3: For Product to be visible for PC Build, select only these Categories during Product creation.
Storage: Solid State Drive (SSD)
In case, Solid State Drive (SSD) are selected from Storage, then in order for the Product Western Digital Blue 250 GB M.2-2280 Solid State Drive to be visible or be selected during PC Build creation, this Product will need to be created under these Categories: Solid State Drive (SSD), SATA SSD. M.2 SATA SSD, M.2/U.2 NVMe SSD, and External SSD and not other Solid State Drive (SSD) Categories.
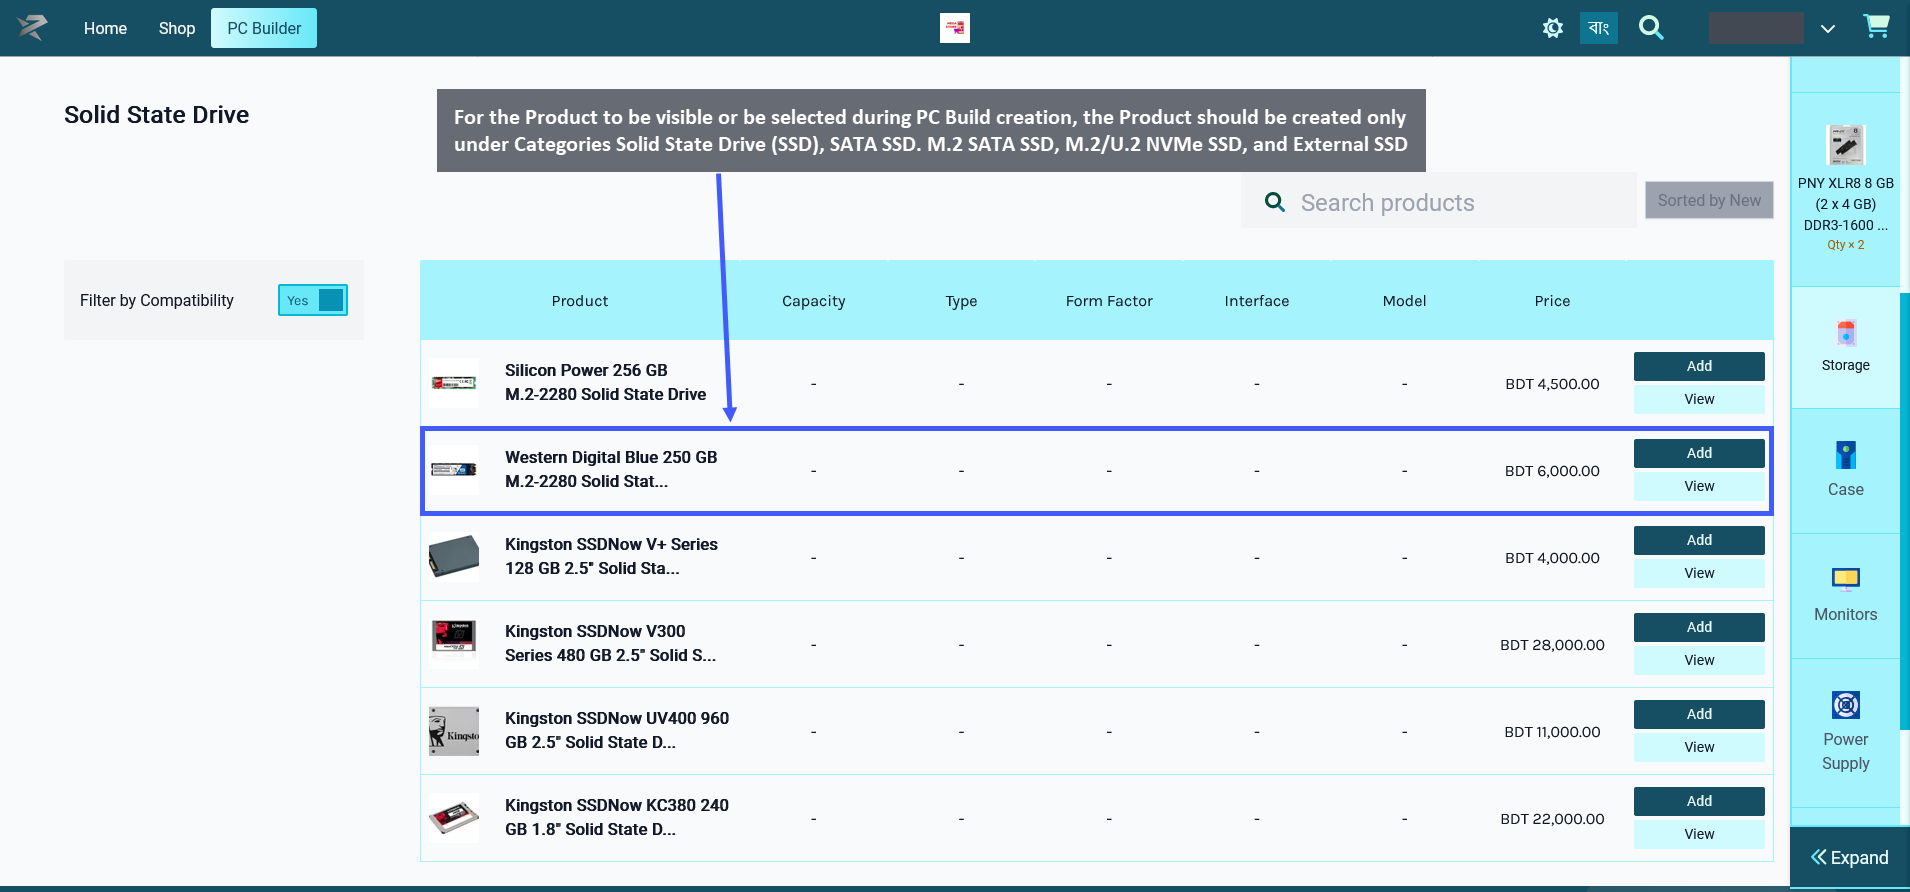
Image 4: For Product to be visible for PC Build, select the specific Solid State Drive (SSD) Categories.
Therefore, even though a Product maybe have several Categories available for selection during Product creation, only certain Categories should be selected for the Product for it to be visible under PC Builds.
When creating a Product for Storage with Solid State Drive (SSD), the Shop Owner should only select Categories: Solid State Drive (SSD), SATA SSD. M.2 SATA SSD, M.2/U.2 NVMe SSD, and External SSD for the Product to be visible under PC Builds. When they will try to add the components of Solid State Drive (SSD) to PC Build later, this Product will then be visible and available for selection under PC Builds to create build.

Image 5: Select only these Categories during Product creation for the Product to be visible for PC Build.
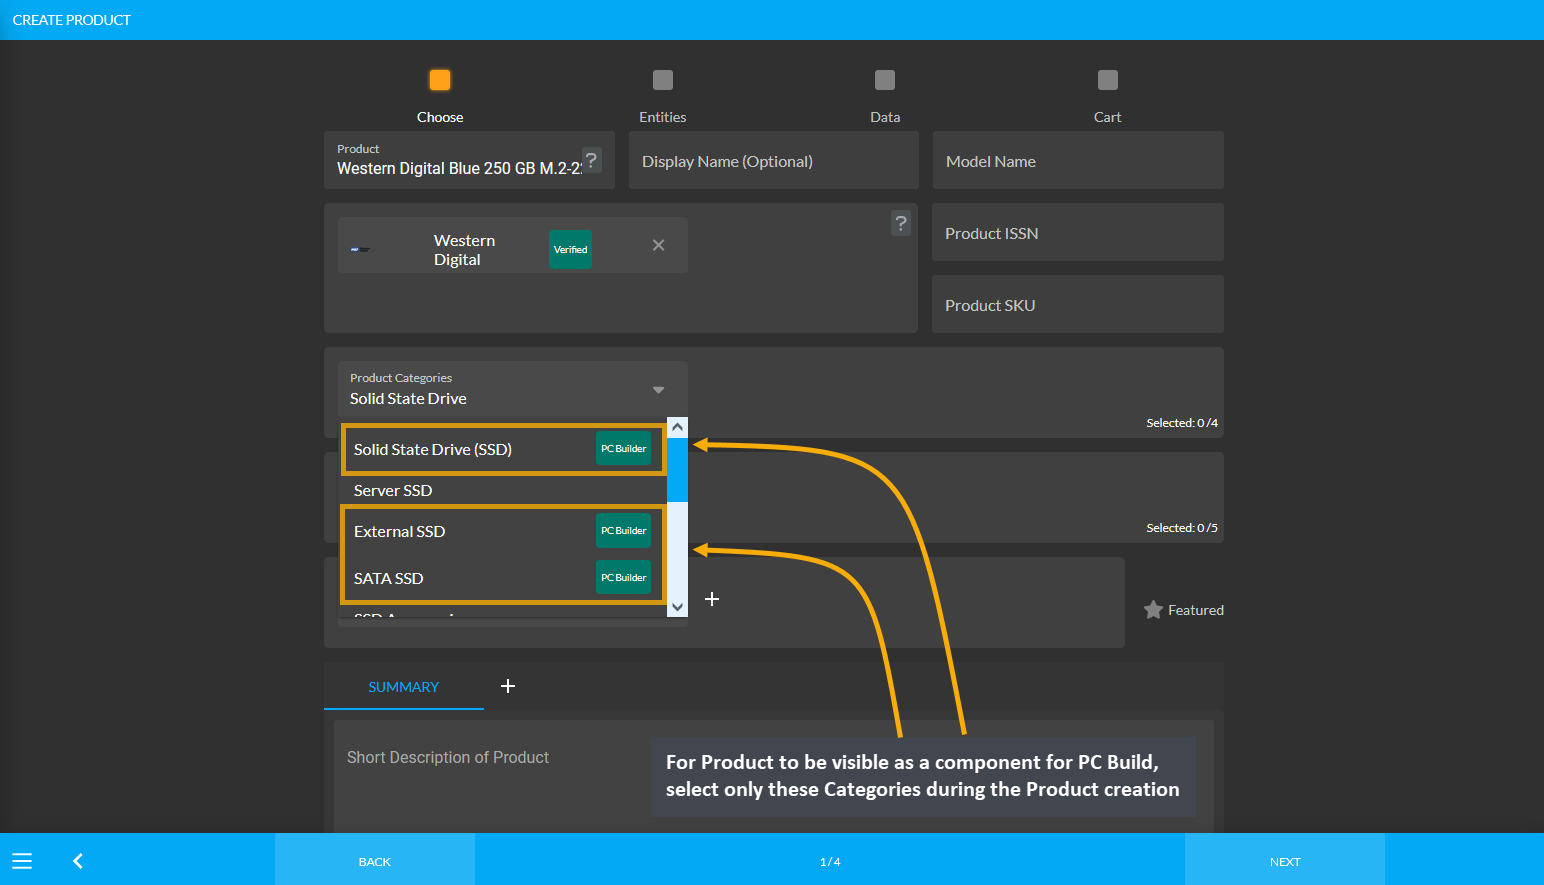
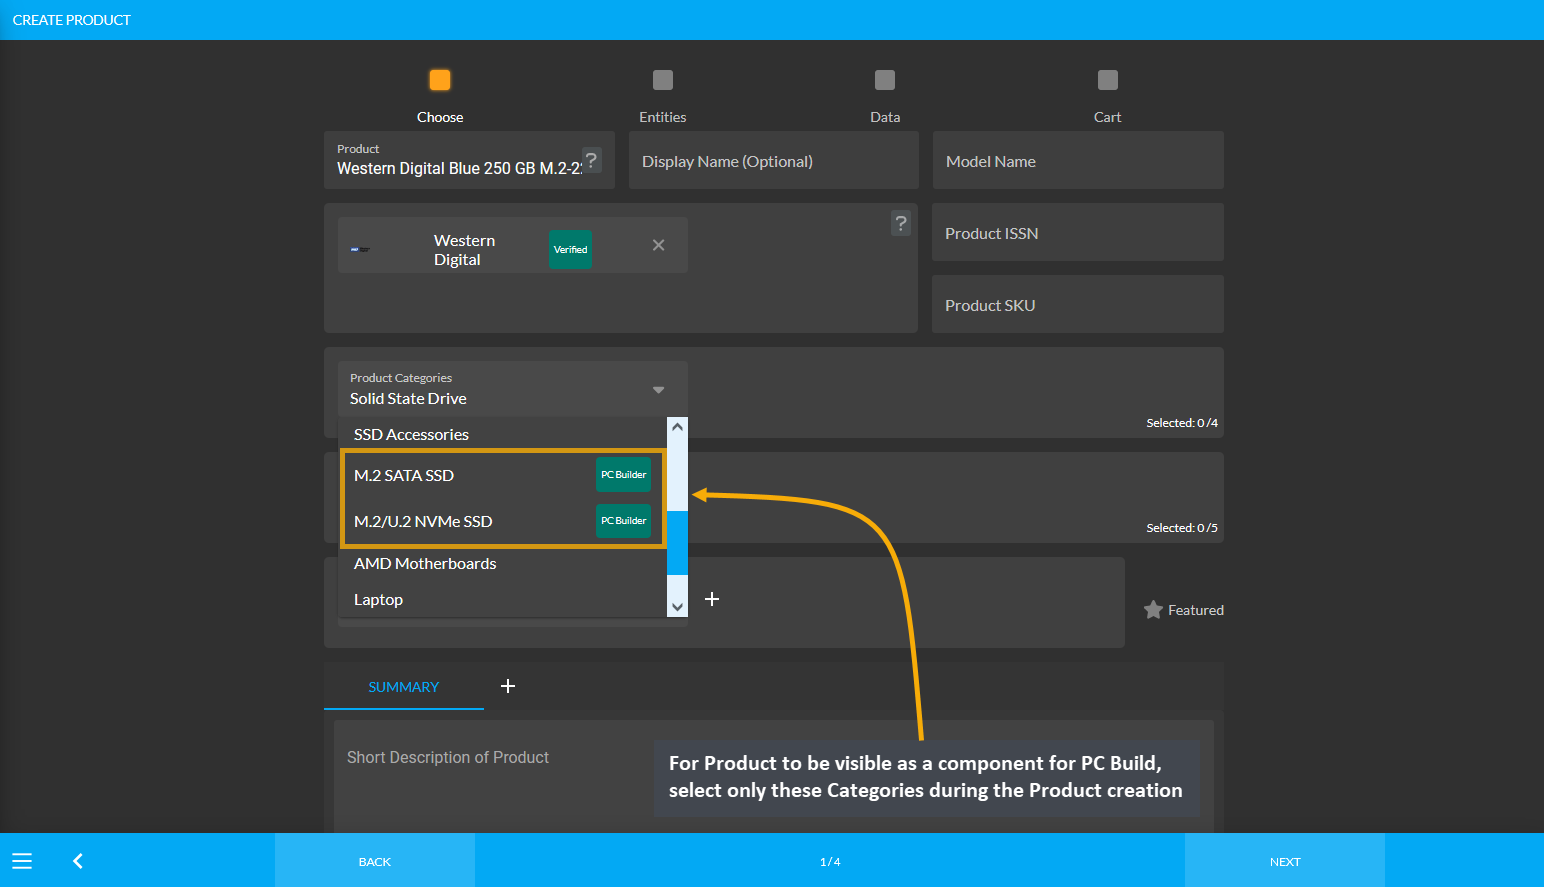
Image 6: For Product to be visible for PC Build, select only these Categories during Product creation.
Product Category: Case
In order for Product(s) to be visible as components to select during PC Build creation, the Shop Owner needs to create Product(s) using specific Product Categories. For example, as shown in the screenshot below, in order for the Product Thermaltake V9 Black Edition ATX Mid Tower Case to be visible or be selected during PC Build creation, the Product should be created only under the Categories Computer Cases and Desktop Cases.
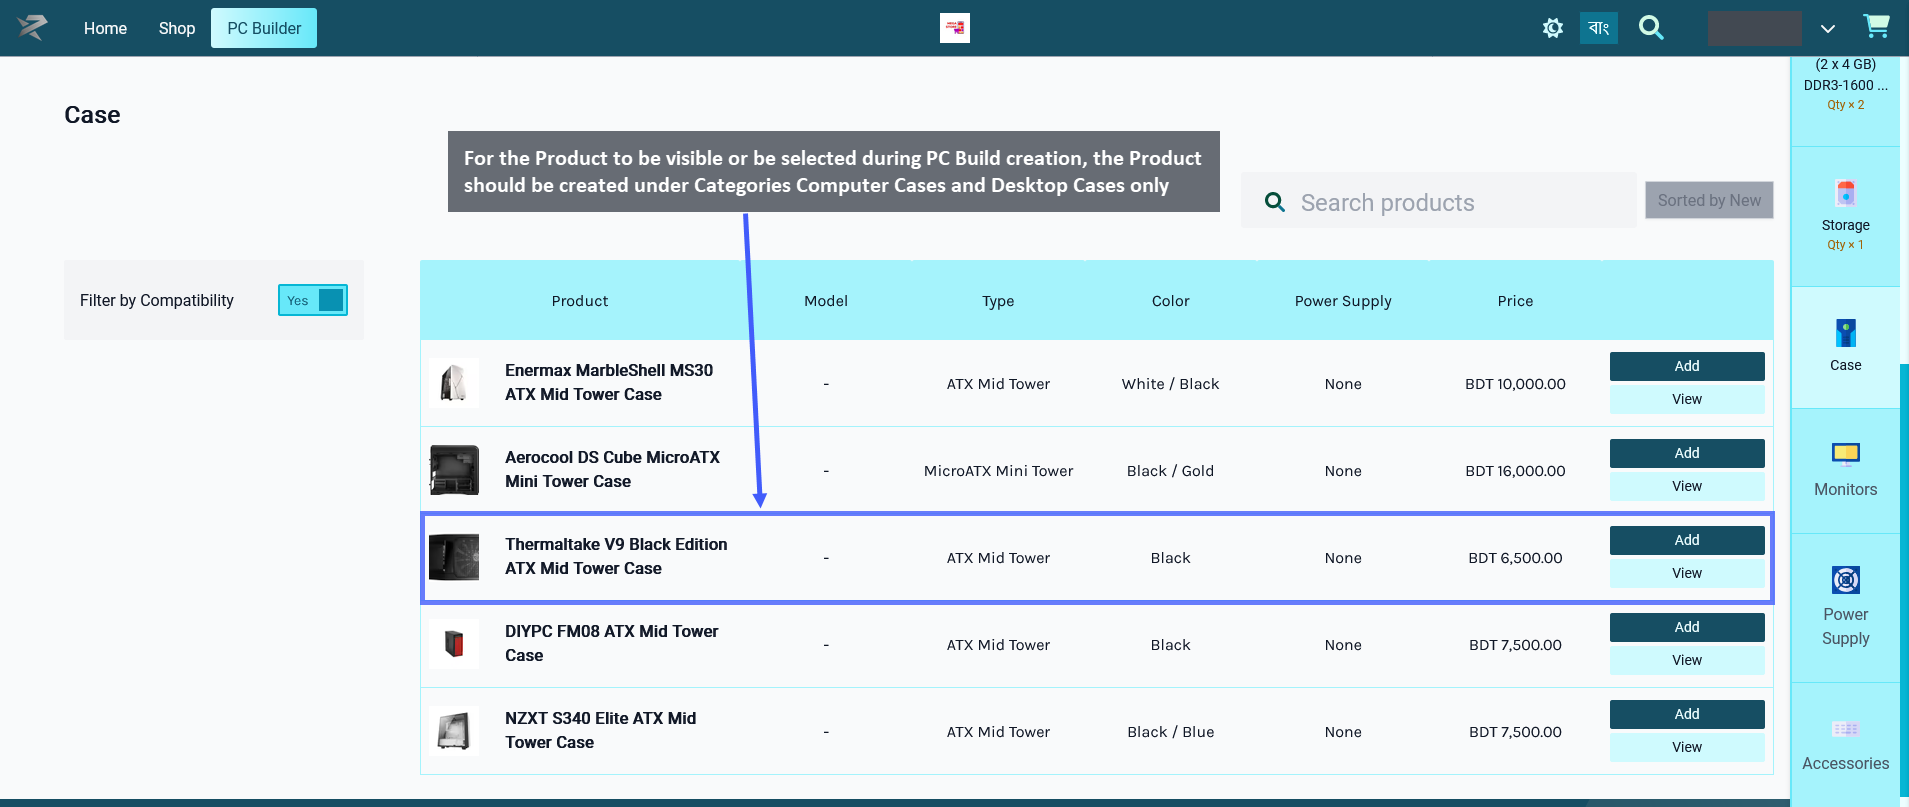
Image 1: For Product to be visible as PC Build component, select only Computer Cases and Desktop Cases.
Therefore, even though a Product maybe have several Categories available for selection during Product creation, only certain Categories should be selected for the Product for it to be visible under PC Builds.
When creating a Product for the Case, the Shop Owner should only select the Categories: Computer Cases and Desktop Cases for the Product to be visible under PC Builds. When they will try to add this component Case to PC Build later, this Product will then be visible and available for selection under PC Builds to create build.

Image 2: Select only these Categories during Product creation for the Product to be visible for PC Build.
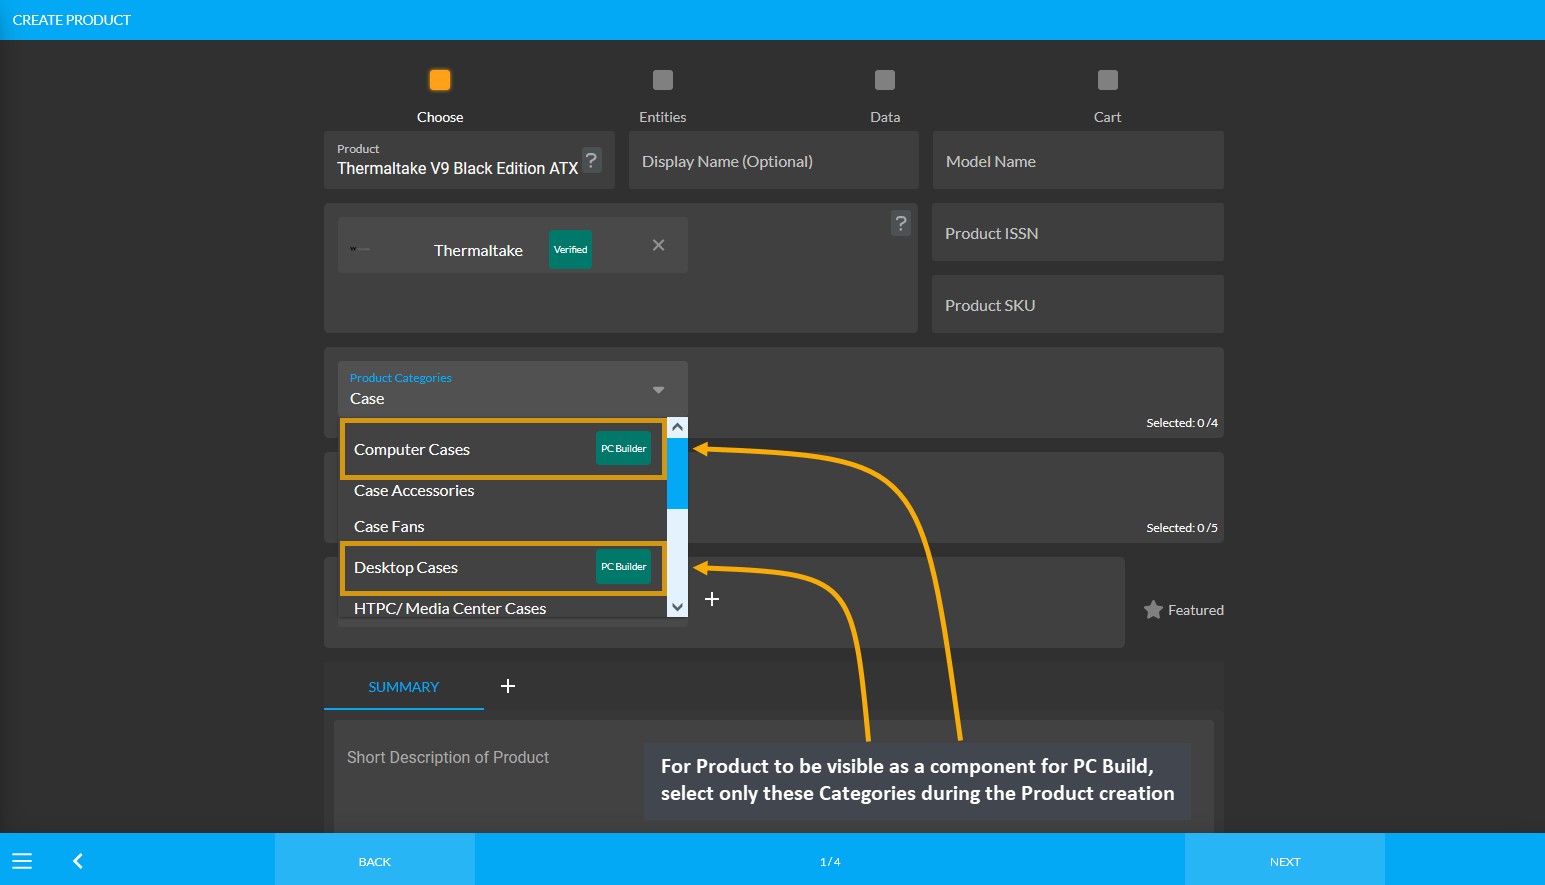
Image 3: For Product to be visible for PC Build, select only these Categories during Product creation.
Product Category: Monitor
In order for Product(s) to be visible as components to select during PC Build creation, the Shop Owner needs to create Product(s) using specific Product Categories. For example, as shown in the screenshot below, in order for the Product Asus VA229QSB 21.5" IPS Full HD Eye Care Monitor to be visible or be selected during PC Build creation, the Product should be created only under the Categories Gaming Monitors, Touchscreen Monitors, and LCD/ LED Monitors.
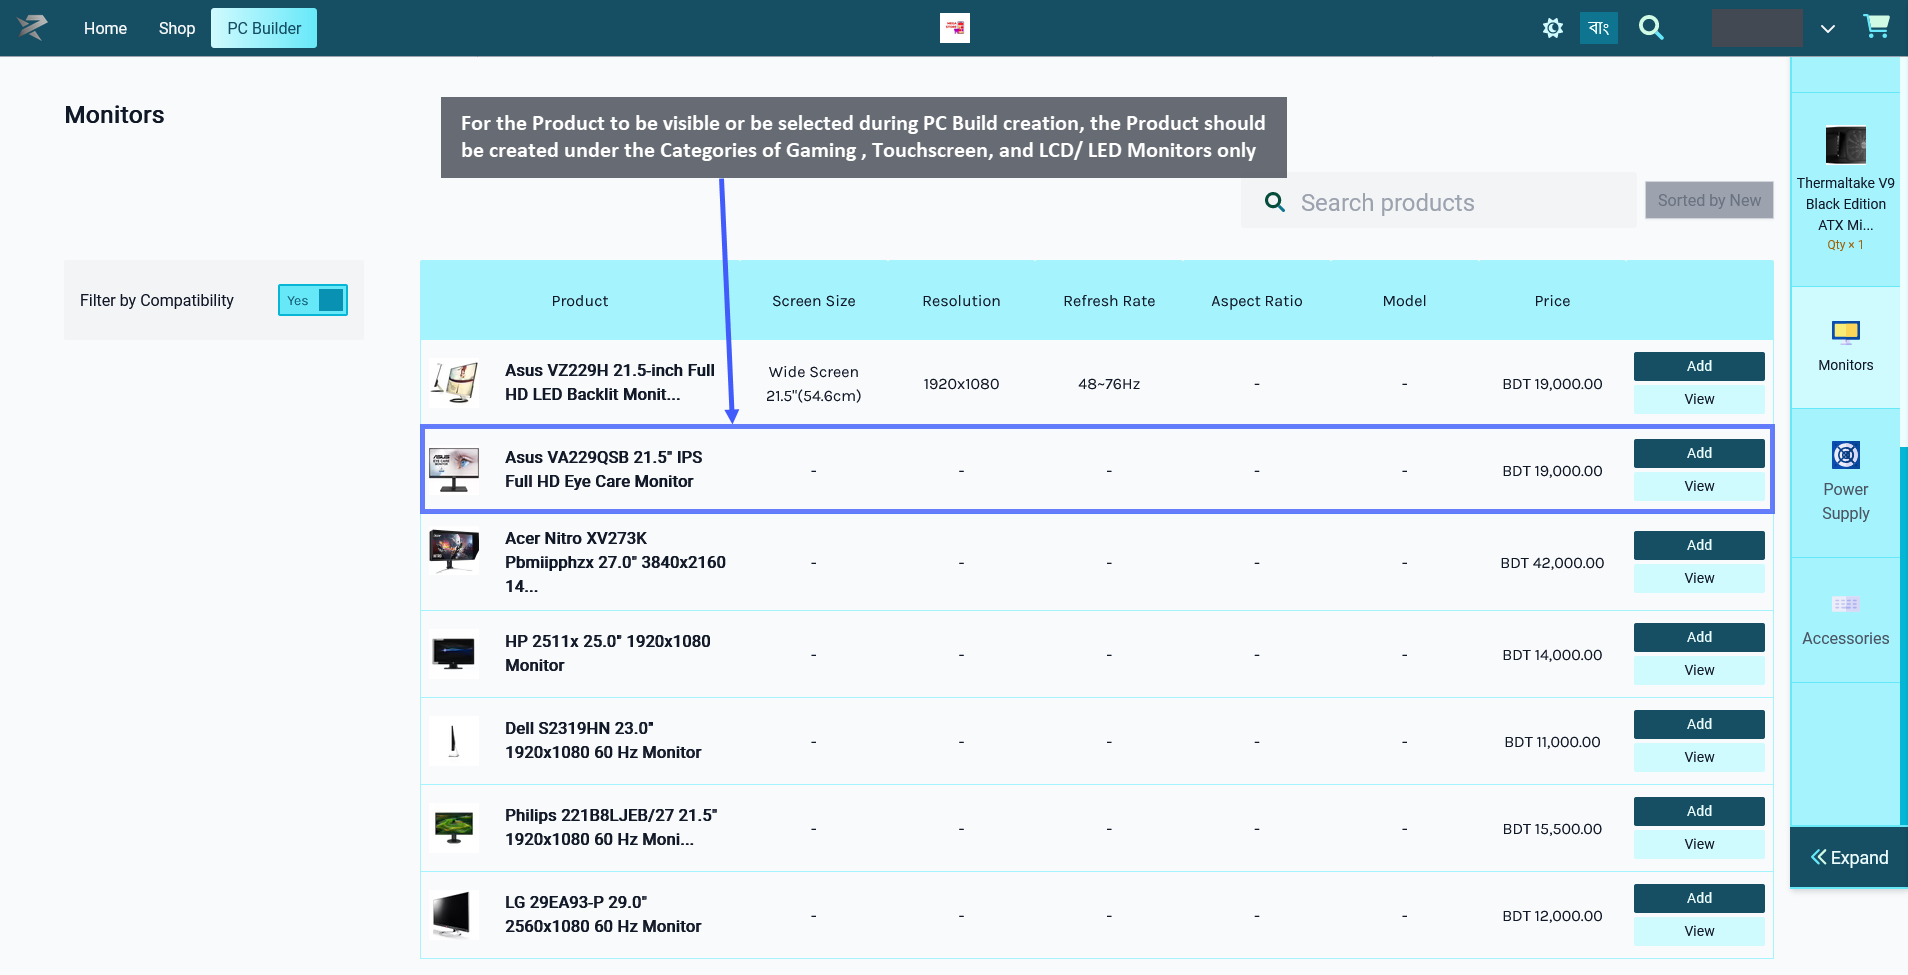
Image 1: For Product to be visible for PC Build, select only Gaming, Touchscreen, and LCD/ LED Monitors.
Therefore, even though a Product maybe have several Categories available for selection during Product creation, only certain Categories should be selected for the Product for it to be visible under PC Builds.
When creating a Product for Monitor, the Shop Owner should only select the Categories: Gaming Monitors, Touchscreen Monitors, and LCD/ LED Monitors for the Product to be visible under PC Builds. When they will try to add this component Monitor to PC Build later, this Product will then be visible and available for selection under PC Builds to create build.
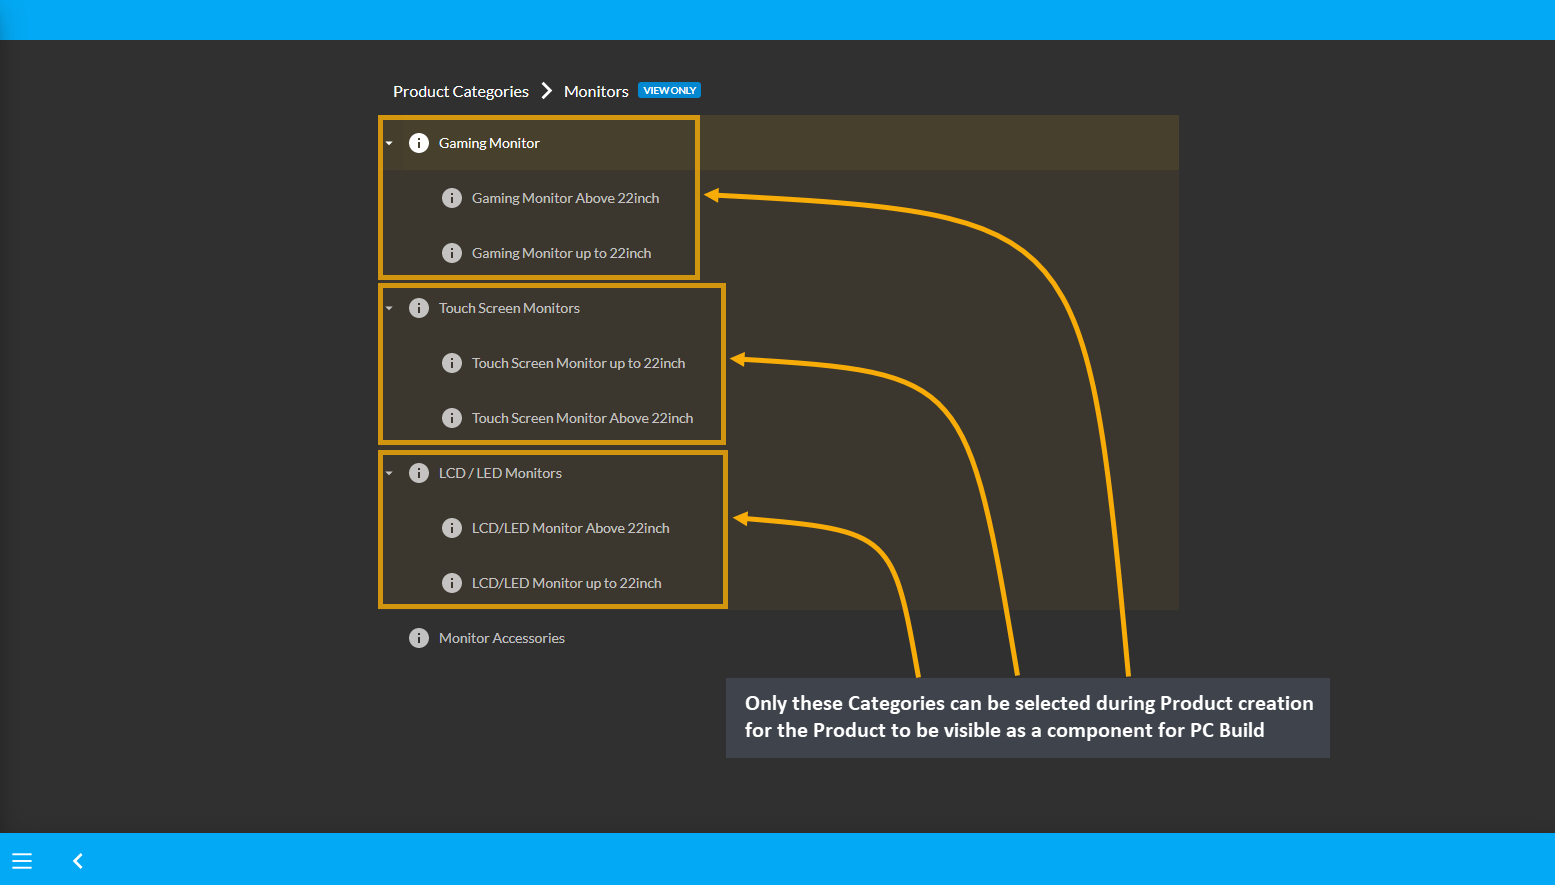
Image 2: Select only these Categories during Product creation for the Product to be visible for PC Build.
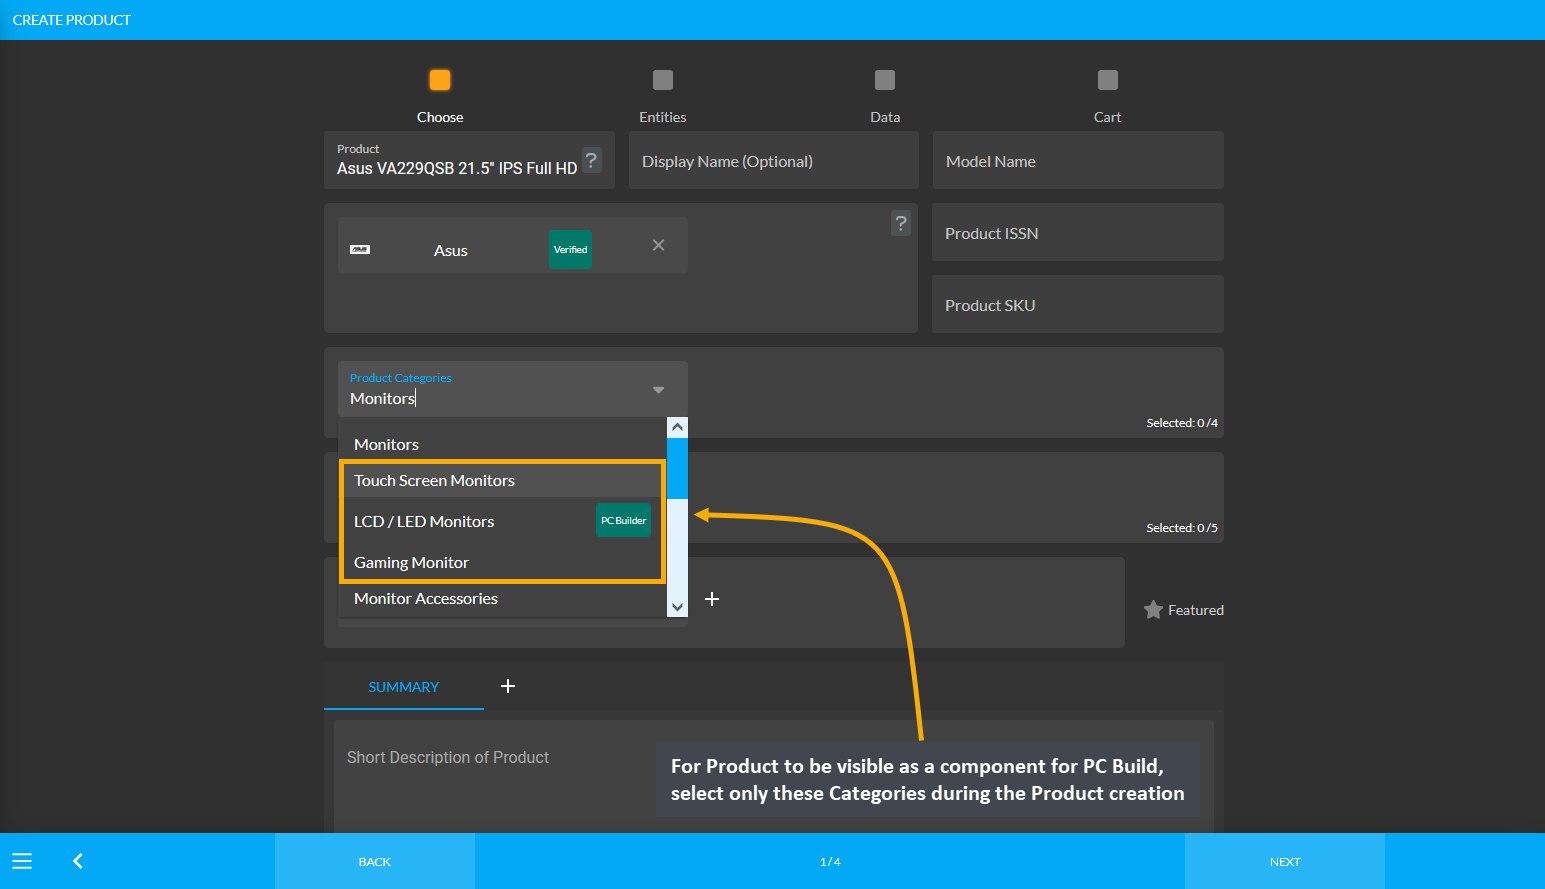
Image 3: For Product to be visible for PC Build, select only these Categories during Product creation.
Product Category: Power Supply
In order for Product(s) to be visible as components to select during PC Build creation, the Shop Owner needs to create Product(s) using specific Product Categories. For example, as shown in the screenshot below, in order for the Product Mars Gaming 650W ATX Power Supply to be visible or be selected during PC Build creation, the Product should be created only under the Categories PC Power Solutions and Desktop Power Supply (PSU).
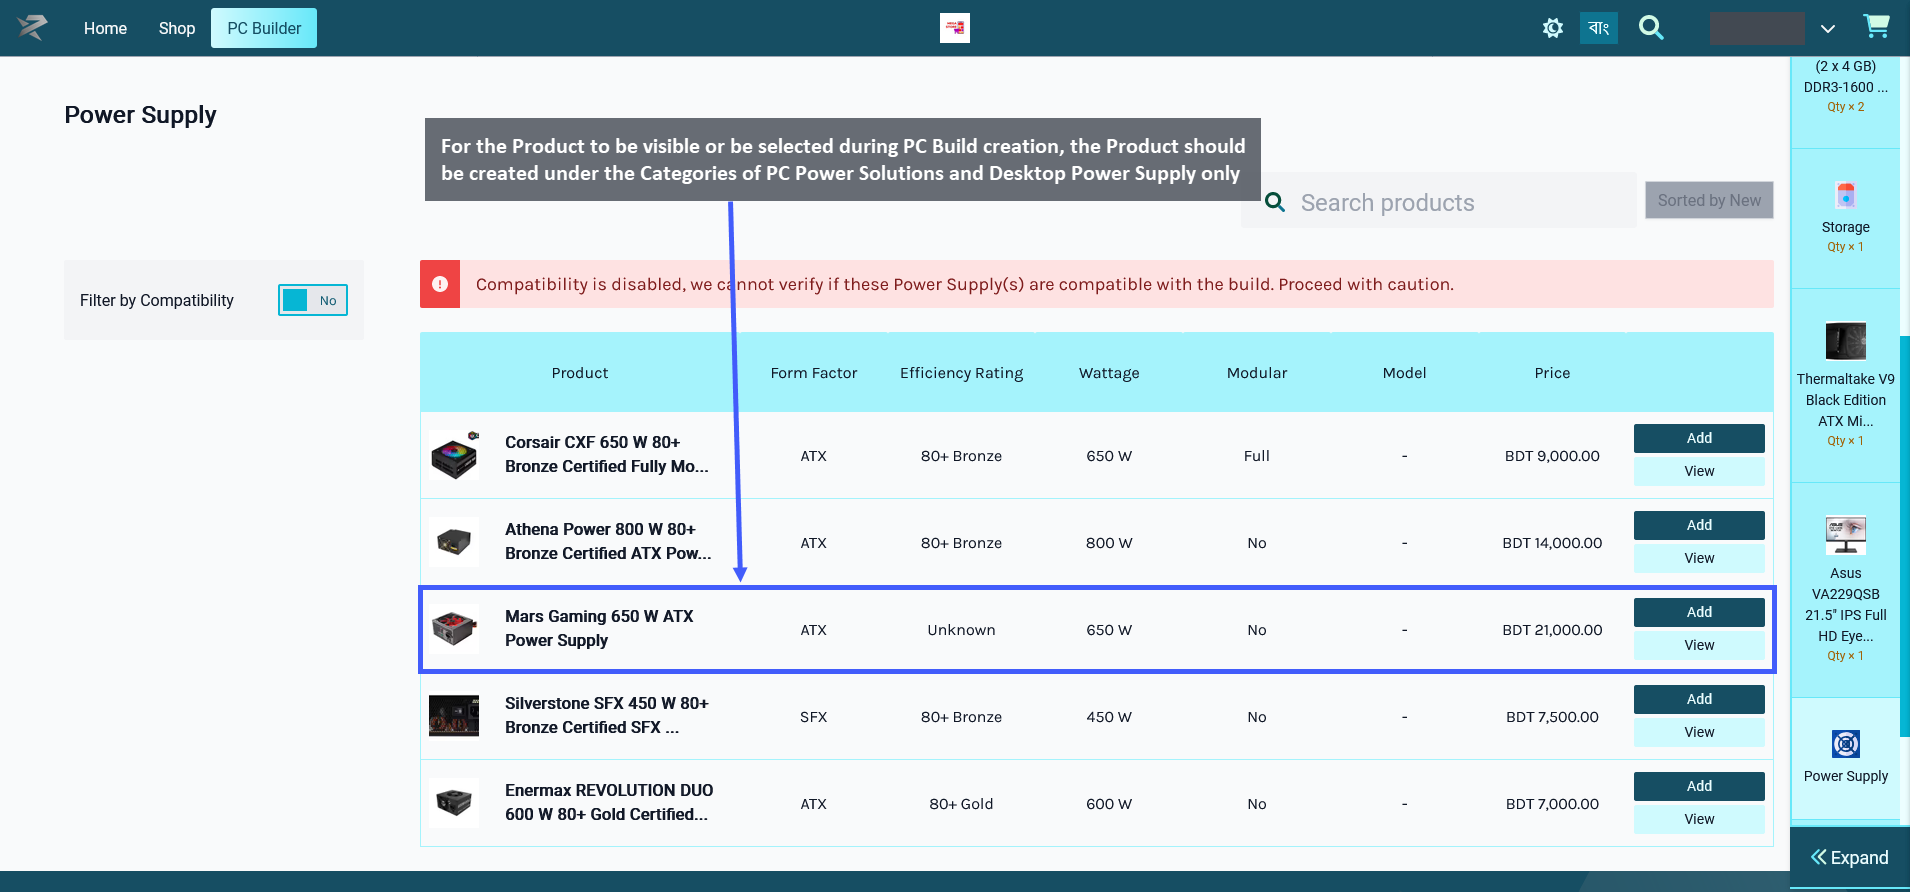
Image 1: For Product to be visible for PC Build, select only PC Power Solutions and Desktop Power Supply.
Therefore, even though a Product maybe have several Categories available for selection during Product creation, only certain Categories should be selected for the Product for it to be visible under PC Builds.
When creating a Product for Power Supply, the Shop Owner should only select the Categories: PC Power Solutions and Desktop Power Supply (PSU) for the Product to be visible under PC Builds. When they will try to add this component Power Supply to PC Build later, this Product will then be visible and available for selection under PC Builds to create build.

Image 2: Select only these Categories during Product creation for the Product to be visible for PC Build.
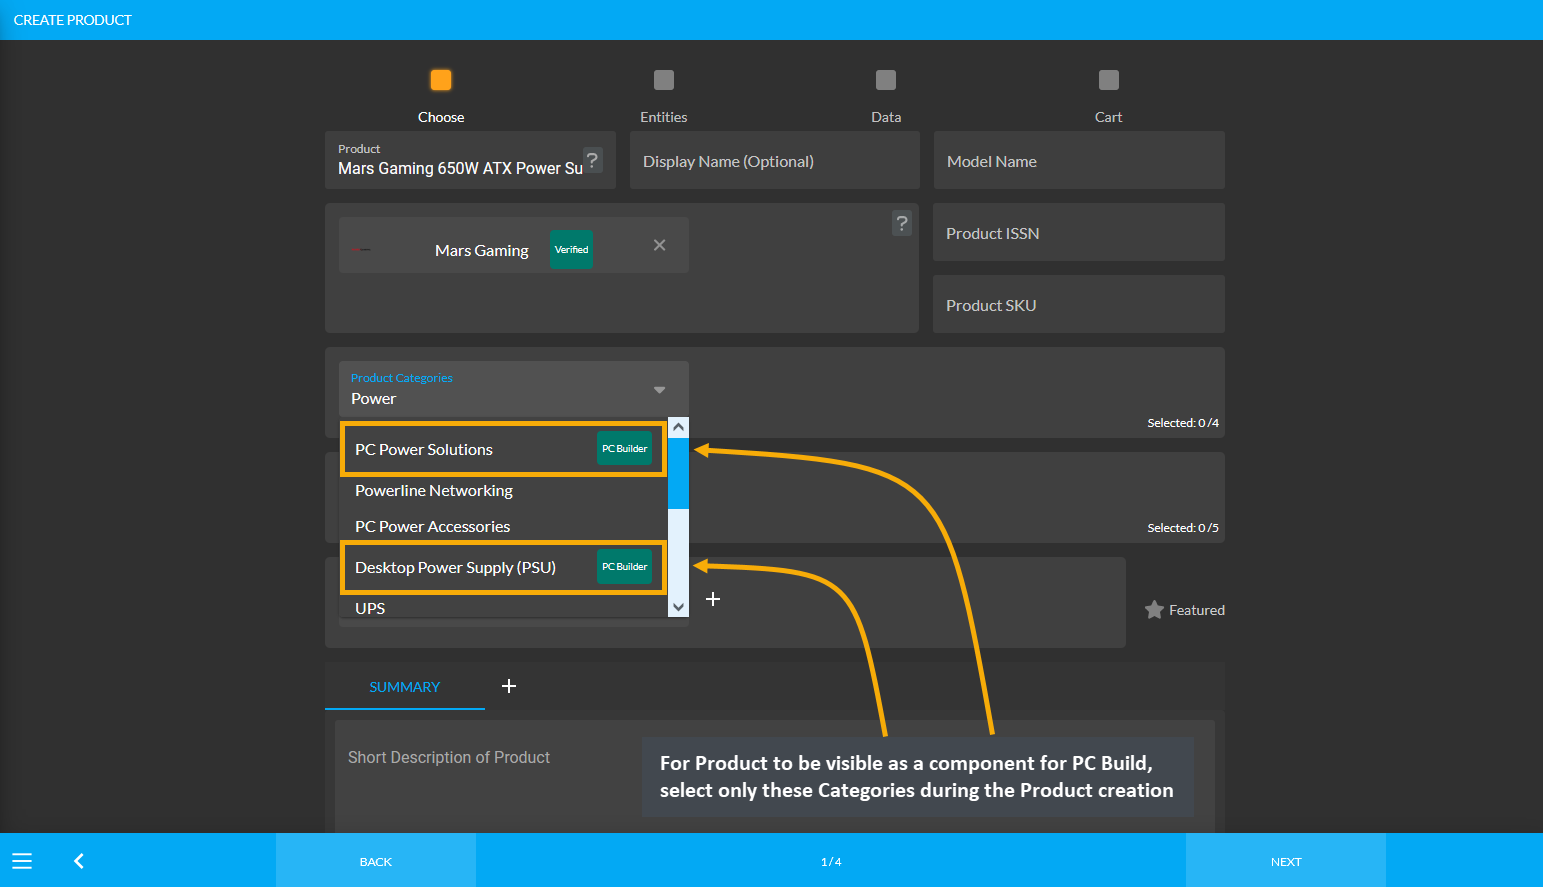
Image 3: For Product to be visible for PC Build, select only these Categories during Product creation.
Product Category: Accessories
In order for Product(s) to be visible as components to select during PC Build creation, the Shop Owner needs to create Product(s) using specific Product Categories. Accessories are available as Mouse, Keyboard, Speaker, and Headphone. During Product creation, specific Categories needs to be set for the Product so that they are visible during the PC Build component selection.
Accessories: Mouse
In case, Mouse is selected from Accessories, then in order for the Product Logitech M90 USB Mouse to be visible or be selected during PC Build creation, this Product needs to be created under the Categories: Mice and Gaming Mice and not other Input Output Devices Categories.
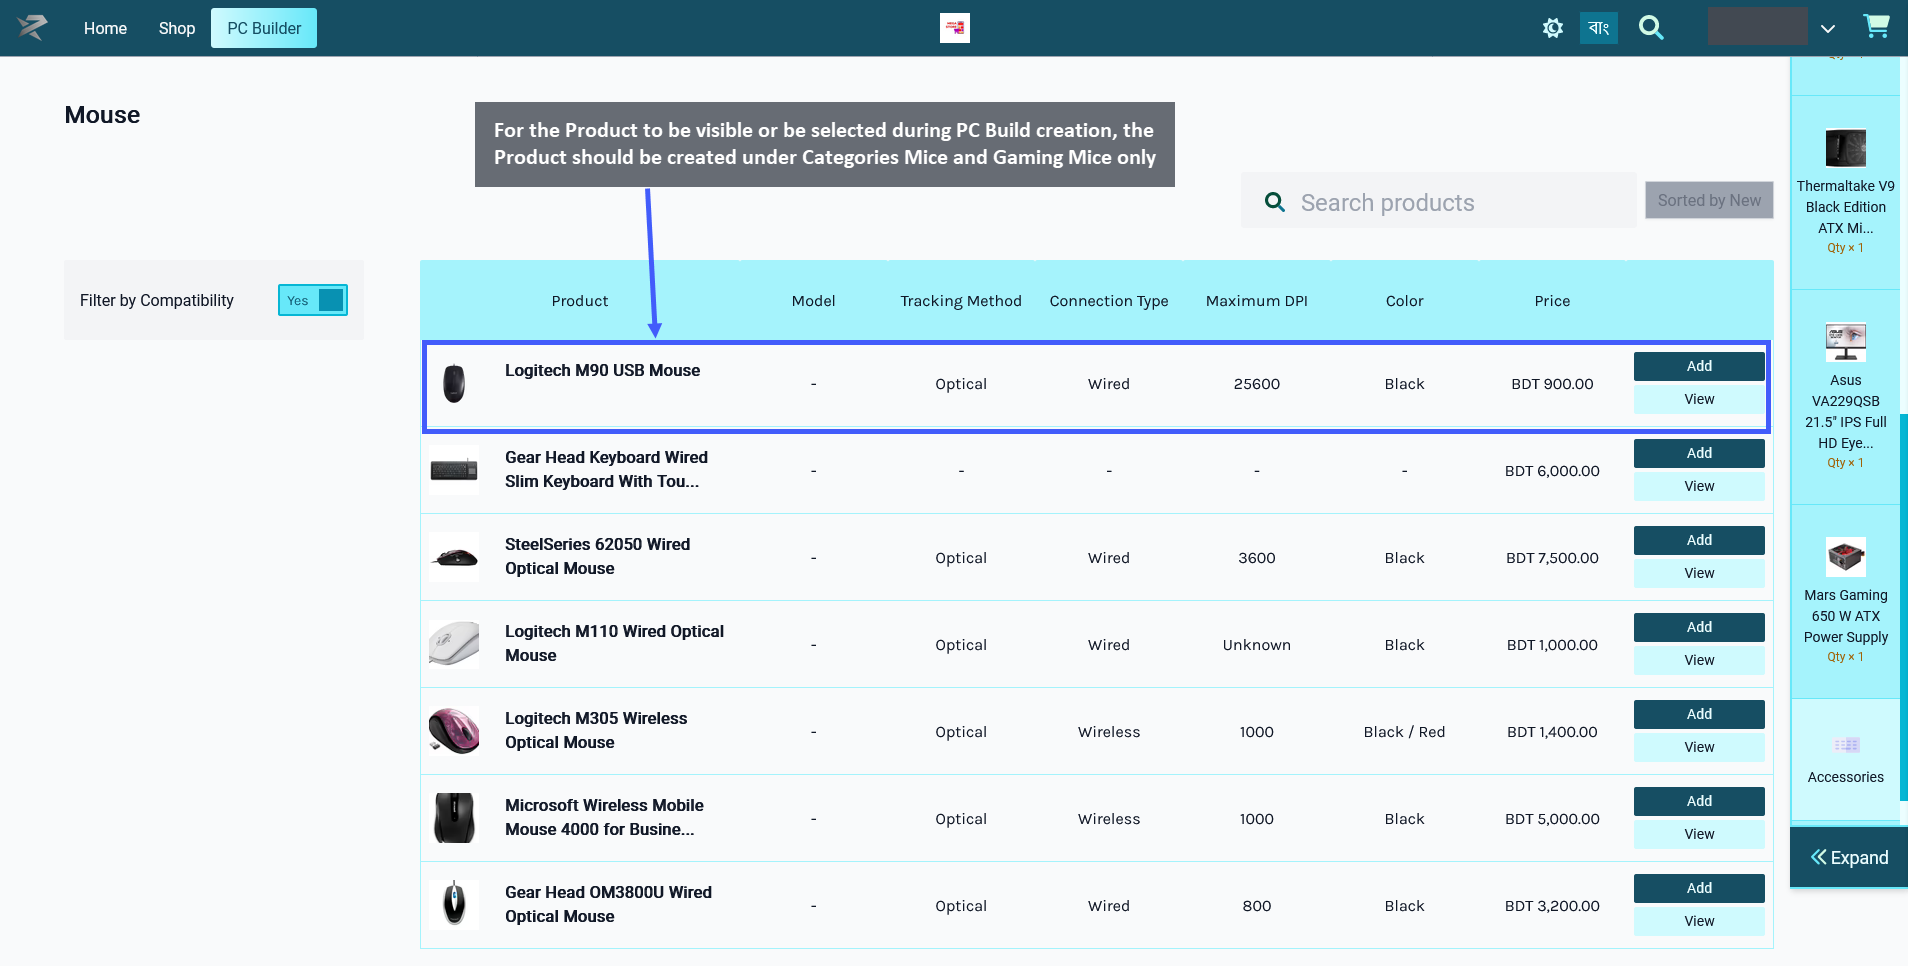
Image 1: For Product to be visible as component for PC Build, select Mice and Gaming Mice Categories.
Therefore, even though a Product maybe have several Categories available for selection during Product creation, only certain Categories should be selected for the Product for it to be visible under PC Builds.
When creating a Product for Accessories with Mouse, the Shop Owner should only select the Categories: Mice and Gaming Mice for the Product to be visible under PC Builds. When they will try to add these components of Mouse to PC Build later, this Product will then be visible and available for selection to create PC Build.

Image 2: Select only these Categories during Product creation for the Product to be visible for PC Build.
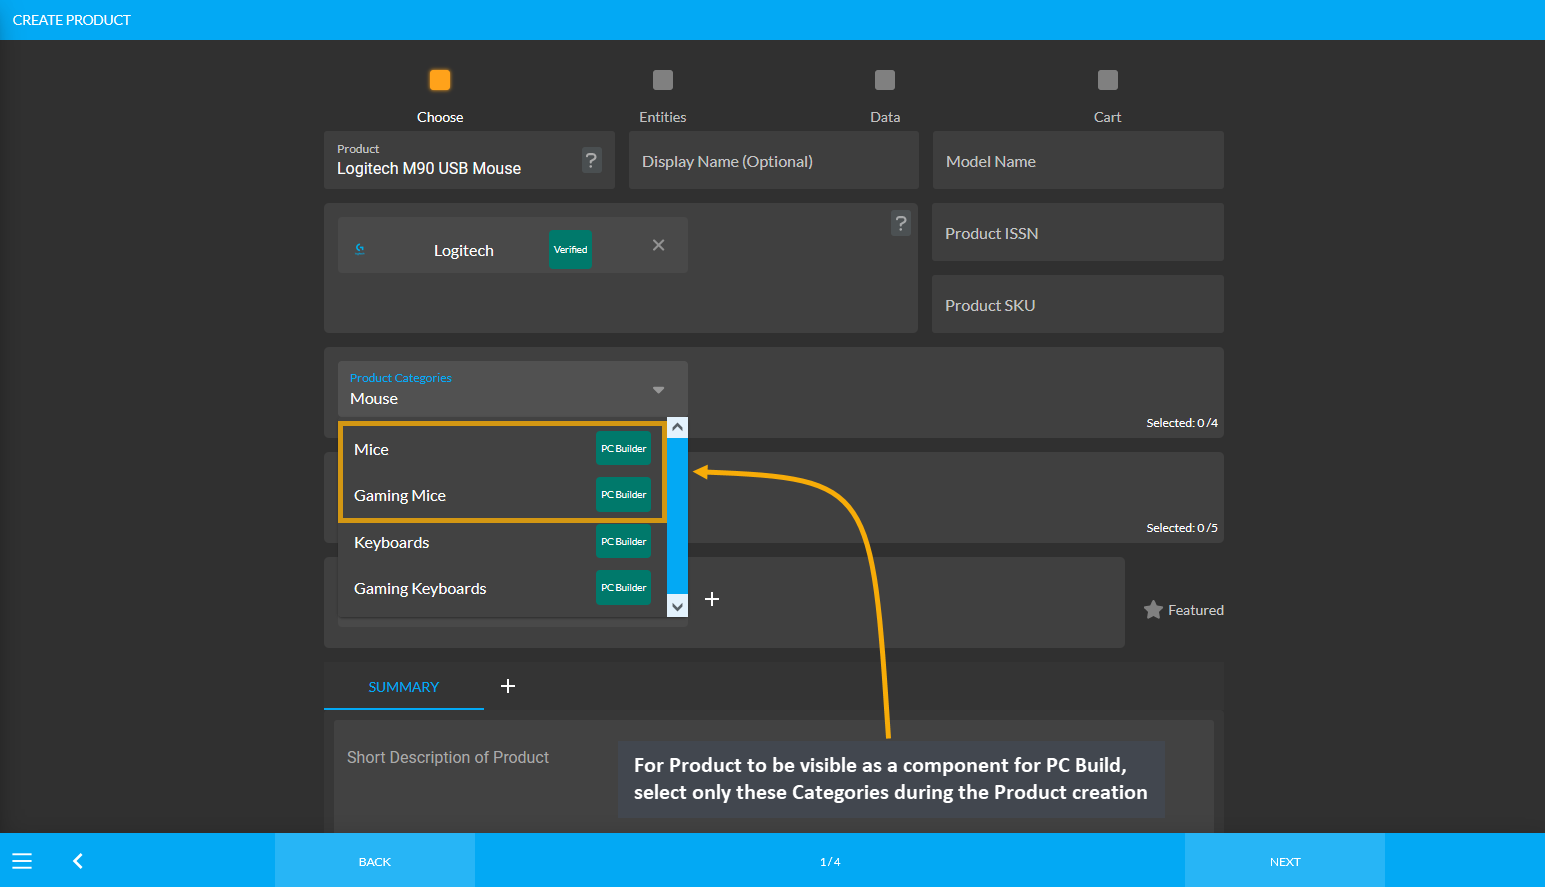
Image 3: For Product to be visible for PC Build, select only these Categories during Product creation.
Accessories: Keyboard
If Keyboard is selected from Accessories, then in order for the Product SolidTek Keyboard Wired Mini Keyboard to be visible or be selected during PC Build creation, this Product needs to be created under Categories: Keyboard and Gaming Keyboard and not other Input Output Devices Categories.
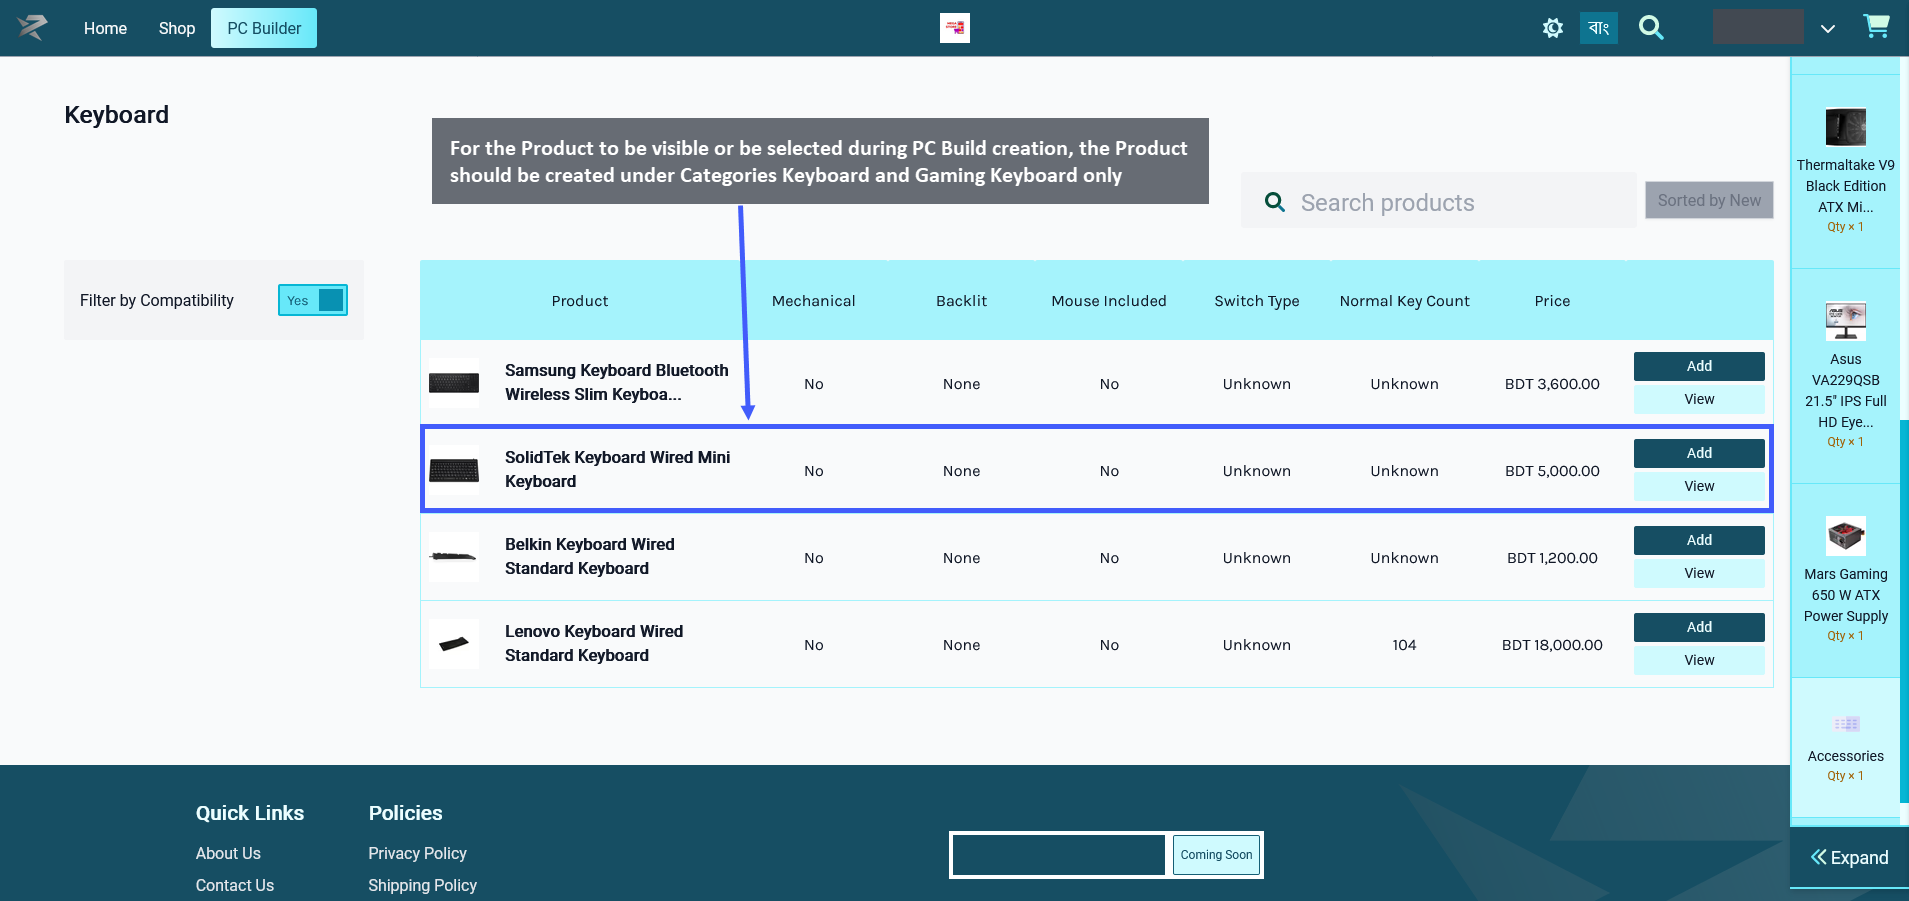
Image 1: For Product to be visible for PC Build, select only Keyboard and Gaming Keyboard Categories.
Therefore, even though a Product maybe have several Categories available for selection during Product creation, only certain Categories should be selected for the Product for it to be visible under PC Builds.
When creating Product for Accessories with Keyboard, Shop Owner should only select the Categories: Keyboard and Gaming Keyboard for the Product to be visible under PC Builds. When they will try to add these components of Keyboard to PC Build later, this Product will then be visible and available for selection to create PC Build.

Image 2: Select only these Categories during Product creation for the Product to be visible for PC Build.
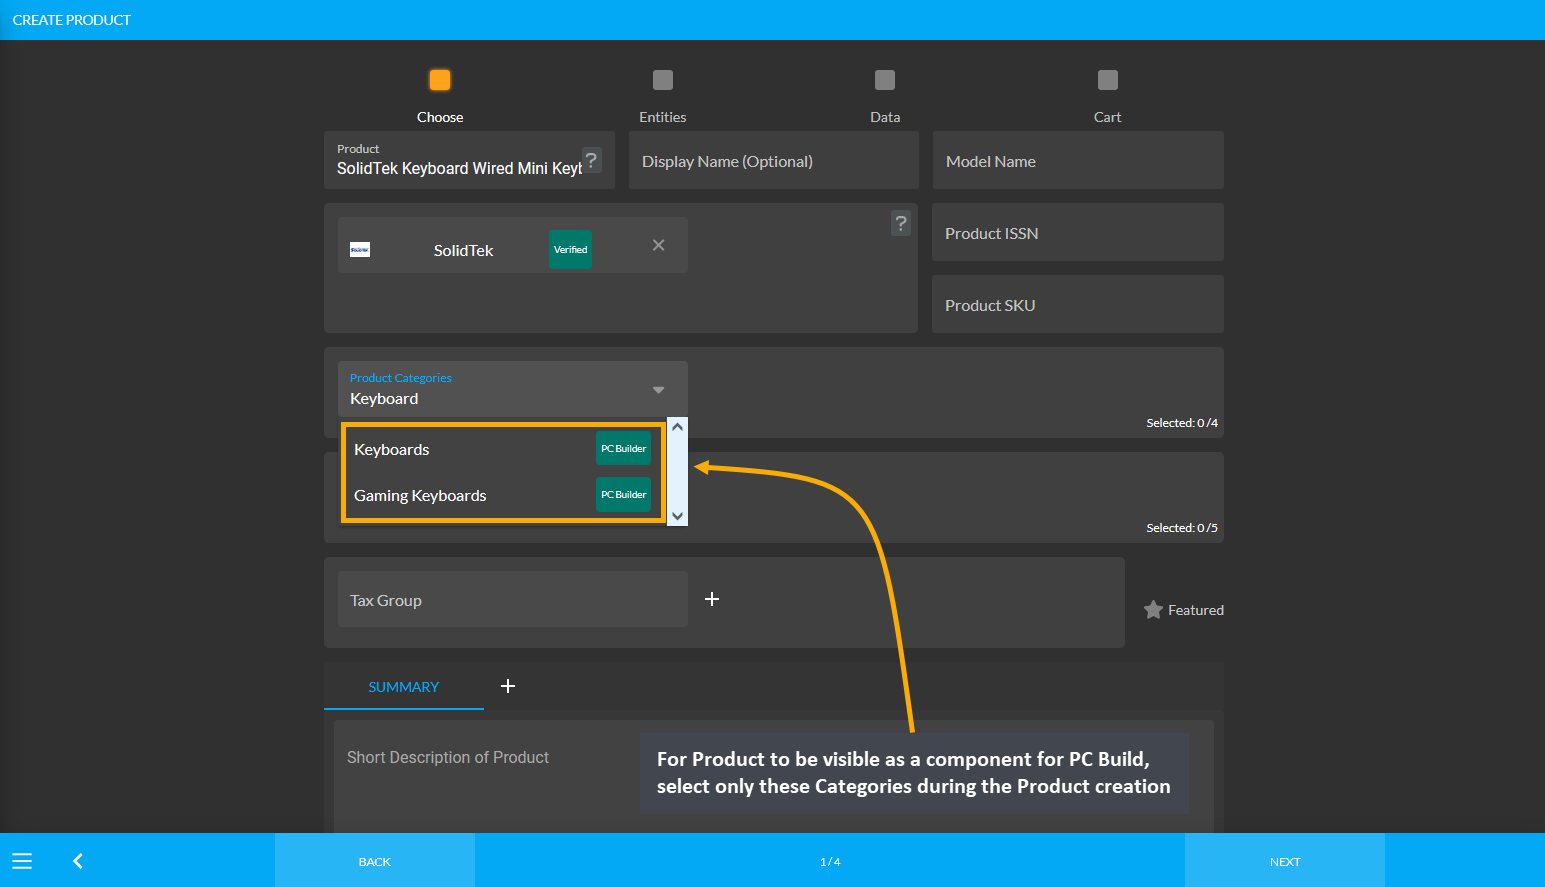
Image 3: For Product to be visible for PC Build, select only these Categories during Product creation.
Accessories: Speakers
In case, the Speakers are selected from Accessories, then in order for the Product Microlab SP-FC20WH 40W 2.1 Channel Speakers to be visible or be selected during PC Build creation, this Product needs to be created under Categories: Speakers and Gaming Speakers and not other Speaker, Headphones, and Mic Categories.
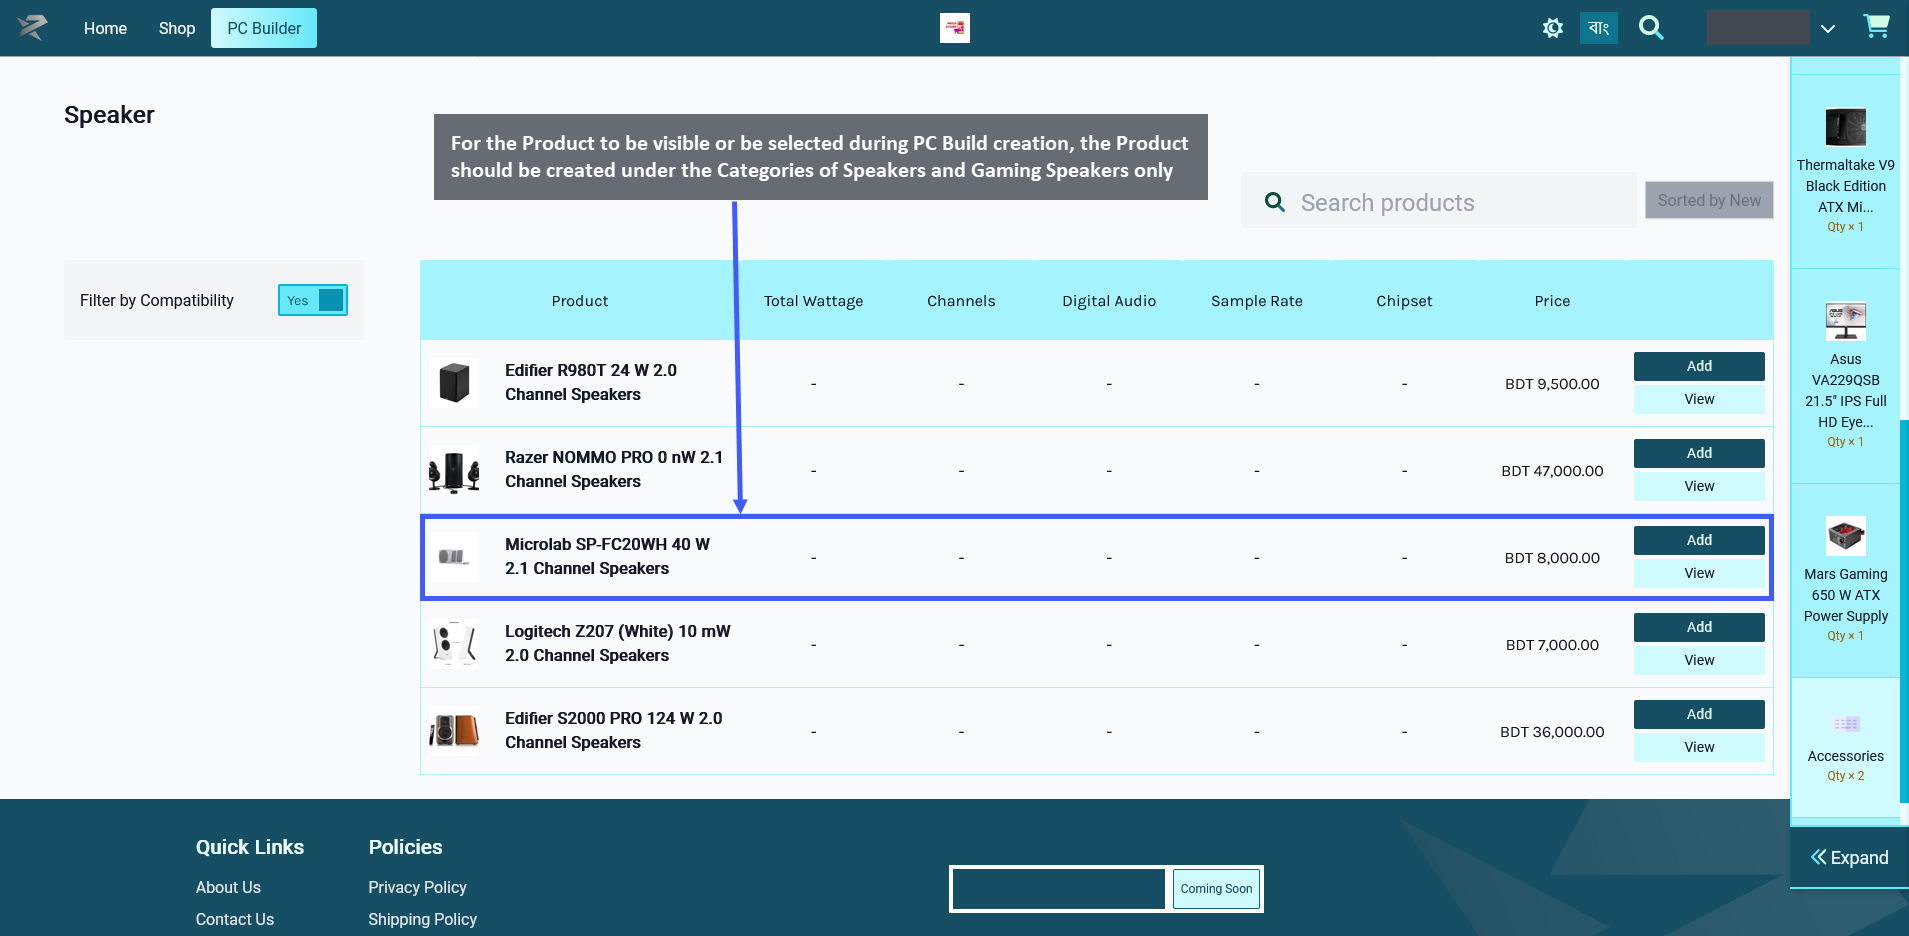
Image 1: For Product to be visible for PC Build, select only Speakers and Gaming Speakers Categories.
Therefore, even though a Product maybe have several Categories available for selection during Product creation, only certain Categories should be selected for the Product for it to be visible under PC Builds.
When creating Product for Accessories with Speakers, Shop Owner should only select the Categories: Speakers and Gaming Speakers for the Product to be visible under PC Builds. When they will try to add these components of Speakers to PC Build later, this Product will then be visible and available for selection to create PC Build.
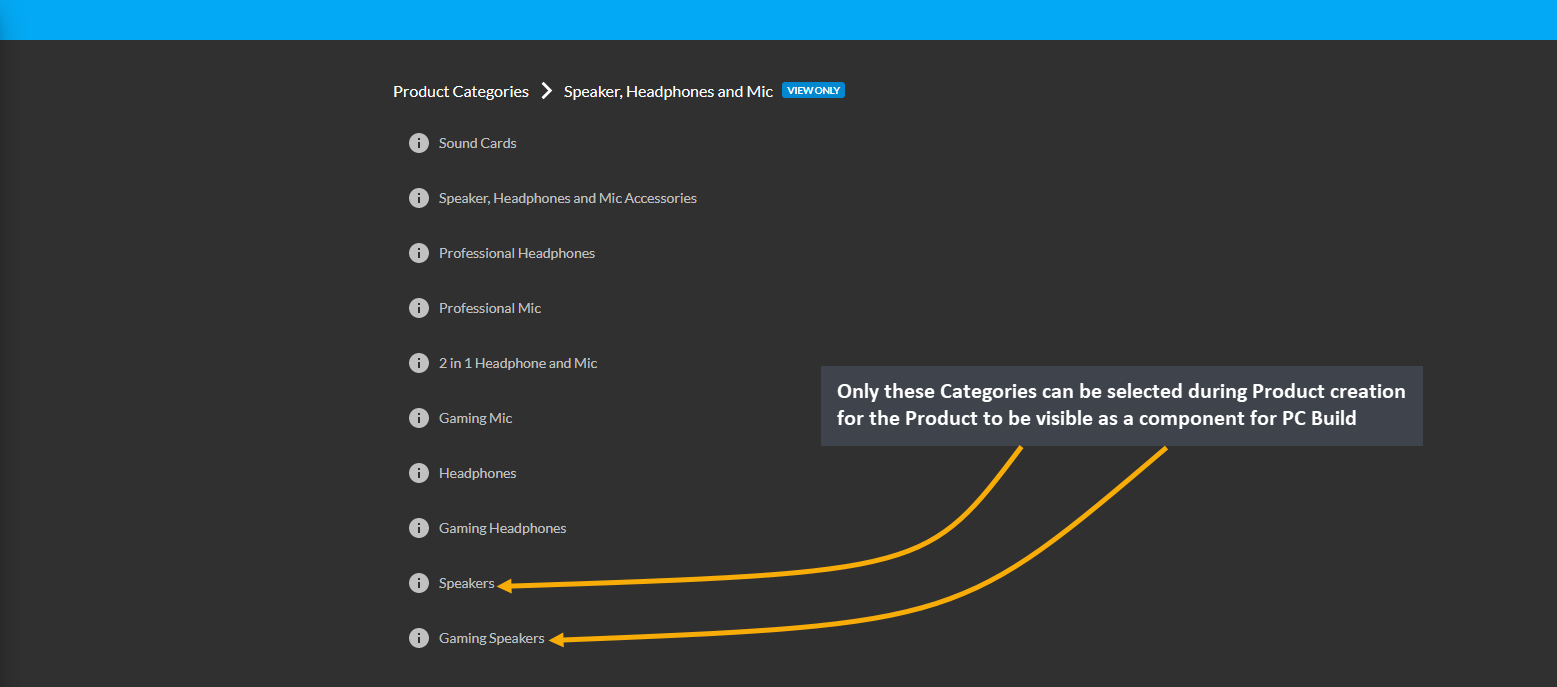
Image 2: Select only these Categories during Product creation for the Product to be visible for PC Build.
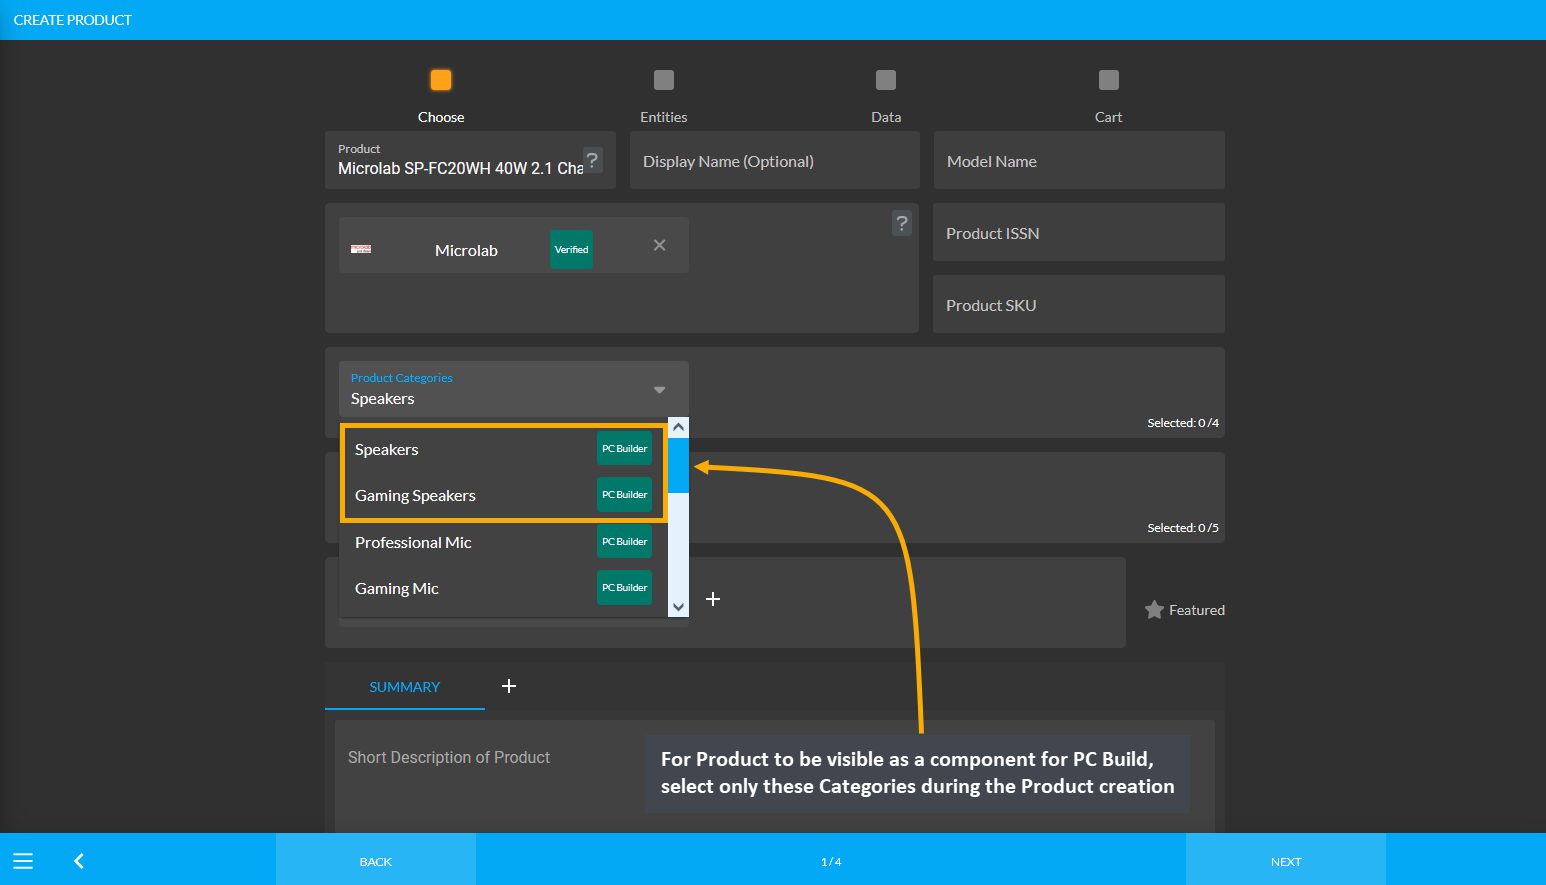
Image 3: For Product to be visible for PC Build, select only these Categories during Product creation.
Accessories: Headphones
In case, Headphones are selected from Accessories, then in order for the Product Audio - Technica ATH-A700 Headphones to be visible or be selected during PC Build creation, this Product needs to be created under the Categories: Headphones, Gaming Headphones, Professional Headphones, 2 in 1 Headphone and Mic, Professional Mic, and Gaming Mic and not other Speaker, Headphones, and Mic Categories.
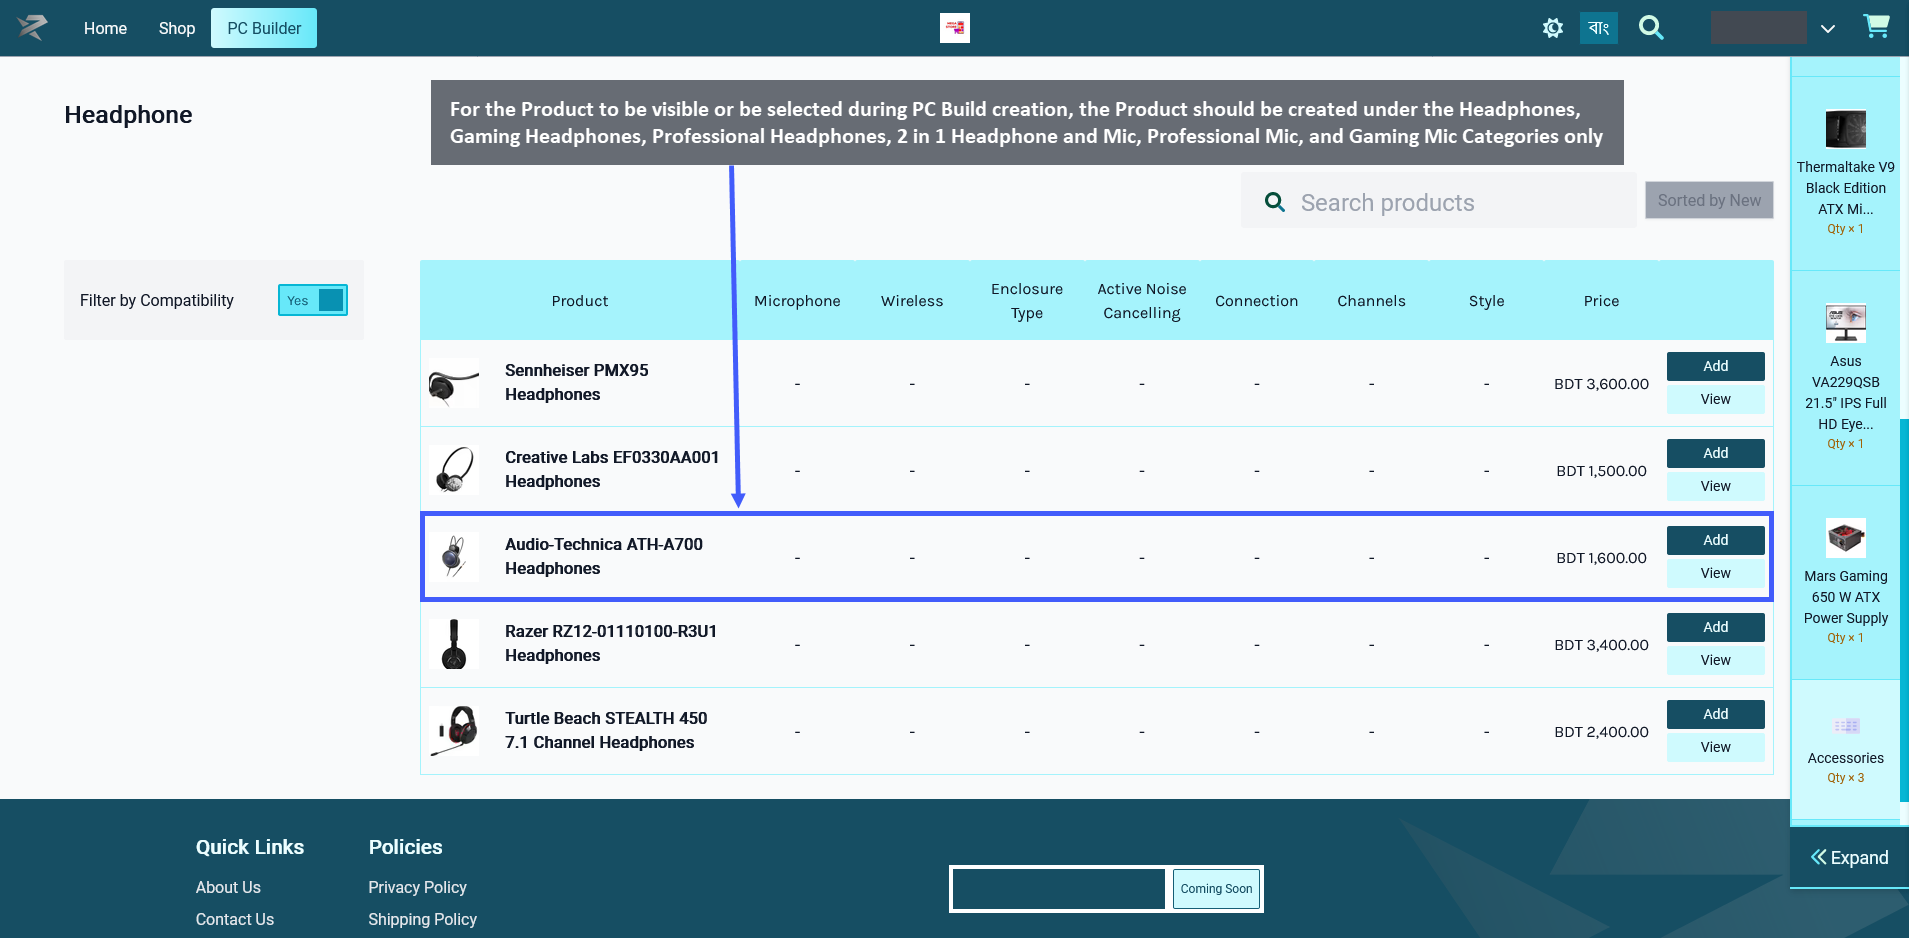
Image 1: For Product to be visible for PC Build, select only Headphones, Gaming Headphones, Professional Headphones, 2 in 1 Headphone and Mic, Professional Mic, and Gaming Mic Categories.
Therefore, even though a Product maybe have several Categories available for selection during Product creation, only certain Categories should be selected for the Product for it to be visible under PC Builds.
When creating a Product for Accessories with Headphones, the Shop Owner should only select these Categories: Headphones, Gaming Headphones, Professional Headphones, 2 in 1 Headphone and Mic, Professional Mic, and Gaming Mic for the Product to be visible under PC Builds. When they will try to add these components of Headphones to PC Build later, this Product will then be visible and available for selection to create PC Build.
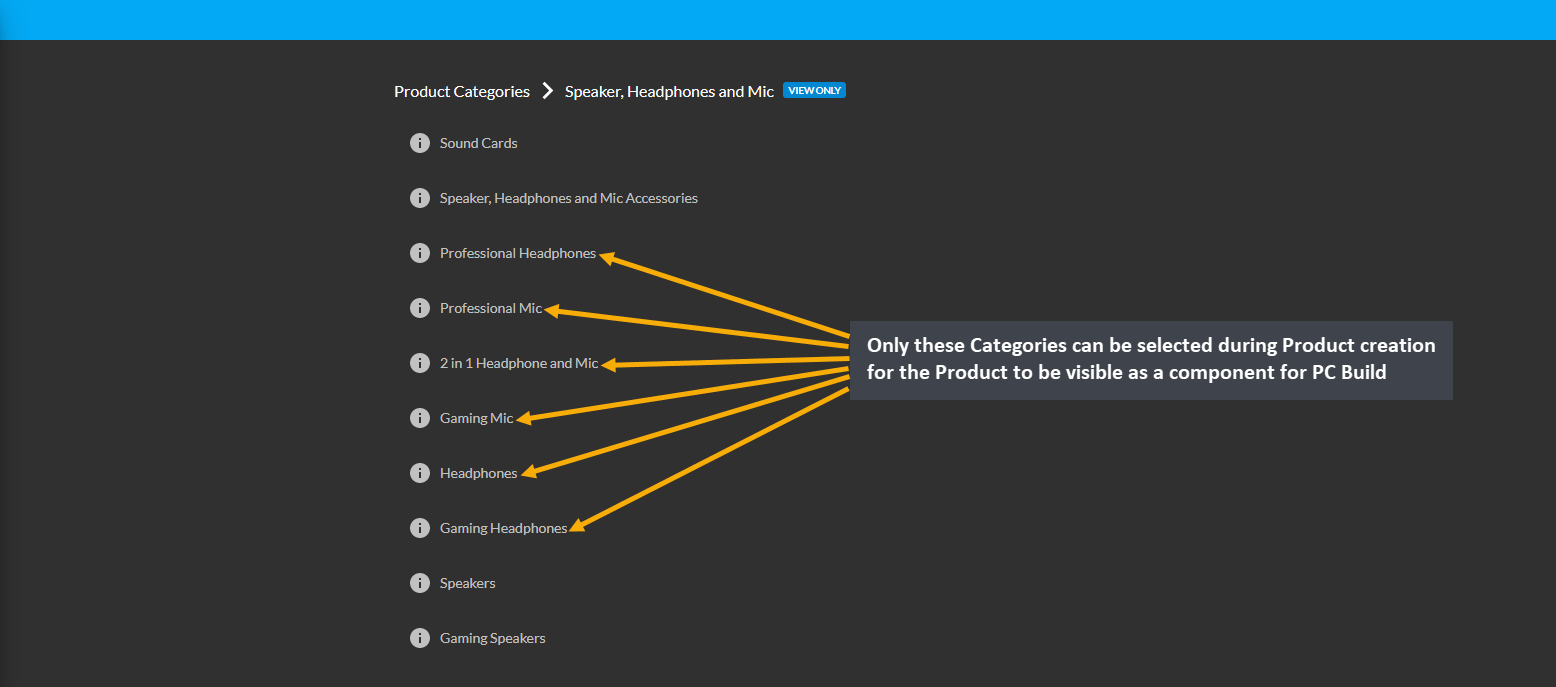
Image 2: Select only these Categories during Product creation for the Product to be visible for PC Build.
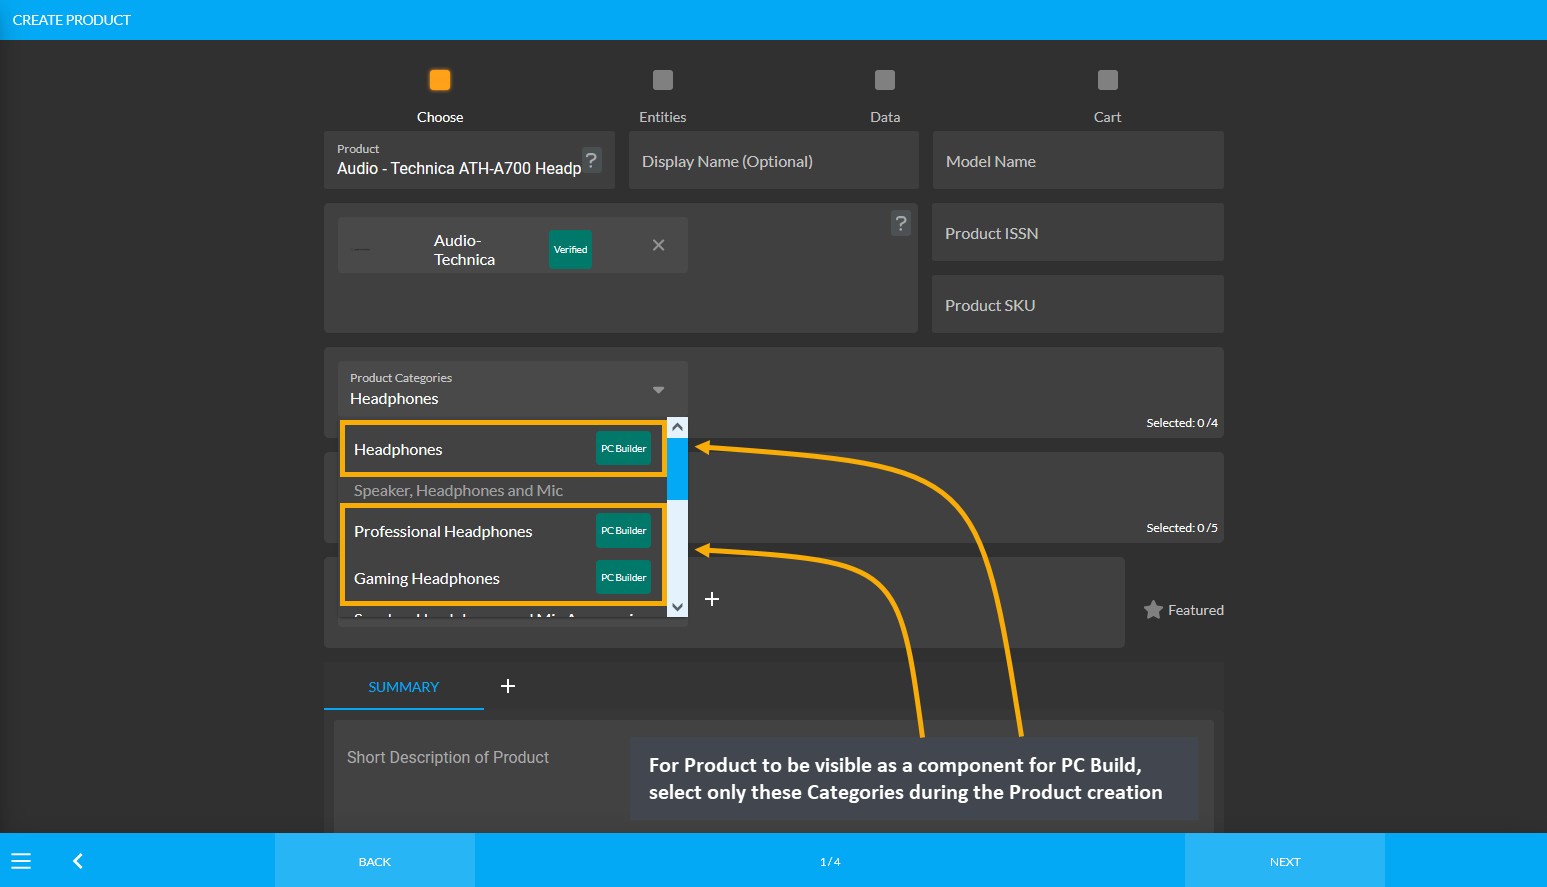
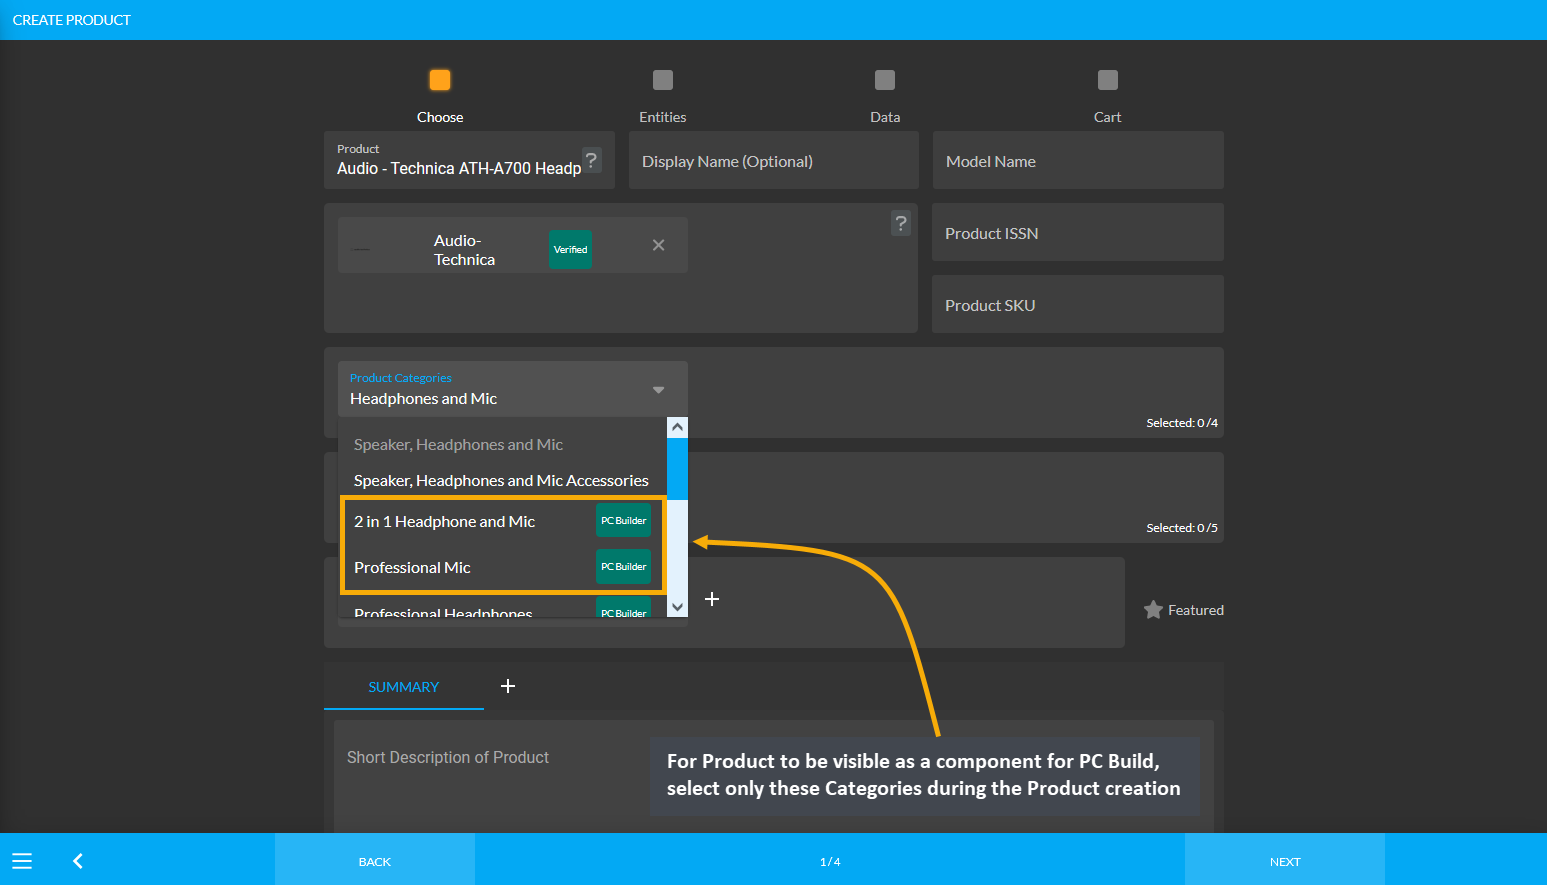
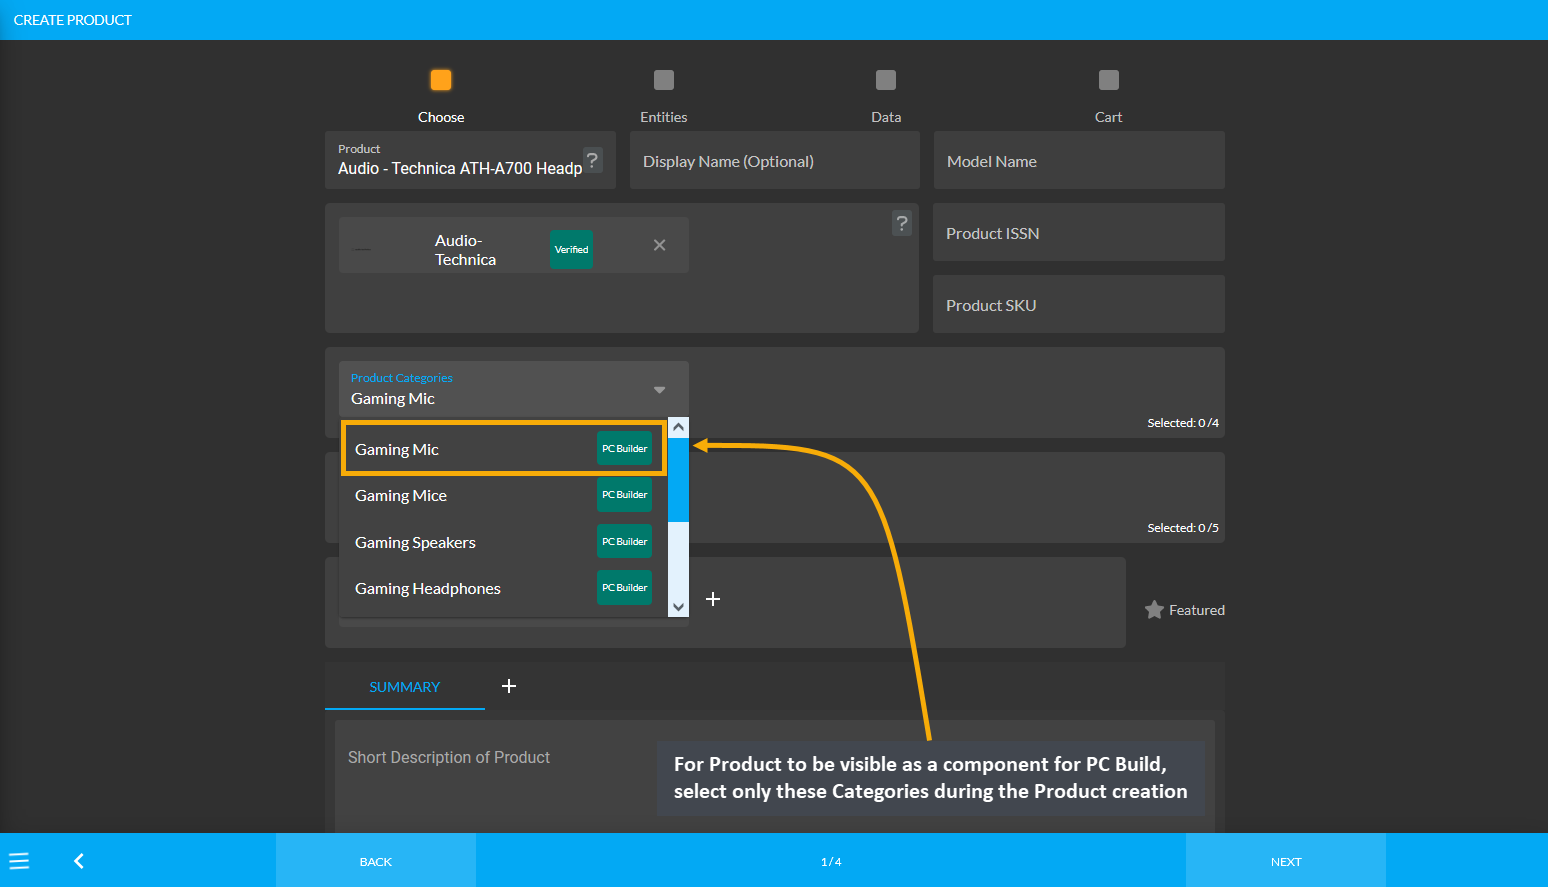
Image 3: For Product to be visible for PC Build, select only these Categories during Product creation.


