Products
Learn More about how to search for Products and create Products using pre-defined templates or create Custom Products from scratch.
Click on the Products module to view product stock by Brand and Categories. From here, you can create products, edit product details, entities, and cart messages.
Product List
The Products tab has Product List showing all the Products in Stock, as well as Products whose Stock are Low, or Out. On top right, there are two search boxes with dropdown to search listed Products by Brand and Category.
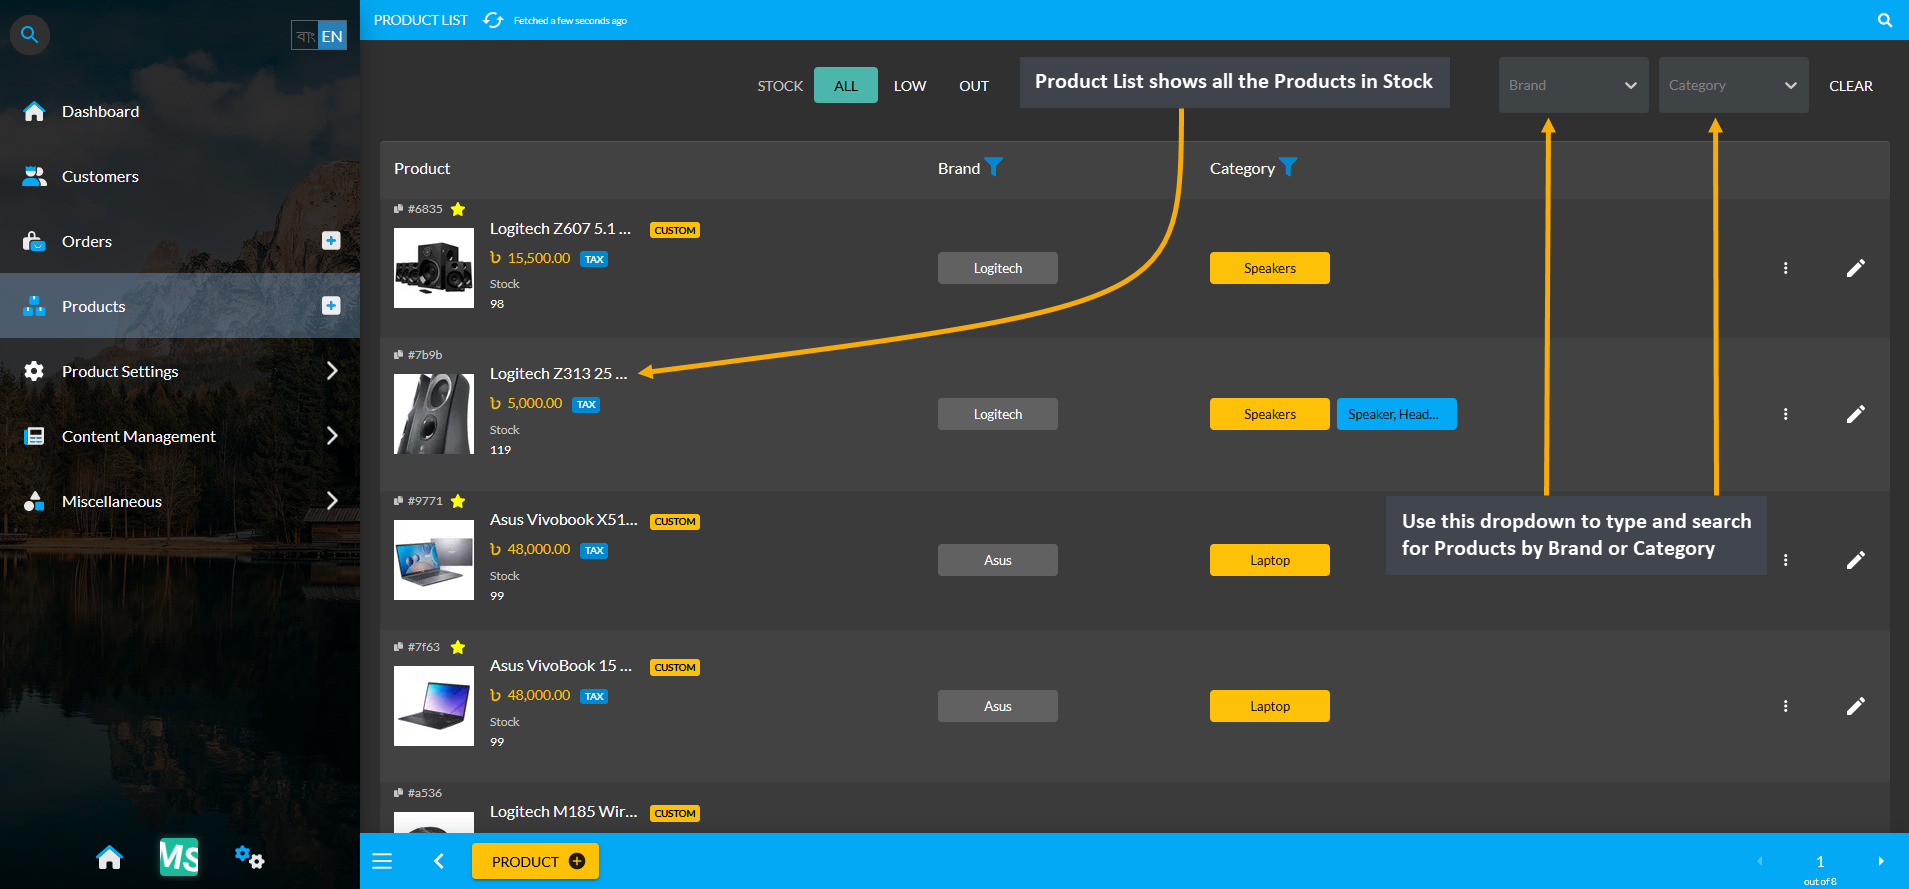
Image 1: Product List shows all the Products, Use dropdown to search Products by Brand or Category on list.
Filter Products by Low and Out
The Shop Owner can also filter Products by Low and Out. Low will bring search results for Low Stock Products and Out will bring search results for Out of Stock Products. Usually Per Unit Products will be Out of Stock when created unless the Units are purchase from a Supplier. Any Limited, Unlimited, or Per Unit Product can be Low in Stock.
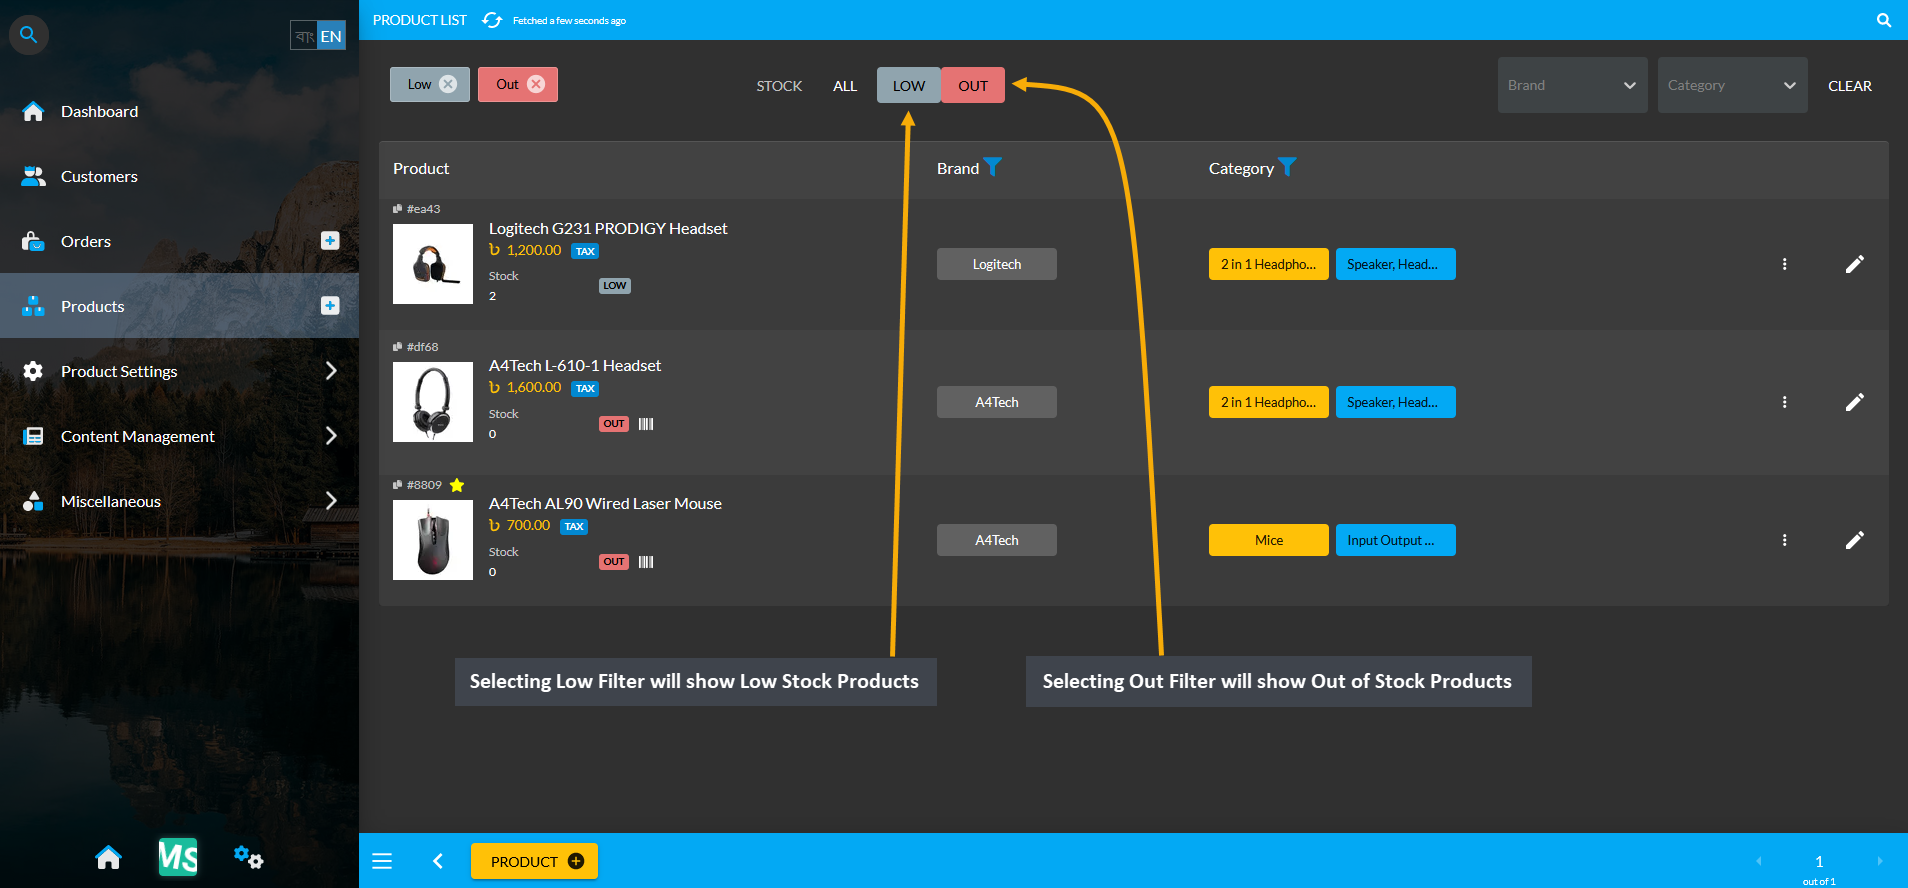
Image 2: Selecting Low Filter will show Low Stock Products and Out Filter will show Out of Stock Products.
Create New Products from Pre-Defined Templates
From the Products tab, New Products can be created from pre-defined templates or Global Products by clicking on the + or the Add button which will redirect to a separate search page for Product creation.
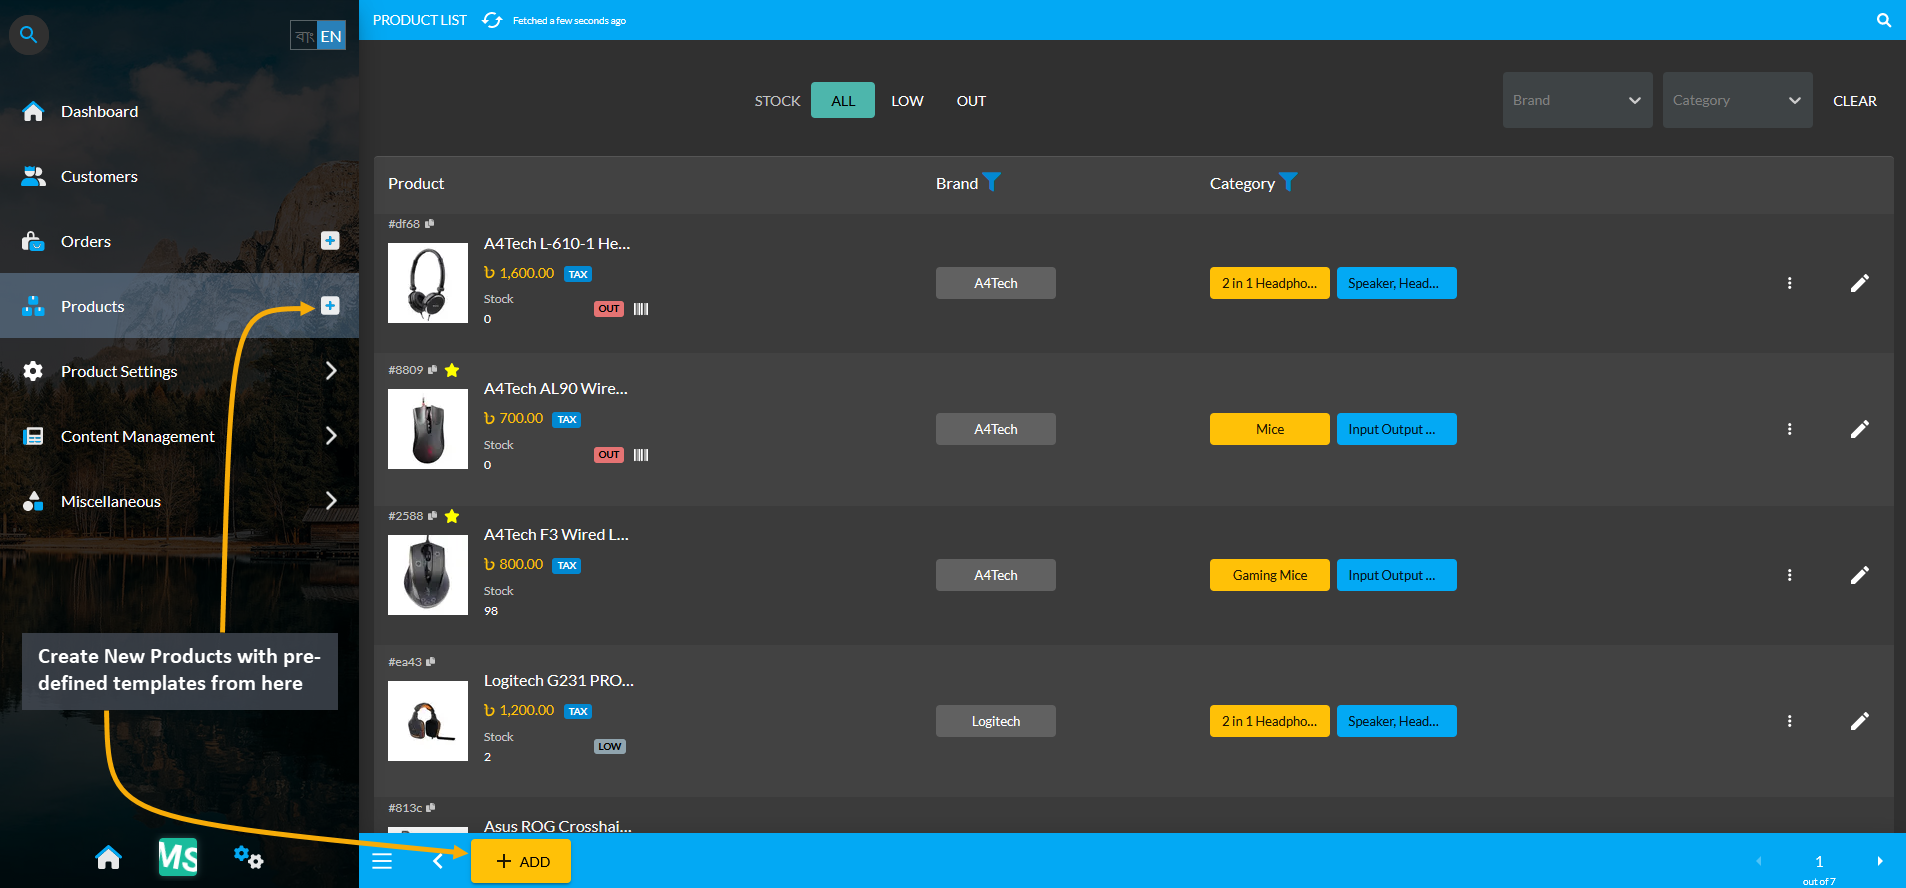
Image 3: Create New Products from Global Products or pre-defined templates by clicking on the ADD button.
There is a Search box in the search page, where typing generic Product names will bring results of the Pre-defined Product Templates if they are already in The Website. Select the target Product that comes up within the search box results. Click the Select button for the target Product that will redirect to a pre-defined Product information page. In this page, the selected Global Product template will have names, attributes, and images already filled out.
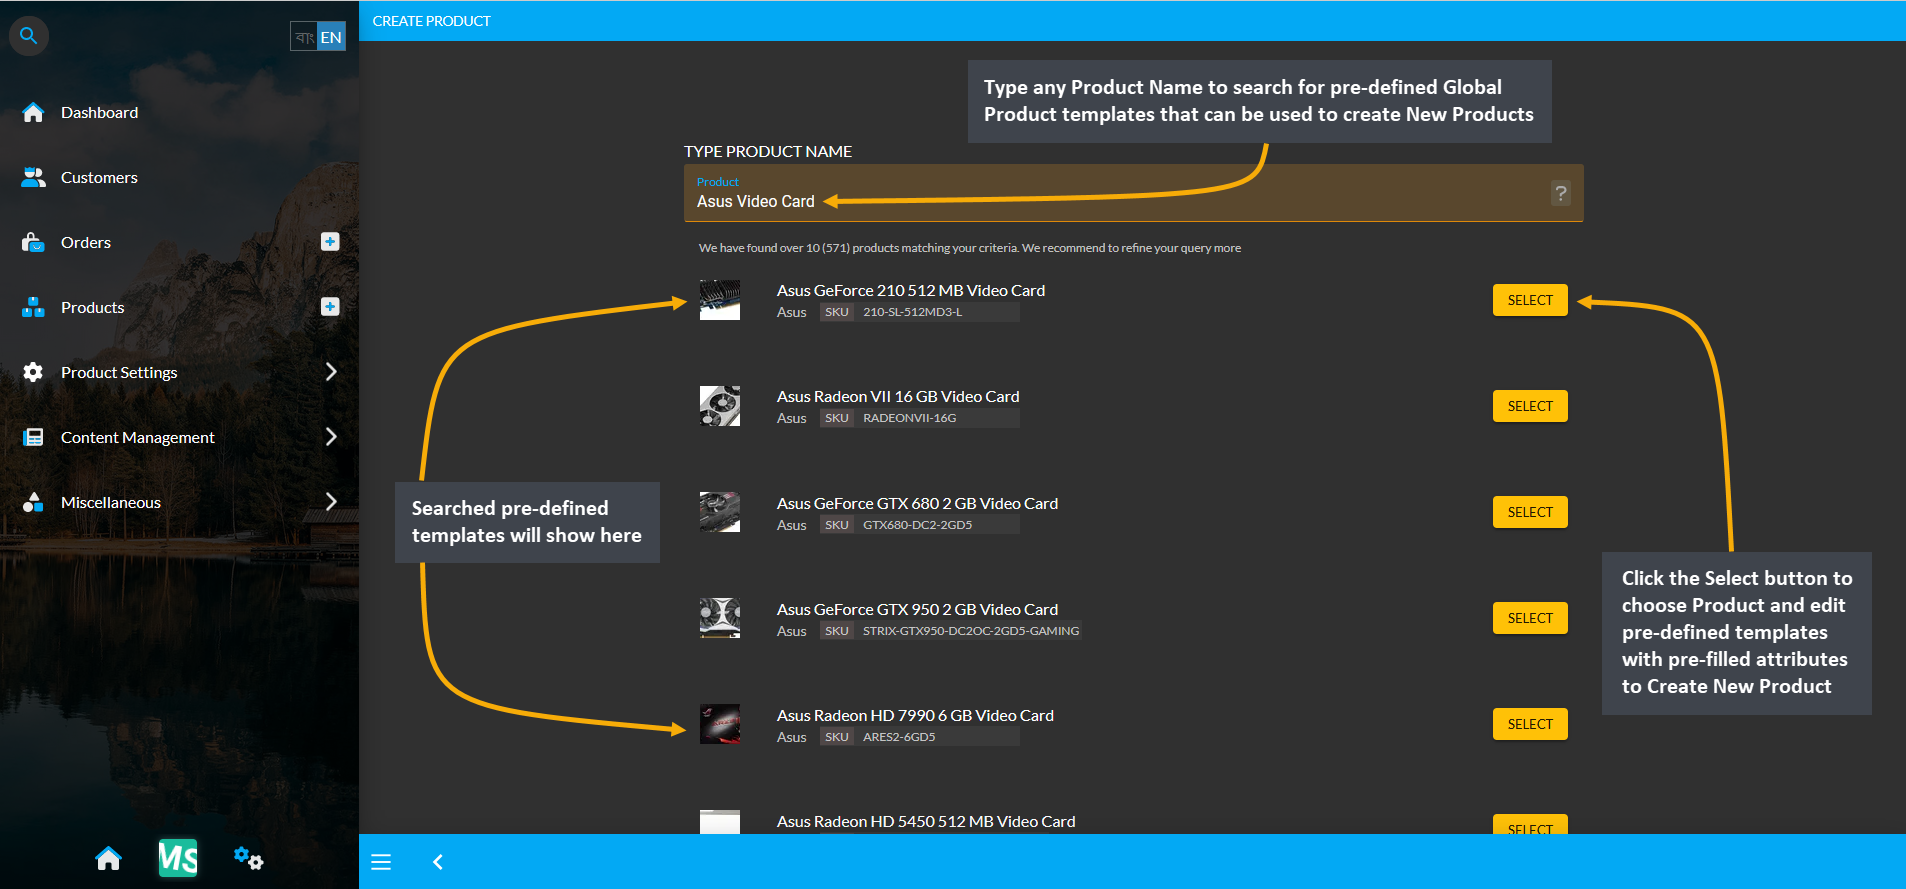
Image 4: Type generic Product name in the search box and select the target Product from search results.
Even though the Pre-defined Product Template will have pre-filled Product name, category, images, and attributes, other details like prices, warranties, Product stock model, Product condition, stock count and stock for sale needs to be filled out. Hit the Submit button to complete creating a New Product for the Shop or the Website.
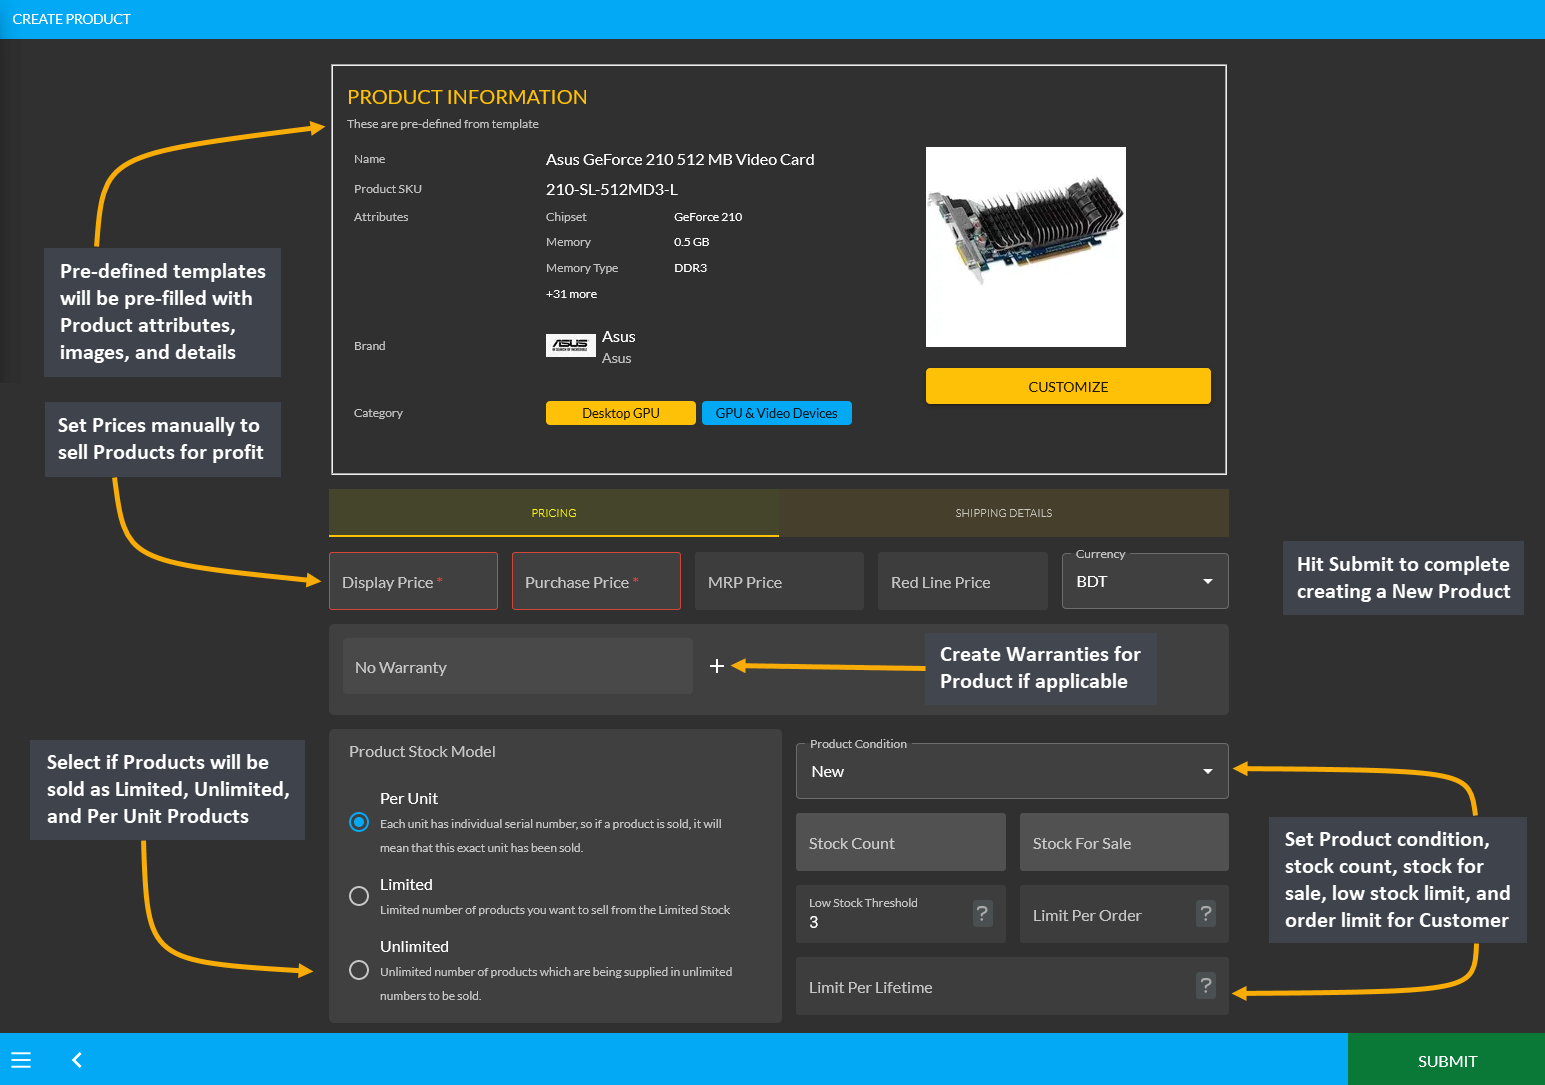
Image 5: Fill details in pre-defined templates information page and hit Submit to create New Product.
1 - Product Creation Template Types
Learn More about how to search for Products and create Products using pre-defined templates or create Custom Products using different templates.
New Blank Product Template
A New Blank Product Template will let the tenant user create a Standalone Product that will have no relation to the Global Product templates. When choosing to create a completely new blank Product from scratch, users will be redirected to the full blank Product Template form where they will be able to add all Product information and images. Products that are not on Global Product list can be created using this template.
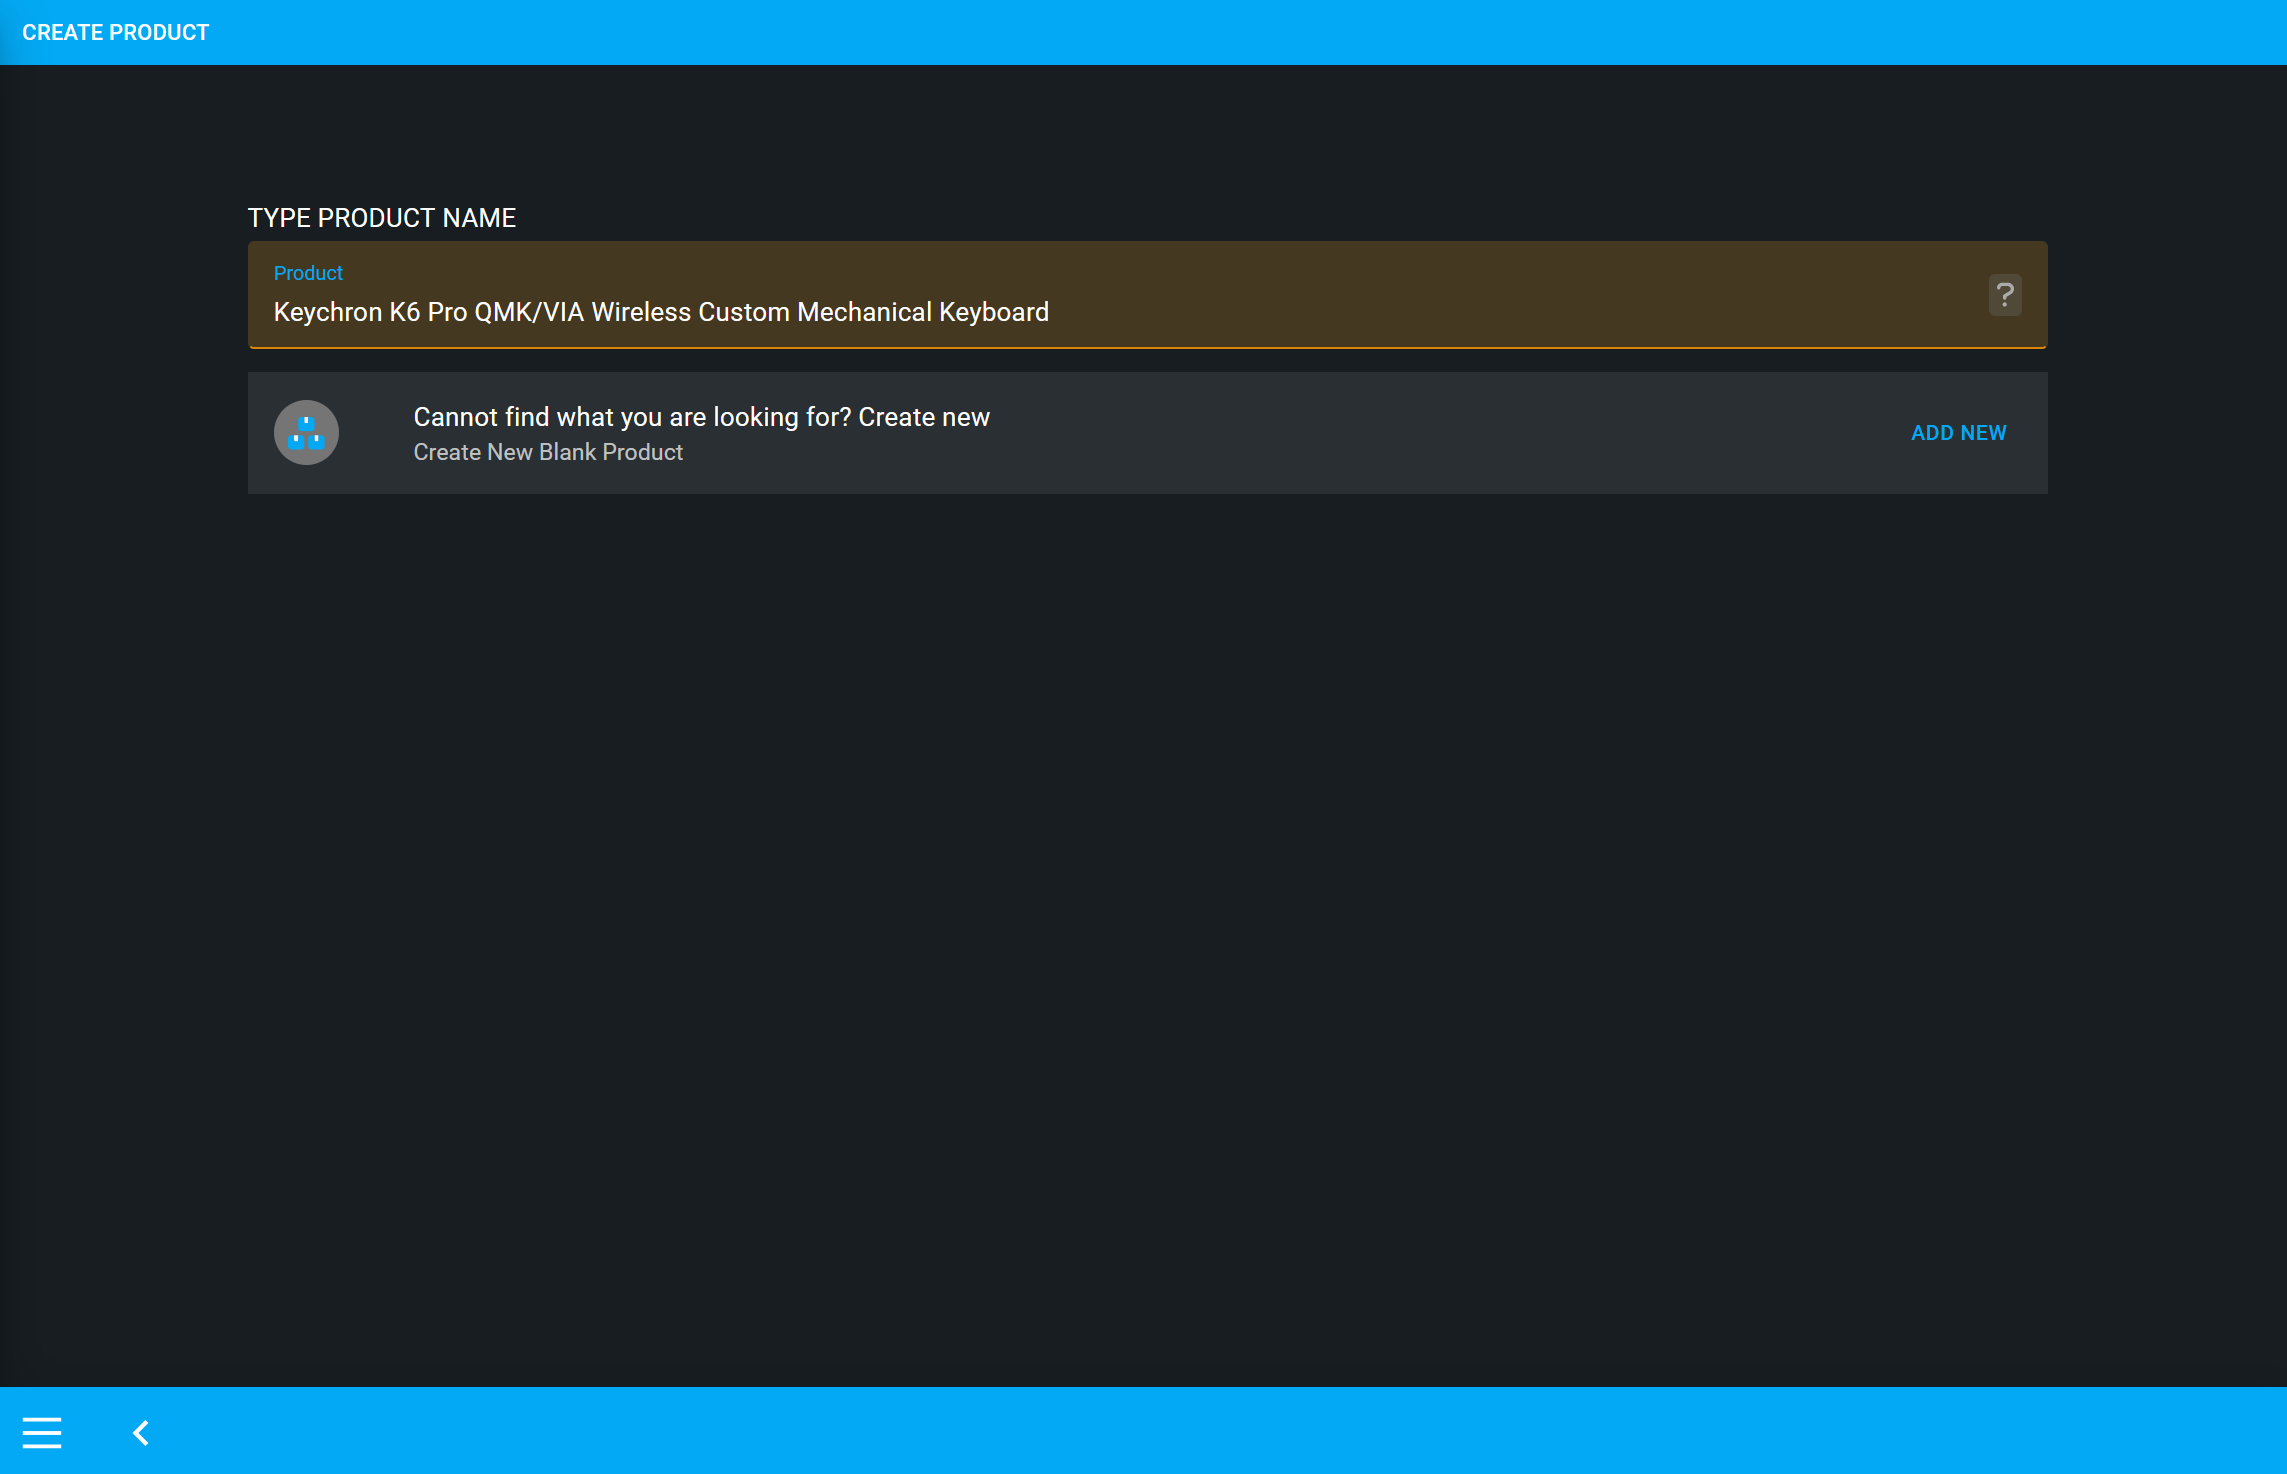
Image 1: When creating a new Product, users will be redirected to the full blank Product Template.
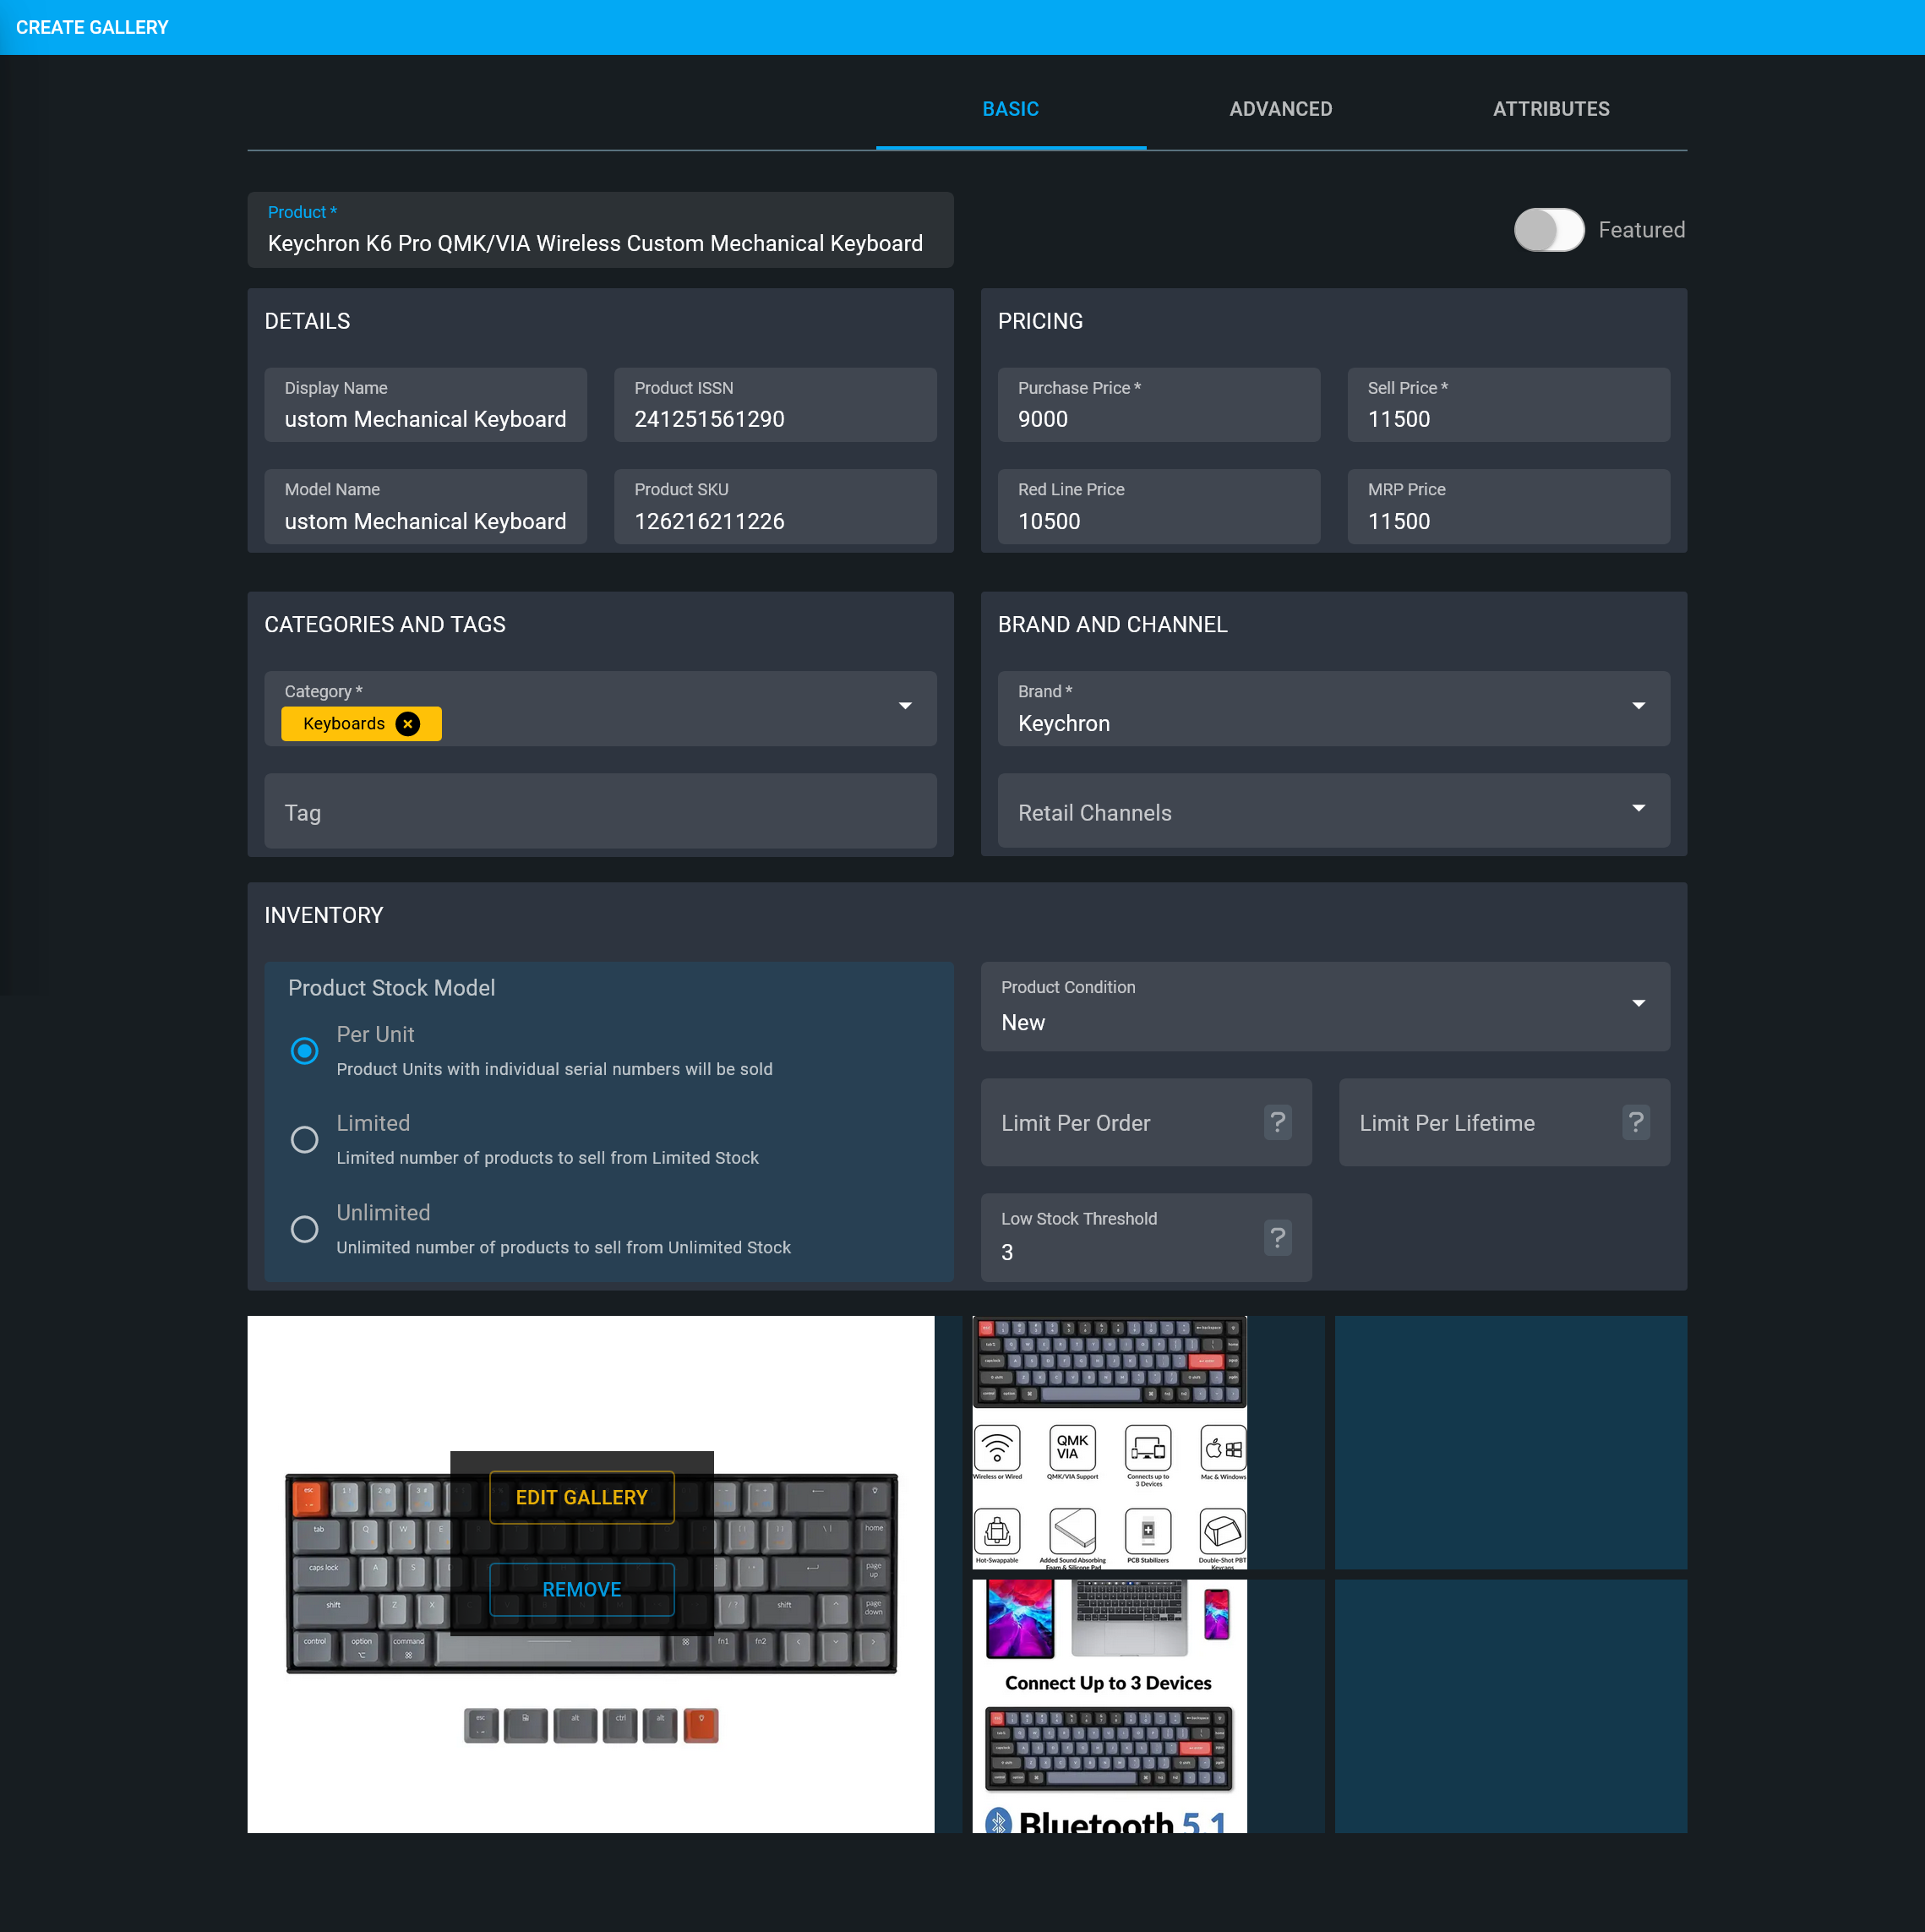
Image 2: Products that are not on Global Product list can be created with New Blank Product Template.
Global Product Template
A Global Product Template will let users create a Product directly from the list of Global Products. They can easily search for Branded Products on the product search bar and select the Global Product with pre-filled information. All they have to do is insert Product names and prices to enlist them on the tenant Product List. This is advantageous for Sellers as they will not have to perform data entry for Branded Products as most of them are already pre-filled in the system with details under Global Products (GP).
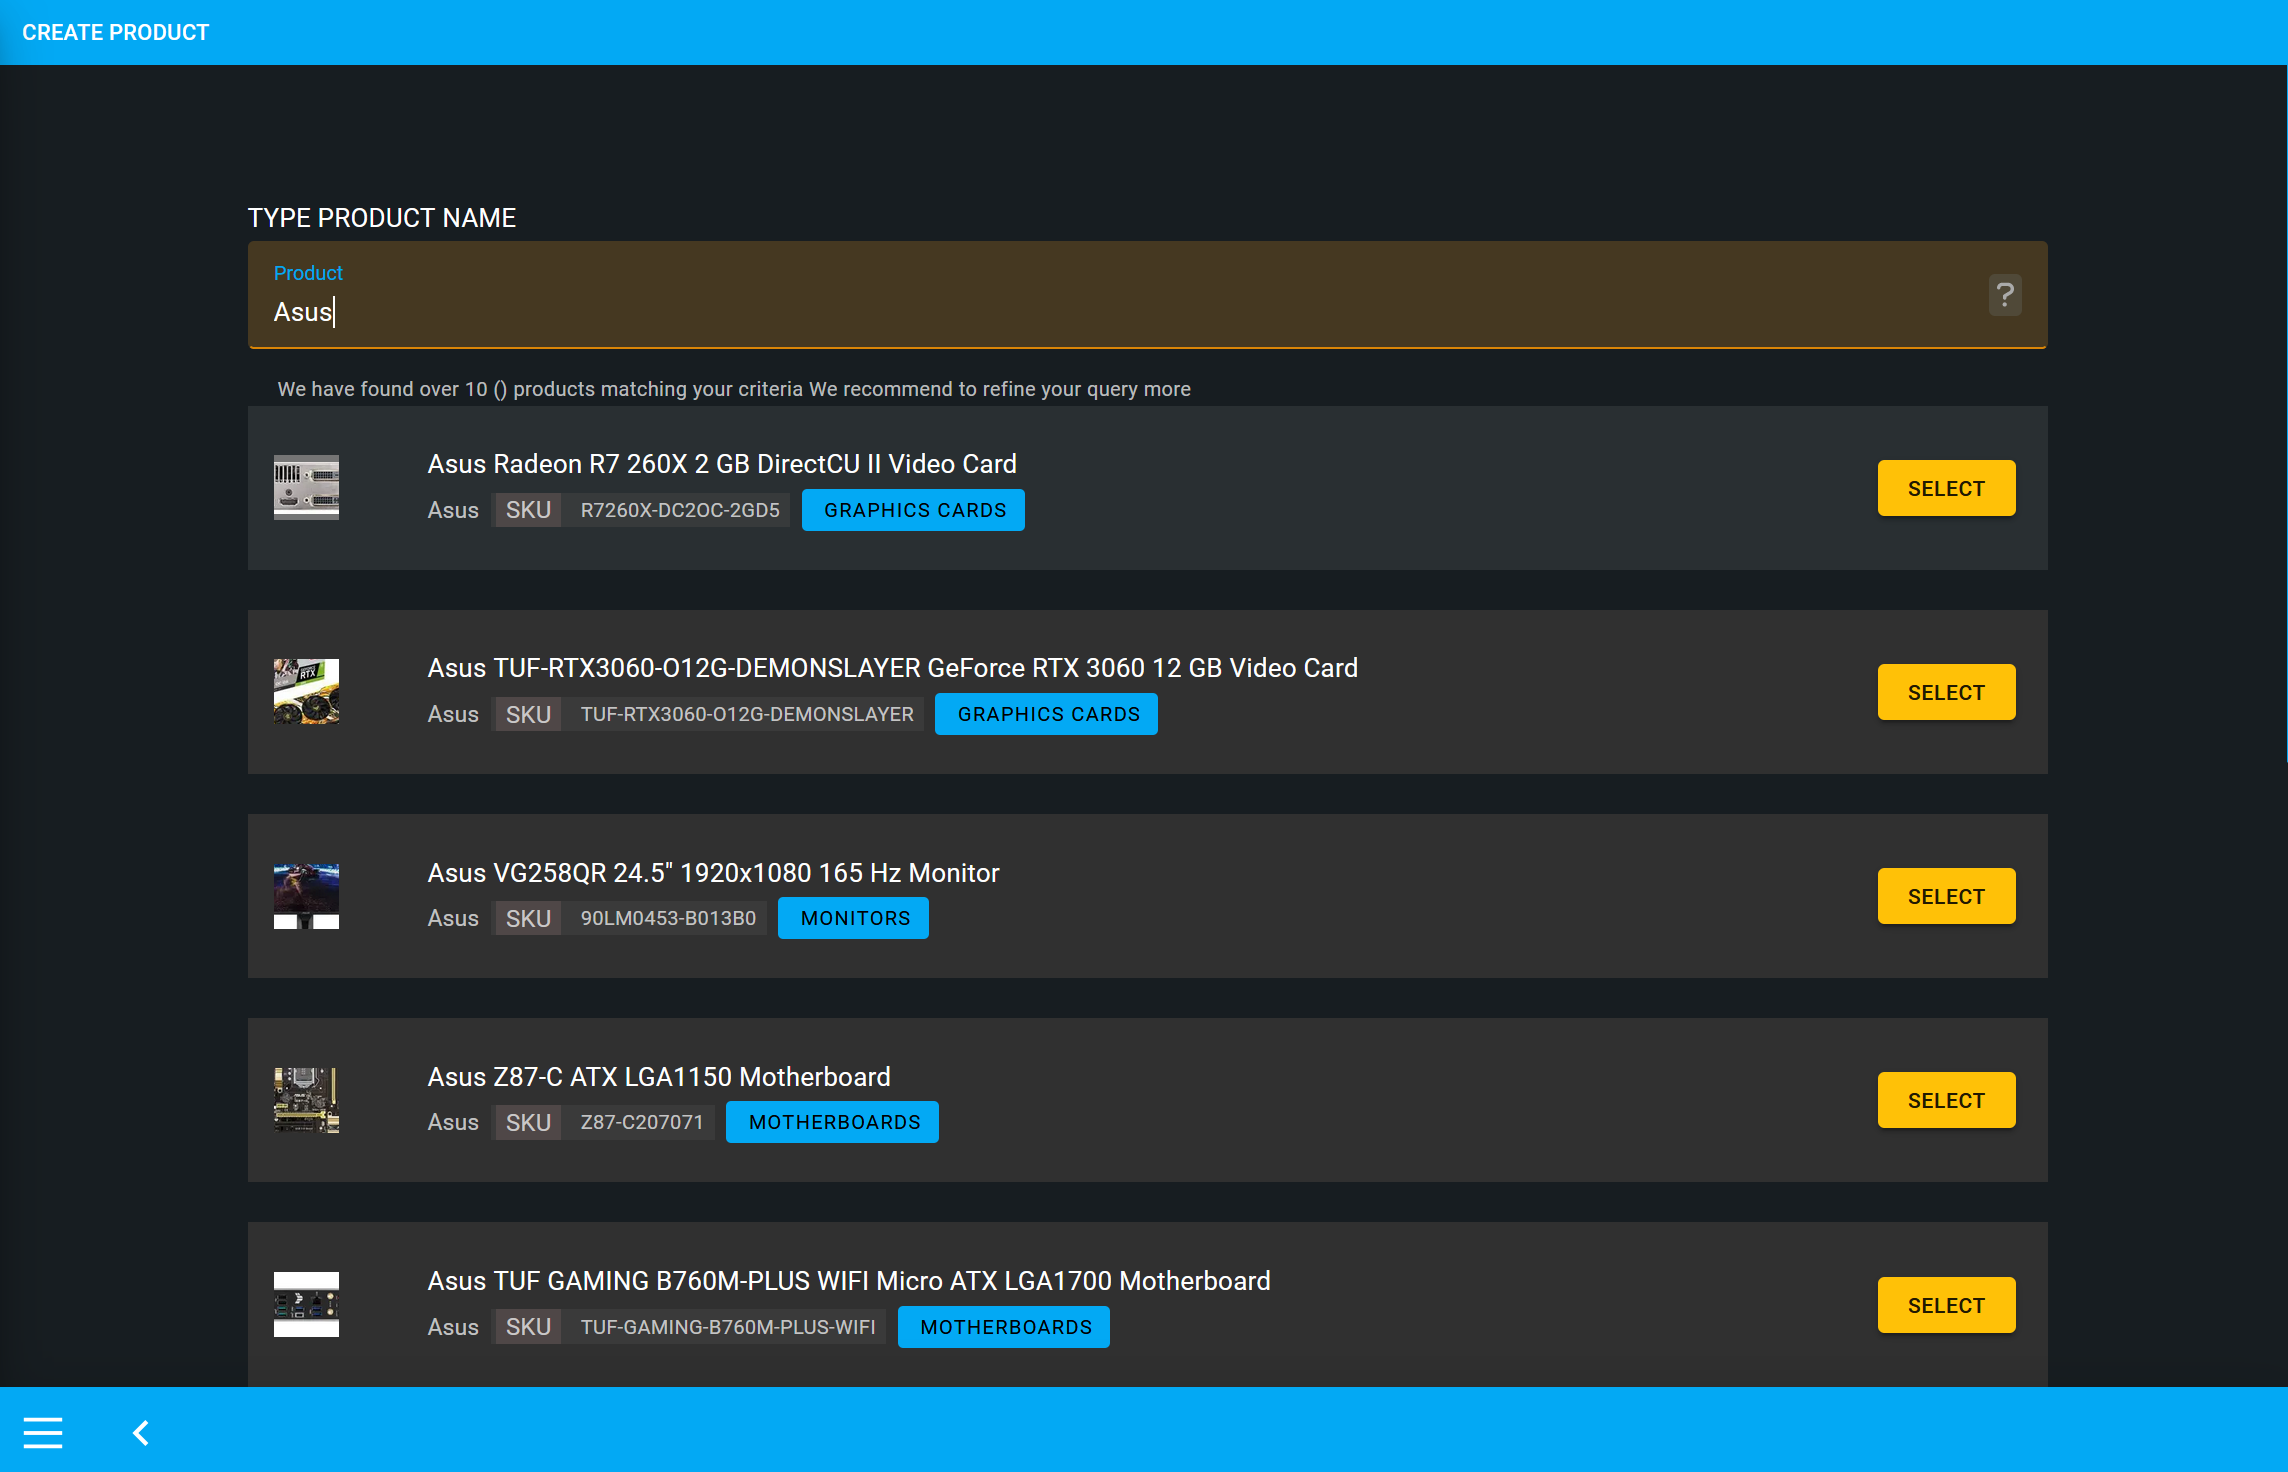
Image 3: Search for Products on search bar and select target Global Product with pre-filled details.
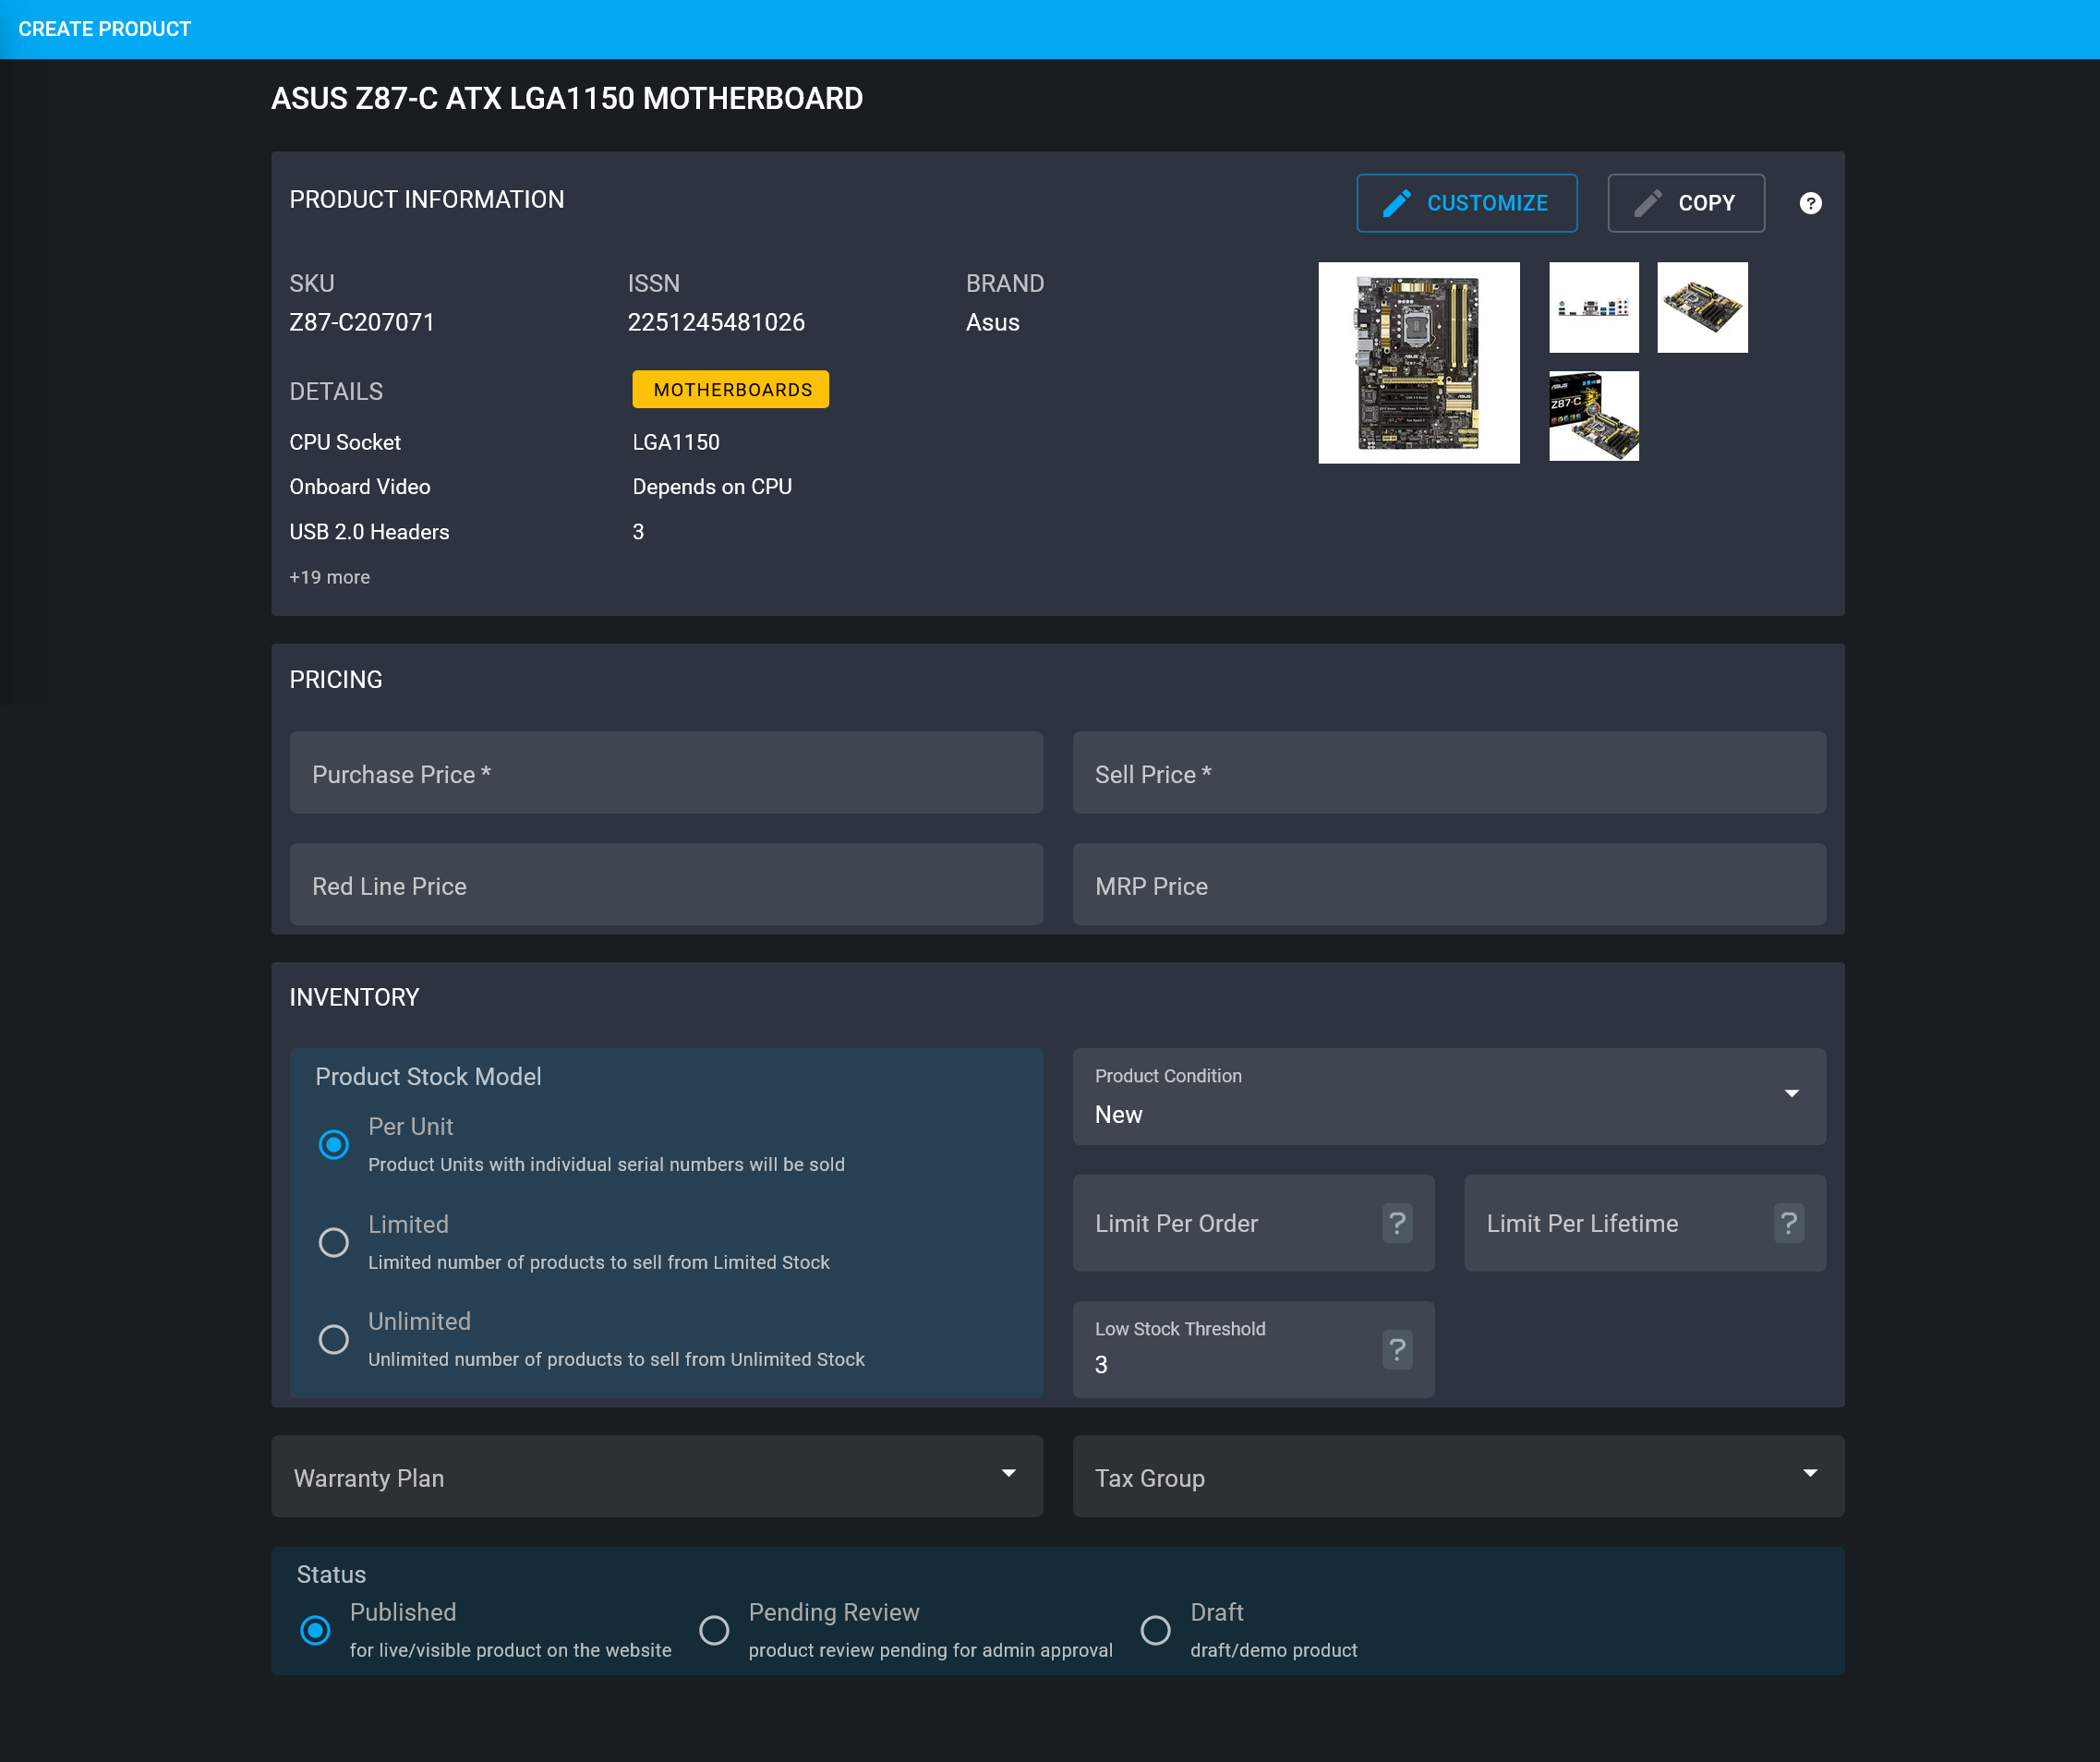
Image 4: Global Product Template will allow creatig a Product directly from Global Products list.
Global Product Template Customize
Customize option on Global Product Template will redirect to the Template Editor to allow customization of some product details, but not all information. So, if users want to customize few details of Global Product data on the template form, then they can select this option. Selecting Customize option will redirect to the full template form, but users will not be able to edit everything on it. Anything that will be changed will be saved, anything that will not be changed will not be saved for the customized Global Product.

Image 5: Select Customize to edit few details of the Global Product data on product template form.
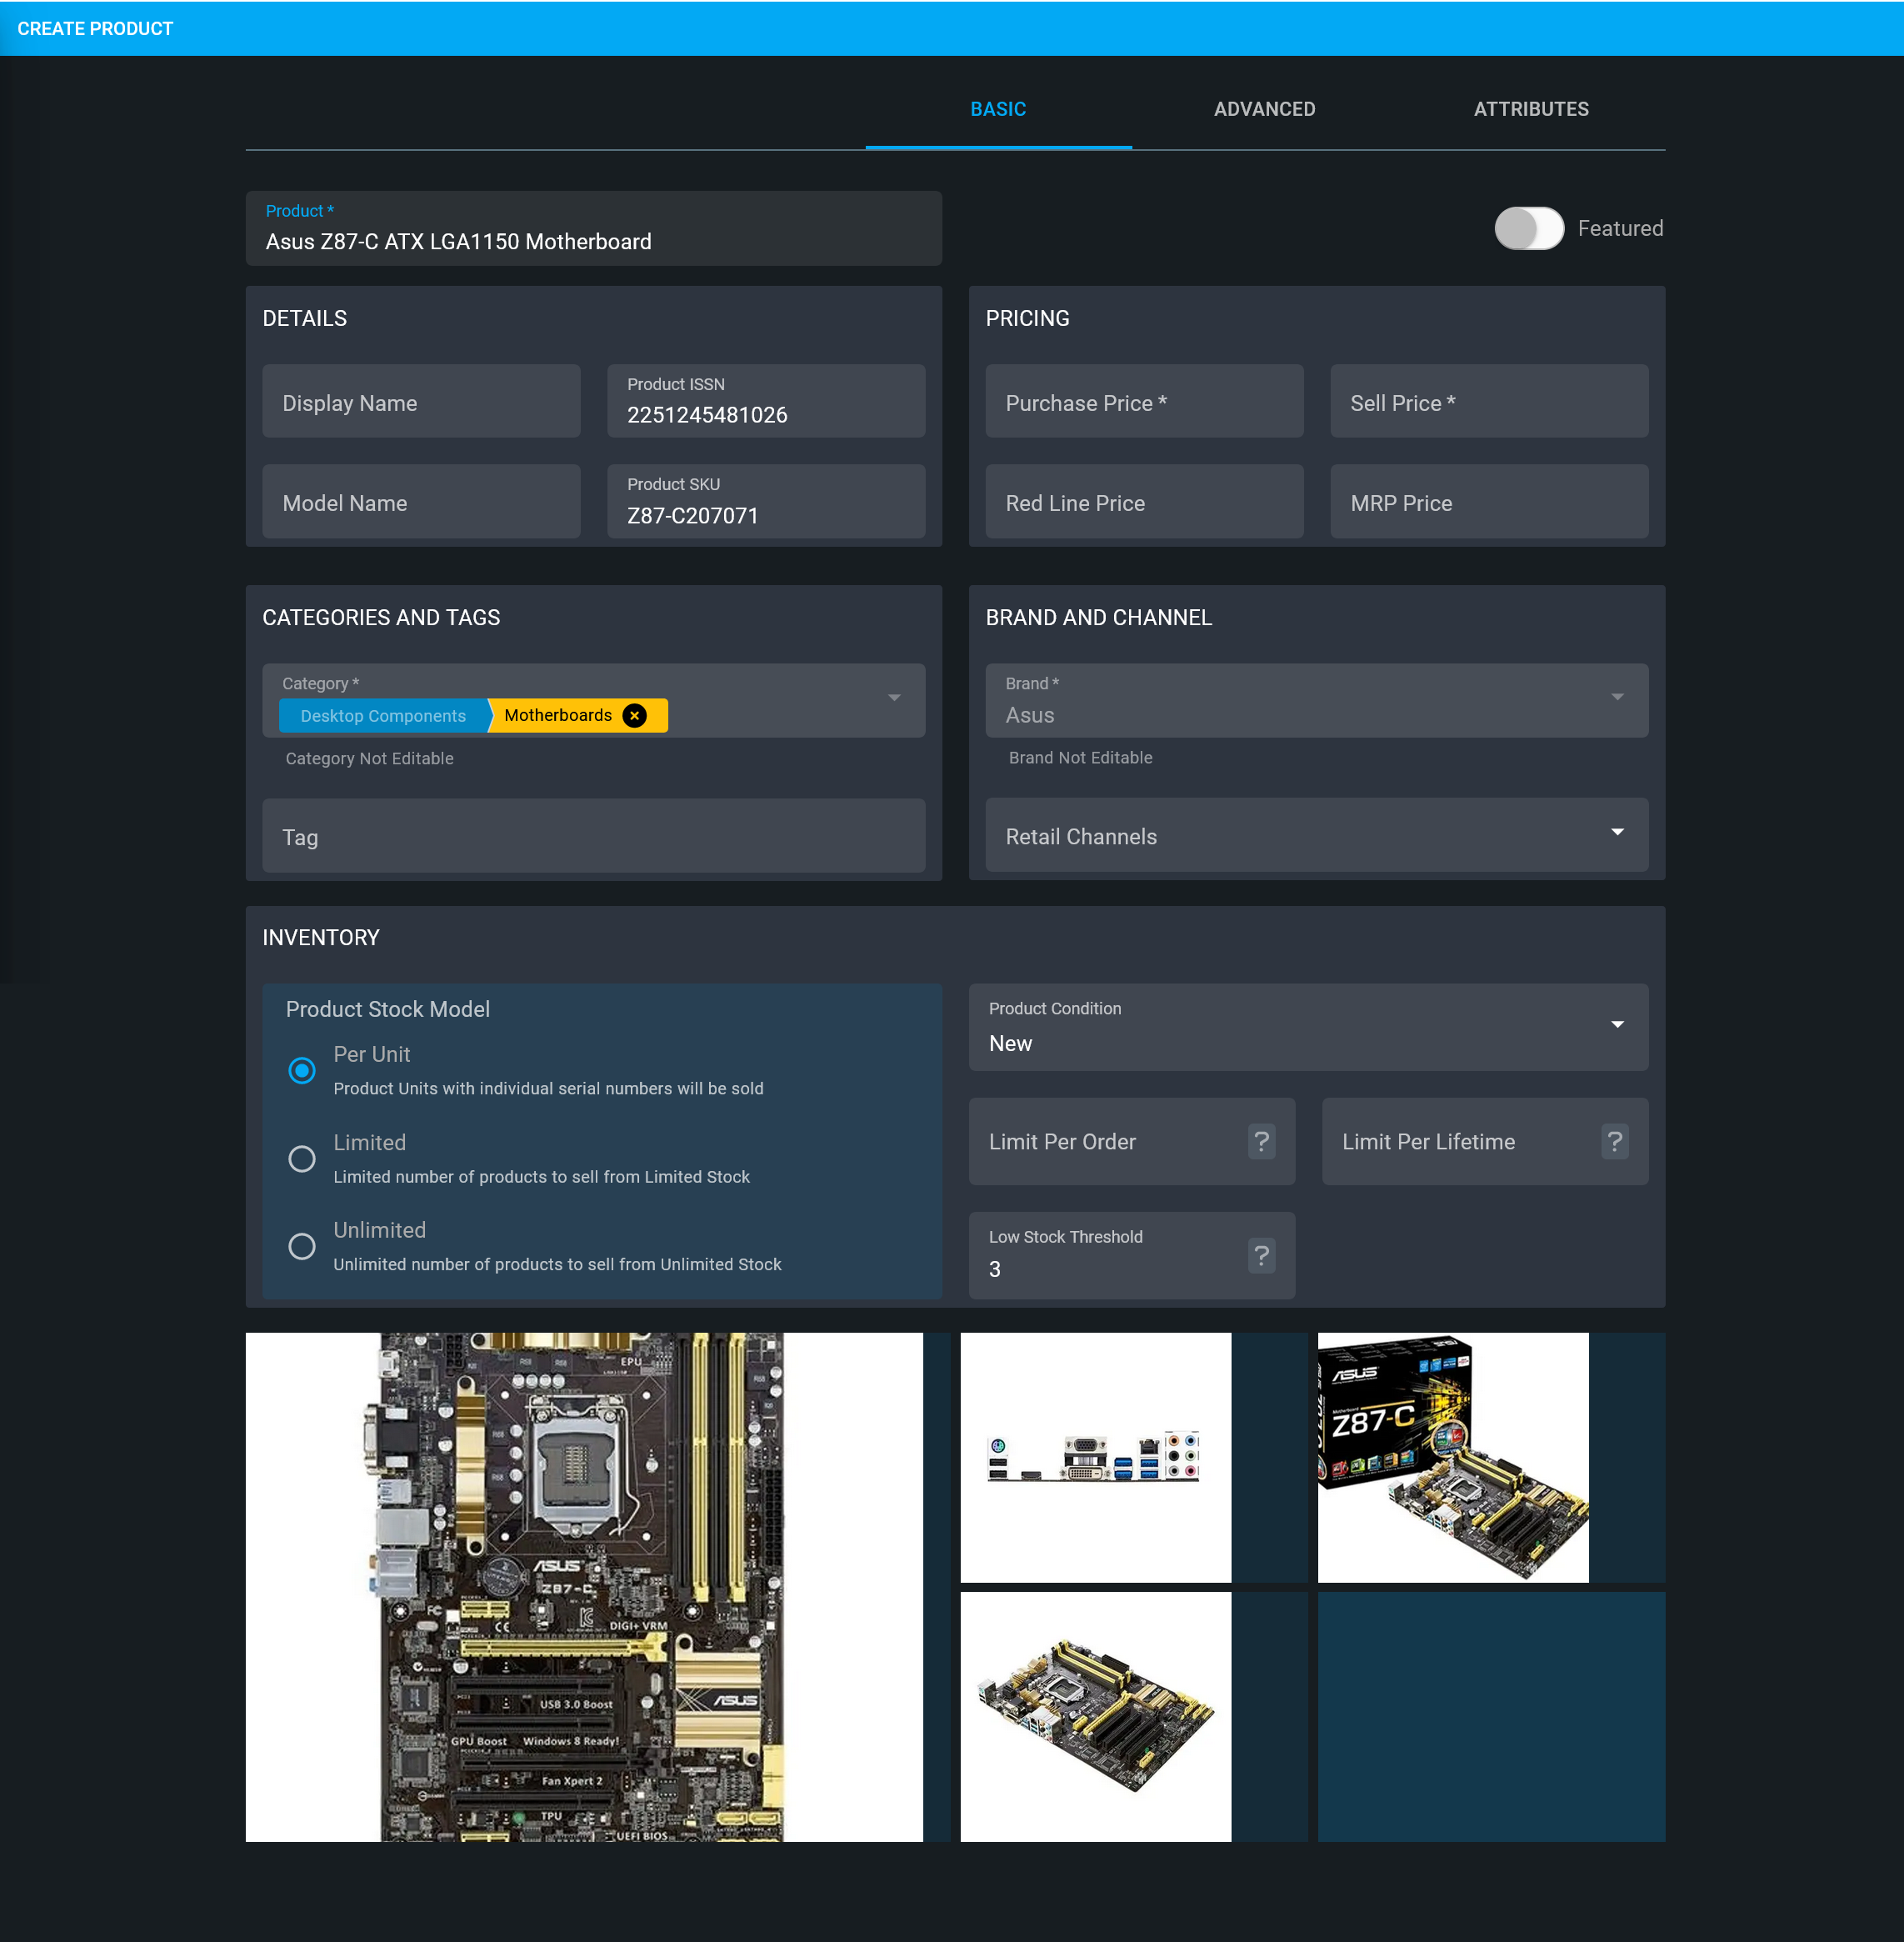
Image 6: Customize option will redirect to Template Editor to allow customization of some GP details.
Global Product Template Copy
Copy option on Global Product Template is a Detached Mode where all the Global Product information are copied from the product template. Hence, selecting Copy will detach the Global Product from the product template and make it a standalone product to edit any details and save those changes. Though product is created from Global Product, it will have no connection with Global Product, but redirect to the full form, so that users can edit all product details, images, and save everything as a standalone product.

Image 7: Select Copy to edit all product details, images, and save everything as standalone product.
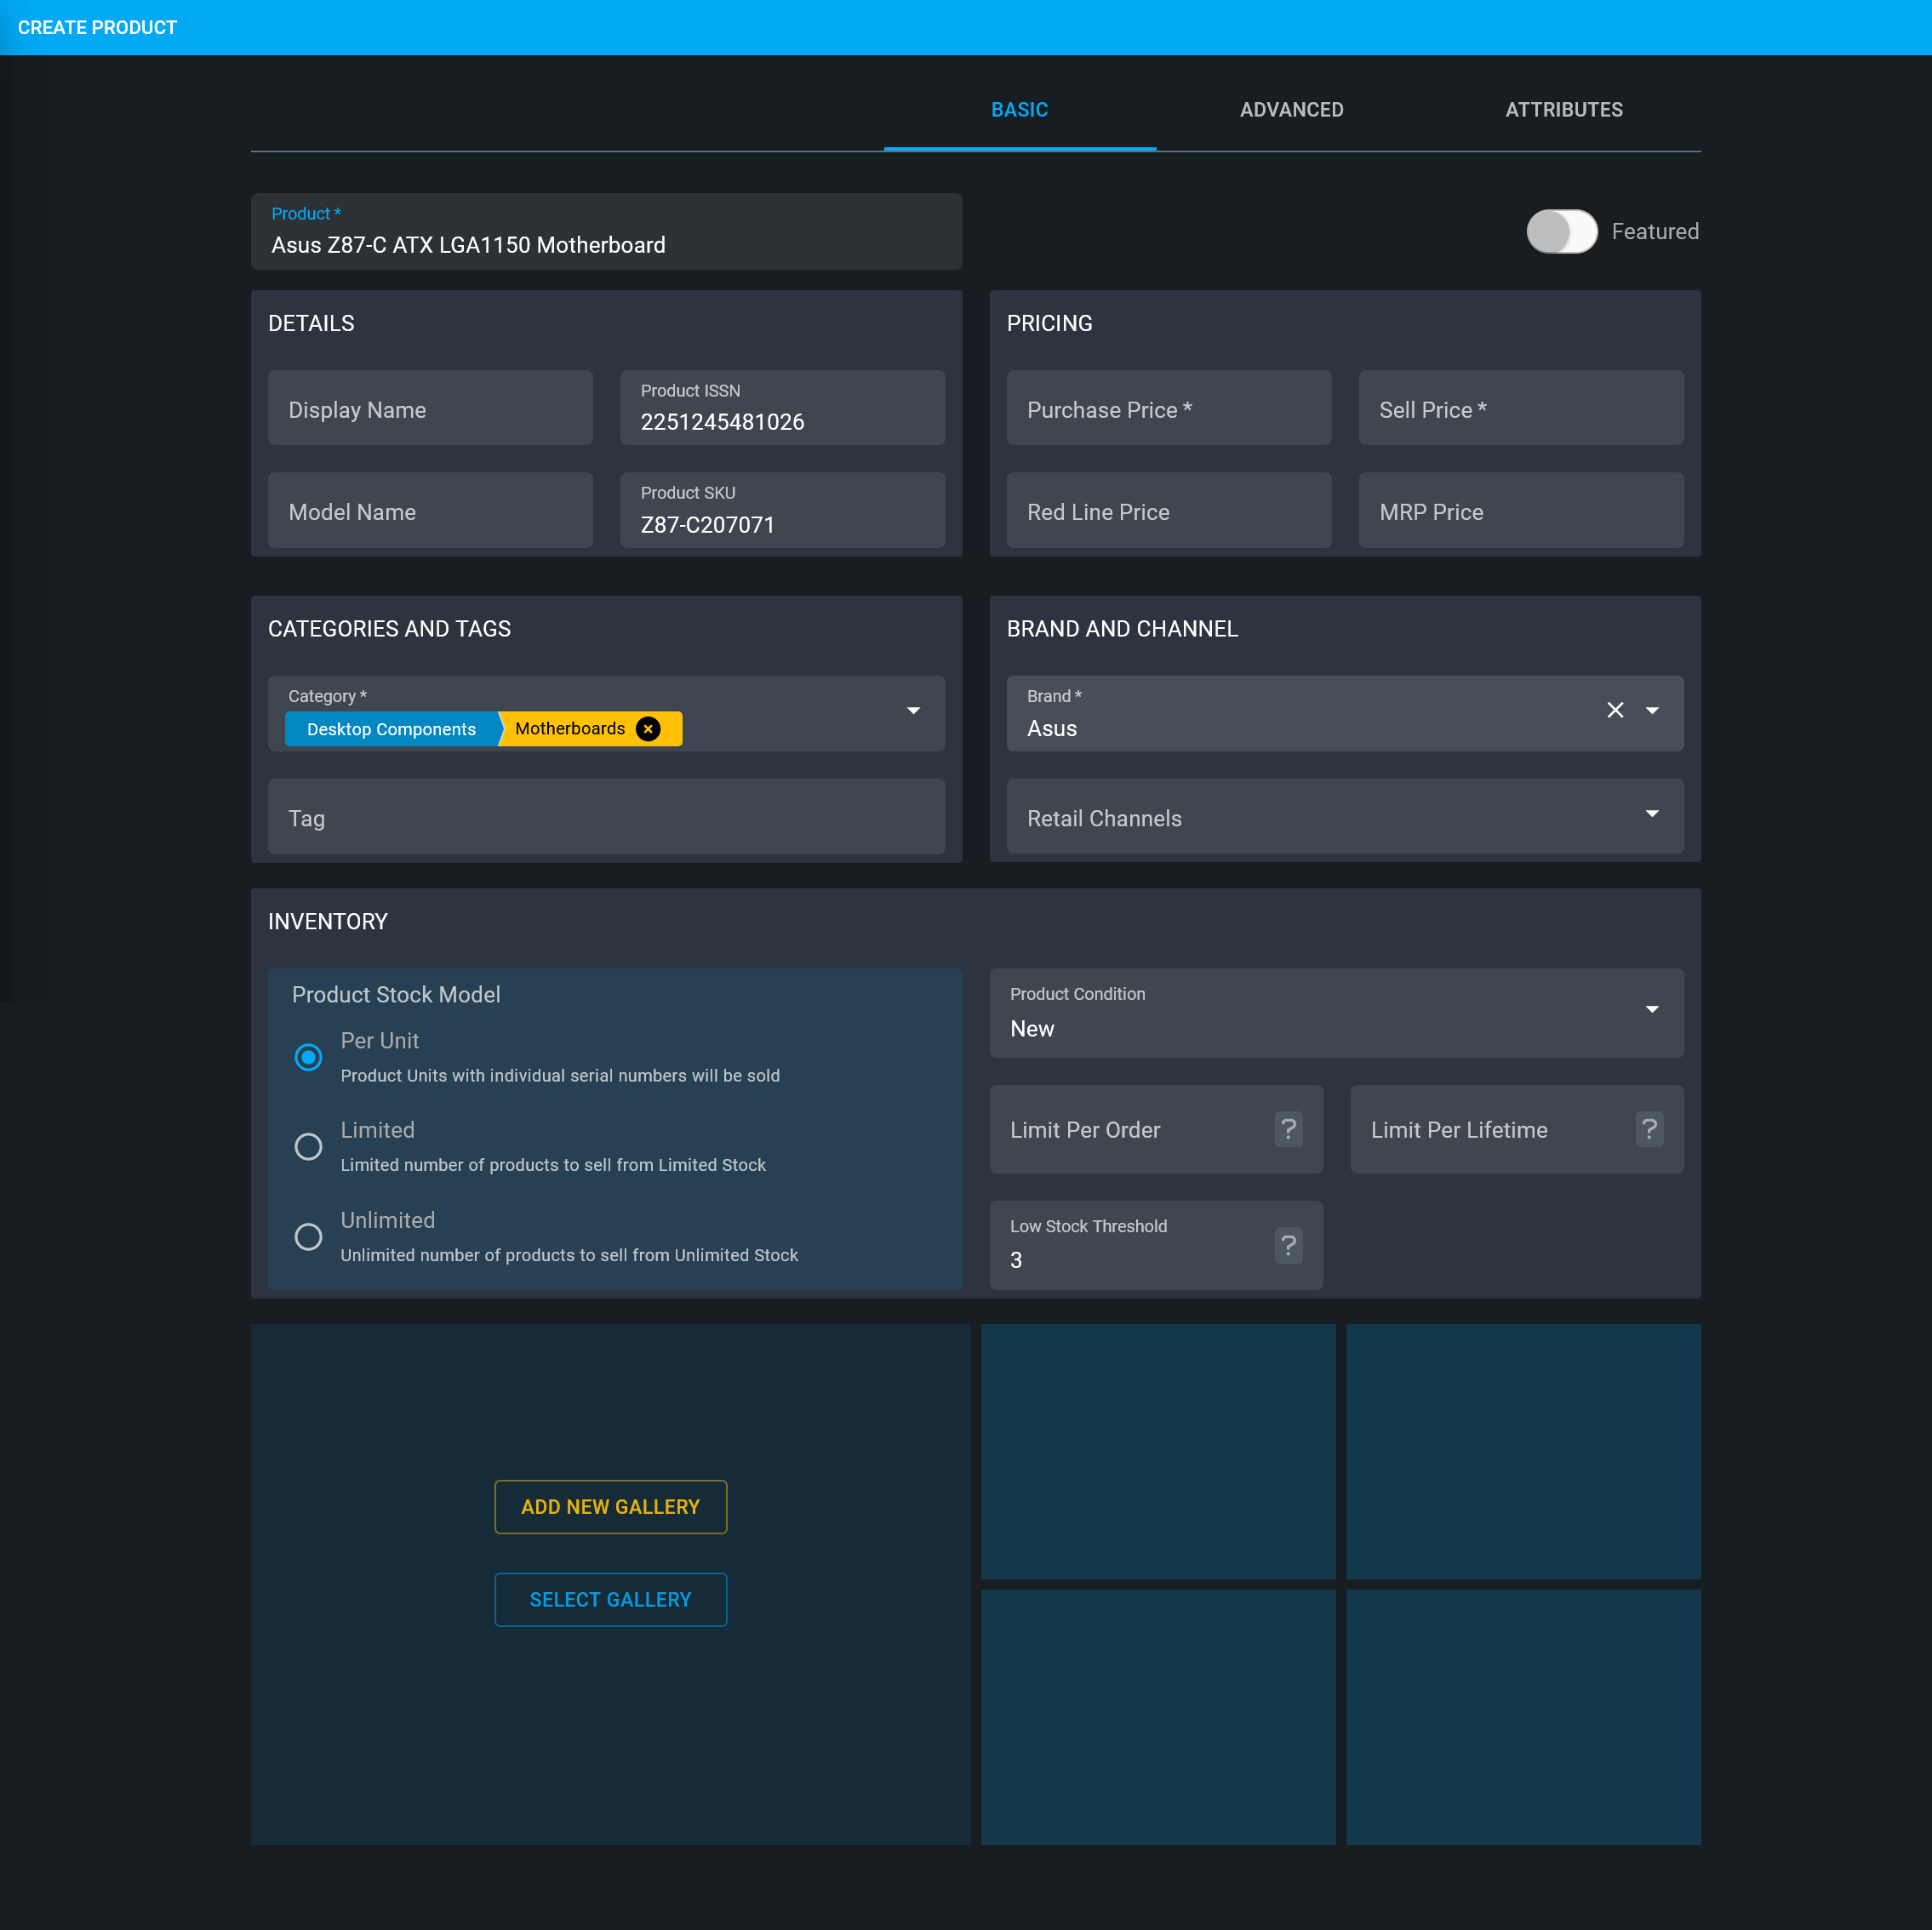
Image 8: Selecting Copy will detach a Global Product from template and make it a standalone product.
2 - Steps to Create New Product
Learn how to create a full Custom Product with details, images, and stock.
Create New Custom Product
If Shop Owner is searching for a target Product that is not available within the Pre-defined Global Product Templates, then they can create their own New Custom Product. For this, click the Products + tab or the + Add button that will redirect to a Product search Page. Type the target Product Name in the Search box. If the Product is not available in search results, then click the Add New button to redirect to a new page to create New Custom Product using a blank Product Template form with all Product information and images.
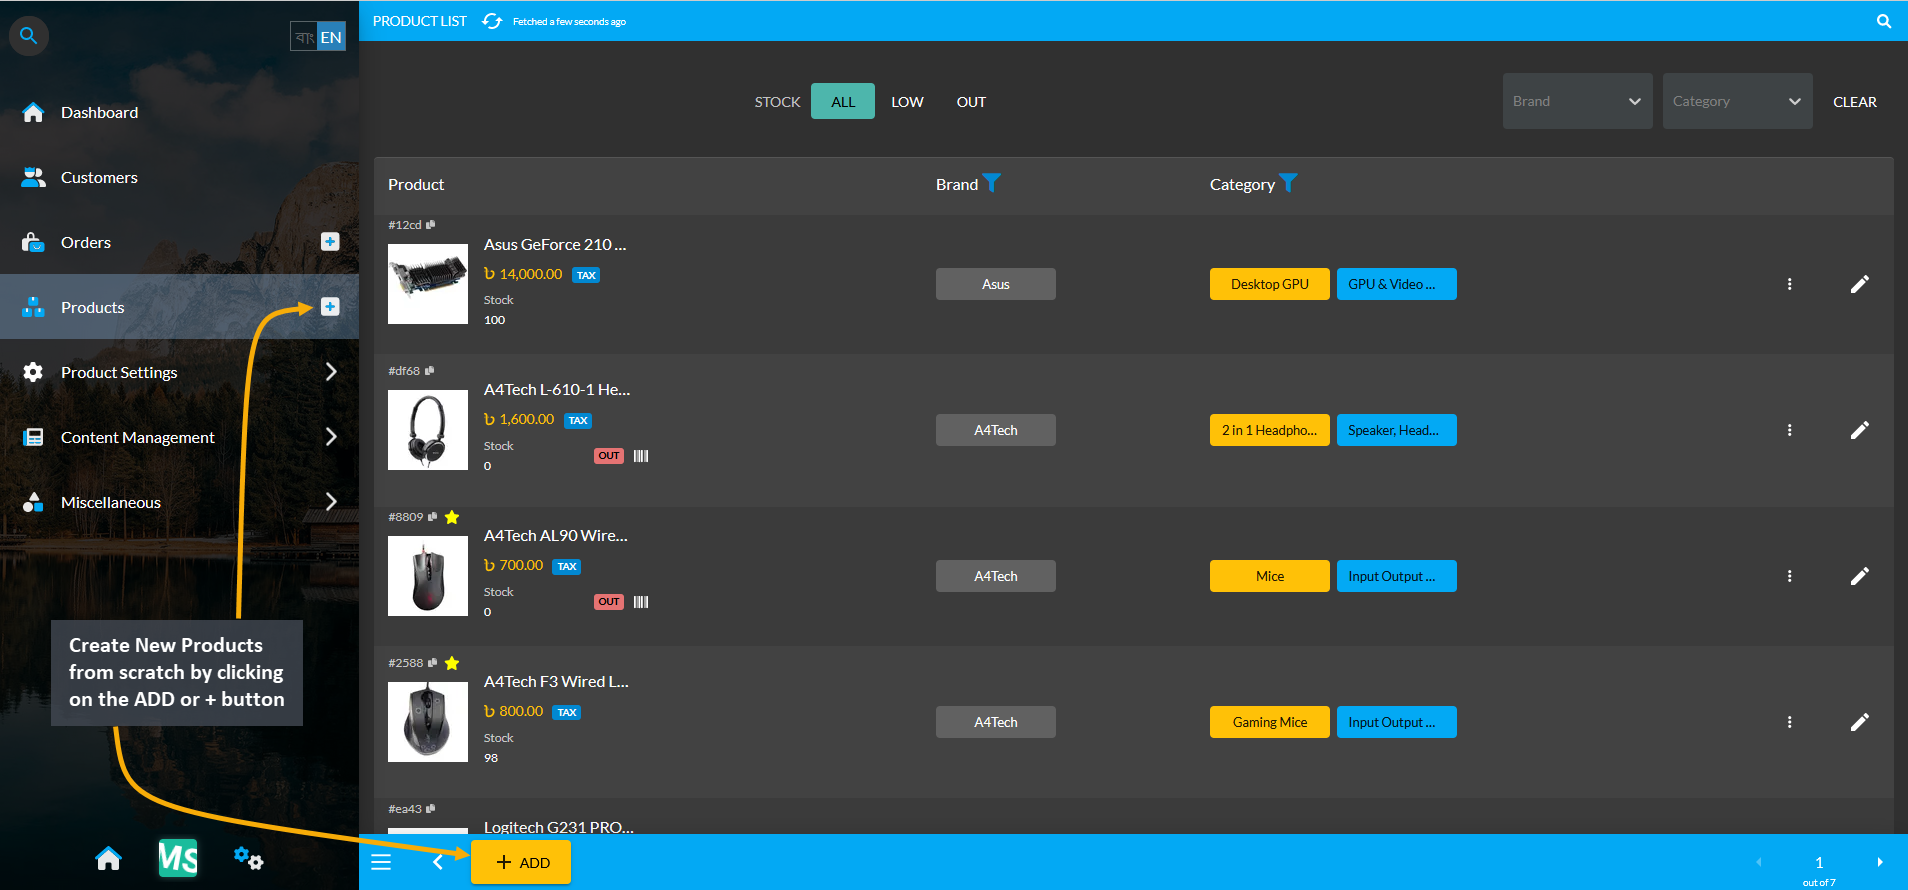
Image 1: Create New Products from scratch by clicking on the ADD or + button from the Products tab.
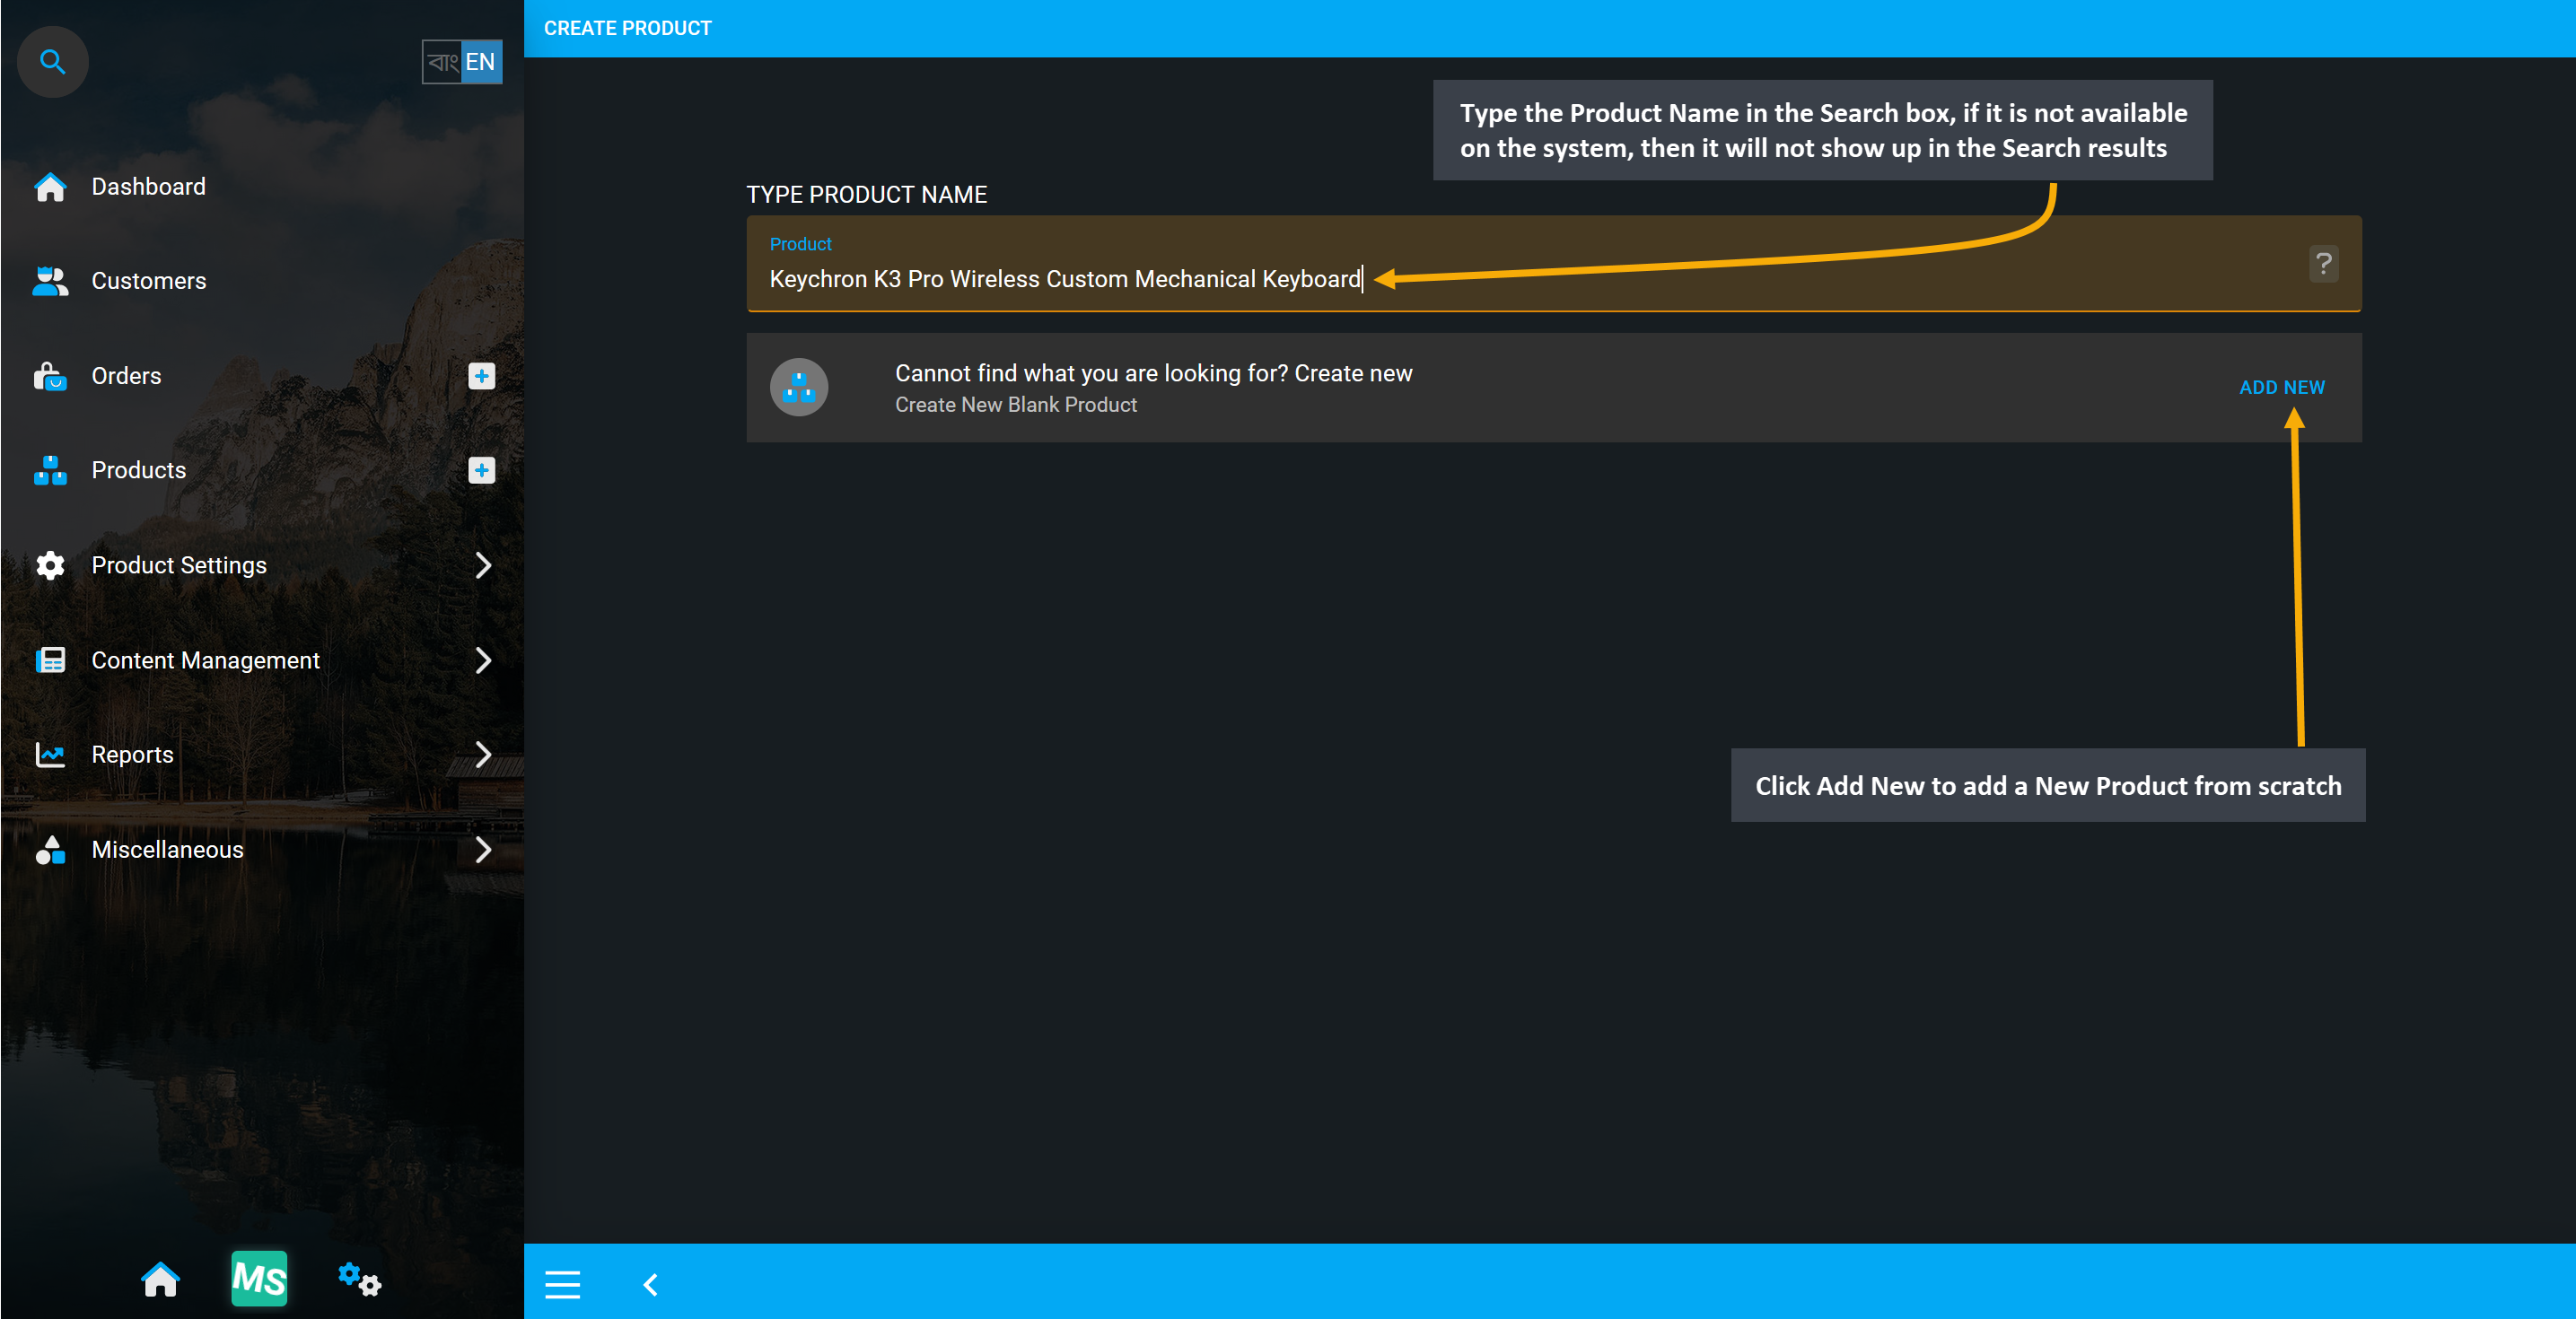
Image 2: Type Product name in search box, if Product is unavailable, click Add New to create Product.
The Create Product page consists of filling out all the main features of the Product i.e. Product Name, Display Name, Model Name, Product ISSN, Product SKU, Product Categories, Tags, Product Purchase Price, Sell Price, Red Line Price, MRP Price, Brand, Retail Channel, Product Gallery, Product Stock Model, and Inventory settings.
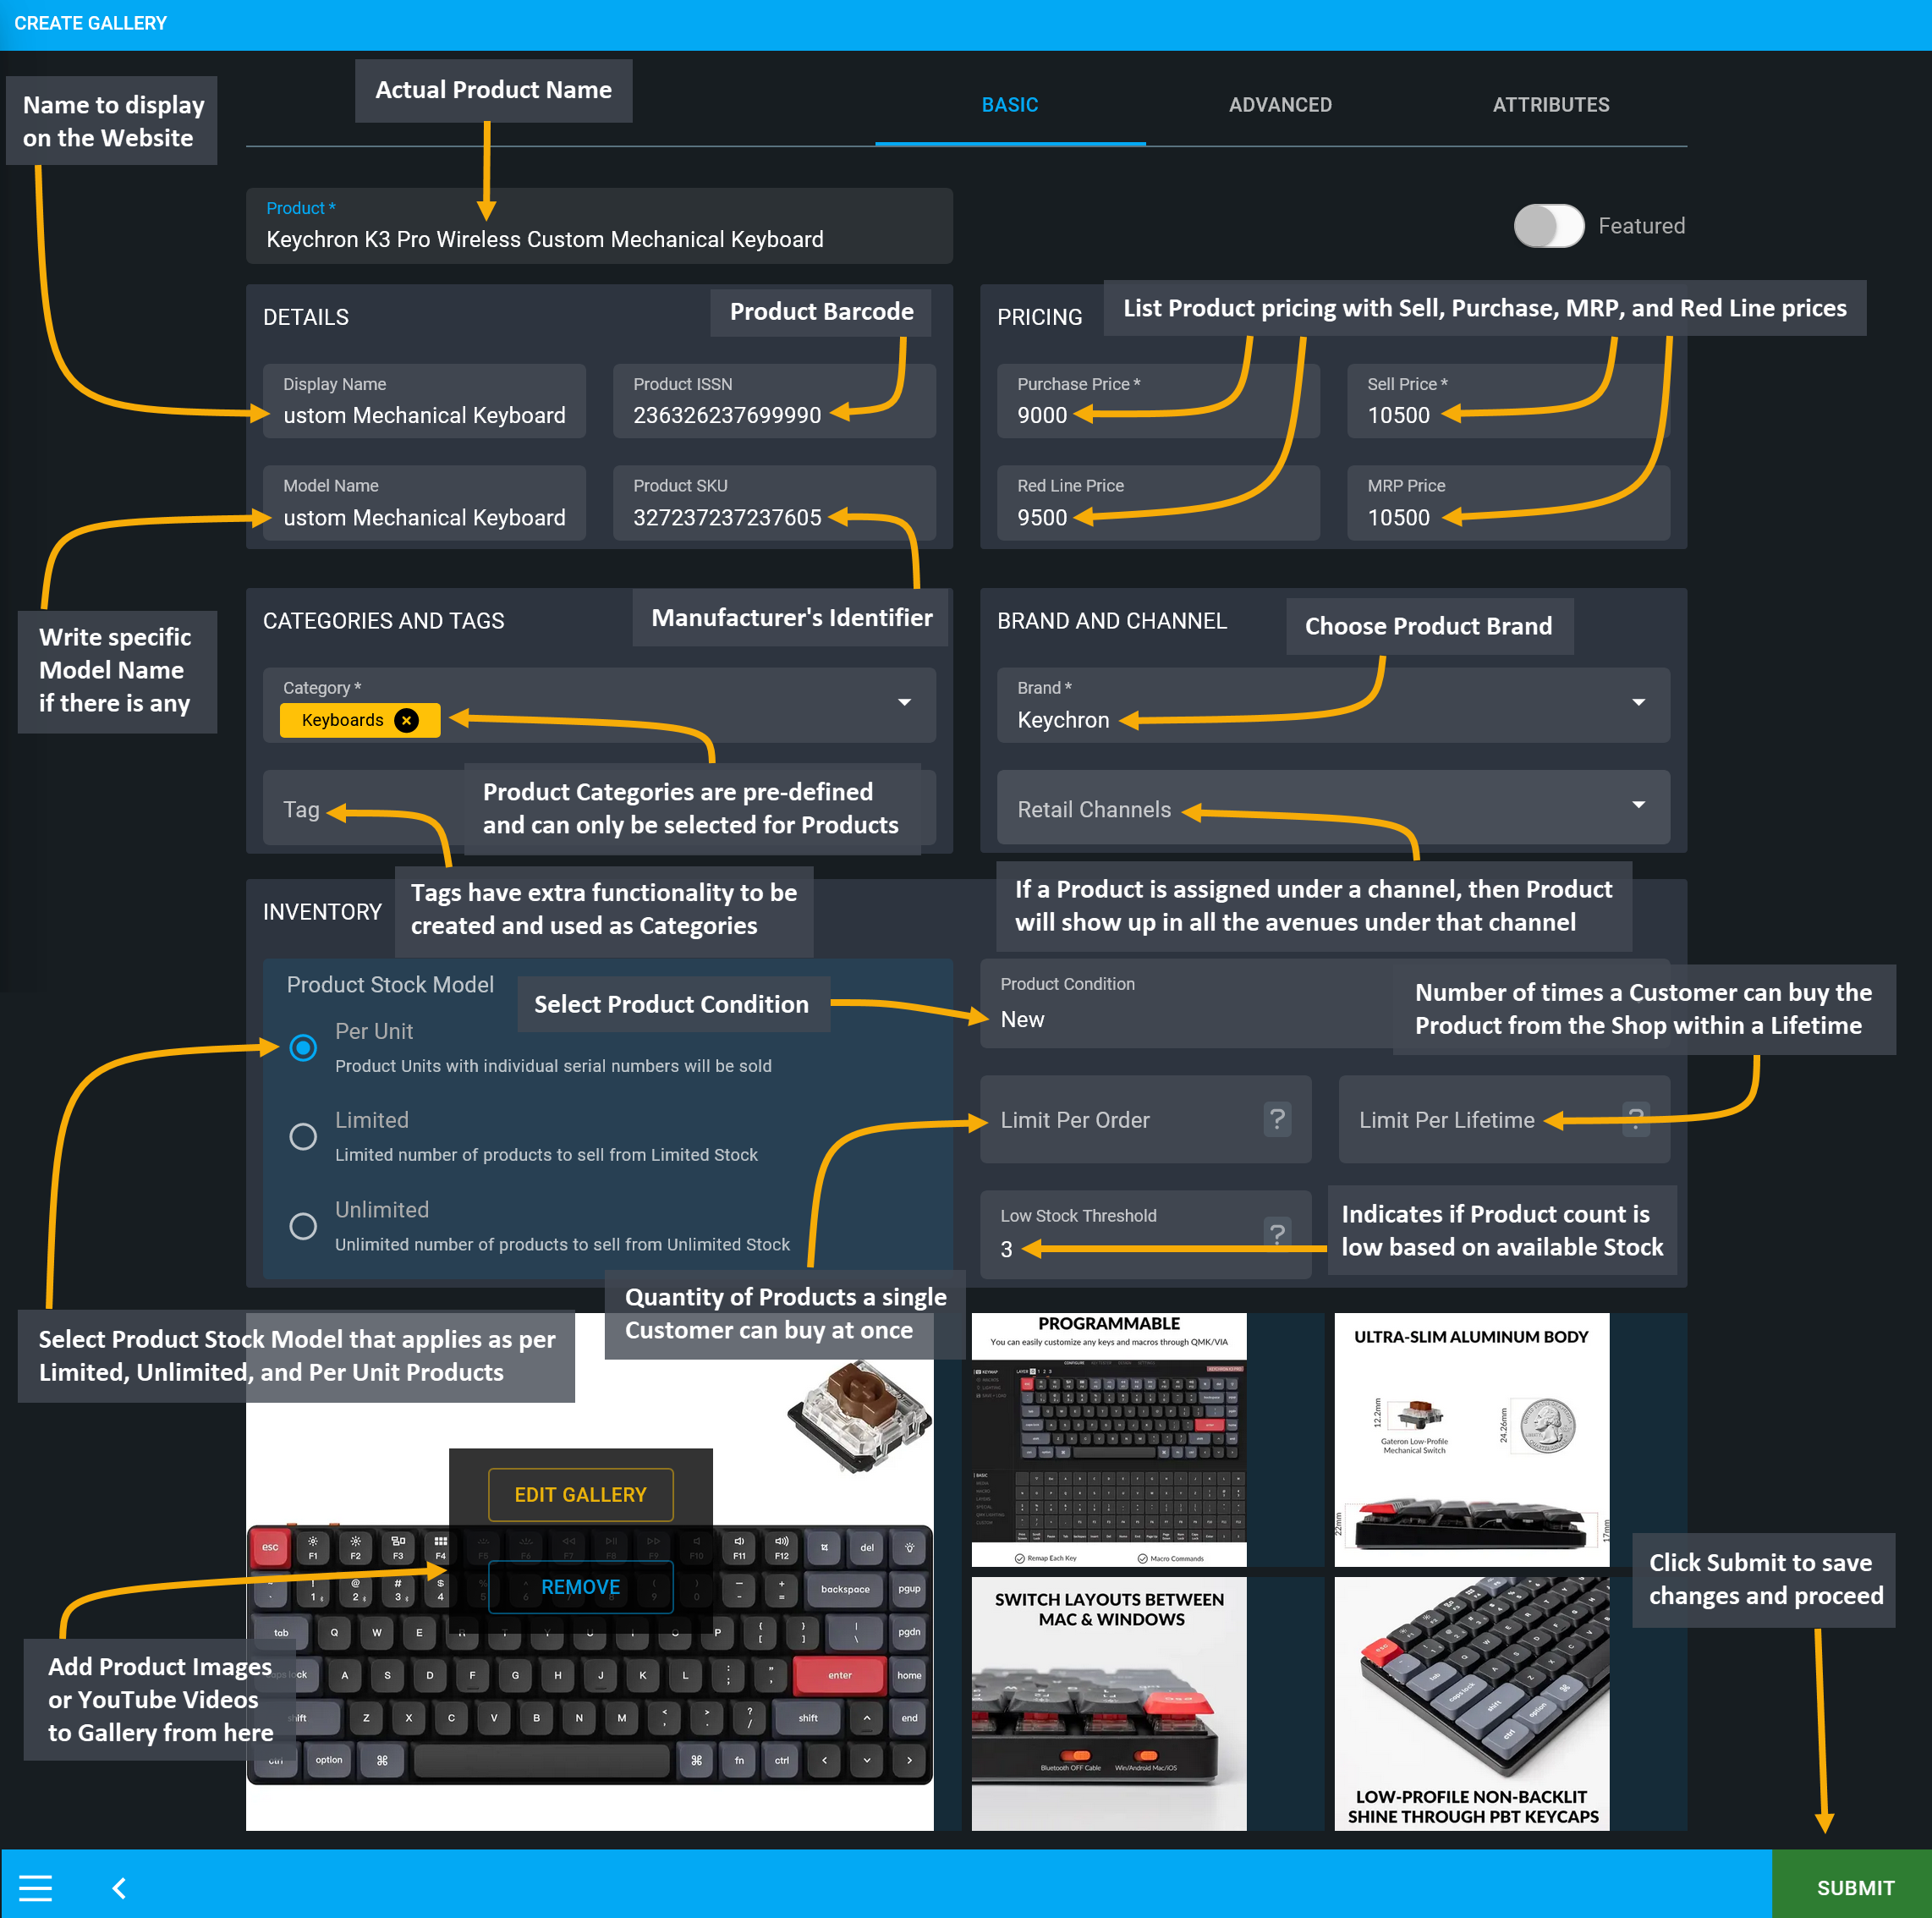
Image 3: Fill out all Product details, features, summary and attributes to create a Custom Product.
Product, Display, Model, ISSN, SKU, and Pricing
To manually create a New Custom Product from scratch, fill out the details like the Product field, which is the actual product name (i.e. Keychron K3 Pro Wireless Custom Mechanical Keyboard). Create Display Name to set name for the Product that will appear in The Website. Please note that, when choosing Products from Global Products template, if Product Name needs to be edited, then it can be done from this option.
Model Name serves as particular model or series of the Product. To create a series i.e. Keychron Pro, model name can be set as Keychron K3 Pro Wireless. Product ISSN is the actual Product barcode and Product SKU is the manufacturer’s identifier, so one Product can have many SKUs. When adding any product, look up with either the Product ISSN or the Product SKU. Global Products will have automatic prefills of Product ISSN and Product SKU. On the right, set the Purchase, Sell, Red Line, and MRP Price of the Product.
Sell Price is the price that will be displayed for Customers on The Website. If Sell Price is less than the Red Line Price, an error message will show. Also, if Sell Price is lower than MRP Price, then a discount tag will be automatically added. Purchase Price indicates the price used to purchase the Product which will have to be lesser than both Sell Price and Red Line Price, or a warning message will show. So, set prices accordingly.
The MRP Price is the official Product price that applies to net Product(s) in market. It is used for a discount tag on the Sell Price. On the other hand, Red Line Price is the price less than which the Shop Owner will not allow to sell the Product. Thus, Shop Owner needs to set these prices accordingly for Products to sell.

Image 4: Fill in Product Name, Display Name, Model Name, Product ISSN, Product SKU, and Pricing.
Product Categories are pre-defined which means that they are limitable, so Tenant Users will not be able to add Categories. So, they will have to use the Product Categories that are already provided in the system. If they need customizable Categories for Products, then they can use Tags as alternatives by turning on the Commerce Category as Tag option from Settings. Then, it will allow using Tags as Categories in the Website.
Tags are similar to Categories with extra functionality that can be used as Custom Categories. The system will enforce to use Categories, but disabling Categories and enabling Tags will allow Shop Owners to create and arrange their own Categories for Products in the Website Shop filter. Both Product Categories and Tags can be added to Product, where Categories will filter out Products and related Tags will show on Website.
Then, there is option to select designated Product Brand from the dropdown menu with renowned brands like HP, AMD, Asus, or Apple etc. Select a brand from the list of Global Brands for the Product or create a new Brand if the brand is not available within the list using the Add Brand option on Product creation page.
When creating a Product, there is another option to select Retail Channel, where Admin will be the default channel. Thus, if a Product is assigned under a retail channel, it will show up in all the avenues under that channel. For instance, Products will show on Facebook store if Facebook avenue is selected. If a channel does not have any avenue (Commerce, Facebook, Google), then it will only allow selling from Admin.

Image 5: Shop Owners need to set Categories, Tags, Brand, and Retail Channel when creating Product.
Product Stock Model, Stock Count, and Gallery
Select Product Stock Model according to the Product types. Per Unit means that each Product unit has an individual serial number. If a Product is sold in an Order, it will mean that this exact Unit has been sold. Limited refers to limited number of products, i.e., Shop Owner has 10 Products in stock, and they want to sell those 10 items. Unlimited refers to limitless Products, i.e. cables used for electronic devices or potato storage, where Products are being supplied in unlimited numbers to be sold.
When selecting Per Unit option, Shop Owner will need to add Units through separate stock purchase order. So, if they are selling 10 Processors and each unit has individual serial, then it will help identify all 10 units apart from each other. If a unit was in a specific order, then that target Product can also be identified by the tracking serial number of the specific unit. This model applies to products in the computer market.
Product Condition refers to the condition of Products whether it is new, used, or refurbished. Limit Per Order indicates the quantity of Products a Customer can buy at once in an Order on the Shop. Similarly, Limit Per Lifetime is the number of times a Customer can buy the Product from the Shop within a lifetime.
Low Stock Threshold indicates if the Product count is Low based on the available stock. For example, if the Shop Owner has 5 Products in stock, and they set the Low Stock Threshold as 3, then nothing will happen. However, if Stock Count is set to 3, then the Stock Status will be set to Low. When Stock Count is set to 0, then the Stock Status will display as Out on The Website.
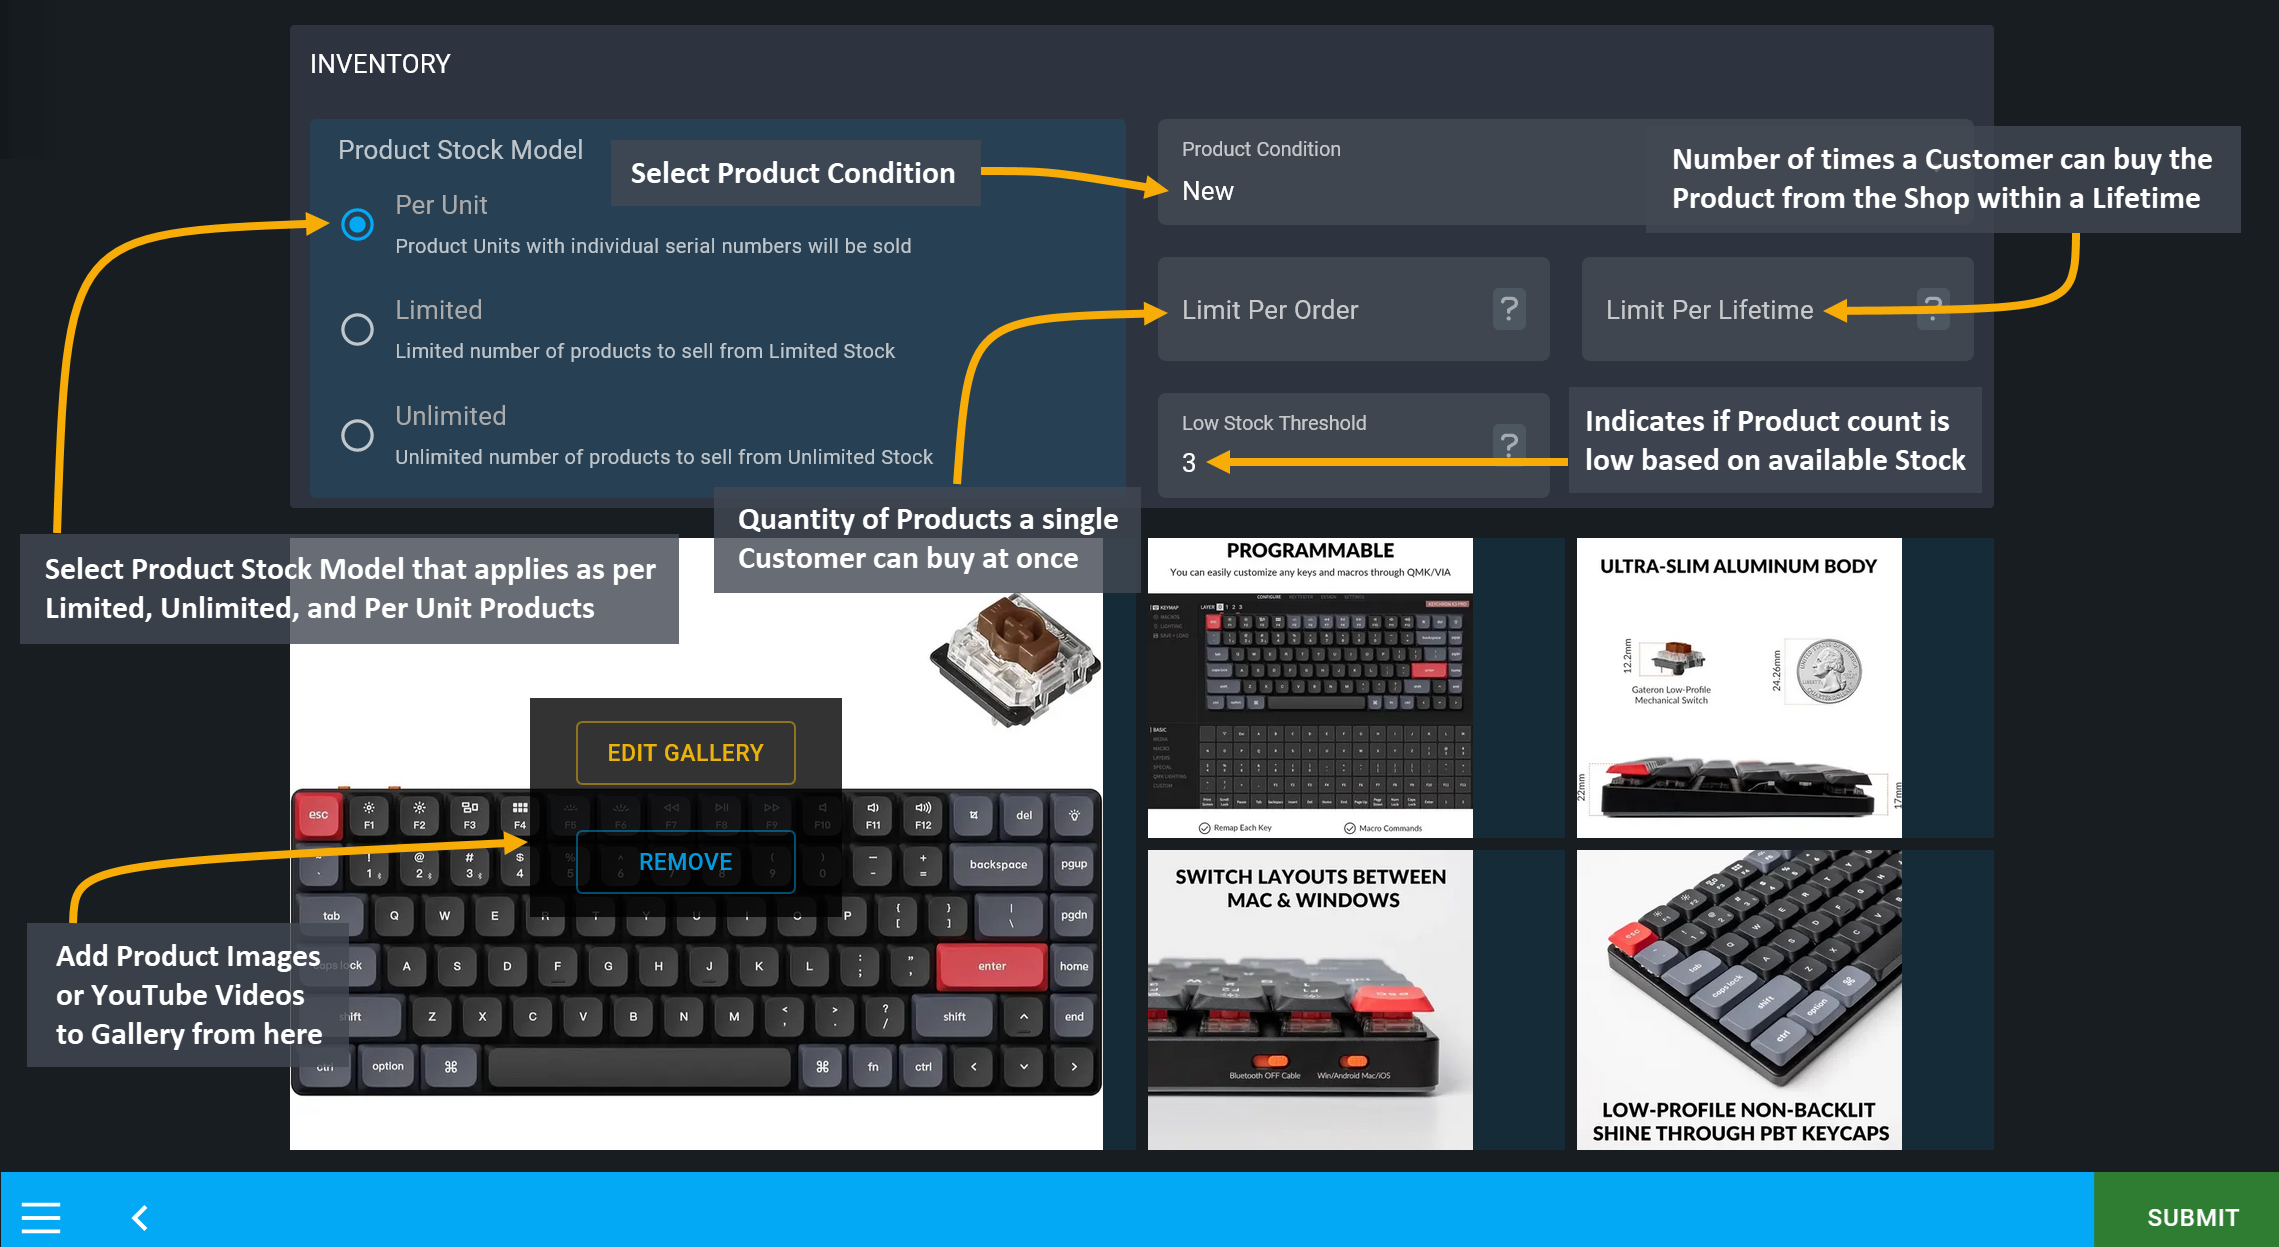
Image 6: Set Product Stock Model, Low Stock Count, Product Condition, and Order limitation options.
Inventory Count applies to Limited Products only, but not for Unlimited Products as the stock in unlimited or Per Unit Products as it has a different inventory system. For example, if Shop Owner has 250 Products, but they do not want to sell more than 200 Products, then Inventory Count will allow limiting the sell of the number of Products from those available Stock. Stock for Sale refers to the total stock available for sale.
Add Images and Videos to Product Gallery
Click Add New Gallery button to add Product images and videos to the gallery. It will redirect to a new page, where Product images can be added by clicking on Upload from Device icon. Add YouTube videos related to the Product in the Gallery by clicking on Embed YouTube Video button and paste YouTube links to embed. Set Gallery Name, Gallery Description, and select Gallery Type using the dropdown. Use Name and Description fields for each image and use delete icon to delete any image. Click Update button to save all the changes.
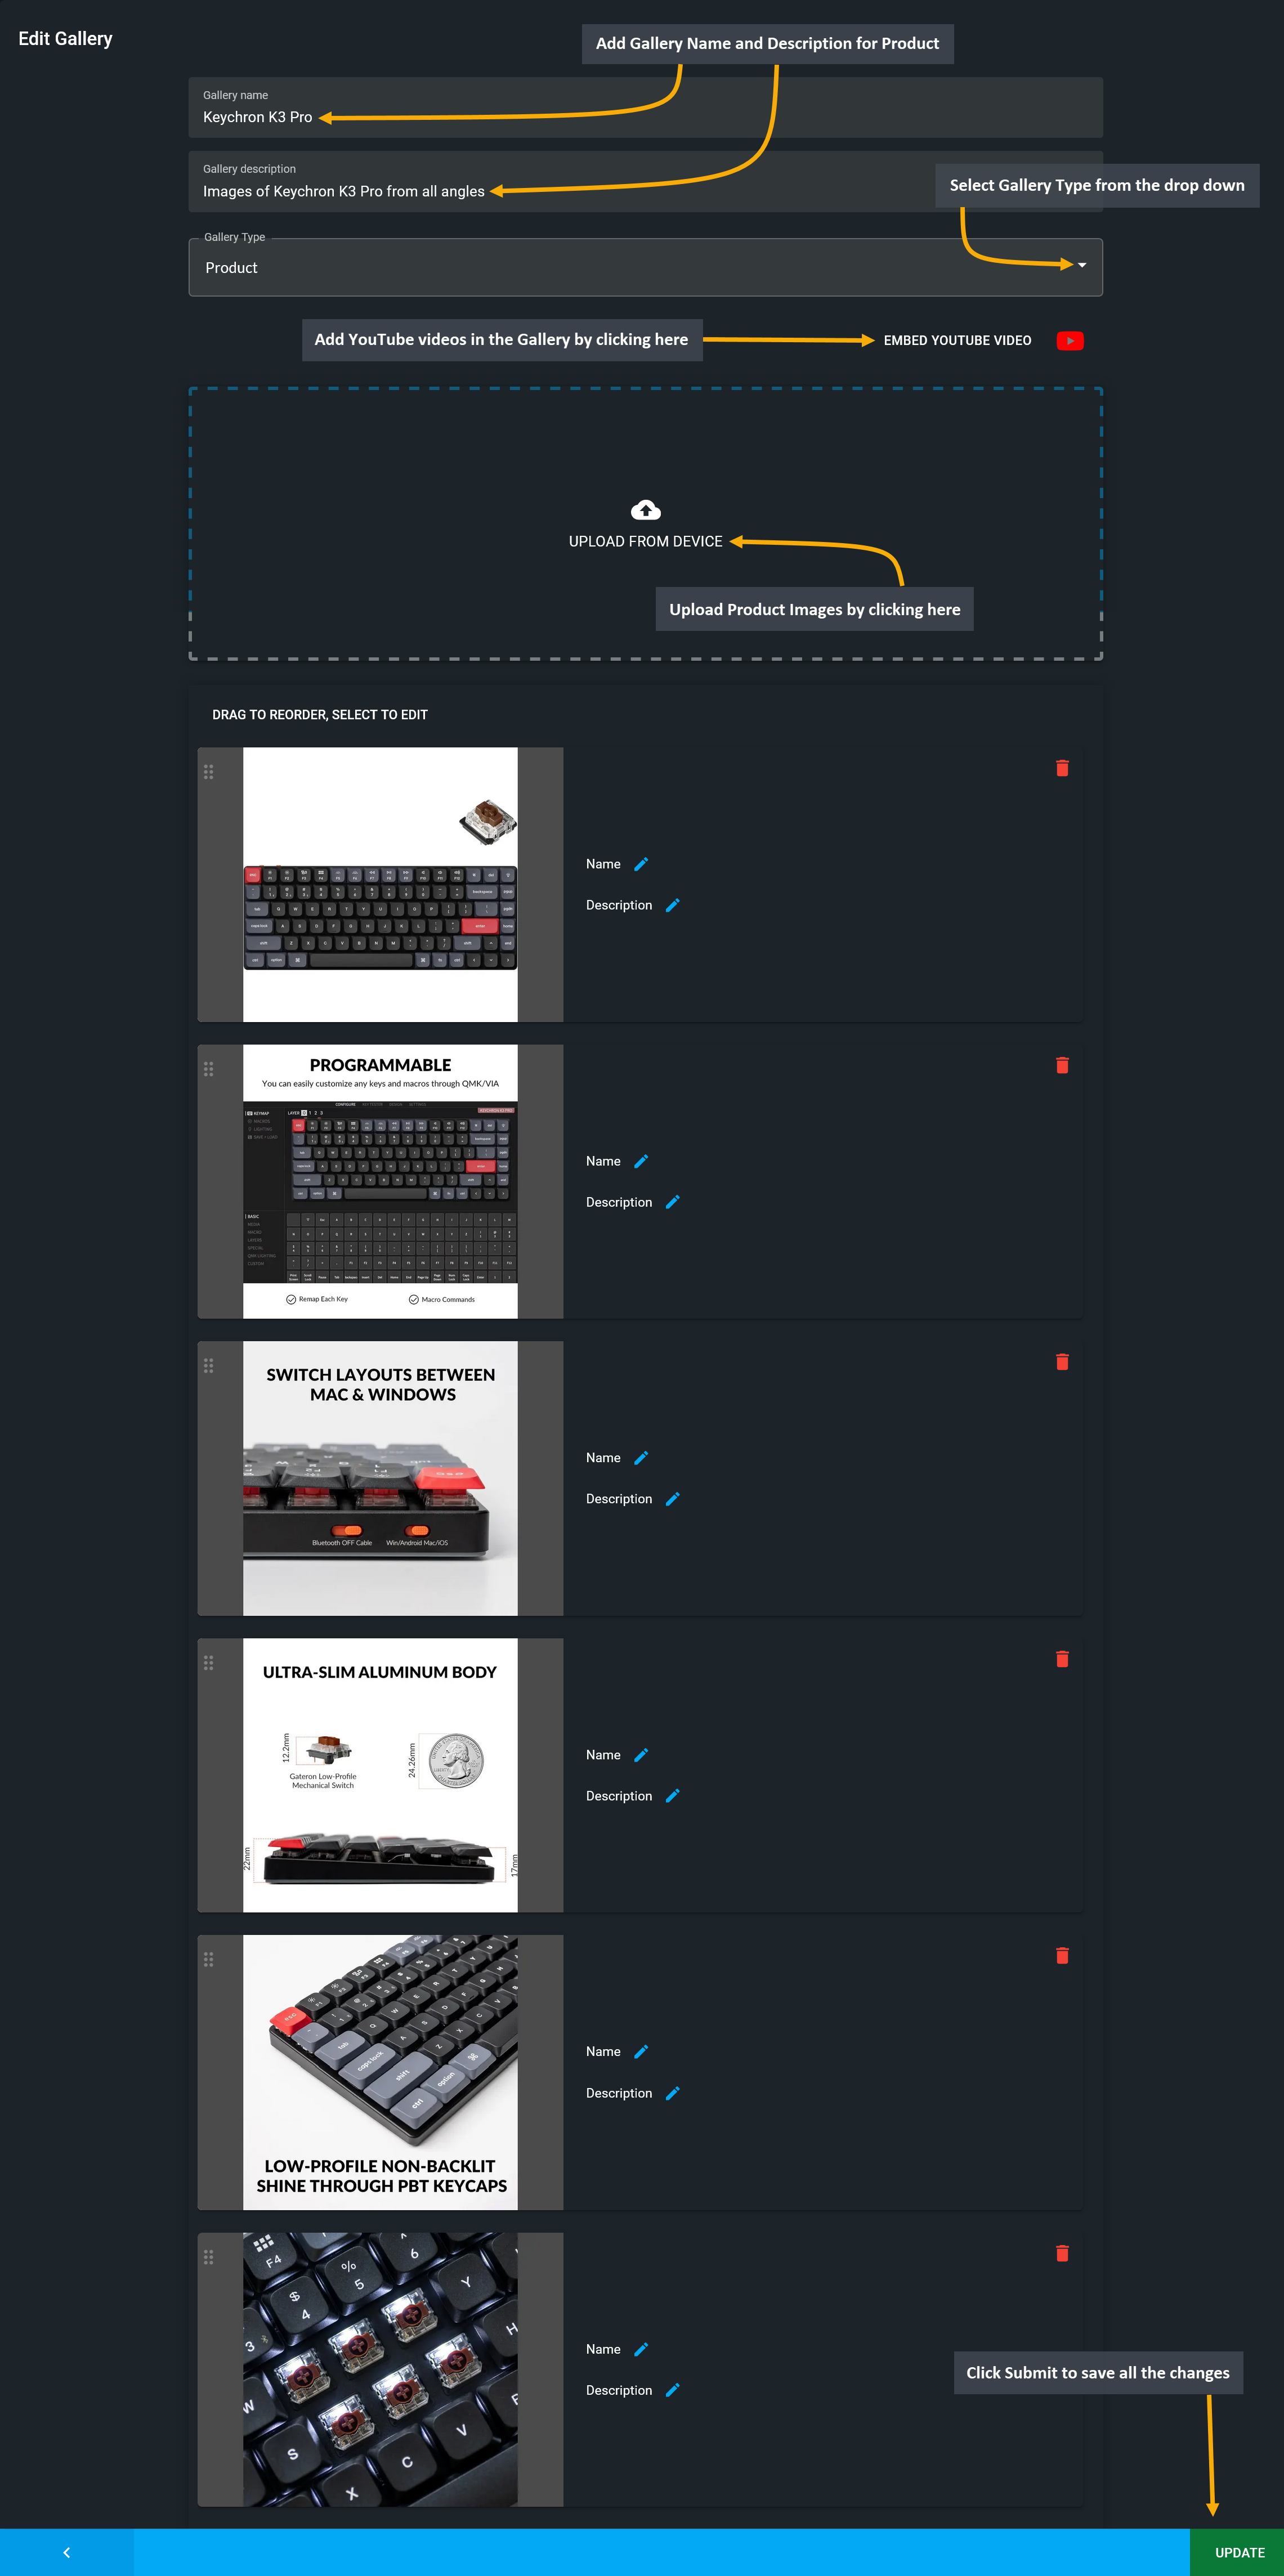
Image 7: Add YouTube videos and Upload Product Images to the Gallery by clicking on the icons.
3 - Product Summary and Attributes
Learn how to set Product entities and Add Images and Videos to Product Gallery.
Product Summary, Warranty, and Tax
The next step is adding Product Summary. Within Summary tab, Shop Owner can add Product summary on different sections using the + option. Each description tab has a word limit of 512 characters.
Existing Warranty Plans can be selected from the dropdown and new Warranty plans can be created using the + button beside dropdown. If any warranty plan cannot be found within dropdown, then new Warranty Plans like Lifetime, International, Local, Parts, can be created by Shop Owner. Different types of warranty can be created and list of Warranties can be found within Global Warranty Plan List under Product Settings.
Tax Group is also pre-defined, so when Tax Group is assigned for a Product during its creation, tax will be charged for that specific Product and the details will be mentioned in the invoice. When CMS page or block is created, only Featured products will be shown within this block. The Featured button allows to filter those featured products.
Assign pre-defined Tax Group for Products, Featured button allows filtering the featured products.
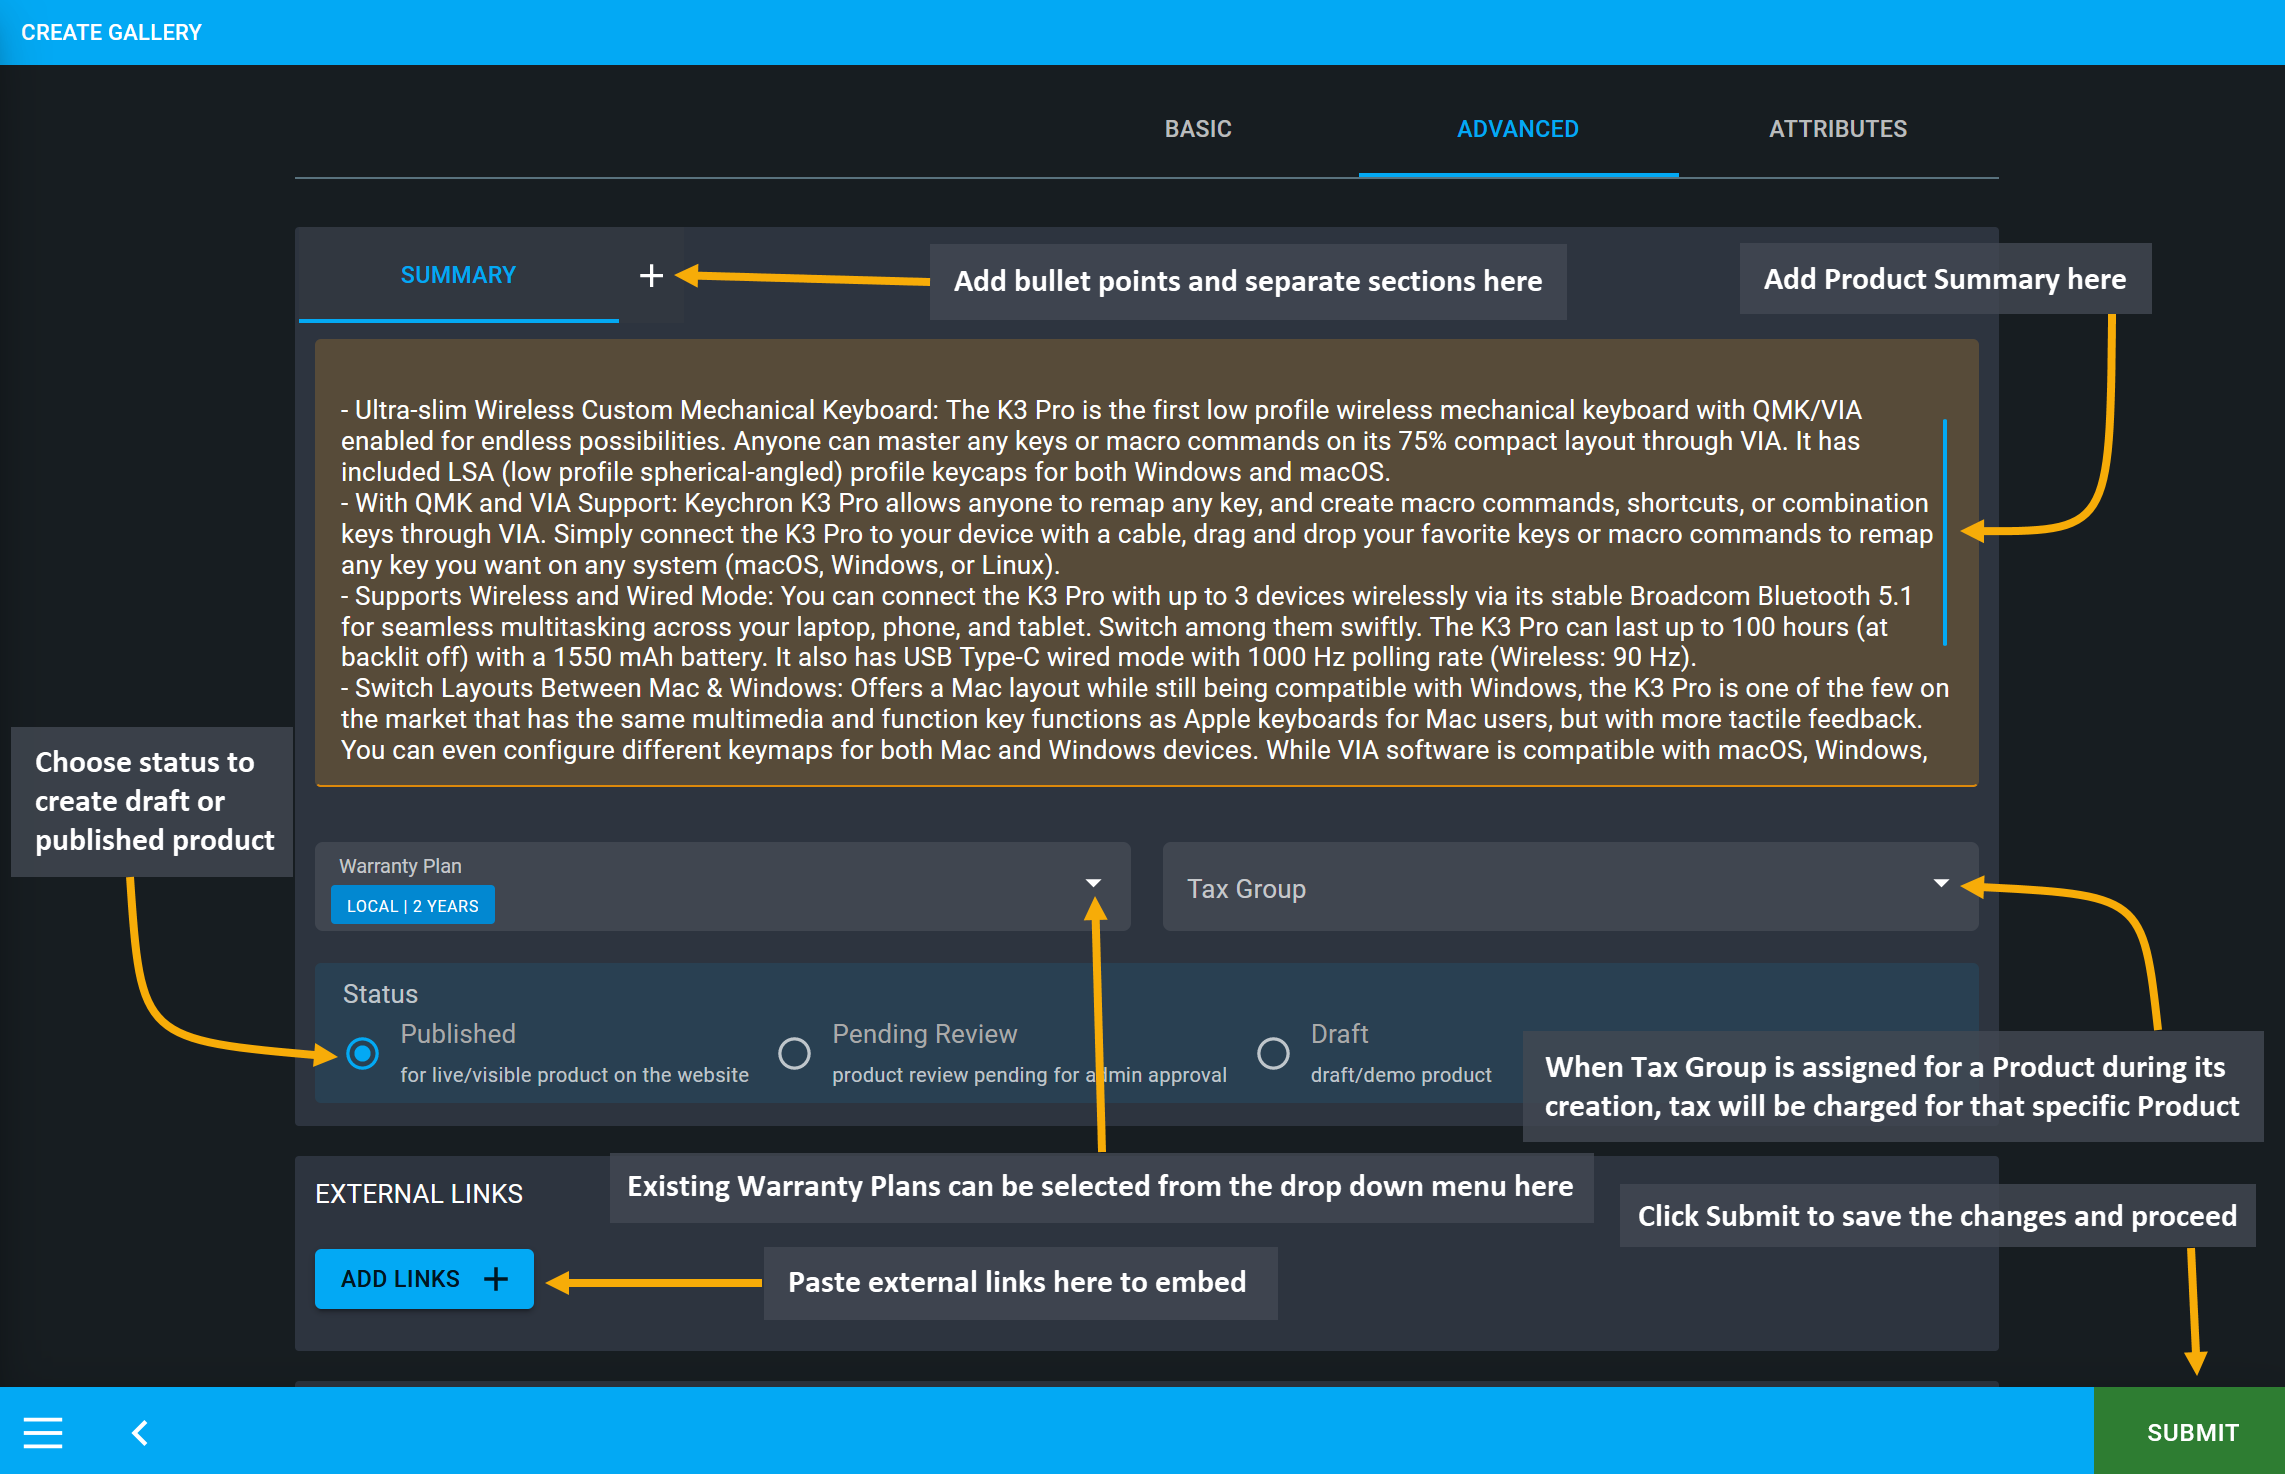
Image 1: List Product pricing with Sell, Purchase, MRP, and Red Line prices and select Warranty Plans.
Select Shipping Details
After Pricing, Shipping Details needs to be set before proceeding to the Cart. The Delivery Type has three options. Physical Products refer to items that will have to be shipped to Customer. Virtual and Downloadable Products refer to items that can be emailed to Customer. The Material State can be selected as Solid, Liquid, and Gas similarly.
Set Product Unit Size according to different Measurement Units. For example, the Shop Owner can sell Products by Carton, 1 Piece, or 1 kg. For example, if Product Unit Size is set as 1, it will indicate 1 Piece. Similarly, if Product Unit Size is set as 1000 Milligram, Milliliter, Millimeter, then it will indicate as Quantity 1 = 1 kg, 1 Liter, or 1 Meter.
Toggle on or off the Is Fragile button to indicate if the Products are brittle or delicate in nature and likely to break which includes without limitation - glass, china and castings. Weight indicates the weight of a single Product with designated measurement unit. Dimension includes setting Length, Width, Height, and Measurement Unit of the Product. See the example screenshot below to understand how to select all the important shipping details.
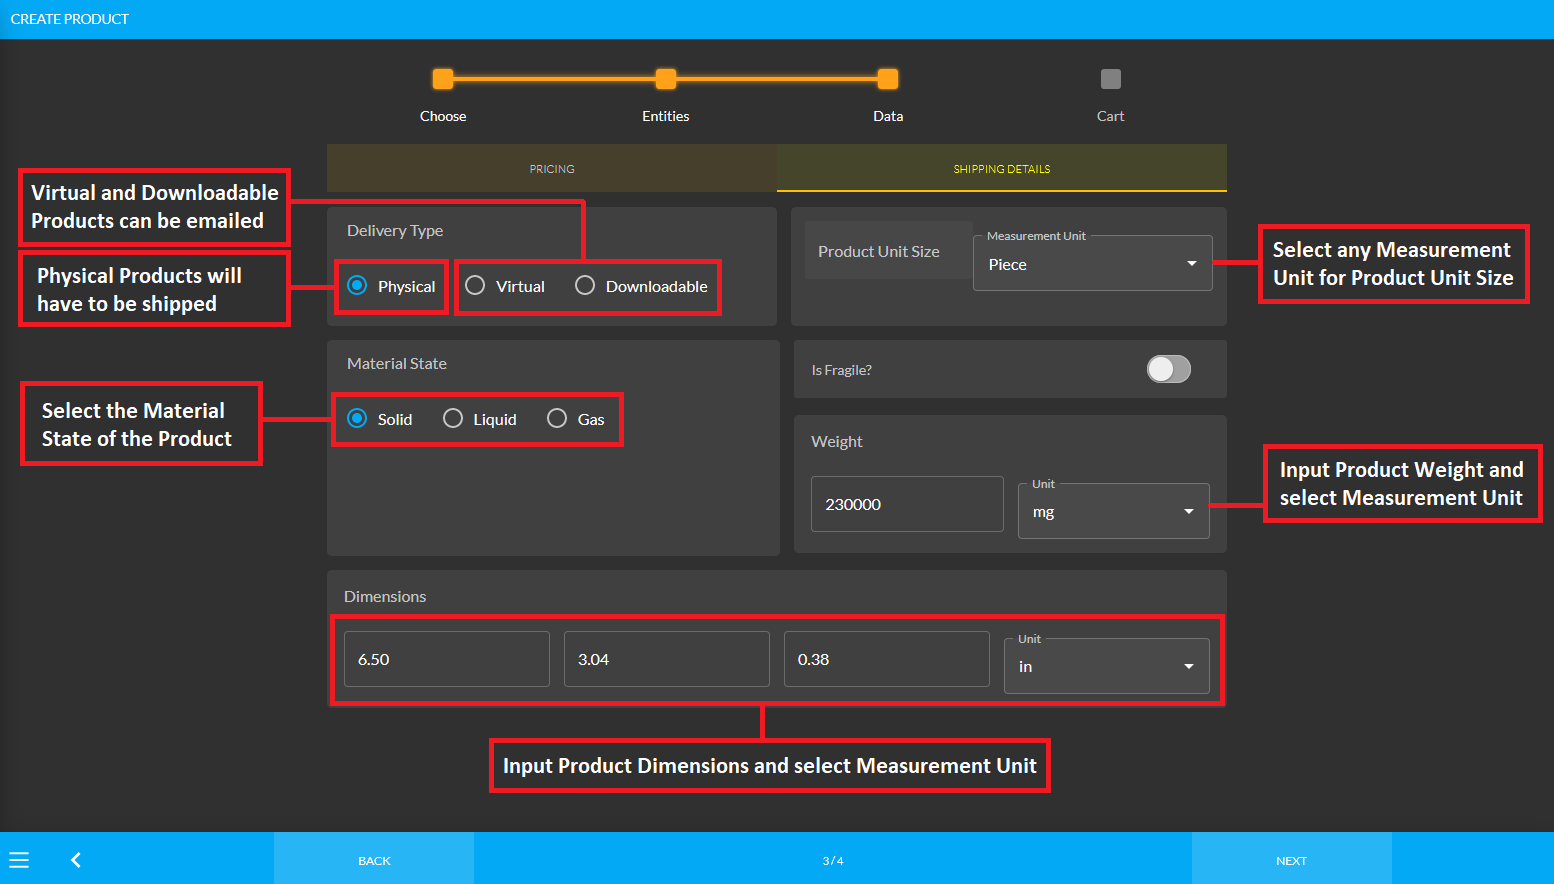
Image 2: Fill out the Shipping Details, Delivery Type, Material State, Product Unit Size, and Dimensions.
Set Product Attributes
Attributes can be created with Single or Multi Value. For example, the screen size of iPhone 14 Pro is 6.1 Inches which is the Single Value attribute of the Product. So, if the Shop Owner wants to add a Product under a specific Category, then they will have to use these specific attributes. Three attributes will show in Product List view and are a Product’s Featured attributes.
Product Images can be added through the Gallery System through the Add New Gallery or Change Gallery buttons. Besides, videos from YouTube or own Product images can be added to the gallery and there is no limit to it. The Product Status have three options: Published Products can actually be bought and sold, Pending Review means the Product is ready to be published but pending for admin approval, and Draft means Demo Product. External Links can be added to redirect Customers to detailed description. Paste external links to embed using the ADD button.
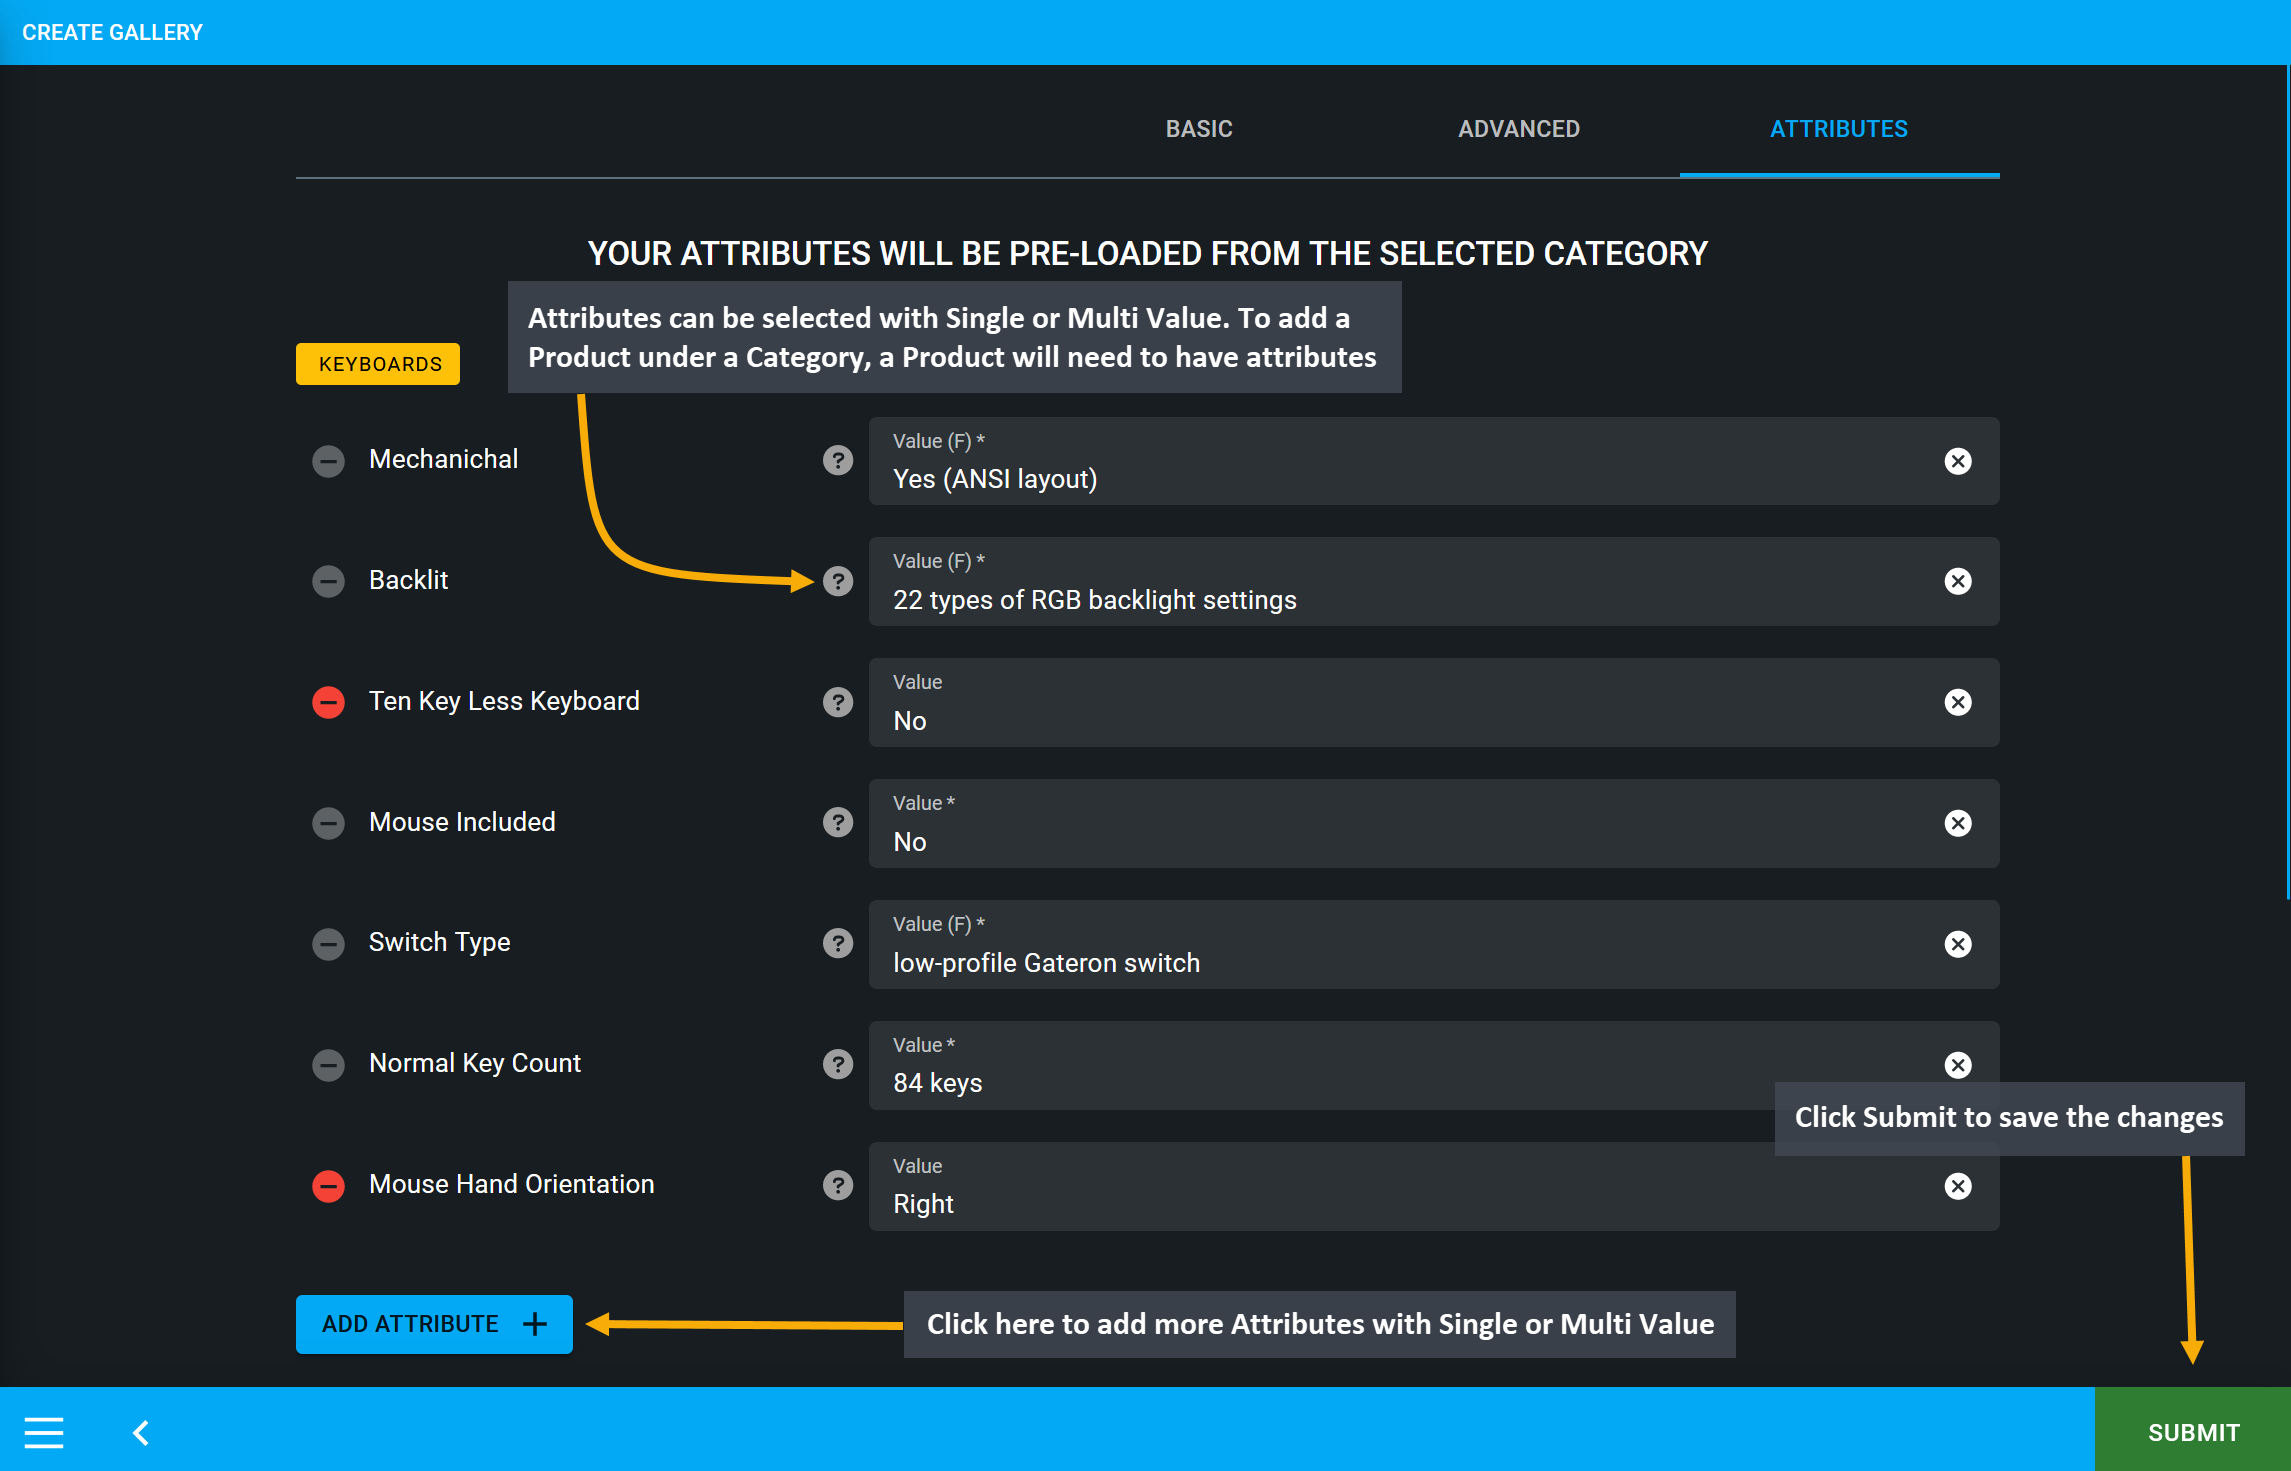
Image 3: Shop Owner can add Product Summary and Attributes can be created with Single or Multi Value.
4 - Create Product Cart
Create Product Cart with Cart Notice, Button Label, After Sales Message, and Notes.
Create Product Cart
Create Product Cart with important details that will show during checkout to the Customers. The Cart Notice is the notice which is shown to Customers after successfully adding Products to cart. Button Label is an alternate to Add to Cart, so if the Shop Owner wants to show something else other than Add to Cart like ‘Buy It Now’ or ‘Follow our Facebook Page’, or ‘On Sale’, then they can do so using this option.
After Sales Message is the message sent to Customer after a successful Product purchase. Include a message like, ‘Thank you so much for your Purchase! Your Order is being processed and will be shipped soon.’ The Notes can be used for displaying important details like, ‘All Orders will be processed in BDT.’
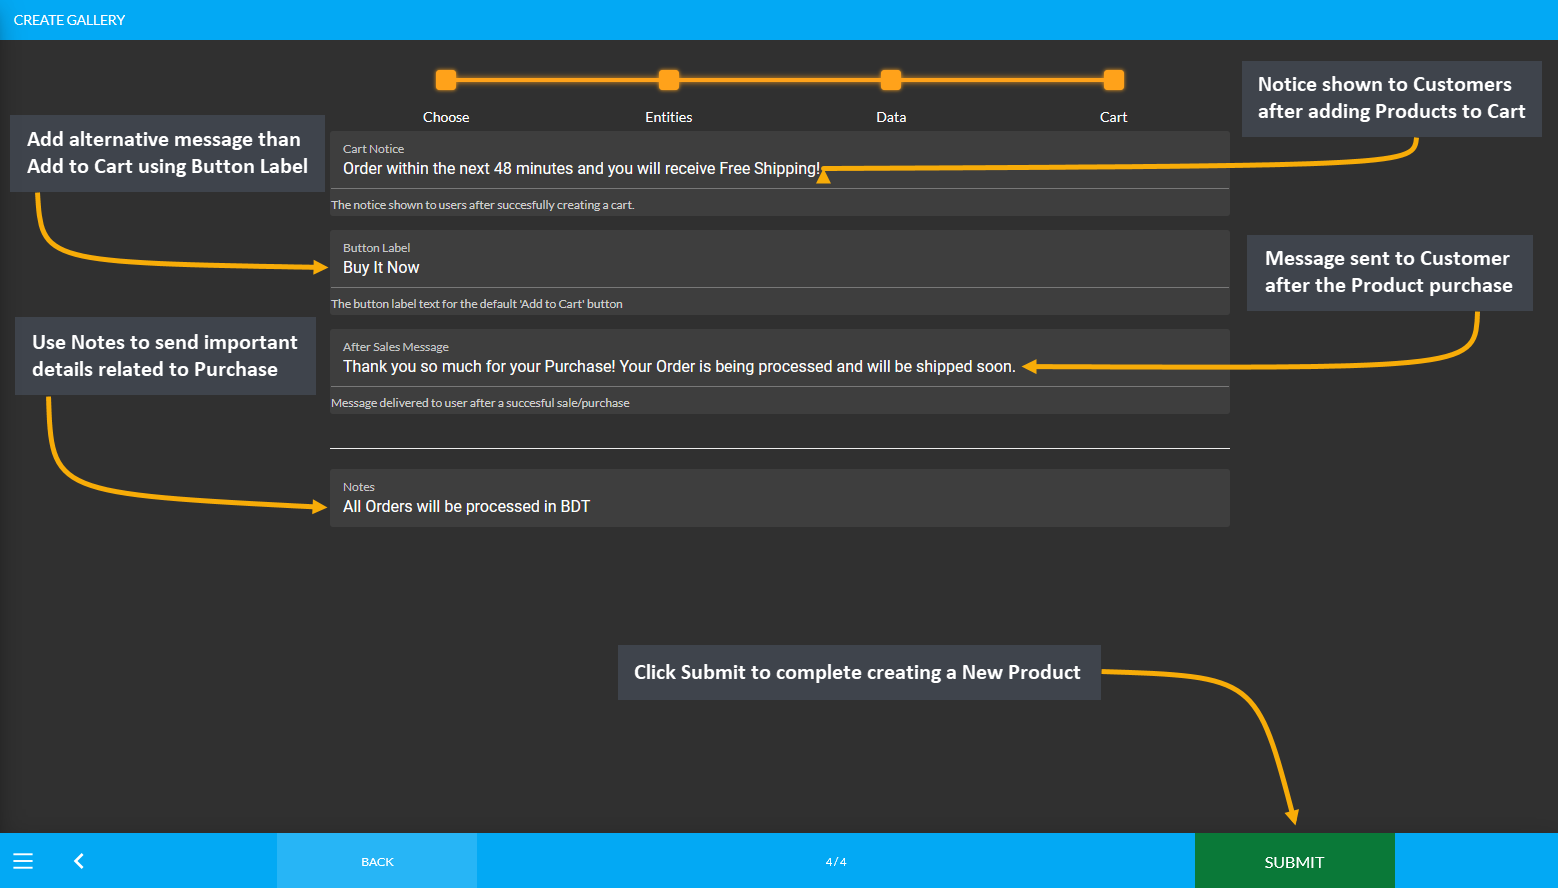
Image 1: Create Product Cart Messages with Cart Notice, Button Label, After Sales Message, and Notes.
New Product Created
After clicking Submit, it will redirect to the Product List where the New Product will show to be successfully created. The Shop Owner can search any Product they have created by going to different pages on the Product List.
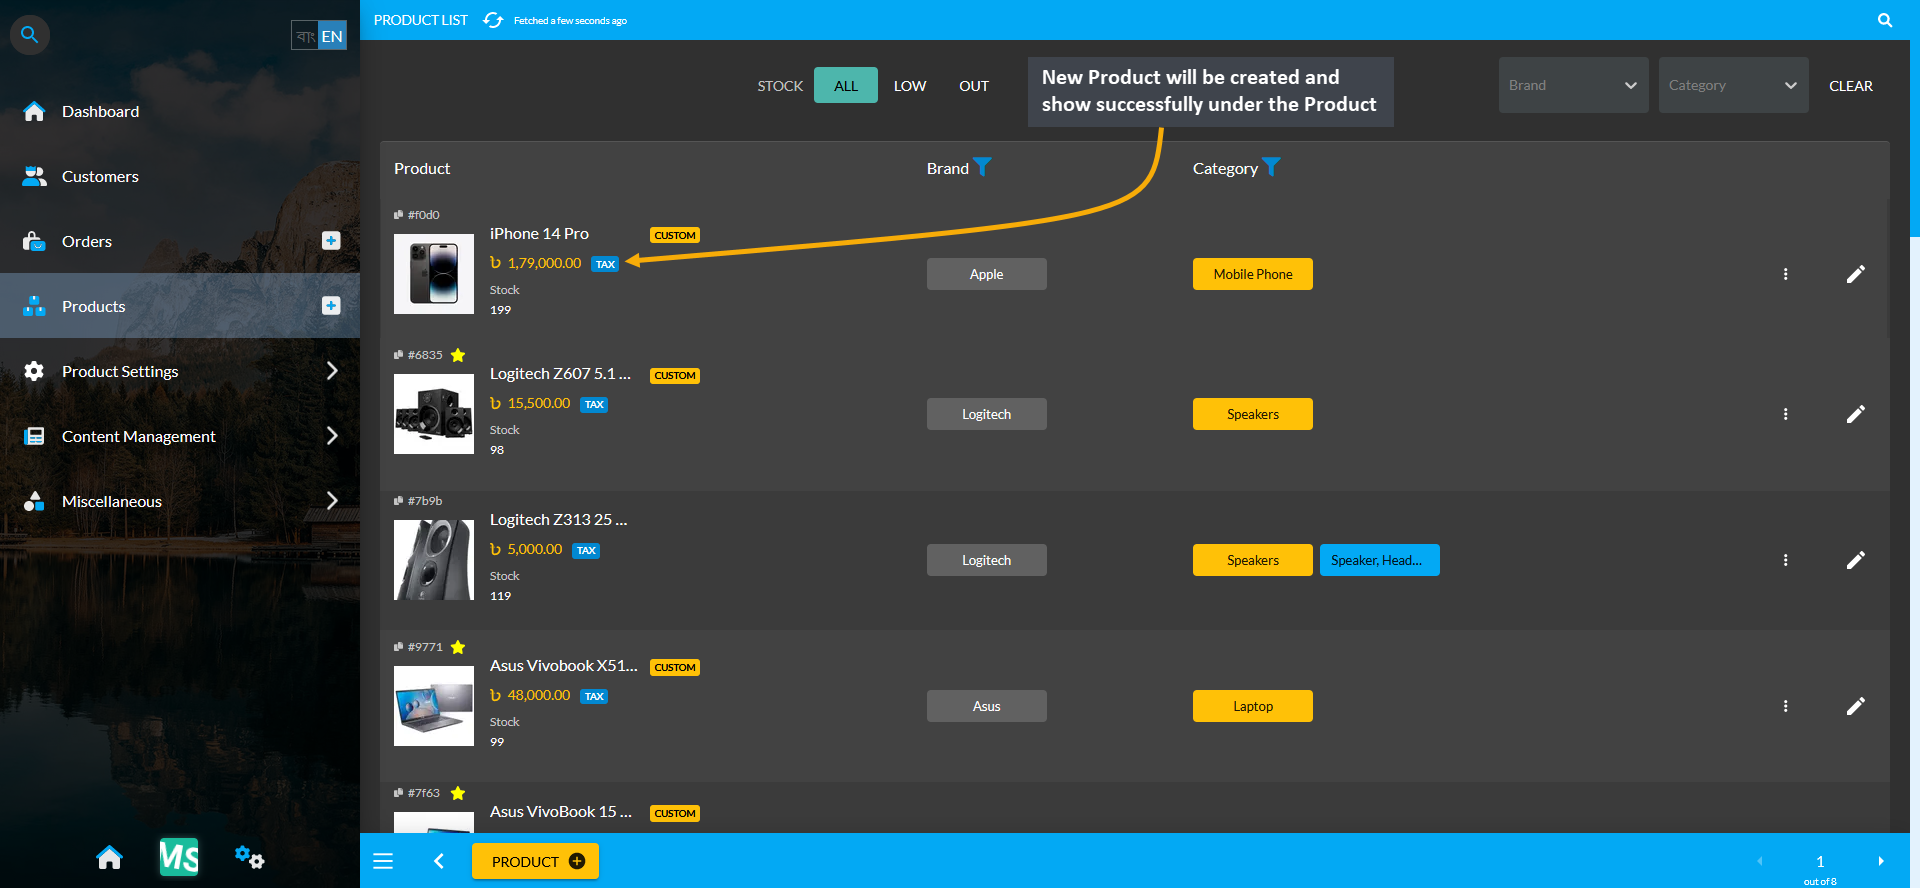
Image 3: The New Product that will be created will show successfully under Product List after creation.


