Steps to Create New Product
Create New Custom Product
If Shop Owner is searching for a target Product that is not available within the Pre-defined Global Product Templates, then they can create their own New Custom Product. For this, click the Products + tab or the + Add button that will redirect to a Product search Page. Type the target Product Name in the Search box. If the Product is not available in search results, then click the Add New button to redirect to a new page to create New Custom Product using a blank Product Template form with all Product information and images.
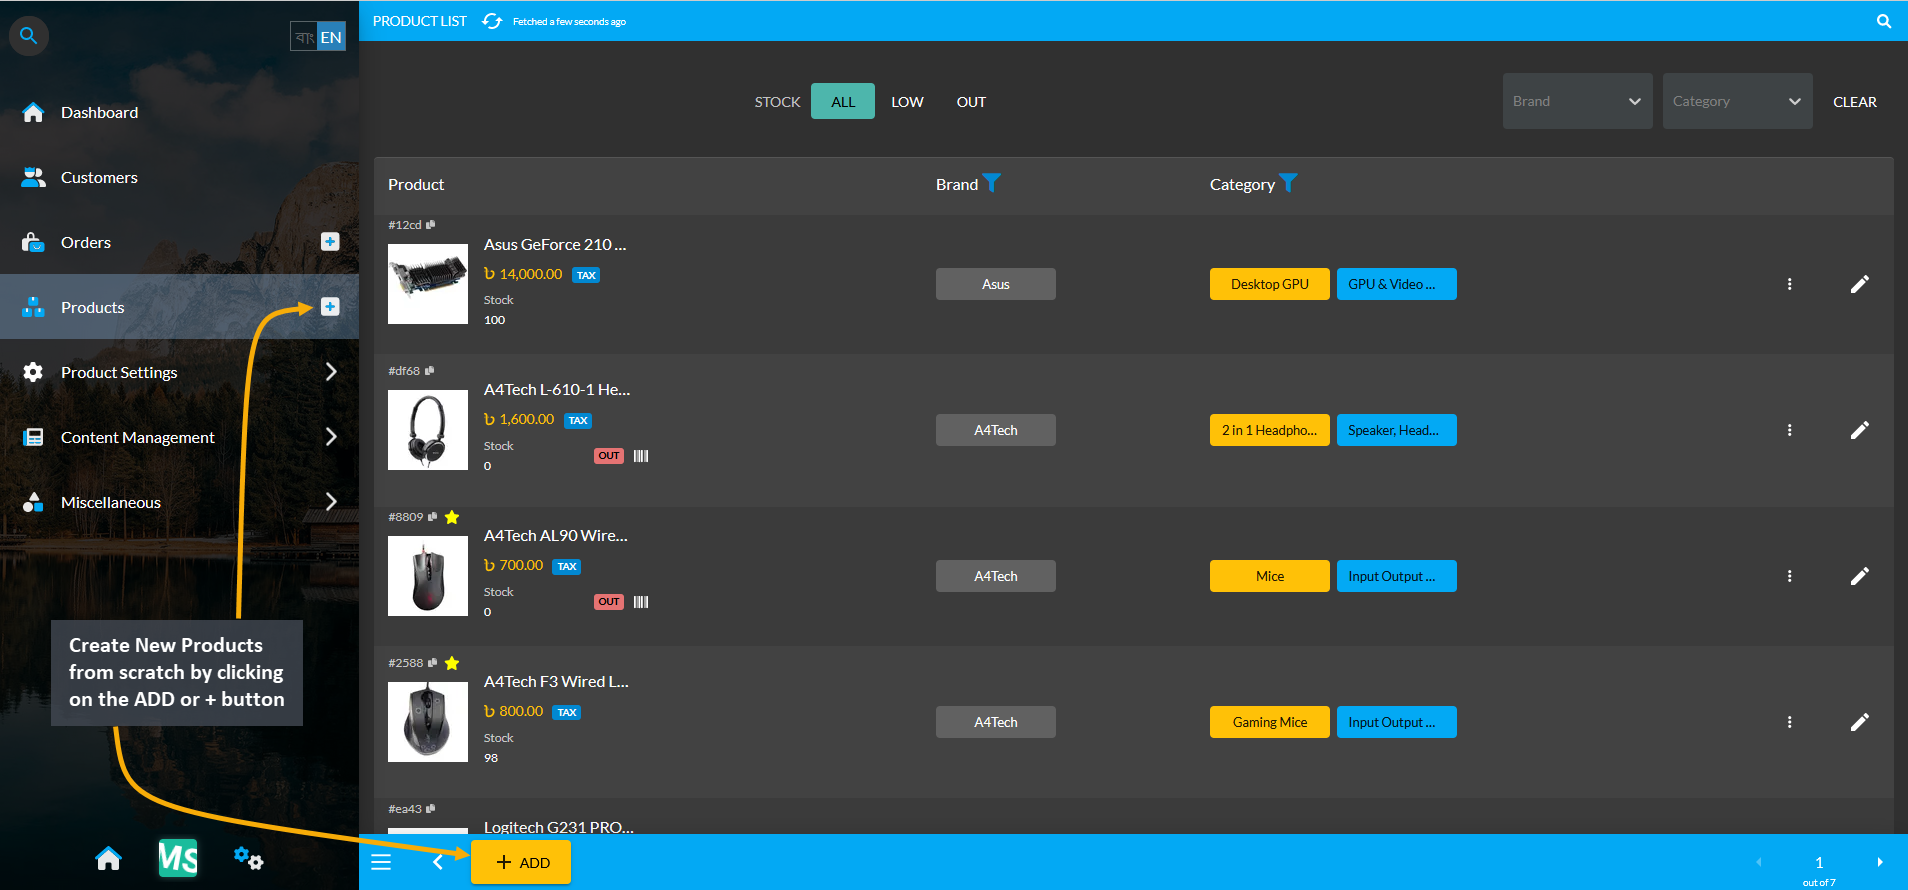
Image 1: Create New Products from scratch by clicking on the ADD or + button from the Products tab.
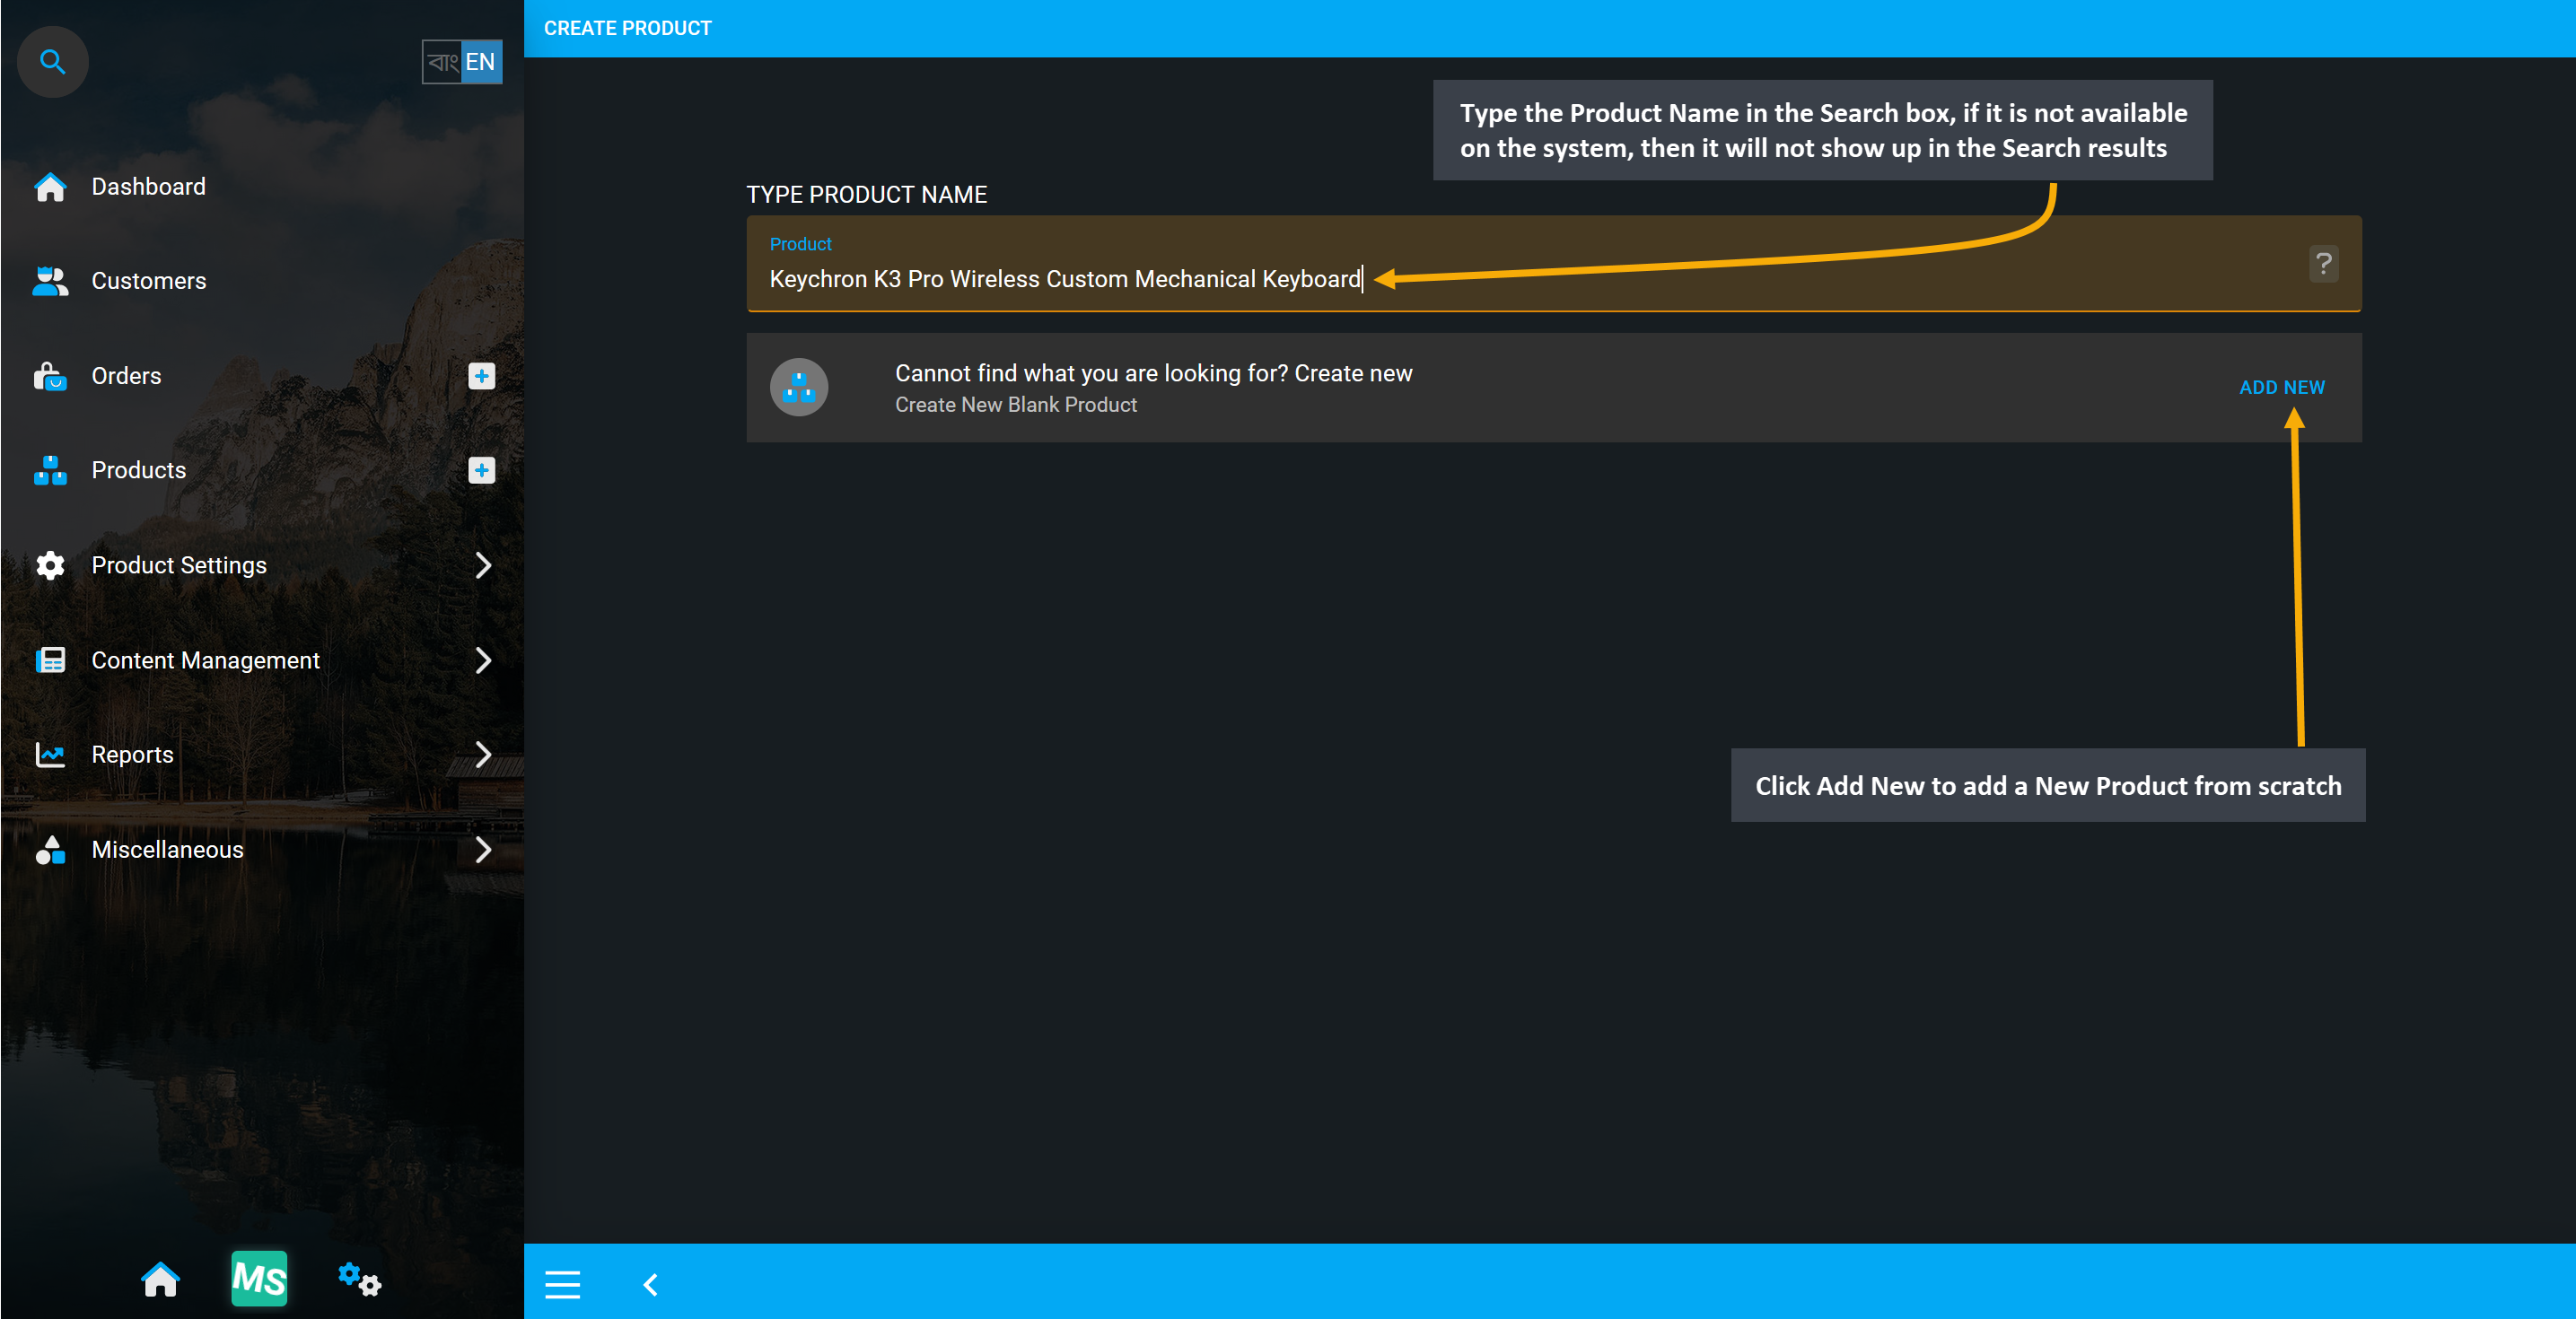
Image 2: Type Product name in search box, if Product is unavailable, click Add New to create Product.
The Create Product page consists of filling out all the main features of the Product i.e. Product Name, Display Name, Model Name, Product ISSN, Product SKU, Product Categories, Tags, Product Purchase Price, Sell Price, Red Line Price, MRP Price, Brand, Retail Channel, Product Gallery, Product Stock Model, and Inventory settings.
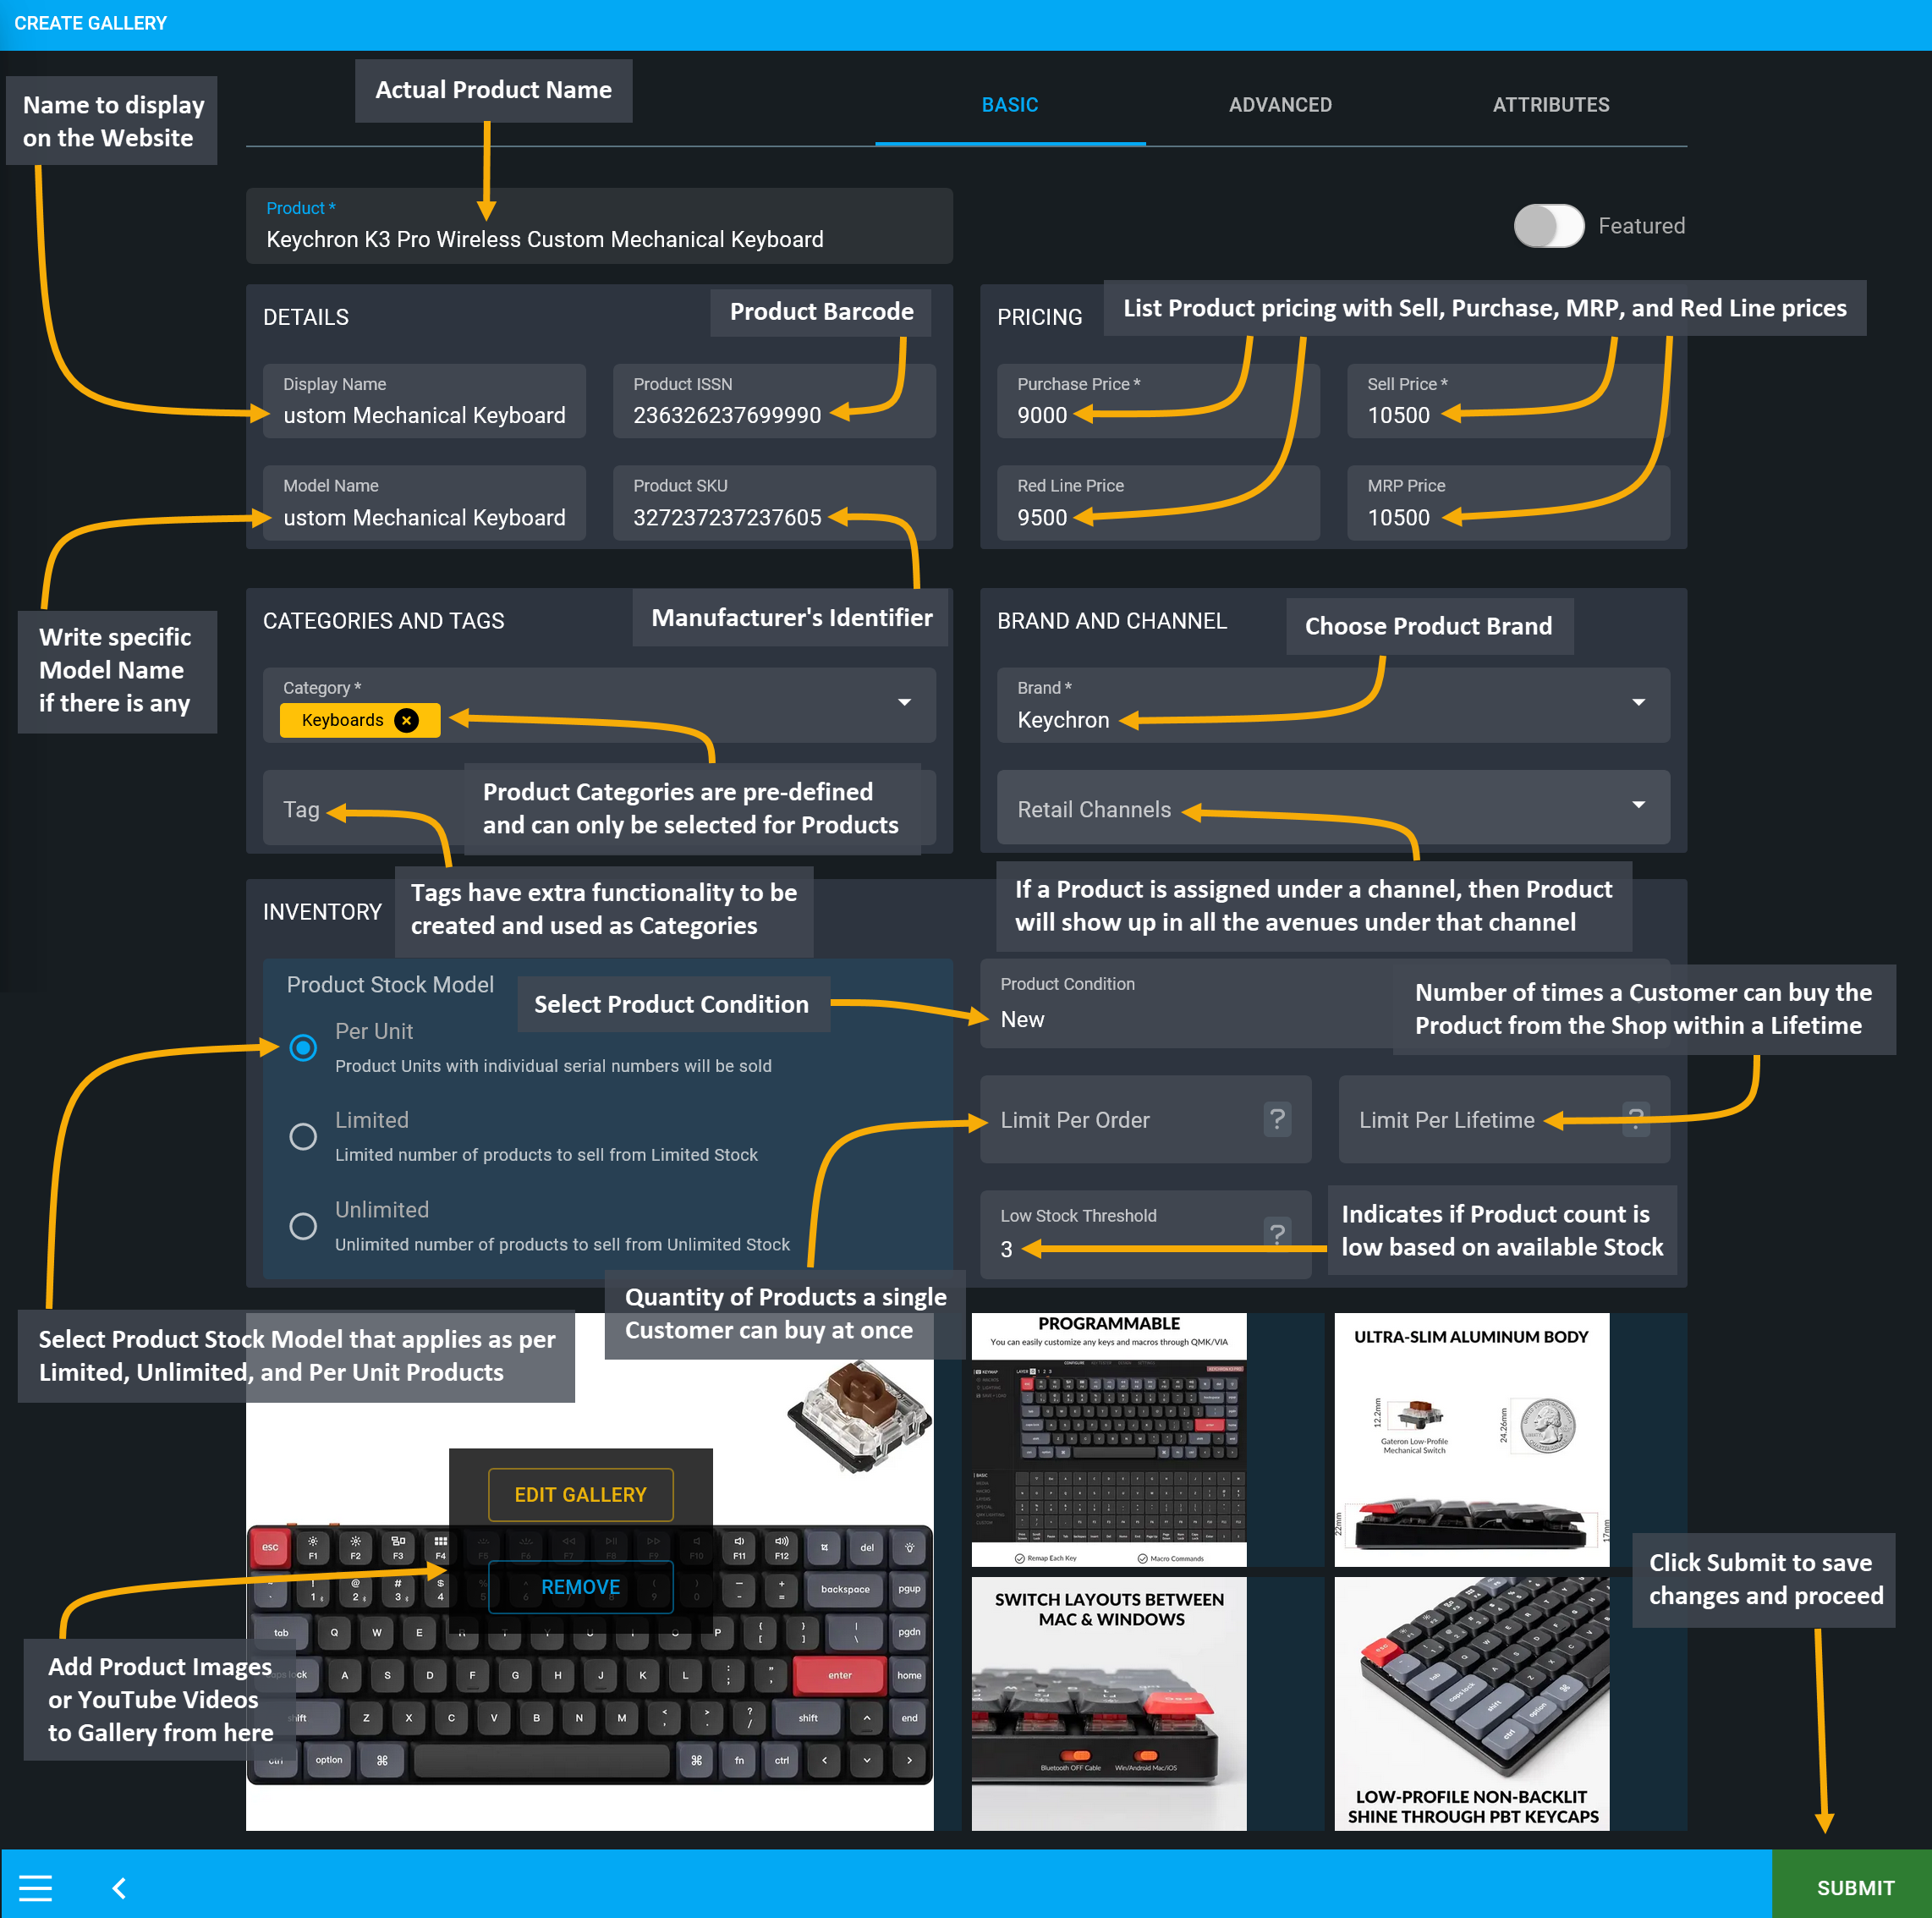
Image 3: Fill out all Product details, features, summary and attributes to create a Custom Product.
Product, Display, Model, ISSN, SKU, and Pricing
To manually create a New Custom Product from scratch, fill out the details like the Product field, which is the actual product name (i.e. Keychron K3 Pro Wireless Custom Mechanical Keyboard). Create Display Name to set name for the Product that will appear in The Website. Please note that, when choosing Products from Global Products template, if Product Name needs to be edited, then it can be done from this option.
Model Name serves as particular model or series of the Product. To create a series i.e. Keychron Pro, model name can be set as Keychron K3 Pro Wireless. Product ISSN is the actual Product barcode and Product SKU is the manufacturer’s identifier, so one Product can have many SKUs. When adding any product, look up with either the Product ISSN or the Product SKU. Global Products will have automatic prefills of Product ISSN and Product SKU. On the right, set the Purchase, Sell, Red Line, and MRP Price of the Product.
Sell Price is the price that will be displayed for Customers on The Website. If Sell Price is less than the Red Line Price, an error message will show. Also, if Sell Price is lower than MRP Price, then a discount tag will be automatically added. Purchase Price indicates the price used to purchase the Product which will have to be lesser than both Sell Price and Red Line Price, or a warning message will show. So, set prices accordingly.
The MRP Price is the official Product price that applies to net Product(s) in market. It is used for a discount tag on the Sell Price. On the other hand, Red Line Price is the price less than which the Shop Owner will not allow to sell the Product. Thus, Shop Owner needs to set these prices accordingly for Products to sell.

Image 4: Fill in Product Name, Display Name, Model Name, Product ISSN, Product SKU, and Pricing.
Product Categories, Tags, Brand, and Channel
Product Categories are pre-defined which means that they are limitable, so Tenant Users will not be able to add Categories. So, they will have to use the Product Categories that are already provided in the system. If they need customizable Categories for Products, then they can use Tags as alternatives by turning on the Commerce Category as Tag option from Settings. Then, it will allow using Tags as Categories in the Website.
Tags are similar to Categories with extra functionality that can be used as Custom Categories. The system will enforce to use Categories, but disabling Categories and enabling Tags will allow Shop Owners to create and arrange their own Categories for Products in the Website Shop filter. Both Product Categories and Tags can be added to Product, where Categories will filter out Products and related Tags will show on Website.
Then, there is option to select designated Product Brand from the dropdown menu with renowned brands like HP, AMD, Asus, or Apple etc. Select a brand from the list of Global Brands for the Product or create a new Brand if the brand is not available within the list using the Add Brand option on Product creation page.
When creating a Product, there is another option to select Retail Channel, where Admin will be the default channel. Thus, if a Product is assigned under a retail channel, it will show up in all the avenues under that channel. For instance, Products will show on Facebook store if Facebook avenue is selected. If a channel does not have any avenue (Commerce, Facebook, Google), then it will only allow selling from Admin.

Image 5: Shop Owners need to set Categories, Tags, Brand, and Retail Channel when creating Product.
Product Stock Model, Stock Count, and Gallery
Select Product Stock Model according to the Product types. Per Unit means that each Product unit has an individual serial number. If a Product is sold in an Order, it will mean that this exact Unit has been sold. Limited refers to limited number of products, i.e., Shop Owner has 10 Products in stock, and they want to sell those 10 items. Unlimited refers to limitless Products, i.e. cables used for electronic devices or potato storage, where Products are being supplied in unlimited numbers to be sold.
When selecting Per Unit option, Shop Owner will need to add Units through separate stock purchase order. So, if they are selling 10 Processors and each unit has individual serial, then it will help identify all 10 units apart from each other. If a unit was in a specific order, then that target Product can also be identified by the tracking serial number of the specific unit. This model applies to products in the computer market.
Product Condition refers to the condition of Products whether it is new, used, or refurbished. Limit Per Order indicates the quantity of Products a Customer can buy at once in an Order on the Shop. Similarly, Limit Per Lifetime is the number of times a Customer can buy the Product from the Shop within a lifetime.
Low Stock Threshold indicates if the Product count is Low based on the available stock. For example, if the Shop Owner has 5 Products in stock, and they set the Low Stock Threshold as 3, then nothing will happen. However, if Stock Count is set to 3, then the Stock Status will be set to Low. When Stock Count is set to 0, then the Stock Status will display as Out on The Website.
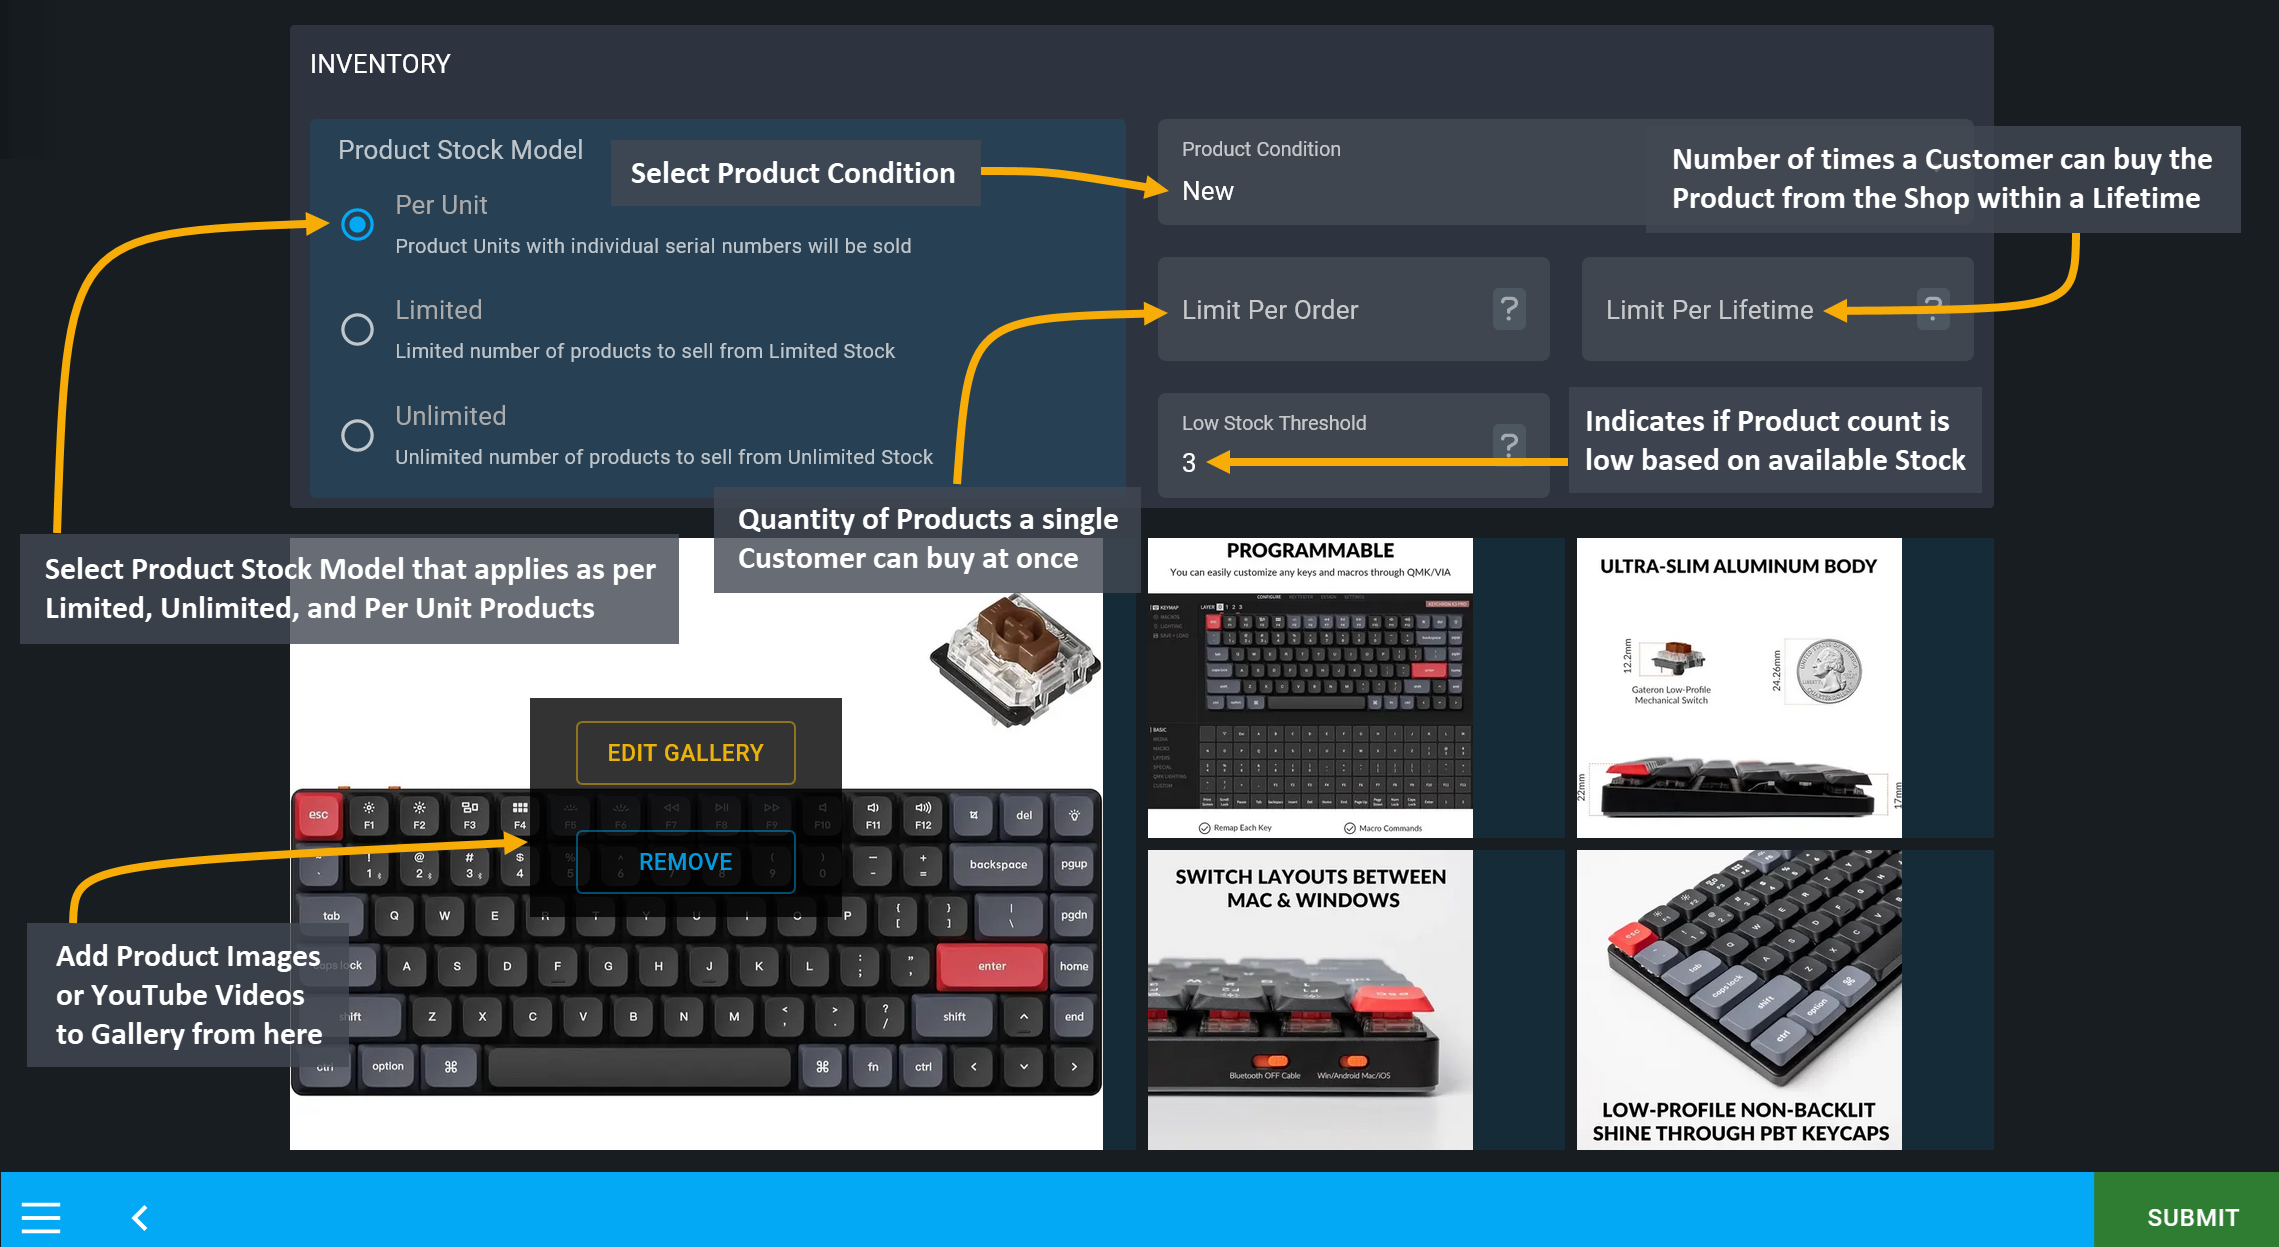
Image 6: Set Product Stock Model, Low Stock Count, Product Condition, and Order limitation options.
Inventory Count applies to Limited Products only, but not for Unlimited Products as the stock in unlimited or Per Unit Products as it has a different inventory system. For example, if Shop Owner has 250 Products, but they do not want to sell more than 200 Products, then Inventory Count will allow limiting the sell of the number of Products from those available Stock. Stock for Sale refers to the total stock available for sale.
Add Images and Videos to Product Gallery
Click Add New Gallery button to add Product images and videos to the gallery. It will redirect to a new page, where Product images can be added by clicking on Upload from Device icon. Add YouTube videos related to the Product in the Gallery by clicking on Embed YouTube Video button and paste YouTube links to embed. Set Gallery Name, Gallery Description, and select Gallery Type using the dropdown. Use Name and Description fields for each image and use delete icon to delete any image. Click Update button to save all the changes.
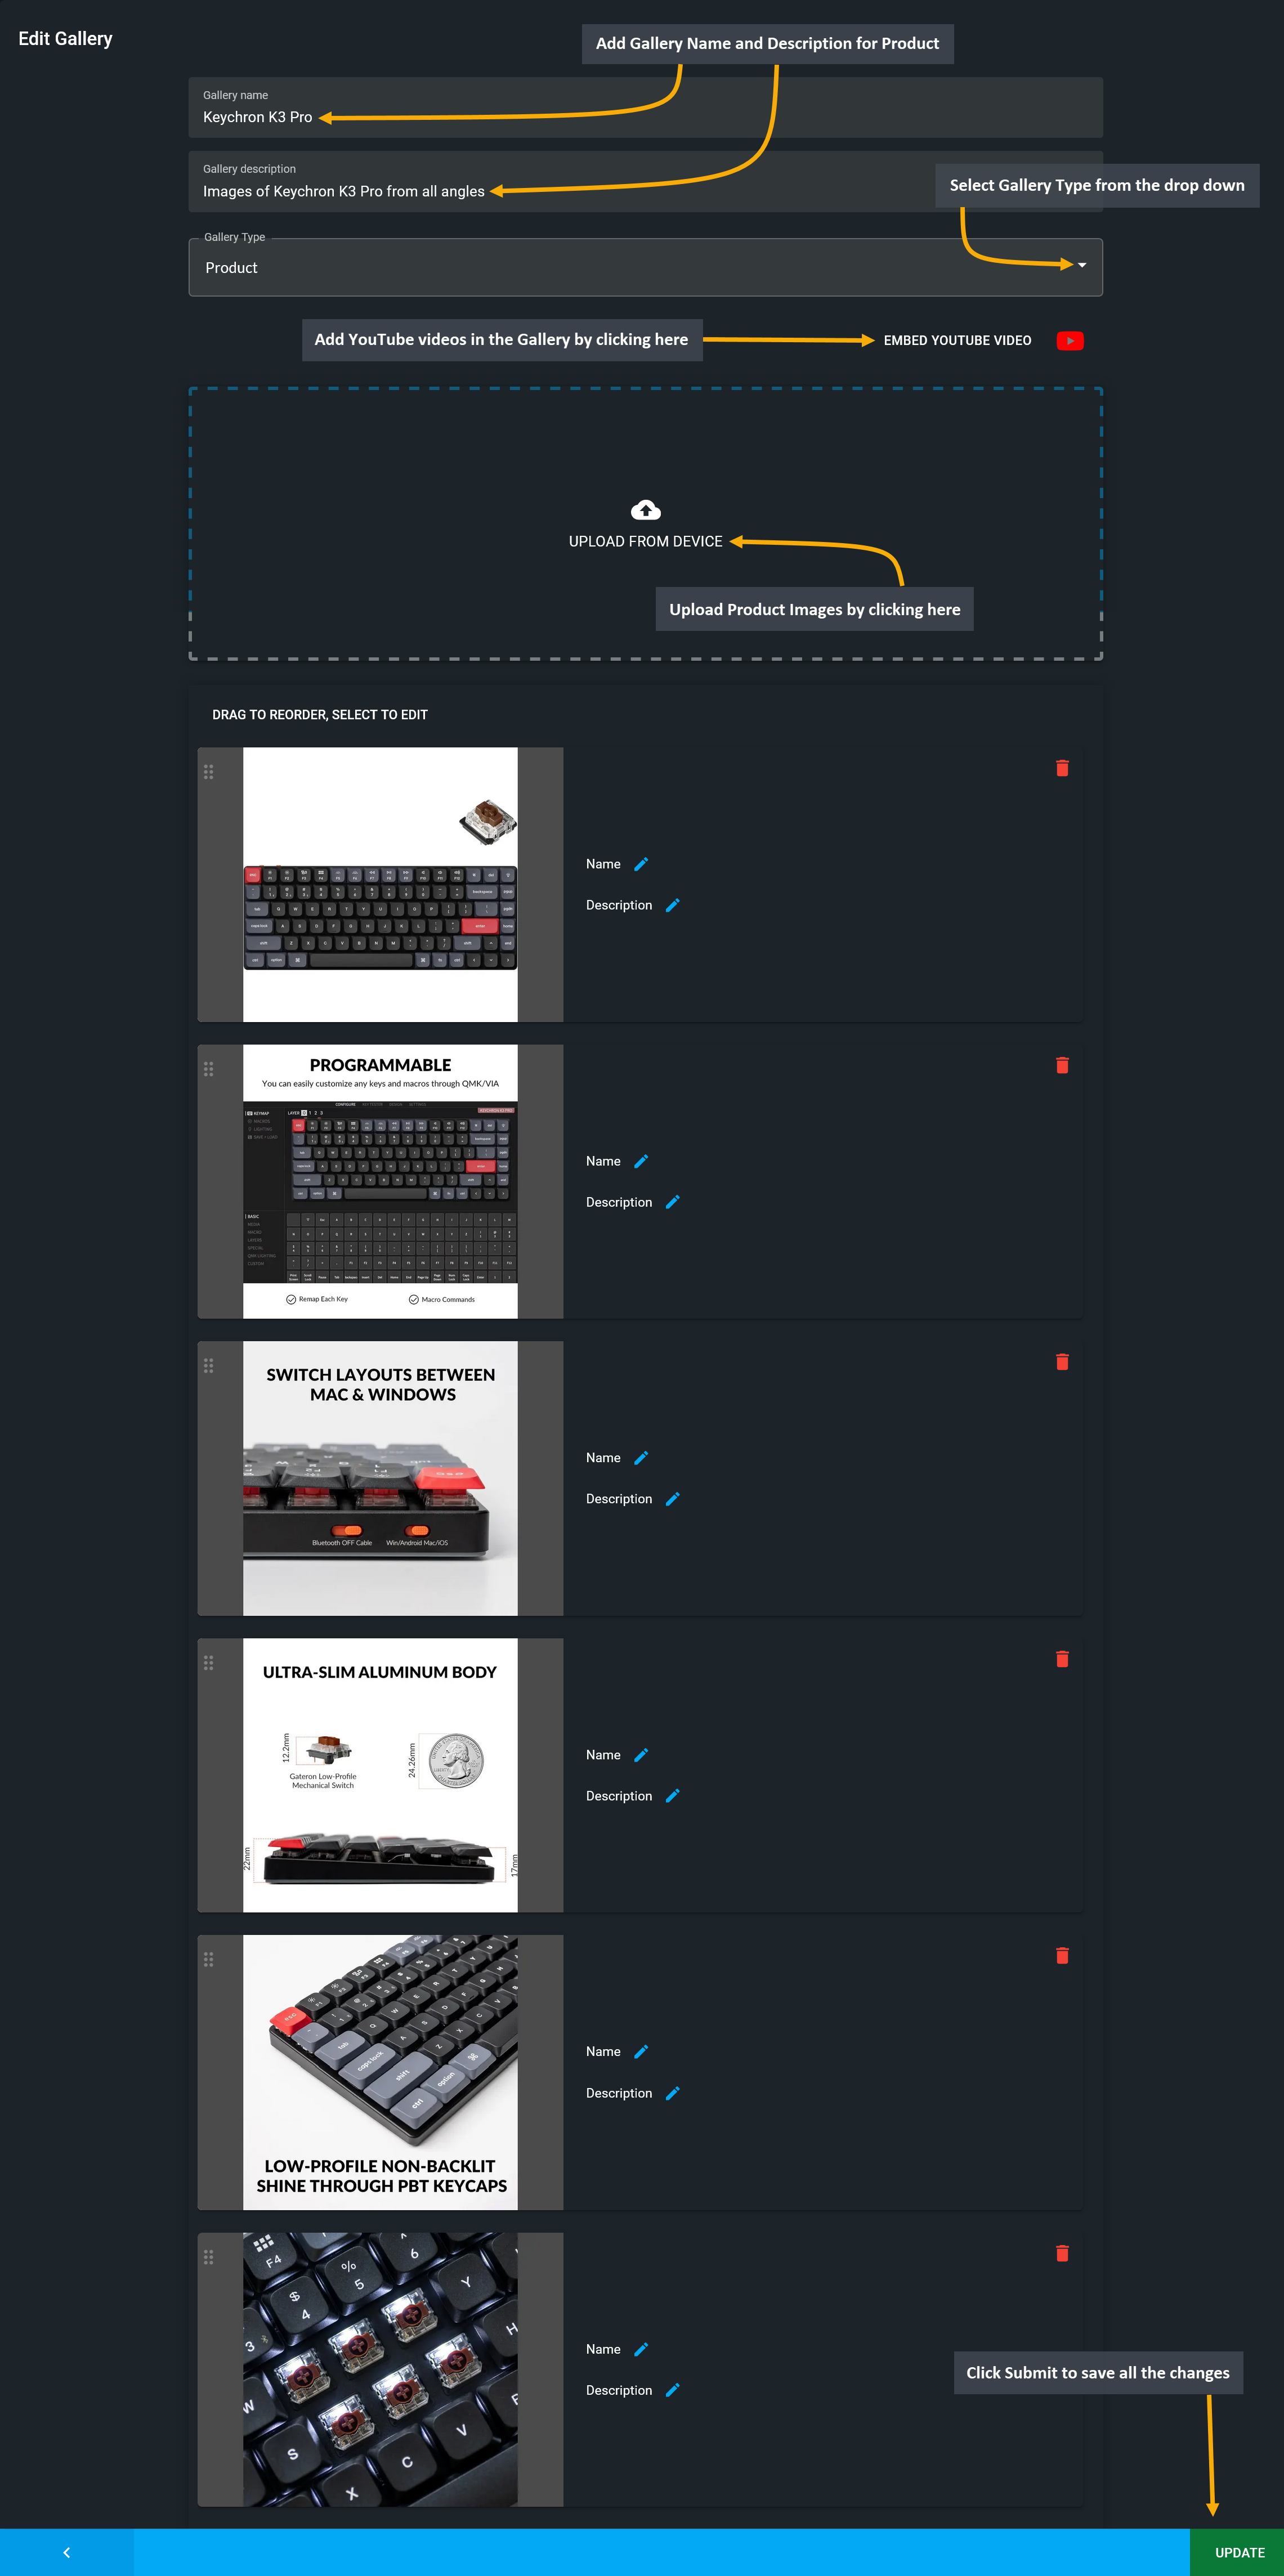
Image 7: Add YouTube videos and Upload Product Images to the Gallery by clicking on the icons.