1 - Frequently Asked Questions (FAQ)
This Operation Manual will guide Shop Owners to perform Admin Panel functions.
The document lists down various questions and their answers which specifically explains about how to carry out particular tasks and how to create and setup various Admin Panel modules.
How to create an Order manually for any Customer?
- The Shop Owner can create Manual Orders by clicking the ADD button at the bottom of the order list page.
- One or several manual Orders can be created for one or multiple Customers by adding different Carts.
- Fill in all the Customer information and add New Product(s) to Cart with desired items and quantities.
- Review the Cart, select Shipment and Payment options and click Confirm Order to place New Order.
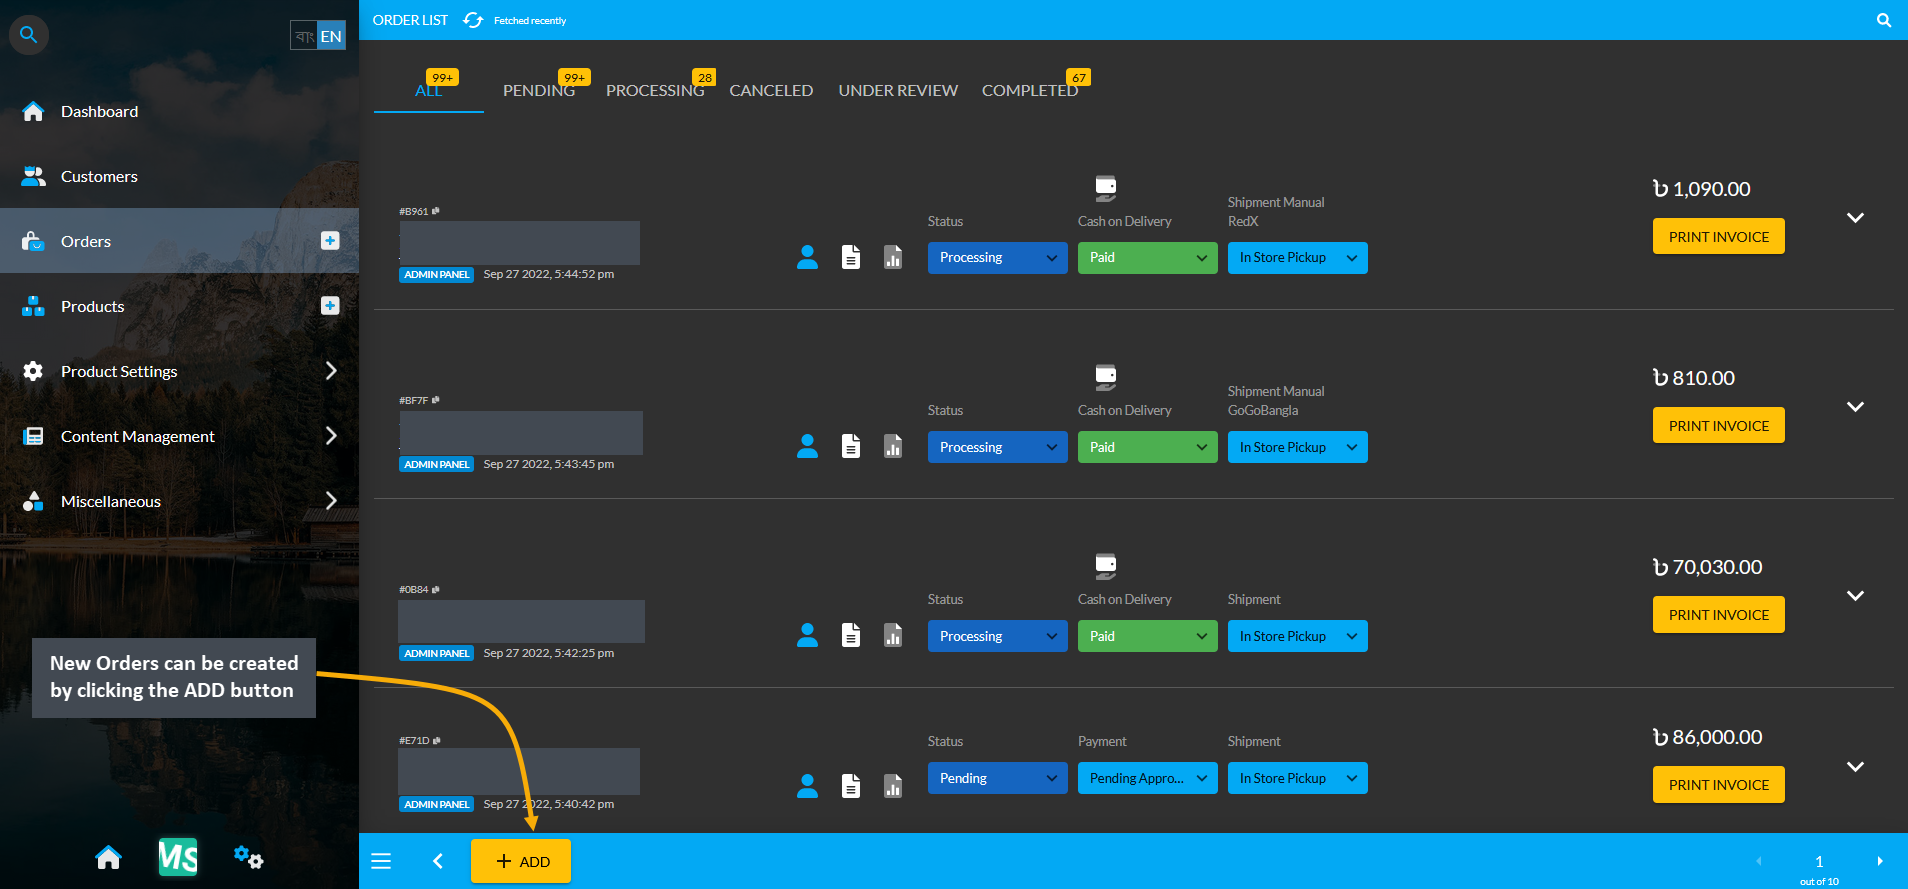
Image 1: Create Manual Orders by clicking the ADD button at the bottom of the order list page.
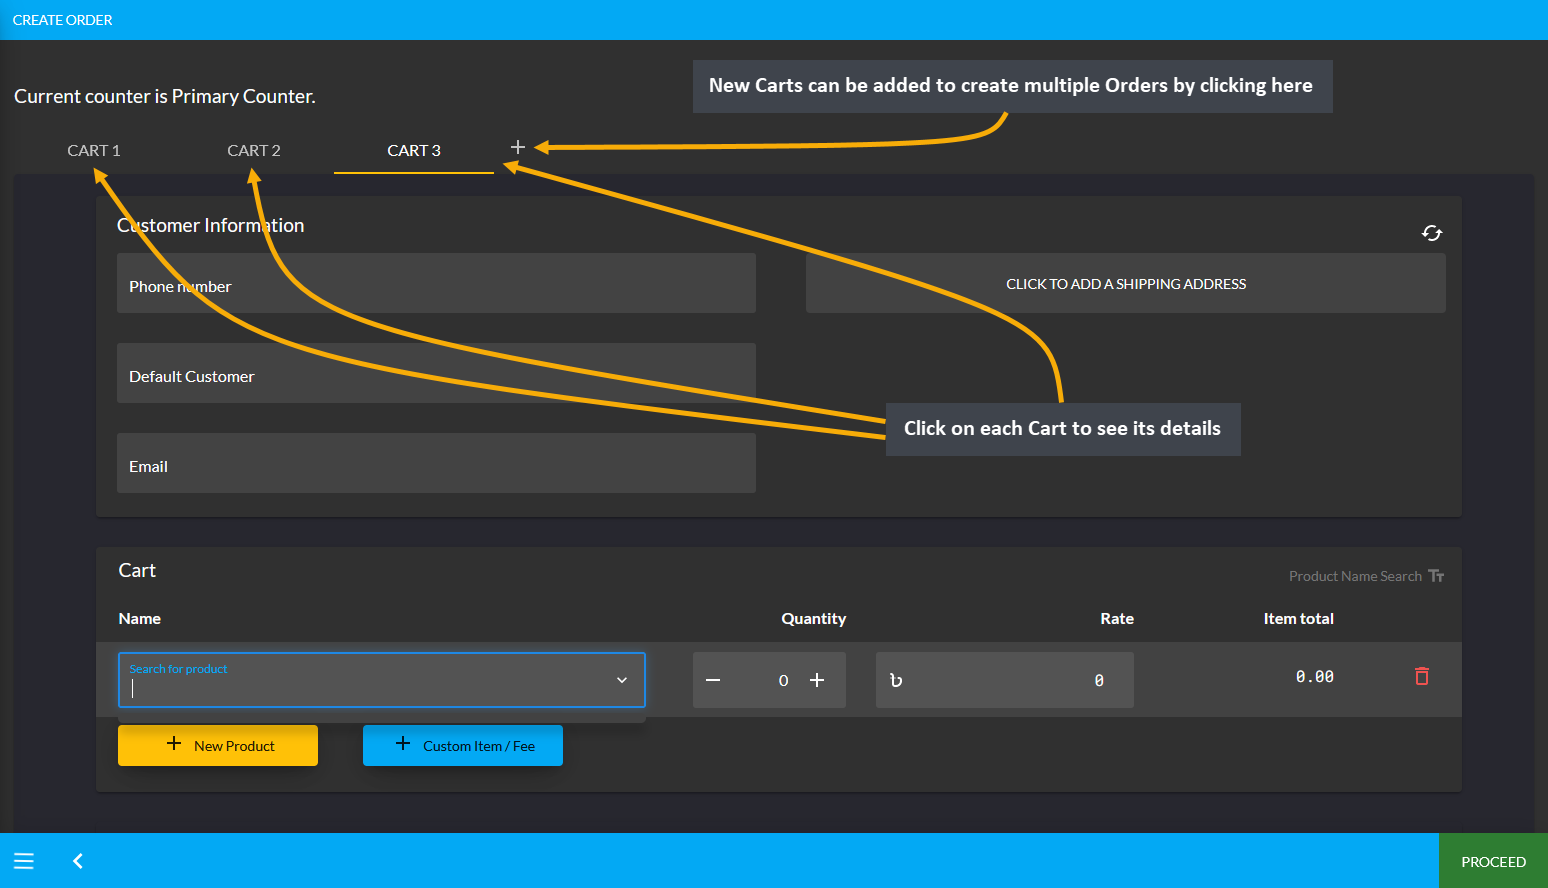
Image 2: Several manual Orders can be created for one or multiple Customers by adding different Carts.
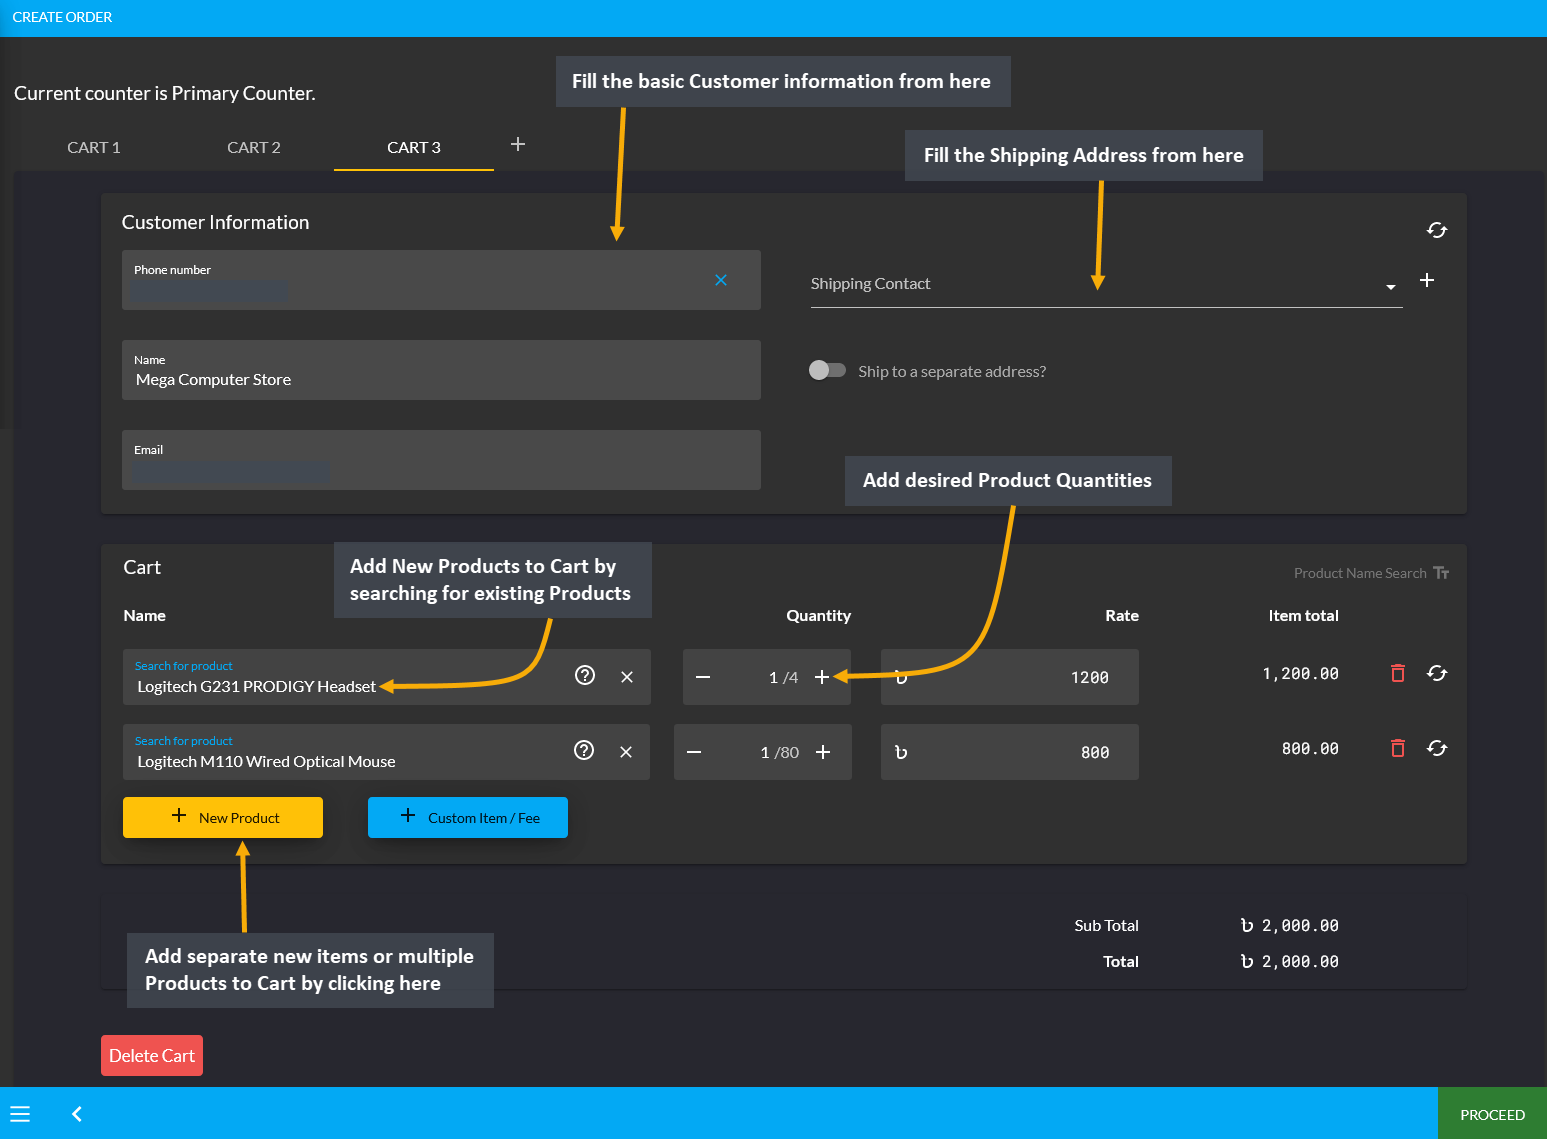
Image 3: Fill in Customer information and add New Product(s) to Cart with desired items and quantities.
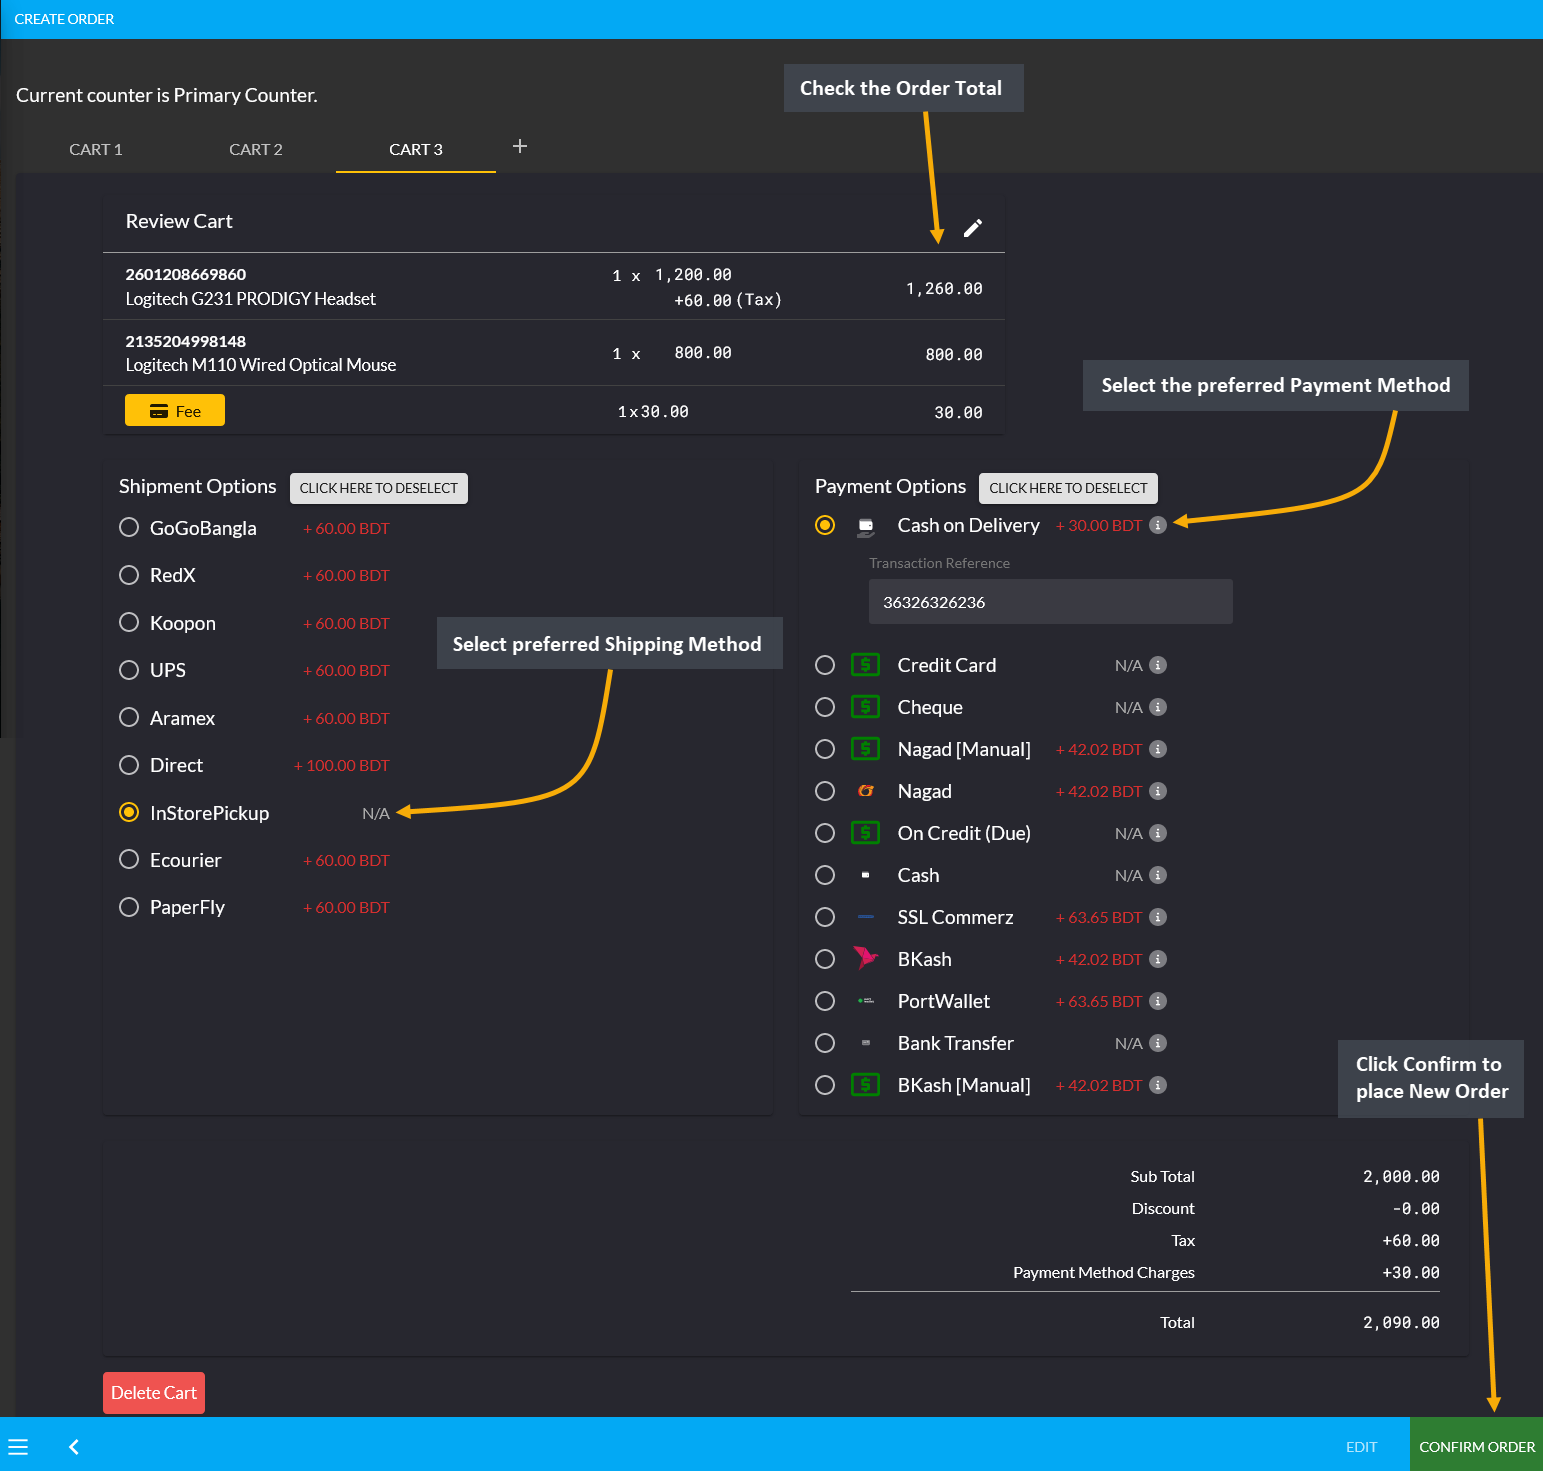
Image 4: Review the Cart, select Shipment and Payment options and click Confirm Order to place New Order.
How to add multiple Product(s) when creating a manual Order?
To add multiple Product(s), click on the New Product button that will add a separate new item to Cart each time.
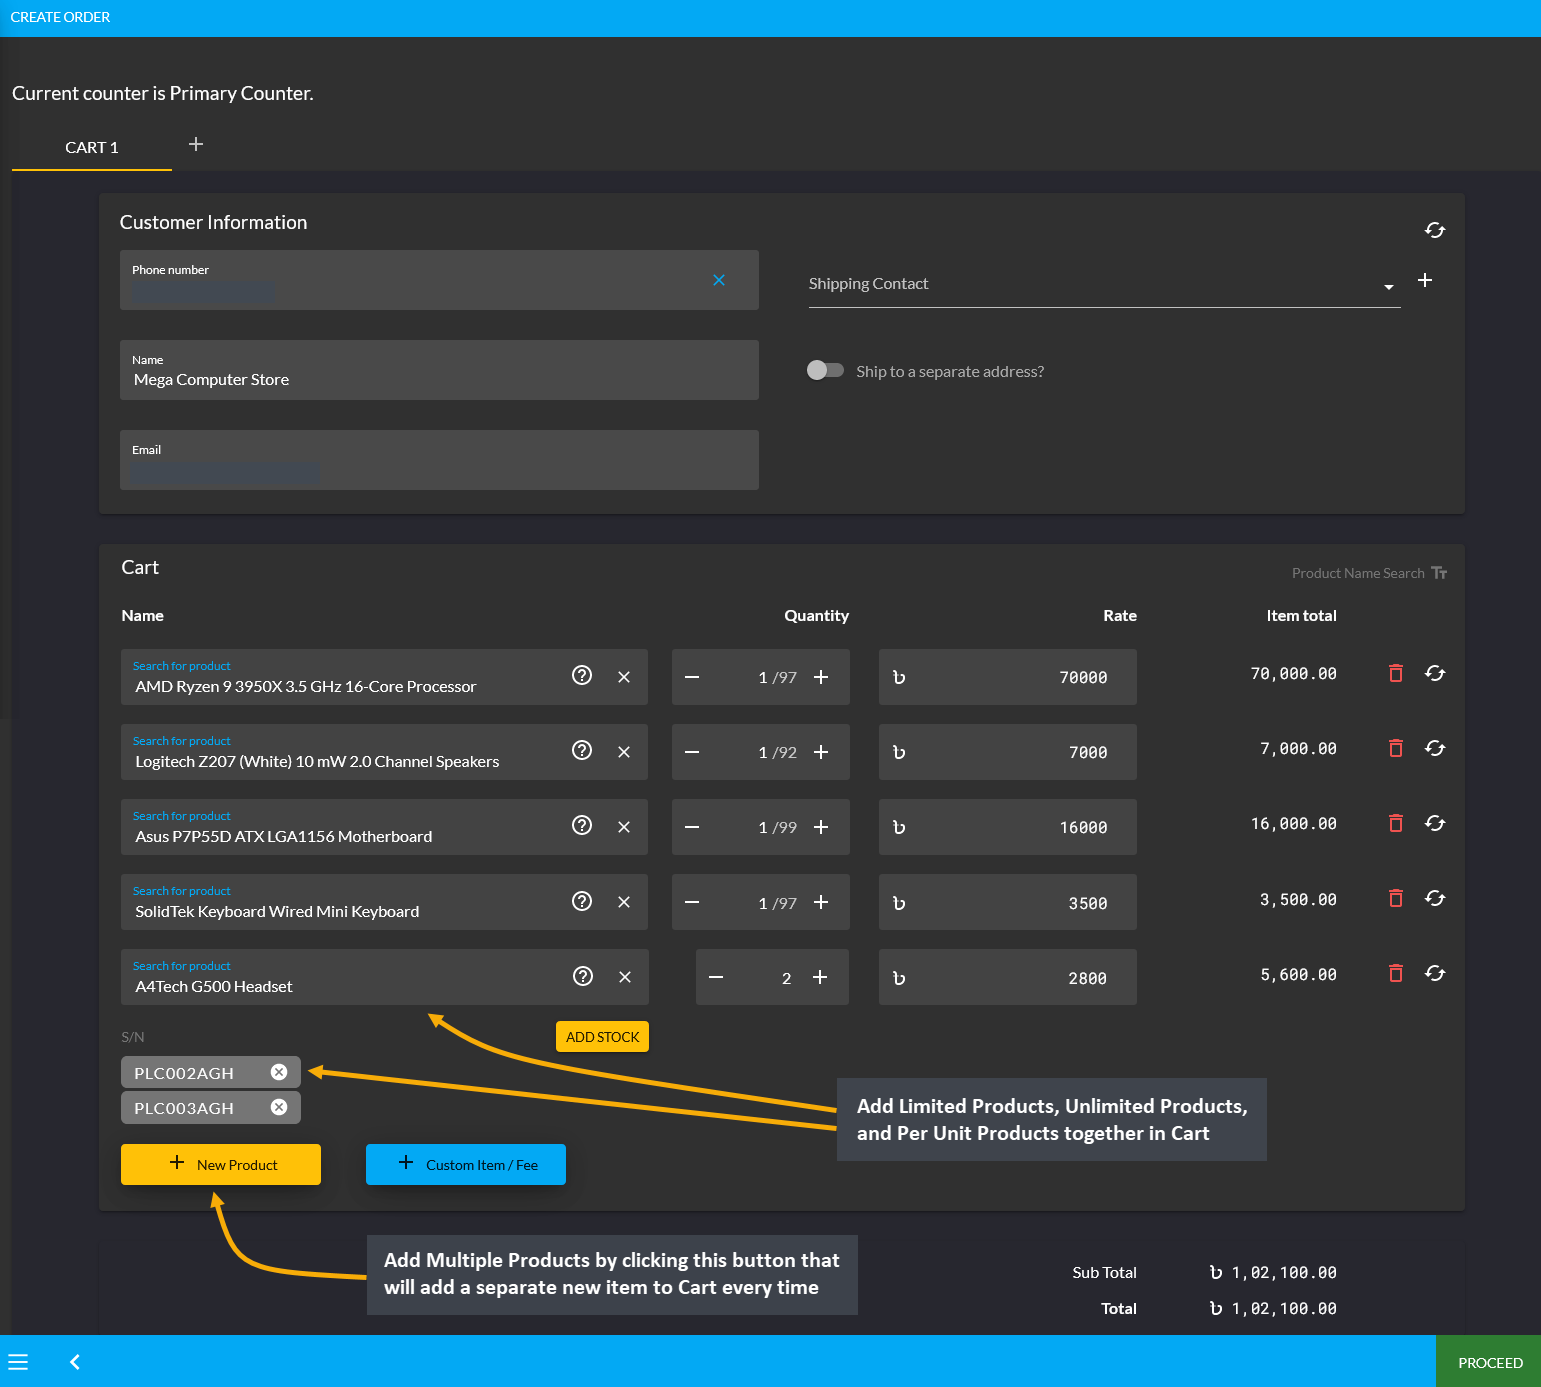
Image: Click the New Product button to add multiple Product(s) separately to Cart manually.
How to add Custom Product(s) to a manual Order?
- Click on the Custom Item/ Fee button to separately add Custom Product(s) to Cart which are not available on existing Product list.
- Clicking on this button will create a new box (underneath Search for Product box) for Custom Product(s).
- To add multiple Custom Product(s), click on the Custom Item/ Fee button with desired quantities and rates.
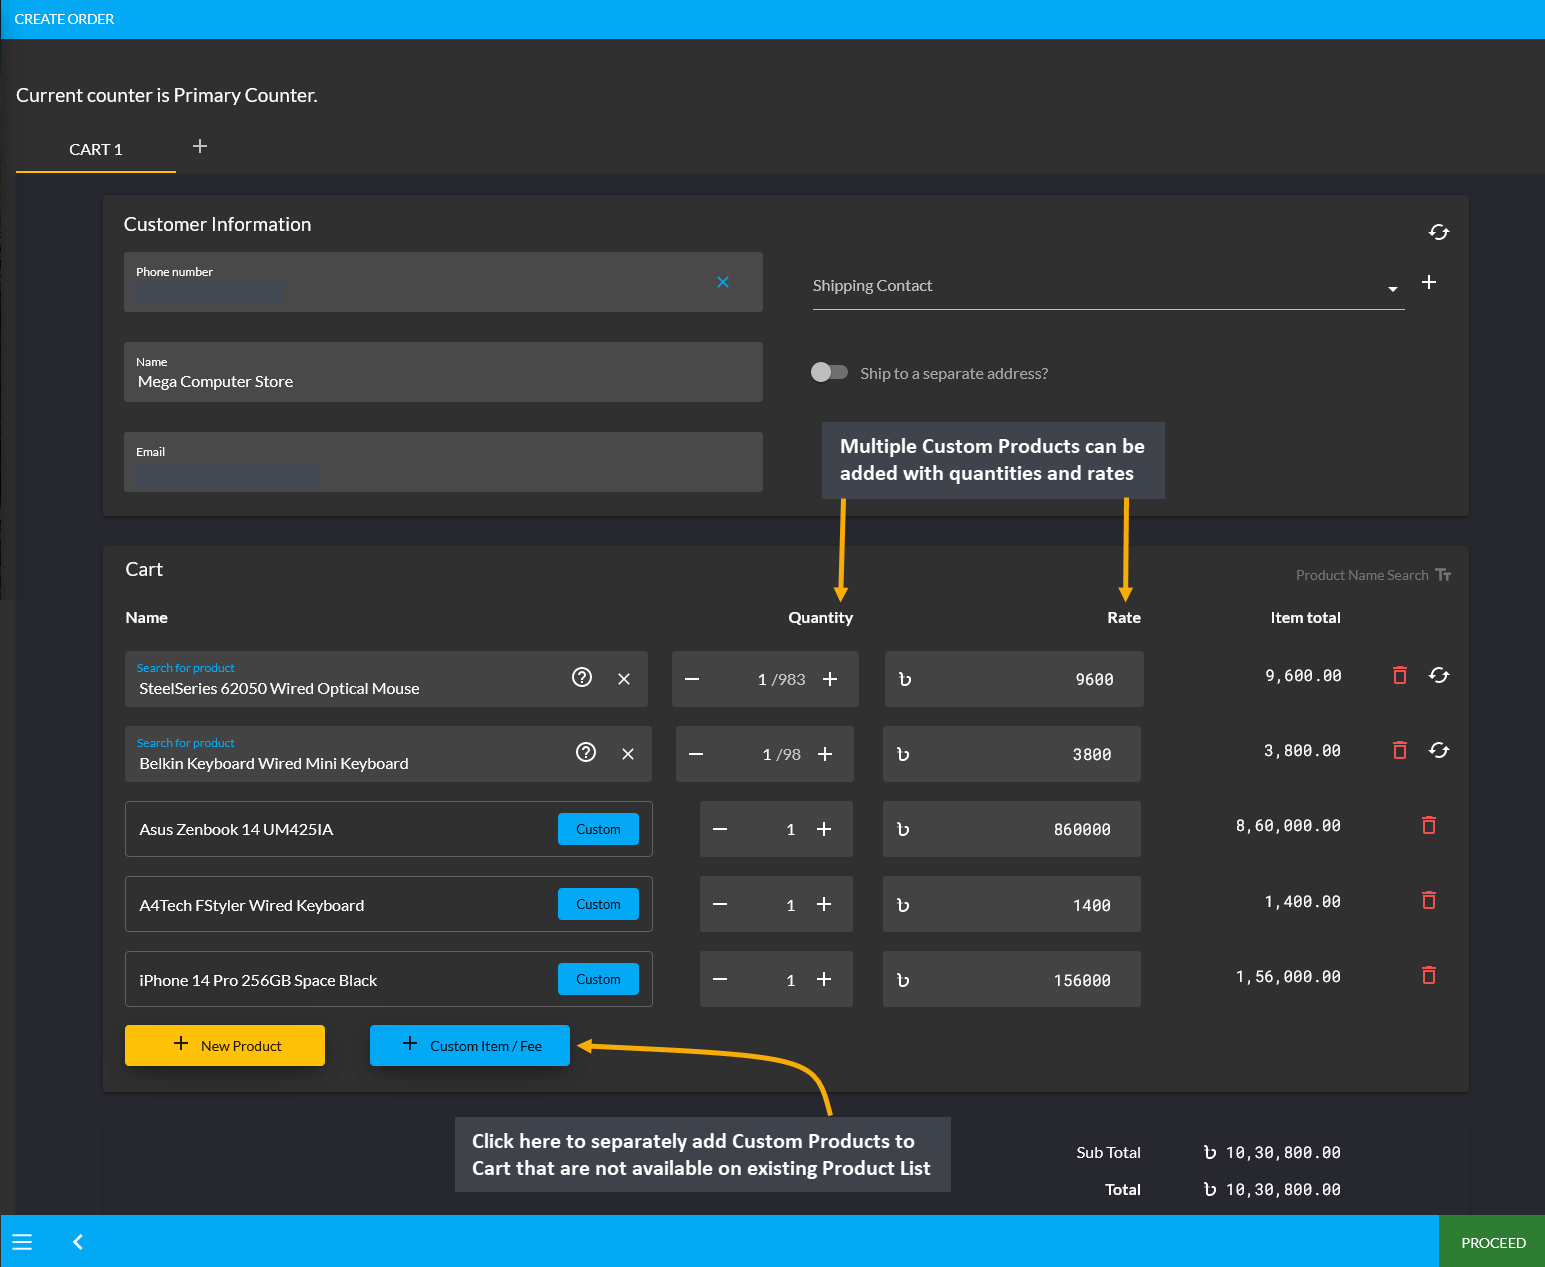
Image: Add Custom Product(s) to Cart by clicking on the Custom Product(s) to Cart.
How to create a New Product from pre-defined templates?
- New Product(s) can be created from pre-defined templates, i.e. the Global Product(s).
- From Products tab, click the ADD button that will redirect to a Product search Page.
- Type the generic Product name in search box to bring a list of pre-defined templates.
- Select the target Product that comes up within the search box results.
- Click it to redirect to a pre-defined Product Information page where details need to be filled.
- Hit the Submit button to complete creating a New Product.
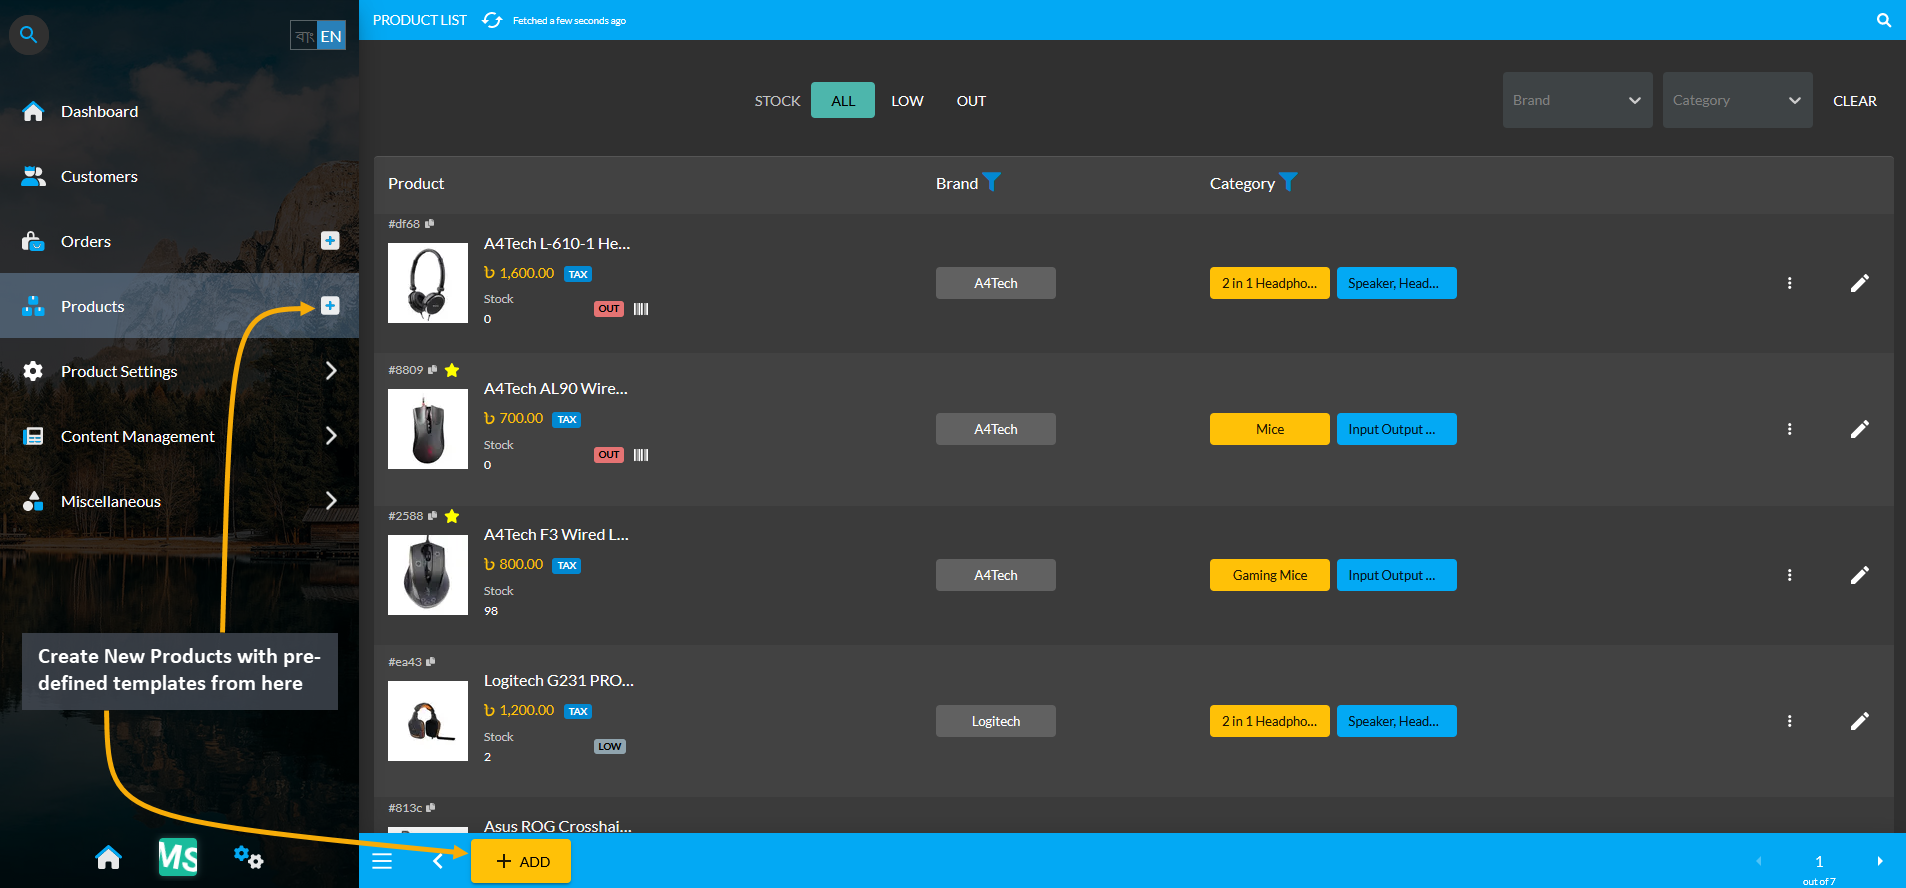
Image 1: Create New Products from pre-defined templates by clicking on the ADD button.
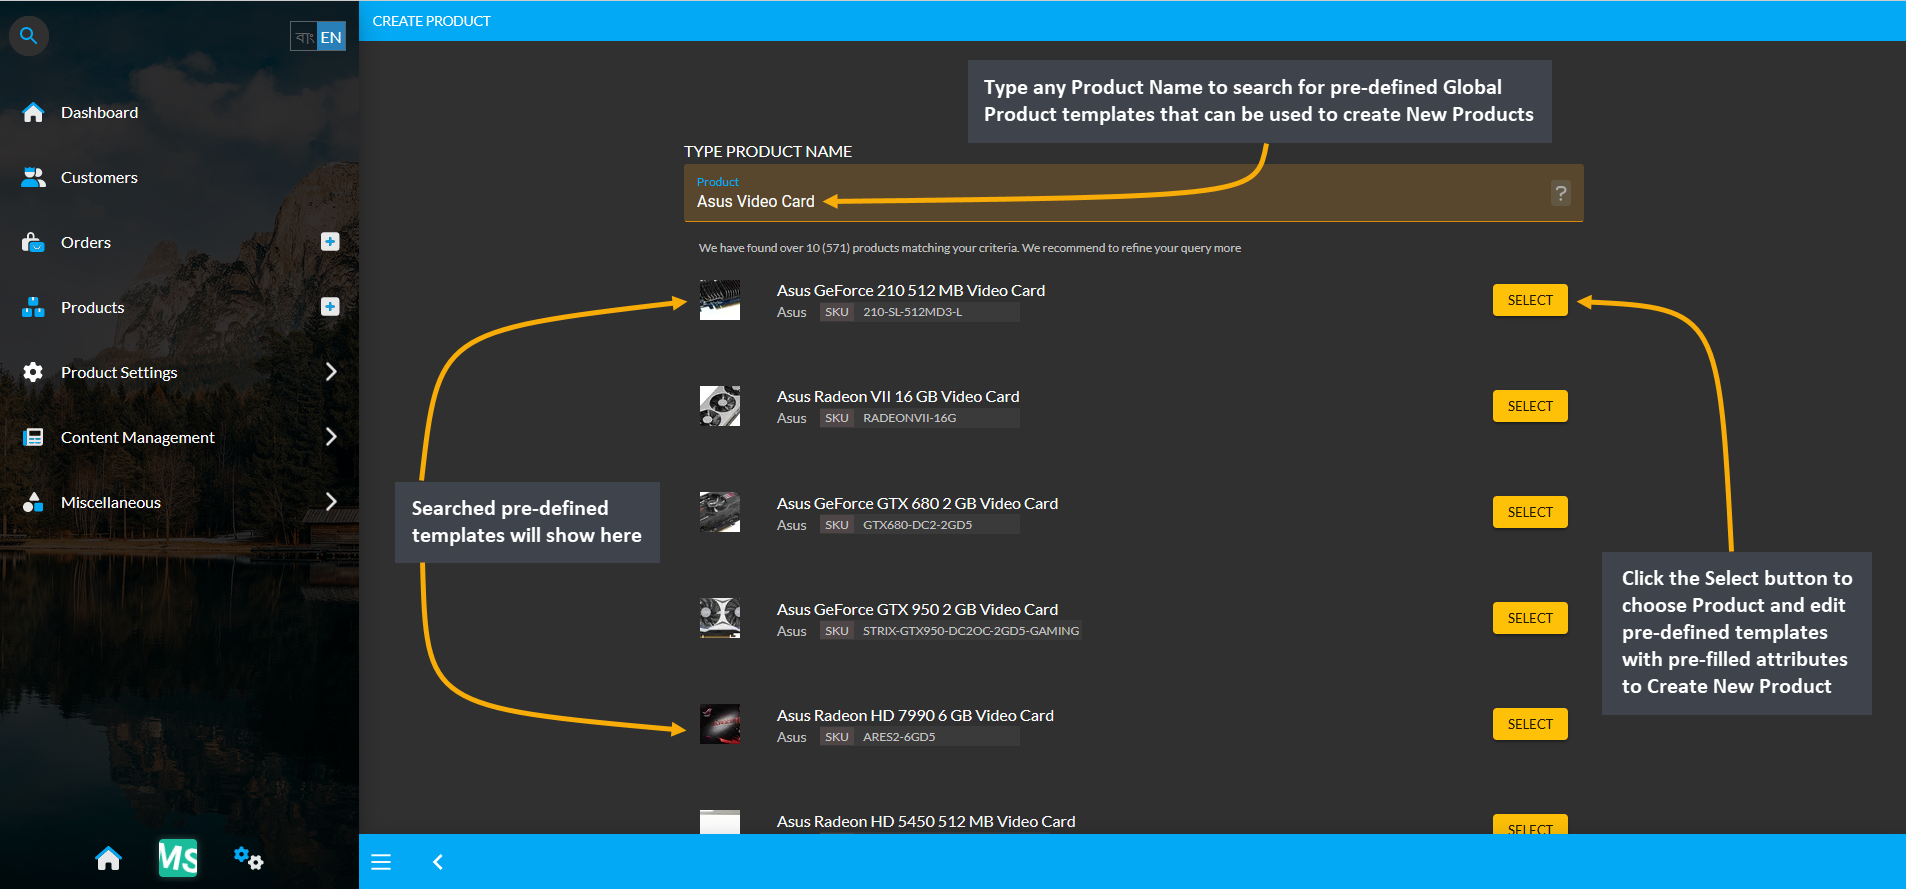
Image 2: Type generic Product name in search box and select the target Product from search results.
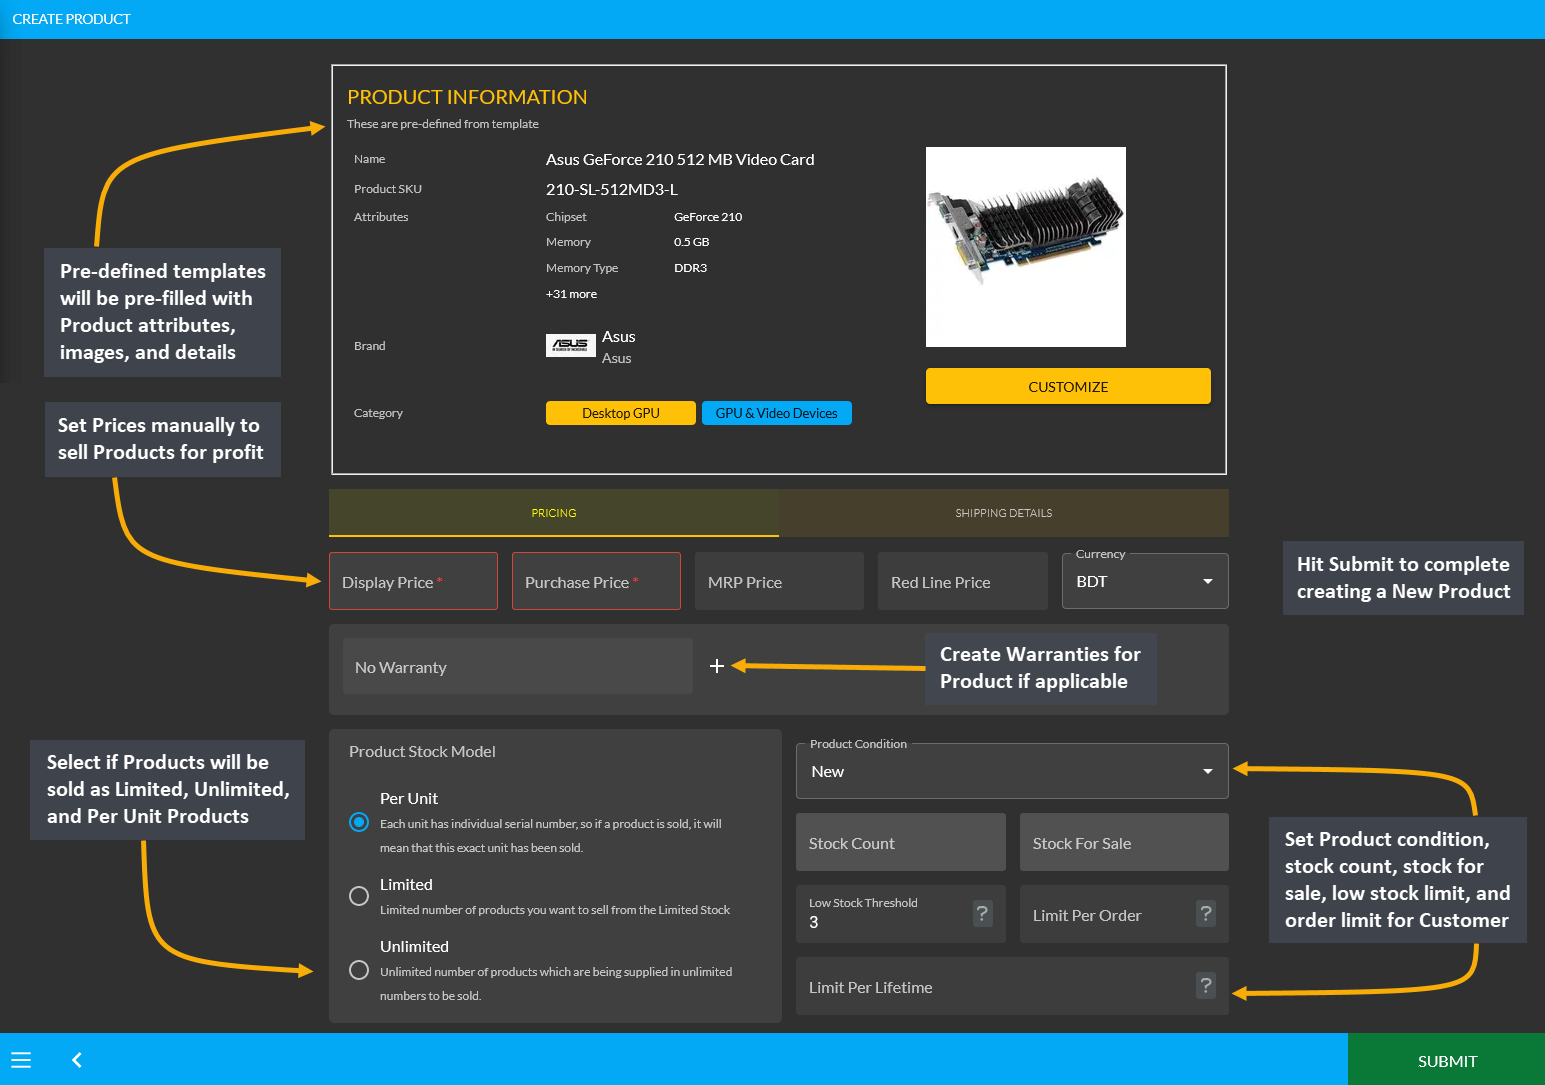
Image 3: Fill details in pre-defined templates information page and hit Submit to create New Product.
What is the function of the Stock for Website field during Product creation?
- Stock for Website is an optional Stock Count where you can set the limit of how many quantities of the Product you want to sell to Customers through the Website.
- This option should only be used if the Shop Owner want to only make a certain amount of stock available for sale on the Website. The rest of the options to set stock or limit sale will be available via Admin portal.
- This feature will be required when the Shop Owner want Customers to purchase more Products, so as they visit the Website to purchase a high demand Product, Shop Owner can upsell other low demand Products to them by increasing the Stock for Website when more Customers are shopping.
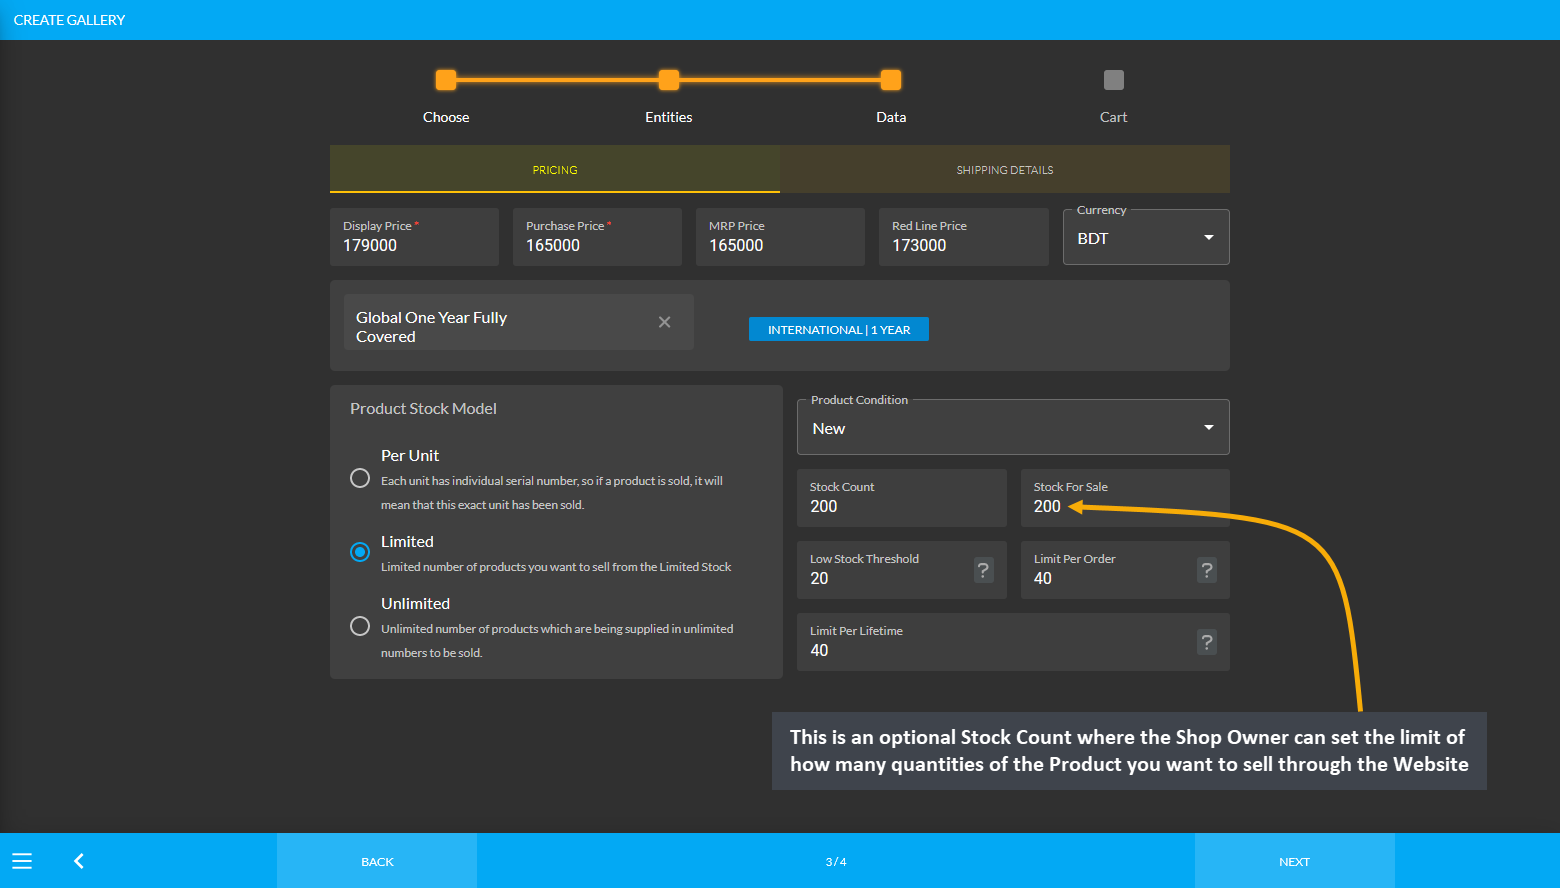
Image 1: Optional Stock Count to set the limit of Product quantities for sale to Customers on the Website.
What are the functions of Stock, Low Stock, and Limit Order setting options?
- Stock Count option will set the total available Stock for Sale from the Inventory.
- Stock for Website option will limit the amount of Inventory available for sale publicly on the Website. So, set the limit of how many quantities of the Product will be sold to Customers through the Website.
- Low Stock Threshold will filter Product Stock as Low or Out. If Stock for Website is set to 5 and Low Stock Threshold is set to 3, then stock status will show Low. If Stock for Website is set to 0, it will show Out.
- Limit Per Order will set the quantity of Products a single Customer buy at once in an Order.
- Limit Per Lifetime will set the number of times a Customer can buy the Product from shop within a lifetime.
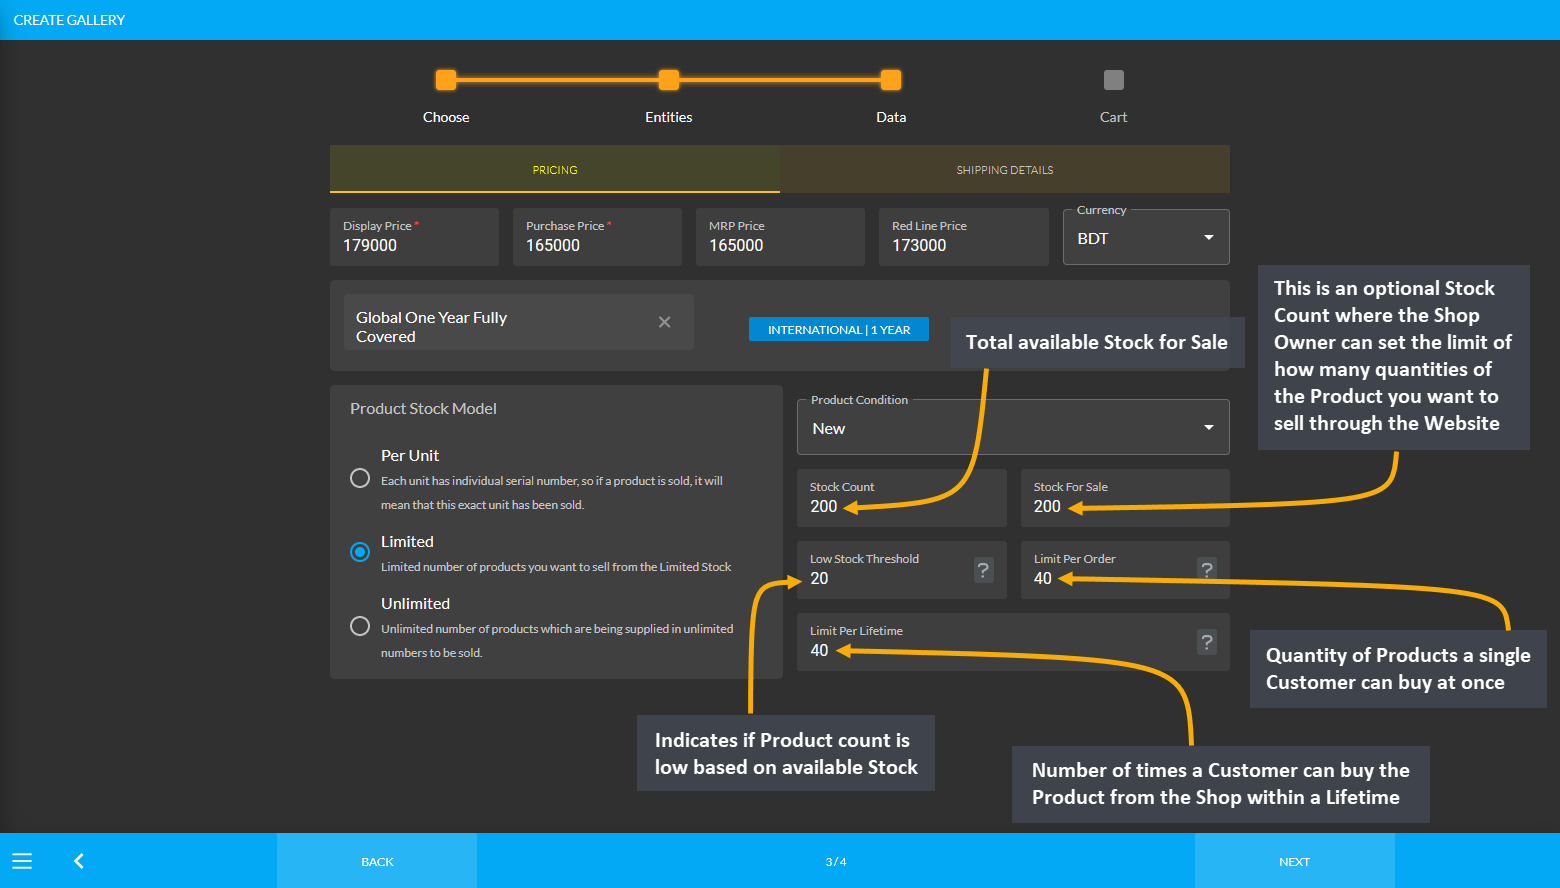
Image 1: Shop Owner can set Stock Count, Low Stock threshold, and Limit Order for sale on the Website.
How to create a New Product if it cannot be found under pre-defined templates?
- From Products tab, click the ADD button that will redirect to a Product search Page.
- Type Product name in the search box. If Product is not available, then click on ADD NEW button.
- Choose Product details and fill out all the main features of the Product.
- Add Product images through Gallery and publish Product and add supplier or external link.
- List prices, set warranty, stock information, and shipping details.
- Create Product Cart with cart notice, button label, after sales message, and notes.
- Hit the Submit button to complete creating a New Product.
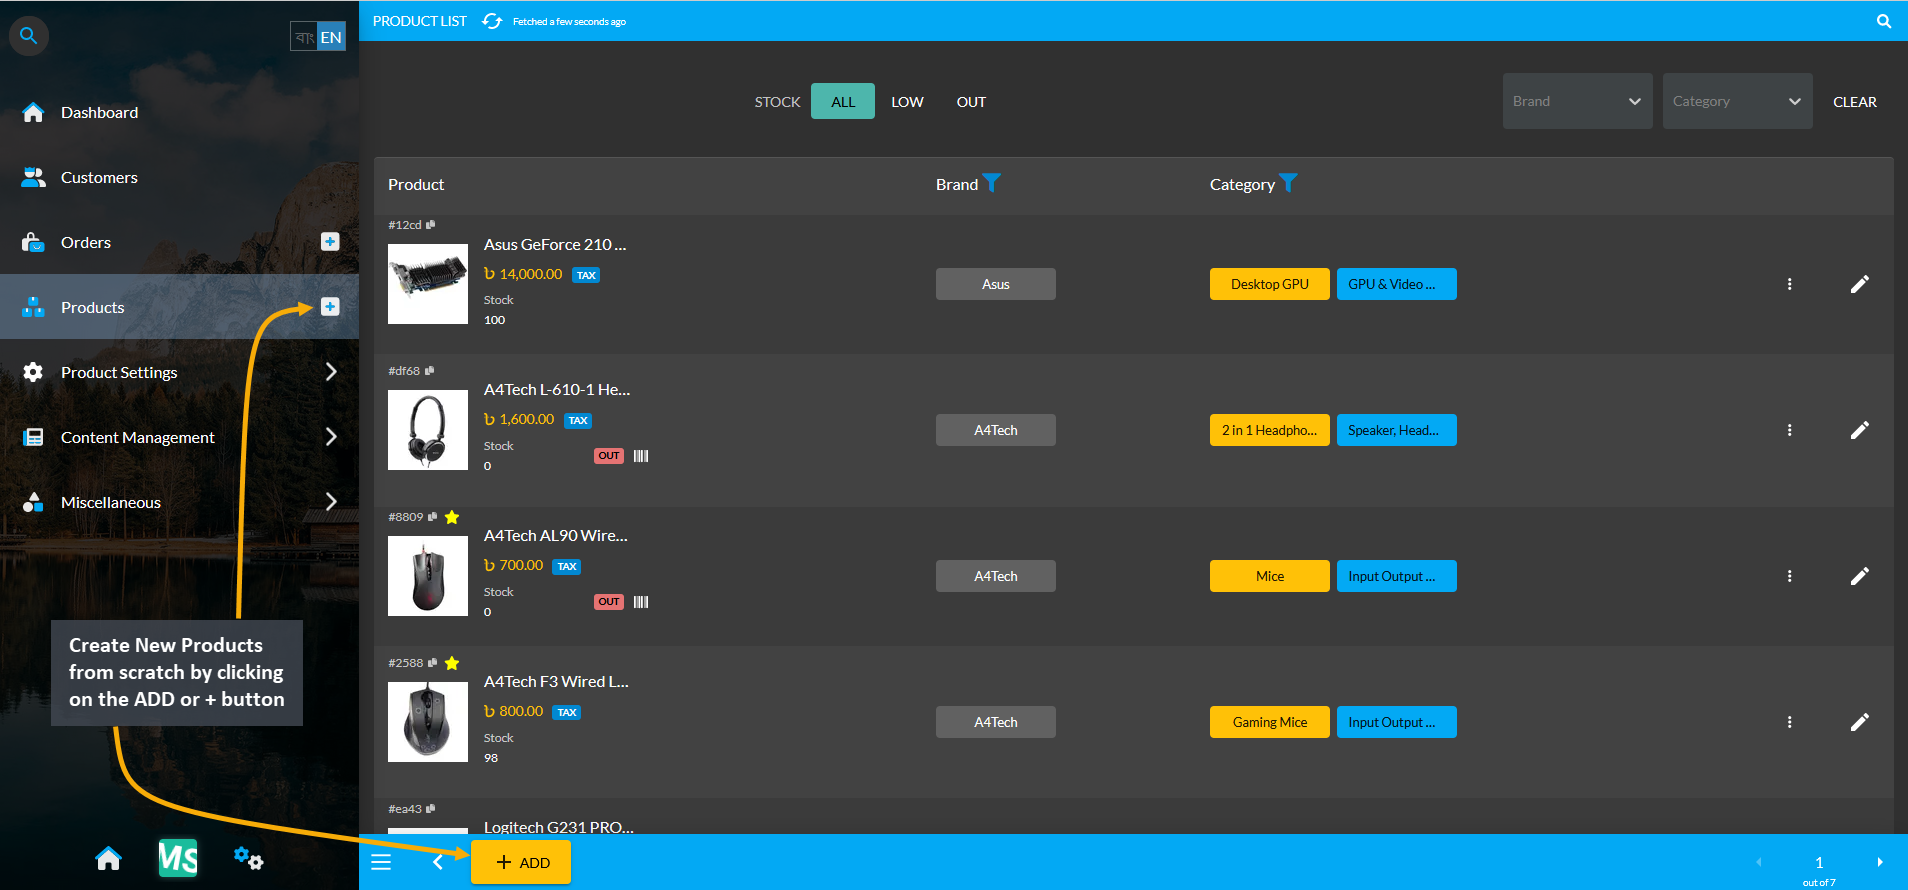
Image 1: Create New Products from scratch by clicking on the ADD button from Products tab.
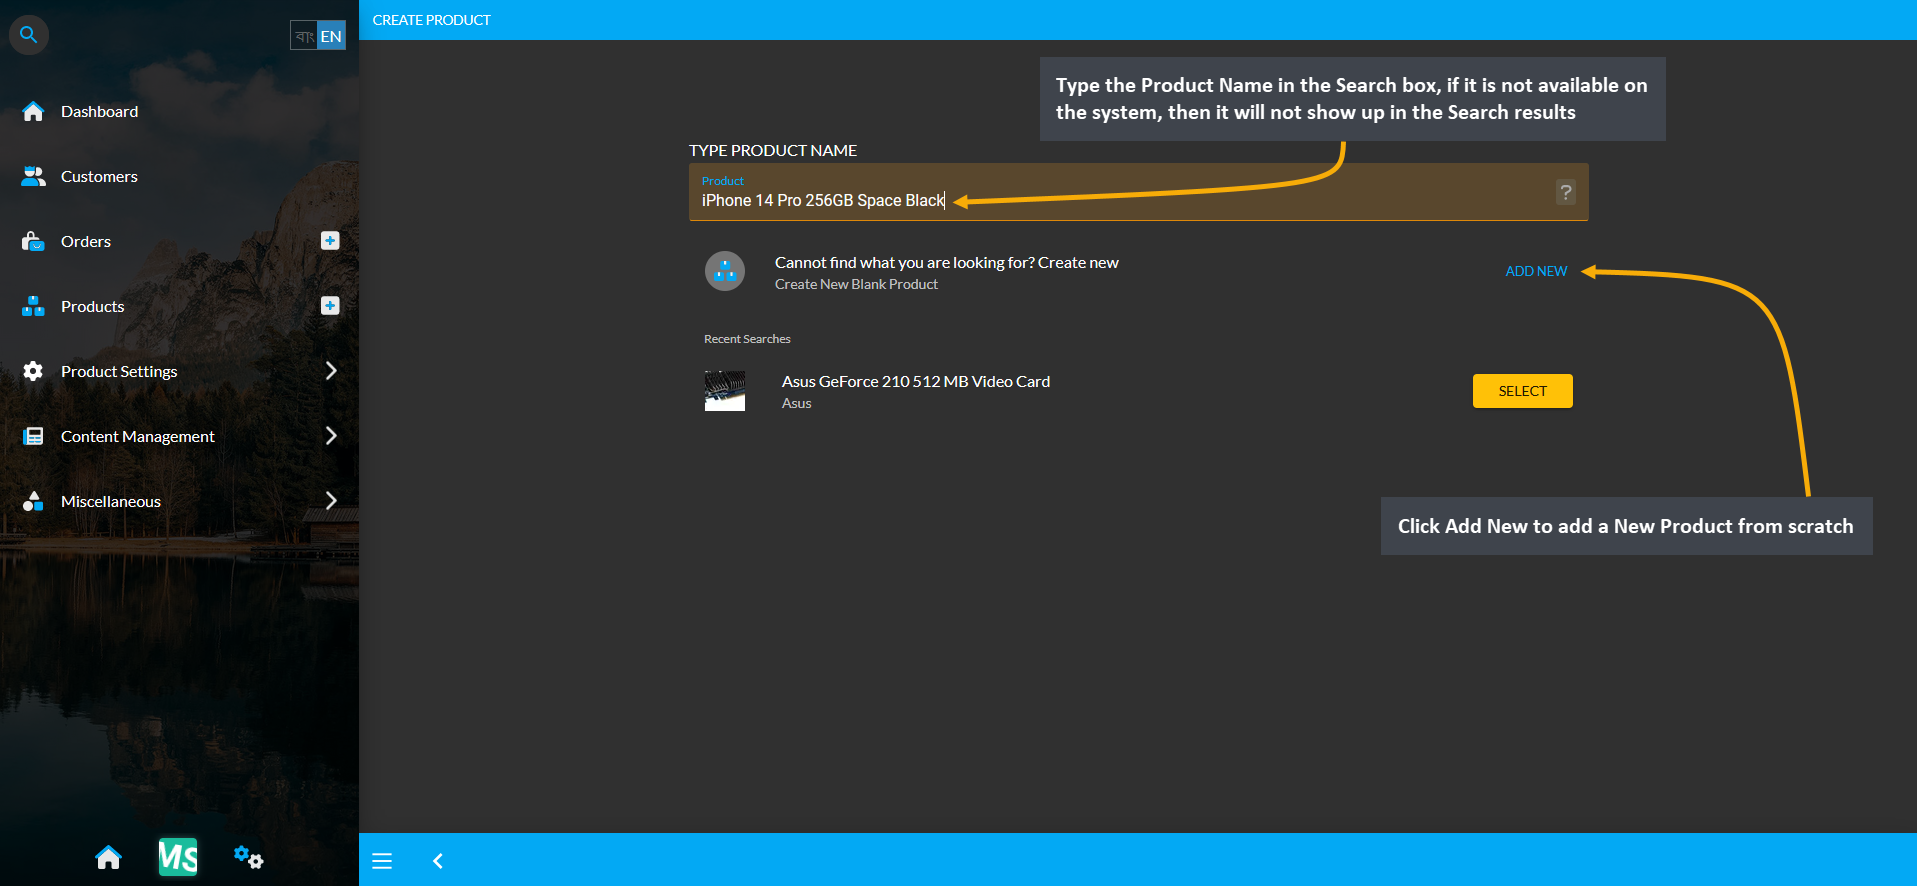
Image 2: Type Product name in search box, if Product is not available, click ADD NEW to create Product.
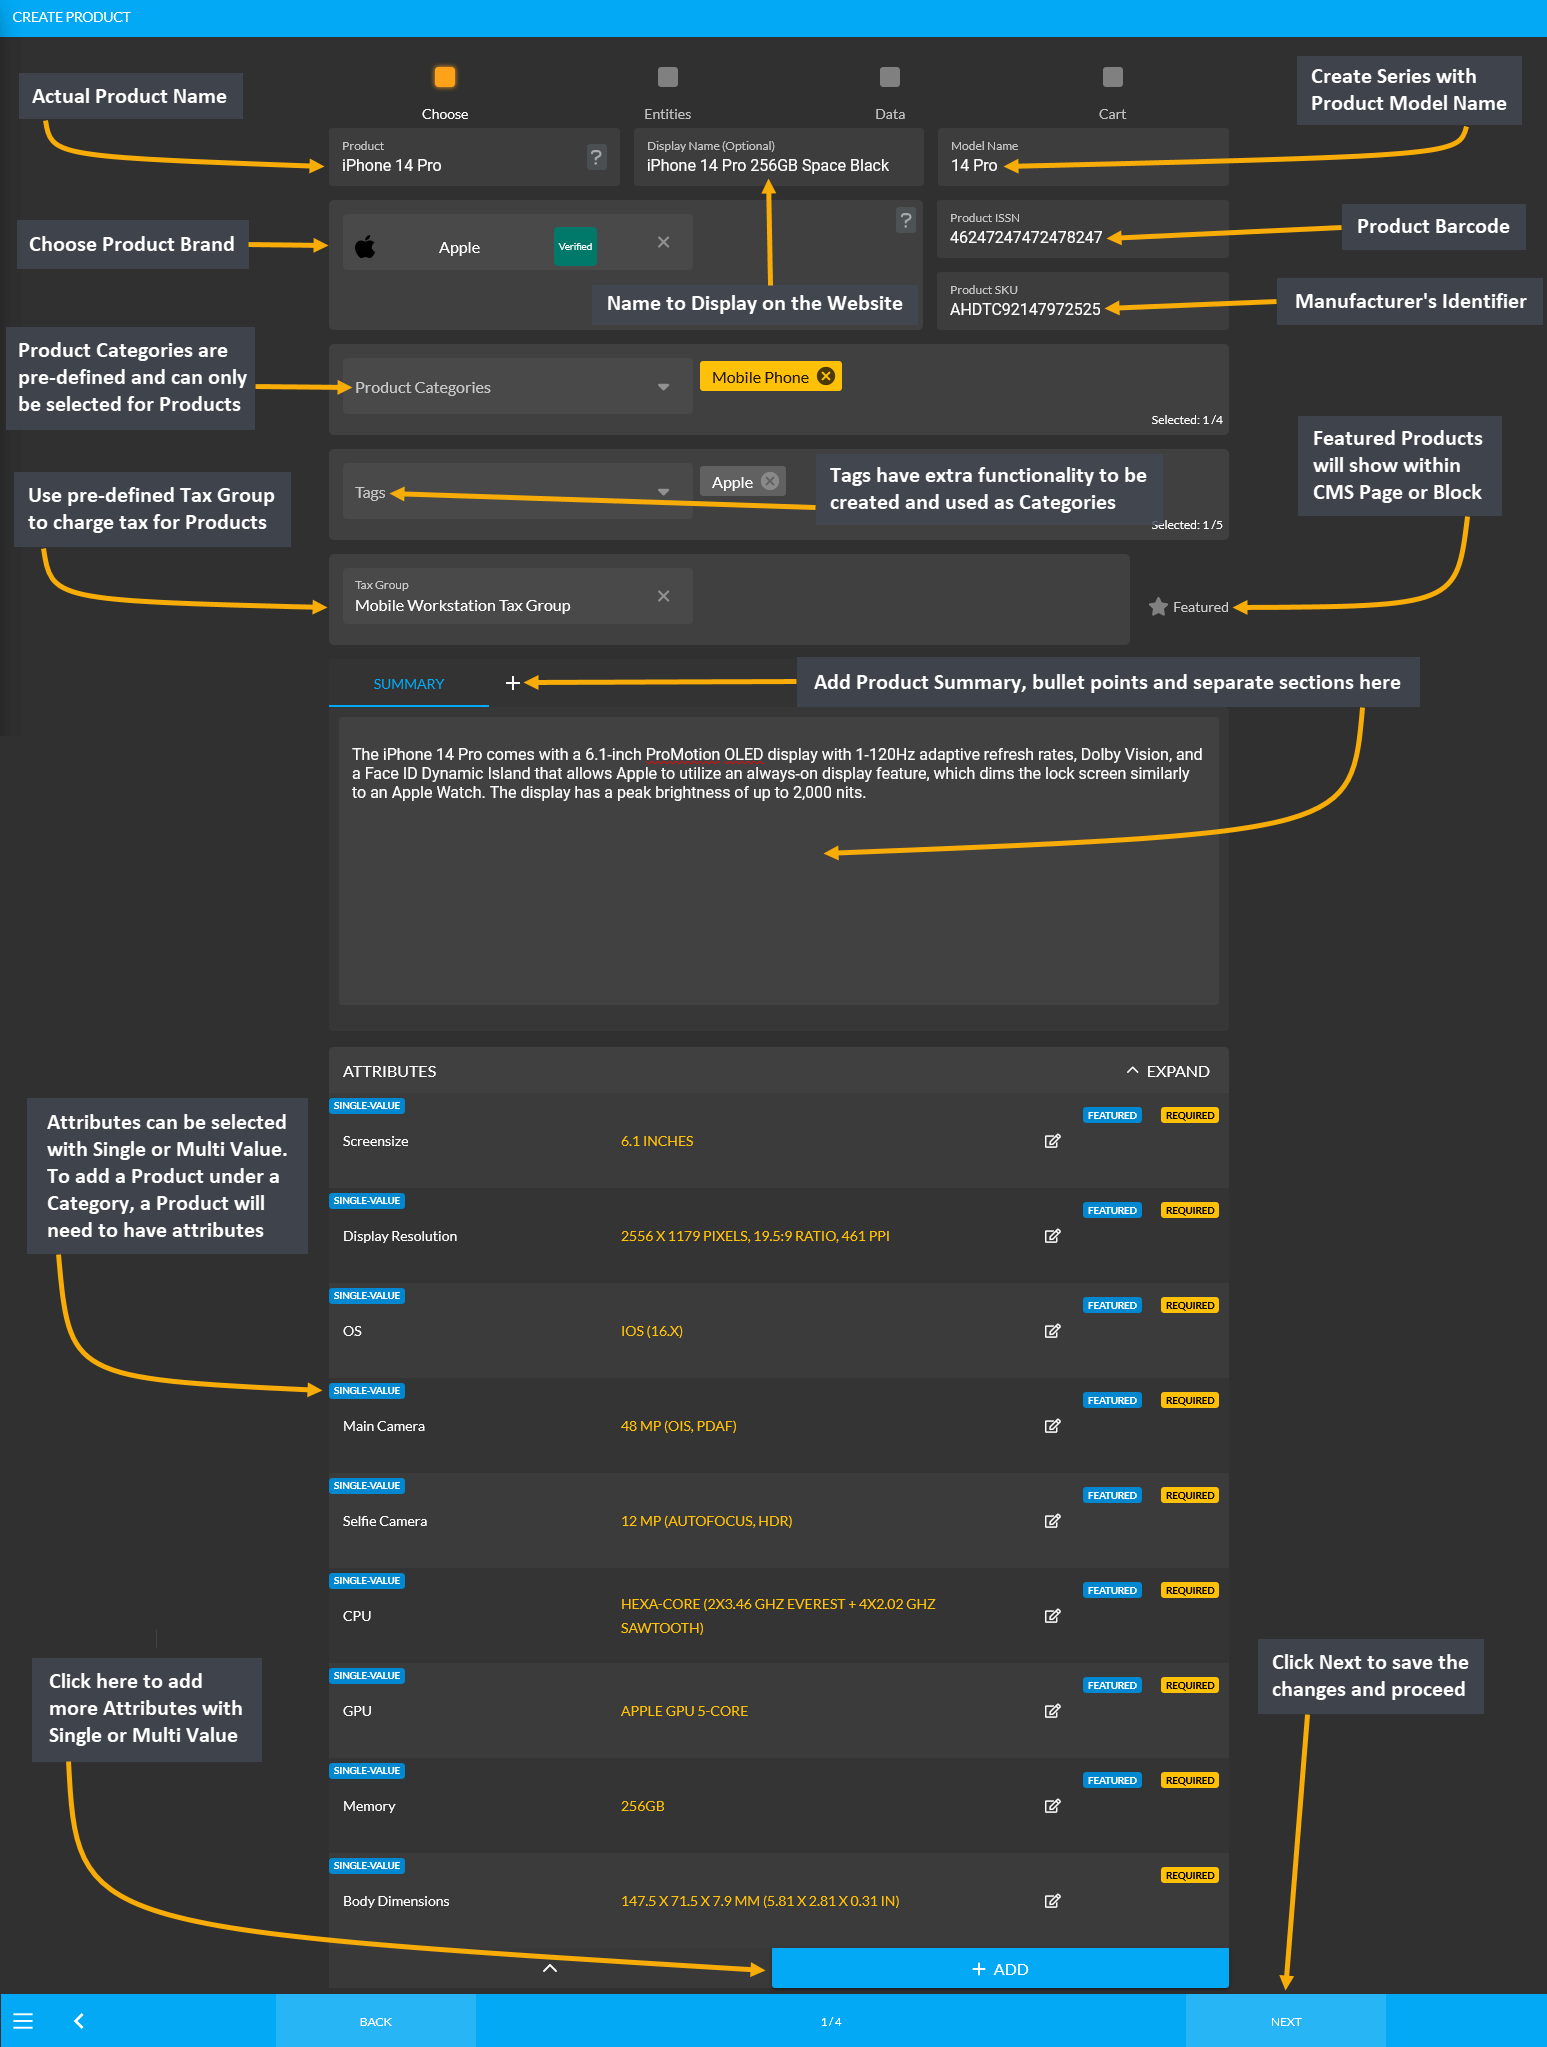
Image 3: Fill out all the Product details, main features, summary and attributes to create New Product.
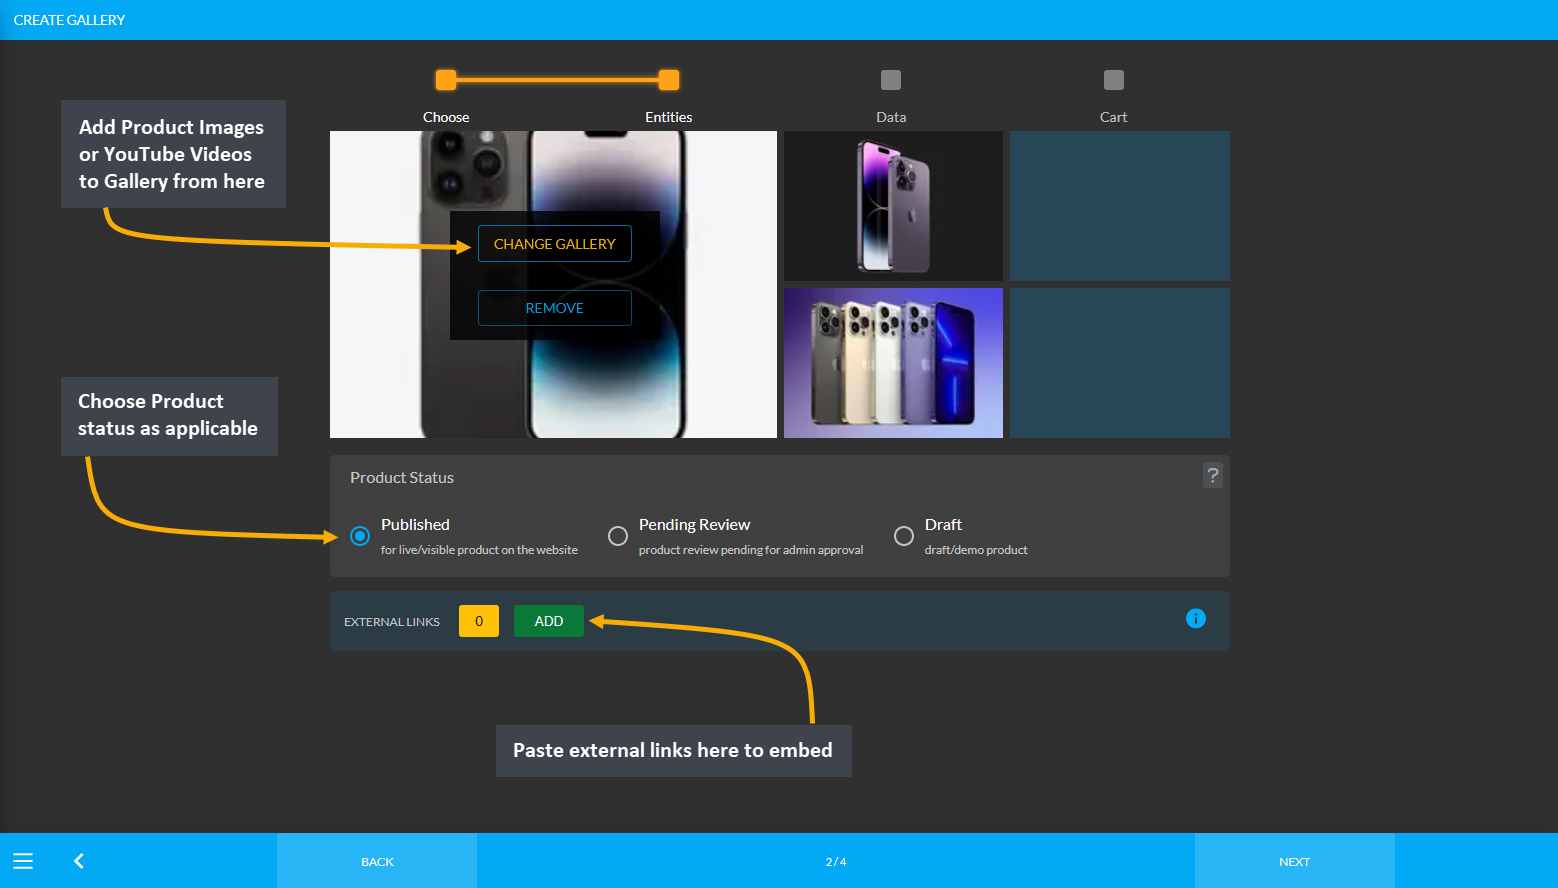
Image 4: Add Product images through Gallery and publish Product and add supplier or external link.
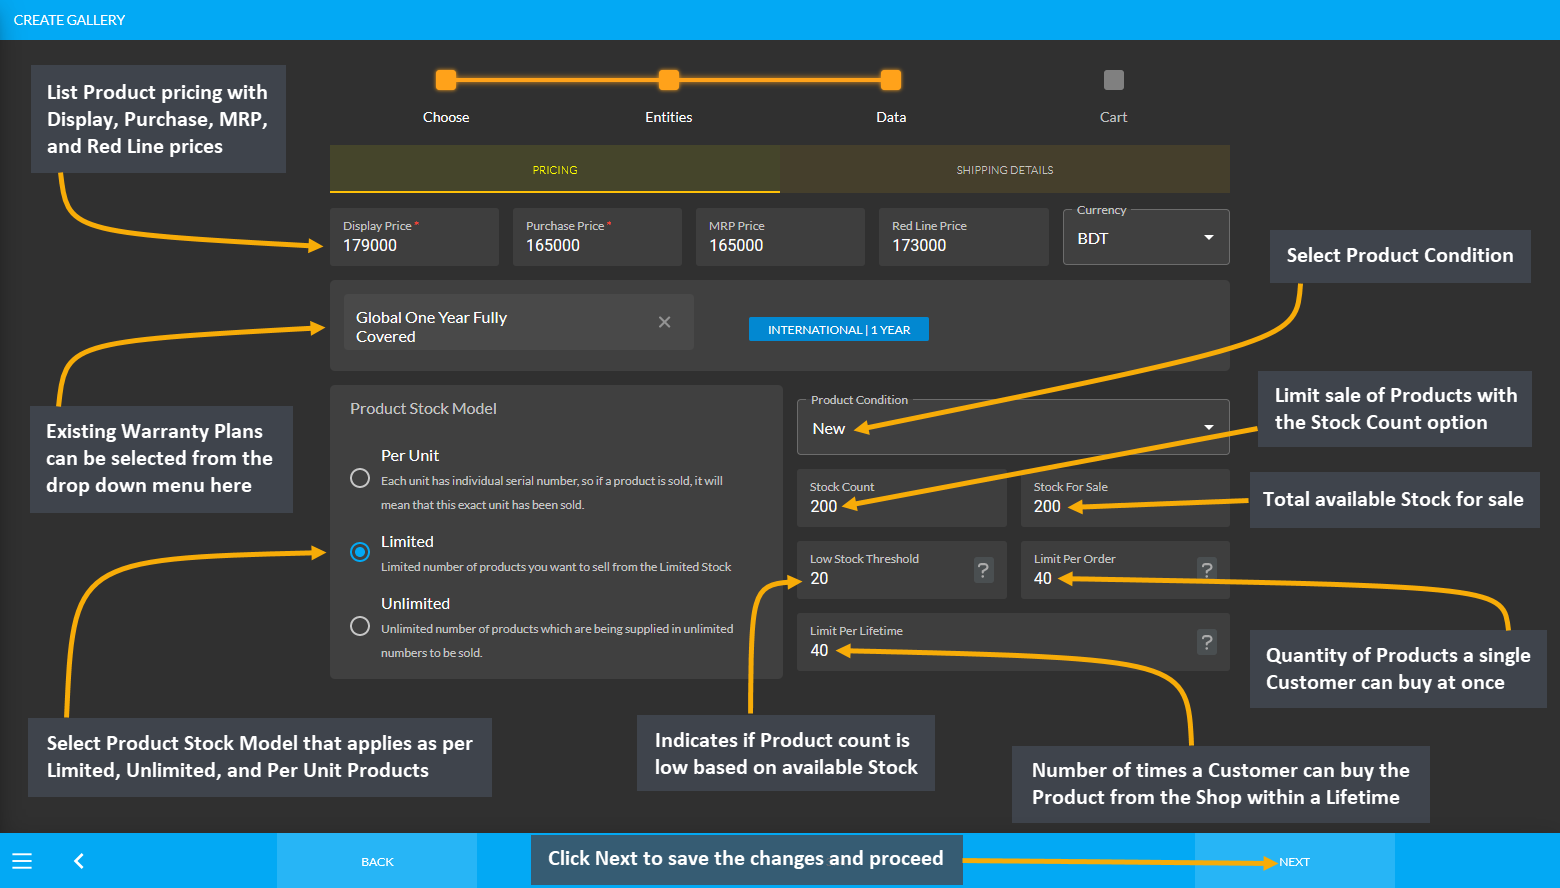
Image 5: List prices, set warranty, stock information, and shipping details.
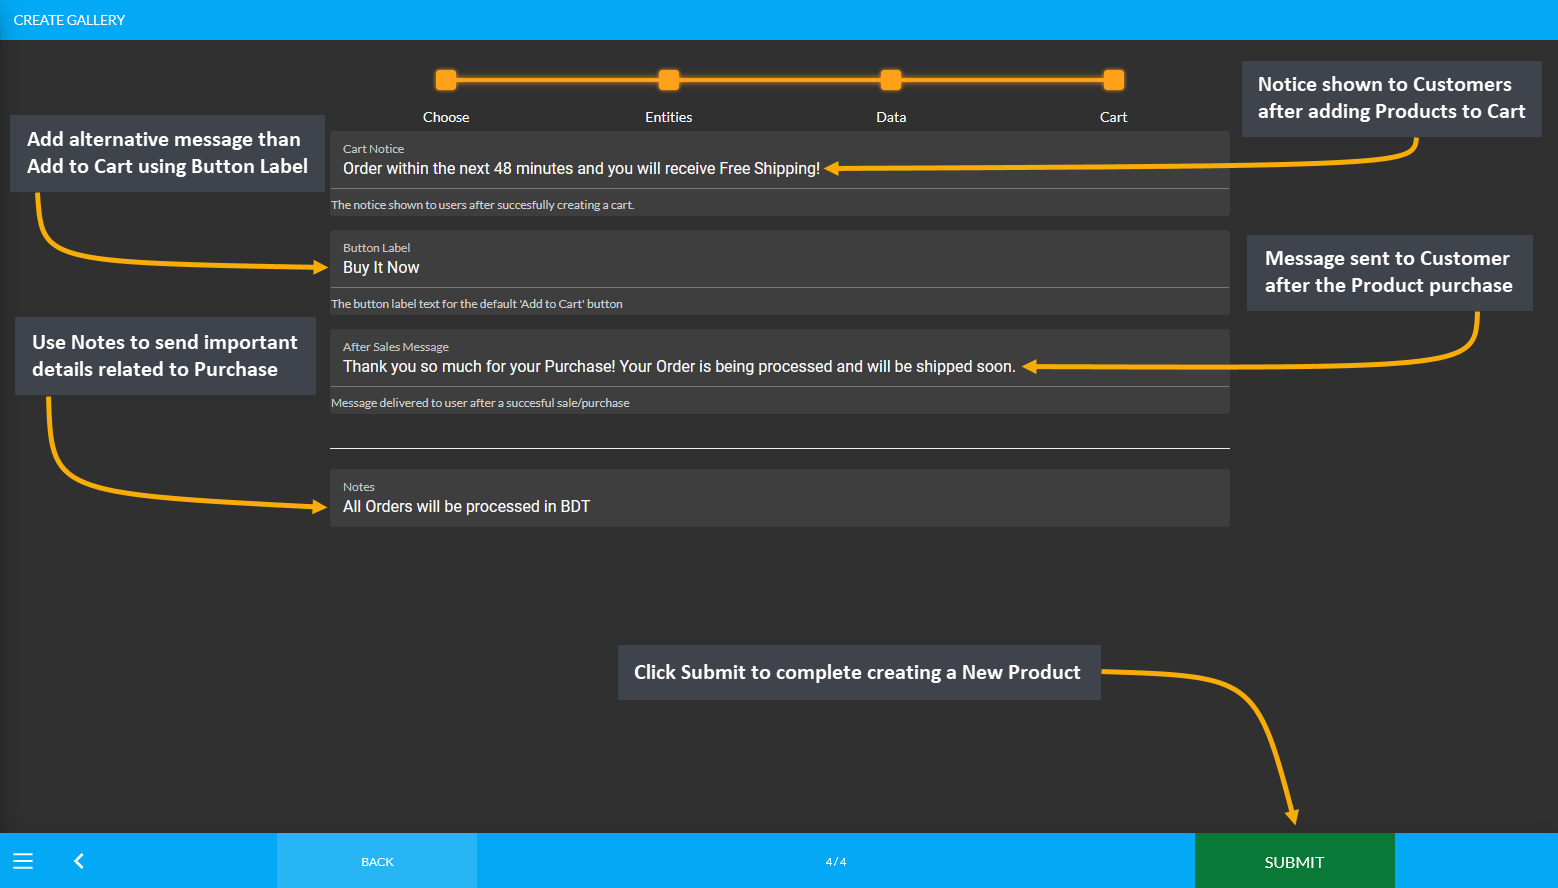
Image 6: Create Product Cart Messages with Cart Notice, Button Label, After Sales Message, and Notes.
From where can Tax Group be added for Product(s)?
- Tax group is bound to Category. Tax Group automatically gets added based on the selected Category.
- Select Category during Product creation and similar Tax Group will automatically be added for Product.
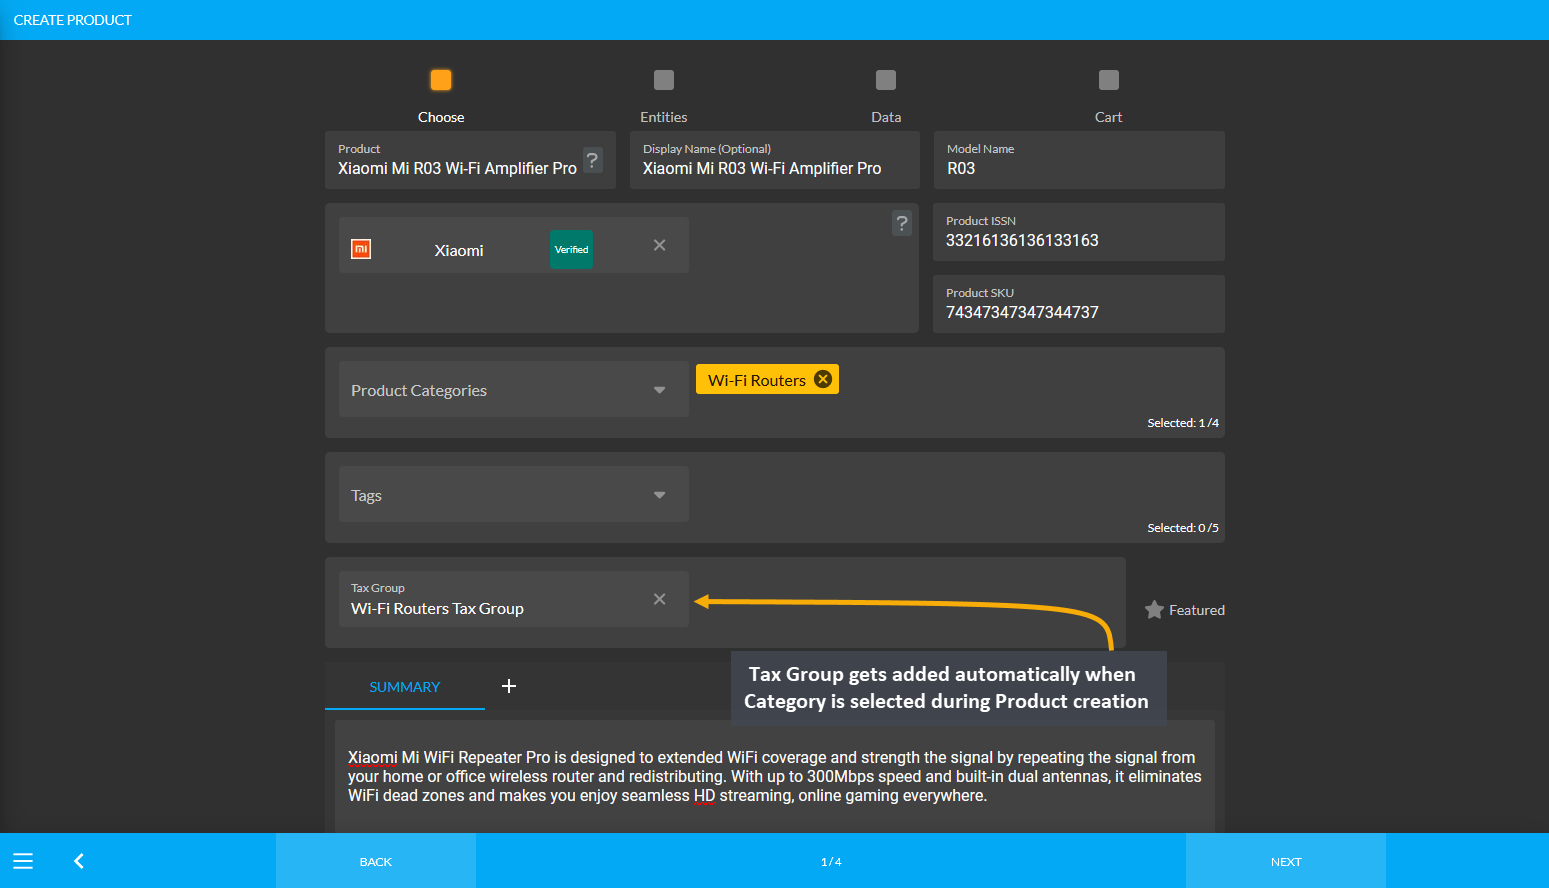
Image: Select Category when creating Product and similar Tax Group will automatically be added.
How can Product Description be added during Product creation?
- When creating New Product manually, there is a separate section called Summary.
- Add the Product Description in paragraphs, sections, or bullet points within this box.
- New Sections for Product Description can be added by using the + button.
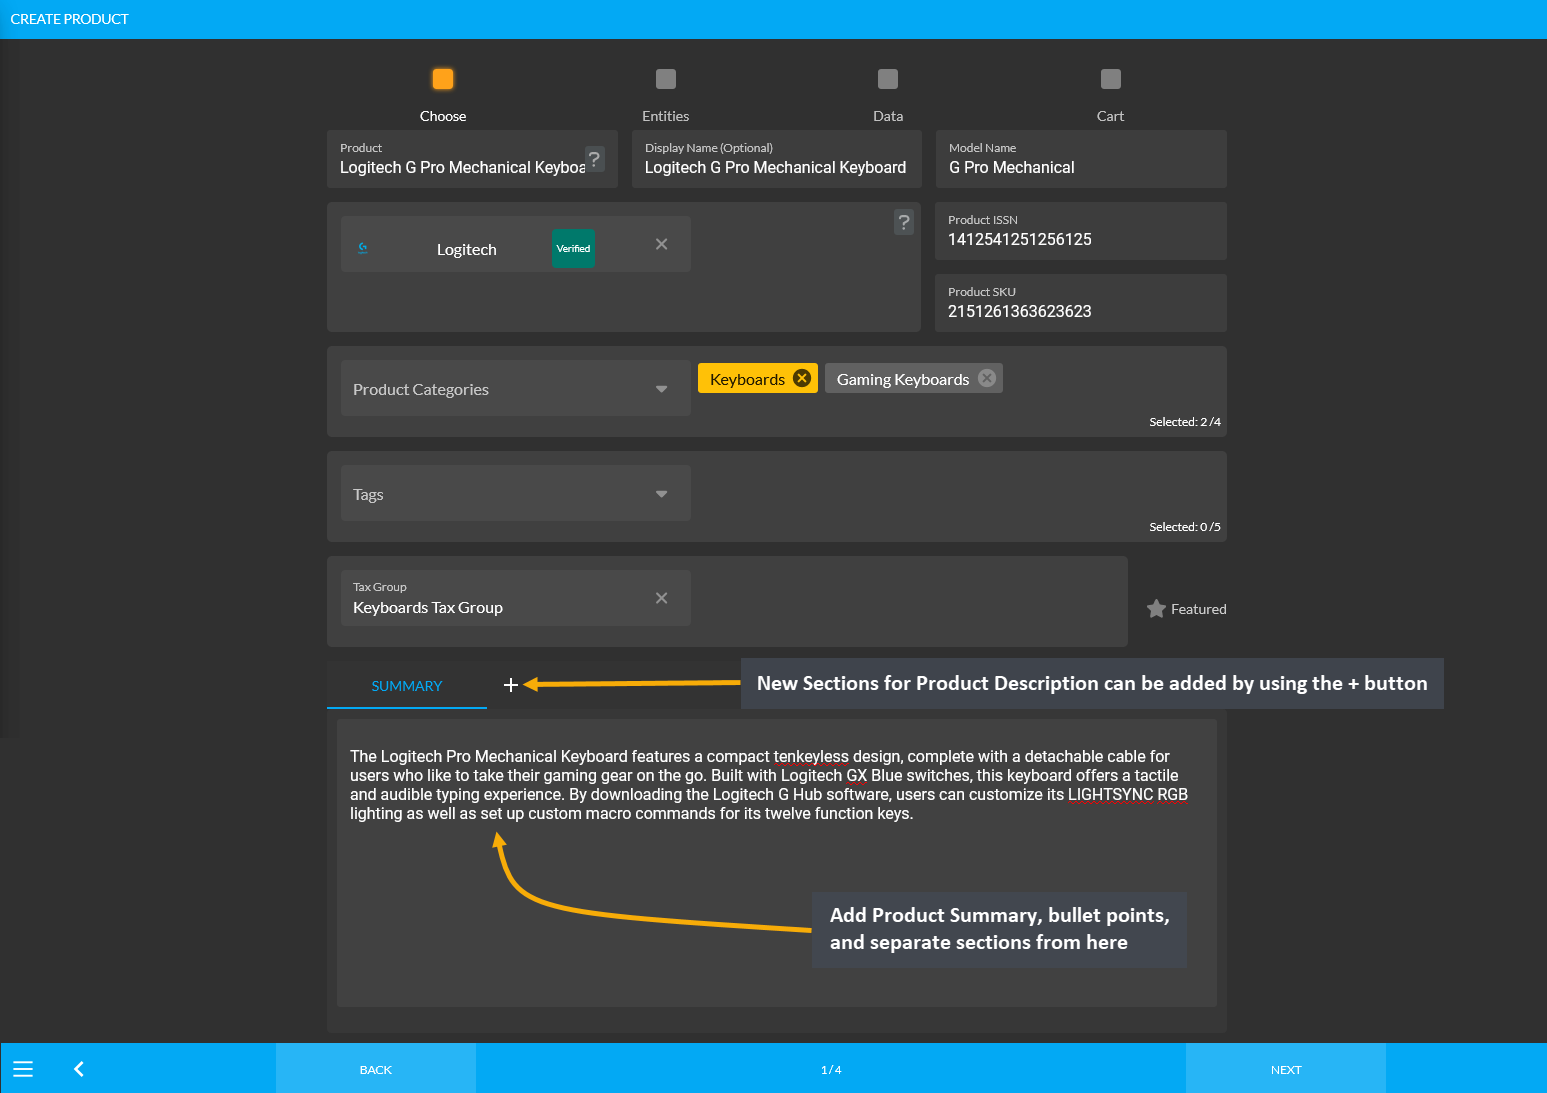
Image: Add Product Description in paragraphs, sections, or bullet points within the Summary box.
How can Product Attributes be added during Product creation?
- Product Attributes are properties that describe a Product. They can be selected with Single or Multi Value.
- For creating a Product under a Category, the Product will need to have attributes.
- When a Category is selected for a Product, some pre-defined attribute fields will become available.
- Fill in these attribute fields with Single or Multi Value to highlight Product characteristics.
- New attributes can be added using the ADD button if they are not available within pre-defined list.
- Within a new pop-up, select Value type, fill out Name and Value, and click Save to create New Attribute.
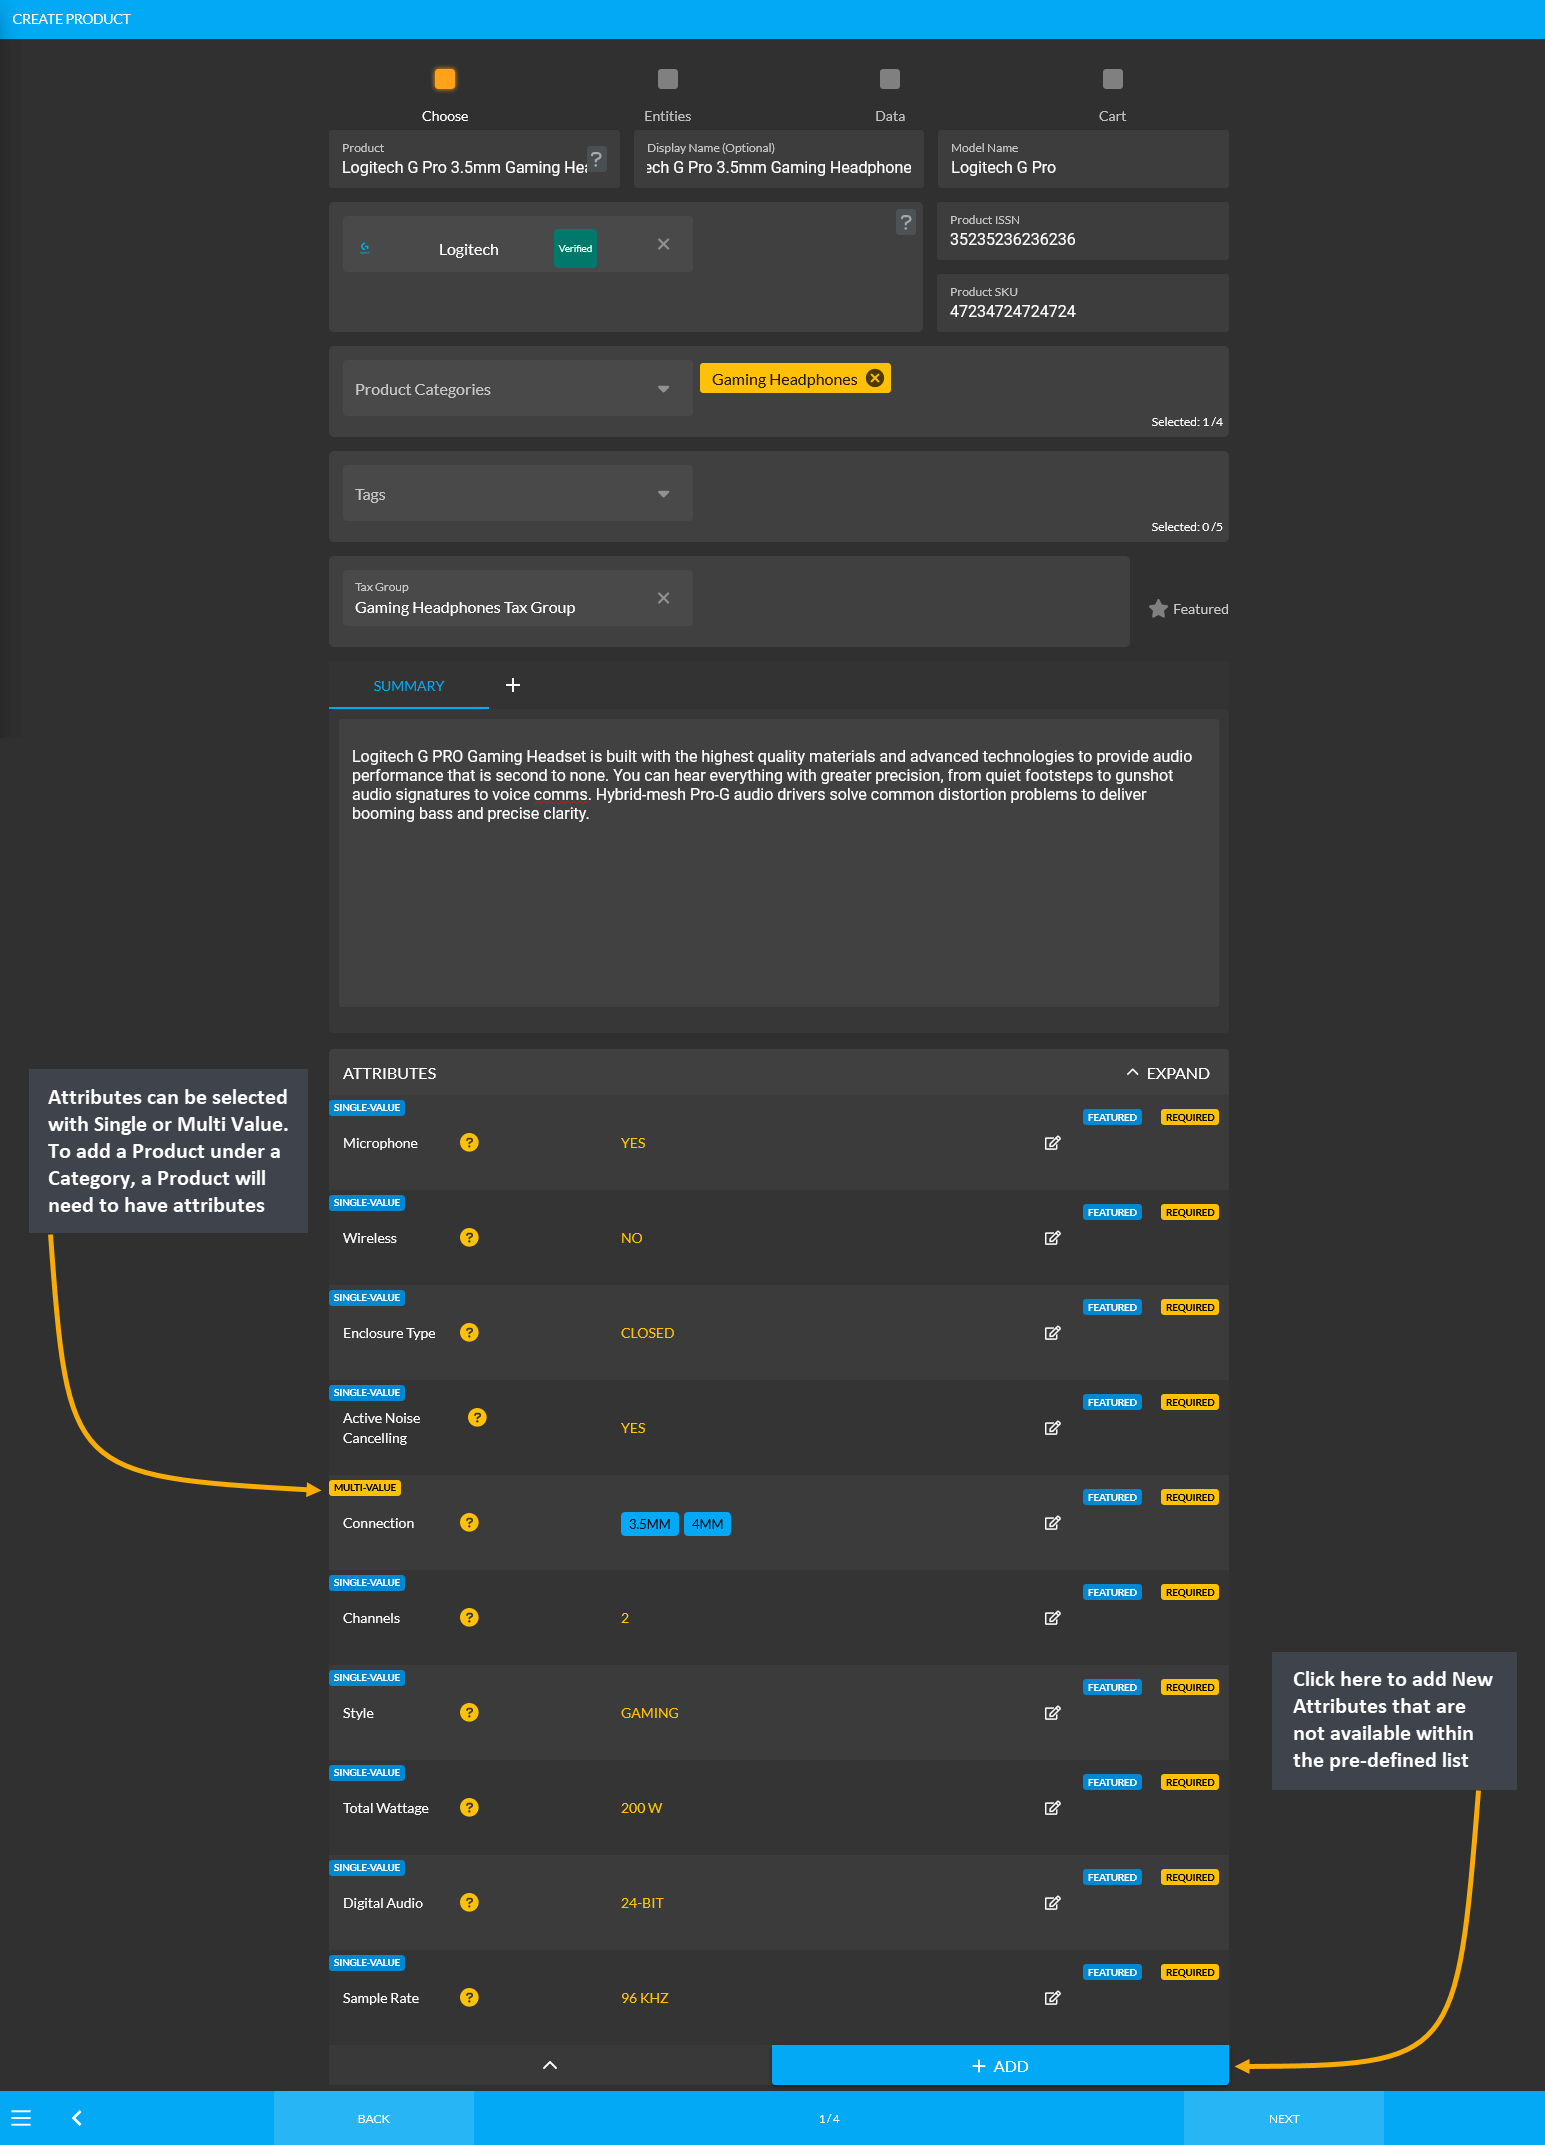
Image 1: Add Product Attributes with Single or Multi Value to highlight Product characteristics.

Image 2: Select Value type, fill out Name and Value, and click Save to create New Attribute.
How to filter Product(s) by Brand, Category, and Stock?
- Products can be filtered based on Brand, Category, and Stock from the Product List.
- On top middle section of the Page, the Stock can be filtered based on All, Low, and Out buttons.
- On the top right side of the Page, there are two separate Brand and Category filter dropdown menus.
- Type the Brand and Category names from these filter dropdown menus to filter specific Products.

Image: Filter specific Products using Stock Filter button and Brand and Category filter dropdown menus.
What is the function of Global Products?
- Global Products contain pre-defined templates that can be duplicated to create New Products.
- They contain pre-filled information like name, SKU, attributes, brand, category, and images.
- List and sell branded Product(s) instantly on the Shop using pre-defined Global Product templates.
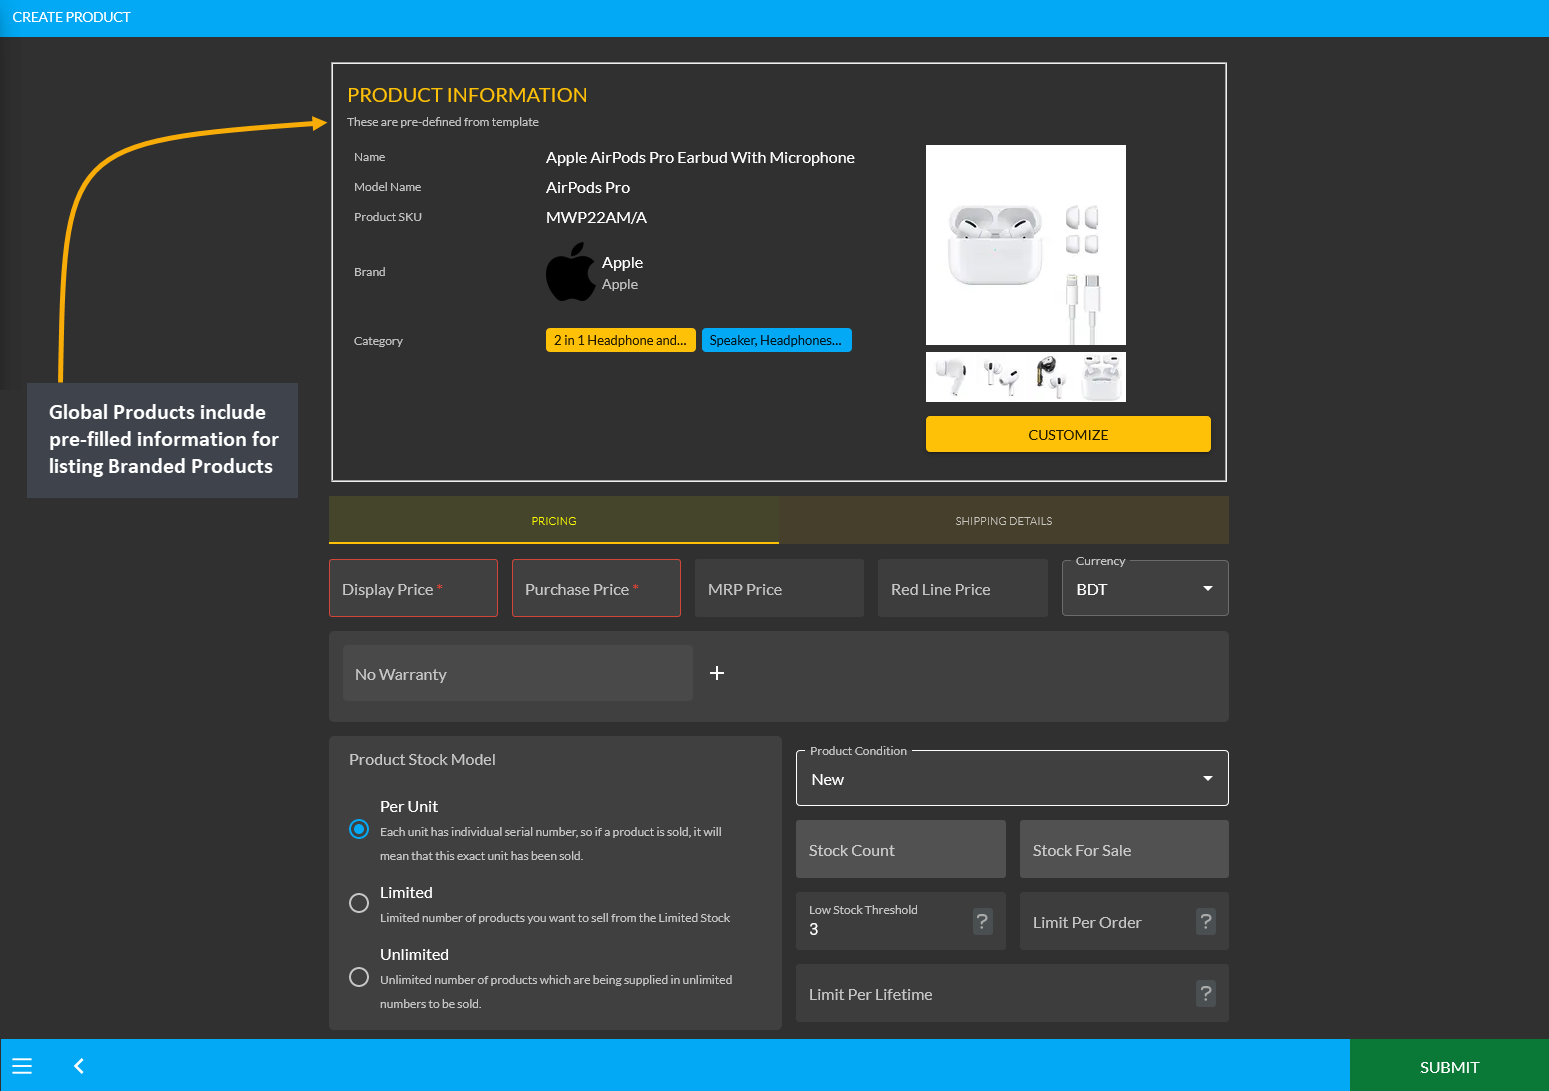
Image: Global Products contain pre-filled information for instantly listing branded Products.
How to update a Product Stock instantly or use the Back Stock Feature?
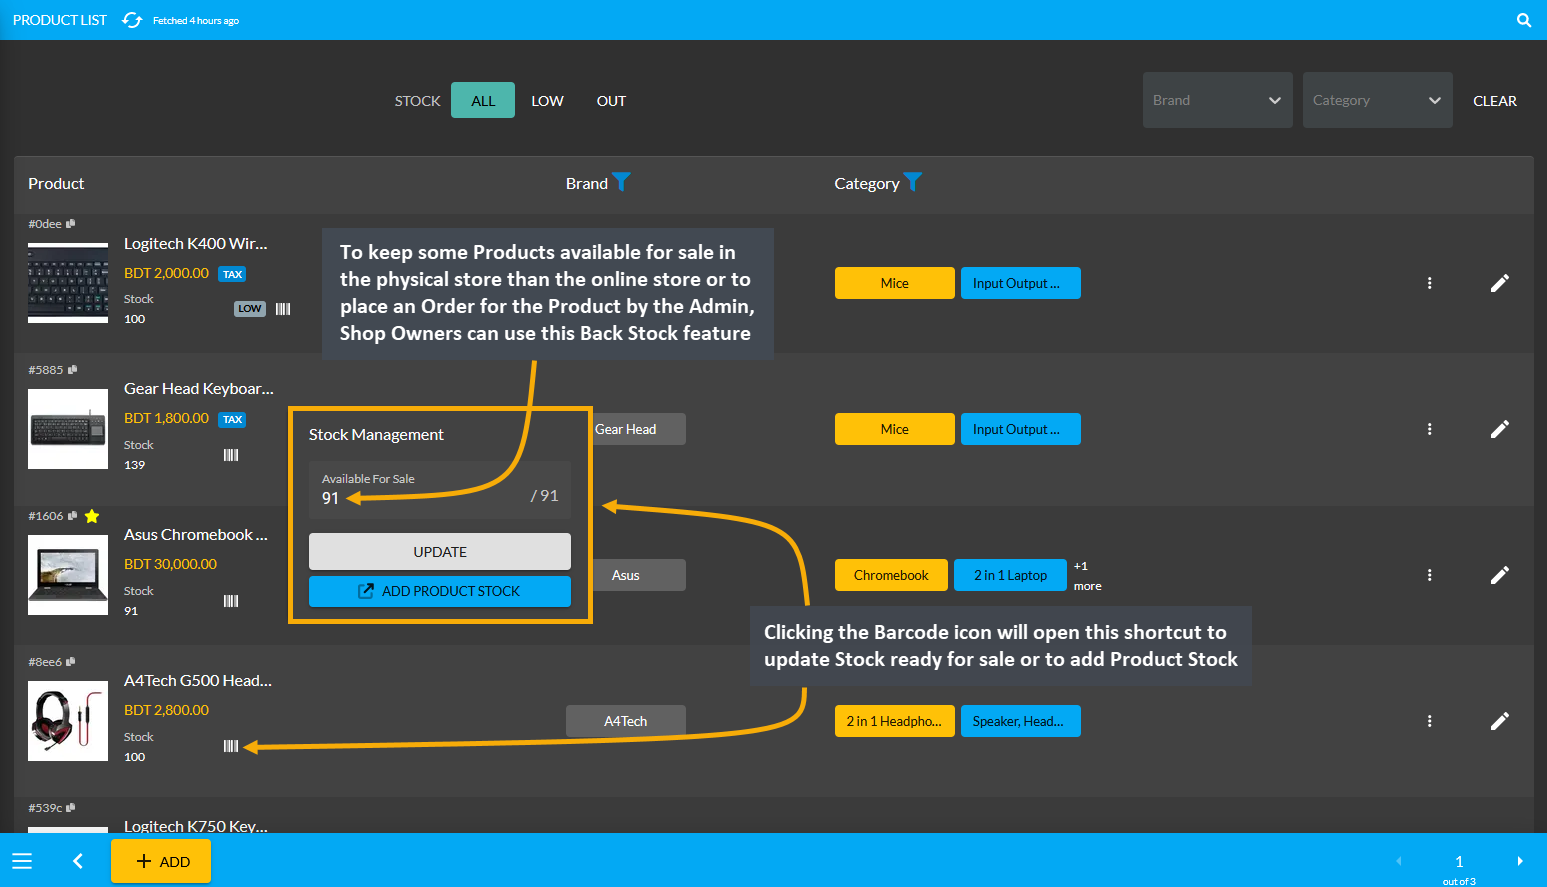
Image: Update a Product Stock instantly by clicking on the Barcode icon that will open a shortcut menu.
How to create a New Brand if a Product Brand cannot be found under the pre-defined list?
- Create a New Brand by clicking on the + or ADD button from Brands tab under Product Settings.
- It will redirect to a separate search page from where New Brands can be created.
- Now type the Brand Name in the search box. If the Brand is not available, then click on ADD NEW button.
- It will redirect to a new page for creating a New Brand called the Create Brand page.
- Here, fill out the Name, Shorter Name, add Aliases, input website URL, and upload Brand logo.
- Use the toggle button to make the Brand Active or Inactive and lick Submit to create New Brand.
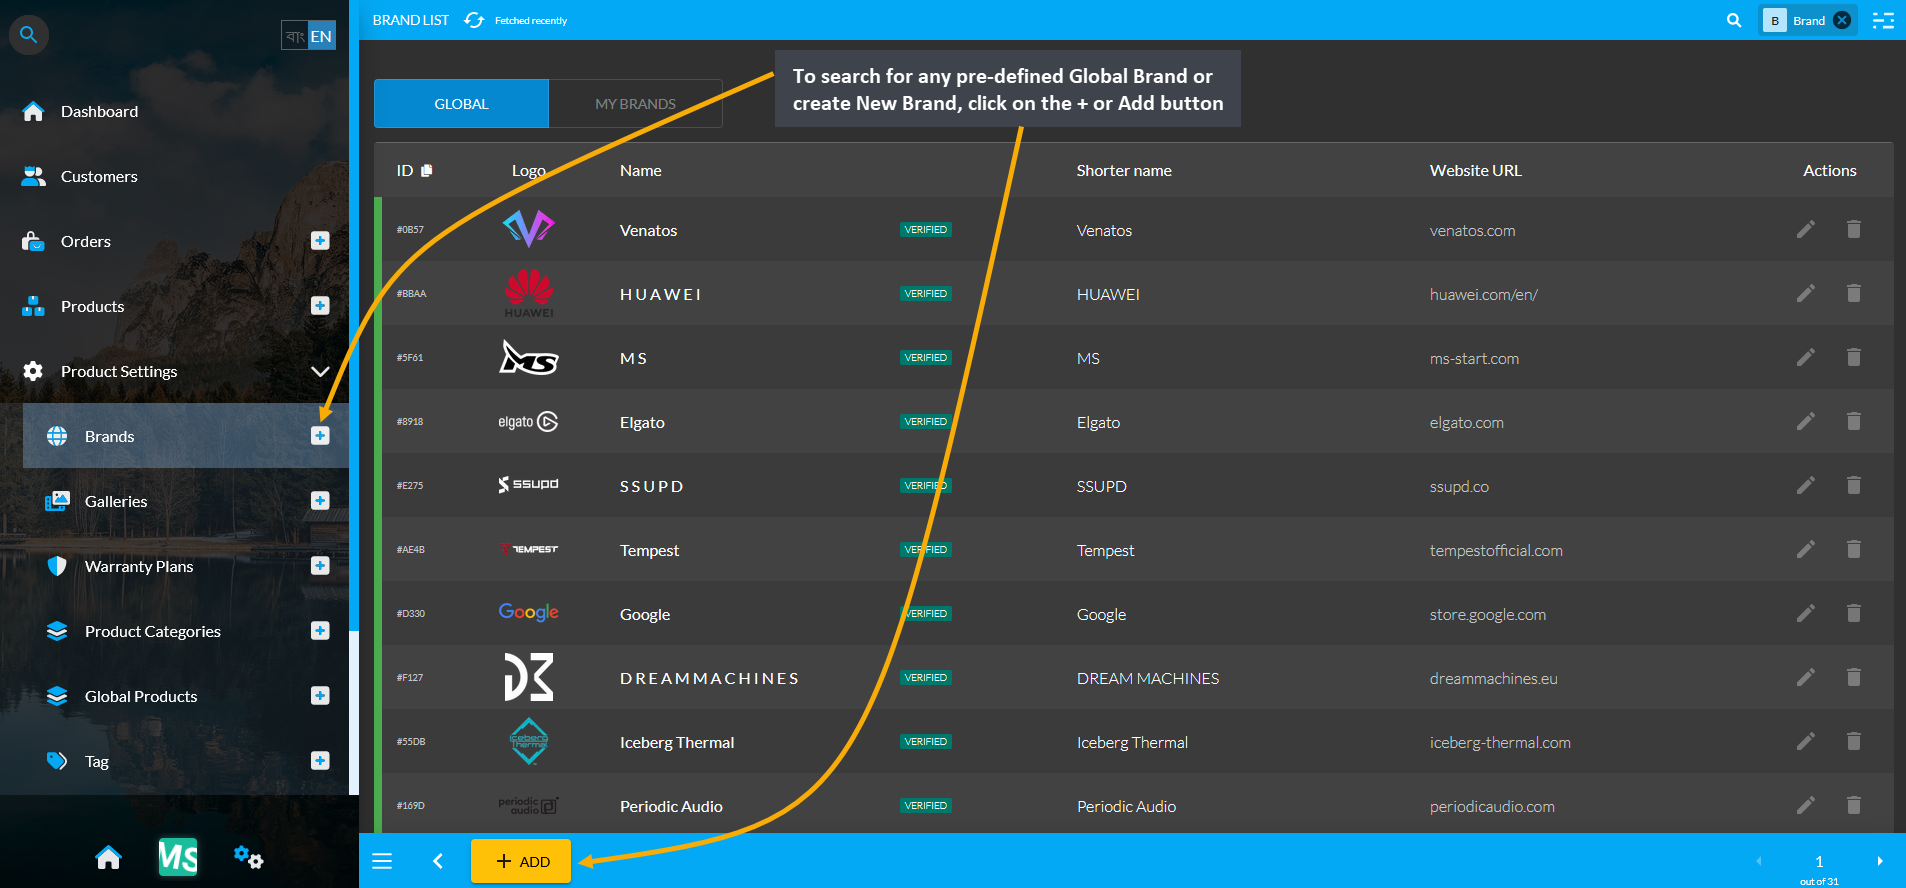
Image 1: Create a New Brand by clicking on the + or ADD button from Brands tab under Product Settings.
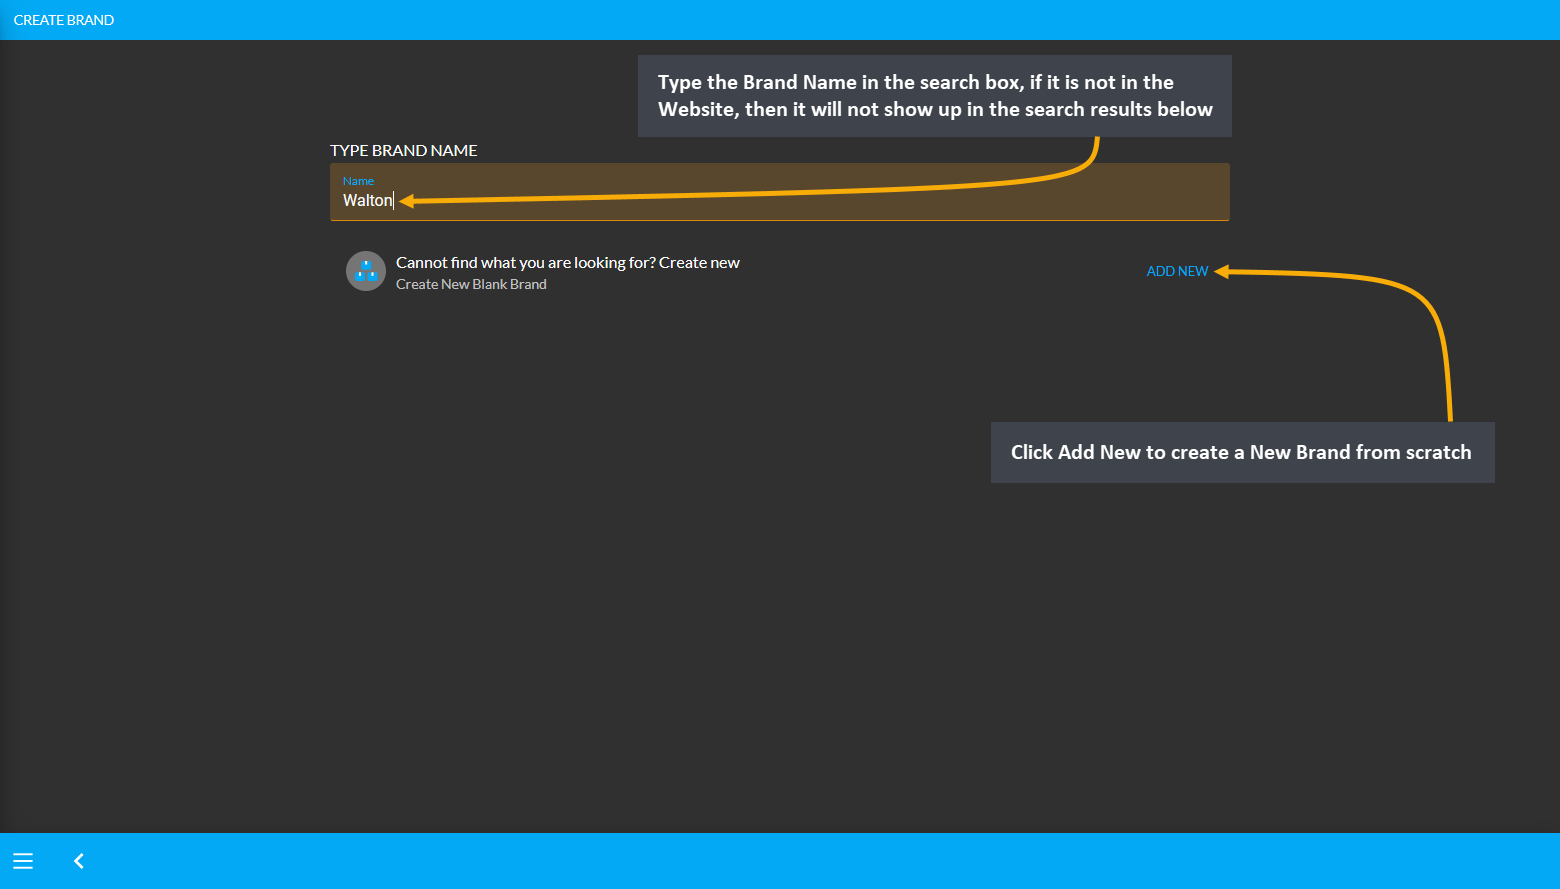
Image 2: Type the Brand Name in the search box, if the Brand is not available, click on ADD NEW button.
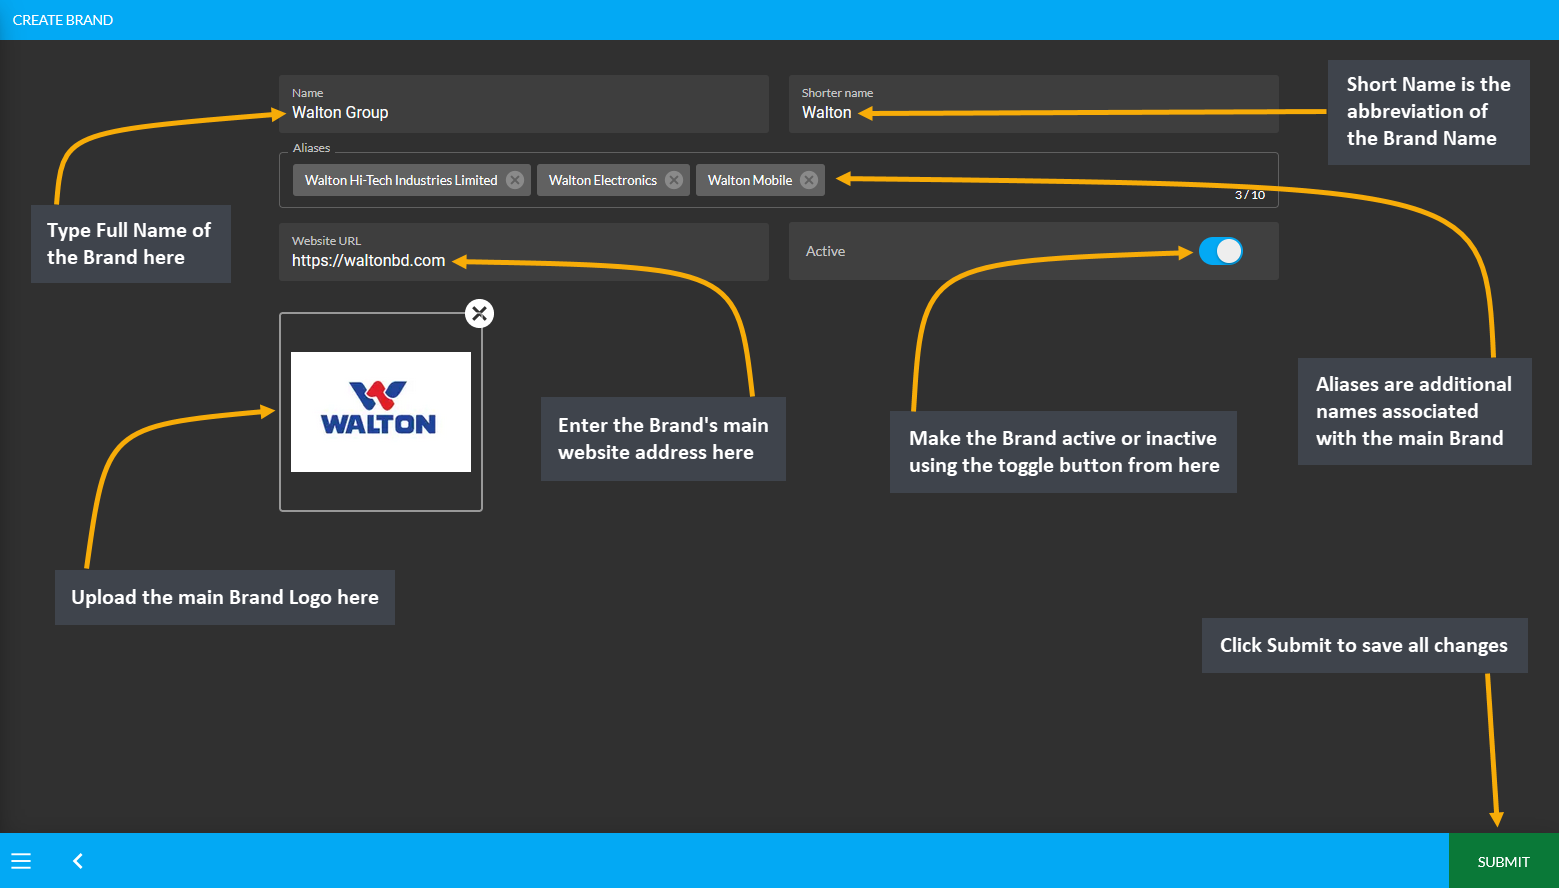
Image 3: Fill out Name, Shorter Name, add Aliases, input website URL, upload Brand logo, and click Save.
What are the functions of the Gallery tab?
- Product Images or YouTube videos can be added in advance through Galleries.
- The already created Gallery List will show up under My Galleries.
- New Galleries can be created beforehand for Product(s) and Branches.
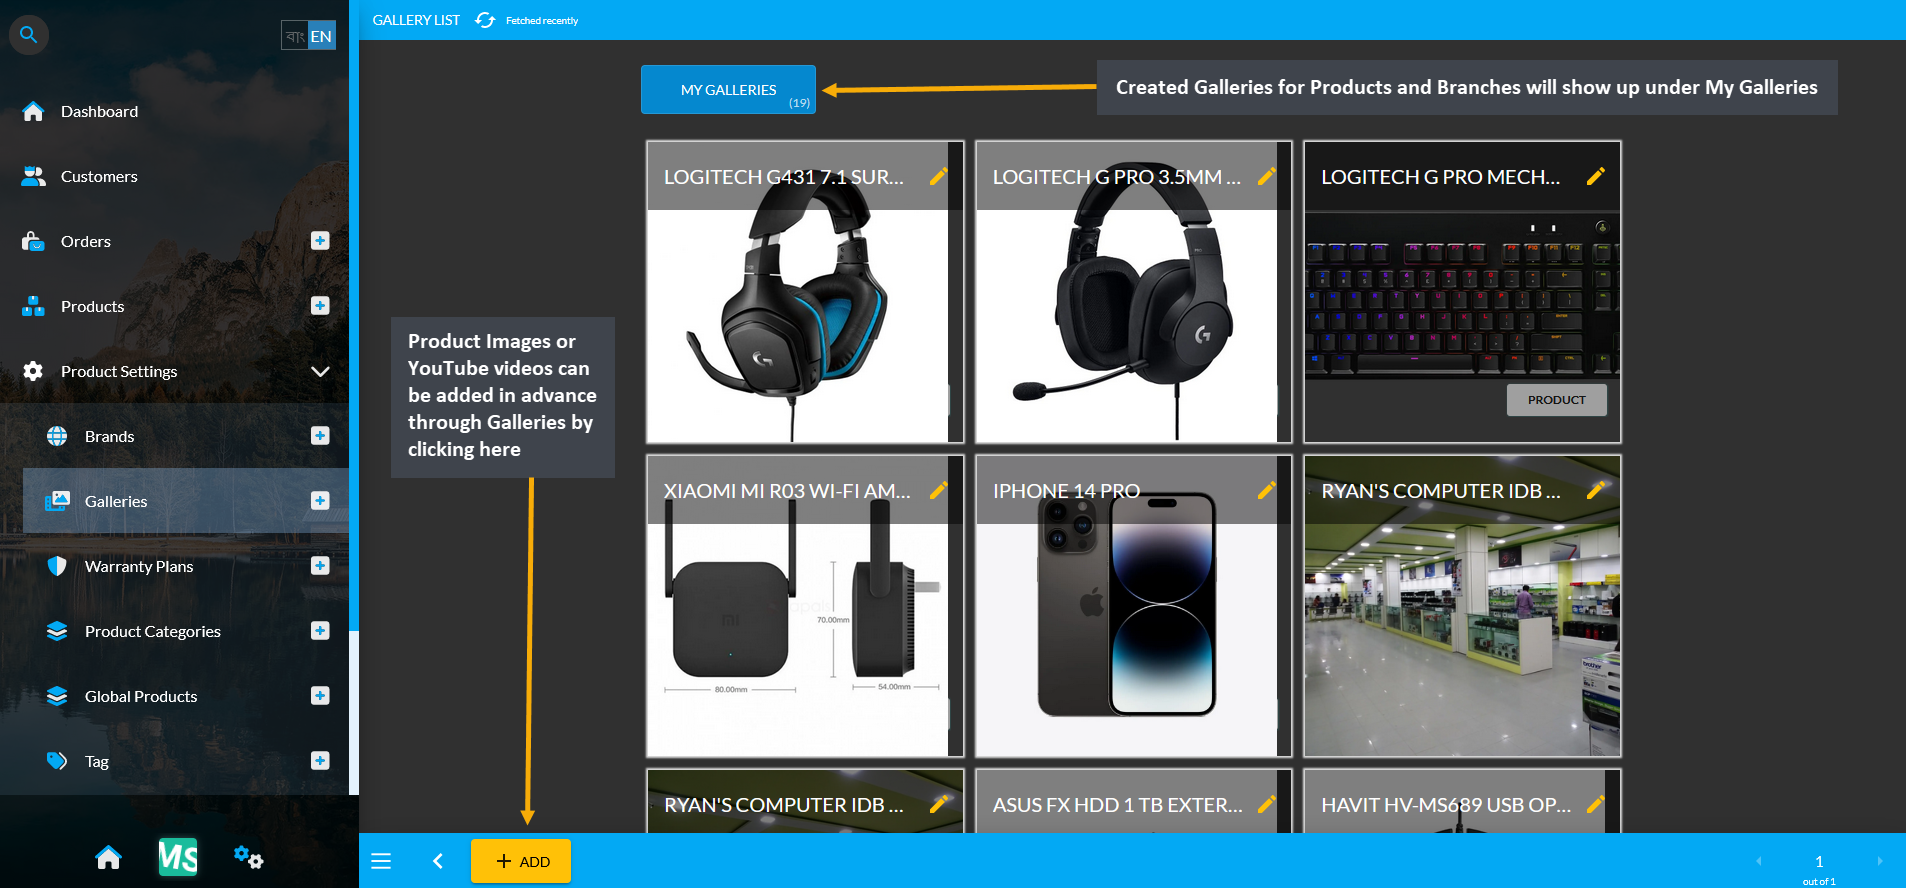
Image: Product Images or YouTube videos can be added in advance through Galleries.
How to create a Product Gallery from the Admin Panel?
- Click on the + or ADD button from the Galleries tab that will redirect to a new page.
- Fill out Gallery Name and Gallery Description and select Product from Gallery Type.
- Add Product images by clicking on the Upload from Device icon.
- Add YouTube videos by clicking on Embed YouTube Video icon and paste link to embed.
- Gallery items can be dragged and reordered as needed.
- Click Submit button to save all the changes.
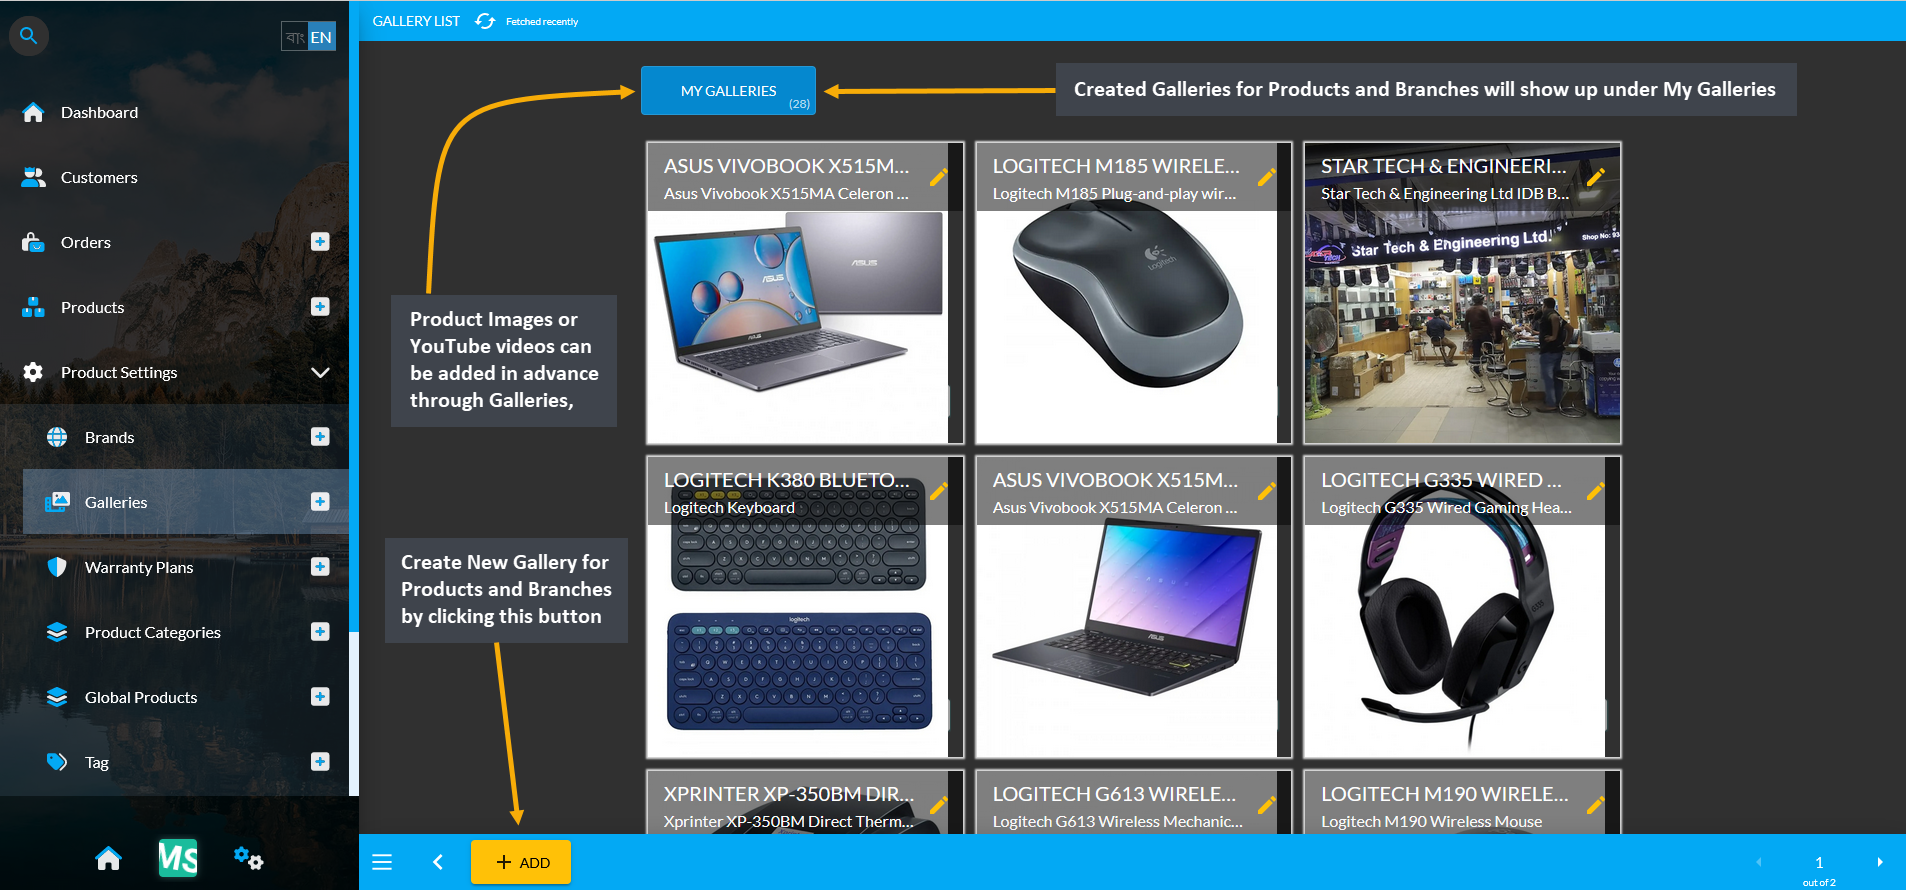
Image 1: Click on the + or ADD button from the Galleries tab that will redirect to a new page.
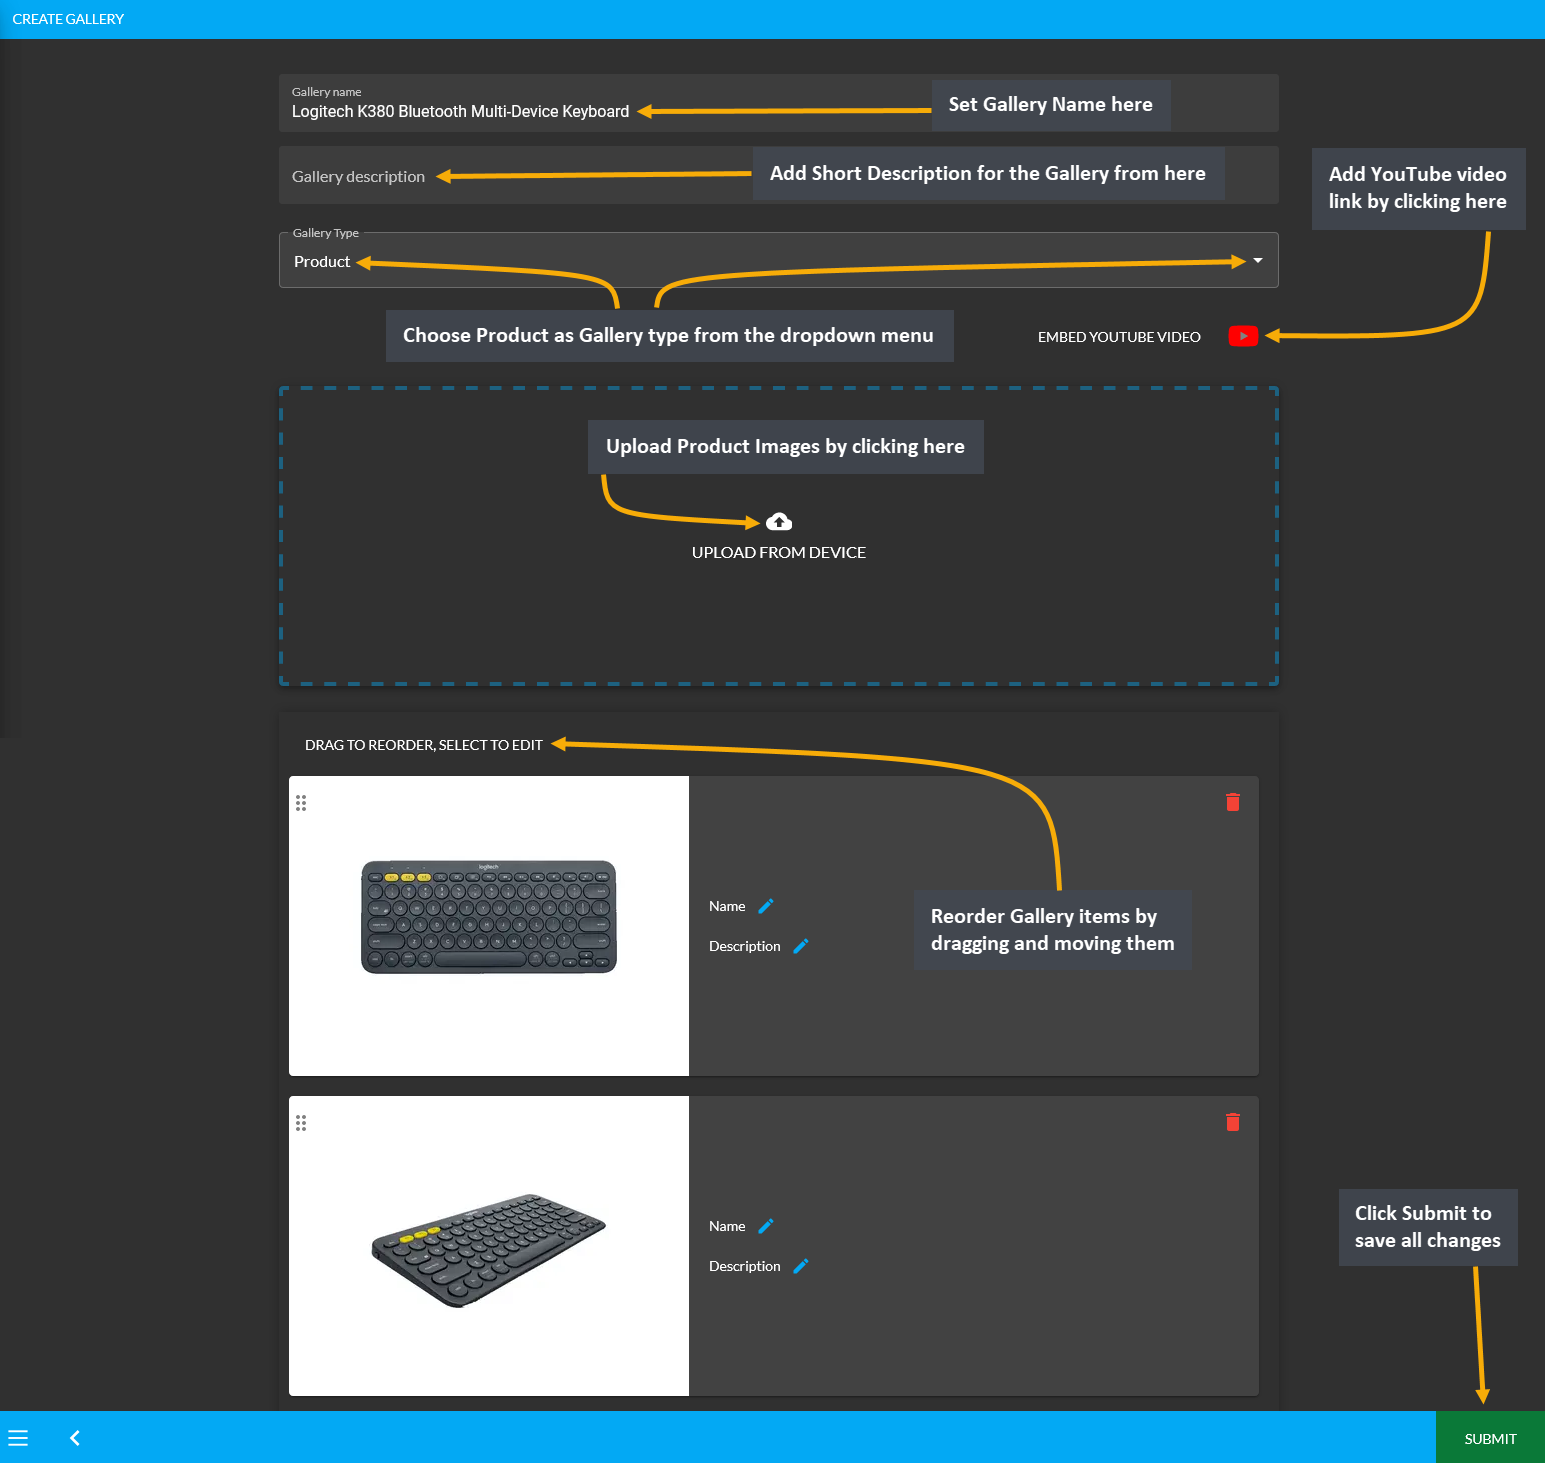
Image 2: Fill out Gallery Name, Description, select Gallery type, add Product images, and videos.
How to create Branch Gallery from the Admin Panel?
- Click on the + or ADD button from the Galleries tab that will redirect to a new page.
- Fill out Gallery Name and Gallery Description and select Branch from Gallery Type.
- Upload Branch images by clicking on the Upload from Device icon.
- Add YouTube videos by clicking on Embed YouTube Video icon and paste link to embed.
- Gallery items can be dragged and reordered as needed.
- Click the Submit button to save all the changes.

Image 1: Click on the + or ADD button from the Galleries tab that will redirect to a new page.
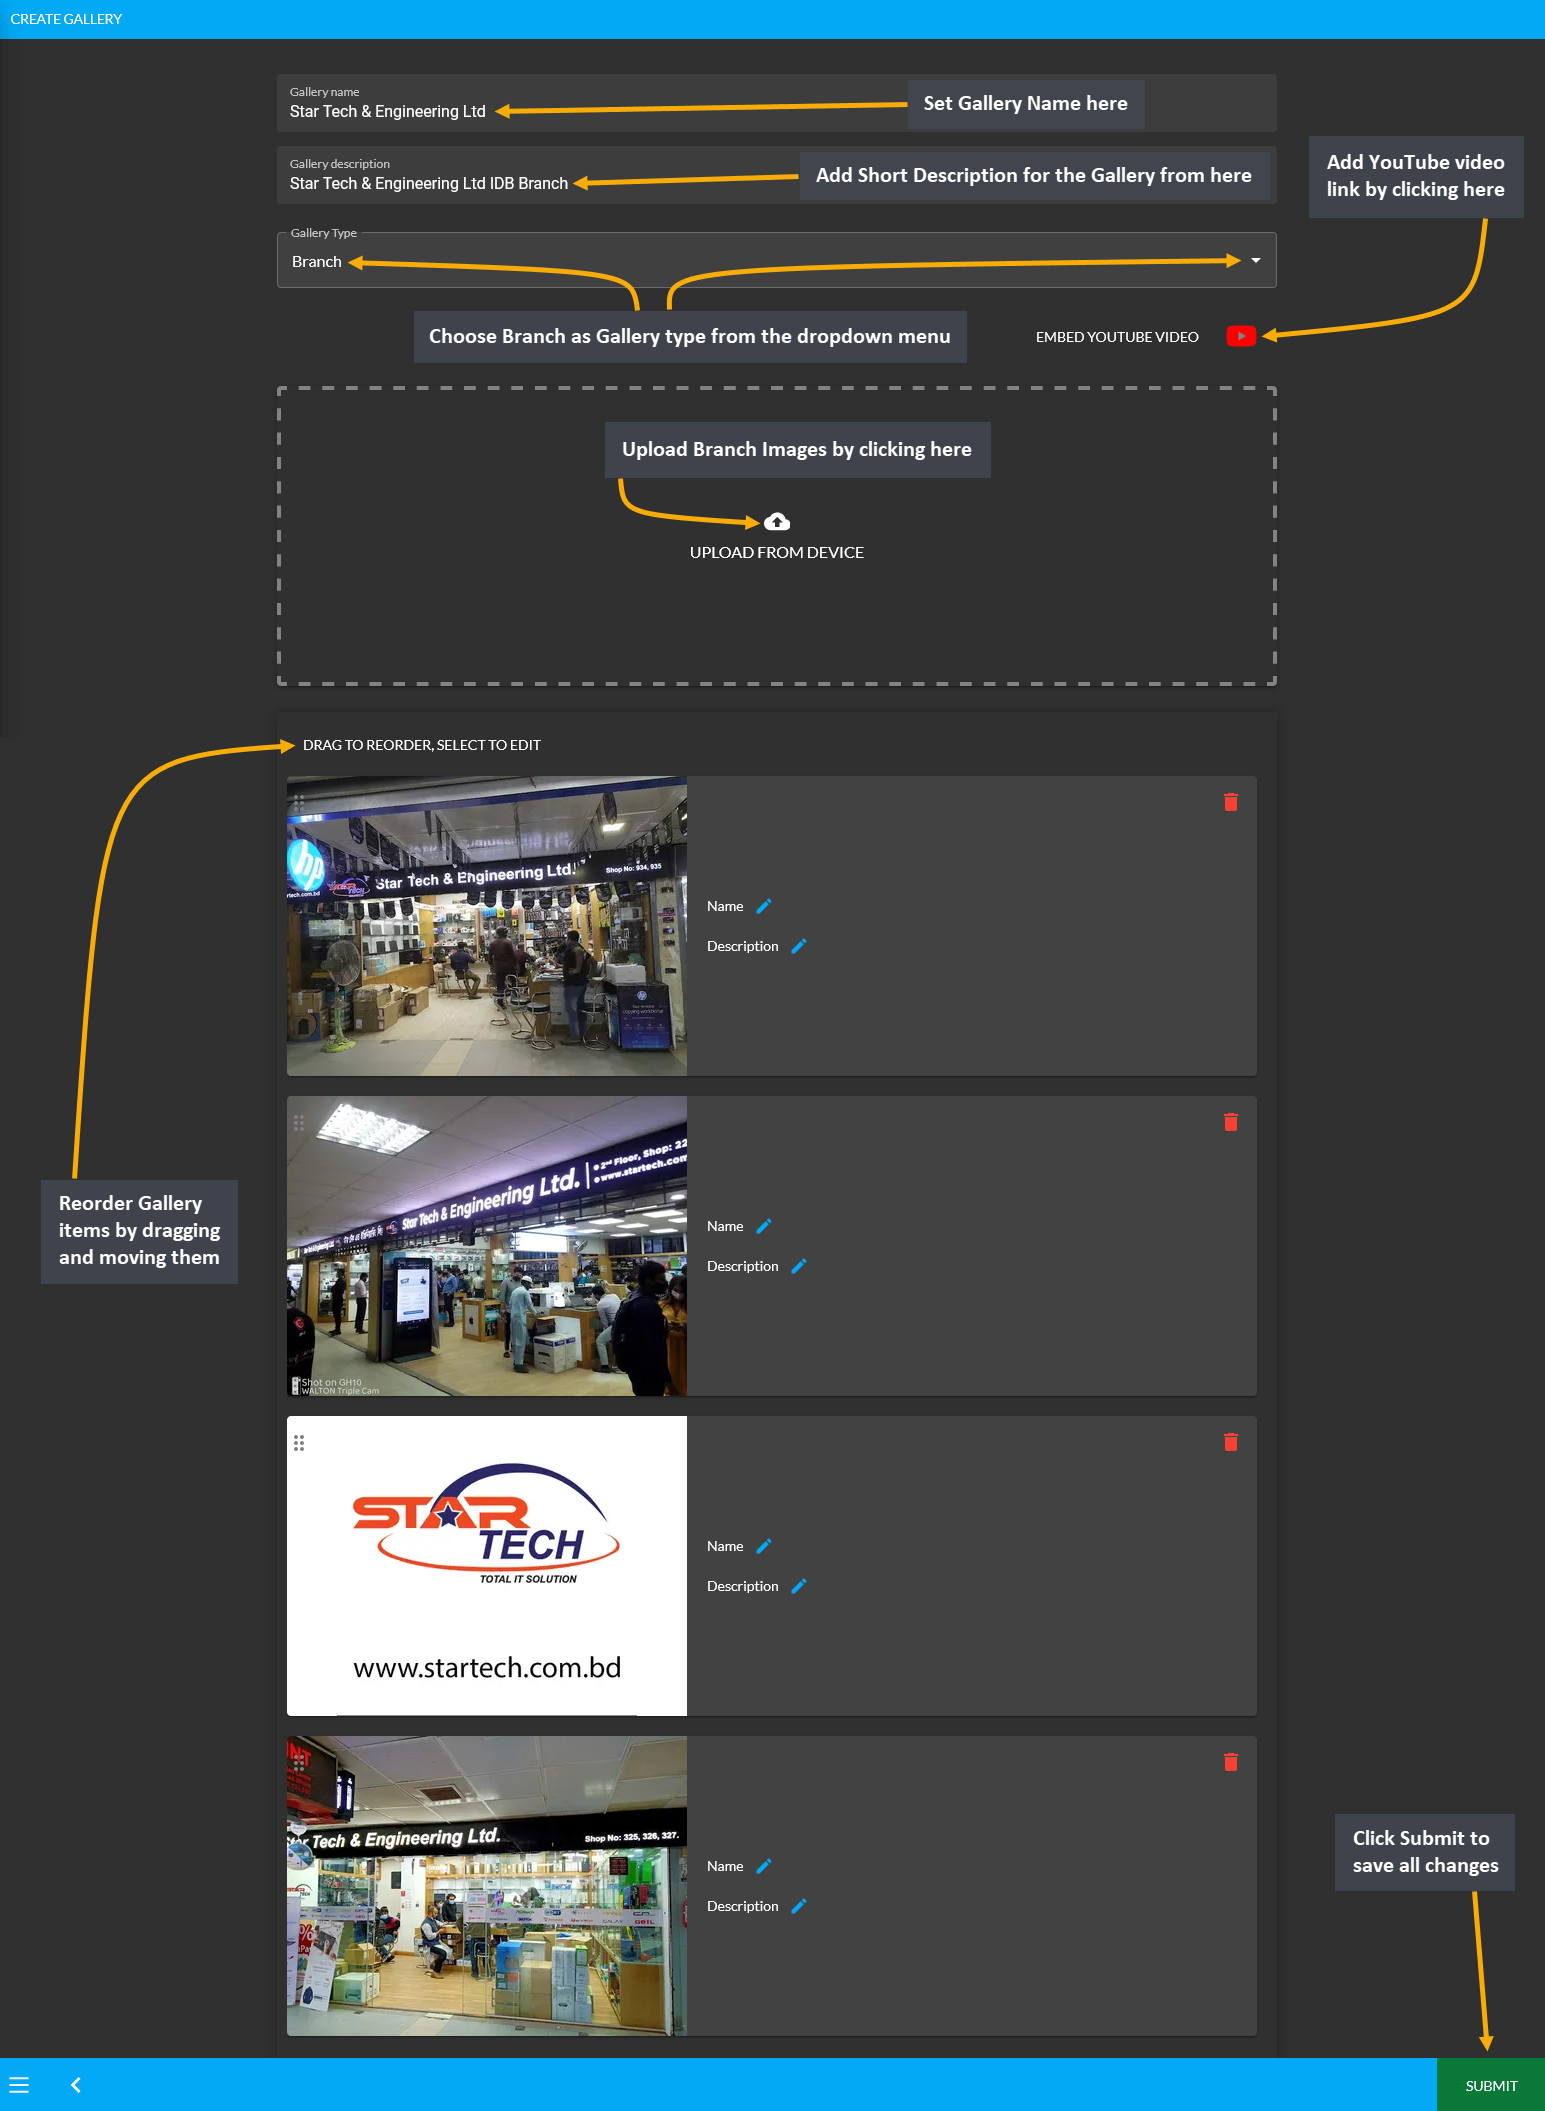
Image 2: Fill out Gallery Name, Description, select Gallery type, add Branch images, and videos.
How to create New Product Warranty Plans?
- From Warranty Plans tab, click the + or ADD button that will redirect to Create Warranty Plan page.
- Type the full name of Warranty for display and use the blue toggle button to keep the warranty active.
- Choose warranty plans that apply to the new warranty by clicking on the Select button for each.
- Clicking on the yellow Select button will open a pop-up from where desired warranty plan can be selected.
- Select the Warranty Plan and click Save to add the plan to the newly created Warranty.
- After selecting Warranty Plans, click Submit to save all the changes and create new Warranty Plan.
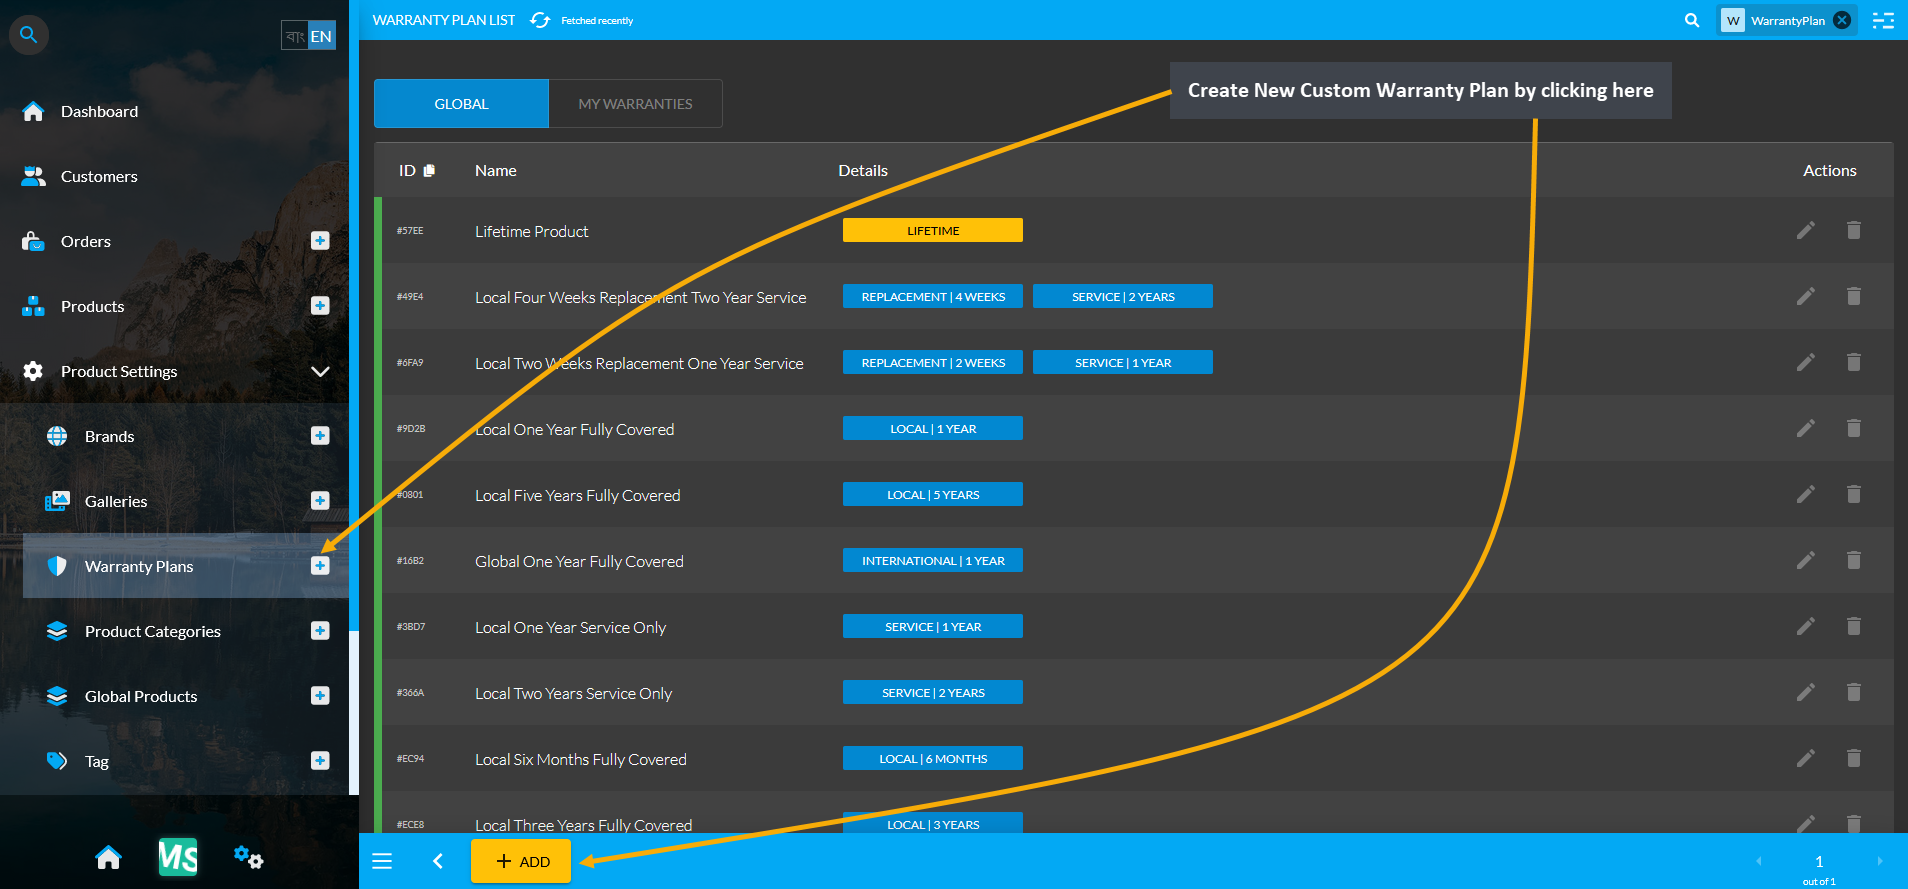
Image 1: From Warranty Plans tab, click the + or ADD button to redirect to Create Warranty Plan page.
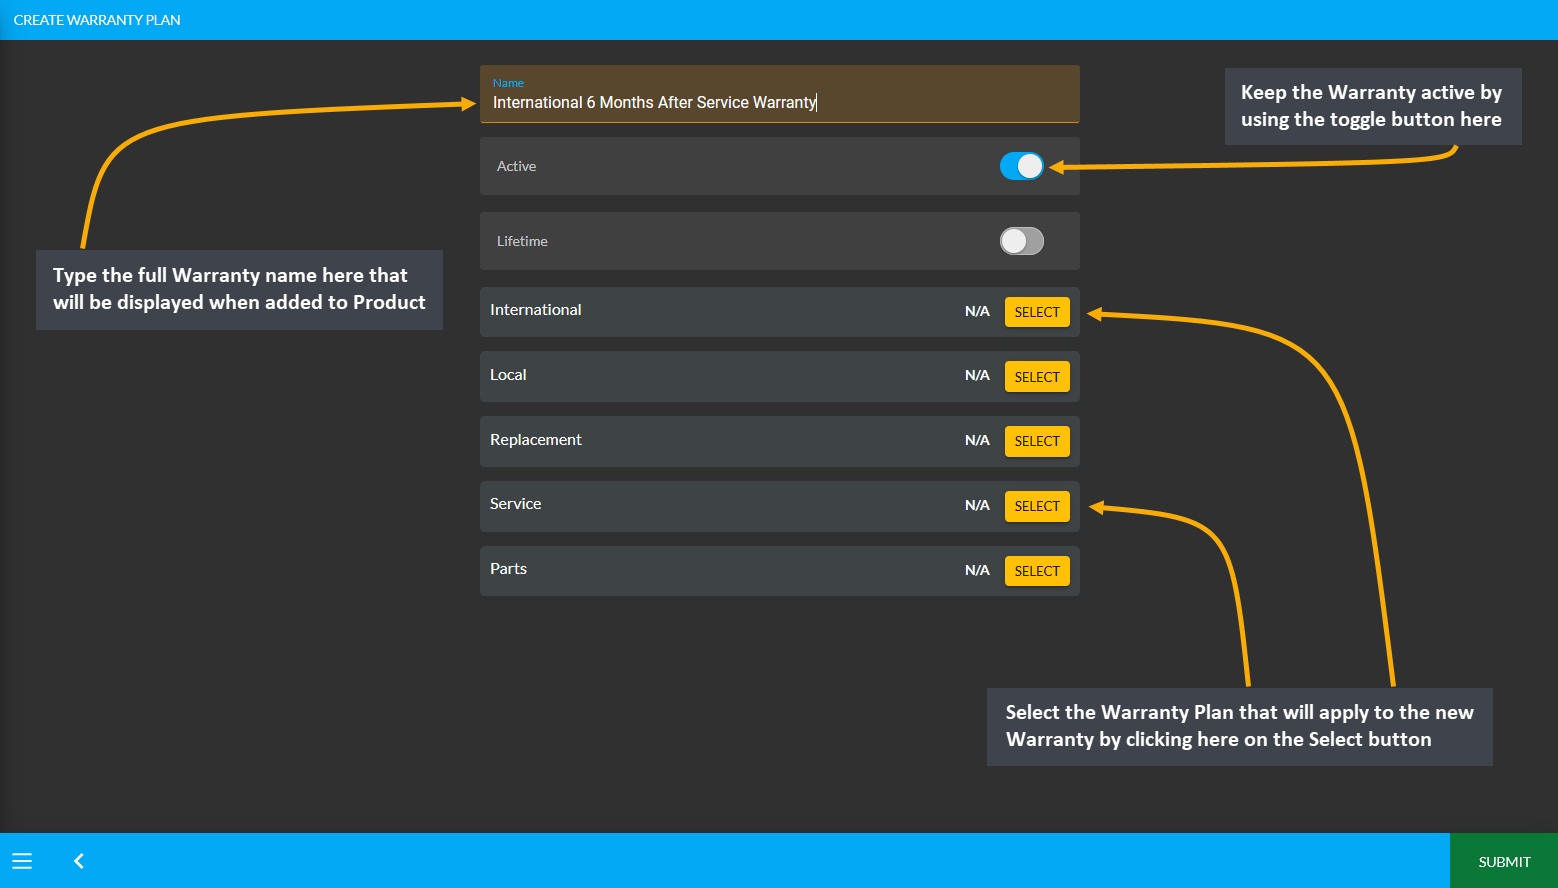
Image 2: Type full Warranty Name for display, use toggle button to keep warranty active, and select plans.
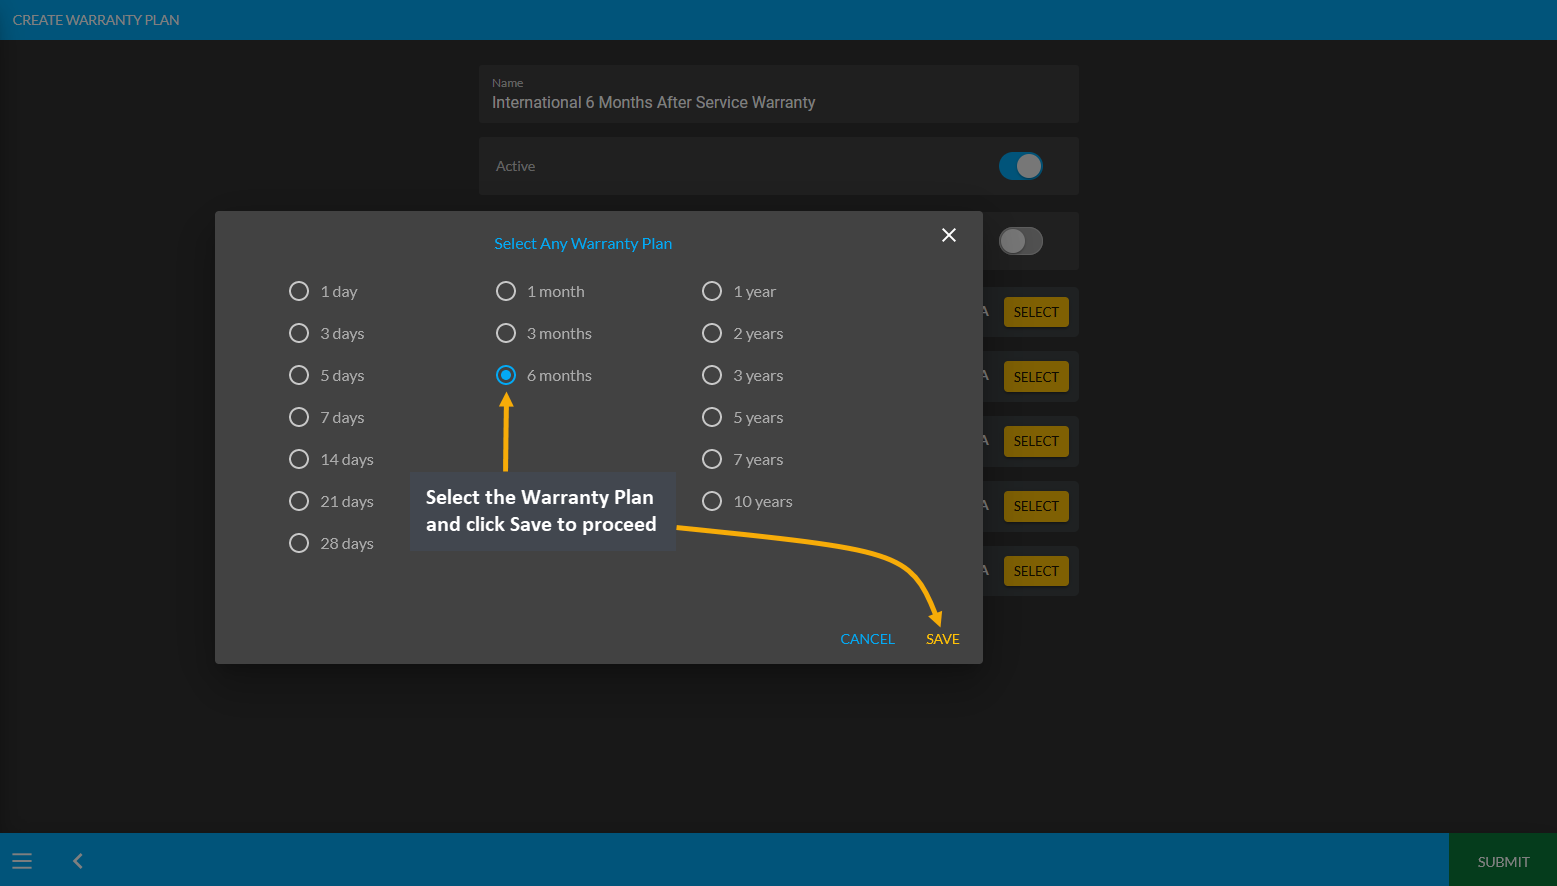
Image 3: Clicking the Select button will open a pop-up from where desired warranty plan can be selected.
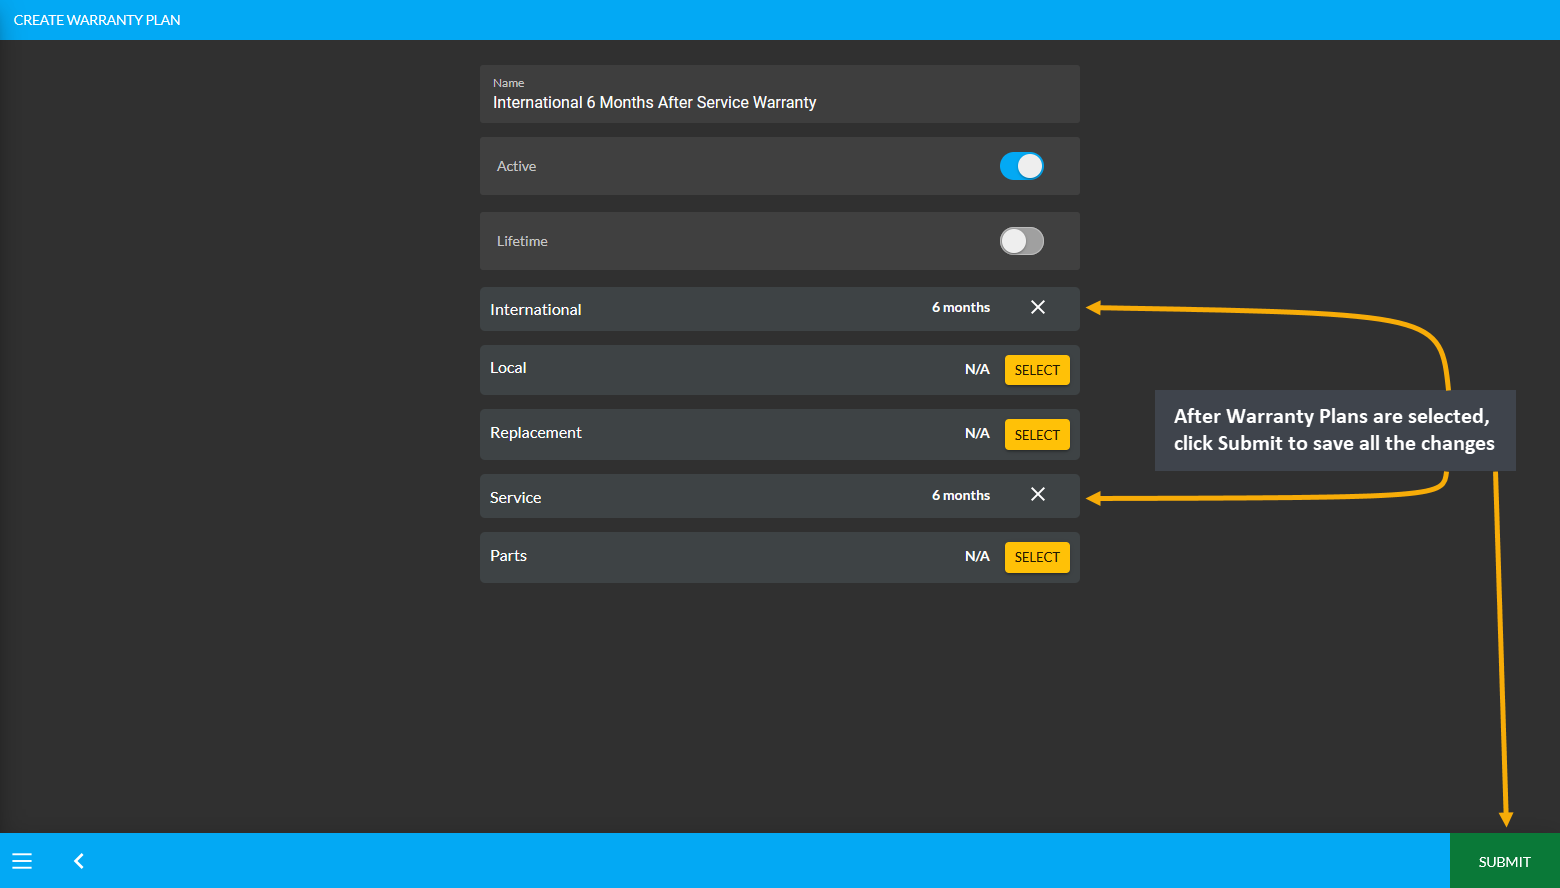
Image 4: After selecting Warranty Plans, click Submit to save all the changes and create new Warranty Plan.
From where can the list of Product Categories be checked?
The entire list of Product Categories can be checked by opening Product Categories from under Product Settings.
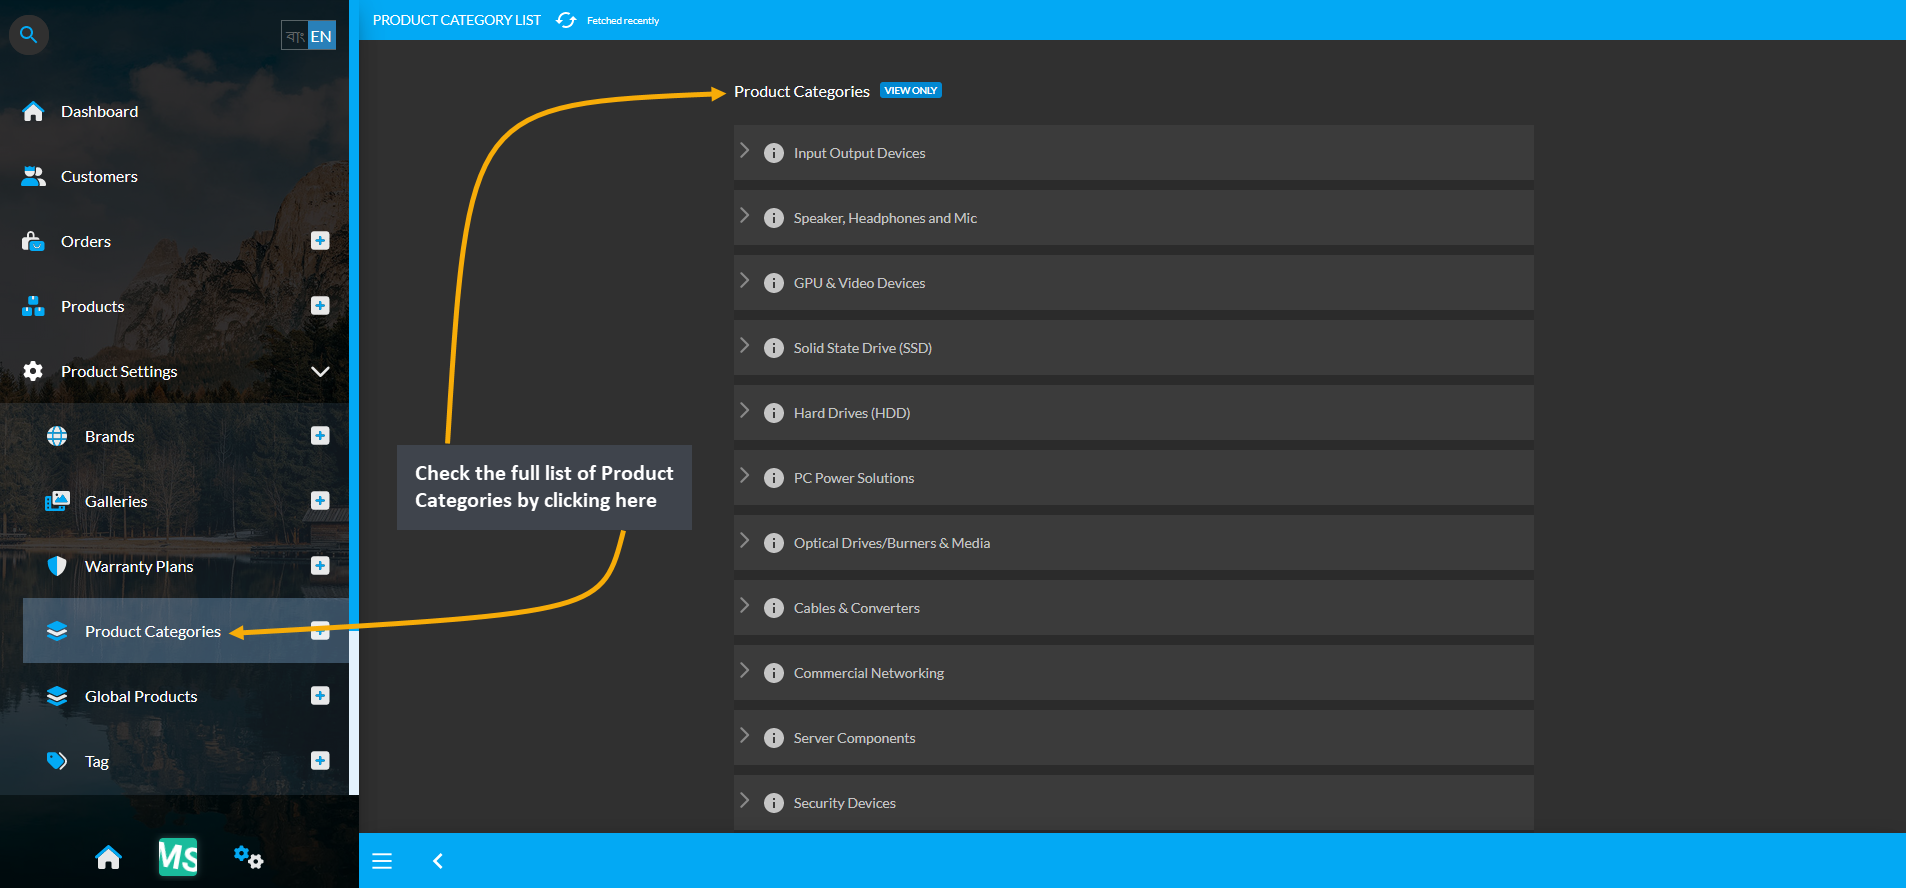
Image: Check the full list of Product Categories from the Product Categories tab under Product Settings.
How to add pre-defined Product Category when creating Product(s)?
- Product Categories are Pre-defined, so Shop Owners will not be able to create Categories.
- The Shop Owners will have to use the Product Categories that are provided in the system.
- During Product creation, Product Category can be selected from the dropdown menu provided.
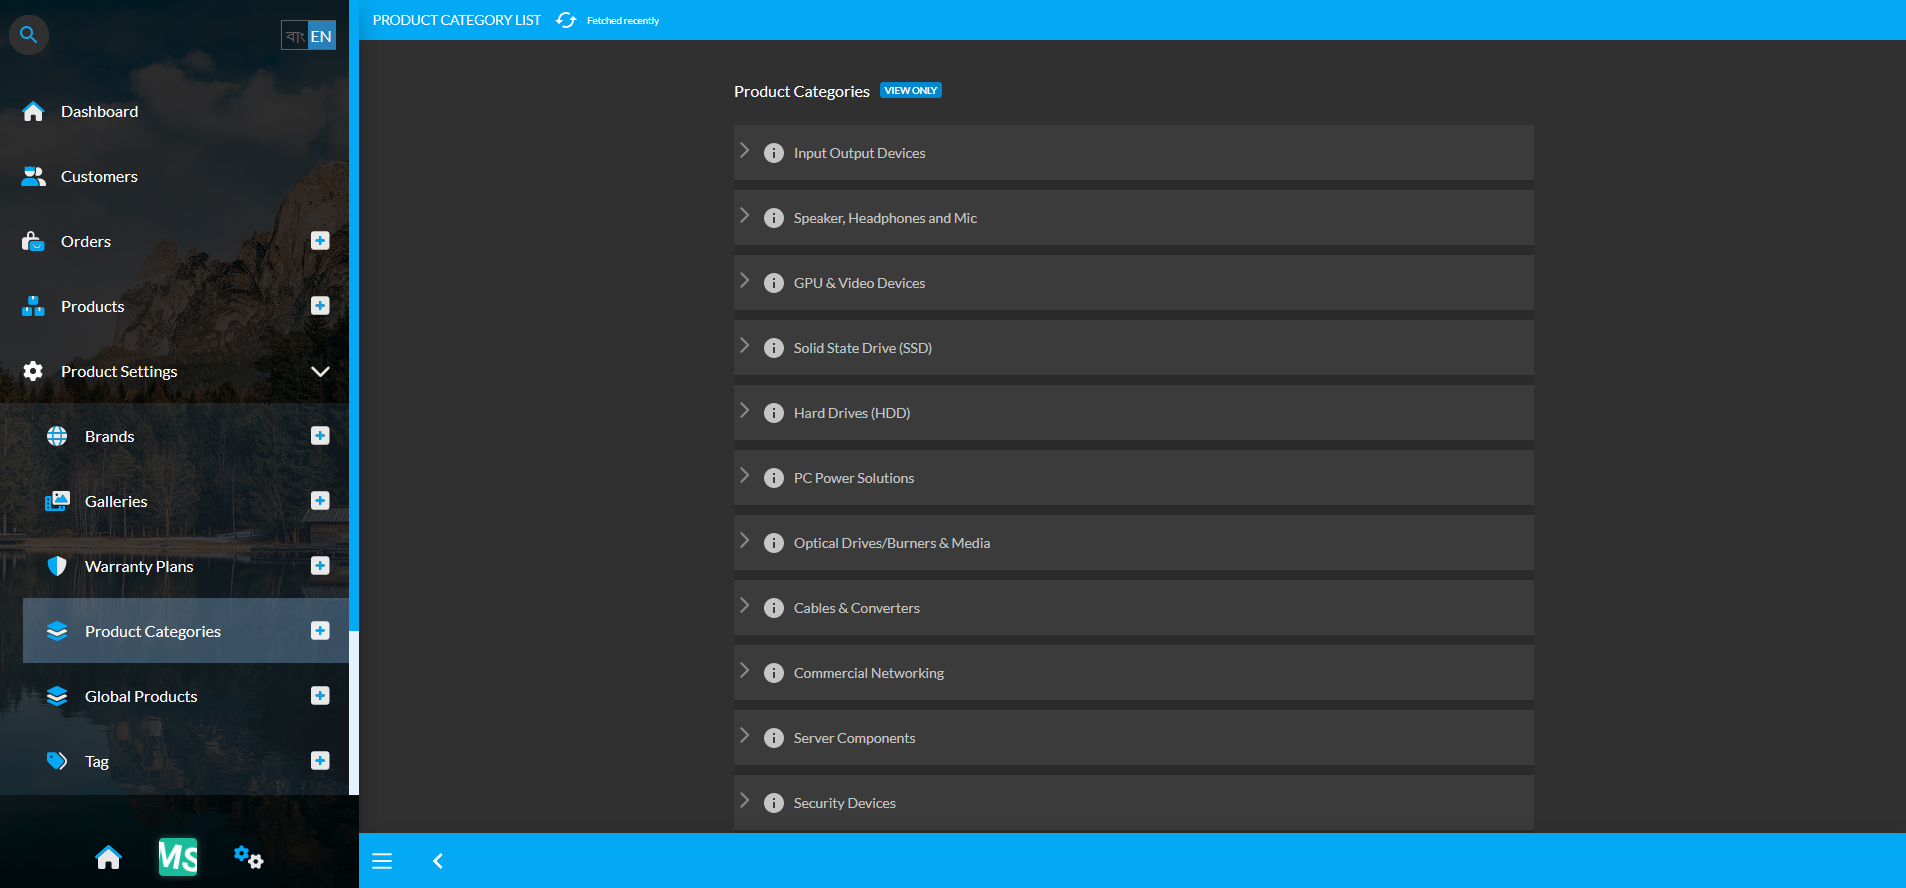
Image 1: Product Categories are Pre-defined, so Shop Owners will not be able to create Categories.
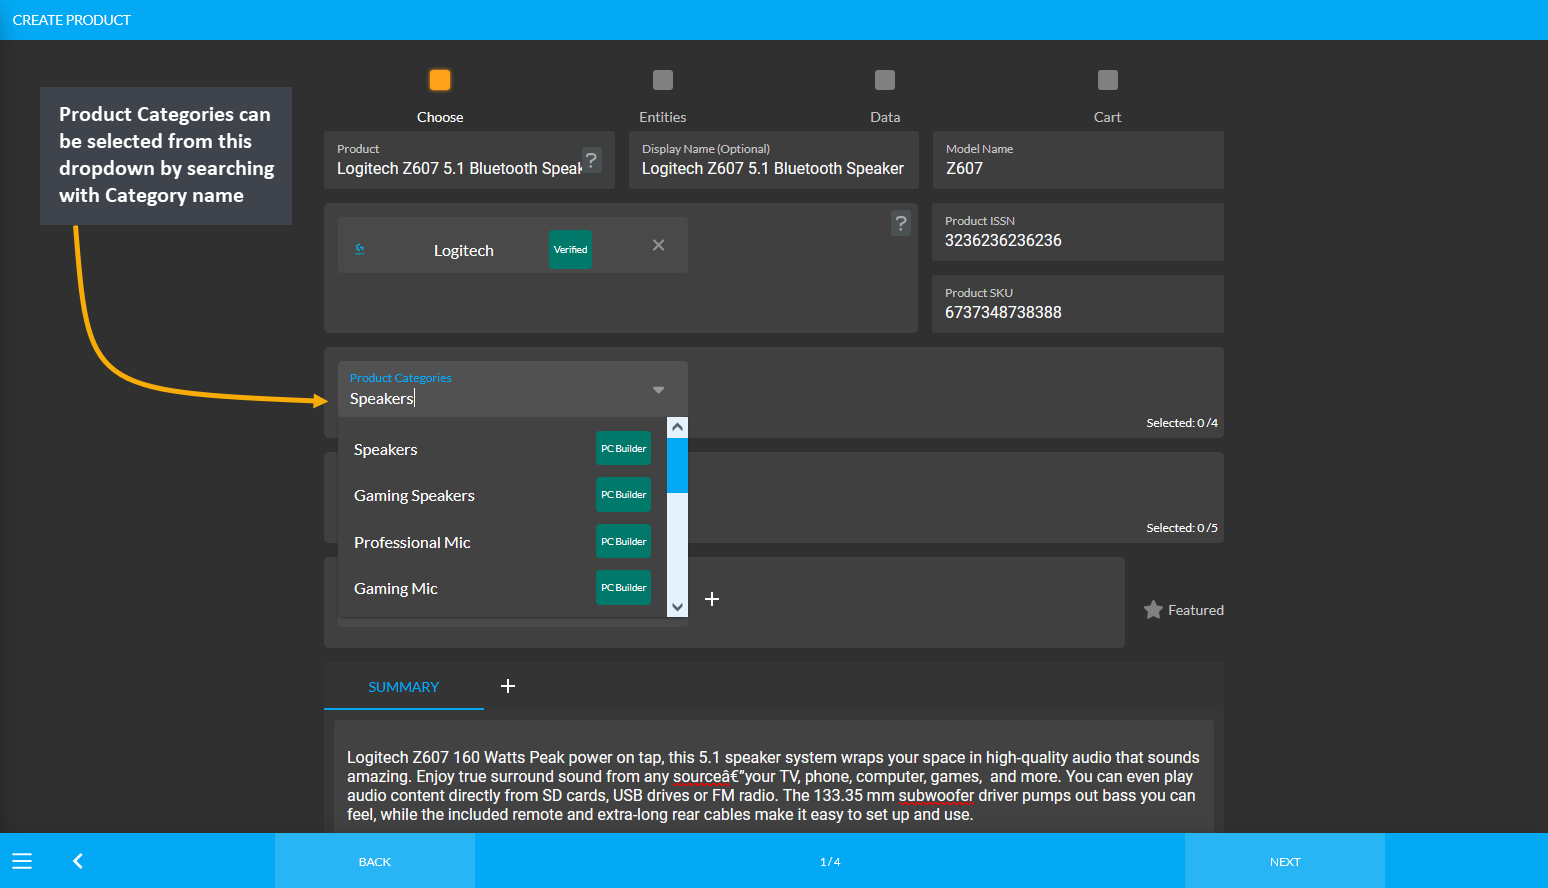
Image 2: During Product creation, Product Category can be selected from the dropdown menu provided.
- Choose Tags from under Product Settings and click the + icon to create new Tag.
- Select Tag Type, set Tag Name, Description and upload Logo and Banner for Tags.
- Activate or deactive the Tag using the toggle button and click Submit to save all changes.
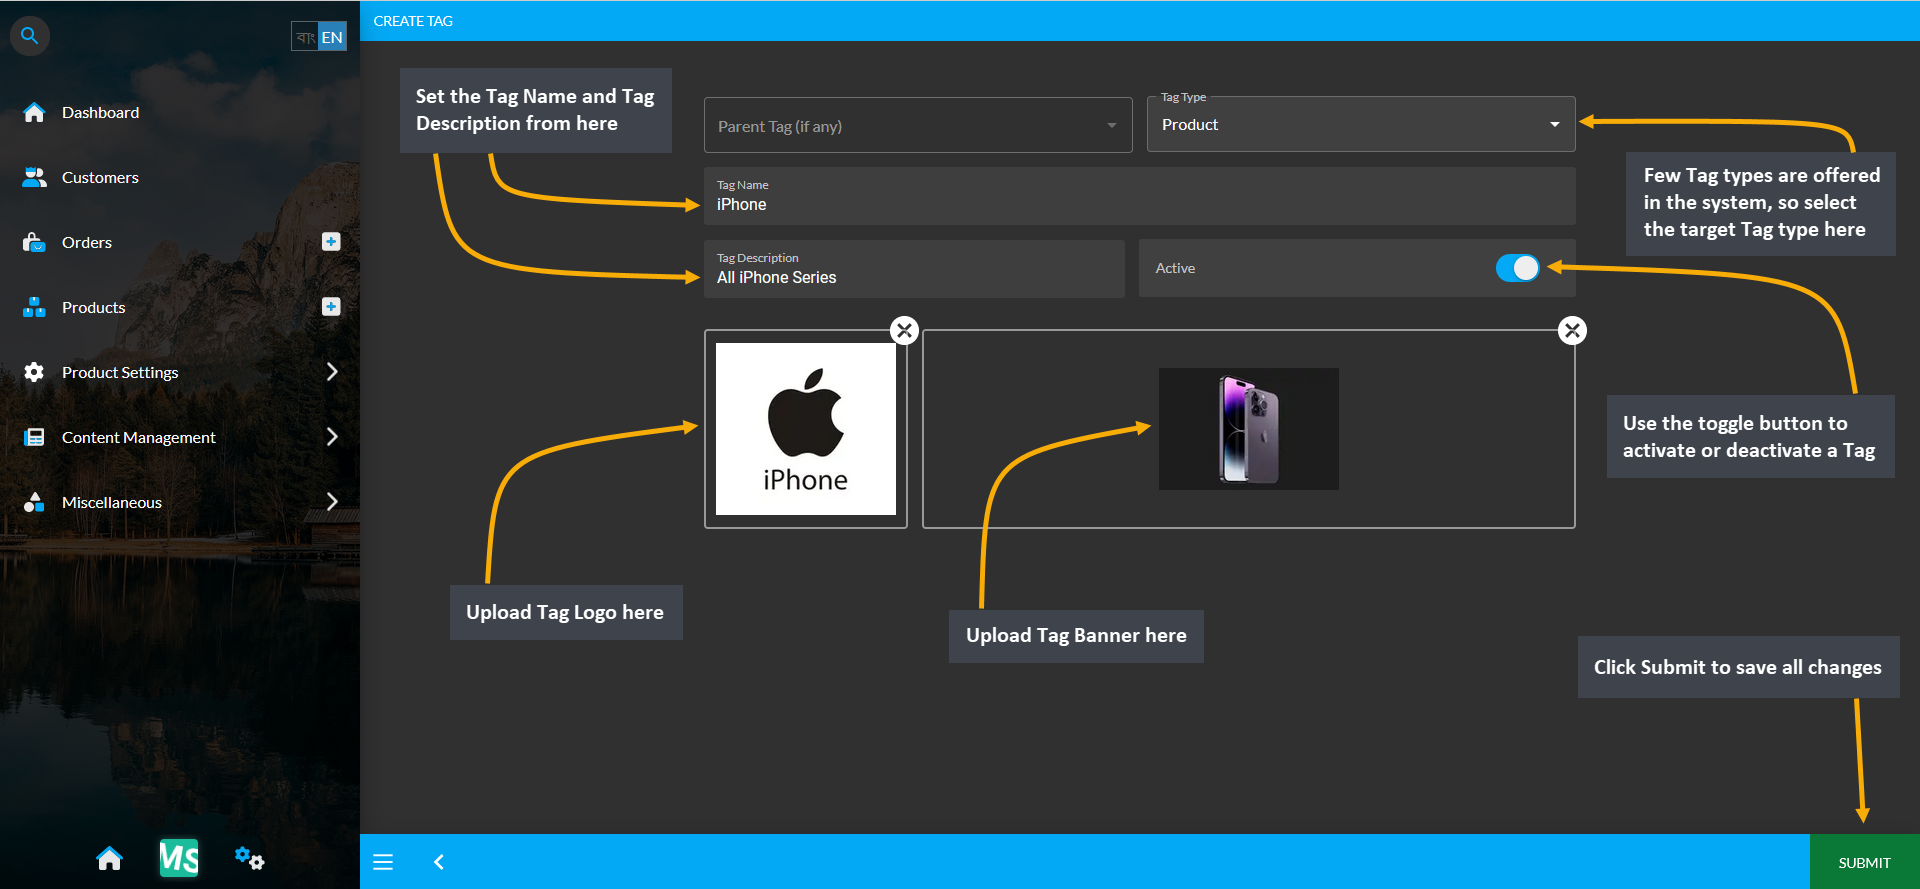
Image: Select Tag Type, set Tag Name, Description and upload Logo and Banner to create Parent Tag.
- Child Tag can be created within a Parent Tag from the Tags List.
- Click on the + icon to create a Child Tag from the selected Parent Tag.
- Select Tag Type, set Tag Name, Description and upload Logo and Banner for Tags.
- Activate or deactive the Tag using the toggle button and click Submit to save all changes.
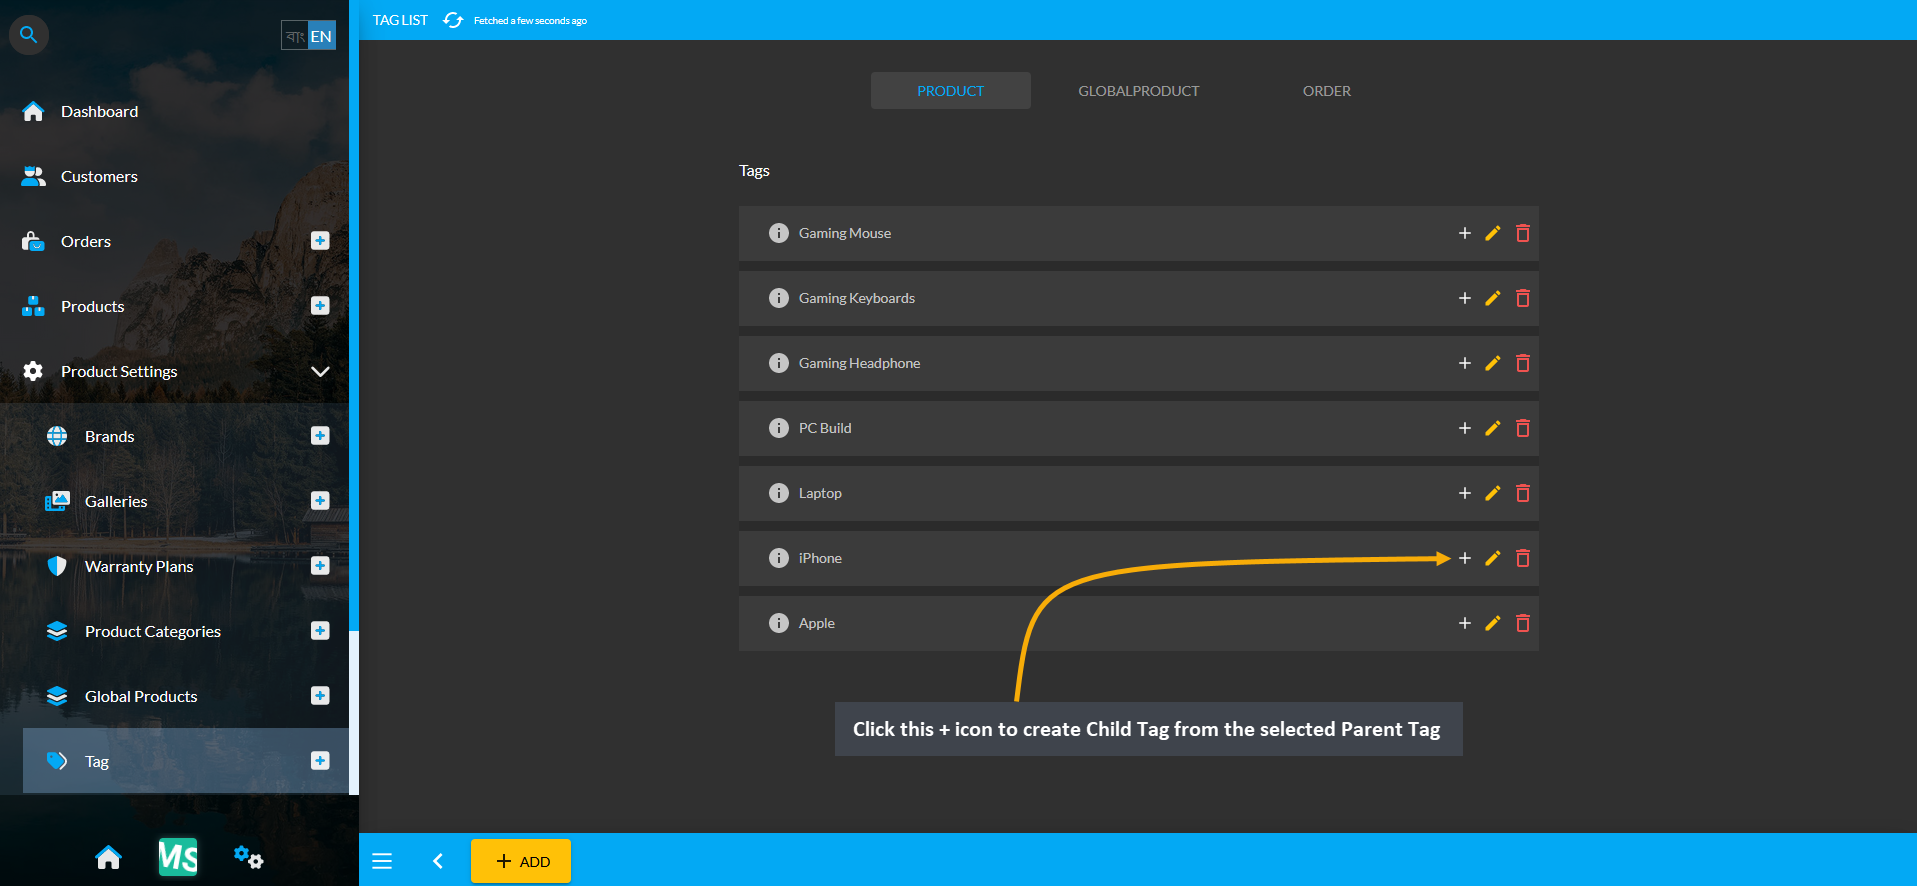
Image 1: Click on the + icon to create a Child Tag from the selected Parent Tag.
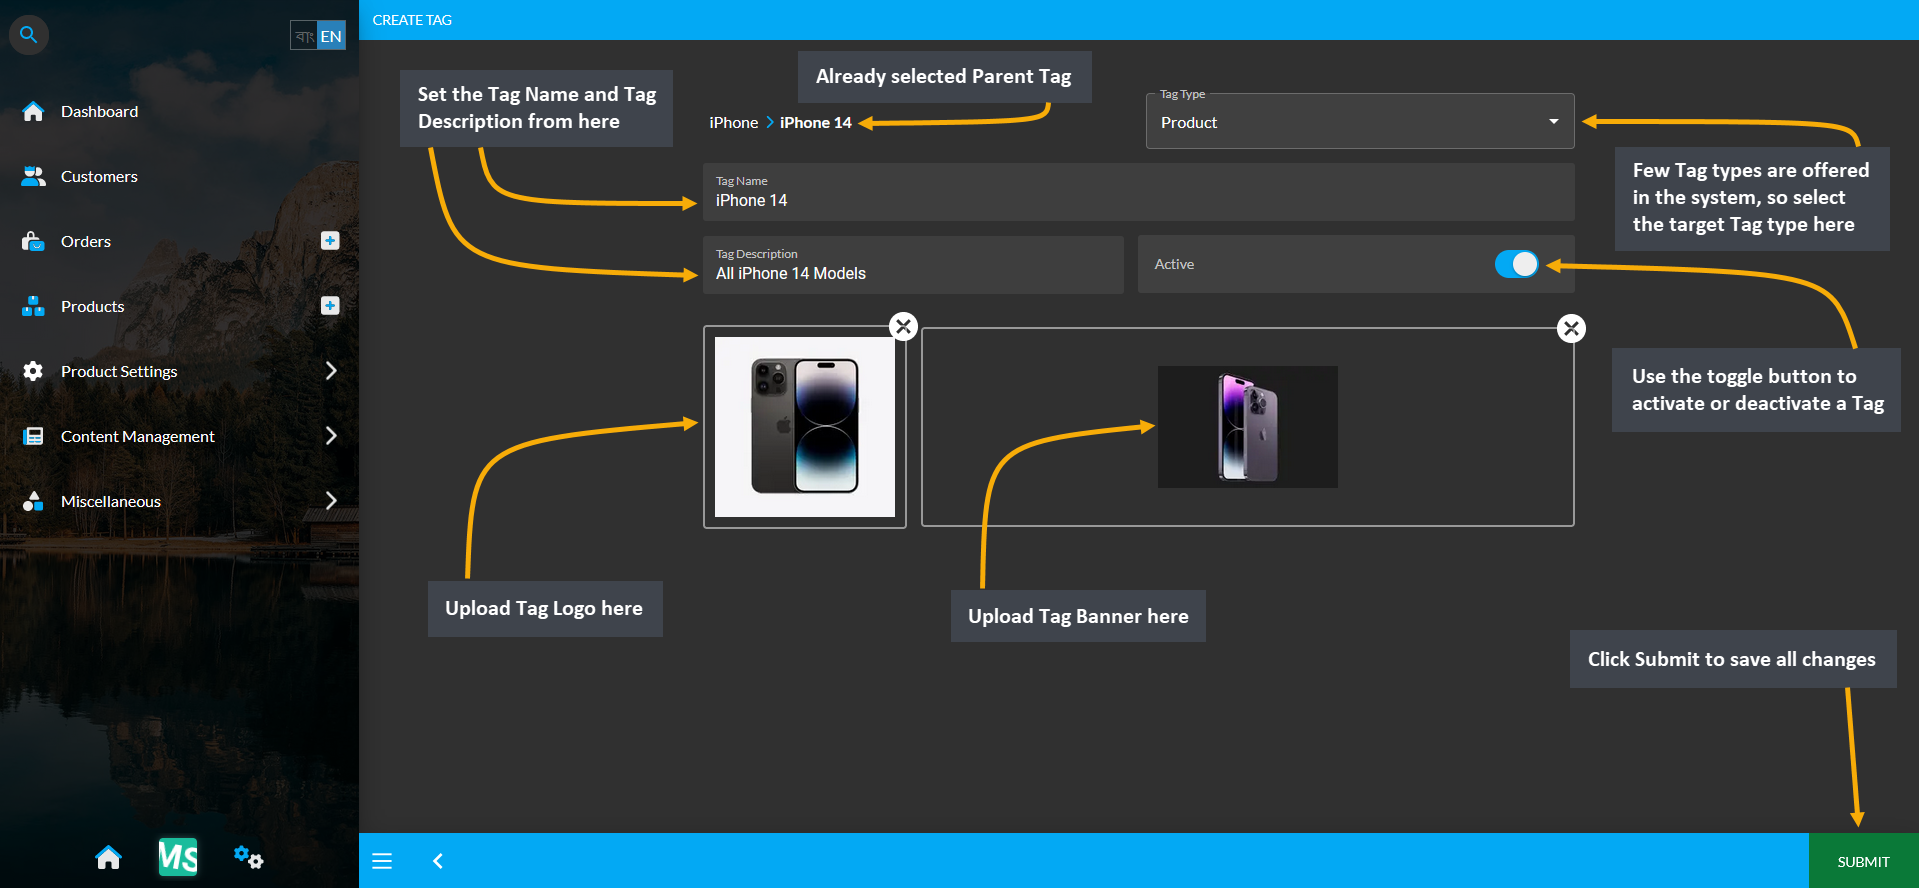
Image 2: Select Tag Type, set Tag Name, Description and upload Logo and Banner to create Child Tag.
View the list of already created Tags from Tags module under Product Settings.
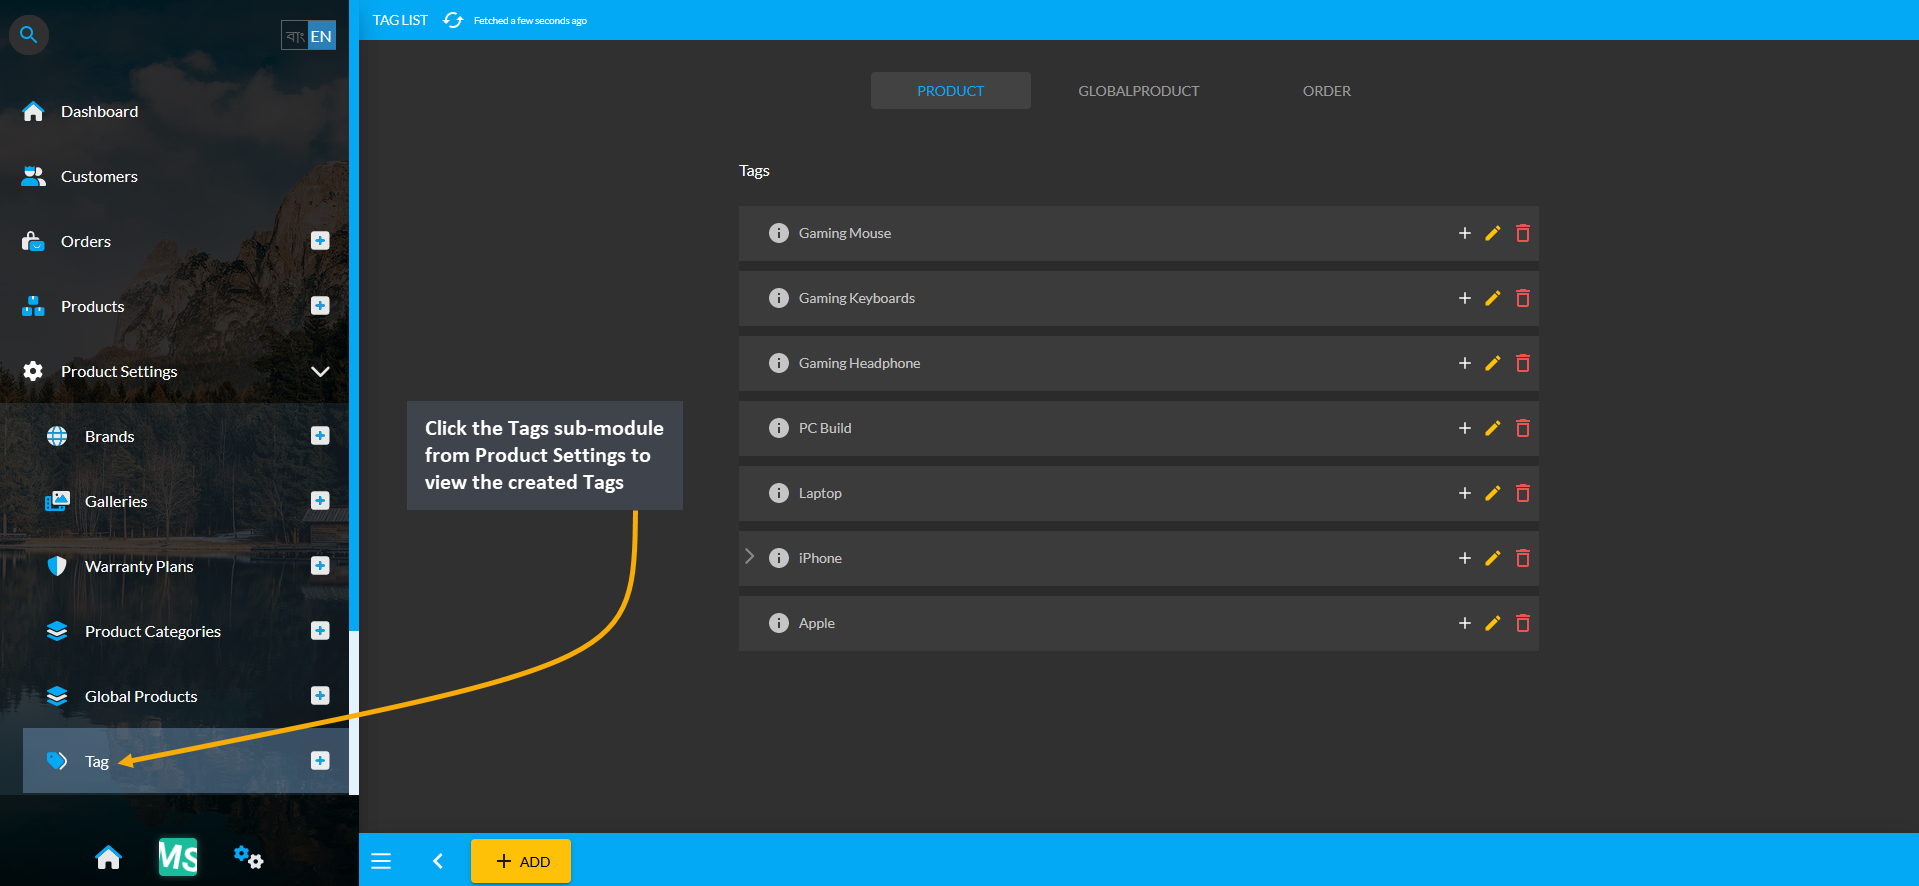
Image: View the list of already created Tags from Tags module under Product Settings.
How to Update Revenue after Order Payment Confirmation?
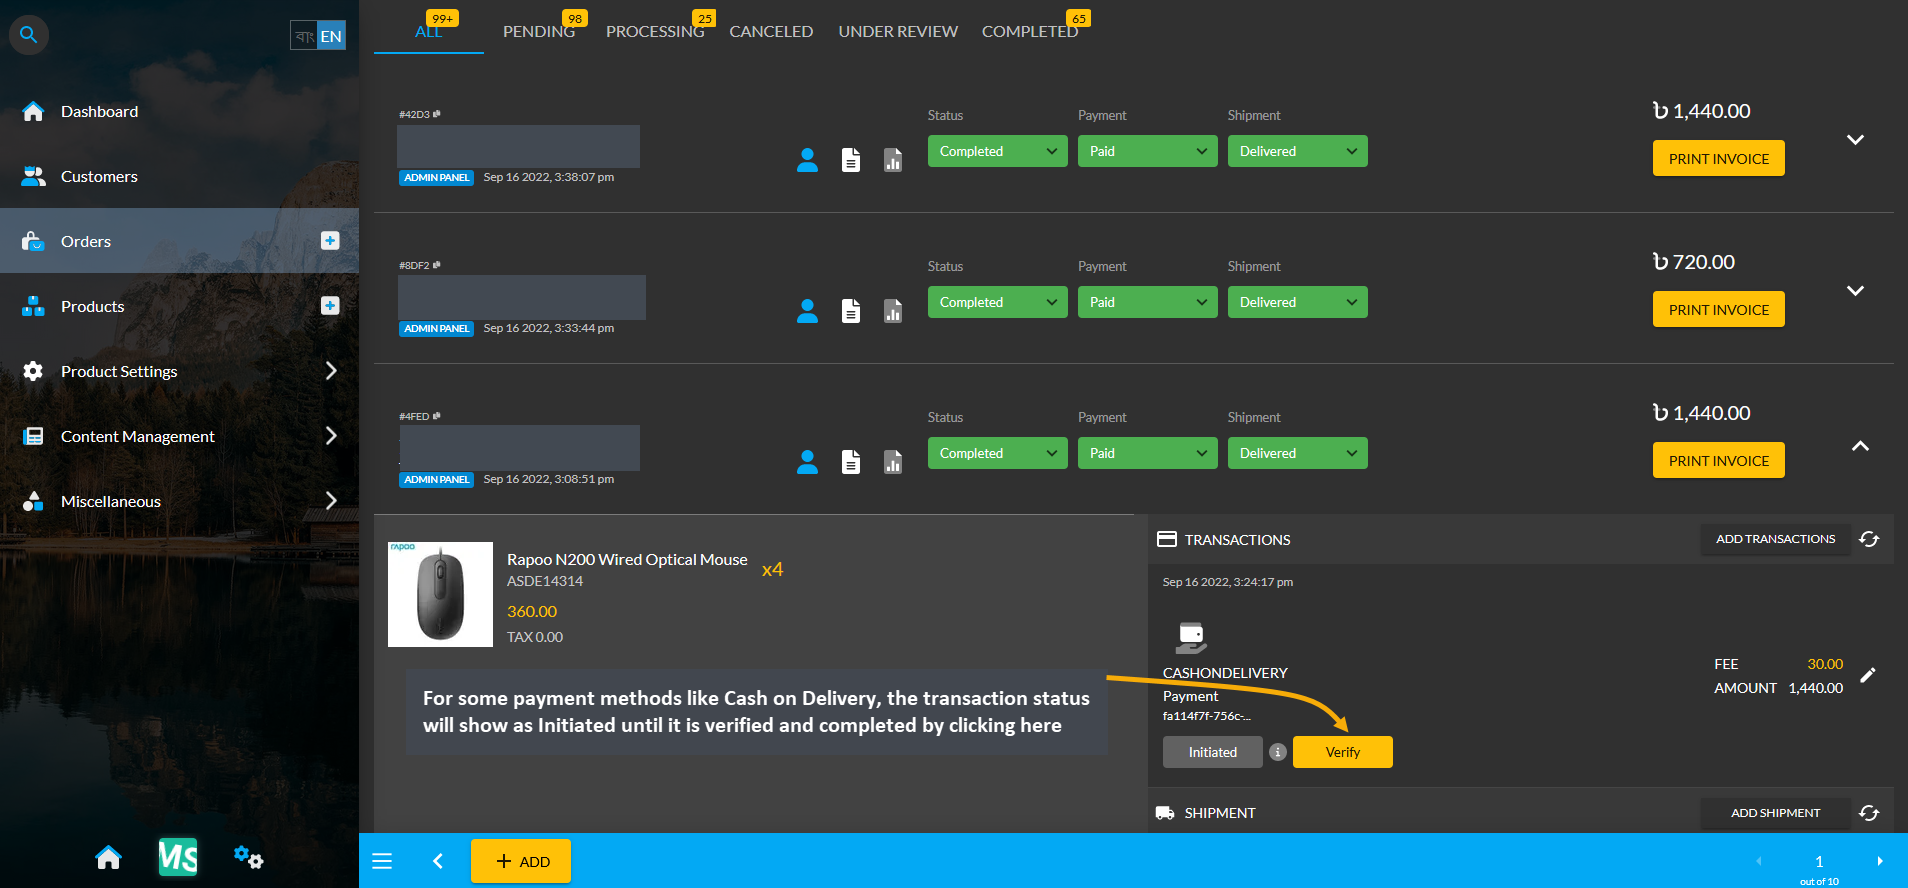
Image 1: Transaction status will show as Initiated until it is verified and completed for some payments.
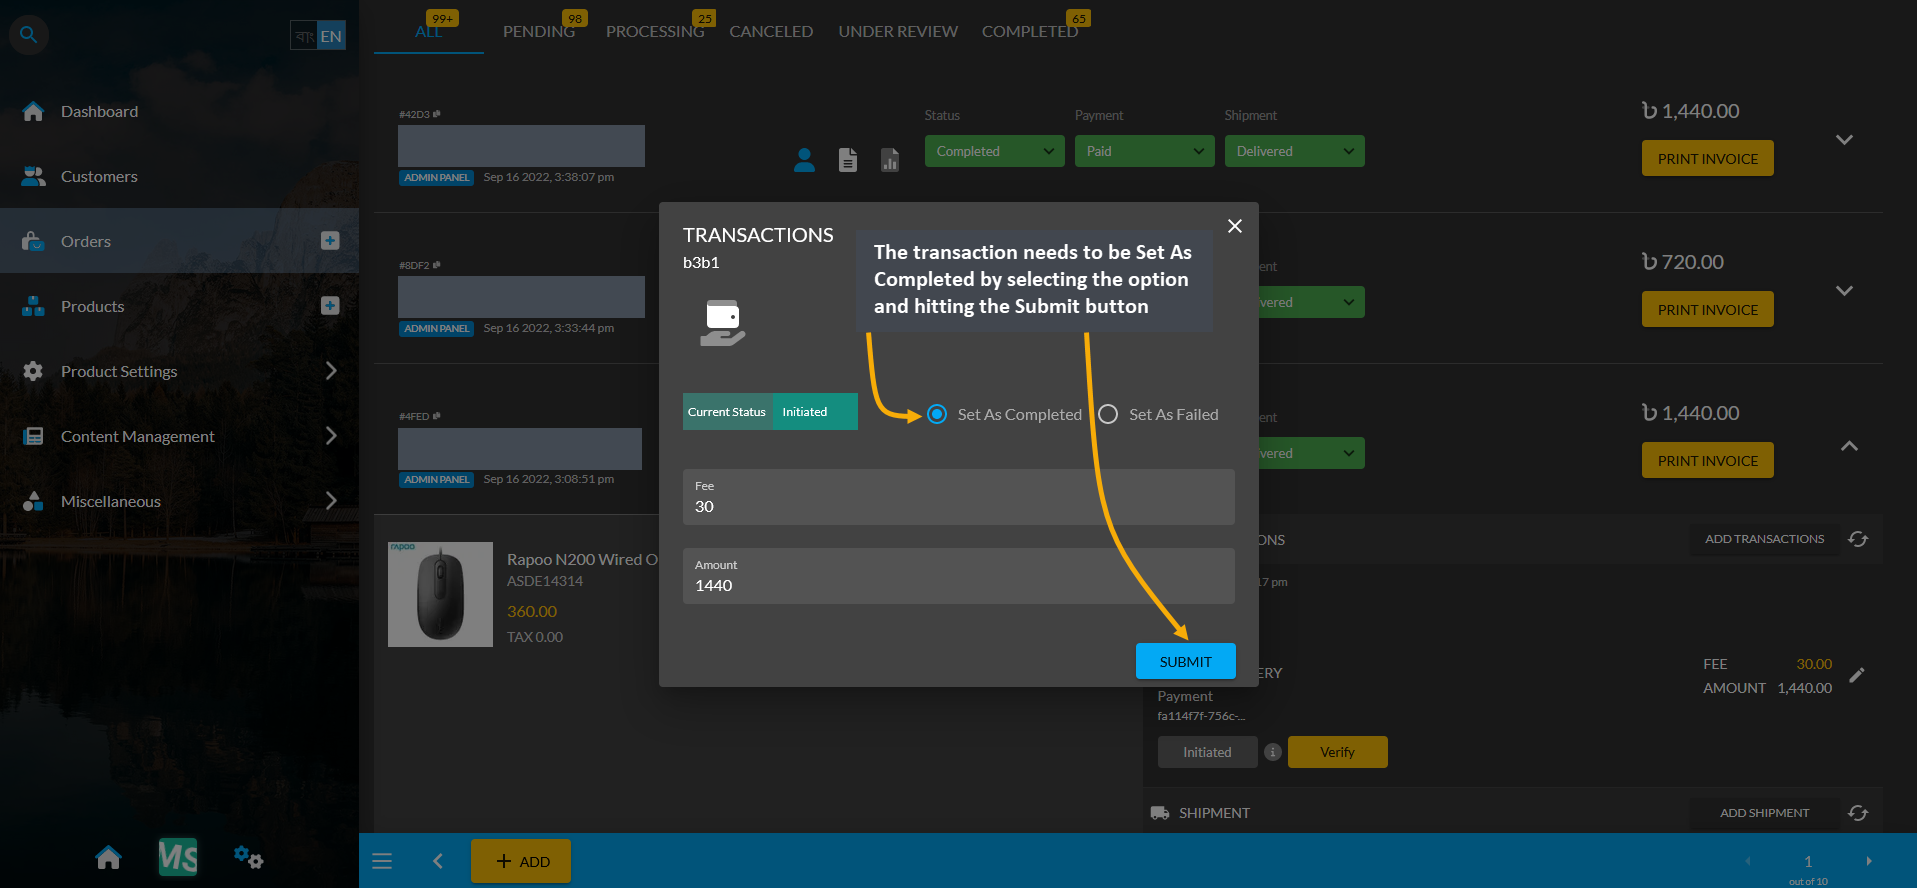
Image 2: Transaction needs to be Set As Completed by selecting the option and hitting the Submit button.
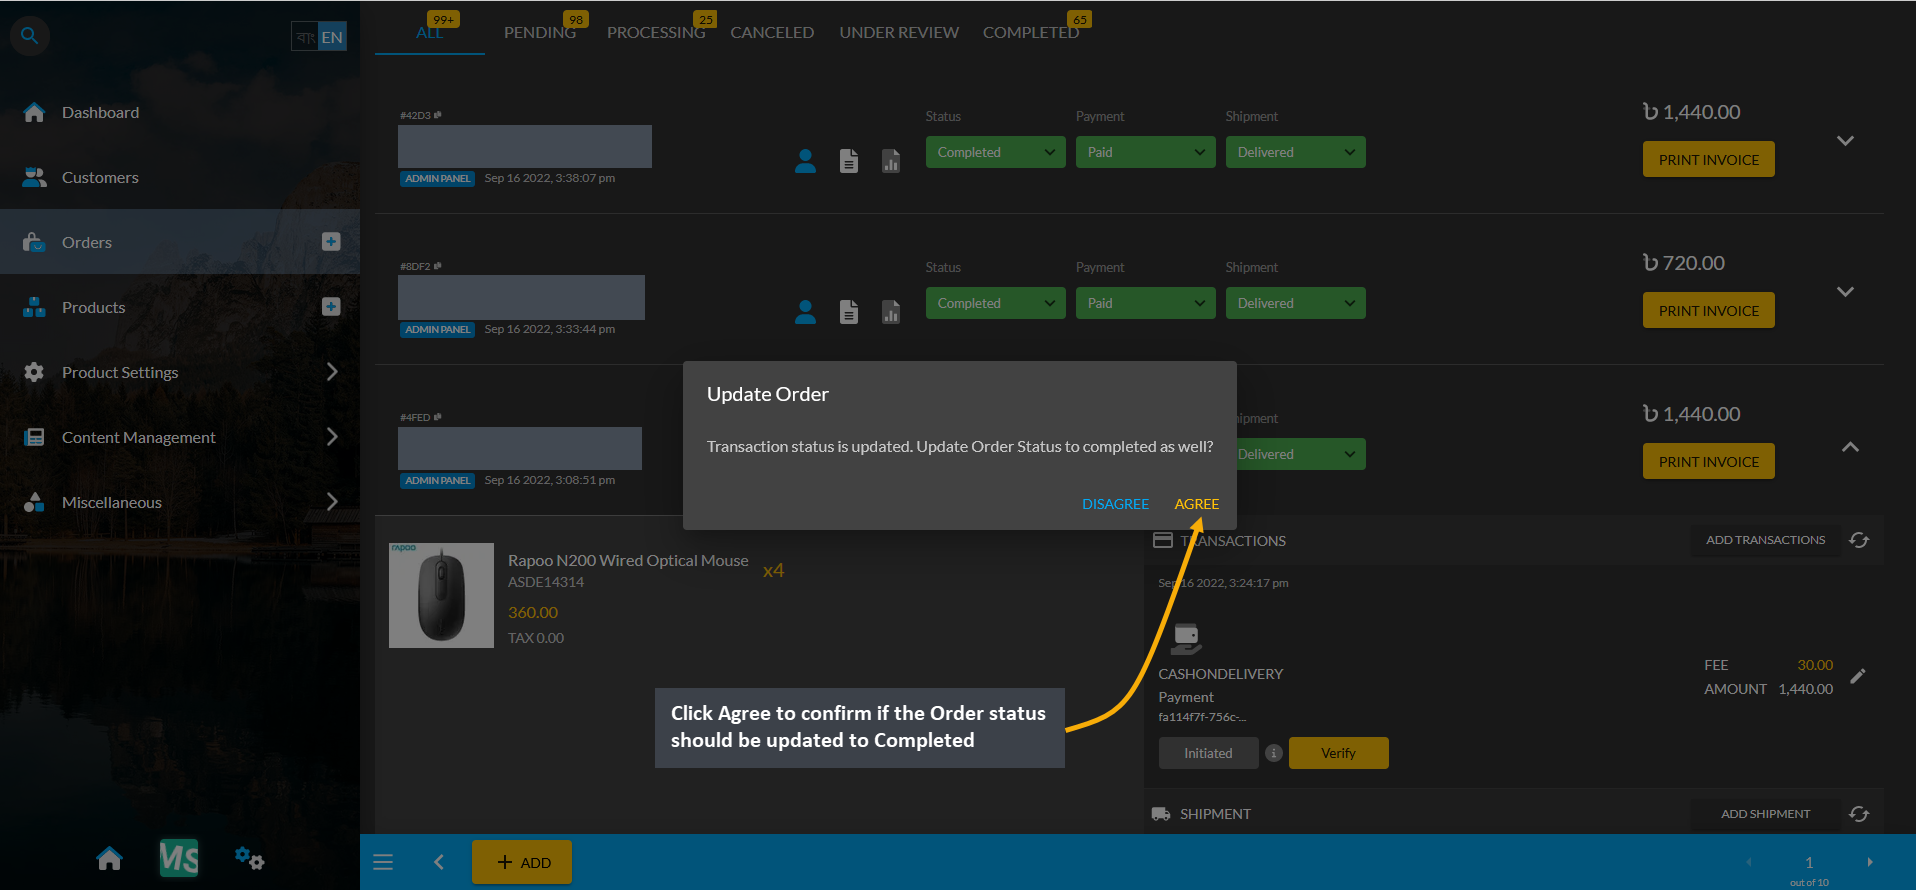
Image 3: Click Agree to confirm if the Order status should be updated to Completed as well.
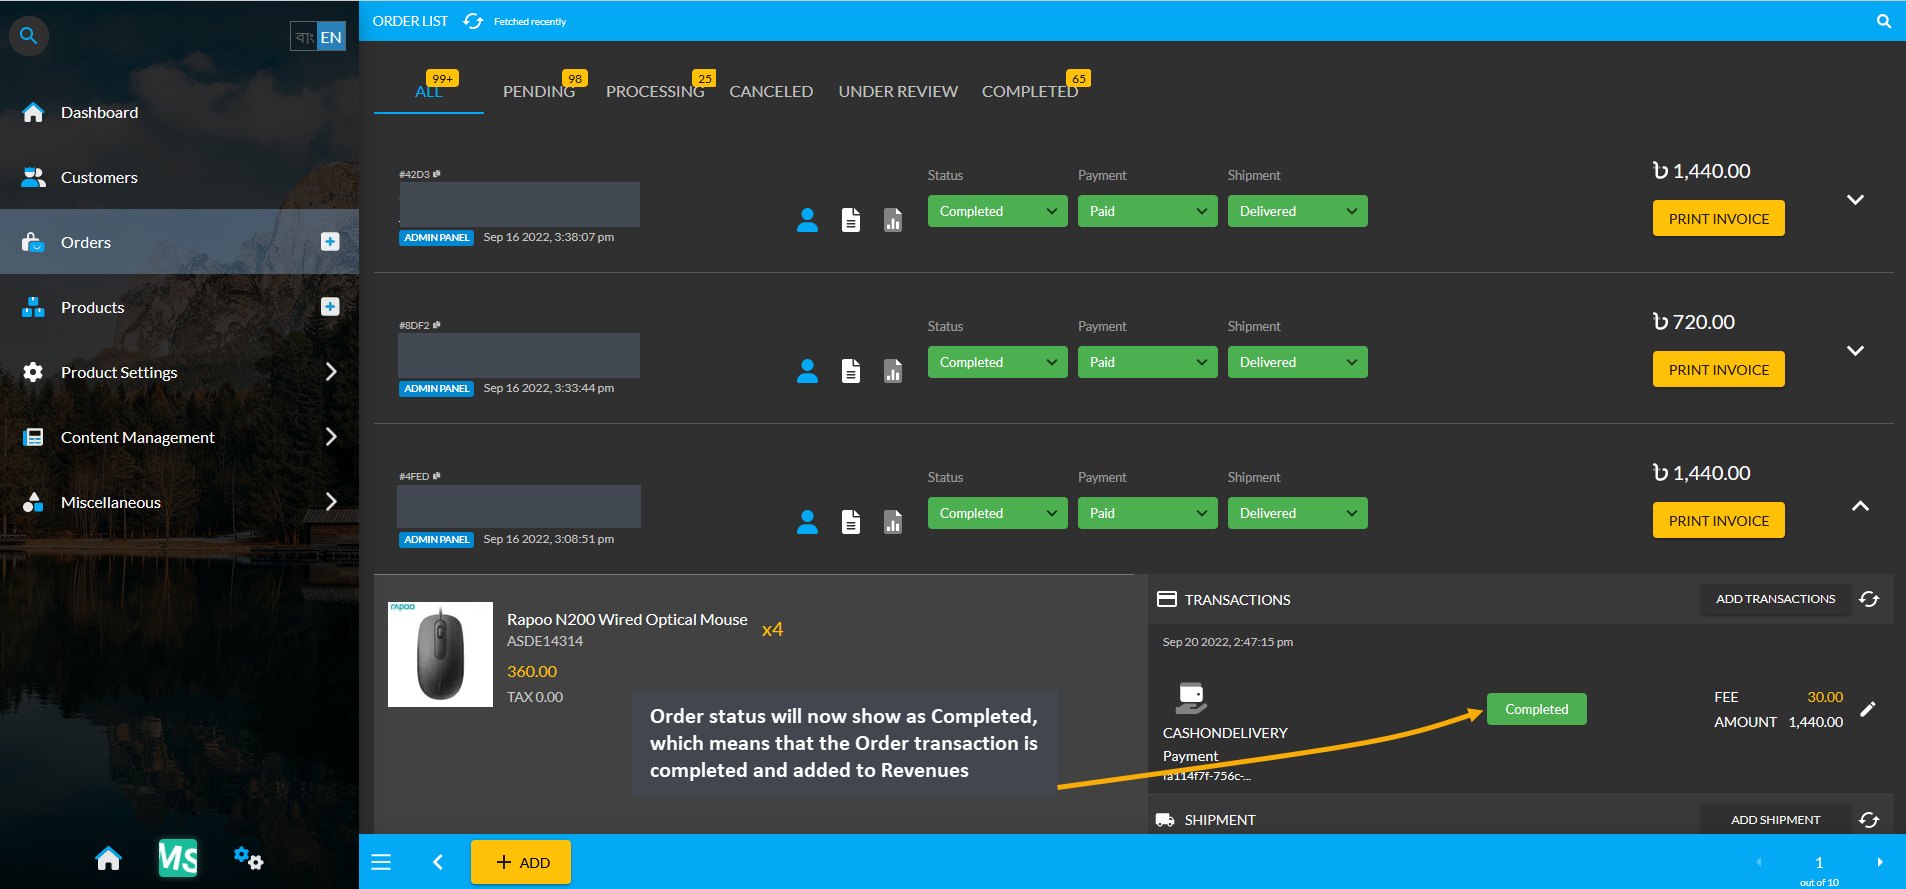
Image 4: Order status will now show as Completed, which means that the Order will add to the Revenues.
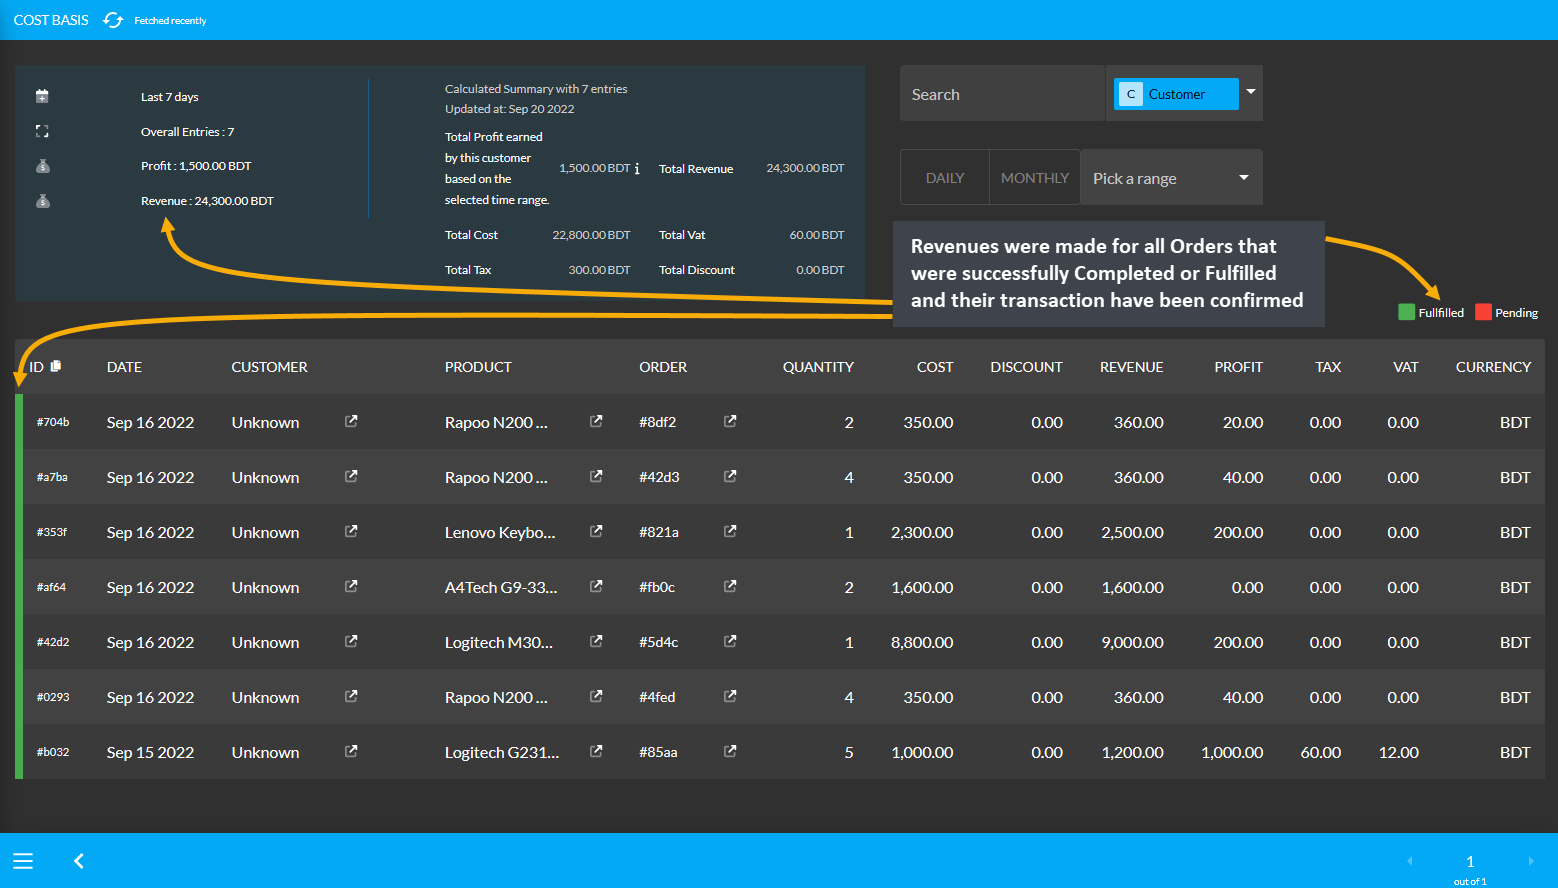
Image 5: Cost Basis will show that Revenues were made for all Orders that were Completed or Fulfilled.
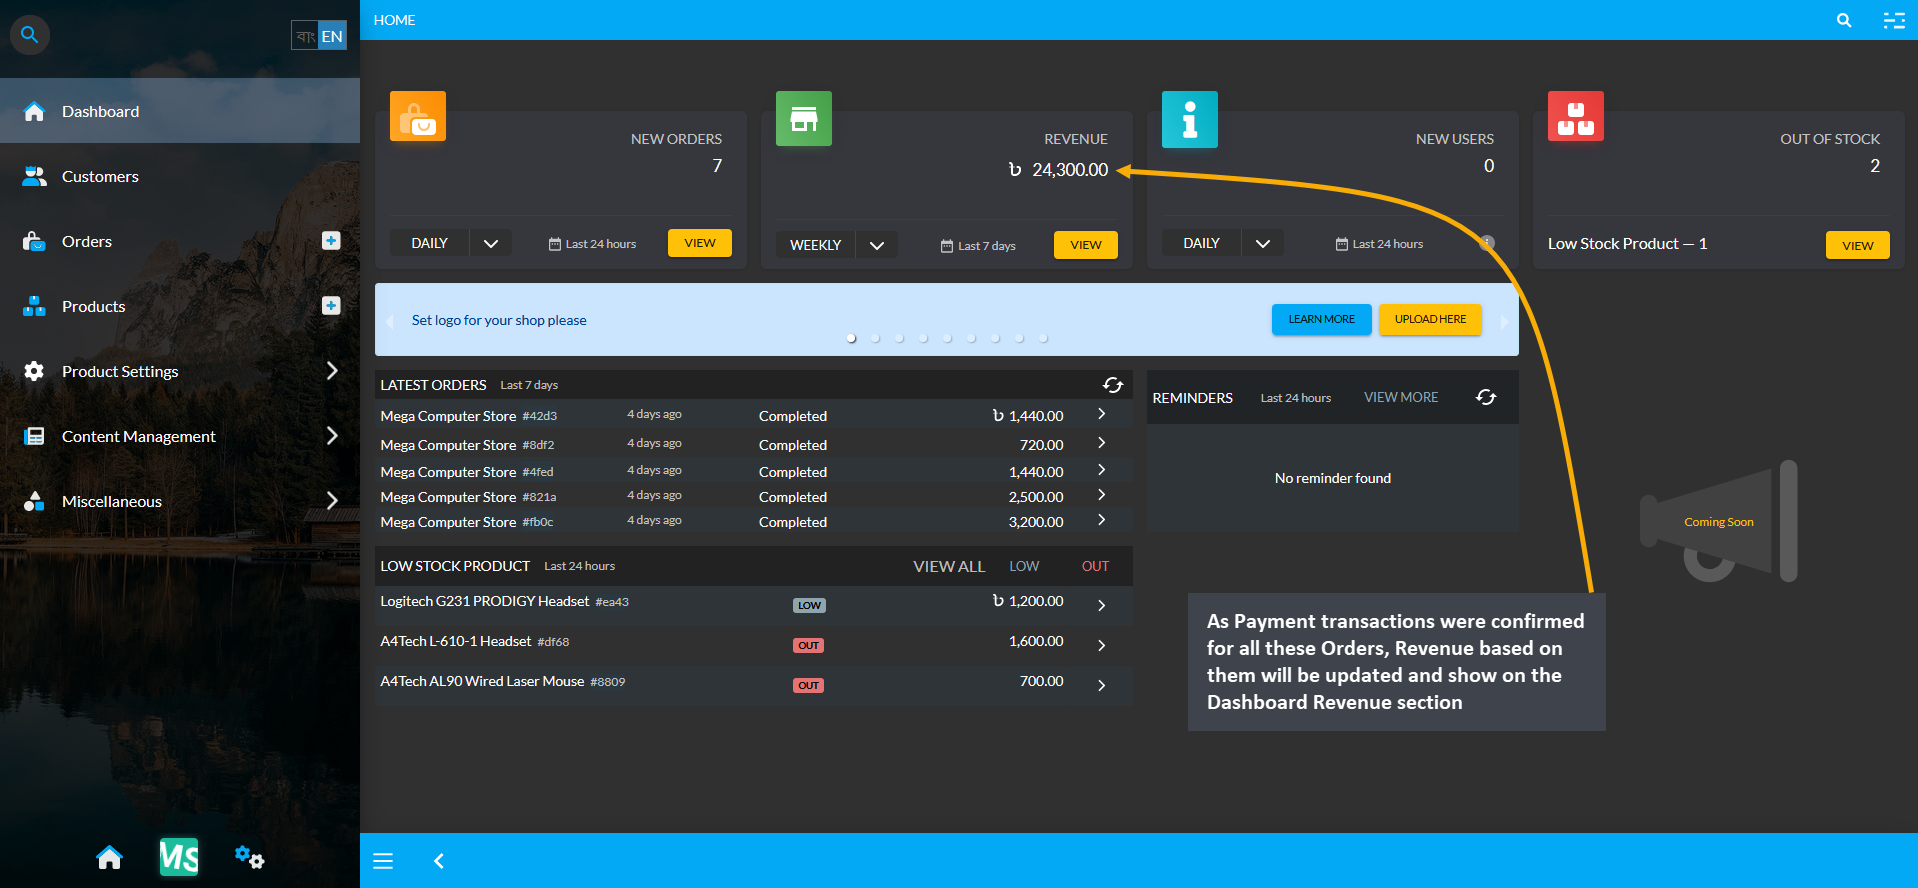
Image 6: Revenue based on Completed Orders will be updated and show on the Dashboard Revenue section.
How to set Payment Gateway Maximum Limit according to Product Price?
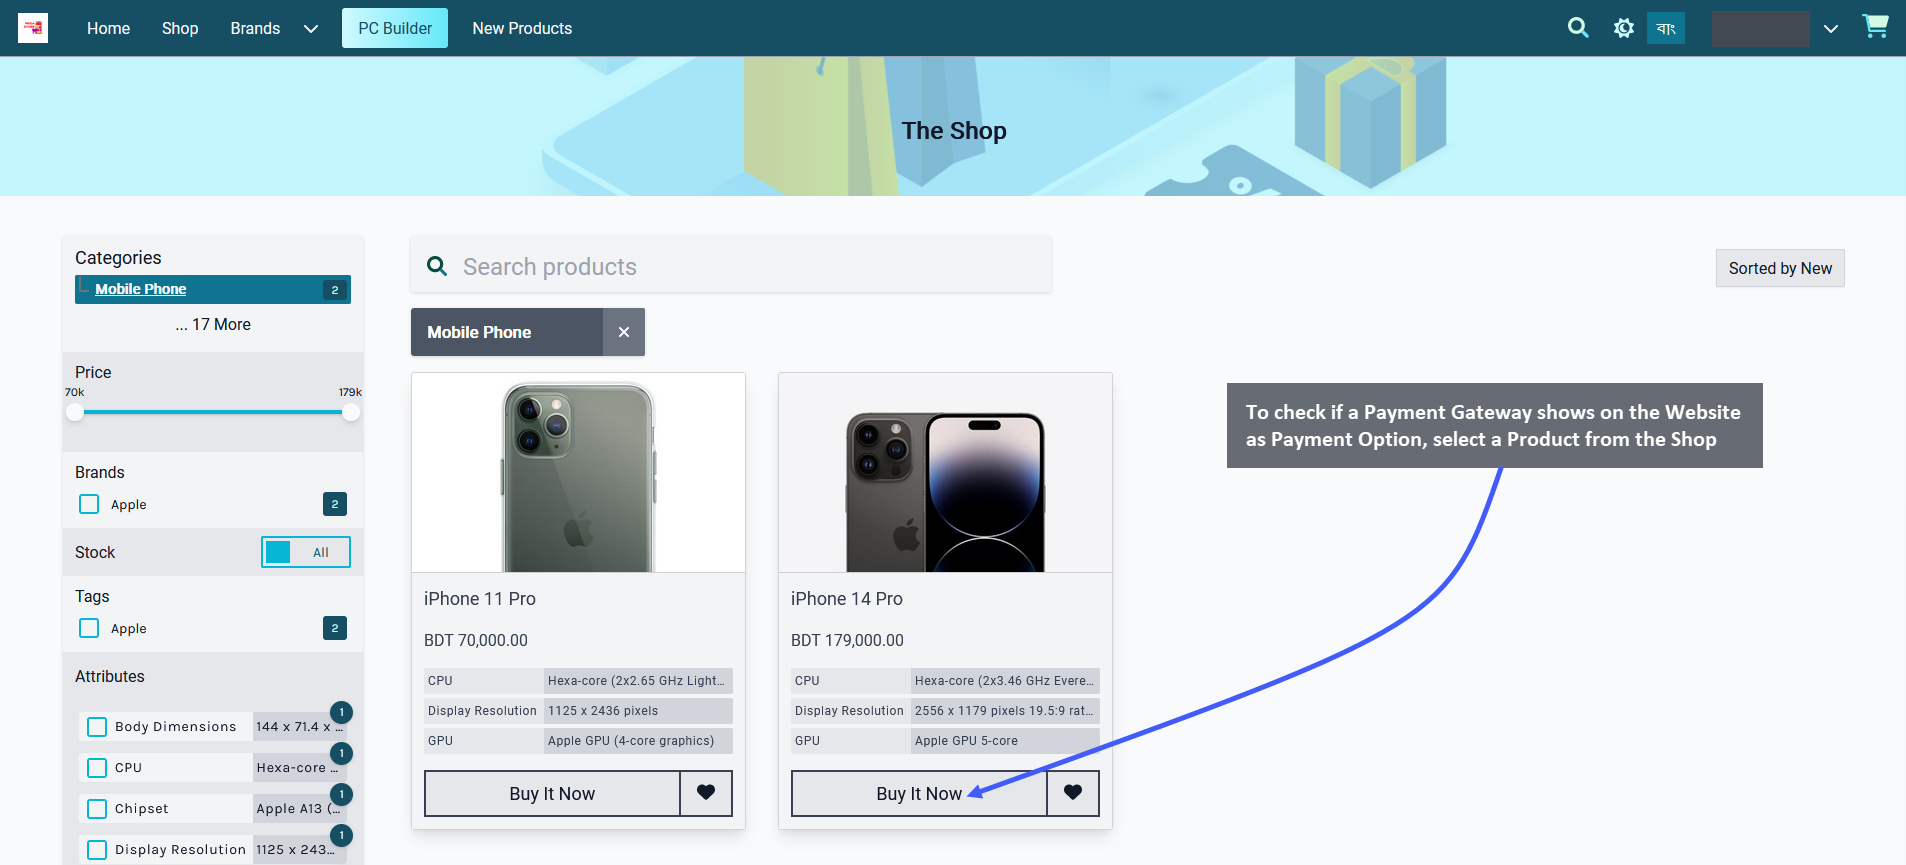
Image 1: To check if a Payment Gateway shows on Website as Payment Option, order a Product from the Shop.
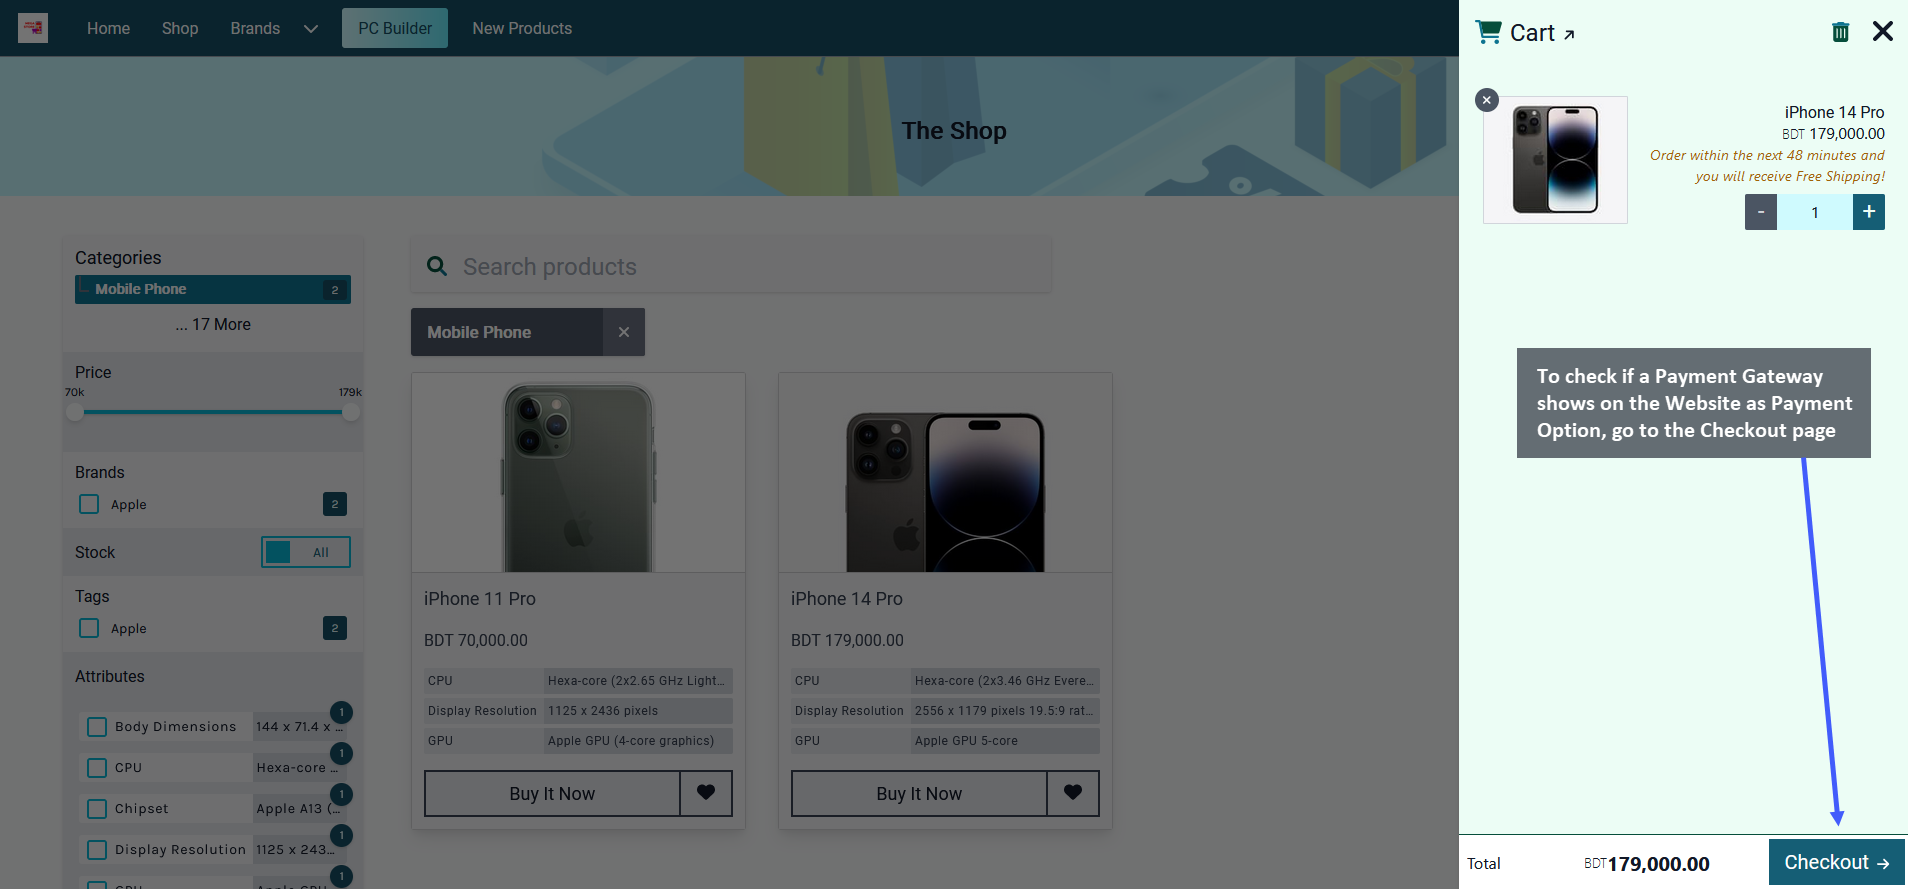
Image 2: To check if a Payment Gateway shows on Website as Payment Option, go to the Checkout page.
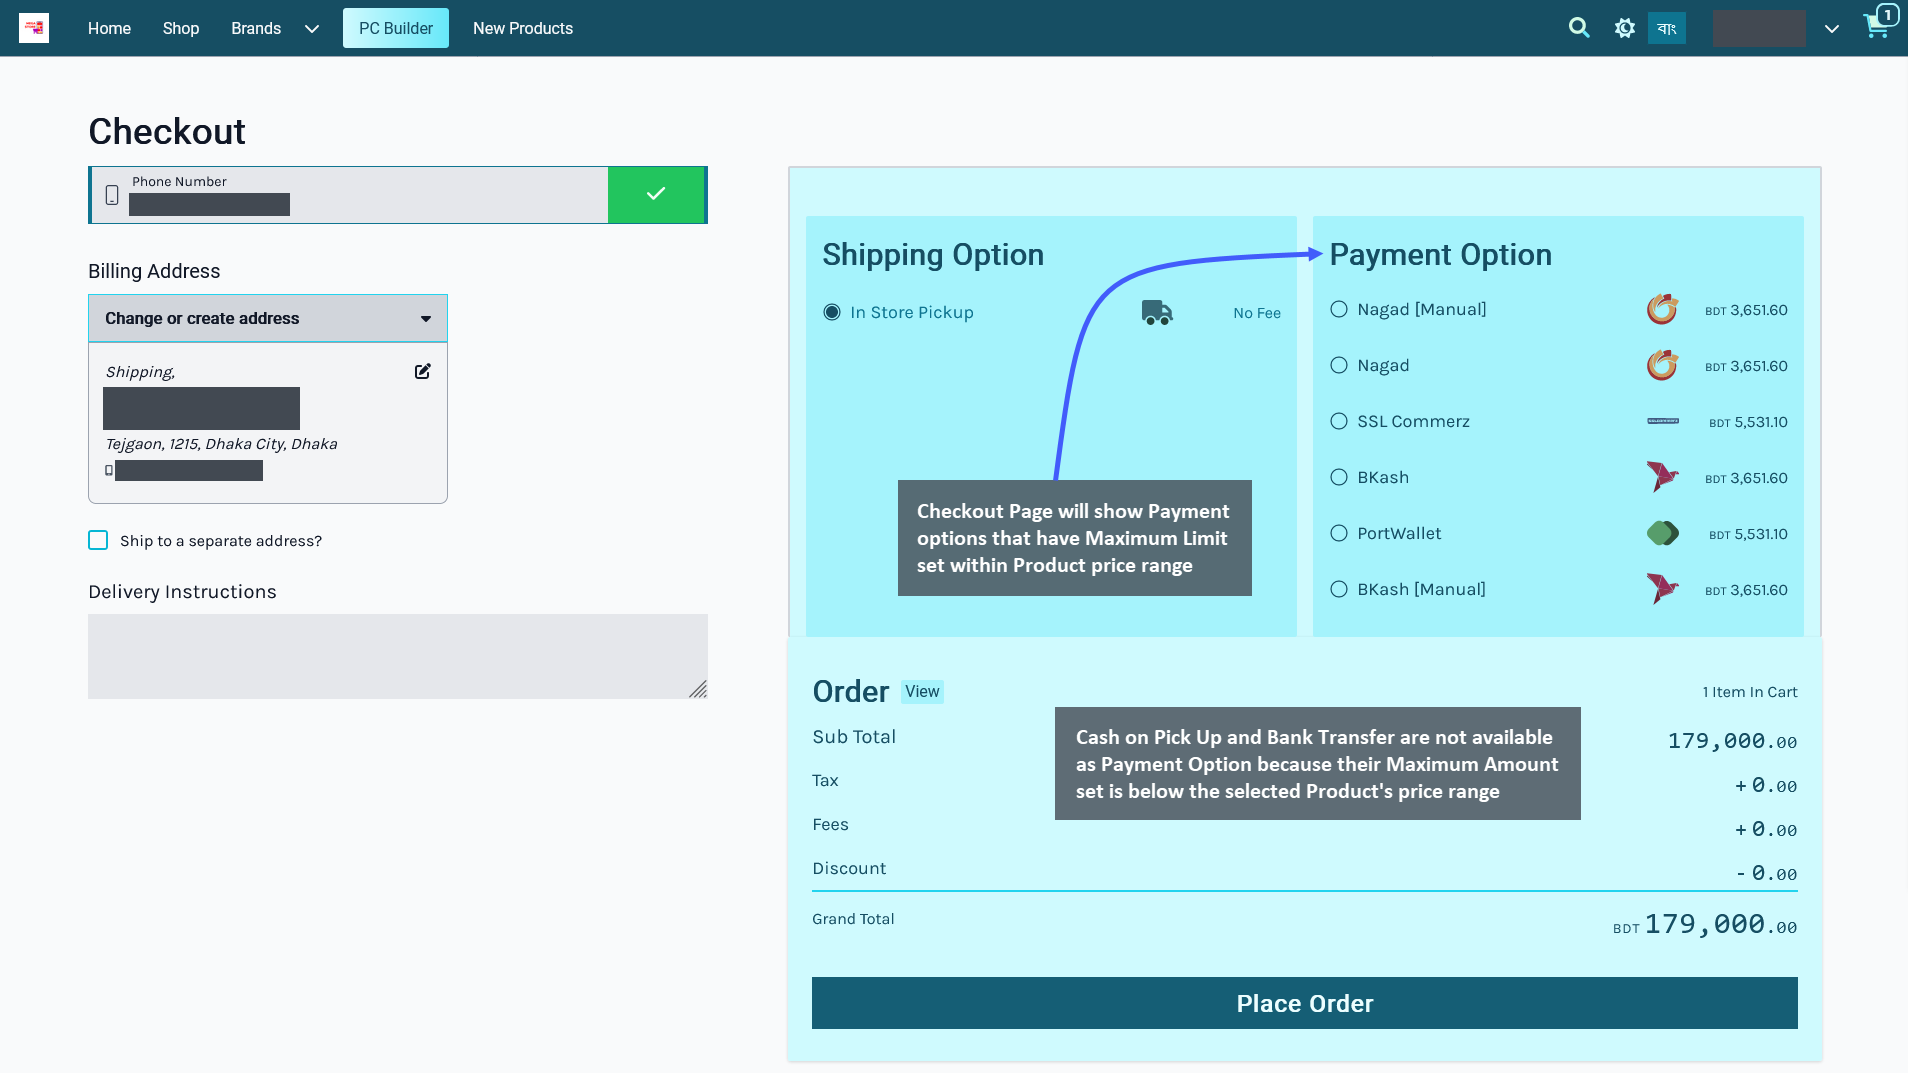
Image 3: Checkout Page will show Payment options that have Maximum Limit set within Product price range.
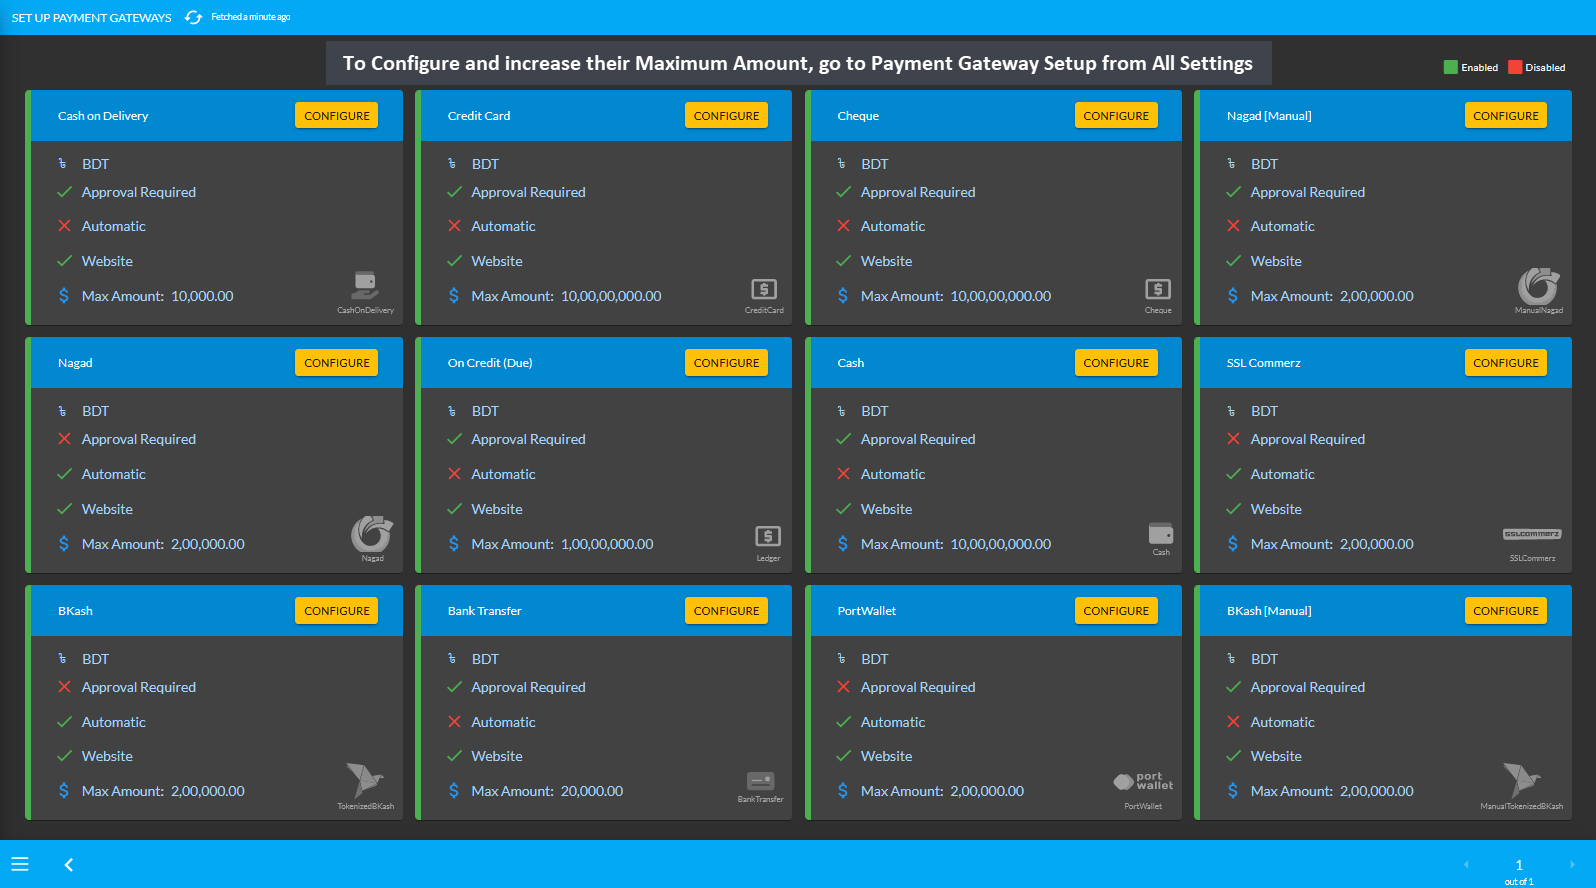
Image 4: To Configure and increase their Maximum Amount, go to Payment Gateway Setup from All Settings.
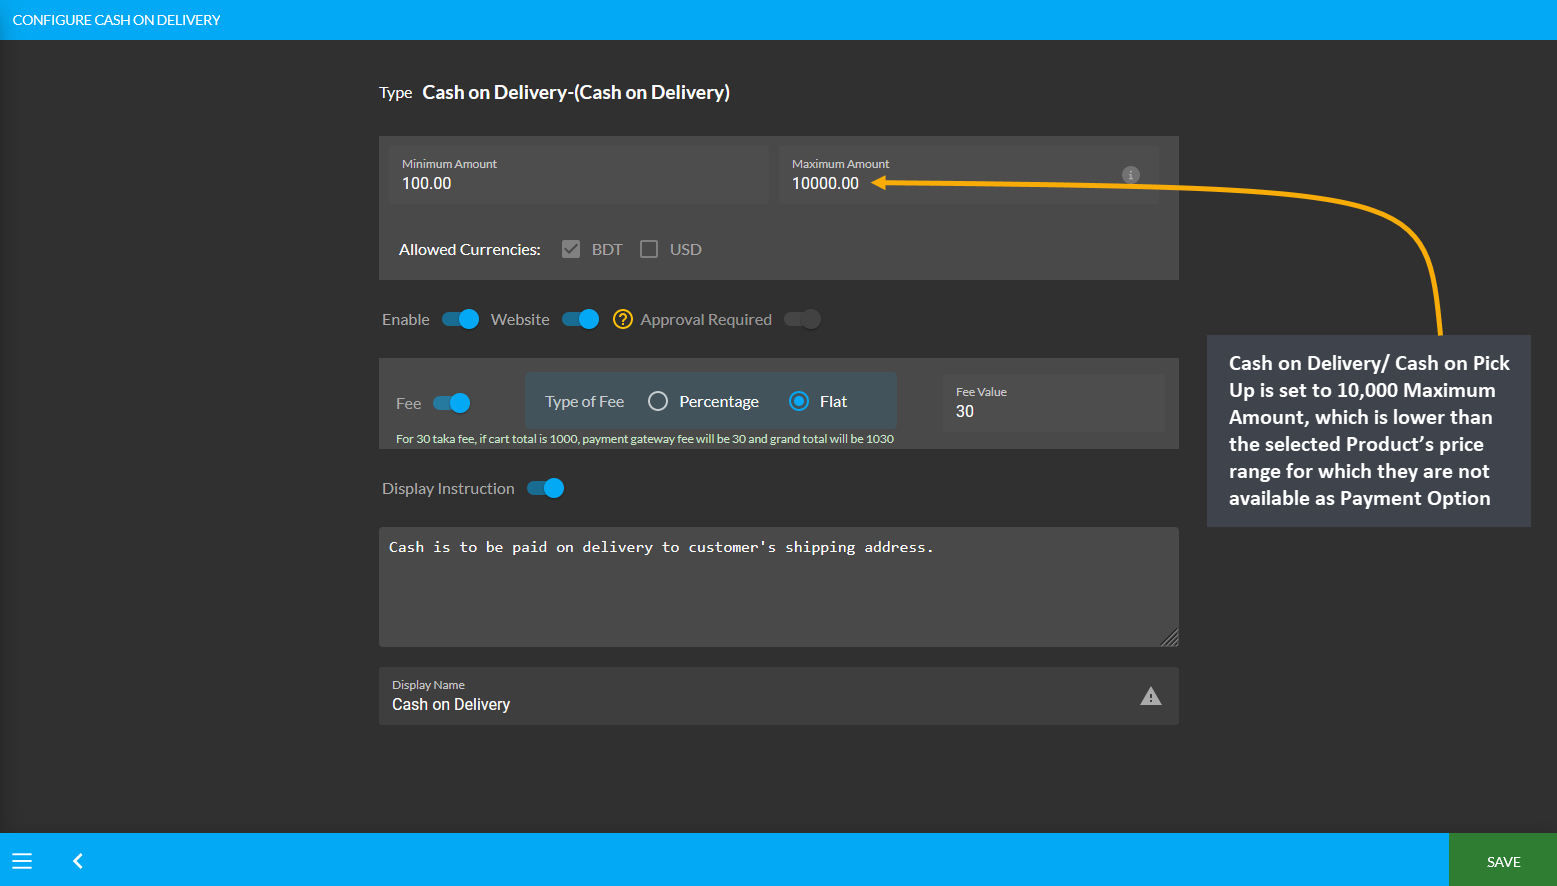
Image 5: Maximum Amount set for Cash on Delivery is lower than selected Product's price range.
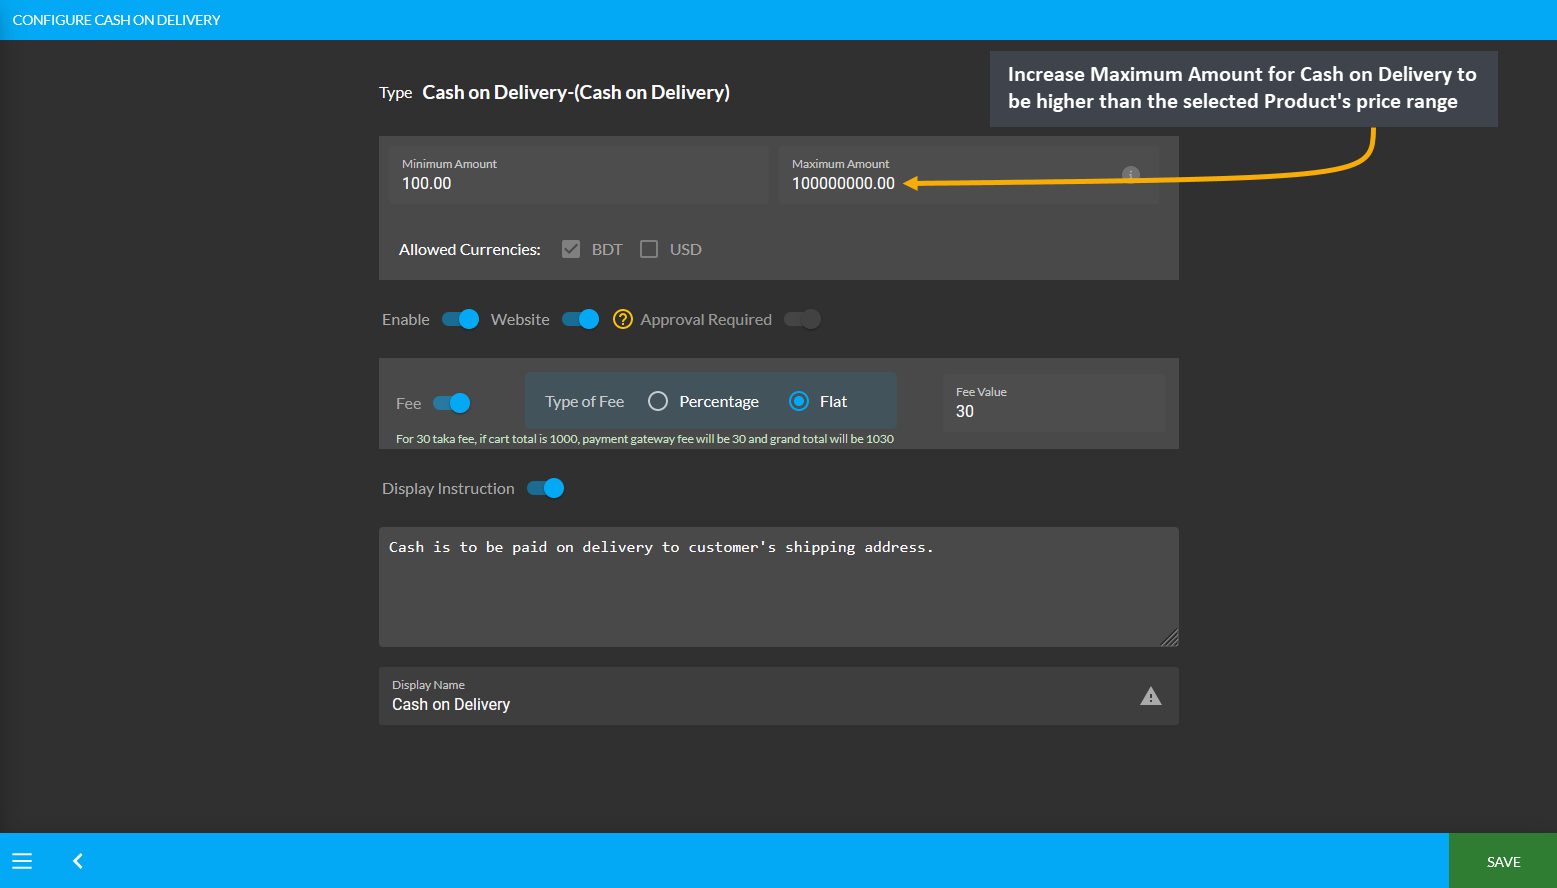
Image 6: Increase Maximum Amount for Cash on Delivery to be higher than selected Product’s price range.
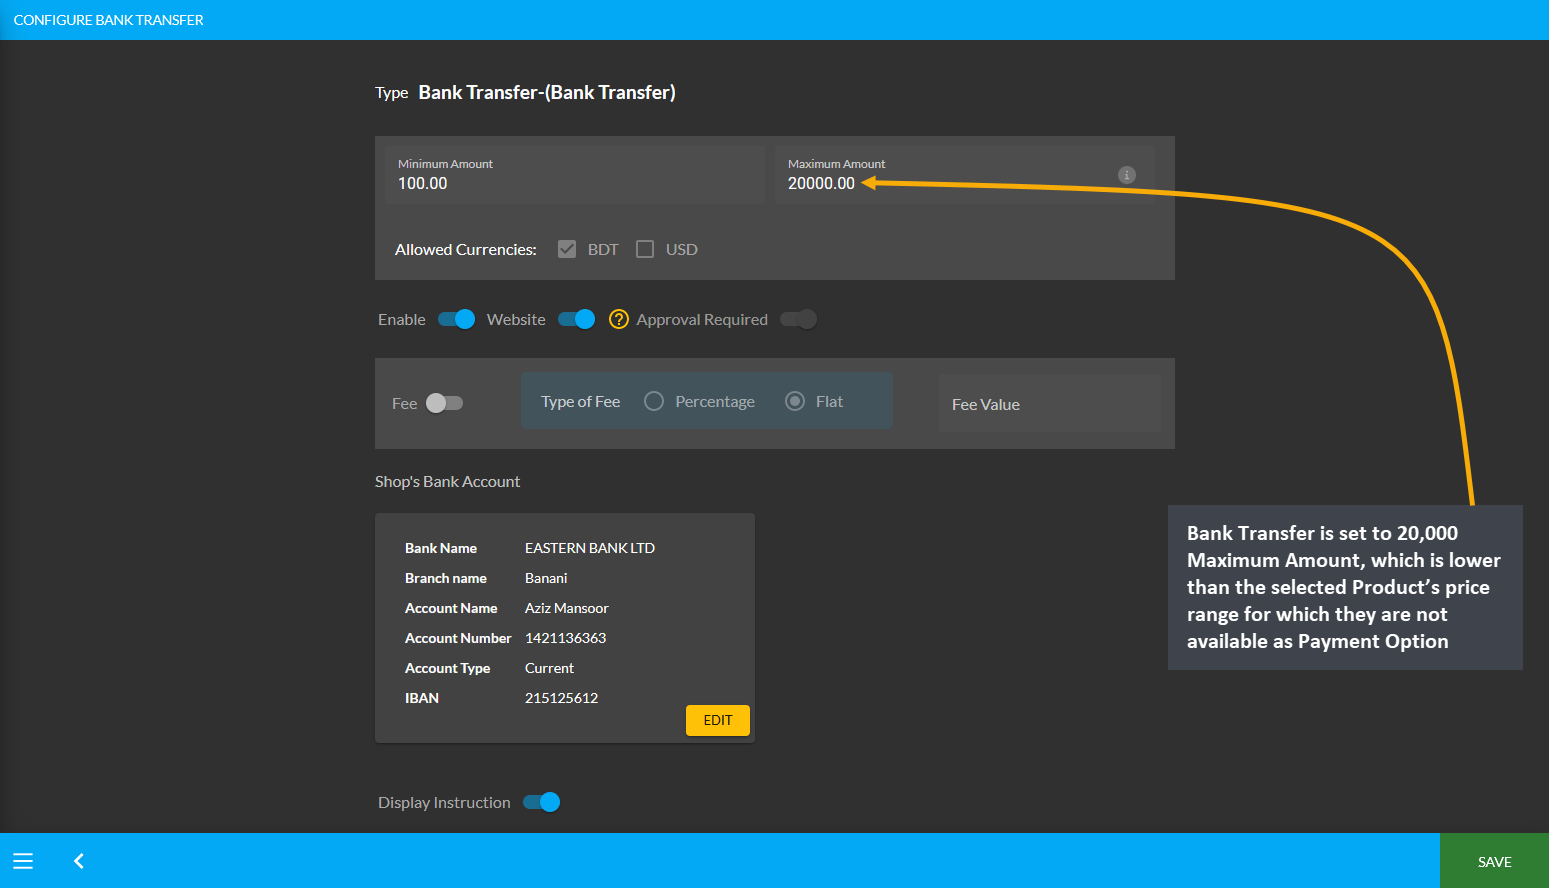
Image 7: Maximum Amount set for Bank Transfer is lower than selected Product's price range.
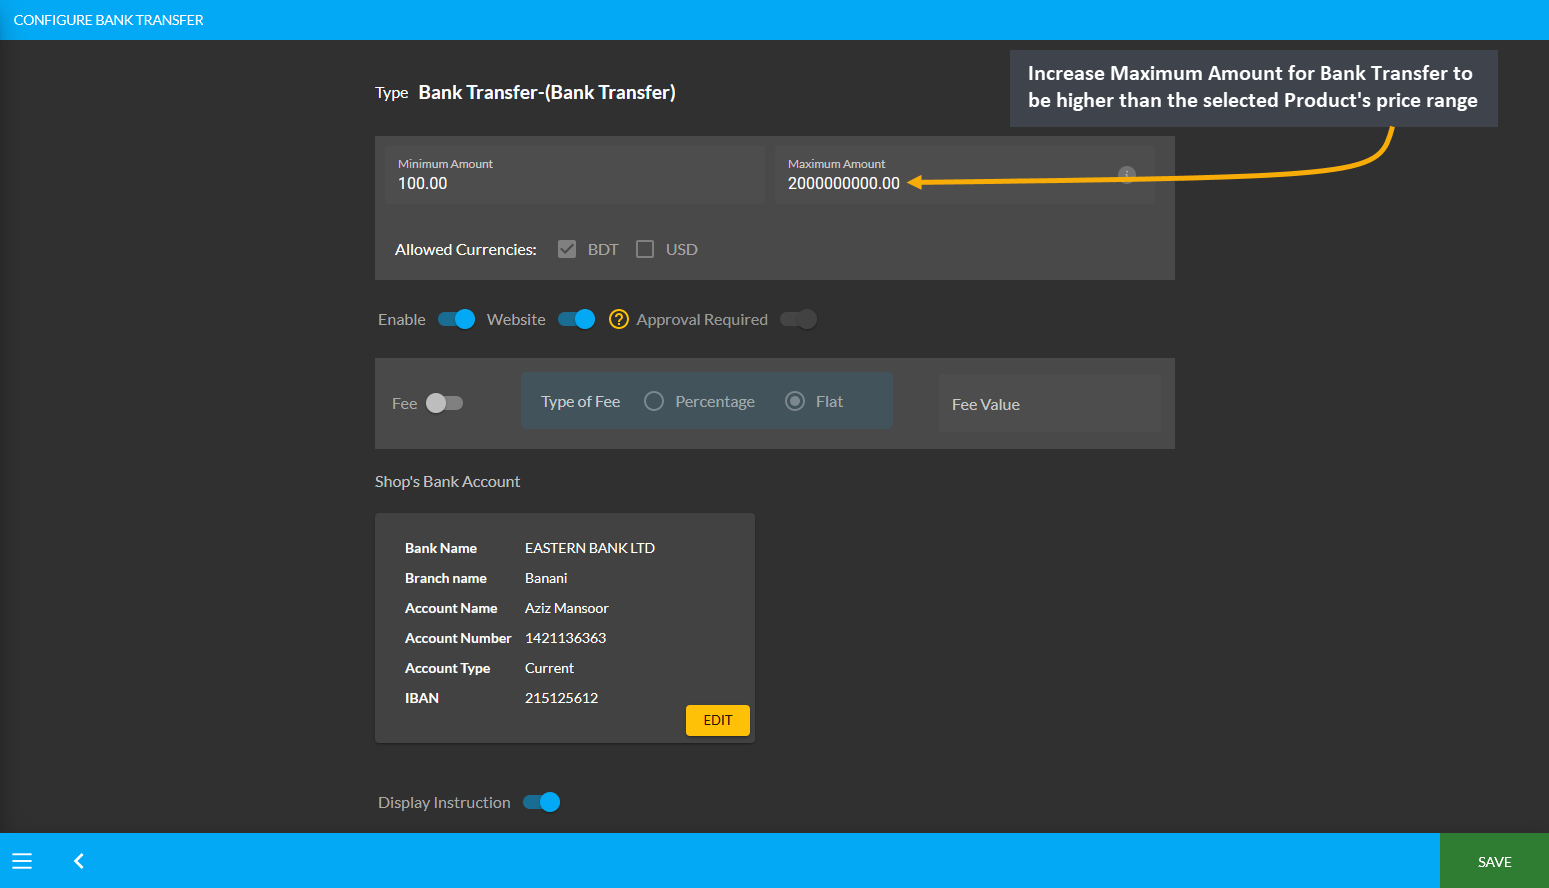
Image 8: Increase Maximum Amount for Bank Transfer to be higher than selected Product’s price range.
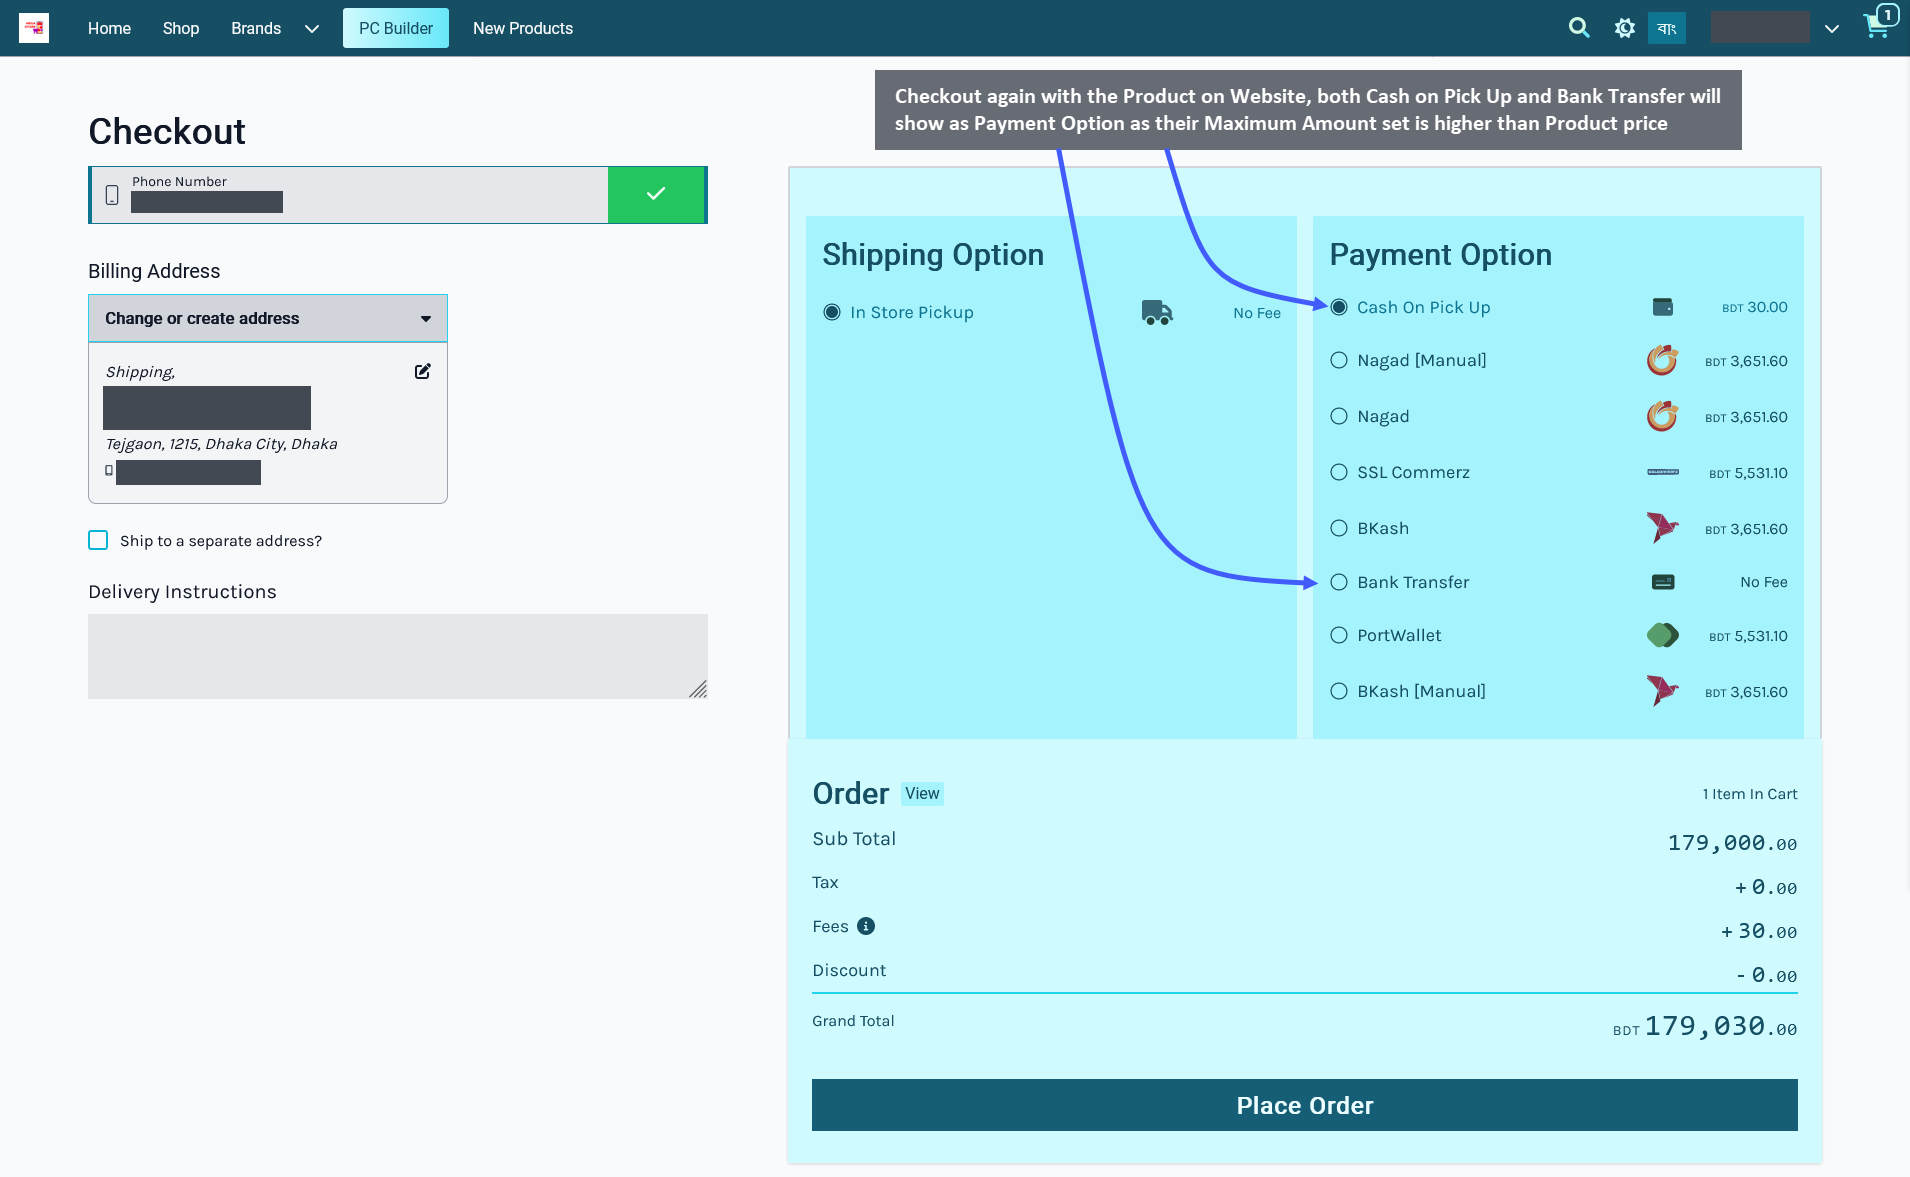
Image 9: Both Cash on Pick Up and Bank Transfer will now be available as Payment Options on the Website.


