Edit Payment Status
Update Payment Status based on customer payment using these options
Click Orders to get access to order configurations and edit Order status, Payment status, and Shipment status.
The Order List page show different types of Orders - Draft, Pending, Processing, Cancelled, Under Review, and Completed. Clicking on each Order, Shop Owners can visit the Order Dashboard to update order and payment statuses according to Customer commitments. On top, is a refresh button to refresh the Page.
Order List page shows each Order with Customer details on the left, with Order total beside it, then Order Status, Payment Status, and Shipment Status that can be updated if Order is in Draft, Pending, or Processing statuses and when Customer makes full payment or when shipment is delivered. Beside statuses, there is a Print Icon, clicking on it will open a dropdown with options to select an automatically generated Invoice or a Challan that can be printed whenever needed. Click View to visit Order Dashboard and see full details.
On the left side beside Customer details within the Order List, there is a dropdown clicking on which will open options to visit the Customer Dashboard, Report, Ledger Breakdown, and Orders on a separate tab.
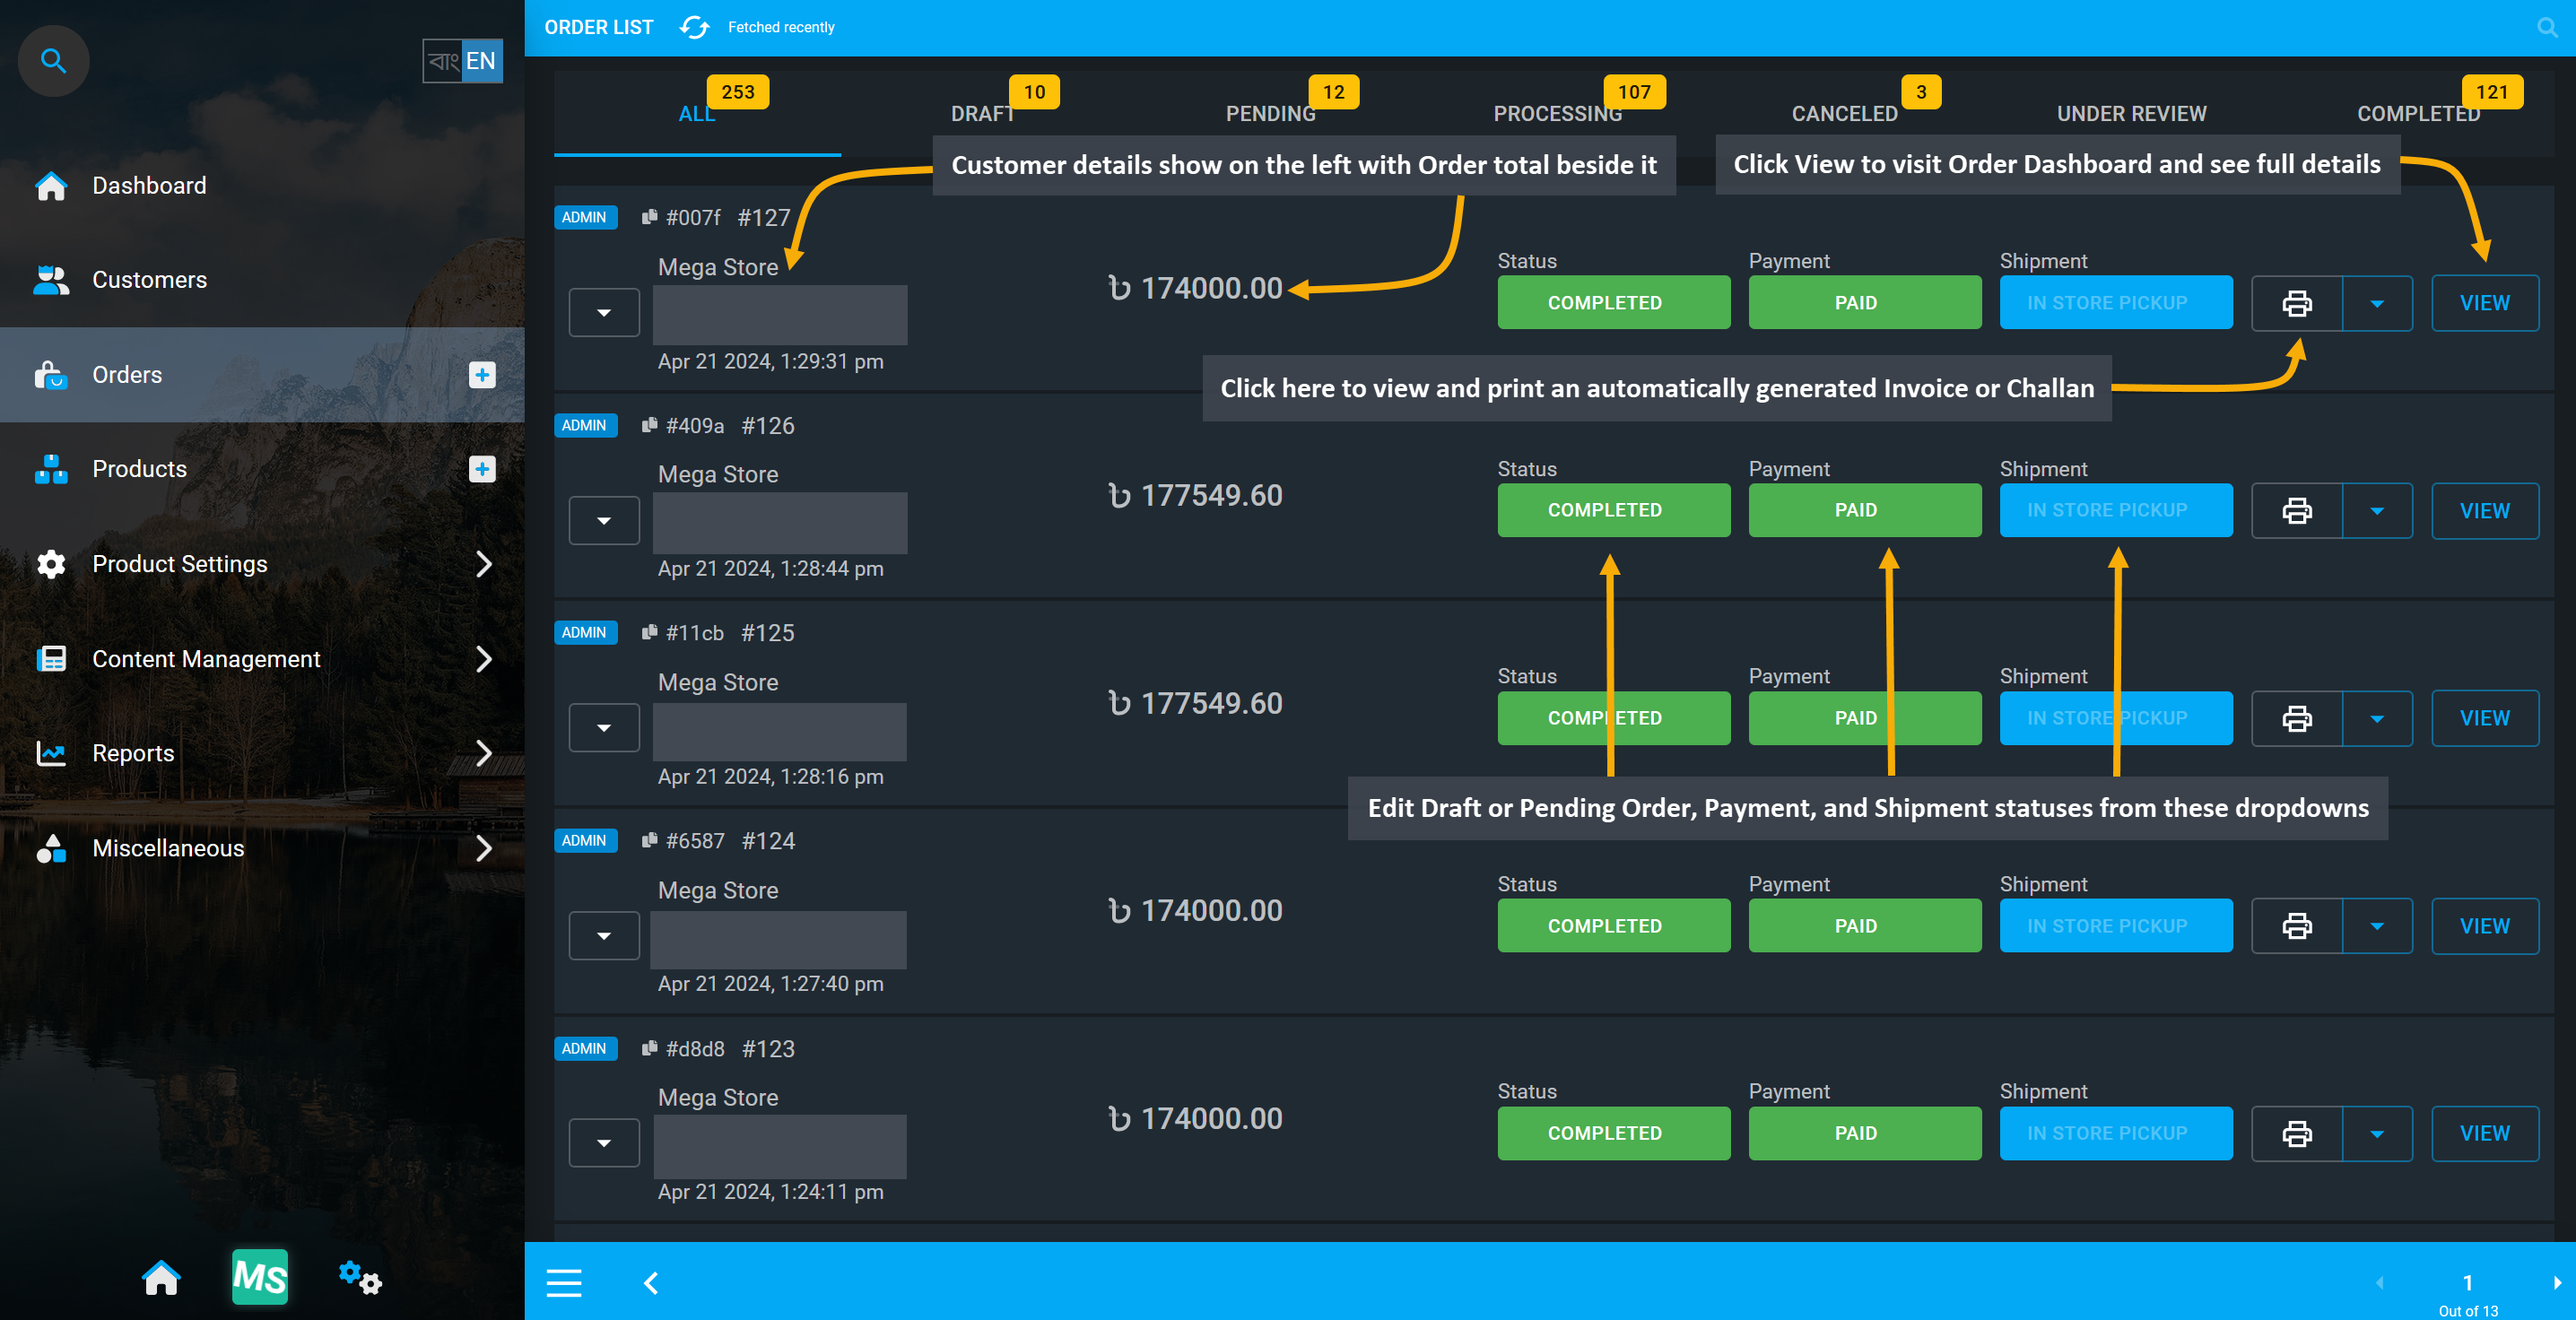
Image 1: Order List show Draft, Pending, Processing, Cancelled, Under Review, and Completed Orders.
![]()
Image 2: Open an automatically generated Invoice or a Challan that can be printed whenever needed.
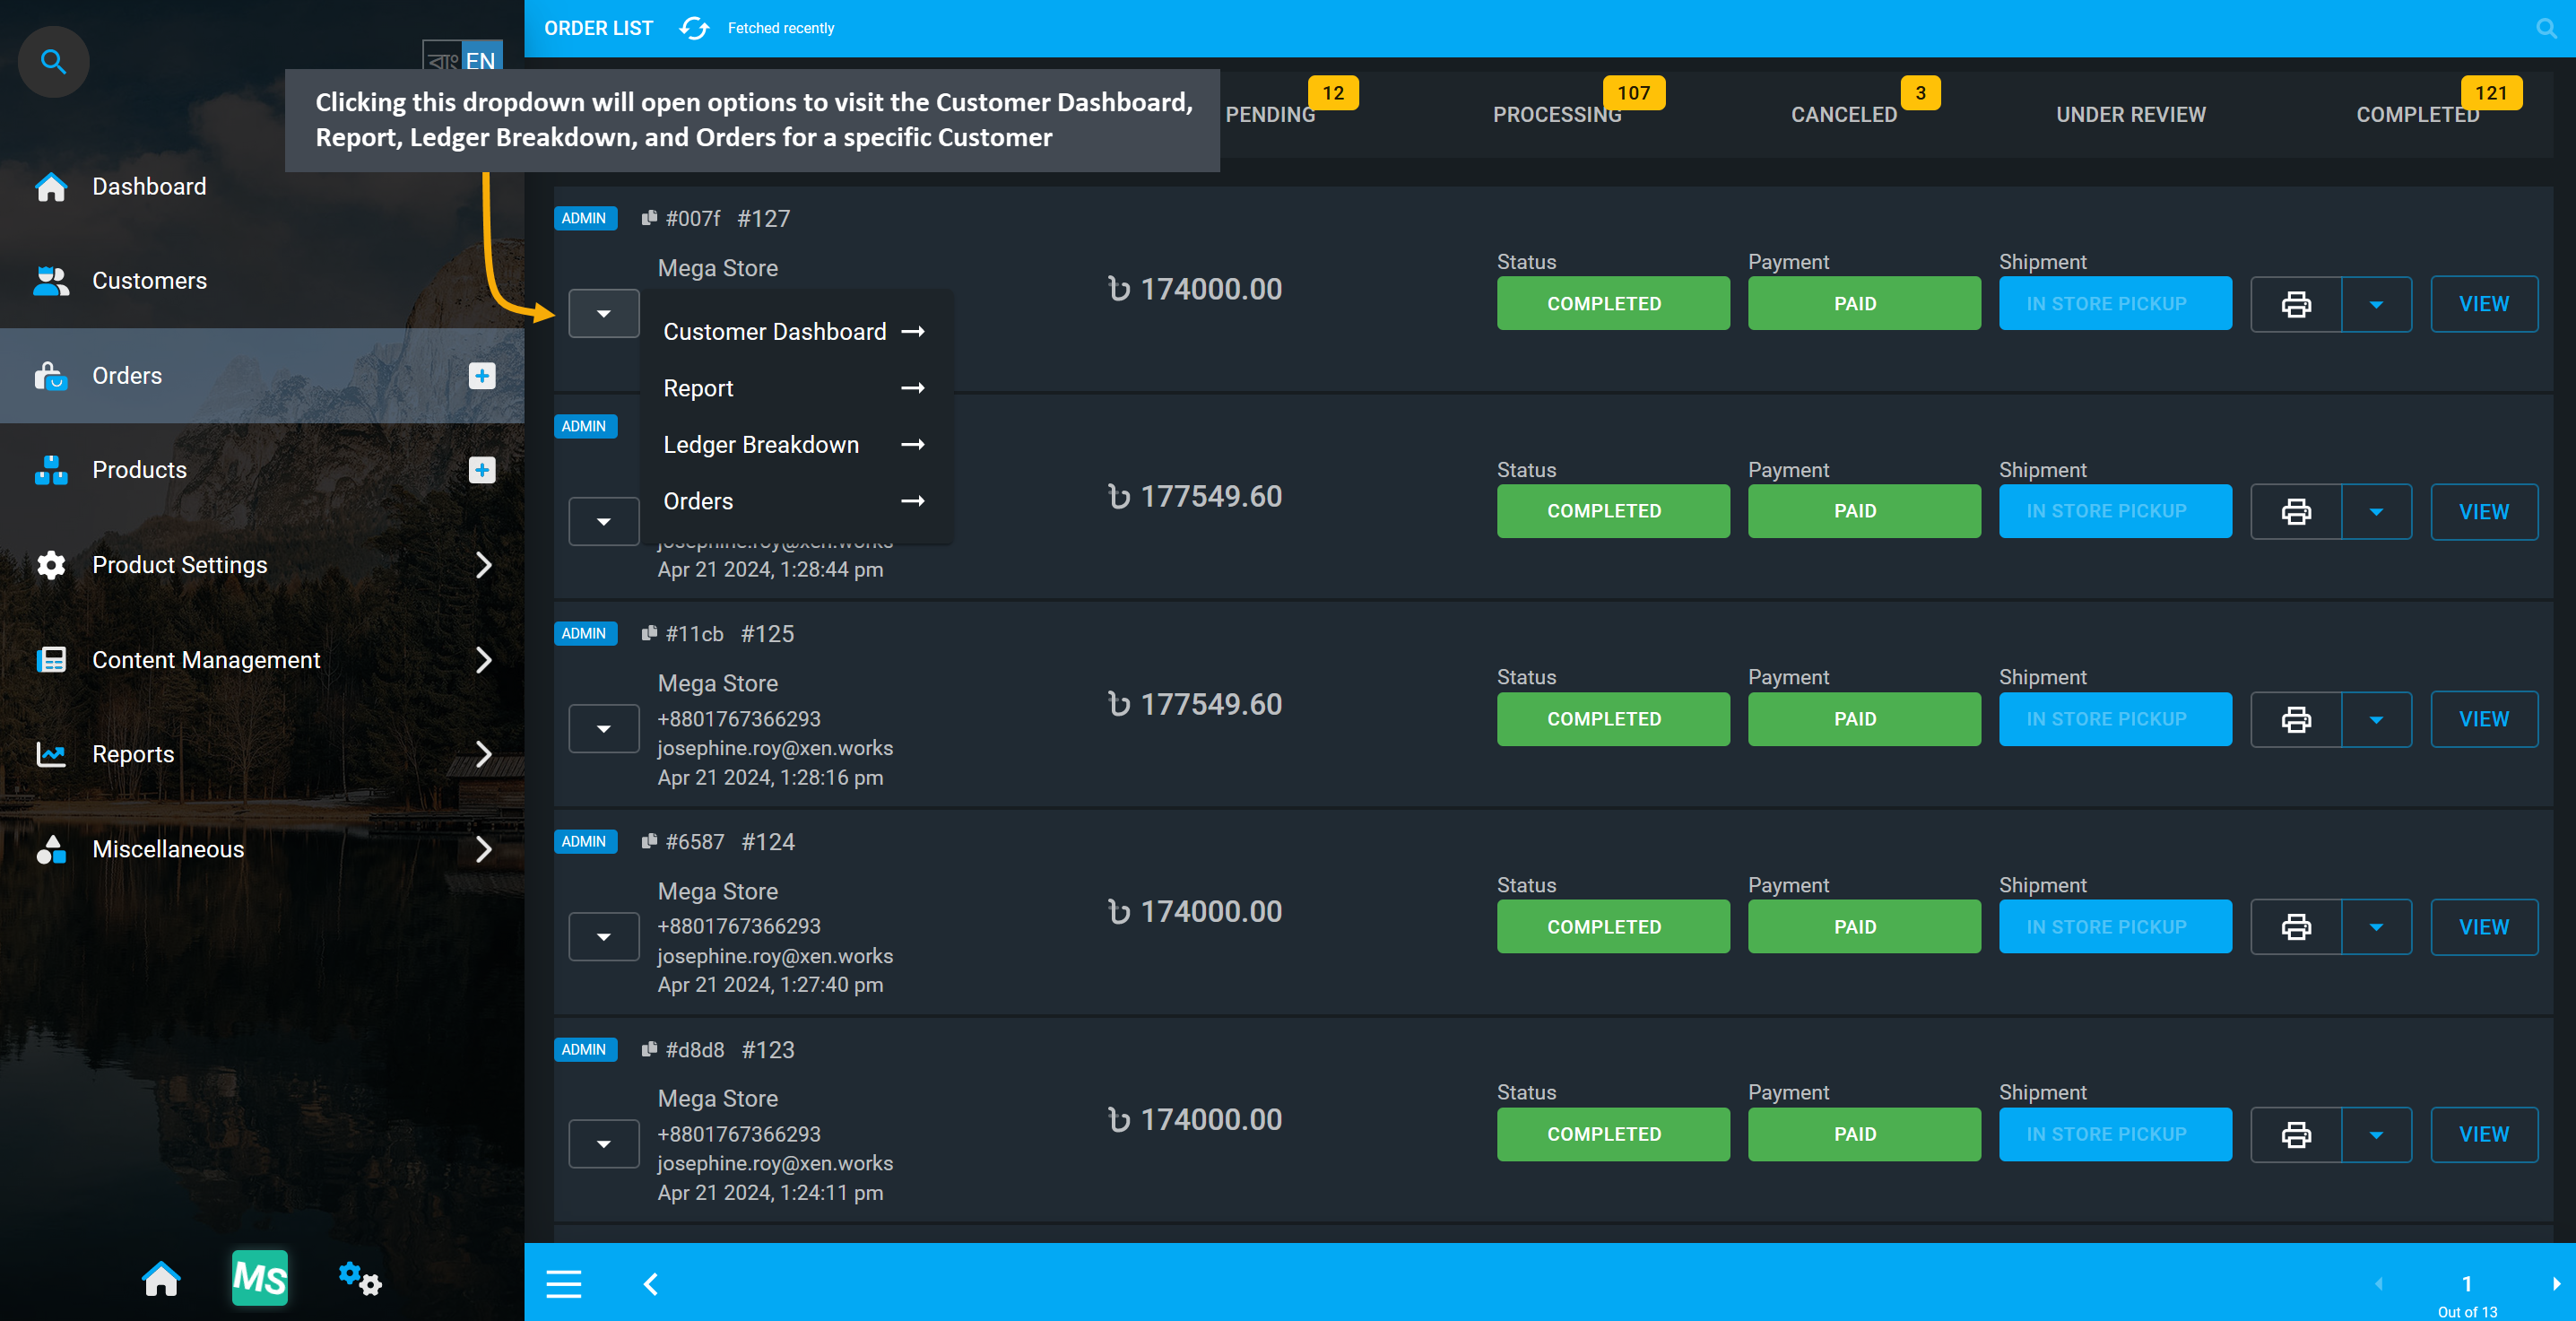
Image 3: Clicking dropdown will open options to visit different navigations for selected Customer.
Automatic Orders created by Customers from the Website will be displayed under All, Pending, Processing, Cancelled, Under Review, and Completed. Besides, Shop Owner can create Manual Orders at their Customer’s request from the Admin Panels by clicking on the Order + button at the bottom of the page or the + button beside Orders tab. Automatic Website Orders will have the label Website beside them and Manual Admin Panel Orders placed by the Shop will have the label Admin beside them to differentiate both Order types.
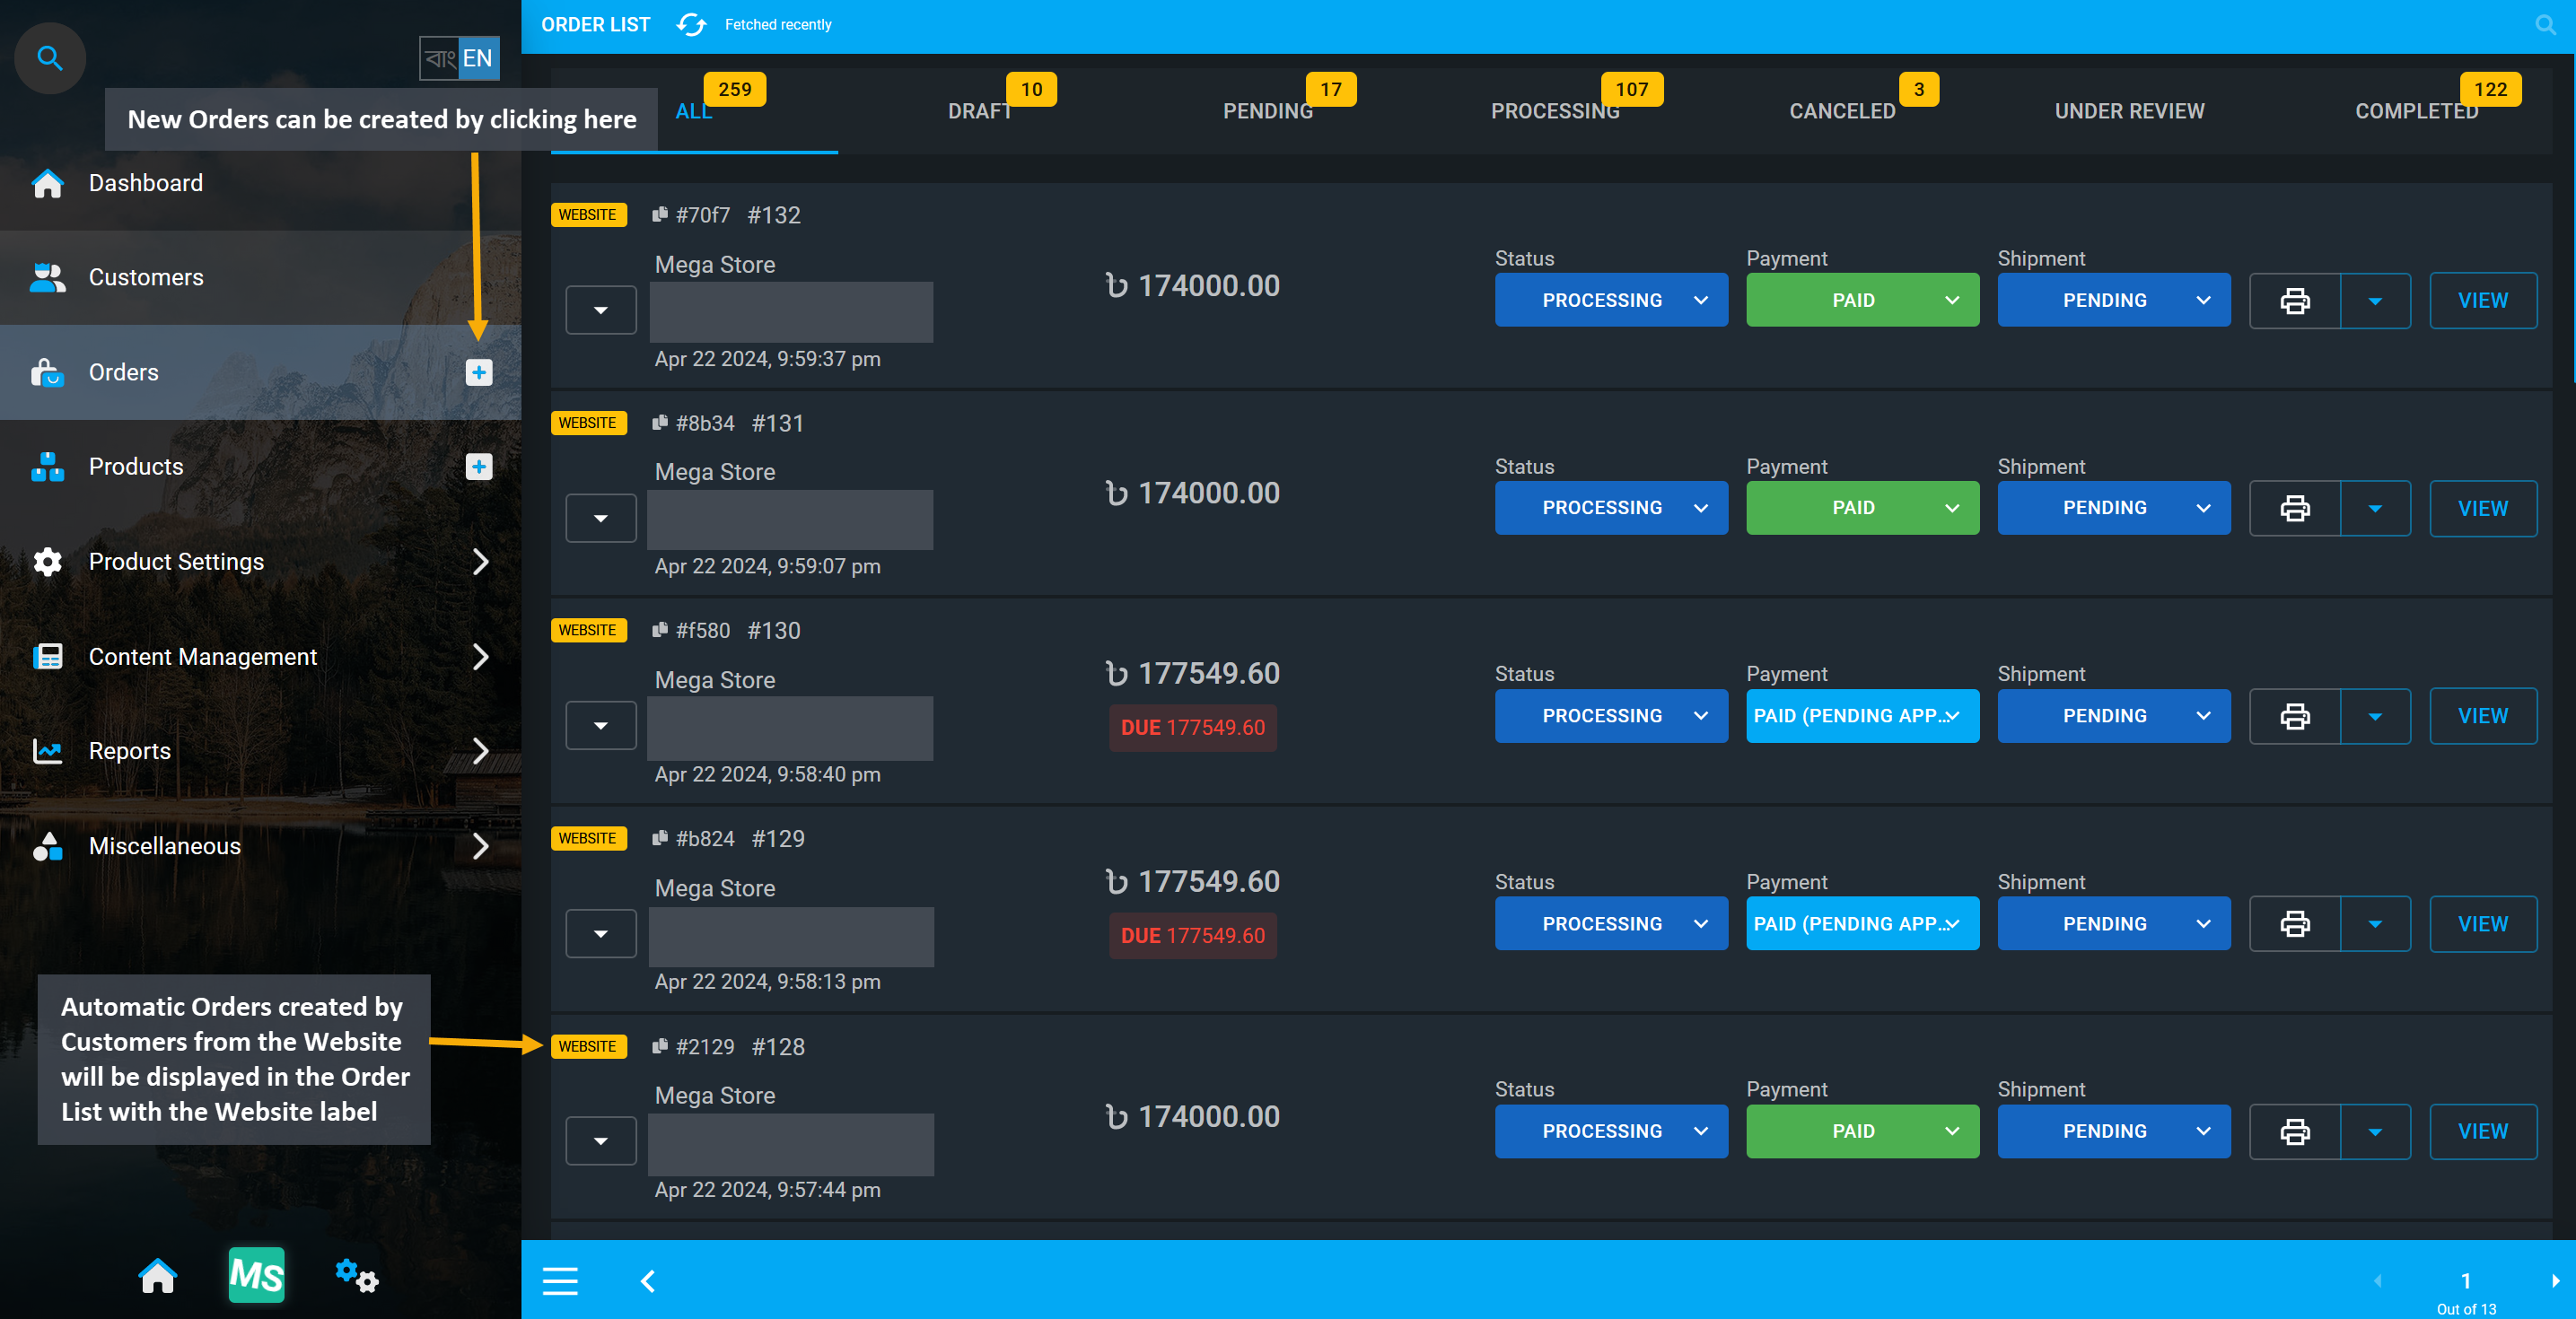
Image 4: Automatic Orders created by Customers from the Website will be displayed with Website label.
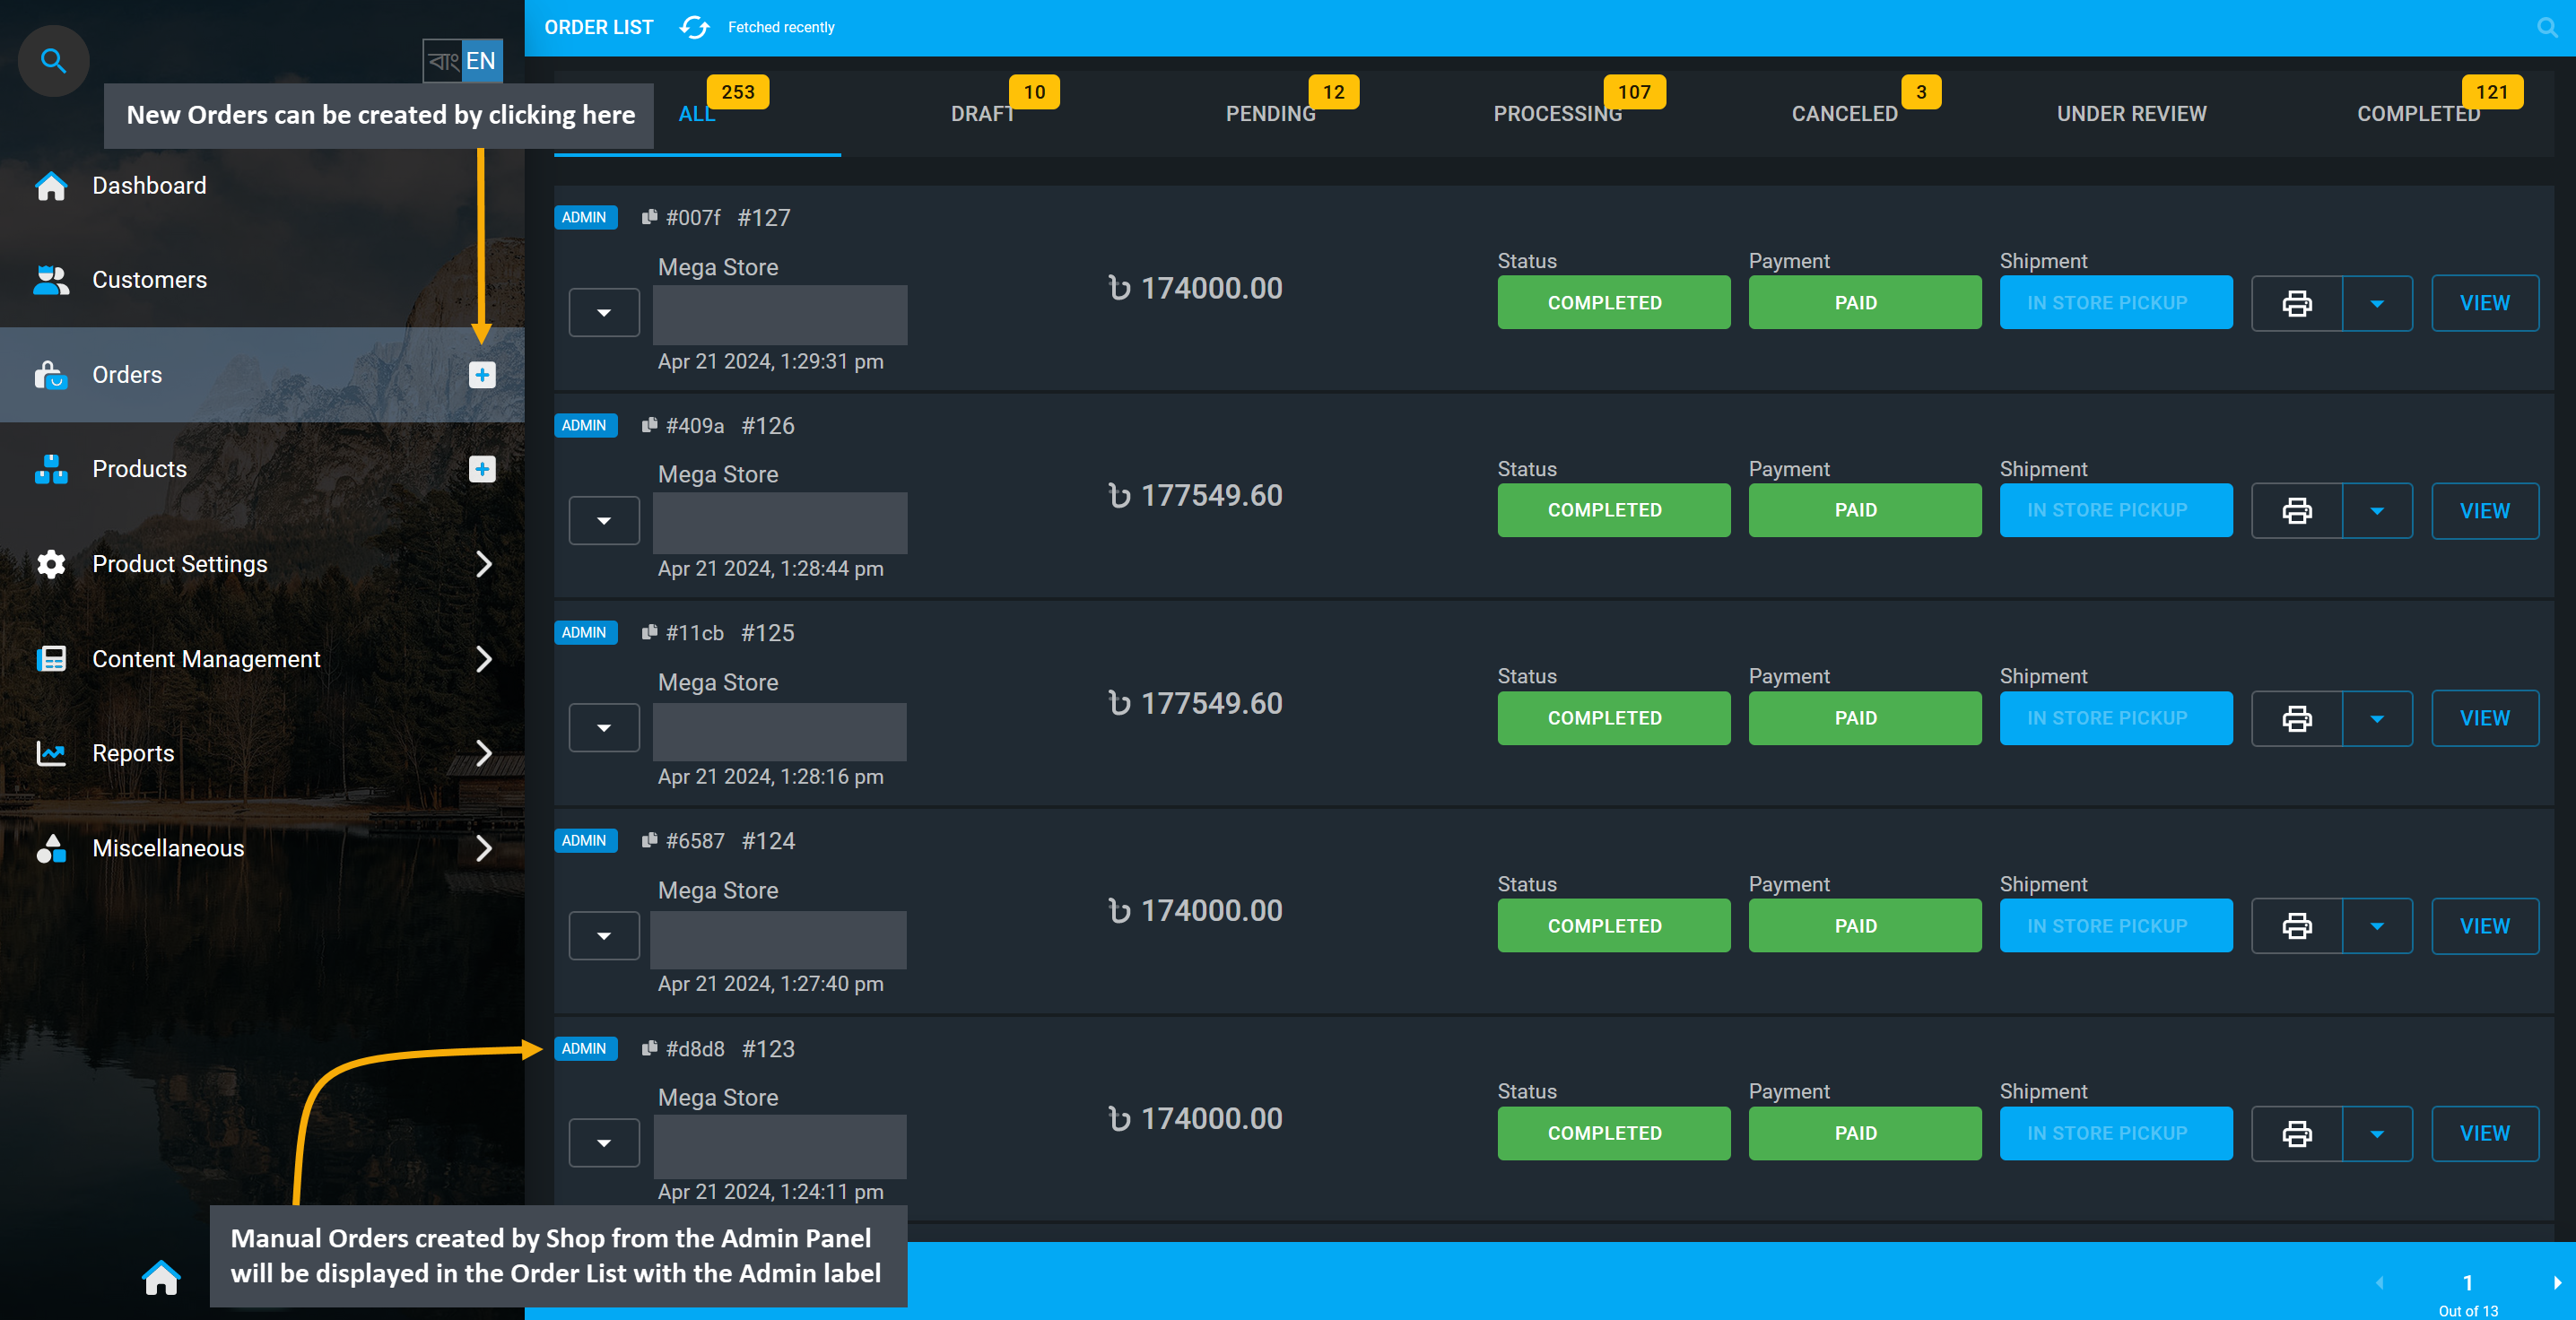
Image 5: Manual Orders created by Shop from the Admin Panel will be displayed with the Admin label.
New Orders can be created by clicking on the + button on the main Orders tab by the Shop Owner.
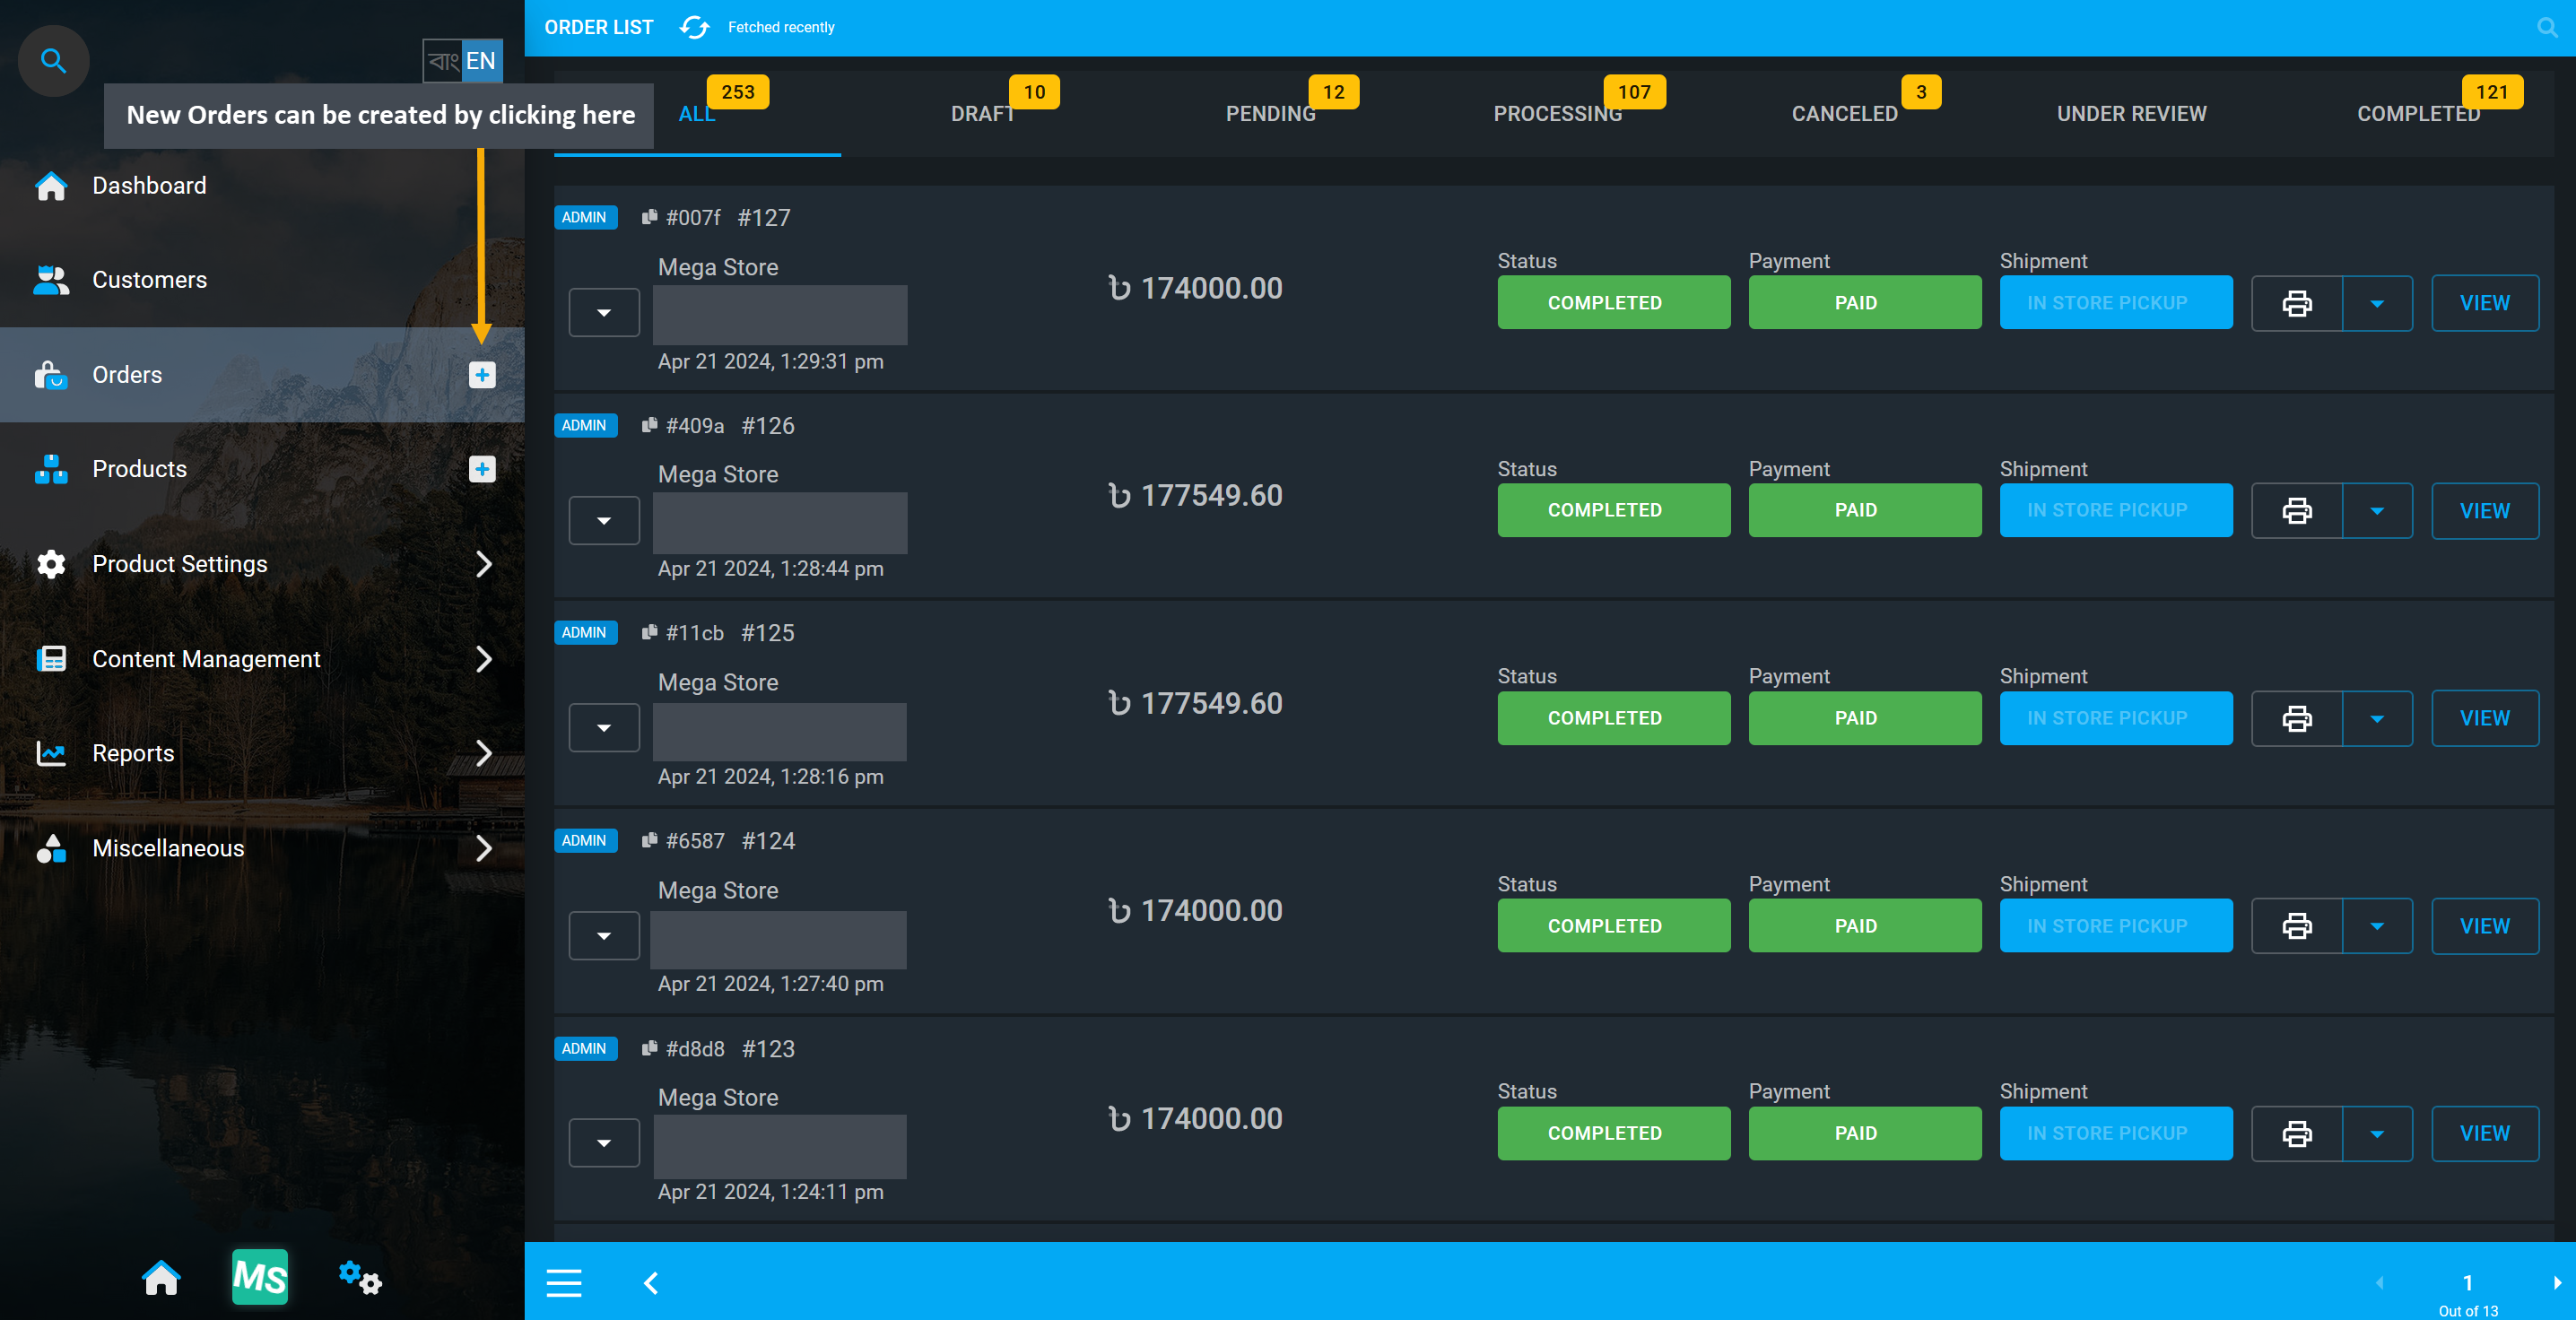
Image 6: Shop Owners can create New Orders by clicking on the + button on the main Orders tab.
The first step towards creating New Order from Admin Panel is to select the Branch and Counter for the Shop. Click Proceed when done. Several Manual Orders can be created for multiple Customers by adding Products to different Carts which can be checked out individually from the Admin Panel at any time.
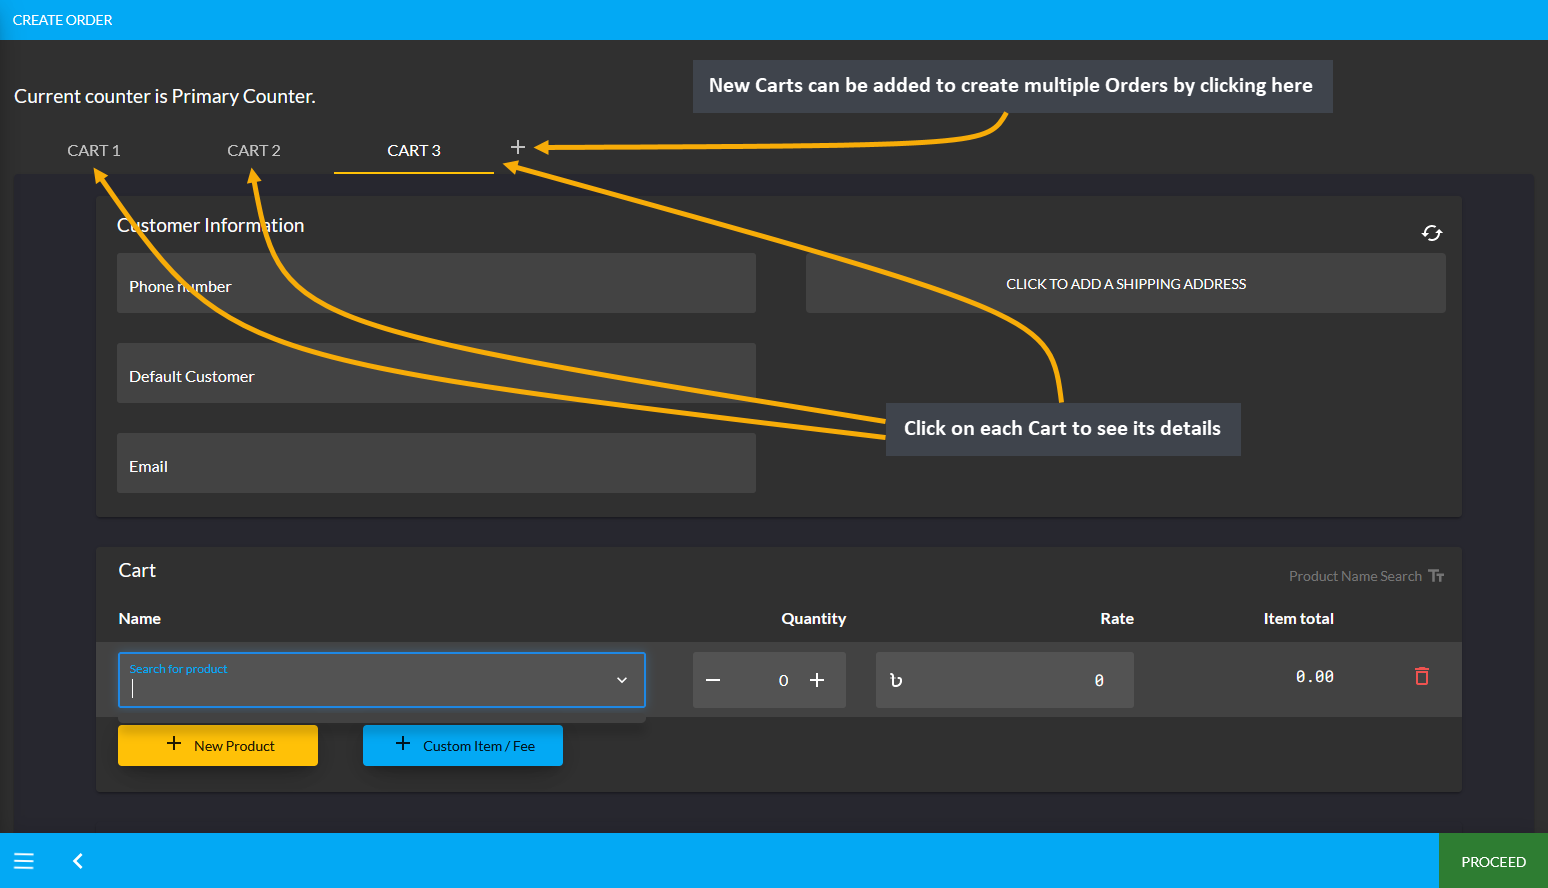
Image 4: Several Orders can be created for multiple Customers by adding Products to different Carts.
On Order Cart, fill in basic Customer information like phone number, name, and email from the Customer Information tab. Then Billing or Shipping Contact which will redirect to a new pop-up to add a new address with the Label (Billing or Shipping), Address, Area, City, Country, and Zip Code. After clicking the Submit button, Shipping Address will be added for Customer. New address can be added by clicking the + button.
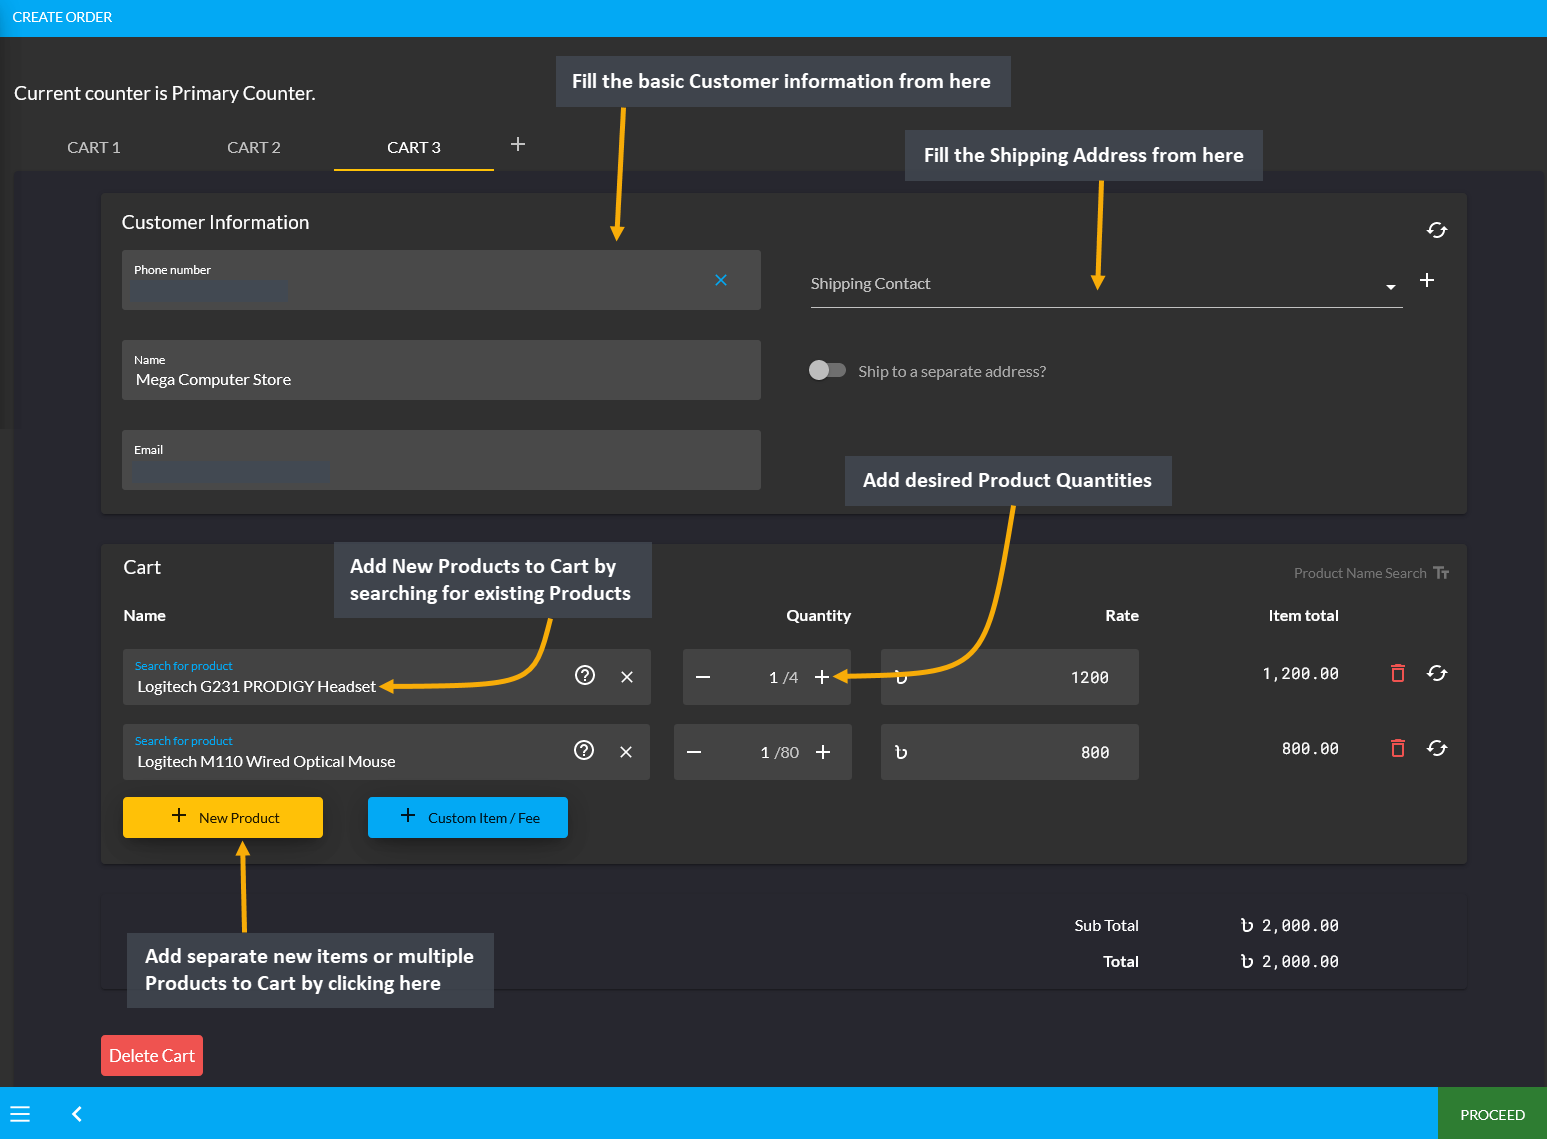
Image 5: Fill out Customer information i.e. phone , name, and email from Customer Information tab.
After confirming the Billing and Shipping address, new Products can be added to the Cart. For this, click the New Product button and a box will appear from which new Product can be added to Cart. Within it, search for existing Products from the Product List and add desired quantities that will automatically calculate the item total. To add multiple Products, click New Product that will add a separate new item to cart each time.
There is a separate option to add Custom Products to Cart that are not on general Product list. For this, click the Custom Item/ Fee button that will let you add Custom Products to Cart which are unavailable on existing product list. Clicking this button will create a new line item box to add a full Custom Product that needs to be added to Cart instantly like laptop screen repair, laptop keyboard repair, audio, or network cable etc.
To add multiple Custom Products, click the Custom Item/ Fee button with desired quantities and rate/ fees. Use Delete Cart button to delete any Cart among multiple carts already opened. Click the Bin Icon to delete Products from the Cart. When cart is fully ready, click Proceed to continue to the next step.
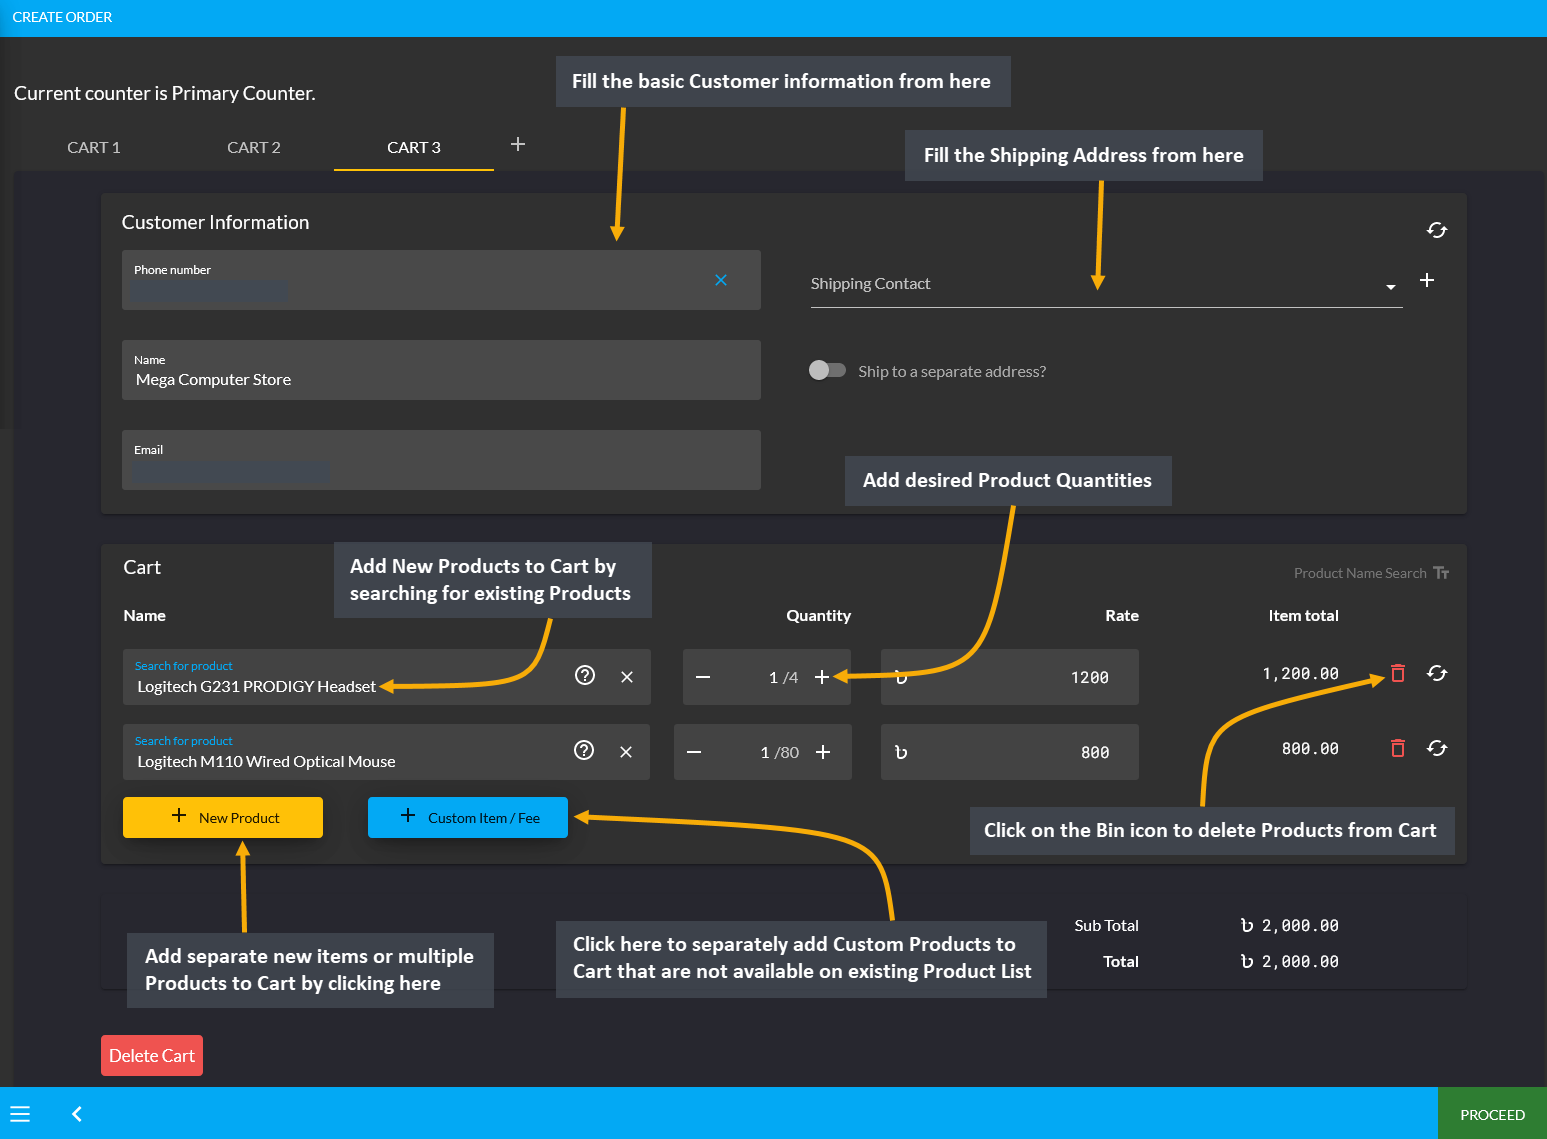
Image 6: Add Multiple Products or add Custom Products to Cart with desired quantities and rates.
In the next page, review the Cart, and select Shipment and Payment options. To make any change, click the Click here to Deselect button. If all the information is correct, click Confirm Order that will redirect to a new page stating that the Order has been confirmed. From here, you can choose to Print Invoice or Close Tab.
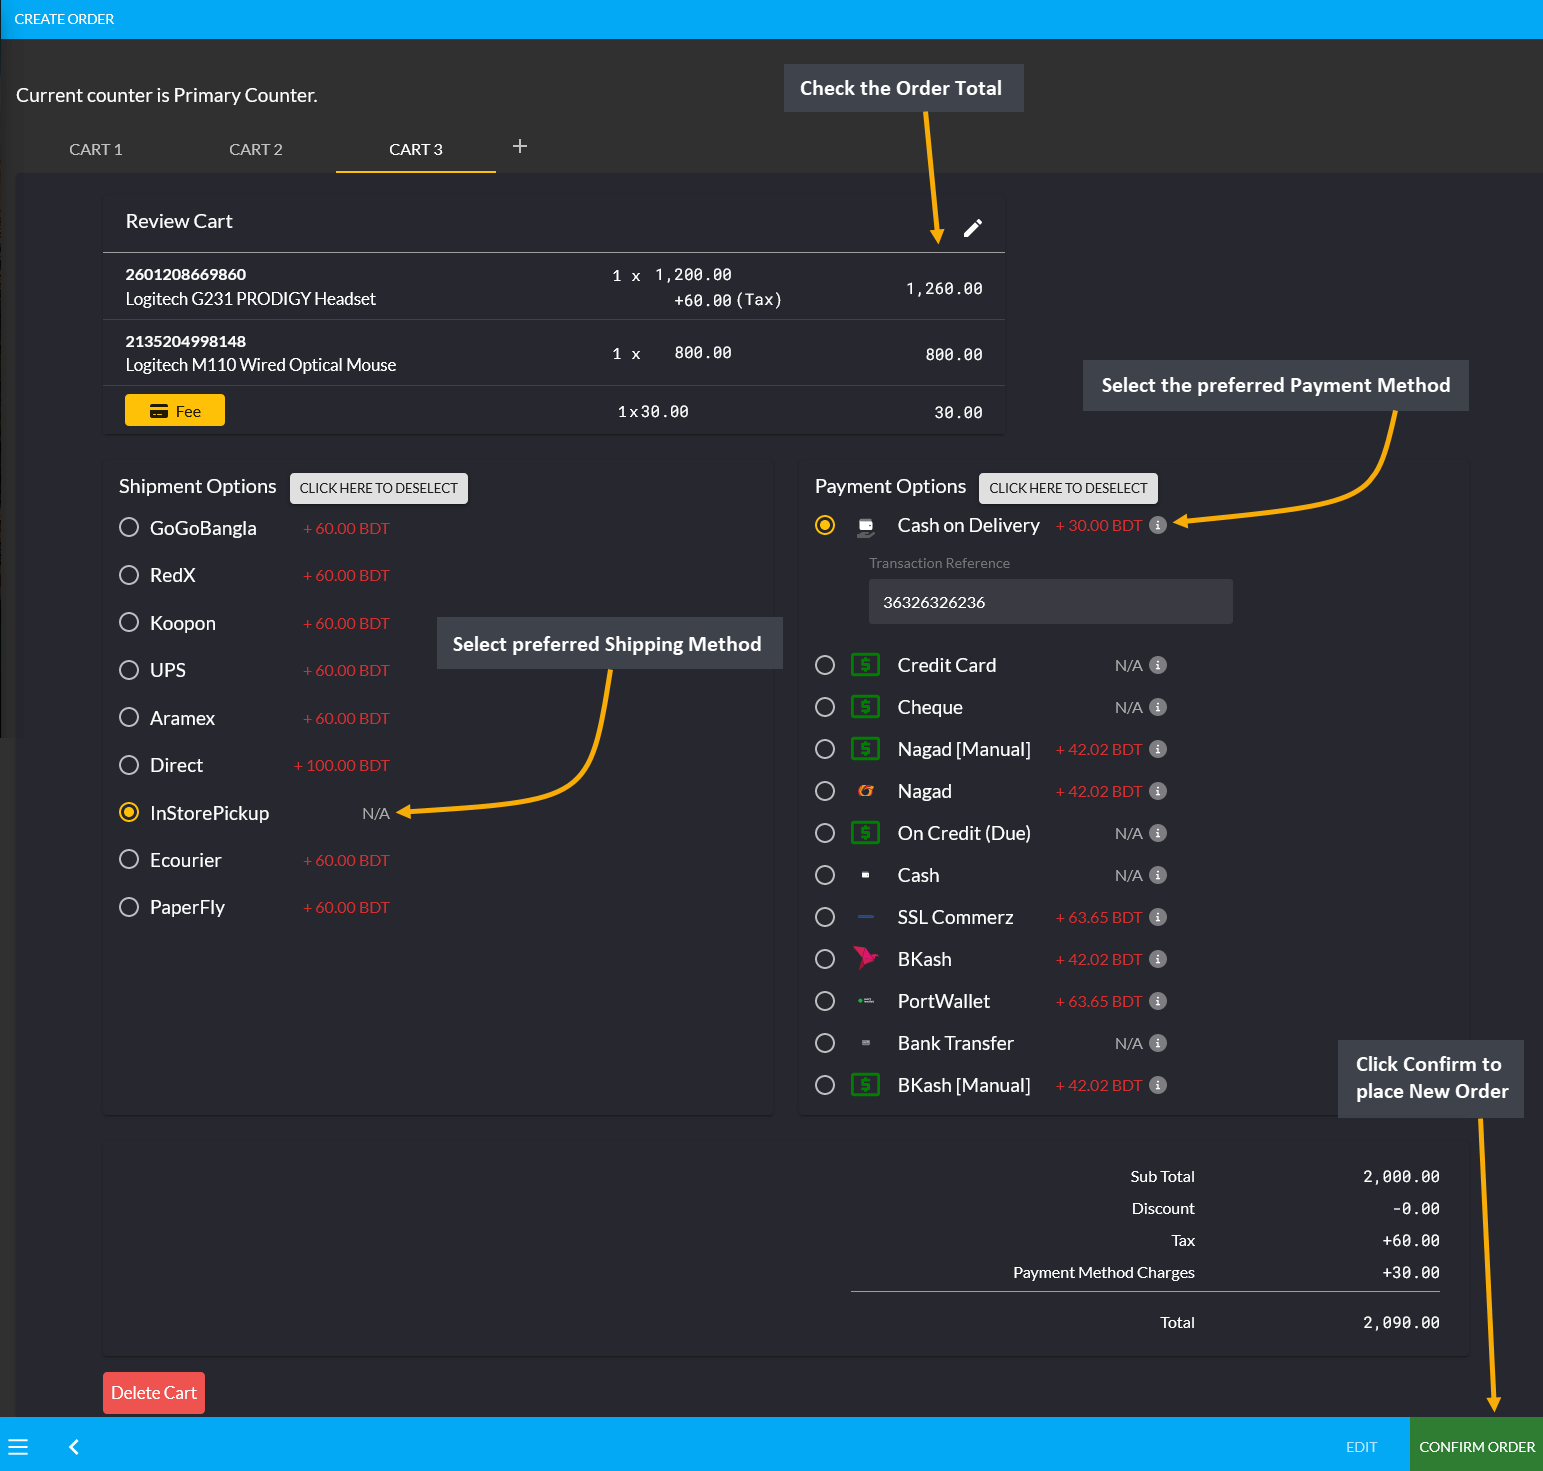
Image 7: Review Cart, select Shipment and Payment options, and click Confirm Order to place Order.
After Order is placed, go to Order List from where Order Invoice can be printed clicking the Print icon that will open full view invoice with Order details and Payment information to print. Set Printer, Pages, Layout, and Colors from the print settings as needed. Then, click Print button to print copies of the Order Invoice.
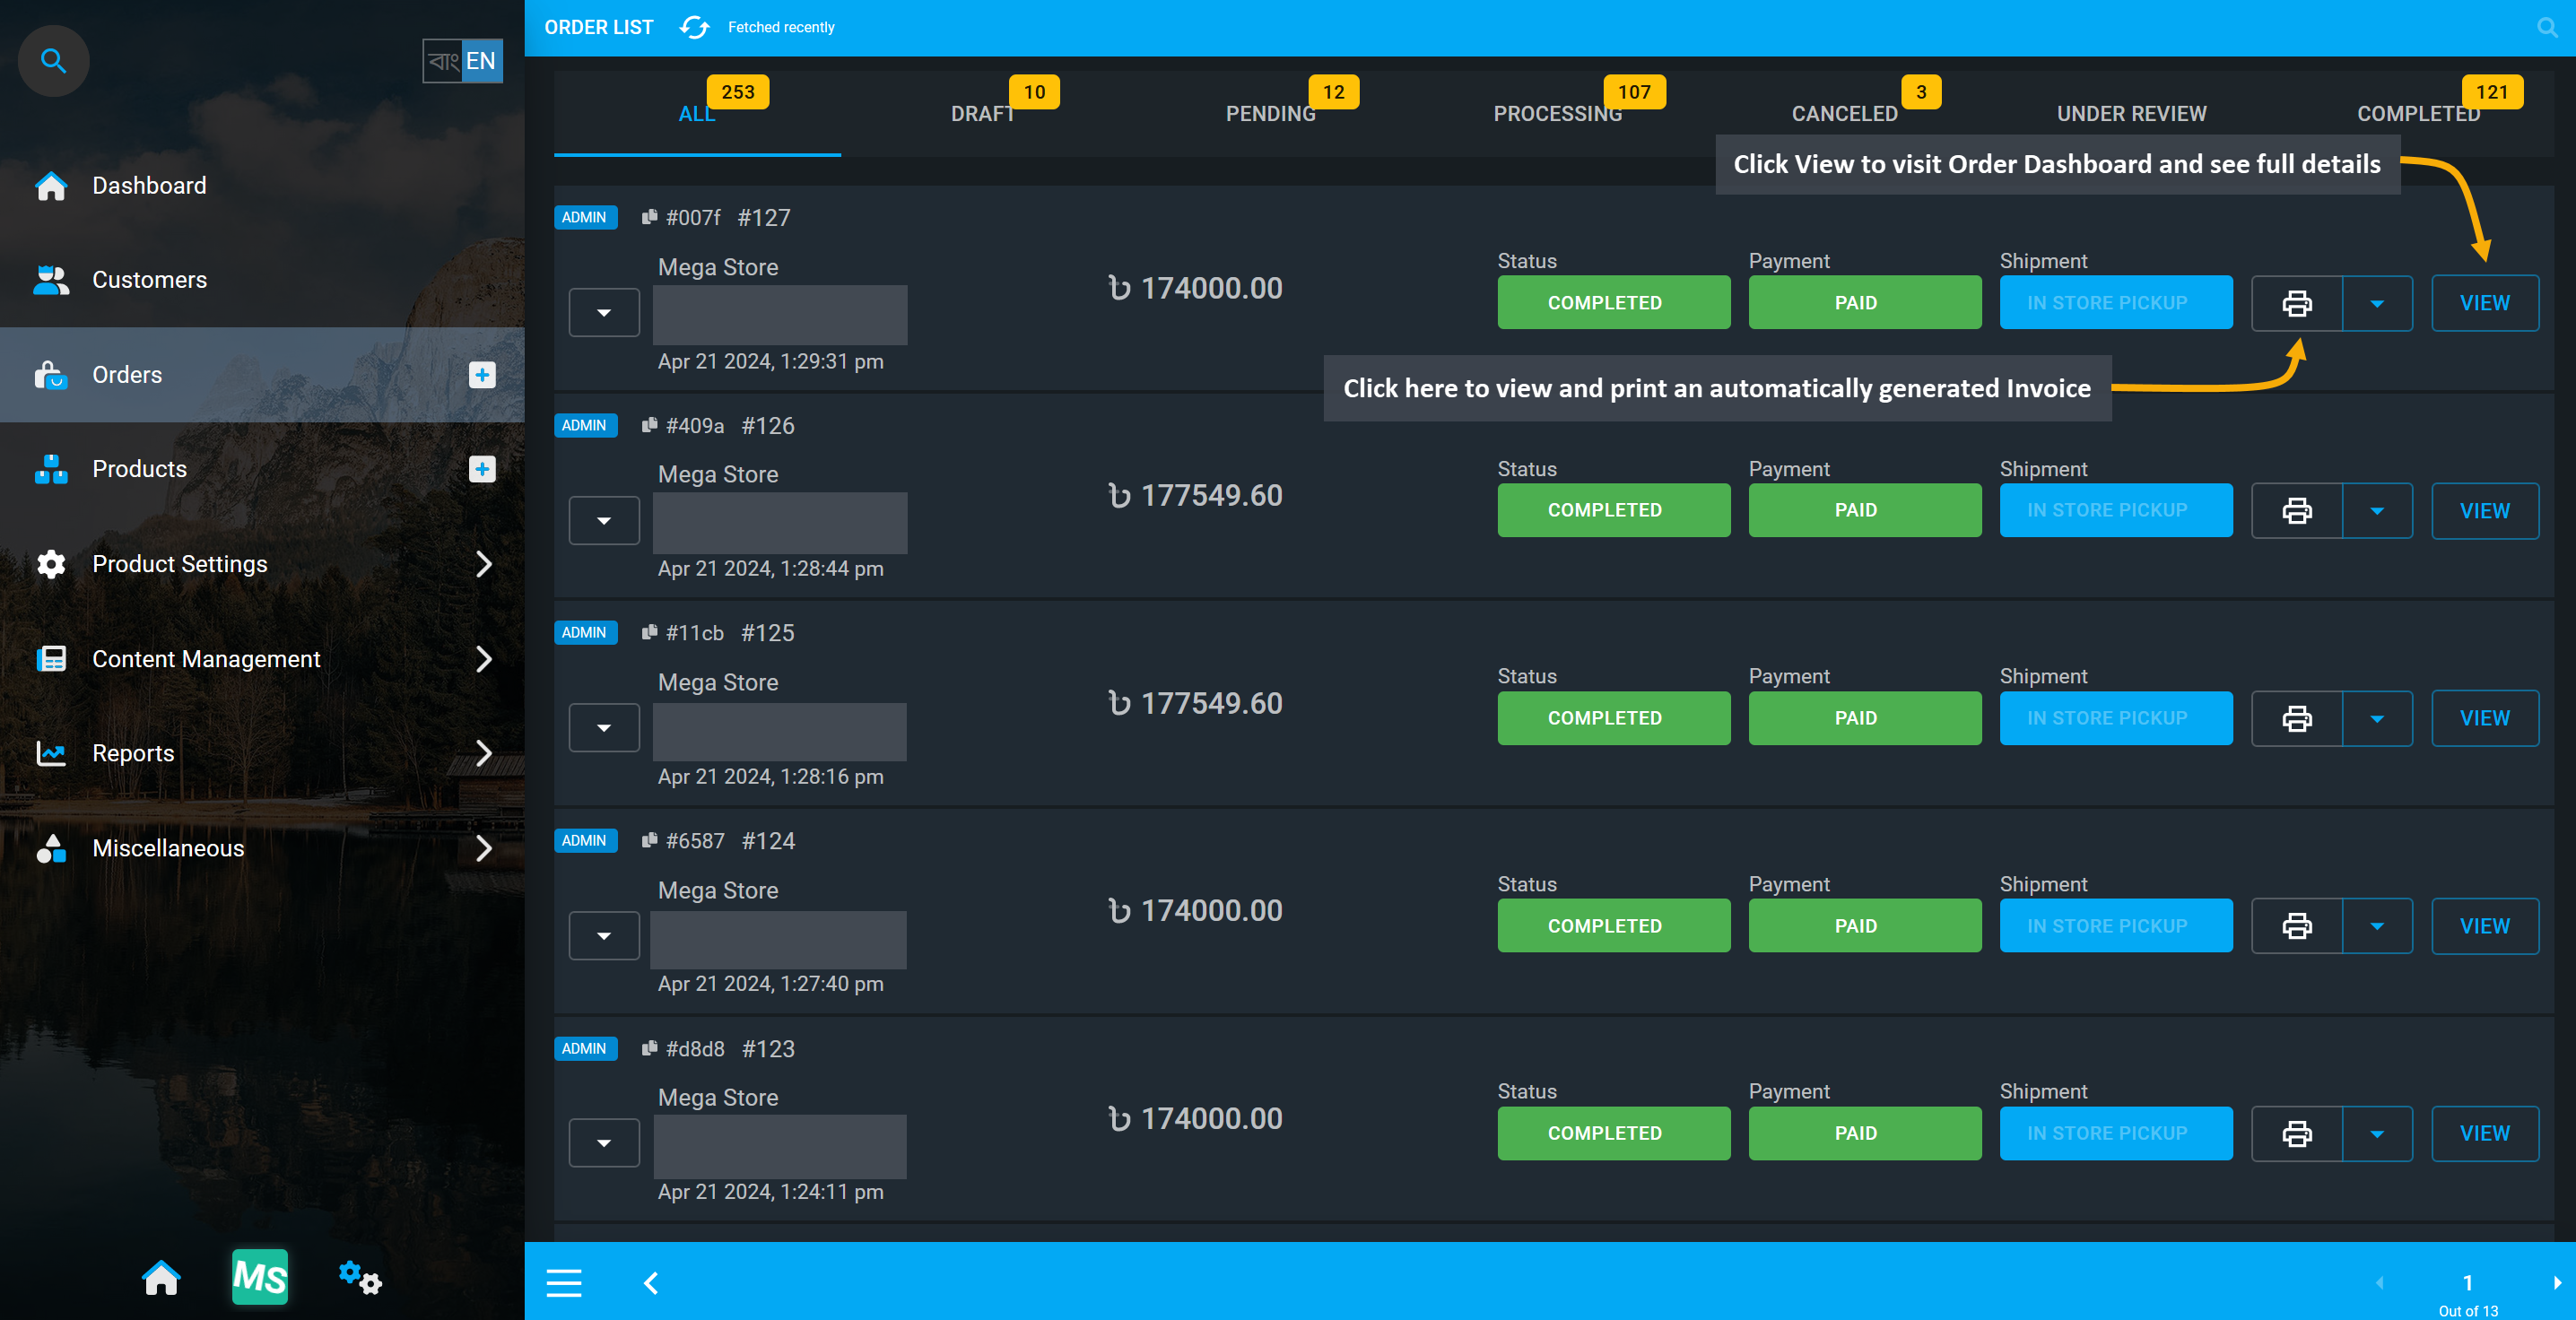
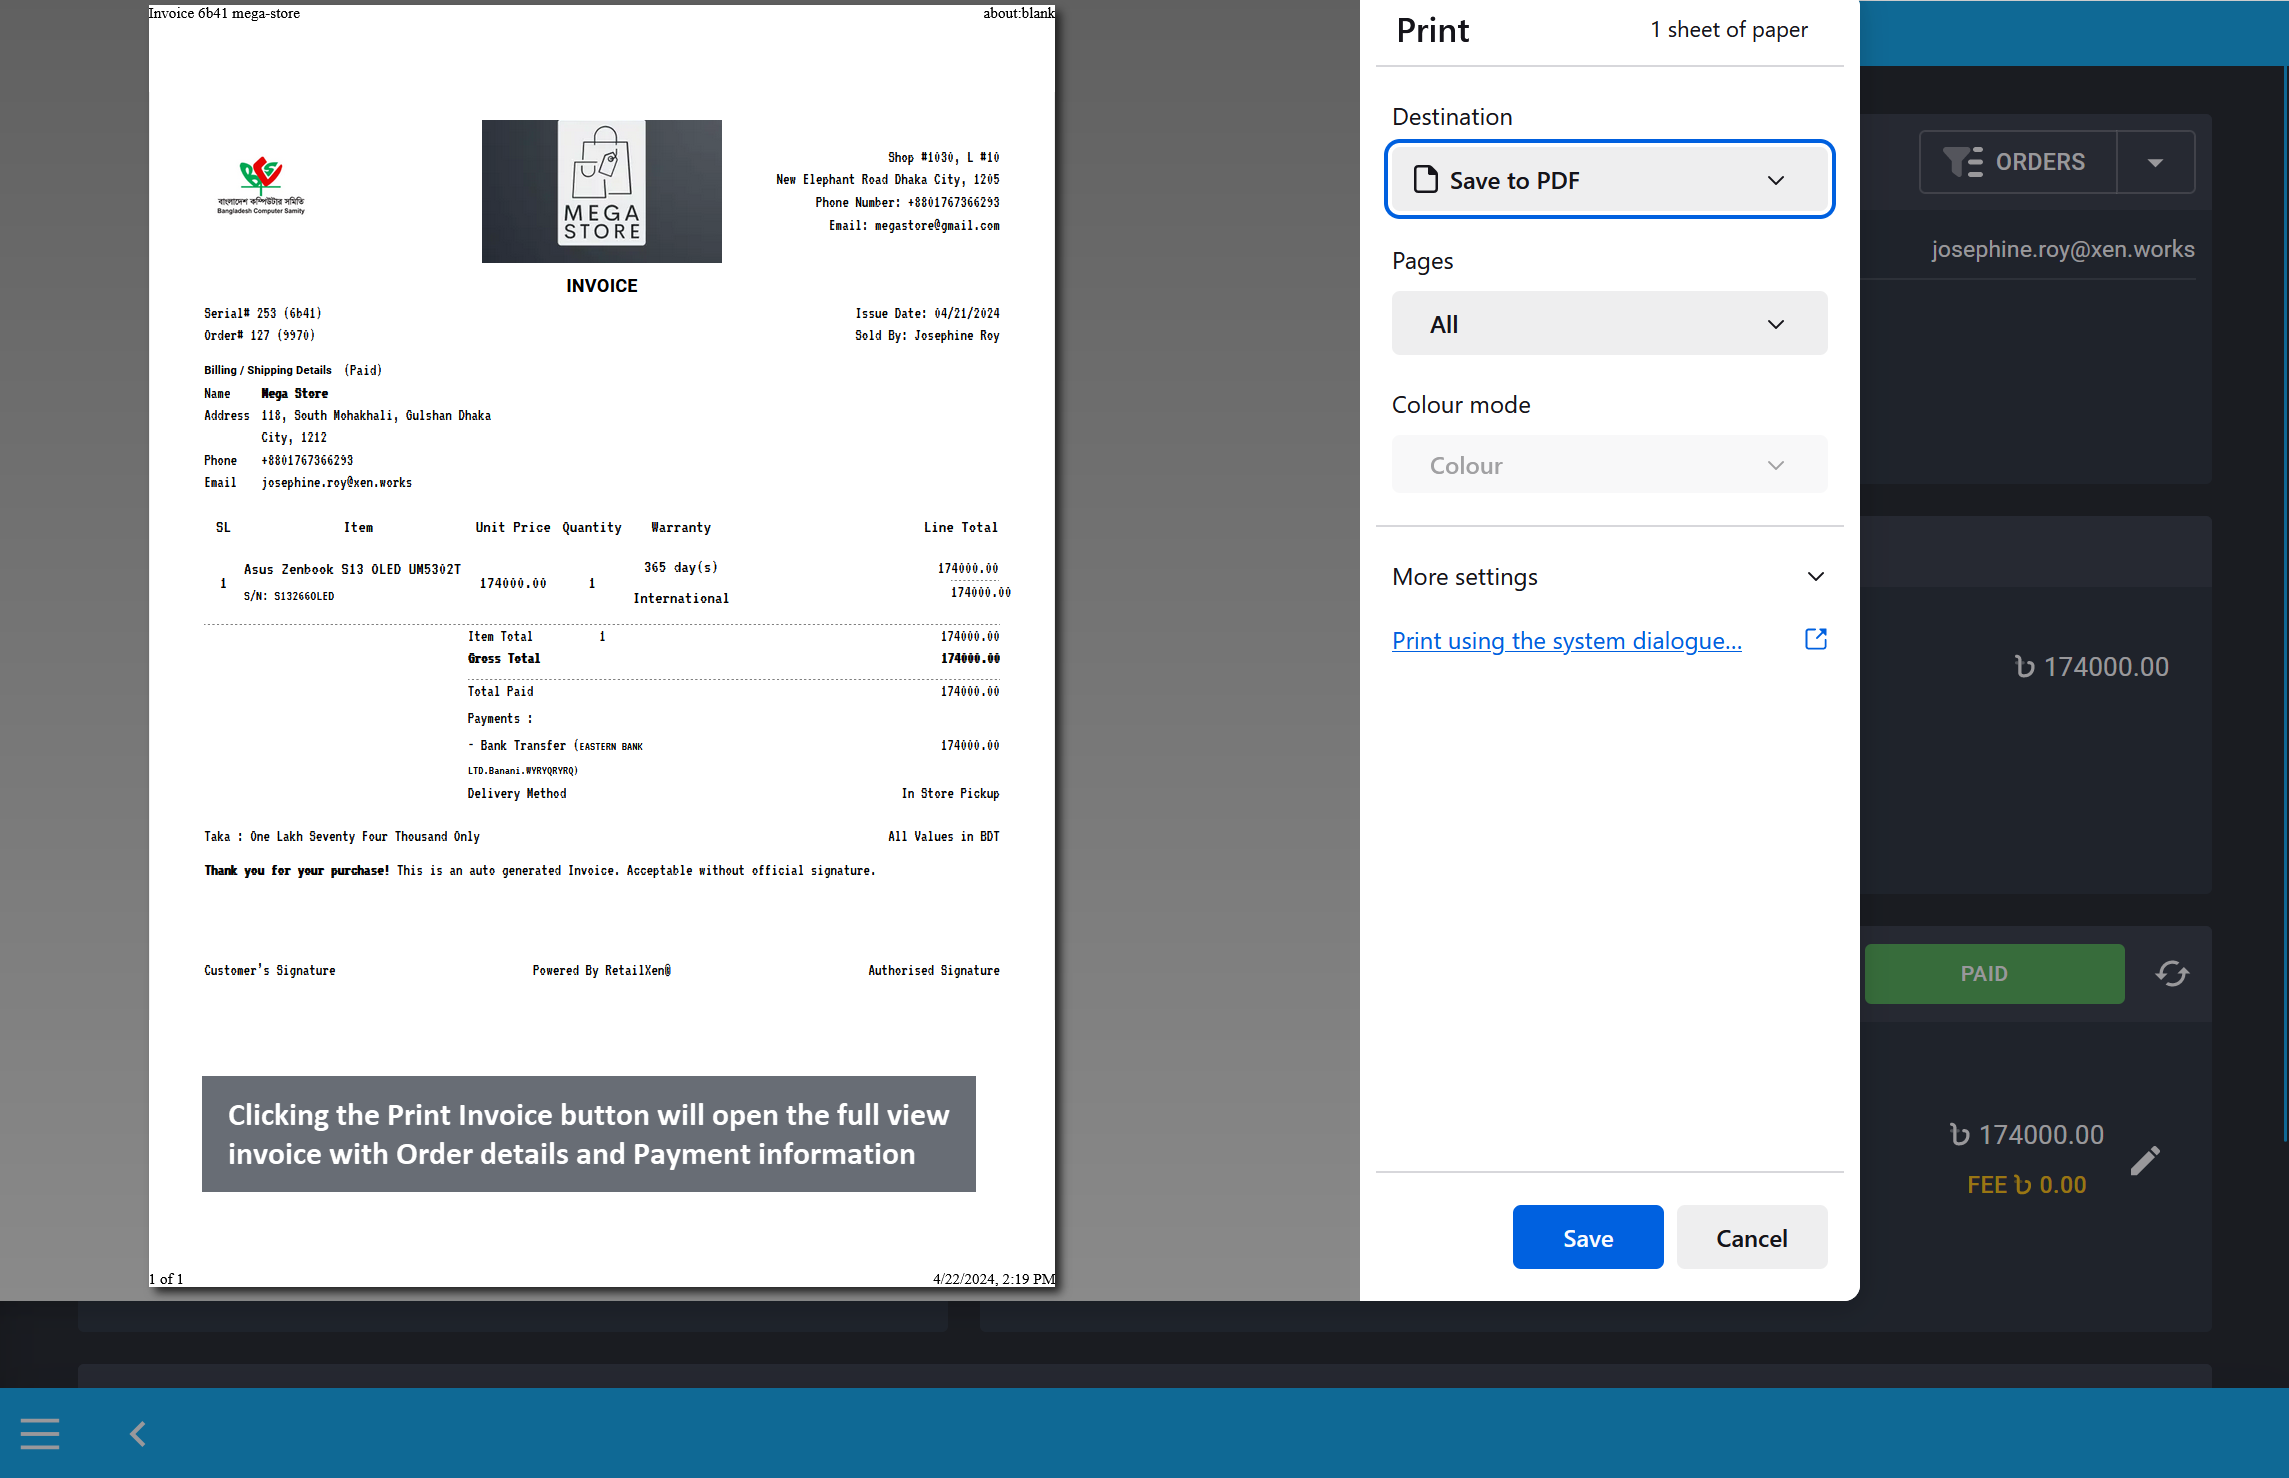
Image 8: Clicking the Print Invoice button will open the full view invoice with full Order details.
Order Invoice can also be viewed and printed from the Order Dashboard. Full Order details including Order total, Customer information, line item, payment, and shipment details will be displayed on the dashboard.
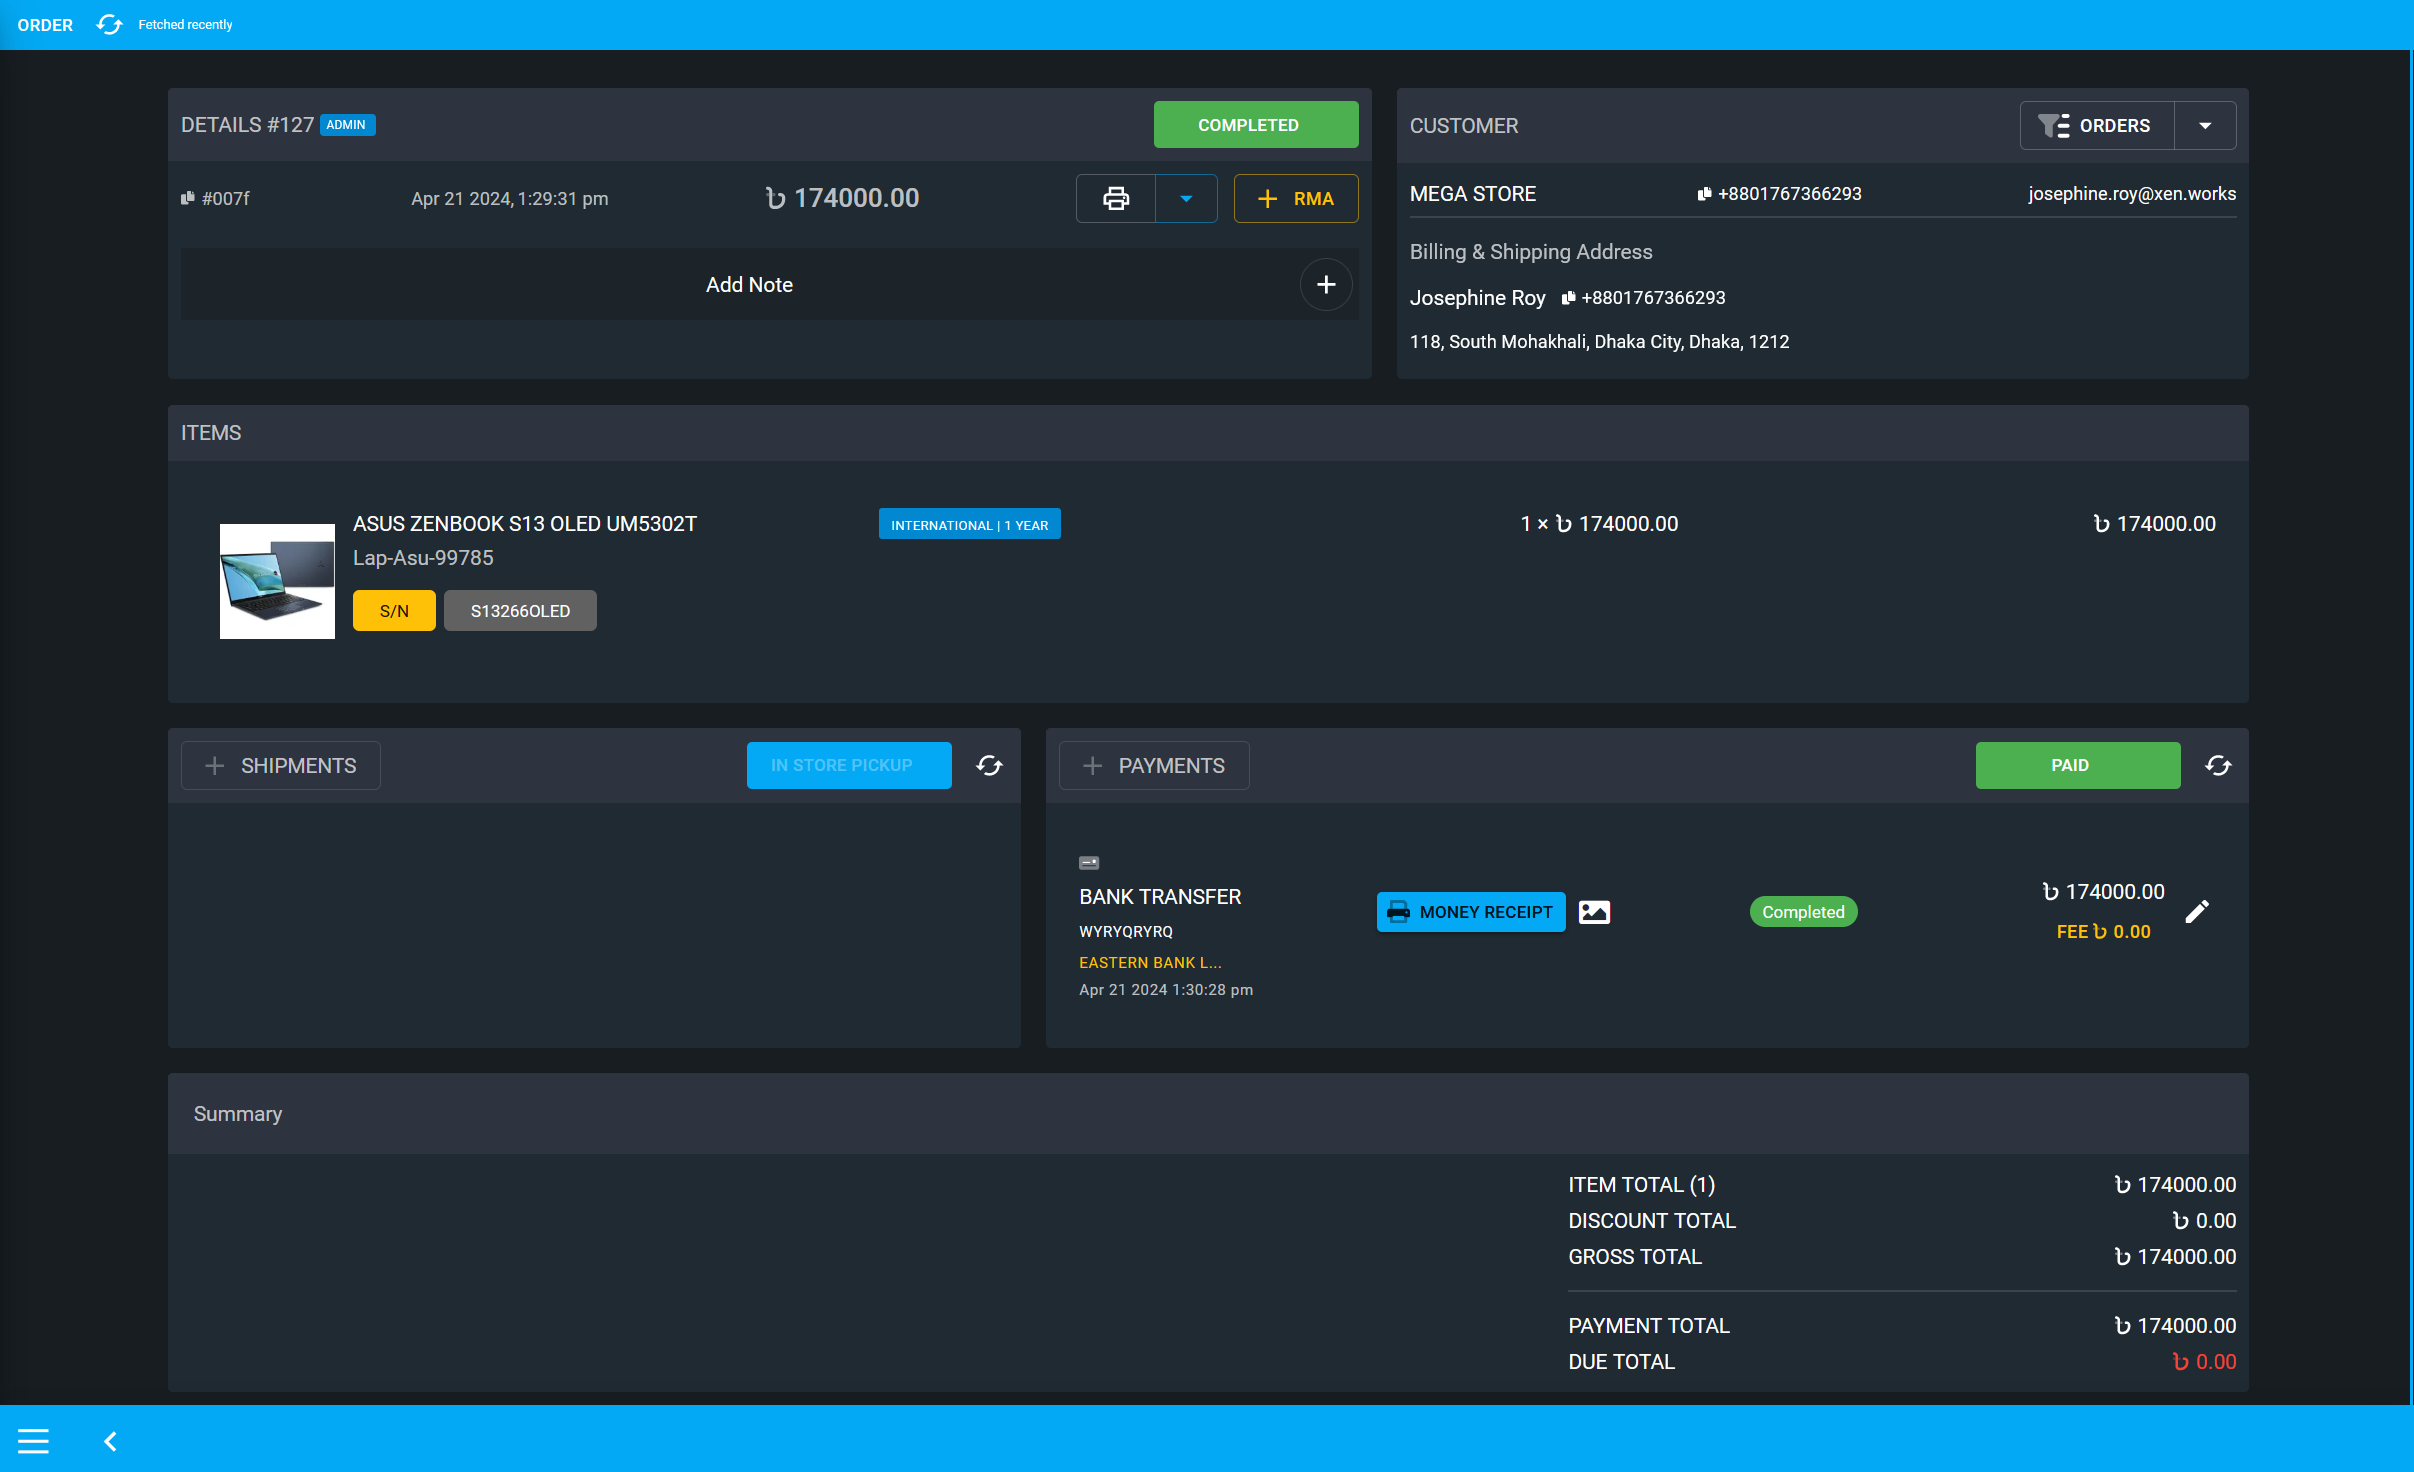
Image 9: Order Dashboard will have full view of Order total, Customer, Payment, and Shipment details.
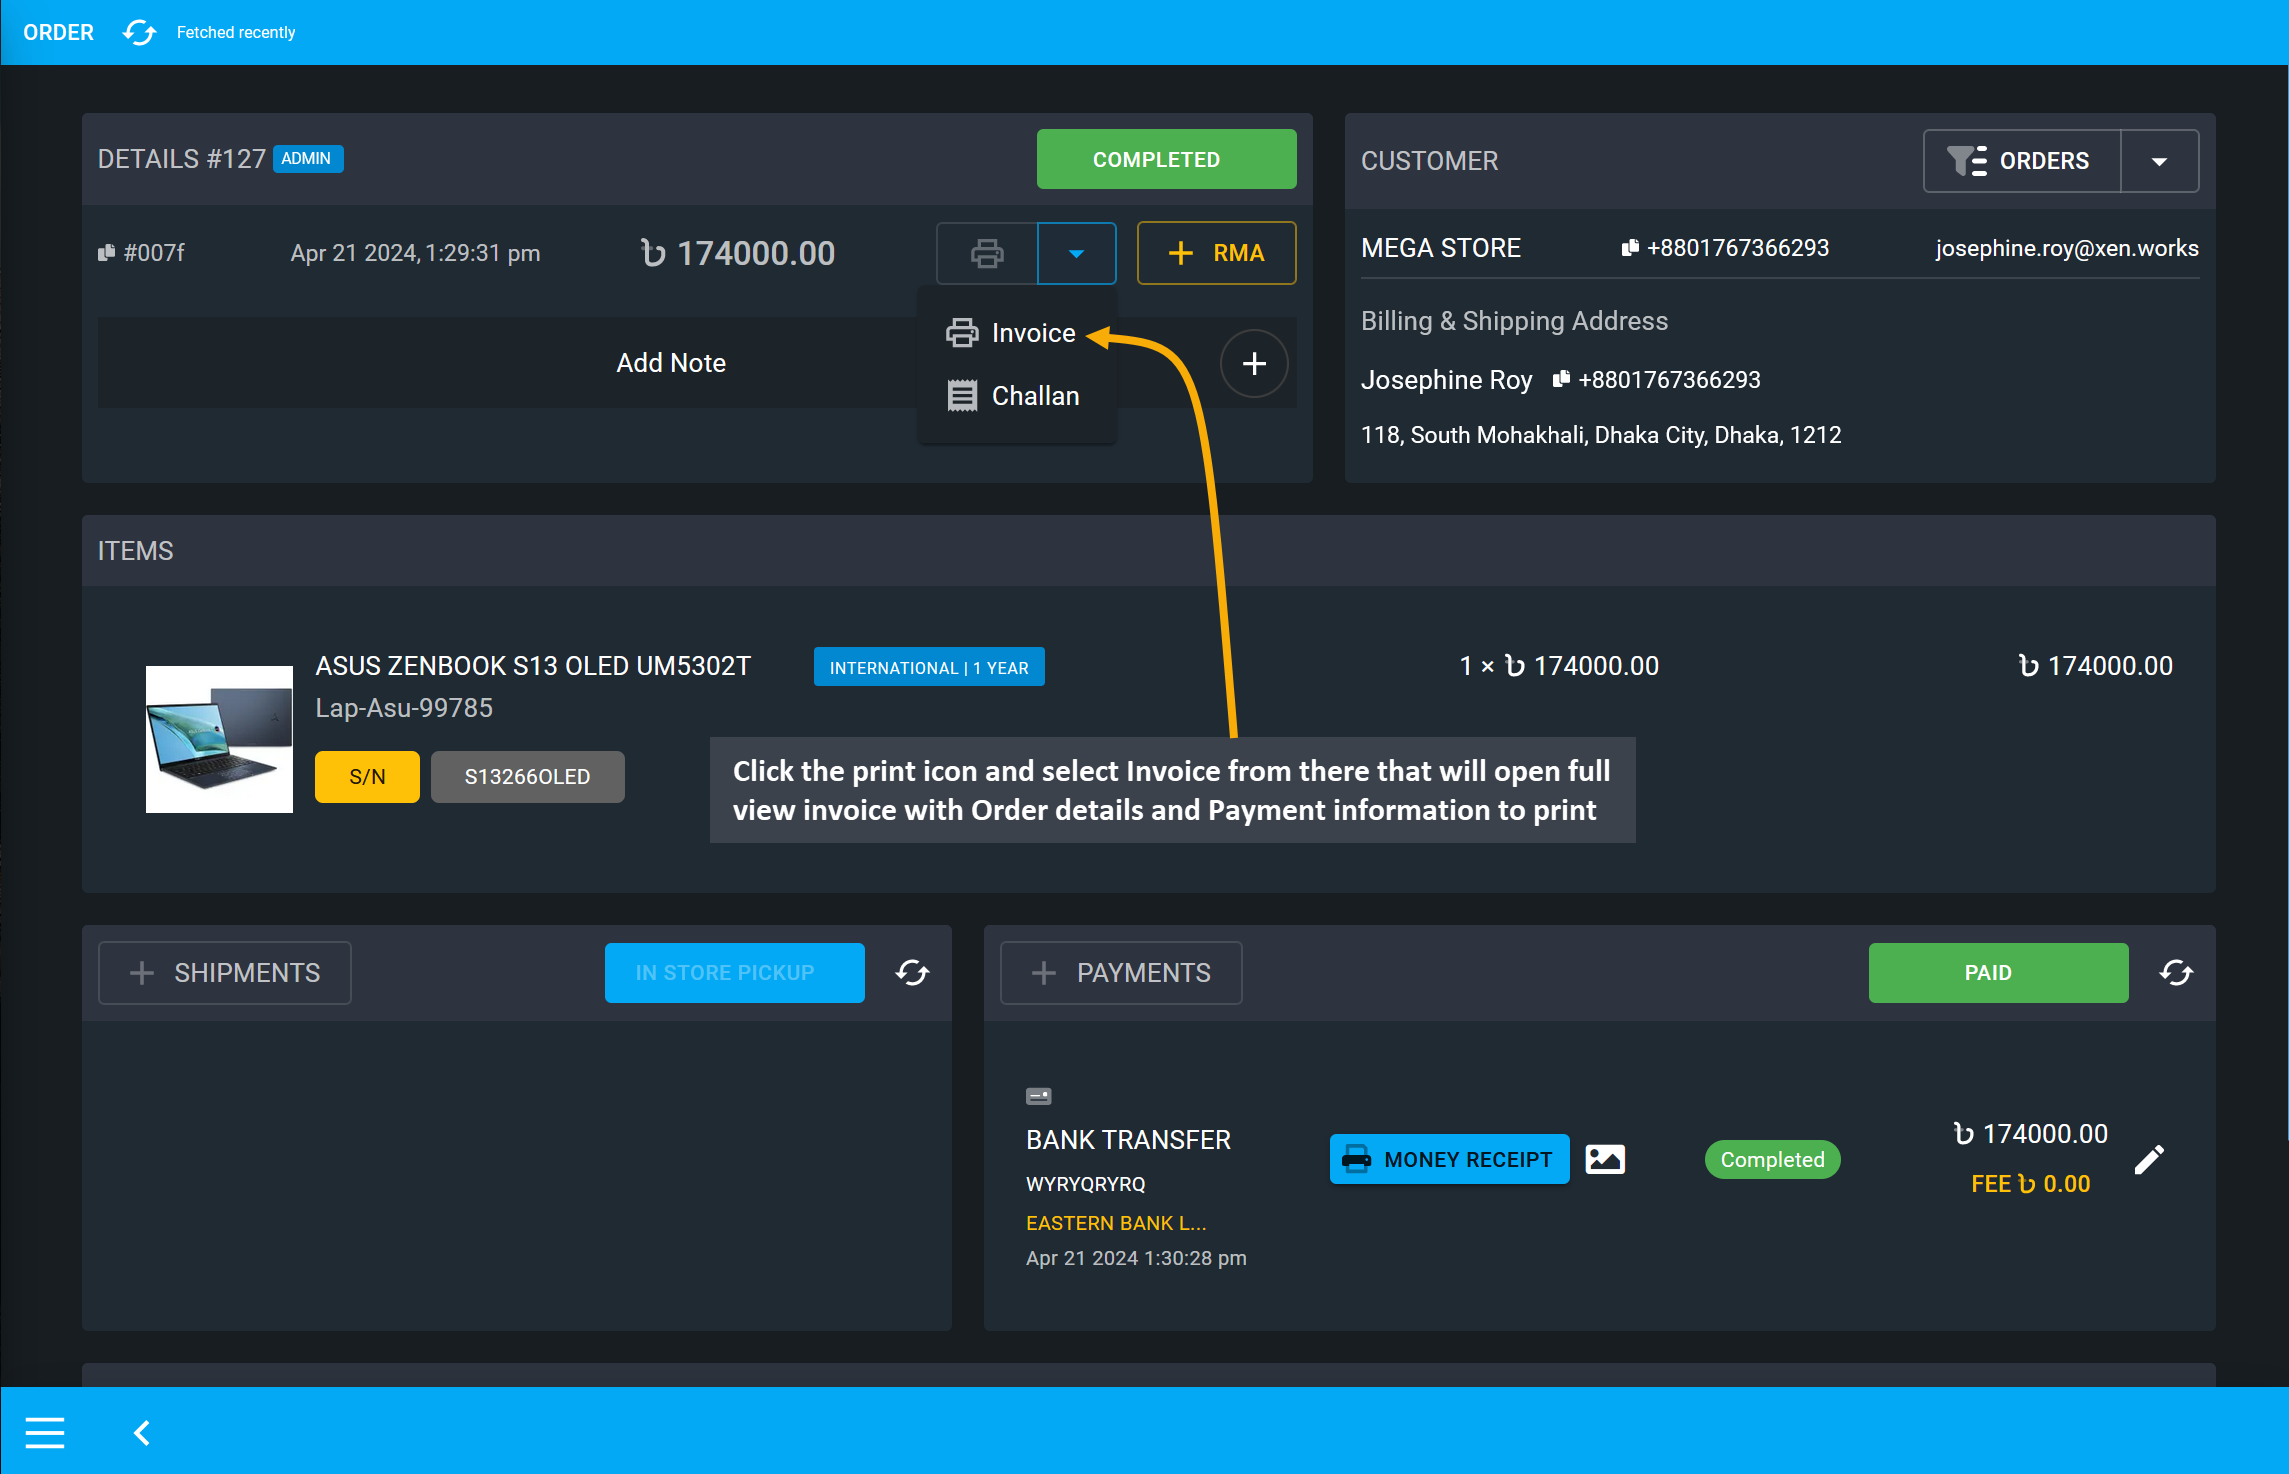
To print Invoice from Order dashboard, click the print icon and select Invoice from there that will open full view invoice with Order details and Payment information to print. Invoice can also be saved as PDF file.
 s
s
Image 10: Click print icon and select Invoice that will open full view Invoice with Order details.
Set Printer, Pages, Layout, and Colors from the print settings as needed. Then, click Print button to print copies of the Order Invoice or click Save to PDF to save a copy of the invoice within your device.

Image 11: Clicking the Print Invoice button will open the full view invoice with full Order details.
Order Challan can also be viewed and printed from the Order Dashboard. Full Order details including Customer information, and line items will be displayed on the challan. Click the Challan icon that will open full view challan with Order details to print. It can also be saved as PDF file.
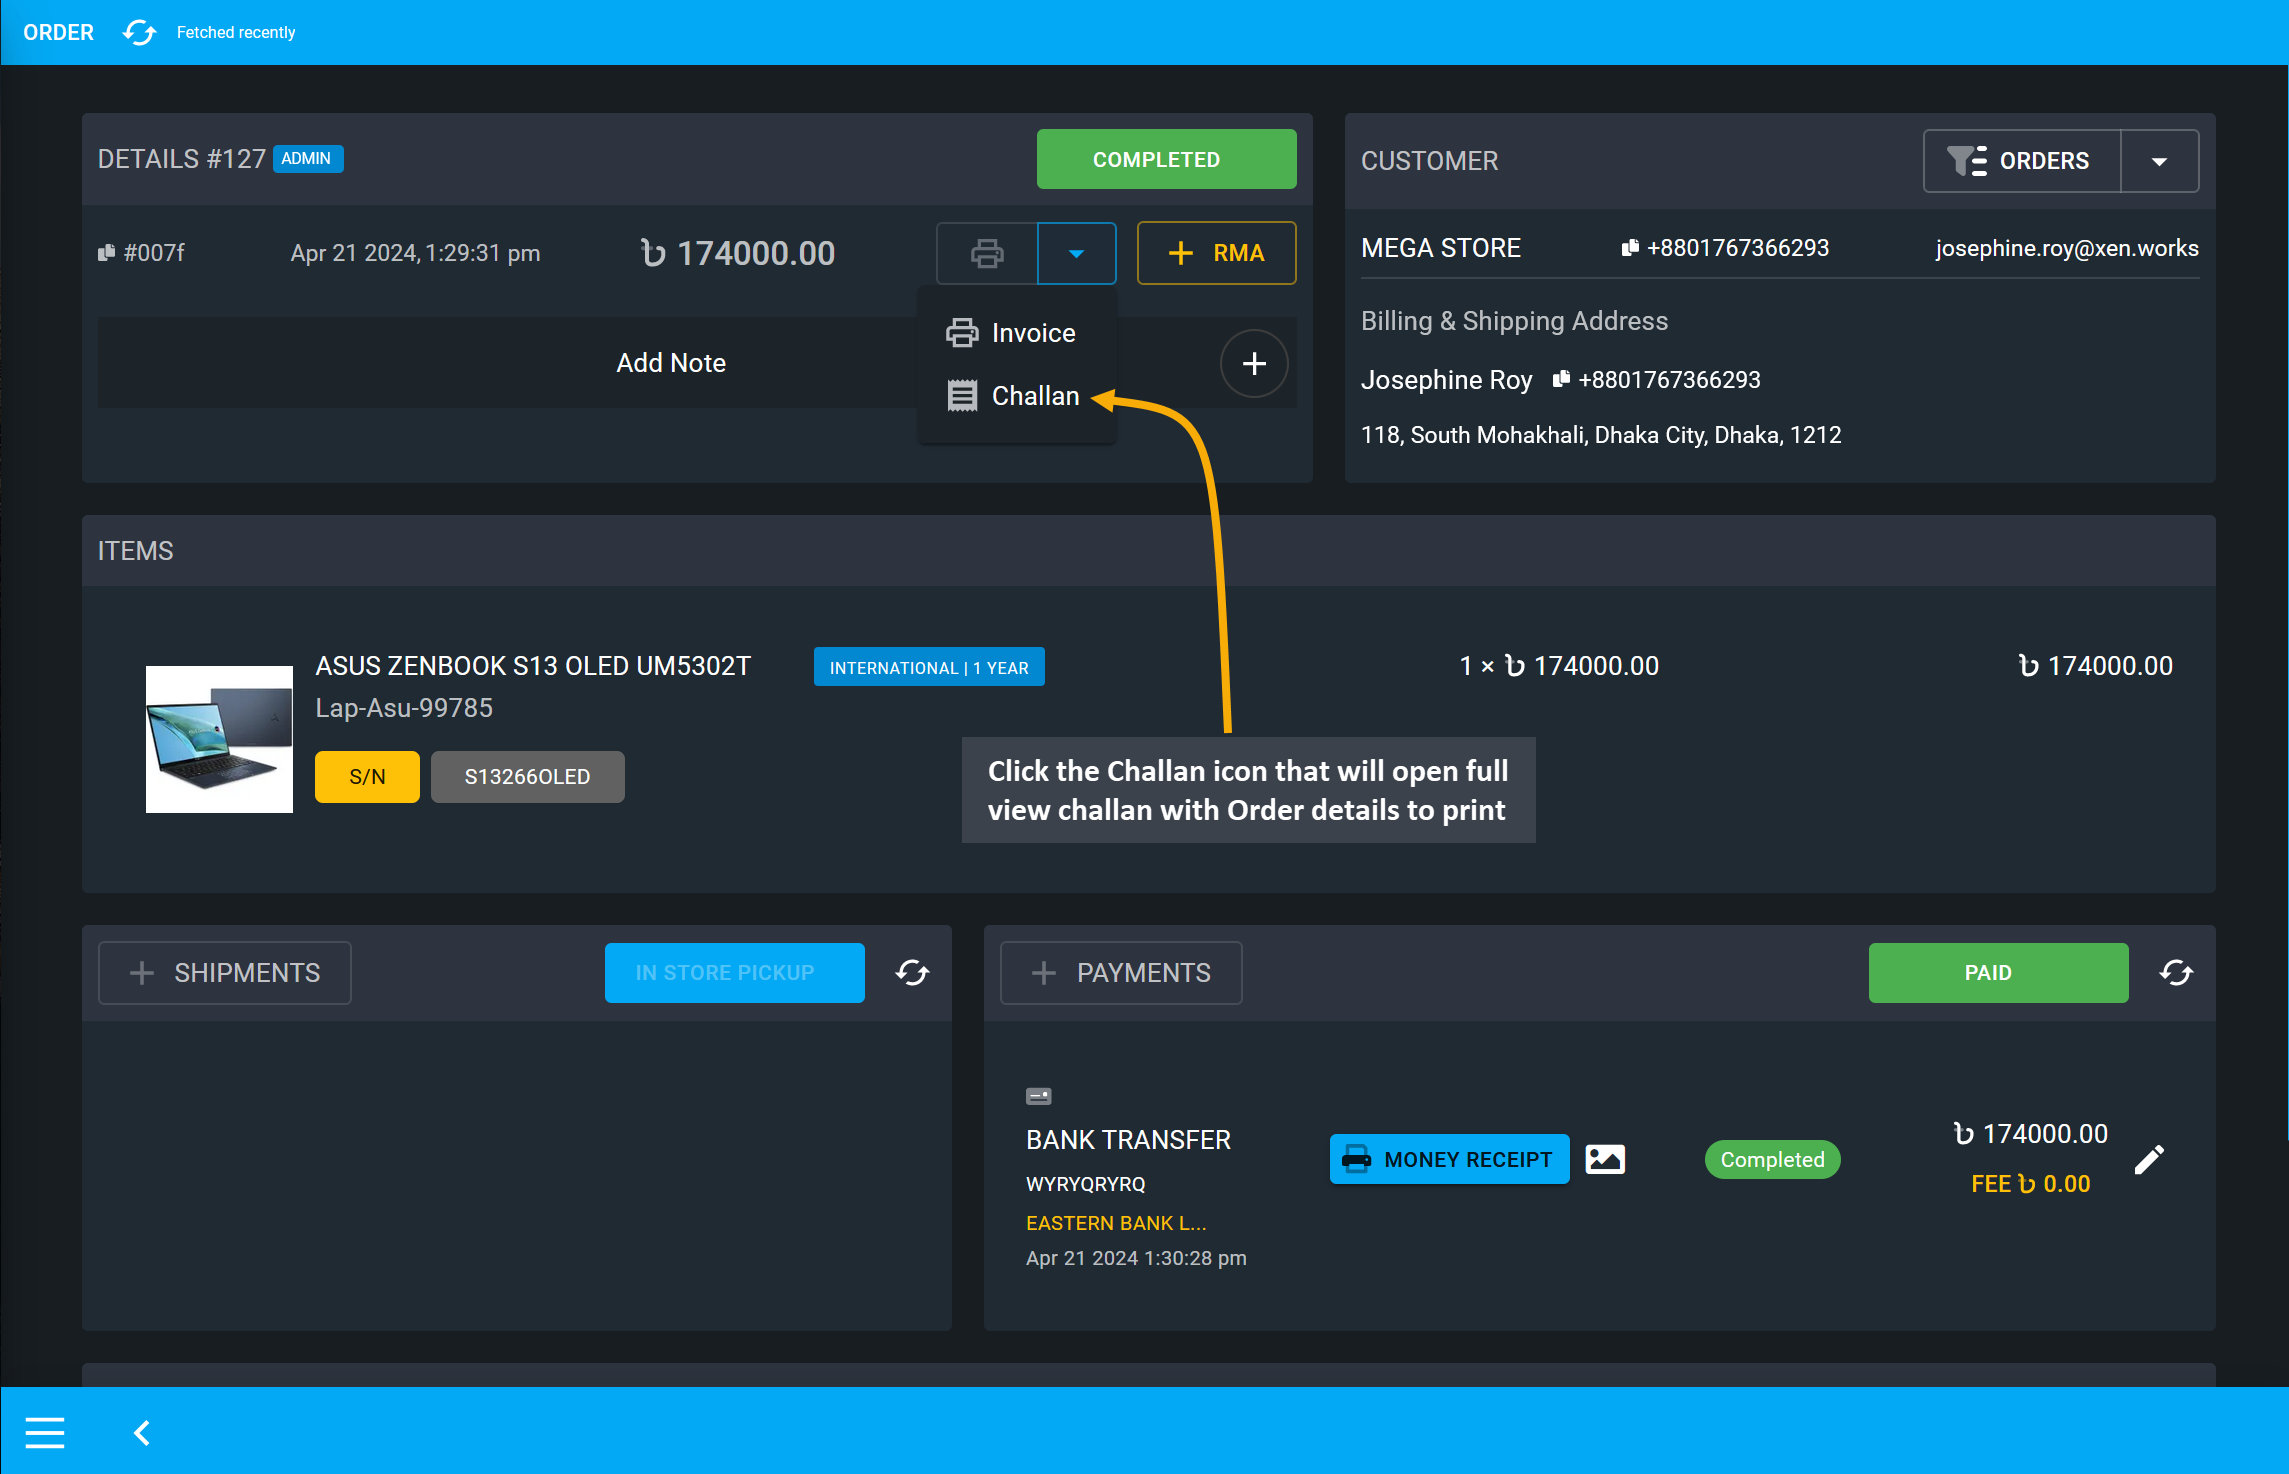
Image 12: Click print icon and select Challan that will open full view Challan with Order details.
Set Printer, Pages, Layout, and Colors from the print settings as needed. Then, click Print button to print copies of the Order Challan or click Save to PDF to save a copy of the challan within your device.
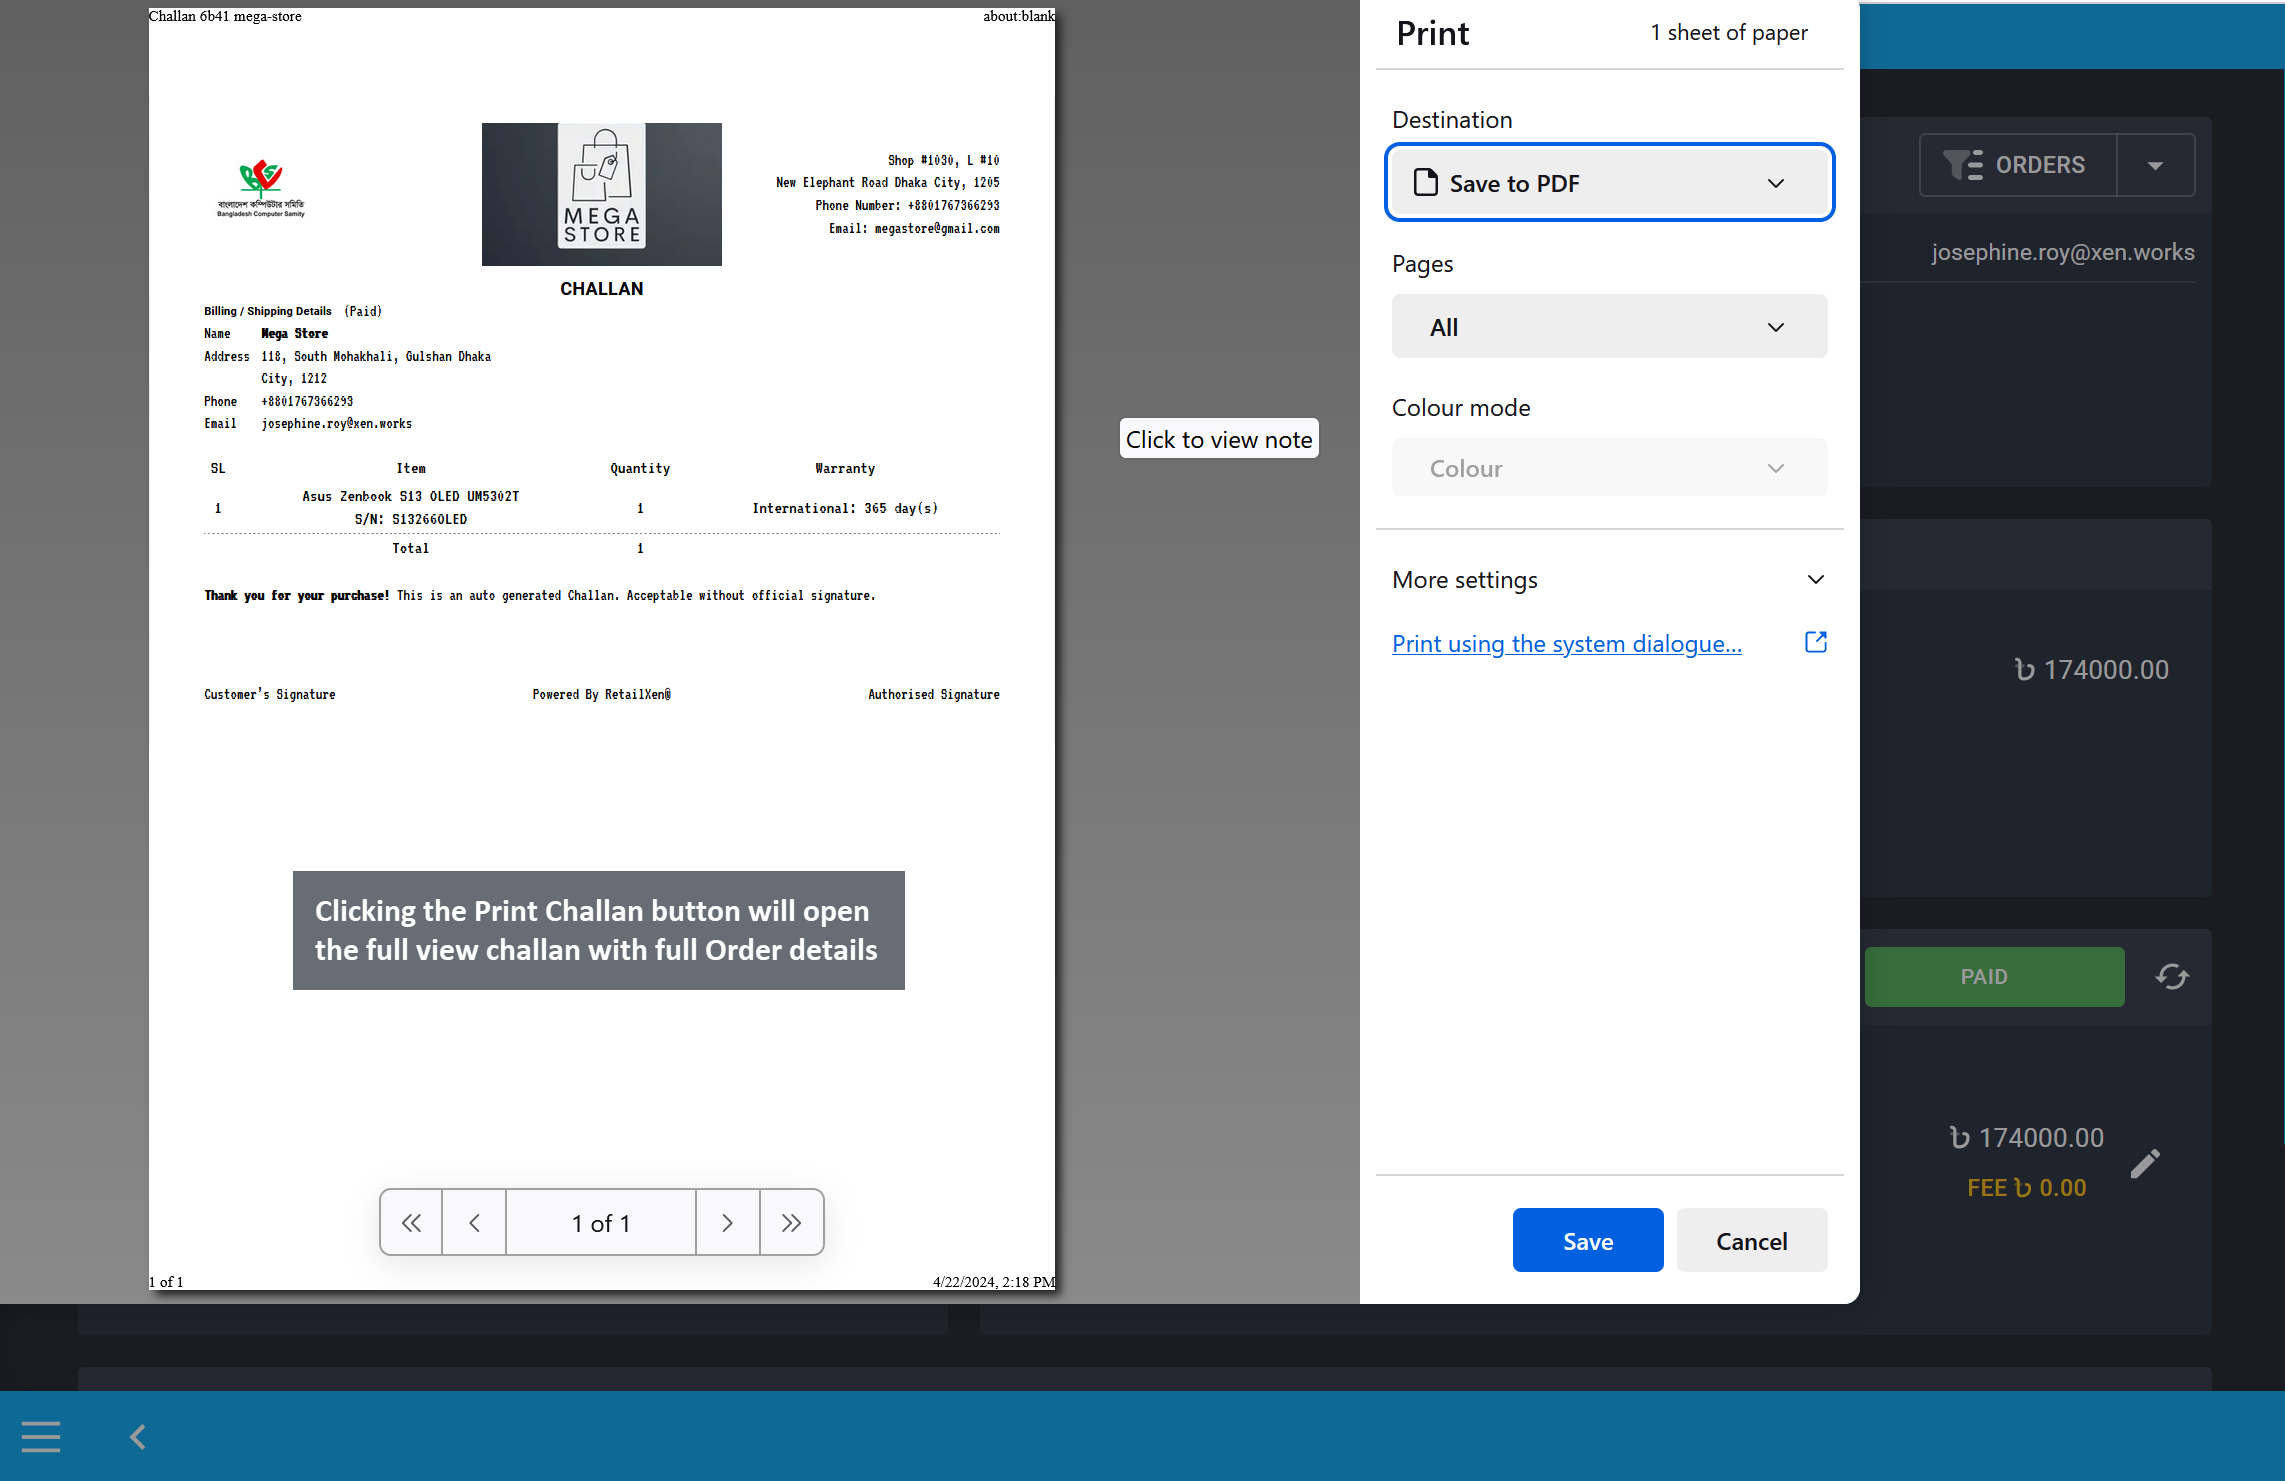
Image 13: Clicking the Print Challan button will open the full view challan with full Order details.
There is a special feature called the Order Note which can be used to note down important Order details for sales team, customer service team, admins, or managers to follow up. Order Note can be written during placing the Order on Cart. The option to write an Order Note is on the second page of the Cart after selecting Shipping and Payment gateways. Use the Note (Optional) field to write important information related to Order that will later show on Order Dashboard.
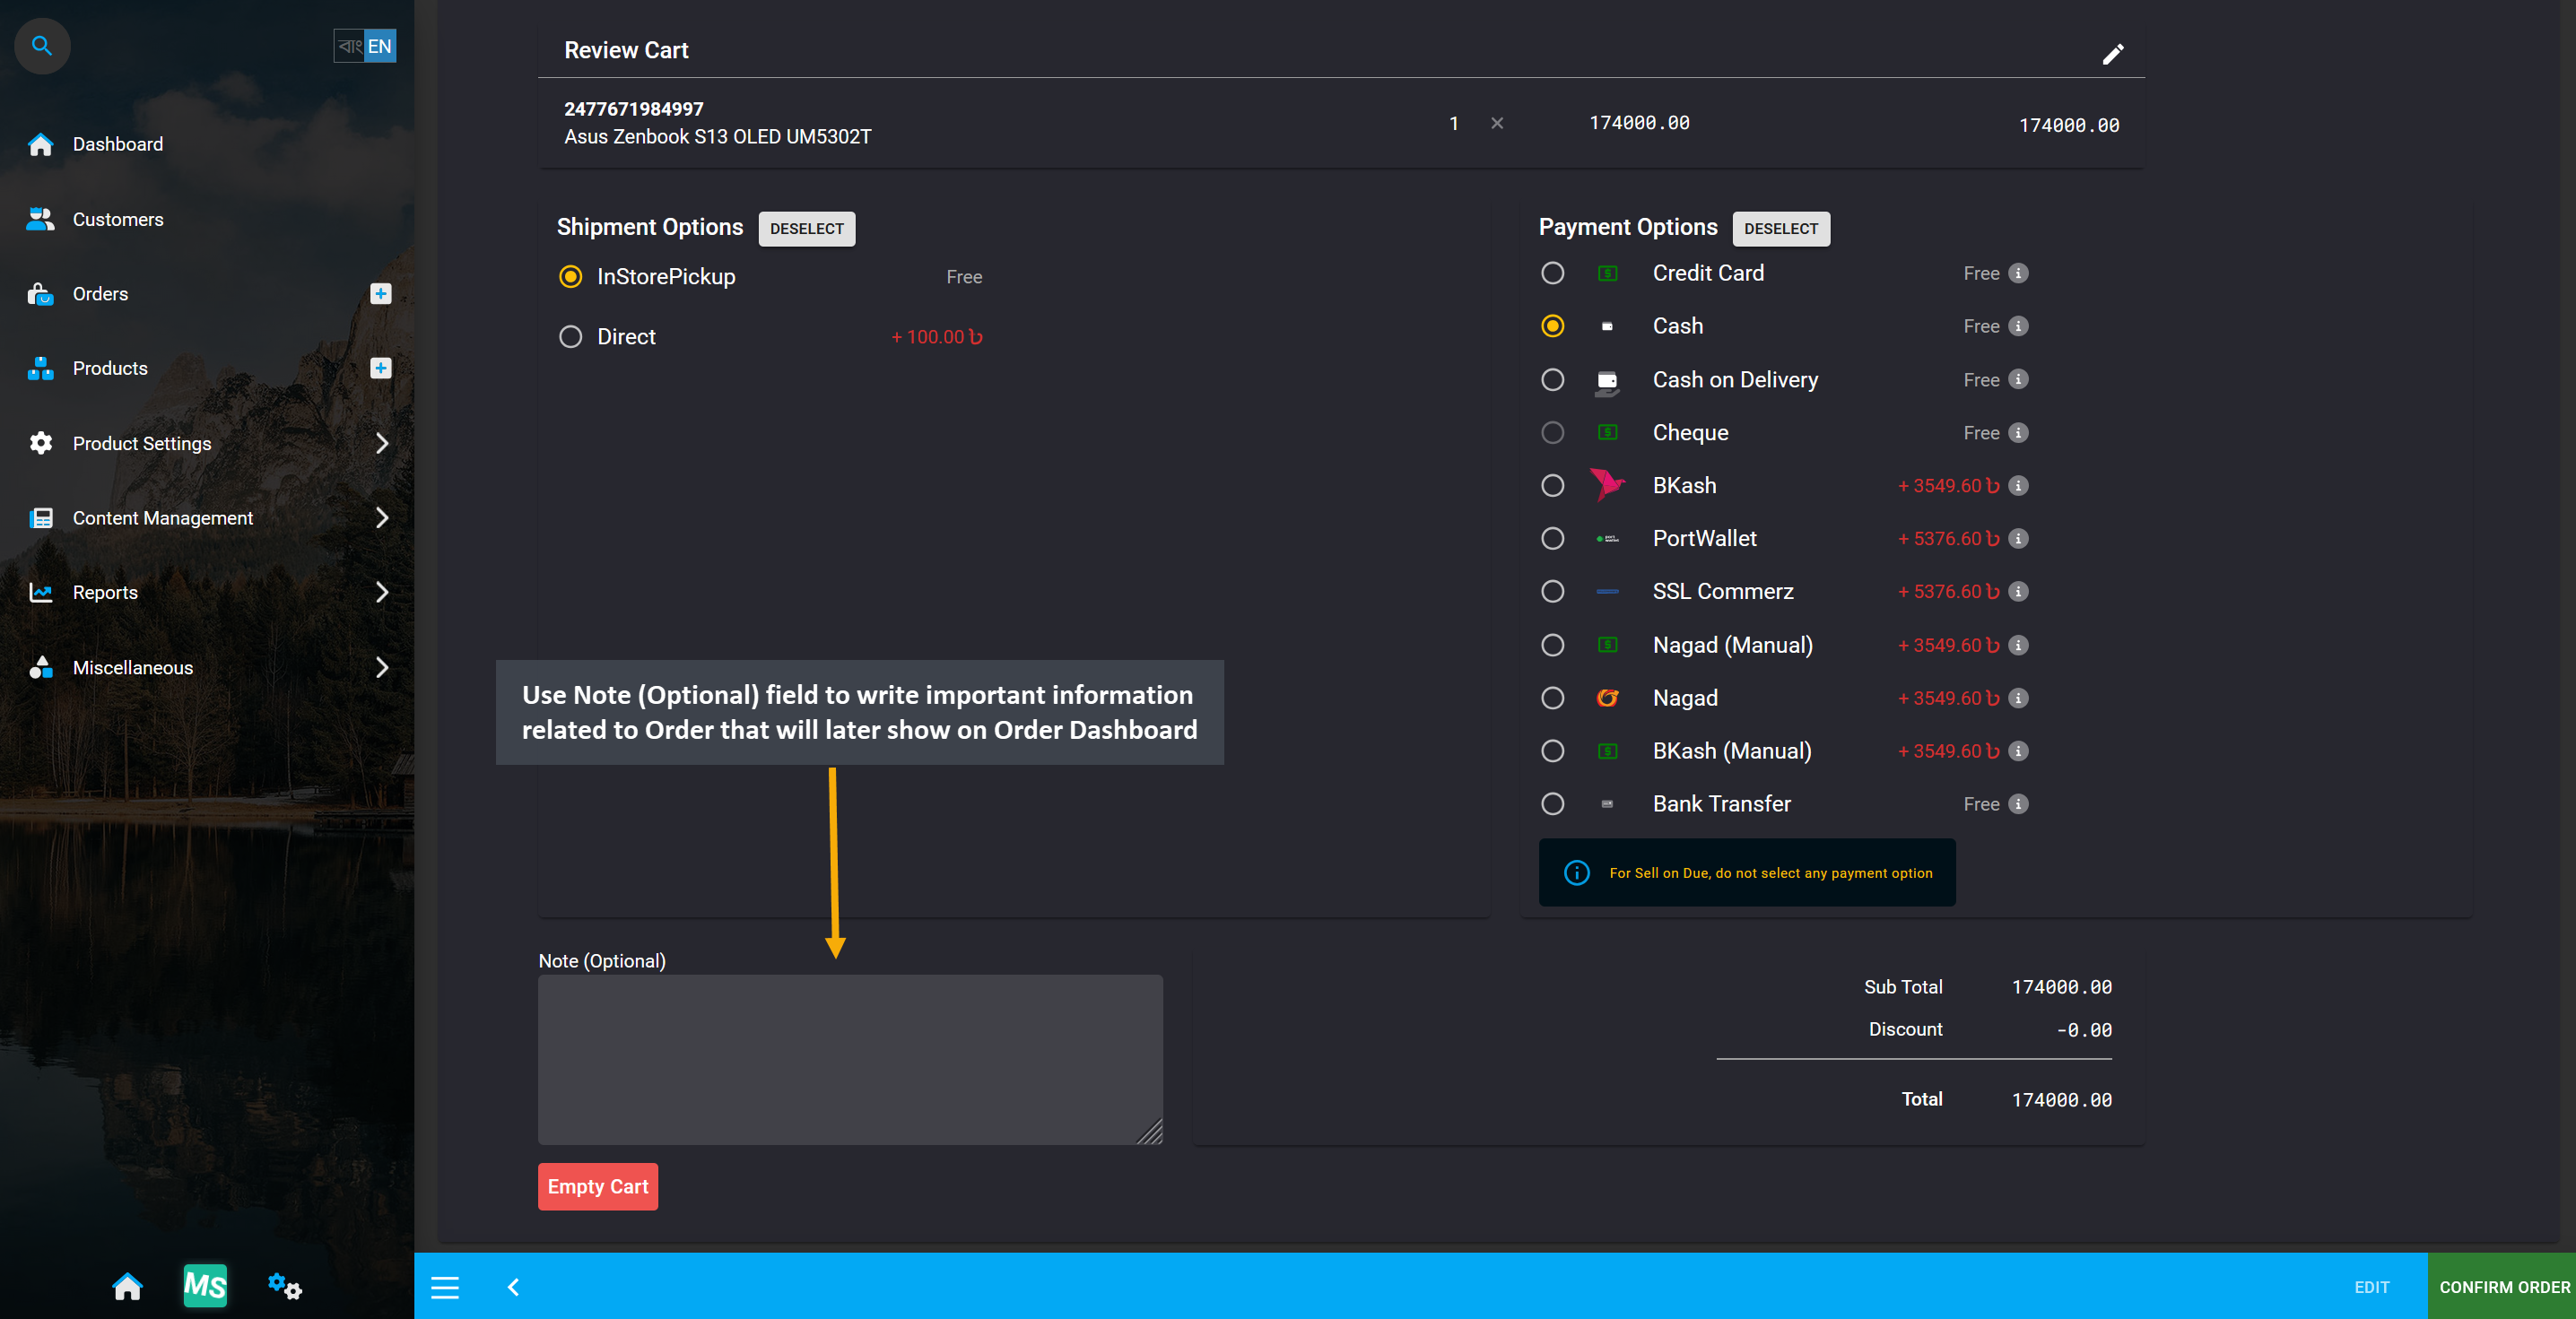
Image 14: Use Note (Optional) field to write important information related to Order on Cart checkout.
If Order Note is not added to Order Cart, then it can also be added later on Order Dashboard. On Order Dashboard, there is a separate section for Note which can be added and edited with important Order details for sales team, customer service team, admins, or managers to follow up. So, add Order Notes according to needs.
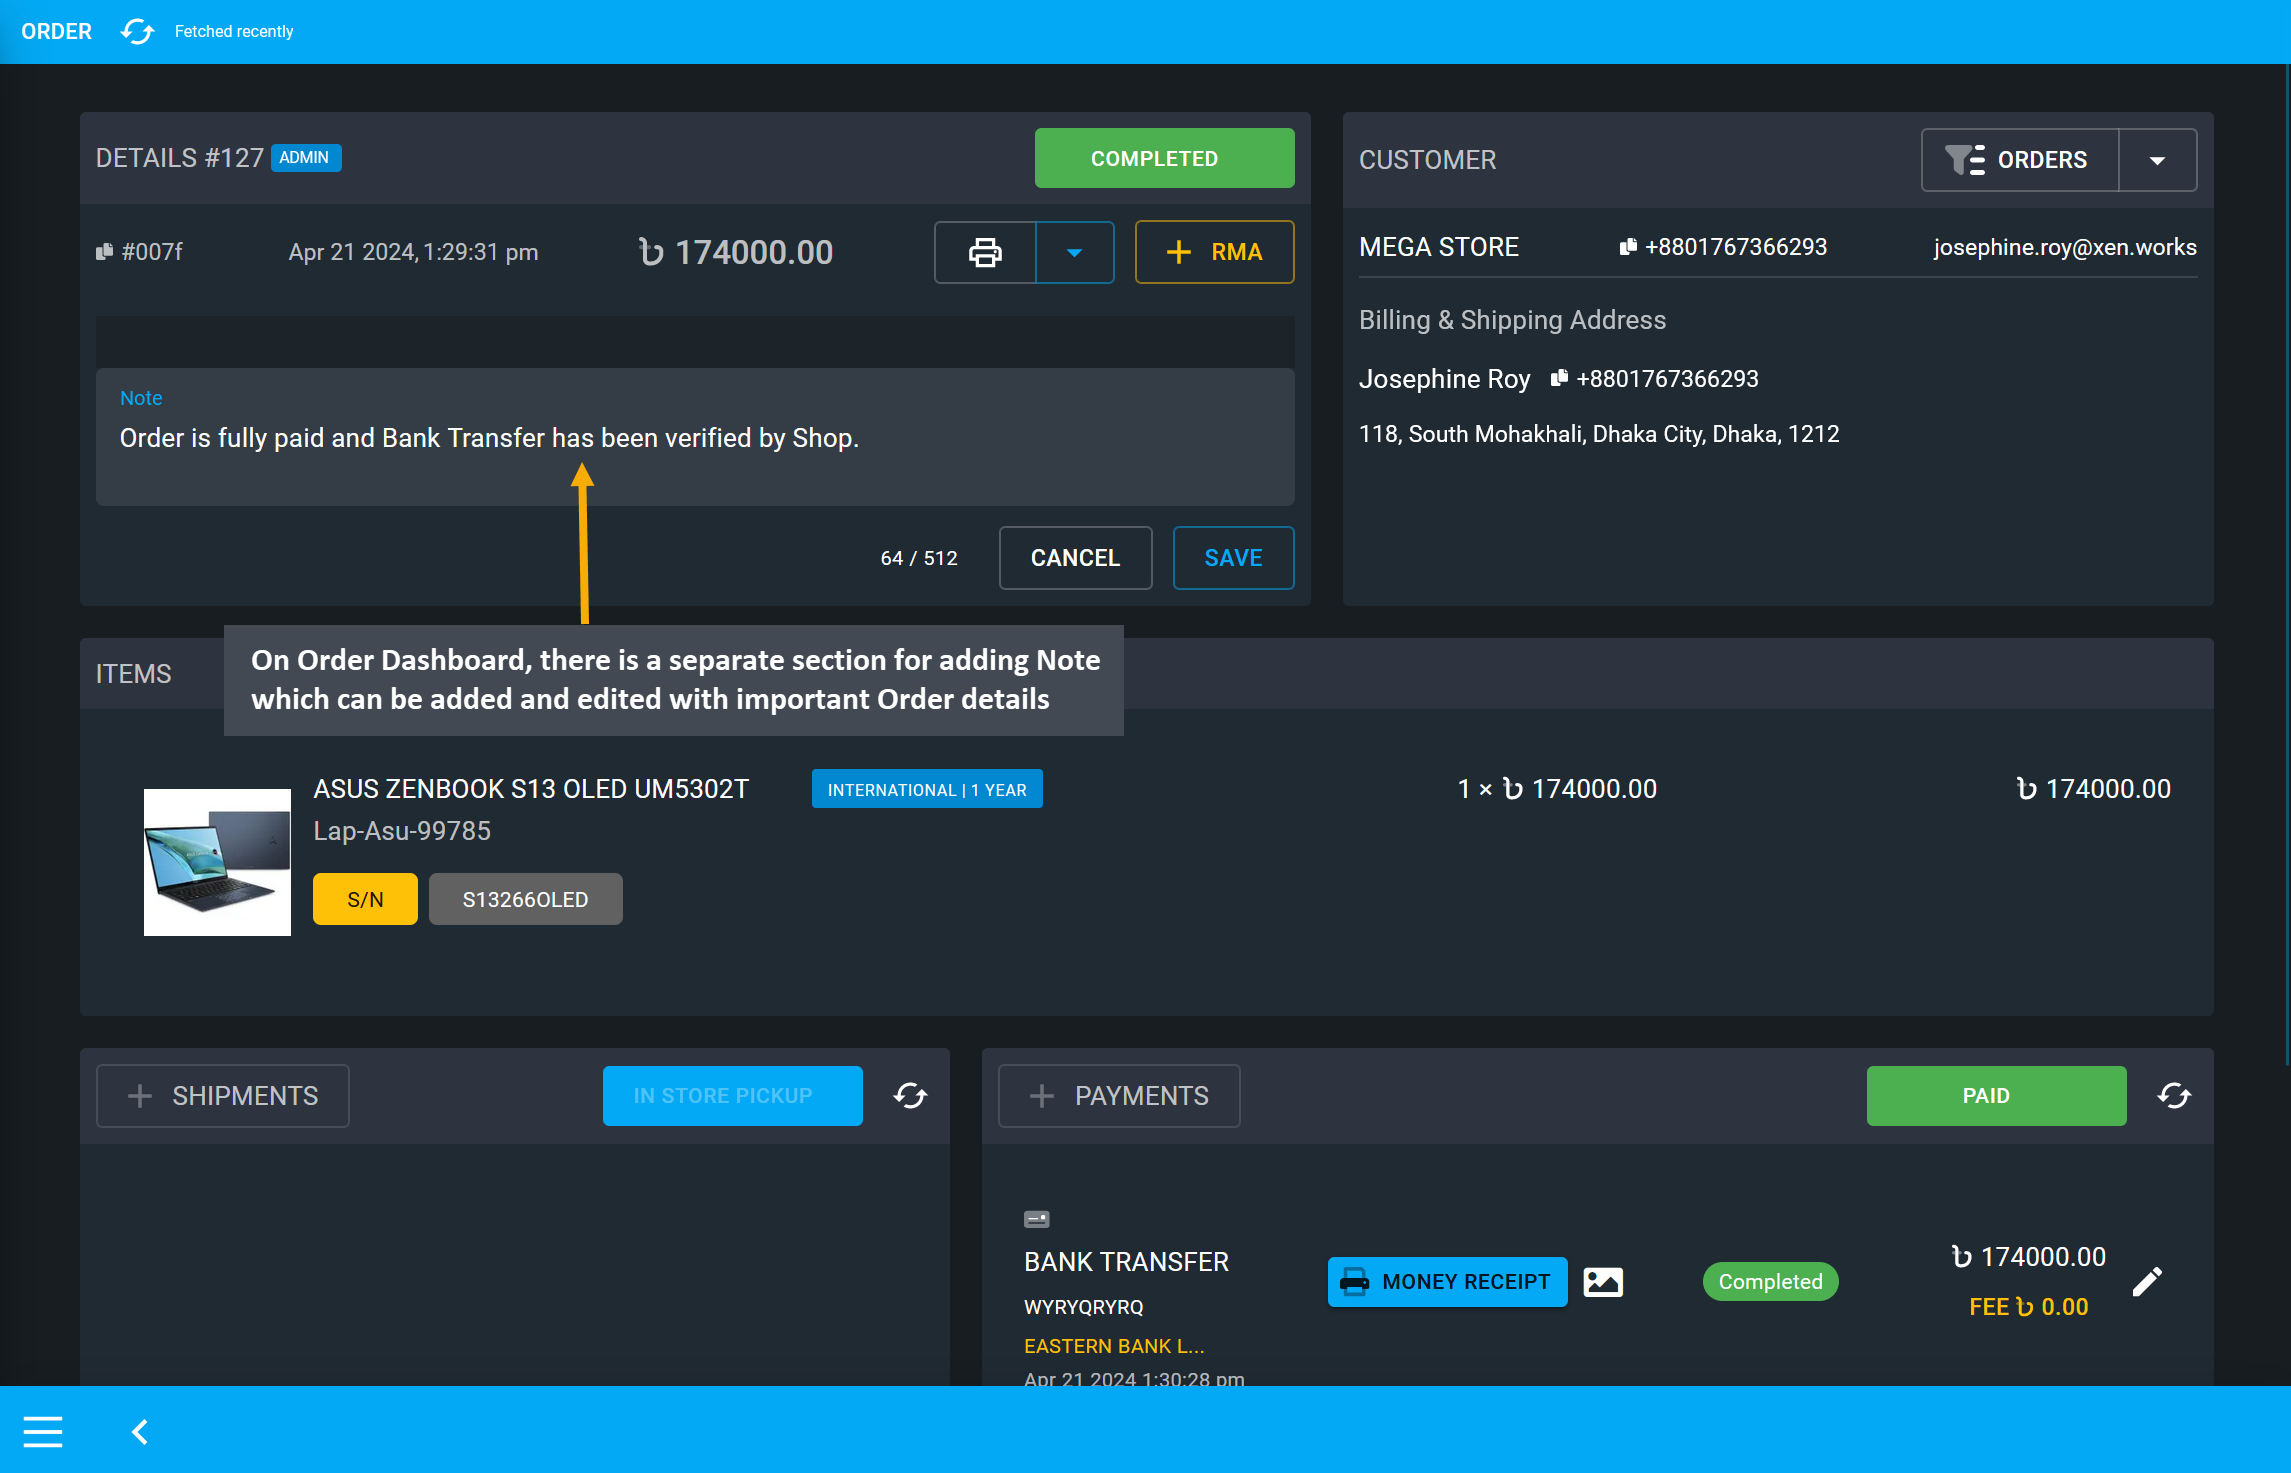
Image 15: Order Dashboard has a Note section that can be added and edited with important details.s
After Bank Transfer, Cheque, or Cash on Delivery, after payment proofs are checked, they can be verified by clicking on the Verify button which will open a modal to set the payment as Completed or Failed.
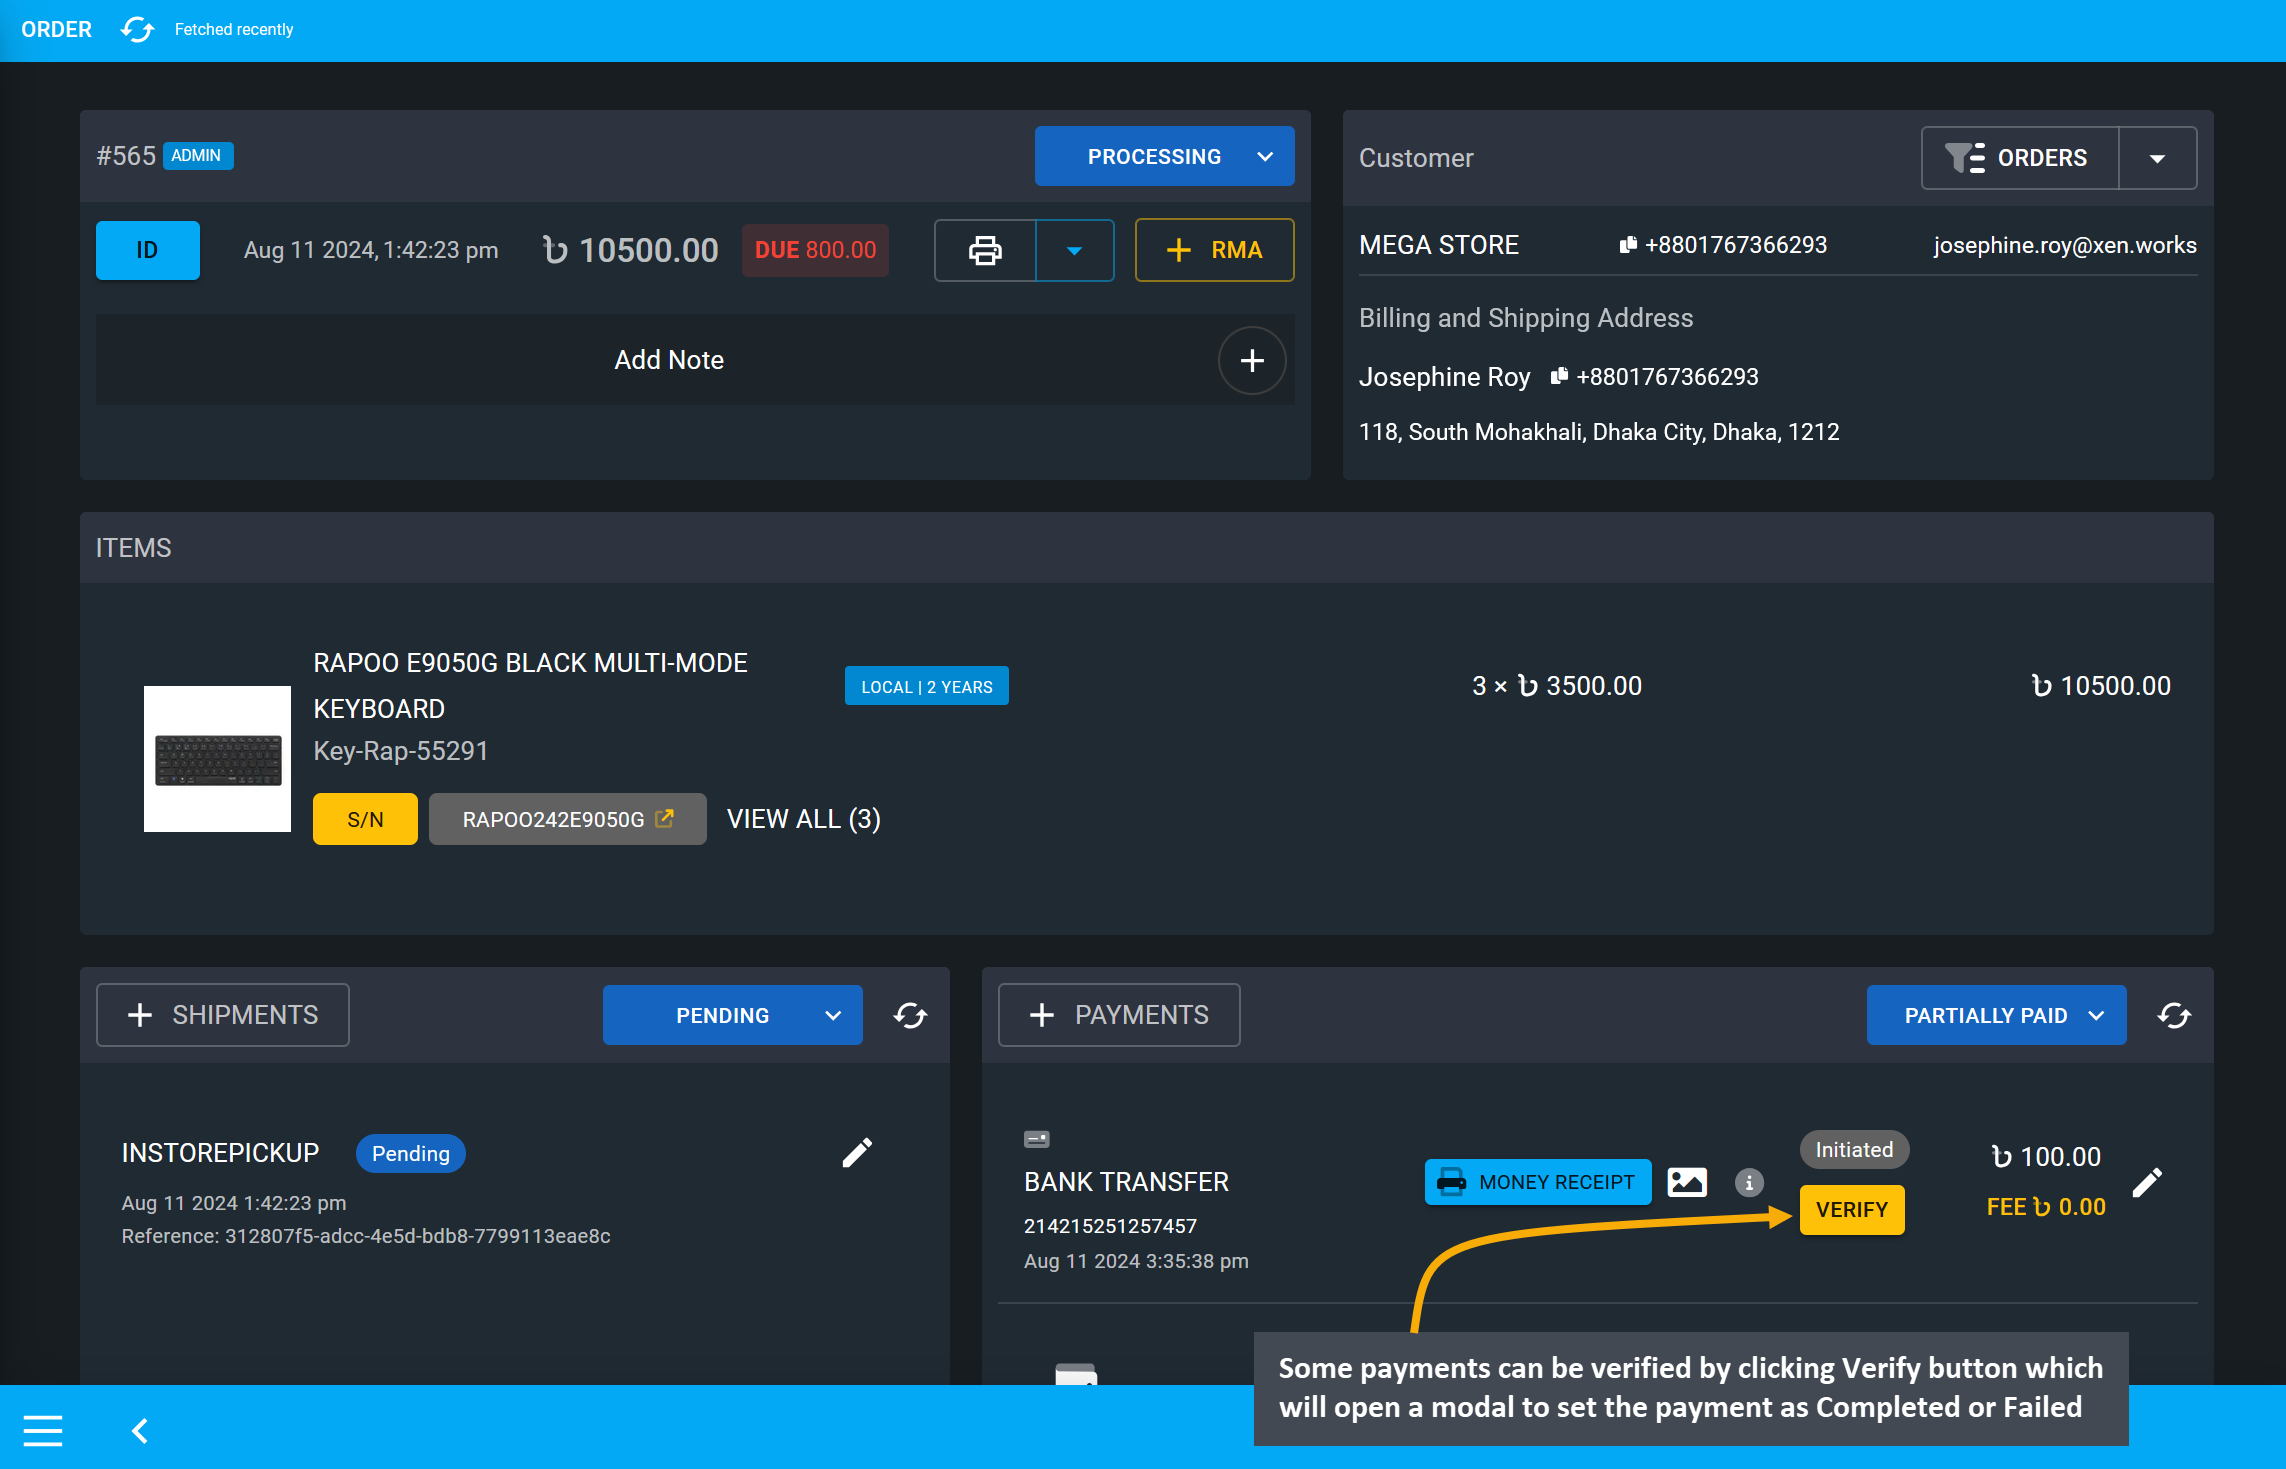
Image 16: Click Verify button on Payments to open a modal to set the payment as Completed or Failed.
After Verify button is clicked, a modal will open, where the transaction can be completed by selecting the option Set as Completed that will verify Order Due and set payment as Paid.
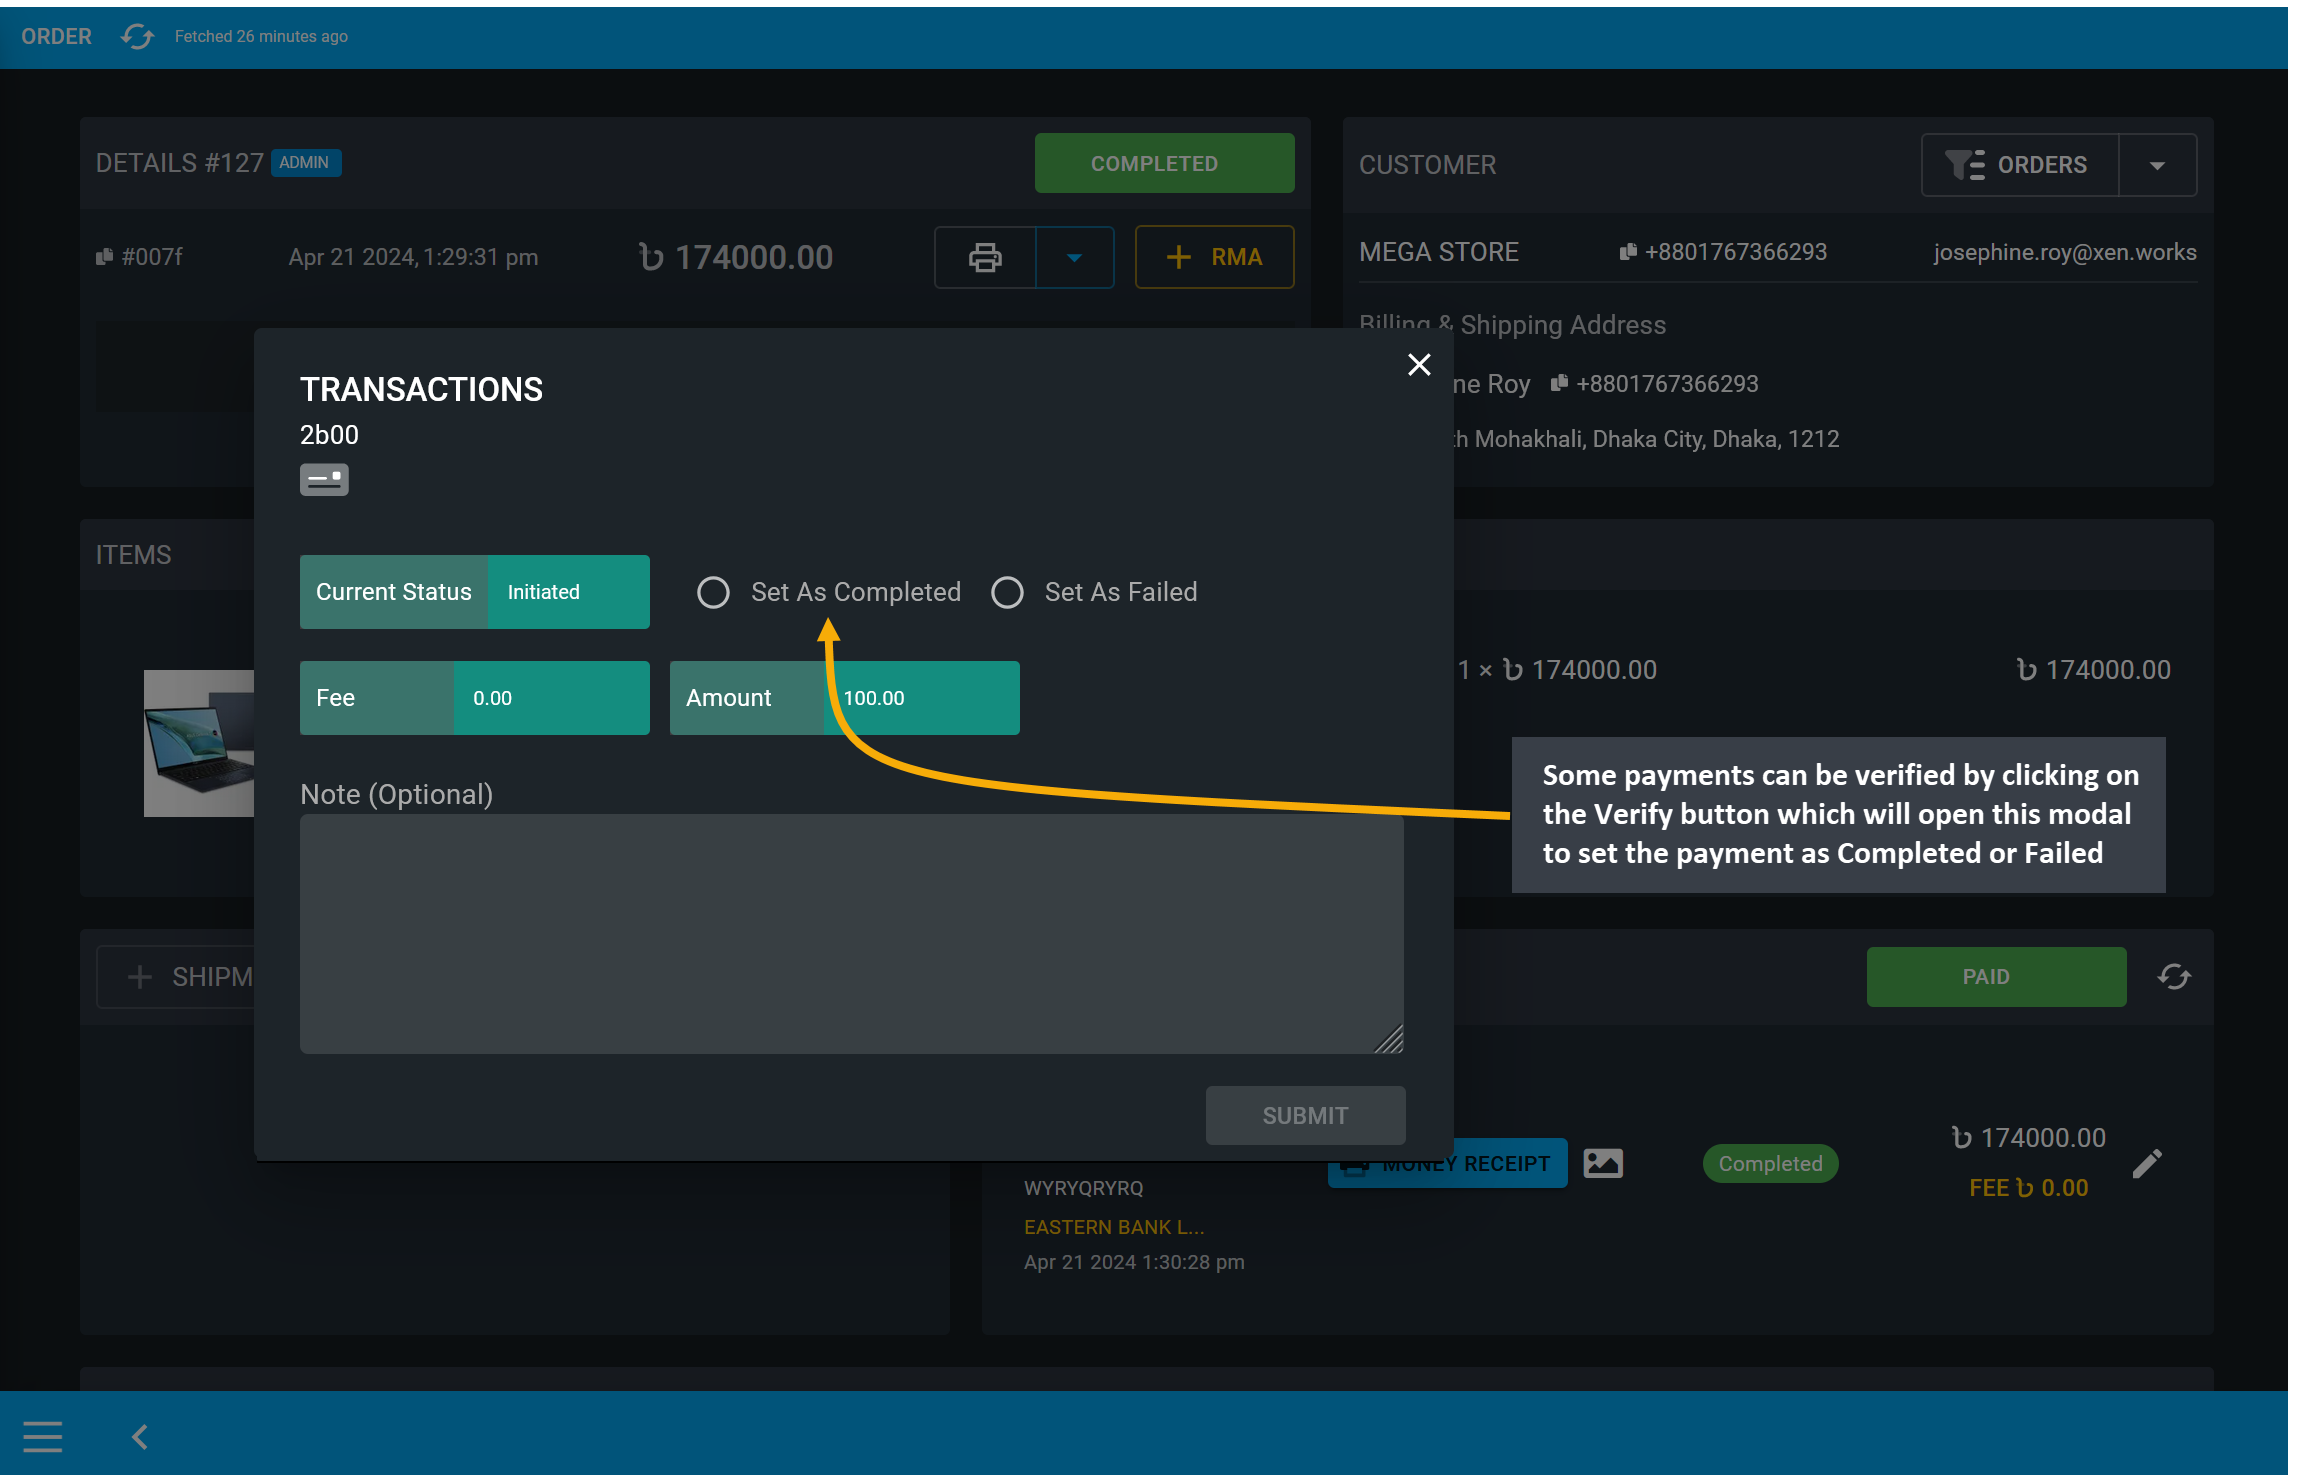
Image 17: Verify a transaction by selecting Set as Completed on the veification transaction modal.
Once payment or transaction verification is completed, the Verify button will convert into a Completed label and the Order Due will be cleared and Payment status will become Paid.
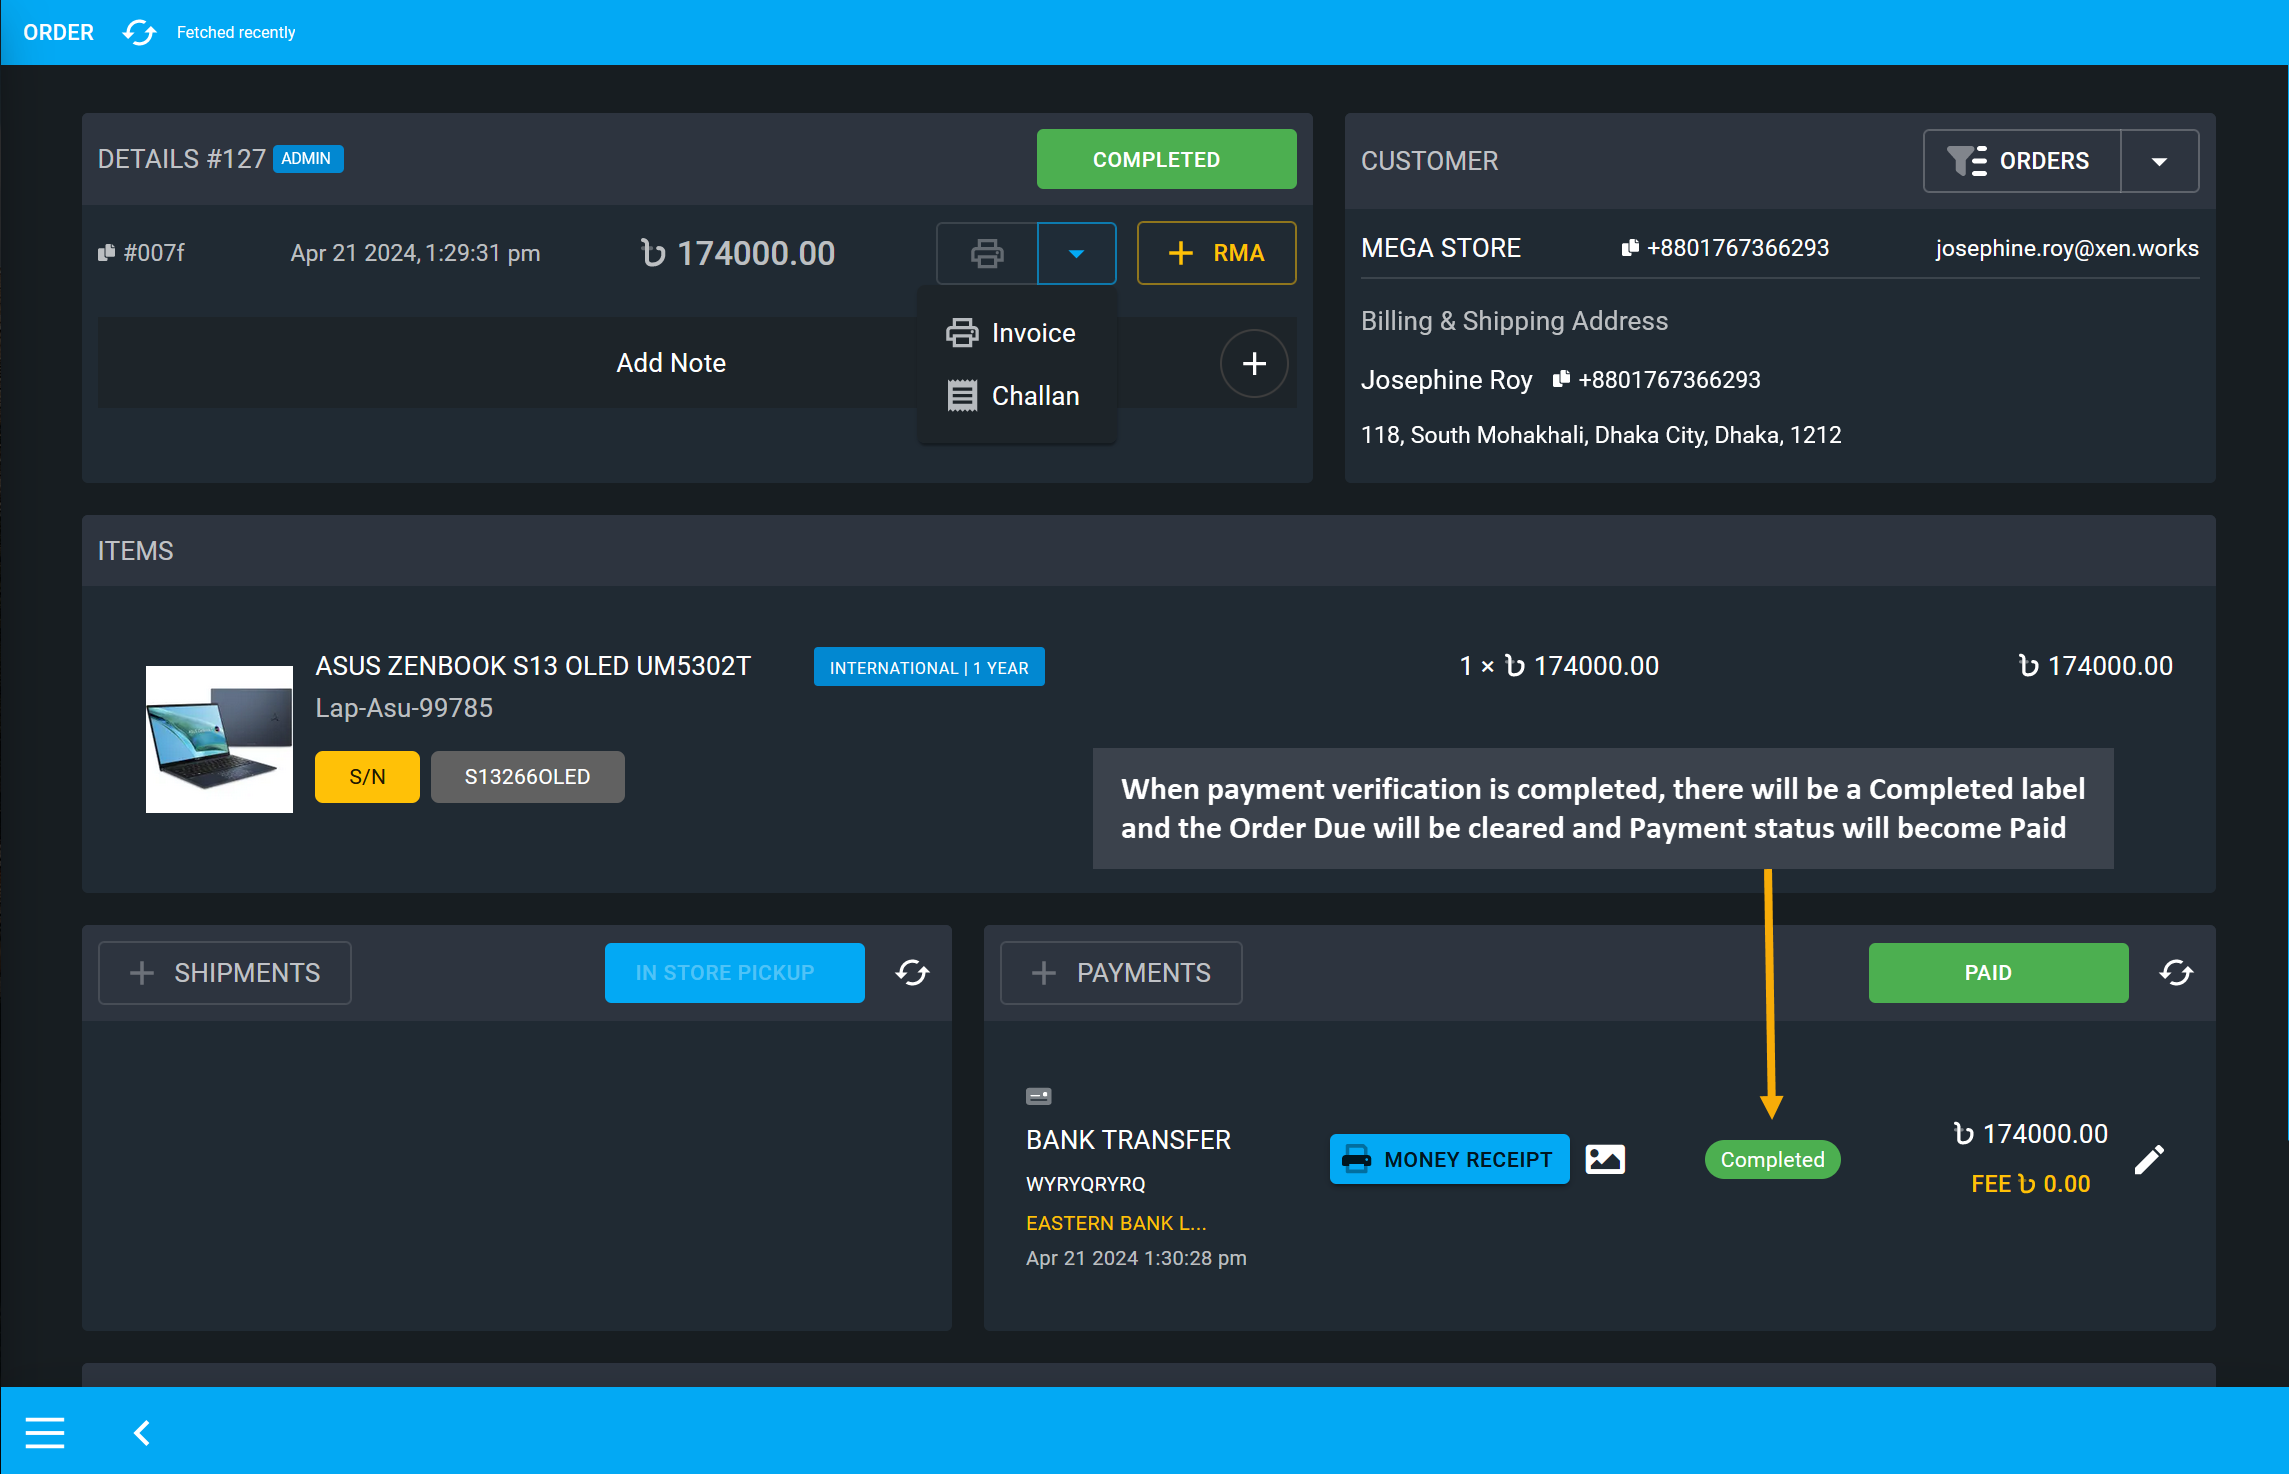
Image 18: When payment verification is completed, Payment status will become Paid on Order Dashboards.
After transaction is completed, a Money Receipt will be available to view and download from the Payments section, click on the Money Receipt label to open and print it for reference.
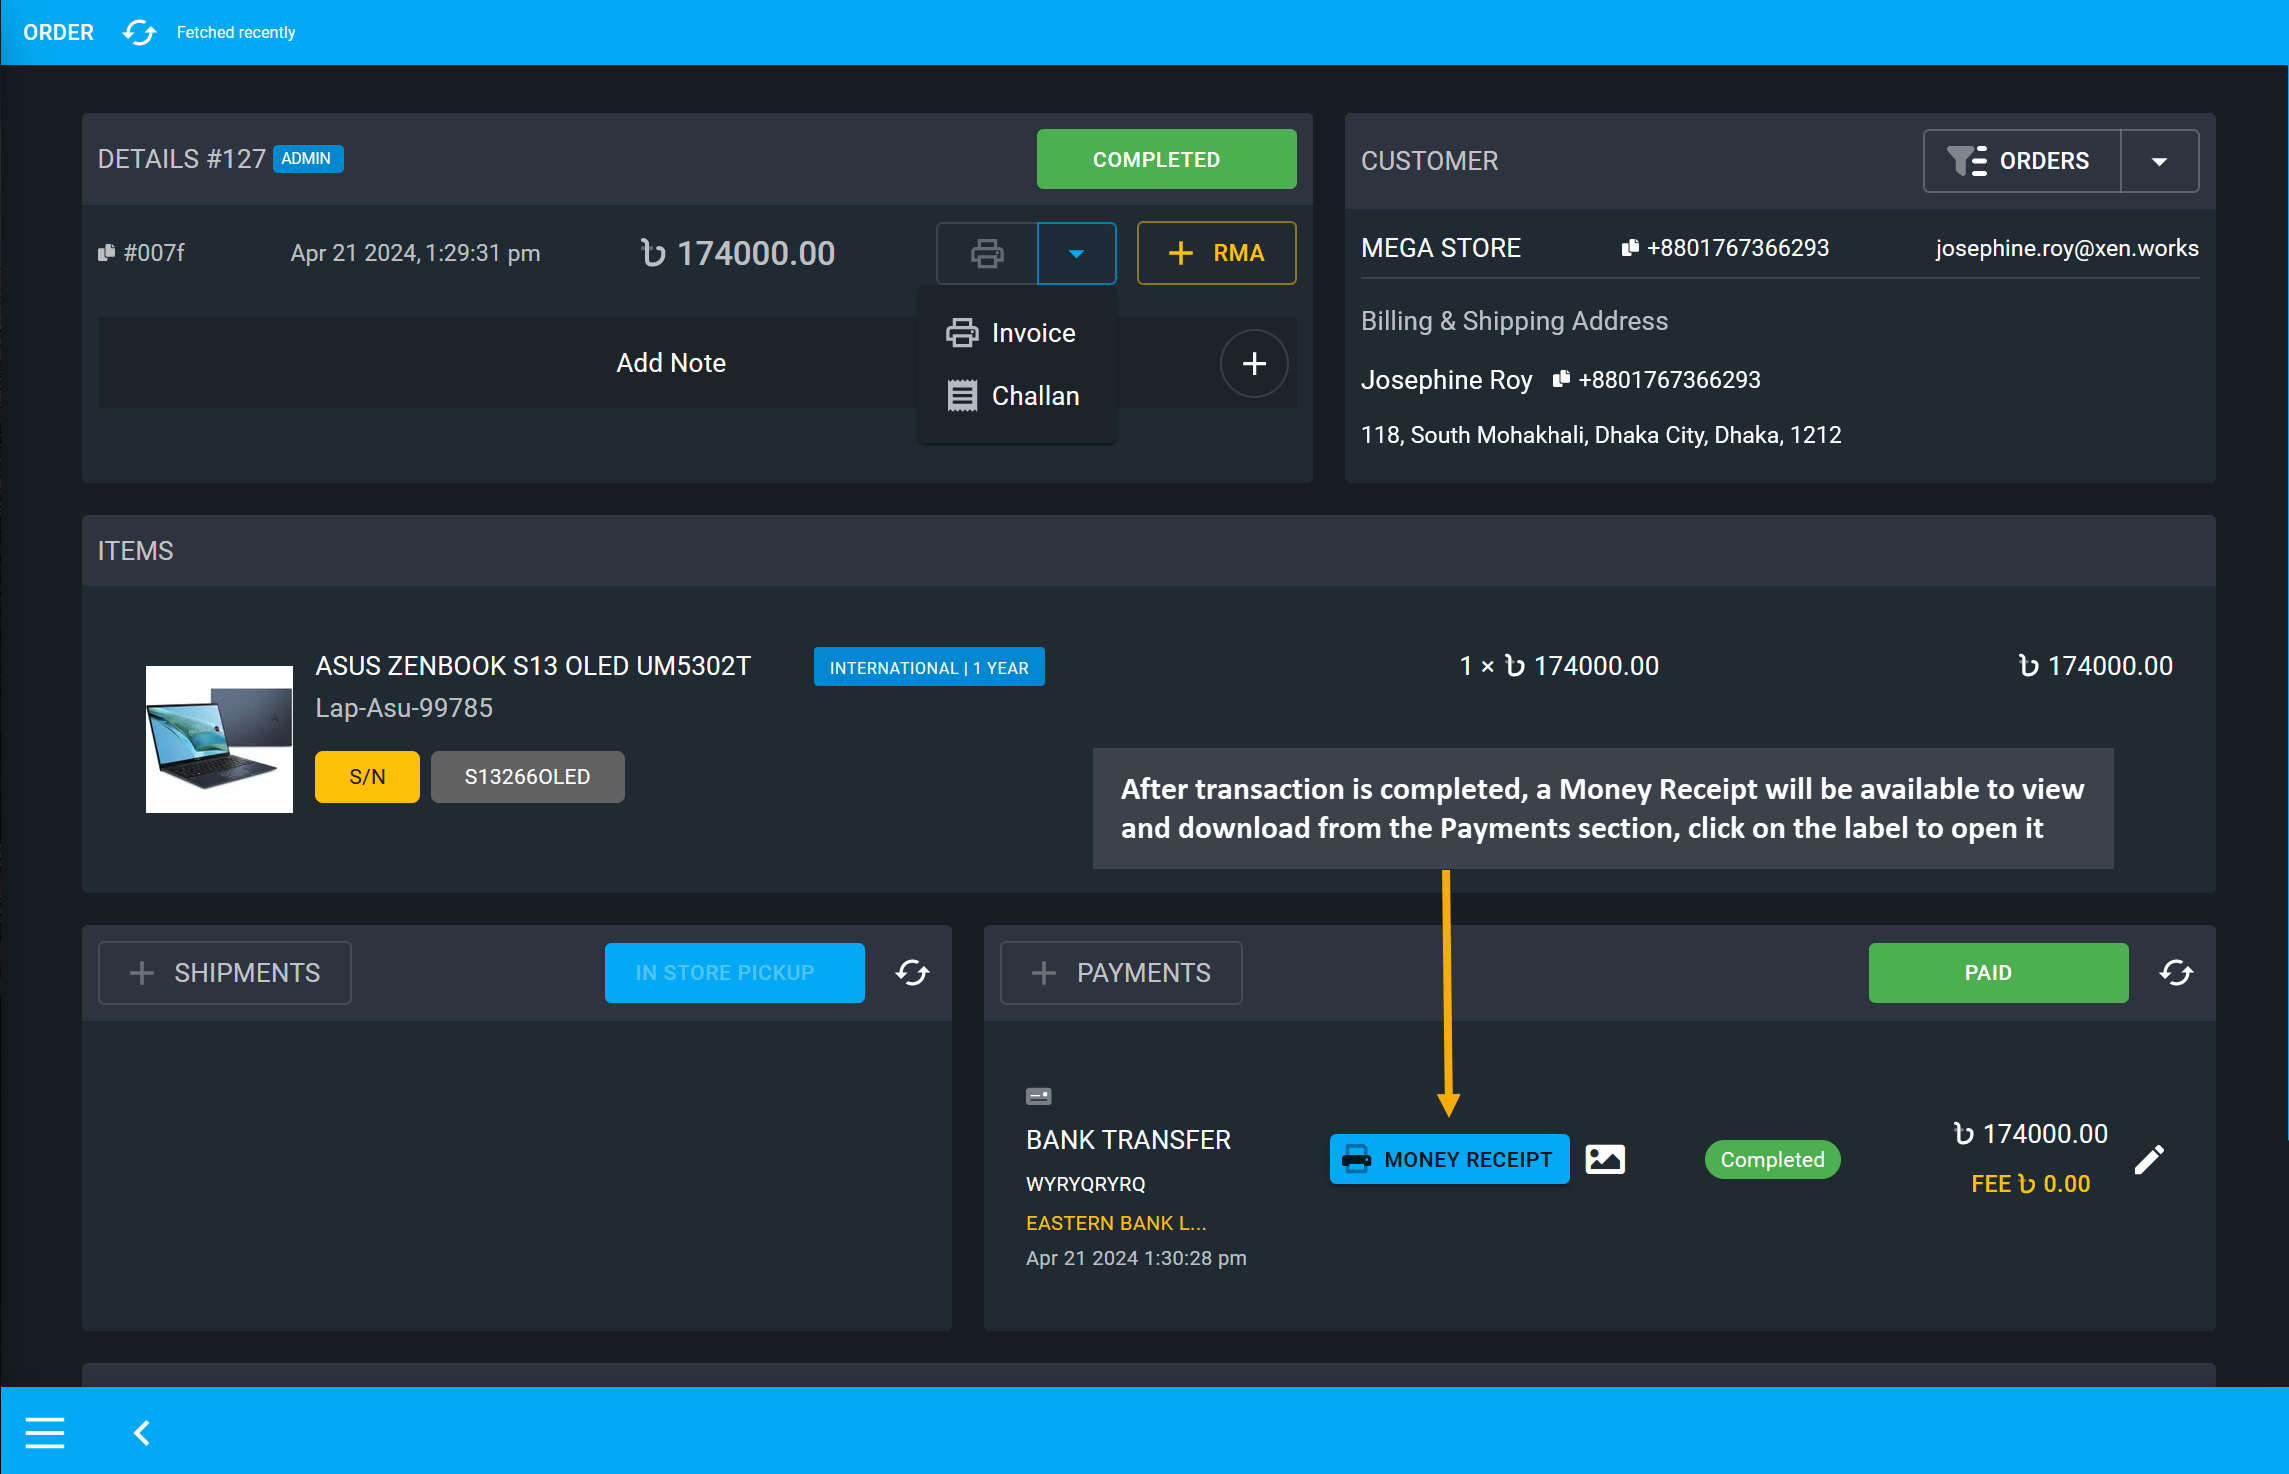
Image 19: After completion of transaction, payment details can be checked from the Money Receipt.
Clicking on the Money Receipt button will open a print view of the payment transaction details.
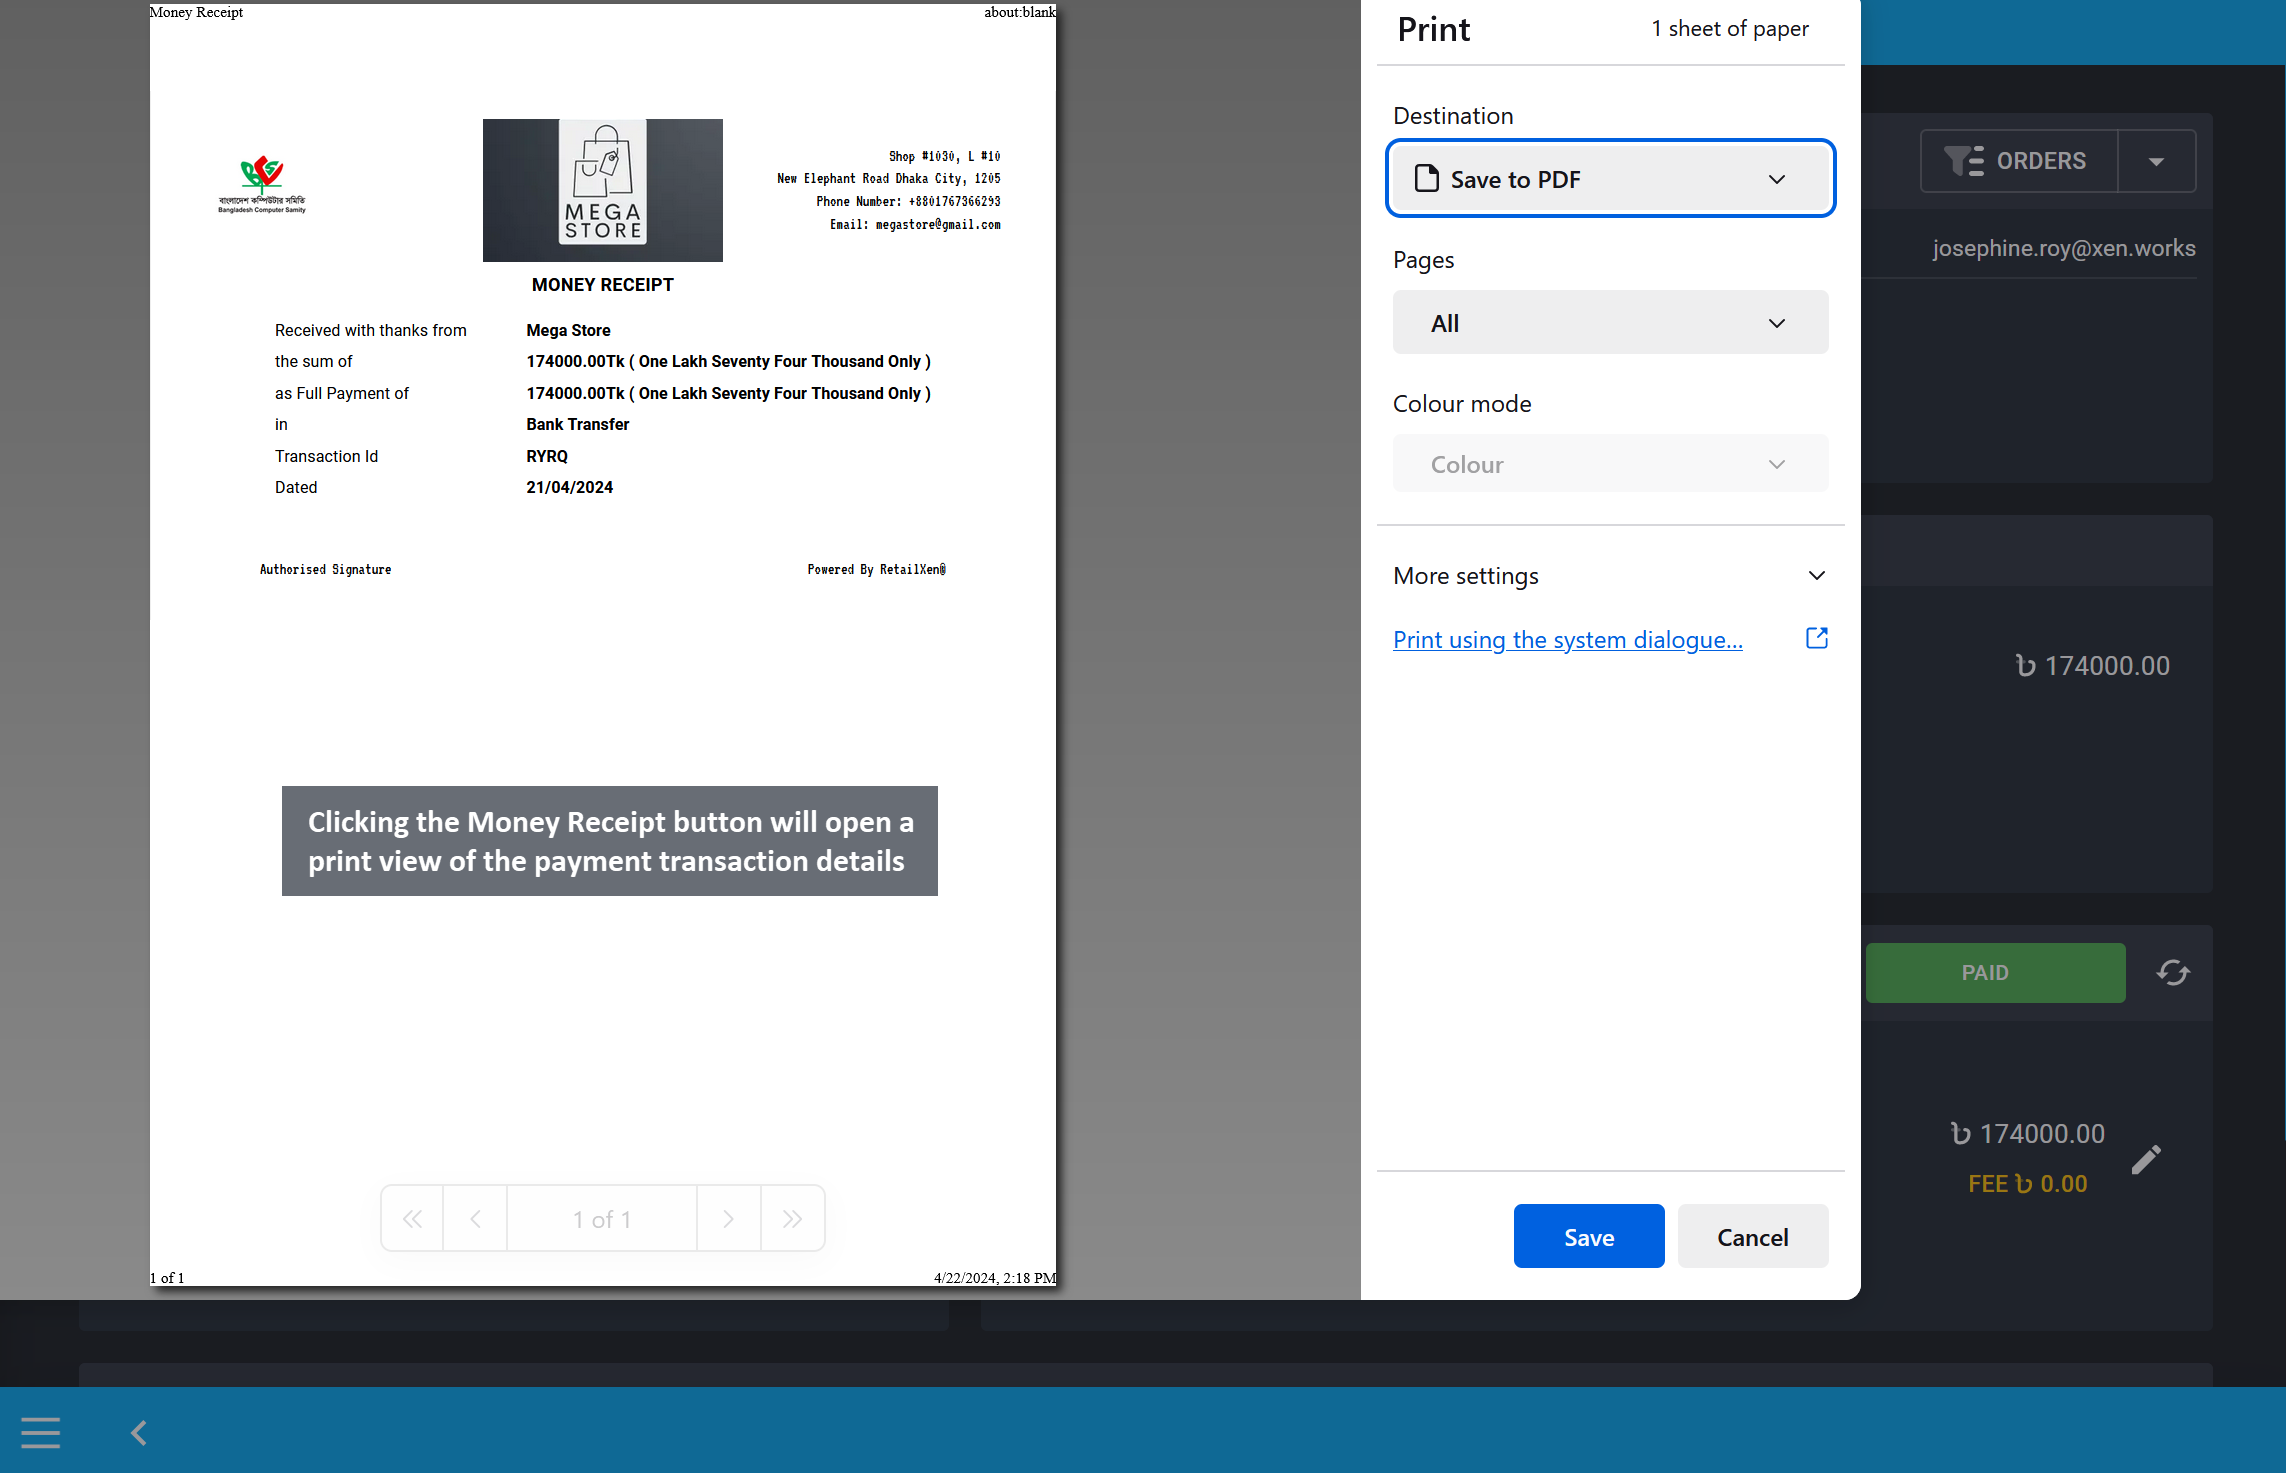
Image 20: Clicking the Money Receipt button will open a print view of payment transaction details.
Within the Order Dashboard, beside the Customer details box, there are dropdown shortcuts to redirect to pages like Customer Dashboard, Report, and Ledger Breakdown. Click pages from the dropdown to visit them directly from the Order Dashboard.
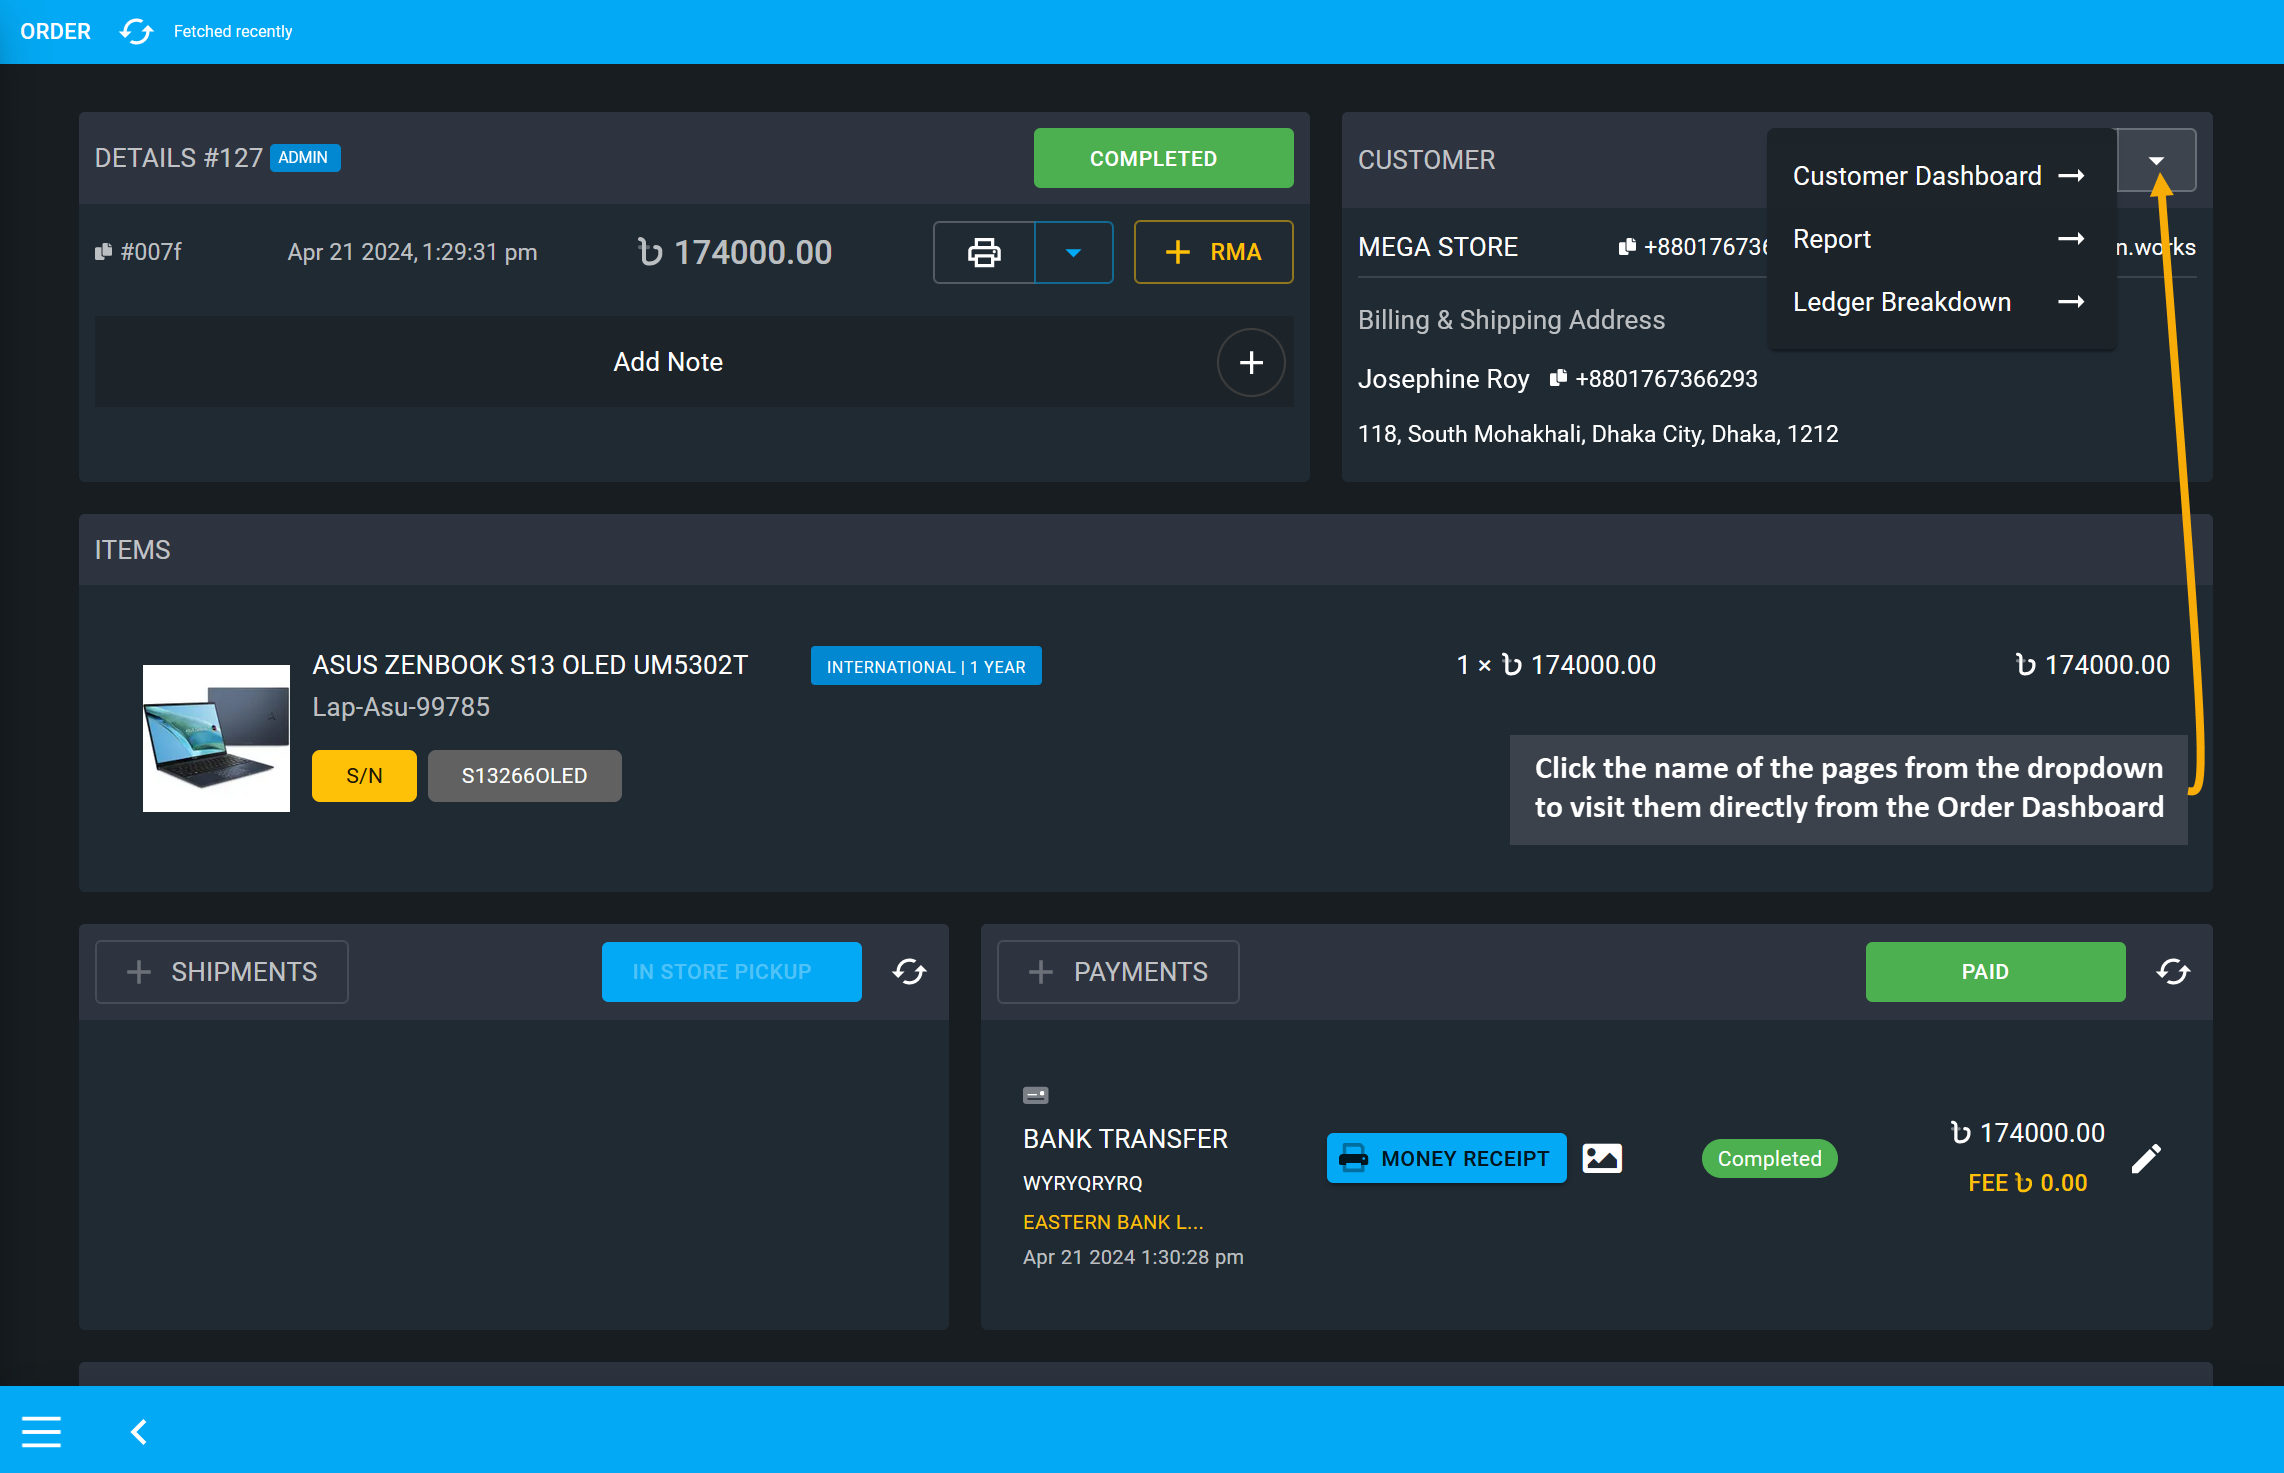
Image 21: Click the name of the pages from the dropdown to visit them directly from Order Dashboard.
Clicking on Customer Dashboard will redirect to the Customer’s Dashboard from Order Dashboard on a separate new tab. So, access to any option related to Customer after checking with the Order.
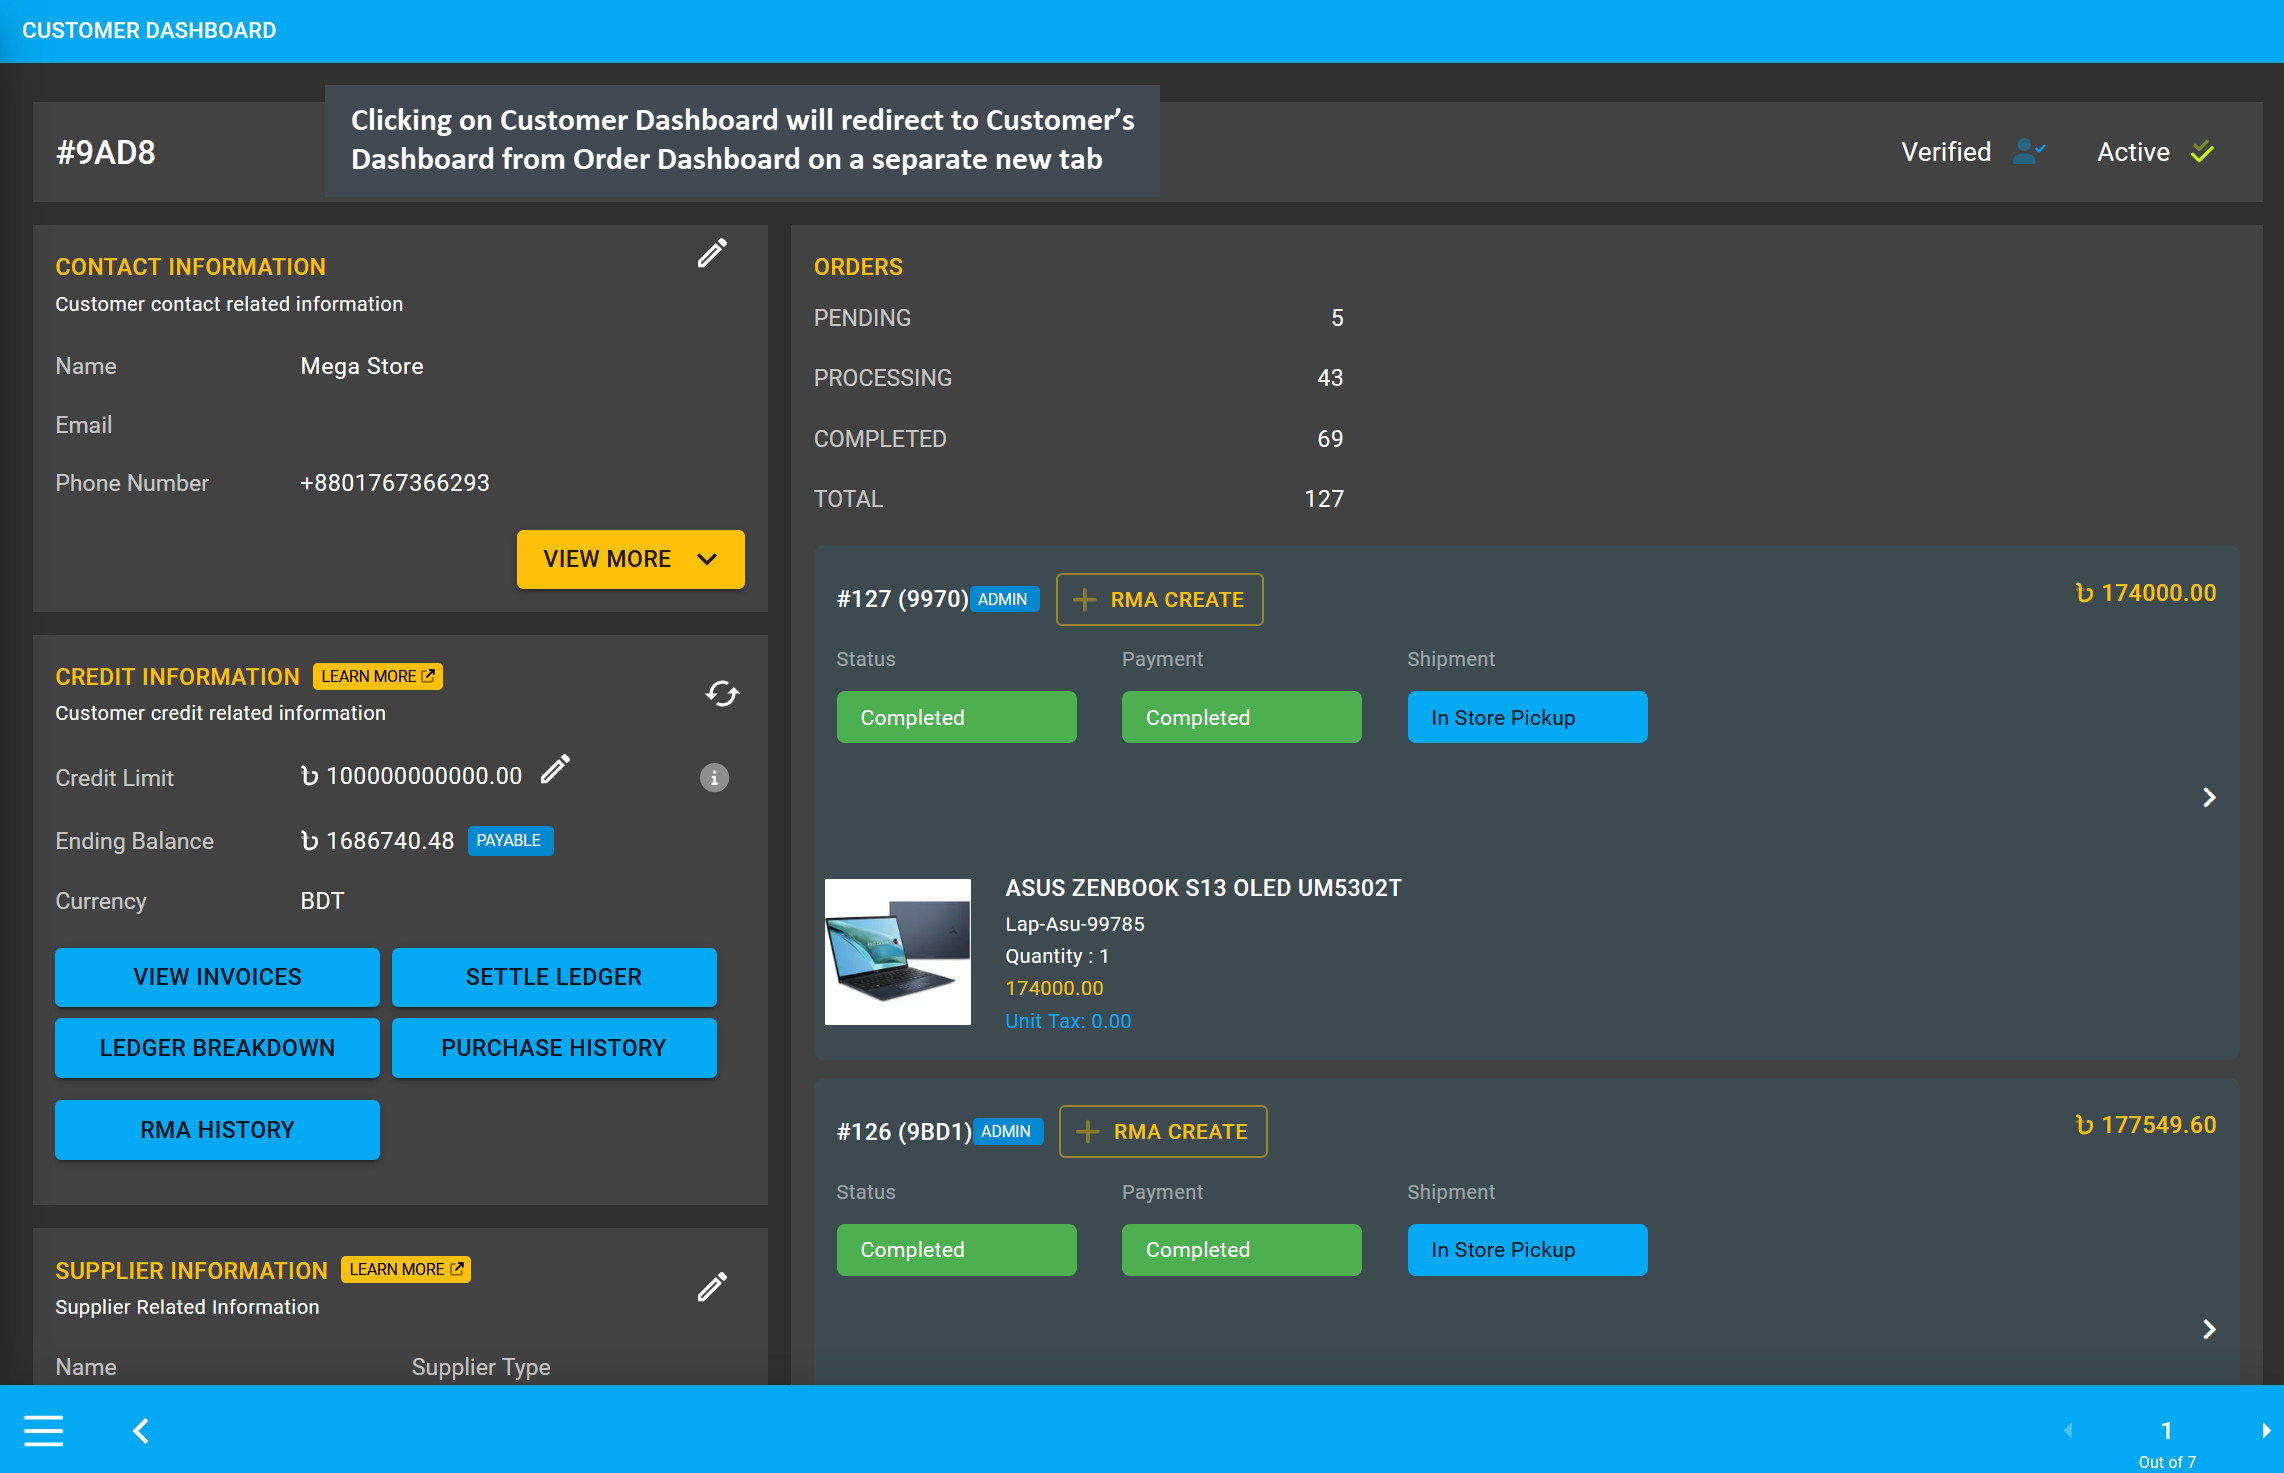
Image 22: Redirect to the Customer’s Dashboard from Order Dashboard by clicking on Order shortcut.
Another Order shortcut is Report that will show the profit loss of an Order, Product, Customer’s selected range. Clicking on Report will redirect to the Cost Basis page showing total profit, revenue, and cost.
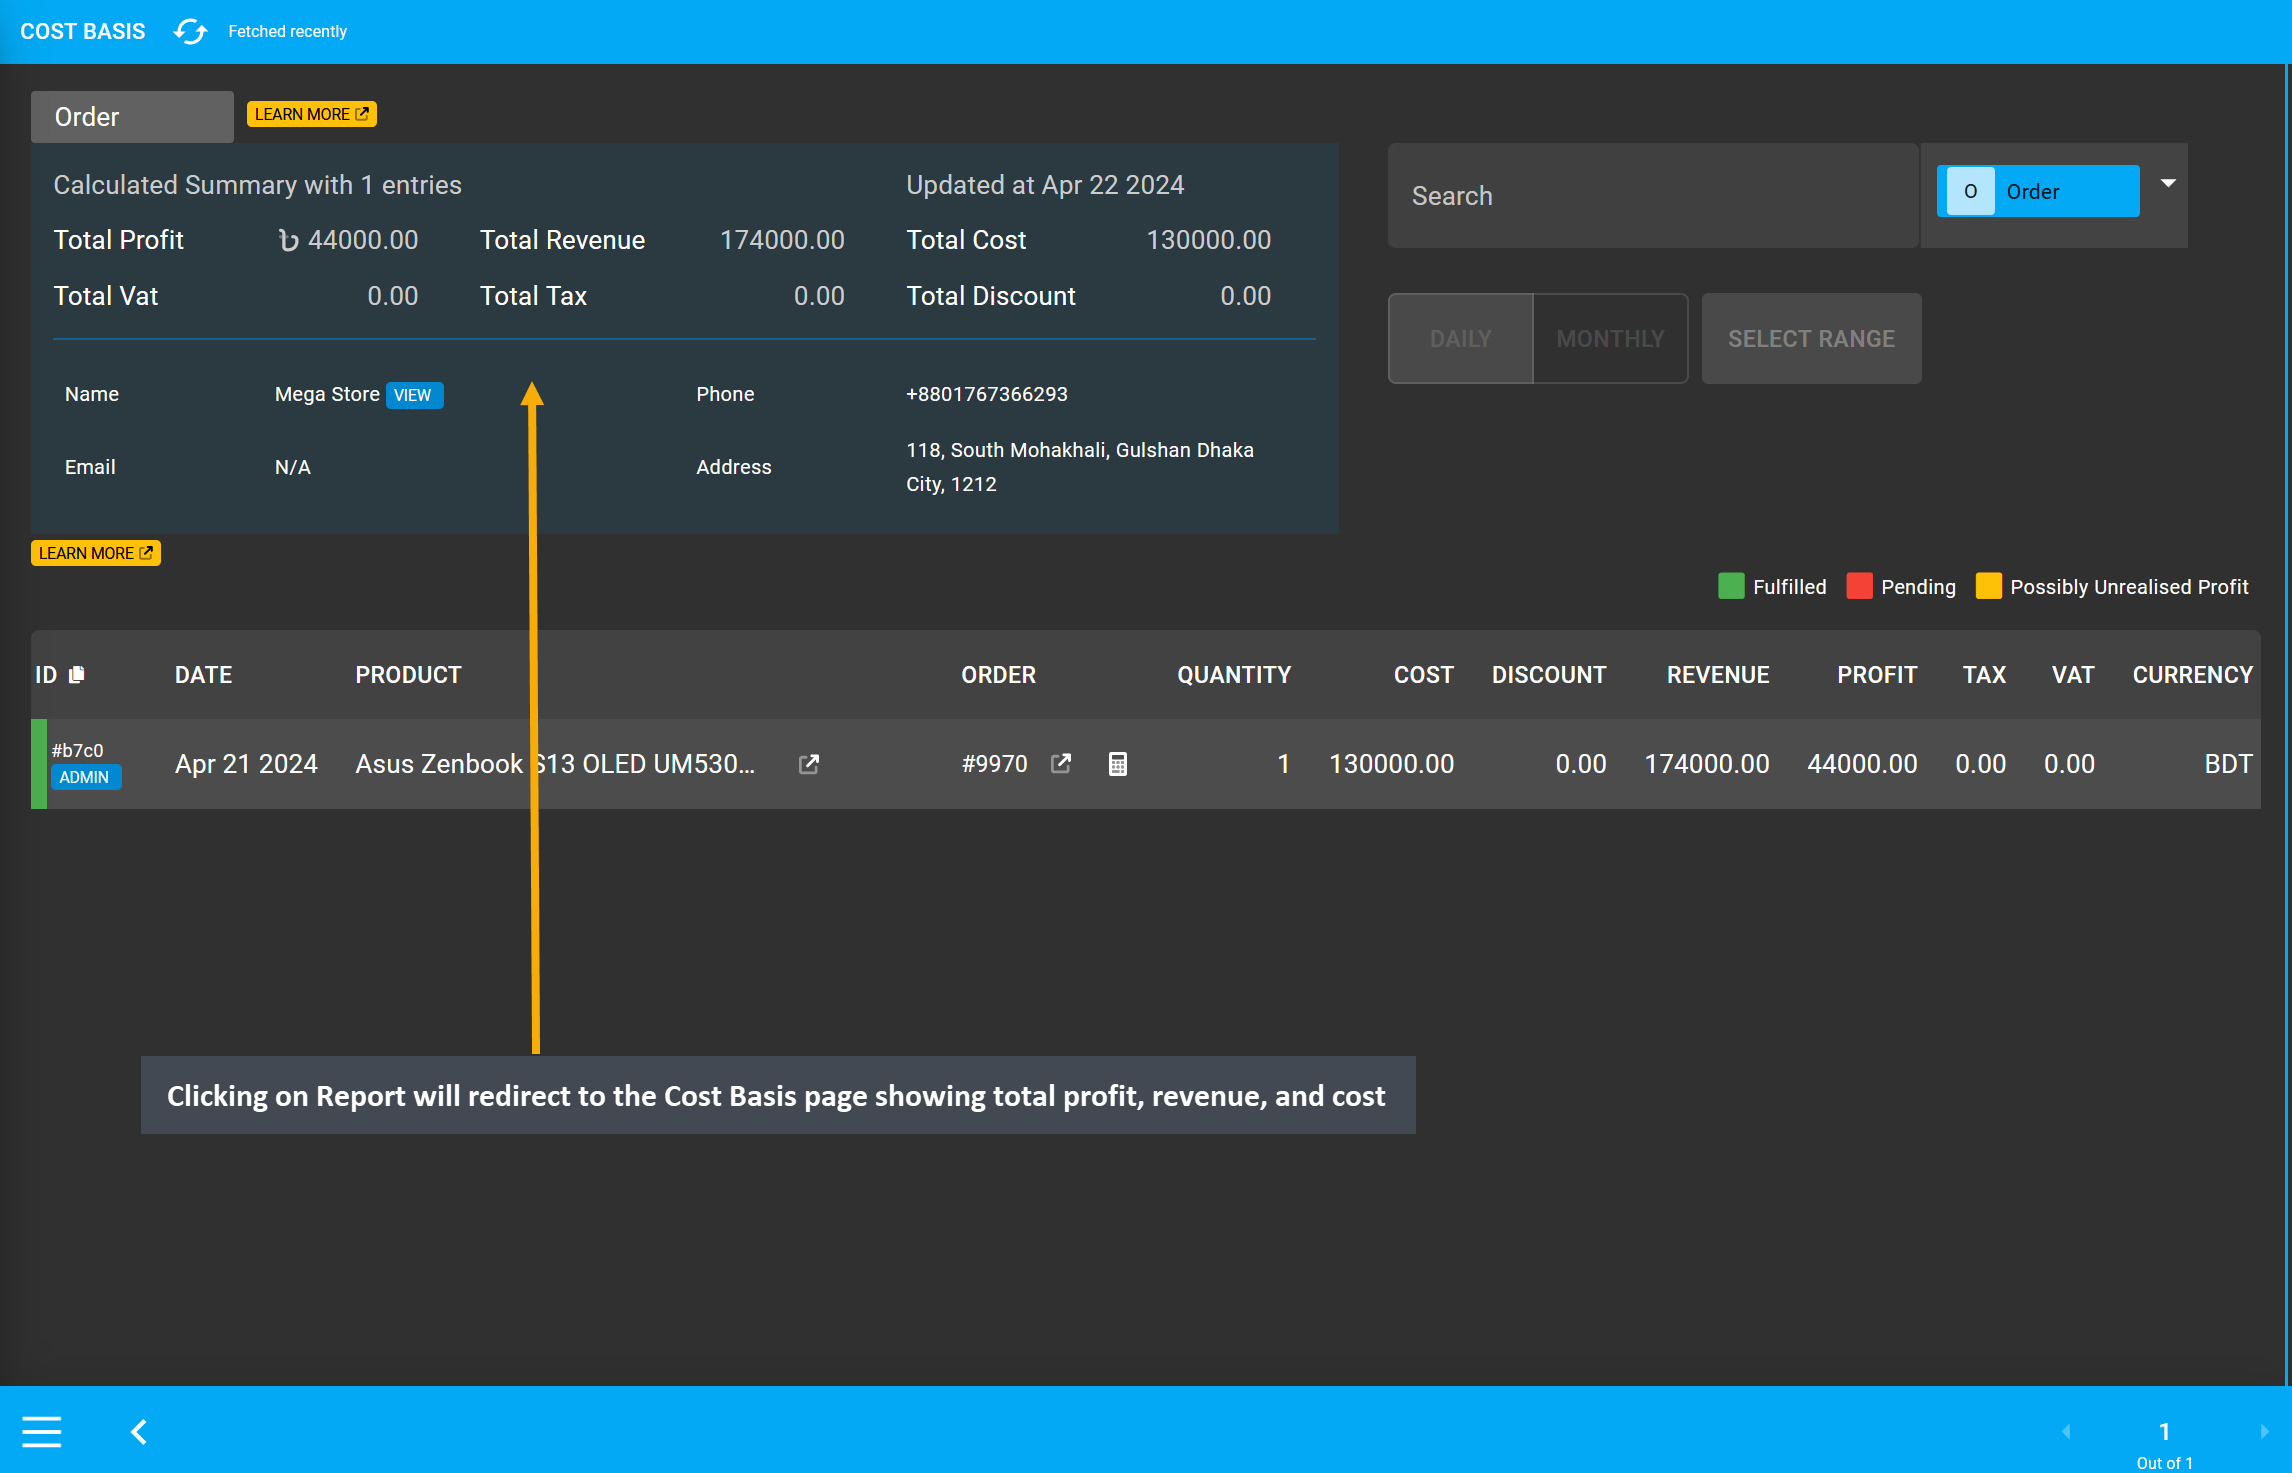
Image 23: Clicking Report will redirect to Cost Basis page showing total profit, revenue, and cost.
The other shortcut is Ledger Breakdown that will show the overall transactions of a Credit Customer and a Credit Supplier. Clicking on Ledger Breakdown will redirect to Ledger showing details of all transactions.
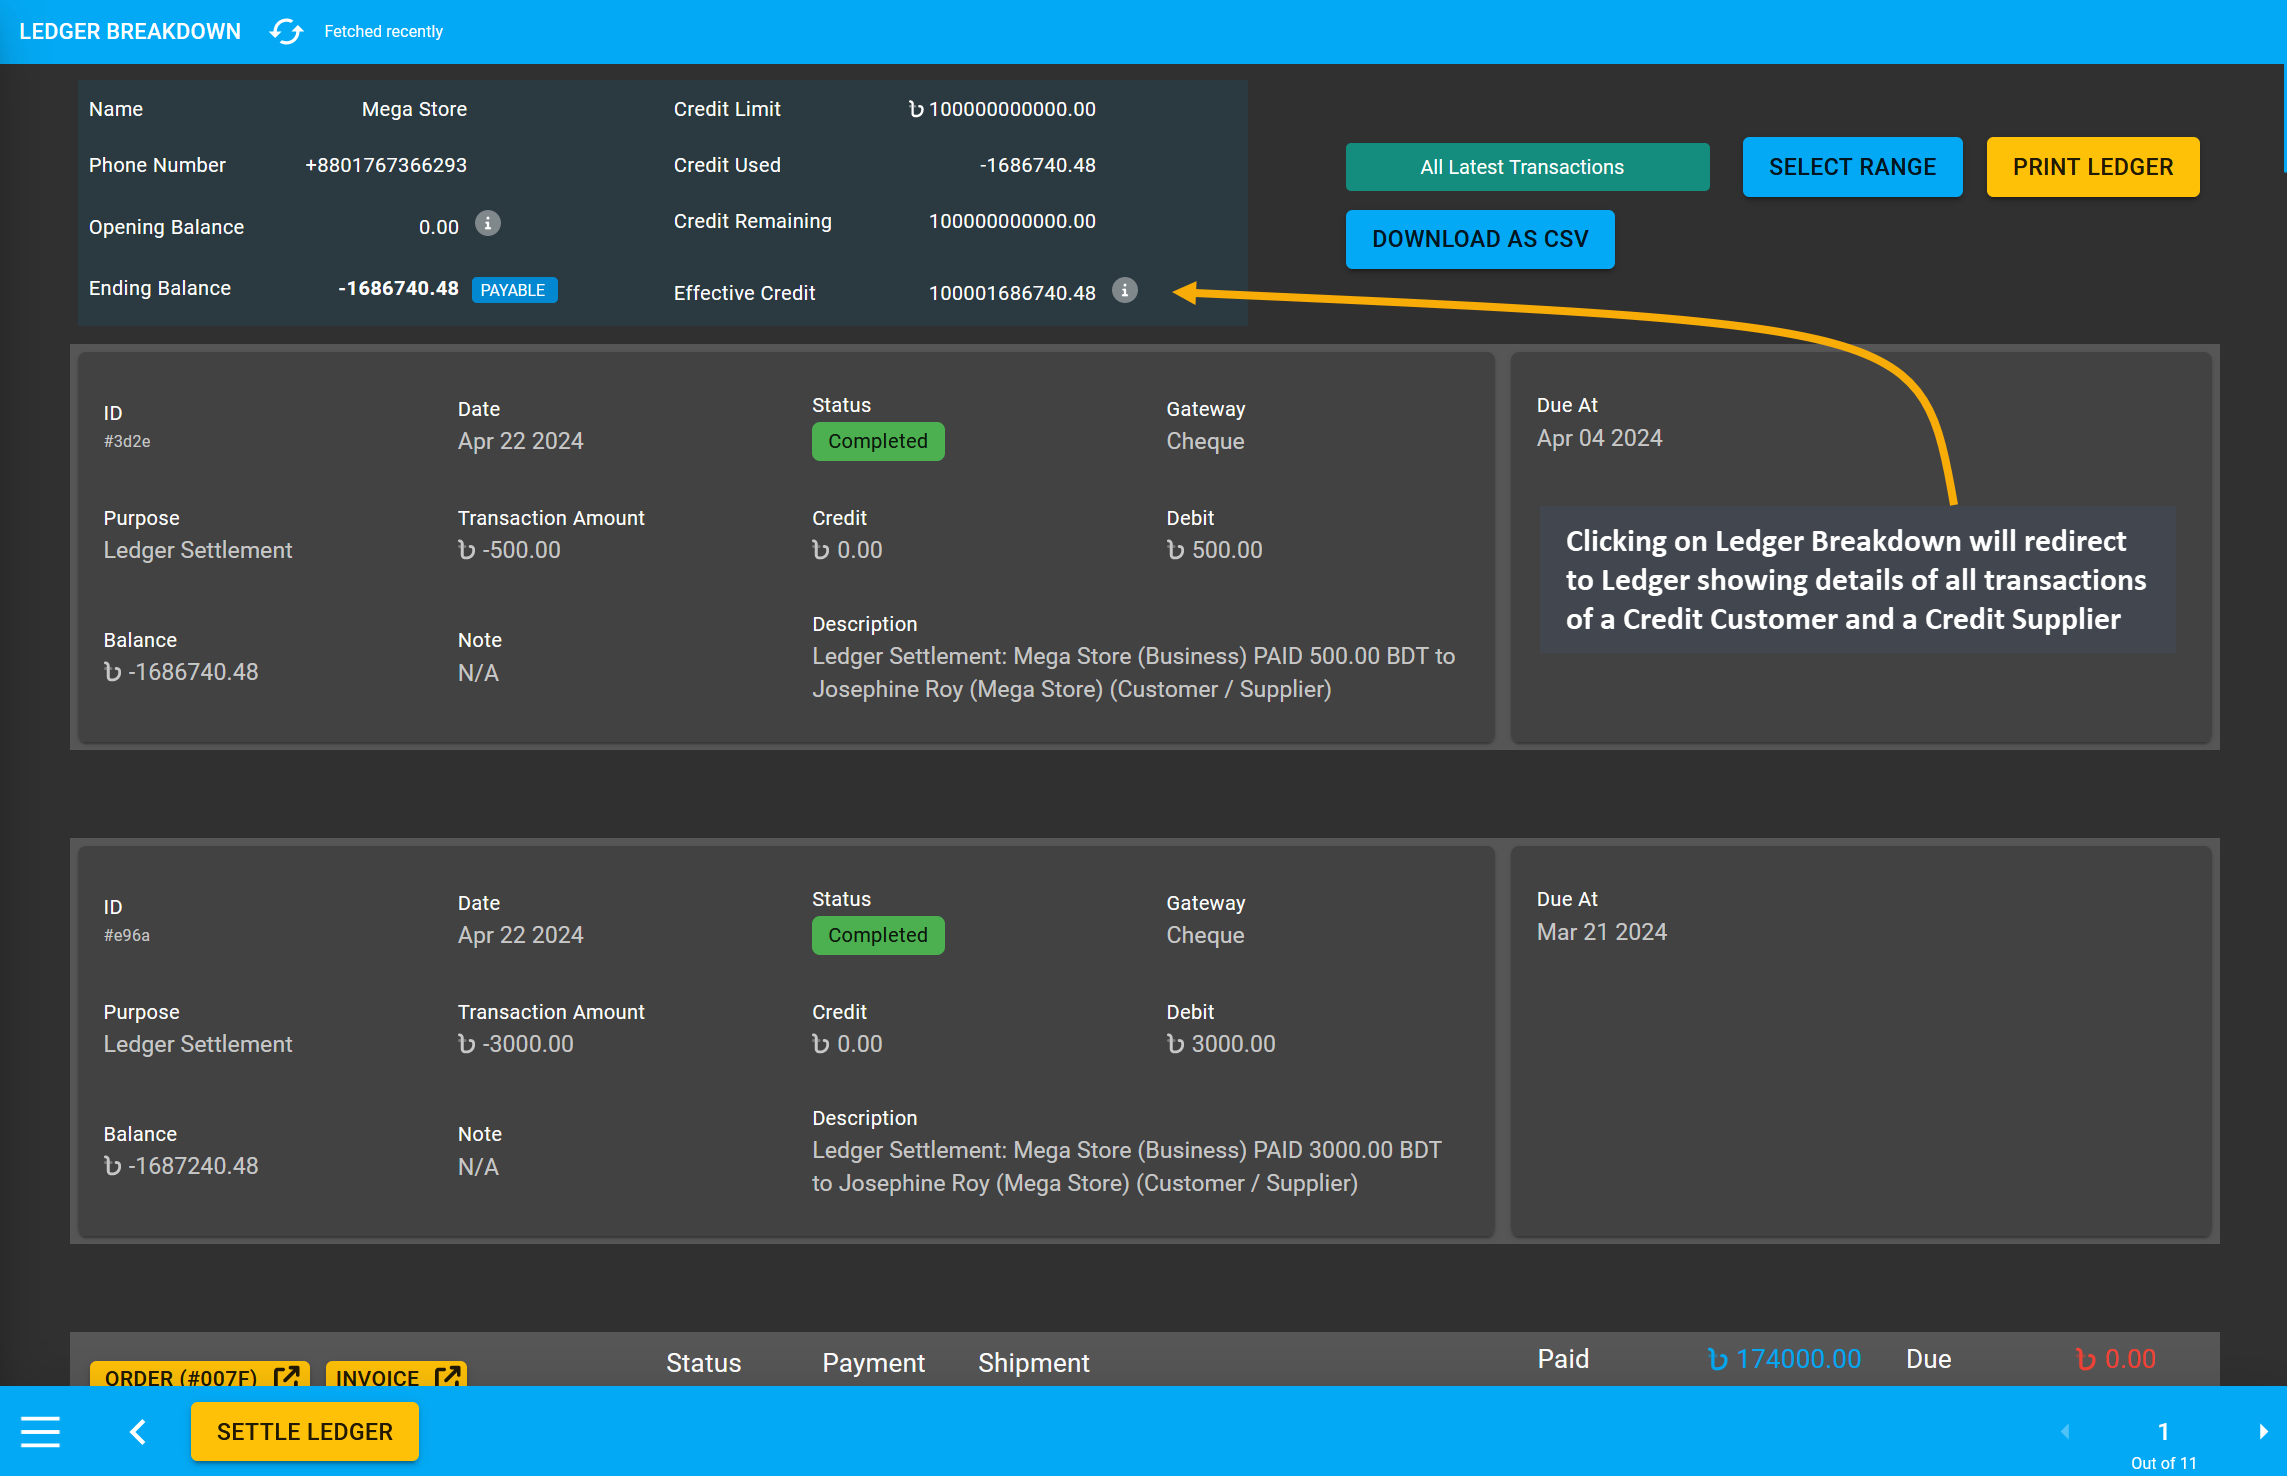
Image 24: Clicking on Ledger Breakdown will redirect to Ledger showing details of all transactions.
Update Payment Status based on customer payment using these options
Learn how to update Order status based on customer payment and delivery.
There are three Order shortcuts which can be used to access Customer information, filter Orders, and examine Cost Basis of Orders.
Update Shipment status after Payment has been confirmed by the Customer.