Order Management
Utilize order tab to keep track of orders and modify order status and details.
Click Orders to get access to order configurations and edit Order status, Payment status, and Shipment status.
List of Orders
The Order List page show different types of Orders - Draft, Pending, Processing, Cancelled, Under Review, and Completed. Clicking on each Order, Shop Owners can visit the Order Dashboard to update order and payment statuses according to Customer commitments. On top, is a refresh button to refresh the Page.
Order List page shows each Order with Customer details on the left, with Order total beside it, then Order Status, Payment Status, and Shipment Status that can be updated if Order is in Draft, Pending, or Processing statuses and when Customer makes full payment or when shipment is delivered. Beside statuses, there is a Print Icon, clicking on it will open a dropdown with options to select an automatically generated Invoice or a Challan that can be printed whenever needed. Click View to visit Order Dashboard and see full details.
On the left side beside Customer details within the Order List, there is a dropdown clicking on which will open options to visit the Customer Dashboard, Report, Ledger Breakdown, and Orders on a separate tab.
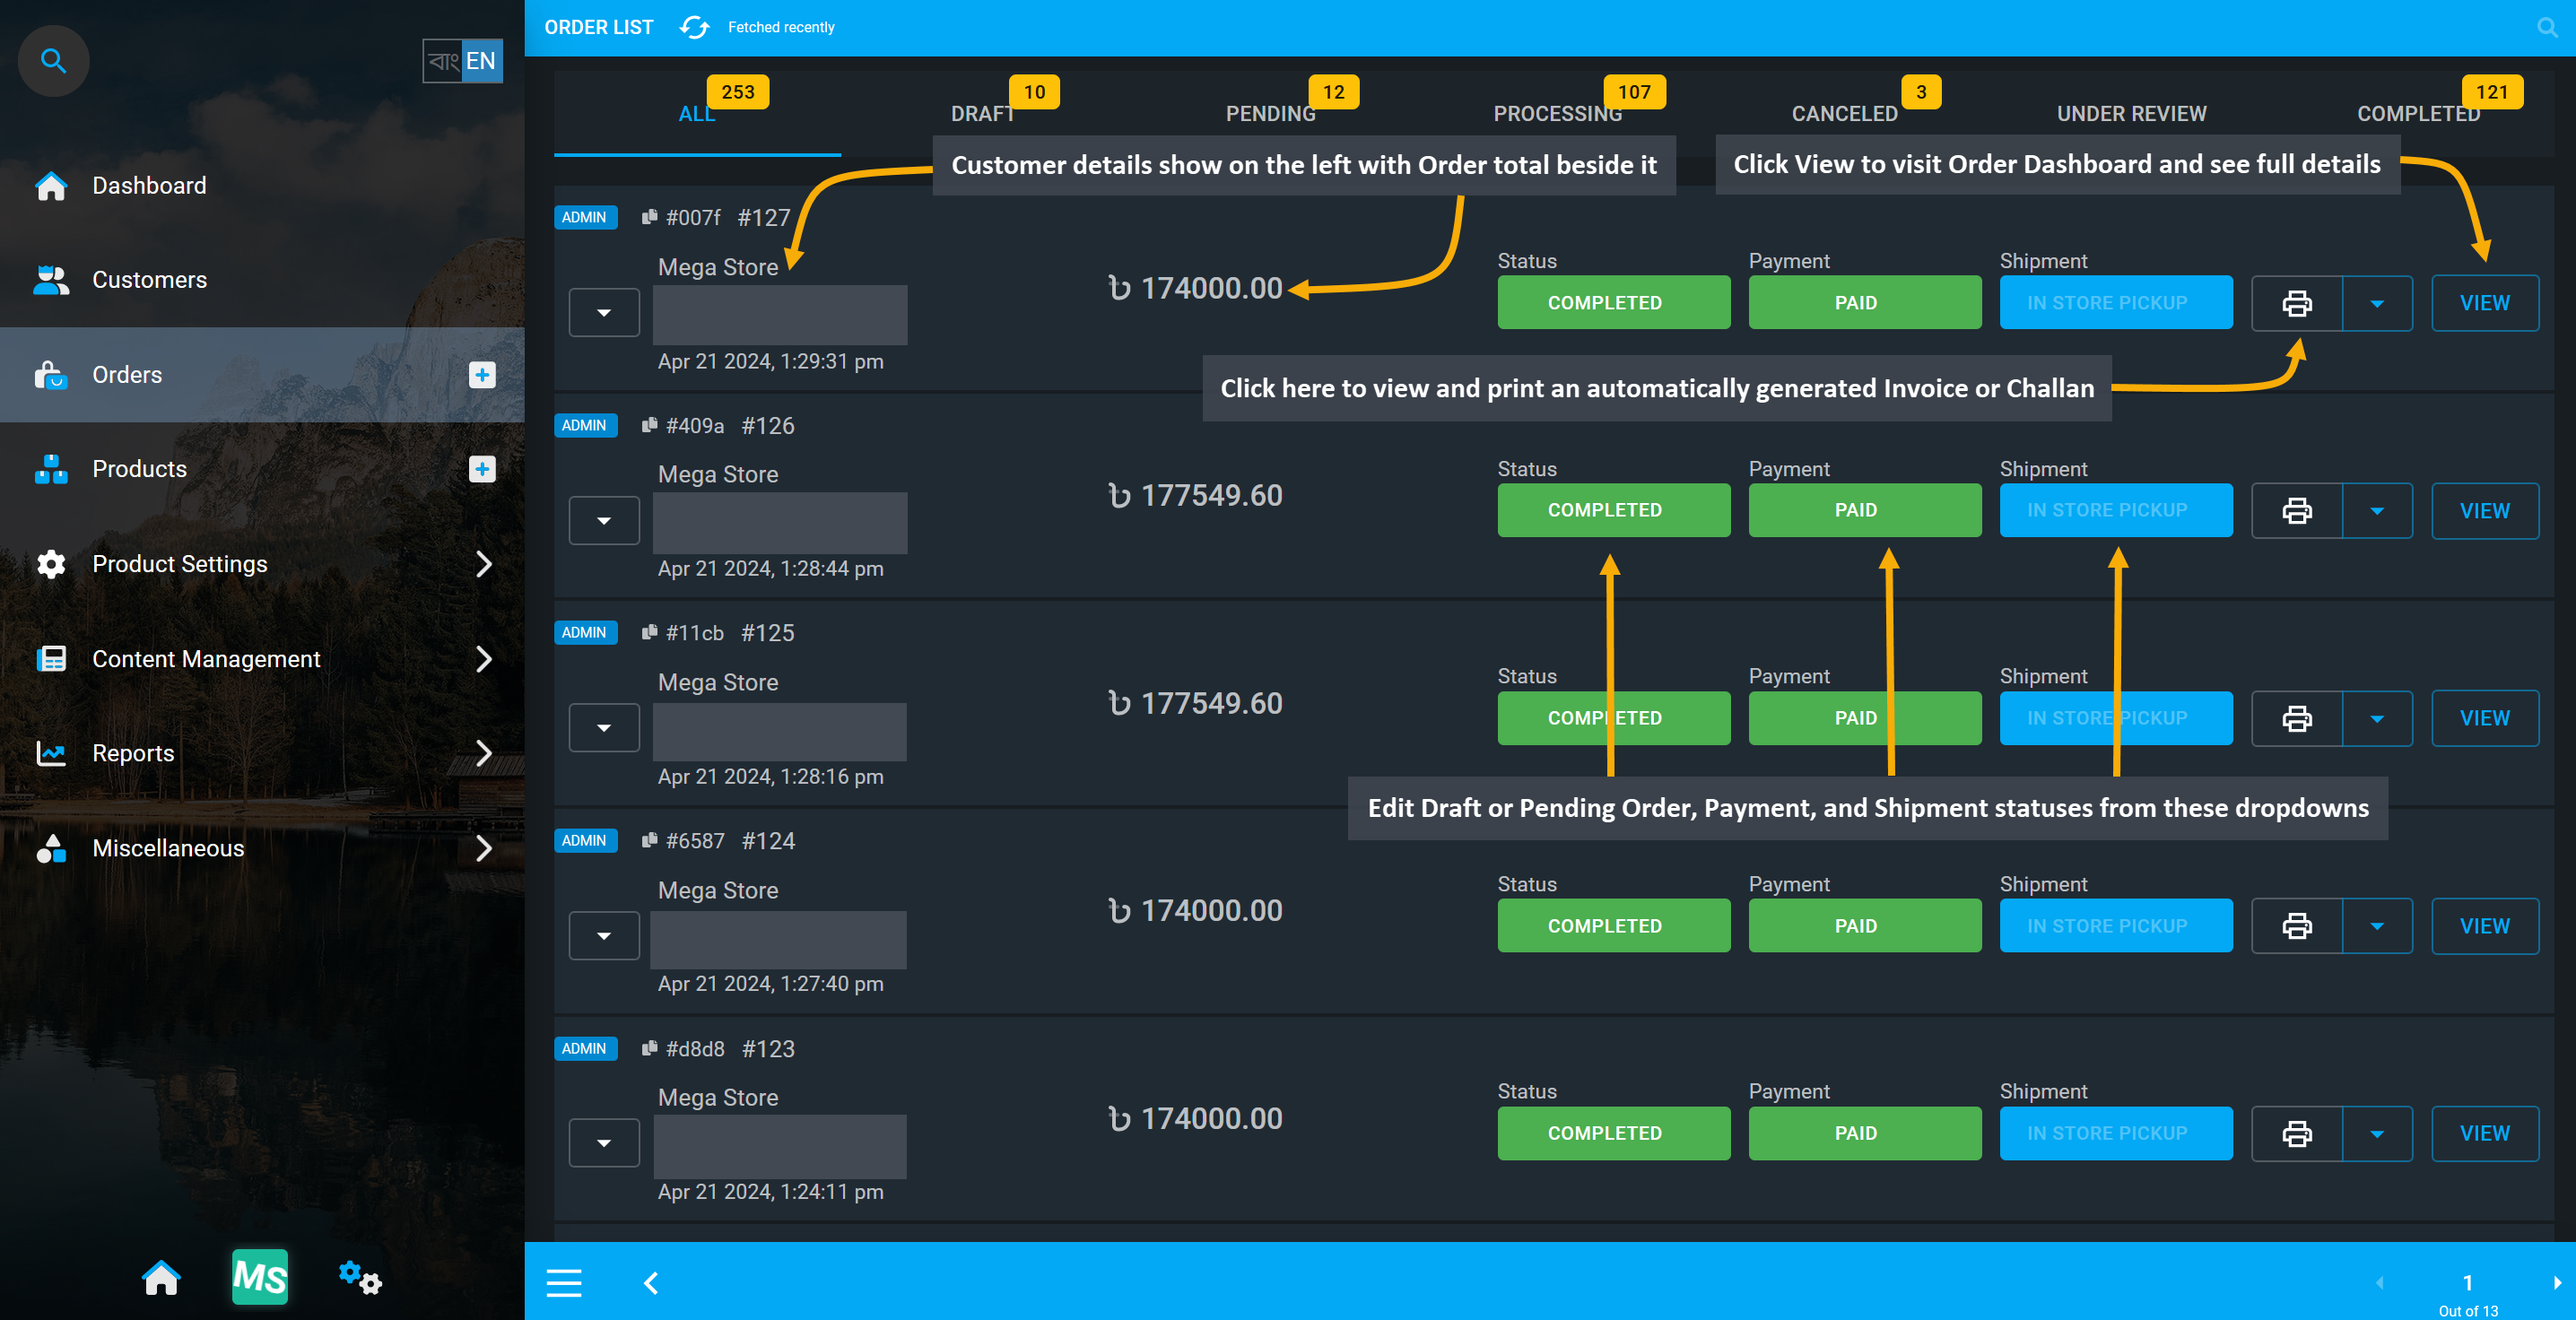
Image 1: Order List show Draft, Pending, Processing, Cancelled, Under Review, and Completed Orders.
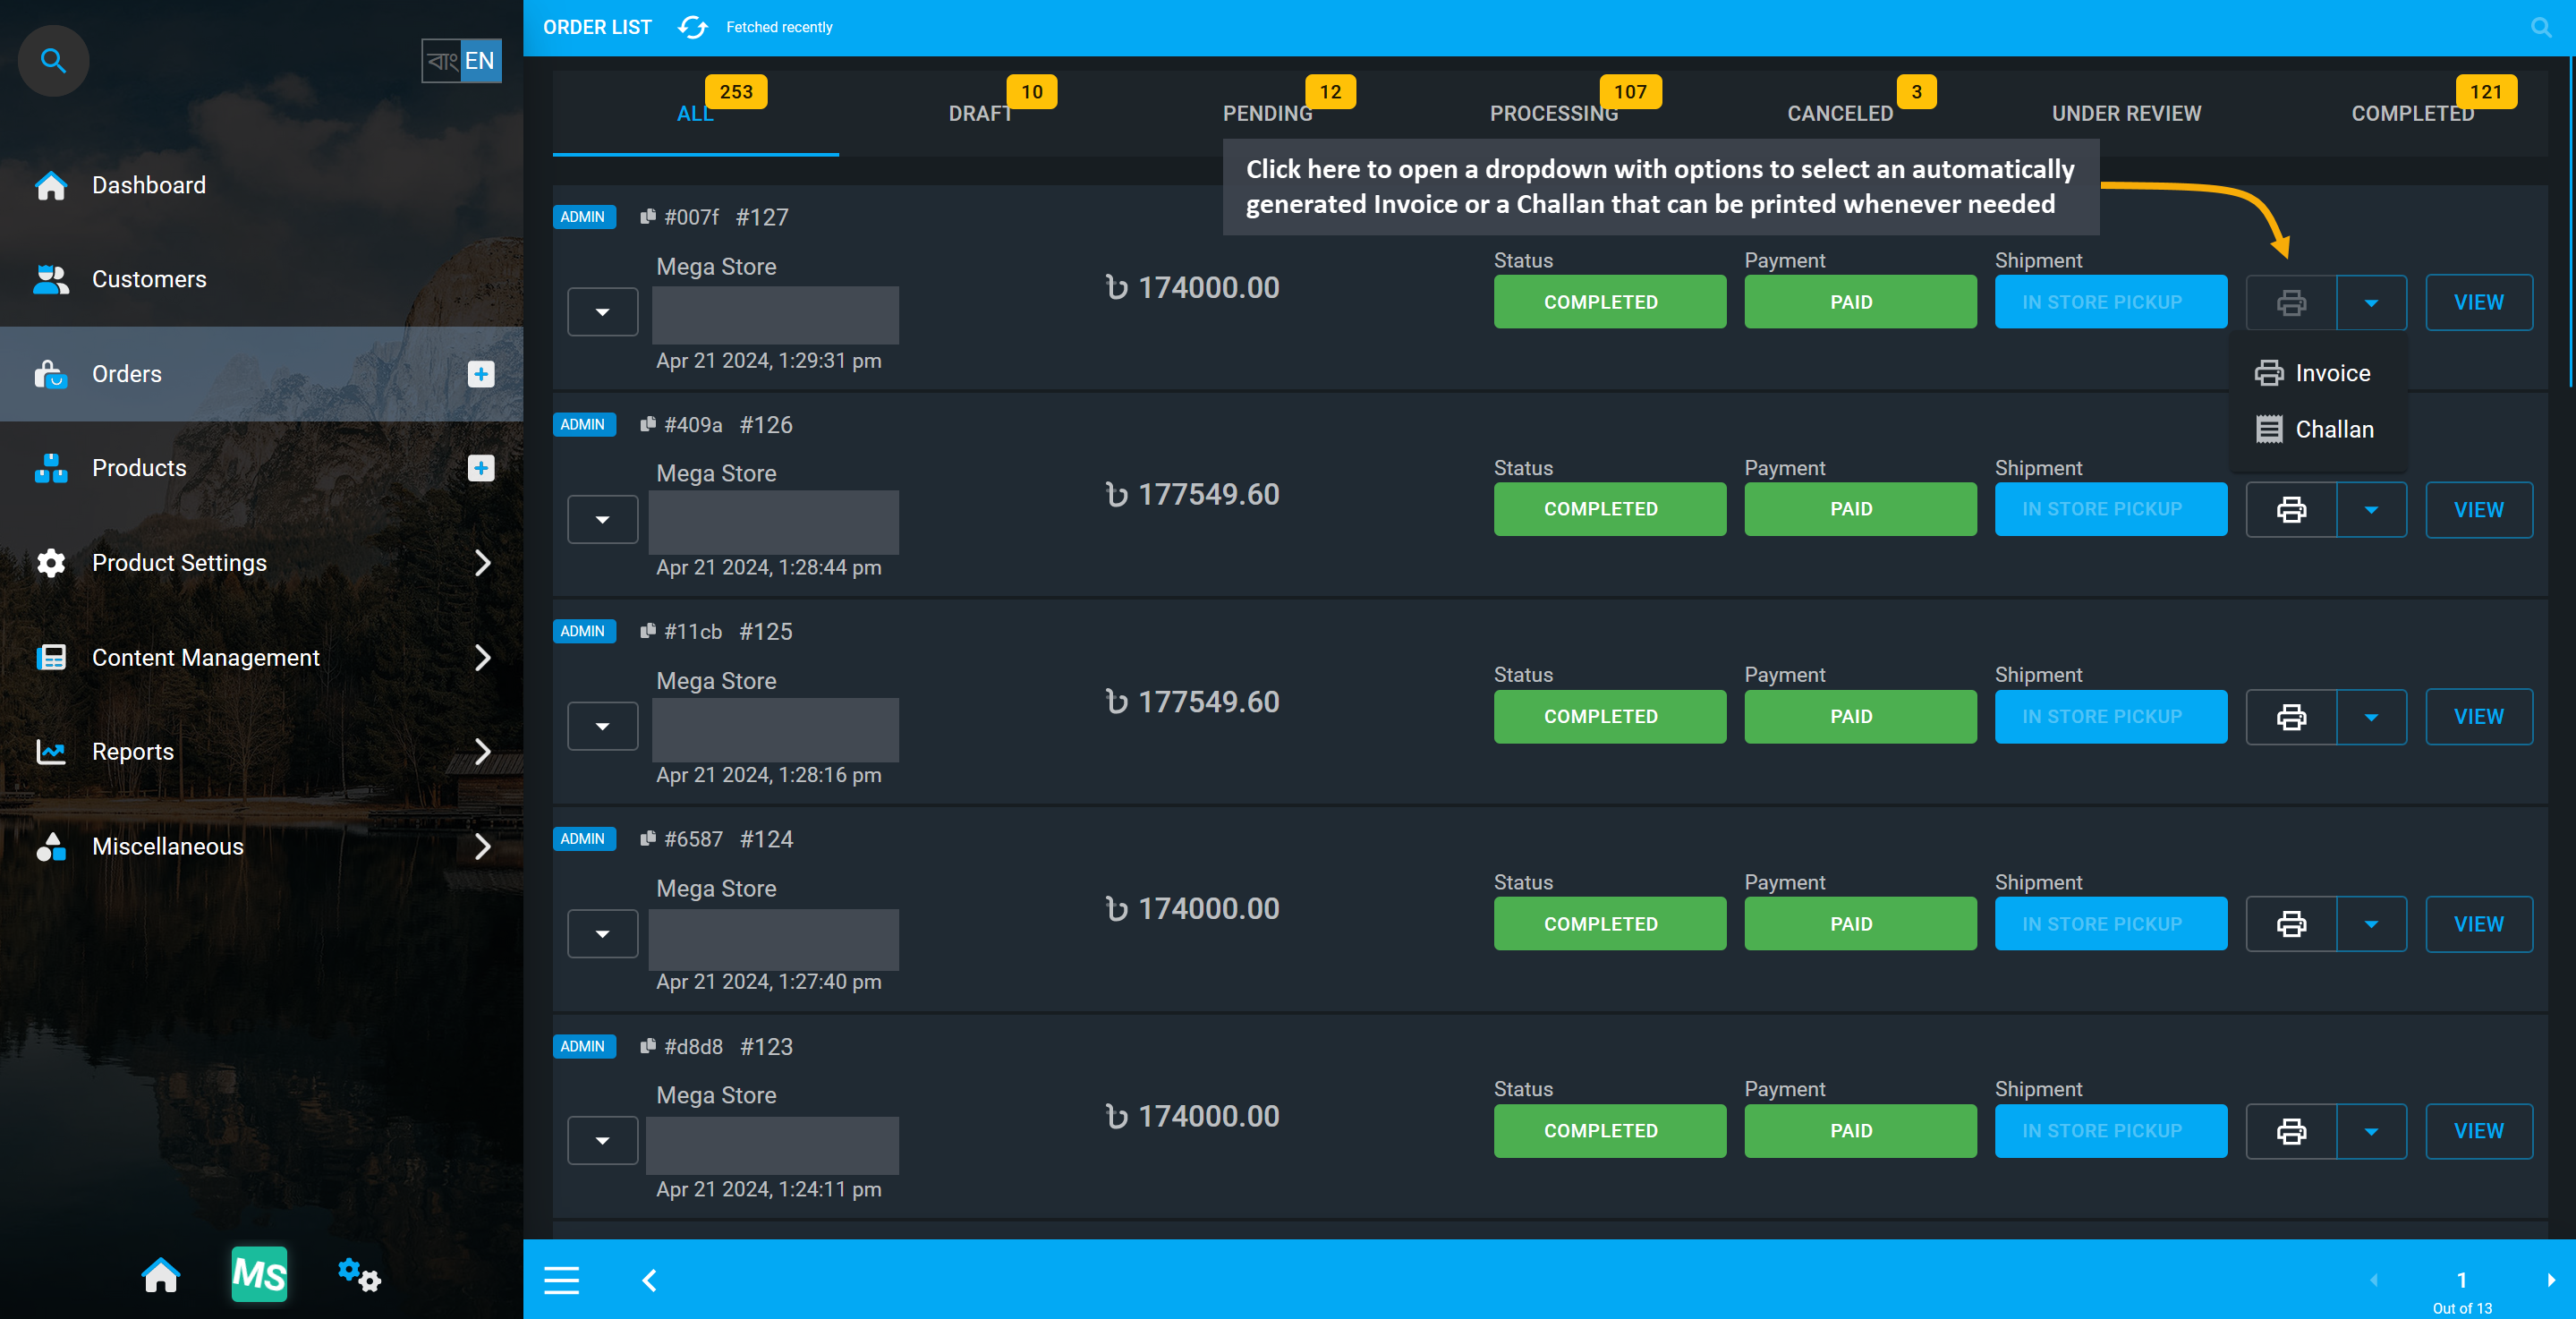
Image 2: Open an automatically generated Invoice or a Challan that can be printed whenever needed.
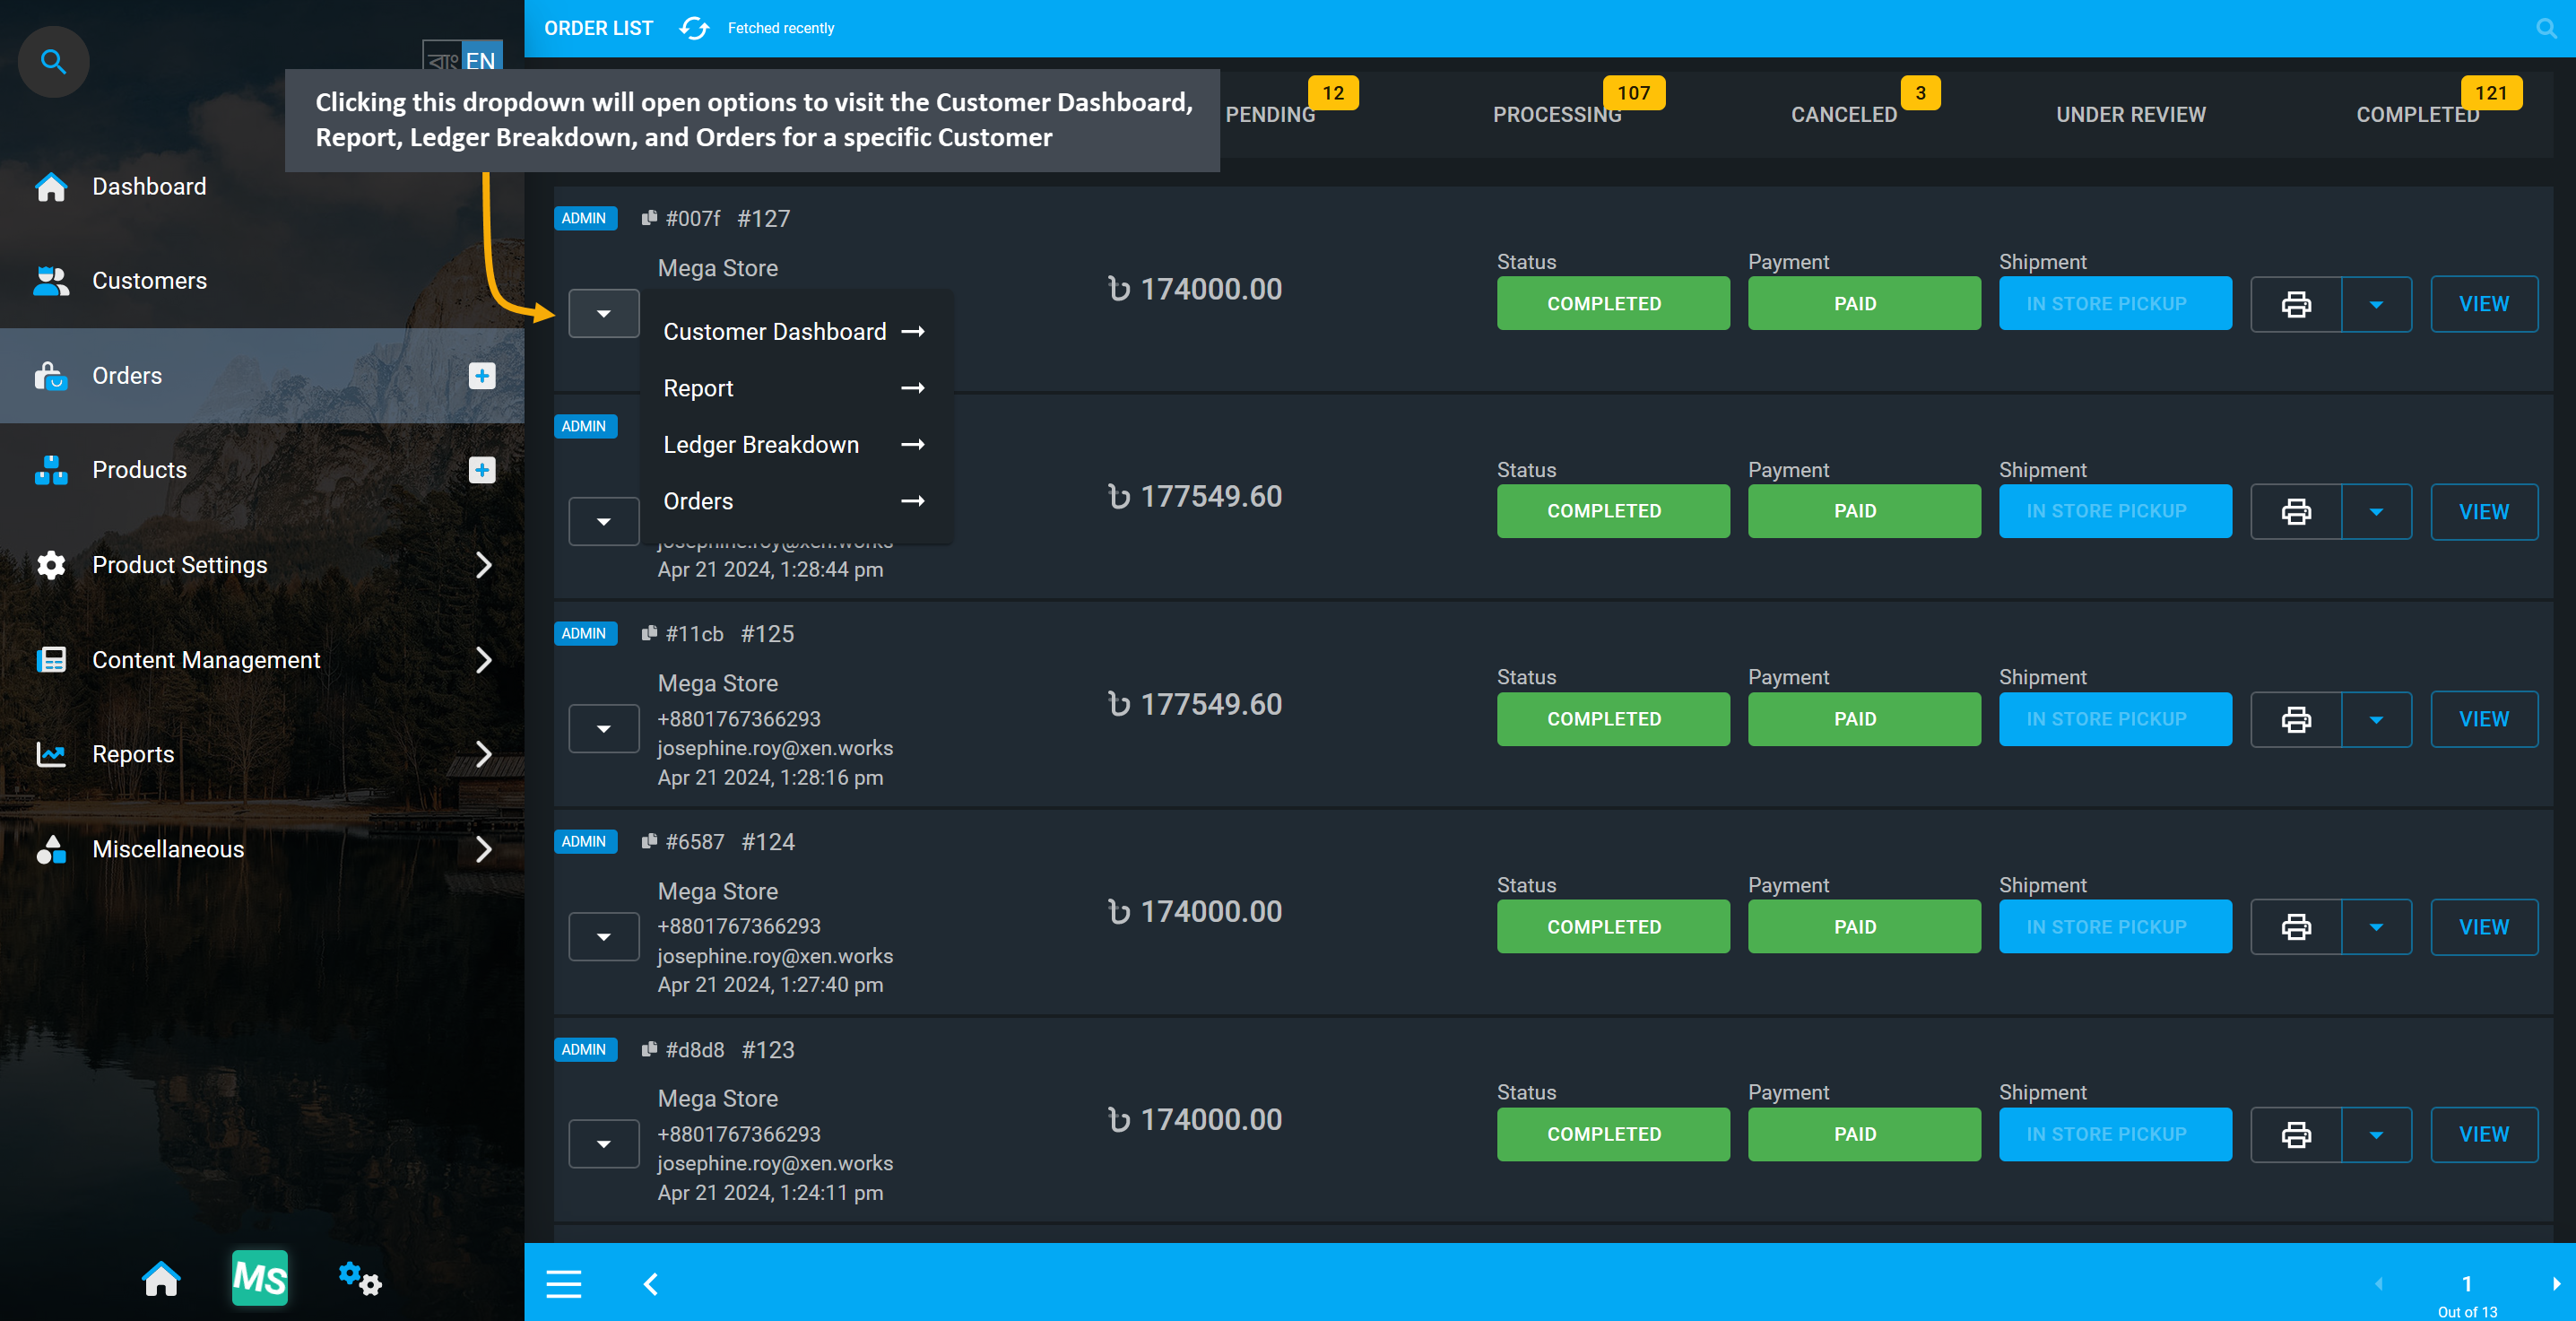
Image 3: Clicking dropdown will open options to visit different navigations for selected Customer.
Automatic and Manual Orders
Automatic Orders created by Customers from the Website will be displayed under All, Pending, Processing, Cancelled, Under Review, and Completed. Besides, Shop Owner can create Manual Orders at their Customer’s request from the Admin Panels by clicking on the Order + button at the bottom of the page or the + button beside Orders tab. Automatic Website Orders will have the label Website beside them and Manual Admin Panel Orders placed by the Shop will have the label Admin beside them to differentiate both Order types.
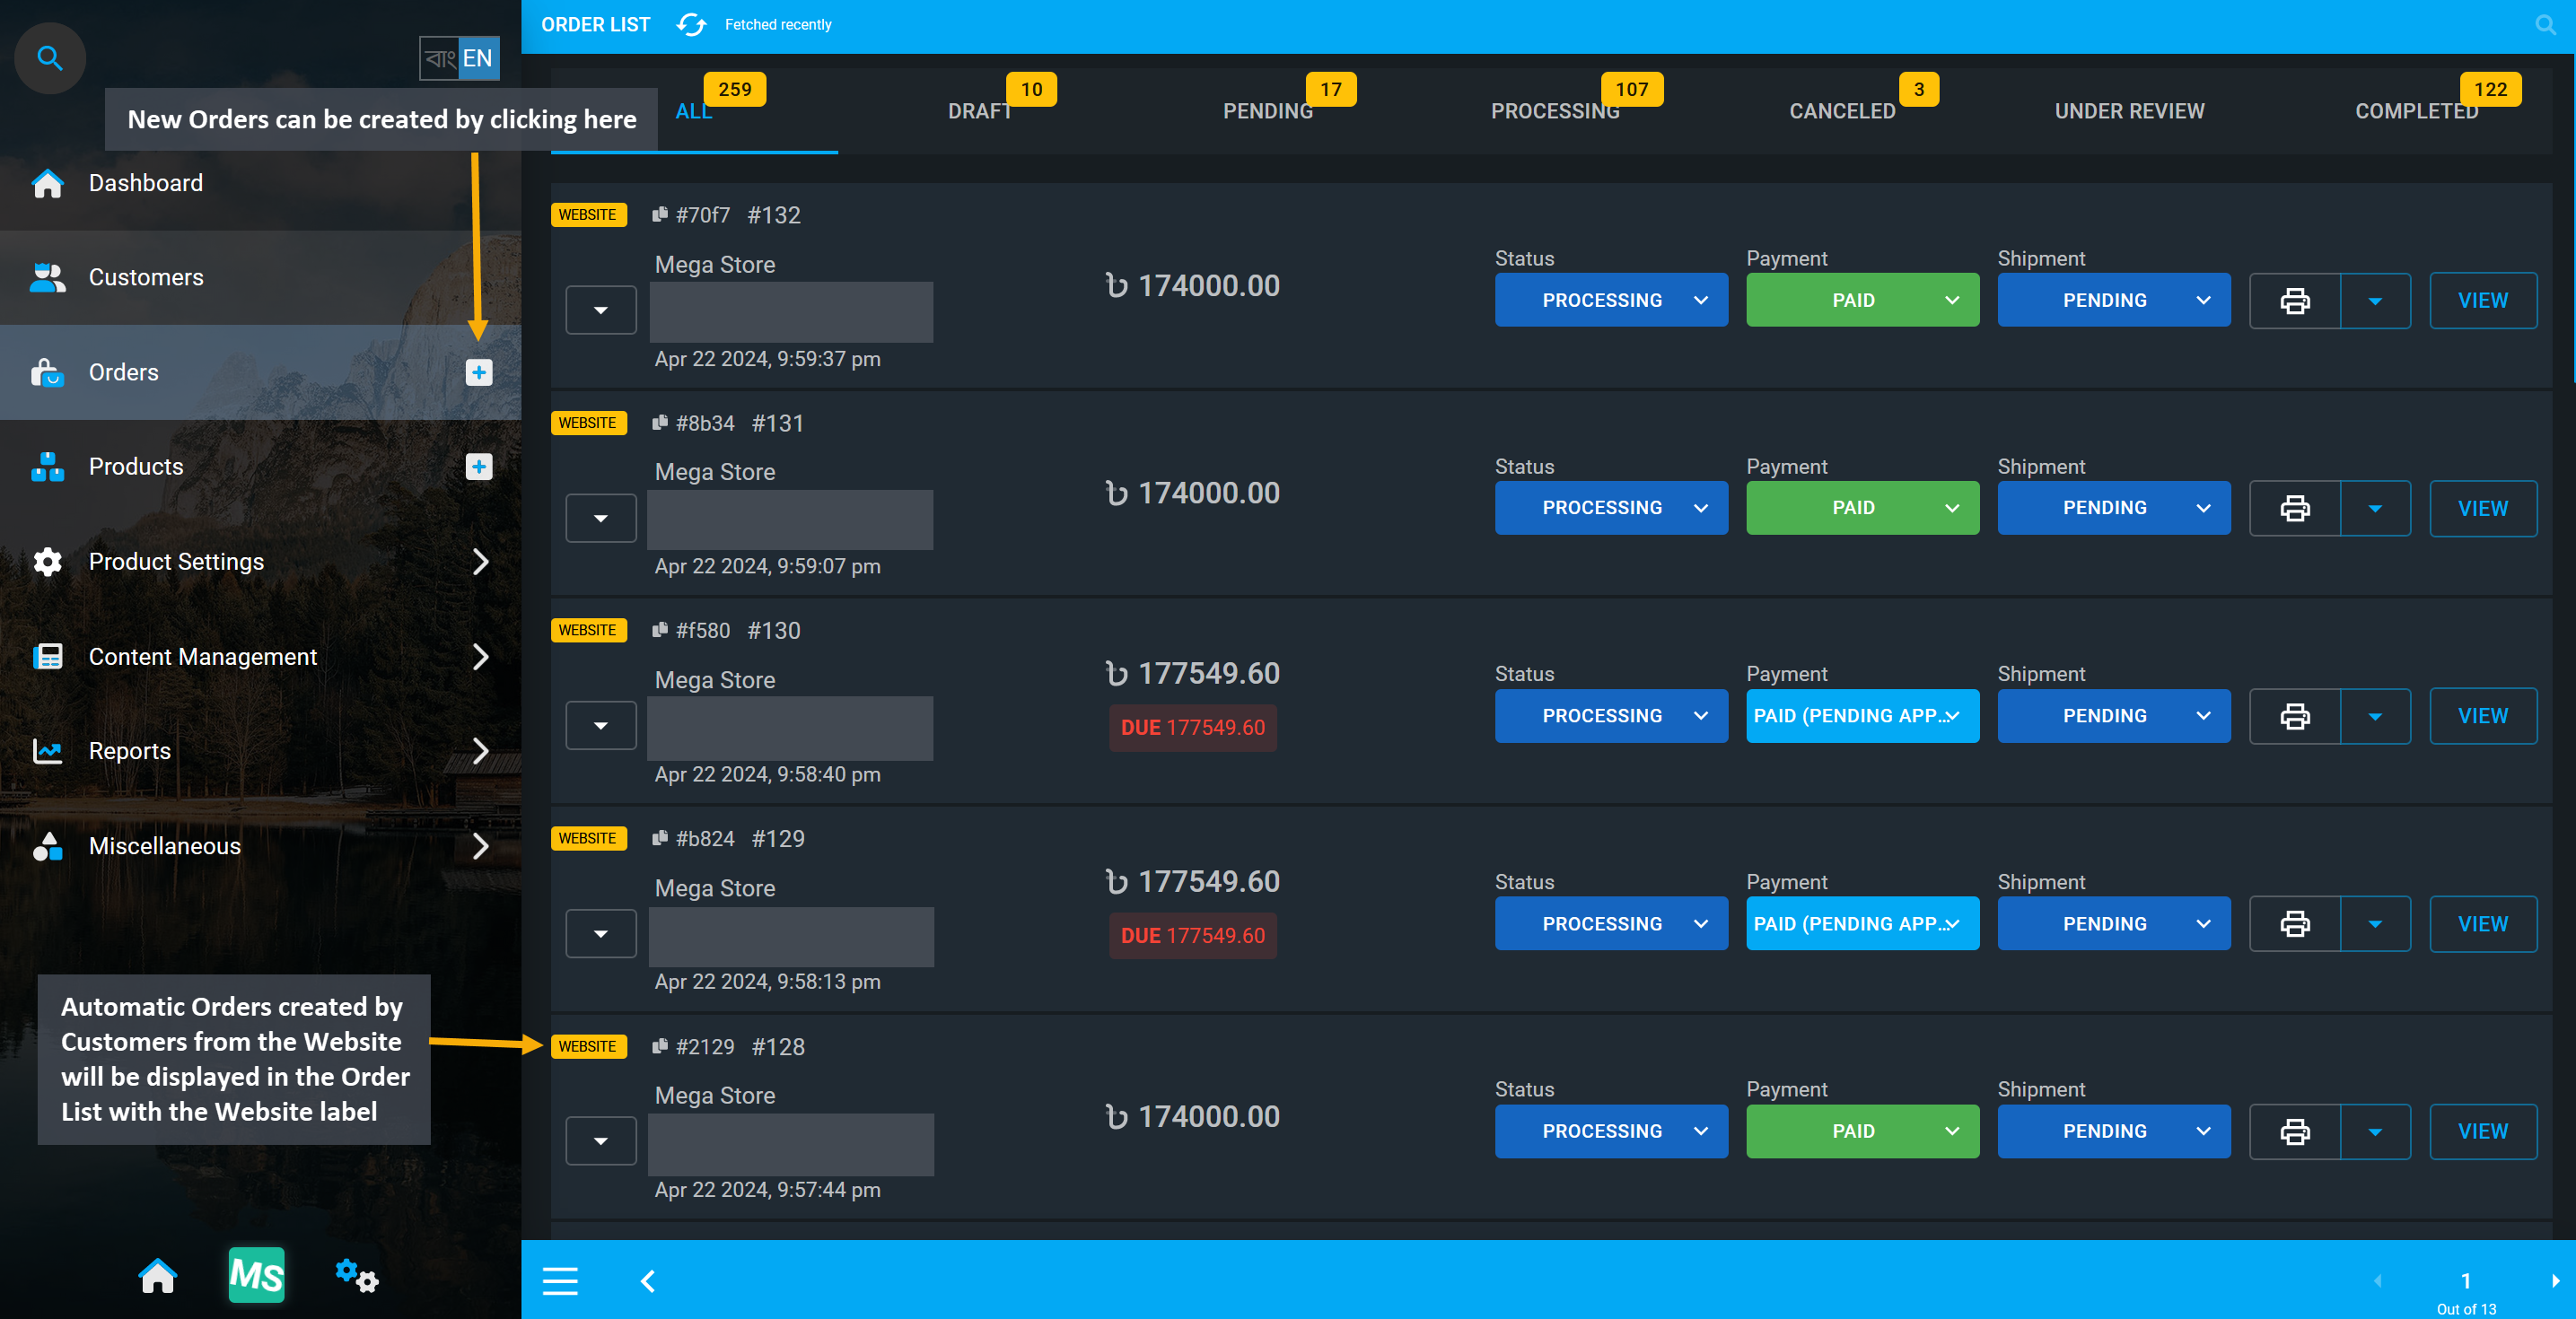
Image 4: Automatic Orders created by Customers from the Website will be displayed with Website label.
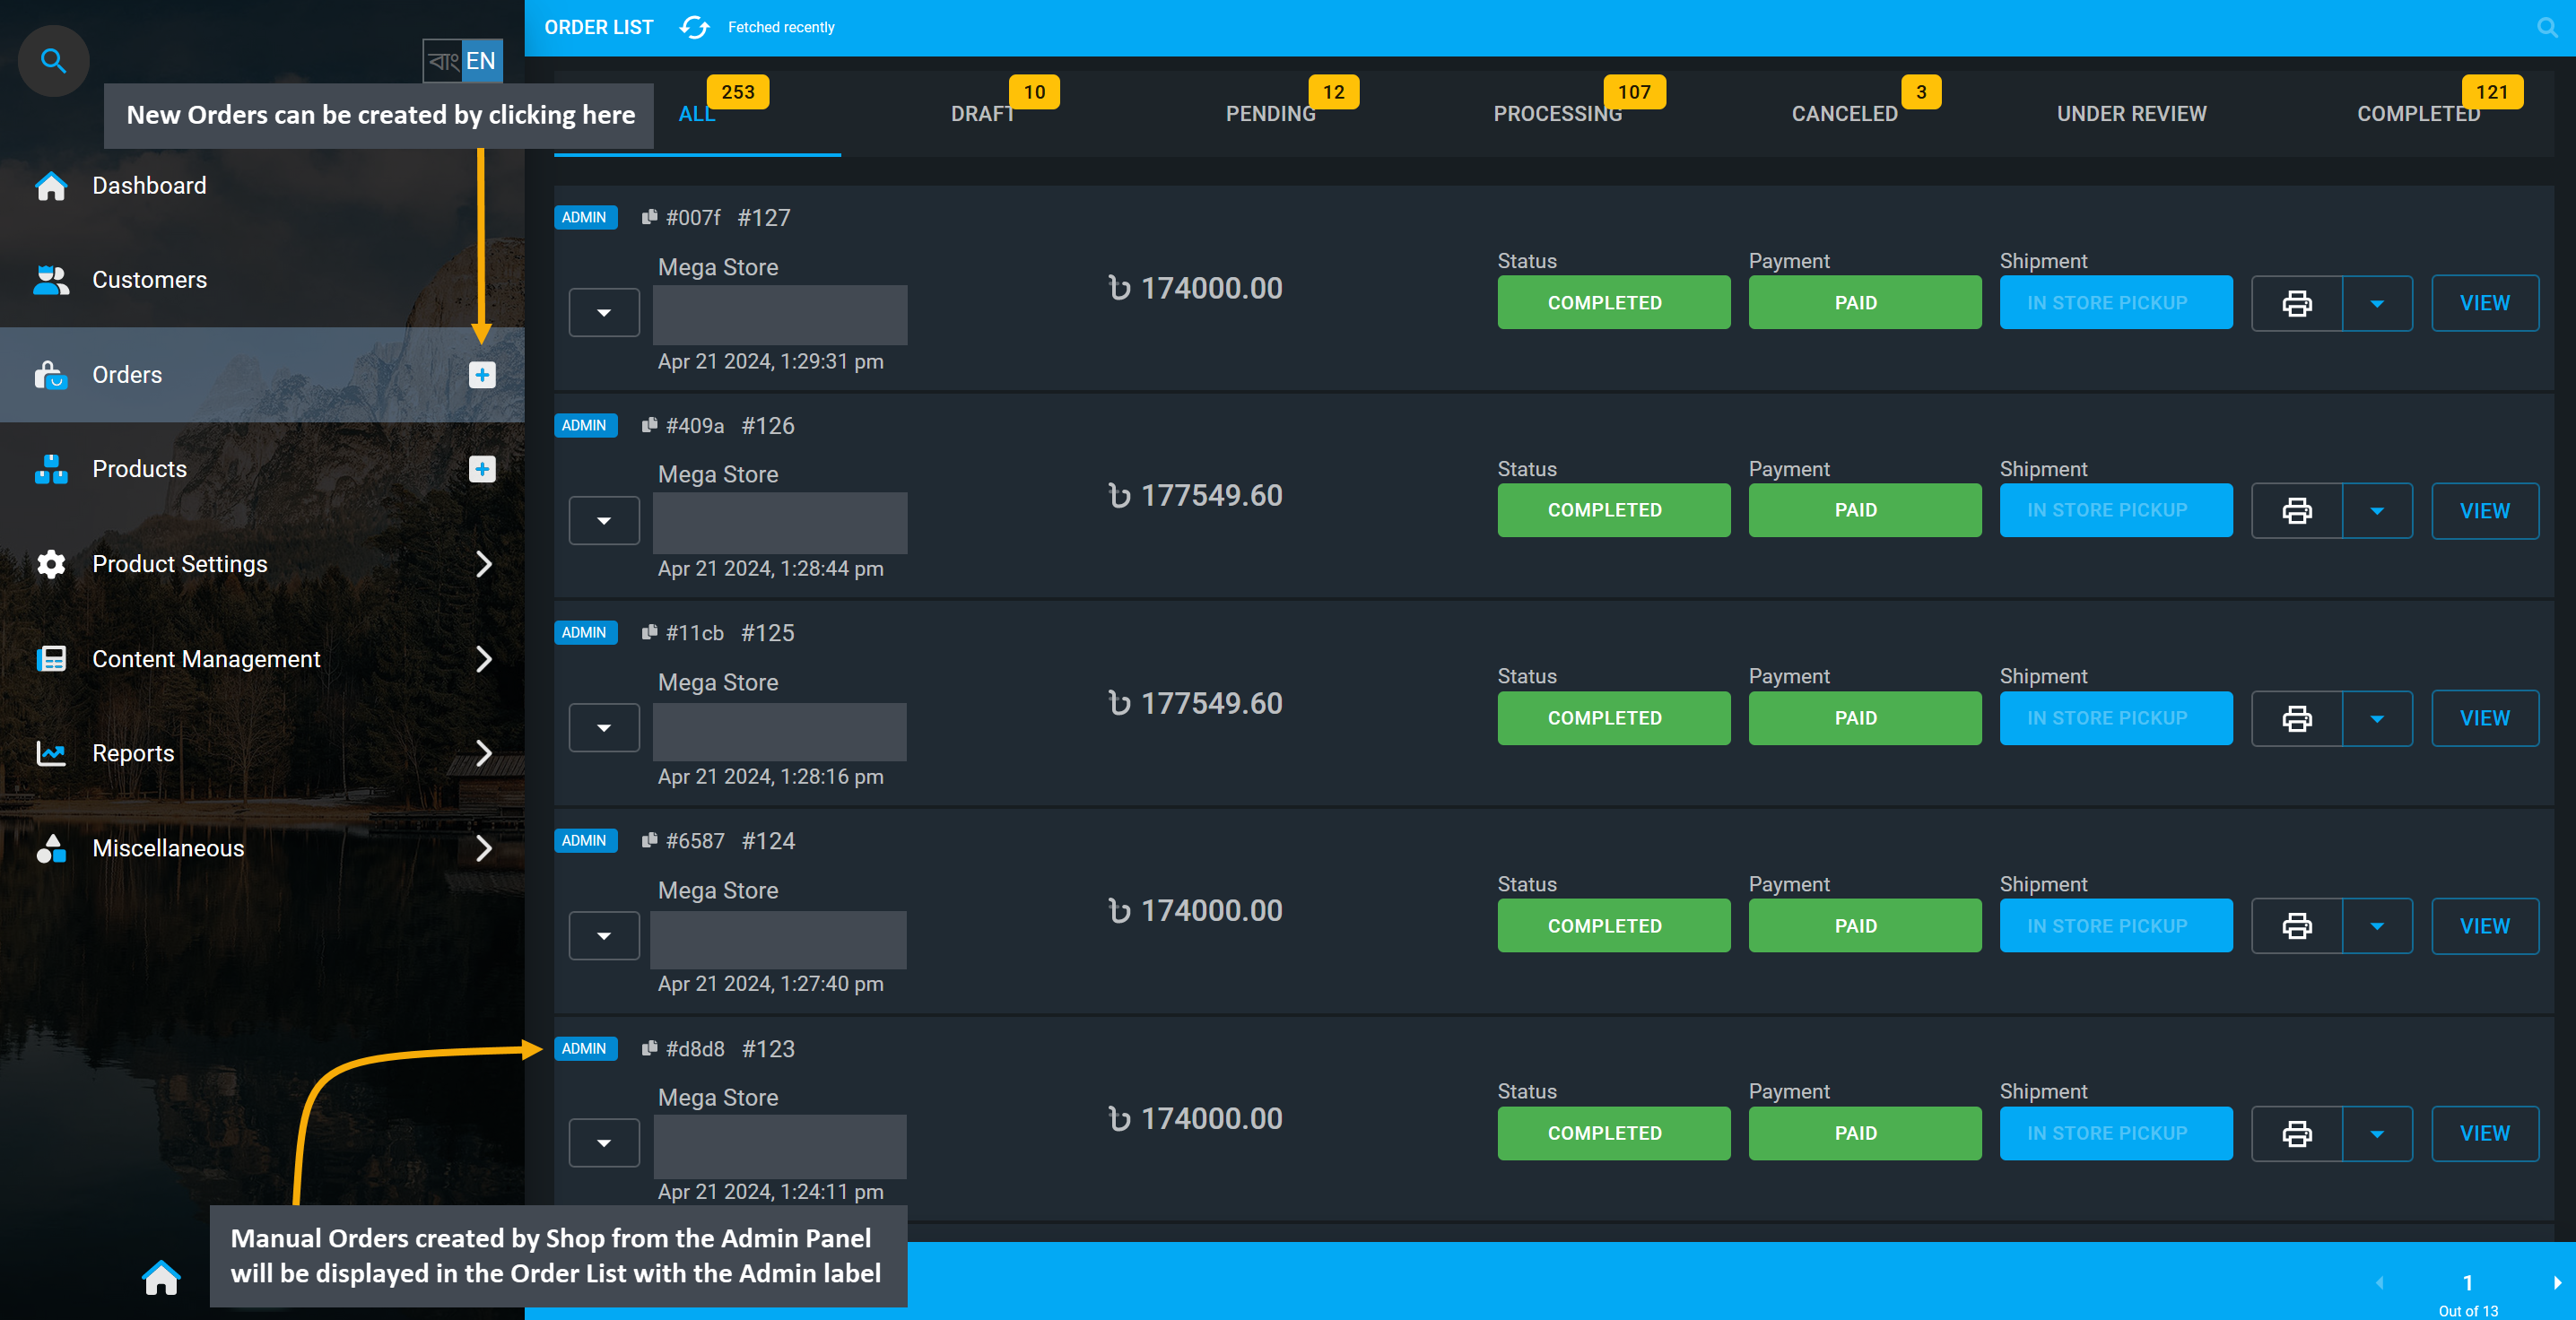
Image 5: Manual Orders created by Shop from the Admin Panel will be displayed with the Admin label.
Create New Order from Admin Panel
New Orders can be created by clicking on the + button on the main Orders tab by the Shop Owner.
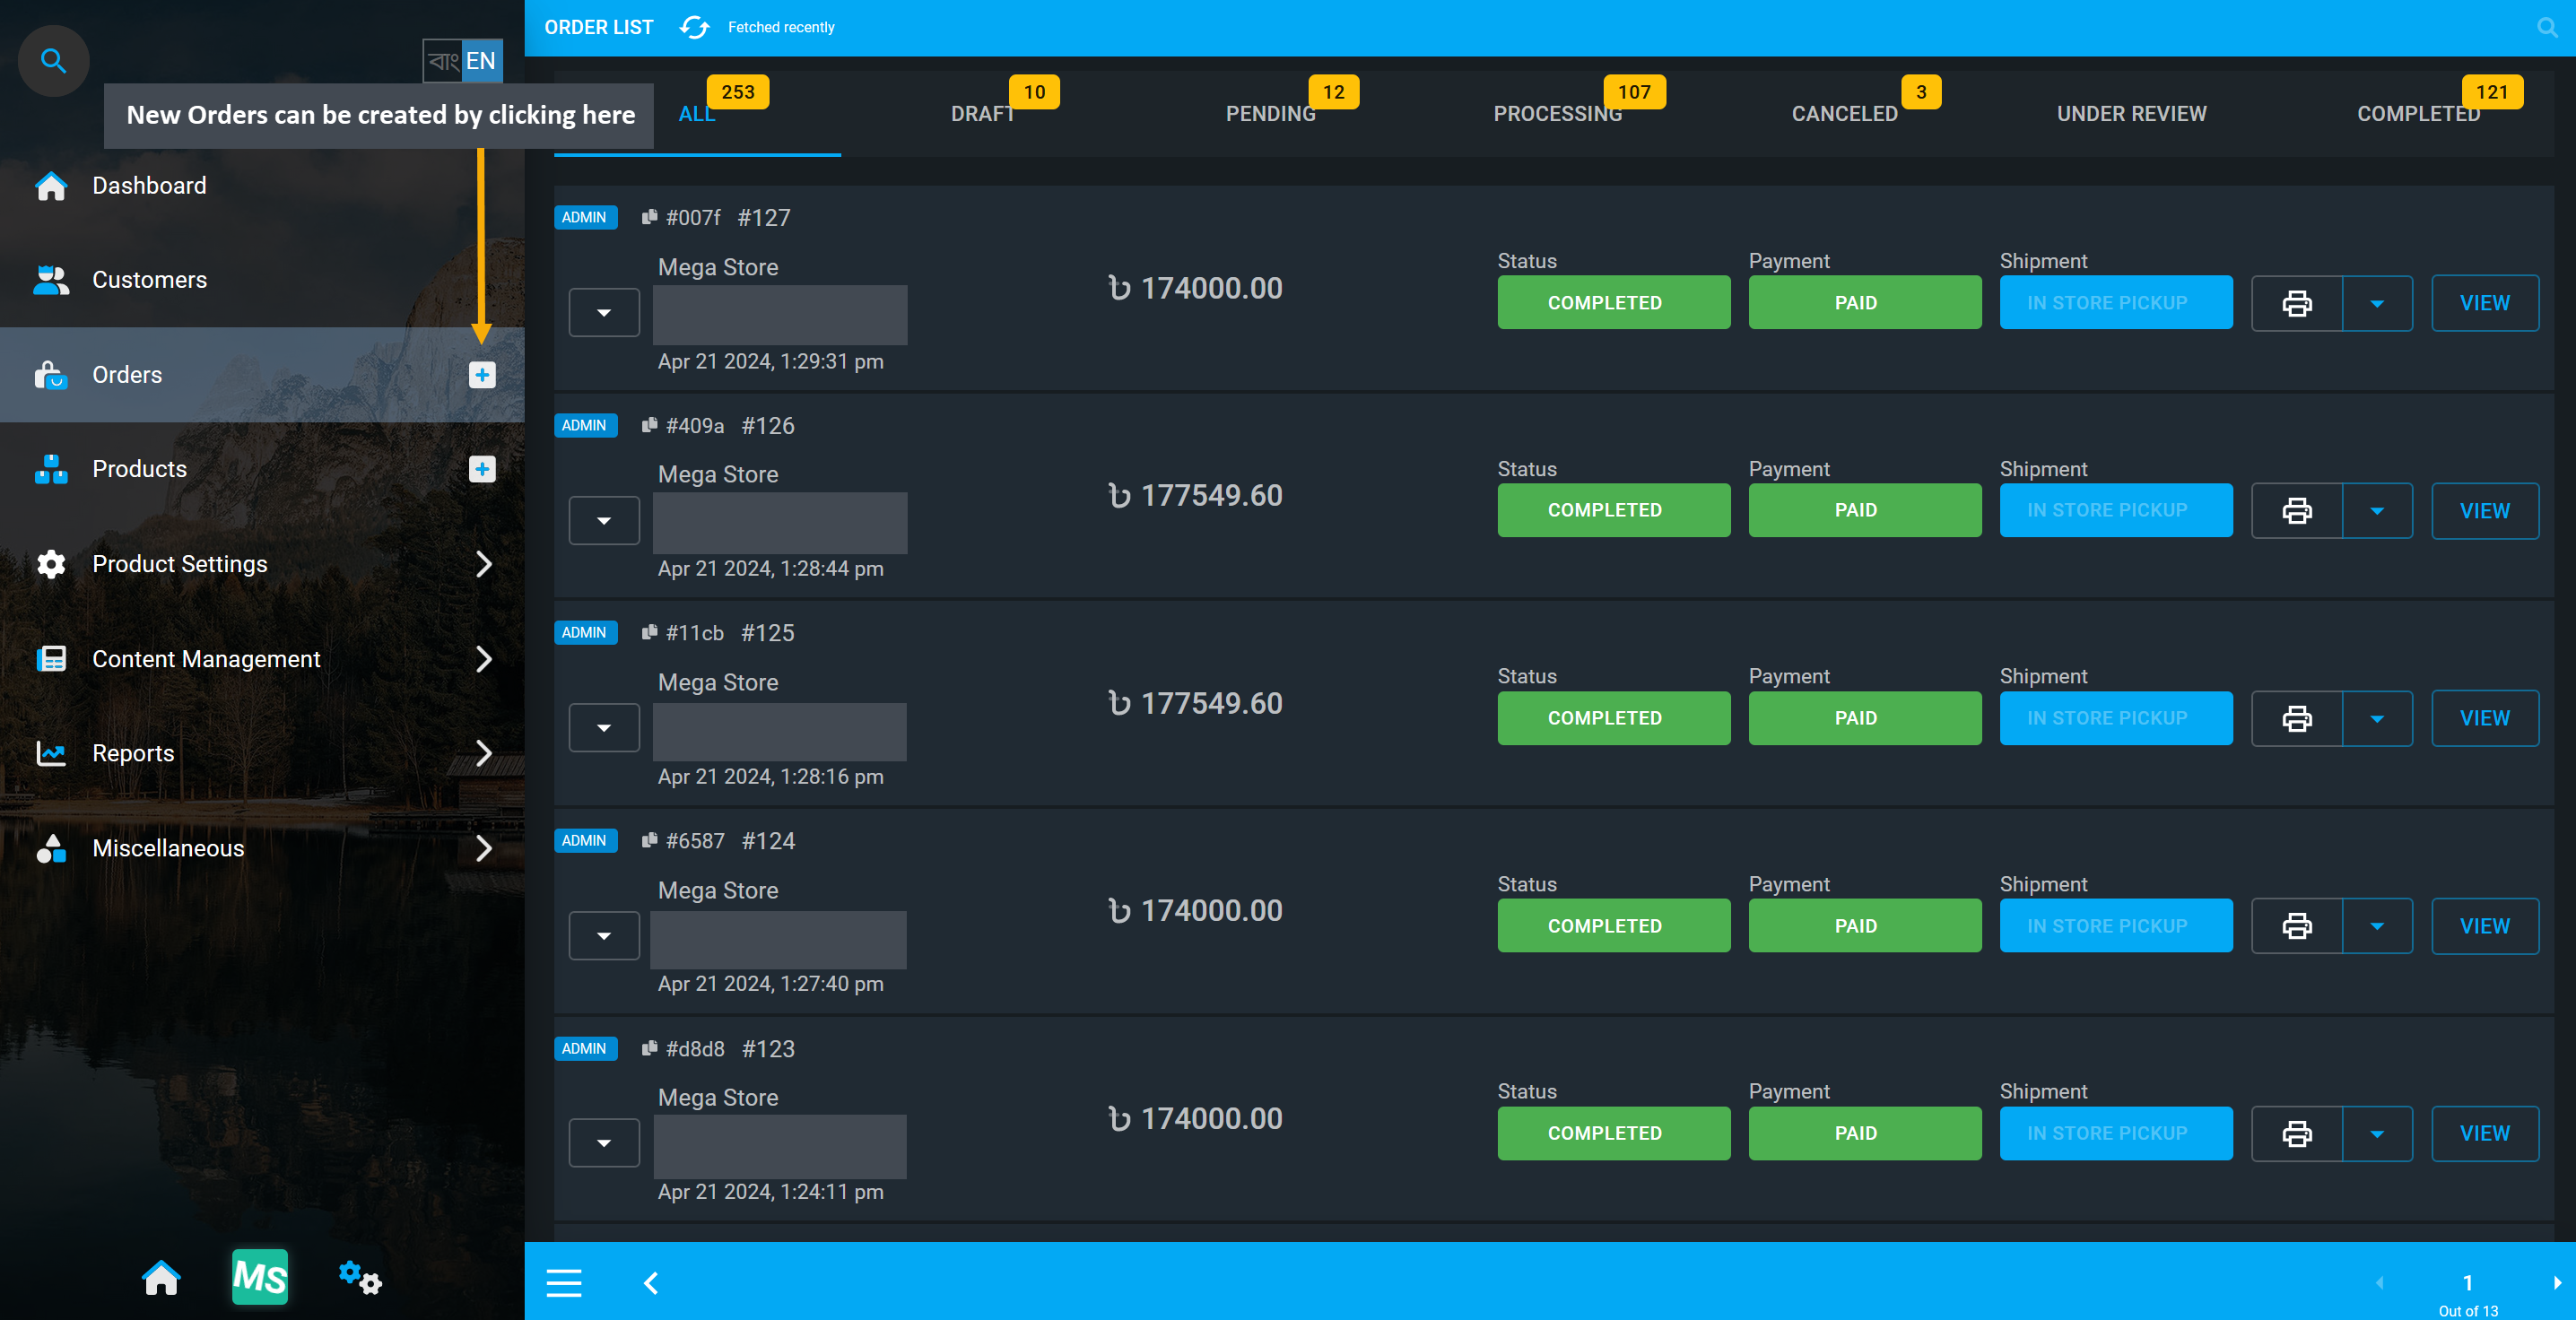
Image 6: Shop Owners can create New Orders by clicking on the + button on the main Orders tab.
The first step towards creating New Order from Admin Panel is to select the Branch and Counter for the Shop. Click Proceed when done. Several Manual Orders can be created for multiple Customers by adding Products to different Carts which can be checked out individually from the Admin Panel at any time.
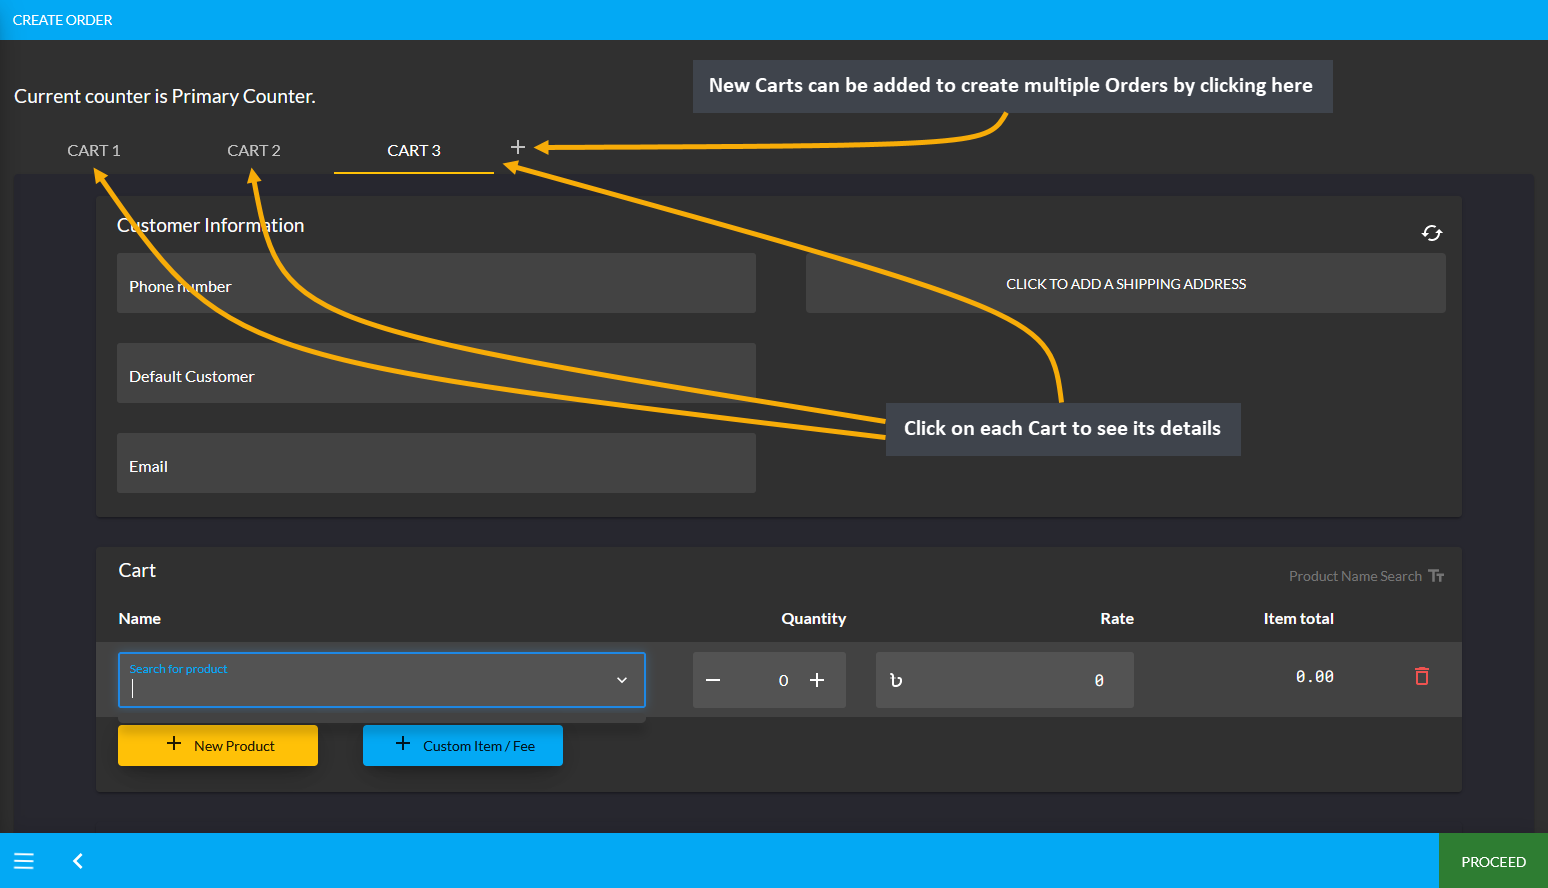
Image 4: Several Orders can be created for multiple Customers by adding Products to different Carts.
On Order Cart, fill in basic Customer information like phone number, name, and email from the Customer Information tab. Then Billing or Shipping Contact which will redirect to a new pop-up to add a new address with the Label (Billing or Shipping), Address, Area, City, Country, and Zip Code. After clicking the Submit button, Shipping Address will be added for Customer. New address can be added by clicking the + button.
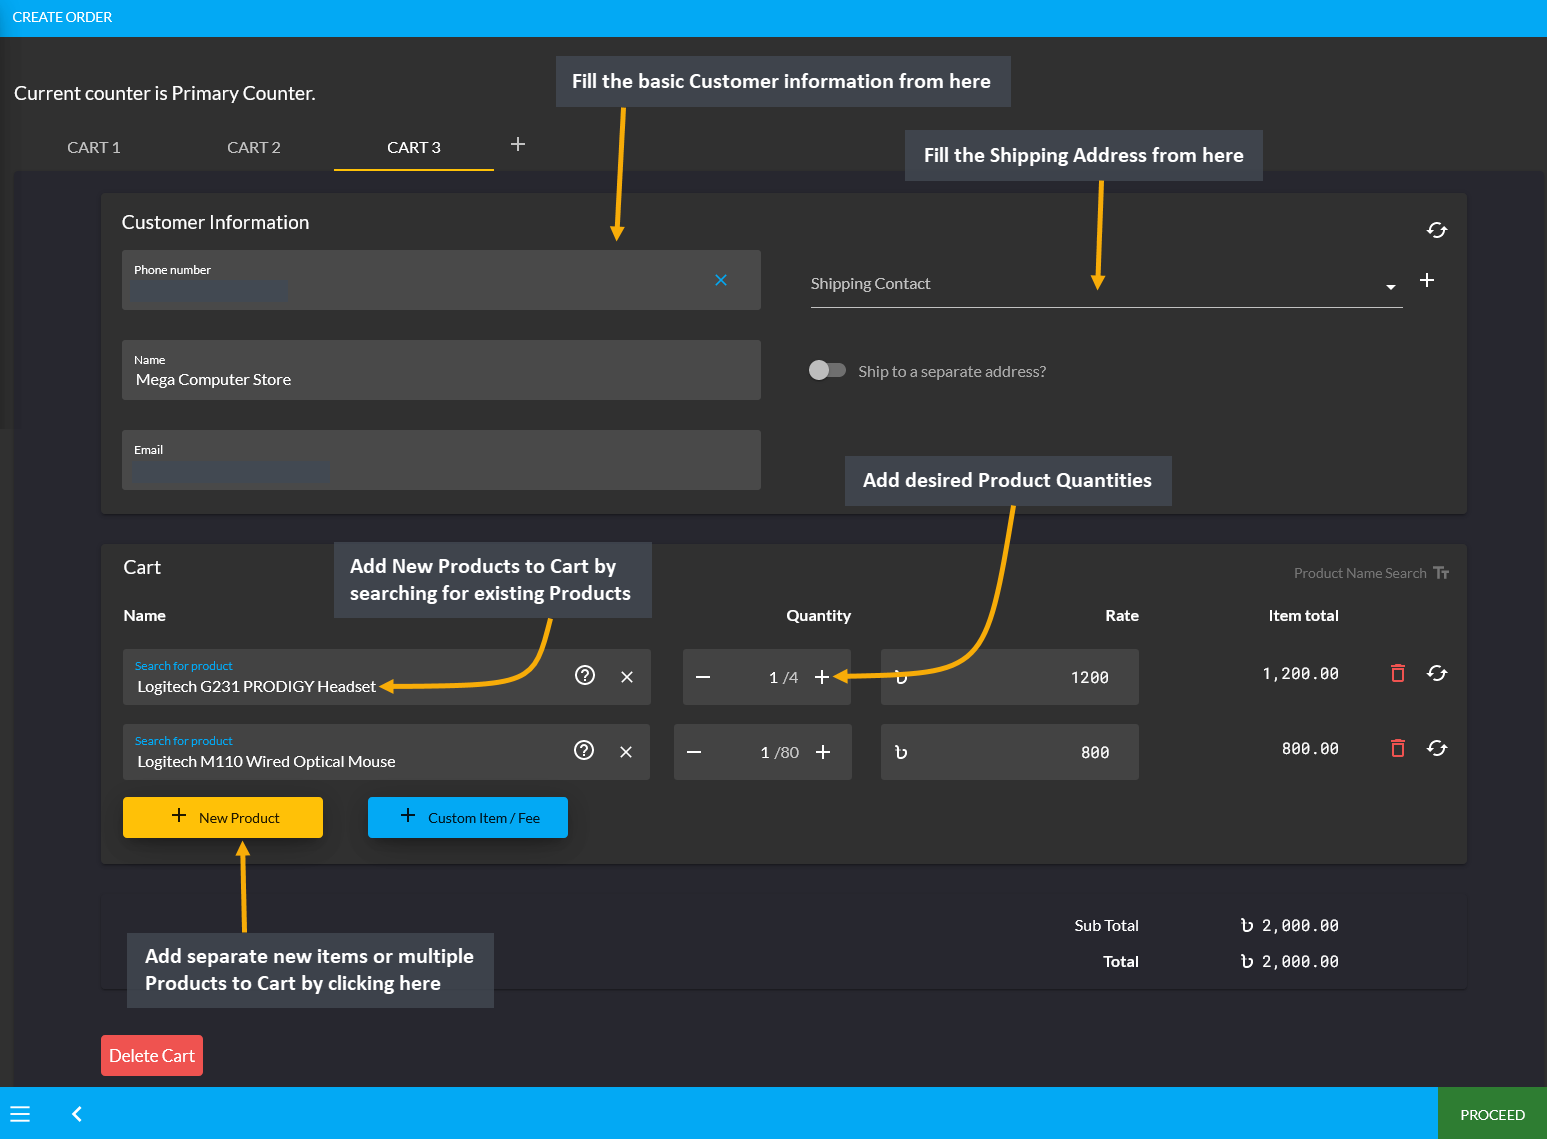
Image 5: Fill out Customer information i.e. phone , name, and email from Customer Information tab.
Add Products to Cart
After confirming the Billing and Shipping address, new Products can be added to the Cart. For this, click the New Product button and a box will appear from which new Product can be added to Cart. Within it, search for existing Products from the Product List and add desired quantities that will automatically calculate the item total. To add multiple Products, click New Product that will add a separate new item to cart each time.
There is a separate option to add Custom Products to Cart that are not on general Product list. For this, click the Custom Item/ Fee button that will let you add Custom Products to Cart which are unavailable on existing product list. Clicking this button will create a new line item box to add a full Custom Product that needs to be added to Cart instantly like laptop screen repair, laptop keyboard repair, audio, or network cable etc.
To add multiple Custom Products, click the Custom Item/ Fee button with desired quantities and rate/ fees. Use Delete Cart button to delete any Cart among multiple carts already opened. Click the Bin Icon to delete Products from the Cart. When cart is fully ready, click Proceed to continue to the next step.
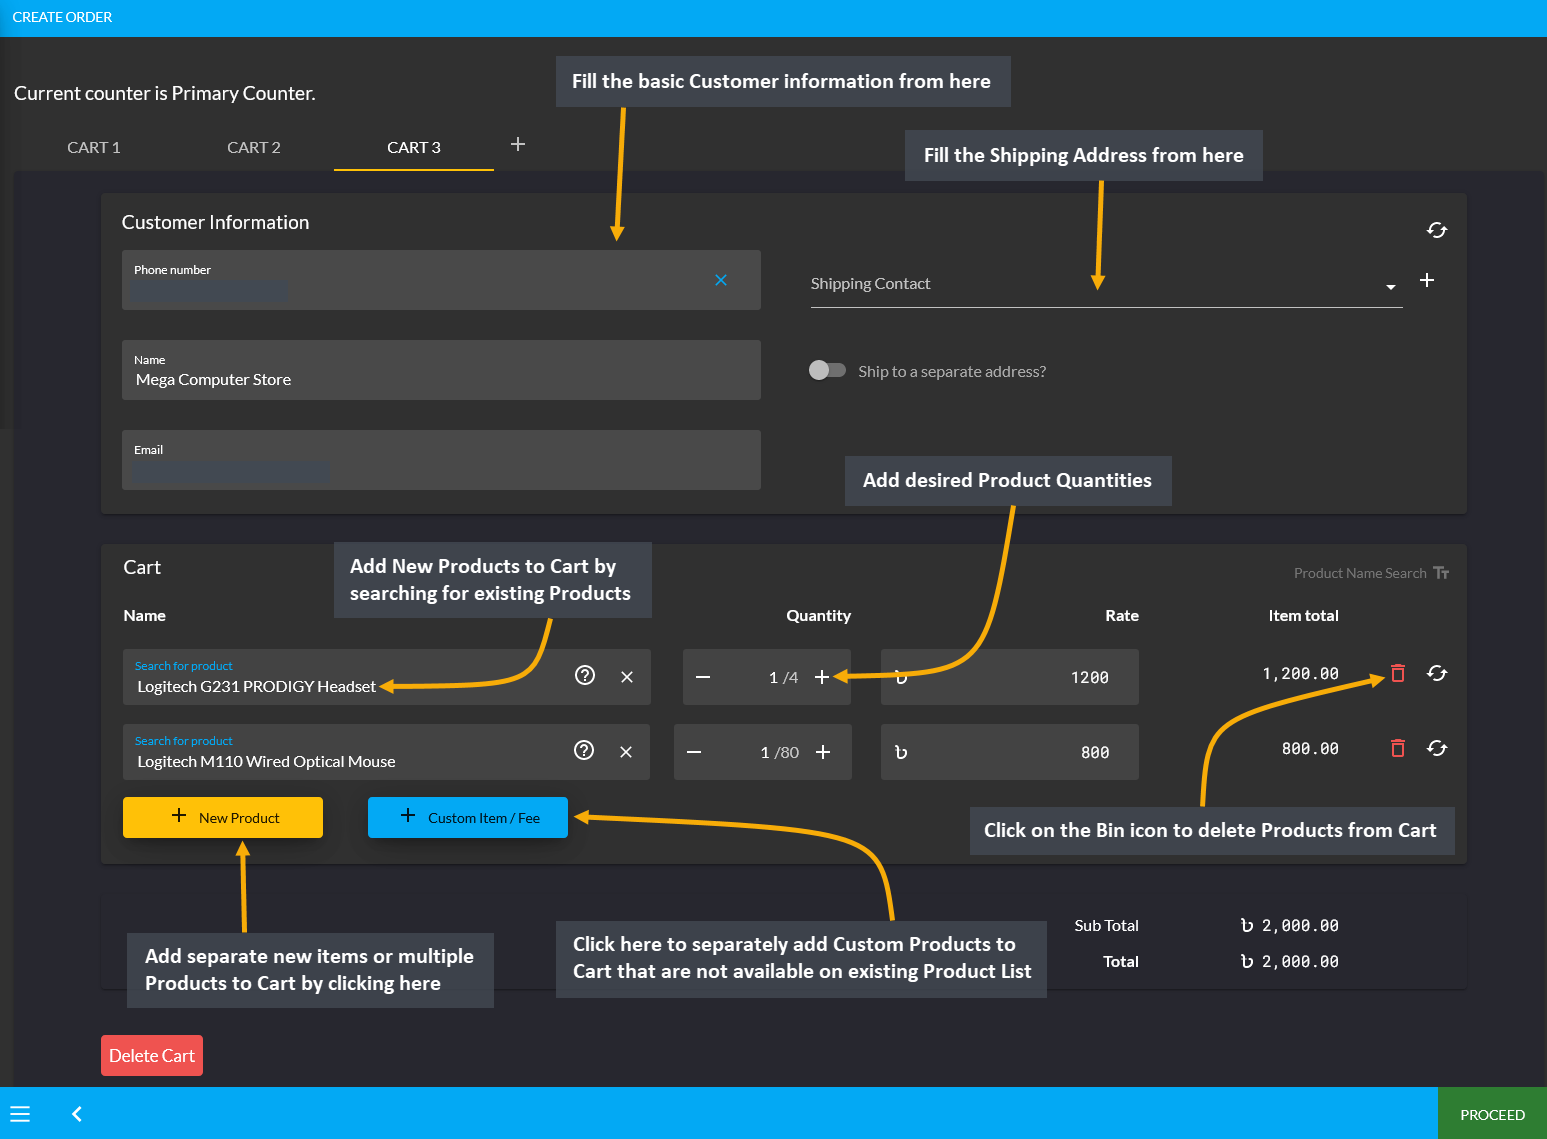
Image 6: Add Multiple Products or add Custom Products to Cart with desired quantities and rates.
Select Shipment and Payment Options
In the next page, review the Cart, and select Shipment and Payment options. To make any change, click the Click here to Deselect button. If all the information is correct, click Confirm Order that will redirect to a new page stating that the Order has been confirmed. From here, you can choose to Print Invoice or Close Tab.
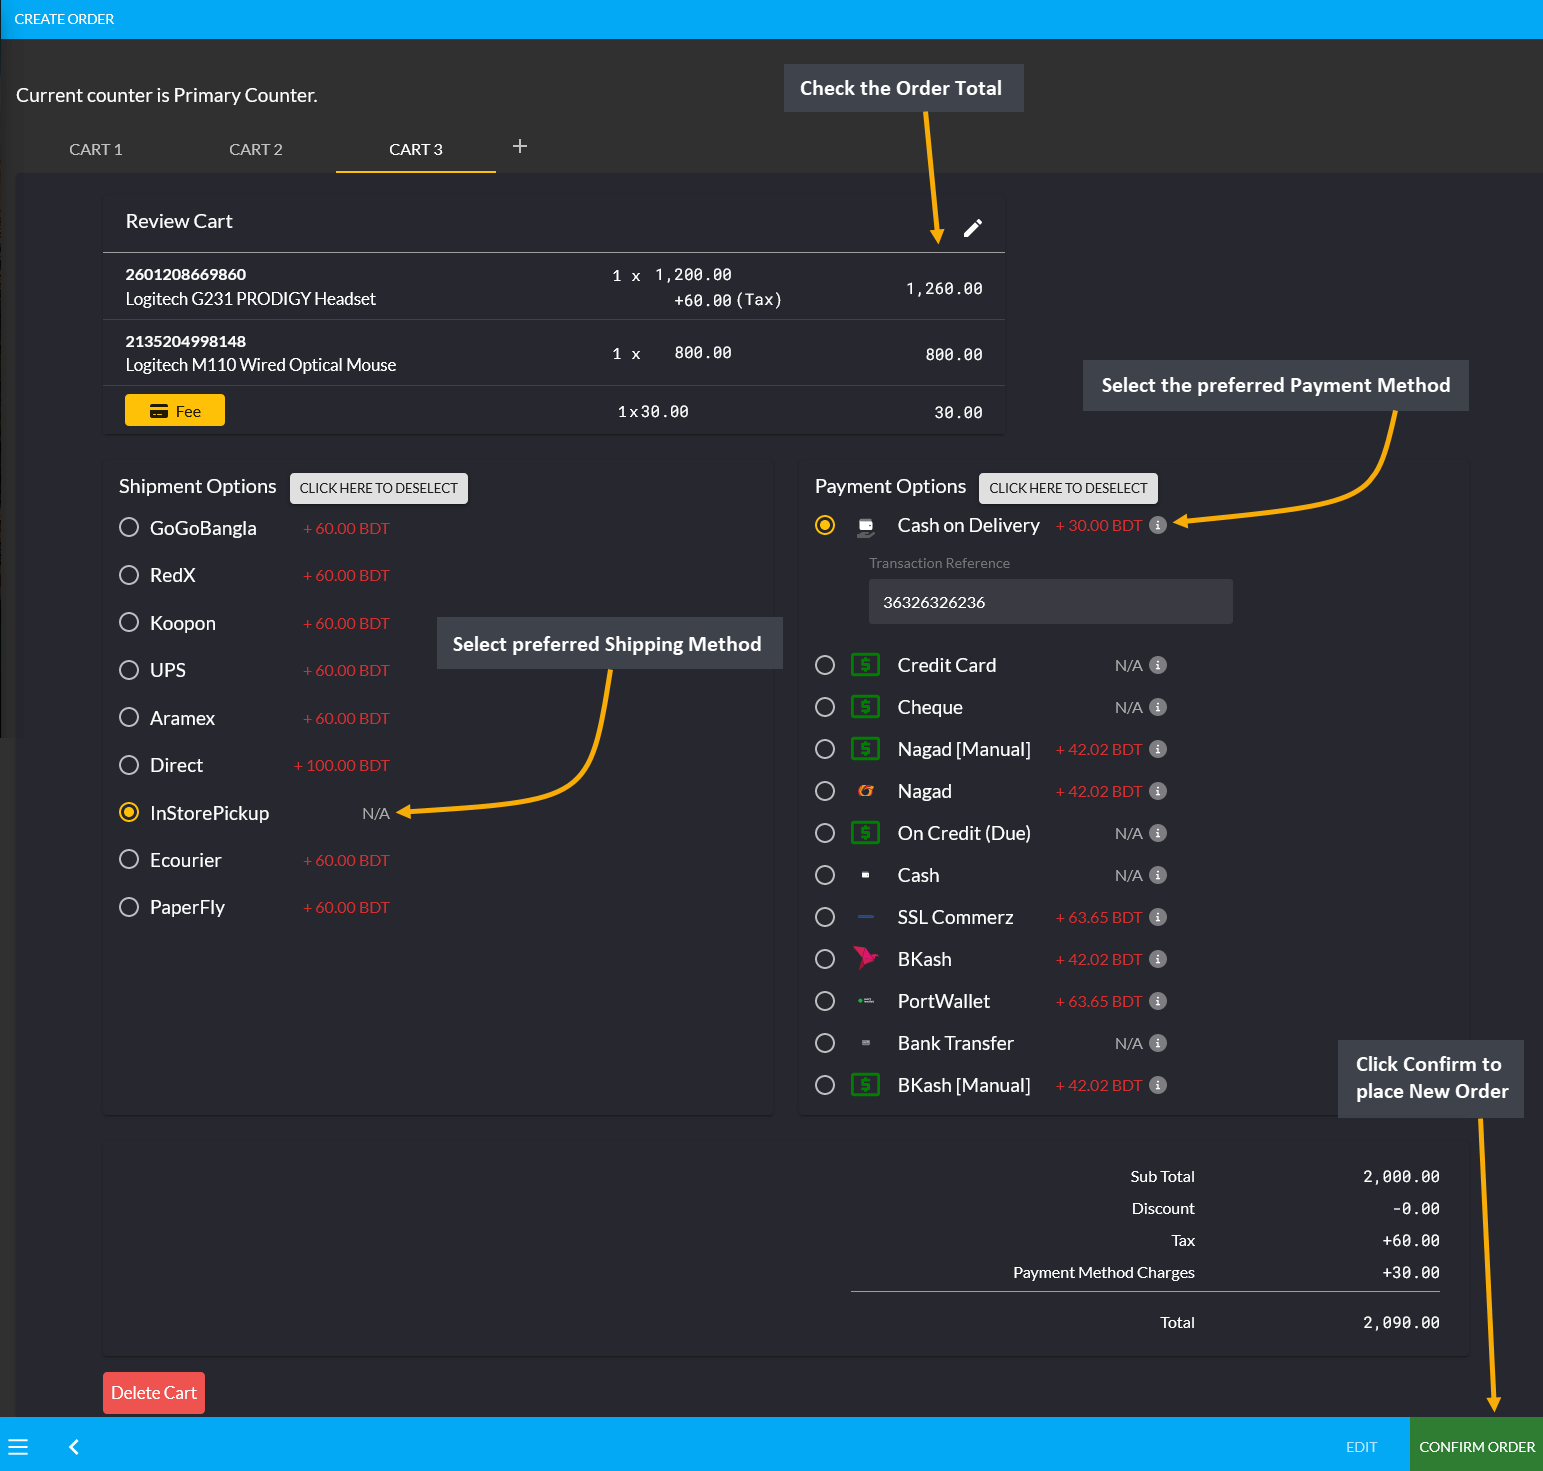
Image 7: Review Cart, select Shipment and Payment options, and click Confirm Order to place Order.
Print Invoice
After Order is placed, go to Order List from where Order Invoice can be printed clicking the Print icon that will open full view invoice with Order details and Payment information to print. Set Printer, Pages, Layout, and Colors from the print settings as needed. Then, click Print button to print copies of the Order Invoice.
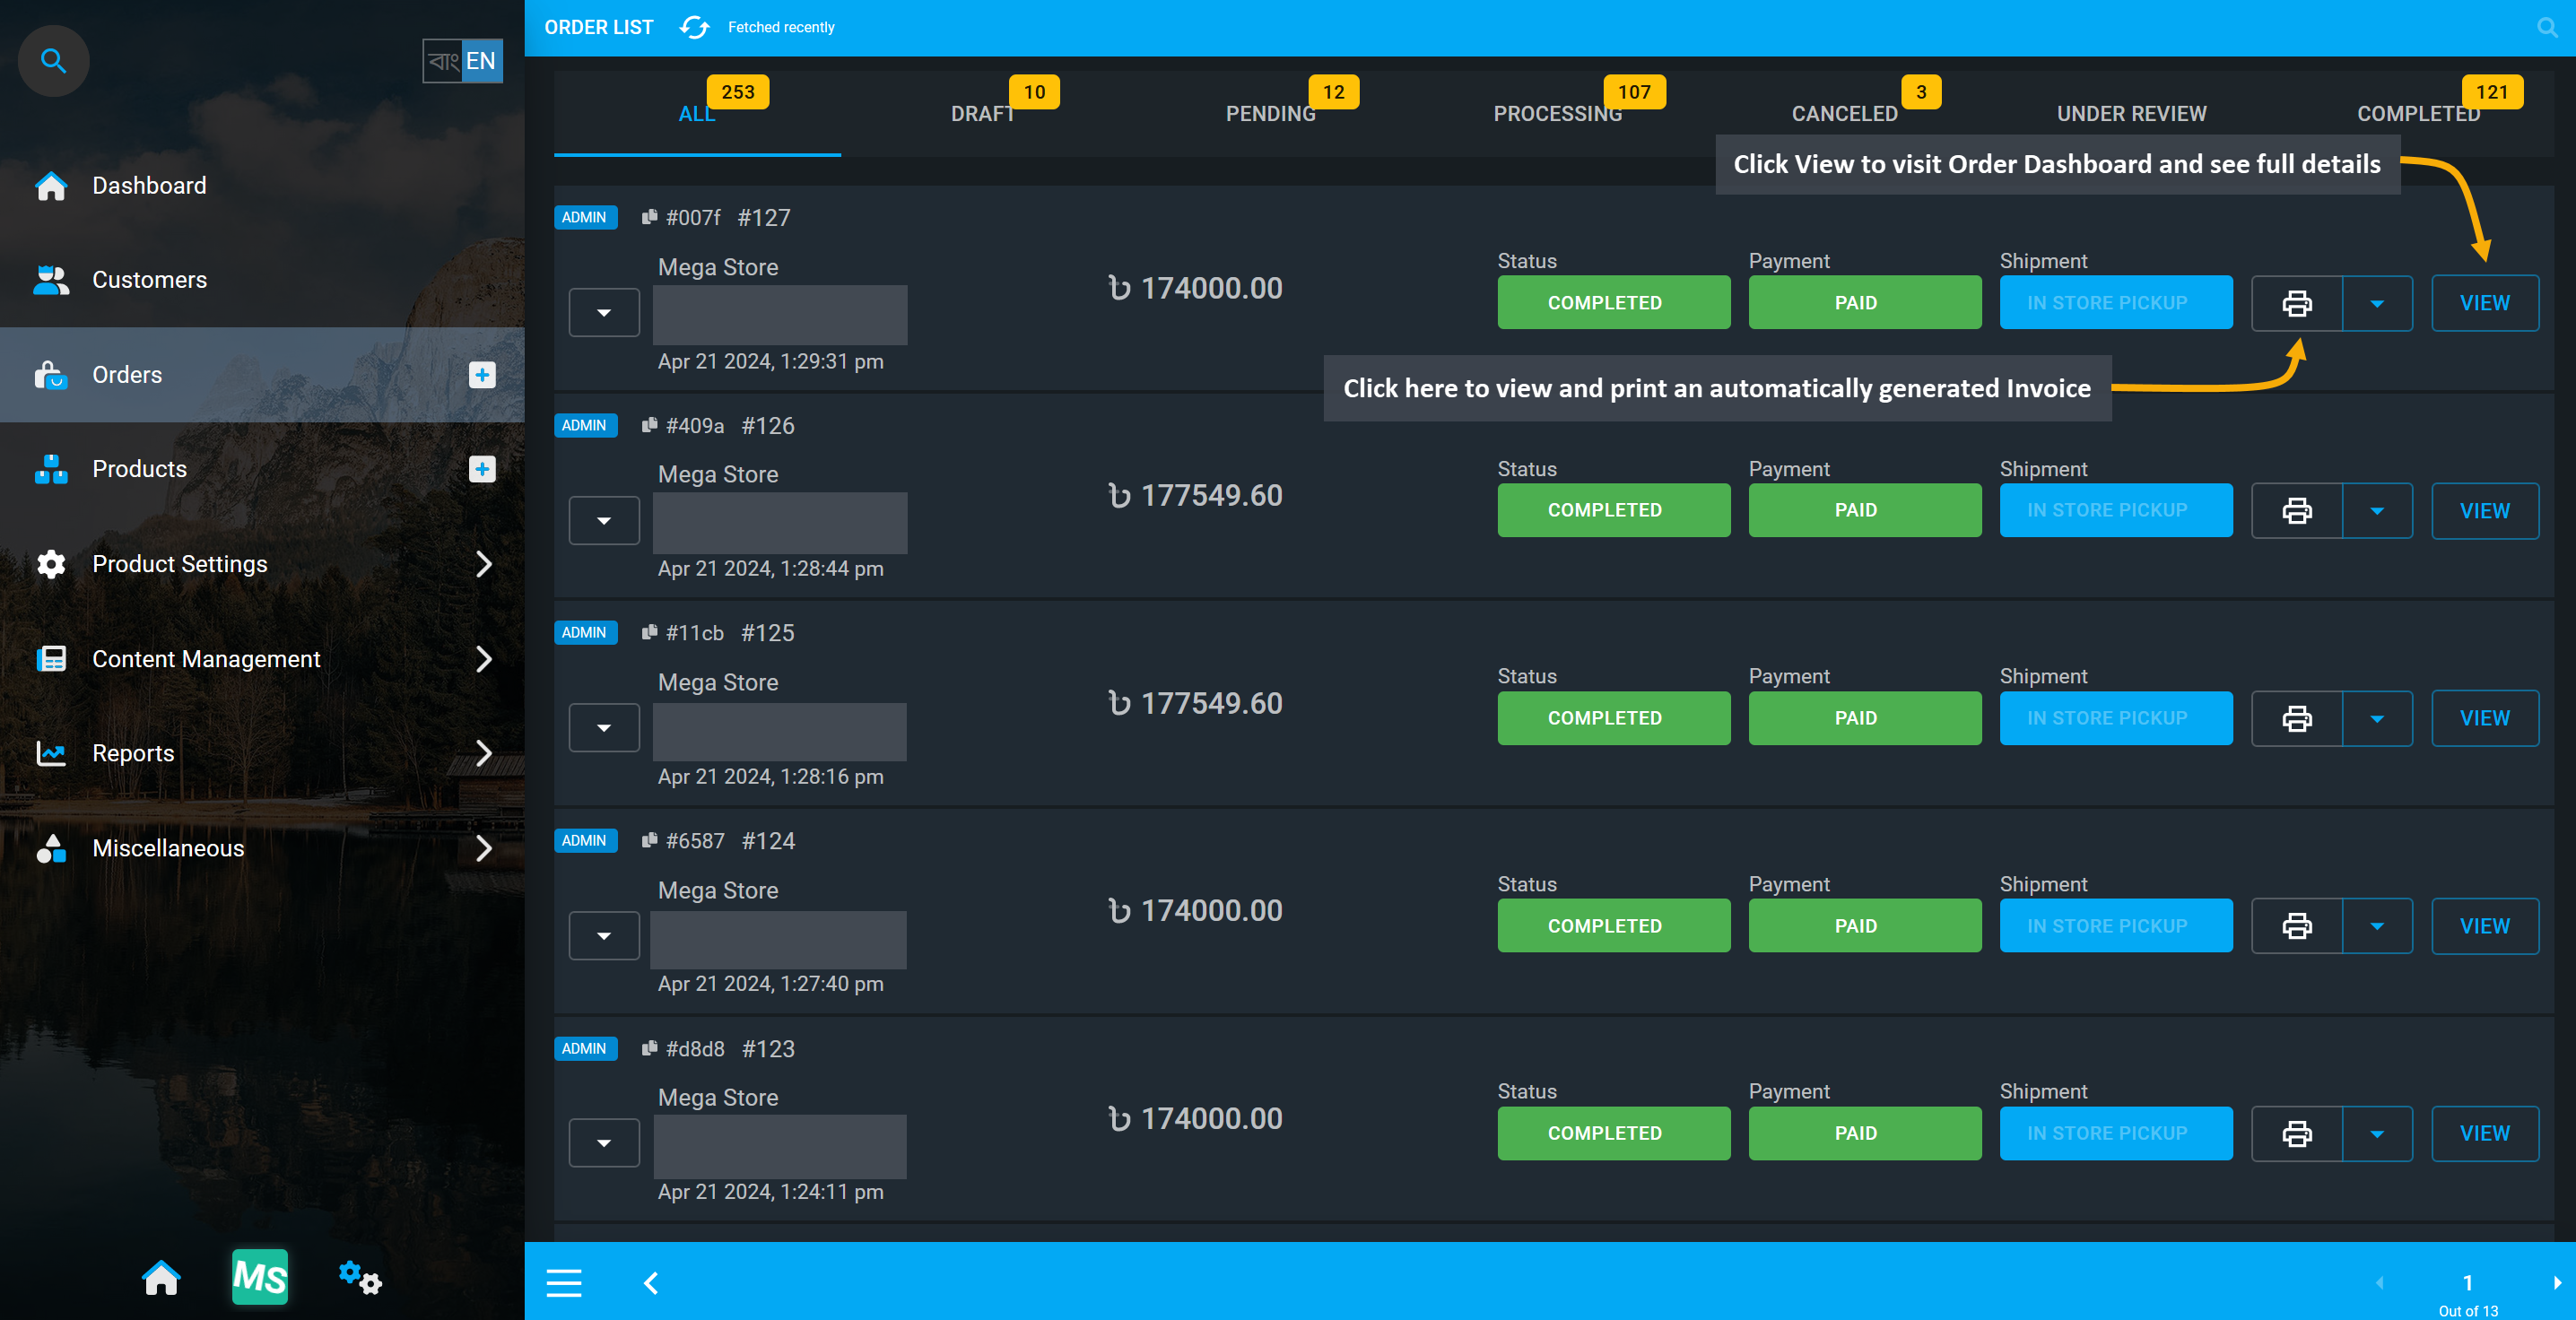
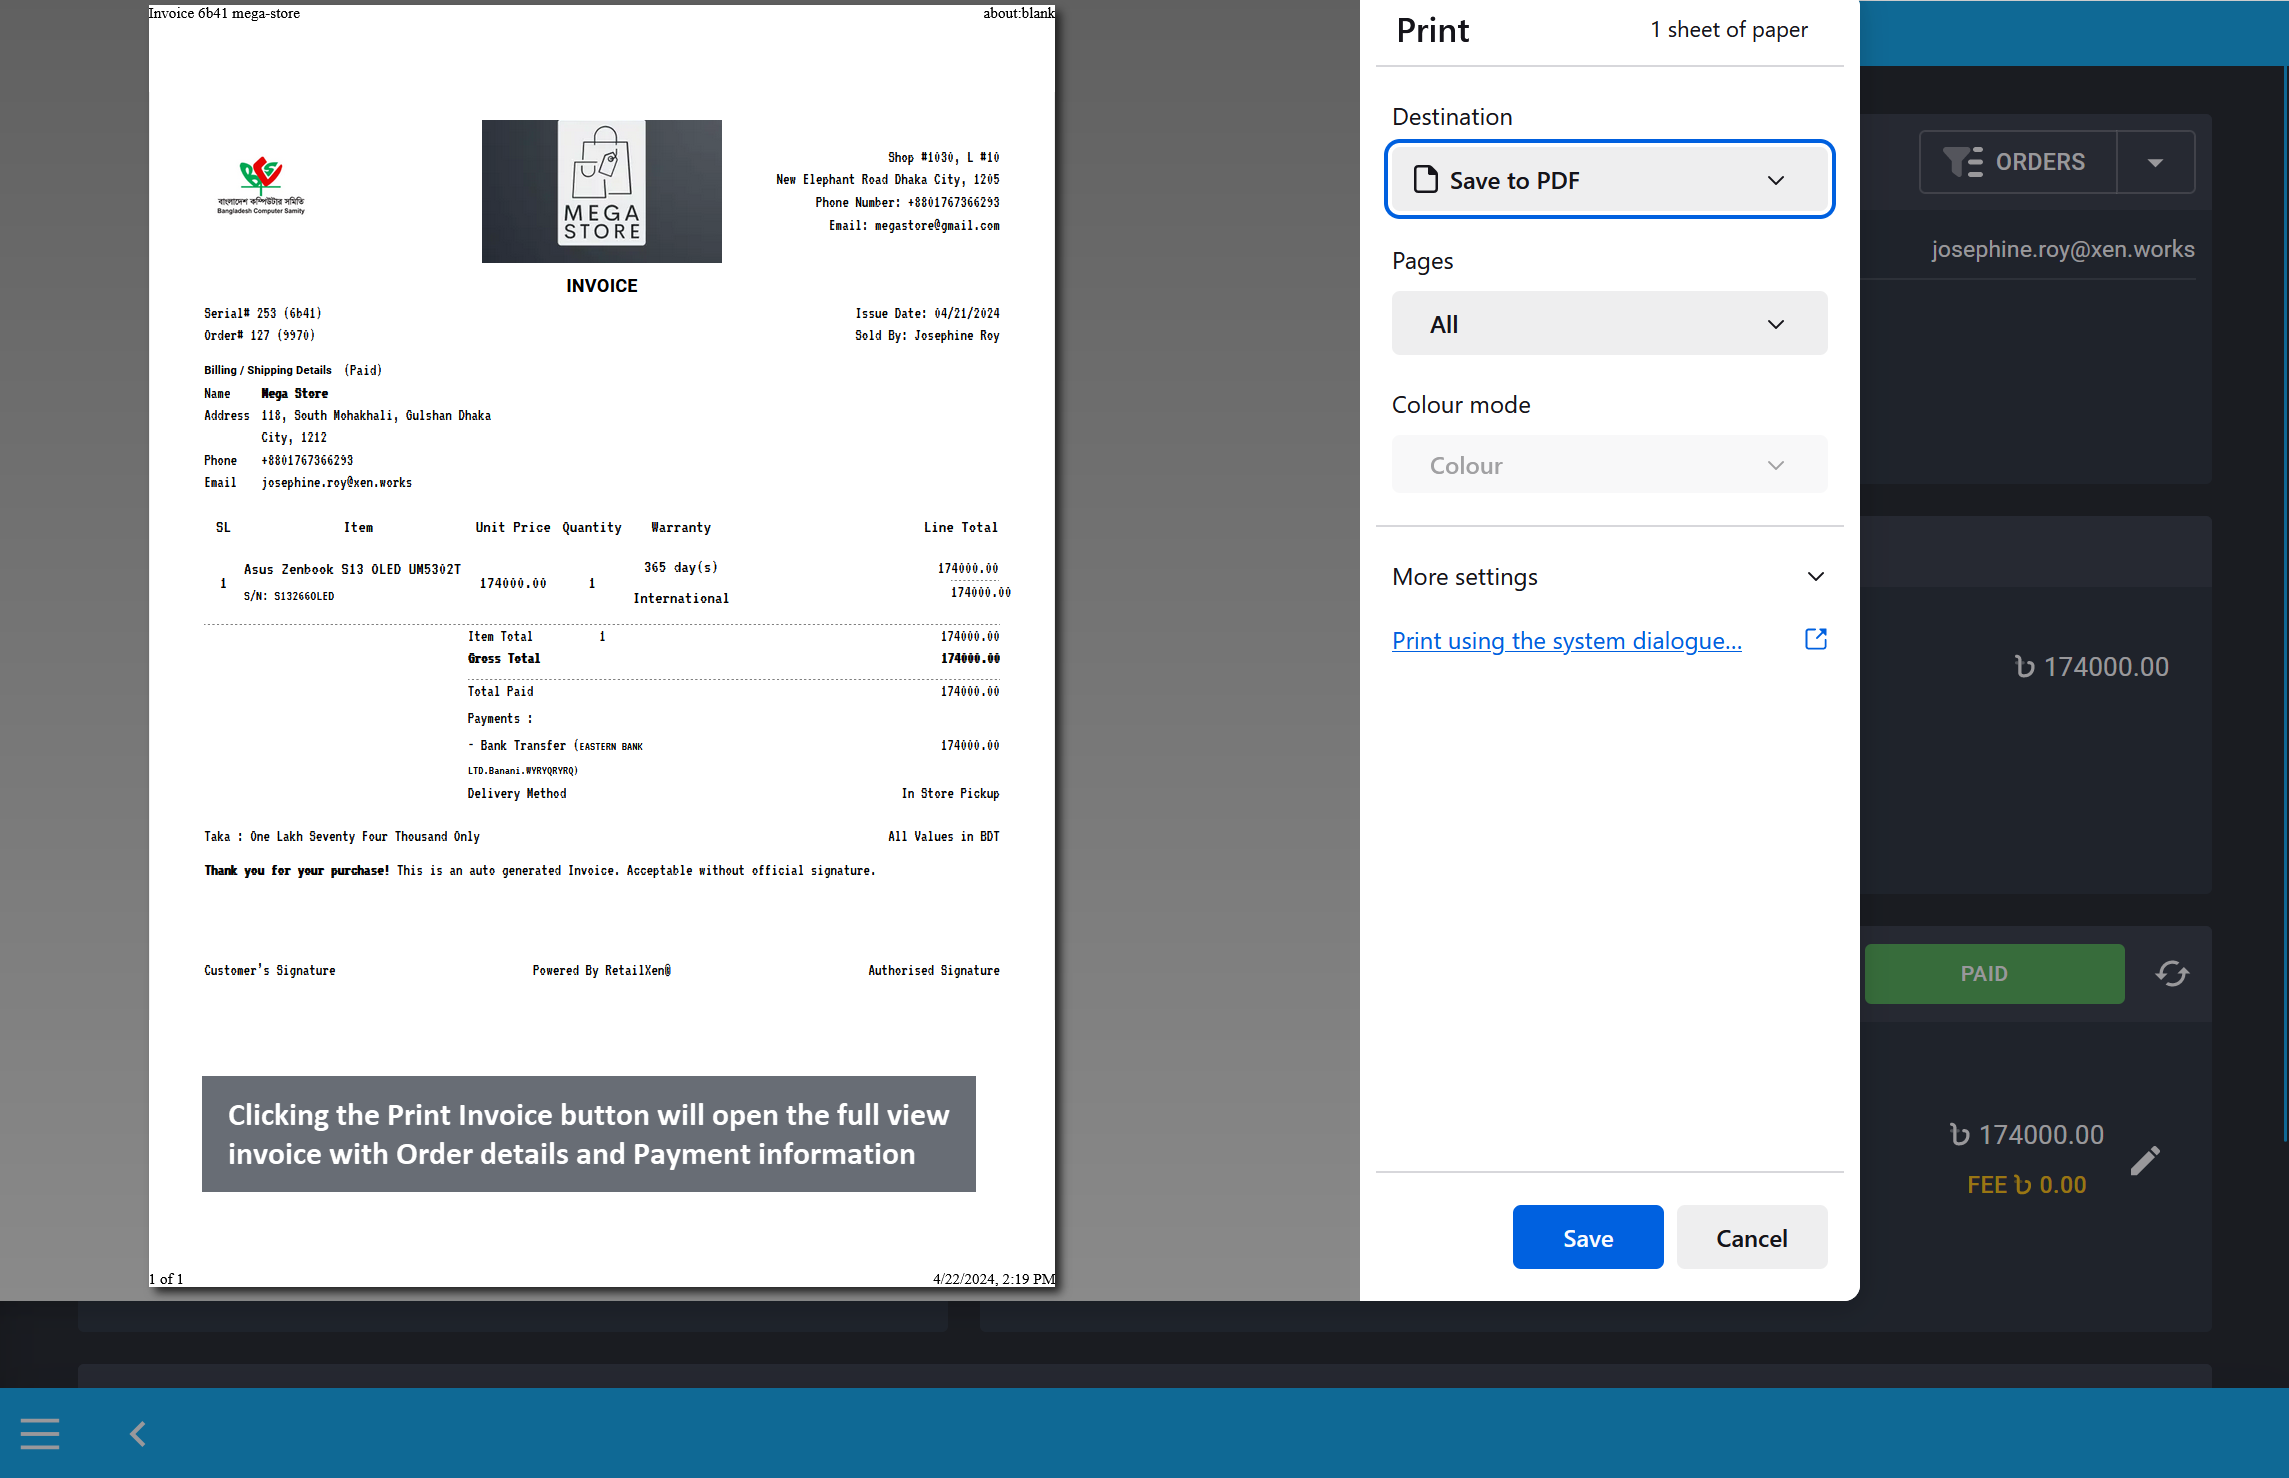
Image 8: Clicking the Print Invoice button will open the full view invoice with full Order details.
Order Invoice can also be viewed and printed from the Order Dashboard. Full Order details including Order total, Customer information, line item, payment, and shipment details will be displayed on the dashboard.
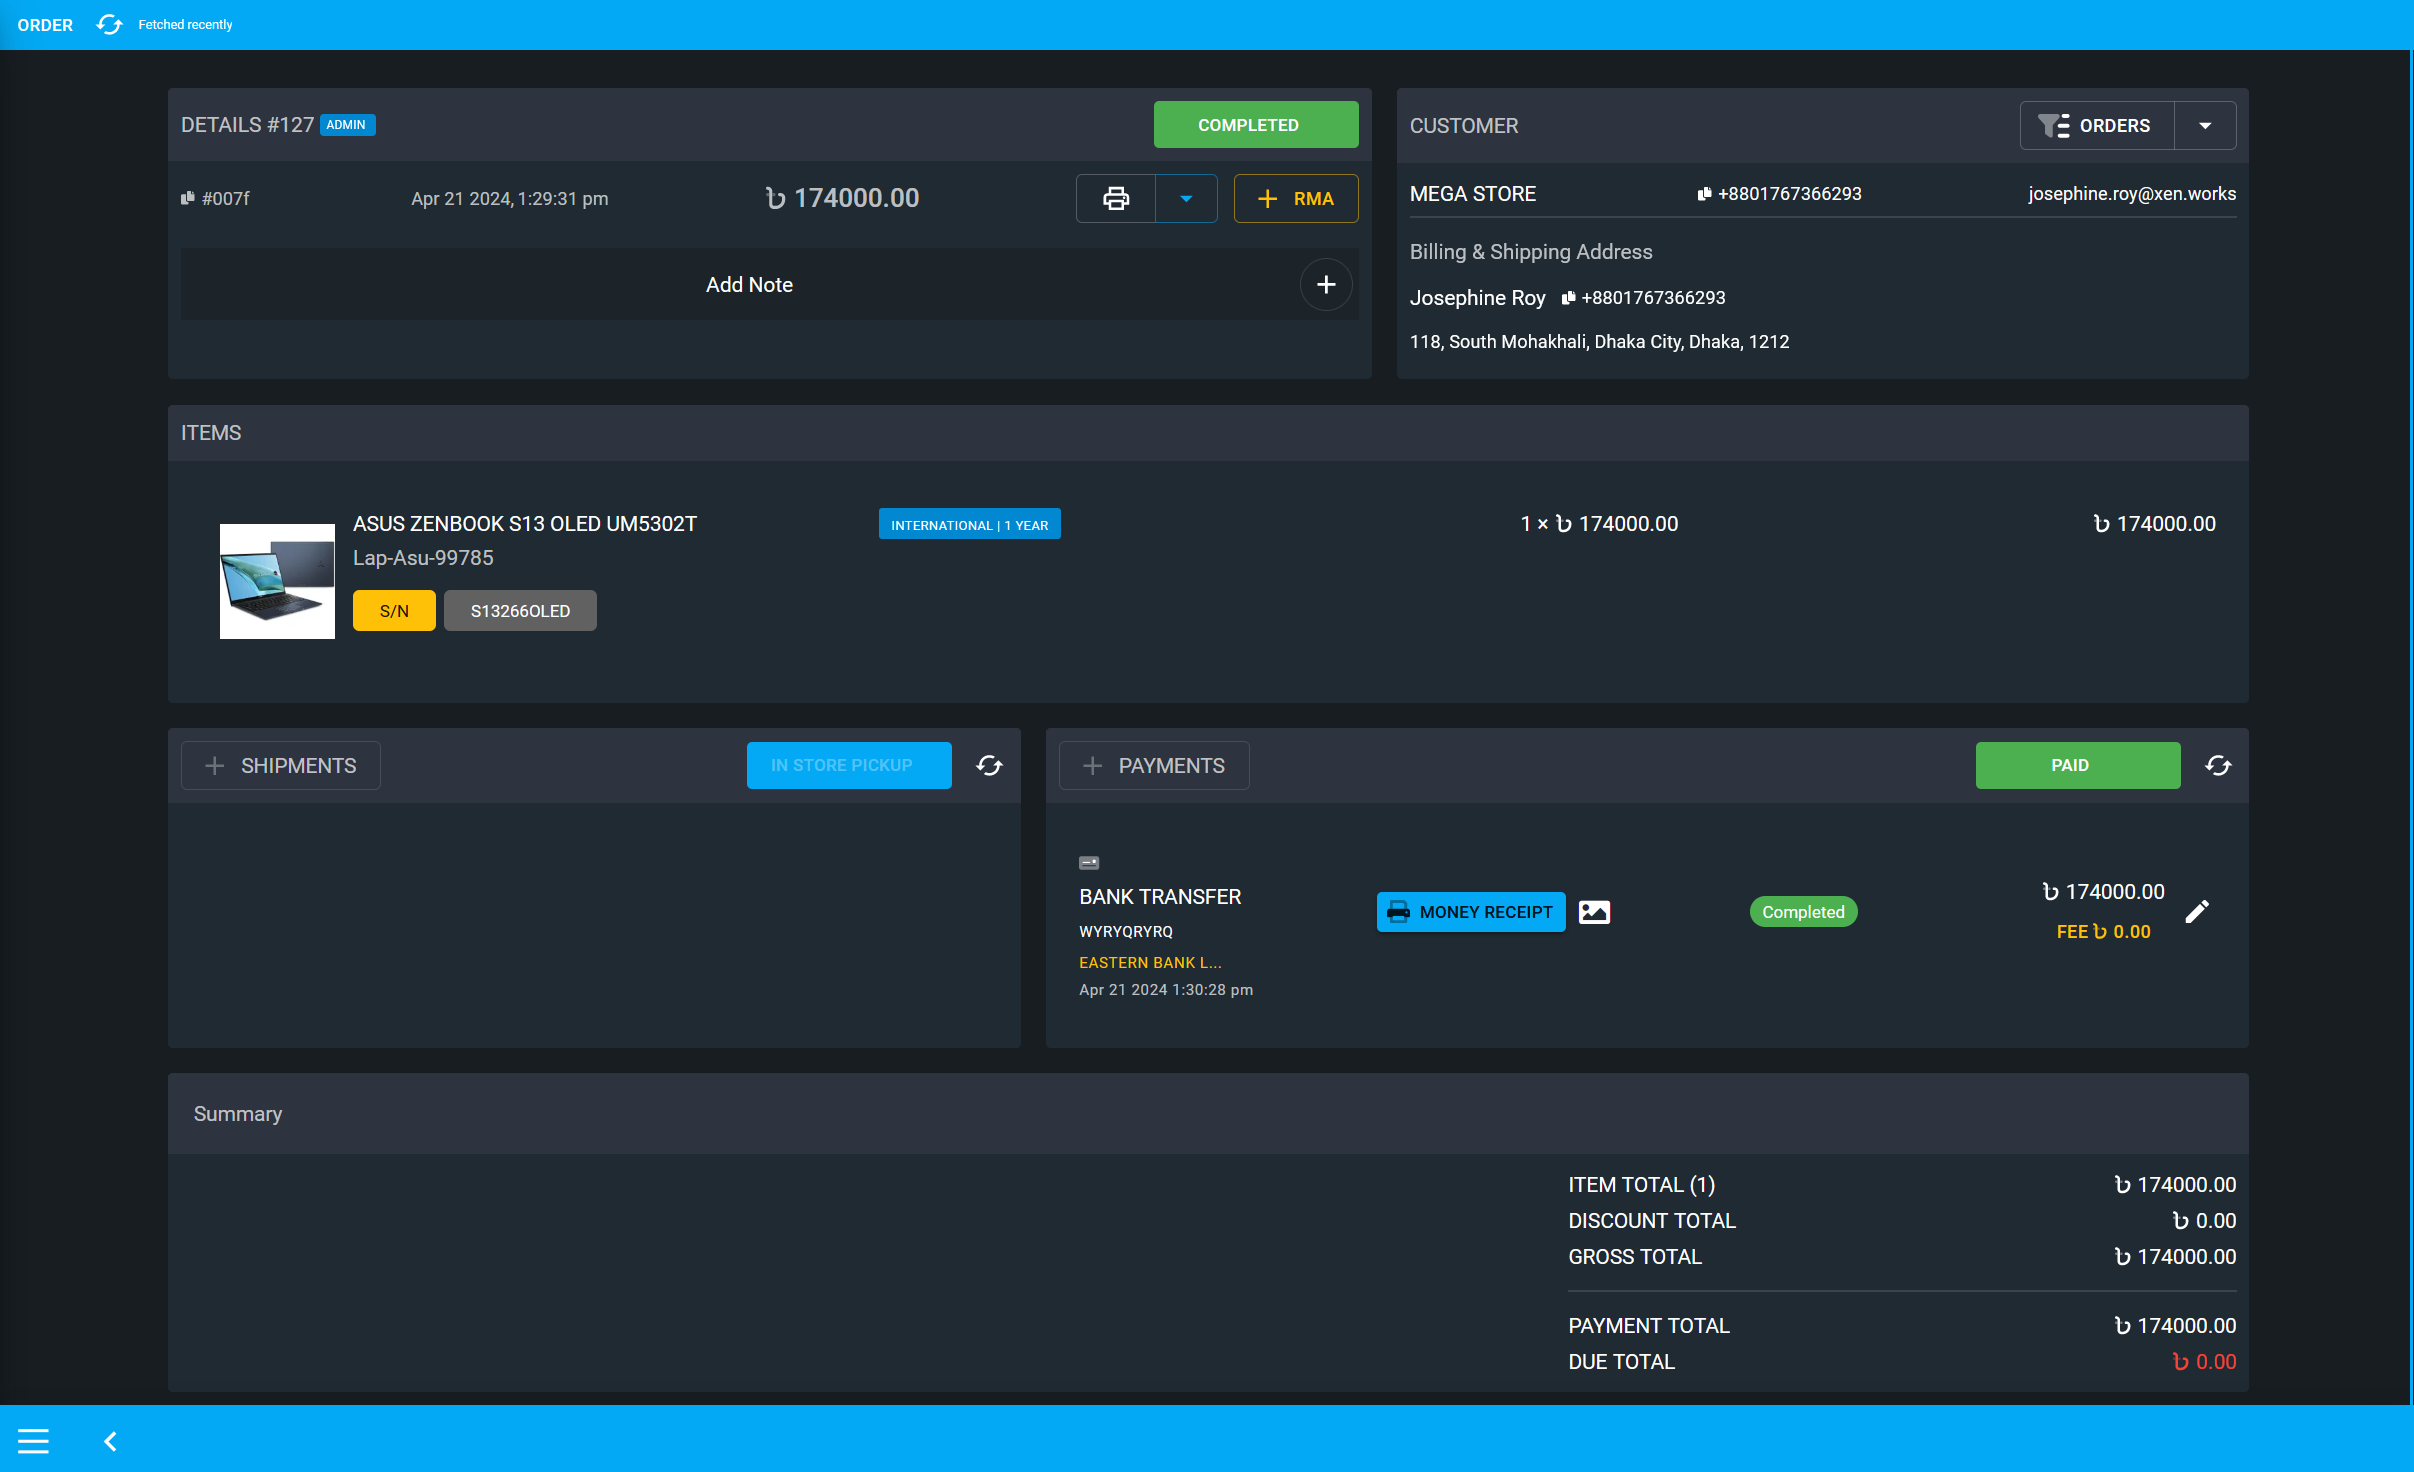
Image 9: Order Dashboard will have full view of Order total, Customer, Payment, and Shipment details.
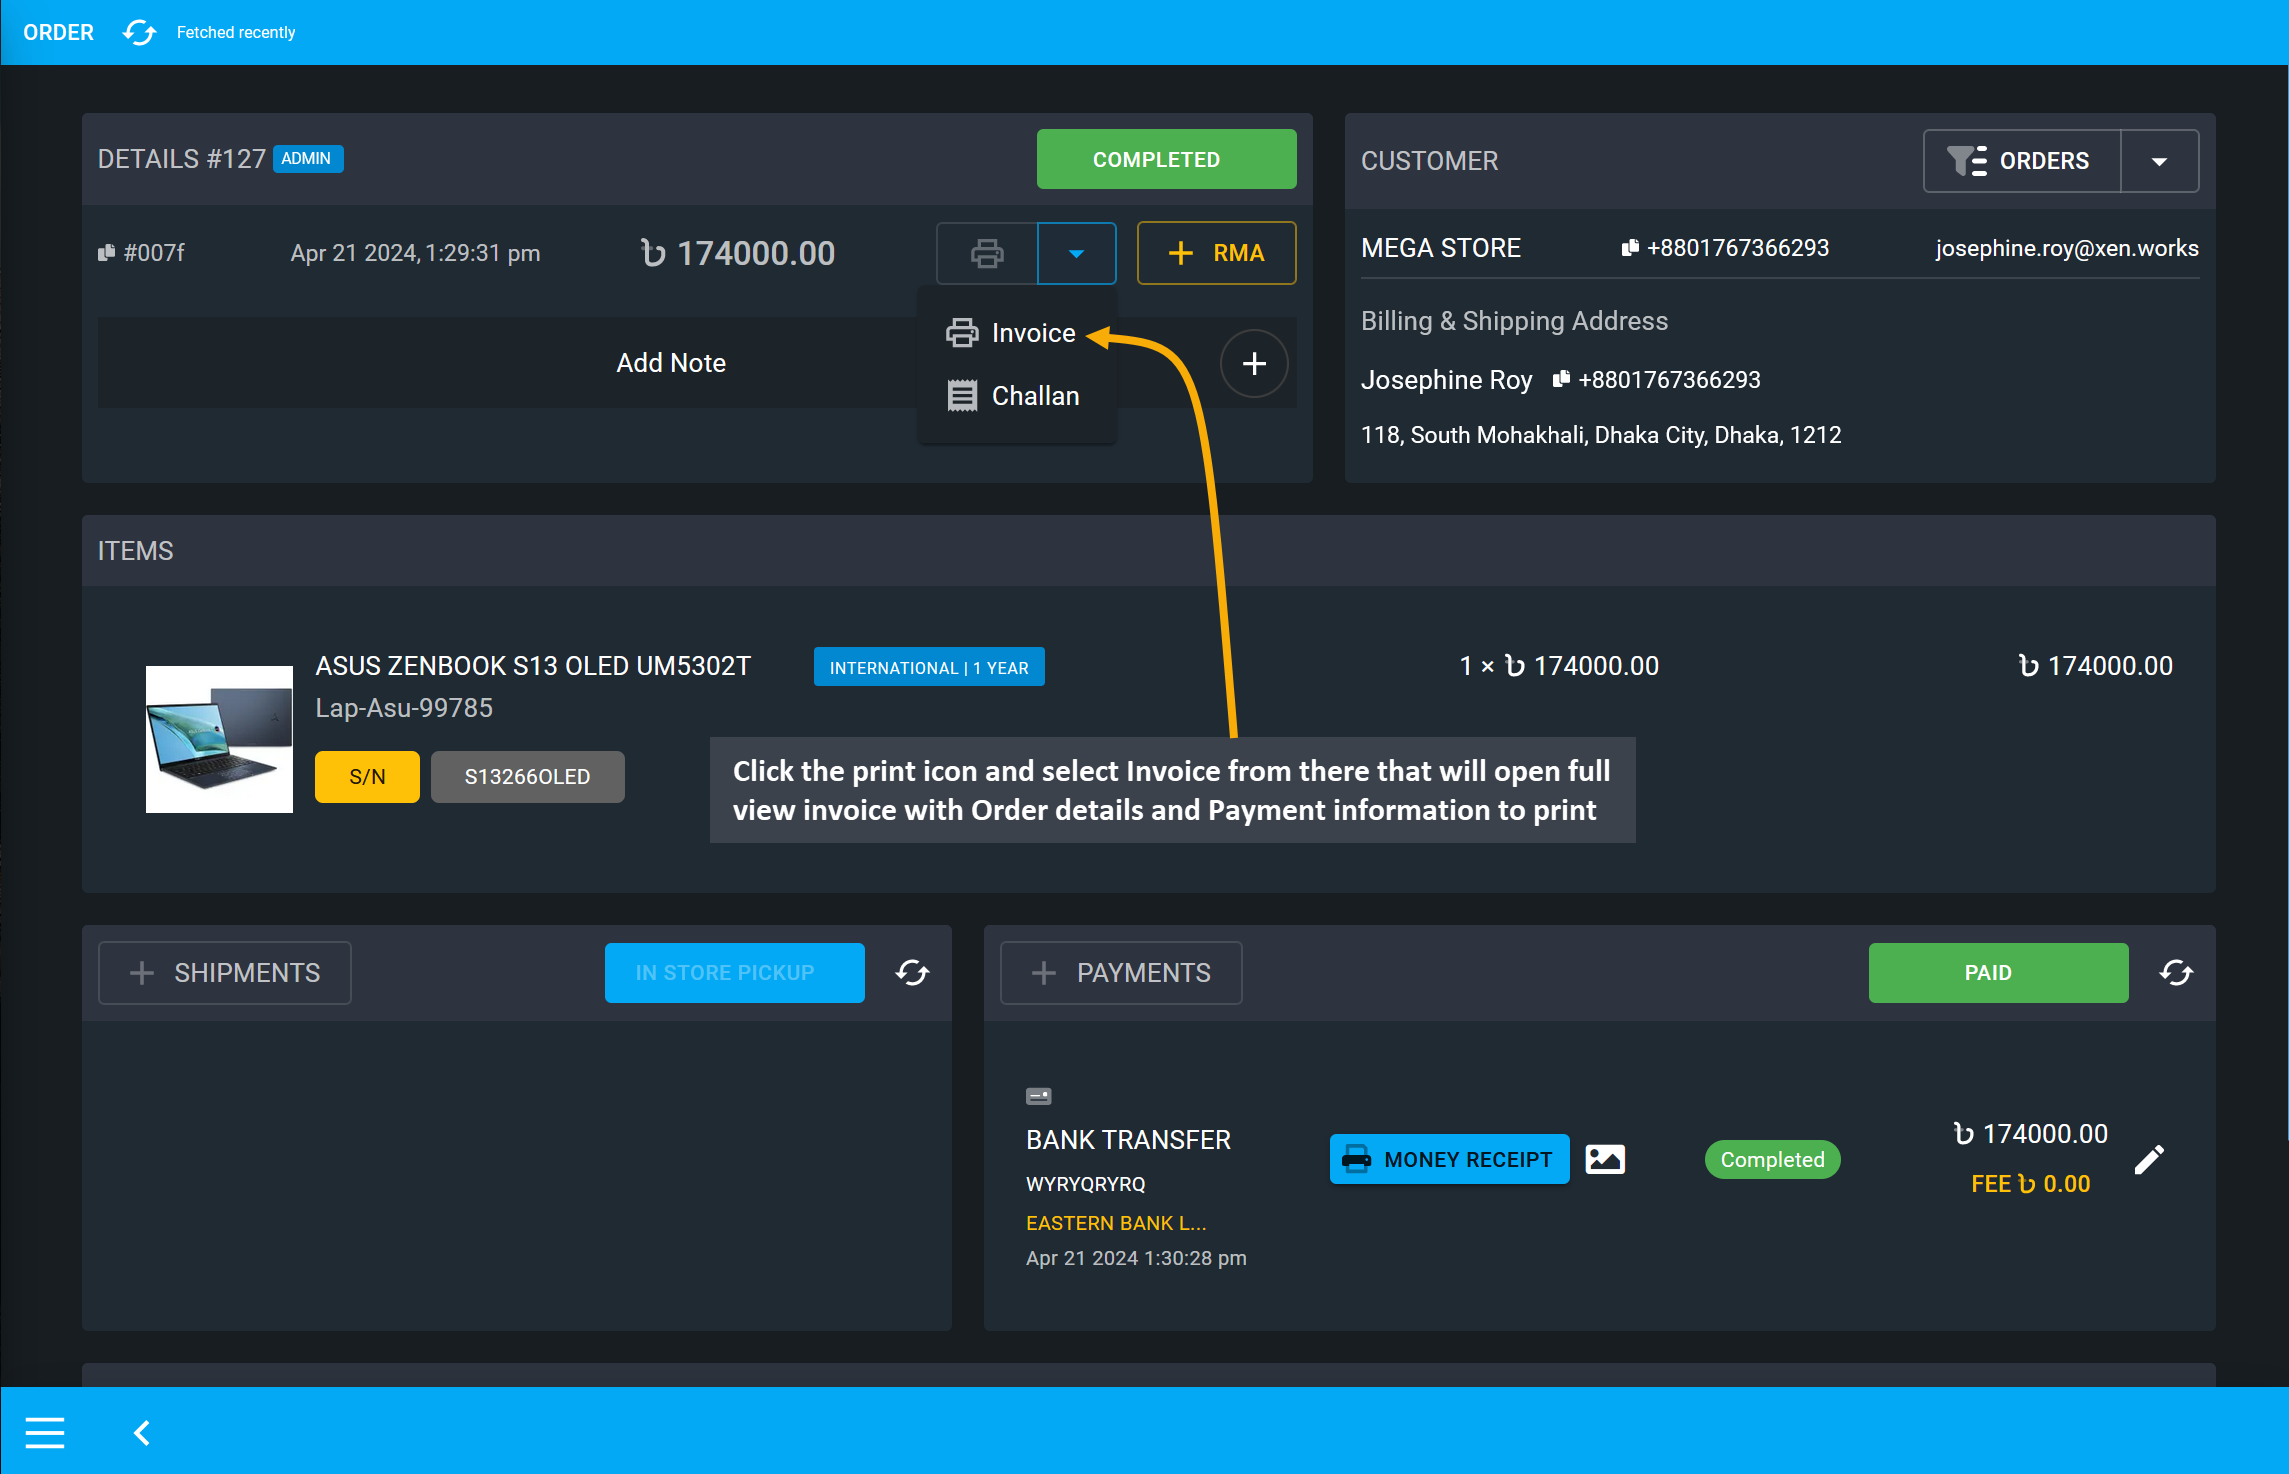
To print Invoice from Order dashboard, click the print icon and select Invoice from there that will open full view invoice with Order details and Payment information to print. Invoice can also be saved as PDF file.
 s
s
Image 10: Click print icon and select Invoice that will open full view Invoice with Order details.
Set Printer, Pages, Layout, and Colors from the print settings as needed. Then, click Print button to print copies of the Order Invoice or click Save to PDF to save a copy of the invoice within your device.

Image 11: Clicking the Print Invoice button will open the full view invoice with full Order details.
Print Challan
Order Challan can also be viewed and printed from the Order Dashboard. Full Order details including Customer information, and line items will be displayed on the challan. Click the Challan icon that will open full view challan with Order details to print. It can also be saved as PDF file.
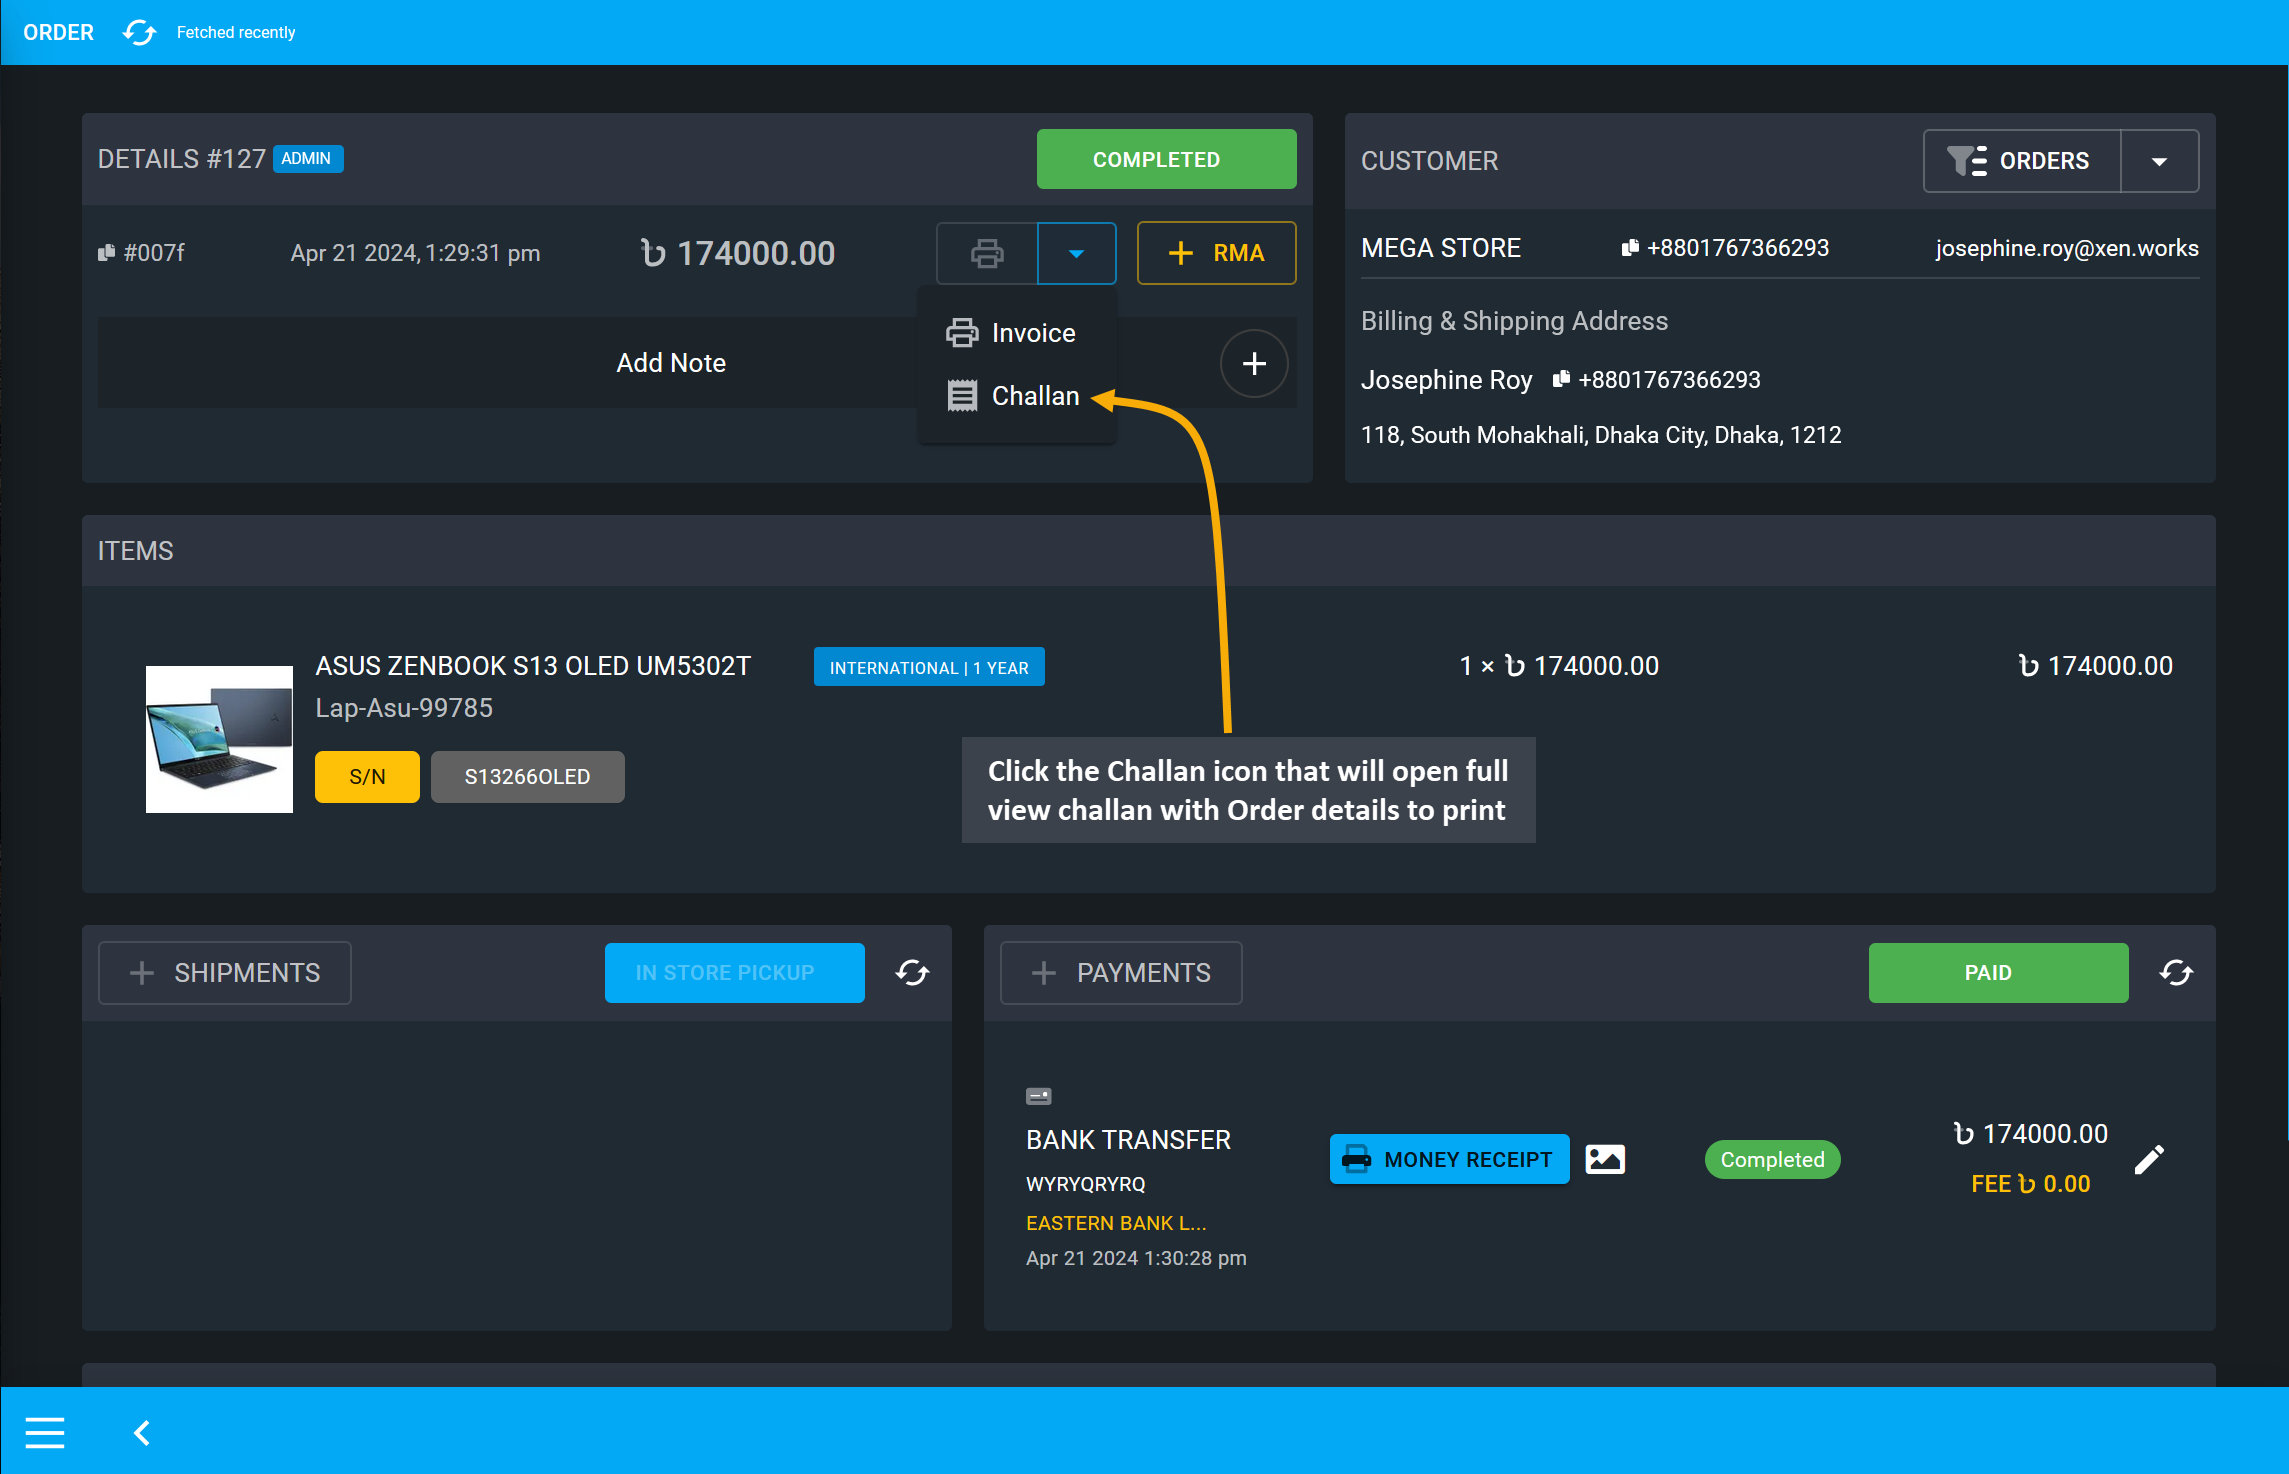
Image 12: Click print icon and select Challan that will open full view Challan with Order details.
Set Printer, Pages, Layout, and Colors from the print settings as needed. Then, click Print button to print copies of the Order Challan or click Save to PDF to save a copy of the challan within your device.
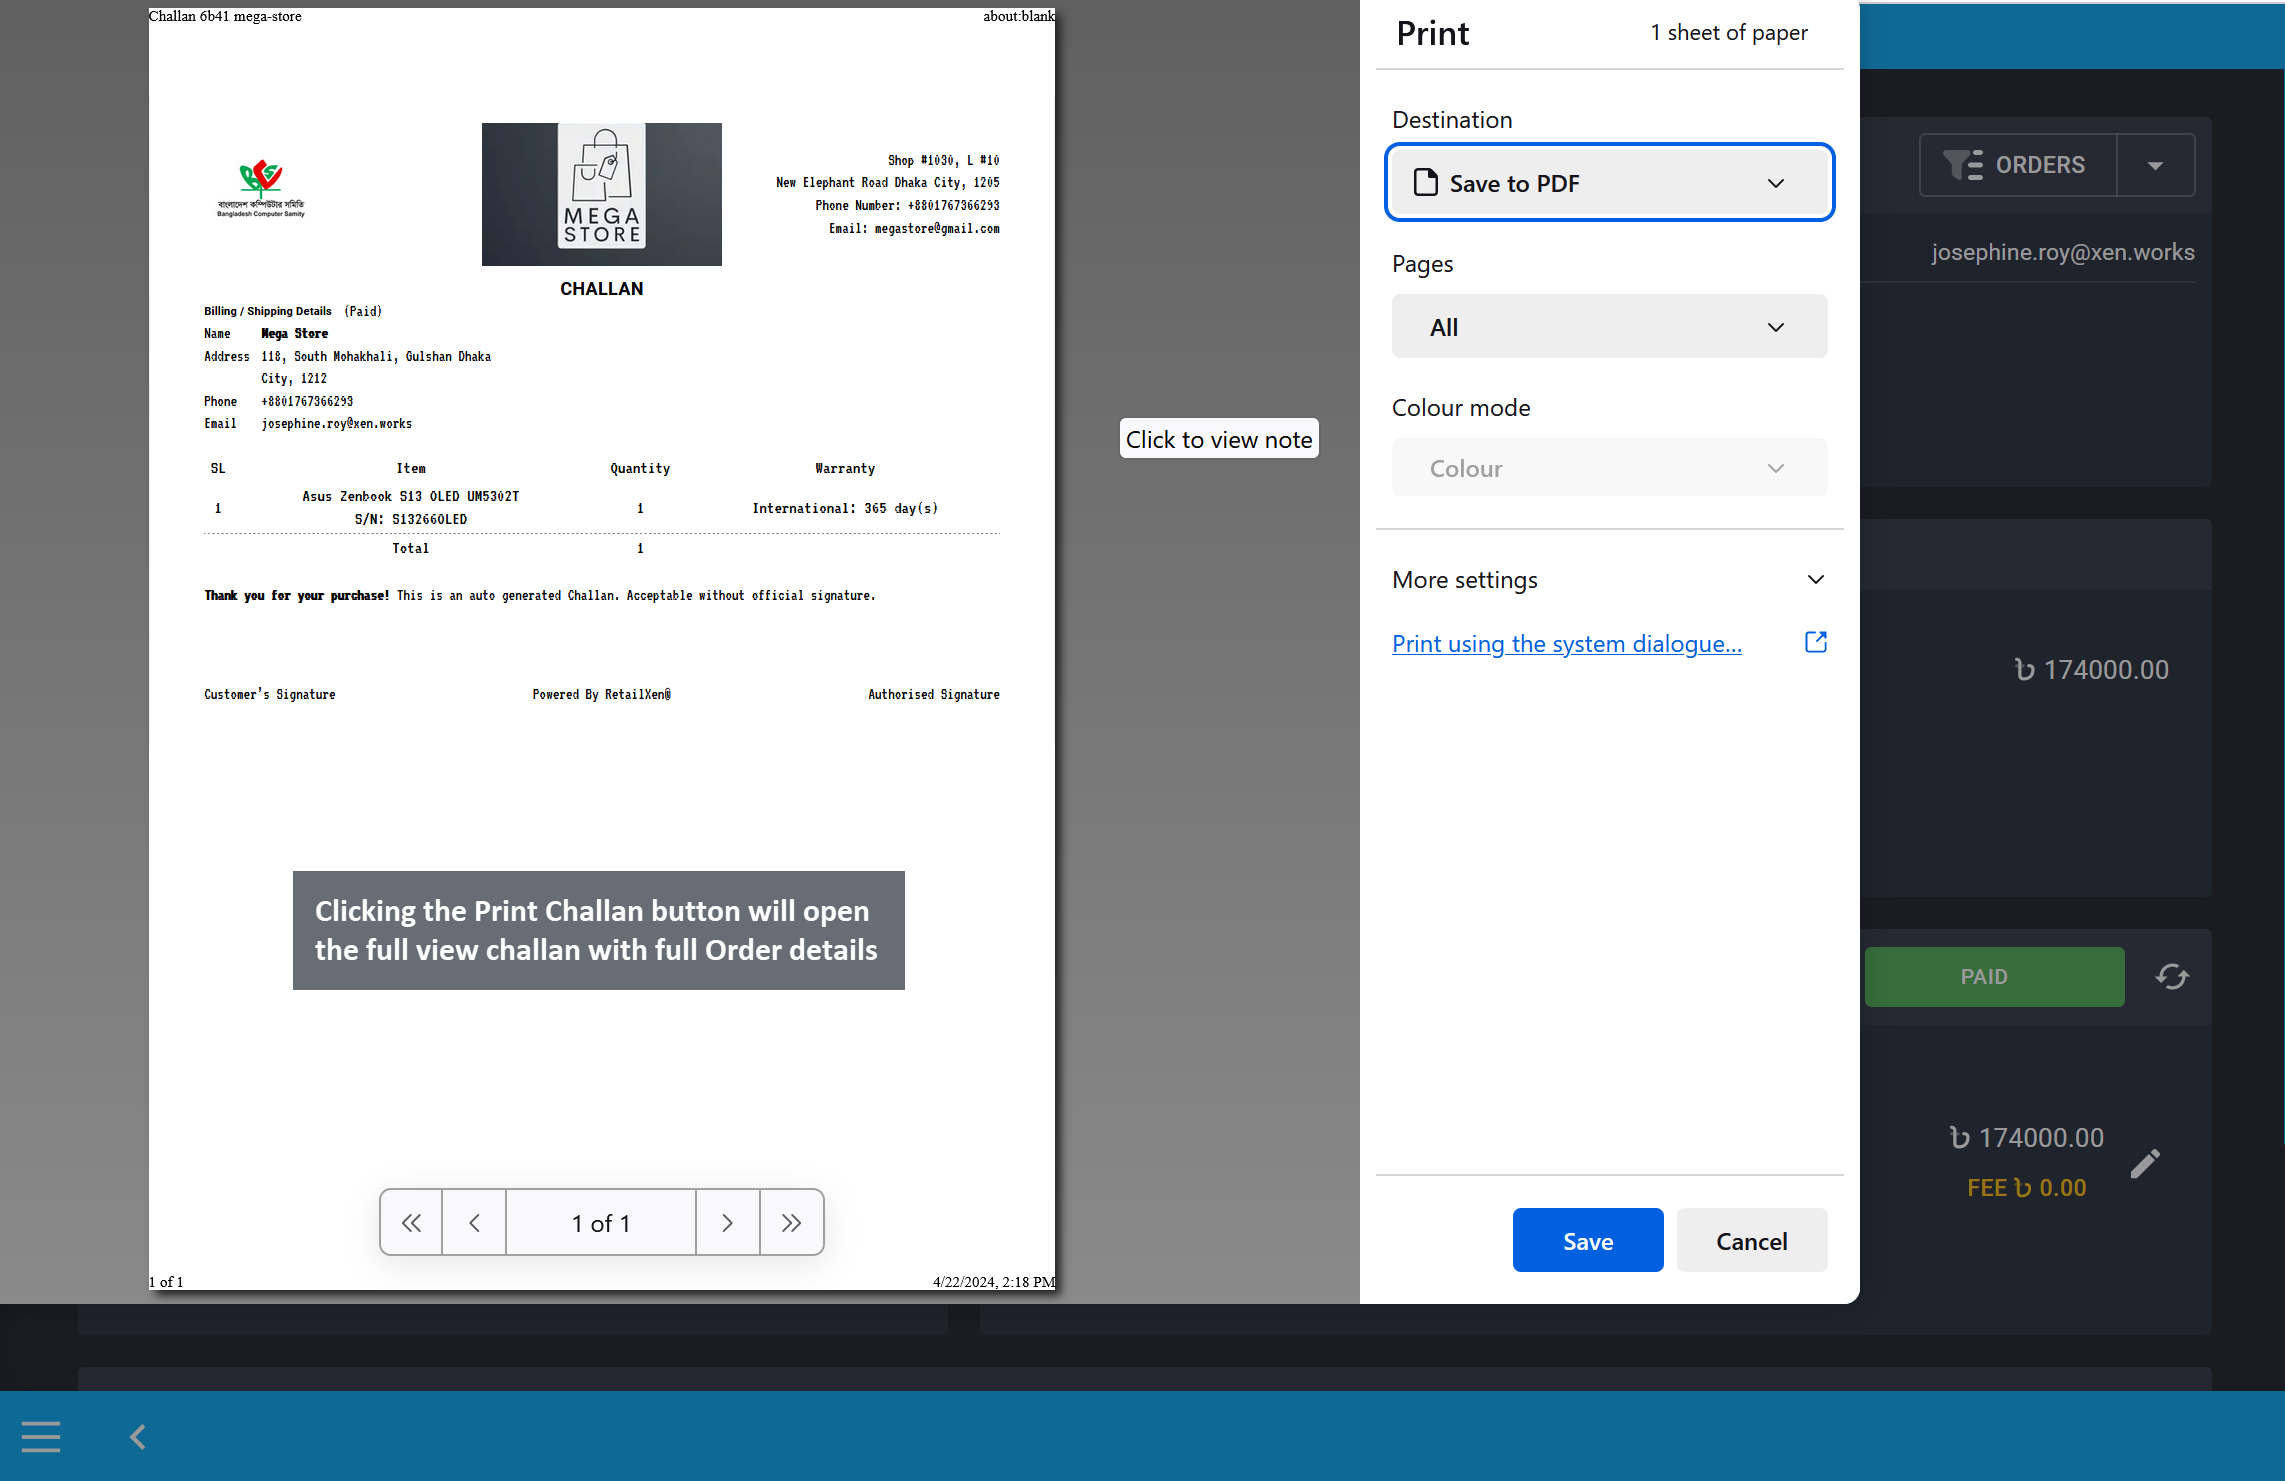
Image 13: Clicking the Print Challan button will open the full view challan with full Order details.
Order Note
There is a special feature called the Order Note which can be used to note down important Order details for sales team, customer service team, admins, or managers to follow up. Order Note can be written during placing the Order on Cart. The option to write an Order Note is on the second page of the Cart after selecting Shipping and Payment gateways. Use the Note (Optional) field to write important information related to Order that will later show on Order Dashboard.
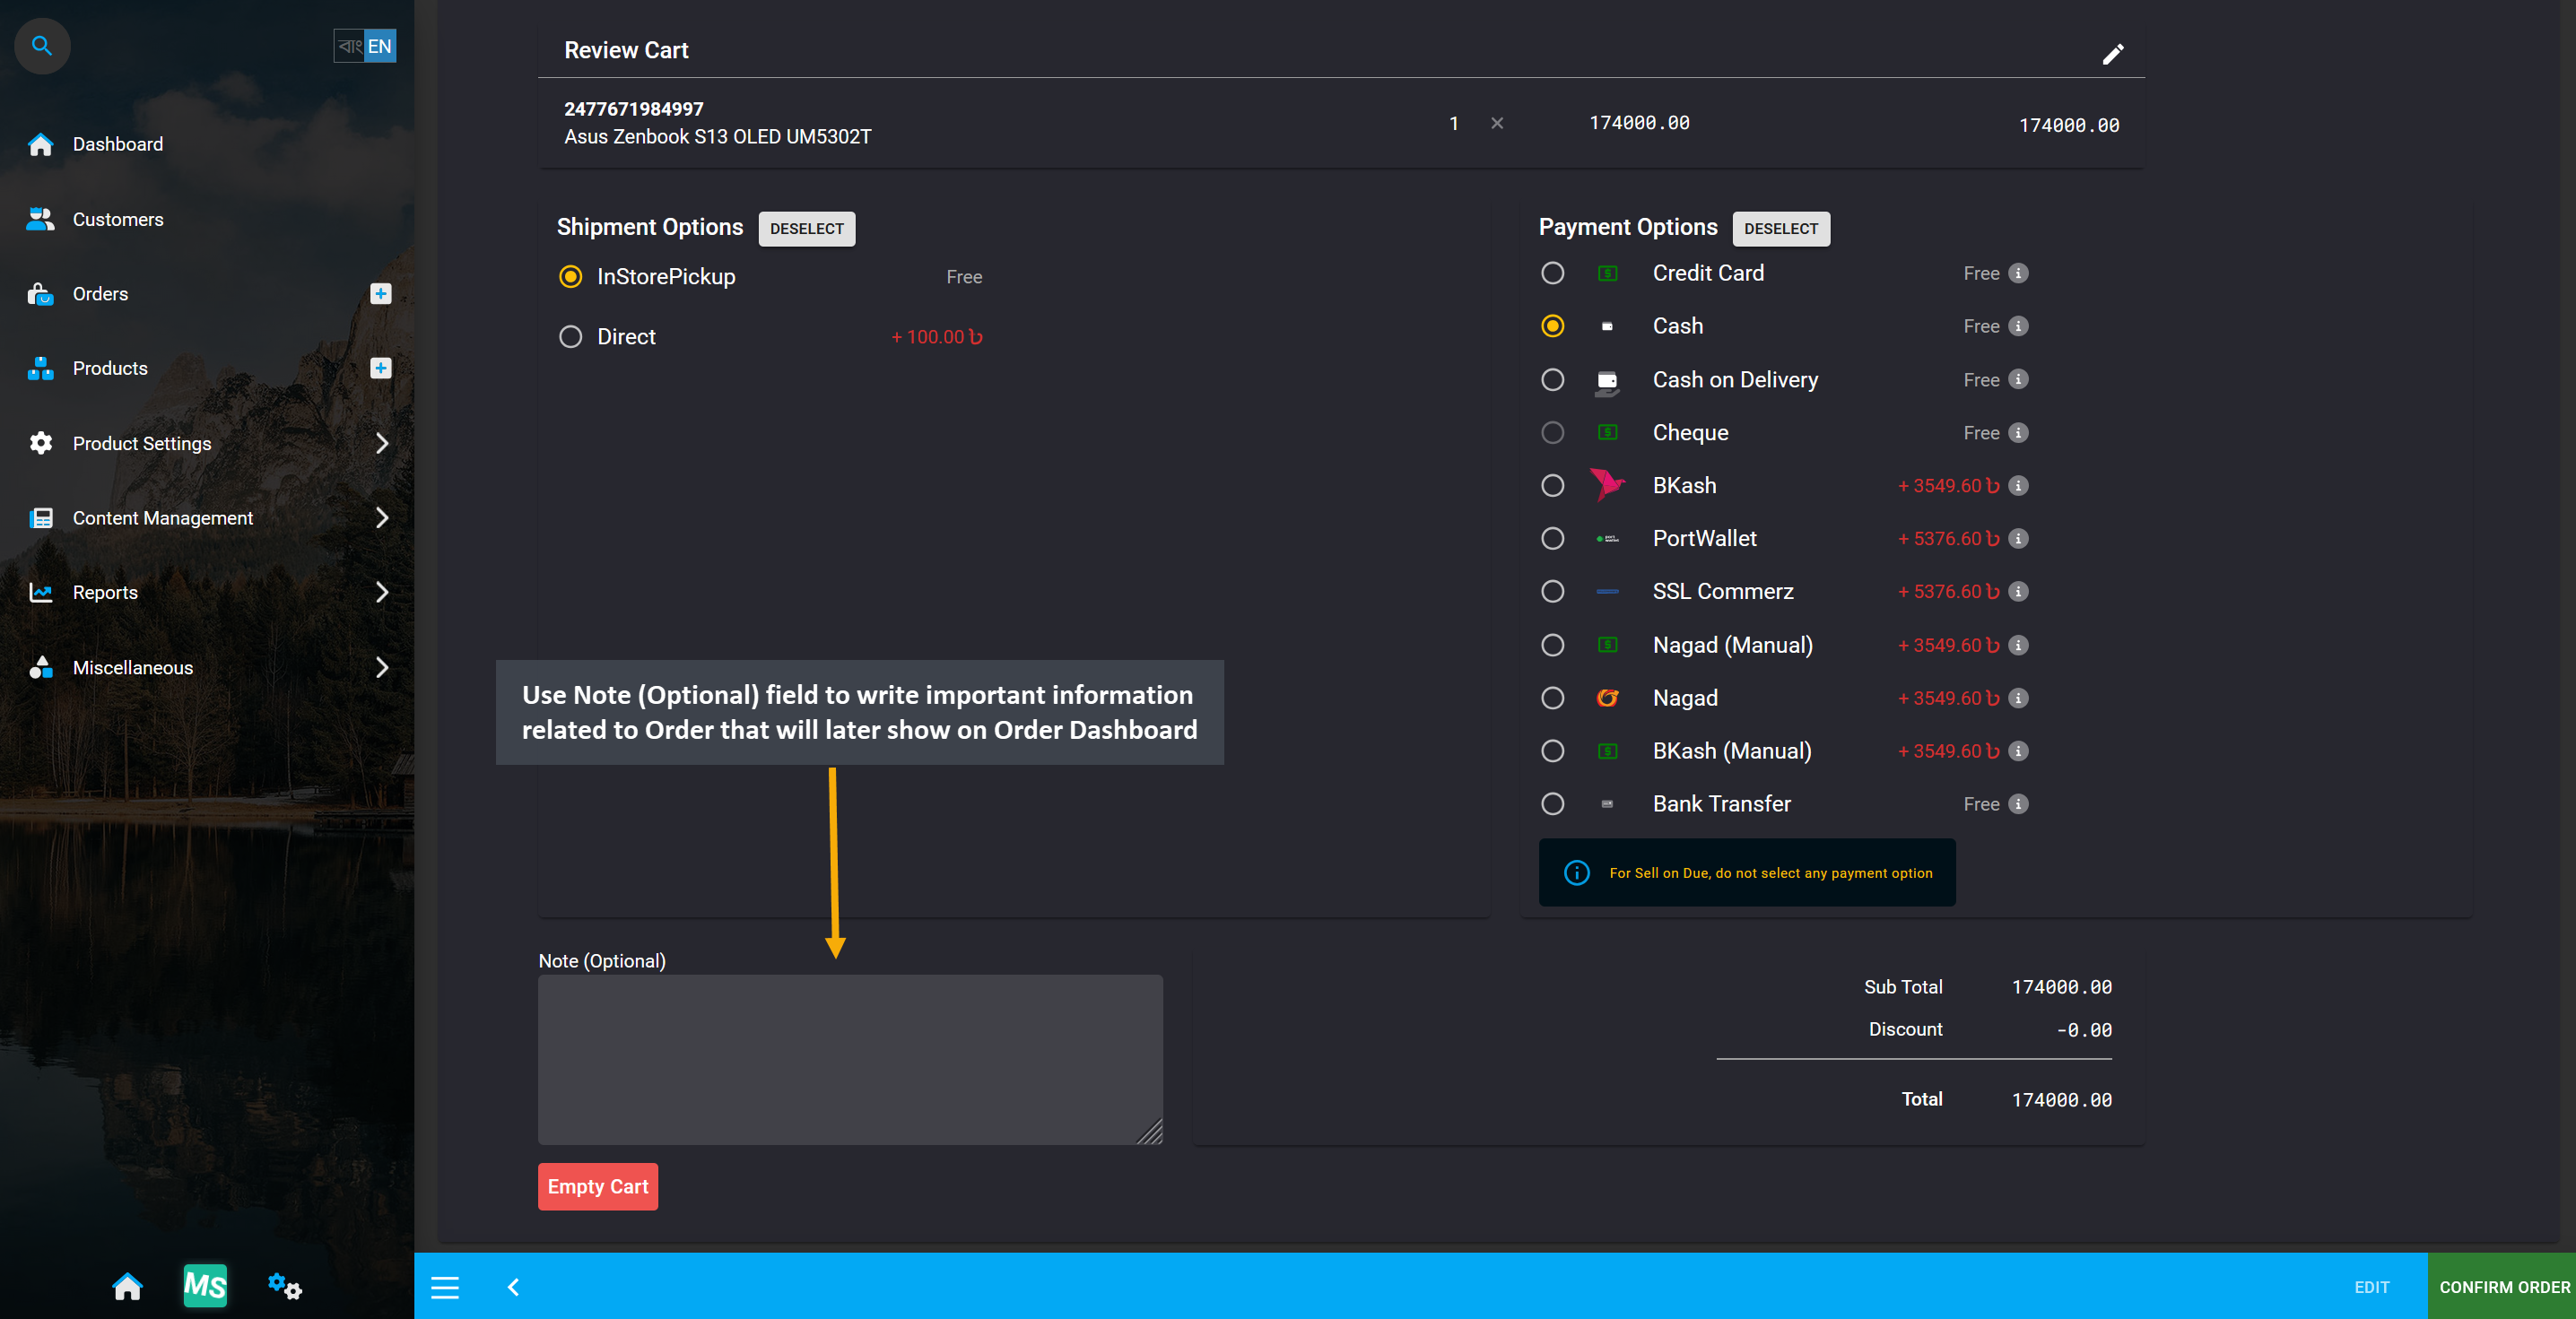
Image 14: Use Note (Optional) field to write important information related to Order on Cart checkout.
If Order Note is not added to Order Cart, then it can also be added later on Order Dashboard. On Order Dashboard, there is a separate section for Note which can be added and edited with important Order details for sales team, customer service team, admins, or managers to follow up. So, add Order Notes according to needs.
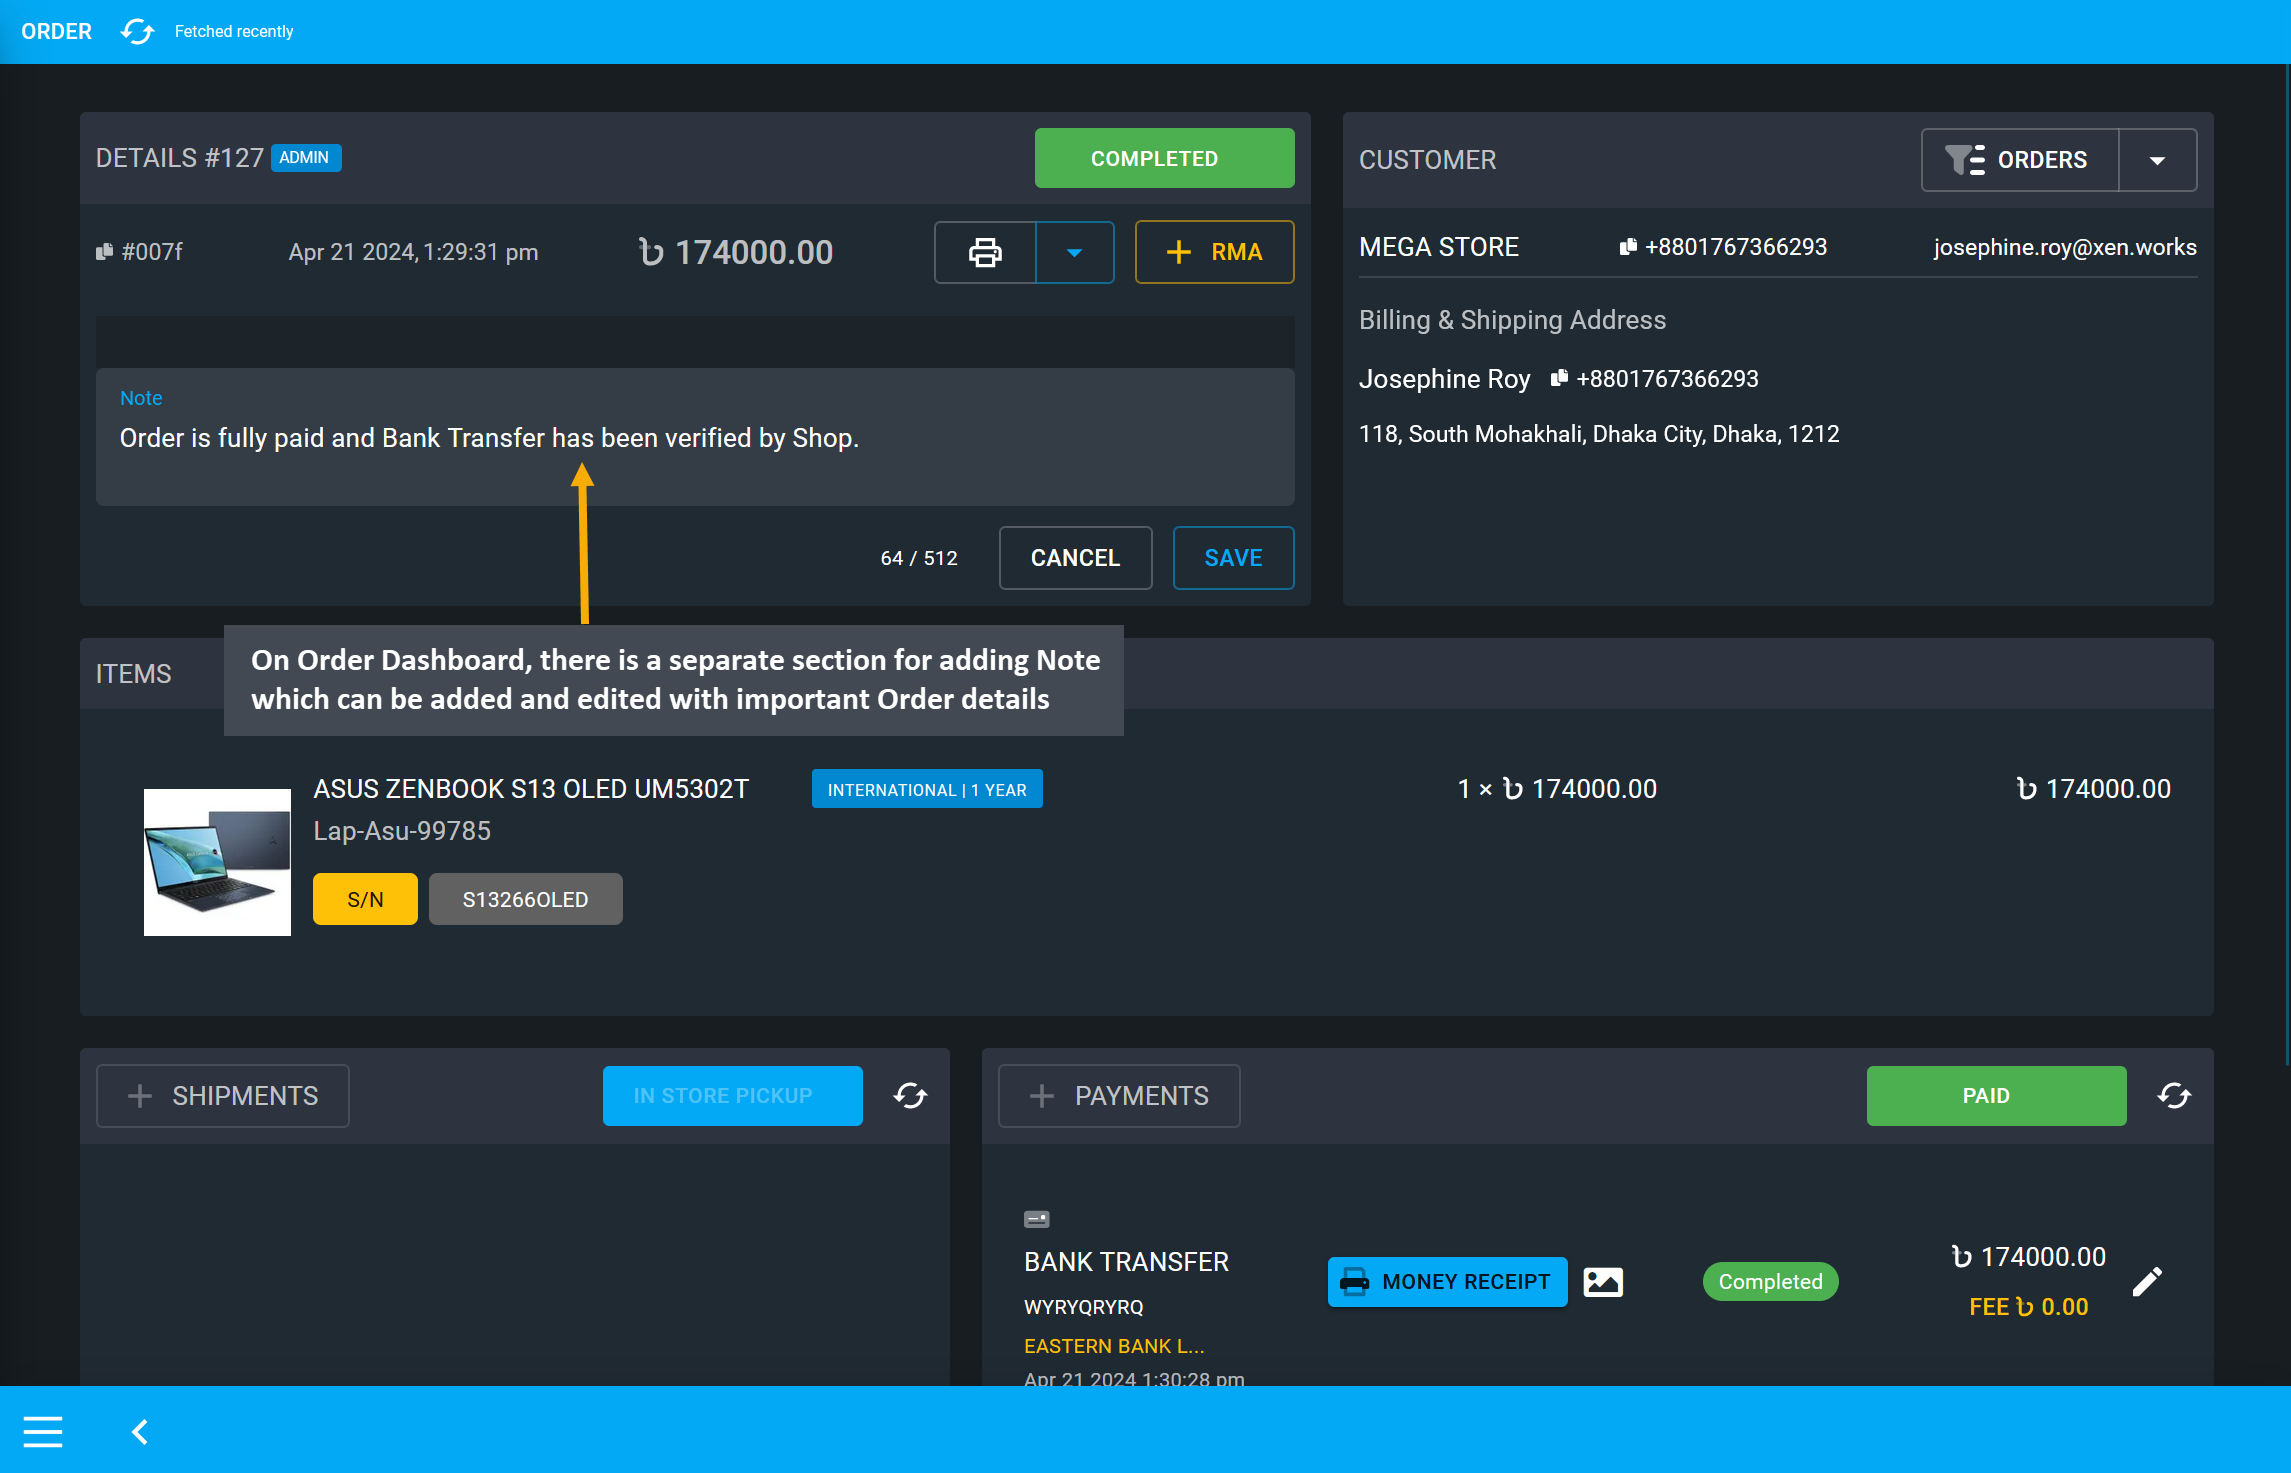
Image 15: Order Dashboard has a Note section that can be added and edited with important details.s
Payment Verification and Money Receipt
After Bank Transfer, Cheque, or Cash on Delivery, after payment proofs are checked, they can be verified by clicking on the Verify button which will open a modal to set the payment as Completed or Failed.
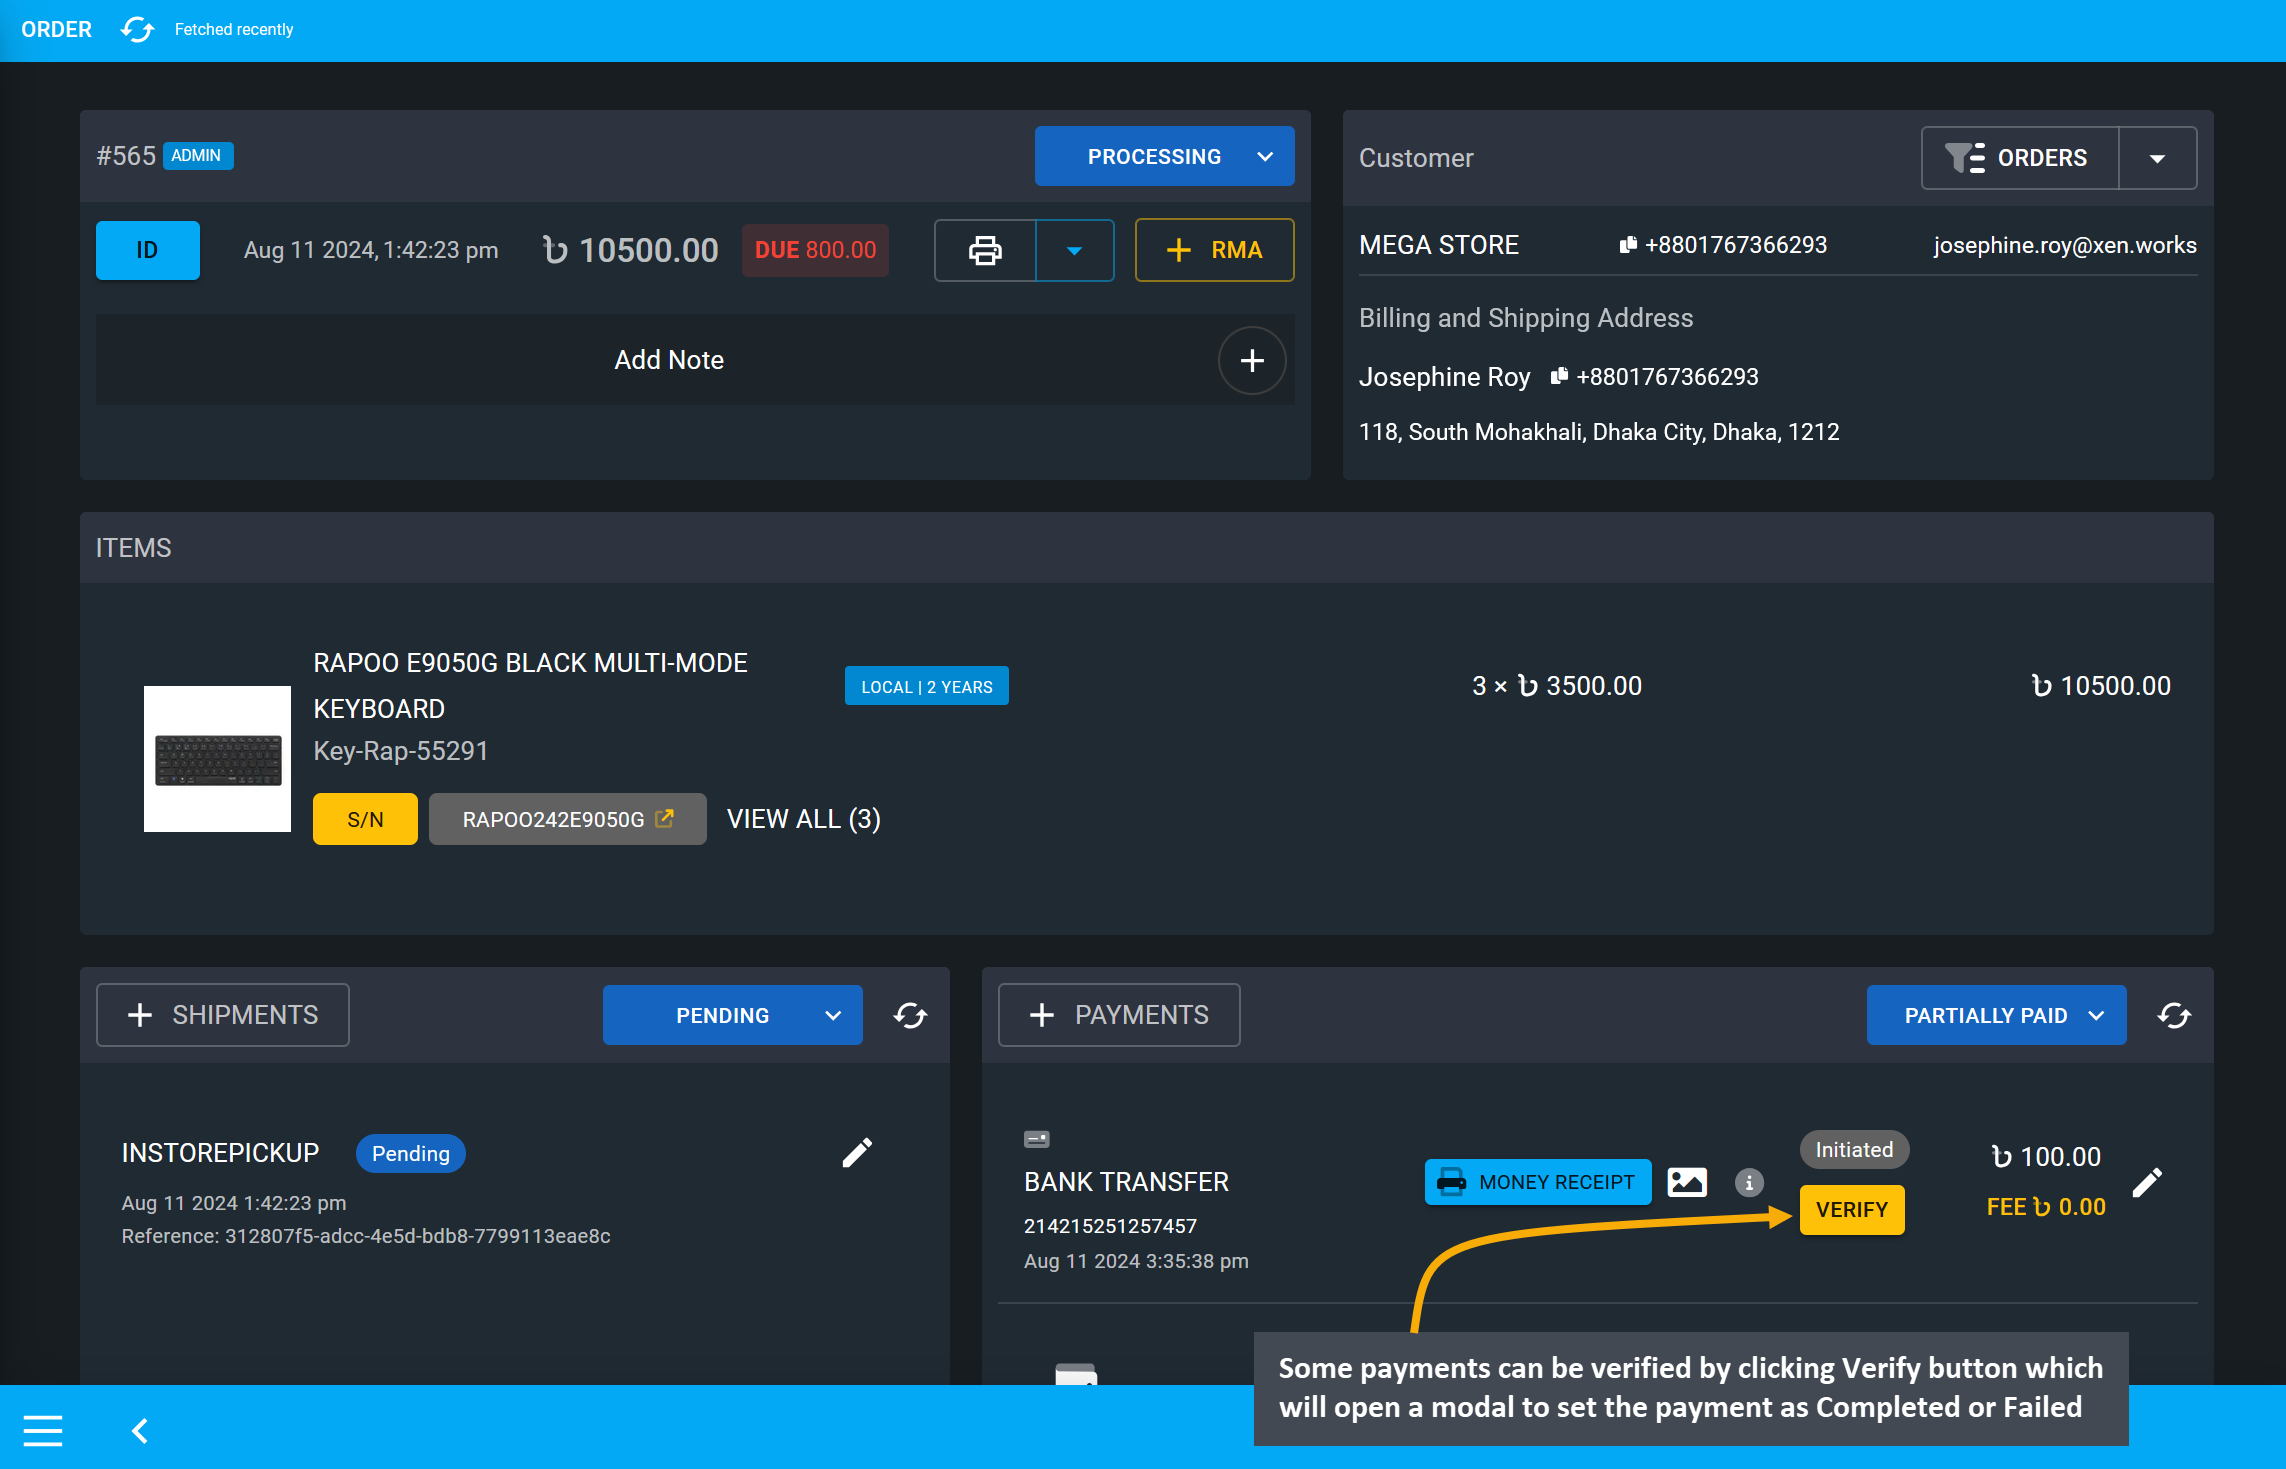
Image 16: Click Verify button on Payments to open a modal to set the payment as Completed or Failed.
After Verify button is clicked, a modal will open, where the transaction can be completed by selecting the option Set as Completed that will verify Order Due and set payment as Paid.
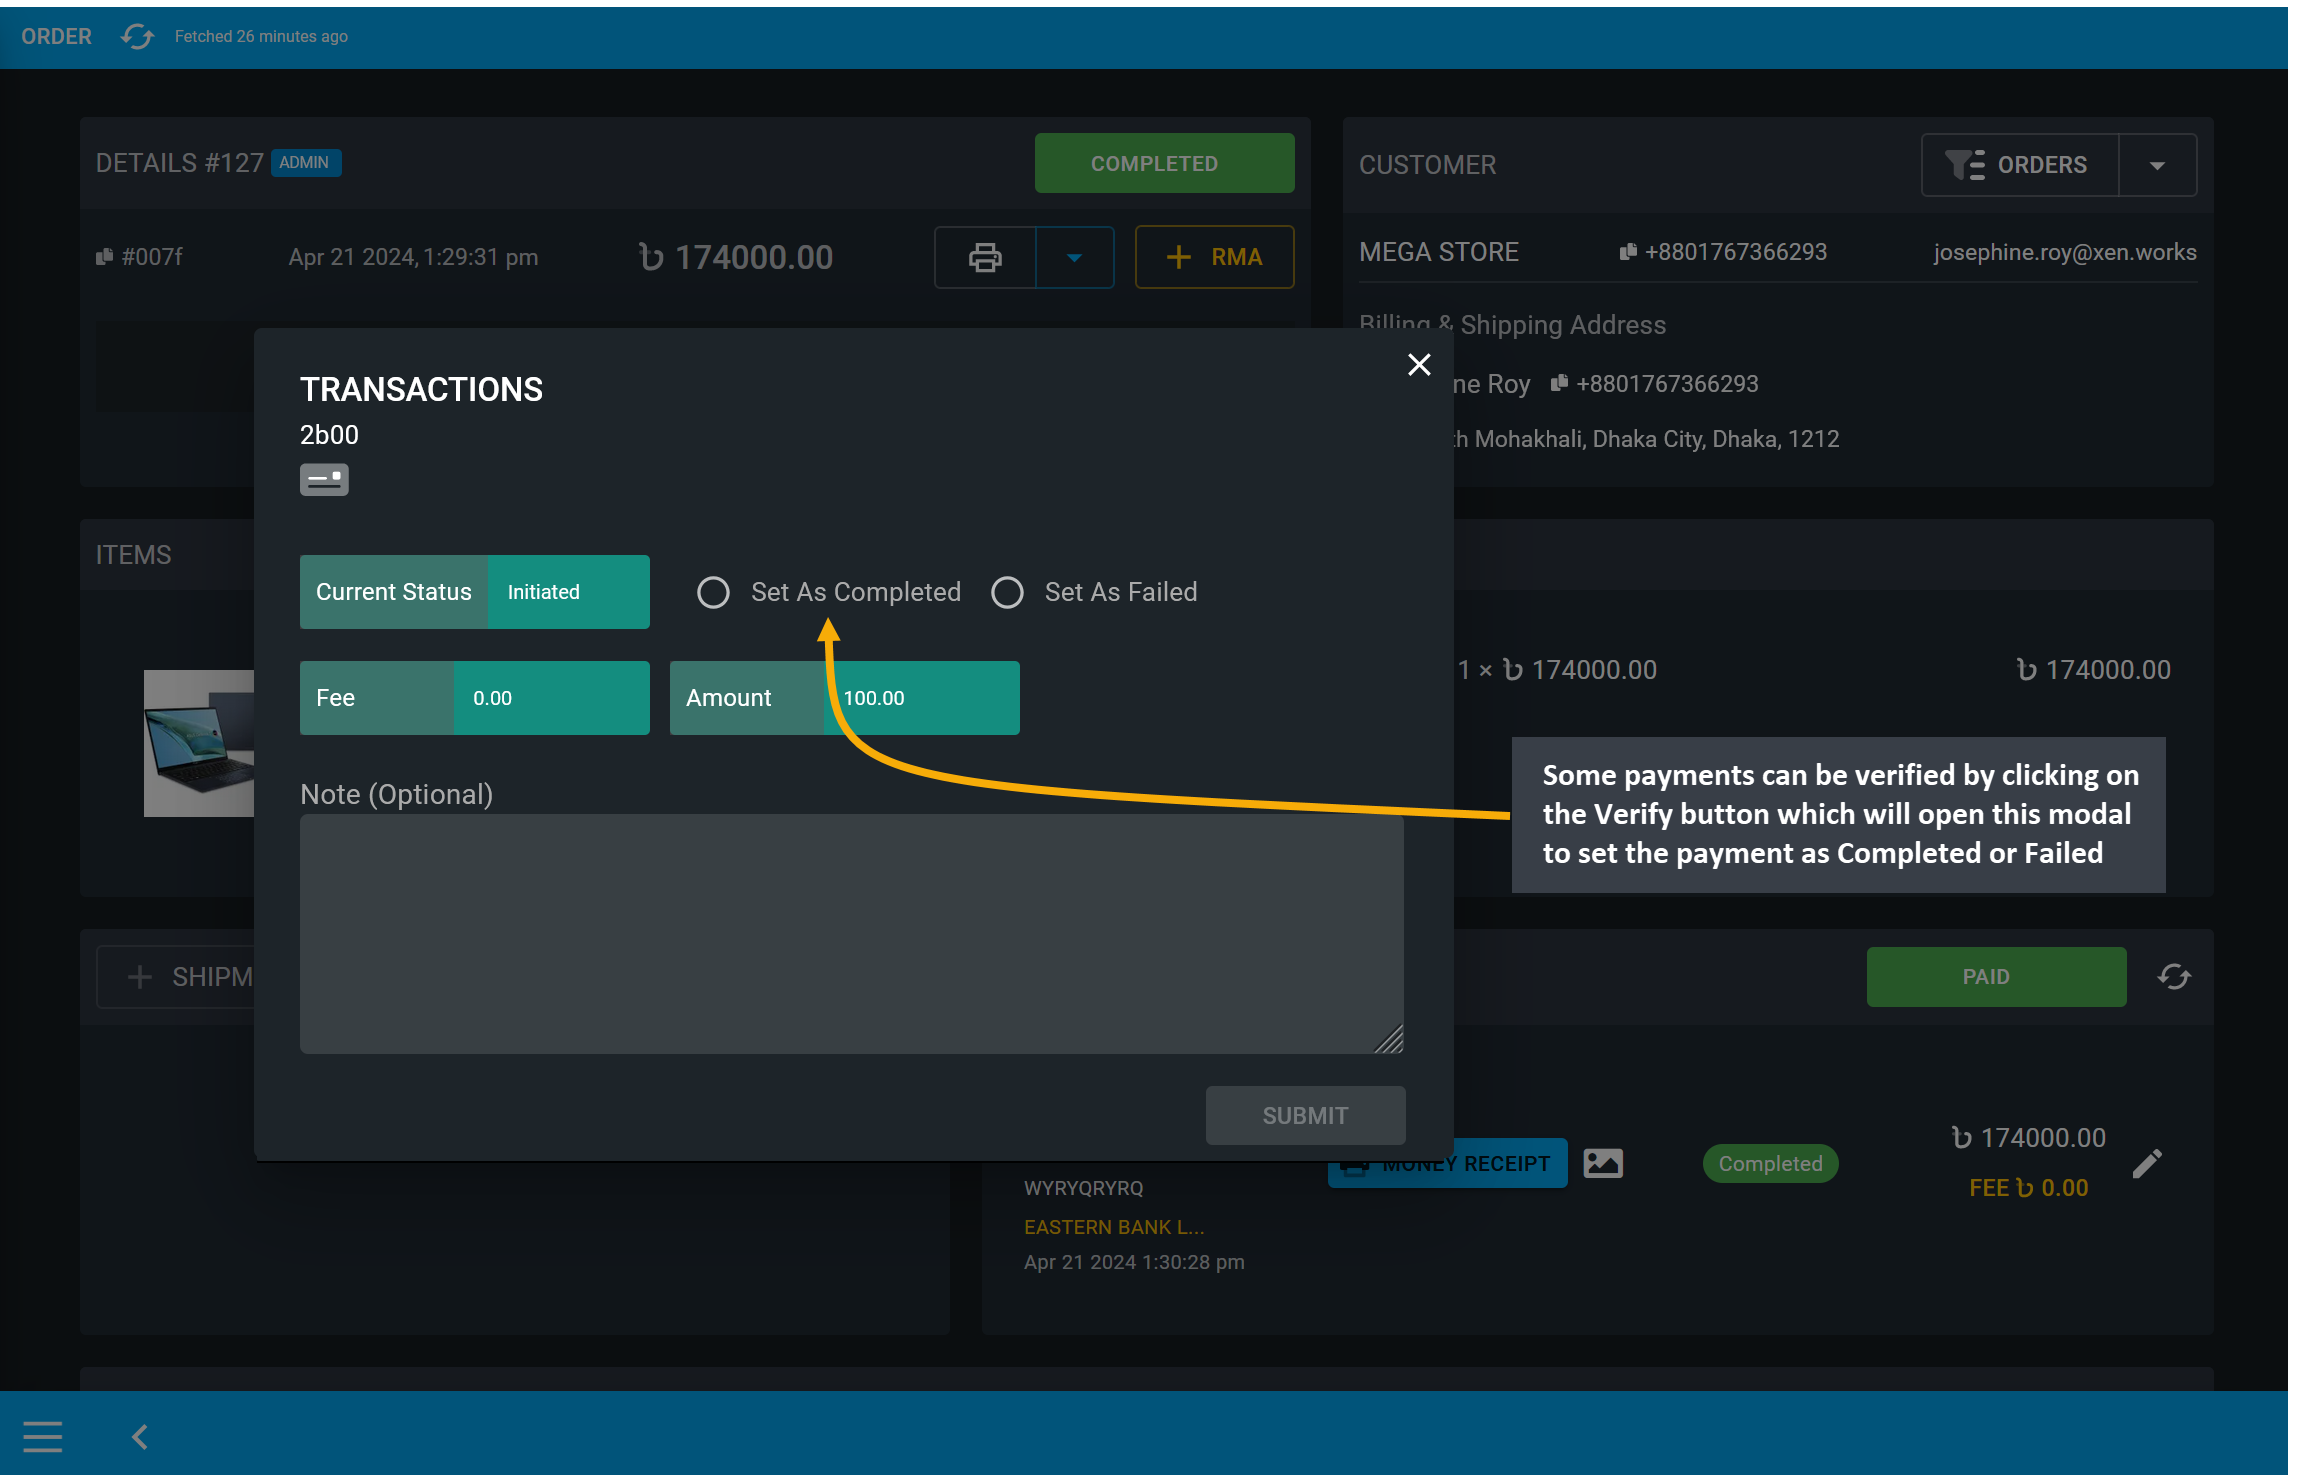
Image 17: Verify a transaction by selecting Set as Completed on the veification transaction modal.
Once payment or transaction verification is completed, the Verify button will convert into a Completed label and the Order Due will be cleared and Payment status will become Paid.
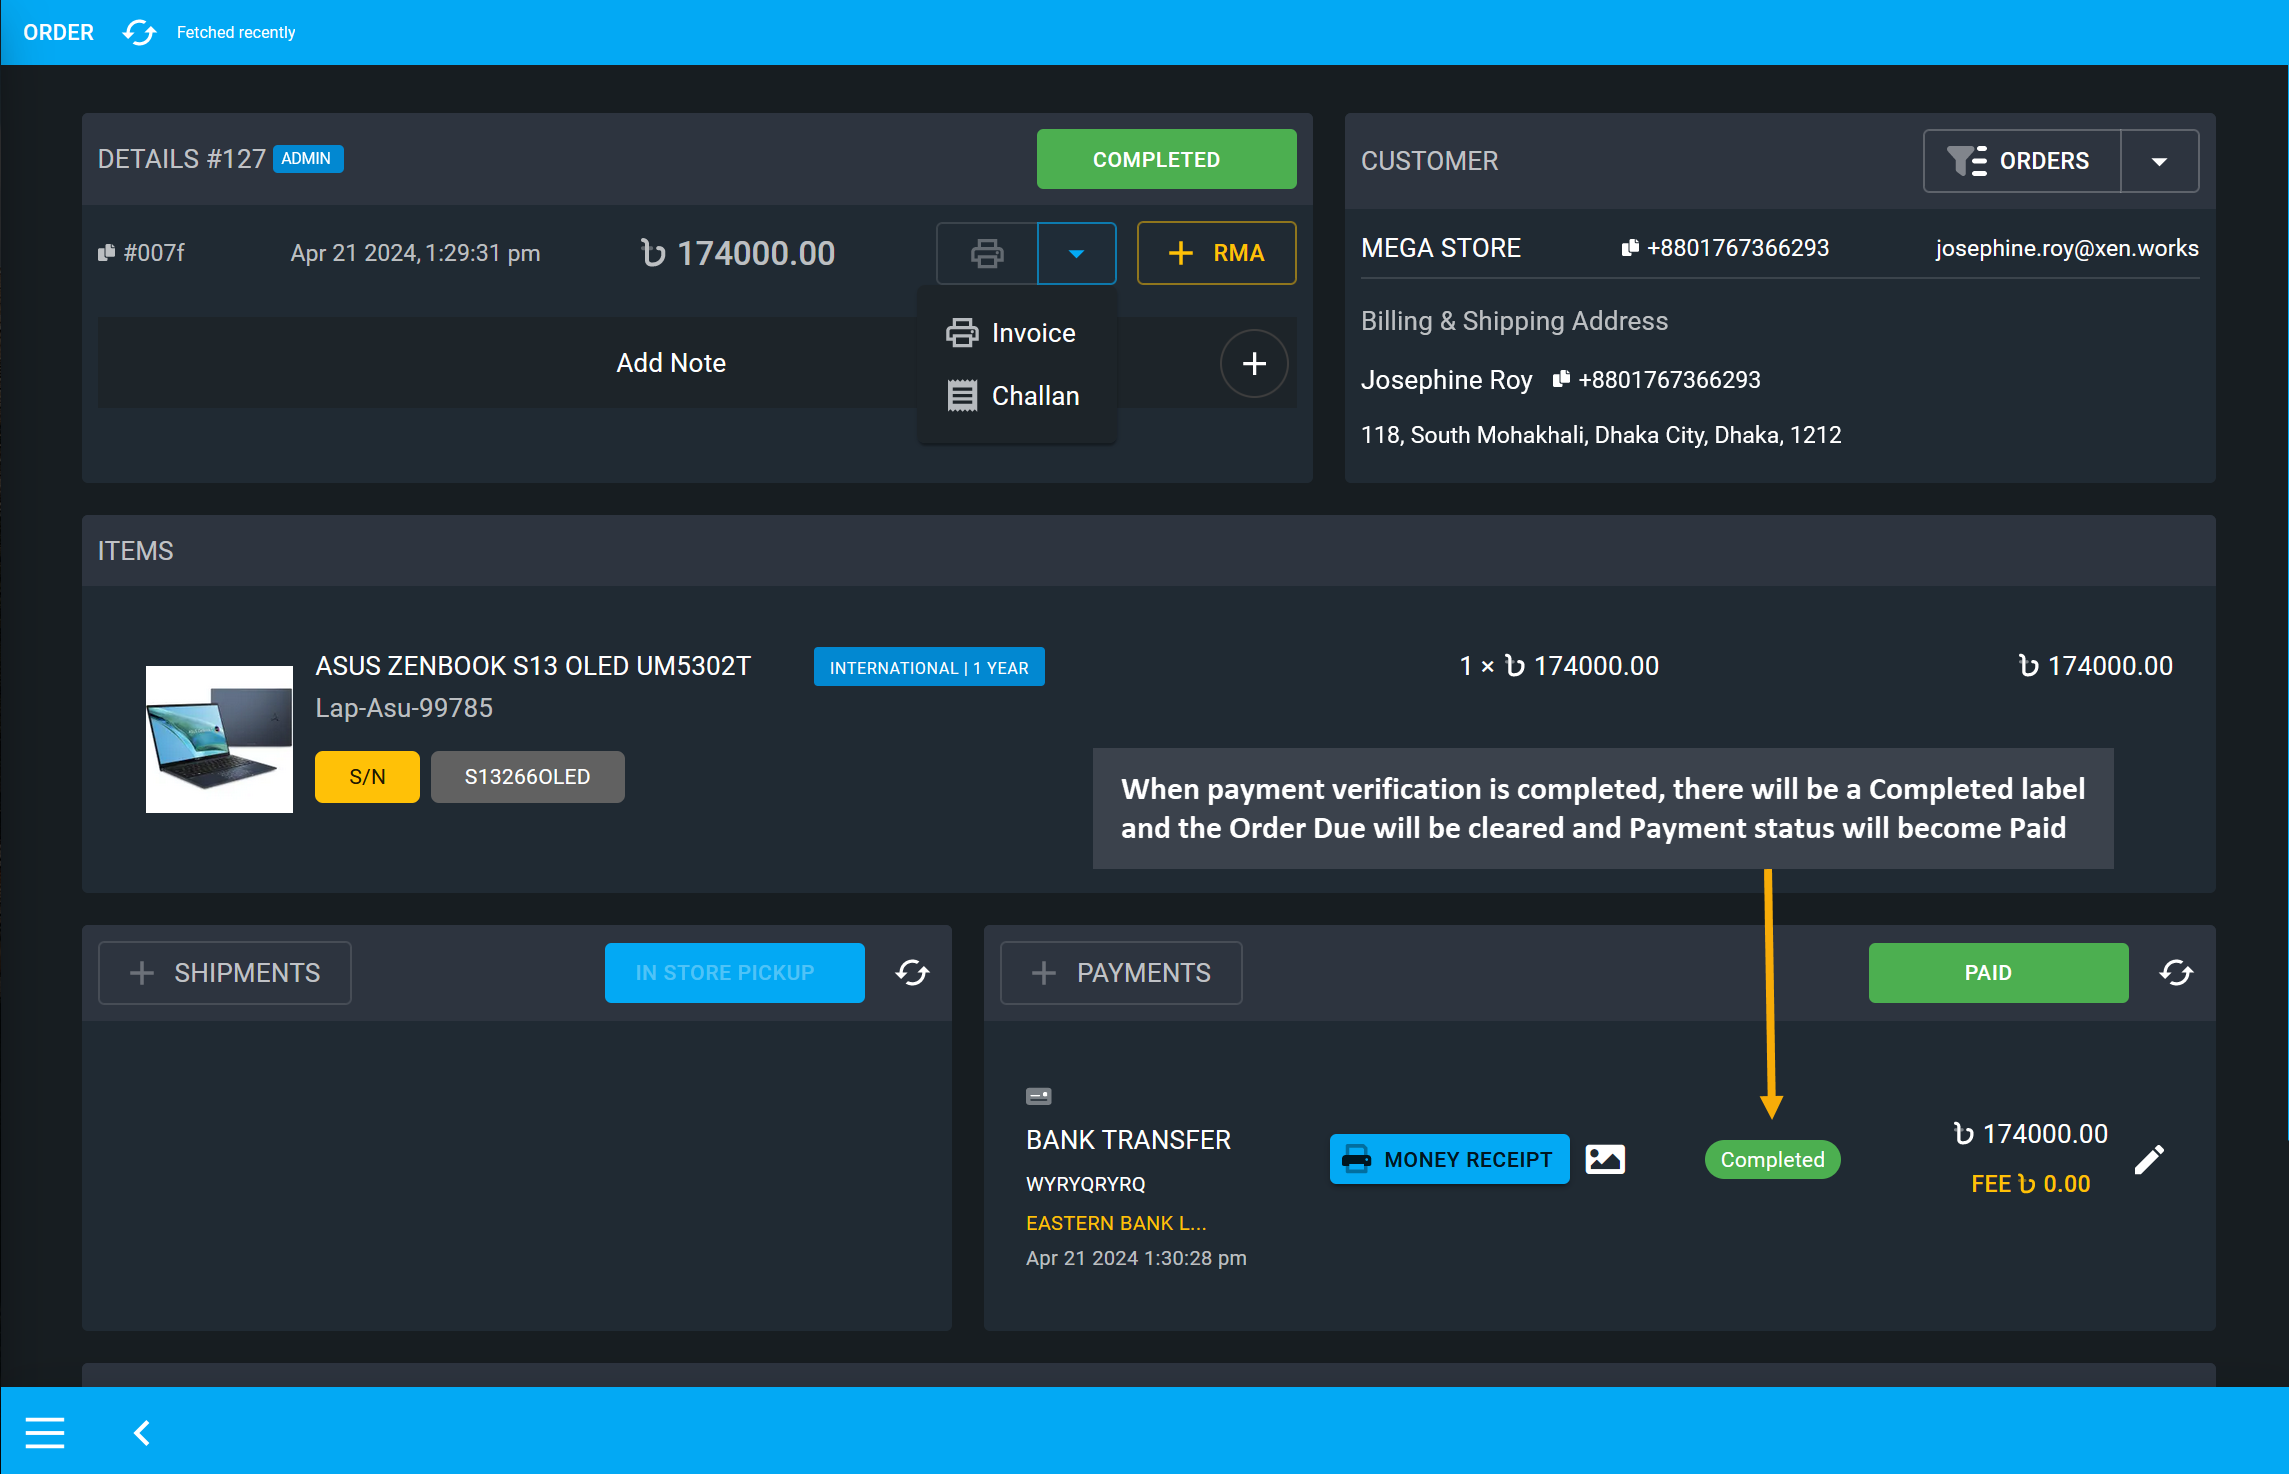
Image 18: When payment verification is completed, Payment status will become Paid on Order Dashboards.
After transaction is completed, a Money Receipt will be available to view and download from the Payments section, click on the Money Receipt label to open and print it for reference.
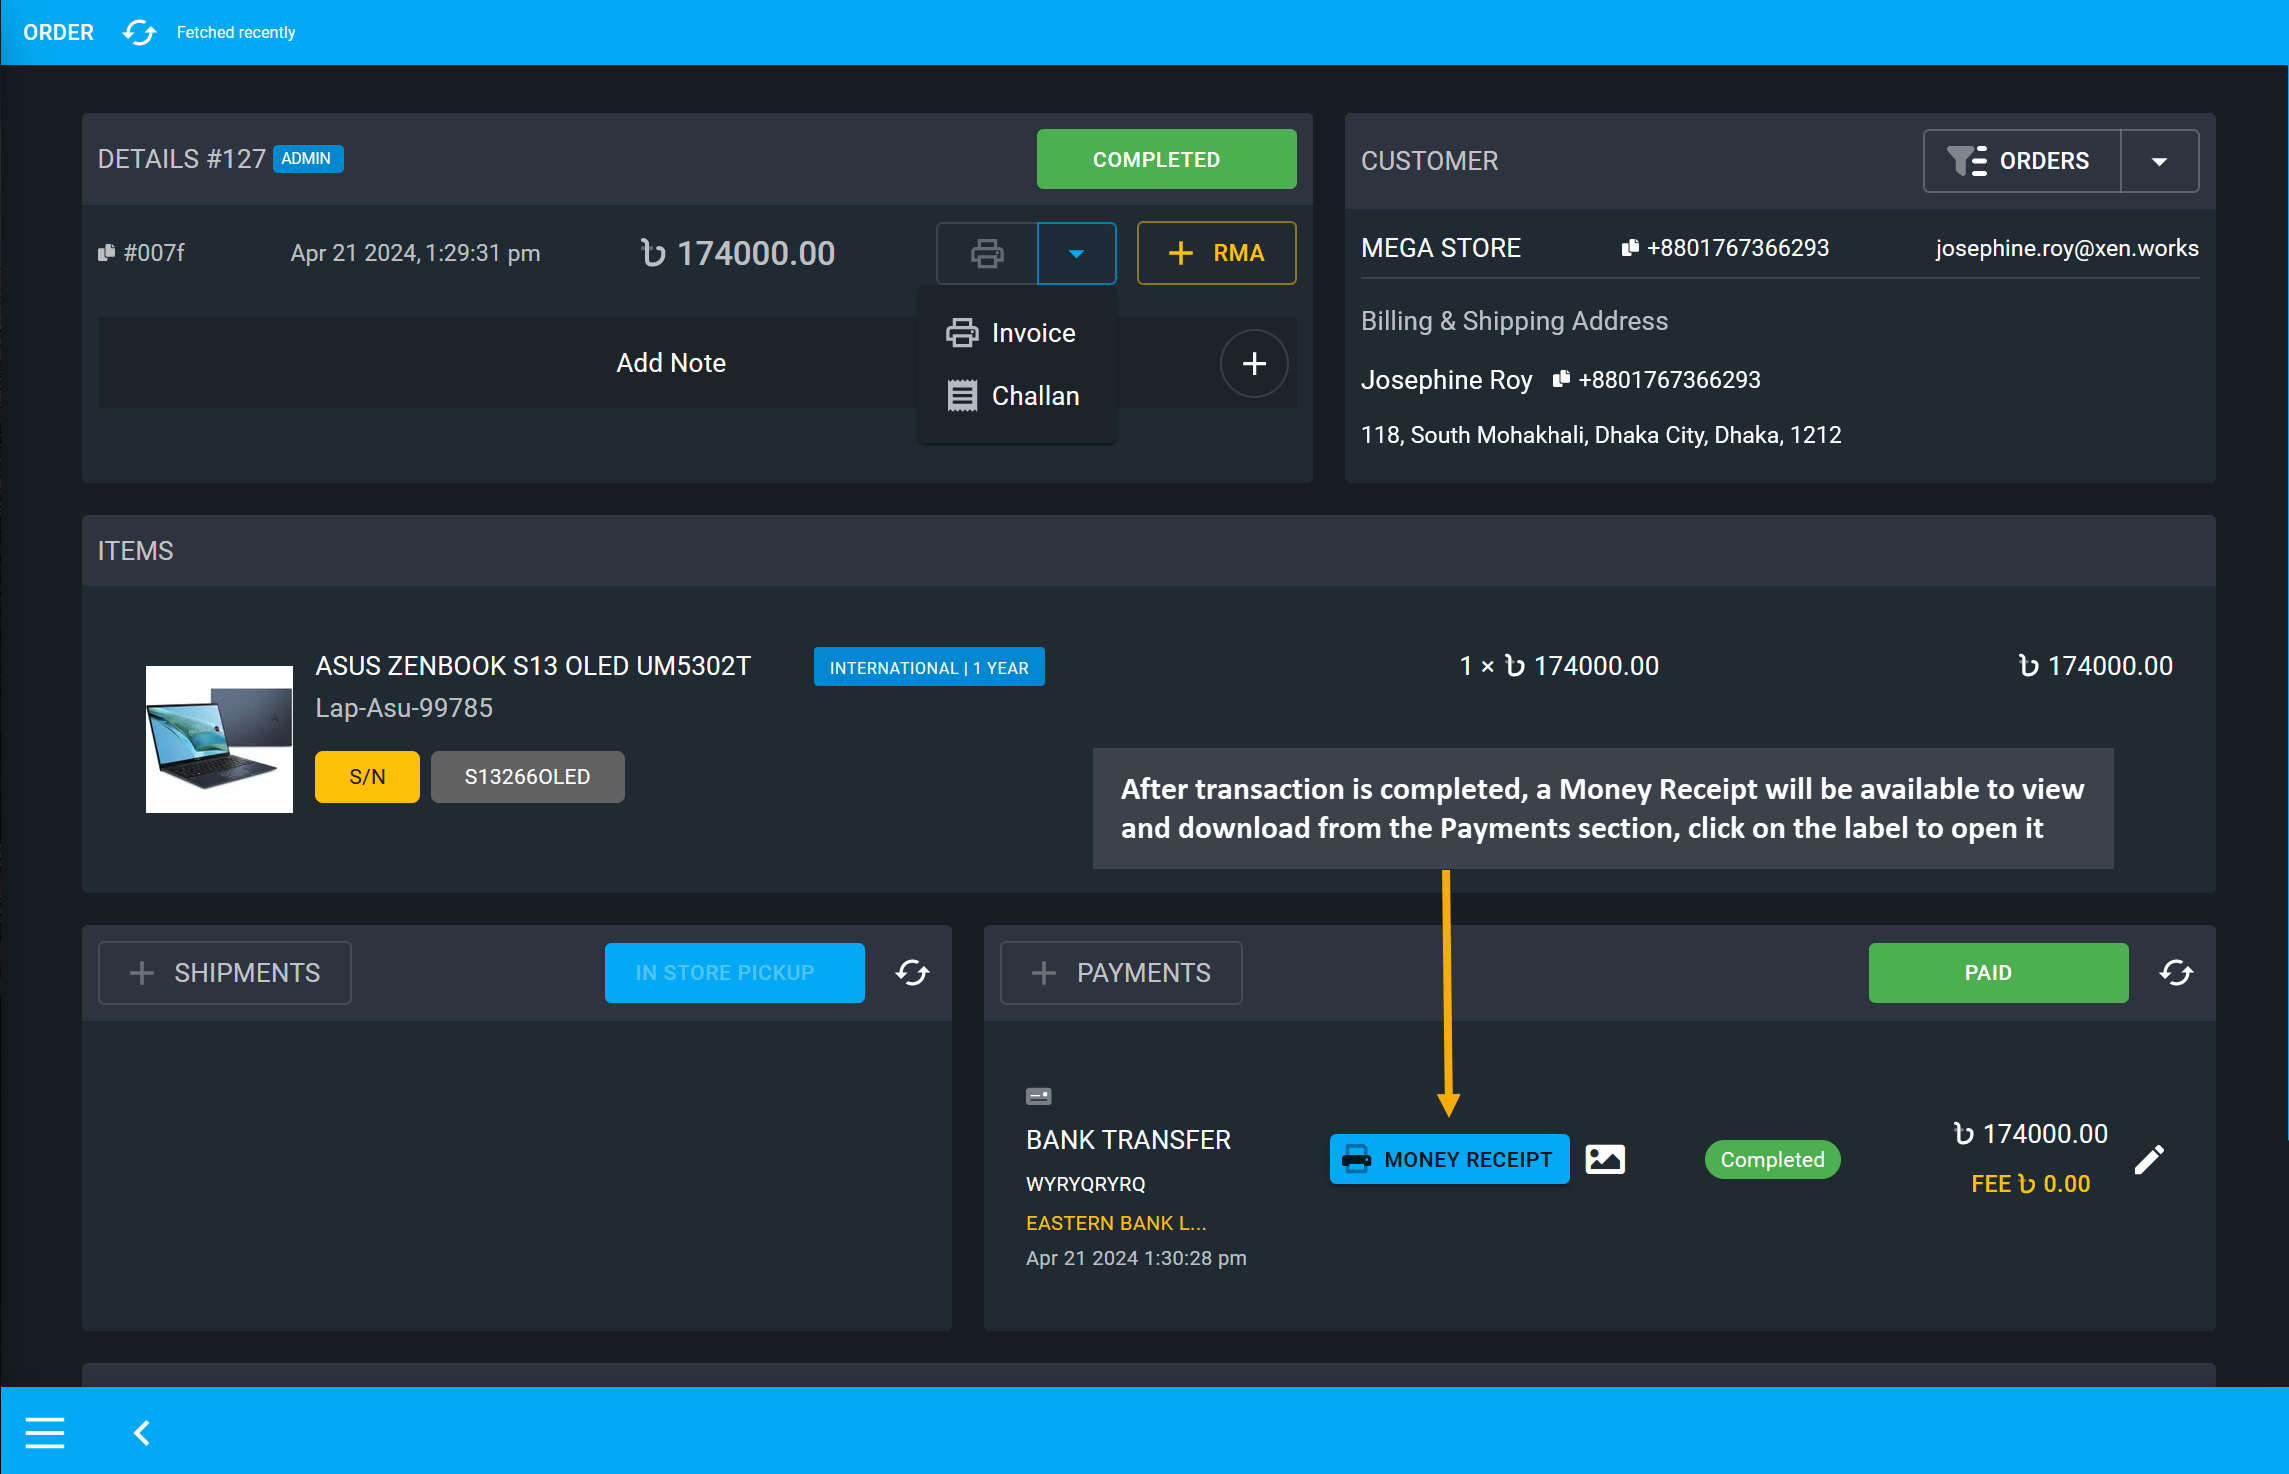
Image 19: After completion of transaction, payment details can be checked from the Money Receipt.
Clicking on the Money Receipt button will open a print view of the payment transaction details.
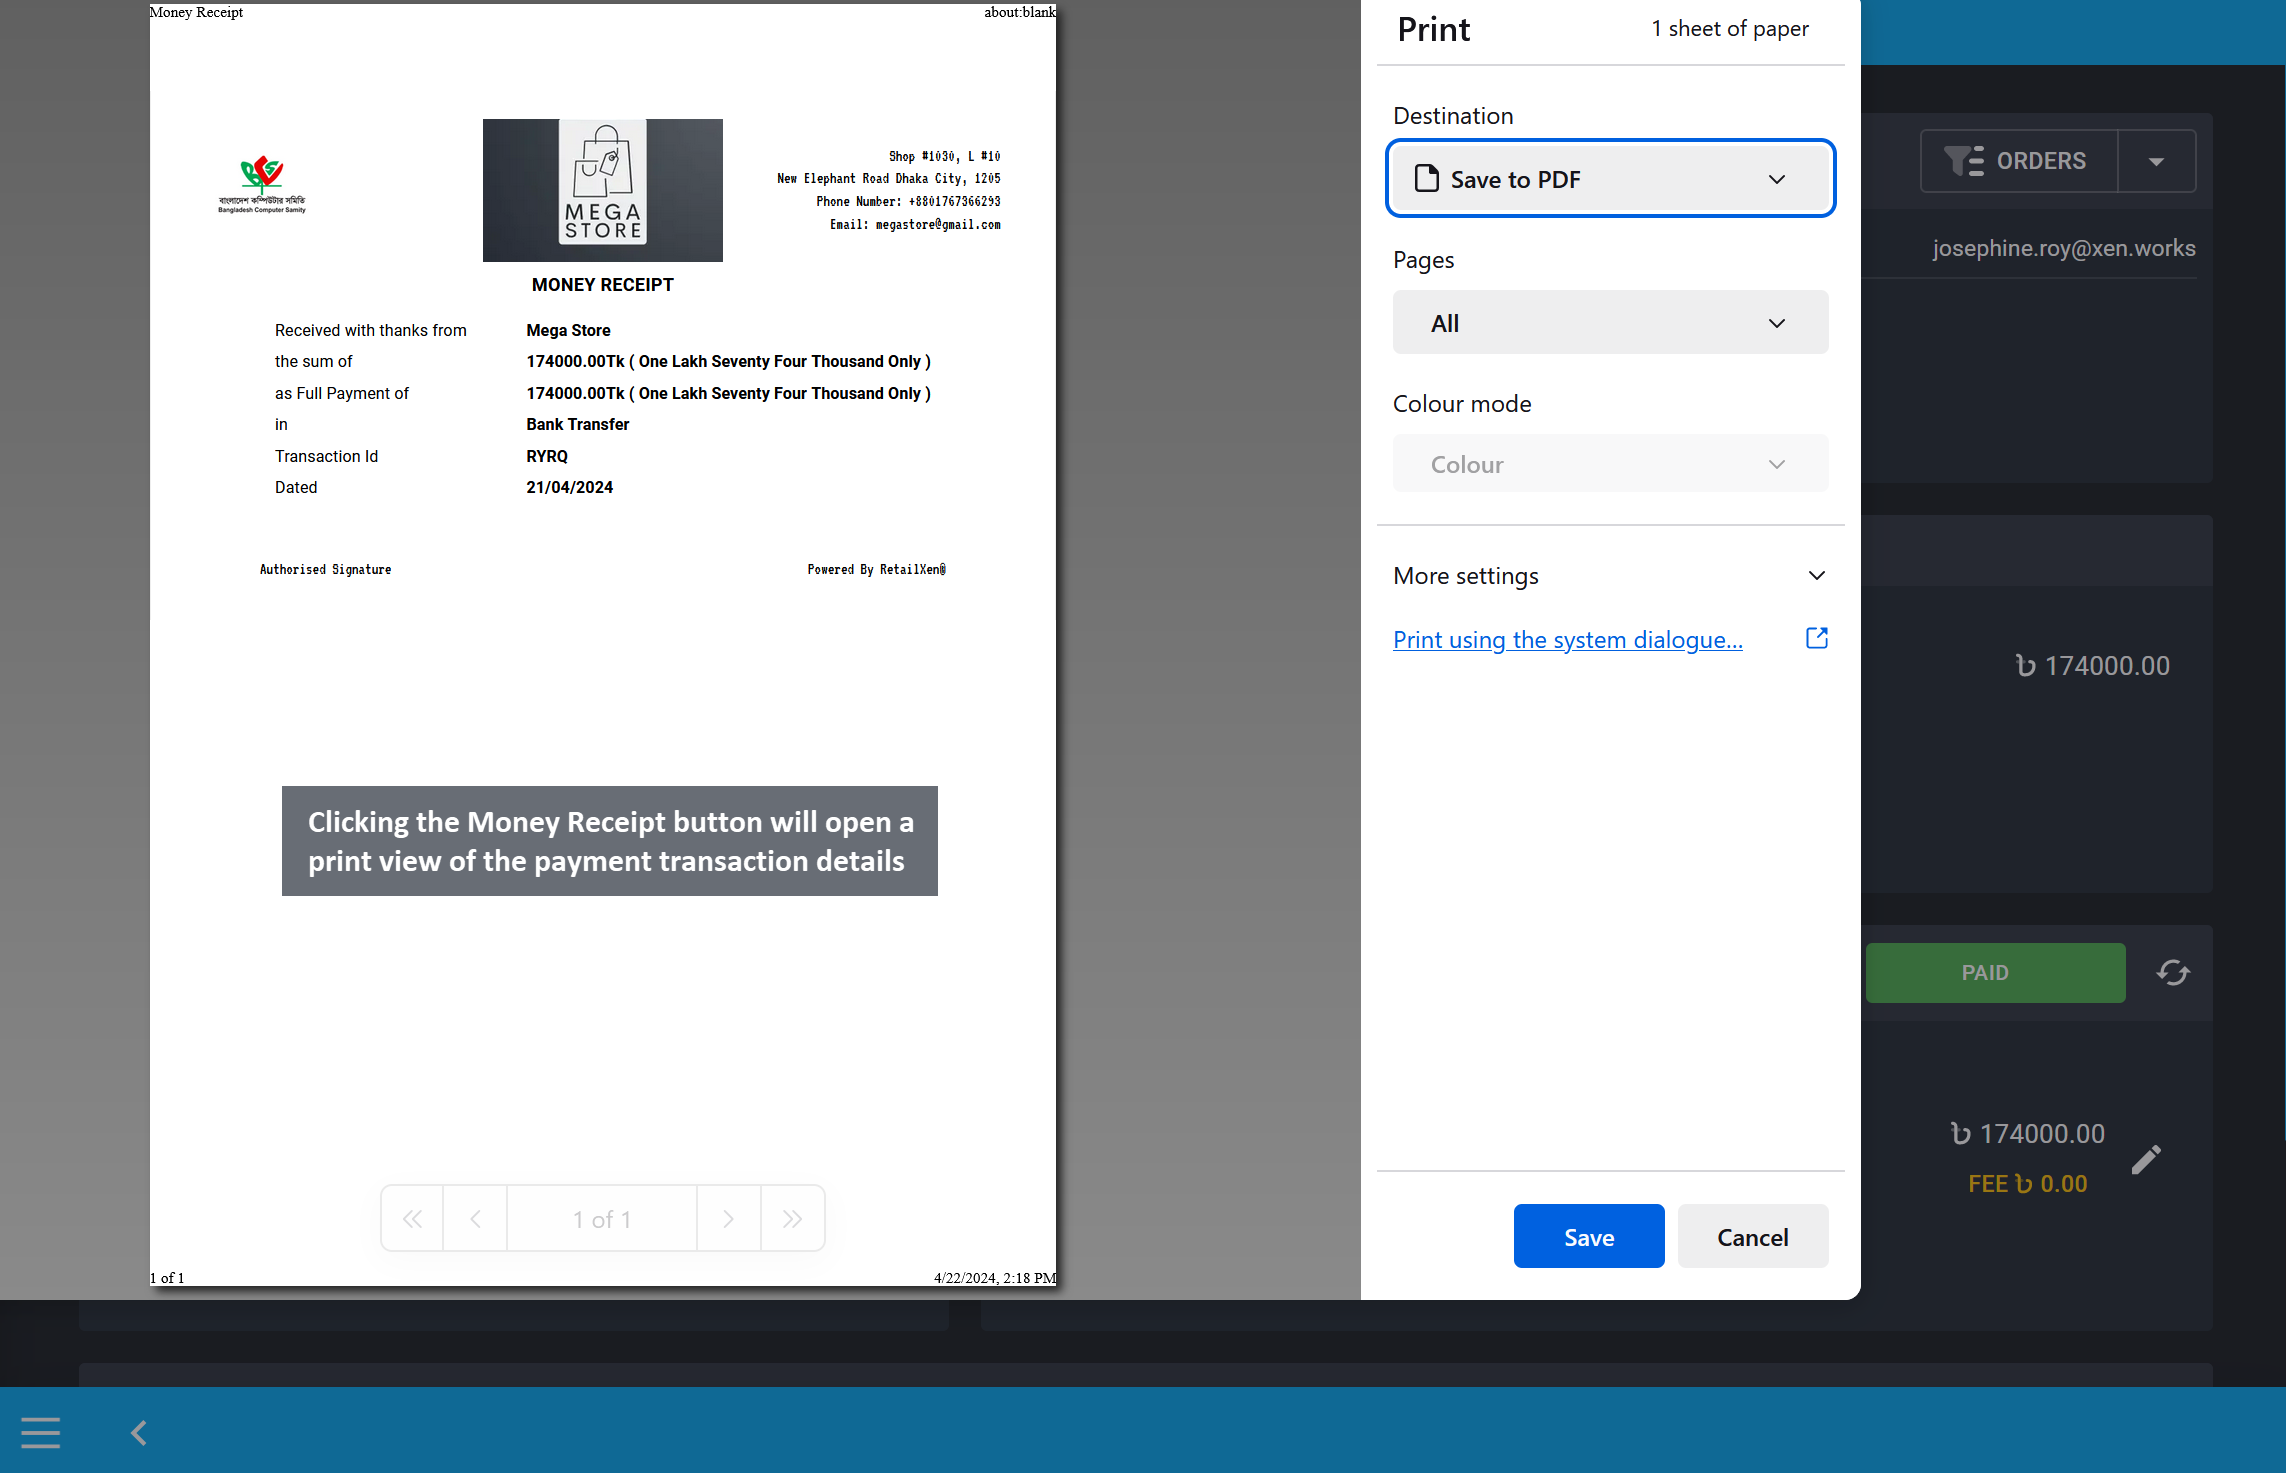
Image 20: Clicking the Money Receipt button will open a print view of payment transaction details.
Order Dashboard Shortcuts
Within the Order Dashboard, beside the Customer details box, there are dropdown shortcuts to redirect to pages like Customer Dashboard, Report, and Ledger Breakdown. Click pages from the dropdown to visit them directly from the Order Dashboard.
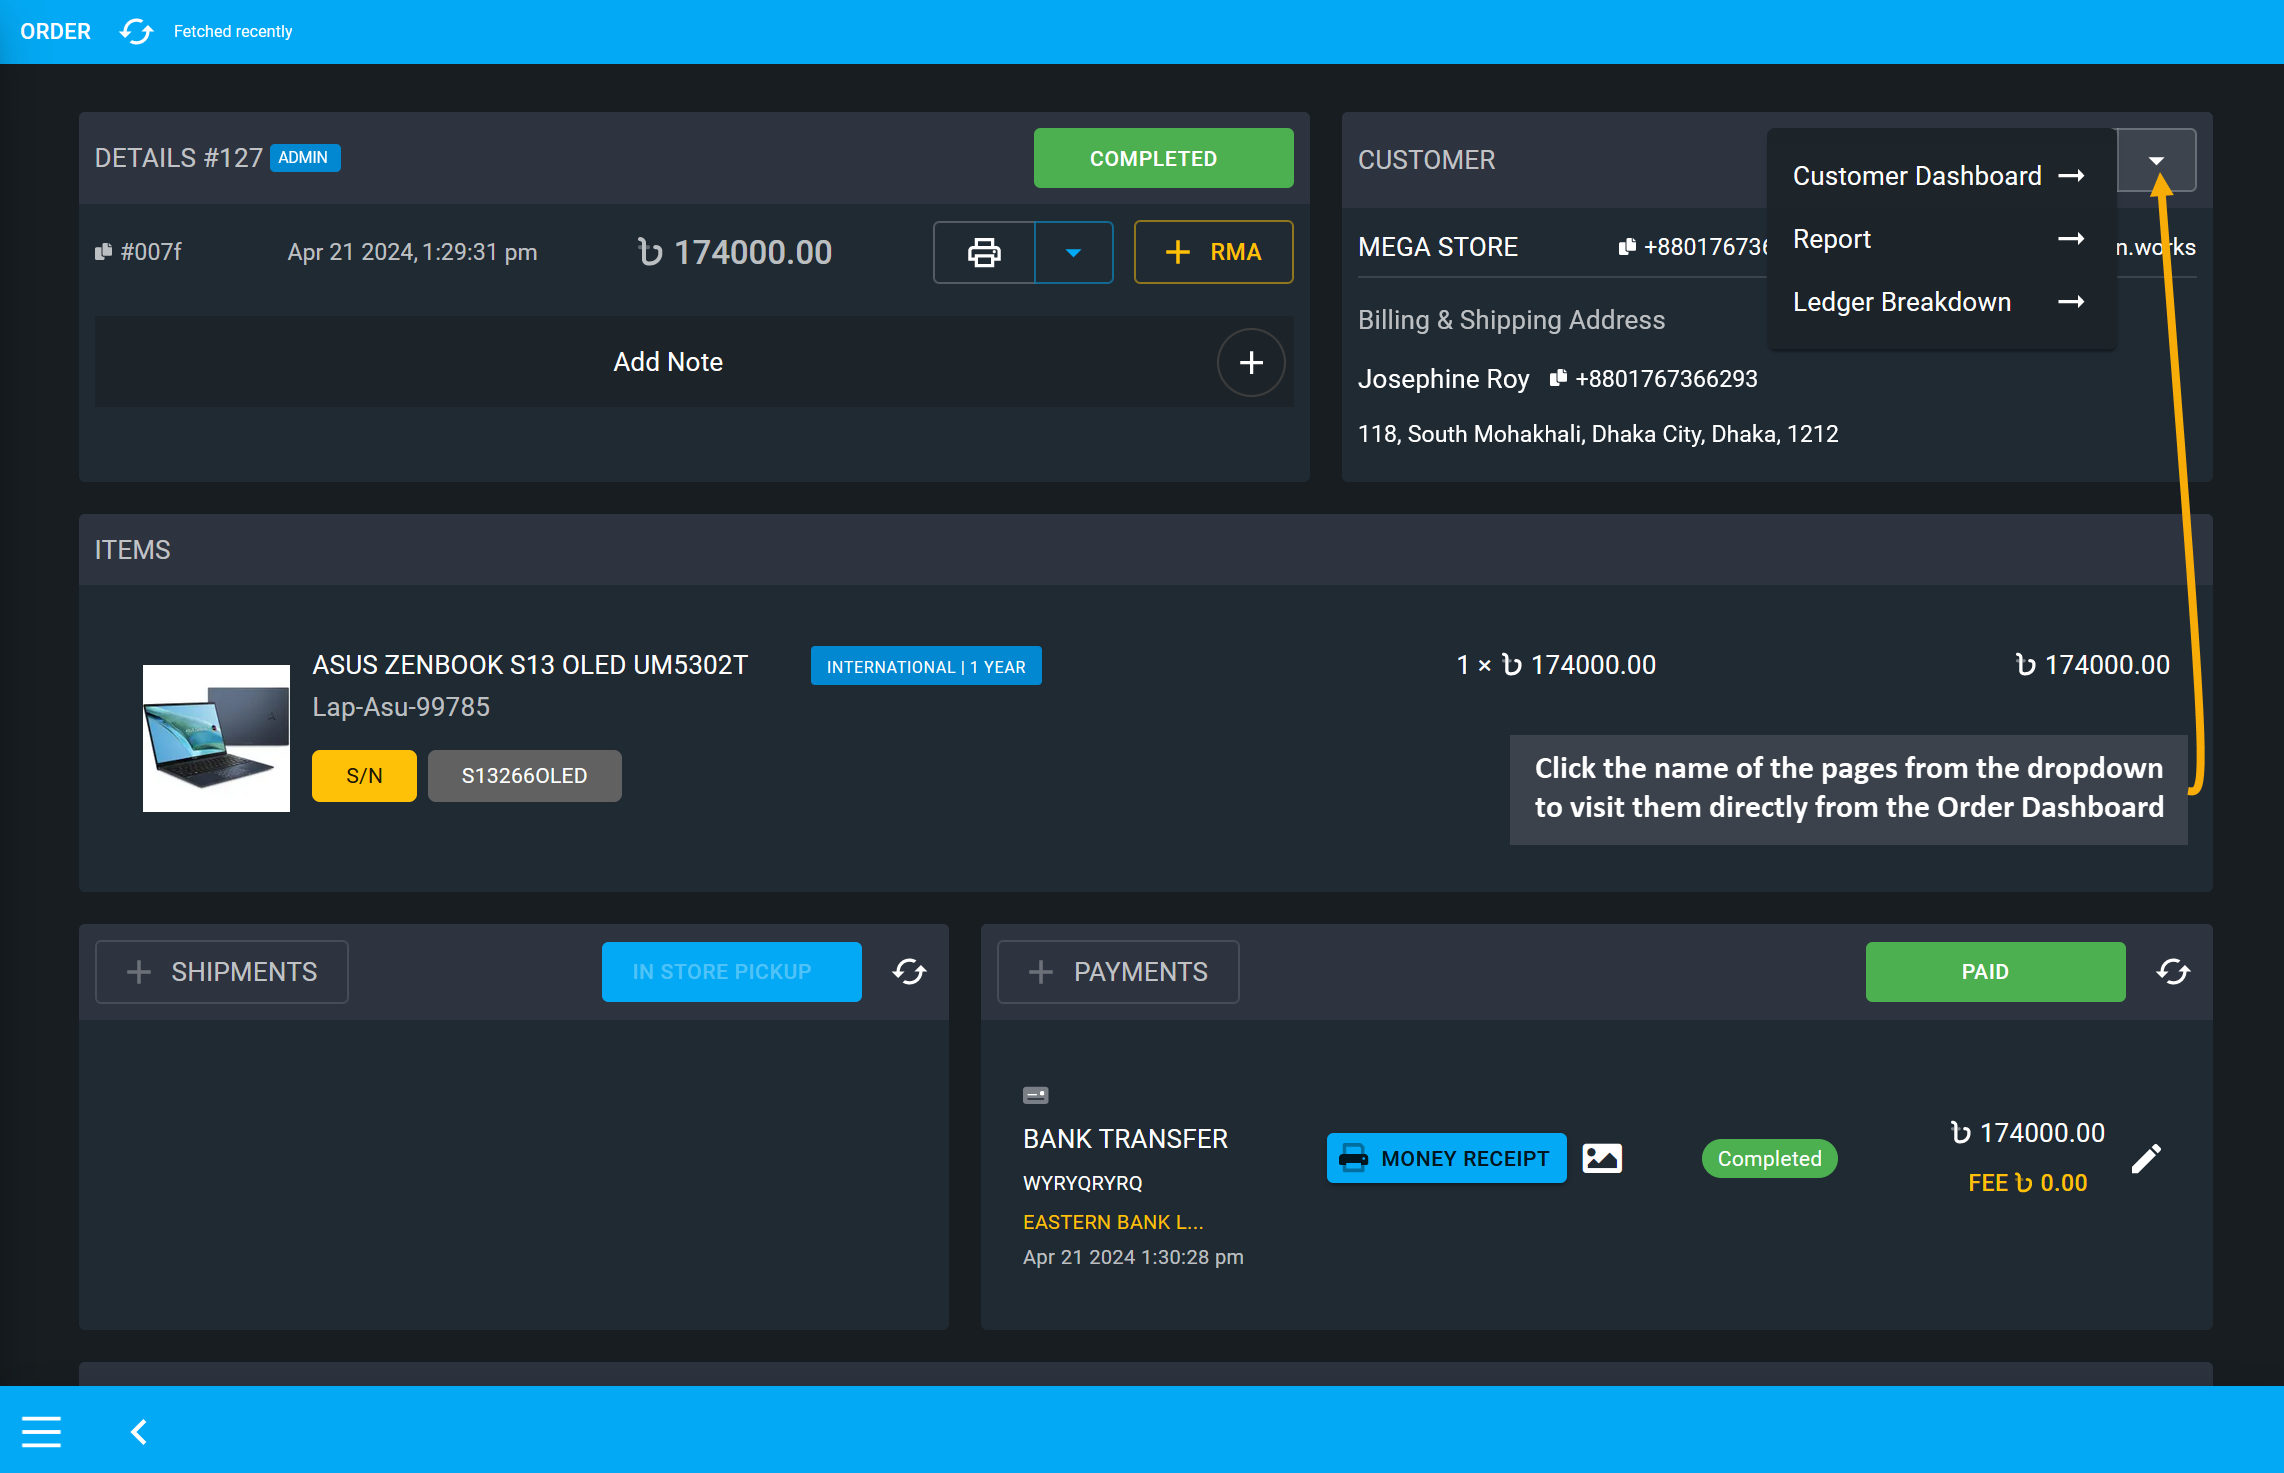
Image 21: Click the name of the pages from the dropdown to visit them directly from Order Dashboard.
Clicking on Customer Dashboard will redirect to the Customer’s Dashboard from Order Dashboard on a separate new tab. So, access to any option related to Customer after checking with the Order.
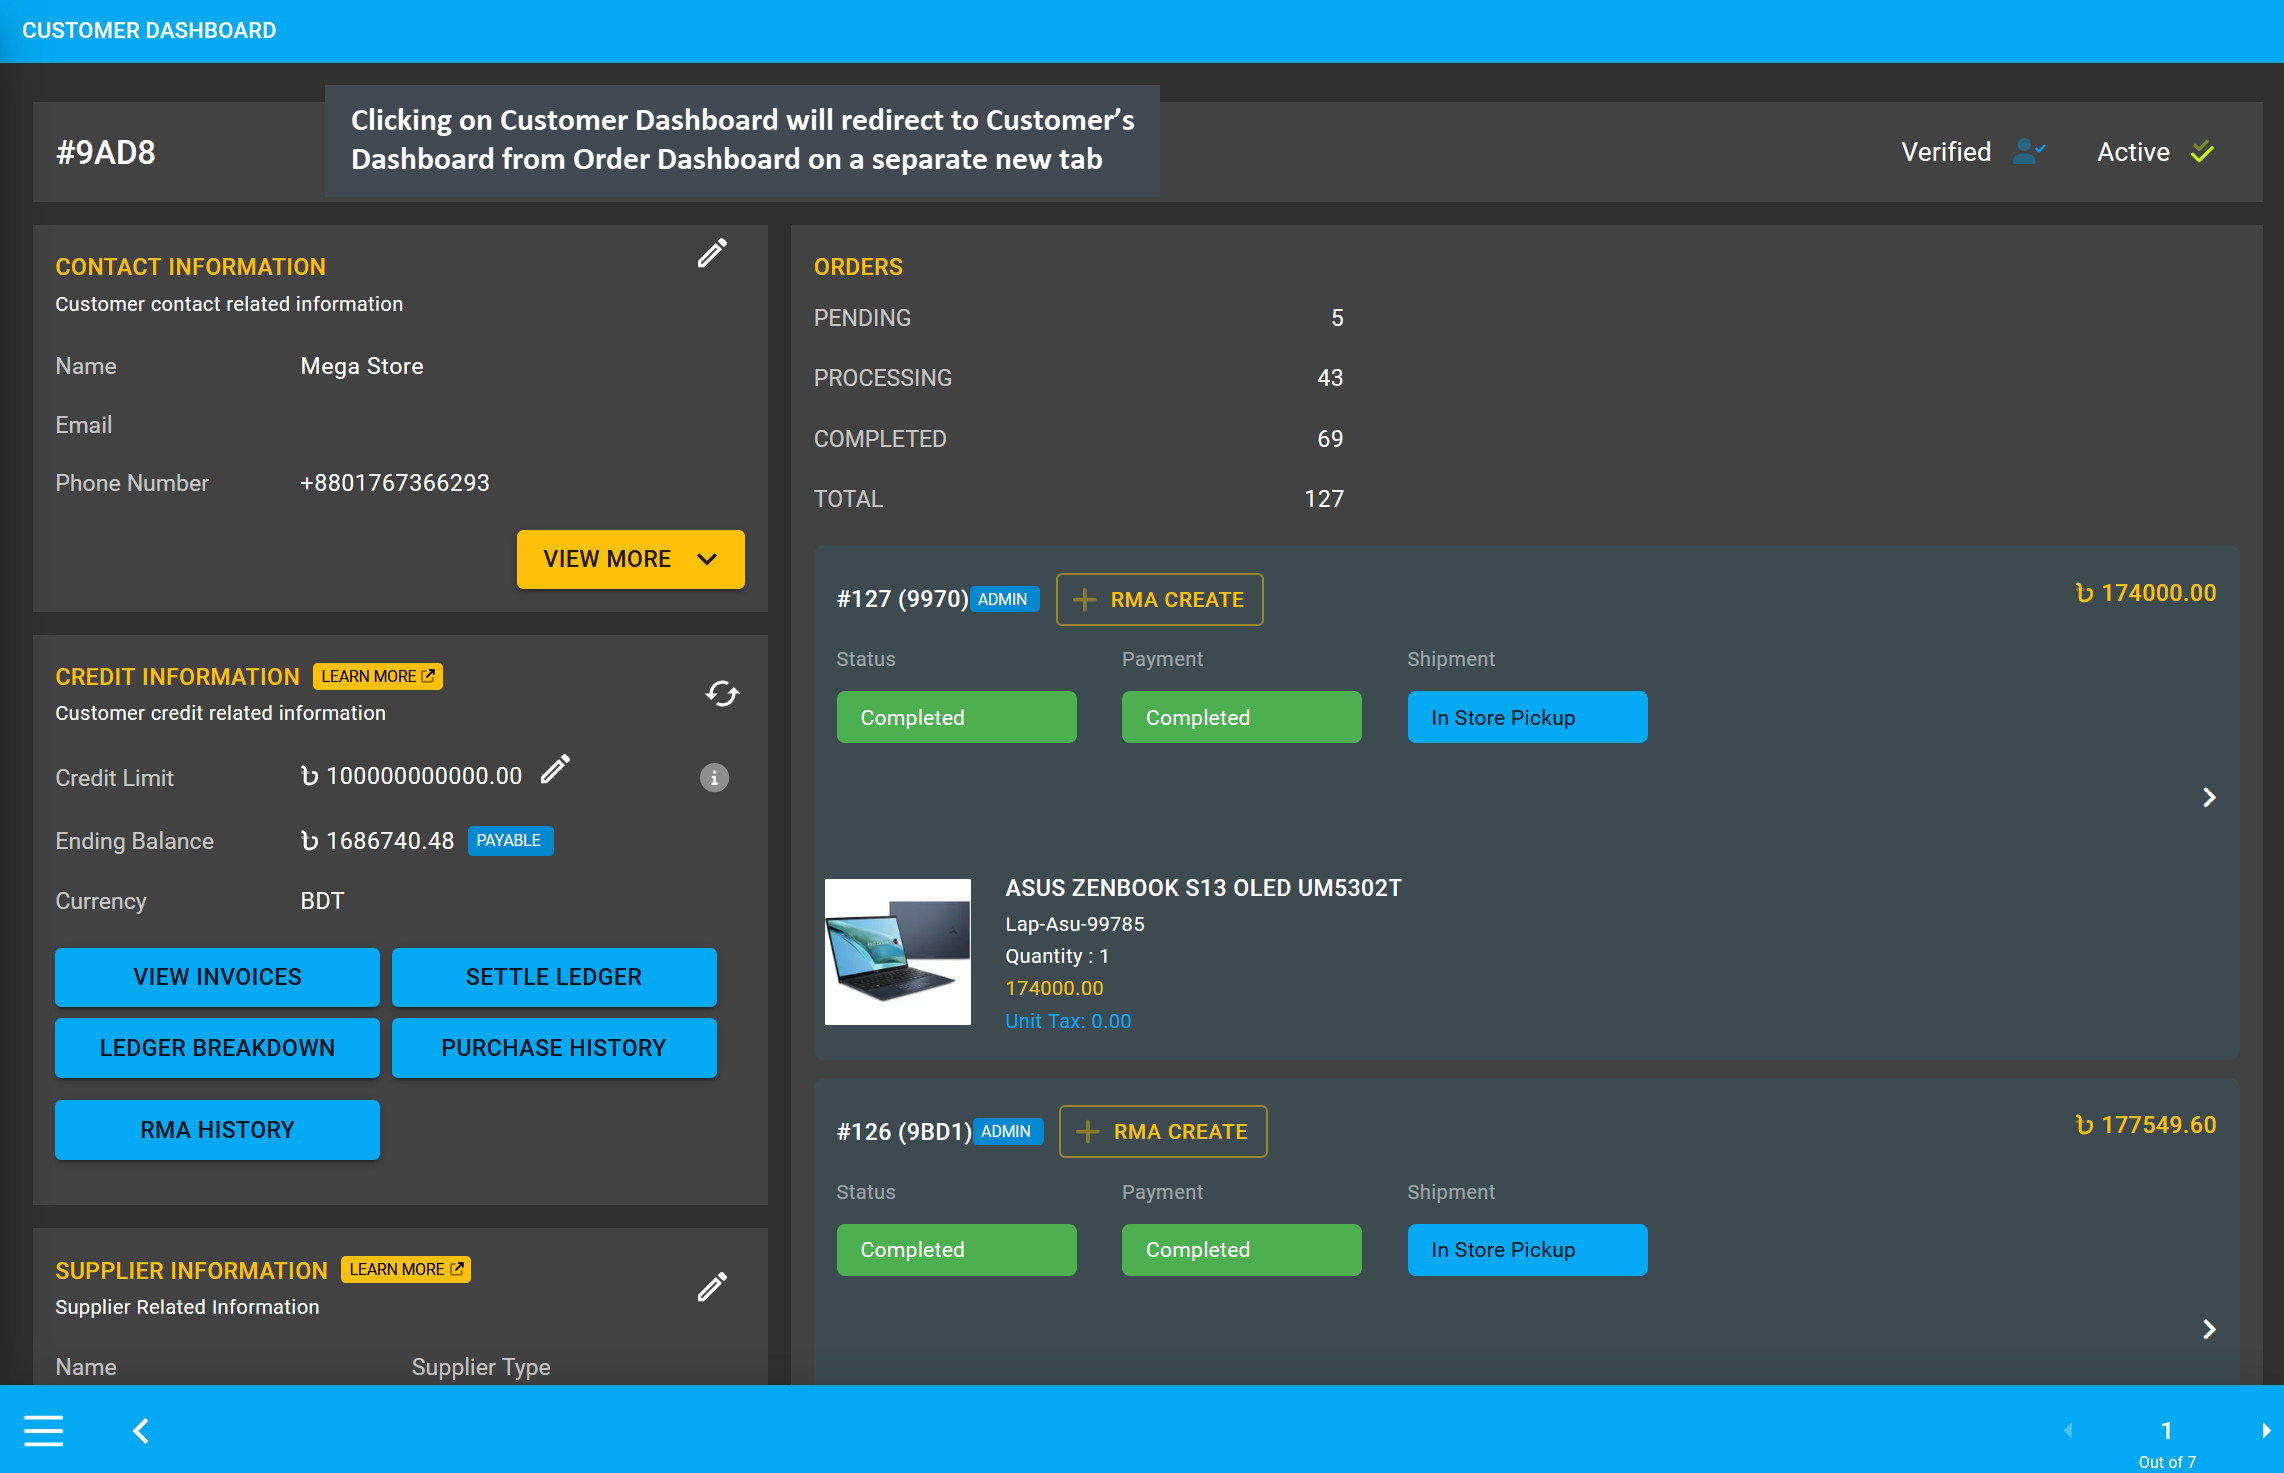
Image 22: Redirect to the Customer’s Dashboard from Order Dashboard by clicking on Order shortcut.
Another Order shortcut is Report that will show the profit loss of an Order, Product, Customer’s selected range. Clicking on Report will redirect to the Cost Basis page showing total profit, revenue, and cost.
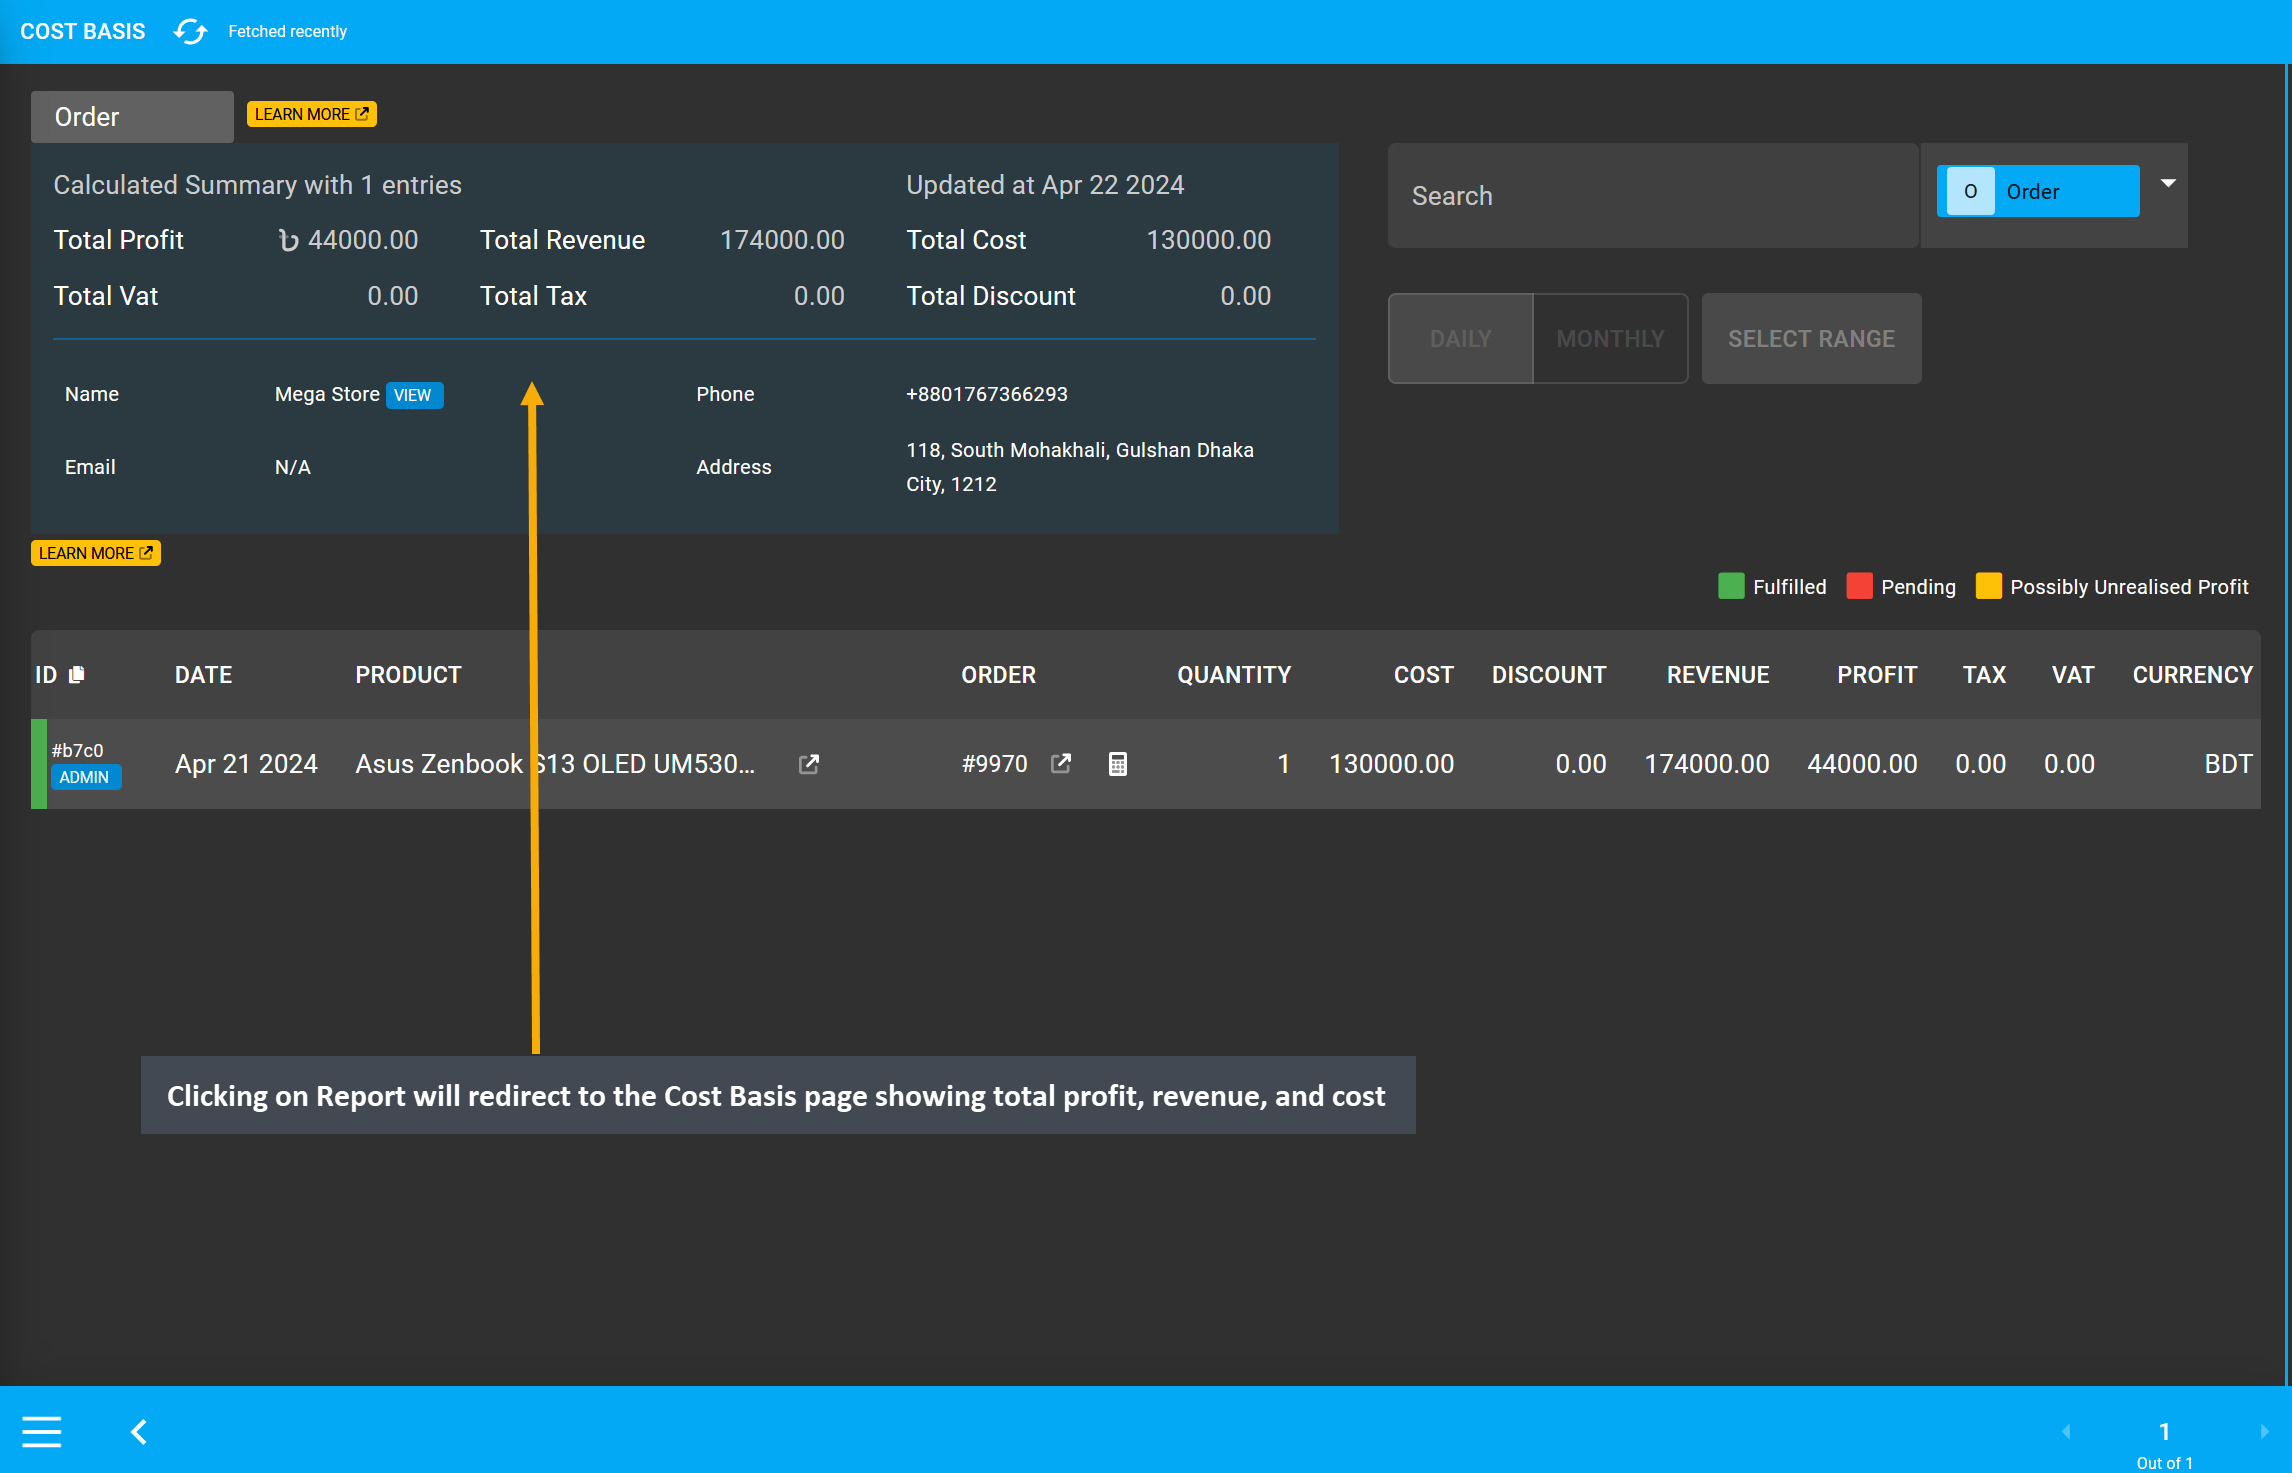
Image 23: Clicking Report will redirect to Cost Basis page showing total profit, revenue, and cost.
The other shortcut is Ledger Breakdown that will show the overall transactions of a Credit Customer and a Credit Supplier. Clicking on Ledger Breakdown will redirect to Ledger showing details of all transactions.
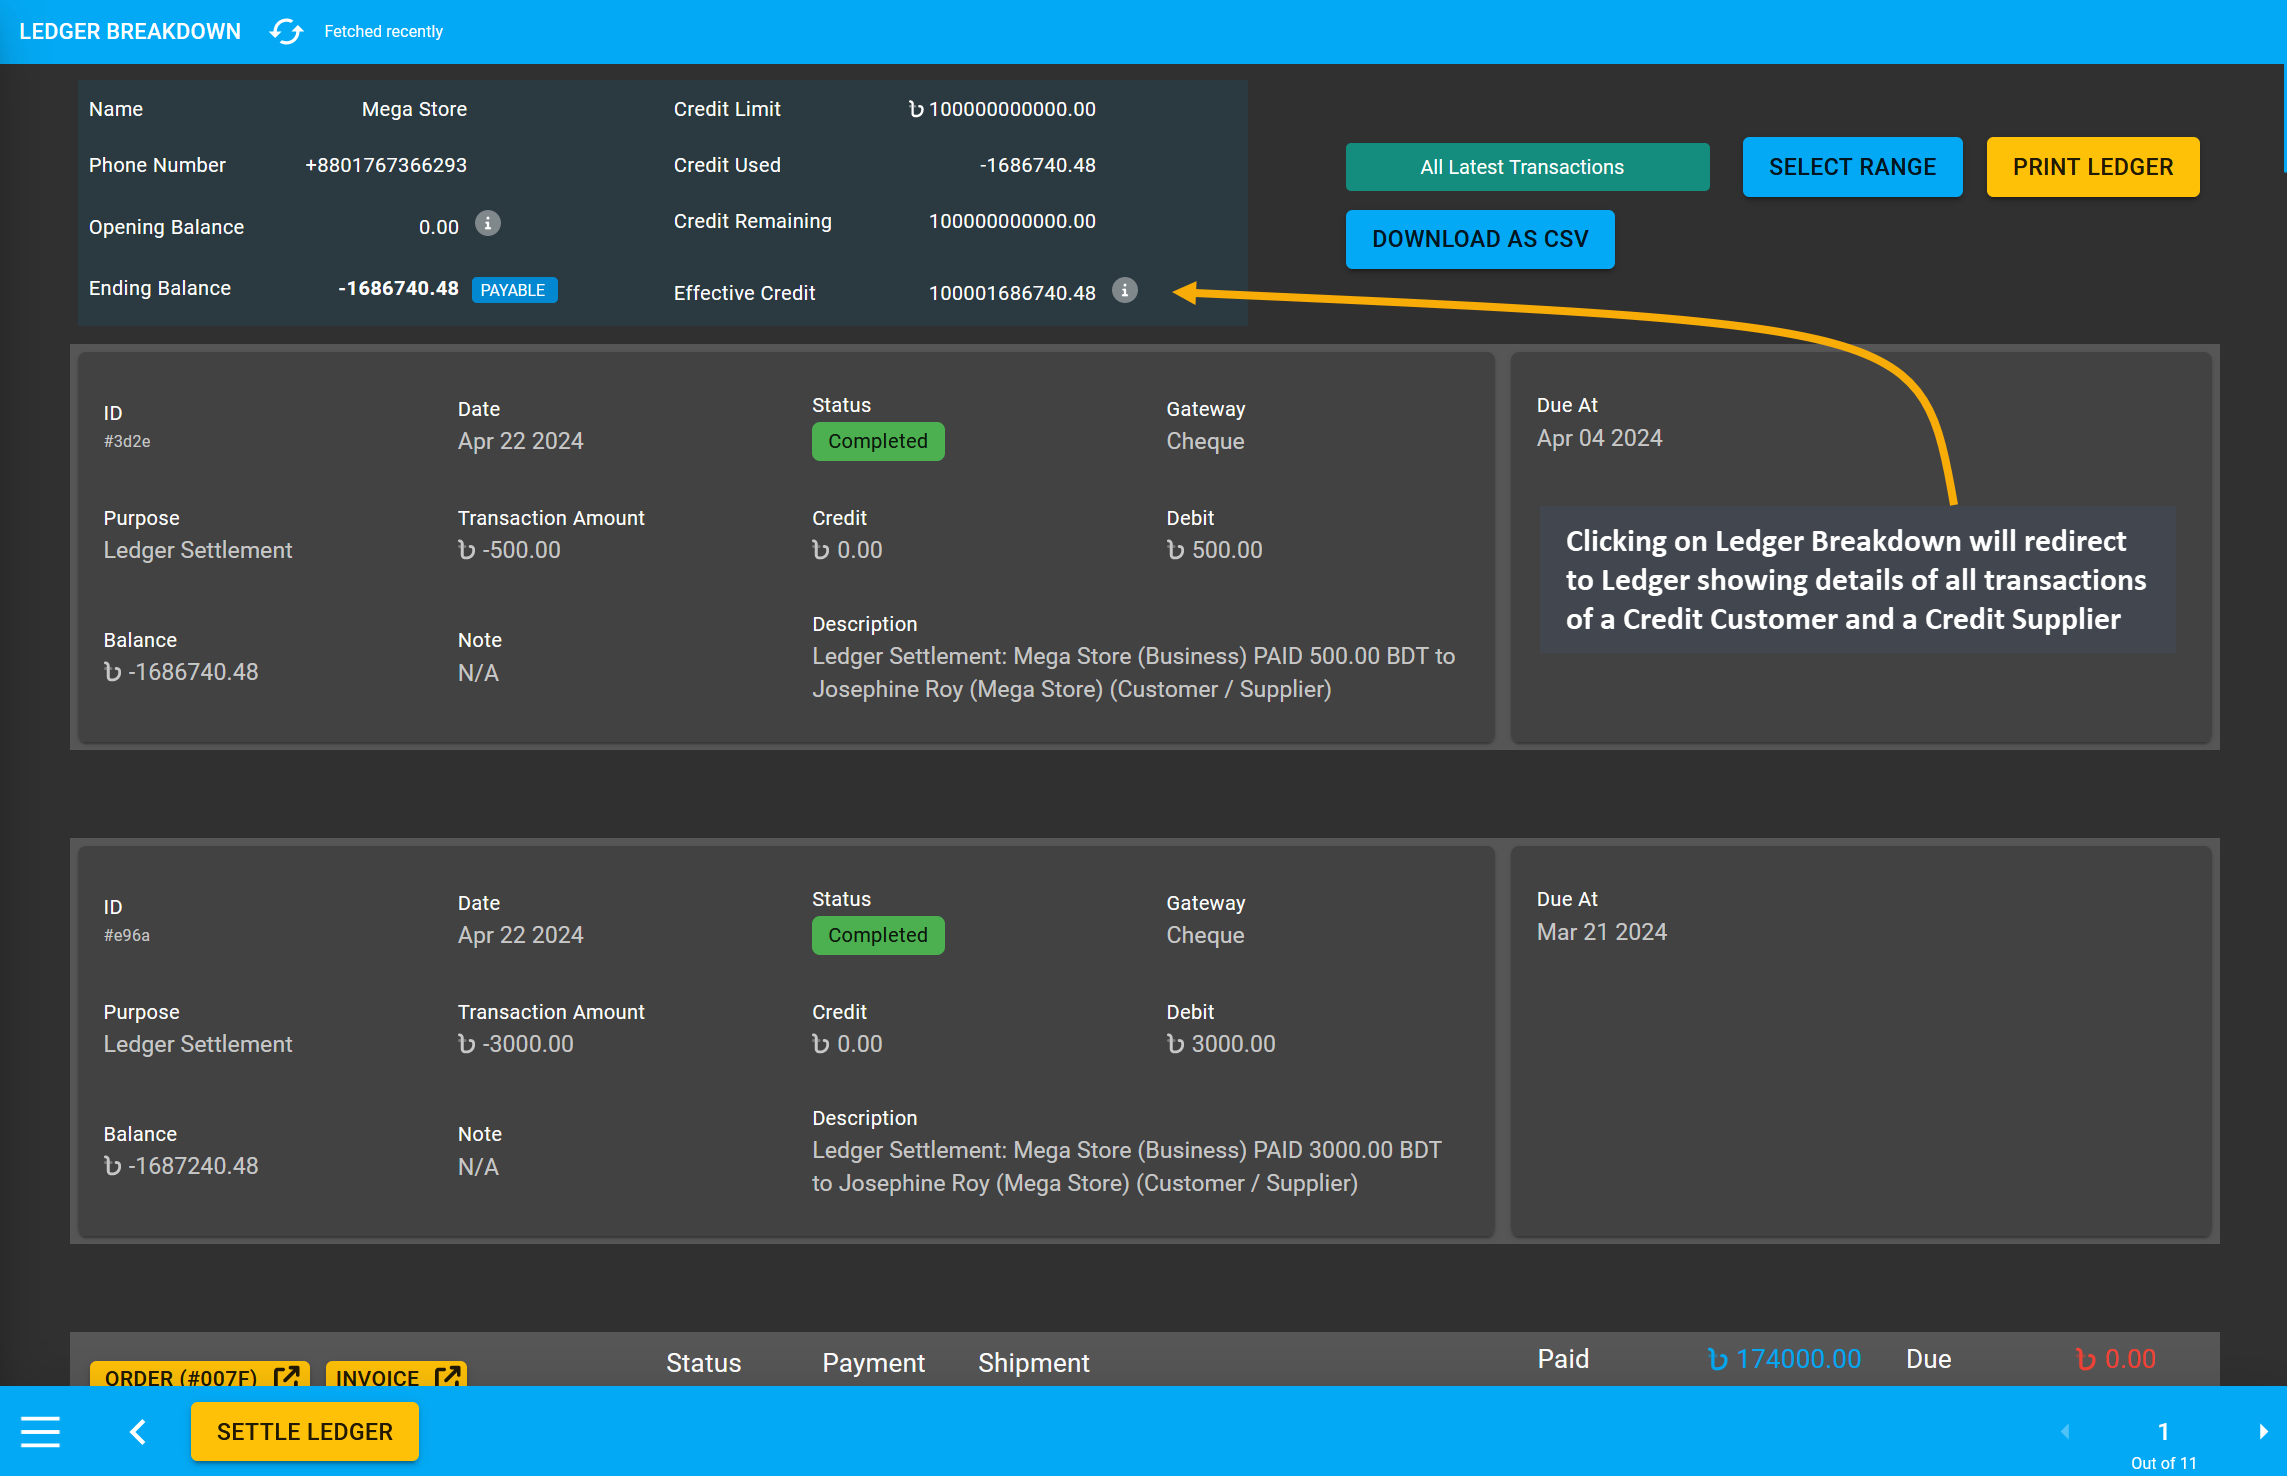
Image 24: Clicking on Ledger Breakdown will redirect to Ledger showing details of all transactions.
1 - Edit Payment Status
Update Payment Status based on customer payment using these options
Update Payment Status
If an Order is made without payment from Cart, the payment will remain Draft on Order Dashboard. For adding payments to the Draft Order, Order status needs to be changed from Draft to Pending and payments can be added by clicking + Payments from the order payment section.
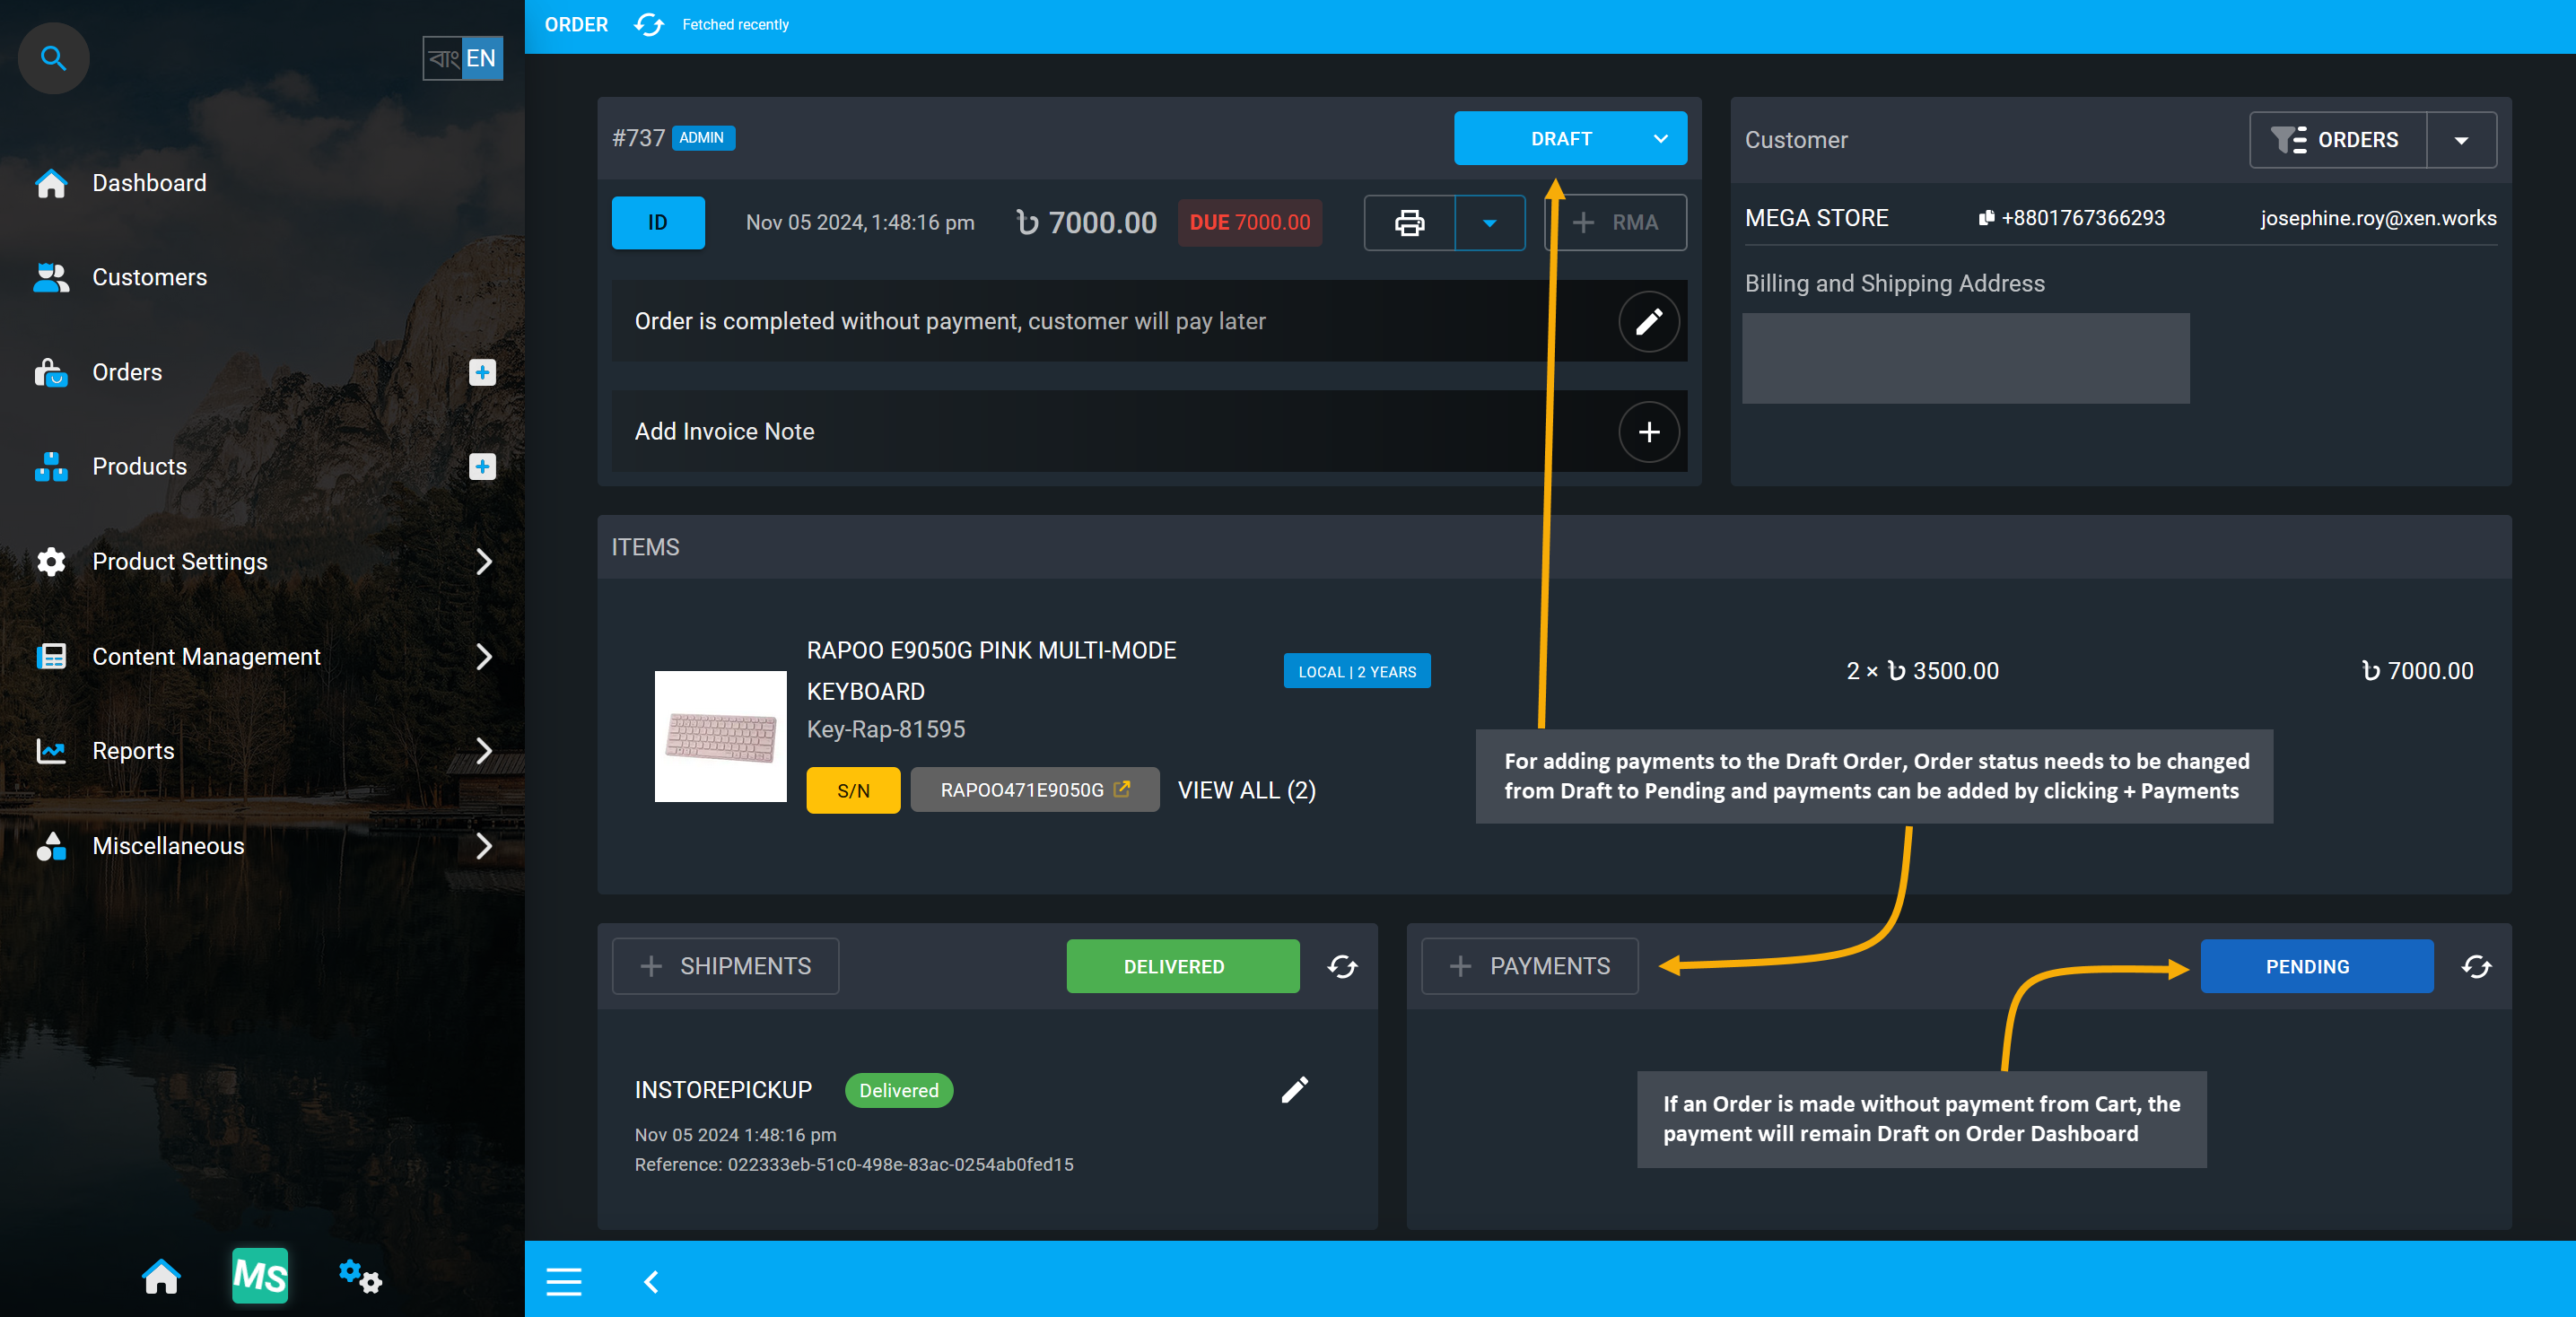
Image 1: Order status need to be updated from Draft to Pending to add payments to unpaid Order.
When an Order is placed, it may have pending Payments or require Payment verification. Usually, when a payment is added from Order dashboard for an unpaid order, it will automatically change the payment status. However, Shop Owner can also manually update to different Payment statuses. Select from various statuses for Payment to update such as Pending, Partially Paid, Free, Paid (Pending Approval), Paid, Refunded, Partially Refunded, and Canceled, based on what action needs to be taken for the transaction status and to keep record of Payment status for an Order.
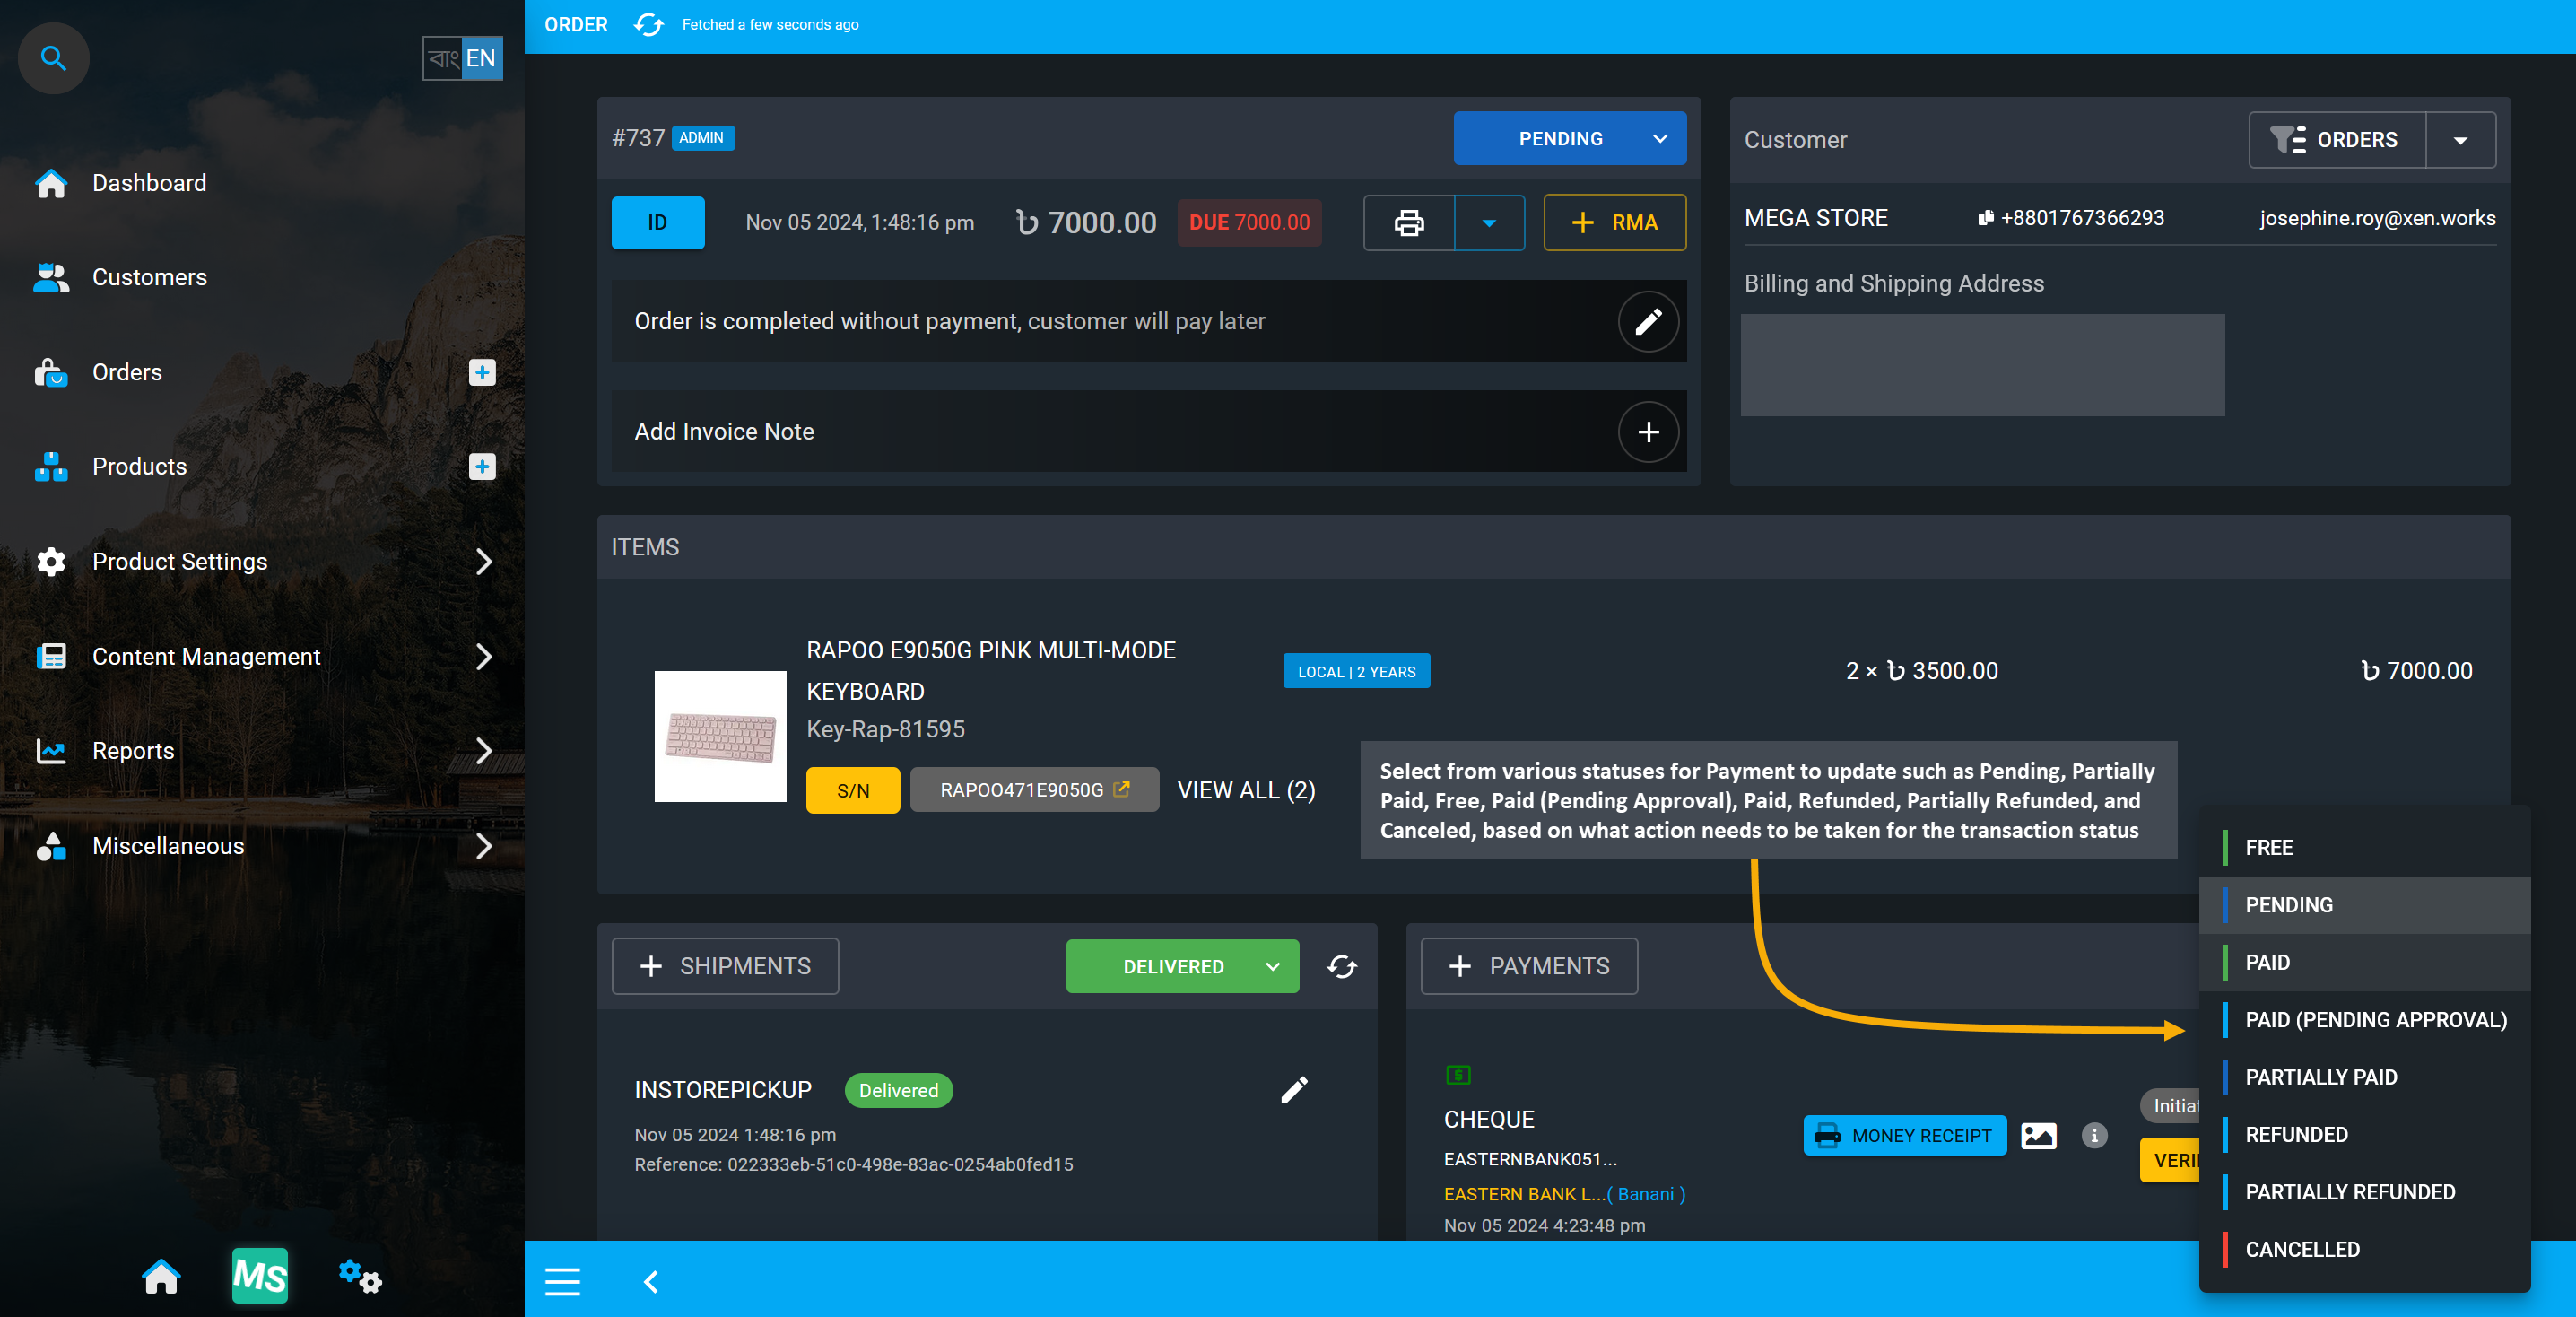
Image 2: Payment statuses can be updated to based on transaction verification and completion.
Payment Status: Free
If any agreement has been made between Seller parties, or between a Shop Owner and a Customer for the other party to receive certain Products as samples or gifts, then the Shop Owner will have to mark them as Free on the Payment status which will automatically reflect on the Order invoice. Seller can set the payment status as Free when they provide gift to customers with purchase, such as laptop bags as free with laptops.
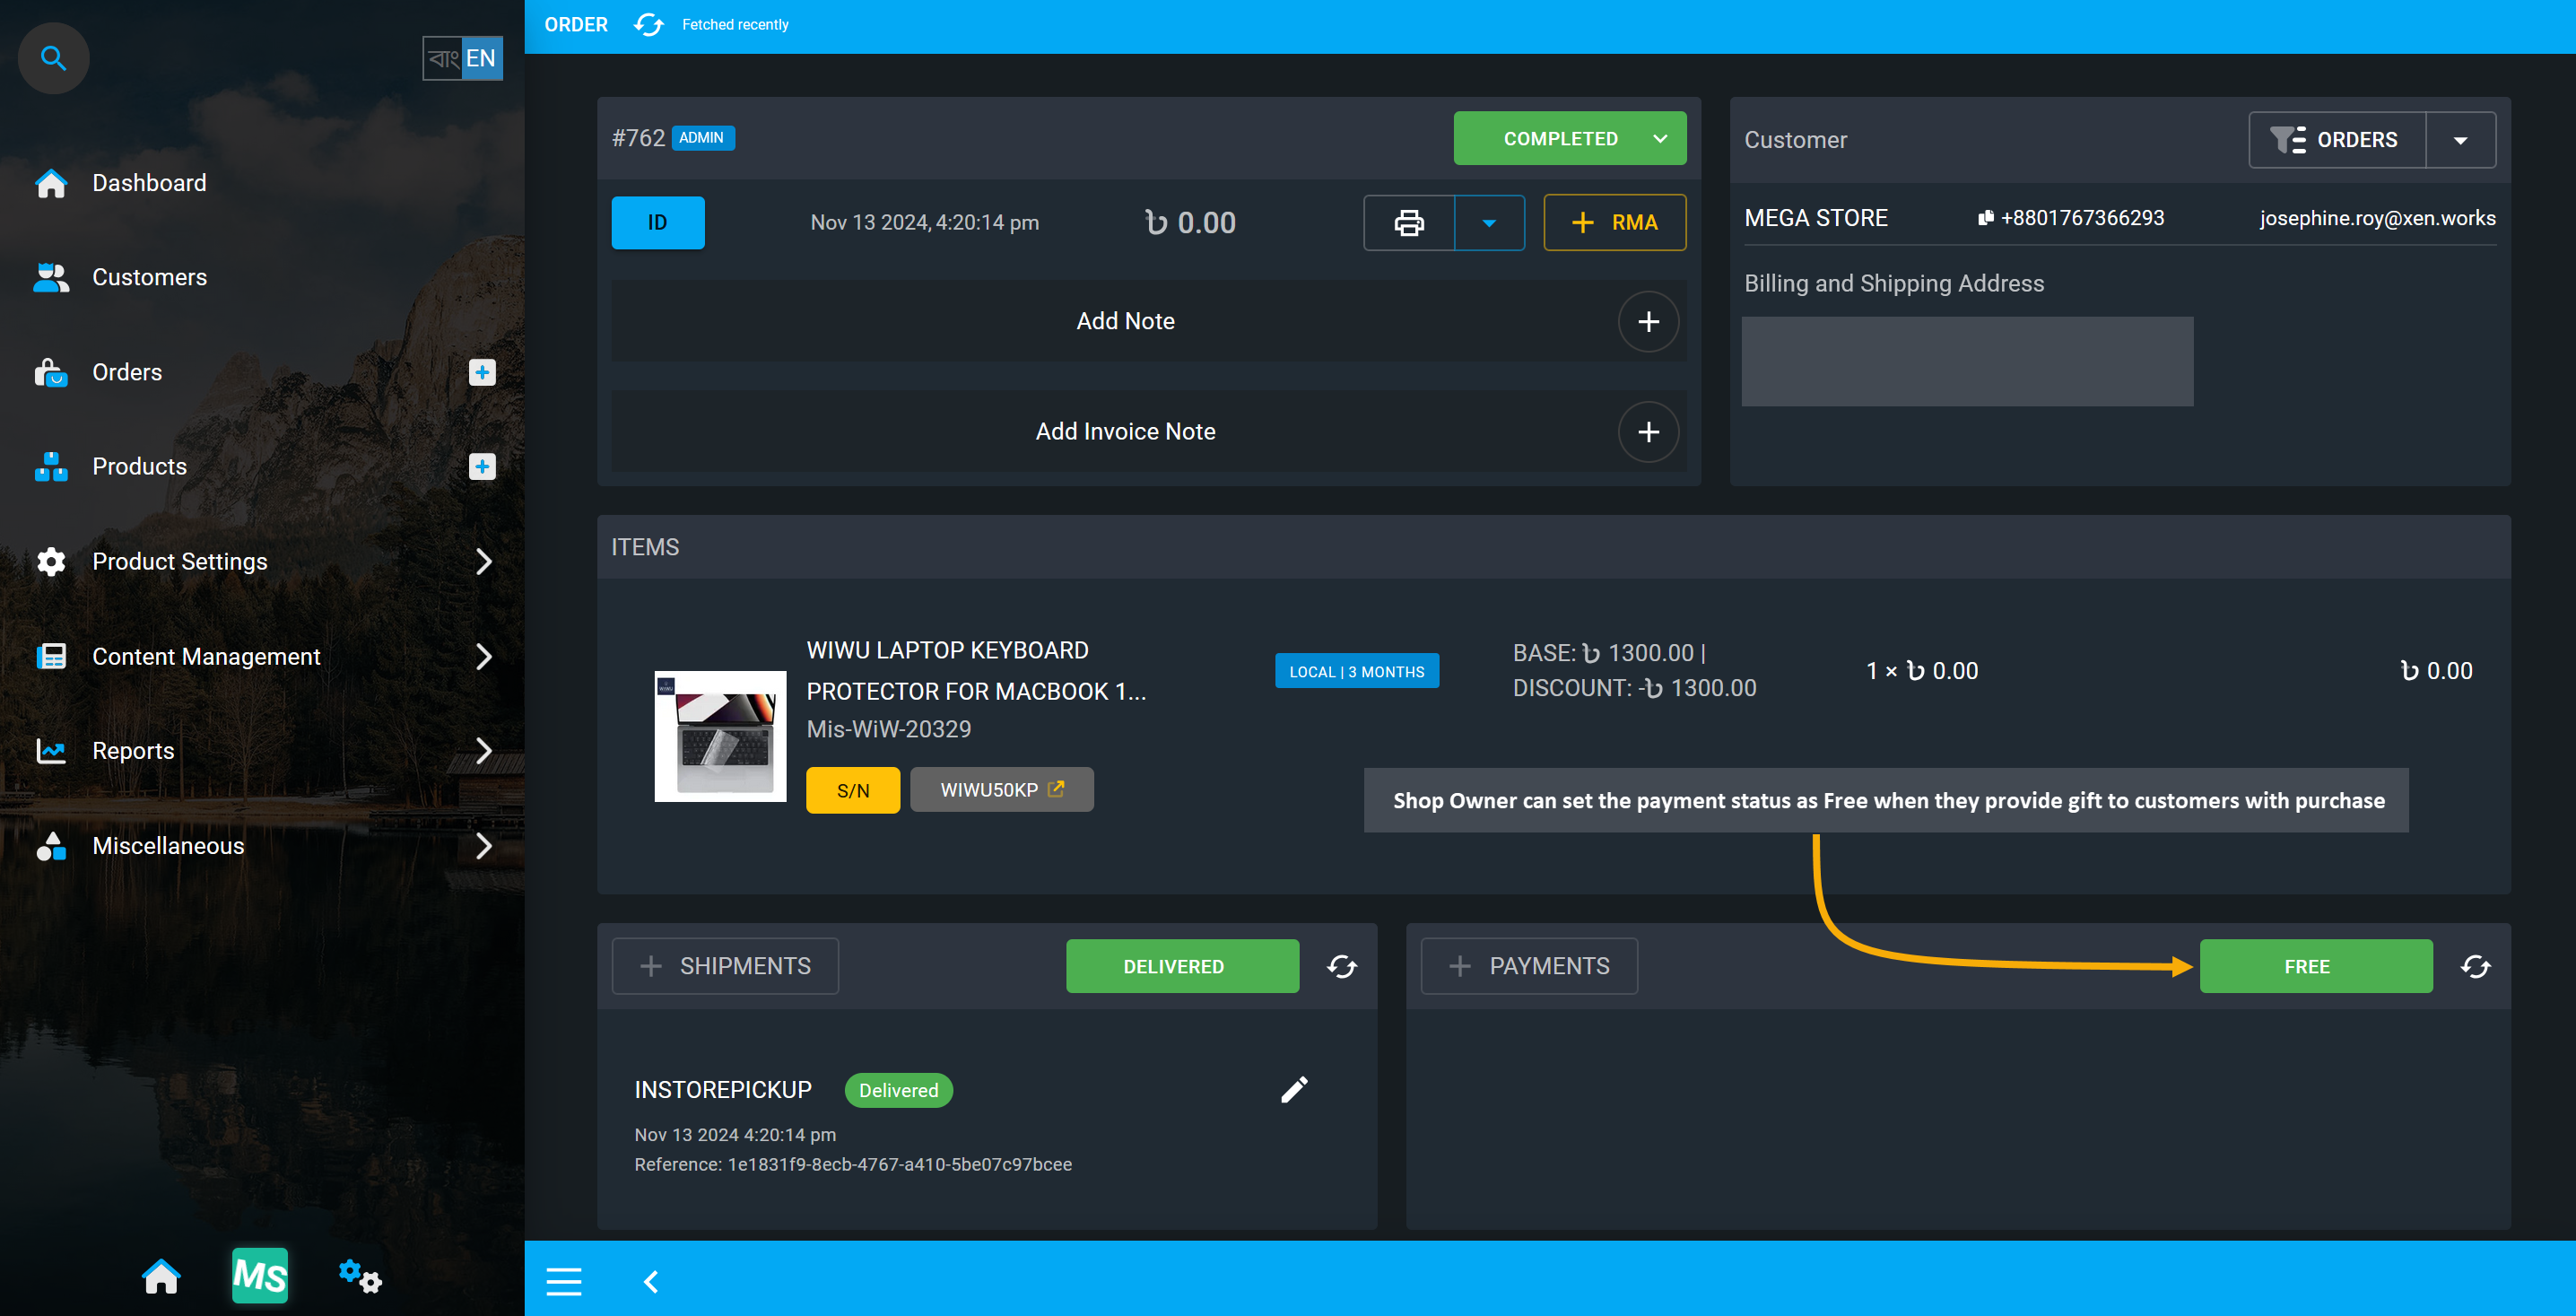
Image 2: Seller can set payment status as Free when they provide gift to customers with purchase.
Payment Status: Pending
Orders having Pending payment status means no payment has been made for the Order. Usually, Orders placed without payment from Order Cart will automatically have Pending payment status. Orders without any payment will show Order status as Draft, which will not allow adding any payments to Order. Hence, for adding payments for Order, Order status needs to be changed from Draft to Pending first.
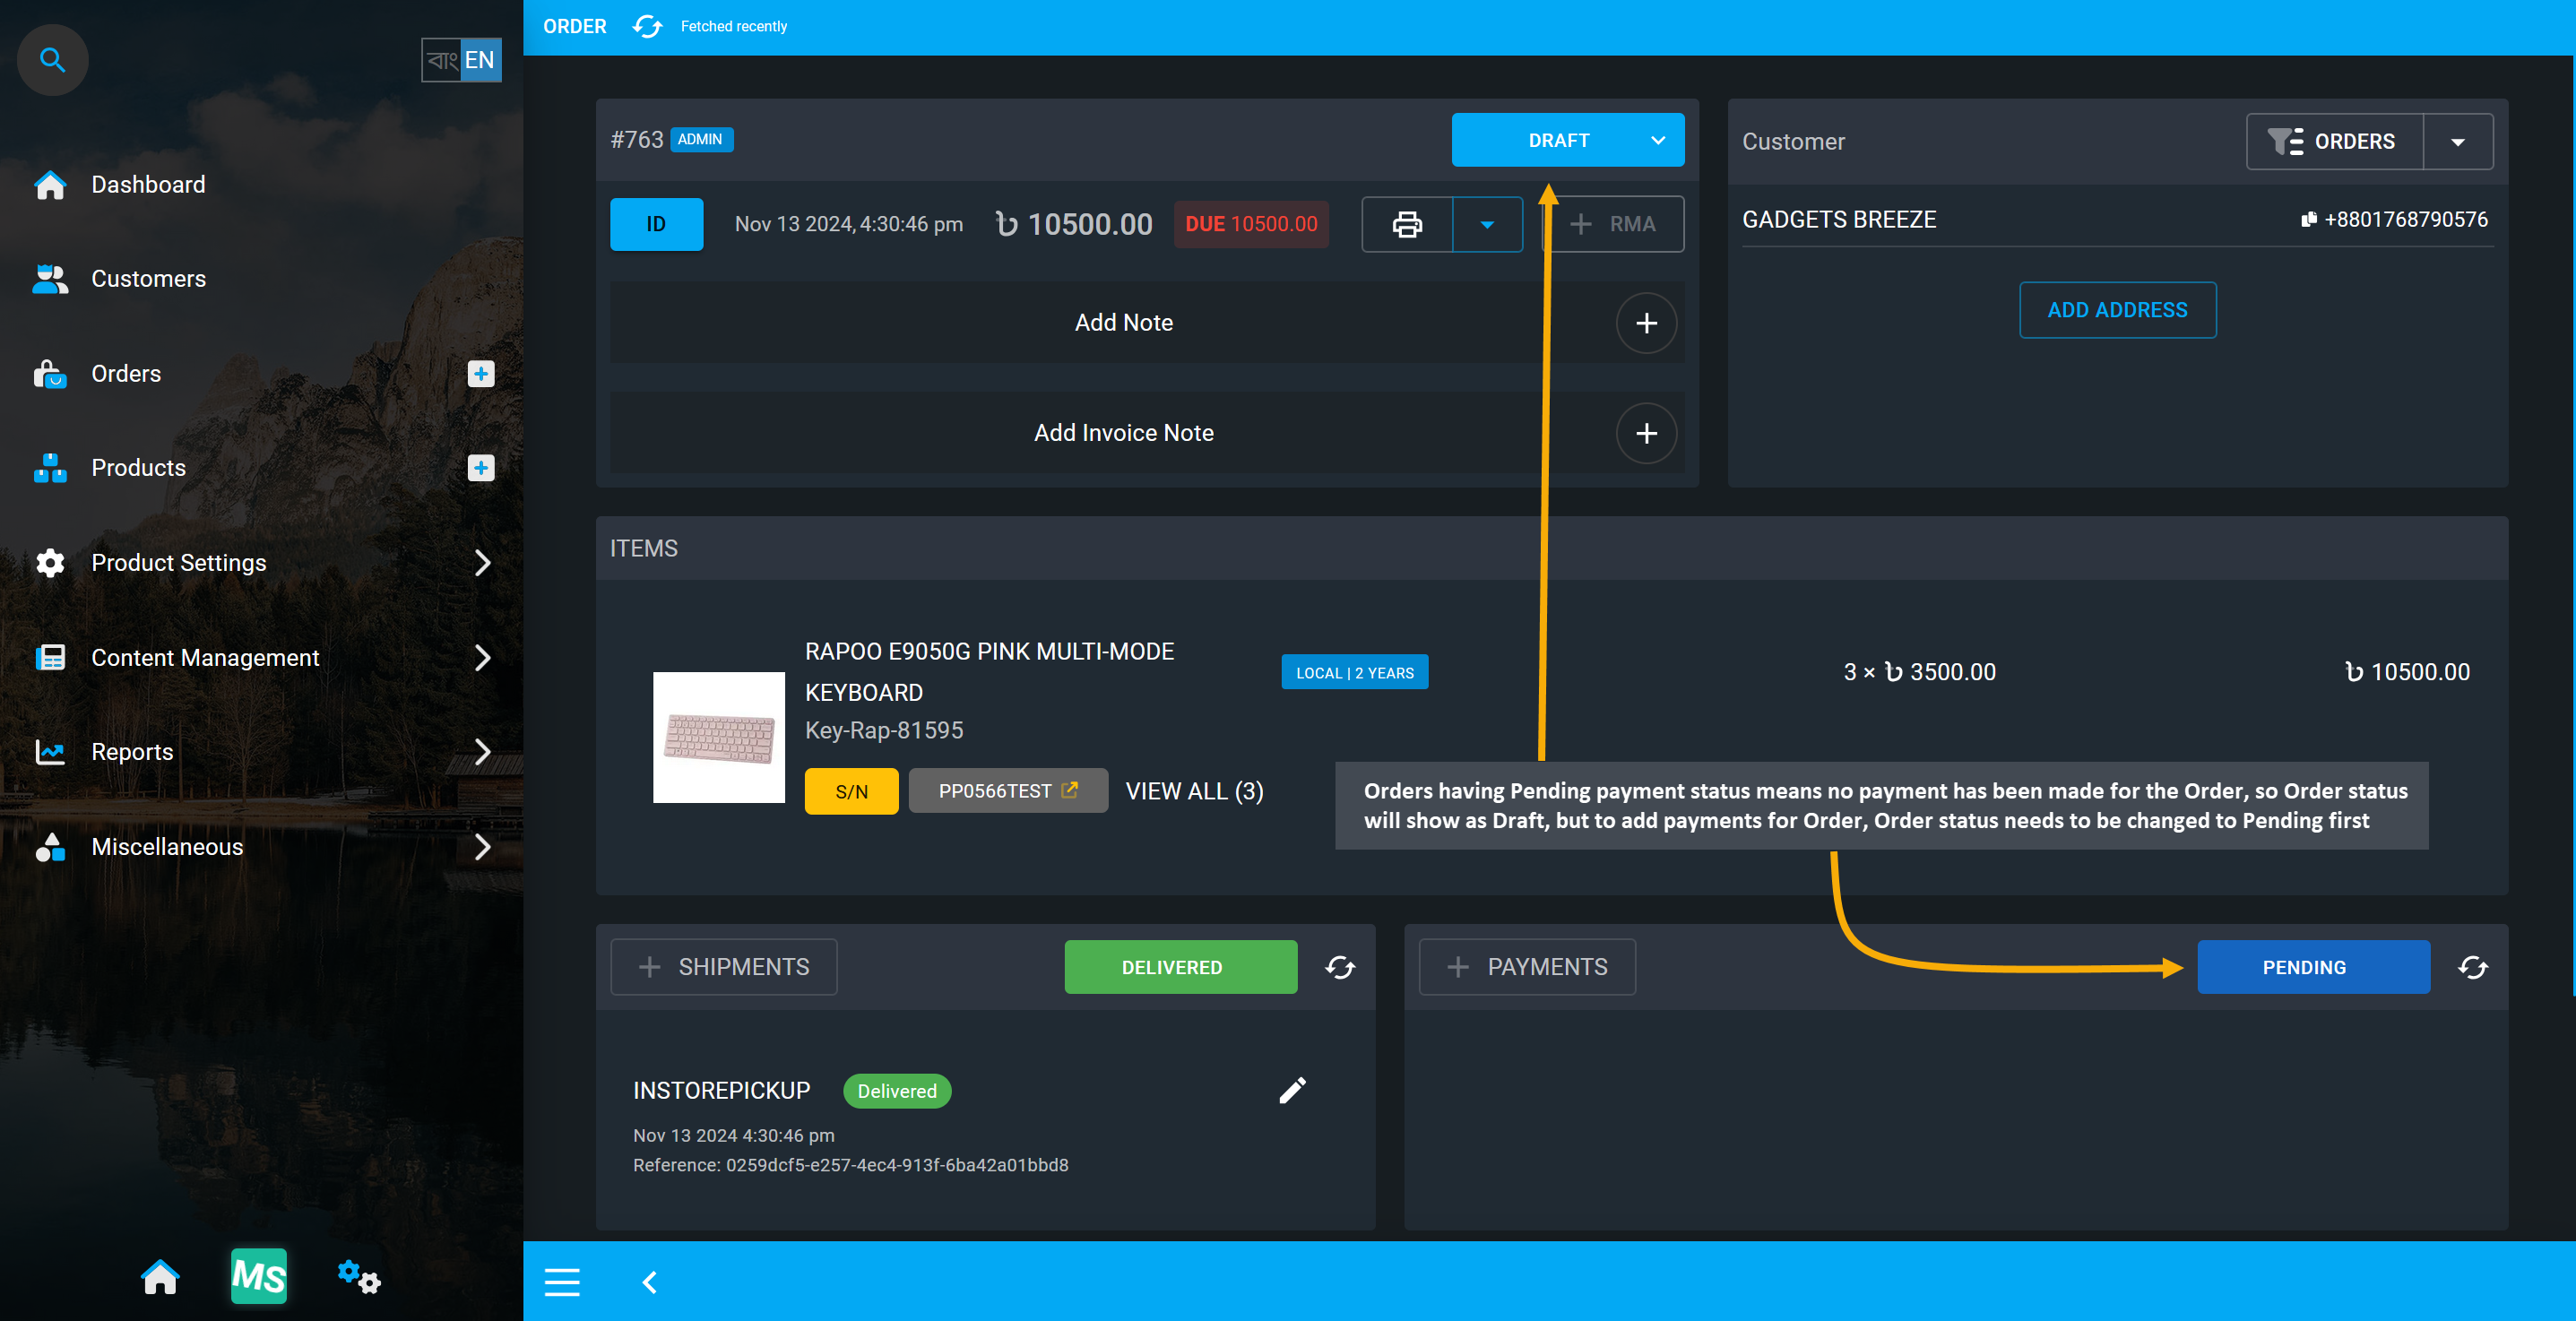
Image 3: Orders having Pending payment status means no payment has been made for the Order.
So, after changing Order Status from Draft to Pending, Shop Owner can add payments to Order. However, if previous Cheque payment or Bank Transfer has failed, then the Shop Owner can change Payment status back to Pending again until a new payment method is added again on Order to clear order dues.
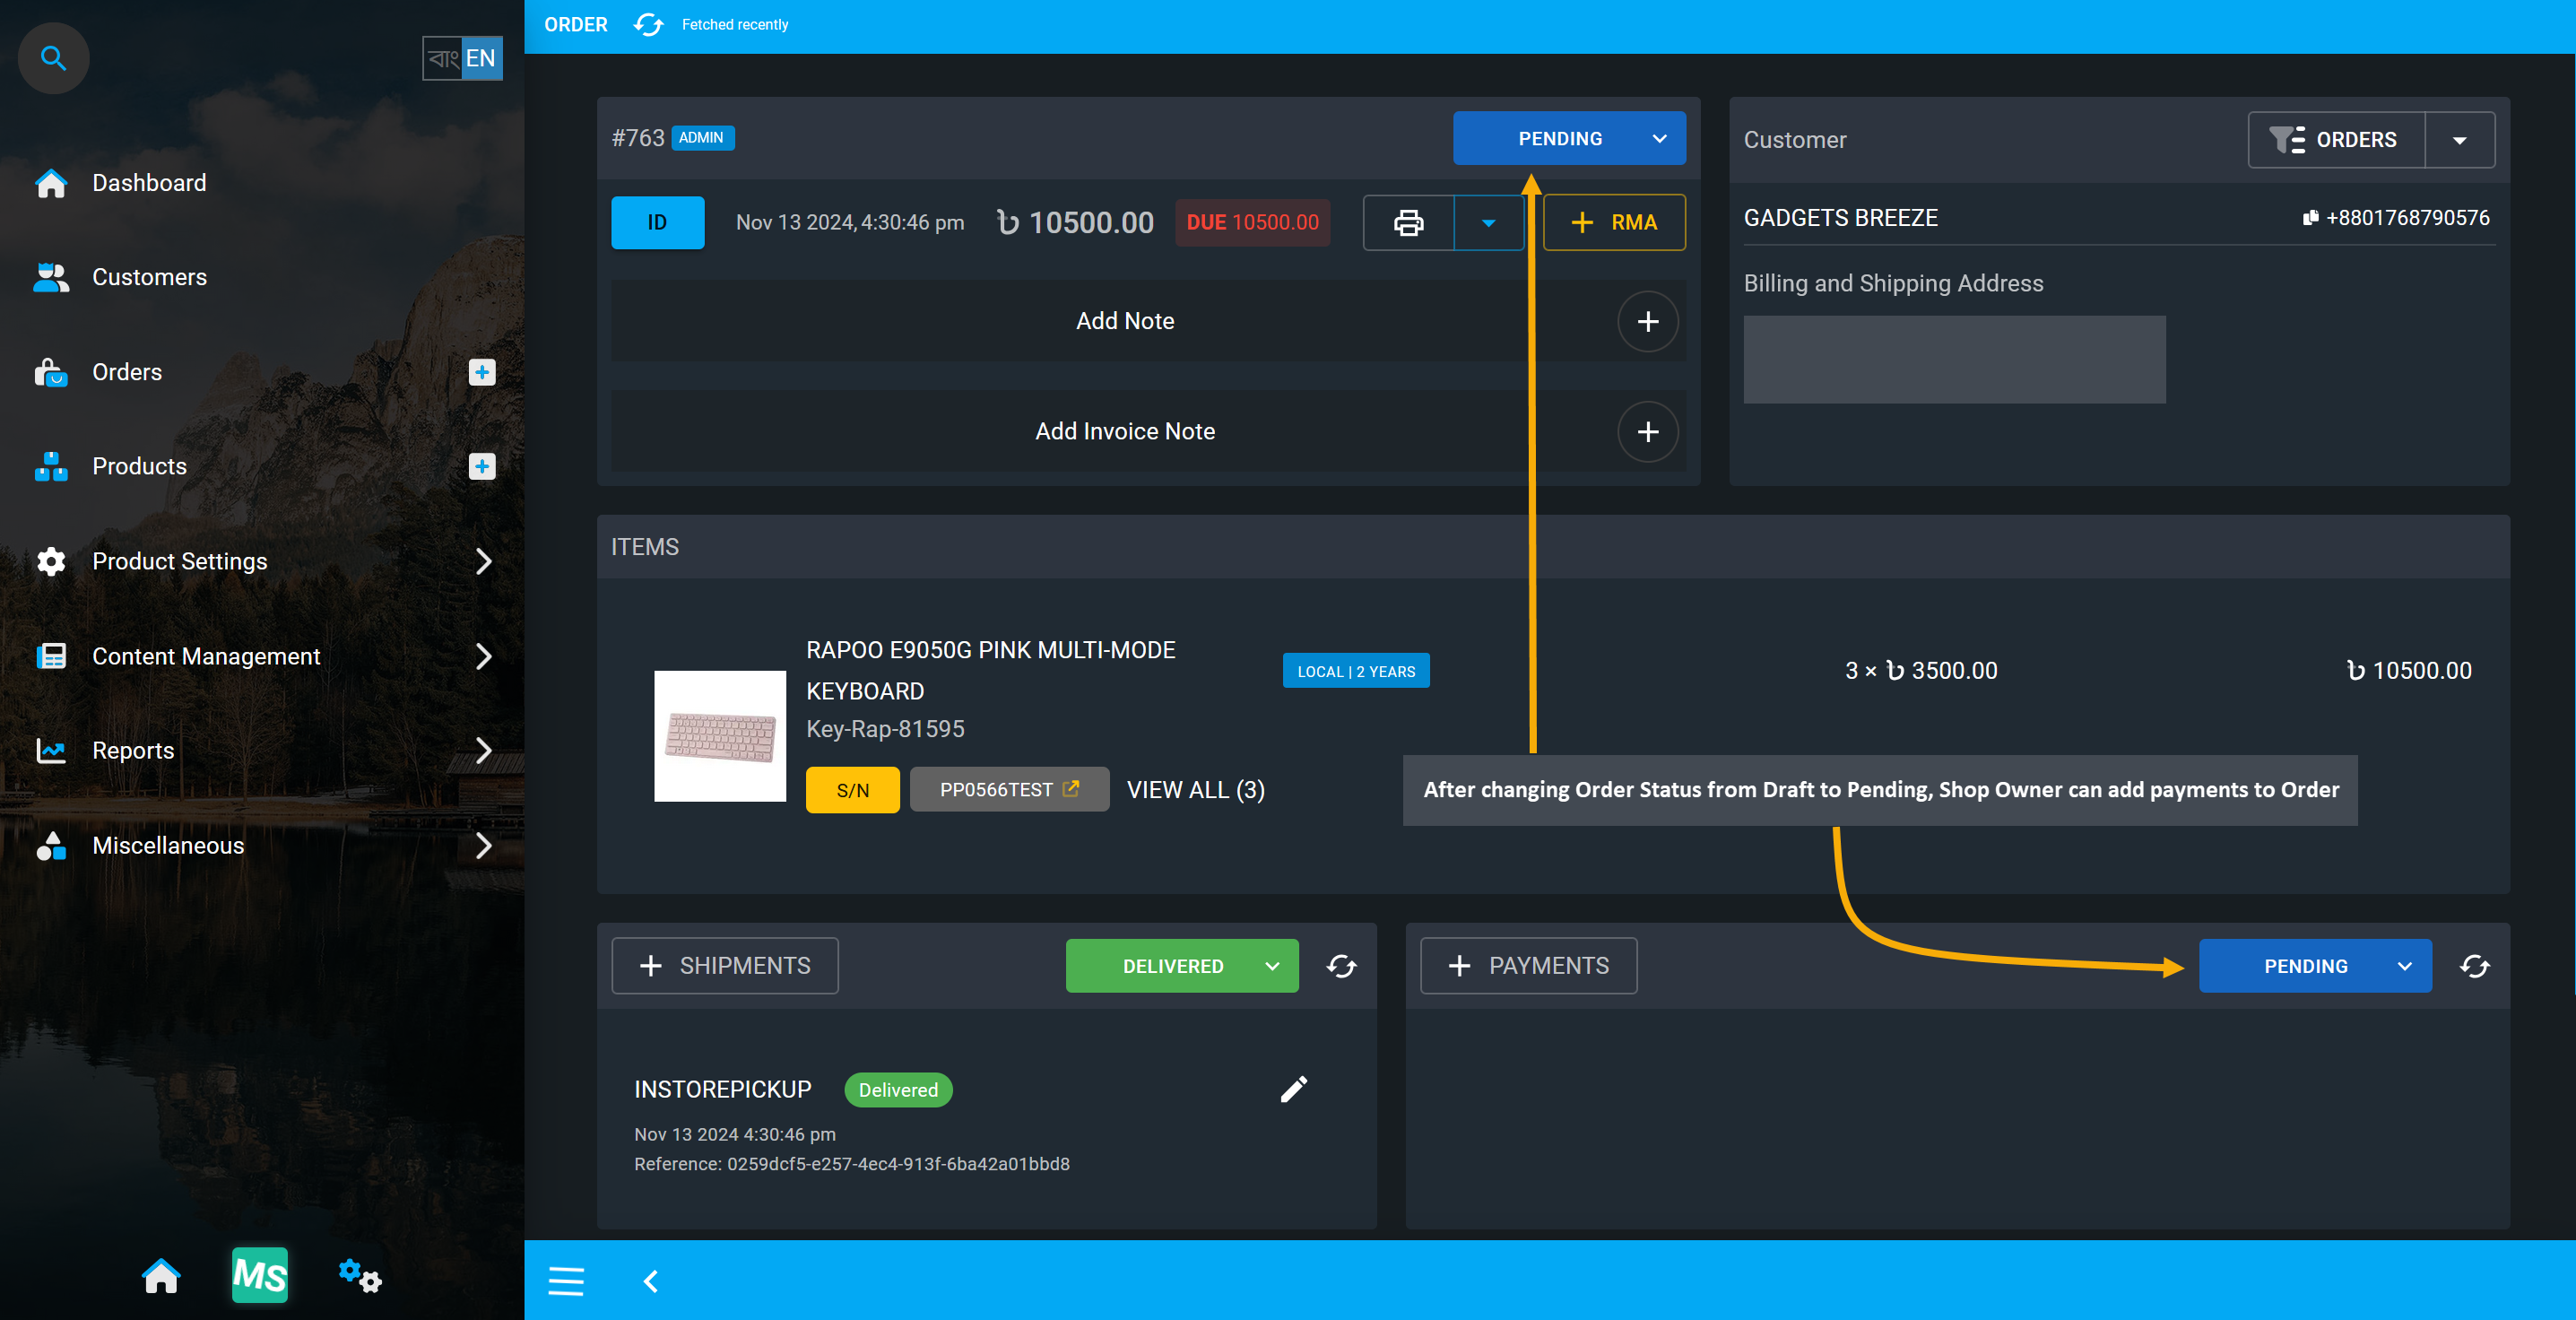
Image 4: After changing Order Status from Draft to Pending, Shop Owner can add Order payments.
Payment Status: Paid
When a Payment is marked as Paid, it means that full payment has been made for the Order or payments have been Verified by the Shop Owner. If Customers have completed their payment using one or multiple Payment Gateways, then Shop Owner can change the Payment status to Paid after Customer have fulfilled all the Order Payment steps from their end and Shop Owner have verified those payments.
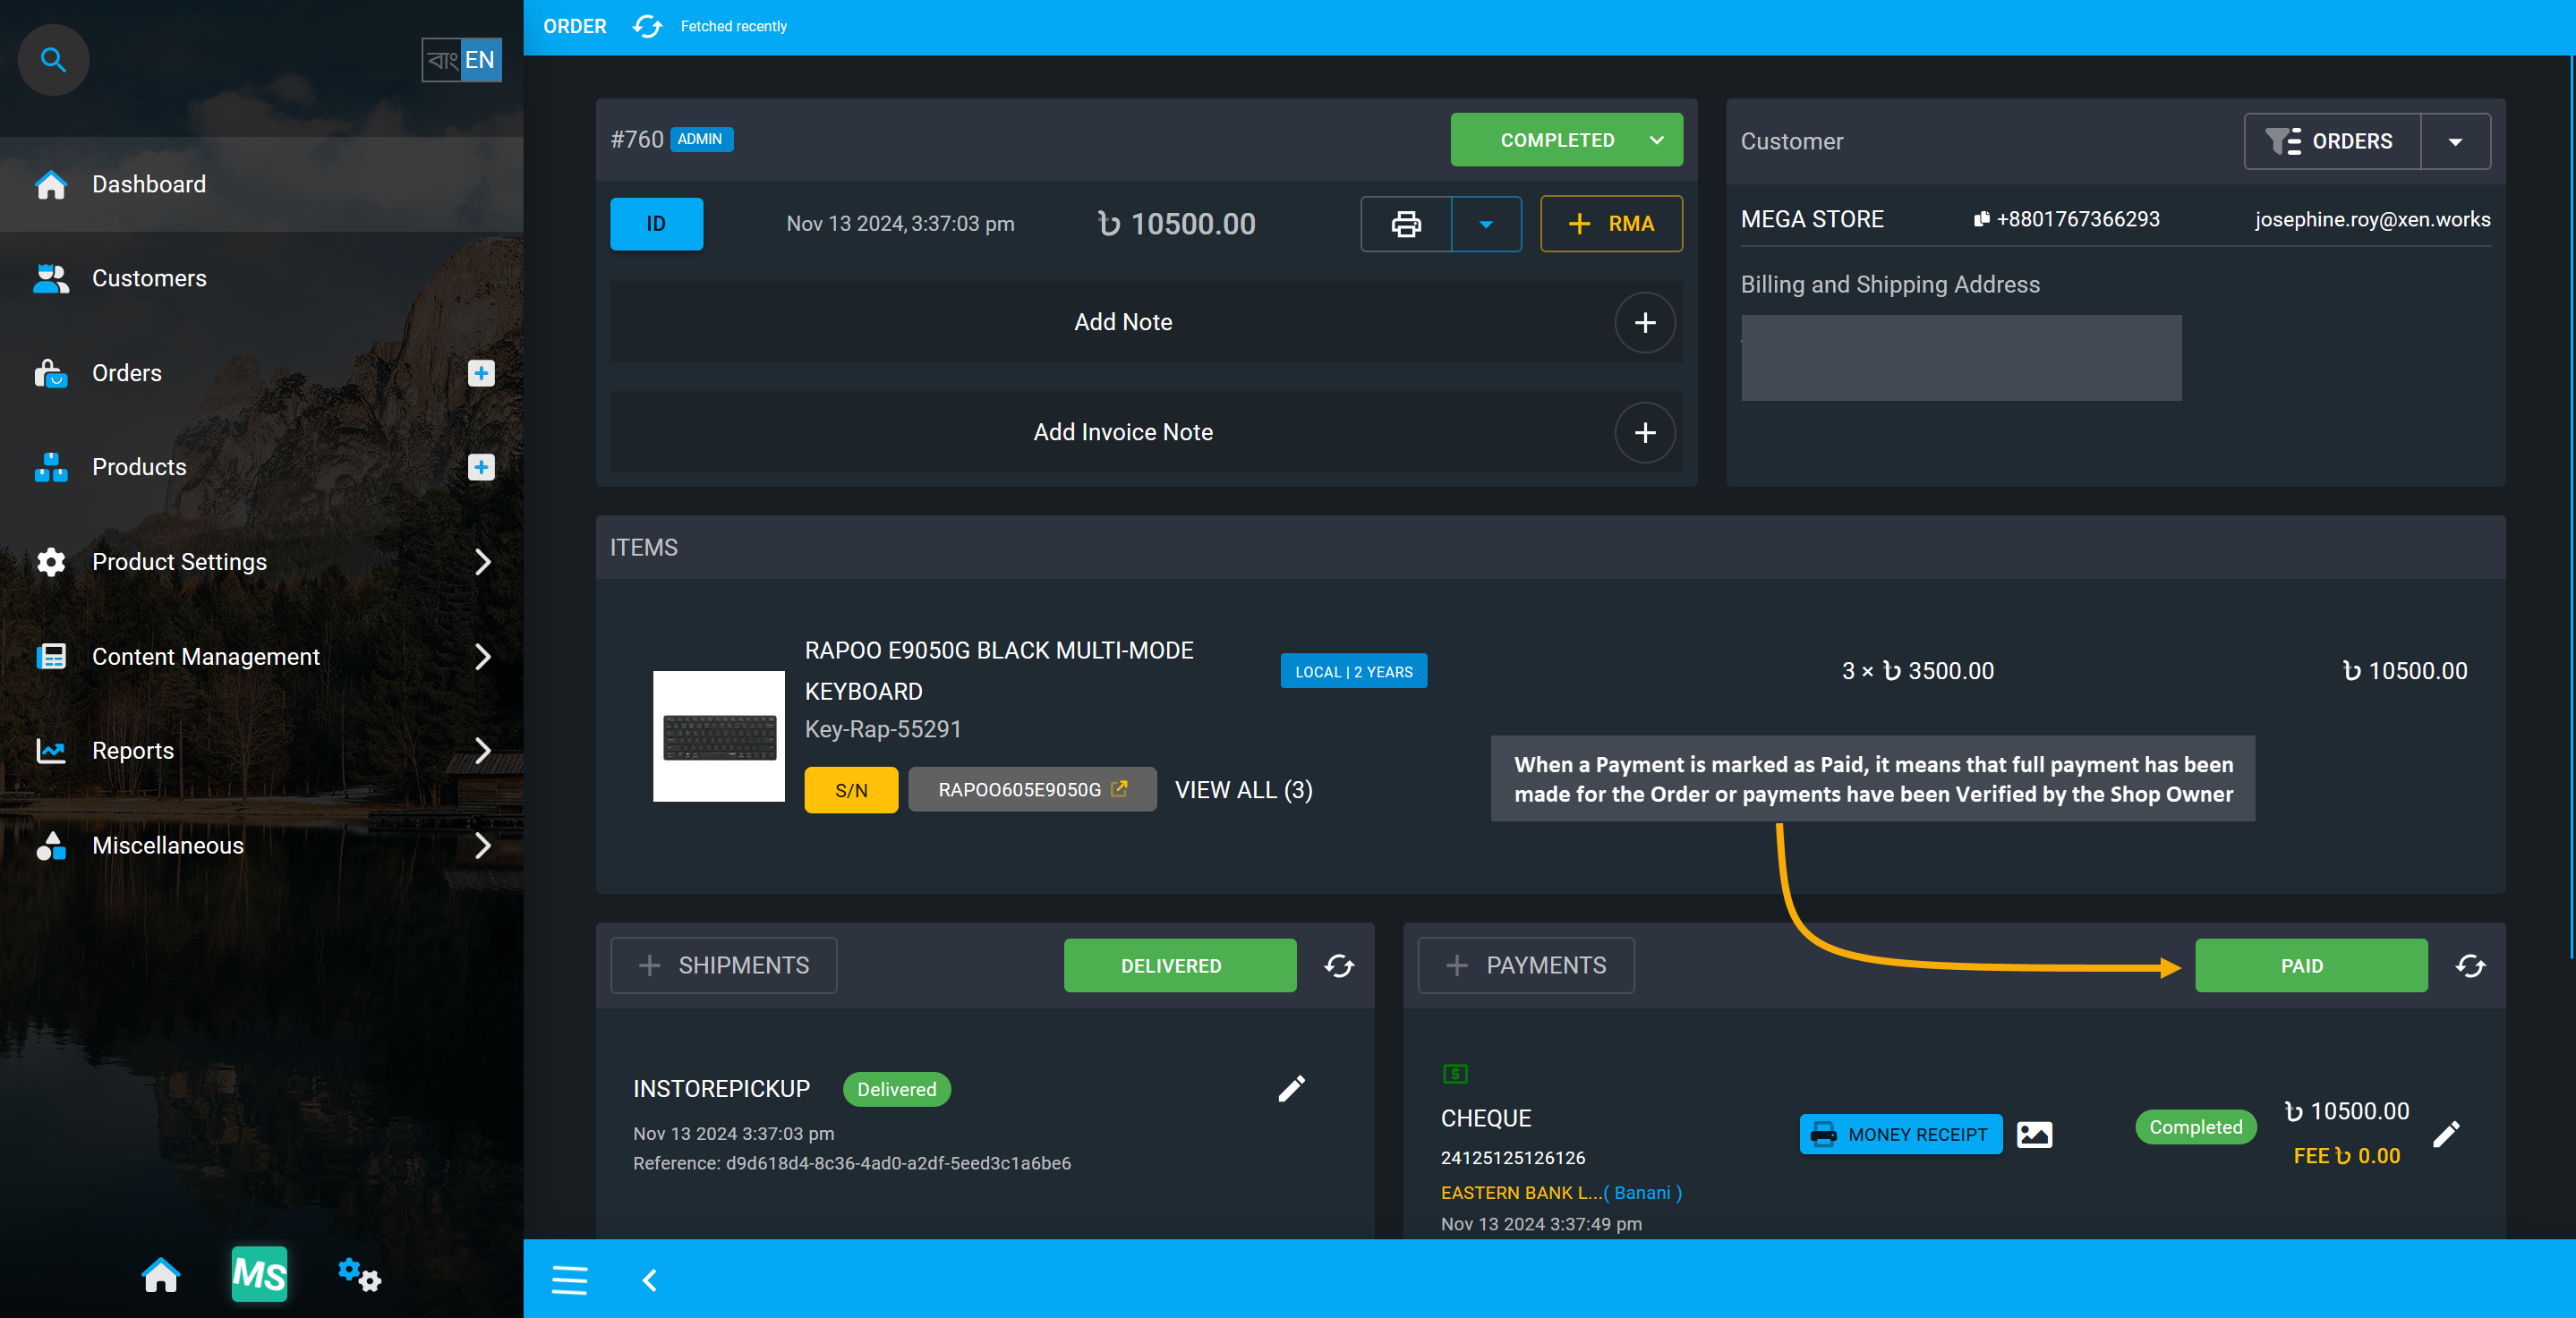
Image 5: When a Payment is marked as Paid, it means that full payment has been made for the Order.
Payment Status: Paid (Pending Approval)
If a payment like Cheque, BKash, Nagad, or Bank Transfer is added on Cart, then payment will need to be verified from Order Dashboard after Order is placed. The Order will have payment status as Paid (Pending Approval). After checking and verifying the payment details, Shop Owner can click the Verify button to set the payment as completed. It will make the payment status automatically paid when it is verified.
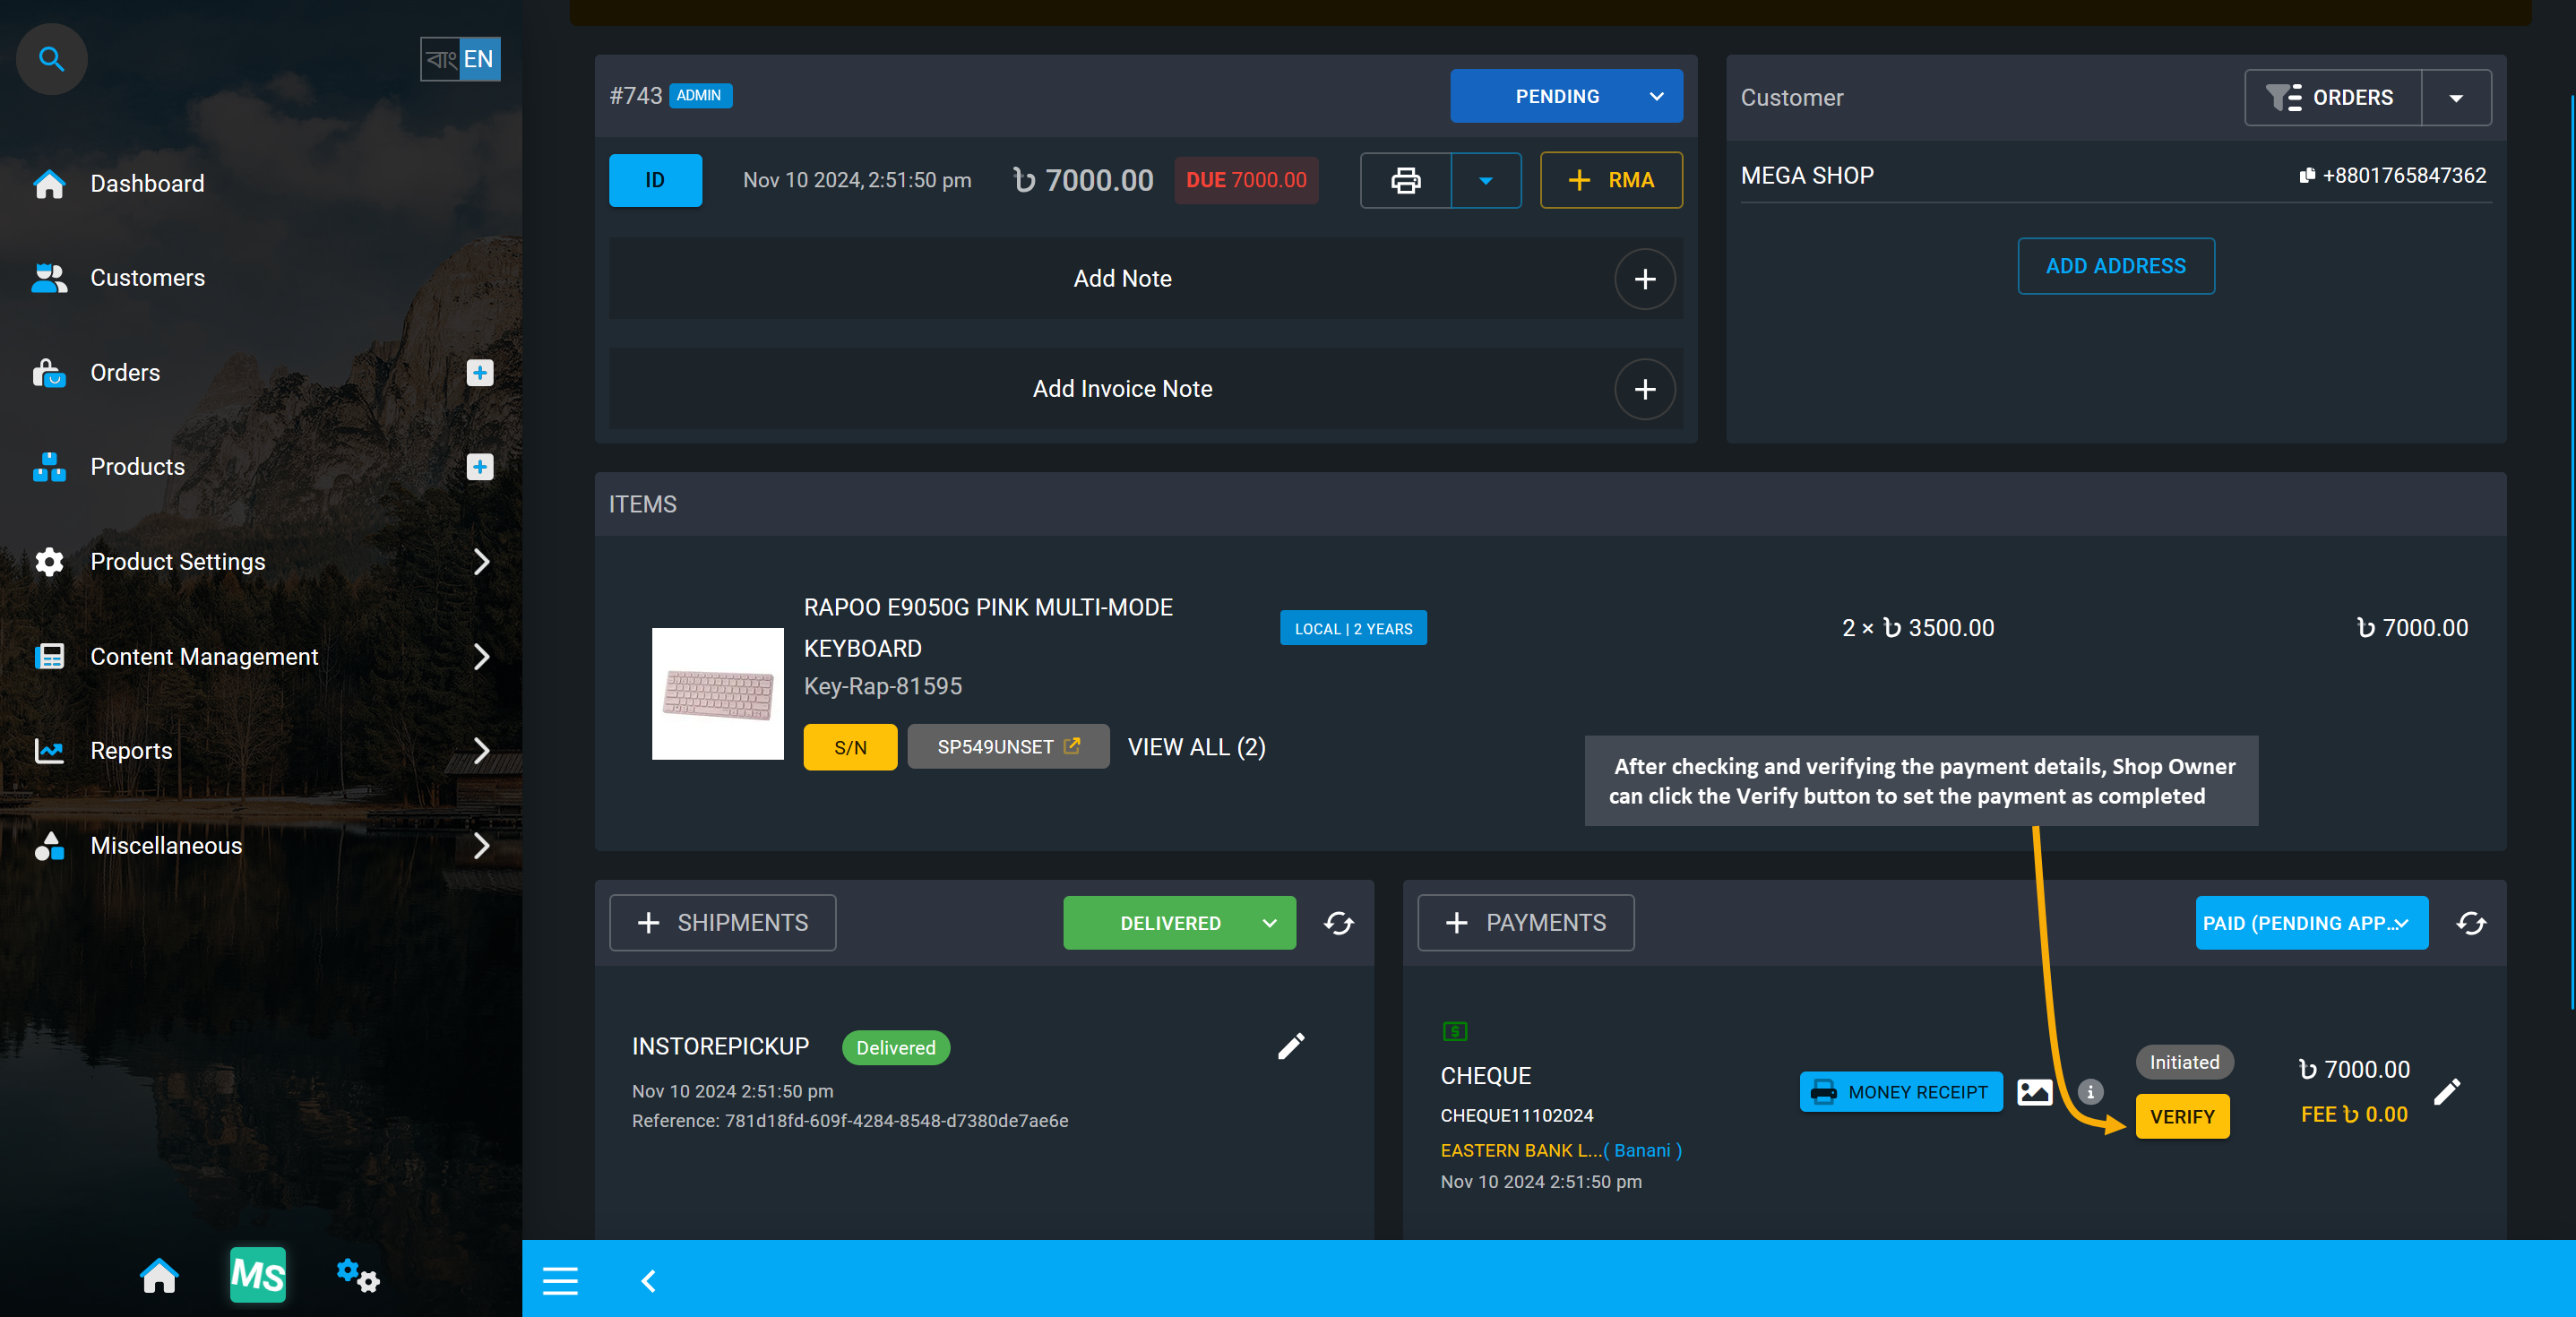
Image 6: Shop Owner can click the Verify button to set the payment as completed after checking.
Payment Status: Partially Paid
If the system capture less than the full amount of the order through card payment, offline, or custom payment method, then the Order’s payment status can be marked as Partially Paid by the Shop Owner. In this case, Order from Cart will usually be made without payment and allow Shop Owner to add payments later from Order Dashboard. Order will remain in Draft status and needs to change to Pending.
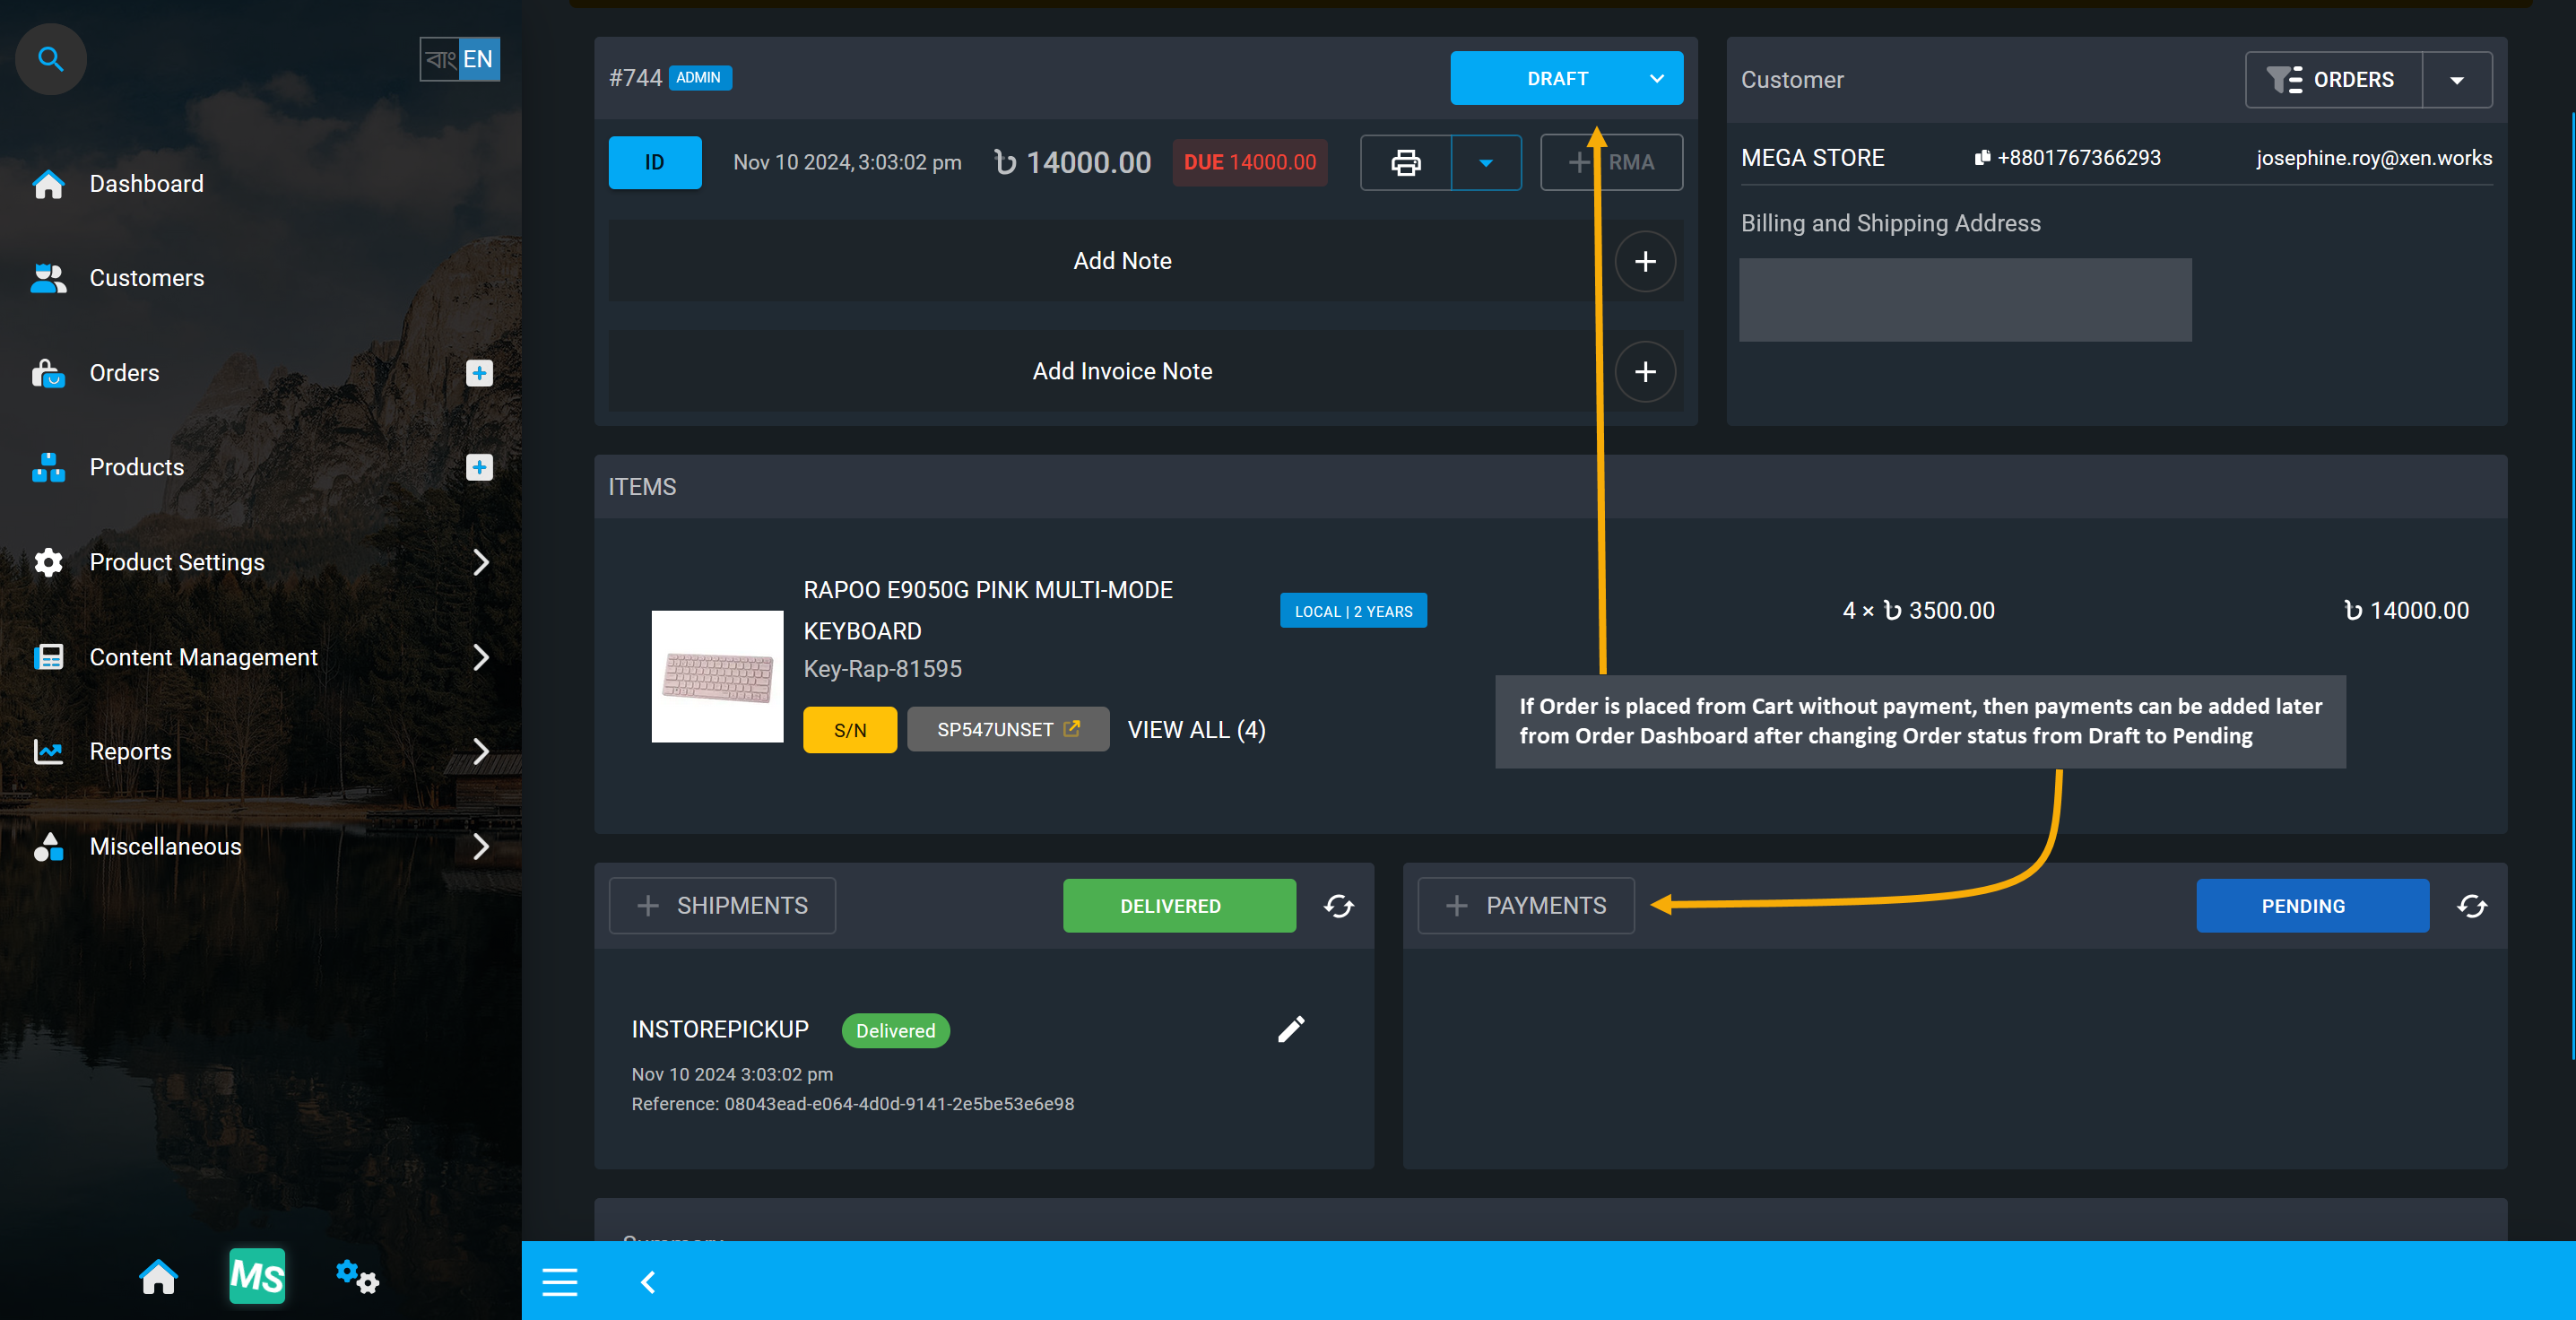
Image 7: Order placed from Cart without payment can have payments added later from Order Dashboard.
After changing Order status from Draft to Pending, Shop Owner can add partial payment from Payments tab. So, after adding payments partially, payment status will automatically show as Partially Paid.
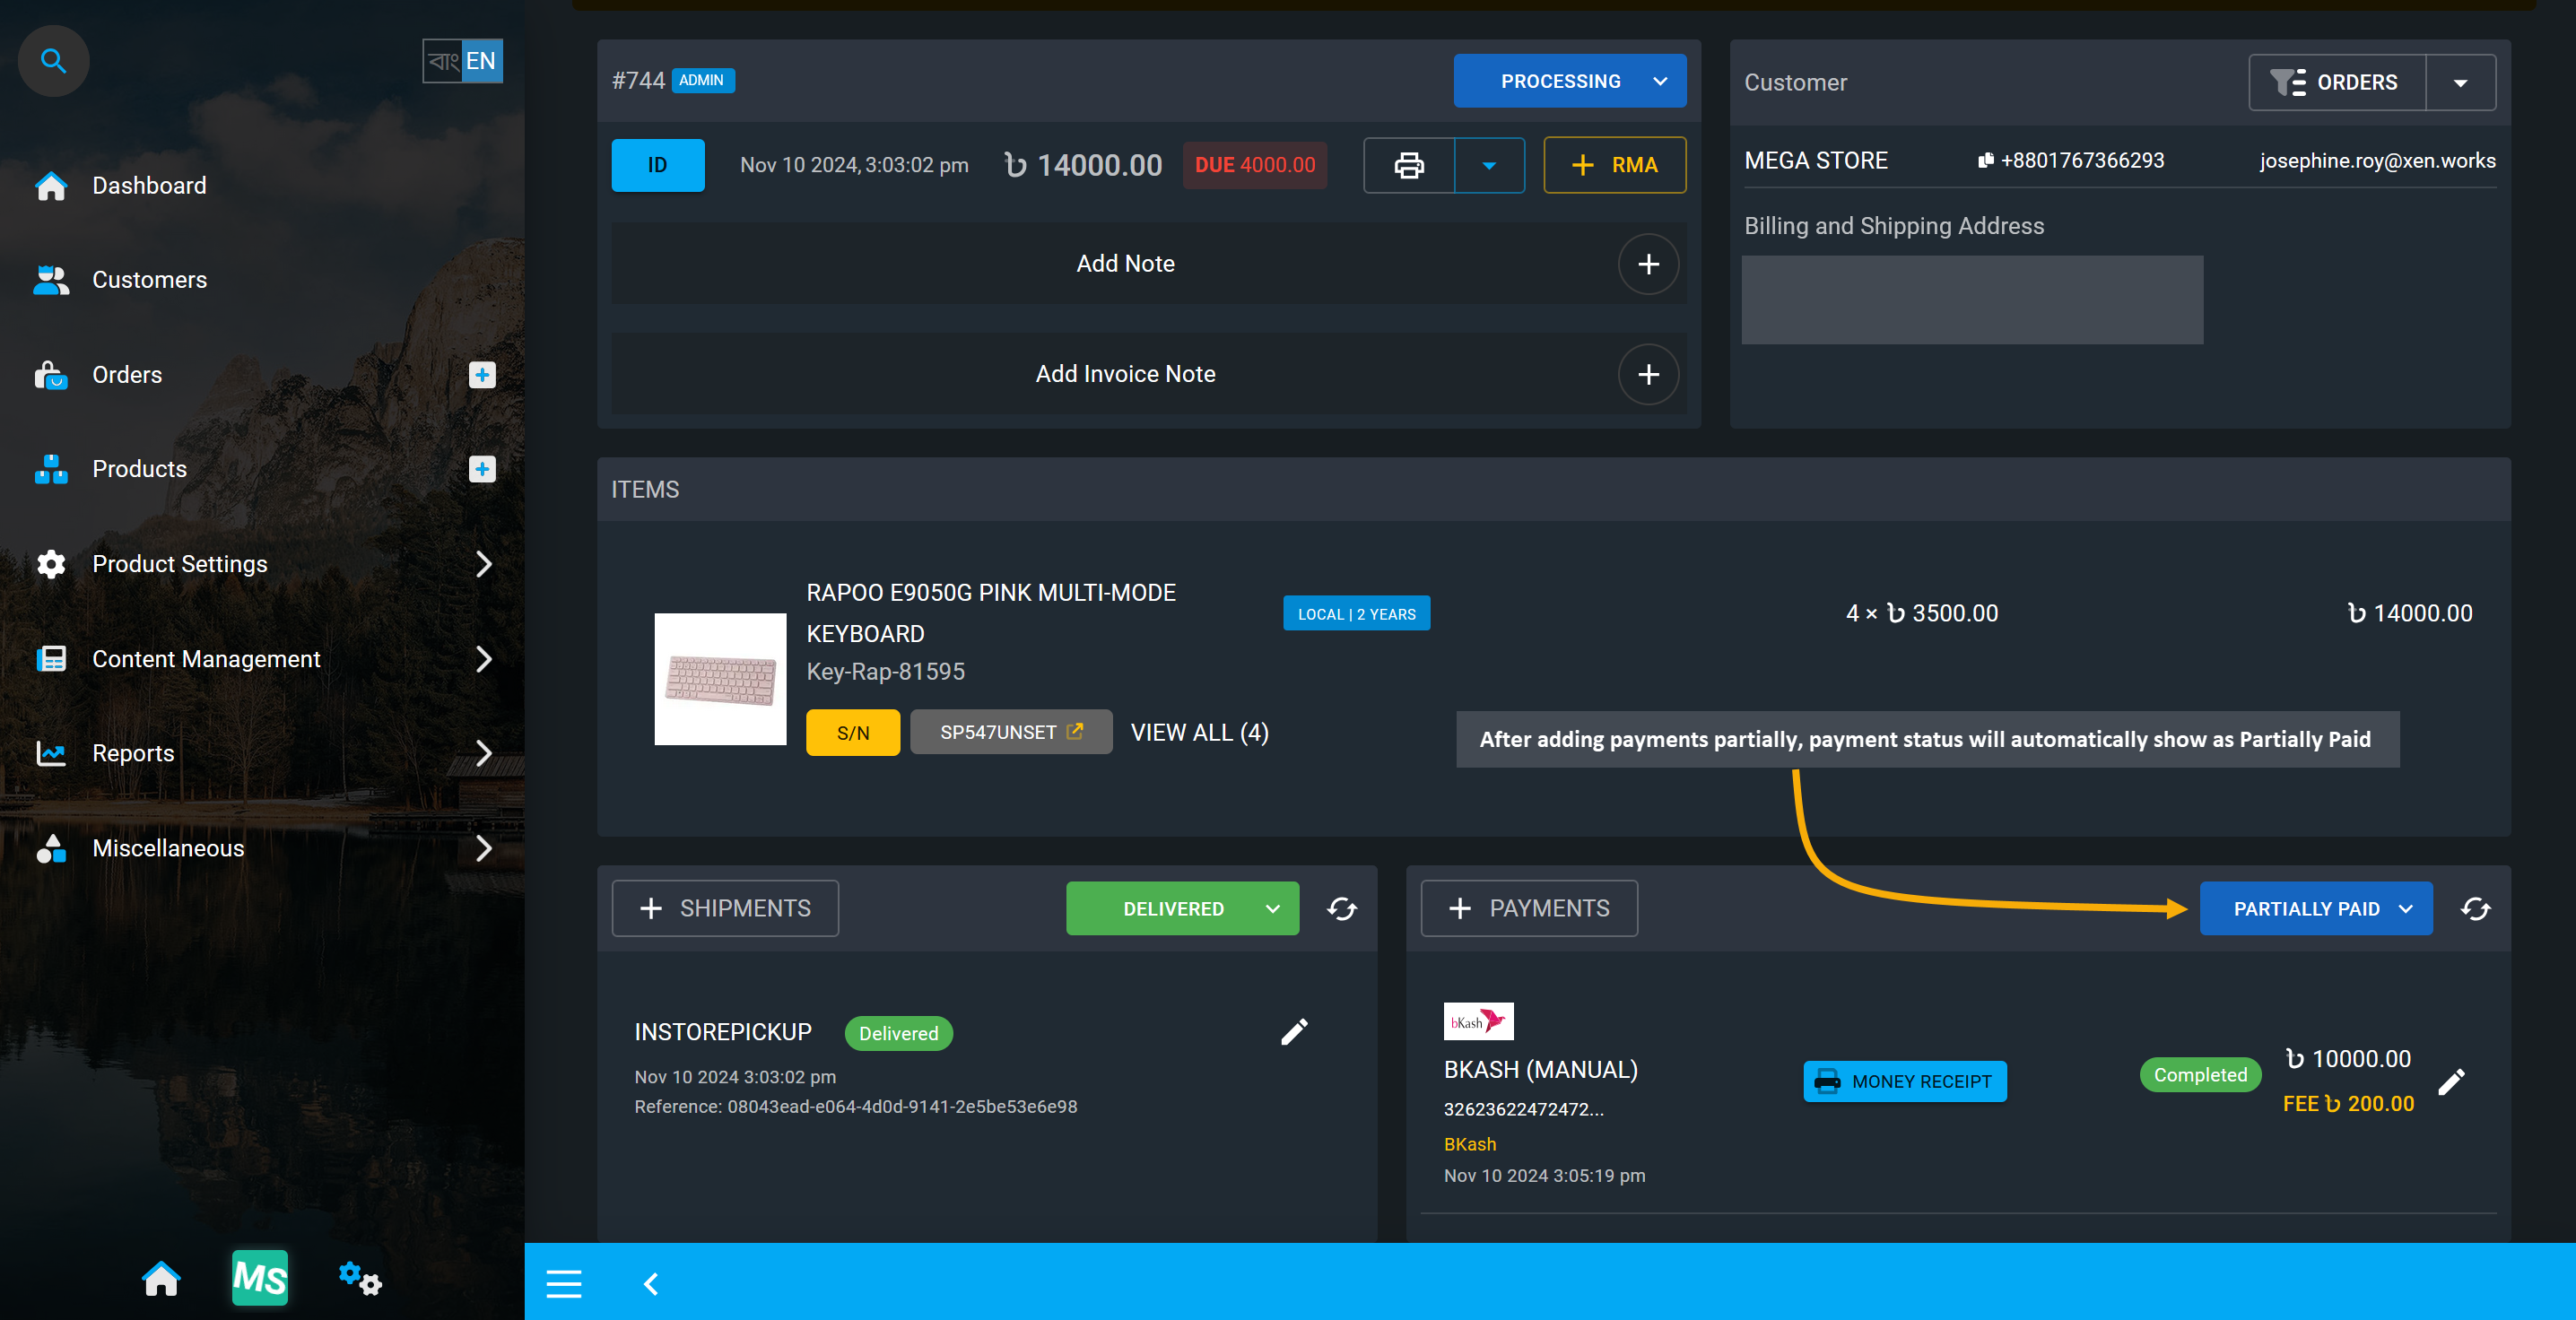
Image 8: After adding payments partially, payment status will automatically show as Partially Paid.
Payment Status: Refunded
If an Order is canceled from Order Dashboard after selecting cancelation options of Refund Payment, return stock, cancel shipments and clicking Proceed, payment status will automatically be changed to Refunded.
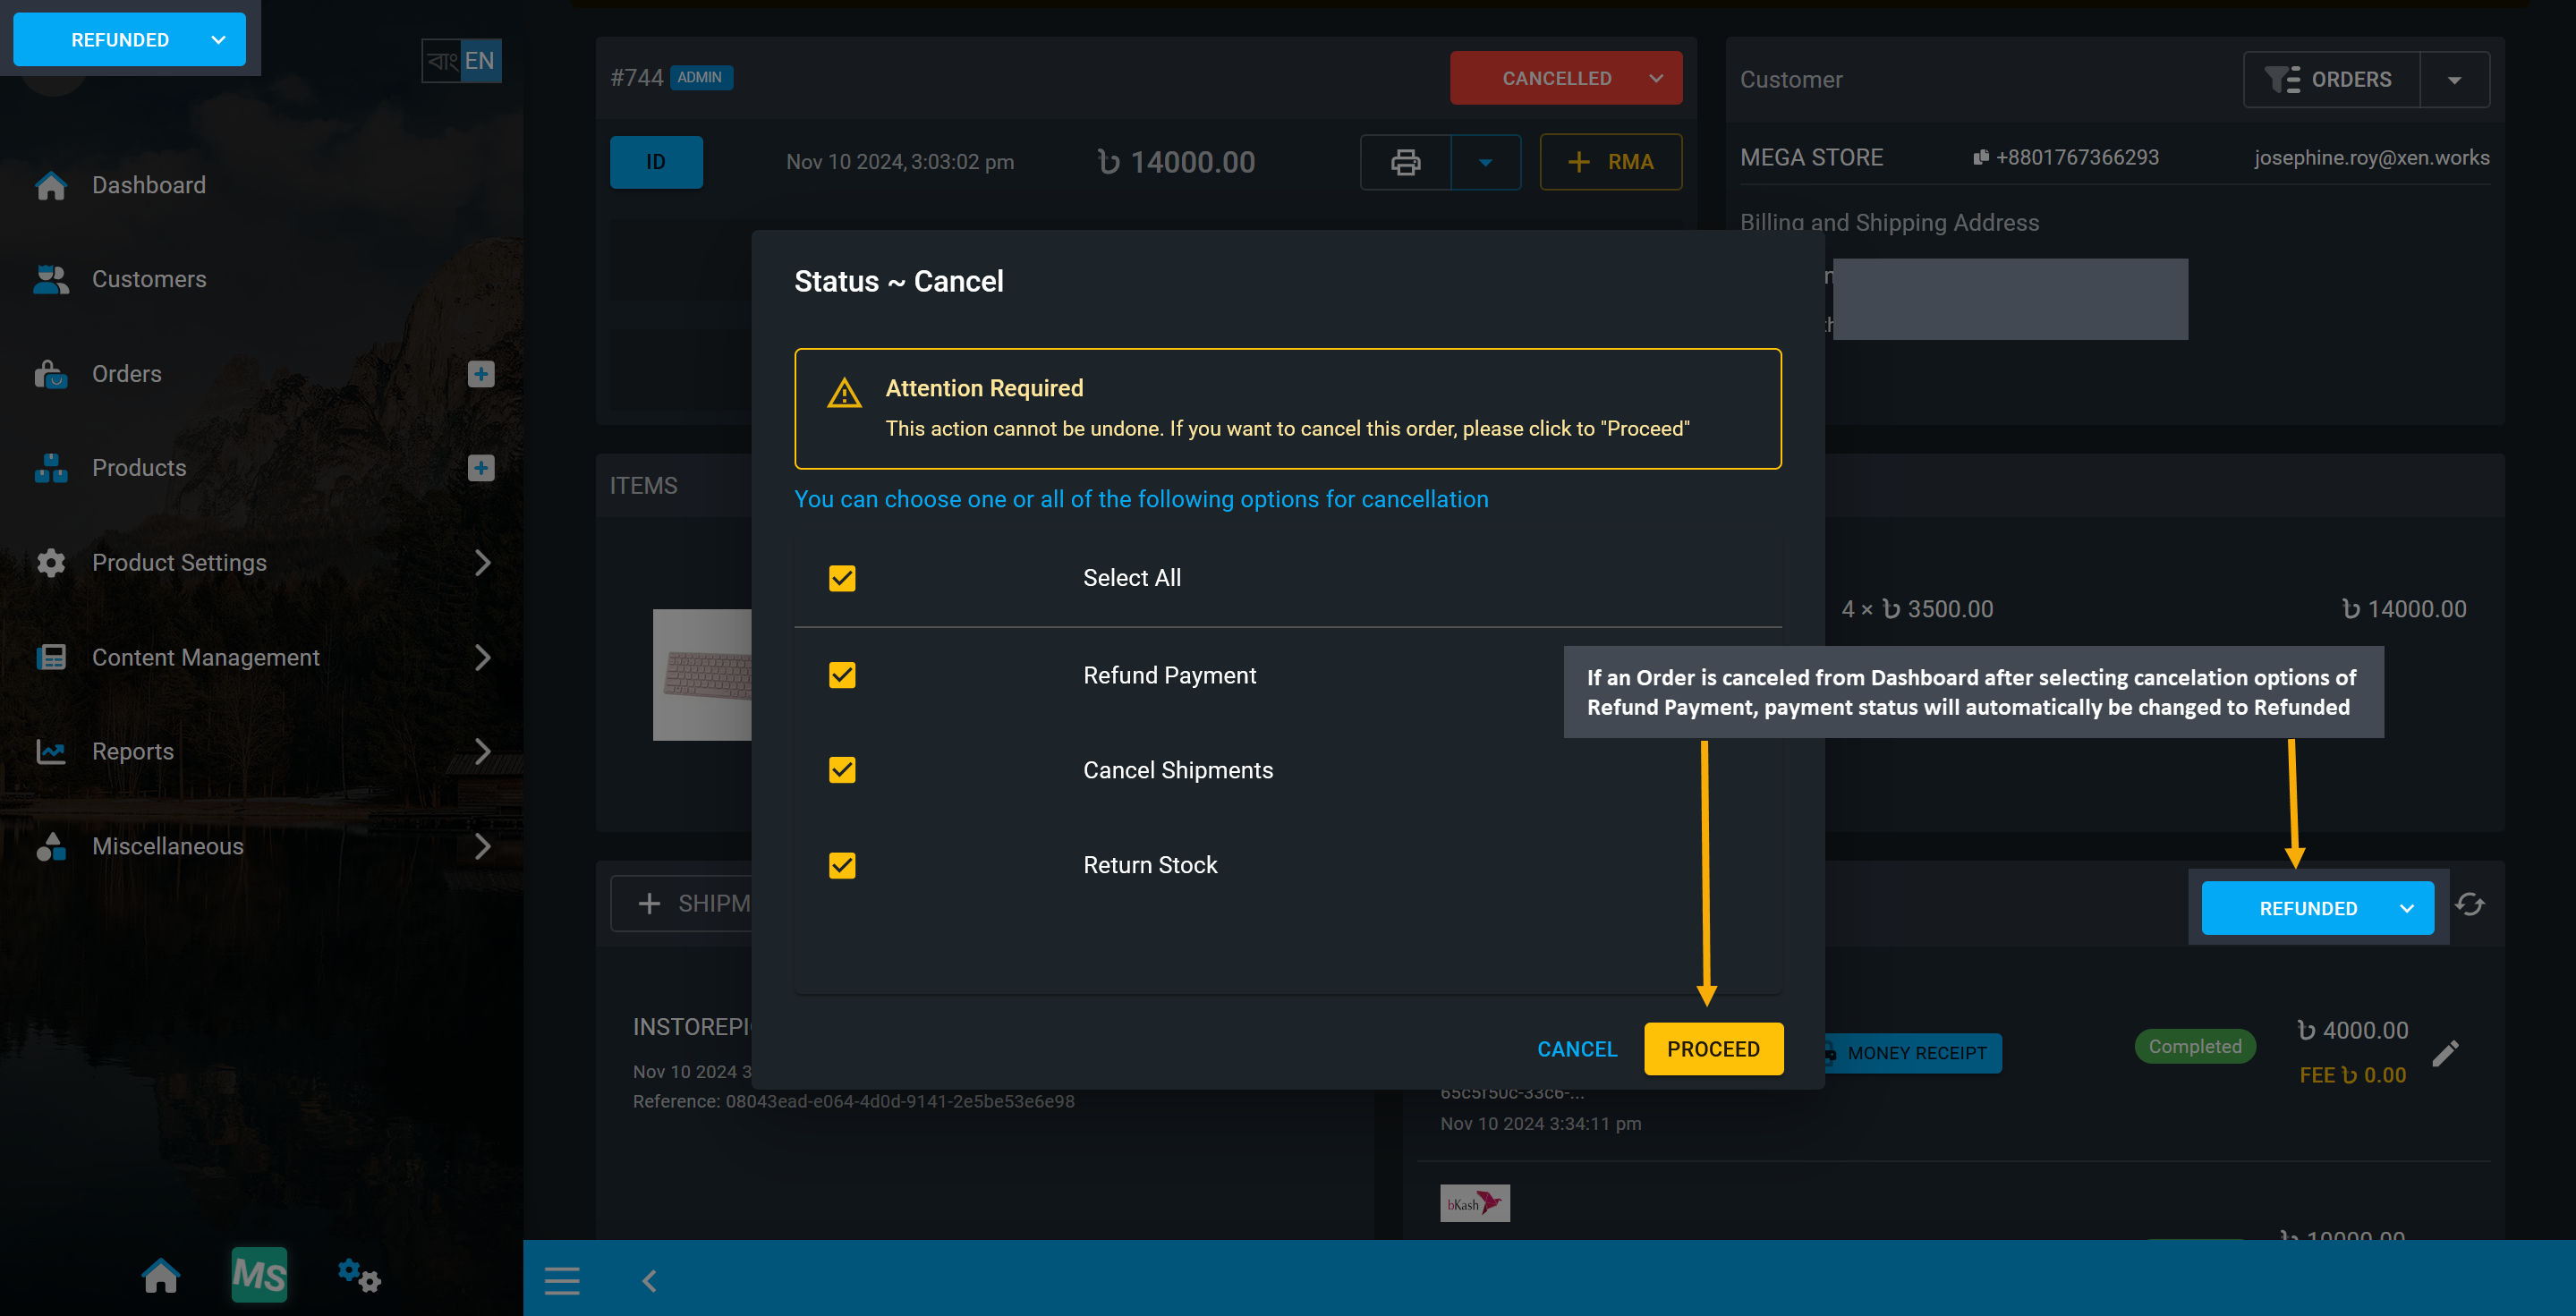
Image 9: If an Order is canceled from Order Dashboard, payment status will be changed to Refunded.
When an Order is canceled and refund, Order status cannot be changed and no payments can be added.
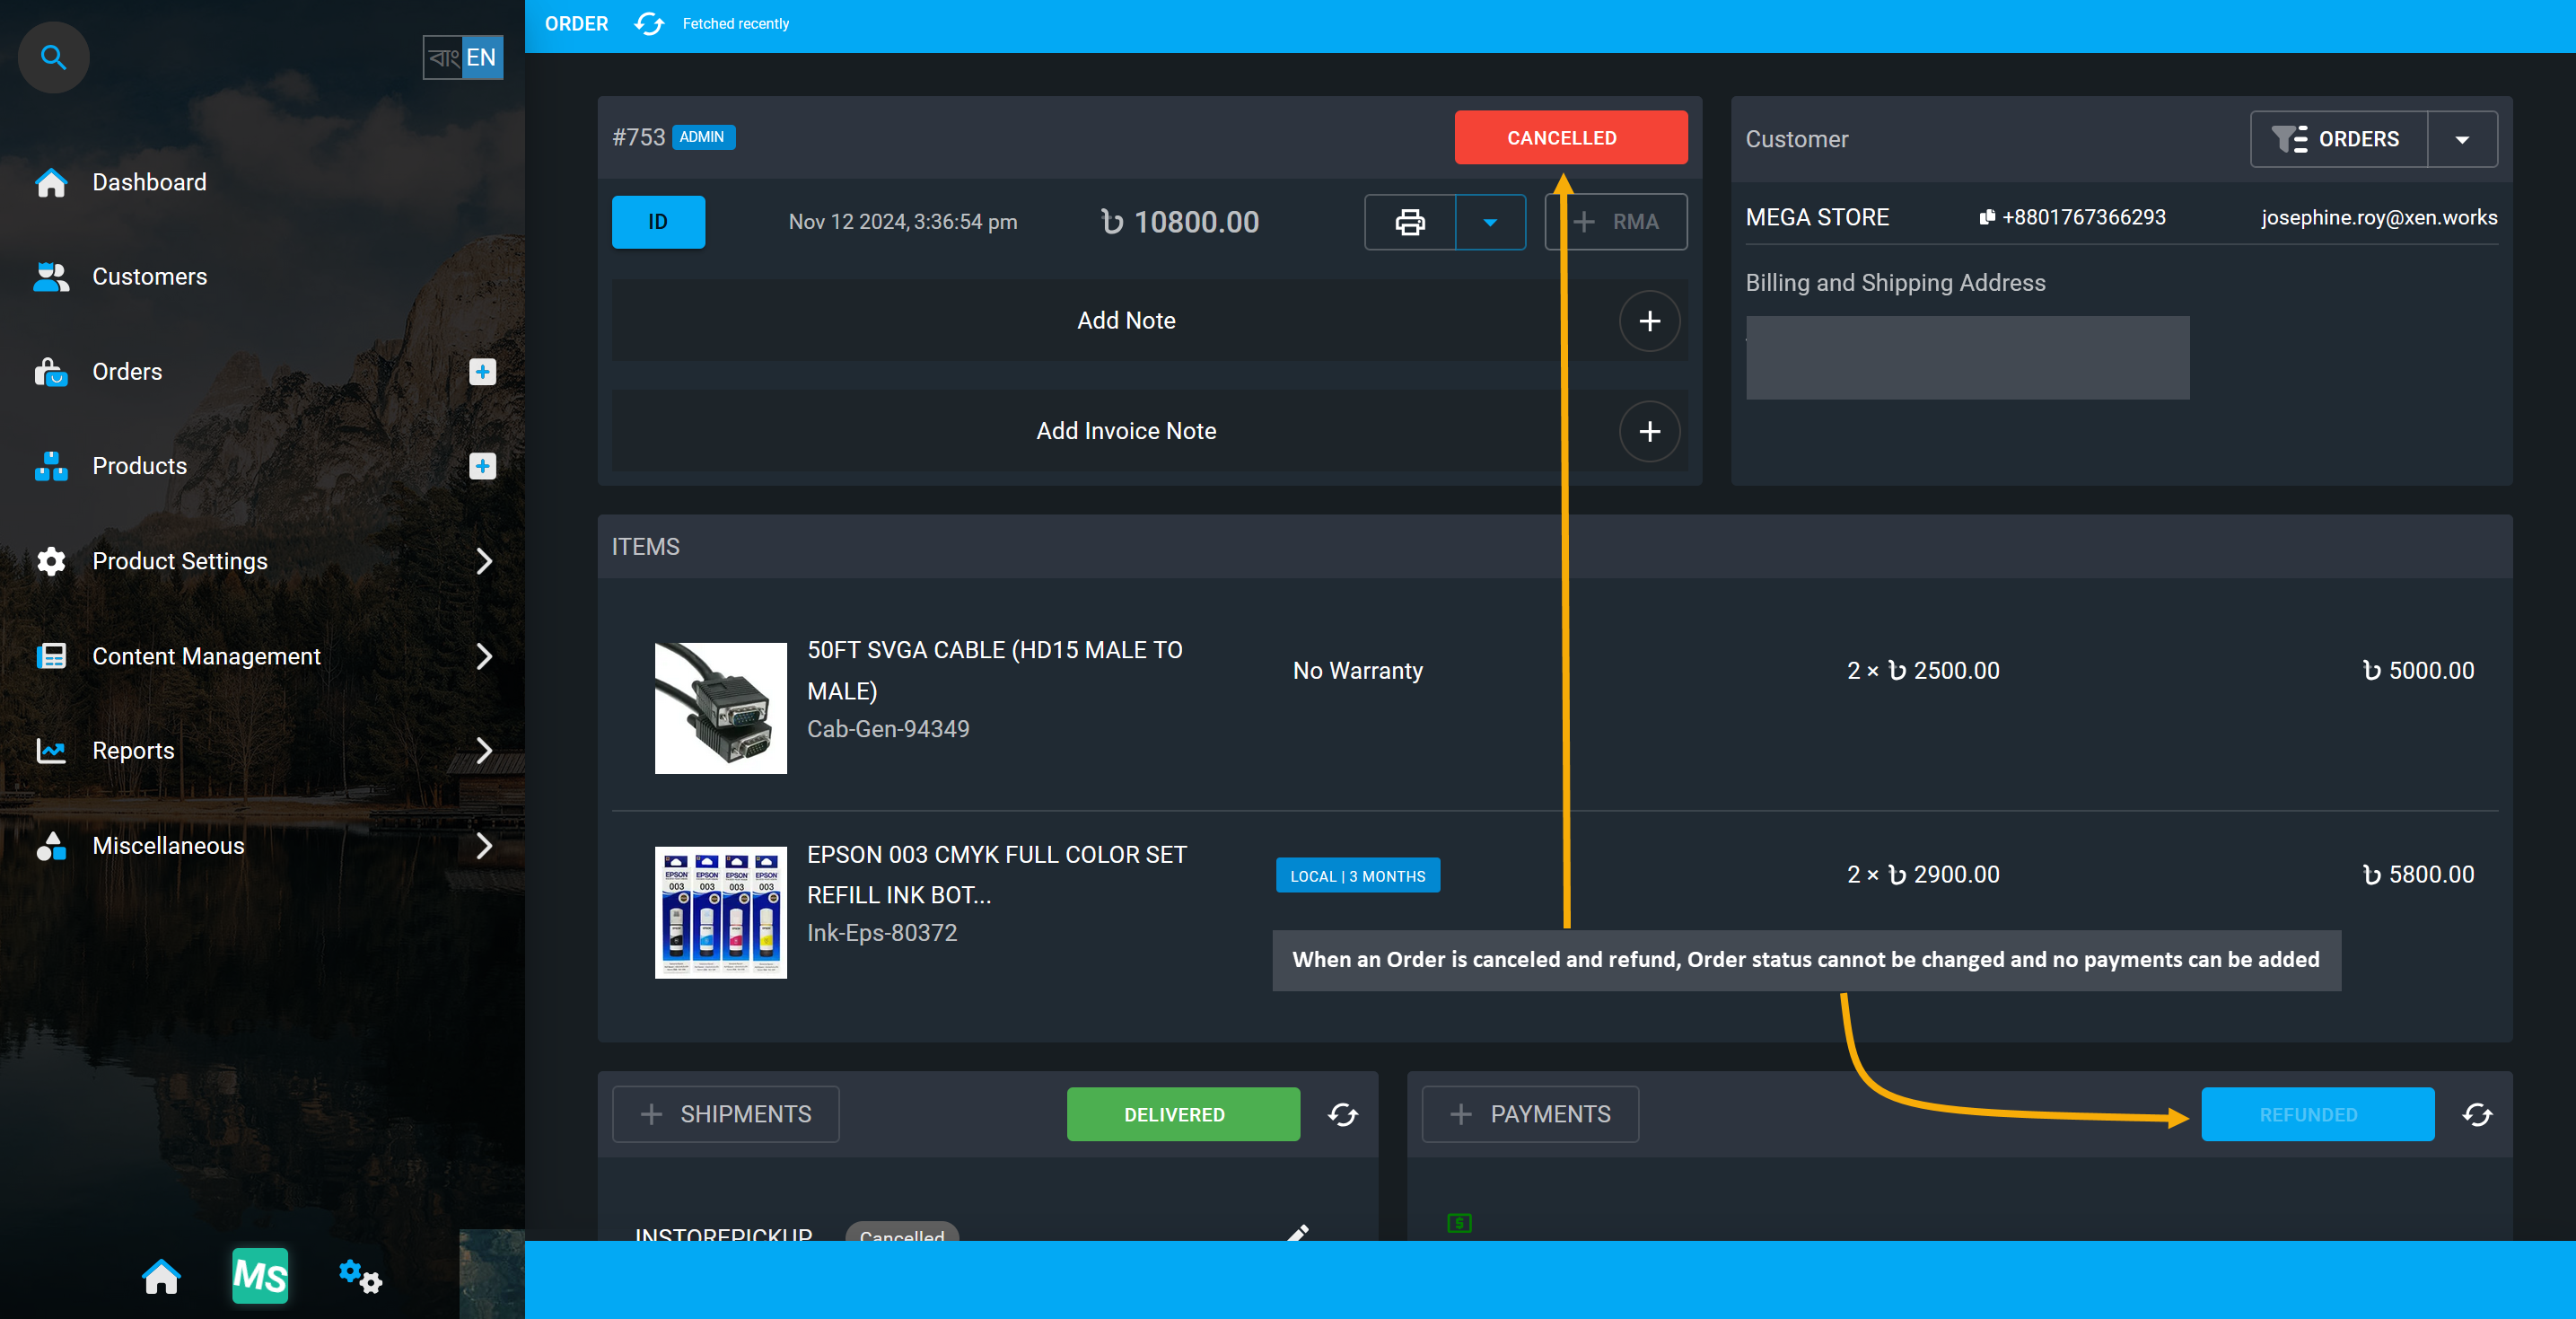
Image 10: Order status cannot be changed and no payments can be added after Order cancelation.
2 - Edit Order Status
Learn how to update Order status based on customer payment and delivery.
Update Order Status
After an Order is placed, it could have pending Payments, pending payment verification, awaiting shipment confirmation, or product under processing. Based on the current status of the order, there are options to update to different Order statuses from Order dashboard. Select from different statuses to update order like Pending, Processing, Canceled, Under Review, and Completed along with Draft status for unpaid orders.
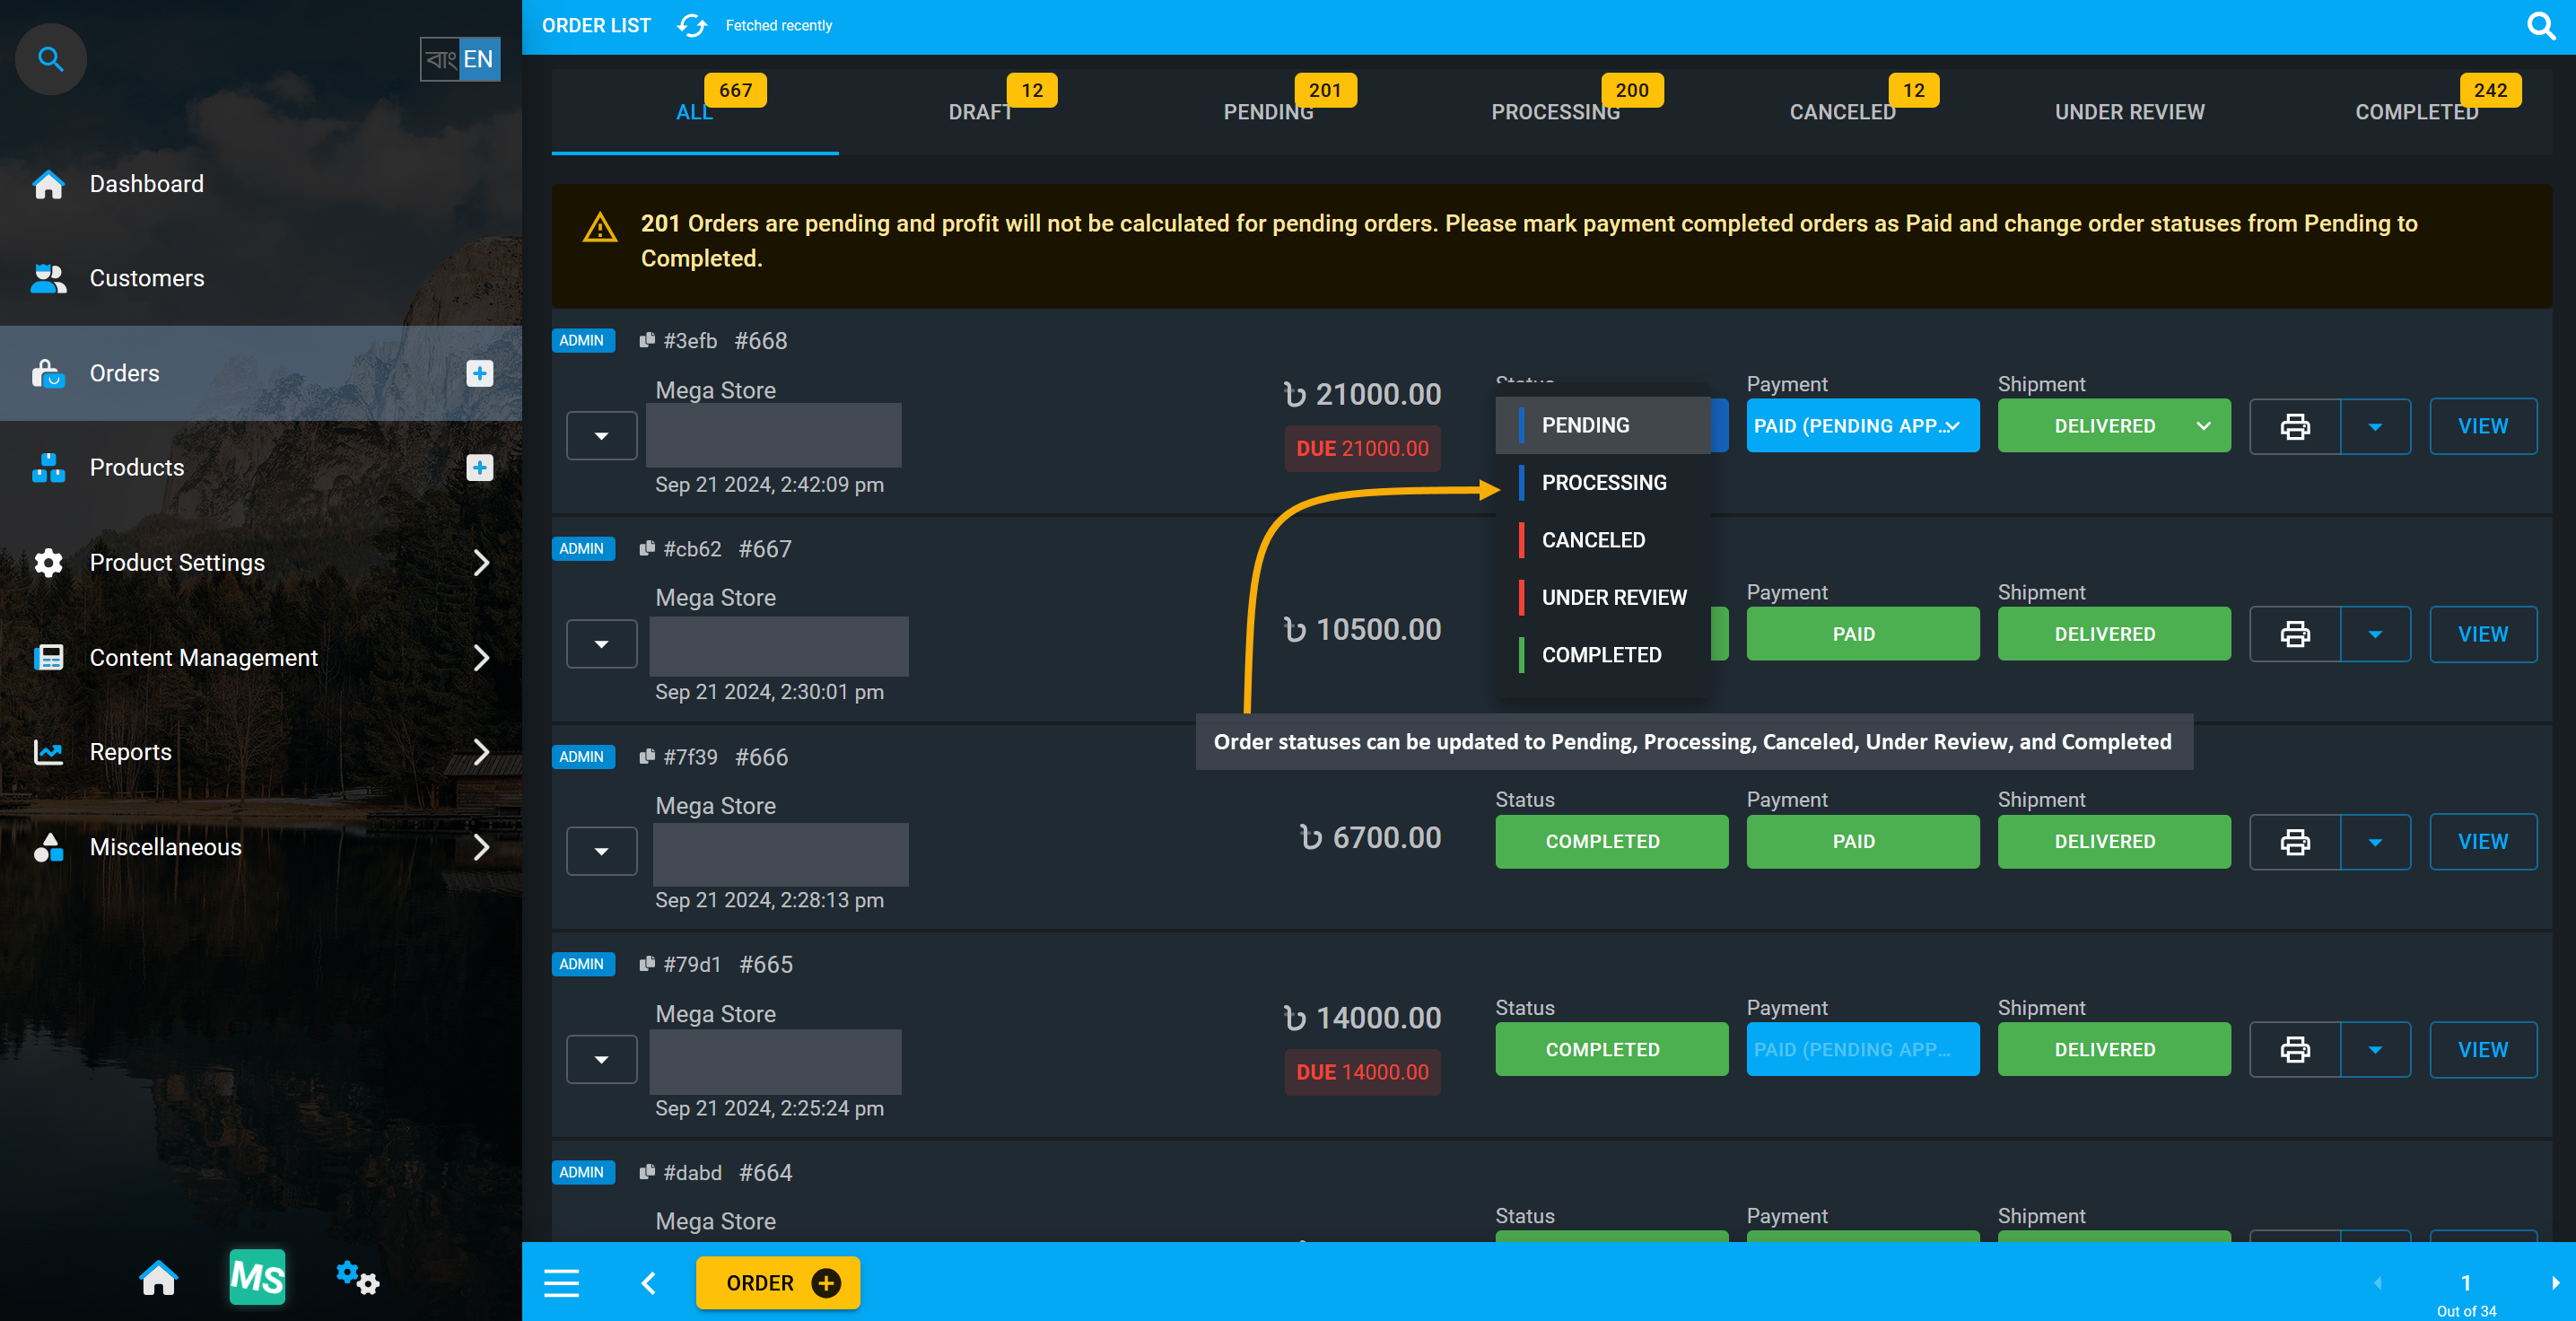
Image 1: Order status can be updated to Pending, Processing, Canceled, Under Review, and Completed.
Order Draft
A Draft Order is an order that is created without payment from the Order Cart. As no payment is added for draft order, it will not reflect on Ledger until the order status is changed to Pending. However, Draft order will allow printing the invoice for customer before payment is made. Draft order can also be canceled.
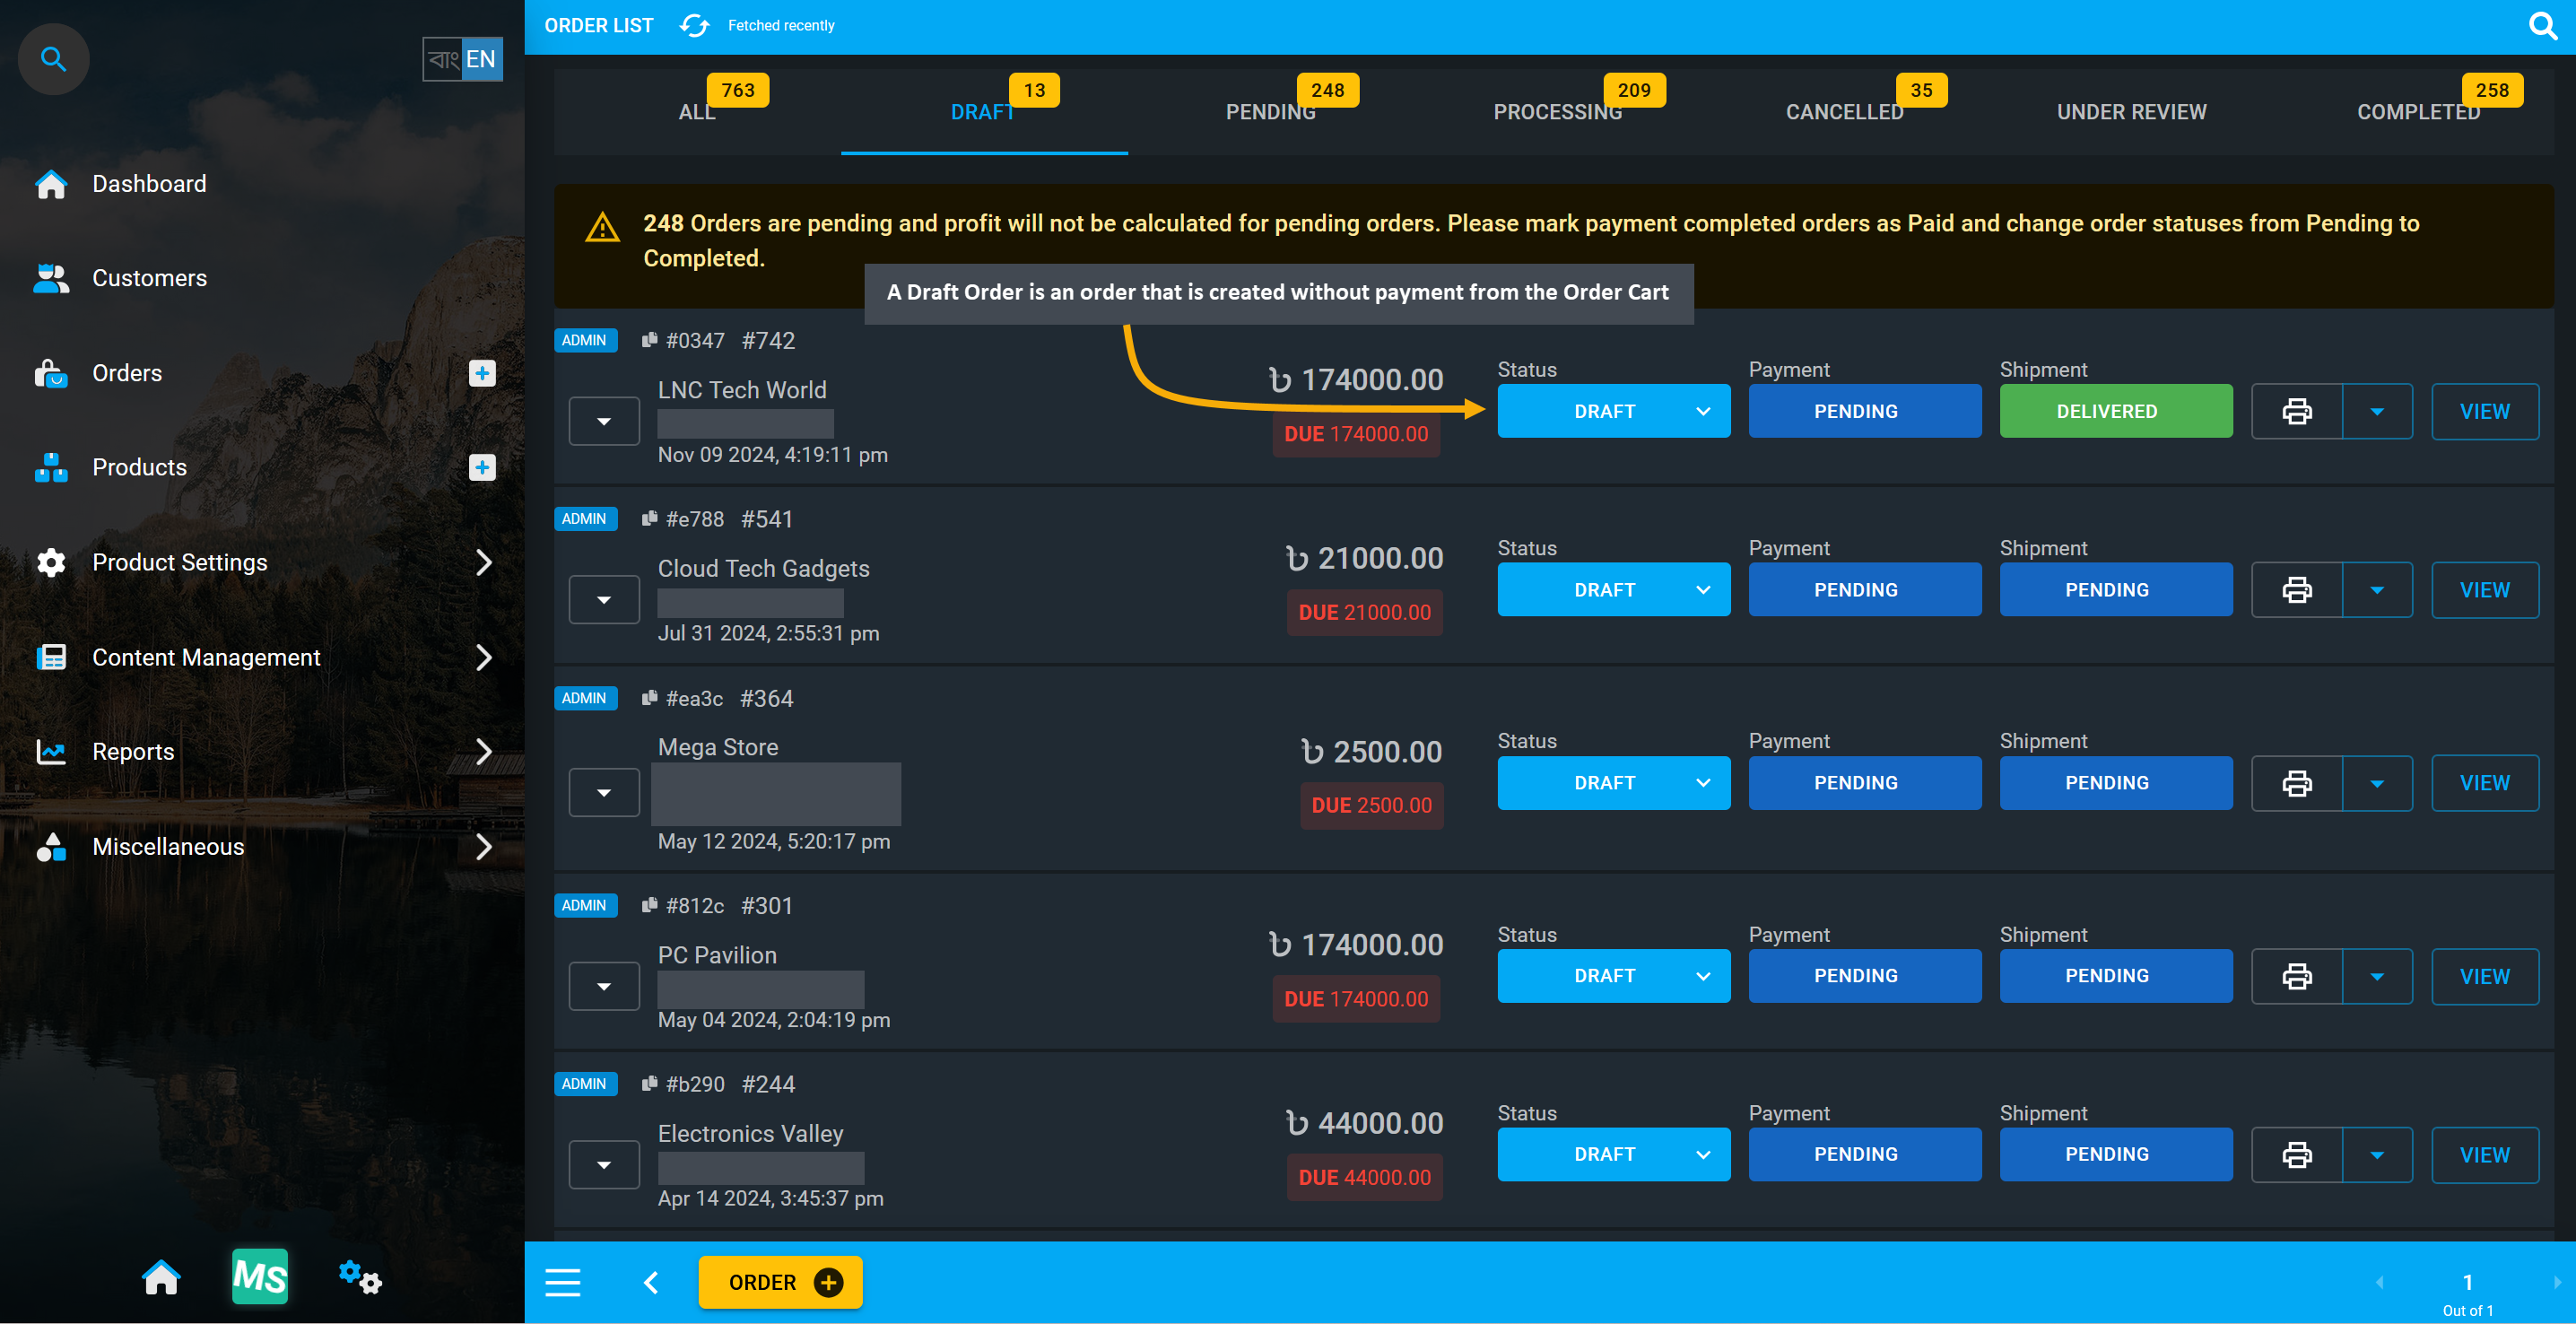
Image 2: Order created from cart without payment is a Draft Order that does not reflect on Ledger.
Order Pending
A Pending Order is an an Order that was not yet executed. It can, for example, be an Order that may have pending Payment from the Customer’s end or delivery pending from the Shop Owner’s end. If an order is Pending, it will still require payment and shipping confirmation to start being processed for the customer.
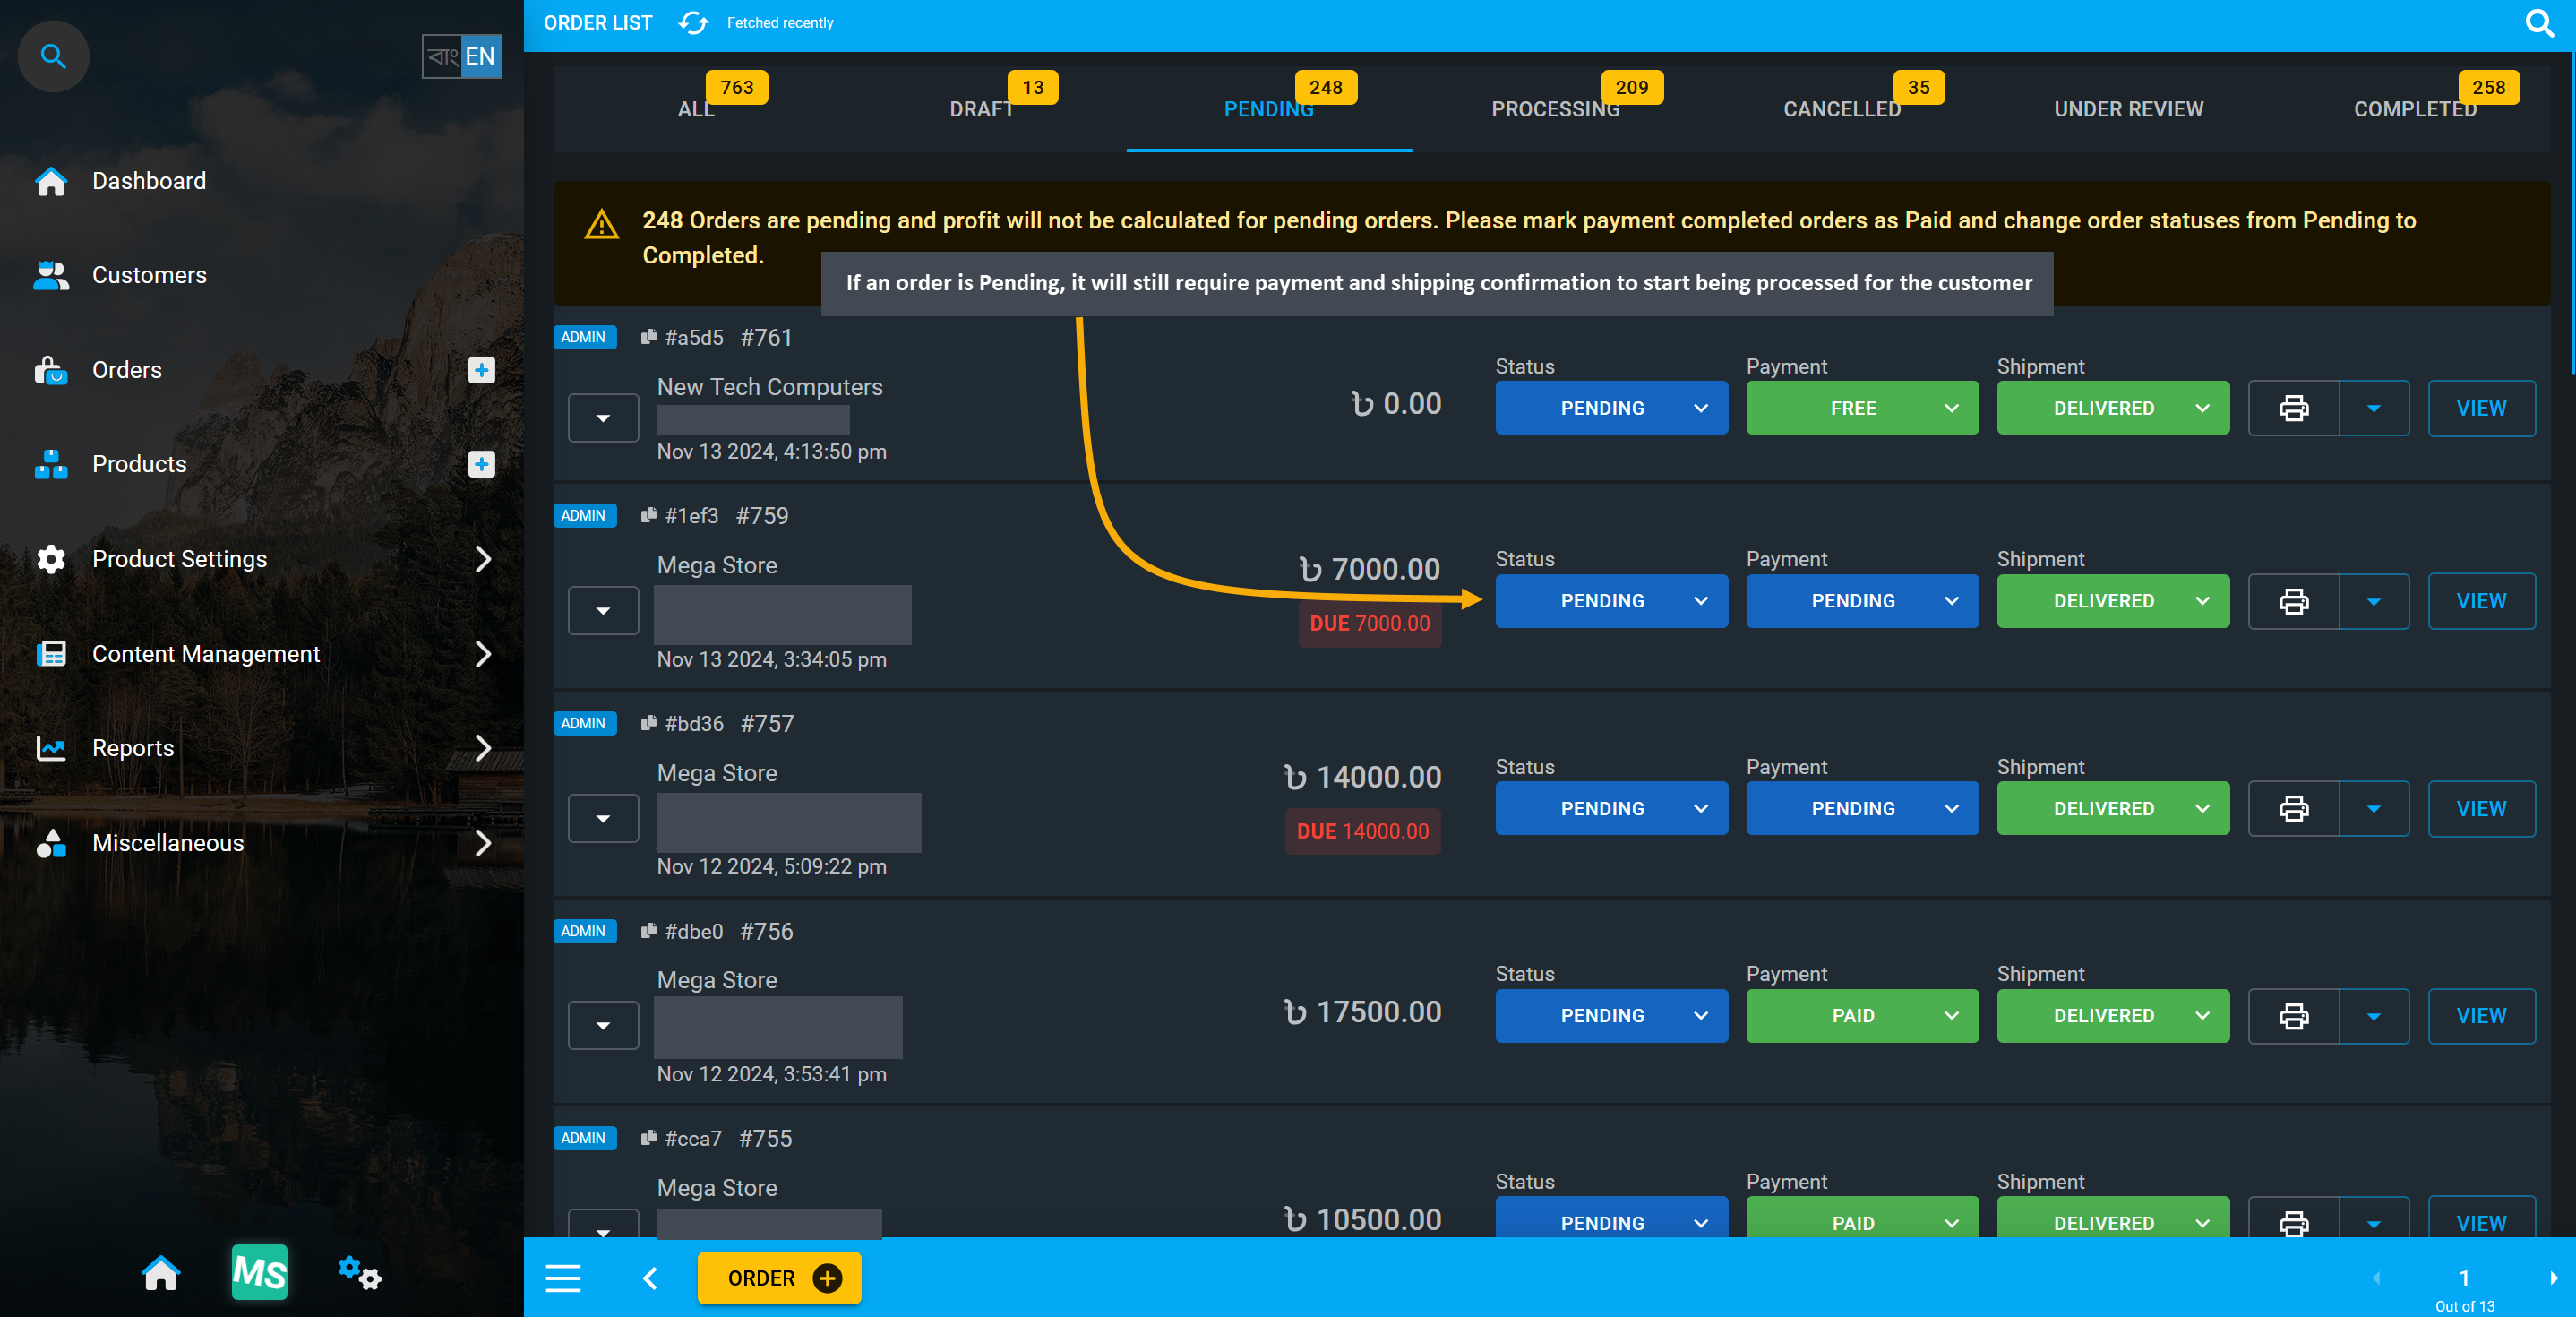
Image 3: Pending orders will require payment and shipping confirmation to start being processed.
Order Processing
Shop Owners can mark Orders as Processing if they are preparing the Product for delivery, indicating the stage where the Order has not been handled to the shipping carrier for delivery, but the product is ready. So, when payment for an Order is completed, the Order status is automatically changed to Processing.
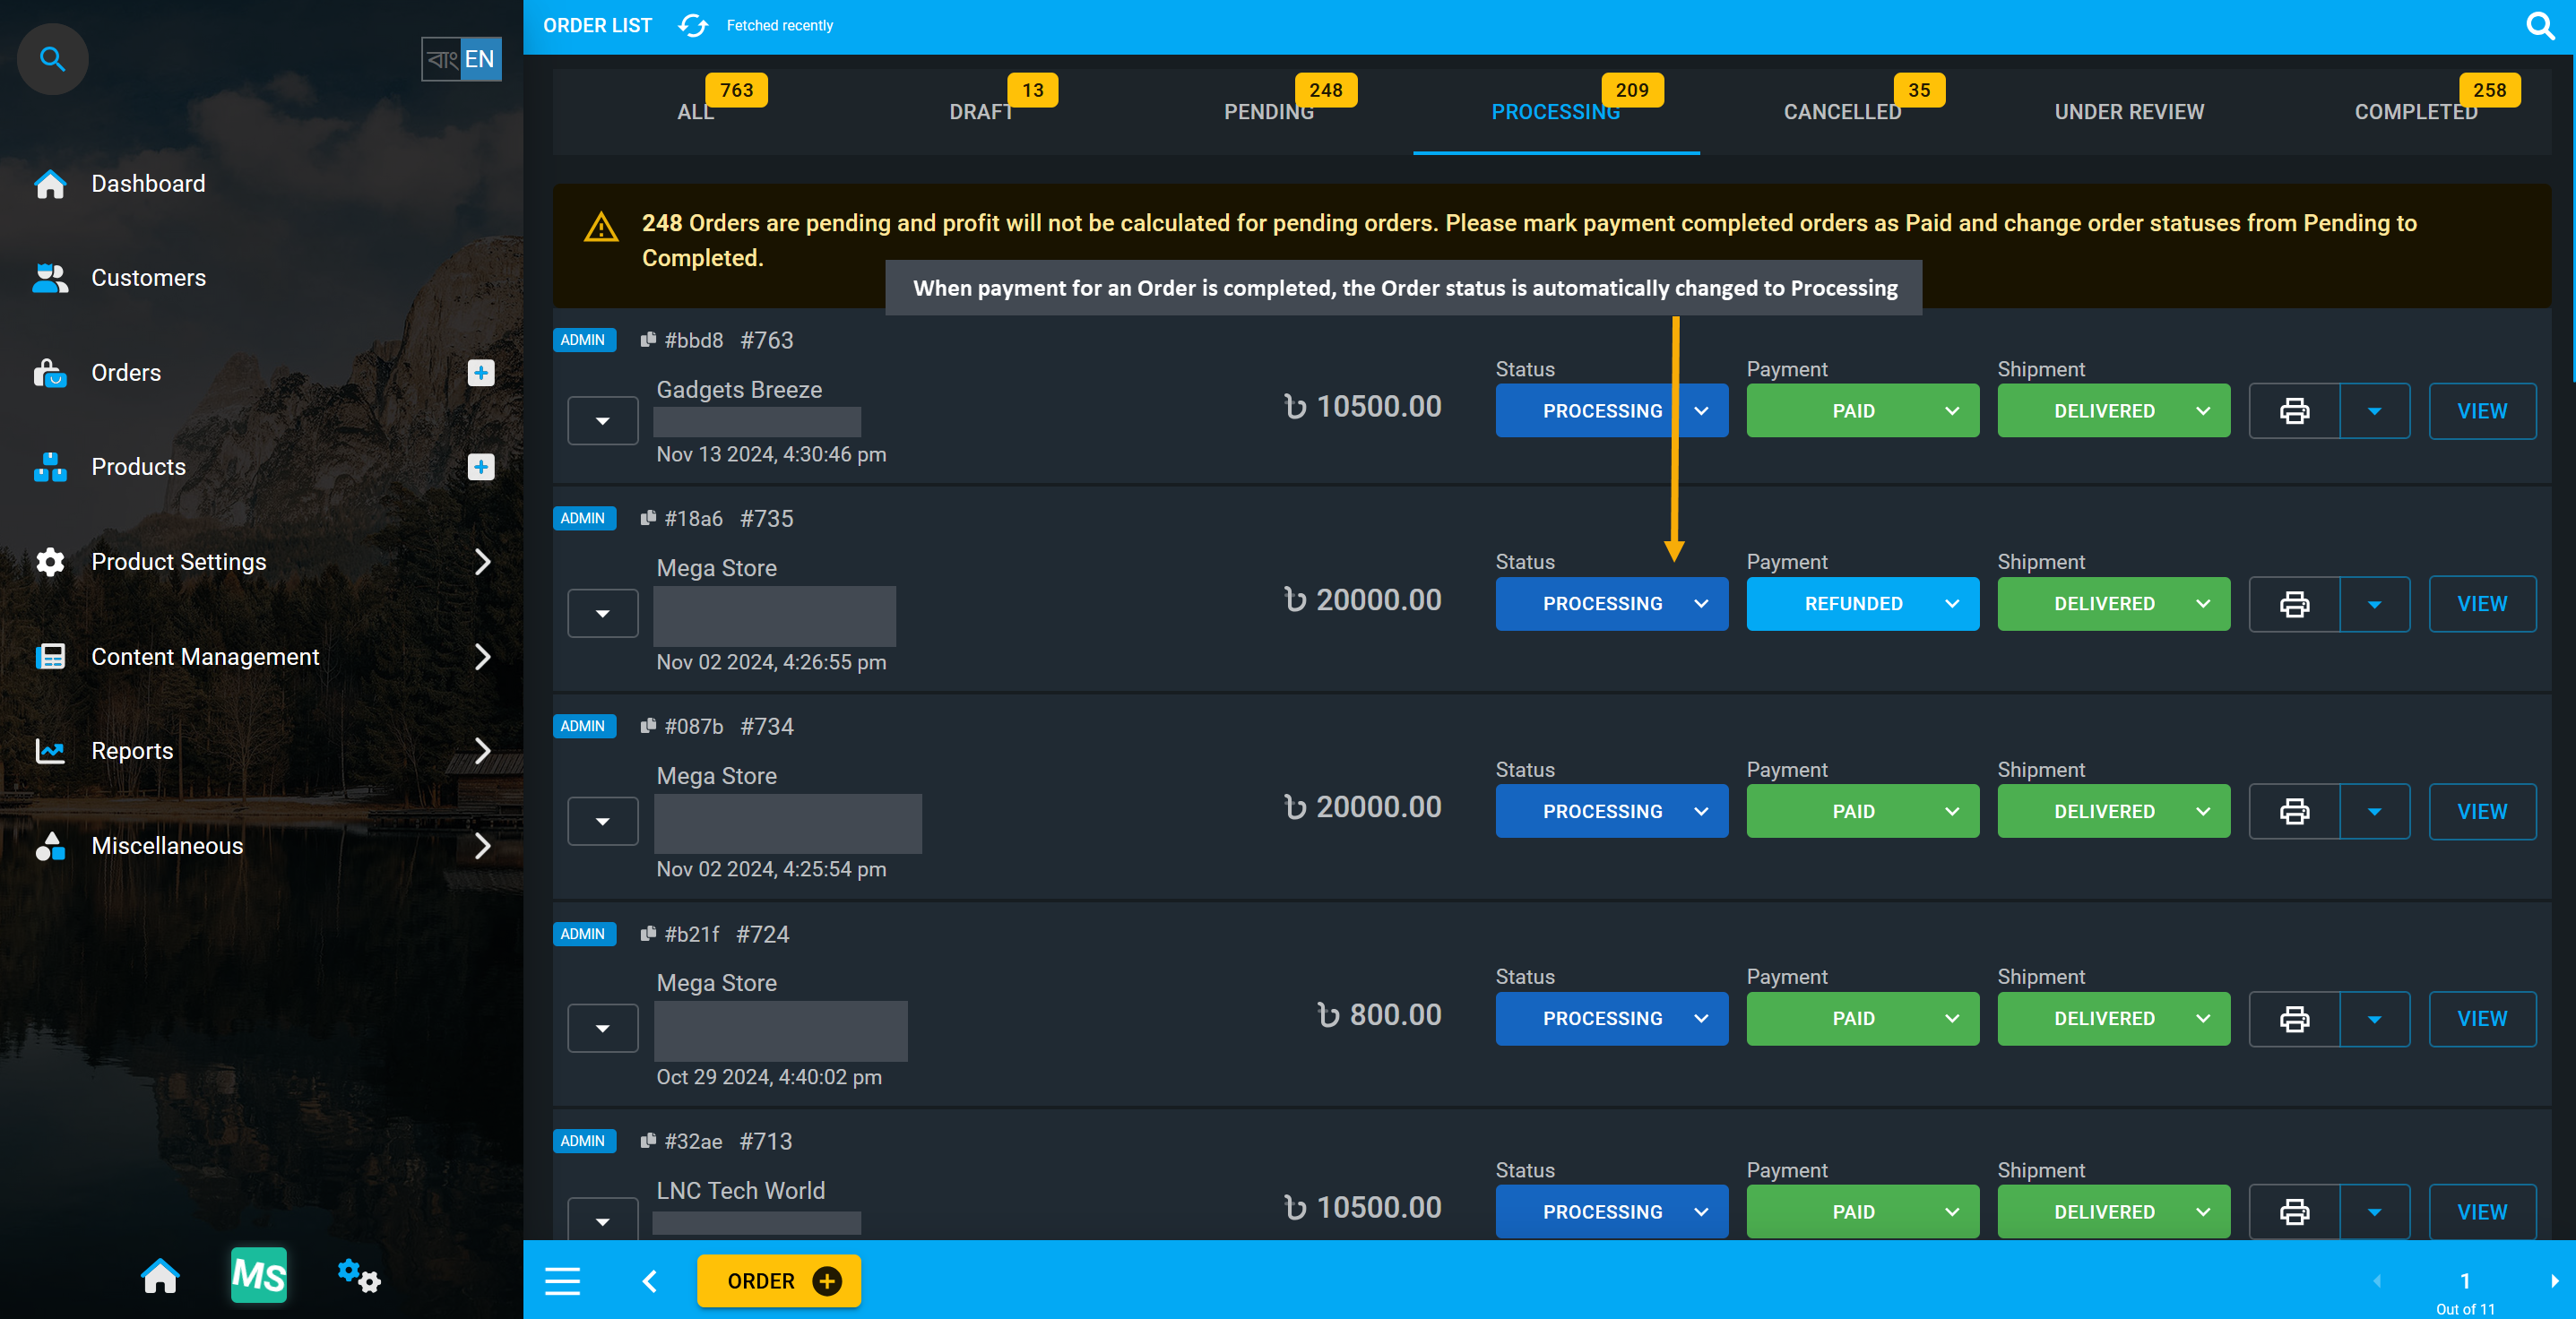
Image 4: When payment for an Order is completed, Order status is automatically changed to Processing.
Order Canceled
Canceled Orders are ones that have been submitted but are no longer in effect in the system. Shop Owner can Cancel Orders that have not been paid by the Customer or entered the shipping process yet. Likewise, paid Orders can also be refunded after confirming return of stock and refunding of payment.
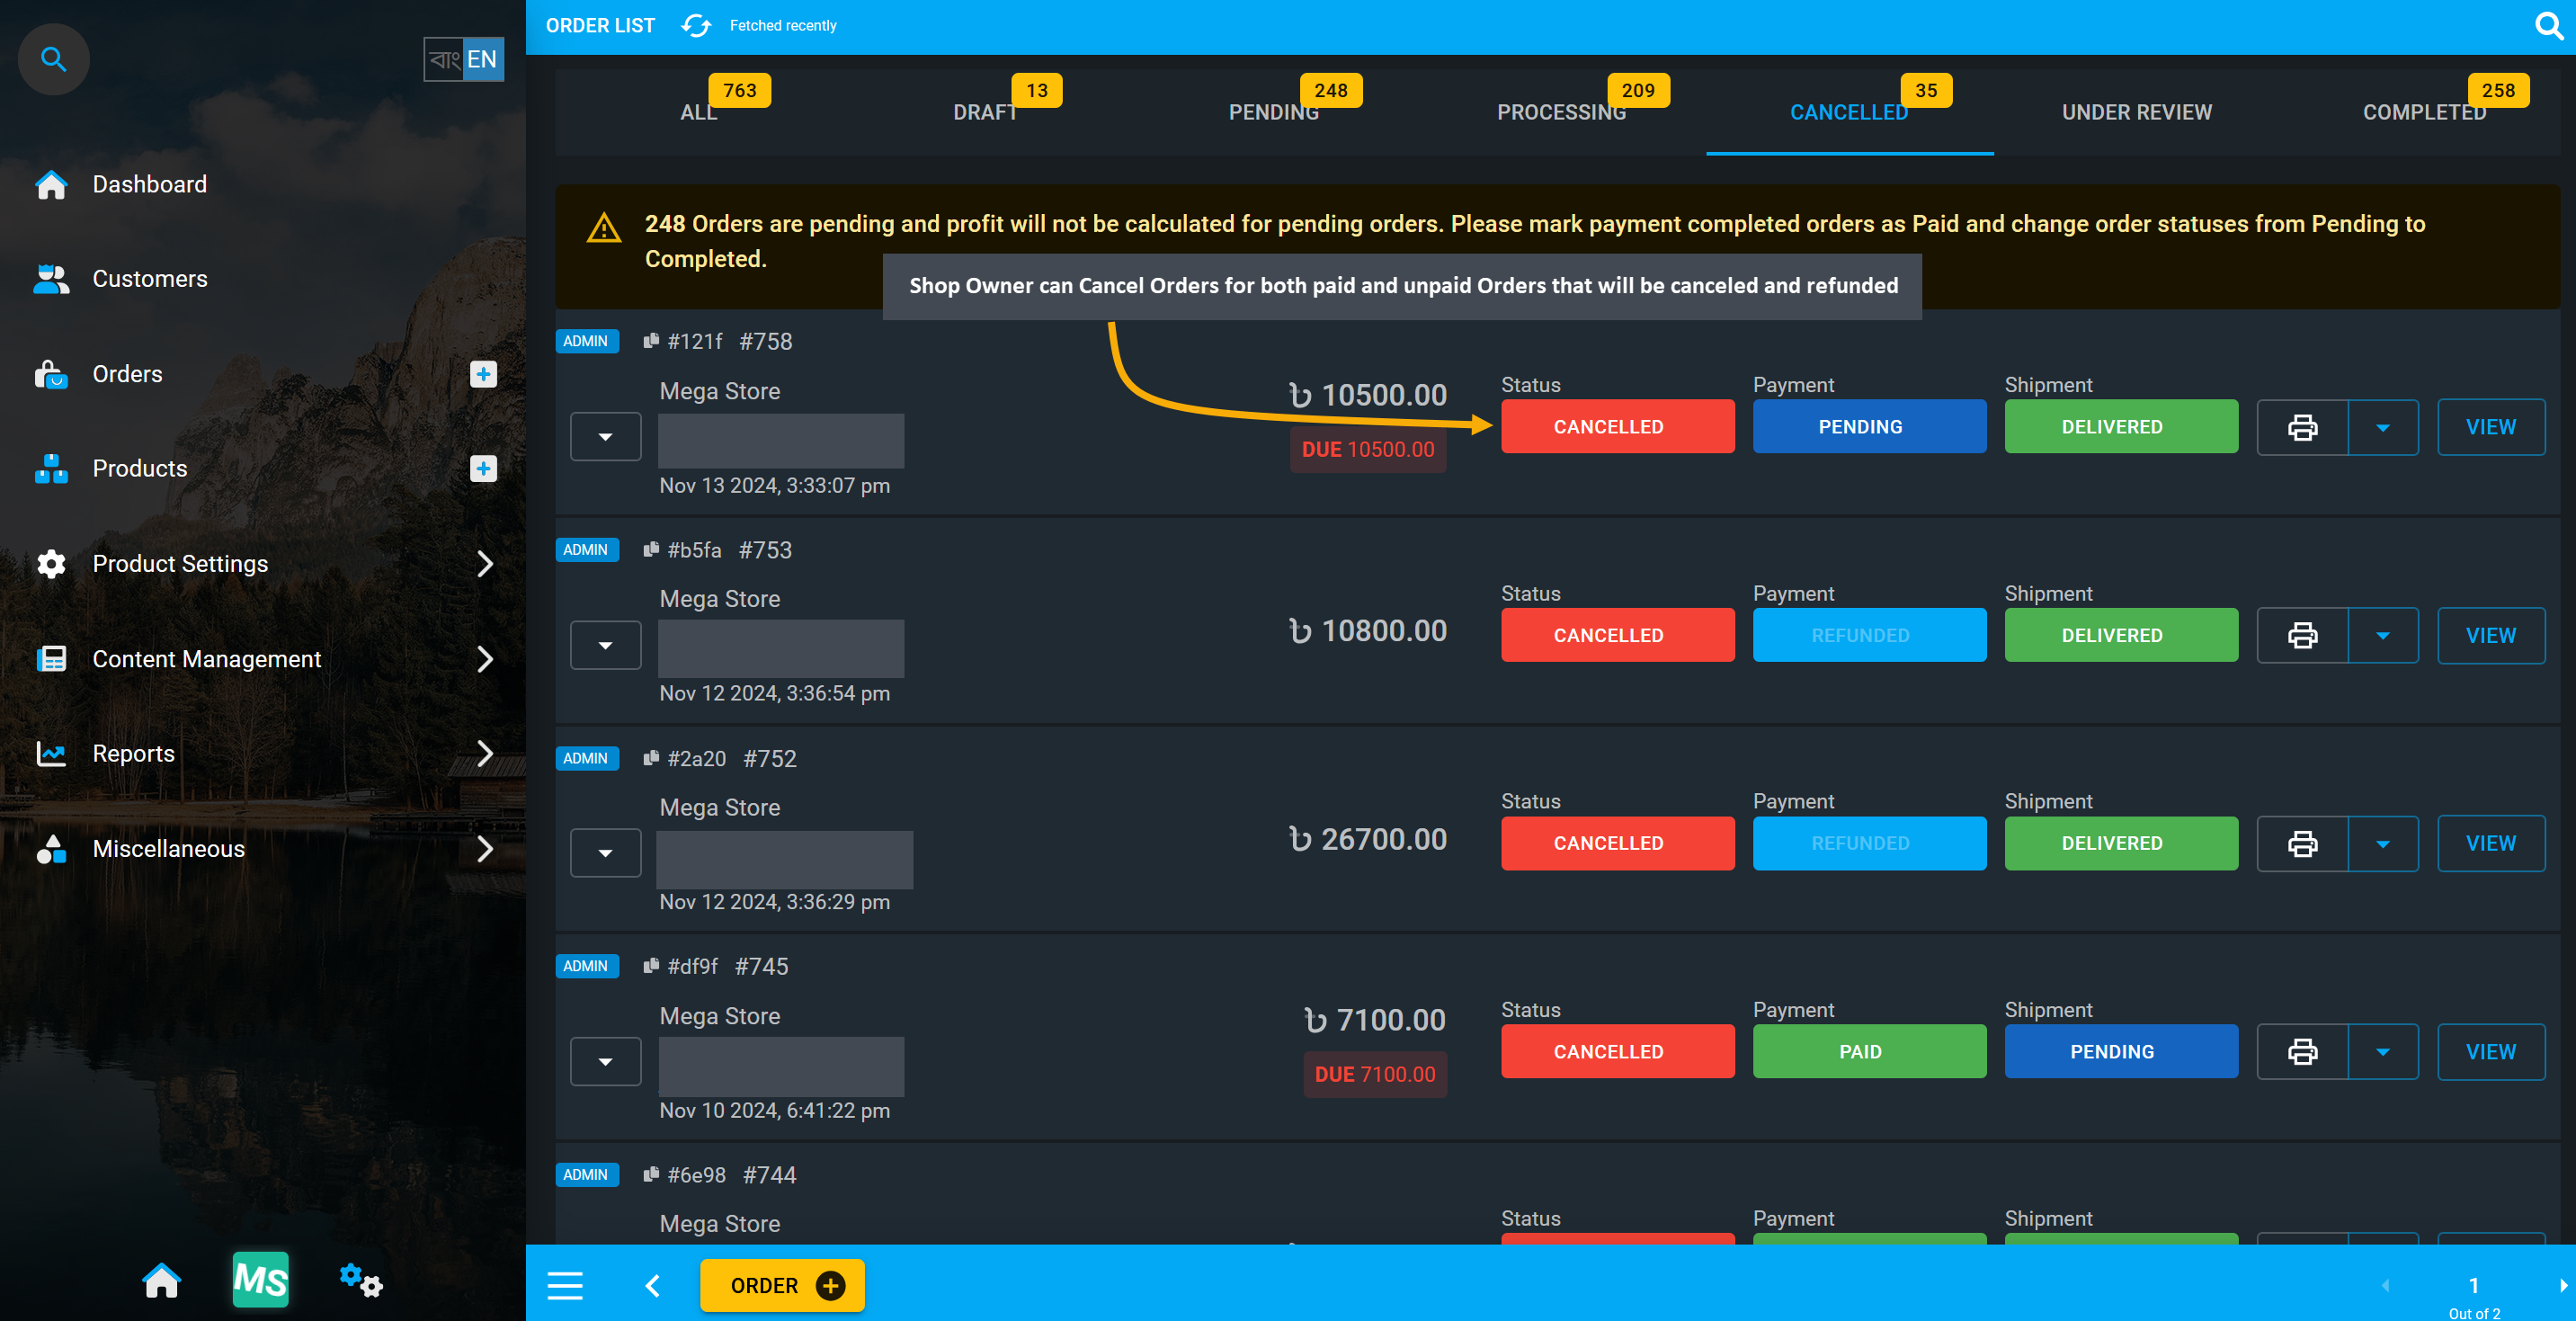
Image 5: Shop Owner can Cancel both paid and unpaid Orders which will be canceled and refunded.
Order Under Review
Order status Under Review means when the Order possess a variety of attributes that require them to be manually released by the Shop Owner. They can put any Order under review and manually review Order information later or request for additional information from the Customer to process order if needed.
Order Completed
When an Order is marked as Completed, it means that the Shop Owner have processed the Order, labeled the package and handed it to the Customer using the In Store Pickup option or handed over to the shipping carrier. Shop Owner can set Orders as Complete when they have fulfilled all the Order steps from their end.
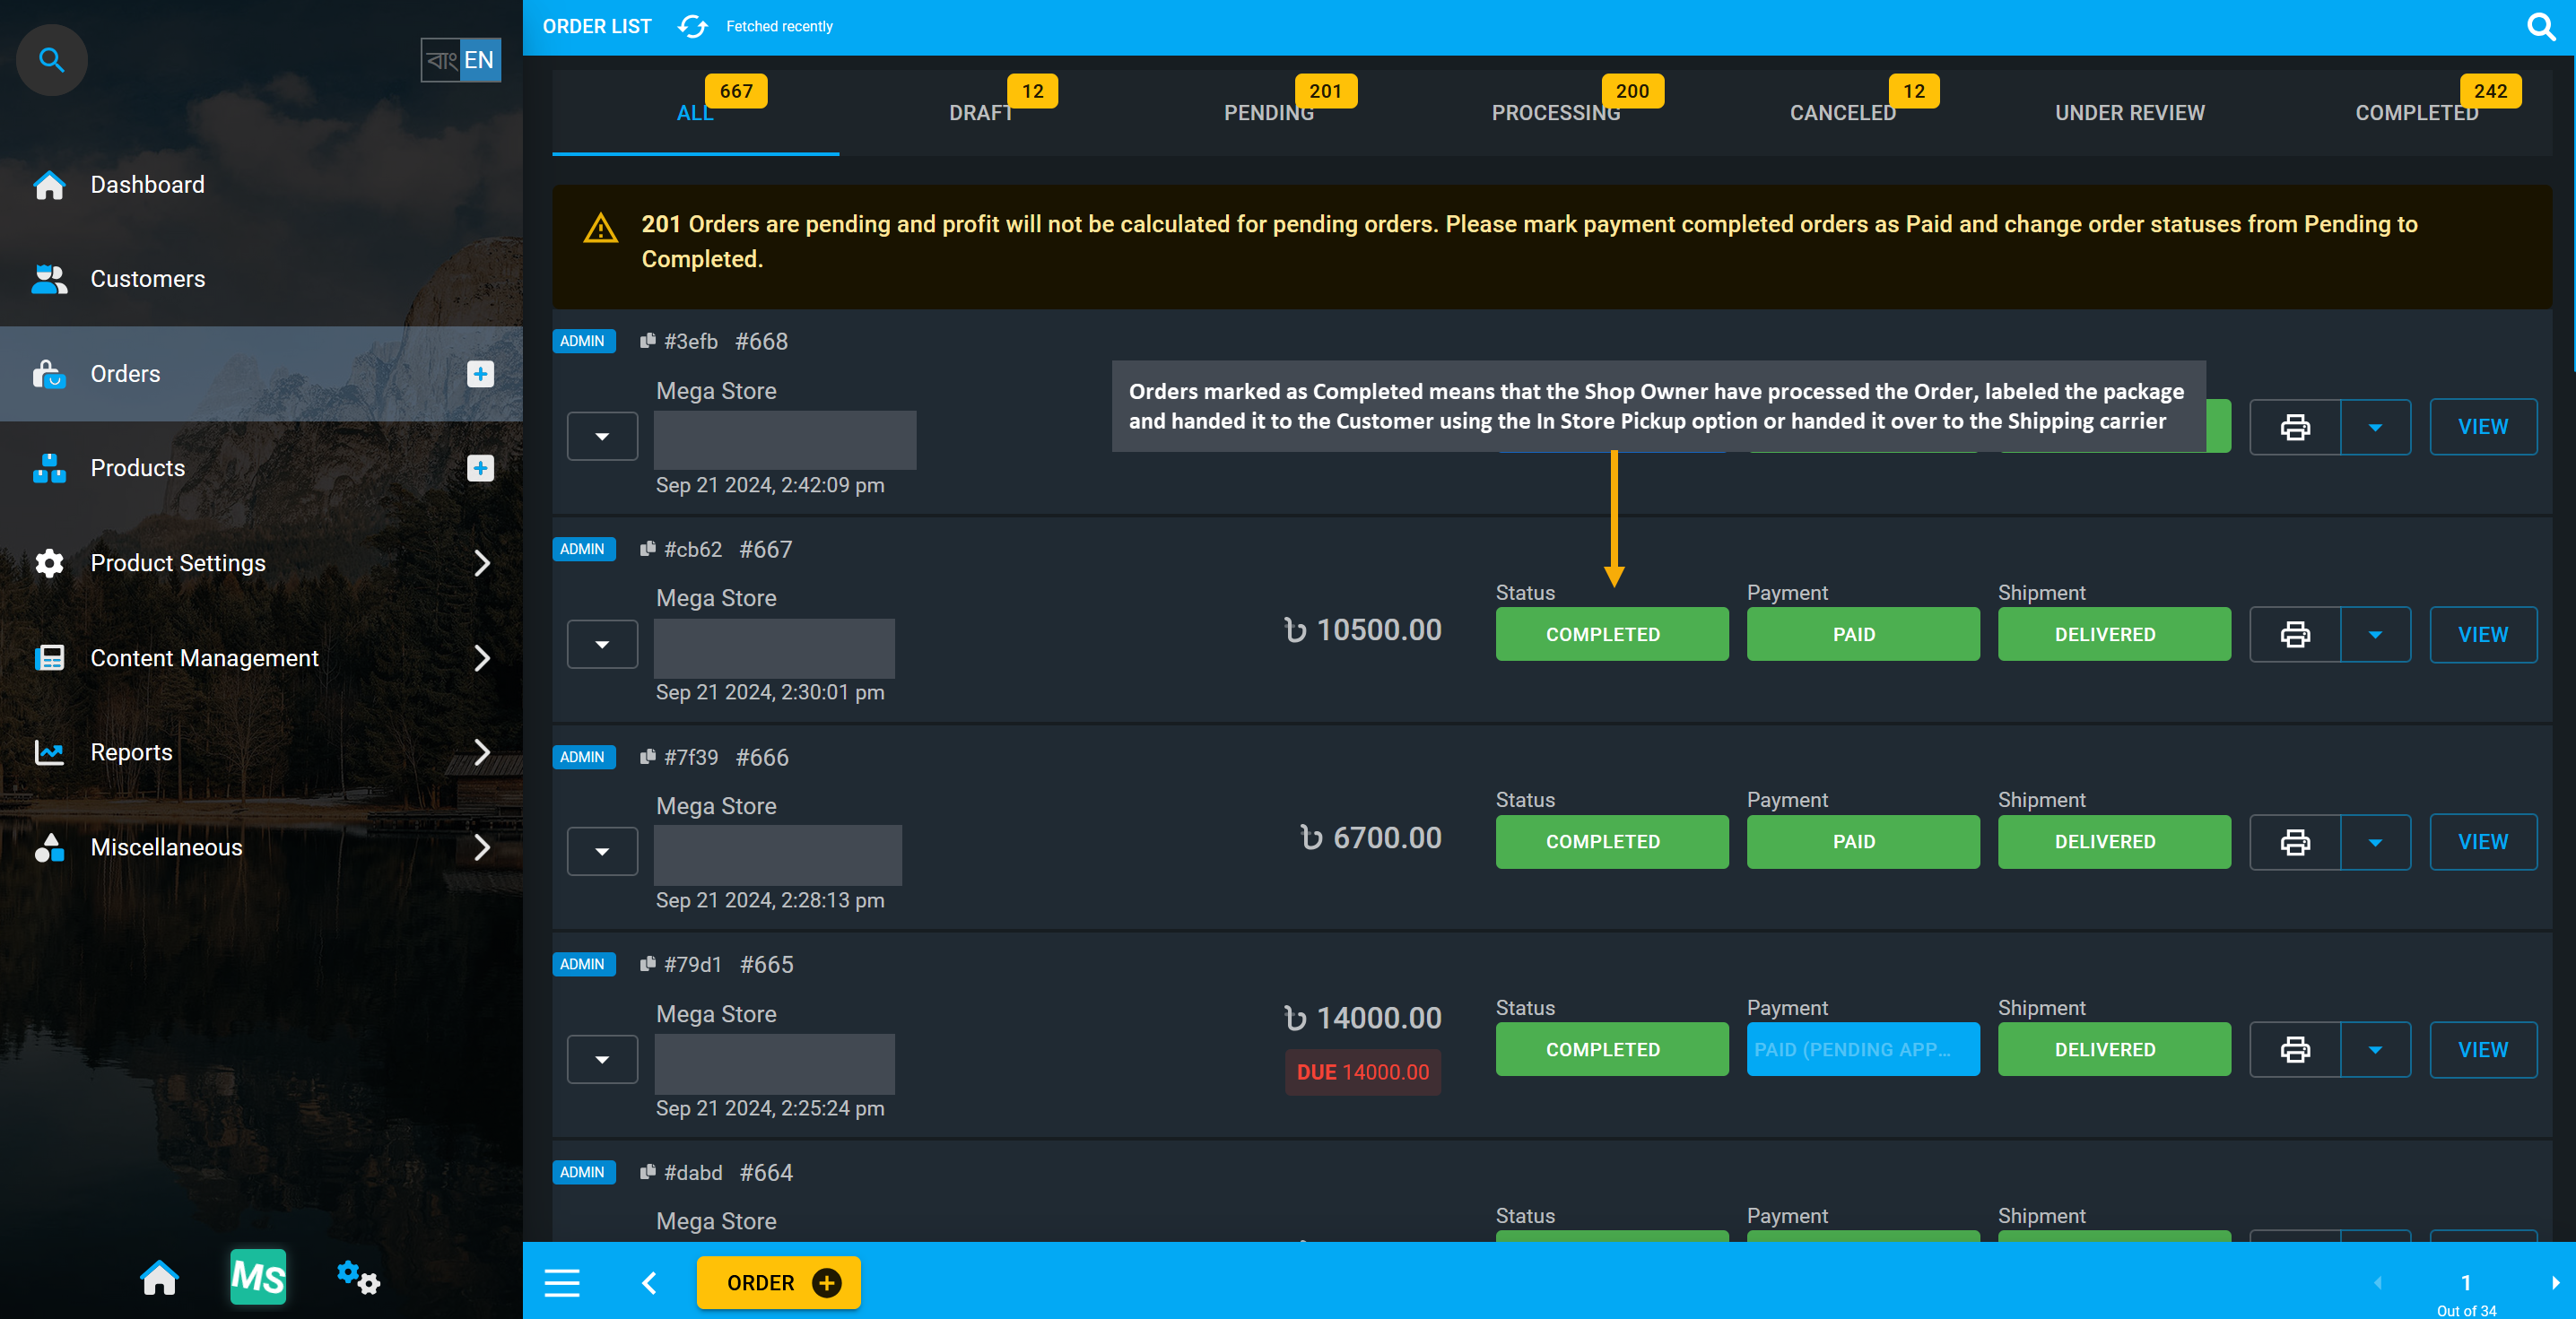
Image 2: Order marked as Completed means Payment was successful and Product is ready for shipping.
Add Transaction and Verify Pending Orders
To convert Pending Orders with Pending Payment, the Shop Owner has to go to Order Dashboard, check, complete, or verify Payment to change the Payment Status to Paid if full order due is cleared.
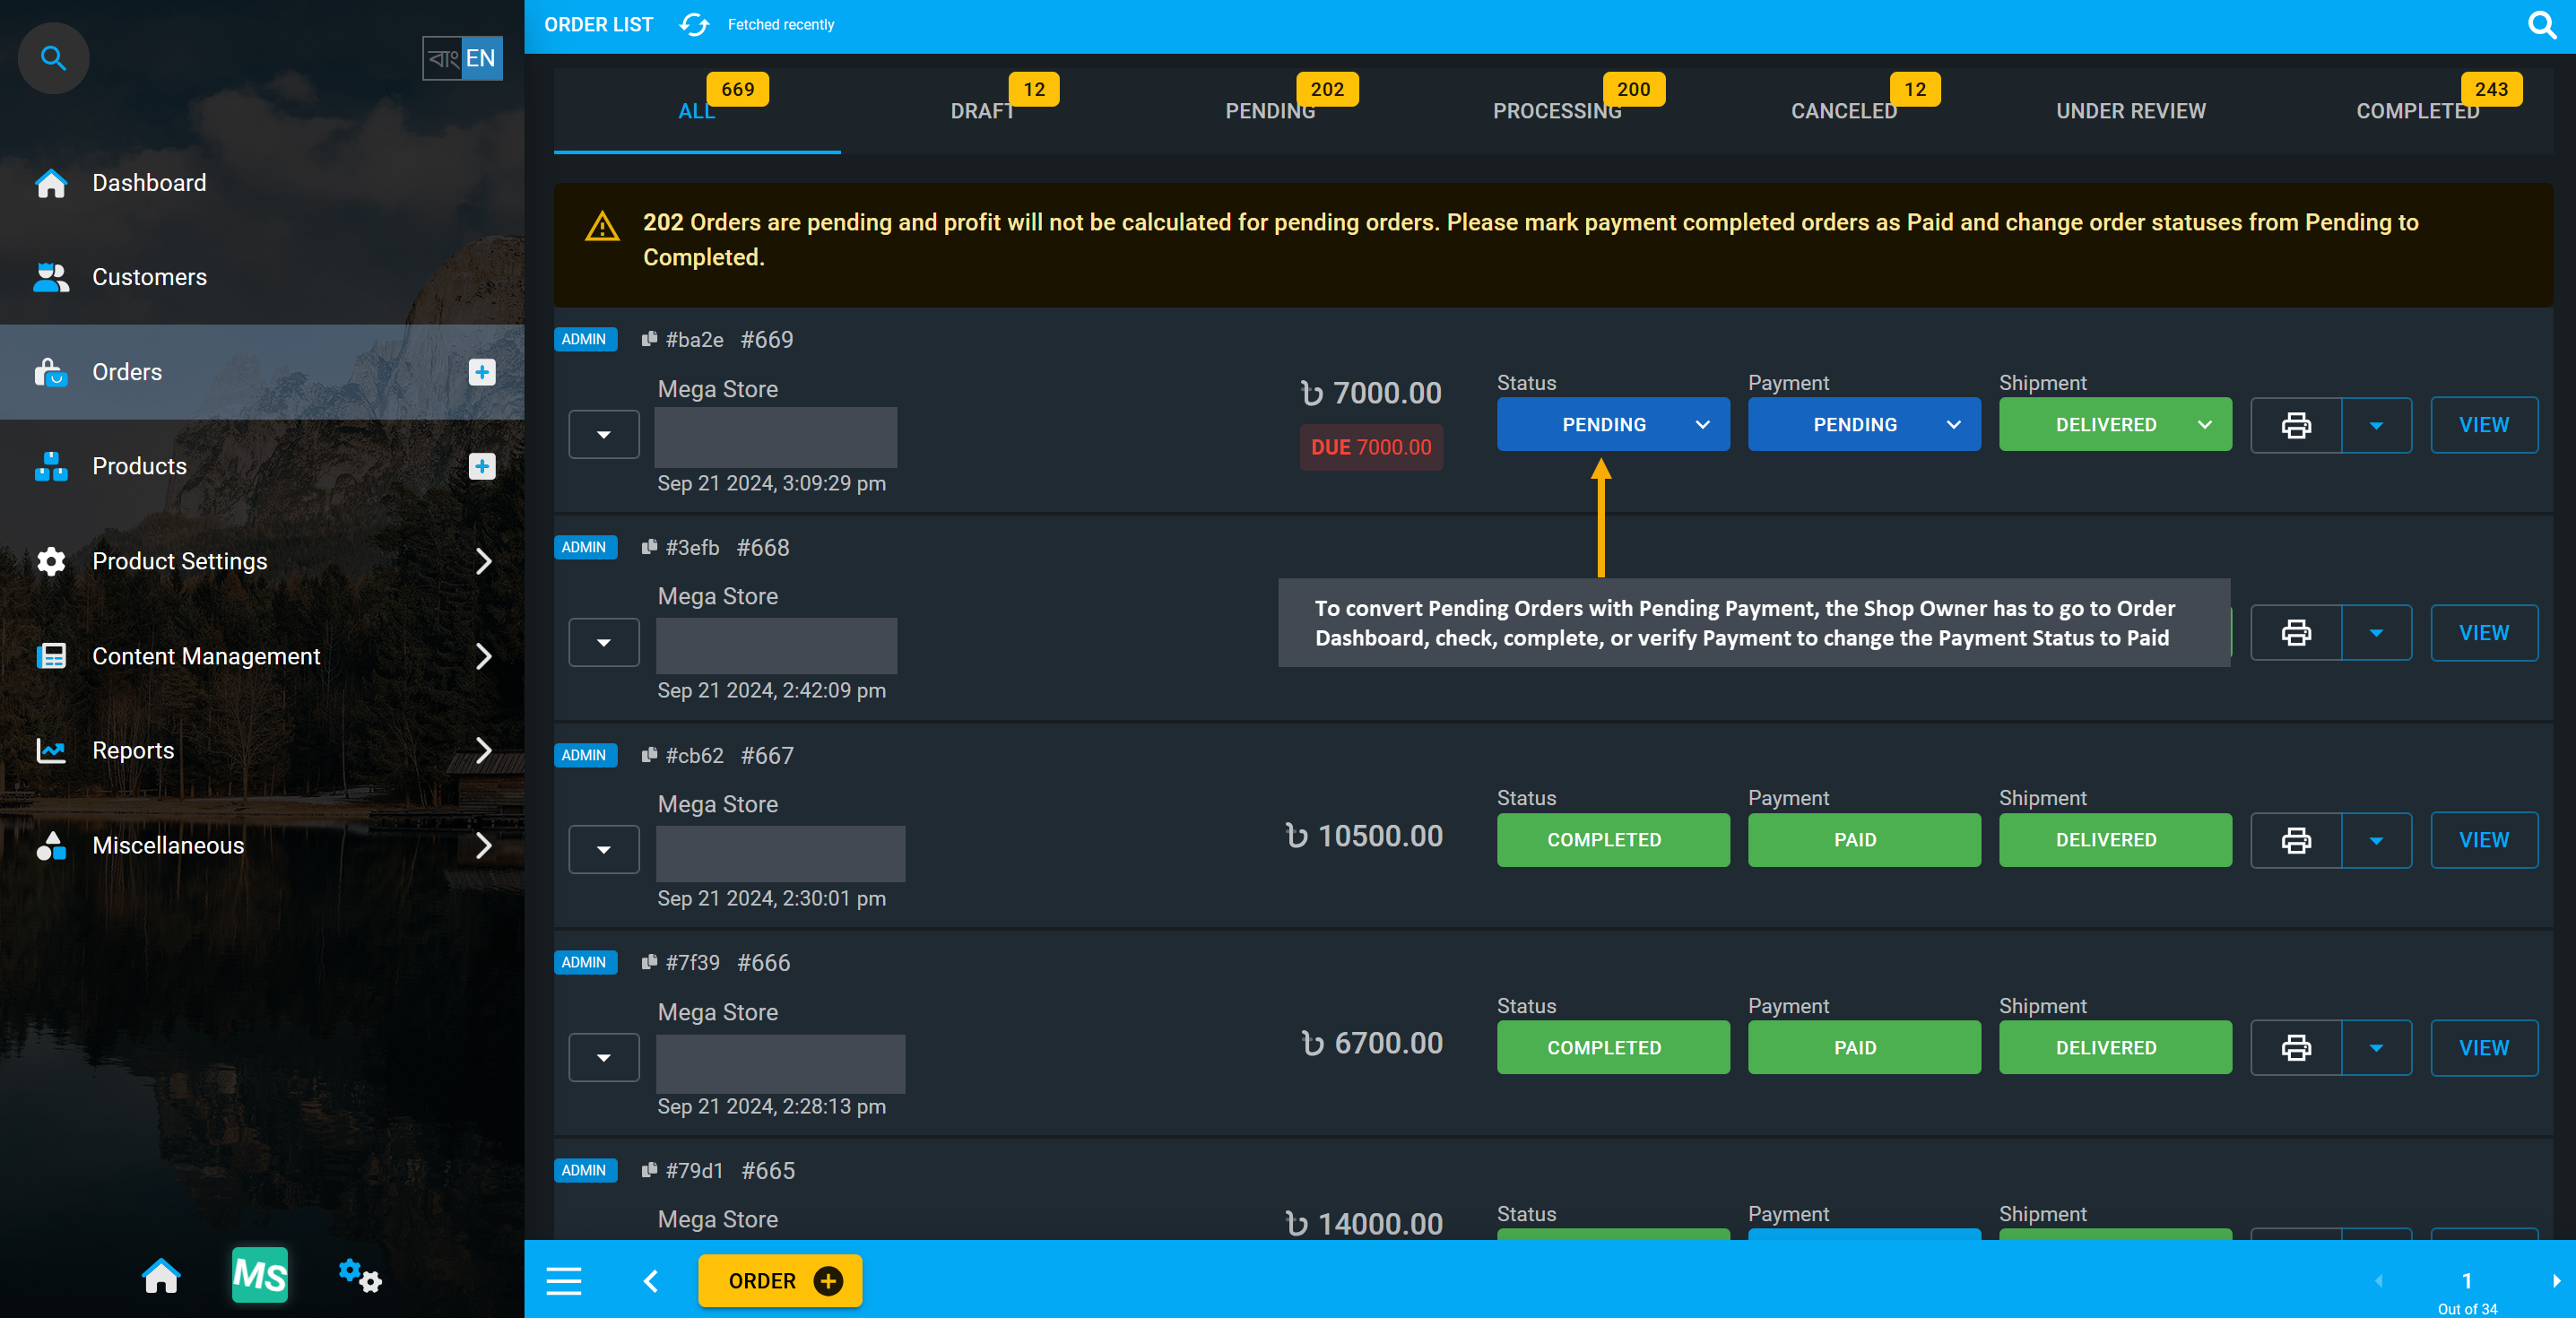
Image 3: To convert Pending Orders, Shop Owner has to go to Order List to complete their payment.
To open Order details, click on the View button to be redirected to Order Dashboard to complete Payment for the Pending Orders and change their status to Completed. Order Payments can be added from there.
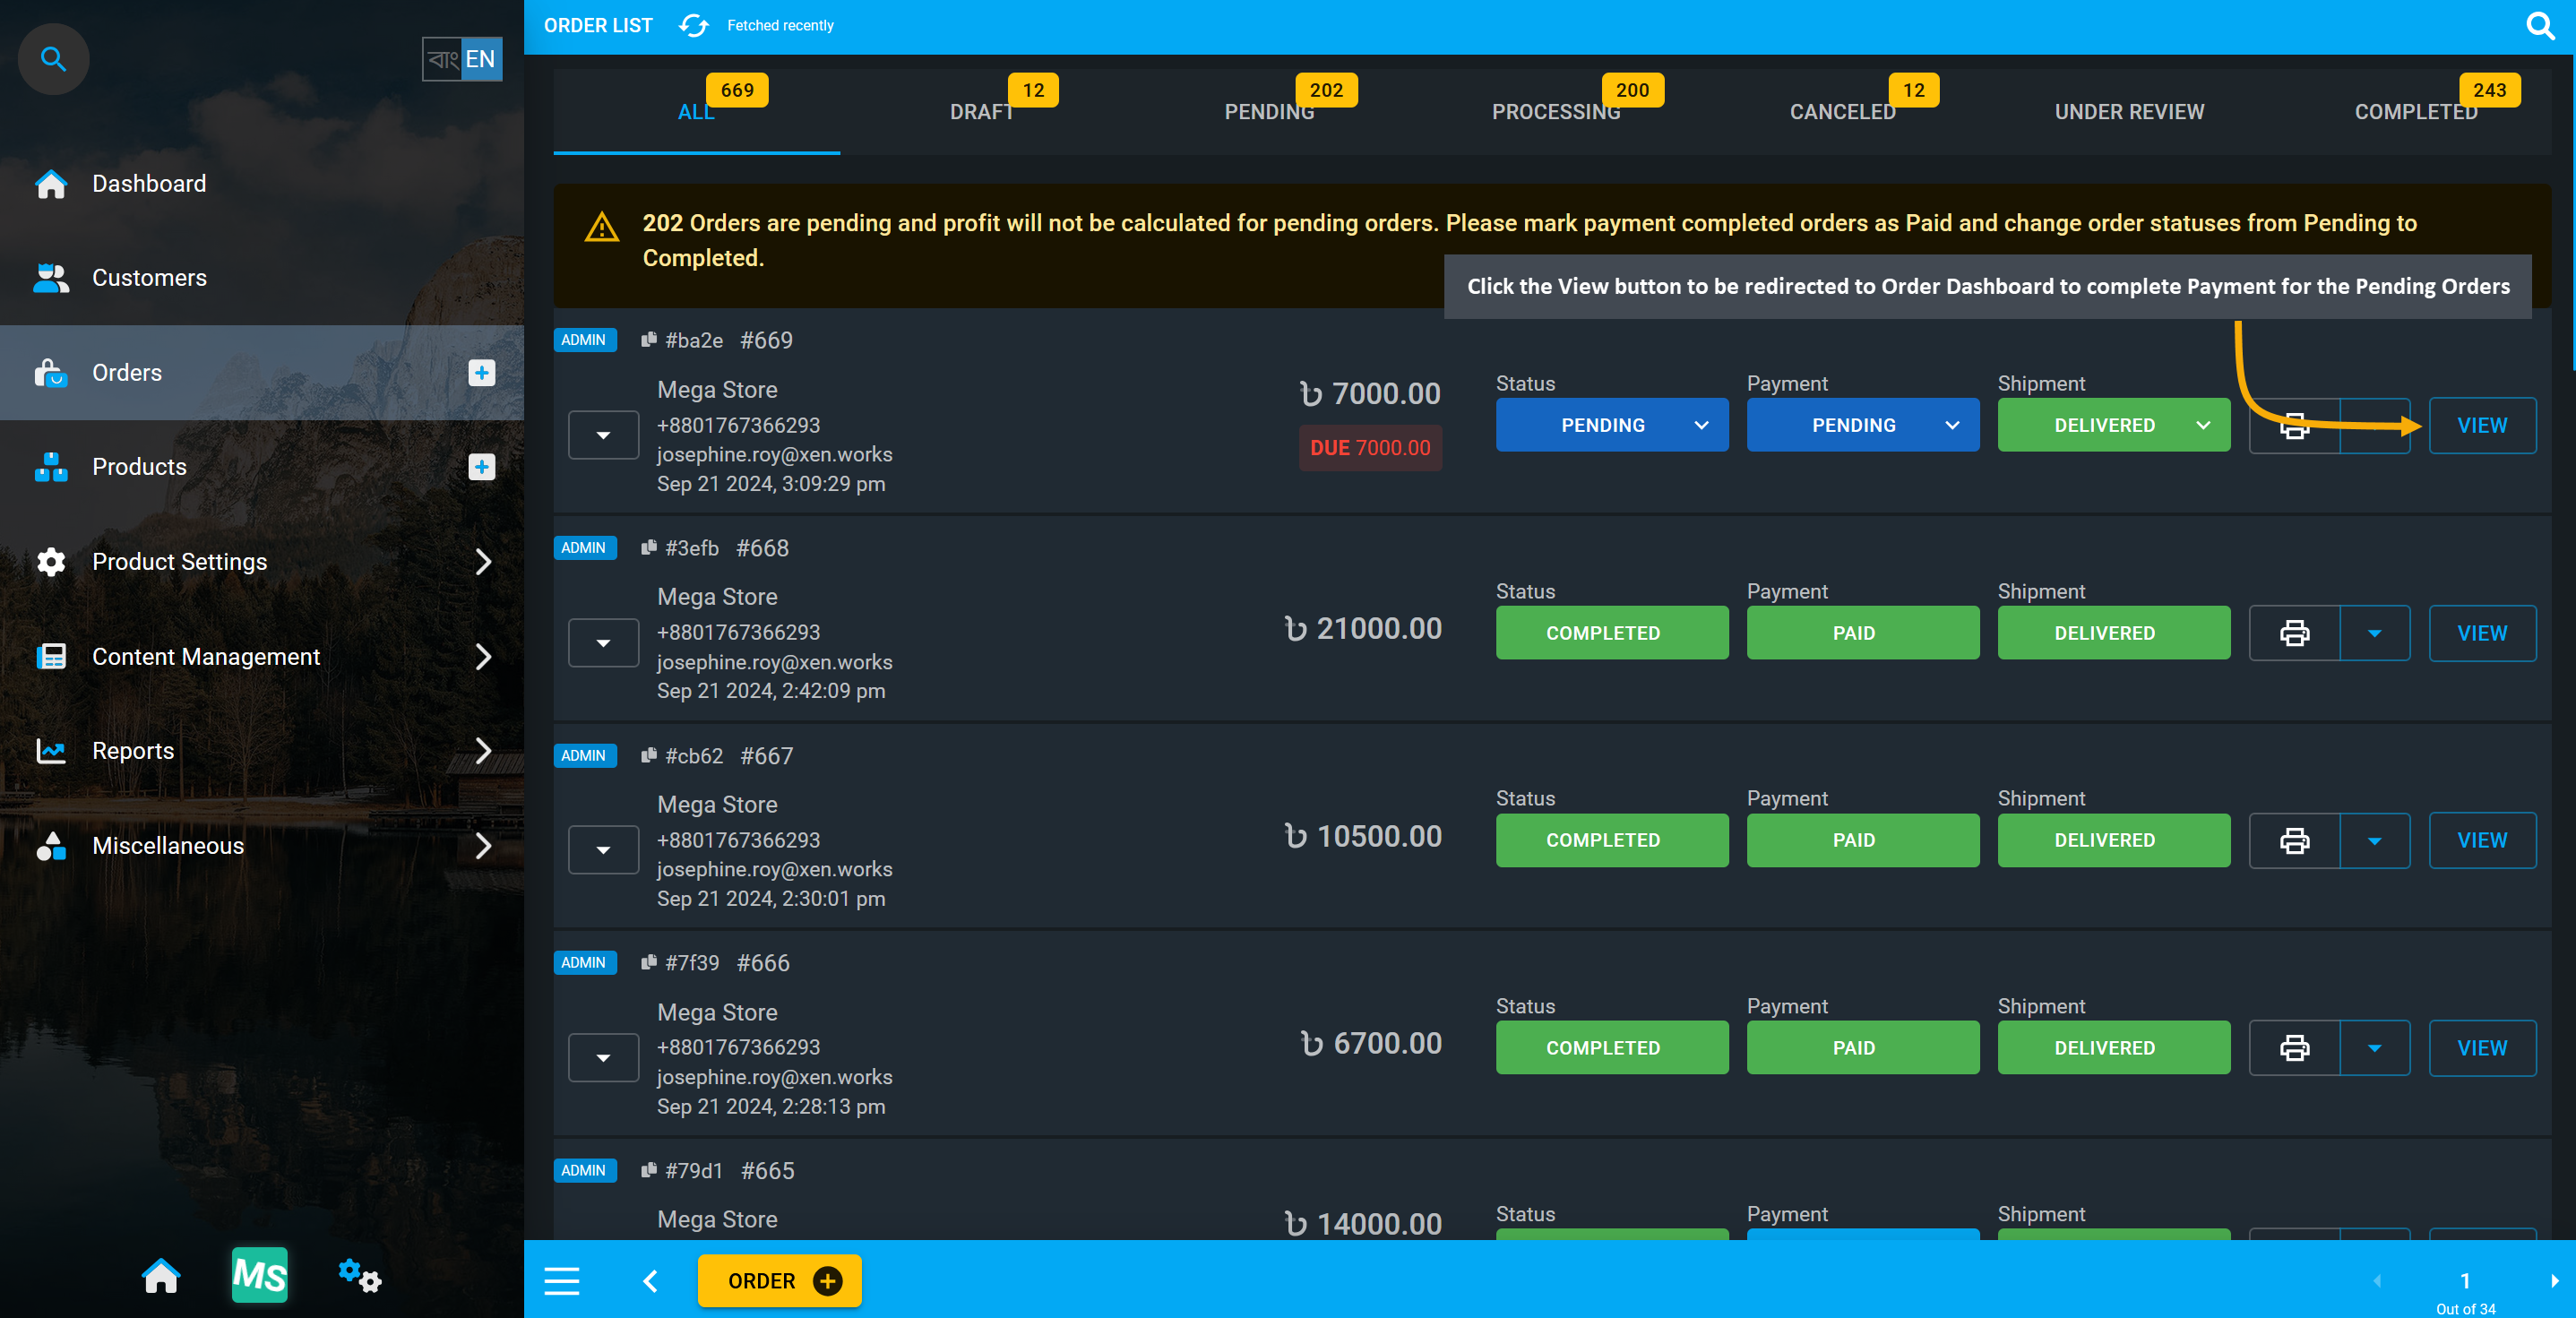
Image 4: Click View button to redirect to Order Dashboard to complete Payment for Pending Orders.
For no payments added to an Order from cart, go to Order Dashboard and click on Payments to select any Payment Gateway and make partial or full payment adding payment details multiple times if needed.
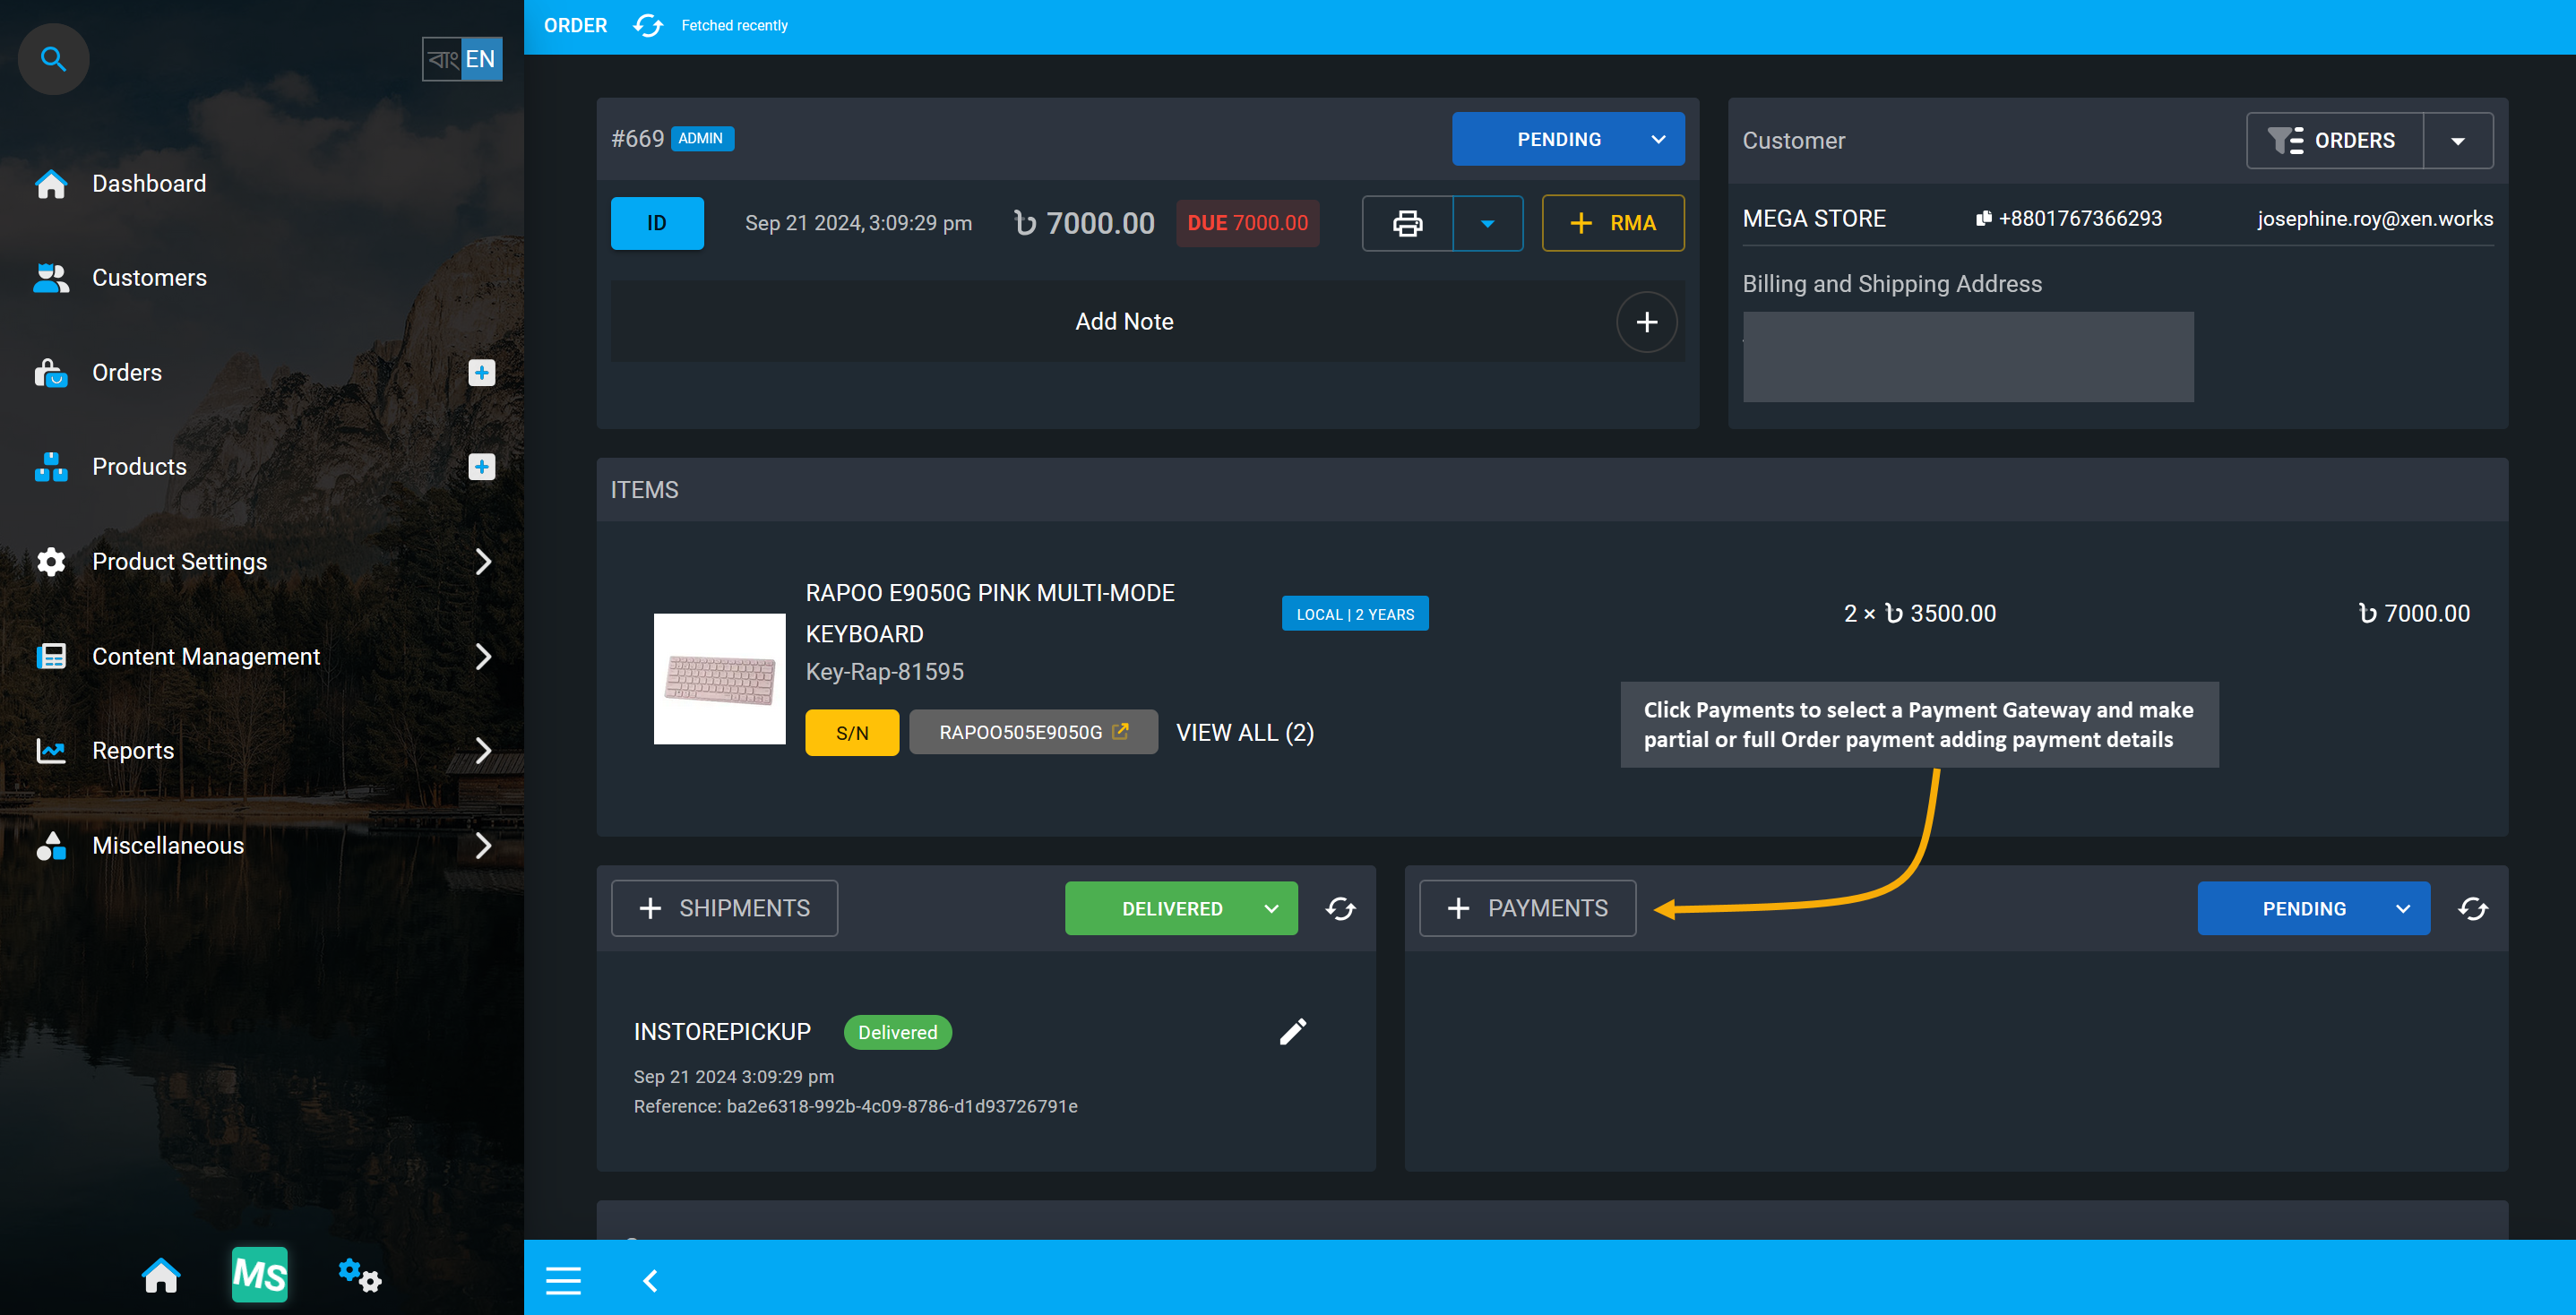
Image 5: Click on Payments to select a Payment Gateway and make partial or full Order payment.
Clicking on Payments will open a modal with different payment gateways to select and make payment for Order. Select a specific payment gateway, set payment amount, fill in the details, and click Submit.
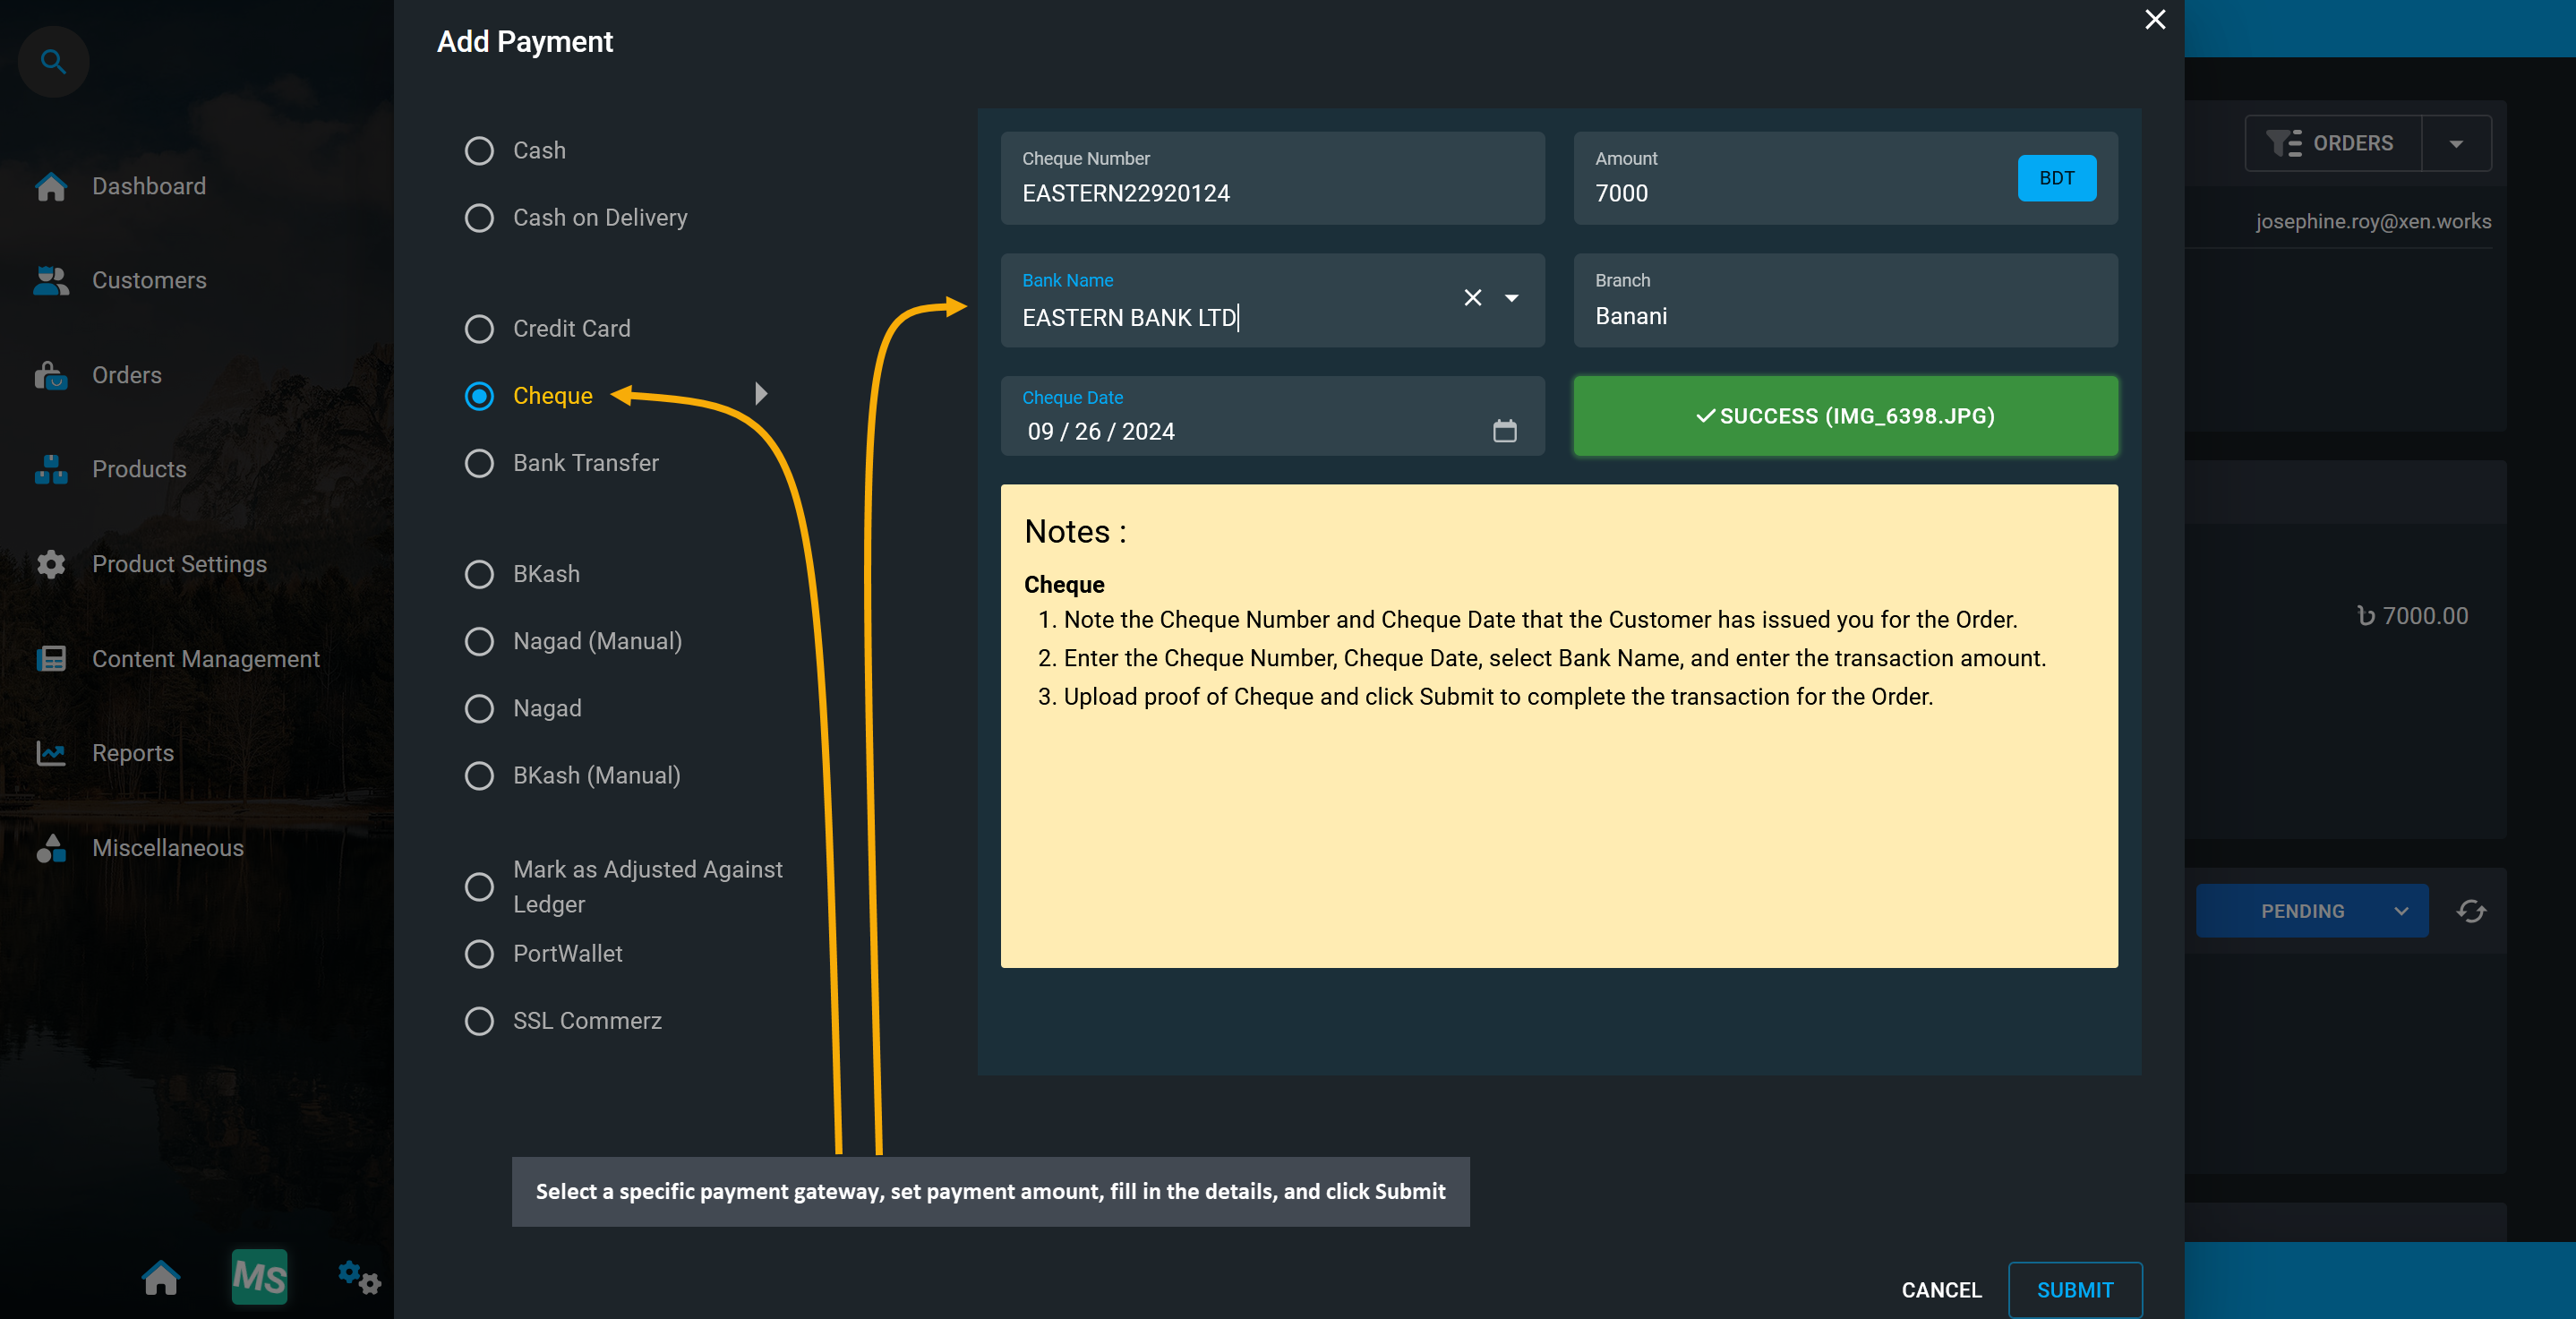
Image 6: Select a specific payment gateway, set payment amount, fill in details, and click Submit.
There will be a confirmation modal to Proceed with the transaction. Carefully recheck transaction amount, transaction reference, and other details, before clicking Proceed to complete the payment.
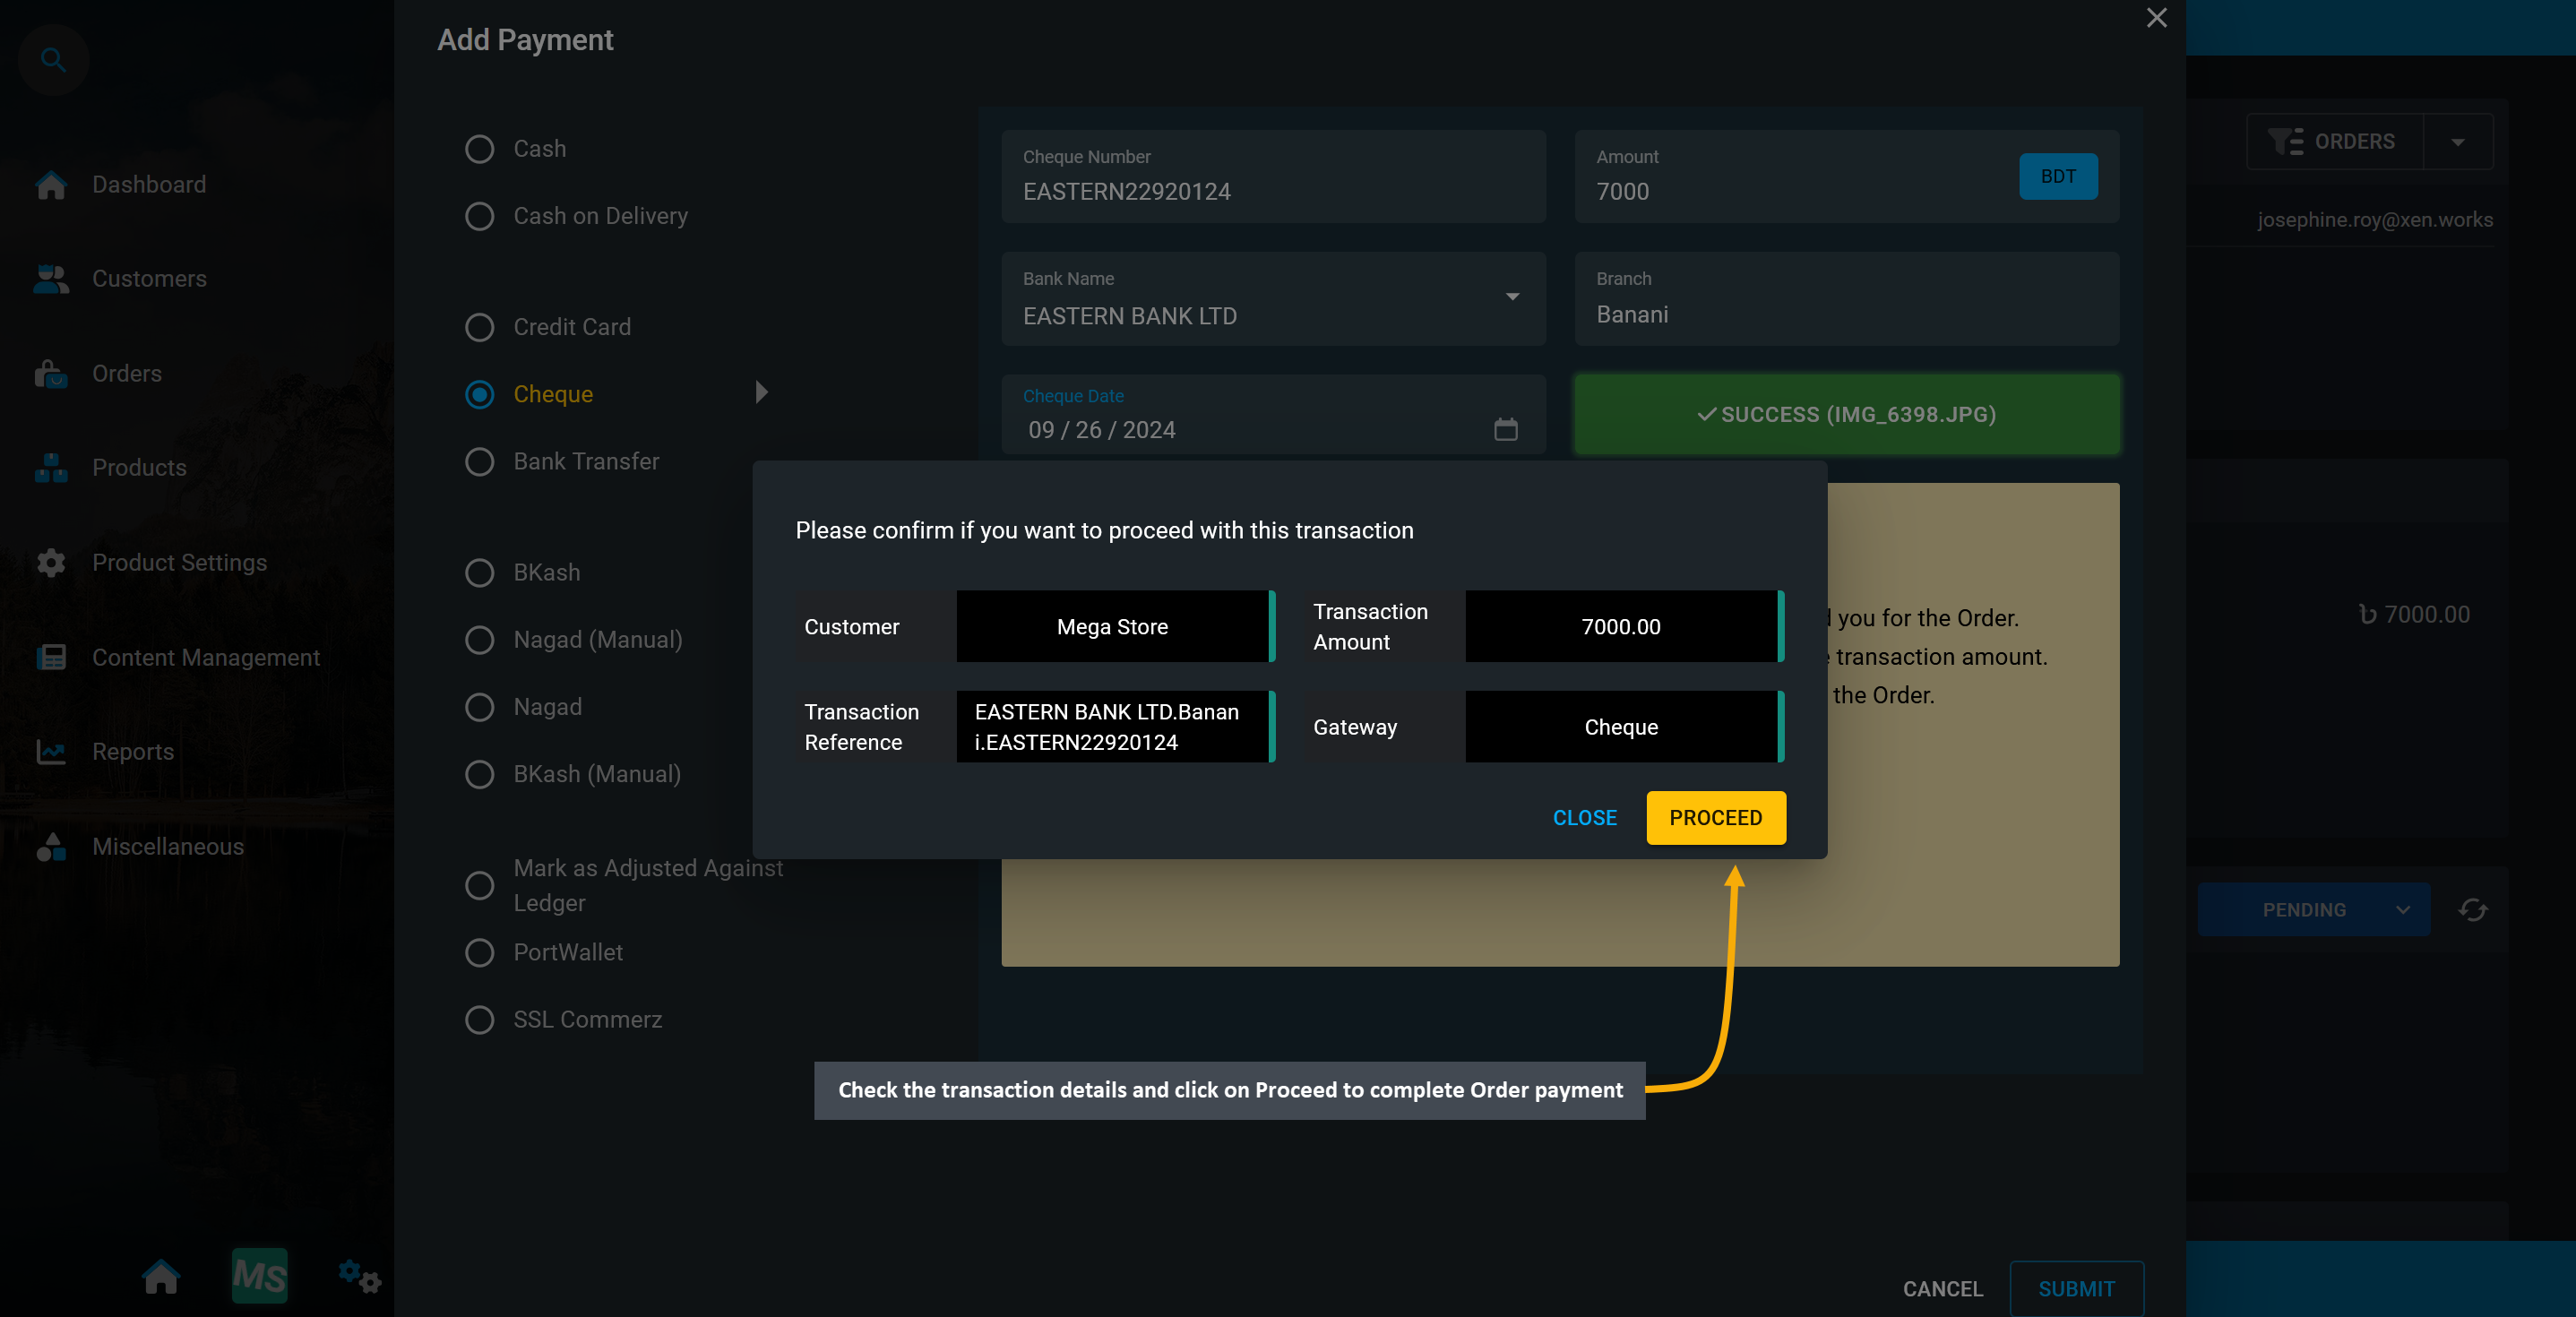
Image 7: There will be a confirmation modal to Proceed with the transaction and complete payment.
Payment Status will show Pending, because though payment is added, its transaction status is technically Initiated, but not yet Verified. Hence, the current status of the transaction will show as Initiated. However, to change the transaction status, it needs to be confirmed, which can be done by clicking the Verify button, or else the transaction will not be completed and add to Revenues. Follow these few steps as shown below.
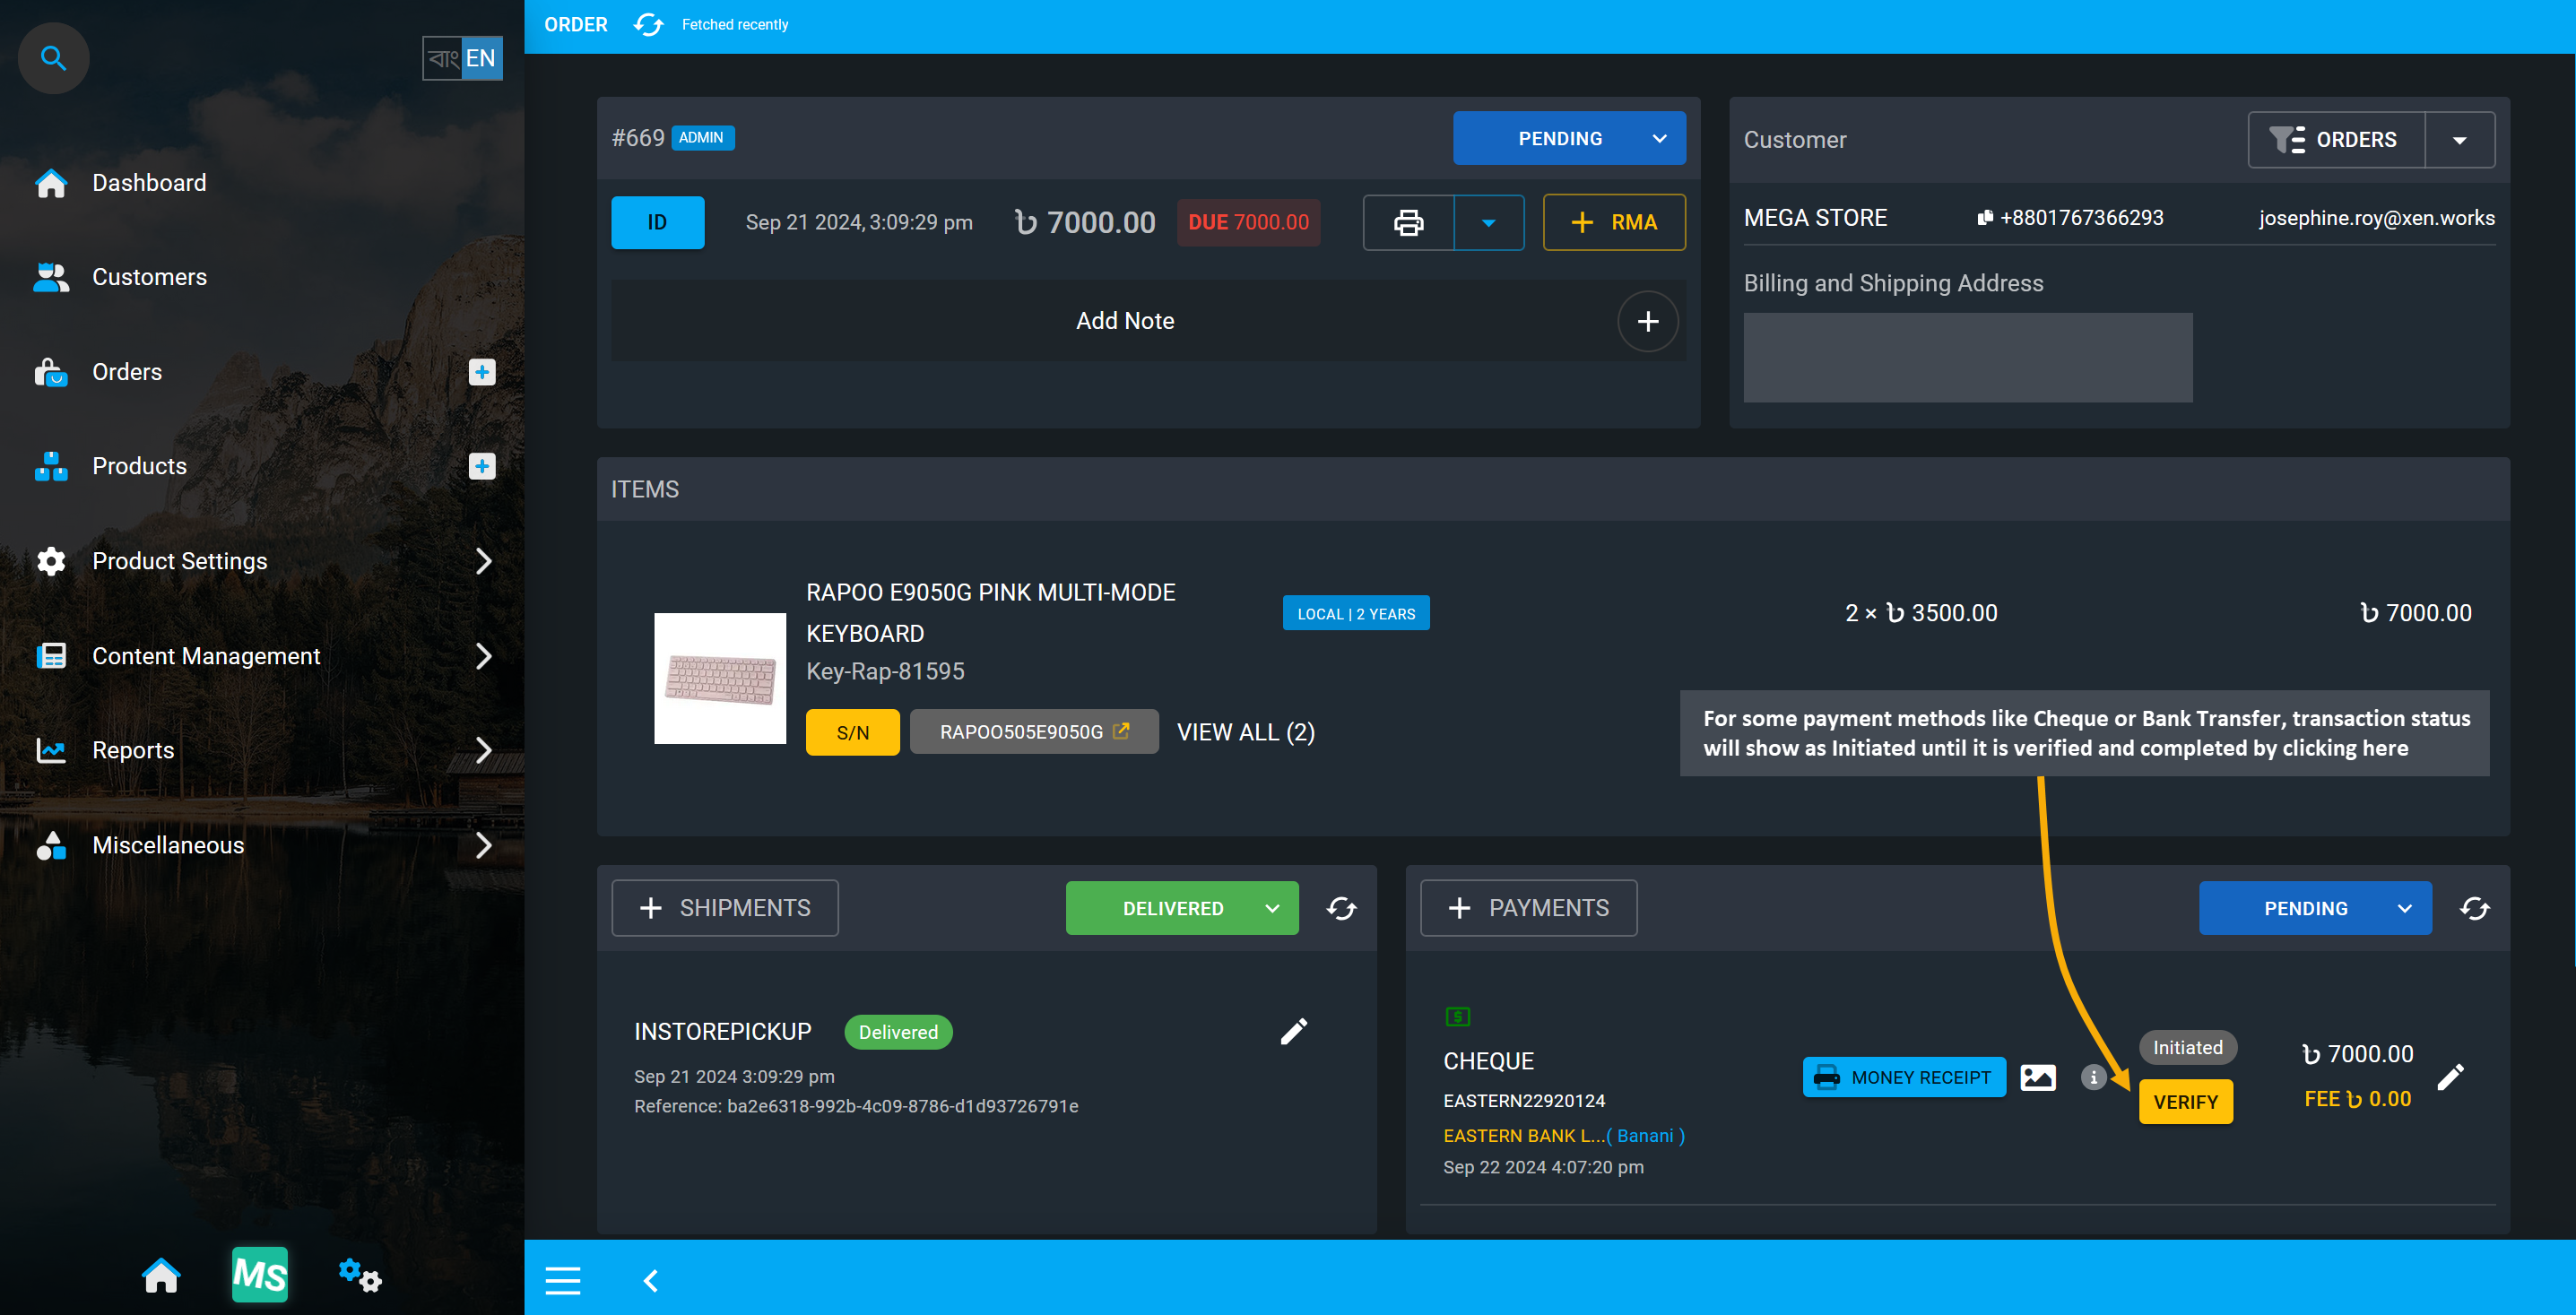
Image 7: Transaction status will show as Initiated until it is completed using the Verify button.
After clicking the Verify button, a modal will show where the transaction needs to be Set As Completed by selecting the option, adding optional Note to input details, and clicking Submit to clear payment dues.
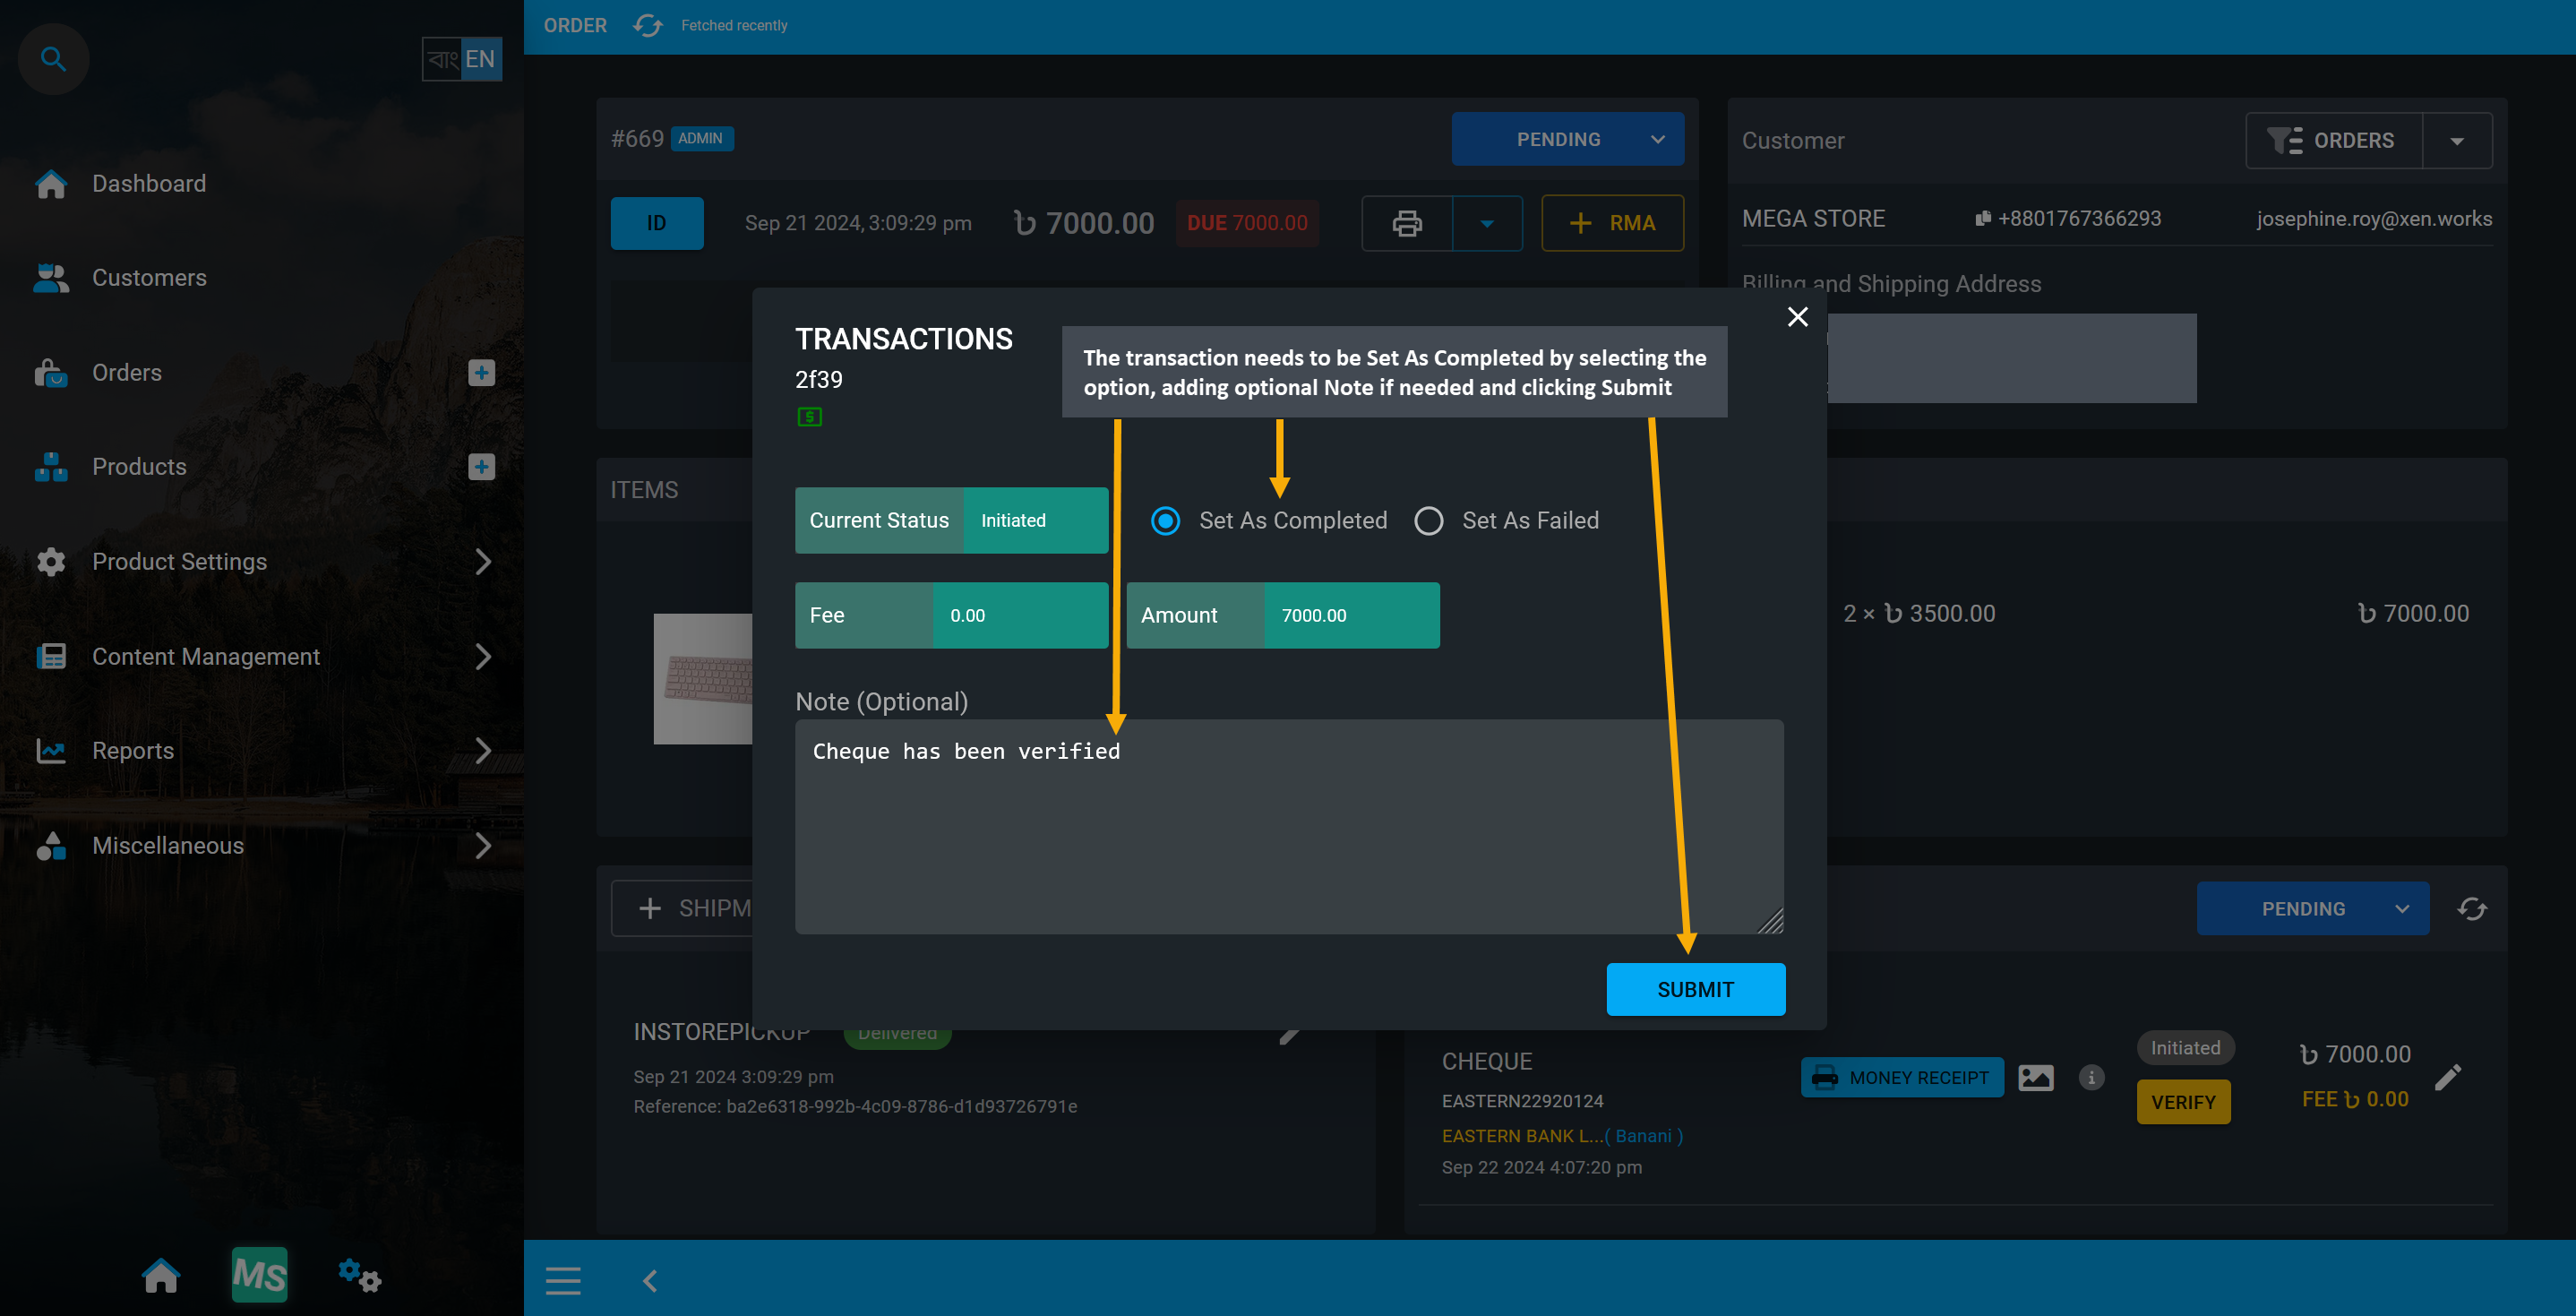
Image 8: Transaction needs to be Set As Completed by selecting the option and clicking Submit.
Once the payment is Verified, the payment method will show as Completed and payment status will change to Paid. A Money Receipt can also be viewed and printed for the verified transaction to provide to customer.
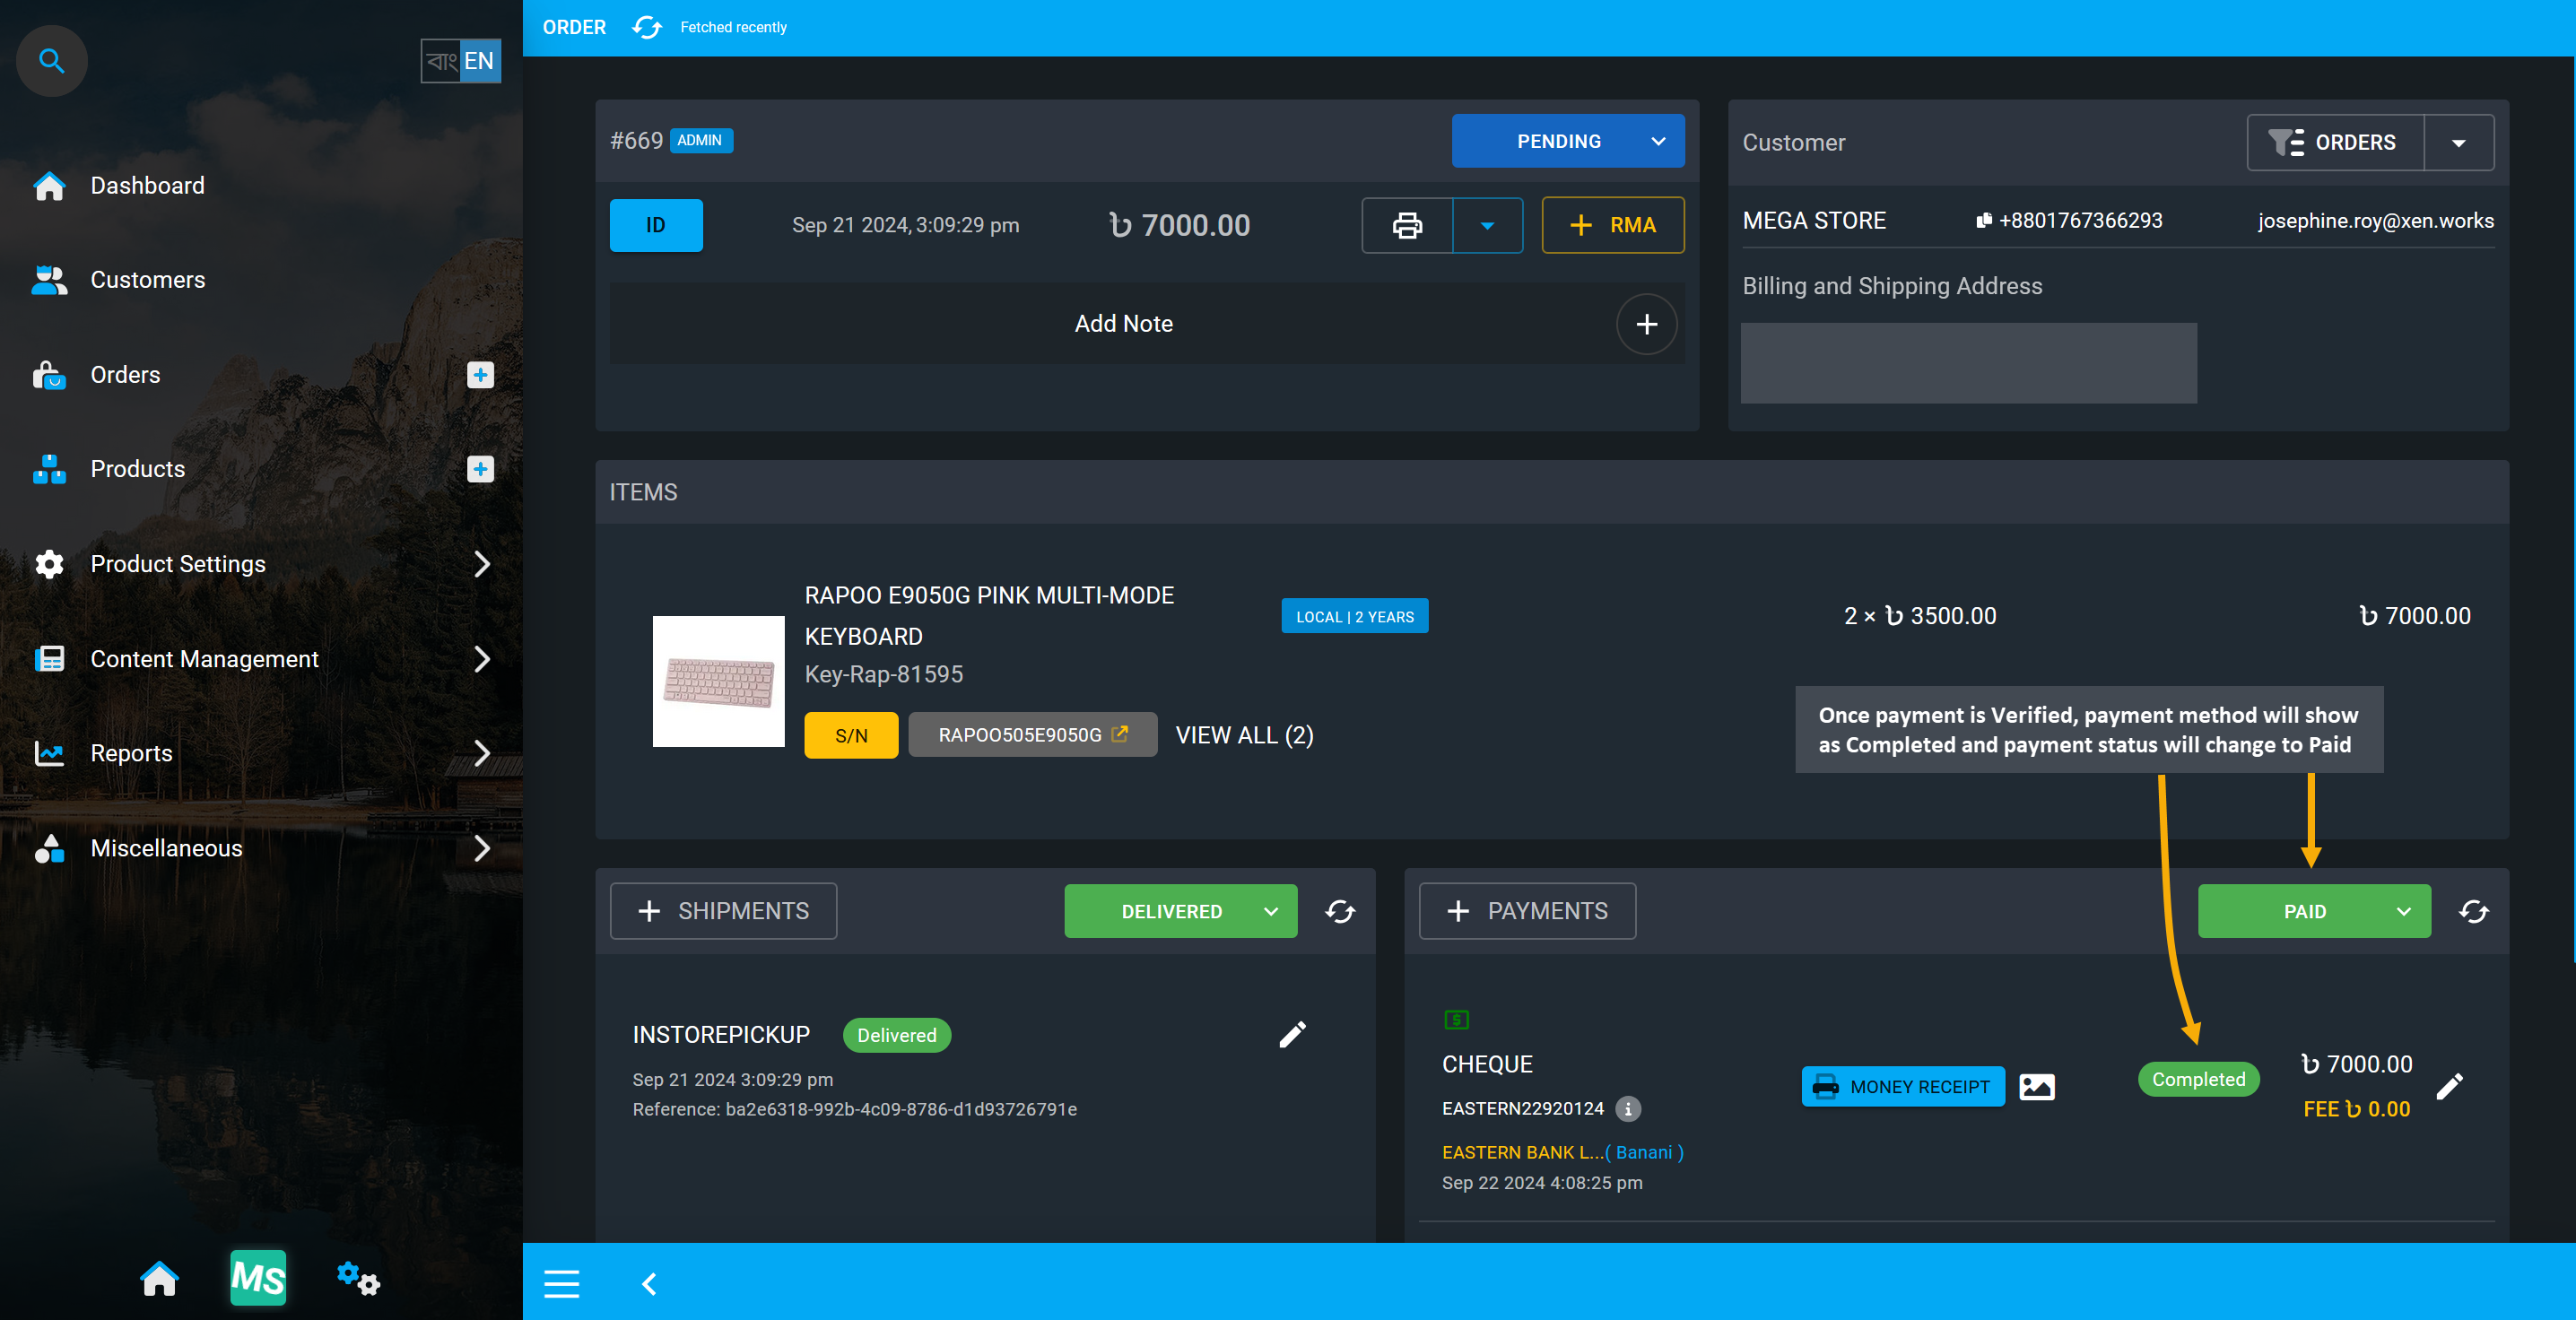
Image 9: Payment method will show as Completed and payment status will be Paid when verified.
After completing payment, if there is no remaining transaction and payment status is Paid, then Order status can be updated to Completed and later changed to only Canceled if customer requests cancelation.
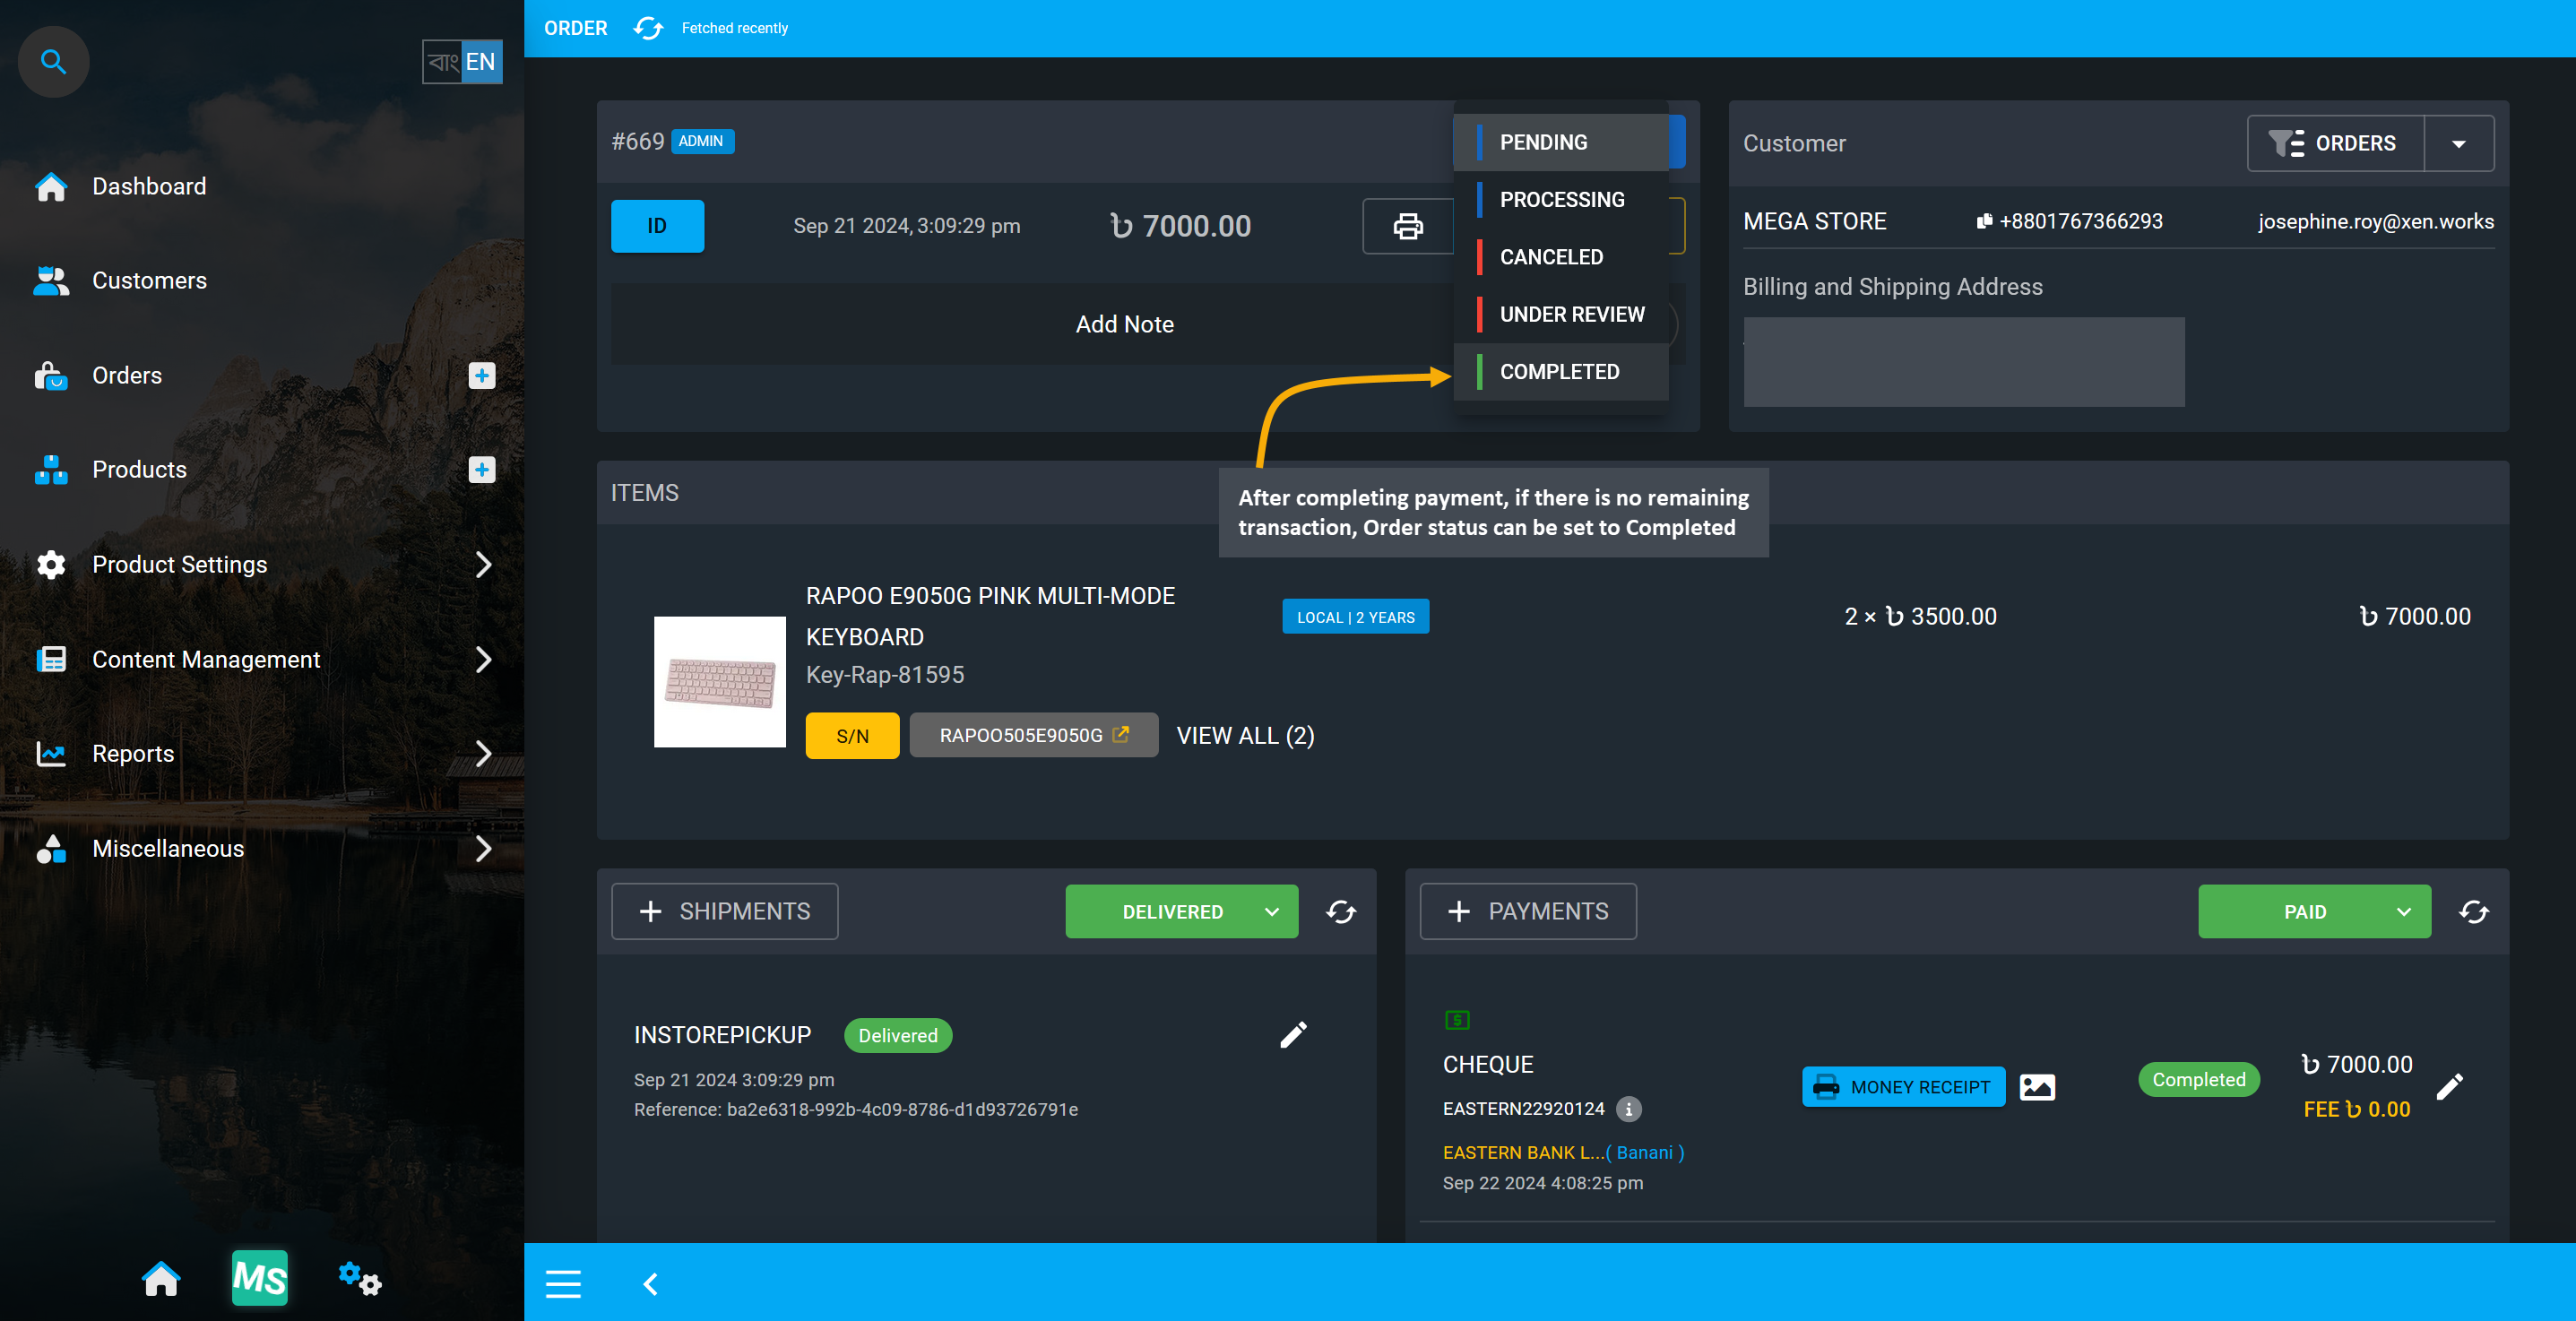
Image 10: If there is no remaining transaction for order, Order status can be set to Completed.
A modal will show up asking to confirm that the transaction status is updated, and if Order status should be updated to Completed too. Order status can no longer be changed after they are marked as Completed. Click Agree to update Order status to Completed after confirming that Order payment is completed.
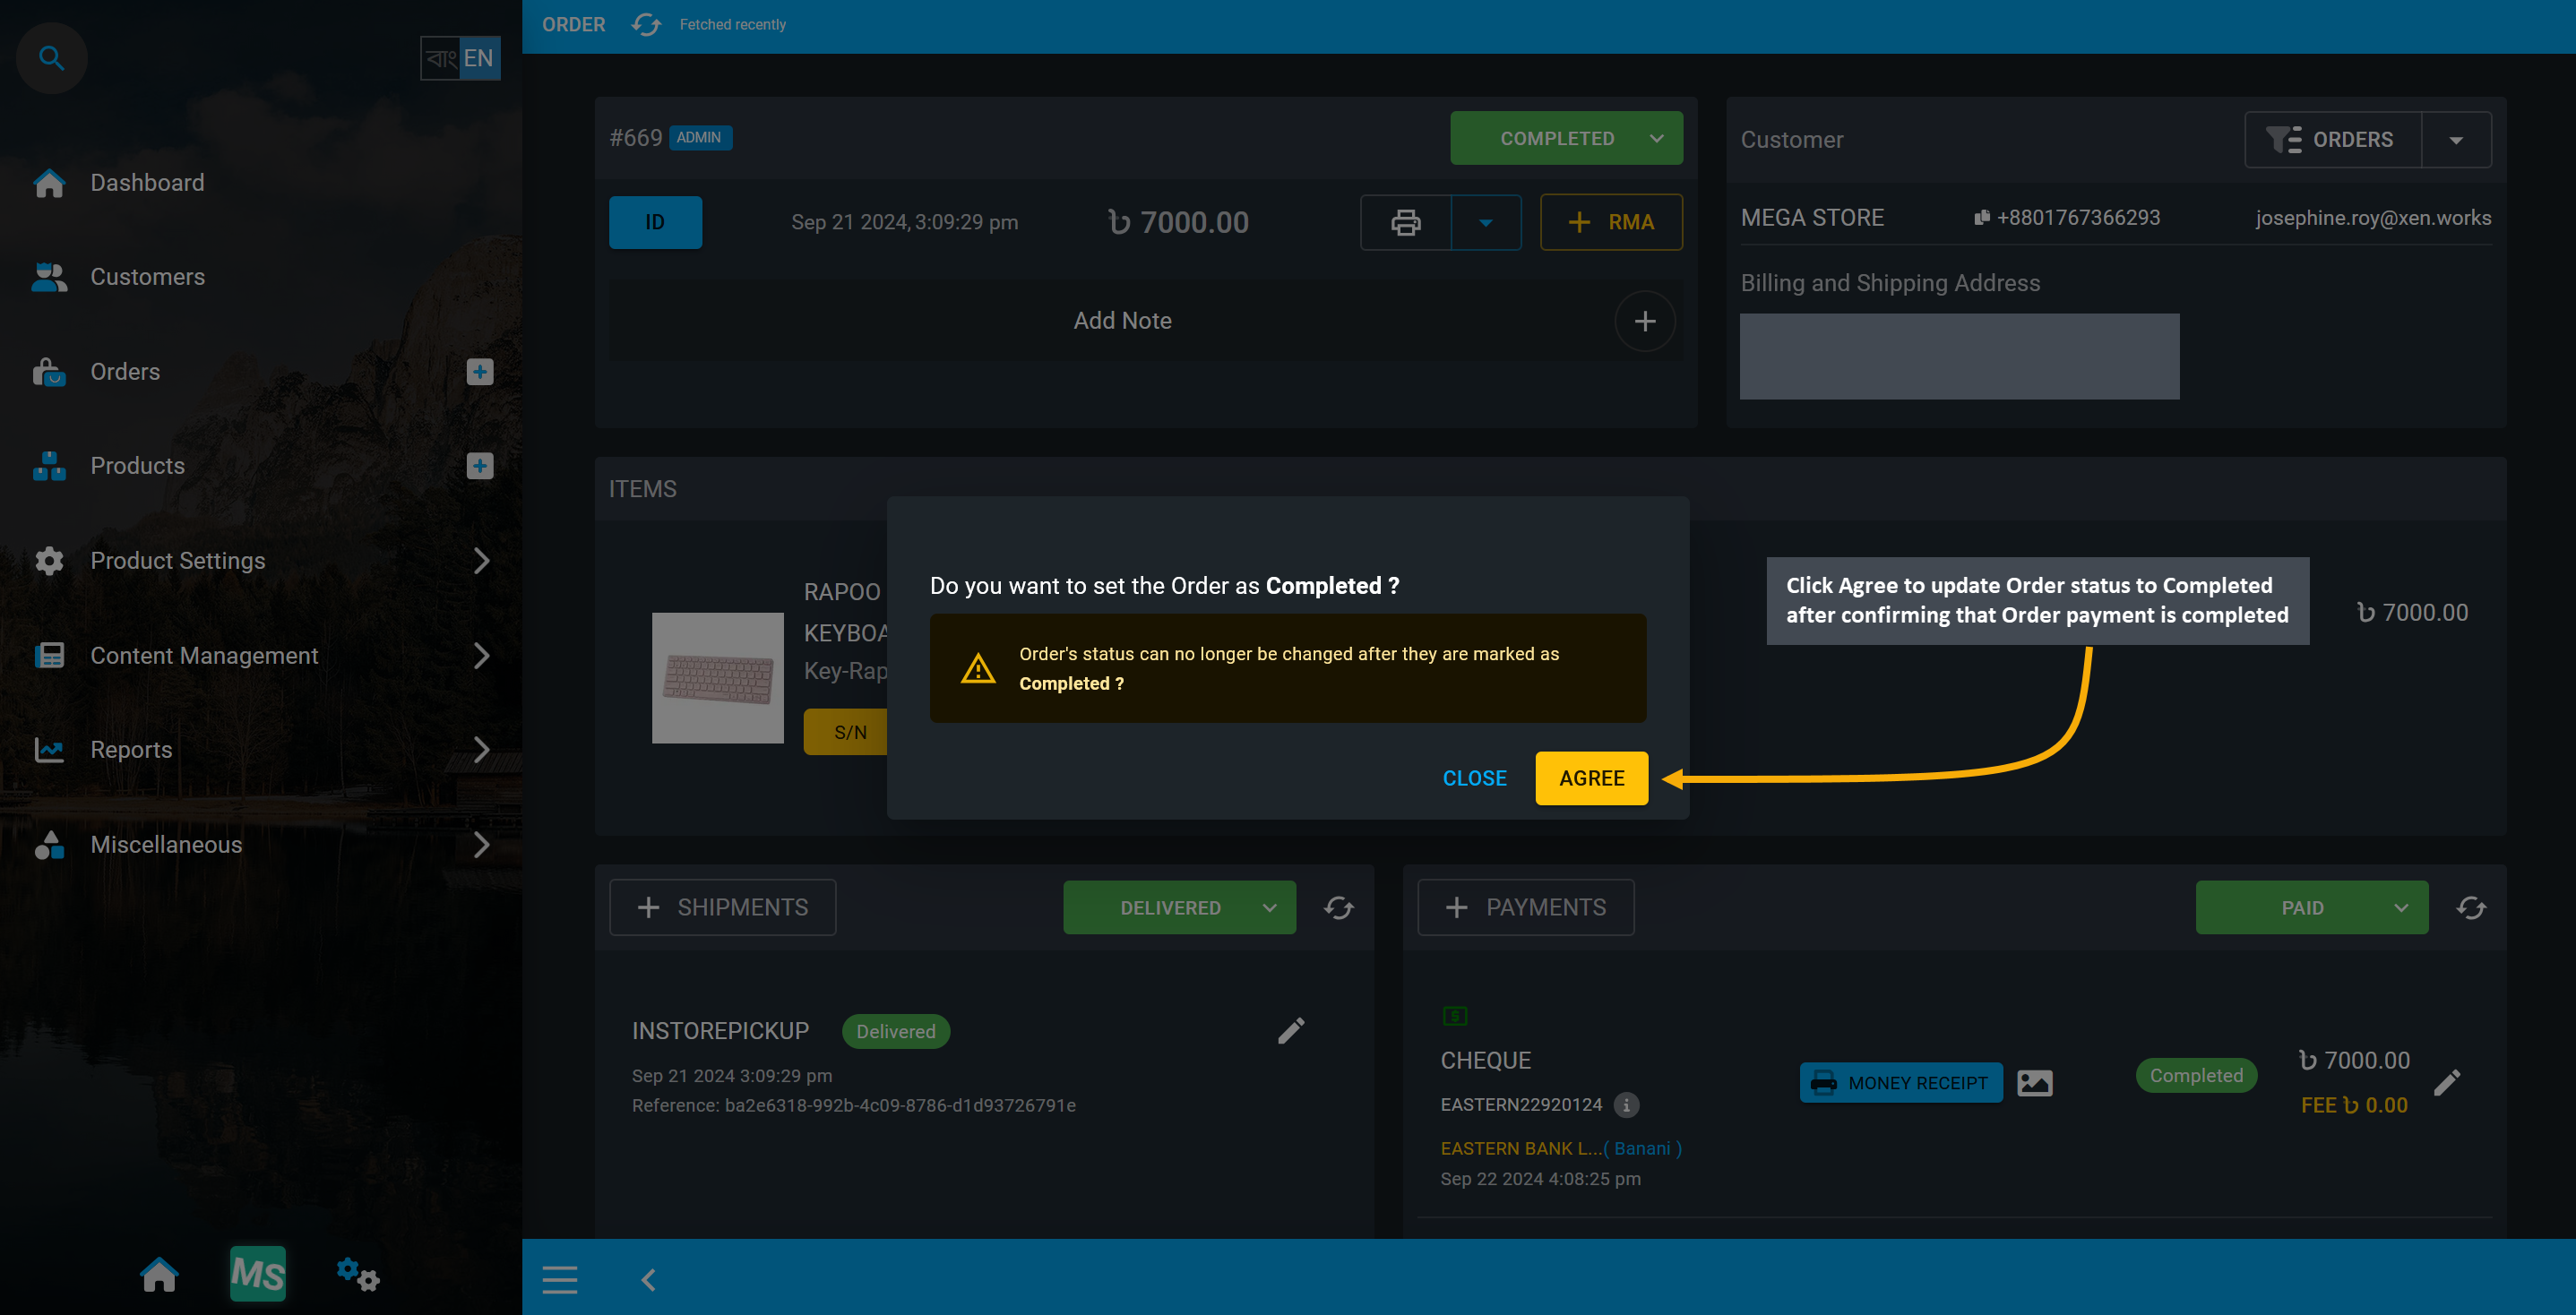
Image 11: Click Agree to update Order status to Completed after confirming payment is completed.
Upon successfully confirming to update the Order status, Order status will now show as Completed, which means that the Order transaction is completed and the Order’s profit-loss will be added to Revenues.
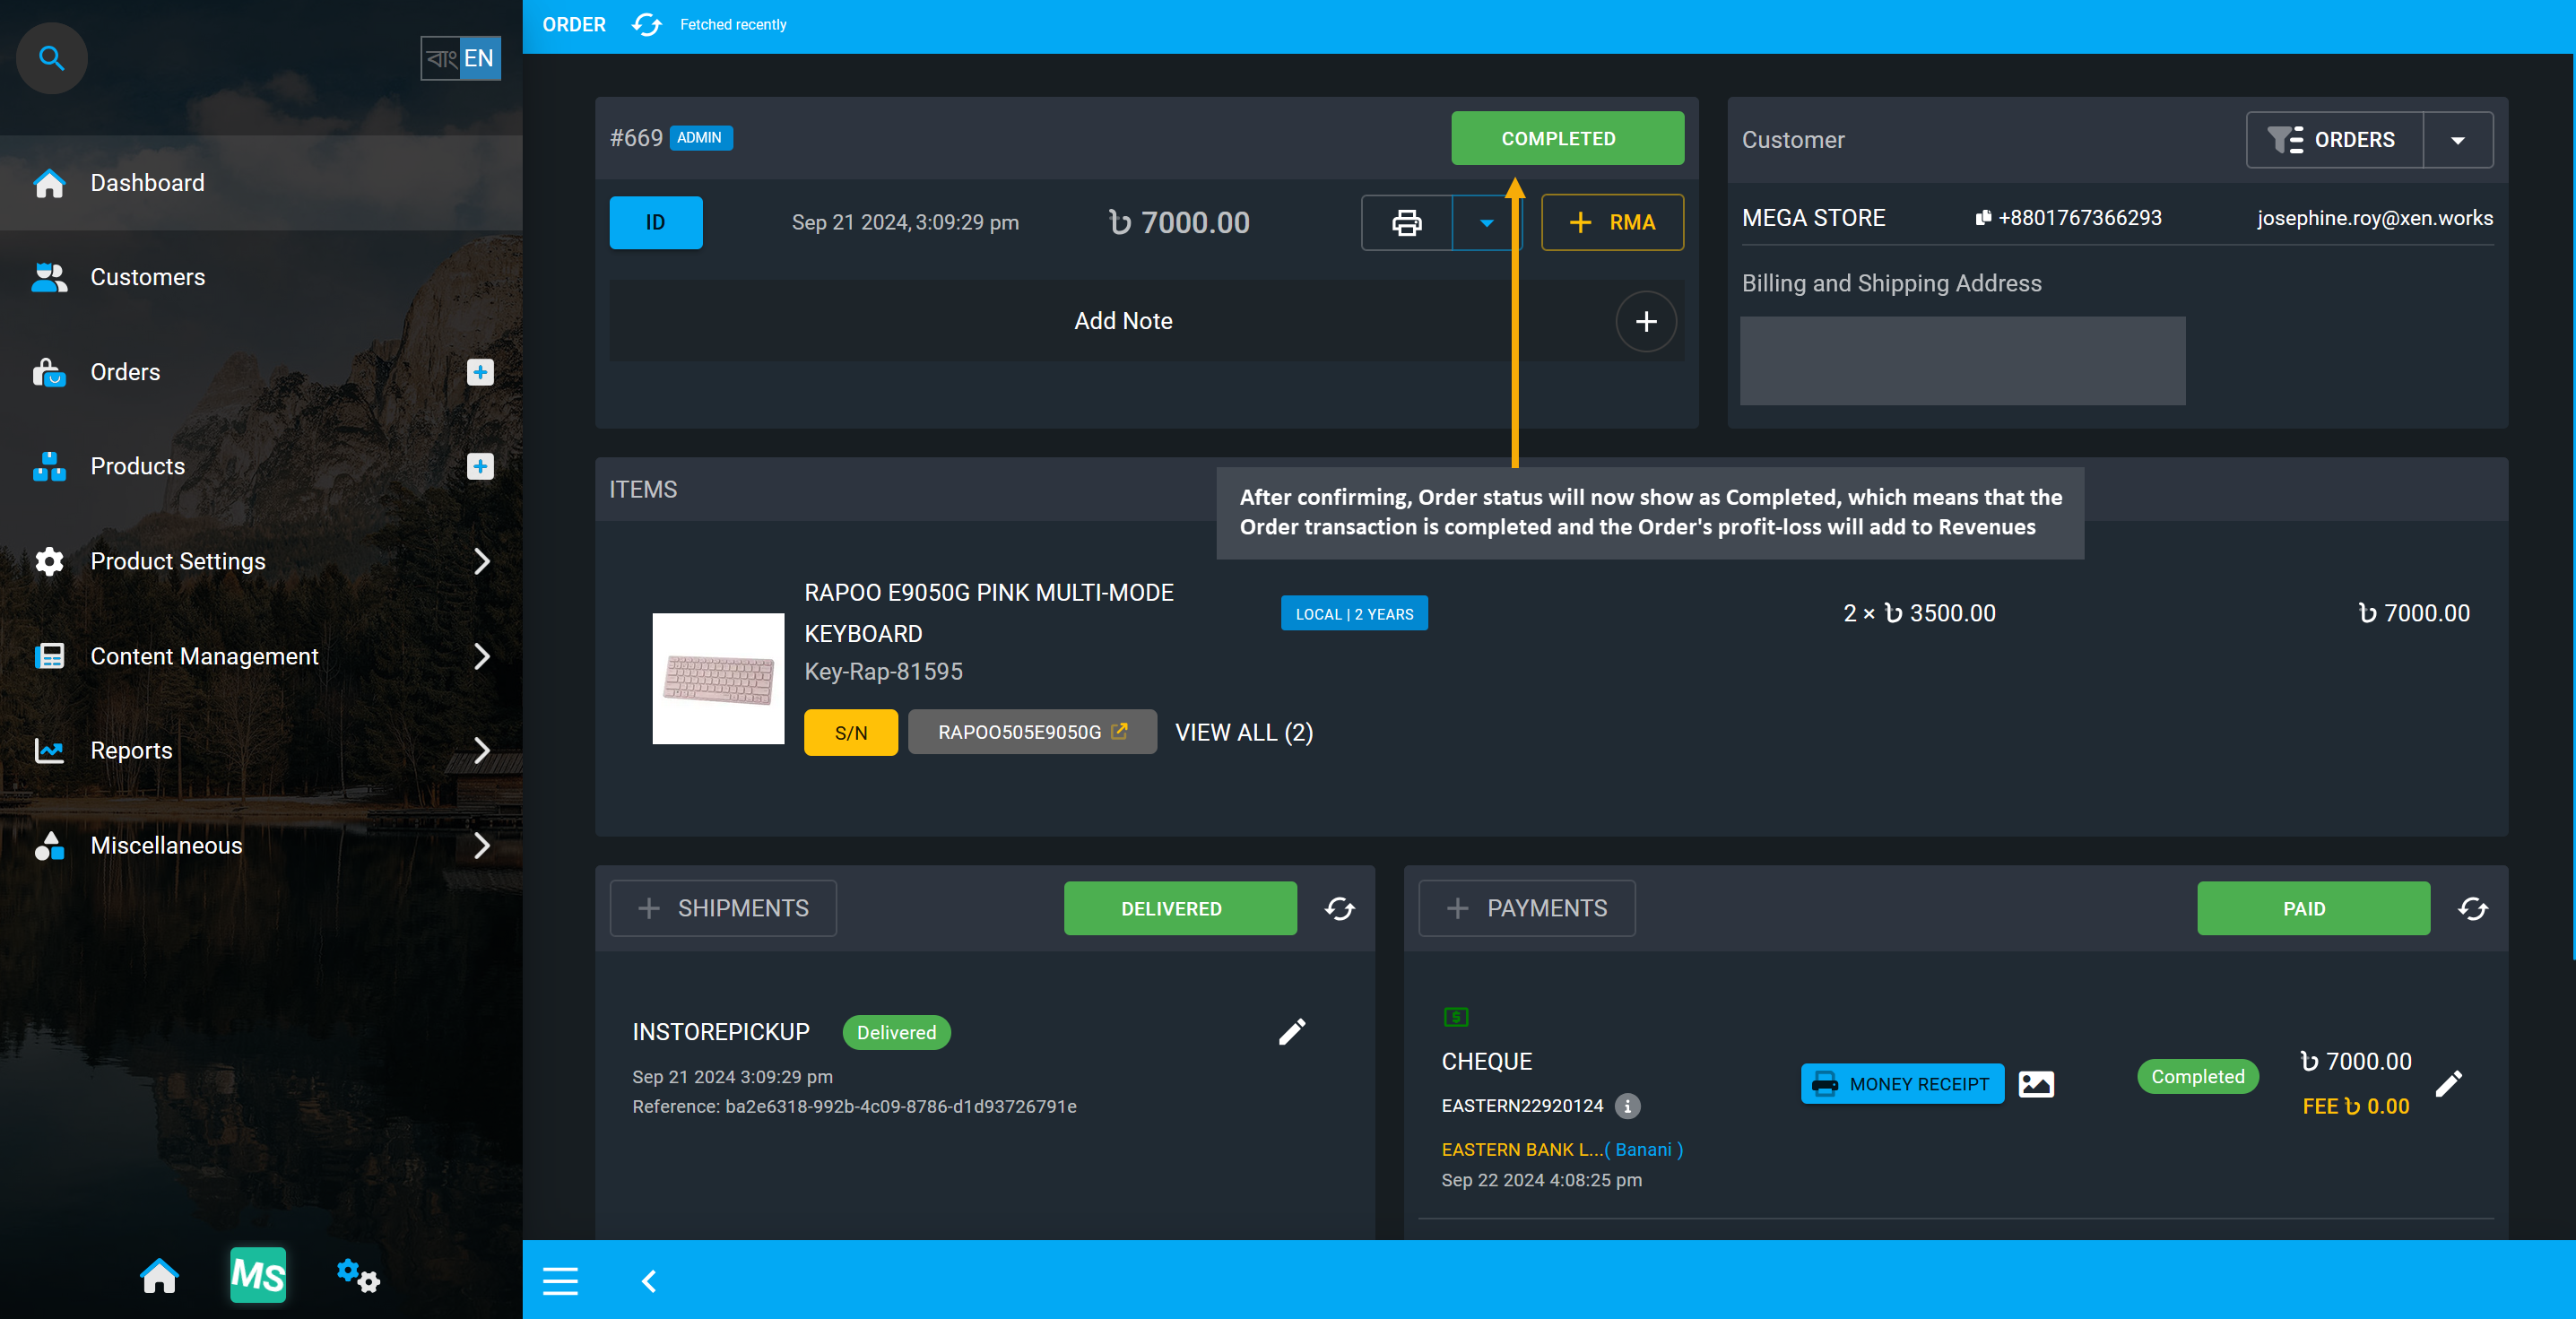
Image 12: Order status will now show as Completed, which means its profit-loss will add to Revenues.
Completed Orders on Order List Page will show Payment status as Paid and Shipment status as delivered.
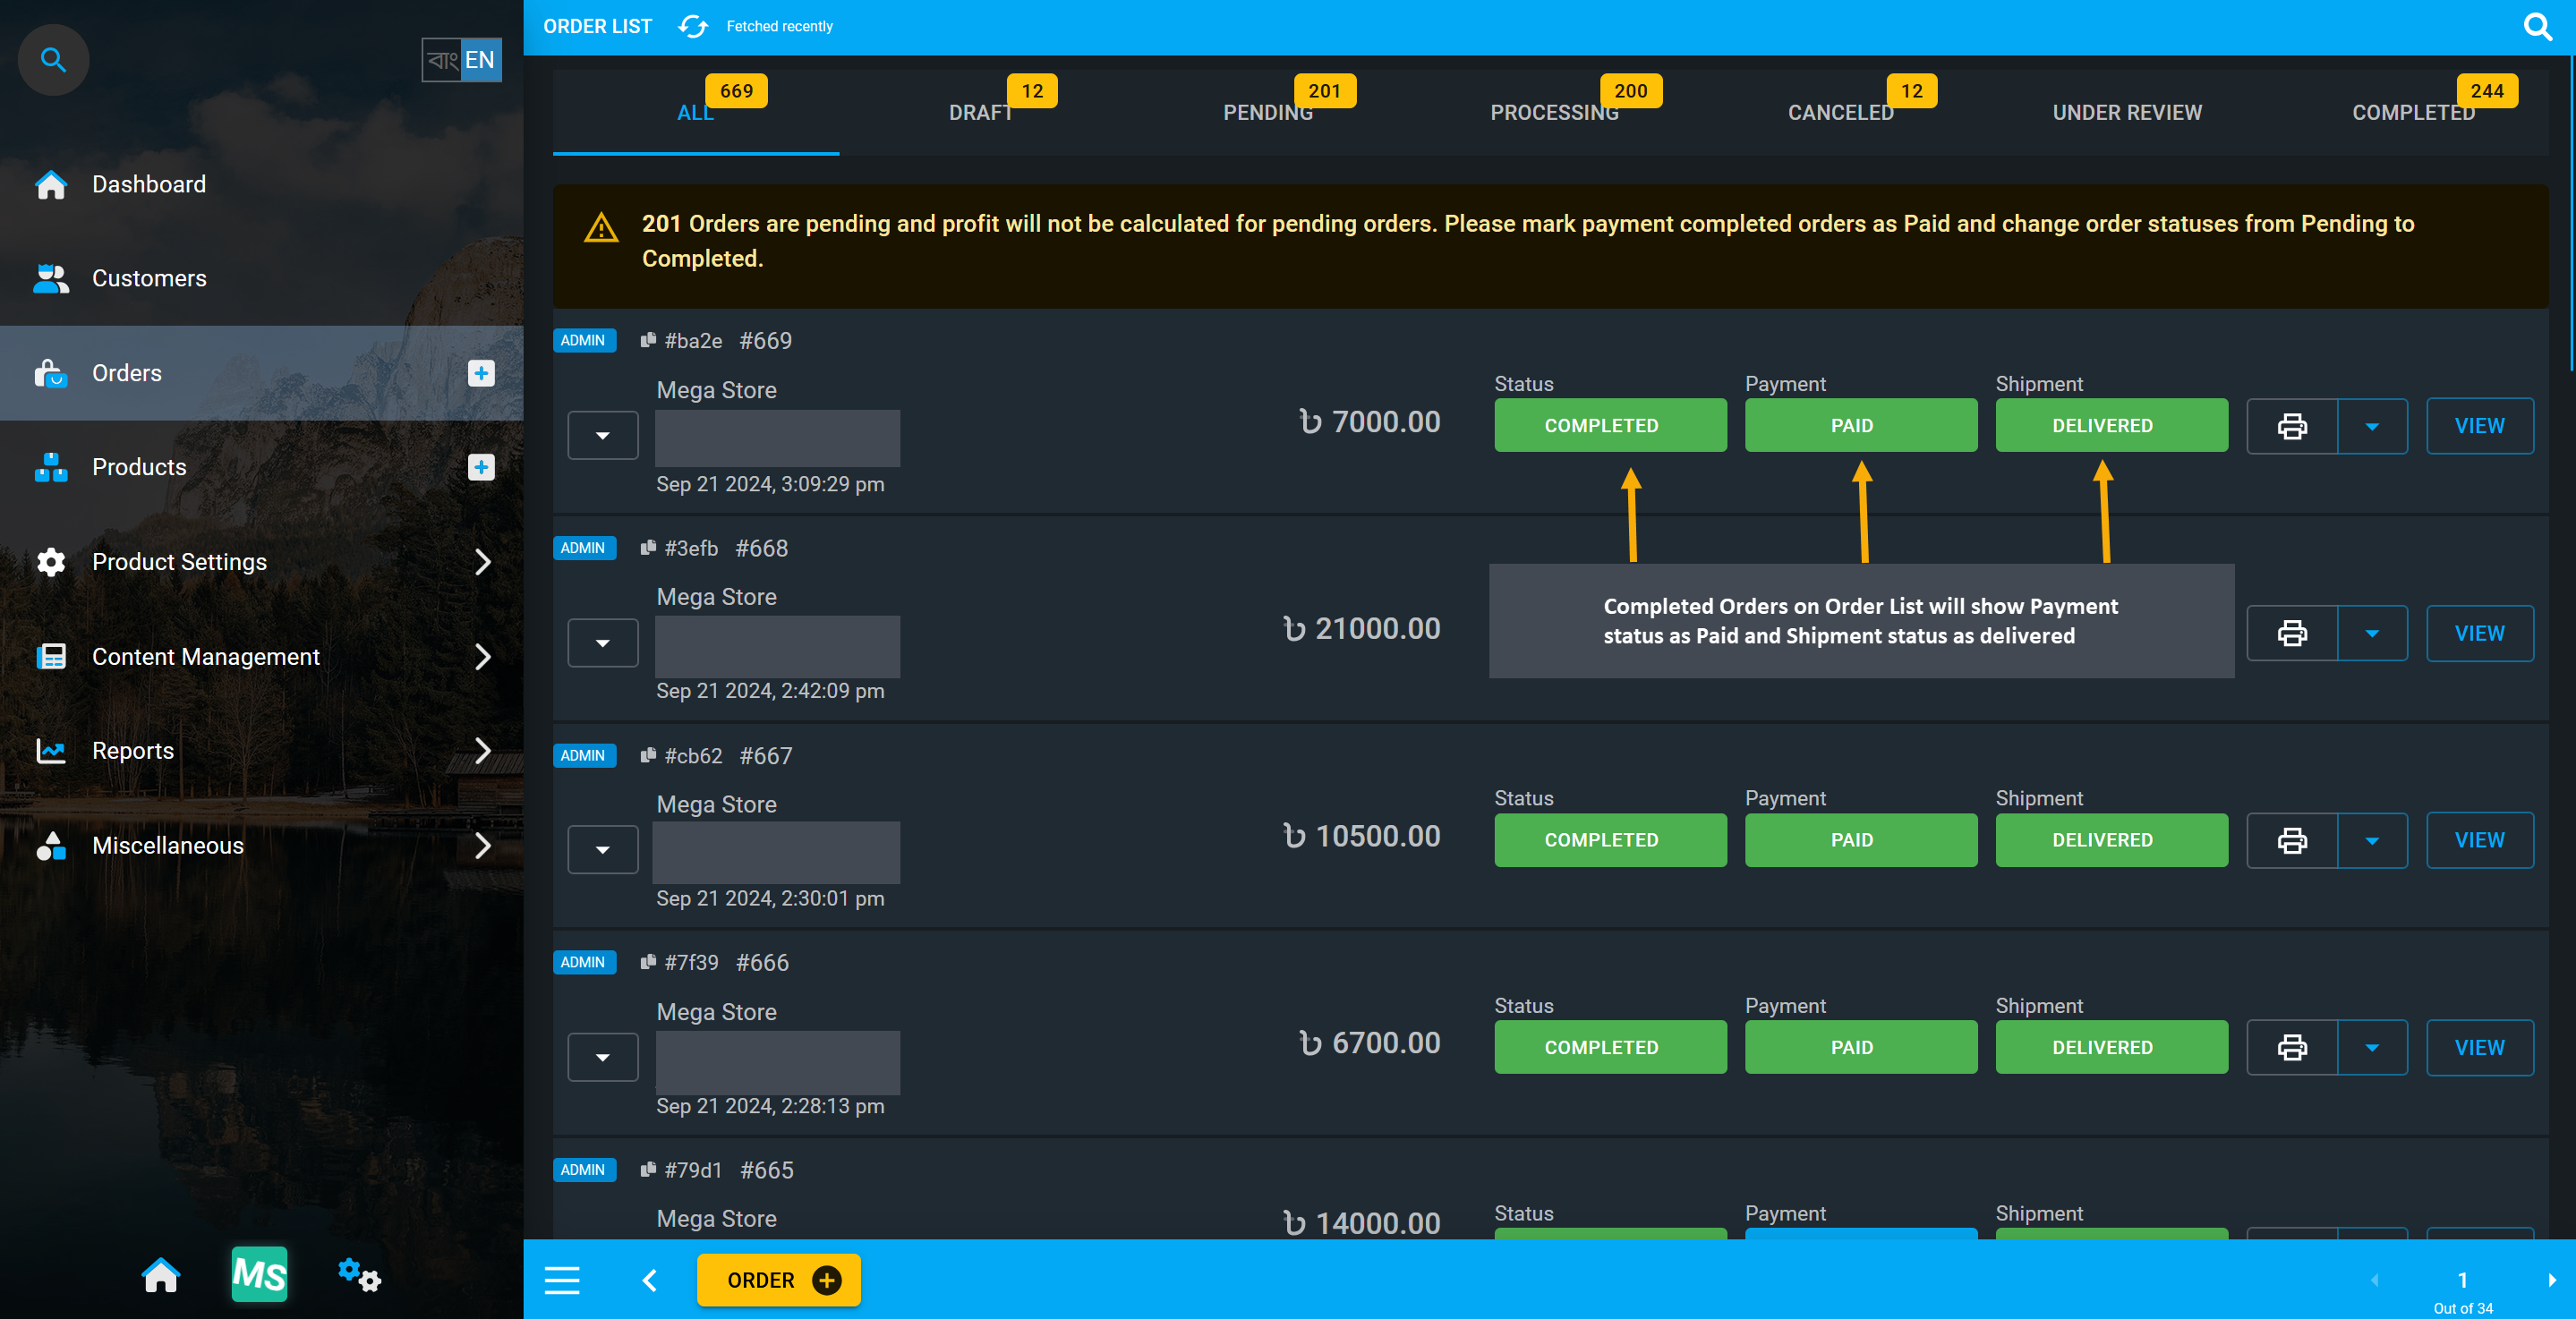
Image 13: All Completed Orders will show Payment status as Paid and Shipment status as delivered.
Enable Draft Order (Order Without Payment)
If an Order is created without payment, with the Enable Draft Order option enabled from Settings, then the Order will be held in a Draft status and cannot have payments or shipments added. Draft Order will not also show on Ledger unless the Order status is changed to Pending. The Enable Draft Order option can be found from Web Settings under Config your Business of All Settings.
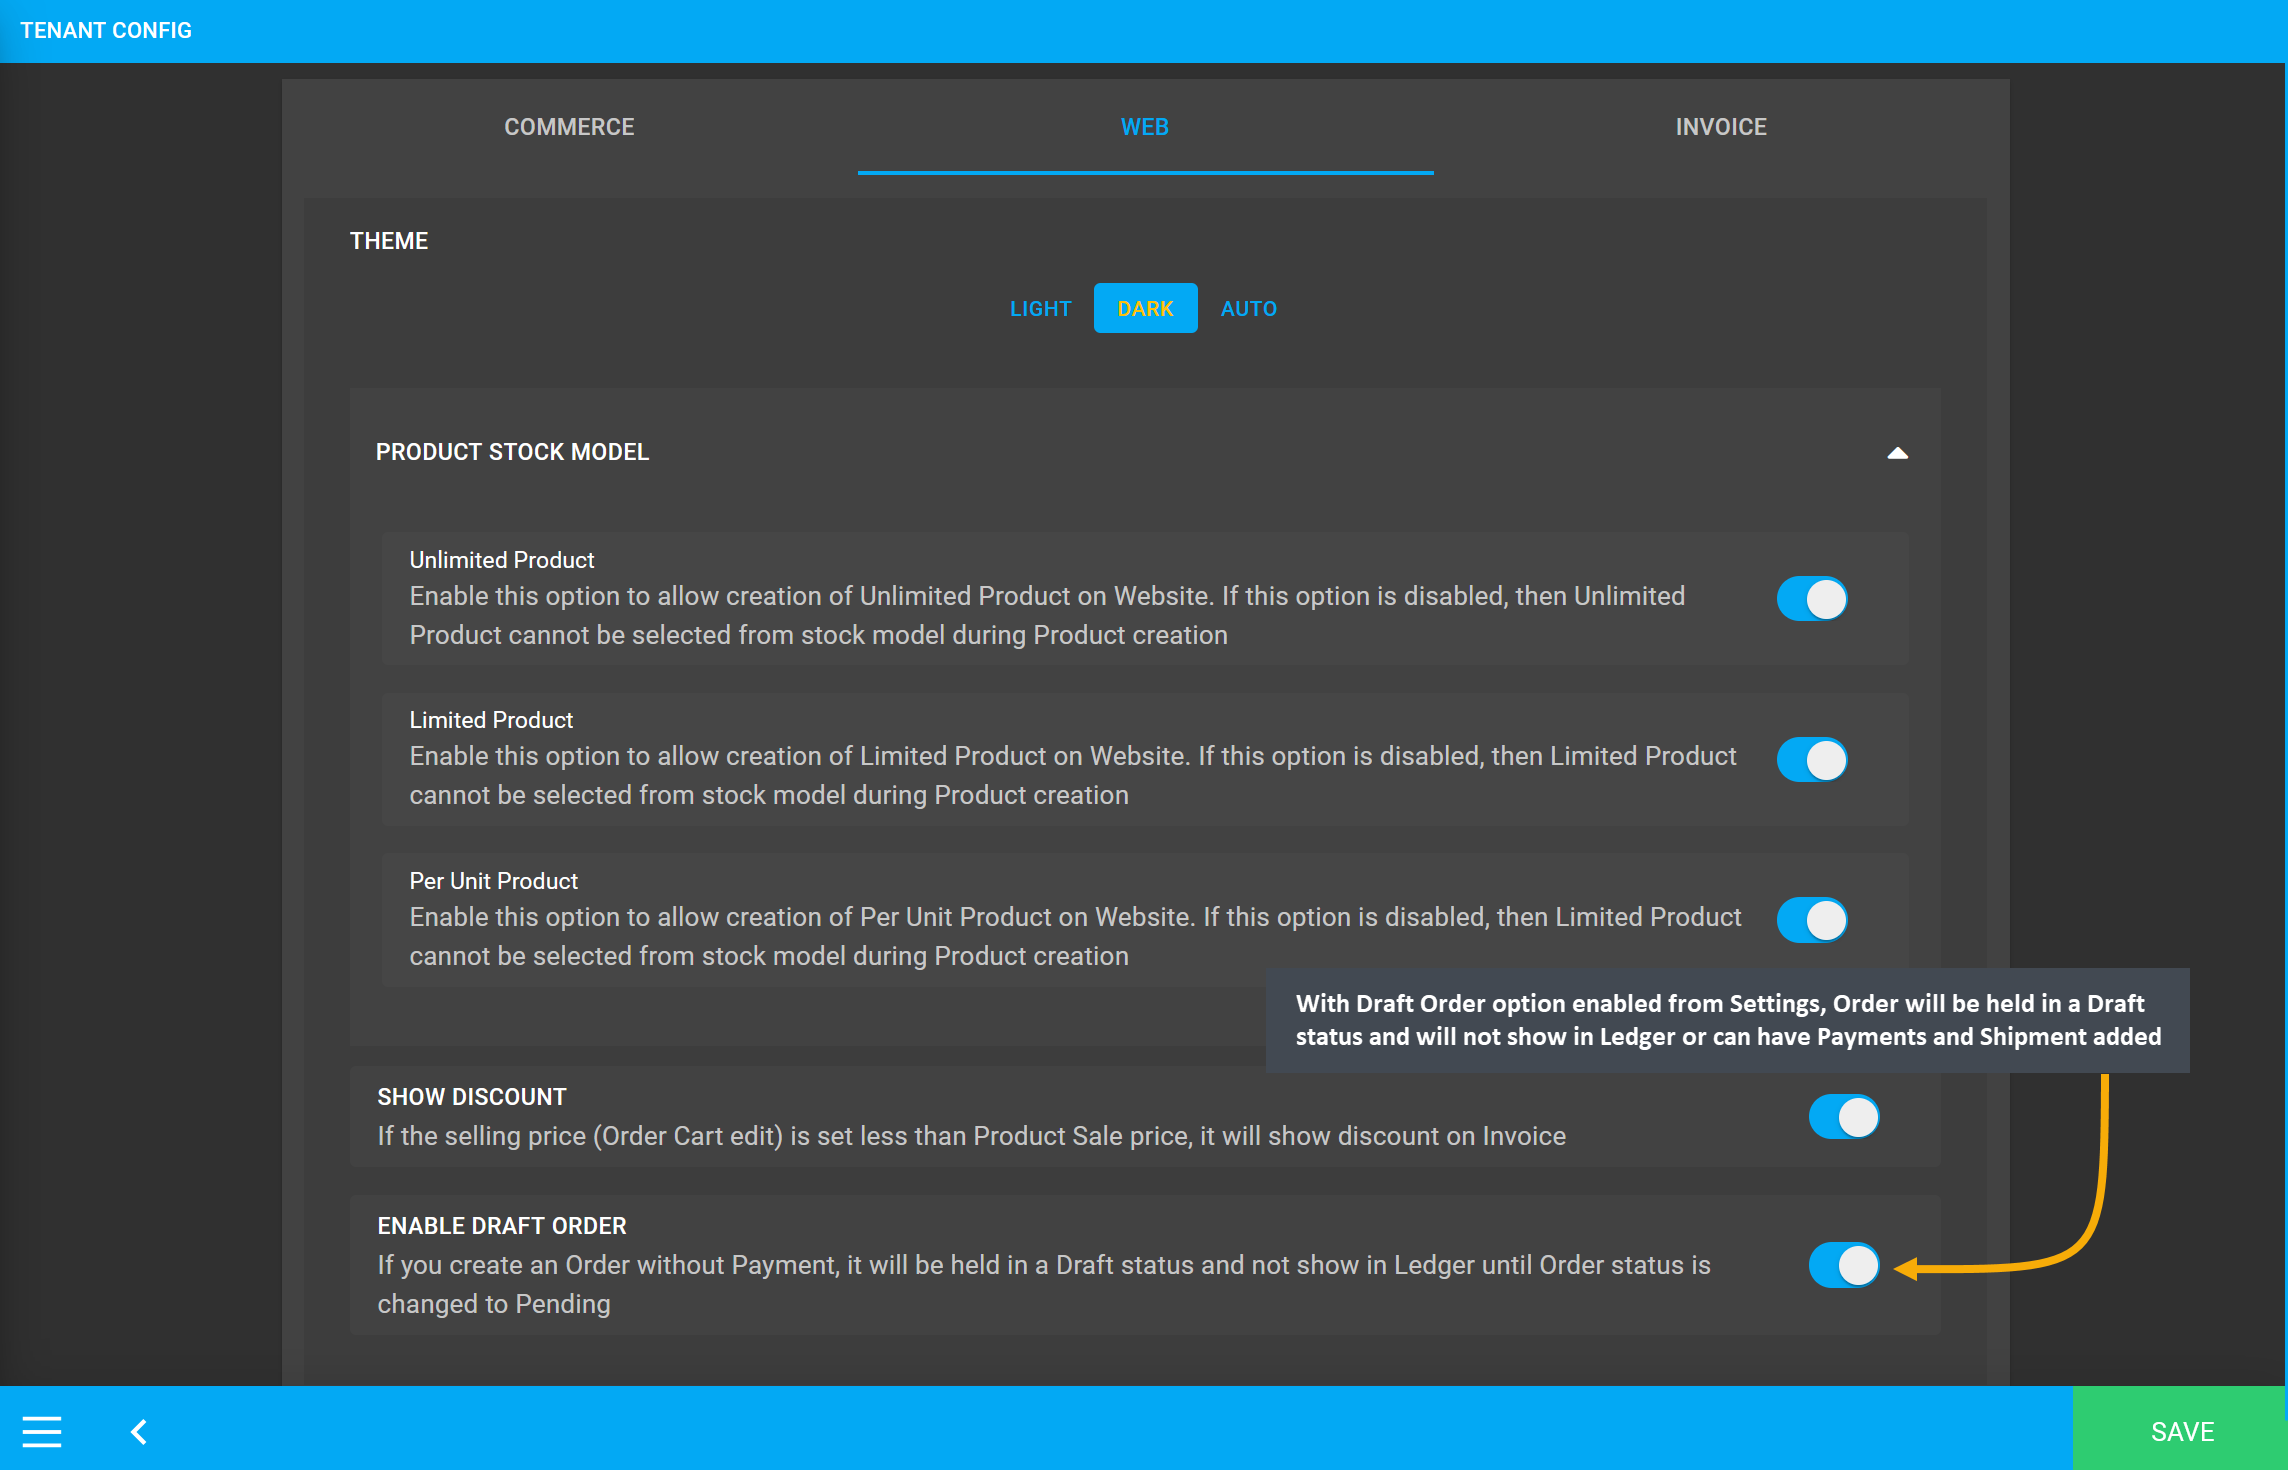
Image 14: With Draft Order option enabled from Settings, Order will be held in a Draft status.
When an Order is completed without selecting any payment on Order Cart, the Order will be created as a Draft Order. Payments and Shipment cannot be added for a Draft Order, unless Order status is changed to Pending. Draft Order will not also show on Ledger, it will show on Ledger only after Order status is changed to Pending. Example screenshots are provided in following steps.
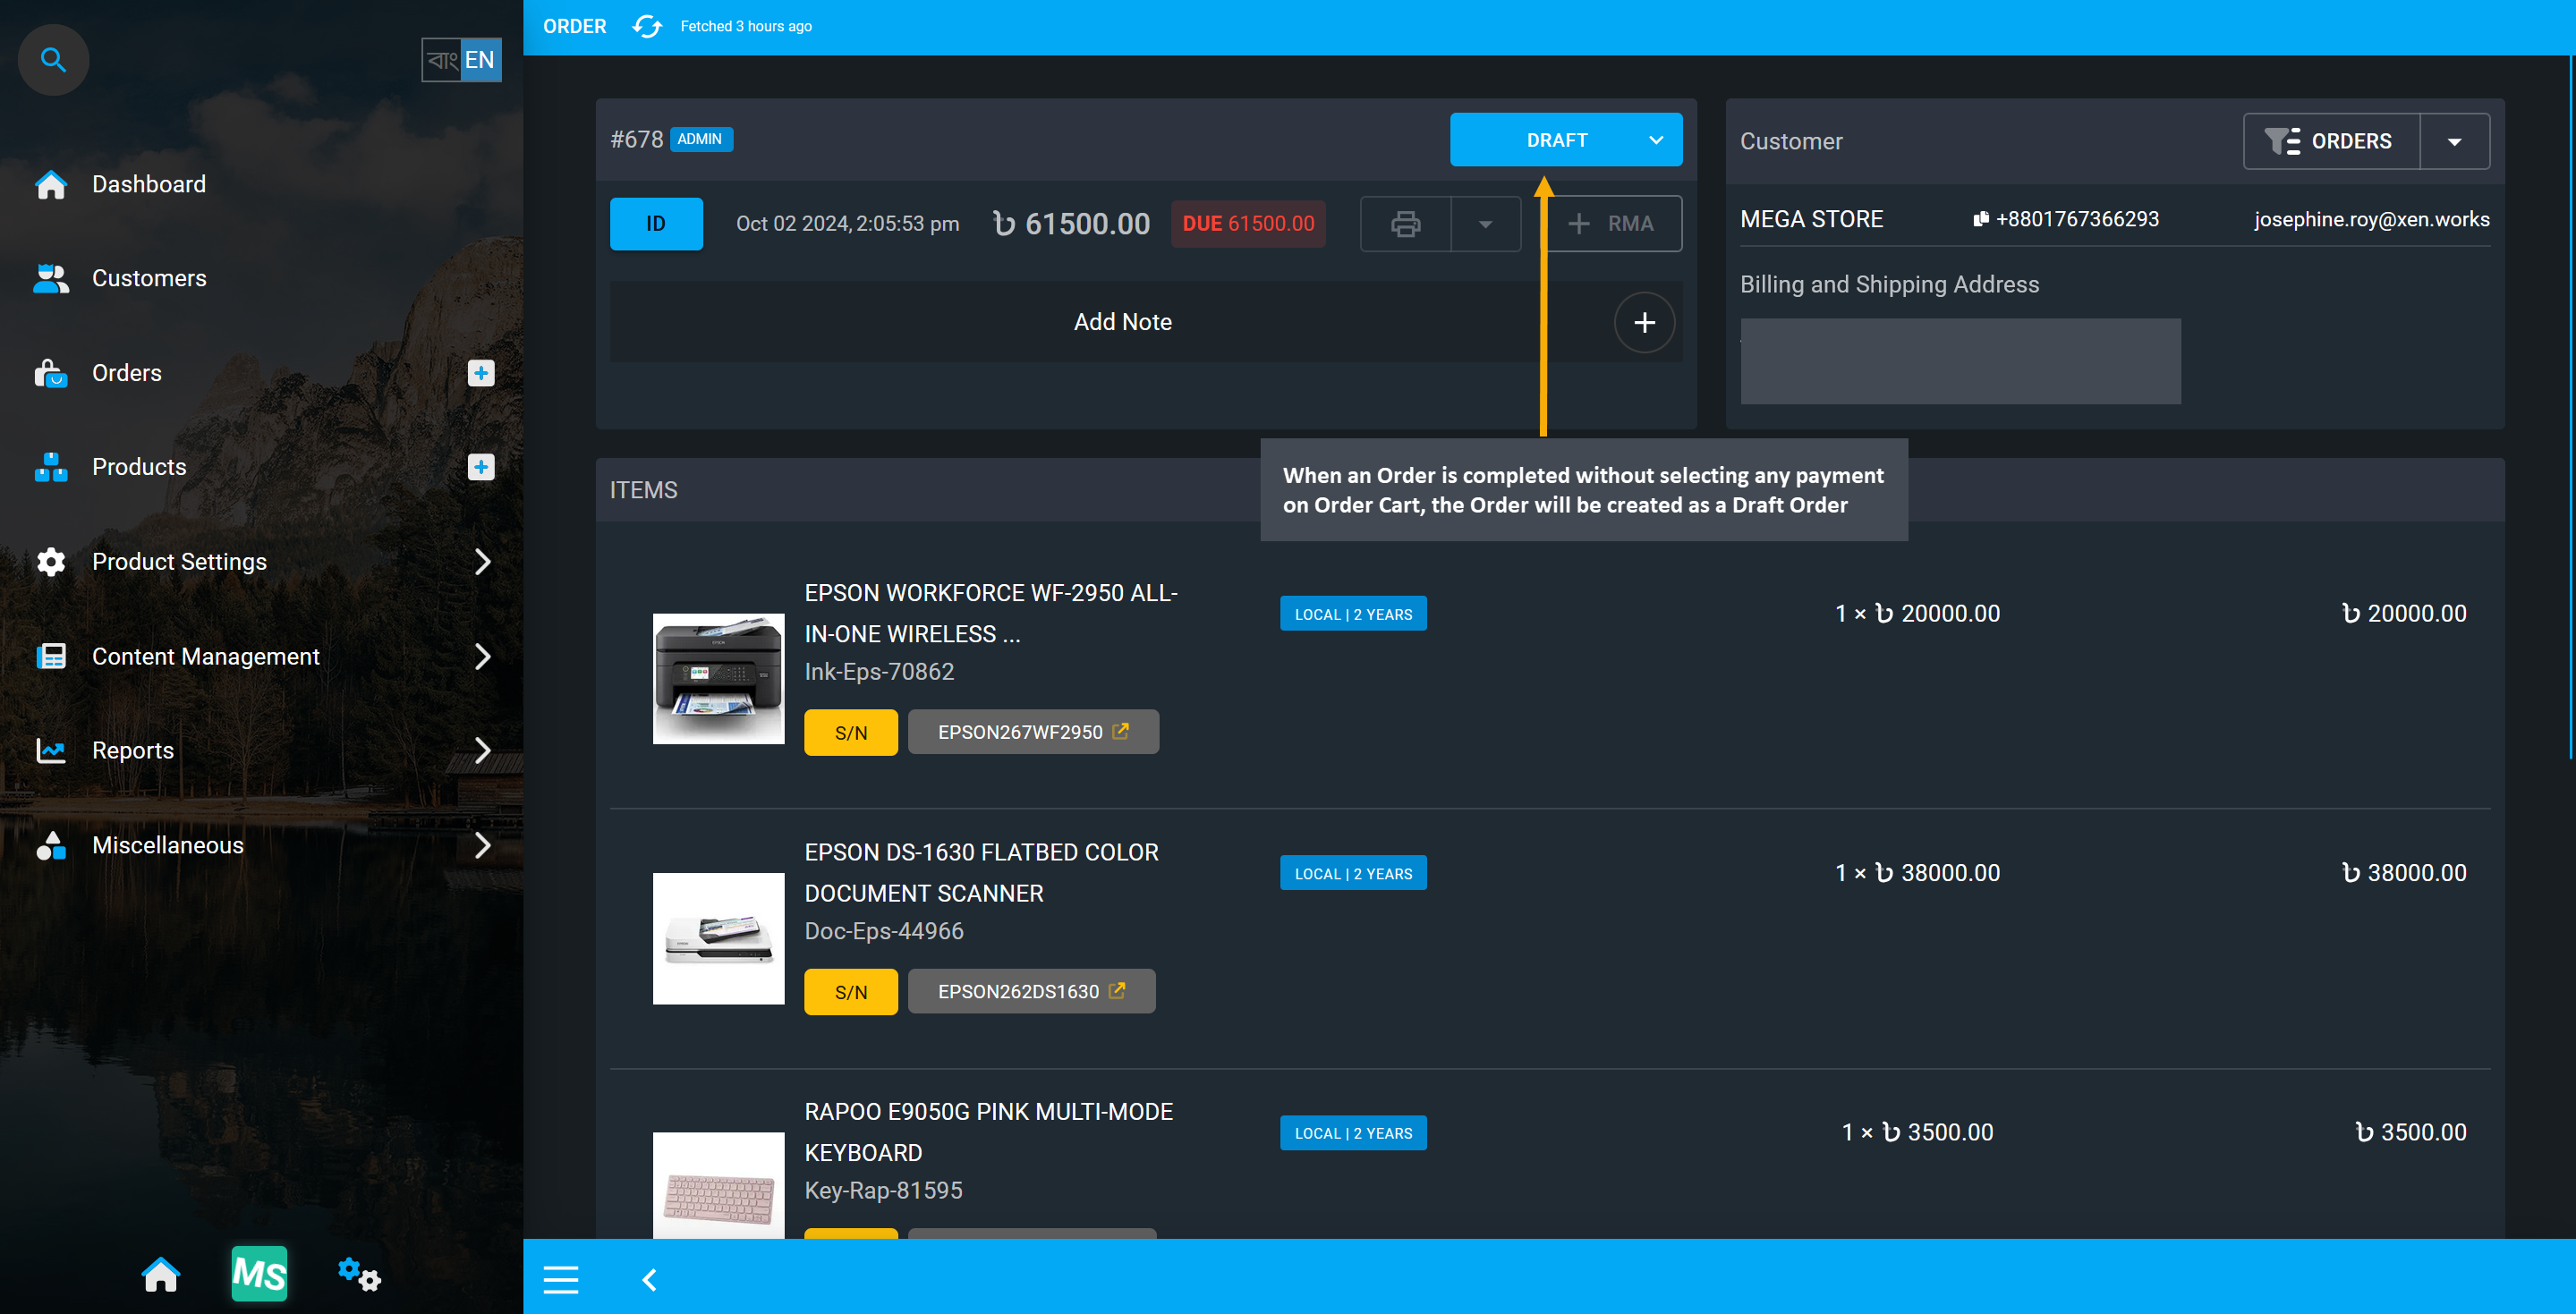
Image 15: Order will be created as a Draft Order when it is completed without selecting any payment.
When an order is a Draft Order, no Payments or Shipments can be added to it unless the Order status is changed to Pending. Payments and Shipments tabs are disabled for Draft Orders.
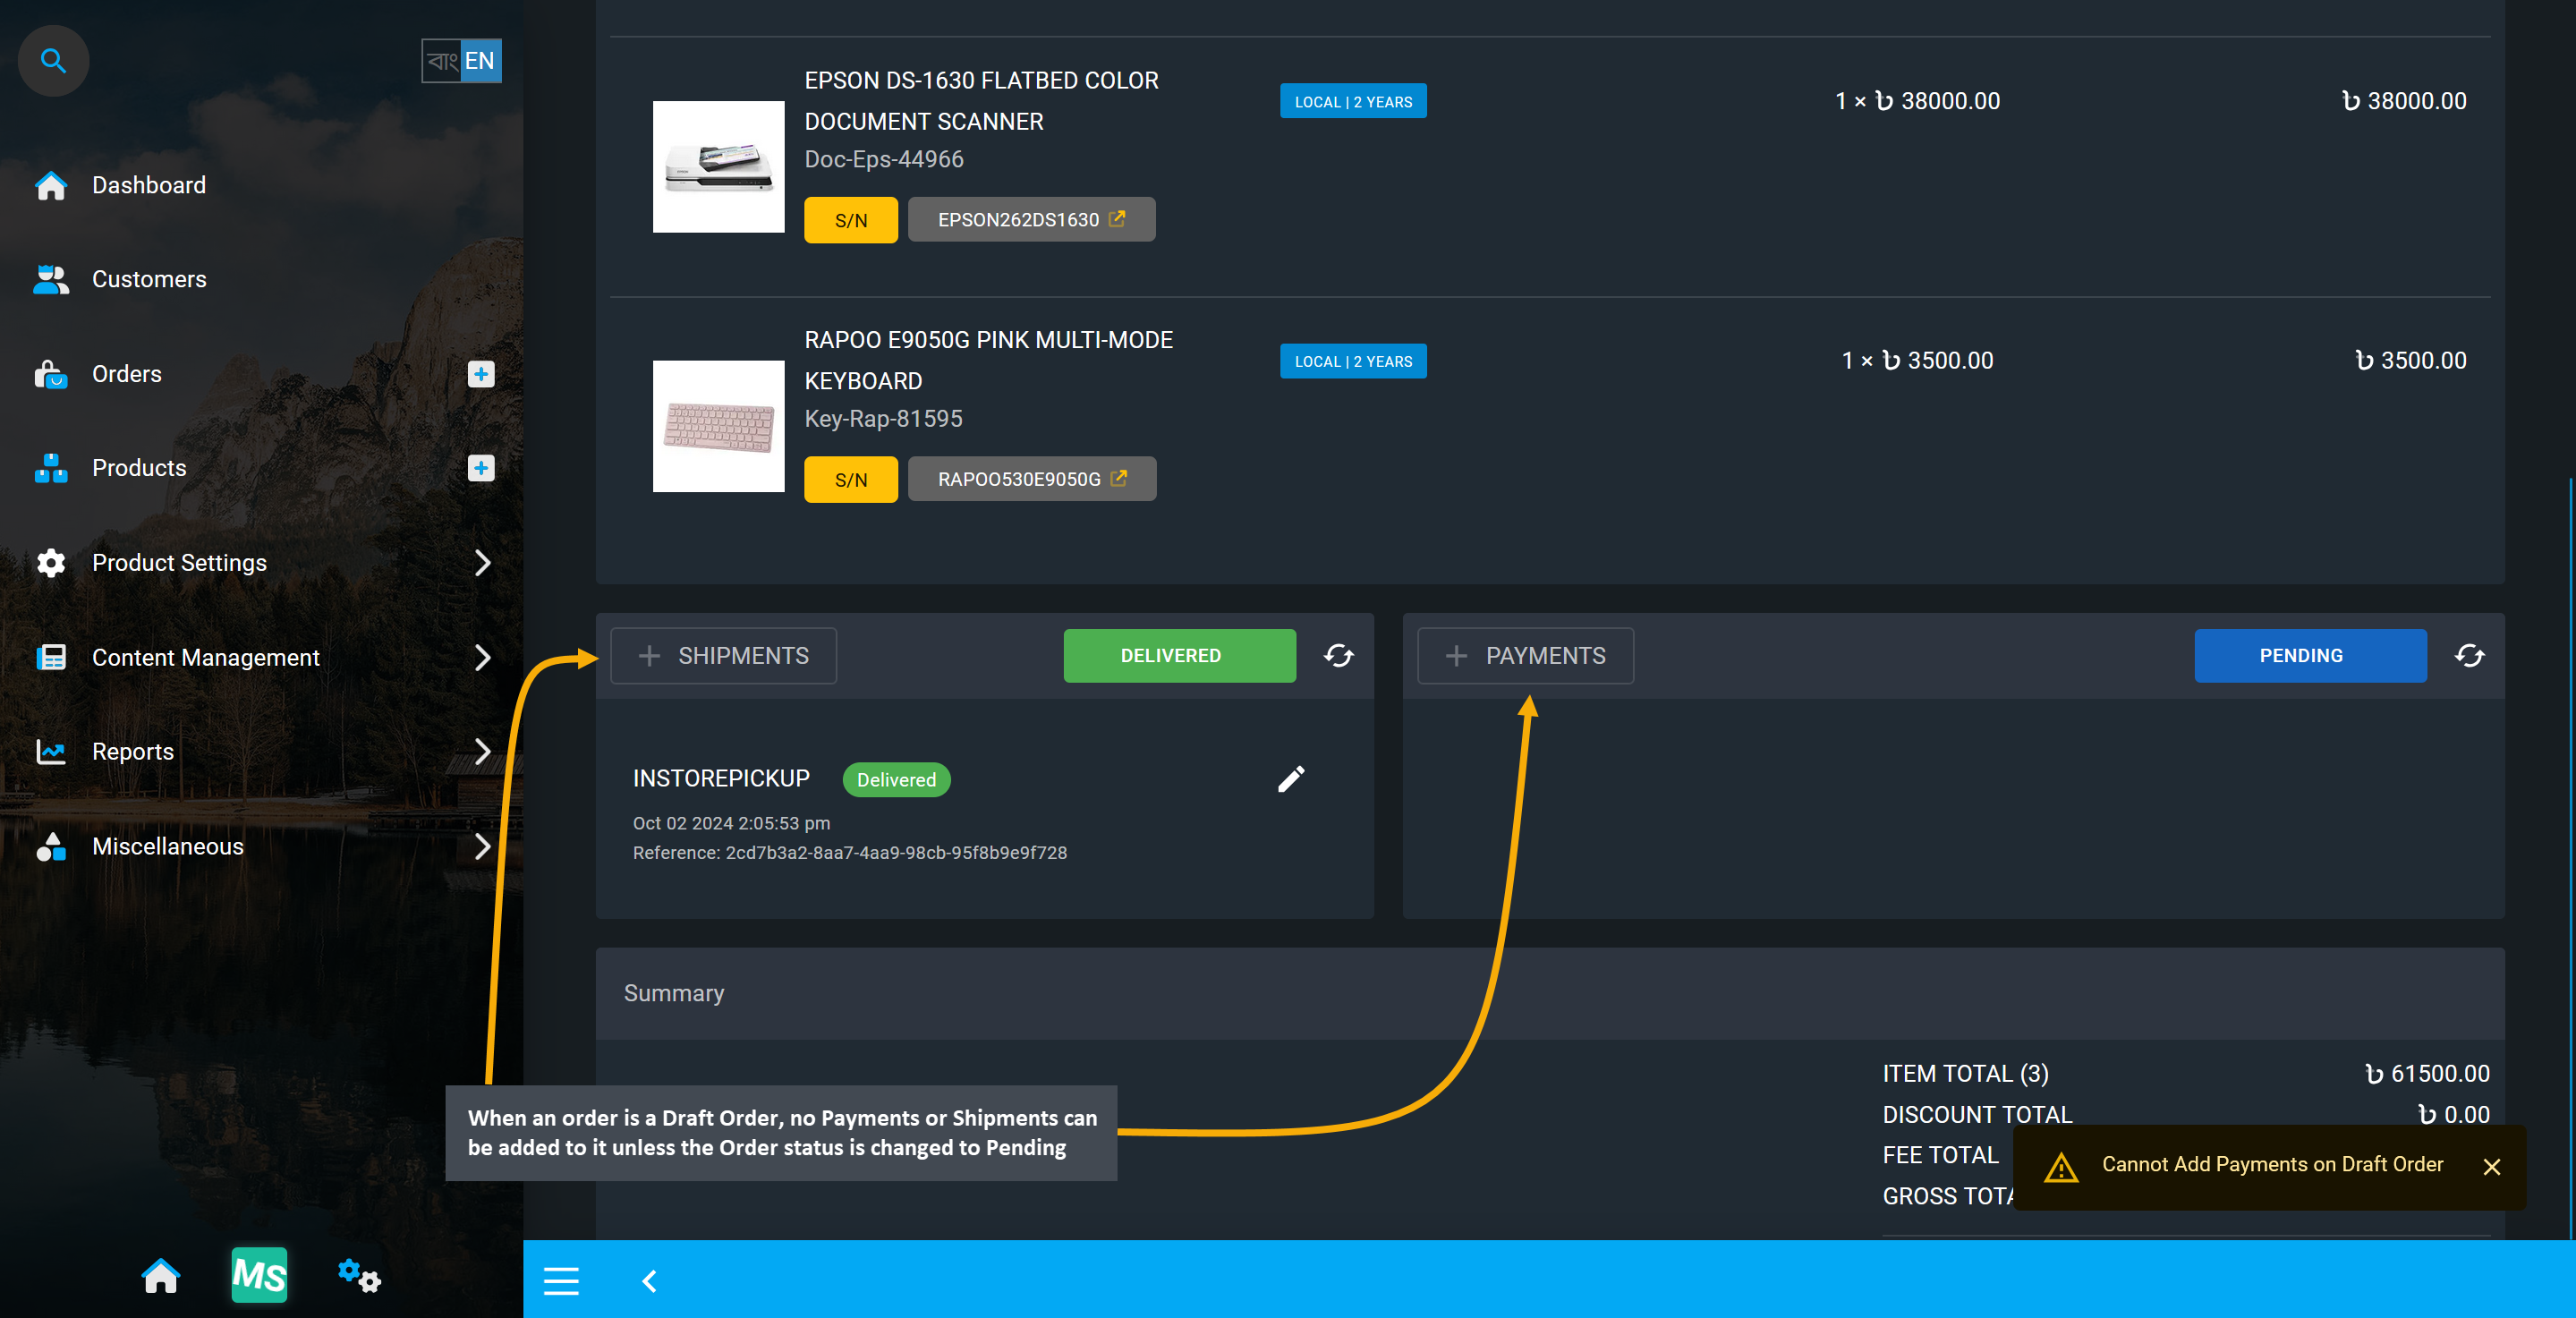
Image 16: Payments or Shipments are blocked for Draft Order till Order status is changed to Pending.
So, after Order status is changed to Pending, Payments and Shipments can be added to Order to view and print invoice. With Pending Order status, order transaction details will also show on Ledger.
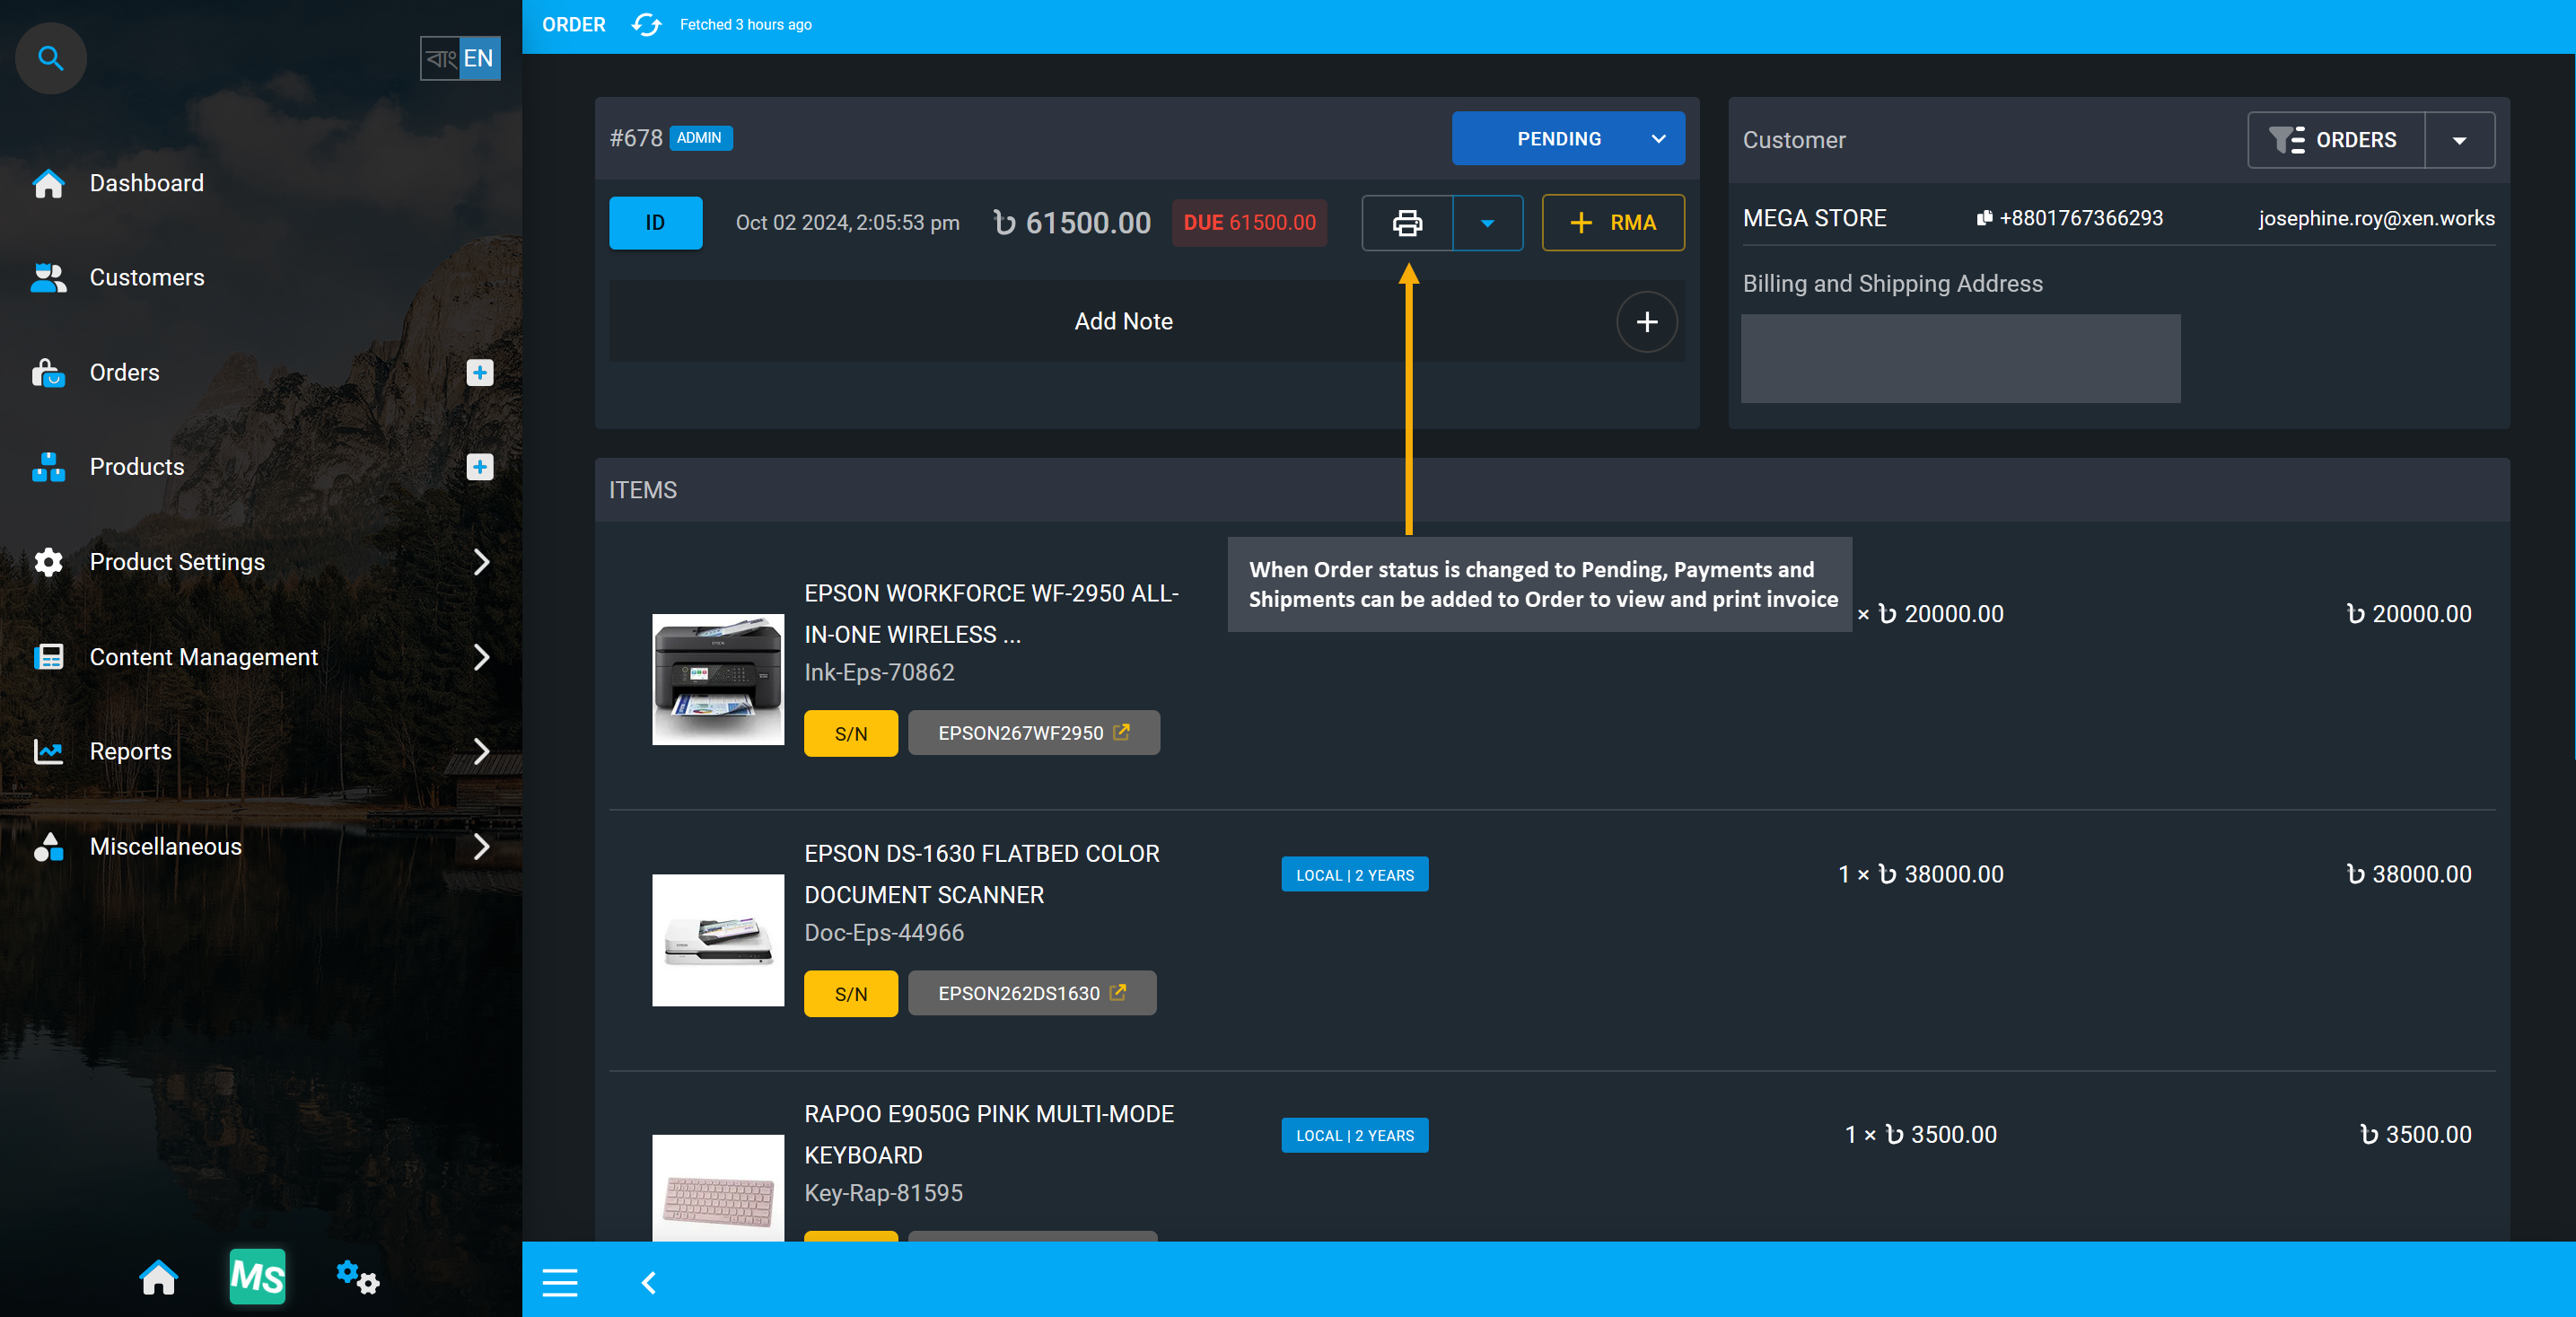
Image 17: When Order status is changed to Pending, Payments and Shipments can be added to Order.
Create Multiple Transactions for Payment
In certain cases, a Shop Owner may need to add Multiple Transactions if one transaction could not have successful verification and is Failed, while another transaction may work to be successfully Completed for an Order’s payment. So, seller can use the Payments button to add multiple transactions like Cash, Cheque, or BKash (Manual) to complete total Order payment on behalf of the Customer from Admin Panel. Using the Edit button, they can change Transaction Status by selecting from Completed or Failed to keep number of transactions that were successful and click Submit to complete the payment process.
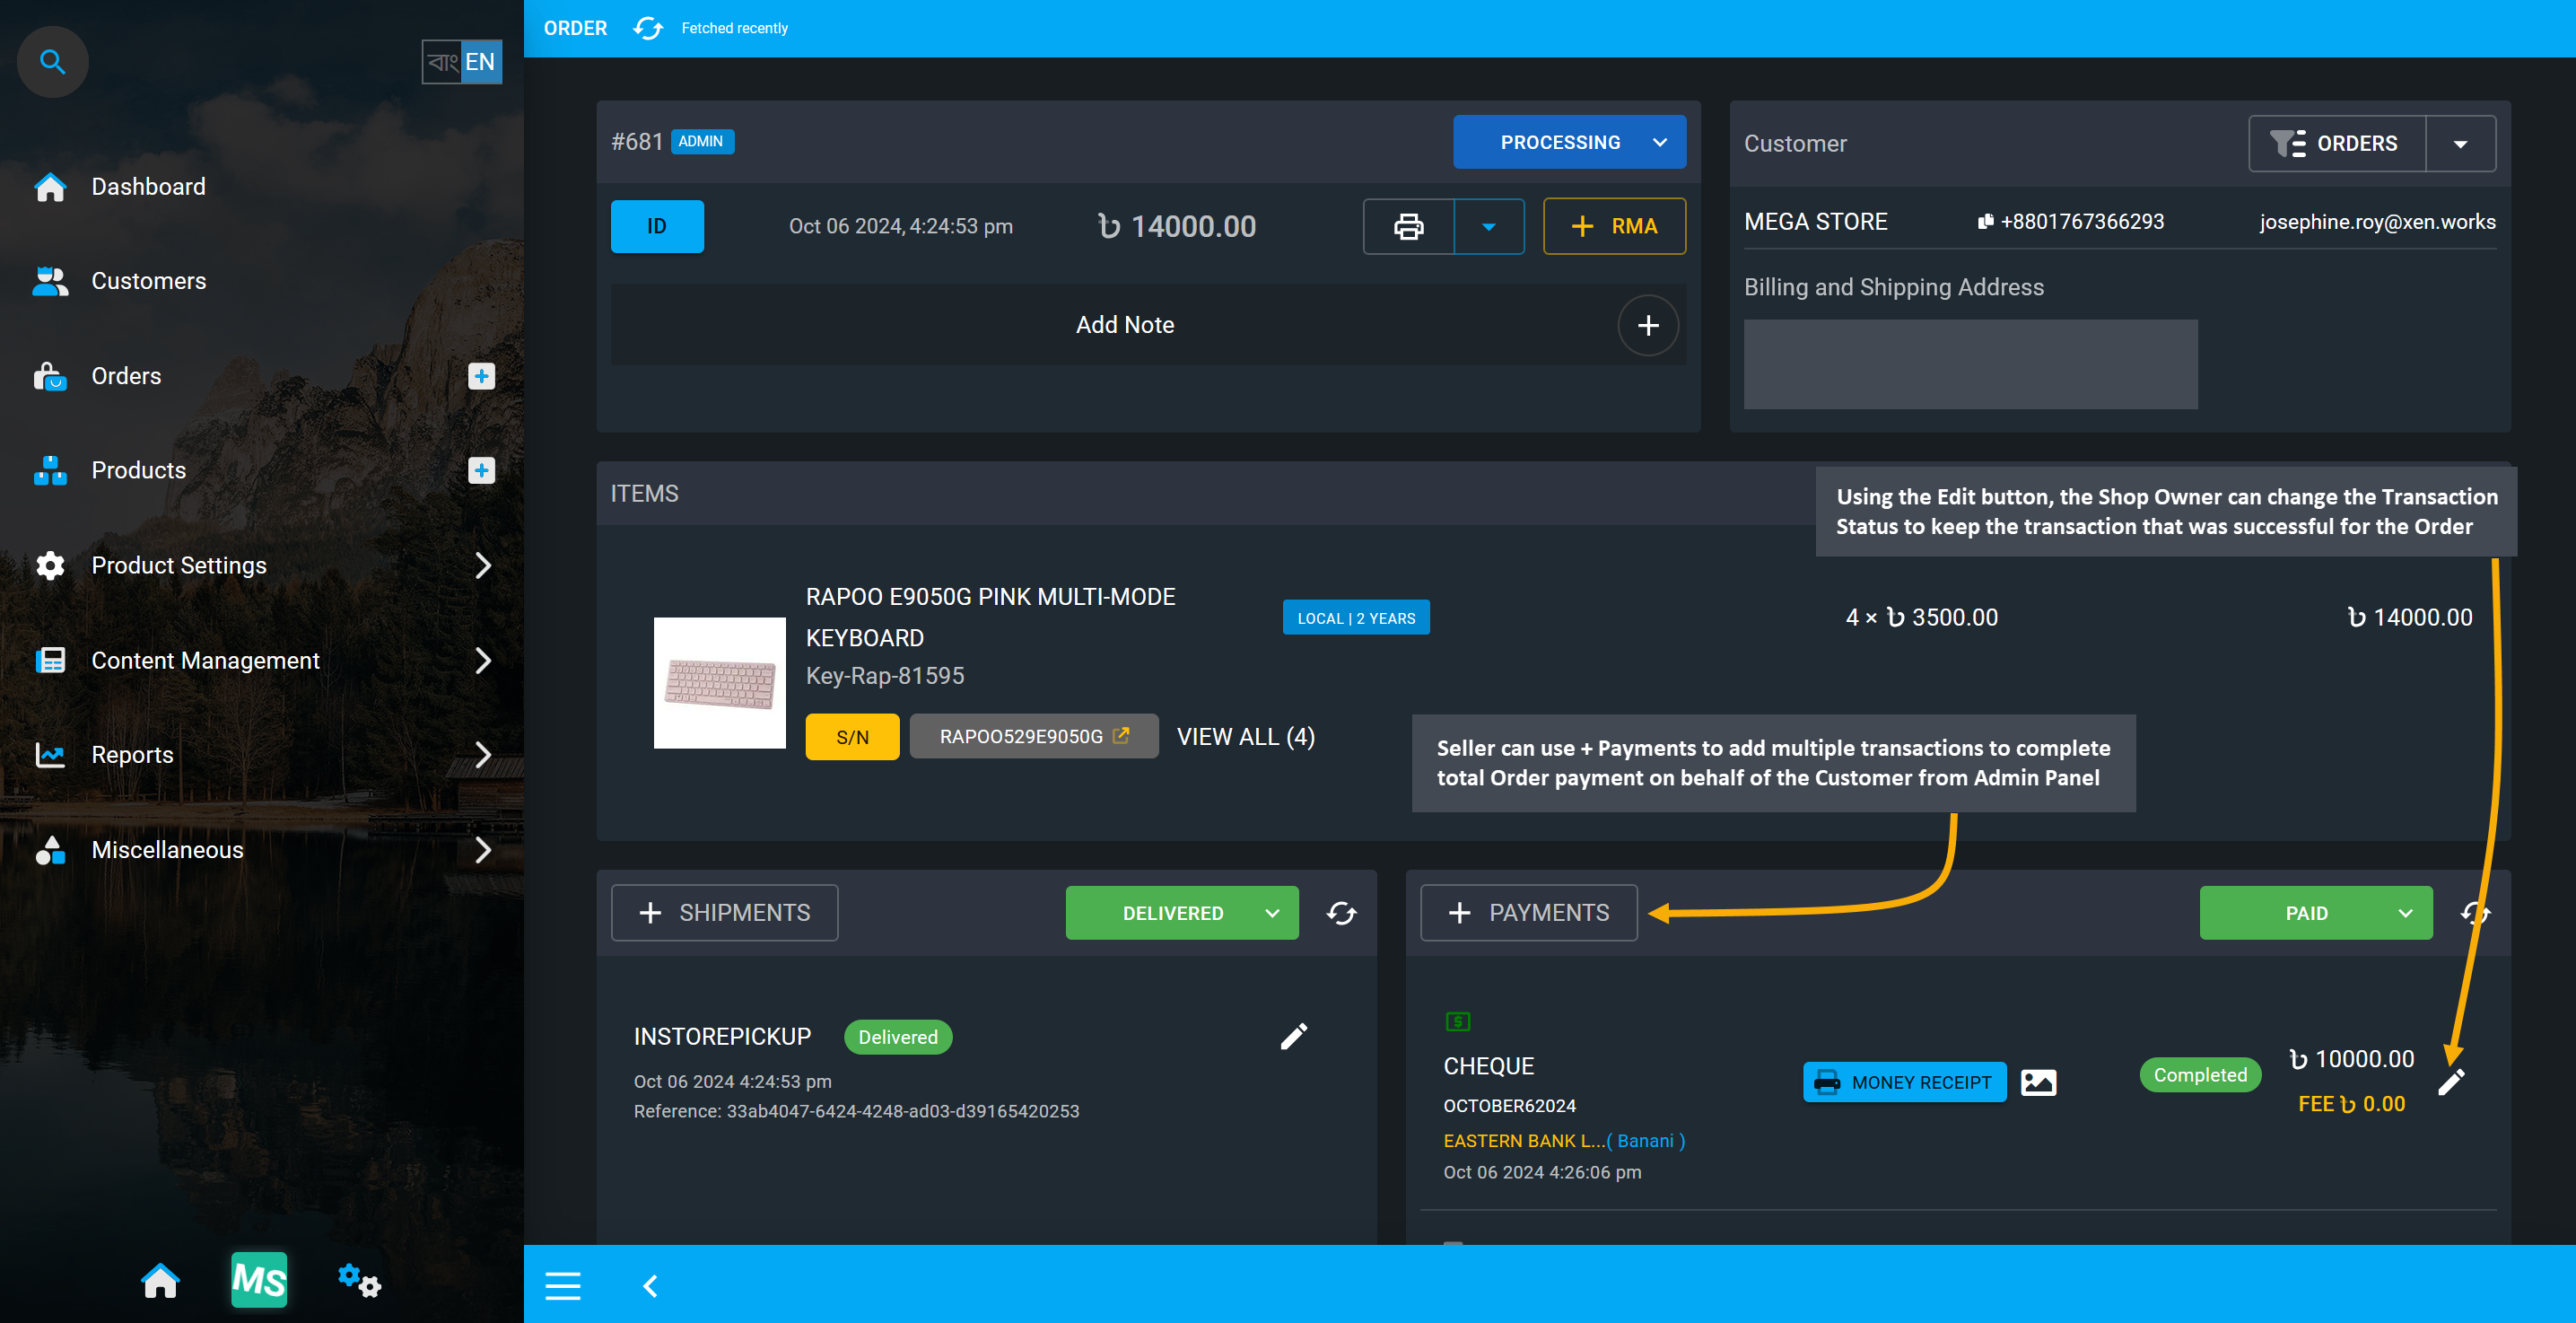
Image 18: The Shop Owner can add Multiple Transactions by clicking + Payments button on Dashboard.
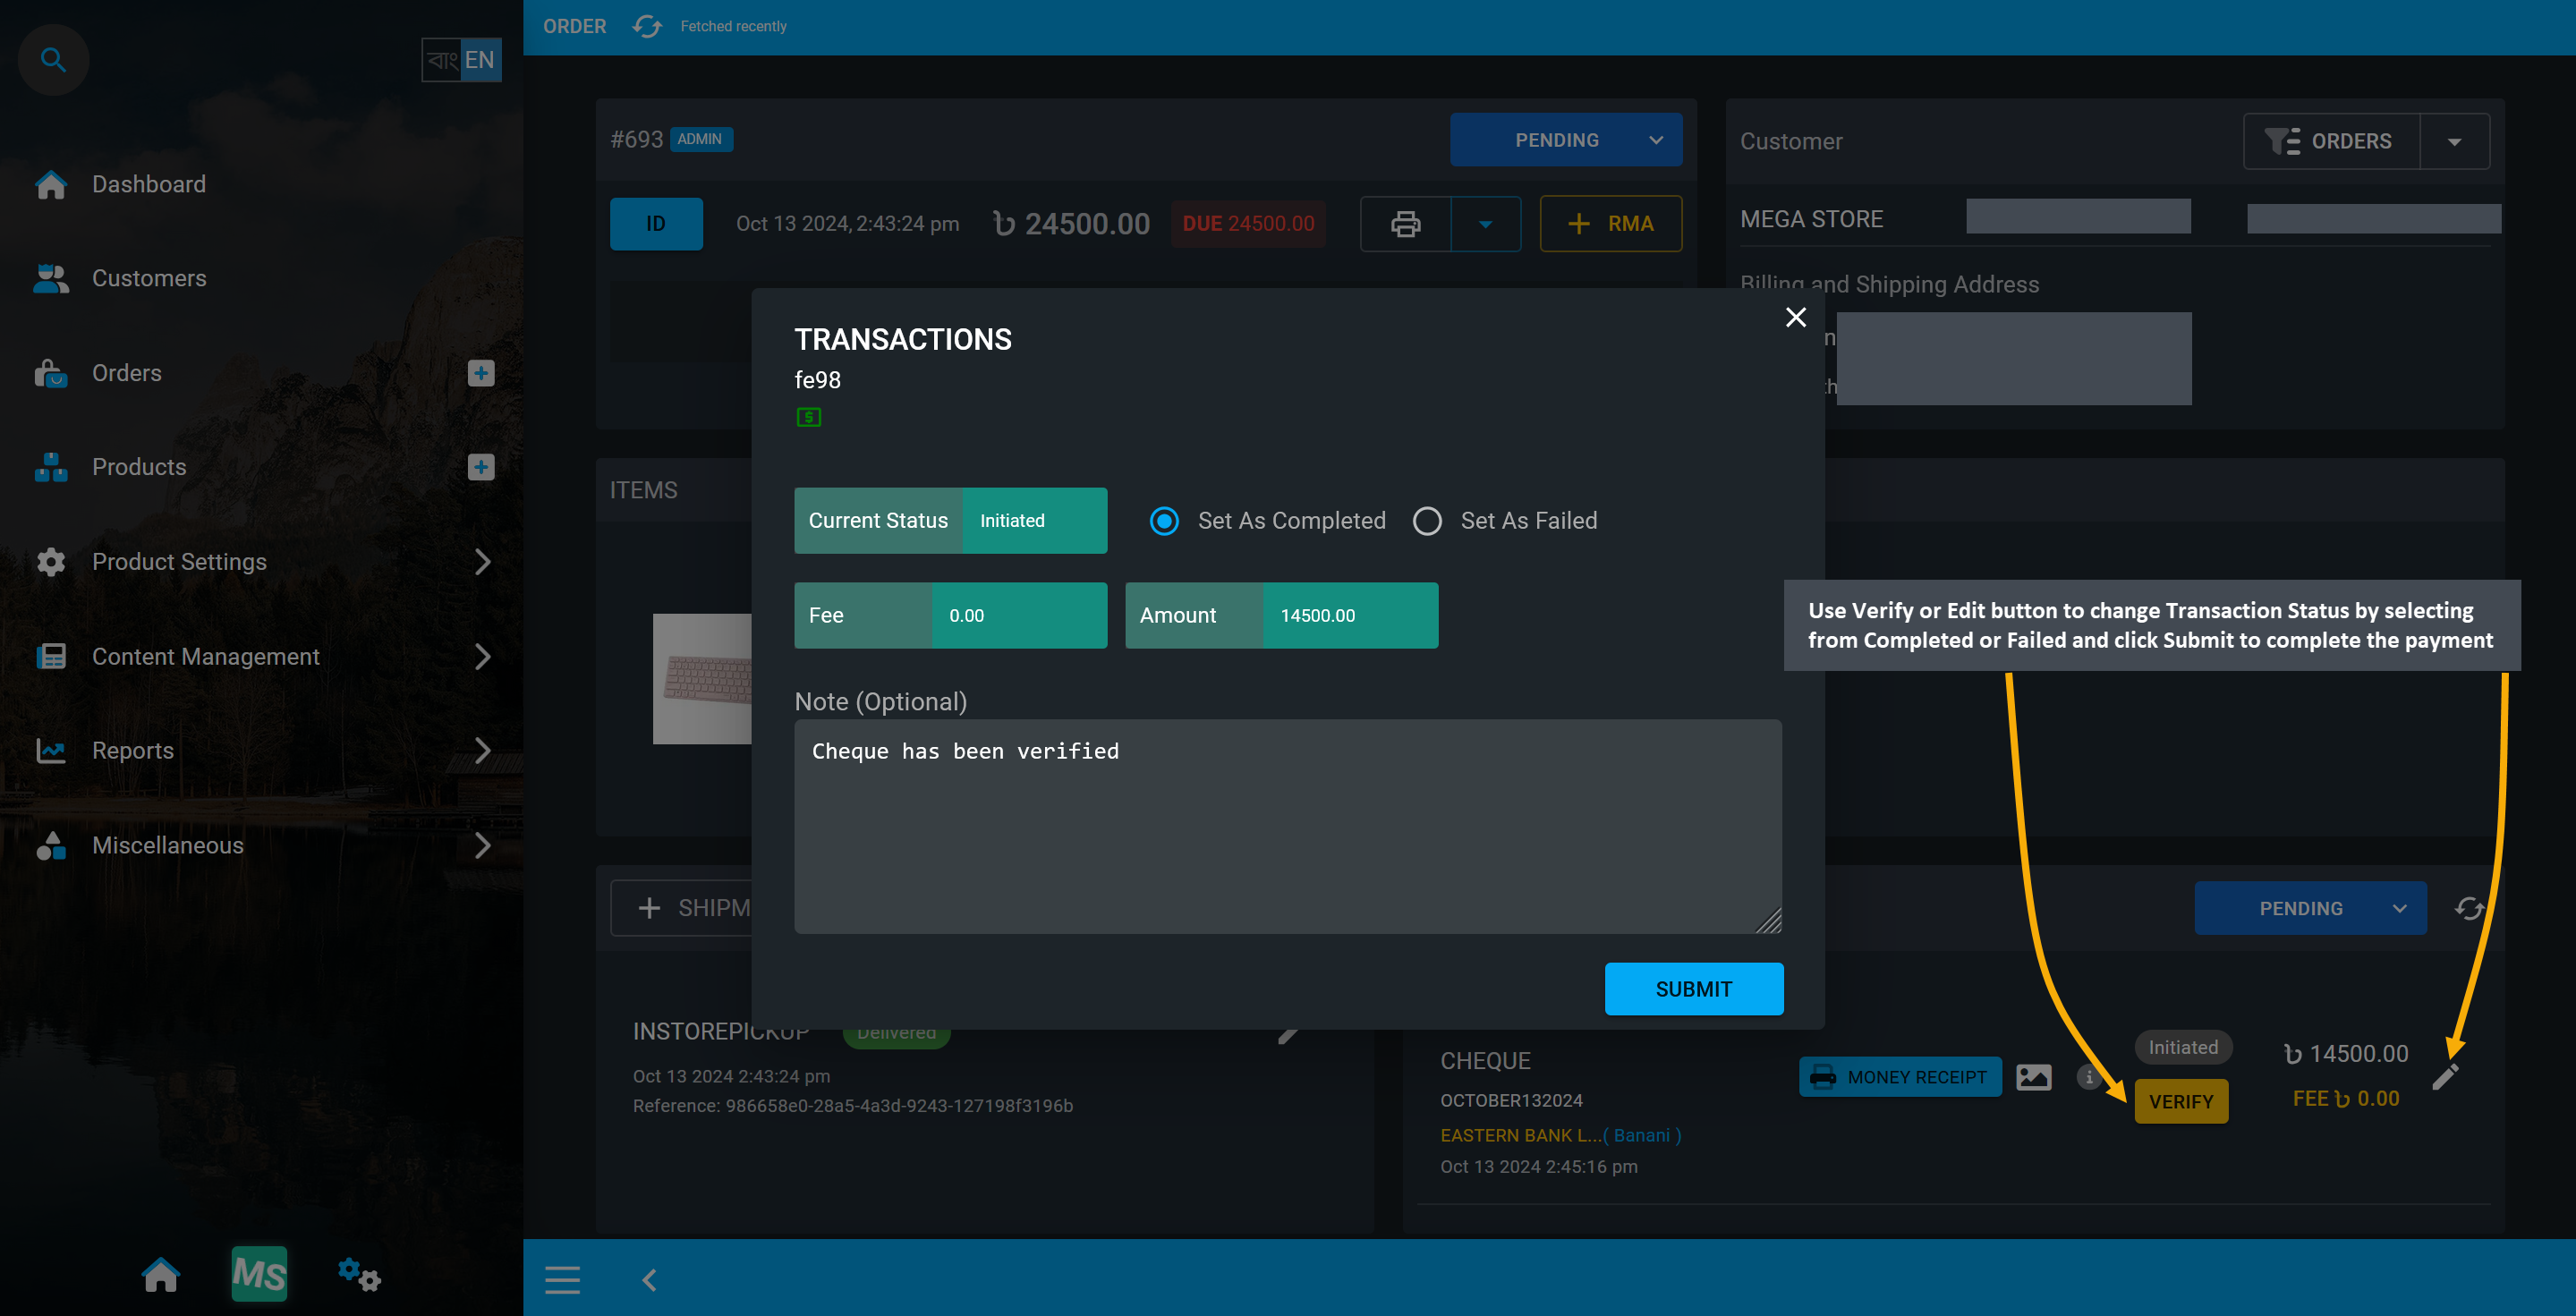
Image 19: Use Verify or Edit button to change the Transaction Status as Completed or Failed.
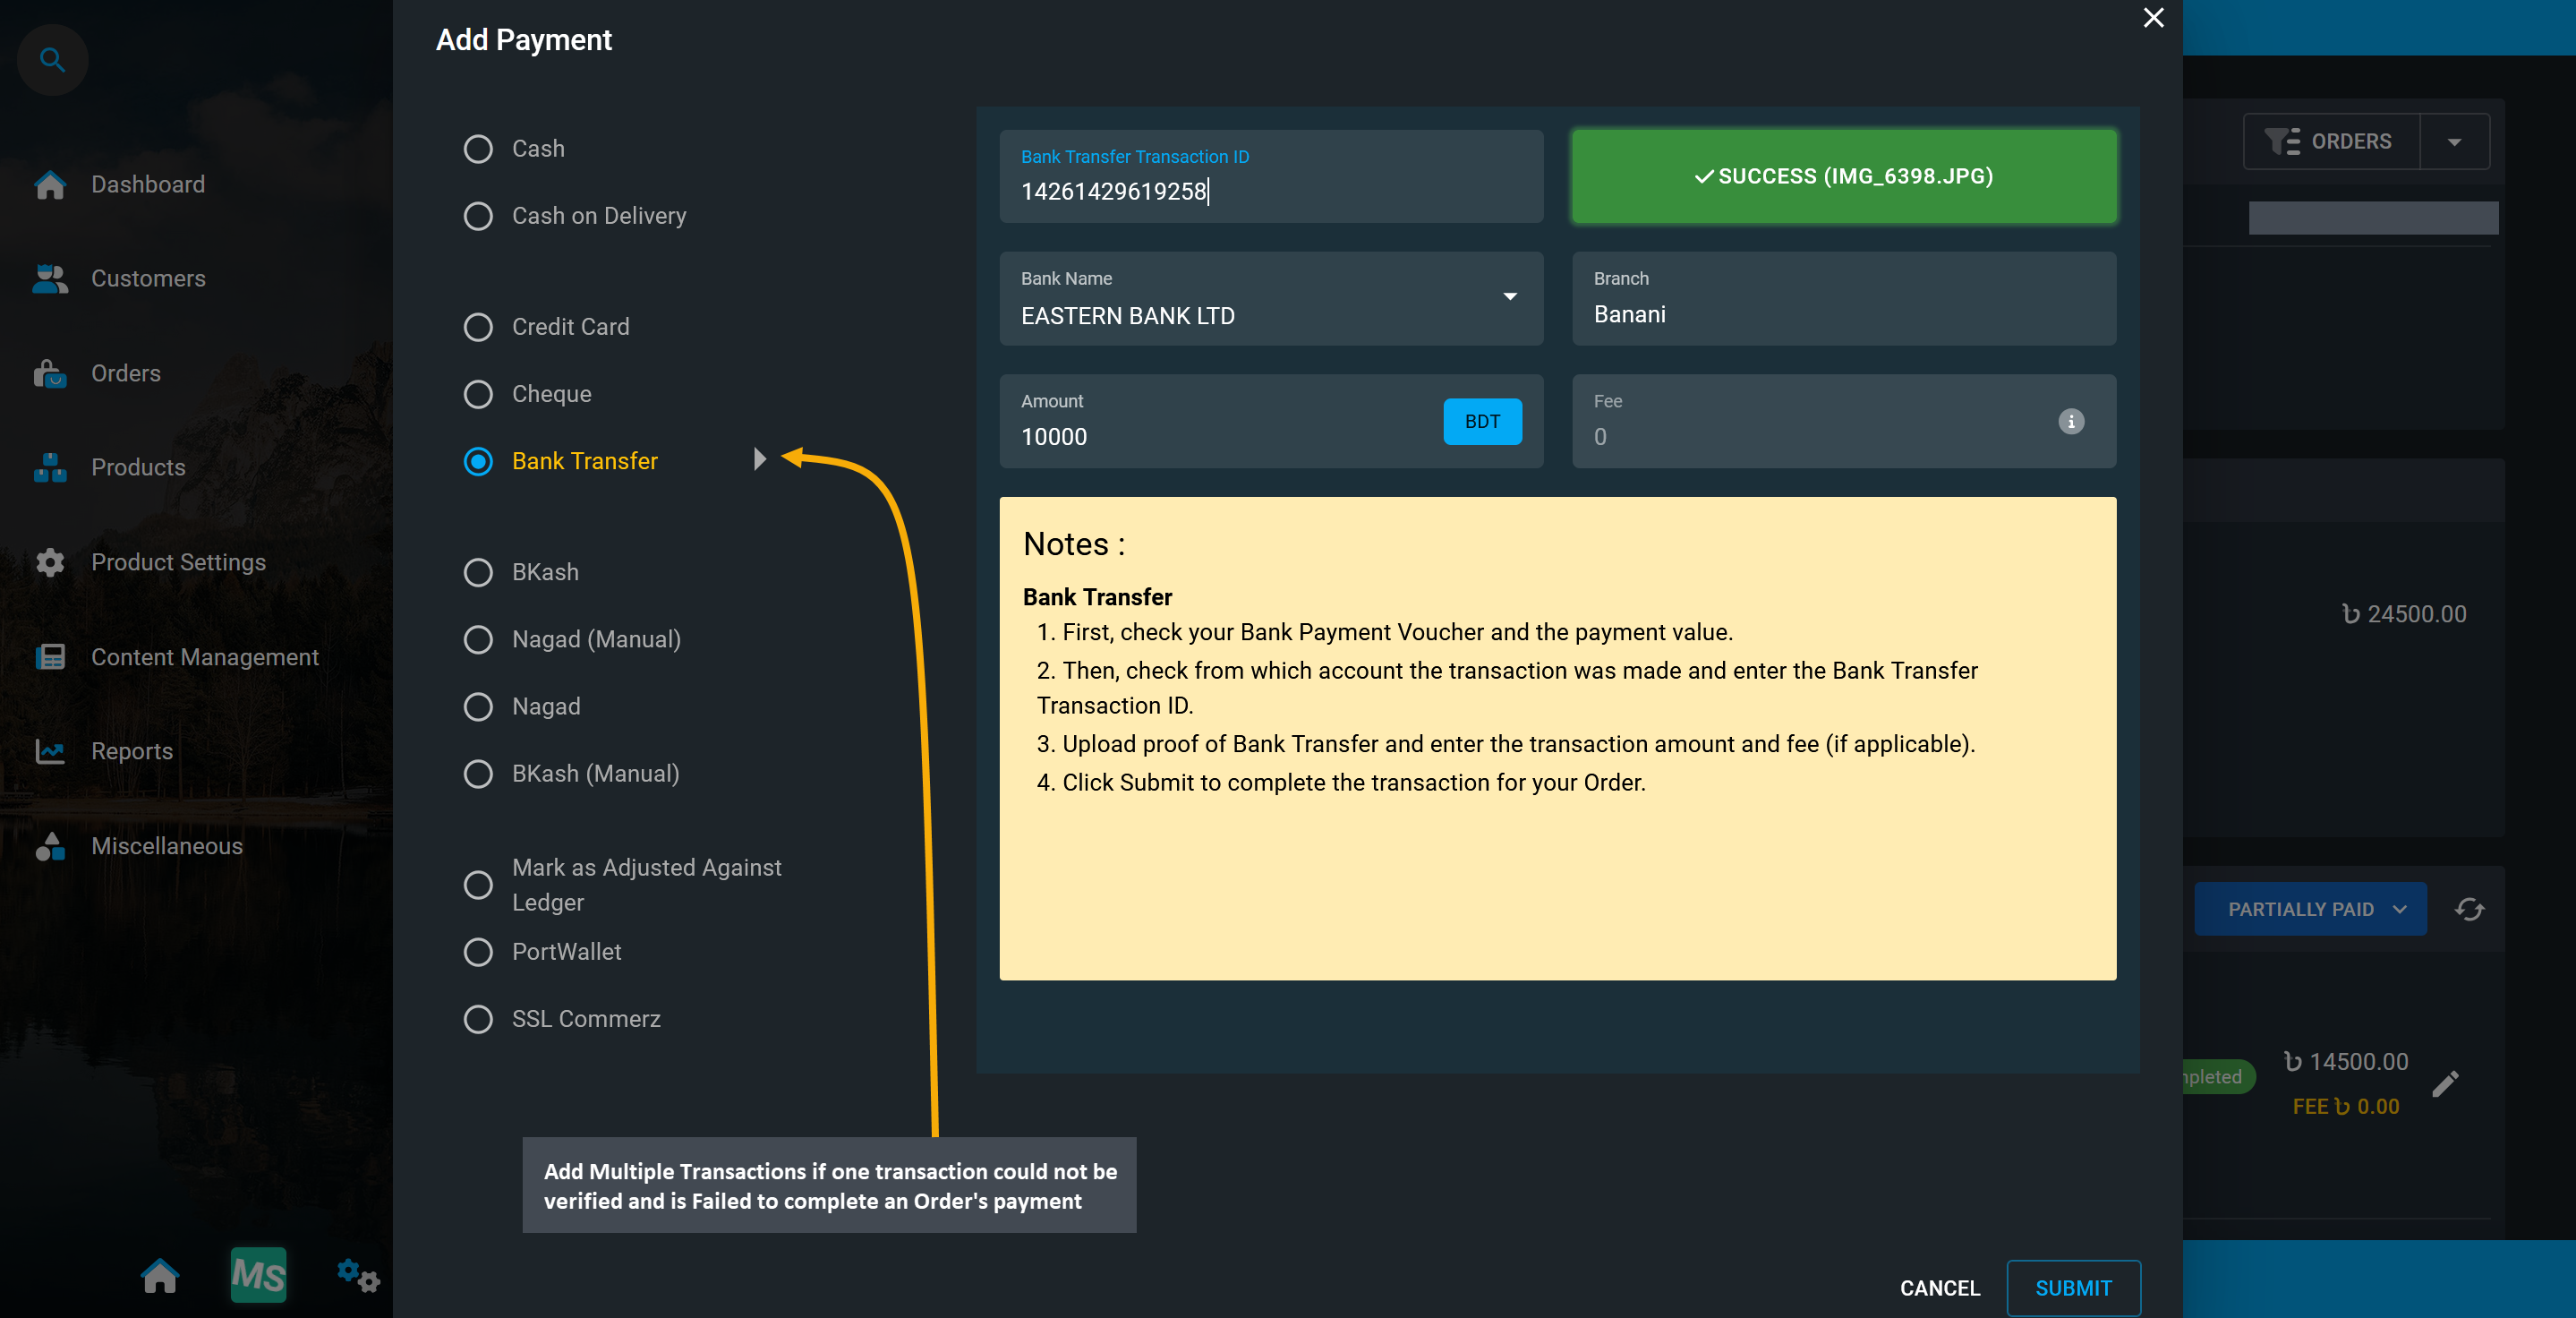
Image 20: Add Multiple Transactions if one transaction could not be verified and is Failed.
Using the Edit button, the Transaction statuses can be changed. Clicking the Edit button will open a modal where Completed or Failed Transaction statuses can be changed to Set As Failed or Set As Completed. Select the desired option according to the Payment status and update it by clicking the Submit button.
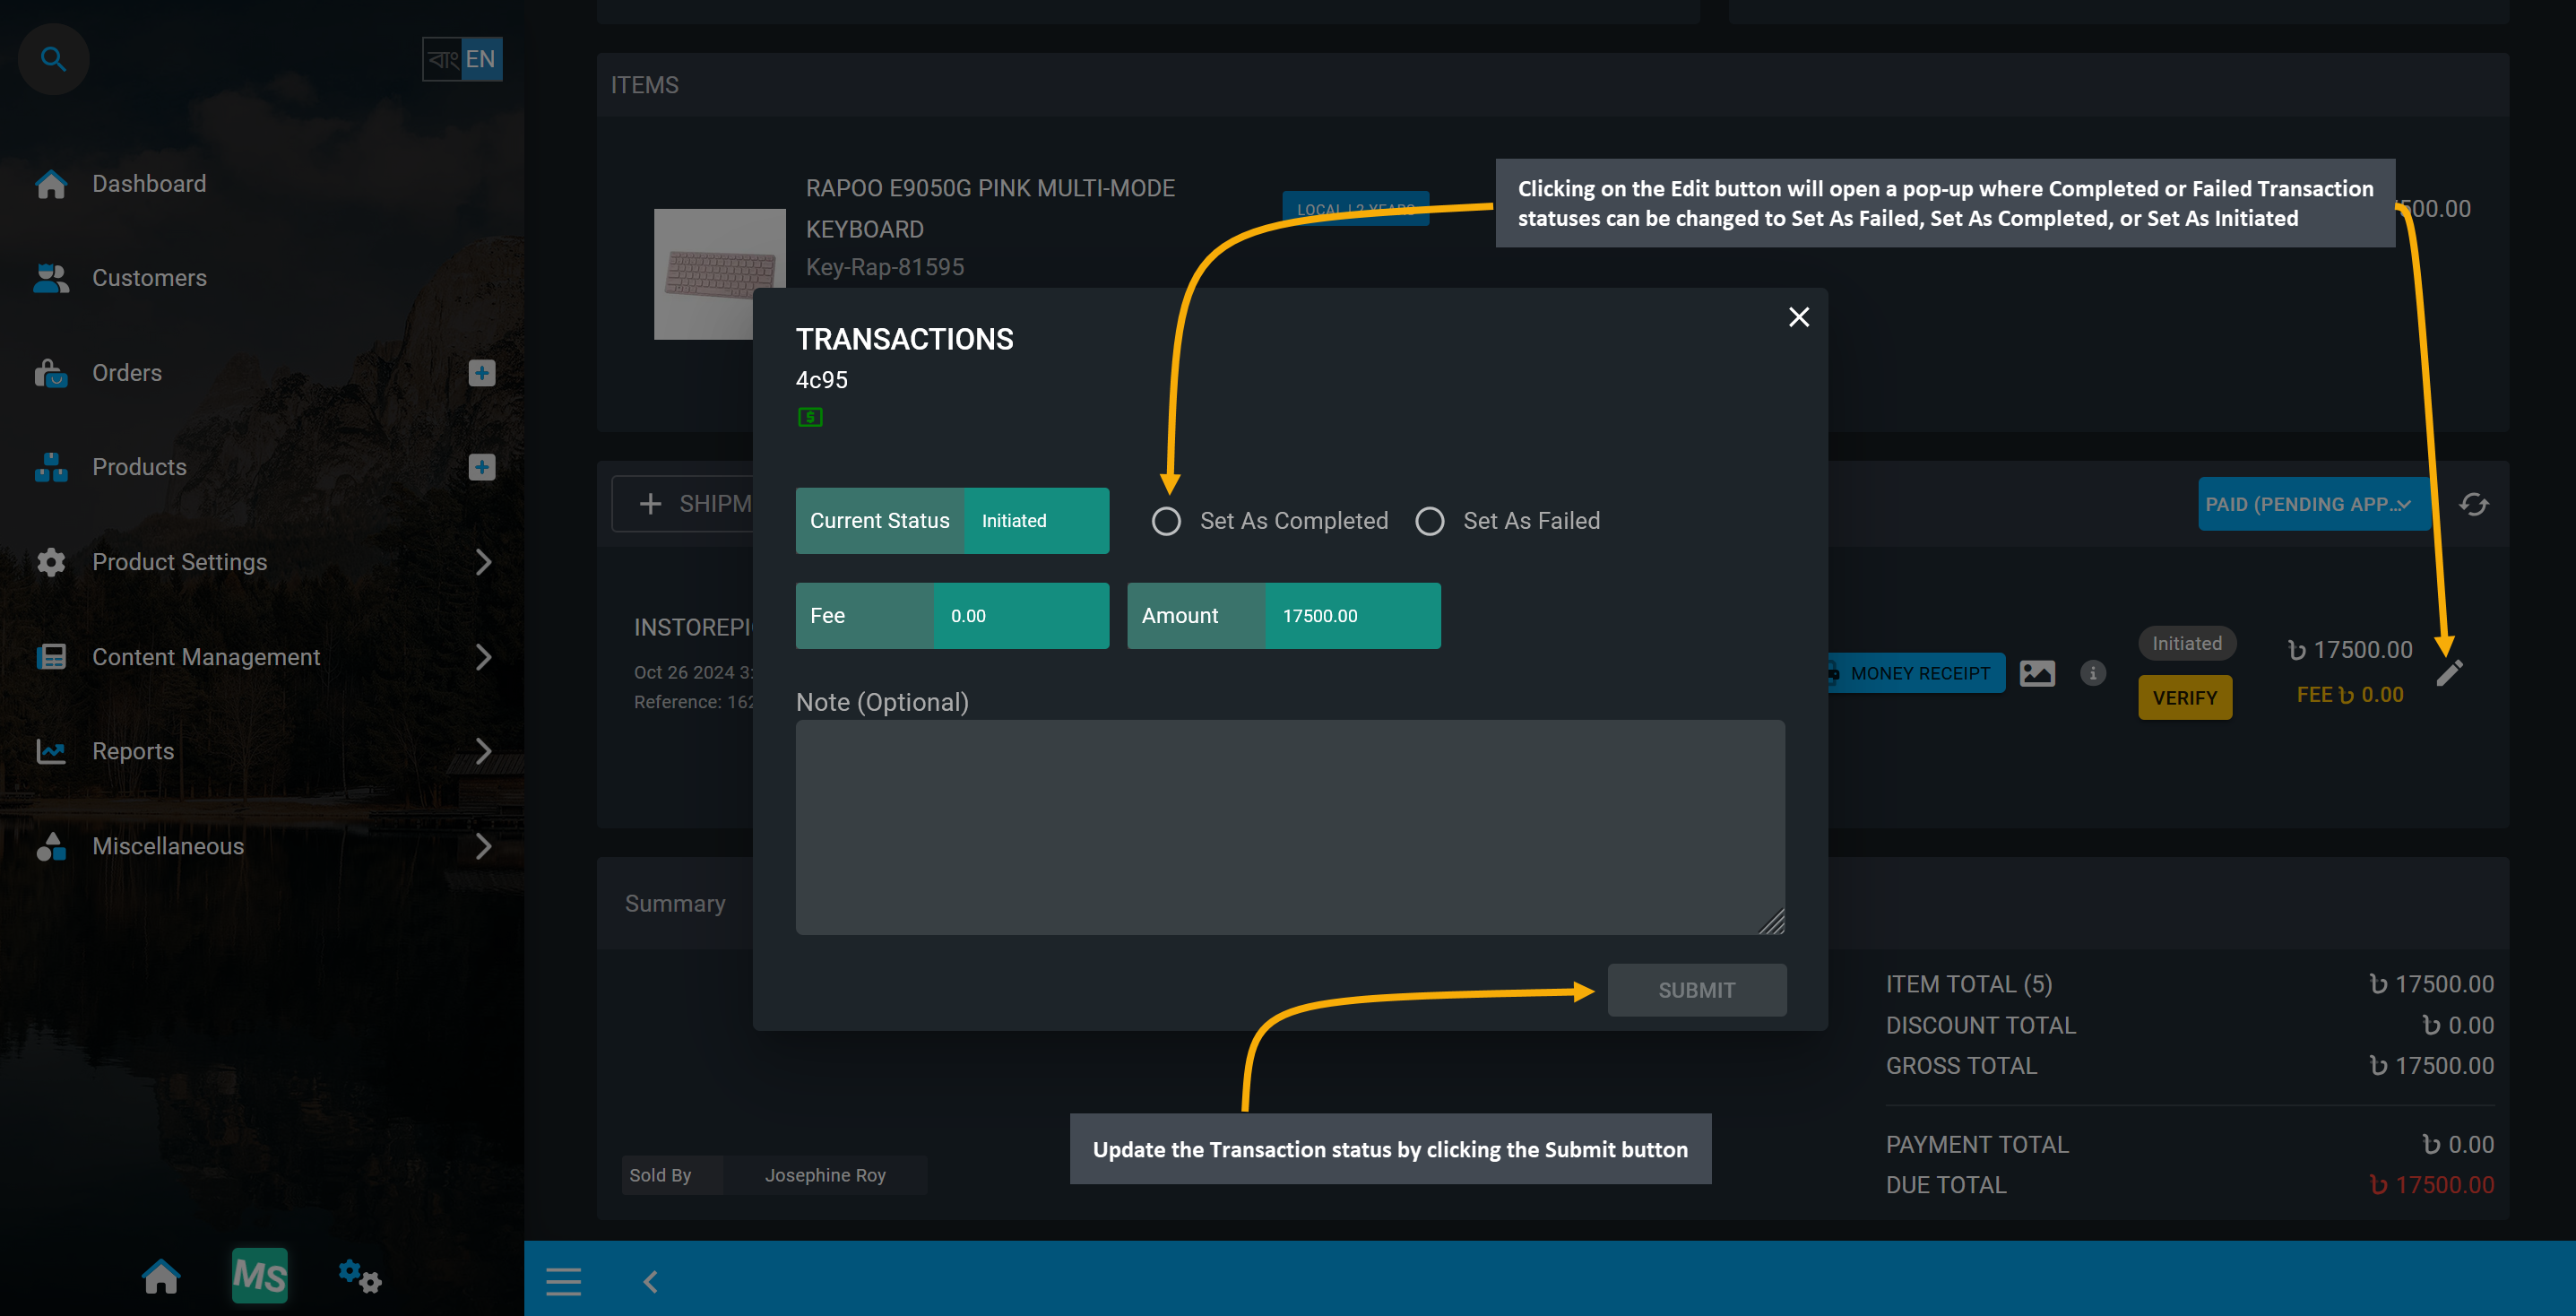
Image 19: Transaction statuses can be changed to Set As Failed, Set As Completed, or Set As Initiated.
Add Shipment Manually for Order
Usually, when placing the Order through Cart, Shipment is automatically selected as InStorePickup which is free of charge as this option is selected for Customers purchasing product directly from shop.
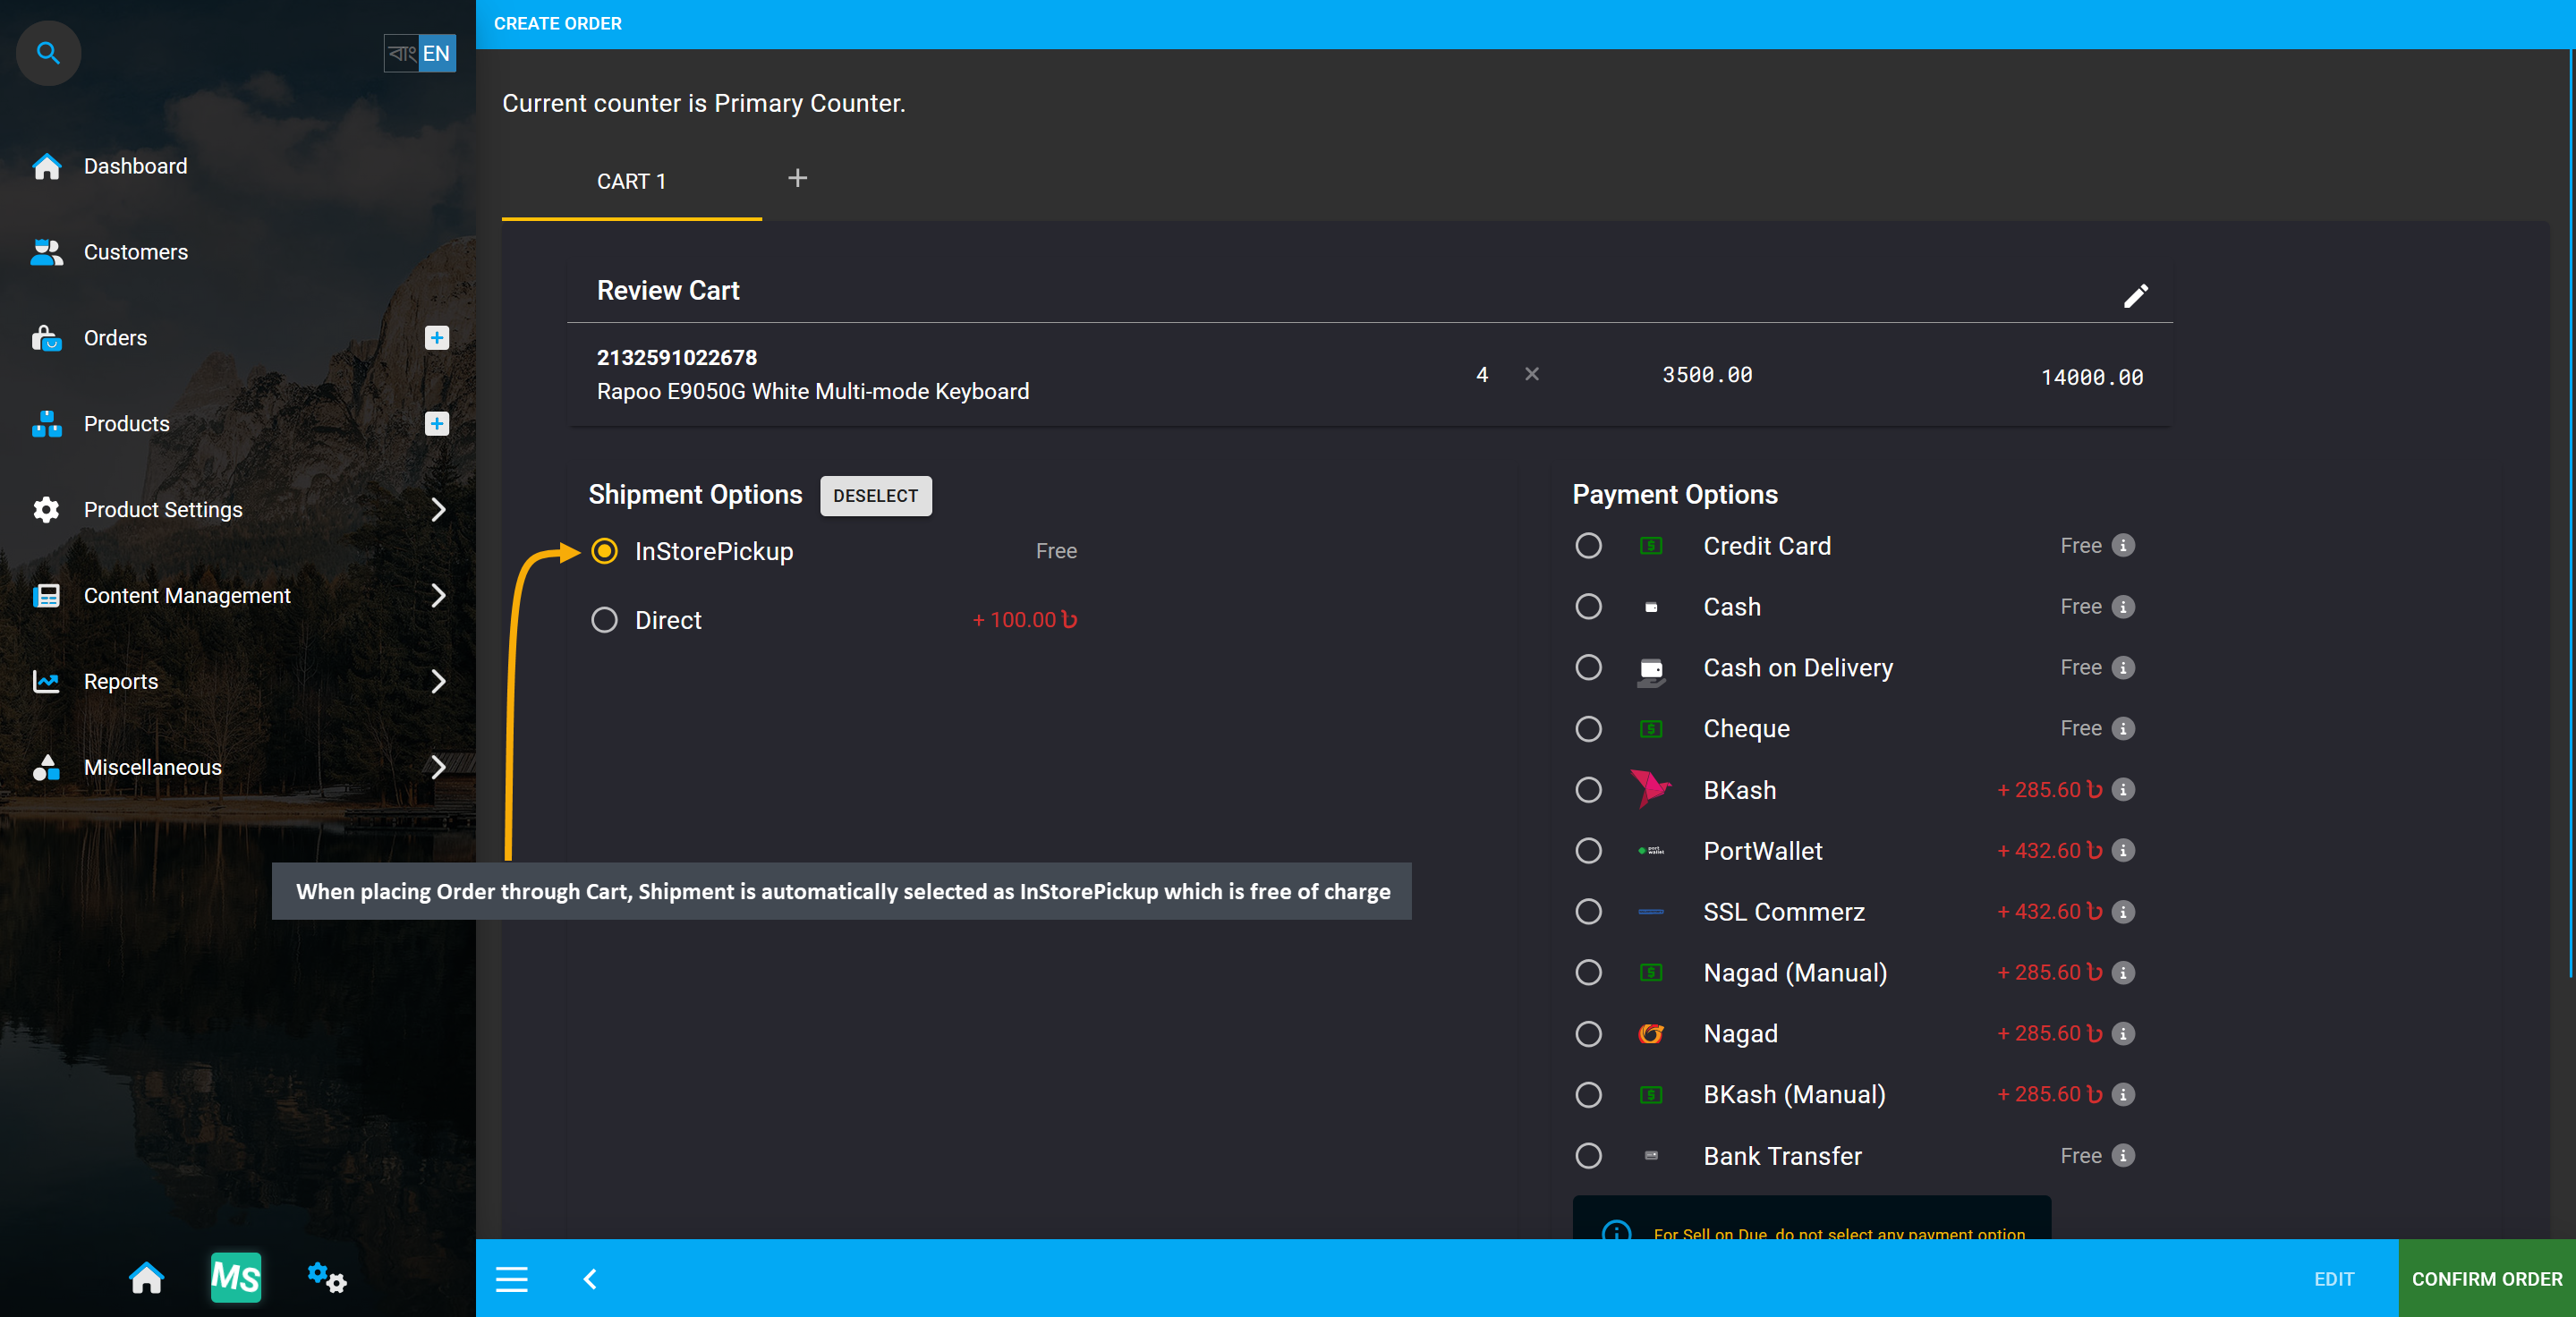
Image 20: When placing Order through Cart, Shipment is automatically selected as InStorePickup.
The Shop Owner can add a Shipment Gateway manually after placing the Order from the Admin Panel. To select a specific Shipping Carrier, they need to click on the + Shipment button which will open a modal.
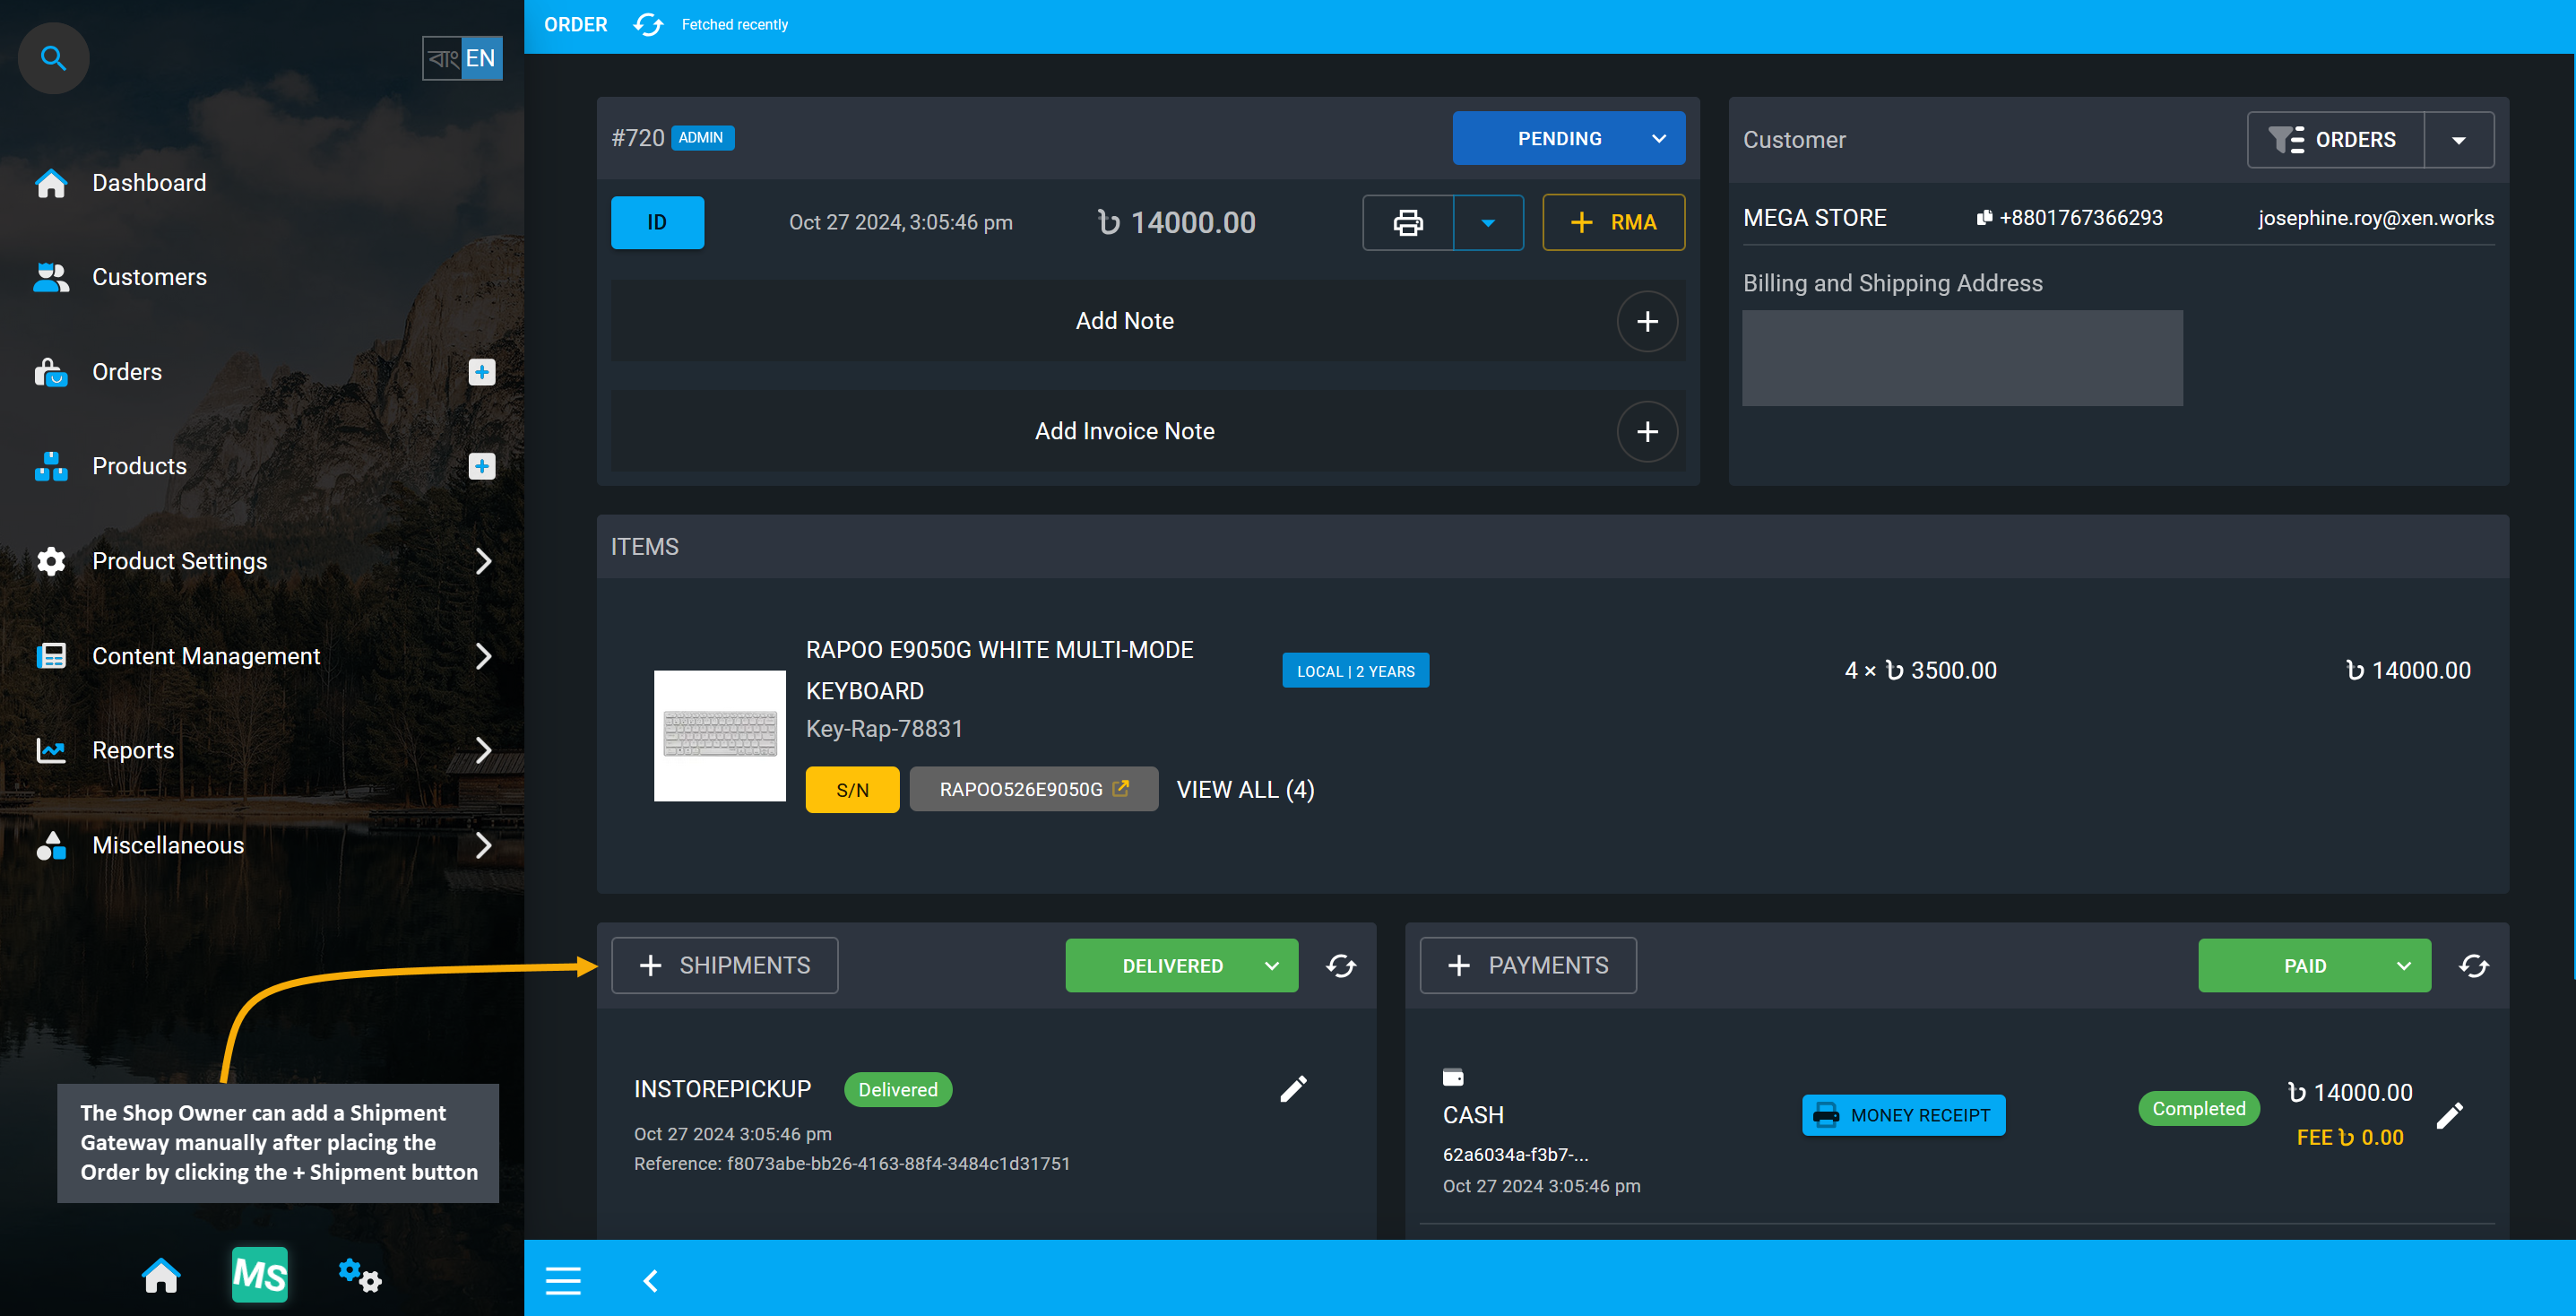
Image 21: Add a Shipment Gateway manually after placing the Order by clicking the + Shipment button.
If specific Shipment Gateways are enabled from settings, then a gateway can be selected for the Order. However, when the order is placed from cart, In Store Pickup is selected as the default Shipping Gateway. However, if a new shipment gateway is added later from Order dashboard, then its status can be updated. Also, tracking number and notes can be added for instruction for shop staff to follow up.
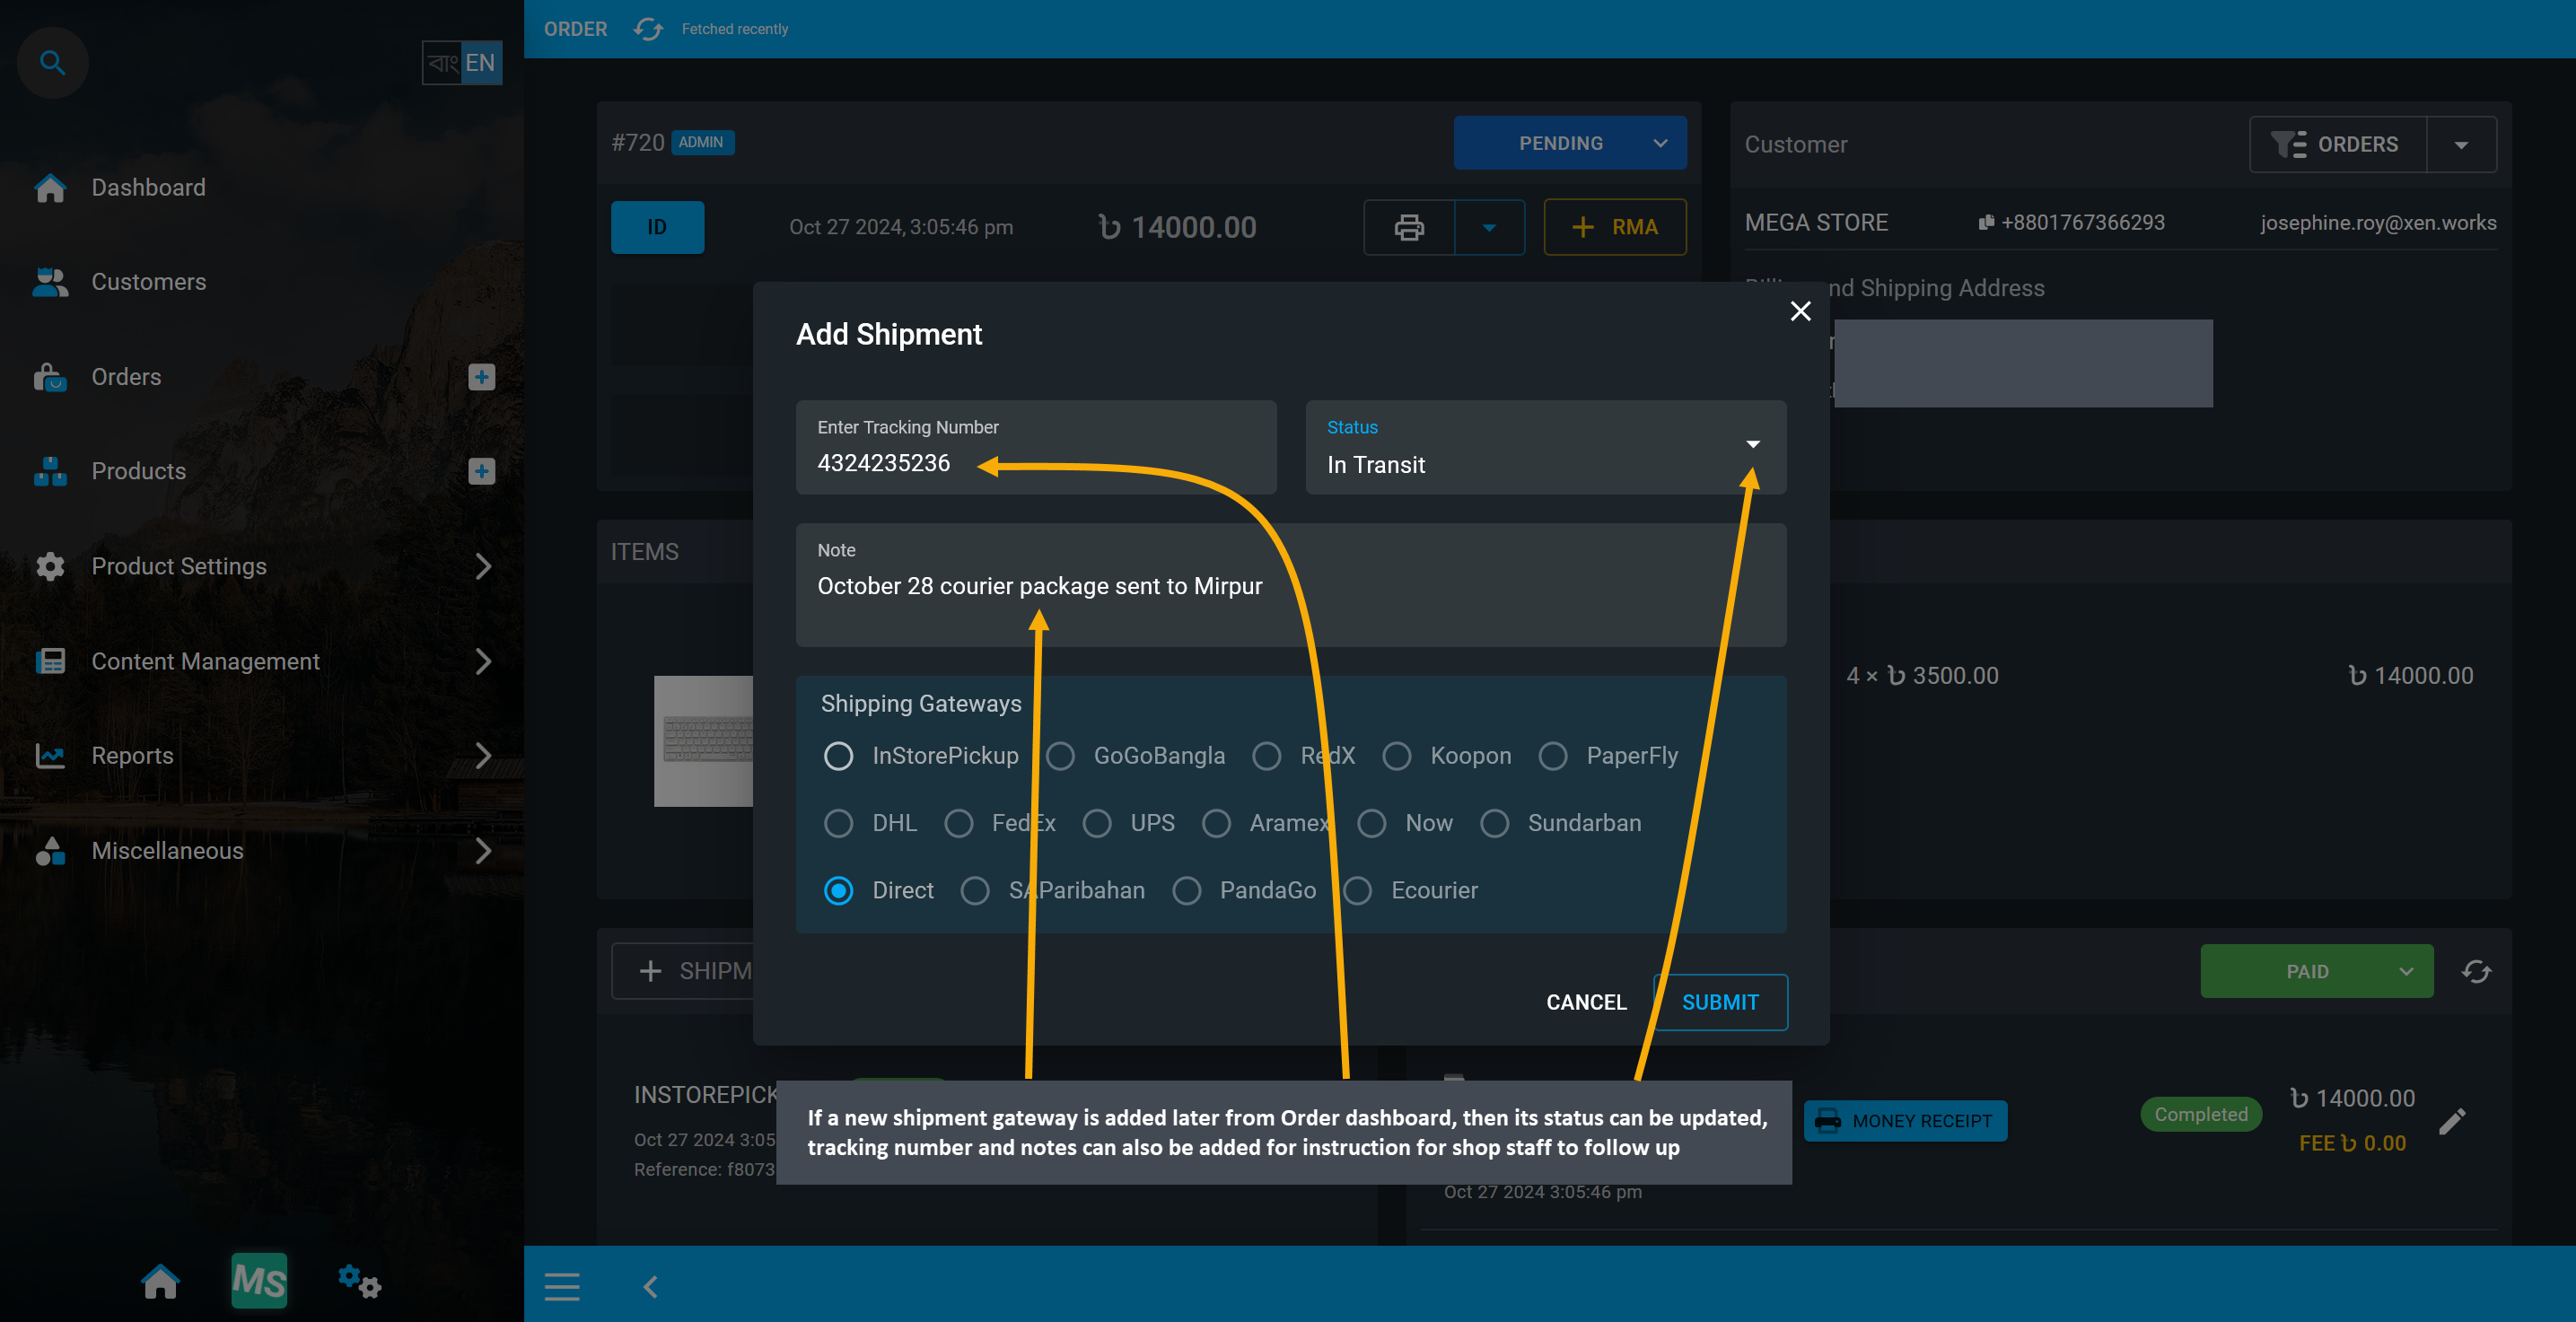
Image 22: If new shipment gateway is added on Order dashboard, then its credentials can be updated.
Status for already added Shipment Gateway can be updated similarly from the Shipments tab. Tracking Number and status can be updated, and notes can also be added.
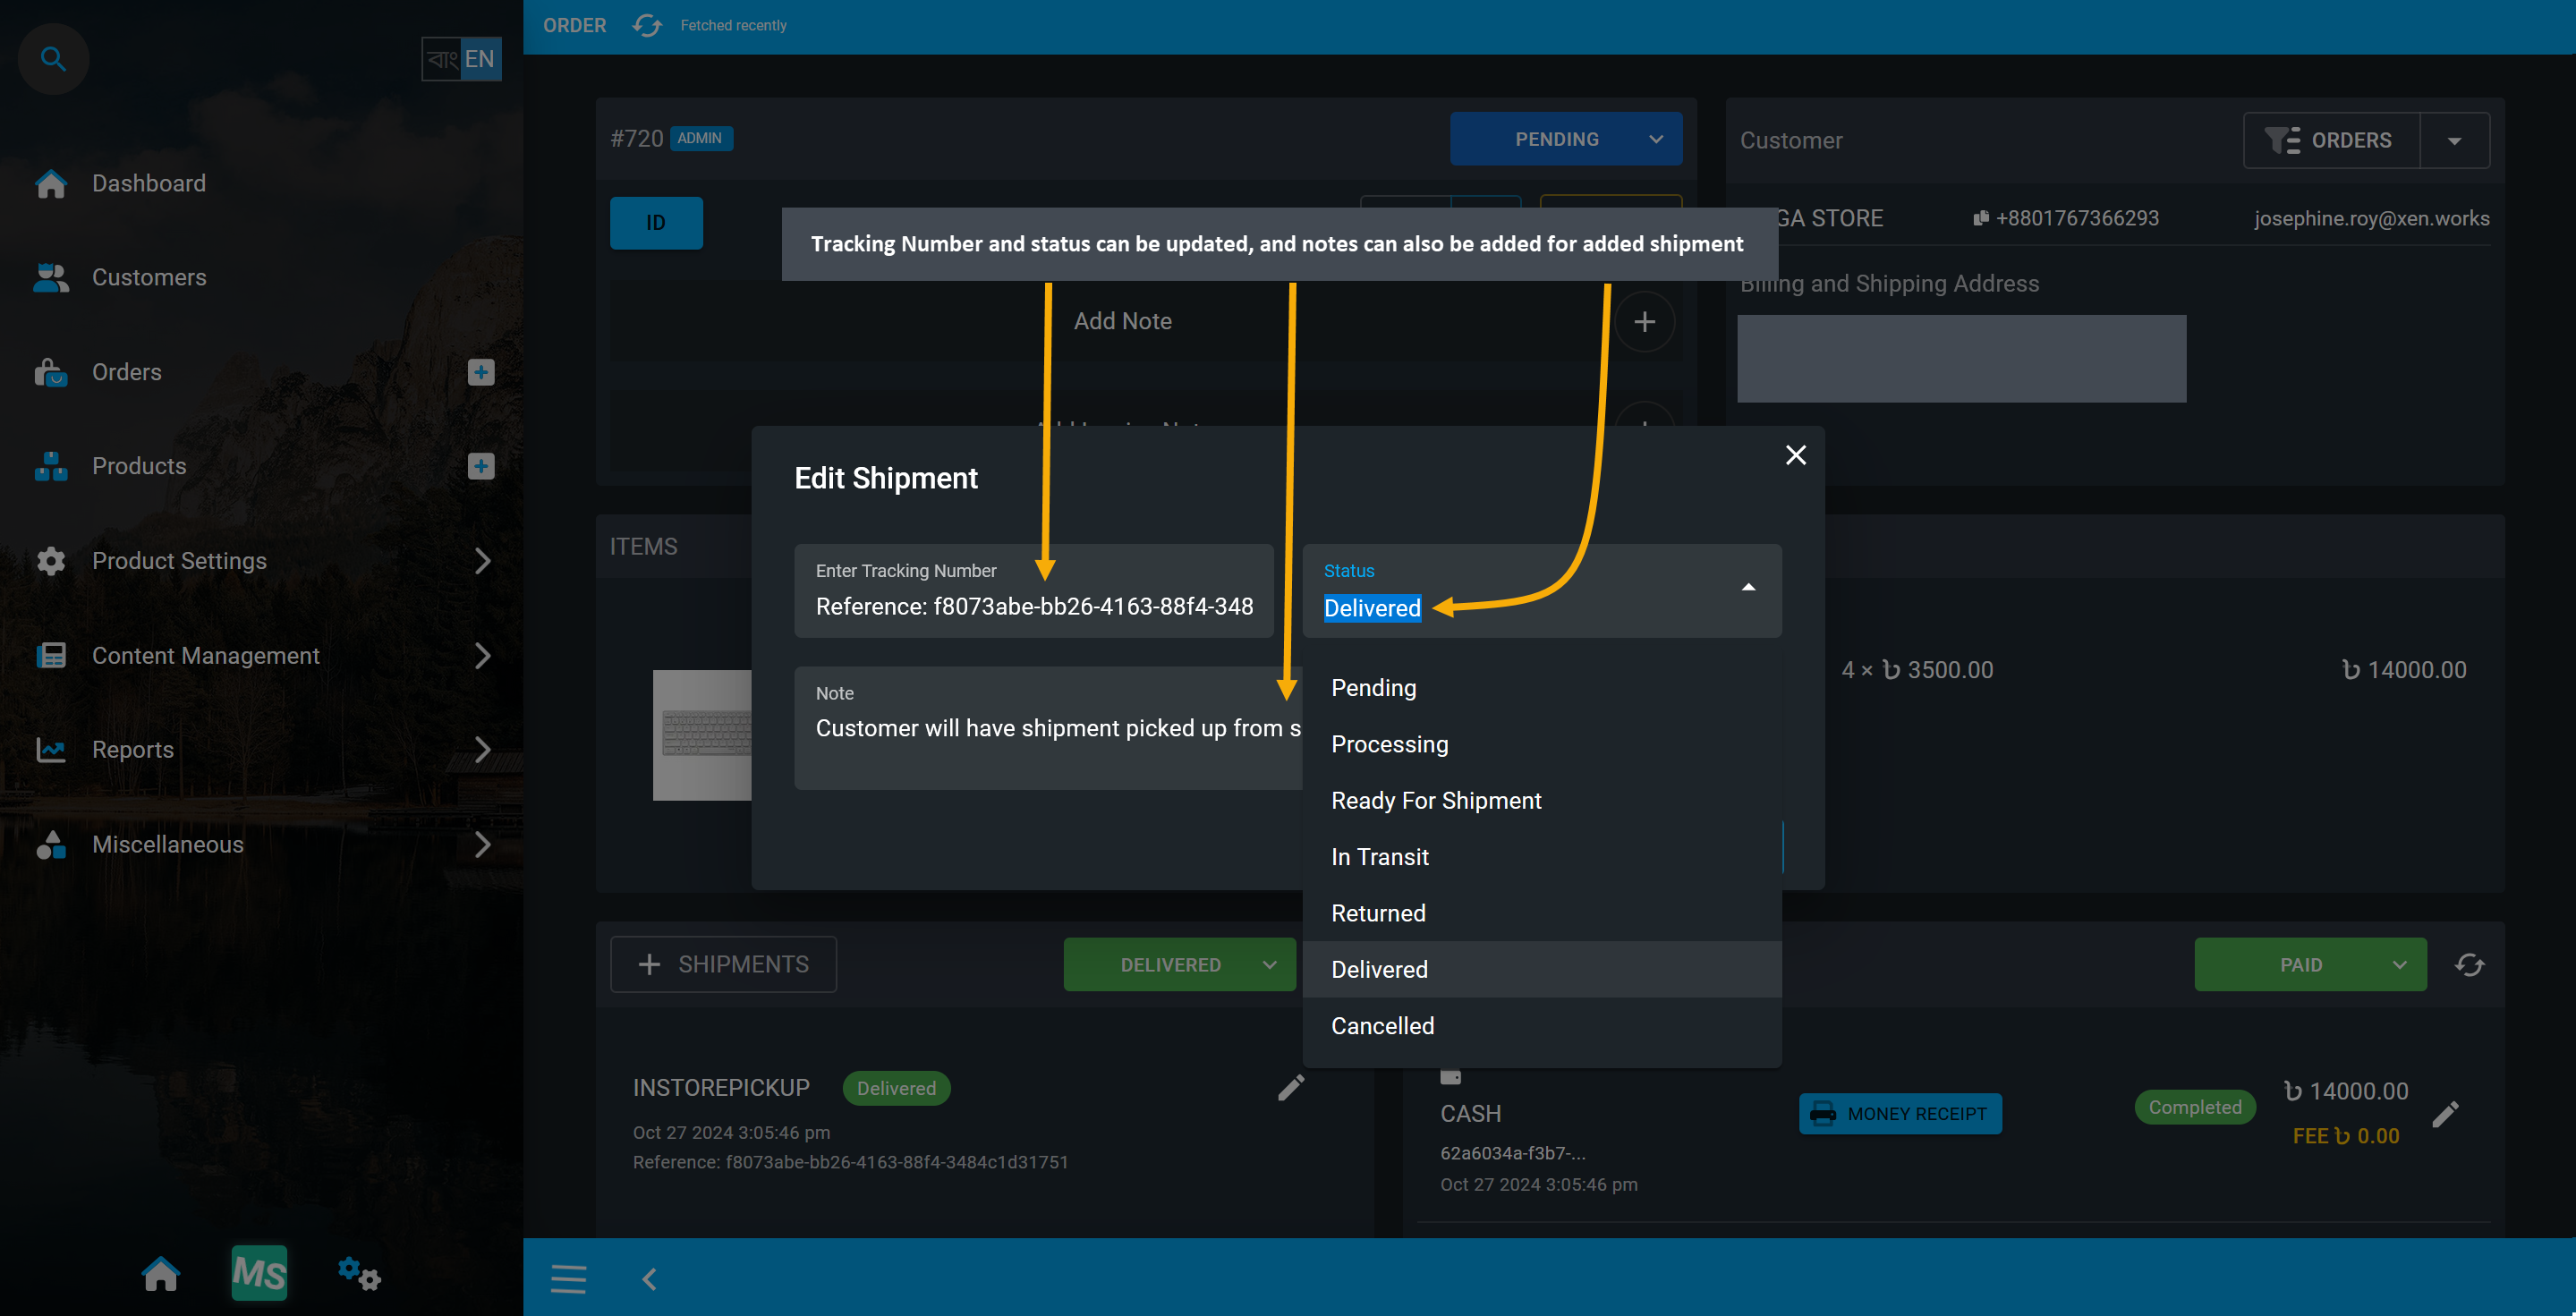
Image 23: Add Shipment Gateway, fill out the Tracking Number, add Notes, and select Shipping status.
Shipment Status will be updated under Shipment tab. Use Edit button to make changes of Shipment details.
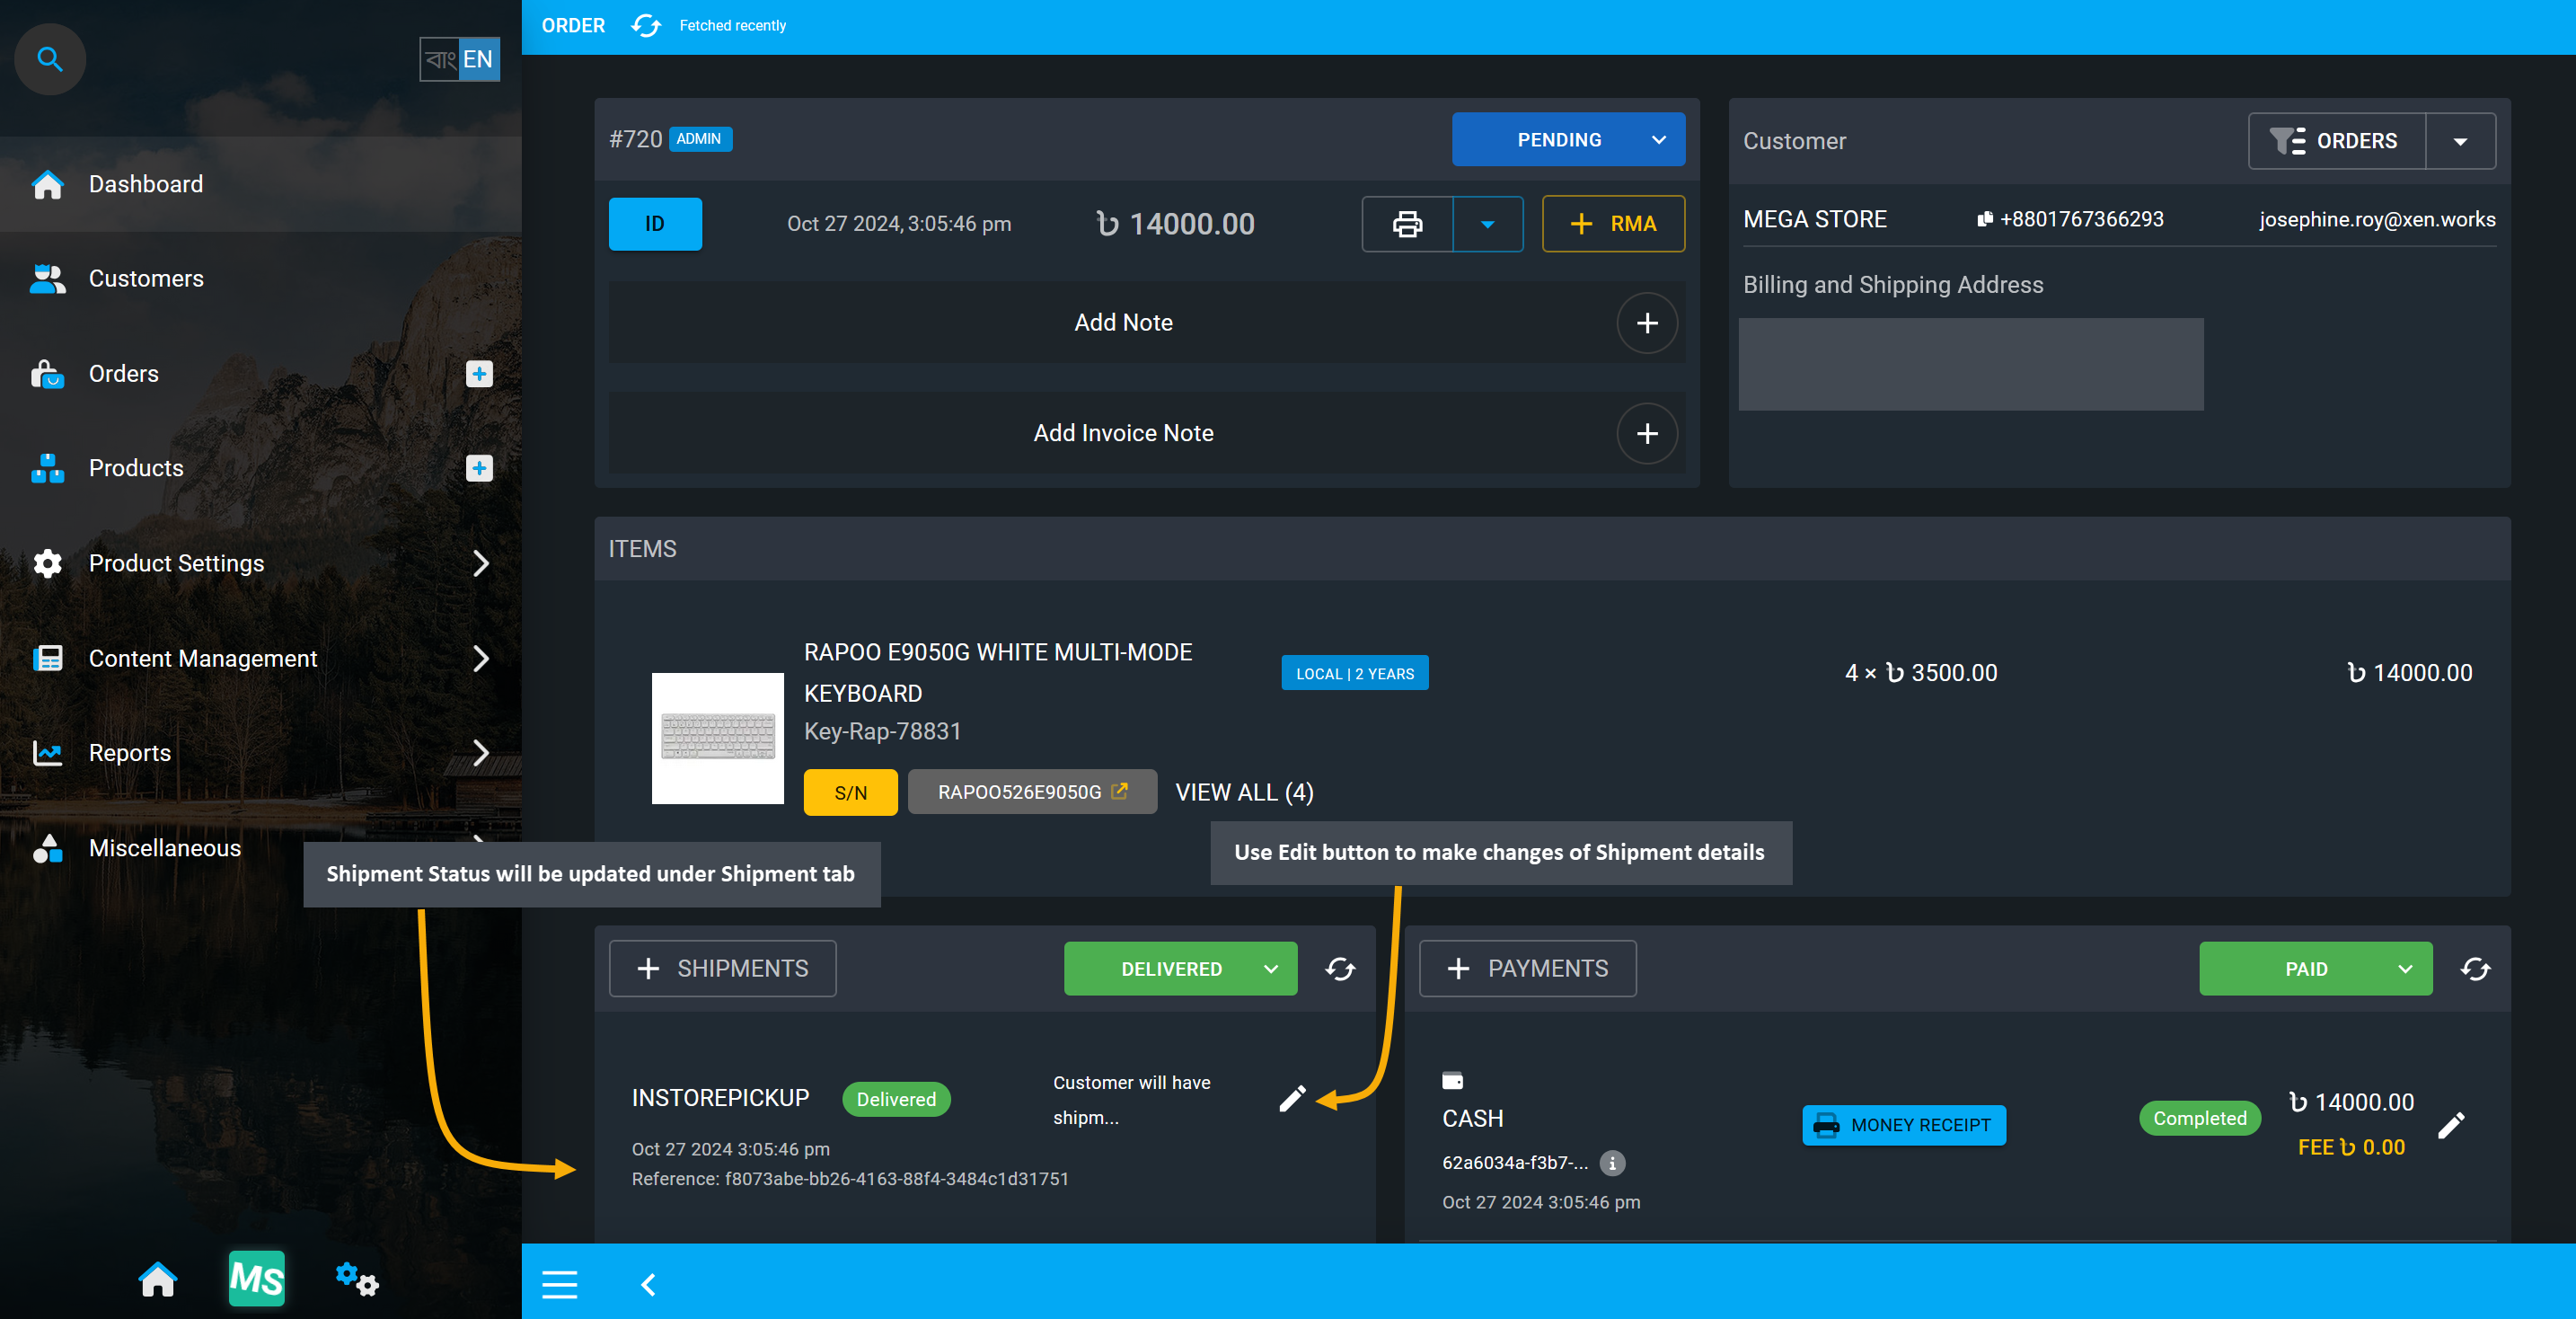
Image 24: Make changes on Shipment status with Edit button to add further shipping information.
3 - Order Shortcuts
There are three Order shortcuts which can be used to access Customer information, filter Orders, and examine Cost Basis of Orders.
Within the Orders tab, there are three shortcut buttons which can be used to access different Order sections. The first blue human icon redirects to Customer Dashboard. The white page icon in the middle acts as the Filter Button to filter out all the Orders of a specific Customer. The grey graph icon shows the calculation of Order Cost Basis.
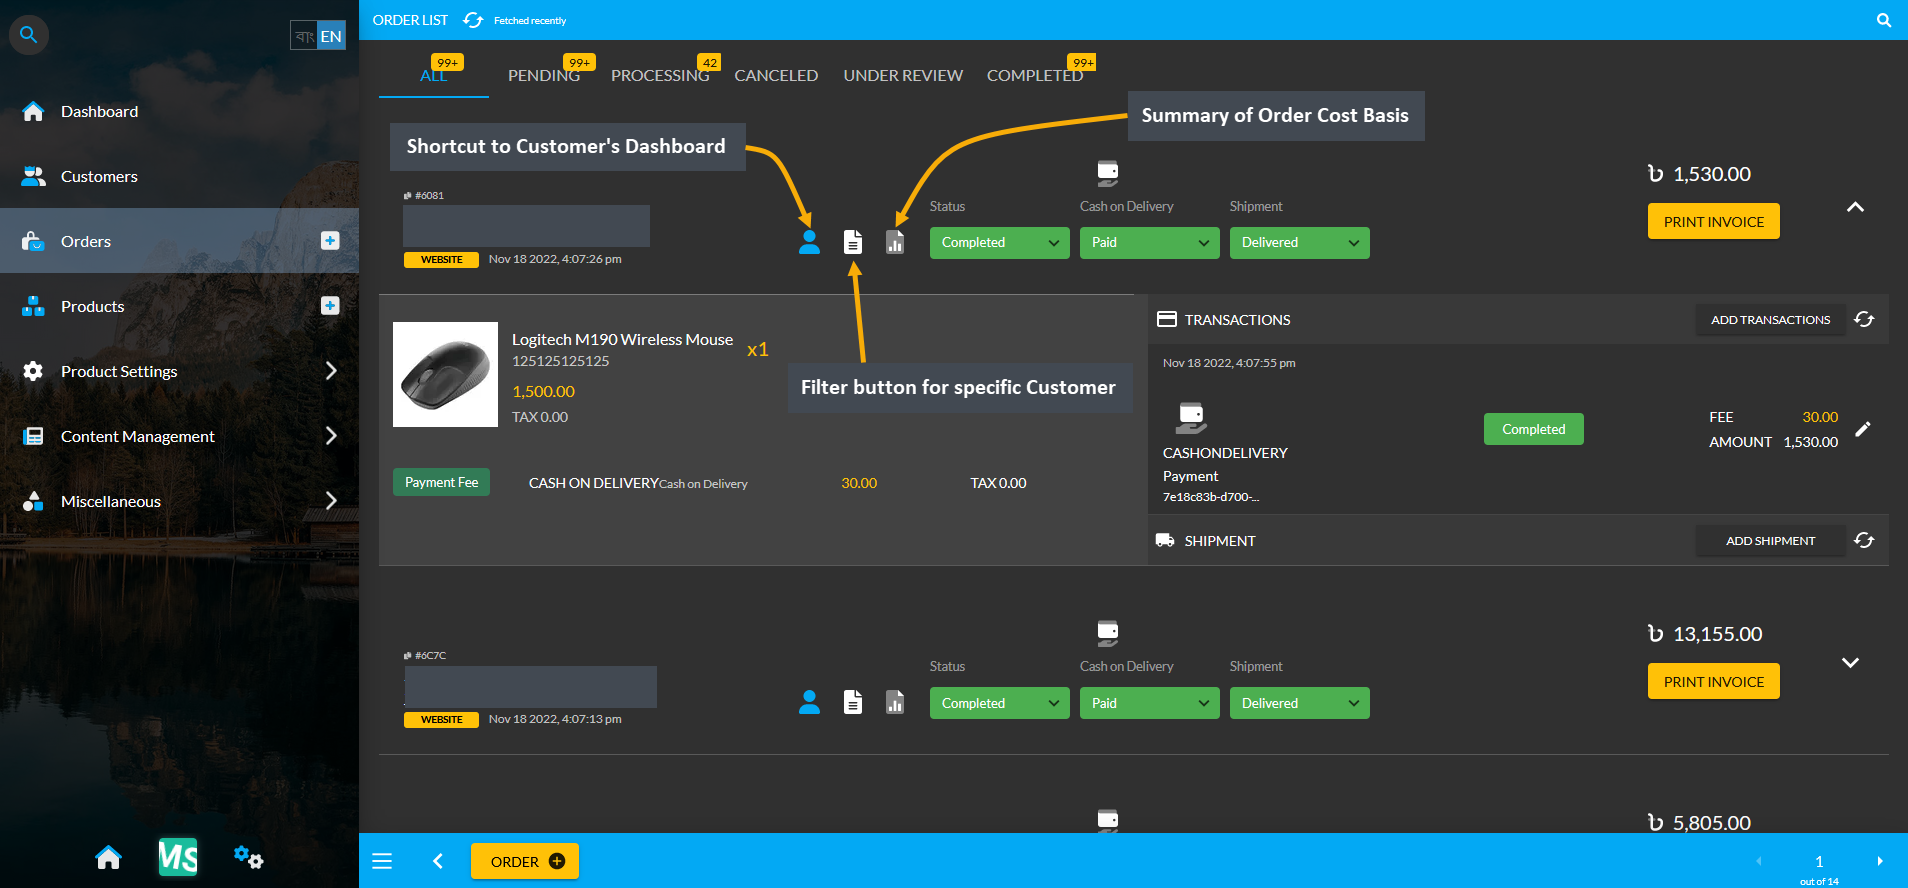
Image 1: Order Shortcut Buttons will redirect to Customer Dashboard, Filter Orders, and show Cost Basis.
Customer Dashboard
In the Customer Dashboard, there is a Contact Information section on the top left side which displays Name, Email, and Phone Number of the Customer. These information can be edited by clicking the Edit button. Clicking it will open a pop-up where the Customer’s Company Name, First Name, Last Name and Credit Limit can be updated, permission to use Credit Limit and permission to view Ledger on the Website can be activated.
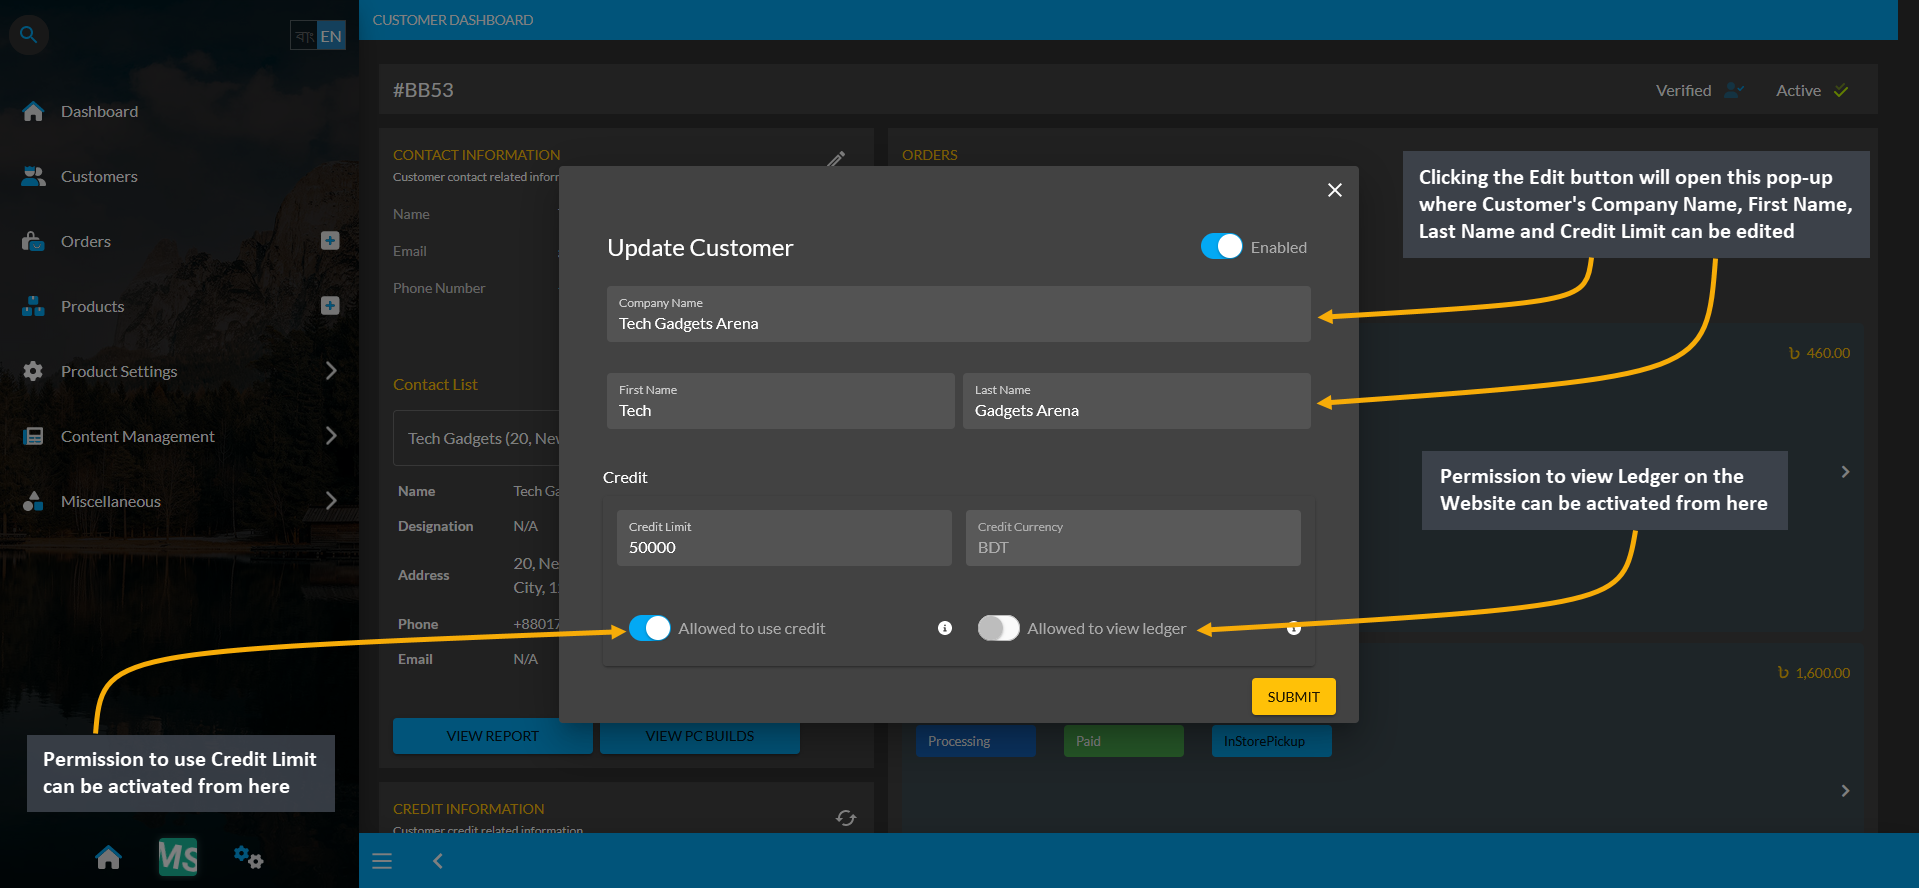
Image 2: Update Customer's Contact Information, Credit Use, and Ledger View permission from the Dashboard.
Clicking the dropdown will open the Customer’s Contact List where different addresses saved from the Customer can be viewed and selected. For instance, if a Customer has different addresses for home, work, and office, they will all be available under the Contact List. This list of addresses can be used as Billing and Shipping addresses during checkout. The selected address will display Name, Designation, Address, Phone, and Email of the Customer.
The entire right side of the Dashboard shows all the Pending, Processing, and Completed Orders of Customer. All recent to previous Orders will show in chronological order with details here. The View Report button will redirect to the Customer’s Cost Basis page and the View PC Builds button will redirect to the PC Build page of the Customer where they have configured, added and saved their own Builds, Customer’s Credit Information section will show Credit Limit, Ending Balance, options to view all Invoices, Ledger Breakdown, and settle Ledger.
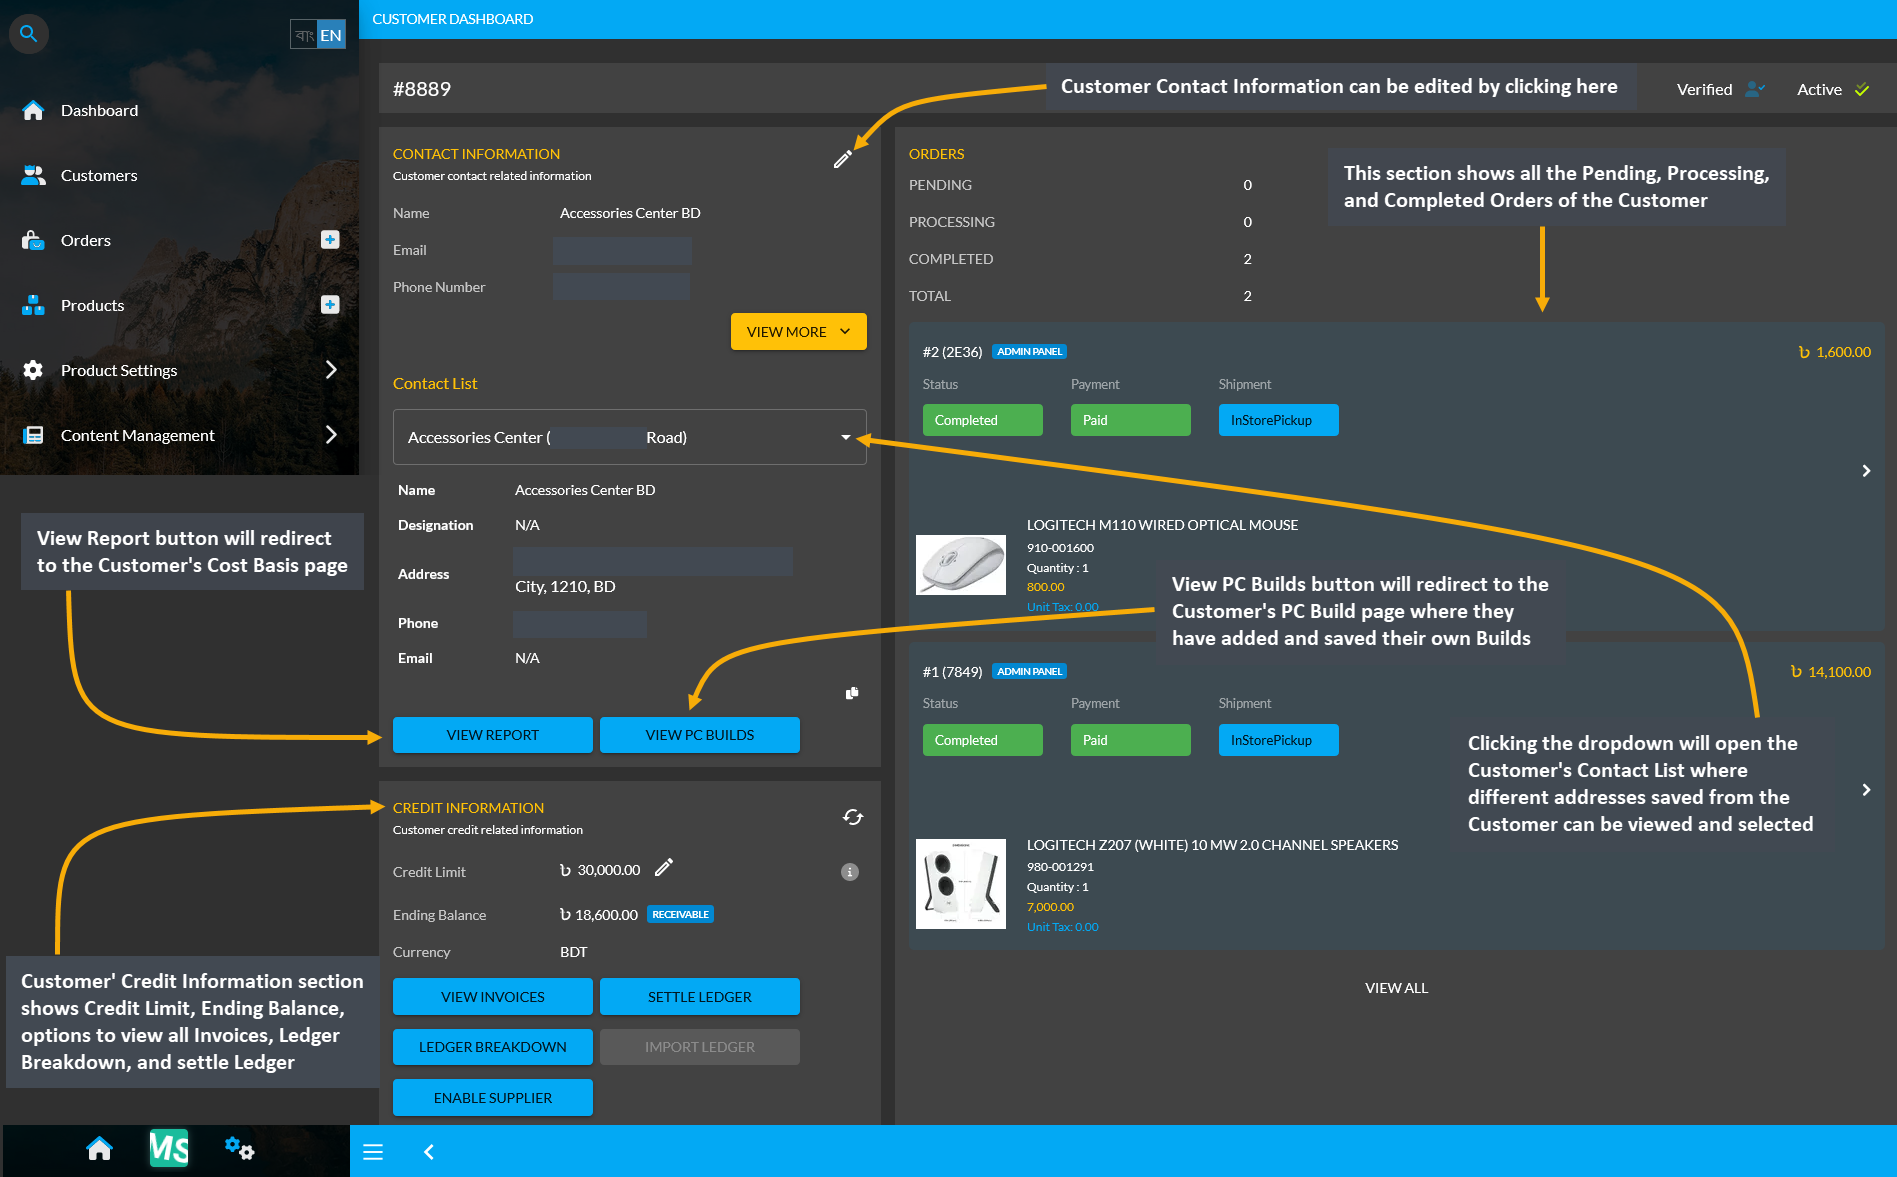
Image 3: Customer Dashboard shows their Contact List, Orders, Report, PC Builds, and Credit Information.
The Customer Filter Button which looks like a white page icon can filter all the current and previous Orders of the selected Customer. Clicking the Filter Button will bring the search results of the selected Customer’s Orders.
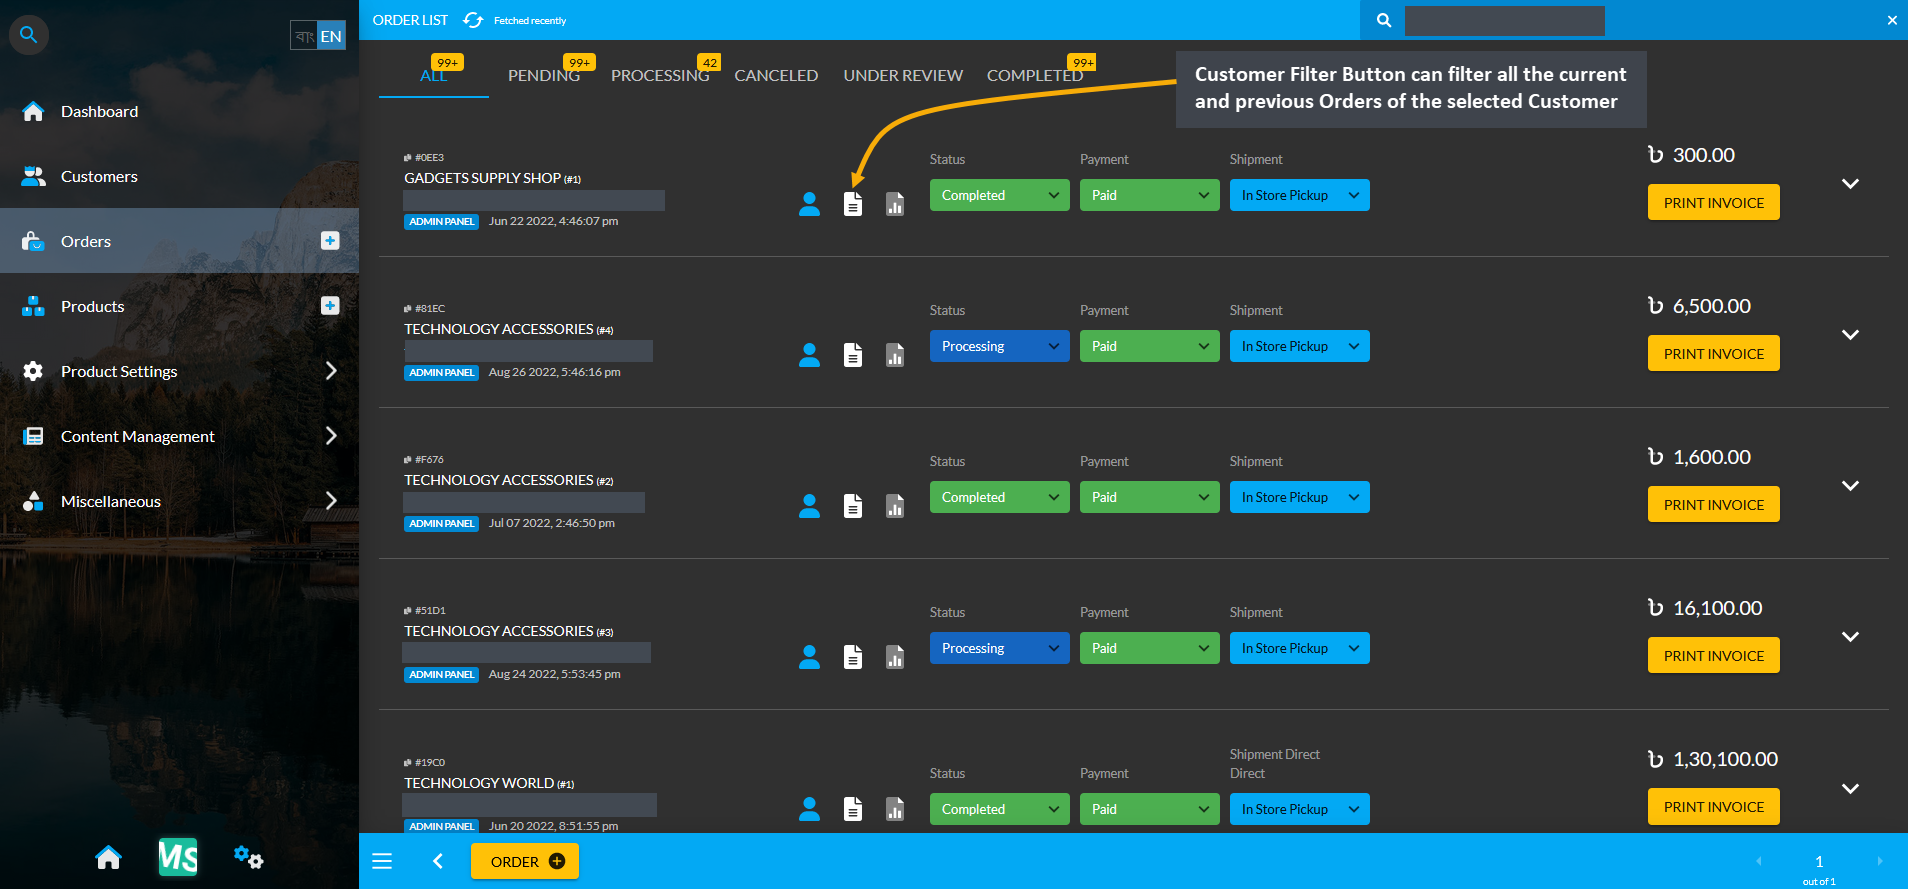
Image 4: Customer Filter Button can filter all the current and previous Orders of the selected Customer.
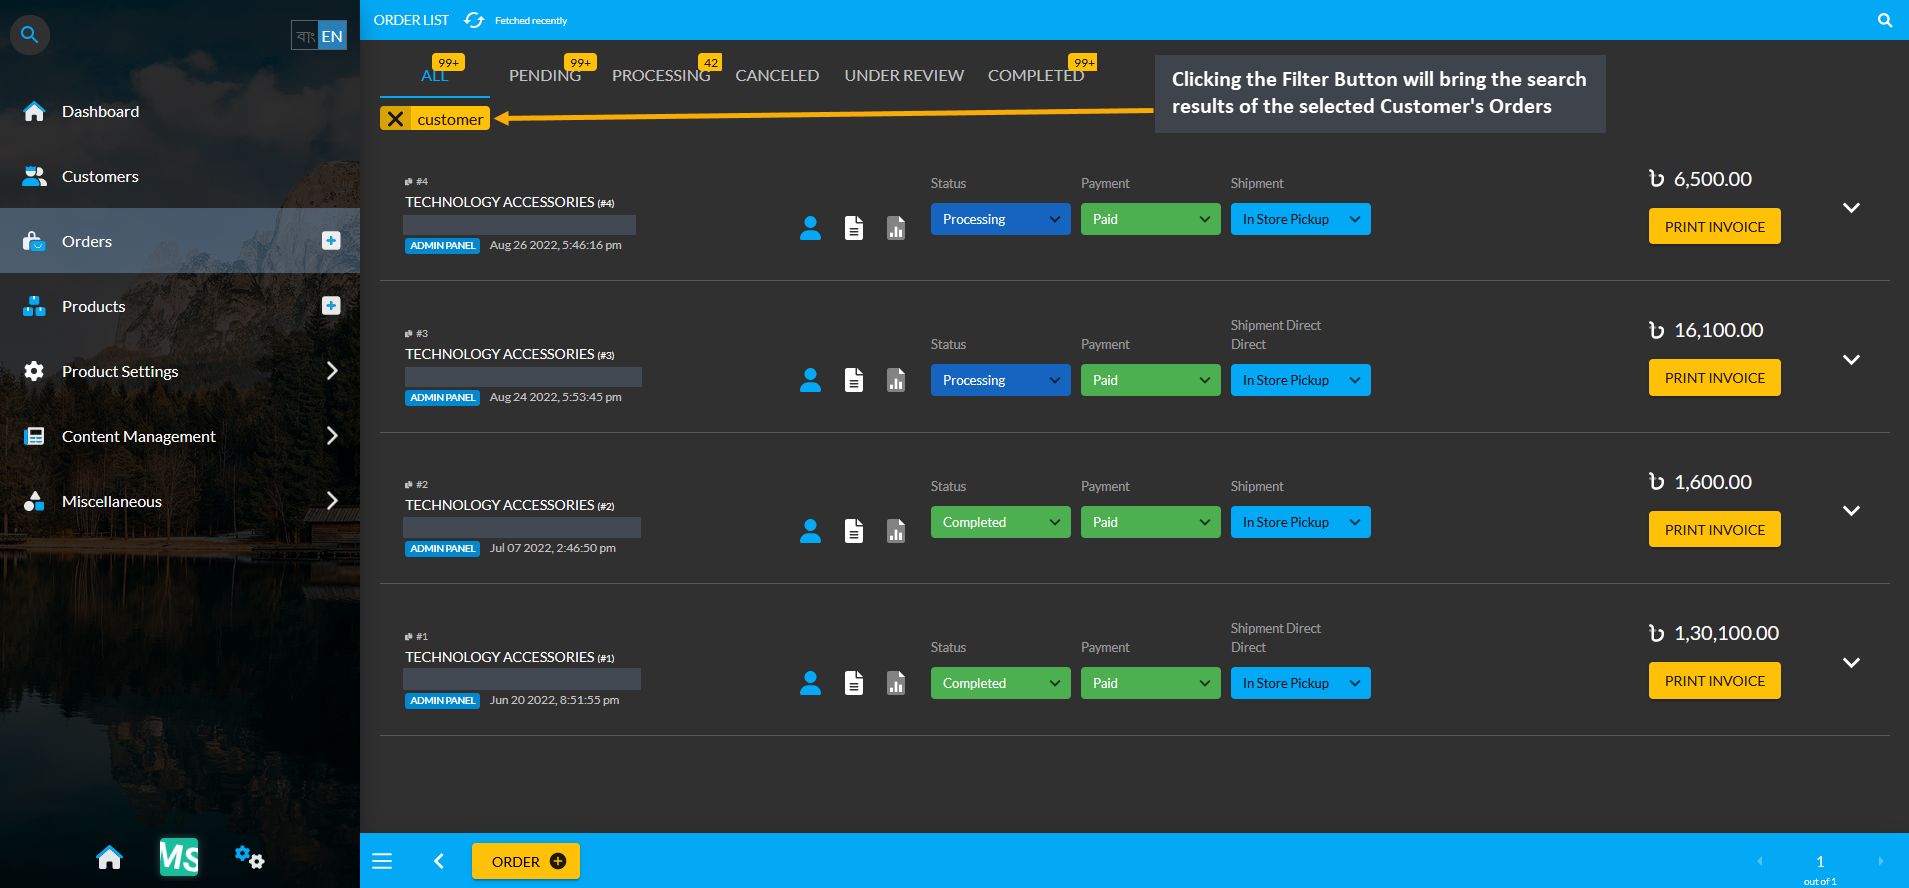
Image 5: Clicking the Filter Button will bring the search results of the selected Customer's Orders.
Order Cost Basis Summary
Click the Orders module which will open the Order List. From there, click on the small gray graph icon that will redirect to the Order Cost Basis page showing total profit, total revenue, total cost, total vat, and total discount.
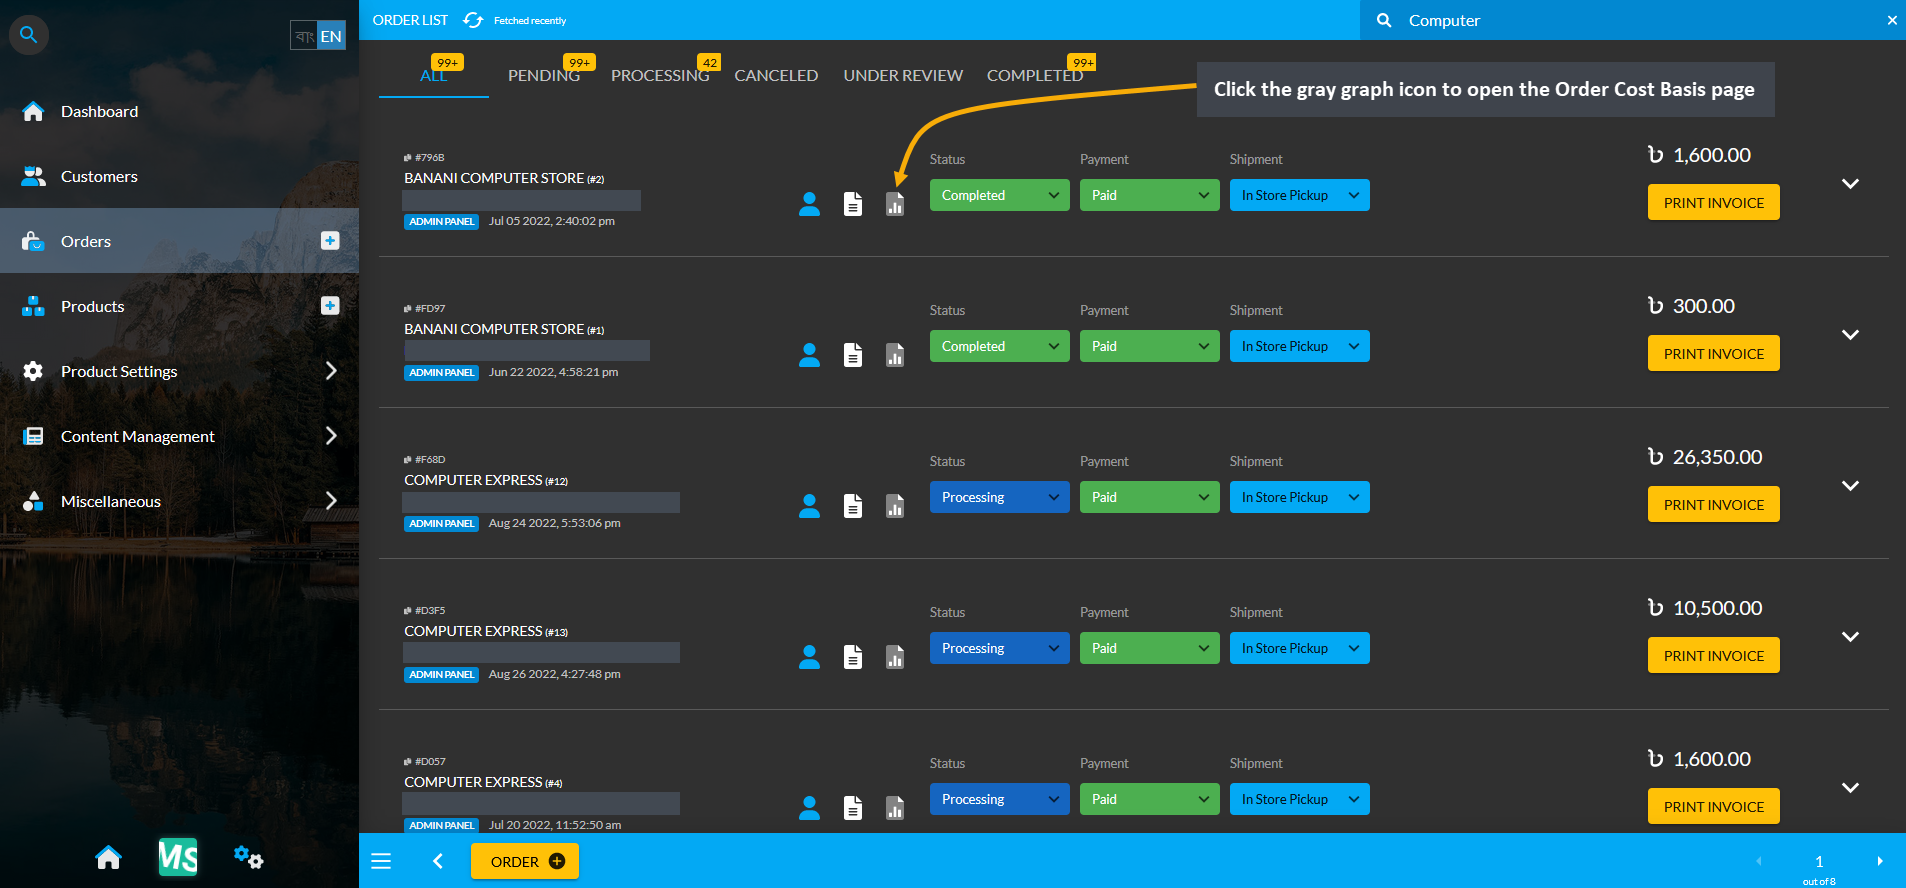
Image 6: Click the small gray graph icon on Order List that will redirect to the Order Cost Basis page.
Cost Basis Summary Section
For Order Cost Basis, the Pick a Range or range filtering option is disabled, because Orders do not have multiple cost basis. Clicking the small gray graph icon from Order List will redirect you to Order Cost Basis page. On the top left of the page is an Order profile box with basic customer information and Order cost basis summary showing total profit, total revenue, total cost, total vat, total tax, and total discount of the selected Order. Below shows the Order date, ordered Product, line item ID, quantity, cost, discount, revenue, profit, tax, vat, and currency.
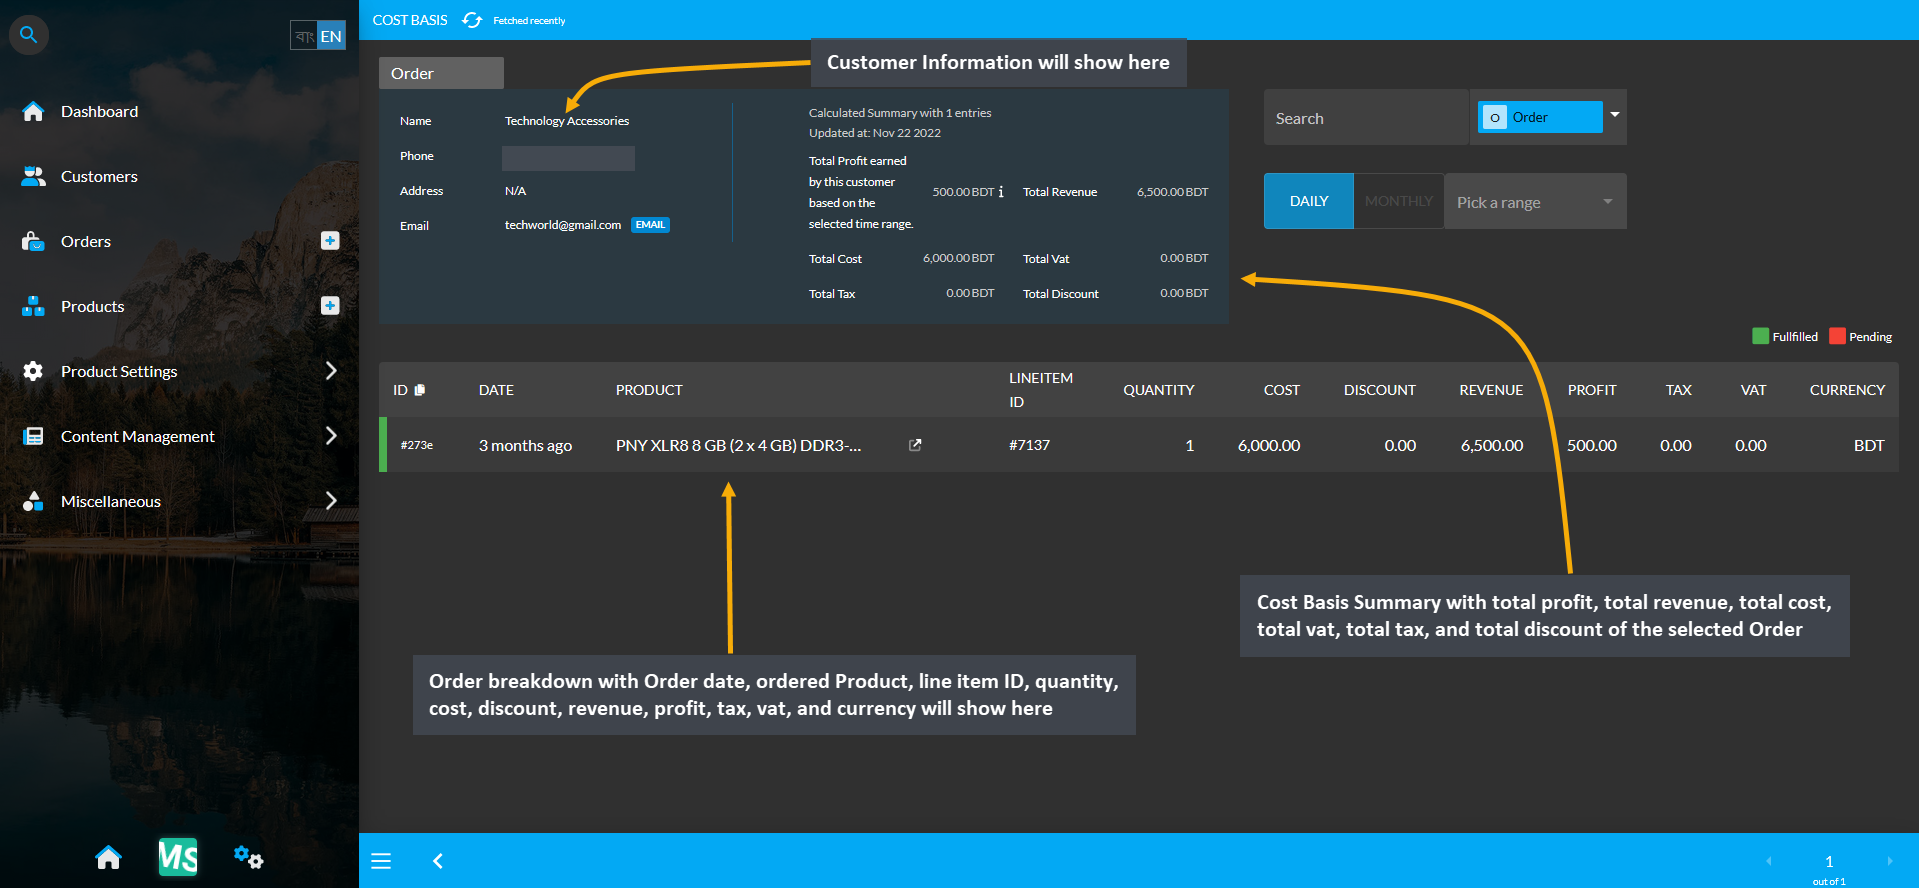
Image 7: Order Cost Basis shows Customer profile, Order Cost Basis summary and detailed Order breakdown.
Cost Basis Search and Range Selection
The Order Cost Basis page also have a Search button with a dropdown menu with four options of Order, Customer, Product, and Product Batch on the top right. Clicking each of these options will bring cost basis summary results of Order, Customer, Product, and Product Batch whichever is selected. For example, to search and find an Order’s Cost Basis result, select Order from the dropdown and type the Customer’s name in the Search box which will bring in the selected Order’s Cost Basis result. In this way, the Shop Owner can search for any Order’s Cost Basis result.
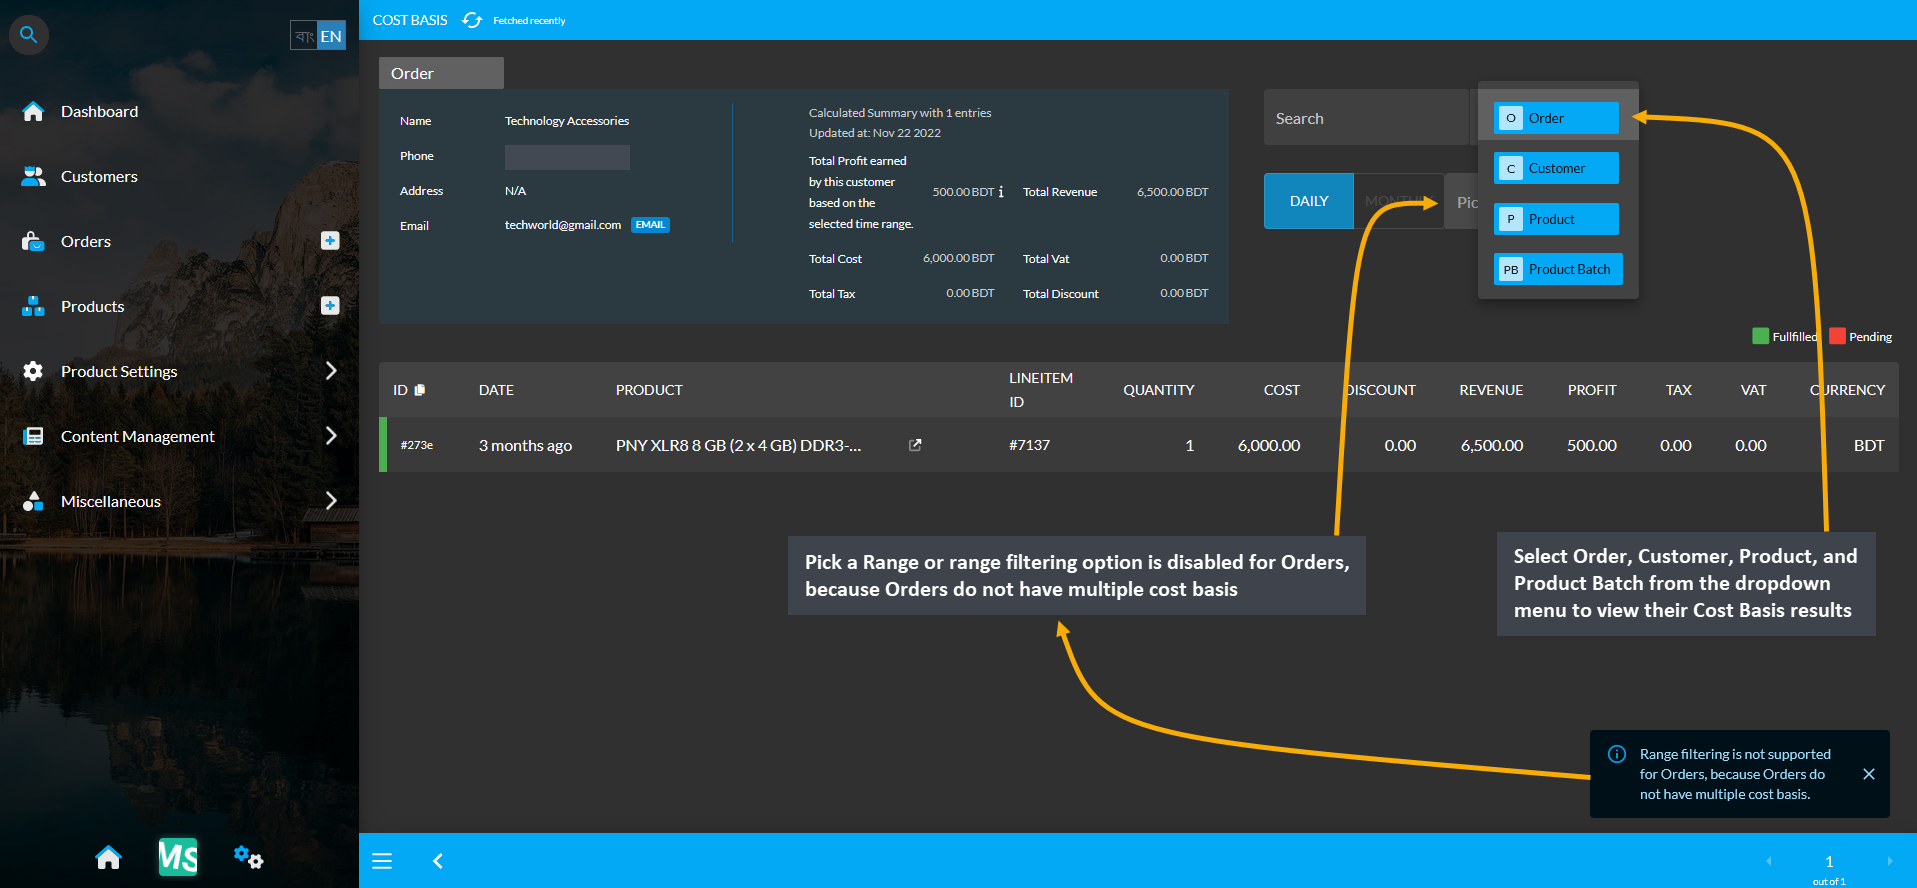
Image 8: Range Filtering option is disabled for Orders, select an option to view their Cost Basis result.
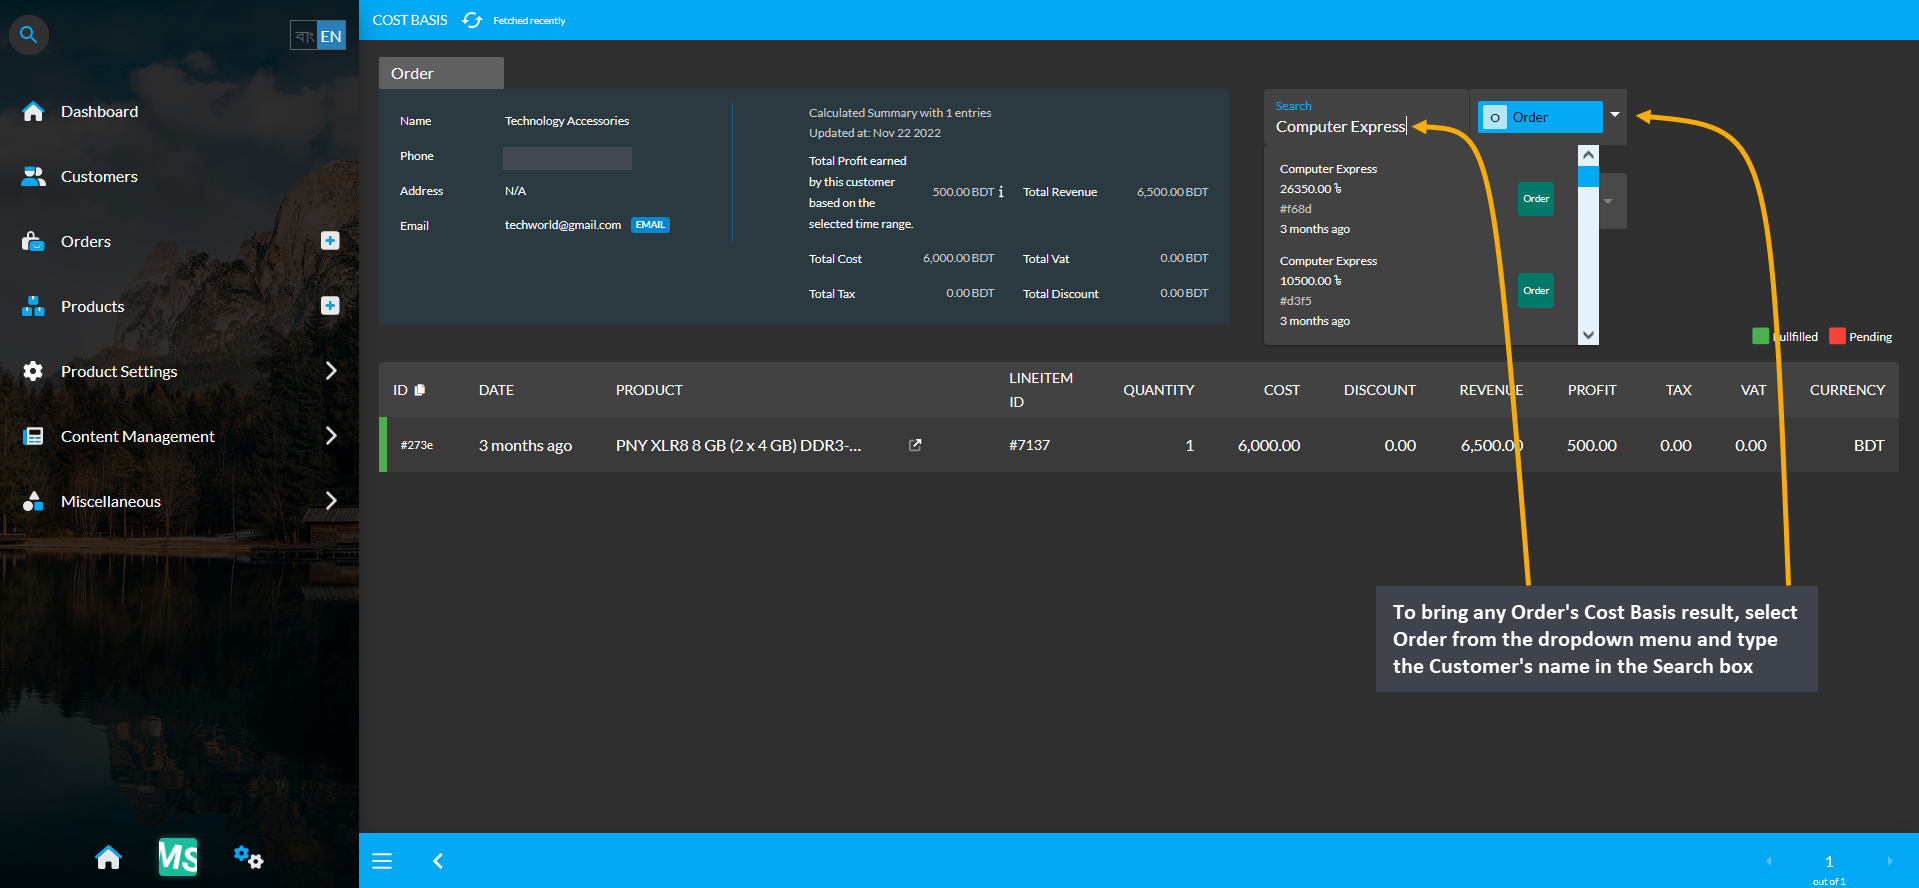
Image 9: Select Order from dropdown and type Customer’s name in Search box to view their Cost Basis result.
4 - Edit Shipment Status
Update Shipment status after Payment has been confirmed by the Customer.
Update Shipment Status
After Payment has been completed by the Customer and the preferred Shipping Carrier has been selected, the Shop Owner can set different Shipping Status based on their progress. Based on Product and Shipping Carrier availability, the Order may remain Pending or Processed (scanned, packed and labelled).
Until Payment is confirmed, Shipping status will show as Pending. However, after Payment is completed, it will automatically changed to Delivered if the option Cash on Delivery is selected. If In Store Pickup is selected, the Shipping status will show as In Store Pickup after Payment confirmation.
There are several options to update to different Shipping statuses by the Admin. Select from five different statuses for Shipment to update like Pending, Processing, In Store Pickup, In Transit, Returned, or Delivered.
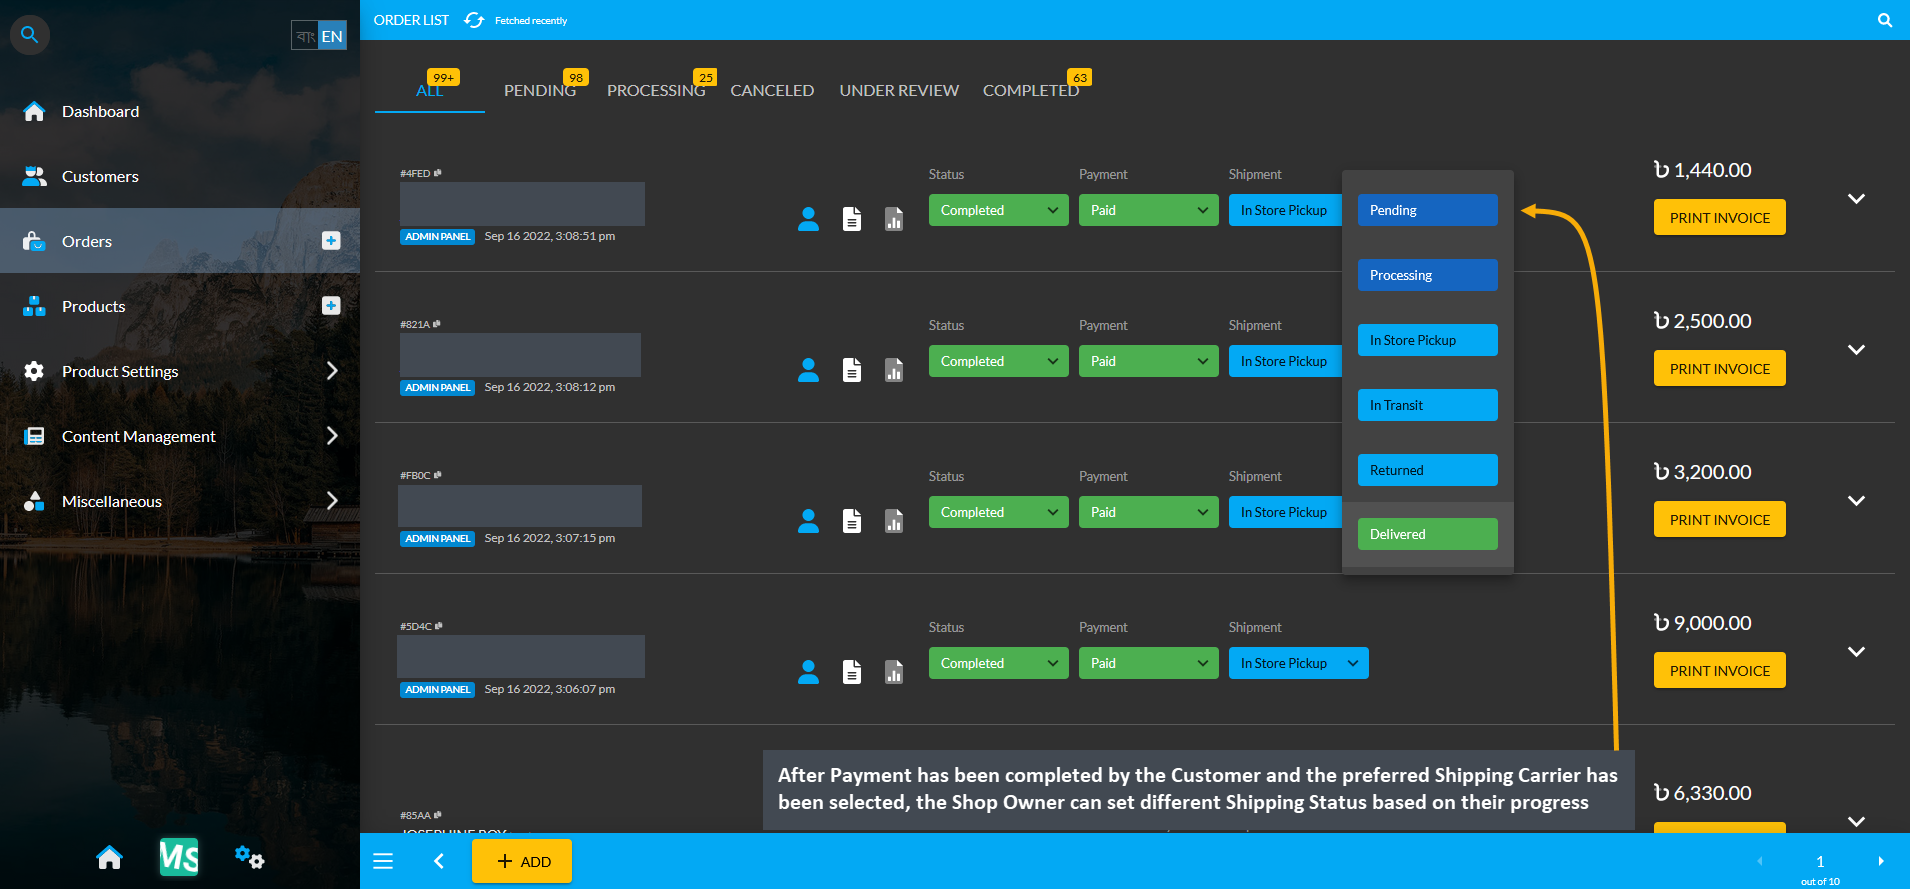
Image 1: After Payment has been completed by the Customer, Shop Owner can set different Shipping Statuses.
Shipment Pending
Shipment status Pending means that the Shop Owner is aware of the Order being placed and will process and ship it soon. So, Shipment status will be marked as Pending as soon as Customer placed Order on the Website.
Shipment Processing
Shipment status Processing means that the Shop Owner has received the Customer’s Order and is preparing it for shipping. If Customer ordered a custom made product, this status means that production for it has started. Thus, the Shop Owner can mark the Shipment status as Processing when they are done packaging the Product which is ready for shipping and to be handed over to the Shipping Carrier.
Shipment In Store Pickup
Shipment status In Store Pickup means that the Customer selected the option to collect their Order themselves from the Shop Owner’s store instead of selecting a home delivery. So, if Customer selected this option, the Shop Owner can set Shipment status to In Store Pickup as the Customer will visit and buy from the store. The In Store Pickup for online Orders will give local Customers a convenient alternative to shipping. Also, this option could allow Customers to purchase certain Products only in the store and not online.
Shipment In Transit
Shipment status In Transit means that the Shop Owner has shipped the Order or handed the package over to the Shipping Carrier. For this, the Shop Owner may choose to provide Shipping Carrier name and Tracking Number of the package for Customer to check their progress and stay updated about when their Product will be delivered.
Shipment Returned
Shipment status Returned means that a Customer chose to return a Product based on its quality or visual defects. Based on the Customer’s request to return the Product, Shop Owner can mark the Shipment status as Returned.
Shipment Delivered
Shipment status Delivered means the delivery person has dropped off the package at Customer’s delivery address and updated all associated tracking systems to complete the transaction. After Shipping Carrier confirms that the Customer have received their Order, the Shop Owner can update the Shipment status to Delivered.
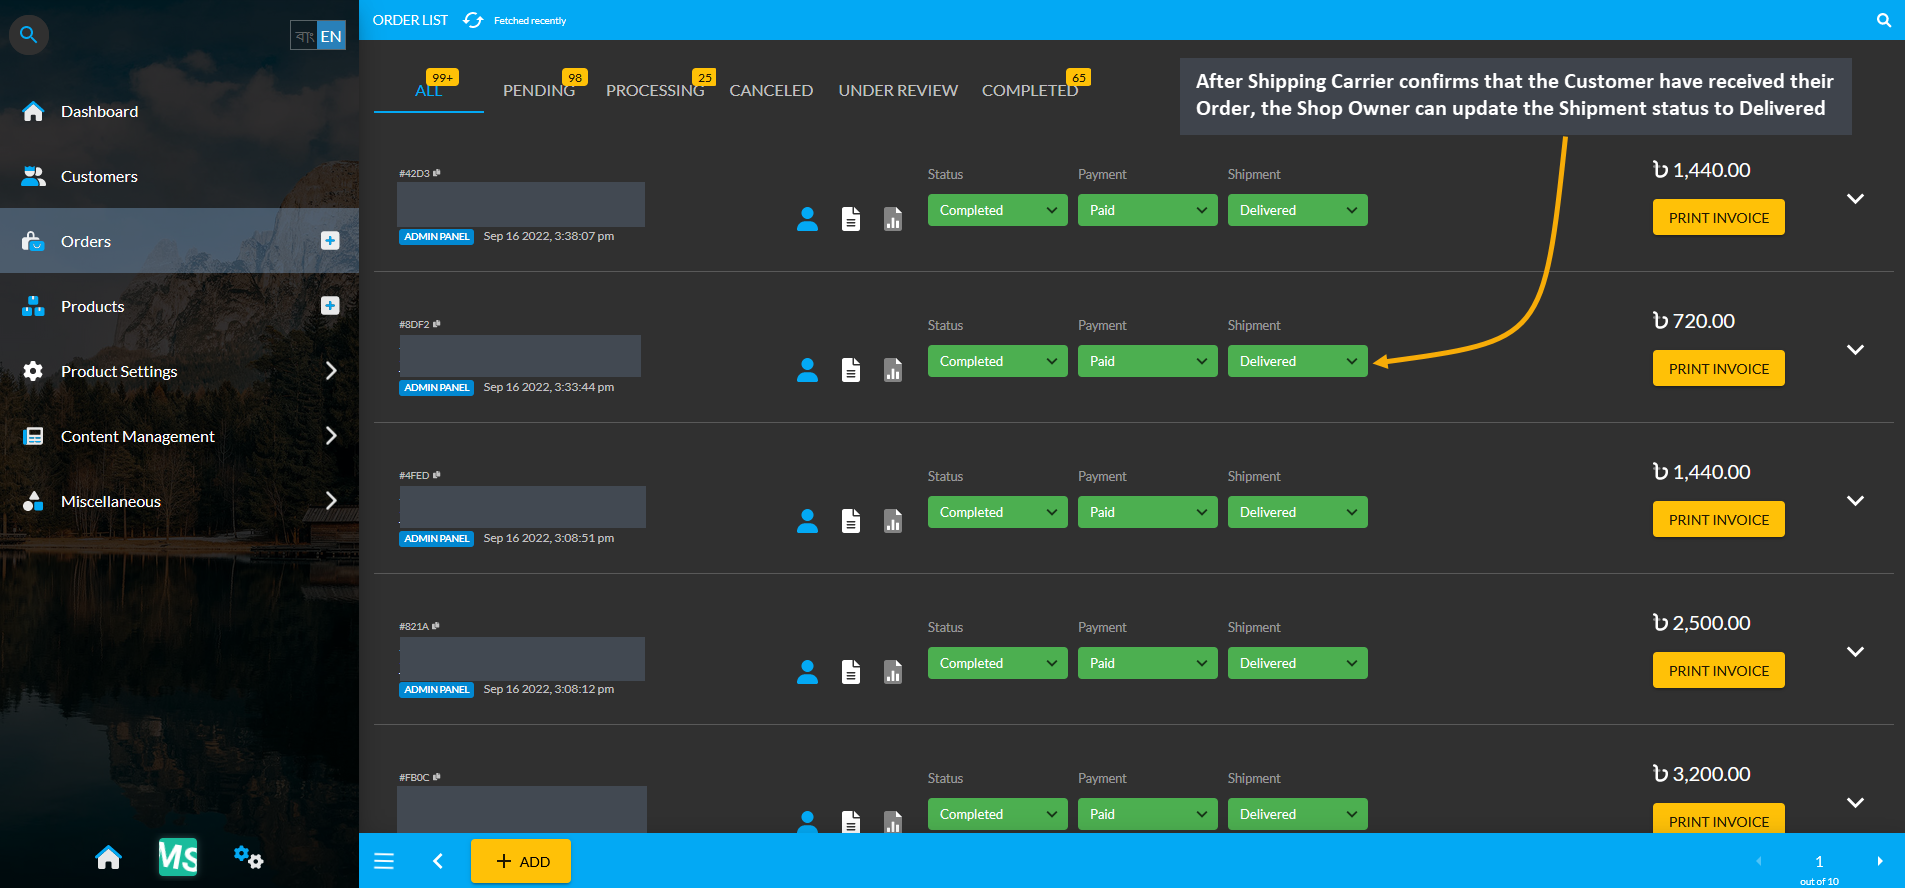
Image 2: After Customer receives their Order, the Shop Owner can update the Shipment status to Delivered.

![]()


 s
s


