Edit Order Status
Update Order Status
After an Order is placed, it could have pending Payments, pending payment verification, awaiting shipment confirmation, or product under processing. Based on the current status of the order, there are options to update to different Order statuses from Order dashboard. Select from different statuses to update order like Pending, Processing, Canceled, Under Review, and Completed along with Draft status for unpaid orders.
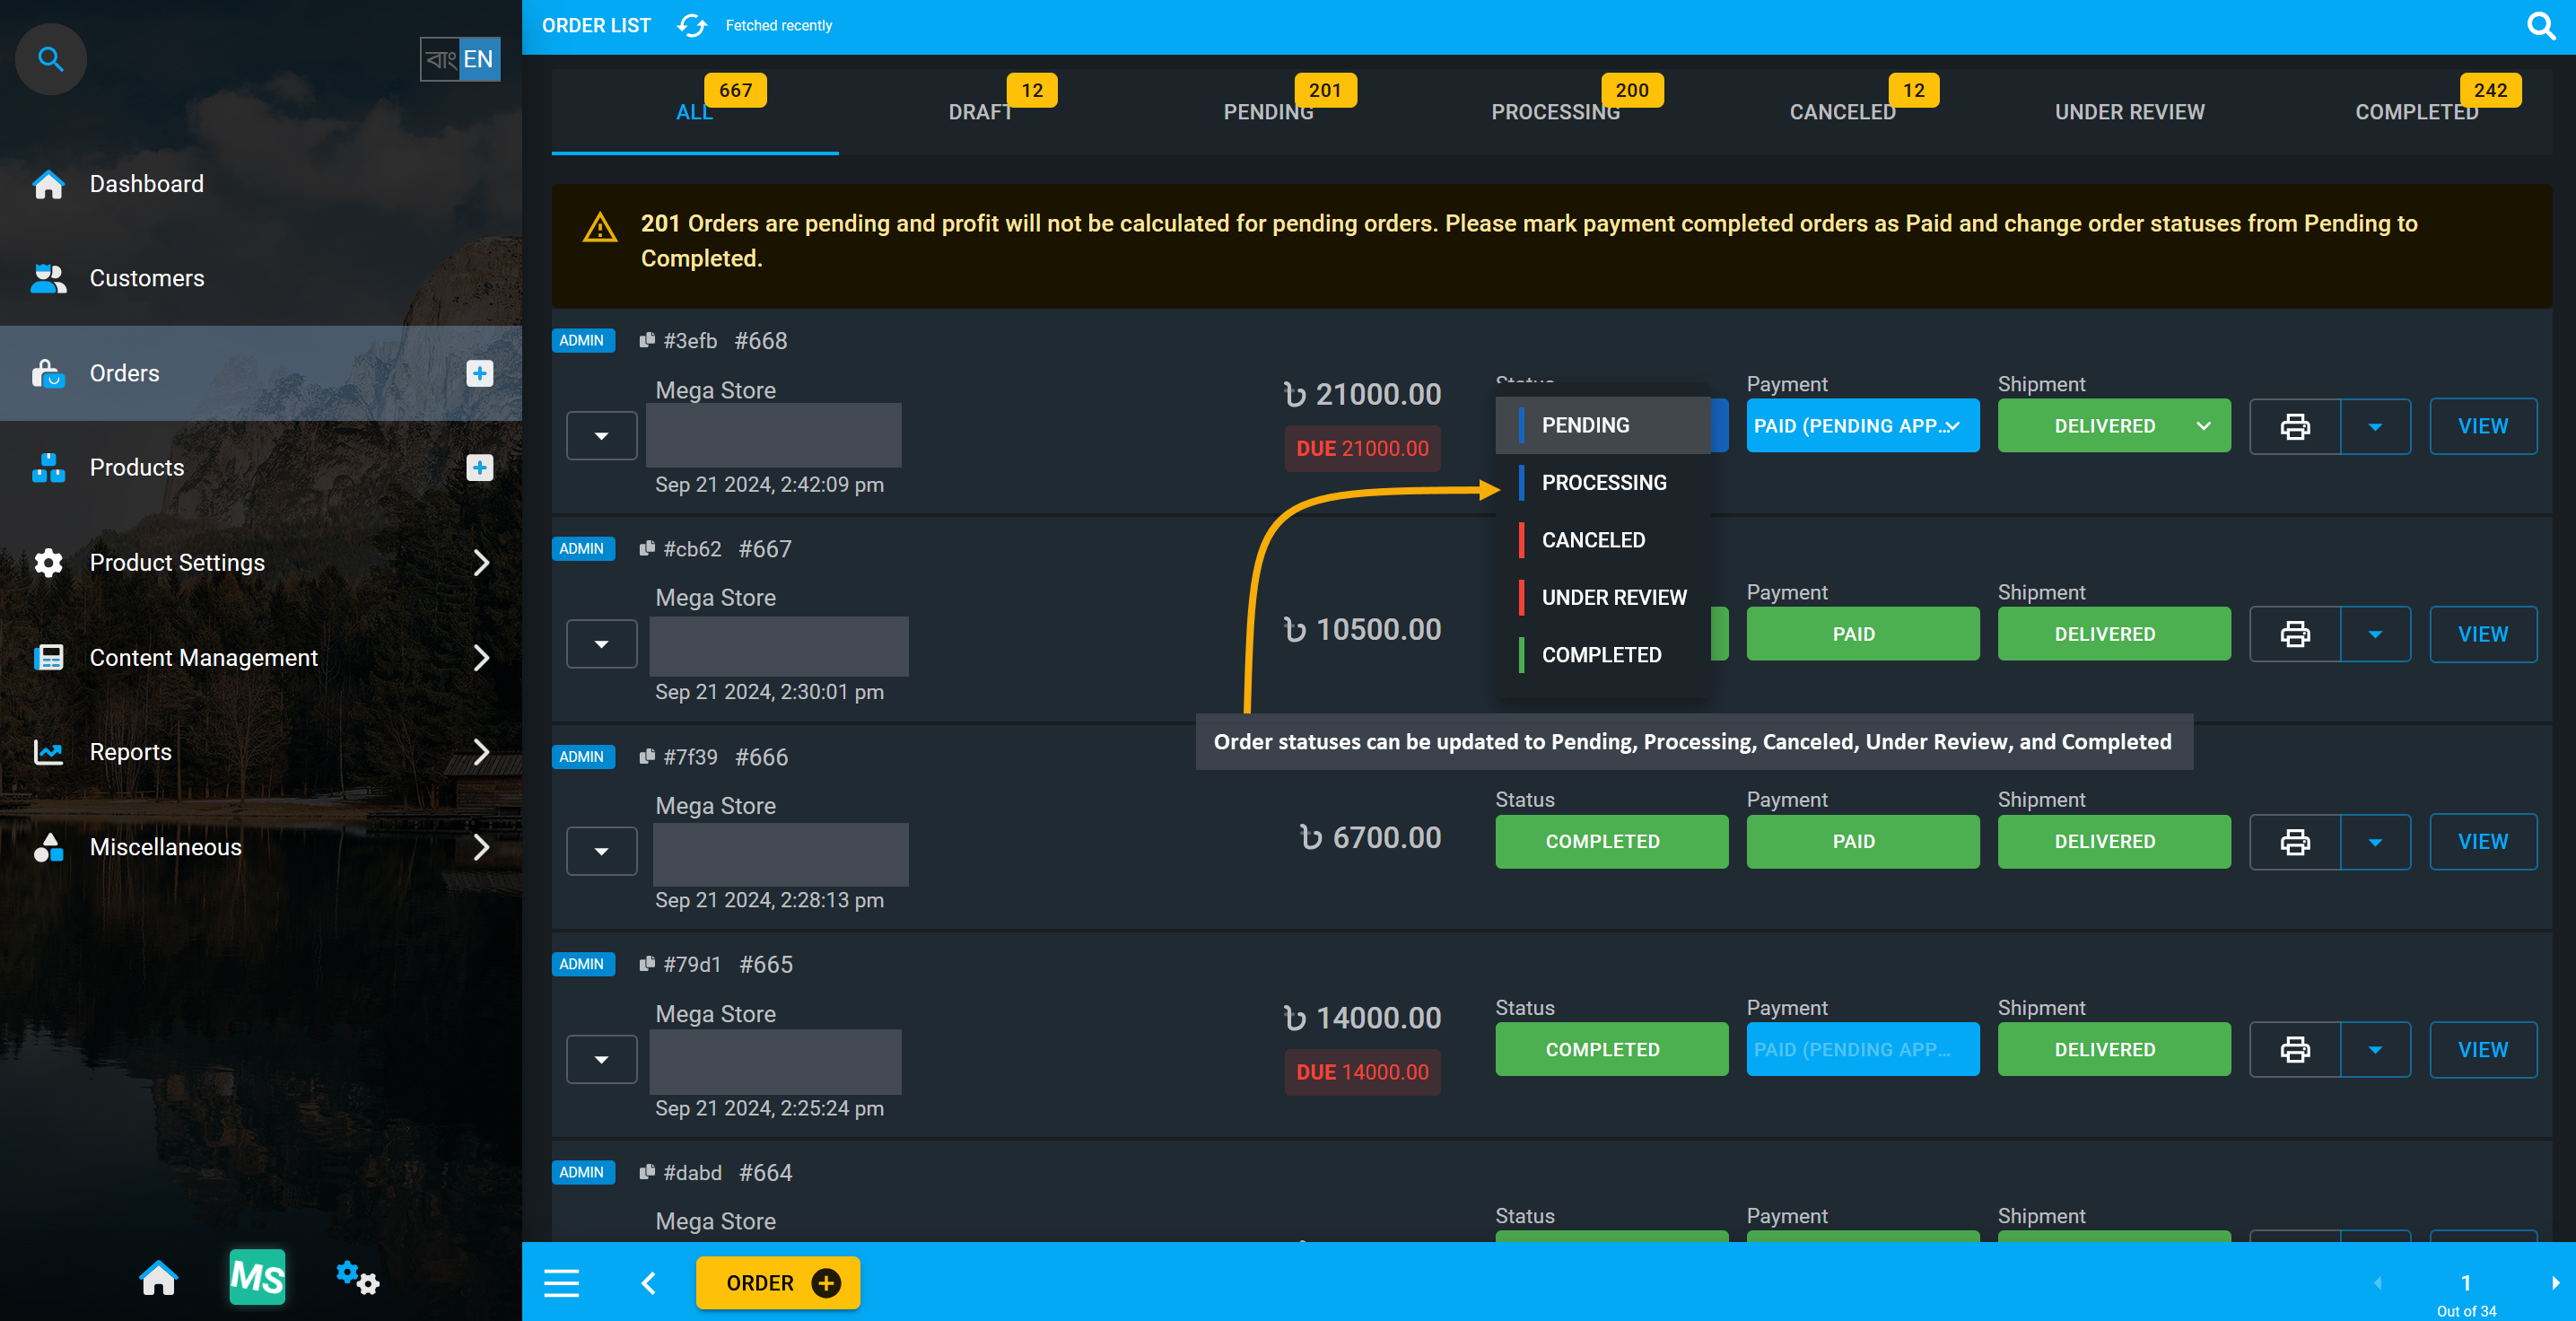
Image 1: Order status can be updated to Pending, Processing, Canceled, Under Review, and Completed.
Order Draft
A Draft Order is an order that is created without payment from the Order Cart. As no payment is added for draft order, it will not reflect on Ledger until the order status is changed to Pending. However, Draft order will allow printing the invoice for customer before payment is made. Draft order can also be canceled.
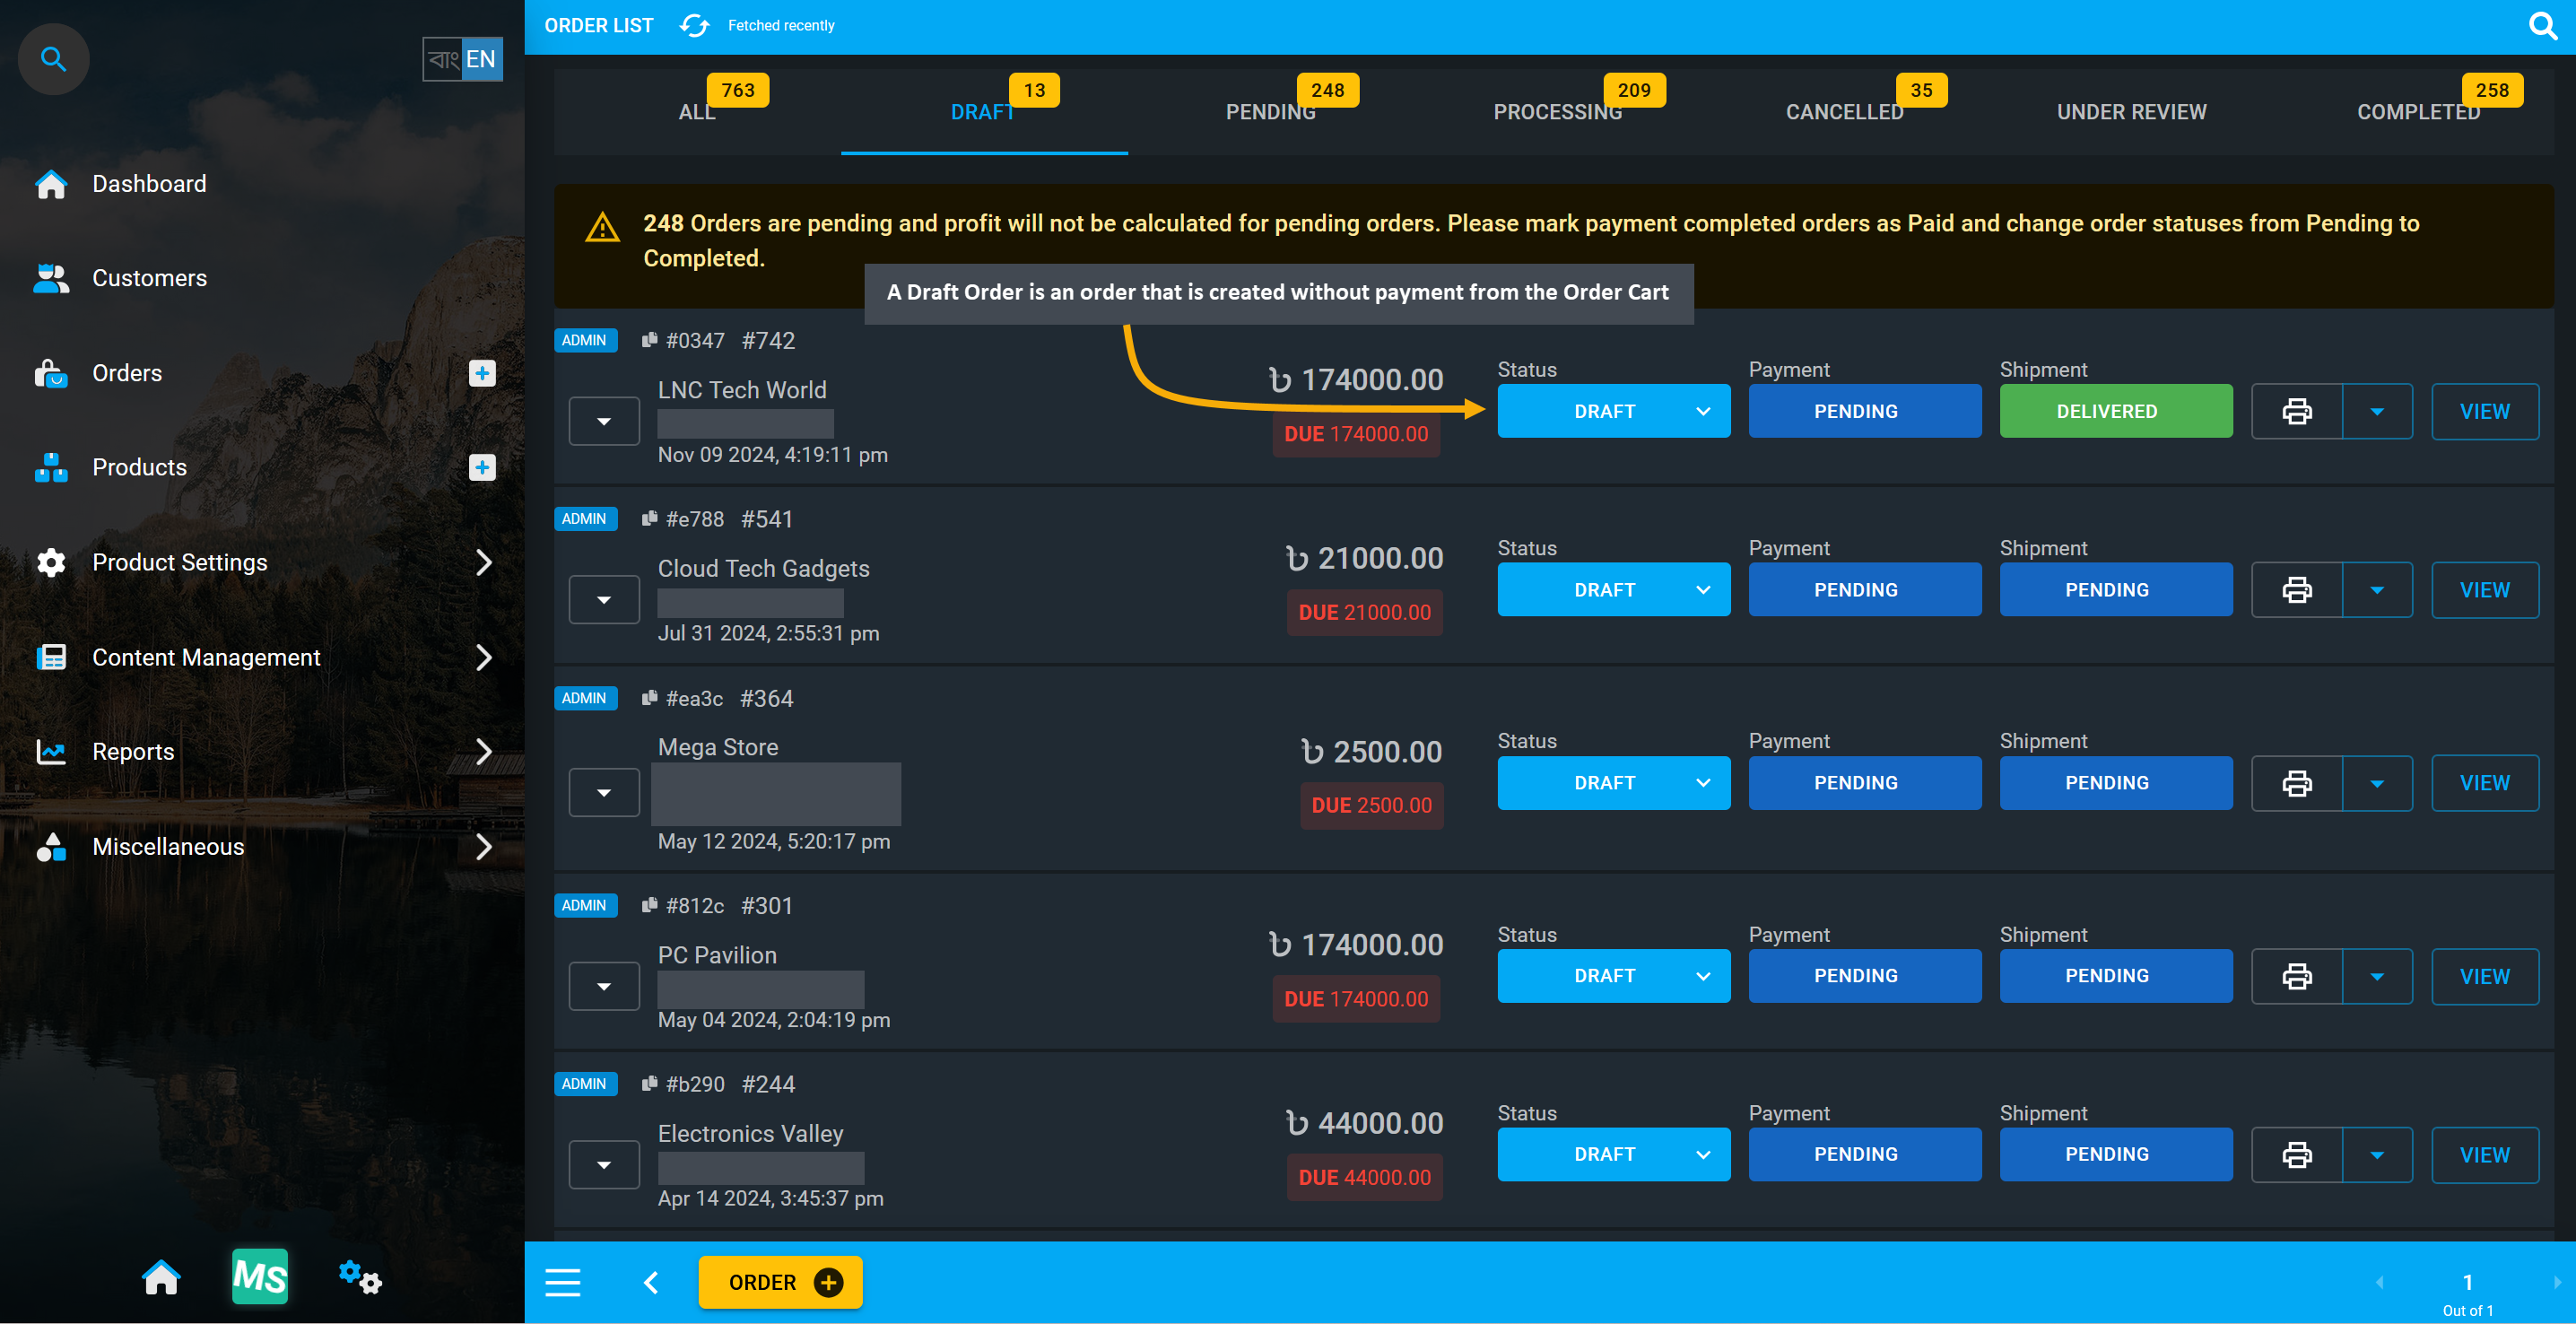
Image 2: Order created from cart without payment is a Draft Order that does not reflect on Ledger.
Order Pending
A Pending Order is an an Order that was not yet executed. It can, for example, be an Order that may have pending Payment from the Customer’s end or delivery pending from the Shop Owner’s end. If an order is Pending, it will still require payment and shipping confirmation to start being processed for the customer.
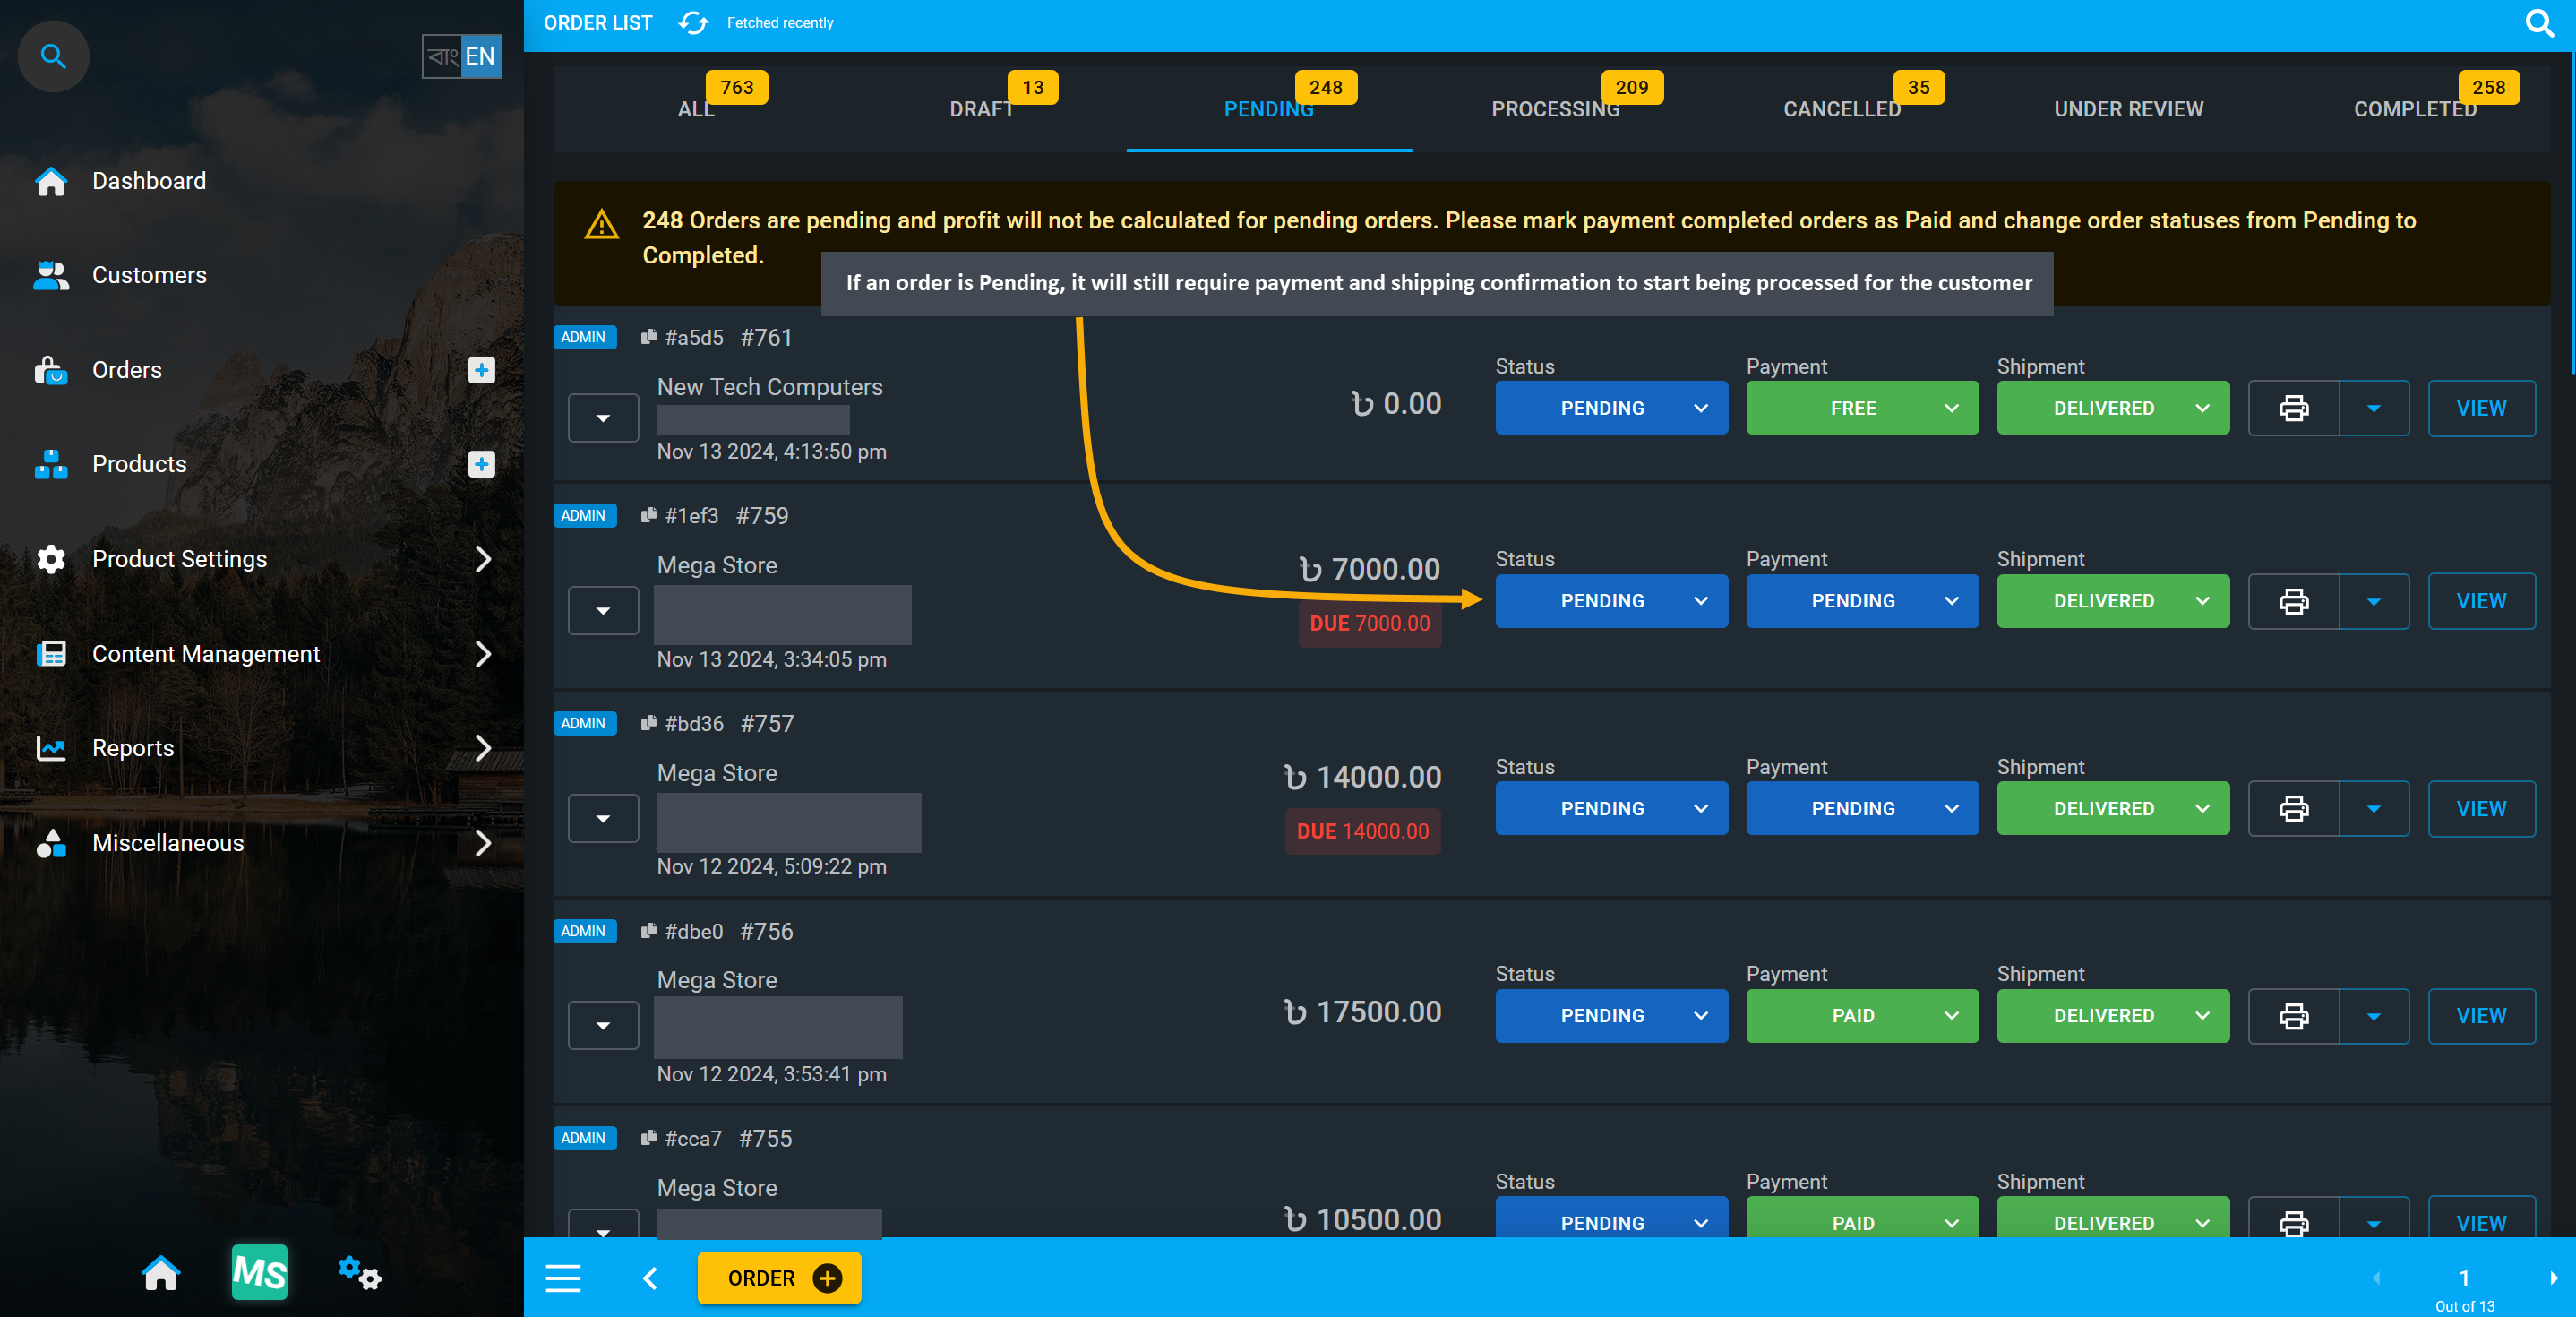
Image 3: Pending orders will require payment and shipping confirmation to start being processed.
Order Processing
Shop Owners can mark Orders as Processing if they are preparing the Product for delivery, indicating the stage where the Order has not been handled to the shipping carrier for delivery, but the product is ready. So, when payment for an Order is completed, the Order status is automatically changed to Processing.
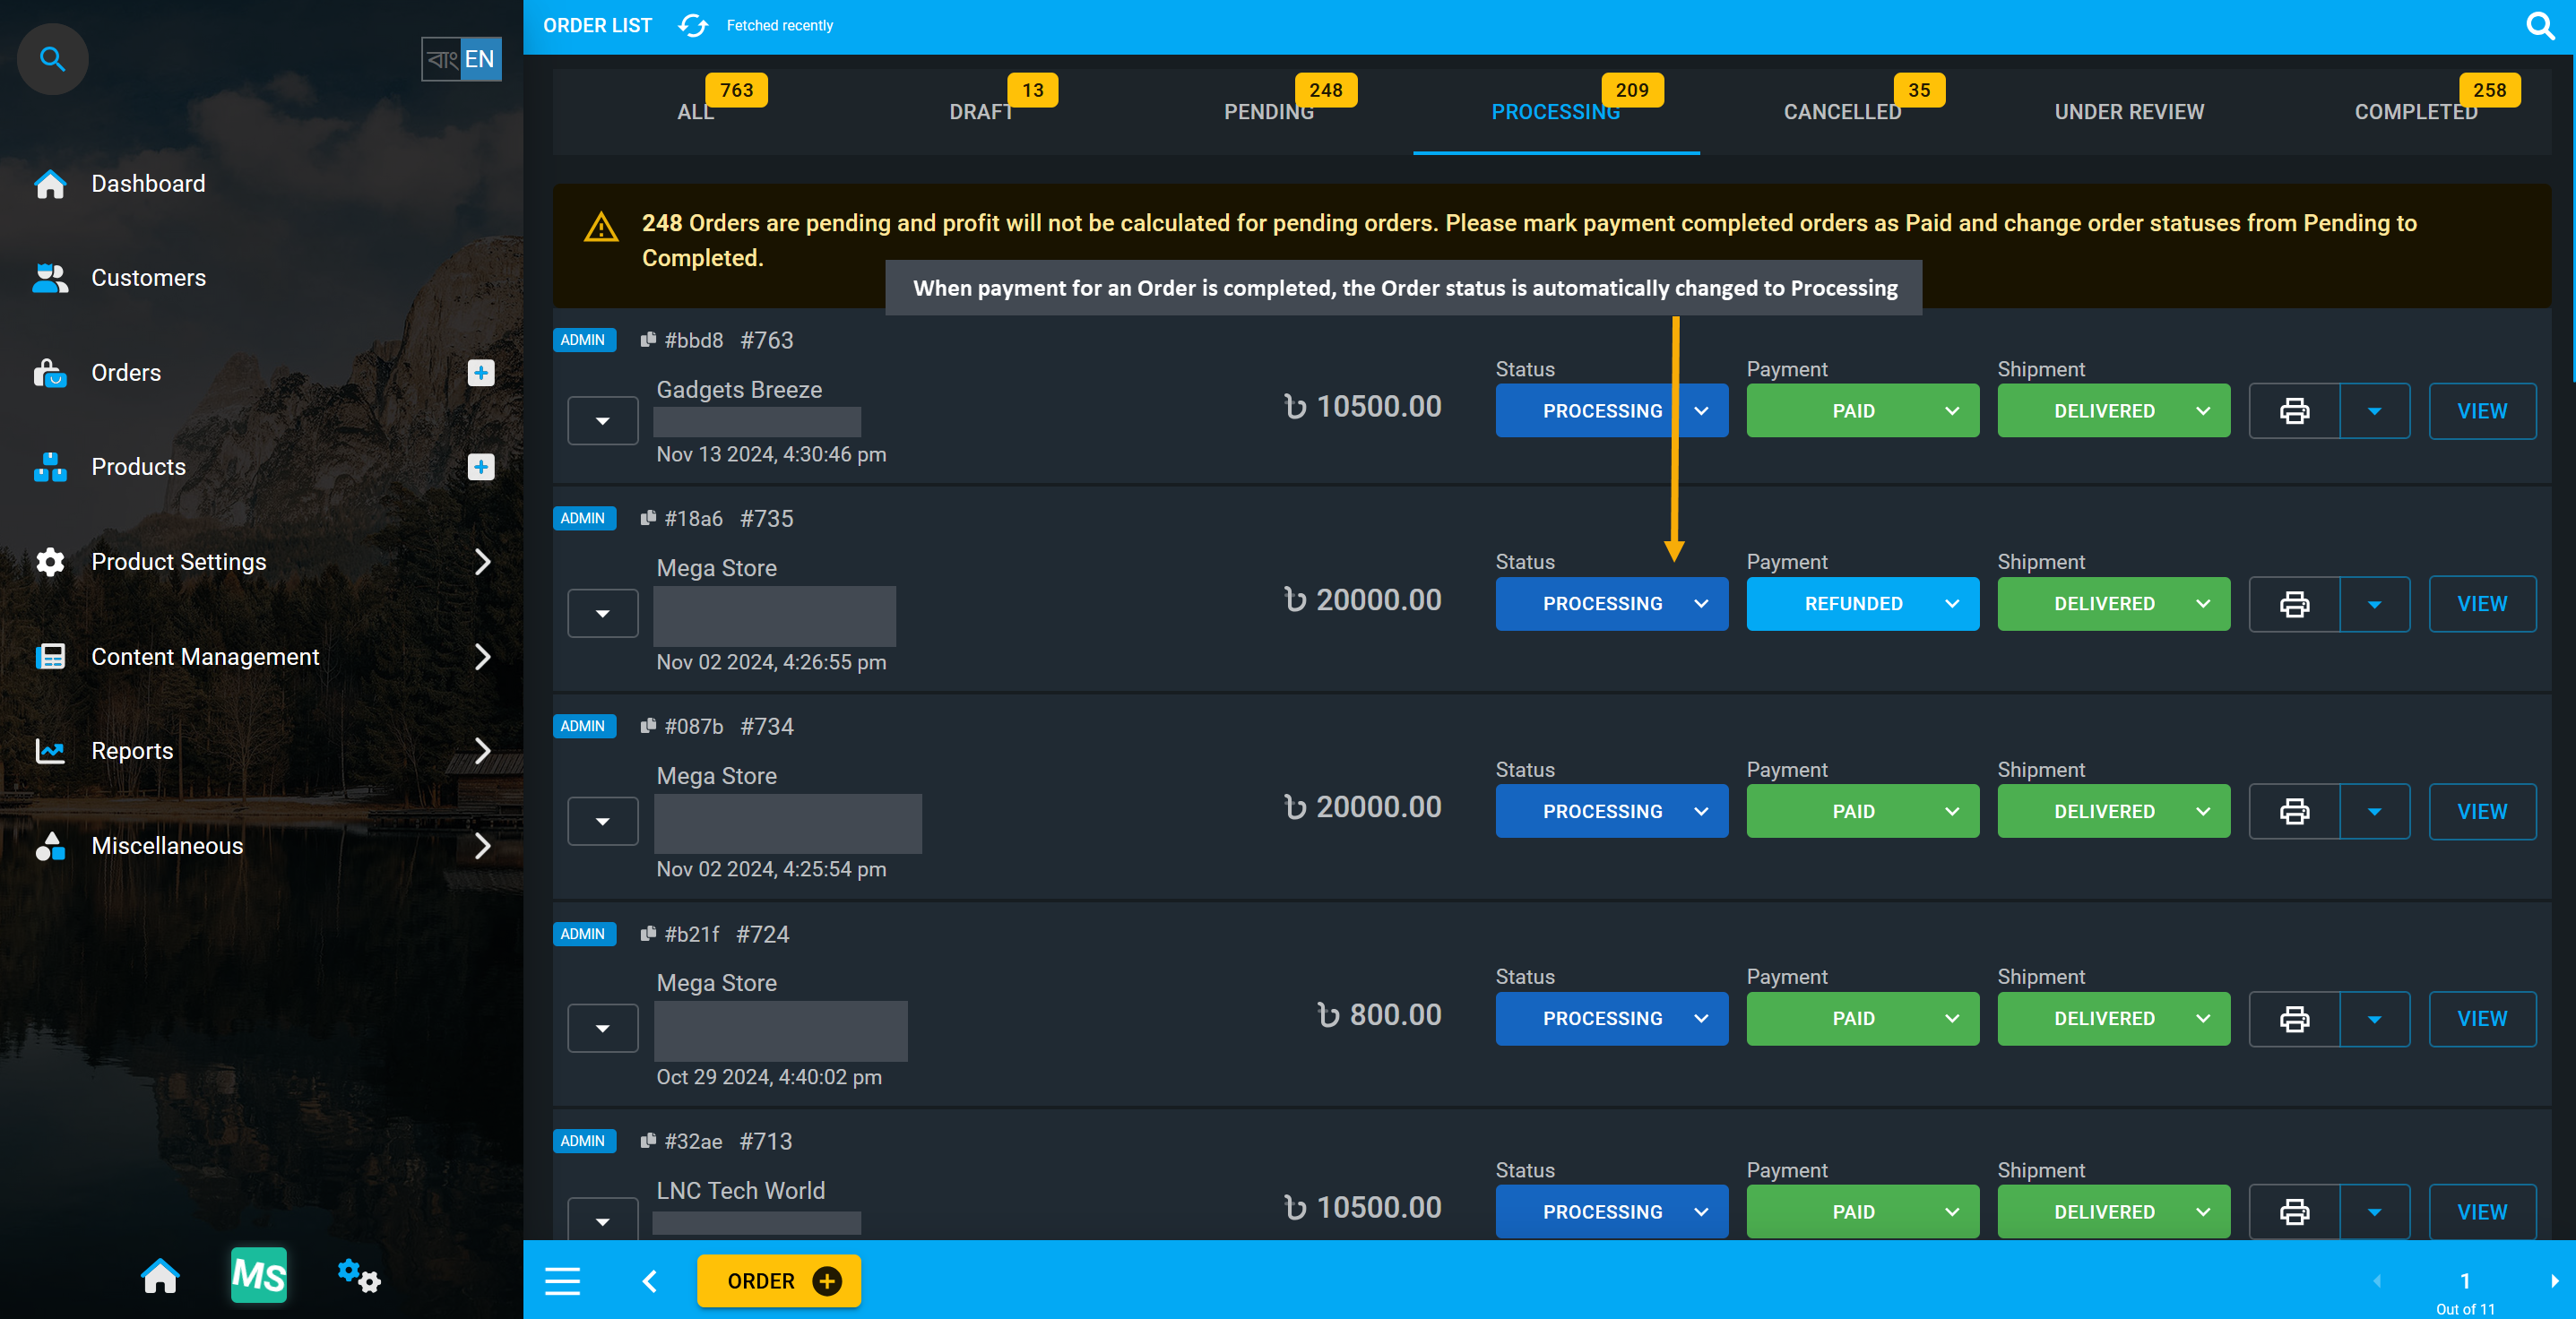
Image 4: When payment for an Order is completed, Order status is automatically changed to Processing.
Order Canceled
Canceled Orders are ones that have been submitted but are no longer in effect in the system. Shop Owner can Cancel Orders that have not been paid by the Customer or entered the shipping process yet. Likewise, paid Orders can also be refunded after confirming return of stock and refunding of payment.
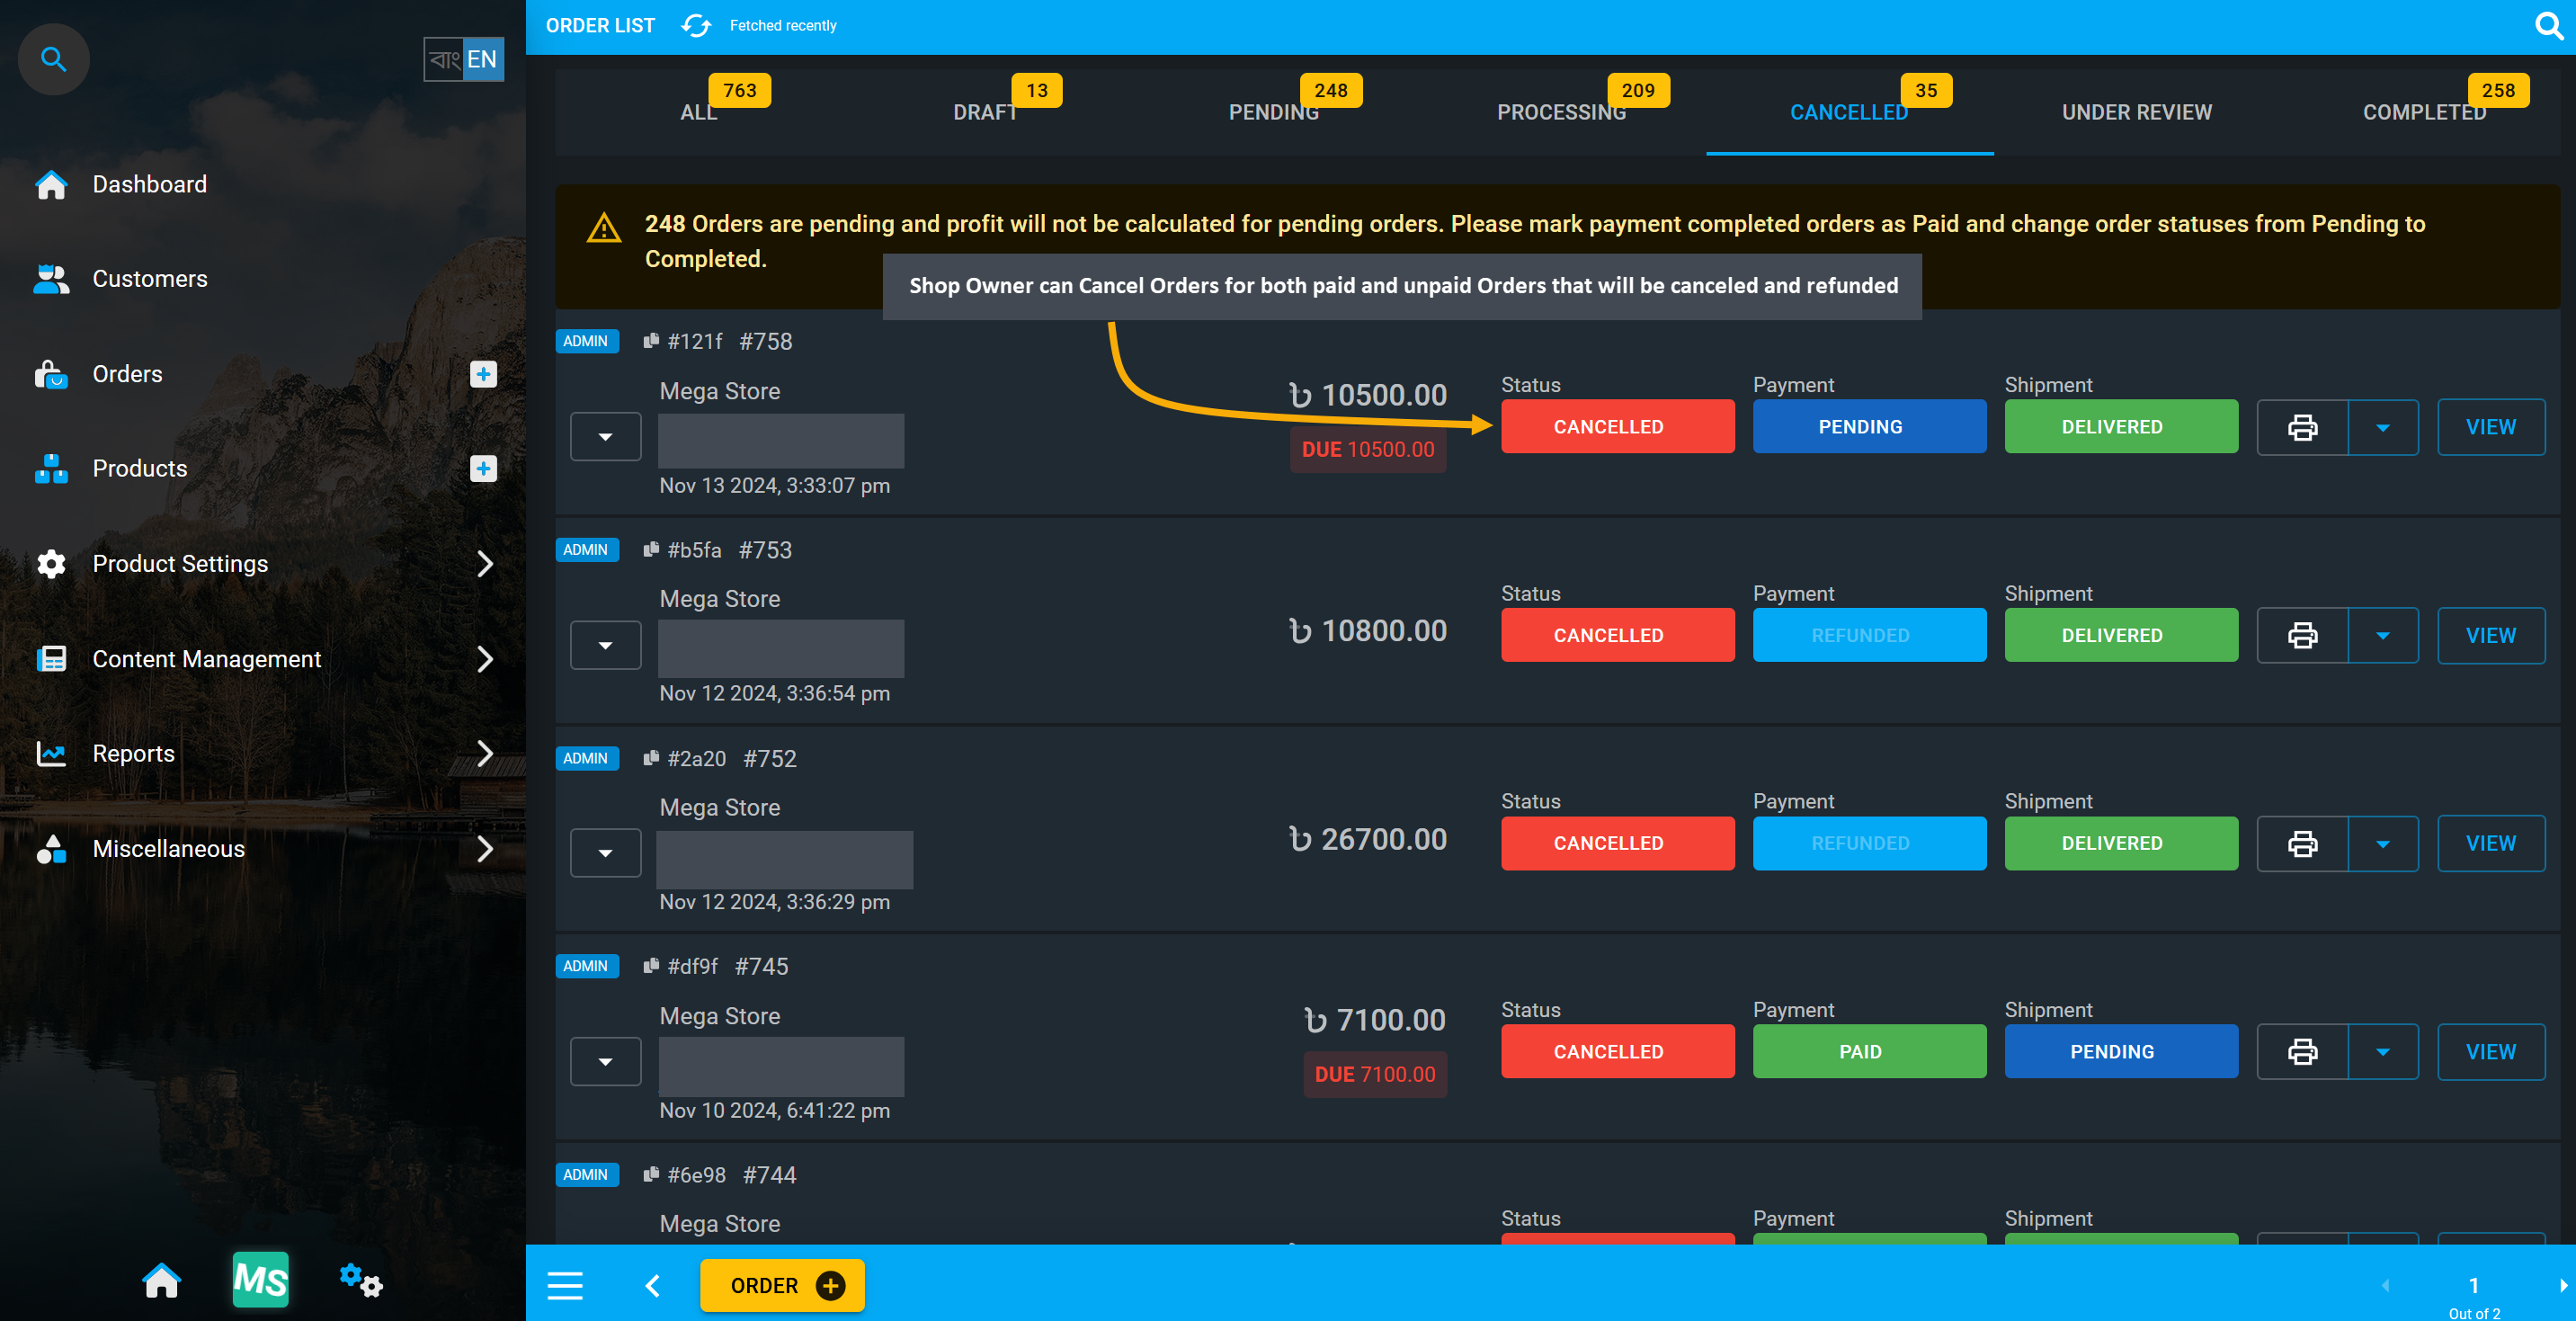
Image 5: Shop Owner can Cancel both paid and unpaid Orders which will be canceled and refunded.
Order Under Review
Order status Under Review means when the Order possess a variety of attributes that require them to be manually released by the Shop Owner. They can put any Order under review and manually review Order information later or request for additional information from the Customer to process order if needed.
Order Completed
When an Order is marked as Completed, it means that the Shop Owner have processed the Order, labeled the package and handed it to the Customer using the In Store Pickup option or handed over to the shipping carrier. Shop Owner can set Orders as Complete when they have fulfilled all the Order steps from their end.
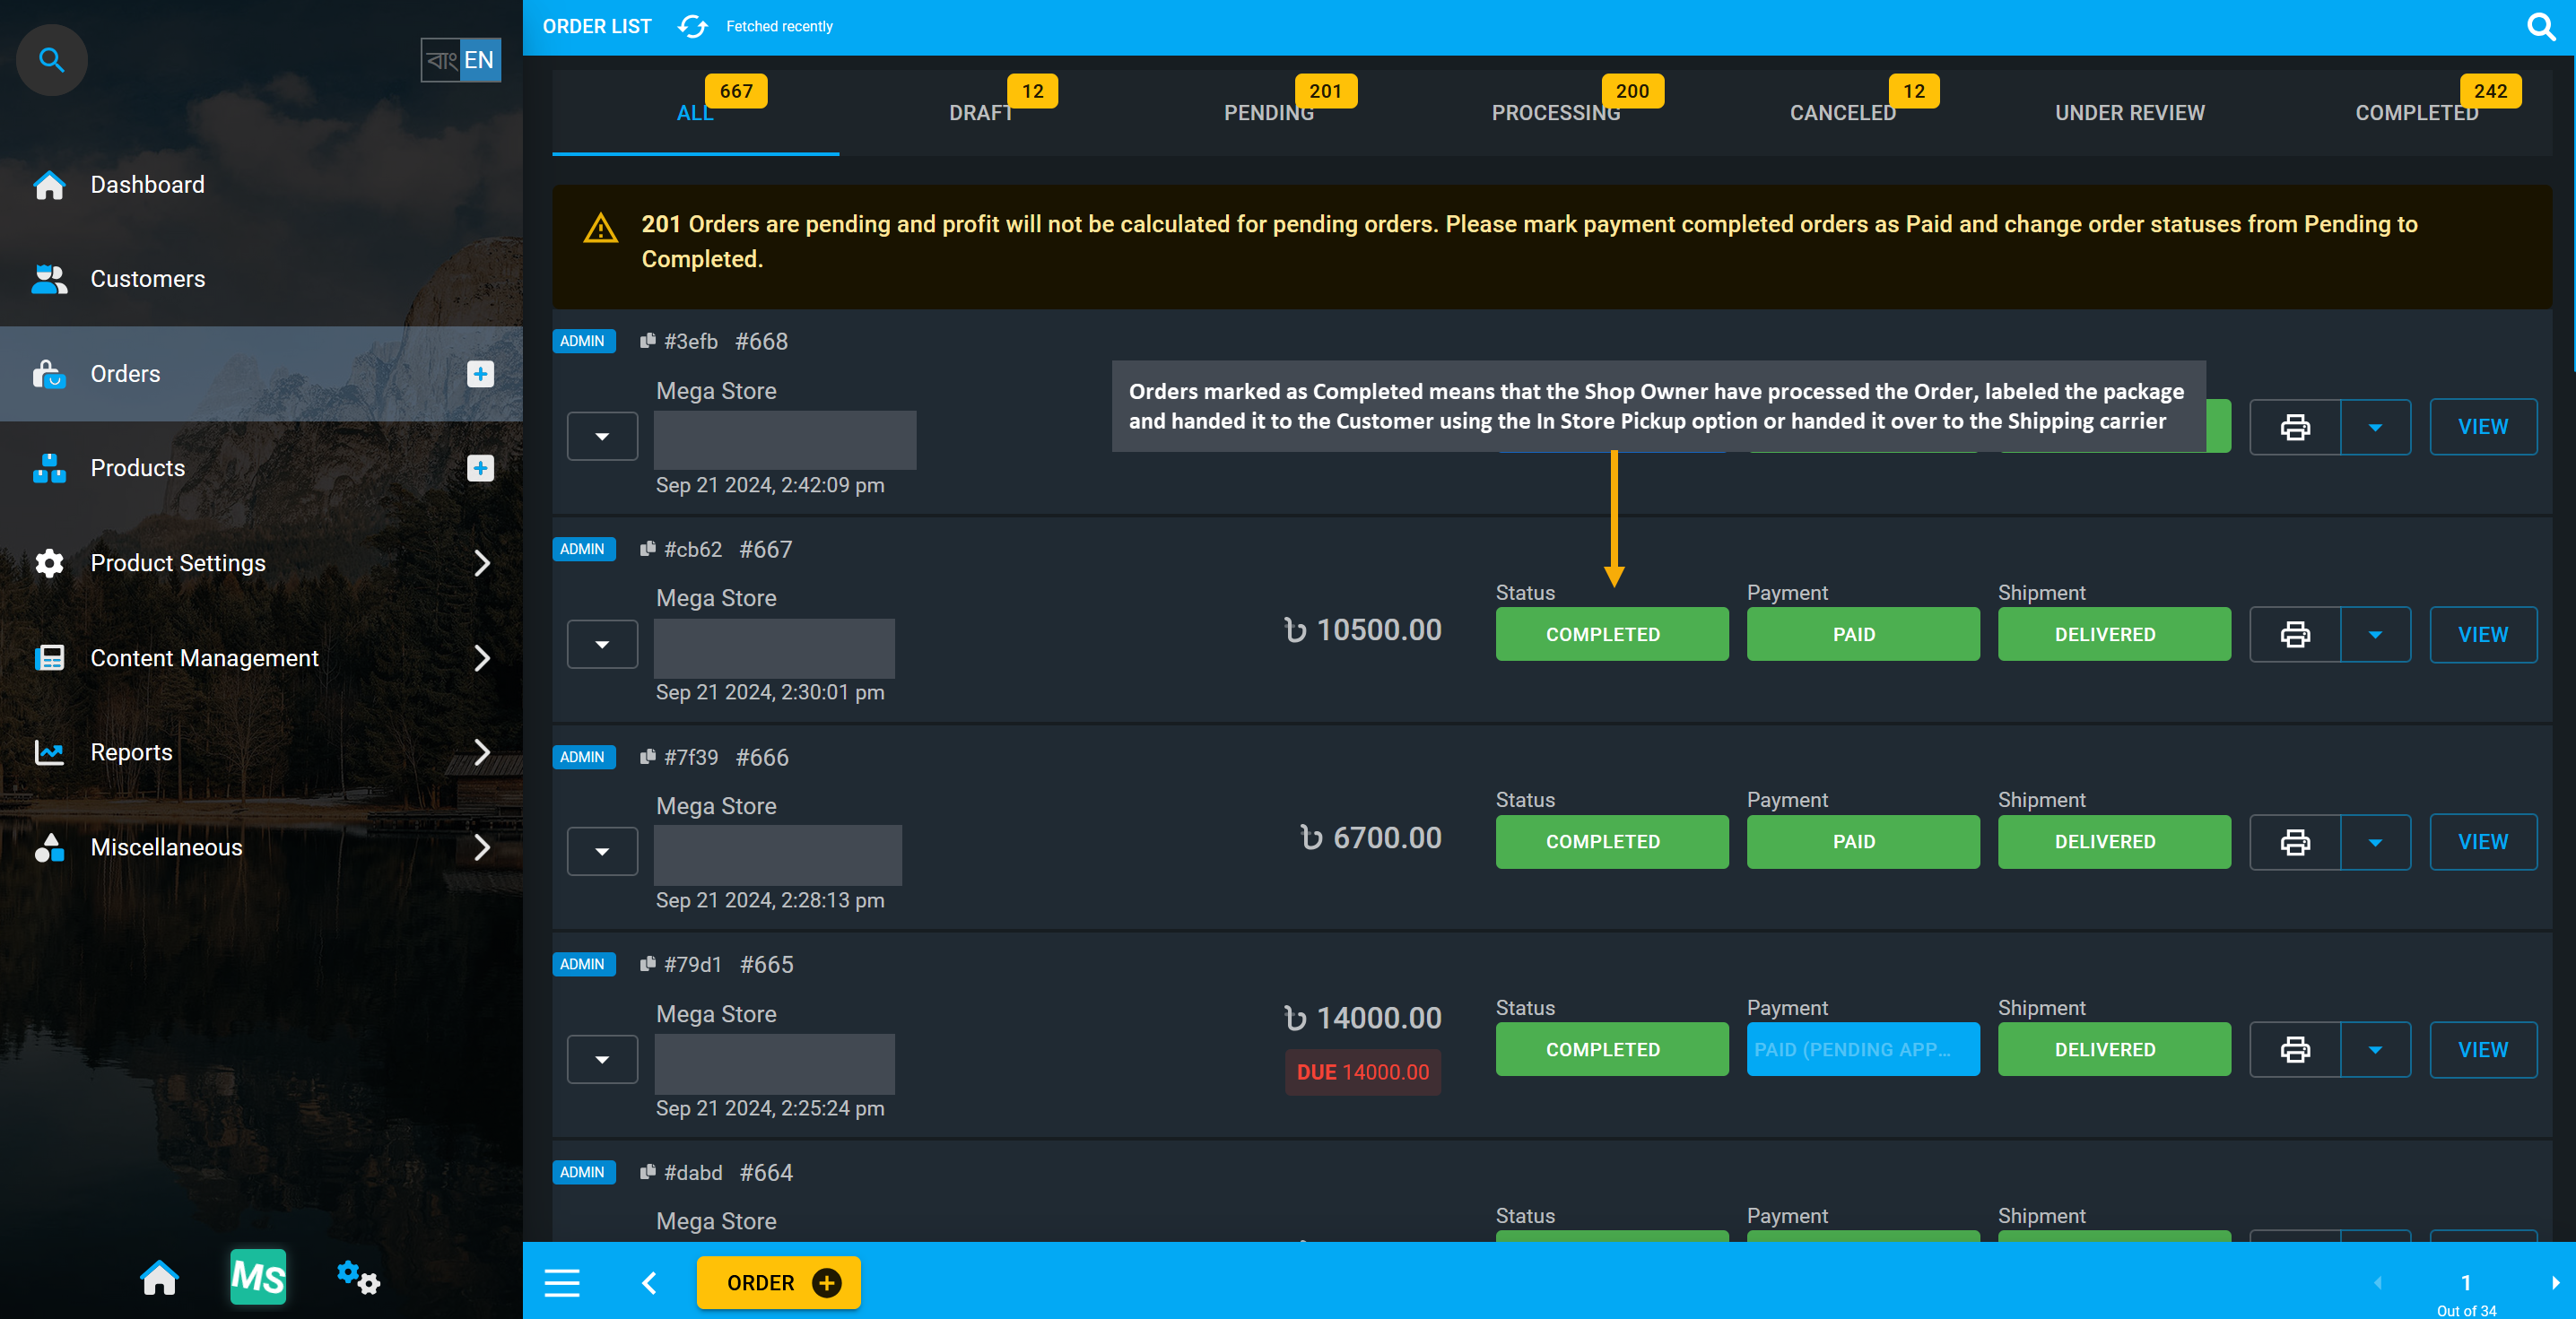
Image 2: Order marked as Completed means Payment was successful and Product is ready for shipping.
Add Transaction and Verify Pending Orders
To convert Pending Orders with Pending Payment, the Shop Owner has to go to Order Dashboard, check, complete, or verify Payment to change the Payment Status to Paid if full order due is cleared.
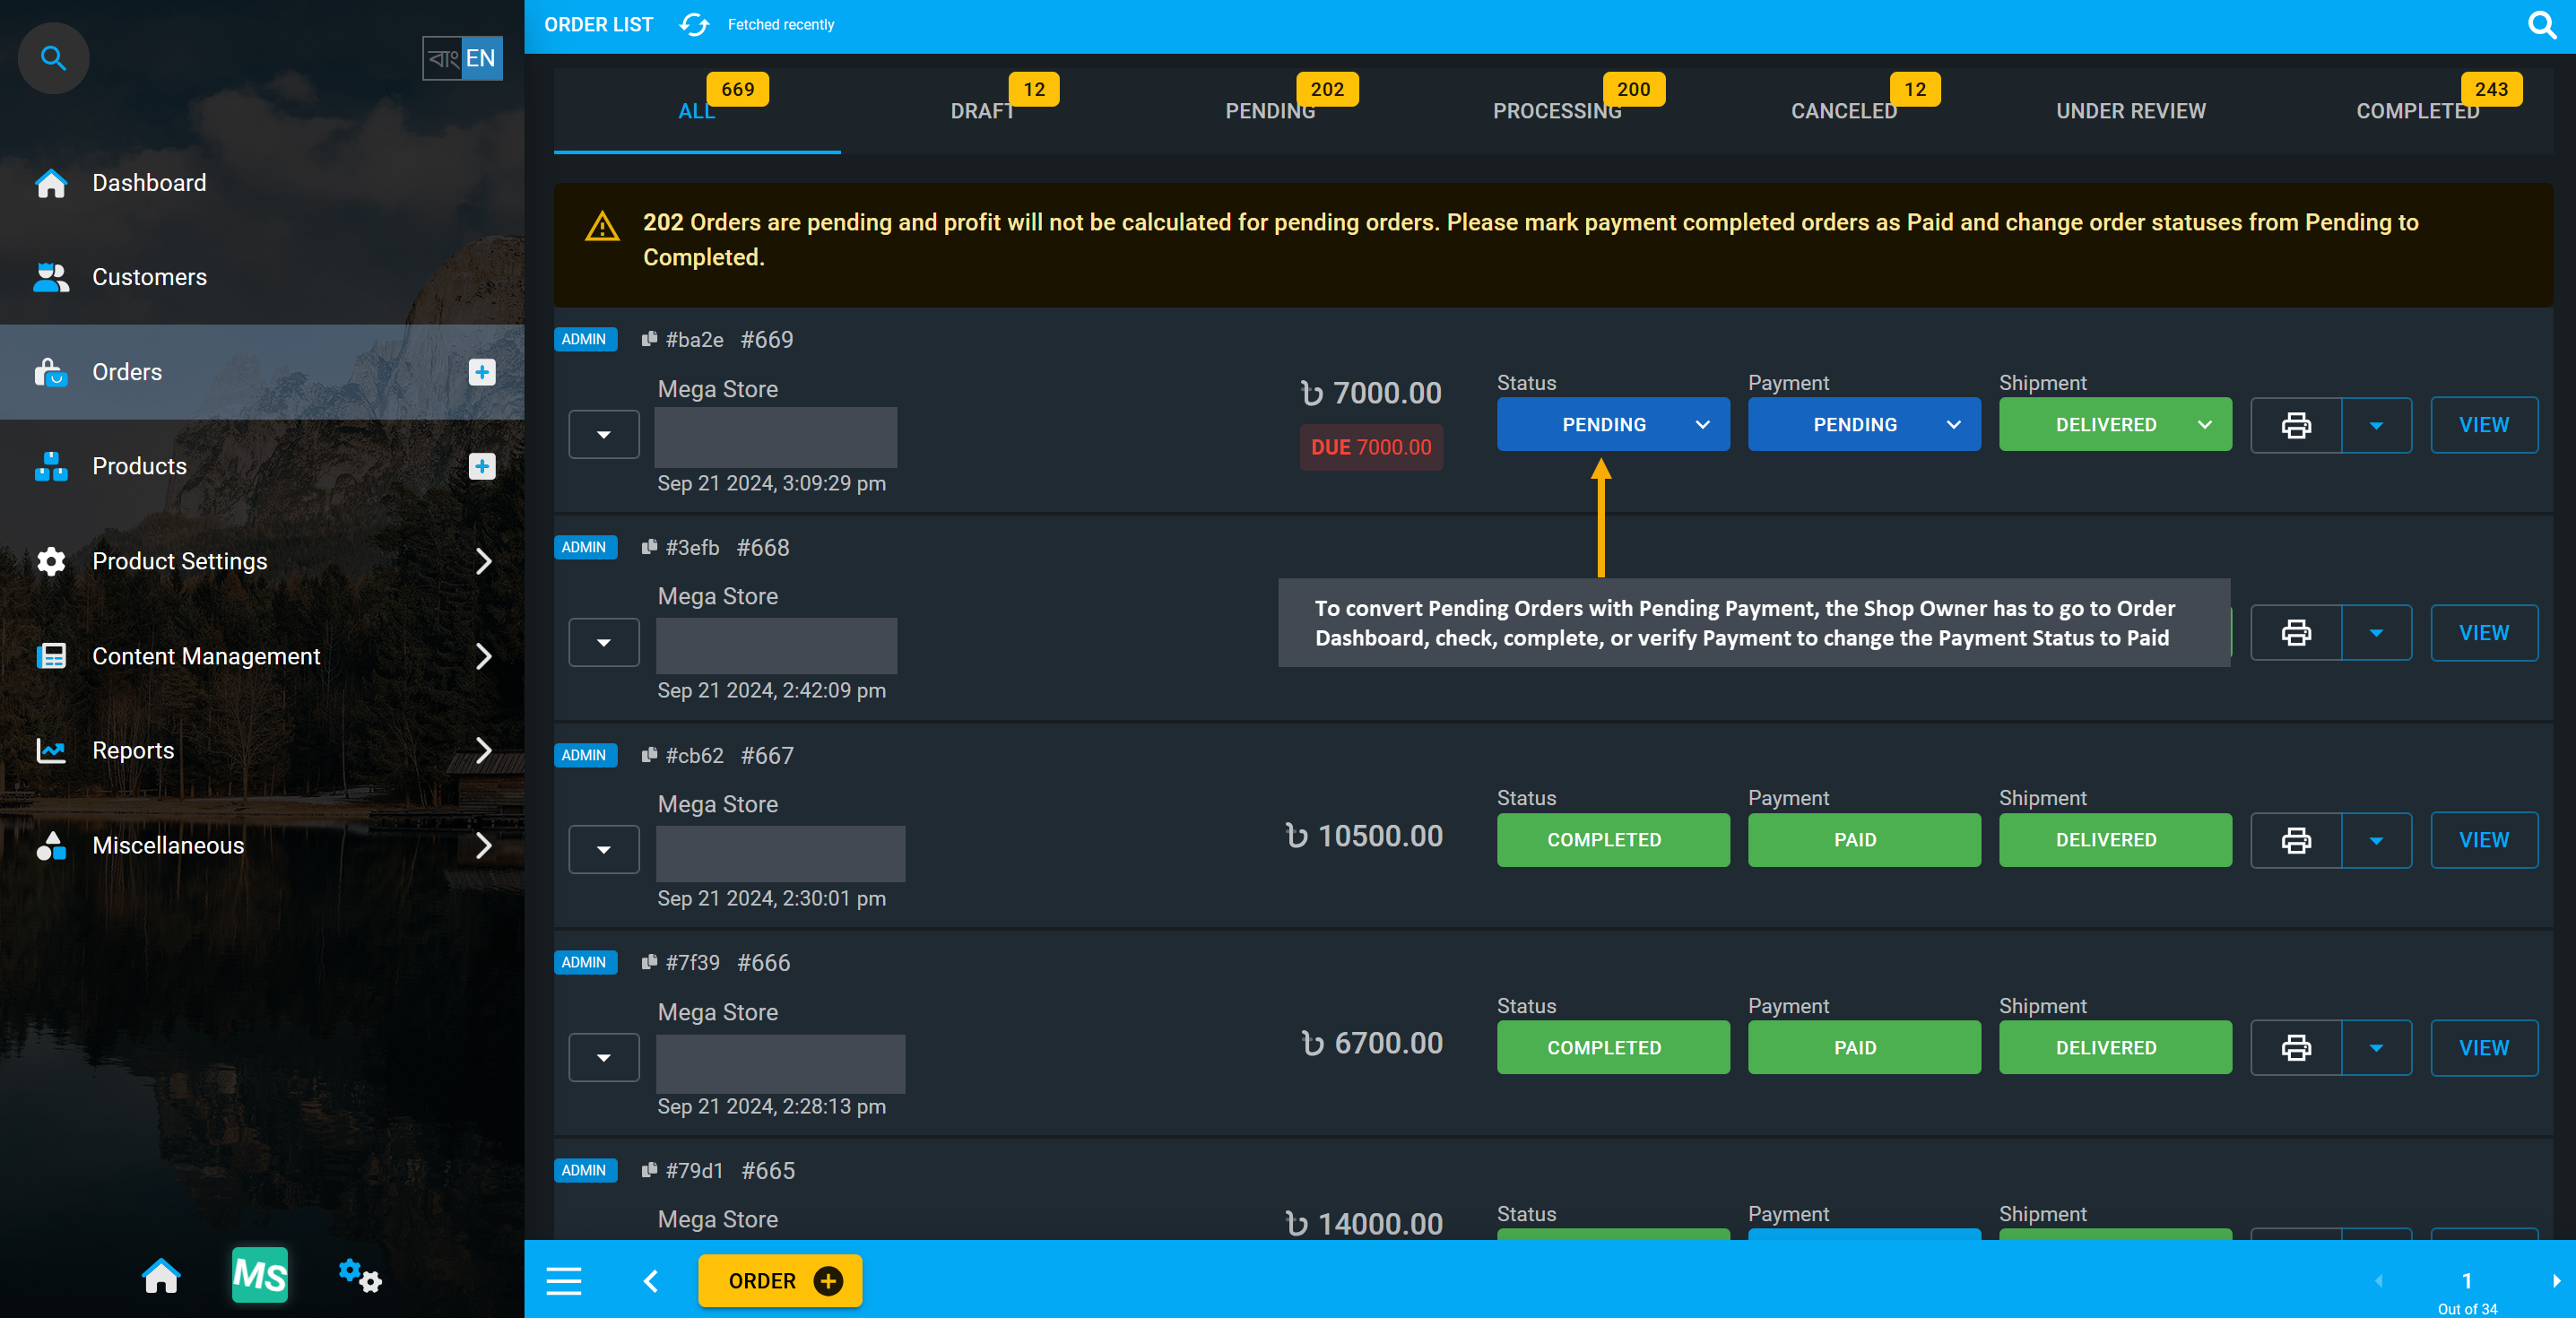
Image 3: To convert Pending Orders, Shop Owner has to go to Order List to complete their payment.
To open Order details, click on the View button to be redirected to Order Dashboard to complete Payment for the Pending Orders and change their status to Completed. Order Payments can be added from there.
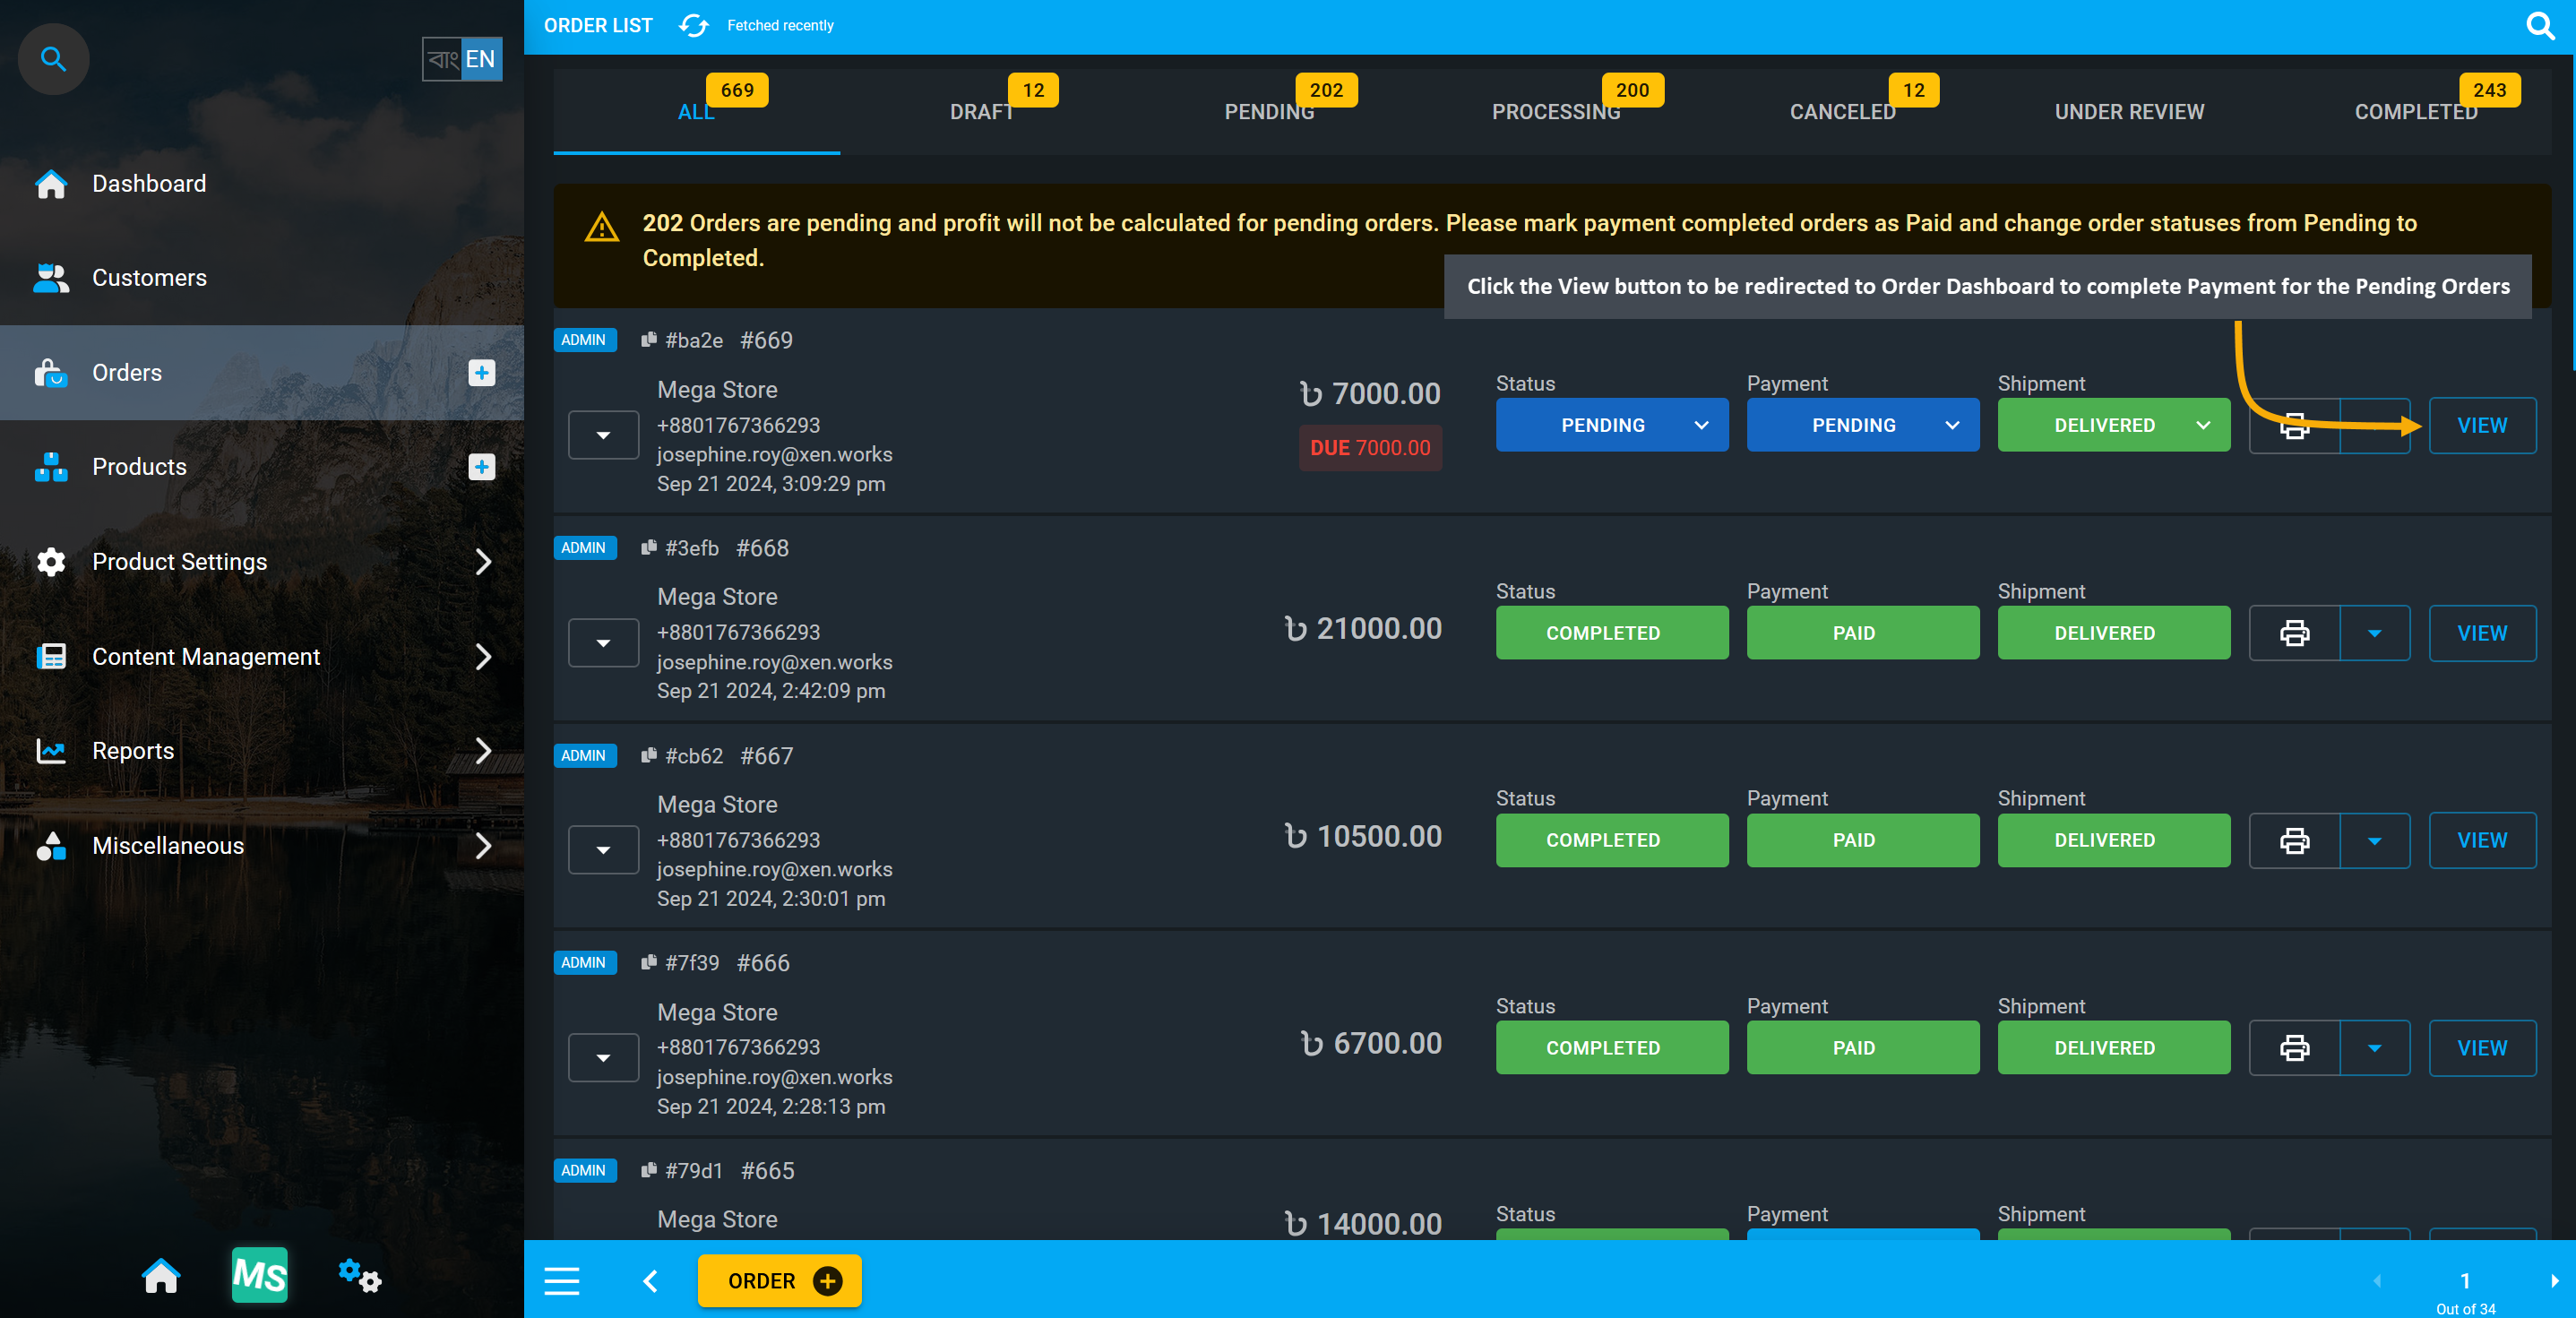
Image 4: Click View button to redirect to Order Dashboard to complete Payment for Pending Orders.
For no payments added to an Order from cart, go to Order Dashboard and click on Payments to select any Payment Gateway and make partial or full payment adding payment details multiple times if needed.
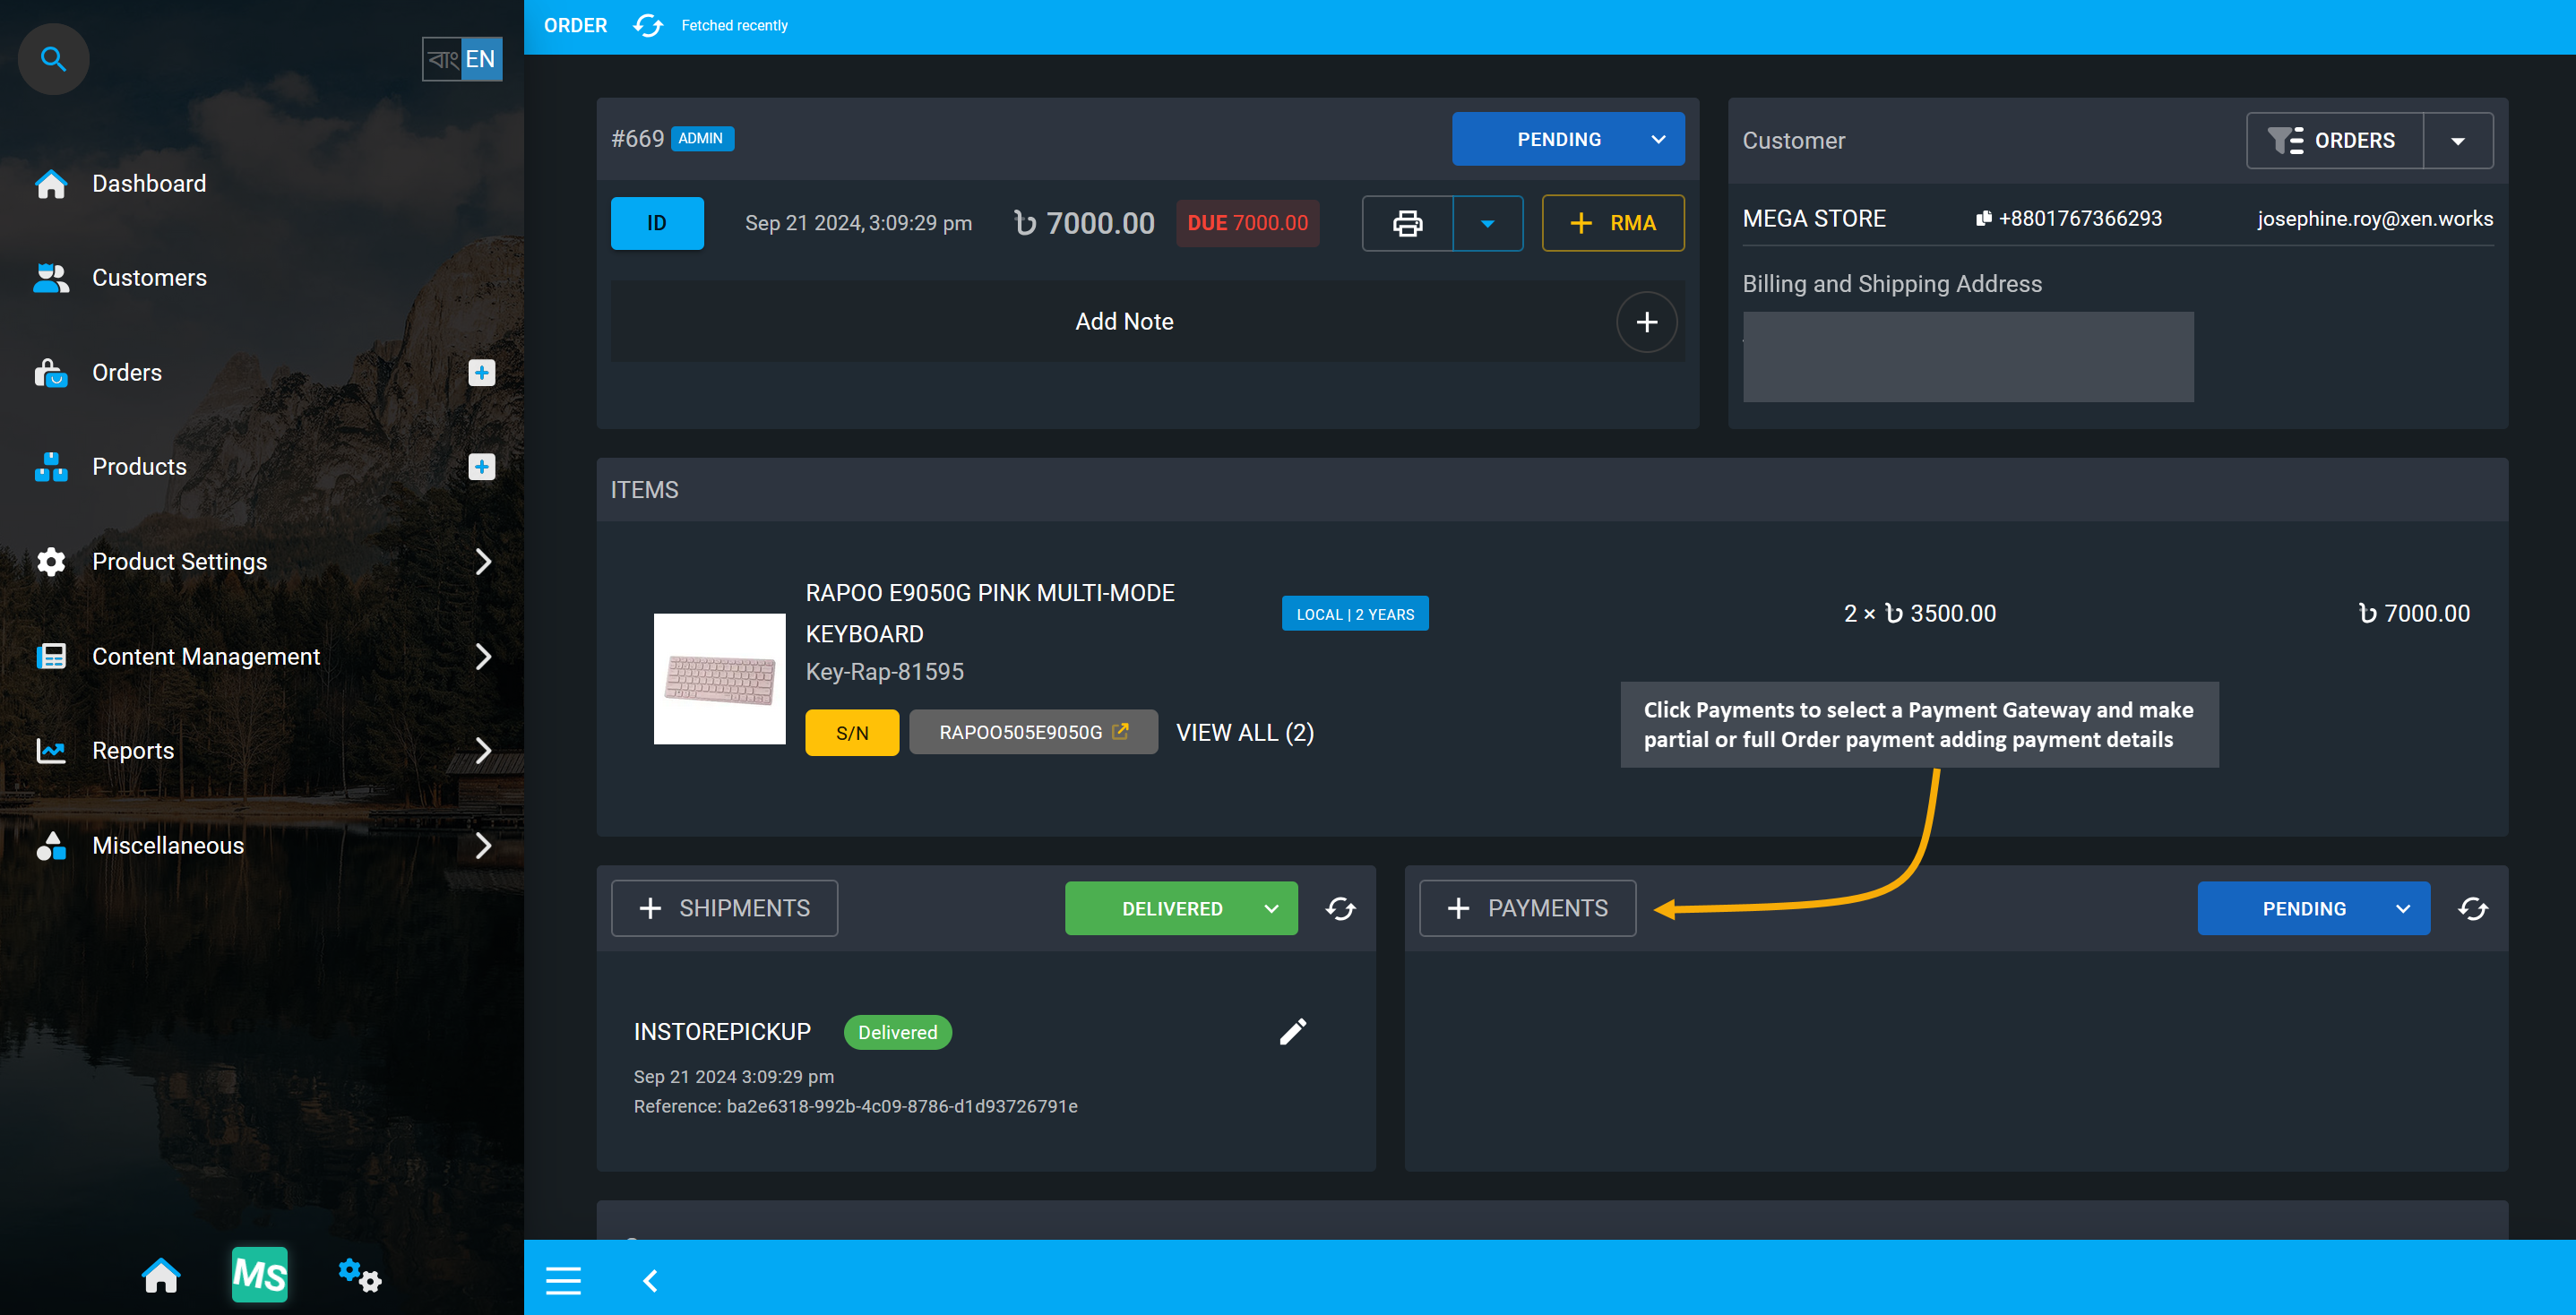
Image 5: Click on Payments to select a Payment Gateway and make partial or full Order payment.
Clicking on Payments will open a modal with different payment gateways to select and make payment for Order. Select a specific payment gateway, set payment amount, fill in the details, and click Submit.
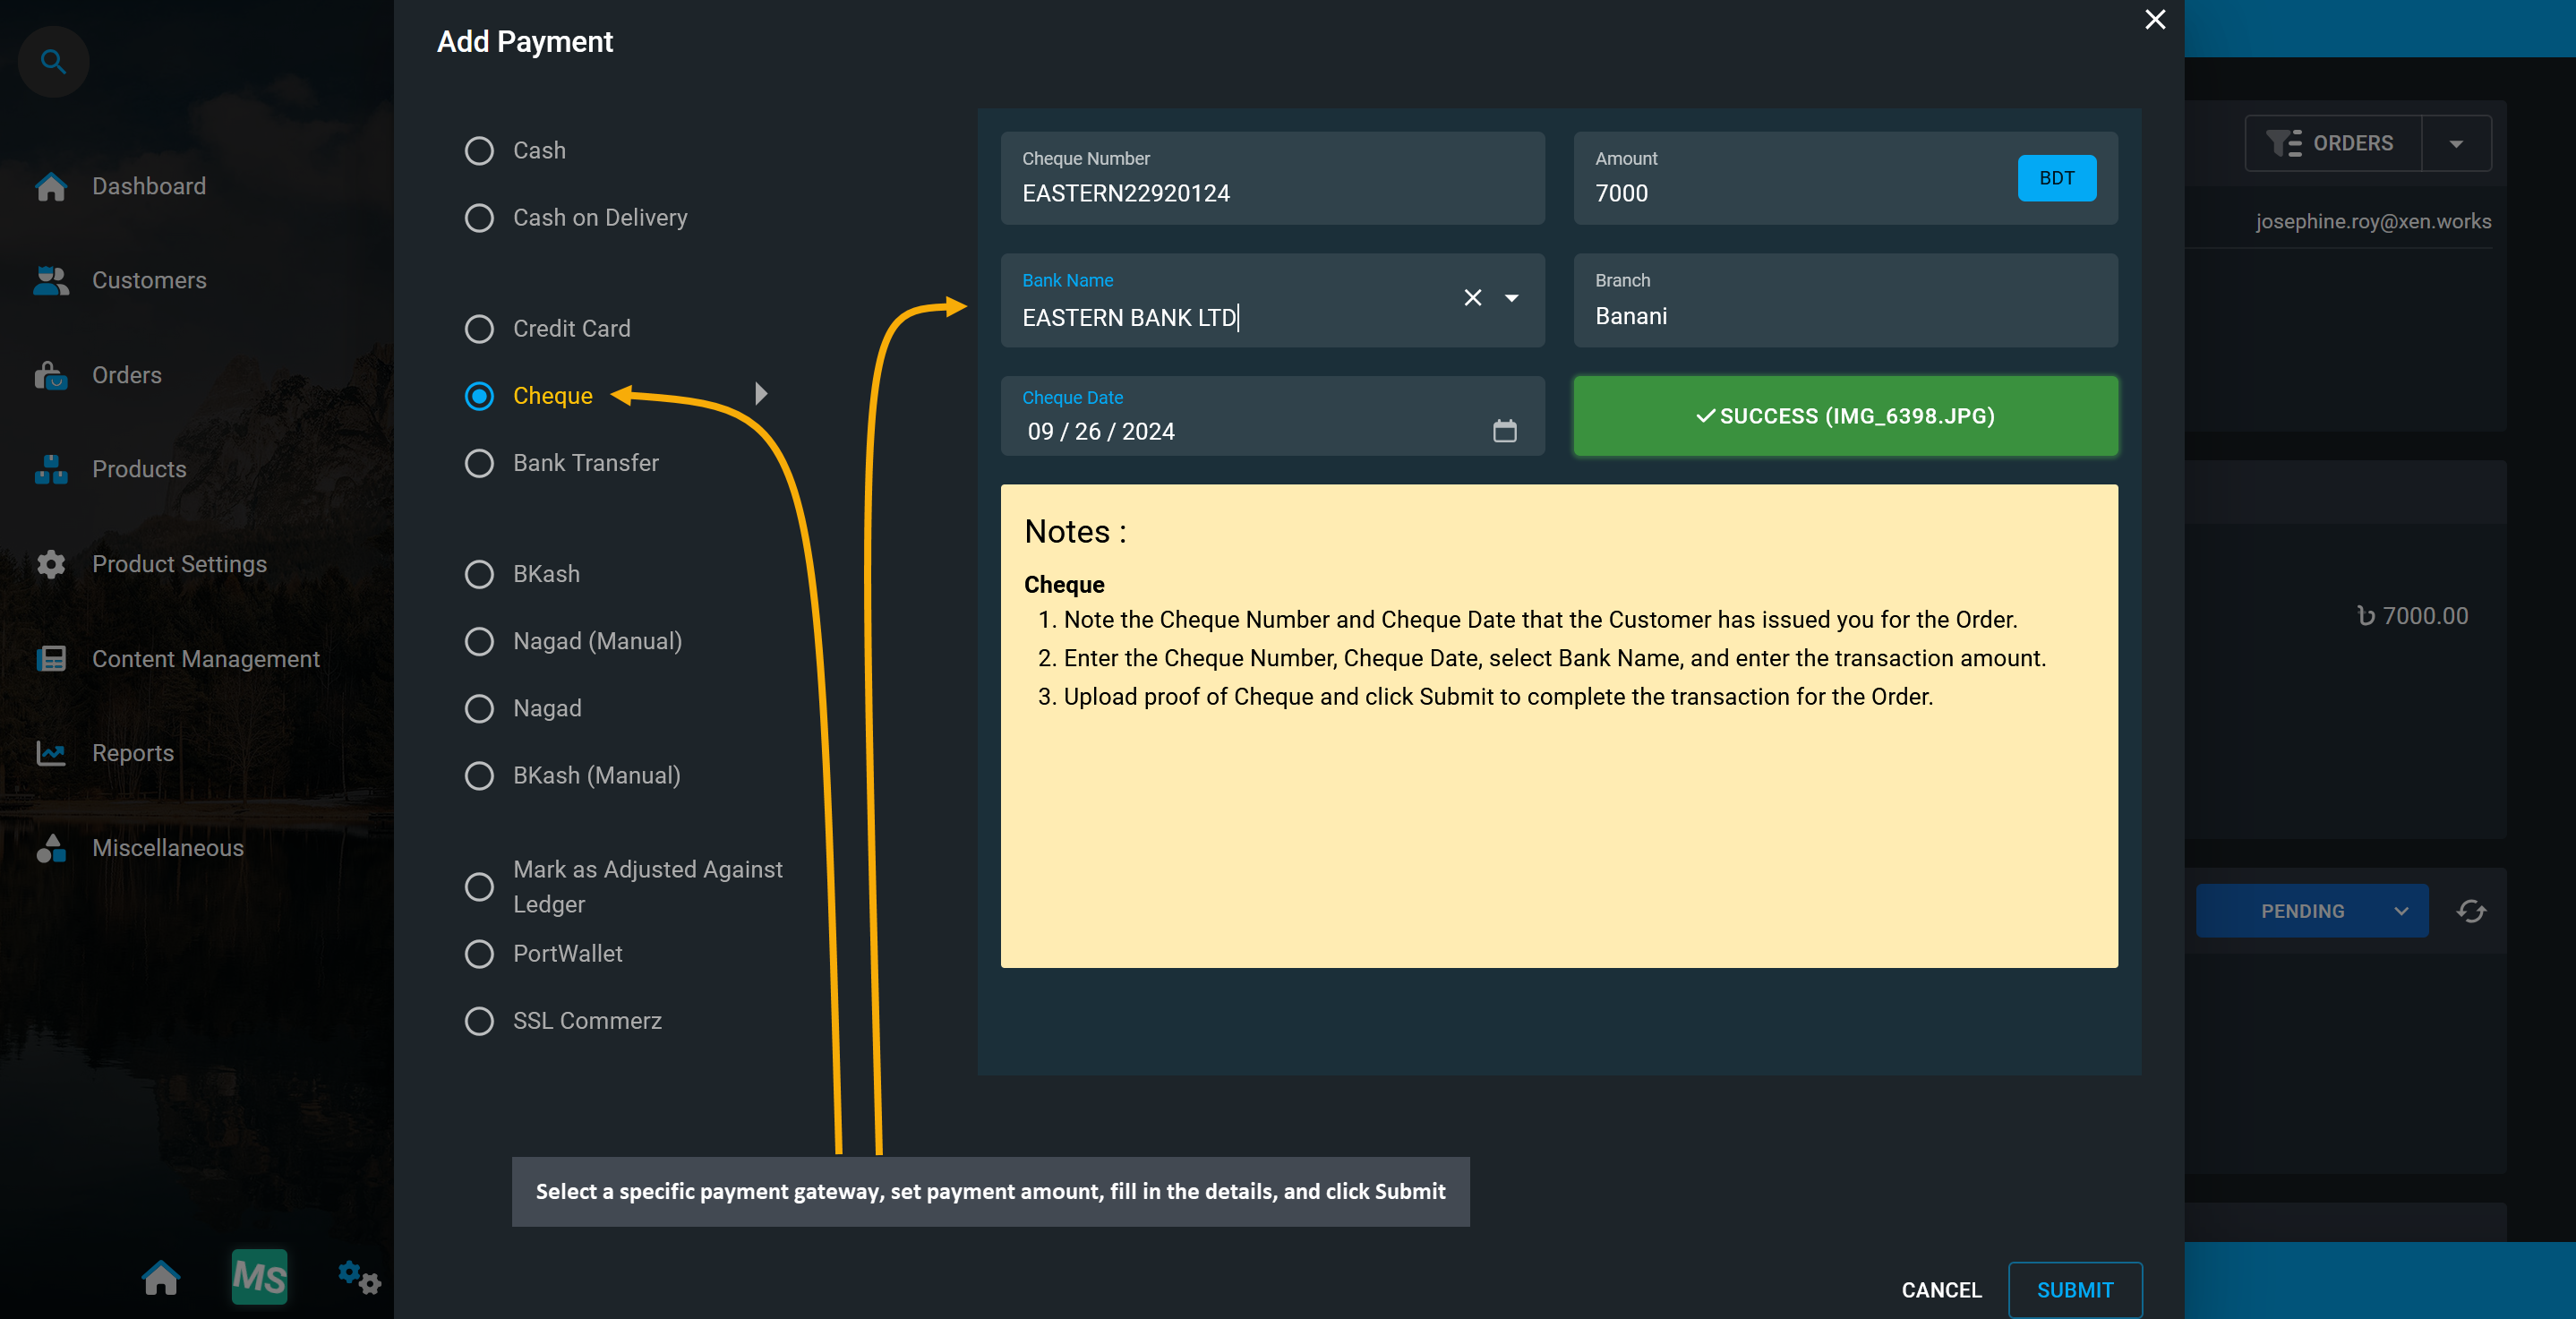
Image 6: Select a specific payment gateway, set payment amount, fill in details, and click Submit.
There will be a confirmation modal to Proceed with the transaction. Carefully recheck transaction amount, transaction reference, and other details, before clicking Proceed to complete the payment.
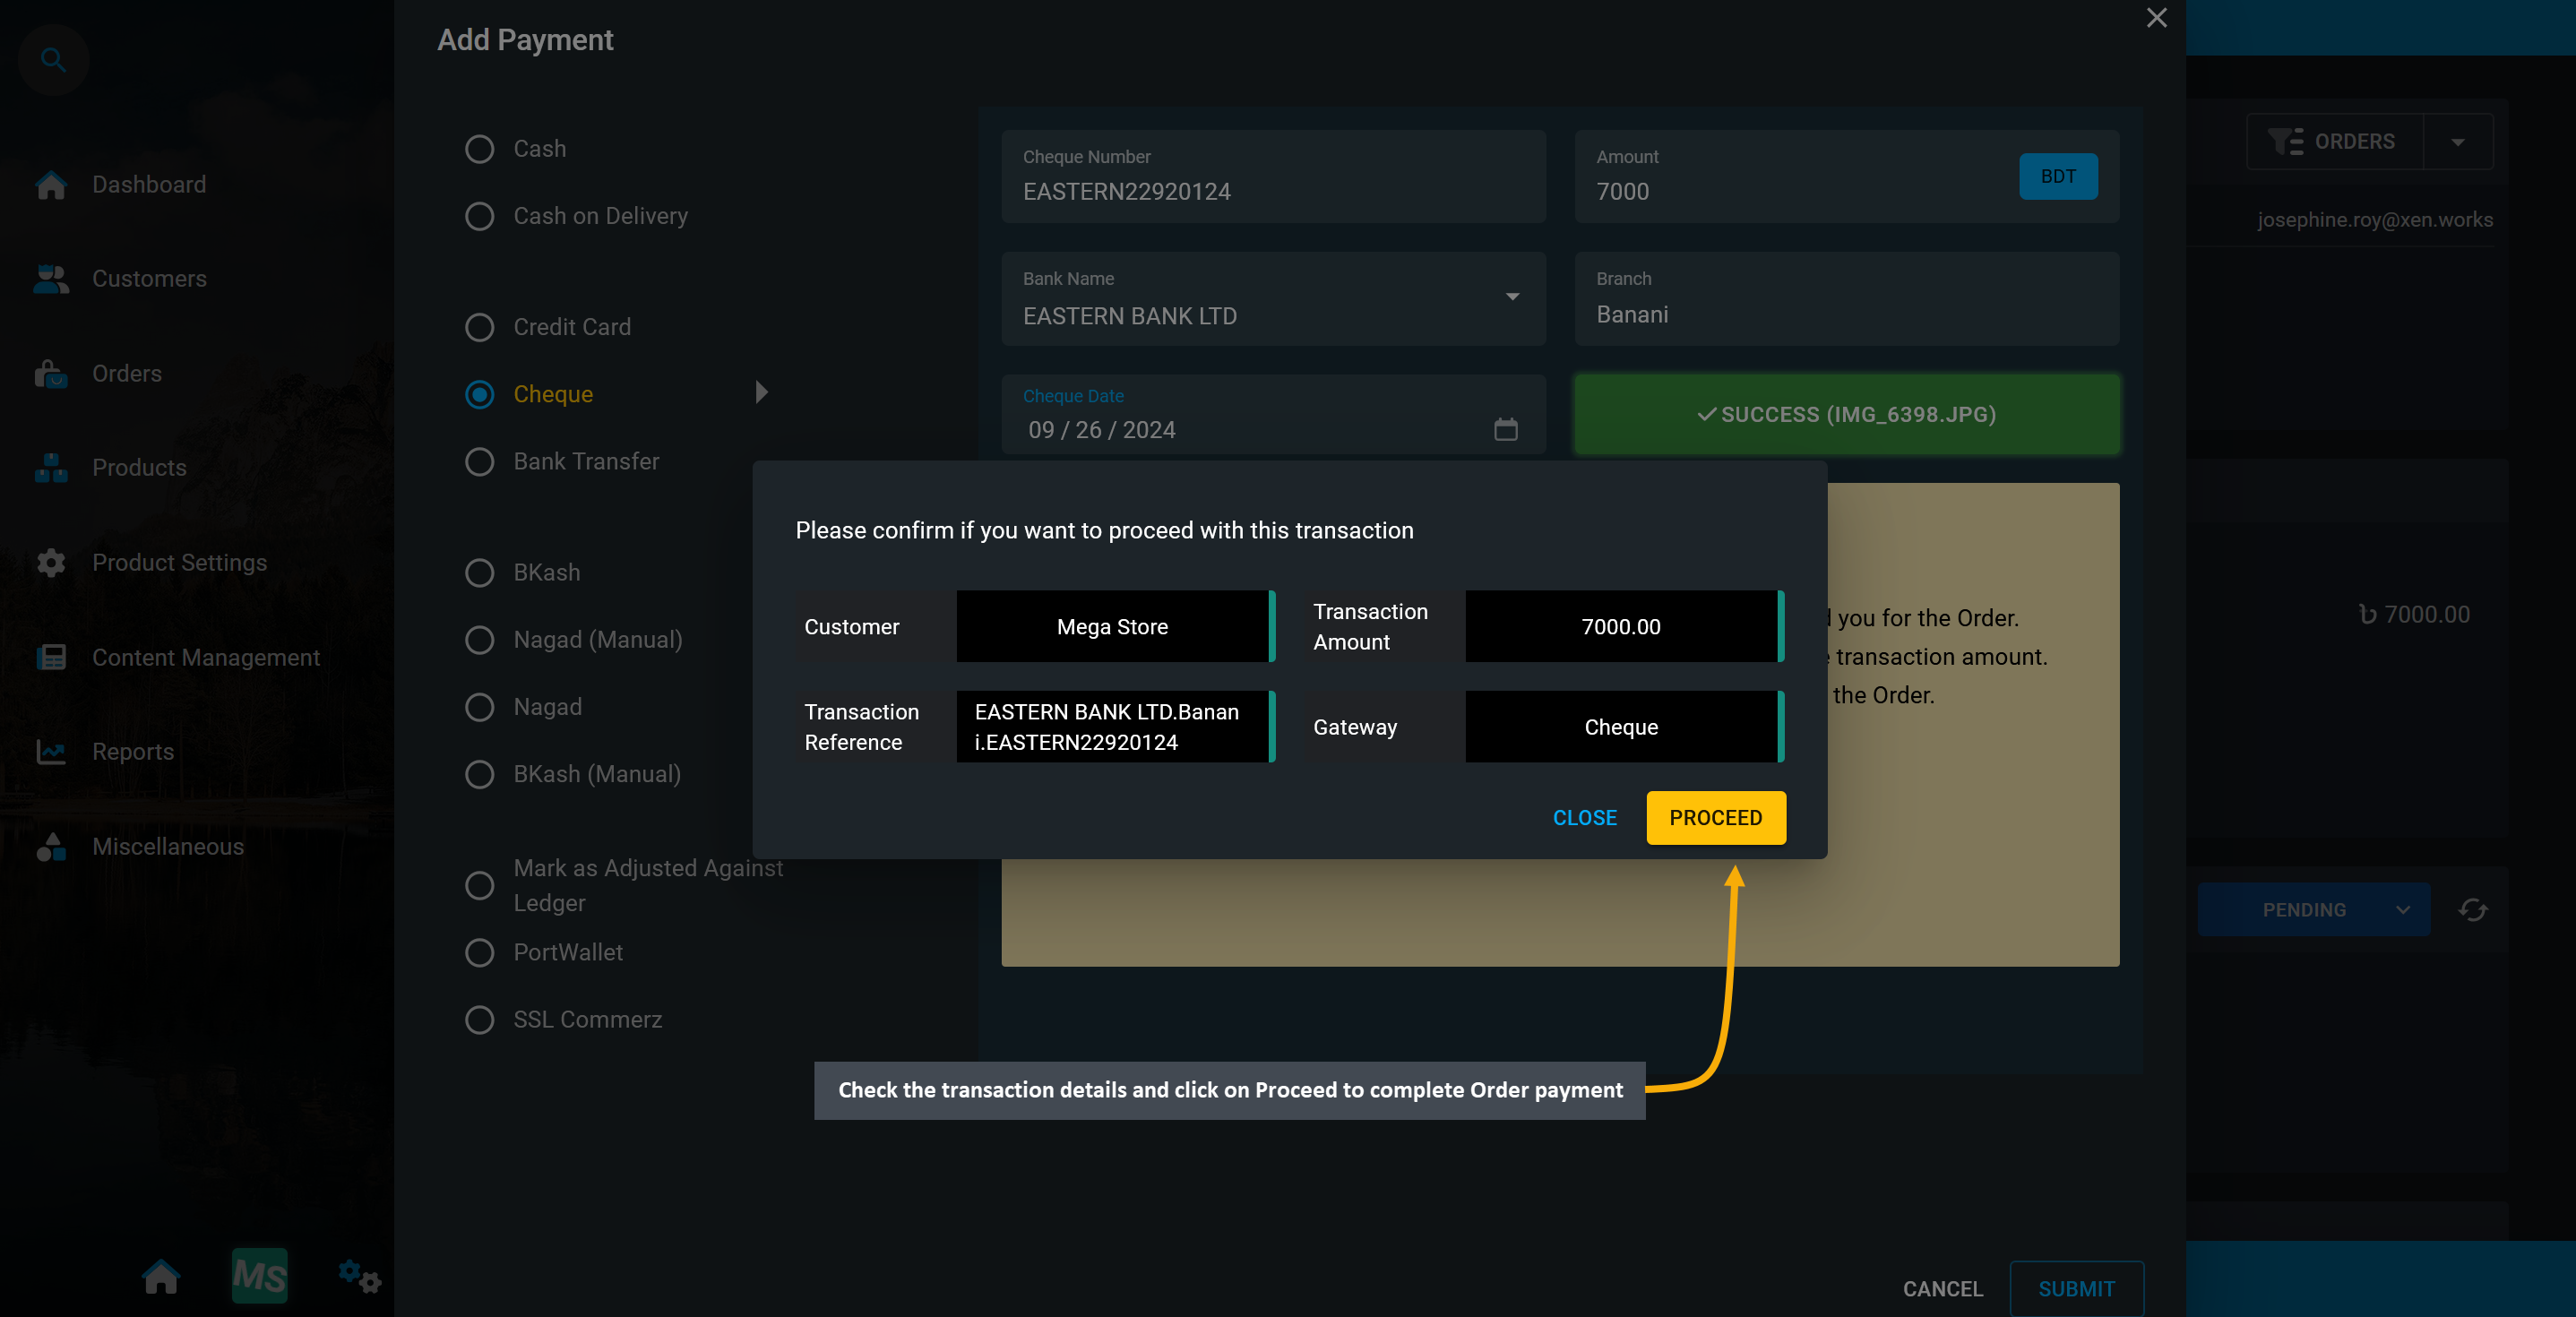
Image 7: There will be a confirmation modal to Proceed with the transaction and complete payment.
Payment Status will show Pending, because though payment is added, its transaction status is technically Initiated, but not yet Verified. Hence, the current status of the transaction will show as Initiated. However, to change the transaction status, it needs to be confirmed, which can be done by clicking the Verify button, or else the transaction will not be completed and add to Revenues. Follow these few steps as shown below.
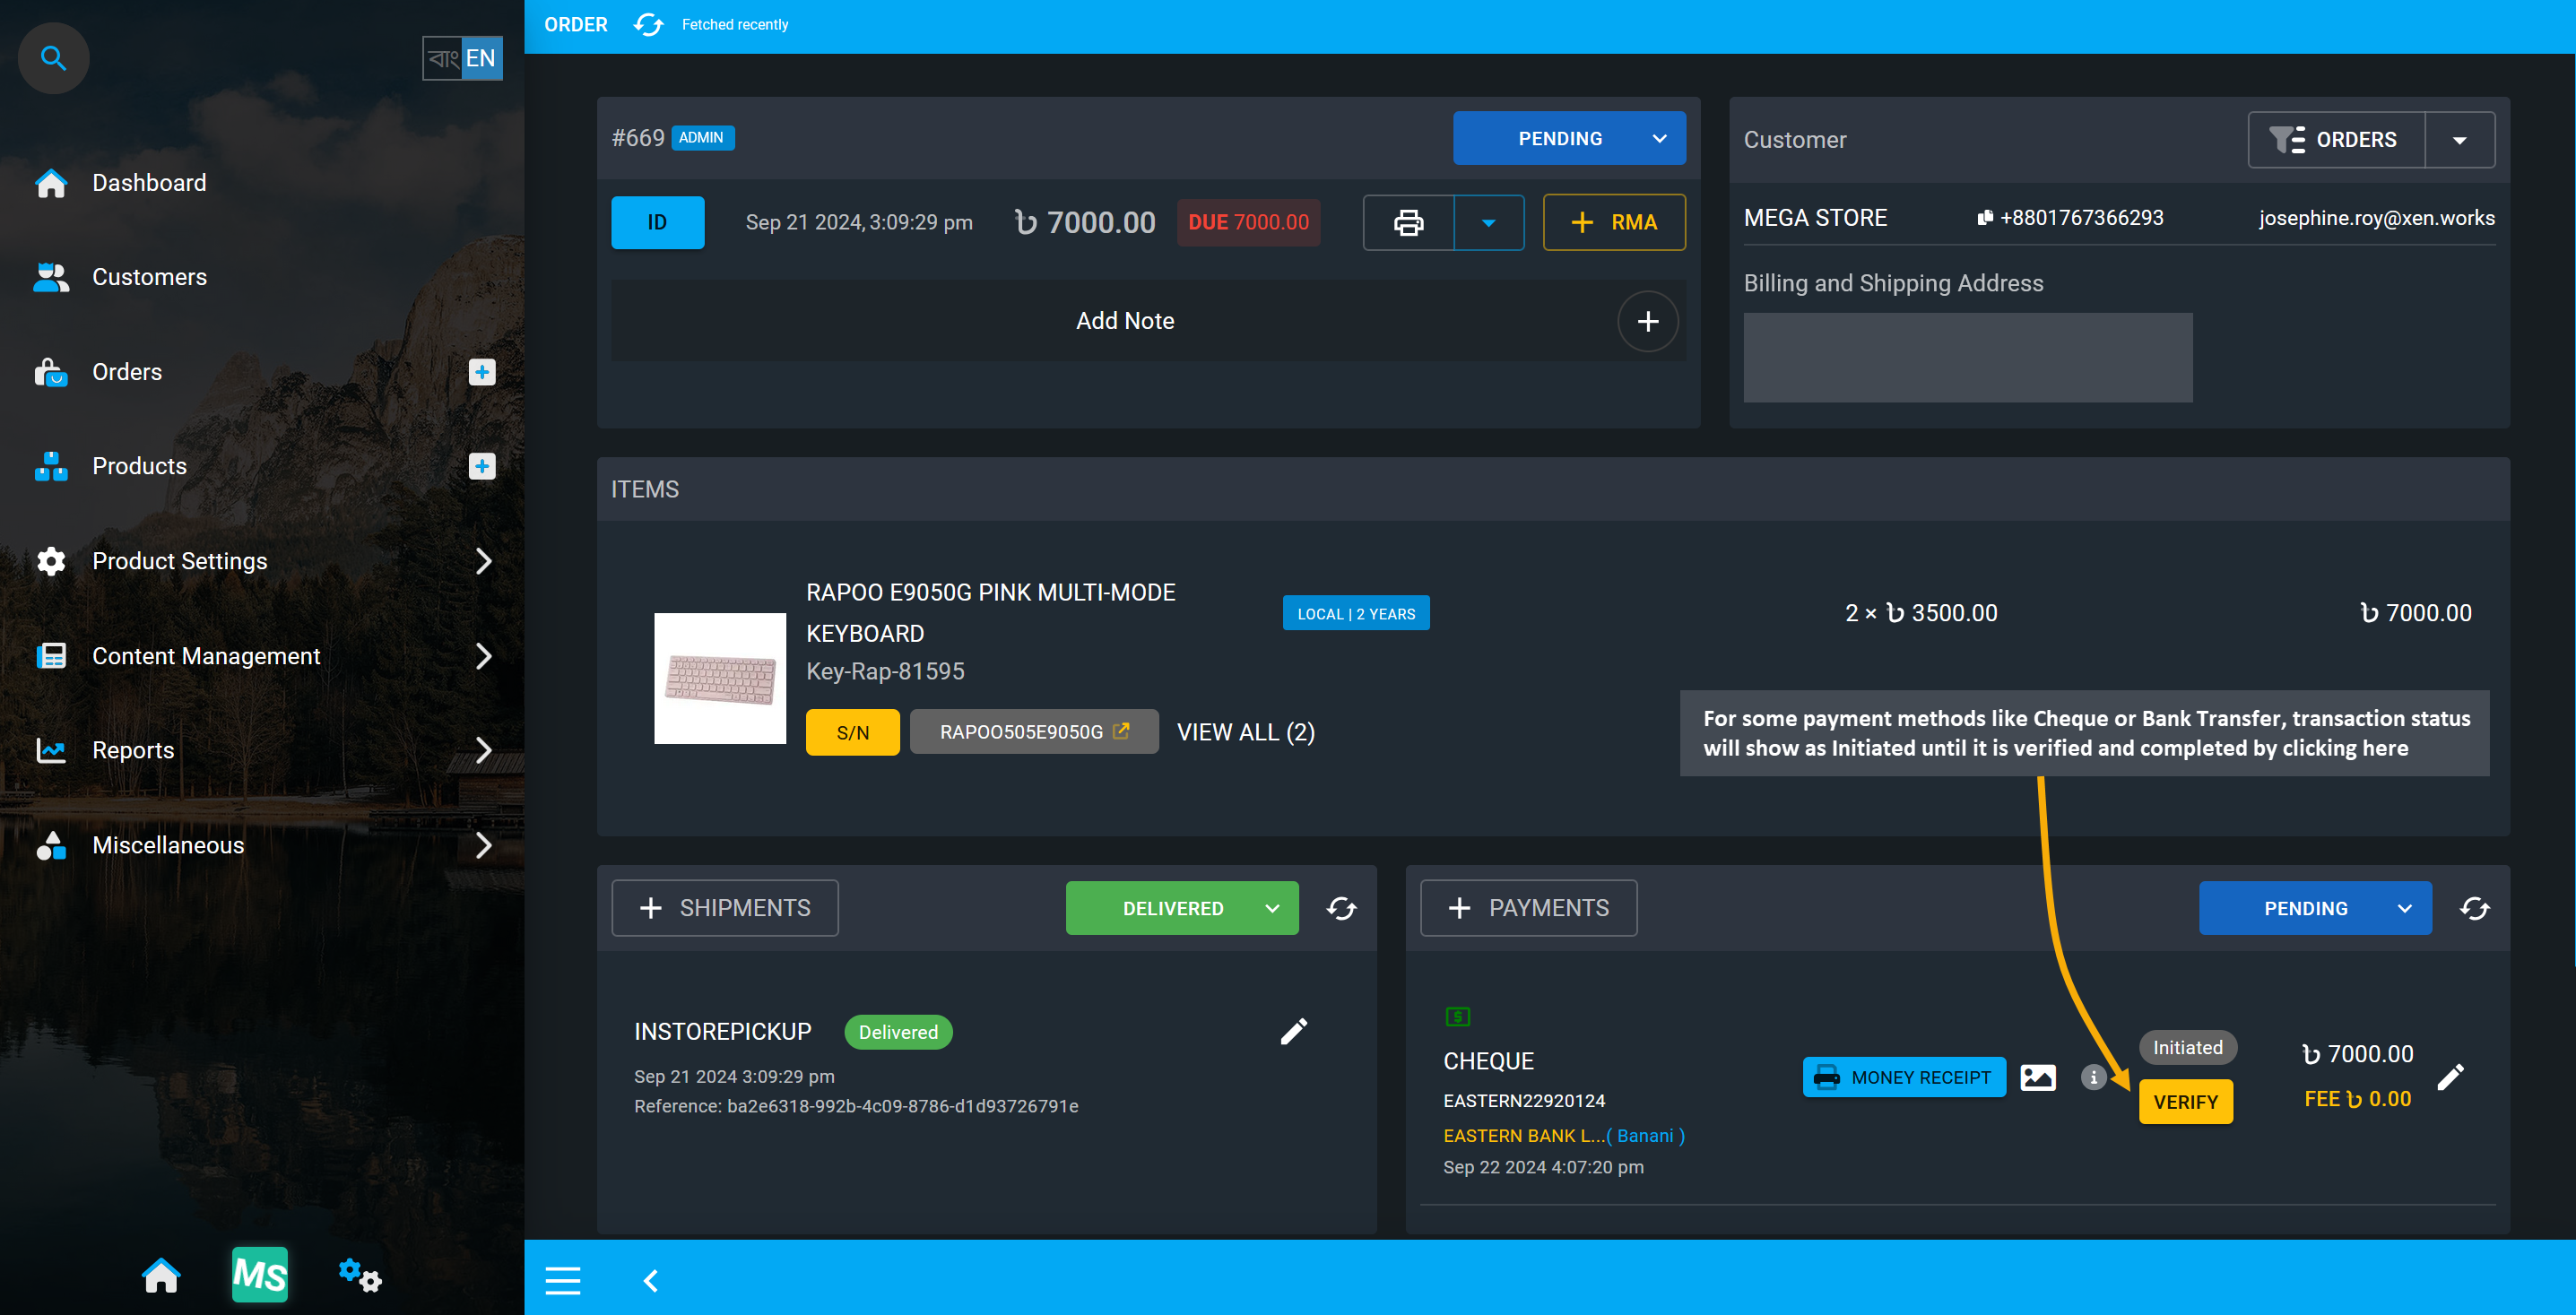
Image 7: Transaction status will show as Initiated until it is completed using the Verify button.
After clicking the Verify button, a modal will show where the transaction needs to be Set As Completed by selecting the option, adding optional Note to input details, and clicking Submit to clear payment dues.
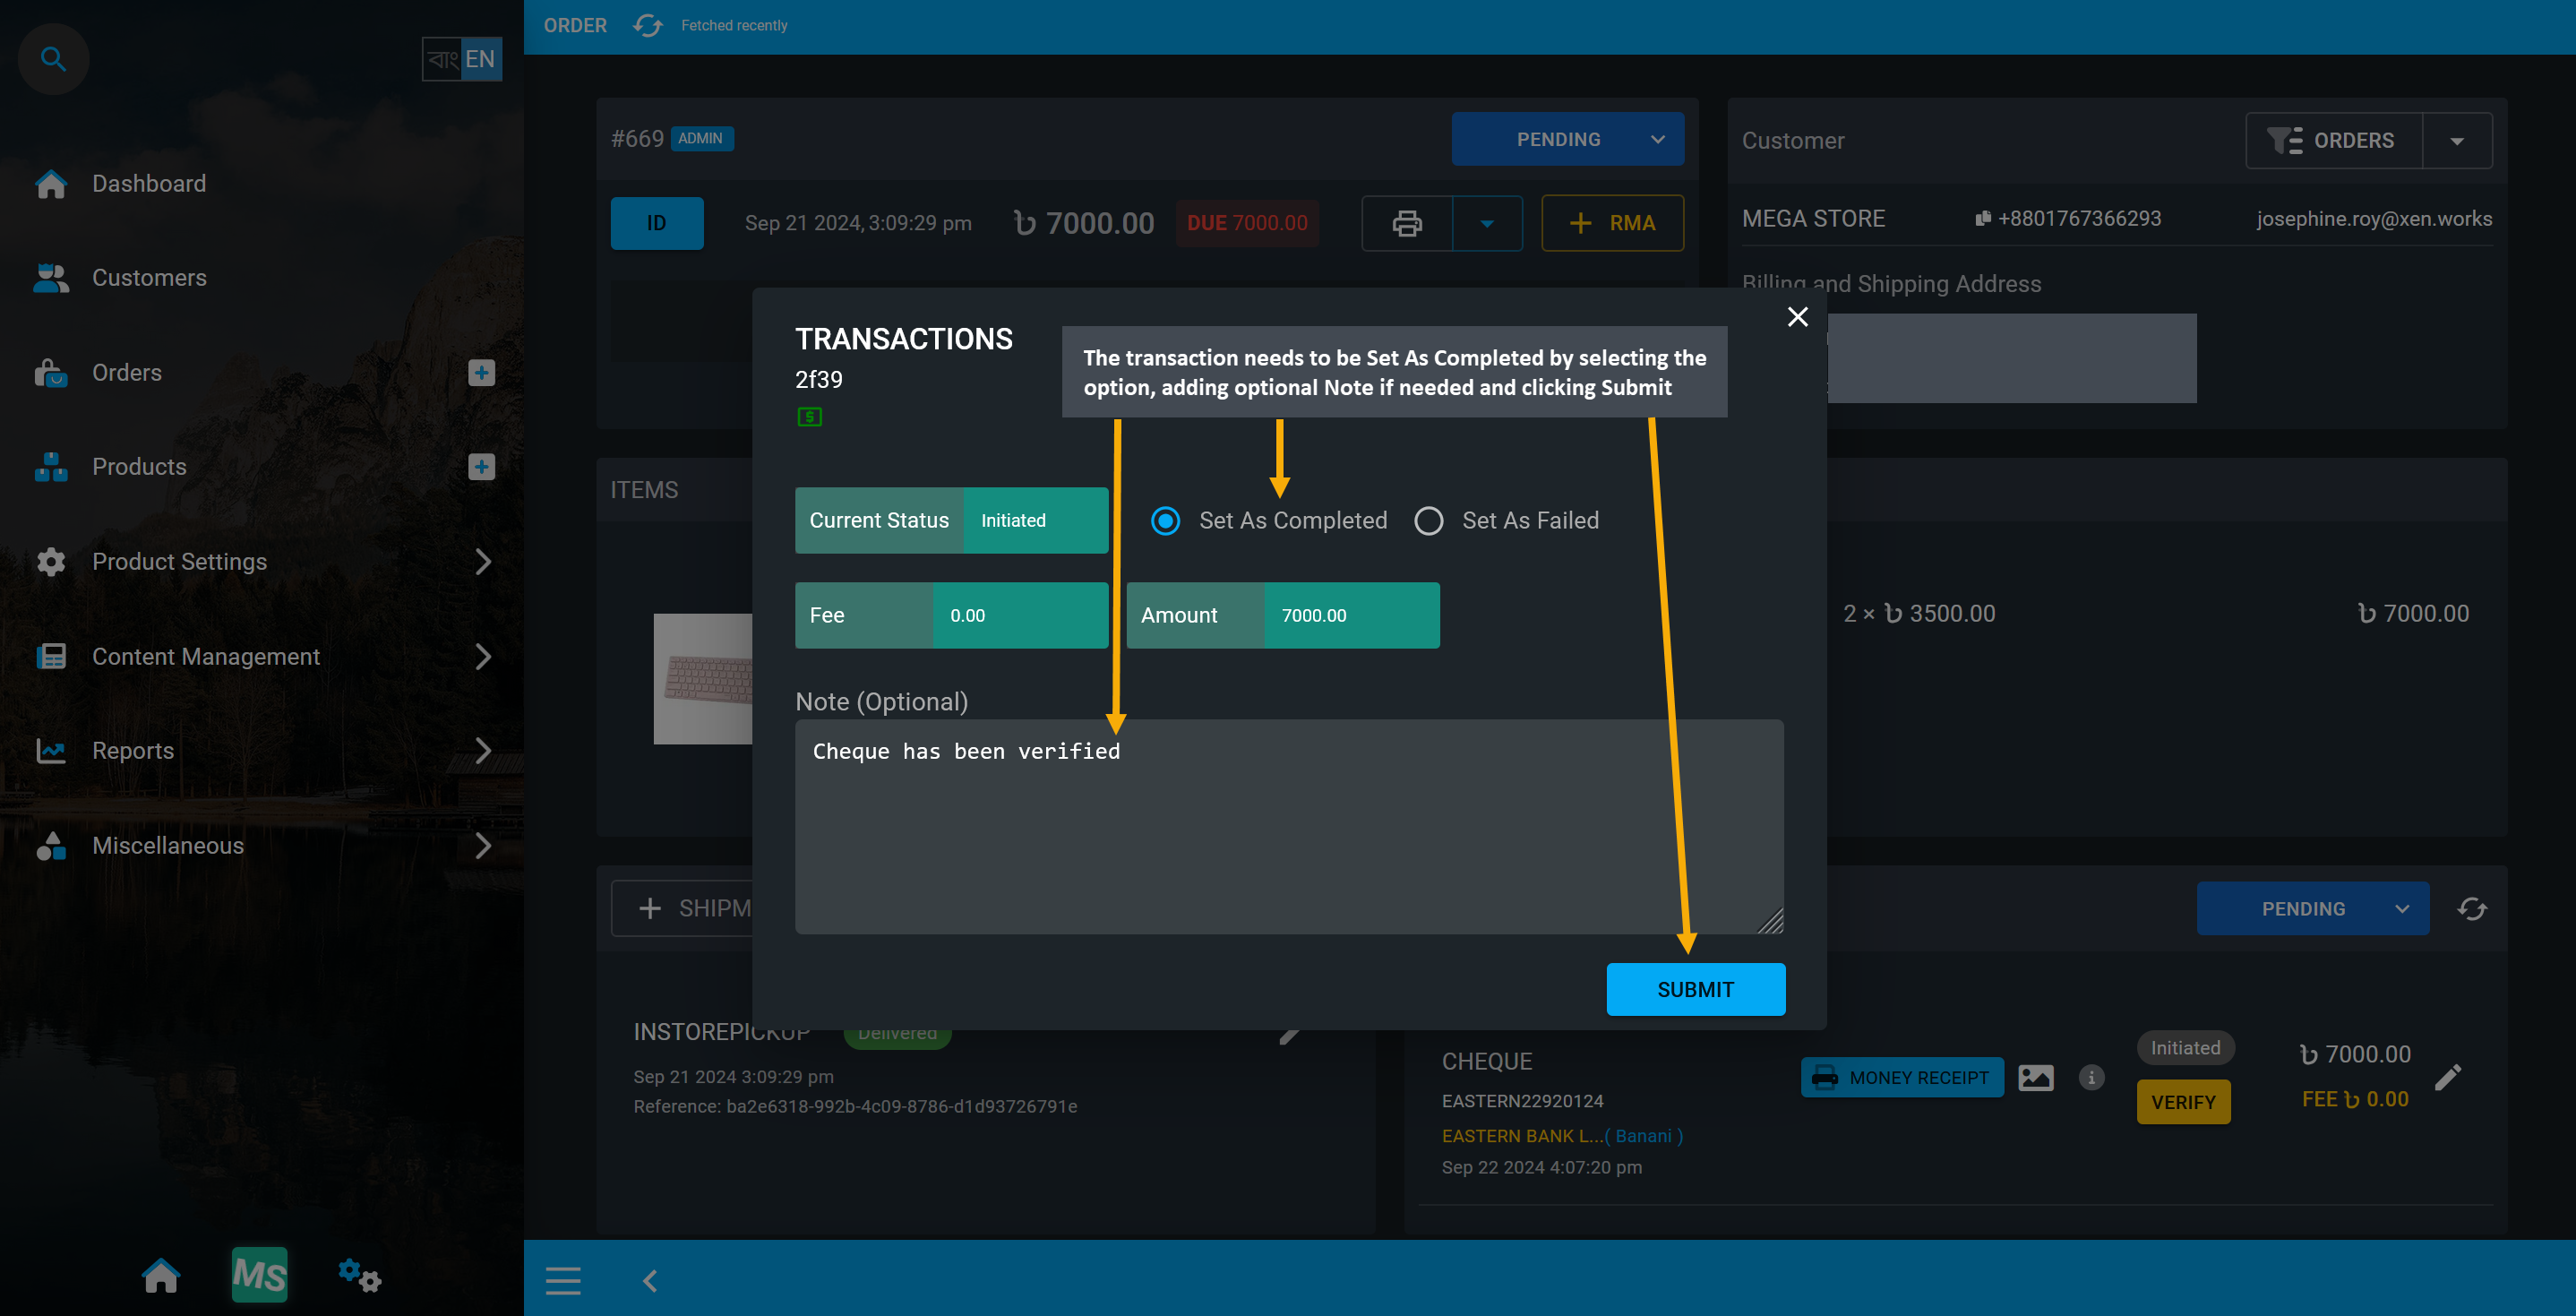
Image 8: Transaction needs to be Set As Completed by selecting the option and clicking Submit.
Once the payment is Verified, the payment method will show as Completed and payment status will change to Paid. A Money Receipt can also be viewed and printed for the verified transaction to provide to customer.
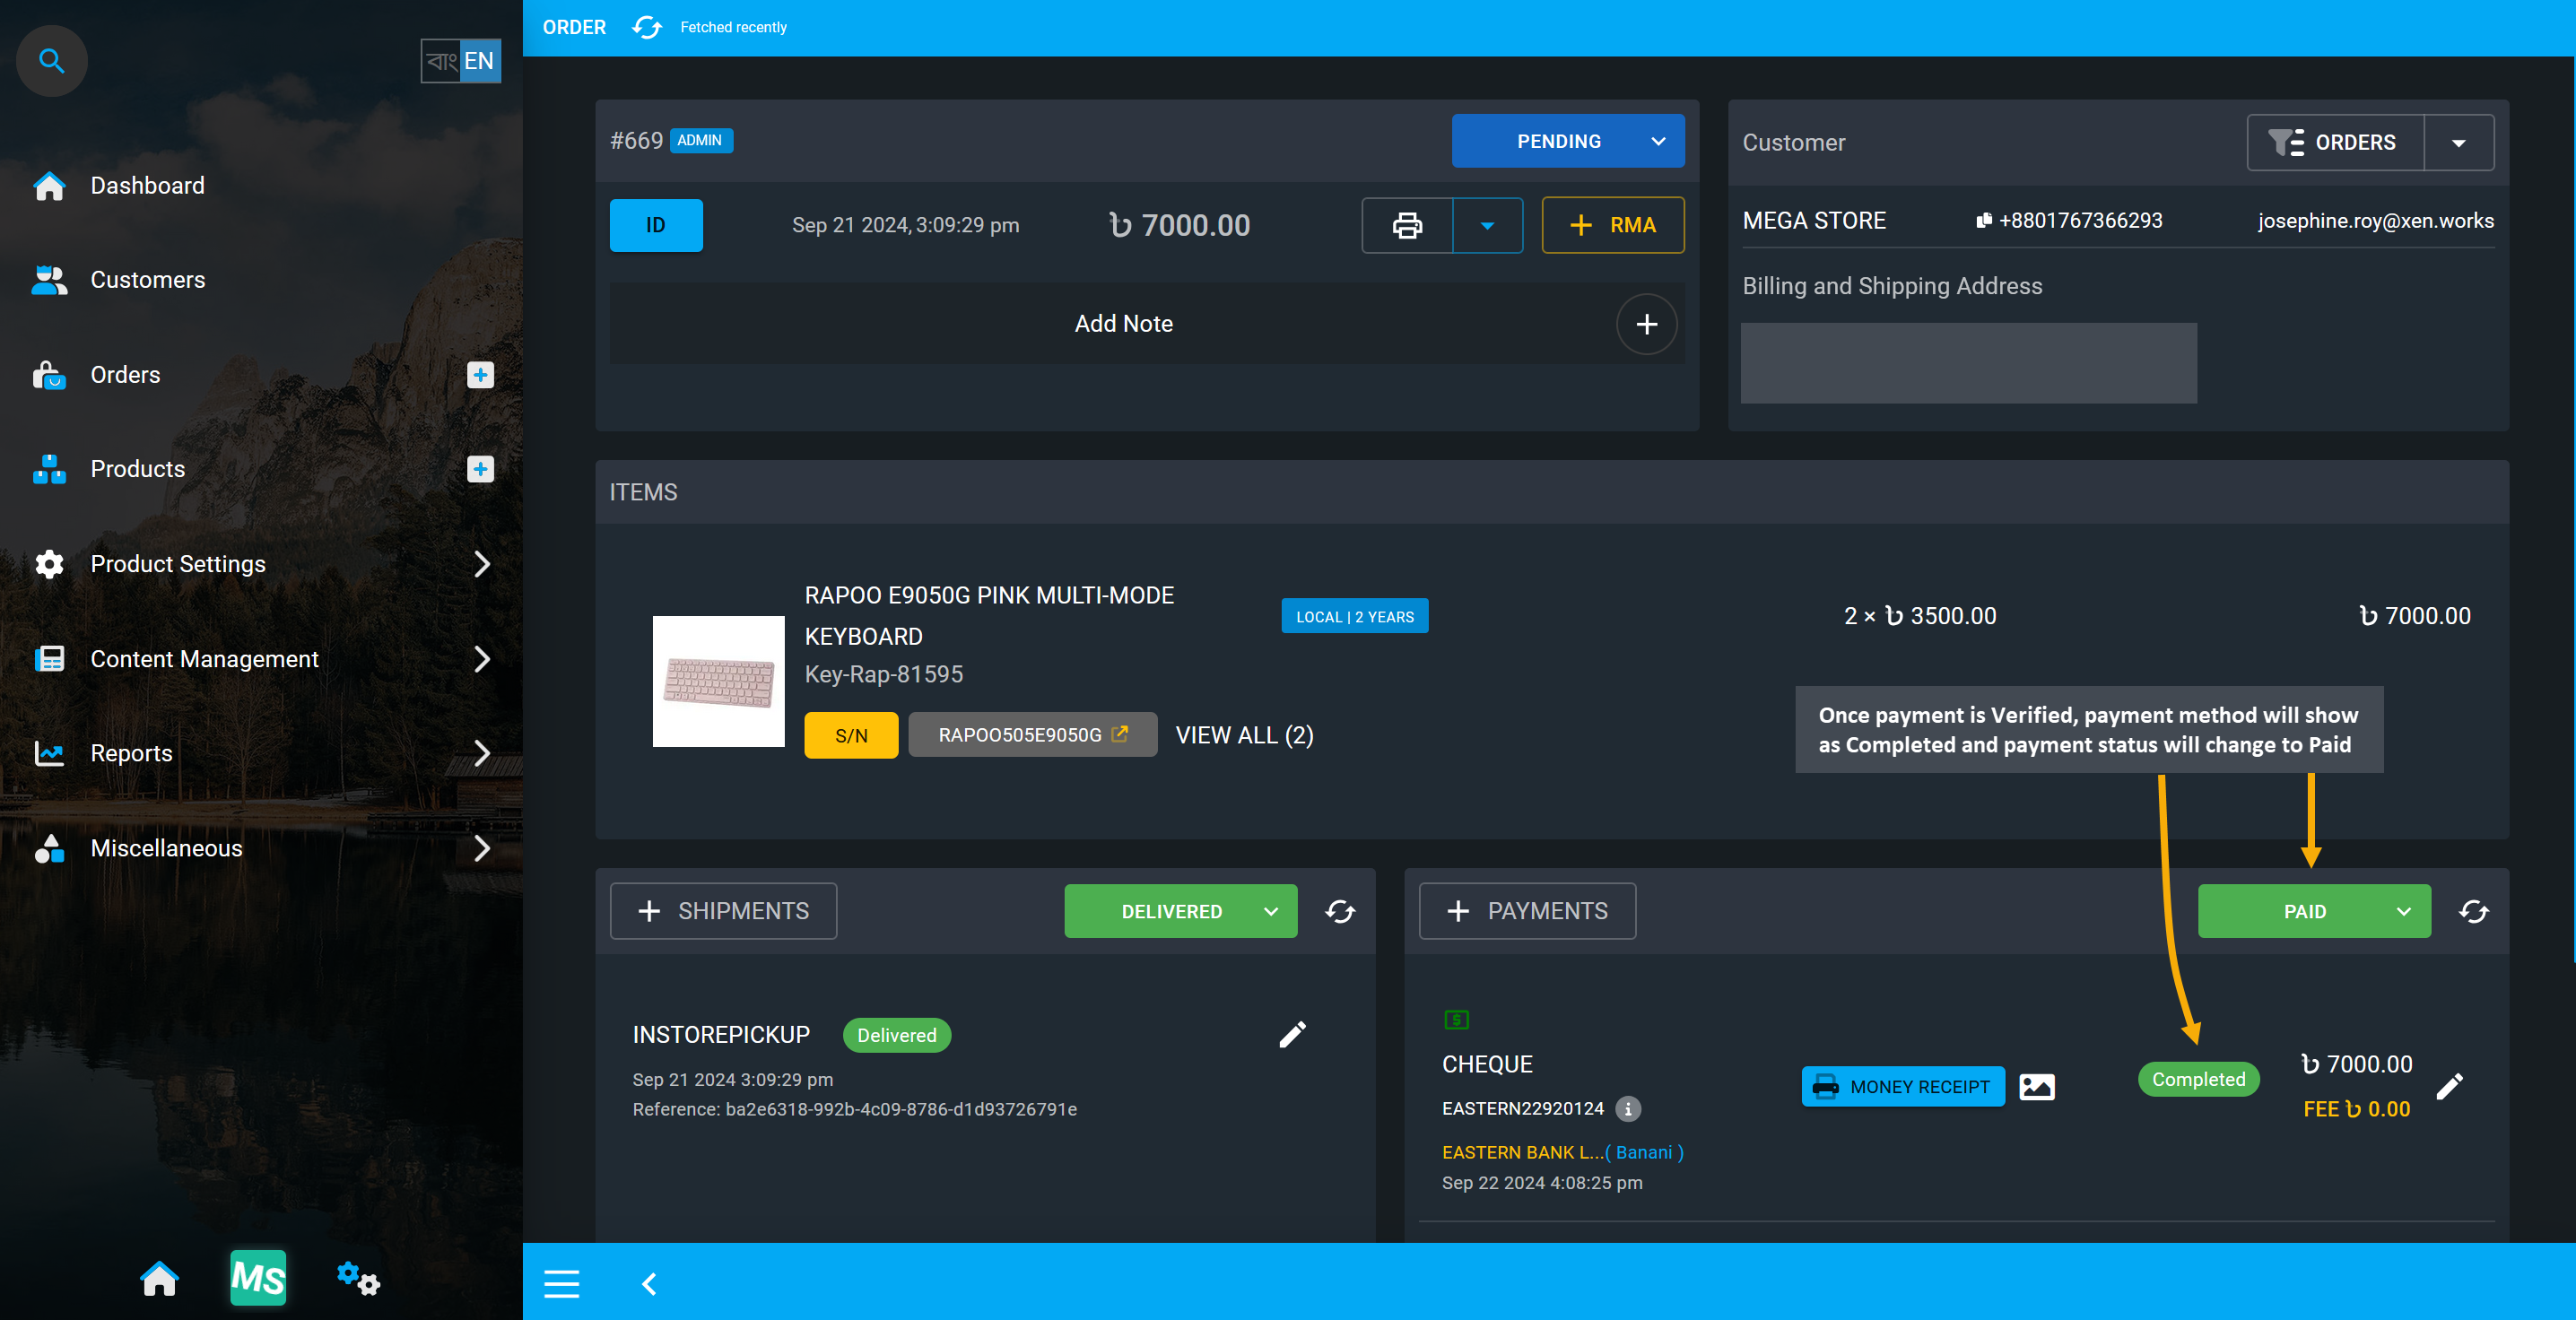
Image 9: Payment method will show as Completed and payment status will be Paid when verified.
After completing payment, if there is no remaining transaction and payment status is Paid, then Order status can be updated to Completed and later changed to only Canceled if customer requests cancelation.
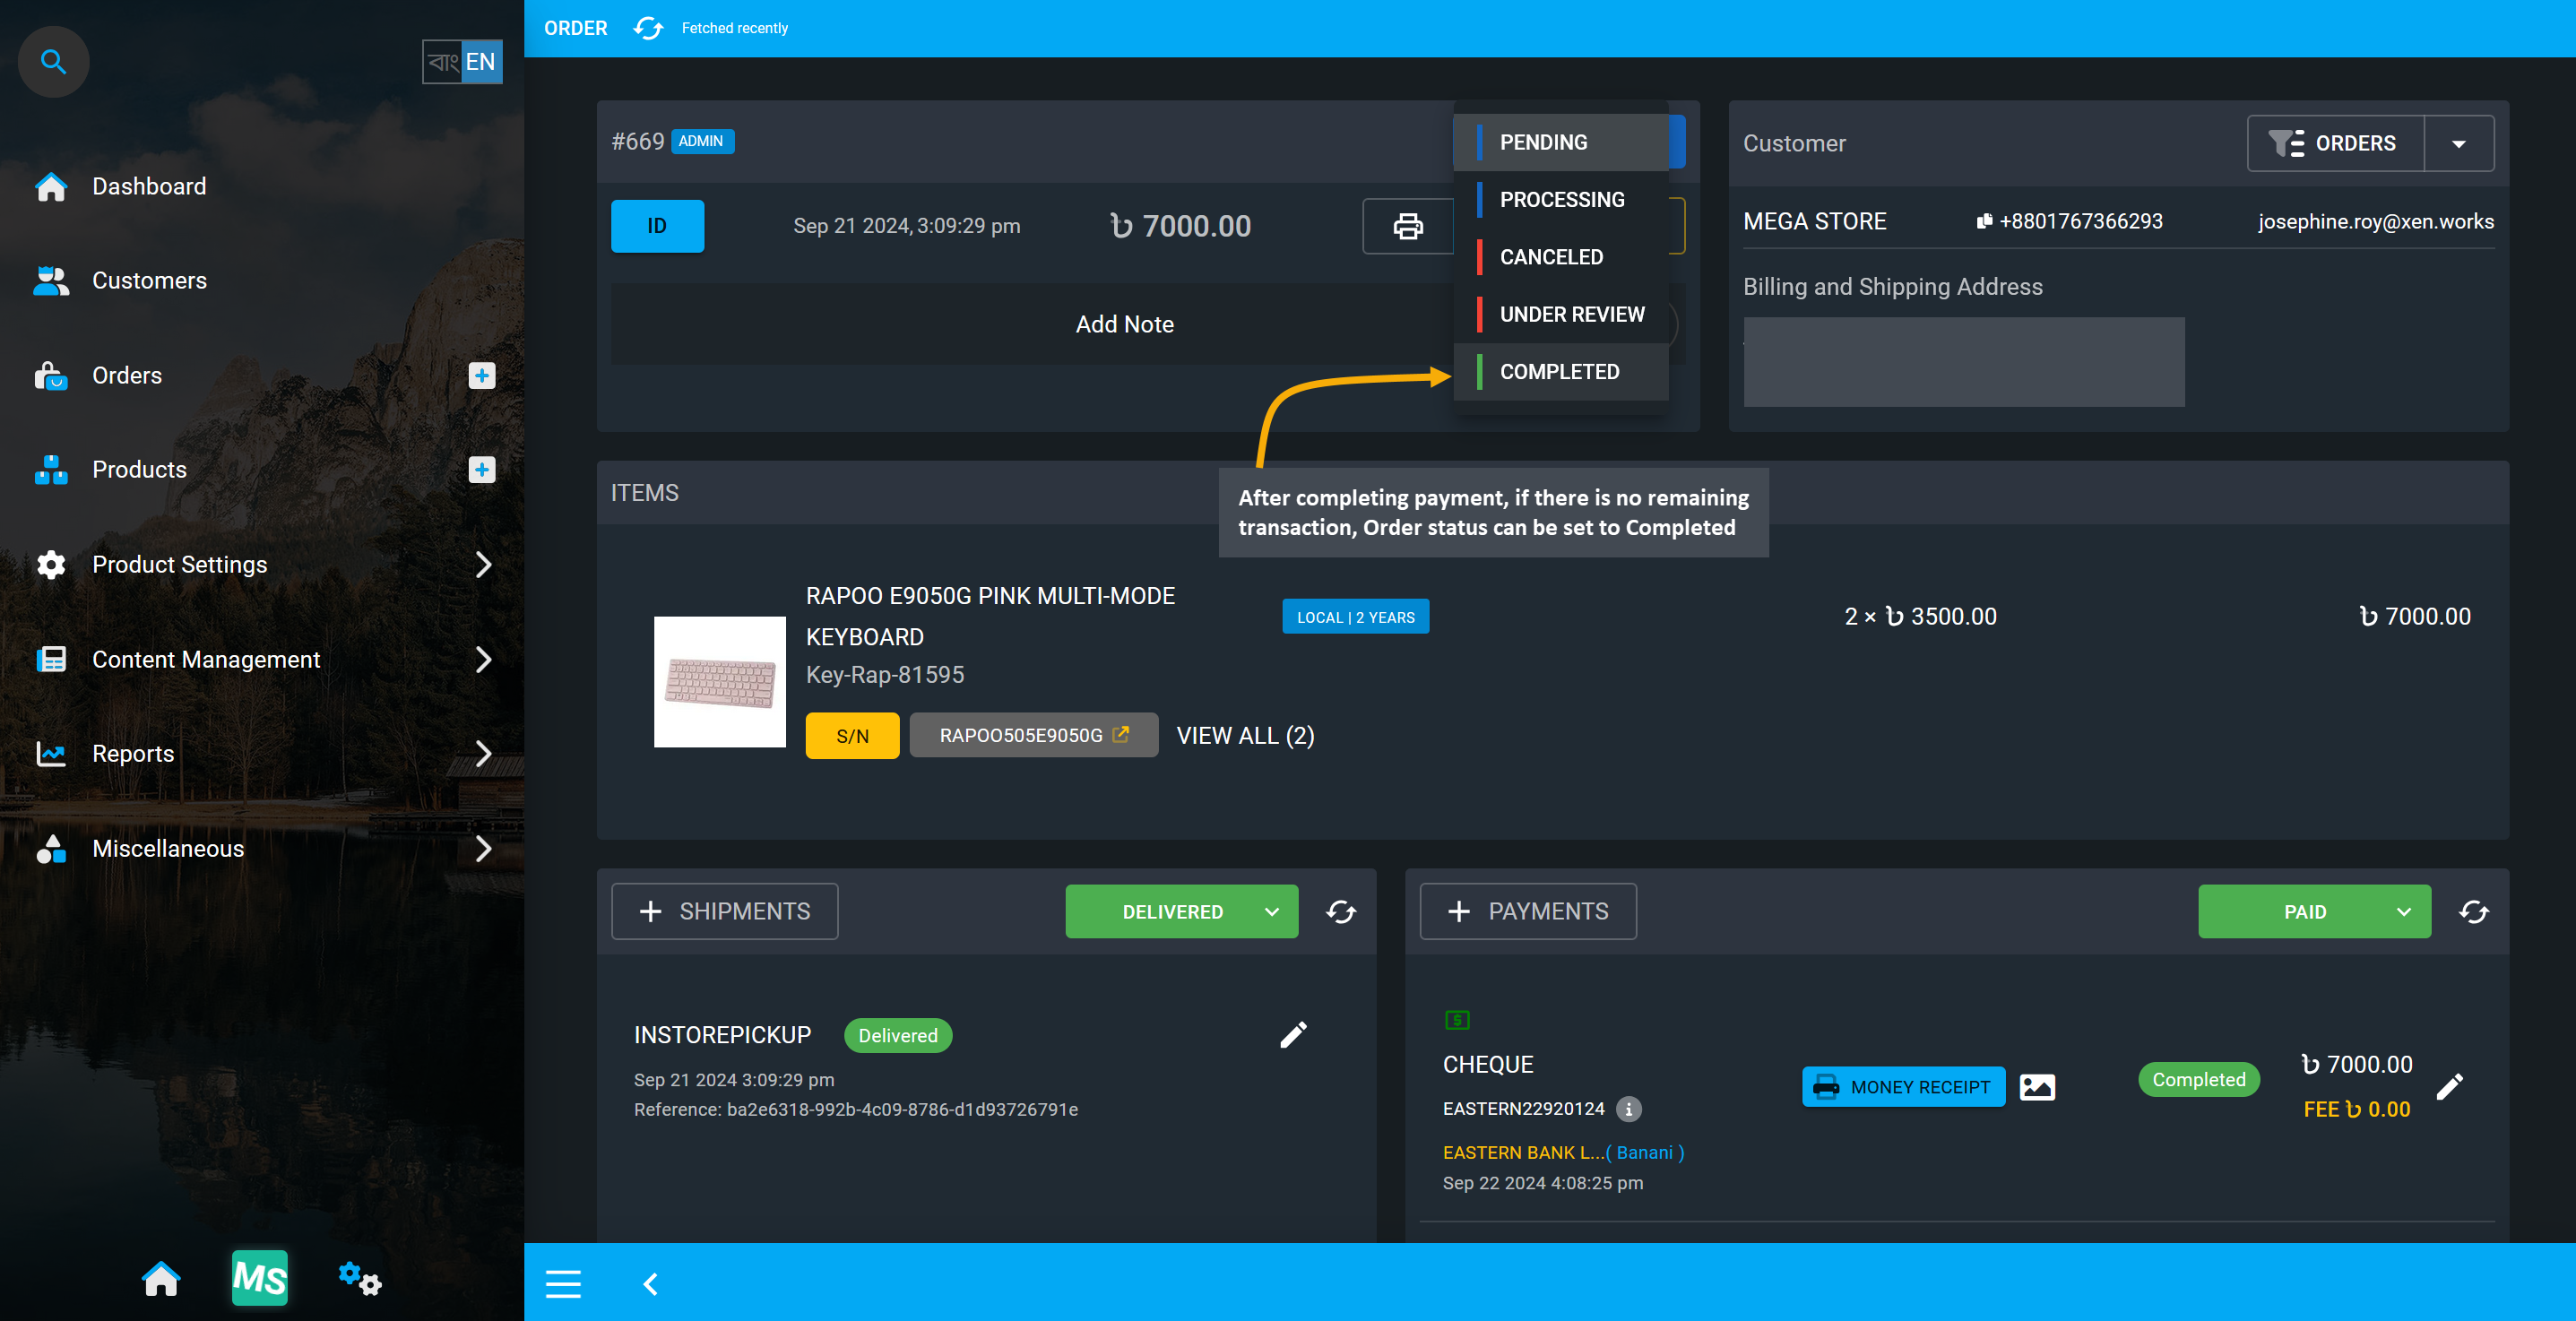
Image 10: If there is no remaining transaction for order, Order status can be set to Completed.
A modal will show up asking to confirm that the transaction status is updated, and if Order status should be updated to Completed too. Order status can no longer be changed after they are marked as Completed. Click Agree to update Order status to Completed after confirming that Order payment is completed.
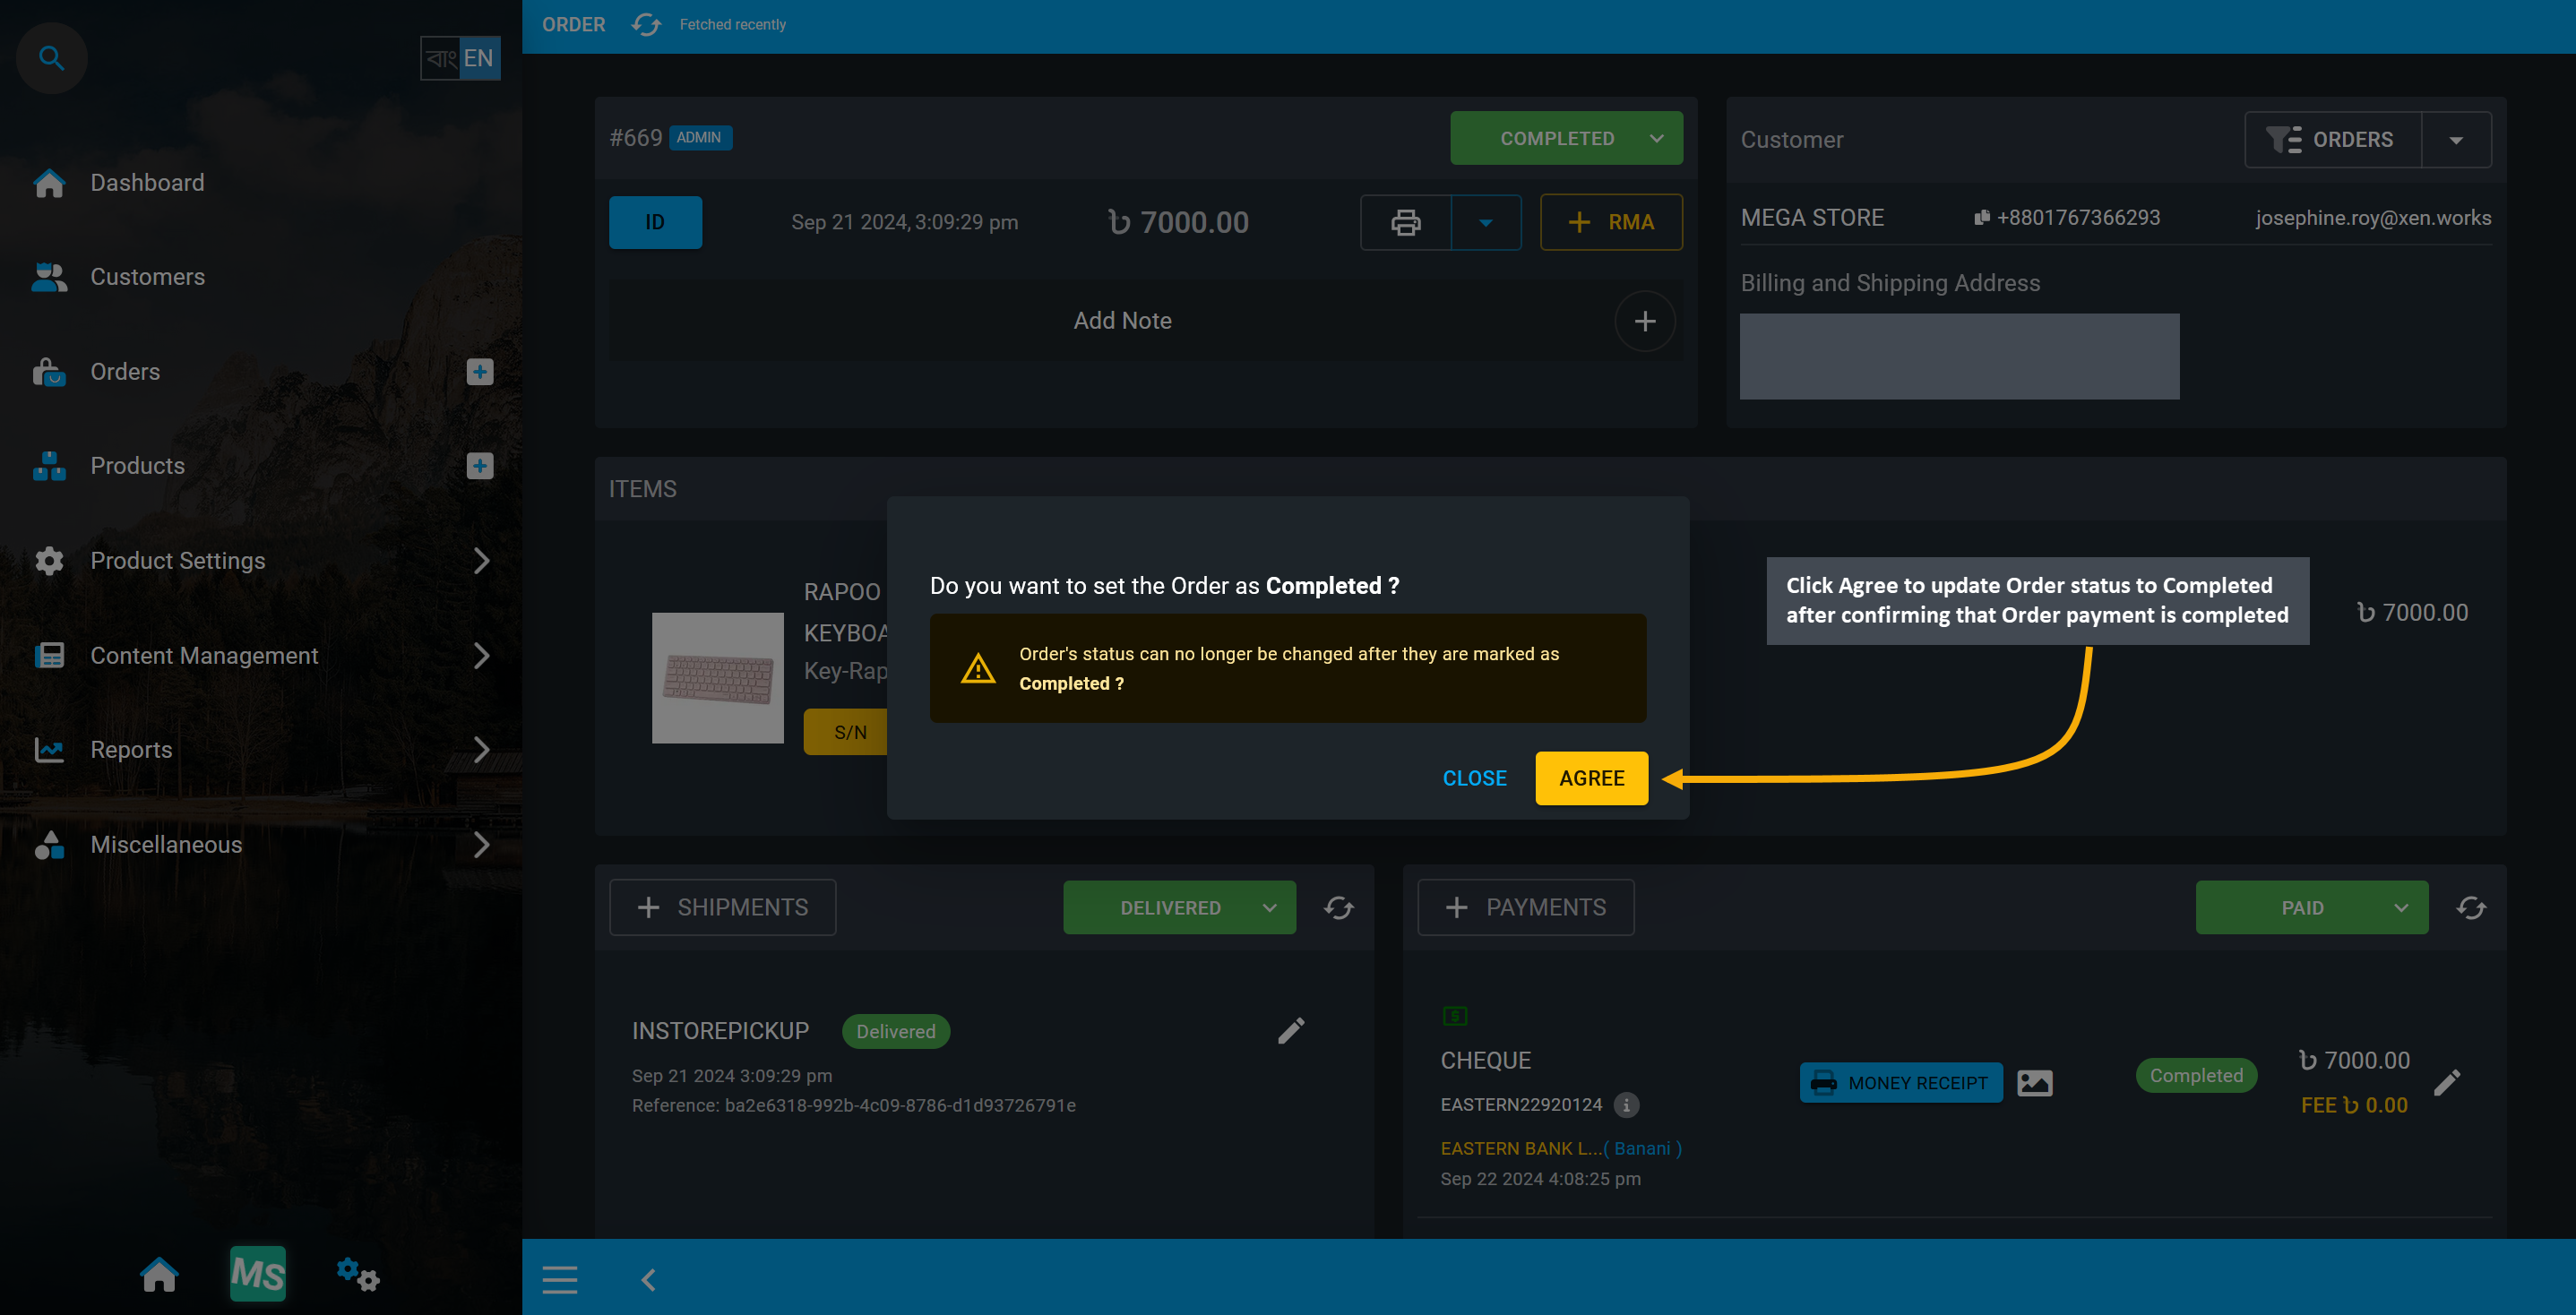
Image 11: Click Agree to update Order status to Completed after confirming payment is completed.
Upon successfully confirming to update the Order status, Order status will now show as Completed, which means that the Order transaction is completed and the Order’s profit-loss will be added to Revenues.
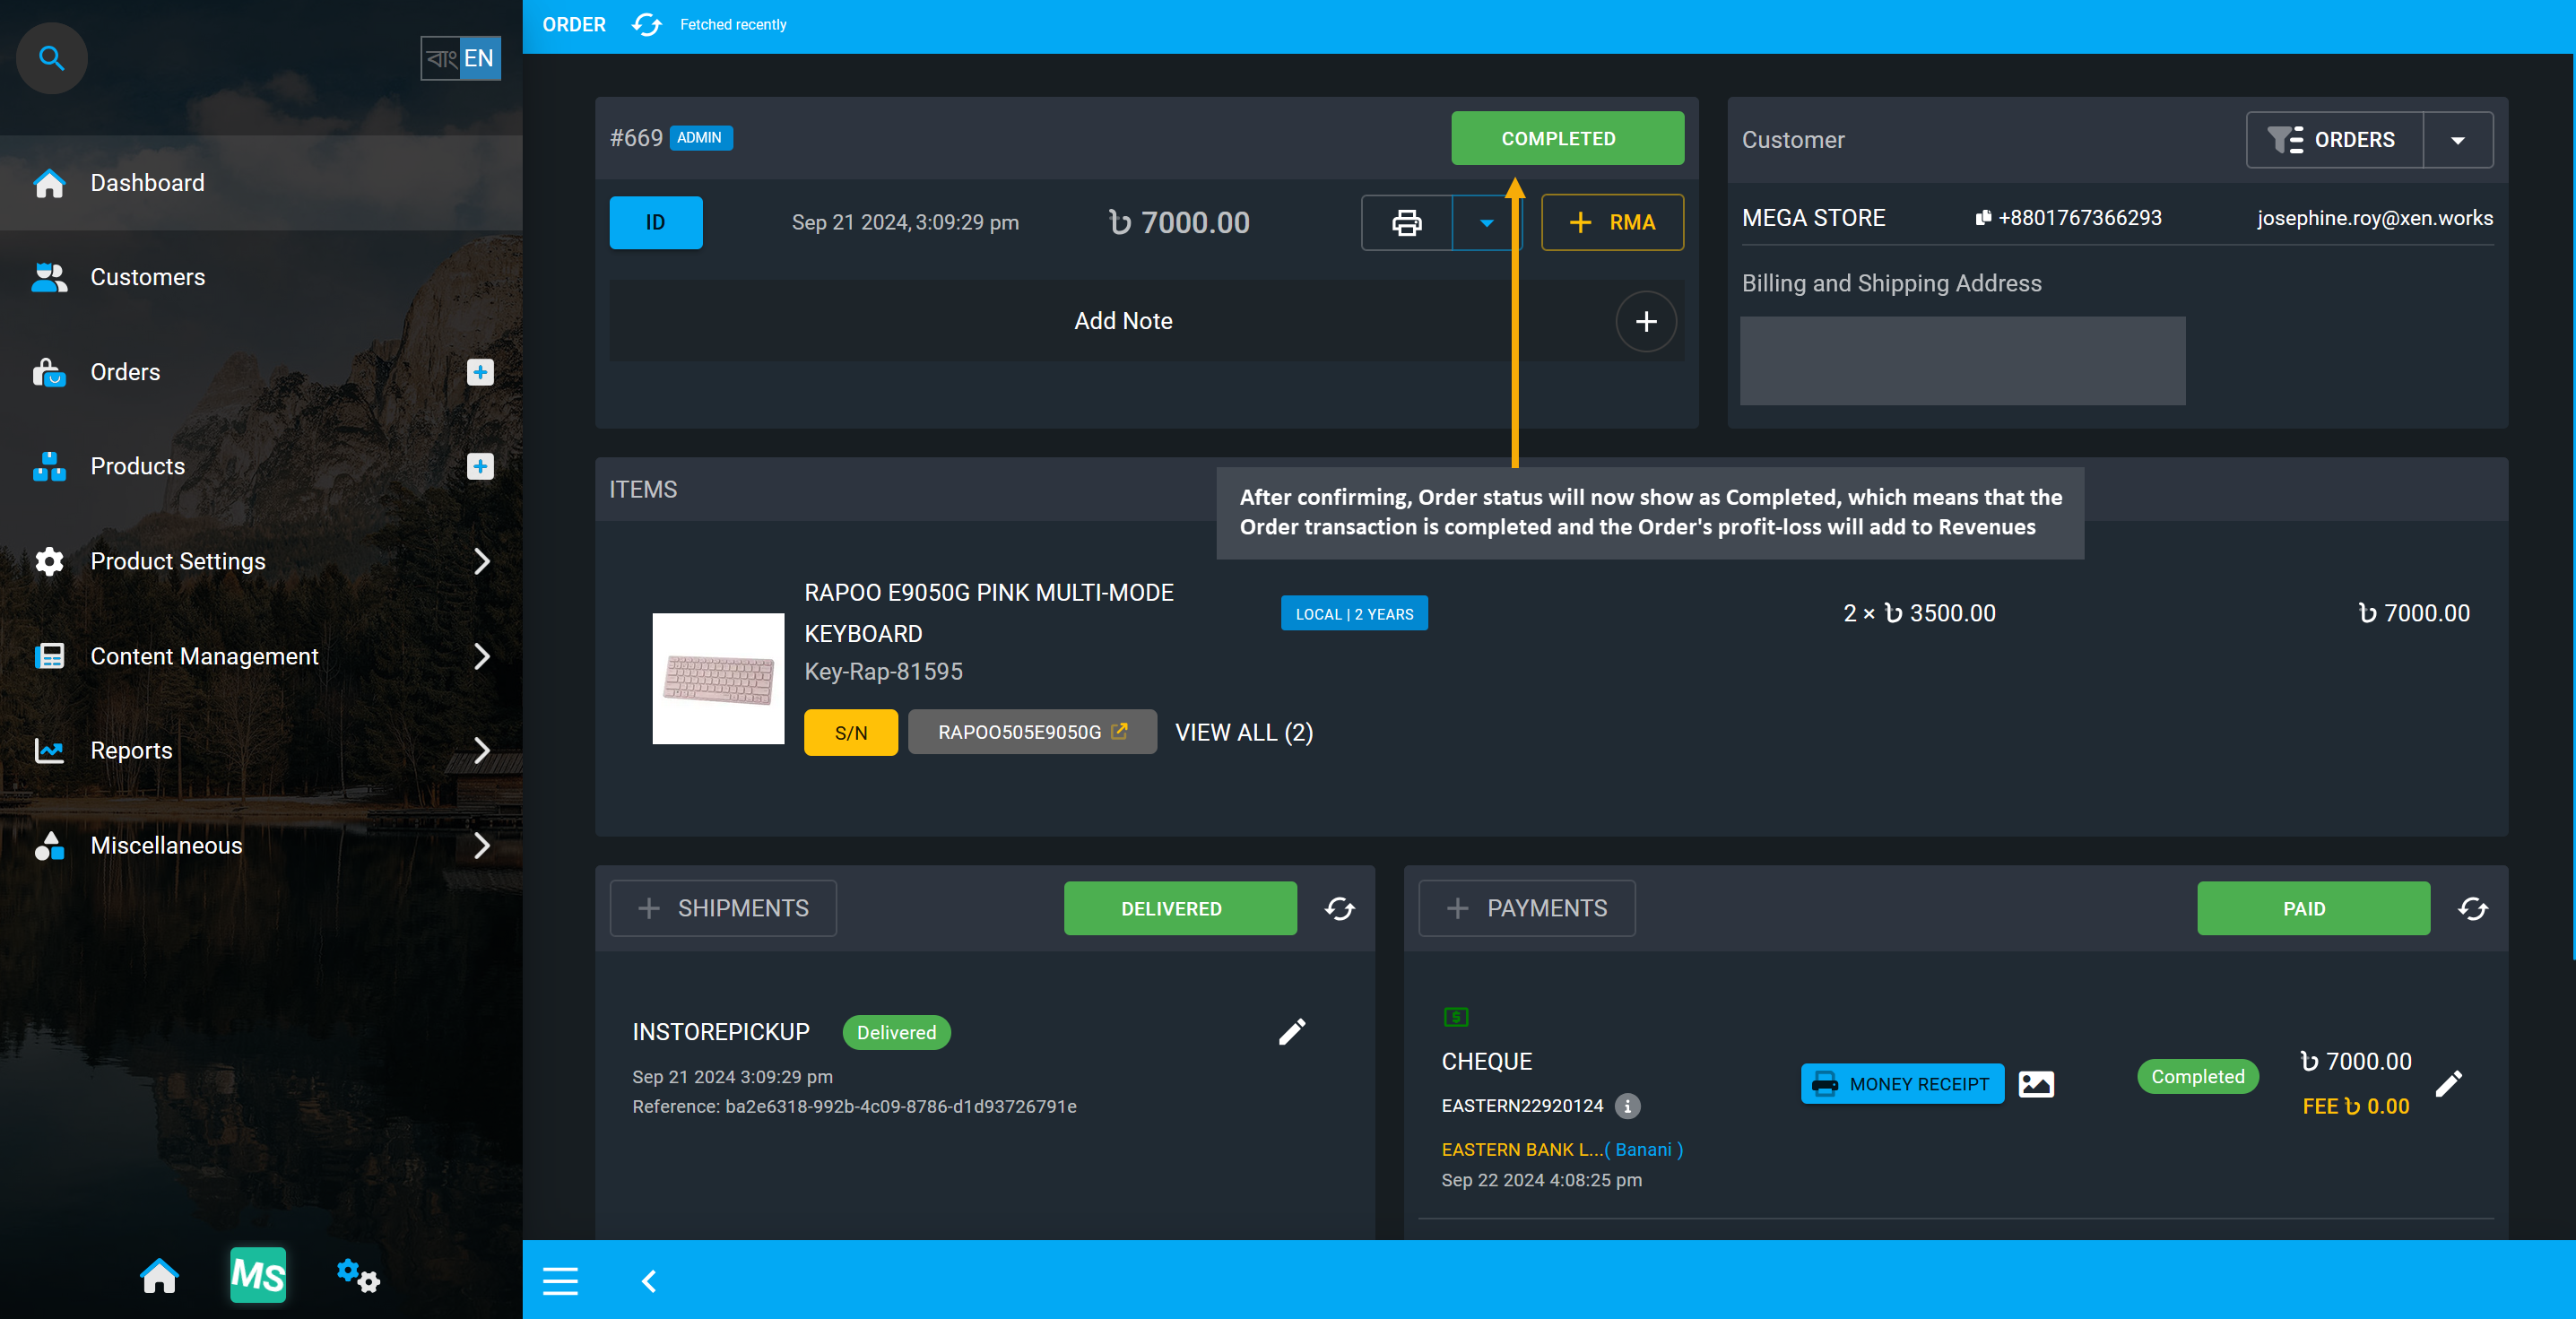
Image 12: Order status will now show as Completed, which means its profit-loss will add to Revenues.
Completed Orders on Order List Page will show Payment status as Paid and Shipment status as delivered.
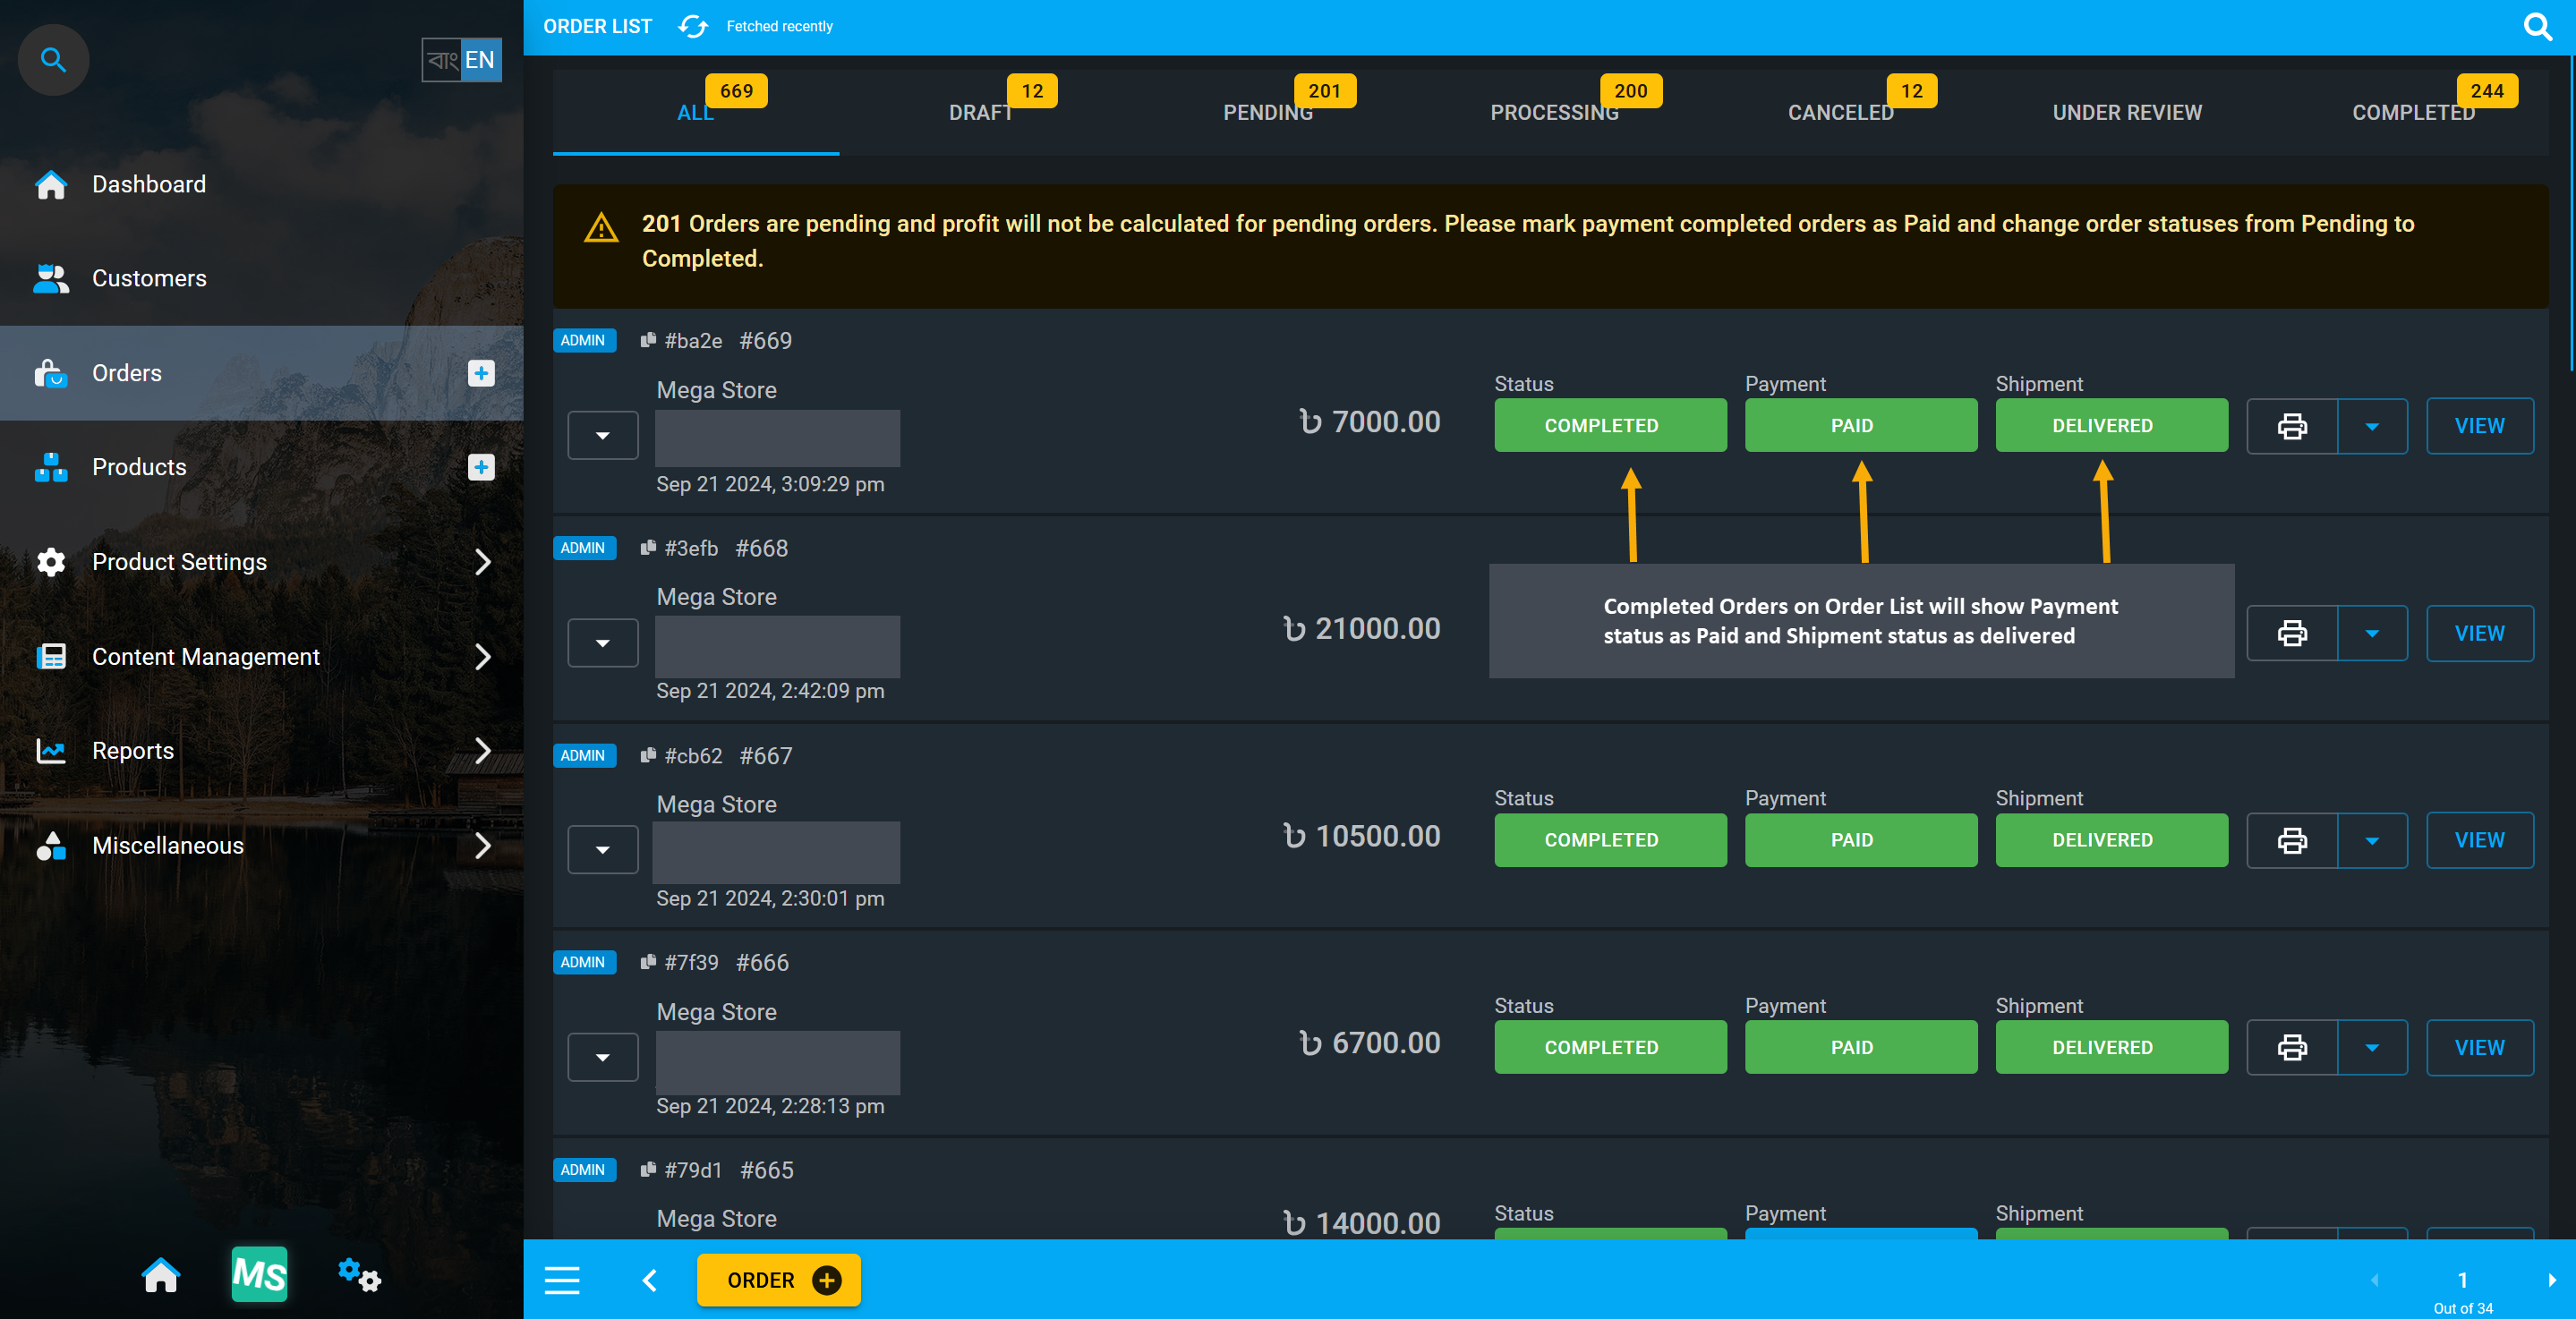
Image 13: All Completed Orders will show Payment status as Paid and Shipment status as delivered.
Enable Draft Order (Order Without Payment)
If an Order is created without payment, with the Enable Draft Order option enabled from Settings, then the Order will be held in a Draft status and cannot have payments or shipments added. Draft Order will not also show on Ledger unless the Order status is changed to Pending. The Enable Draft Order option can be found from Web Settings under Config your Business of All Settings.
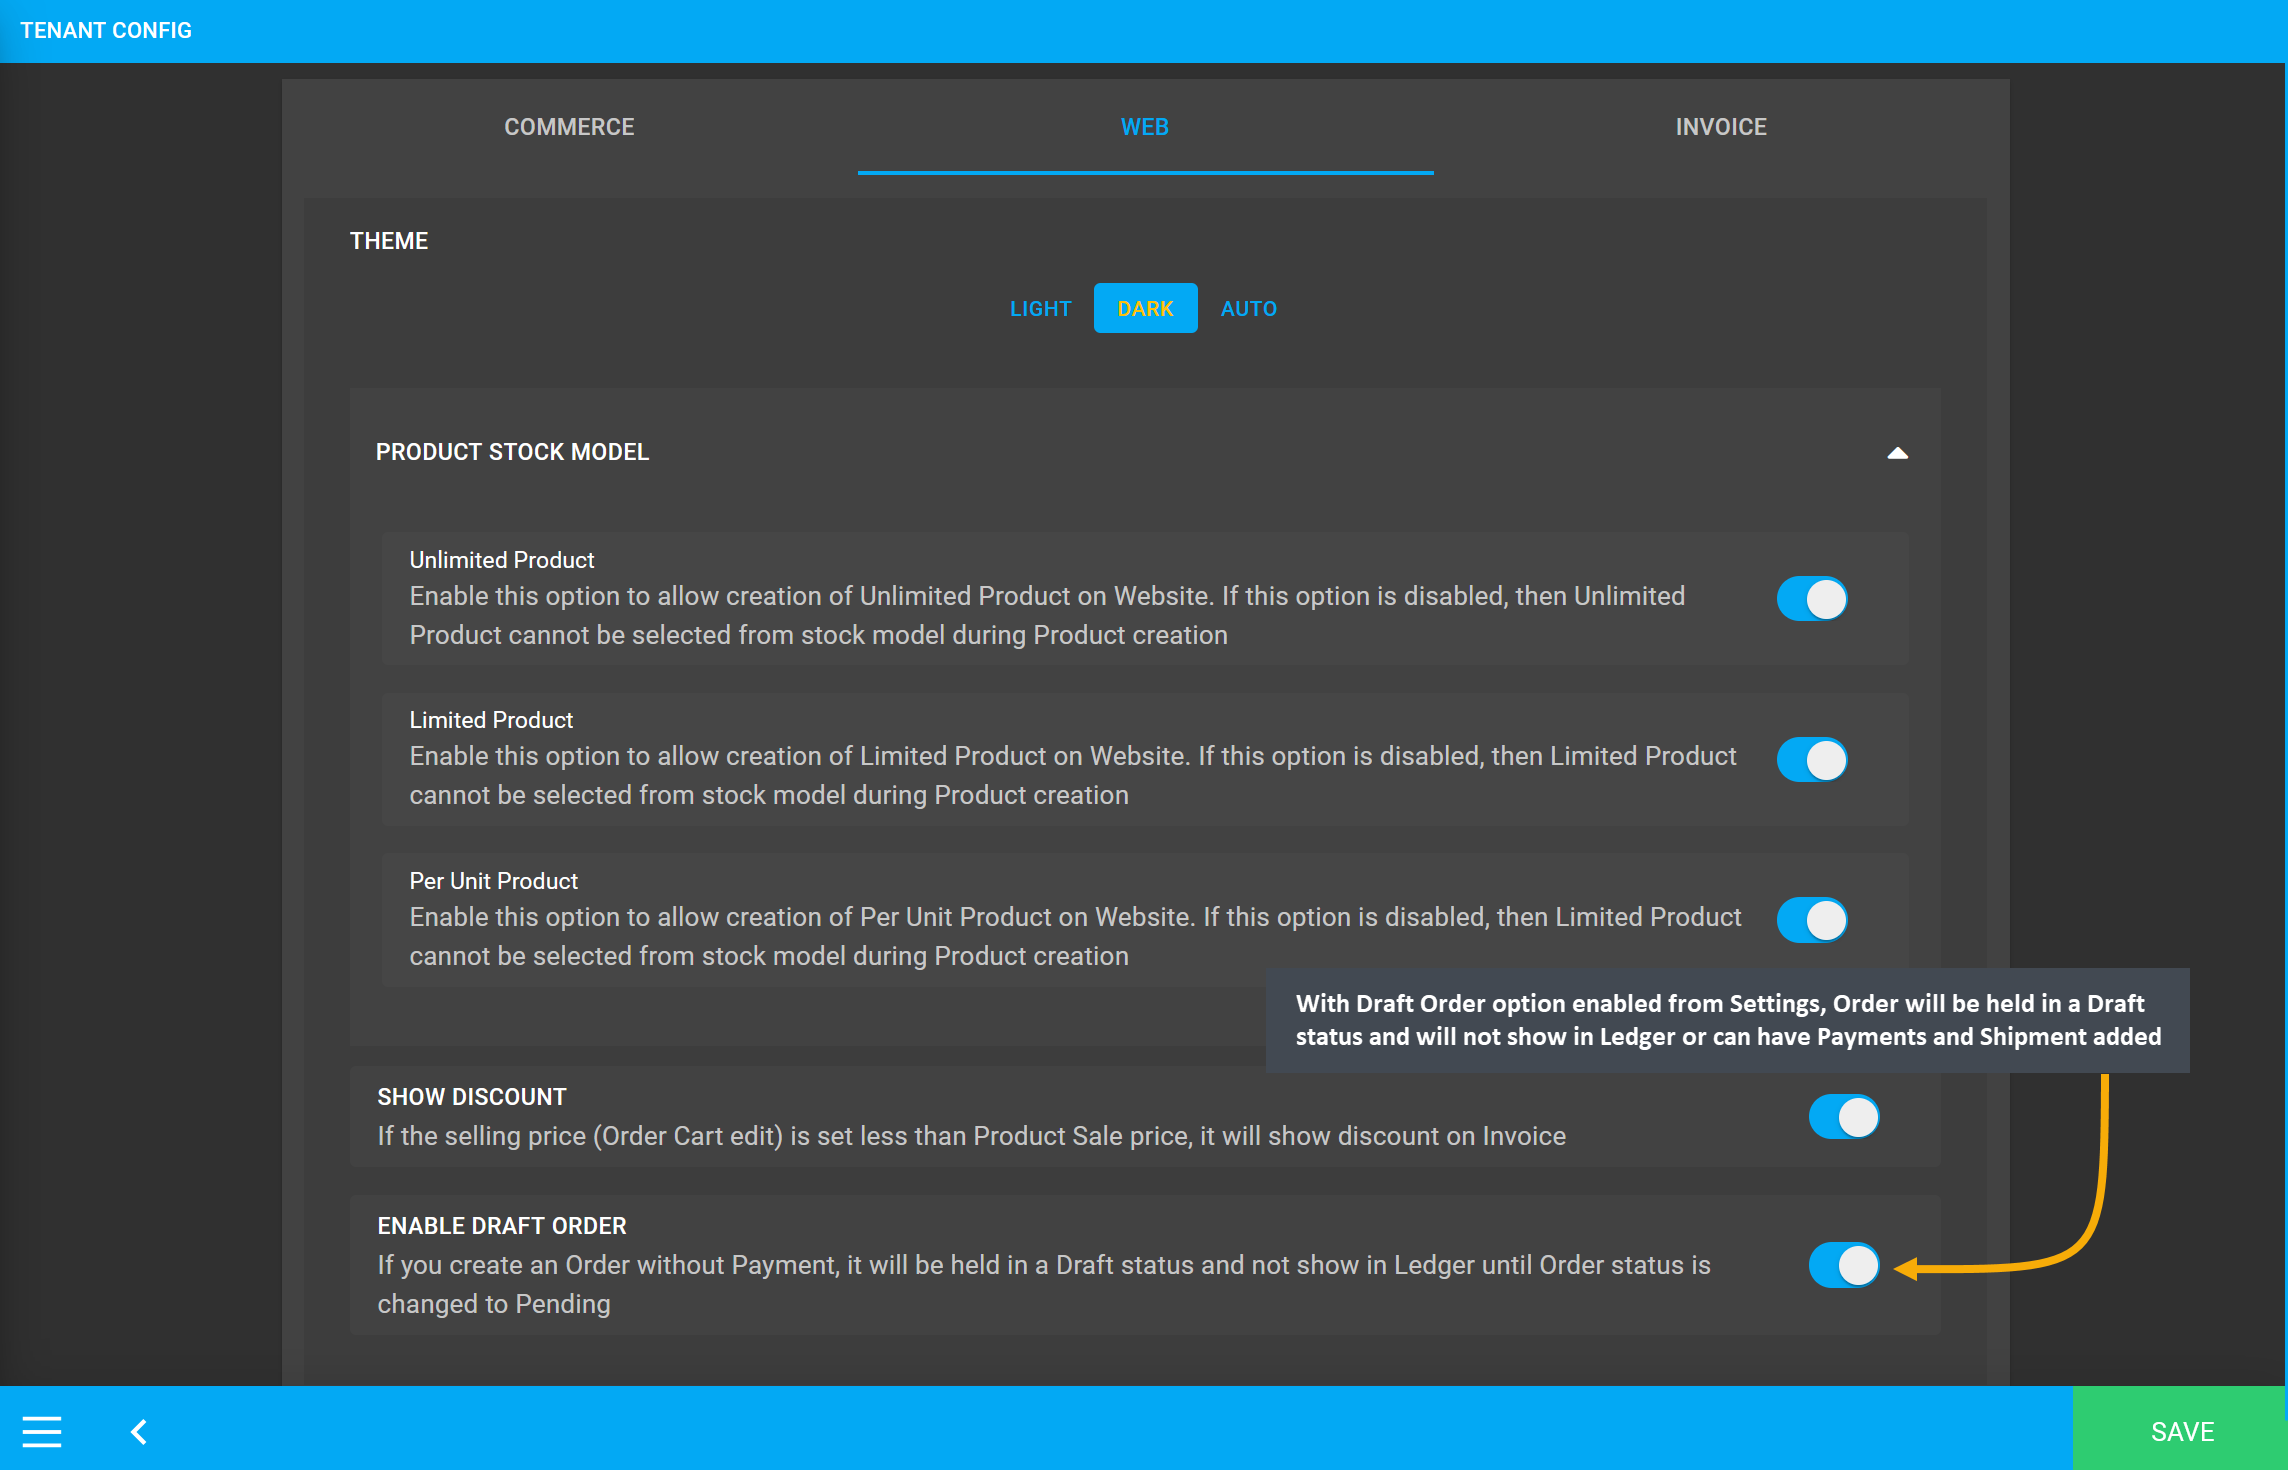
Image 14: With Draft Order option enabled from Settings, Order will be held in a Draft status.
When an Order is completed without selecting any payment on Order Cart, the Order will be created as a Draft Order. Payments and Shipment cannot be added for a Draft Order, unless Order status is changed to Pending. Draft Order will not also show on Ledger, it will show on Ledger only after Order status is changed to Pending. Example screenshots are provided in following steps.
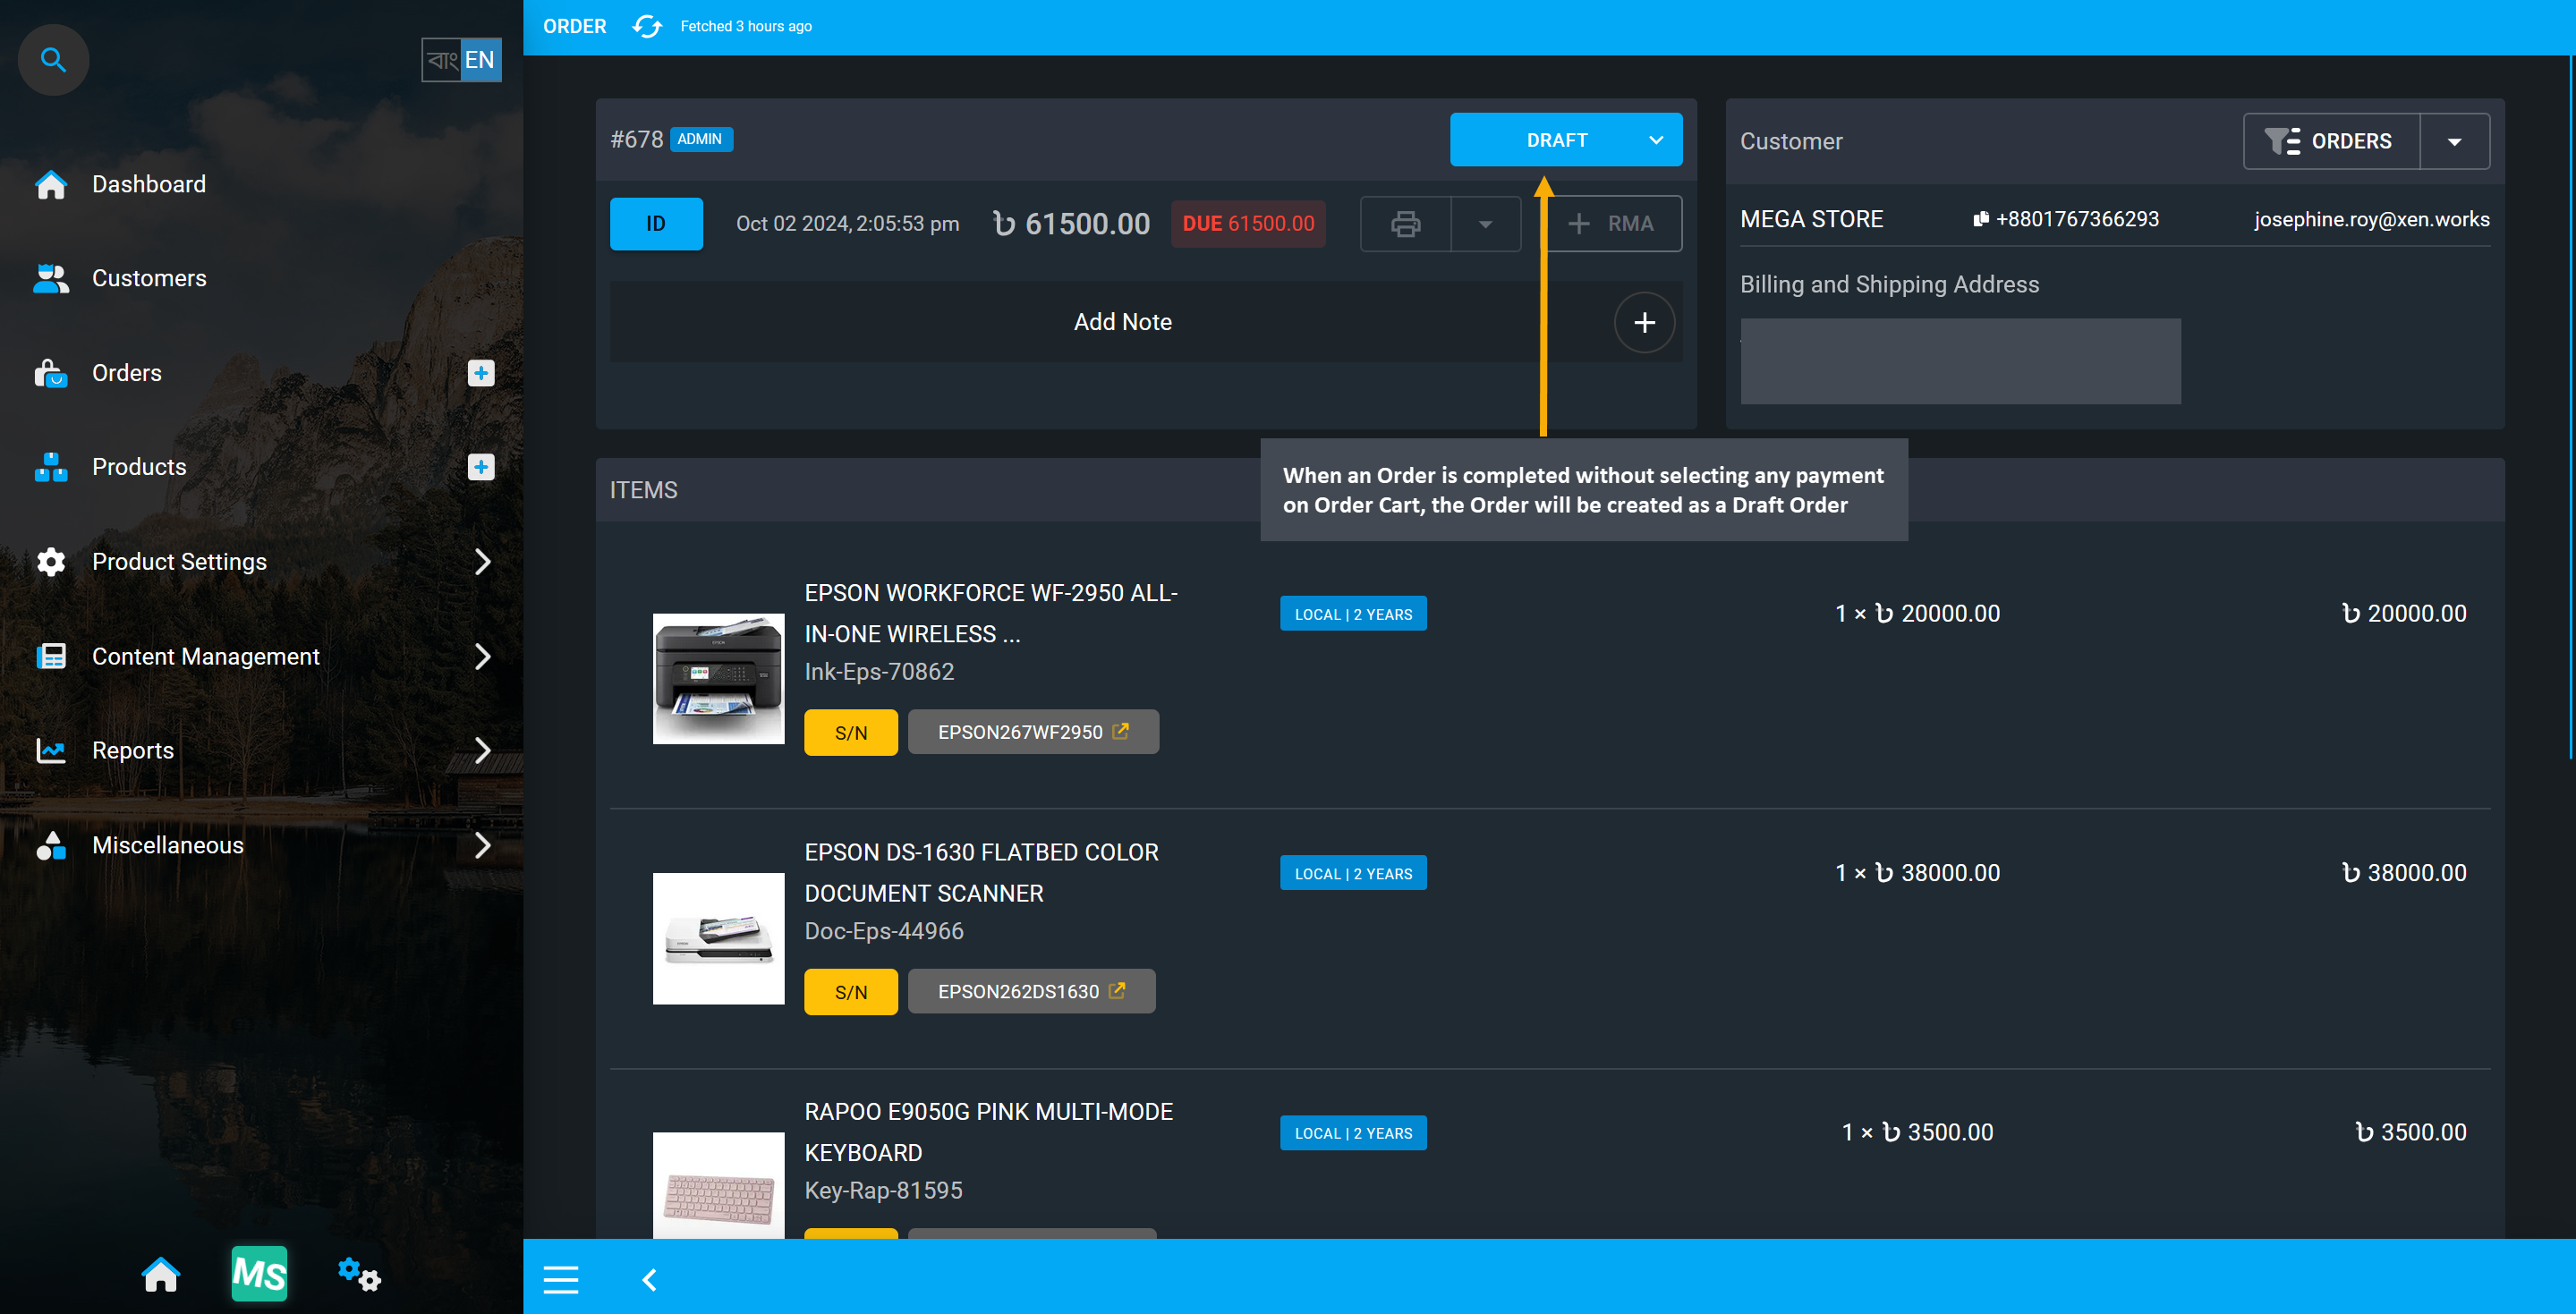
Image 15: Order will be created as a Draft Order when it is completed without selecting any payment.
When an order is a Draft Order, no Payments or Shipments can be added to it unless the Order status is changed to Pending. Payments and Shipments tabs are disabled for Draft Orders.
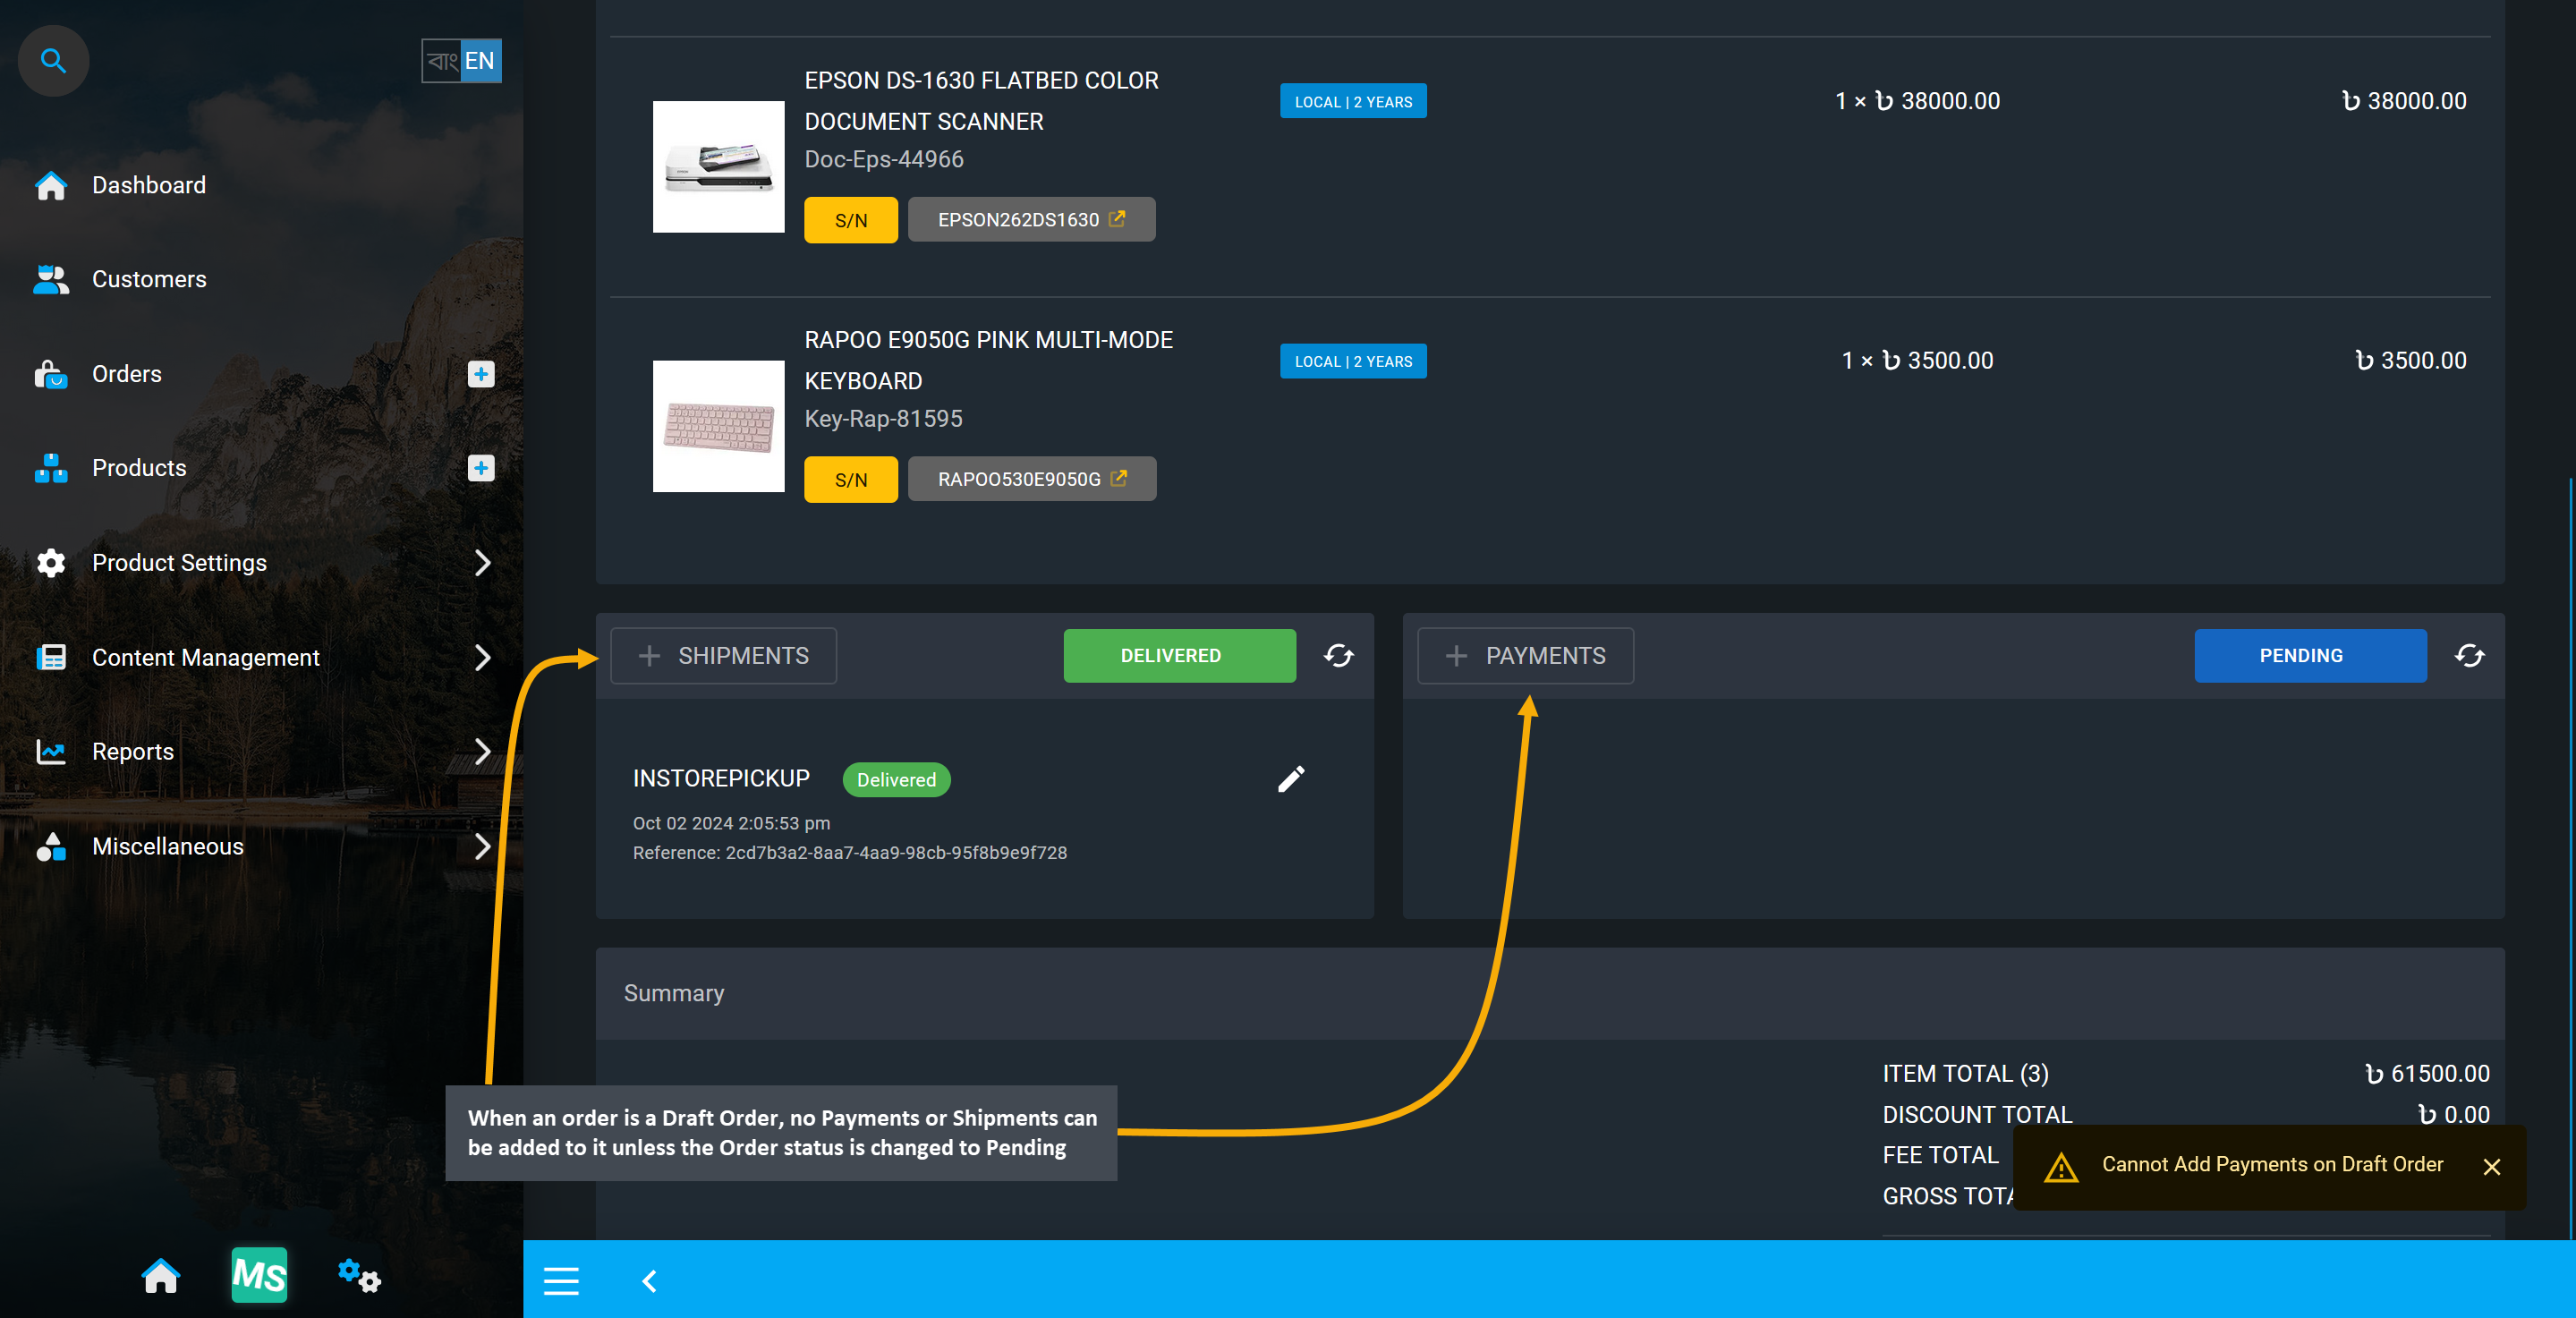
Image 16: Payments or Shipments are blocked for Draft Order till Order status is changed to Pending.
So, after Order status is changed to Pending, Payments and Shipments can be added to Order to view and print invoice. With Pending Order status, order transaction details will also show on Ledger.
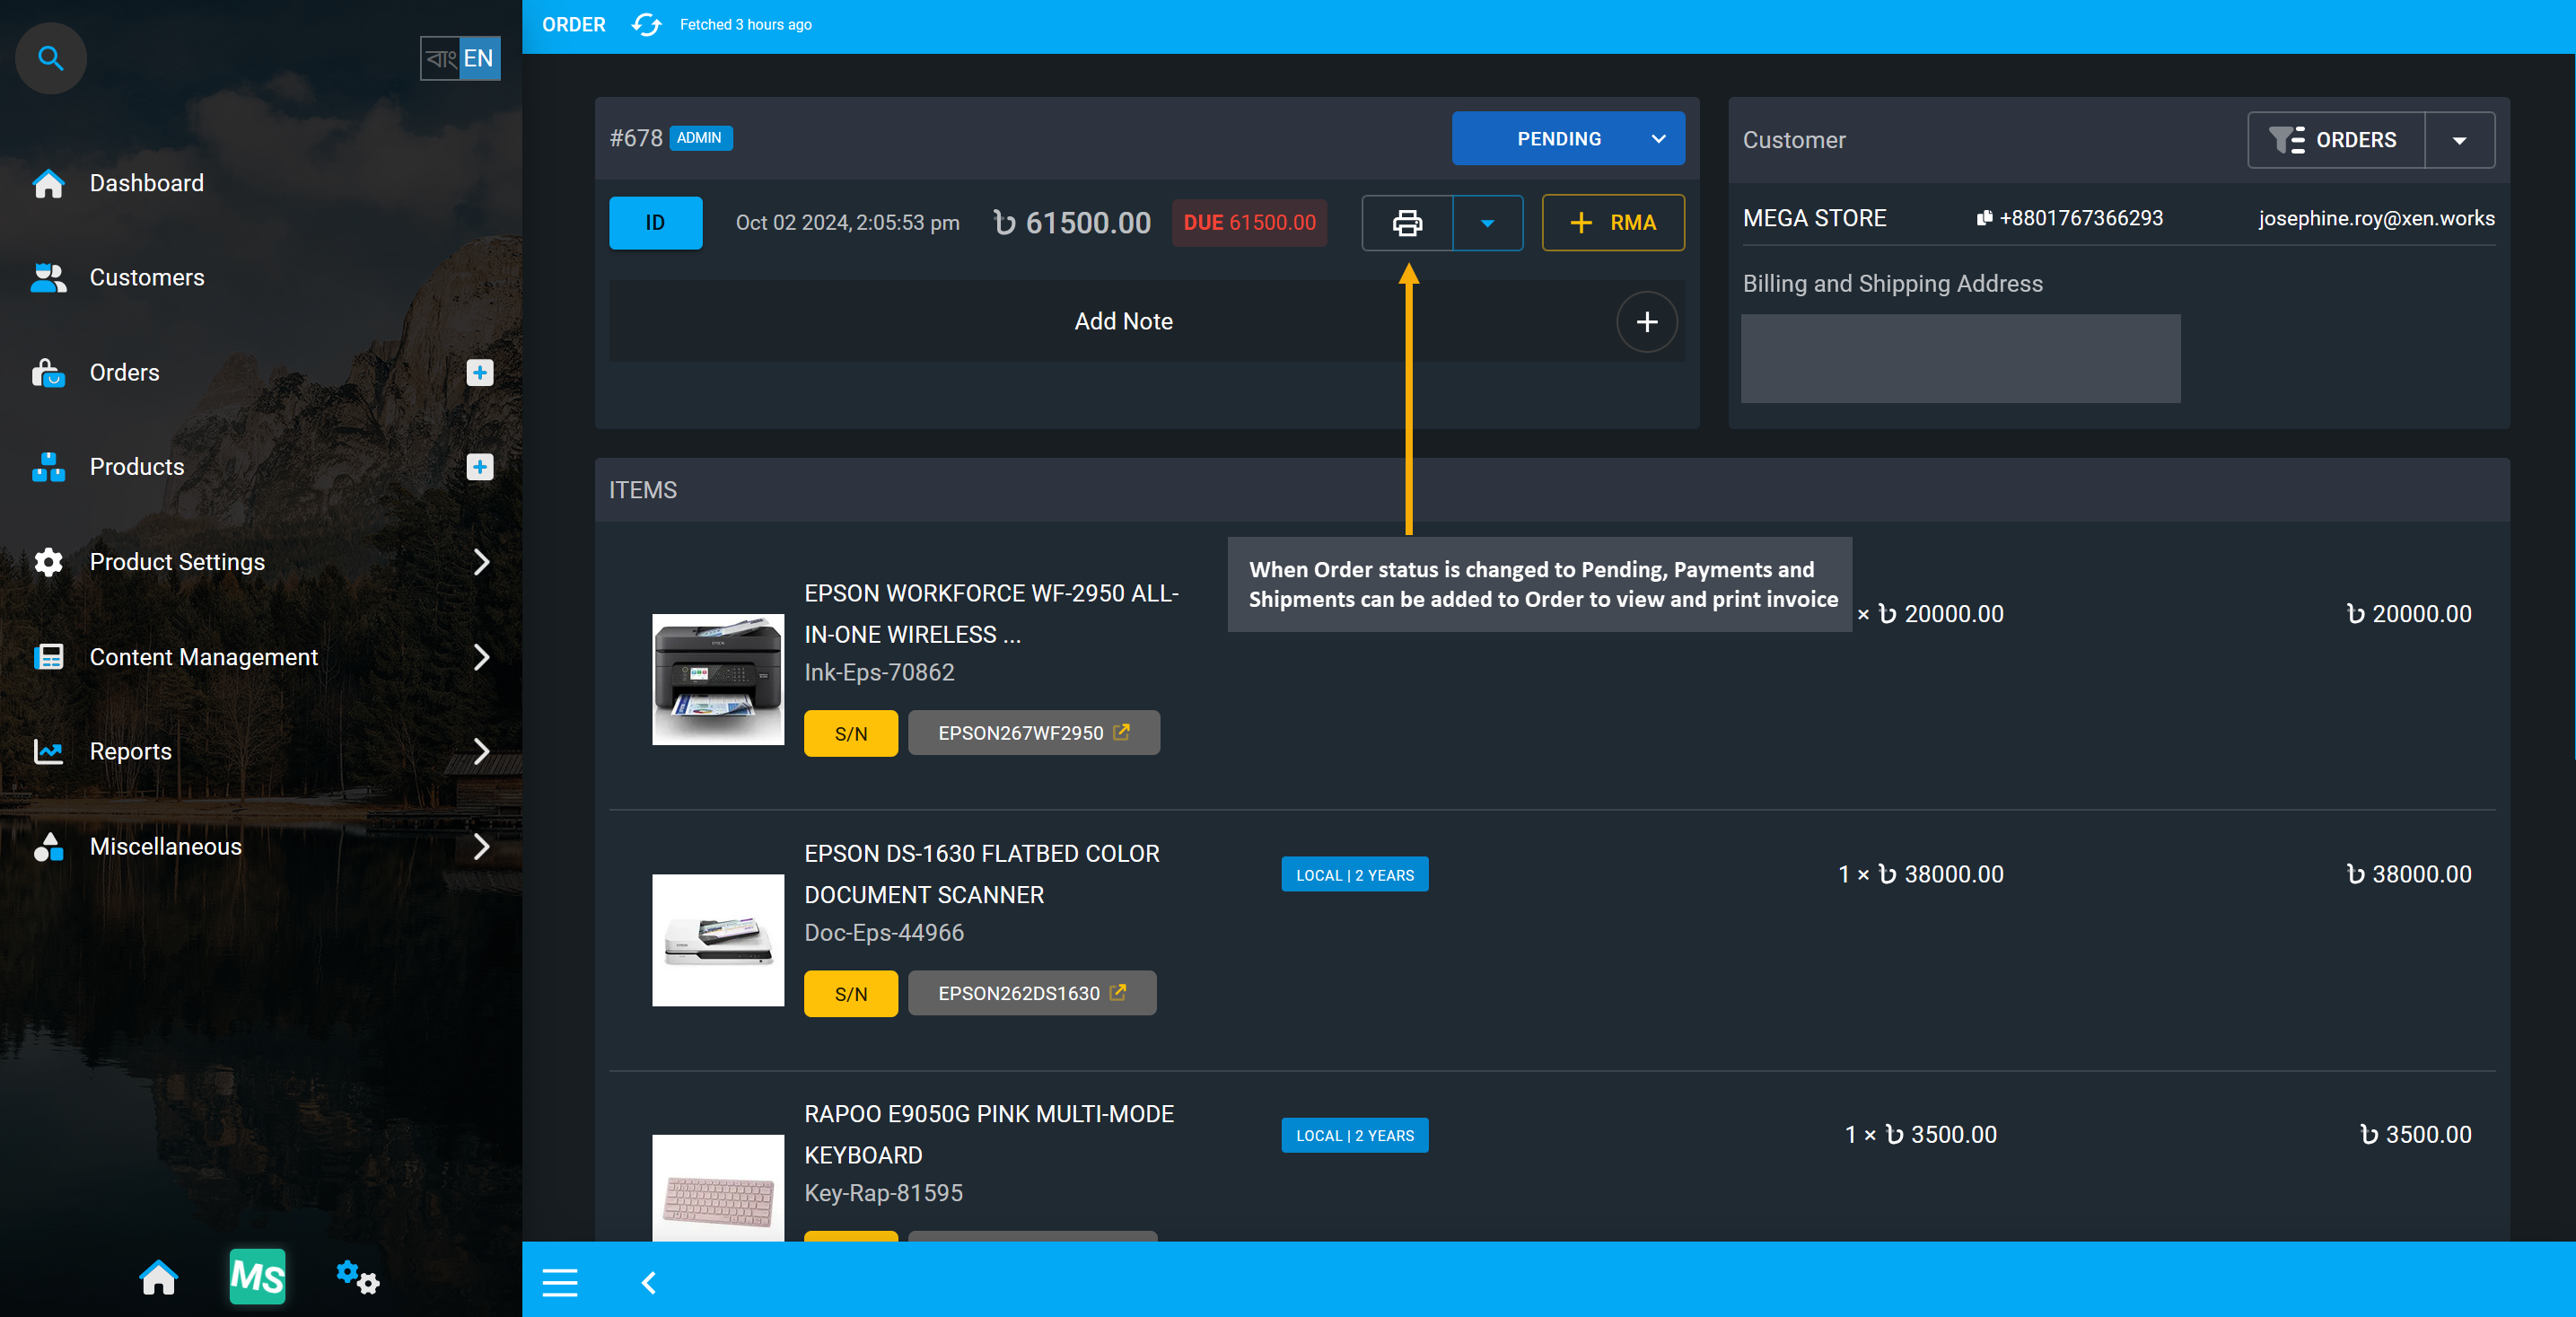
Image 17: When Order status is changed to Pending, Payments and Shipments can be added to Order.
Create Multiple Transactions for Payment
In certain cases, a Shop Owner may need to add Multiple Transactions if one transaction could not have successful verification and is Failed, while another transaction may work to be successfully Completed for an Order’s payment. So, seller can use the Payments button to add multiple transactions like Cash, Cheque, or BKash (Manual) to complete total Order payment on behalf of the Customer from Admin Panel. Using the Edit button, they can change Transaction Status by selecting from Completed or Failed to keep number of transactions that were successful and click Submit to complete the payment process.
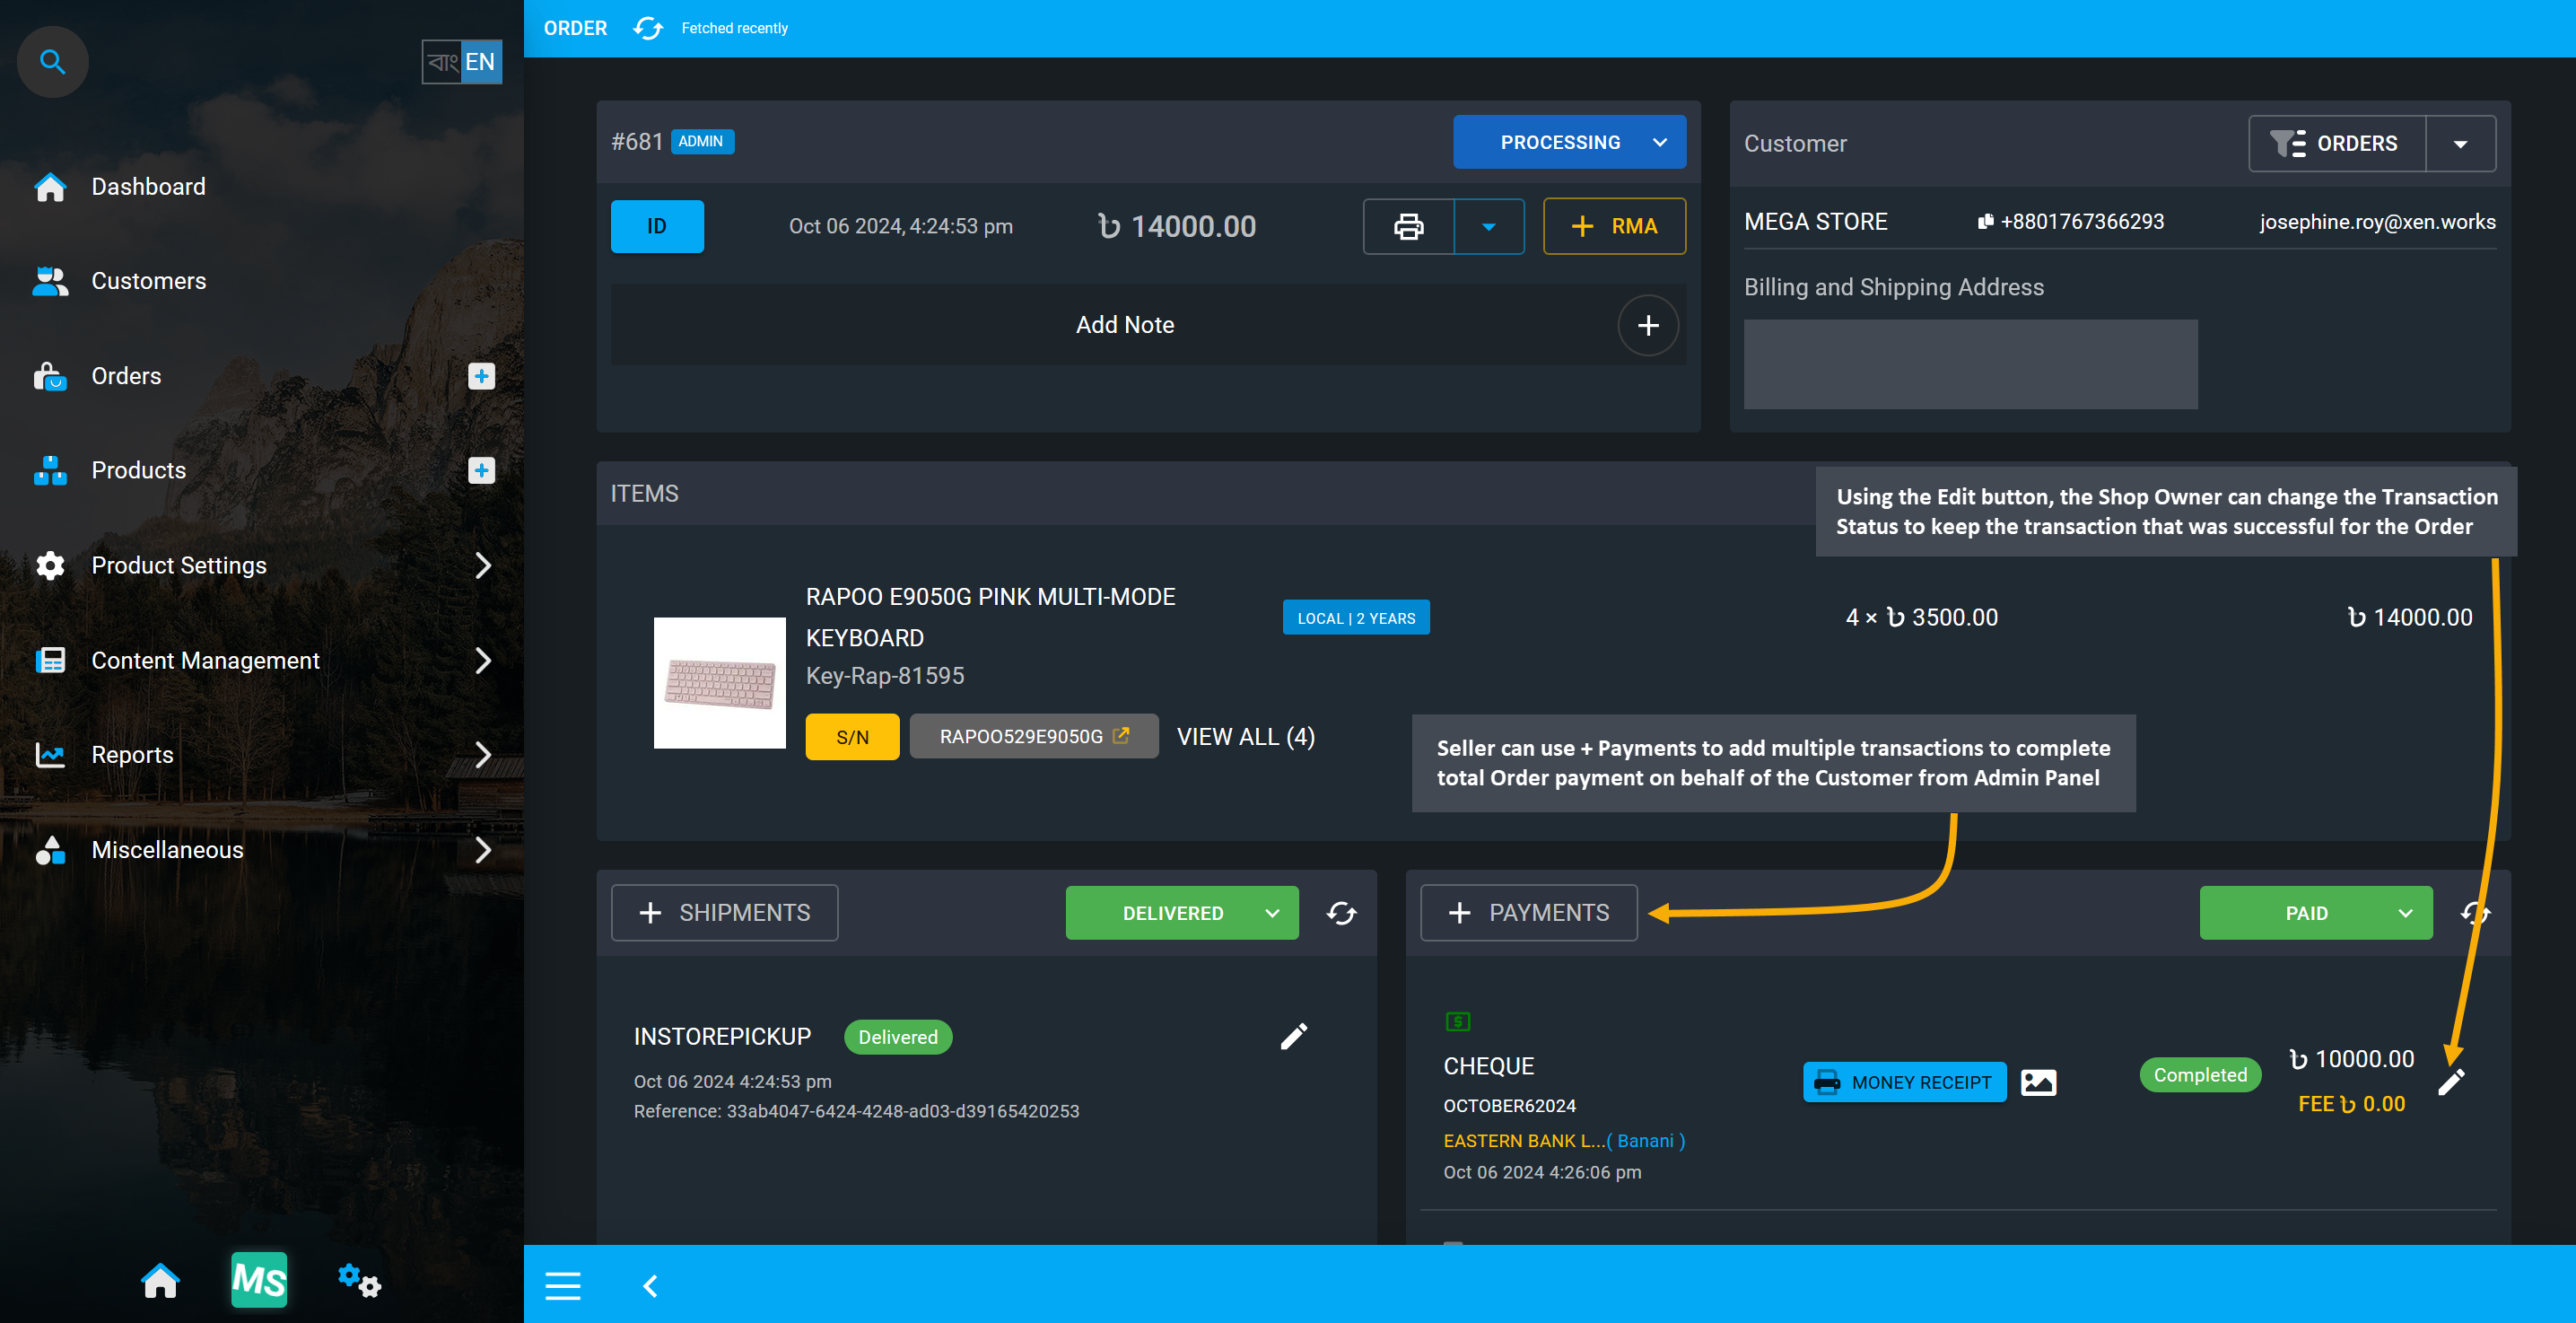
Image 18: The Shop Owner can add Multiple Transactions by clicking + Payments button on Dashboard.
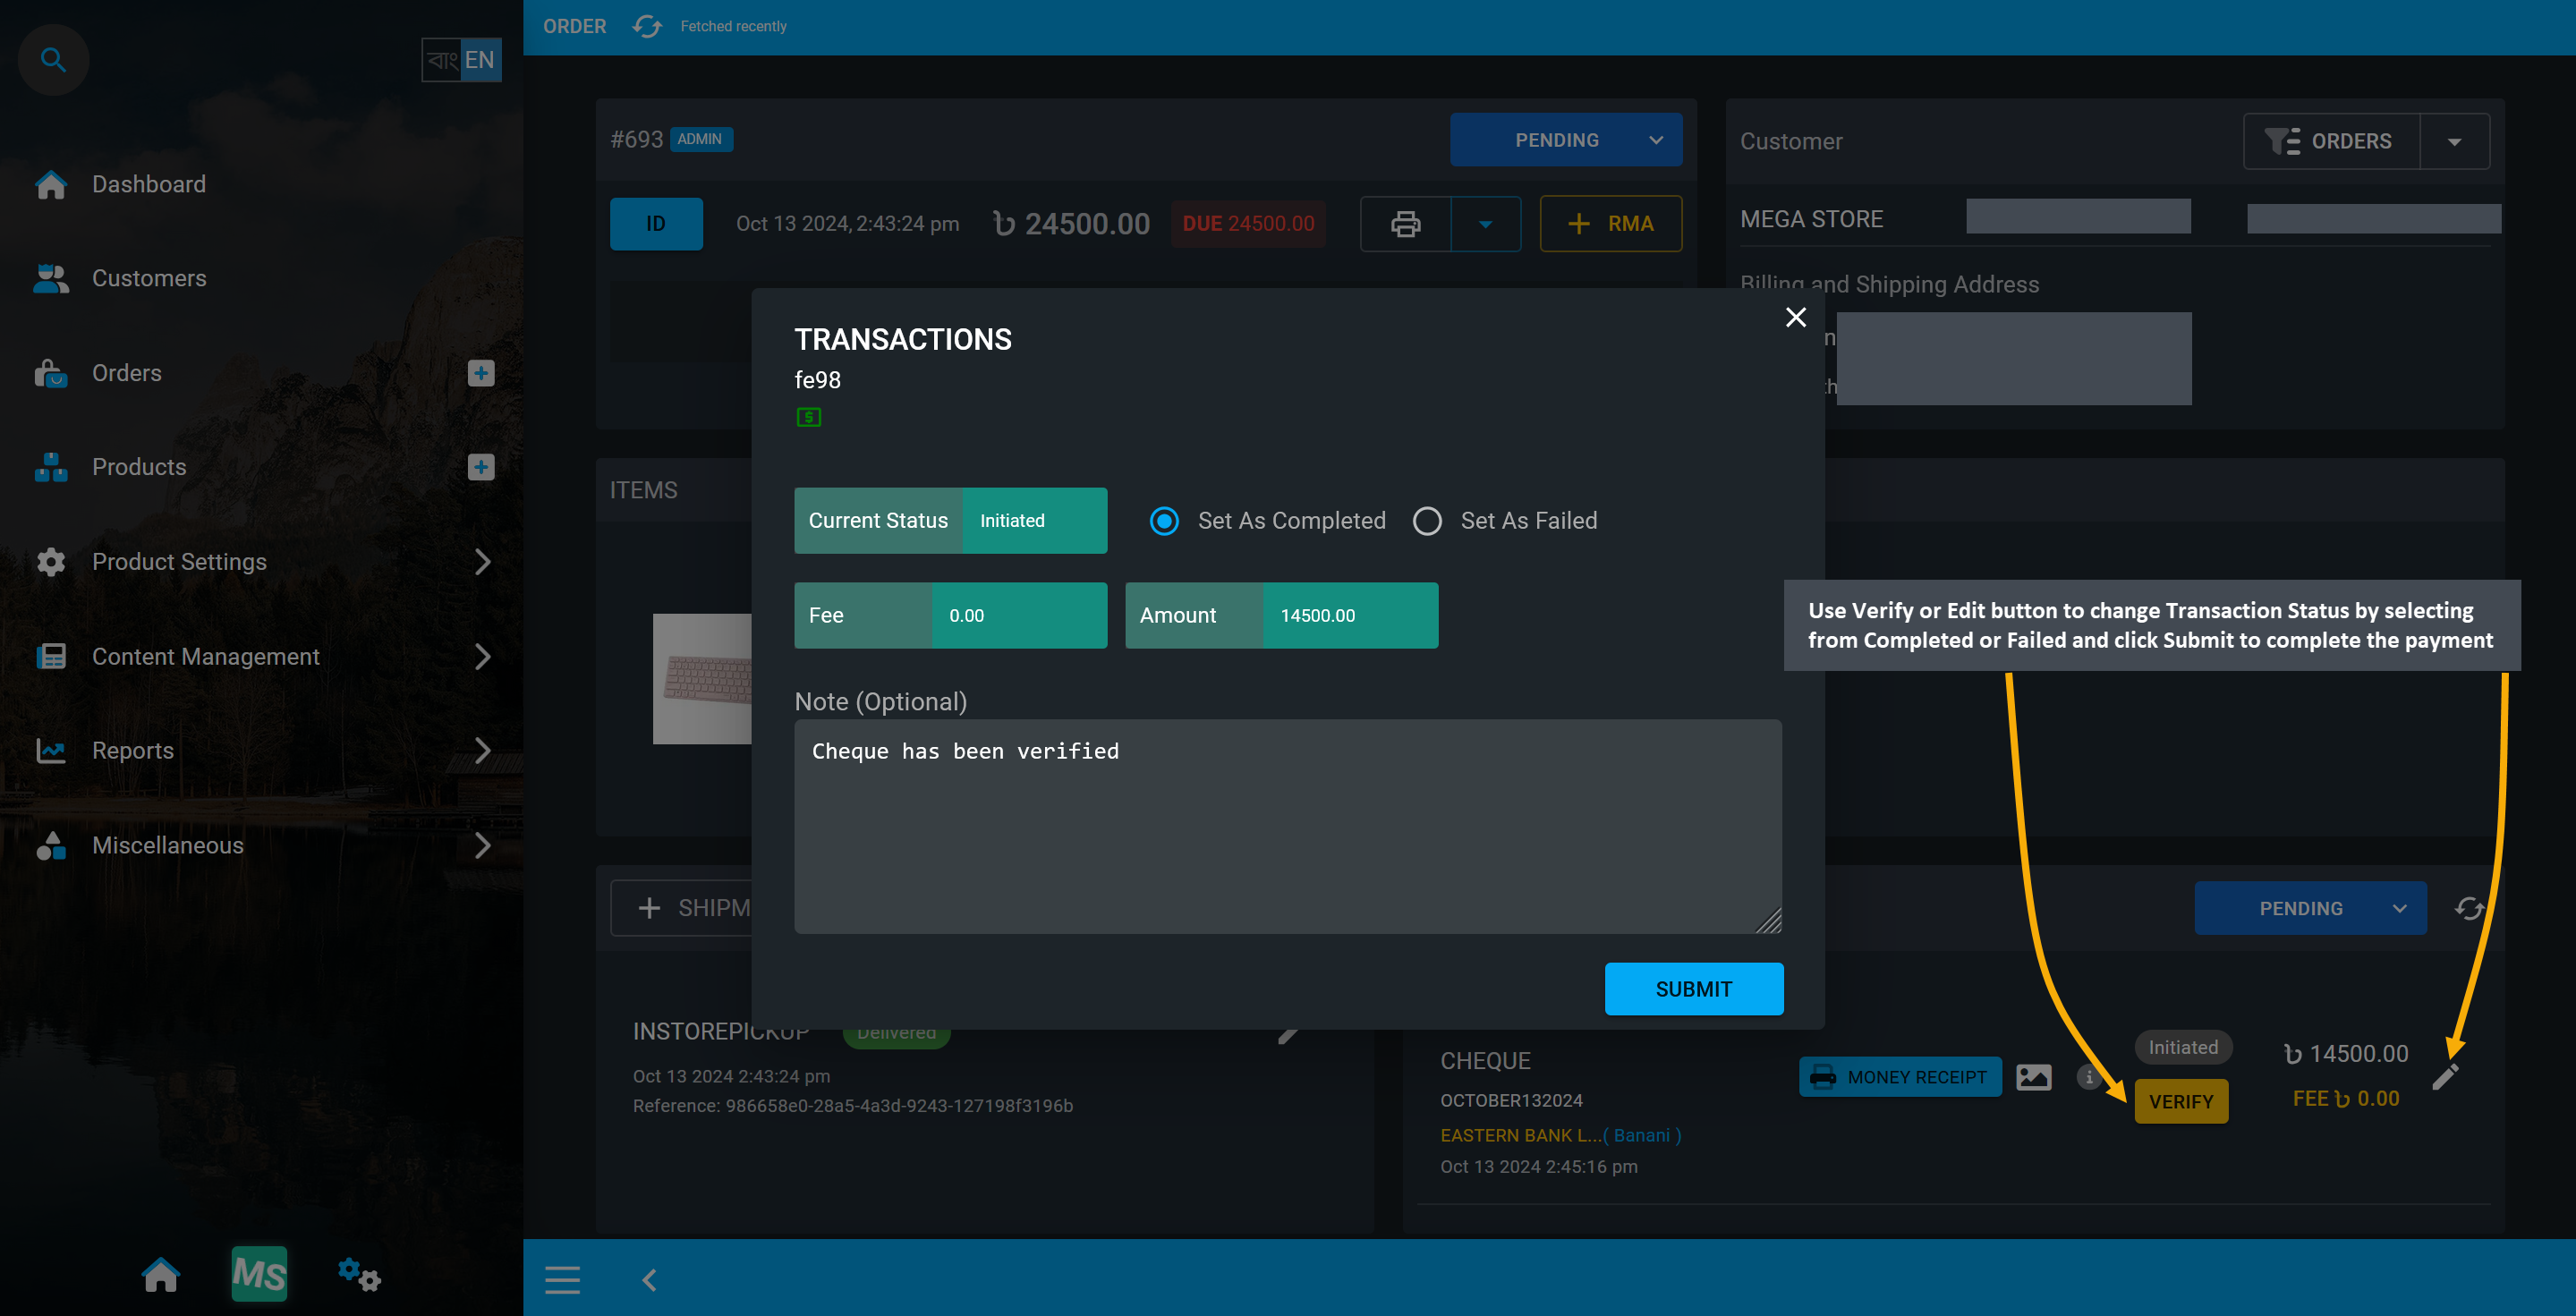
Image 19: Use Verify or Edit button to change the Transaction Status as Completed or Failed.
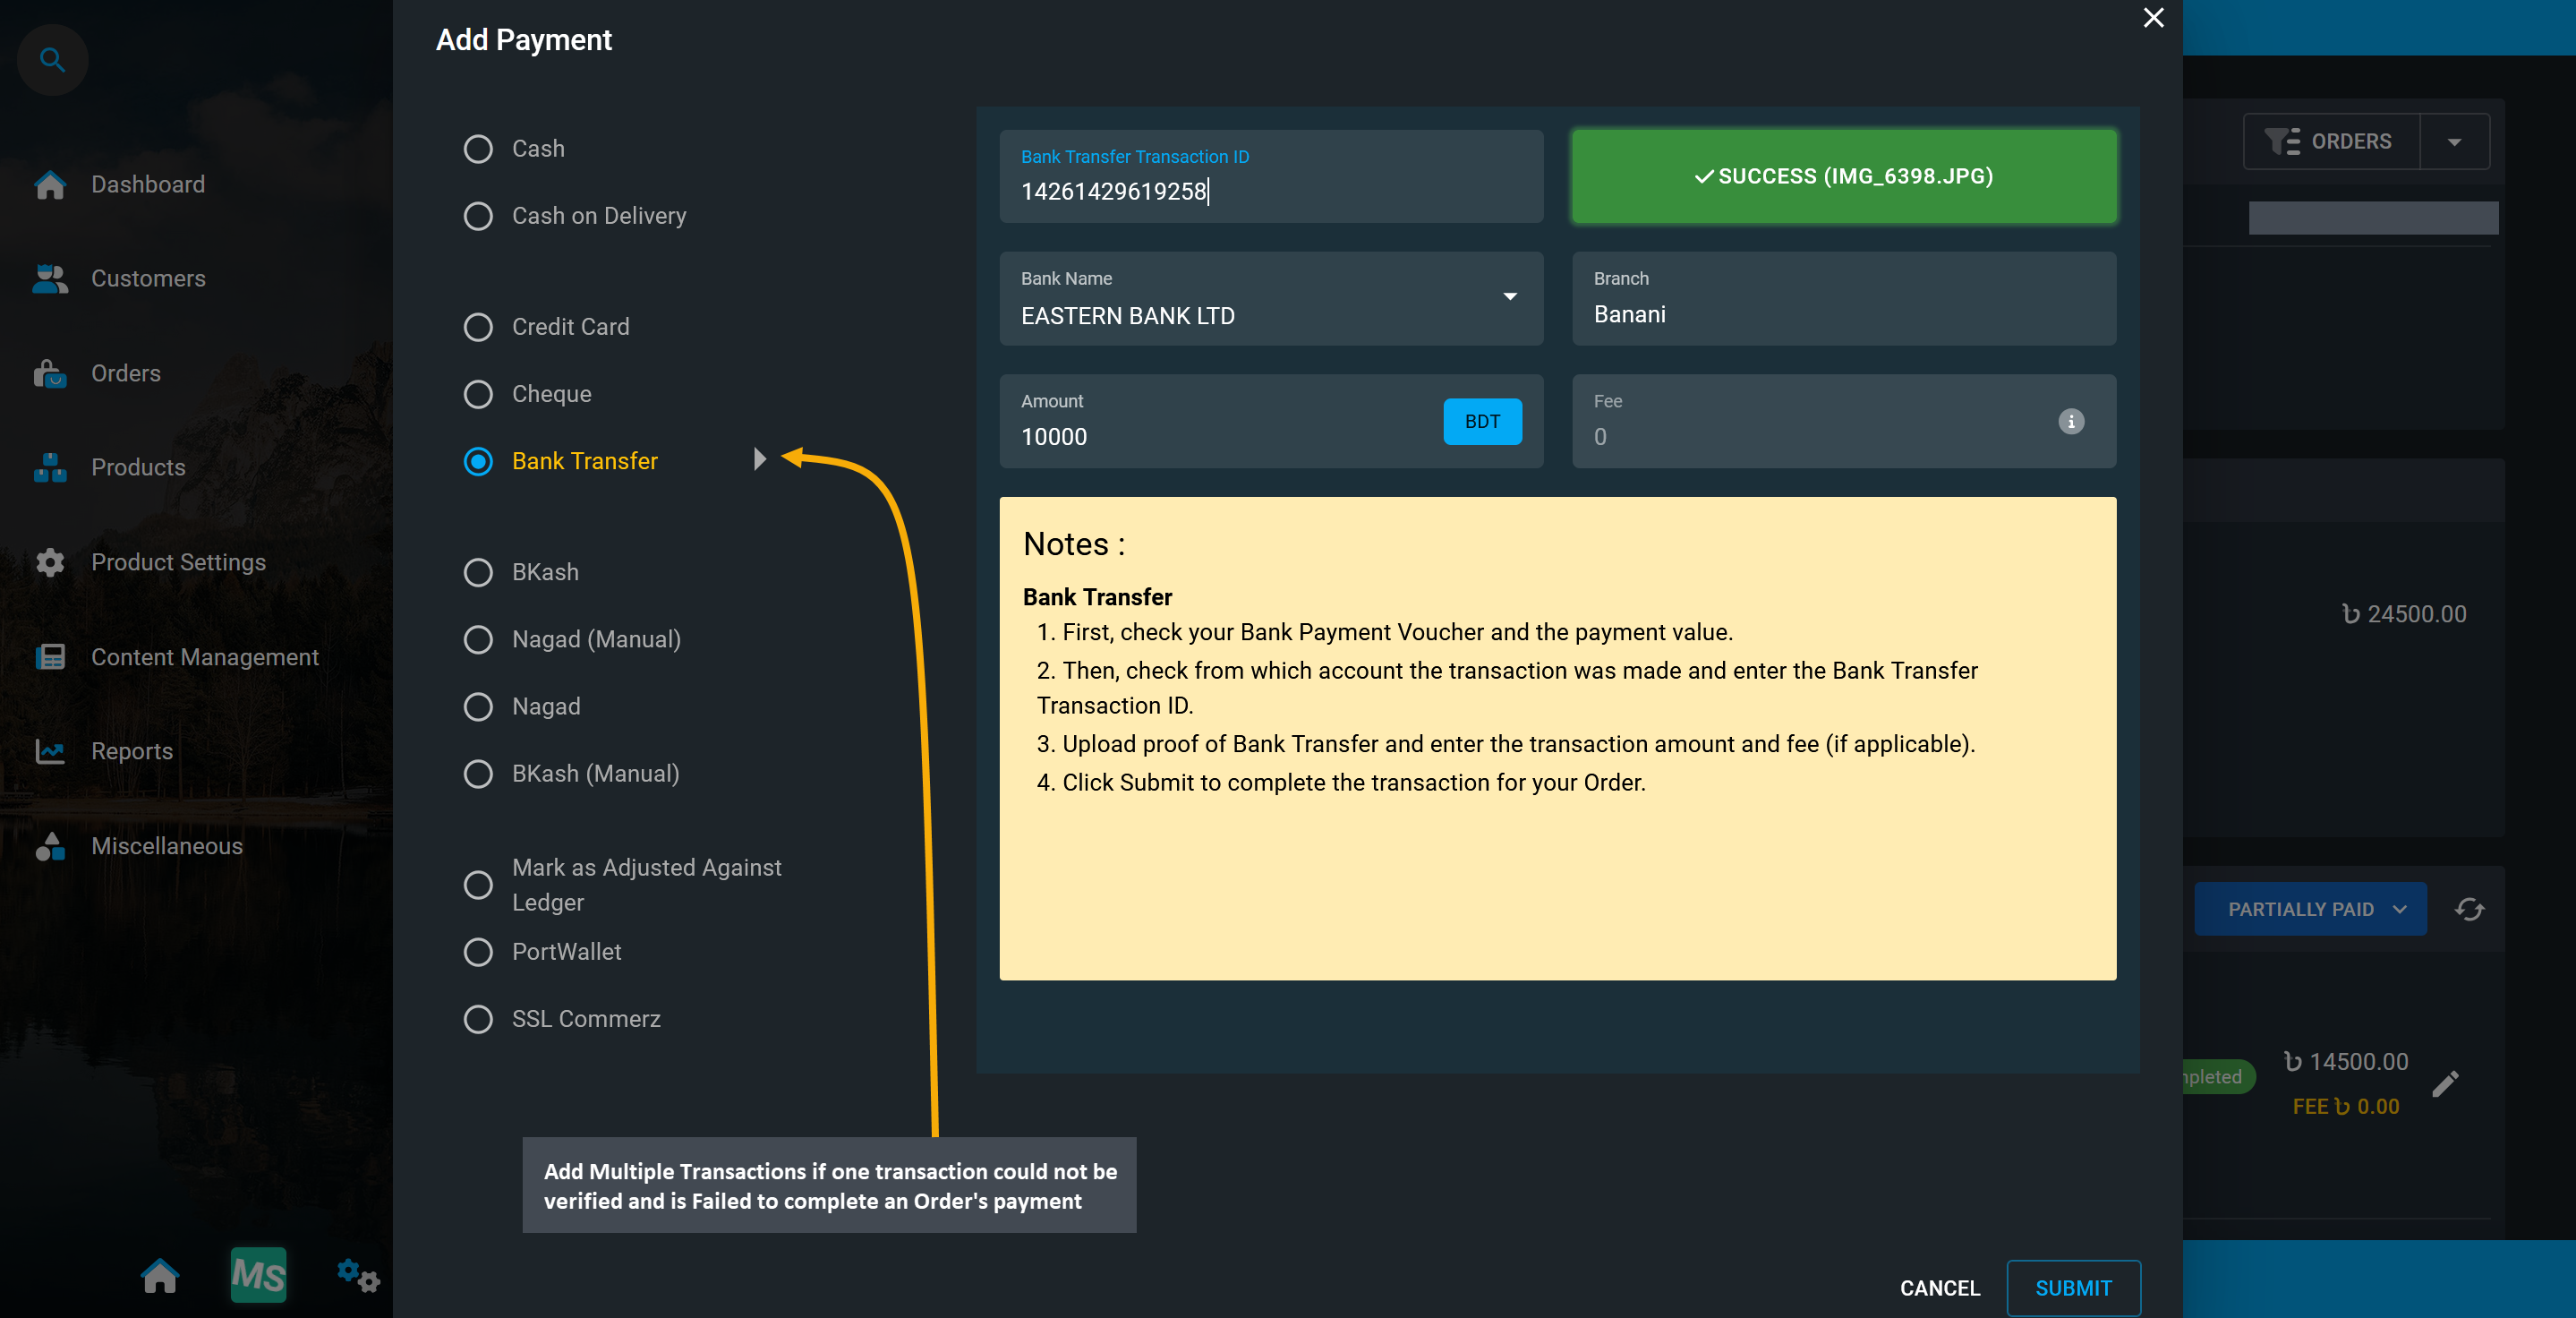
Image 20: Add Multiple Transactions if one transaction could not be verified and is Failed.
Change Transaction Status with Edit button
Using the Edit button, the Transaction statuses can be changed. Clicking the Edit button will open a modal where Completed or Failed Transaction statuses can be changed to Set As Failed or Set As Completed. Select the desired option according to the Payment status and update it by clicking the Submit button.
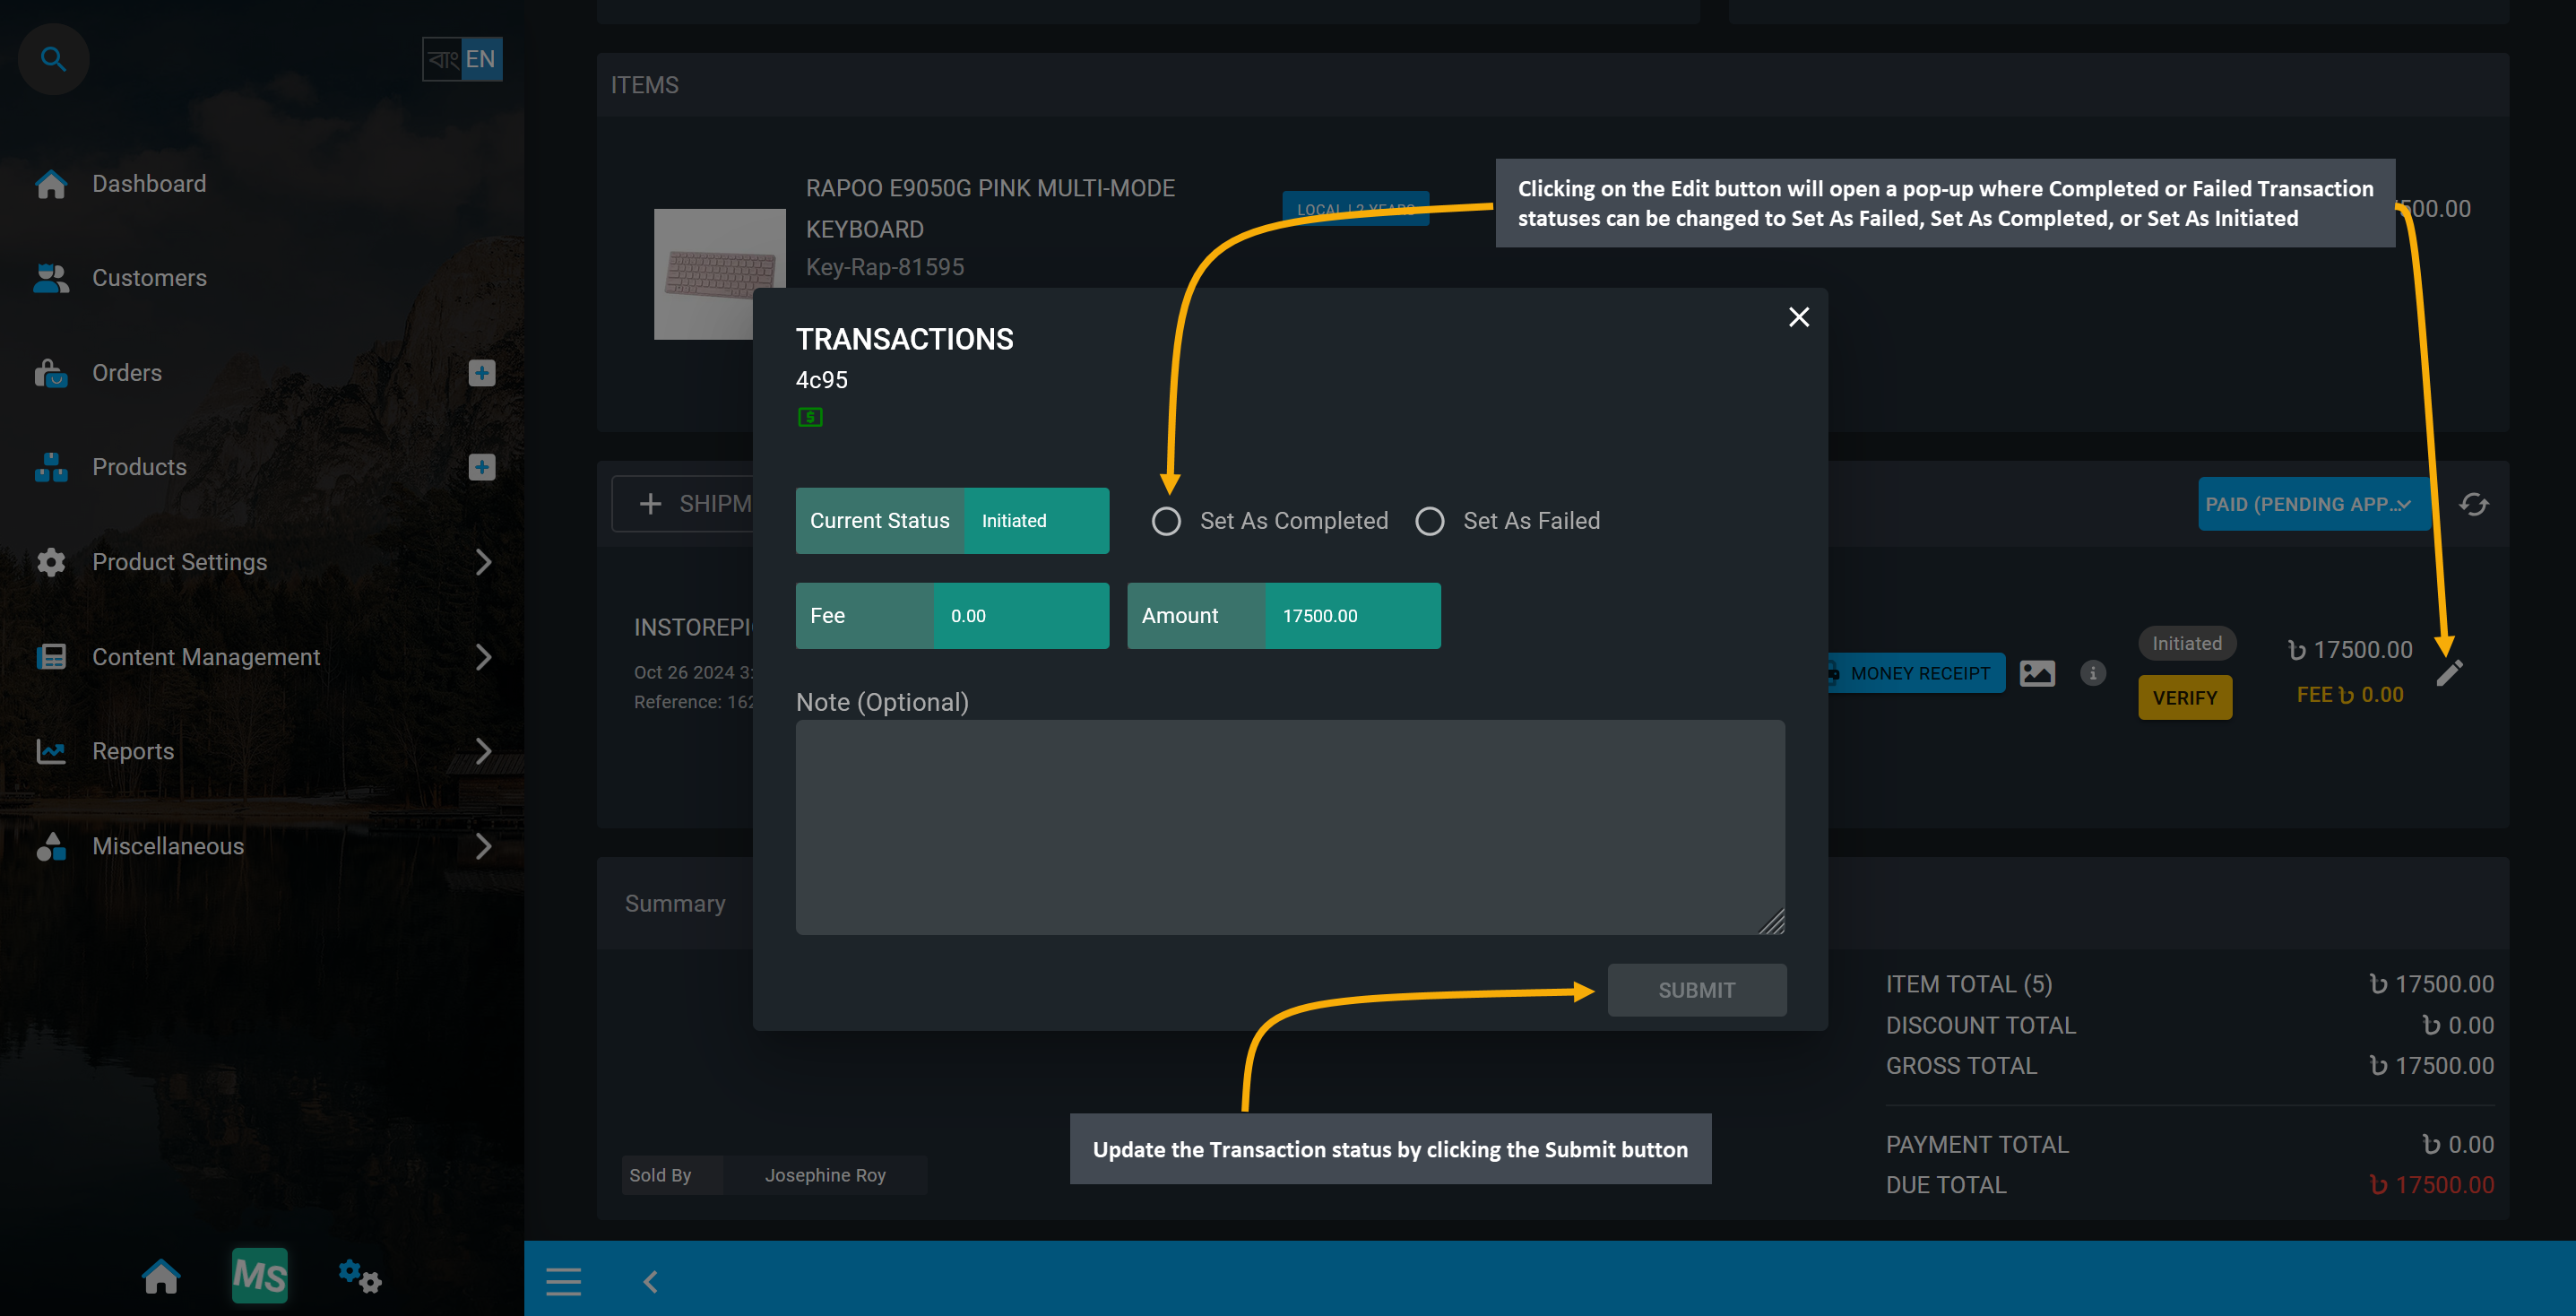
Image 19: Transaction statuses can be changed to Set As Failed, Set As Completed, or Set As Initiated.
Add Shipment Manually for Order
Usually, when placing the Order through Cart, Shipment is automatically selected as InStorePickup which is free of charge as this option is selected for Customers purchasing product directly from shop.
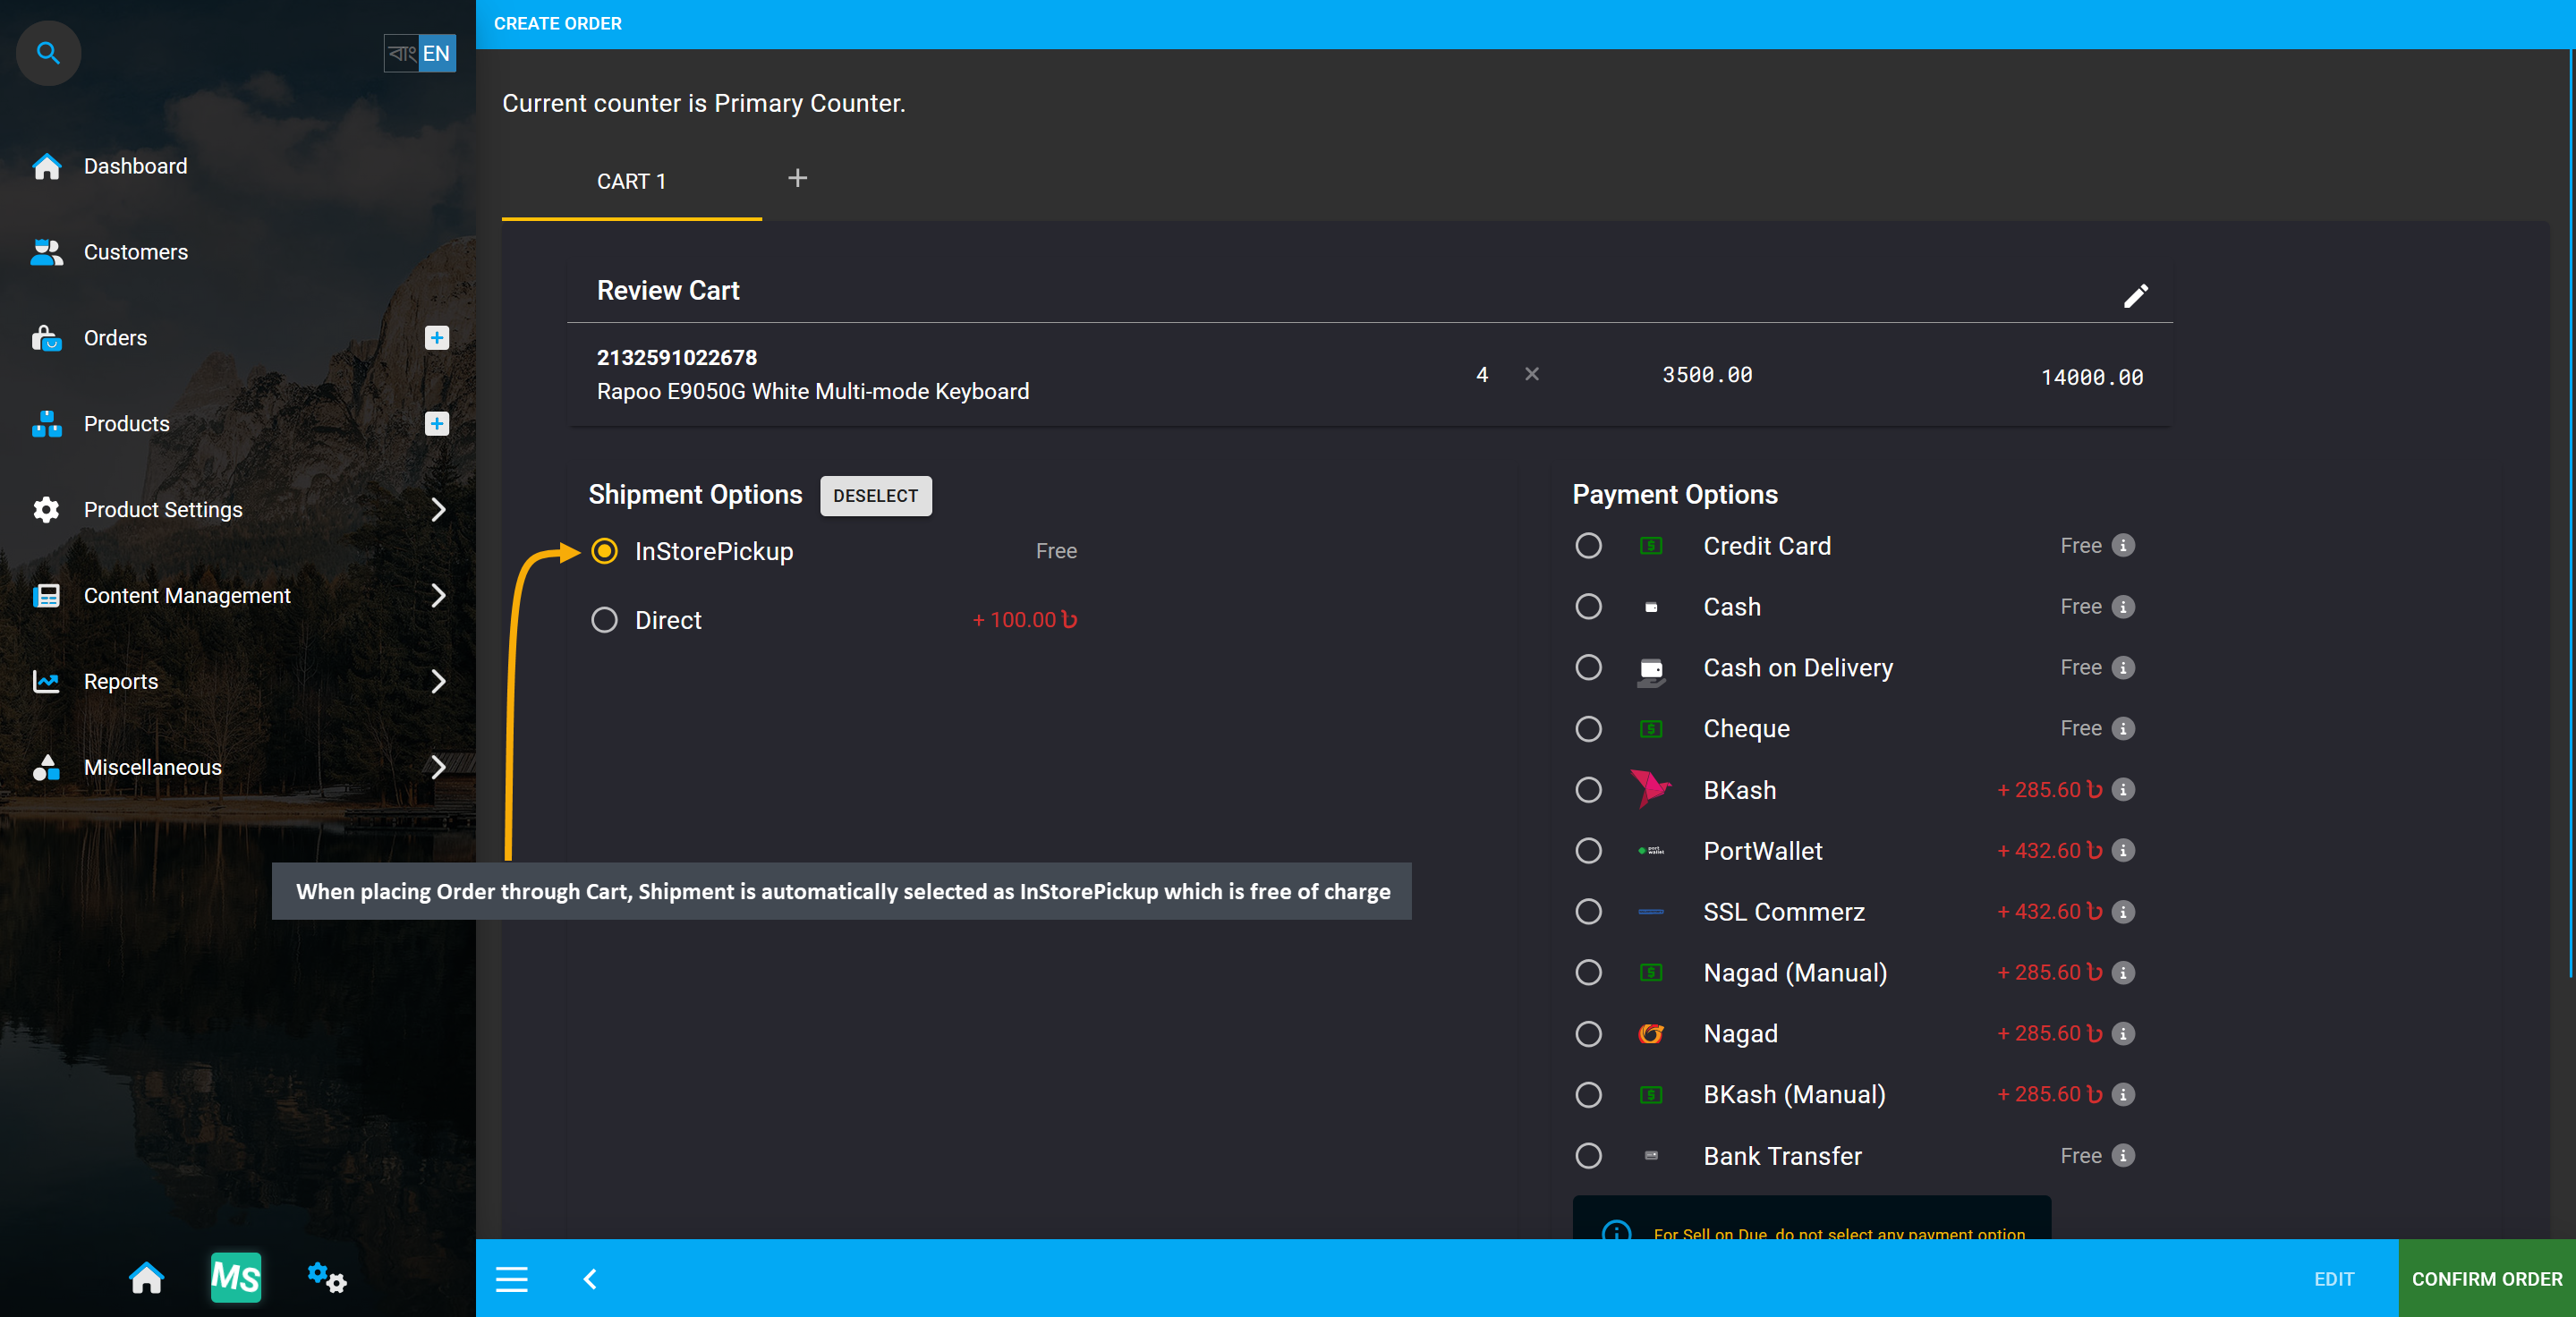
Image 20: When placing Order through Cart, Shipment is automatically selected as InStorePickup.
The Shop Owner can add a Shipment Gateway manually after placing the Order from the Admin Panel. To select a specific Shipping Carrier, they need to click on the + Shipment button which will open a modal.
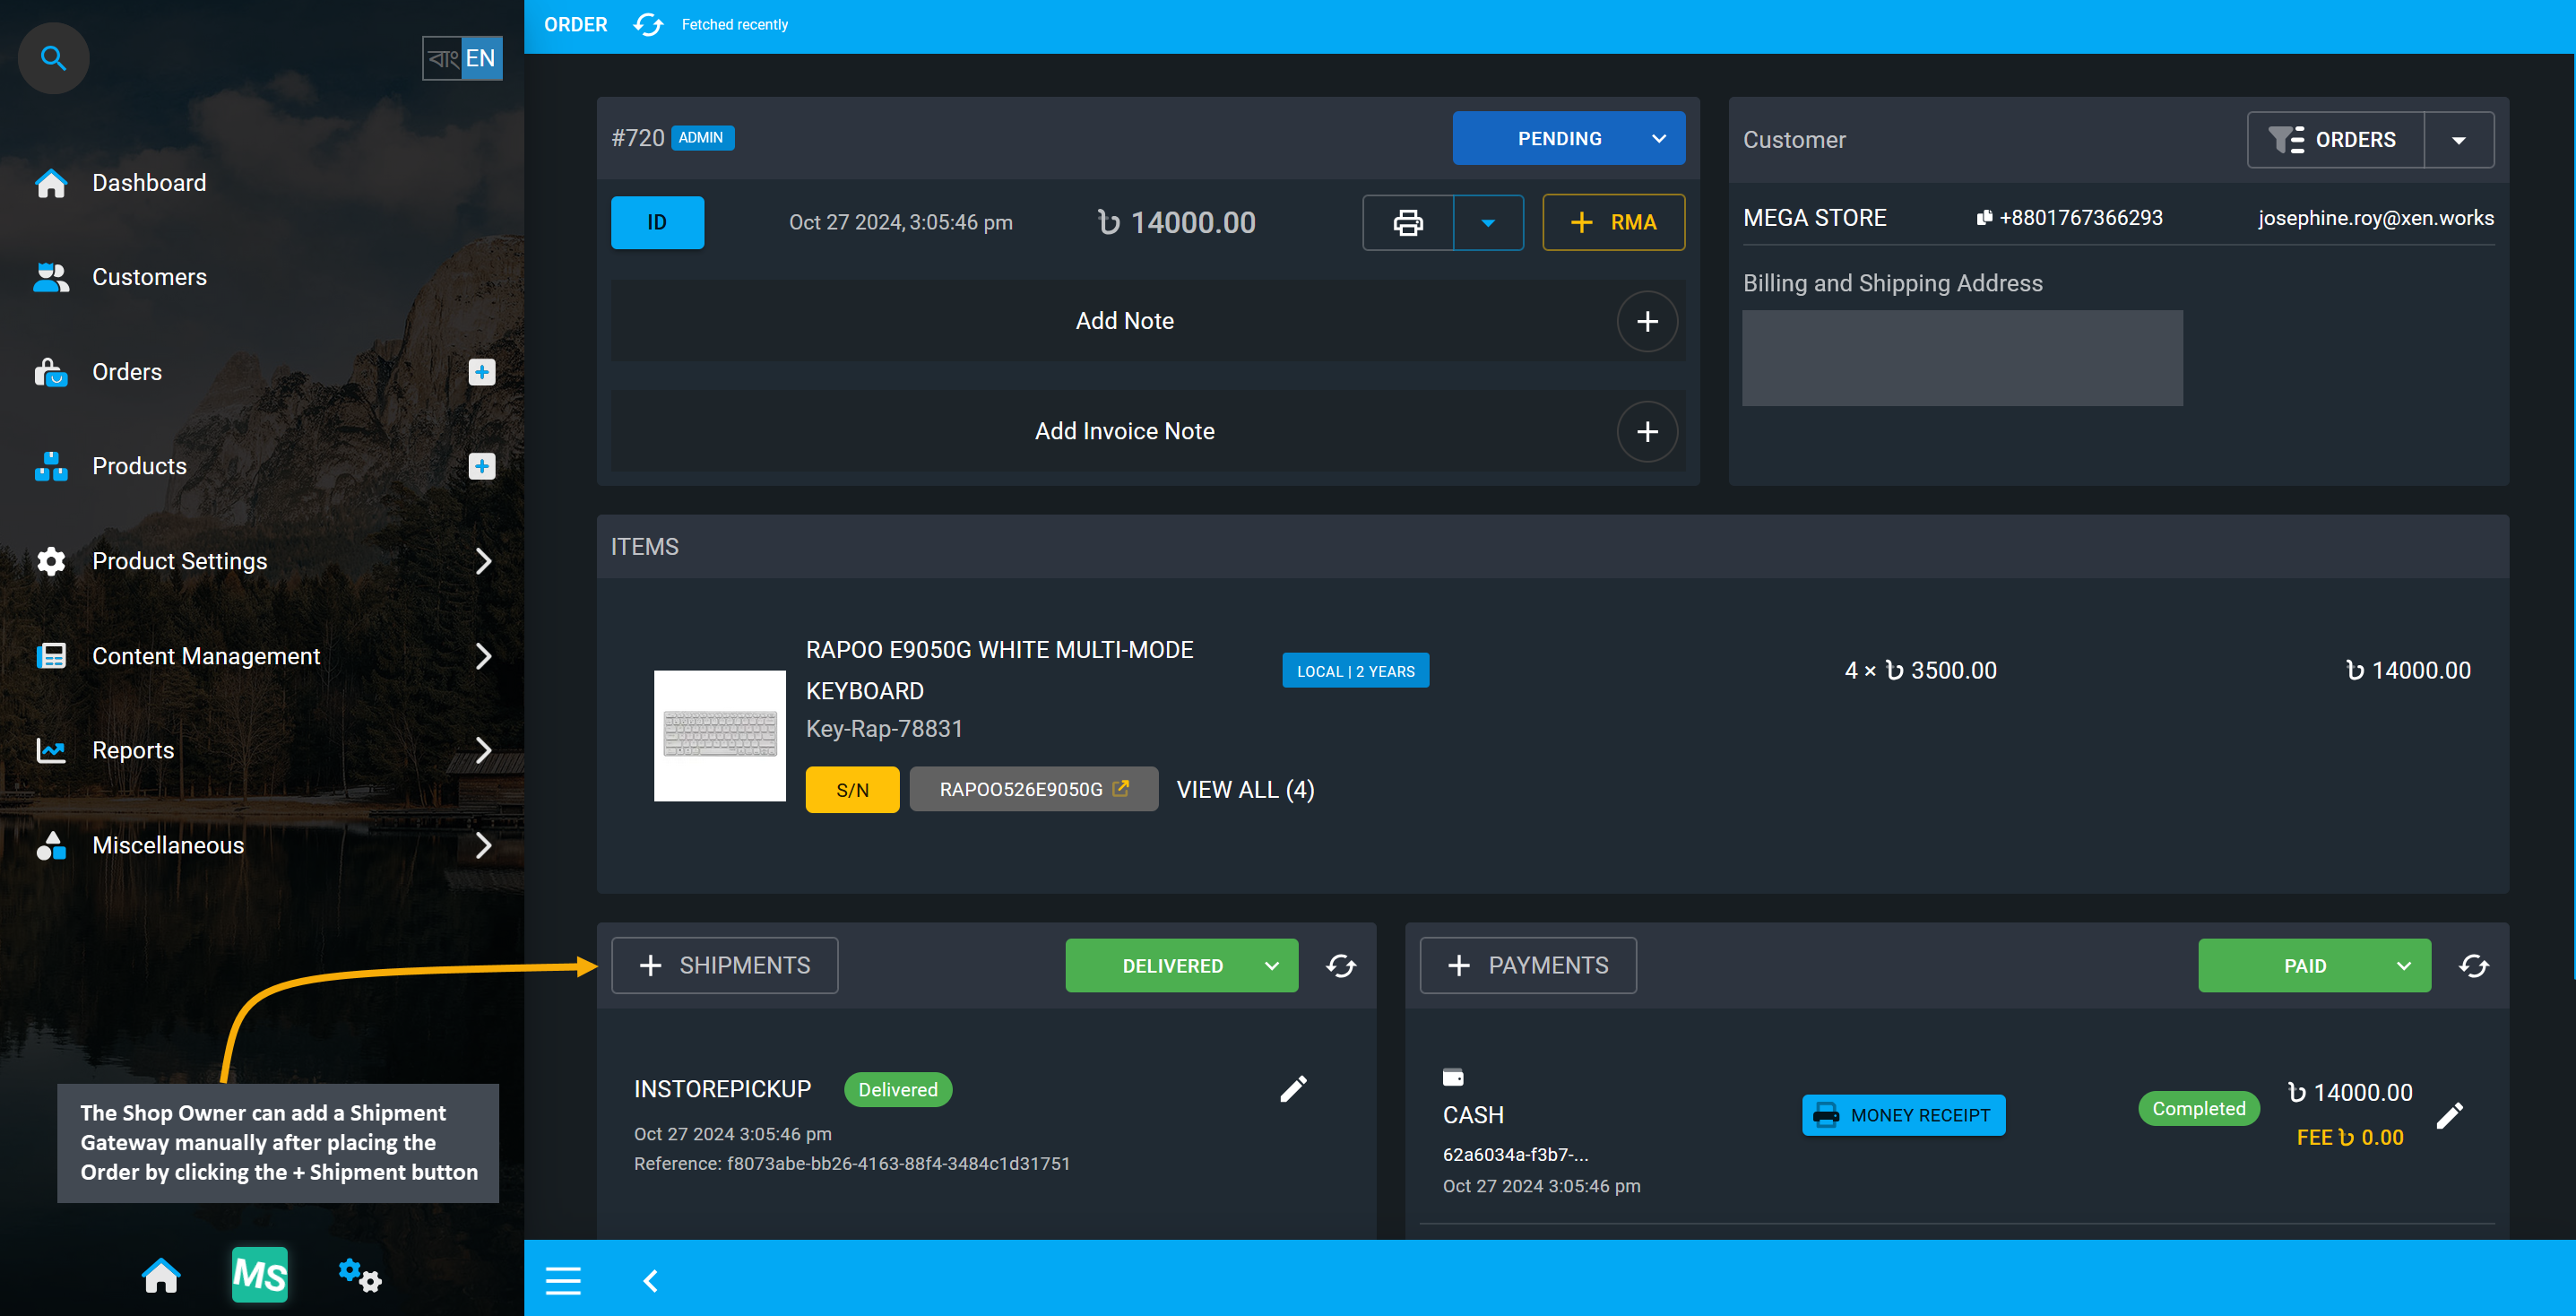
Image 21: Add a Shipment Gateway manually after placing the Order by clicking the + Shipment button.
If specific Shipment Gateways are enabled from settings, then a gateway can be selected for the Order. However, when the order is placed from cart, In Store Pickup is selected as the default Shipping Gateway. However, if a new shipment gateway is added later from Order dashboard, then its status can be updated. Also, tracking number and notes can be added for instruction for shop staff to follow up.
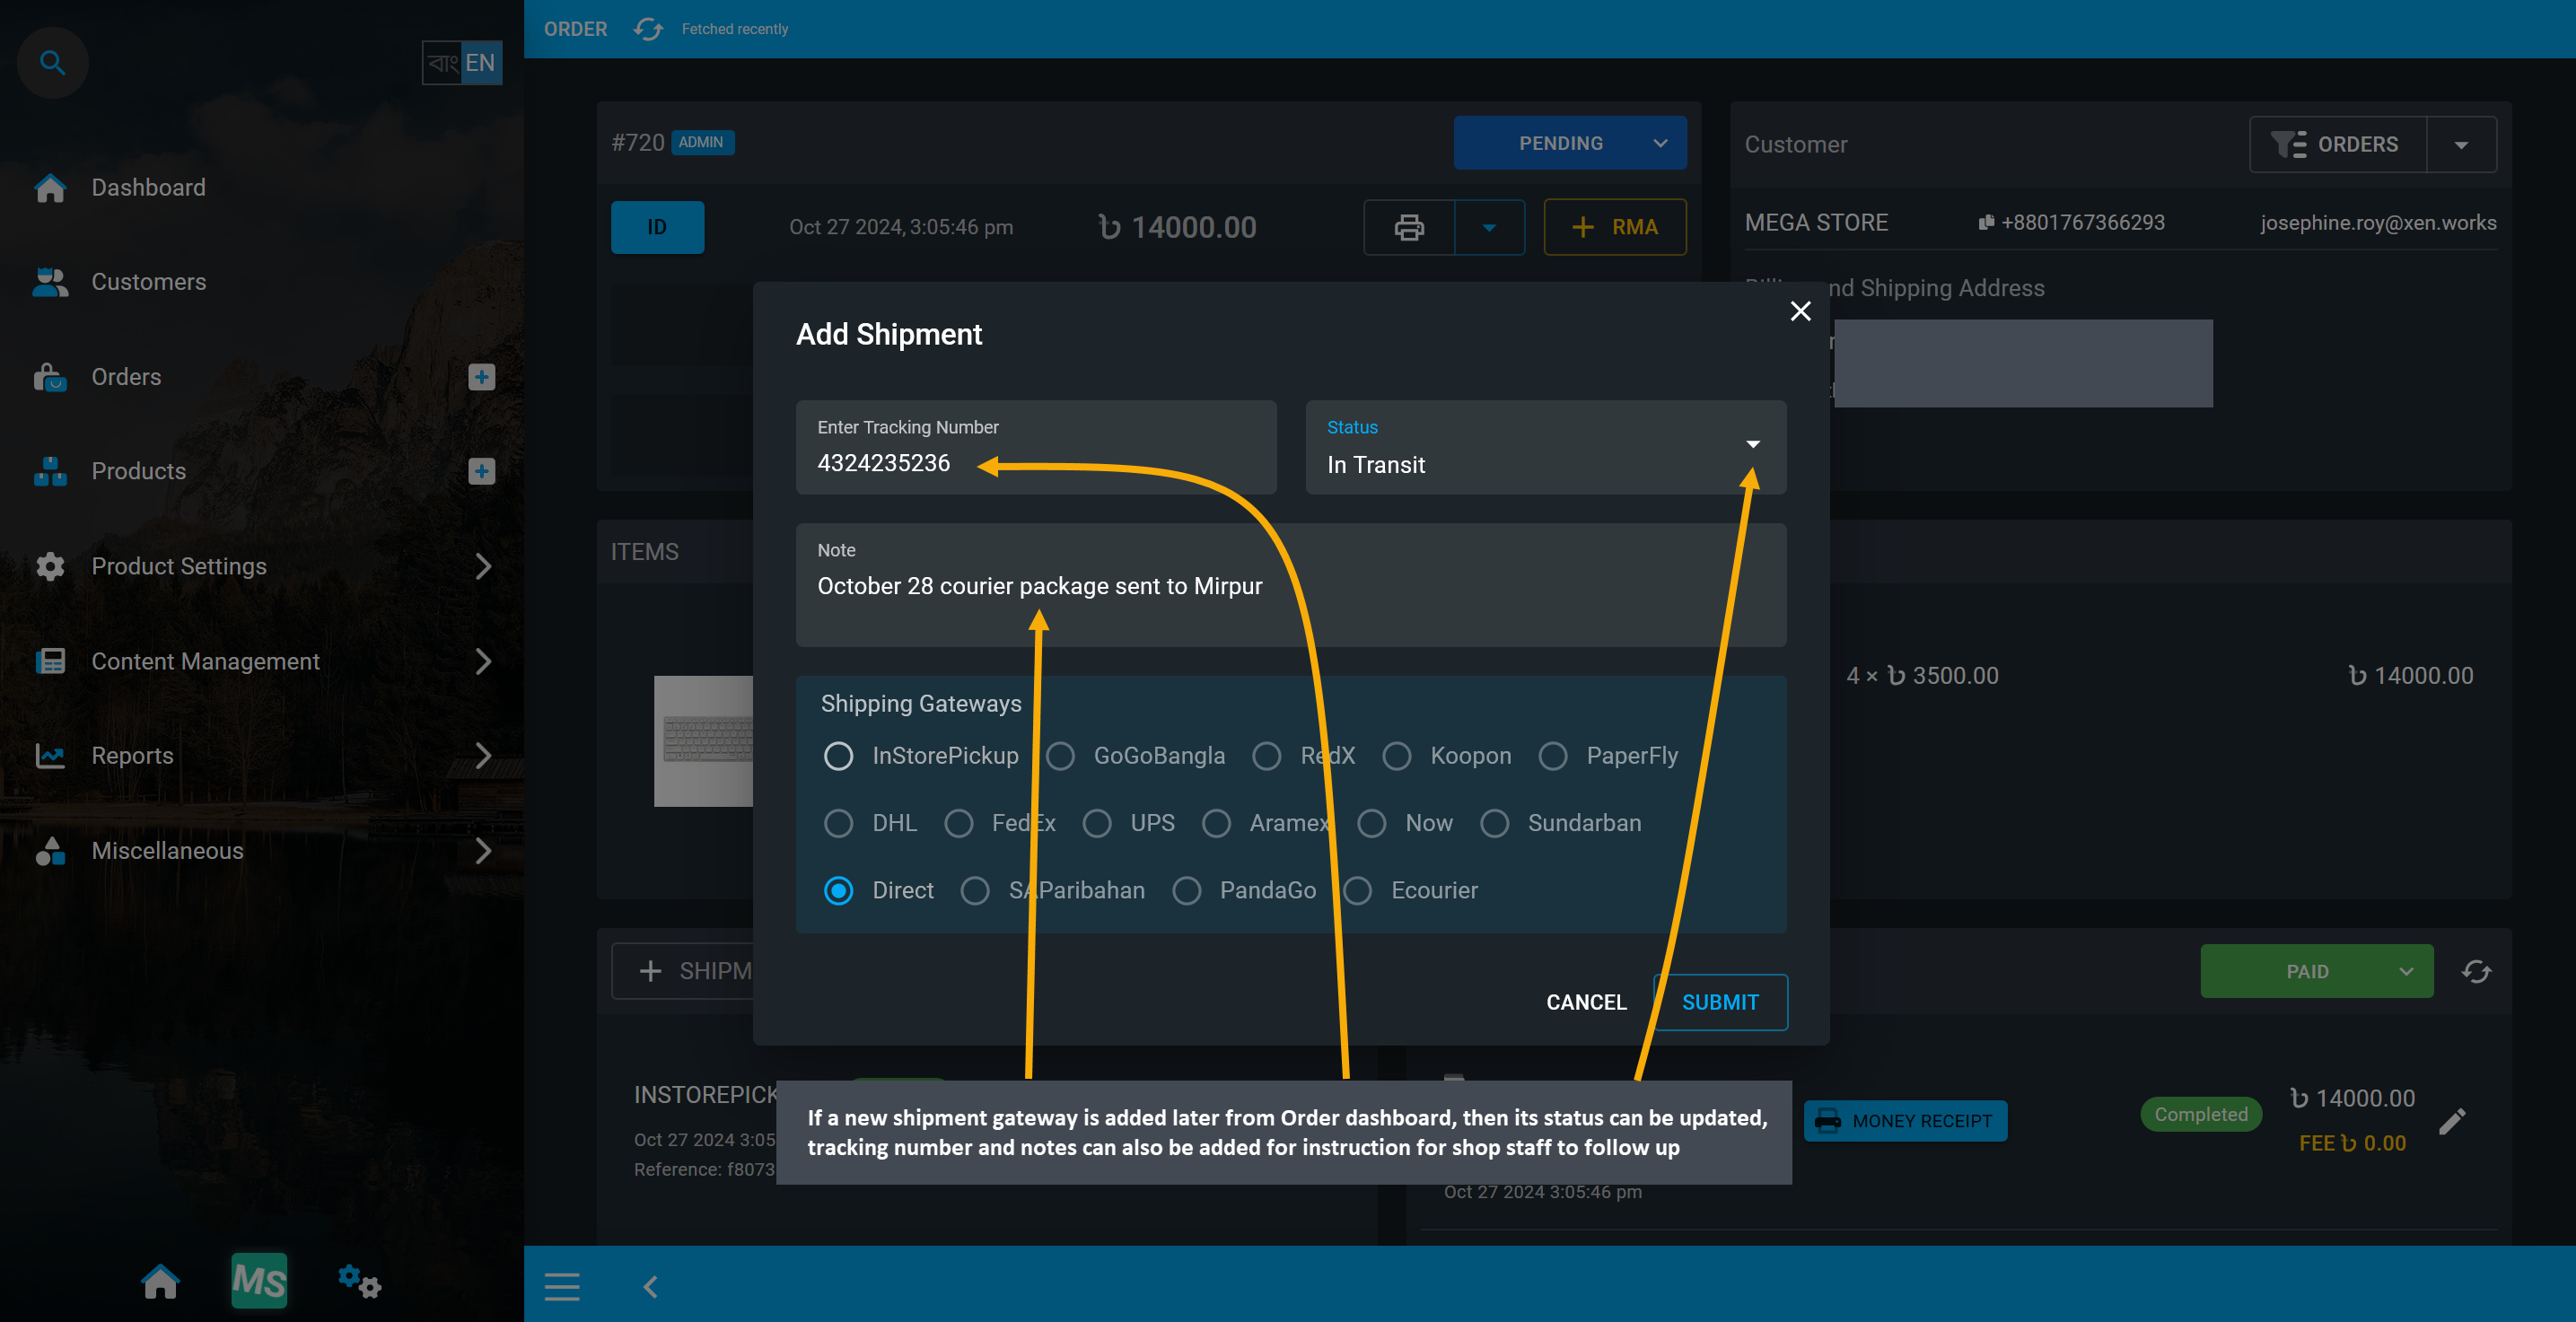
Image 22: If new shipment gateway is added on Order dashboard, then its credentials can be updated.
Status for already added Shipment Gateway can be updated similarly from the Shipments tab. Tracking Number and status can be updated, and notes can also be added.
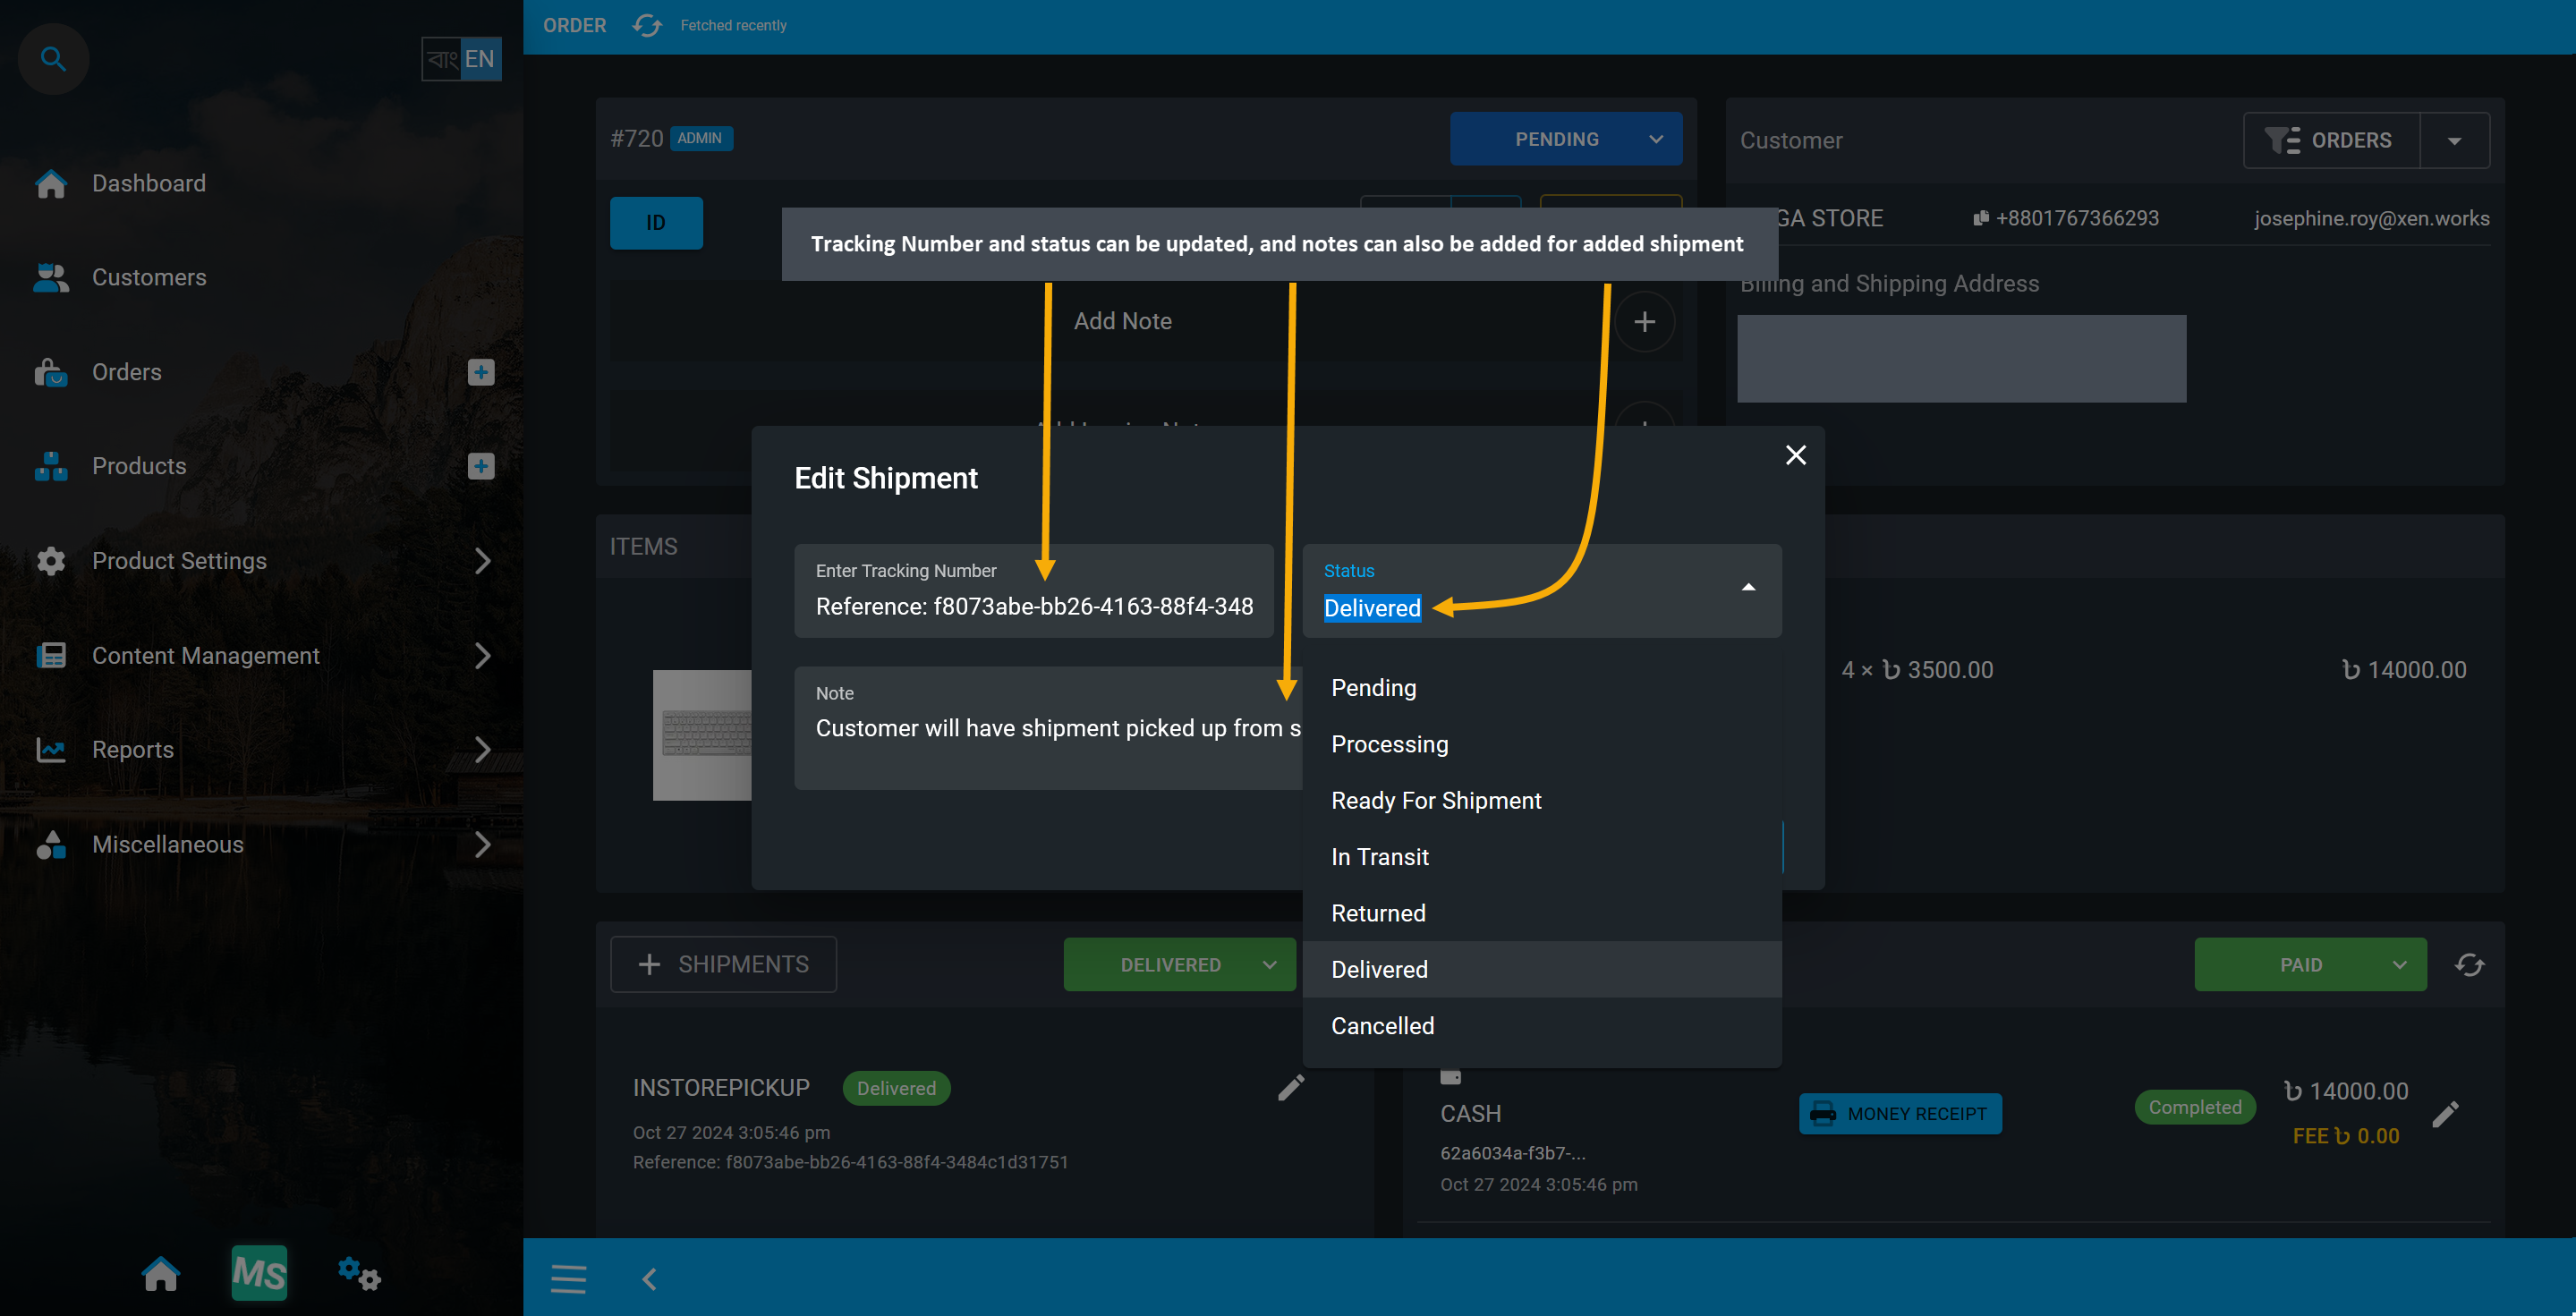
Image 23: Add Shipment Gateway, fill out the Tracking Number, add Notes, and select Shipping status.
Shipment Status will be updated under Shipment tab. Use Edit button to make changes of Shipment details.
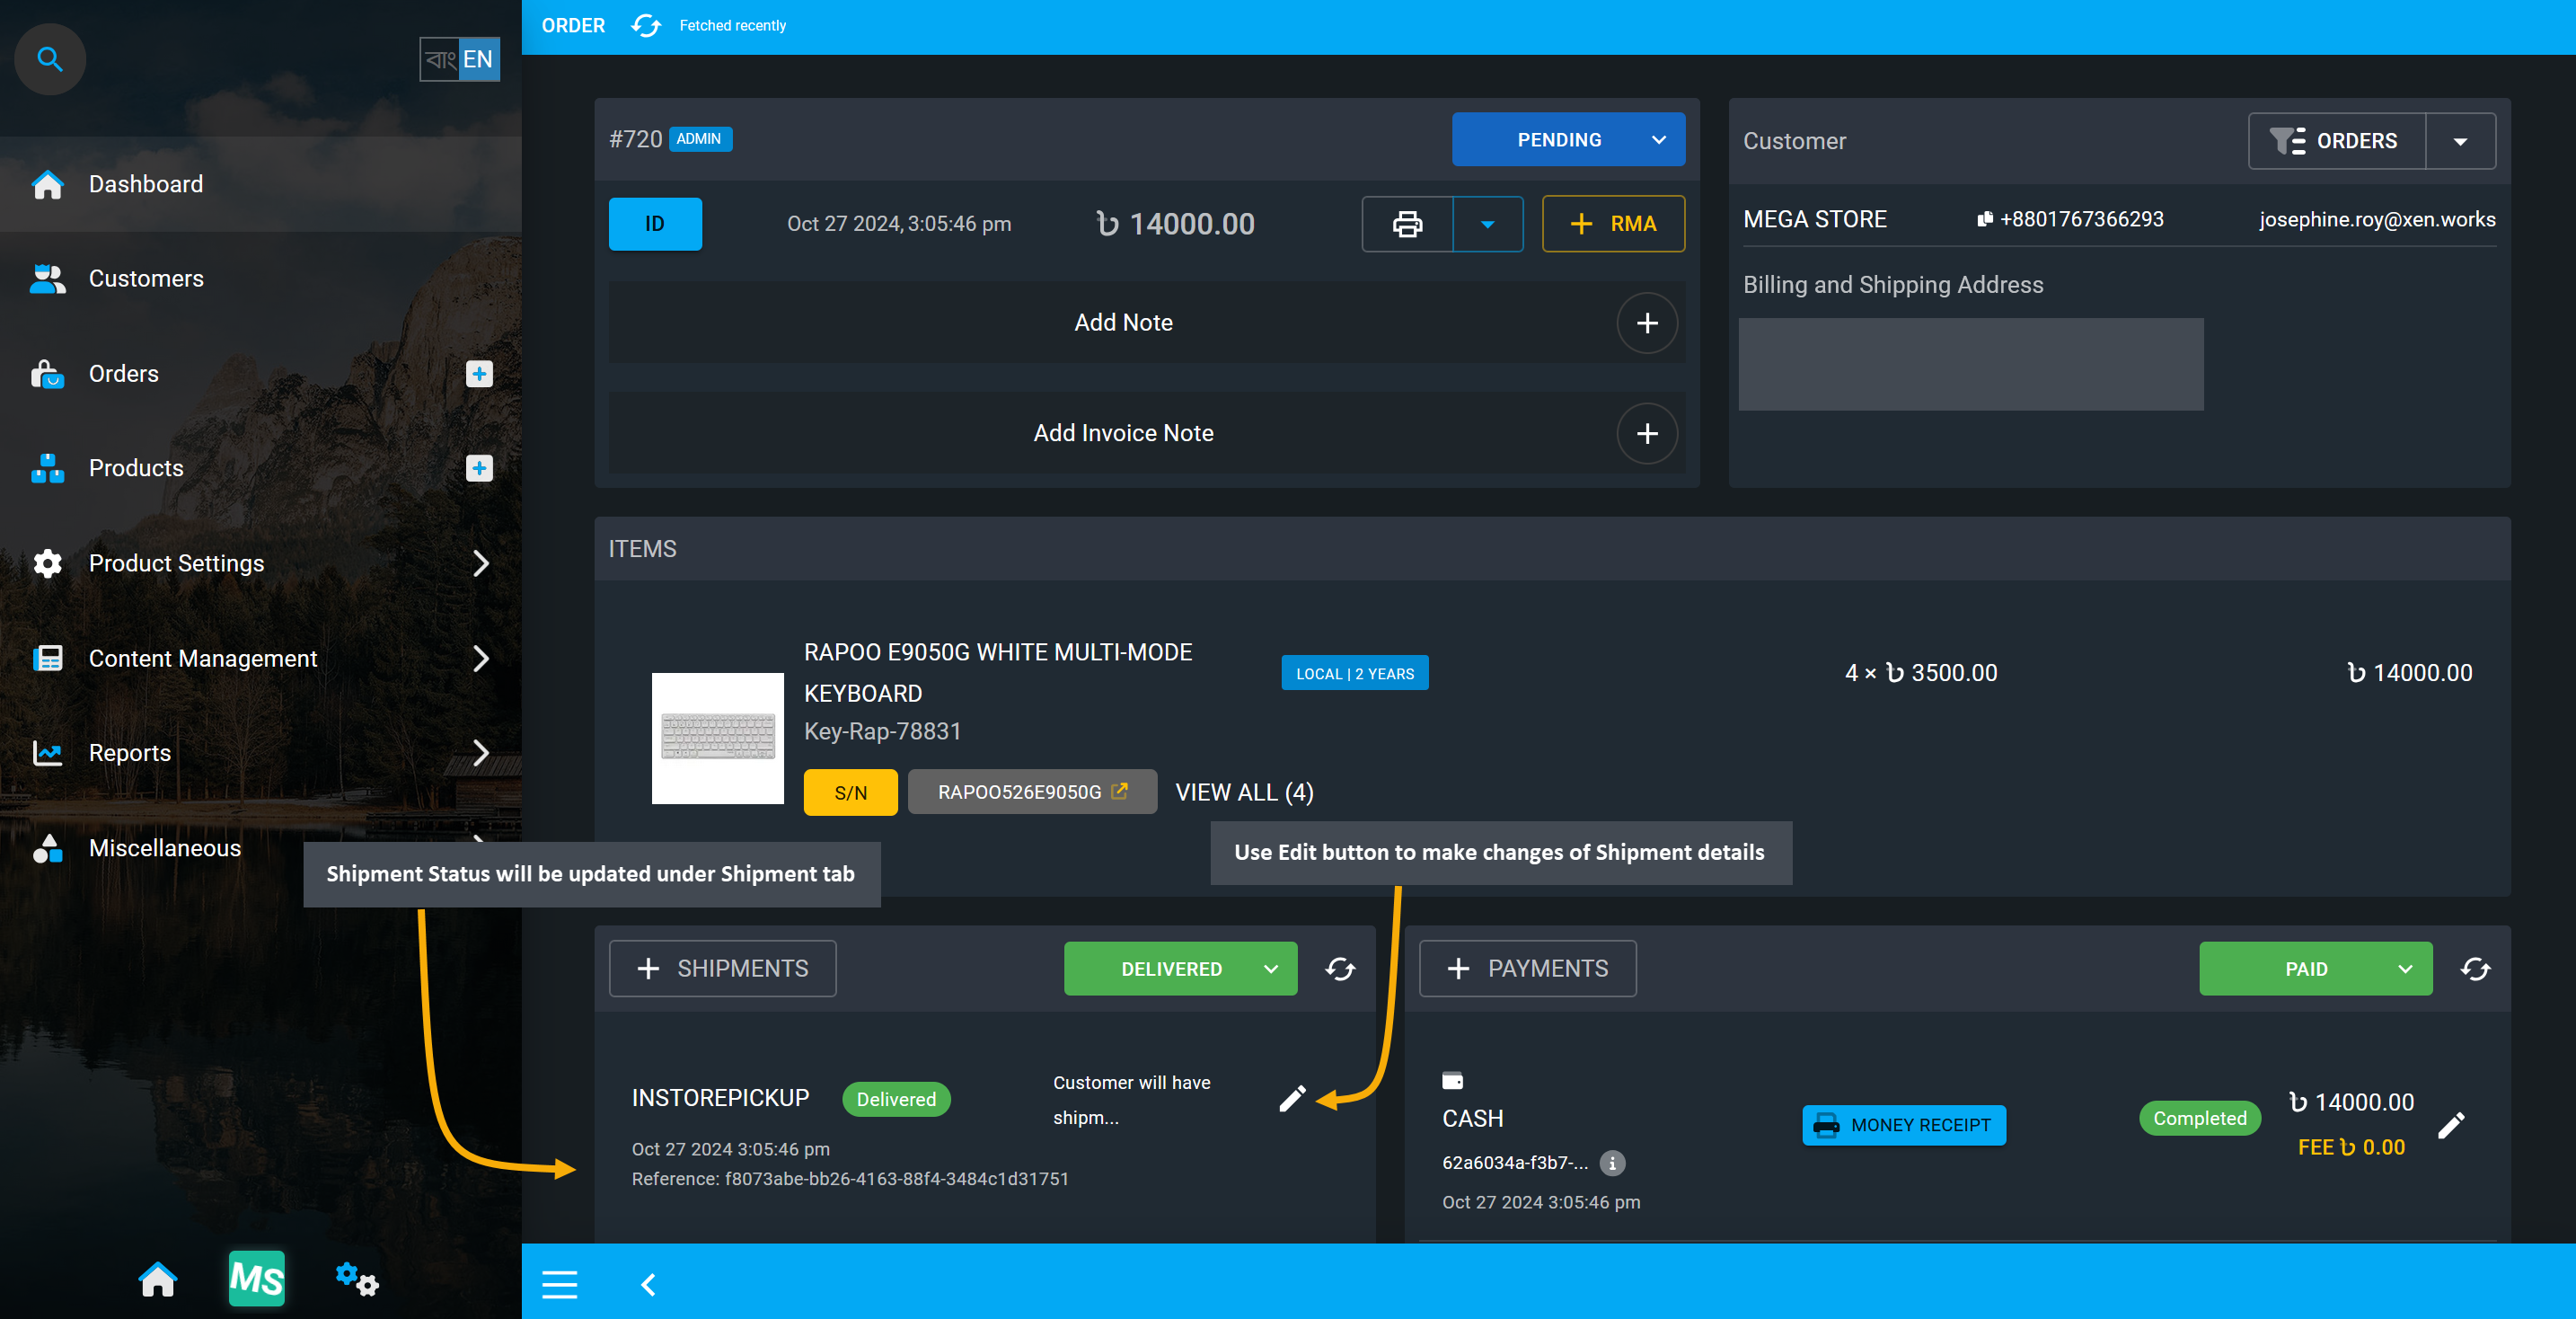
Image 24: Make changes on Shipment status with Edit button to add further shipping information.