Create and Manage Product Batch
Create and Manage Product Batch
Creating Product Batch will make it easier for the Shop Owner to remember when a specific Batch with a specific Product Stock was purchased and with how much price. For instance, they bought 50 Per Unit Products of Gear Head Keyboard Wired Slim Keyboard With Touchpad for 800 BDT on August 15 and purchased another 60 Per Unit Products of Gear Head Keyboard Wired Slim Keyboard With Touchpad for 700 BDT on August 18. Creating separate Product Stock of these Per Unit Products under individual Product Batches will make it convenient to keep count of which Product Stock were sold later.
Manage Product Batch
The options to Manage Product Batches can be accessed from within the Per Unit Product under Product List. Click on the ellipsis ⋮ button and then select Stock that will redirect to the Unit Stock Management page.
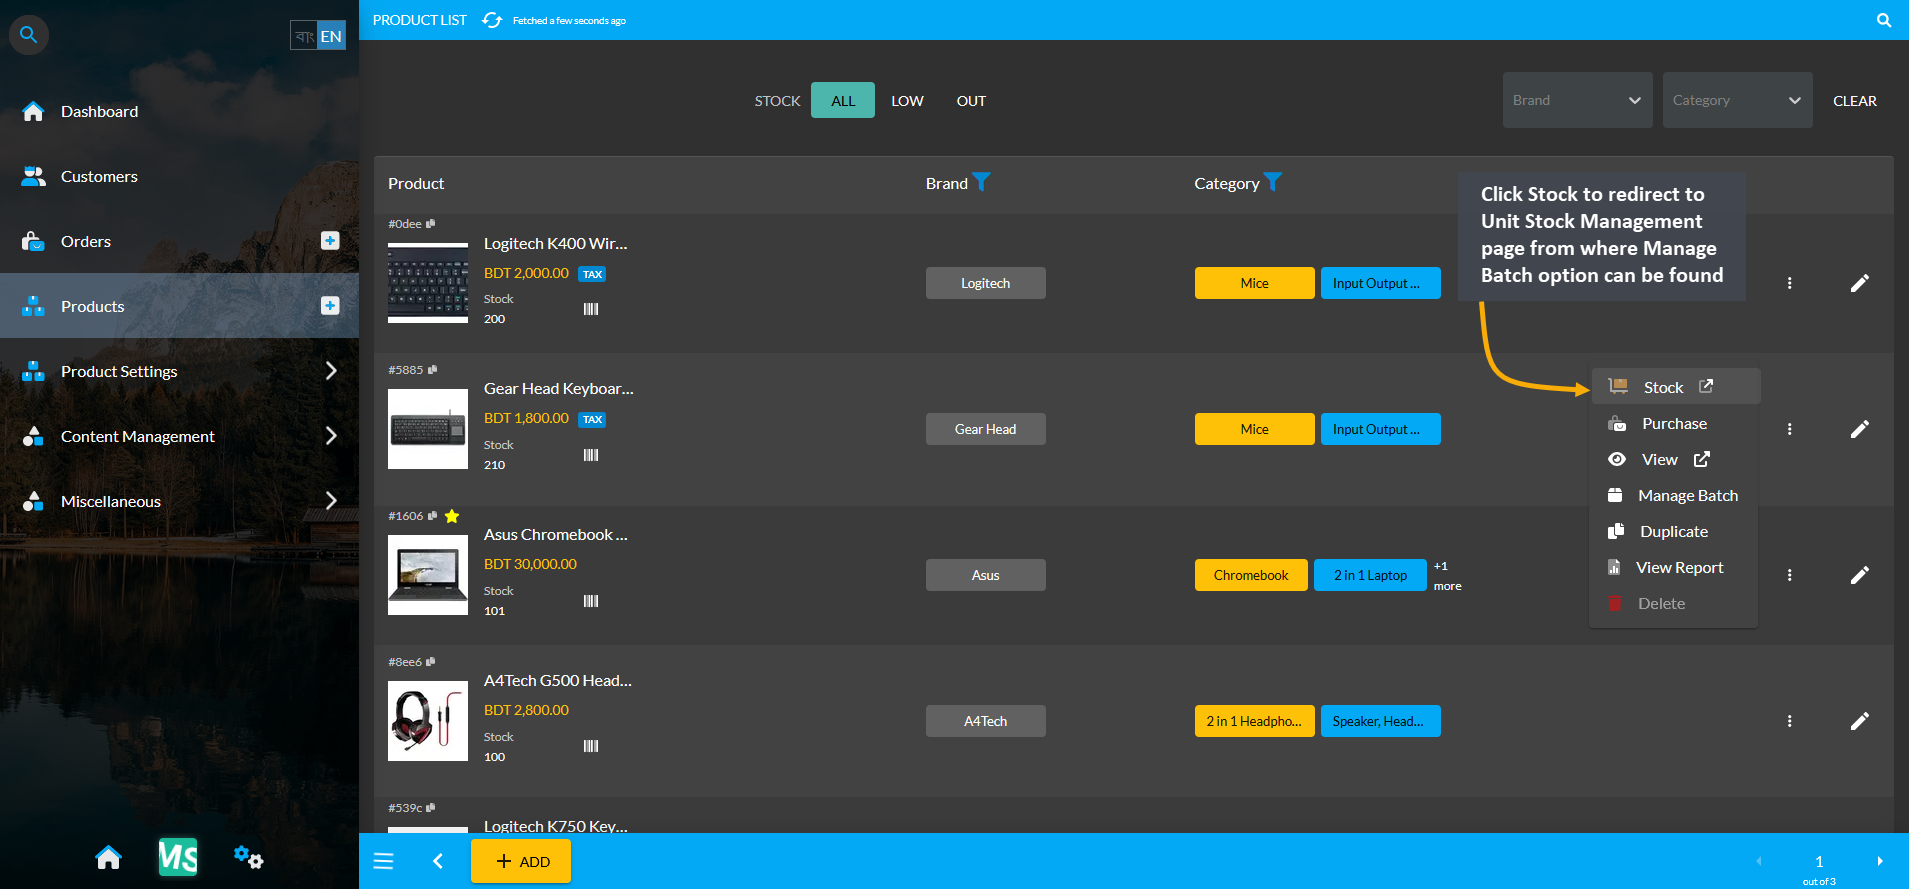
Image 1: Click the ⋮ button and select Stock that will redirect to the Unit Stock Management page.
On the Unit Stock Management page, click Manage Batches button to edit Batches from the Product Batch List.
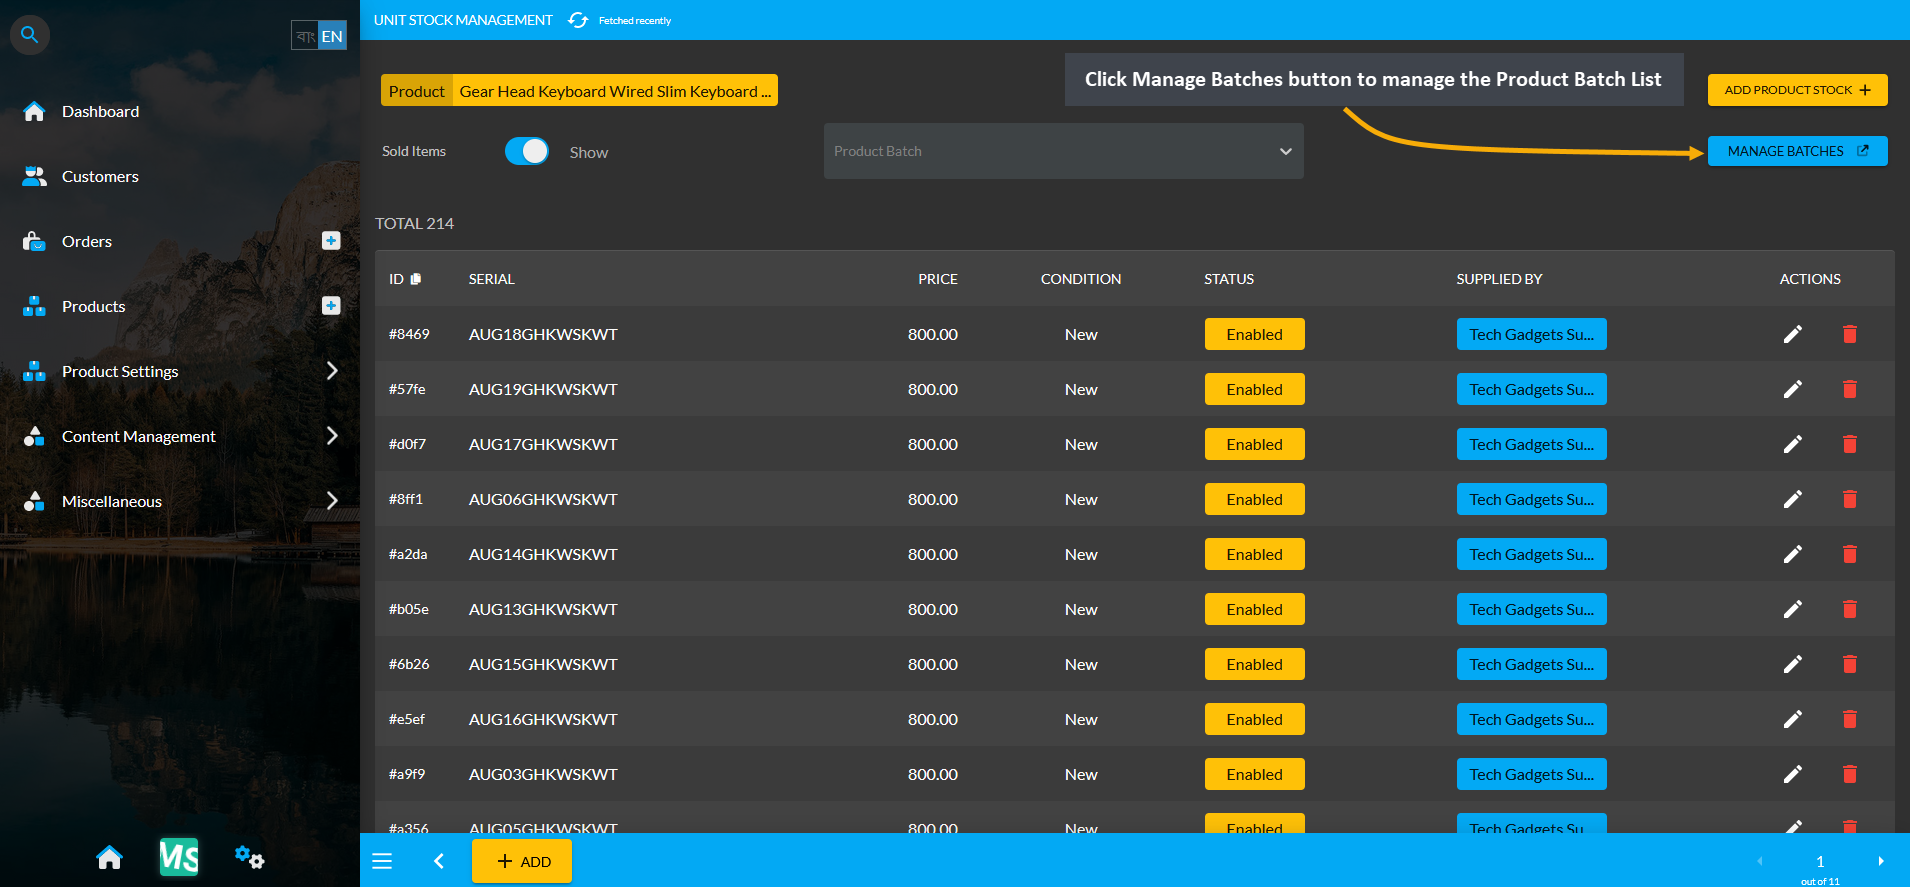
Image 2: Click the Manage Batches button on Unit Stock Management Page to edit Batches from Product List.
Another option to Manage Product Batches can be found by directly clicking on Manage Batches button within the Per Unit Product on the Product List page. This will redirect to the Product Batch List page.
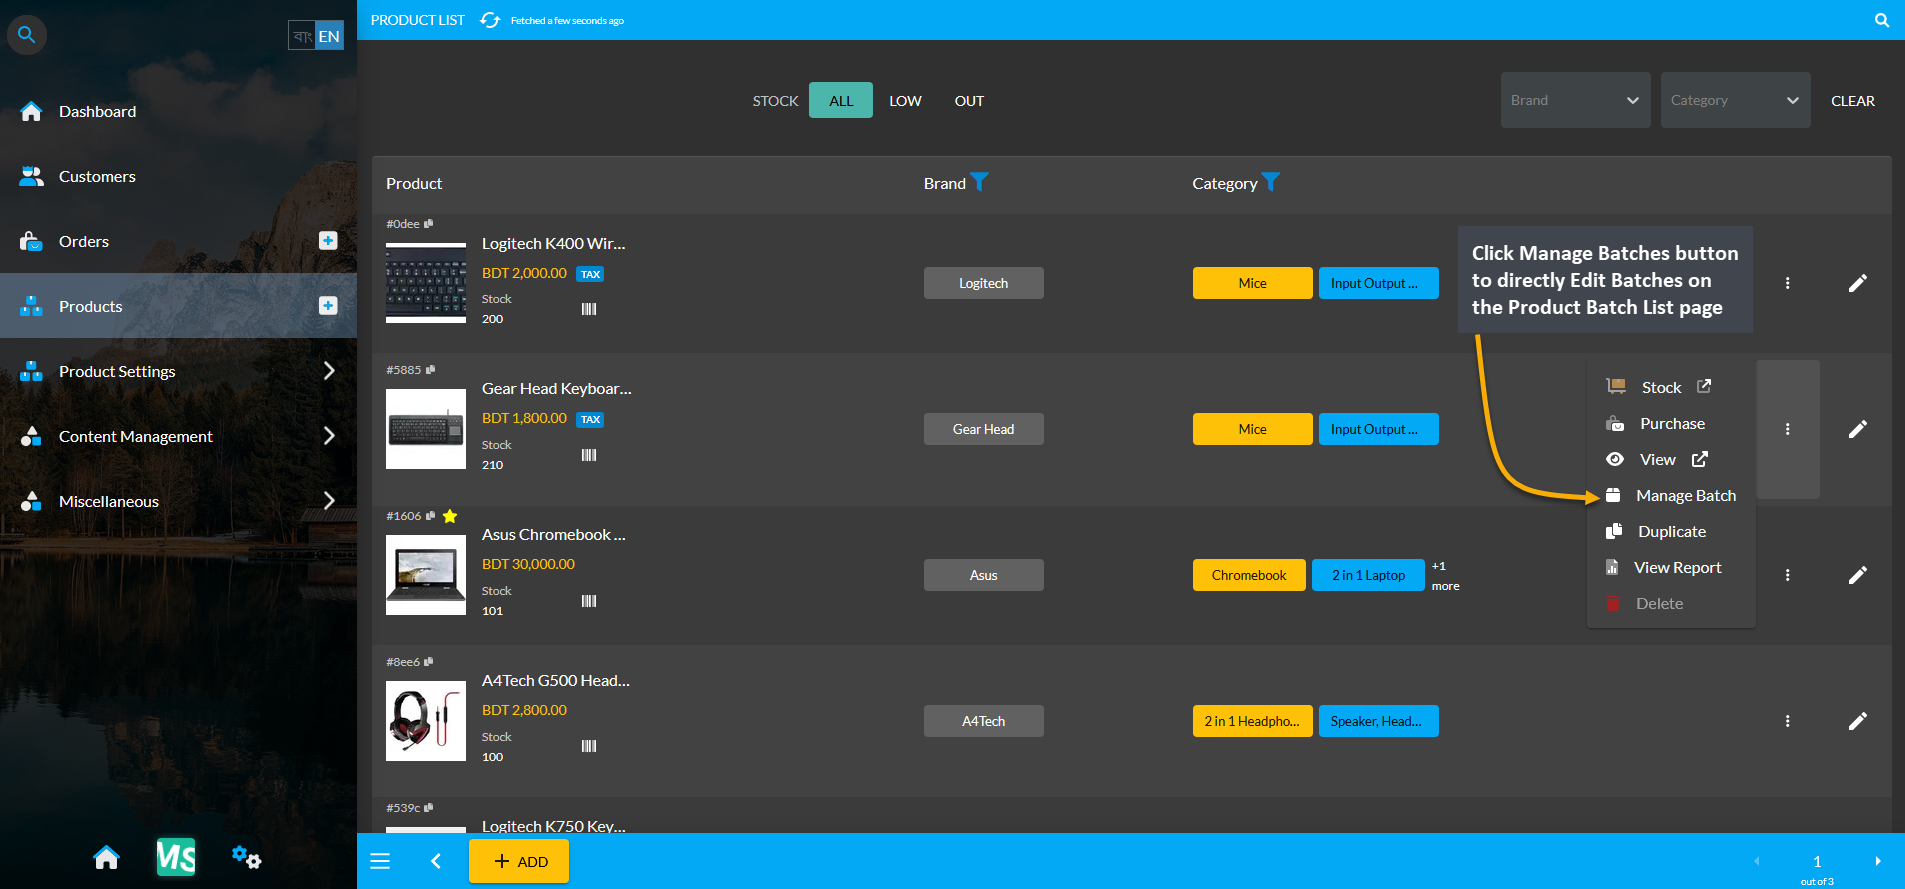
Image 3: Click the Manage Batches button from Product List to directly view the Product Batch List page.
Cost Basis on Product Batch List Page
On the Product Batch List page, the Shop Owner can view the history of Per Unit Product Stock purchases. There is a gray graph icon, clicking on which will open the Cost Basis for the selected Product Batch as shown below.
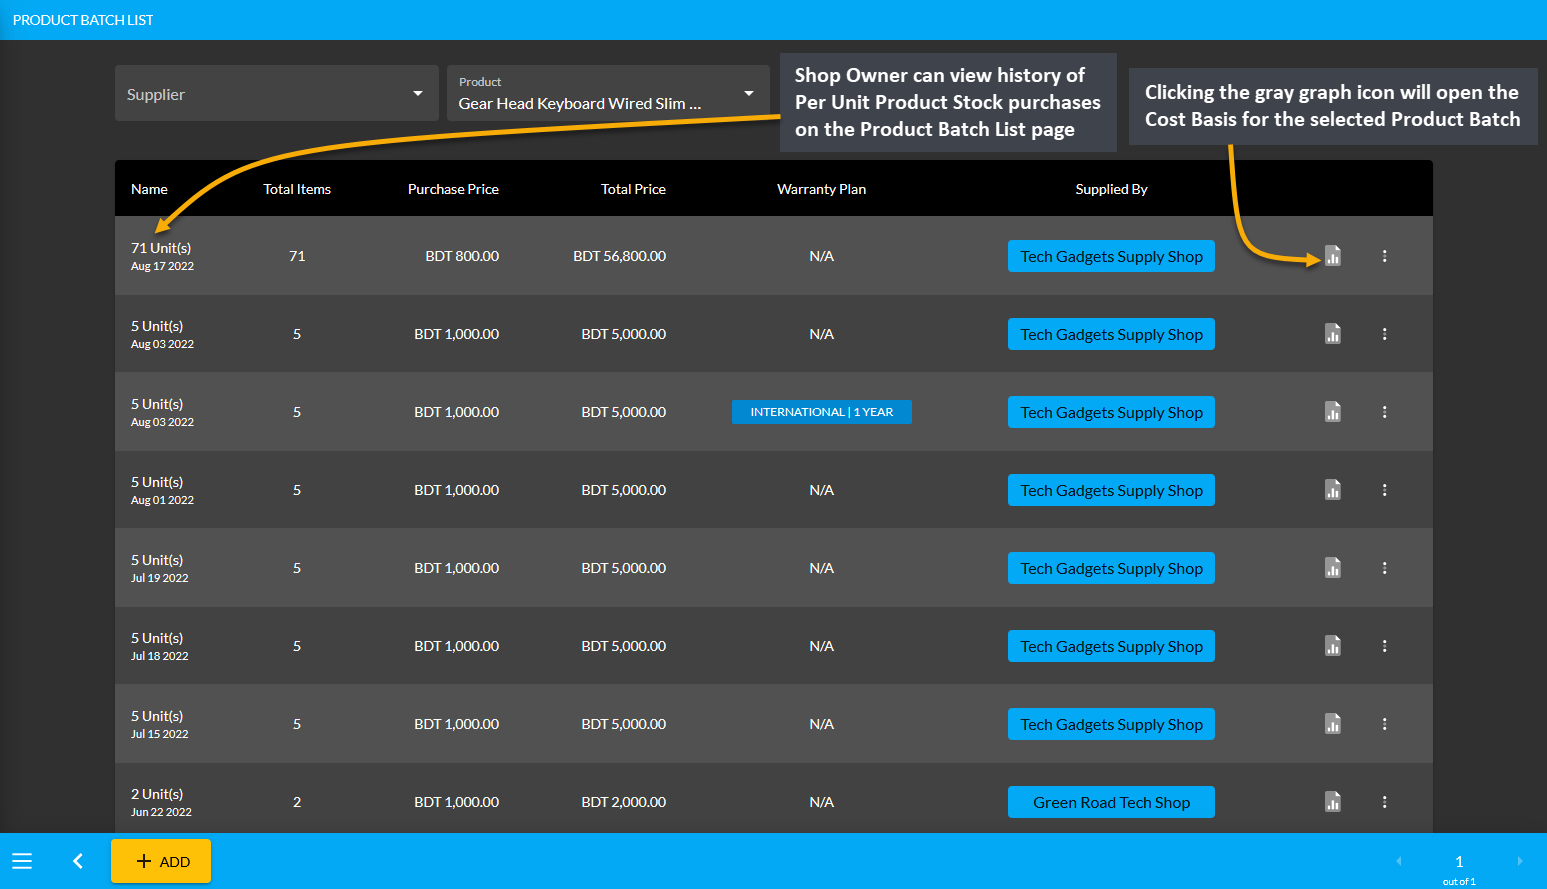
Image 4: View history of Per Unit Product Stock purchases from the Product Batch List page.
When redirected to the Cost Basis page of the Product Batch by clicking on the gray graph icon, the Shop Owner will be able to see Daily, Monthly, Hourly, Weekly, Half Yearly, and Yearly revenues and profits. The example shows the Cost Basis of 71 Units of Gear Head Keyboard Wired Slim Keyboard With Touchpad bought on August 17, 2022.
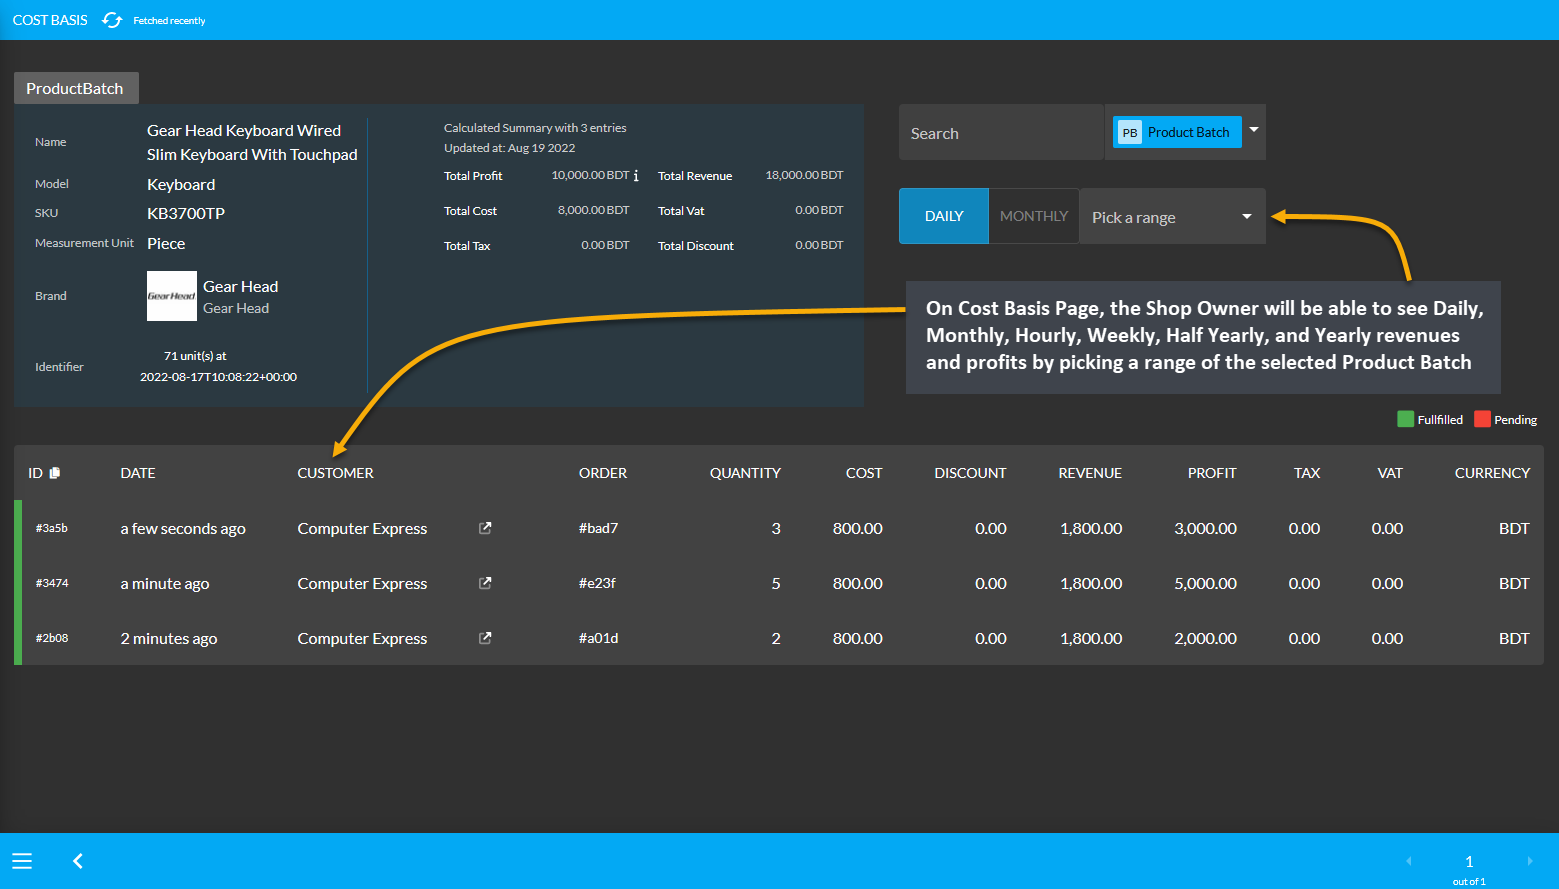
Image 5: Clicking on the gray graph icon will redirect to the Cost Basis page of selected Product Batch.
View and Edit Product Batch
On the Product Batch List page, clicking on the ellipsis ⋮ button will open View, Edit, and Delete options of Per Unit Product Batches. Using these options, the Shop owner can edit or delete selected Product Batch information.
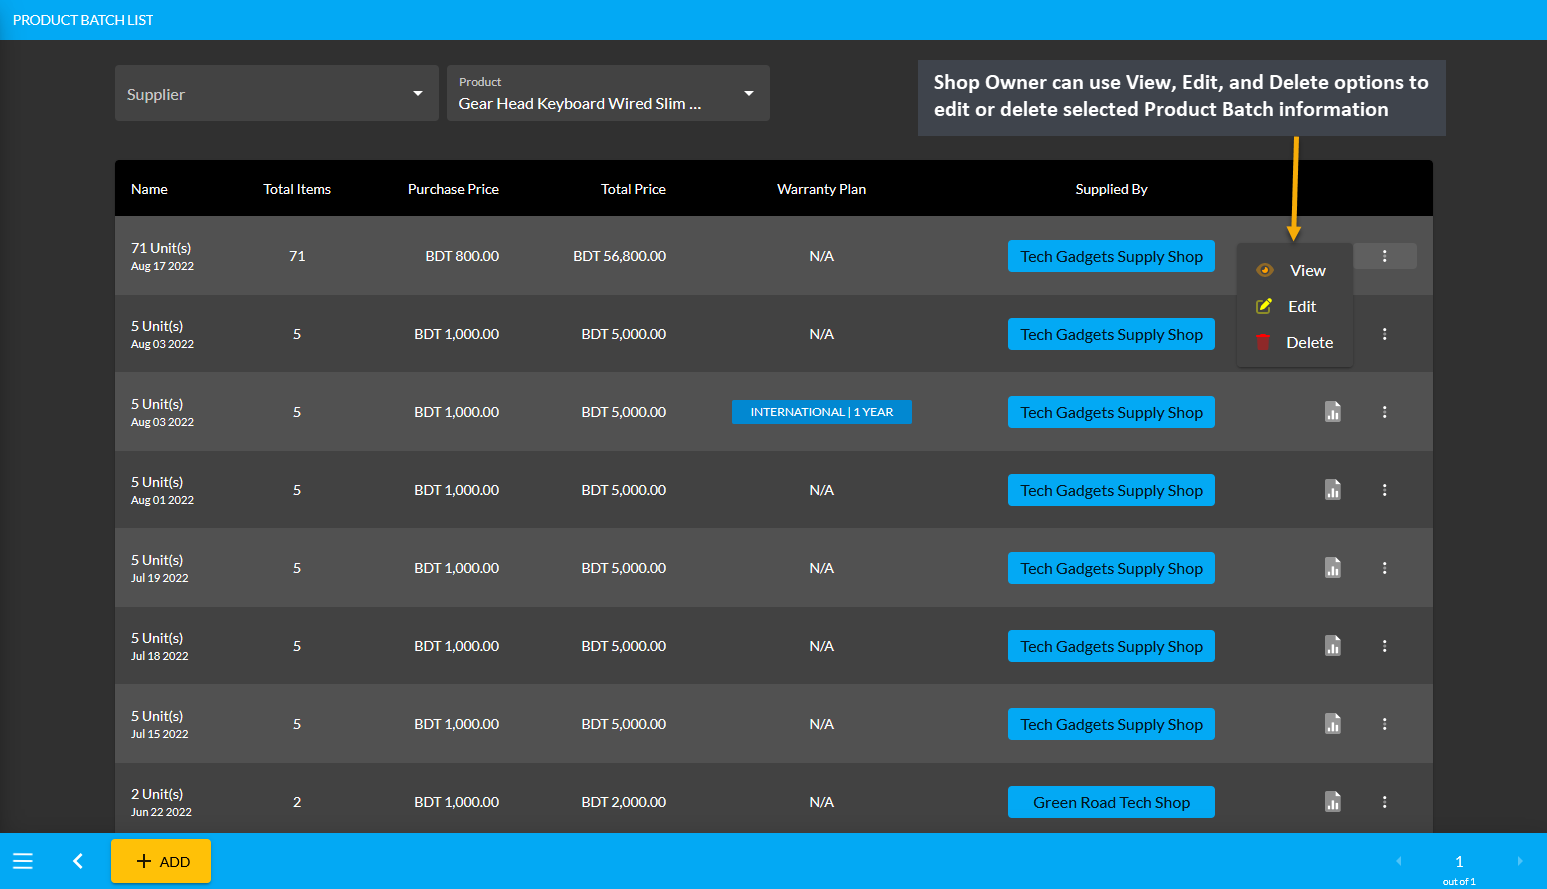
Image 5: Clicking on the gray graph icon will redirect to the Cost Basis page of selected Product Batch.
Clicking the View button will redirect to the Unit Stock Management page, where the Shop Owner can see all the Product Stock details of the selected Per Unit Product and their Enabled or Sold statuses.
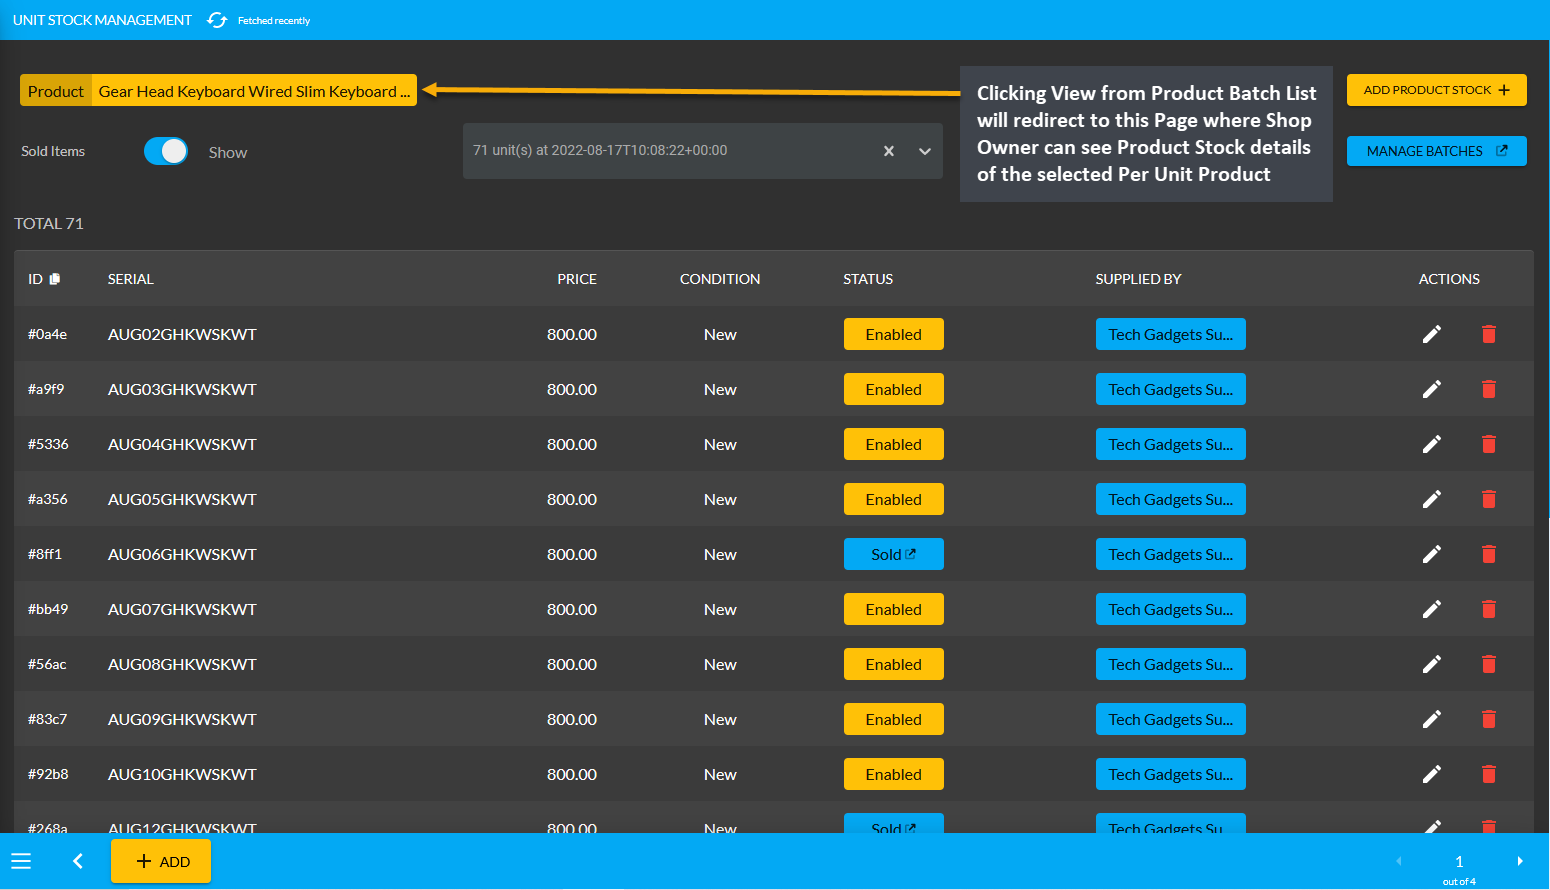
Image 6: Click View from Product Batch List to view Per Unit Product stock on Unit Stock Management page.
Clicking the Edit button will redirect to Update Product Batch page, where the Shop Owner can edit Batch name, purchase price, warranty, Supplier name, and expiry date of the selected Product Batch.
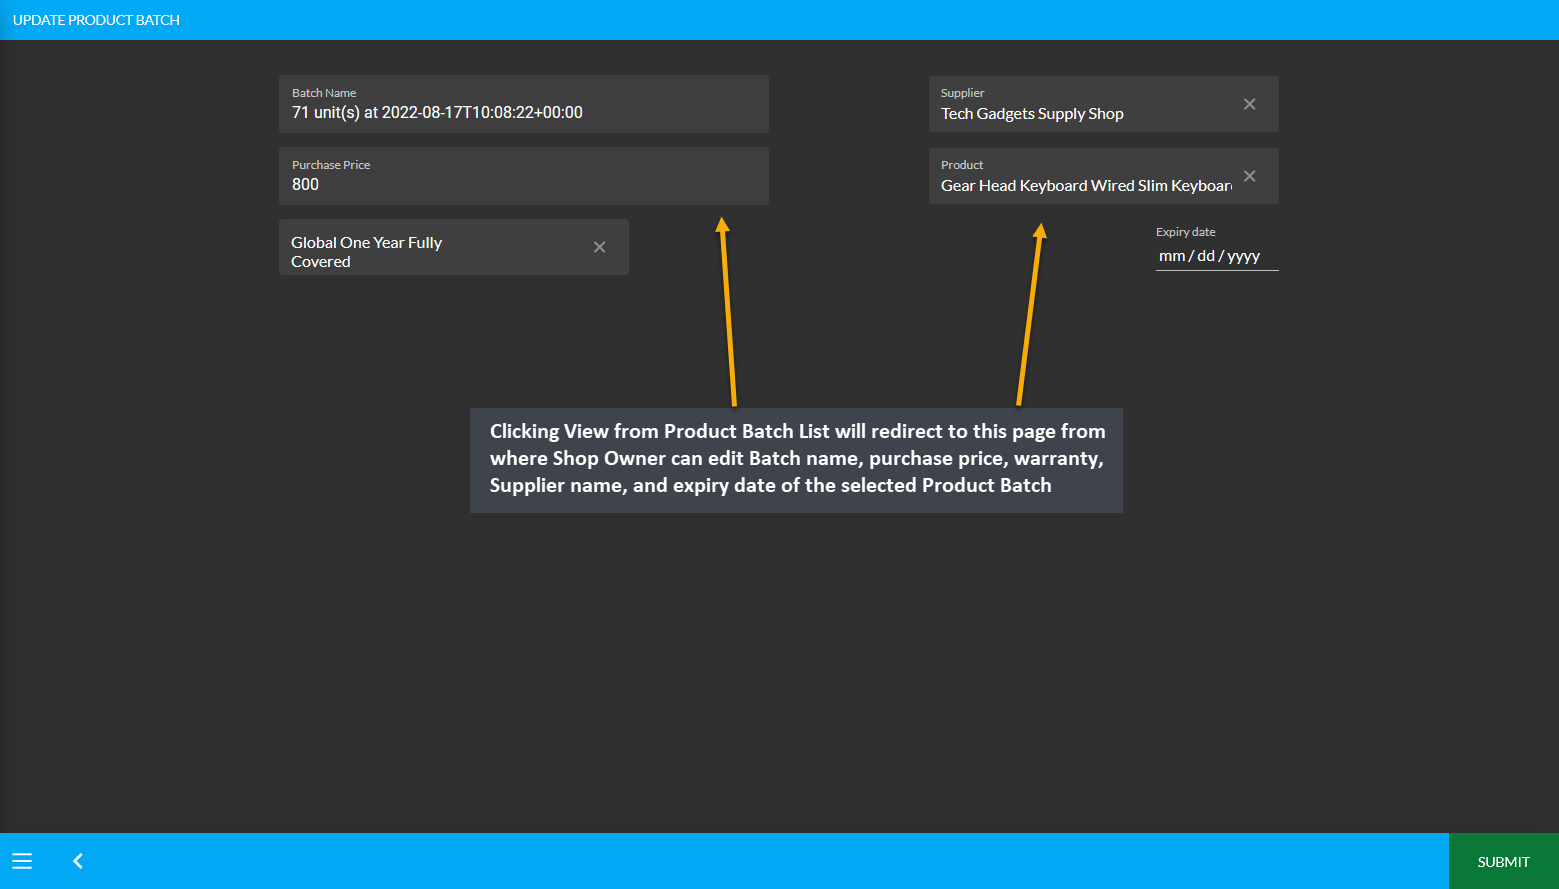
Image 7: Click Edit from Product Batch List to edit Product Batch details on Product Batch Update page.
Create New Product Batch
The Unit Stock Management page can be accessed by clicking on Stock. This will give Shop Owner access to create New Product Batch or purchase Per Unit Products directly from Credit Supplier. From there, click Add Product Stock button to purchase Per Unit Products in Batches which will redirect to the Add Product Stock page.
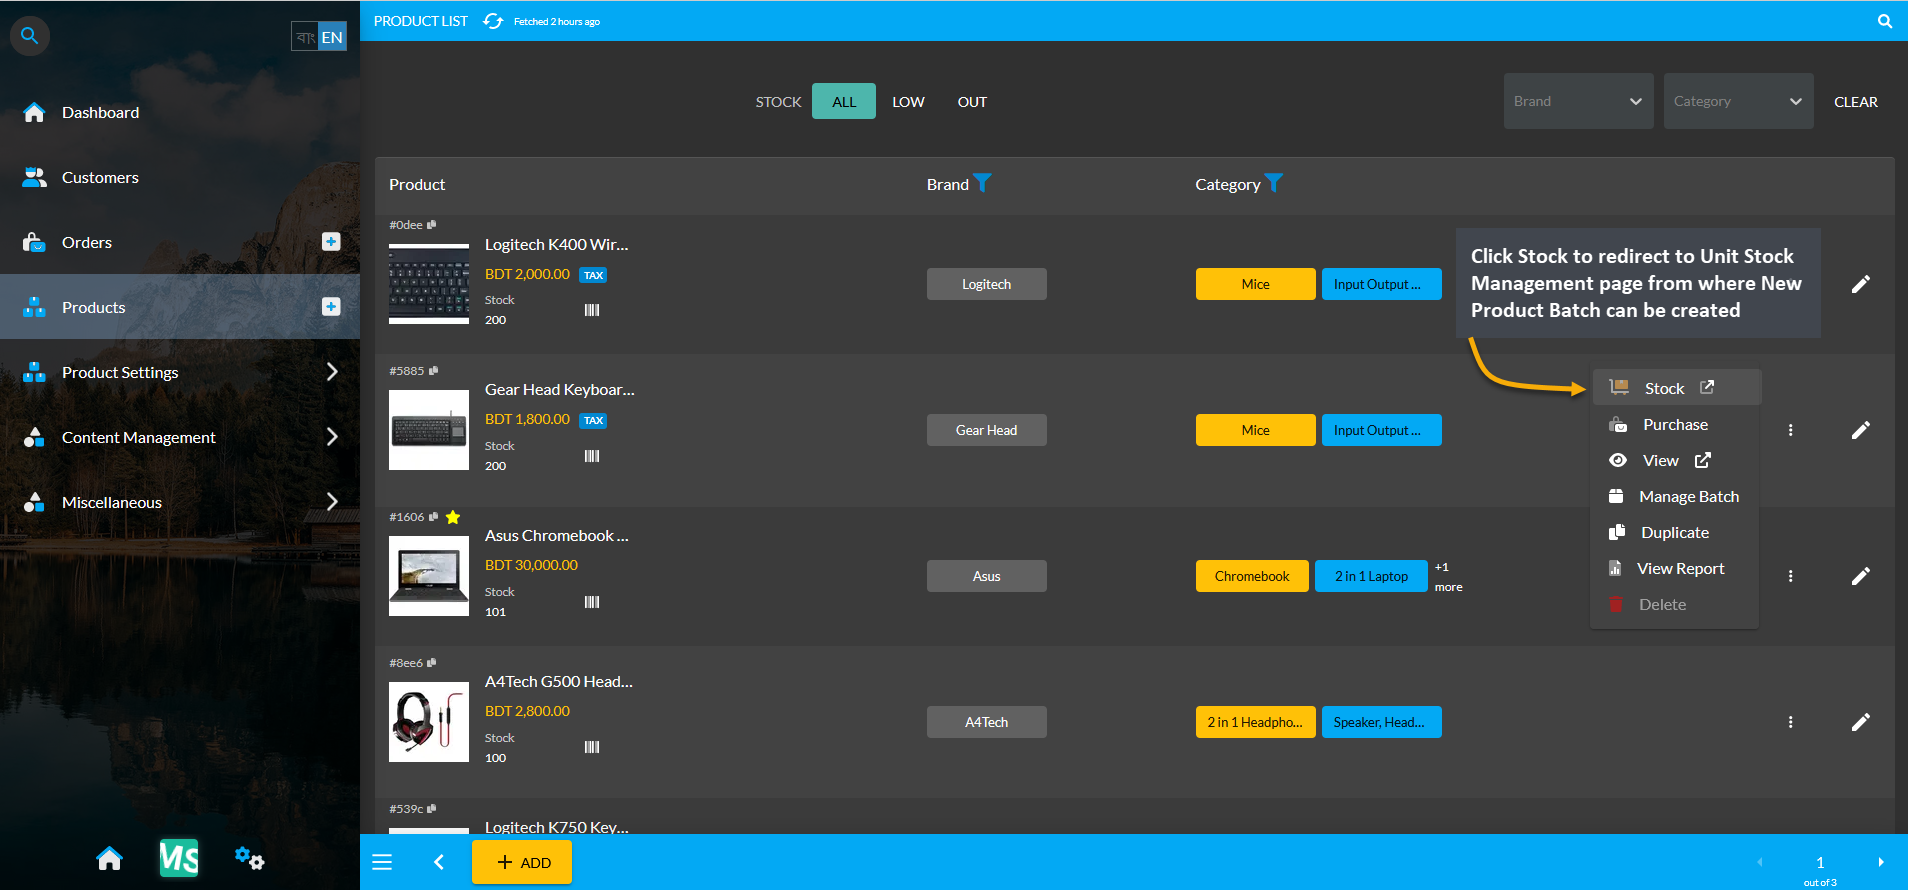
Image 8: Click Stock to access option to create New Product Batch from Unit Stock Management Page.
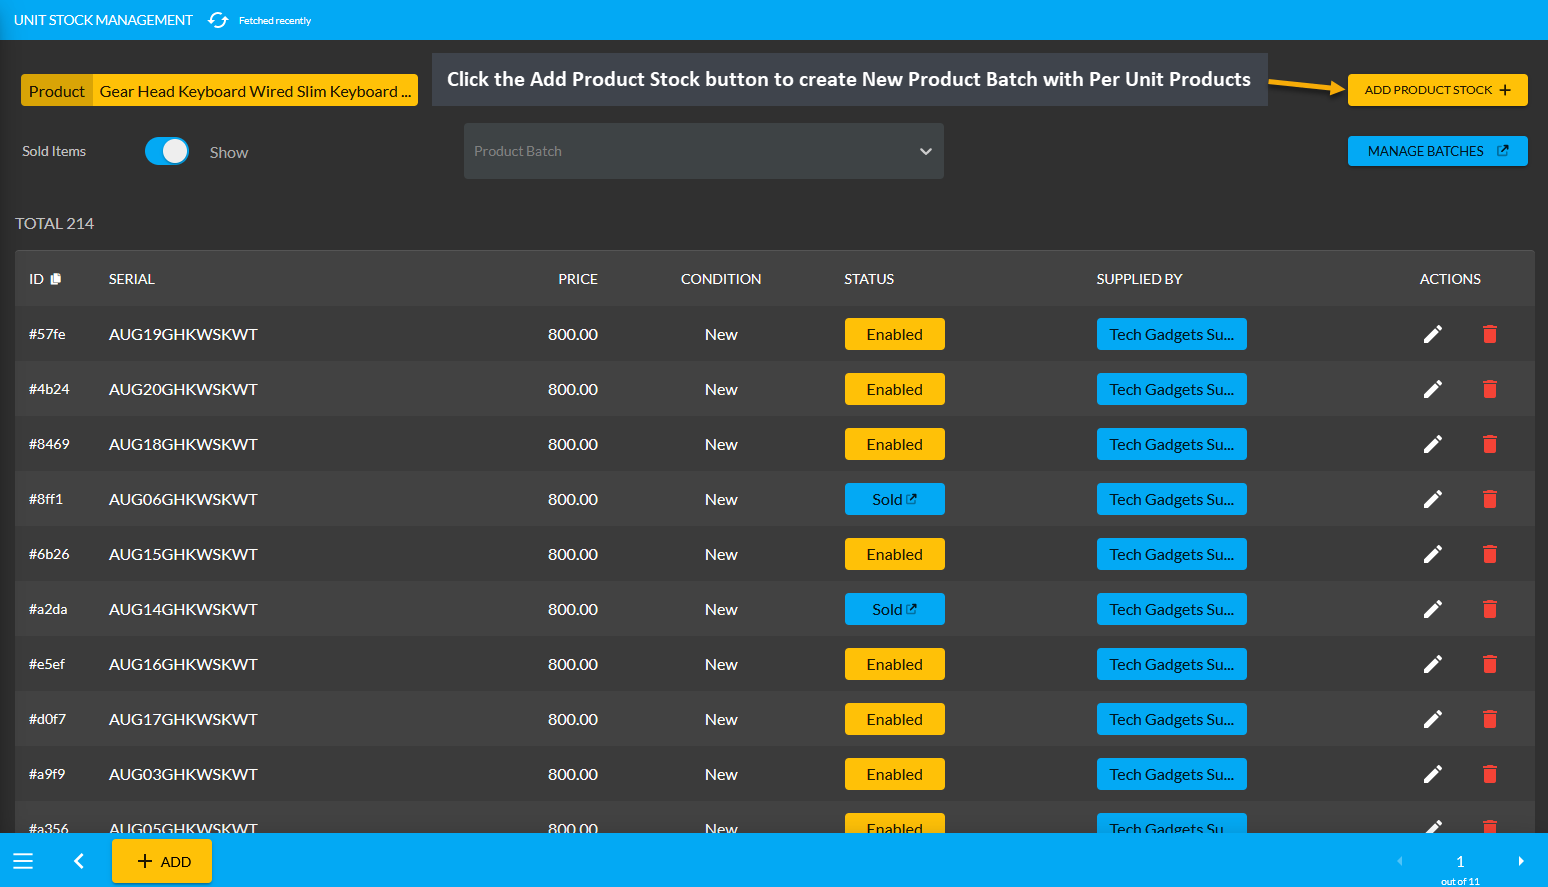
Image 9: Click the Add Product Stock button to create New Product Batch with Per Unit Products.
Purchase Per Unit Products in Batches
On the Add Product Stock page, the Shop Owner can purchase Per Unit Products from the Credit Supplier Without Payment, with Full Payment, or with Partial Payment. Another option is Untracked, purchasing through which will leave no records of purchase. Select any of the Payment Methods from Acquisition Options. After that, set the Purchase Price Per Unit, select Credit Supplier, and select Warranty if it is not automatically selected.
Turn on the toggle button to enable auto increment for sale stock count. Then click Auto Generate Serial Numbers button to generate Quantity and Serial of Per Unit Product that Shop Owner will buy from Supplier. It will open a pop-up, where Prefix, Suffix, Start Counter, and End Counter needs to be filled to generate Product Stock with individual serial numbers.
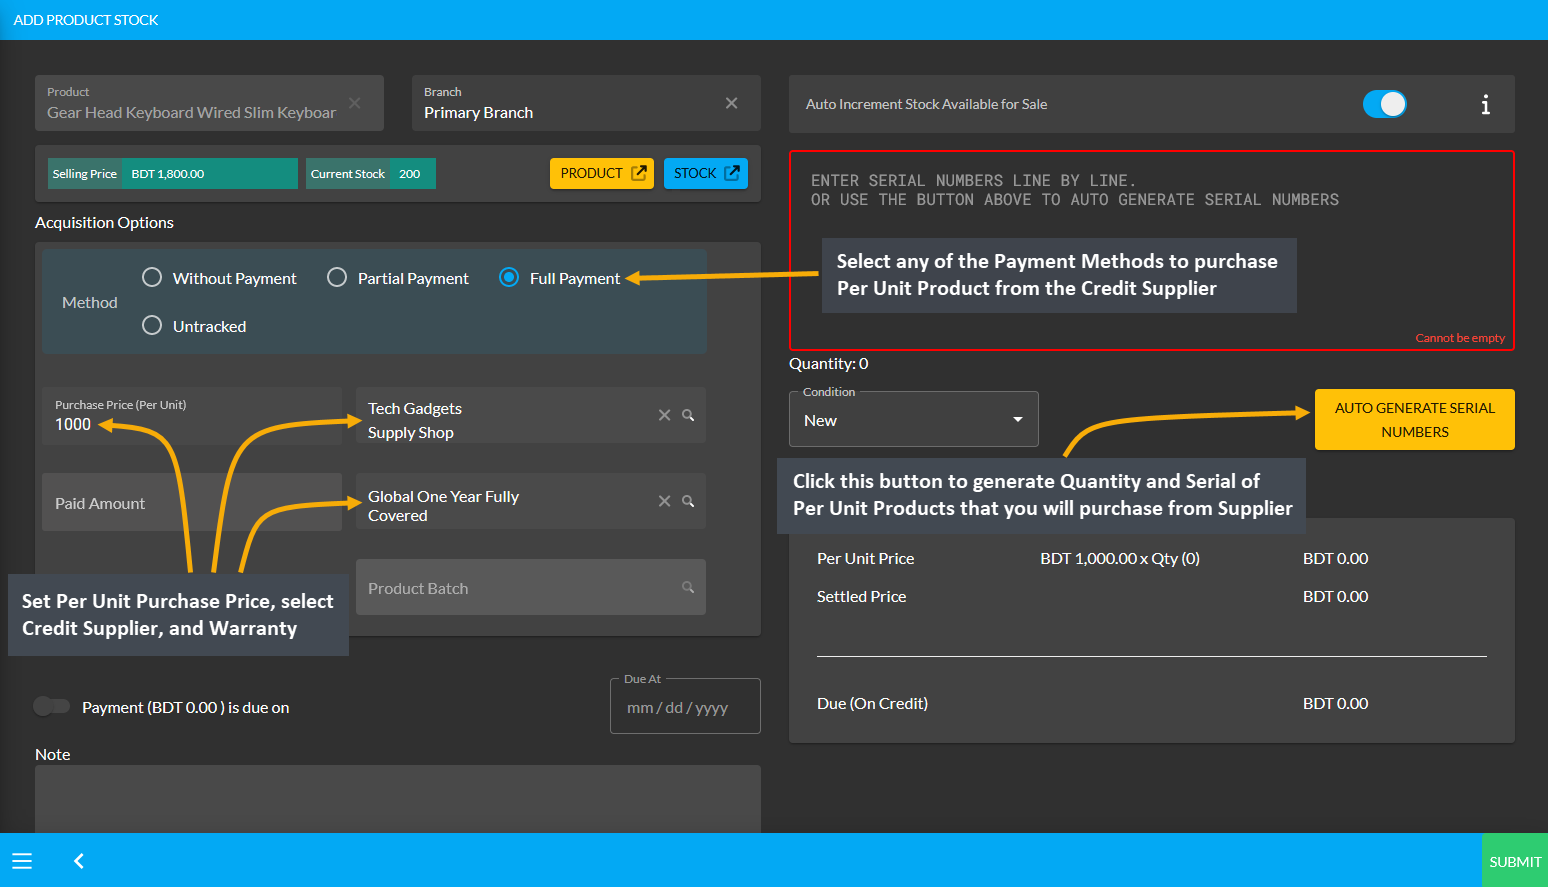
Image 10: Set Purchase Price, select Supplier and Warranty, and click Auto Generate Serial Numbers button.
After clicking the Auto Generate Serial Numbers button, a pop-up will appear where Product Serial Number and Quantity needs to be set with Prefix, Suffix, Start Counter, and End Counter. Click the Generate button to create the Per Unit Products for purchase from the Credit Supplier that will add the serial numbers inside the box.
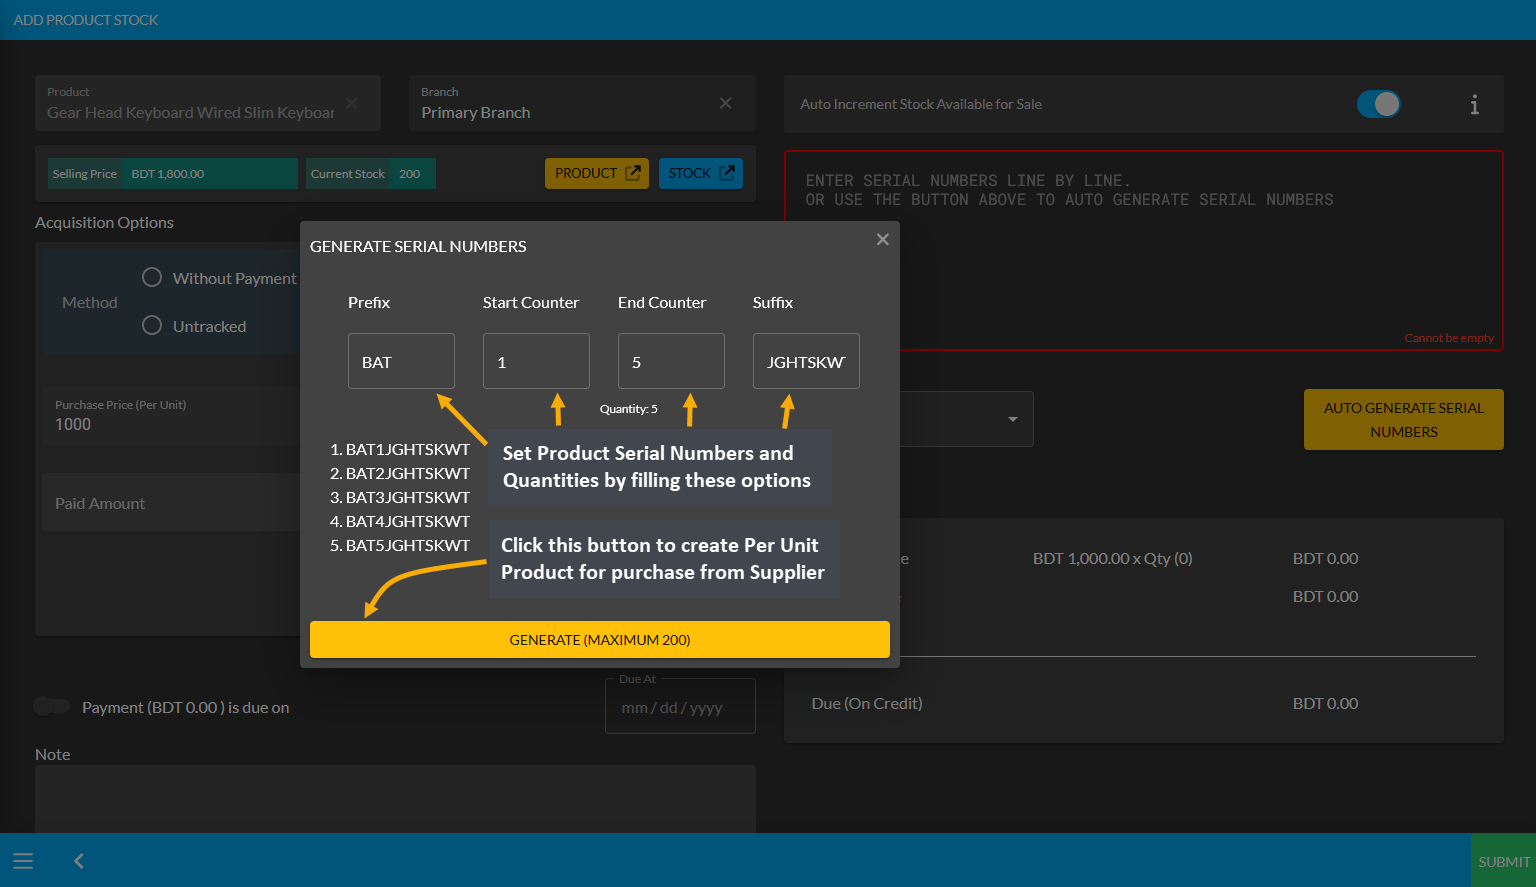
Image 11: Set Product Serial Number and Quantity with Prefix, Suffix, Start Counter, and End Counter.
After Product Serial Numbers and Quantities are generated for the target Per Unit Product, full payment amount will automatically be set on the Paid Amount box. For other payment options, turn on Payment Due toggle button and select the Due Date or add Note as needed. The autogenerated serial numbers for created Per Unit Product quantities will show inside the box. Click the Submit button to complete the purchase process.
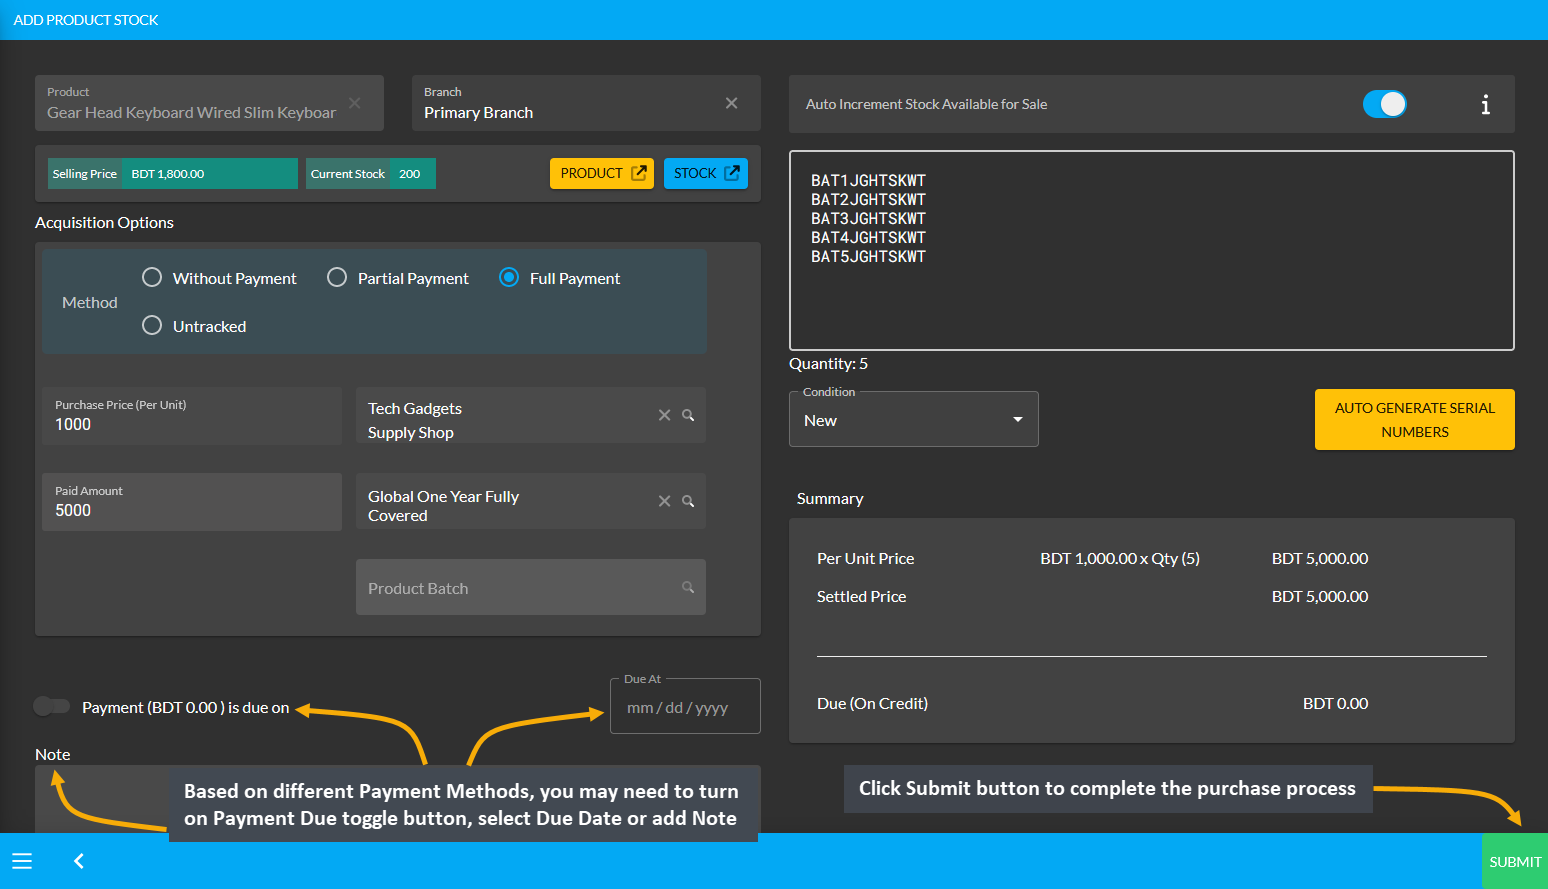
Image 12: After all necessary purchase details are set, click Submit to complete the purchase process.
Then, a pop-up will show uploading assigned Per Unit Product quantities and confirm when units are successfully created. Click Okay to save changes when auto generated serial numbers are 100% uploaded for completing the Per Unit Product purchase process from Credit Supplier. If Shop Owner wants to purchase more quantities of the same Per Unit Product from the same Credit Supplier, then they need to click the Purchase Product from Same Supplier button as shown in the example screenshot.
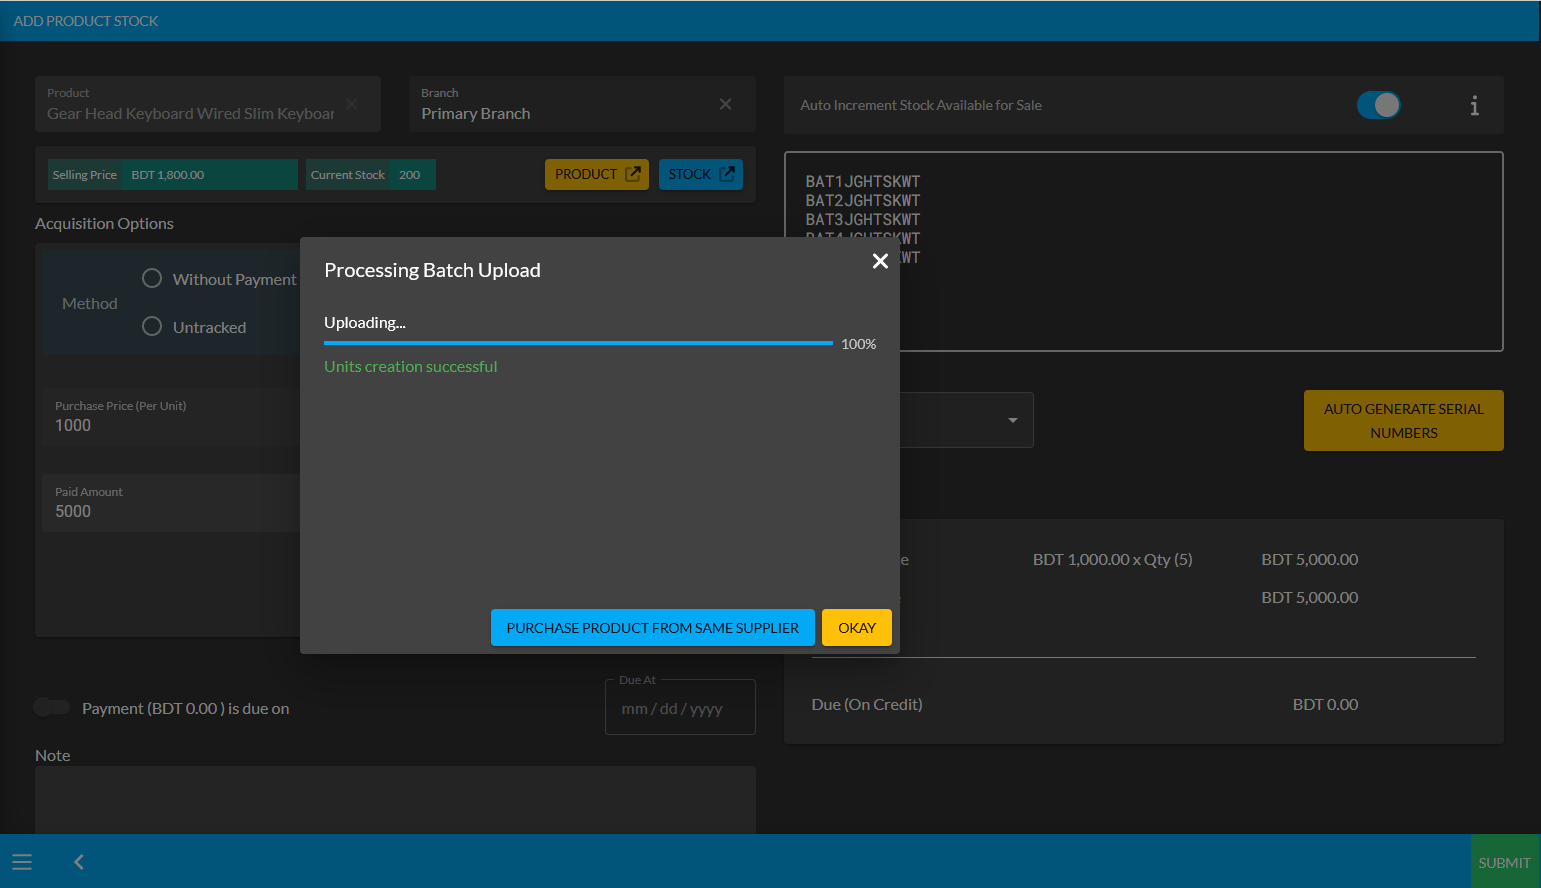
Image 13: Pop-up showing successful creation or batch upload of Per Unit Product. Click Okay to proceed.
Clicking on Okay will redirect to the Unit Stock Management page where the successfully created Batch of Per Unit Products will be displayed on the top of the list. For Per Unit Products, the individual serial numbers will also be displayed with Product SKUs, through which stocks can be differentiated. Click here to learn in details about Per Unit Product Purchase of all types using different Payment Methods to create New Product Batches.
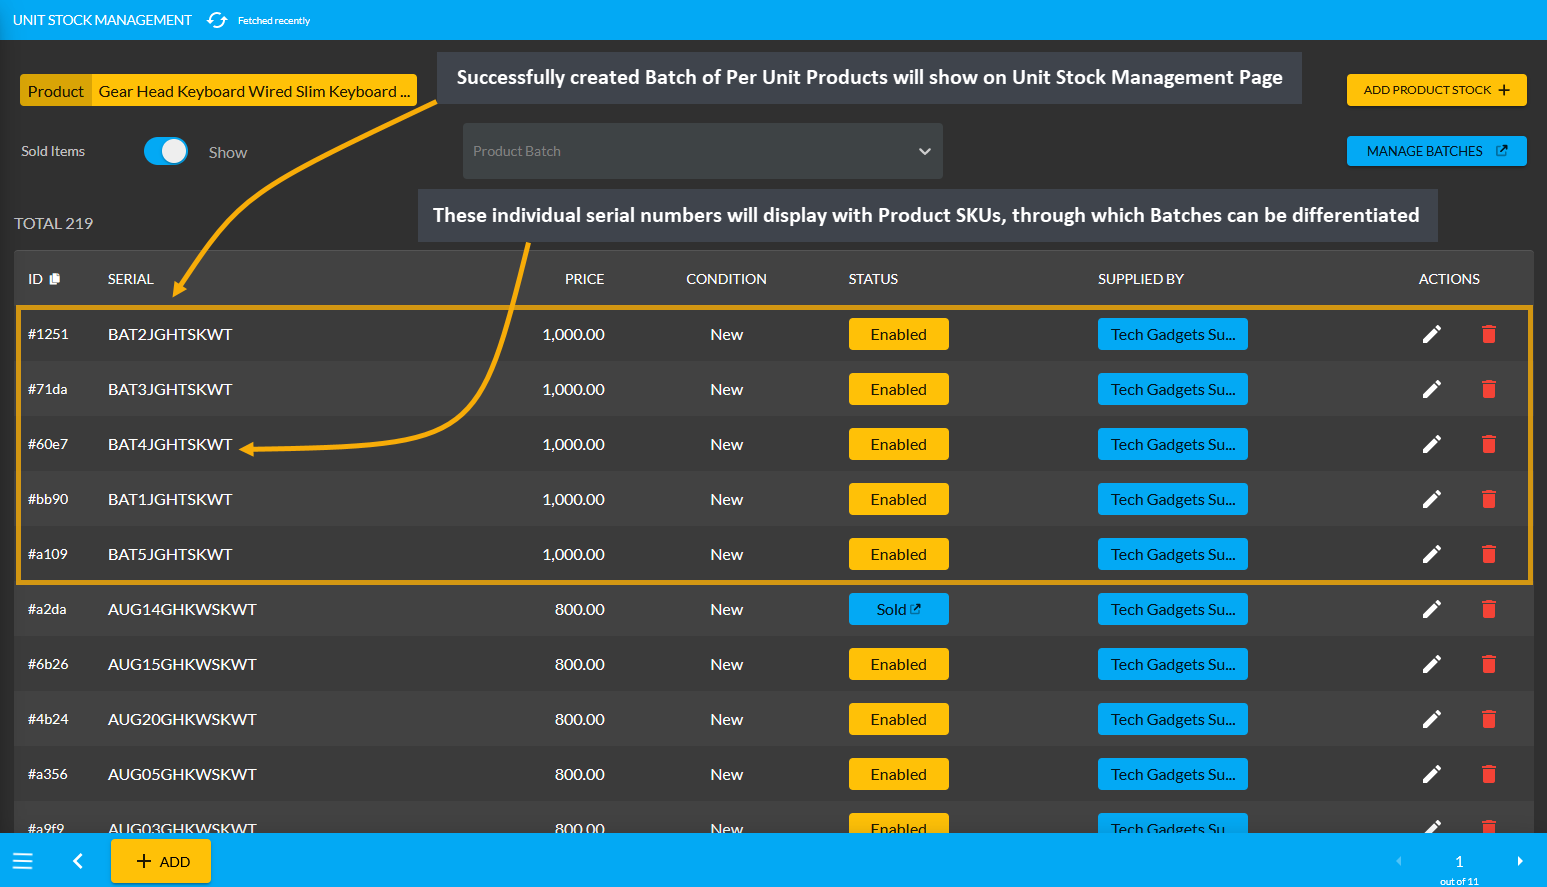
Image 14: Successfully created Batch of Per Unit Products will display on the Unit Stock Management Page.
Available Stock for Sale Explained
When the Shop Owner turns on the Auto Increment Stock Available for Sale toggle button, it will determine if the added Product Units will be added within the main available Stock for sale or not. For instance, a Shop Owner has 10 Processors to sell both at store and online, but they were already sold online. Later, when a Customer visits the store to Order 2 Processors, they will not be able to buy them even though the Processors were stacked in the store shelves, because those 10 Processors were already sold online.
Therefore, to avoid such negative situations, the Shop Owner can sell maximum 6 Processors online and keep 4 Processors in Back Stock. For Customers who visits in-person at the store, the Shop Owner can place Order for them and assign Stock from these 4 Processors without facing any Out of Stock issue. Thus, if they turn off the Auto Increment Stock Available for Sale toggle button beforehand, the 4 Processors will be unavailable or show Out of Stock for automated sale online after 6 Processors are sold out of 10 Processors.
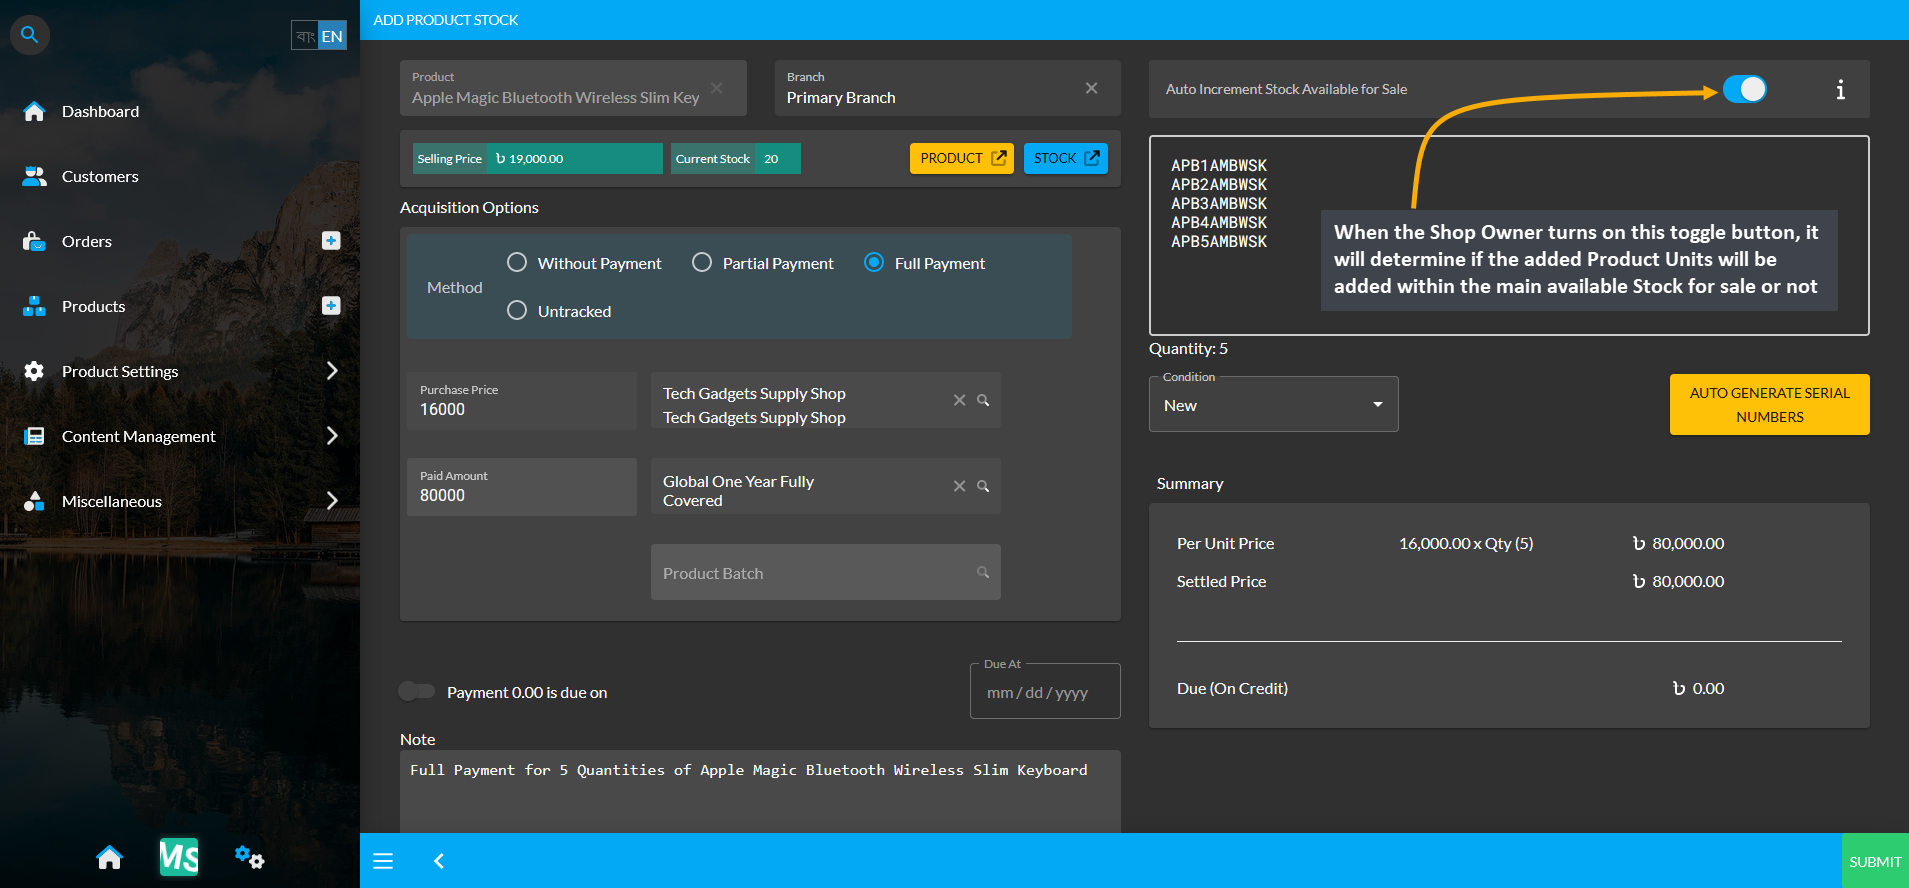
Image 15: Determine if added Product Units will be added within the main available Stock for sale or not.