Product Settings
Learn more about creating and managing Brands, Galleries, Warranty Plans, Product Categories, Tags, and RMA within Product Settings.
Product Settings
Product Settings include important modules that can be used to set important aspects of Product such as Brands, Galleries, Warranty Plans, Product Categories, RMA and Tags. Below are some short descriptions about them.
Brands
The Brands section consists of Global Brands and My Brands. Global Brands are pre-defined Brands which can be selected during Product creation. My Brands are Custom Brands that Shop Owner can create which are generally local Brands and which are not already under the list of Global Brands.
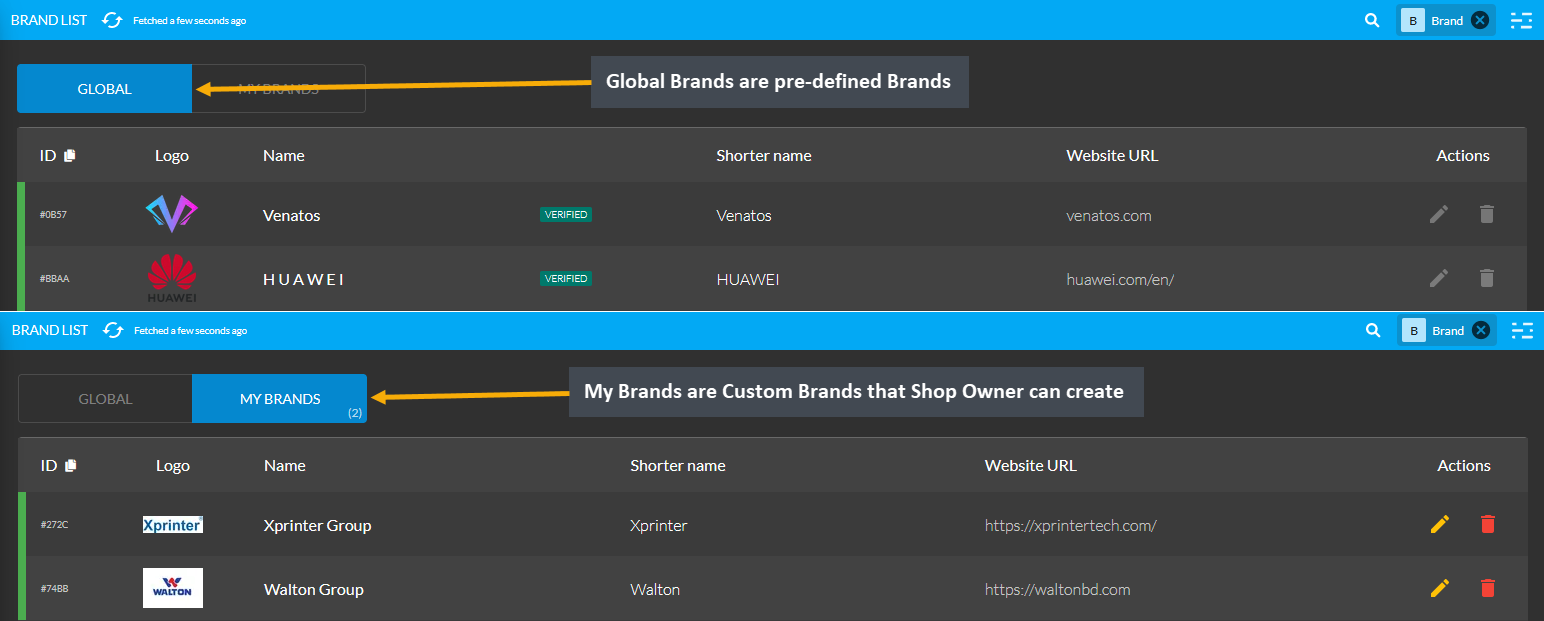
Image 1: Global Brands are pre-defined Brands and My Brands are Custom Brands created by the Shop Owner.
Galleries
Galleries allow adding Images for Products and Branches beforehand to use later to create Product and Branch. Product Images or YouTube videos can be added in advance through Galleries. The already created Gallery List will show up under My Galleries. Gallery items can be dragged and reordered as needed.
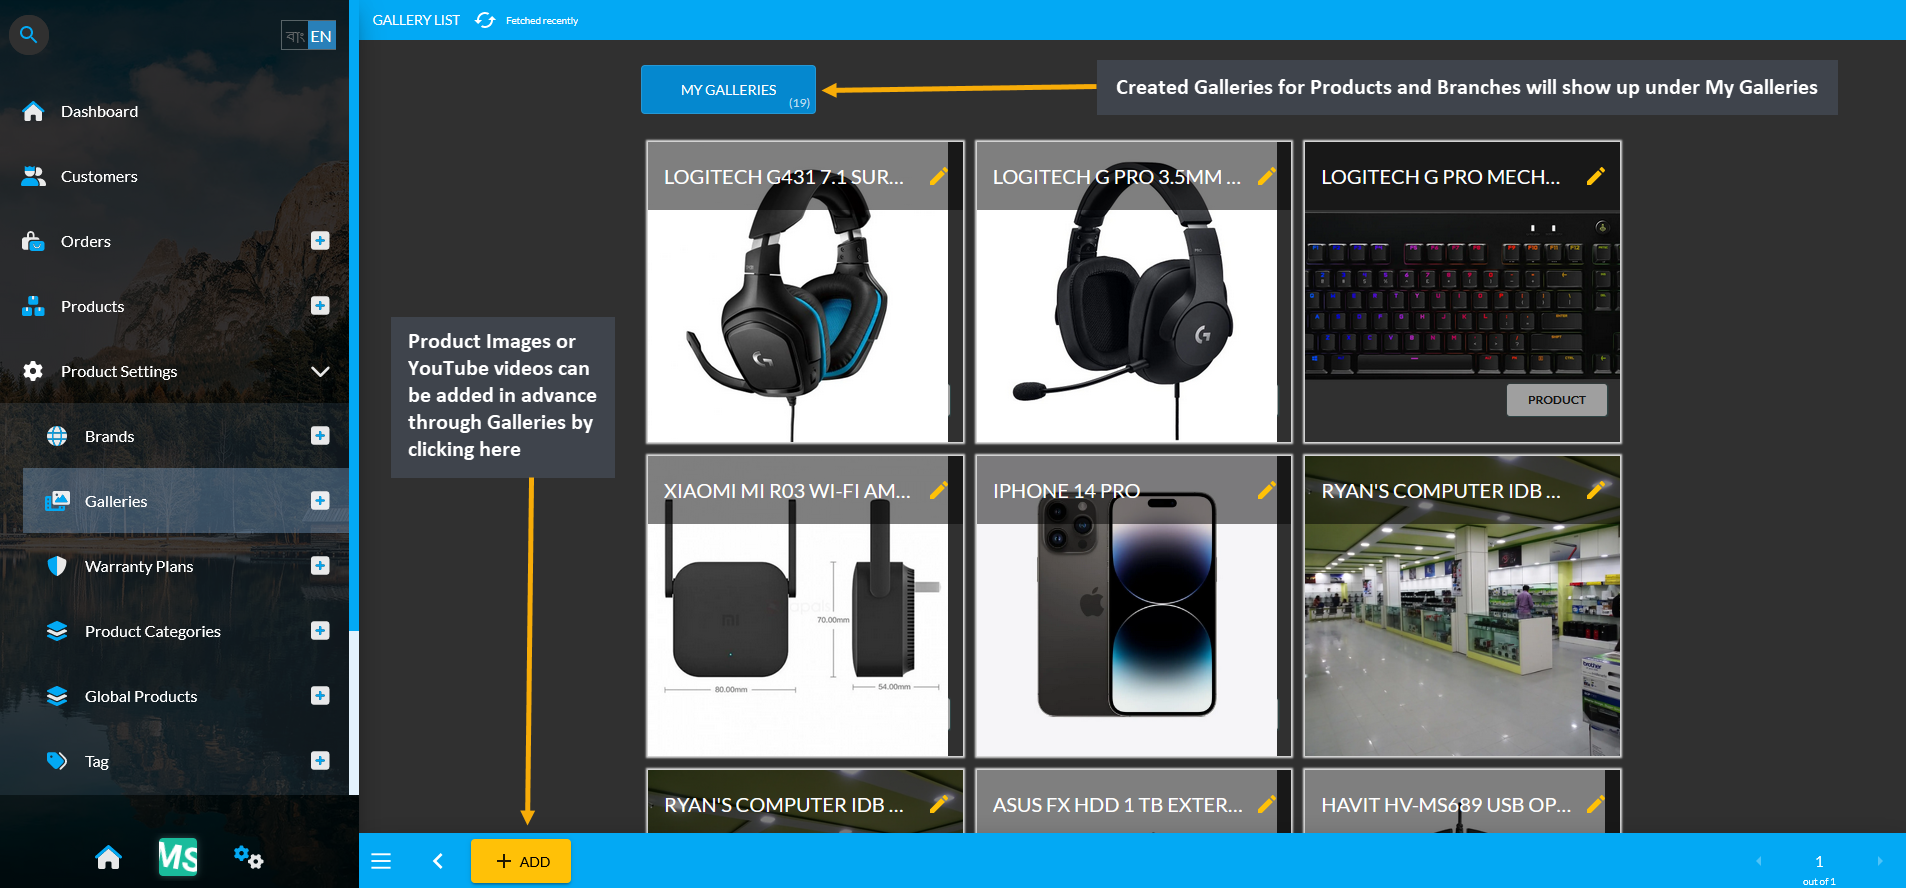
Image 2: Galleries allow adding Images and Videos for Products and Branches beforehand to use later.
Warranty Plans
The Warranty Plans section consists of Global Warranty Plans and My Warranty Plans. Global Warranty Plans are pre-defined warranty or service contracts for Products. My Warranty Plans are custom-made warranty or service contracts that Shop Owner can create which are not already under Global Warranty Plans.
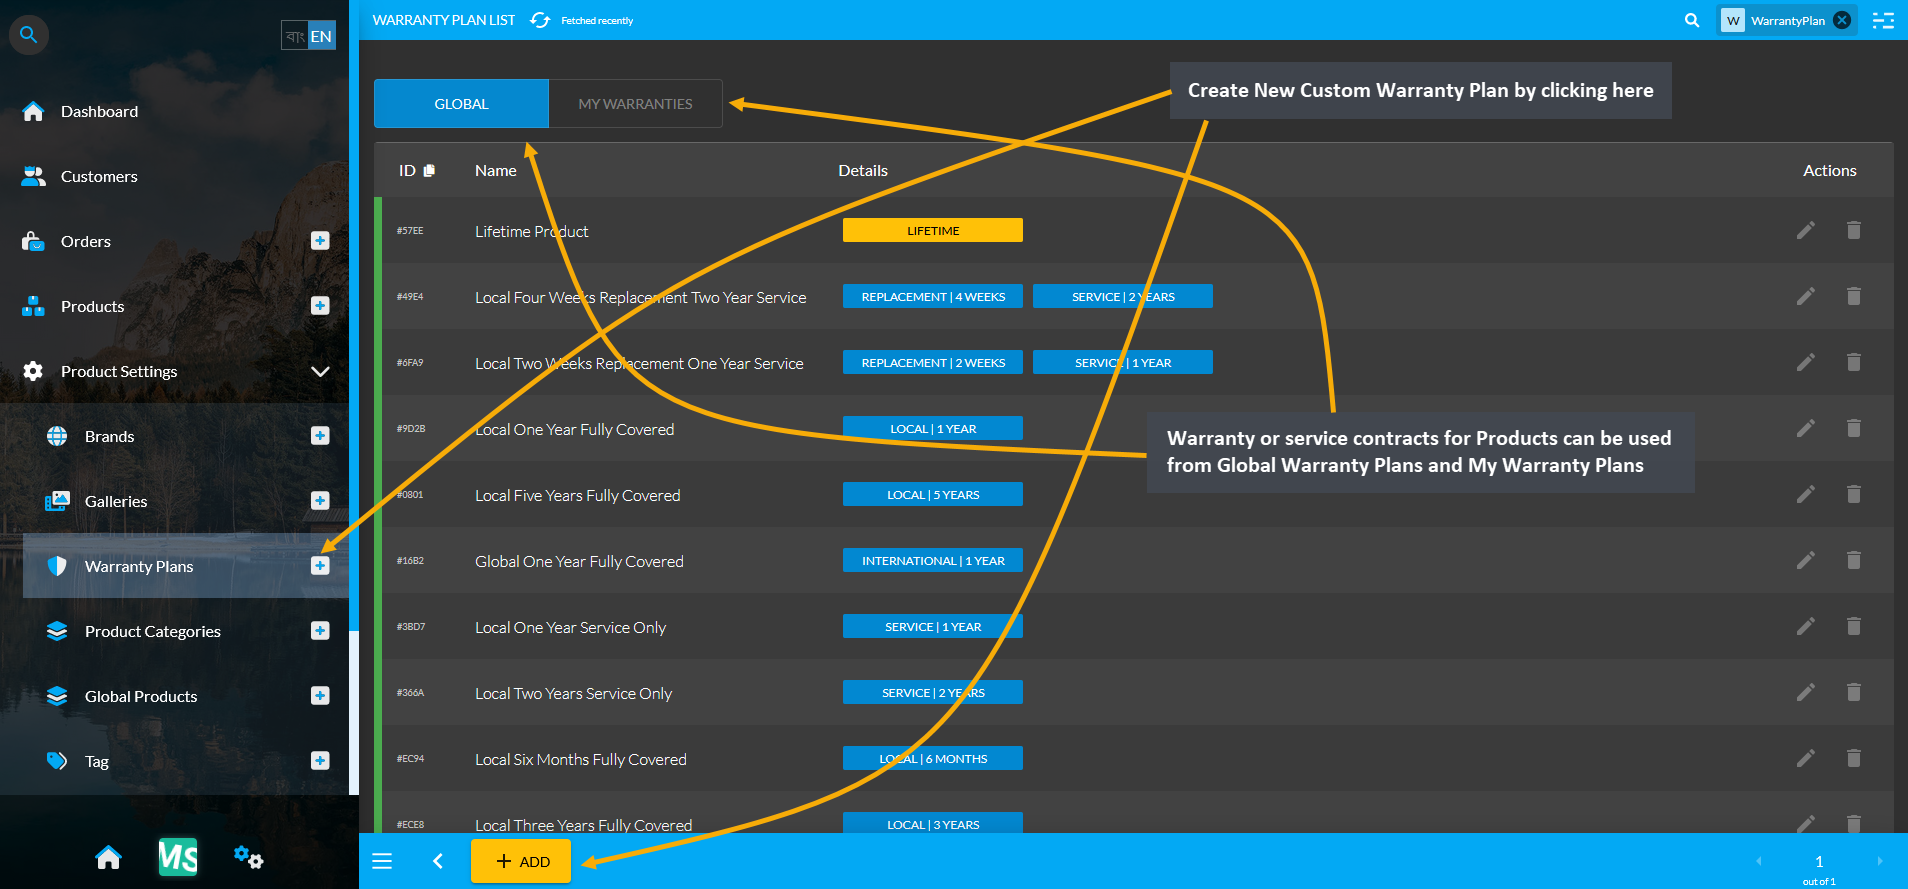
Image 3: Create service contracts for Products from Global Warranty Plans and and My Warranty Plans list.
Product Categories
Product Categories are Pre-defined, so Shop Owners will not be able to create Categories. The Shop Owners will have to use the Product Categories that are provided in the system. During Product creation, Product Category can be selected from the dropdown menu provided. The full list of Categories can be checked by opening the Product Categories tab from under the Product Settings. The list can also be reordered by dragging.
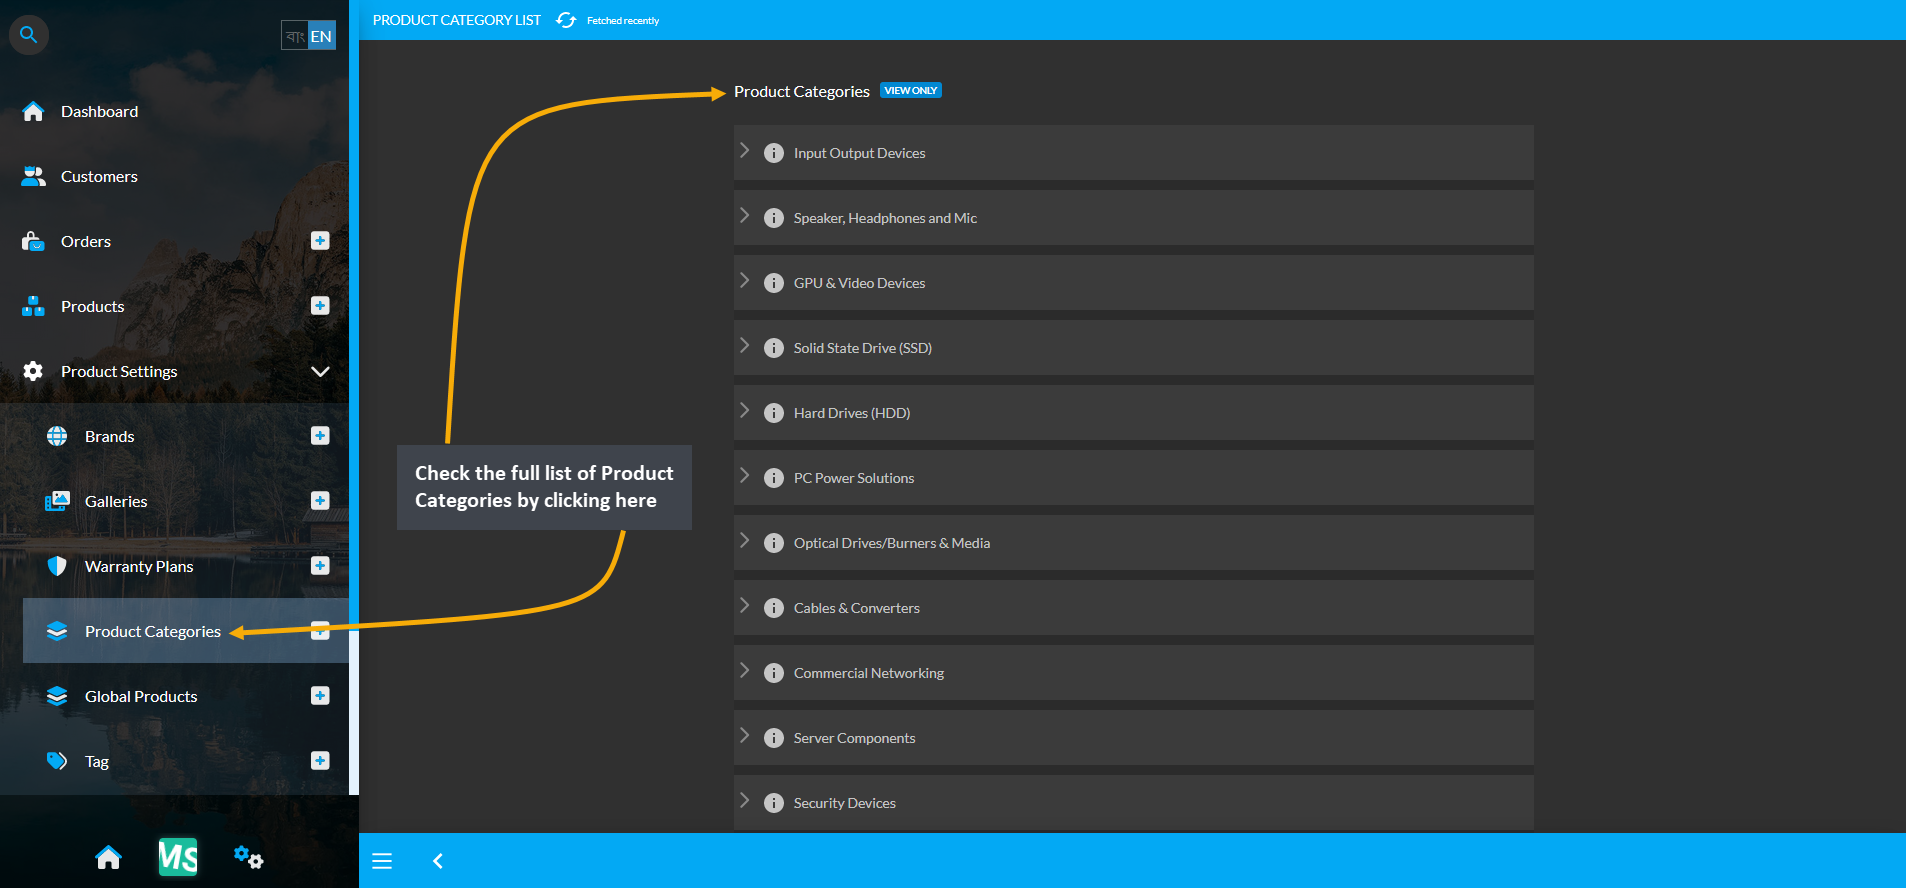
Image 4: Check the full list of Product Categories from the Product Categories tab under Product Settings.
Global Products
Global Products contain pre-defined templates that can be duplicated to create New Products. They contain pre-filled information like name, SKU, attributes, brand, category, and images. The Shop Owner can list and sell the Global Products i.e. branded Products instantly on the Shop using pre-defined Global Product templates.
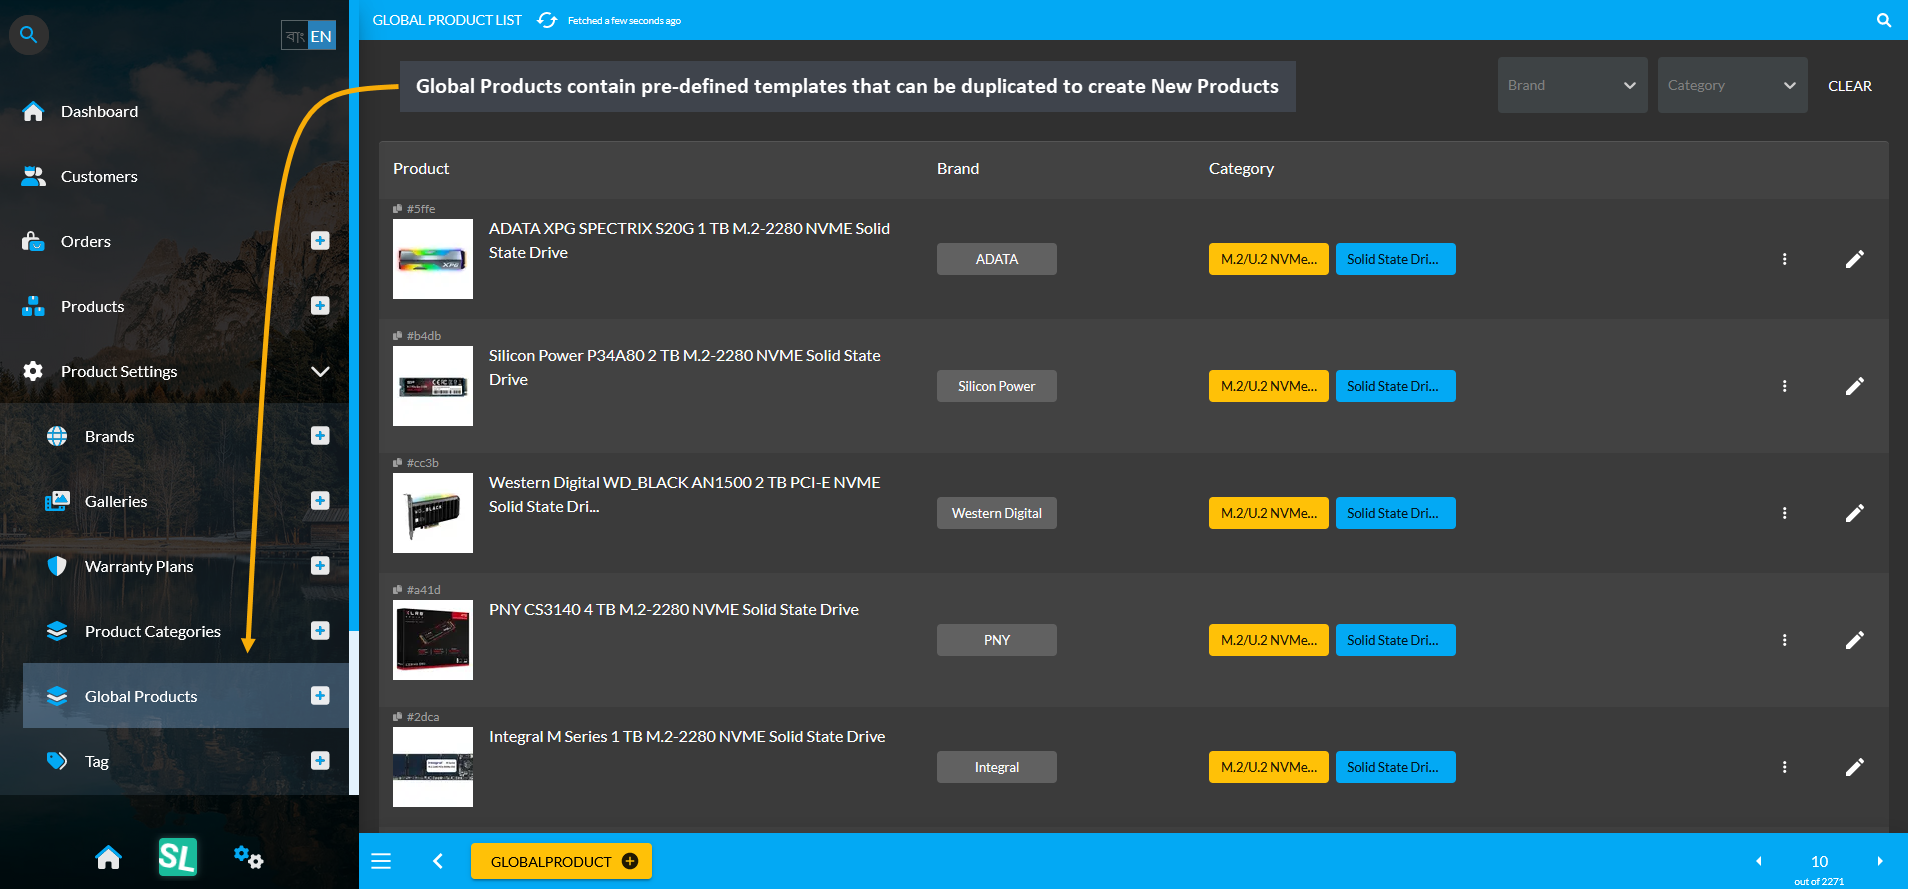
Image 5: Global Products contain pre-defined templates that can be duplicated to create New Products.
Tags are similar to Categories with extra functionality, so the Shop Owners can build their own Custom product category hierarchy using Tags. Child Tags can also be created under the Parent Tags for tagging Products.

Image 6: Shop Owners can build their own Custom product category hierarchy using Tags instead of Category.
RMA
For effective Warranty management, Retail Xen provides a Robust Warranty Management System (RMA), through which Shop Owners can track all warranties of any Product throughout its lifecycle. Using the system, the Shop Owners will be able to create, activate, and track warranties and warranty claims for Products.
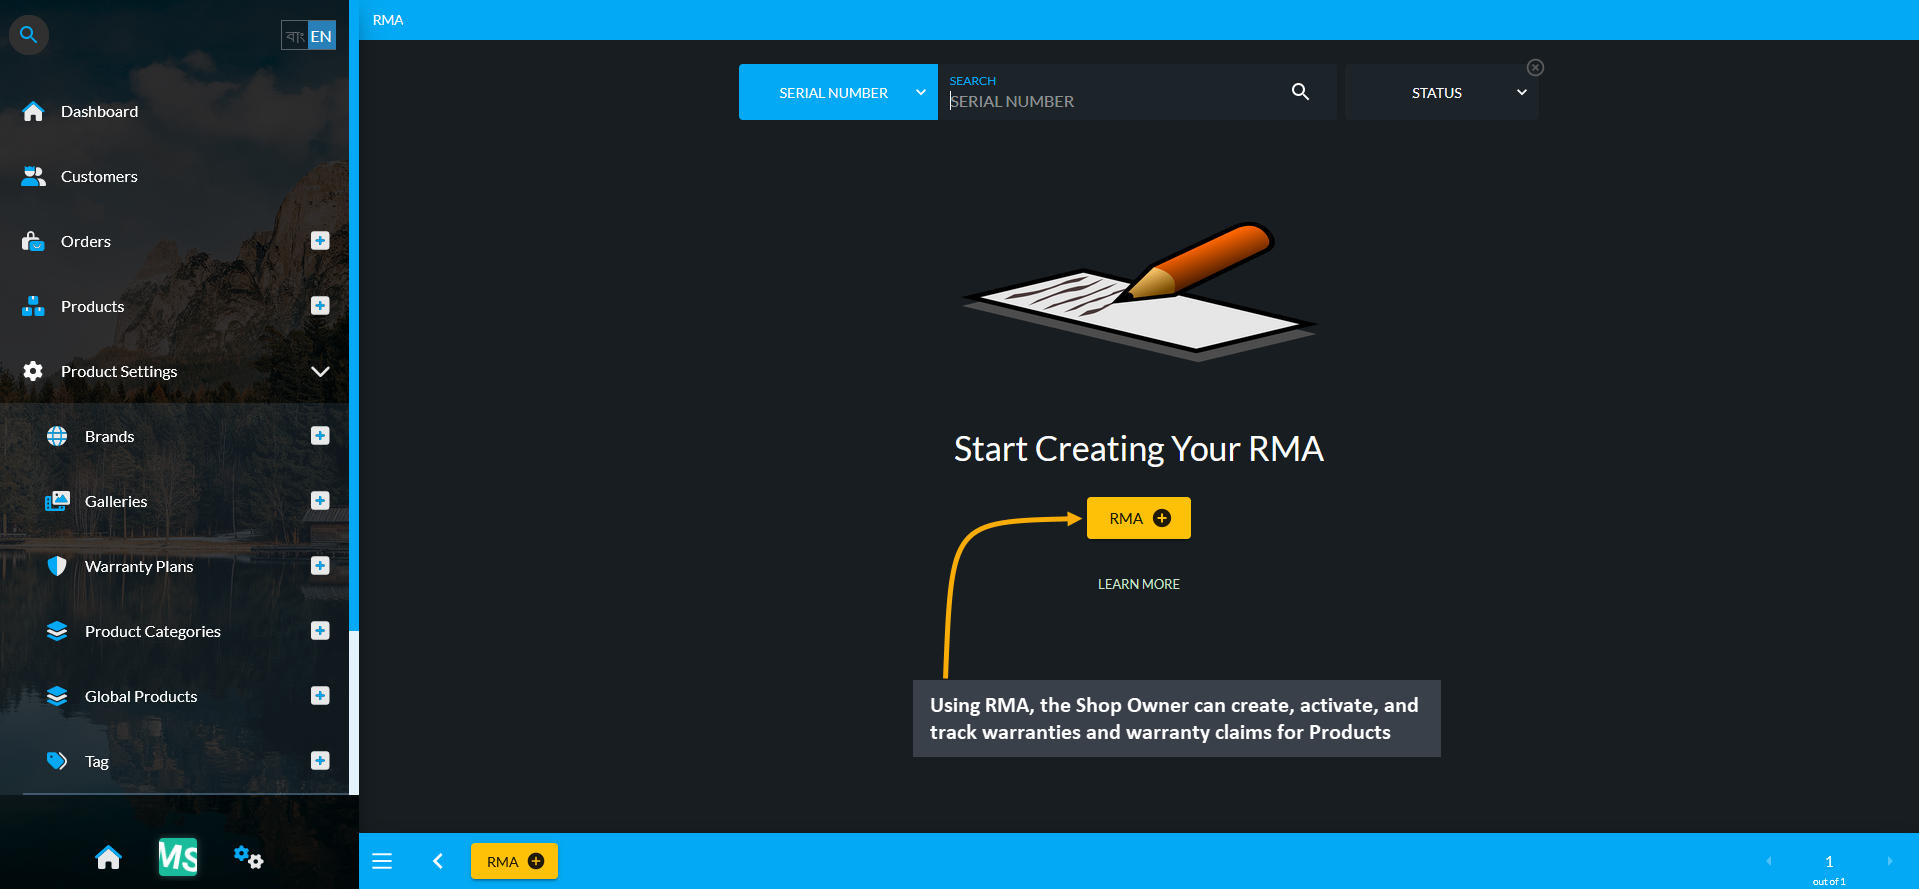
Image 7: Using RMA, Shop Owner can create, activate, and track warranties and warranty claims for Products.
1 - Brands
Learn more about how to manage Global Brands and create My Brands.
Difference: Global Brands and My Brands
Global Brands are pre-defined Brands which can be selected during Product creation. Conversely, My Brands are Custom Brands that Shop Owner can create which are not already under Global Brands. Please note that, Shop Owner can not make any changes to Global Brands but they can make changes for their own Brands.
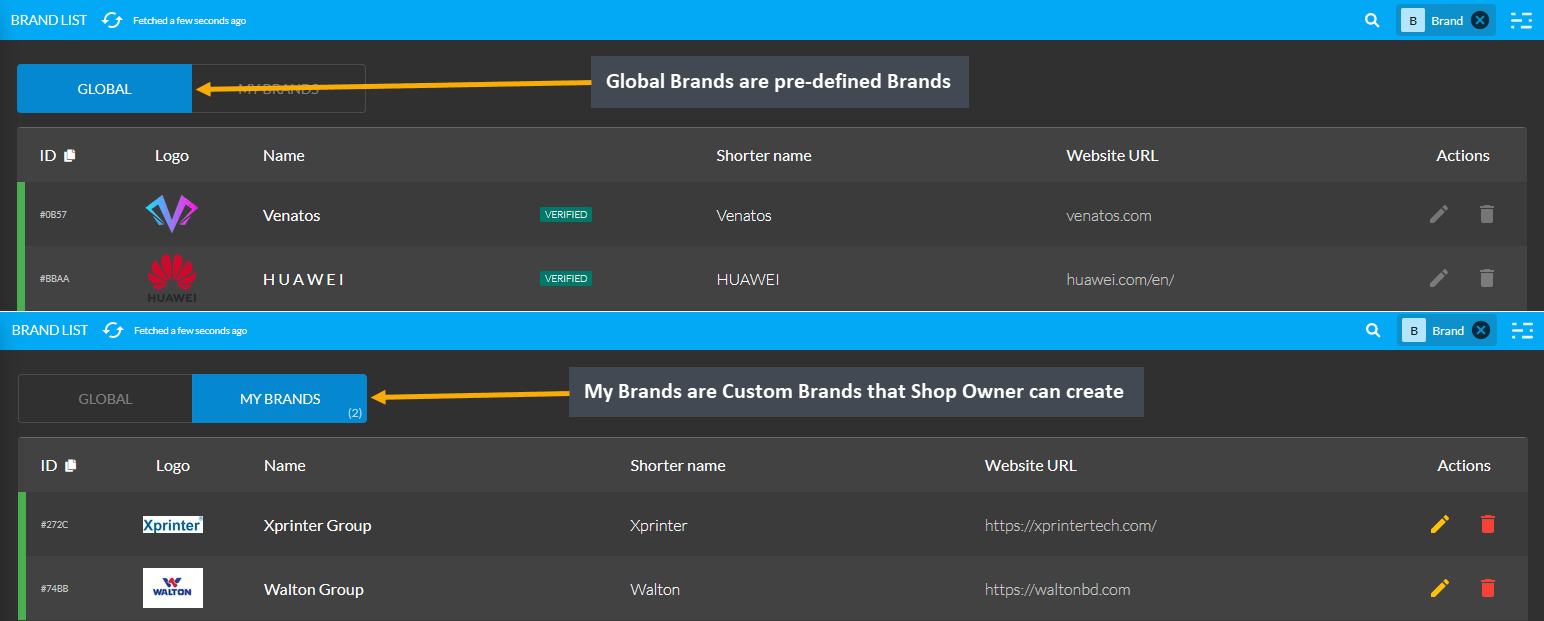
Image 1: Global Brands are pre-defined Brands and My Brands are Custom Brands created by the Shop Owner.
Global Brands
Global Brands are pre-defined Brands which can be selected during Product creation. Check the full list of Global Brands from the Brands tab under Product Settings. Global Brands can only be incorporated during any Product creation, they do not have any permission to edit or delete. Renowned Brands can be found under this list.
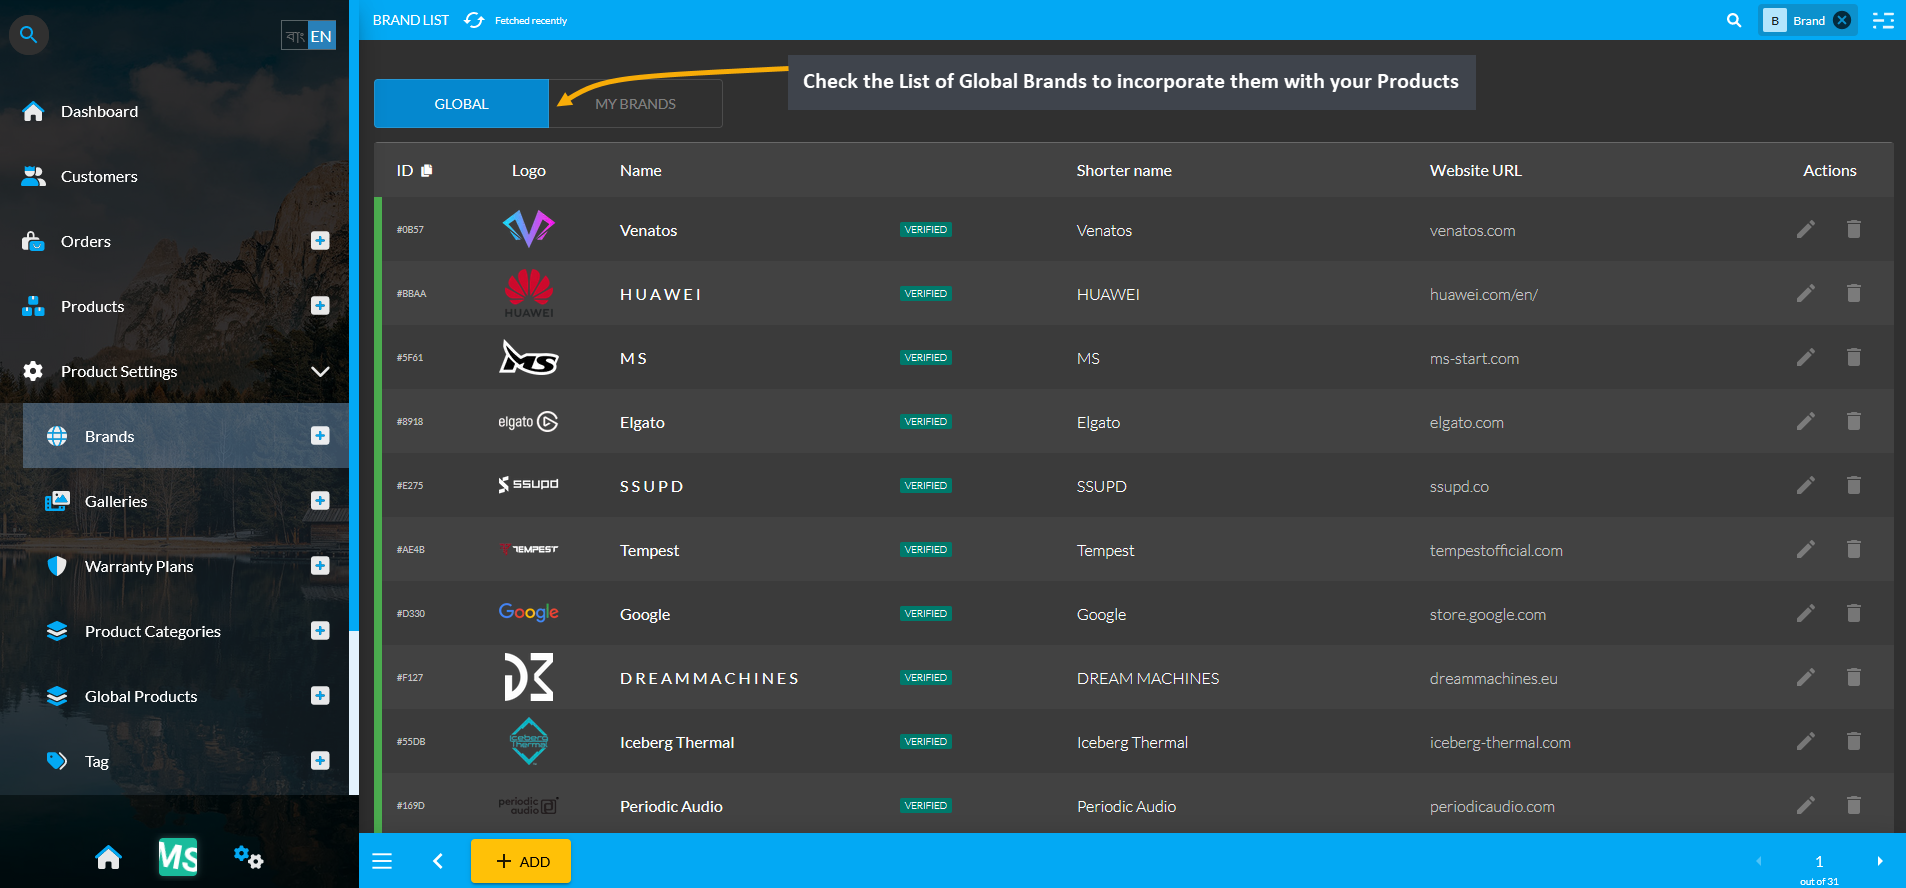
Image 2: Check the List of Global Brands to incorporate them with your Products from the Brands tab.
Search Global Brands
Shop Owners can search for pre-defined Global Brands by clicking on the + or Add button which will redirect to a search page from where existing Brands can be searched. In the Search page, there is a Search Box where typing Brand Name will bring result of the target pre-defined Global Brand if they are already in The Website. The name of the searched Brands will show up under the Search box as shown in the example.
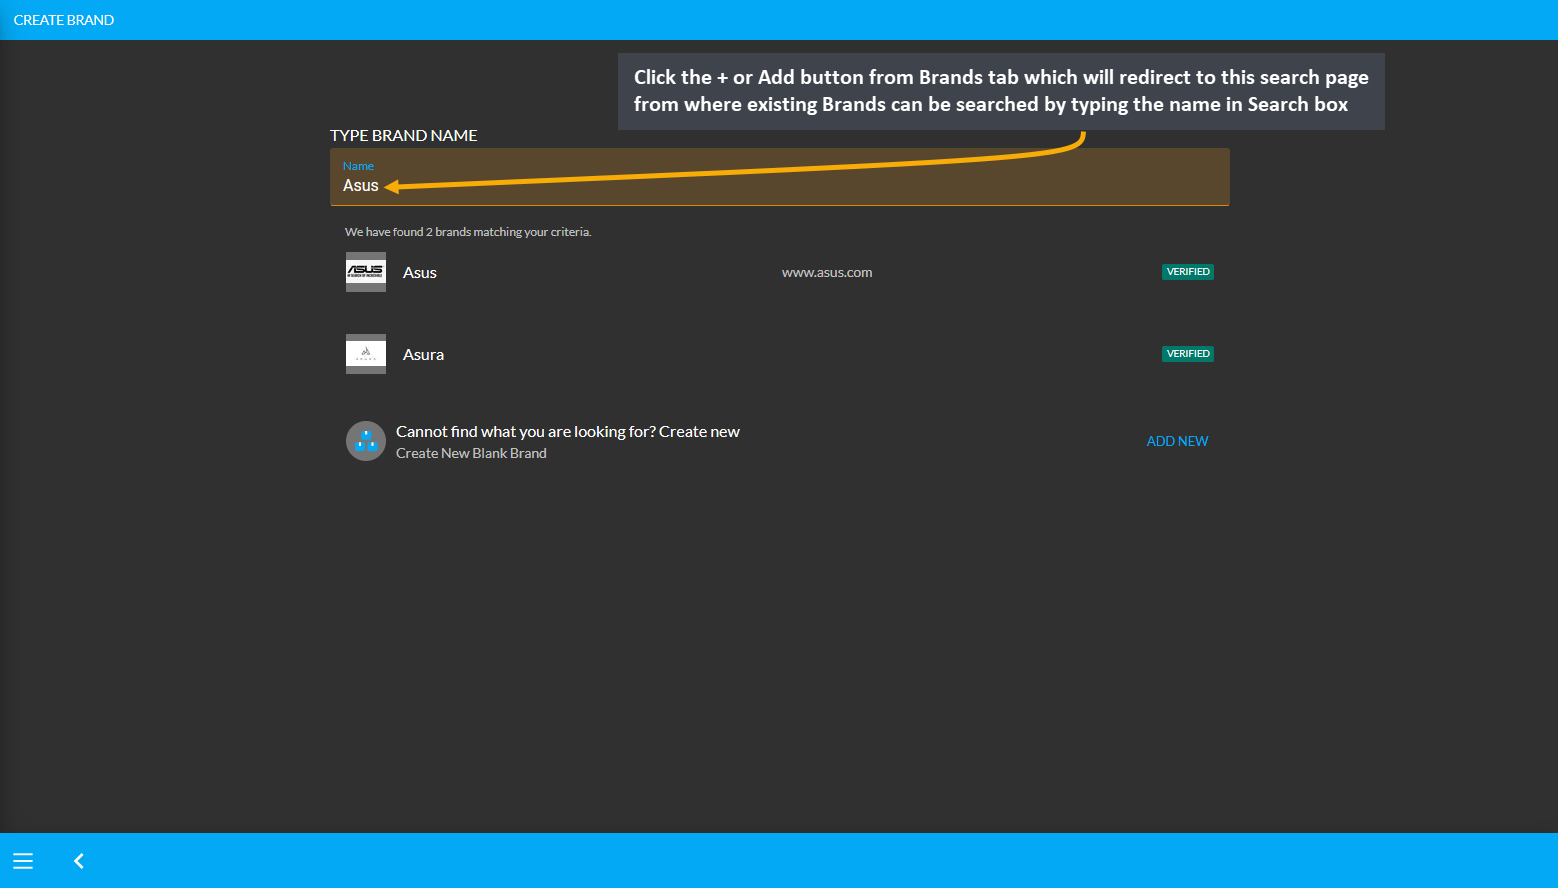
Image 3: Search Global Brands by clicking the + or Add button which will redirect to a new Search page.
Create a New Brand
Shop Owners can create a New Brand by clicking on the + or Add button which will redirect to a separate search page from where New Brands can be created. Any New Brands created will be under the My Brands List.
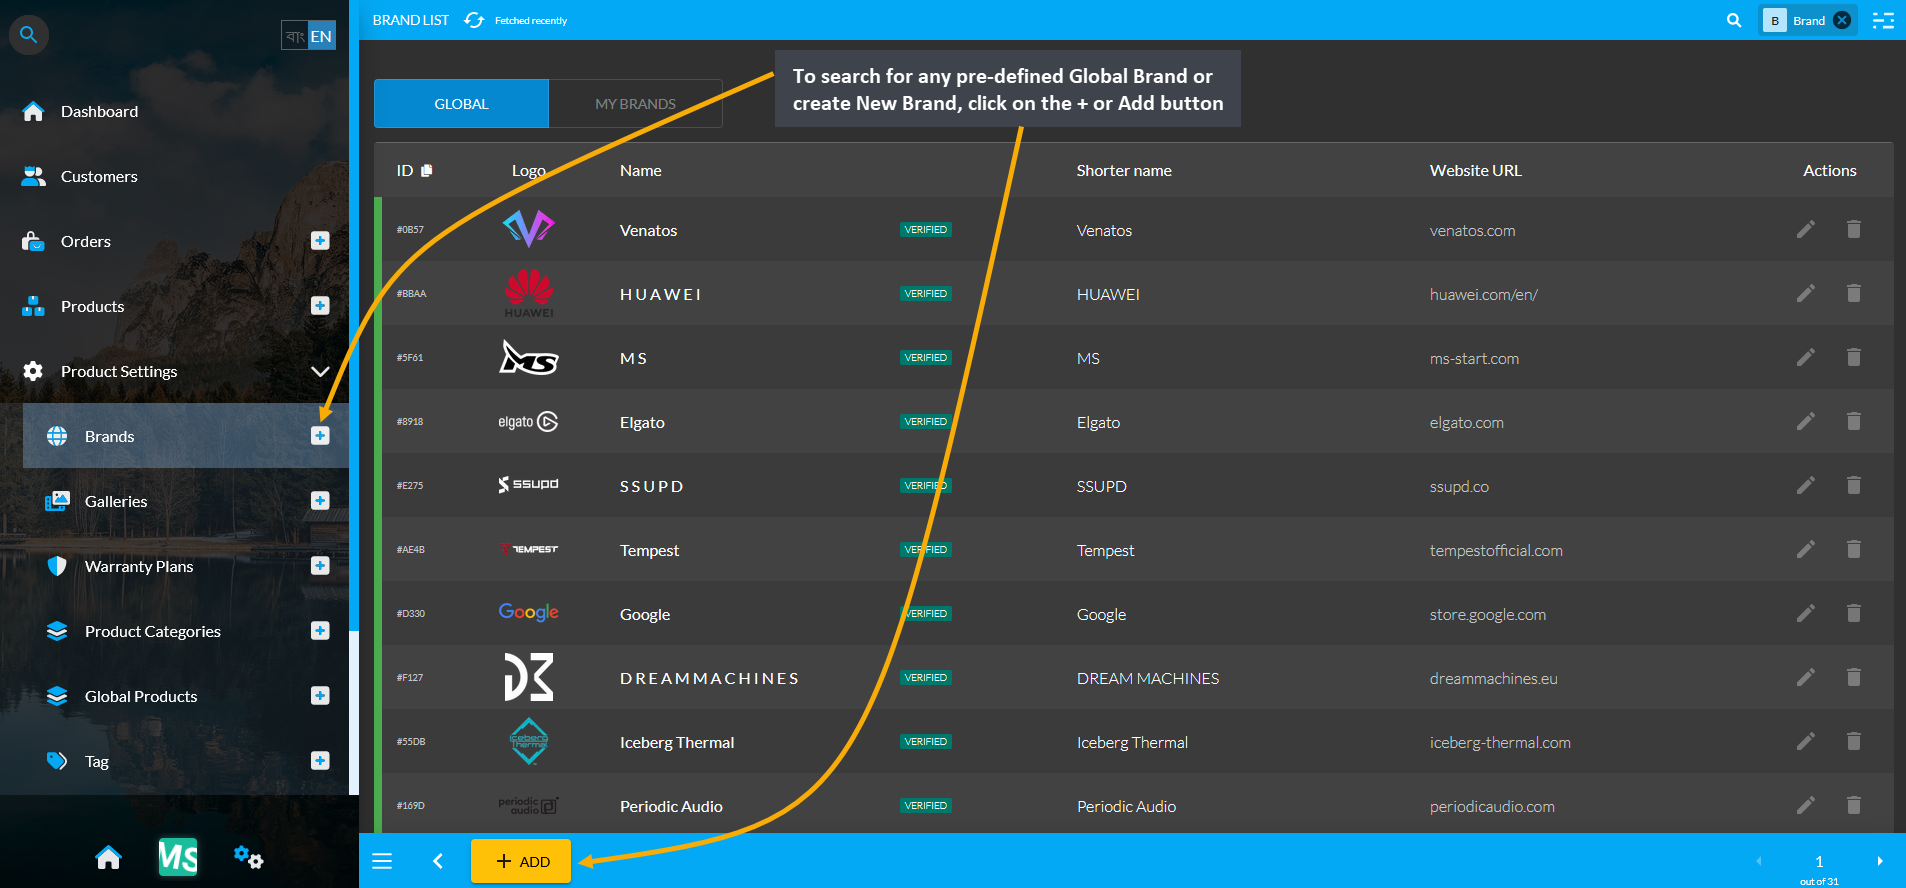
Image 4: Click the + or Add button to redirect to the Search page from where New Brands can be created.
To create a New Brand, type the target Brand Name on the Search Box in the Search page. If the Brand Name does not show up in the search results, it will mean that the typed Brand Name is not available on the Website. In this case, click the Add New button which will redirect to a new page for creating a New Brand from scratch.
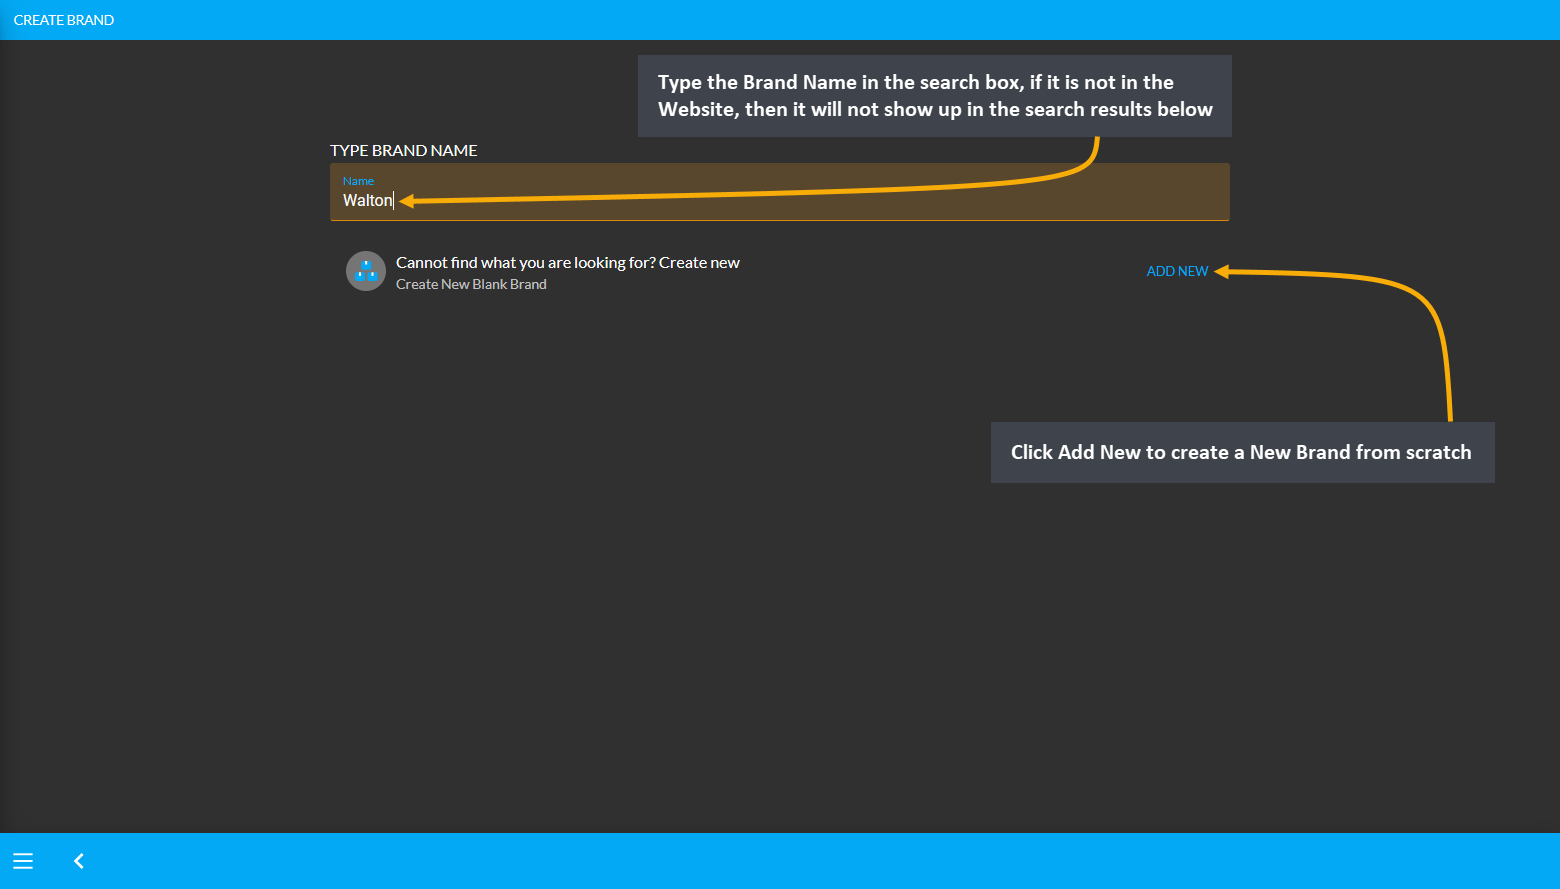
Image 5: Create a New Brand by clicking the Add New button after typing the Brand Name on the Search box.
In the Create Brand page, fill out the Full Name of the Brand. The Shorter Name refers to the abbreviation of Brand Name which needs to be filled in as well. Aliases are used to indicate additional names associated with the Brand like its subsidiaries. Enter the Brand’s website address in the Website URL field. Below this, there is an upload box to upload the Brand Logo. Make a Brand active or inactive by using the toggle button. Click Submit to save changes.
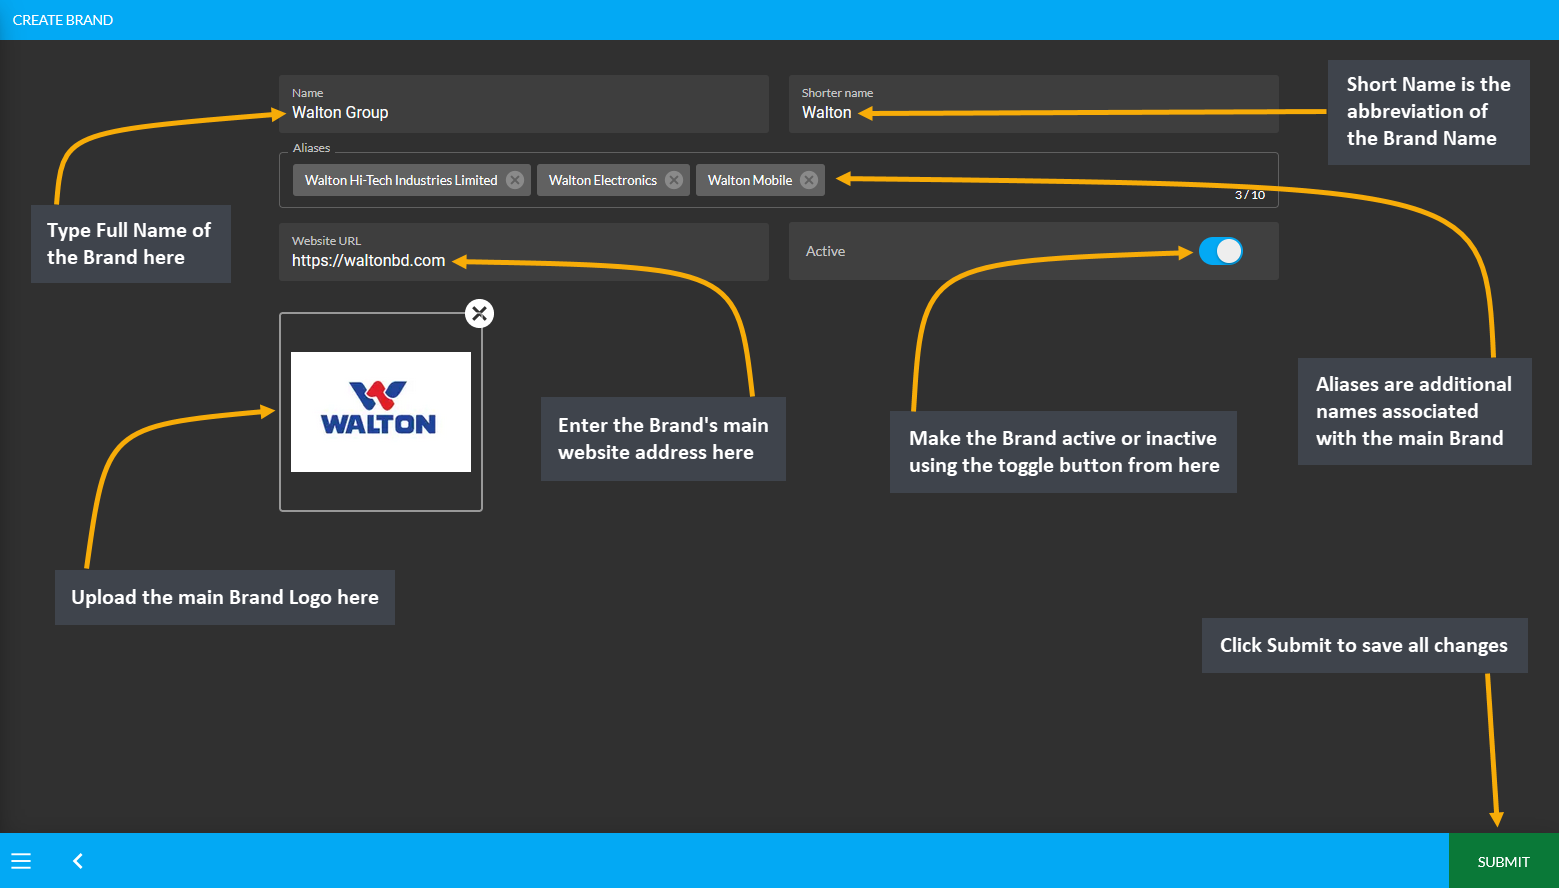
Image 6: Create New Brand with Names, Aliases, Website Address, and Brand Logo on the Create Brand page.
Brands Search Shortcut
Brands can be searched within the Search Box on the top right corner of the Brand List page. Here, typing both the Brand Name and Aliases will bring the target Brand Name on the search results that the Shop Owner needs to find.
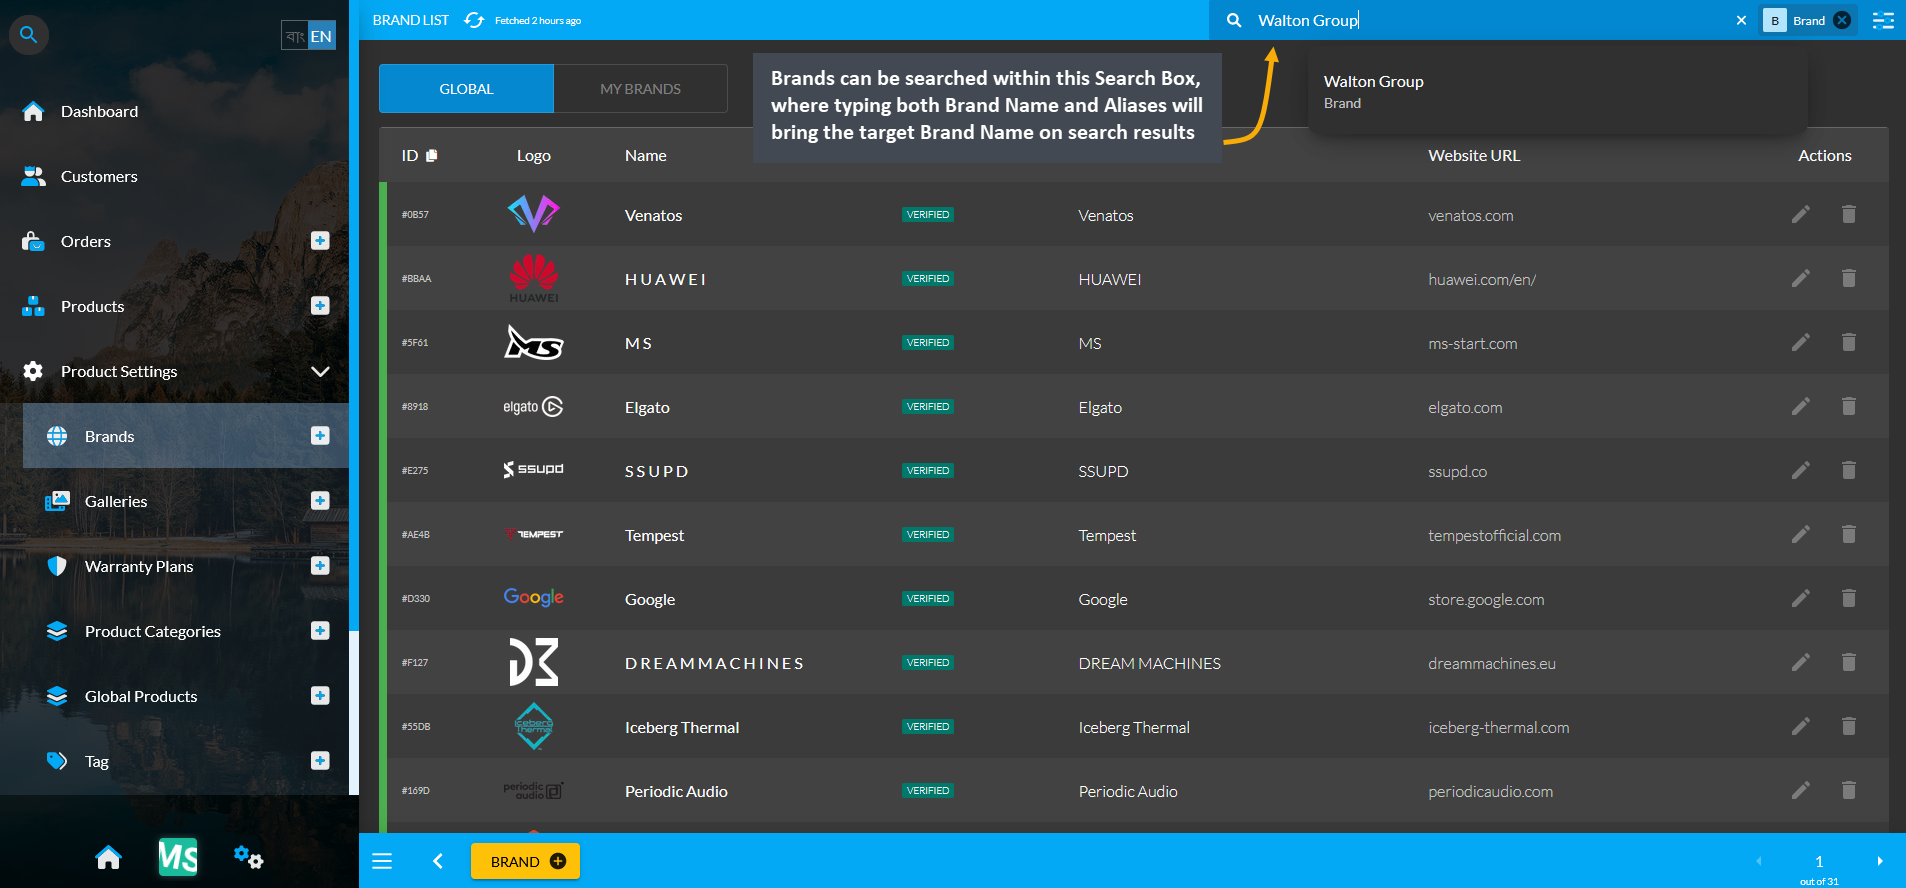
Image 7: Brands can be searched within the Search Box on the top right corner on the Brand List Page.
My Brands (Custom Brands)
My Brands are Custom Brands that the Shop Owner has created which were not already under Global Brands List. After the Shop Owner successfully creates their own Brand, it will show up within My Brands List under the Brands tab. Shop Owners can make changes for their own Brands by clicking the Edit and Delete icons which will let them modify or delete the Brands they have created. A Shop Owner can create as many Custom Brands as they need.
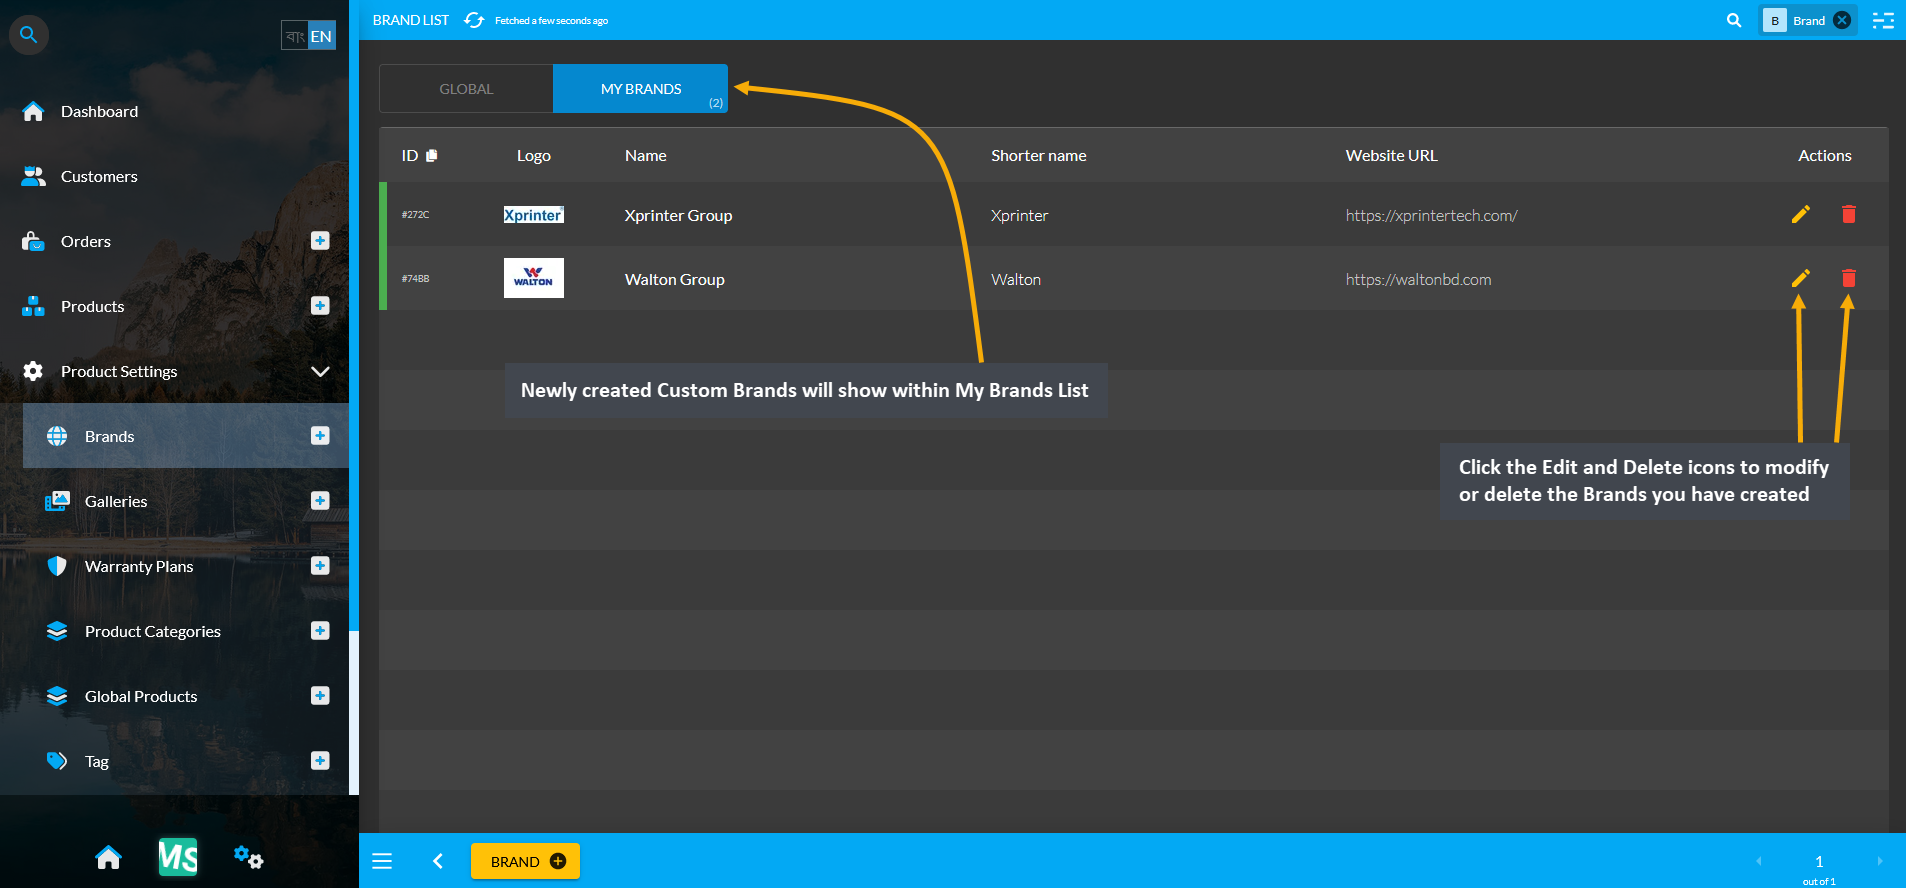
Image 8: Newly created Custom Brands will show under My Brands List, modify them with Edit or Delete icons.
2 - Galleries
Learn more about creating Galleries for Products and Branches in advance.
Product Gallery
Galleries allow adding Images for Products and Branches beforehand to use later to create Product and Branch. Product Images or YouTube videos can be added in advance through Galleries under Product Settings. The already created Gallery List will show up under Galleries. Gallery items can be dragged and reordered as needed. Create a New Gallery, click on the + or ADD button which will redirect to a new page for Gallery creation.
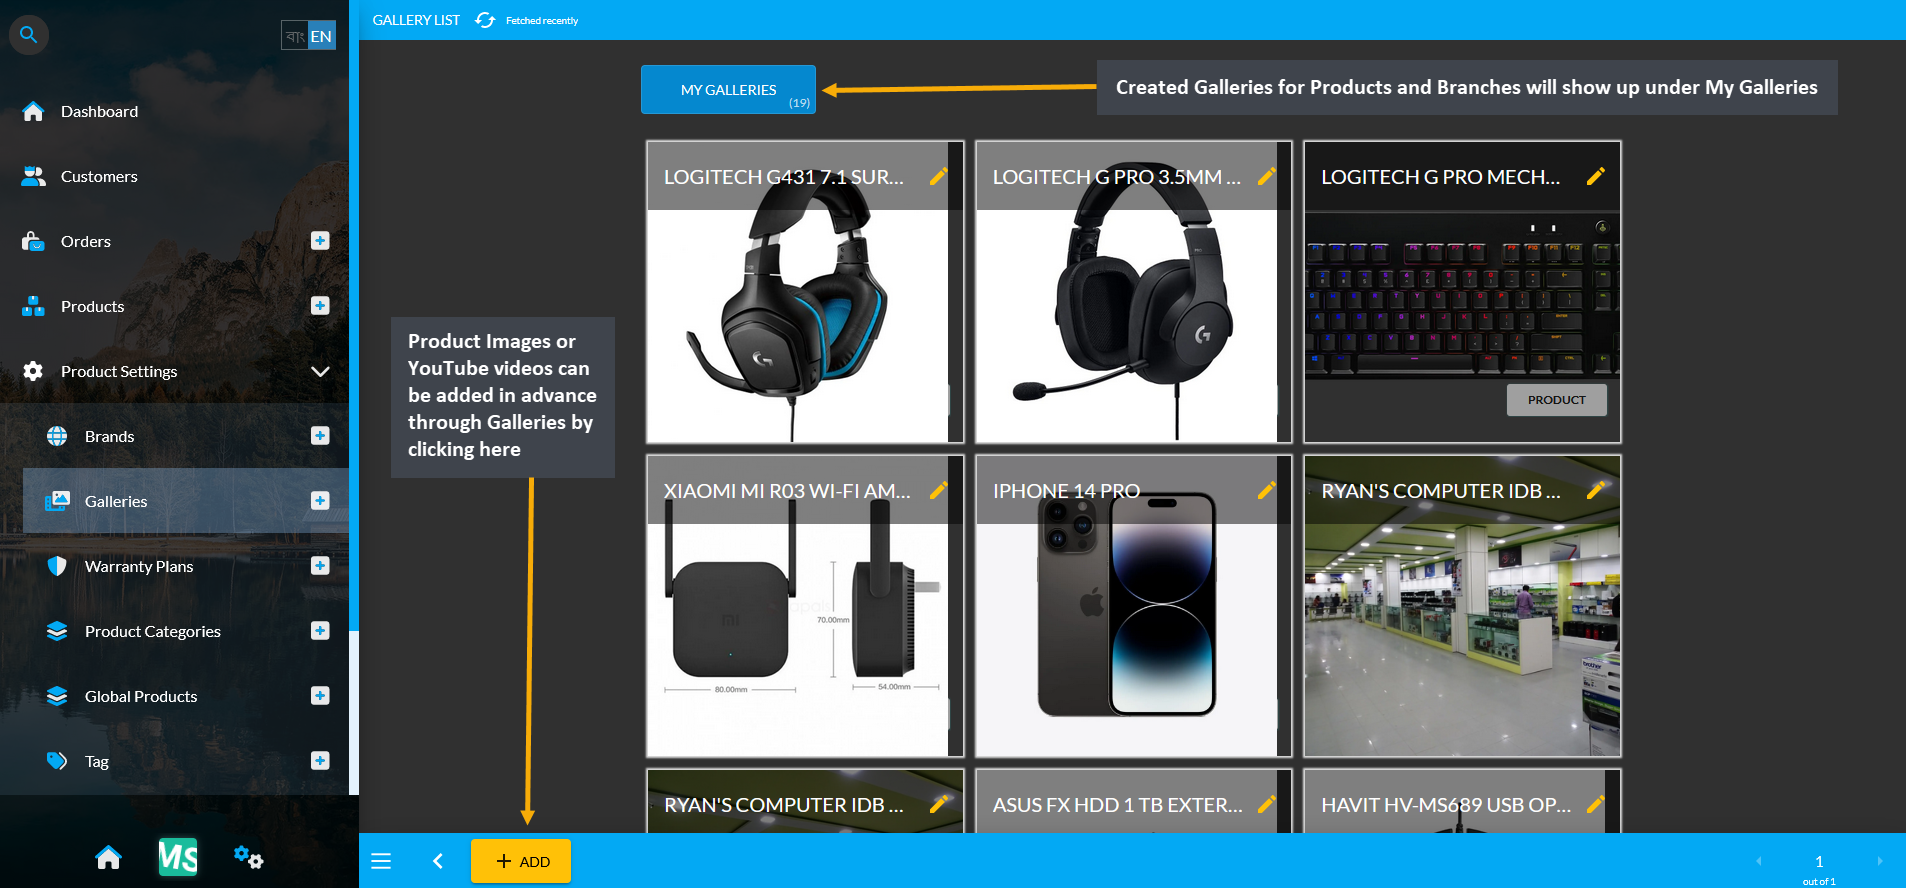
Image 1: Galleries allow adding Images and Videos for Products and Branches beforehand to use later.
Create Product Gallery
To create Gallery for Product, click on the + or ADD button from the Galleries tab that will redirect to a new page.
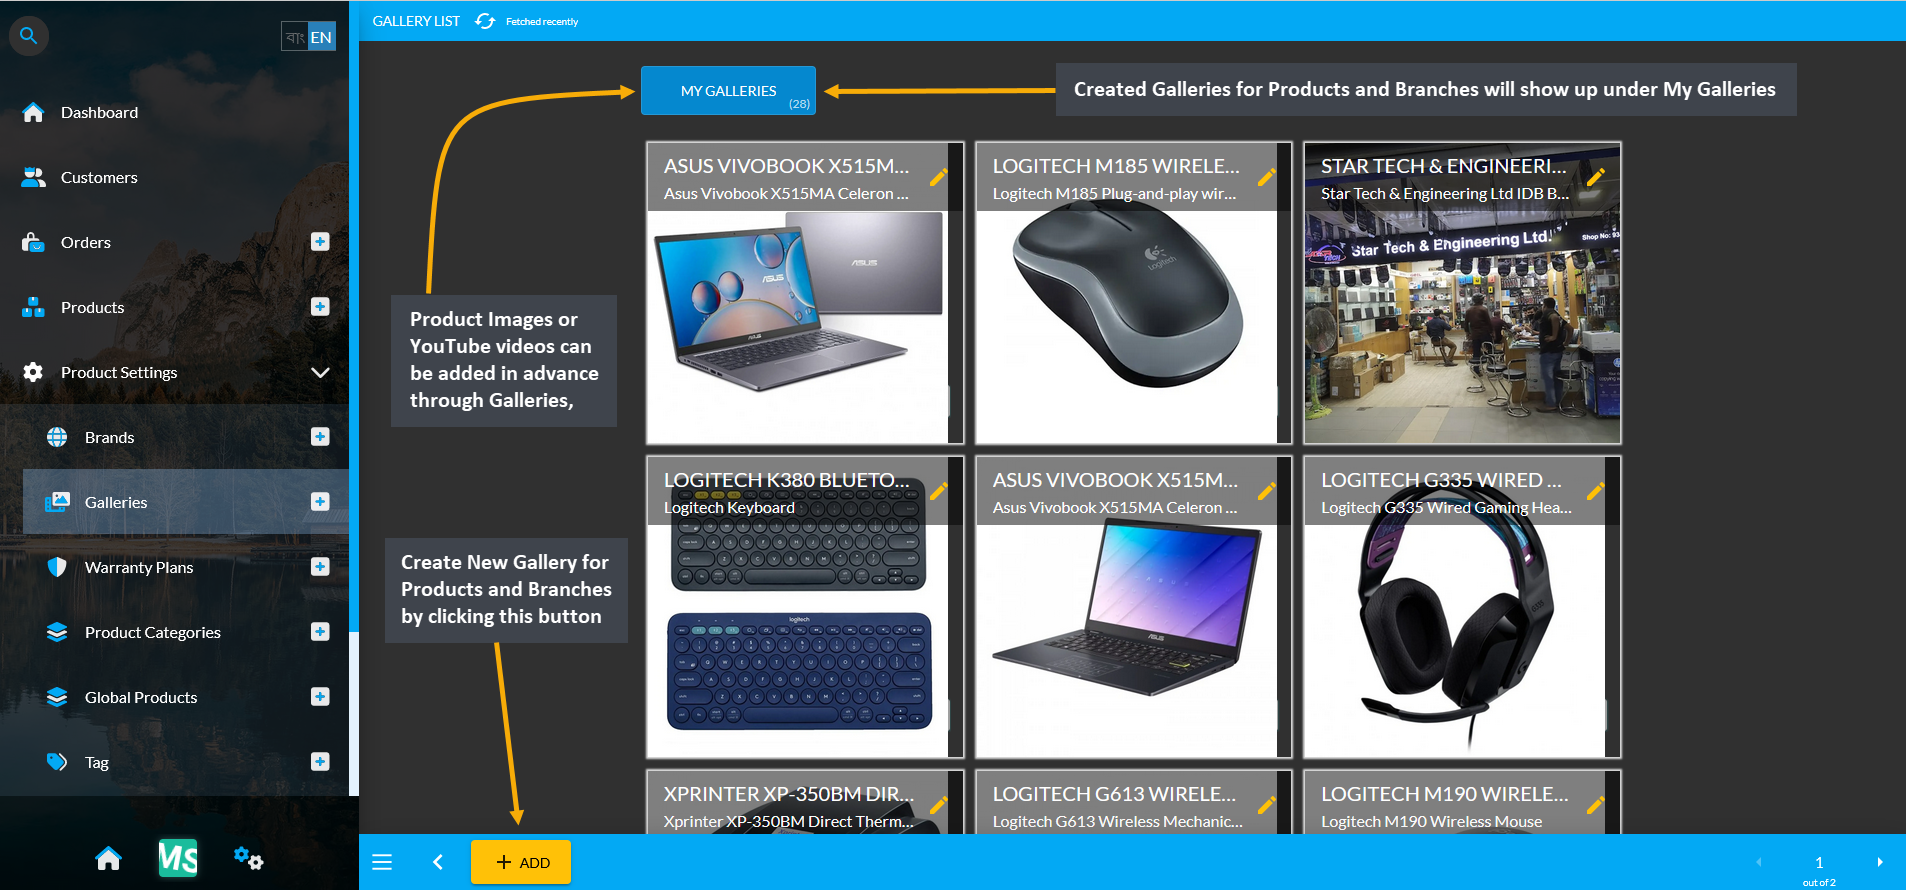
Image 2: Click on the + or ADD button from the Galleries tab that will redirect to Gallery creation page.
The first step is to fill out Gallery Name and Gallery Description. Then, select Product from the dropdown menu of Gallery Type. After this, add Product images by clicking on the Upload from Device icon. To include YouTube video in the Product gallery, click on Embed YouTube Video icon and paste external link to embed. Gallery items can be dragged and reordered as needed. Click Submit button to save all the changes and create new Gallery.
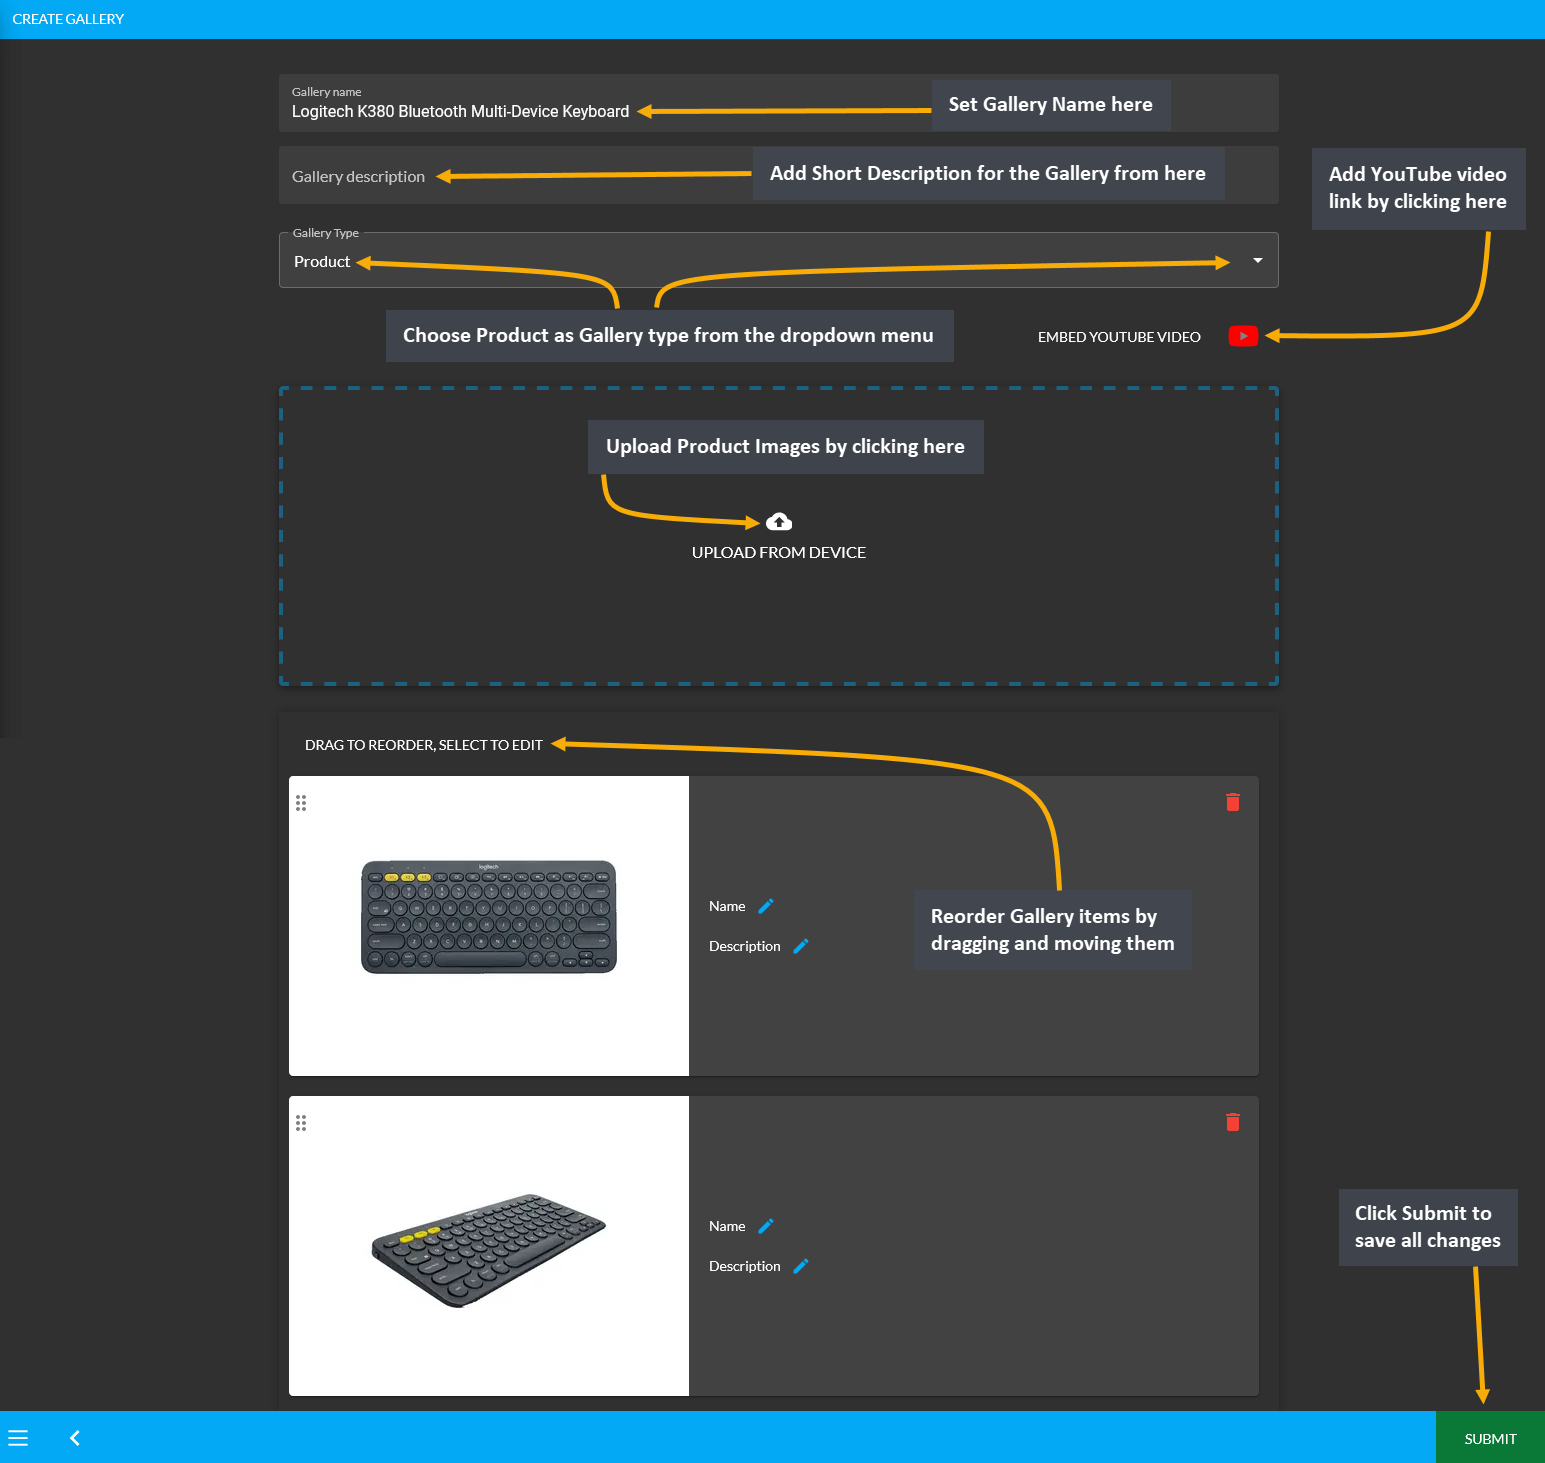
Image 3: Fill out the Gallery Name, Description, select Gallery type, add Product images, and videos.
Create Branch Gallery
To create Gallery for Branch, click on the + or ADD button from the Galleries tab that will redirect to a new page.

Image 4: Click on the + or ADD button from the Galleries tab that will redirect to a new page.
The first step is to fill out Gallery Name and Gallery Description. Then, select Branch from the drop down menu of Gallery Type. After this, upload Branch images by clicking on the Upload from Device icon. To include YouTube video in the Product gallery, click on Embed YouTube Video icon and paste external link to embed. Gallery items can be dragged and reordered as needed. Click the Submit button to save all the changes.
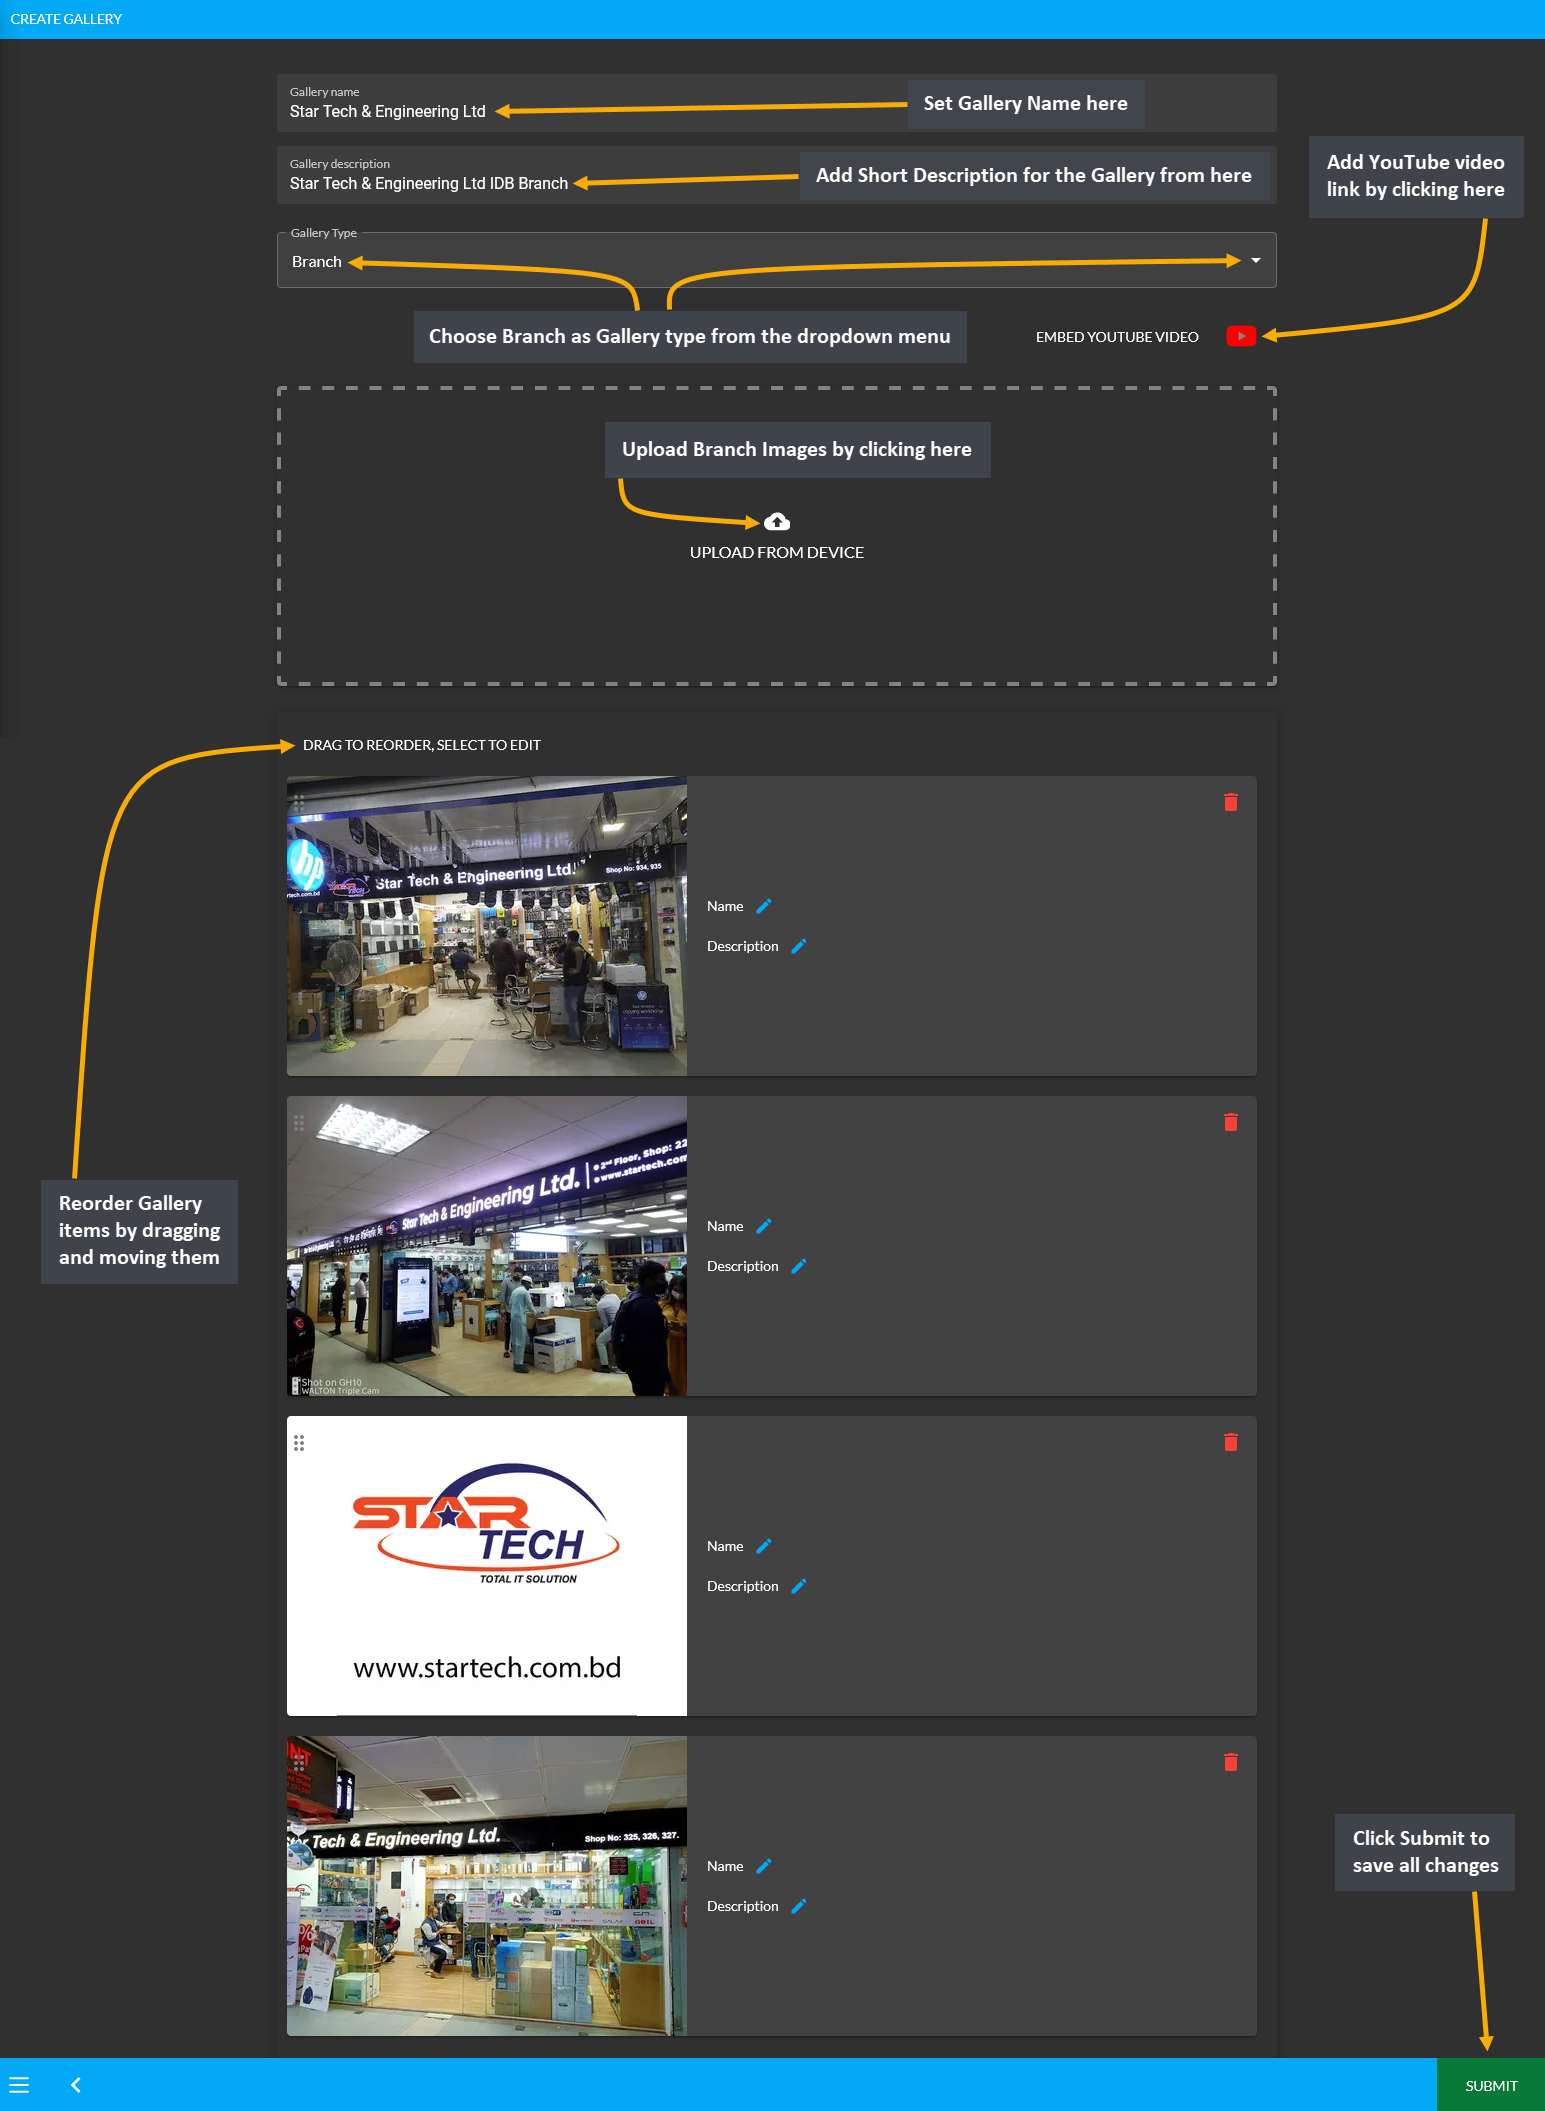
Image 5: Fill out the Gallery Name, Description, select Gallery type, add Branch images, and videos.
Newly created Product and Branch galleries will show under My Galleries as shown in the screenshot below.
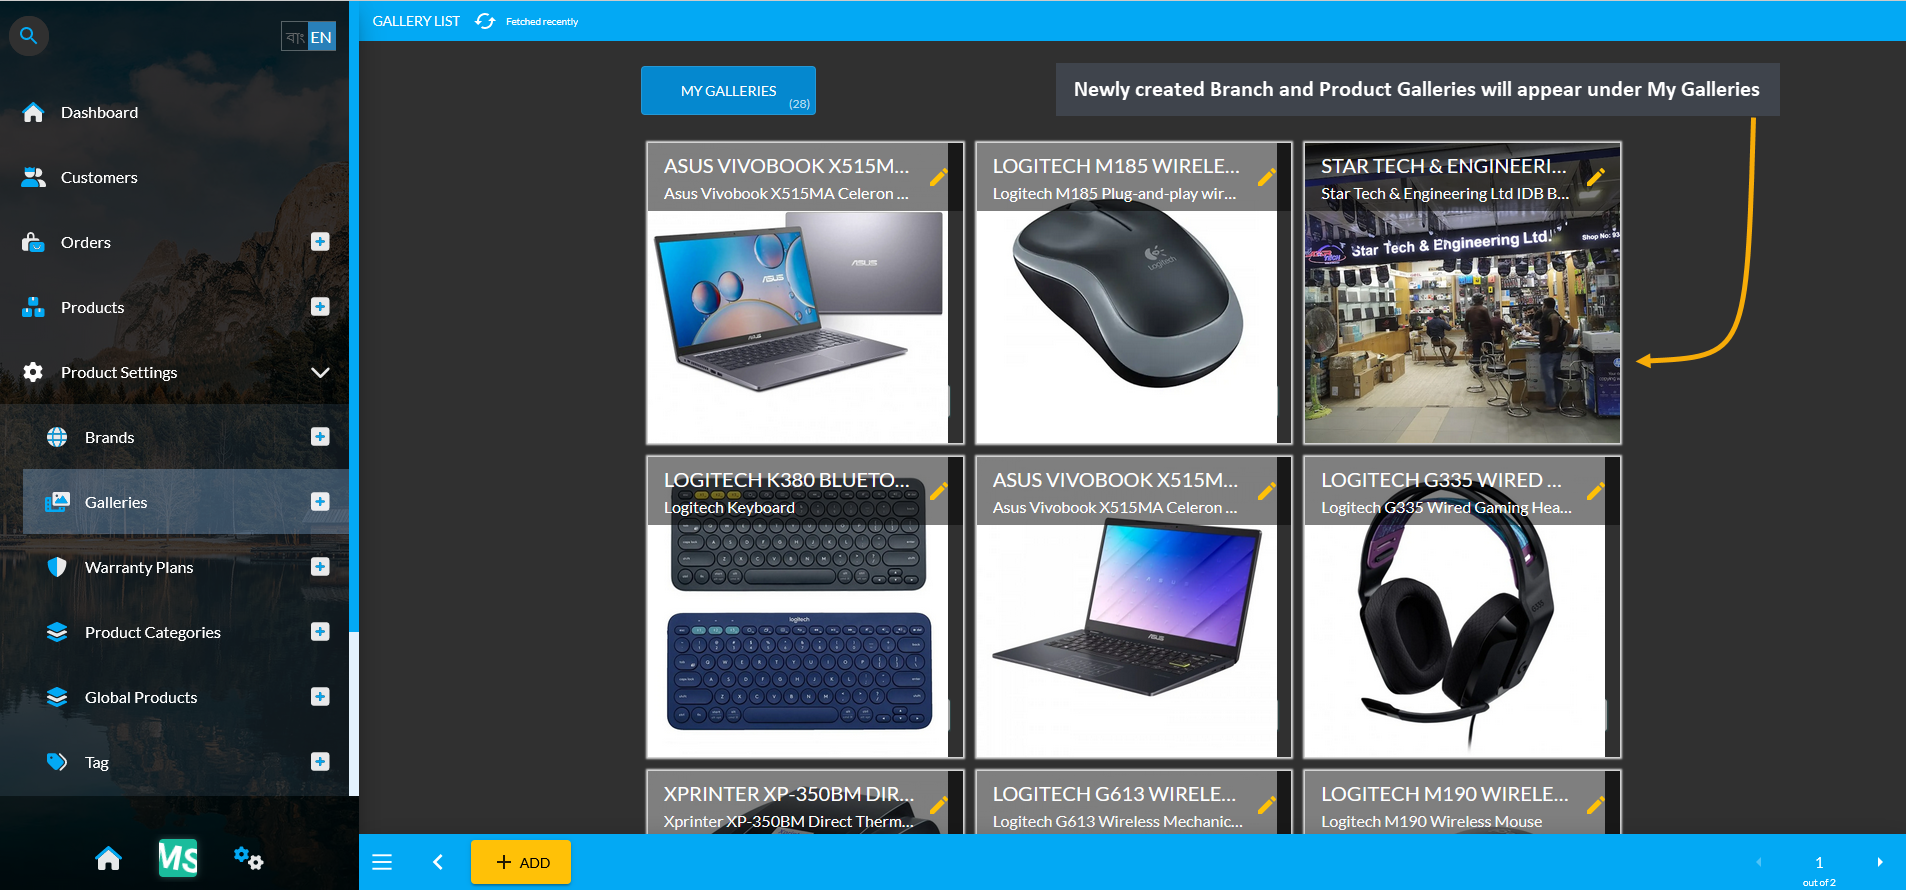
Image 6: Newly created Branch and Product Galleries will appear under My Galleries that can be used later.
3 - Warranty Plans
Learn more about how to manage and create individual Product Settings.
What are Warranty Plans?
Warranty Plans are extended warranty or service contracts which offers extended repairs or additional features and benefits for Products. This warranty is a form of guarantee that a manufacturer offers to repair or replace a faulty Product within a window of time after purchase. Shop Owners can select and create own Warranty Plans.
The Warranty Plans section consists of Global Warranty Plans and My Warranty Plans. Global Warranty Plans are pre-defined warranty or service contracts for Products. My Warranty Plans are custom-made warranty or service contracts that Shop Owner can create which are not already under Global Warranty Plans.
Pre-defined Global Warranty Plans
The Warranty Plan List displays pre-defined Global Warranties by default in Warranty Plans page that Shop Owner can apply for Products to show in the Website. The list of Warranties can be found under Global Warranty Plan under Product Settings. Global Warranty Plans can be selected during Product creation in the Product Edit page.
Under Pricing tab, pre-defined Global Warranty Plans can be selected for Product from the dropdown. If the target Warranty Plan cannot be found under the Global Warranty Plans, then the Shop Owner can create new Warranty Plans by clicking the + button. The selected Warranty plan will show in blue color. So, add Warranty like Lifetime, International, Local, Parts, and Service etc. from pre-defined Global Warranties when creating Products.
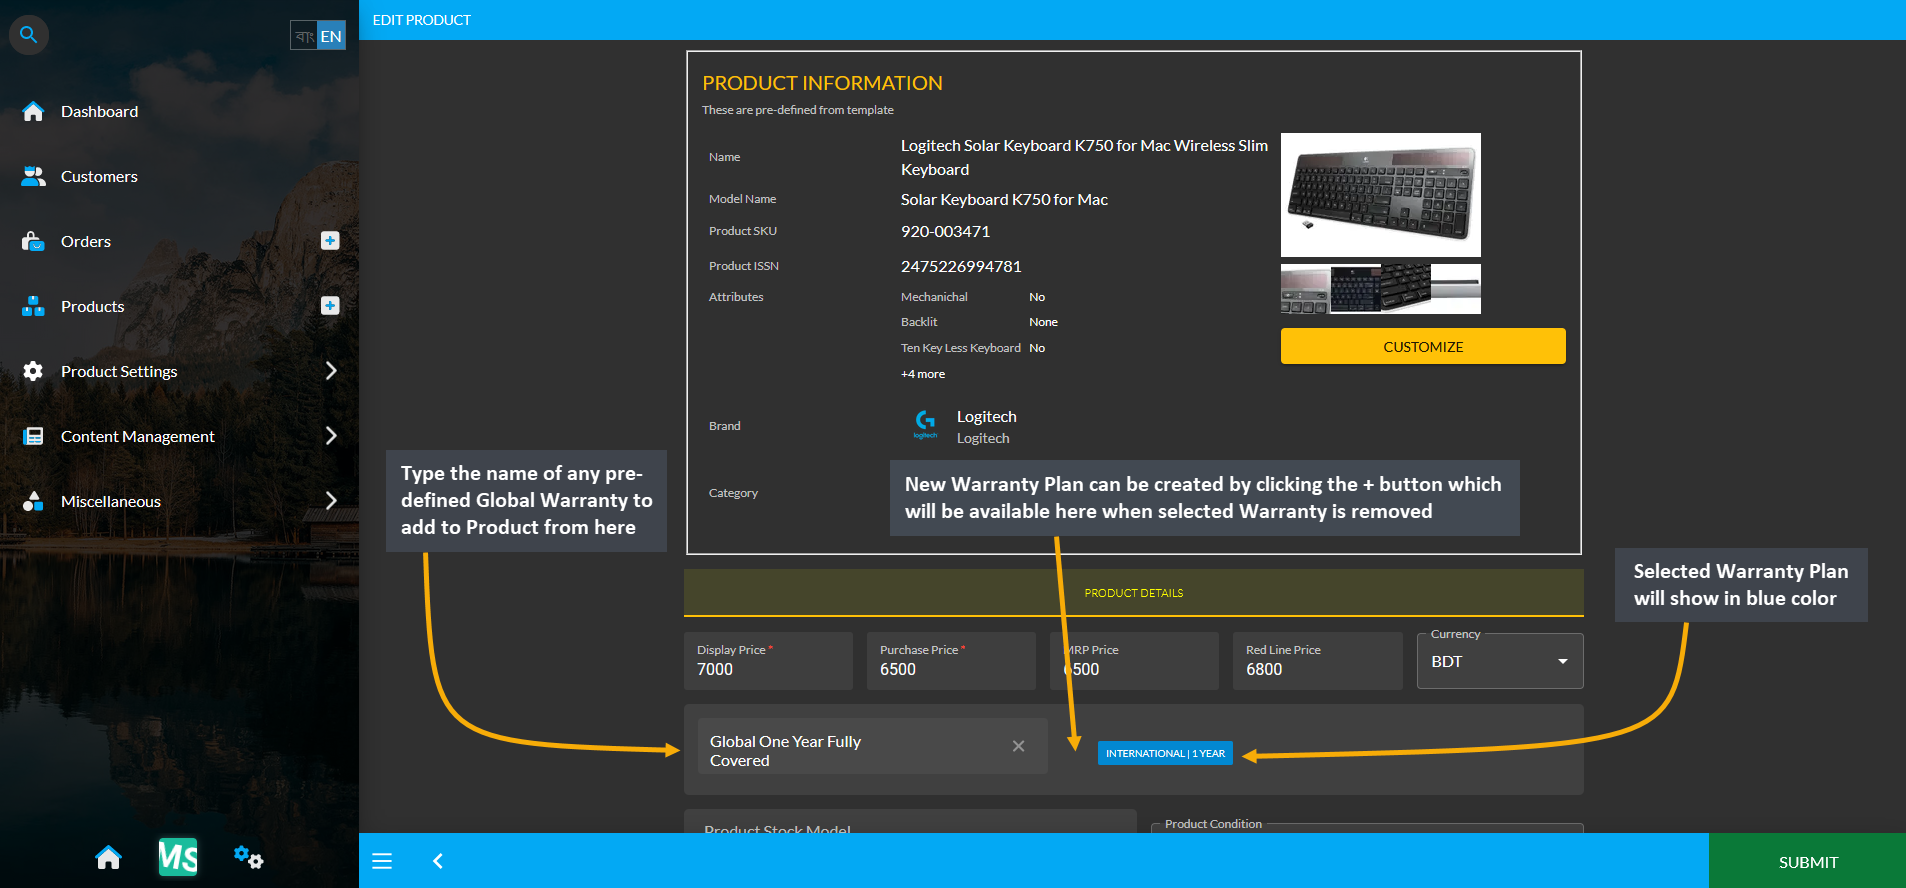
Image 1: Select Global Warranty Plan during Product creation or create new Warranty Plan from scratch.
Create New Warranty Plans
On the Warranty Plan List page, click on the + or ADD button to create New Warranty Plan for Products. The Global Warranty Plans will be displayed by default. The newly created Warranty Plans will show under My Warranties.
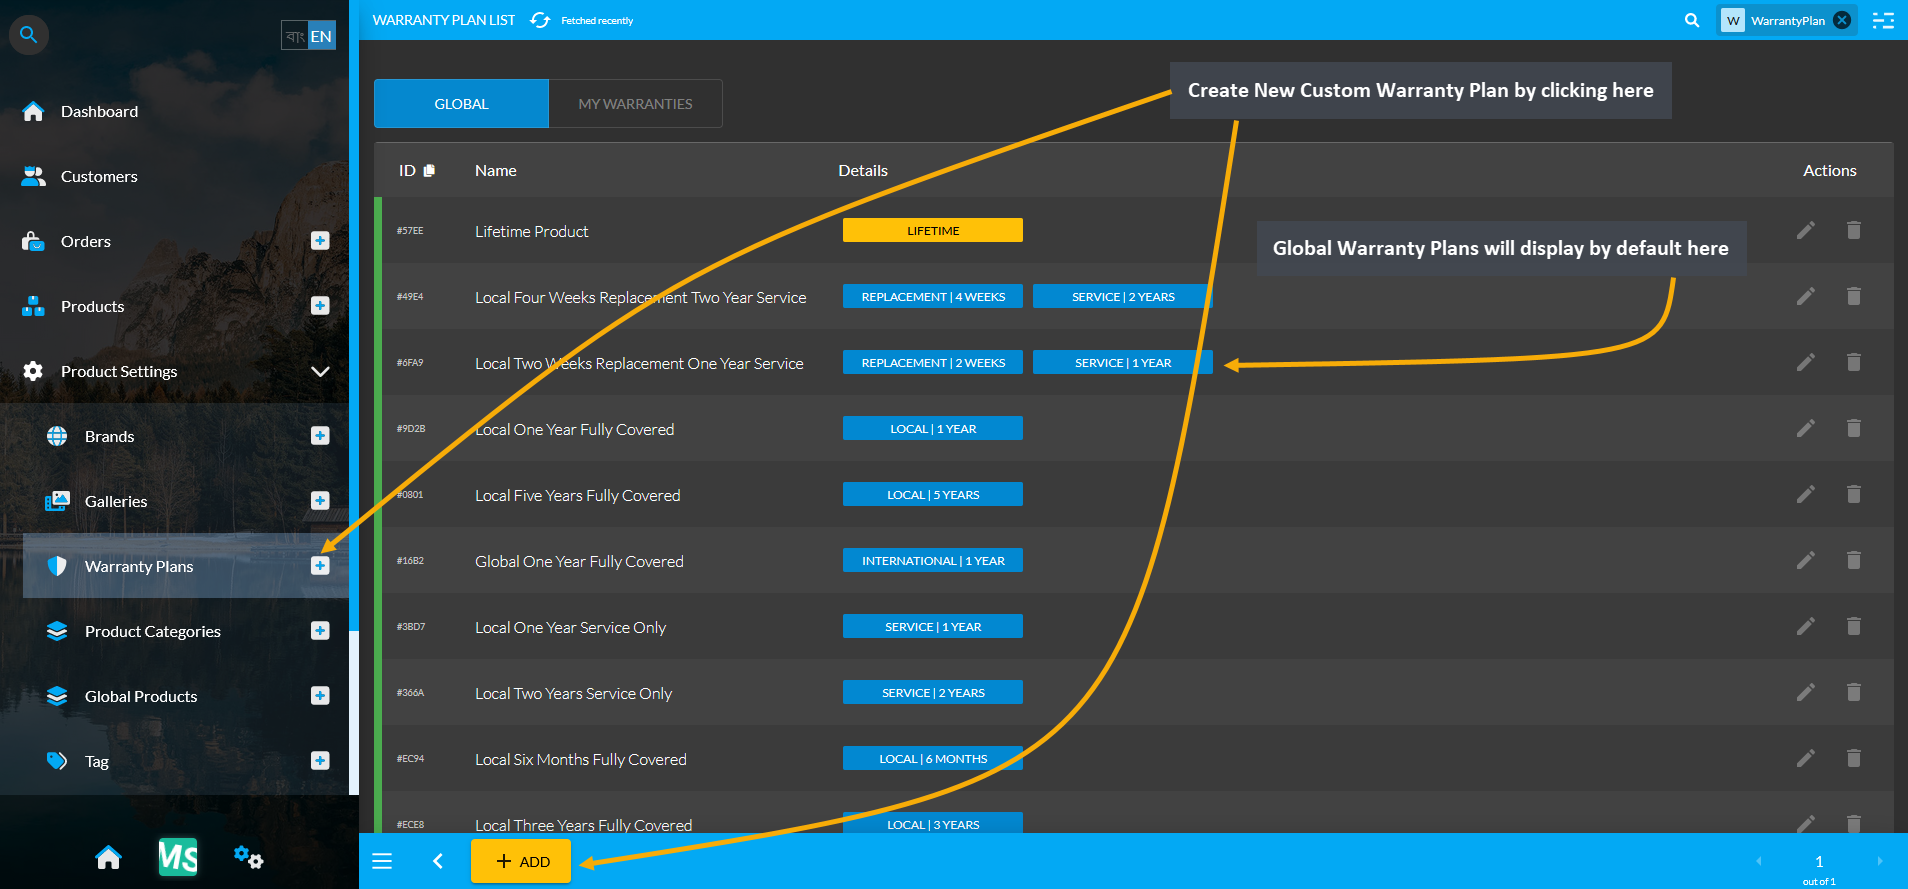
Image 2: From Warranty Plans tab, click the + or ADD button to redirect to Create Warranty Plan page.
When being redirected to the new page to Create Warranty Plan, first type in the full name of the Warranty that will be displayed on The Website. Use the blue toggle button to keep the warranty active. Choose warranty plans that apply to the new warranty by clicking on the Select button for each as shown in the example screenshot.
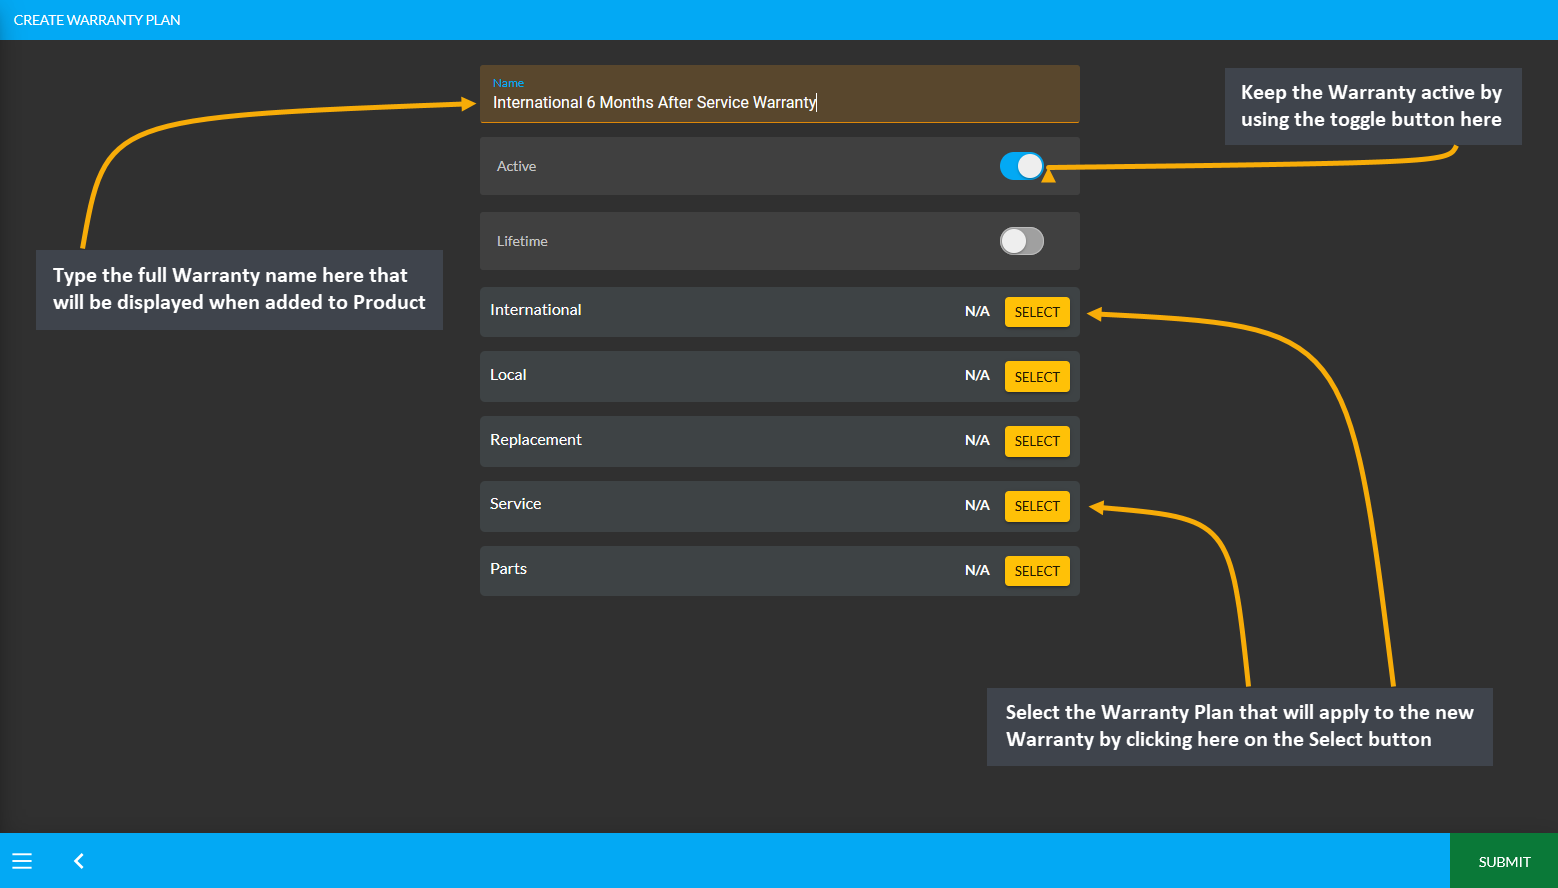
Image 3: Type full Warranty Name for display, use toggle button to keep warranty active, and select plans.
Clicking on the yellow Select button will open a pop-up from where desired warranty plan can be selected. Select the Warranty Plan and click Save to add the plan to the newly created Warranty. Like this, several Warranty Plans can be added to the main Warranty for International, Local, Replacement, Service, and Parts.
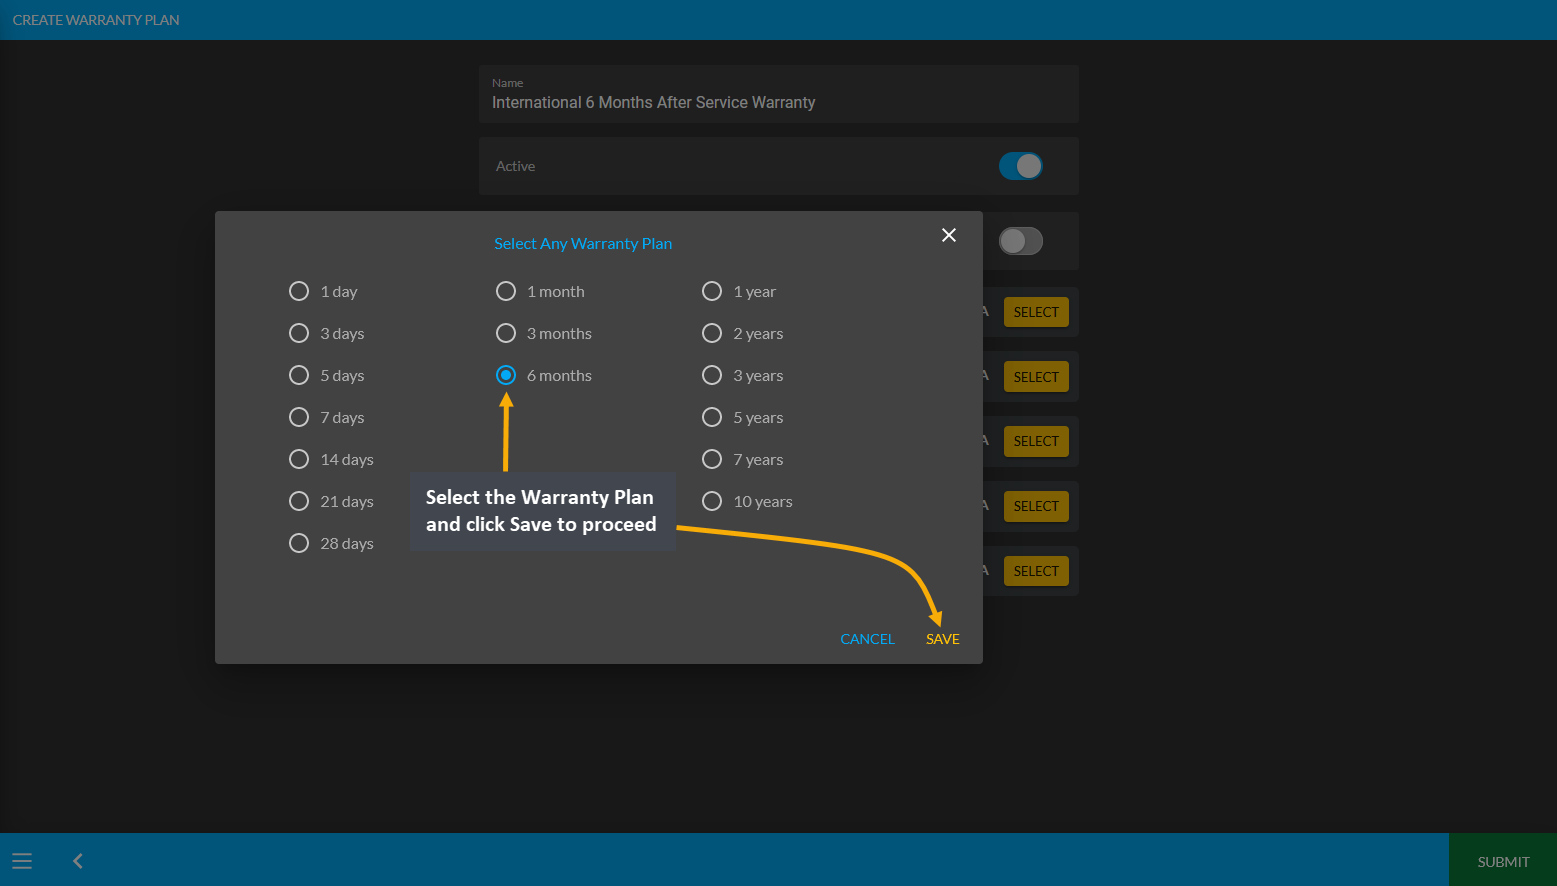
Image 4: Clicking the Select button will open a pop-up from where desired warranty plan can be selected.
After selecting the applicable Warranty Plans, click Submit to save all the changes and create new Warranty Plan.
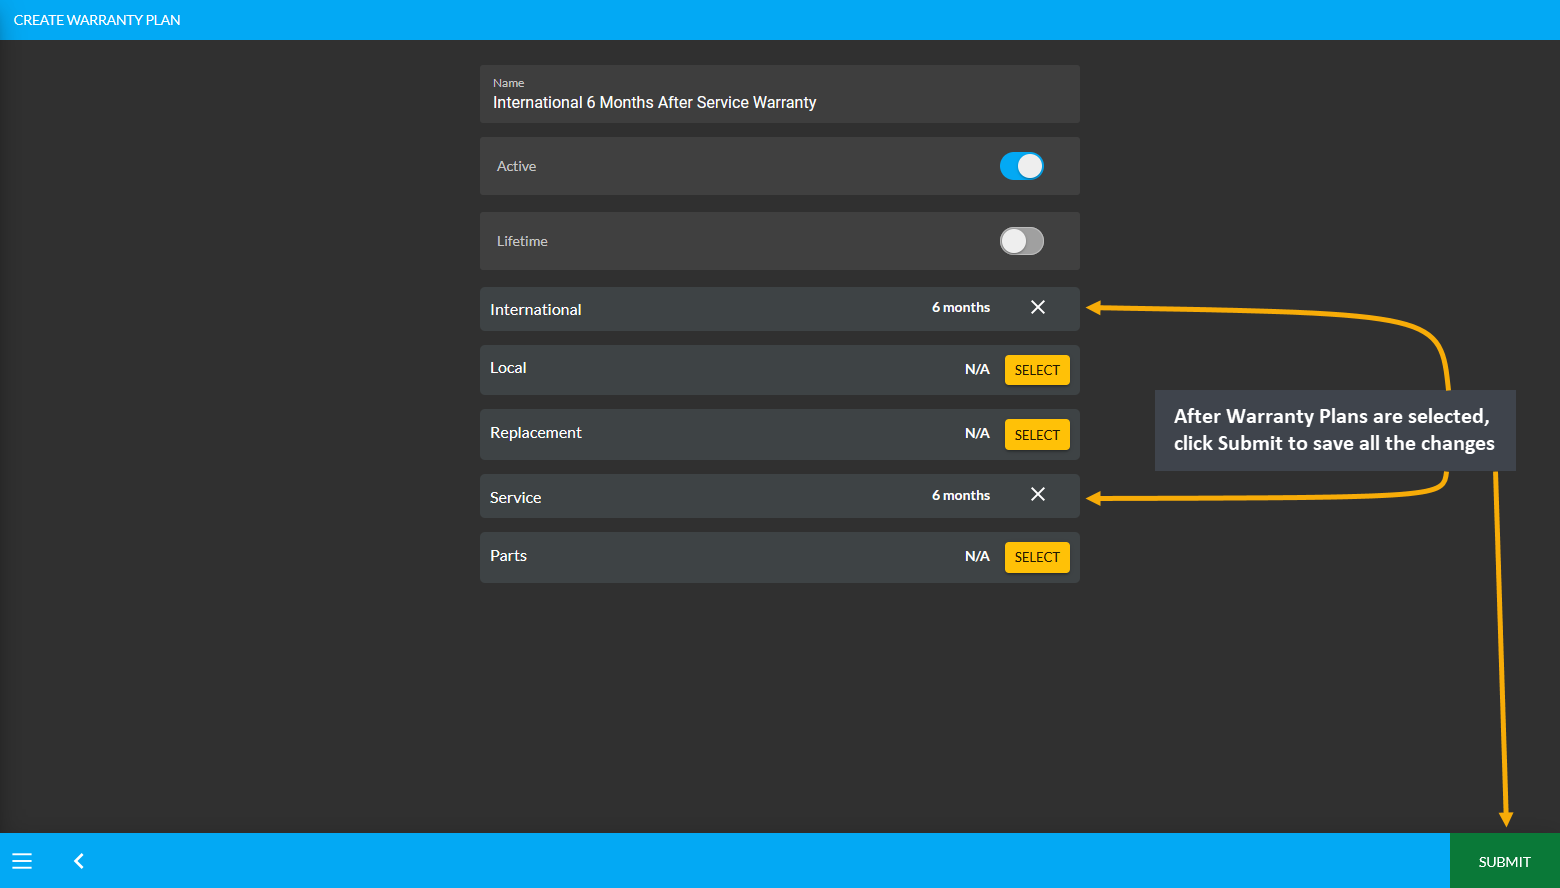
Image 5: After selecting Warranty Plans, click Submit to save all the changes and create new Warranty Plan.
Create Lifetime Warranty Plan
Lifetime Warranty can also be created by selecting the Lifetime toggle button that will disable other Warranty Plans. Type the full name of the Lifetime Warranty Plan and click Submit to save all the changes. The Lifetime Warranties will not require any duration input like others.
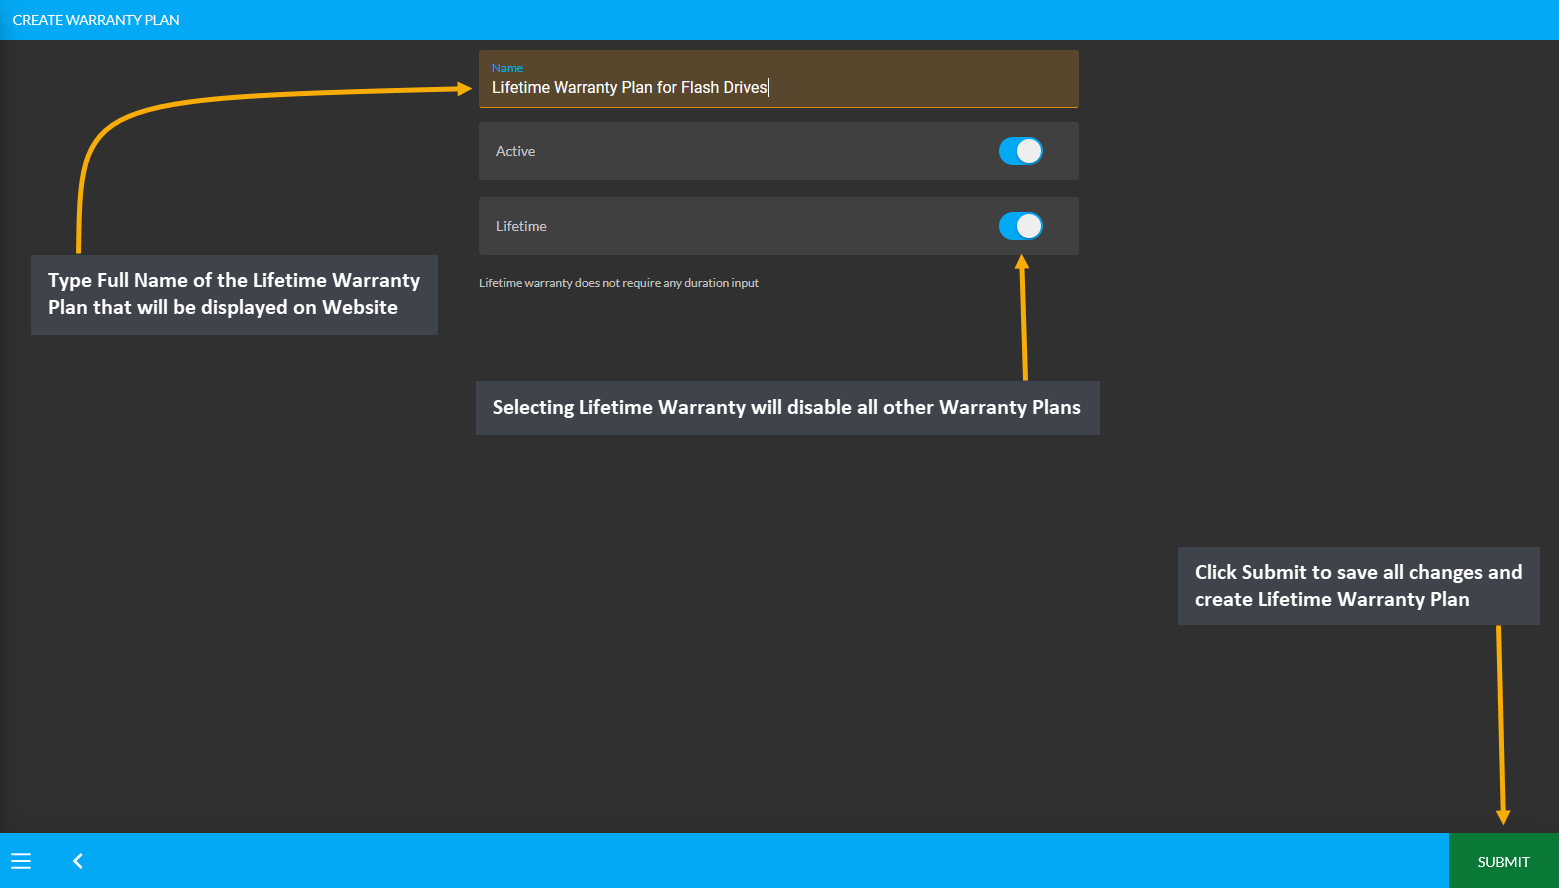
Image 6: Create Lifetime Warranty by enabling the Lifetime toggle that will disable other Warranty Plans.
All the newly created Warranty Plans can be found under My Warranties on the Warranty Plan List page from where they can be edited or deleted using the Edit and Delete icons.
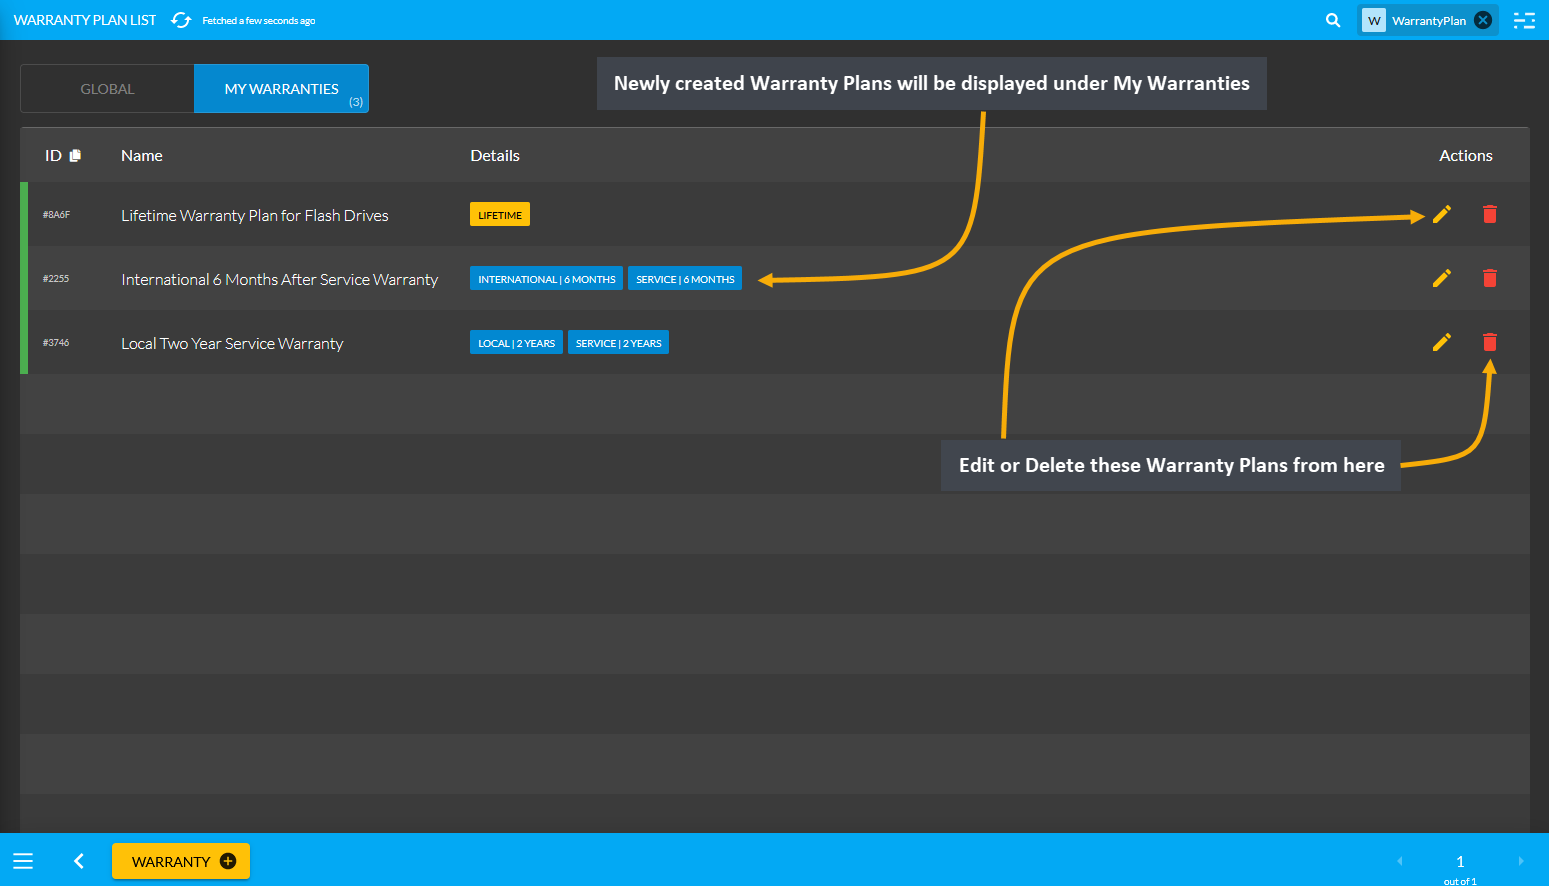
Image 7: All newly created Warranty Plans can be found under My Warranties on the Warranty Plan List Page.
4 - Product Categories
Learn more about how to manage Categories and add them when creating Products.
Product Categories
Product Categories are Pre-defined which means that, the Categories are limitable, so users will not be able to add Categories. The Shop Owners will have to use the Product Categories that are already provided in the system. So, Categories are available by Product Types and the entire list of Product Categories can be checked by opening the Product Categories from under Product Settings. Product Categories will be displayed in View Only List by default.
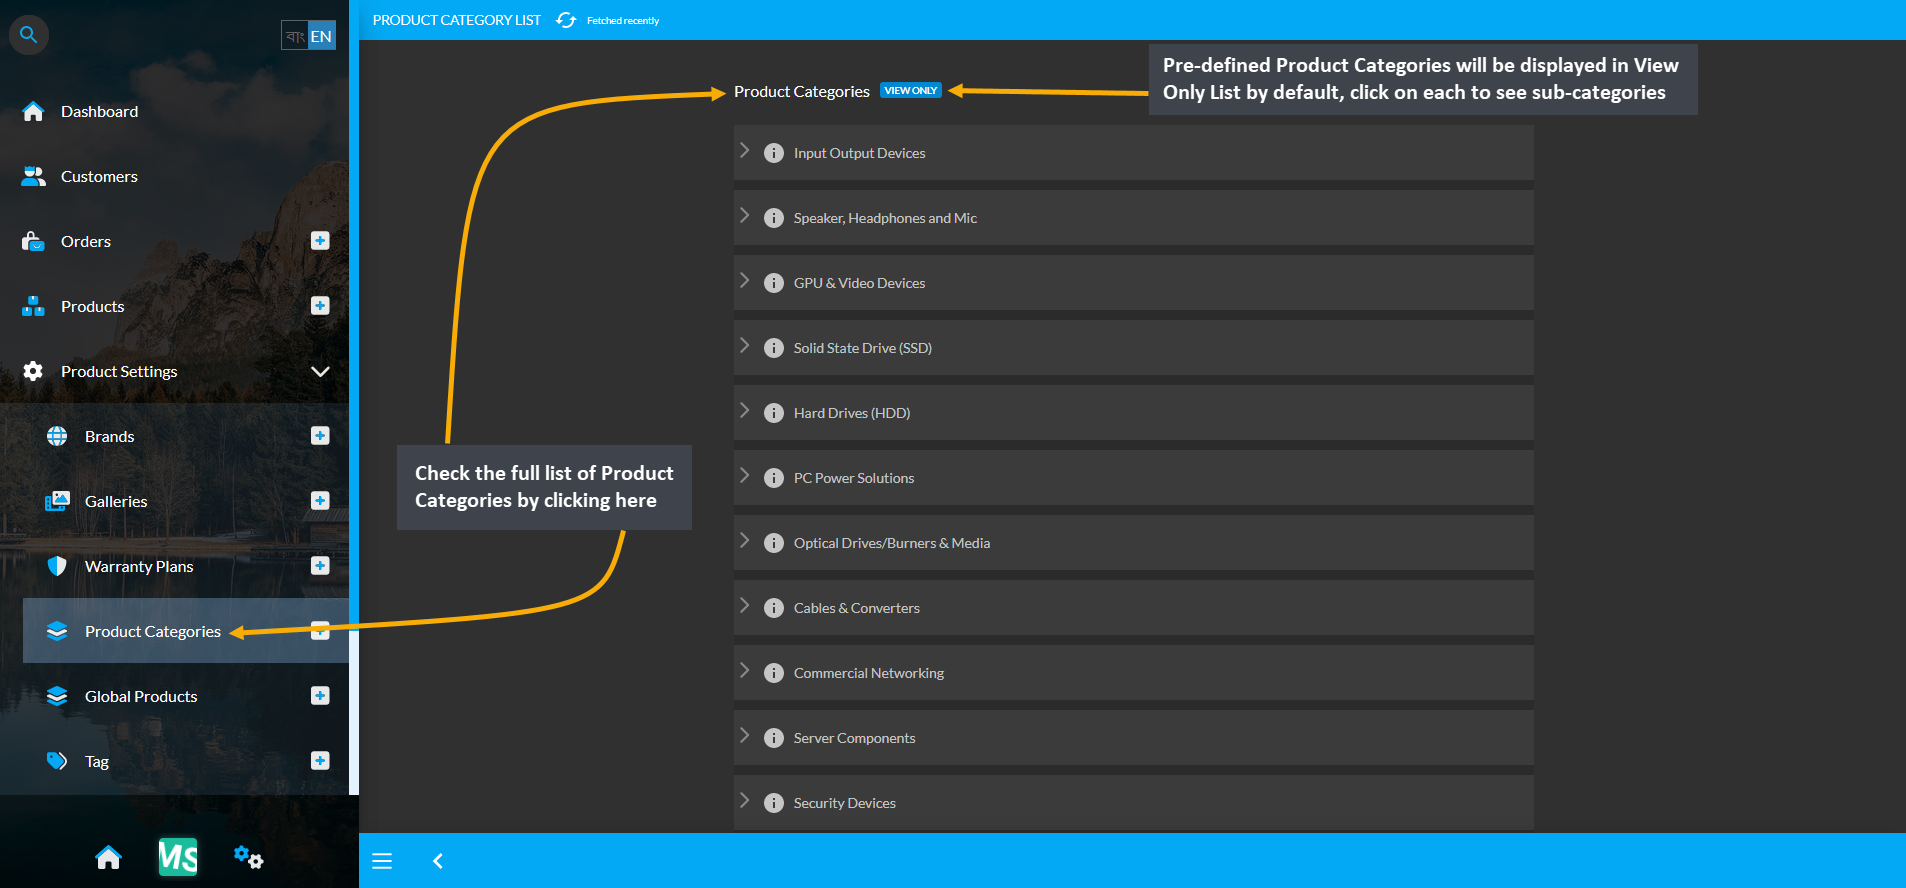
Image 1: Check the full list of Product Categories from the Product Categories tab under Product Settings.
Clicking on each Product Category will open their sub-categories on a new page. As shown in the example below, clicking on the main Category Input Output Devices will redirect to a new page displaying its Sub-Categories in list.
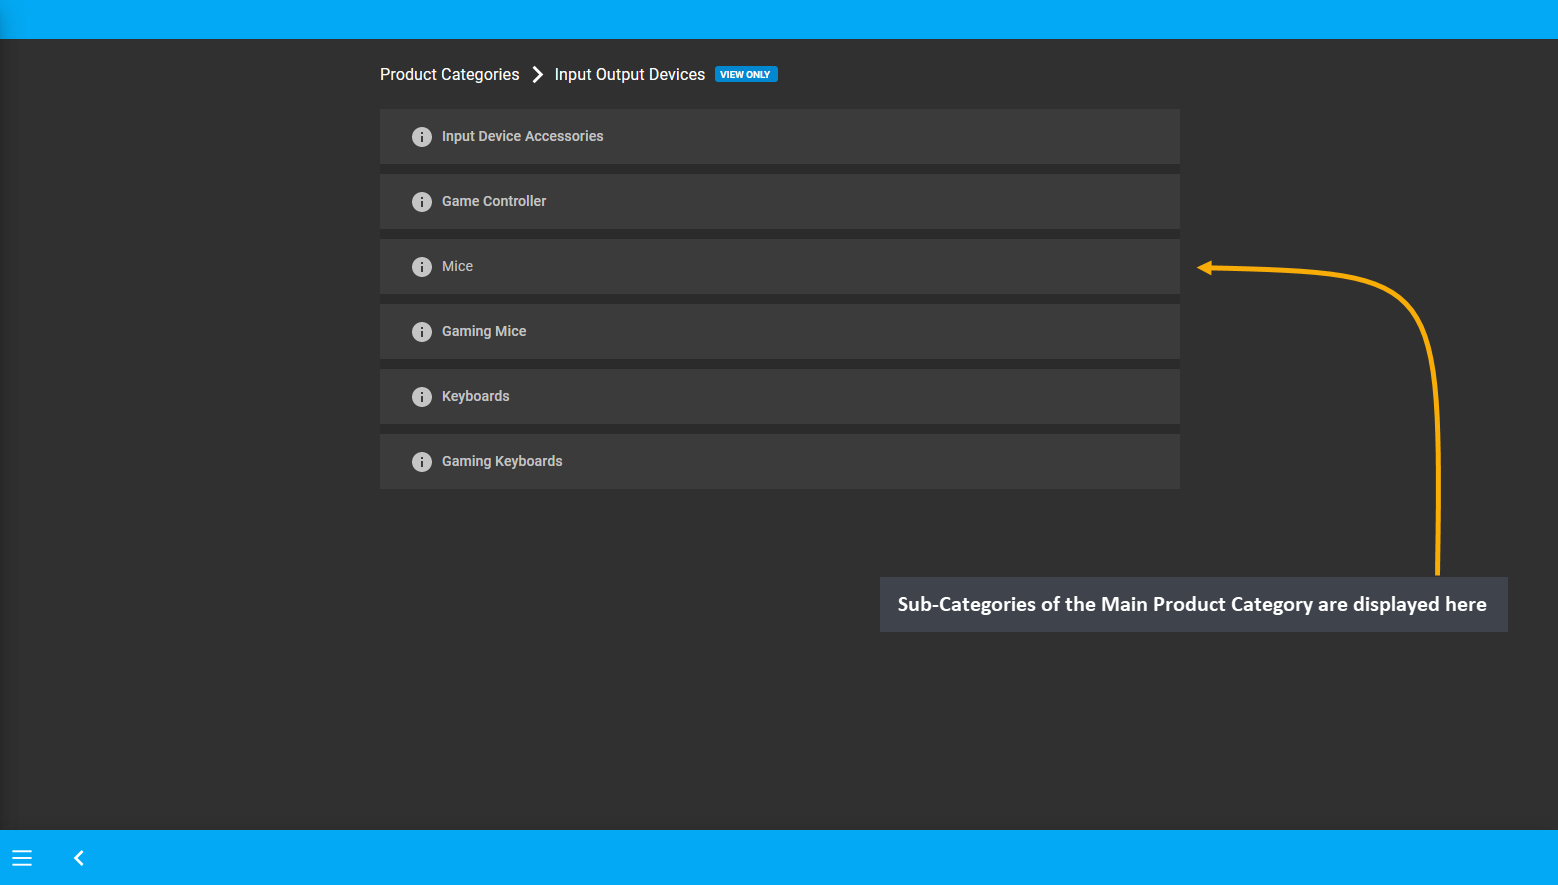
Image 2: Clicking on each Product Category will open their Sub-Categories on a new page within a List.
During Product creation, Product Category can be selected for each Product from the dropdown menu provided.
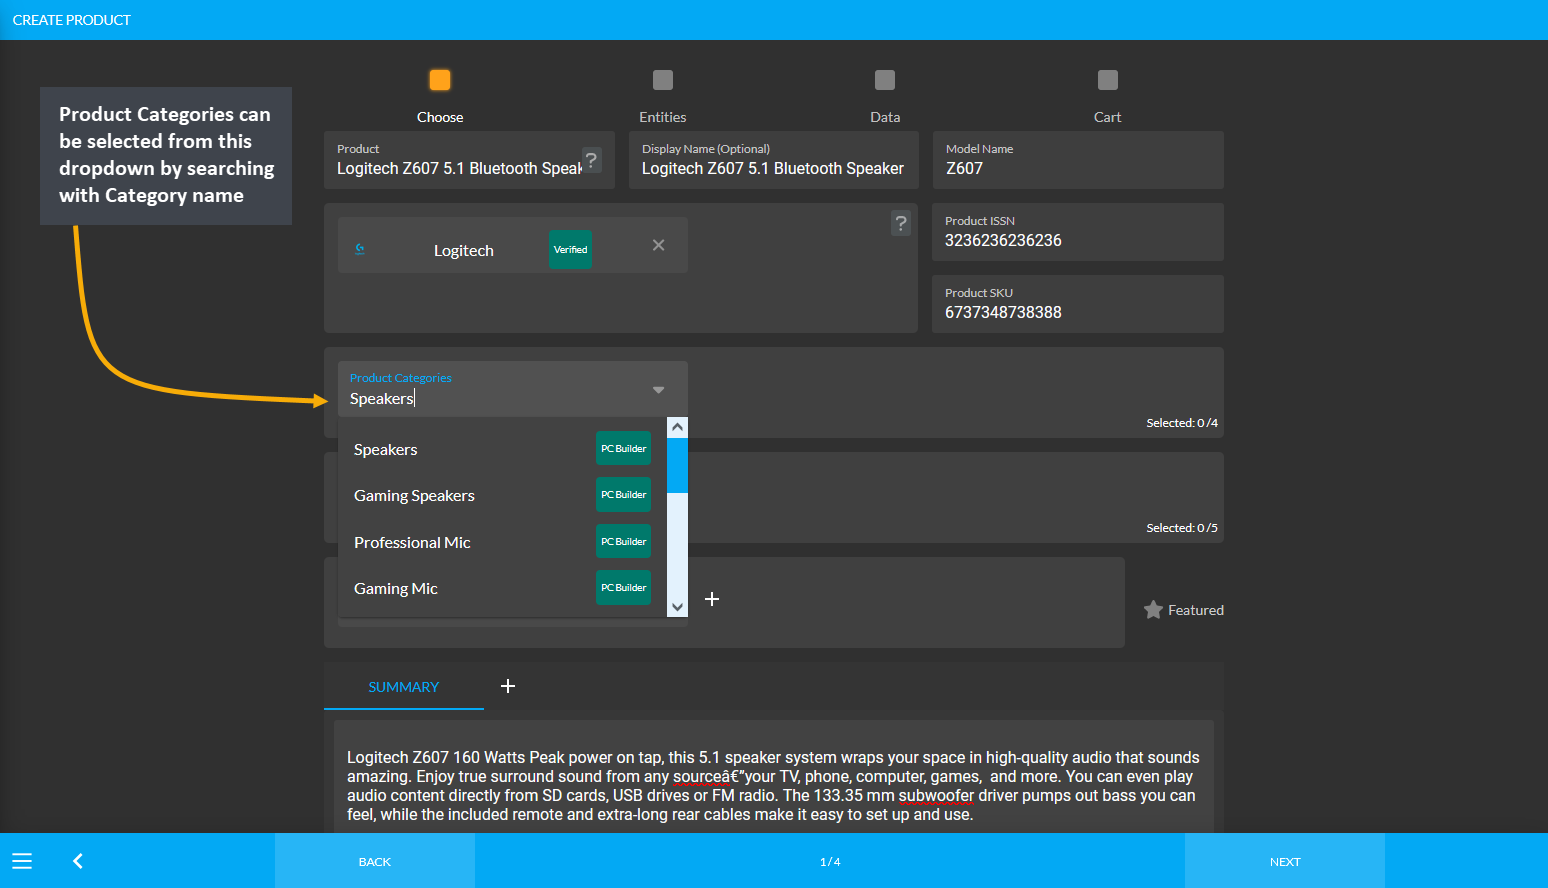
Image 3: During Product creation, Product Category can be selected for Product from dropdown menu provided.
6 - Tags
Learn more about how to manage and create individual Product Settings.
Tags are similar to Categories with extra functionality. These entities that can be used to build custom collections of other entities. Currently the system support using them with Products, Global Products, and Orders. So, apart from pre-defined Product Categories in the system, Shop Owners can build their own custom product category hierarchy using Tags when needed. For instance, both 4g and 5g phones have been released in 2021, so tags can be created as 4g and 5g to define those Product(s).
In the system, Product Categories are pre-defined, the Shop Owners cannot create them. For instance, the Office Solutions category has several sub-categories. So, if a Shop Owner wants to sell Printer-Scanner combo Product, they will have to create a New Category because such category does not exist under Office Solutions category. Tags allow creating New Categories like 3D printer-scanner, receipt printer-scanner, or barcode printer-scanner etc.

Image 1: Shop Owners can create and enable Tags to use as Product Categories in the Website Shop filter.
Enable use of Tags as Categories in the Website Shop filter by turning on the Commerce Category as Tag option using the toggle button from the Basic Settings under Config Your Business from All Settings.

Image 2: Enable use of Tags as Categories in Website Shop filter by turning on Commerce Category as Tag.
When Tag is enabled to use as Commerce Category, Products created with those Tags will show as Categories on the Website Shop Filter. In the example, the Tags Apple, Gaming Mouse, Gaming Keyboard, Gaming Headphone, Laptop, and Apple which were added to Products are showing as main Categories on the Website as Tag has been enabled to use as Commerce Category.

Image 3: When Tag is enabled as Category, Products created with Tags will show as Categories on Website.
If a specific Tag Category is selected, then Products created under those Tags will show on Website Shop Filter.

Image 4: If a specific Tag Category is selected, then Products created under those Tags will show.
To add Tags to any Product, first click on the Products module and from there, click on the + icon which will open the page to add New Product(s). For existing Product(s), search Product Name on the search bar. If the Product is not available, the search bar will suggest adding a new product with Add New button.
Clicking on it will redirect to Create Product page where Tags can be added to that Product. Type any existing Tag Names in the search bar and click on it, which will automatically add that tag to the Product. Here, Shop Owners can add a maximum of 5 Tags to any Product.

Create Child Tag
Child Tag can be created within a Parent Tag from the Tags List. Click on the + icon to create a Child Tag for the selected Parent Tag. It will redirect to a new page where new Child Tag can be created by adding Tag Name, Tag Description, Images, and selecting Tag Type as illustrated in the example screenshot below.
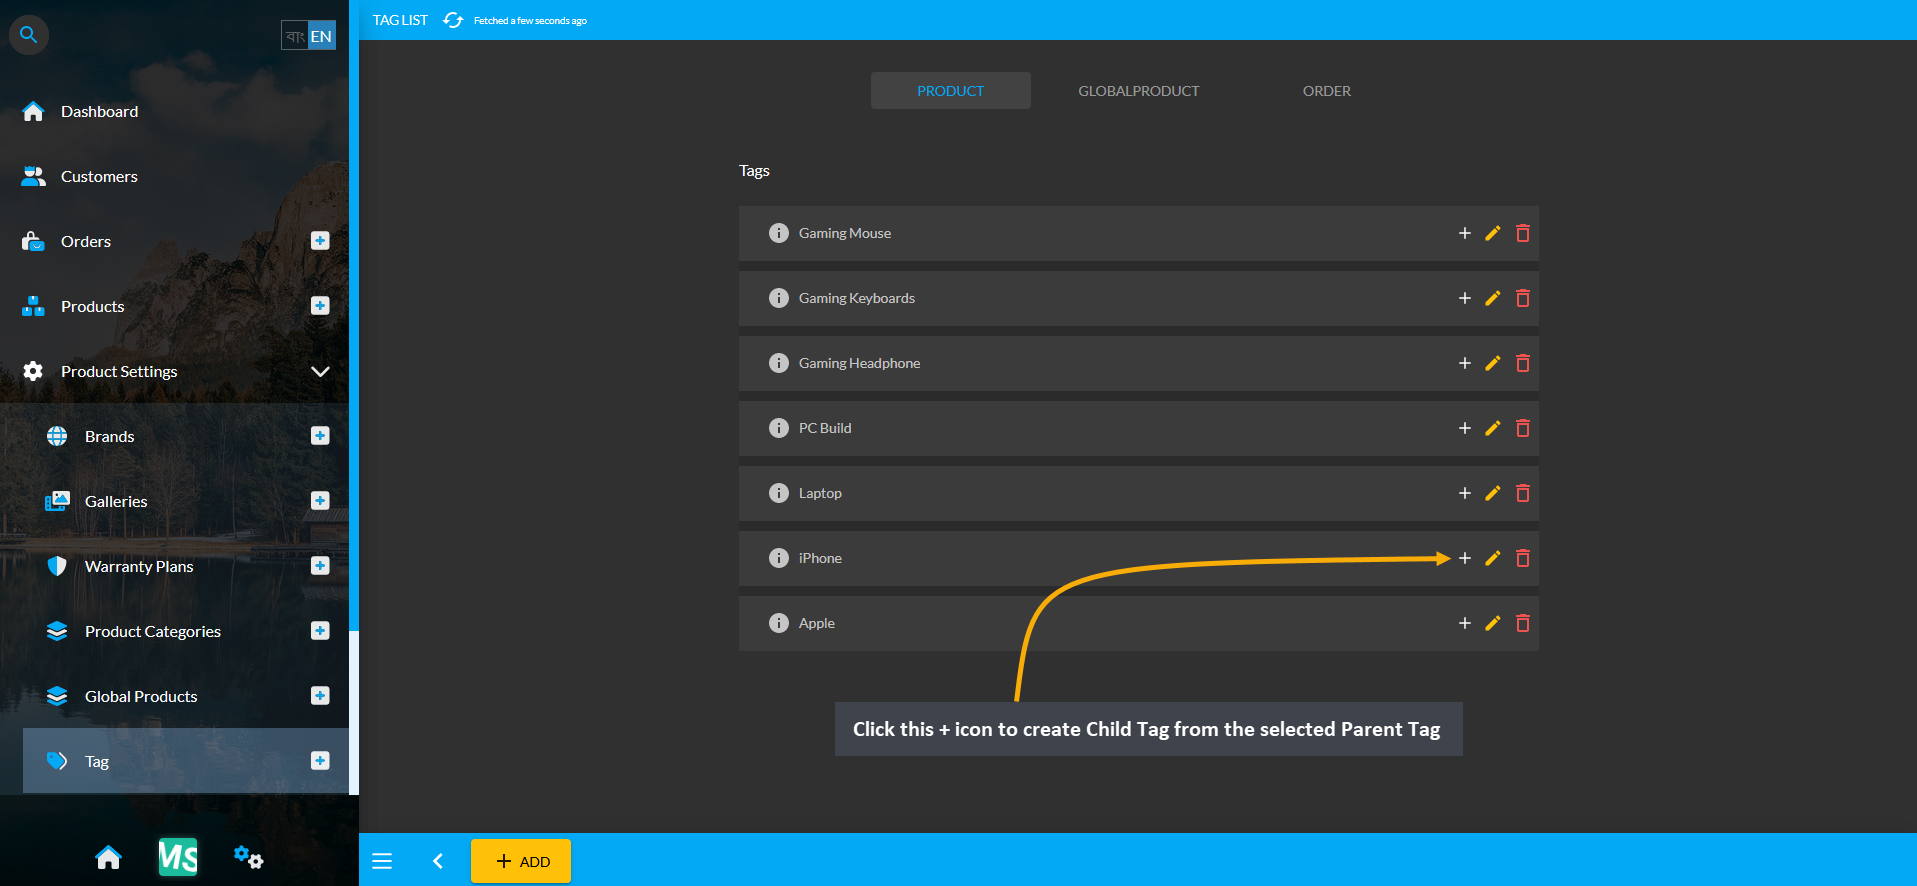
Image 1: Click on the + icon to create a Child Tag from the selected Parent Tag.
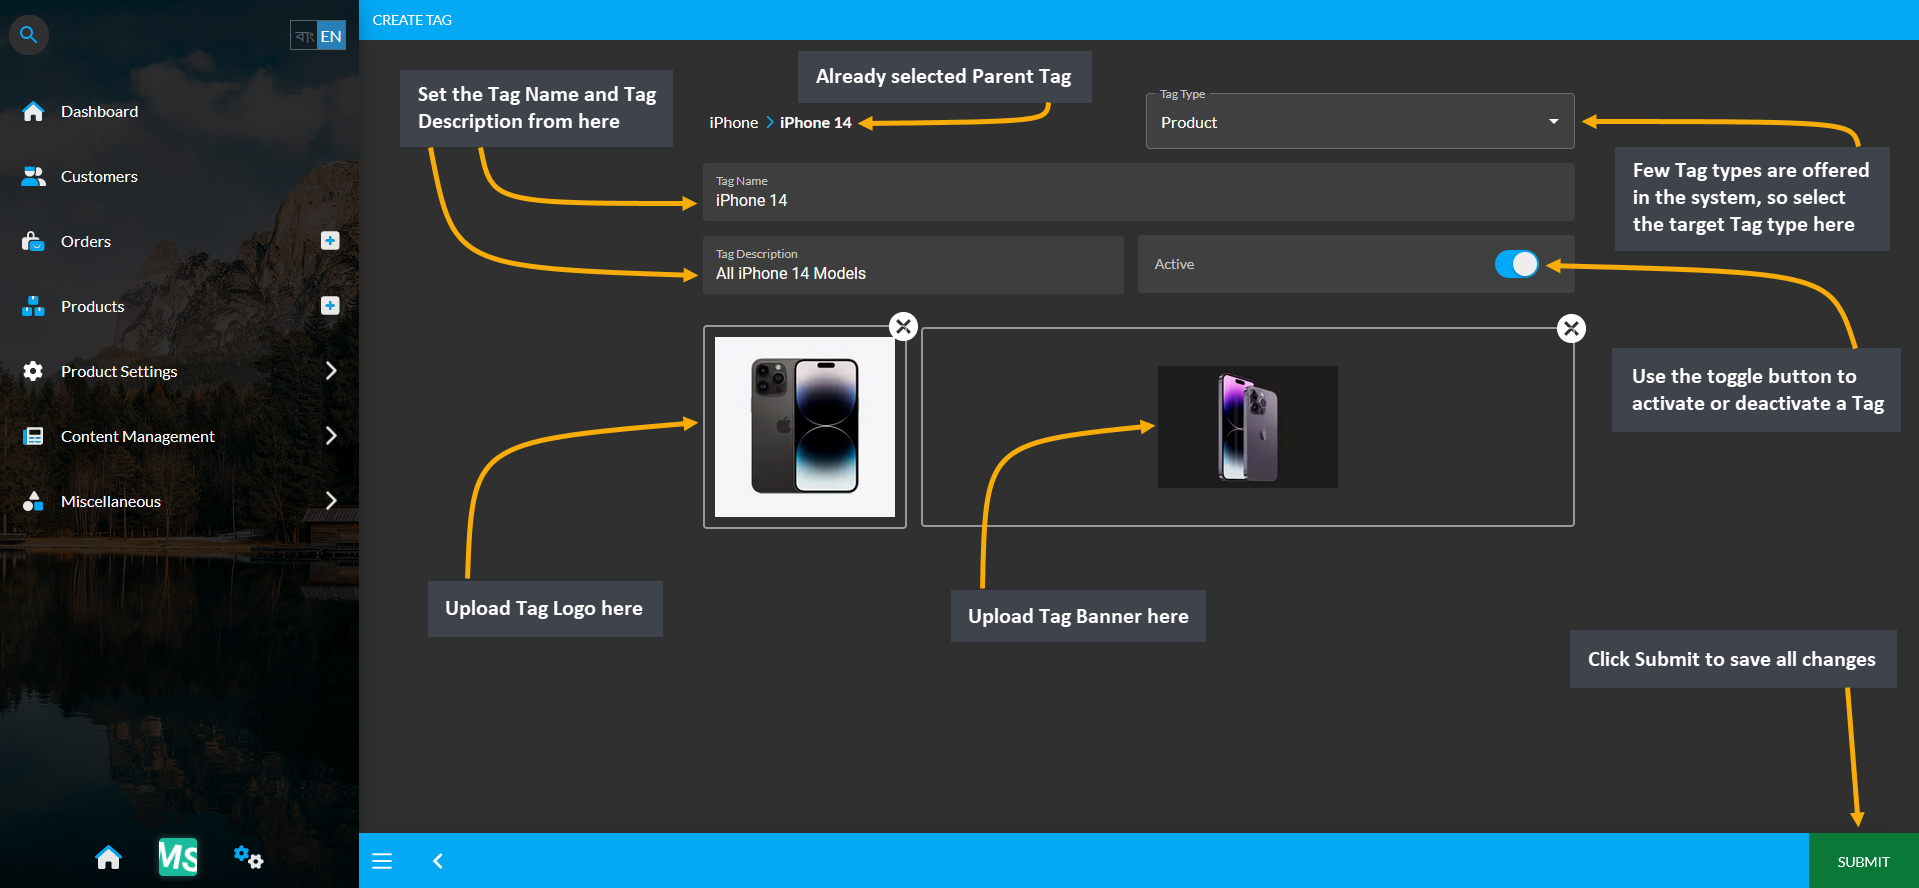
Image 2: Select Tag Type, set Tag Name, Description and upload Logo and Banner to create Child Tag.
The Child Tag or Tags created under the Parent Tag will display in a list and they can be edited if needed.

Image 3: Child Tag or Tags created under the Parent Tag will display in a list and they can be edited.
Options to create tags can be found under Product Settings. Choose Tags from there and click on the + icon to create new tags for the shop. On the Create Tag page, there are options to select Tag Type. Also, set Tag Name and Tag Description below which are two boxes to upload logo and banner for tags. There is a toggle button to activate and deactivate tags. Click Submit to save all the changes as shown in the example screenshot.
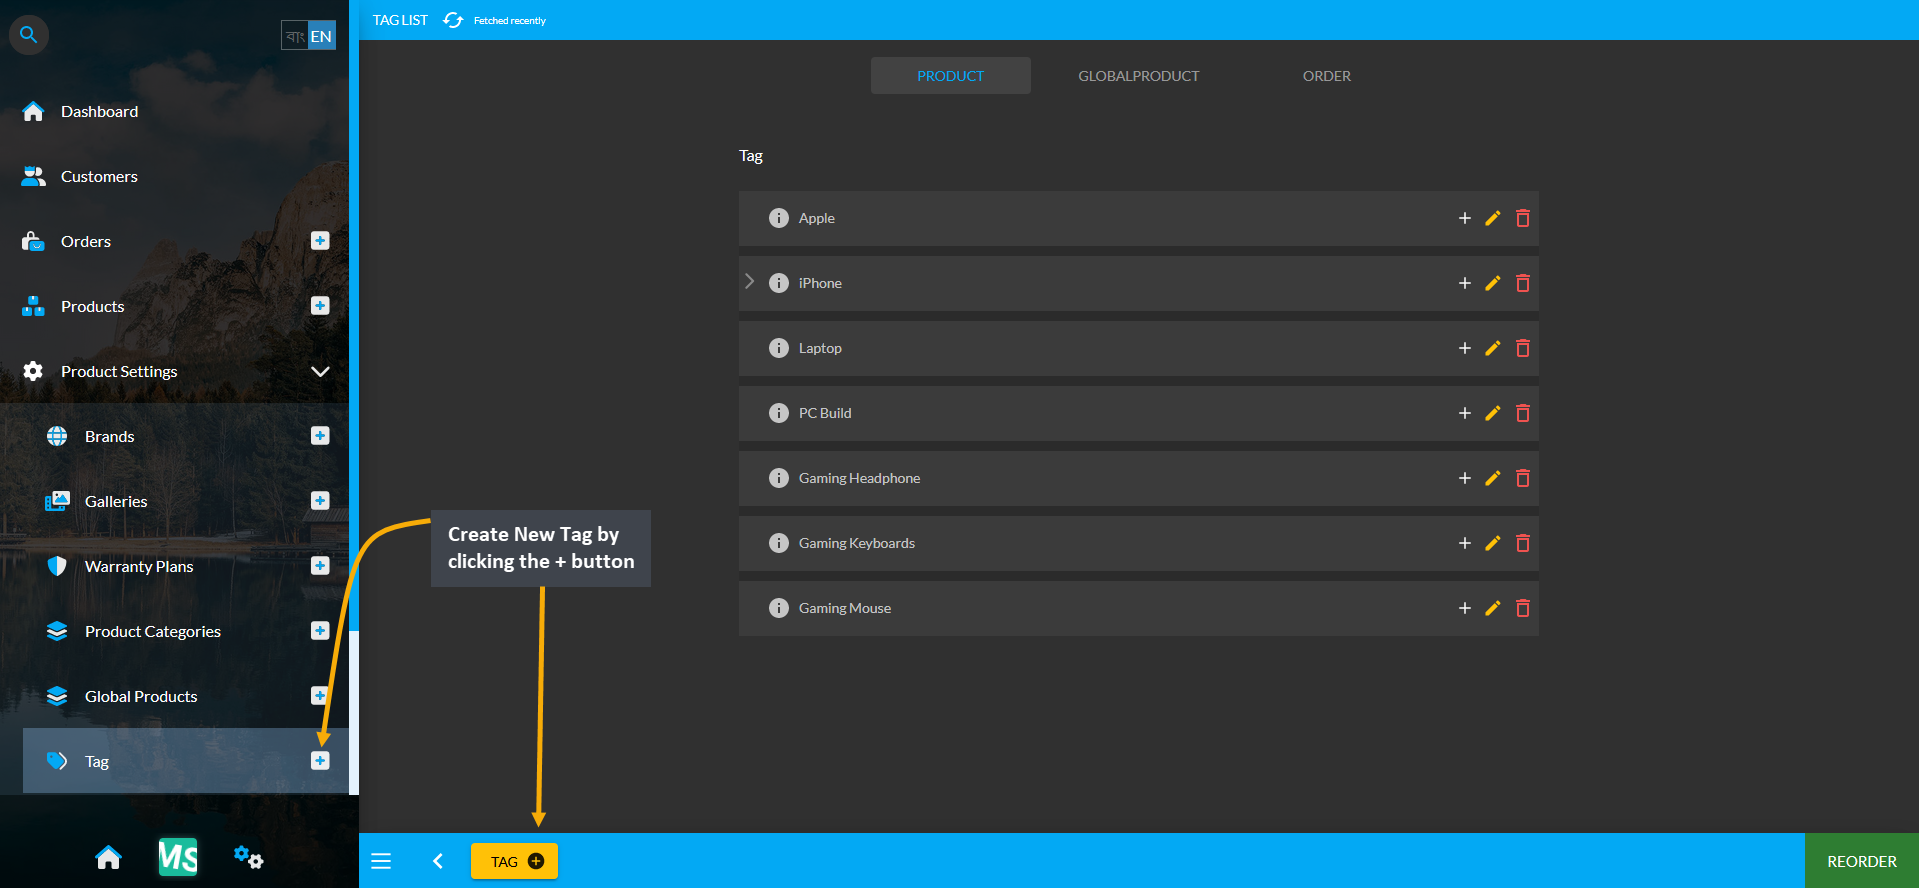
Image 1: Click the + button to create New Tags for the Shop filter from Tags tab under Product Settings.
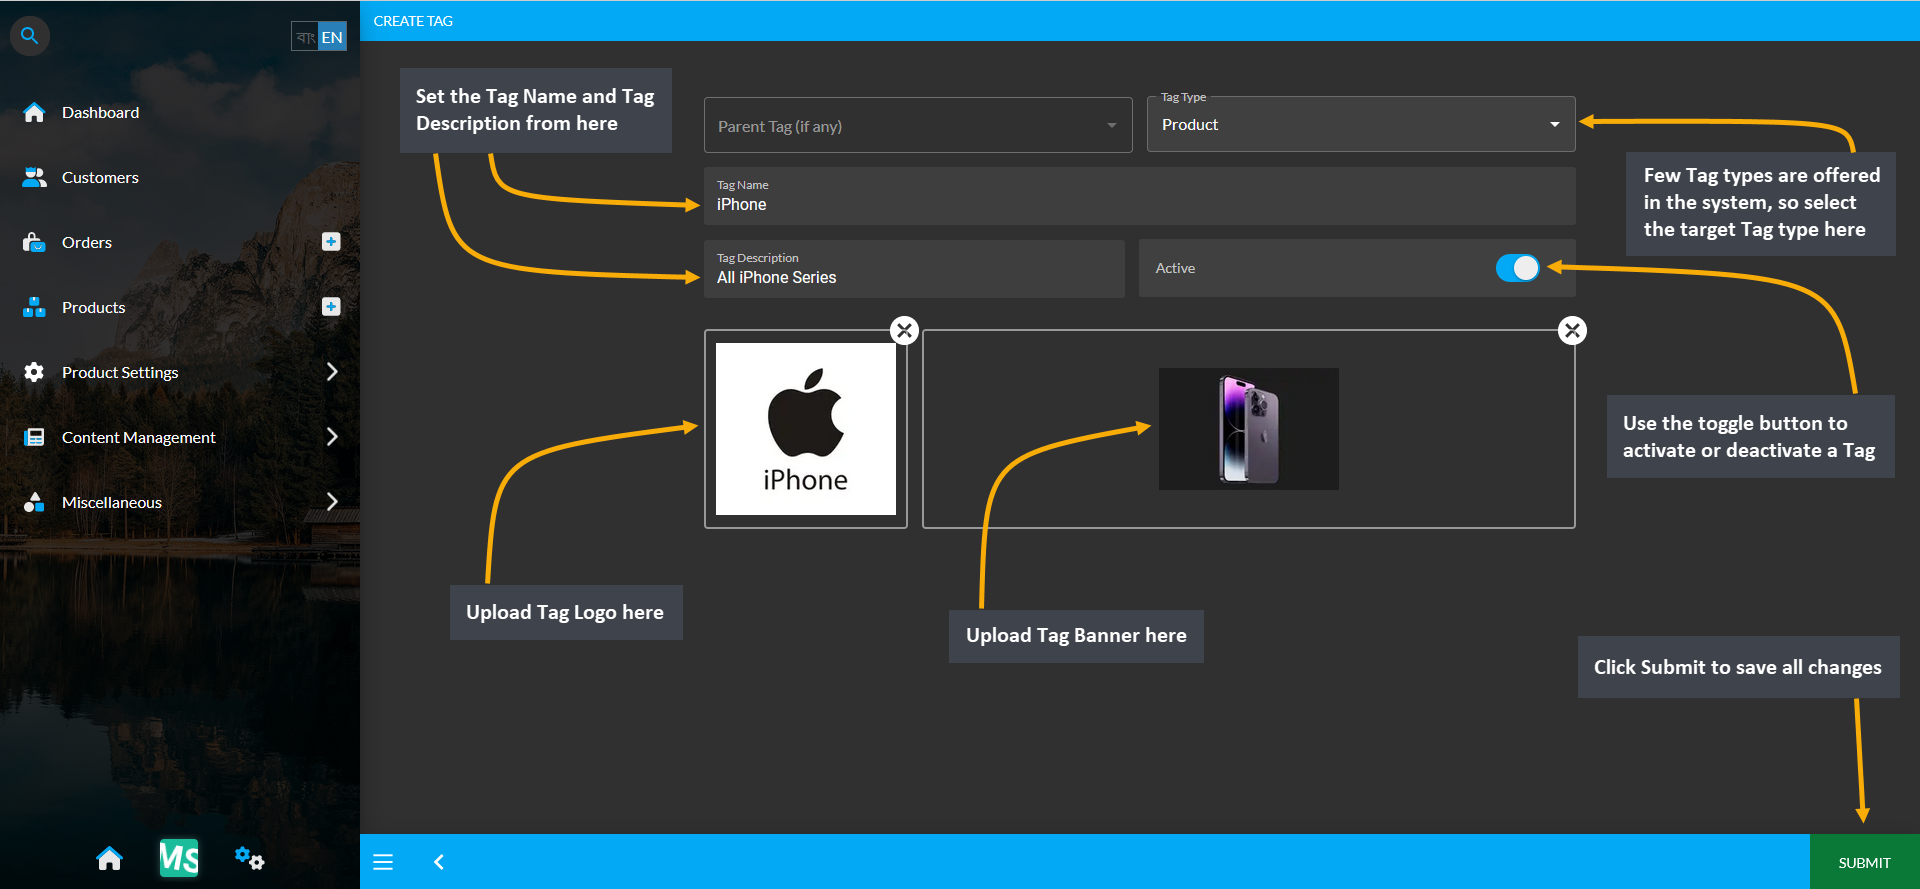
Image 2: Select Tag Type, set Tag Name, Description and upload Logo and Banner to create Parent Tag.
The Tags created in the system will display on The Website. For instance, if Apple Tag is selected, it will bring the search results of all the Product(s) with Apple tags in The Website as shown in the screenshot below.
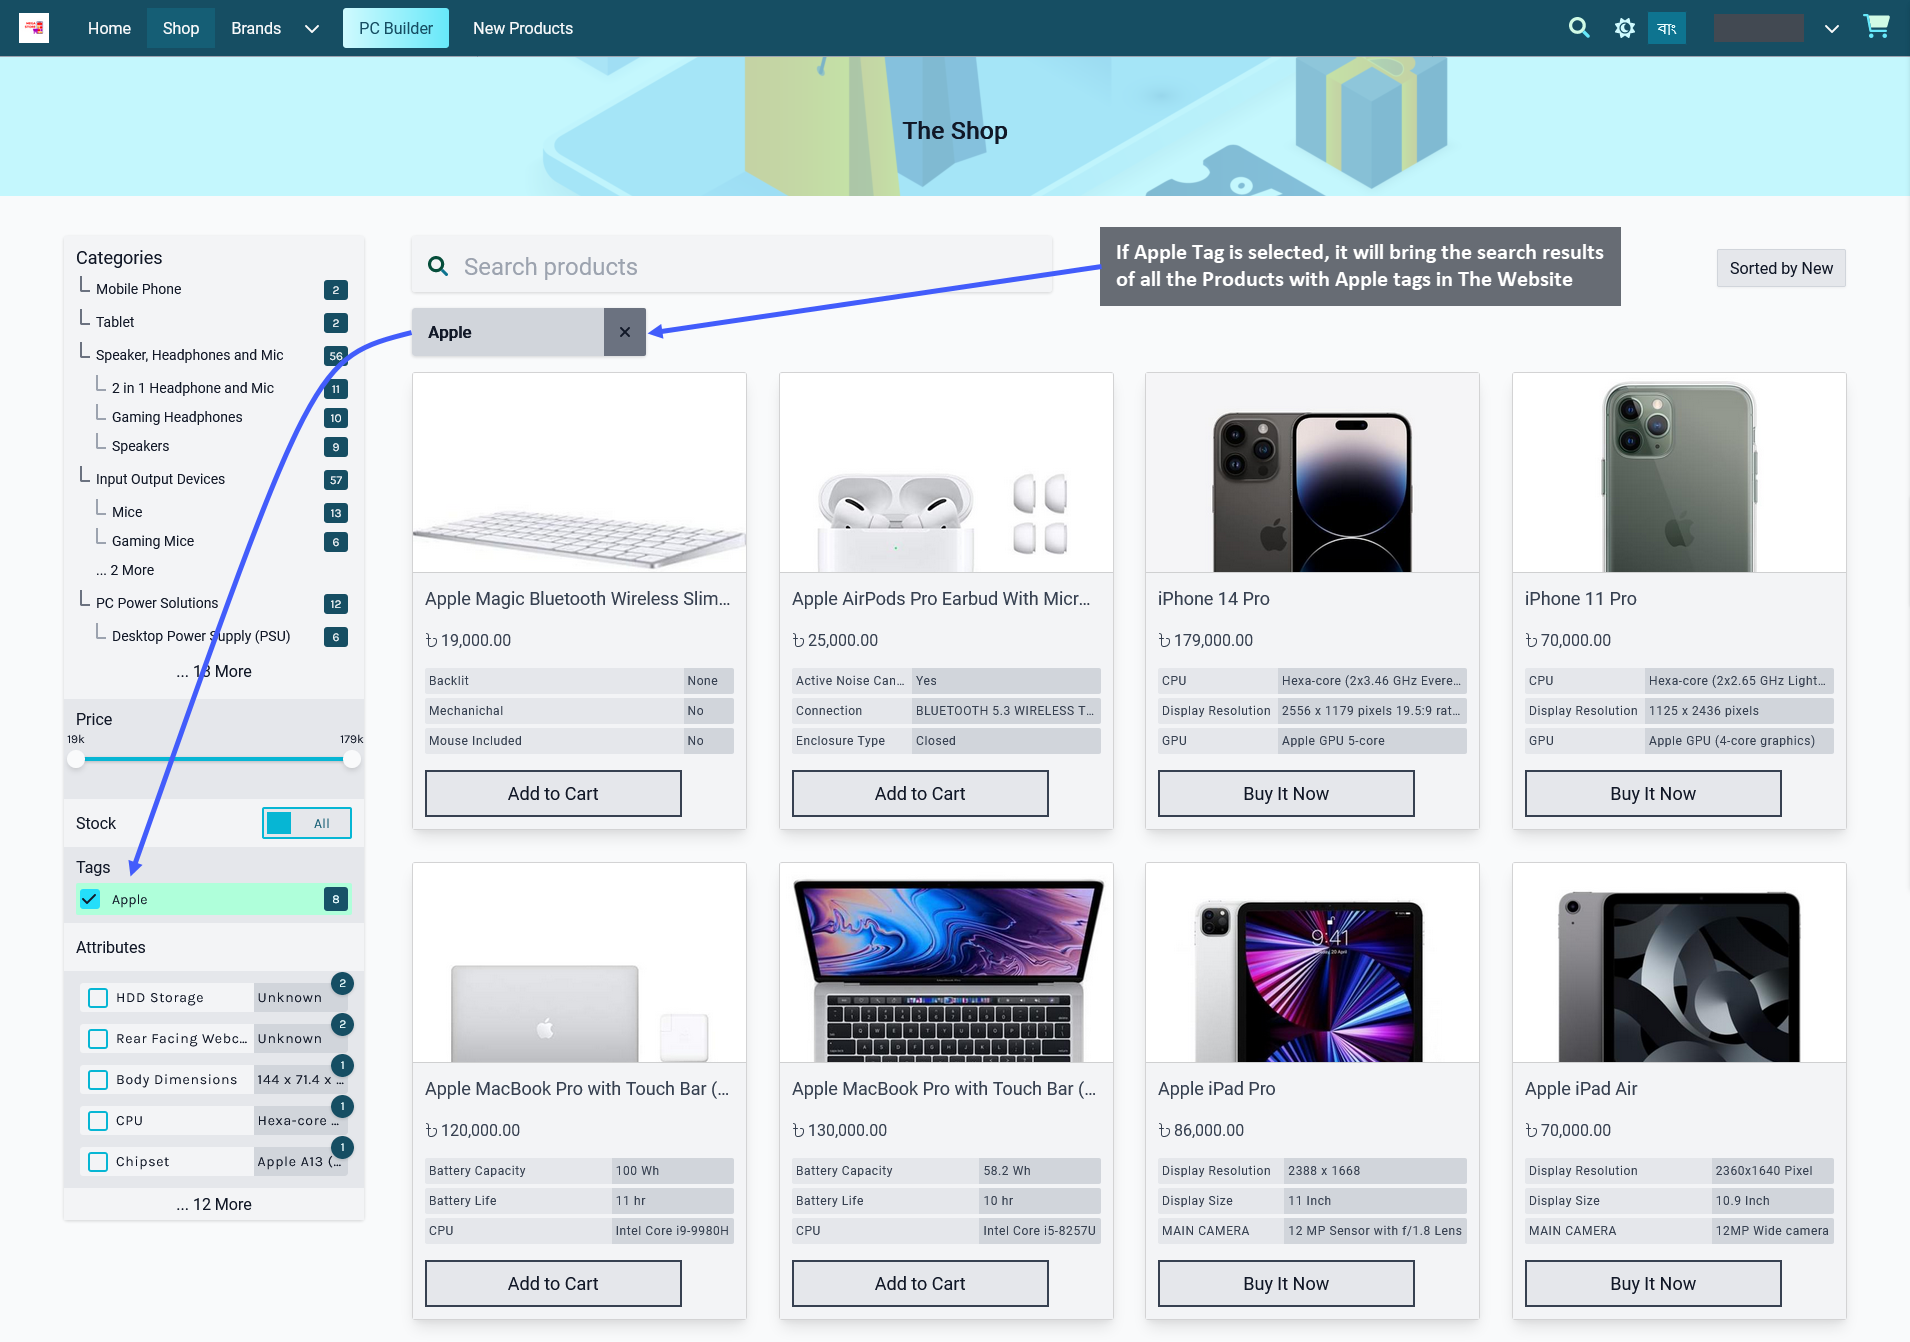
Image 3: If a Tag is selected, it will bring search results of all Products with that Tag in The Website.
View the list of existing tags by clicking on the Tags module from the left side panel. The page will display the list of Tags created. To delete any tag individually, click the Delete Button to immediately delete the tag. There is an Edit Button beside the Delete Button through which details for Tags can be edited and updated.
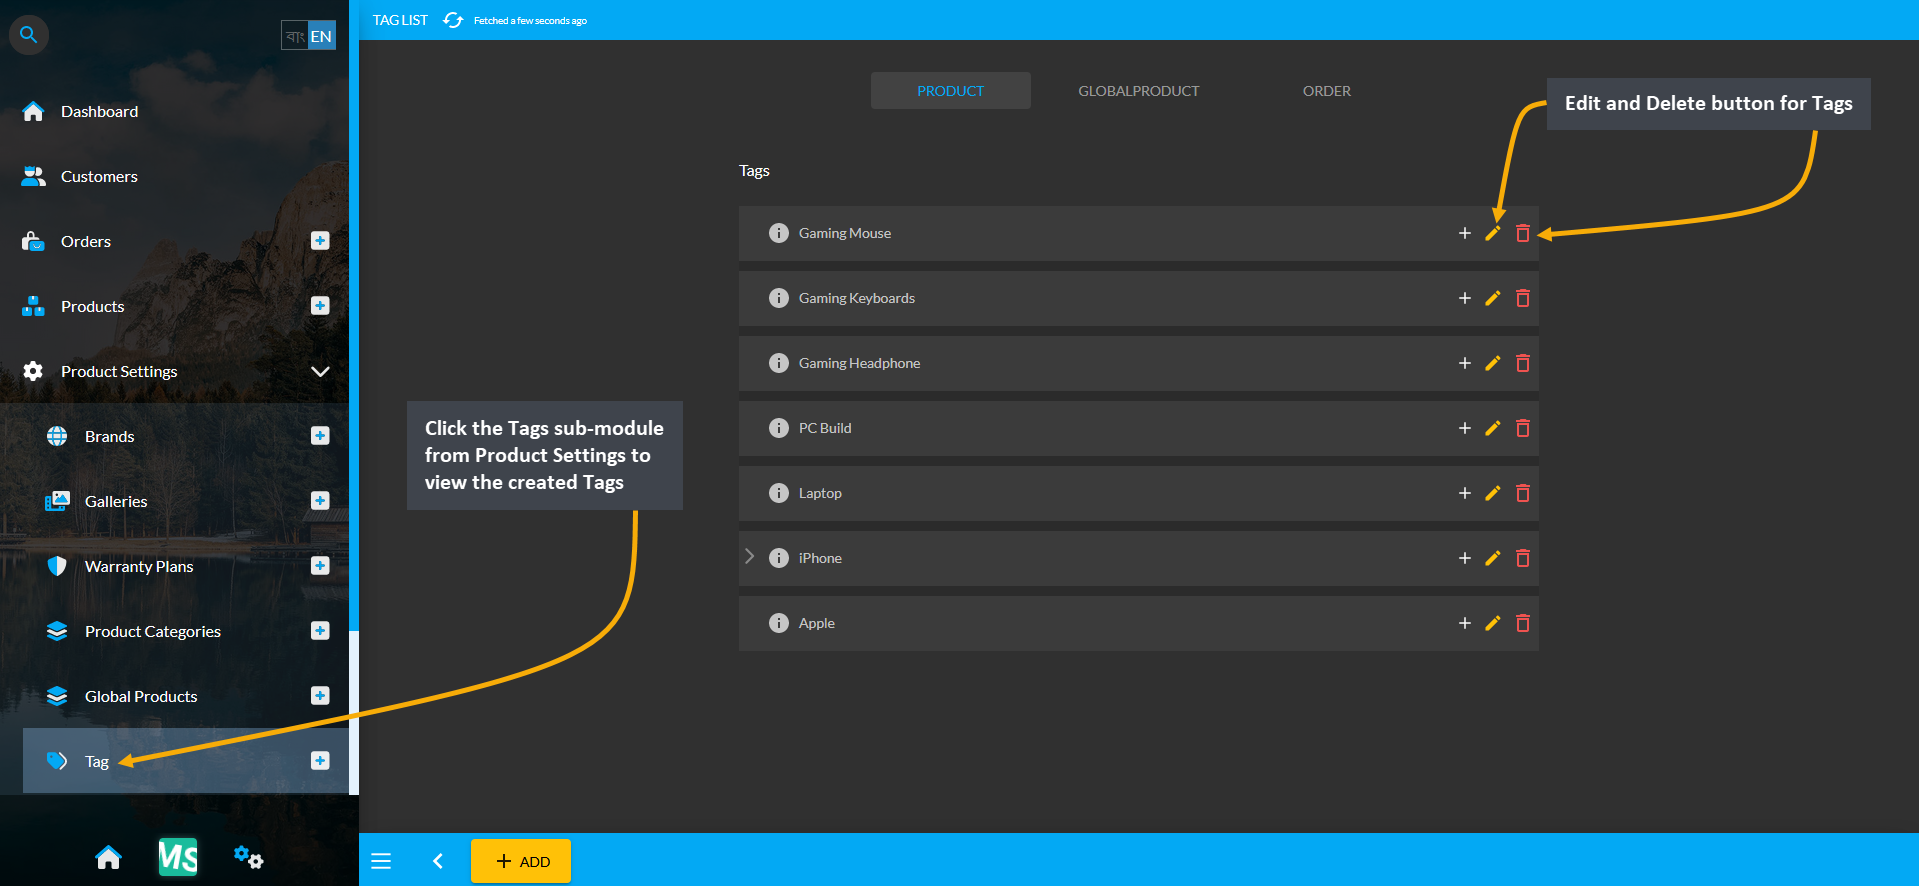
Image 4: View the list of already created Tags from Tags module under Product Settings.
Clicking on the Edit Button will redirect to this page where details for any Tags can be edited and updated.
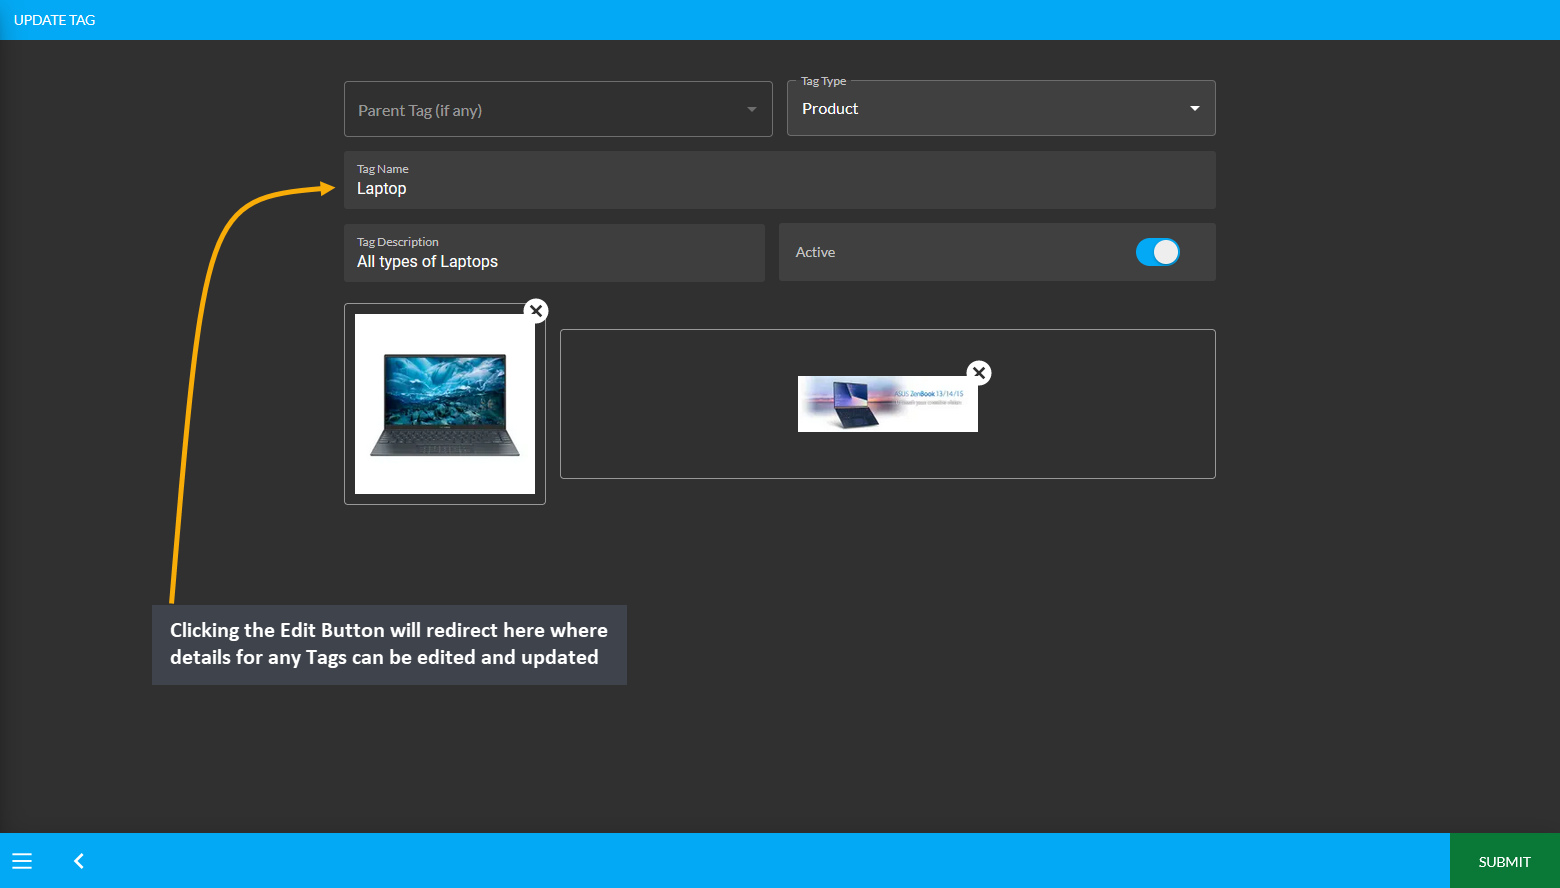
Image 5: Clicking the Edit Button will redirect here where details for any Tags can be edited and updated.


