Comment
Learn more about creating and managing RMA’s Comment workflow actions for Products.
For effective Warranty management, Retail Xen provides a Return Merchandise Authorization (RMA), through which Shop Owners can track all the Product related claims, return process, warranty process, refund claims, custom service warranty, and Product exchange process. Using RMA workflow, the Shop Owners will be able to receive a Product, arrange exchange or refund, track warranties, and Product claims.
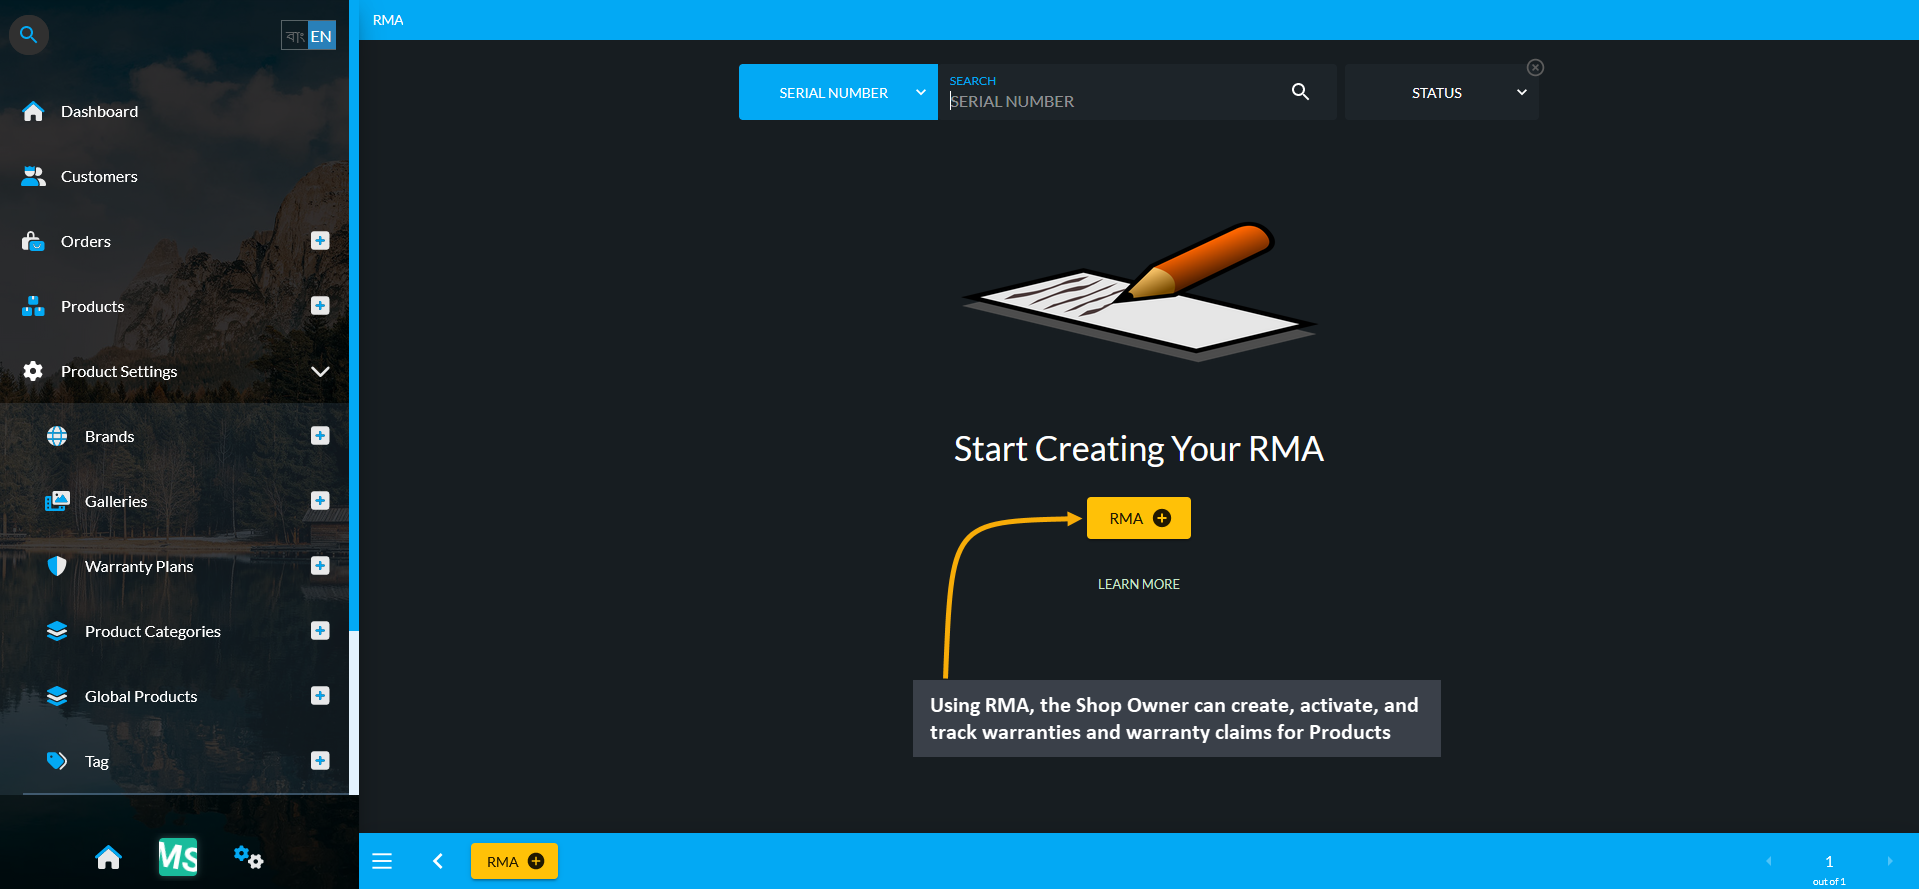
Image 1: Using RMA, Shop Owner can create, activate, and track warranties and warranty claims for Products.
RMA can be created for Limited Products, Unlimited Products, and also Per Unit Products. Limited Products can be sold from the Limited Stock. Unlimited Products are being supplied in unlimited numbers to be sold. Each unit of Per Unit Product has an individual serial number, so if a product is sold, it will mean that an exact unit is sold.
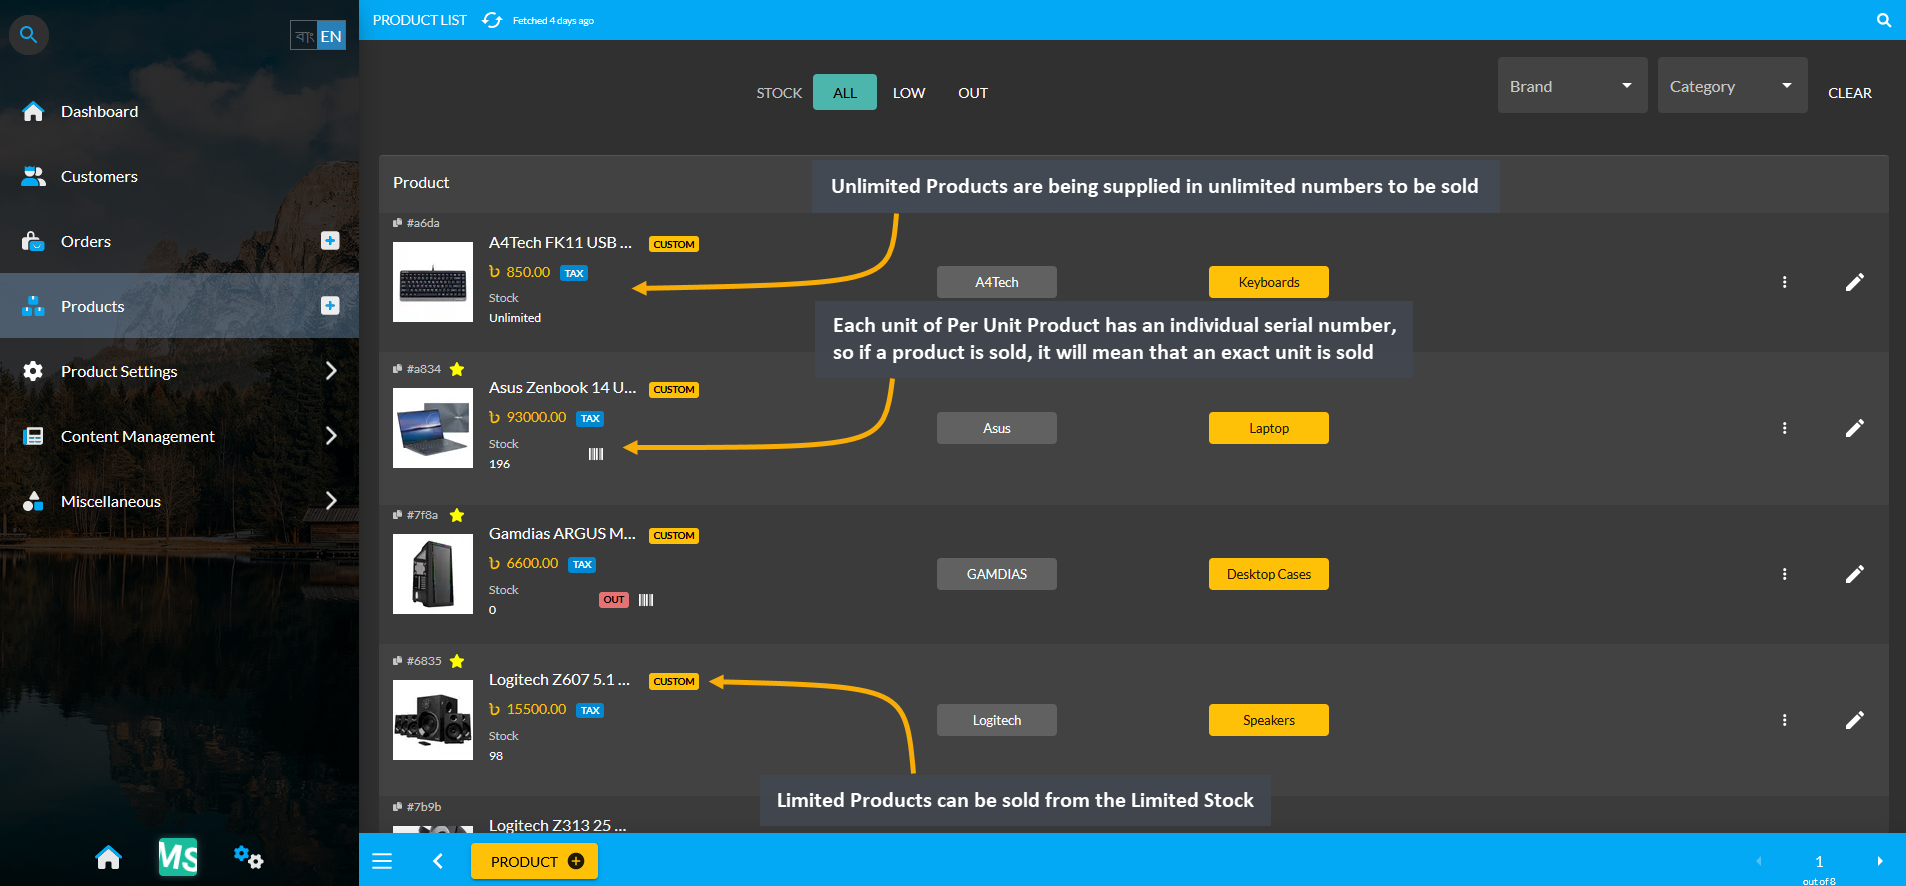
Image 2: RMA can be created for Orders of Limited Products, Unlimited Products, and also Per Unit Products.
RMA can be allocated only for defective or faulty Products from an existing Order. Therefore, Shop Owner will have to have a New Order to allocate RMA. For instance, a New Order is placed for the Per Unit Product A4Tech B120 Wired Gaming Keyboard here. Order can be created for previous Customer or a completely New Customer.
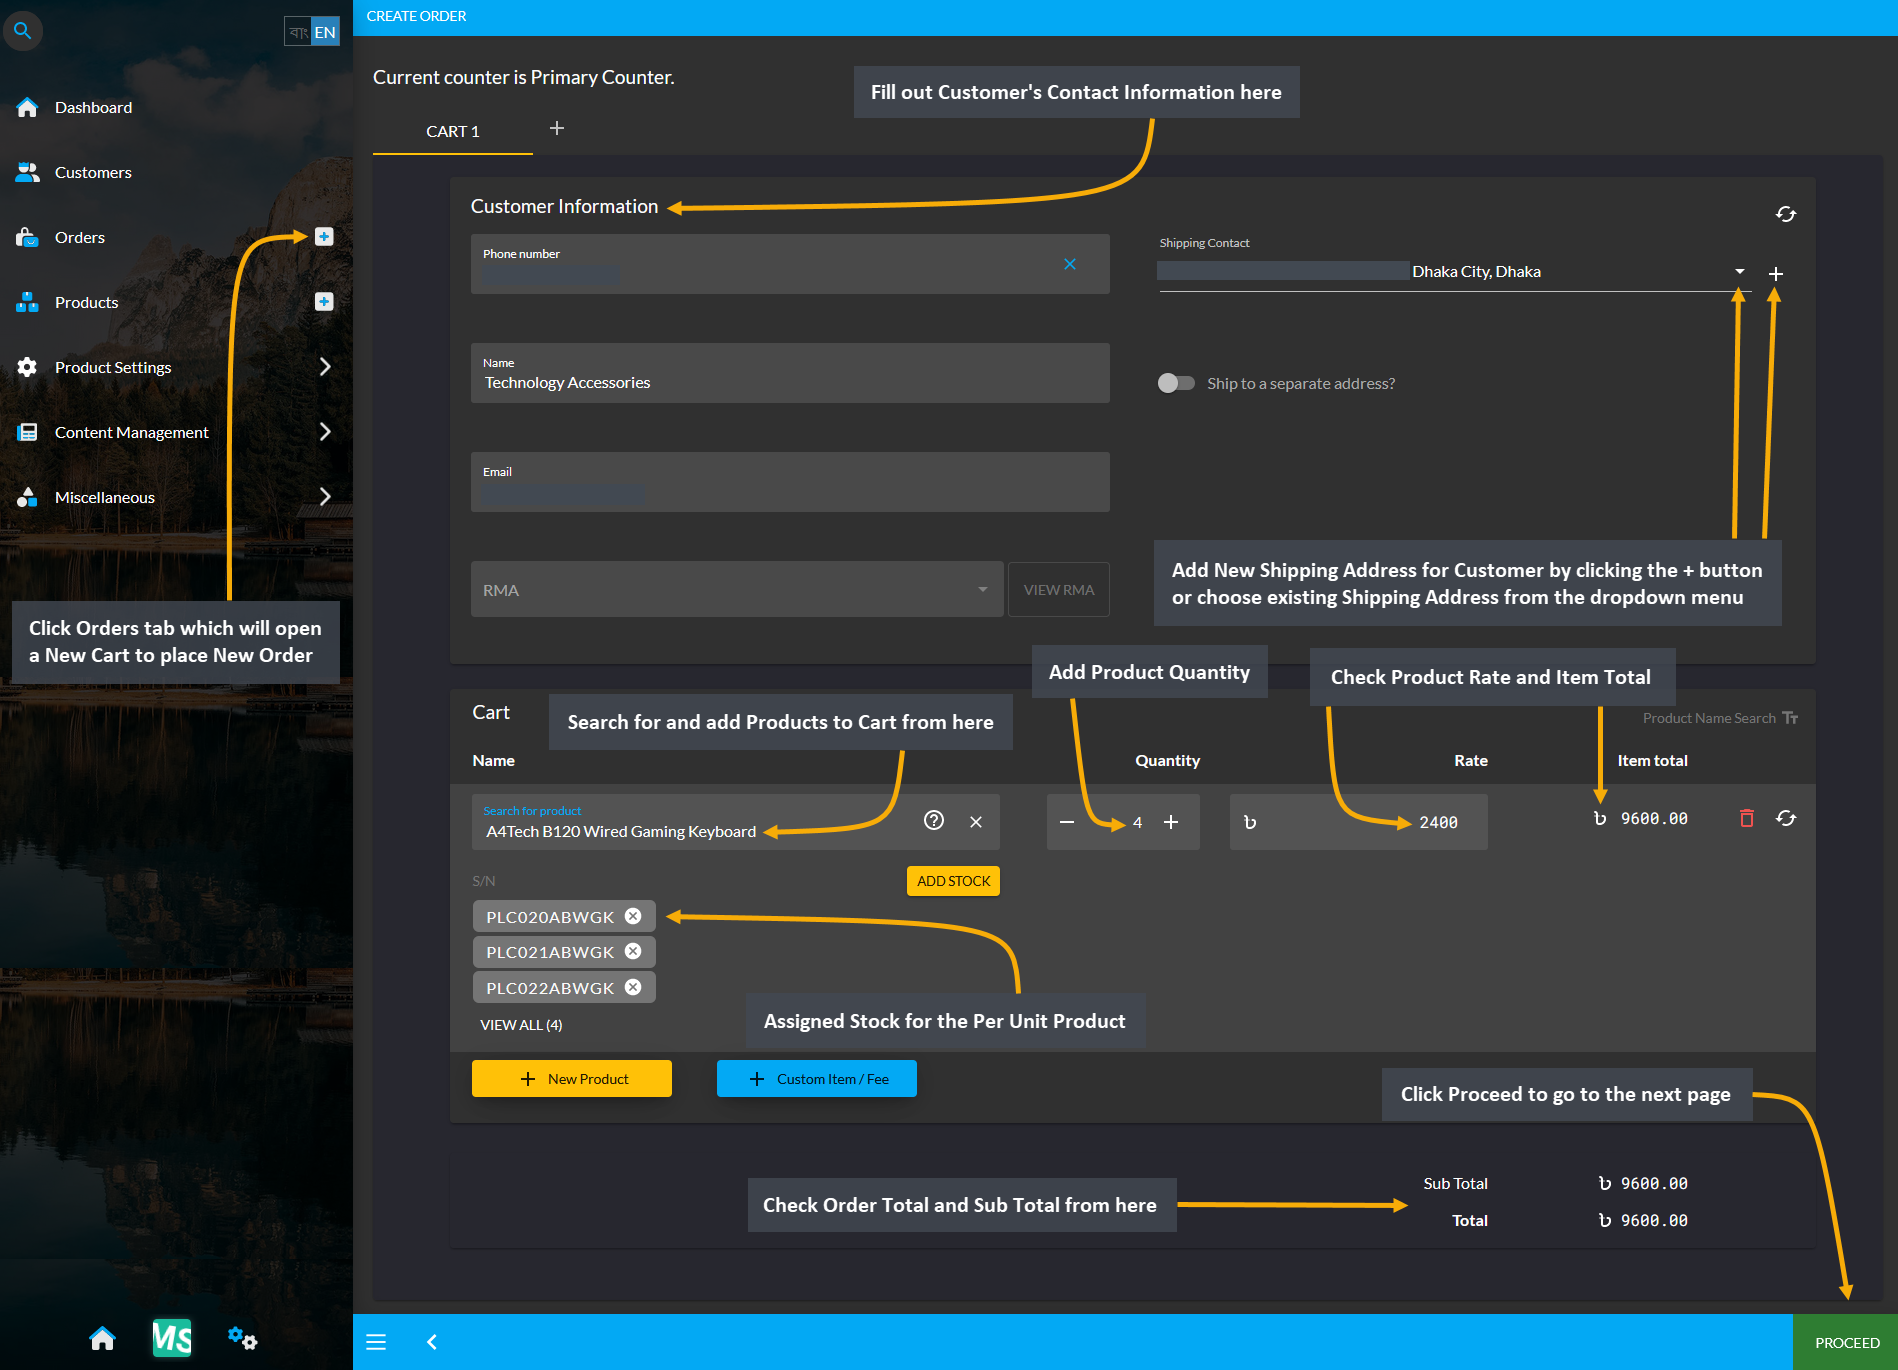
Image 3: RMA can be allocated for faulty Products from existing Order, so a New Order is placed as example.
So, clicking on Orders tab will open a New Cart from where New Order can be placed. Fill out Customer’s Contact Information and add New Shipping Address for Customer by clicking the + button or choose existing Shipping Address from the dropdown menu. Then, search and add Products to Cart, add Product Quantity, assign Stock for the Per Unit Product, check Product Rate, Item Total, Order Total and Sub Total. After completing all steps, click Proceed. In the next page, select preferred Shipping and Payment options, and click Confirm Order.
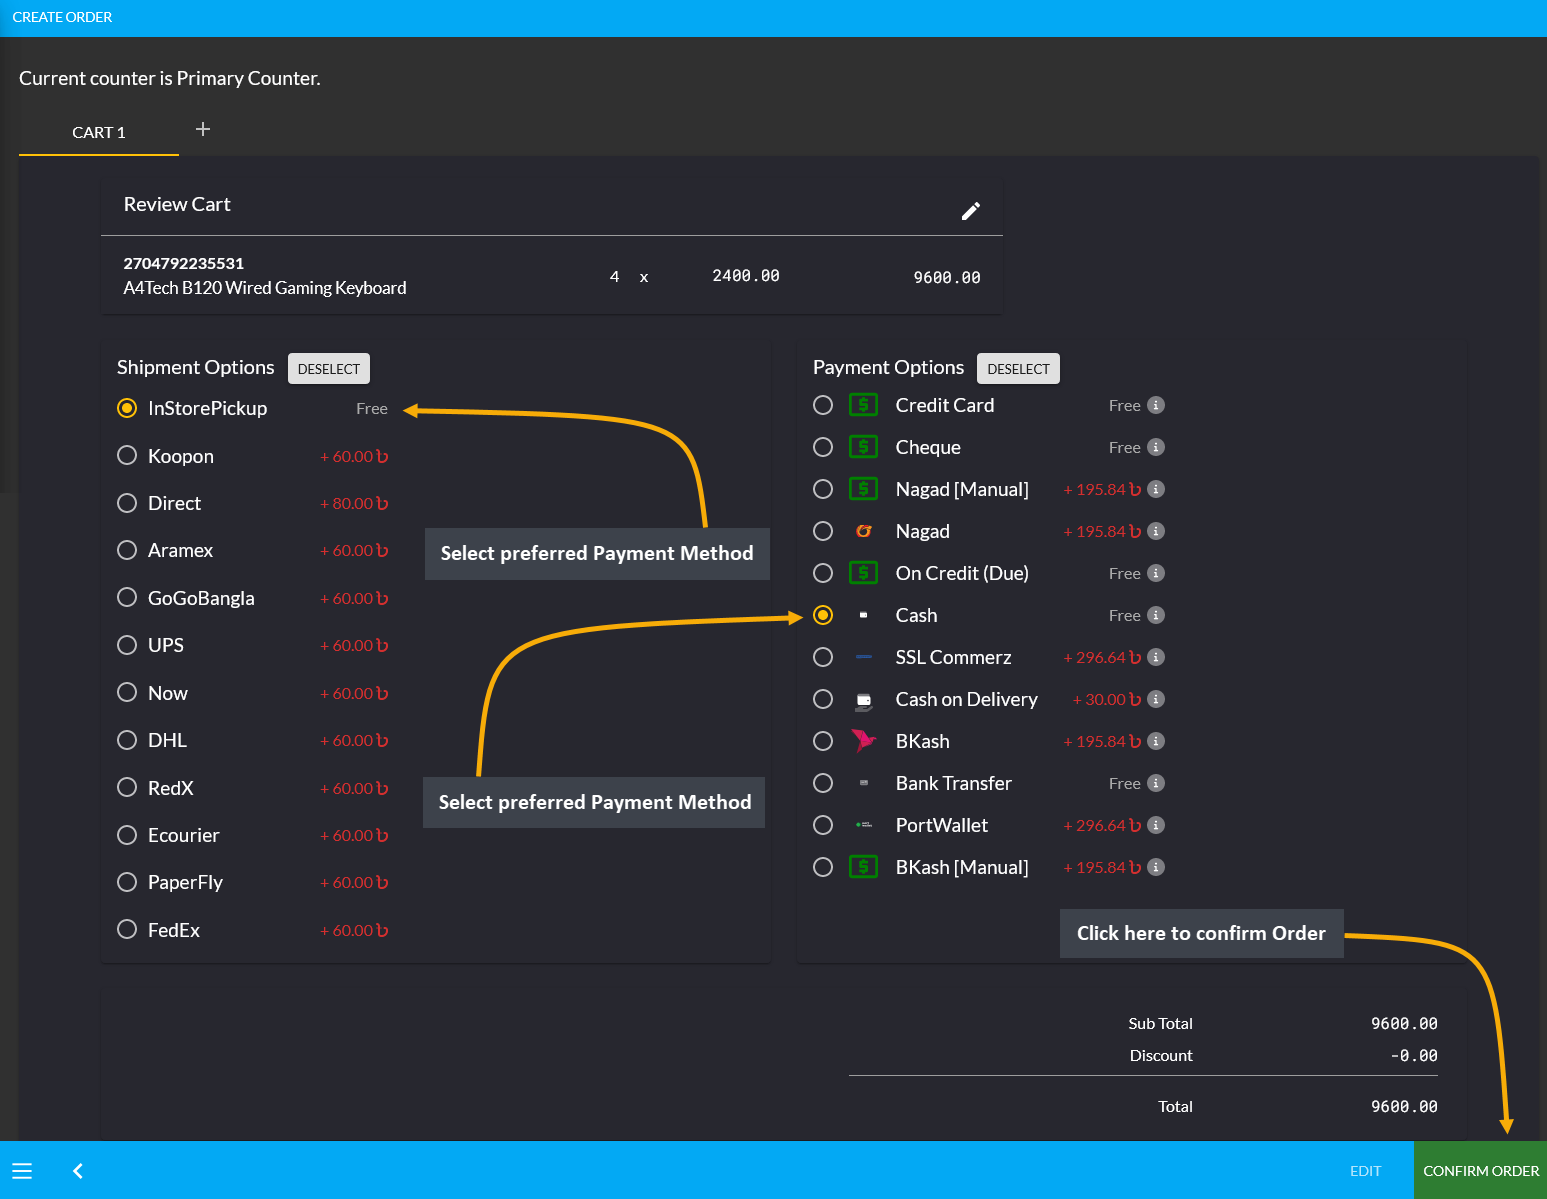
Image 3: Select preferred Shipping Method and Payment Method and click Confirm Order to place New Order.
From four Per Unit Products that Customer have purchased, Serial Numbers PLC021ABWGK, PLC022ABWGK, and PLC023ABWGK for A4Tech B120 Wired Gaming Keyboard were not faulty. However, Serial Number PLC020ABWGK for A4Tech B120 Wired Gaming Keyboard Per Unit Product was found to be faulty, so Customer wants to claim their Warranty for this Product. Therefore, Shop Owner will have to report an RMA to help the Customer return this Product and exchange them with another Per Unit Product of the same Batch.
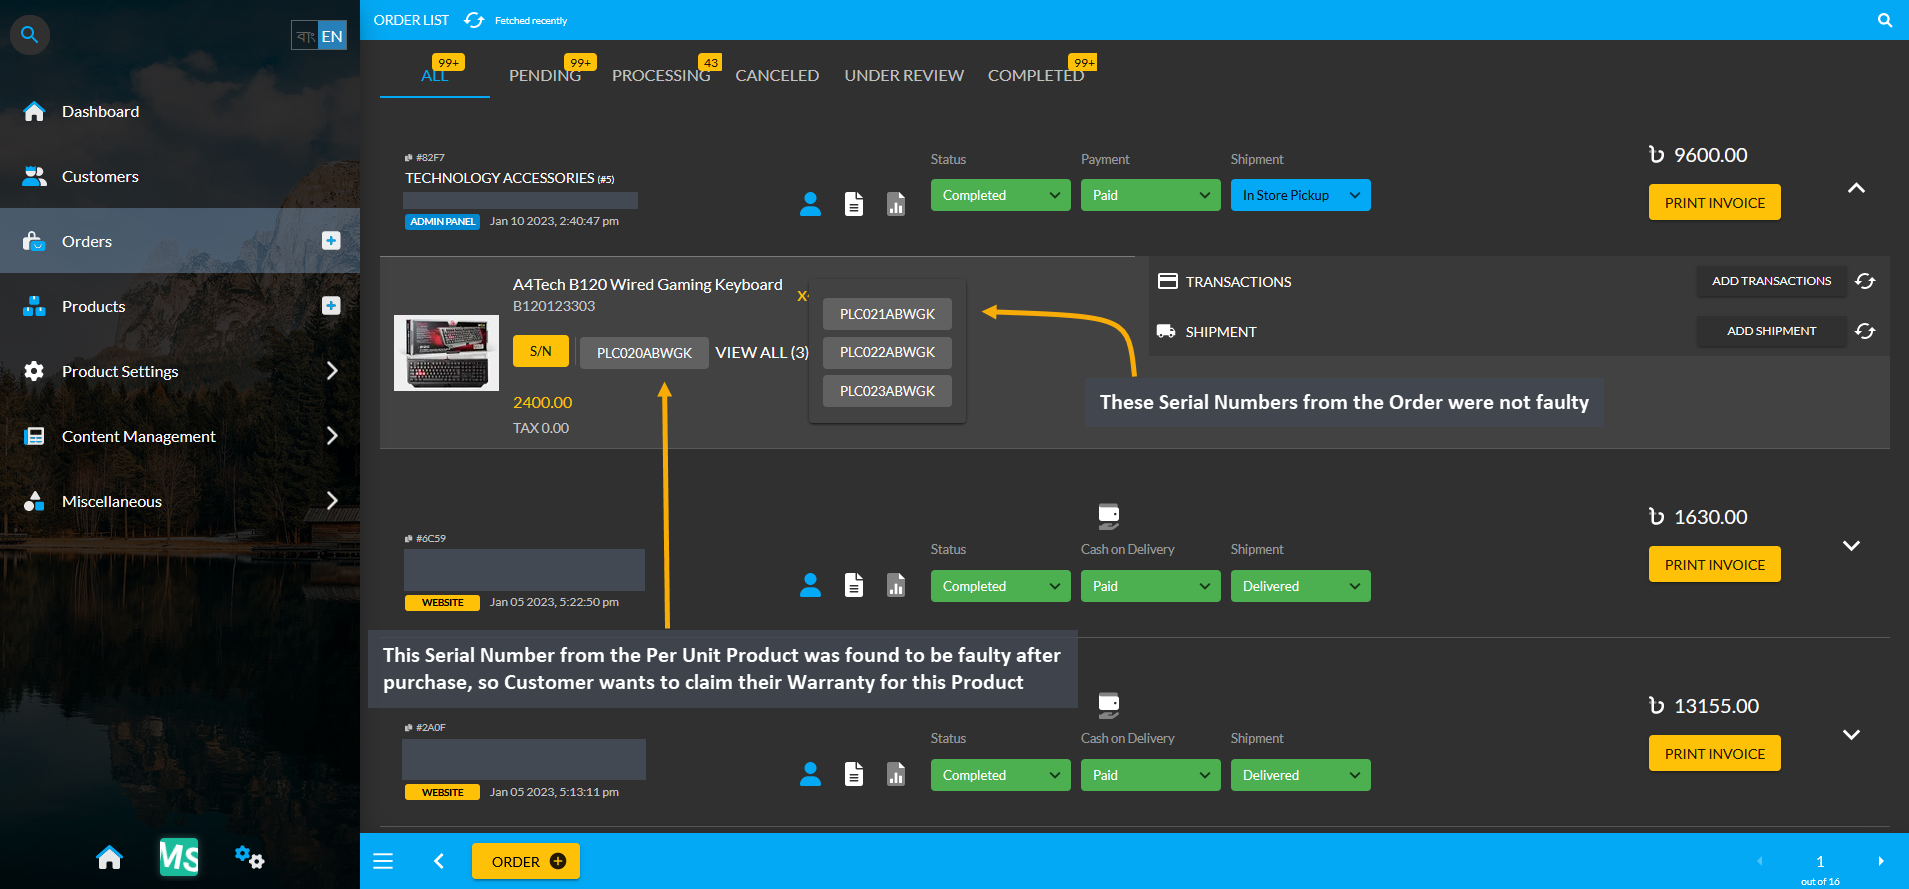
Image 4: A Serial Number for the Per Unit Product A4Tech B120 Wired Gaming Keyboard was found to be faulty.
Now, in order to allocate an RMA, go to RMA from Product Settings, where the list of existing RMA cases will show on the search page. In this RMA list page, existing RMA can be specifically searched with Product Serial Number, Customer Phone, or Customer Email. Select any one of these three options and type the serial number, phone, or email in the search box. Beside it, there is a Status bar that will allow checking the RMA based on their statuses.
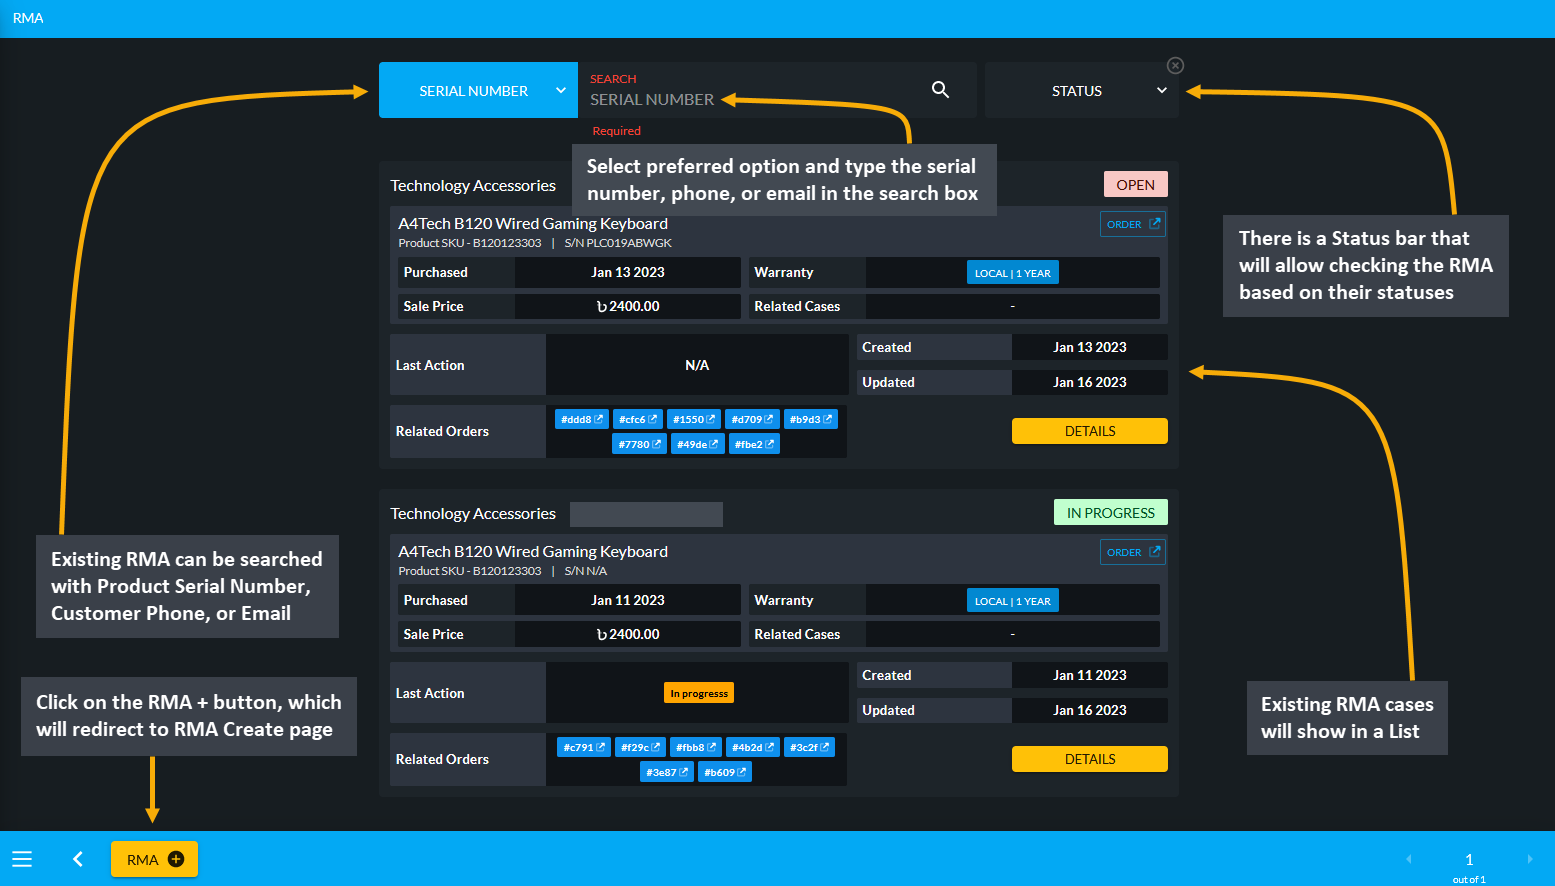
Image 5: Existing RMA cases can be searched with their Product Serial Number, Customer Phone, or Email.
To create a new RMA, click on the RMA + button, which will redirect to the RMA Create page. Here, new RMA can be created with Product Serial Number, Customer Phone, or Customer Email. Select the preferred option and type the serial number, phone, or email in the search box. Copy them from Order List page, paste them in the search box, and click on the search icon. This will bring the details of the Order on the RMA create page.
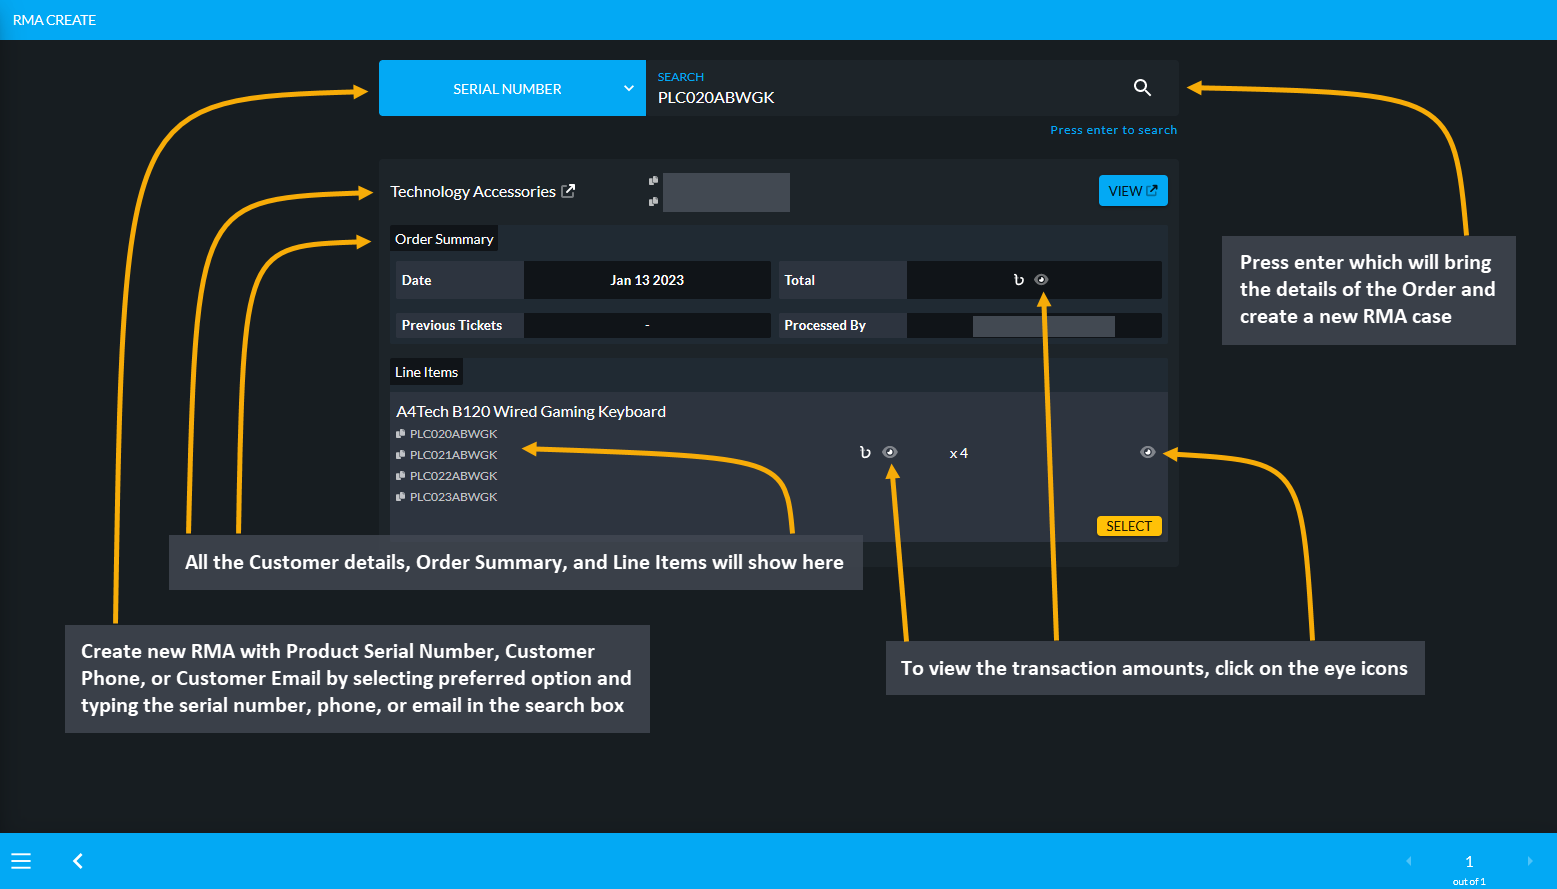
Image 6: Create new RMA with Product Serial Number, Customer Phone, or Customer Email by typing on search.
For instance, when searched with the Serial Number of the Per Unit Product, it will show all the Customer details, Order Summary, and Line Items. To view the transaction amounts, click on the eye icons. Click the Select button or click within the line item box that will open a pop-up, from where Serial Number of the faulty Product needs to be selected. Check the details below and click the Create button to create new RMA.
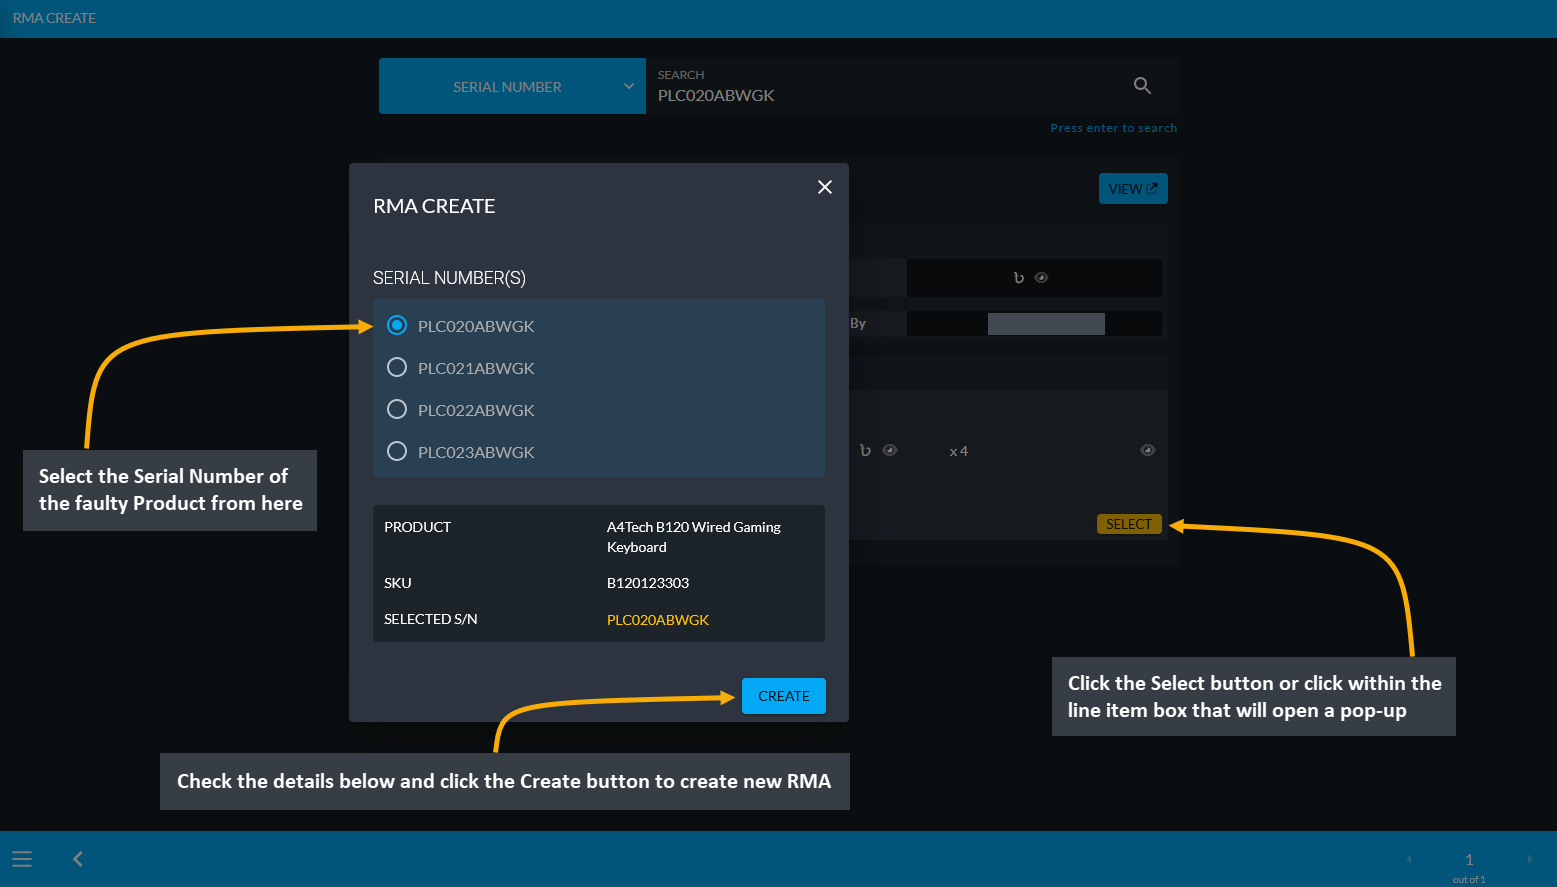
Image 7: Select Serial Number of faulty Product, check details and click Create button to create new RMA.
After RMA is created, the Order and RMA case details will show on the RMA View page. Within Product details, the purchased date, warranty date, sale price, and Related Cases will show. Below it are the RMA Workflow, which will allow Shop Owner to take action for the Product with different actions. There are several workflow actions like Comment, Denial, Supplier, Service, Return, Exchange, Refund, and Warranty. Click on each of these workflows for adding comment, uploading images, and updating status to save the workflow update for the RMA case.
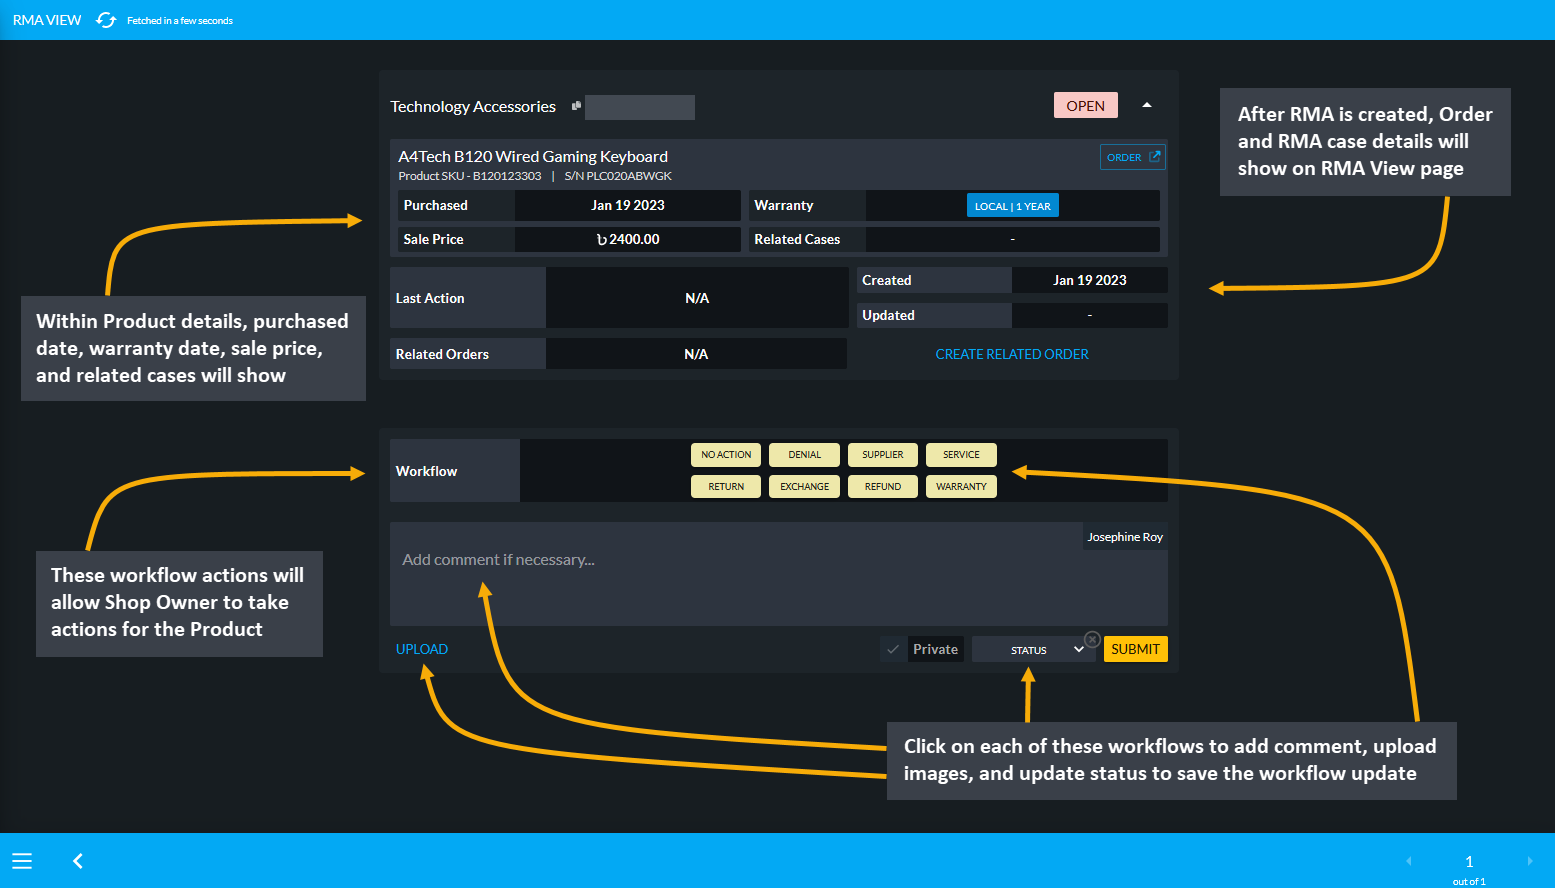
Image 8: Product details, Order details, RMA case details, RMA workflow actions, and status can be updated.
After an RMA is created, the Shop Owner can use the Suggestions button to add predefined suggestions that can be used for explaining Product defect issues. These suggestions will be handy for Warranty or Service workflows.
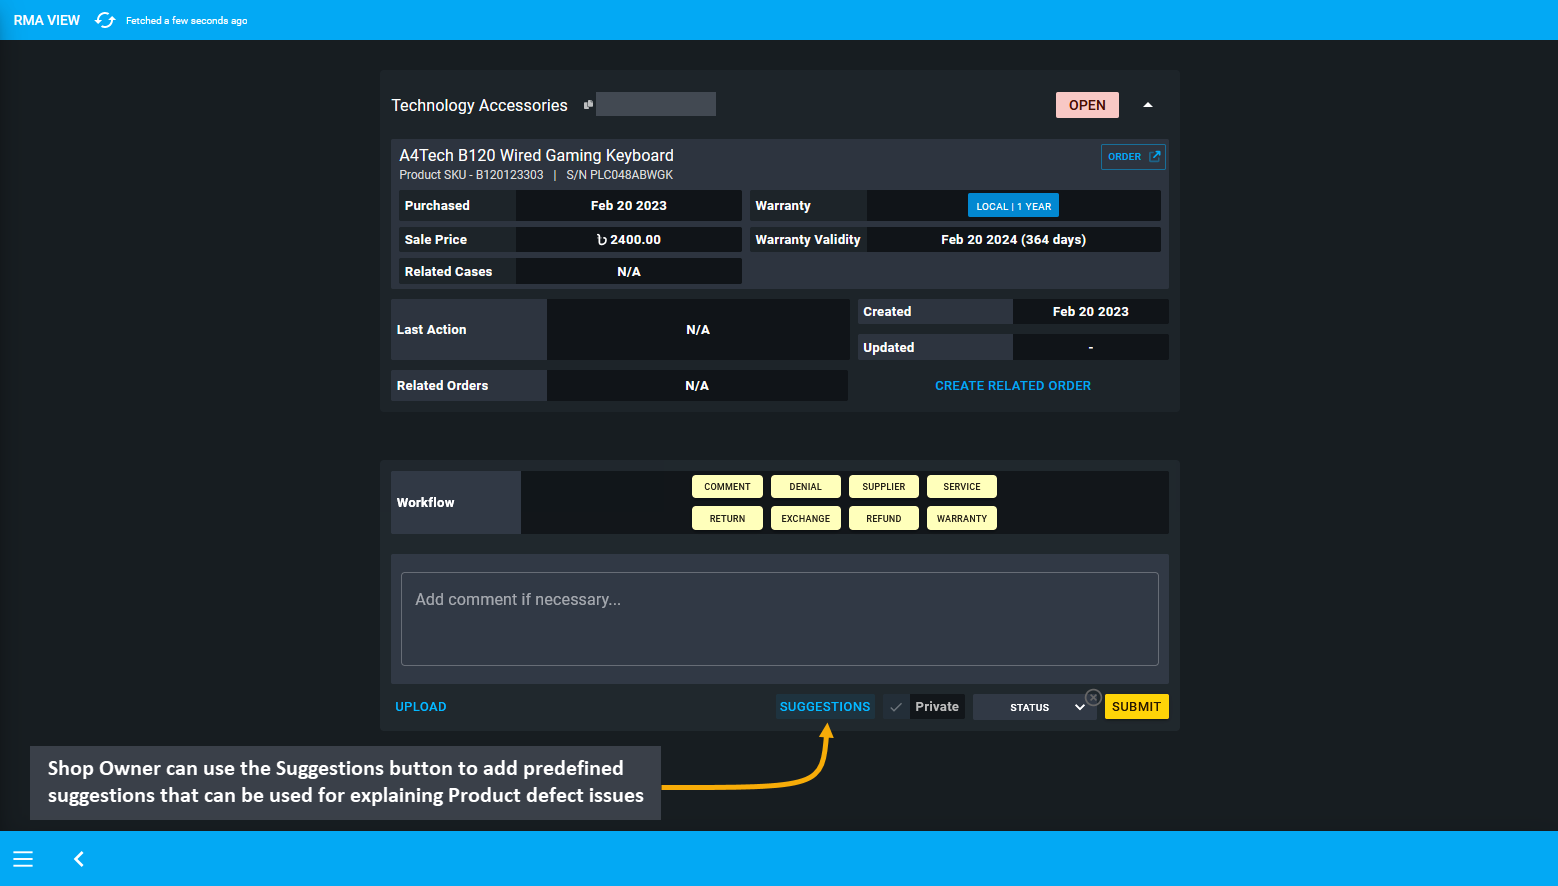
Image 9: Shop Owner can use Suggestions button to add predefined suggestions that explain Product issues.
When the Suggestions button is clicked, a pop-up will open with all the predefined suggestions for generally faced Product defect issues. The Shop Owner can select their target suggestion by clicking on it which will automatically add in the comment box. Some common issues regarding faulty computer related Products are provided.
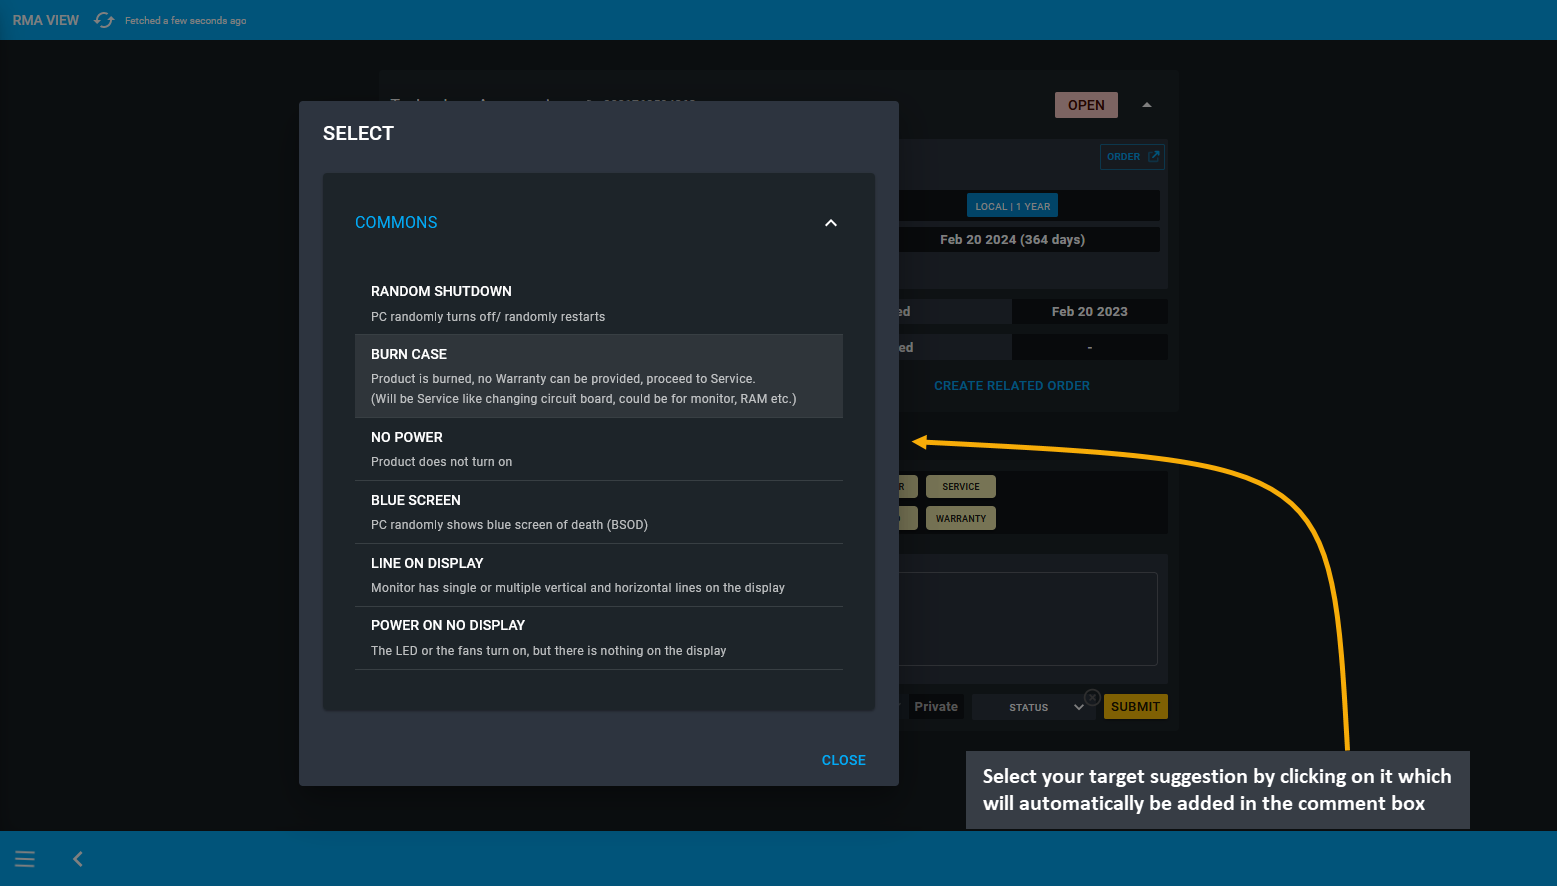
Image 10: Select your target suggestion by clicking on it which will automatically add in the comment box.
After the selected predefined suggestion is automatically added in the comment box, select the RMA workflow as Warranty or Service, select status as In Progress from the dropdown and hit Submit to save the changes. Generally, if there is any active Warranty and if any suggestion is selected, then Warranty will automatically be preselected as workflow. Conversely, if there is no active Warranty, then other options can be selected from the workflow list.
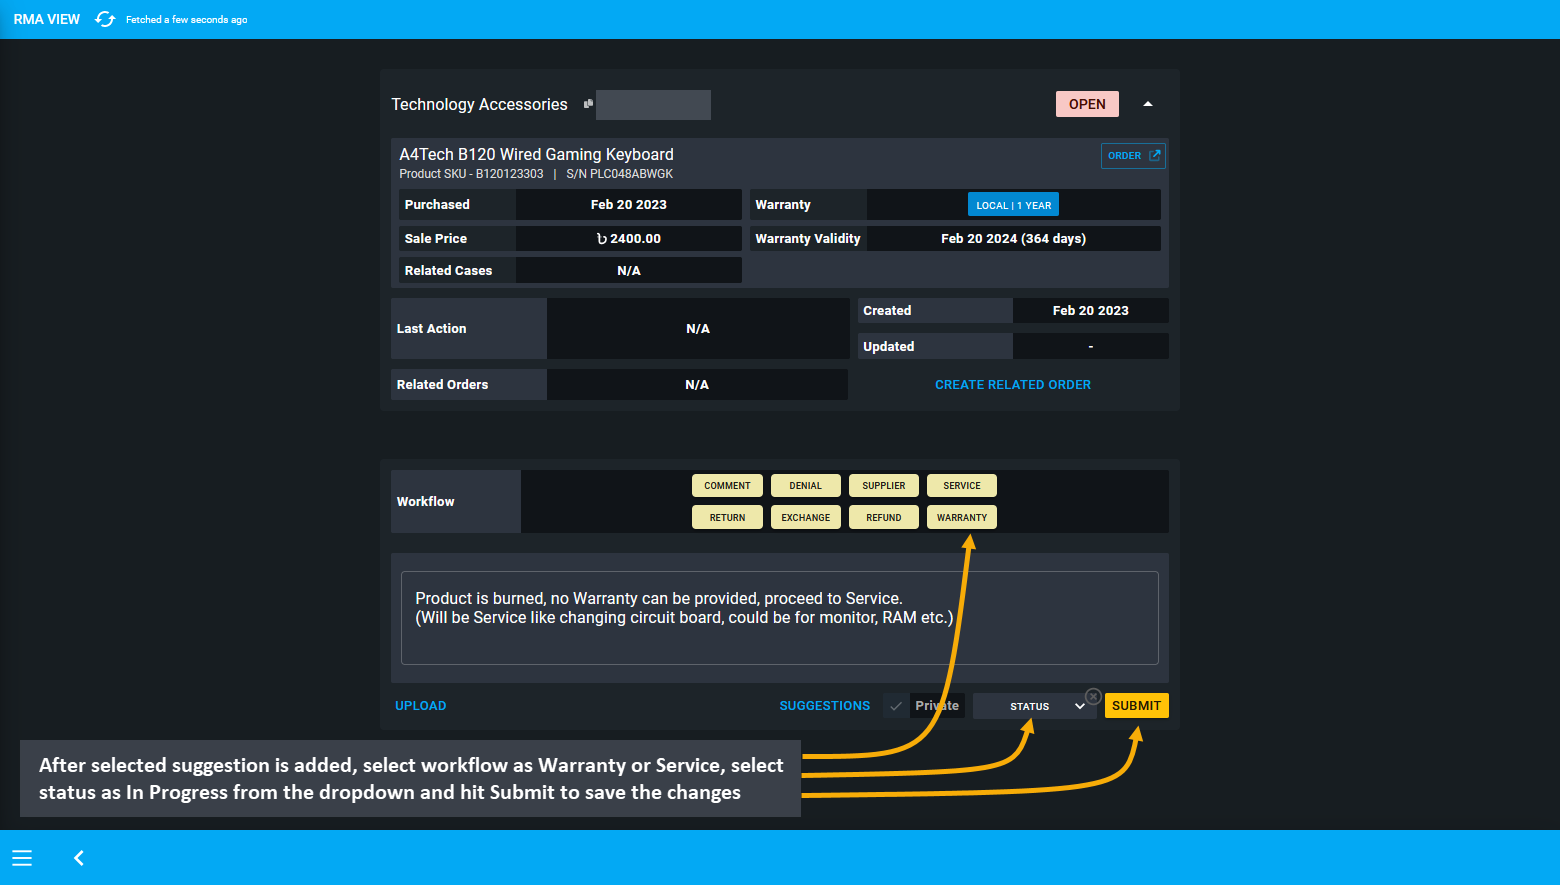
Image 11: After selected suggestion is added, select workflow, status and hit Submit to save all changes.
No Action indicates adding a comment about the Product or the RMA case. Denial indicates that Shop Owner will deny the claim of the defective Product from the Customer. Supplier indicates that to claim the warranty, Product has been sent to the Supplier and all updates associated with it can be updated using this. Service indicates any repairing done for the Product with payment from the Customer. Return indicates the Product being returned by the Customer to the Shop Owner. Exchange indicates that Product will be exchanged with another Product by the Shop Owner. Refund indicates that full or partial refund will be made to the Customer if Shop Owner is unable to repair or exchange the Product. Warranty indicates the progress of warranty service for the faulty Product.
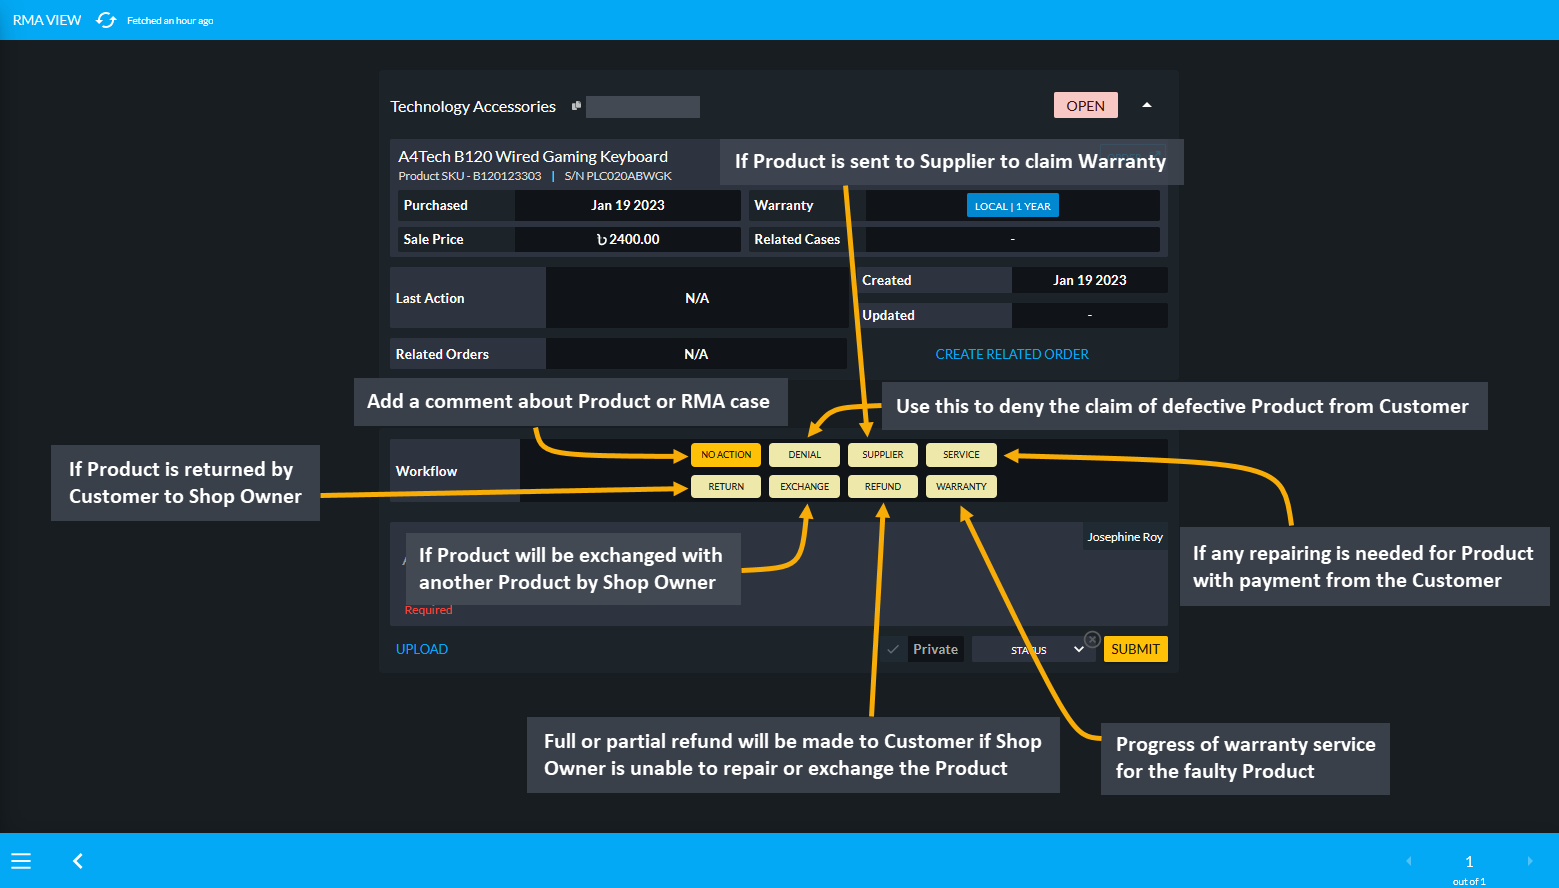
Image 12: There are several workflow actions that Shop Owner can use to take action and update RMA case.
RMA for a Product can be created by using the RMA Create button from Order List. For this, go to the target Order and click the RMA Create button that will redirect to the RMA Create page to start a new RMA case. The RMA Create button on Order List will skip initial search on RMA page needed to create an RMA.
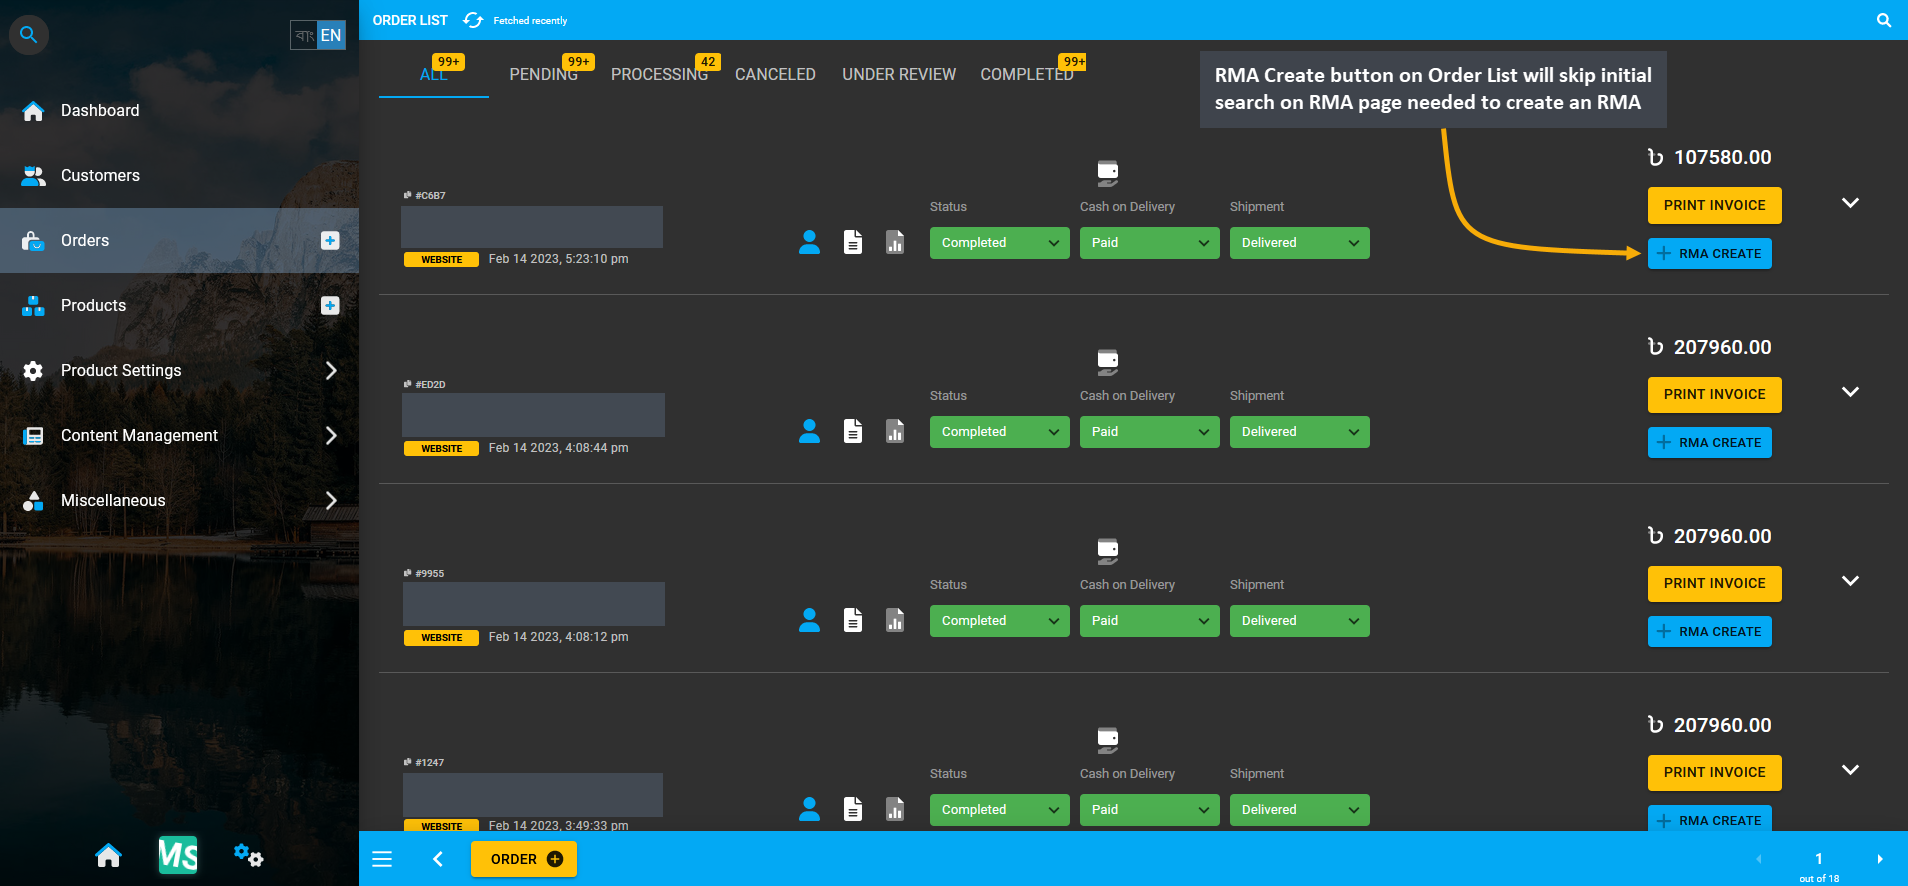
Image 13: RMA Create button on Order List will skip initial search on RMA page needed to create an RMA.
The RMA Create page will open from where the target faulty Product can be selected to create a new RMA case.
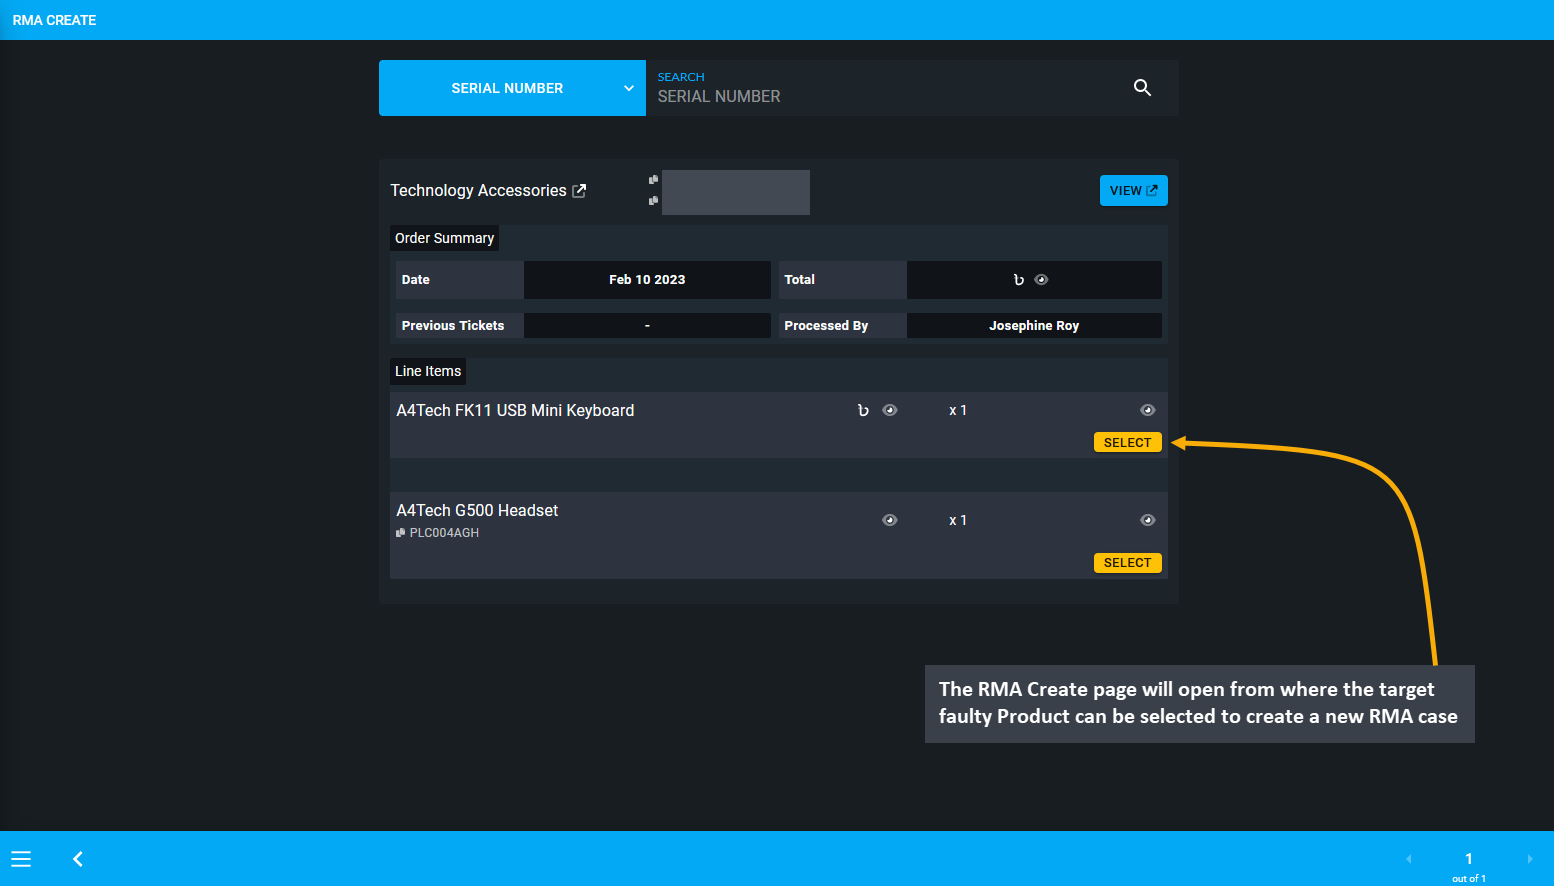
Image 14: Select the target faulty Product from list to create a new RMA case from the he RMA Create page.
RMA for a Product can be created by using the RMA Create button from the Order List on Customer Dashboard. For this, go to the Customer Dashboard and click the RMA Create button beside the target Order that will redirect to the RMA Create page to start a new RMA case. The RMA Create button on Customer Dashboard will skip initial search on RMA page needed to create an RMA.
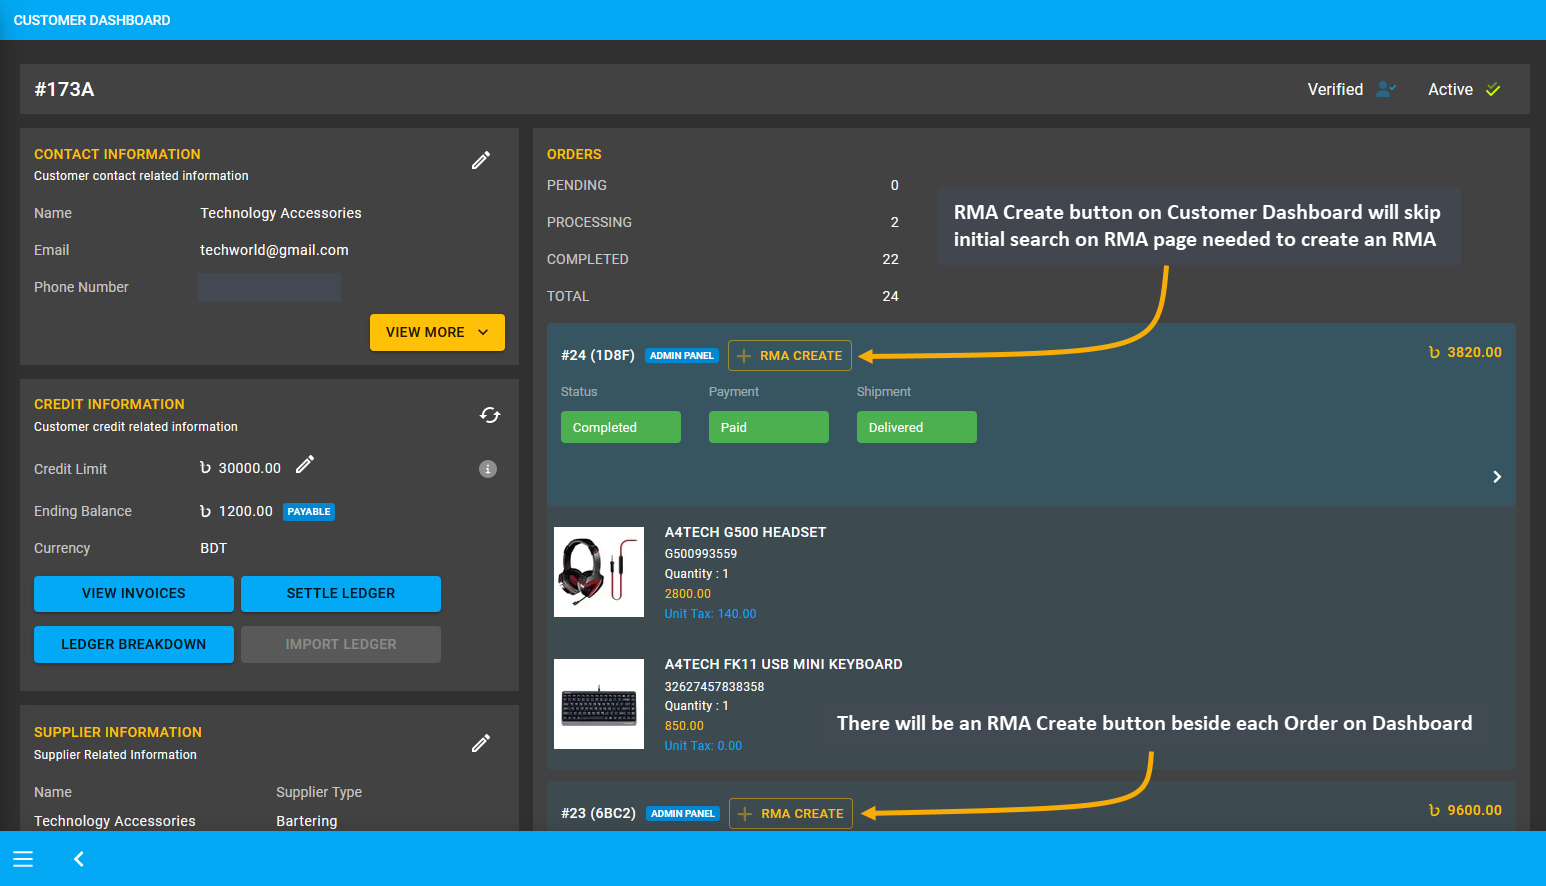
Image 15: RMA Create button on Dashboard will skip the initial search on RMA page needed to create an RMA.
The RMA Create page will open from where the target faulty Product can be selected to create a new RMA case.
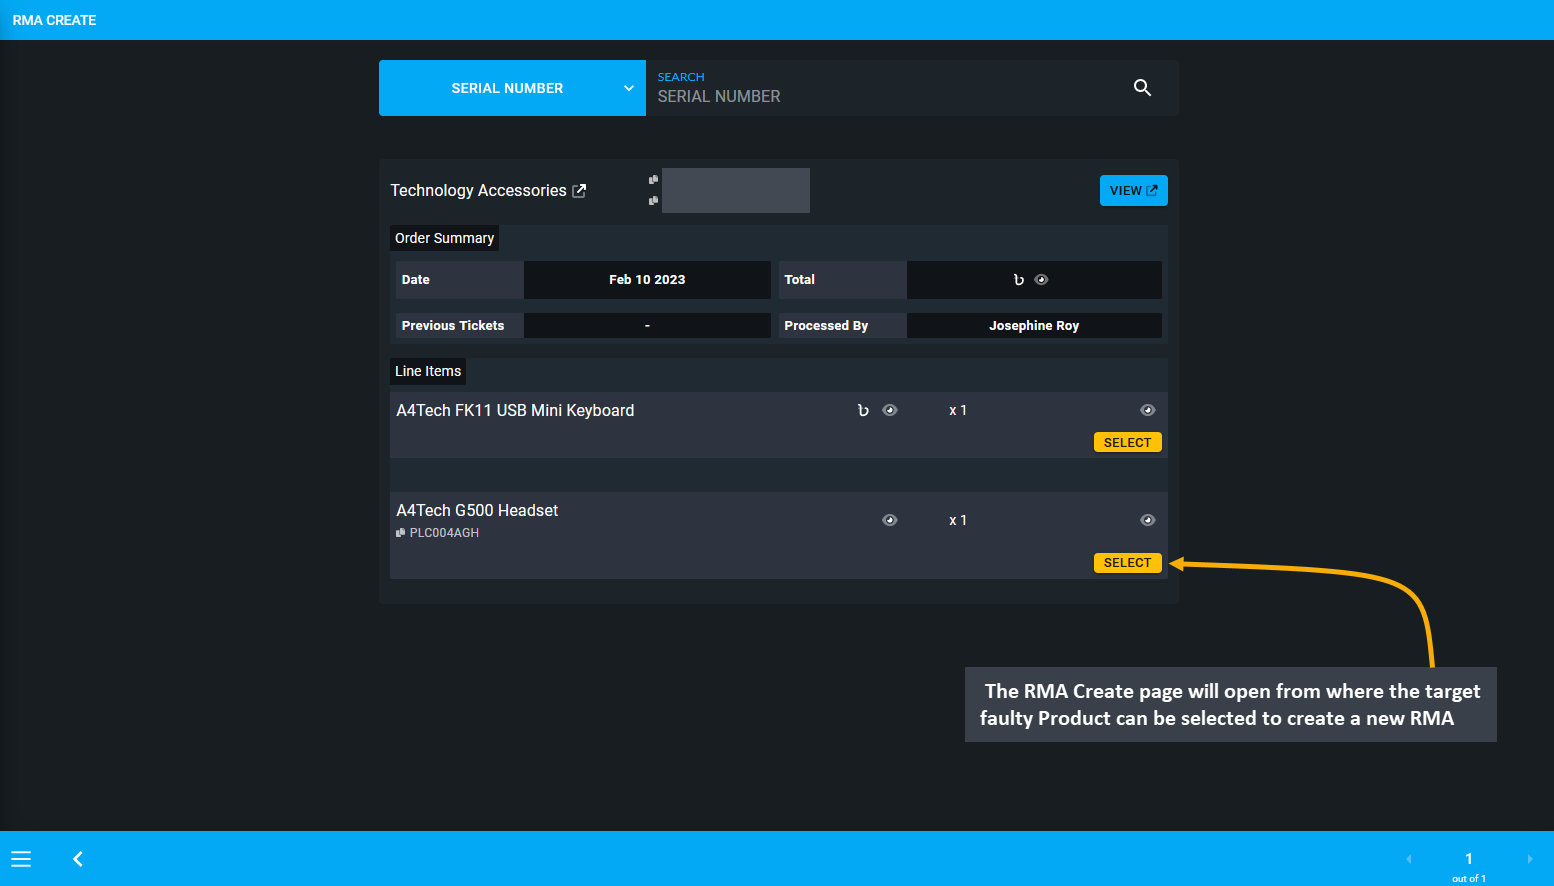
Image 16: Select the target faulty Product from list to create a new RMA case from the he RMA Create page.
Learn more about creating and managing RMA’s Comment workflow actions for Products.
Learn more about creating and managing RMA’s Denial workflow actions for Products.
Learn more about creating and managing RMA’s Supplier workflow actions for Products.
Learn more about creating and managing RMA’s Service workflow actions for Products.
Learn more about creating and managing RMA’s Return workflow actions for Products.
Learn more about creating and managing RMA’s Exchange workflow actions for Products.
Learn more about creating and managing RMA’s Refund workflow actions for Products.
Learn more about creating and managing RMA’s Warranty workflow actions for Products.
Learn how to create and manage RMA for individual component of the PC Build.