RMA
Learn more about creating and managing RMA for Limited, Unlimited, and Per Unit Products.
What is RMA?
For effective Warranty management, Retail Xen provides a Return Merchandise Authorization (RMA), through which Shop Owners can track all the Product related claims, return process, warranty process, refund claims, custom service warranty, and Product exchange process. Using RMA workflow, the Shop Owners will be able to receive a Product, arrange exchange or refund, track warranties, and Product claims.
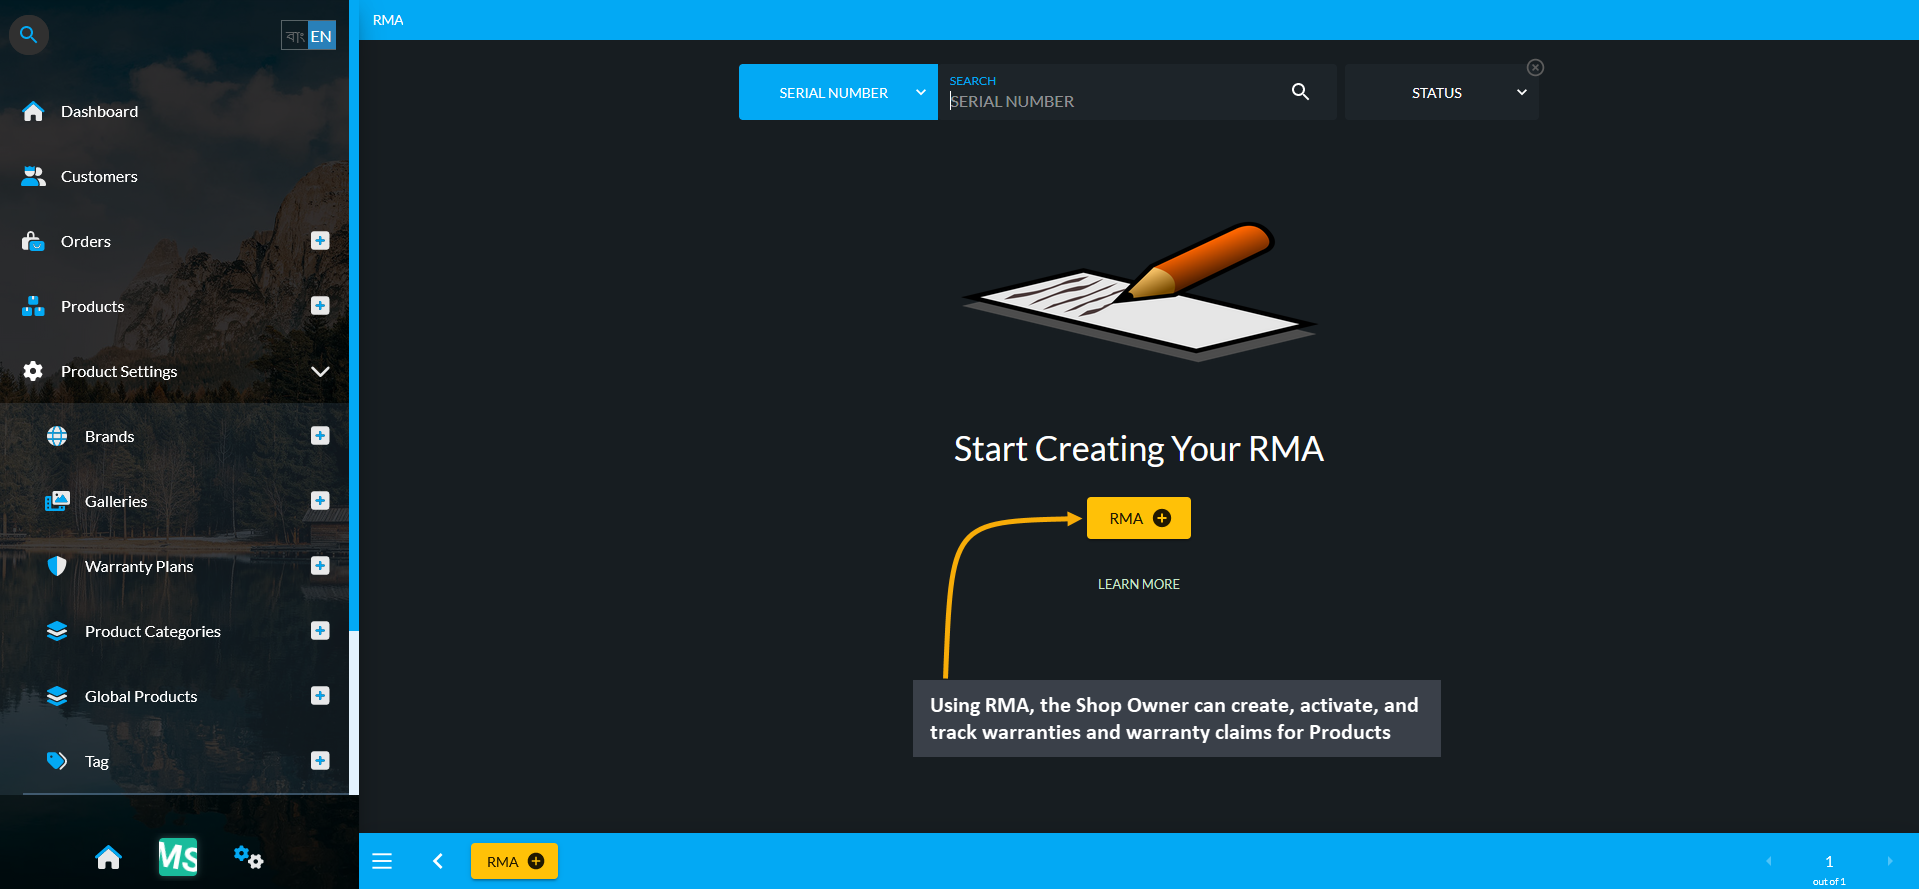
Image 1: Using RMA, Shop Owner can create, activate, and track warranties and warranty claims for Products.
RMA can be created for Limited Products, Unlimited Products, and also Per Unit Products. Limited Products can be sold from the Limited Stock. Unlimited Products are being supplied in unlimited numbers to be sold. Each unit of Per Unit Product has an individual serial number, so if a product is sold, it will mean that an exact unit is sold.
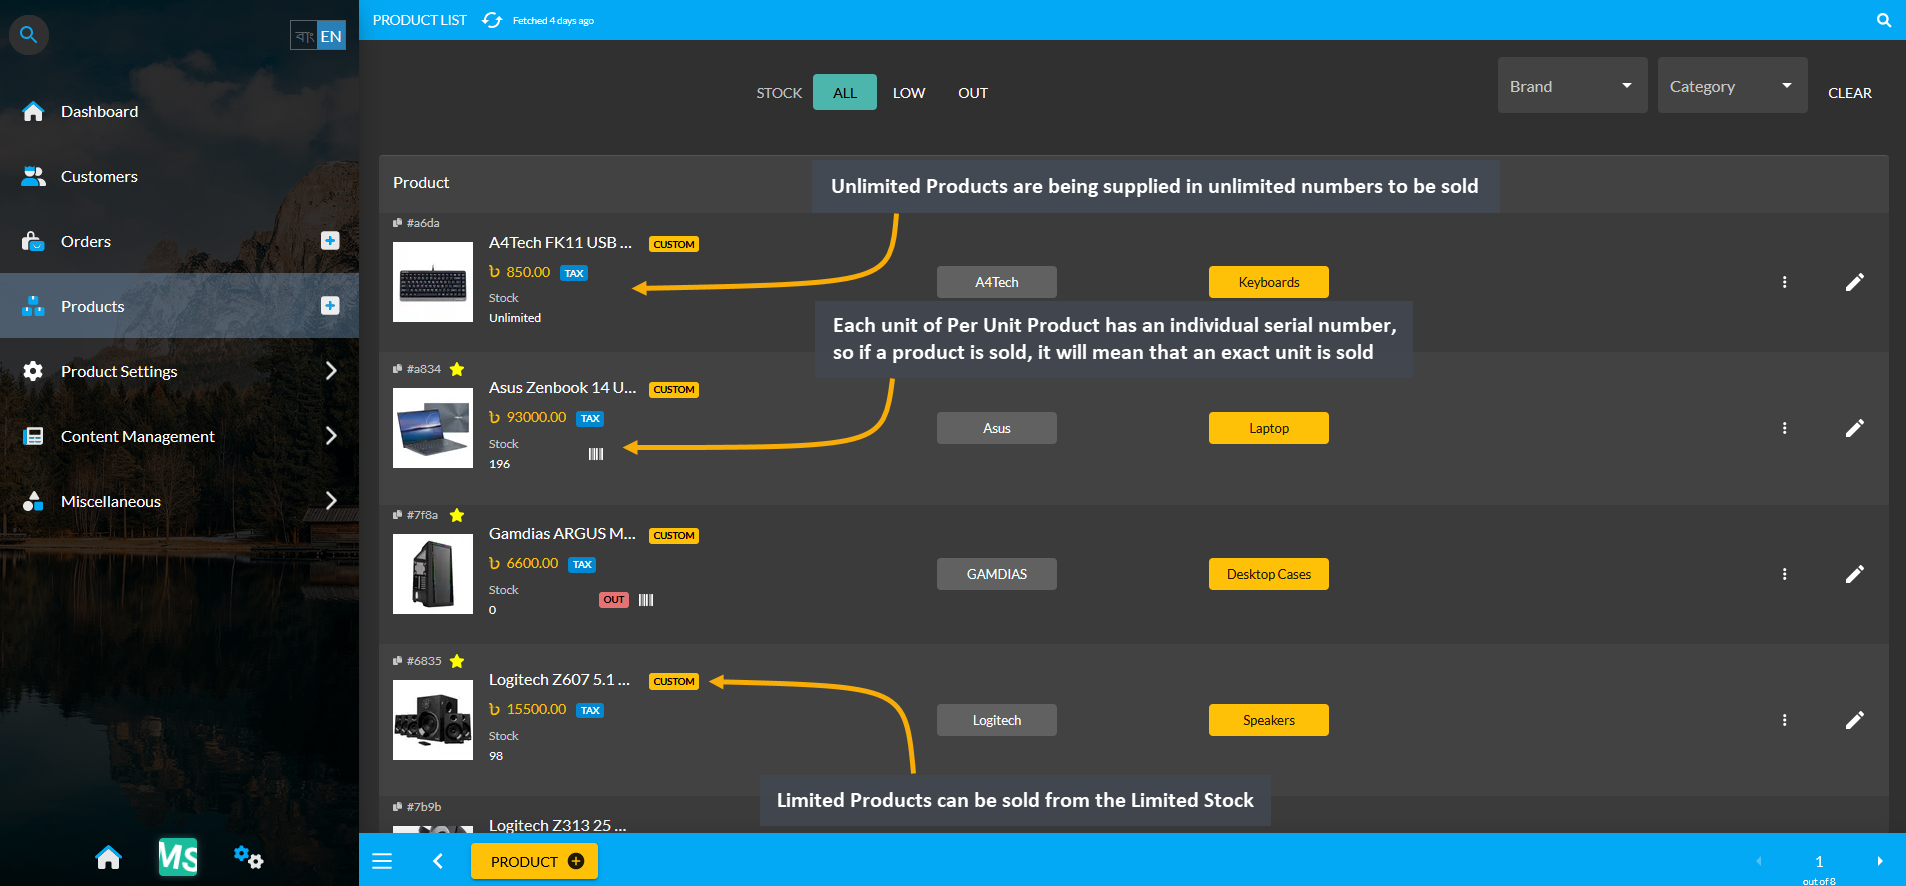
Image 2: RMA can be created for Orders of Limited Products, Unlimited Products, and also Per Unit Products.
Allocate RMA for an Order
RMA can be allocated only for defective or faulty Products from an existing Order. Therefore, Shop Owner will have to have a New Order to allocate RMA. For instance, a New Order is placed for the Per Unit Product A4Tech B120 Wired Gaming Keyboard here. Order can be created for previous Customer or a completely New Customer.
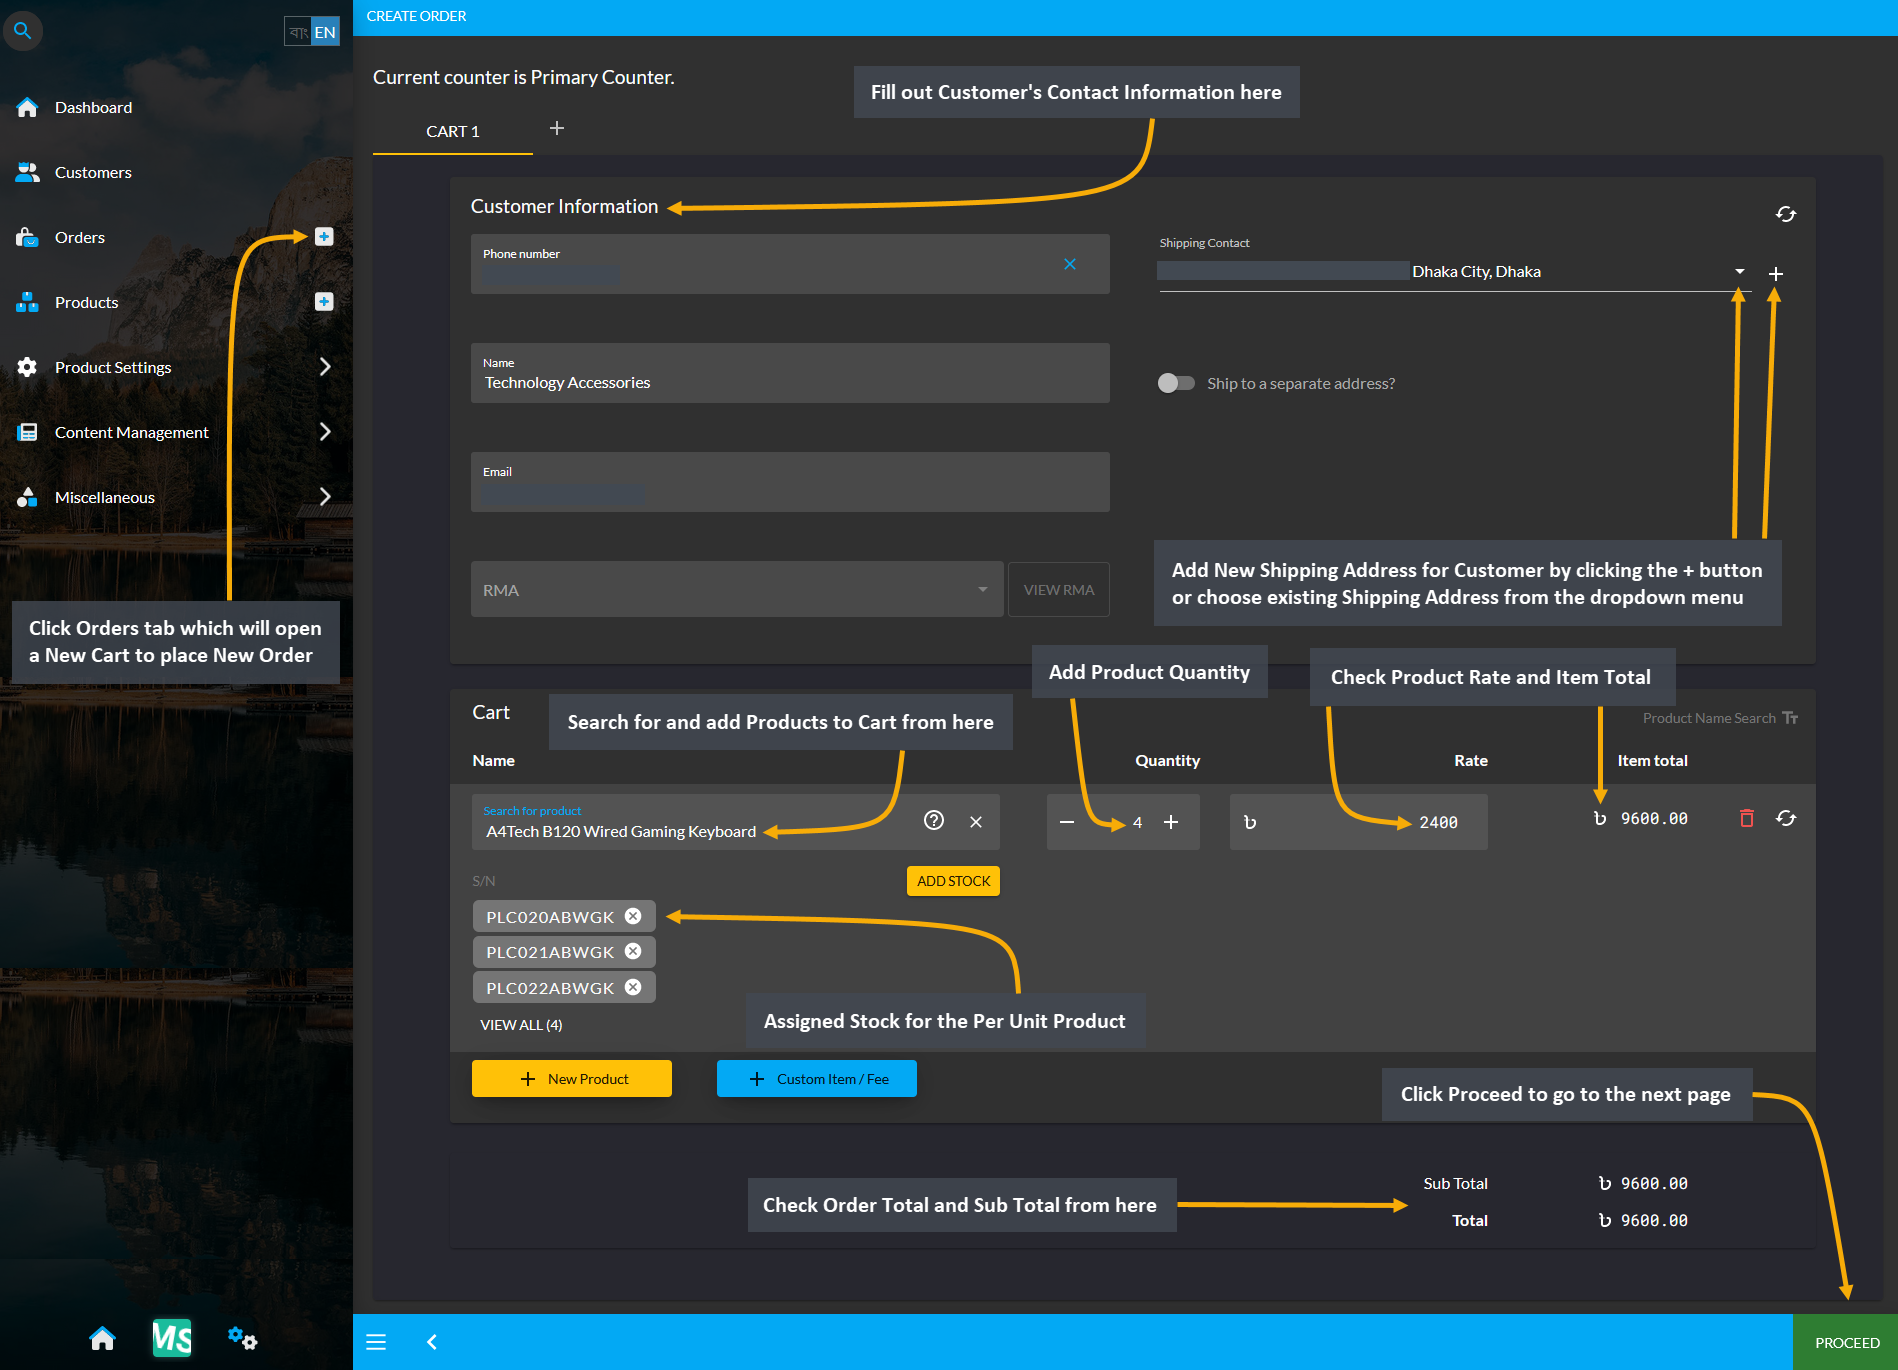
Image 3: RMA can be allocated for faulty Products from existing Order, so a New Order is placed as example.
So, clicking on Orders tab will open a New Cart from where New Order can be placed. Fill out Customer’s Contact Information and add New Shipping Address for Customer by clicking the + button or choose existing Shipping Address from the dropdown menu. Then, search and add Products to Cart, add Product Quantity, assign Stock for the Per Unit Product, check Product Rate, Item Total, Order Total and Sub Total. After completing all steps, click Proceed. In the next page, select preferred Shipping and Payment options, and click Confirm Order.
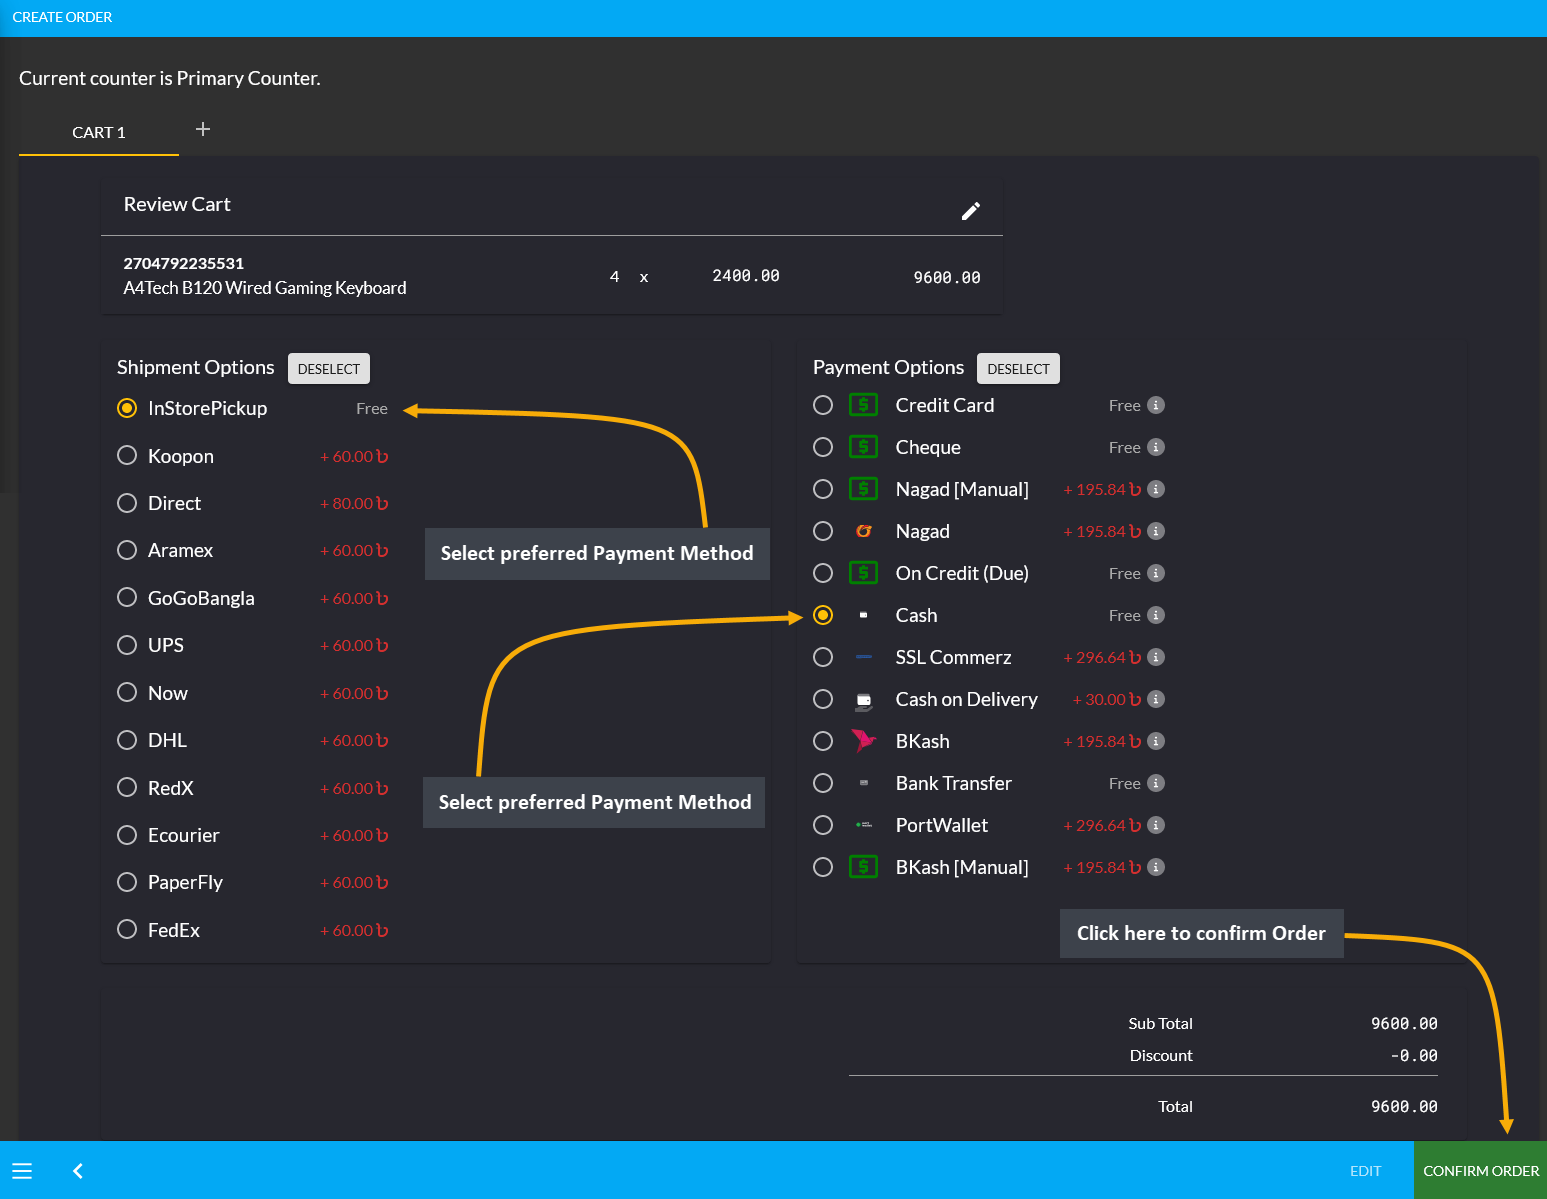
Image 3: Select preferred Shipping Method and Payment Method and click Confirm Order to place New Order.
From four Per Unit Products that Customer have purchased, Serial Numbers PLC021ABWGK, PLC022ABWGK, and PLC023ABWGK for A4Tech B120 Wired Gaming Keyboard were not faulty. However, Serial Number PLC020ABWGK for A4Tech B120 Wired Gaming Keyboard Per Unit Product was found to be faulty, so Customer wants to claim their Warranty for this Product. Therefore, Shop Owner will have to report an RMA to help the Customer return this Product and exchange them with another Per Unit Product of the same Batch.
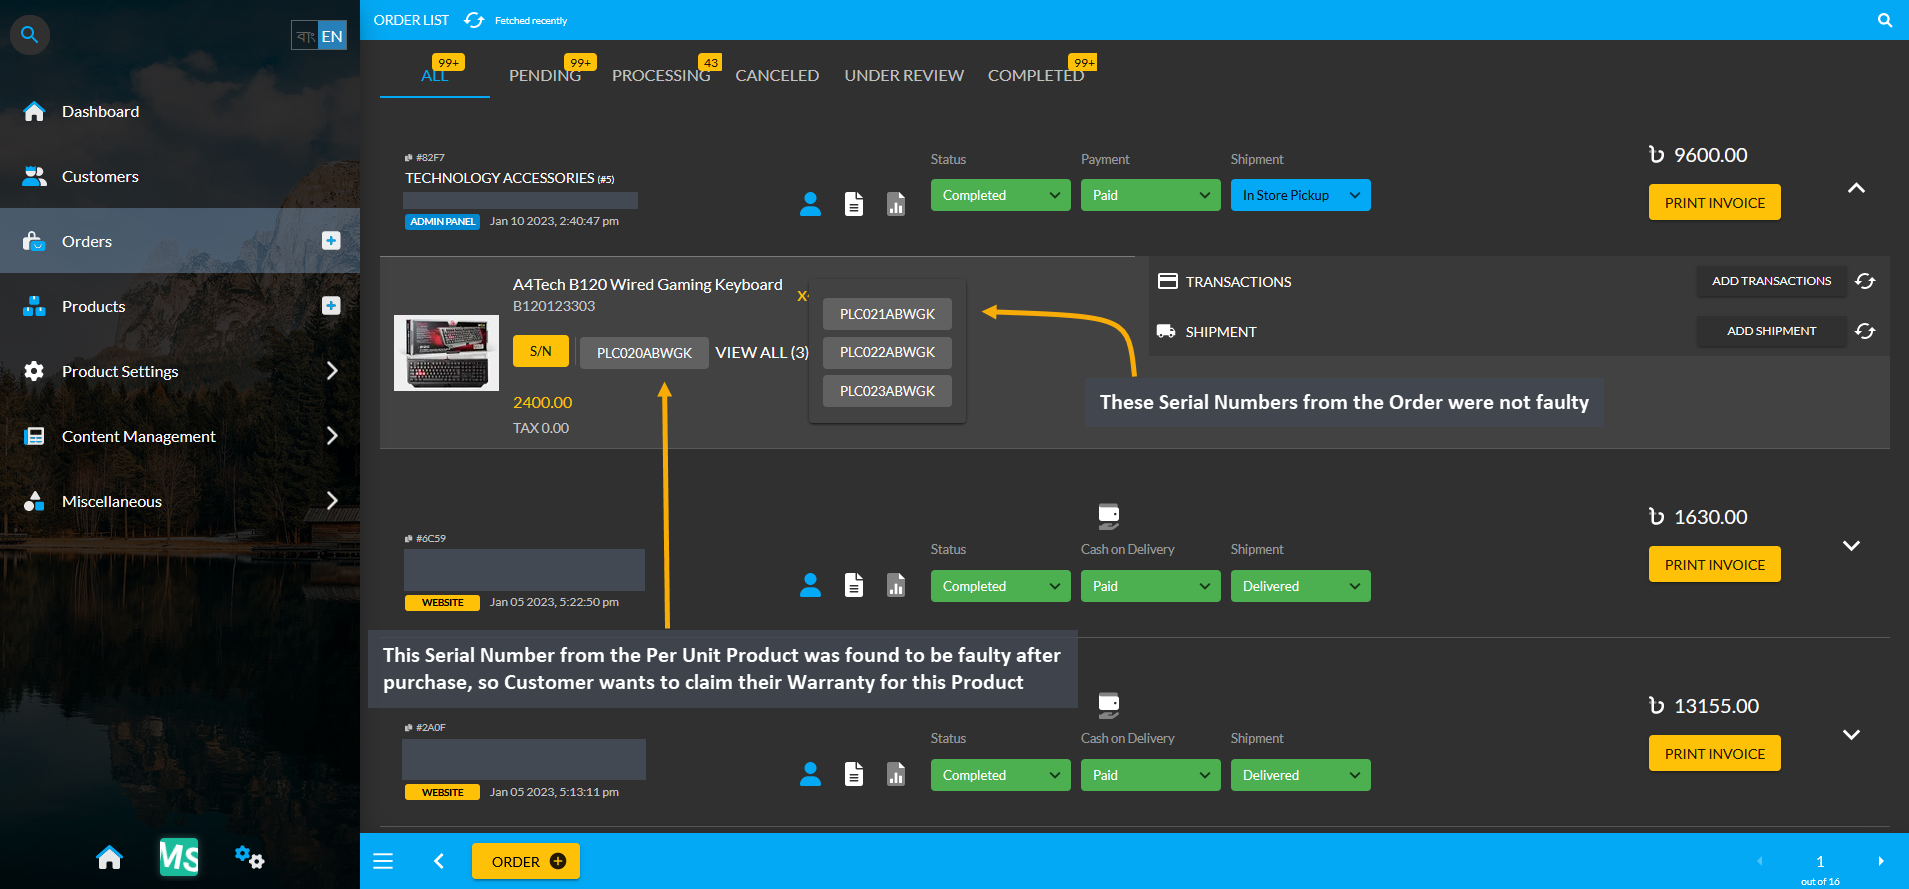
Image 4: A Serial Number for the Per Unit Product A4Tech B120 Wired Gaming Keyboard was found to be faulty.
Create RMA for an Order
Now, in order to allocate an RMA, go to RMA from Product Settings, where the list of existing RMA cases will show on the search page. In this RMA list page, existing RMA can be specifically searched with Product Serial Number, Customer Phone, or Customer Email. Select any one of these three options and type the serial number, phone, or email in the search box. Beside it, there is a Status bar that will allow checking the RMA based on their statuses.
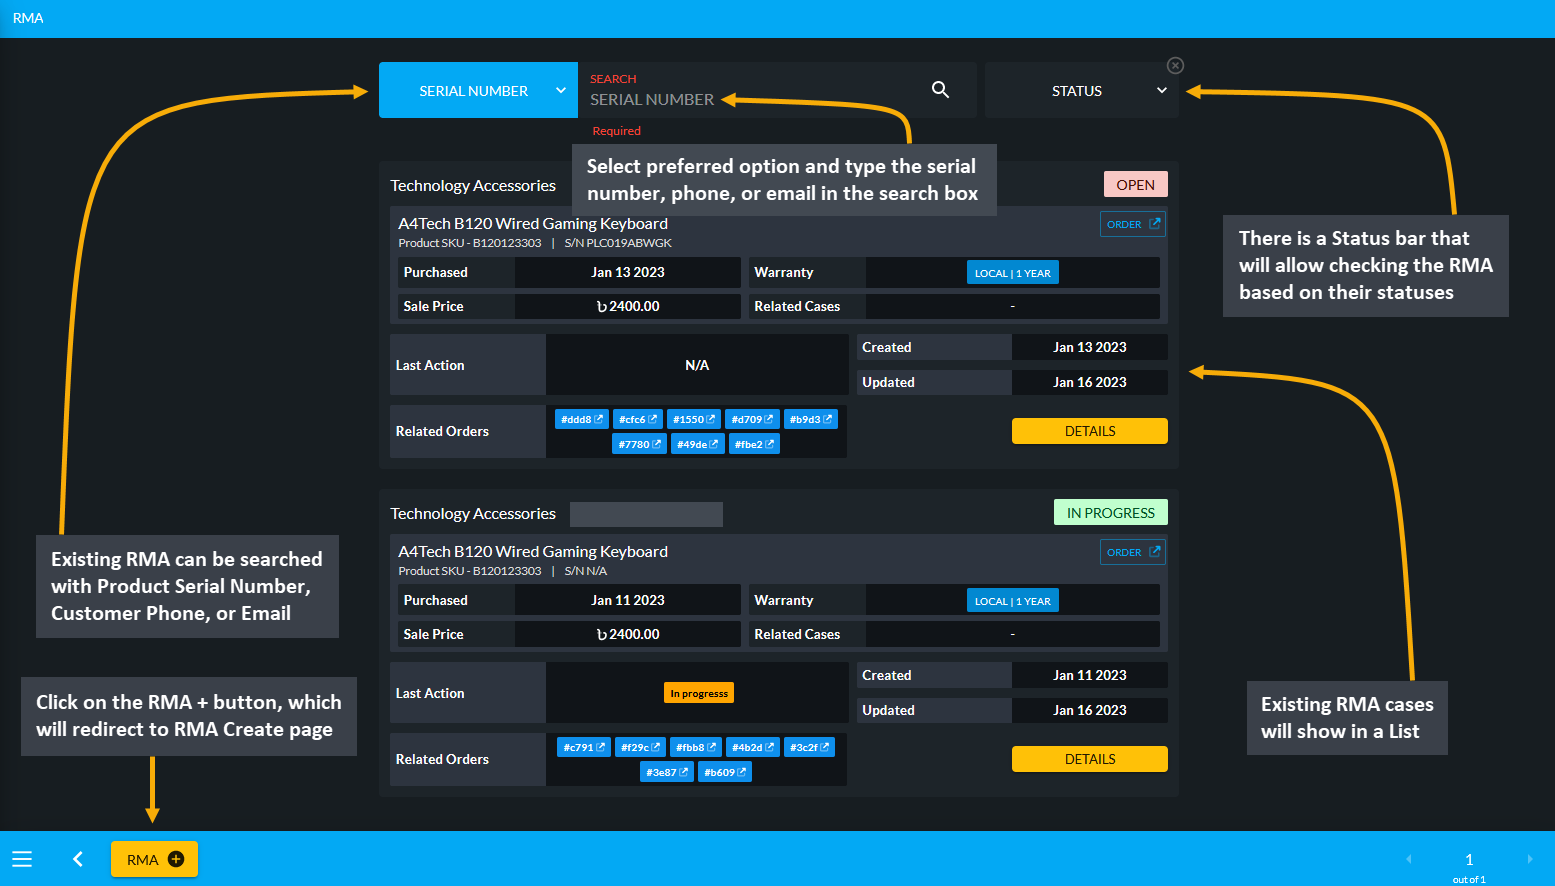
Image 5: Existing RMA cases can be searched with their Product Serial Number, Customer Phone, or Email.
To create a new RMA, click on the RMA + button, which will redirect to the RMA Create page. Here, new RMA can be created with Product Serial Number, Customer Phone, or Customer Email. Select the preferred option and type the serial number, phone, or email in the search box. Copy them from Order List page, paste them in the search box, and click on the search icon. This will bring the details of the Order on the RMA create page.
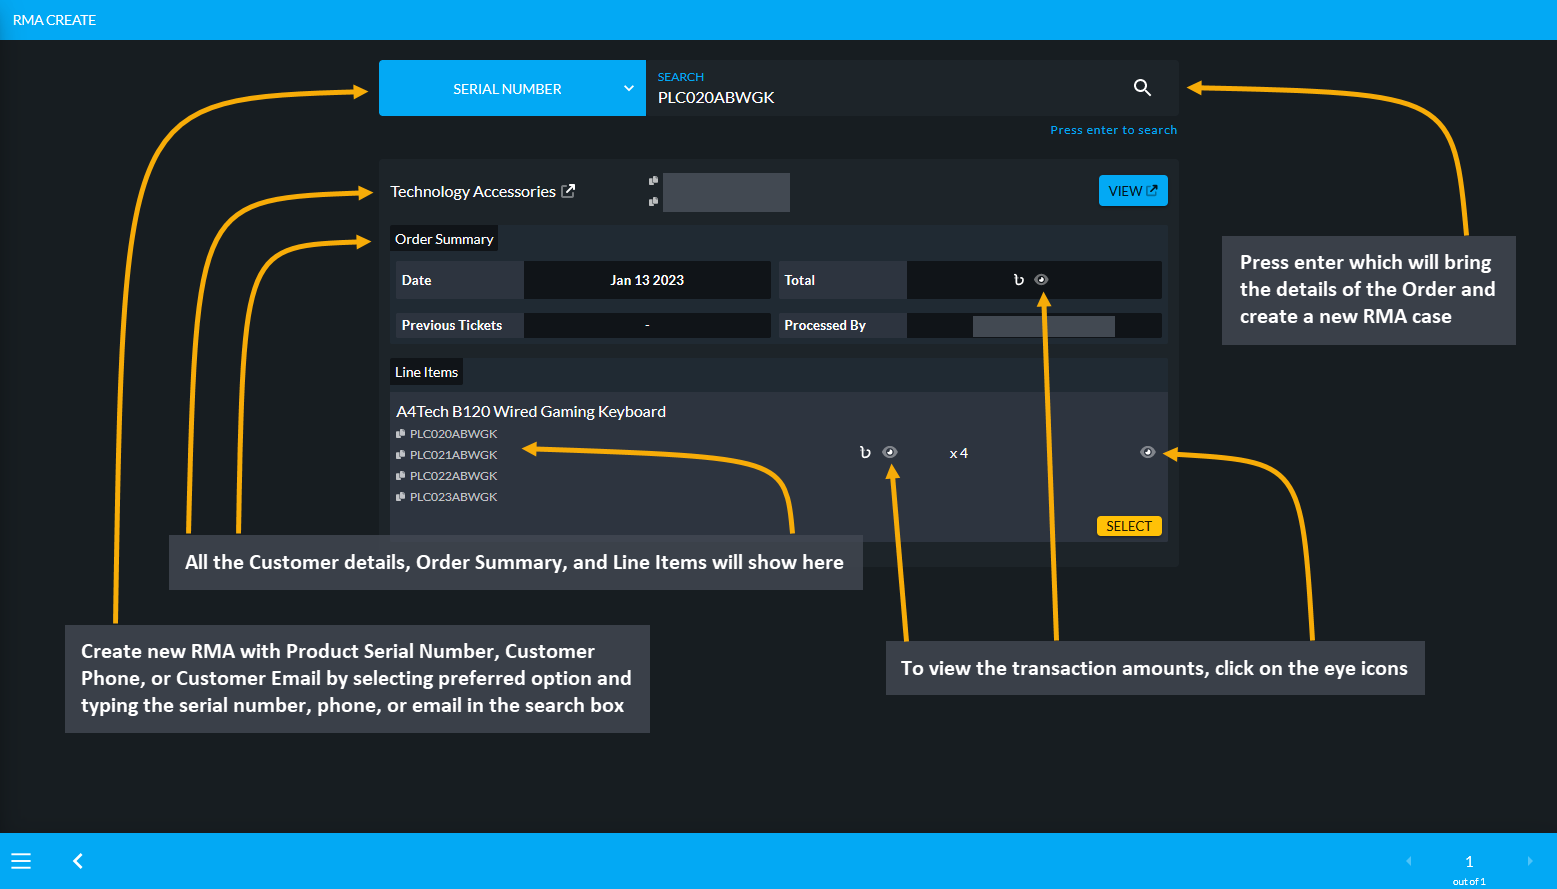
Image 6: Create new RMA with Product Serial Number, Customer Phone, or Customer Email by typing on search.
For instance, when searched with the Serial Number of the Per Unit Product, it will show all the Customer details, Order Summary, and Line Items. To view the transaction amounts, click on the eye icons. Click the Select button or click within the line item box that will open a pop-up, from where Serial Number of the faulty Product needs to be selected. Check the details below and click the Create button to create new RMA.
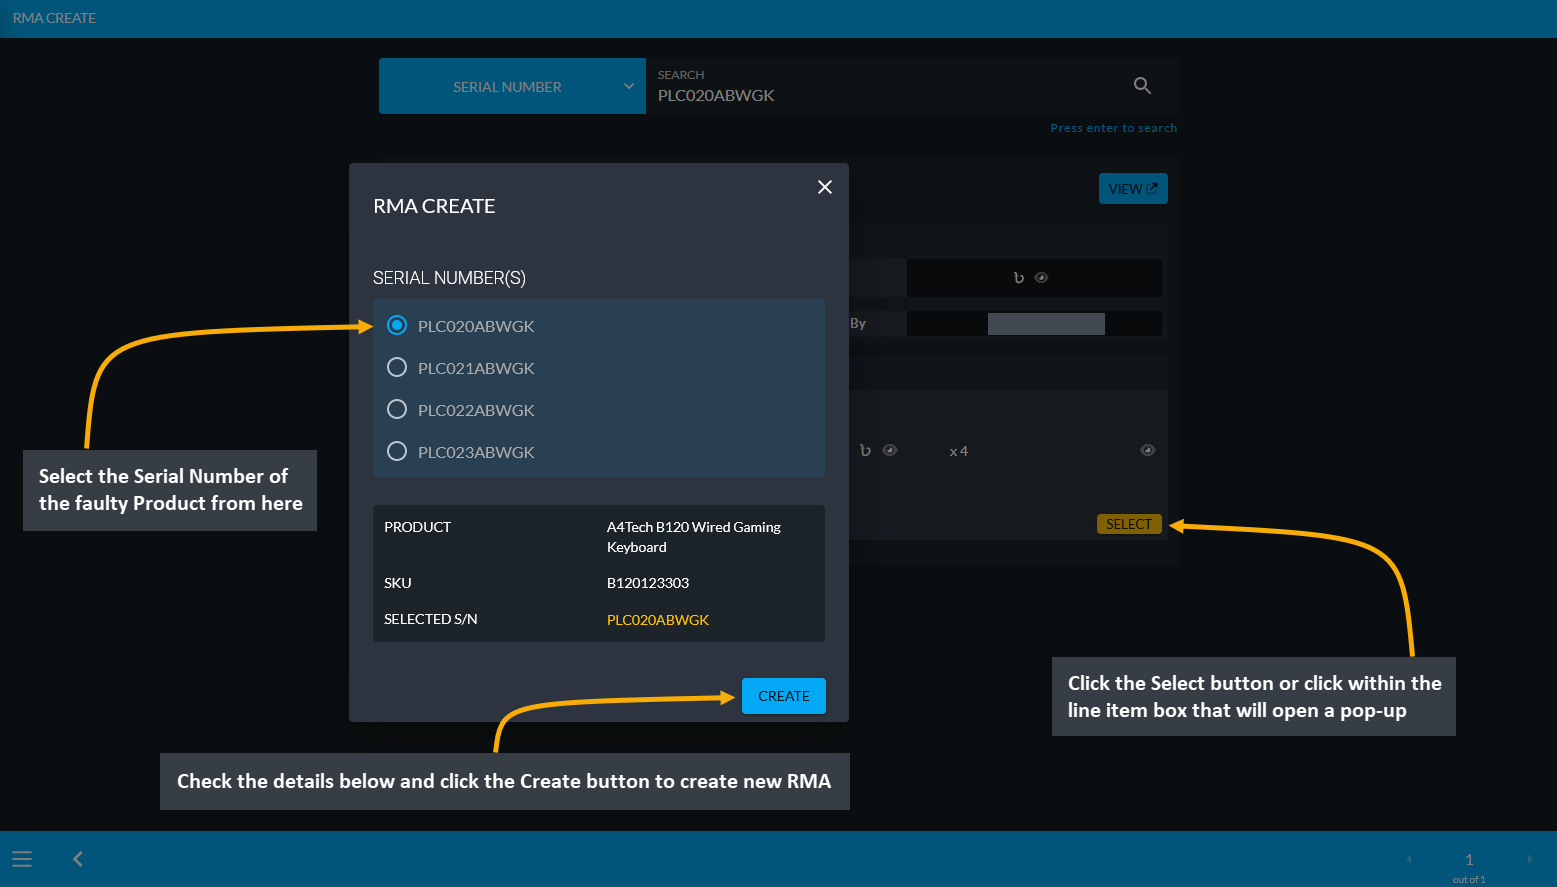
Image 7: Select Serial Number of faulty Product, check details and click Create button to create new RMA.
After RMA is created, the Order and RMA case details will show on the RMA View page. Within Product details, the purchased date, warranty date, sale price, and Related Cases will show. Below it are the RMA Workflow, which will allow Shop Owner to take action for the Product with different actions. There are several workflow actions like Comment, Denial, Supplier, Service, Return, Exchange, Refund, and Warranty. Click on each of these workflows for adding comment, uploading images, and updating status to save the workflow update for the RMA case.
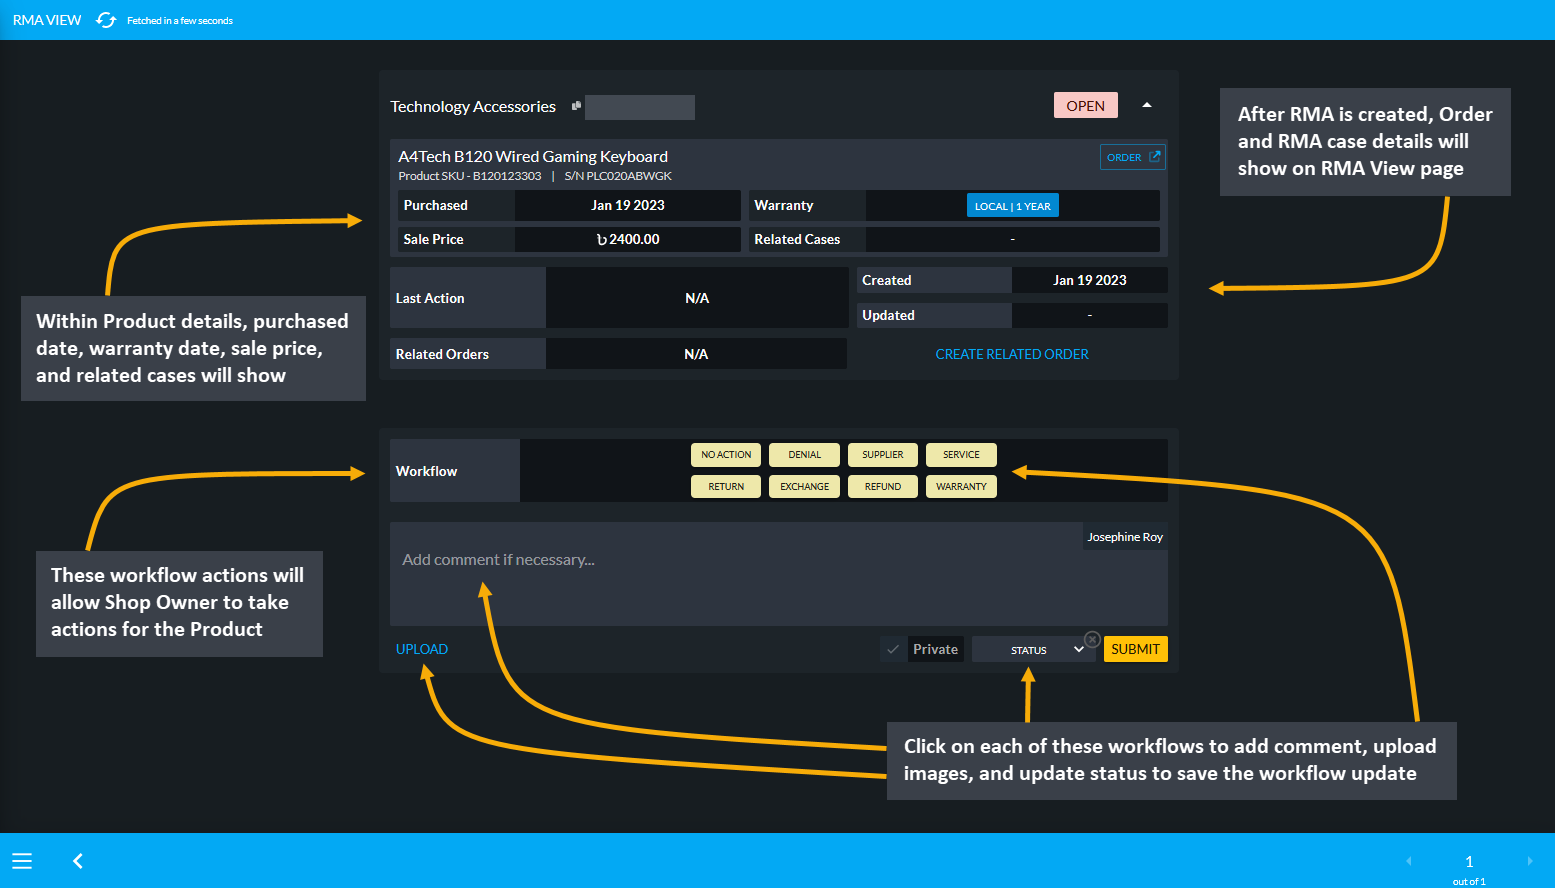
Image 8: Product details, Order details, RMA case details, RMA workflow actions, and status can be updated.
Predefined Suggestions
After an RMA is created, the Shop Owner can use the Suggestions button to add predefined suggestions that can be used for explaining Product defect issues. These suggestions will be handy for Warranty or Service workflows.
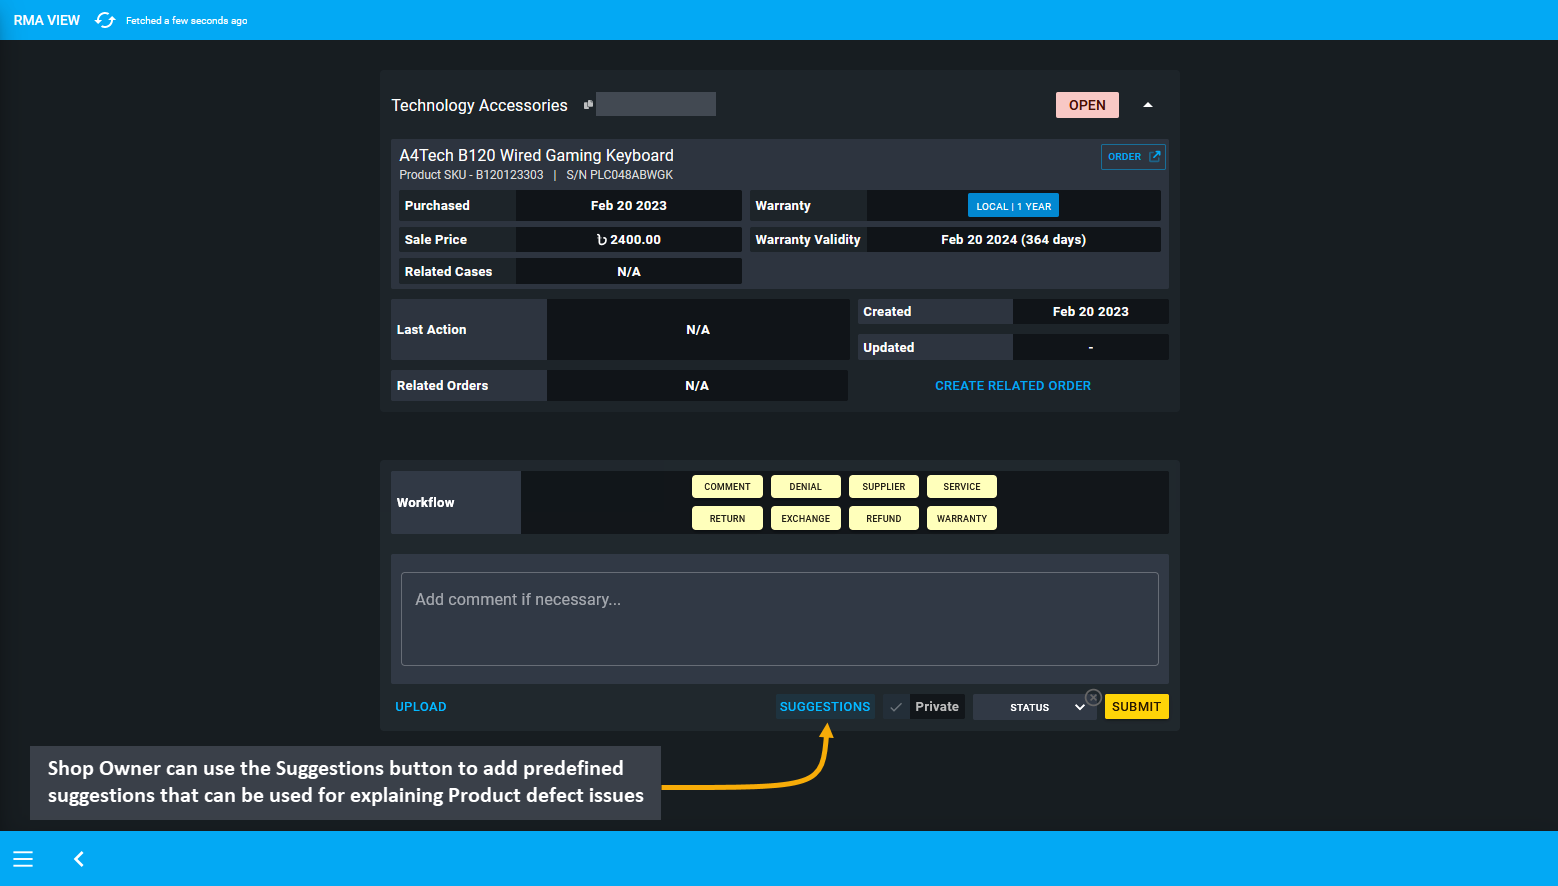
Image 9: Shop Owner can use Suggestions button to add predefined suggestions that explain Product issues.
When the Suggestions button is clicked, a pop-up will open with all the predefined suggestions for generally faced Product defect issues. The Shop Owner can select their target suggestion by clicking on it which will automatically add in the comment box. Some common issues regarding faulty computer related Products are provided.
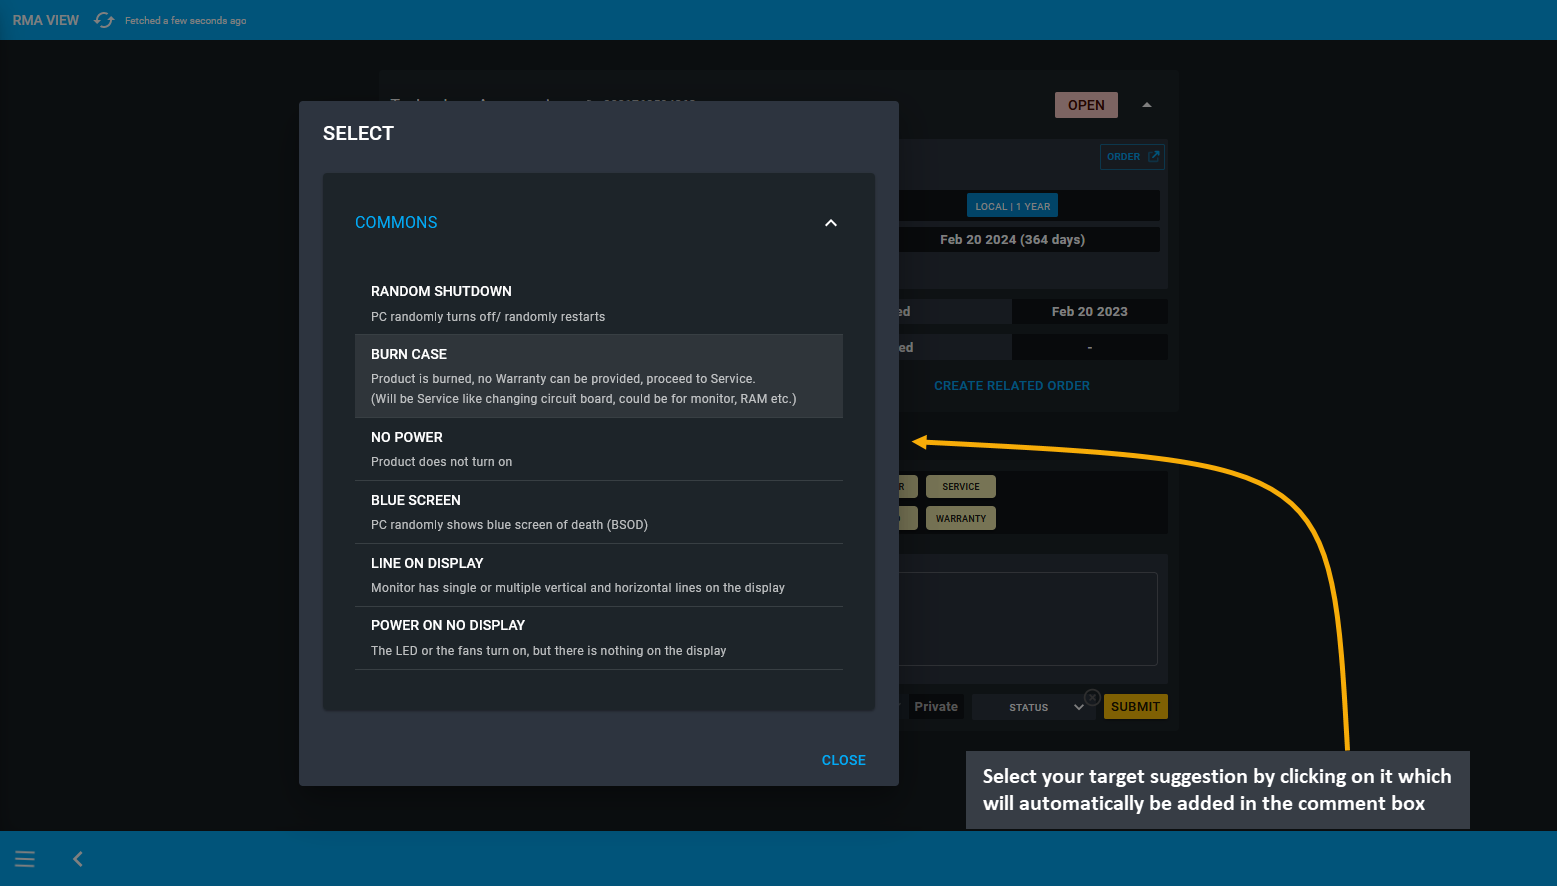
Image 10: Select your target suggestion by clicking on it which will automatically add in the comment box.
After the selected predefined suggestion is automatically added in the comment box, select the RMA workflow as Warranty or Service, select status as In Progress from the dropdown and hit Submit to save the changes. Generally, if there is any active Warranty and if any suggestion is selected, then Warranty will automatically be preselected as workflow. Conversely, if there is no active Warranty, then other options can be selected from the workflow list.
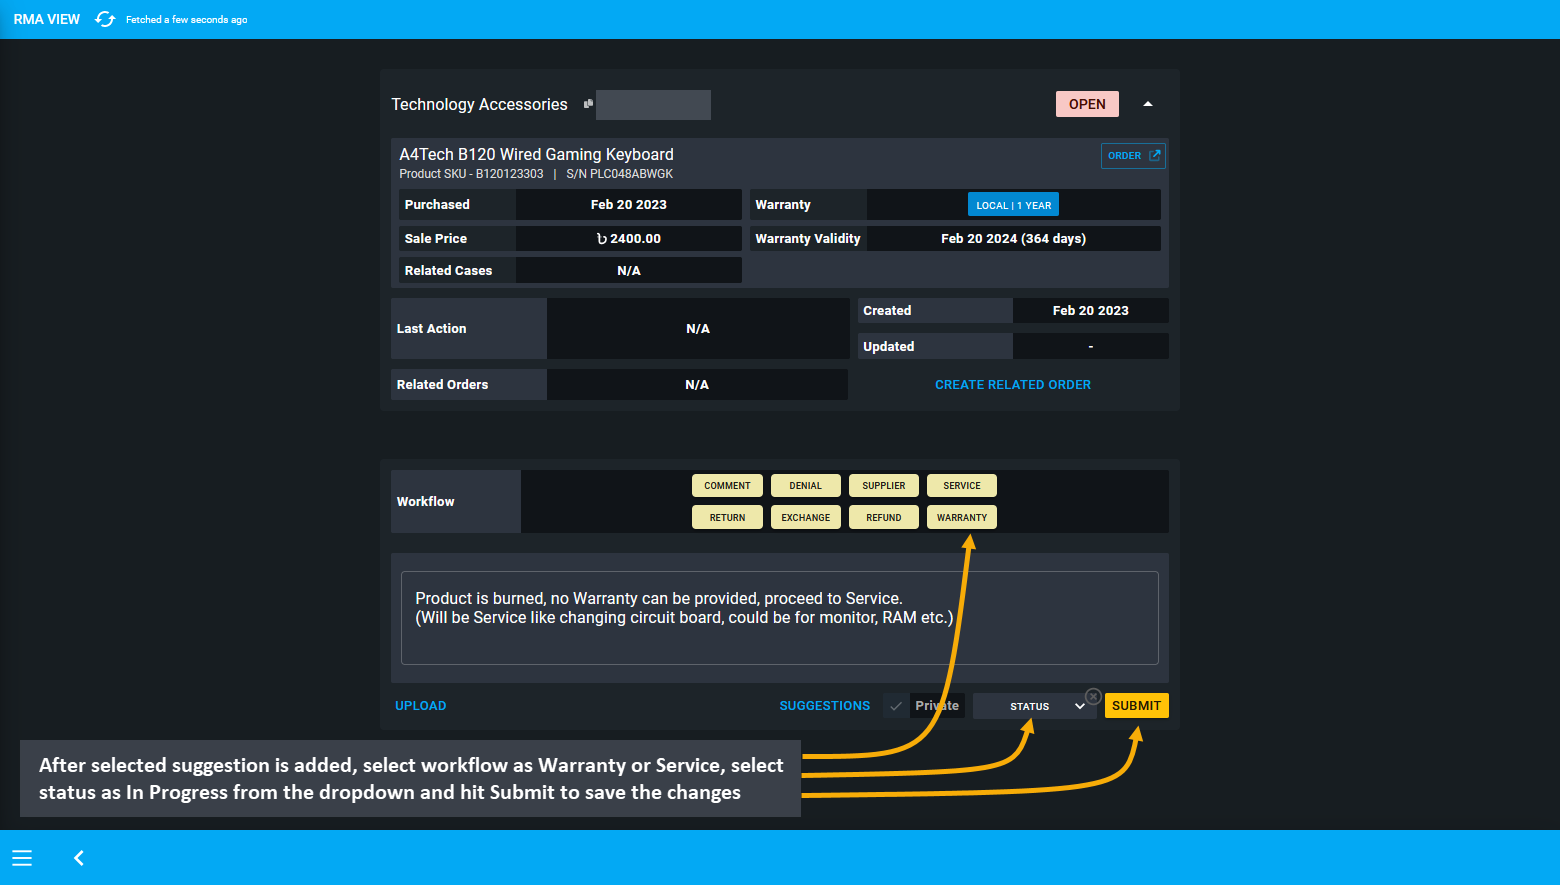
Image 11: After selected suggestion is added, select workflow, status and hit Submit to save all changes.
Workflow Terms Explained
No Action indicates adding a comment about the Product or the RMA case. Denial indicates that Shop Owner will deny the claim of the defective Product from the Customer. Supplier indicates that to claim the warranty, Product has been sent to the Supplier and all updates associated with it can be updated using this. Service indicates any repairing done for the Product with payment from the Customer. Return indicates the Product being returned by the Customer to the Shop Owner. Exchange indicates that Product will be exchanged with another Product by the Shop Owner. Refund indicates that full or partial refund will be made to the Customer if Shop Owner is unable to repair or exchange the Product. Warranty indicates the progress of warranty service for the faulty Product.
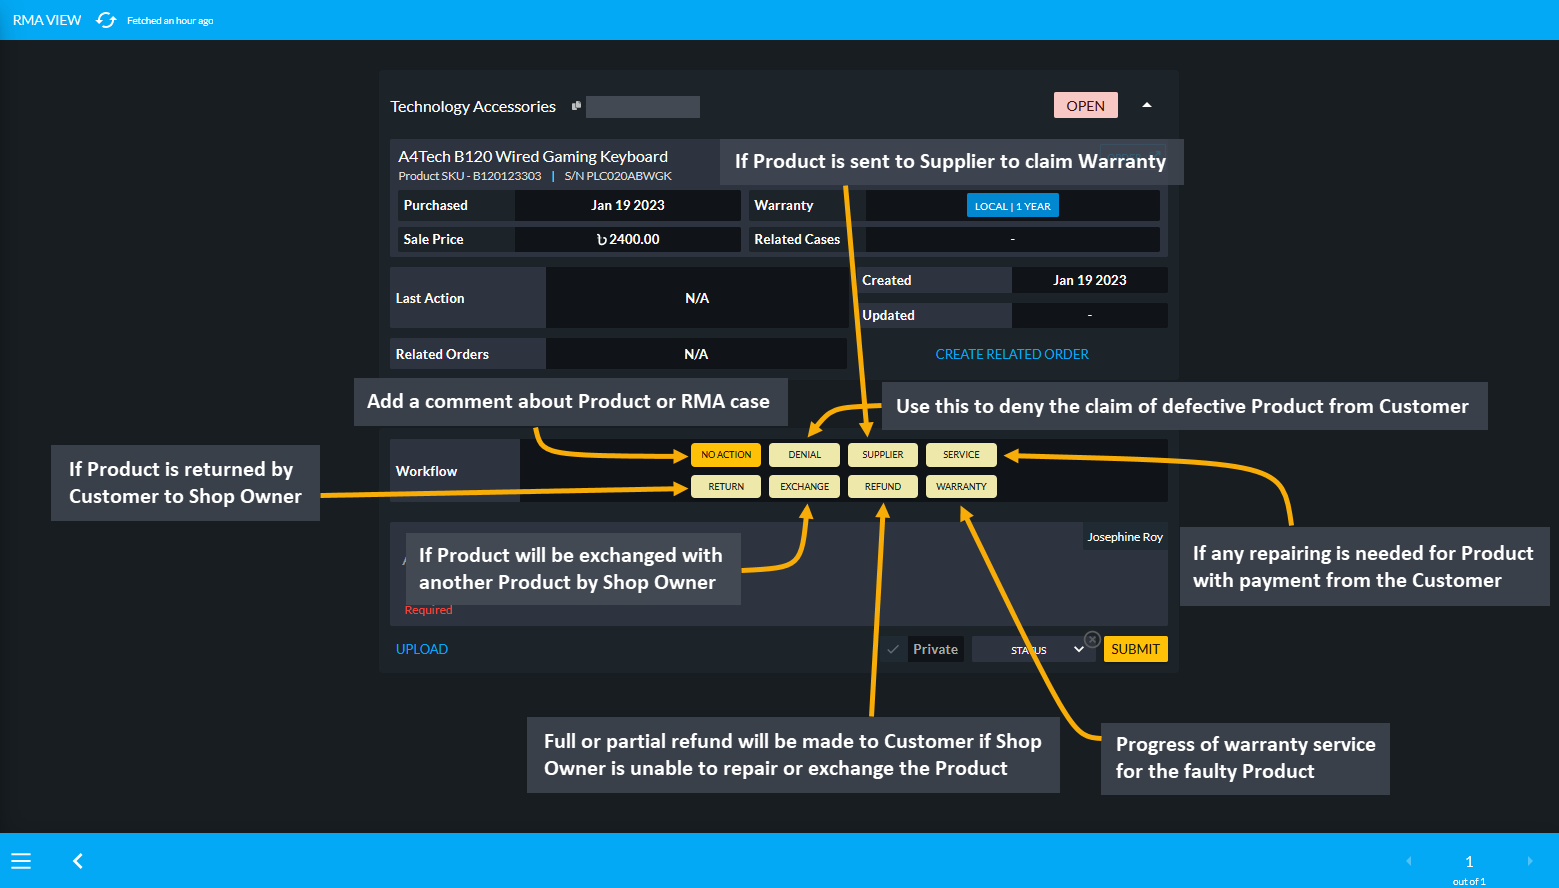
Image 12: There are several workflow actions that Shop Owner can use to take action and update RMA case.
RMA for a Product can be created by using the RMA Create button from Order List. For this, go to the target Order and click the RMA Create button that will redirect to the RMA Create page to start a new RMA case. The RMA Create button on Order List will skip initial search on RMA page needed to create an RMA.
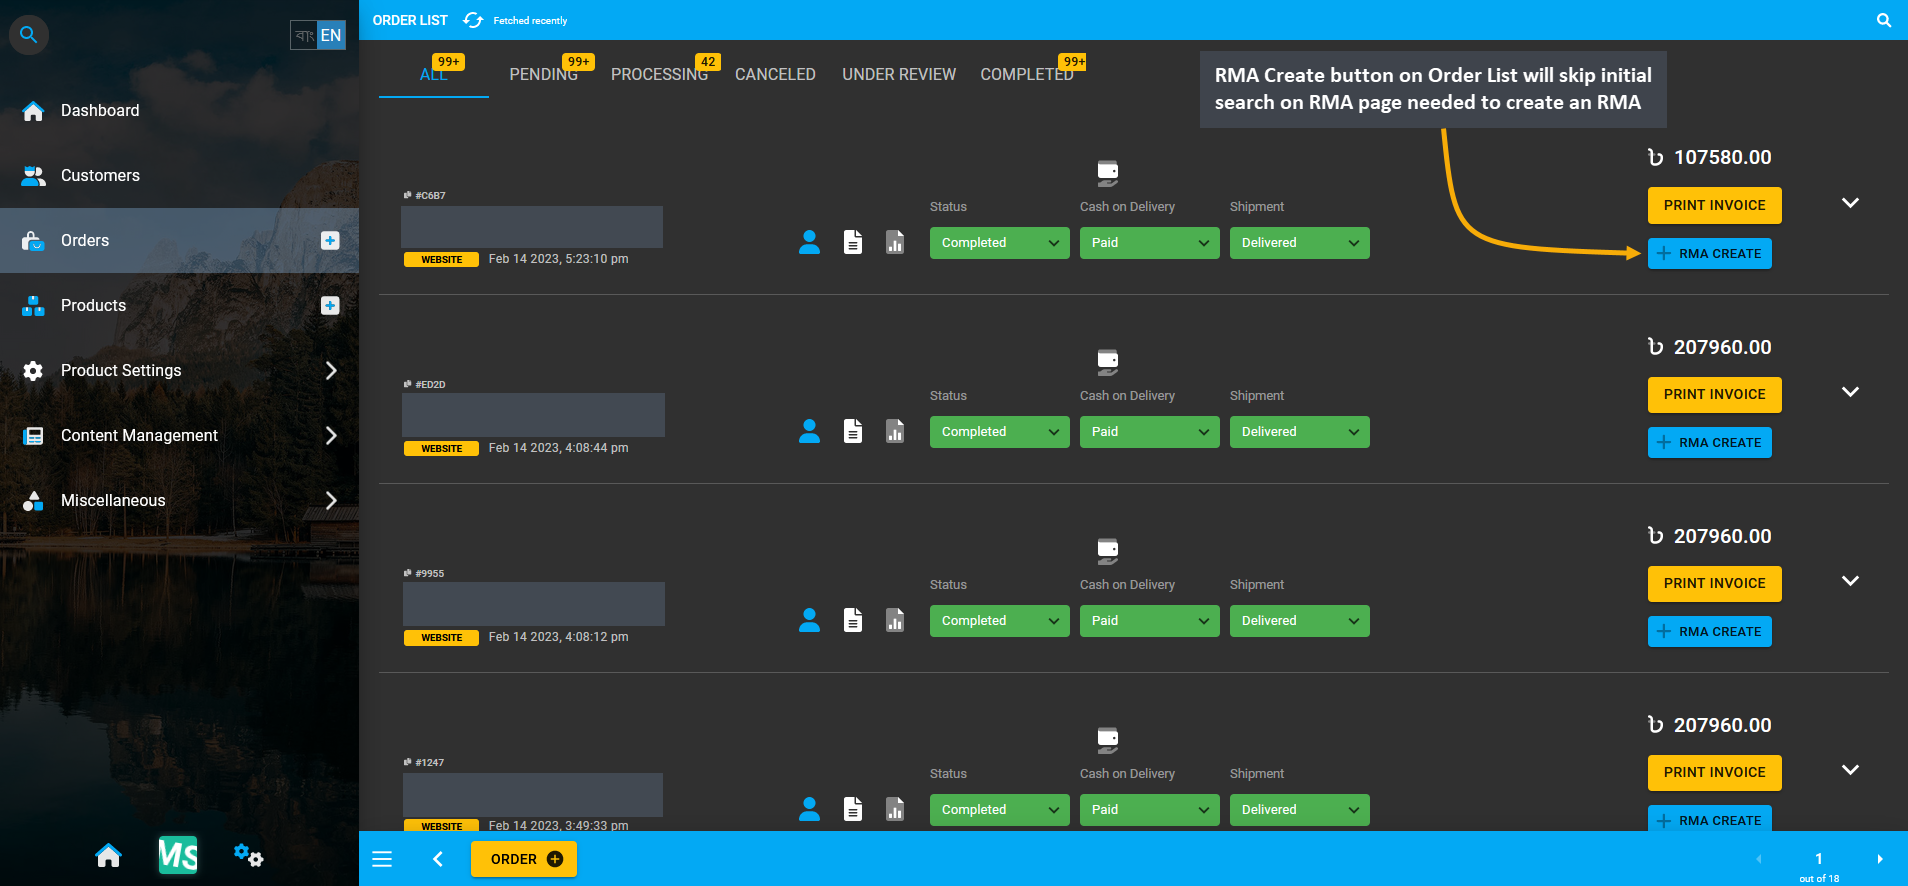
Image 13: RMA Create button on Order List will skip initial search on RMA page needed to create an RMA.
The RMA Create page will open from where the target faulty Product can be selected to create a new RMA case.
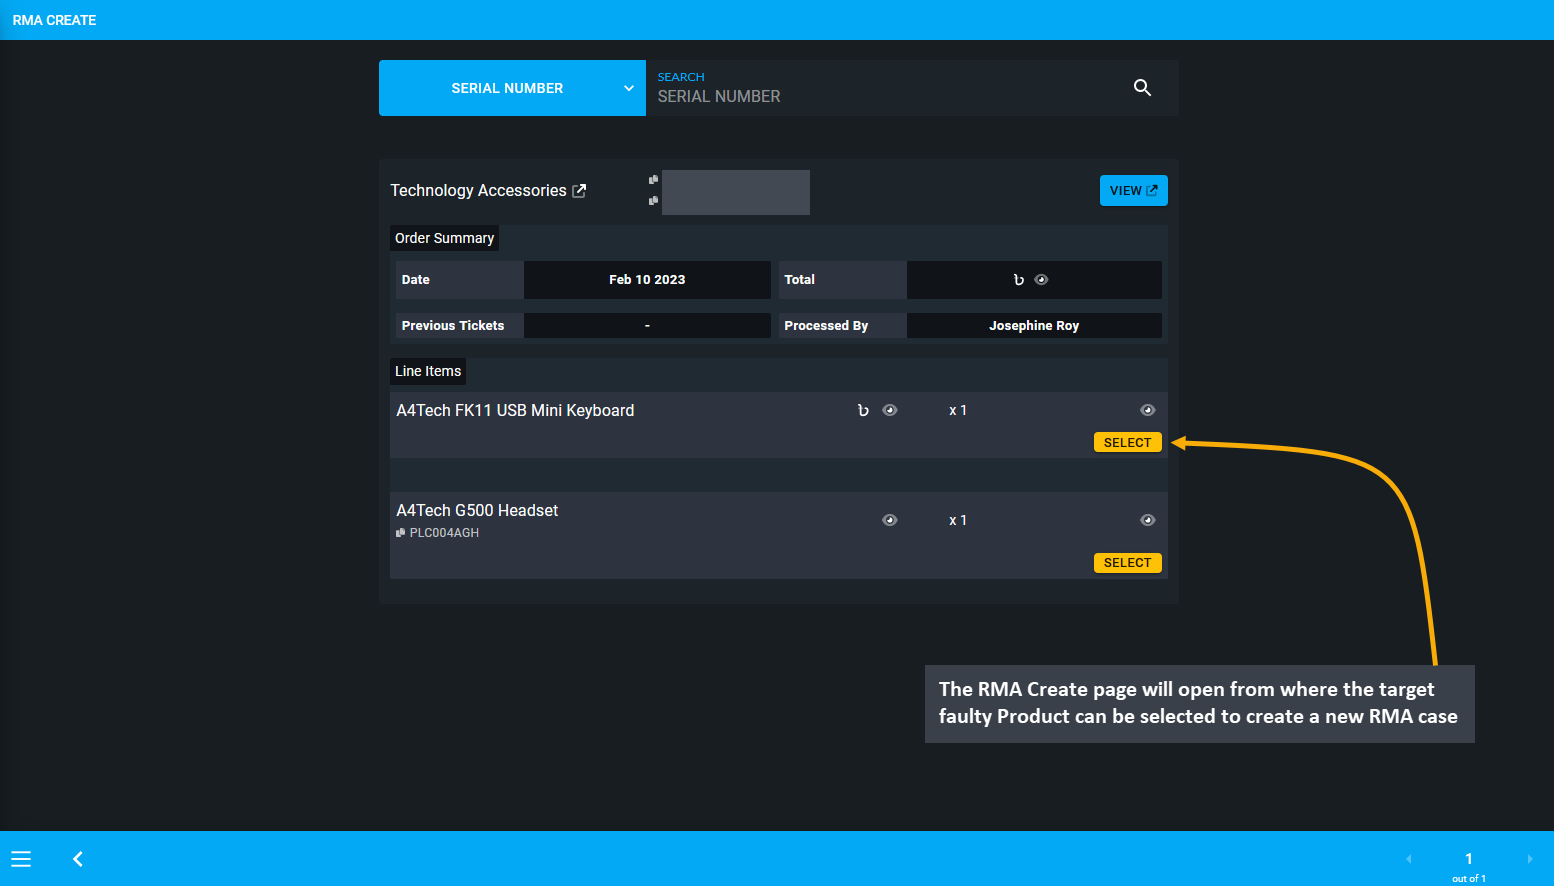
Image 14: Select the target faulty Product from list to create a new RMA case from the he RMA Create page.
RMA for a Product can be created by using the RMA Create button from the Order List on Customer Dashboard. For this, go to the Customer Dashboard and click the RMA Create button beside the target Order that will redirect to the RMA Create page to start a new RMA case. The RMA Create button on Customer Dashboard will skip initial search on RMA page needed to create an RMA.
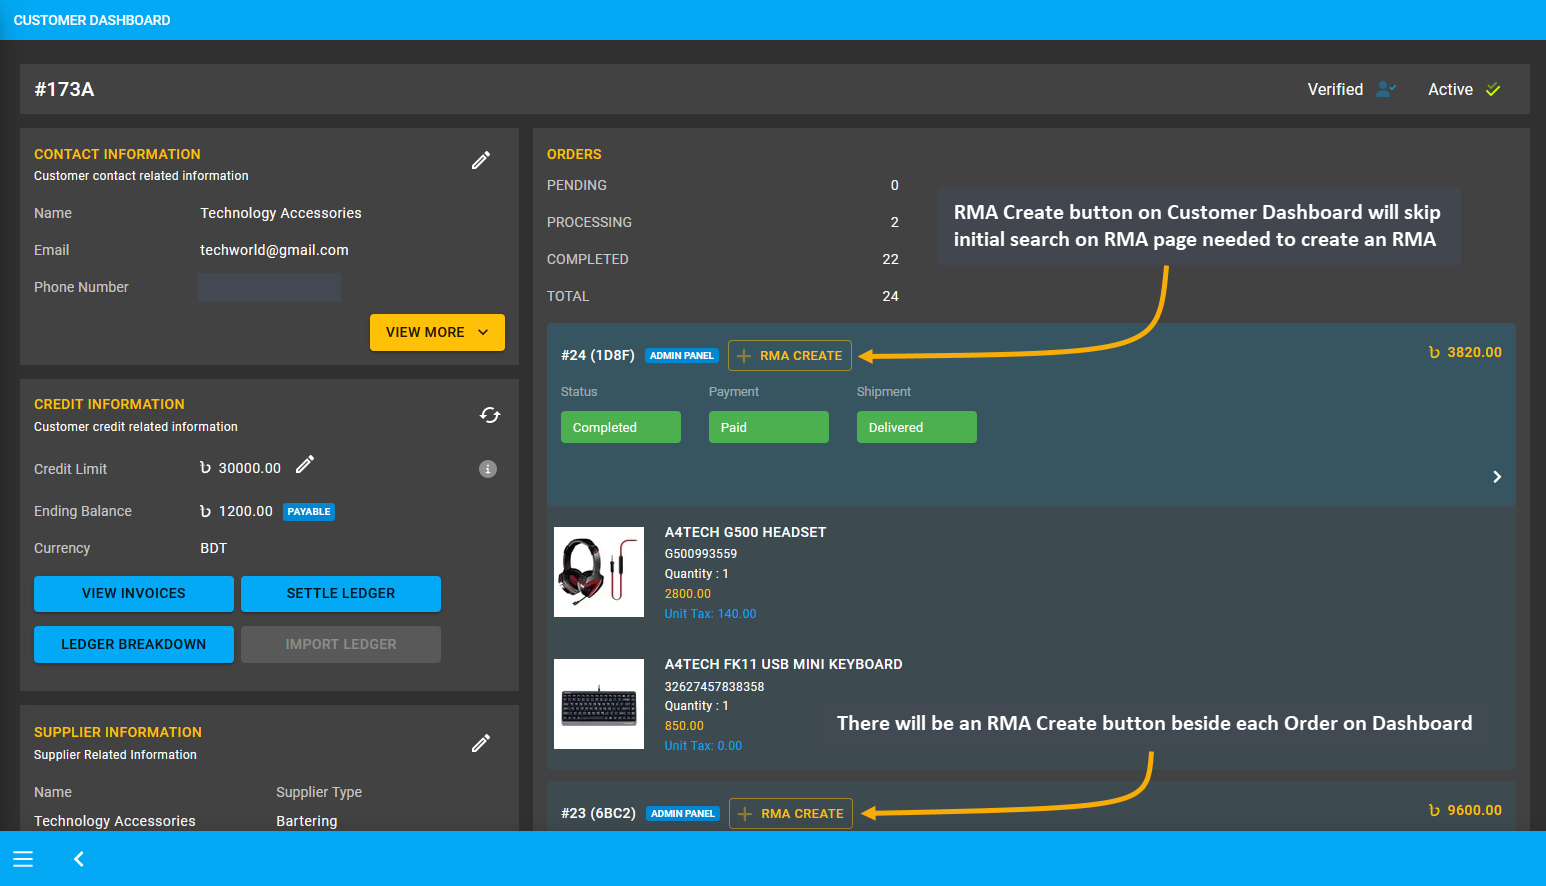
Image 15: RMA Create button on Dashboard will skip the initial search on RMA page needed to create an RMA.
The RMA Create page will open from where the target faulty Product can be selected to create a new RMA case.
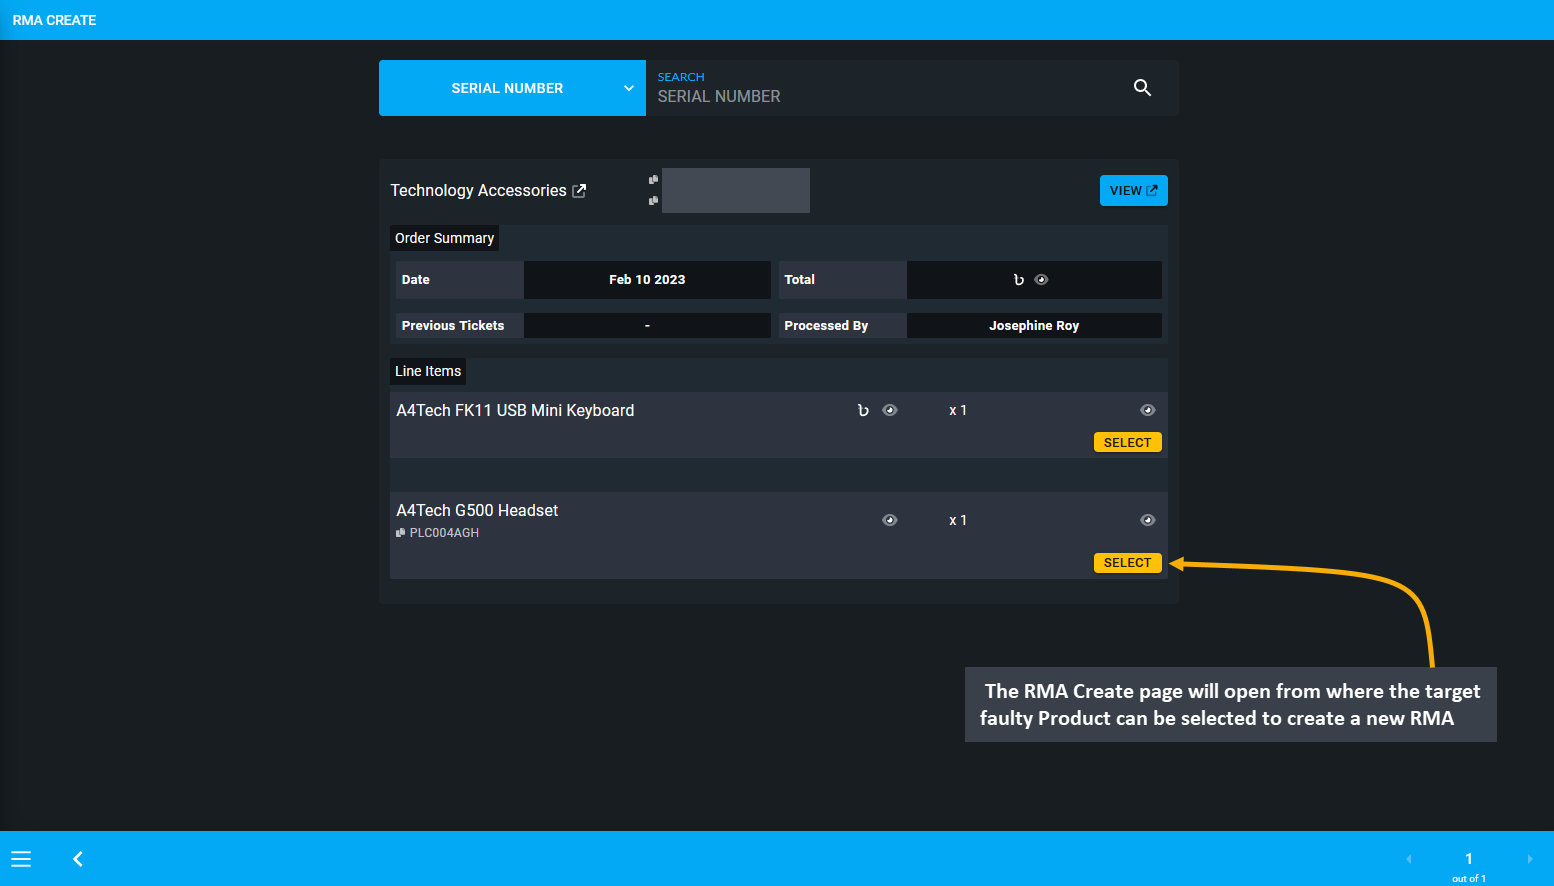
Image 16: Select the target faulty Product from list to create a new RMA case from the he RMA Create page.
1 - Comment
Learn more about creating and managing RMA’s Comment workflow actions for Products.
Comment means that the Shop Owner is adding a comment about an update on the Product or the RMA case. This workflow only allows adding a comment than performing any other action.
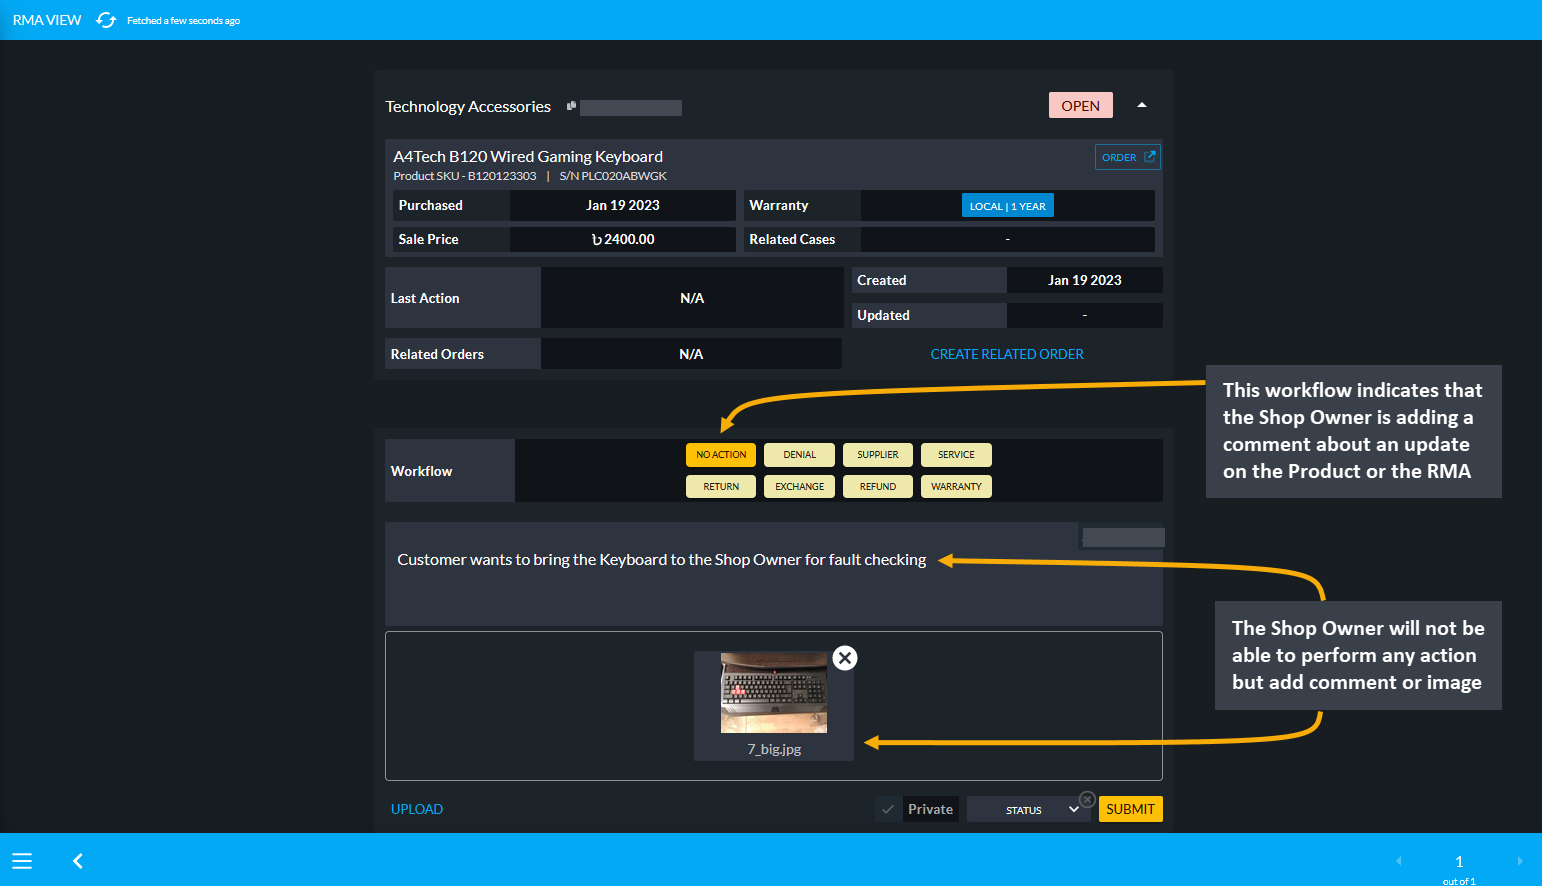
Image 1: Indicates that Shop Owner is adding a comment about an update on the Product or the RMA case.
2 - Denial
Learn more about creating and managing RMA’s Denial workflow actions for Products.
Denial of RMA
Denial means that the Shop Owner has denied the claim from the Customer and they will not provide RMA to the Customer and the RMA case will be closed. It could be denying the warranty claim, or defective Product claim etc. After an RMA case is denied, the case will close and status will automatically be changed from Open to Resolved.
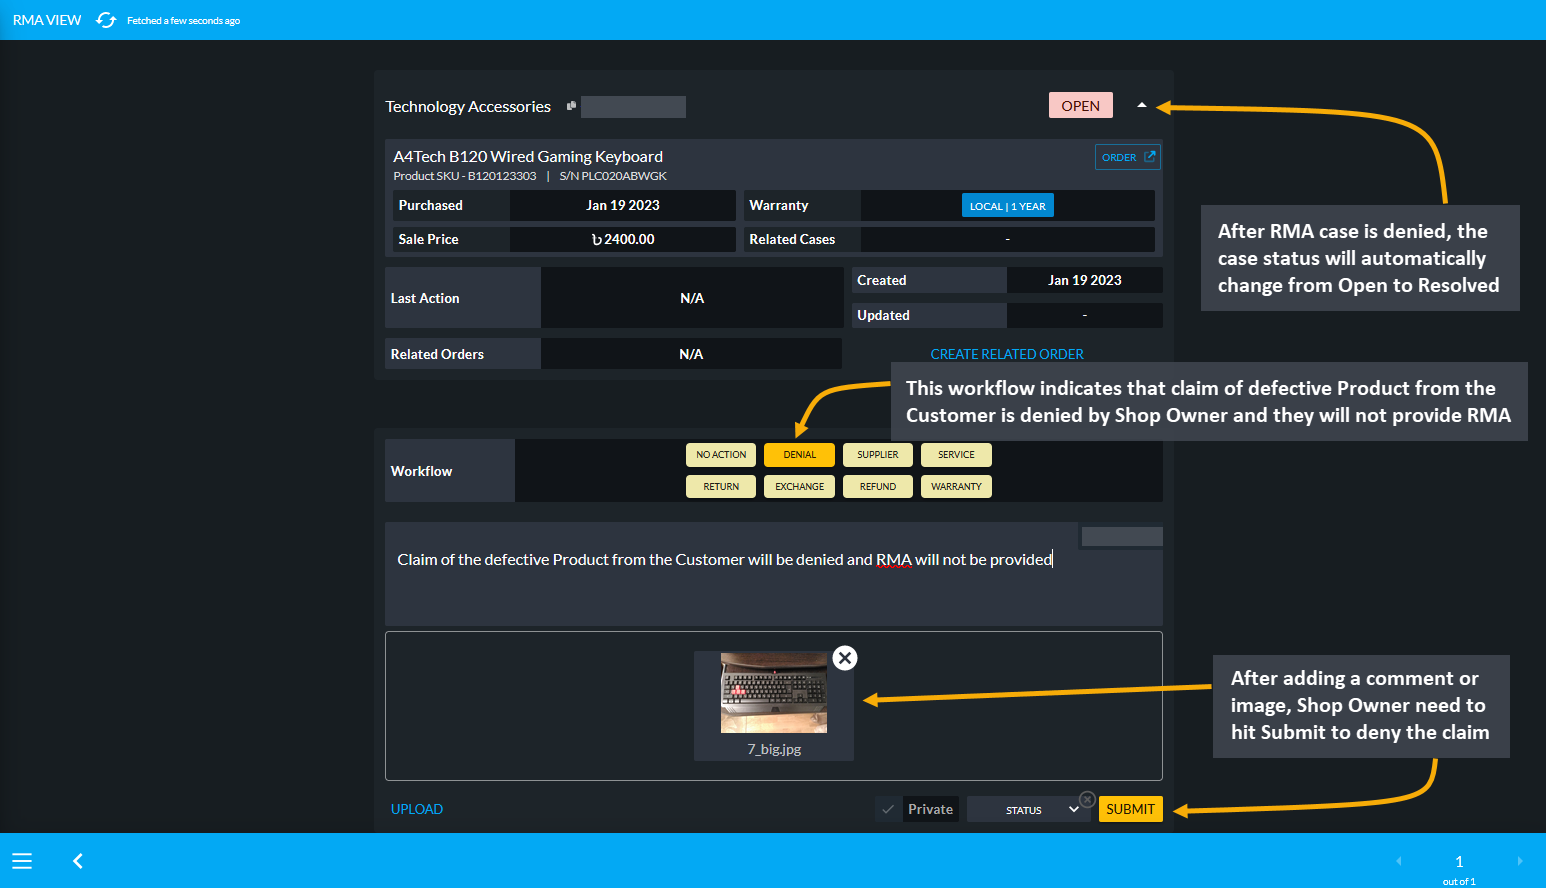
Image 1: Indicates that Shop Owner Shop Owner has denied the Customer's claim and will not provide RMA.
For instance, if a Per Unit Product i.e. A4Tech FM12 FSTYLER USB Mouse was sold without a Warranty, but Customer came back after three months claiming that the mouse is not working properly. Then the Shop Owner can inform them that the Product was sold without any Warranty, so claim for any Product exchange will be denied.
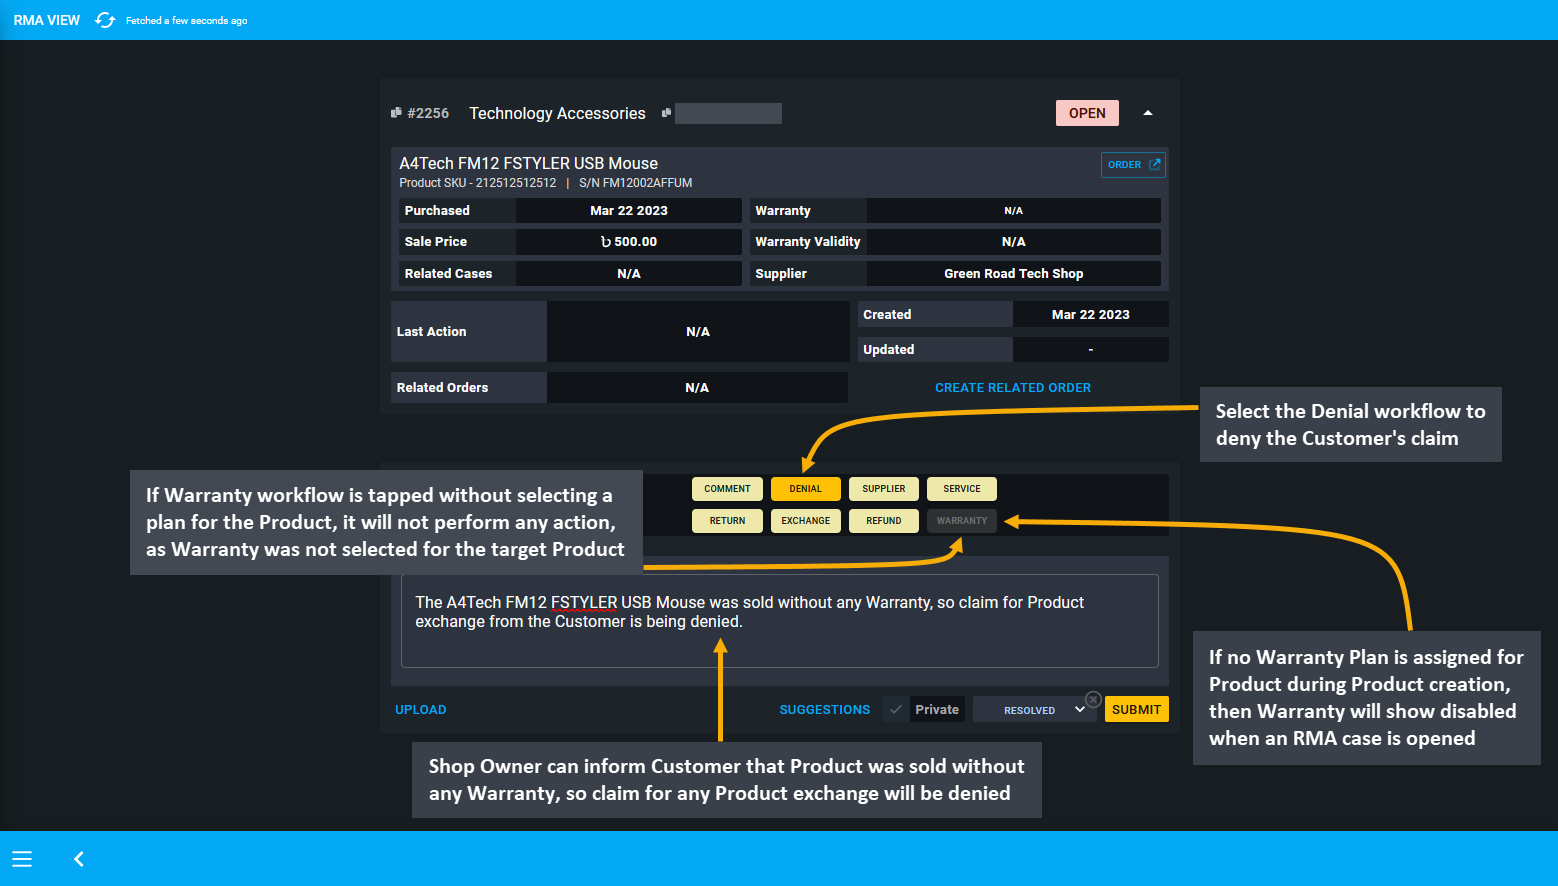
Image 2: If no Warranty Plan is assigned for Product during creation, then Warranty will show disabled.
In this case, it must be noted that if no Warranty Plan is assigned for the Product during Product creation, then the Warranty will show disabled when an RMA case is opened. Thus, if the Warranty workflow is tapped without selecting a plan for the Product, it will not perform any action, as Warranty was not selected for the Product. So, after selecting Denial as workflow and selecting status as Resolved, the RMA case will be automatically Resolved.
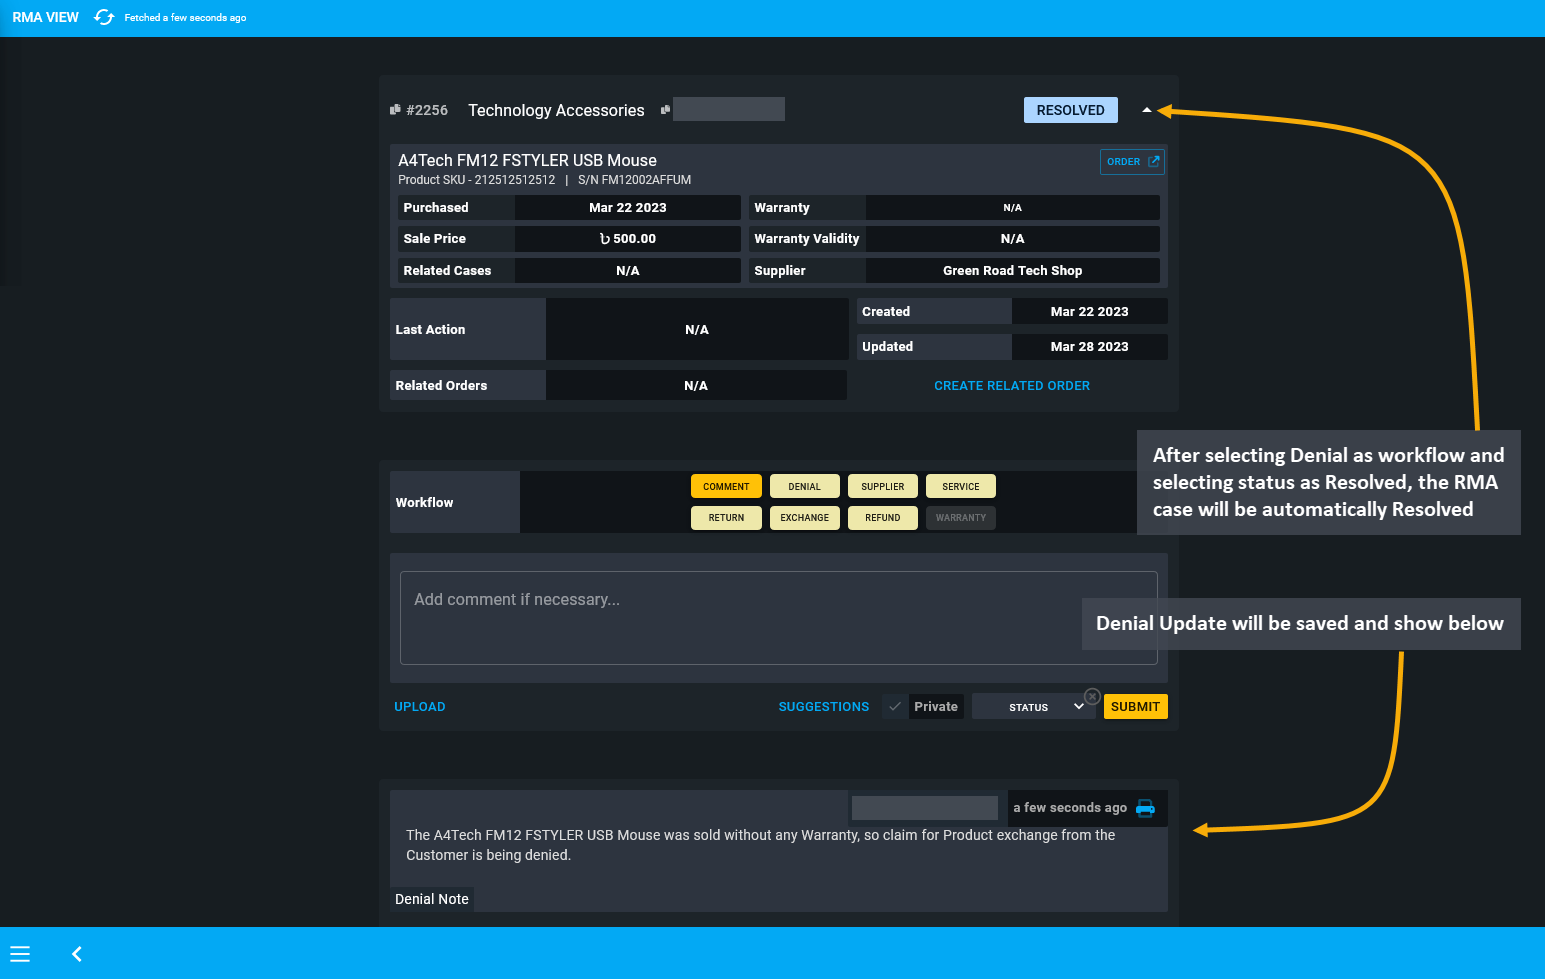
Image 3: After selecting Denial as workflow and selecting status as Resolved, RMA case will be Resolved.
3 - Supplier
Learn more about creating and managing RMA’s Supplier workflow actions for Products.
Supplier provides Warranty
Supplier indicates tracking all the communications with the Supplier. For instance, Shop Owner can update that to claim warranty, Product has been sent to the Supplier and all updates associated with it can be added within this workflow. Within the market, there are very few importers or Suppliers from whom the Shop Owner purchases their Products. Therefore, Shop Owners do not have the ability to provide warranty directly to their Customers.
In this case, the Shop Owner will communicate with Supplier regarding the Customer’s Product based on which they will add an update within this workflow. The Shop Owner will use this workflow to internally track the update by adding a comment provided by the Supplier. It could be uploading a file or adding a custom comment.
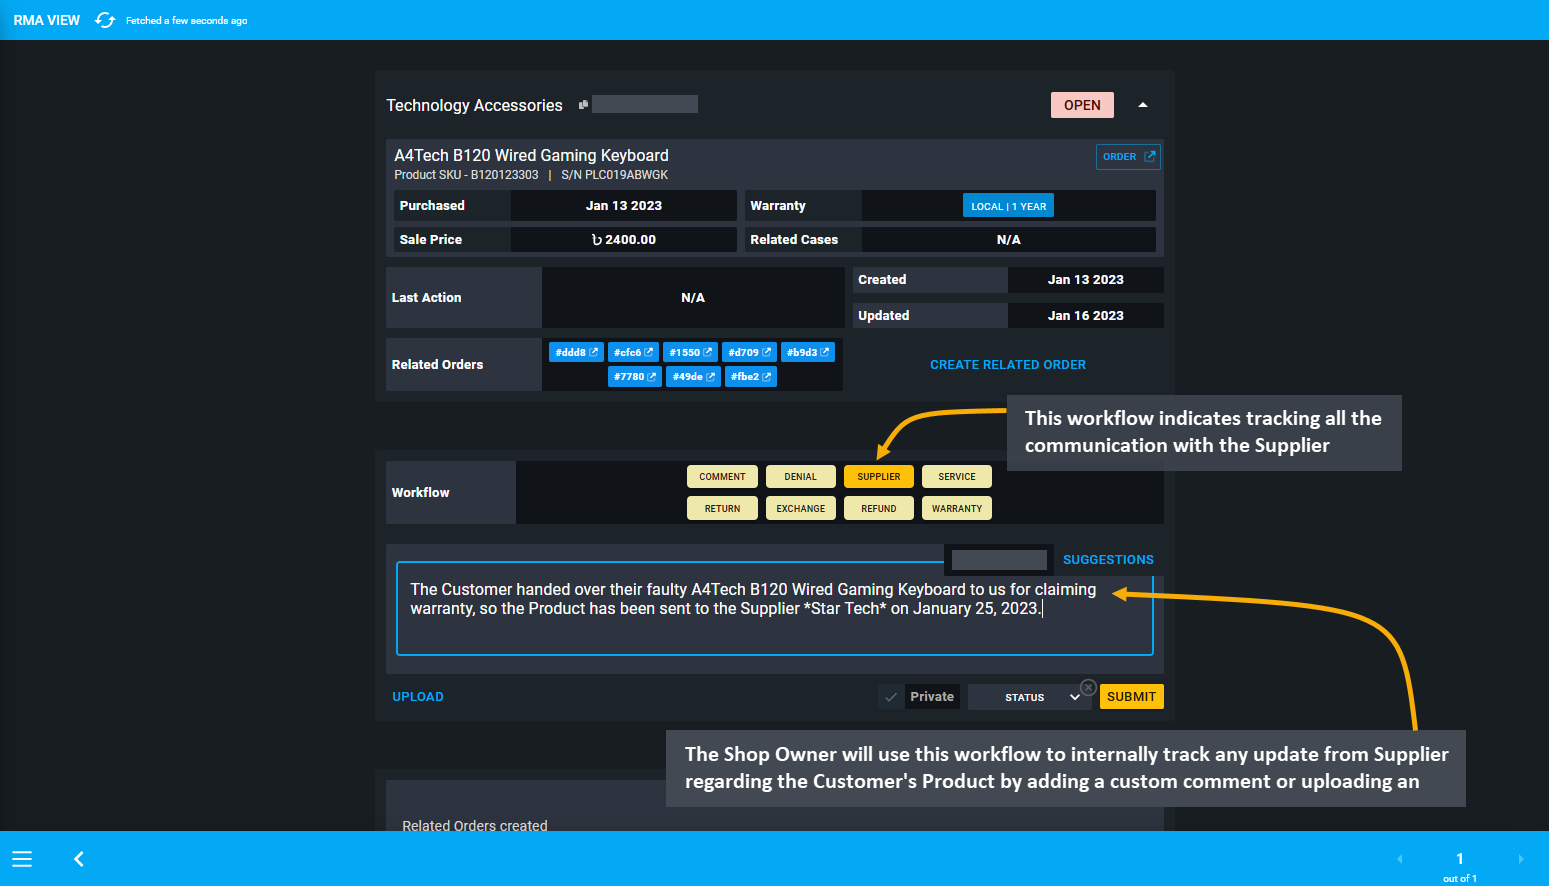
Image 1: This workflow indicates that the Shop Owner is tracking all the communication with the Supplier.
For instance, the Shop Owner purchased Products from Supplier Green Road Tech Shop to resell to Customers. So, if for any reason, the Customer handed over the Product to the Shop Owner for claiming warranty, they will send it to the Supplier. If the Supplier provides an update on the Customer’s Product after a week, then Shop Owner will add it under the comments within the Supplier’s workflow to keep record of communication.
Exchange of Faulty Product by Supplier
In another case, the Shop Owner purchased the Product A4Tech B120 Wired Gaming Keyboard from the Supplier Green Road Tech Shop and sold it to a Customer who found problems with keys on the keyboard after purchase. So, the Shop Owner will receive the faulty Product from Customer and write a note under the Supplier workflow after sending the Product back to Supplier for review and resolution.
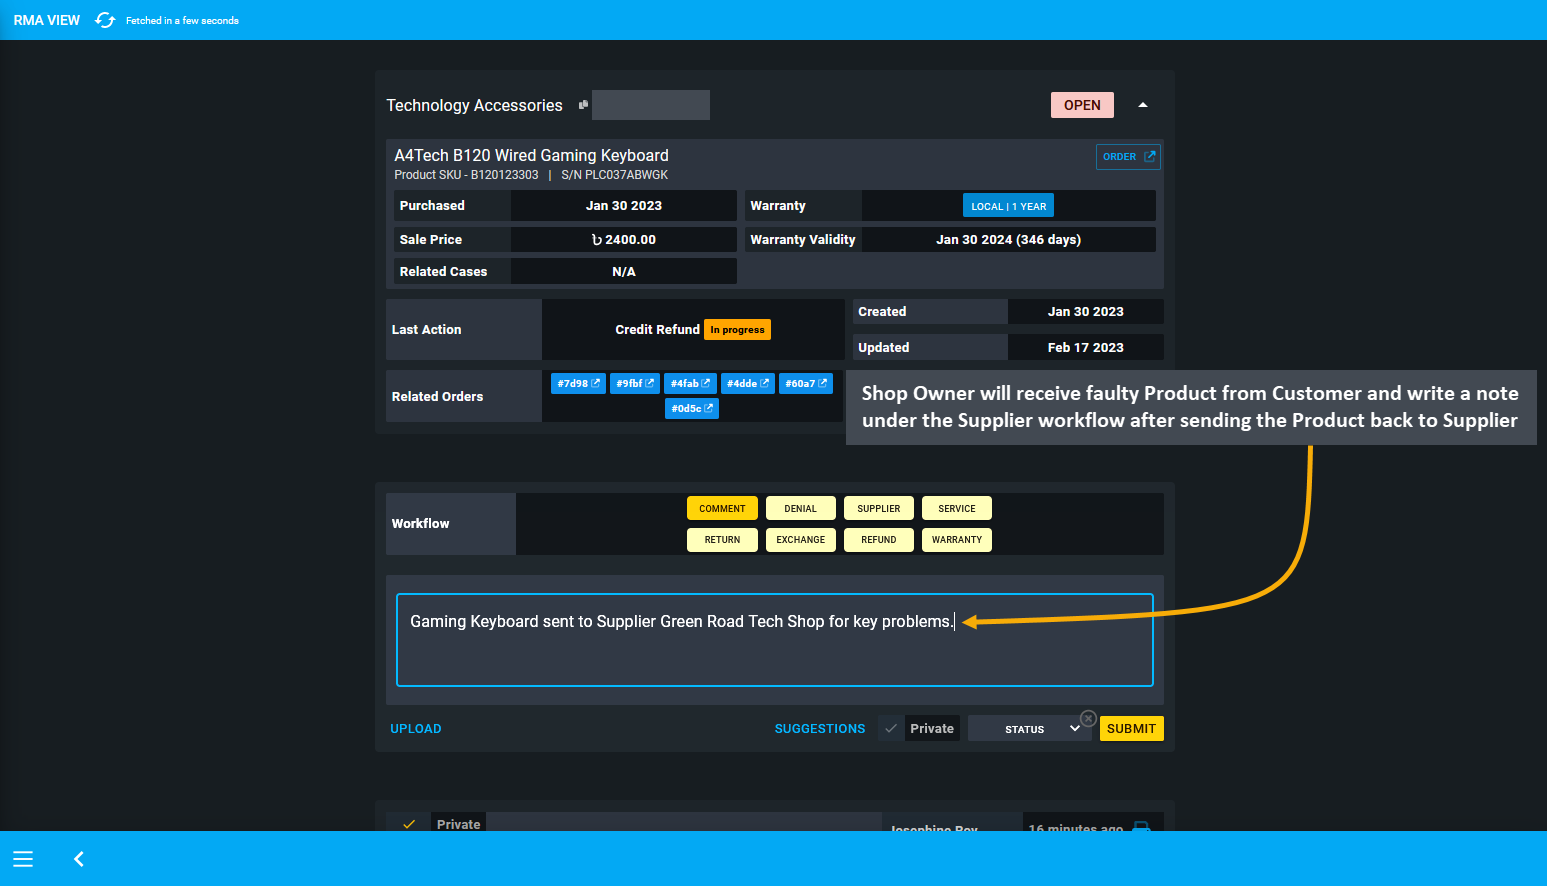
Image 2: Shop Owner will receive faulty Product from Customer and write an update under Supplier workflow.
The Supplier communicated back with Shop Owner and confirmed that the Product A4Tech B120 Wired Gaming Keyboard with Serial Number PLC037ABWGK was indeed faulty. Therefore, they are going to provide Shop Owner with another New Product A4Tech B120 Wired Gaming Keyboard. So, Shop Owner will have to purchase this as a New Product Stock. To do this, select Stock from Product A4Tech B120 Wired Gaming Keyboard on Product List.
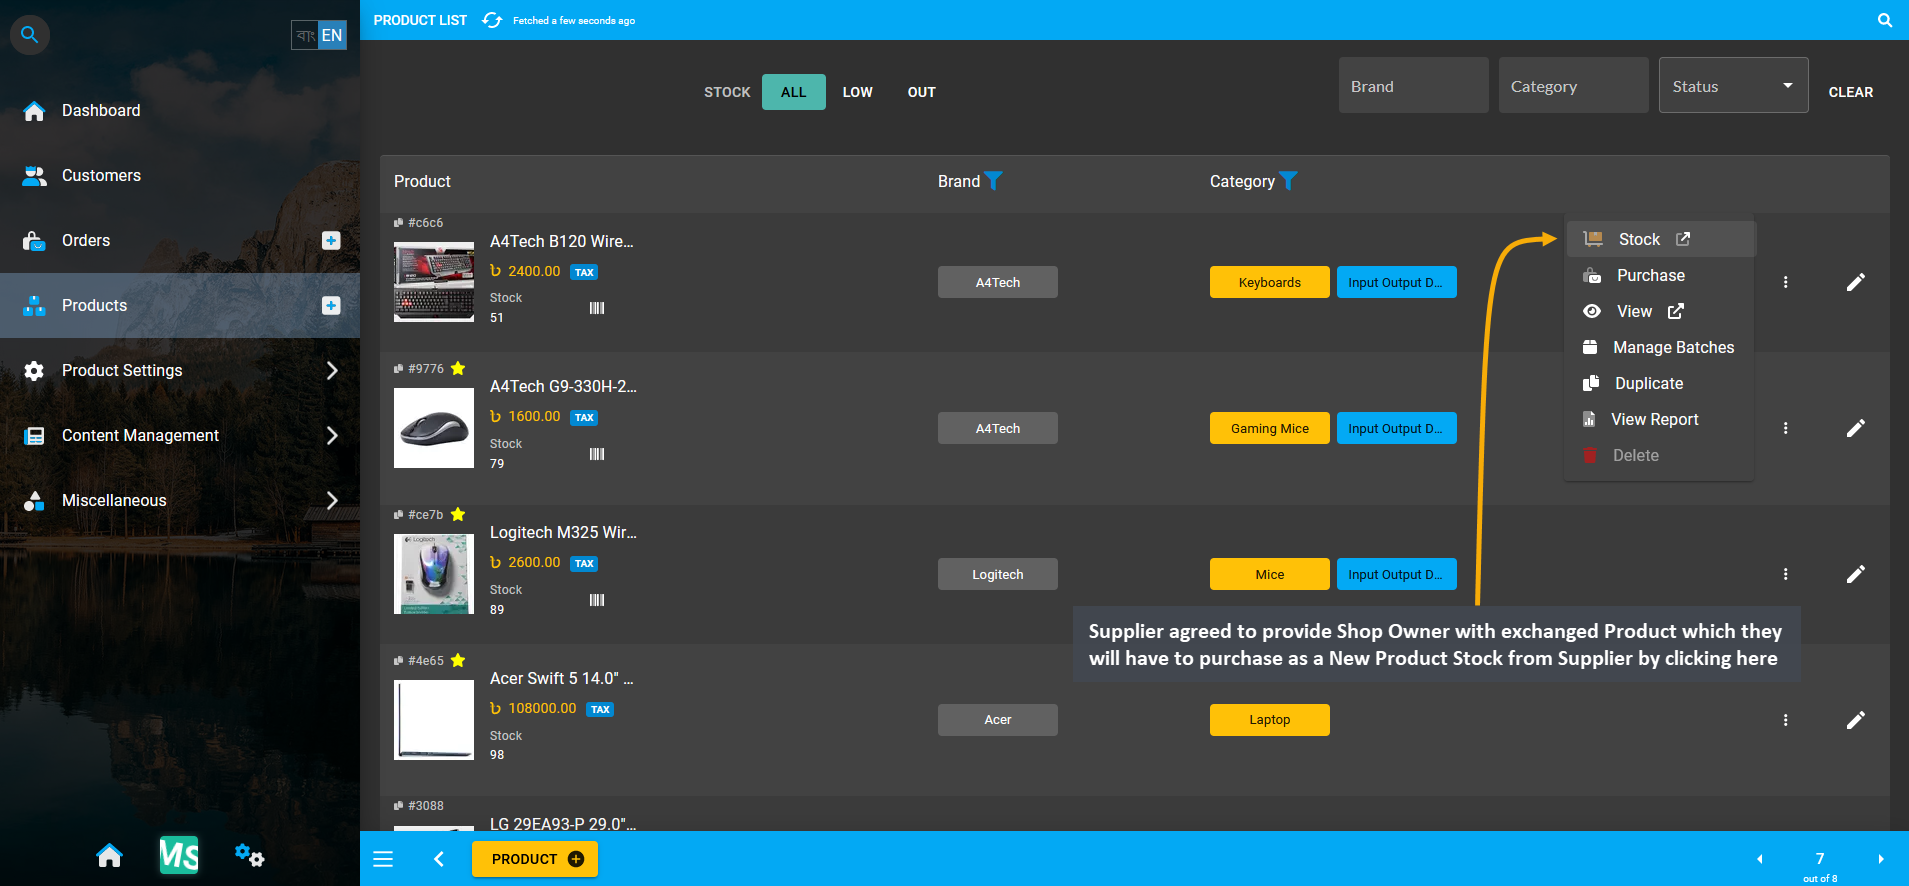
Image 3: Select Stock from target Product on Product List to purchase exchanged Product from the Supplier.
This will redirect to the Unit Stock Management page, so click Add Product Stock button that will redirect to Product Stock purchase page. Here, Shop Owner will purchase the New Product A4Tech B120 Wired Gaming Keyboard from the Supplier Without Payment as the Supplier Green Road Tech Shop is providing it as an exchange for the originally faulty Product with Serial Number PLC037ABWGK. So, set purchase price, select the Supplier and warranty plan.
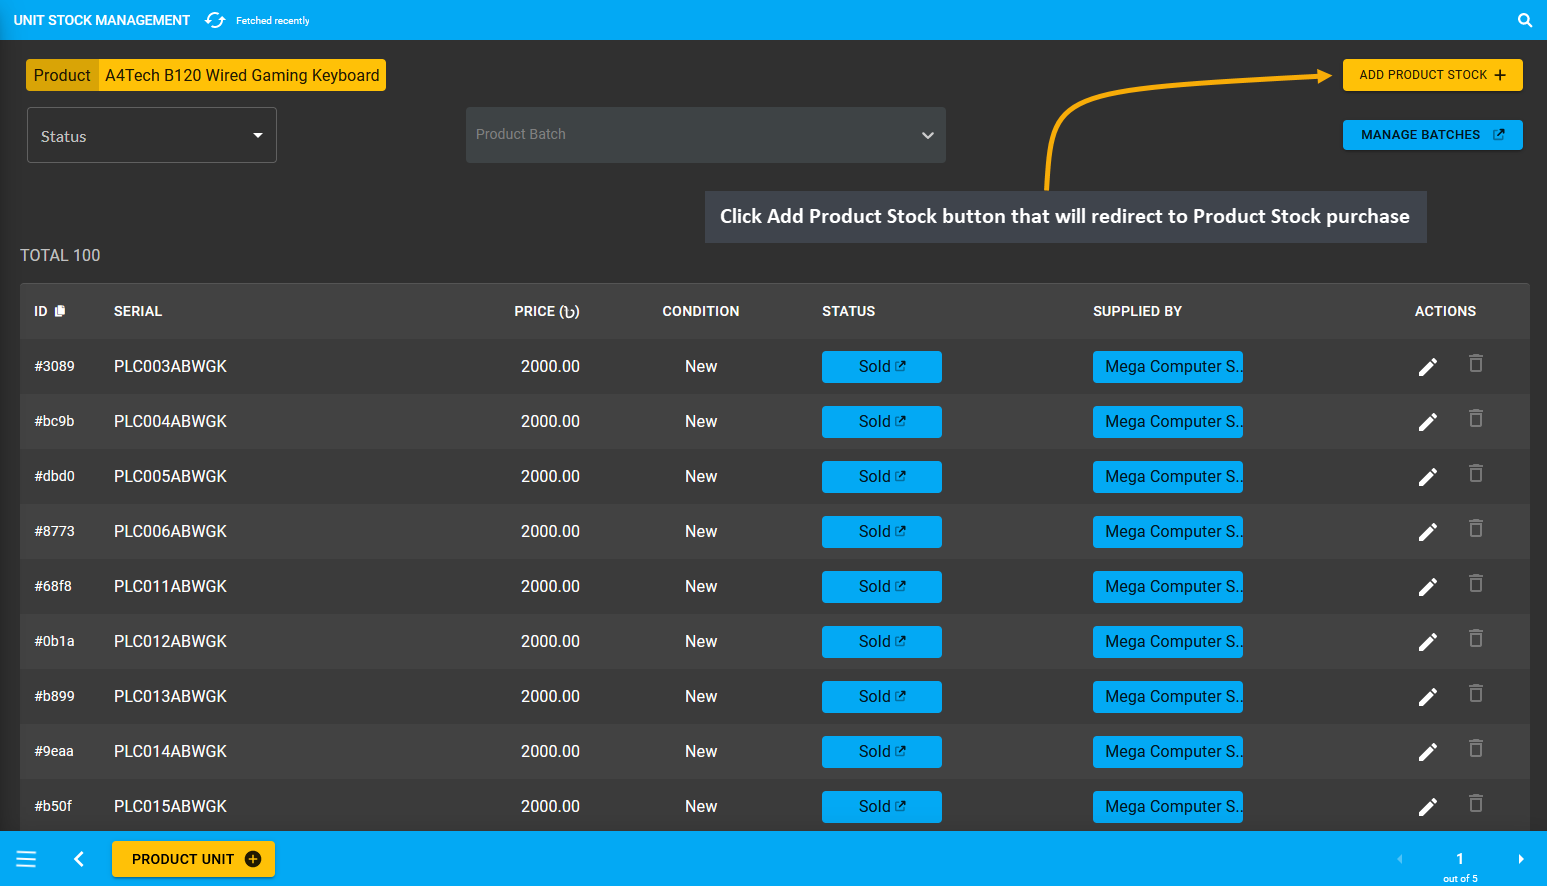
Image 4: Click Add Product Stock to be redirected to the Product Stock purchase page to buy from Supplier.
Then, add New Product Stock which Supplier will provide to Shop Owner by clicking Auto Generate Serial Numbers. Here, a New Product Stock from Supplier was generated with the Serial Number SUPPLIER1EXCHANGE. Add a note that, the Supplier has provided Shop Owner with a New Product mentioning the Product Serial and RMA Case ID.
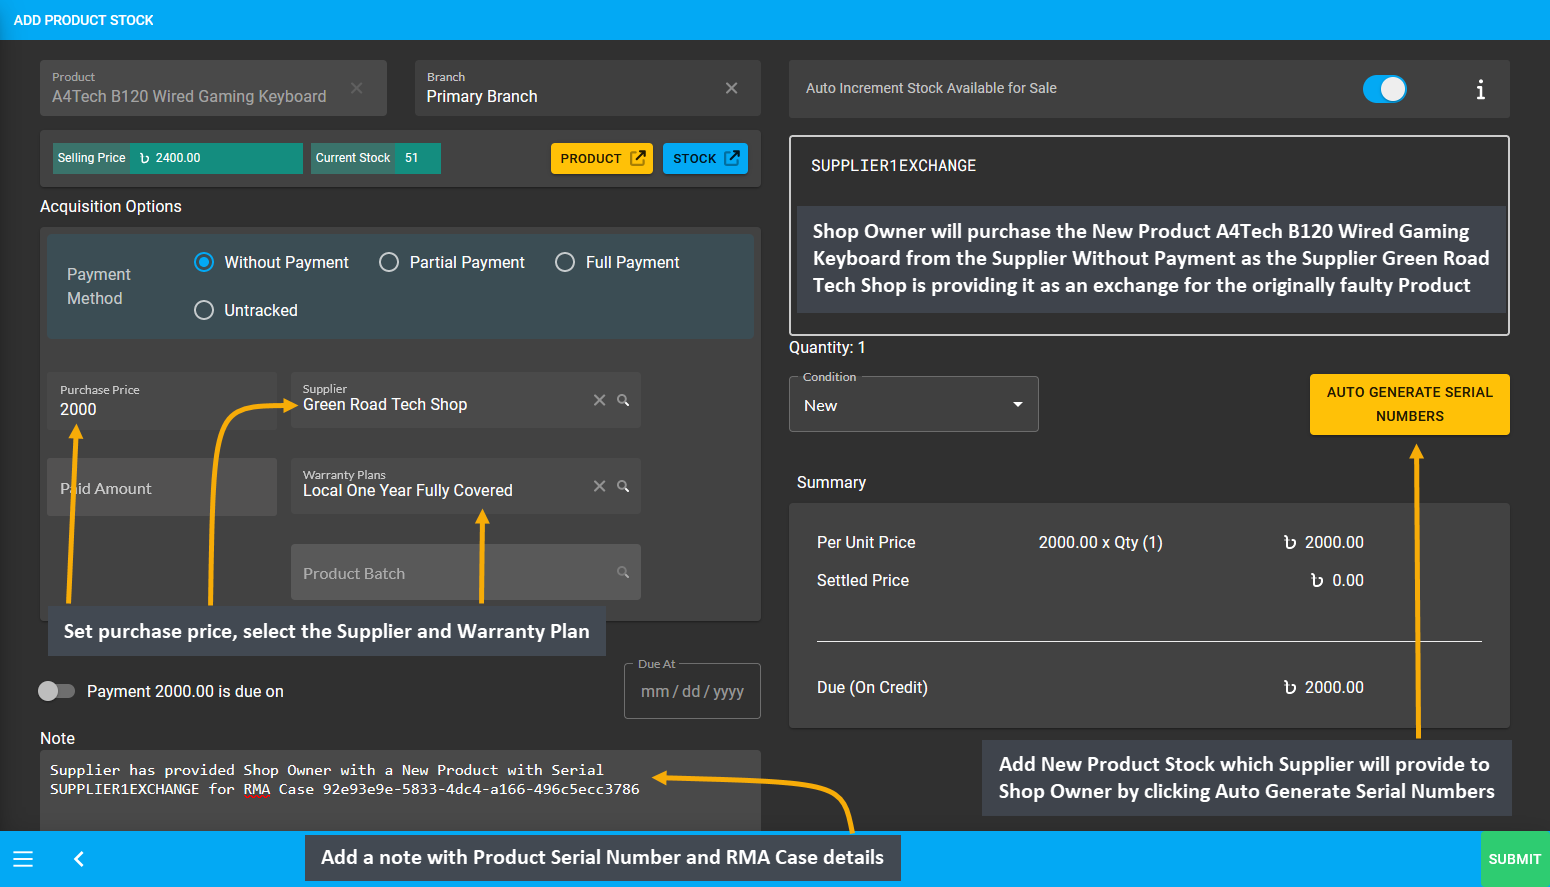
Image 5: Purchase exchanged Product from Supplier by adding Stock, selecting Supplier, and adding details.
After clicking Submit, the New Product Stock with Serial Number SUPPLIER1EXCHANGE will be updated on the Unit Stock Management page. Copy the Product Serial Number that will be exchanged with faulty Product on RMA case.
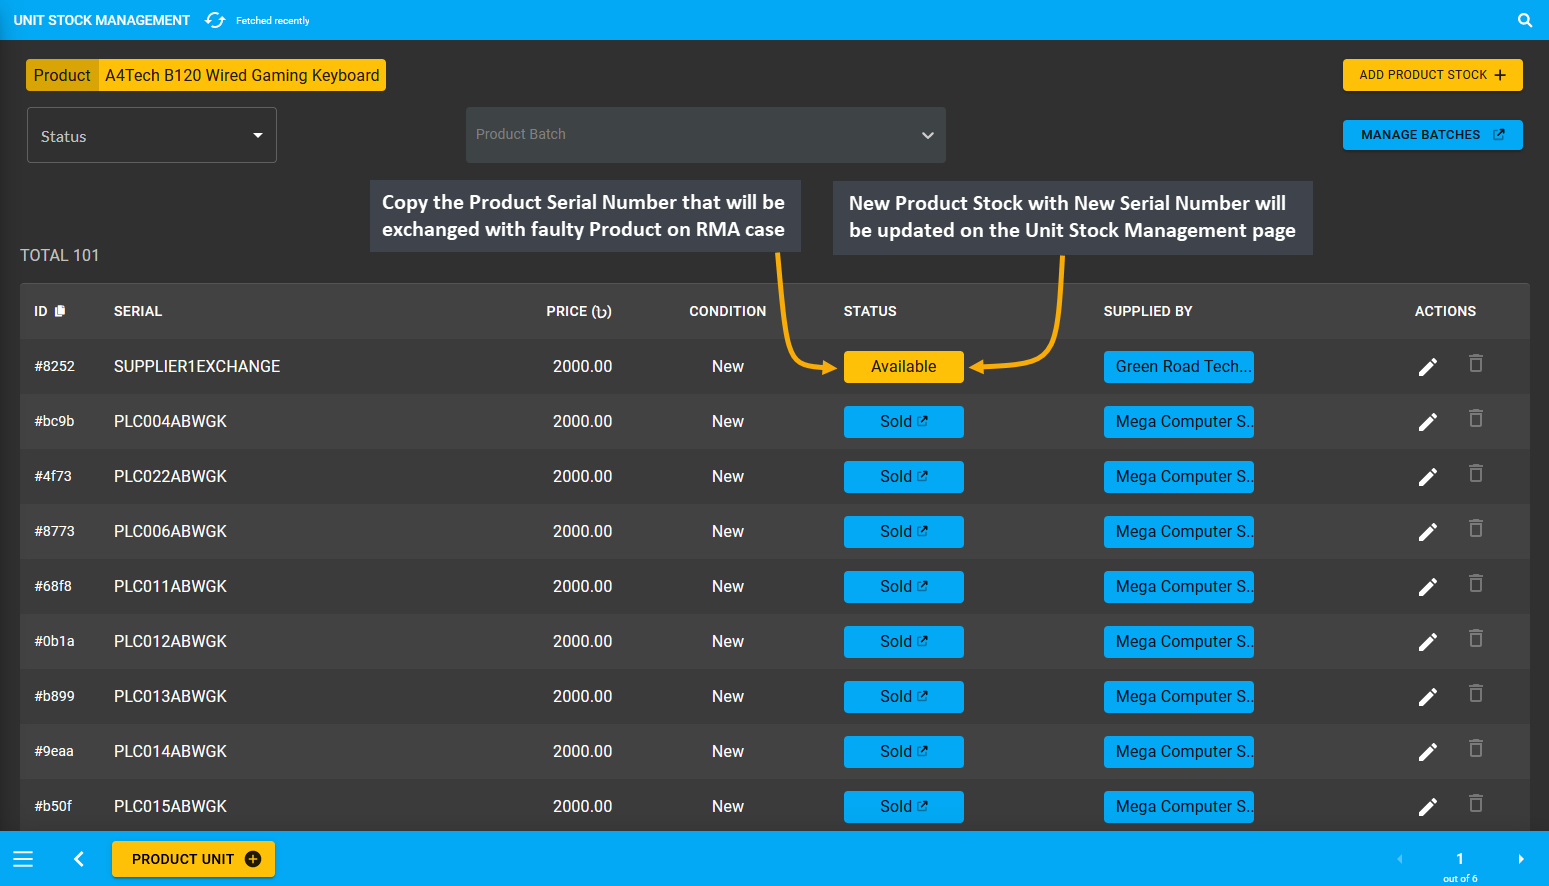
Image 6: New Product with Serial Number will be updated on Inventory, copy its Serial to use for Exchange.
Now, back in the RMA View page, the Shop Owner will have to open the Exchange workflow to give the exchanged Product to Customer that they have received from the Supplier. Within exchange details, input the Serial Number SUPPLIER1EXCHANGE and select Returned to indicate that the Faulty Product with Serial Number PLC037ABWGK has been returned back to the Supplier. Add a comment to indicate that the Shop Owner has received the exchanged Product from Supplier to provide it to Customer. Select Resolved as status to close the RMA case and click Submit.
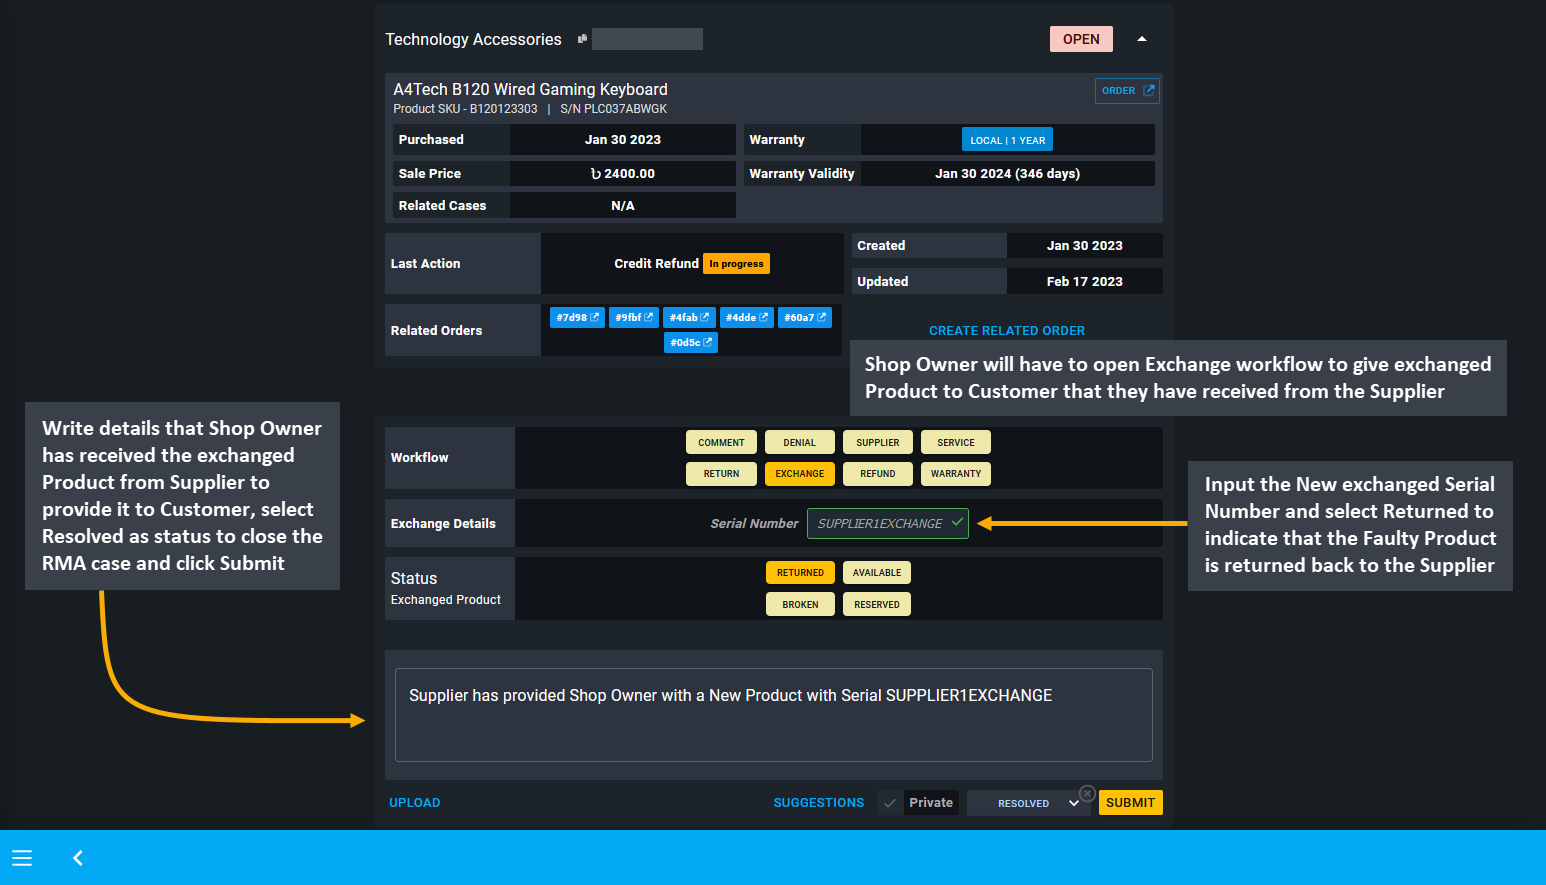
Image 7: Input the Serial Number of the New Product within Exchange Details box and select Returned status.
4 - Service
Learn more about creating and managing RMA’s Service workflow actions for Products.
Service Warranty for Repairing
Service means custom service warranty, it indicates any repairing done for the Product with payment from the Customer. Service warranty will be provided to Customer by the Shop Owner if their Product warranty is over. Hence, this option needs to be selected when the warranty period for the Customer’s Product is over.
If the Shop Owner wants to charge the Customer regarding non-warranty related services, they can also use the option to Create Related Orders. Creating a related Order or several related Orders for the RMA case will allow the Shop Owner to charge Customer for additional service for the Product. Related Orders can be created by the Shop Owner to sell a Product or a Product’s part to the Customer, or charge payment for service from the Customer.

Image 1: This workflow indicates any repairing done for the Product with payment from the Customer.
Related Orders can be created by the Shop Owner to sell a Product or a Product’s part to the Customer, or charge payment for Service from the Customer. For instance, if an RMA case needs to be resolved through Payment, then the Shop Owner can Create Related Order to charge Customer for Service or Product that they need to purchase.
For instance, if Customer contacted the Shop Owner about a Product that is having technical problems and asked for a replacement, but Warranty has expired, then Shop Owner will not provide exchange for the Product even if they are facing problems with it. In this case, if Customer wants to purchase the same Product, then they can ask for Service for which a Related Order can be created with additional payment from the Customer.
The Related Order that will be created under the Service workflow will get recorded under Related Orders on RMA case. To create a Related Order, the Shop Owner can add a Comment to keep record of why the Related Order was created. After clicking the Create Related Order button, Order Cart will open with Customer’s information prefilled.
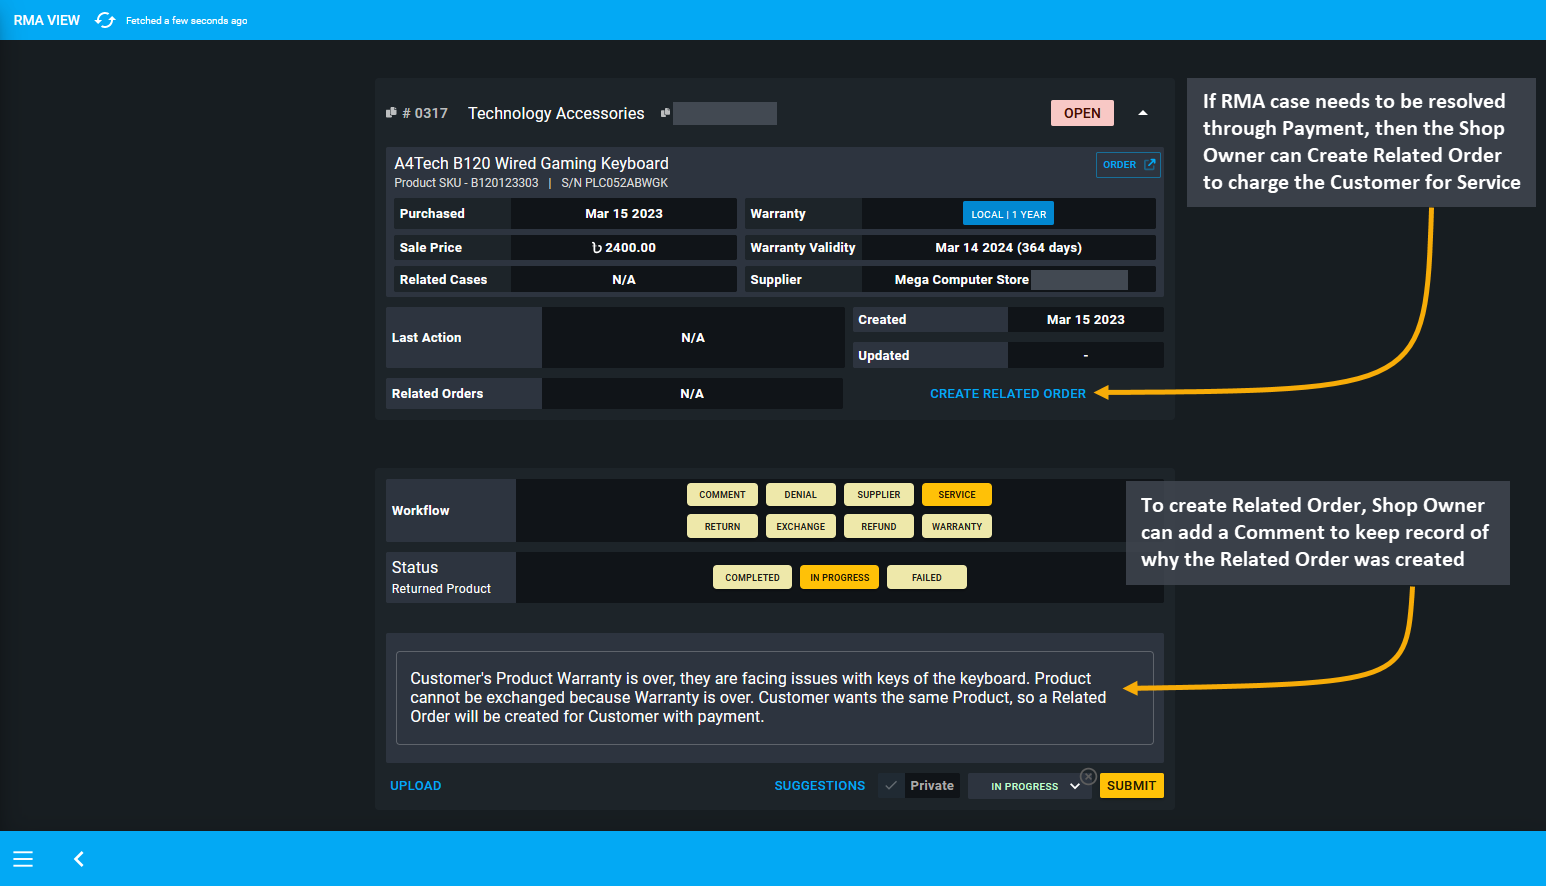
Image 2: If an RMA case needs to be resolved through Payment, then Shop Owner can Create a Related Order.
Therefore, Shop Owner will now have to add the Product to Cart for which additional payment will be charged. Assign the Stock for the Per Unit Product and check Product quantity, Order total, subtotal. Click on the Proceed button to charge Product payment from the Customer for the Related Order of the RMA case.
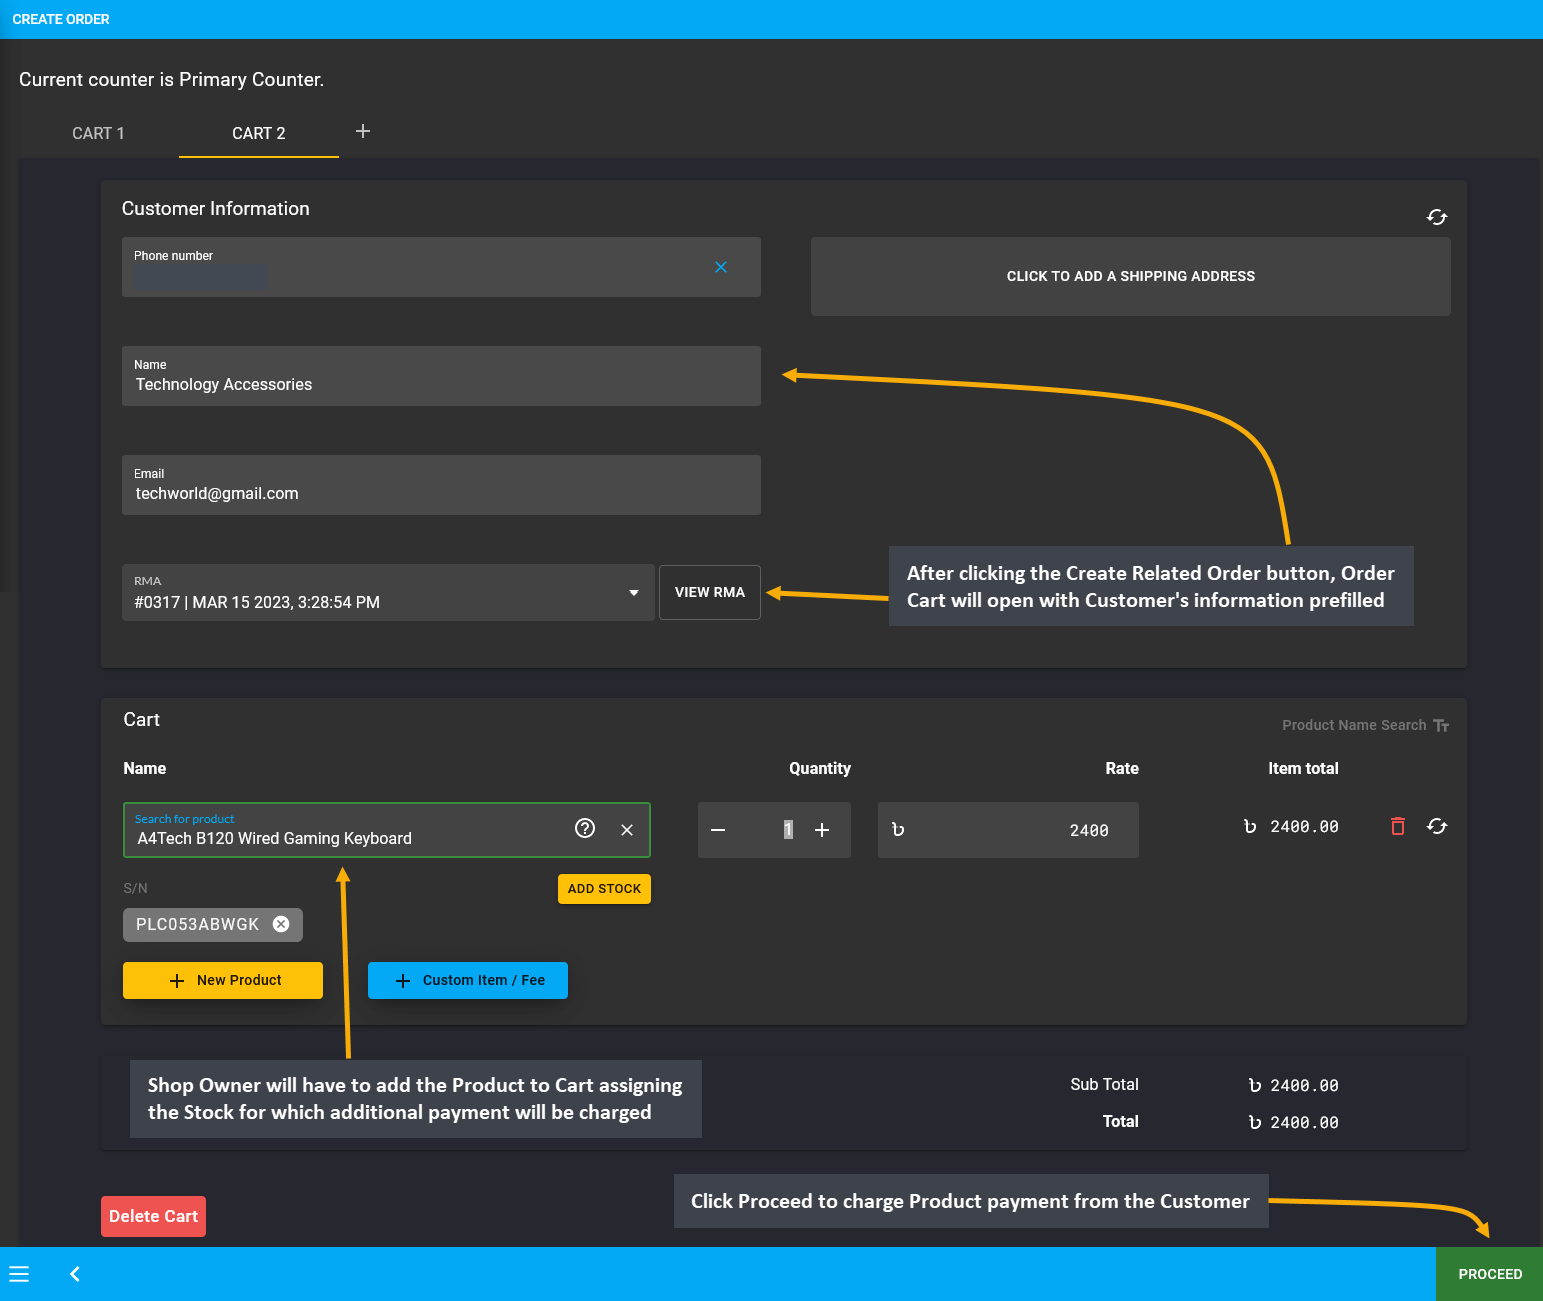
Image 3: The Shop Owner will have to add the Product to Cart for which additional payment will be charged.
In the following page, select Customer’s preferred Shipment and Payment options. Add a note stating that Related Order was created upon Customer’s request for the RMA case to purchase the same Product with payment under Service as the original Product is out of Warranty. Click Confirm Order to create the Related Order for RMA case.
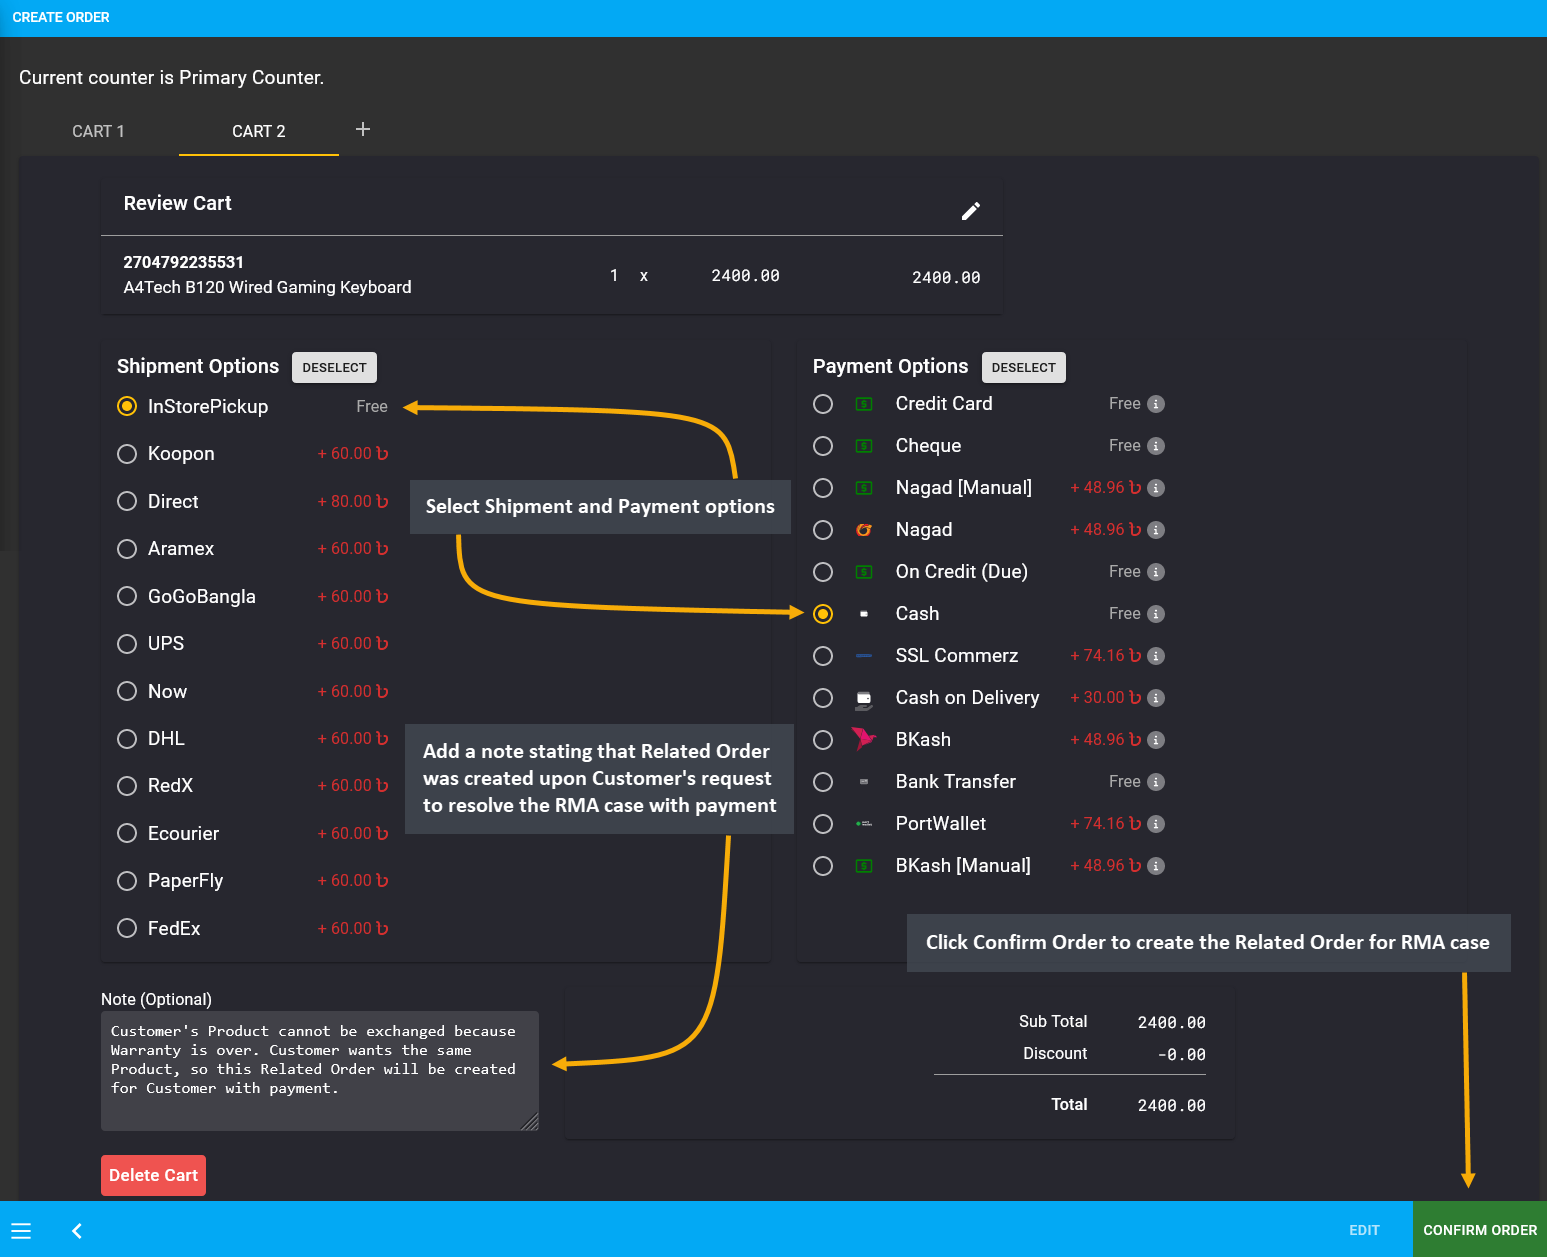
Image 4: Related Order was created upon Customer's request to resolve the RMA case Warranty with payment.
After Order is completed, Shop Owner can click View Order button that will automatically redirect to the Related Order on the general Order List. It will display the note which explains that the Order is related to RMA case.
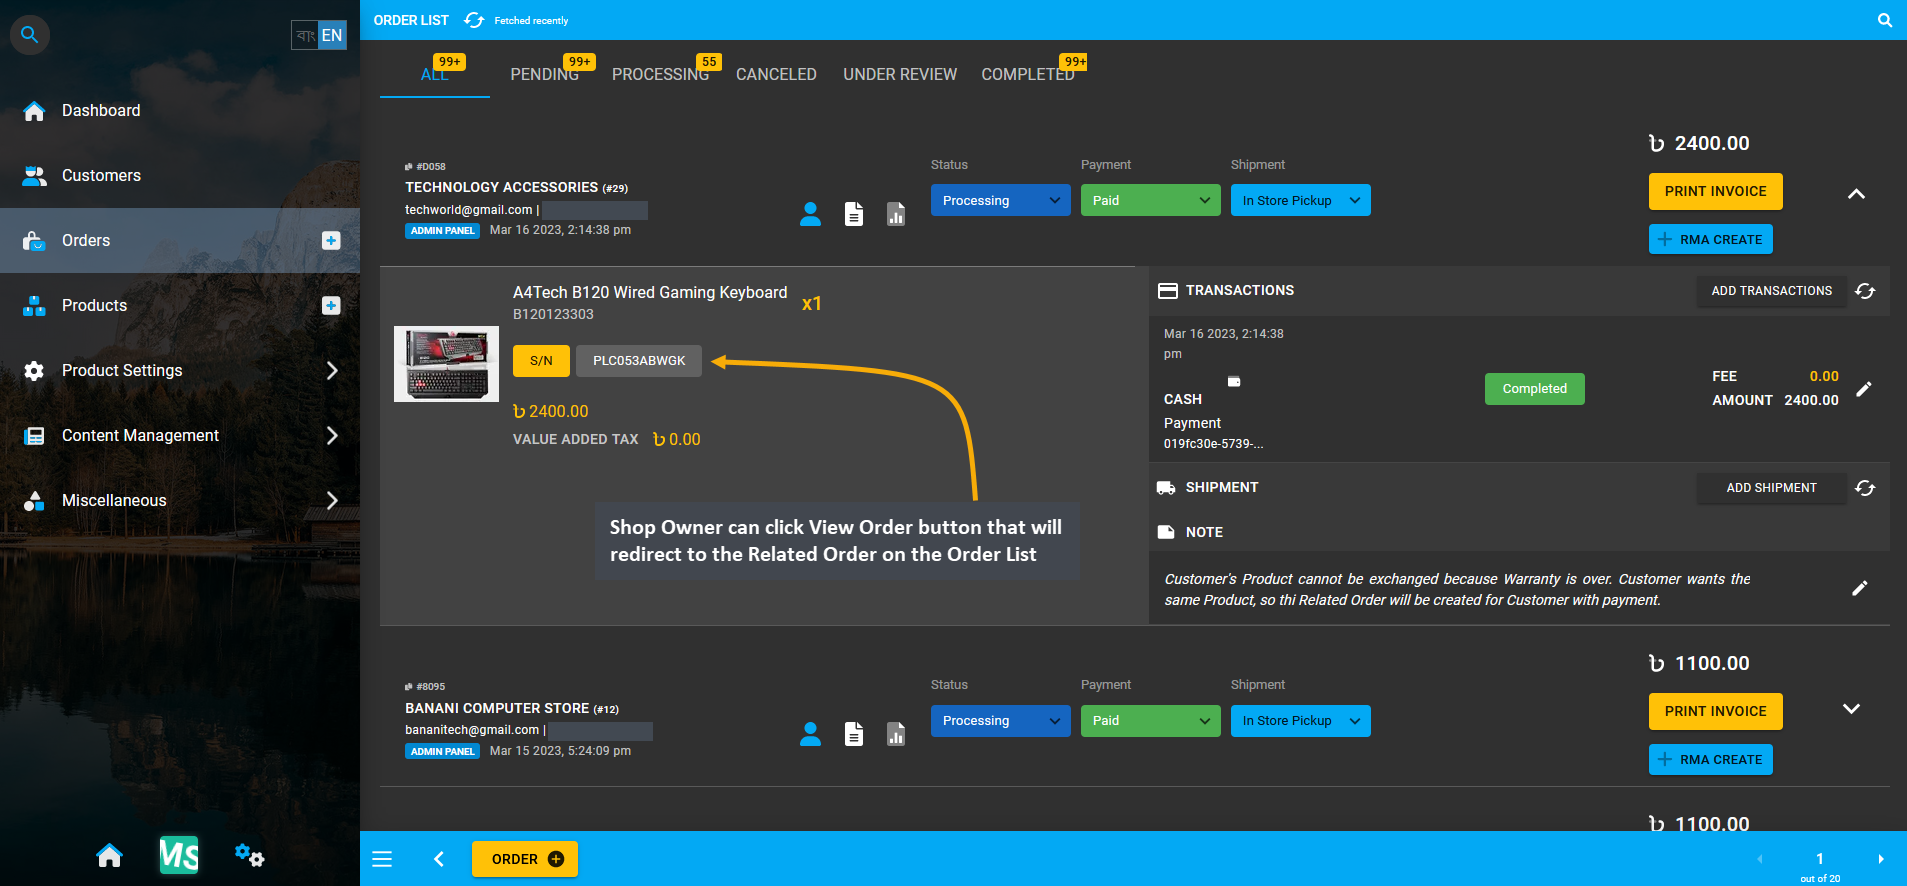
Image 5: Shop Owner can click View Order button that will redirect to the Related Order on the Order List.
Back in the RMA case, the Related Order created as Service with payment for the expired Warranty case will show under Related Orders tab. For convenience, Shop Owner can select Completed status under Service workflow. They need to select the final status as Resolved to close the RMA case as non-warranty related Service was provided to the Customer with additional payment through purchase of another A4Tech B120 Wired Gaming Keyboard.
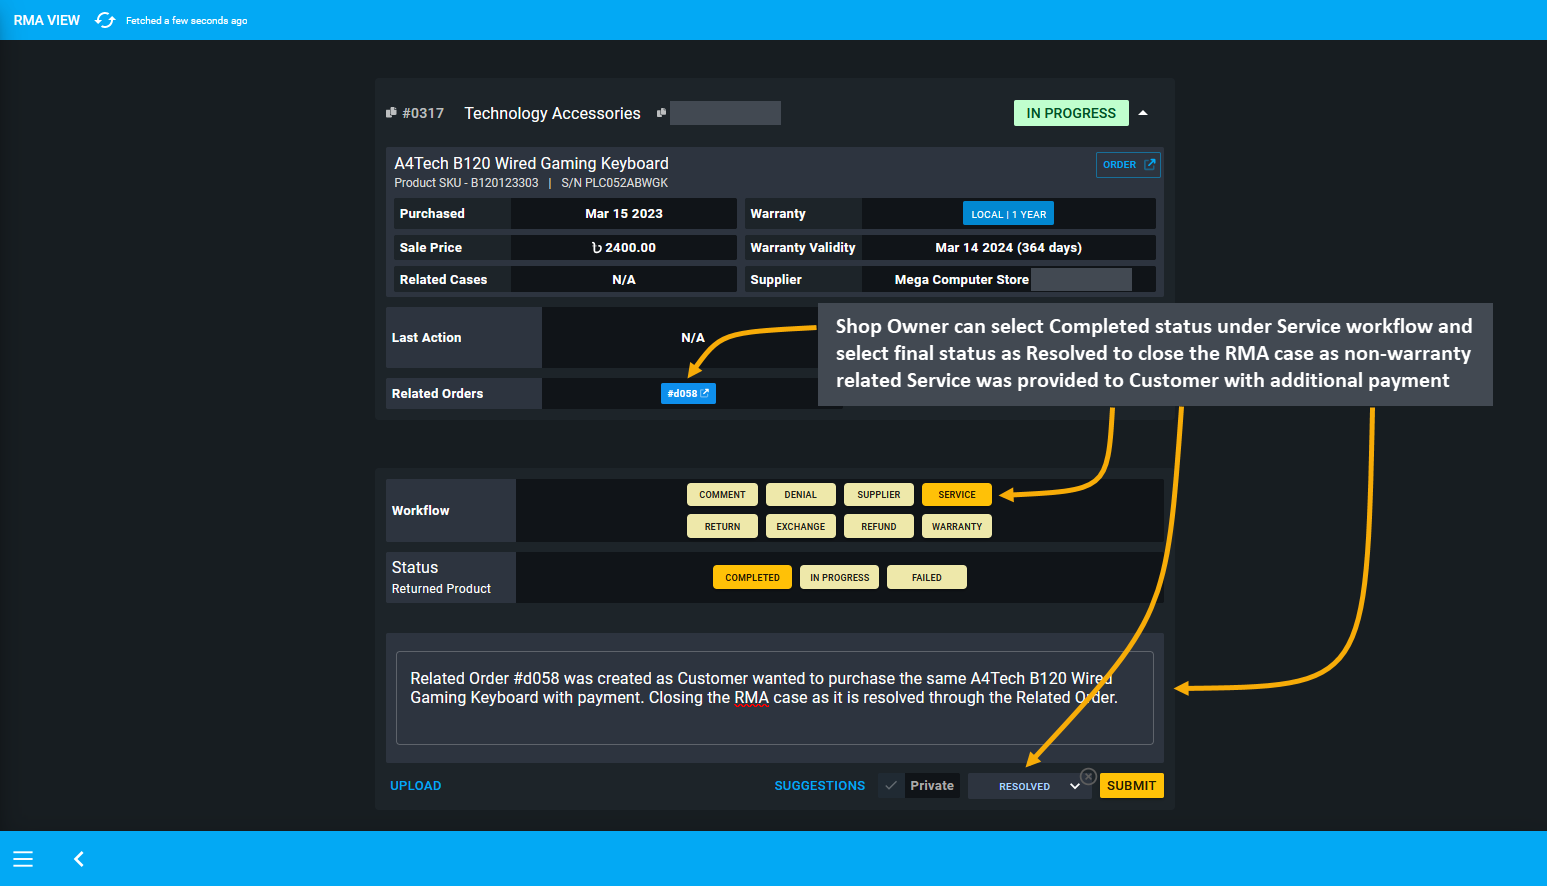
Image 6: Shop Owner can add a Comment stating details and select status as Resolved to close the RMA case.
5 - Return
Learn more about creating and managing RMA’s Return workflow actions for Products.
Return of Product by Customer
If the Customer wants to return a Product back to the Shop Owner for some reason, the Shop Owner can restock it back. When Return is selected as the workflow, the Shop Owner will have to select how they want to restock the Product from Returned, Available, Broken, and Reserved which will determine the status of the restocked Product.
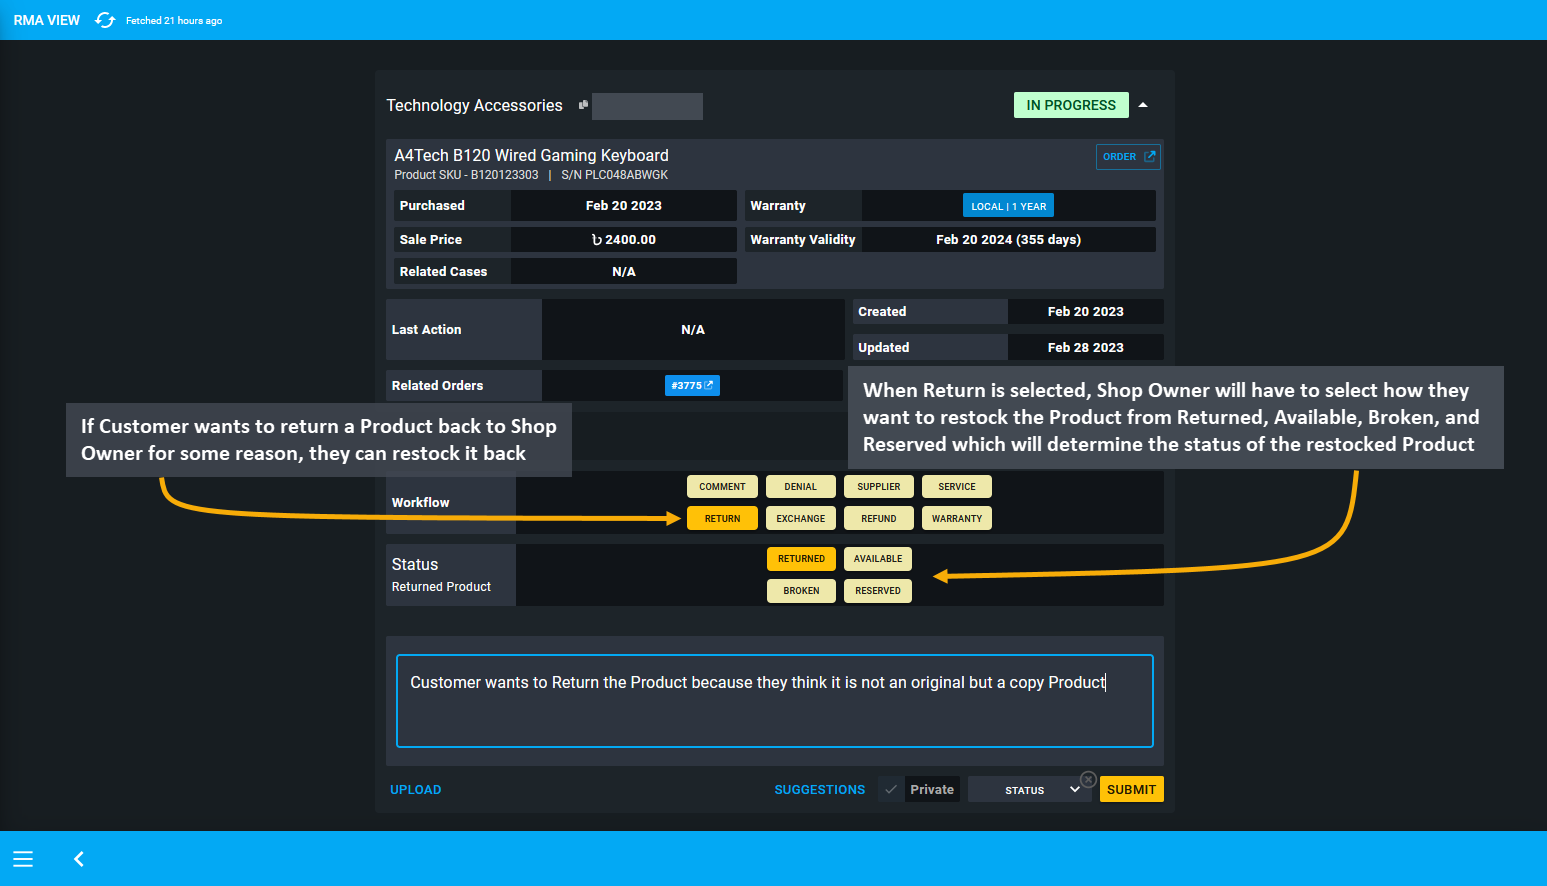
Image 1: When Return is selected, Shop Owner will have to select how they want to restock the Product.
Restock Product under Returned and Available
If the Customer wants to return the Product completely, then Shop Owner will have to select Returned and then refund Customer upon the return of their Product, because a Refund will typically follow after Return. Selecting Available will allow Shop Owner to restock the Product and resell it. Selecting Returned or Available will allow them to restock and resell the Product from the system, but selecting Broken or Reserved will not allow reselling.
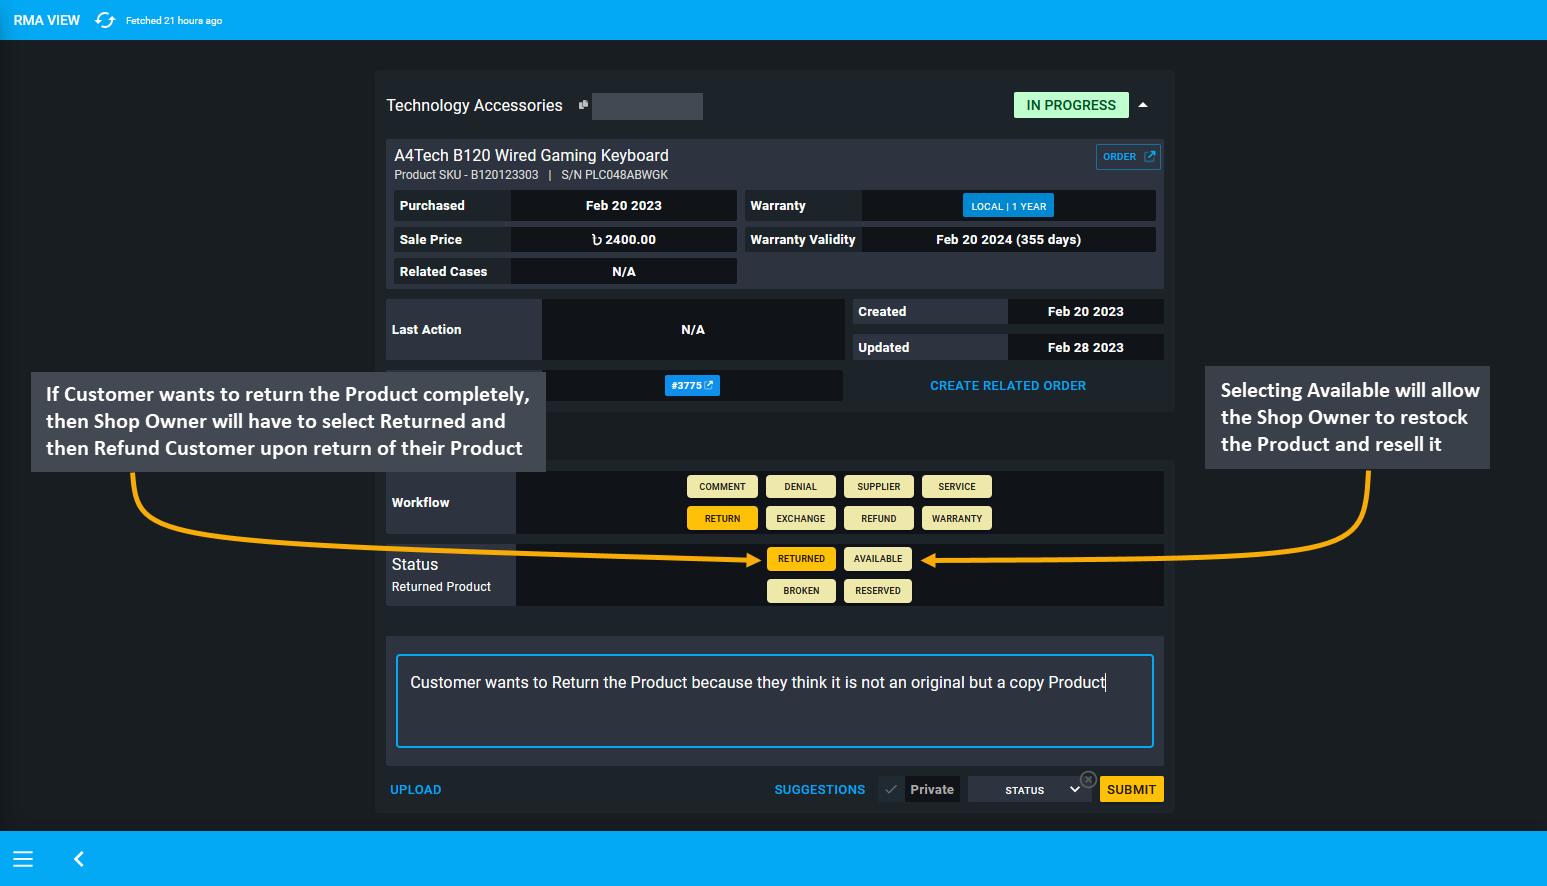
Image 2: Selecting Returned or Available will allow Shop Owner to restock and resell Product from system.
Restock Product under Broken and Reserved
If the Shop Owner does not want to resell the returned Product from the Customer, then they will have to select Reserved which will not allow selling the Product from the system. When Shop Owner wants to keep the returned Product as Reserved, it could mean that they want to test the Product to find out the cause of its defect etc. Also, selecting the option Broken will mean that the Product is completely broken beyond repair and cannot be reused.
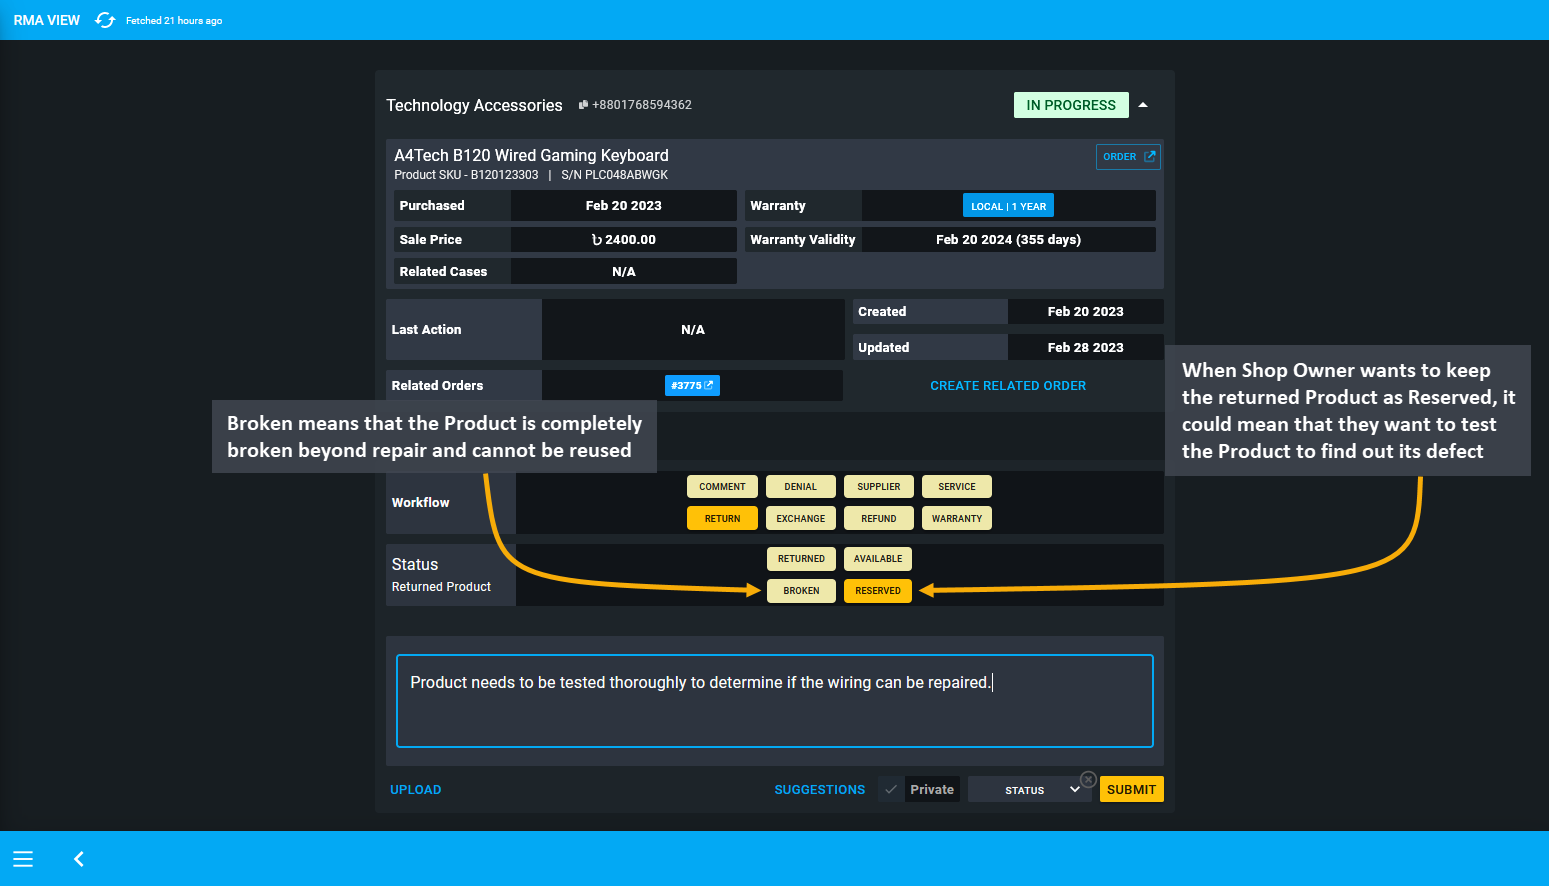
Image 3: Selecting Reserved or Broken will mean that Product has defects or it is broken beyond repair.
If the Shop Owner takes the Product Returned from Customer and resell it to another Customer, then it should display under the Related Orders on the RMA case.
Refund Customer after Product Return
After Customer have Returned their Product, Shop Owner will have to refund them in Full or Partial amount based on the Product condition. Typically, a Refund will always follow after Product Return. For this, the Shop Owner will have to select Refund as workflow and select the refund amount. If they want to issue Full Refund, they will have to select Full from Refund Amount, which will be highlighted under Refund Summary before refund is requested.
If they want to issue a Partial Refund, they will have to select Partial from Refund Amount and input partial refund amount that they would like to issue in the box beside it. Add a comment and click Submit to issue the refund.
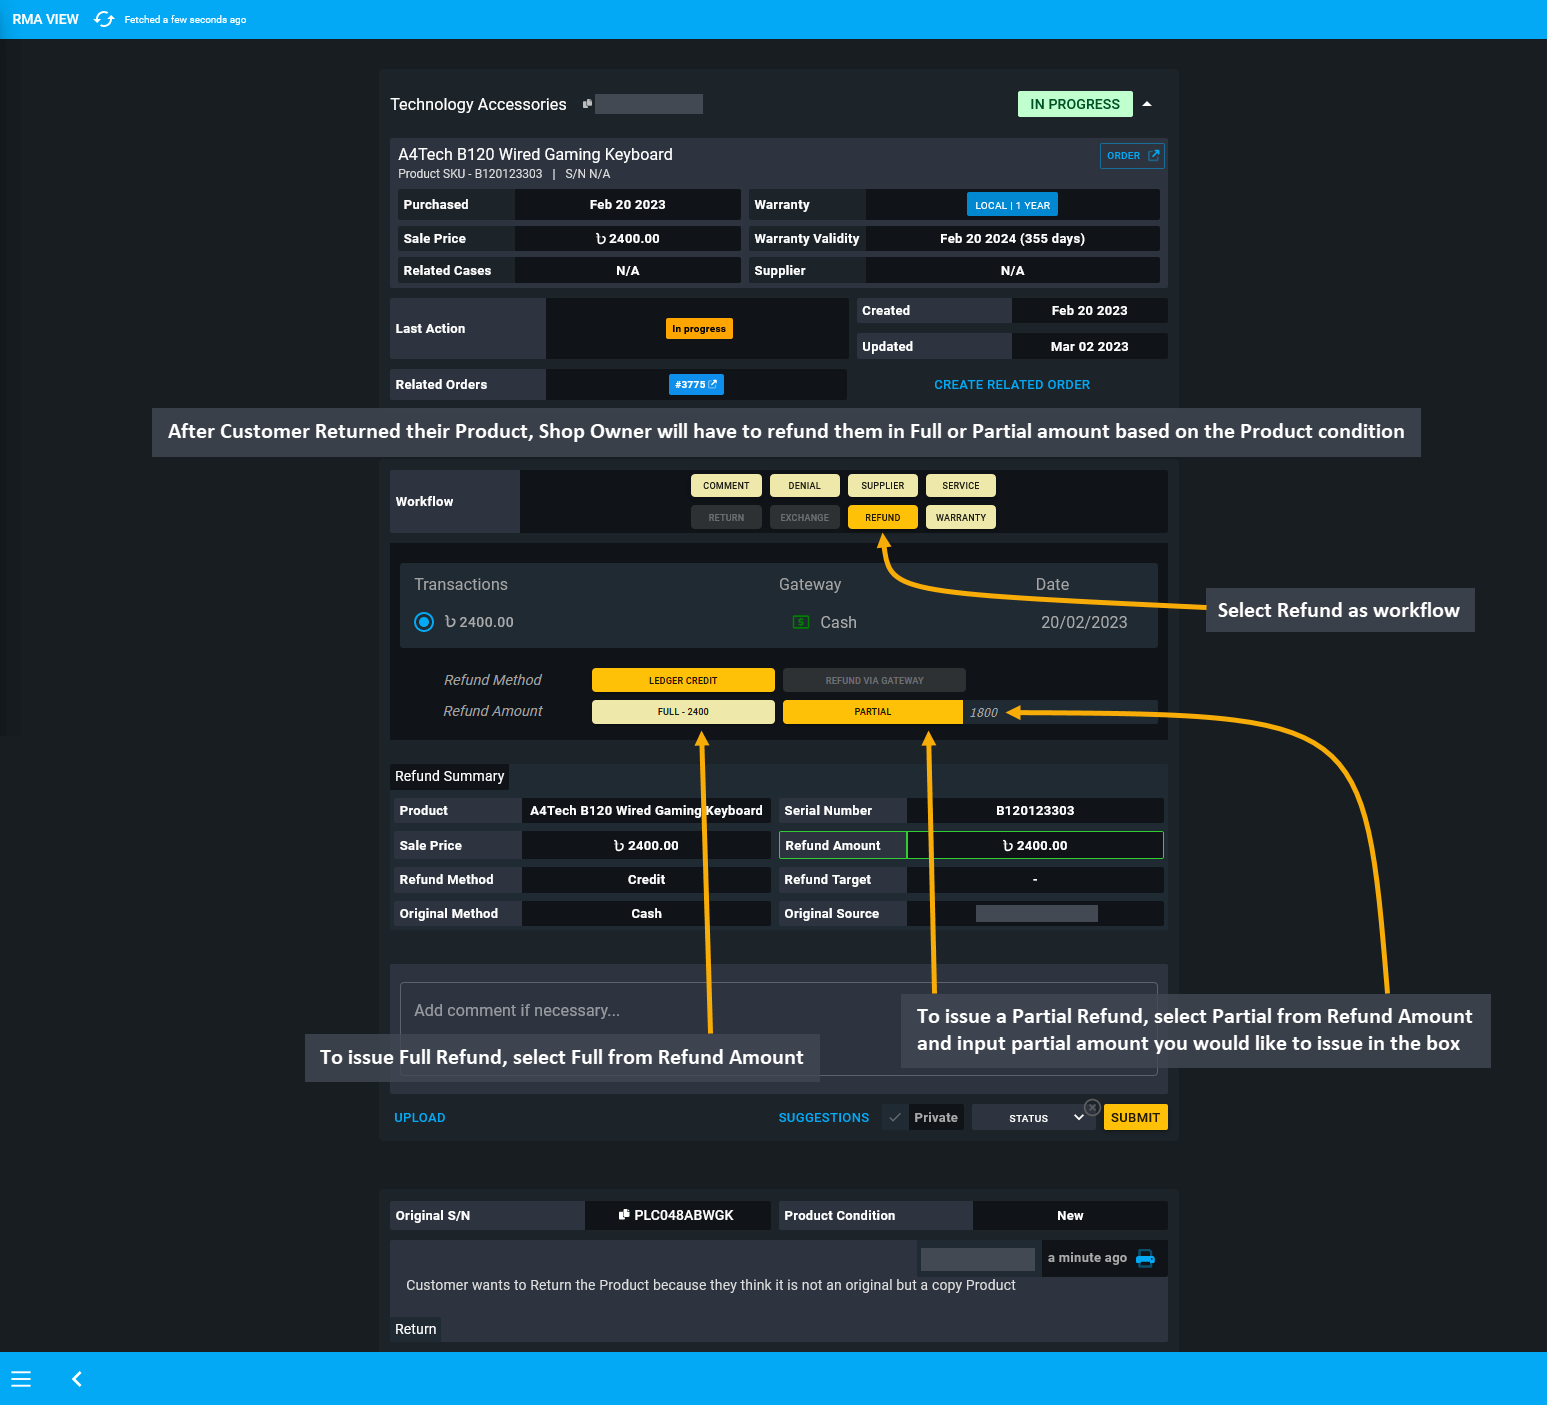
Image 4: Shop Owner will have to refund them in Full or Partial amount based on the Product condition.
Shop Owner must record under Comments the reason behind the Refund to refer back in future. If Full Refund is issued after Customer Returned their Product, then Shop Owner can select RMA case status as Resolved to close it.
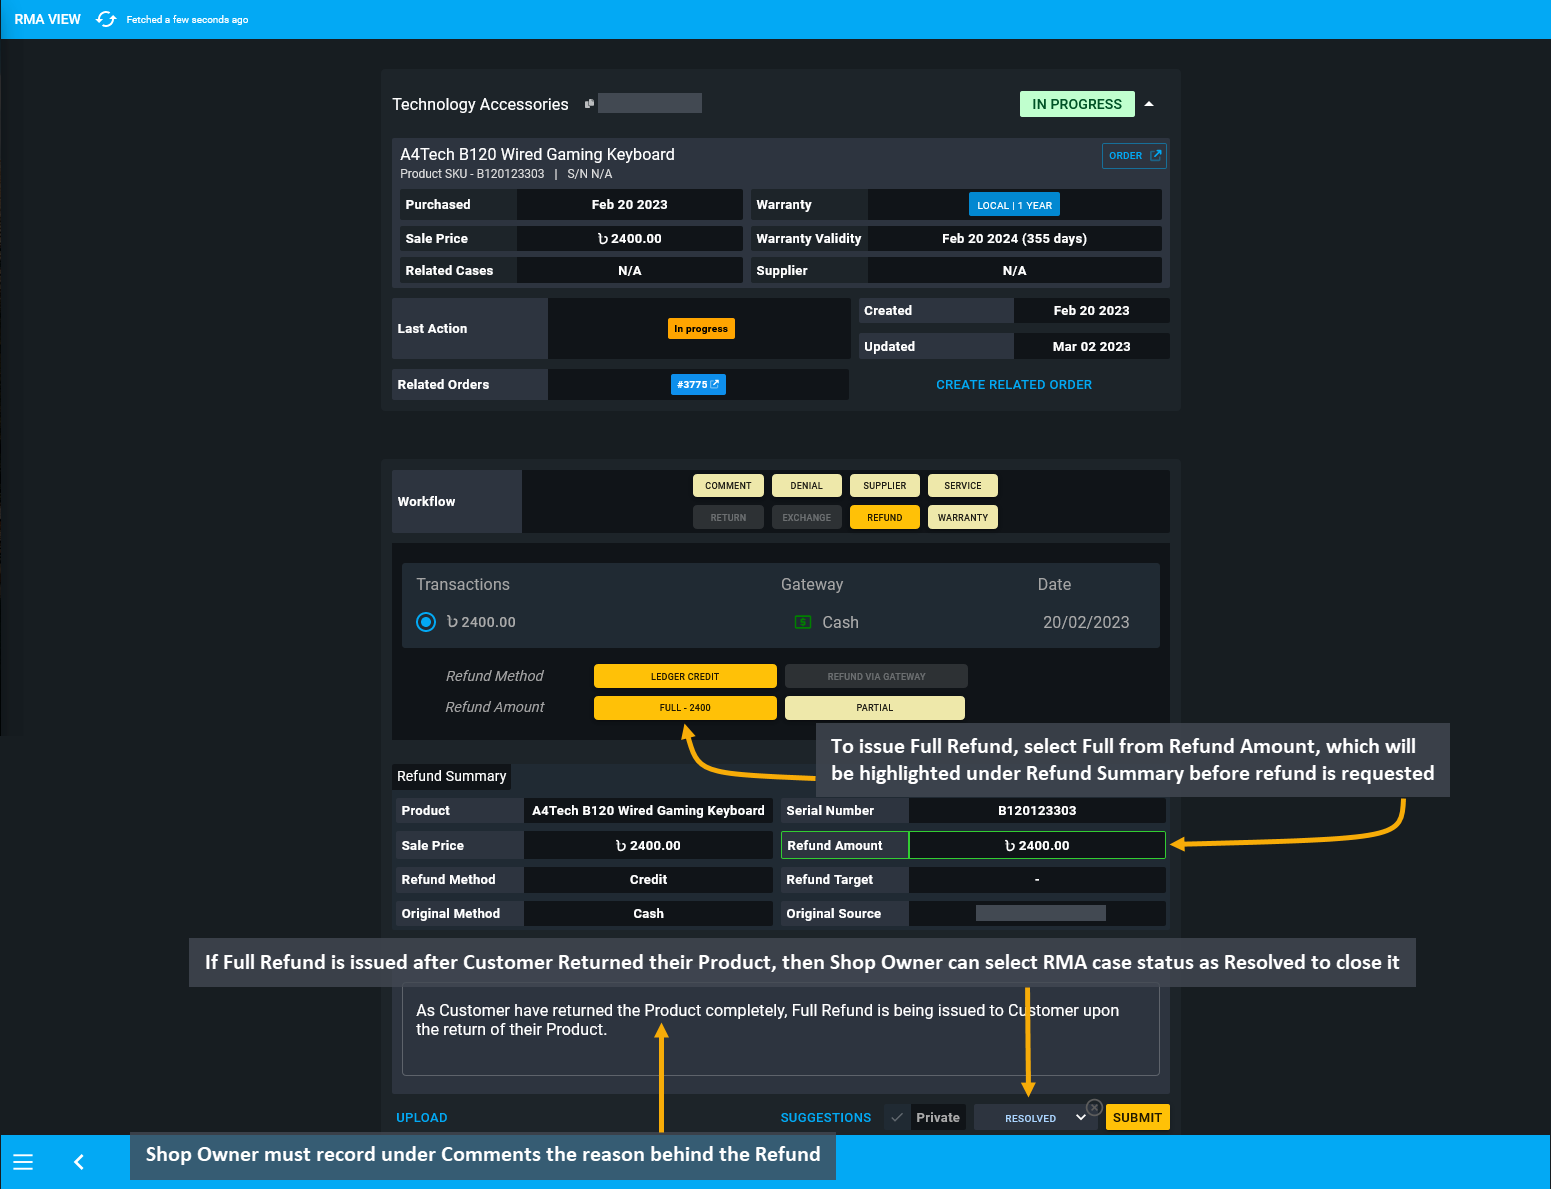
Image 5: Shop Owner must record under Comments the reason behind the Refund to refer back in future.
Once the Shop Owner selects RMA case status as Resolved, the case will be closed. Also, as Refund was issued to resolve the case, it will be recorded under Last Action, displaying Credit Refund as Completed. Furthermore, as the Product was Returned completely to Shop Owner, the Per Unit Product Serial Number will show as N/A.
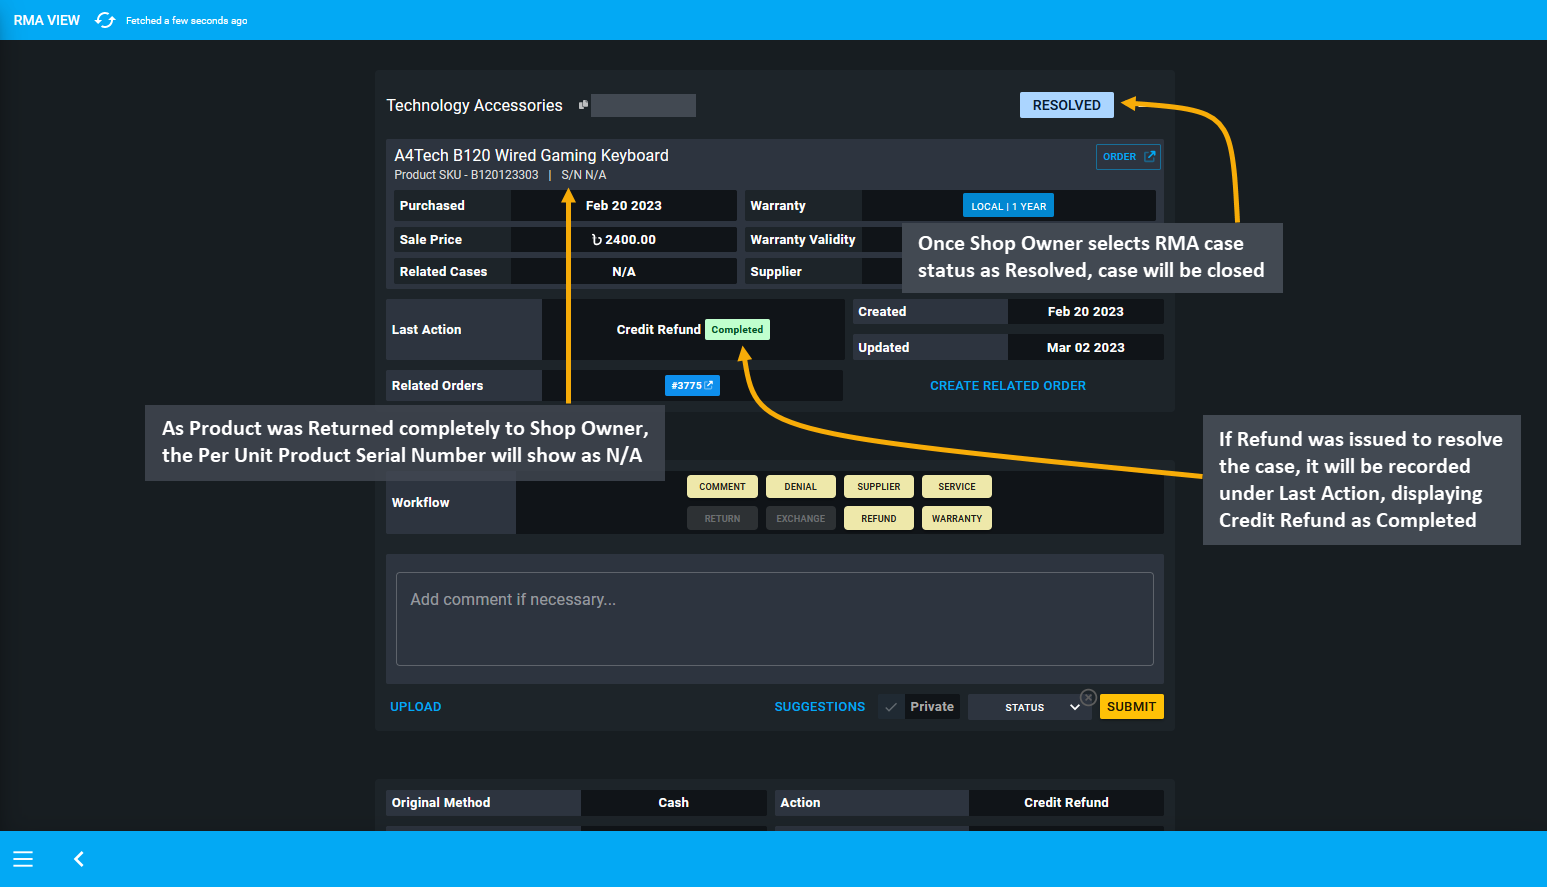
Image 6: If Refund was issued to resolve the case, it will display Last Action Credit Refund as Completed.
Returned Product Restocked
If the Shop Owner wants to find the Customer’s Returned Product at the inventory, then they will have to go to the Product List page and select Stock from target Per Unit Product, which will redirect to Unit Stock Management Page.
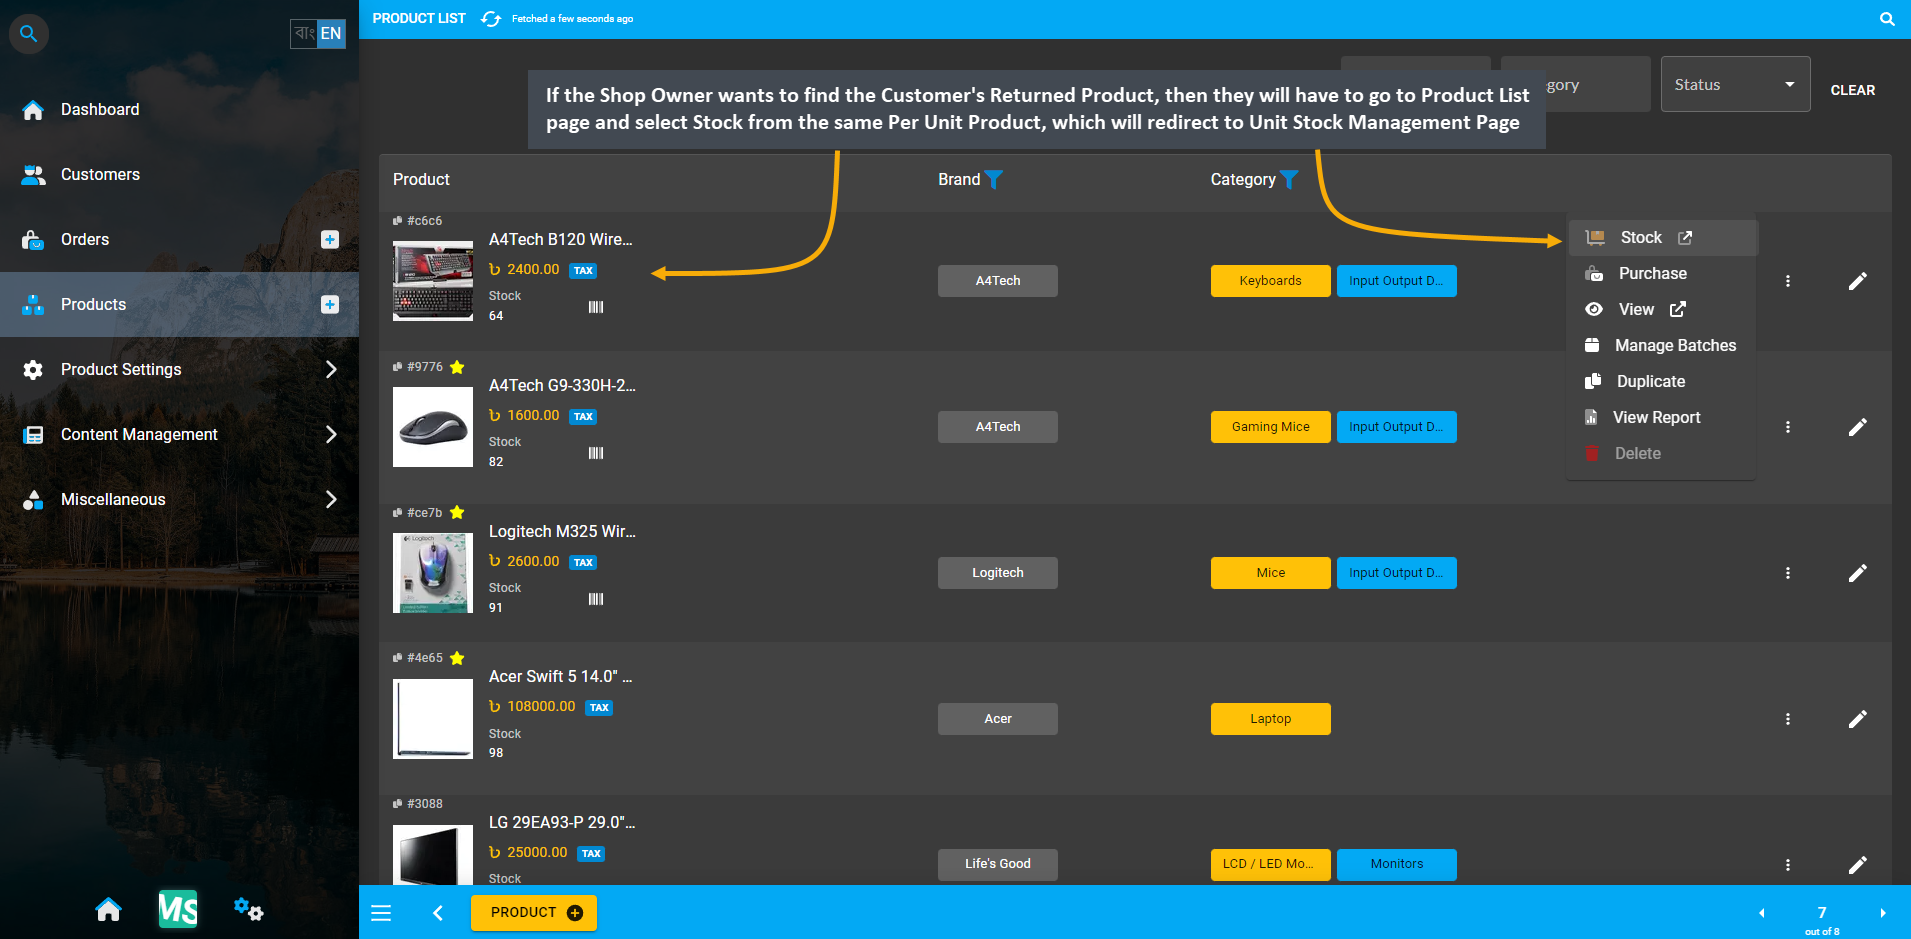
Image 7: If Shop Owner wants to find Customer's Returned Product, it will be in Unit Stock Management Page.
In the Unit Stock Management Page, there is a dropdown menu for selecting Stock status from Available, Broken, Reserved, Sold, Returned, and RMA. From here, select Returned to bring only the Returned Product results.
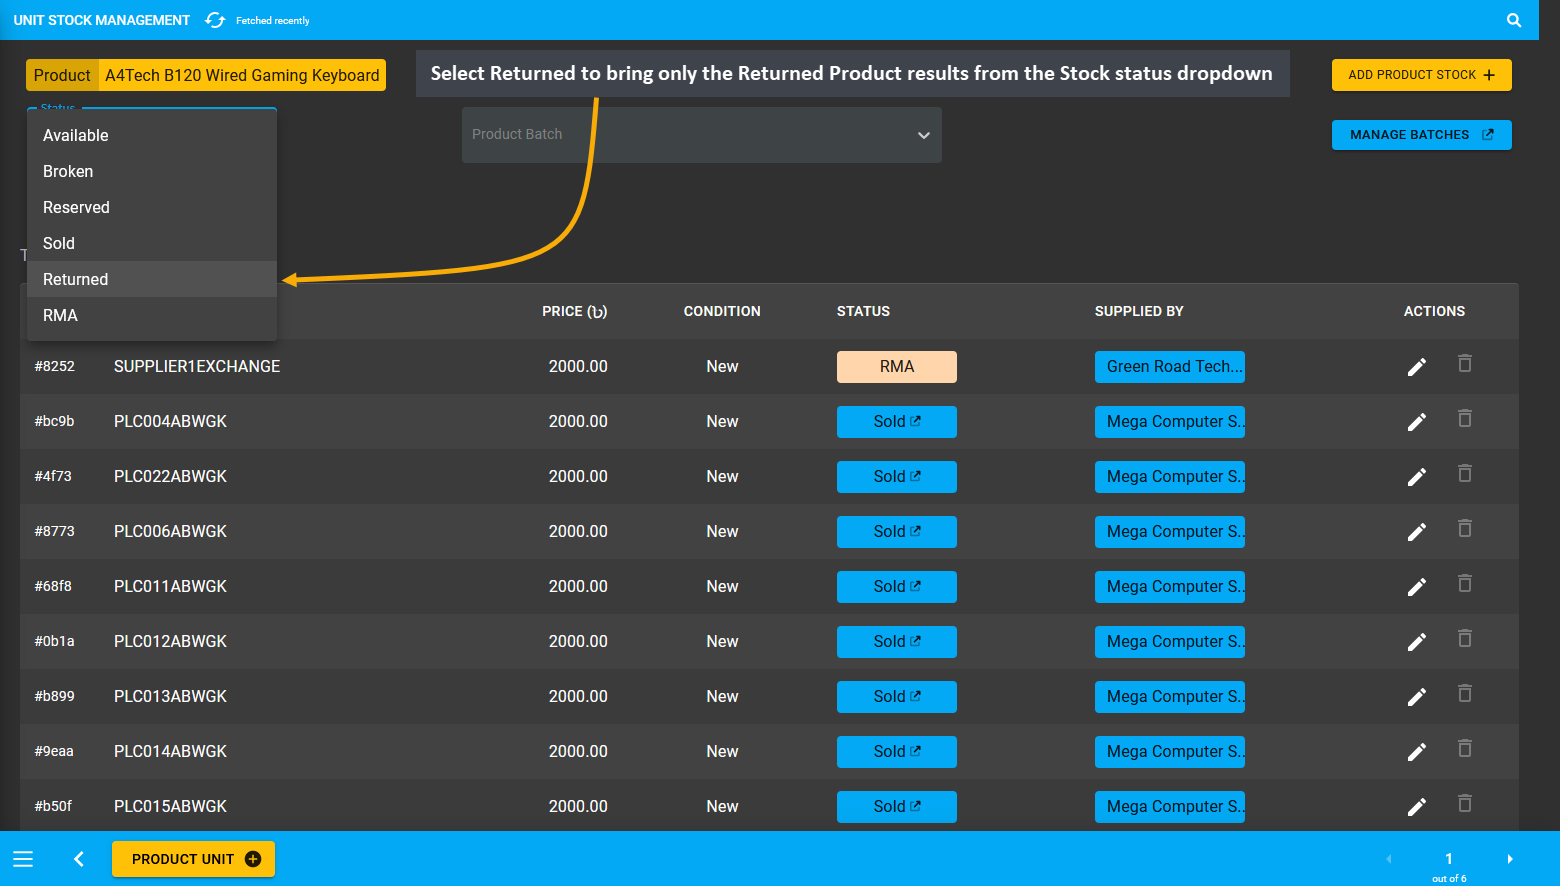
Image 8: Select Returned option to bring only the Returned Product results from the Stock status dropdown.
Selecting Returned from Stock status dropdown will bring results of all the Returned Products from the Customers. Here, Shop Owner will find the Returned Per Unit Product Serial PLC048ABWGK for which full refund was issued.
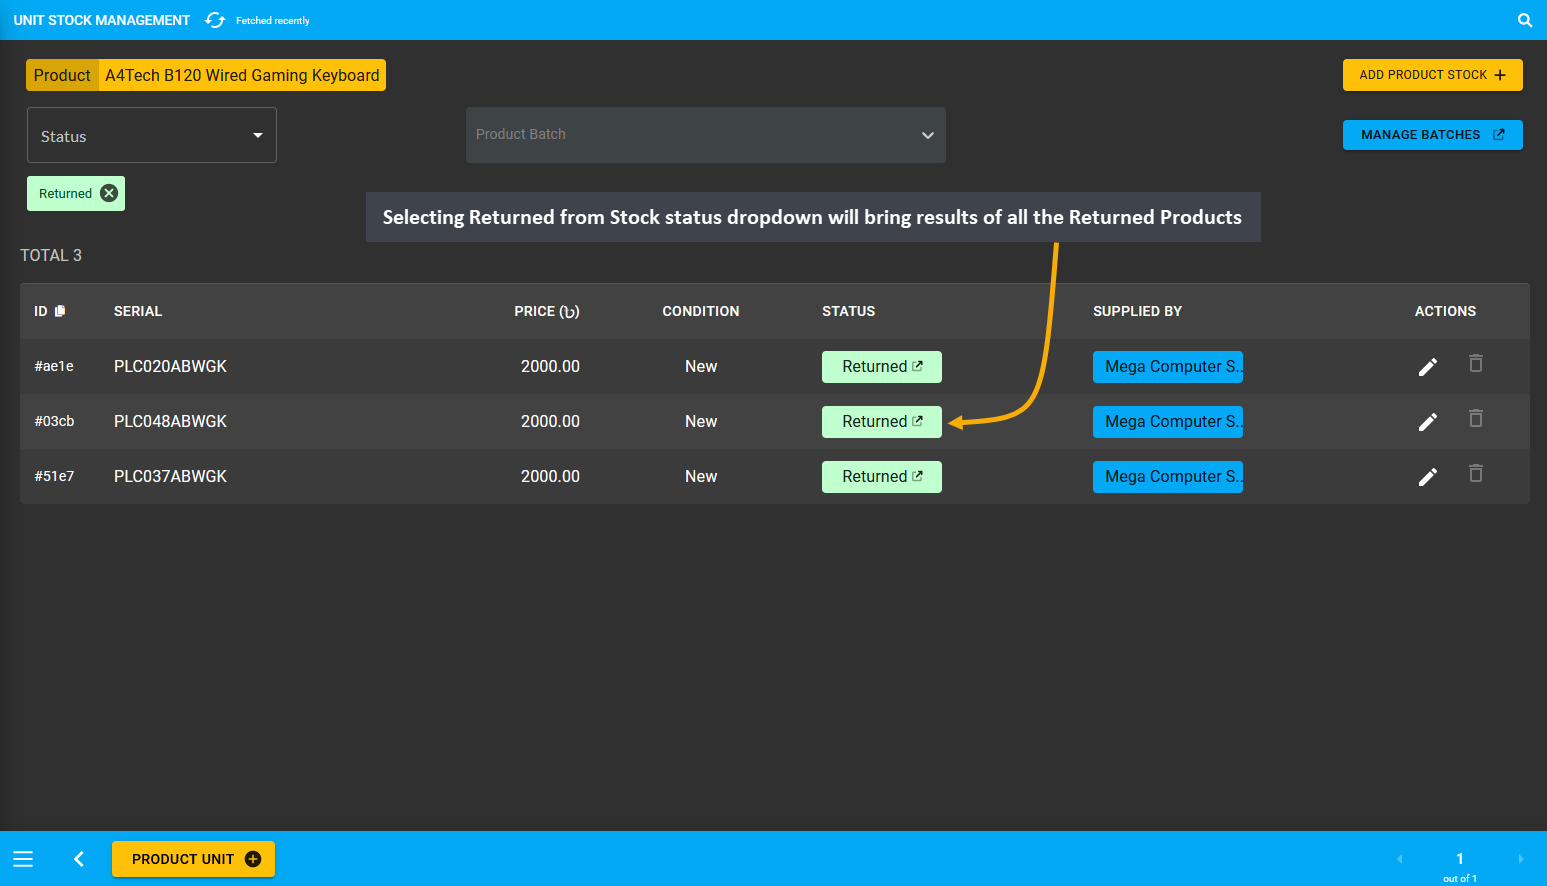
Image 9: Selecting Returned from Stock status dropdown will bring results of all the Returned Products.
Sell Returned Product as New Product
Related Cases will be created from Returned Orders. For example, if a Returned Product from one RMA case is sold as a New Product on a New Order, and if a New RMA Case is created for this Order, then the original RMA Case ID of the Returned Product will show under the Related Cases on the New RMA Case. So, click the + button from the Orders tab to open New Cart and place New Order with the Returned Product by adding it as the Product Stock.
Now, fill in the basic Customer information like phone number, name, and email from Customer Information tab. Then click the + button beside Shipping Contact that will redirect to a new pop-up to add new address with Label (Billing or Shipping), Address, Area, City, Country, and Zip Code. After clicking the Submit button, Shipping Address will be added to the Customer information. New address can be added by clicking the + button.
After confirming Billing and Shipping addressed, new Products can be added to the Order Cart. To add a Per Unit Product to Cart, search for the Returned Product i.e. A4Tech B120 Wired Gaming Keyboard from the Product List, 1 quantity will be added that will automatically calculate the item total. Click Add Stock to add a Per Unit Product.
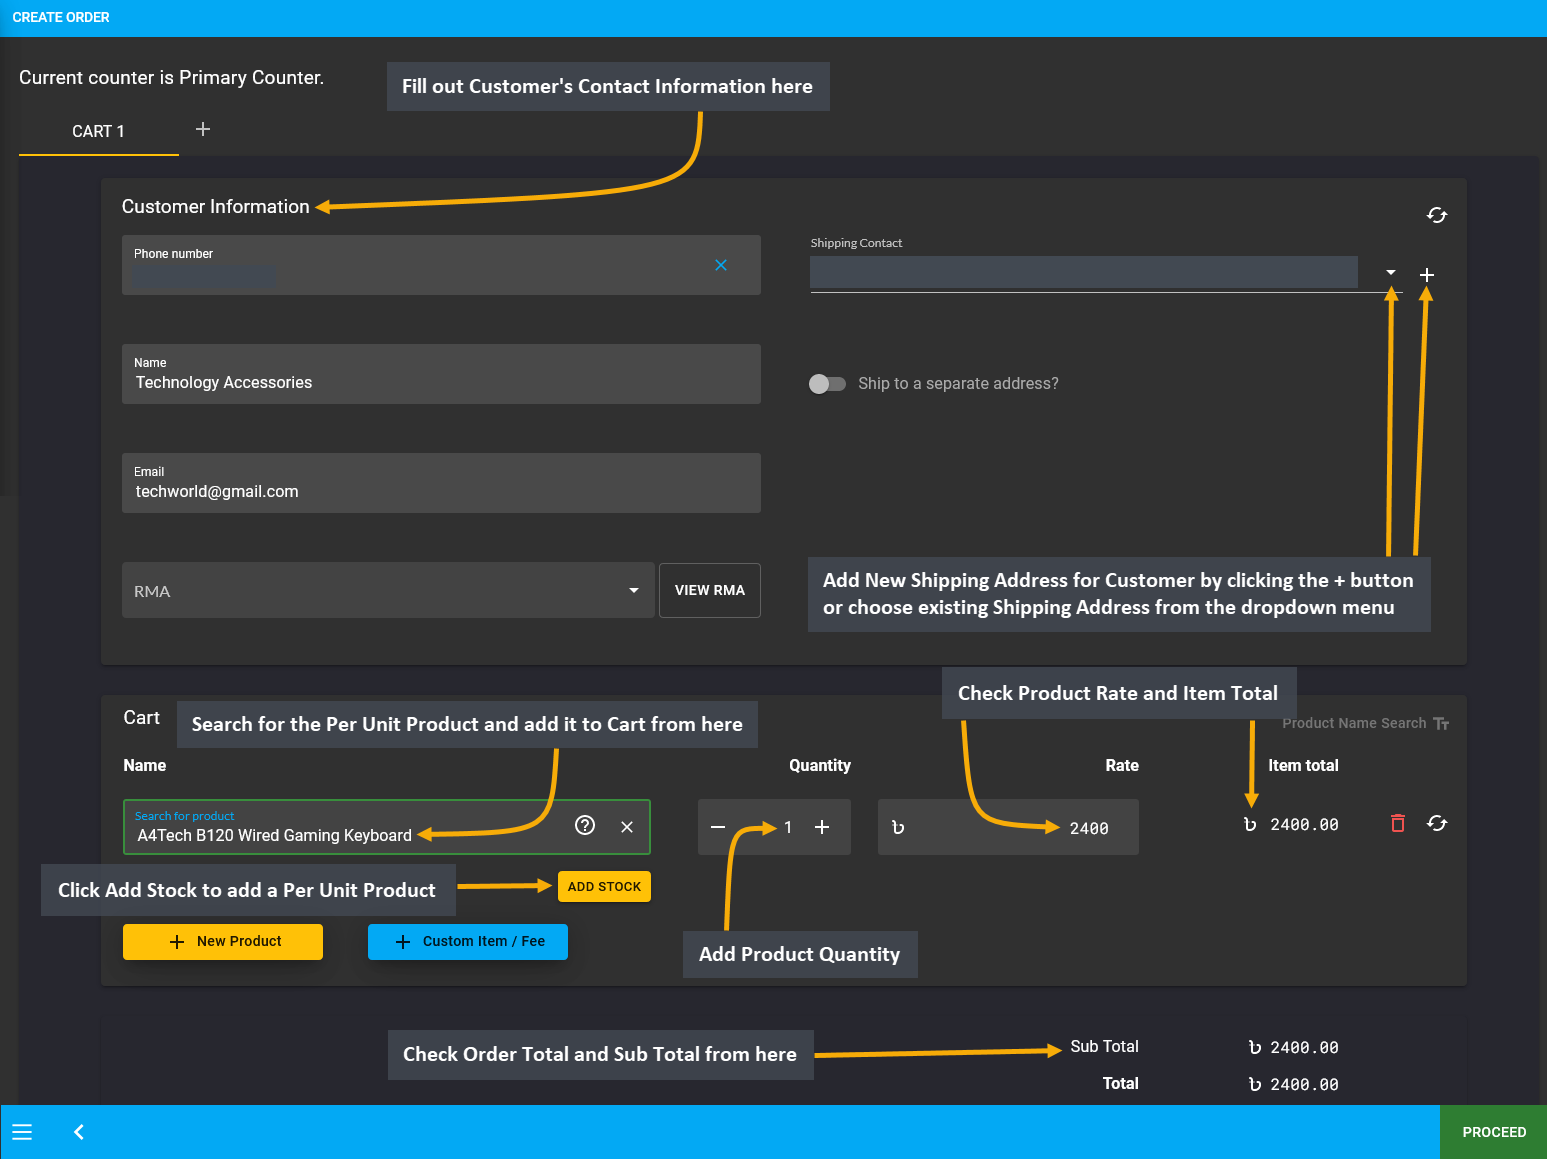
Image 10: Fill out Customer information, search for the Returned Product from Product List to add to Cart.
Clicking the Add Stock button will open a new pop-up, from where a Serial Number for the Per Unit Product needs to be selected. As the Shop Owner intends to sell the Returned Product with Serial Number PLC048ABWGK, they will have to type in the serial number on the Search box. This will bring the Returned Product with Serial Number PLC048ABWGK in search results with the tag Returned. Click on the Serial Number PLC048ABWGK to add to Cart.
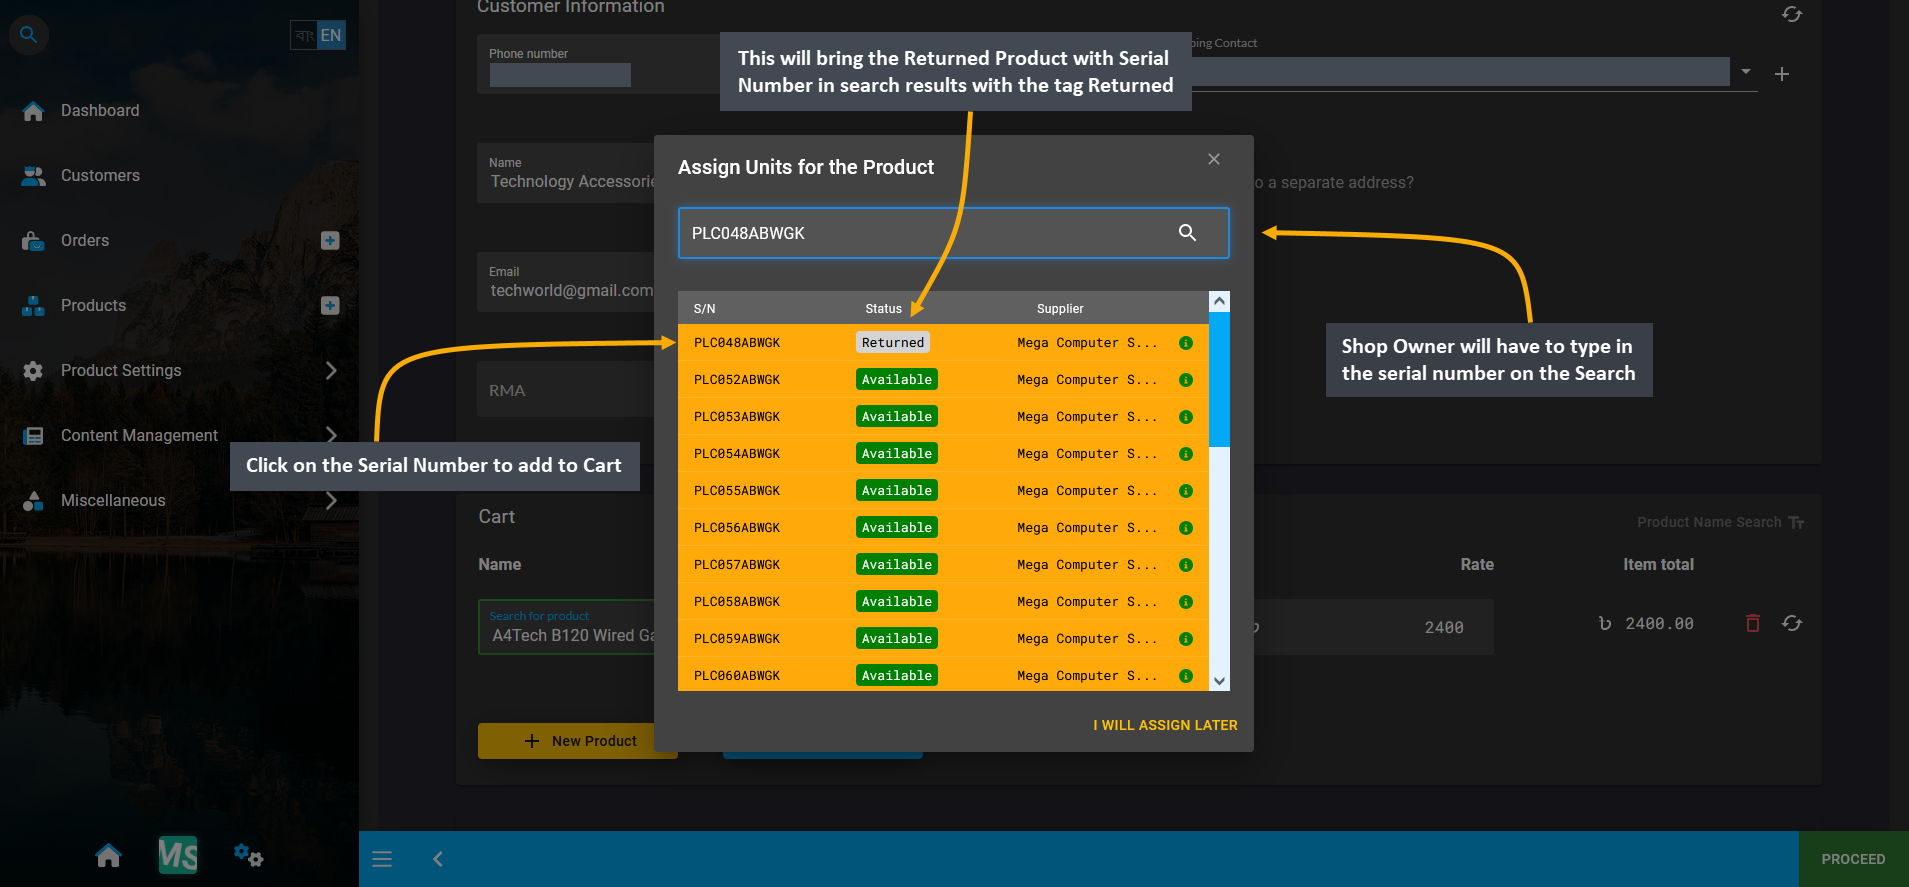
Image 11: Type the Serial Number on the Search box that will bring the Returned Product Serial as result.
After the Returned Product with selected Serial Number PLC048ABWGK is clicked from Stock List, it will show as added Stock on the pop-up. Now, click Okay to complete assigning Stock for the target Per Unit Product.
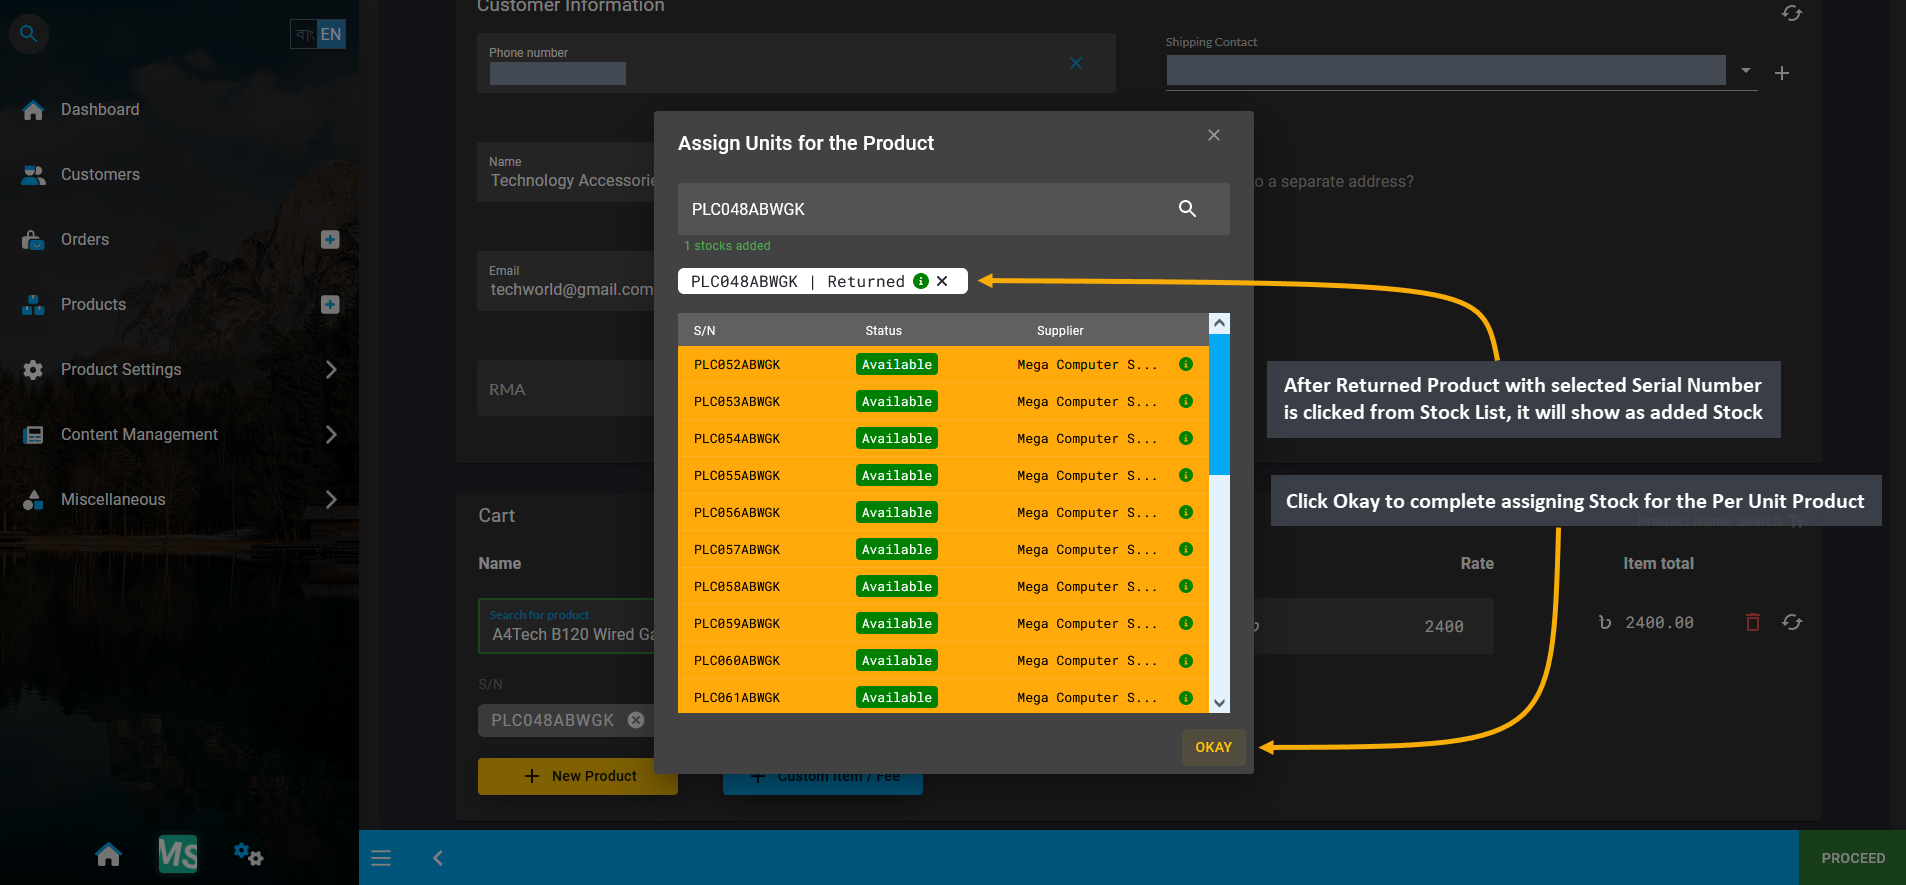
Image 12: After Returned Product with Serial Number is clicked, it will show as added Stock on the pop-up.
Now, the Returned Product with selected Serial Number PLC048ABWGK from the previous RMA case will be sold as New Product on this New Order. It is assumed that the Returned Product was fixed by the Shop Owner to resell as a New Product. As the Returned Product Serial was added to the Product on Cart, click Proceed to go to next page.
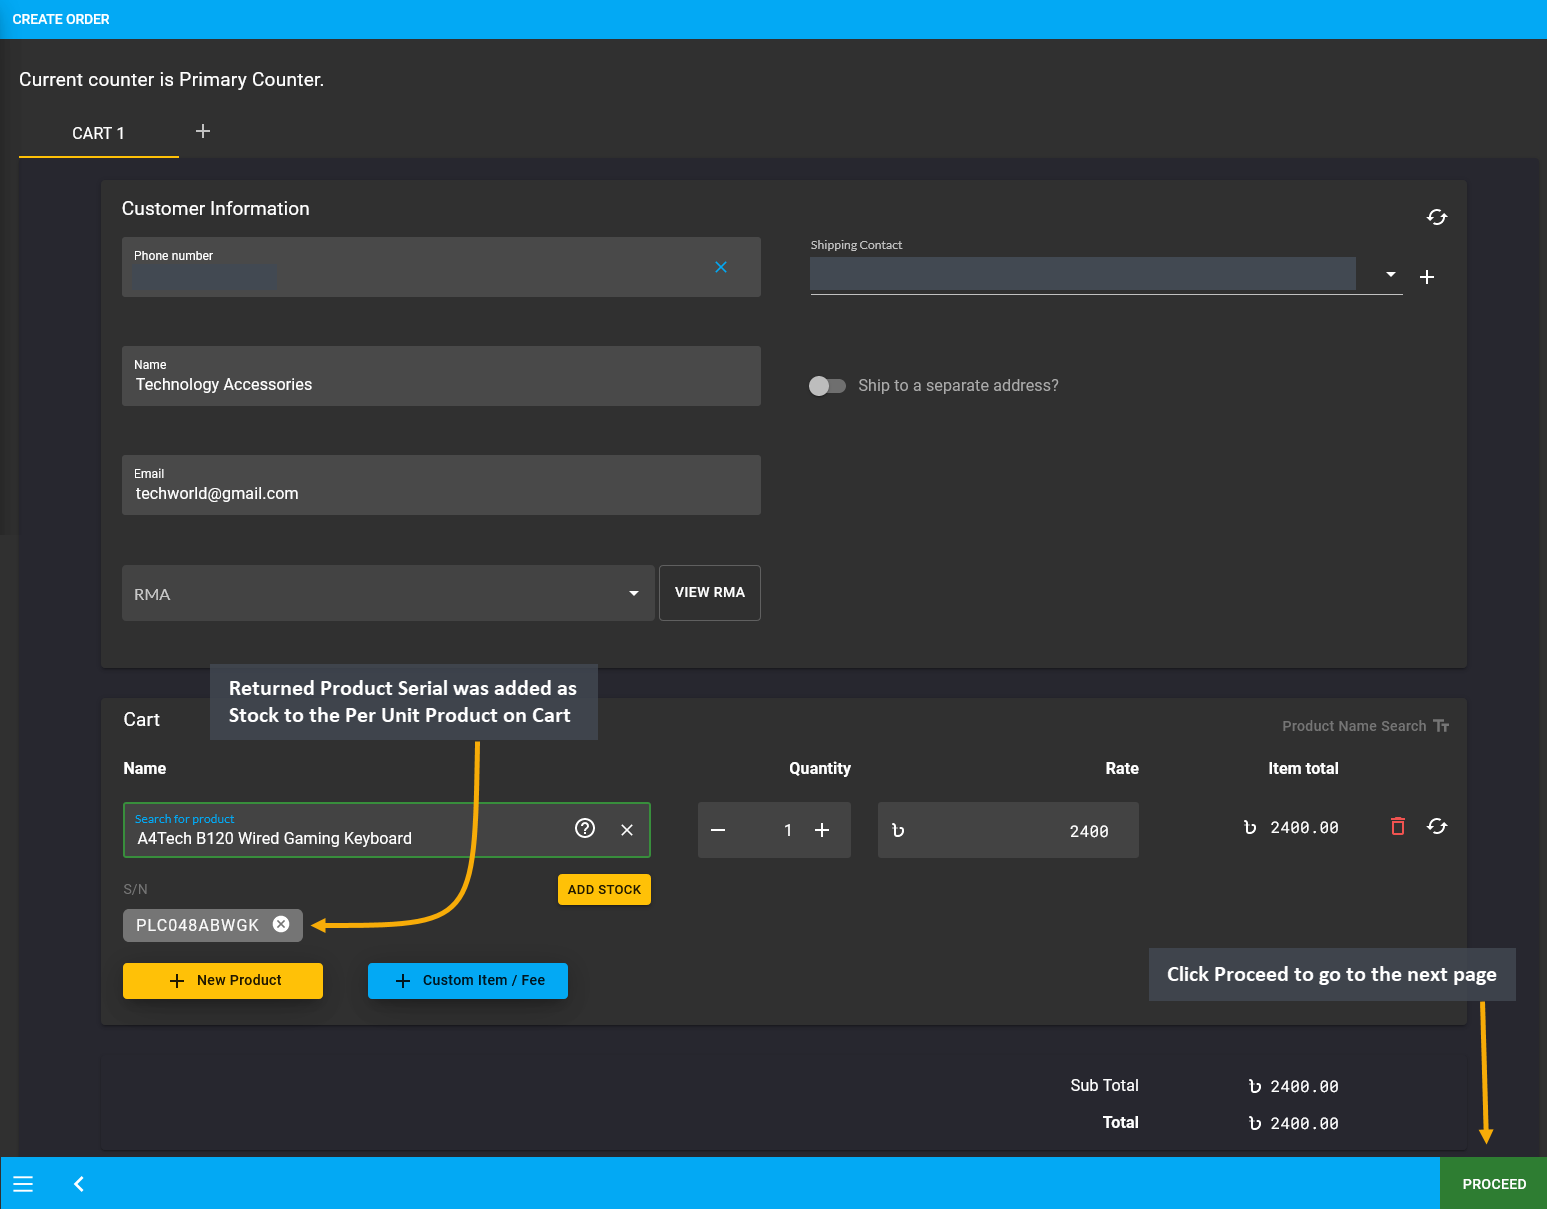
Image 13: After Returned Product Serial was added as Stock on Cart, Click Proceed to go to the next page.
In the next page, review the Cart, and select Shipment and Payment options. To make any changes, click the Edit button. If all the information is correct, click Confirm Order that will redirect to a new page with the message that the Order has been confirmed. From here, you can choose to Print Invoice, Close Tab, or View Order.
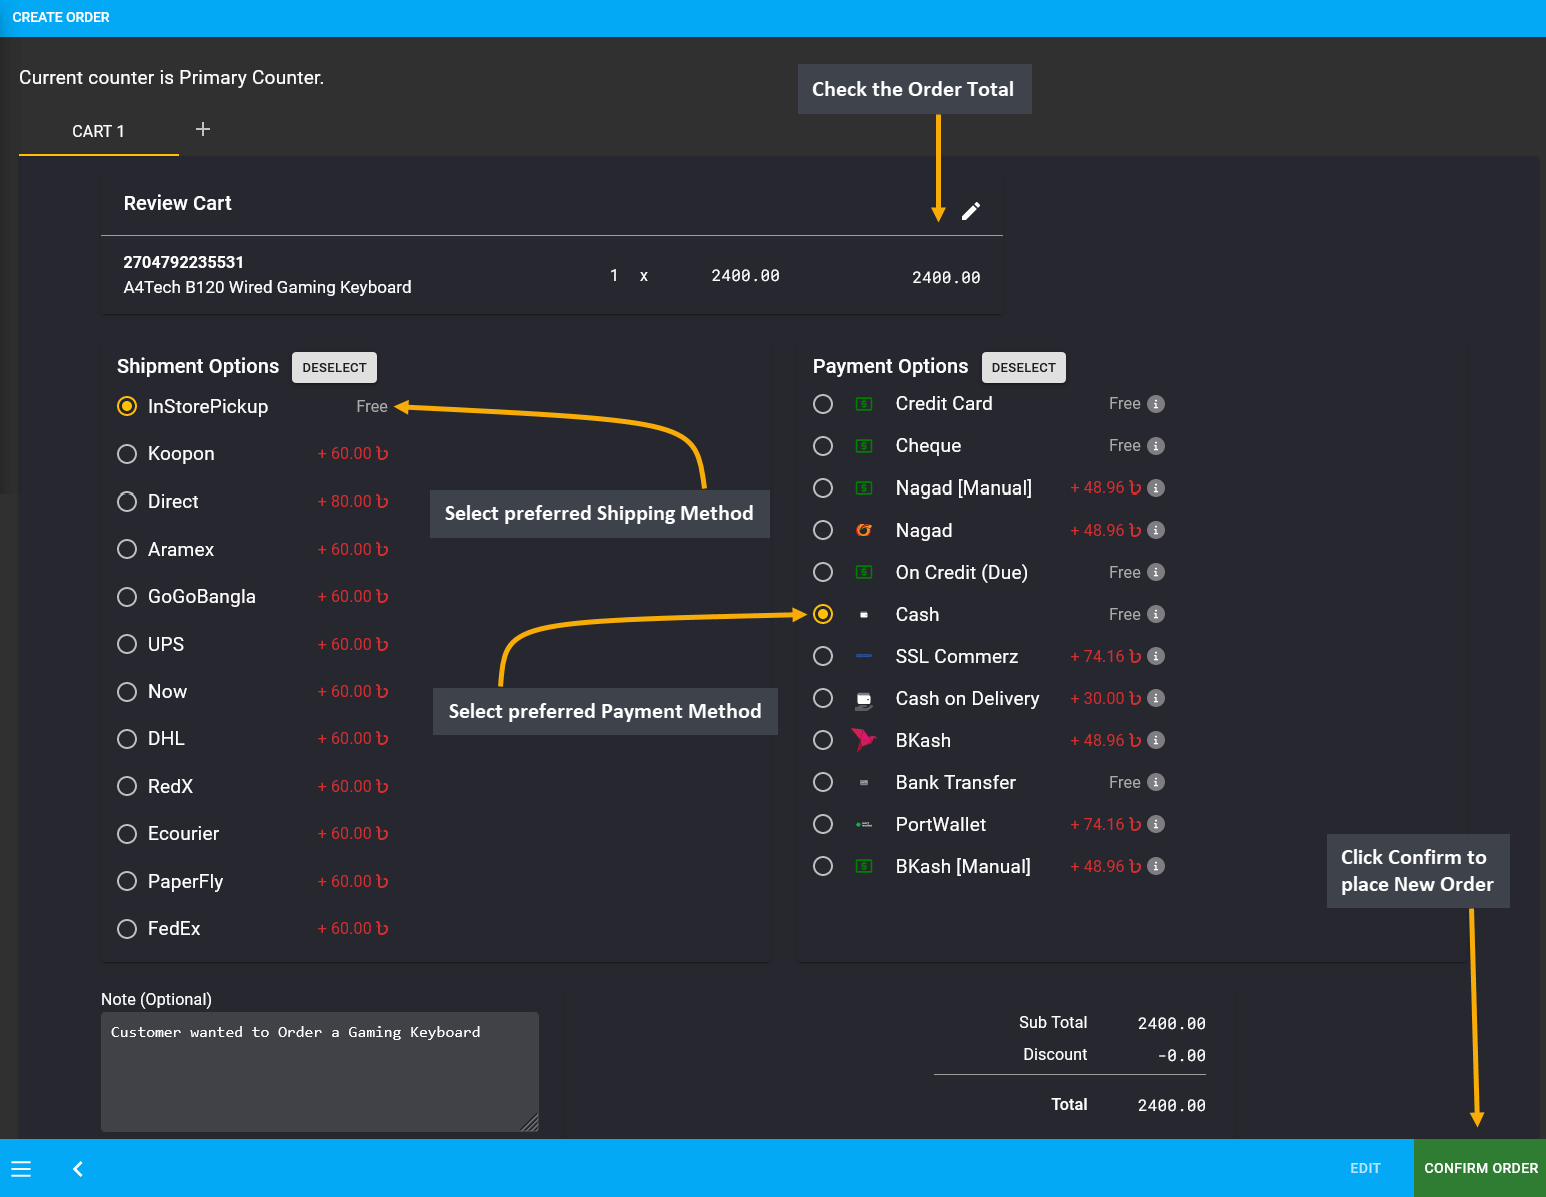
Image 14: Review the Cart, select Shipment and Payment options, and click Confirm Order to place the Order.
In this way, the Returned Product was sold as a New Product on a New Order which can be seen on the Order List.
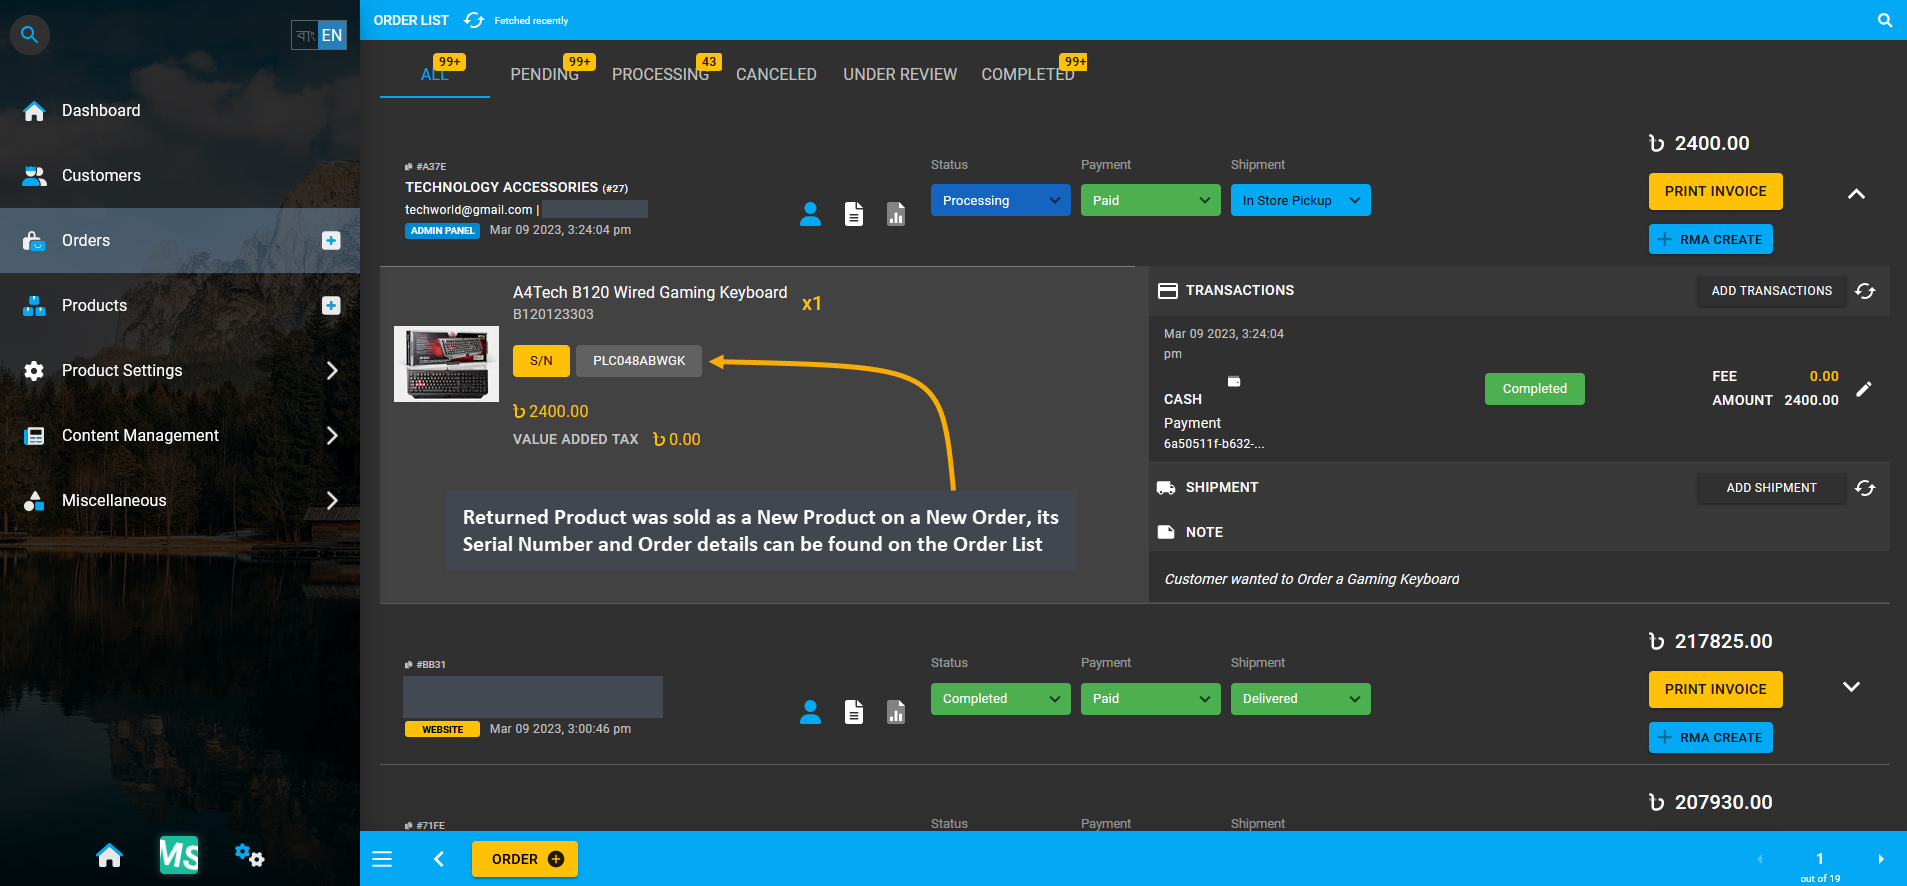
Image 15: Returned Per Unit Product sold as New Product on a New Order will be on Order List with details.
Create Returned Product New Order RMA Case
If Returned Product from one RMA case is sold as a New Product, and if a New RMA Case is created for this Order, then the original RMA Case ID of the Returned Product will show under the Related Cases on the New RMA Case. So, for example, an RMA Case will be created for New Order that was placed with Returned Product PLC048ABWGK.
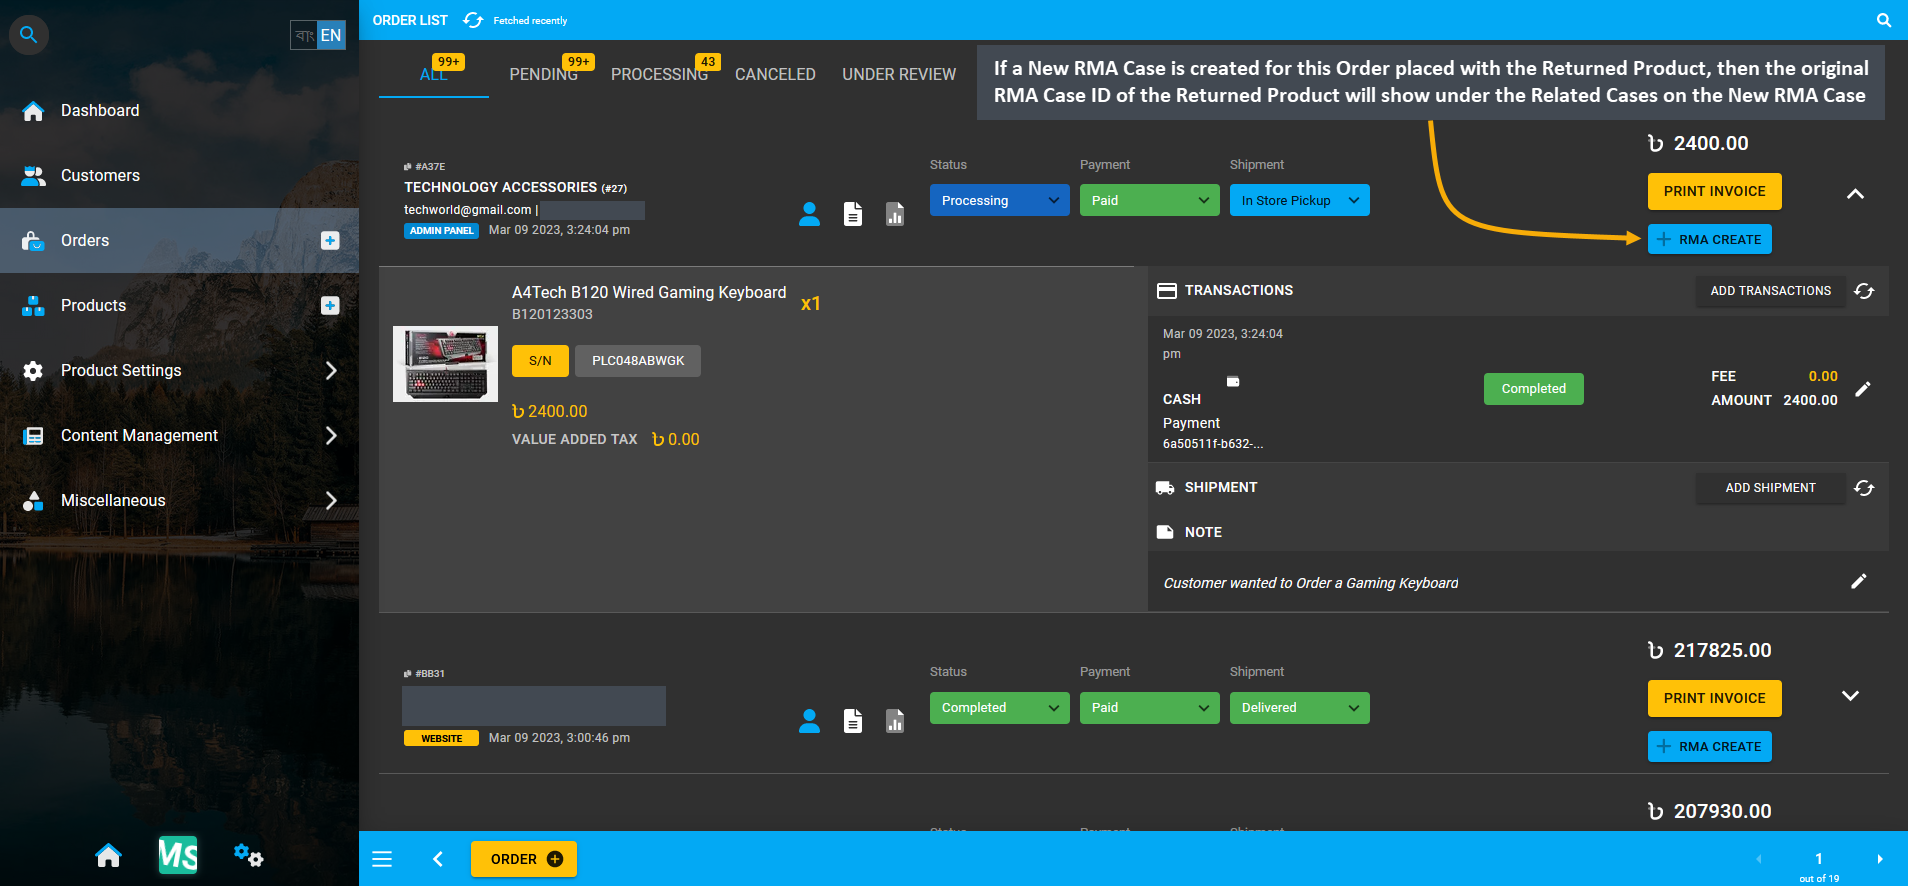
Image 16: New RMA Case for Returned Product New Order will show original RMA Case ID under Related Cases.
Therefore, when the + RMA Create button will be clicked, it will redirect to creating a New RMA Case for the New Order of Returned Product PLC048ABWGK. The New RMA Case ID is #6a71 and the Original RMA Case ID #cbb5 of the Returned Product will show under Related Cases of this New RMA Case. With the Original RMA Case ID #cbb5 showing under Related Cases, the Shop Owner will be able to track back the Product history through it if needed.
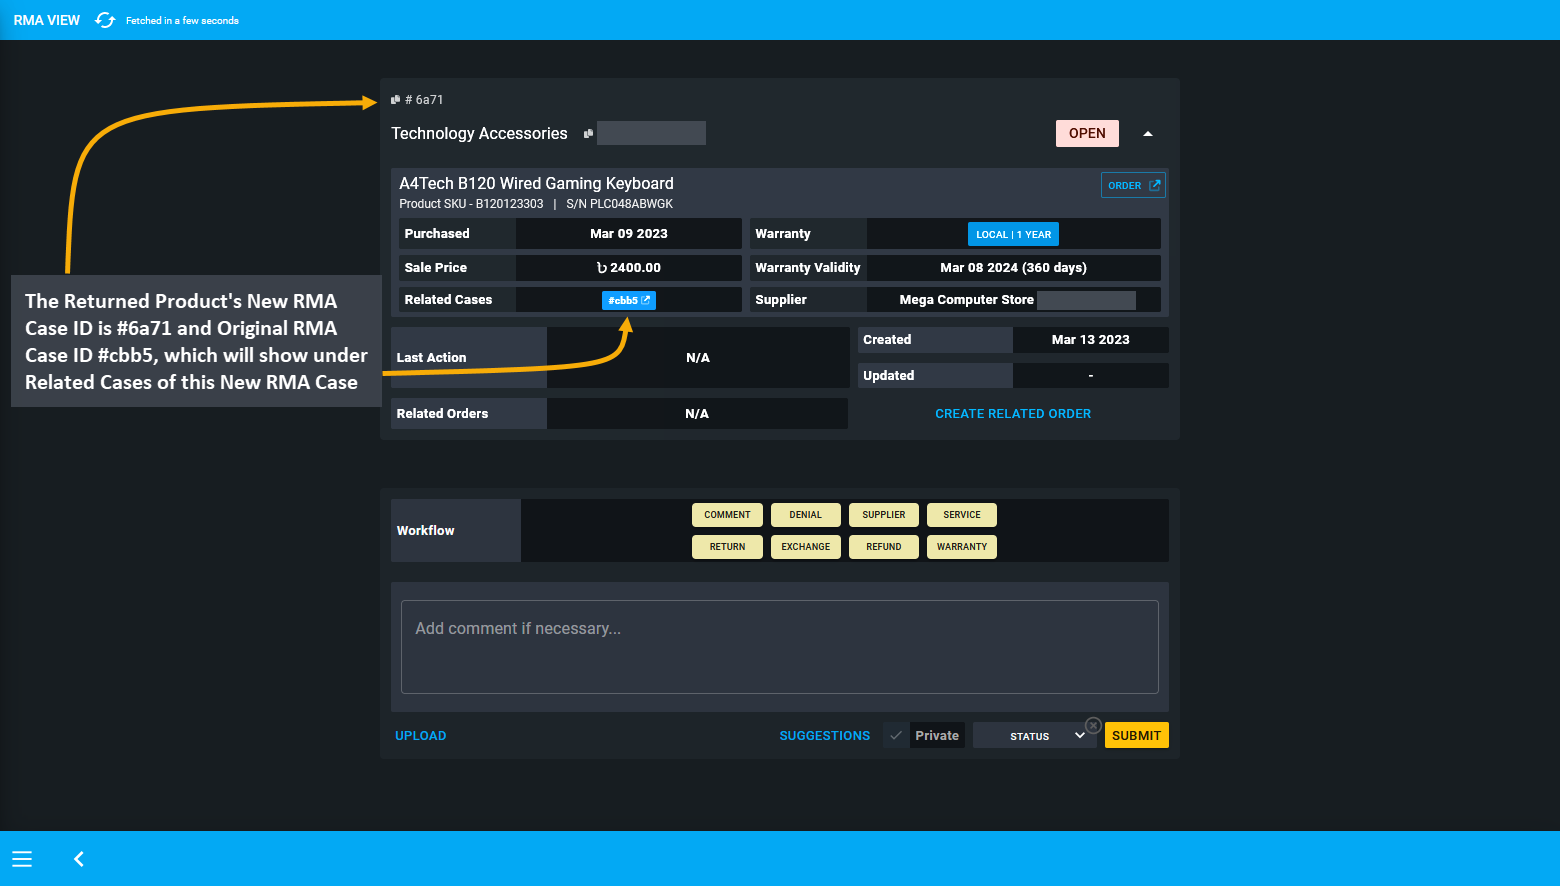
Image 17: New RMA Case ID is #6a71 and Original RMA Case ID #cbb5 which will show under its Related Cases.
6 - Exchange
Learn more about creating and managing RMA’s Exchange workflow actions for Products.
Exchange Faulty Per Unit Product
If the Shop Owner wants to Exchange the Customer’s faulty Product with another Per Unit Product, then they will have to go to the Product List page and select Stock from the Per Unit Product i.e. the A4Tech B120 Wired Gaming Keyboard. This will redirect to the Unit Stock Management Page, from where the Shop Owner can select another Per Unit Product that is not sold to exchange with the faulty Product. Here, Products marked as Enabled means that they can be sold or used as an exchange Product for the Customer.
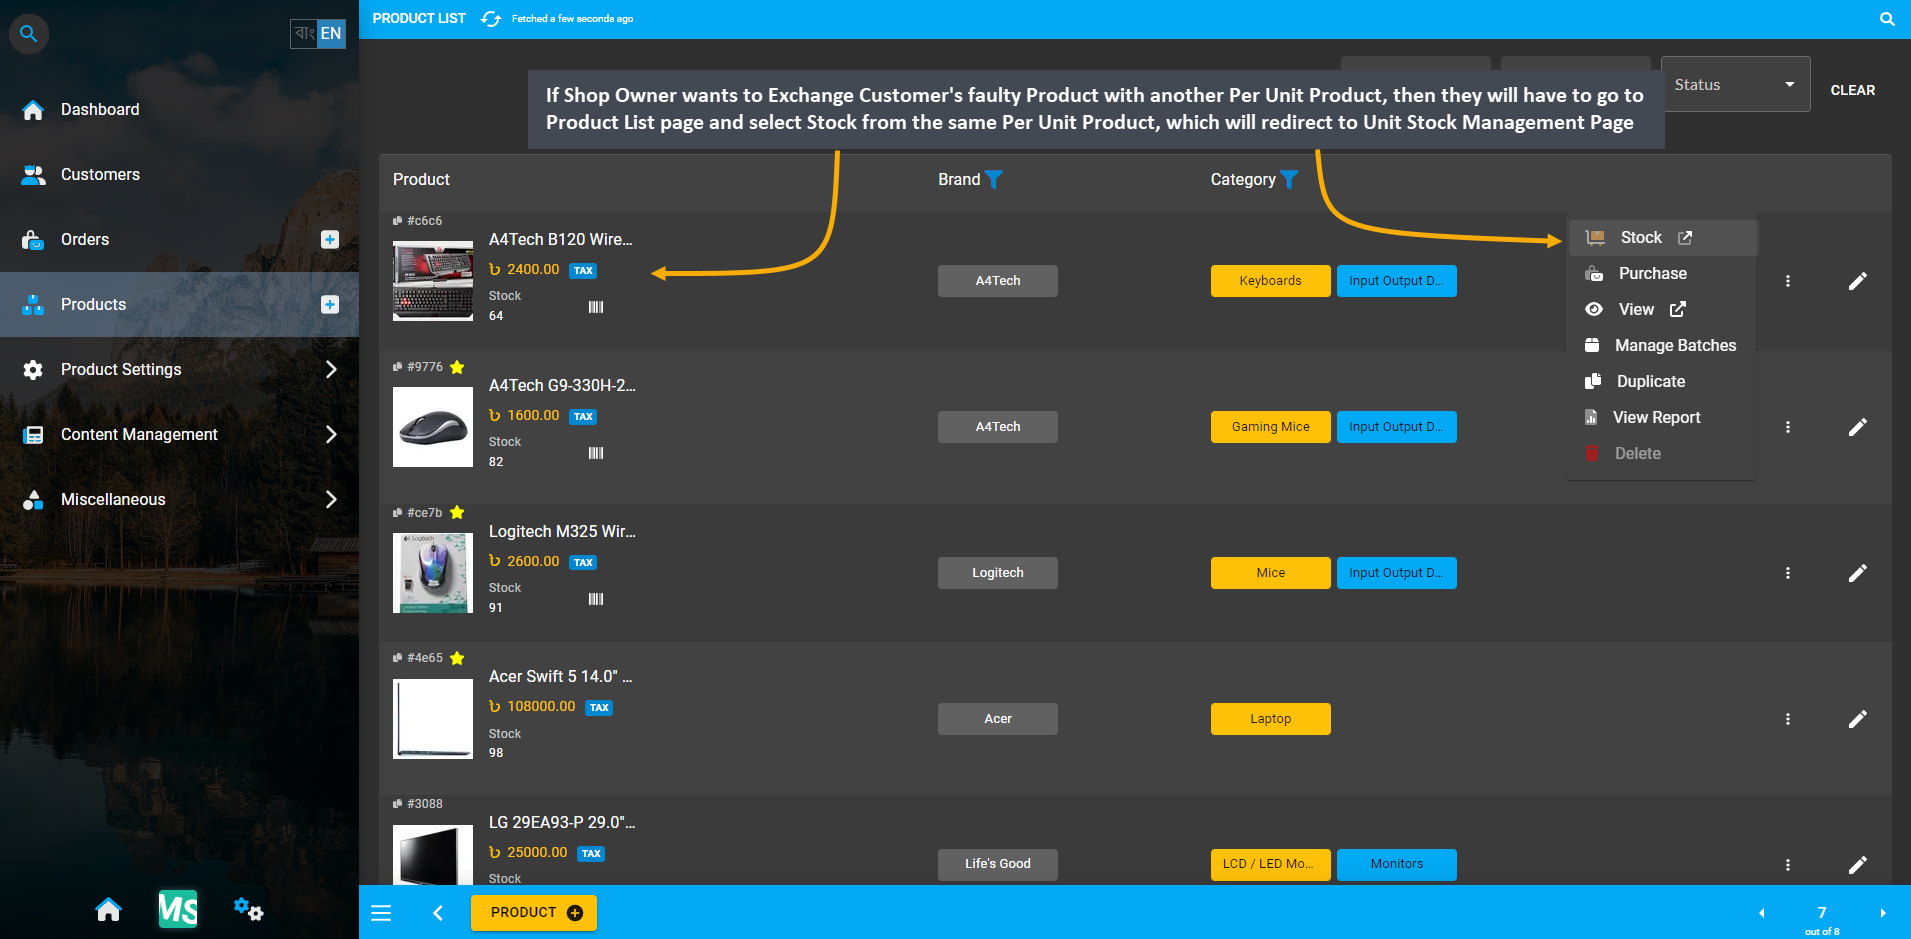
Image 1: Select Stock from the Per Unit Product on Product List page to go to Unit Stock Management Page.
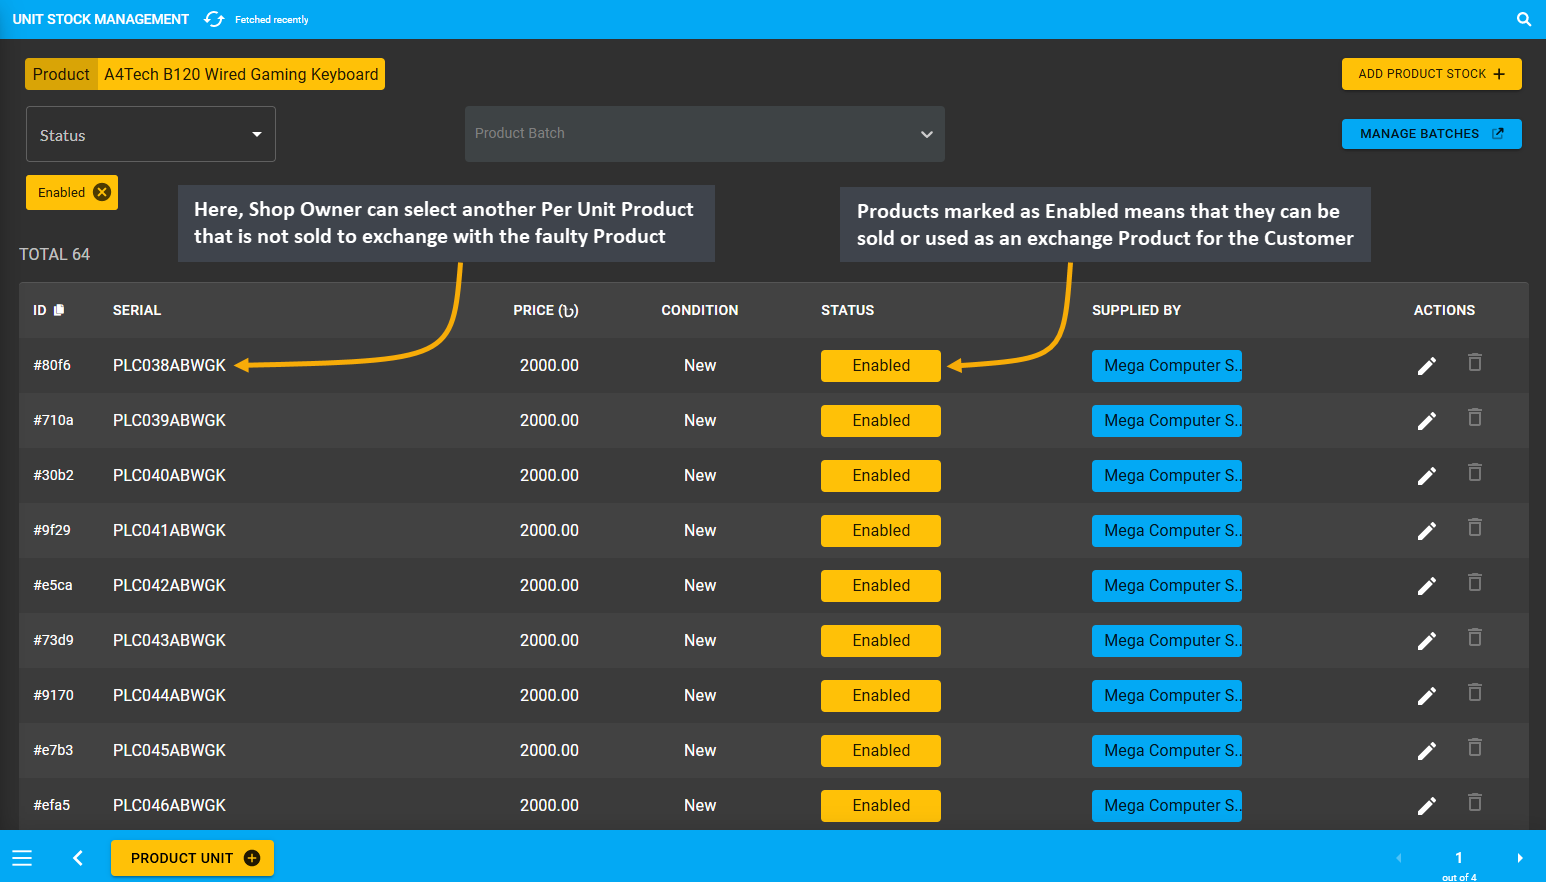
Image 2: Shop Owner can select another Per Unit Product that is not sold to exchange with faulty Product.
Therefore, after copying the Serial Number of the available Per Unit Product from Unit Stock Management Page, the Shop Owner needs to input that number within the Serial Number box under Exchange Details on RMA View page. Products that are only available or shows as Enabled on the Unit Stock Management Page can be used to exchange with faulty Products for RMA cases. If unavailable Product serial number is added, it will show error.
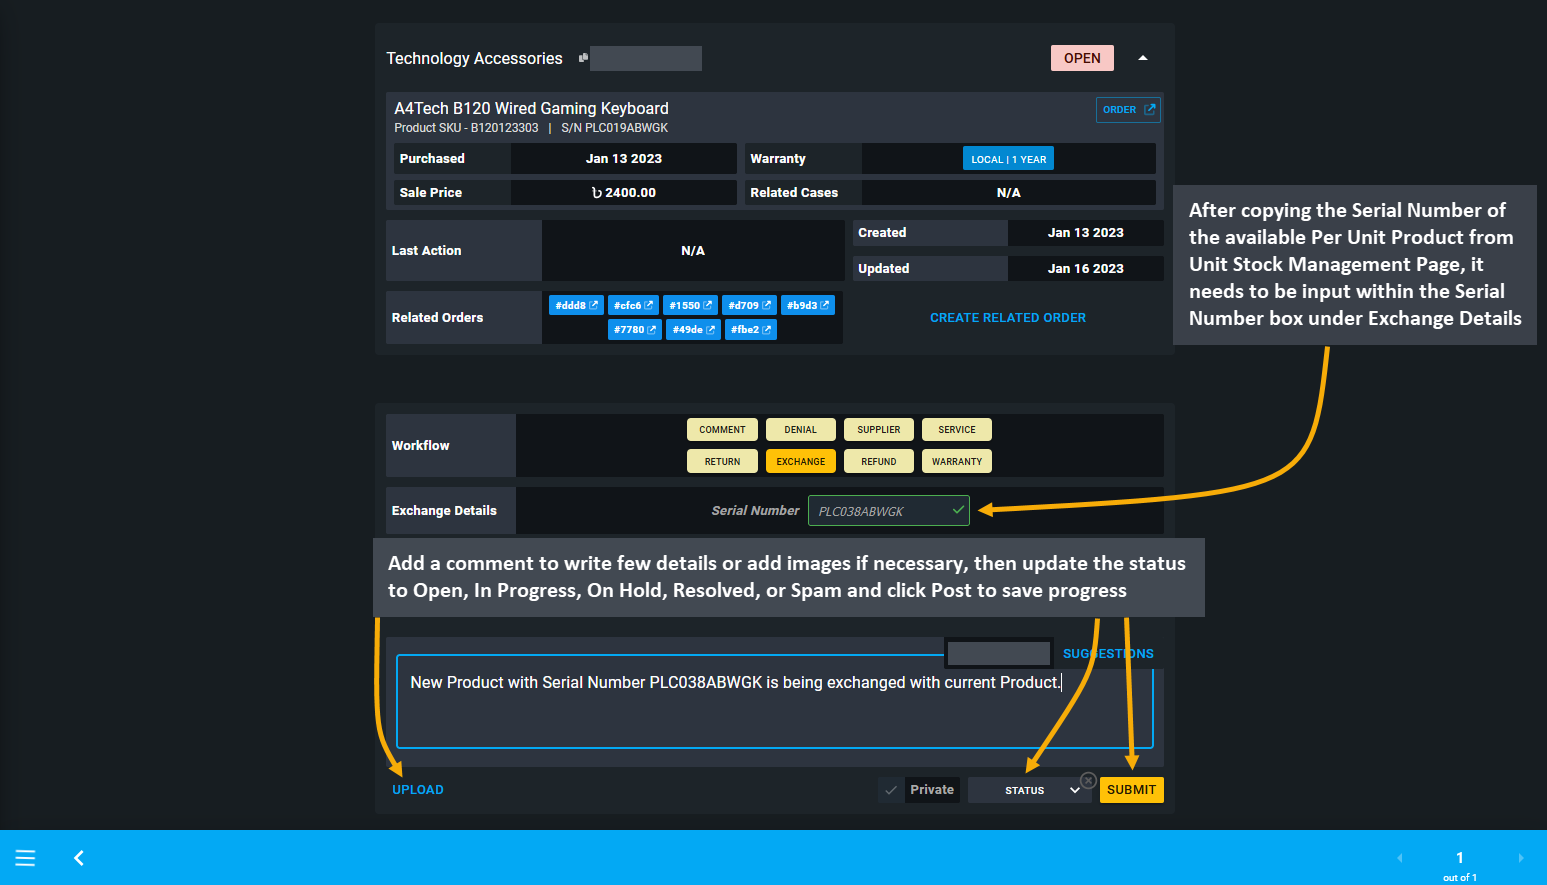
Image 3: Input the Serial Number of the exchanged Product on the Serial Number box under Exchange details.
Add a comment to write few details or add images if necessary, then update the status to Open, In Progress, On Hold, Resolved, or Spam and click the Post button to save the progress. Saved details will show below with Original Serial Number and Exchanged Serial Number for the Per Unit Products.
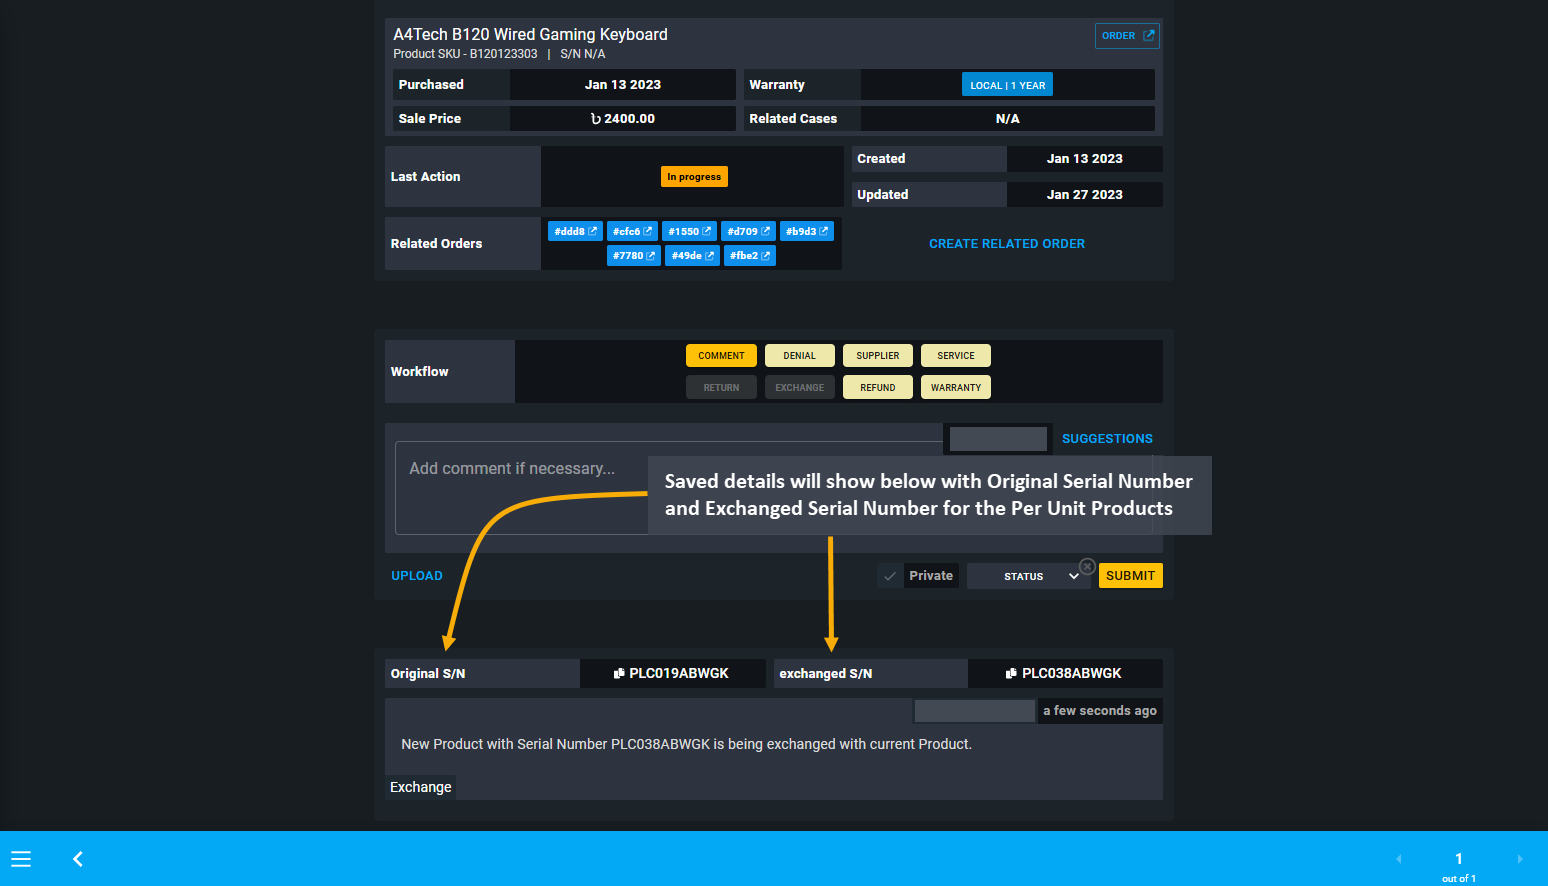
Image 4: Details will be saved with Original and Exchanged Serial Number for Per Unit Products on update.
7 - Refund
Learn more about creating and managing RMA’s Refund workflow actions for Products.
Refund for Faulty Product
If the Shop Owner needs to provide Refund to Customer, it can be done through the Ledger Credit option from the refund methods. Actual Gateway Refund is not supported yet, so Refund will go to the Customer’s Ledger Credit. Refund amount can be paid in partial or full depending on the Customer’s claim on the RMA case.
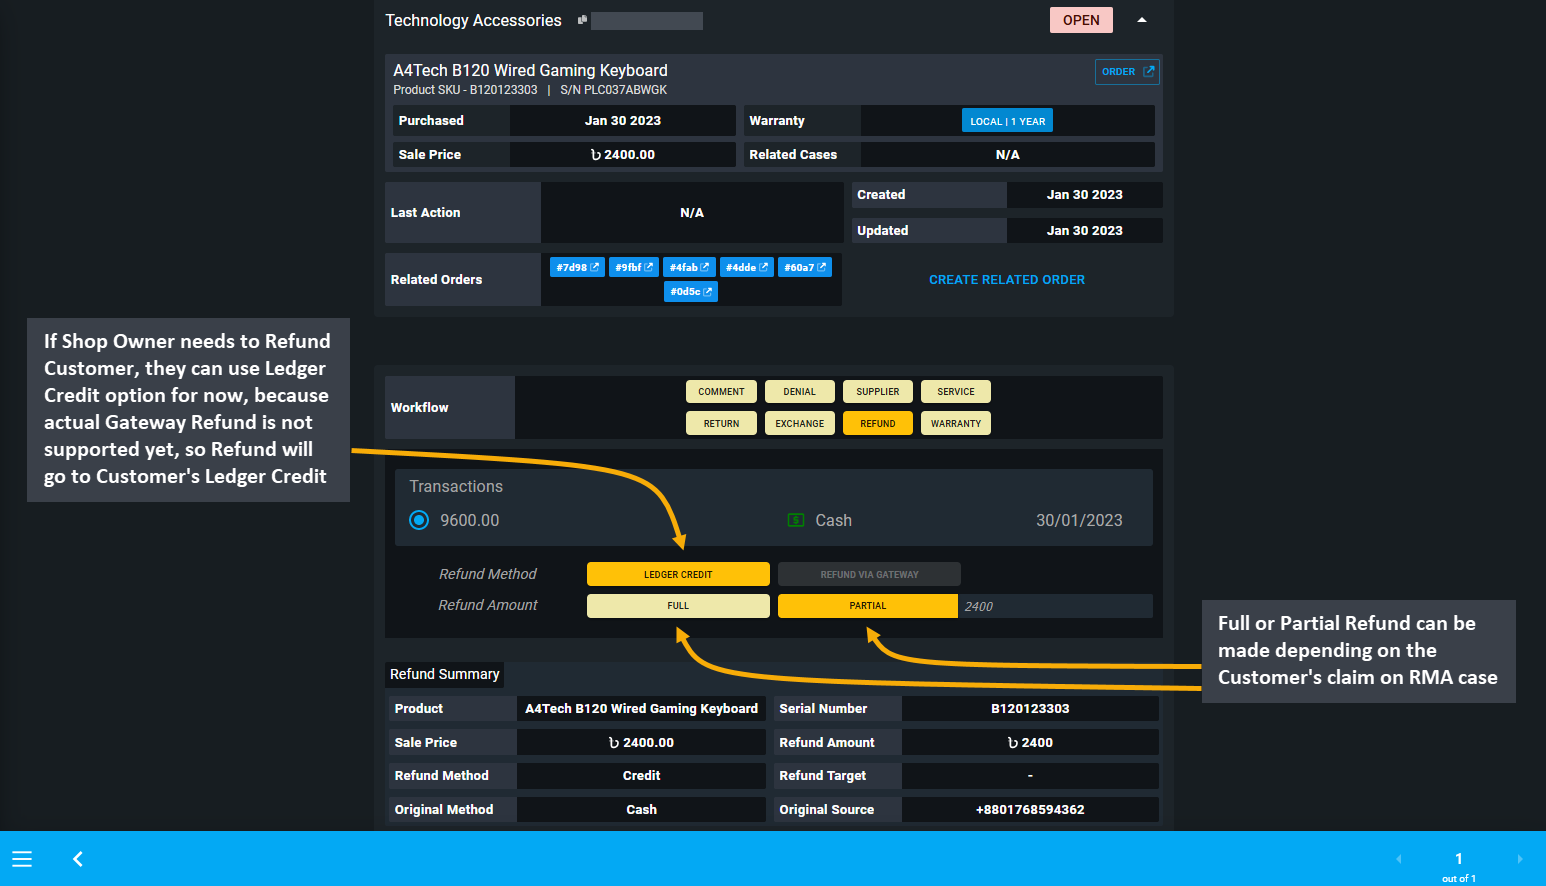
Image 1: If Shop Owner needs to Refund Customer, they can use Ledger Credit option for Regular Customers.
Full Refund and Override Feature
Shop Owner can provide Full Refund if the situation requires. For instance, if Customer purchased 2 Quantities of Keyboards, 1 Quantity of Mouse, and found the 2 Quantities of Keyboards faulty, they may ask for a full refund. In this case, the Shop Owner will have to select the Full Refund option and use the Override feature to refund the Customer if refund amount is greater than the Product sale price as Customer requested refund for full Order.
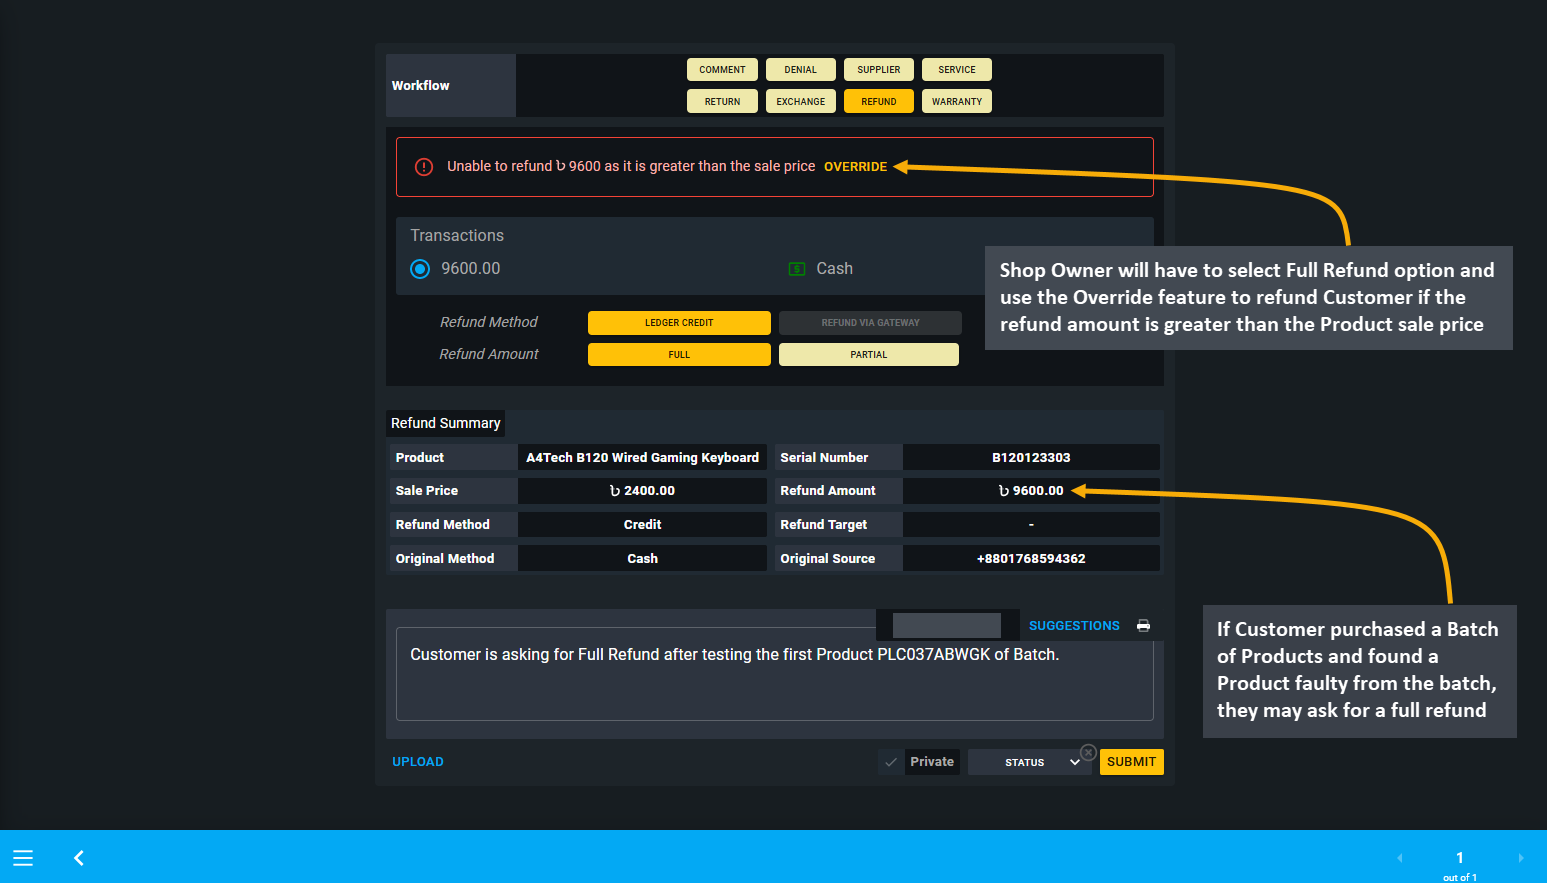
Image 2: Override feature to refund Customer if the refund amount is greater than the Product sale price.
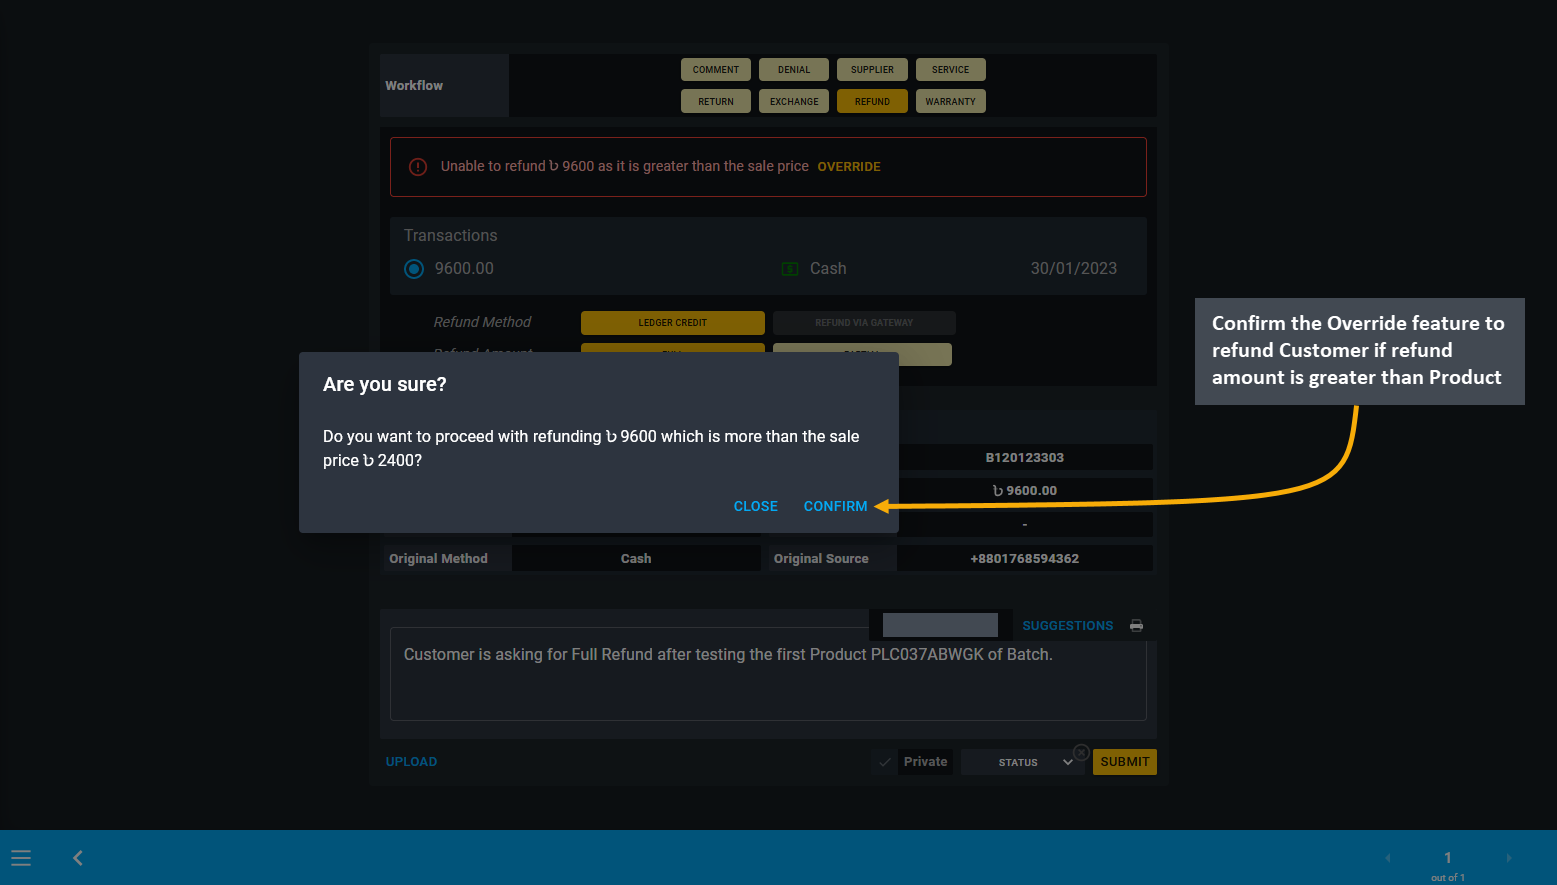
Image 3: Confirm Override feature to refund Customer if refund amount is greater than Product sale price.
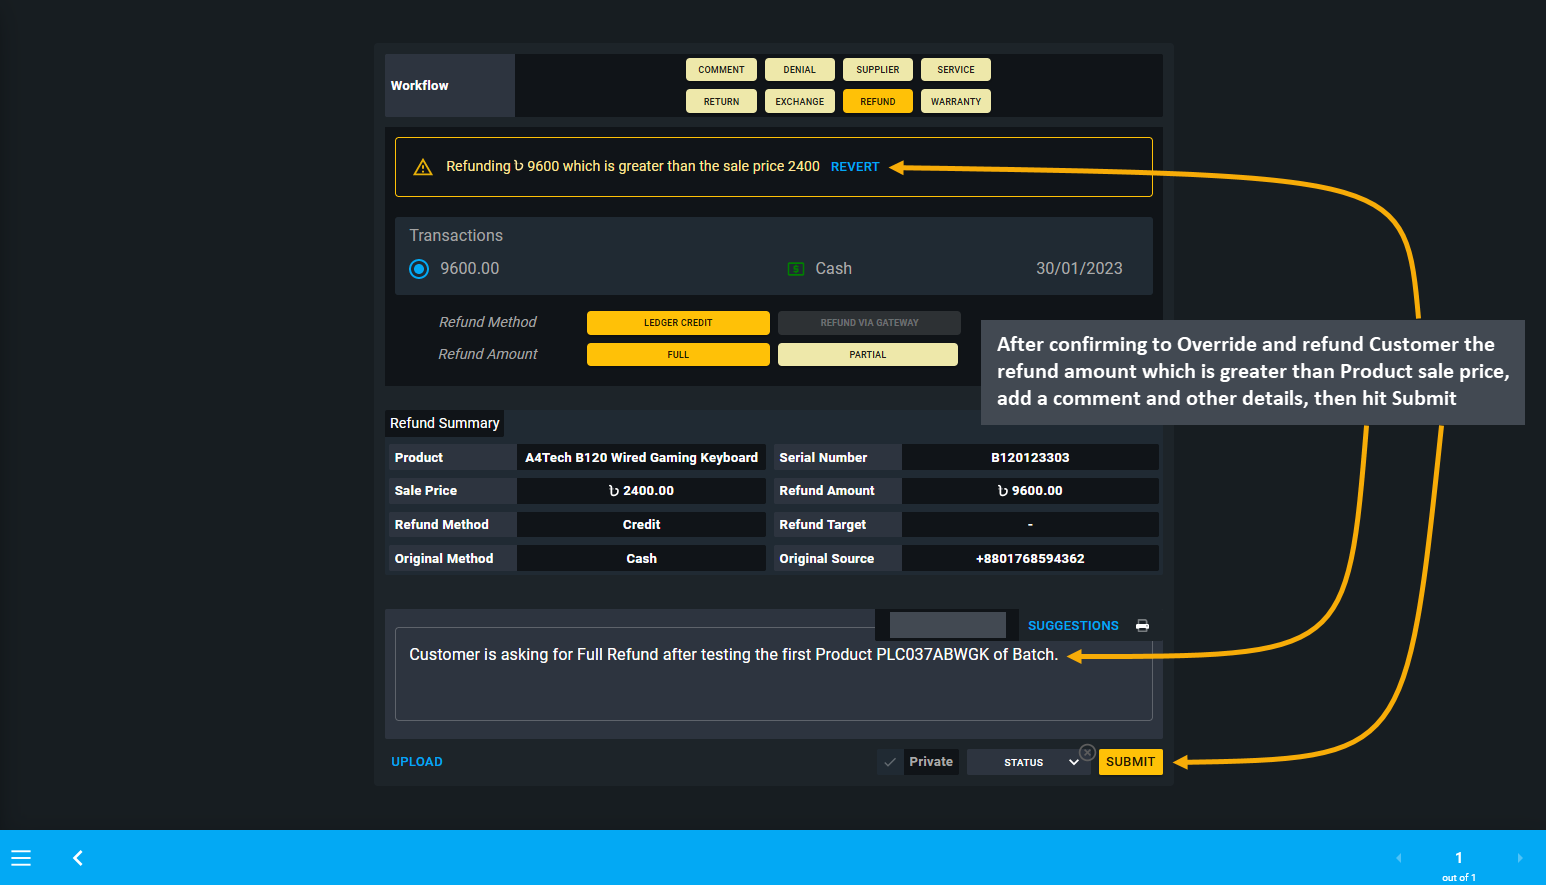
Image 4: After confirming to Override to refund Customer, add a comment or other details, then hit Submit.
Partial Refund
Shop Owner can also provide Partial Refund if the situation requires. For instance, if Customer still wants to keep the faulty Product and ask for a partial Refund, then Shop Owner can select Partial Refund option to give a partial refund and input the amount within the Refund Amount box. Write the refund reason in the comment box, upload image, and select Status before clicking Submit to complete the process of Partial Refund for RMA Case.
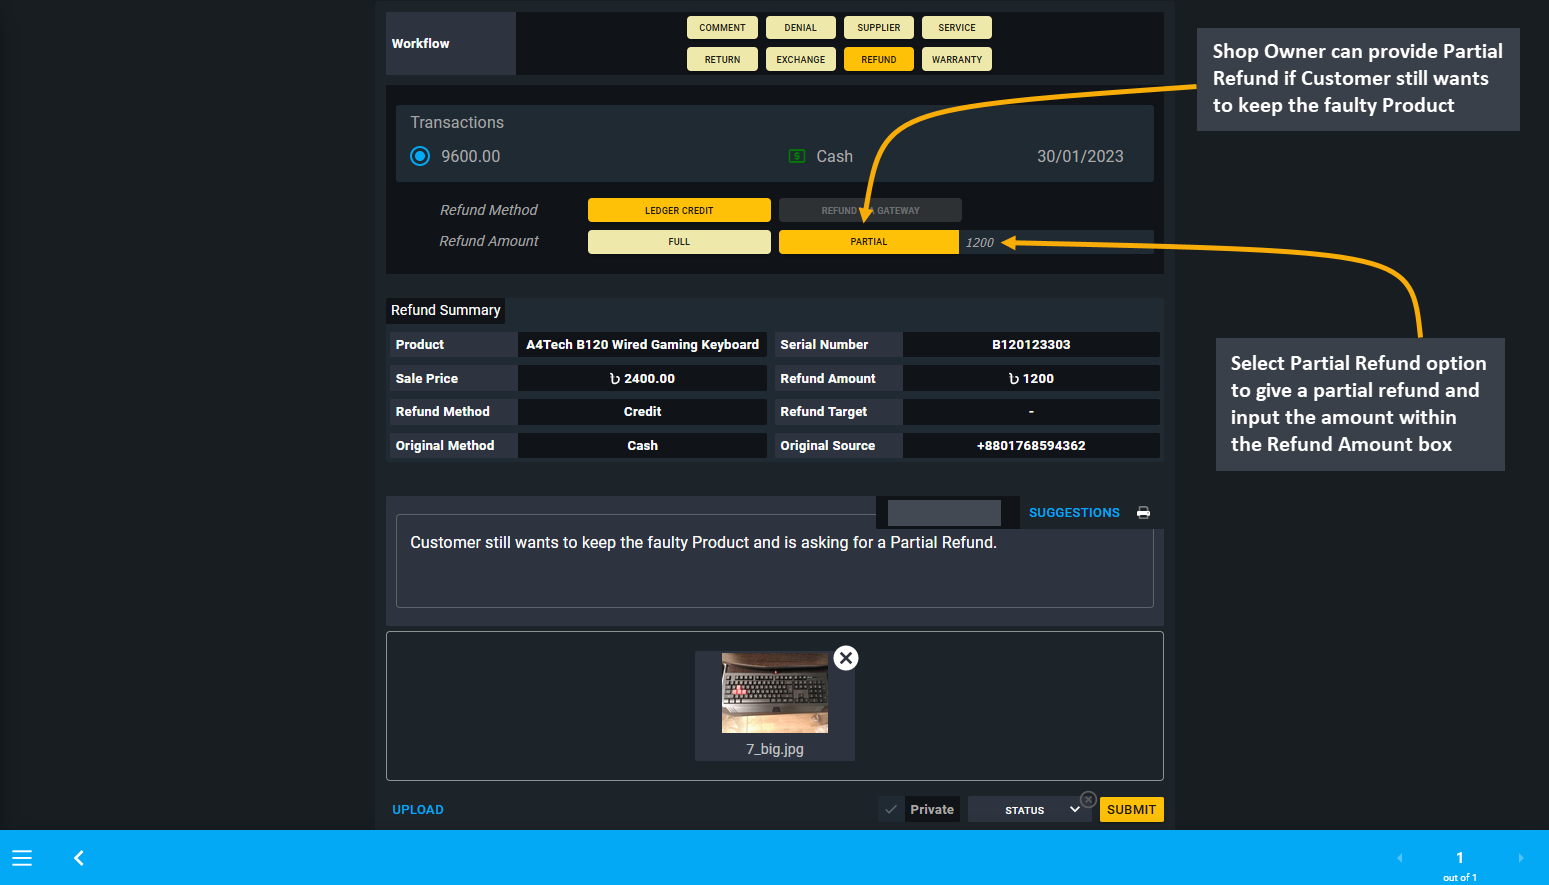
Image 5: Shop Owner can provide Partial Refund if the Customer still wants to keep the faulty Product.
Cash Customer Refund not Supported
Regular Customers can be refunded via Ledger Credit or any other Payment Gateways. However, Refund for Cash Customers are not supported yet at this moment, because they do not have specific contact details and payment information associated with their account. So, the best way to issue refund for any Cash Customer is to create a Regular Customer Profile for them and them send them the Refund amount on that account as Ledger Credit.
If the Shop Owner tries to open RMA against a Cash Customer, they will be notified that the Cash Customer does not have any phone number, address, or payment details available. Therefore, to refund a Cash Customer, they will be automatically suggested to make a New Regular Customer with phone number, full address, and payment details. Then, the Cash Customer’s Order will be assigned to this New Regular Customer and RMA can be created under this Customer and Refund can be issued as Ledger Credit which is only currently supported.
8 - Warranty
Learn more about creating and managing RMA’s Warranty workflow actions for Products.
Create RMA based on Warranty
Warranty will be applicable when Warranty Plan will be applied to the target Product. If the Warranty workflow shows disabled, it will mean that no Warranty Plan was added for the Product. Therefore, for processing any warranty case within or after Product warranty period, the Shop Owner will have to select this option.
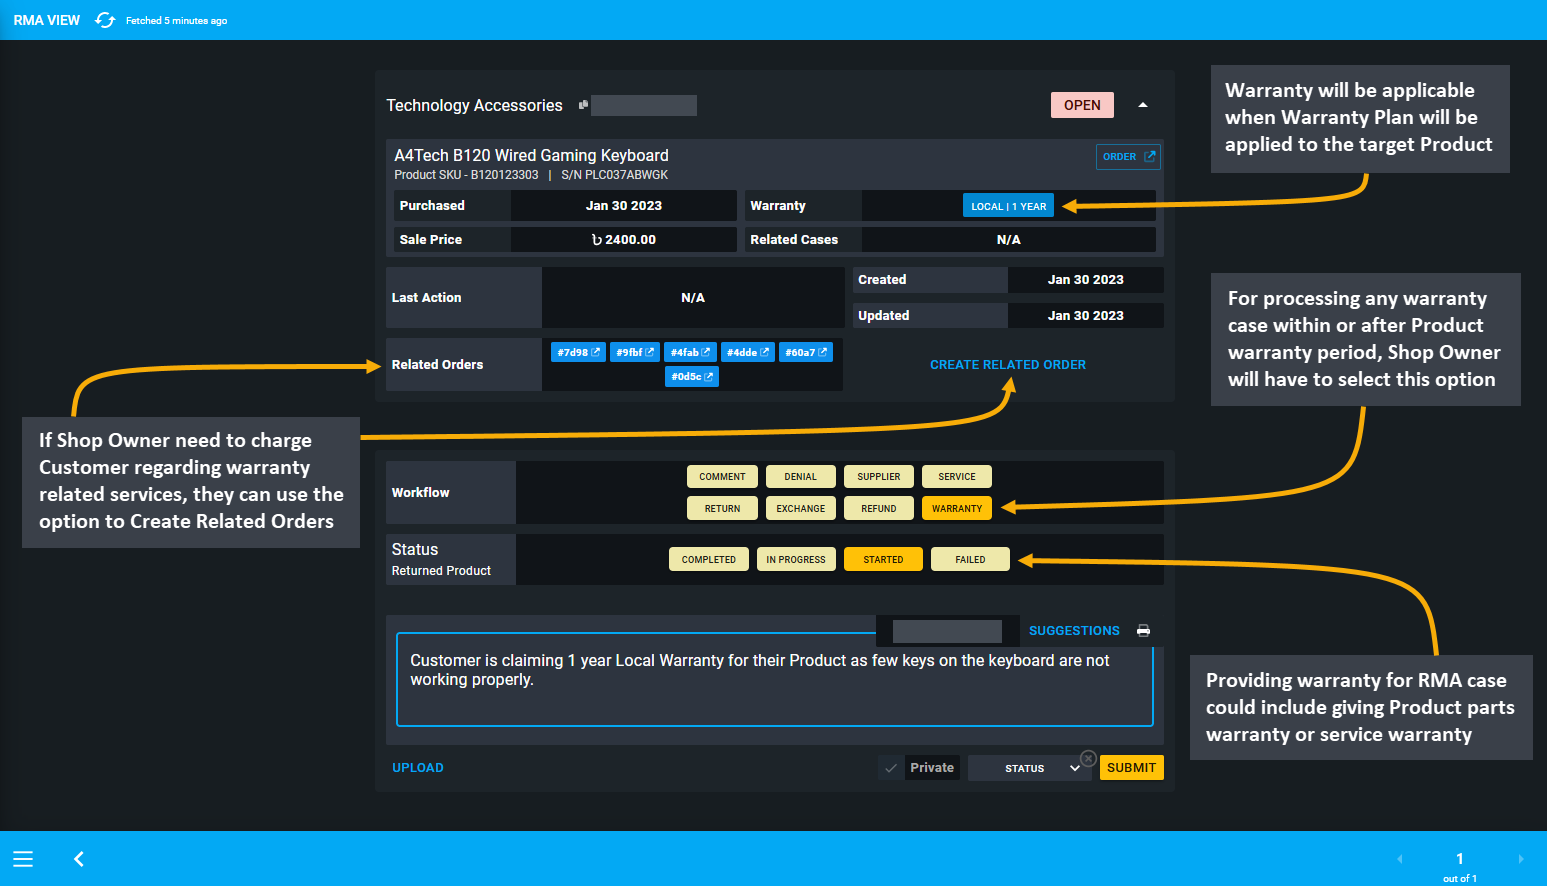
Image 1: Use Warranty to process any warranty case within or after Product warranty period that applies.
Receiving and Denying Warranty Claim
Customer could be requesting for Warranty claim on their Product within the warranty period from Shop Owner. For example, when Customer approached Shop Owner to claim Warranty on their gaming keyboard, they must record it under the Warranty workflow. So, select workflow as Warranty and status as In Progress and click Submit with the comment when receiving the Warranty claim from the Customer. This will start the warranty case.
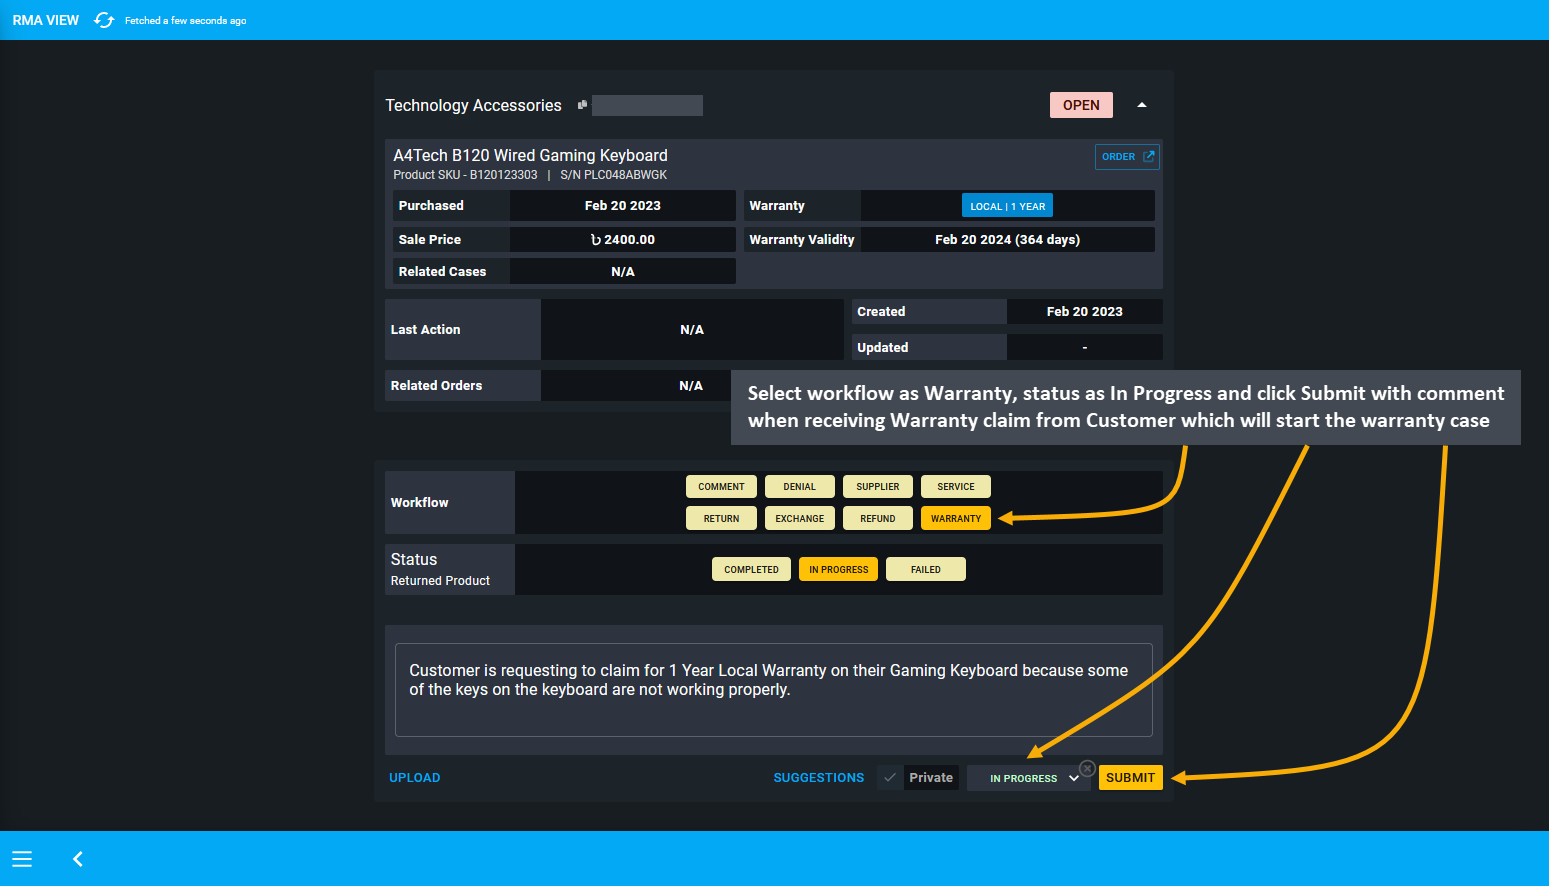
Image 2: When receiving Warranty claim from Customer, record it with comment which will start the case.
If, after thorough evaluation, the technical team found the Product to not be defective, then the Shop Owner can deny the Customer’s claim. In this case, they need to select workflow as Denial, select status as Resolved, and click Submit before closing the RMA case with comments. In this way, a Shop Owner can deny any Warranty claim.
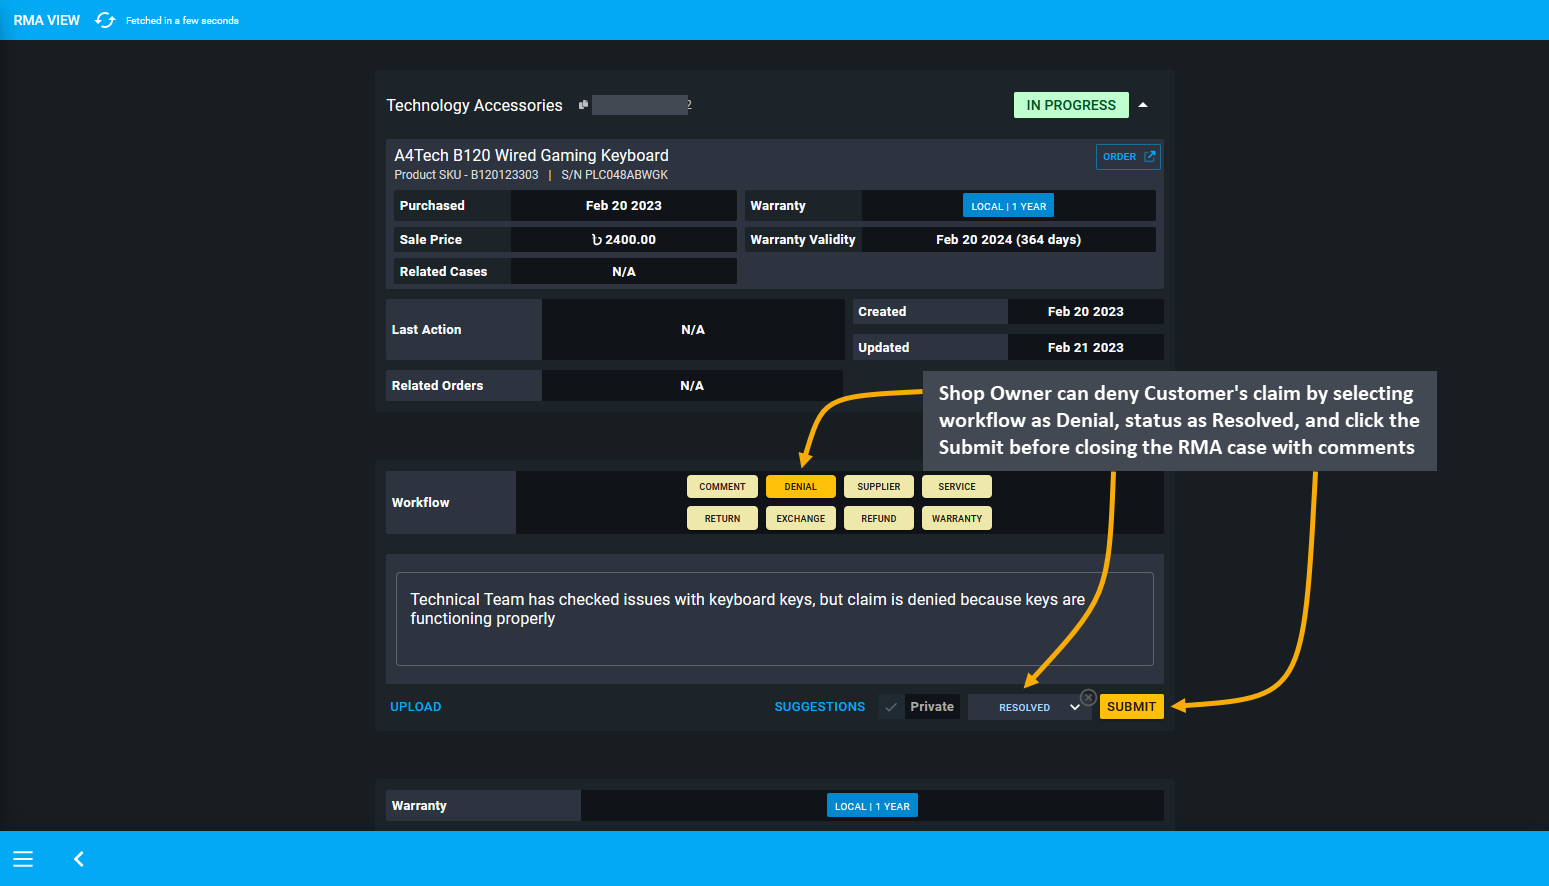
Image 3: Shop Owner can deny a Customer's claim by selecting workflow as Denial and status as Resolved.
Providing Warranty for an RMA case could include giving 3 months’ Product parts warranty or 6 months’ service warranty. So for instance, if parts warranty is expired for the Product, Shop Owner will have to charge Customer to provide the service for Product parts. Similarly, if they need to charge a Customer regarding warranty related services, they can use the option to Create Related Orders. Creating a related Order or several related Orders for the RMA case will allow the Shop Owner to charge Customer for additional service for the Product.
Related Orders can be created by Shop Owner to sell a Product or a Product’s part to the Customer, or charge payment for service from the Customer. For instance, if an RMA case needs to be resolved through Payment, then Shop Owner can Create Related Order to charge the Customer for the Product they need to purchase.
In order to create a Related Order, the Shop Owner can add a Comment to keep record of why the related Order was created. For example, if the Customer contacted the Shop Owner about a Product that is having technical problems and asks for a replacement, the Shop Owner will have to check if the Product is still under warranty. If the Product’s Warranty has expired, but Customer still wants the same Product, then Shop can provide another Product to them with payment for it. In this case, the Shop Owner can create a Related Order as they will provide a similar Product to Customer with additional payment that will get recorded under Related Orders on RMA case.
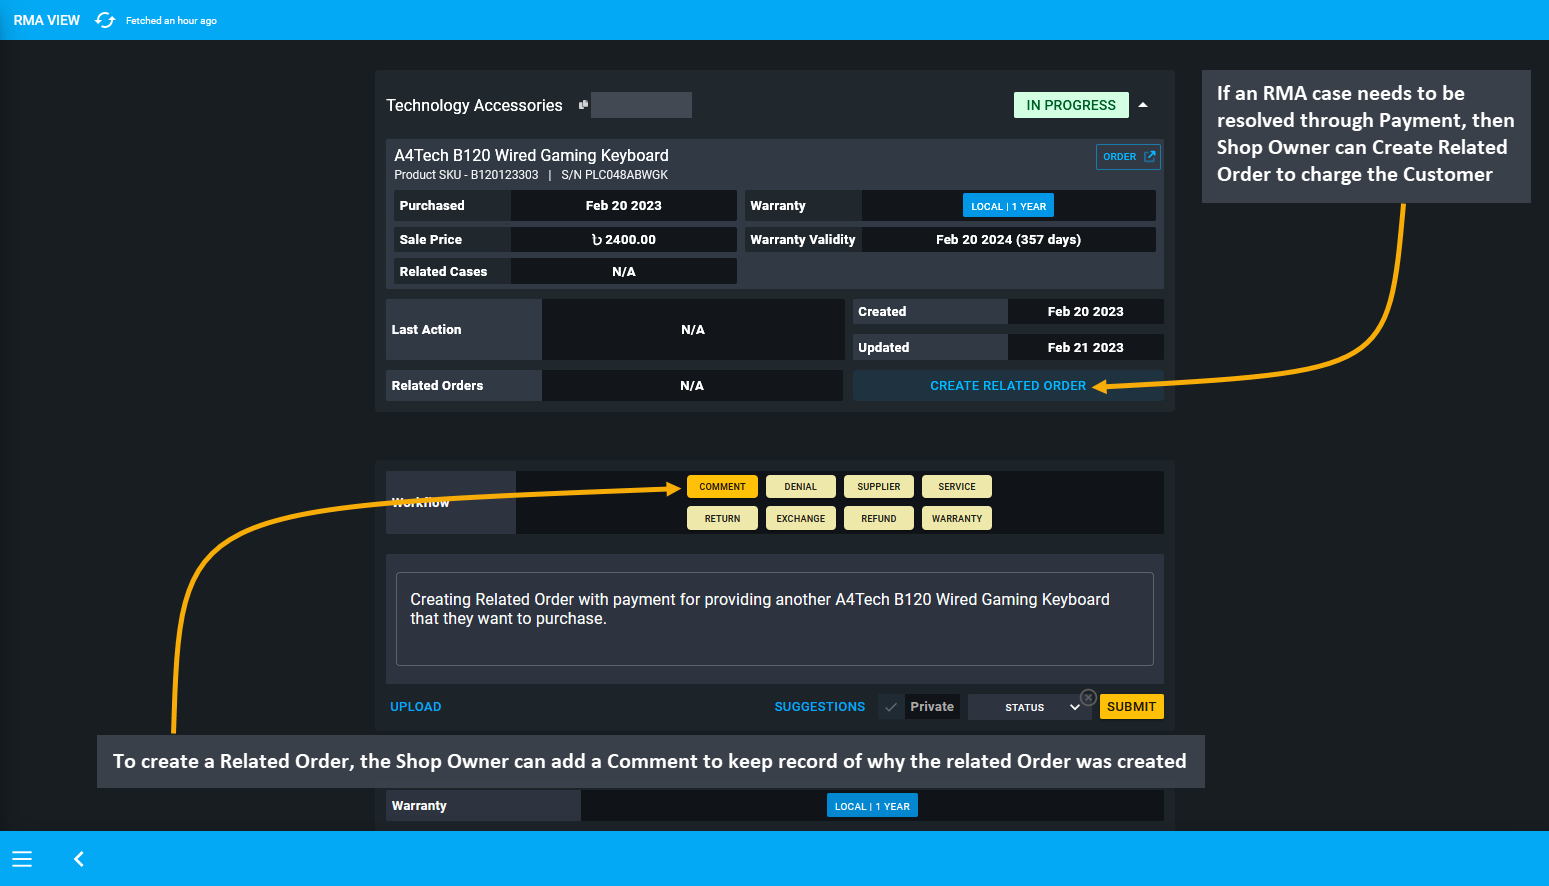
Image 4: If an RMA case needs to be resolved through Payment, then Shop Owner can Create a Related Order.
After clicking the Create Related Order button, the Order Cart will open with Customer’s information automatically prefilled, the Shop Owner will now have to add the Product to Cart for which additional payment will be charged. Check Product quantity, Order total, subtotal, and click Proceed to charge Product payment from the Customer.
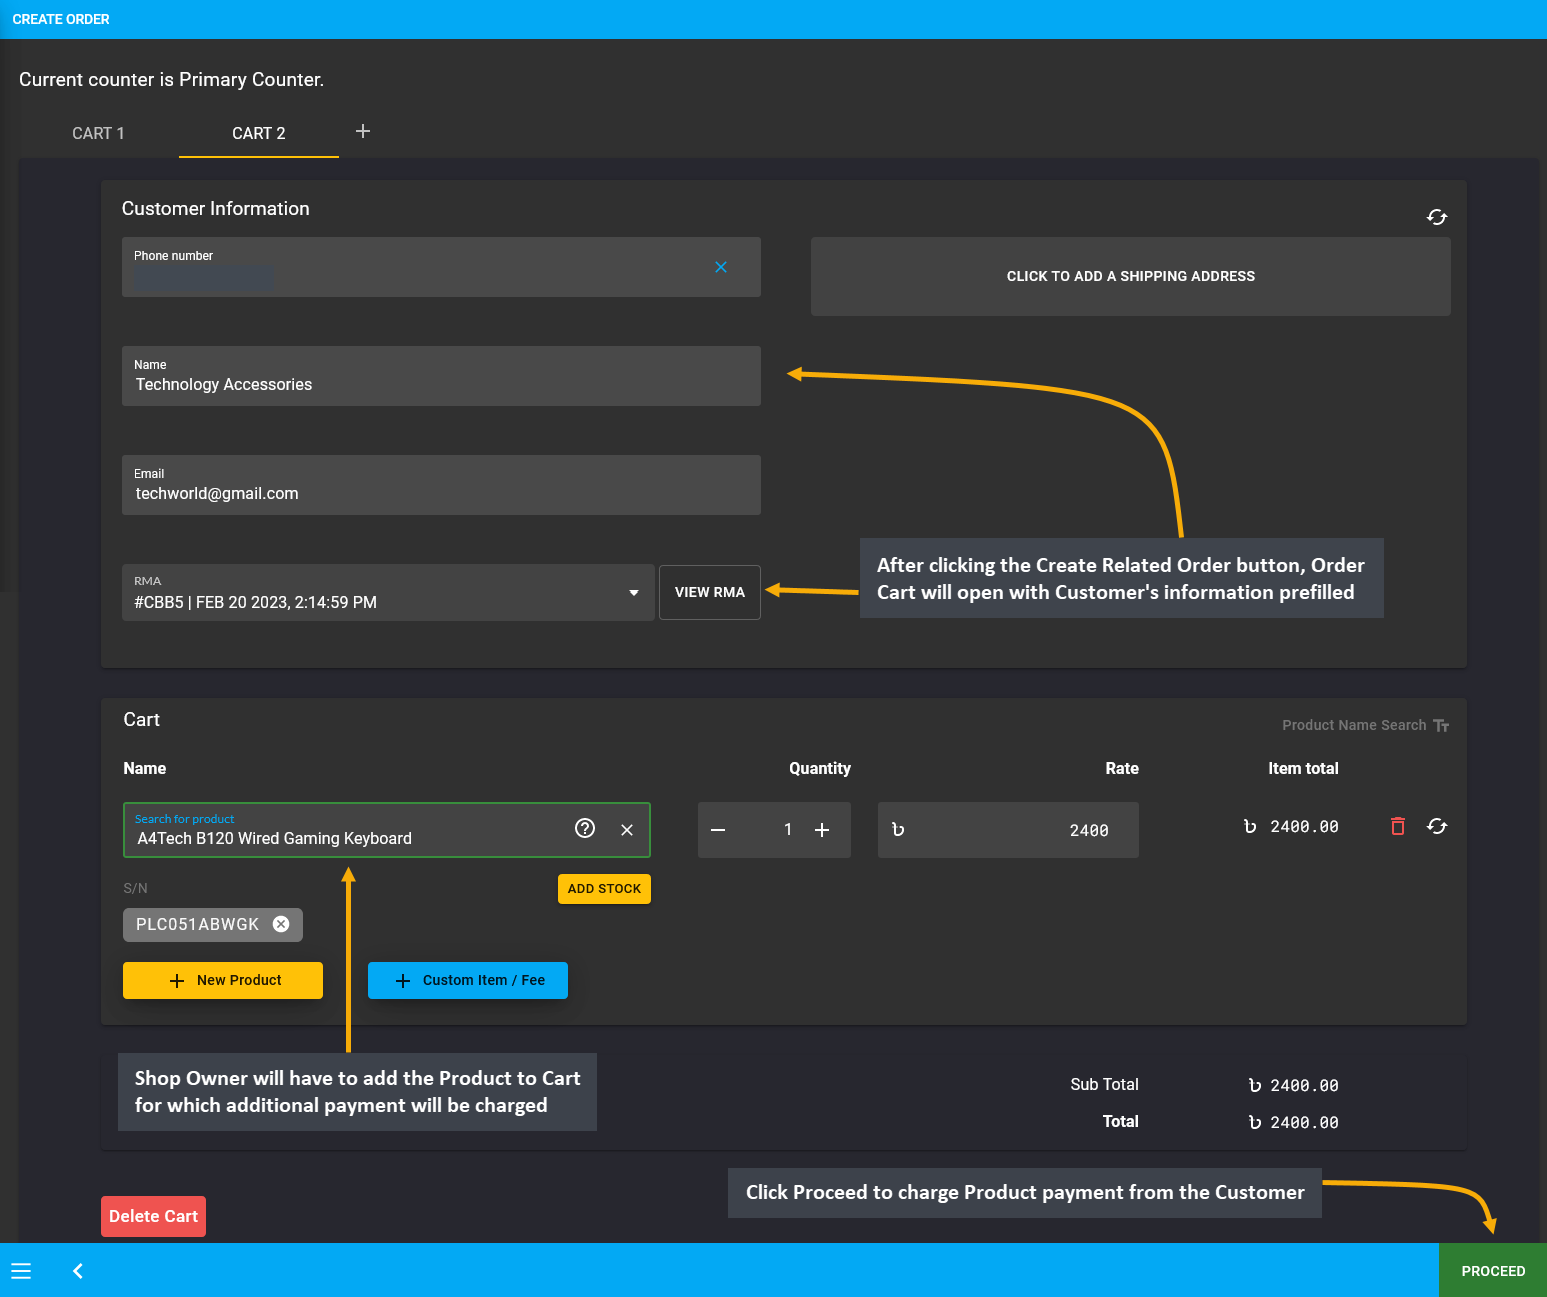
Image 5: The Shop Owner will have to add the Product to Cart for which additional payment will be charged.
In the following page, select Customer’s preferred Shipment and Payment options. Add a note stating that Related Order was created upon Customer’s request for the RMA case to purchase the same Product with payment as the original Product is out of Warranty. Click Confirm Order to complete creating the Related Order for the RMA case.
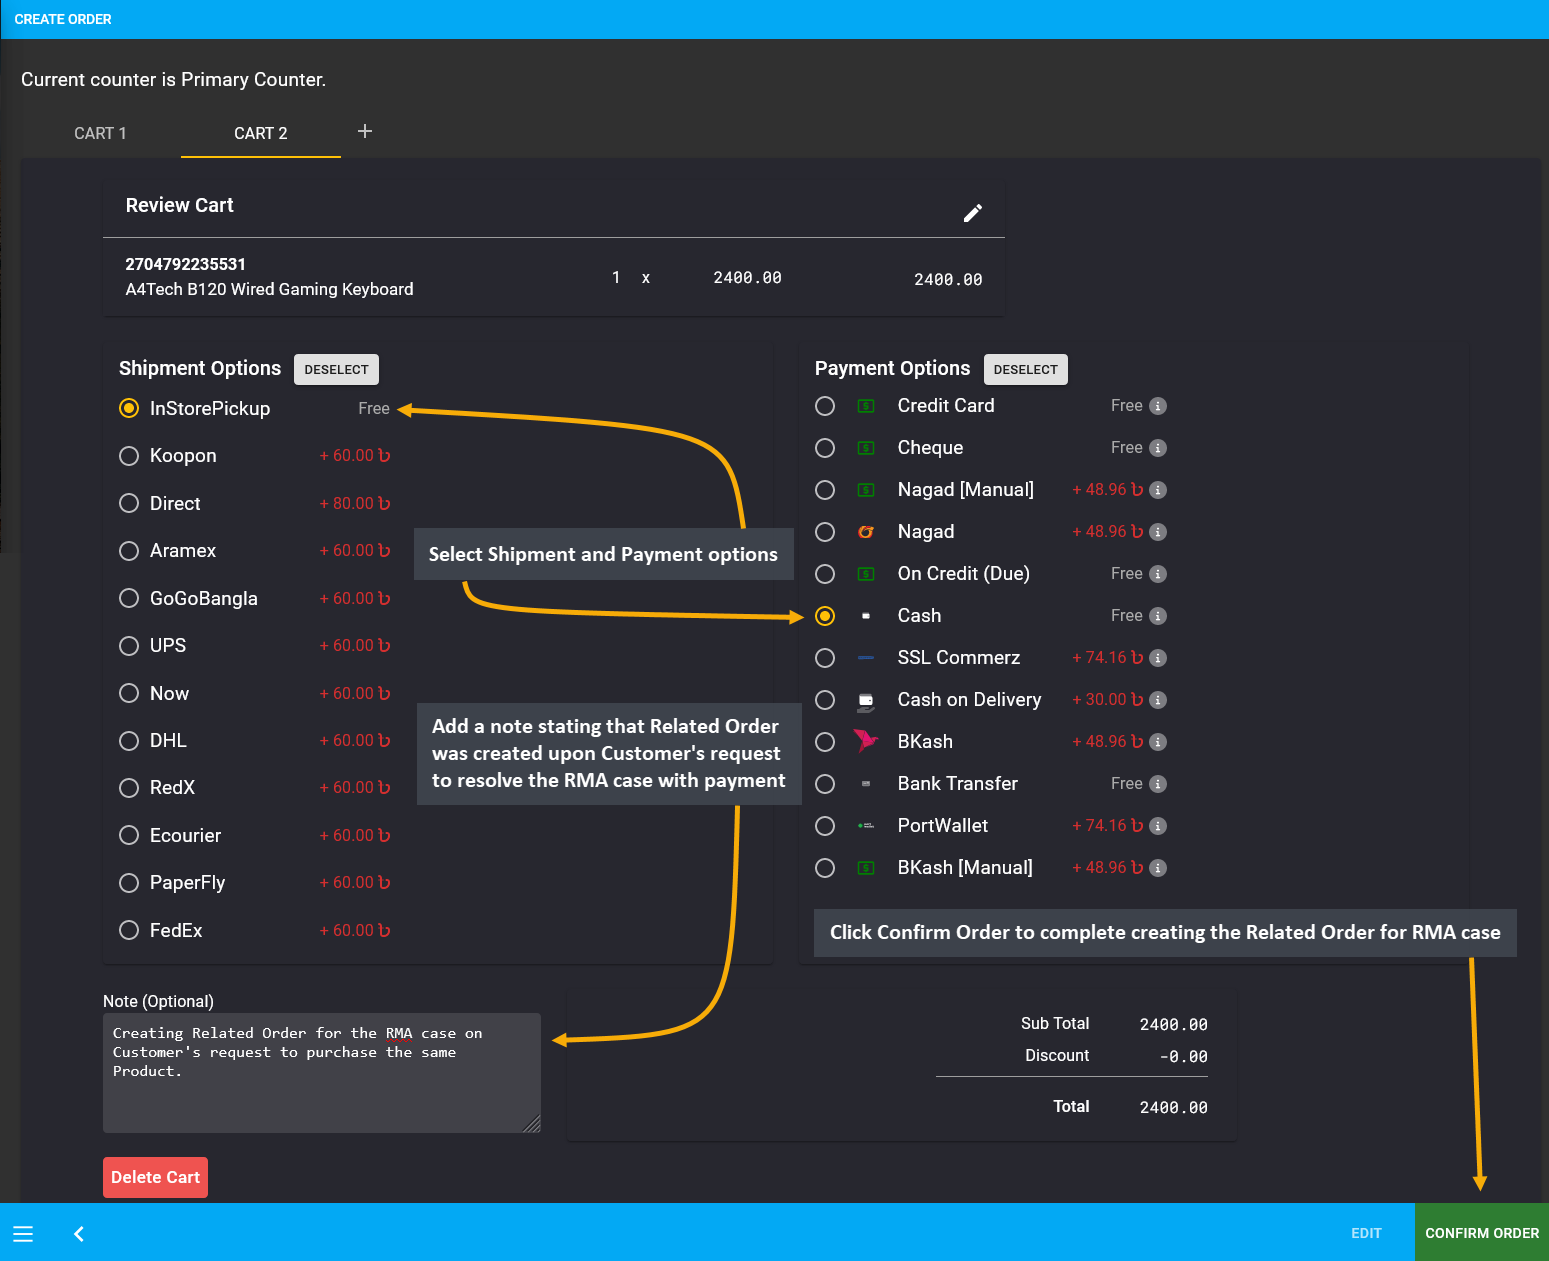
Image 6: Related Order was created upon Customer's request to resolve the RMA case Warranty with payment.
After Order is completed, Shop Owner can click View Order button that will automatically redirect to the Related Order on the general Order List. It will display the note which explains that the Order is related to RMA case.
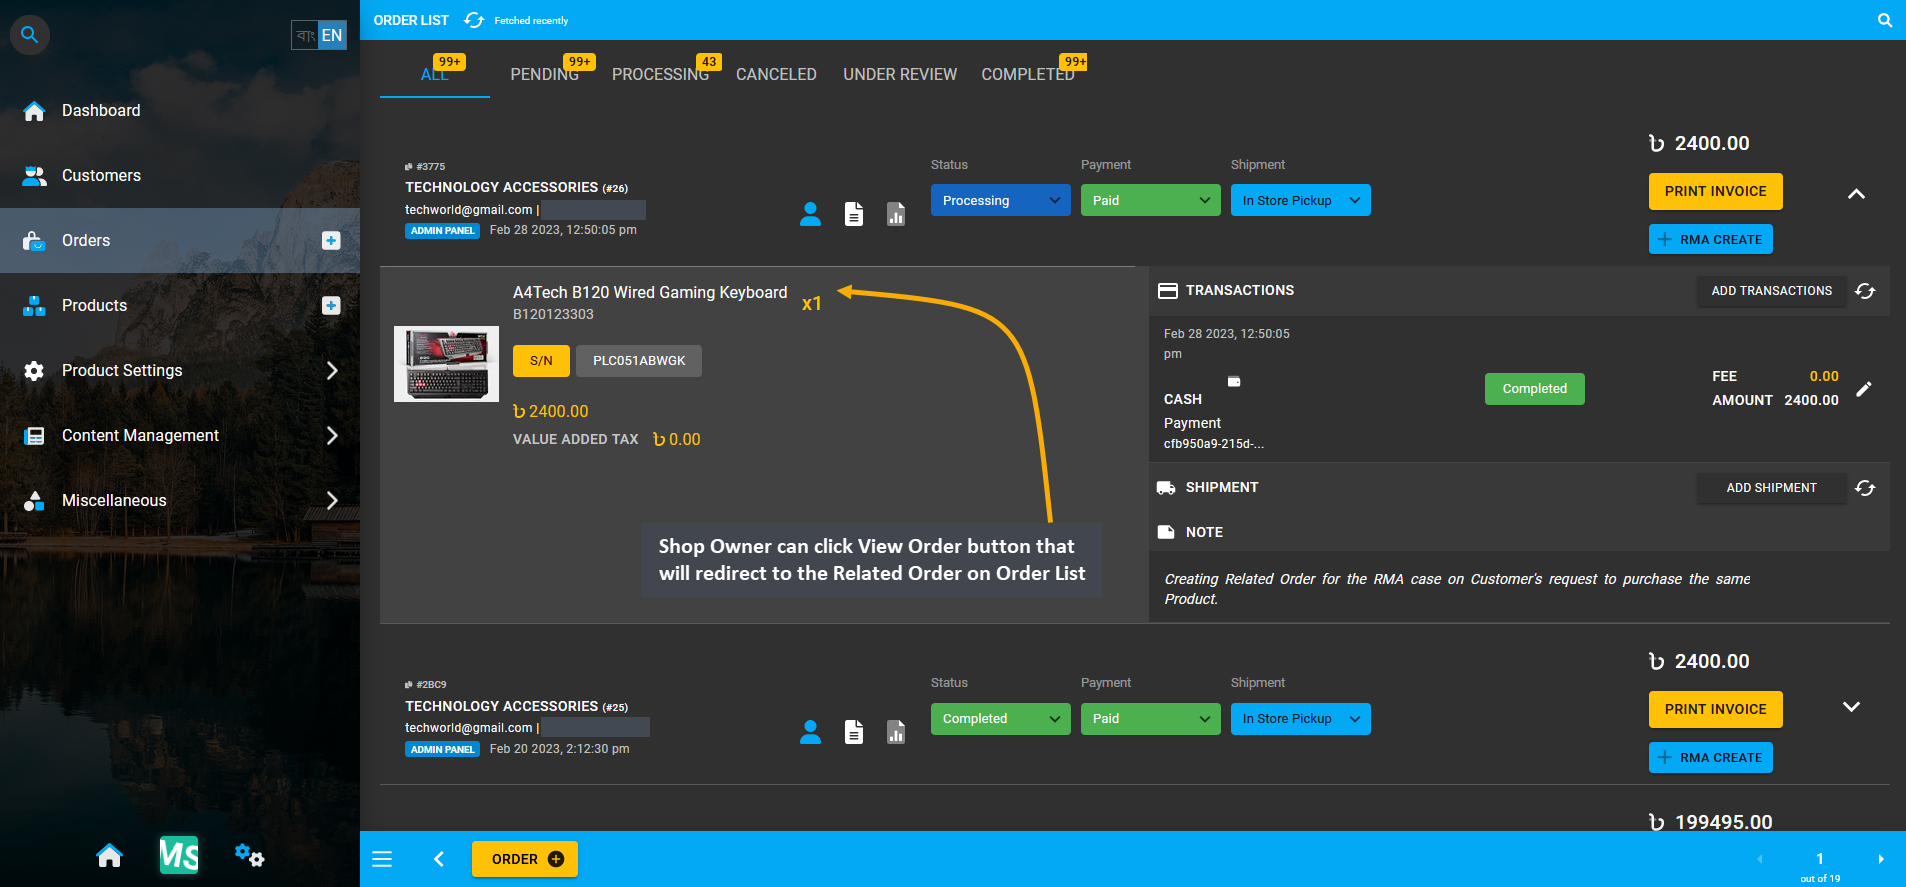
Image 7: Shop Owner can click View Order button that will redirect to the Related Order on the Order List.
Back in the RMA case, the Related Order created for the expired Warranty case will display under Related Orders tab. If more related Orders are created, they will be recorded under the same tab. For convenience, Shop Owner can add a Comment and select status as Resolved to close the RMA case as the Customer’s expired Warranty claim was successfully resolved with purchase of another A4Tech B120 Wired Gaming Keyboard.
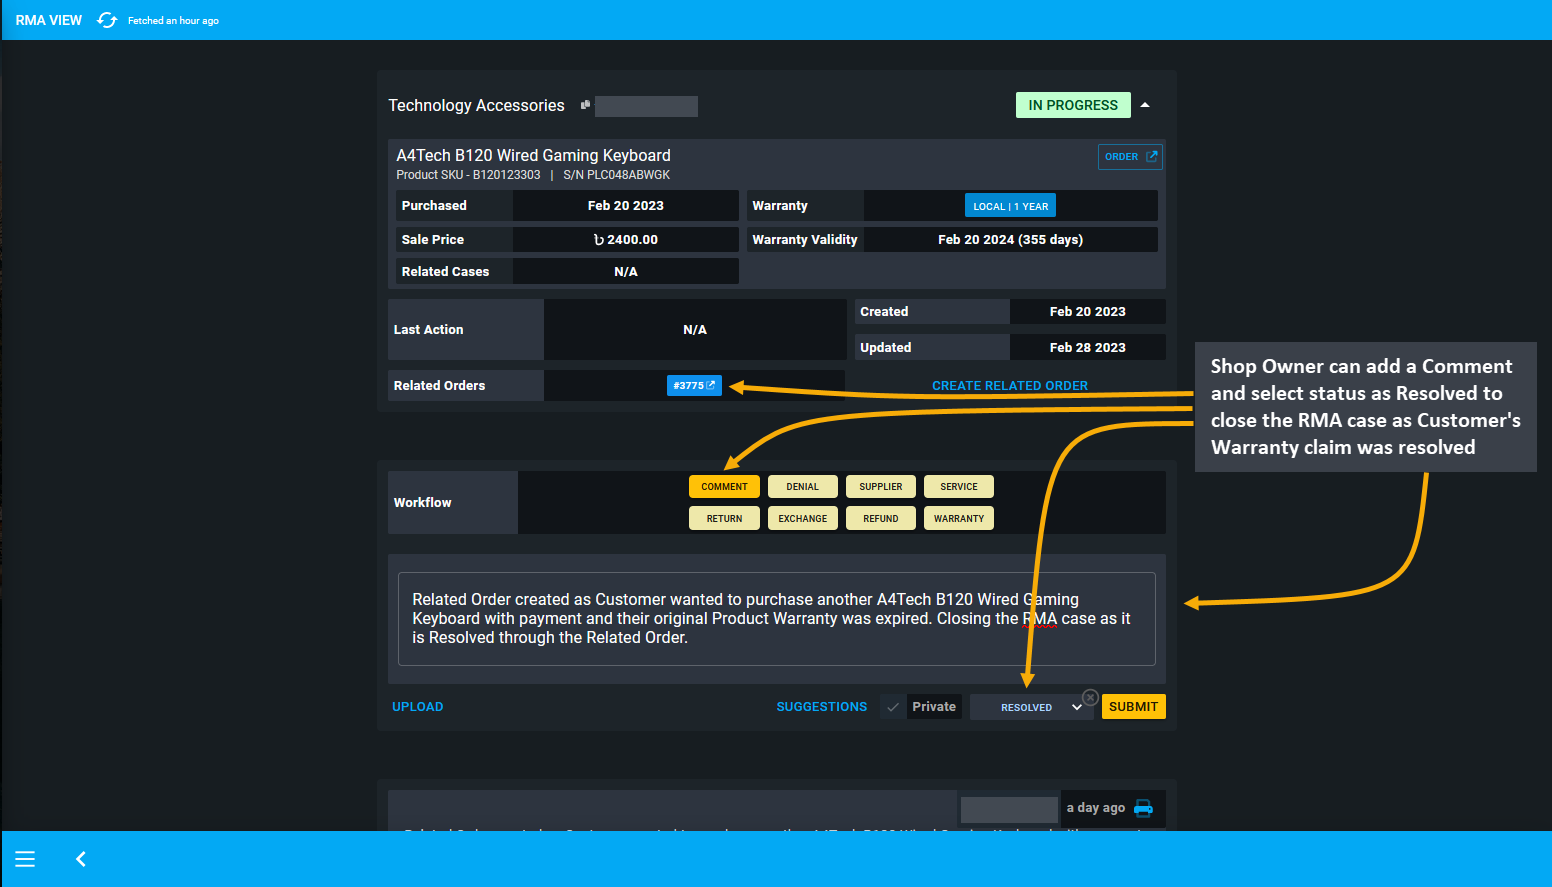
Image 7: Shop Owner can add a Comment stating details and select status as Resolved to close the RMA case.
9 - PC Build RMA
Learn how to create and manage RMA for individual component of the PC Build.
RMA for PC Build
RMA Case for PC Build can be created for its individual items, but not for the full Order. For instance, an Order was created with 10 PC Build components, but for now RMA can be created for individual component of the PC Build. Creating an RMA for the full Order is not yet supported in RMA, but Shop Owner can always create an RMA based on i.e. a motherboard product and write down that the full system has been received from the Customer.
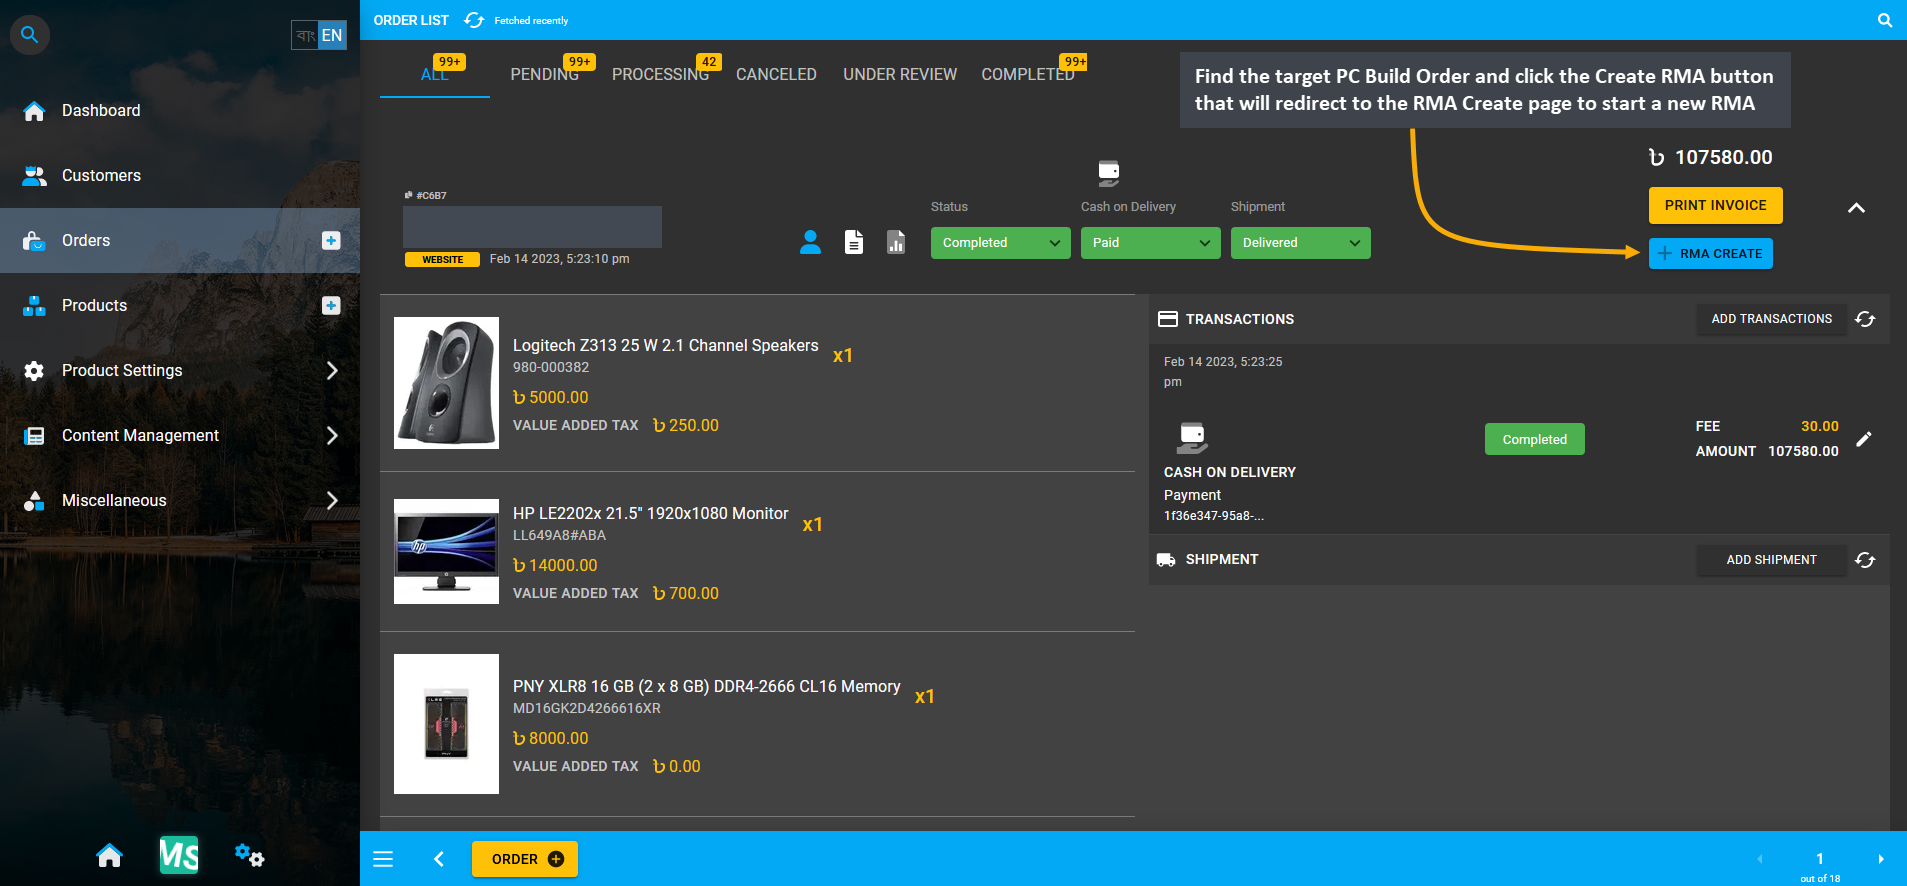
Image 1: Find target PC Build Order and click Create RMA button that will redirect to the RMA Create page.
RMA for an individual component of the PC Build can be created by using the RMA Create button from Order List for any PC Build Order. For this, go to the target PC Build Order and click the Create RMA button that will redirect to the RMA Create page to start a new RMA case for the faulty PC Build component.
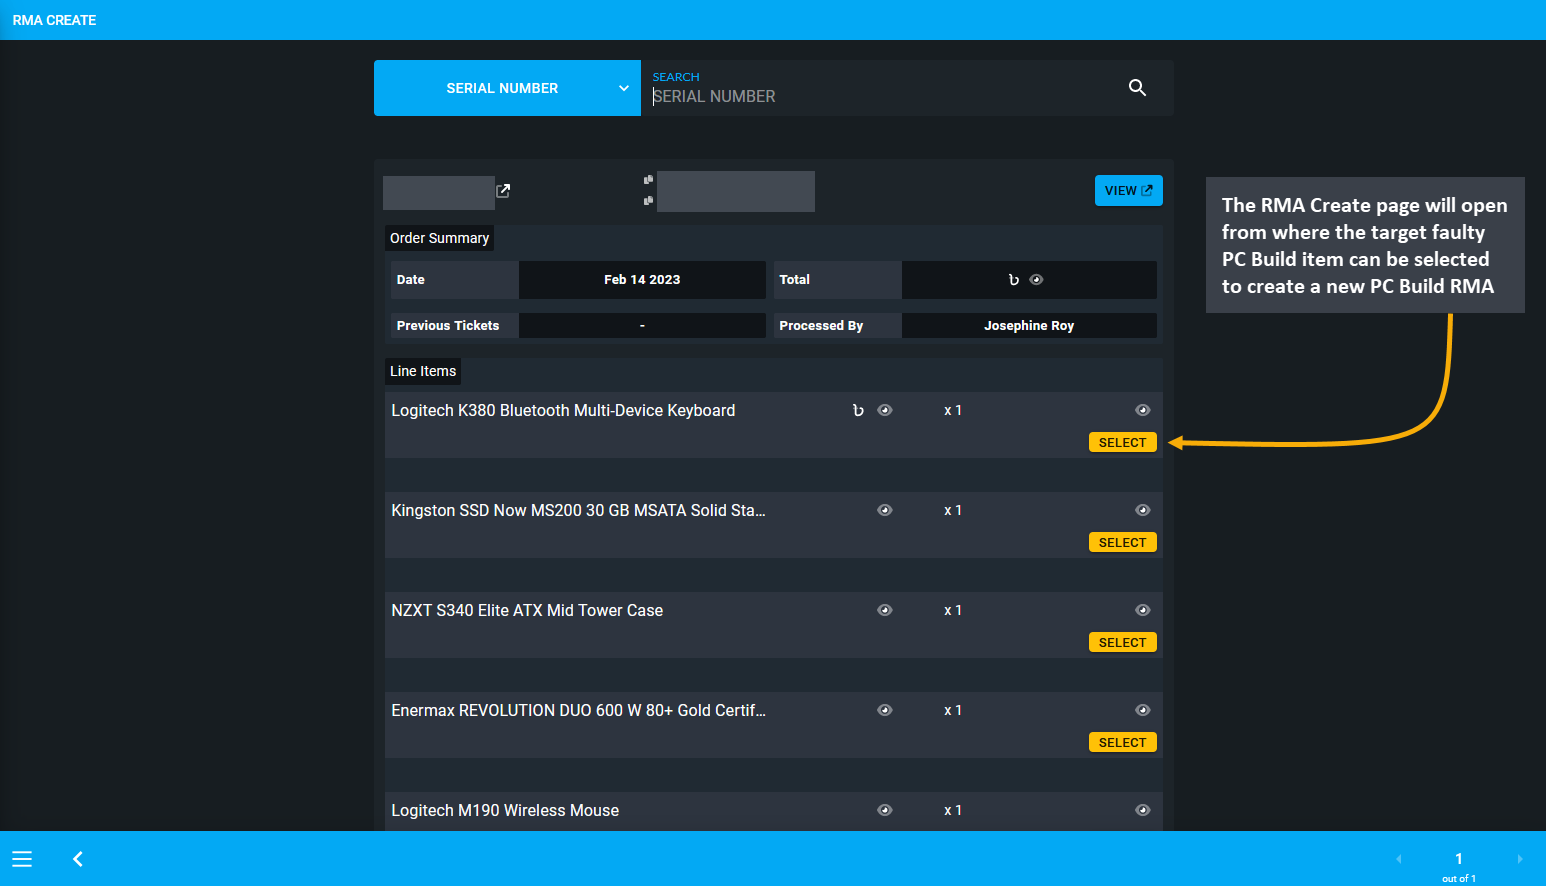
Image 2: Select the faulty PC Build Item from list to create a new RMA case from the he RMA Create page.
RMA Create page will open from where the target faulty PC Build item can be selected to create a new RMA case. After the target PC Build component is selected, a pop-up will ask to confirm before creating the new RMA case.
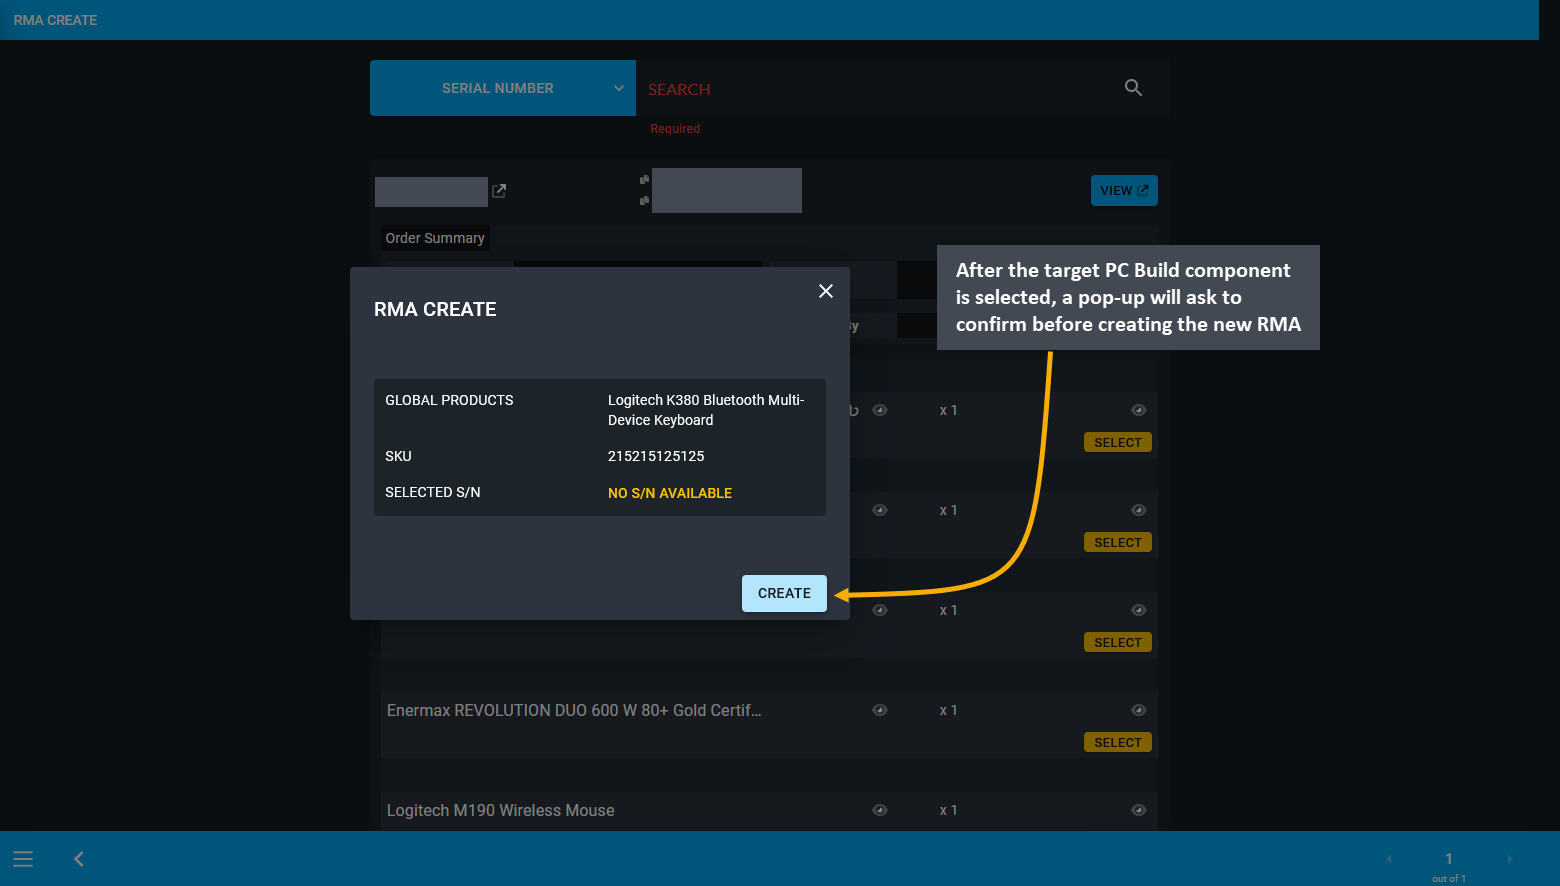
Image 3: After PC Build component is selected, a pop-up will ask to confirm before creating new RMA case.
After the new PC Build RMA Case is created based on faulty PC Build component, the Shop Owner can write down that the full system has been received from the Customer and mention the PC Build component that is faulty.
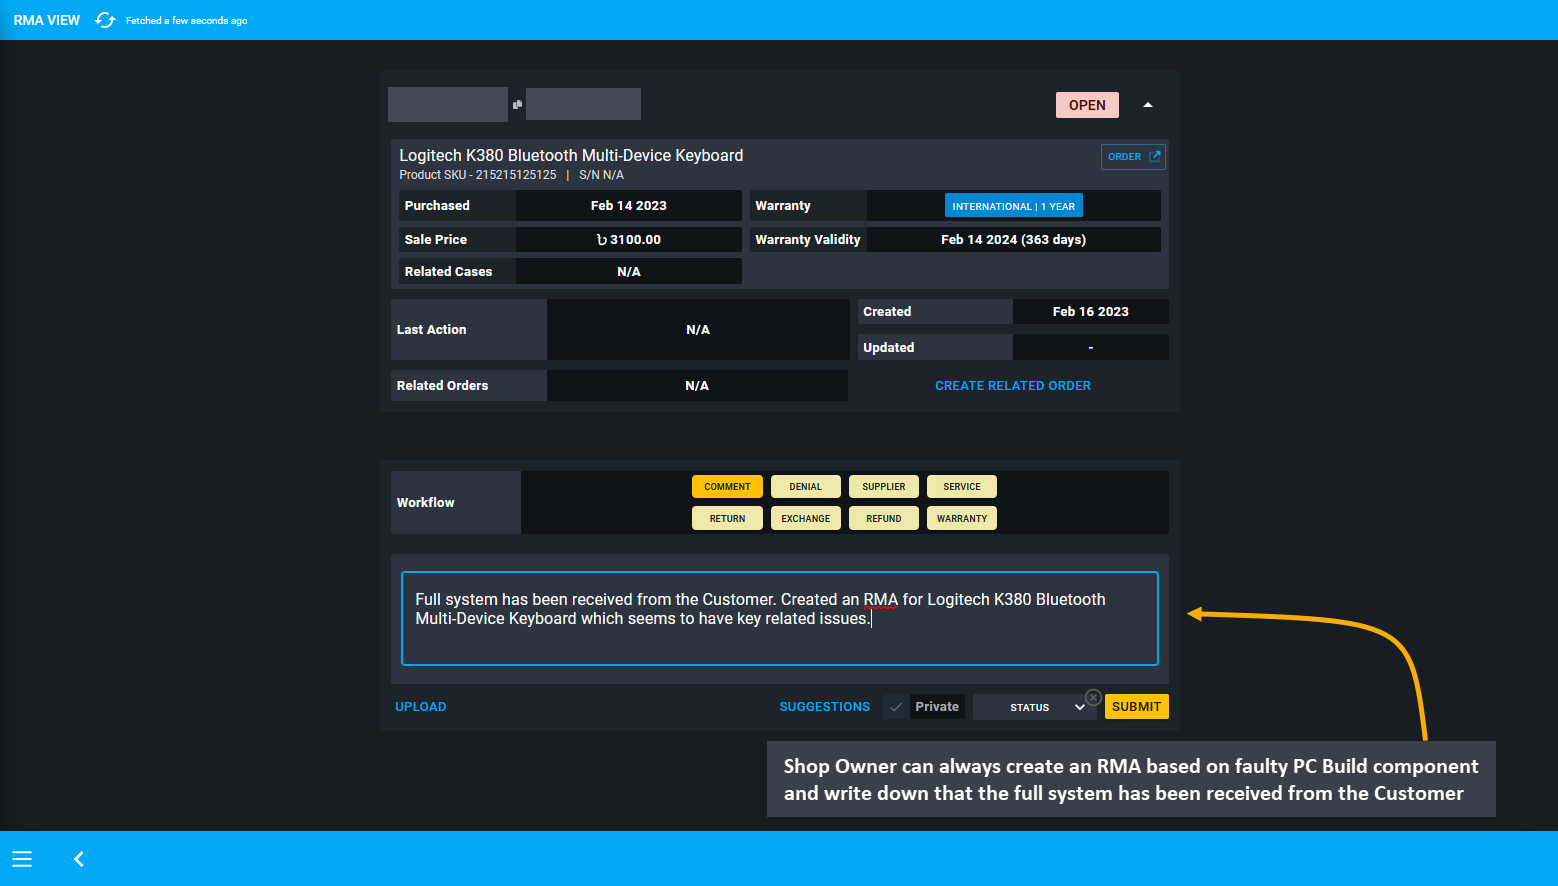
Image 4: Create RMA for faulty PC Build component and write down that the full system has been received.


