Warranty
Create RMA based on Warranty
Warranty will be applicable when Warranty Plan will be applied to the target Product. If the Warranty workflow shows disabled, it will mean that no Warranty Plan was added for the Product. Therefore, for processing any warranty case within or after Product warranty period, the Shop Owner will have to select this option.
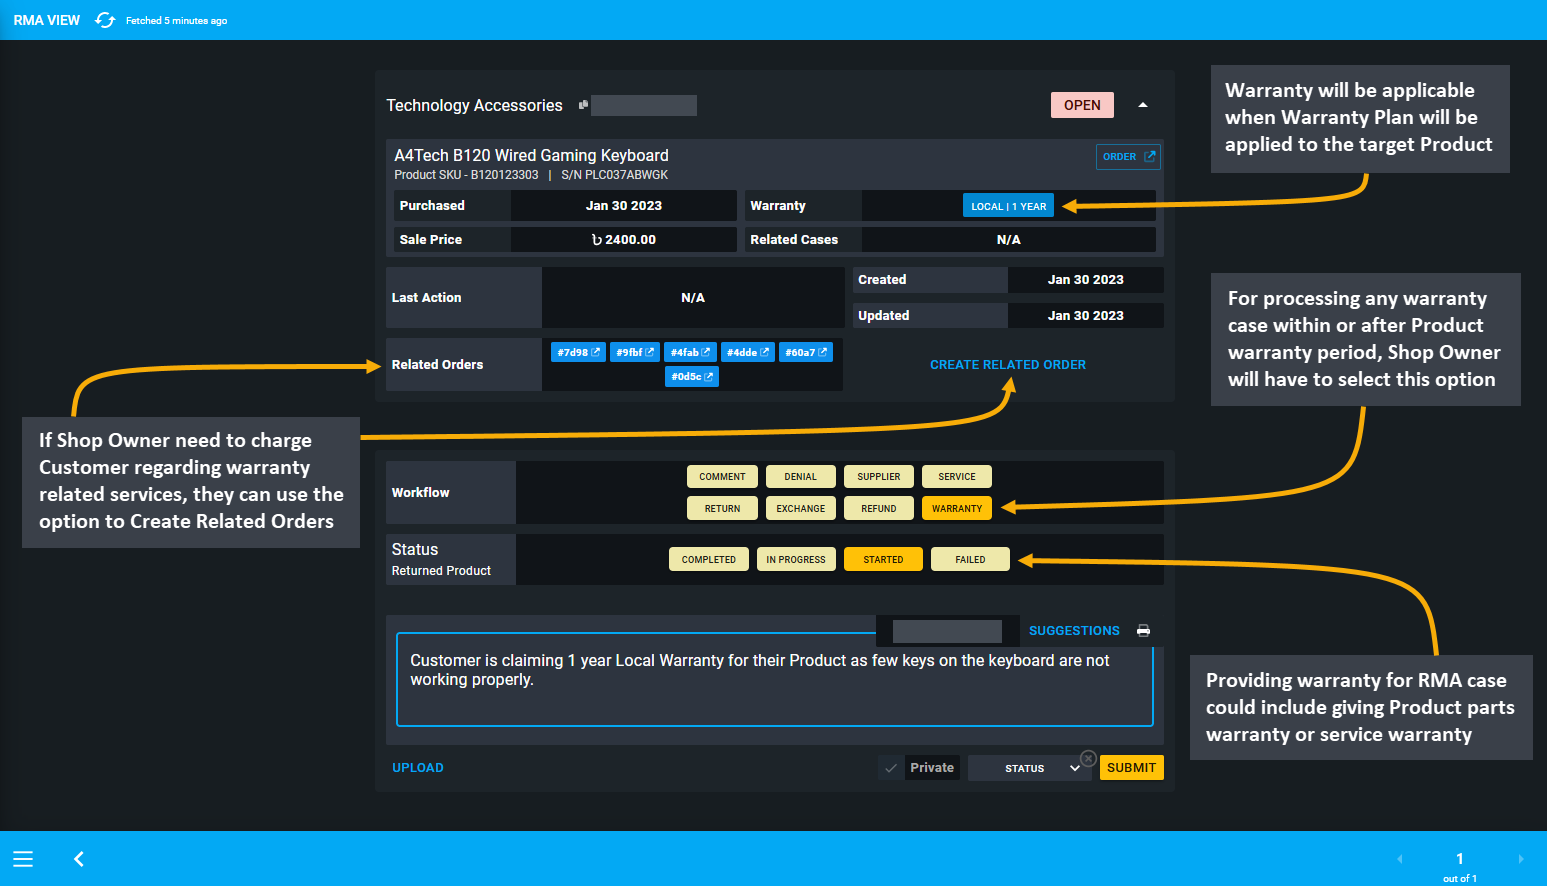
Image 1: Use Warranty to process any warranty case within or after Product warranty period that applies.
Receiving and Denying Warranty Claim
Customer could be requesting for Warranty claim on their Product within the warranty period from Shop Owner. For example, when Customer approached Shop Owner to claim Warranty on their gaming keyboard, they must record it under the Warranty workflow. So, select workflow as Warranty and status as In Progress and click Submit with the comment when receiving the Warranty claim from the Customer. This will start the warranty case.
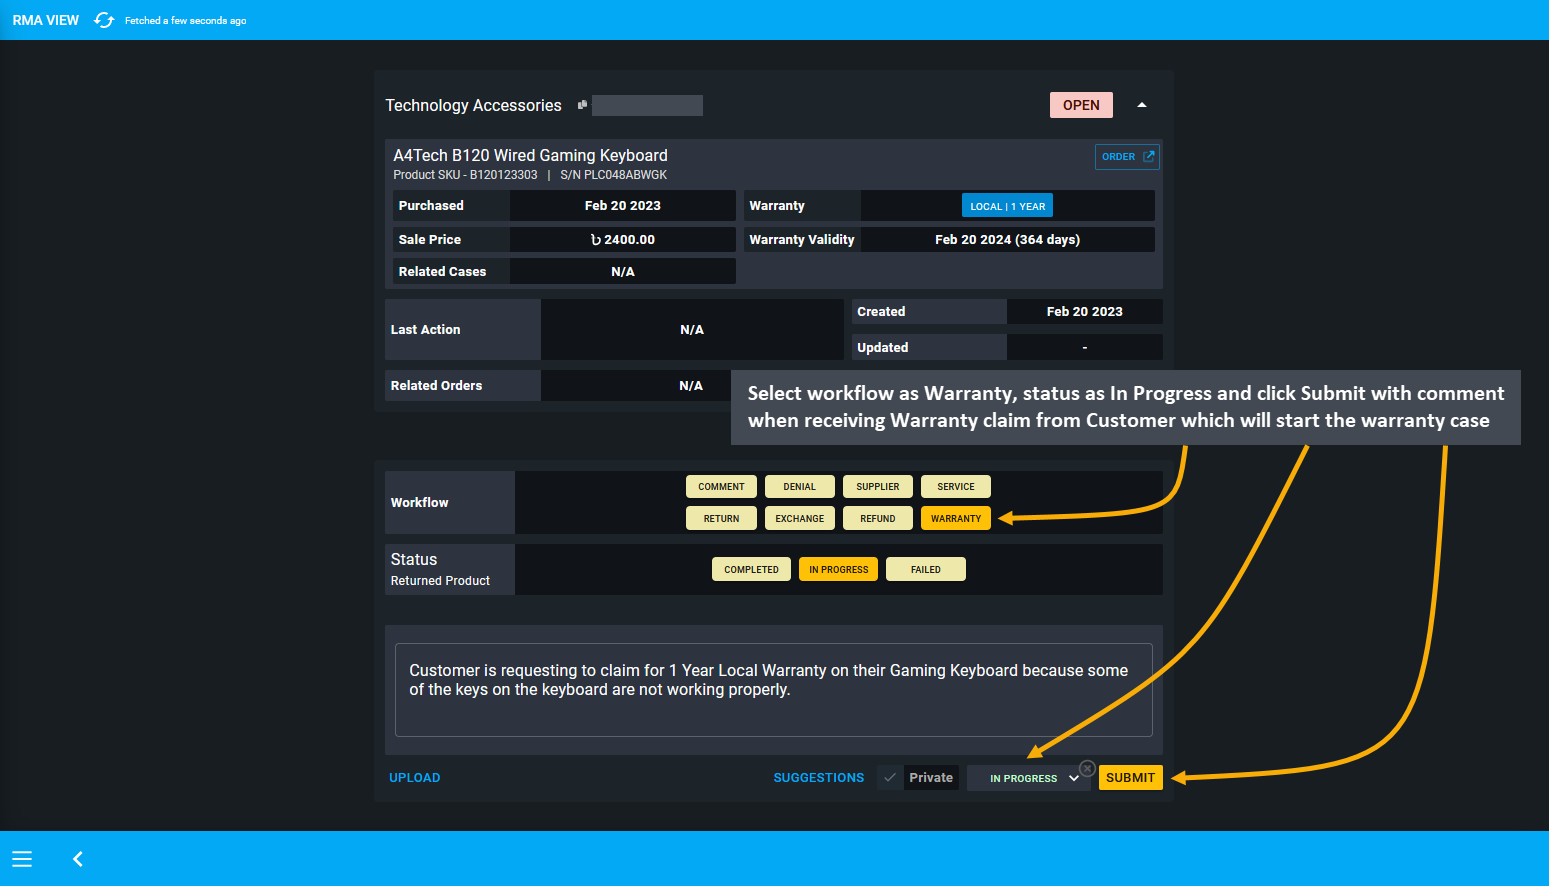
Image 2: When receiving Warranty claim from Customer, record it with comment which will start the case.
If, after thorough evaluation, the technical team found the Product to not be defective, then the Shop Owner can deny the Customer’s claim. In this case, they need to select workflow as Denial, select status as Resolved, and click Submit before closing the RMA case with comments. In this way, a Shop Owner can deny any Warranty claim.
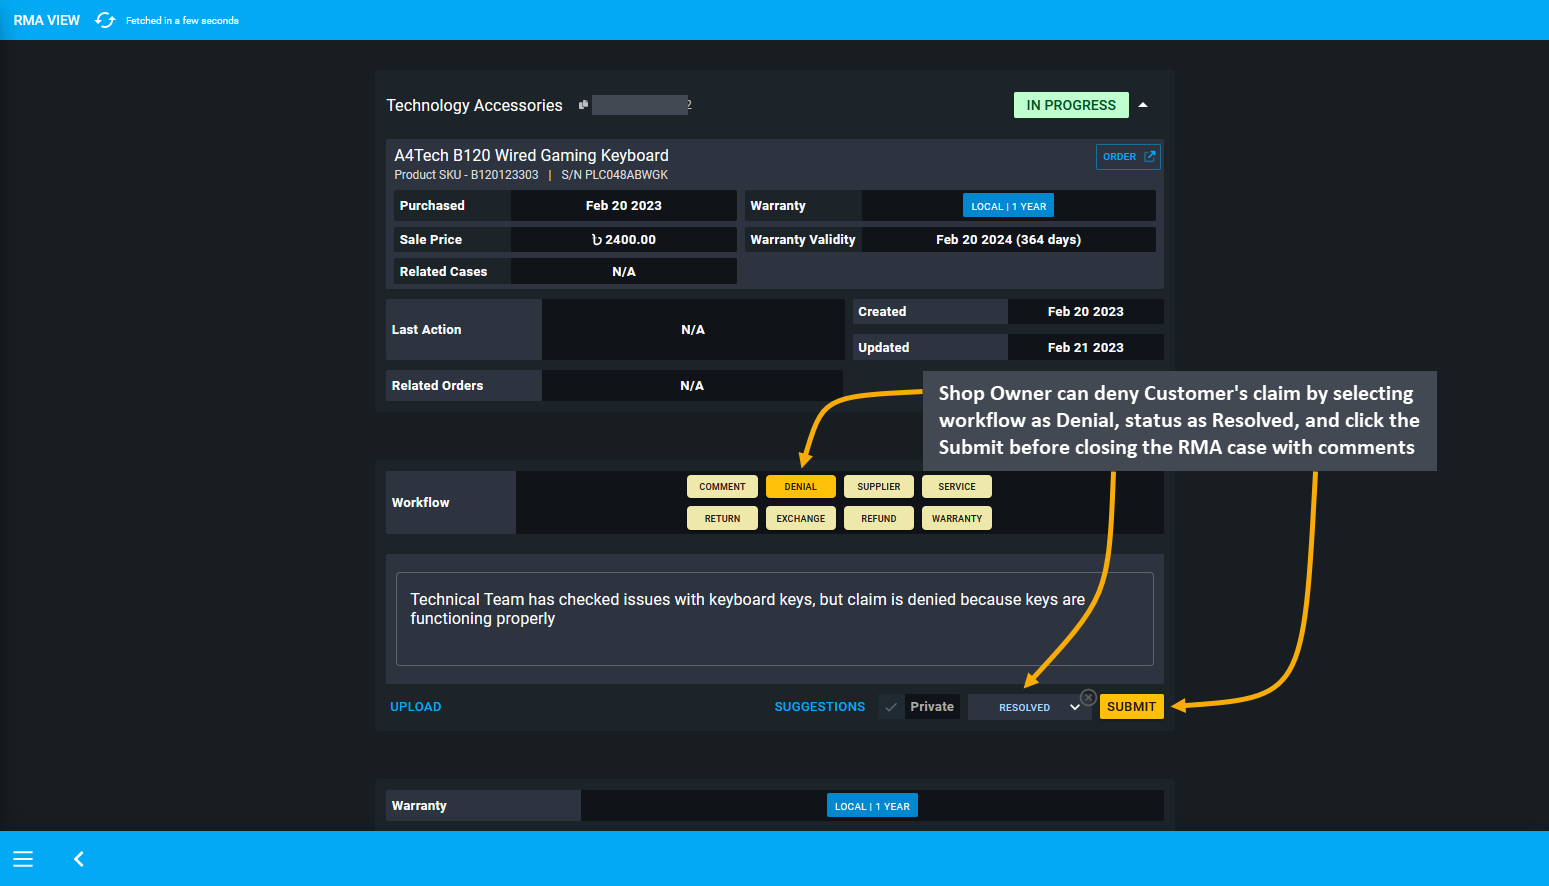
Image 3: Shop Owner can deny a Customer's claim by selecting workflow as Denial and status as Resolved.
Providing Warranty for an RMA case could include giving 3 months’ Product parts warranty or 6 months’ service warranty. So for instance, if parts warranty is expired for the Product, Shop Owner will have to charge Customer to provide the service for Product parts. Similarly, if they need to charge a Customer regarding warranty related services, they can use the option to Create Related Orders. Creating a related Order or several related Orders for the RMA case will allow the Shop Owner to charge Customer for additional service for the Product.
Create Related Orders
Related Orders can be created by Shop Owner to sell a Product or a Product’s part to the Customer, or charge payment for service from the Customer. For instance, if an RMA case needs to be resolved through Payment, then Shop Owner can Create Related Order to charge the Customer for the Product they need to purchase.
Related Order for Expired Warranty
In order to create a Related Order, the Shop Owner can add a Comment to keep record of why the related Order was created. For example, if the Customer contacted the Shop Owner about a Product that is having technical problems and asks for a replacement, the Shop Owner will have to check if the Product is still under warranty. If the Product’s Warranty has expired, but Customer still wants the same Product, then Shop can provide another Product to them with payment for it. In this case, the Shop Owner can create a Related Order as they will provide a similar Product to Customer with additional payment that will get recorded under Related Orders on RMA case.
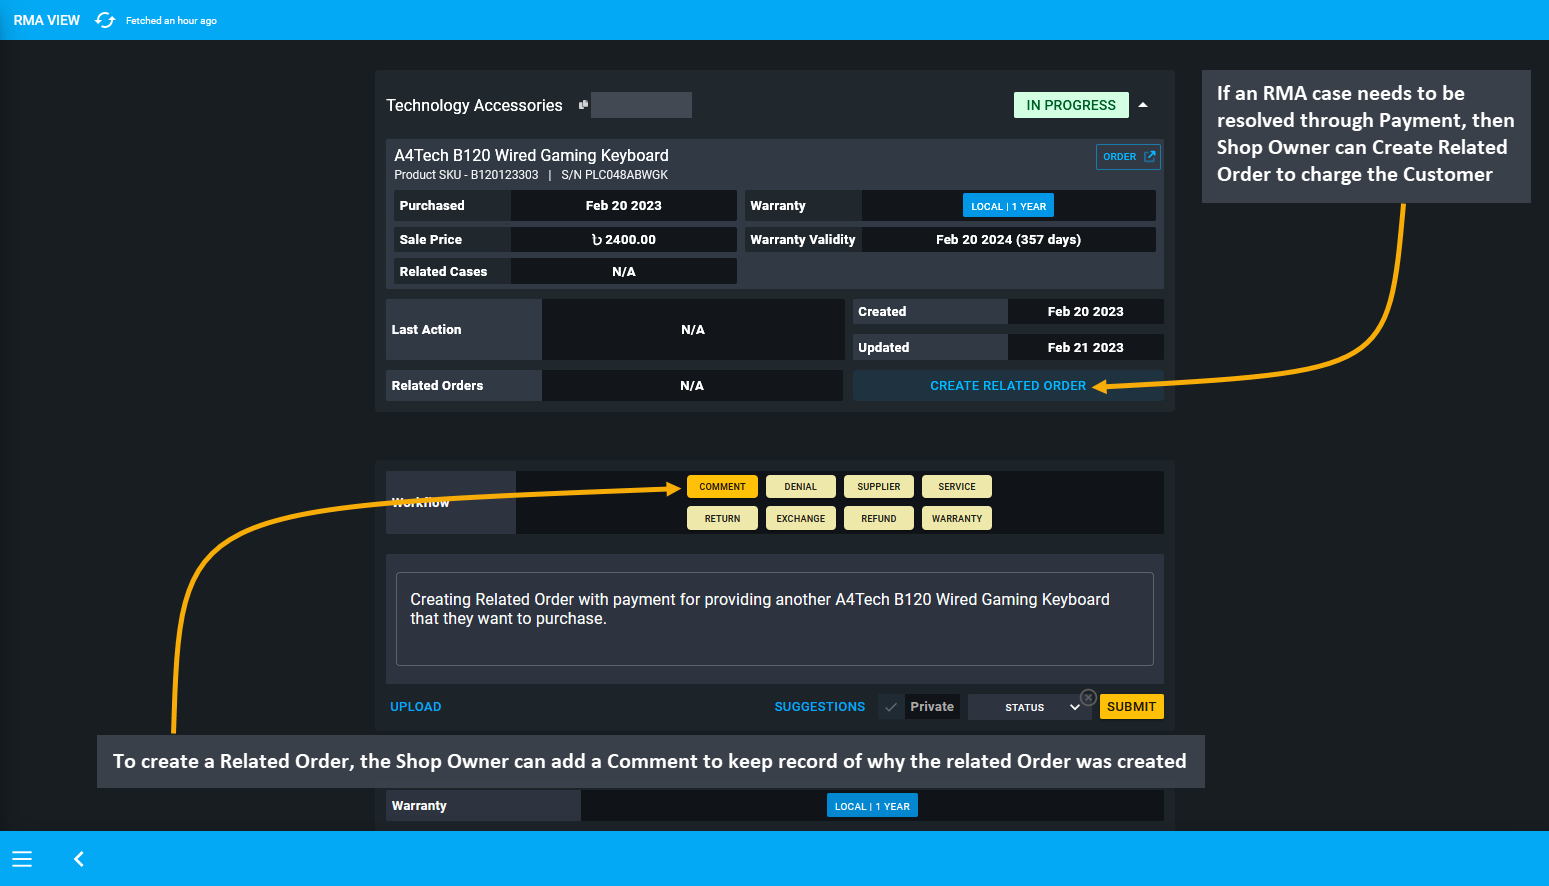
Image 4: If an RMA case needs to be resolved through Payment, then Shop Owner can Create a Related Order.
After clicking the Create Related Order button, the Order Cart will open with Customer’s information automatically prefilled, the Shop Owner will now have to add the Product to Cart for which additional payment will be charged. Check Product quantity, Order total, subtotal, and click Proceed to charge Product payment from the Customer.
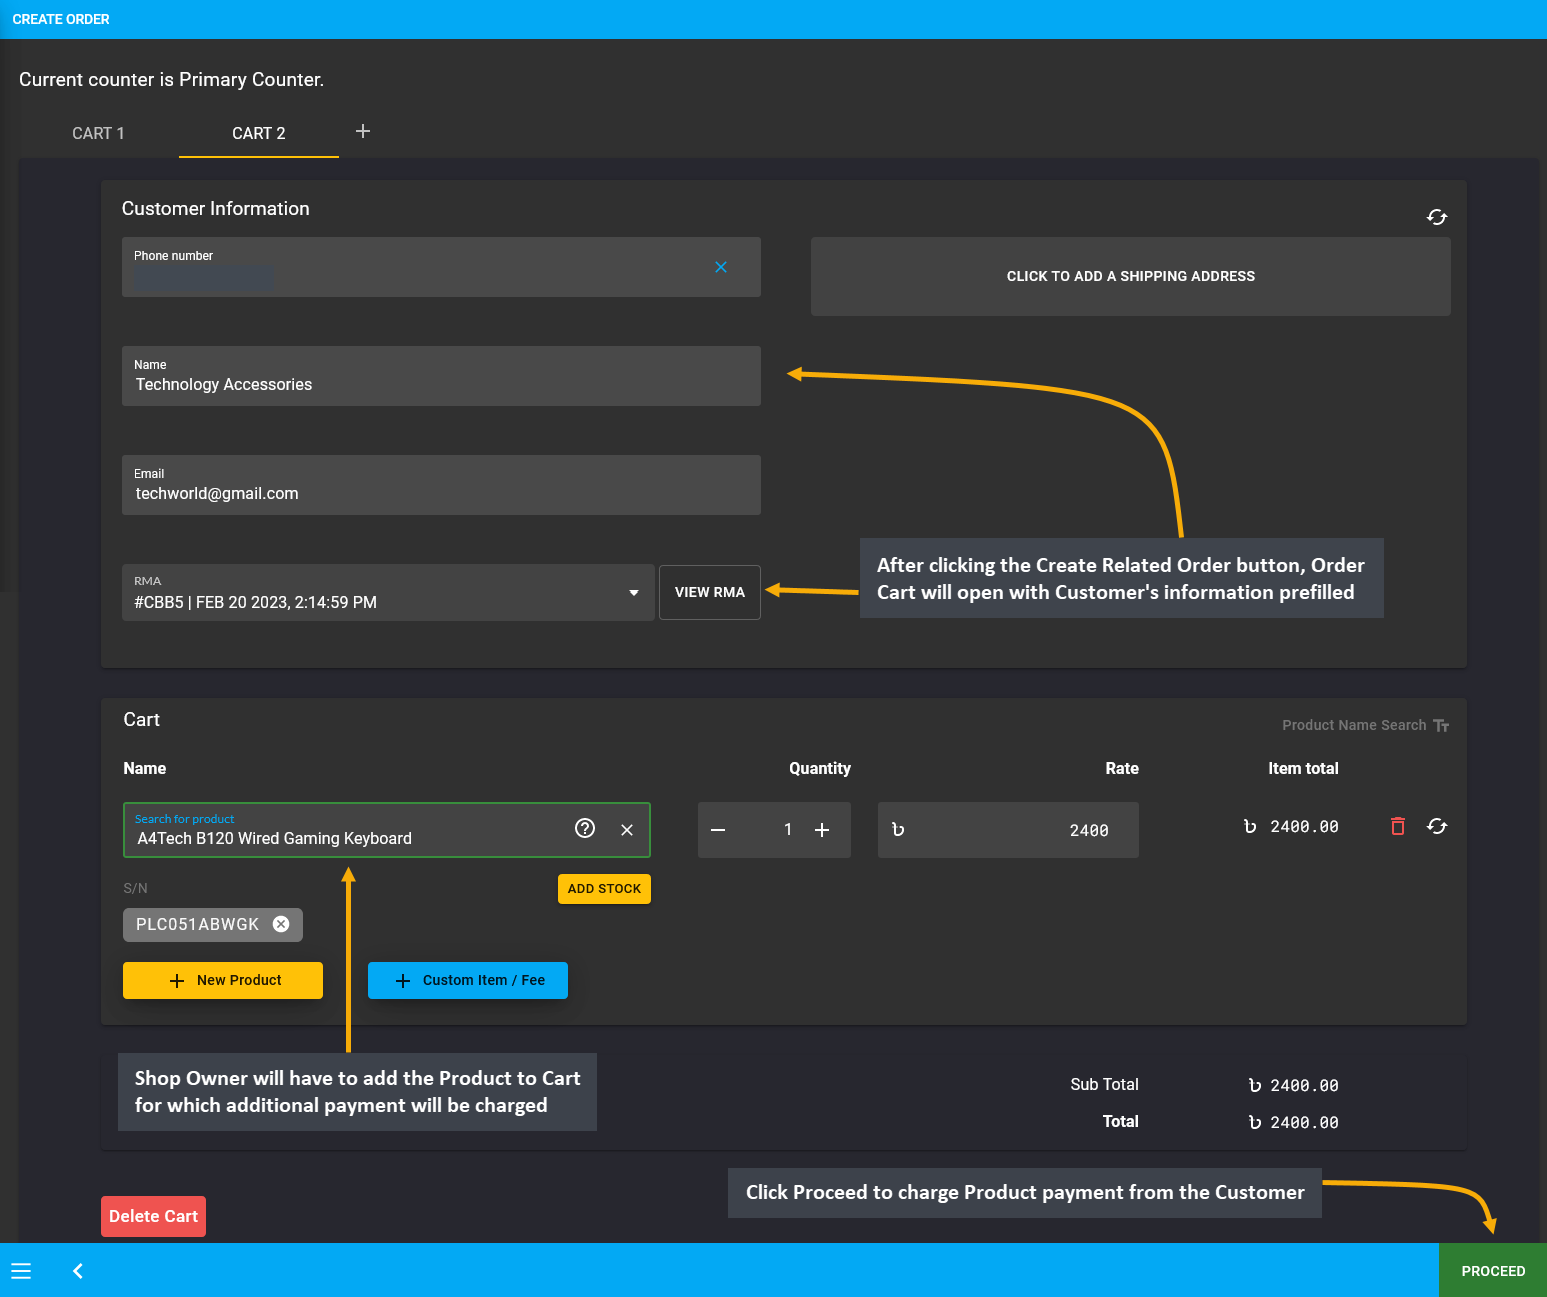
Image 5: The Shop Owner will have to add the Product to Cart for which additional payment will be charged.
In the following page, select Customer’s preferred Shipment and Payment options. Add a note stating that Related Order was created upon Customer’s request for the RMA case to purchase the same Product with payment as the original Product is out of Warranty. Click Confirm Order to complete creating the Related Order for the RMA case.
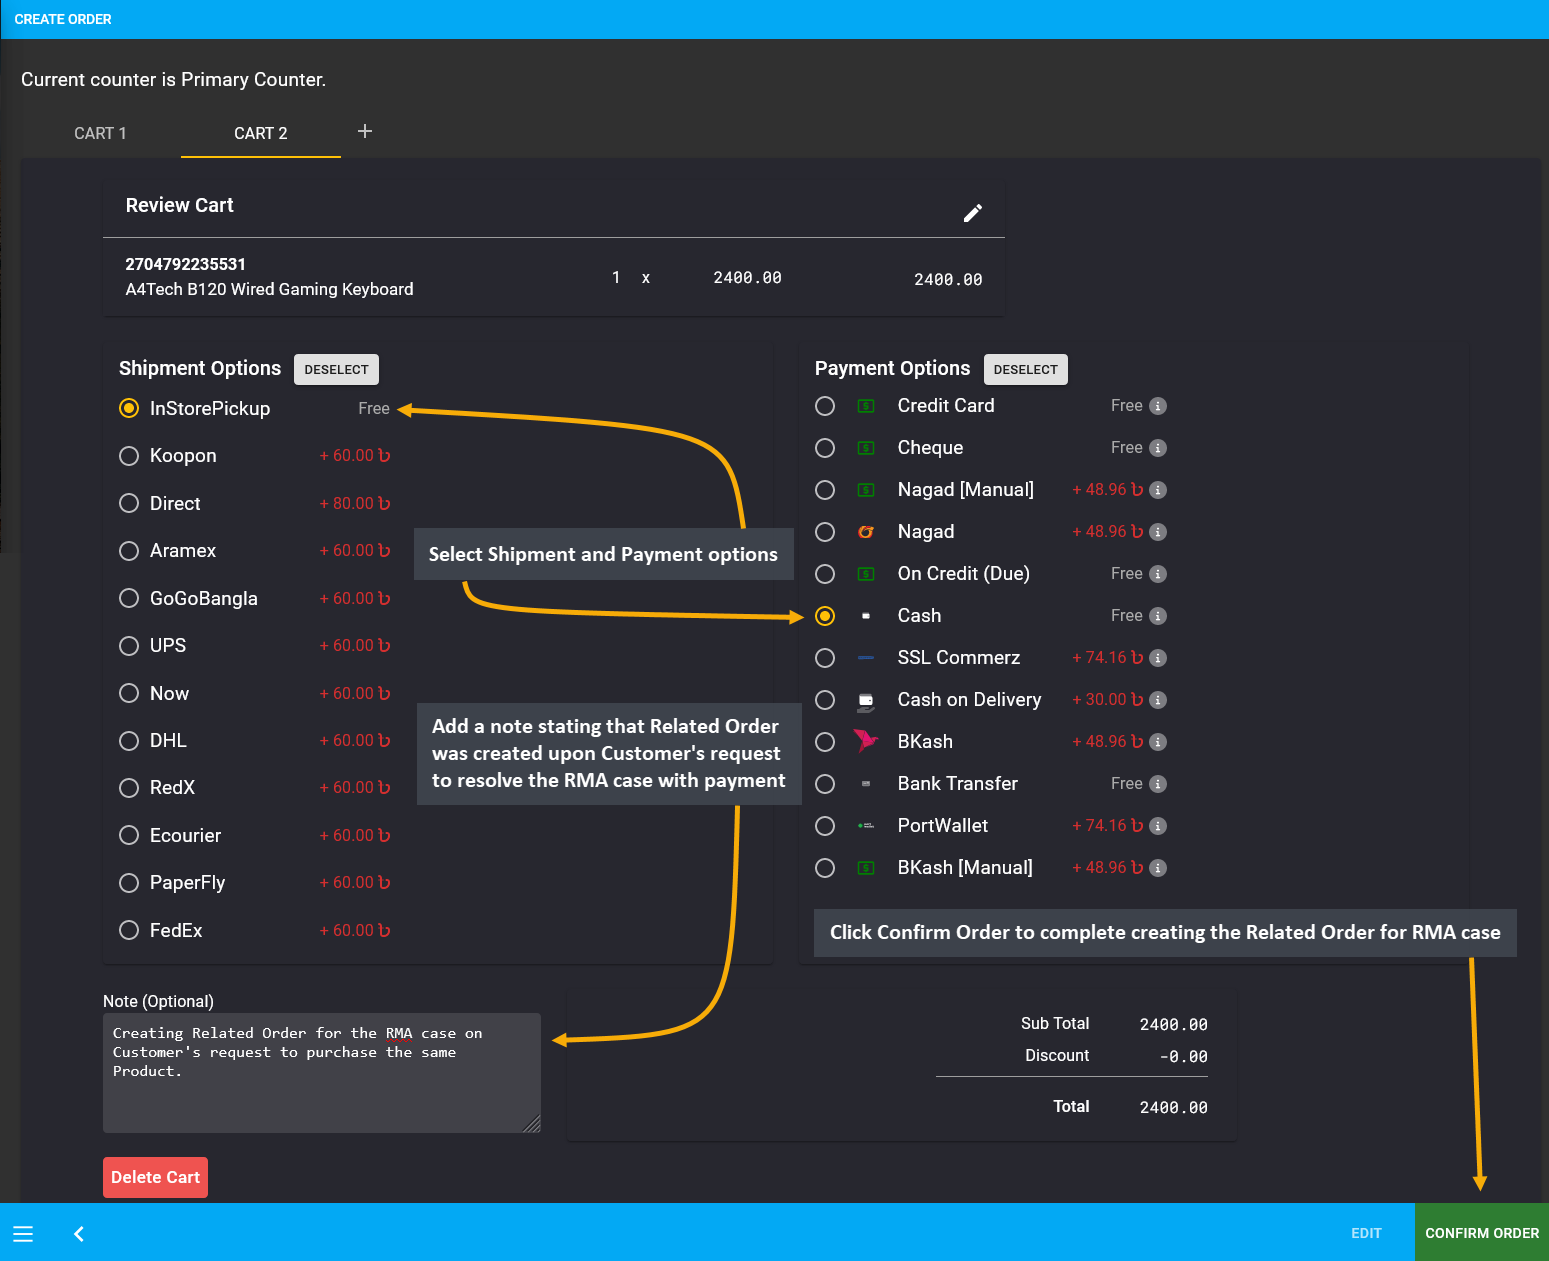
Image 6: Related Order was created upon Customer's request to resolve the RMA case Warranty with payment.
After Order is completed, Shop Owner can click View Order button that will automatically redirect to the Related Order on the general Order List. It will display the note which explains that the Order is related to RMA case.
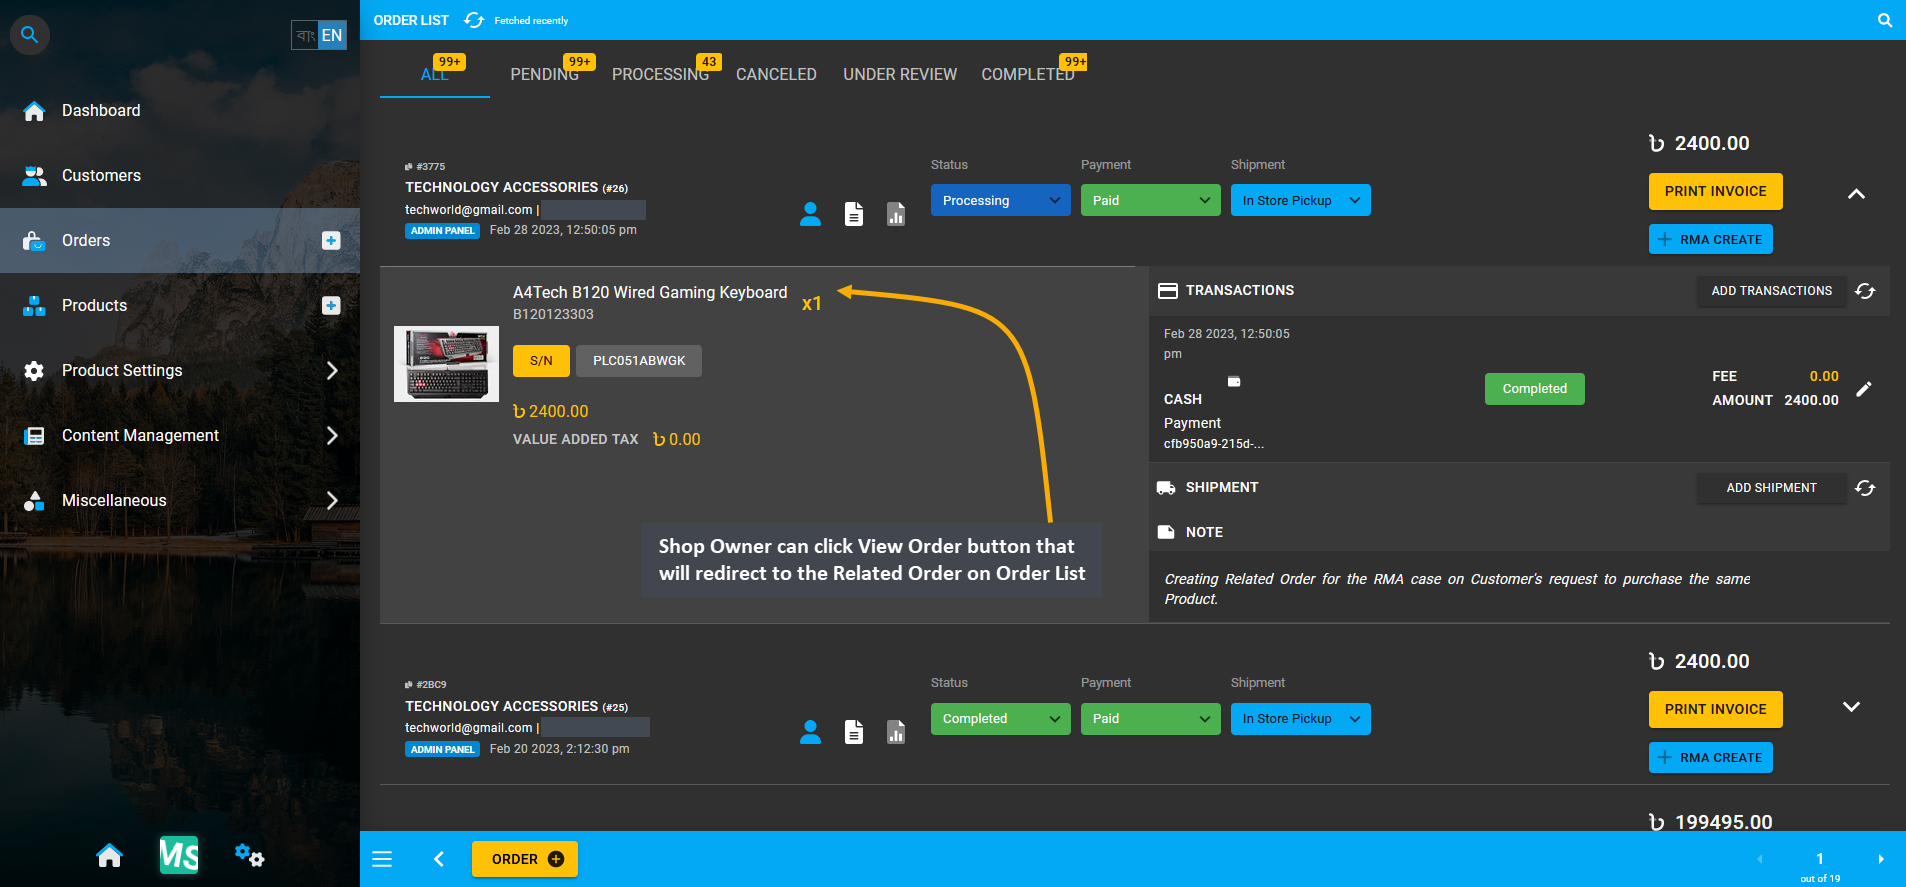
Image 7: Shop Owner can click View Order button that will redirect to the Related Order on the Order List.
Back in the RMA case, the Related Order created for the expired Warranty case will display under Related Orders tab. If more related Orders are created, they will be recorded under the same tab. For convenience, Shop Owner can add a Comment and select status as Resolved to close the RMA case as the Customer’s expired Warranty claim was successfully resolved with purchase of another A4Tech B120 Wired Gaming Keyboard.
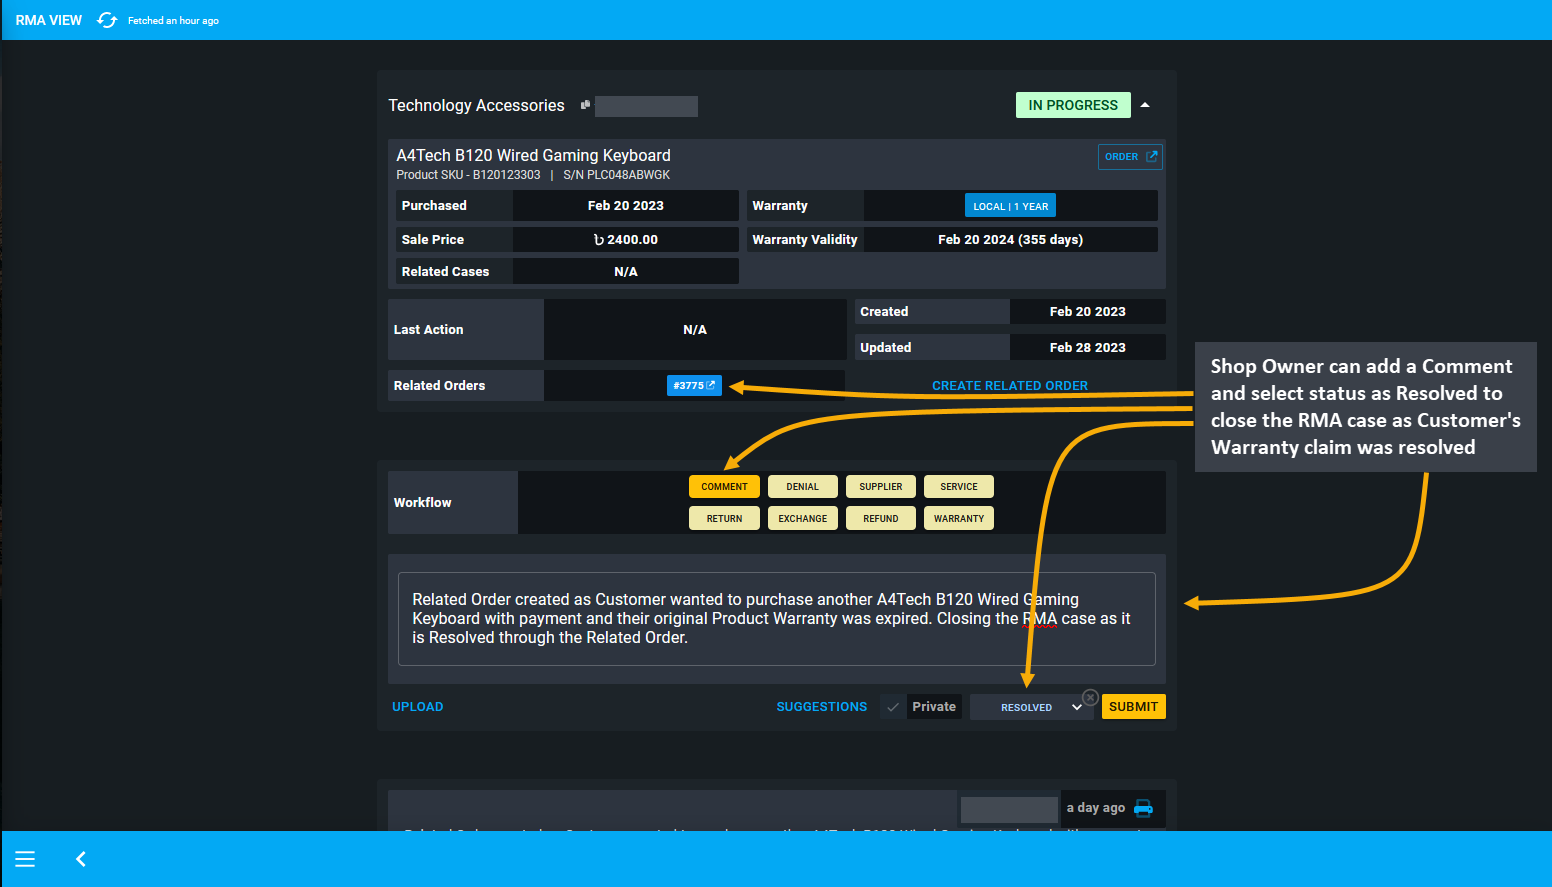
Image 7: Shop Owner can add a Comment stating details and select status as Resolved to close the RMA case.